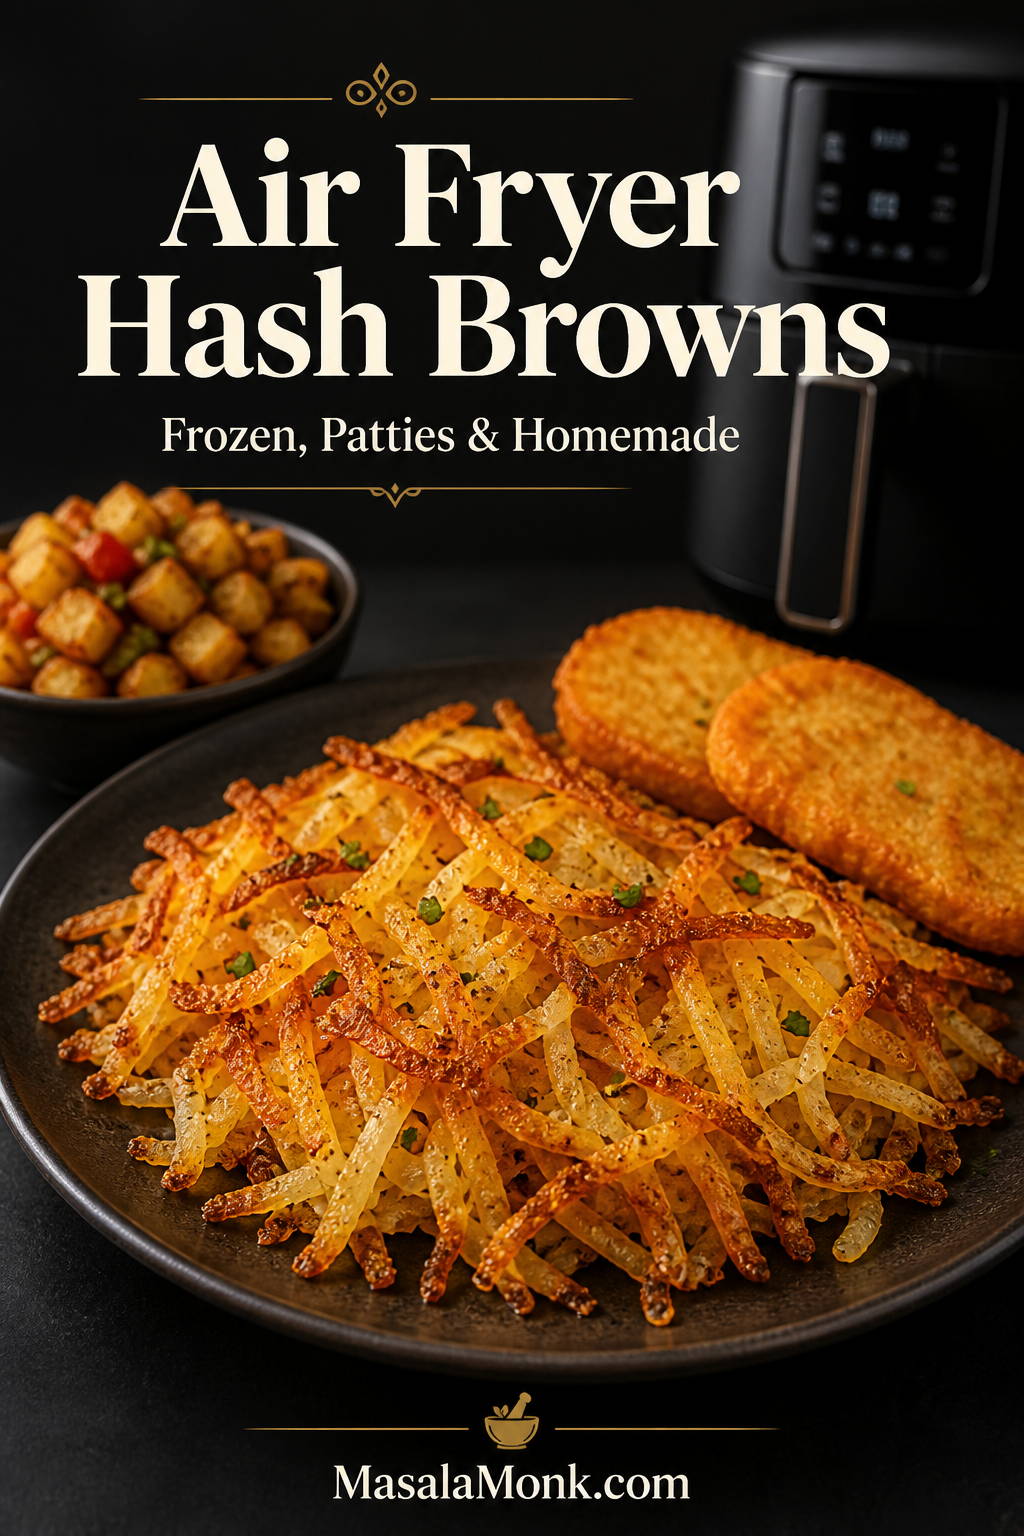
Crispy air fryer hash browns are one of those small breakfast wins that feel much bigger than the effort: golden edges, tender potato centers, and no skillet babysitting. Once you know which temperature works for each hash brown style, the air fryer does most of the work.
Loose frozen shredded hash browns need a thin layer, a little oil, and regular shaking. Frozen hash brown patties cook faster because they are already shaped and usually contain some oil. Meanwhile, homemade hash browns need one extra step before cooking: the grated potatoes must be rinsed or soaked, then squeezed very dry so they crisp instead of steaming.
This guide gives you the right air fryer time and temperature for frozen shredded hash browns, frozen patties, homemade shredded hash browns, diced breakfast potatoes, and leftovers. You will also learn when to use oil, why thawing usually hurts crispness, how to tell when each style is done, and how to fix hash browns that turn out soggy or pale.
What’s in this guide
Quick Answer: How Long to Cook Hash Browns in the Air Fryer?
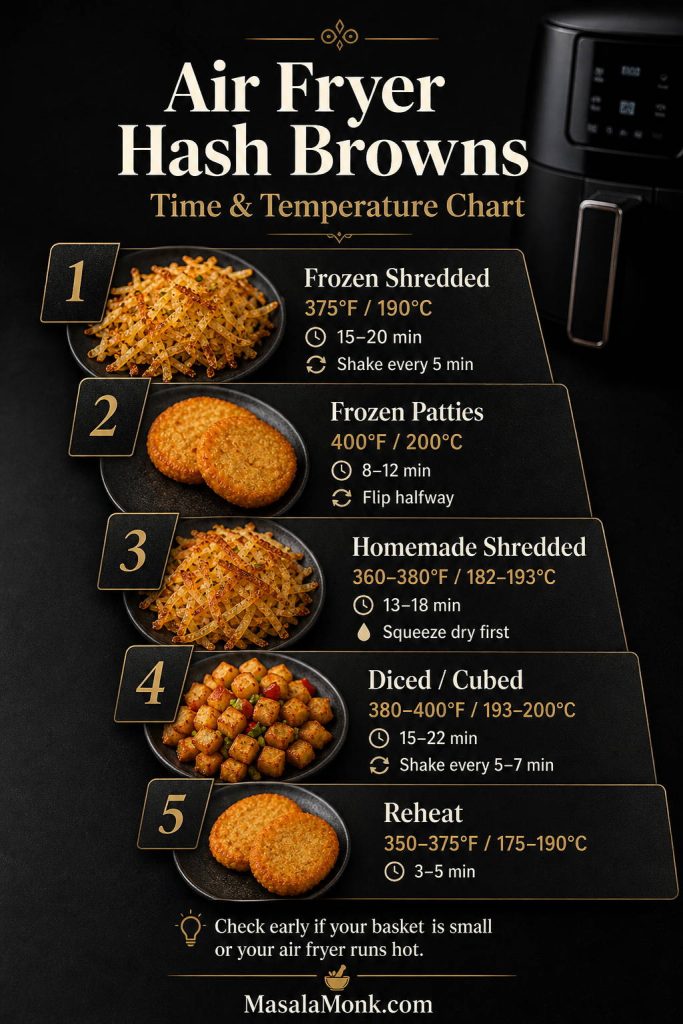
Frozen shredded hash browns take 15–20 minutes at 375°F / 190°C. Toss the potato shreds with a little oil, spread them in a thin layer, and shake or flip every 5 minutes so they crisp evenly.
Frozen hash brown patties take 8–12 minutes at 400°F / 200°C. Cook them from frozen in a single layer and flip halfway through.
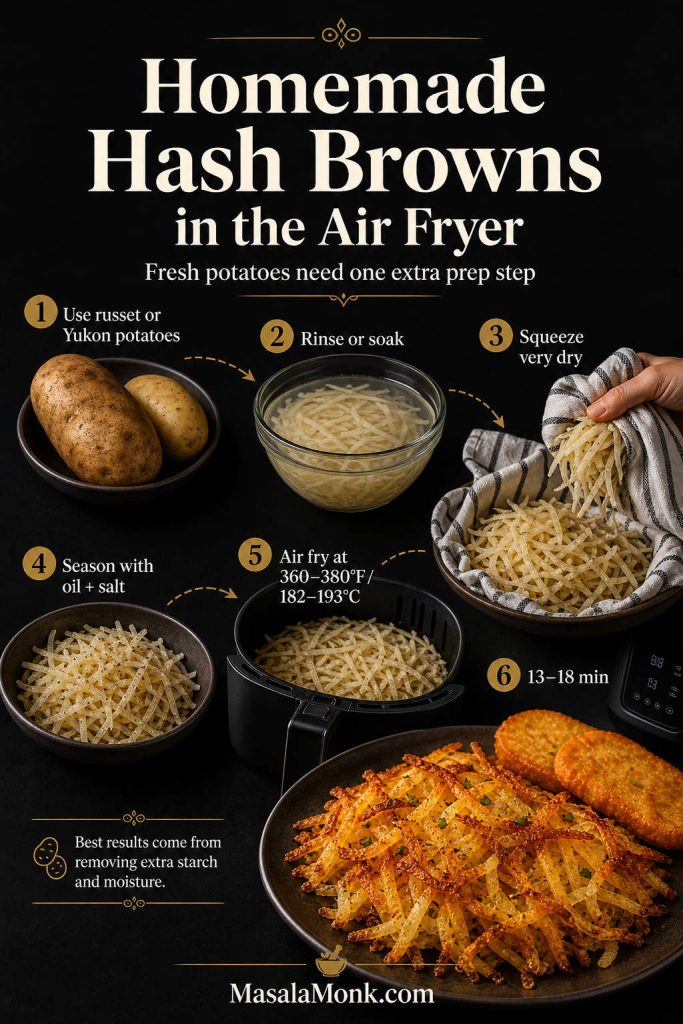
Homemade shredded hash browns take about 13–18 minutes at 360–380°F / 182–193°C. Fresh potatoes need to be rinsed or soaked, then squeezed very dry before they go into the air fryer.
Frozen diced or cubed breakfast potatoes take 15–22 minutes at 380–400°F / 193–200°C. Shake every 5–7 minutes and use the lower temperature for larger cubes.
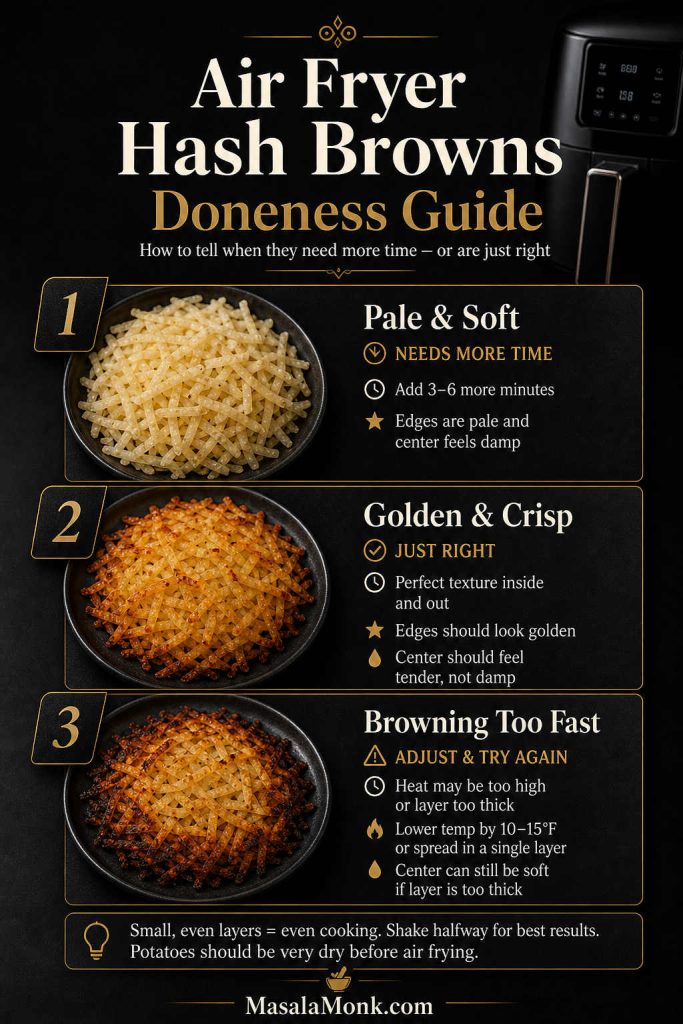
If your first batch is a little pale or a little soft, do not start over. Most air fryer hash brown problems can be fixed with a thinner layer, a few more minutes, or a quick shake halfway through cooking.
Which Hash Browns Do You Have?
Start here before choosing a method. The timing changes because each style has a different shape, moisture level, and surface area.

| If you have… | Use this air fryer method | Best for |
|---|---|---|
| Loose frozen shredded hash browns | 375°F / 190°C for 15–20 minutes | Crispy diner-style shredded potatoes |
| Frozen hash brown patties | 400°F / 200°C for 8–12 minutes | Breakfast sandwiches or quick plate sides |
| Fresh grated potatoes | Rinse, squeeze dry, then cook at 360–380°F / 182–193°C for 13–18 minutes | Homemade hash browns from scratch |
| Frozen diced or cubed breakfast potatoes | 380–400°F / 193–200°C for 15–22 minutes | Country-style potatoes and crisp potato cubes |
| Leftover cooked hash browns | 350–375°F / 175–190°C for 3–5 minutes | Bringing back crisp edges |
Best Method for Crispy Air Fryer Hash Browns
For the classic loose, crispy hash brown texture, frozen shredded hash browns are the easiest and most reliable starting point. Use 15–16 oz / 425–450 g frozen shredded potatoes, toss them with 1½–2 tbsp oil, spread them in a thin layer, and air fry at 375°F / 190°C for 15–20 minutes, shaking every 5 minutes.
The best batch should taste like classic diner hash browns with extra crisp edges: golden and frilly on the outside, tender in the center, salty enough to eat plain, and sturdy enough for eggs, ketchup, hot sauce, or a breakfast sandwich.
If you enjoy crisp potato recipes, MasalaMonk’s crispy homemade French fries guide is a useful companion because it also focuses on moisture control, hot cooking, and getting the potato surface properly browned.
Use frozen patties when you want the fastest option, homemade shredded potatoes when you want a from-scratch version, and diced or cubed potatoes when you want country-style breakfast potatoes with crisp edges.
Air Fryer Hash Browns Time and Temperature Chart
Use this chart as your main guide. Air fryer models vary, so check a few minutes early the first time you cook a new bag, basket size, or potato style.
| Hash brown type | Amount | Temperature | Time | Flip or shake? | Oil? |
|---|---|---|---|---|---|
| Frozen shredded hash browns | 15–16 oz / 425–450 g | 375°F / 190°C | 15–20 minutes | Shake or flip every 5 minutes | Yes, 1½–2 tbsp / 22–30 ml |
| Frozen hash brown patties | 4 patties | 400°F / 200°C | 8–12 minutes | Flip halfway | Usually no |
| Homemade shredded hash browns | 1 lb / 450 g potatoes | 360–380°F / 182–193°C | 13–18 minutes | Optional, depending on layer thickness | Yes, 1–2 tbsp / 15–30 ml |
| Frozen diced or cubed breakfast potatoes | 16 oz / 450 g | 380–400°F / 193–200°C | 15–22 minutes | Shake every 5–7 minutes | Yes, 1–2 tbsp / 15–30 ml |
| Reheating cooked hash browns | Any amount in one layer | 350–375°F / 175–190°C | 3–5 minutes | Optional | No |
What Is the Best Temperature for Air Fryer Hash Browns?
The best temperature depends on the potato format. A single number does not work equally well for patties, loose shreds, diced potatoes, and homemade grated potatoes.
- 400°F / 200°C is best for frozen hash brown patties because patties are compact and already shaped. As a result, higher heat helps crisp the outside quickly.
- 375°F / 190°C is better for frozen shredded hash browns because loose potato shreds need enough time to dry, brown, and crisp without burning at the edges too fast.
- 360–380°F / 182–193°C works well for homemade hash browns because fresh grated potatoes hold more moisture. Therefore, slightly gentler heat gives them time to cook through after they are squeezed dry.
- 380–400°F / 193–200°C works best for diced or cubed potatoes because cube size matters. Smaller diced potatoes can handle 400°F / 200°C for faster browning, while larger cubes often do better at 380°F / 193°C so the centers turn tender before the edges get too dark.
If the potatoes look cooked but pale, add a few more minutes before increasing the heat. However, if the edges are browning too fast while the center stays soft, the layer is probably too thick.
Ingredients You Need
You only need potatoes, a little fat, and seasoning. However, the best ingredient list depends on the style of hash browns you are cooking. Start with the group that matches what you have, then adjust the seasoning after cooking while the potatoes are still hot.
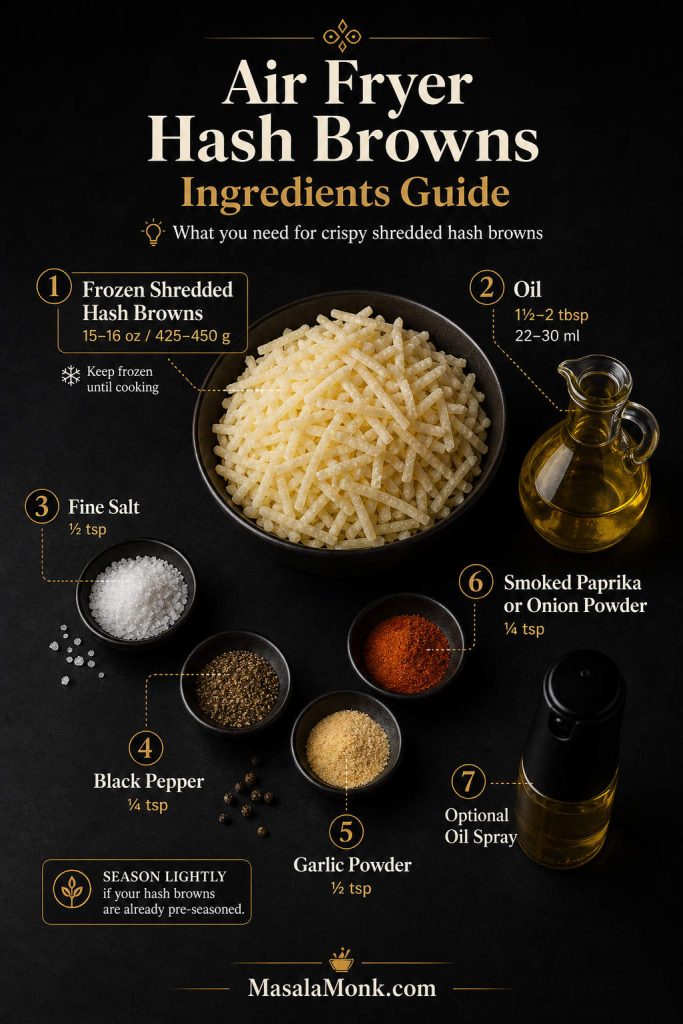
Frozen Shredded Hash Browns
- Frozen shredded hash browns, 15–16 oz / 425–450 g: Keep them frozen until cooking so they do not release extra moisture before they hit the hot air fryer basket.
- Oil, 1½–2 tbsp / 22–30 ml: Olive oil, avocado oil, or a neutral cooking oil all work. Because loose potato shreds dry out as they cook, a light coating of oil helps them brown more evenly.
- Fine salt, ½ tsp: Start lightly, especially if your frozen hash browns are already seasoned.
- Black pepper, ¼ tsp: Add a small amount before cooking, then adjust at the end if the potatoes need more bite.
- Garlic powder, ½ tsp: This gives the hash browns a savory breakfast flavor without adding fresh garlic, which can burn in the air fryer.
- Smoked paprika or onion powder, ¼ tsp: Either one adds deeper flavor. For a simpler batch, skip both and stay with salt, pepper, and garlic powder.
Frozen Hash Brown Patties
- Frozen hash brown patties, 4: Cook them straight from frozen and keep them in a single layer.
- Oil spray, optional: Most patties already contain enough oil to crisp. Still, a light spray can help if the surface looks dry or pale halfway through cooking.
- Salt, optional: Since many frozen patties are already salted, taste after cooking before adding more.
Homemade Shredded Hash Browns
- Russet or Yukon potatoes, 1 lb / 450 g: Russets crisp well and give you a more classic hash brown texture. Yukon potatoes, meanwhile, have a creamier center.
- Oil or melted butter, 1–2 tbsp / 15–30 ml: Oil gives better crispness, while butter adds richer flavor. If using butter, watch the edges because it browns faster.
- Fine salt, ½ tsp: Season only after the grated potatoes have been rinsed and squeezed dry.
- Black pepper, ¼ tsp: Add it with the salt, then adjust after cooking if needed.
- Garlic powder or onion powder, ¼–½ tsp: Use either one for a more savory homemade hash brown without adding wet ingredients.
Equipment
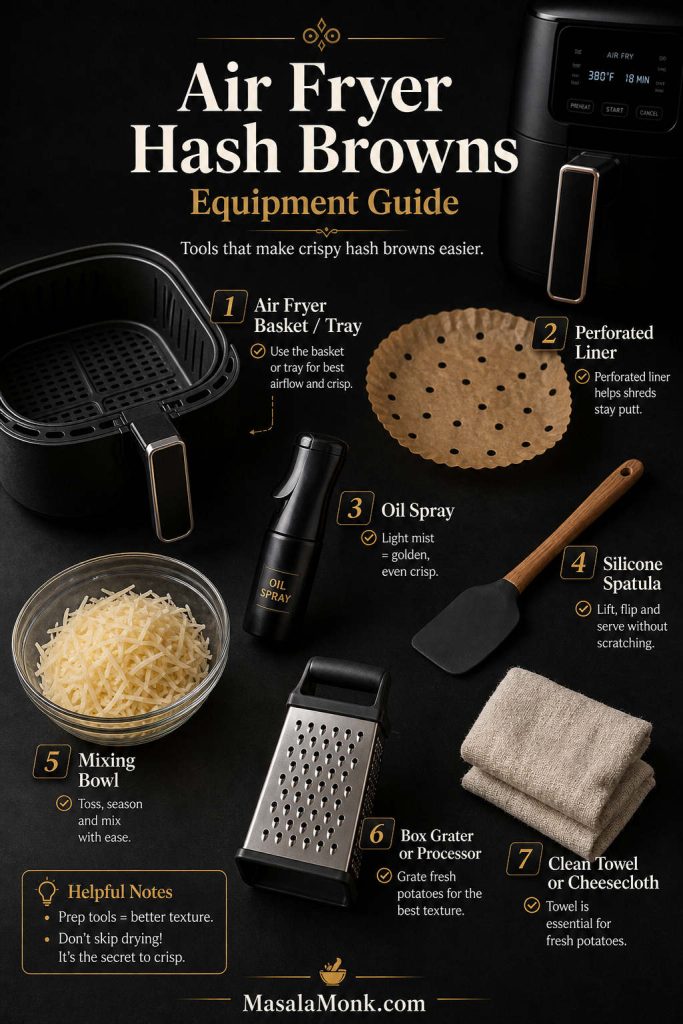
You do not need much equipment, although a few small tools make the process easier.
- Air fryer basket or tray: A basket-style air fryer is easiest for shaking loose shredded potatoes.
- Mixing bowl: Use it to coat shredded or diced potatoes evenly with oil and seasoning.
- Oil spray: This helps with sticking and browning, especially if your basket is not very nonstick.
- Silicone spatula: Helpful for pressing, lifting, and flipping sections of shredded potatoes.
- Box grater or food processor: Needed only for homemade hash browns from fresh potatoes.
- Clean towel or cheesecloth: Essential for squeezing moisture from grated potatoes.
- Perforated parchment or silicone liner: Useful if loose shreds fall through the basket holes.
Frozen Shredded Hash Browns in the Air Fryer
Loose frozen shredded hash browns are the main method in this guide because they give you the classic diner-style texture: crisp edges, soft potato centers, and a loose shredded finish. They need more attention than patties because the potato shreds can clump, steam, or fall through the basket if the layer is too thick.
How to Cook Frozen Shredded Hash Browns
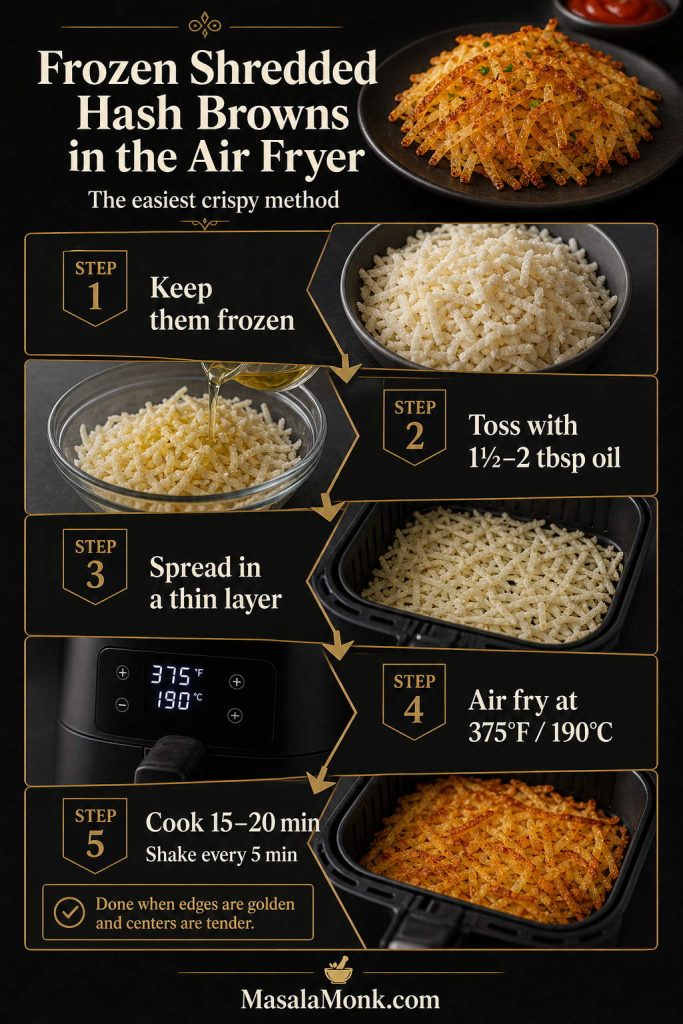
- Keep them frozen. Do not thaw the potatoes first.
- Toss with oil and seasoning. Add 15–16 oz / 425–450 g frozen potato shreds to a bowl with 1½–2 tbsp / 22–30 ml oil, salt, pepper, and garlic powder.
- Spread in a thin layer. Aim for about ½ inch / 1.25 cm thick. If your basket is small, cook in two batches.
- Air fry at 375°F / 190°C for 15–20 minutes. Shake, stir, or flip sections every 5 minutes.
- Crisp to taste. Add 2–4 minutes at the end if the potatoes are cooked but not golden enough.
The biggest mistake is using too much potato in one batch. As a result, the potatoes trap steam instead of crisping. A thin layer, meanwhile, gives you better browning and a cleaner shredded texture.
When the potatoes are ready, the outer shreds should look golden and crisp, while the center should feel tender rather than wet or starchy. If the middle still looks damp after 15 minutes, spread the potatoes out again and cook a few minutes longer before serving.
Air Fryer Hash Brown Patties
Frozen hash brown patties are the easiest air fryer version because they are already shaped, compact, and usually contain enough oil to brown well. They are ideal for breakfast sandwiches, quick sides, and busy mornings.
They also work especially well inside breakfast sandwiches. For more filling ideas, sauces, and make-ahead combinations, see MasalaMonk’s breakfast sandwich recipes.
How to Cook Frozen Hash Brown Patties
- Set the air fryer to 400°F / 200°C. Preheat if your model works better that way.
- Add the patties in one layer. Do not stack or overlap them.
- Air fry for 8–12 minutes. Flip halfway through.
- Add time for extra crispness. Cook 2–3 minutes longer if you want deeper browning.
- Season after cooking. Many frozen patties are already salted, so taste before adding more.
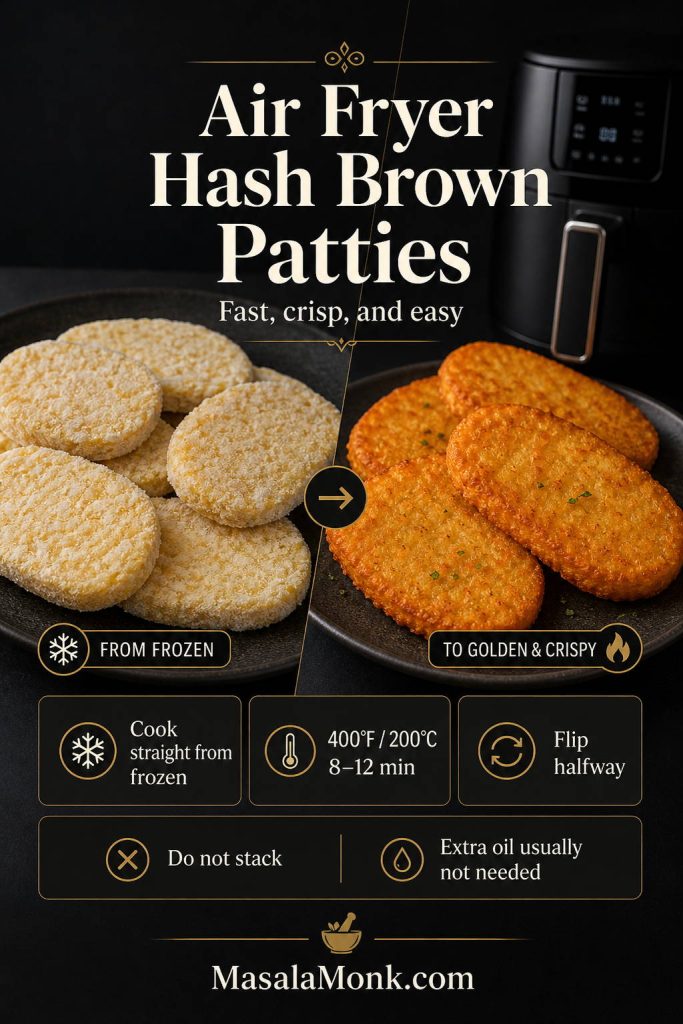
The patties should be golden on both sides and crisp around the edges. If they look pale after 8 minutes, keep cooking rather than removing them too early. Because patties are already shaped, they usually need more time, not more oil.
Homemade Hash Browns in the Air Fryer
Homemade air fryer hash browns taste fresher than frozen ones, but they need proper prep. Freshly grated potatoes hold water and surface starch. If that moisture stays in the potatoes, the hash browns can turn soft, gummy, or pale.
Rinsing removes excess surface starch, while squeezing removes water. Both steps matter: starch can make the potatoes gummy, and water makes them steam. The Idaho Potato Commission’s classic hash brown guide also points to the same core technique: rinse out excess starch, squeeze out as much water as possible, keep the potatoes thin, and cook hot for crisp results.
How to Make Homemade Shredded Hash Browns
- Grate the potatoes. Use 1 lb / 450 g russet or Yukon potatoes.
- Rinse or soak. Rinse the grated potatoes under cold water until the water looks clearer, or soak them for 10–20 minutes and rinse again.
- Squeeze very dry. Wrap the potatoes in a clean towel or cheesecloth and squeeze out as much water as possible.
- Season after drying. Toss with 1–2 tbsp / 15–30 ml oil or melted butter, salt, pepper, and optional garlic powder.
- Spread thinly. Press into an even layer in the air fryer basket.
- Air fry at 360–380°F / 182–193°C for 13–18 minutes. Check early and add time as needed for browning.
For one large pressed layer, avoid moving the potatoes too early. However, if you want looser breakfast-style hash browns, stir or flip sections partway through cooking.
Homemade Hash Brown Patties Variation
Homemade hash brown patties are possible, although they are more of a variation than the main method here. Mix squeezed-dry shredded potatoes with a little starch, shape them into thin patties, chill or freeze until firm, then air fry until crisp.
A good starting point is 500 g / 1.1 lb grated potatoes, 1 tbsp cornstarch, 1 tbsp rice flour if you want extra crispness, 1 tbsp oil, 2–3 tbsp melted butter, salt, pepper, and garlic powder. Shape into patties about 1 cm thick, chill until firm, then cook at 400°F / 200°C for 13–15 minutes.
Diced or Cubed Hash Browns in the Air Fryer
Diced or cubed hash browns are often sold as frozen breakfast potatoes, country potatoes, or cubed potatoes. They need more time than patties because the pieces are thicker. However, they can still get crisp edges if they are tossed with oil and shaken during cooking.
- Use 16 oz / 450 g frozen diced or cubed potatoes. Do not thaw.
- Toss with 1–2 tbsp / 15–30 ml oil. Add salt, pepper, garlic powder, paprika, or your favorite breakfast potato seasoning.
- Spread in one layer. A little overlap is fine, but avoid a deep pile.
- Air fry at 380–400°F / 193–200°C for 15–22 minutes. Use 400°F / 200°C for smaller diced potatoes or faster browning. Use 380°F / 193°C for larger cubes so the centers have more time to turn tender.
- Shake every 5–7 minutes. Add 3–5 extra minutes if the cubes are large, crowded, or still firm in the center.
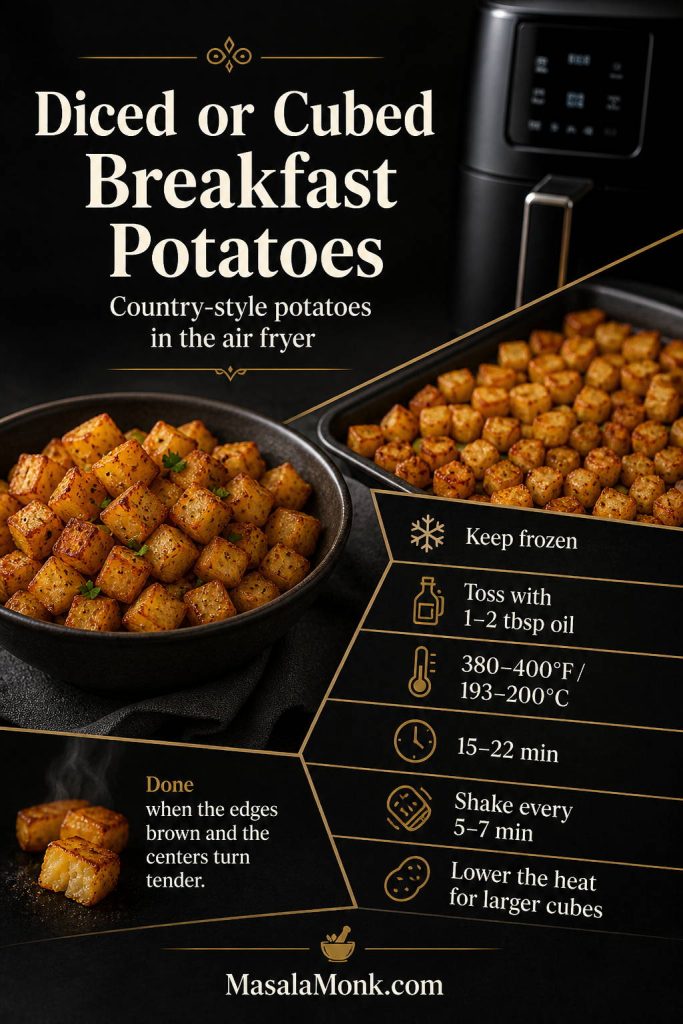
The cubes are done when the edges are browned and the centers are fully tender. When the outside browns before the middle softens, lower the temperature to 380°F / 193°C and cook a few minutes longer. For pale but tender potatoes, raise the heat near the end or add 2–3 more minutes.
Beyond breakfast, MasalaMonk’s air fried chilli garlic potato bites are another crisp air fryer potato idea with a snack-style, spicy finish.
Do You Need to Thaw Hash Browns First?
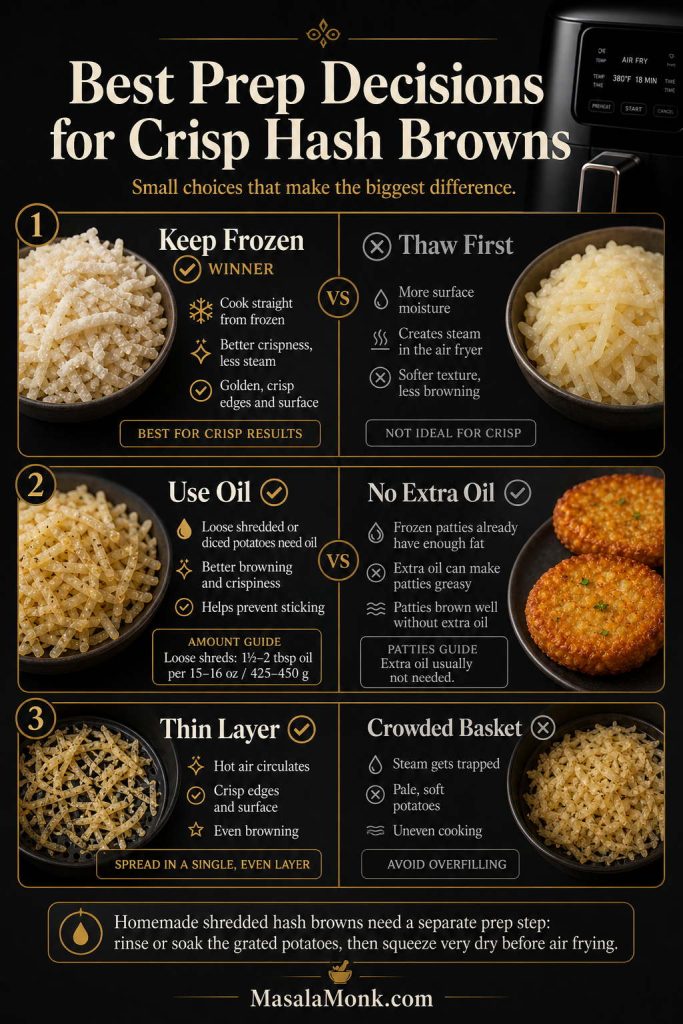
No. For most air fryer hash browns, frozen is better than thawed. Loose shredded potatoes, patties, and diced breakfast potatoes can all go straight into the air fryer.
Thawing often adds surface moisture, especially with shredded potatoes. That extra water can make the hash browns steam before they brown. If your frozen hash browns are stuck together in a block, break them apart as much as possible instead of fully thawing them.
Homemade hash browns are different because they start fresh, not frozen. The key is still moisture control: rinse or soak the grated potatoes, then squeeze them dry before adding oil and seasoning.
Oil or No Oil?
The oil question depends on the style. Patties and loose shredded potatoes do not cook the same way in the air fryer.
| Type | Oil needed? | Why |
|---|---|---|
| Frozen hash brown patties | Usually no | Many frozen patties already contain oil and crisp well on their own. |
| Frozen shredded hash browns | Yes | Oil helps the loose potato shreds brown instead of drying out or staying pale. |
| Homemade shredded hash browns | Yes | Fresh potatoes need fat for crisp edges and better color. |
| Diced or cubed breakfast potatoes | Yes | Oil helps the thicker potato edges brown evenly. |
You can make oil-free air fryer hash browns, but they usually turn out drier and less golden. For the best texture, use a small amount of oil on loose shredded or diced potatoes, and skip extra oil on patties unless the surface looks dry or pale.
How to Make Air Fryer Hash Browns Extra Crispy
Extra crispiness comes from airflow, surface dryness, and enough time. Therefore, focus on the layer first before adding more seasoning or turning the heat higher.
- Use a thin layer. Loose shredded hash browns should not be piled too deep. Around ½ inch / 1.25 cm is a useful guide.
- Do not overcrowd the basket. If the potatoes steam, they will soften before they crisp.
- Use oil for shredded or diced potatoes. Patties can often cook without it, but loose potatoes need help browning.
- Shake or flip regularly. Shredded hash browns should be moved every 5 minutes. Patties usually need one flip halfway through.
- Add time at the end. If the potatoes are cooked but not crisp enough, cook 2–4 minutes longer.
- Serve immediately. Hash browns soften as they sit, especially if they are stacked on a plate.

For another deep dive into air fryer crisping, MasalaMonk’s air fryer chicken wings guide follows the same bigger principle: dry surfaces, enough airflow, and the right finish make the difference between soft and crisp.
Common Air Fryer Hash Brown Mistakes
If your hash browns come out soft, pale, or uneven, it usually does not mean the method failed. Most problems come from a few small air fryer habits that are easy to fix.
If your air fryer results are inconsistent across recipes, MasalaMonk’s common air fryer mistakes guide is a useful side read for crowding, airflow, temperature, and limp results.
- Adding too many shredded potatoes to the basket: A thick pile steams instead of crisping.
- Thawing frozen hash browns first: Thawed potato shreds often release extra moisture.
- Skipping oil on loose shredded or diced potatoes: These styles need some fat for better browning.
- Moving homemade hash browns too early: Let them firm up before flipping or stirring.
- Stacking patties: Frozen patties need direct airflow on both sides.
- Serving them too late: Hash browns lose crispness as they sit and steam on the plate.
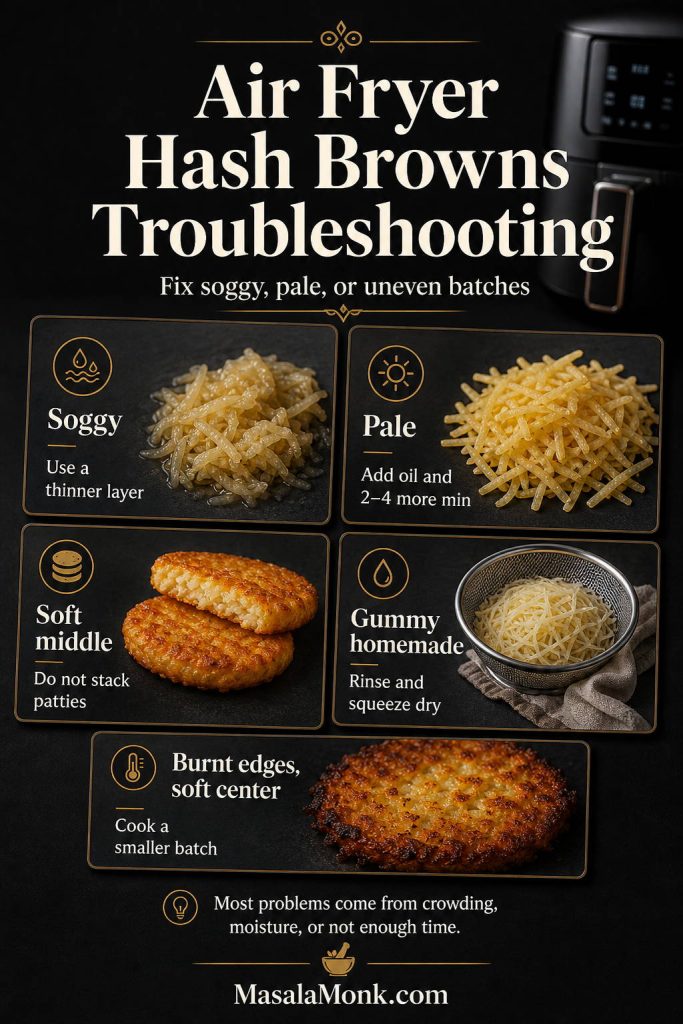
Why Are My Air Fryer Hash Browns Soggy?
If your hash browns are soft instead of crisp, the problem is usually moisture, crowding, or not enough air circulation. Use this table to fix the most common issues.
| Problem | Likely reason | Fix |
|---|---|---|
| Loose shredded hash browns are soggy | The layer is too thick or the potatoes were not moved during cooking. | Keep the layer thin and shake or flip every 5 minutes. |
| Hash browns are pale | Not enough oil, not enough time, or temperature too low. | Use a light coating of oil and add 2–4 minutes. |
| Patties are soft in the middle | They were stacked, crowded, or not cooked long enough. | Cook in one layer at 400°F / 200°C and flip halfway. |
| Homemade hash browns are gummy | The fresh potatoes kept too much starch and moisture. | Rinse or soak the grated potatoes, then squeeze very dry. |
| Edges burn but the middle is soft | The potato layer is too thick. | Use a thinner layer or cook in batches. |
| Shreds fall through the basket | The air fryer basket holes are too wide. | Use perforated parchment, a silicone liner, or a tray-style basket. |
| Hash browns stick to the basket | Not enough oil or the potatoes were moved too early. | Spray the basket lightly and let the potatoes firm up before flipping. |
Storage and Reheating
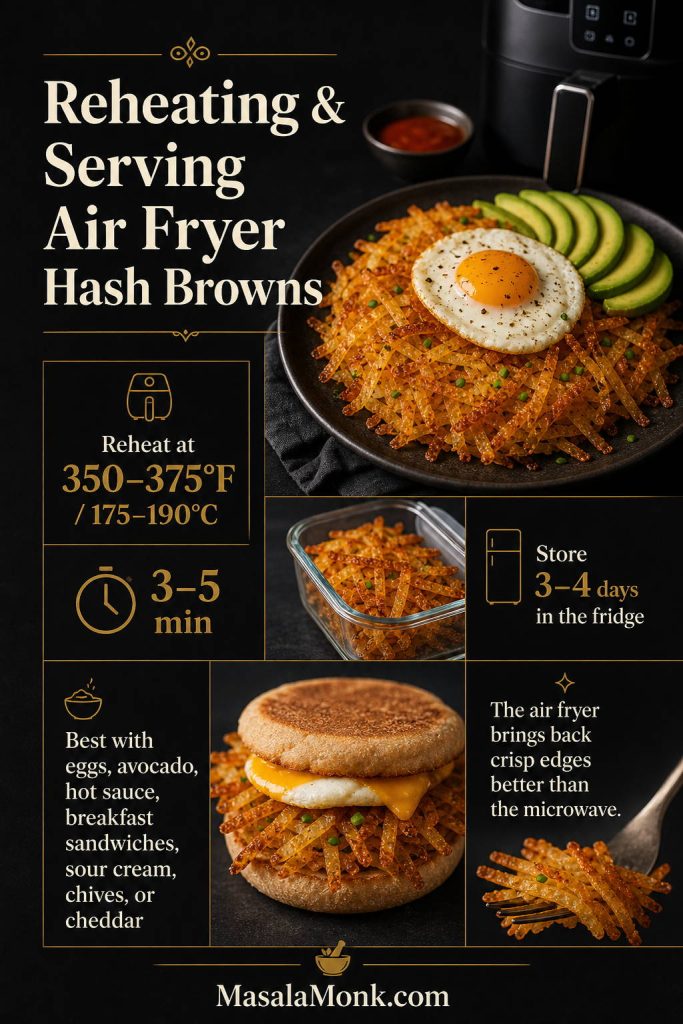
Air fryer hash browns taste best right after cooking, but leftovers can still be reheated well. The air fryer is much better than the microwave when you want to bring back crisp edges.
- Refrigerate: Store cooked hash browns in an airtight container for 3–4 days.
- Reheat refrigerated hash browns: Air fry at 350–375°F / 175–190°C for 3–5 minutes.
- Reheat frozen homemade patties: Air fry at 375–400°F / 190–200°C for 5–8 minutes.
- Avoid stacking while cooling: Steam softens the crisp surface.
For food safety, refrigerate leftovers quickly and eat them within 3–4 days. If you are checking temperature, FoodSafety.gov lists 165°F / 74°C for reheating leftovers.
For homemade shaped patties, freeze them in a single layer first. Once firm, transfer them to a freezer bag so they do not stick together.
What to Serve with Air Fryer Hash Browns
Air fryer hash browns work with almost any breakfast plate. Keep it simple with air fryer hard-boiled eggs, avocado, and hot sauce, or turn the hash browns into the crispy base for a bigger brunch bowl.
- Fried, scrambled, or poached eggs
- Breakfast sandwiches with eggs, cheese, and sauce
- Avocado, hot sauce, and lime
- Sausage, bacon, or vegetarian breakfast patties
- Baked beans or grilled tomatoes
- Sour cream, chives, and cheddar
- Ketchup, hot sauce, or spicy mayo
- Breakfast bowls with eggs, cheese, salsa, and greens
To make the meal more filling, use the hash browns as the crisp base and add eggs, cheese, sautéed vegetables, and a spoonful of salsa or hot sauce on top.
For a snack-style plate, top crispy patties with sour cream, chives, cheddar, hot sauce, or a little chaat masala for a sharper MasalaMonk-style finish.
More Potato Ideas
If potatoes are the main event, MasalaMonk’s potato appetizers guide has more crisp, cheesy, party-friendly potato options for brunch spreads, snacks, and sides.
Once you know your hash brown style, the method is simple: keep frozen potatoes frozen, keep loose shreds thin, give patties direct airflow, and use a few extra minutes when the color is not there yet. That is usually all it takes to move from soft potatoes to crisp, golden hash browns.
Crispy Air Fryer Hash Browns
This crispy air fryer hash browns recipe starts with frozen shredded potatoes because they give the easiest classic breakfast texture: golden edges, tender centers, and loose crispy shreds. The notes below include quick adjustments for frozen hash brown patties, homemade shredded hash browns, diced breakfast potatoes, and reheating.
Ingredients
- 15–16 oz / 425–450 g frozen shredded hash browns, not thawed
- 1½–2 tbsp / 22–30 ml olive oil, avocado oil, or neutral oil
- ½ tsp fine salt, plus more to taste
- ¼ tsp black pepper
- ½ tsp garlic powder
- ¼ tsp smoked paprika or onion powder, optional
- Oil spray, for the basket if needed
Instructions
- Preheat if needed. Set the air fryer to 375°F / 190°C. Some models do not need preheating, but preheating helps if your air fryer runs cool.
- Season the hash browns. Add the frozen shredded hash browns to a mixing bowl. Toss with oil, salt, pepper, garlic powder, and optional smoked paprika or onion powder.
- Spread in the basket. Lightly spray the basket if needed. Spread the potatoes in a thin, even layer, around ½ inch / 1.25 cm thick. Cook in batches if your basket is small.
- Air fry. Cook for 15–20 minutes, shaking, stirring, or flipping sections every 5 minutes.
- Crisp to taste. Once the potatoes are golden and cooked through, add 2–4 minutes if you want deeper crisp edges.
- Serve immediately. Taste and adjust salt while hot.
Recipe Notes
- Frozen hash brown patties: Cook from frozen at 400°F / 200°C for 8–12 minutes, flipping halfway. No oil is usually needed.
- Homemade shredded hash browns: Grate 1 lb / 450 g potatoes, rinse or soak, squeeze very dry, toss with oil and seasoning, then air fry at 360–380°F / 182–193°C for 13–18 minutes.
- Diced or cubed breakfast potatoes: Toss 16 oz / 450 g frozen diced or cubed potatoes with 1–2 tbsp / 15–30 ml oil and air fry at 380–400°F / 193–200°C for 15–22 minutes, shaking every 5–7 minutes.
- Extra crispy: Keep the layer thin, avoid overcrowding, and add a few minutes at the end.
- Storage: Refrigerate leftovers for 3–4 days. Reheat in the air fryer at 350–375°F / 175–190°C for 3–5 minutes.

FAQs About Air Fryer Hash Browns
Do frozen hash browns work in the air fryer?
Frozen shredded hash browns, frozen hash brown patties, and frozen diced potatoes all work well in the air fryer. Cook them from frozen rather than thawing first so they crisp instead of steaming.
How long do frozen shredded hash browns take in the air fryer?
Frozen shredded hash browns usually take 15–20 minutes at 375°F / 190°C. Shake or flip them every 5 minutes so the potato shreds brown evenly.
What is the best air fryer temperature for hash brown patties?
Frozen hash brown patties usually crisp best at 400°F / 200°C for 8–12 minutes. Flip them halfway through, then add 2–3 minutes if you want deeper browning.
Should frozen hash browns be thawed before air frying?
Keep frozen hash browns frozen before air frying. Thawing can add surface moisture, especially with loose shredded potatoes, which makes them steam before they crisp.
Do you need to preheat the air fryer for hash browns?
Preheating helps hash brown patties and loose shredded hash browns start crisping faster, but it is not always required. If your air fryer runs hot or preheats automatically, check early. If your first batch turns out pale, preheat the next batch for 2–3 minutes before adding the potatoes.
Why are my air fryer hash browns not crispy?
The most common reasons are overcrowding, too much moisture, not enough oil for shredded potatoes, or not enough cooking time. Use a thinner layer, toss loose potatoes with oil, and add a few extra minutes if needed.
How do you make homemade hash browns in the air fryer?
Grate the potatoes, rinse or soak them, squeeze them very dry, then season with oil and salt. Air fry at 360–380°F / 182–193°C for 13–18 minutes, checking early for browning.
How long do diced hash browns or breakfast potatoes take?
Frozen diced or cubed hash browns usually take 15–22 minutes at 380–400°F / 193–200°C. Shake every 5–7 minutes and use the lower temperature for larger cubes.
Do hash brown patties need extra oil?
Most frozen hash brown patties already contain enough oil to crisp in the air fryer. A light spray helps only if the surface looks dry or pale during cooking.
Should hash brown patties be stacked in the air fryer?
Keep frozen hash brown patties in a single layer so hot air can reach both sides. Stacking traps steam between the patties, which leaves the middle surfaces soft instead of crisp.
Does parchment paper work for air fryer hash browns?
Perforated parchment or an air fryer-safe liner can help with loose shredded hash browns that fall through wide basket holes. Avoid solid parchment that blocks airflow, and do not preheat with loose parchment inside the basket because it can lift toward the heating element.
What is the best way to reheat hash browns?
The air fryer is the best way to bring back crisp edges. Reheat cooked hash browns at 350–375°F / 175–190°C for 3–5 minutes, depending on thickness.
Why do homemade hash browns turn gummy?
Homemade hash browns usually turn gummy when the grated potatoes hold too much starch and water. Rinse or soak the potatoes first, then squeeze them very dry before adding oil and seasoning.
Which oil works best for air fryer hash browns?
Olive oil, avocado oil, and neutral cooking oils all work. Use enough to lightly coat loose shredded or diced potatoes, but skip extra oil for frozen patties unless they look dry.
Do frozen shredded hash browns go straight into the air fryer?
Frozen shredded hash browns go straight into the air fryer without thawing. Toss them with oil and seasoning, spread them in a thin layer, and cook at 375°F / 190°C for 15–20 minutes, shaking every 5 minutes.