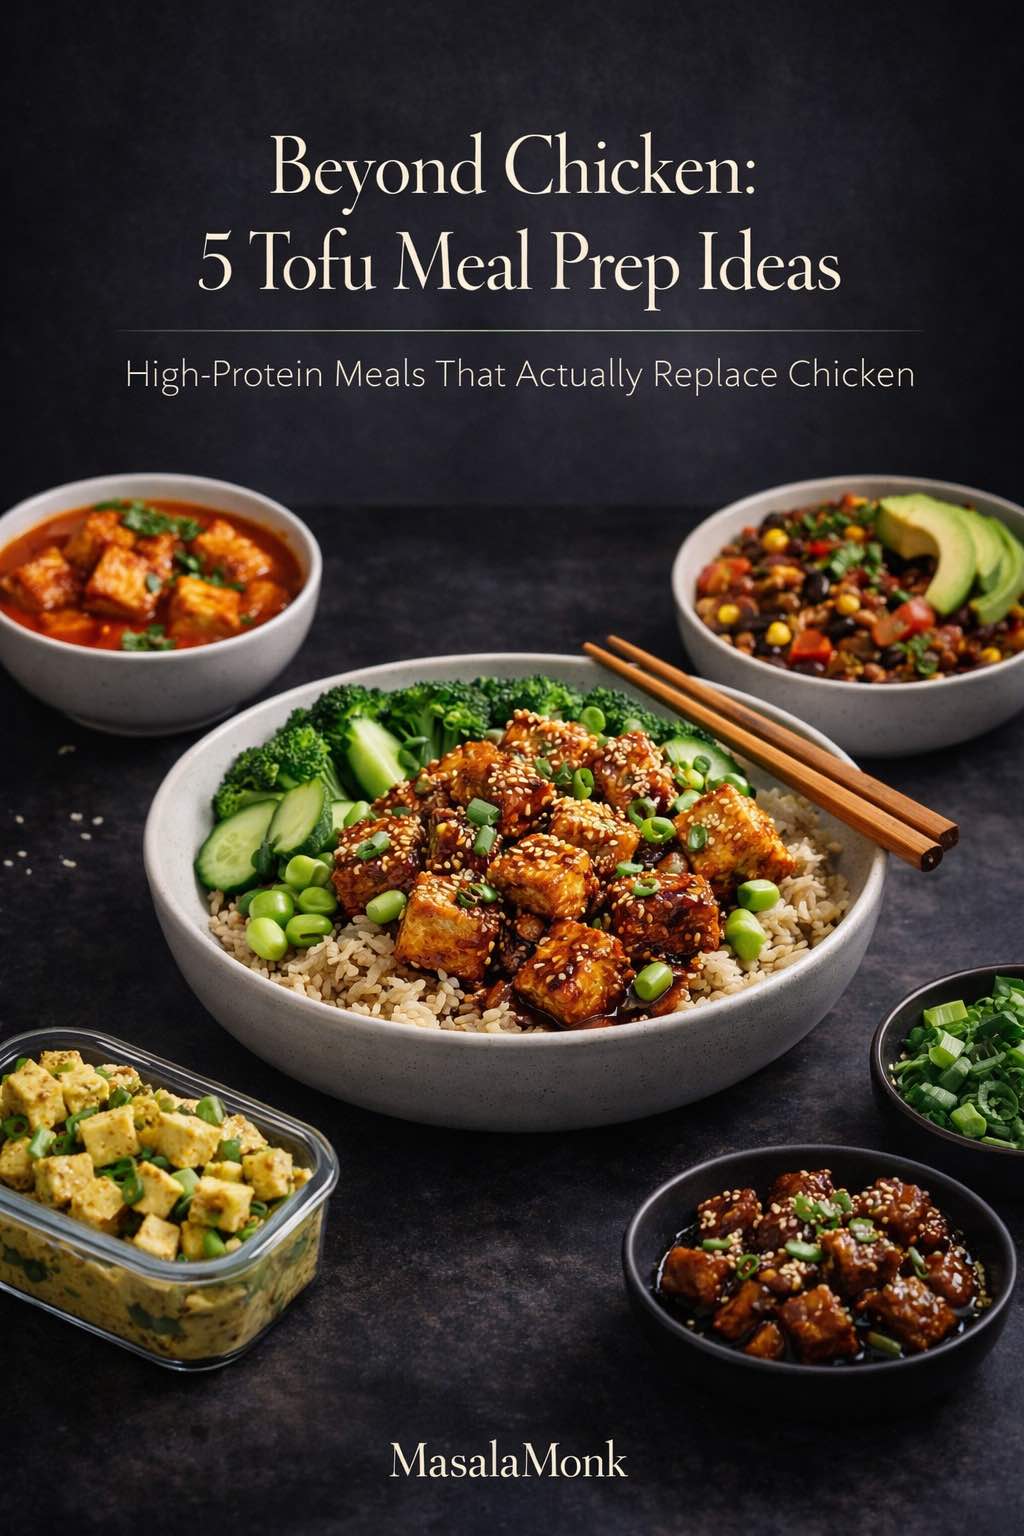
Tofu meal prep can be substantial, flavorful, and still worth opening on day four. That is exactly what this guide is built to deliver.
These lunches are designed for real weekday life. They are filling enough to count as proper lunch, varied enough to keep the week from feeling repetitive, and practical enough to prep ahead without sliding into bland tofu, soggy vegetables, or disappointing containers by midweek.
Just as importantly, the hemp seeds are doing real work throughout the lineup. Rather than sitting on top like a token healthy ingredient, they show up as a nutty crust, a creamy dressing base, a richer sauce builder, a fresh herby crunch, and a proper ranch-style finish that makes wraps feel complete instead of merely assembled.
If you want to build a broader plant-based lunch system beyond this page, MasalaMonk’s guide to plant-based protein sources for high-protein meal prep is a natural companion.
Quick answers before you cook
Can tofu be meal prepped? Yes. Tofu is one of the best meal-prep proteins because it roasts well, absorbs flavor, and works naturally in rice bowls, quinoa bowls, noodles, and wraps.
What tofu is best for meal prep? Extra-firm tofu is the easiest and most reliable option because it holds shape well and develops better edges after roasting. Firm tofu also works when you want a slightly softer bite.
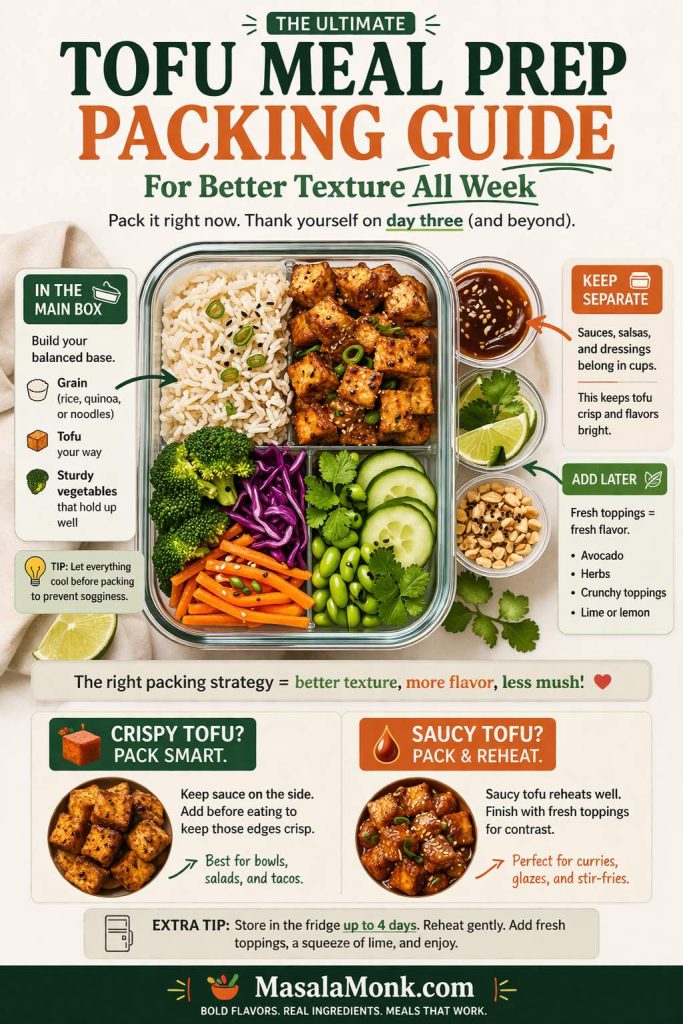
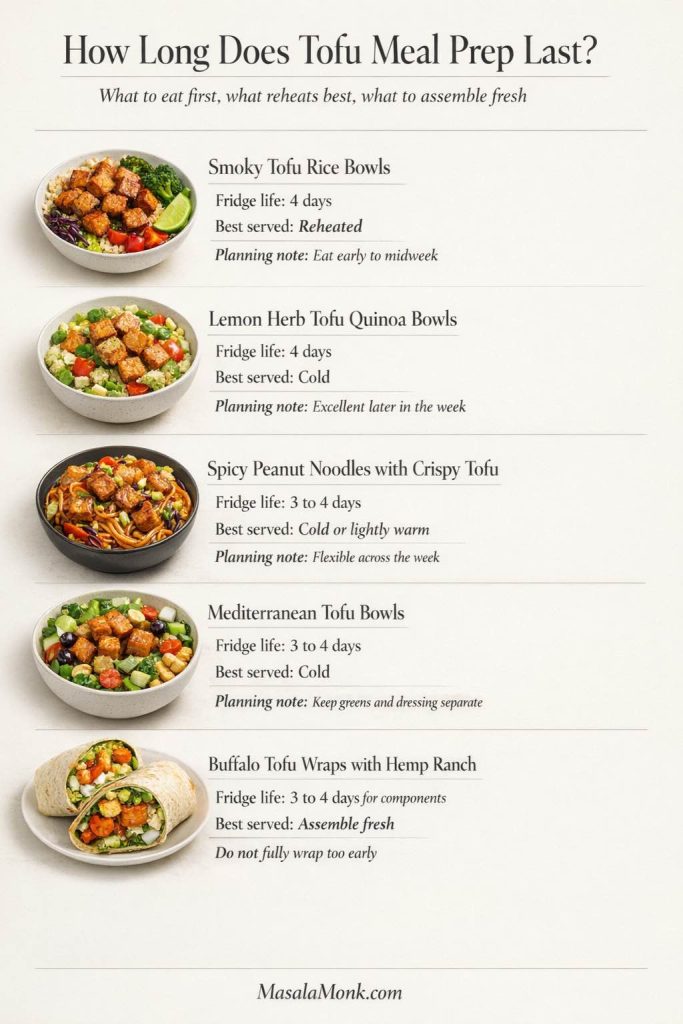
How long does tofu meal prep last? Most tofu meal prep keeps well for 3 to 4 days in the fridge when sauces, watery vegetables, and crunchy toppings are packed separately.
What is the biggest mistake? Packing hot tofu with wet vegetables or dressing too early. As a result, a good meal-prep container can turn soggy by day three.
What is the key rule for better tofu meal prep? Press well, roast until it has real color, cool before sealing, and keep wet and dry elements separate whenever texture matters.
Also Read: Easy English Scone Recipe
Tofu Meal Prep at a Glance
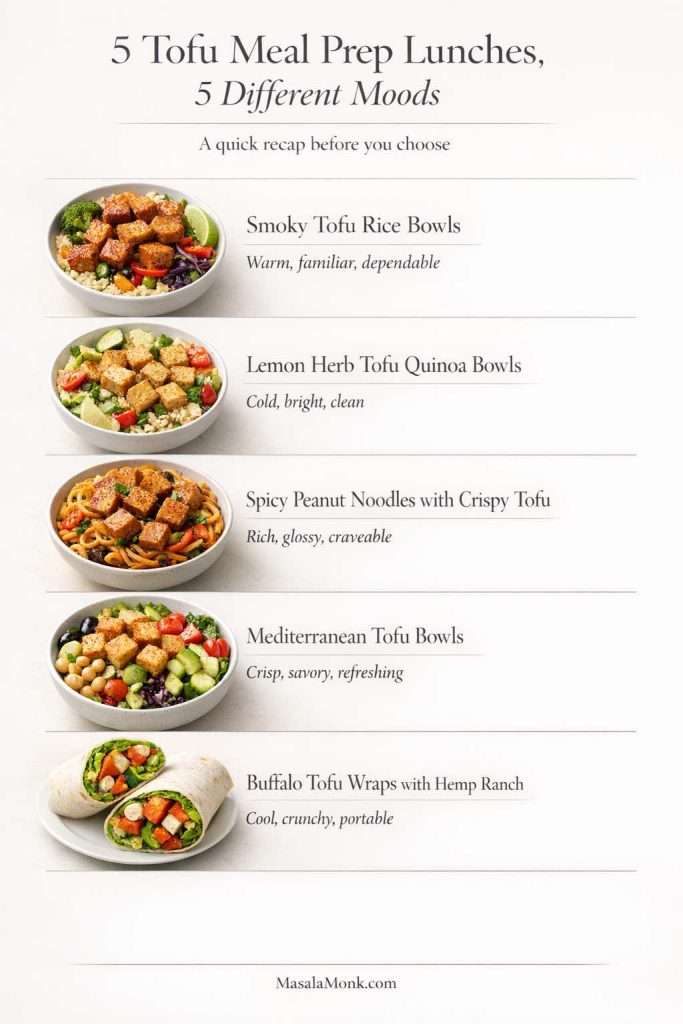
Use this as your fast decision guide before choosing a recipe. When you already know you want something warm, cold, craveable, or easy to eat on the go, this section makes the choice quicker. Better yet, it helps you match the right lunch to the right point in the week instead of rereading every recipe section once time is already tight.
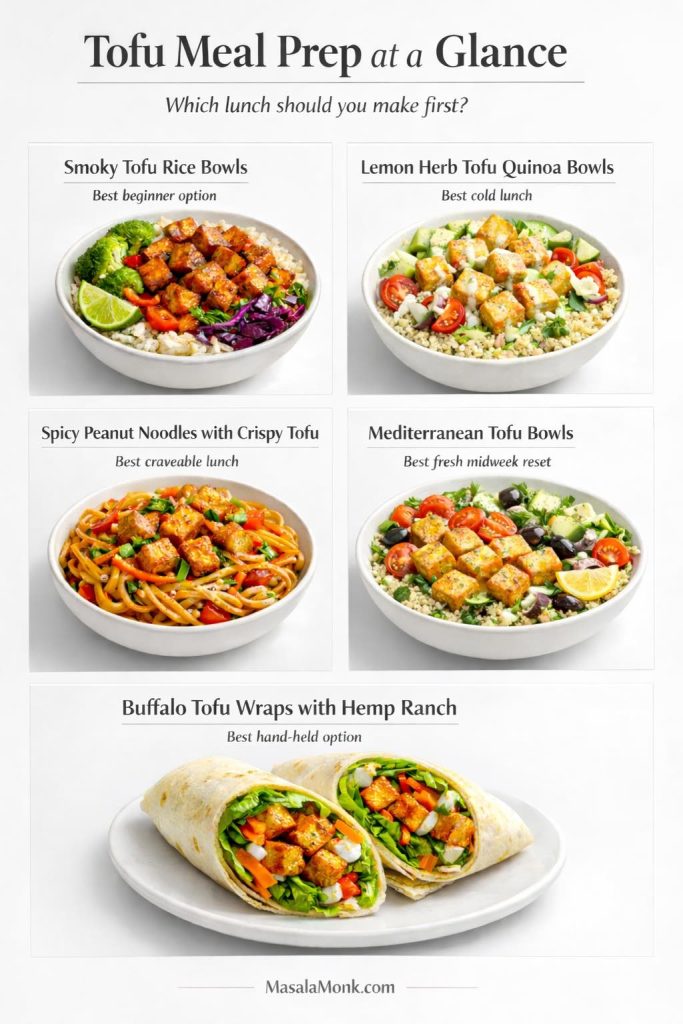
- Best beginner option: Smoky Tofu Rice Bowls
- Best cold lunch: Lemon Herb Tofu Quinoa Bowls
- Best reheated lunch: Smoky Tofu Rice Bowls
- Best craveable lunch: Spicy Peanut Noodles with Crispy Tofu
- Best fresh midweek reset: Mediterranean Tofu Bowls
- Best hand-held option: Buffalo Tofu Wraps with Hemp Ranch
- Best choice if you are tired of bowls: Buffalo Tofu Wraps with Hemp Ranch
- Best day-three or day-four option: Lemon Herb Tofu Quinoa Bowls
New to tofu meal prep? Start with the smoky rice bowls. They are the clearest proof that tofu can feel just as satisfying as the classic protein-rice-and-vegetable lunch people usually build around chicken. From there, branching into the colder, fresher, or more sauce-driven options becomes much easier.
Why Tofu Meal Prep Often Disappoints by Day Three — and How This Guide Fixes It
Too often, tofu meal prep falls off by day three because moisture builds, texture softens, and the containers start tasting repetitive. Sometimes the tofu was never pressed or browned enough to begin with. In other cases, the real problem is packing hot ingredients with wet vegetables or dressing too early, which quietly sets everything up to turn soggy in the fridge.
This guide fixes that by treating texture and packing order as part of the recipe, not as an afterthought. Instead of stretching one baked-tofu method across several near-identical boxes, it gives you five genuinely different lunches with different textures, different flavor directions, and different kinds of lunch appeal. Consequently, the week feels less repetitive, while the food itself holds up better.
Hemp seeds make that system stronger. Here, they are not just included for nutrition. They help create a nutty crust, a creamier dressing, a fuller sauce, a brighter finishing crunch, and a better ranch-style spread. In practice, that means the recipes eat better as the week goes on instead of feeling like containers you are forcing yourself to finish.
Also Read: Sourdough English Muffins Recipe
Best Tofu for Meal Prep and How to Prep It
For these recipes, extra-firm tofu is the easiest place to start. It gives you stronger edges, cleaner pieces, and better structure after cooking. Firm tofu also works well, particularly when you want a slightly softer center or a more delicate bite in the finished meal. If you can get super-firm tofu, that is even better because it usually needs less pressing and holds its shape beautifully.
However, silken tofu is not the right fit here. It can be useful in sauces or creamy blends, but it is not built for bowls, noodles, and wraps like these. Even if it sounds convenient, it will not give you the kind of meal-prep texture that keeps well through the week.
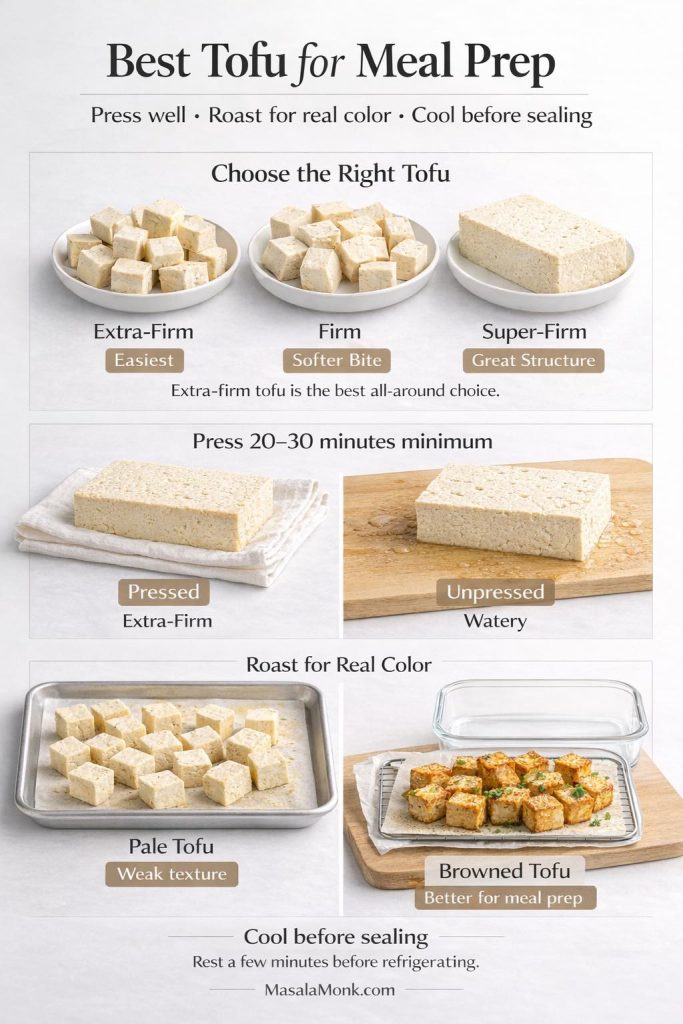
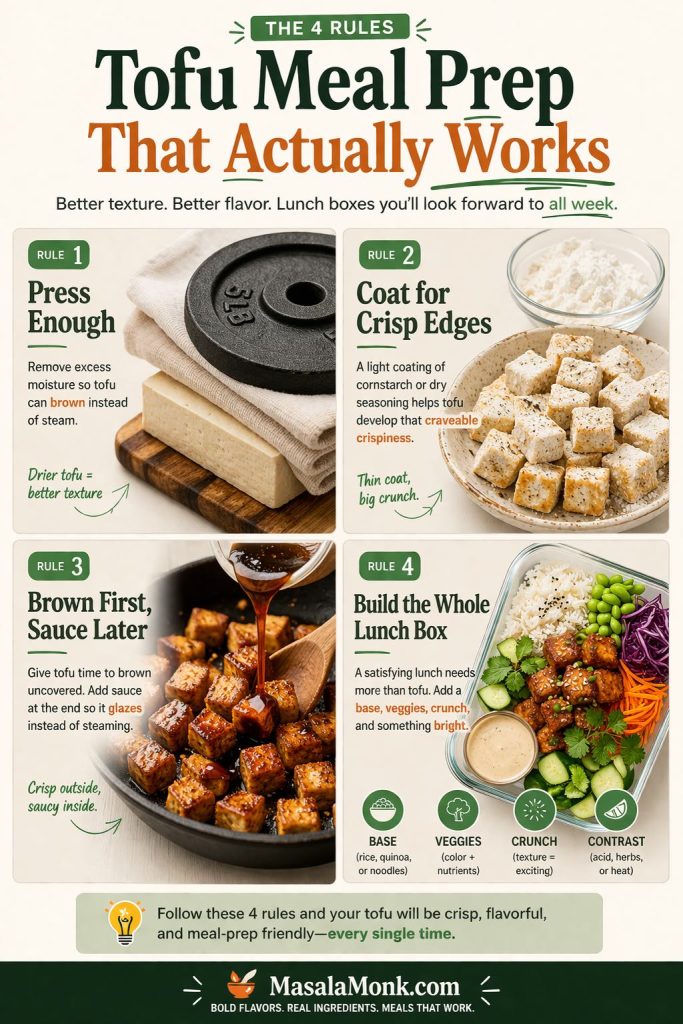
The prep matters just as much as the type you choose. First, press the tofu until it no longer feels waterlogged when you cut it. Twenty to thirty minutes is a good minimum, and longer is even better if time allows. Then season it with more intention than just a splash of soy sauce and hope for the best. Tofu responds well to layered flavor: salt or soy, aromatics, acid, herbs, spices, and a finishing element.
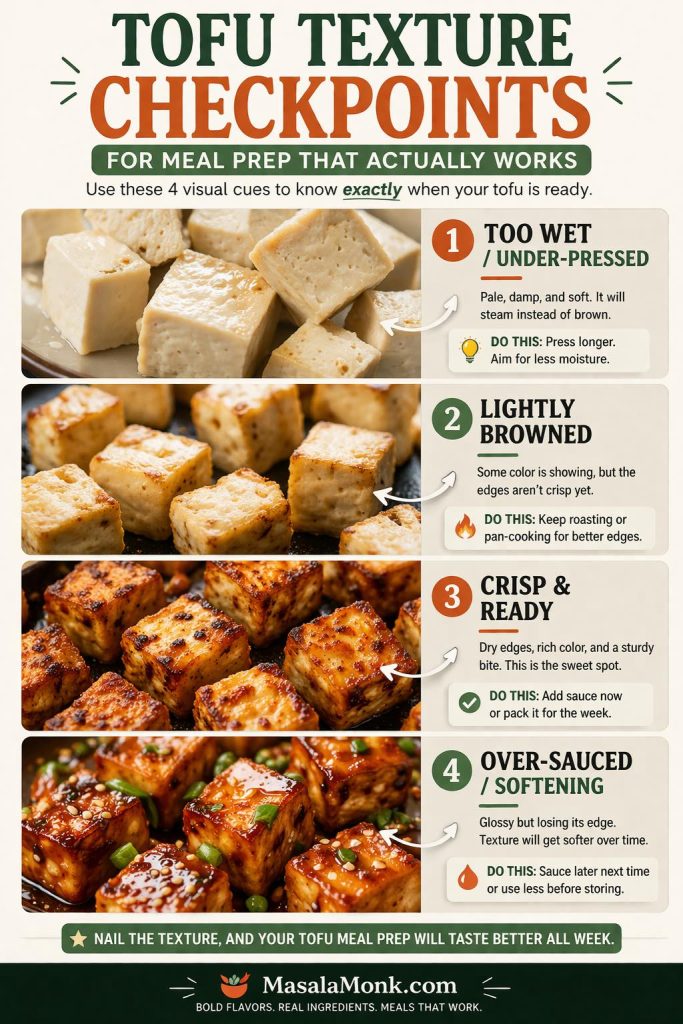
Most importantly, cook for texture rather than mere doneness. Pale tofu rarely improves in the fridge. Instead, what you want is visible browning, firmer edges, and enough structure that the tofu can survive storage and reheating without collapsing into softness. Once cooked, let it cool before sealing it into containers. That pause protects more texture than most people expect.
If you like crisp, prep-friendly plant-based lunches in general, MasalaMonk’s high-protein vegan meal prep ideas using an air fryer are worth a look too.
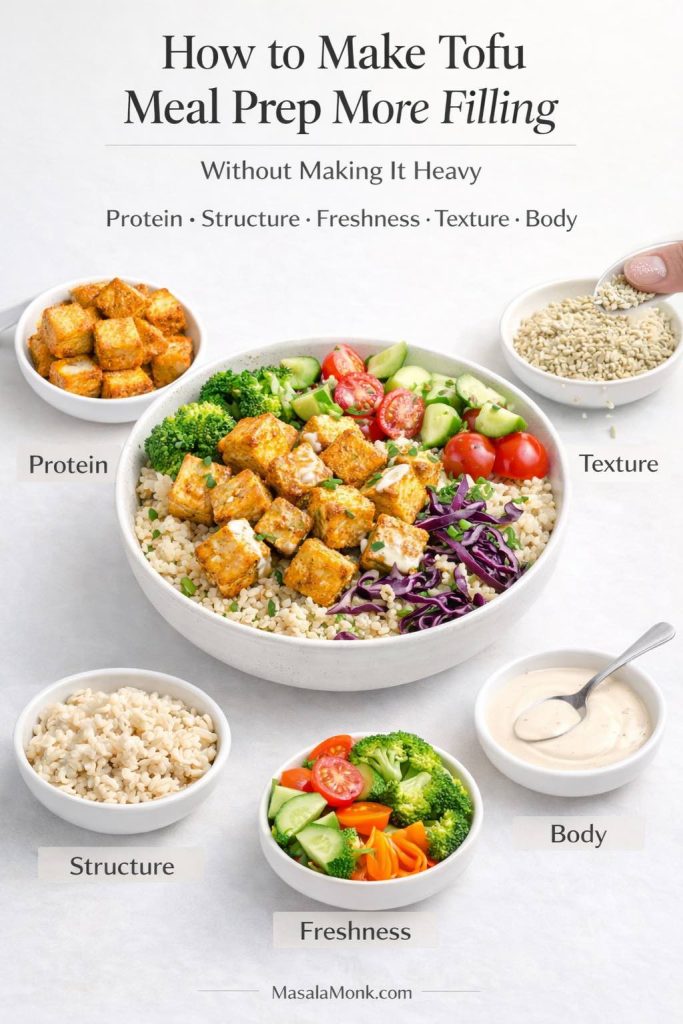
How to Make Tofu Meal Prep More Filling Without Making It Heavy
One of the easiest ways to improve tofu meal prep is to make it more filling without turning it into a heavy lunch you stop looking forward to by Wednesday. The answer is not to pile in random extras until the meal feels joyless. Rather, build in staying power with a proper base, a good texture contrast, and a sauce or dressing that adds body without flooding the container.
In practice, that usually means tofu plus rice, quinoa, or noodles for structure; vegetables that either roast well or stay crisp; and hemp seeds, yogurt, tahini, or peanut-based sauces that make the lunch feel complete instead of sparse. That is where these recipes work especially well. Tofu carries the main protein role, while hemp seeds add richness, body, and texture in ways that improve the actual eating experience.
This matters because the best tofu meal prep recipes are the ones you actually want to repeat. A filling lunch should still feel bright, balanced, and easy to eat. That is precisely why these bowls, noodles, and wraps are designed to hold well in the fridge while still eating like lunch first and meal prep second.
For a grain-forward prep angle, MasalaMonk’s plant-based meal prep ideas using quinoa as a protein source pair especially well with the quinoa bowls below.
Also Read: White Russian Recipe: 7 Variants to Try, From Classic to Frozen
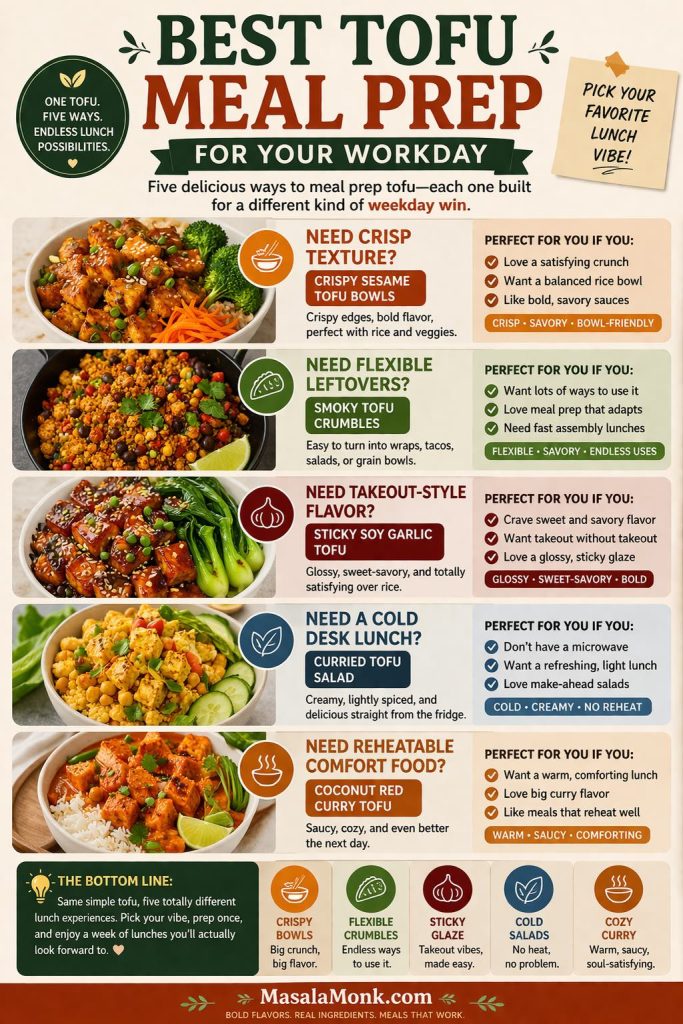
The 5 Tofu Meal Prep Recipes
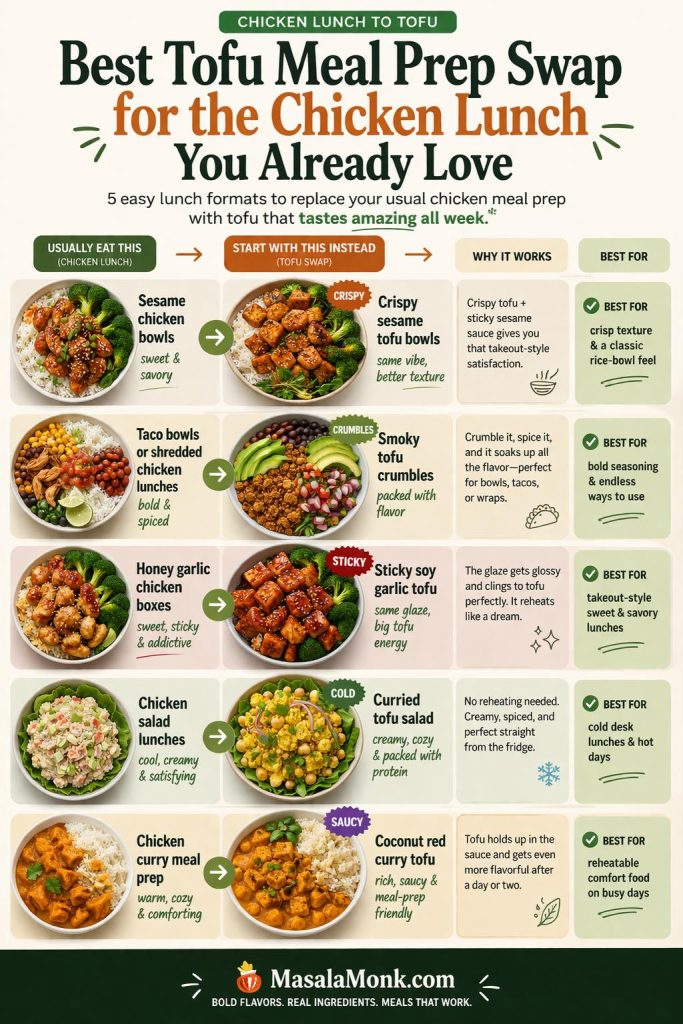
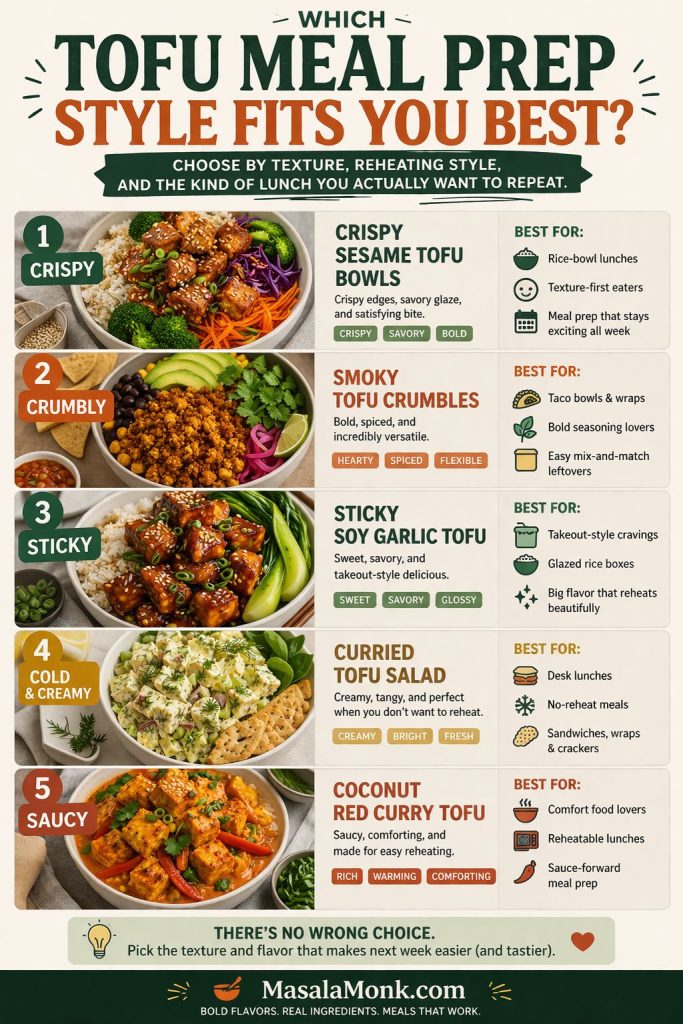
The recipes below are built to cover different lunch moods across the week, from a warm rice bowl to a bright quinoa bowl, spicy noodles, a crisp Mediterranean option, and a hand-held buffalo wrap. Protein estimates are approximate and based on generic ingredient values, so they can vary slightly depending on the tofu, noodles, tortillas, and yogurt you use.
If you landed here mainly for the recipes, you can jump straight into the one that fits your week best. On the other hand, if you are still deciding, the short intros and quick snapshots will help you match the right lunch mood to the right container.
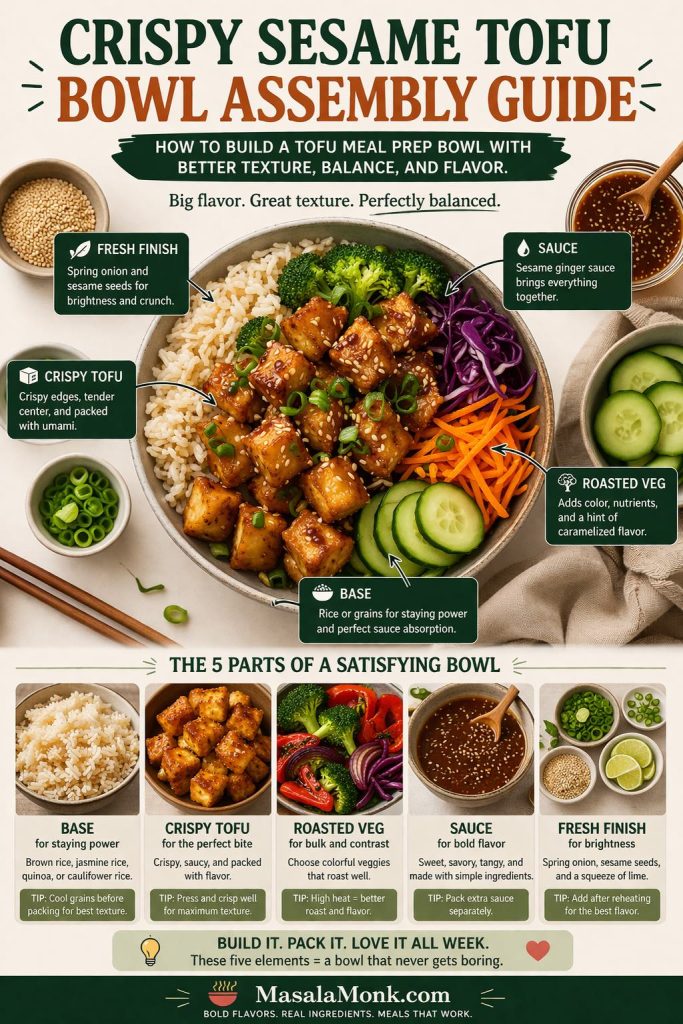
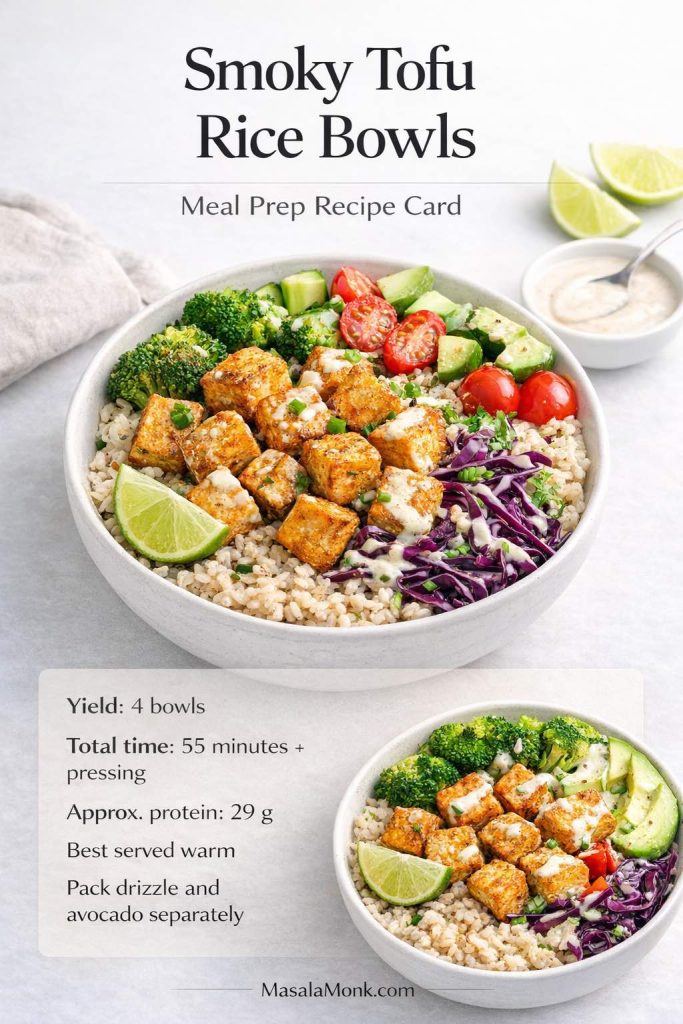
1) Smoky Tofu Rice Bowls
Choose this bowl when you want the most familiar lunch format in the post. If your idea of dependable tofu meal prep still looks like some version of protein, rice, and vegetables, this one gives you that same structure with much more character.
The tofu roasts into something smoky, toasty, and lightly nutty from the hemp crust, while roasted broccoli and bell peppers bring sweetness and body. Shredded cabbage keeps the bowl from feeling too soft, and a sharp lime yogurt drizzle wakes everything back up after reheating. For that reason, this is the easiest recipe here to trust on the first try.
Quick recipe snapshot
- Best served: Warm, with cool toppings added after reheating
- Fridge life: 4 days
- Reheats well: Yes
- Pack separately: Lime yogurt drizzle, avocado, and lime wedges
- Best texture trait: Smoky, browned tofu with rough hemp-crusted edges
- Approximate protein per serving: about 29 g
Ingredients
Hemp-crusted tofu
- 2 (14-ounce / 396 g) blocks extra-firm tofu, pressed and cubed
- 1 tablespoon soy sauce or tamari
- 1 tablespoon olive oil
- 1 tablespoon cornstarch
- 1 teaspoon smoked paprika
- 1 teaspoon chili powder
- 1/2 teaspoon garlic powder
- 1/2 teaspoon onion powder
- 1/4 teaspoon black pepper
- 1/3 cup hemp seeds
Rice bowl base
- 4 cups cooked rice
- 2 cups broccoli florets
- 1 red bell pepper, sliced
- 2 cups shredded cabbage
- 1 avocado, sliced for serving
- Lime wedges
Lime yogurt drizzle
- 1/2 cup plain yogurt
- 1 tablespoon lime juice
- 1 teaspoon hot sauce
- Pinch of salt
Method
- Heat the oven to 425°F and line two trays.
- Toss the tofu with soy sauce, olive oil, cornstarch, smoked paprika, chili powder, garlic powder, onion powder, and black pepper.
- Add the hemp seeds and toss again so they cling to the tofu.
- Spread the tofu on one tray in a single layer.
- Toss the broccoli and bell pepper with a little oil and salt and spread them on the second tray.
- Roast for 25 to 30 minutes, flipping the tofu once, until the tofu is browned at the edges and the hemp seeds smell lightly toasted.
- Stir together the yogurt, lime juice, hot sauce, and salt.
- Cool the hot ingredients slightly, then divide the rice, tofu, vegetables, and cabbage among containers.
- Pack the drizzle, avocado, and lime wedges separately.
What you should notice
The tofu should have darkened corners, a lightly rough hemp crust, and a savory smoky aroma. Meanwhile, the cabbage and lime should keep the bowl from feeling too dense. Once you open the container later in the week, the bowl should still feel balanced rather than heavy.
Best storage tip
Keep the drizzle separate until serving. That one move helps the tofu keep more of its edge and keeps the cabbage crisp longer. In turn, the reheated bowl feels much closer to freshly built lunch rather than day-four leftovers.
Also Read: Mango Sorbet Recipe: Healthy & Plant Based Dessert
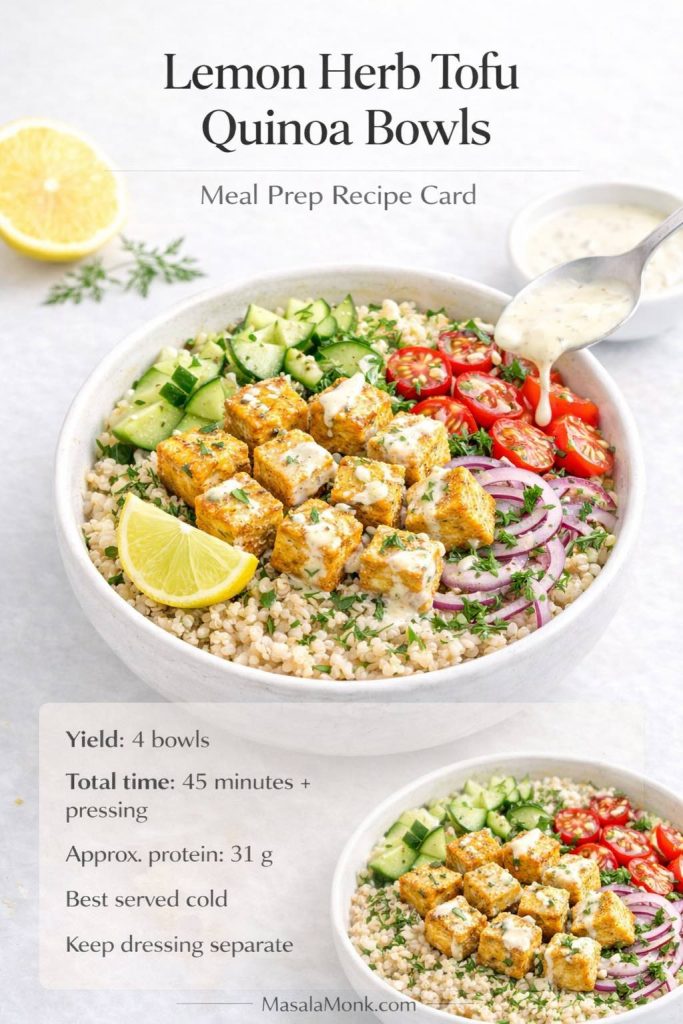
2) Lemon Herb Tofu Quinoa Bowls
Reach for this bowl when you want a cold lunch that still feels full, bright, and properly satisfying instead of dry and dutiful. At the same time, it stays calm and clean enough to work especially well later in the week.
The tofu is seasoned simply so the lemon, herbs, and creamy hemp dressing can lead. Quinoa gives the bowl structure and extra staying power, while the fresh herbs keep the flavor from flattening in the fridge. As a result, this becomes one of the smartest later-week lunches in the lineup and one of the easiest to eat straight from the container.
Quick recipe snapshot
- Best served: Cold
- Fridge life: 4 days
- Reheats well: Not necessary
- Pack separately: Creamy hemp dressing
- Best texture trait: Bright, herby, fresh-tasting quinoa bowl with creamy finish
- Approximate protein per serving: about 31 g
Ingredients
Lemon-herb tofu
- 2 (14-ounce / 396 g) blocks firm tofu, pressed and cubed
- 1 tablespoon olive oil
- 1 tablespoon lemon juice
- 1 teaspoon dried oregano
- 1 teaspoon garlic powder
- 1/2 teaspoon salt
- 1/4 teaspoon black pepper
Quinoa bowl base
- 4 cups cooked quinoa
- 1 cucumber, chopped
- 1 1/2 cups cherry tomatoes, halved
- 1/2 red onion, thinly sliced
- 1 cup chopped parsley
- 1/4 cup chopped dill or mint
- 3 tablespoons hemp seeds, for topping
Creamy hemp dressing
- 1/3 cup hemp seeds
- 3 tablespoons plain yogurt
- 2 tablespoons lemon juice
- 1 tablespoon olive oil
- 1 teaspoon Dijon mustard
- 1 small garlic clove
- 2 to 4 tablespoons water
- Salt and pepper to taste
Method
- Heat the oven to 425°F.
- Toss the tofu with olive oil, lemon juice, oregano, garlic powder, salt, and black pepper.
- Roast for about 25 minutes, flipping once, until lightly golden and firm.
- Blend or whisk together the dressing ingredients until smooth and lightly creamy.
- Divide the quinoa among containers, then add the cucumber, tomatoes, red onion, herbs, and tofu.
- Sprinkle with hemp seeds.
- Pack the dressing separately and spoon it over just before eating.
What you should notice
When you open this bowl cold, it should smell lemony and herby right away. At the same time, the dressing should coat the quinoa and tofu without making the container loose or watery. Ideally, the whole bowl should feel bright first and creamy second, not the other way around.
Best storage tip
Do not toss everything with the dressing in advance unless you are eating it within a day. Keeping it separate makes the bowl feel fresher for longer. More importantly, it stops the herbs and vegetables from collapsing too early.
Also Read: Protein Ice Cream Recipe: 10 Creamy Homemade Recipes
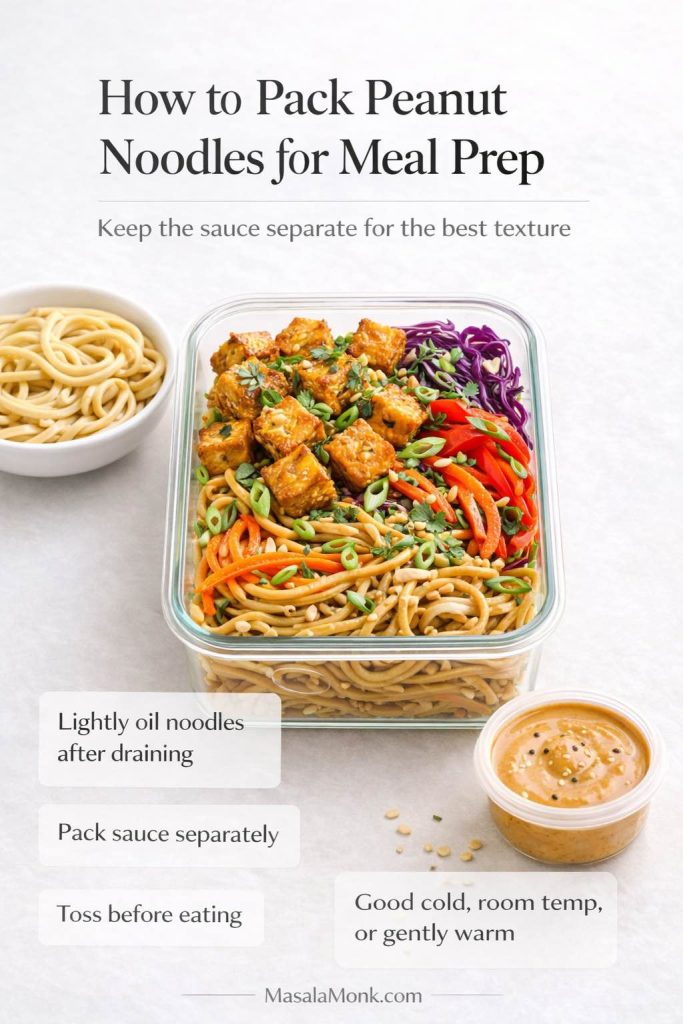
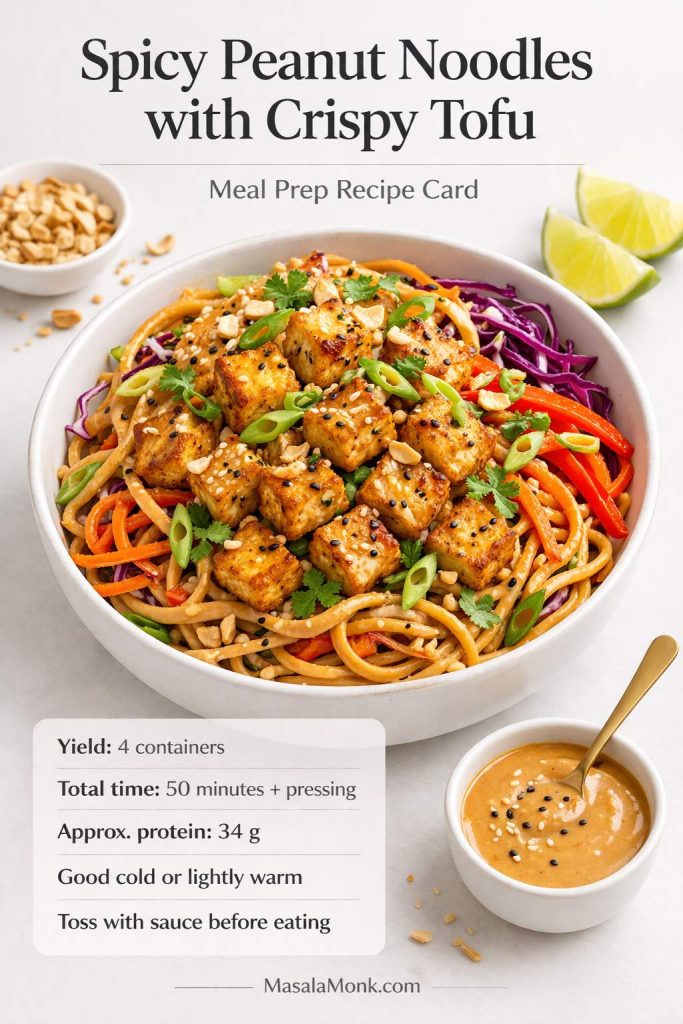
3) Spicy Peanut Noodles with Crispy Tofu
Pick this one when you want the least “meal prep feeling” lunch in the lineup. Sometimes the smartest way to stay consistent with prep is to make at least one meal that feels saucy, bold, and a little indulgent.
Here, the sauce is the whole point. Peanut butter gives it body, the hemp seeds make it feel fuller and smoother, the tofu brings chew, and the noodles give the whole thing real comfort-food energy without turning it heavy or dull. Since it works cold, at room temperature, or lightly warm, it is also one of the most flexible containers in the entire post.
Quick recipe snapshot
- Best served: Cold, room temperature, or gently warmed
- Fridge life: 3 to 4 days
- Reheats well: Lightly, but also good cold
- Pack separately: Spicy peanut-hemp sauce
- Best texture trait: Glossy noodles with crisp-edged tofu and rich clingy sauce
- Approximate protein per serving: about 34 g
Ingredients
Crispy tofu
- 2 (14-ounce / 396 g) blocks extra-firm tofu, pressed and torn into chunks
- 1 tablespoon soy sauce
- 1 tablespoon neutral oil
- 1 tablespoon cornstarch
- 1 teaspoon garlic powder
Noodle base
- 12 ounces dry noodles, such as wheat noodles or rice noodles
- 2 cups shredded cabbage
- 2 cups shredded carrots
- 1 red bell pepper, thinly sliced
- 3 green onions, sliced
- Cilantro, optional
Spicy peanut-hemp sauce
- 1/3 cup peanut butter
- 2 tablespoons soy sauce
- 1 tablespoon rice vinegar
- 1 tablespoon maple syrup
- 1 to 2 teaspoons sriracha
- 1 teaspoon sesame oil
- 1/4 cup hemp seeds
- Warm water, as needed
Method
- Heat the oven to 425°F.
- Toss the tofu with soy sauce, oil, cornstarch, and garlic powder.
- Roast for about 25 minutes, flipping once, until crisp at the edges.
- Cook the noodles until just tender, then drain and cool slightly.
- Blend or whisk together the sauce ingredients, adding warm water until the sauce is smooth, glossy, and thick enough to cling.
- Divide the noodles and vegetables among containers, then add the tofu and green onions.
- Pack the sauce separately and toss through just before eating.
What you should notice
The sauce should coat the back of a spoon. The tofu should have crisp edges and a slightly chewy center. Once everything is tossed together, the noodles should look glossy and coated, not soupy. Even so, the whole bowl should still feel lively because of the raw vegetables, not weighed down by the sauce.
Best storage tip
A tiny bit of oil on the noodles after draining helps keep them from clumping in the fridge. After that, keeping the sauce separate gives you much more control over texture when it is time to eat.
Also Read: Homemade Mango Ice Cream Recipe
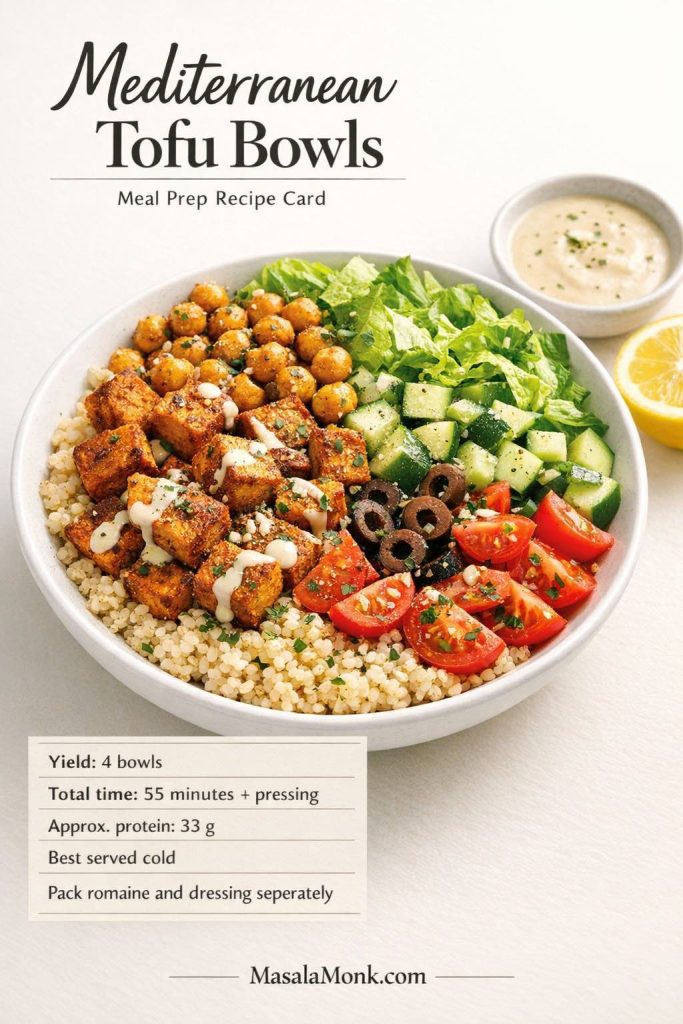
4) Mediterranean Tofu Bowls
Go with this bowl when richer lunches start feeling repetitive. By the middle of the week, something brighter and sharper often sounds much more appealing.
The tofu is warmly spiced and roasted, but the real lift comes from the finish. A lemony herbed hemp crunch gives the bowl a clear texture role instead of hiding quietly in the background, while cucumbers, tomatoes, olives, and romaine keep everything crisp, savory, and bright. By contrast with the noodle prep, this lunch is not trying to comfort you. It is trying to refresh you, which is exactly why it works so well in the same lineup.
Quick recipe snapshot
- Best served: Cold or cool room temperature
- Fridge life: 3 to 4 days
- Reheats well: Not ideal once assembled
- Pack separately: Romaine, dressing, and herbed hemp crunch for best texture
- Best texture trait: Crisp, briny, lemony contrast with nutty finishing crunch
- Approximate protein per serving: about 33 g
Ingredients
Spiced tofu
- 2 (14-ounce / 396 g) blocks firm tofu, pressed and cubed
- 1 tablespoon olive oil
- 1 tablespoon lemon juice
- 1 teaspoon smoked paprika
- 1 teaspoon ground cumin
- 1/2 teaspoon garlic powder
- 1/2 teaspoon salt
- Black pepper to taste
Mediterranean bowl base
- 4 cups cooked quinoa
- 1 cucumber, chopped
- 1 1/2 cups chopped tomatoes
- 1/2 cup sliced olives
- 1 cup shredded romaine
- 1 cup roasted chickpeas
Creamy lemon dressing
- 3 tablespoons tahini
- 2 tablespoons lemon juice
- 1 small garlic clove
- 2 to 4 tablespoons water
- Salt and pepper to taste
Herbed hemp crunch
- 1/3 cup hemp seeds
- 2 tablespoons chopped parsley
- 1 tablespoon chopped dill
- 1 teaspoon lemon zest
- Pinch of salt
- Black pepper
Method
- Roast the tofu at 425°F for 25 to 30 minutes until browned and firm.
- Whisk together the dressing ingredients.
- Stir together the hemp crunch ingredients in a small bowl.
- Divide the quinoa among containers and add the cucumber, tomatoes, olives, tofu, and roasted chickpeas.
- Pack the romaine, dressing, and hemp crunch separately when possible for the best texture.
- Add the fresh elements just before serving.
What you should notice
The hemp topping should smell lemony and fresh and add a real nutty bite. As a result, the finished bowl should feel crisp, bright, and layered rather than soft and one-note. Even on day three, it should still taste awake rather than tired.
Best storage tip
Store the romaine outside the main hot ingredients if you want the best texture on days three and four. In the same way, keeping the crunch and dressing separate protects the part of this bowl that makes it feel fresh in the first place.
Also Read: Cookie Pie Recipe: 10 Best Flavors, Fillings and Variations
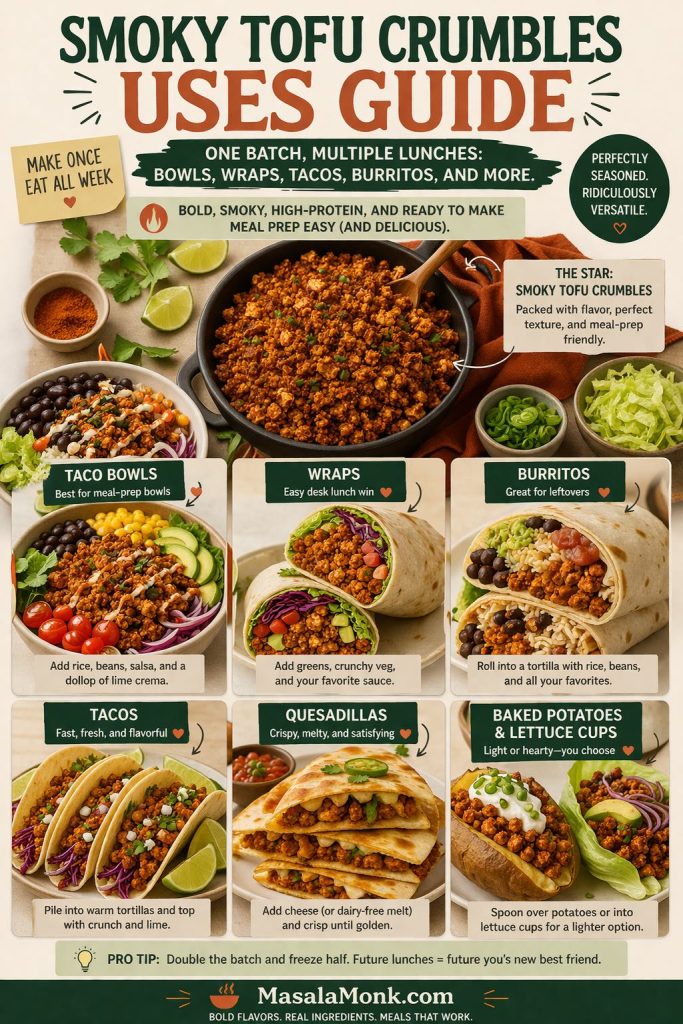
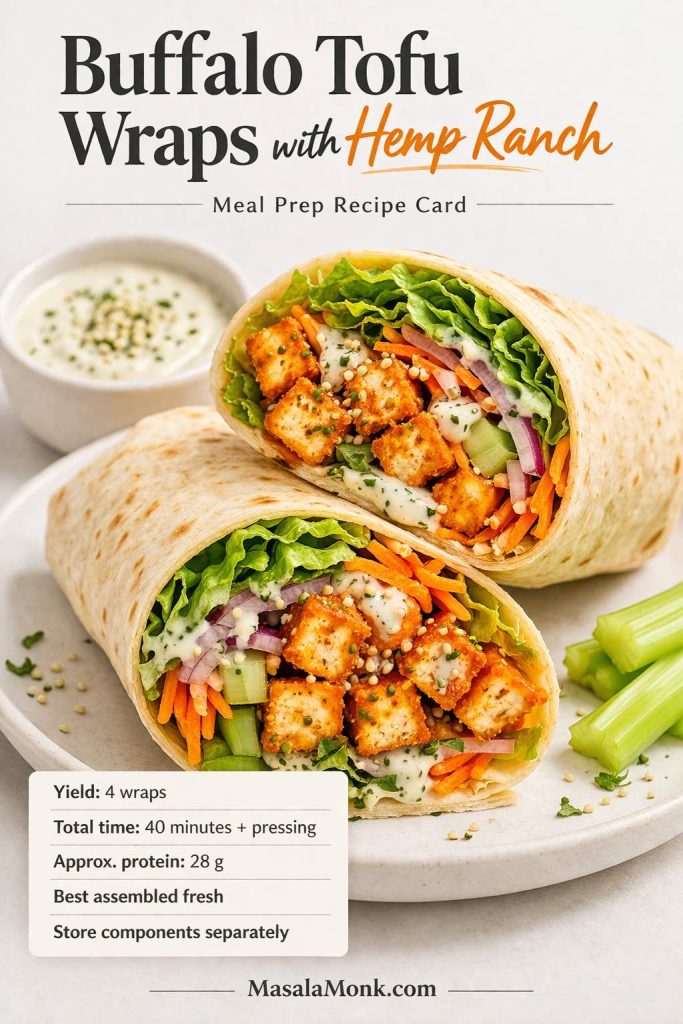
5) Buffalo Tofu Wraps with Hemp Ranch
This is the lunch that breaks the bowl rhythm. After several container-style meals, that shift alone makes the lineup feel more useful.
Buffalo tofu brings heat and punch, the fresh vegetables add crunch and lift, and the hemp ranch gives the wrap its real identity by cooling the buffalo heat and adding creamy body. Using shredded or finely crumbled tofu also makes the filling feel more natural inside a wrap rather than like bowl tofu folded into a tortilla at the last second. That difference matters, because this lunch is supposed to feel packed on purpose.
Quick recipe snapshot
- Best served: Cold, assembled fresh
- Fridge life: 3 to 4 days for components
- Reheats well: Not as a full wrap
- Pack separately: Buffalo tofu, wrap vegetables, tortillas, and hemp ranch
- Best texture trait: Sticky spicy tofu balanced by cool creamy ranch and fresh crunch
- Approximate protein per serving: about 28 g
Ingredients
Buffalo tofu
- 2 (14-ounce / 396 g) blocks extra-firm tofu, pressed and shredded or finely crumbled
- 1 tablespoon olive oil
- 1/2 teaspoon garlic powder
- 1/2 teaspoon paprika
- 1/2 teaspoon salt
- Black pepper to taste
- 1/3 cup buffalo sauce
Wrap filling
- 4 large flour tortillas or wraps
- 2 cups shredded lettuce
- 1 cup shredded carrots
- 1 cup finely chopped celery
- 1/2 red onion, thinly sliced
- 2 tablespoons hemp seeds, for sprinkling
Hemp ranch
- 1/4 cup hemp seeds
- 1/2 cup plain yogurt
- 1 tablespoon lemon juice
- 1 teaspoon Dijon mustard
- 1 tablespoon chopped parsley or dill
- Pinch of garlic powder
- Salt and pepper to taste
- Splash of water, if needed
Method
- Heat the oven to 425°F.
- Toss the shredded or finely crumbled tofu with olive oil, garlic powder, paprika, salt, and black pepper.
- Spread it out on a tray and roast for about 20 minutes, stirring once, until the edges are lightly browned.
- Toss the hot tofu with buffalo sauce and let it cool slightly.
- Blend or whisk together the hemp ranch ingredients until creamy and spreadable.
- For the best texture, store the wrap filling separately and assemble fresh before eating.
- To serve, spread hemp ranch on the wrap, then layer the lettuce, carrots, celery, onion, tofu, and a light sprinkle of hemp seeds before rolling tightly.
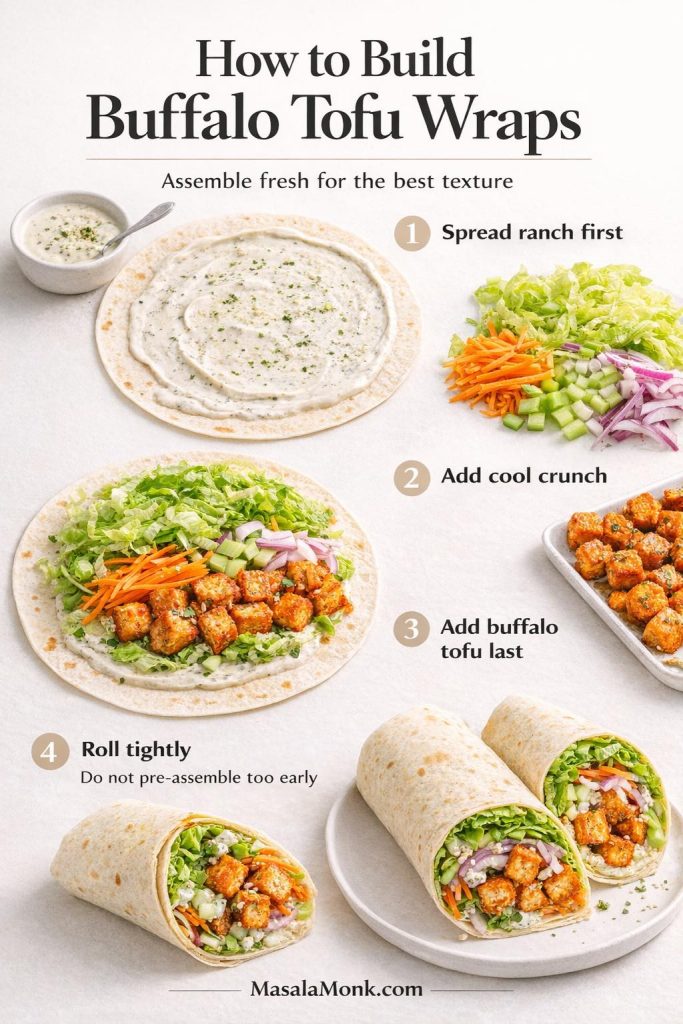
What you should notice
The tofu should look sticky and spicy at the edges, while the ranch should be thick enough to spread without making the wrap soggy. Once assembled, the wrap should feel cool, crisp, creamy, and sharp in the right order, not like a sauce-heavy bundle that falls flat after two bites.
Best storage tip
If you fully assemble these on day one, they soften much faster. Therefore, they are better when the components are prepped ahead and wrapped fresh. That way, you keep the convenience without giving up the texture that makes the wrap worth eating.
Also Read: Punjabi Mutton Bhuna – Amritsari Village-Style Gosht Recipe
Which Tofu Meal Prep Recipes Are Best Hot, Cold, or Build-Fresh?
The Smoky Tofu Rice Bowls reheat best because the rice and roasted vegetables are built for warmth, and the bowl can be refreshed with cool cabbage and lime yogurt drizzle afterward. So if you want the most classic microwave-friendly tofu meal prep option in the post, start there.
Meanwhile, the Spicy Peanut Noodles with Crispy Tofu work both ways. Some people prefer them cold or at room temperature, while others like them gently warmed before tossing with sauce. Because of that flexibility, they are one of the easiest lunches here to fit into different workday setups.
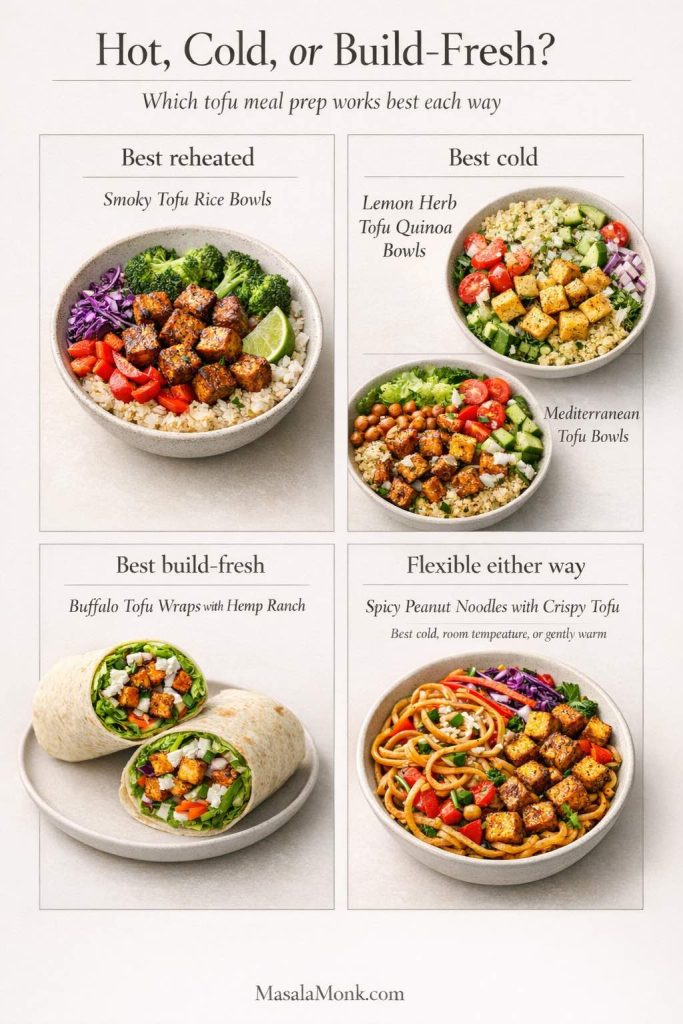
For cold lunches, the Lemon Herb Tofu Quinoa Bowls are excellent. Likewise, the Mediterranean Tofu Bowls are at their best when the romaine, dressing, and herbed hemp crunch stay fresh until serving. In both cases, the freshness is the point, so there is no need to force reheating into the equation.
By contrast, the Buffalo Tofu Wraps with Hemp Ranch are best assembled from cold components just before eating. They can still be fully meal-prepped, of course. Even so, the smartest move is to treat them as a build-fresh lunch rather than a fully wrapped make-ahead one.
Also Read: Peach Cobbler with Canned Peaches (Dessert Recipe)
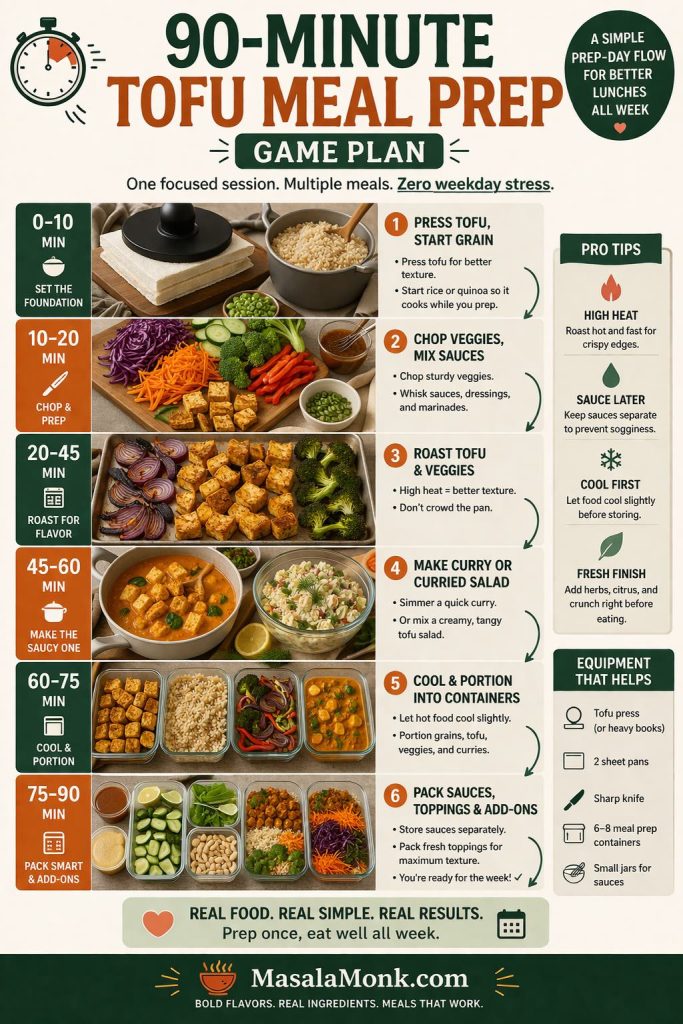
How to Meal Prep Tofu for the Week in Under 90 Minutes
You do not need to treat this like five separate cooking projects. Instead, the smarter move is to overlap the work so the whole prep session stays manageable.
Start by pressing all the tofu first. While that happens, get your grains cooking. Then preheat the oven and prep your vegetables. Once the tofu goes in, mix the sauces and dressings while everything roasts. Meanwhile, chop herbs and pack the fresh components during that same window. In practice, that overlap is what keeps a big prep session from turning into an all-afternoon chore.
A practical workflow looks like this:
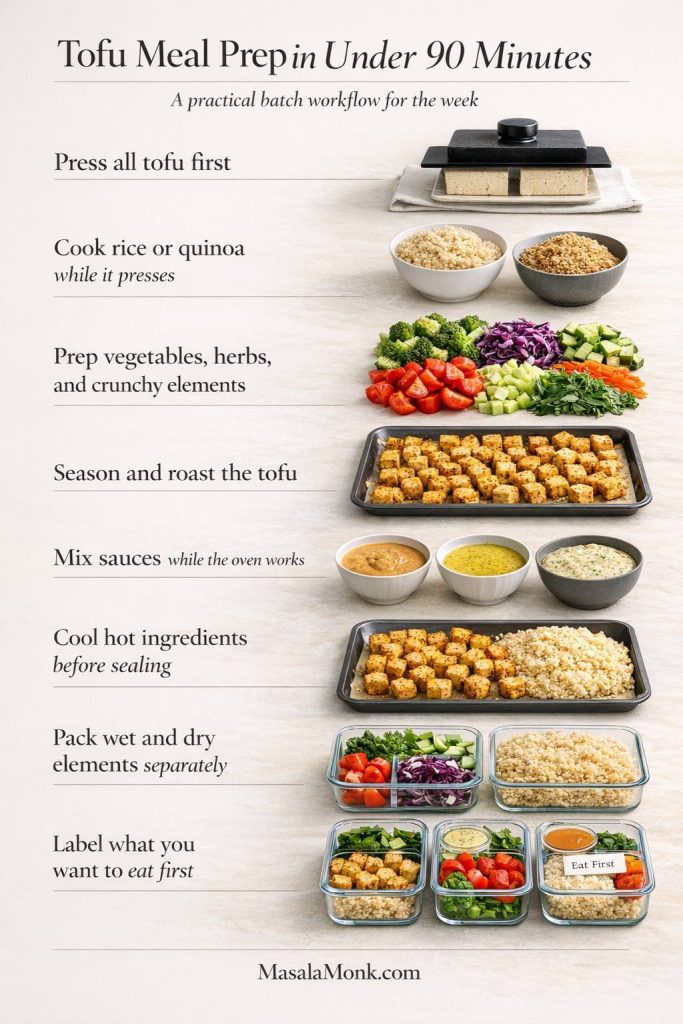
- Press all the tofu first.
- Cook rice or quinoa while it presses.
- Preheat the oven and line your trays.
- Chop vegetables, herbs, and crunchy toppings.
- Season the tofu and roast it.
- Mix the hemp dressing, peanut sauce, tahini dressing, and hemp ranch while the oven is working.
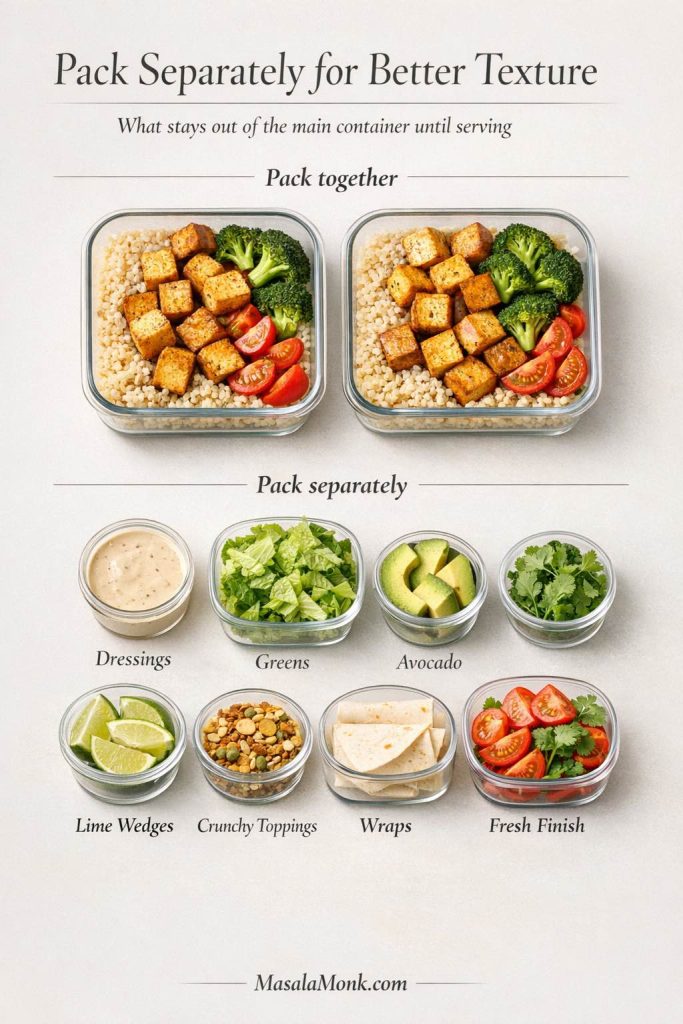
- Cool the hot components before closing containers.
- Pack wet and dry elements separately wherever texture matters.
- Label the containers you want to eat first.
That kind of workflow keeps the prep manageable and makes the whole post more useful in real life. It also makes a big difference in texture, because cooling before packing is one of the easiest ways to avoid condensation and sogginess. Once you start overlapping the work instead of treating every recipe like a separate task, the whole system becomes much more realistic.
Also Read: Masterclass in Chai: How to Make the Perfect Masala Chai (Recipe)
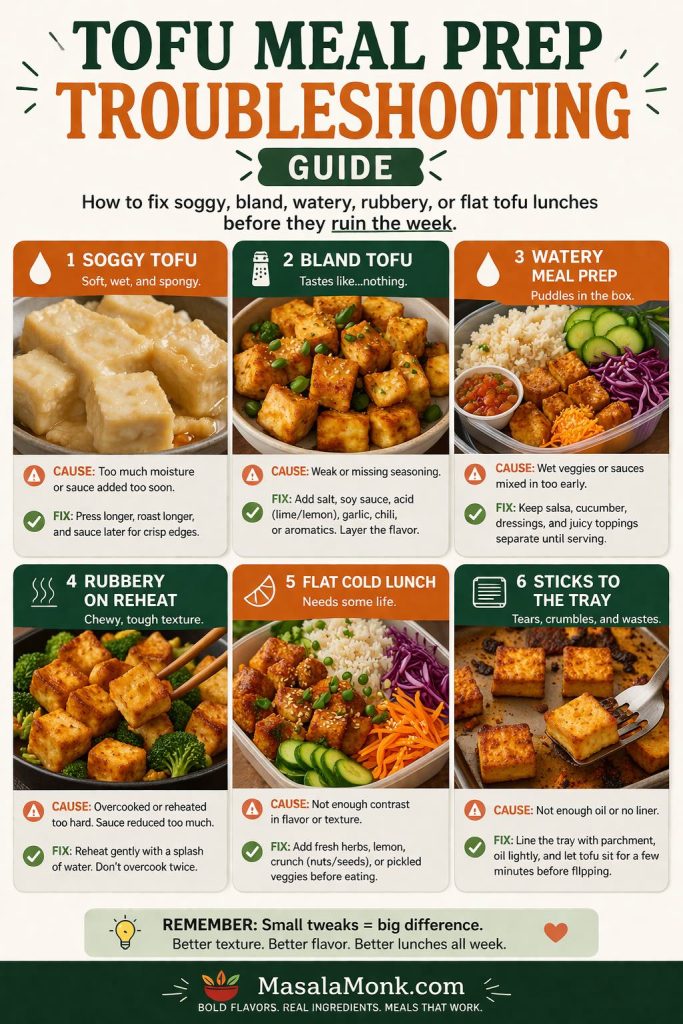
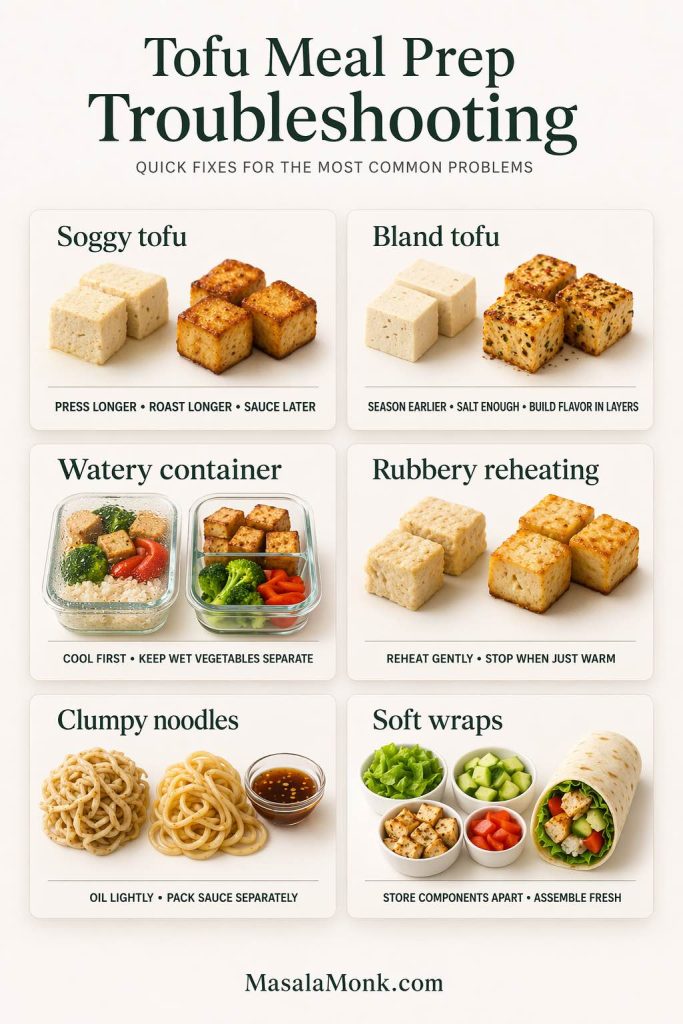
Troubleshooting Tofu Meal Prep
Use this as a quick check before blaming tofu itself. In most cases, the problem is moisture, weak seasoning, or packing order.
If tofu turns soggy
The most likely reason is too much moisture or sauce added too early. So press longer, roast longer, and sauce later. In many cases, the fix is not dramatic at all. It is simply a matter of letting the tofu get drier before you ask it to hold texture for several days.
If tofu tastes bland
The issue is usually weak seasoning or under-salted sauce. So use soy, acid, garlic, herbs, chili, and enough salt where needed. More specifically, do not expect one last-minute sauce to rescue tofu that never had enough flavor built into it from the start.
If the container turns watery
Wet vegetables were probably packed too early or against hot ingredients. Therefore, keep cucumbers, tomatoes, lettuce, and dressings separate whenever possible. Once the hot ingredients cool, you can combine more confidently without setting off that slow soggy slide in the fridge.
If reheated tofu turns rubbery
It was probably overcooked twice or reheated too aggressively. Instead, reheat more gently and stop once warm rather than blasting it until very hot. That small change alone usually keeps the texture much more pleasant.
If noodles clump
They were likely packed dry and cooled too tightly. In that case, toss them with a tiny bit of oil after draining and keep the sauce separate. Then, when it is time to eat, the noodles loosen more easily and the sauce coats them more evenly.
If wraps go soft too fast
They were assembled too early or loaded with too much wet sauce. So pack the filling and the wraps separately and build them fresh. That way, you still get the convenience of prep without sacrificing the crisp bite that makes the wrap work.
Also Read: Air Fryer Salmon Recipe (Time, Temp, and Tips for Perfect Fillets)
How Long Does Tofu Meal Prep Last?
For both quality and practicality, these meals are best treated as a 3-to-4-day refrigerator plan. That way, the textures still feel intentional rather than tired. Meals like the quinoa bowls and Mediterranean bowls tend to hold especially well when the dressing stays separate. Meanwhile, the rice bowl and noodle prep also sit comfortably in that window. For wraps, the components are best prepped ahead and assembled fresh.
Planning for a full five-day workweek? The easiest move is either to prep a smaller second batch midweek or to freeze part of the cooked tofu early and rotate it in later. That approach usually works better than asking one big Sunday prep to stay perfect longer than it really should. For general food-safety guidance on refrigerated leftovers, the USDA’s leftovers and food safety guidance is a useful reference point.

Final thoughts on tofu meal prep
These tofu meal prep ideas work because they treat tofu like a genuinely useful weekday protein instead of a backup option. Once the texture is handled properly, the sauces are built with intention, and the wet elements are packed separately where needed, tofu stops feeling like the compromise lunch and starts feeling like one of the smartest things you can prep for the week.
A practical place to start is the Smoky Tofu Rice Bowls, then follow with the Lemon Herb Tofu Quinoa Bowls or Mediterranean Tofu Bowls later in the week when colder, brighter lunches sound more appealing. Likewise, if you want a different flavor direction for the same weekday problem, these high-protein Indian meal prep ideas are worth bookmarking too. Above all, strong texture, smart packing, and enough variety to keep lunch interesting will take your tofu meal prep much further than novelty alone.
Also Read: Tapas Recipe With a Twist: 5 Indian-Inspired Small Plates
Tofu Meal Prep FAQs
1. Is tofu meal prep good for high-protein lunches?
Yes. Tofu meal prep works well for high-protein lunches, especially when you pair tofu with ingredients like hemp seeds, quinoa, chickpeas, yogurt- or tahini-based sauces, or peanut sauce. More importantly, it can still feel like real food rather than a protein project when the texture and seasoning are handled properly.
2. What tofu is best for meal prep?
Extra-firm tofu is usually the best choice because it holds shape well and roasts into stronger edges. However, firm tofu also works well when you want a slightly softer bite. Silken tofu, by contrast, is not the right fit for bowls, noodles, and wraps like these.
3. How do I keep tofu from getting soggy in meal prep?
Press it well, avoid drowning it in marinade, roast it until it has real color, cool it before sealing, and keep sauces separate whenever crispness matters. Taken together, those steps solve most soggy tofu meal prep problems. In other words, the answer is usually better moisture control, not giving up on tofu.
4. Can I eat these tofu meal prep ideas cold?
Yes. Lemon Herb Tofu Quinoa Bowls and Mediterranean Tofu Bowls are especially good cold. Meanwhile, the noodle prep also works well cold or at room temperature. By contrast, rice bowls usually benefit most from reheating.
5. Do hemp seeds really help in meal prep, or are they just for nutrition?
They help with both. Hemp seeds add protein, but they also add creaminess, nuttiness, body, and texture. In this post, they matter most because they improve the actual eating experience, not just the nutrition label. That is precisely why they belong here.
6. Which recipe is best if I am new to tofu meal prep?
Start with the Smoky Tofu Rice Bowls. They feel the most familiar, reheat well, and give you the clearest sense of how satisfying tofu meal prep can be when the texture is right. After that, the other recipes make much more sense because you already trust the base ingredient.