Posted on Leave a comment

Duck Confit Recipe: Crispy Duck Legs, Easy Oven Method & Duck Fat Guide

Crispy duck confit leg served with roasted potatoes, salad greens, and a small bowl of sauce.

Duck confit sounds like the kind of dish that belongs in a French restaurant kitchen: heavy pans, jars of duck fat, a long wait, and someone at the stove who already knows exactly what “done” feels like. But the scary part is not really the cooking. It is the uncertainty: how much fat is enough, whether the cure will make the duck too salty, why the skin looks soft after hours in the oven, and whether the meat is tender enough before you try to crisp it.

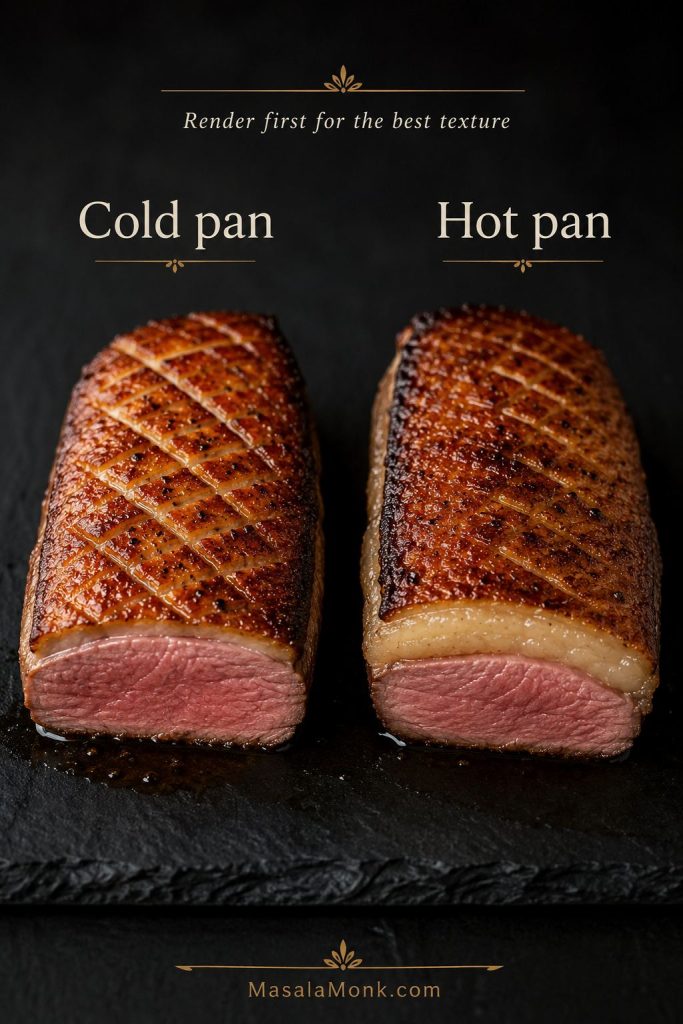
Once you understand the rhythm, the method becomes much less intimidating. You salt the duck legs, cook them slowly in fat until the meat turns silky, and then crisp the skin at the end. The slow cook is for tenderness. The final hot finish is for crackly skin. When those two jobs are separated, the recipe becomes calmer, more predictable, and much easier to repeat.

A Classic Oven Method Built for Home Cooks

This duck confit recipe gives you a classic-style oven method first: skin-on, bone-in duck legs, a measured salt cure, aromatics, duck fat, a low oven, and a crisp golden finish. Then it walks you through the parts that usually make home cooks hesitate: duck fat, pan size, salt, tenderness, storage, and crisping the skin without drying the meat.

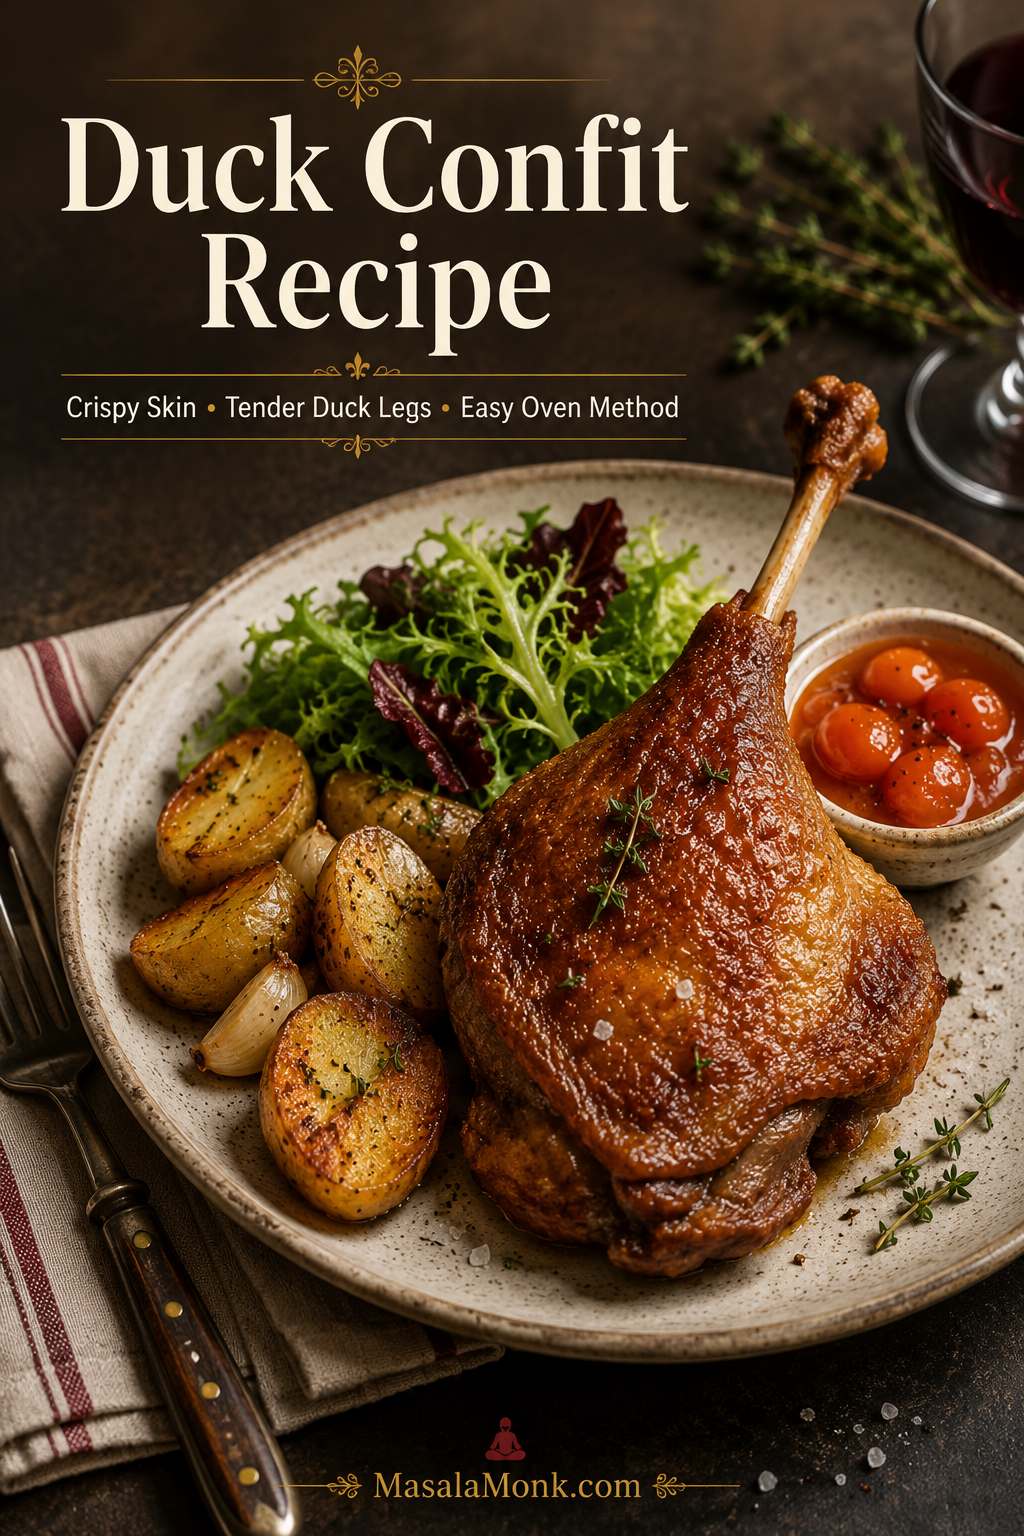
The finished leg should arrive at the table with crackly skin, tender meat that pulls easily from the bone, and enough savory duck fat left behind to make potatoes, mushrooms, eggs, beans, and vegetables feel like part of the reward.

This version is built for home cooks: classic enough to taste right, practical enough for a normal kitchen, and detailed enough that you always know whether the duck is on track.

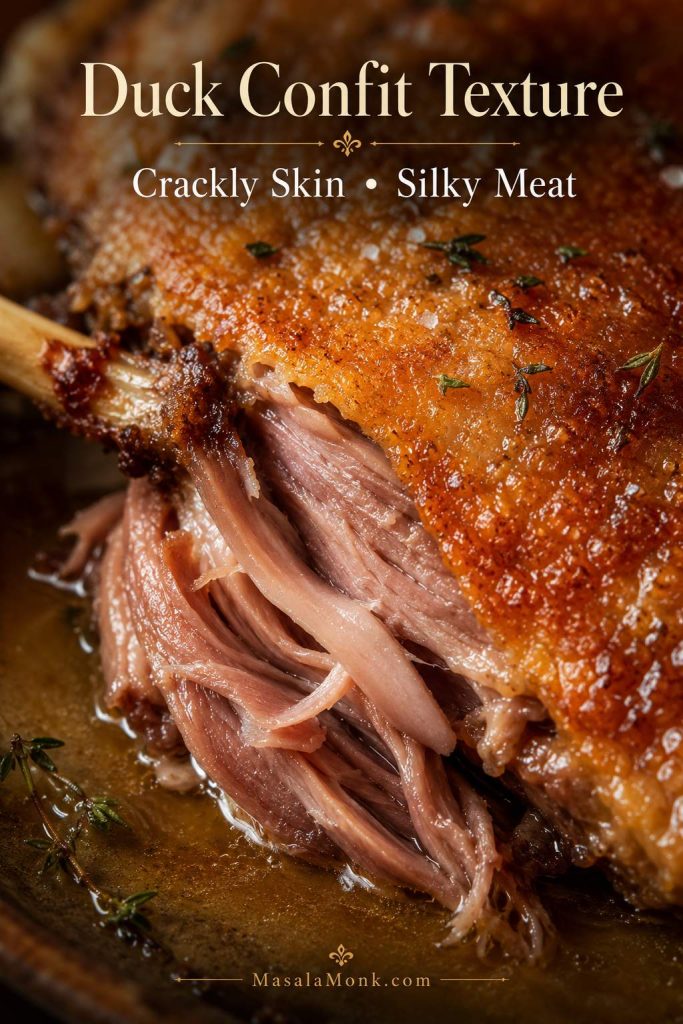
What duck confit should feel like: The slow cook is for tender meat, while the final heat is what makes the skin crackly.

Close-up of duck confit with crisp golden skin pulled back to show tender shredded meat underneath.
First, the slow oven cook makes the meat silky; then the final crisping step turns the skin golden, crackly, and deeply satisfying.

Quick Answer: The Most Reliable Duck Confit Method

The most reliable way to make duck confit at home is to use skin-on, bone-in duck legs. Cure them with salt and aromatics for 12 to 24 hours, then cook them slowly in duck fat in a close-fitting dish at 105°C / 225°F for 3½ to 4 hours, until the meat is tender enough to pull easily from the bone. After that, lift the legs from the fat and crisp them skin-side down in a skillet or roast them in a hot oven until the skin turns golden.

The full recipe card is below, but if you are cooking now, the oven method is the main path to follow. From start to table, duck confit usually takes overnight to about 1¼ days, but most of that time is inactive. The hands-on work is closer to 35–45 minutes, split between curing, arranging the duck, handling the fat, and crisping before serving.

Best path for most cooks: start with the oven method, the lower salt range, and the skillet crisp. Treat lower-fat or gadget methods as fallbacks after you understand the main method.

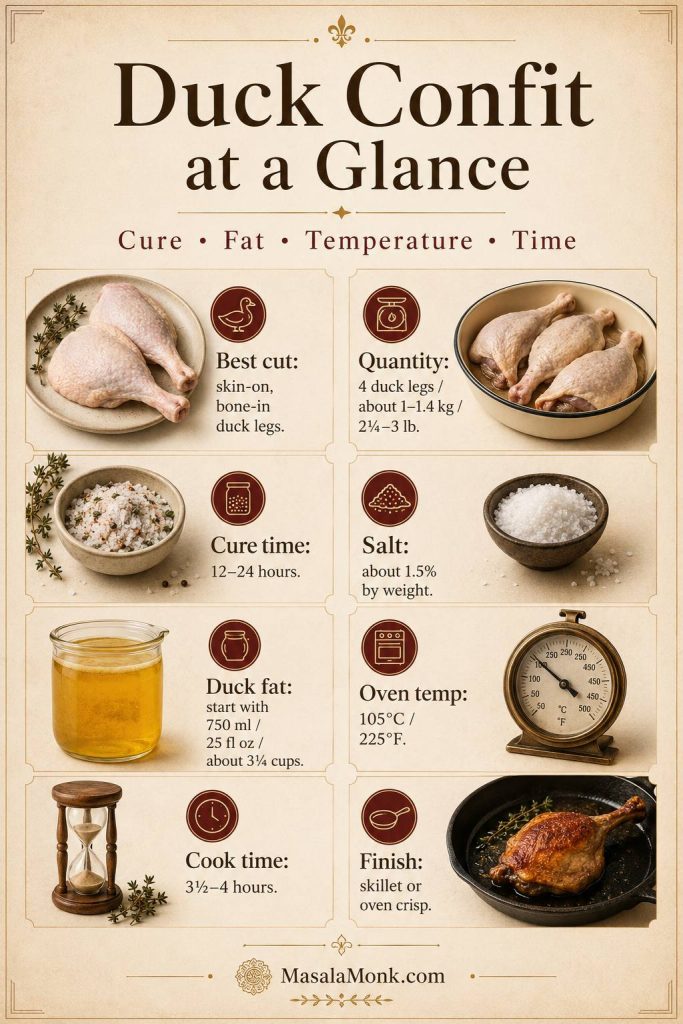
Duck Confit at a Glance

Best cutSkin-on, bone-in duck legs
ServingsPlan on 1 duck leg per person; very large legs can serve 2 lighter portions with sides
Quantity4 duck legs, about 1–1.4 kg / 2¼–3 lb total
Salt guideAbout 1.5% of the duck’s weight, usually 15–21 g kosher salt for 4 legs
Cure time12–24 hours
Duck fatStart with 750 ml / 25 US fl oz / about 3¼ cups; exact amount depends on pan size
Oven temperature105°C / 225°F, or about 95–100°C / 205–212°F for fan/convection ovens
Cook time3½–4 hours, or until very tender; fan ovens may need 30–60 minutes more
FinishSkillet crisp for the most controlled skin, or hot oven crisp for several legs
Total timeOvernight to 1¼ days, mostly inactive
Duck confit guide showing duck legs, salt, duck fat, oven temperature, cure time, cook time, and crisping method.
Before you start, these duck confit basics prevent confusion: measured salt, low oven heat, gentle fat coverage, and a final crisp for the skin.

Common mistakes to avoid: using a pan that is too wide, measuring fine salt by volume, letting the fat bubble hard, trying to crisp wet skin, and judging doneness only by time. Get those five things right, and the method becomes much calmer.

Success cues: after curing, the skin feels a little firmer; during cooking, the fat barely moves; when done, the leg feels loose and the meat pulls back slightly from the bone; after crisping, the skin is golden, dry, and crackly.

Why This Duck Confit Recipe Works

Good confit is not about complicated technique. Each stage has a clear job: the cure seasons the meat, low oven heat tenderizes it, duck fat protects it from harsh heat, and the final crisping step gives the skin that golden finish people remember. That contrast is the reason duck confit feels special: the meat is gentle and rich, while the skin gives you the crisp edge that keeps the whole plate from feeling heavy.

  • A measured salt cure seasons the legs deeply. Instead of a vague handful of salt, this recipe gives a weight-based range so the duck tastes seasoned, not aggressively salty.
  • Low oven heat keeps the cooking controlled. Duck legs need time for connective tissue to soften. A low oven lets that happen without the fat bubbling hard around the meat.
  • Duck fat surrounds the legs and regulates heat. The fat is not there to make the meat greasy. It creates a steady cooking environment.
  • A close-fitting pan reduces the amount of fat needed. Dish shape can save you from buying far more duck fat than necessary.
  • Crisping happens after the slow cook. Skin that looks soft after confit is normal; the skillet or hot oven creates the crackly finish right before serving.

What Is Duck Confit?

Duck confit is a classic method where duck legs are salted, slowly cooked in fat, and then crisped before serving. Traditionally, confit was also a preservation technique: the cooked duck was stored under a protective layer of fat. Today, most home cooks make it because it creates an incredible contrast of textures — deeply tender meat under crisp, golden skin.

The word confit can make the process sound complicated, but the actual cooking is quiet and controlled. You are not deep-frying the duck. You are cooking it slowly in warm fat, almost like a rich, careful braise. The fat surrounds the meat, protects it from harsh heat, and helps the connective tissue soften gradually.

This is a classic-style oven version, not a pressure-cooker shortcut or a duck breast confit. Those methods can work, but the main recipe here is built around duck legs, a salt cure, duck fat, low heat, and a final crisp.

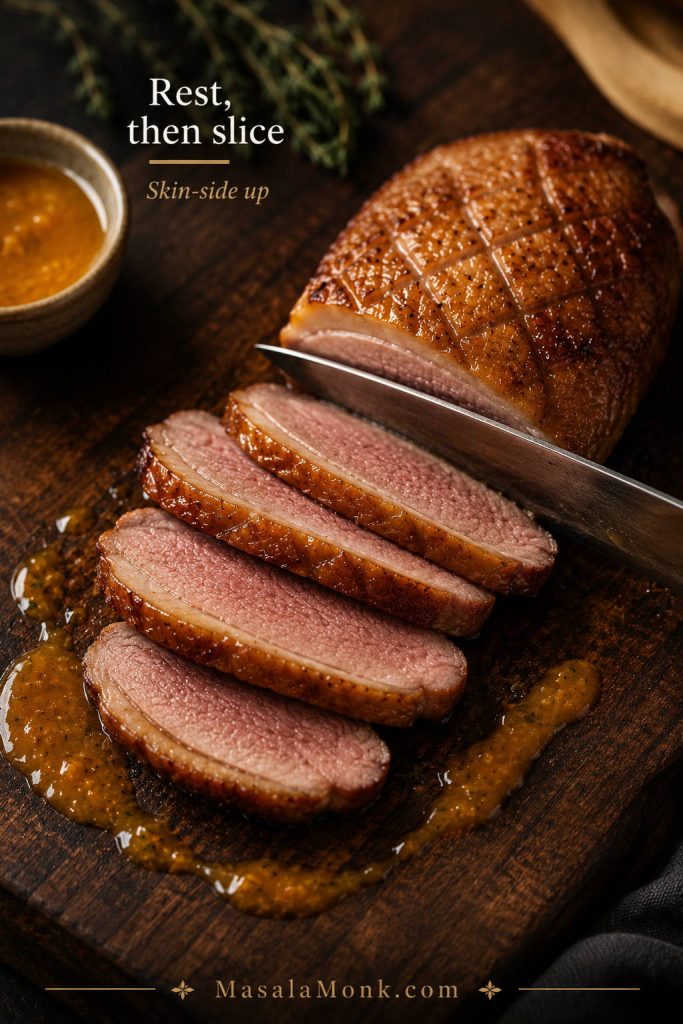
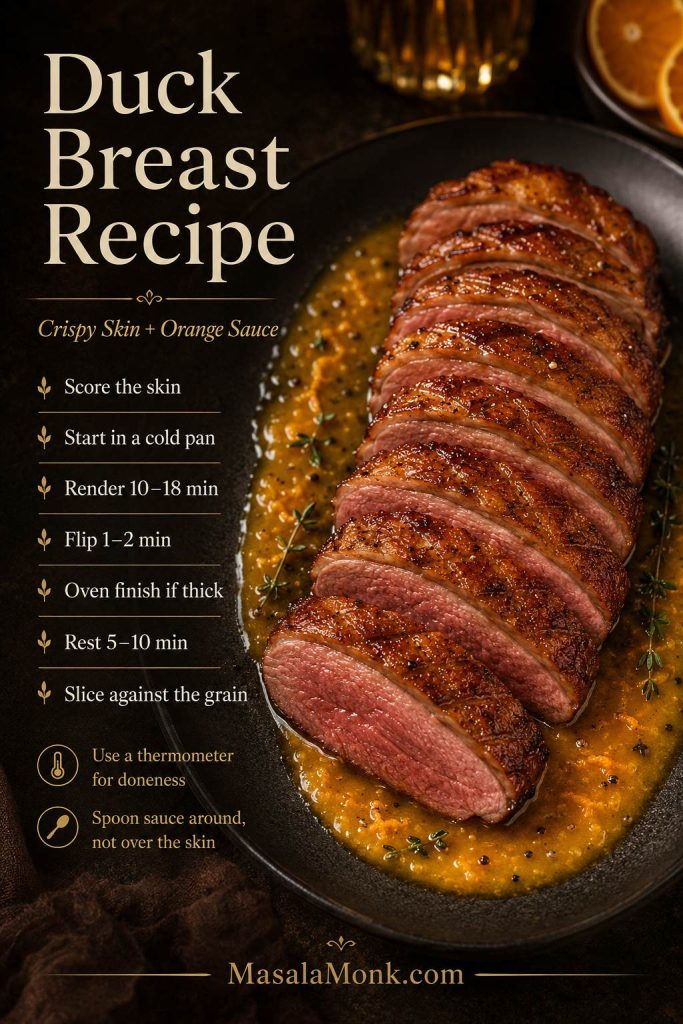
Duck leg confit works so well because legs have more connective tissue than breast meat. Duck breast is better cooked quickly to medium-rare with crisp skin. For that style, see this duck breast recipe instead.

Duck Confit vs Roast or Braised Duck Legs

All three can be delicious, but they do not cook the same way. Roast duck legs go straight into dry oven heat, braised duck legs soften in liquid, and confit legs are slowly cooked in fat before they are crisped. That fat-cook-first, crisp-later rhythm is what gives the dish its silky meat and golden skin.

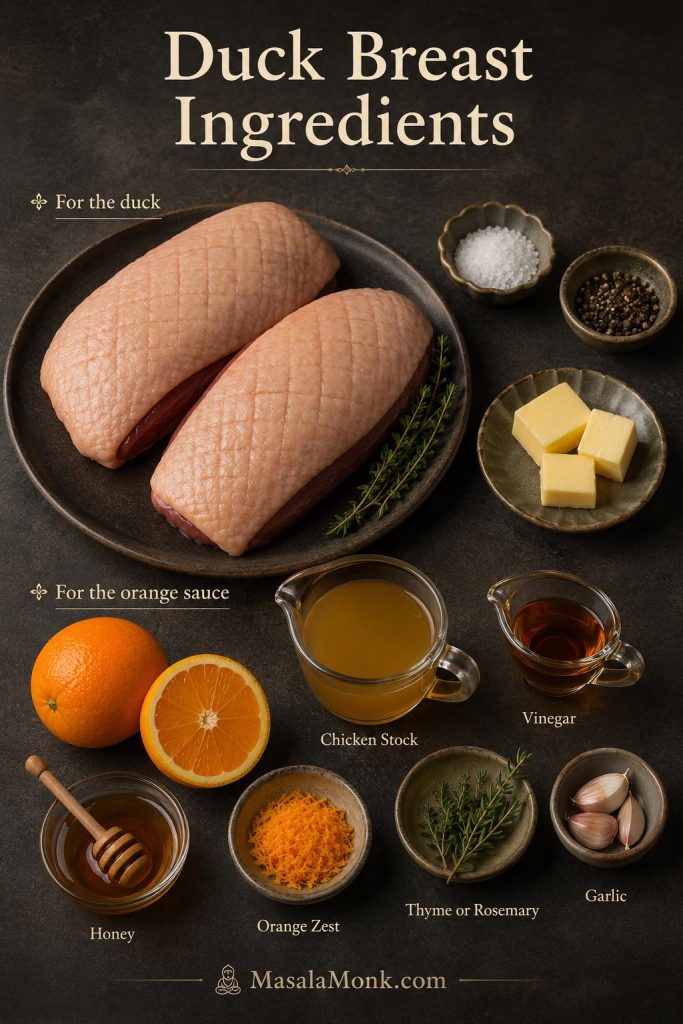
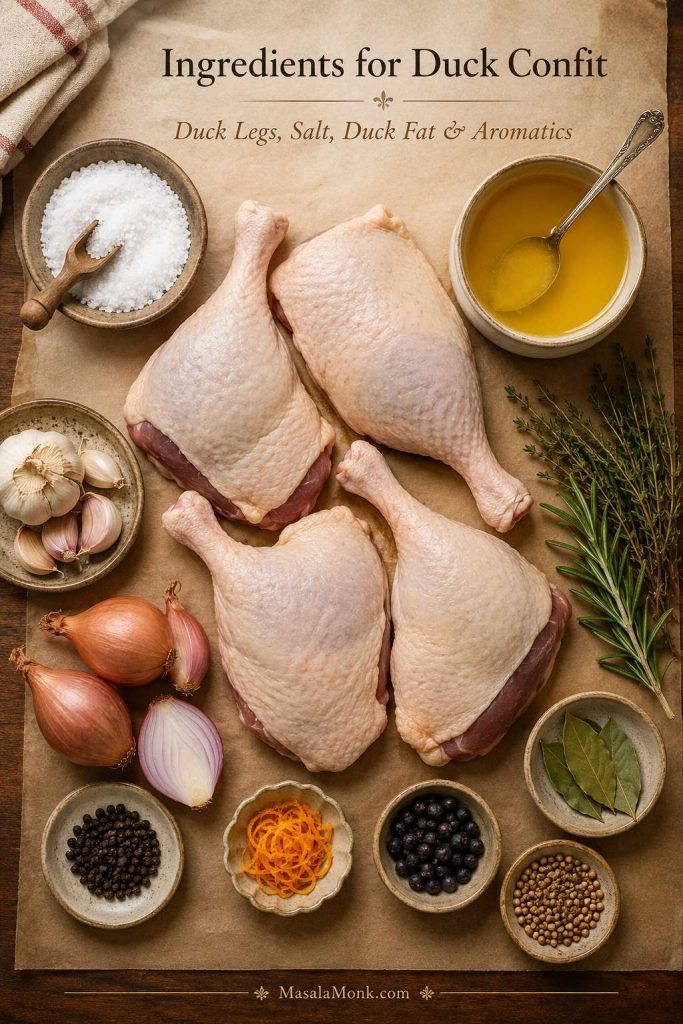
Ingredients for Duck Confit

The most reliable version does not need a long, intimidating ingredient list. Duck legs, salt, fat, and a few aromatics are enough. The aromatics should support the duck, not bury it.

Before you cure the duck: use this as a quick check: duck legs, measured salt, clean fat, and simple aromatics are doing most of the work.
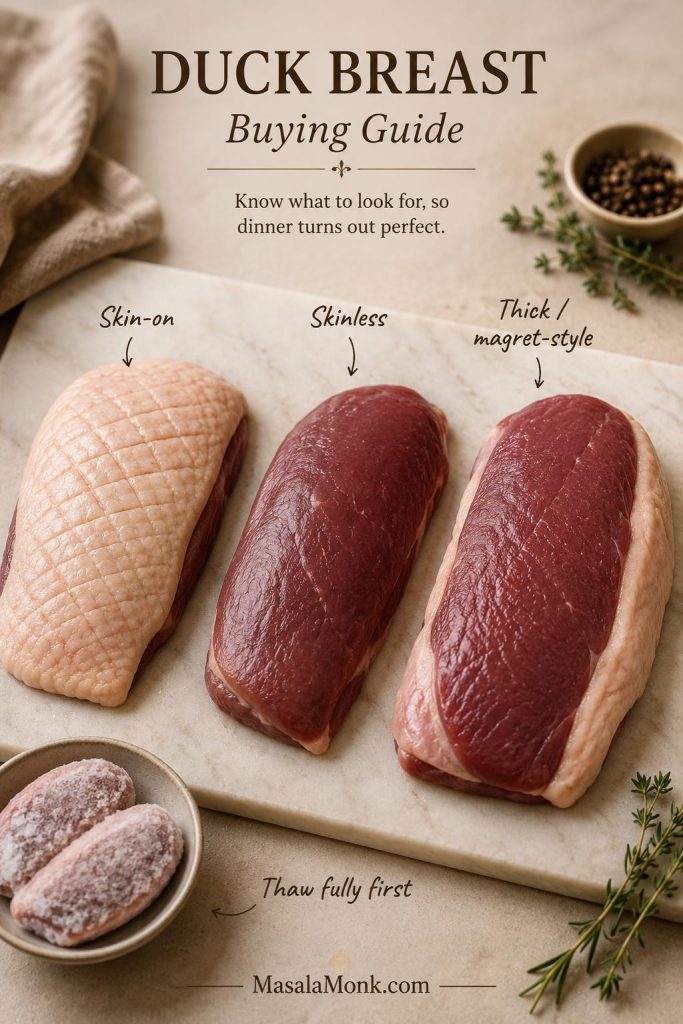
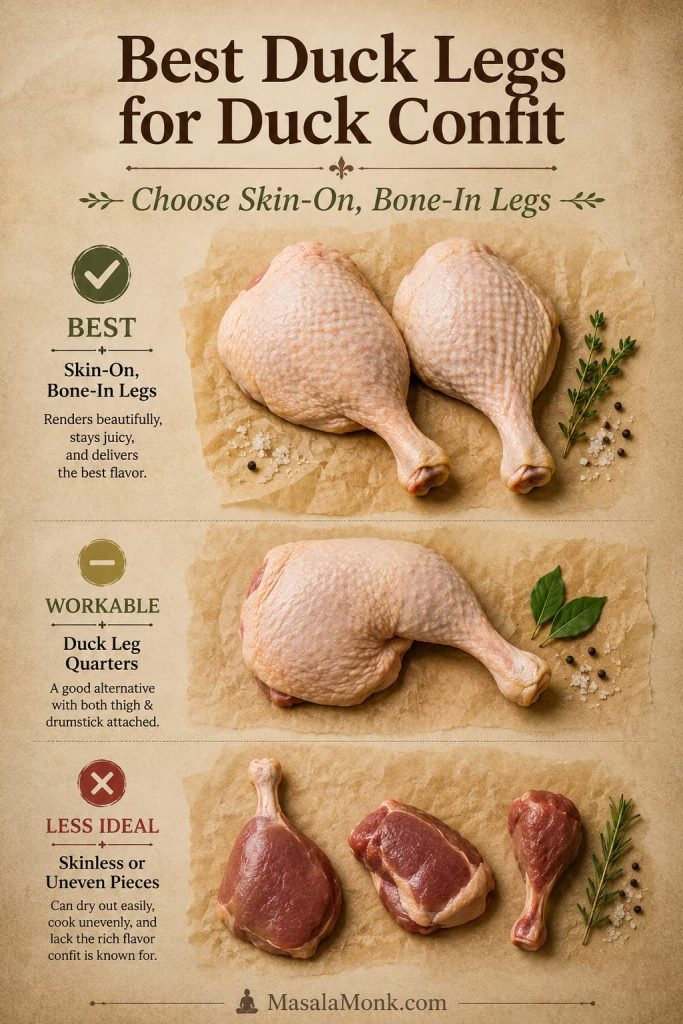
Raw duck legs arranged with duck fat, salt, garlic, shallots, herbs, bay leaves, peppercorns, orange zest, and spices.
Duck confit uses a short ingredient list, but each part matters: duck legs bring collagen and fat, salt seasons deeply, and aromatics perfume the slow cook.

Duck Legs

Use 4 skin-on, bone-in duck legs, about 1–1.4 kg / 2¼–3 lb total. The skin is important because it becomes crisp at the end. The bone protects the meat and gives the finished legs a better texture.

If your duck legs are very large, expect the cooking time to sit closer to 4 hours. Smaller legs may be tender earlier, so start checking them after about 3 hours. The timer is useful, but tenderness is the real test.

Plan on one duck leg per person for a main course. If the legs are especially large and you are serving several sides, one leg can sometimes serve two lighter portions.

Duck leg buying visual: Skin-on, bone-in legs are the safest choice because they bring the fat, skin, bone, and connective tissue that make confit work.

Guide comparing skin-on bone-in duck legs, duck leg quarters, and less ideal skinless or uneven duck pieces.
For reliable oven duck confit, choose skin-on, bone-in duck legs of similar size so they cure, cook, and crisp more evenly.
  • Fresh or frozen both work. If using frozen duck legs, thaw them fully in the refrigerator before curing.
  • Choose similar sizes if possible. Legs that are close in size will cure and cook more evenly.
  • Keep the skin on. Skinless duck legs will not give you classic texture.
  • Fatty-looking legs are useful here. Some of that fat renders into the dish and can be strained for later cooking.
  • Skip pre-marinated duck legs. They may already be salty or sweetened, which makes the cure harder to control.

Duck Confit Salt Guide

Use about 1.5% salt by weight of the duck legs. That means about 15 g salt for 1 kg duck legs, 18 g for 1.2 kg, and 21 g for 1.4 kg. For most batches of 4 duck legs, 15–21 g kosher salt lands in the right range.

Duck confit salt guide with duck legs, kosher salt, a kitchen scale, and examples for 1.5 percent salt by weight.
A 1.5% salt cure gives you repeatable control, so the duck tastes seasoned and rich without becoming aggressively salty after resting.

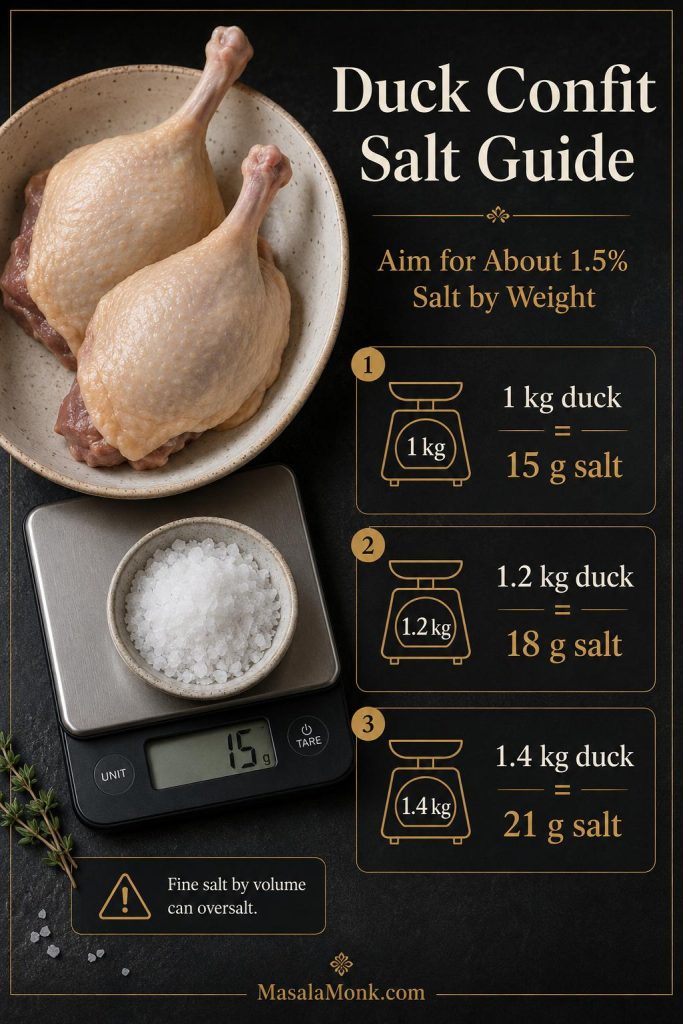
Weighing the salt is better than using spoons because different salts vary dramatically by volume. Fine salt packs more tightly and tastes saltier by the spoonful, so use the lower end if you are not weighing.

For a gentler first try, use the lower end of the range and cure for 12 hours. You can always finish the cooked duck with a little flaky salt, but it is harder to fix a cure that was too heavy.

Duck Fat

Start with about 750 ml / 25 US fl oz / 3¼ cups rendered duck fat for 4 duck legs. You may need less if your pan is close-fitting, or more if your pan is wide. The exact quantity depends on the shape of your dish more than the recipe itself.

For the visual version, see the duck fat guide. Aim to cover the meaty parts with fat. Bone tips can poke out, and a tiny patch of skin above the fat is not a disaster. However, if a large patch of meat is exposed, switch to a smaller dish. If you cannot, turn the legs once halfway through cooking while they are still firm enough to handle.

Aromatics

For a classic but not fussy flavor, use garlic, shallots, thyme, rosemary, bay leaves, and black peppercorns. Orange zest, juniper berries, or coriander seeds are optional. They add a more restaurant-style aroma, but the recipe still works beautifully without them.

  • Garlic gives warmth and depth.
  • Shallots add gentle sweetness.
  • Thyme and rosemary give the duck a classic savory backbone.
  • Bay leaves add quiet background aroma.
  • Black peppercorns give mild spice without making the duck taste peppery.
  • Orange zest is optional, but especially good if you plan to serve the legs with orange sauce.

About the aromatics: use thyme, peppercorns, orange zest, juniper, or coriander in the cure. Use fresh garlic, thickly sliced shallots, bay leaves, rosemary, and more thyme in the cooking fat. Discard the wet cure aromatics before cooking, especially if they are covered in salt or moisture.

Equipment and Pan Size

You do not need restaurant equipment, but the right pan makes the whole recipe easier and cheaper because it reduces the amount of duck fat you need.

Best Pan and Equipment for Duck Confit

A close-fitting vessel is the key piece: it keeps the fat level higher around the legs and makes the rest of the equipment feel simple.

Duck confit equipment setup with a close-fitting baking dish, Dutch oven, skillet, strainer, tongs, and jar of duck fat.
The right pan saves both fat and stress: a close-fitting dish raises the duck fat level, keeps the legs close together, and makes the home oven method easier.
  • Close-fitting oven-safe baking dish, casserole, or small Dutch oven: the most important piece of equipment.
  • Lid, foil, or parchment: keeps the duck covered during the slow cook.
  • Tongs or a wide spatula: for lifting tender legs without tearing them.
  • Heavy skillet: for crisping the skin before serving.
  • Fine-mesh strainer and clean jar: for saving clean duck fat after cooking.

The duck legs should fit in one layer. They can sit close together, but they should not be piled on top of each other. A compact casserole or small Dutch oven usually works better than a wide roasting tray for a first batch.

  • Strongest choice: a small Dutch oven or compact ceramic baking dish.
  • Good choice: a medium casserole with a tight lid.
  • Use only if needed: a wide roasting pan, because it requires more fat.
  • Skip: shallow trays where the duck cannot be mostly covered.

A heatproof jug can make warm fat easier to pour, and a digital thermometer is useful if you want to check that the fat is staying low and steady. A nonstick skillet is helpful for crisping if you are nervous about the skin sticking or tearing.

How Much Duck Fat Do You Really Need?

Duck fat is usually the moment people pause — not because the recipe is hard, but because the jar looks expensive and the instructions often sound vague about how much you really need. This is the part worth making practical.

Recipes say “cover the duck with fat,” but that can mean very different amounts depending on the pan. The practical rule is simple: use the smallest oven-safe dish that fits the duck legs in a single layer without stacking them. A compact pan saves fat and keeps the duck more evenly covered.

Pan Size and Duck Fat Amount

Use this pan-size guide before buying more duck fat, because the same four legs can need very different amounts in different dishes.
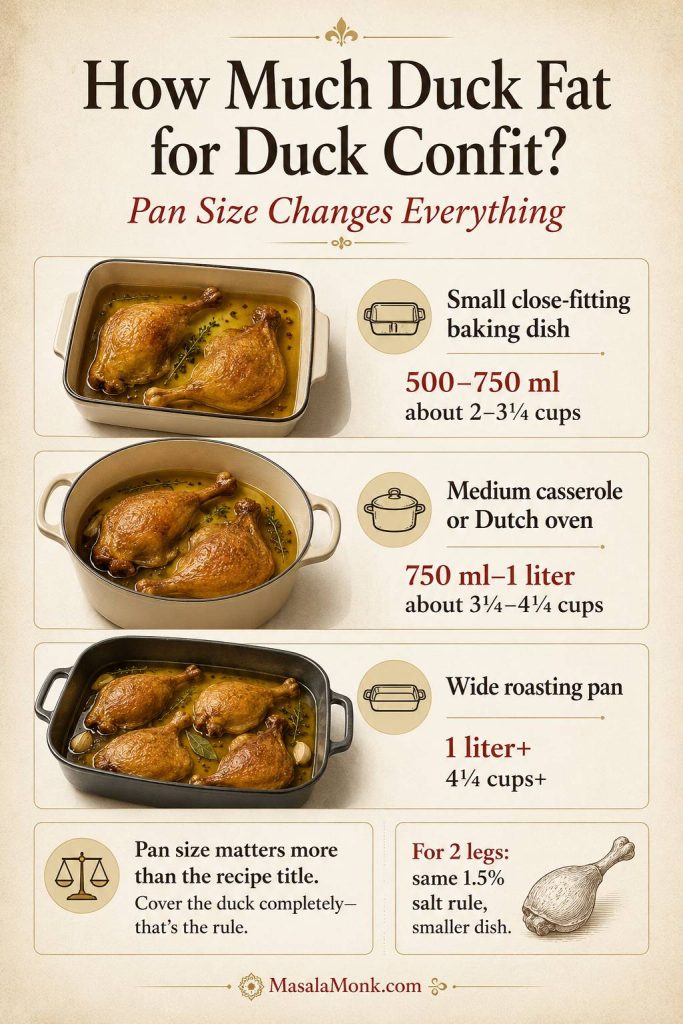
Duck fat guide comparing a small baking dish, medium casserole or Dutch oven, and wide roasting pan with different fat amounts.
Duck fat needs change with the dish, not just the number of legs; a narrow pan raises the fat level and reduces waste.
Pan setupLikely duck fat needed for 4 legsMost useful for
Small close-fitting baking dish500–750 ml / about 2–3¼ cupsSaving duck fat
Medium casserole or Dutch oven750 ml–1 liter / about 3¼–4¼ cupsMost home batches
Wide roasting pan1 liter+ / 4¼ cups+Only when you have enough fat

This is usually the moment the recipe starts to feel less extravagant and more manageable: the duck does not need a dramatic pot of fat, just the right dish and enough quiet heat.

Scaling the recipe: for 2 duck legs, keep the salt at about 1.5% of the duck’s weight and use the smallest dish that fits them. For 6–8 legs, keep them in one layer or use two dishes. The fat amount changes with the dish, not just the number of legs, and the cook time still depends on tenderness.

How to Cure Duck Legs for Confit

The cure should feel controlled, not like you are packing the duck in salt. You are seasoning the meat deeply and giving the surface time to firm slightly before the slow cook.

What the Cure Should Look Like

The surface should look evenly seasoned, with aromatics adding flavor rather than burying the duck under salt.

Raw duck legs in a baking dish being sprinkled with salt, herbs, peppercorns, bay leaves, and orange zest.
Curing duck legs should feel measured, not intimidating: salt seasons the meat while herbs, bay, pepper, garlic, and citrus add quiet background flavor.
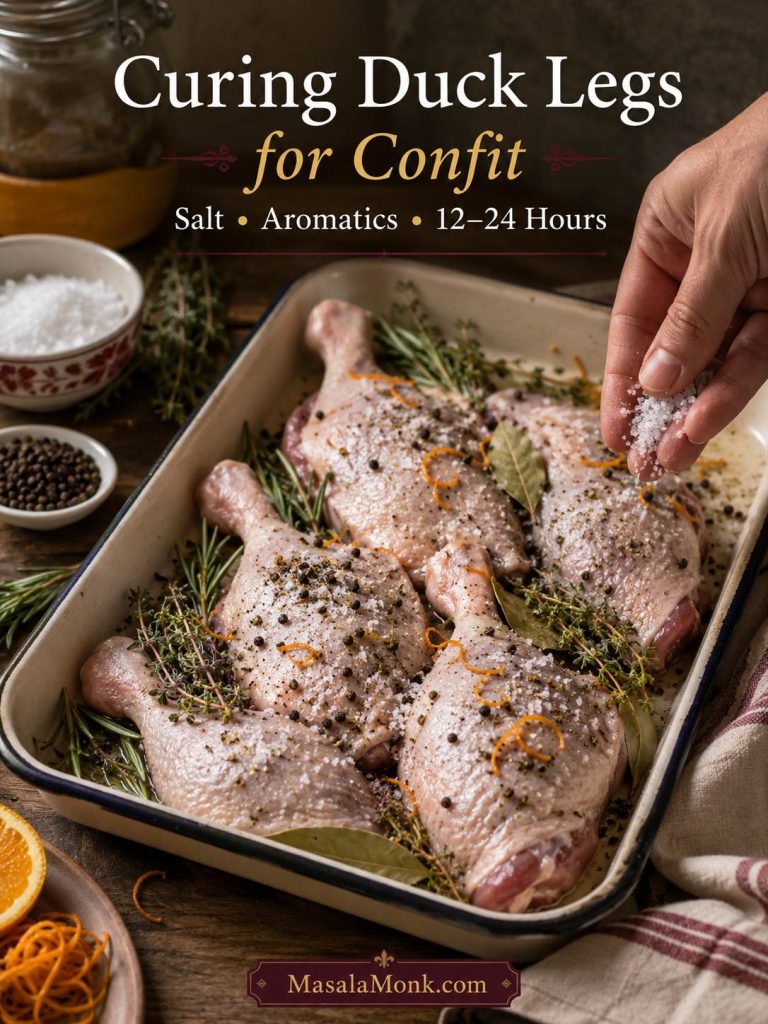
  1. Pat the duck legs dry. Moisture on the surface makes the cure less even.
  2. Rub with salt. Use about 1.5% salt by weight, or 15–21 g kosher salt for 4 duck legs, depending on their total weight.
  3. Add cure aromatics. Use thyme, peppercorns, optional orange zest, and optional juniper or coriander here if you like.
  4. Cover and refrigerate. Cure for 12–24 hours.
  5. Remove excess cure. Wipe off aromatics and visible salt. Rinse only if there are clumps of salt or the cure looks heavy.
  6. Dry very thoroughly. If you have time, let the legs sit uncovered in the refrigerator for 30–60 minutes after wiping or rinsing. The drier the surface, the cleaner the cooking fat and the better the final crisping.

For most home cooks, 12 hours gives balanced seasoning and 24 hours gives deeper flavor. A 1–2 hour cure can work for shortcut versions, but for this recipe, 12–24 hours is the safest and most balanced range. For a first batch, choose 12 hours and the lower salt range.

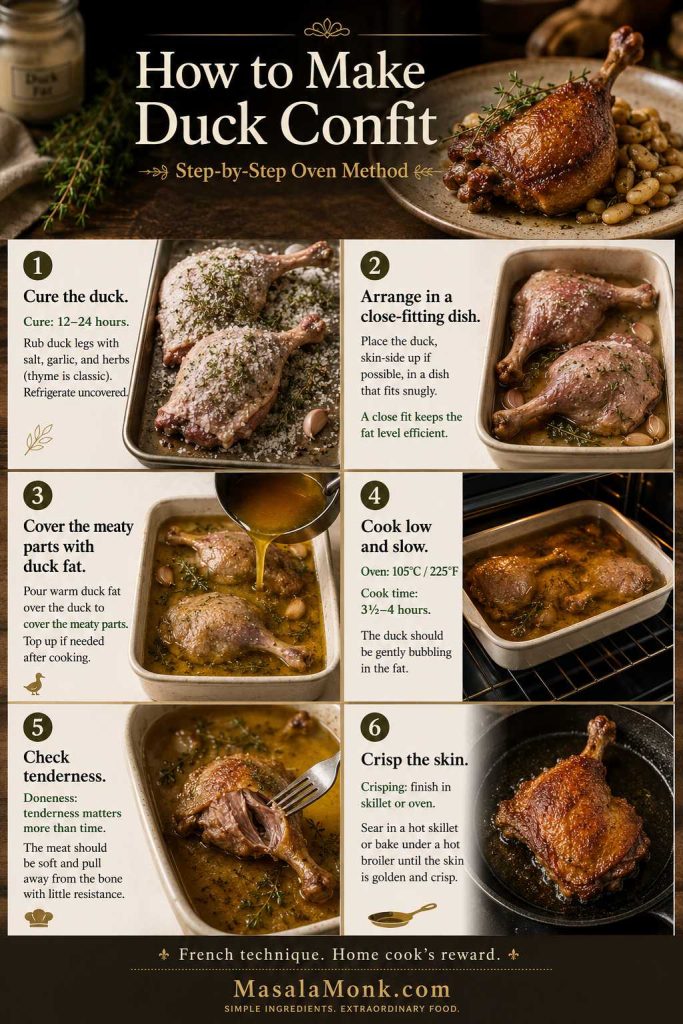
How to Make Duck Confit in the Oven

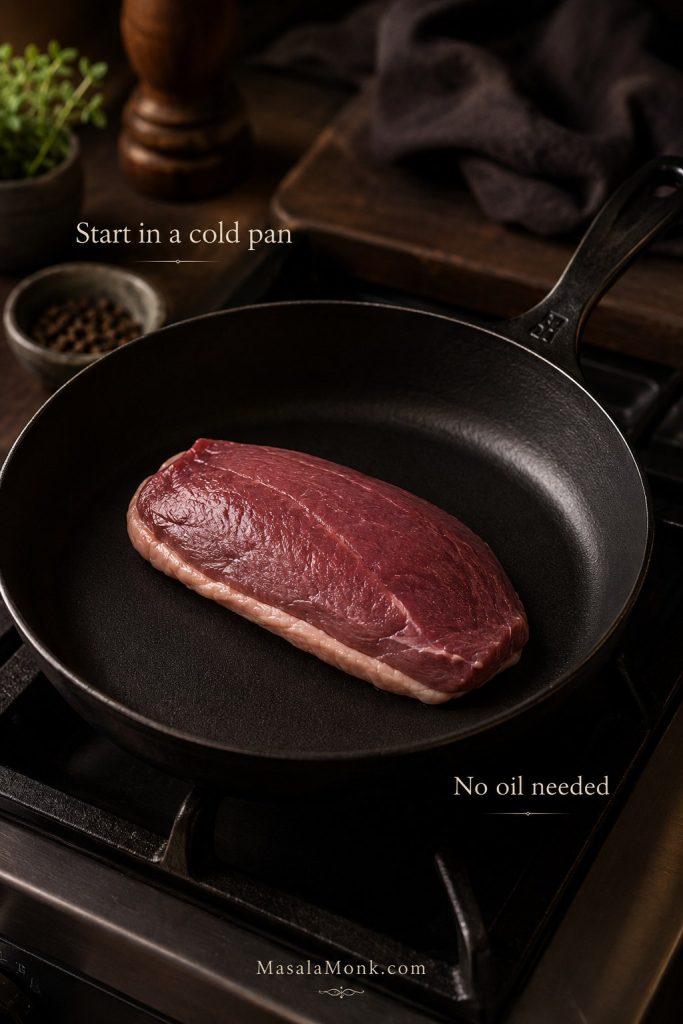
Start with this oven method if this is your first batch. It gives you the most reliable balance of classic texture, steady heat, and kitchen sanity. Once the legs are in the fat and the oven is low, your job is mostly to leave them alone.

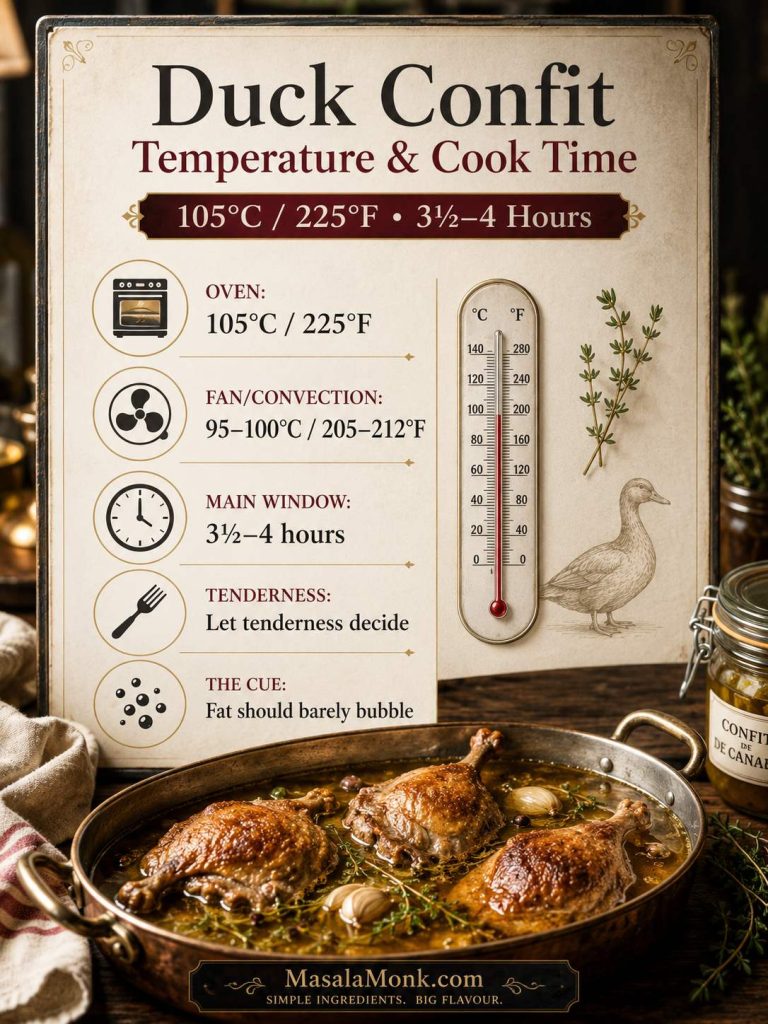
The duck cooks at 105°C / 225°F for 3½ to 4 hours, then gets crisped at the end. If you are using a fan or convection oven, reduce the temperature to about 95–100°C / 205–212°F and check the fat after the first hour. The fat is right when it barely bubbles instead of boiling hard.

Duck confit recipes vary because oven temperature, pan shape, leg size, and how deeply the meat is submerged all change the timing; use 3½–4 hours as the main window, but let tenderness decide.

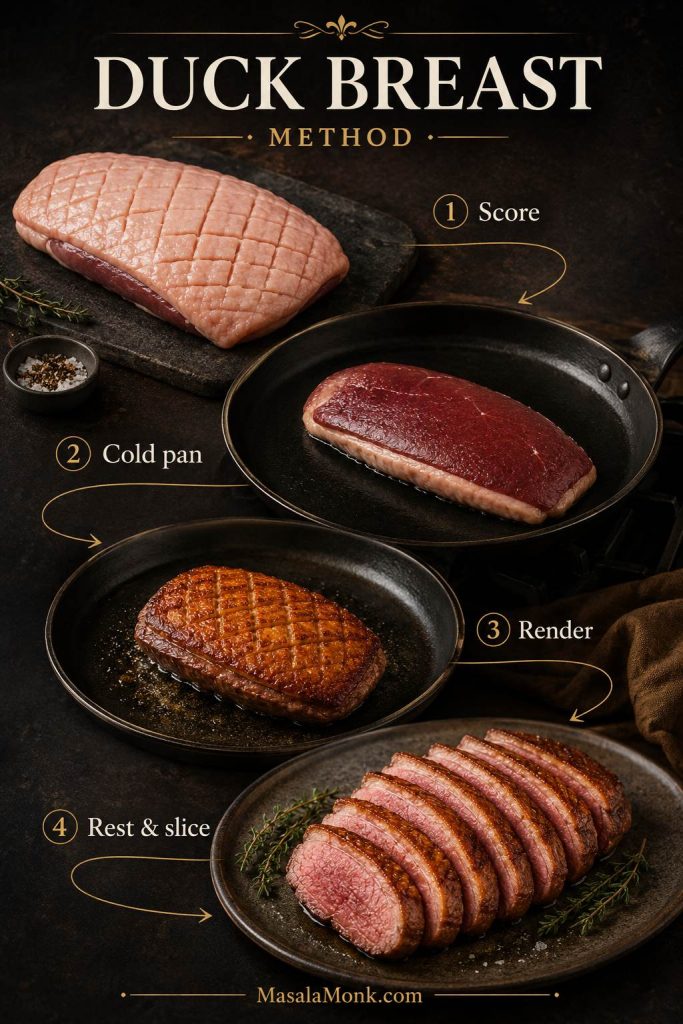
Before you start the oven method: this step-by-step image shows the full rhythm: cure, arrange, cover with fat, cook low, test tenderness, and crisp.

Step-by-step duck confit guide showing curing, arranging in a close dish, adding duck fat, slow cooking, checking tenderness, and crisping.
The oven method works because each stage has one job: season the duck, cook it gently in fat, test tenderness, and crisp only at the end.

Duck Confit Temperature and Cook Time

The low oven target keeps the fat calm; the clock gives you a window, but tenderness still decides the finish.

Duck confit temperature guide showing 105°C or 225°F, fan oven adjustment, 3½ to 4 hour cook time, and tenderness cues.
The 105°C / 225°F oven target keeps the fat calm, but real cook time still depends on leg size, dish shape, and fat depth.

Step 1: Melt the Duck Fat

Warm the duck fat just until liquid. It only needs to be fluid enough to pour around the duck legs. If it is hot enough to sputter, it is hotter than it needs to be.

Step 2: Arrange the Duck in a Close-Fitting Dish

Place the cured, dried legs in the smallest oven-safe dish that holds them in one layer without stacking. Add fresh garlic, thickly sliced shallots, bay leaves, rosemary, thyme, and peppercorns around the legs. Discard the wet cure aromatics rather than carrying all of that salt and moisture into the cooking fat.

Step 3: Cover with Duck Fat

Pour warm fat over the legs until the meaty parts are mostly submerged. If you are just short, press a piece of parchment directly over the duck before covering the dish. This helps keep the legs tucked under the fat. If a large patch of meat remains exposed, move everything to a smaller dish or check the short-on-duck-fat guide before adding more fat.

Step 4: Cover and Cook Low

Cover the dish with a lid, foil, or parchment plus foil. Cook at 105°C / 225°F for 3½ to 4 hours. Keep the fat nearly still, with only a few lazy bubbles at the edges. Hard bubbling means the heat is too aggressive.

What the Fat Should Look Like During the Slow Cook

This is the visual cue to watch for: the fat should be warm and quiet, not boiling around the duck.

Duck legs cooking gently in golden duck fat with garlic, shallots, bay leaves, thyme, and only a few small bubbles.
During the slow cook, the duck fat should barely bubble. Hard bubbling means the oven heat is too aggressive for silky confit texture.

Step 5: Check for Tenderness

Use the timer as a checkpoint; tenderness decides when the duck is ready. The legs are done when the meat offers almost no resistance when pierced, the joint bends easily, and the meat starts to pull back from the bone.

If the meat still feels tight, use the doneness cues and give it more time. This method is forgiving when the heat is low and steady. It is much better to cook the legs a little longer in quiet fat than to pull them before the connective tissue has softened.

Step 6: Cool in the Fat or Crisp Right Away

If serving immediately, lift the legs carefully from the fat and let the excess drip away before crisping. If making ahead, cool them until they are no longer steaming, transfer to a clean container with enough fat to cover, and refrigerate promptly. Move the duck and fat into shallow storage once they are no longer steaming so they chill faster.

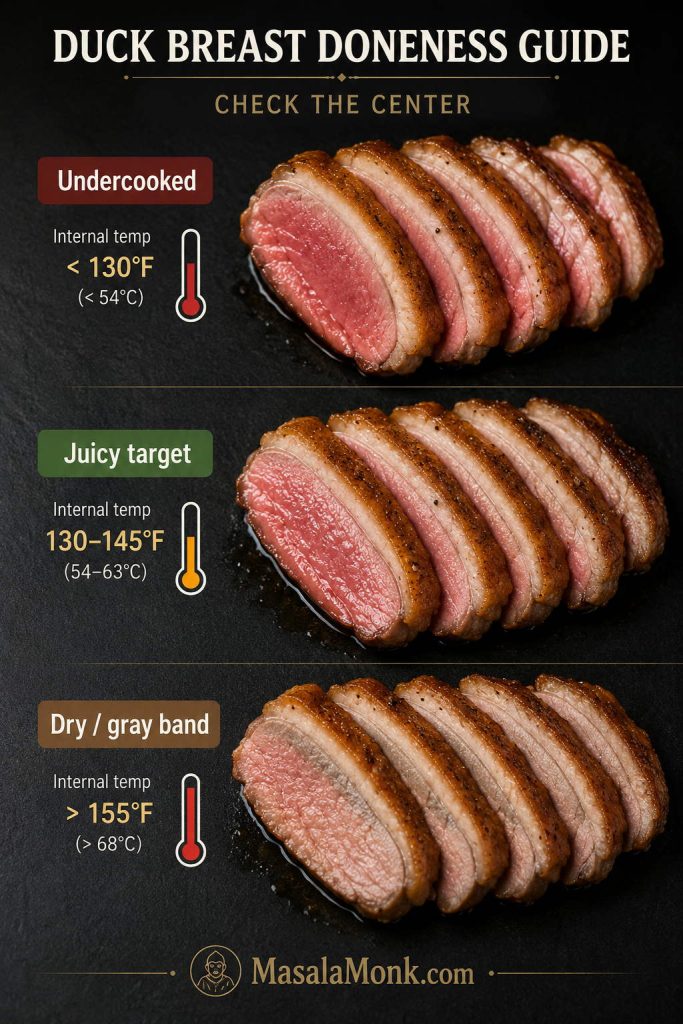
How to Know It Is Done

This dish is done by texture, not by a neat internal temperature target. The legs need enough time for connective tissue to soften. That is why the most useful cues are physical.

How to Know Duck Confit Is Done

Look for looseness, not drama: the leg should bend easily and the meat should give way without force.

Cooked duck confit leg being tested with a fork, with tender meat, exposed bone, and a small close-up of pulled meat.
A done duck confit leg should feel relaxed: the joint loosens, the meat pulls from the bone, and a fork meets very little resistance.
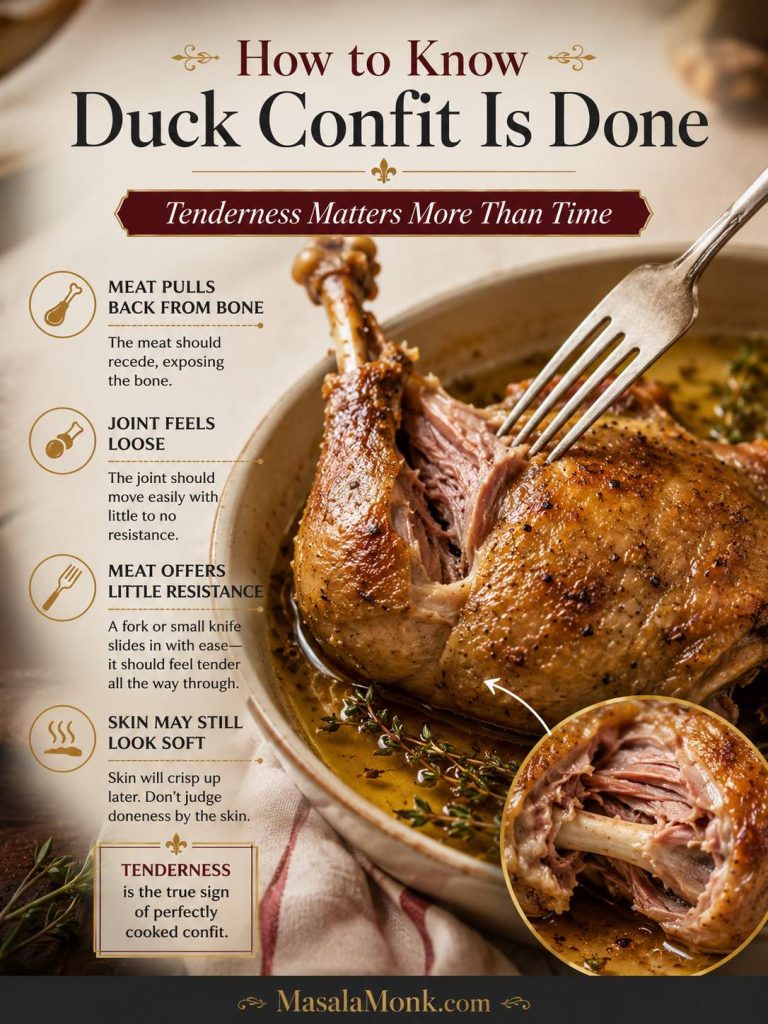
  • Meat offers almost no resistance when pierced with a skewer or small knife.
  • At the joint, the leg bends easily.
  • You may see the meat pull back slightly from the bone.
  • A fork can loosen the meat without force.
  • The skin may still look soft and pale; that is normal before crisping.

If the meat still feels tight, return the legs to the fat and cook for another 30–45 minutes. Because the heat is low, an extra half hour is usually safer than serving duck that has not fully relaxed.

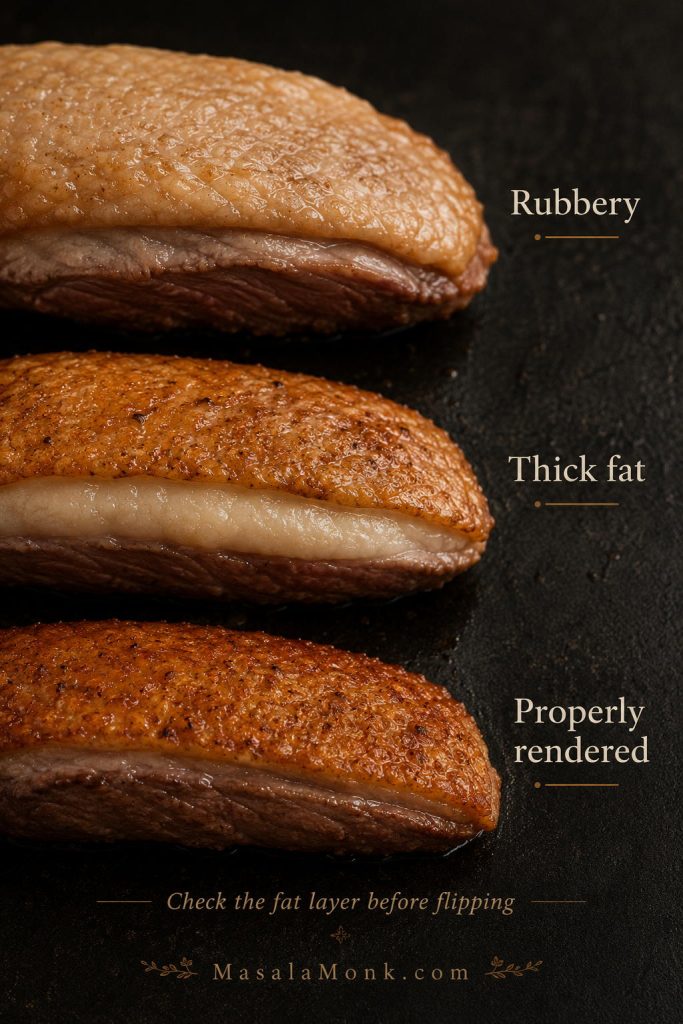
How to Crisp the Skin

The crisping step is where the recipe starts to feel special. The meat is already cooked; you are not trying to cook the duck again. You are slowly waking up the skin.

Before crisping, lift the legs from the fat and wipe away any thick clinging fat from the skin. Let them drain on a rack for a few minutes if they look especially glossy. Skin that is wet or coated in too much fat will take longer to crisp and may brown unevenly.

For the crispest skin, make the legs ahead, chill them in the fat, then lift, wipe, and crisp when cool or cold. The skin is easier to handle once the fat has set, and it is less likely to tear in the pan.

Crisp the legs as close to serving as possible. The meat can wait in the fat, but the skin is at its best within minutes of crisping.

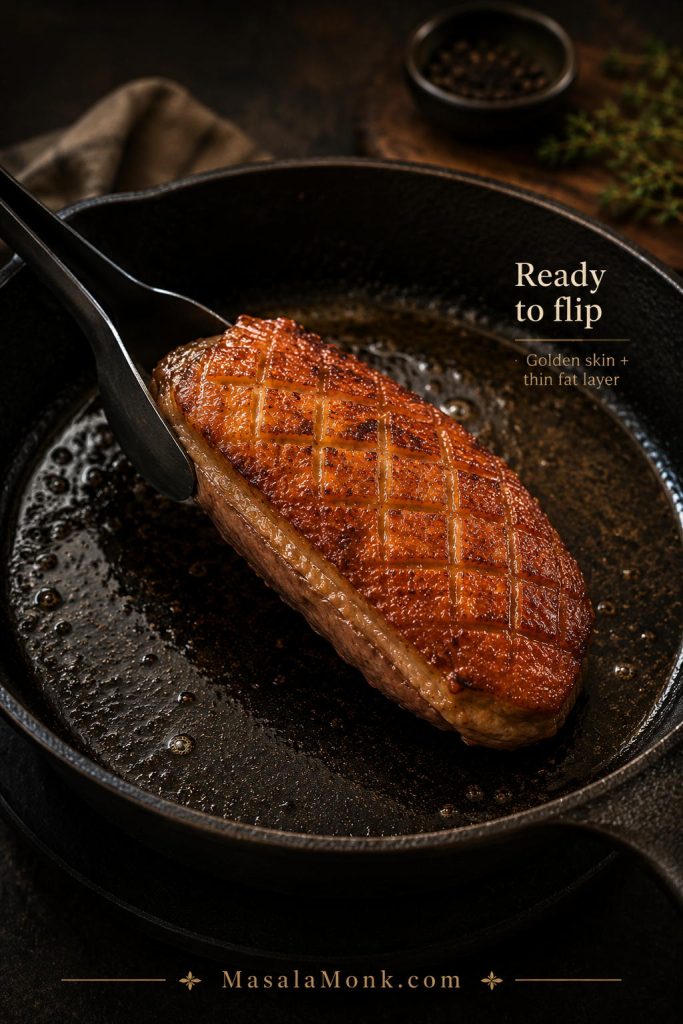
How to Crisp Duck Confit Skin

The slow cook is already done, so the final heat should focus on dry skin, steady browning, and a crisp finish right before serving.

Duck confit crisping guide showing one leg in a skillet and several legs on a rack in the oven.
The duck is already cooked, so crisping is only about texture: dry the skin first, then use a skillet or hot oven until it turns deeply golden.

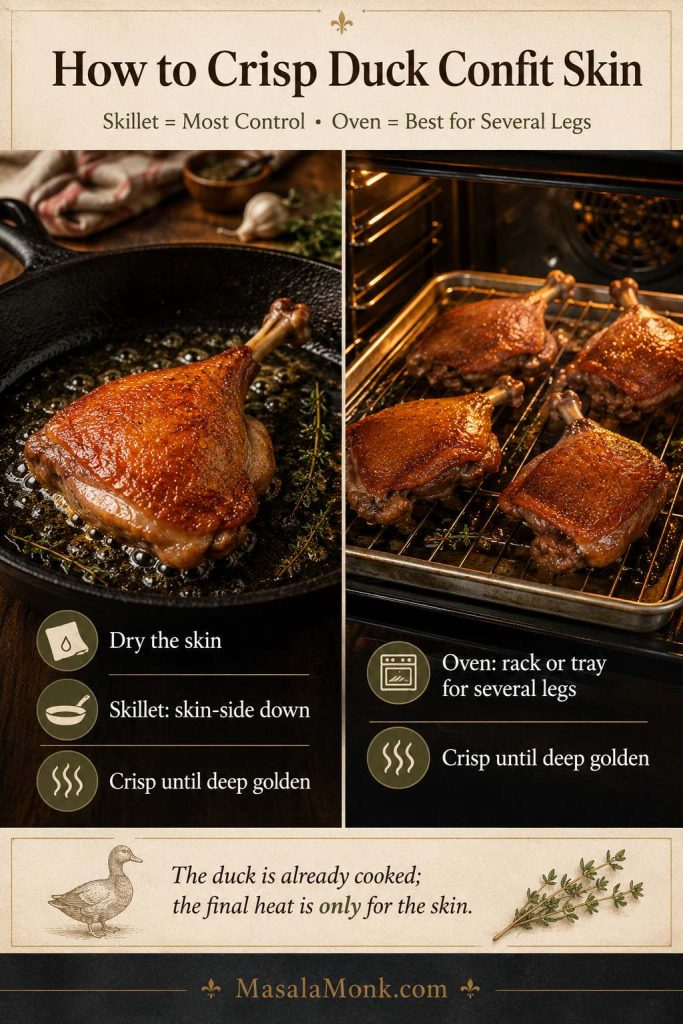
Most Reliable Method: Skillet Crisp

Place the legs skin-side down in a heavy skillet or nonstick skillet over medium heat. Cook for 6–10 minutes, or until the skin is crisp and deeply golden. Nonstick is especially forgiving if you are nervous about the skin sticking or tearing.

If the skin seems stuck, it usually needs more time. Once enough fat renders, it loosens more easily. Let it crisp until it naturally releases from the pan; this is a patience step, not a high-heat step.

This is where the quiet, slow recipe finally turns dramatic.

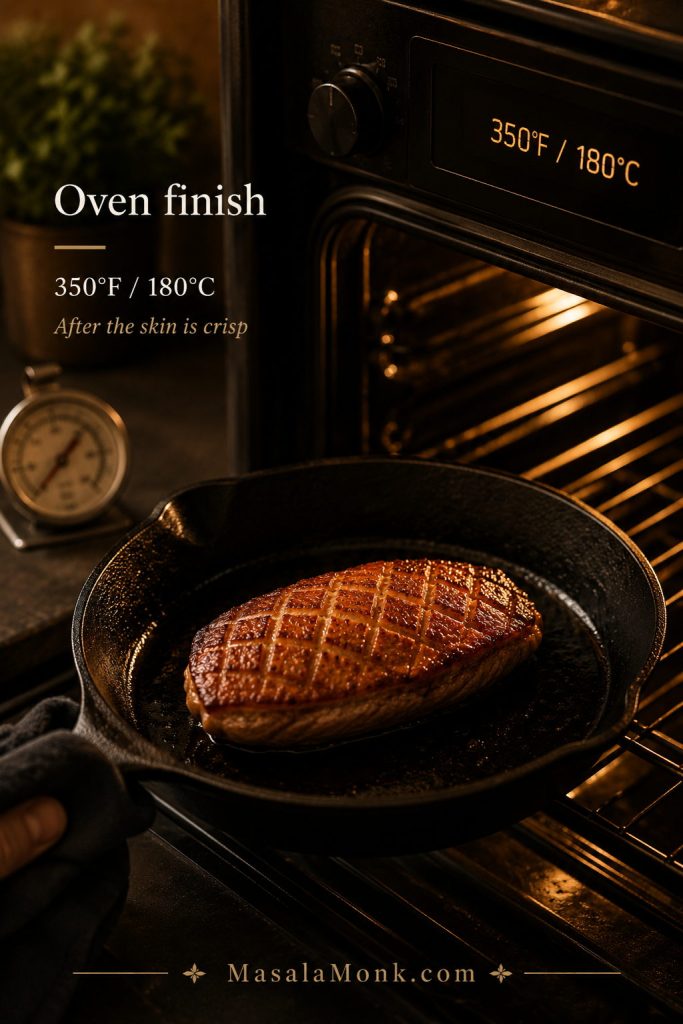
Hands-Off Method: Hot Oven Crisp

Place the legs on a rack set over a tray and roast at 200°C / 400°F for 20–30 minutes, until the skin is crisp and the meat is hot. This method is useful when cooking several legs at once.

Fast Finish: Broiler or Grill

A broiler or grill can help finish stubborn skin, but use it carefully. Duck skin can go from golden to burnt quickly. Keep the legs several inches from the heat and watch closely for the last 2–5 minutes.

If You Are Short on Duck Fat

Classic confit uses rendered duck fat because it gives the cleanest, fullest flavor. However, if the price of duck fat is the only thing stopping you, you can still make a useful confit-style version. Duck fat is still the best choice for clean flavor and silky meat, while substitutes are practical fallbacks when budget or availability gets in the way.

When the Duck Fat Looks Too Low

A compact dish is often the difference between exposed meat and good coverage, especially when you are trying to avoid buying another jar of fat.

Comparison showing duck legs in a large dish with low fat coverage and a smaller dish where the fat covers the meat better.
When duck fat looks low, the fix is often simple: move the legs into a snug dish so the fat surrounds more of the meat.

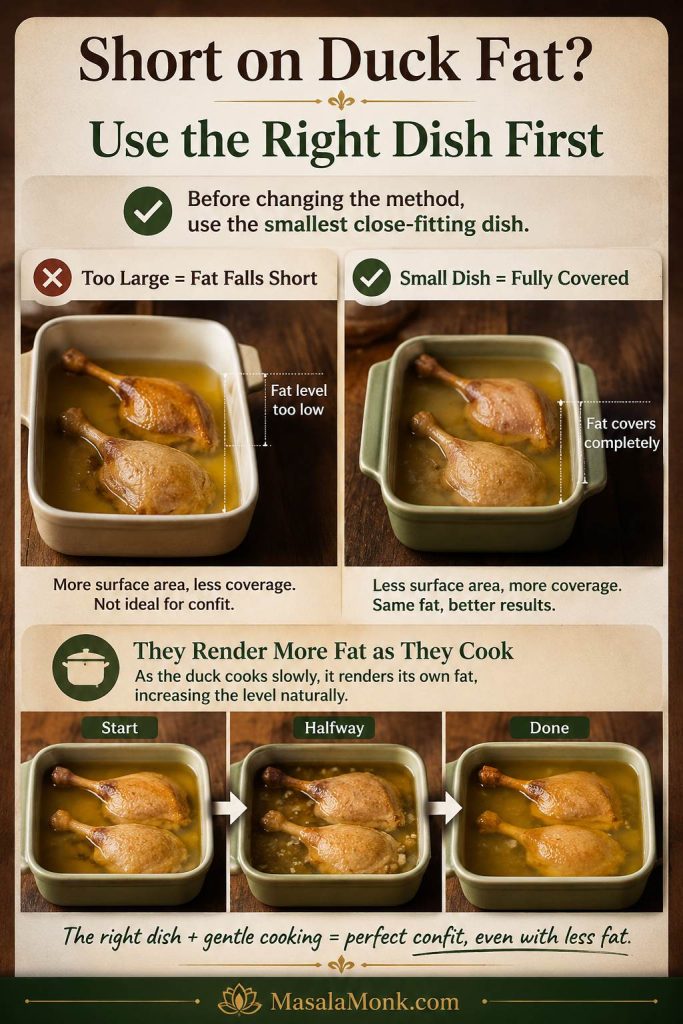
A small amount of duck fat can still work when the dish is compact enough, because the legs will render more fat as they cook. Some easy confit-style methods add a small splash of water or stock at the beginning to prevent scorching while the fat renders. This can be delicious, but it is closer to a confit-style braise than full duck-fat confit.

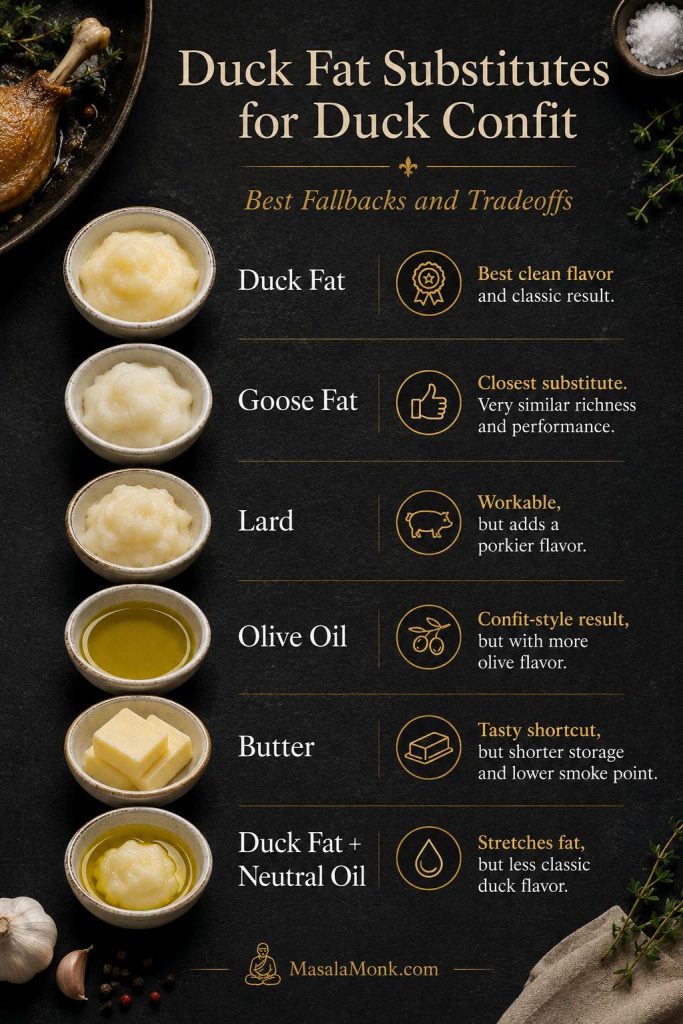
Duck Fat Substitutes for Duck Confit

Substitute fats can help when duck fat is expensive or unavailable, but the flavor and storage behavior will not be exactly the same.

Comparison of duck fat, goose fat, lard, olive oil, butter, and duck fat mixed with neutral oil for duck confit.
Duck fat gives the cleanest classic flavor, but goose fat, lard, olive oil, butter, or mixed fats can work when you understand the tradeoffs.
Fat optionHow it worksTradeoff
Duck fatClassic choice with the cleanest duck flavorMost traditional, but can be expensive
Goose fatClosest substitute if duck fat is unavailableRich and poultry-friendly, but not identical
LardWorks as a cooking fatAdds a porkier flavor
Olive oilCan create a confit-style resultFlavor becomes more olive-oil-forward
ButterTasty shortcut when duck fat is unavailableContains water and milk solids, so storage is shorter
Duck fat + neutral oilCan stretch a small amount of duck fatLess classic flavor; treat leftovers conservatively

If using butter, strain and store the leftover fat separately and treat the cooked duck like normal leftovers rather than traditional fat-preserved confit.

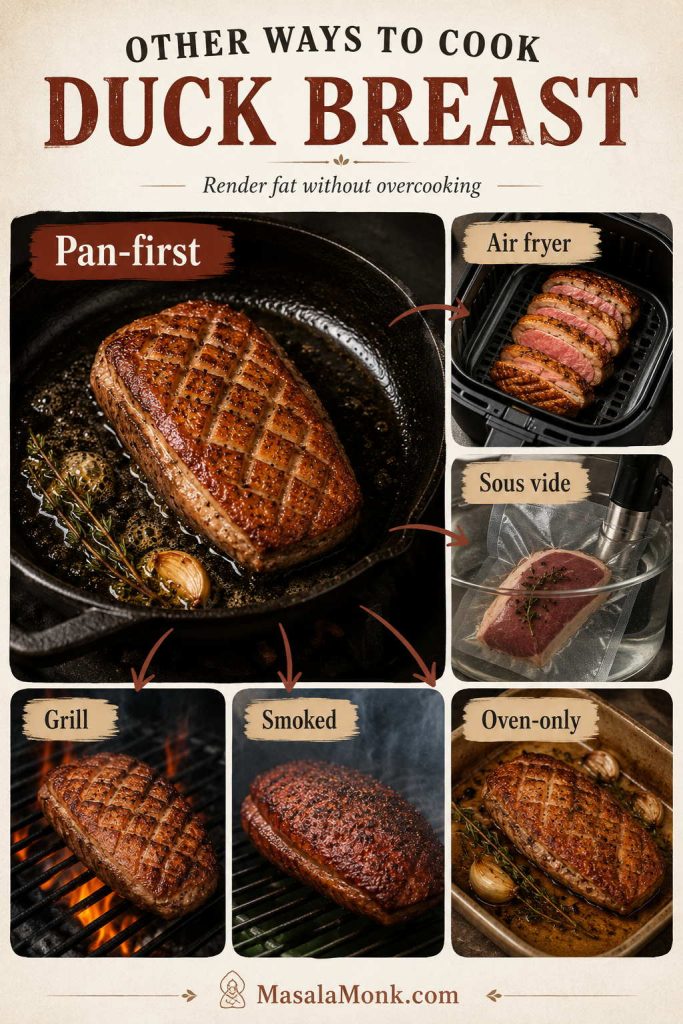
Other Ways to Cook Duck Confit

Once you understand the oven method, the shortcuts and gadget versions are easier to judge. These are useful when they solve a real problem — less duck fat, less oven time, or more hands-off cooking — but they should not distract from the main method if this is your first batch.

Method comparison visual: The oven method stays the main path here, while the other approaches are practical alternatives for specific kitchens.
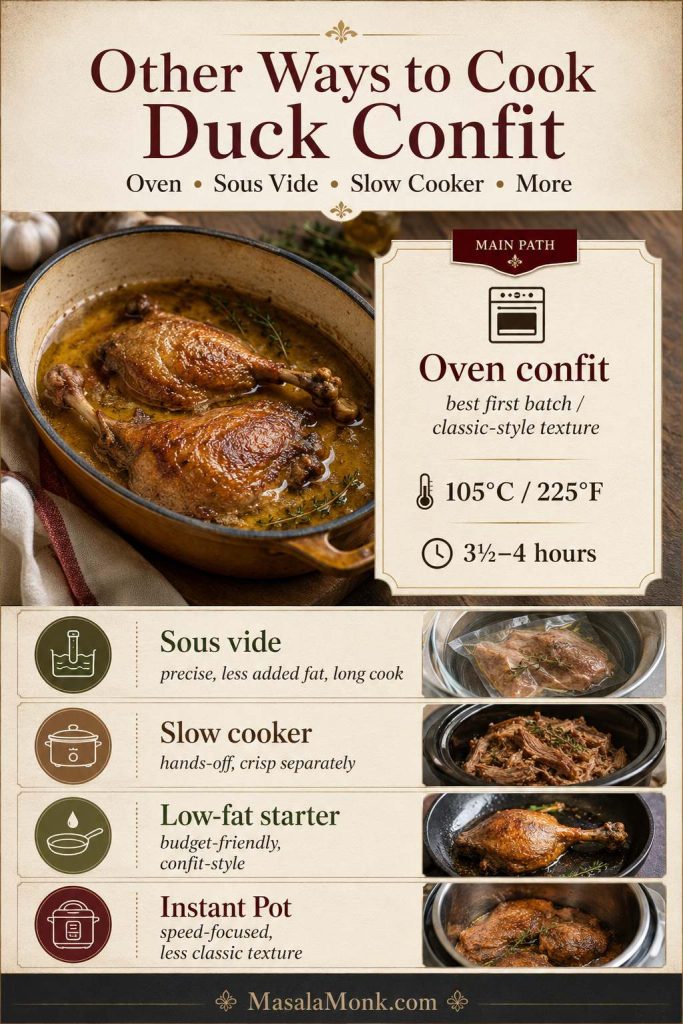
Duck confit method guide comparing oven confit with sous vide, slow cooker, low-fat starter, and Instant Pot approaches.
Oven duck confit is the best first path for classic texture, while sous vide, slow cooker, low-fat, and pressure-cooker versions solve different kitchen problems.
MethodBest forTradeoff
Oven confitFirst batch and silky meat with crisp skinNeeds enough fat and time
Sous videLess added fat and precise temperatureLong cook; no traditional fat storage
Slow cookerHands-off tendernessSkin must be crisped separately
Low-fat starterBudget cooking or limited duck fatMore confit-style braise than classic confit
Instant PotSpeed-focused experimentLess classic texture and control

Make-Ahead Timeline

This is one of those dishes that rewards planning ahead. You do not need to stand over the stove all day; you just need to give the cure and slow cook enough time to do their work.

How the timing works: the cure and slow cook are mostly inactive, while the final crisping happens just before serving.

Make-ahead duck confit timeline showing curing, cooking low, crisping before dinner, and straining duck fat after serving.
Duck confit rewards planning because most of the work is inactive; after the legs are cooked, the final crisping step makes them taste freshly finished.
WhenWhat to do
Night before or up to 24 hours before servingSalt-cure the duck legs with aromatics.
Earlier on serving day or the day beforeCook the legs slowly in duck fat until tender.
Before dinnerLift the chilled legs from the fat, wipe the skin well, and crisp.
After servingStrain the fat, store leftovers, and save clean duck fat for later cooking.

What to Serve with Duck Confit

Because the legs are savory and full-flavored, the best sides either absorb the duck juices, cut through the fat, or add a little sweetness and acidity. You do not need many sides. One potato or bean dish, one bright salad or vegetable, and one sauce are enough.

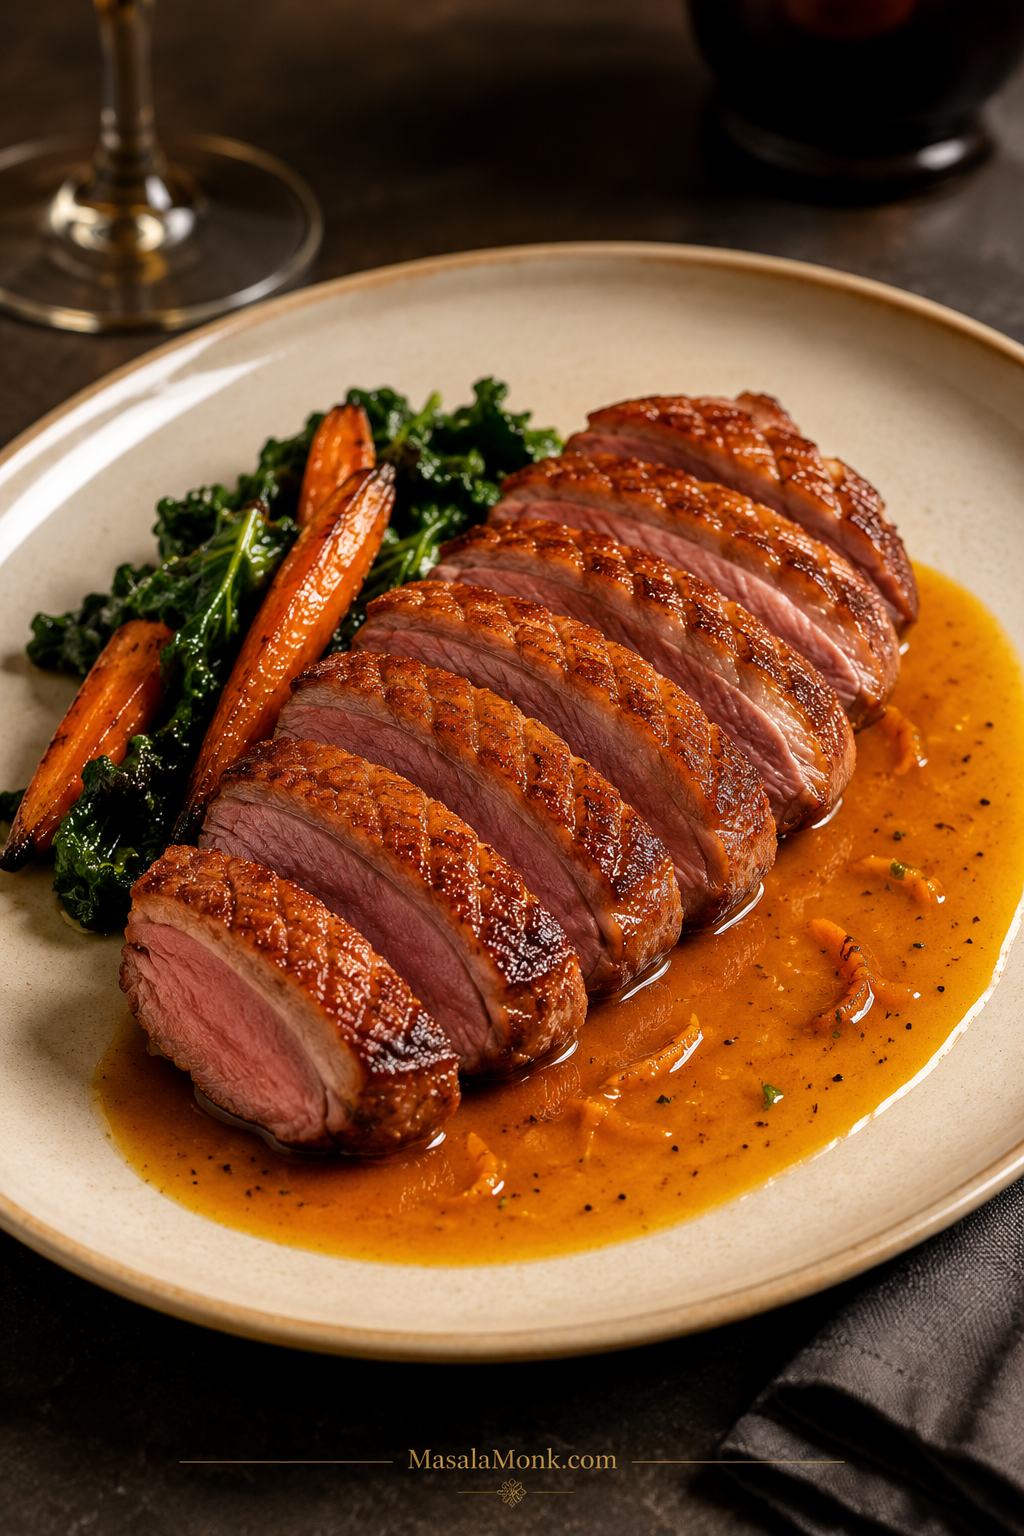
My favorite way to serve it is simple: one crisp leg, potatoes that have met a spoonful of duck fat, a bitter green salad with a sharp dressing, and a small spoon of orange or cherry sauce. That plate gives you richness, crunch, acidity, and enough restraint that the duck remains the reason everyone is at the table.

The best plate gives you crackly skin, tender meat, something starchy, and something sharp enough to make you want the next bite.

How to build the plate: use the sides to balance the richness: something starchy, something green or sharp, and a sauce that wakes up the plate.

Duck confit served with roasted potatoes, bitter greens, beans or lentils, red cabbage, and several sharp sauces.
Because duck confit is rich, the best sides either absorb fat, add freshness, or bring acidity through potatoes, greens, beans, cabbage, or sharp sauces.

Easy Plate Ideas

  • Bistro-style plate: one crisp duck leg, duck fat potatoes, bitter greens, and orange or cherry sauce.
  • Rustic plate: duck confit with white beans, braised cabbage, and mustard vinaigrette.
  • Lighter plate: crisp duck over lentils, herbs, and something cold and sharp, such as a simple cucumber salad.
  • Cold-weather plate: duck legs with potatoes, roasted carrots, and a red wine or cherry sauce.

Potatoes, Beans, and Starches

  • Duck fat potatoes — the most obvious and probably the most memorable pairing.
  • Mashed potatoes — if you want a softer side, these garlic mashed potatoes give the duck a creamy, buttery base.
  • White beans — especially with garlic, herbs, and a little stock.
  • Lentils — earthy, simple, and excellent with full-flavored duck.
  • Potato salad — for a make-ahead side, choose a mustardy or vinegar-leaning potato salad rather than a very heavy creamy one.

Vegetables and Greens

  • Bitter greens such as arugula, frisée, endive, or radicchio.
  • Braised cabbage, especially red cabbage with a little vinegar.
  • Roasted carrots with herbs or citrus.
  • Green beans with garlic and lemon.
  • Mushrooms sautéed in a little duck fat.
  • Lemony chickpea salad if you want the meal to feel fresh but still filling.

Sauces and Fruit Pairings

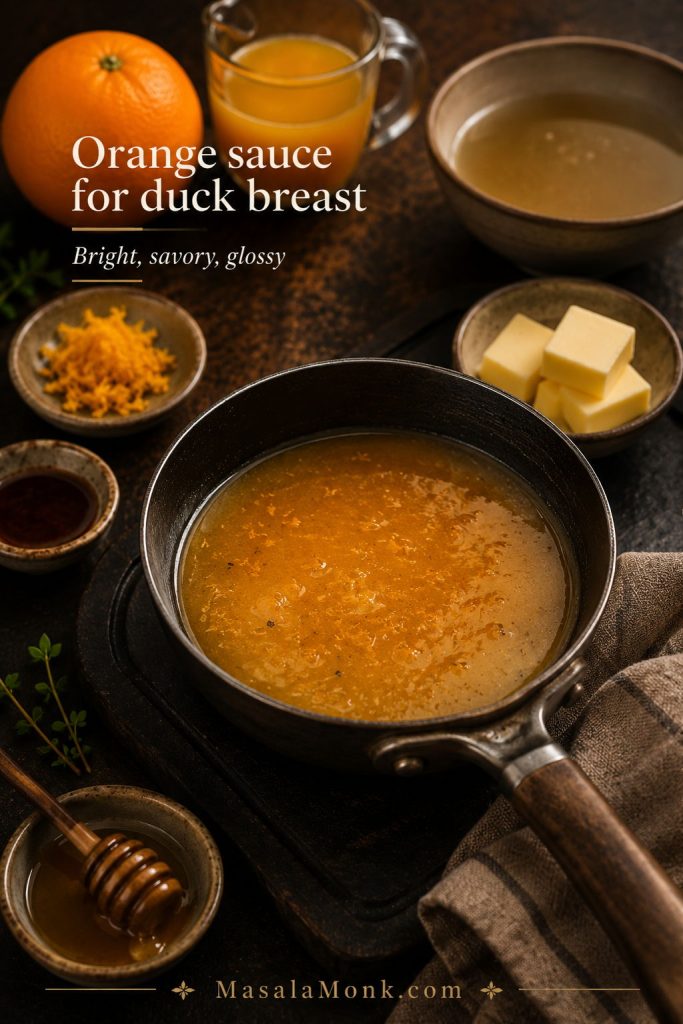
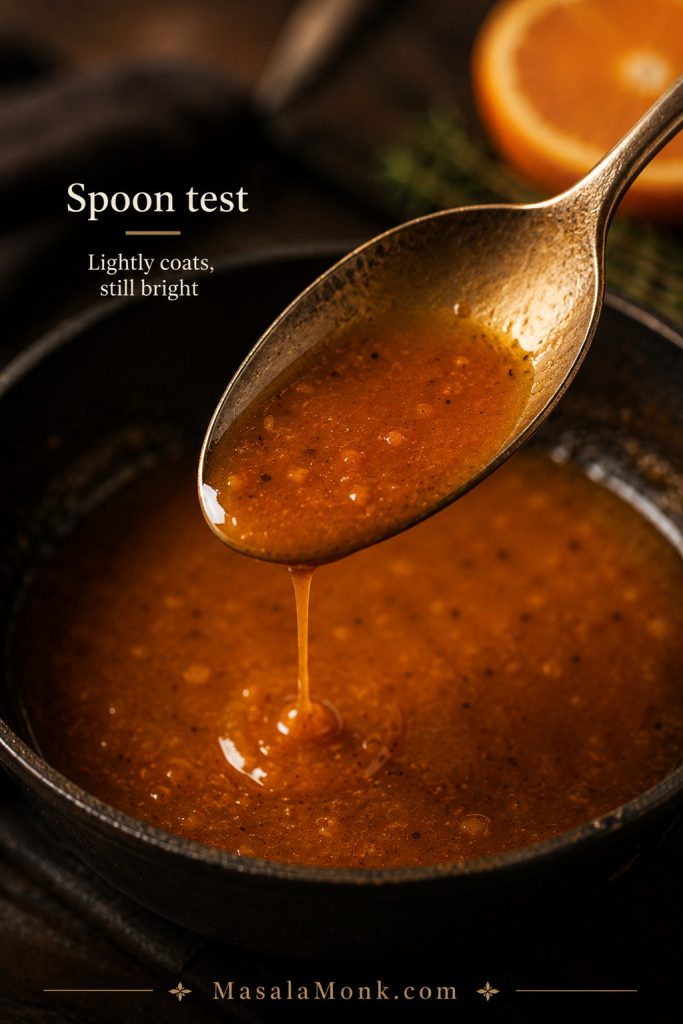
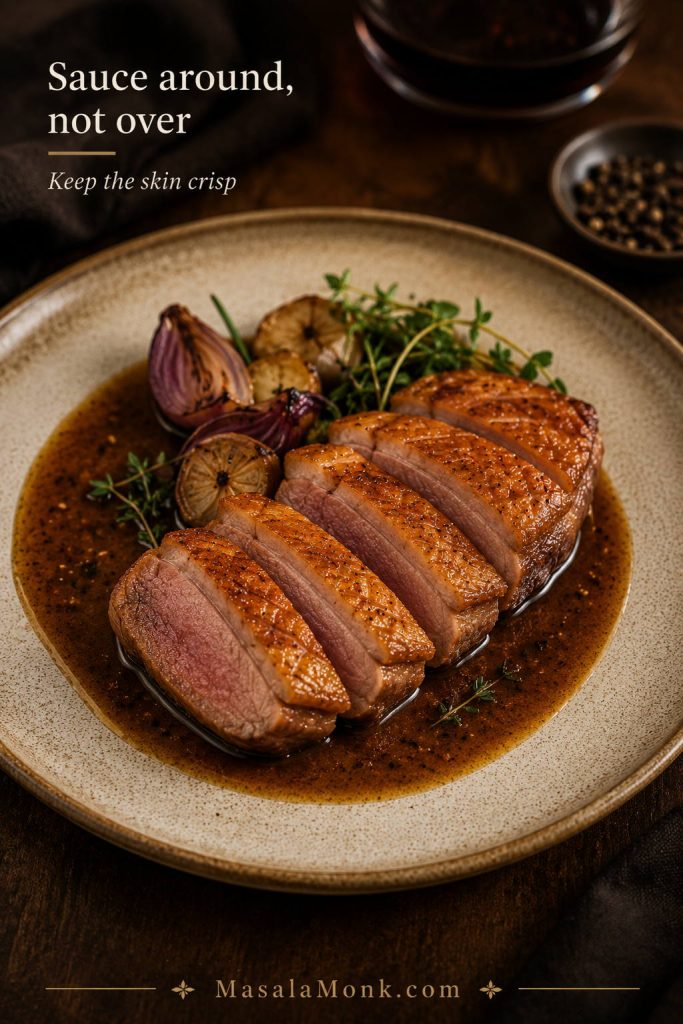
The dish does not need a heavy sauce, but a small spoonful of something sharp, fruity, or winey can make the plate feel complete. Orange sauce is a classic pairing; this orange sauce for duck works especially well if you use orange zest in the cure.

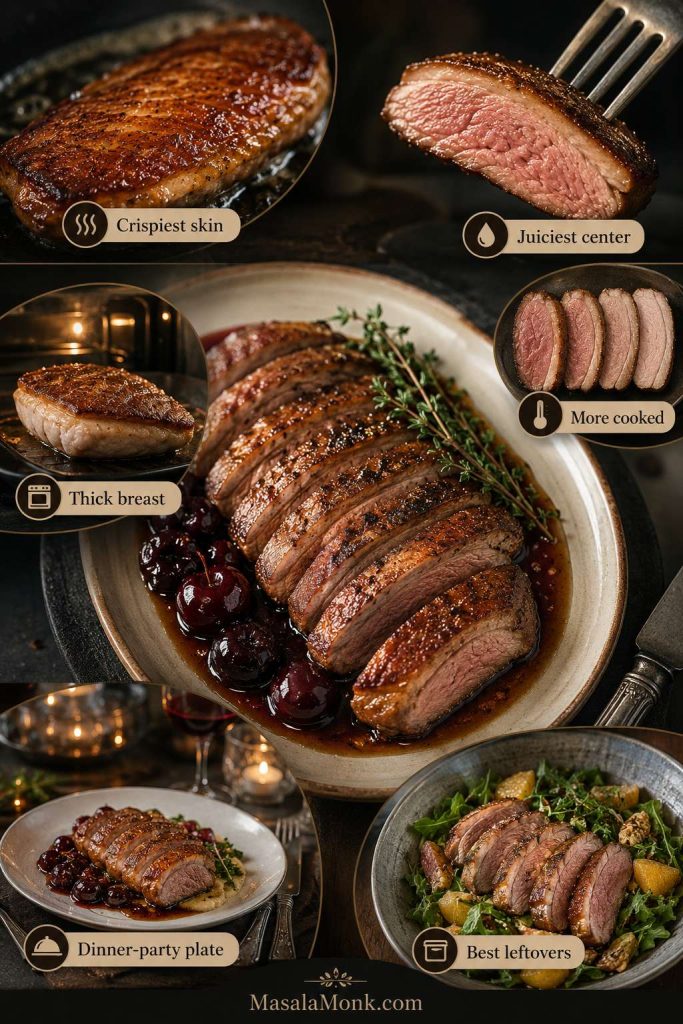
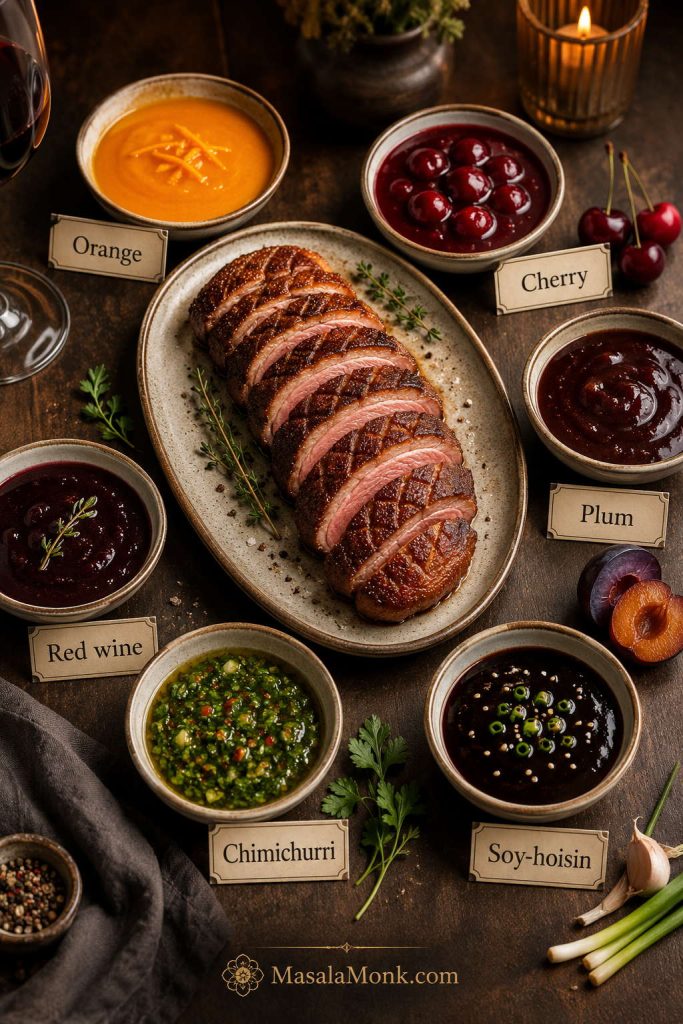
Choose orange or cherry sauce for a sweet-sharp plate, red wine sauce for a deeper dinner-party feel, mustard vinaigrette for a lighter salad-style plate, and plum sauce if you want a sweeter, fruitier direction. For a cheese-board-style plate, a small spoon of fig jam can work beside crisp duck, bitter greens, and something salty.

Recipes Using Duck Confit

The quiet advantage of duck confit is that tomorrow’s dinner is already halfway done. Once the duck is cooked, the meat can be shredded and folded into quick meals that taste far more luxurious than the effort involved.

Best Ways to Use Leftover Duck Confit

A small amount of shredded duck can carry a whole meal, especially when it is crisped briefly before being folded into pasta, beans, hash, or salad.

Leftover duck confit used in pasta, potato hash with egg, salad, tacos, and beans.
Leftover duck confit is powerful in small amounts; fold it into pasta, hash, salad, tacos, or beans to make simple meals taste rich and restaurant-worthy.

To use leftover duck confit, lift the meat from the fat, remove the bone, shred the meat, and crisp it in a skillet with a spoonful of duck fat. Add it near the end of cooking so it stays savory and textured instead of disappearing into the dish.

The easiest wins are pasta, hash, beans, and salads because they let a small amount of shredded duck flavor the whole dish.

  • Pasta with duck confit: toss shredded duck with garlic, mushrooms, herbs, and a little pasta water.
  • Warm duck salad: serve crisp shredded duck over bitter greens with a sharp vinaigrette.
  • Potato hash with duck confit: crisp potatoes in duck fat, then add shredded duck and herbs.
  • Crispy duck tacos: crisp the shredded meat and serve with pickled onions.
  • Grilled cheese with duck confit: use a small amount of shredded duck with sharp cheese and mustard.
  • White beans with duck confit: fold the meat into white beans with garlic, thyme, and stock.
  • Ramen with duck confit: add shredded duck to broth, noodles, greens, and a soft egg.
  • Crisp duck over fries: for an occasional comfort-food plate, pile crisp shredded duck over hot fries and add a sharp sauce or pickled onions.

What to Do with Leftover Duck Fat

Leftover duck fat is part of the reward. Strain it, chill it, and use it wisely. It turns ordinary potatoes into something memorable and adds depth to vegetables, eggs, mushrooms, beans, and seared meats.

Best Uses for Leftover Duck Fat

Clean, strained duck fat is worth saving because even a spoonful can make simple vegetables, eggs, or beans taste richer.

Jar of clean golden duck fat surrounded by roast potatoes, eggs, mushrooms, cabbage, green beans, roasted vegetables, strainer, and jars.
After cooking, strain and chill the leftover duck fat; then use small spoonfuls to add deep savory flavor to potatoes, eggs, mushrooms, cabbage, beans, and vegetables.
  • Strain it through a fine-mesh sieve while warm, not scorching hot.
  • Remove spent aromatics such as herbs, garlic, shallots, bay leaves, and peppercorns before storing the fat.
  • Let juices settle if the fat looks cloudy; watery juices can collect underneath.
  • Separate the clean fat from the juices after chilling if a darker layer settles at the bottom.
  • Store in a clean jar in the fridge.
  • Use clean utensils each time you scoop fat out.
  • Do not pour hot fat down the sink. Let unwanted fat solidify, then discard it properly.

After chilling, clean fat will set on top and darker juices may settle underneath. The pale solid layer is fat. The darker layer underneath is meat juice, salt, and aromatics. Save the clean fat for cooking; use the darker juices quickly in beans, pan sauce, or gravy, or discard them.

Use duck fat for roast potatoes, fried eggs, mushrooms, cabbage, beans, carrots, Brussels sprouts, and pan-seared meats. Discard it if it smells off, looks moldy, or has been contaminated with crumbs or meat juices over time.

Storage, Freezing, and Reheating

This is one of those dishes that rewards making ahead, but home storage should be handled carefully. Traditional confit was preserved under fat, but modern kitchens vary in cleanliness, temperature control, salt levels, and handling. This recipe is written as a modern dinner recipe, not a long-term preservation project.

The fat helps protect the texture, but this recipe uses a regular salt cure, not curing salt for long-term preservation. In a home kitchen, it is safest to treat the cooked legs like cooked poultry unless you are deliberately following a tested preservation method. Once the duck and fat are no longer steaming, move them into shallow storage so they cool evenly and safely.

Storage visual guide: This image keeps the storage advice modern and safe: chill promptly, store airtight, freeze when needed, and crisp after reheating.

Duck confit storage guide showing a refrigerated container, freezer bag, reheating pan, crisping skillet, date labels, and safety notes.
For home cooks, duck confit should be treated as cooked food, not shelf-stable preservation: cool promptly, store airtight, freeze if needed, and crisp after reheating.

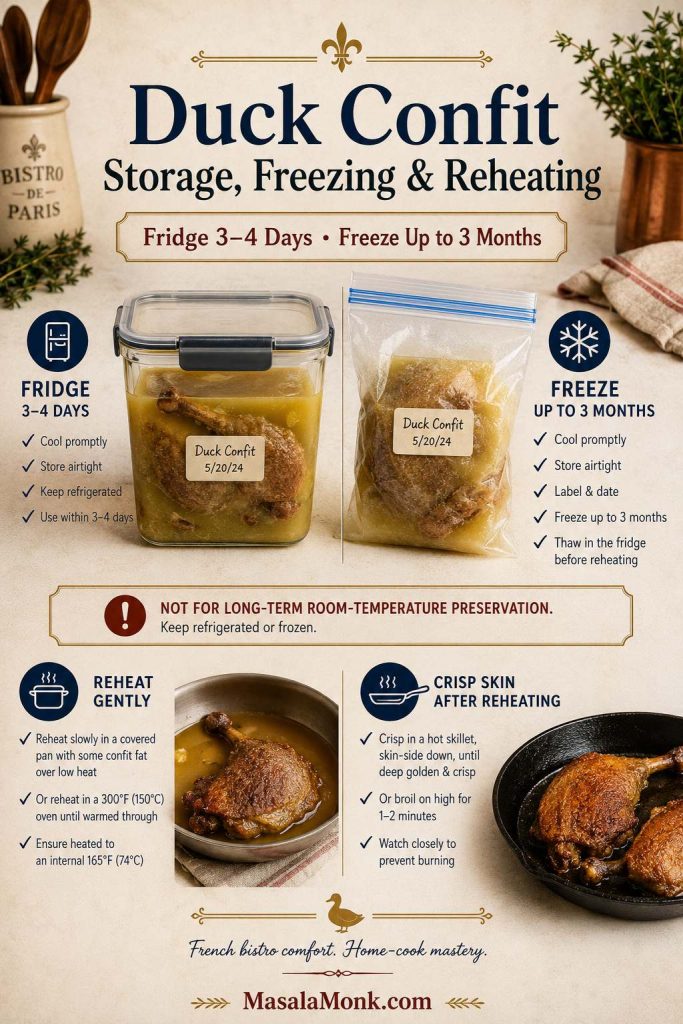
How Long to Store Duck Confit

For normal home storage, refrigerate the cooked legs for 3–4 days. When in doubt, freeze instead of stretching fridge storage.

SituationBest methodNotes
Normal cooked duck confitRefrigerate 3–4 daysKeep covered and chilled
Traditional fat-covered storageOnly for careful cooks using very clean containersFor everyday home cooking, use 3–4 days or freeze
Low-fat or butter shortcut versionTreat as normal cooked duckUse 3–4 days in the fridge; do not rely on long fat-covered storage
FreezingFreeze up to 3 monthsFreeze with some fat to protect the meat
Reheating whole legsSkillet or ovenReheat slowly, then crisp the skin
Reheating shredded meatSkillet with a little duck fatBest for pasta, hash, tacos, and beans

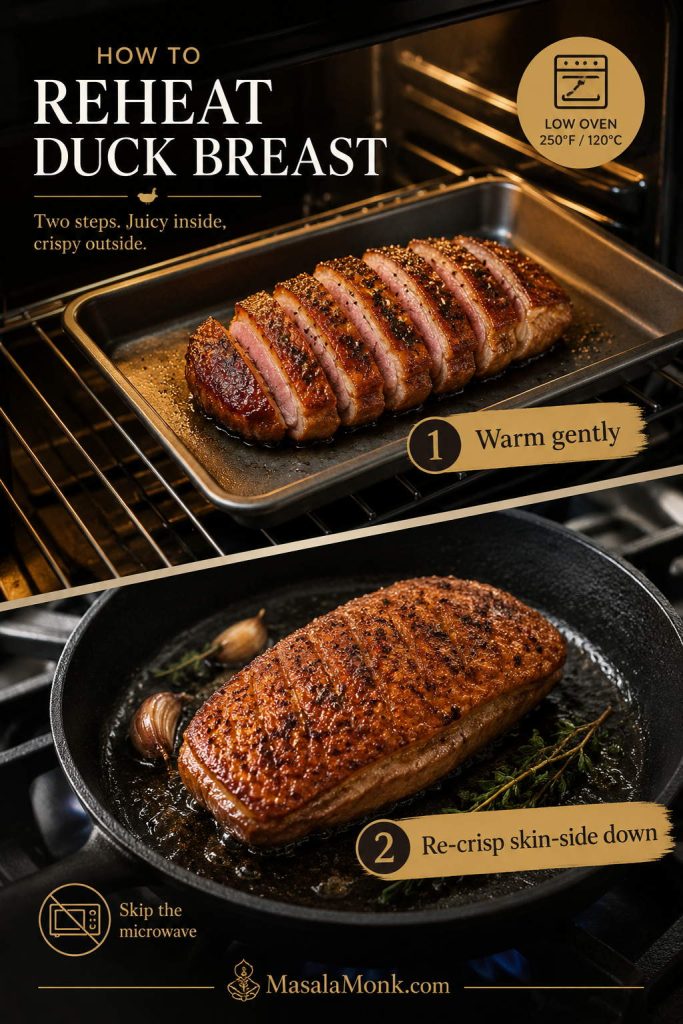
How to Reheat Without Losing Crisp Skin

For best texture, skip the microwave for whole legs. The meat may warm, but the skin will turn soft. If you are shredding the duck for pasta or hash, reheating in a skillet with a little duck fat is much better.

When storage feels uncertain — especially if the duck cooled slowly or sat out longer than planned — treat it like cooked poultry and follow standard leftovers guidance rather than relying on old-style confit storage. The USDA leftovers and food safety guide is a useful reference.

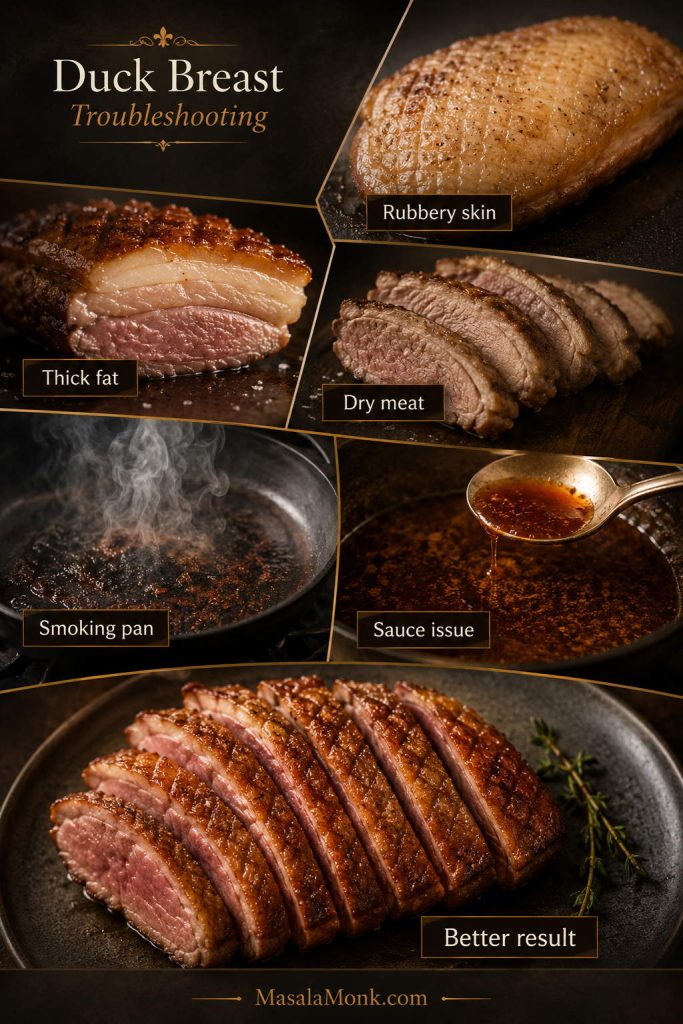
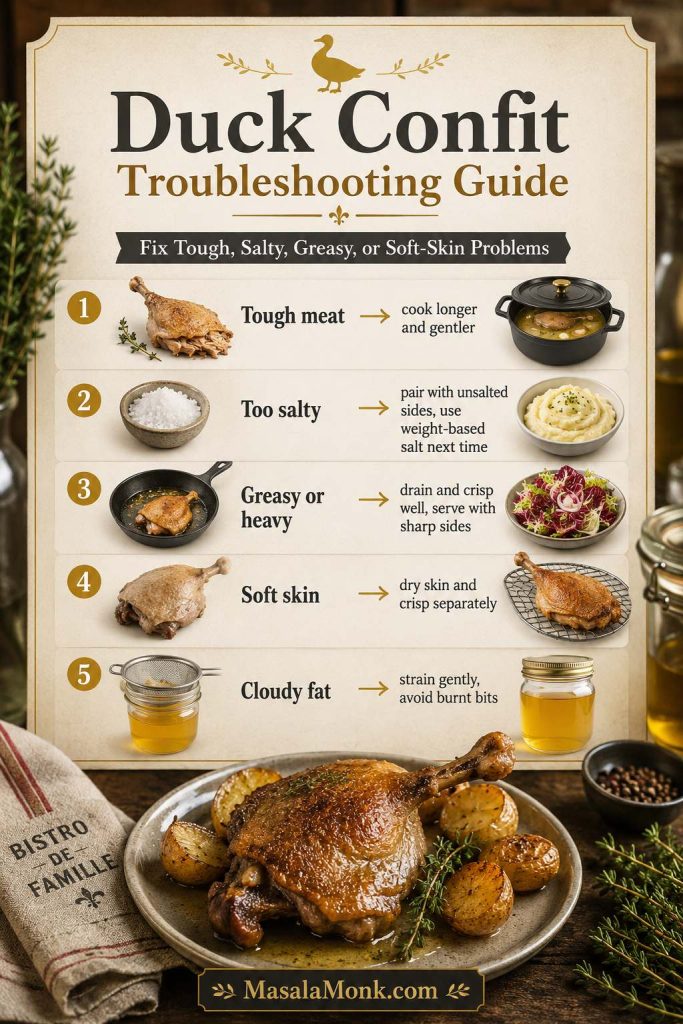
Duck Confit Troubleshooting

If something goes wrong, start here; this section is also worth checking before you change the oven temperature, salt, or pan. Most duck confit problems are fixable because the cooking is slow.

How to Fix Common Duck Confit Problems

Most problems point back to the same few causes: salt, heat, pan size, surface moisture, or how the fat was strained.

Duck confit troubleshooting guide showing fixes for tough meat, too salty duck, greasy texture, soft skin, and cloudy duck fat.
Most duck confit problems are fixable: cook tough meat longer, balance salt with plain sides, drain excess fat, dry the skin, and strain cloudy fat gently.
ProblemLikely causeFix nowFix next time
Duck is too saltyCure was too long, or fine salt was used by volumeServe with unsalted potatoes, beans, lentils, or bitter greensWeigh the salt and use a shorter cure
Meat is toughDuck was not cooked long enoughReturn to the fat for 30–45 minutesCook to tenderness, not just time
Meat is dryFat was too hot or bubbling hardServe with sauce or shred into pasta/beansLower the oven temperature and keep the fat barely moving
Final duck tastes greasyToo much fat clinging to the skin before crispingWipe the skin and drain on a rack after crispingLet excess fat drip off before skillet or oven finishing
Skin will not crispSurface is wet or coated with too much fatWipe well and crisp skin-side down in a skilletChill uncovered or wipe very well before crisping
Skin browns but stays softHeat is too high or the skin is still dampLower heat and keep cooking skin-side downDry the legs better before crisping
Skin tearsMoved too soon or pan was too hotLet the rest of the skin release naturallyUse medium heat and wait before turning
Not enough duck fatPan is too wideMove duck to a smaller dishChoose a compact dish from the start
Fat looks cloudyMoisture and juices mixed into the fatStrain, chill, and separate carefullyStore clean strained fat separately from juices

Duck Confit FAQs

Is duck confit hard to make?

Not really. Duck confit asks for time more than skill. Most of the recipe is inactive: salt the legs, let them rest, cook them slowly in fat, then crisp the skin before serving.

Which cut of duck is best for confit?

Skin-on, bone-in legs are the cut to buy because they have the fat, skin, bone, and connective tissue that make confit work. Duck breast is better cooked quickly and is not the classic cut for confit.

How much duck fat do I really need?

For 4 duck legs, start with about 750 ml / 25 US fl oz / 3¼ cups rendered duck fat, but pan size matters more than the number. A compact dish may need less, while a wide roasting pan may need much more.

Does duck confit need to be fully submerged in fat?

The meaty parts should be covered by fat for the most even cooking. Bone tips or a very small patch of skin can sit above the fat, especially if you use parchment and a tight cover. If too much meat is exposed, move the legs to a smaller pan before adding more fat.

What temperature should duck confit cook at?

This recipe uses 105°C / 225°F for 3½–4 hours. For fan or convection ovens, reduce the temperature to about 95–100°C / 205–212°F. The goal is low, steady heat: the fat should barely bubble, not boil aggressively.

Why is my duck confit not crispy?

Soft skin after the slow cook is normal — the crisping happens at the end, not during the fat cook. Wipe away excess fat, use medium heat, and give the skin enough time in the pan before moving it.

Can I make duck confit without duck fat?

You can make a confit-style duck leg with goose fat, lard, olive oil, butter, or a mix of duck fat and neutral oil, but duck fat gives the cleanest classic flavor. Treat substitute-fat versions like normal cooked leftovers rather than long fat-preserved confit.

Can I make duck confit with only 2 legs?

Yes. Keep the salt at about 1.5% of the duck’s weight and use the smallest oven-safe dish that fits the legs in one layer. The duck fat amount will depend more on the dish size than the number of legs.

Can I reuse duck fat after making confit?

Yes, if it is clean and smells fresh. Strain it, chill it, separate the pale fat from darker juices underneath, and use clean utensils each time. Discard it if it smells off, looks moldy, or has been contaminated with crumbs or meat juices.

What can I make with leftover duck confit?

Use leftovers in pasta, salads, tacos, hash, white beans, risotto, ramen, grilled cheese, or warm grain bowls. Shred the meat and crisp it in a skillet with a little duck fat for the best flavor.

At this point, the method is simple: cure, cover with fat, cook low, crisp. The recipe card below keeps the steps tight so you can cook from it.

Duck Confit Recipe

This duck confit recipe turns skin-on, bone-in duck legs into silky, pull-apart meat with golden crisp skin. The method is slow but mostly hands-off, with clear guidance for salt, duck fat, pan size, make-ahead storage, and final crisping.

Yield
4 servings
Total Hands-On Time
35–45 minutes
Prep Time
25 minutes
Inactive Cure Time
12–24 hours
Oven Cook Time
3½–4 hours
Finish Time
10–30 minutes
Total Time
Overnight to 1¼ days, mostly inactive
Method
Oven confit

Before you start: use a close-fitting oven-safe dish. Pan size affects how much duck fat you need.

Ingredients

For the Duck and Cure

  • 4 skin-on, bone-in duck legs, about 1–1.4 kg / 2¼–3 lb total
  • 15–21 g kosher salt, or about 1.5% of the duck’s weight
  • 2–4 small thyme sprigs
  • 1 teaspoon black peppercorns, lightly crushed
  • Optional: 2 strips orange zest
  • Optional: 4–6 juniper berries or 1 teaspoon coriander seeds

For Cooking

  • 750 ml / 25 US fl oz / about 3¼ cups rendered duck fat, plus more if needed depending on pan size
  • 6 garlic cloves, lightly smashed
  • 1–2 shallots, halved or thickly sliced
  • 4 small thyme sprigs
  • 1–2 small rosemary sprigs
  • 2 bay leaves
  • Optional: a few extra black peppercorns

Instructions

Cure and Cook the Duck

  1. Cure the duck. Pat the duck legs dry. Rub evenly with salt, then add thyme, peppercorns, and any optional cure aromatics. Cover and refrigerate for 12–24 hours.
  2. Prepare for cooking. Remove the duck from the cure. Wipe off aromatics and visible salt. Rinse only if there are clumps of salt or the cure looks heavy, then pat very dry. Discard the wet cure aromatics.
  3. Heat the oven. Preheat to 105°C / 225°F. If using a fan/convection oven, use about 95–100°C / 205–212°F and expect the cook time to run slightly longer.
  4. Melt the duck fat. Warm the duck fat just until liquid. It should be fluid enough to pour, not sputtering hot.
  5. Arrange and cover. Place the legs in the smallest close-fitting oven-safe dish or Dutch oven that holds them in one layer without stacking. Add fresh garlic, shallots, herbs, bay leaves, and optional peppercorns. Pour warm duck fat over the legs until the meaty parts are mostly submerged. Use parchment directly over the duck if needed, then cover with a lid or foil.
  6. Cook low and slow. Bake for 3½–4 hours, until the meat is very tender, pulls back slightly from the bone, and offers almost no resistance when pierced. The fat should barely bubble, not boil hard.

Cool, Crisp, and Serve

  1. Cool or finish. If making ahead, cool the legs until no longer steaming, transfer them to a clean container with enough fat to cover, and refrigerate promptly. If serving now, carefully lift them from the fat and let excess fat drip away.
  2. Crisp the skin. Wipe excess fat from the skin. Crisp skin-side down in a heavy or nonstick skillet over medium heat for 6–10 minutes, or roast on a rack at 200°C / 400°F for 20–30 minutes.
  3. Serve. Serve with duck fat potatoes, beans, lentils, bitter greens, braised cabbage, or a sharp fruit sauce such as orange, cherry, or plum.

Recipe Notes

  • Keep the fat quiet: the duck should cook slowly, not fry.
  • Judge the skin at the end: it will look soft after the slow cook; it crisps only during the final skillet or oven finish.
  • Salt carefully: weigh the salt if possible. If measuring by volume instead of weight, use coarse kosher salt; fine salt can make the cure too salty.
  • Leftover fat: strain, chill, and reuse clean duck fat for potatoes, eggs, mushrooms, beans, and vegetables.
  • Butter shortcut note: if you used butter instead of duck fat, the leftover fat will contain milk solids and water, so store it separately and use it sooner.

Storage

Refrigerate cooked duck confit for 3–4 days or freeze for up to 3 months. This recipe is for modern home storage, not long-term preservation. Reheat slowly, then crisp before serving.

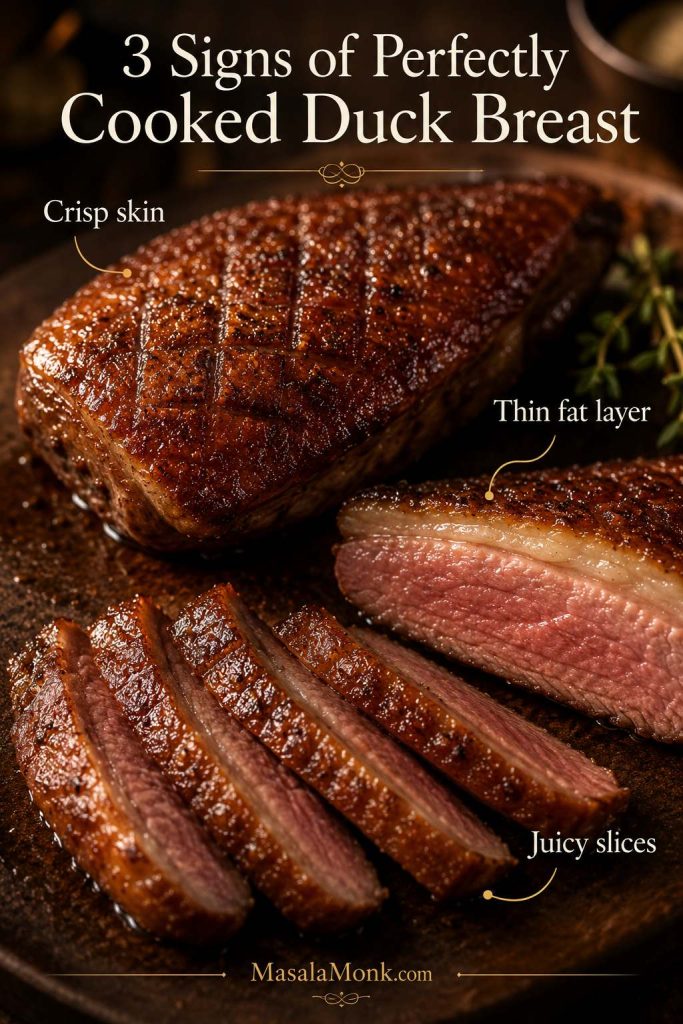
Final texture visual: By the end of the process, the plate should show both parts of the method: tender meat from the slow cook and crisp skin from the final finish.

Duck confit leg served with pulled tender meat, crisp skin, roasted potatoes, salad greens, sauce, and a jar of duck fat.
By the end, this recipe gives you two rewards: crisp duck confit for dinner and clean golden duck fat for potatoes, eggs, vegetables, and beans.

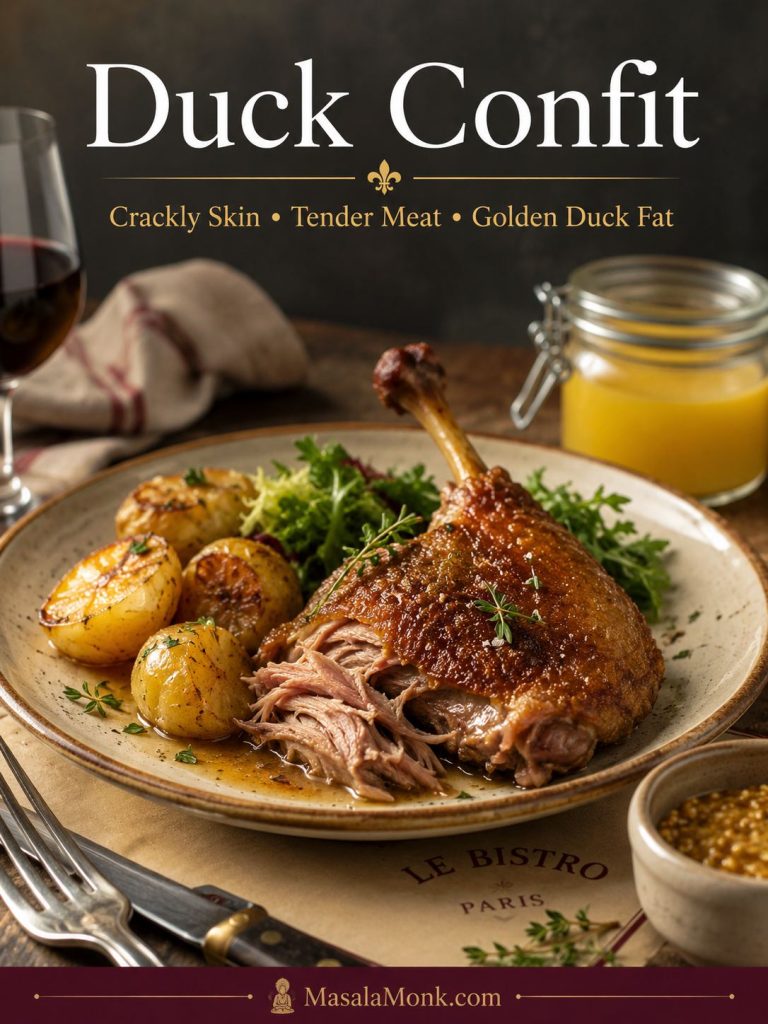
The first time you make duck confit, the process feels mysterious. The second time, you know the rhythm: salt, rest, cover, cook, crisp. By then, the mystery is gone — and what is left is tender duck, crackly skin, and a jar of golden fat waiting for the next meal.

Back to top ↑

Posted on 1 Comment

Duck Breast Recipe

Sliced duck breast with crispy scored skin, pink center, orange sauce, greens, and potatoes on a dinner plate

Duck breast can feel intimidating the first time: beautiful when it works, frustrating when the skin turns rubbery or the meat dries out. The good news is that the method is much calmer than it looks. You do not need a complicated marinade or a chef’s trick. You need to score the skin, start in a cold pan, render the fat slowly, finish gently, rest, and slice.

This duck breast recipe gives you crisp golden skin, a tender center, and a quick orange sauce you can make while the duck rests. More importantly, it shows you what to look for at each stage: how deep to score, how the fat should bubble, when the skin is ready to flip, and how to choose the right temperature for your table.

Because duck breast is rich and easy to overthink, this guide also covers sauces, sides, air fryer and sous vide notes, storage, reheating, leftovers, and troubleshooting. By the end, you should know how to avoid rubbery skin, greasy fat, and dry meat — and what to do if something starts going wrong.

The payoff is a plate that feels special without being frantic: crisp salted skin, a thin rendered fat layer, juicy slices, and a glossy sauce you make while the duck rests.

Before you start: the slow part is the skin-side render. It may feel like nothing is happening for the first few minutes, but that quiet start is exactly what helps the fat melt instead of trapping a chewy layer under the skin.

Quick Answer: Best Way to Cook Duck Breast

Duck breast usually cooks best when you score the skin, season it well, place it skin-side down in a cold dry pan, and slowly render the fat over low to medium-low heat until the skin is golden and crisp. Once most of the fat has melted, flip the breast briefly to cook the meat side, then finish in a 350°F / 180°C oven if the breast is thick or still under your preferred temperature.

Rest the duck skin-side up for 5–10 minutes, then slice it against the grain. Many cooks prefer duck breast medium-rare to medium for juicier slices, while the official poultry safety benchmark is 165°F / 74°C. Use a thermometer and choose the doneness that feels right for you and the people you are serving.

Not sure which doneness to choose? Use the duck breast temperature guide before you start cooking.

Four-step duck breast method showing scored breast, cold pan start, rendered skin, and sliced cooked duck
The method feels simpler when you see the rhythm: score the skin, start cold, render patiently, rest, and slice only after the juices settle.

What success looks like: the skin should be deeply golden and crisp, the white fat layer should look much thinner, and the sliced meat should be juicy rather than dry. If the skin is browning fast but the fat still looks thick, lower the heat and keep rendering.

Close-up guide showing crispy duck skin, thin rendered fat layer, and juicy sliced duck breast
Before you rely on timing alone, check the visual cues: crisp skin, a thinner fat layer, and meat that still looks moist after slicing.

Quick cooking formula: score the skin, season, start skin-side down in a cold dry pan, render gently for 10–18 minutes, flip for 1–2 minutes, oven-finish thick breasts if needed, rest skin-side up for 5–10 minutes, then slice against the grain.

For the visual stage-by-stage version, jump to the duck breast rendering cues before you start cooking.

Duck Breast Recipe at a Glance

Best methodCold-pan pan-seared
Serves2
Total time35–50 minutes
Oil needed?No
Best panHeavy skillet, preferably oven-safe
Oven finishOptional, 350°F / 180°C
Best sauceOrange, cherry, plum, or red wine sauce
Main mistakeCooking too hot before the fat renders

Choose Your Duck Breast Goal

Your goal Best move
Crispiest skin Render longer over low to medium-low heat, and spoon sauce around the slices rather than over the skin.
Juiciest center Use a thermometer, pull the duck a few degrees before your final target, and rest it skin-side up.
Less pink / more cautious doneness Cook closer to the official poultry benchmark, knowing the meat will be firmer.
Thick magret-style breast Render the skin on the stovetop first, then finish gently in a 350°F / 180°C oven.
Date-night or dinner-party plate Use orange or cherry sauce, crisp potatoes, and bitter greens to balance the richness.
Nervous beginner Trust the cues more than the clock: thinner fat layer, golden skin, gentle bubbling, and thermometer-confirmed doneness.
Best leftovers Slice cold or reheat gently, then add cooked duck near the end of rice, noodles, salads, or pasta.
Duck breast goal guide for crispy skin, juicy center, cautious doneness, thick breast, dinner plate, and leftovers
Before the pan heats up, decide what matters most: crispest skin, juiciest slices, cautious doneness, or a more polished dinner-party plate.

Why This Duck Breast Recipe Works

Duck breast cooks differently from chicken breast because it has a thick layer of fat under the skin. If you start with high heat, the skin can brown before that fat melts, leaving a chewy layer underneath. Starting in a cold pan gives the fat time to render gradually, so the skin crisps while the meat stays protected from harsh heat.

Scoring the skin gives the fat more places to escape. Drying the skin helps it brown instead of steam. Pouring off excess fat keeps the duck from sitting in a deep pool of hot fat. Resting skin-side up protects the crisp surface while the juices settle.

Once you understand those four ideas — score, dry, render slowly, rest properly — this cut becomes much easier to cook consistently.

That contrast is why duck breast feels special: the knife taps through crisp skin, the center stays tender, and the sauce belongs beside the slices instead of drowning them.

Ingredients for Duck Breast

You do not need much to make excellent duck breast. Salt, pepper, and a good pan do most of the work. The optional orange sauce makes the plate feel complete, but the cooking technique matters more than the sauce.

For the Duck Breast

  • 2 skin-on boneless duck breasts, about 6–8 oz / 170–225 g each
  • 1 tsp kosher salt, or about ½ tsp fine salt
  • ¼ tsp black pepper
  • Optional: 1 small thyme or rosemary sprig
  • Optional: 1 small garlic clove, lightly crushed

For the Optional Orange Sauce

  • ¼ cup / 60 ml fresh orange juice
  • ½ cup / 120 ml chicken stock
  • 1 tbsp white wine vinegar or red wine vinegar
  • 1–2 tsp honey or sugar
  • 1 tsp orange zest
  • 1 tbsp / 14 g cold butter
  • Salt and black pepper, to taste
Raw skin-on duck breasts with salt, pepper, orange, butter, stock, vinegar, honey, herbs, garlic, and orange zest
With duck breast, a short ingredient list works because salt, controlled heat, and a bright orange sauce do more than a complicated marinade.

No oil needed: Duck breast brings its own cooking fat. Starting in a dry pan lets that fat melt naturally, so the skin can crisp without adding oil.

What Kind of Duck Breast to Buy

For this recipe, the best choice is skin-on boneless duck breast. The skin and fat are not a problem to avoid; they are the reason the recipe works. The goal is to slowly melt that fat so the skin becomes crisp and the meat stays juicy.

Type Best use What to know
Skin-on duck breast Best for this recipe The fat renders slowly and the skin crisps in the pan.
Skinless duck breast Leaner preparations It will not give crispy skin and cooks more like a lean steak.
Duck fillet Same general use Often another name for boneless duck breast.
Magret or moulard duck breast Larger, richer portions Usually fattier and thicker, so it often needs a longer render and oven finish.
Frozen duck breast Fine if thawed properly Thaw fully in the fridge and pat very dry before cooking.
Duck breast buying guide showing skin-on duck breast, skinless duck breast, frozen duck, and thick magret-style duck breast
Skin-on duck breast is the right starting point for crispy skin; thicker magret-style pieces simply need more rendering time and a gentler finish.

Smaller duck breasts, around 4–5 oz / 112–140 g each, may finish entirely on the stovetop. Larger breasts, around 7–8 oz / 200–225 g or more, often benefit from a short oven finish after the skin has rendered.

If the package has very different-sized breasts, cook to temperature rather than trying to make both pieces follow the same timing. The smaller one may need to come out of the pan first.

Equipment You Need

You do not need many tools, but a few of them make the recipe much easier to control. The most helpful one is an instant-read thermometer, especially if you are nervous about doneness.

  • Sharp knife: for scoring the skin cleanly.
  • Paper towels: for drying the skin very well.
  • Heavy skillet: cast iron, stainless steel, carbon steel, or heavy nonstick all work.
  • Instant-read thermometer: the easiest way to avoid overcooking.
  • Small pan, spatula, or cooking weight: useful if the duck breast curls as it renders.
  • Heatproof bowl: for pouring off rendered duck fat.
  • Small saucepan: optional, if making sauce separately.

Best pan choice: Use an oven-safe skillet if possible. That way, if the skin is crisp but the center is still under your target temperature, you can move the whole pan into the oven without transferring the duck.

How to Score Duck Breast

Scoring means making shallow cuts through the skin and fat so the fat can render more evenly. The goal is to cut through the skin and fat, not into the meat. If you see red flesh through the cuts, you have gone too deep.

Knife scoring the skin and fat of a raw duck breast without cutting into the meat
Score through the skin and fat only, because cutting into the meat can release juices before the duck breast has finished cooking.

Parallel Score vs Crosshatch Score

A parallel score is easier for beginners: make diagonal lines across the skin about ¼ inch apart. A crosshatch score adds a second set of diagonal lines in the opposite direction. Both work, as long as the cuts are shallow enough to protect the meat.

How Deep Should the Cuts Be?

Deep enough to open the fat layer, but not so deep that the meat is exposed. This matters because cutting into the meat lets juices escape and can make the duck cook unevenly.

Scoring result What happens
Too shallow The fat does not render as evenly, so the skin can stay thick and chewy.
Just right The fat melts slowly, the skin crisps, and the meat stays juicy.
Too deep Juices leak out, the meat can cook too fast, and the skin may steam instead of crisp.
Duck breast scoring depth guide comparing too shallow, just right, and too deep cuts in the skin
The best scoring depth opens the fat layer without exposing the meat, which helps the skin render while the center stays protected.

How to Cook Duck Breast with Crispy Skin

Once you know what to look for, the method becomes much less stressful. Dry the skin, score the fat, start in a cold pan, let the fat render slowly, then flip, finish, rest, and slice. Each step has a visible cue, so you are not just guessing by the clock.

If you only remember one thing: do not rush the skin side. Crisp duck breast comes from slow rendering, not aggressive searing.

1. Pat the Duck Dry

Dry skin browns better. Pat the duck breasts very well with paper towels, especially on the skin side. For an even better result, season the duck and leave it uncovered in the fridge for a few hours or overnight, then bring it out for about 20–30 minutes before cooking.

2. Start in a Cold Pan

Place the duck breasts skin-side down in a cold, dry skillet. Do not add oil. Turn the heat to low or medium-low.

Raw duck breast placed skin-side down in a dry skillet for a cold pan start with no added oil
Start cold and dry; the pan should look quiet before the fat begins to pool.

It will feel strange if you are used to searing steak in a ripping-hot pan, but duck breast is different. The pan starts quiet, then the fat gradually pools and the skin begins to crisp. If the heat is too high too early, the outside browns before the fat underneath has time to melt.

Cold Pan vs Hot Pan for Duck Breast

A hot pan can make duck breast look browned before it is actually well rendered. That is the trap. The skin may turn golden, but the fat underneath can stay thick and chewy. A cold pan gives the fat time to melt slowly before the skin gets too dark.

Method What happens Result
Cold pan The fat melts slowly before the skin browns too much. Crispier skin, thinner fat layer, juicier meat.
Hot pan The skin browns quickly while fat stays trapped underneath. Golden-looking skin with chewy fat and a higher risk of overcooked meat.
Comparison of cold pan duck breast with thin rendered fat and hot pan duck breast with thicker fat under browned skin
High heat can brown duck skin before the fat has melted; meanwhile, a cold-pan start gives the fat time to render more evenly.

For crisp skin, render first: before relying on the oven, grill, or air fryer, let the fat layer thin in a pan. Otherwise, the meat can cook before the skin has a chance to become properly crisp.

If the duck breast curls and the edges lift away from the pan, press gently with a spatula for the first few minutes or place a lighter pan on top. This keeps the skin flat against the pan so it crisps evenly instead of leaving pale, rubbery patches.

3. Render the Fat Slowly

Cook the duck skin-side down for about 10–18 minutes, depending on the size of the breast, the pan, and the heat level. Use the clock as a guide, but trust the visual cues more.

Duck Breast Rendering Cues

Before you flip, ask three things: is the skin golden, has the white fat layer thinned, and does the skin release from the pan? If yes, you are probably ready.

If you are standing over the pan wondering whether to turn up the heat, wait a little longer first. Duck fat starts slowly, then suddenly the pan becomes more active. That slow change is normal.

Stage What you should see What it means
First few minutes Little fat, quiet pan, skin beginning to warm Normal. The fat has not fully started rendering yet.
Mid-render Gentle bubbling and a shallow pool of clear fat The heat is working. Pour off excess fat if it pools deeply.
Almost ready to flip Golden skin, thinner white fat layer, skin releases from pan The skin is crisp and most of the fat has rendered.
Too hot Smoke, dark patches, loud spitting Lower the heat and pour off excess fat.
Too cool No bubbling after several minutes Increase the heat slightly, but do not jump to high heat.
Duck breast rendering guide showing quiet start, gentle bubbling fat, and golden skin ready to flip
The render starts quietly, then gentle bubbling appears; once the fat layer thins and the skin turns golden, the duck is ready to flip.

Save the duck fat: Pour rendered duck fat into a heatproof bowl, let it cool, then refrigerate it in a clean covered jar. Use it for roasted potatoes, fried rice, sautéed greens, eggs, or roasted vegetables.

Tiny heat adjustments matter here: if the fat is bubbling gently, stay patient. If it smokes or spits hard, lower the heat before the skin darkens.

4. When to Flip Duck Breast

Flip the duck when the skin is golden, crisp, and releases from the pan. The thick white fat layer should look much thinner than when you started.

Duck breast lifted from a skillet to show golden crispy scored skin and a thin rendered fat layer
Wait for the skin to release easily from the pan; forcing the flip too early can tear the crust and leave fat under-rendered.

Cook the flesh side for 1–2 minutes if you are aiming for medium-rare to medium. Smaller breasts may finish here. Thicker breasts usually need the oven finish below.

If the skin is browning but the fat still looks thick, check the skin and fat troubleshooting table before flipping.

Stovetop Only vs Oven Finish

Use this finish Best for What to do
Stovetop only Smaller duck breasts, about 4–5 oz / 112–140 g Render the skin fully, flip, and cook the flesh side briefly until the center reaches your target.
Oven finish Larger or thicker breasts, about 6–8 oz / 170–225 g or more Render until the skin is crisp, flip briefly, then move the oven-safe pan to 350°F / 180°C.

5. Oven-Finish Option

When the skin is crisp but the center is still under your preferred temperature, transfer the oven-safe skillet to a 350°F / 180°C oven.

Crisp-skinned duck breast in an oven-safe skillet being finished in a 350°F oven with a thermometer nearby
Once the skin is already crisp, the oven can gently finish a thicker duck breast without forcing the pan to overcook the outside.

Once you choose the oven finish, use the times below as a starting point and confirm with a thermometer.

Doneness preference Approximate oven finish after rendering
Medium-rare 5–6 minutes
Medium 7–8 minutes
More cooked 10–12 minutes, checking with a thermometer

These times are only guides. Duck breast size varies a lot, so a thermometer is much more reliable than the clock.

6. Rest and Slice

Transfer the duck to a cutting board and rest it skin-side up for 5–10 minutes. Resting lets the juices settle. Keeping the skin side up helps preserve the crisp surface.

This is the moment to be patient. Cut too early and the juices run; wait a few minutes and the slices look cleaner, calmer, and more luxurious.

Do not cover the duck tightly while it rests. Trapped steam can soften the skin you worked so carefully to crisp.

Slice against the grain into neat pieces. If you are serving with sauce, spoon the sauce around the duck rather than flooding the skin.

Rested duck breast being sliced against the grain with crispy skin, pink meat, and orange sauce nearby
Resting skin-side up protects the crisp surface, while slicing against the grain gives cleaner pieces with better texture.

Duck Breast Temperature Guide

Duck breast temperature can feel confusing because duck is poultry, but many cooks treat the breast more like steak for texture. The table below separates texture preferences from the official safety benchmark so you can make a clear choice.

Doneness Internal temperature Result
Rare 125°F / 52°C Deep pink and very soft; less common for cautious home cooks.
Medium-rare 130–135°F / 54–57°C Pink, juicy, and tender.
Medium 140°F / 60°C Lightly pink and firmer.
Medium-well 150–155°F / 66–68°C Much firmer, less pink, less juicy.
Official poultry safety benchmark 165°F / 74°C Meets the official poultry safety guideline; the meat will be much firmer.
Duck breast temperature guide with sliced examples for rare, medium-rare, medium, medium-well, and 165°F benchmark
Use duck breast temperatures as a guide, then choose the doneness that fits your table, texture preference, and food-safety comfort level.

For the neatest result, pull the duck a few degrees before your final target. The internal temperature can rise slightly as it rests, especially if the breast is thick or has been oven-finished.

Food safety note: Duck is poultry, and the official USDA/FSIS safe minimum for poultry is 165°F / 74°C, measured with a food thermometer. Many duck breast recipes use lower temperatures for a pinker, more tender result, so consider who you are serving and choose the doneness that feels appropriate. You can read the USDA/FSIS safe temperature chart.

Instant-read thermometer inserted from the side into the thickest part of a cooked duck breast
Check the thickest part from the side for the most accurate reading, instead of probing through the fat cap or touching the pan.

Quick Orange Sauce for Duck Breast

Once the duck is resting, you have the perfect window to make sauce. Keep it simple: a few minutes in the pan is enough.

Small pan of orange sauce with orange juice, zest, vinegar, stock, honey, and butter for duck breast
Orange sauce works best when it stays bright and savory, because duck needs acidity and gloss more than heavy sweetness.

Orange sauce works because duck needs brightness. The meat is rich, the skin is salty and crisp, and the sauce should bring citrus, acidity, and a little gloss without turning sticky or candy-sweet.

This should not taste like marmalade poured over meat. It should be bright, savory, and just sweet enough to round the edges of the vinegar. The pan drippings bring depth, the orange brings lift, and the butter gives it a glossy finish.

How to Make It

  1. After removing the duck to rest, pour off most of the fat from the pan.
  2. Add orange juice, chicken stock, vinegar, and honey.
  3. Scrape up the browned bits from the pan, avoiding any burnt bits.
  4. Simmer until the sauce is lightly syrupy.
  5. Turn off the heat and whisk in cold butter and orange zest.
  6. Taste and adjust with salt, pepper, vinegar, or honey.

The sauce is ready when it lightly coats a spoon but still tastes bright. If it starts tasting sticky or jammy, loosen it with a splash of stock or orange juice.

Spoon lifted from orange sauce showing a light glossy coating on the back of the spoon
The sauce is ready when it lightly coats a spoon but still moves easily; reduce it too far and it can turn sticky.

Sauce Around the Duck, Not Over the Skin

The sauce should flatter the duck, not hide it. Spoon it around the slices instead of over the crisp top, especially if you want the first bite to keep that rendered skin texture.

Sliced duck breast plated with orange sauce around the slices while the crispy skin stays uncovered
Spoon sauce around the slices instead of over the skin, so the crisp rendered top survives the first bite.

If the sauce tastes too sweet, sharp, thin, or flat, use the orange sauce fixes before serving.

How to Fix the Sauce

Sauce issue Fix
Sweet and heavy Balance it with a splash of vinegar, more orange zest, or a small pinch of salt.
Sharp or vinegary Round the edges with a little honey, sugar, or cold butter.
Thin and watery Keep simmering until the sauce lightly coats a spoon.
Rich or greasy Loosen it with a splash of orange juice, stock, or vinegar.
Flat tasting Wake it up with salt, black pepper, orange zest, or a tiny splash of vinegar.
Bitter edge Soften the bitterness with stock, butter, or a little honey, and avoid scraping up burnt pan bits.
Orange sauce troubleshooting guide with sweet, sharp, thin, rich, flat, bitter, and balanced sauce cues
If the pan sauce tastes off, adjust before serving: acid sharpens sweetness, butter softens edges, and salt wakes up flat flavors.

Best Sauces for Duck Breast

Because the meat is rich, the best sauces usually bring acidity, fruit, wine, herbs, spice, or a salty-sweet contrast. Orange sauce is the classic first choice, but the best sauce depends on the mood of the meal.

Sauce Choose it when Flavor direction
Orange sauce You want the classic bright version. Citrusy, lightly sweet, and balanced.
Cherry sauce You want a holiday, date-night, or dinner-party plate. Tart-sweet, rich, and elegant.
Plum sauce You want a sweet-sharp Asian-style direction. Fruity, glossy, and good with five-spice.
Red wine sauce You want less sweetness and more savory depth. Deep, wine-rich, and restaurant-style.
Berry sauce You want a quick fruit sauce without making orange sauce. Works with blackberries, raspberries, or mixed berries.
Chimichurri You want freshness instead of fruit. Herby, garlicky, acidic, and bright.
Soy-hoisin glaze You want duck with rice, noodles, pancakes, or cucumber. Salty-sweet, glossy, and Asian-style.
Sliced duck breast with bowls of orange, cherry, plum, red wine, chimichurri, and soy-hoisin sauces
From orange sauce to chimichurri, the best sauce should balance duck’s richness while leaving the crispy skin as the main event.

If fruit sauces are not your thing, a green herb sauce can make the plate feel fresher and less heavy. MasalaMonk’s chimichurri recipe is a useful direction when you want garlic, herbs, vinegar, and brightness instead of sweetness.

For an Asian-style duck breast, keep the glaze glossy but controlled. MasalaMonk’s teriyaki sauce recipe is a useful base to adapt with orange, ginger, garlic, sesame, chili, or extra vinegar so the duck stays balanced rather than overly sweet.

What to Serve with Duck Breast

Think in contrasts. Duck breast likes something crisp, something fresh, and something that can catch sauce. Potatoes make the plate cozy, bitter greens keep it from feeling heavy, and rice or noodles turn it into an easy bowl-style dinner.

Sliced duck breast served with potatoes, bitter greens, rice or noodles, and bright orange sauce
A balanced duck breast dinner needs contrast: something rich, something fresh, and something that catches sauce without making the plate heavy.

For complete meal ideas, jump to the easy duck breast plate formulas.

Classic Dinner Sides

  • Duck fat potatoes, when you want the richest bistro-style plate.
  • Mashed potatoes, when you want something soft to catch sauce.
  • Potato gratin, when the meal should feel more like a special dinner.
  • Roasted carrots, when you want sweetness without adding another sauce.
  • Green beans, when you need a familiar holiday-style vegetable.
  • Brussels sprouts, when you want bitterness and crisp edges against the rich duck.

If you want the plate to feel more like a holiday dinner than a weeknight skillet meal, MasalaMonk’s hashbrown casserole recipe gives you the creamy, golden potato side that can stand up to duck’s richness.

Fresh Sides

  • Arugula salad, especially with orange, lemon, or a sharp vinaigrette.
  • Orange and fennel salad, especially with orange sauce or cherry sauce.
  • Cabbage slaw, when you want crunch and acidity.
  • Cucumber salad, especially with soy-hoisin or plum sauce.
  • Bitter greens with vinaigrette, when the duck breast is very rich.

For a holiday-style green vegetable side, MasalaMonk’s green bean casserole recipe ideas give you a classic direction plus lighter and richer variations, depending on how heavy the rest of the meal feels.

Rice, Noodles, and Asian-Style Sides

  • Jasmine rice, especially with orange, plum, soy-hoisin, or ginger-garlic sauce.
  • Fried rice, when you have leftover sliced duck.
  • Garlic noodles, when you want something rich but fast.
  • Stir-fried greens, when you want a lighter plate.
  • Thin pancakes with plum or hoisin sauce, cucumber, and scallions.

If you are serving duck with orange sauce, plum sauce, or a soy-hoisin glaze, rice is one of the easiest bases. MasalaMonk’s how to cook rice guide is useful when you want fluffy rice that will not turn gummy under the sauce.

For a bowl-style meal, think rice, sliced duck, cucumber, scallions, sauce, and something crisp. Keep the duck sliced on top rather than buried under sauce so the skin stays the star.

Sliced duck breast over jasmine rice with cucumber, scallions, and dark soy-hoisin or plum glaze on the side
For an Asian-style duck breast bowl, keep the glaze controlled and the skin visible so the rice catches flavor without hiding texture.

Easy Duck Breast Plate Formulas

Plate style What to serve
Classic bistro plate Duck breast, duck fat potatoes, green beans or bitter greens, and orange sauce.
Date-night plate Duck breast, potato gratin, arugula salad, and cherry or red wine sauce.
Fresh citrus plate Duck breast, orange-fennel salad, roasted carrots, and light orange pan sauce.
Asian-style plate Duck breast, jasmine rice, cucumber, scallions, and plum or soy-hoisin glaze.
Leftover lunch plate Cold sliced duck, bitter greens, potato salad, pickles, and a sharp vinaigrette.
Five duck breast meal ideas labeled bistro, date night, citrus, Asian-style, and leftover lunch
Once the duck is cooked well, the same method can become a bistro plate, date-night dinner, citrus salad, rice bowl, or next-day lunch.

Build the plate: for a classic dinner, pair duck breast with crisp potatoes and bitter greens. For a brighter plate, use orange sauce with rice or fennel salad. For an Asian-style version, slice the duck over rice or noodles and keep the glaze light.

Other Ways to Cook Duck Breast

After you learn the cold-pan method, the other versions make more sense. Each one still has to answer the same question: how do you render the fat without overcooking the meat?

Duck breast cooking methods guide with pan-first, air fryer, sous vide, grill, smoked, and oven-only options
Air fryer, sous vide, grill, smoked, and oven-only methods can all work, but each one still has to manage the fat layer carefully.

If any method leaves the skin soft or the center dry, check common duck breast problems before changing the recipe.

Air Fryer Duck Breast

Air fryer duck breast is best for convenience, not necessarily for the crispiest skin. The fat still needs time to render, so thick duck breasts usually do better if you pre-render the skin in a pan before using the air fryer to finish. Use a thermometer because air fryer timing varies by model and breast size.

Sous Vide Duck Breast

Sous vide is best for precise doneness. The weakness is skin texture: the skin comes out soft, so the final pan render is not optional if you want crisp skin. Cook the duck sous vide to your preferred temperature, pat it very dry, then render and crisp the skin in a pan.

Grilled Duck Breast

Grilled duck breast is best for smoky flavor, but duck fat can flare over direct heat. Render some fat first or grill over controlled heat, then finish to temperature. Avoid blasting the skin over high heat before the fat layer has thinned.

Smoked Duck Breast

Smoked duck breast has a deeper flavor and works well when you want a richer, more savory result. The challenge is balancing smoke, rendered fat, and final skin texture. For the best finish, smoke gently and crisp the skin separately if needed.

Oven-Only Duck Breast

Oven-only duck breast is best avoided if crispy skin is the goal. Oven heat cooks the meat, but it does not manage the fat layer as precisely as a pan. If you want crisp skin, render the fat in a pan first, then use the oven only to finish the center.

How to Fix Common Duck Breast Problems

Start by diagnosing the problem in order: skin first, fat layer second, center temperature third, sauce last. Rubbery skin usually points to moisture or rushed heat. A thick white fat layer usually means the pan got too hot too soon. Dry meat usually means the duck stayed on the heat after the center was already close to your target temperature.

If something looks off, do not panic. Most duck breast problems are fixable technique problems: wet skin, uneven pan contact, heat that climbed too fast, or sauce that reduced too far.

Duck breast troubleshooting guide showing rubbery skin, thick fat, dry meat, smoking pan, sauce issue, and better result
Most duck breast problems trace back to moisture, rushed heat, uneven pan contact, missed temperature, or sauce that reduced too far.

Skin and Fat Problems

Problem Why it happened Fix
Rubbery skin The skin was wet, the heat climbed too fast, or the fat layer needed more time. Dry the skin well, start in a cold pan, and keep cooking skin-side down over lower heat.
Brown skin with thick fat underneath The pan was too hot before the fat had time to melt. Lower the heat and continue rendering skin-side down until the white layer looks thinner.
Pale patches on the skin The breast curled or did not touch the pan evenly. Press gently early in cooking or use a light pan or cooking weight to keep the skin flat.
Crisp skin that softens on the plate The duck was covered tightly, sauced over the skin, or rested skin-side down. Rest skin-side up, keep it uncovered, and spoon sauce around the slices instead of over the crisp top.
Close-up comparison of rubbery duck skin, thick fat under browned skin, and properly rendered thin fat layer
Brown skin does not always mean rendered fat, so check the side of the breast before deciding it is ready to flip.

Meat and Doneness Problems

Problem Why it happened Fix
Crisp skin but undercooked center The breast is thick, or the meat side did not get enough gentle finishing time. Move the oven-safe pan to a 350°F / 180°C oven and finish to your preferred internal temperature.
Dry or overcooked meat The duck stayed on the heat after the center was already near target. Use a thermometer and pull the duck a few degrees early, especially before resting.
Gray band around the meat The heat was too aggressive or the oven finish went too long. Use gentler heat, avoid rushing the render, and check earlier with a thermometer.
Juices running across the board The duck was sliced before it had time to rest. Rest 5–10 minutes skin-side up, then slice against the grain.
Duck breast doneness guide comparing undercooked center, juicy target slices, and dry gray band
Timing helps, but the center tells the truth; checking doneness prevents both an undercooked middle and a dry gray band.

Pan and Cooking Problems

Problem Why it happened Fix
Smoking pan The heat is too high or too much rendered fat has pooled in the skillet. Lower the heat and carefully pour excess fat into a heatproof bowl.
Greasy-tasting duck The fat layer did not render enough before the meat finished cooking. Score more carefully next time and give the skin side more time over lower heat.
Duck breast curling in the pan The edges lifted away from the hot surface. Press gently with a spatula during the first few minutes or use a small pan as a light weight.
Skin sticking to the pan The duck was moved too early or the skin had not released naturally. Give it more time. Properly rendered skin usually releases more easily once it is ready.

Orange Sauce Problems

Problem Why it happened Fix
Thin sauce It has not reduced long enough. Simmer until it lightly coats a spoon.
Over-sweet sauce Too much honey, sugar, or sweet orange juice made it taste heavy. Add vinegar, orange zest, a pinch of salt, or a splash of stock.
Bitter sauce Orange pith, zest, or pan bits cooked too hard. Add stock, butter, or a little honey, and avoid scraping up burnt bits from the pan.
Flat sauce It needs more salt, acid, or brightness. Add a small splash of vinegar, more orange zest, black pepper, or a pinch of salt.

Make-Ahead, Storage, and Reheating

Duck breast is best right after cooking, when the skin is crisp and the meat is freshly rested. However, you can prep parts of the recipe ahead and store leftovers safely.

What You Can Prep Ahead

  • Score the duck breast up to 1 day ahead.
  • Season it and leave it uncovered on a plate or small rack in the fridge for a few hours or overnight to help dry the skin.
  • Make orange sauce, cherry sauce, plum sauce, or red wine sauce ahead and reheat gently.
  • Prep sides before cooking the duck, because duck breast is best served soon after resting.

How to Store Cooked Duck Breast

  • Cool cooked duck breast promptly.
  • Refrigerate within 2 hours of cooking, or within 1 hour if the room is very hot.
  • Store in an airtight container in the refrigerator.
  • Use within 3–4 days.
  • Keep sauce separate if possible so the skin does not soften.

How to Reheat Duck Breast Without Ruining the Skin

  • For best texture, reheat gently in a low oven until warmed through, then re-crisp the skin in a skillet.
  • Place the duck skin-side down in a dry skillet over medium-low heat to bring back some crispness.
  • Avoid microwaving if you care about crisp skin; it softens the skin quickly.
  • For the official USDA/FSIS leftover safety guideline, reheat leftovers to 165°F / 74°C.
Two-step reheating guide showing duck breast warmed in a low oven and re-crisped skin-side down in a skillet
Warm leftover duck gently first, then re-crisp it skin-side down in a skillet instead of relying on the microwave.

For broader leftover storage and reheating safety, the USDA/FSIS food safety basics guide is a useful reference.

What to Do with Leftover Duck Breast

Leftovers are not a downgrade here. Thin slices of cooked duck can turn into excellent lunches as long as you add them gently and avoid cooking them a second time.

Planning to warm the duck later? Read how to reheat duck breast without ruining the skin before you start.

  • Add slices to salad with orange, arugula, and vinaigrette.
  • Use in fried rice with scallions and a little soy sauce. For the best rice texture, borrow the cold-rice method from MasalaMonk’s Spam fried rice recipe and fold sliced duck in near the end so it does not overcook.
  • Add to noodles with greens and chili oil.
  • Tuck into wraps or thin pancakes with plum sauce.
  • Serve cold with mustard, pickles, or fruit chutney.
  • Add to pasta at the very end, just to warm through. Duck works especially well with bright herb sauces, so MasalaMonk’s pesto recipe and variations can give you a fresh sauce direction for leftover duck pasta.
Leftover duck breast served in salad, fried rice, noodles, and a wrap or pasta dish
Add leftover duck near the end of salads, fried rice, noodles, wraps, or pasta so the slices warm without drying out.

For a cold lunch plate, leftover sliced duck also works with potato salad, pickles, bitter greens, and a sharp dressing. MasalaMonk’s potato salad recipes are useful if you want a creamy, tangy, or lighter side to build around.

Duck Breast Recipe with Crispy Skin

This duck breast recipe starts in a cold pan so the fat can render slowly and the skin can crisp without overcooking the meat. Serve it with the quick orange pan sauce, or use the sauce guide above to take it in a cherry, plum, red wine, herb-bright, or Asian-style direction.

Servings2
Prep Time10 minutes
Cook Time18–28 minutes
Rest Time5–10 minutes

Ingredients

  • 2 skin-on boneless duck breasts, about 6–8 oz / 170–225 g each
  • 1 tsp kosher salt, or about ½ tsp fine salt
  • ¼ tsp black pepper
  • Optional: 1 thyme or rosemary sprig
  • Optional: 1 garlic clove, lightly crushed

Optional Orange Sauce

  • ¼ cup / 60 ml fresh orange juice
  • ½ cup / 120 ml chicken stock
  • 1 tbsp white wine vinegar or red wine vinegar
  • 1–2 tsp honey or sugar
  • 1 tsp orange zest
  • 1 tbsp / 14 g cold butter
  • Salt and black pepper, to taste

Duck Breast Method

  1. Pat the duck breasts very dry with paper towels.
  2. Score the skin in diagonal lines or a crosshatch pattern, cutting through the skin and fat but not into the meat.
  3. Season both sides with salt and pepper, using a little more salt on the skin side.
  4. Place the duck breasts skin-side down in a cold, dry skillet.
  5. Turn the heat to low or medium-low. Cook slowly for 10–18 minutes, pouring off excess fat as needed, until the skin is golden and crisp and much of the fat has rendered.
  6. Flip the duck and cook the flesh side for 1–2 minutes.
  7. If the breast is thick or still below your preferred temperature, transfer the oven-safe skillet to a 350°F / 180°C oven for 5–8 minutes.
  8. Rest the duck skin-side up for 5–10 minutes.
  9. Slice against the grain and serve with orange sauce or your preferred duck breast sauce.

Orange Sauce Method

  1. Pour off most of the fat from the pan after removing the duck.
  2. Add orange juice, stock, vinegar, and honey.
  3. Scrape up browned bits and simmer until lightly syrupy, avoiding any burnt bits.
  4. Turn off the heat and whisk in cold butter and orange zest.
  5. Season to taste with salt, pepper, vinegar, or honey.

Notes

  • Use an instant-read thermometer for best results.
  • Pull the duck a few degrees before your final target because the internal temperature can rise slightly as it rests.
  • Rest the duck skin-side up and do not cover it tightly.
  • Keep sauce around the slices, not over the skin, if you want the crispest bite.
  • Save rendered duck fat for potatoes, vegetables, fried rice, greens, or eggs.
Duck breast recipe card with cold-pan method, timing, temperature, orange sauce, and sauce placement note
Keep the core method simple: score shallowly, start cold, render patiently, rest skin-side up, and spoon sauce around the crisp top.

Once the cold-pan render clicks, duck breast stops feeling like a restaurant trick. You are not forcing it; you are letting the fat melt, the skin crisp, and the center come up gently. Serve it with a light sauce, slice it cleanly, and it feels like a special-occasion dinner you can actually repeat.

FAQs About Duck Breast

Do you start duck breast in a cold pan?

Start duck breast in a cold pan when you want crisp skin. The gradual heat gives the fat time to melt before the surface browns, which helps prevent a golden-looking but chewy skin layer.

How long does duck breast take to cook?

Duck breast usually takes 18–28 minutes of cooking time: 10–18 minutes skin-side down to render the fat, 1–2 minutes on the flesh side, plus 5–8 minutes in the oven if the breast is thick. Use timing as a guide, but let the thermometer make the final decision.

Do you have to finish duck breast in the oven?

No. Smaller duck breasts can finish on the stovetop after the skin has rendered. Thicker breasts are easier to control with a short oven finish at 350°F / 180°C after the skin is already crisp.

Should duck breast be pink?

Many cooks prefer duck breast pink because the texture stays tender and juicy. However, duck is poultry, and the official safe minimum is 165°F / 74°C, so use a thermometer and choose based on your comfort level and who you are serving.

What temperature is best for duck breast?

For a softer, juicier texture, many cooks prefer 130–135°F / 54–57°C for medium-rare or about 140°F / 60°C for medium. The official poultry safety benchmark is 165°F / 74°C.

What sauce goes best with duck breast?

Orange sauce is the classic pairing for duck breast because citrus cuts through the fat without hiding the flavor of the meat. Cherry, plum, red wine, berry, chimichurri, and soy-hoisin sauces also work, depending on whether you want fruity, savory, fresh, or Asian-style flavors.

Why is my duck skin rubbery?

Rubbery duck skin usually means the surface was wet, the heat was too high too early, or the fat layer needed more time. Dry the breast well, start in a cold pan, and keep cooking skin-side down until the white fat layer looks much thinner.

Do you need oil to cook duck breast?

No. Duck breast has enough fat under the skin. Starting it in a dry cold pan lets that fat melt naturally and crisp the skin.

Can you cook duck breast from frozen?

Thaw it first for this method. Frozen duck breast releases moisture as it cooks, which makes crisp skin much harder to achieve.

How do you reheat duck breast and keep the skin crispy?

Reheat gently in a low oven until warmed through, then place the duck skin-side down in a dry skillet over medium-low heat to re-crisp the skin. Microwaving is faster, but it softens the skin.

What can I make with leftover duck breast?

Use thin slices in salads, fried rice, noodles, wraps, sandwiches, or pasta. Add cooked duck near the end so it warms without overcooking.

Is duck breast the same as duck fillet?

In many shops and recipes, duck fillet means boneless duck breast. For this crispy-skin method, choose skin-on duck breast or skin-on duck fillet.

Final Thoughts

Good duck breast is not about rushing a dramatic sear. It is about giving the fat enough time to render, watching the skin, checking the temperature, and resting the meat before you slice.

Once that rhythm makes sense, duck breast becomes one of the most satisfying restaurant-style dinners to cook at home: crisp skin, tender slices, a sauce that brightens the plate, and enough confidence to make it again.

What is your favorite way to serve duck breast — orange sauce, cherry sauce, potatoes, rice, bitter greens, or something else? Share it in the comments so other readers can try it too.

Posted on Leave a comment

DIY Salami: Low Sodium, Spicy, Dry-Cured, and Charcuterie Perfection

DIY Salami & Charcuterie

There’s a reason salami has been a staple in kitchens around the world for centuries. Its bold flavors, satisfying texture, and impressive shelf life make it a superstar—whether you enjoy it as a snack, in a sandwich, or as the star of your next charcuterie board. But what if you want to make your own salami at home—with lower sodium, more spice, less processing, or custom flavors? What if you want to build the ultimate, health-forward charcuterie experience?

Let’s dive into everything you need to know, with actionable tips, DIY ideas, and pairing inspiration you can use right away.


Why Make Salami at Home?

  • Control the salt and spices: Perfect for low-sodium diets or those who love extra heat.
  • Avoid additives and preservatives: Skip synthetic nitrites or questionable fillers.
  • Endless creativity: Experiment with meat blends, herbs, heat, and even plant-based versions.
  • Impress at gatherings: Nothing says “wow” like homemade charcuterie.

1. DIY Low-Sodium Salami: Satisfy Your Cravings, Not Your Salt Meter

Why try it?
Most commercial salami is loaded with salt—sometimes 600 mg or more per serving. But you can easily make your own version with 30–50% less sodium and plenty of flavor.

How to DIY:

  • Use lean beef, chicken, or turkey for the base.
  • Add salt at 30–50% of typical recipes (start with 1/2 teaspoon per pound and adjust to taste).
  • Punch up flavor with garlic, black pepper, fresh herbs (rosemary, parsley), and a squeeze of lemon for brightness.
  • Skip sodium-heavy extras like cheese or soy sauce in the mix.
  • Bake or steam your log (wrapped in foil or baking paper) at 160°C (325°F) until cooked through. Cool before slicing.

Pairing tips:

  • Serve with crunchy, fresh veggies and unsalted nuts.
  • Choose mild, low-sodium cheeses like fresh mozzarella or ricotta.
  • Avoid pairing with aged cheeses and salted crackers—balance is key!

2. Spicy DIY Salami: Bring the Heat!

Why try it?
Traditional spicy salamis—like Calabrese or Ventricina—are legendary, but homemade means you control the fire!

How to DIY:

  • Start with any basic ground meat salami recipe.
  • Add chili flakes, black pepper, cayenne, or smoked paprika to taste.
  • For smoky depth, add a touch of liquid smoke or smoked paprika.
  • Optional: Add minced jalapeño or chili paste for extra heat.
  • Steam or bake your log, then chill before slicing thin.

Pairing tips:

  • Serve with creamy cheeses (brie, burrata) to balance the spice.
  • Add fruit like figs, dates, or honey for a sweet counterpoint.
  • Use with mild pickles or fresh bread; avoid pairing with sharp/spicy cheeses that can overwhelm.

3. Salami for Charcuterie Boards: Flavor, Texture, and Balance

Why DIY for charcuterie?
Nothing is more impressive (or fun) than a board filled with your own creations.

How to DIY:

  • Make two or three small-batch salamis: one classic (garlic, black pepper), one herby (fennel seed, thyme), one spicy (see above).
  • Mix textures—try one leaner, one with a touch more fat.
  • For color, roll some logs in cracked pepper, chopped herbs, or smoked paprika before cooking.

Building the board:

  • Pair with a variety of cheeses: soft (goat), semi-firm (manchego), hard (aged cheddar).
  • Add olives, nuts, fresh fruit, pickles, and something sweet (fig jam, honey).
  • Use a mix of crackers and crusty bread, but leave space so each element stands out.

What to avoid:

  • Too many salty or spicy ingredients together.
  • Overcrowding—simplicity and balance always win.

4. Dry-Cured Salami: The Traditional Artisan’s Route

Why try it?
Dry-cured salami has the deepest flavor, the most tradition, and—if made safely—the longest shelf life. This style takes patience and care but is incredibly rewarding.

How to DIY (basic method):

  • Mix pork shoulder (or blend of pork and beef), pork fat, salt, black pepper, garlic, red wine, and your favorite spices.
  • Use natural casings (from a butcher) and a starter culture (for safe fermentation).
  • Stuff mixture into casings, tie, and hang in a cool (15–20°C), humid (80–90%) environment for 3–6 weeks.
  • Dry until the log loses about 30% of its weight.
  • Always follow proven recipes and food safety guidelines!

Pairing tips:

  • Thinly slice and serve with crusty bread, olives, and a sharp, nutty cheese.
  • Pair with juicy tomatoes or simple greens for freshness.
  • Don’t pair with other strong, funky cured meats—let your dry-cured masterpiece shine.

What to avoid:

  • Attempting dry-curing without proper temp/humidity control.
  • Skipping starter cultures or curing salts—safety first!

5. Uncured Salami: What Does It Really Mean?

What is it?
“Uncured” means it’s made without synthetic nitrites or nitrates—using natural sources like celery powder instead. Some home recipes simply skip curing salts altogether and use baking/steaming for safety.

How to DIY:

  • Use lean meat, sea salt, celery powder (if desired), black pepper, garlic, and vinegar or wine.
  • Bake or steam until fully cooked—no need for extra preservatives.

Pairing tips:

  • Great with crunchy veggies, soft cheeses, and fresh herbs.
  • Enjoy as part of a healthy lunchbox with whole grain crackers and fruit.

What to avoid:

  • Assuming “uncured” means preservative-free—it’s still a preserved meat.
  • Storing homemade uncured salami too long—consume within a week if not dry-cured.

6. General DIY & Pairing Tips

  • Start small: Try mini logs with different spices and meats.
  • Stay safe: If fermenting or curing, always use a tested recipe and proper food safety measures.
  • Experiment: Mix meats (turkey and pork; beef and chicken), add seeds, chopped nuts, or even dried cranberries for creative twists.
  • Variety matters: For your charcuterie, always include something fresh (veggies or fruit), something creamy, something crunchy, and your show-stopping salami.

Common Mistakes to Avoid

  • Over-salting or under-seasoning: Always taste-test with a mini patty before shaping your whole log.
  • Rushing the chilling or drying stage: Let flavors develop and the texture firm up!
  • Using poor-quality meat: The flavor of your salami is only as good as what you start with.
  • Ignoring food safety: When in doubt, stick to cooked (not cured) recipes.

Conclusion: Your DIY Salami Journey Starts Here

Whether you want to cut sodium, dial up the spice, try traditional dry-curing, or impress your friends with a custom charcuterie board, homemade salami puts you in control. You get healthier results, unique flavors, and the satisfaction of true kitchen creativity.

Ready to try?
Mix up a batch, slice it thin, and build your board. Share your results, ask questions, and keep experimenting—your salami adventure is just beginning!


Explore more recipes and guides on MasalaMonk.com, and tag us with your homemade creations!
What’s your favorite salami style? Have you ever made your own? Let us know in the comments!

10 FAQs for DIY Salami & Charcuterie

1. Can I really make salami at home safely?
Yes! Oven-baked and steamed salami recipes are safest for beginners. If you try dry-curing, always use a trusted recipe, proper salt, and (if possible) a starter culture and curing chamber.

2. How do I lower the sodium in homemade salami?
Simply use less salt—start with about half the amount most recipes recommend and boost flavor with fresh herbs, garlic, pepper, and lemon zest.

3. What’s the difference between cured, uncured, and dry-cured salami?
Cured salami uses synthetic nitrates/nitrites for preservation; uncured uses natural sources like celery powder; dry-cured is fermented and aged for weeks using salt and sometimes a starter culture.

4. Can I make spicy salami at home?
Absolutely! Just add chili flakes, black pepper, smoked paprika, or minced chilies to your favorite base recipe.

5. How long does homemade salami last?
Oven-baked and steamed salami lasts up to a week in the fridge. Dry-cured salami can last for weeks to months if stored properly.

6. Do I need special equipment for homemade salami?
No special equipment for baked/steamed recipes. For dry-curing, a sausage stuffer, casings, and (ideally) a curing chamber or temperature- and humidity-controlled fridge help.

7. What meats work best for DIY salami?
Traditional salami uses pork, but beef, chicken, turkey, and even plant-based options work well. Leaner meats make lighter salamis.

8. How do I build a balanced charcuterie board with homemade salami?
Mix flavors and textures: include creamy cheese, crunchy veggies or nuts, a sweet element (fruit or jam), and your homemade salami, sliced thin.

9. What should I avoid when making or pairing salami?
Avoid excess salt or spice, overcrowding your board, using low-quality meats, or skipping food safety steps. Don’t pair all salty or all spicy items—balance is key.

10. Is uncured salami healthier?
Uncured salami avoids synthetic additives but still uses natural curing agents. For the healthiest option, make your own with minimal salt, no fillers, and lots of fresh flavor.