Air fryer pork tenderloin is the kind of dinner that feels almost too easy when it goes right. The outside turns browned and savory, the inside stays juicy, and you can slice it onto plates in about half an hour without heating the oven.
You are not trying to make fancy pork here. The goal is smoky browned edges, tender slices, and just enough pan-style flavor to make dinner feel like more than a shortcut. Everything comes down to three things: cook it hot, check it early, and rest before slicing.
Because pork tenderloin is lean, a few extra minutes can turn glossy slices into dry pork, especially if your piece is small, your air fryer runs hot, or the package in front of you is actually pork loin instead of tenderloin.
This guide is built for the real-life versions too: small tenderloins, hot air fryers, pre-marinated packs, pork fillet labels, frozen pork, and the moment you realize your potatoes need longer than the pork.
Quick Answer
Cook pork tenderloin in the air fryer at 400°F / 200°C, or 205°C if your air fryer uses exact 5-degree settings, until the middle of the pork reads 145°F / 63°C. Most 1–1½ lb / 450–680g tenderloins take about 18–24 minutes, but small or slim pieces can finish sooner. Start checking early, rest for 5 minutes, then slice across the grain.
The clock gets you close. A temperature check saves the pork.
What success looks like
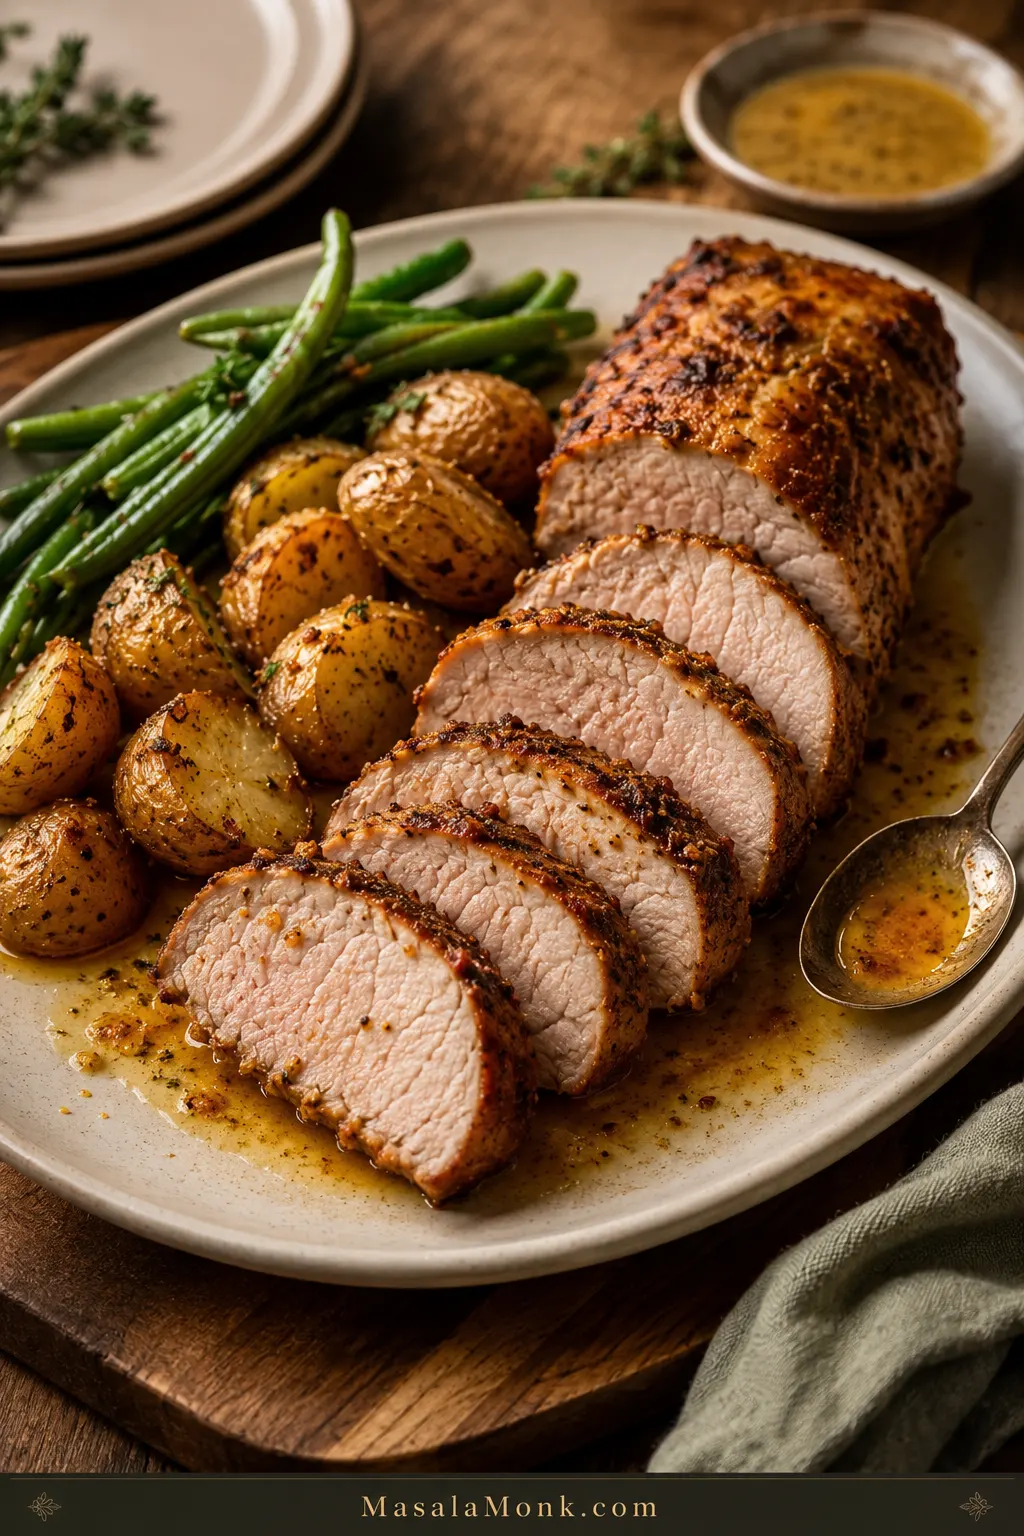
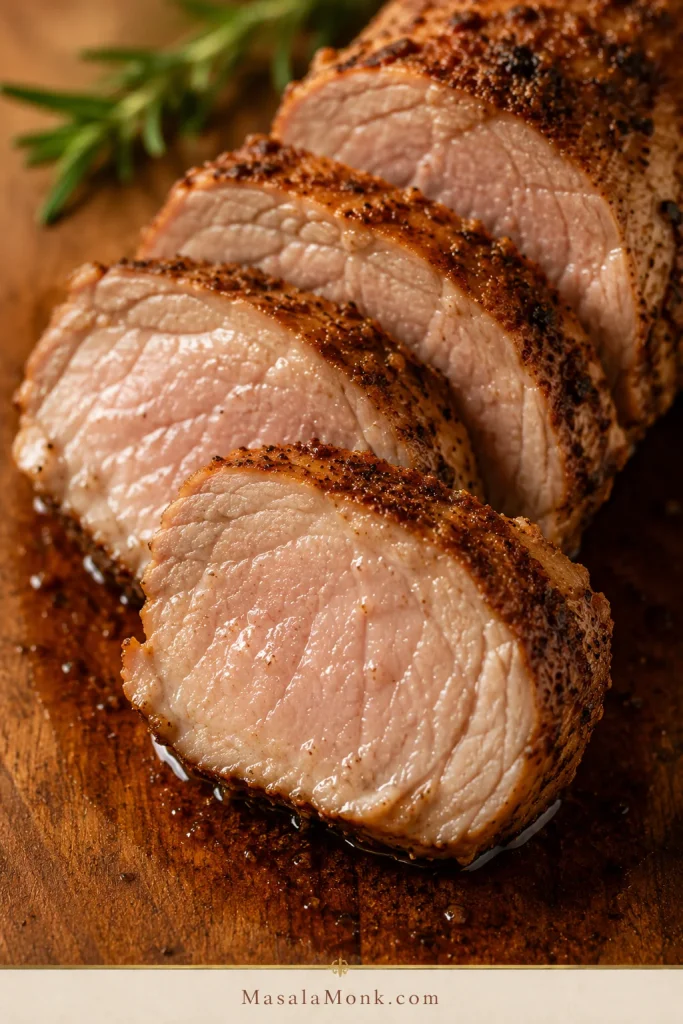
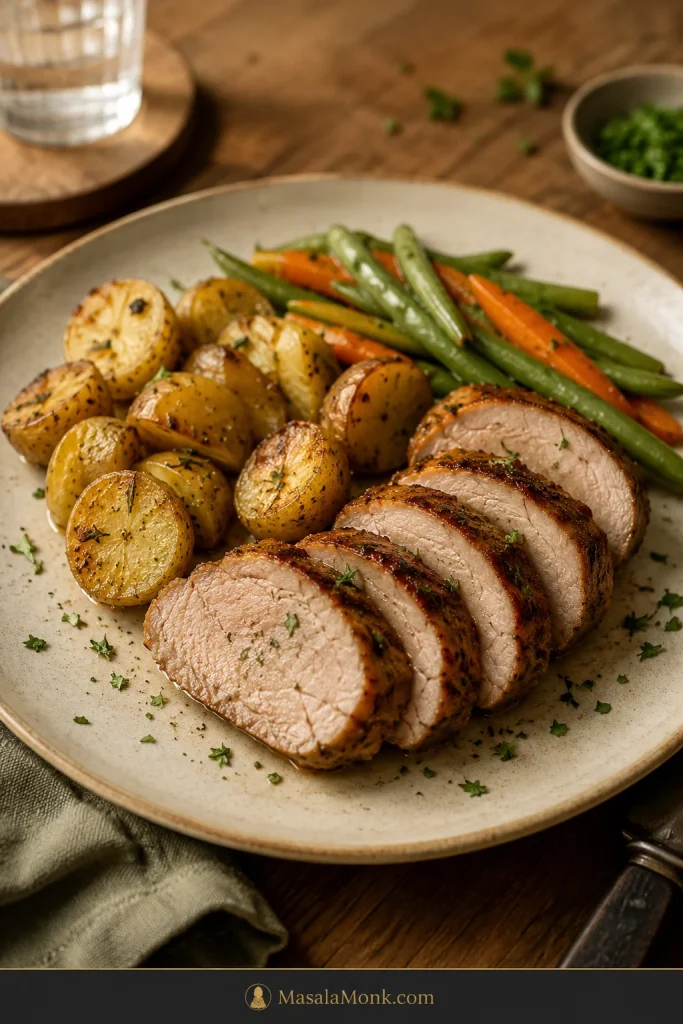
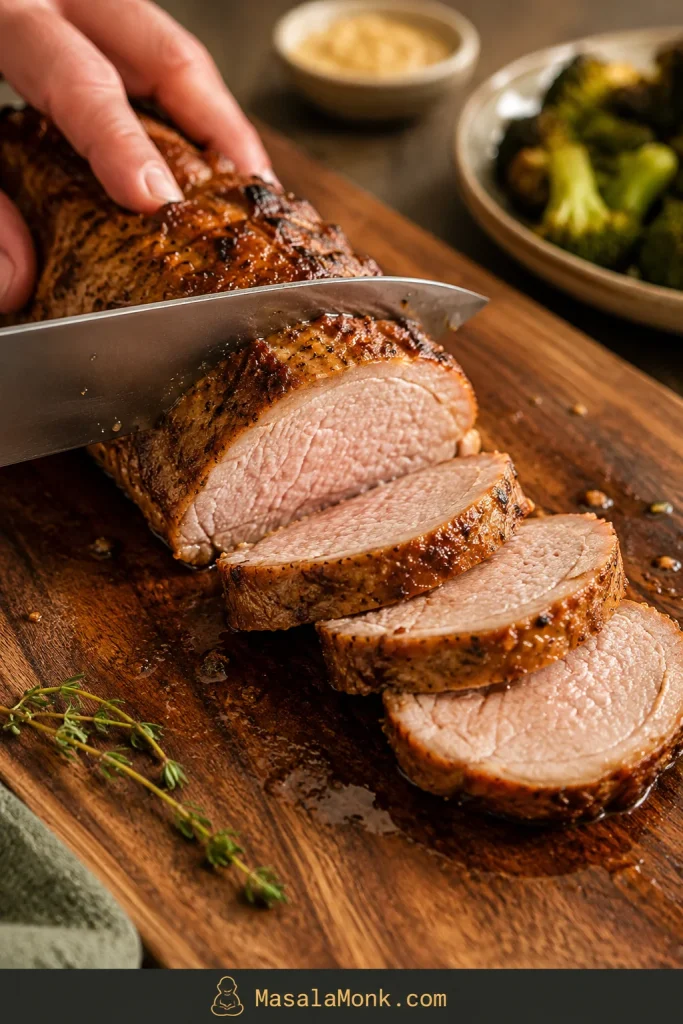
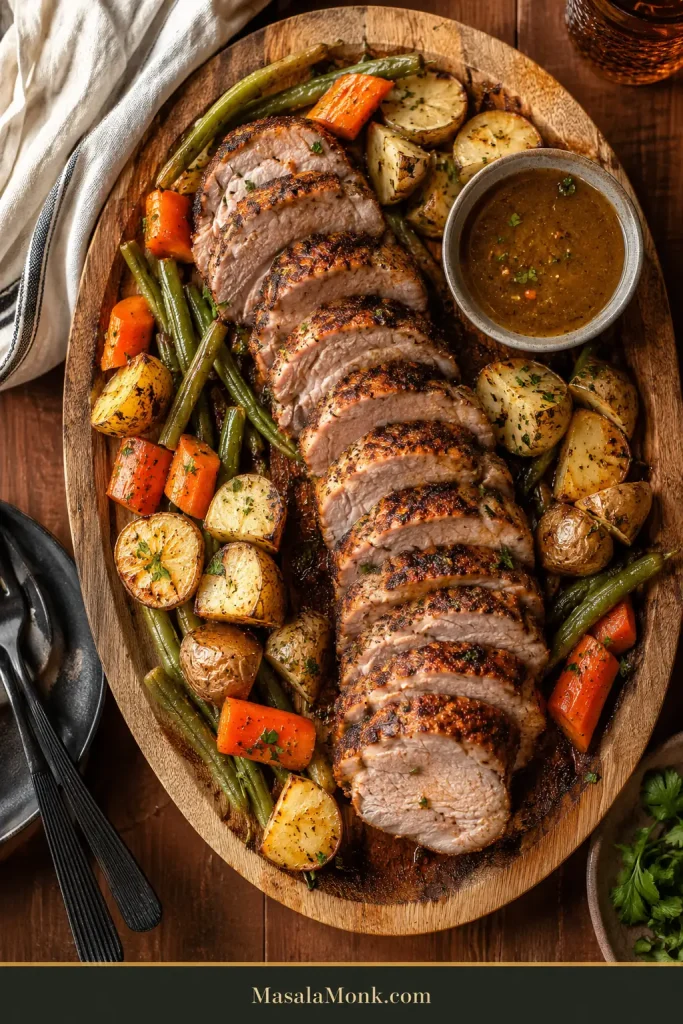
The pork should have browned, smoky-garlic edges, a moist center, and slices that look glossy instead of chalky. Spoon any board juices back over the sliced pork before serving. That little step makes the whole plate feel more finished.
Texture check: Before serving, look for a moist center and glossy slices rather than a chalky cut surface.
Ready to cook? Jump to the recipe cardNeed timing? See the chart
Make this when
- You want pork that slices juicy, not dry and gray.
- You need dinner fast, but still want it to feel complete.
- You bought pork tenderloin or pork fillet and need clear air fryer timing.
- You are using a Ninja Foodi, basket air fryer, oven-style air fryer, or pre-marinated pack.
- You want potatoes, carrots, green beans, rice, salad, or a simple sauce on the side.
Air Fryer Pork Tenderloin Recipe Card
This is the fast version: season the pork with a smoky garlic-Dijon rub, air fry it hot, check once before it overcooks, and rest it so the slices stay juicy.
Recipe at a Glance
| Recipe | Air Fryer Pork Tenderloin |
| Best cut | Pork tenderloin or pork fillet, 1–1½ lb / 450–680g |
| Prep time | 5–10 minutes |
| Cook time | 18–24 minutes for most tenderloins |
| Start checking | 13–14 minutes for small/slim pieces; 16–18 minutes for standard pieces |
| Rest time | 5 minutes |
| Total time | About 28–35 minutes |
| Servings | 4 |
| Air fryer temperature | 400°F / 200°C, or 205°C if available |
| Internal temperature | 145°F / 63°C in the center, then rest |
Ingredients
- 1 pork tenderloin, 1–1½ lb / 450–680g
- 1 tablespoon / 15 ml olive oil or avocado oil
- 1 teaspoon / 5 ml Dijon mustard
- 1–2 teaspoons brown sugar or honey
- 1 teaspoon smoked paprika
- 1 teaspoon garlic powder
- ½ teaspoon onion powder
- ¾–1 teaspoon kosher salt, depending on size and seasoning
- ½ teaspoon black pepper
- Pinch of cayenne, chili powder, or red pepper flakes, optional
Method
- Preheat the air fryer to 400°F / 200°C, or 205°C if your air fryer allows that setting. Give it 3–5 minutes if your model recommends preheating.
- Pat the pork dry. Remove any tough silver skin if present.
- Mix the oil, Dijon mustard, brown sugar or honey, smoked paprika, garlic powder, onion powder, salt, pepper, and optional chili in a small bowl.
- Rub the seasoning mixture all over the tenderloin.
- Place it in the air fryer basket with space around it. Cut it in half crosswise if needed so it fits without curling tightly.
- Air fry for 10–12 minutes, then flip.
- Continue cooking until the middle reaches 145°F / 63°C, checking early for small or slim tenderloins.
- Rest loosely tented for 5 minutes, then slice across the grain into thick, juicy pieces.
Do not cook by time alone. A slim 1 lb tenderloin and a thick 1½ lb tenderloin should not be treated like the same piece of meat.
A simple plate of potatoes and green vegetables turns the tenderloin into a full weeknight dinner after the main method is done.
From here, the things that change the result are the cut, the thickness, the air fryer style, and when you stop cooking. That is what the rest of the guide helps you control.
Table of Contents
Start Here
Cook It Right
Choose your path
With a plain tenderloin, start with the recipe card and cooking chart. For a package labeled pork loin filet, check the cut section before you season anything. Adding potatoes or carrots? Read the sides section first so the pork does not wait around while the vegetables finish.
Why This Works
The air fryer works beautifully for pork tenderloin because the cut is small enough to cook through before the outside has time to dry out. You get browned edges without babysitting a skillet, as long as you stop at temperature.
The flavor is simple but satisfying: smoky, garlicky, lightly tangy, and just sweet enough to help the edges brown. Oil helps the rub toast instead of sitting dry on the surface. Dijon adds a quiet tang without making the pork taste mustardy. Brown sugar or honey helps the outside color. The short rest keeps the slices glossy when you cut in.
When it comes out right, the edges are smoky and browned, the slices look moist, and the mustard-garlic rub tastes like it took more effort than it did.
That is also why this tenderloin cooks hotter than some air fryer pork chops. Pork chops are flatter and can tighten quickly, so if the package in front of you is actually chops, switch to this air fryer boneless pork chops guide instead.
The no-dry rules
- Use pork tenderloin, not pork loin. The cuts are different and need different timing.
- Cook hot, but check early. 400°F / 200°C browns well, but small pieces finish quickly.
- Test the middle, not the tapered end. The thin tail is not the doneness judge.
- Rest before slicing. Five quiet minutes gives you glossier, juicier slices.
- Do not chase “no pink.” A slight blush can be normal when the pork is cooked to temperature.
Before any of those rules can help, though, the cut has to be right.
Pork Tenderloin vs Pork Loin vs Pork Fillet
This is worth checking before you cook, because the wrong cut is the easiest way to follow the recipe perfectly and still end up disappointed. Pork tenderloin, pork loin, pork loin filet, pork fillet, and pork roast sound similar, but they do not cook the same way.
How to Identify the Right Cut
Cut check: Shape matters here; this visual helps you confirm tenderloin or pork fillet before using the air fryer timing.
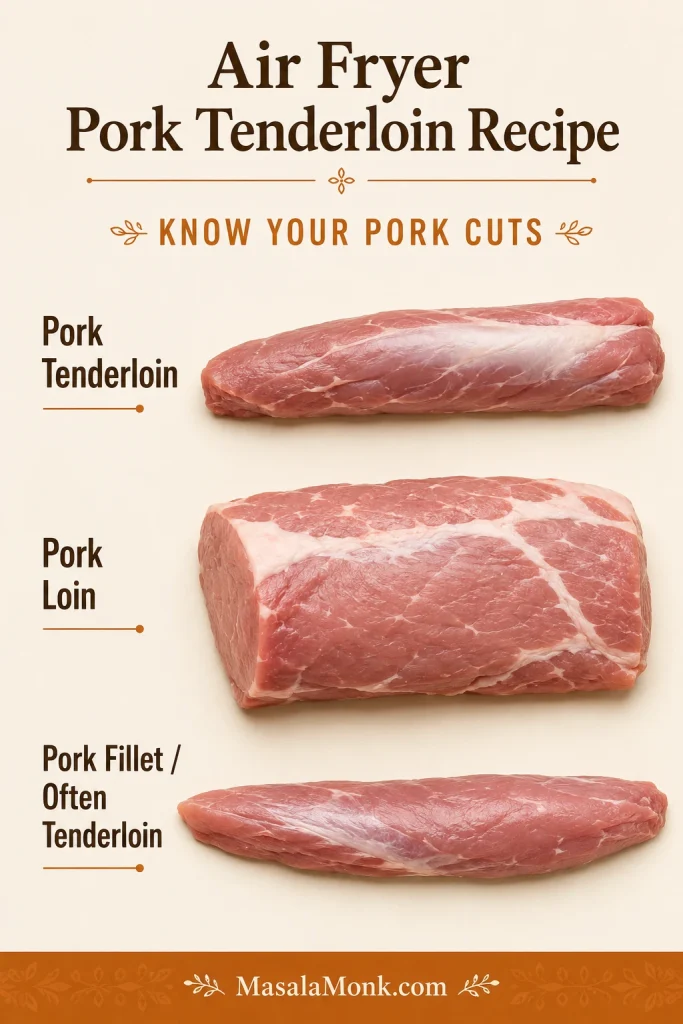
| Package says | What it likely is | Use this recipe? |
|---|---|---|
| Pork tenderloin | Long, narrow, lean cut, usually 1–1½ lb | Yes |
| Pork fillet | Often the same cut as pork tenderloin in UK, Australia, and some grocery labeling | Yes, if long, narrow, and about 450–680g / 1–1½ lb |
| Pork loin | Wider, larger roast-style cut | No, it needs different timing |
| Pork loin filet | Can be a branded or pre-marinated loin-style cut; check shape and weight carefully | Maybe, only if it looks like tenderloin |
| Pork roast | Usually larger and wider than tenderloin | No |
When to Switch Recipes
If it is wide like a roast, stop. This method is for a long, narrow pork tenderloin or pork fillet. A pork loin roast needs a different timing plan.
If your package turns out to be a bigger pork loin, you are not stuck — just switch methods. MasalaMonk already has a dedicated slow cooker pork loin recipe and a smoked pork loin recipe for that larger cut.
If you have pork tenderloin but want another cooking method, see the pork tenderloin in oven guide or this softer, hands-off slow cooker pork tenderloin recipe.
Cut confirmed? Back to the recipe cardGo to the cooking time chart
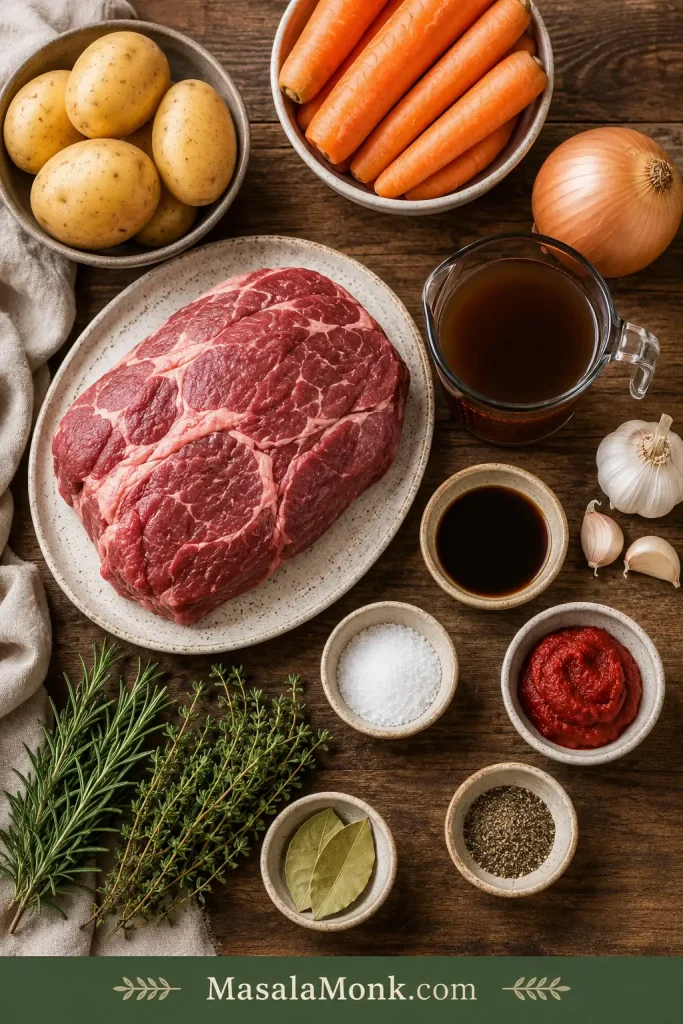
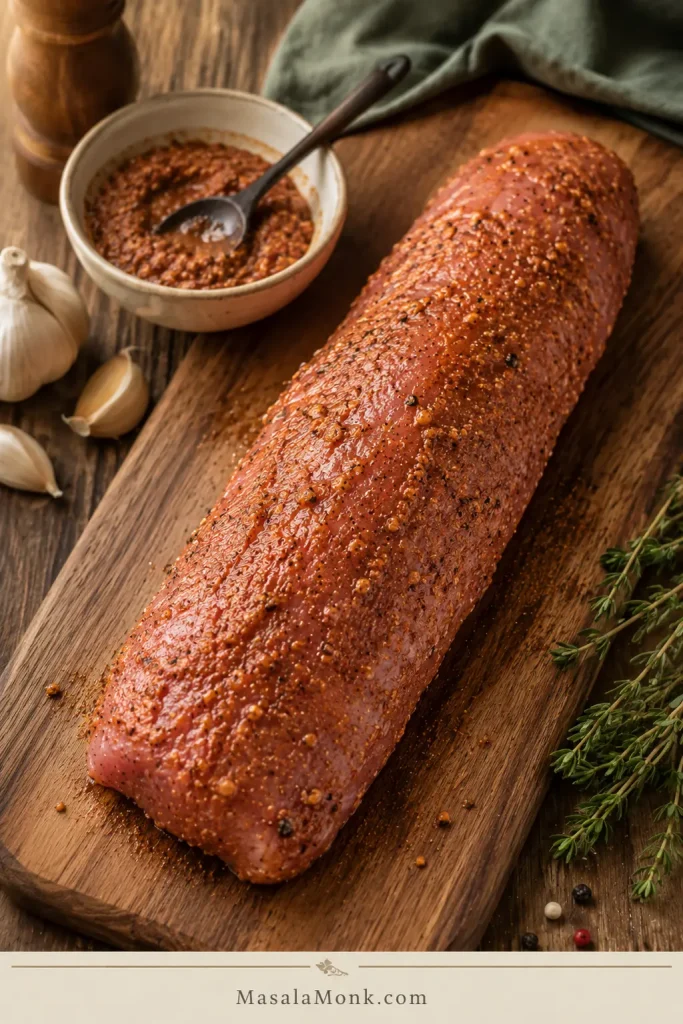
Ingredients for Juicy Pork Tenderloin
The ingredient list is short on purpose. Pork tenderloin does not need to be buried under sauce. It needs enough fat for browning, enough salt for flavor, and a rub that gives the air fryer something to toast.
The result is a smoky garlic crust with a little mustardy brightness and just enough sweetness to make the edges taste dinner-worthy, not sugary.
What Each Ingredient Does
Gather the rub ingredients before preheating so the pork can go from seasoning to basket without losing momentum.
| Ingredient | US amount | Metric amount | Why it helps |
|---|---|---|---|
| Pork tenderloin | 1–1½ lb | 450–680g | The ideal size for this method |
| Olive oil or avocado oil | 1 tbsp | 15 ml | Helps browning and seasoning coverage |
| Dijon mustard | 1 tsp | 5 ml | Adds tang and helps the rub cling |
| Brown sugar or honey | 1–2 tsp | 5–10 ml | Balances lean pork and helps browning |
| Smoked paprika | 1 tsp | 2–3g | Adds color and smoky depth |
| Garlic powder | 1 tsp | 3g | Main savory note |
| Onion powder | ½ tsp | 1–2g | Rounds out the rub |
| Kosher salt | ¾–1 tsp | 4–6g | Prevents bland pork |
| Black pepper | ½ tsp | 1g | Adds gentle heat |
| Cayenne or chili powder | Pinch | Pinch | Optional heat |
Salt and Seasoning Notes
For smaller or pre-marinated tenderloins, stay near the lower salt amount. Use the higher amount for a plain, larger one. When the pork is already seasoned, injected, or packed in a salty marinade, reduce the salt in the rub.
With fine salt or table salt instead of kosher salt, start with about ½ teaspoon for a 1 lb / 450g tenderloin and adjust next time. Fine salt packs more tightly, so the same spoonful tastes saltier.
Easy Substitutions
- No Dijon? Use yellow mustard, whole-grain mustard, or skip it and add a small splash of lemon juice or vinegar for brightness.
- No smoked paprika? Use regular paprika with a pinch of chili powder, cayenne, or cumin.
- No brown sugar? Use honey or maple syrup. Skip the sweetener if your marinade is already sweet.
- No avocado oil? Olive oil works well. Use a light coating so the rub clings and browns.
- Using a salty seasoning blend? Reduce or skip the added salt until you know how salty the blend is.
Rub texture: Aim for a loose paste that coats the pork evenly instead of dropping into the basket.
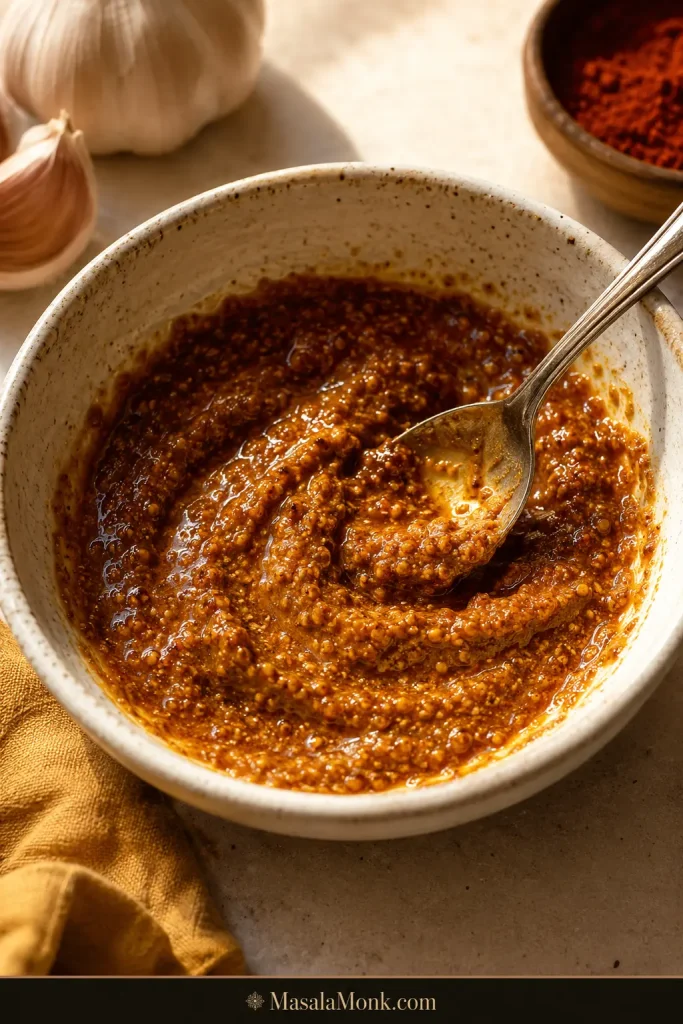
Can I use a marinade instead?
Yes. For a simple marinade-style version, mix 1 tablespoon oil, 2 teaspoons soy sauce, 1 teaspoon Dijon mustard, 1 tablespoon honey or brown sugar, 1 teaspoon garlic powder, and 1–2 teaspoons lemon juice or vinegar. Marinate for 20–30 minutes if you have time, then air fry the same way and check the internal temperature.
Equipment You Need
You can make this with basic kitchen tools, but the thermometer is the one that matters. Pork tenderloin is too lean and too quick-cooking for blind timing.
- Air fryer
- Instant-read thermometer
- Tongs
- Small bowl for the seasoning paste
- Measuring spoons
- Paper towels
- Cutting board
- Sharp knife for trimming silver skin and slicing
Basket Air Fryer, Oven-Style Air Fryer, and Ninja Foodi Notes
Air fryer style changes how quickly the outside browns, so use this as a first-check guide before trusting one fixed time.
| Air fryer type | What to expect | First check |
|---|---|---|
| Basket air fryer | Browns fastest with strong direct airflow | 13–16 minutes |
| Oven-style air fryer | May need a few extra minutes | 16–18 minutes |
| Ninja Foodi or Foodi Grill | Can brown aggressively from the top | 13–15 minutes |
| Small air fryer | Cut the tenderloin in half; do not coil it tightly | Based on thickness |
| Air fryer with liner | Browning can slow if airflow is blocked | Check color and temperature early |
How to Prepare the Pork
A good result starts before the basket: dry the surface, season all sides, and remove any tough silver skin so the finished slices are tender from edge to edge.
Prep Steps Before Air Frying
Look for the shiny strip before seasoning; trimming it now prevents chewy bites later.
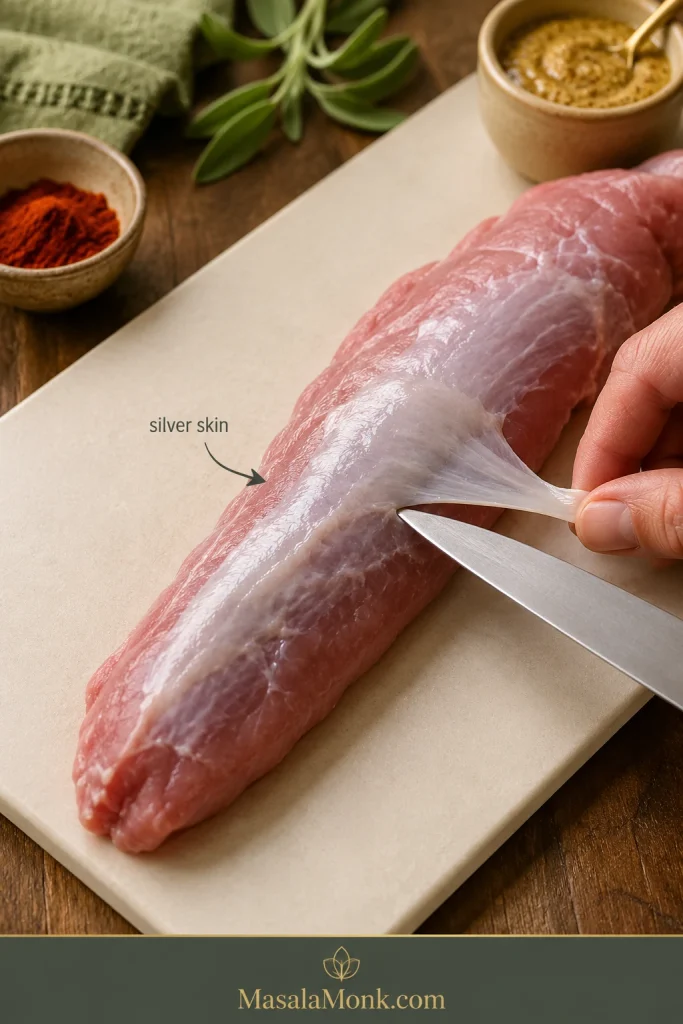
- Pat it dry. Surface moisture slows browning.
- Remove silver skin. This is the shiny, tough membrane that does not soften well during cooking. Slide a thin knife under it and trim it away.
- Trim lightly. Pork tenderloin is already lean. Remove loose fat or ragged edges, but do not over-trim.
- Protect the thin tail. If the tapered end is very thin, tuck it slightly under so it does not overcook too far ahead of the center.
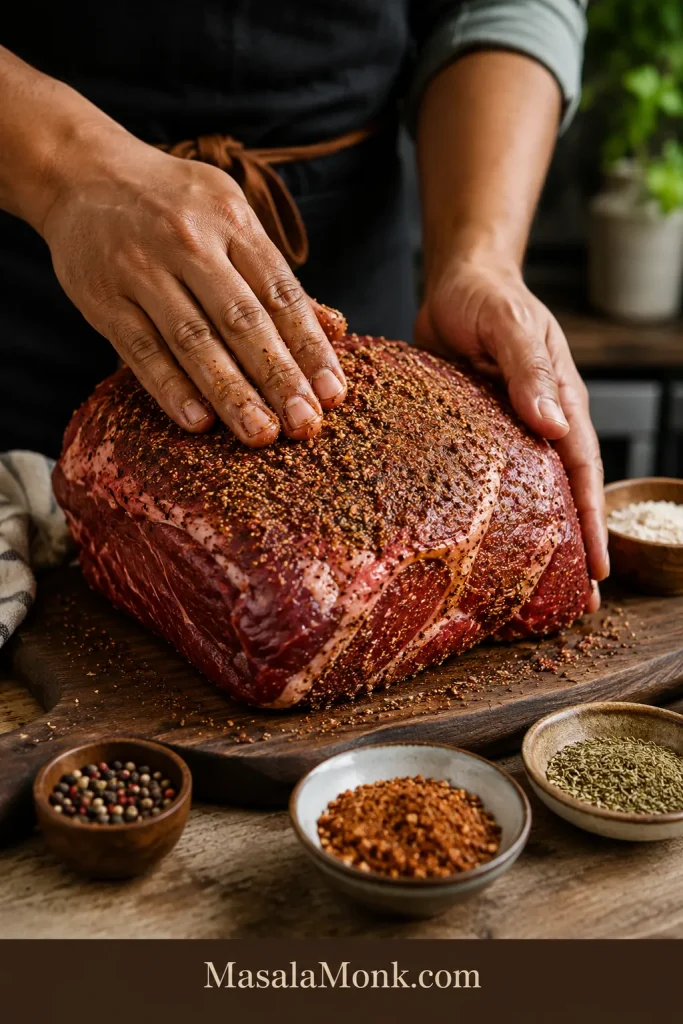
- Season all over. Coat the top, bottom, sides, and tapered end.
- Let it sit briefly. Even 5–10 minutes while the air fryer preheats helps the seasoning settle.
Seasoning Check Before Air Frying
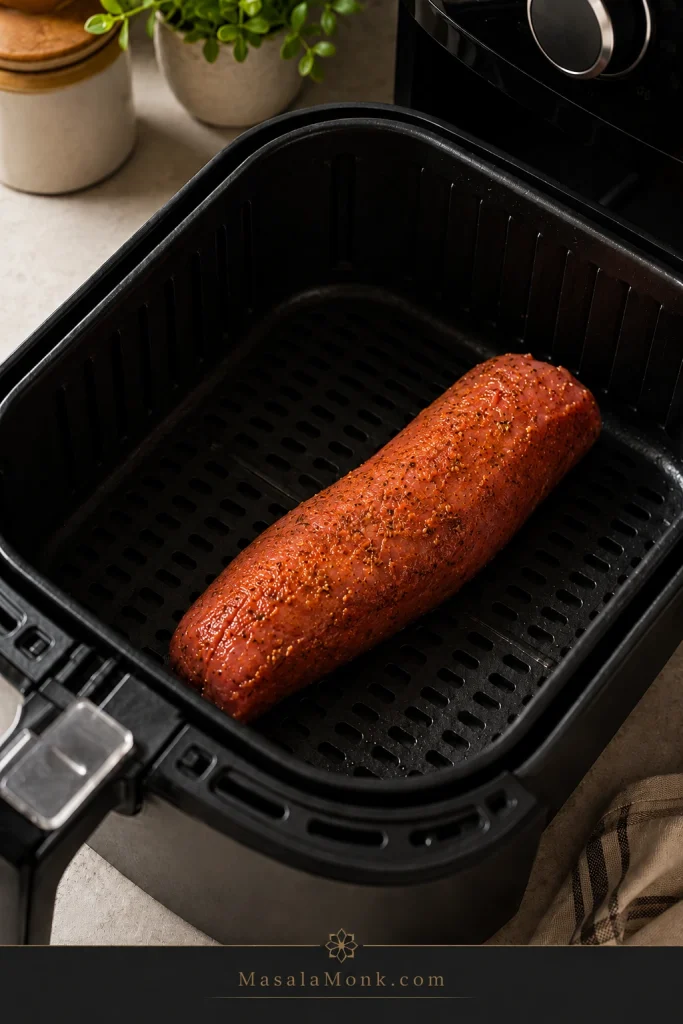
The tenderloin should look evenly coated before cooking, with no bare patches on the sides or tapered end.
How to Cook It in the Air Fryer
This is where the pork starts becoming dinner, not just a timing problem. Once it is seasoned, the cooking is simple. The only trick is not walking away for too long the first time you make it in your air fryer.
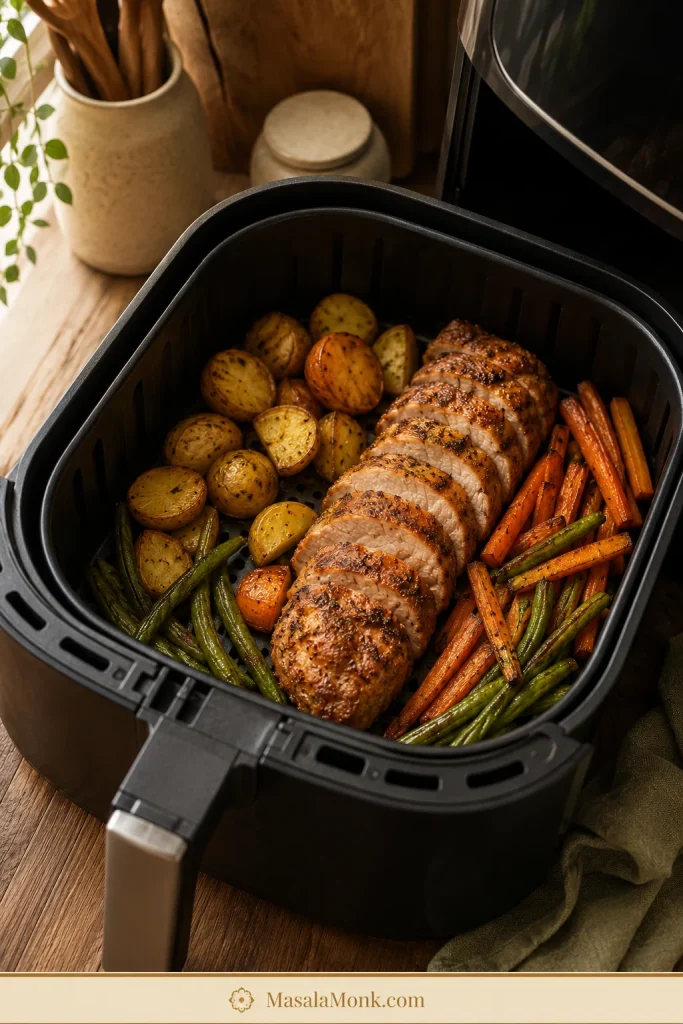
Basket spacing: Leave visible room around the pork so hot air can reach the sides and brown the surface.
Step-by-Step Air Fryer Method
- Preheat the air fryer. Set it to 400°F / 200°C, or 205°C if available. Preheat for 3–5 minutes if your air fryer recommends it.
- Season the pork. Rub the oil, mustard, and spice mixture over the whole tenderloin.
- Place it in the basket. Leave space around the meat so hot air can circulate. Cut it in half crosswise if it is too long.
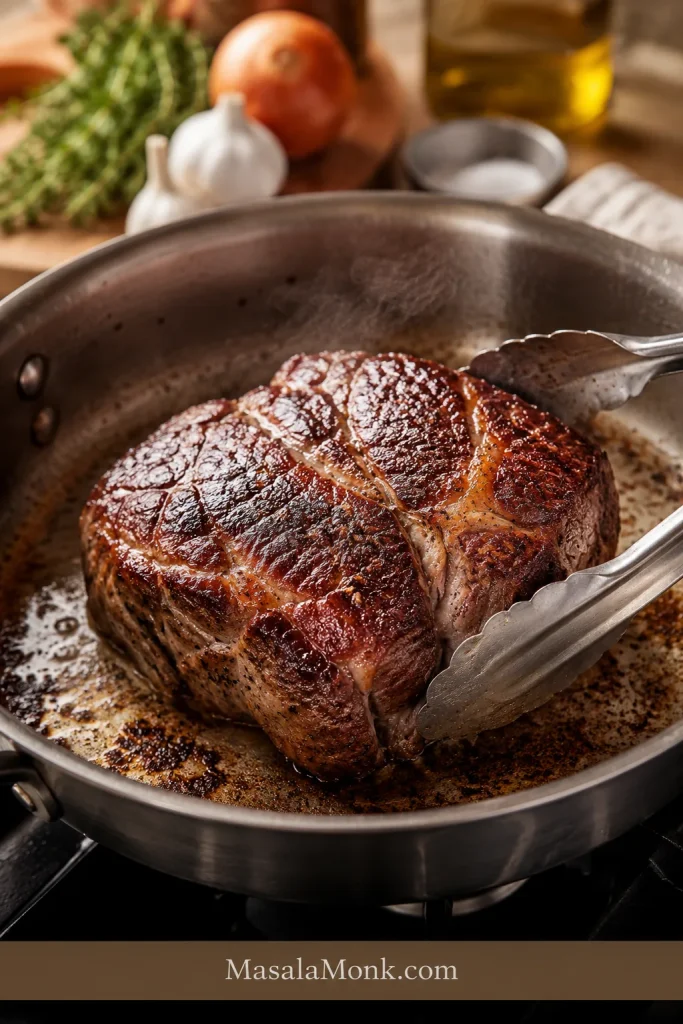
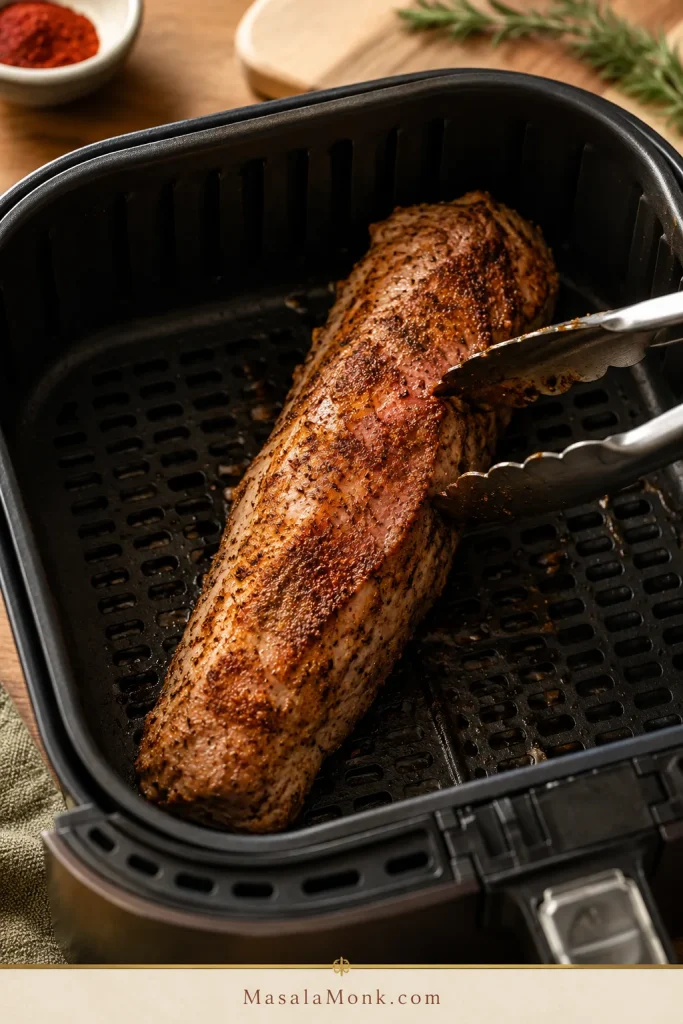
- Cook the first side. Air fry for 10–12 minutes. The outside should be starting to color, but it does not need to look deeply browned yet.
- Flip. Turn the tenderloin with tongs. Some juices in the basket are normal.
- Watch the surface. By the time it is close, the rub should smell toasted and savory, and the outside should look browned in patches rather than wet.
- Finish cooking. Continue air frying until the middle reaches 145°F / 63°C.
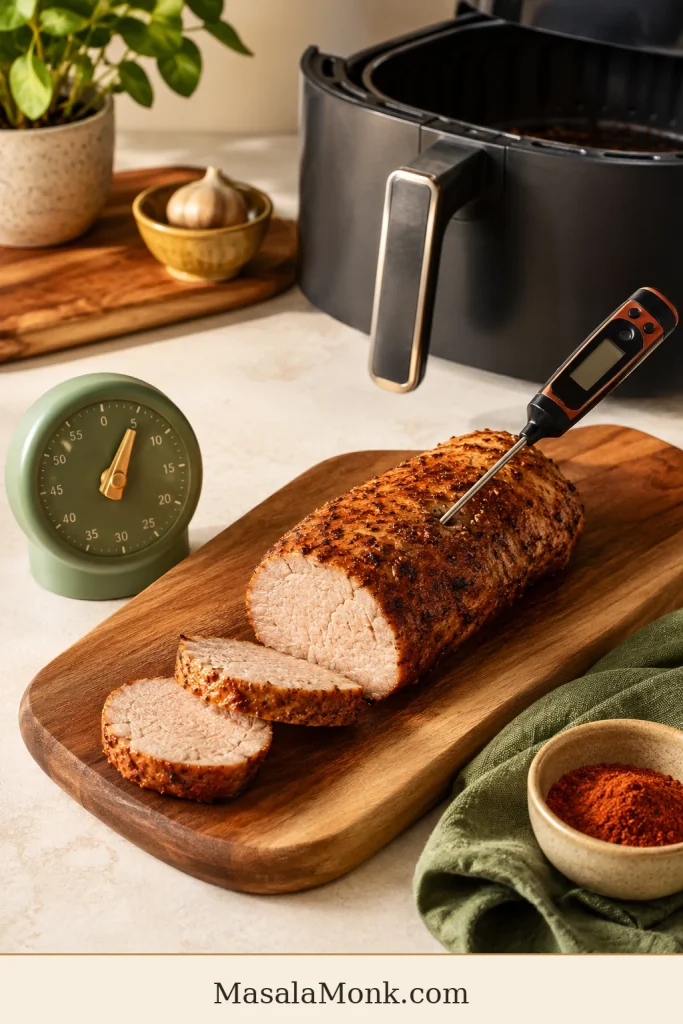
- Rest. Transfer to a board and rest loosely tented for 5 minutes.
- Slice. Cut across the grain into thick slices. The center should look moist, not chalky.
After the Flip
After the flip, browned patches are enough; from this point, temperature matters more than chasing a darker crust.
When the Outside Browns Fast
Dark edges before a done center usually mean the heat is too aggressive. Lower the air fryer to 375–390°F / 190–200°C for the remaining minutes. If the pork is cooked through but pale, brush it with a little oil, honey mustard, or pan juices and air fry for 1–2 more minutes only if it is not already above temperature.
Rest and Slice Before Serving
Resting is not just waiting. It helps the juices settle before you slice. Spoon those juices back over the meat, and the pork tastes more finished.
Rest the pork here before slicing so the juices settle and the board juices can be spooned back over the meat.
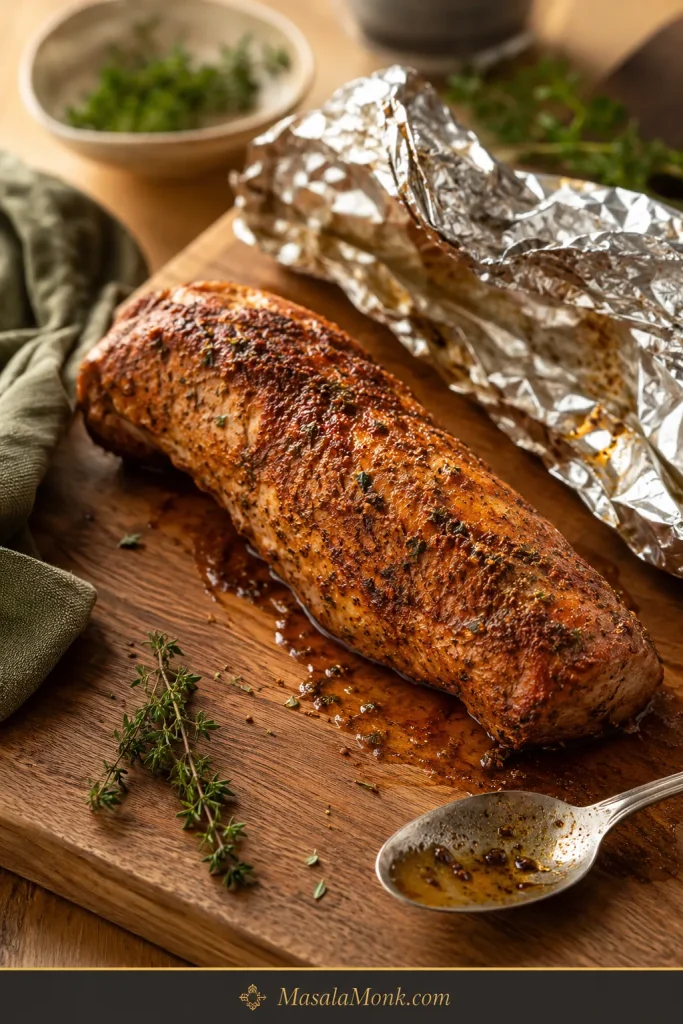
When the tenderloin has rested, use a steady cross-grain cut to make thick slices that stay moist on the plate.
Need exact timing? See the chartCheck the temperature guide
Cooking Time Chart by Weight
The chart is here to keep you from guessing, not to make the recipe complicated. Use the earliest check time when cooking a new brand, a new air fryer, or a pre-marinated pack.
First time with this air fryer? Watch closely once. After that, your own air fryer timing becomes the shortcut.
Use the timer to know when to start checking, then let the thermometer decide when the pork is done.
| Pork tenderloin size | Metric | Air fryer temp | Start checking | Likely total time |
|---|---|---|---|---|
| Small or slim tenderloin | 450g / 1 lb | 400°F / 200°C | 13–14 min | 14–18 min |
| Standard tenderloin | 565g / 1¼ lb | 400°F / 200°C | 16 min | 18–22 min |
| Larger tenderloin | 680g / 1½ lb | 400°F / 200°C | 18–20 min | 20–26 min |
| Very thick tenderloin | 700g+ / 1½ lb+ | 390–400°F / 200–205°C | 20 min | 24–28 min |
| Cut in half to fit | Same total weight | 400°F / 200°C | 13–16 min | Depends on thickness, not length |
How to Use the Chart
Cutting a tenderloin in half does not automatically cook it in half the time. Thickness matters more than length. Pieces that stay thick in the center still need time, while slim pieces finish faster.
Save your first successful timing. Once you know how your air fryer handles a 1 lb or 1½ lb tenderloin, this recipe becomes much easier the next time.
If your “very thick tenderloin” is actually wide like a roast, pause and check the package. It may be pork loin, not tenderloin, and it needs a different cooking plan.
Internal Temperature and Pink Pork
Pork tenderloin is done when the middle of the thickest part reaches 145°F / 63°C, followed by a short rest. Check the largest section, not the thin tail end.
Temperature check: Measure the thickest center, not the thin end, when checking for 145°F / 63°C.
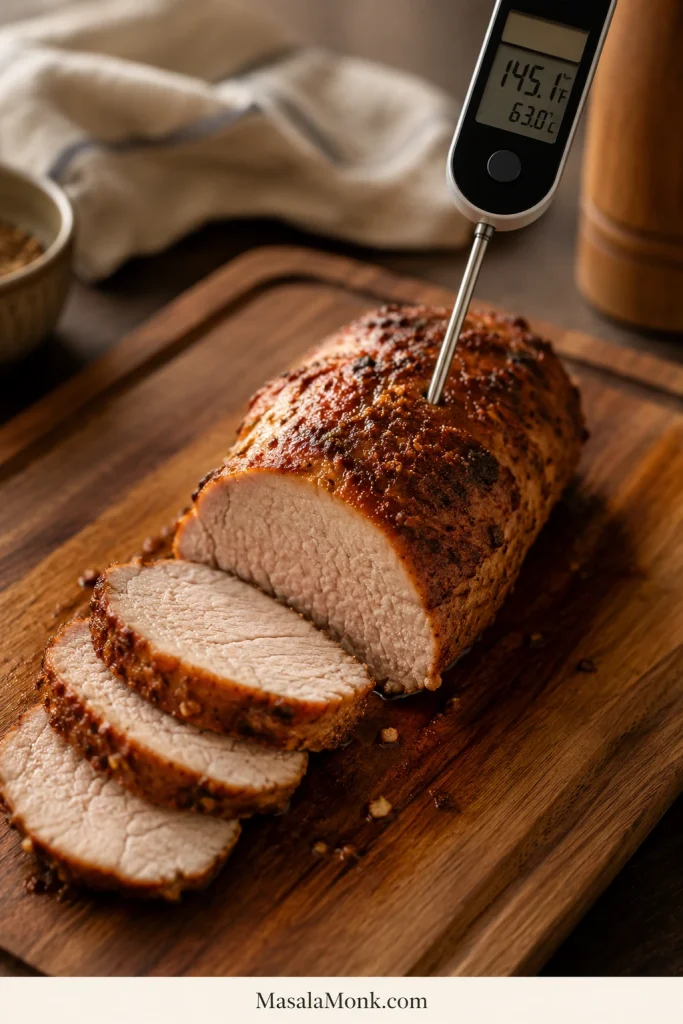
For food safety, FoodSafety.gov lists pork steaks, roasts, and chops at 145°F / 63°C with a 3-minute rest.
The National Pork Board pork cooking temperature guide gives the same practical guidance: 145°F, a short rest, and a digital thermometer.
What Pink Pork Means
That is why a slight blush of pink can be normal. Pink does not automatically mean raw; temperature tells you more than color.
For beginners, keep the target simple: cook to 145°F / 63°C, then rest for 5 minutes. Experienced cooks may start watching closely around 140–143°F because carryover can raise the final temperature during rest, but the clearest serving target for this recipe is still 145°F / 63°C.
Once you trust the thermometer, pork tenderloin stops being stressful. Instead of guessing by color or cutting into it five times, cook to the number, let it rest, and slice when the juices have settled.
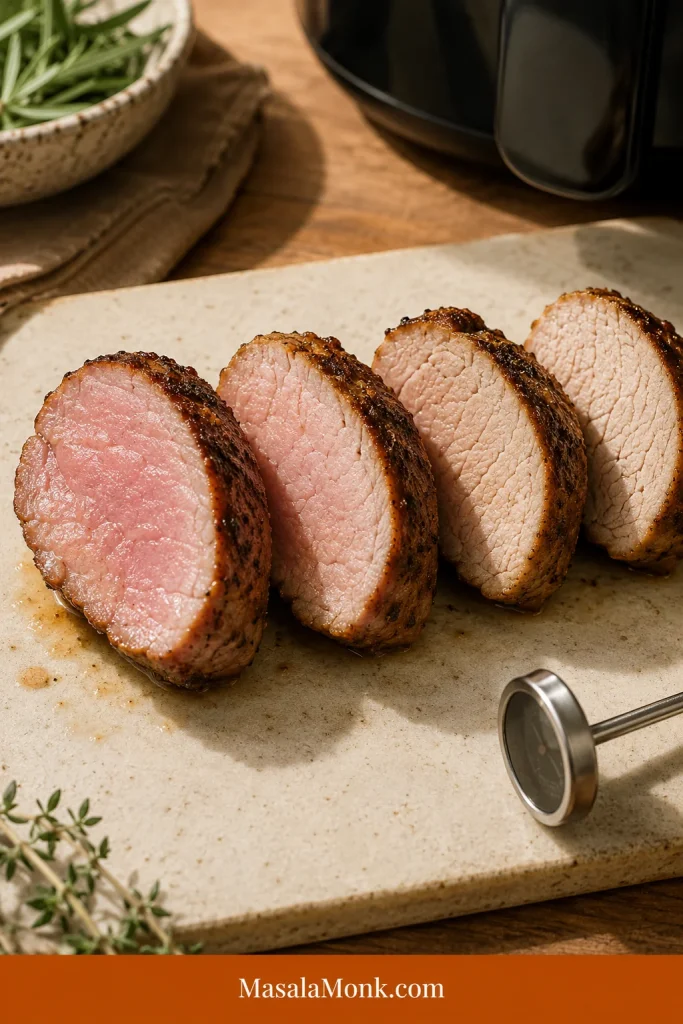
Doneness guide
- 140–143°F / 60–62°C: Watch closely here only if you understand carryover cooking and will rest the pork immediately.
- 145°F / 63°C: Clearest finished target for most home cooks.
- 150°F / 66°C: Still usable, but getting firmer.
- 160°F / 71°C and above: Much drier, especially in lean tenderloin.
This visual pairs with the doneness guide: as pork cooks longer, the slices turn paler, firmer, and less glossy.
Nervous about dryness? Troubleshoot itBack to the recipe card
Why It Turns Dry — and How to Prevent It
This is the section to read if you are nervous, using a new air fryer, or already worried you left the pork in a minute too long. Dryness usually comes down to timing, cut, or resting. The good news is that all three are fixable.
| Problem | What happens | Fix |
|---|---|---|
| Cooking by time only | The pork can overcook before you notice | Use the time chart, then do the doneness check |
| Using pork loin instead of tenderloin | The cut is larger and needs different timing | Check the package and shape before cooking |
| Very small tenderloin | It cooks faster than the recipe range | Start checking at 13–14 minutes |
| No rest | Juices run out when sliced | Rest 5 minutes before cutting |
| Sugary marinade burns early | The outside darkens before the middle is done | Check early or reduce the temperature slightly |
| Aggressive reheating | Leftovers become dry and firm | Reheat gently with sauce, broth, or butter |
Match Your Result
Still not sure what happened? Match the result:
- Outside dark, inside not ready: The heat was too aggressive, the rub was sugary, or the pork sat too close to the heating element. Lower the temperature for the remaining minutes.
- Pale outside, dry inside: The pork likely cooked too long without enough surface oil or browning. Next time, dry it well, coat lightly with oil, and start checking earlier.
- Only the thin end was dry: The tenderloin was tapered. Tuck the thin tail slightly under or expect the end pieces to cook faster than the center slices.
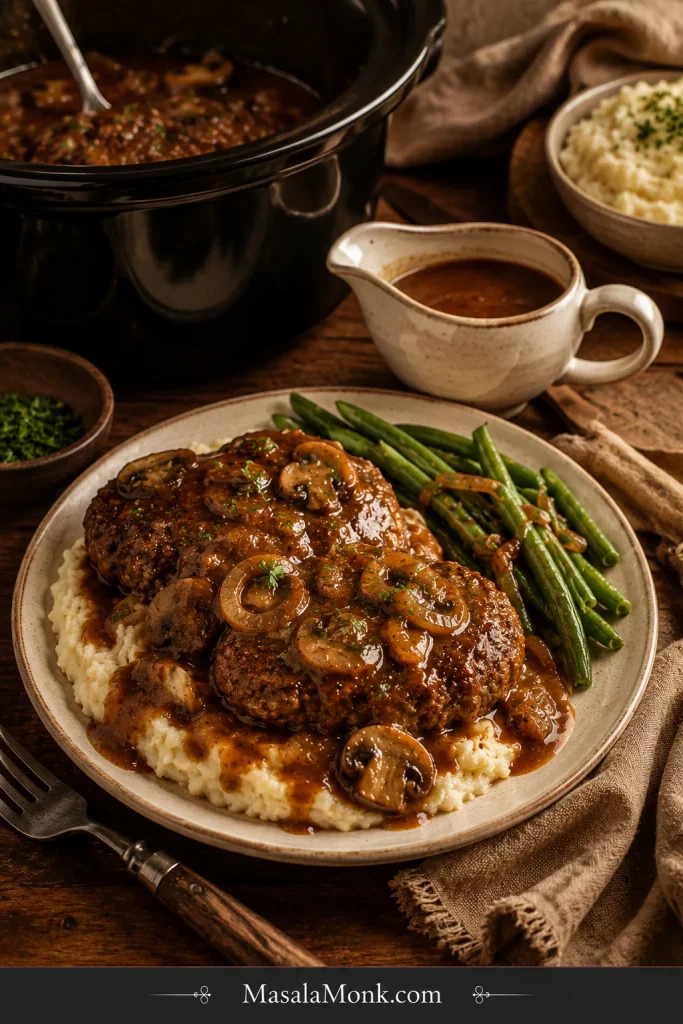
Dry pork is not ideal, but it is rarely beyond saving. Slice it thicker and serve it with something moist: pan juices, honey mustard, mushroom sauce, gravy, melted butter, broth, apple chutney, or a spoon of barbecue sauce.
If the slices need extra help, a spoon of creamy mushroom sauce turns slightly over-rested or lean pork into a much softer dinner plate.
Adding Potatoes, Carrots, or Green Beans
After the pork is under control, the real trick is keeping the sides from making it wait. You can cook it with potatoes, carrots, green beans, or sweet potatoes in the air fryer, but dense vegetables often take longer than the pork.
The pork is the part you protect. Vegetables are the part you can let keep cooking.
Best No-Dry Method
- Cook the tenderloin first.
- Rest it for 5–10 minutes.
- While it rests, cook or finish the potatoes, carrots, or green beans in the air fryer.
- Slice the pork right before serving.
This keeps the pork from waiting around while the potatoes catch up.
If you would rather keep the air fryer focused on the meat, make the potatoes separately. These ranch roasted potatoes give you crisp, salty-herby edges without forcing the tenderloin to wait in the basket.
One-Basket Dinner Example
For a simple one-basket version, use 1 lb / 450g pork tenderloin, 8 oz / 225g baby potatoes, and 1 large carrot. Halve the baby potatoes, slice the carrot thinly, toss the vegetables with oil and seasoning, and air fry them for 8–10 minutes at 390–400°F / 200–205°C. Add the seasoned pork, then cook until it reaches 145°F / 63°C. If the meat finishes before the vegetables are tender, remove and rest it while the vegetables cook a few minutes longer.
One-basket note: Keep the pork visible and let dense vegetables finish separately if they need more time.
Vegetable Timing Tips
| Side | Best way to handle it |
|---|---|
| Baby potatoes | Halve them and give them a head start. |
| Regular potatoes | Cut into ½-inch cubes so they cook faster. |
| Carrots | Slice thinly or cut small; thick carrots need extra time. |
| Green beans | Add later or cook while pork rests. |
| Sweet potatoes | Cut small and expect them to need more time than green vegetables. |
For a sweeter vegetable side, roasted carrots with honey, maple, or garlic work especially well with the smoky paprika and mustard in this pork rub.
Can You Cook It From Frozen?
Thawed is the recipe. Frozen is the emergency version.
A thawed tenderloin seasons better, browns better, cooks more evenly, and usually has a better texture. If you are staring at a frozen one and need a fallback, drop the heat and give it more time.
- Use a lower temperature: about 330°F / 165°C.
- Start checking around 30 minutes and expect roughly 33–38 minutes for many pieces, depending on thickness.
- Start from frozen, then season once the surface softens enough for the rub to stick.
- Flip halfway.
- Check the middle, not just the browned outside.
- Rest before slicing.
Do not cook a frozen double pack as one solid block. Separate the tenderloins first if they are frozen together. Do not use this fallback method for stuffed, rolled, or bacon-wrapped frozen tenderloin. Frozen breaded pork tenderloin is also a different product from raw whole tenderloin, so follow the package guidance and confirm doneness.
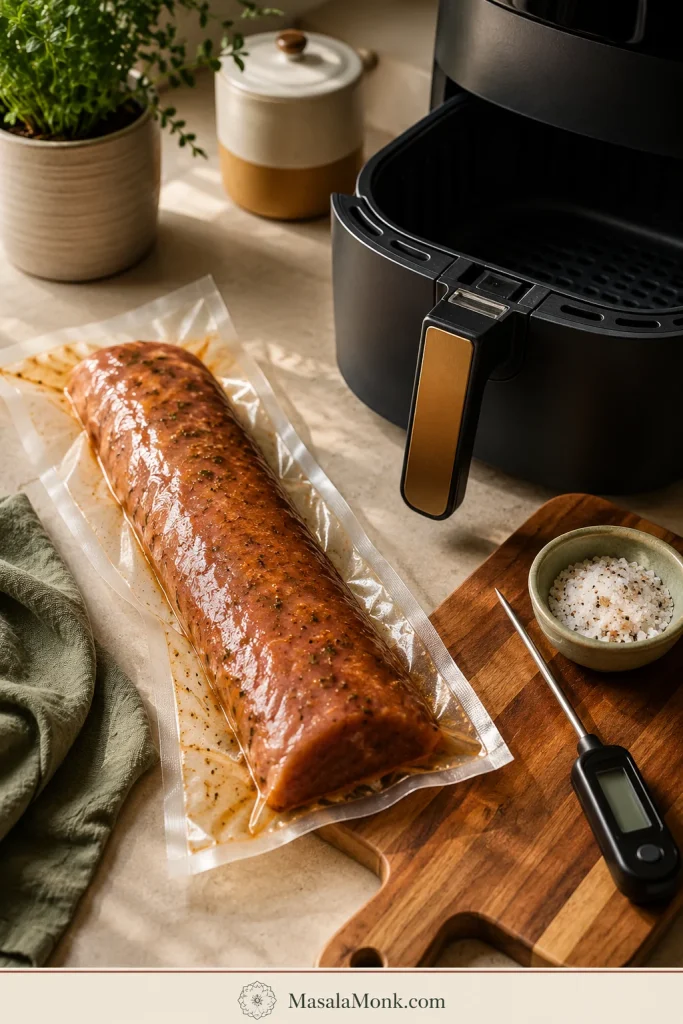
Smithfield, Hormel, and Pre-Marinated Packs
Pre-marinated packs are where label confusion shows up again. They are convenient, but some are pork tenderloin, some are pork loin filet, and some are wider, sweeter, or saltier than this recipe assumes.
These packs can still make an easy dinner; they just need a quick label check before they go into the basket.
Before cooking a pre-marinated pack, check the shape, salt level, sweetness, and final temperature instead of trusting the label alone.
Pre-Marinated Package Checklist
- Check the package name, weight, and shape before cooking.
- Long, narrow packs around 1–1½ lb / 450–680g usually work with this method.
- A pork loin filet label deserves a closer look. It may look long in the package but still be wider and denser than pork tenderloin.
- Wider pork loin filet or roast-style packs need different timing.
- Pat off excess wet marinade if it is very drippy.
- Start checking around 15 minutes because sugar-heavy marinades can brown faster.
- Dark edges early are a sign to check temperature before assuming the pork is done.
- Use less added salt because many pre-marinated packs are already seasoned.
Package timing is a starting point, not a promise. Use the package for flavor guidance and your thermometer for doneness.
Air Fryer Pork Tenderloin Medallions
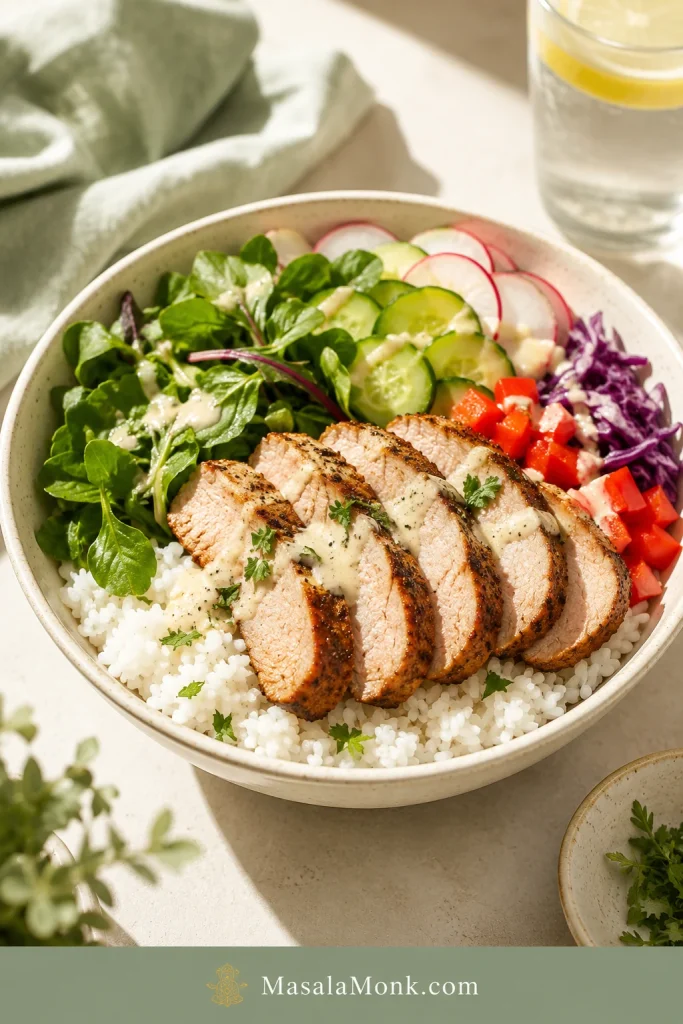
If you sliced the pork already, switch timing systems. Medallions cook much faster than a whole tenderloin, which makes them useful for rice bowls, salads, wraps, or a faster dinner plate.
- Slice the tenderloin into even medallions, about 1–1½ inches thick.
- Season both sides.
- Air fry at 350°F / 175°C for about 9–12 minutes, flipping once.
- Start checking around 7–8 minutes if the pieces are closer to 1 inch thick.
- Check the largest medallion for 145°F / 63°C, then rest briefly before serving.
Even thickness matters. Tiny end pieces cook faster than center-cut medallions, so pull them early if needed.
Flavor Variations
After you know when to stop cooking, the flavor can go almost anywhere. The timing usually stays close unless the tenderloin is thicker, smaller, wrapped, frozen, or heavily coated.
- Honey mustard: Add extra Dijon and honey, then finish sliced pork with a small spoon of sauce.
- BBQ rub: Use smoked paprika, brown sugar, garlic powder, onion powder, salt, pepper, and chili powder.
- Garlic herb: Use garlic powder, thyme, rosemary, parsley, black pepper, and olive oil.
- Cajun: Use Cajun seasoning, smoked paprika, garlic, and oil. Watch the salt if your blend is salty.
- Soy-Dijon marinade: Use soy sauce, Dijon mustard, honey, garlic powder, and a little vinegar or lemon juice.
- Spicy chili-garlic: Add chili flakes, cayenne, or chili paste to the oil and mustard mixture.
- Bacon-wrapped: Cook more carefully because bacon needs time to render. Start checking early so the pork does not overcook while the bacon browns.
Choose honey mustard for a softer family-style dinner, Cajun for heat, garlic herb for mashed potatoes, and BBQ rub if you want leftovers for sandwiches.
After slicing, this honey mustard dressing can double as a bright pork drizzle, especially with the honey mustard or garlic herb versions.
With BBQ-style pork tenderloin, creamy coleslaw is a natural fresh side because it brings crunch, tang, and a little sweetness.
What to Serve with It
This pork tenderloin is flexible enough for a quick weeknight dinner, a meal-prep bowl, or a slightly nicer weekend plate. A few slices over mashed potatoes feels cozy; the same pork over rice with sauce becomes lunch tomorrow.
Once the pork is sliced, a platter with vegetables, potatoes, sauce, and board juices makes serving easier.
Comfort sides
A classic comfort plate starts with sliced pork over creamy mashed potatoes, so the juices, mustard sauce, or mushroom gravy have somewhere to land.
Garlic mashed potatoes are the richer version, especially if you are skipping a sauce. For a cozy family-style dinner, creamy macaroni and cheese also works well with something green or crisp on the side.
Fresh sides
Something crisp beside the warm pork helps balance the plate. A wedge salad gives you cold crunch, creamy dressing, and steakhouse-style balance. Green beans, simple salad, apple sauce, apple chutney, and roasted carrots also fit the plate.
Bowls, wraps, and easy leftovers
Sliced pork works well over rice, in wraps, on salads, or tucked into quick bowls with vegetables and sauce. If you are turning leftovers into rice bowls, this how to cook rice guide helps with stovetop, rice cooker, and Instant Pot timing.
Make-Ahead Tips
You can season the pork up to 12 hours ahead and refrigerate it covered. Let it sit at room temperature for 15–20 minutes while the air fryer preheats, then cook as directed.
If the rub contains a lot of salt or soy sauce, avoid over-marinating a very small tenderloin. The smaller the piece, the faster salty marinades can make the texture feel firm.
Storage and Reheating
Leftover pork is best when you treat it gently. The meat is lean, so reheating should warm it through without blasting away the moisture you protected during cooking.
| Need | Best method |
|---|---|
| Fridge storage | Store in an airtight container for 3–4 days. |
| Freezer storage | Freeze sliced or portioned pork, wrapped well, for easier reheating. |
| Air fryer reheating | Reheat slices at 350°F / 175°C for 3–4 minutes. |
| Microwave reheating | Add a splash of broth, water, butter, or sauce and heat gently. |
| What to avoid | Do not blast a whole cooked tenderloin in the air fryer again. It can dry out before the center warms. |
Leftover slices are best used gently: tucked into rice bowls with sauce, folded into wraps, chopped into breakfast hash, or added cold to salads instead of aggressively reheated.
Extra slices can become an easy lunch with rice, crisp vegetables, greens, and a sauce that brings moisture back.
Go to FAQBack to the recipe cardBack to top
FAQ
How long do you cook pork tenderloin in the air fryer?
Most 1–1½ lb / 450–680g pork tenderloins take 18–24 minutes at 400°F / 200°C. Slim 1 lb pieces may finish closer to 14–18 minutes, while thick pieces may need 24–28 minutes. Use the chart, then confirm 145°F / 63°C in the center.
What temperature should I air fry pork tenderloin?
Set the air fryer to 400°F / 200°C, or 205°C if your model allows that setting. This gives good browning without a long cook time. If your air fryer runs very hot, reduce slightly to 375–390°F / 190–200°C and cook to temperature.
How do I keep it from drying out?
Use the right cut, check early, and rest before slicing. The mistake is usually not the seasoning — it is leaving lean pork in the air fryer a few minutes too long.
What if I do not have a meat thermometer?
A thermometer is strongly recommended because pork tenderloin is lean and cooks quickly. Without one, use the timing chart, slice into the thickest part, and check that the pork is hot all the way through with no raw-looking center. This is less reliable than a temperature check, so a small instant-read thermometer is worth it.
Is pork tenderloin the same as pork loin?
No. Pork tenderloin is long, narrow, and usually 1–1½ lb. Loin is wider, larger, and more roast-like. They need different cooking times, so checking the package before cooking matters.
Is pork fillet the same as pork tenderloin?
Often, yes. In many places, pork tenderloin is sold as pork fillet. If your pork fillet is long, narrow, and around 450–680g / 1–1½ lb, this air fryer method applies.
Can pork tenderloin be pink inside?
Yes. A slight blush can be normal when the pork is cooked to temperature. Do not keep cooking just to erase every hint of pink, or the tenderloin can turn dry.
Do I need to flip it?
Yes. Flipping helps the pork brown more evenly, especially in basket-style air fryers where the top often gets more direct heat than the bottom. Turn it after the first 10–12 minutes, then finish cooking.
Can I cook frozen pork tenderloin in the air fryer?
You can, but thawed is better for browning and texture. For frozen pork tenderloin, use about 330°F / 165°C, begin testing around 30 minutes, season once the surface softens, flip halfway, and confirm doneness before serving.
Can I cook pork tenderloin and potatoes together?
Yes, but potatoes need a head start because they usually take longer. Cook the pork first and finish the vegetables while it rests, or start small-cut potatoes 8–10 minutes before adding the pork.
How do I cook pre-marinated pork tenderloin?
Check that the package is actually pork tenderloin and not pork loin filet. Pat off excess wet marinade if needed, begin testing around 15 minutes, and cook until the pork reaches 145°F / 63°C. If the outside darkens early, check the temperature before assuming the middle is done.
Can I season pork tenderloin ahead of time?
Yes. You can season it up to 12 hours ahead and refrigerate it covered. Let it sit out for 15–20 minutes while the air fryer preheats so it is not going into the basket ice-cold.
How do I reheat leftovers?
Reheat slices at 350°F / 175°C for 3–4 minutes in the air fryer, or microwave gently with a splash of broth, water, butter, or sauce. Sliced pork reheats better than a whole tenderloin because it warms faster and needs less time.
Can I make pork tenderloin medallions in the air fryer?
Yes. Slice the tenderloin into even 1–1½ inch medallions, season both sides, and air fry at 350°F / 175°C for about 9–12 minutes, flipping once. Start checking early if the pieces are closer to 1 inch thick.
Final Tip
Once you know the cut, the temperature, and when to stop cooking, air fryer pork tenderloin becomes a very easy win: browned outside, juicy inside, and flexible enough for potatoes, salads, bowls, or leftovers the next day. The first cook teaches you your air fryer; after that, this becomes one of those dinners you can repeat without hovering over the basket.
If your air fryer runs especially hot or slow, drop your timing in the comments — model, weight, and total cook time are especially helpful. Someone else with the same style of air fryer may be comparing notes before dinner.