In an age of trendy superfoods and flashy detox regimens, sometimes the most powerful solutions are quietly simmering in your kitchen. The humble combination of turmeric, ginger, and cinnamon—when brewed into a warm, earthy tea—offers a trio of health benefits rooted in centuries of traditional medicine and increasingly backed by modern science.
Whether you’re seeking sustainable weight loss, better digestion, reduced inflammation, or a sharper mind, this golden trio deserves a place in your daily routine.
Let’s explore the what, why, and how behind this health-boosting brew—and how to incorporate it practically into modern life.
🌿 What’s in the Cup?
Turmeric
Known for its vibrant yellow-orange hue, turmeric contains curcumin, a potent anti-inflammatory and antioxidant. Its benefits go far beyond spice—curcumin is being studied for its ability to reduce systemic inflammation, boost metabolism, and even support cognitive health.
Ginger
Ginger’s spicy warmth comes from compounds like gingerol, which has thermogenic properties (it helps burn more calories), soothes digestion, and may reduce appetite and blood sugar spikes.
Cinnamon
Cinnamon contains cinnamaldehyde, which helps regulate blood sugar, reduces cravings, and may even activate genes that suppress fat storage. Plus, it gives the tea a subtly sweet and comforting aroma.
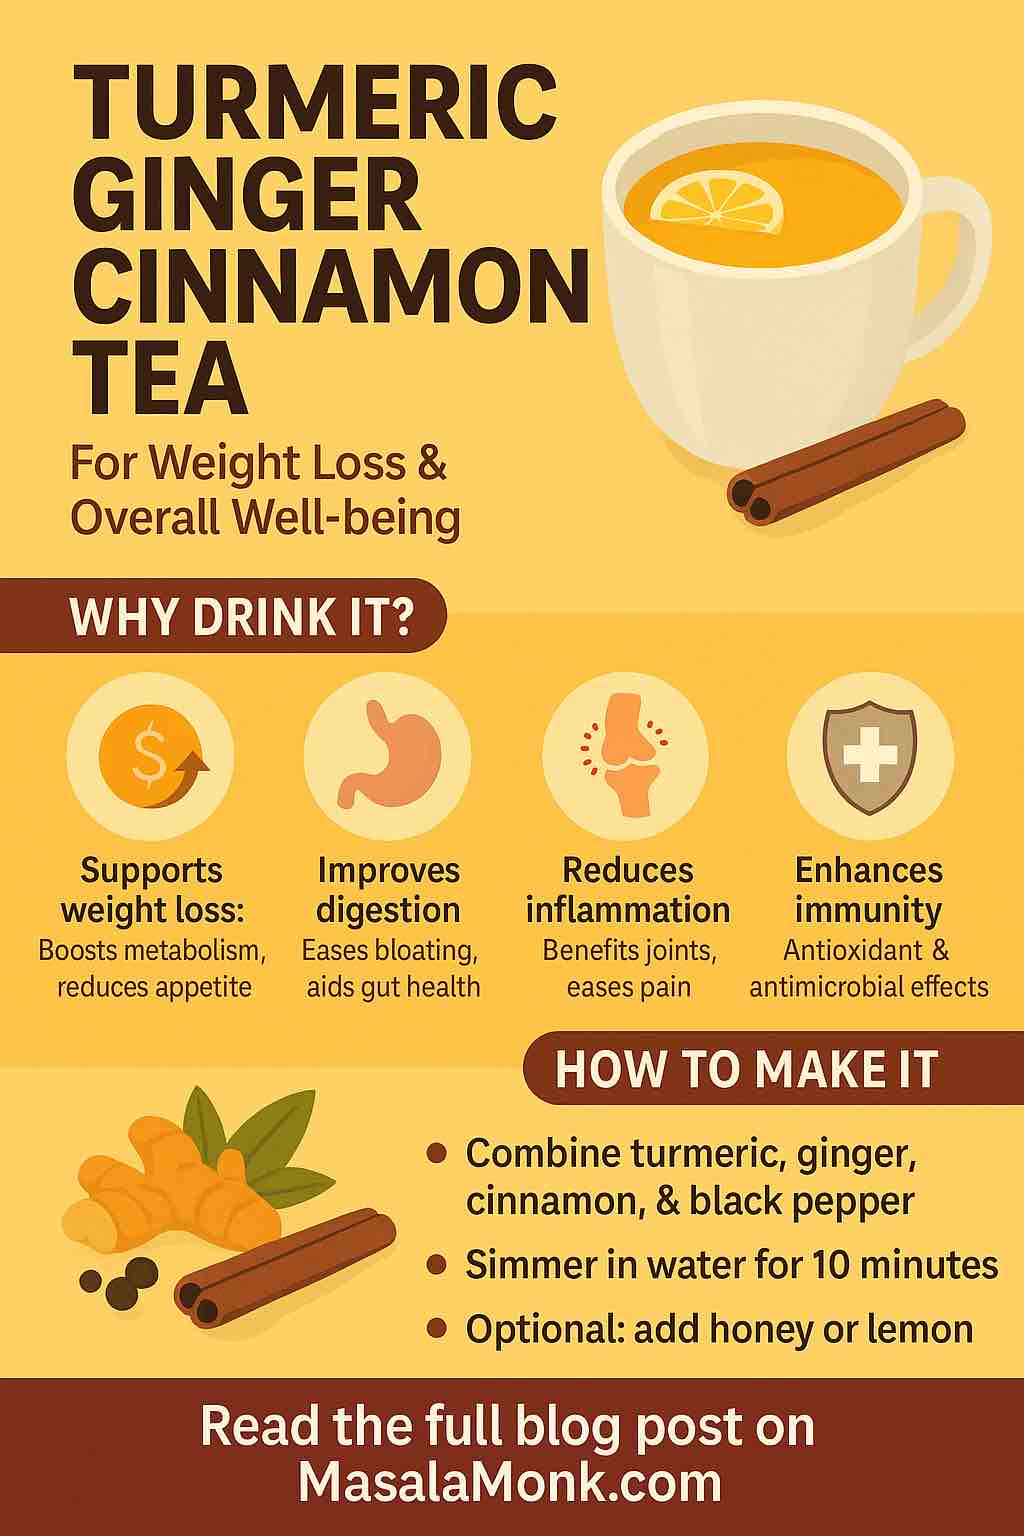
🔥 Why This Combo Works — The Science-Backed Benefits
1. Weight Loss Support (But Not a Shortcut)
Recent studies show that each of these ingredients plays a role in healthy weight management:
- Thermogenesis Boost: Ginger and cinnamon can raise internal body temperature, subtly increasing calorie expenditure.
- Blood Sugar Balance: Cinnamon lowers blood glucose levels, which reduces fat storage and sugar cravings.
- Inflammation Control: Chronic inflammation impairs metabolism and hormonal balance—turmeric’s curcumin is a well-known inflammation buster.
✅ 2024 and 2025 meta-analyses confirm modest reductions in weight, BMI, and waist circumference when people include these spices in their diets over 8–12 weeks.
2. Better Digestion & Gut Comfort
- Ginger stimulates digestive enzymes and promotes smoother movement of food through the GI tract.
- Turmeric enhances bile production, helping the body digest fats.
- Cinnamon reduces gas and bloating by calming gut spasms.
Perfect as a post-meal tea to soothe and settle your belly.
3. Natural Anti-Inflammatory & Pain Relief
This trio naturally reduces inflammation—meaning fewer aches, reduced joint pain, and support for autoimmune and chronic pain sufferers. In fact, curcumin is being compared to ibuprofen in its pain-relieving potential (without gut side effects).
4. Immune & Brain Support
Turmeric and ginger both have anti-microbial properties, helping the body resist infection. Meanwhile, their antioxidant compounds protect brain cells and may slow age-related cognitive decline.
🍵 How to Make the Perfect Cup
💡 Basic Recipe:
Ingredients:
- 1 cup water
- ½ tsp ground turmeric (or 1 tsp fresh grated)
- ½ tsp ground ginger (or 1 tsp fresh grated)
- ¼ tsp cinnamon
- 1 pinch black pepper (essential for curcumin absorption—boosts by 2000%)
- Optional: ½ tsp coconut oil or ghee (fat improves curcumin bioavailability)
- Optional: Honey or lemon to taste
Instructions:
- Bring water to a gentle boil.
- Add all spices and reduce heat to a low simmer for 10–12 minutes.
- Strain (if using fresh ingredients), and pour into a mug.
- Add honey/lemon and enjoy warm.
🕒 When to Drink:
- Morning: Kickstart digestion and metabolism.
- Post-meal: Soothe bloating, help digestion.
- Evening: As a caffeine-free, calming anti-inflammatory tonic.
⚖️ How to Integrate Into a Weight Loss Routine
- Consistency Is Key
Drink this tea daily for 8–12 weeks to observe effects. Studies show cumulative impact, not overnight results. - Pair with Lifestyle
This tea is supportive, not standalone. For meaningful weight loss:- Combine with a whole-food, lower-sugar diet.
- Move daily—walk, yoga, or resistance training.
- Prioritize sleep—poor sleep blocks fat loss.
- Start Small
Sensitive to spice? Start with half doses and increase as your taste buds adjust. - Hydration First
Don’t replace water—this is a supplement, not a hydration source. Drink plenty of plain water throughout the day.
🚨 Cautions & Who Should Avoid It
While this tea is safe for most, consider the following:
- Pregnant or breastfeeding? Ask your doctor—large amounts of turmeric or ginger may not be advised.
- On medications? Turmeric and ginger can interact with blood thinners and diabetes meds.
- Gallbladder issues or GERD? Spices may irritate symptoms—start low or skip.
💬 Real-World Tips from People Who Swear by It
“I replaced my nightly wine with this tea. Lost 8 lbs in 6 weeks just from better sleep, fewer cravings, and no snacking after dinner.”
— Julia T., 43
“I drink it first thing in the morning—it feels like my gut just works better all day. I don’t bloat like I used to.”
— Nishant R., 29
“I’ve been struggling with inflammation in my joints for years. This tea isn’t magic, but after 3 months, I can feel a difference in how stiff I wake up.”
— Mark F., 58
🧭 Conclusion: A Small Habit With Big Potential
Turmeric, ginger, and cinnamon tea isn’t a quick-fix miracle—but it’s a powerful daily ritual that nourishes your body from the inside out. With consistent use, you might notice easier digestion, improved energy, more stable weight, and less inflammation clouding your system.
It’s easy to prepare, inexpensive, and aligns with both ancient wisdom and the latest science.
Ready to sip your way to better health? Start with one cup tomorrow—and see how your body responds.
🔁 Frequently Asked Questions (FAQs)
1. Can turmeric-ginger-cinnamon tea really help me lose weight?
Yes—but as a supportive tool, not a magic bullet. The tea can slightly boost metabolism, reduce inflammation, balance blood sugar, and curb cravings. However, weight loss requires consistent lifestyle changes like a healthy diet and regular activity.
2. How long does it take to see results?
Most people notice benefits like reduced bloating, improved digestion, and fewer cravings within 1–2 weeks. For measurable weight or inflammation-related changes, consistent use over 8–12 weeks is recommended based on clinical observations.
3. Can I drink this tea on an empty stomach?
Yes, many people drink it first thing in the morning. However, if you’re sensitive to spices or have acid reflux, you may prefer taking it after meals or with a small snack.
4. Do I need to use fresh turmeric and ginger?
Fresh is ideal for maximum potency, but ground (dried) spices work well too. Just be sure to use high-quality, organic spices to avoid fillers or irradiation. Adjust quantities accordingly—powdered forms are more concentrated.
5. Why is black pepper important in the recipe?
Black pepper contains piperine, which boosts curcumin absorption by up to 2000%. Without it, your body may absorb very little of turmeric’s active compound. Just a small pinch makes a big difference.
6. Can I batch-prep the tea ahead of time?
Yes! You can make 2–3 cups at once, store them in the fridge (up to 48 hours), and reheat gently as needed. Avoid microwaving if possible—gently warming on the stove preserves the compounds better.
7. Is it safe to drink every day?
For most people, yes. Daily use is generally safe and beneficial in moderate doses (1–2 cups/day). However, consult your doctor if you’re pregnant, breastfeeding, or taking medications for blood pressure, blood sugar, or clotting.
8. Can I sweeten it?
Yes—raw honey or a few drops of stevia are great natural options. Avoid adding regular sugar, as it counteracts the blood-sugar benefits of the tea. A slice of lemon can also enhance flavor and add vitamin C.
9. Will it help with joint pain or arthritis?
Many users report reduced joint stiffness and inflammation over time, thanks to the anti-inflammatory properties of curcumin and gingerols. It’s not a replacement for medication but can complement your treatment plan naturally.
10. Can I drink it before bed?
Yes. It’s naturally caffeine-free and may actually promote better sleep by reducing inflammation, supporting digestion, and stabilizing blood sugar. Many people find it relaxing as a nighttime ritual.