Posted on Leave a comment

Dal Tadka Recipe: Restaurant-Style Punjabi Yellow Dal

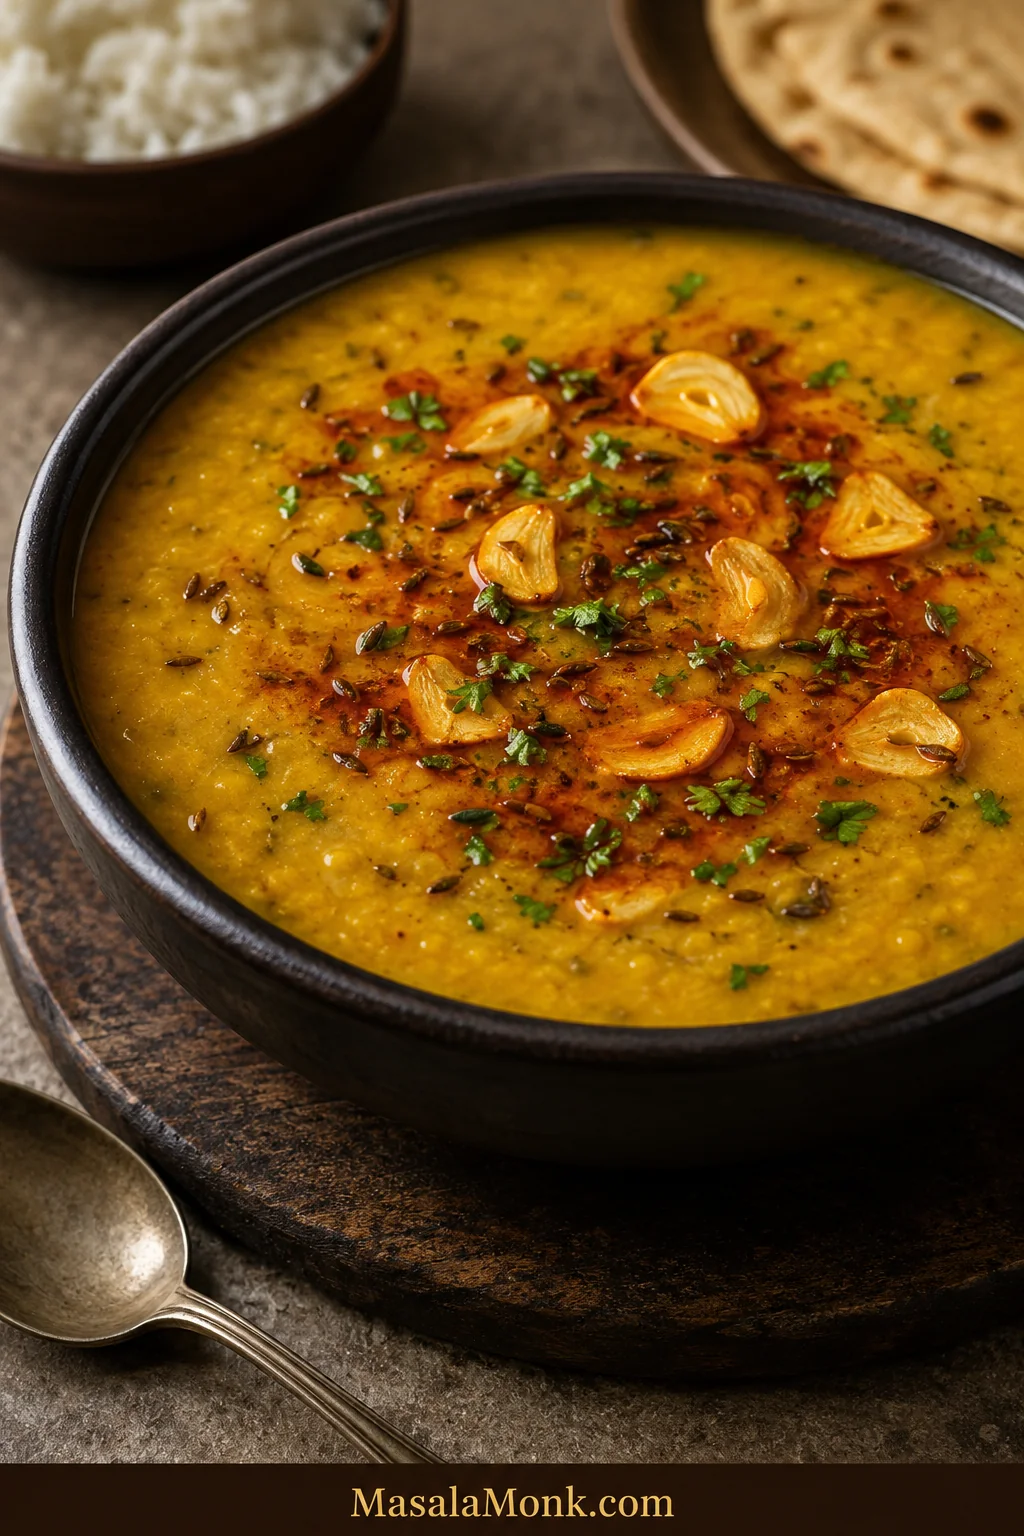
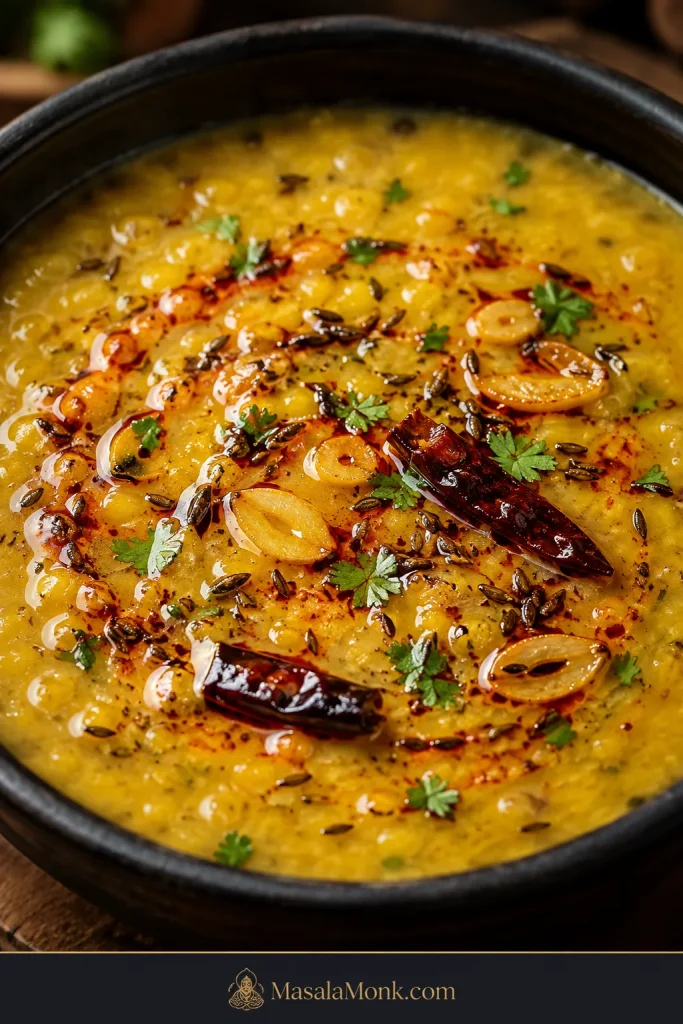
Creamy Punjabi Dal Tadka topped with red chilli ghee, thin golden garlic, cumin, dried chilli and coriander.

The final tadka announces dinner before the bowl reaches the table. Cumin crackles, garlic turns gold, and hot ghee carries the smell of red chilli across the kitchen. Underneath that dramatic finish, the dal has a quieter job: it should fall creamy from the spoon, with no watery separation, no gluey heaviness and no firm lentils interrupting each mouthful.

This Dal Tadka recipe gives you the familiar restaurant-style Punjabi yellow dal, along with the choices that shape it. Start with toor dal for the classic version, blend in a little yellow moong for a softer finish, and cook it in a pressure cooker, Instant Pot or heavy saucepan. The finished dal is creamy without feeling heavy, warmly spiced through the pot and bright with fresh cumin and garlic at the surface.

You will judge the lentils by how easily a grain crushes, the consistency by how the dal falls from the ladle and the tadka by the colour of the garlic—not by timing alone.

The disappointing bowl often contains all the right ingredients. Usually, one stage was rushed: the lentils came off the heat while still grainy, the tomato base remained raw, the consistency was never corrected, or the garlic crossed from golden to bitter while nobody was looking.

The MasalaMonk rule: the lentils decide when the dal is cooked; the final simmer decides its texture; the fresh tadka decides how memorable it tastes.

Quick Answer: How to Make Restaurant-Style Dal Tadka

Cook the dal: pressure-cook 1 cup toor dal (200 g) with 2¾ cups water (660 ml), turmeric and part of the salt.

In a stovetop cooker, cook for 8 minutes at pressure. In an Instant Pot, use 7 minutes for soaked dal or 8 minutes for unsoaked dal, followed by a full natural pressure release. Every grain should crush without resistance.

Build the body: whisk the lentils partly smooth, combine them with an onion-tomato masala cooked until glossy, then simmer with kasuri methi and enough hot water to reach a creamy, pourable consistency.

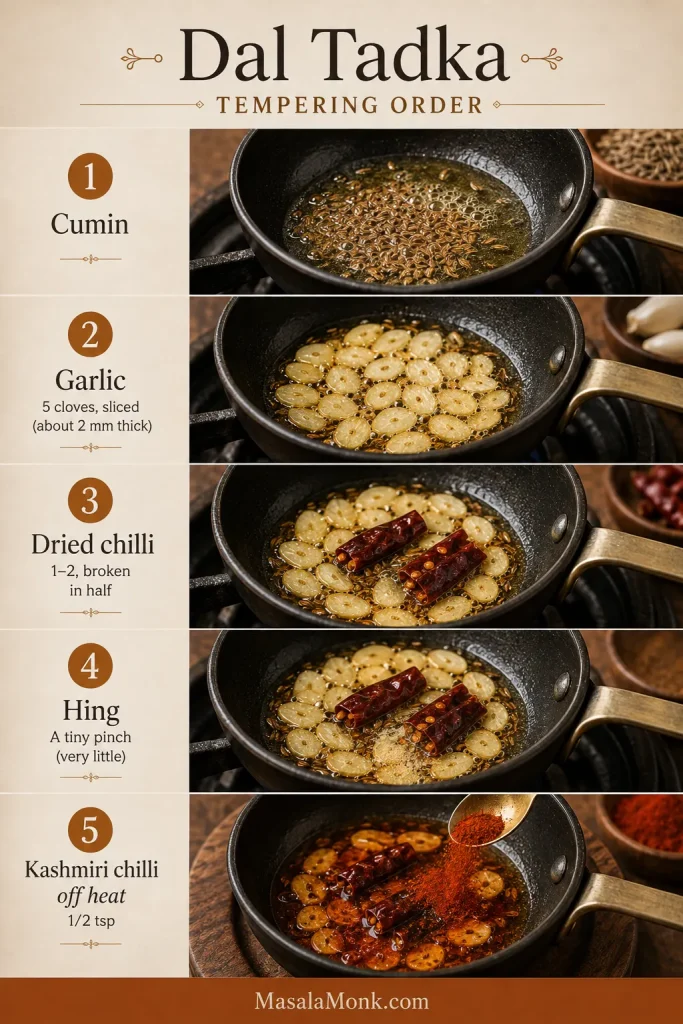
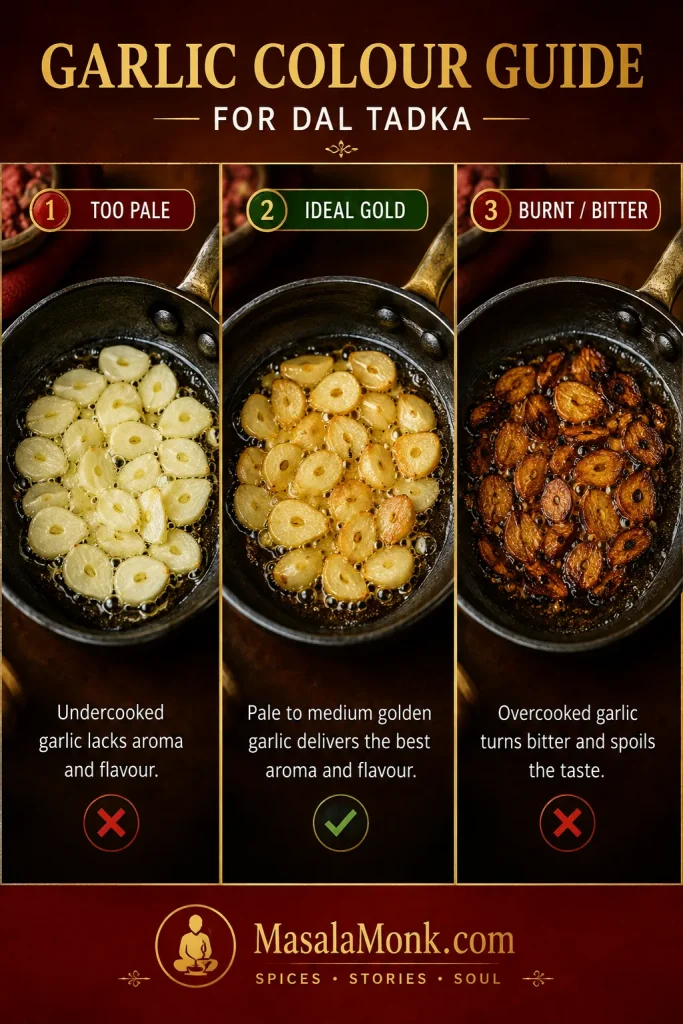
Finish at the table: bloom cumin in ghee, add evenly sliced garlic, then add dried chilli as the garlic begins colouring and hing for the final few seconds. Stop the garlic at pale-to-medium gold, remove the pan from the heat, add Kashmiri chilli powder and pour the tadka immediately.

Dal Tadka is also written as Dal Tarka or Tarka Dal. Tadka, tarka and chaunk all describe spices and aromatics bloomed in hot fat. This Punjabi version begins with toor/arhar dal.

Pick your finish

Choose your Dal Tadka style

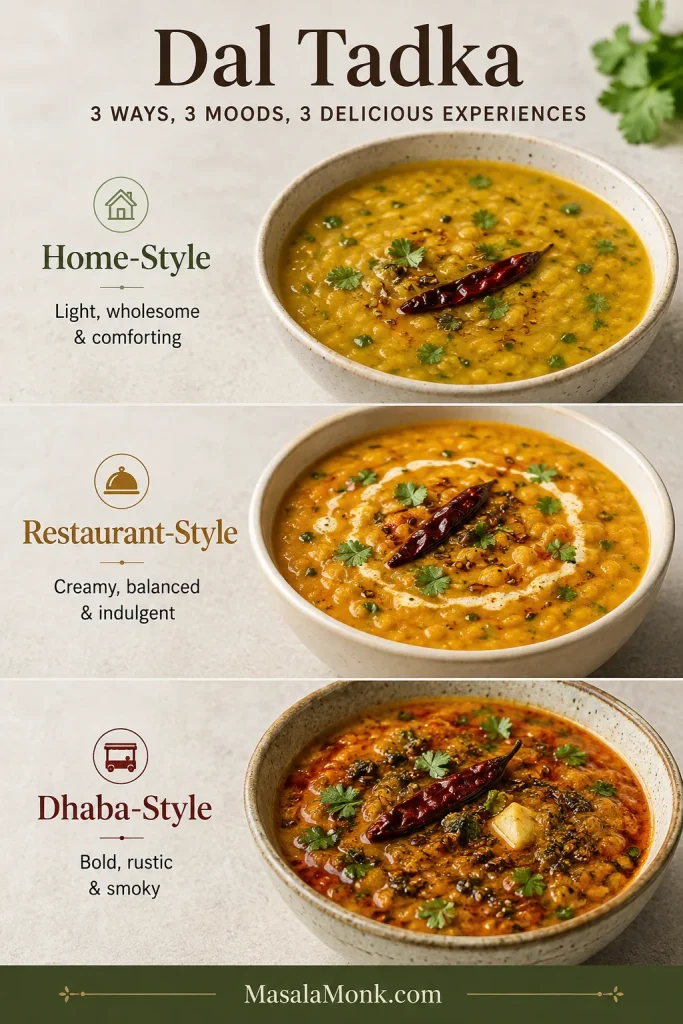
One pot can feel light and comforting, creamy and restaurant-style, or bold and smoky. Decide before building the masala and tadka, because each style changes how far you cook the tomatoes, how thick you leave the dal and how much fat you use.

StyleWhat it tastes likeHow to finish it
Everyday home-styleLight, familiar and weeknight-friendlyKeep the dal a little loose; use about 1 tablespoon fat in the base and 1 tablespoon in the final tadka; cook the tomato only until softened; skip cream and smoke; finish with lemon
Restaurant-styleCreamy, rounded and aromatic with a glossy red tadkaWhisk the dal partly smooth, cook the tomato base thoroughly, use kasuri methi and make the full garlic-ghee tadka
Dhaba-styleBolder, thicker, garlicky and slightly smokyUse the full tadka, add extra sliced garlic, keep the dal slightly thicker and use the optional short dhungar
Choose a lighter home-style, creamy restaurant-style or bolder dhaba-style finish.
Three bowls comparing lighter home-style, creamy restaurant-style and thicker dhaba-style Dal Tadka.
These are three finishes for the same base dal, adjusted through consistency, tomato reduction, garlic, fat and optional smoke.

Make it now

Restaurant-Style Dal Tadka Recipe

Soft toor dal is stirred into a glossy onion-tomato masala, loosened to a creamy pour, then finished with a fresh garlic-cumin tadka.

Recipe shortcuts: Ingredients · Instructions · Garlic tadka · Final balance

Timing and yield

Yield4 main-dish or 5 side servings (about 40–50 g dry dal per person)

PrepAbout 15–20 minutes

Active cookingAbout 20–30 minutes

Pressure cycleAbout 30–45 minutes, including heating and natural release

Total elapsedAbout 55–70 minutes, plus optional soaking

Saucepan totalAbout 80–110 minutes, plus soaking

Dietary note: Vegetarian; vegan with oil and no butter or cream; gluten-free when the hing is labelled gluten-free.

These windows overlap: chop while the cooker heats, then build the masala as the pressure releases. The total reflects the real clock rather than adding every line together.

Equipment

  • 3–4 litre stovetop pressure cooker, 6-quart Instant Pot or a heavy 3–4 litre saucepan
  • Medium frying pan or kadai for the onion-tomato masala
  • Small, preferably deep tadka pan with a long handle; otherwise use your smallest heavy saucepan or frying pan
  • Whisk, wooden spoon or dal ghutni
  • Heatproof serving bowl and ladle
  • Optional: natural charcoal, tongs and a small steel bowl for dhungar

Ingredients

For cooking the dal

  • 1 cup toor/arhar dal (200 g / 7 oz), or ¾ cup toor plus ¼ cup yellow moong
  • 2¾ cups water (660 ml) for pressure cooking
  • ½ teaspoon turmeric
  • 1¼ teaspoons fine salt (about 7–8 g), divided, plus more after tasting
  • ½–1 cup hot water (120–240 ml), as needed after cooking

For the onion-tomato masala

  • 1½ tablespoons ghee or neutral oil (22 ml)
  • 1 teaspoon cumin seeds
  • 1 medium onion, finely chopped (about 140 g / 5 oz)
  • 10–12 g finely grated ginger (about 1 packed tablespoon)
  • 4 garlic cloves, finely chopped or crushed (about 12 g)
  • 1–2 green chillies; slit for gentler heat or finely chop to spread the heat through the dal
  • 2 medium tomatoes, finely chopped or crushed (about 250 g / 9 oz)
  • 1 teaspoon ground coriander
  • ½ teaspoon Kashmiri chilli powder; use mild paprika only if Kashmiri chilli is unavailable
  • ¼ teaspoon garam masala
  • 1 teaspoon kasuri methi, crushed between your palms

For the final tadka and balance

  • 1½ tablespoons ghee (22 ml), or oil for a vegan version
  • 1 teaspoon cumin seeds
  • 5 medium garlic cloves, thinly and evenly sliced, about 2 mm thick (about 15 g)
  • 1–2 dried red chillies, broken in half
  • Up to a scant ⅛ teaspoon hing/asafoetida, optional; use less when yours is strong or pure, and check compounded hing for wheat when cooking gluten-free
  • ½ teaspoon Kashmiri chilli powder
  • 2–3 tablespoons chopped coriander leaves/cilantro
  • Lemon juice: 1–2 teaspoons, if the finished dal needs brightness

Optional for a richer or smoky finish

  • Butter or cream: 1 tablespoon
  • Dhungar: 1 piece natural lump charcoal, about 1 inch/2.5 cm, plus ½ teaspoon ghee

How the ingredients work together

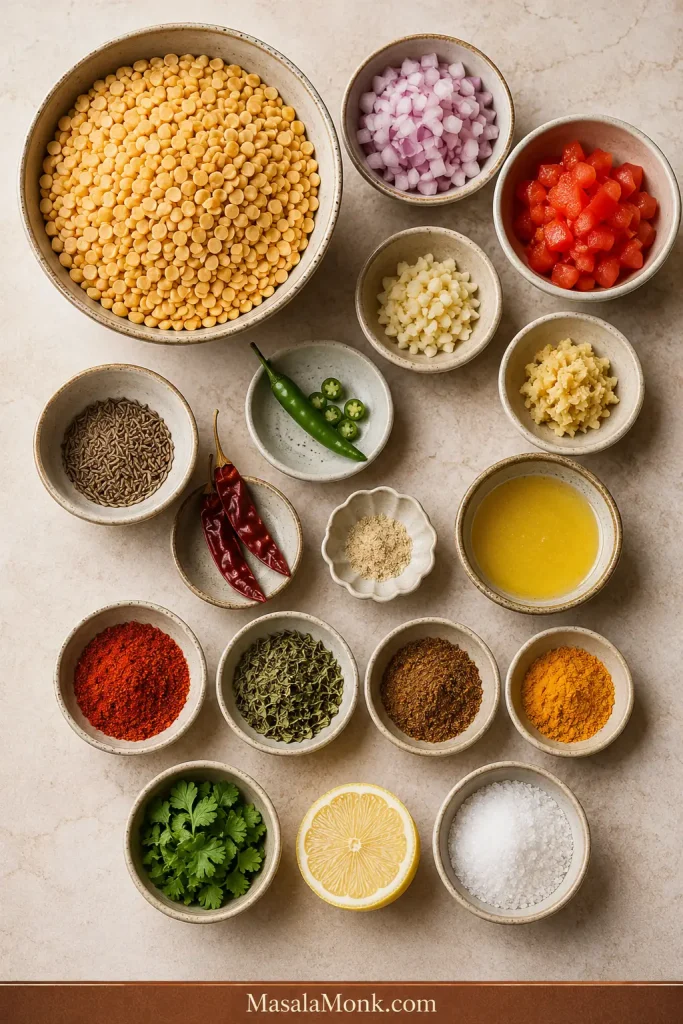
Toor dal, onion, tomatoes, garlic, ginger, cumin, chillies, spices, coriander, lemon and ghee arranged together.
Think of the ingredients in three layers: lentils create body, the masala supplies depth, and the final tadka carries aroma.

Use the waiting time: chop the onion, tomato, ginger and garlic while the cooker builds pressure. Cook the masala while the pressure releases. Measure the finishing-tadka ingredients before the garlic enters hot ghee; that last stage moves too quickly for cupboard hunting.

Instructions

1. Rinse and optionally soak the dal

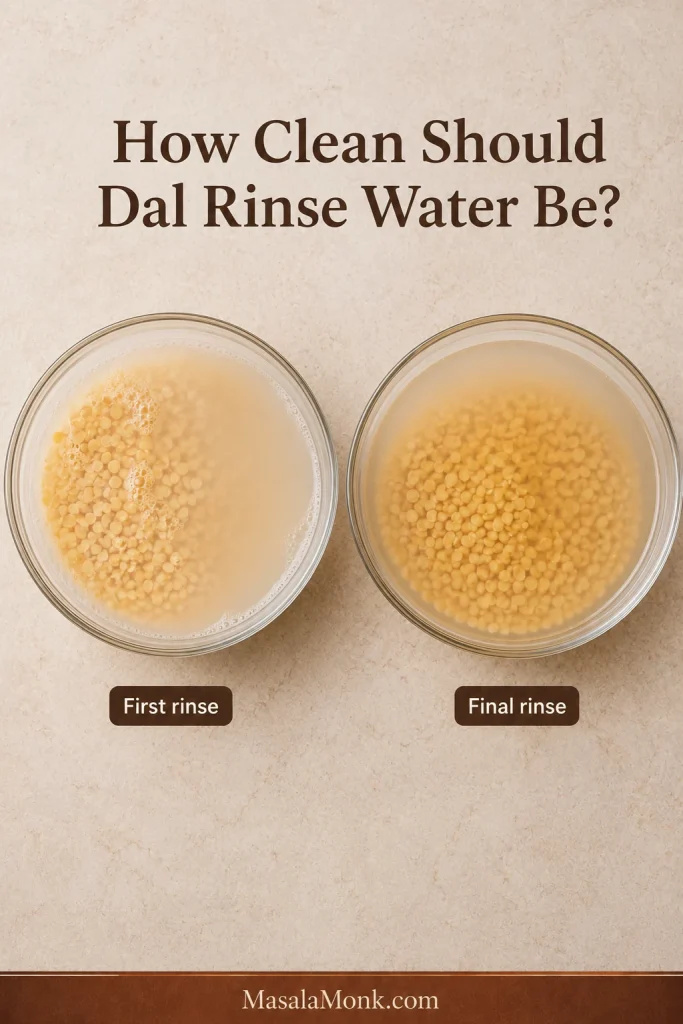
Put the dal in a bowl and rinse it three or four times, rubbing it gently between your fingers, until the water changes from very cloudy to lightly hazy. Drain well.

Soaking for 20–30 minutes is optional for a pressure cooker or Instant Pot, but it helps older lentils cook more evenly. If using an ordinary saucepan, soak toor dal for 1–2 hours; older lentils benefit from the longer end.

Two bowls showing very cloudy first-rinse water and lightly hazy water after repeatedly washing toor dal.
Lightly hazy water is enough; the goal is to remove obvious surface residue, not rinse until the water becomes perfectly transparent.

2. Cook until the lentils completely soften

Add the drained dal, 2¾ cups water, turmeric and ½ teaspoon salt to your cooker.

Choose your cooking method
  • Stovetop pressure cooker: bring to full pressure over medium-high heat. Lower to medium and cook for 8 minutes; use 10 minutes for older, unsoaked lentils. Turn off the heat and let the pressure fall naturally. Cooker designs and burners vary, so use elapsed pressure time and the grain test rather than whistle count.
  • Instant Pot: cook on High Pressure for 7 minutes when soaked or 8 minutes when unsoaked. Allow the pressure to release naturally until the float valve drops; do not force an immediate release for this starchy, expanding food.
  • Saucepan: begin with 4 cups water instead of 2¾ cups. Bring to a boil, skim excessive foam, then simmer partly covered for 45–75 minutes after soaking. Stir occasionally and keep a kettle of hot water nearby; older lentils may need longer.
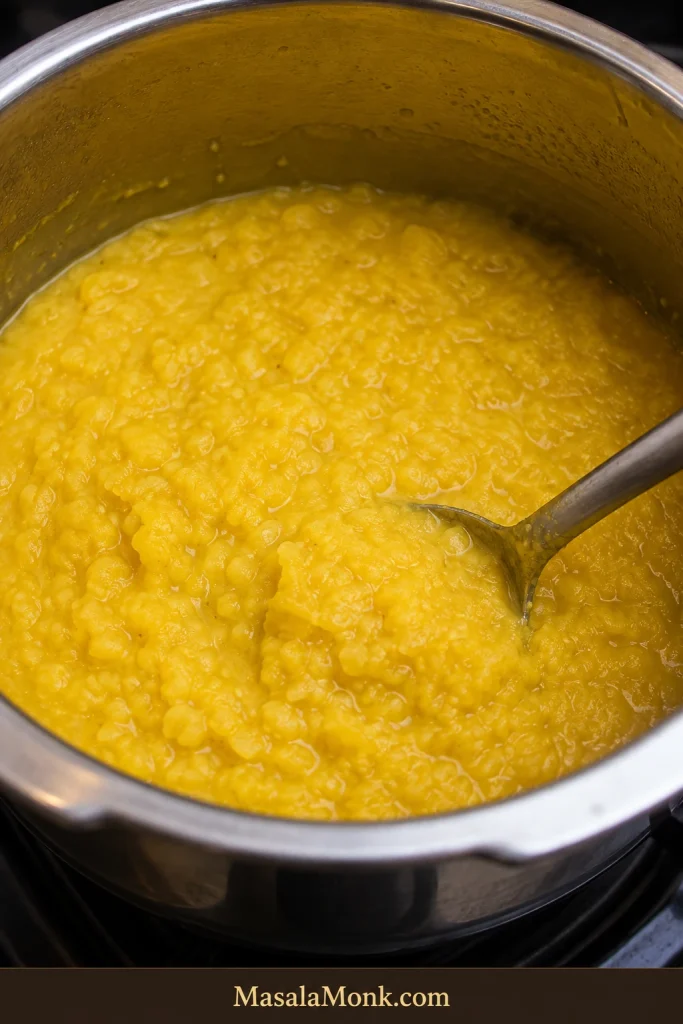
Fully cooked toor dal in a steel pressure cooker, with swollen grains beginning to split and collapse.
Softness matters more than looseness here: water can be adjusted later, but firm lentil centres must be cooked out now.

Pressure-cooker safety: follow the manual for your model. In an Instant Pot, keep lentils, water and other ingredients below the ½ fill line used for expanding or starchy foods; overfilling can obstruct the steam-release path. Never cover or obstruct the valve while pressure is releasing. For model-specific details, check the Instant Pot safety guidance (opens in a new tab).

Using another cooker? Compare pressure cooker, Instant Pot and saucepan timing.

Check the grain, not the clock

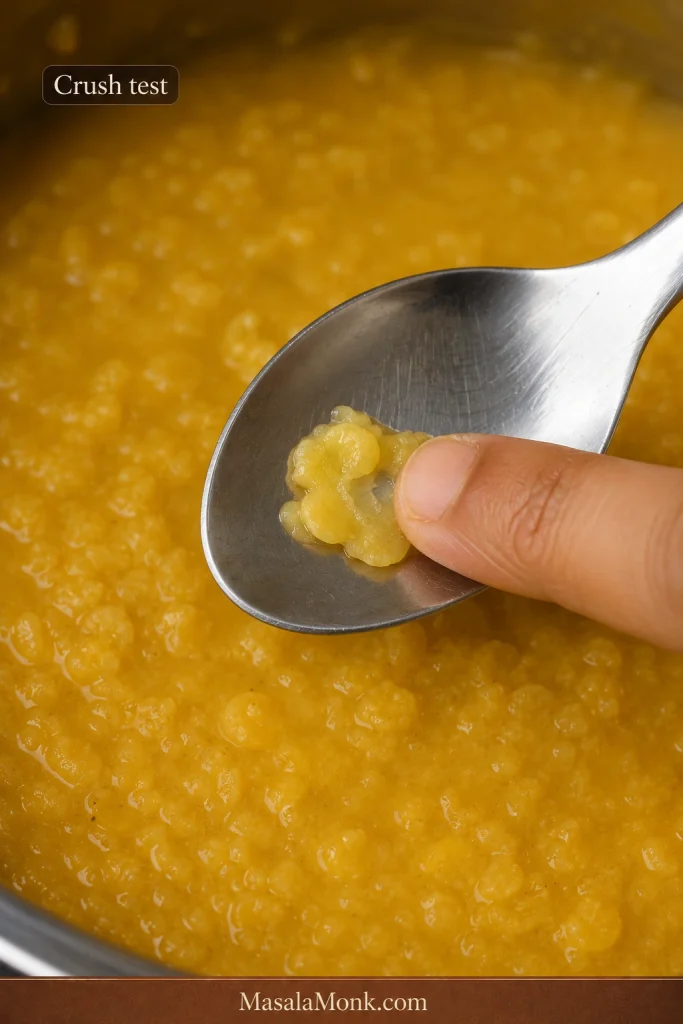
Lift out one grain, let it cool for a few seconds, then press it between your fingers—or crush it against the side of the pot with a spoon. It should collapse easily with no firm or chalky centre. If it still feels grainy, add a splash of hot water and cook it longer. Once the grain yields without resistance, the hardest part is done.

A cooked toor dal grain being pressed between fingertips and collapsing without a firm centre.
This single-grain test outranks the timer because older or drier lentils may need longer even when every measured quantity stays unchanged.

3. Whisk to a creamy texture

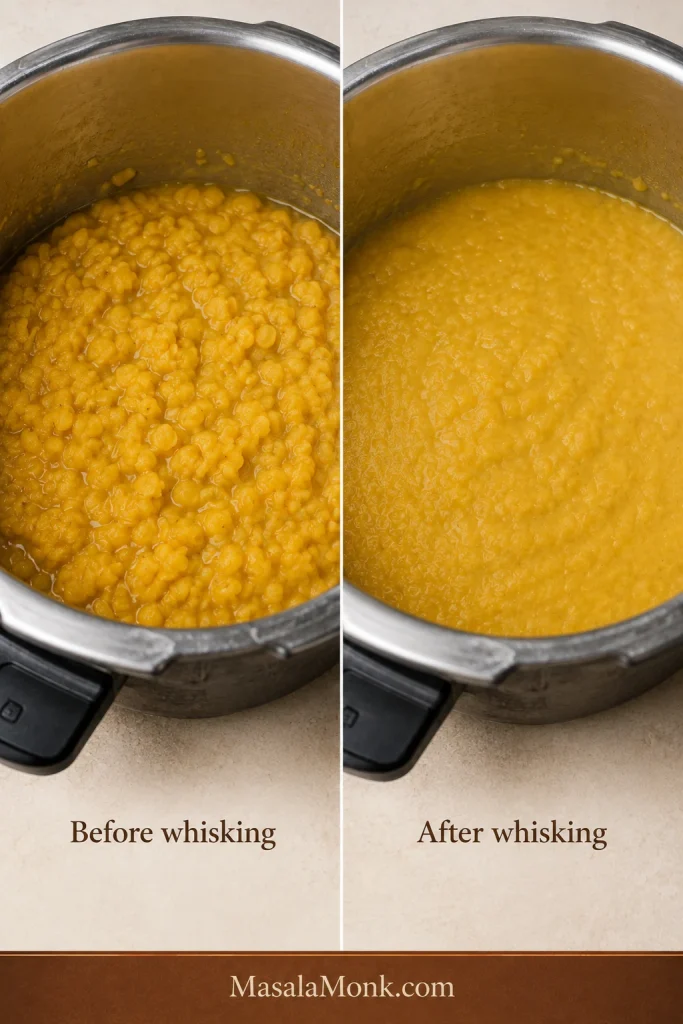
Whisk or mash the cooked dal for 20–30 seconds, breaking down most of the grains while leaving a little natural texture.

The cooker may open to dal far thicker than you expected. That is normal. Hold back the extra water for now; the masala adds moisture, and the final flow is easier to judge once everything is together.

Cooked dal with visible grains beside smoother whisked dal that still retains slight natural texture.
Whisking changes structure, not doneness: it makes softened grains cohesive, but it cannot rescue lentils that remain firm inside.

4. Build the onion-tomato masala

Heat 1½ tablespoons ghee or oil in a medium pan over medium heat. Add the cumin. It should sizzle promptly and smell nutty within 15–20 seconds. If it sits silently, the fat is not hot enough.

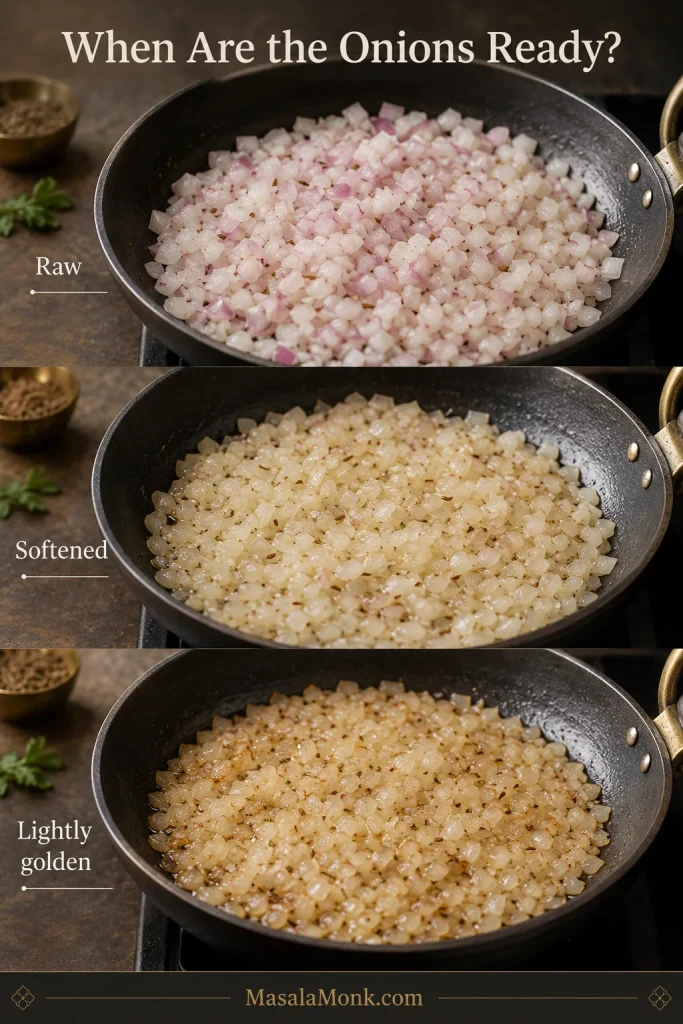
Add the onion with ⅛ teaspoon of the measured salt. Cook for 6–8 minutes, stirring regularly, until soft and golden at the edges and free of its raw sharpness.

Chopped onions shown raw, softened and finally translucent with lightly golden edges in a dark pan.
Edge colour is the safest stopping cue because it removes raw onion sharpness without introducing the heaviness of deep browning.

Add the ginger, chopped garlic and green chilli. Cook for 60–90 seconds, until fragrant and the garlic begins turning pale gold.
Reduce the tomatoes until glossy

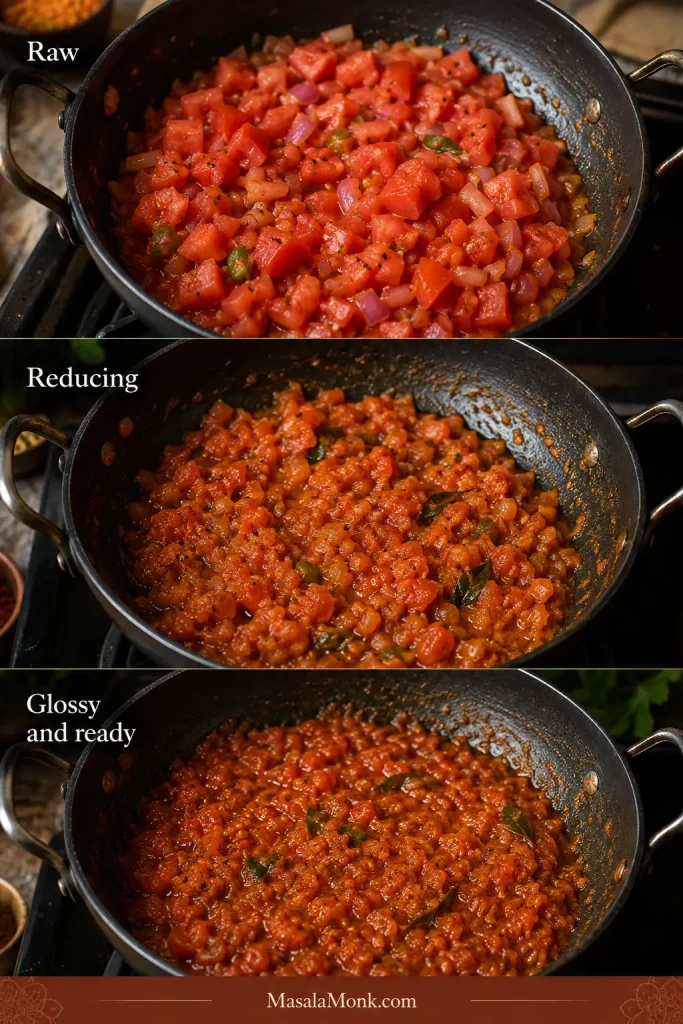
Add the tomatoes. Cook over medium heat for 7–10 minutes, stirring and pressing them against the pan, until they collapse into the onion, lose their raw smell and form a cohesive, glossy masala. Small beads of fat may appear around the edges.

The masala should smell rounder and sweeter now. This is the patient part: extra butter later cannot replace tomatoes that still taste raw.

Tomato masala progressing from watery chopped tomatoes to a thick, cohesive and glossy onion-tomato mixture.
Judge readiness by movement as well as colour: once done, tomato and onion move together instead of releasing watery liquid separately.

Lower the heat. Add ground coriander and the first ½ teaspoon Kashmiri chilli powder. Stir for 20–30 seconds. If the pan looks dry, add one tablespoon water rather than letting the spices scorch.

5. Combine, season and set the consistency

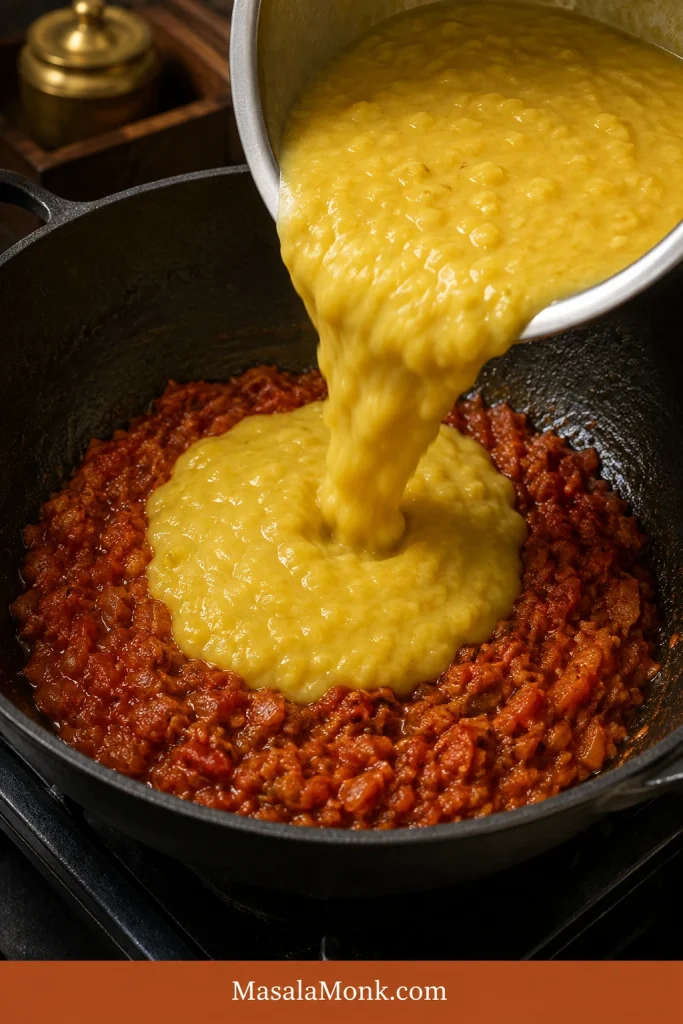
Pour the cooked dal into the masala pan, or scrape the masala into the cooker if that gives you more room. Stir until the colour and texture are even.

Soft yellow dal being poured into reduced onion-tomato masala in a dark cooking pan.
A brief simmer after combining lets the masala season the lentils evenly instead of remaining concentrated in isolated pockets.

Add ½ cup hot water, the garam masala, crushed kasuri methi and ½ teaspoon of the measured salt. Reserve the final ⅛ teaspoon until after tasting. Bring the dal to a gentle simmer and cook uncovered for 4–6 minutes, stirring once or twice.

Set the final consistency

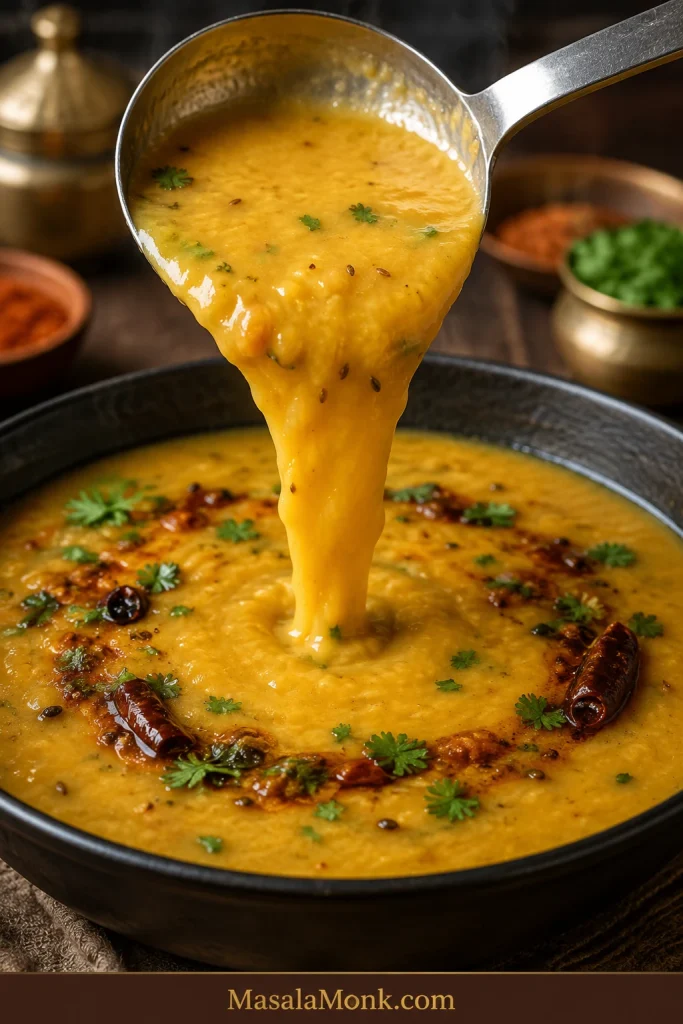
Judge the texture while the dal is hot. It should pour from a ladle in one creamy stream, then settle back into the pan. This flow carries the tadka through the dal instead of swallowing it.

Creamy yellow dal falling from a steel ladle into a pot in a broad, continuous ribbon.
Watch the ribbon’s leading edge: it should fall as one creamy stream rather than break into lumps or leak clear liquid.

If the dal drops in a mound, add hot water in ¼-cup/60 ml increments. If clear liquid runs ahead of the lentils, whisk briefly and simmer uncovered until the mixture comes together. Stop while it is a little looser than you want at the table; it will thicken as it rests.

Still unsure about the texture? Use the visual Dal Tadka consistency guide.

Taste the dal before making the tadka: check the salt, tomato sharpness and body. Add the reserved ⅛ teaspoon salt if needed. If the tomato still tastes raw or sharp, simmer for another 2–3 minutes.

Stir in the optional butter or cream, then turn off the heat. Hold the lemon until after the tadka so you can judge the complete spoonful and keep dairy smooth. After the fresh tempering goes in, avoid prolonged simmering; it will flatten the aroma.

6. Make the garlic tadka

Five-step sequence showing cumin, sliced garlic, broken dried chilli, hing and Kashmiri chilli added off the heat.
The order follows heat tolerance: cumin needs the longest contact, garlic needs controlled browning, and chilli powder needs residual heat only.

Put the serving bowl close to the stove and measure every tadka ingredient before heating the ghee. Once the garlic starts colouring, there is no useful pause button.

Heat 1½ tablespoons ghee in a small, deep pan over medium heat until fully melted and shimmering, but not smoking. Add the cumin seeds and let them sizzle actively for about 10–20 seconds.

Control the garlic colour

Add the evenly sliced garlic and reduce the heat to medium-low. Cook, swirling or stirring, until the edges begin to turn pale gold. Add the dried red chillies, then add the hing for the final 5–10 seconds. Pull the pan when the garlic is pale to medium gold; it will continue darkening in the hot ghee.

Three pans comparing pale garlic, evenly golden garlic and dark burnt garlic slices frying in ghee.
Garlic continues darkening after the pan leaves the flame, so stop one shade earlier than the colour wanted on the finished dal.
Bloom, pour and divide the tadka

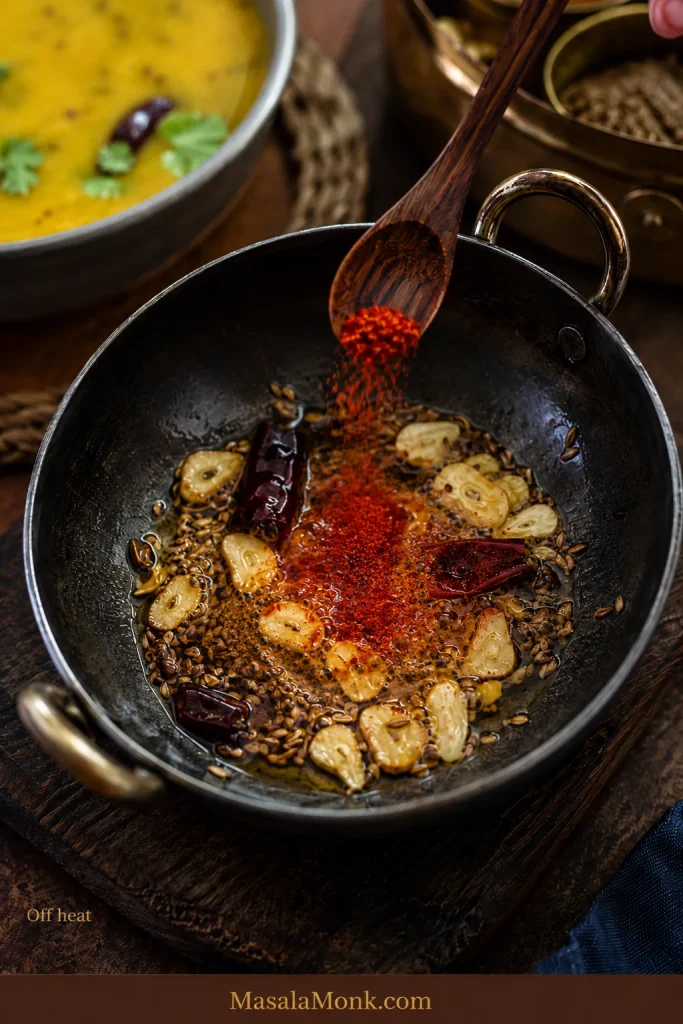
With the pan off the heat, add ½ teaspoon Kashmiri chilli powder and swirl immediately. The ghee should turn red without the chilli powder blackening.

Kashmiri chilli powder being added to hot ghee with cumin, golden garlic and dried chilli away from the burner.
Residual heat is enough to colour the ghee; returning the pan to the flame adds no benefit and can scorch the chilli powder.

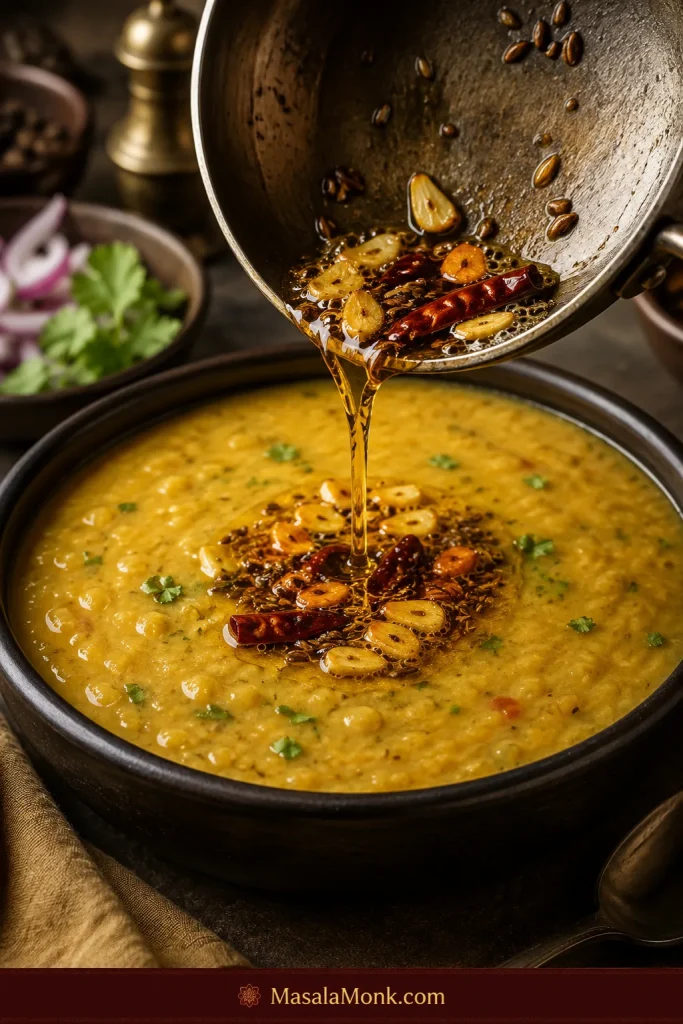
Pour about three-quarters of the sizzling tadka over the dal while the ghee is still hot and aromatic.

A small pan pouring red-gold ghee with cumin, sliced garlic and dried chilli over creamy yellow dal.
The brief crackle confirms the tadka is still hot enough to release aroma, although the surface should remain mostly creamy rather than oily.

Stir once so most of the tempering travels through the pot, then spoon the remainder over the surface and finish with chopped coriander.

7. Let the tadka settle, then serve

Let the tadka sit for a moment, then taste a spoonful that catches both dal and tempering.

If the dal tightened while the tadka was cooking, gently stir in warm water one tablespoon at a time. Once the texture is right, add lemon ½ teaspoon at a time, up to 2 teaspoons, if the spoonful still needs lift.

Serve while the garlic is still fragrant and the red ghee remains visible. Dal continues thickening on the way to the table, so finish it slightly looser than the texture you want at serving. When rice is part of the meal, MasalaMonk’s guide to cooking rice covers basmati, stovetop, cooker and Instant Pot methods.

Close-up of creamy Dal Tadka with restrained red ghee, thin golden garlic, cumin, dried chilli and coriander.
Use the exposed yellow dal as a proportion check: if tempering hides most of the surface, the finish is heavier than necessary.

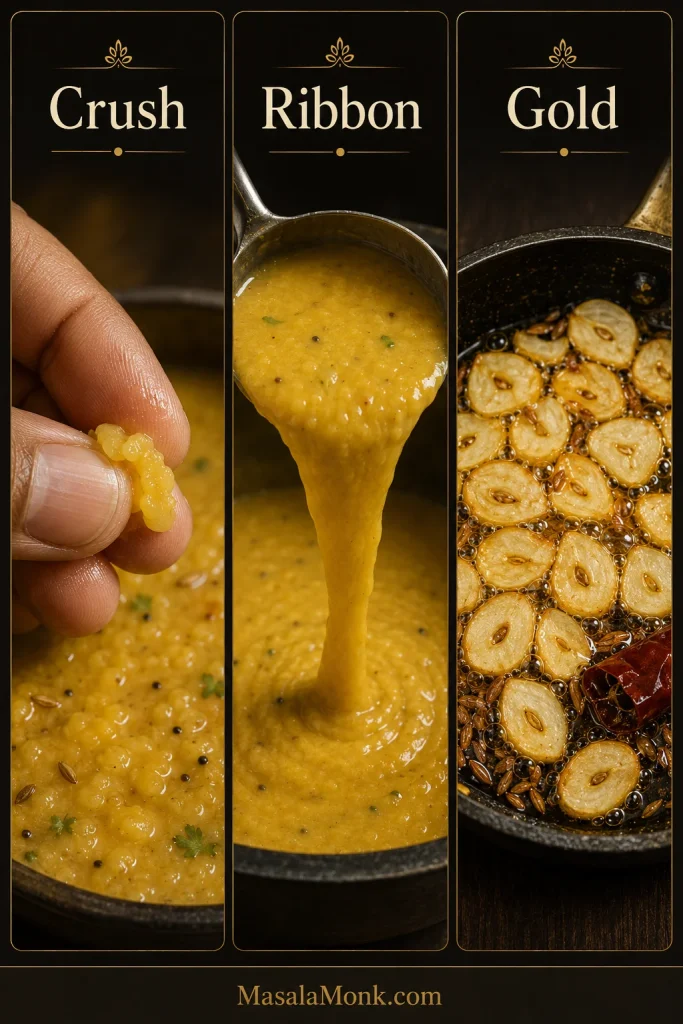
Crush. Ribbon. Gold. Crush one lentil: it should collapse. Lift one ladle: the dal should fall in a broad creamy ribbon. Look at the garlic: it should be golden. When all three agree, carry the dal to the table.

Three panels showing a soft lentil crushing, creamy dal ribboning from a ladle and sliced garlic frying until golden.
These checks isolate three failure points—lentil doneness, final consistency and tempering control—so a beautiful surface cannot hide an undercooked base.

Make Dal Tadka work in your kitchen

The main recipe gets dinner on the table. The sections below help when your lentils are older, your cooker behaves differently or you prefer the dal lighter, thicker or smokier.

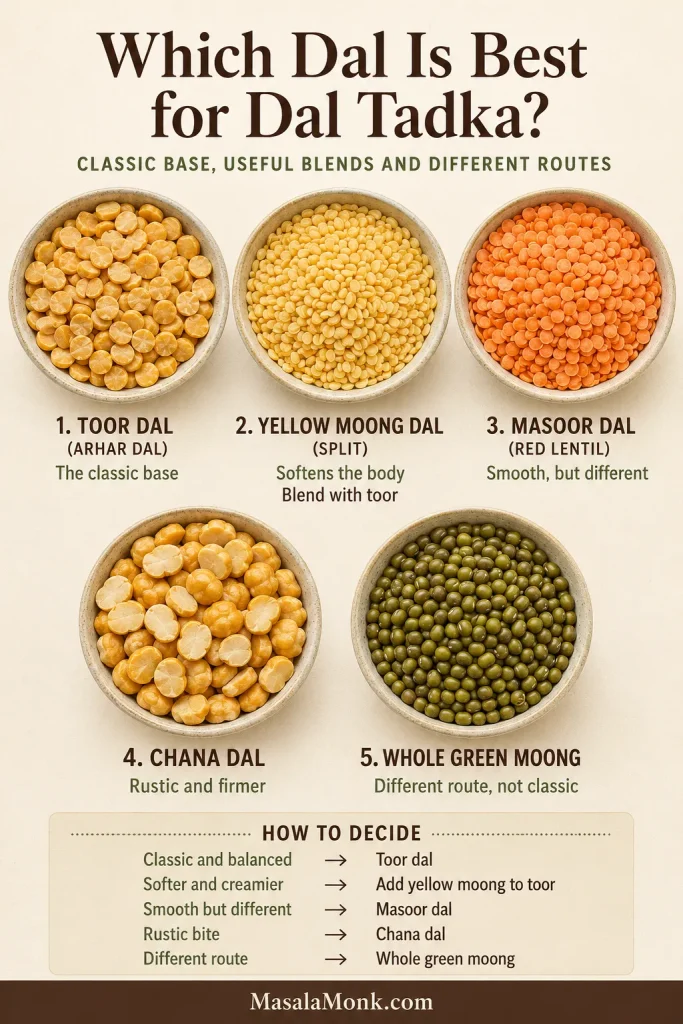
Which dal is used in Dal Tadka?

For a Punjabi-style Dal Tadka, toor dal is the most dependable starting point. It may also be labelled arhar dal, tur dal, tuvar dal or split pigeon peas. These names refer to the same lentil.

Some restaurants mix in yellow moong, masoor or a little chana dal. That does not make one version authentic and another wrong. It changes what the spoon feels like: moong softens the body, masoor breaks down quickly, and chana leaves a faint nutty texture.

Five labelled bowls containing toor dal, yellow moong, red masoor, chana dal and whole green moong.
Choose by spoon feel, not colour alone: toor stays classic, moong softens, masoor smooths and chana leaves more visible texture.

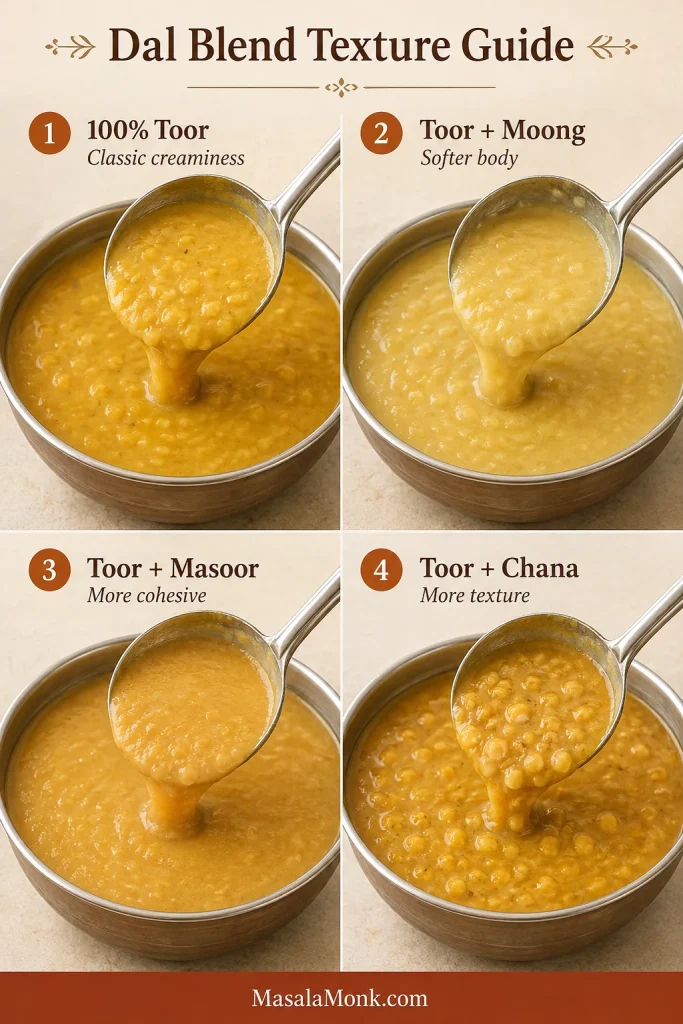
How common dal blends change the texture

Dal choiceResultWhat changes
100% toor/arhar dalClassic, creamy and clean-tastingBest default for this recipe
¾ toor + ¼ yellow moongSofter, lighter and slightly creamierCooks at a similar pace and is the easiest blend to use
¾ toor + ¼ masoorVery soft and cohesive because masoor breaks down earlierBegin with the all-toor timing; let the toor grains decide doneness and expect to adjust the water
Toor with a little chana dalNutty with more visible textureSoak first; chana dal decides the minimum cooking time
100% yellow moongLight, mild and quick-cookingProduces a different everyday dal and deserves its own method
Whole green moongEarthy, hearty and texturedNeeds soaking and a longer cook; do not use as a direct swap here
How common lentil choices change the texture and cooking behaviour of Dal Tadka.
Four panels comparing cooked all-toor, toor-moong, toor-masoor and toor-chana dal blends.
Blend ratios change the dal’s body before butter or cream is added, making lentil choice the recipe’s first texture decision.

For the clearest starting point, use 200 g toor dal. For a softer blend, use 150 g toor plus 50 g yellow moong. Begin checking at the same time, then let the softened grain decide whether it needs longer.

Ingredients that shape the flavour

Garlic works twice. Chopped garlic melts into the masala, while evenly sliced garlic gives the fresh tempering its recognisable aroma and golden pieces.

Keep kasuri methi and garam masala in the background. One teaspoon kasuri methi gives the dal its warm restaurant-style aroma, while ¼ teaspoon garam masala deepens the base without taking over. If your blend smells flat, MasalaMonk’s homemade garam masala recipe explains how the whole-spice balance is built.

No kasuri methi? Skip it instead of replacing it with fresh fenugreek. The cumin-garlic tempering will still give the dal a satisfying finish.

Handle Kashmiri chilli and hing gently. Take the tadka pan off the flame before adding the chilli powder so it blooms red without scorching. Hing needs just the final few seconds in the hot fat, and strong or pure hing needs far less than a mild compounded product. For gluten-free Dal Tadka, check the label because some compounded asafoetida contains wheat flour.

Regional note: this Punjabi version is led by cumin and garlic. Mustard seeds and curry leaves are central to many other regional dals, especially in South Indian cooking, but this recipe does not need them.

Pressure cooker, Instant Pot or saucepan?

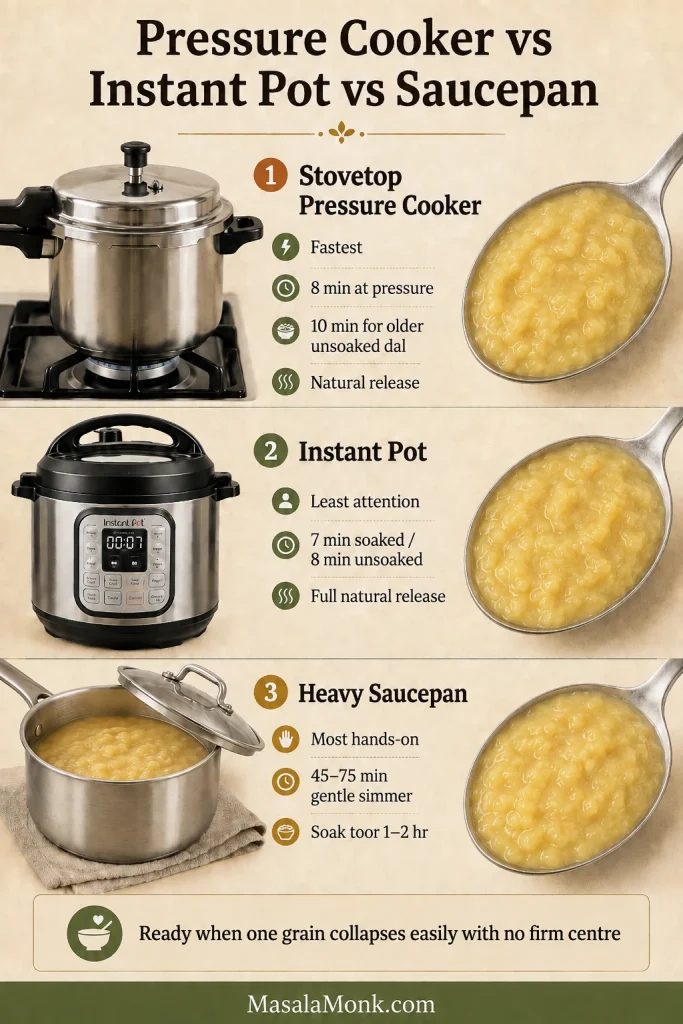
A stovetop pressure cooker is fastest, an Instant Pot asks for the least attention, and a saucepan lets you watch the lentils soften. Choose the method that fits how you like to cook; the grain test stays the same.

MethodSoakingStarting waterFirst timing windowReady when
Stovetop pressure cookerOptional 20–30 min2¾ cups / 660 ml8 min at pressure; 10 for older unsoaked dal; natural releaseA grain collapses immediately with no chalky centre
Instant PotOptional 20–30 min2¾ cups / 660 ml7 min soaked or 8 min unsoaked; full natural releaseThe dal whisks creamy with almost no resistance
Heavy saucepan1–2 hr for toorBegin with 4 cups / 950 ml45–75 min gentle simmer; older dal may need longerNo firm grains remain and the liquid no longer looks separate
Starting points for toor dal in a stovetop pressure cooker, Instant Pot or heavy saucepan.
Stovetop pressure cooker, Instant Pot and saucepan shown with spoonfuls of fully softened plain toor dal.
Pressure time and saucepan simmer time measure different things; compare these methods by attention and final softness rather than numbers alone.

Cooker size, heat and lentil age vary; the softened grain gives the final answer.

Return to the cooking step · Check the final consistency

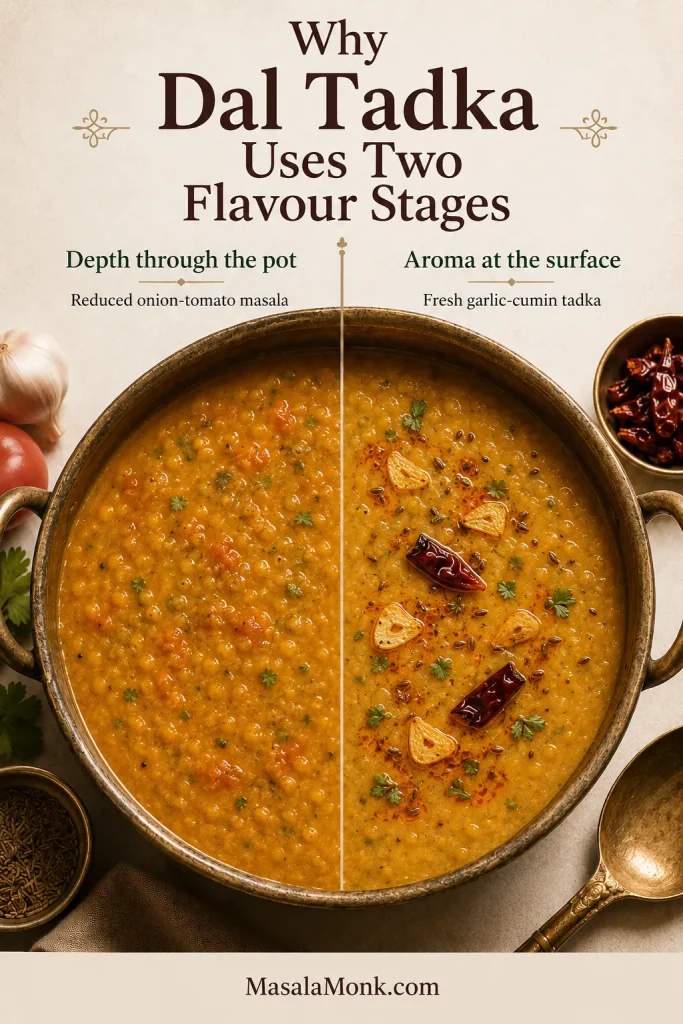
Why restaurant-style dal needs two flavour stages

Restaurant-style Dal Tadka tastes layered because each stage keeps its own job. Tender lentils create the creamy body. The reduced onion-tomato masala carries sweetness and savoury depth through every spoonful. The garlic-cumin tadka goes in at the end, while its aroma is still vivid. That is where the richness comes from—not oil floating on top.

Split pot showing onion-tomato masala mixed through dal and fresh garlic-cumin tadka visible at the surface.
Keep the final tadka out of a prolonged simmer: cooked masala tolerates time, but fresh garlic-cumin aroma quickly becomes quieter.

How thick should Dal Tadka be?

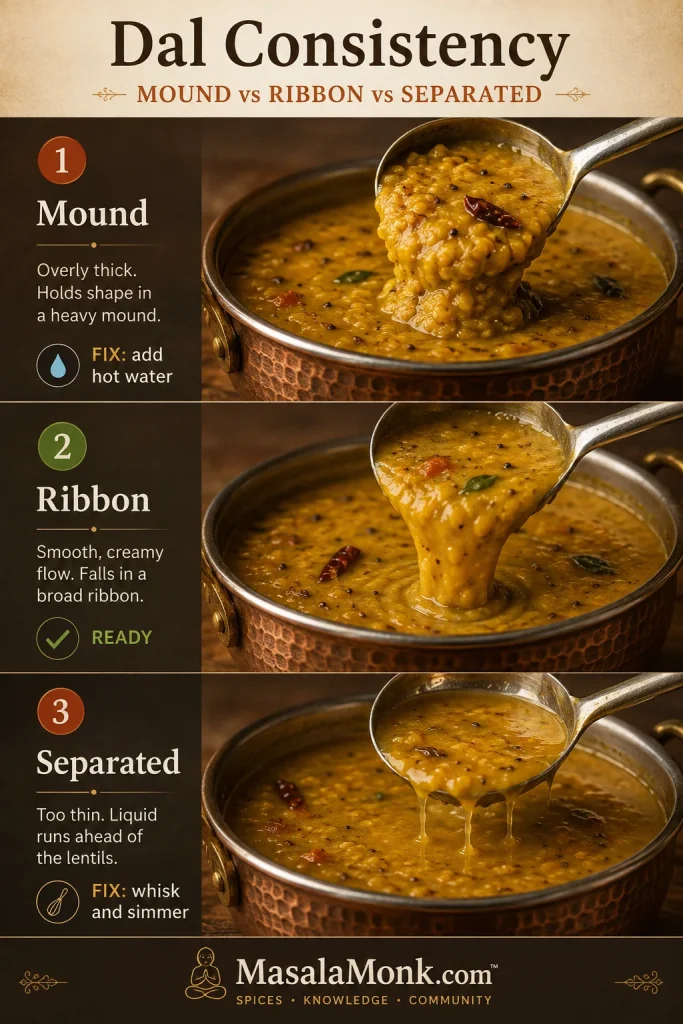
The ideal texture depends on how you are serving it, but restaurant-style Dal Tadka should be creamy and pourable: cohesive on the spoon, then willing to flow back into the pot.

What you seeWhat it meansWhat to do
Dal sits in a mound and barely movesToo thickAdd hot water ¼ cup/60 ml at a time
Dal falls in a broad ribbon and settles slowlyCreamy restaurant-style flowStop adjusting; it will thicken slightly as it rests
Clear liquid runs ahead of lentil solidsToo thin or not yet cohesiveWhisk briefly and simmer uncovered
Dal feels creamy but turns stiff after 10 minutesNormal cooling and starch thickeningKeep it slightly loose before serving
Use the ladle flow—not thickness in the pot alone—to judge the final consistency.

Use the comparison below to identify the problem before adjusting. Change one thing at a time, then give the dal a moment to settle before judging again. For a sturdy flatbread such as MasalaMonk’s jowar-bajra roti, stop a little thicker; for rice, leave it looser. If dinner runs five minutes late, restore the flow just before serving.

Three panels showing overly thick dal, correctly ribboning dal and separated dal with watery liquid ahead of the lentils.
The same bowl can be too thick or merely separated, so watch how it falls before deciding whether to add water or simmer.

Dal Tadka troubleshooting

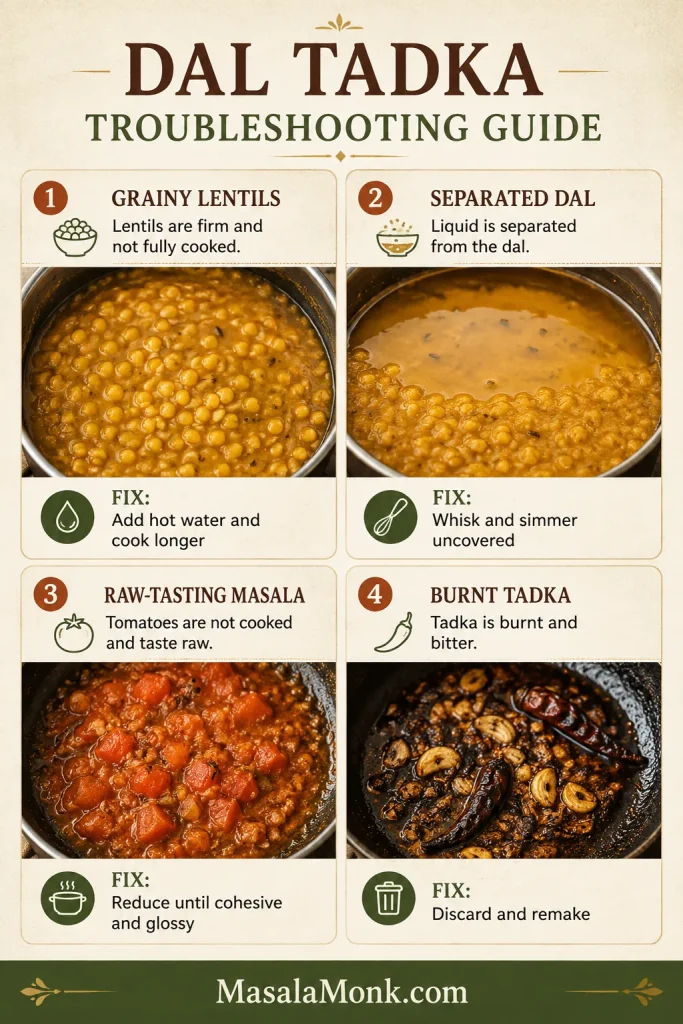
Most disappointing pots are recoverable. Before reaching for more spice, ask which stage needs another minute. Grainy dal needs cooking, separated dal needs whisking and reduction, and a weak finish usually needs balance or a fresh tempering.

Four panels showing grainy lentils, separated dal, raw tomato masala and burnt tadka with a fix for each.
Four visible failures point to different causes; diagnose the texture or colour first instead of automatically adding more spice, water or fat.

Fix texture and consistency problems

ProblemLikely causeMost useful fix
Watery or separated dalUndercooked lentils, too much adjustment water or too little whiskingConfirm the grains are soft, whisk briefly and simmer uncovered; do not add flour or starch
Grainy dalOld lentils, hard water or insufficient pressure timeAdd ¼–½ cup hot water and pressure-cook 2–3 minutes more, or simmer covered until the grains collapse; if this repeats across batches, try filtered water
Dal became stiff while waitingNormal starch thickening as it coolsFold in warm water a tablespoon at a time; recheck salt only after the texture is right
Correct the physical texture before changing the seasoning.

Fix flavour and tempering problems

ProblemLikely causeMost useful fix
Flat flavourToo little salt or acidity, raw masala, or a tadka made too earlyCheck salt first, then add lemon by the teaspoon; cook raw tomato longer or make a small fresh tadka
Bitter tadkaGarlic or chilli powder burnedDiscard and remake the small tadka; stop garlic at pale-to-medium gold and add chilli powder off heat
Too much oil on topThe tadka was too large for the amount of dalSpoon off excess and loosen the dal if needed; use the lighter home-style quantity next time
Tomato tastes sharp or rawThe masala was combined too soonSimmer before adding the final tadka until the raw smell disappears and the base looks cohesive
Garlic softened or disappearedUneven slices or all the tadka was stirred through earlySlice evenly, fry just before serving and reserve part of the tadka for the surface
Match the flavour problem to the stage that created it.

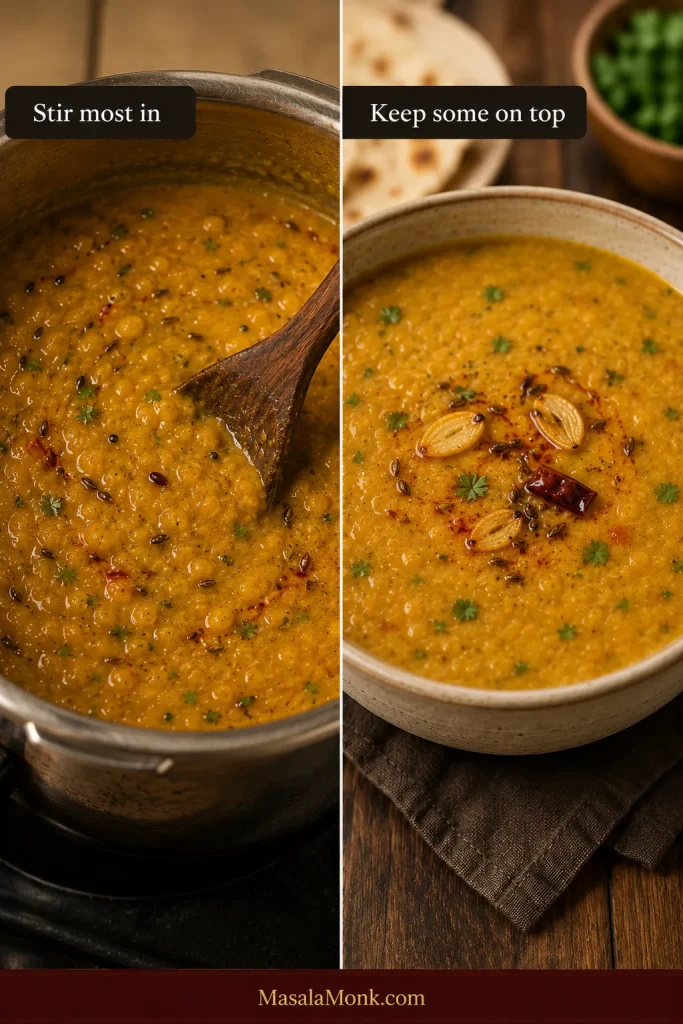
When the garlic and red ghee disappear into the pot, the problem is usually distribution rather than quantity. Stir most of the tadka through for flavour in every serving, but reserve a smaller portion for the surface so the freshest aroma and crispest garlic remain noticeable.

Split image showing tadka stirred through a pot of dal and a smaller portion left visible on the served bowl.
Dividing the tadka solves two jobs at once: flavour throughout the pot and a fresher aromatic layer at the surface.

When the texture is right but the flavour is flat

When the texture is right but the flavour remains dull, taste in this order: salt, acidity, tomato reduction and tadka freshness. If the garlic is dark brown, the chilli smells scorched or the fat tastes bitter, remake the tempering. Two fresh minutes are better than letting burnt garlic follow every spoonful.

Back to the recipe card · Recheck consistency · Back to top ↑

How to make the dal dhaba-style

For bolder dhaba-style dal, change four things instead of doubling every spice.

  1. Keep the dal slightly thicker, but still loose enough to settle naturally.
  2. Add two extra sliced garlic cloves to the final tadka.
  3. Taste first; if the kasuri methi is too quiet, add up to another ½ teaspoon during the final simmer.
  4. Use a brief charcoal dhungar for smoke.

How to smoke the dal without making it bitter

The same brief charcoal method appears in MasalaMonk’s butter chicken recipe, but Dal Tadka needs a lighter exposure.

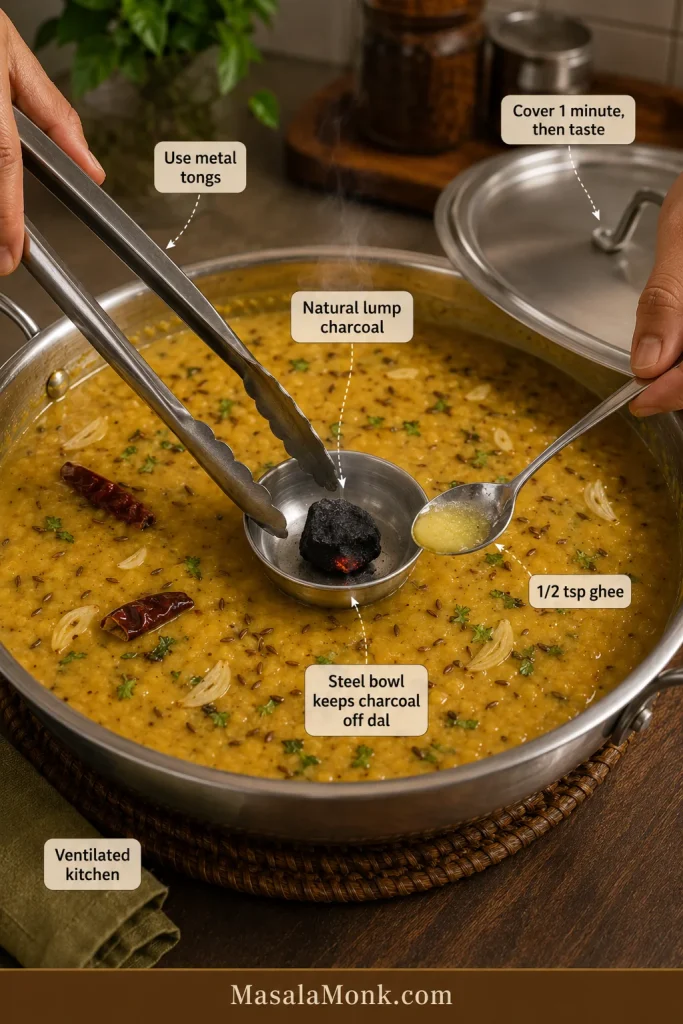
Working beneath strong ventilation, heat the 1-inch/2.5 cm piece of natural lump charcoal—not a self-lighting briquette—over a flame until it glows red in places and develops a light grey surface. Handle it only with tongs.

Put a small steel bowl in the centre of the finished dal and place the hot charcoal inside it without letting the charcoal touch the food. Drizzle ½ teaspoon ghee over the charcoal and immediately cover the pot.

Metal tongs holding hot charcoal in a steel bowl inside dal while a small spoon pours ghee over it.
Treat one minute as the first checkpoint, not a minimum target; smoke is easy to add, whereas oversmoked dal cannot be corrected.

Start with 60 seconds. Uncover, remove the bowl and taste. Smoke is easy to add and impossible to remove. Repeat for one more minute if you deliberately want a stronger smoke.

Leave the used charcoal in a heatproof metal container until it is completely cold before disposal.

Back to the recipe card · Go to serving ideas · Back to top ↑

Useful variations

Once the lentils are tender and the tadka is fresh, the recipe is easy to adapt. Change one thing at a time so the garlic, tomato and spices still taste as though they belong together.

Vegan Dal Tadka

Use sunflower, rice bran, canola or another neutral oil for the masala and tadka, then skip butter and cream. Mustard oil gives the dal a sharper, more mustard-led flavour; choose it when that is the direction you want.

No-onion, no-garlic Dal Tadka

Skip the onion and garlic. Use ginger, cumin, tomato and kasuri methi, then finish with lemon. Use up to the full scant ⅛ teaspoon hing for a mild compounded product; use considerably less when it is strong or pure. A South Indian no-onion version may use mustard seeds, curry leaves and a different spice balance.

Lasooni or extra-garlic Dal Tadka

Add two or three extra garlic cloves to the final tadka and reserve the crispest slices for the top. For a gentler garlic flavour, use two cloves in the masala and four in the tadka. Fried garlic creates the recognisable lasooni aroma more clearly than simply adding more crushed garlic to the base.

Milder family version

Use one green chilli or omit it, choose mild Kashmiri chilli for colour and leave the dried chilli whole so it perfumes the ghee without releasing as much heat. Adults can add chilli at the table.

Fresh, lighter home-style version

Use 1 tablespoon oil in the masala and 1 tablespoon ghee or oil in the tadka. Cook the tomatoes for 3–5 minutes, until softened but still bright; skip cream and smoke, then finish with lemon and coriander. A crisp cucumber salad makes a natural cool contrast.

Dal Tadka vs Dal Fry: what is the difference?

Restaurants and home kitchens often use the names loosely, but the usual distinction is about technique.

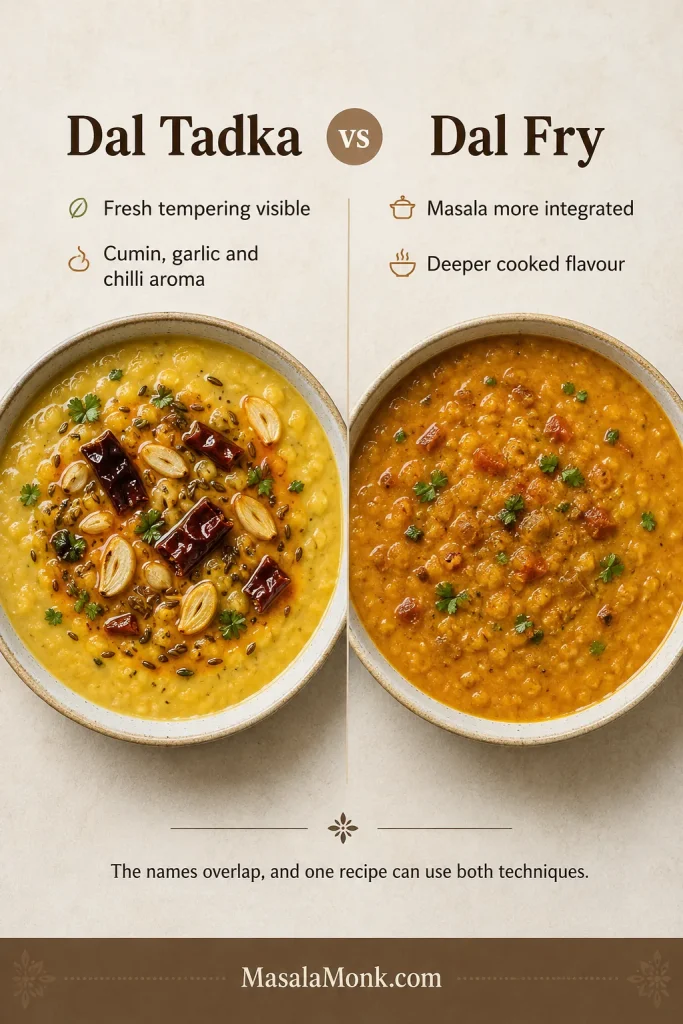
FeatureDal TadkaDal Fry
Defining moveA fresh tempering is poured over or stirred into the finished dalCooked dal is simmered in a fried onion-tomato masala
AppearanceOften has visible ghee, garlic and chilli on topUsually looks more uniformly mixed
Flavour emphasisFresh cumin, garlic and chilli aromaDeeper cooked masala flavour
Can a recipe use both?YesYes
A final fresh tempering is the clearest practical cue for Dal Tadka.
Dal Tadka with visible surface tempering beside Dal Fry with masala mixed more evenly throughout.
Because one recipe can use both techniques, identify the difference by where the masala and fresh tempering do their work.

This recipe uses both a cooked masala base and a final tempering, a common restaurant-style approach. The fresh cumin, garlic and chilli on top make the dish unmistakably Dal Tadka.

What to serve with Dal Tadka

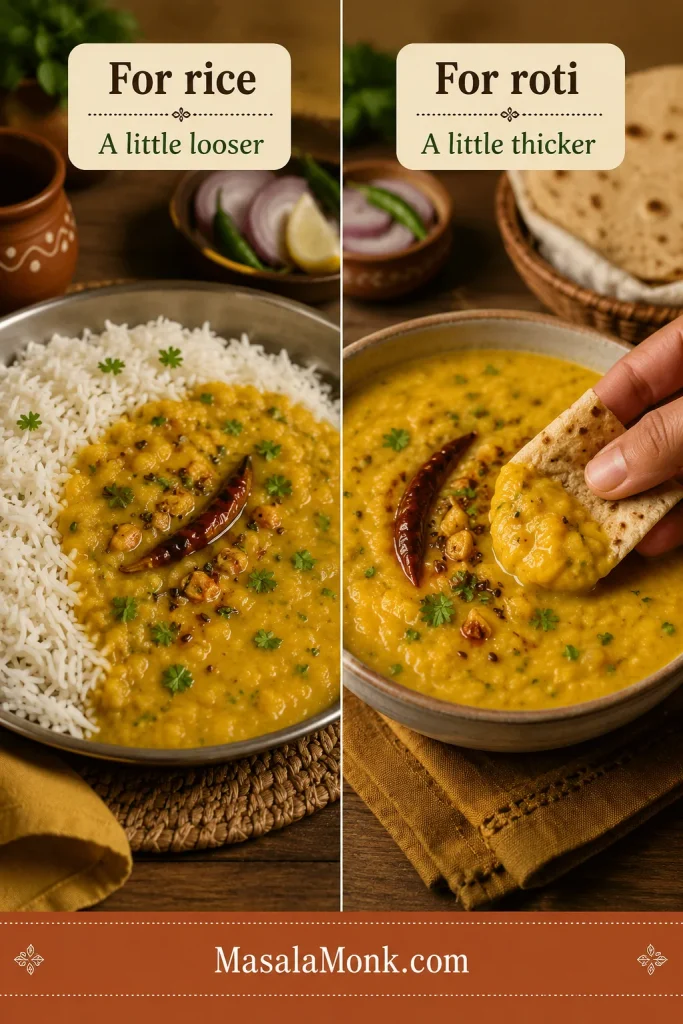
Dal Tadka can anchor a quiet weekday dinner or sit within a larger North Indian spread. For the simplest meal, rice, dal, curd and pickle are enough. With rotis, keep the dal slightly thicker and add a dry vegetable or cooling raita alongside.

Looser Dal Tadka served with basmati rice beside slightly thicker dal being scooped with roti.
Rice benefits from dal that flows between the grains, while roti needs enough body to stay on a torn piece without becoming paste-like.
  • With rice: basmati rice, jeera rice or plain steamed rice
  • With bread: roti, phulka, naan, tandoori roti or paratha
  • For contrast: cucumber raita, plain curd, sliced onion, lemon and pickle; MasalaMonk’s palak raita makes a more substantial cooling side
  • For a fuller meal: a dry vegetable, papad and a fresh salad

Leave the dal looser for rice and slightly thicker for roti. That small adjustment changes how naturally it sits with the rest of the meal.

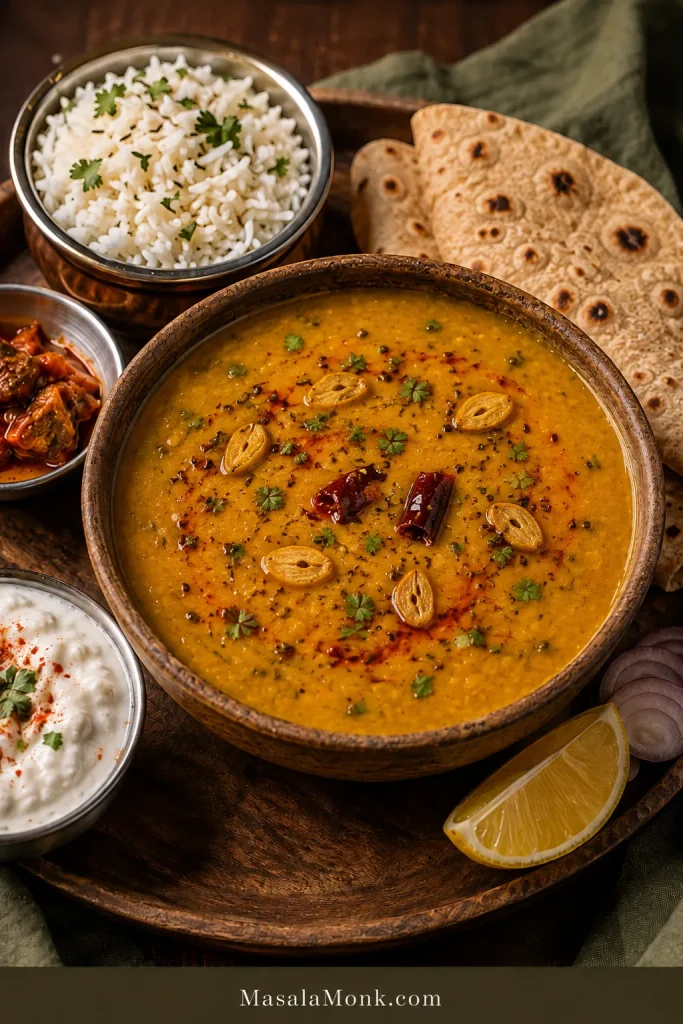
Dal Tadka served with basmati rice, rotis, raita, Indian pickle, lemon and sliced red onion.
Build contrast with one cooling side and one sharp side: raita softens the chilli, while pickle or lemon keeps the creamy dal lively.

Make ahead, store and reheat

Dal is generous to tomorrow’s dinner, but its texture and aroma need different treatment: cool the base promptly, then restore the flow and make a fresh tadka when you reheat it.

Best make-ahead method

Cook the dal and onion-tomato base in advance, but hold back the serving-time tempering. Reheat the portion you need, restore the consistency, then check the salt and make a fresh tadka before serving. For Indian meal prep, store the base in portions and finish each one as it goes to the table.

Refrigerator

Transfer the dal to shallow covered containers and refrigerate at 40°F/4°C or below within two hours—or within one hour when the room is above 90°F/32°C. Use it within 3–4 days. These limits follow the USDA leftovers guidance (opens in a new tab). The dal will become substantially thicker as it chills.

Freezer

Freeze the cooked dal and masala base without the final tadka in meal-sized portions. For best texture and flavour, use within about 2–3 months. Thaw in the refrigerator—or reheat from frozen slowly in a saucepan—then add a new tadka before serving.

How to reheat without ruining the texture

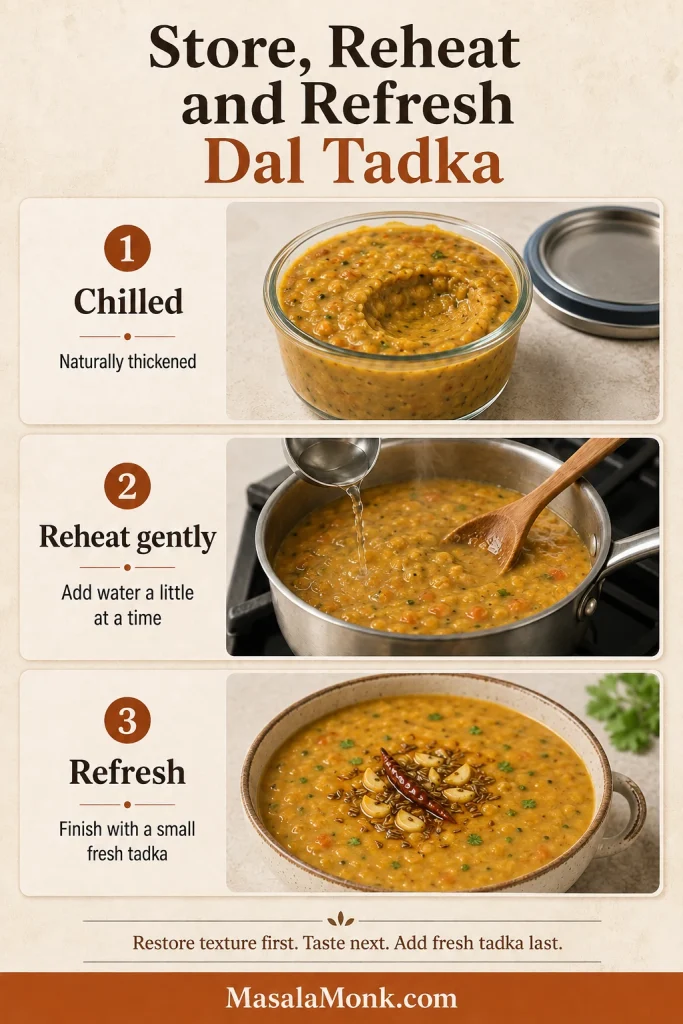
Put the dal in a saucepan with a splash of water. Reheat gently, stirring as it loosens, until steaming hot throughout—165°F/74°C if you check with a thermometer. Add a little more as needed until the dal is creamy and pourable again. Restore the consistency first, then taste for salt and acidity because dilution changes both.

Three stages showing chilled thick dal, gentle reheating with added water and refreshed dal finished with fresh tadka.
Restore the consistency before correcting salt or lemon because added water changes both; make the fresh tadka only after the texture is right.

Back to the recipe card · Serving ideas · Back to top ↑

Frequently asked questions

Can I make Dal Tadka without a pressure cooker?

Yes. Soak the toor dal for 1–2 hours, begin with about 4 cups/950 ml water and simmer it in a heavy saucepan until every grain crushes easily. Expect roughly 45–75 minutes after soaking, and longer for particularly old lentils.

Can I use red lentils instead of toor dal?

You can make a good tarka dal with red lentils, but it will not behave exactly like this Punjabi toor-dal recipe. Red lentils cook faster, break down more completely and usually need less time.

Can I use packaged Dal Tadka masala?

Packaged Dal Tadka masala can work. Add it conservatively to the cooked onion-tomato base, and check whether the blend already contains salt, chilli, dried mango or kasuri methi before adding the recipe’s full seasoning. A packet can simplify the base; freshly bloomed cumin, garlic and chilli still give the finished dal its clearest aroma, so keep the fresh garlic tadka.

Can I make Dal Tadka without tomato?

Tomato is optional. Cook the onion until properly golden, then build the base with ginger, garlic and spices. The dal will be less red and slightly less sweet. Begin with ⅛ teaspoon amchur or 1 teaspoon lemon juice after tasting, then add more if needed.

Can I double the recipe?

Doubling works, provided the cooker remains within the manufacturer’s limit for expanding foods. In an Instant Pot, the combined lentils, water and other ingredients must stay below the ½ line. Ingredient quantities can double, but pressure time usually does not. Scale salt and chilli conservatively at first, then adjust after combining. A large batch is often better with two smaller tadkas than one overcrowded pan.

Return to the recipe card · Back to top ↑

The final tadka is worth waiting for

Cook the lentils ahead. Prepare the masala while the cooker releases. Adjust the consistency and hold the pot on low heat while the rest of dinner comes together.

But make the last tadka when the rice is fluffed, the rotis are coming off the tawa and everyone is almost ready to eat.

That brief rush of cumin, golden garlic and red chilli is not decoration. It is what turns a pot of lentils into the bowl people lean toward before it has even stopped sizzling.

Posted on 4 Comments

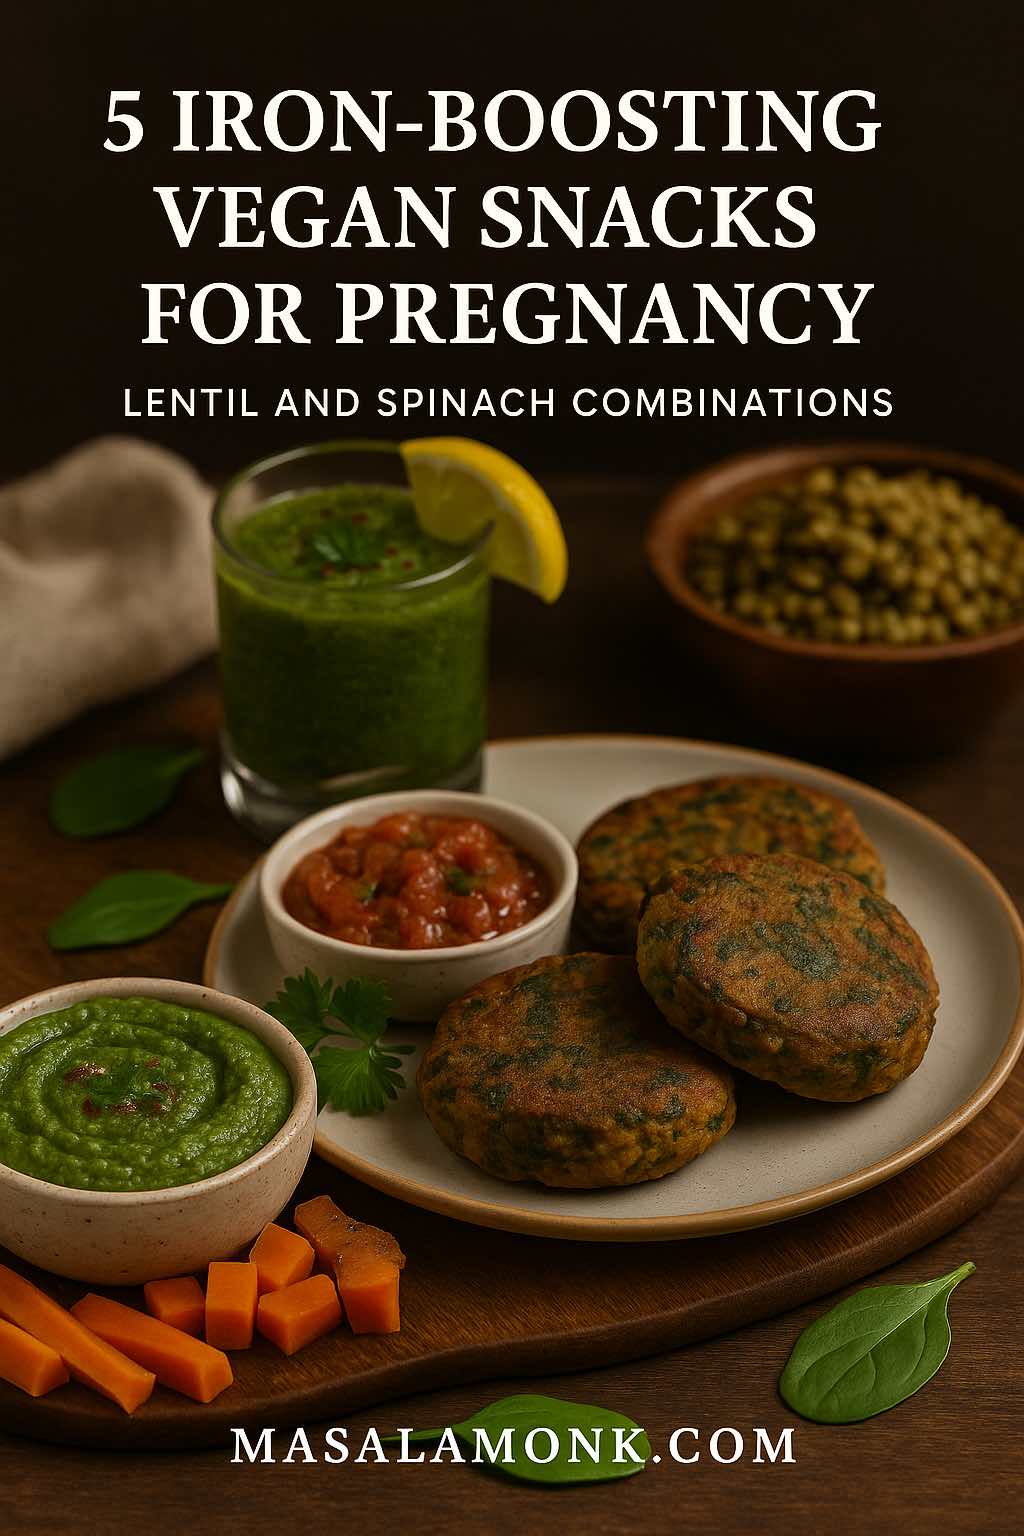
5 Iron-Boosting Vegan Snacks for Pregnancy: Lentil and Spinach Combinations

IRON-BOOSTING VEGAN SNACKS FOR PREGNANCY LENTIL AND SPINACH COMBINATIONS

Pregnancy is a beautiful journey—but let’s be honest, it can also leave you feeling exhausted, especially if your iron levels take a dip. Iron is the mineral that keeps your blood oxygenated and your energy steady, and during pregnancy your body needs almost 50% more of it—jumping from 18 mg/day to a whopping 27 mg/day.

If you’re following a plant-based lifestyle, you might already know that your iron comes in the “non-heme” form, which isn’t absorbed quite as efficiently as the “heme” iron from animal products. But don’t worry—research in 2025 has shown that with smart food pairings, preparation methods, and a little creativity in the kitchen, plant-based diets can fully support a healthy pregnancy.

And here’s where two humble heroes—lentils and spinach—come into play.


Why Iron Matters So Much During Pregnancy

During pregnancy, your blood volume increases by about 50%, which means your body is working double-time to carry oxygen to both you and your growing baby. That requires more hemoglobin—and hemoglobin is built from iron.

Daily iron needs:

  • Before pregnancy: ~18 mg/day
  • During pregnancy: ~27 mg/day

Low iron can lead to anemia, which may cause fatigue, dizziness, shortness of breath, and even affect your baby’s growth. Research from 2025 confirms that well-planned plant-based diets can meet these increased needs—especially when you pay attention to iron absorption.


Why Lentils + Spinach Are a Perfect Pair

  • Lentils: ~6–7 mg of iron per cooked cup, plus high folate content for fetal brain and spine development, fiber for digestion, and plant protein.
  • Spinach: ~6.4 mg of iron per cooked cup, along with vitamins A, K, and a touch of vitamin C.
  • Vitamin C synergy: Combining these with vitamin C-rich foods (bell peppers, lemon juice, tomatoes) can dramatically improve iron absorption.

💡 Pro tip: Cooking in a cast-iron pan can naturally increase the iron content of your meals—a method validated by recent UC Davis nutrition research.


The Science of Absorption (Made Simple)

Iron from plants (non-heme iron) isn’t absorbed as efficiently as iron from meat (heme iron). But there are easy ways to change that:

Do

  • Pair with vitamin C sources to boost absorption.
  • Soak, sprout, or ferment lentils to reduce phytates (iron blockers).
  • Cook in cast-iron cookware.

Don’t

  • Drink tea or coffee with iron-rich meals (tannins can block absorption by up to 60%).
  • Rely solely on spinach without pairing with other absorption-friendly foods.

5 Delicious Lentil + Spinach Snacks for Pregnancy

Pregnancy snacks don’t have to be bland or repetitive. With lentils and spinach as the foundation, you can create snacks that are not only rich in iron, folate, and fiber, but also bursting with flavor and texture. Here’s a detailed look at five tried-and-true recipes, with extra tips for enhancing absorption, making them in bulk, and adding variety.


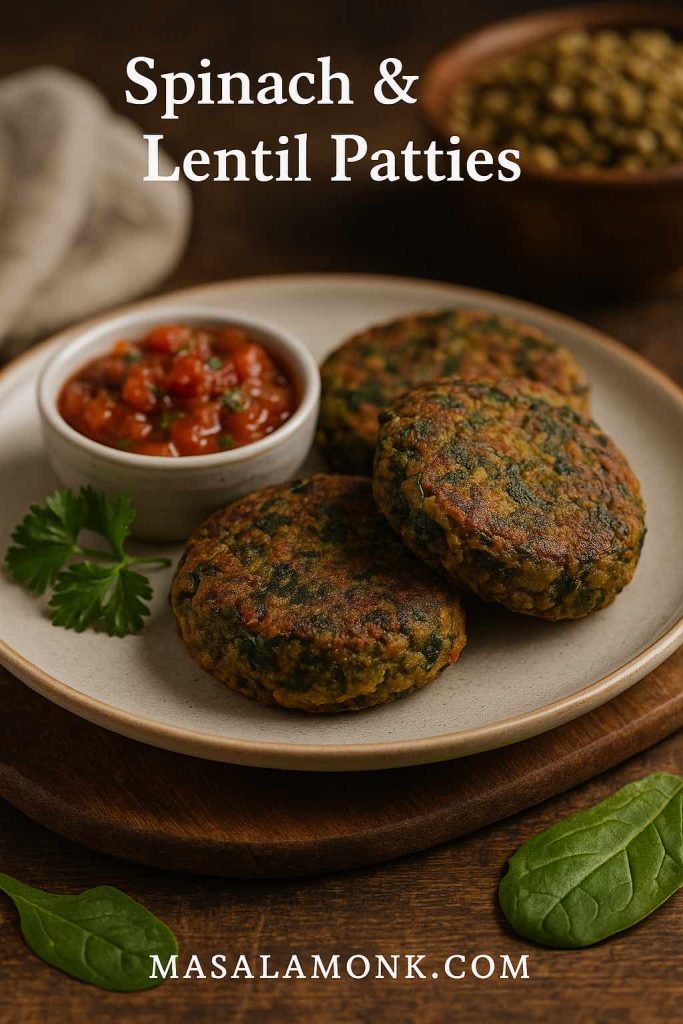
1. Spinach & Lentil Patties

Why they work:
These patties deliver iron, protein, and folate in a compact, freezer-friendly form. They’re satisfying enough for a midday hunger pang and versatile enough to double as a burger patty for dinner.

Spinach & Lentil Patties
“Iron-rich and freezer-friendly, these Spinach & Lentil Patties are the ultimate pregnancy snack—packed with folate, plant protein, and flavor. Pair with vitamin C-rich salsa to boost iron absorption and keep your energy levels steady all day.”

Ingredients:

  • 1 cup cooked brown or green lentils (soaked overnight for better digestion)
  • 2 cups fresh spinach leaves, finely chopped
  • ½ cup breadcrumbs or oat flour
  • 1 small onion, finely diced
  • 2 cloves garlic, minced
  • 1 tsp ground cumin
  • Juice of ½ lemon (vitamin C boost)
  • Salt & pepper to taste
  • 2 tbsp olive oil for pan-searing

Method:

  1. Prep the lentils: Boil soaked lentils until tender but not mushy. Drain well to prevent soggy patties.
  2. Cook the spinach: Sauté with onion and garlic until just wilted.
  3. Mix: Combine lentils, spinach mixture, breadcrumbs, spices, and lemon juice. Mash lightly, leaving some lentil texture.
  4. Shape: Form into small patties.
  5. Cook: Pan-sear in a cast-iron skillet until golden on each side.

💡 Related: Boosting Folate in Pregnancy: Top 5 Lentil and Bean Dishes

Pregnancy Tip: Pair with fresh tomato salsa or bell pepper chutney to increase non-heme iron absorption.

Make-Ahead: Freeze uncooked patties between parchment sheets. Cook straight from frozen, adding 2–3 extra minutes per side.


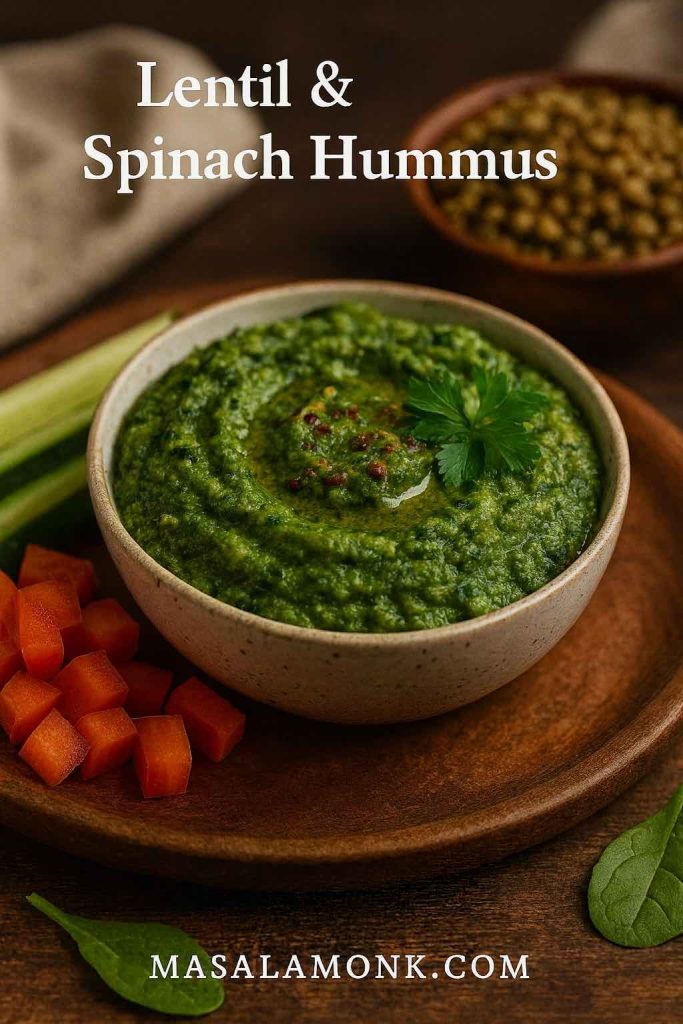
2. Lentil & Spinach Hummus

Why they work:
A smooth, creamy dip that sneaks in greens without compromising flavor. Perfect for an afternoon snack that also helps you meet your protein quota.

Lentil & Spinach Hummus
“Creamy, colorful, and nutrient-dense—this Lentil & Spinach Hummus is a pregnancy-friendly twist on a classic dip. With red lentils, leafy greens, and vitamin C from lemon juice, it’s an easy way to fuel up on iron and protein between meals.”

Ingredients:

  • 1 cup red lentils, boiled until soft
  • 1 cup spinach, blanched for 30 seconds
  • 2 tbsp tahini (calcium + healthy fats)
  • 2 tbsp lemon juice (vitamin C)
  • 1 garlic clove, roasted or raw
  • 1 tbsp olive oil
  • Salt & cumin to taste

Method:

  1. Cook lentils: Boil until soft, drain well.
  2. Blanch spinach: Drop into boiling water for 30 seconds, then shock in ice water to keep it green.
  3. Blend: Add lentils, spinach, tahini, lemon juice, garlic, olive oil, salt, and cumin to a food processor. Blend until creamy.

Serving Tip: Serve with carrot sticks, cucumber rounds, or bell pepper strips.

💡 Related: 5 Sugarless Snacks Rich in Iron for Pregnant Nights

Pregnancy Tip: Red lentils cook quickly and are easy to digest—ideal for pregnancy when digestion can slow down.

Flavor Variations: Add roasted red peppers or sun-dried tomatoes for a smoky twist.


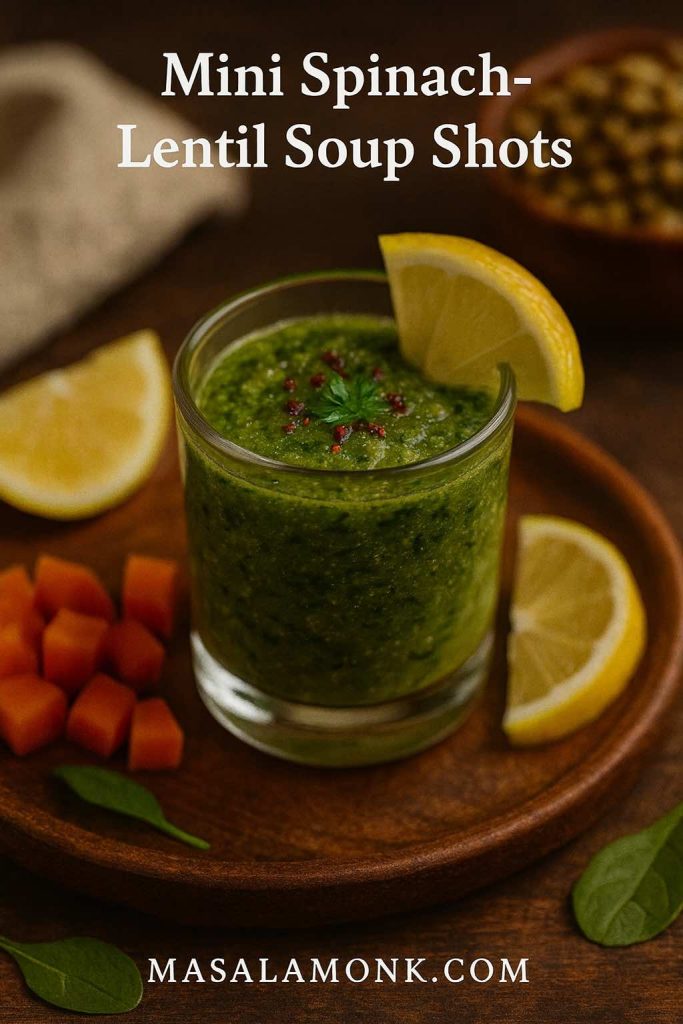
3. Mini Spinach-Lentil Soup Shots

Why they work:
These are perfect when you want something warm and nourishing without committing to a full bowl. Great as a mid-morning boost or evening wind-down.

Mini Spinach-Lentil Soup Shots
“Warm, soothing, and bursting with nutrition—these Mini Spinach-Lentil Soup Shots are perfect for pregnancy snacking. Packed with plant-based iron, folate, and a touch of turmeric, they’re the ultimate comfort boost in a cup.”

Ingredients:

  • ½ cup red or yellow lentils
  • 2 cups vegetable broth (low sodium)
  • 1 cup chopped spinach
  • 1 medium tomato, diced (vitamin C)
  • ½ onion, chopped
  • 1 garlic clove, minced
  • ½ tsp turmeric
  • Salt & pepper to taste
  • Lemon wedges to serve

Method:

  1. Cook lentils: Simmer in vegetable broth with onion, garlic, tomato, and turmeric until soft.
  2. Add spinach: Stir in chopped spinach just before blending.
  3. Blend: Puree until silky smooth.
  4. Serve: Pour into small mugs or shot glasses, garnish with lemon.

💡 Related: 5 Folate-Focused Recipes for a Nourishing Pregnancy

Pregnancy Tip: Turmeric adds anti-inflammatory benefits, but keep portions moderate (¼–½ tsp) during pregnancy.

Make-Ahead: Freeze in small glass jars; thaw overnight for a ready-to-go warm snack.


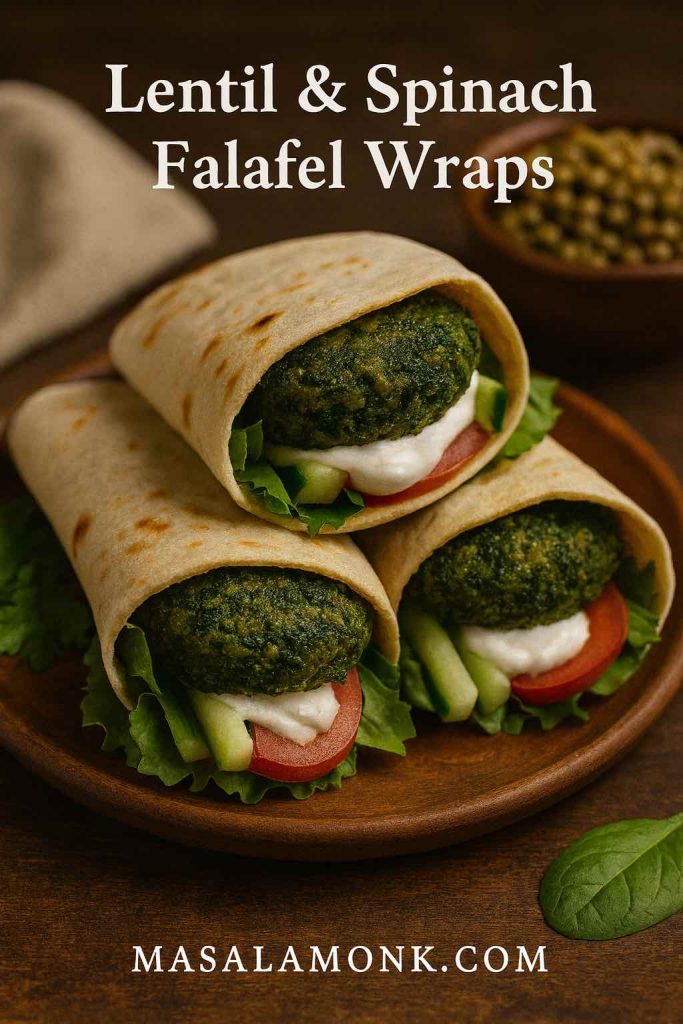
4. Lentil & Spinach Falafel Wraps

Why they work:
These wraps are a complete mini-meal in one — protein-packed falafels made with lentils and spinach, wrapped with crisp vegetables and a creamy dressing. Perfect for a quick lunch or a portable pregnancy-friendly snack.

Lentil & Spinach Falafel Wraps
“Wholesome and portable, these Lentil & Spinach Falafel Wraps deliver plant-based iron, fiber, and healthy fats in every bite. Ideal for busy pregnancy days when you need a nourishing, on-the-go meal that’s as tasty as it is energizing.”

Ingredients:

  • 1 cup green lentils, cooked and drained
  • 1½ cups spinach, finely chopped
  • ¼ cup chickpea flour (binds and boosts protein)
  • 2 cloves garlic, minced
  • 1 tsp cumin powder
  • ½ tsp coriander powder
  • Salt & pepper to taste
  • 4 whole wheat pitas or wraps
  • Salad fillings: lettuce, tomato slices, cucumber sticks
  • Tahini or yogurt dressing
  • Lemon wedges

Method:

  1. Mix: In a food processor, blend lentils, spinach, garlic, chickpea flour, and spices into a coarse mixture.
  2. Shape: Form into small patties or balls.
  3. Cook: Bake at 200°C (390°F) for 20 minutes or pan-fry with minimal oil until golden.
  4. Assemble: Place falafels in pitas with salad fillings and drizzle generously with tahini or yogurt dressing. Squeeze lemon juice over before serving.

💡 Related: 10 Exotic Superfoods for a Healthy Pregnancy

Pregnancy Tip: Add sliced avocado for healthy fats and extra creaminess.

Batch Tip: Prepare falafel mixture in advance and refrigerate for up to 2 days, or freeze shaped falafels to cook later.


5. Spinach-Lentil Energy Wraps

Why they work:
Fresh, crunchy, and portable—these wraps require minimal prep and can be customized for different cravings.

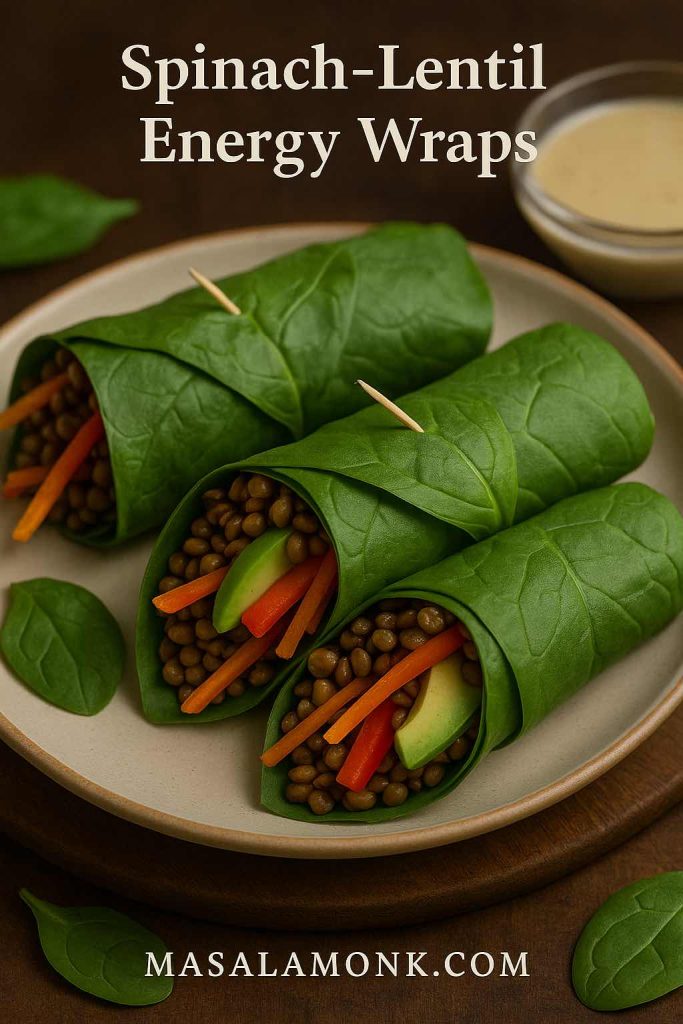
Spinach-Lentil Energy Wraps
“Fresh, crunchy, and loaded with pregnancy-safe nutrients—these Spinach-Lentil Energy Wraps combine iron-rich lentils, crisp veggies, and creamy avocado for a satisfying, blood-sugar-friendly snack anytime.”

Ingredients:

  • Large spinach leaves or whole-grain tortillas
  • 1 cup cooked brown lentils
  • ½ cup shredded carrots
  • ½ cup thinly sliced bell peppers (vitamin C)
  • ¼ avocado, sliced (healthy fats)
  • 2 tbsp tahini-lemon dressing

Method:

  1. Prep filling: Mix lentils with carrots, bell peppers, and avocado.
  2. Assemble: Lay spinach leaves or tortillas flat, fill with lentil mixture.
  3. Dress: Drizzle with tahini-lemon dressing.
  4. Wrap & secure: Roll tightly and secure with a toothpick if needed.

💡 Related: 5 Omega-3 Rich Vegan Snack Ideas for Pregnant Women

Pregnancy Tip: These wraps are rich in fiber and healthy fats, helping to maintain steady blood sugar levels.

Make-Ahead: Pack in parchment for a quick grab-and-go snack; store in the fridge for up to 24 hours.


🥗 Final Pro Tips for All 5 Recipes

  • Enhance absorption: Always pair with a vitamin C source.
  • Diversify your greens: Swap spinach with kale or amaranth leaves for variety.
  • Play with spices: Pregnancy-safe spices like cumin, coriander, and fennel add flavor and aid digestion.
  • Mind your portions: Multiple smaller snacks can be easier on digestion than one large portion during pregnancy.

Pregnancy Nutrition Tip

Even with the best snack lineup, iron deficiency can still sneak up during pregnancy. Pay attention to symptoms like unusual fatigue, dizziness, or shortness of breath—and don’t skip your prenatal checkups. If your doctor recommends a supplement, it’s not a failure—it’s just an extra tool in your pregnancy wellness kit.


Final Thoughts

Pregnancy nutrition can feel overwhelming, but it doesn’t have to be complicated. By combining the humble lentil with vibrant spinach—and pairing them with vitamin C—you can create snacks that are as delicious as they are nourishing.

Think of these recipes as a starting point. Once you get the hang of the flavor combos, you’ll find endless variations. And by linking your snacks to other nutrient-packed recipes—like Folate-Focused Recipes or Omega-3 Rich Vegan Snack Ideas—you can build a pregnancy-friendly menu that keeps you energized and your baby thriving.

So go ahead—grab those lentils and spinach. Your body (and your baby) will thank you.

FAQs – Lentil & Spinach Pregnancy Snacks

1. Why are lentils and spinach recommended during pregnancy?

Lentils and spinach are both rich in iron, folate, and fiber—three nutrients vital for pregnancy. Iron supports healthy blood oxygen levels, folate aids fetal brain and spinal development, and fiber helps prevent constipation, which is common during pregnancy.


2. How much iron do I need daily while pregnant?

Most pregnant women need about 27 mg of iron per day, compared to 18 mg before pregnancy. Since plant-based iron (non-heme iron) is absorbed less efficiently, it’s important to pair it with vitamin C-rich foods like bell peppers, tomatoes, or lemon juice.


3. Can I meet my iron needs on a plant-based diet during pregnancy?

Yes. Research in 2025 confirms that with smart food pairings, soaking or sprouting legumes, and cooking methods like using cast-iron pans, plant-based diets can fully support healthy pregnancy iron levels.


4. Why should I pair lentils and spinach with vitamin C?

Vitamin C helps convert plant-based iron into a form your body can absorb more easily. Adding lemon juice, fresh tomatoes, or bell peppers to your lentil and spinach dishes can significantly boost iron uptake.


5. Can I freeze these snacks for later?

Absolutely. Most of these recipes—especially patties, cutlets, and falafel—can be frozen uncooked between parchment sheets or cooked and cooled before freezing. This makes healthy snacking quick and convenient.


6. Are these recipes safe for gestational diabetes?

Yes, with some adjustments. These snacks are high in fiber and protein, which help stabilize blood sugar. If needed, reduce or avoid added refined carbs (like breadcrumbs) and use oat or chickpea flour instead.


7. Can I substitute spinach with other greens?

Yes. Kale, Swiss chard, and amaranth leaves are excellent alternatives, offering similar nutrient profiles and slightly different flavors. Just adjust cooking times, as tougher greens may need a bit longer to soften.


8. Do lentils need to be soaked before cooking?

Soaking lentils isn’t strictly necessary, but it can reduce cooking time and help lower phytates—natural compounds that can reduce iron absorption. For better digestion during pregnancy, soaking is recommended.


9. Can I make these snacks gluten-free?

Yes. Replace breadcrumbs with oat flour, chickpea flour, or ground flaxseeds. All five recipes can be adapted to be 100% gluten-free without losing flavor or texture.


10. Are there any foods I should avoid pairing with these snacks?

Avoid consuming tea, coffee, or high-calcium dairy products at the same time as iron-rich meals, as tannins and calcium can block iron absorption. Instead, enjoy those beverages between meals.

Posted on 1 Comment

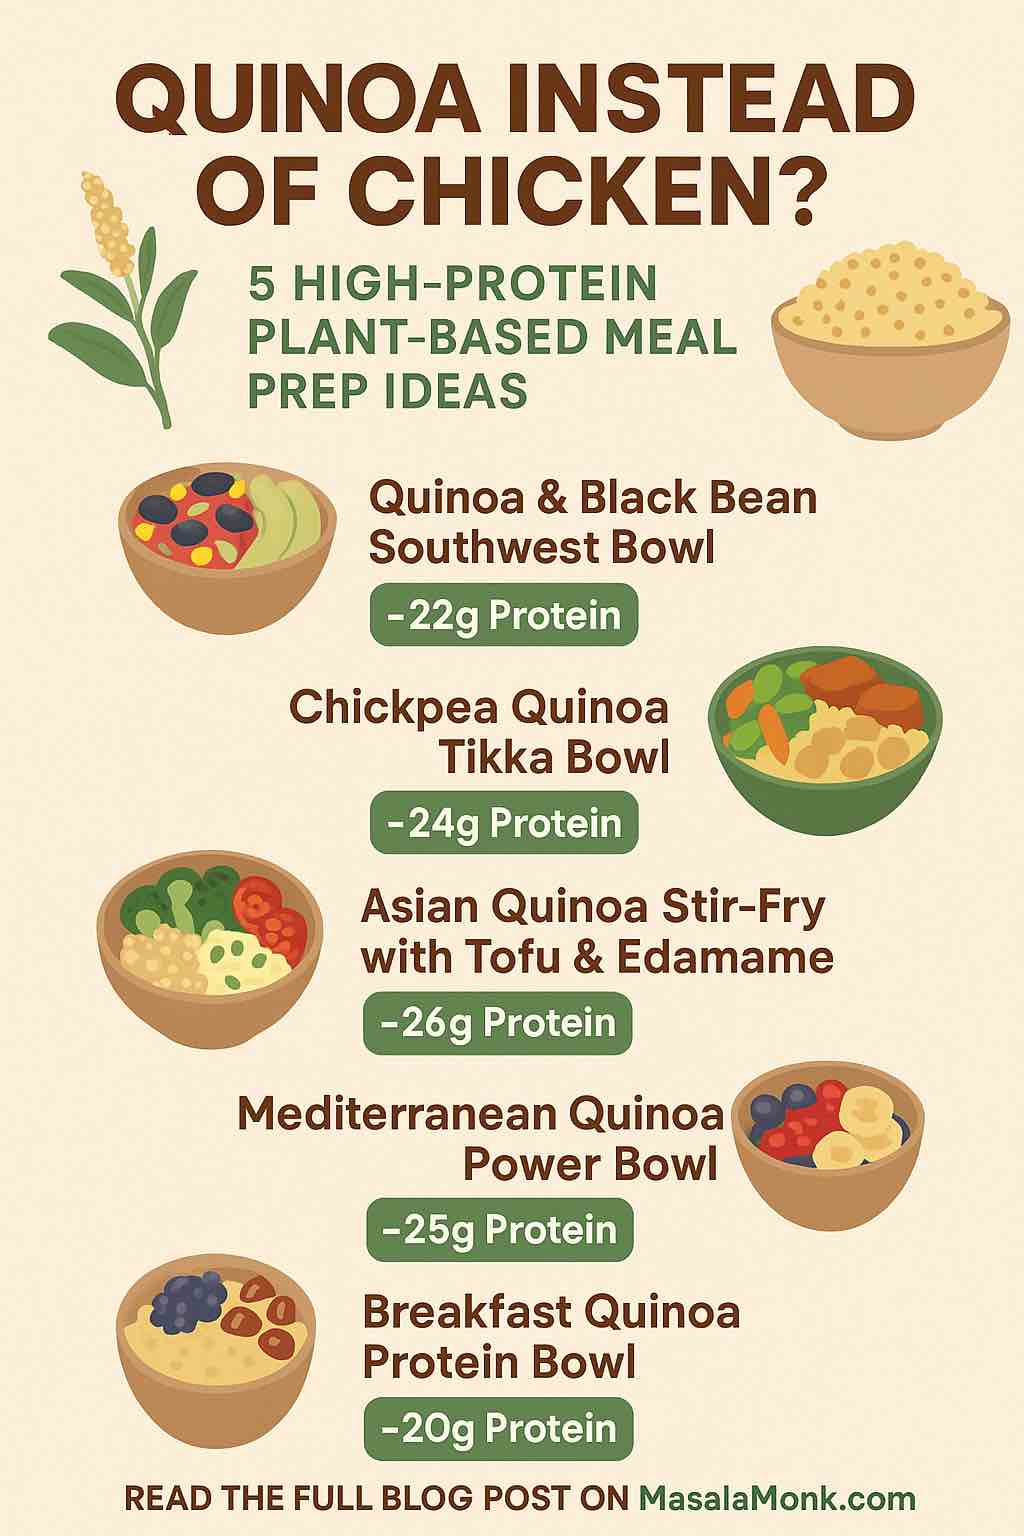
‘Quinoa’ Instead of ‘Chicken’: 5 High Protein Plant-Based Meal Prep Ideas

QUINOA INSTEAD OF CHICKEN

Ditching meat doesn’t mean sacrificing protein. Meet quinoa — your new plant-based powerhouse.


🧭 Why Replace Chicken with Quinoa?

When we think of high-protein meals, chicken breast often dominates the conversation. But for those seeking a plant-based, sustainable, and gut-friendly alternative, quinoa is the underrated hero. While not as protein-dense by weight (cooked chicken has ~31g per 100g vs. quinoa’s ~4.4g), quinoa is a complete protein, offers complex carbs, and has an unbeatable ability to pair with other proteins for a balanced meal.

What makes quinoa ideal for meal prep?

  • Stays fluffy even after refrigeration or freezing
  • Cooks in 15–20 minutes
  • Versatile: works in savory bowls, salads, and even breakfast
  • Naturally gluten-free, fiber-rich, and easily digestible

🥗 The Protein Strategy: Quinoa + “Companions”

Quinoa alone isn’t enough to hit 25–35g of protein per meal. But combined with legumes, tofu, tempeh, seeds, or nut-based sauces, it becomes the perfect foundation for high-protein meals.

Let’s dig into five meal prep-friendly ideas that prove plant-based doesn’t mean protein-poor.


1. 🌮 Quinoa & Black Bean Southwest Bowl

Total Protein: ~22g per serving
Prep Time: 30 min
Serves: 4

Ingredients:

  • 1 cup dry quinoa
  • 1½ cups cooked black beans
  • 1 cup corn kernels (fresh or frozen)
  • 1 red bell pepper, diced
  • 1 avocado, sliced
  • 2 tbsp nutritional yeast
  • Optional: vegan cheese, hot sauce

Dressing:

  • Juice of 2 limes
  • 1 tbsp olive oil
  • 1 tsp cumin
  • Salt, pepper, chili flakes to taste

Method:

  1. Cook quinoa in vegetable broth for flavor.
  2. In a large bowl, mix quinoa, beans, corn, pepper.
  3. Add dressing, toss well, and top with avocado.
  4. Store in airtight containers. Add avocado fresh each day if preferred.

Make it Extra: Add pan-seared tempeh or grilled tofu to hit 30g+ protein.


2. 🍛 Chickpea Quinoa Tikka Bowl

Total Protein: ~24g
Prep Time: 35 min
Serves: 4

Ingredients:

  • 1 cup quinoa
  • 1½ cups cooked chickpeas
  • 1 small onion, diced
  • 2 garlic cloves
  • 1 tbsp ginger, minced
  • 2 tbsp tomato paste
  • 1 tbsp garam masala
  • ½ tsp turmeric
  • 1 can light coconut milk

Method:

  1. Cook quinoa and set aside.
  2. In a pan, sauté onions, garlic, ginger.
  3. Add tomato paste and spices, cook until aromatic.
  4. Add chickpeas and coconut milk. Simmer for 10 minutes.
  5. Serve over quinoa.

Meal Prep Tip: Freeze the curry separately and defrost as needed. Serve with greens or roasted cauliflower for texture.


3. 🥦 Asian Quinoa Stir-Fry with Tofu & Edamame

Total Protein: ~26g
Prep Time: 25 min
Serves: 4

Ingredients:

  • 1 cup quinoa
  • 1 block extra-firm tofu, cubed
  • 1 cup shelled edamame
  • 1 cup broccoli florets
  • 2 carrots, julienned
  • 1 tbsp sesame oil
  • 2 tbsp tamari or soy sauce
  • 1 tbsp rice vinegar
  • 1 tsp garlic powder

Method:

  1. Cook quinoa and steam veggies lightly.
  2. Pan-fry tofu until golden and crisp.
  3. Toss all ingredients together in a large skillet with sauces.
  4. Portion into containers with sesame seeds on top.

Flavor Hack: Add crushed peanuts or sriracha tahini for extra bite and bonus protein.


4. 🧆 Mediterranean Quinoa Power Bowl

Total Protein: ~25g
Prep Time: 30 min
Serves: 4

Ingredients:

  • 1 cup quinoa
  • 1 cup cooked lentils
  • ½ cup hummus
  • ½ cucumber, diced
  • Cherry tomatoes
  • Kalamata olives
  • Red onion
  • 2 tbsp pumpkin seeds
  • Lemon-tahini dressing

Method:

  1. Assemble quinoa base and layer lentils and veggies.
  2. Top with hummus and drizzle dressing.
  3. Add seeds before sealing containers.

Eat Cold: This is a no-reheat option. Keeps beautifully in the fridge for up to 4 days.


5. 🥣 Breakfast Quinoa Protein Bowl

Total Protein: ~20g
Prep Time: 10 min
Overnight chill: Yes
Serves: 2

Ingredients:

  • 1 cup cooked quinoa (cooled)
  • 1 tbsp chia seeds
  • 1 tbsp almond butter
  • 1 tbsp hemp seeds
  • ¾ cup unsweetened soy milk
  • ½ tsp cinnamon
  • Berries and banana slices to top

Method:

  1. Mix everything in a jar or container.
  2. Let sit overnight.
  3. Top with fruits and a dash of maple syrup before eating.

Tip: Use a protein-rich plant milk (like soy or pea-based) for a better amino acid profile.


🧠 Nutrition Hacks: Boost Protein in Every Bite

Add-InProtein (per serving)How to Use
Hemp seeds (3 tbsp)~10gTop any bowl or stir into dressing
Pumpkin seeds (¼ cup)~8gAdd crunch to salads
Nutritional yeast~5g (2 tbsp)Mix into sauces, soups, or dressings
Tempeh (100g)~19gGrill and layer into any bowl
Edamame (½ cup)~9gWorks in stir-fries and salads

📦 Meal Prep Strategy: From Sunday to Friday

✅ Do This on Prep Day:

  • Cook 3–4 cups of quinoa (makes ~9 cups cooked)
  • Roast a sheet tray of tofu, tempeh, and seasonal vegetables
  • Make 2 dressings: one tahini-based, one citrusy
  • Portion bowls with protein, starch, and veg separately if possible
  • Pack sauces in small jars to prevent sogginess

🧊 Storage Tips:

  • Quinoa keeps 5–6 days in the fridge
  • Most dressings stay fresh 7 days
  • Chickpea or lentil curries can freeze for up to 2 months
  • Keep leafy greens separate if possible

🌟 Final Thoughts

Quinoa may not dethrone chicken on pure protein quantity alone, but it wins when paired well, especially for those prioritizing plant-based variety, digestive health, and meal prep convenience.

By combining smart ingredients and a bit of prep, you can hit your protein goals without a single piece of meat — and enjoy every bite doing it.

🔍 10 Frequently Asked Questions (FAQs)

1. Is quinoa enough to meet my protein needs without meat?

Answer: On its own, quinoa provides about 8g of protein per cup. While that’s less than chicken, it’s a complete protein, and when combined with legumes, seeds, tofu, or tempeh, it can easily help you reach 20–35g of protein per meal — comparable to meat-based dishes.


2. Can I freeze quinoa-based meal prep bowls?

Answer: Yes. Cooked quinoa freezes very well. For best texture, freeze quinoa and sauces separately, and avoid freezing fresh vegetables or avocado. Reheat gently to maintain flavor and texture.


3. How long does cooked quinoa last in the fridge?

Answer: Properly stored in an airtight container, cooked quinoa lasts up to 6 days in the fridge. It’s ideal for batch cooking once a week.


4. What’s the best way to season quinoa?

Answer: Cook quinoa in vegetable broth instead of water, and add herbs, garlic powder, or a bay leaf to infuse flavor. Drizzle with lemon juice or mix in dressings right before serving.


5. Can I eat quinoa for breakfast and still get protein?

Answer: Absolutely. A quinoa breakfast bowl with almond butter, chia seeds, hemp seeds, and soy milk can offer 20g+ protein. It’s also a good gluten-free alternative to oats.


6. Is quinoa better than brown rice nutritionally?

Answer: Quinoa is higher in protein and contains all 9 essential amino acids, making it a better protein source. It also has more fiber, magnesium, and iron compared to brown rice.


7. What type of quinoa should I use for meal prep?

Answer: White quinoa is the most neutral in flavor and softest in texture, making it great for bowls. Red or black quinoa is firmer and works well in salads. All types have similar nutrition.


8. What are good plant-based protein add-ons to quinoa?

Answer: Top choices include chickpeas, lentils, tofu, tempeh, edamame, hemp seeds, and pumpkin seeds. Combining multiple sources helps you hit your amino acid and protein targets.


9. Can kids or athletes use quinoa-based meal preps?

Answer: Yes. Quinoa is easy to digest, gluten-free, and great for energy and recovery. For athletes, combine it with lentils and a healthy fat (like tahini or avocado) for sustained fuel.


10. Does quinoa cause bloating or digestion issues?

Answer: Quinoa is generally easy to digest. However, rinsing it before cooking removes saponins, which can cause mild irritation or bitterness. Always rinse thoroughly for best results.

Posted on Leave a comment

Instant Pot Lentil Recipes for Effortless Weight Loss and Quick Meals

Instant Pot Lentil Recipes

In our fast-paced world, finding meals that are both healthy and convenient can be a struggle. For those aiming to shed pounds without sacrificing flavor or time, lentils cooked in an Instant Pot offer an ideal solution. These tiny legumes are nutritional powerhouses: high in protein, fiber-rich, and incredibly versatile. Whether you’re seeking hearty soups, spicy curries, or savory stews, the Instant Pot simplifies the process and delivers consistently delicious results.


Why Lentils Are a Smart Choice for Weight Loss

Lentils are a top-tier ingredient for anyone focused on healthful eating and weight management. Here’s why:

  • High in Protein: Keeps you full longer, curbs hunger pangs.
  • Rich in Fiber: Aids digestion, promotes satiety, and helps regulate blood sugar levels.
  • Low in Calories: You can eat a generous portion without overloading on calories.
  • Nutrient-Dense: Packed with iron, folate, magnesium, and B vitamins.
  • Budget-Friendly: A cost-effective protein source, ideal for batch cooking and meal prep.

Instant Pot: The Time-Saving Game Changer

The Instant Pot revolutionizes how we cook lentils. Traditional stovetop methods can take up to an hour and require constant supervision. With the Instant Pot:

  • Cook time is reduced to as little as 10-20 minutes.
  • Hands-off process: Set it and walk away.
  • Reliable texture every time—no mush, no undercooked centers.
  • Great for meal prepping: Cook in bulk and refrigerate or freeze.

5 Instant Pot Lentil Recipes You’ll Love

1. Moroccan-Inspired Lentils

Flavor Profile: Warm, spicy, and subtly sweet.

Ingredients:

  • Green or brown lentils
  • Diced sweet potato
  • Carrots, onions
  • Crushed tomatoes
  • Spices: cumin, cinnamon, paprika, ginger, cayenne
  • Lemon juice

How to Make: Add all ingredients to the Instant Pot. Cook on high pressure for 15 minutes, then let it naturally release for 10 minutes. Garnish with parsley and a squeeze of lemon.

Health Perks: Anti-inflammatory spices and fiber-rich vegetables support metabolism and digestion.


2. Classic French-Style Lentil Soup

Flavor Profile: Savory, aromatic, and comforting.

Ingredients:

  • Green or French lentils
  • Onion, garlic, carrot, celery
  • Fire-roasted tomatoes
  • Fresh thyme, bay leaves
  • Kale or spinach (added after cooking)

How to Make: Sauté aromatics using the Sauté function. Add lentils, tomatoes, broth, and spices. Cook on high pressure for 15 minutes and let release naturally. Stir in greens before serving.

Health Perks: A bowl full of vitamins, antioxidants, and fiber.


3. Smoky Vegan Lentils

Flavor Profile: Bold, rich, and slightly smoky.

Ingredients:

  • Brown lentils
  • Tomato paste, garlic, onion
  • Paprika, cumin, coriander
  • Liquid smoke or smoked paprika
  • Maple syrup (optional)

How to Make: Sauté aromatics and spices, then add lentils and broth. Cook for 10 minutes on high pressure, natural release. Serve over rice or baked sweet potatoes.

Health Perks: A hearty plant-based option with depth of flavor and minimal fat.


4. Hearty Lentil and Potato Stew

Flavor Profile: Thick, satisfying, and earthy.

Ingredients:

  • Green lentils
  • Diced potatoes, carrots, onions
  • Tomato paste, garlic
  • Vegetable broth, bay leaves, thyme

How to Make: Add everything to the pot and cook on high pressure for 12 minutes. Natural release. Use an immersion blender for a partially blended, thick texture.

Health Perks: Potatoes add volume without excessive calories; excellent for portion control.


5. Instant Pot Lentil Curry

Flavor Profile: Fragrant, spicy, and deeply savory.

Ingredients:

  • Red or brown lentils
  • Onion, garlic, ginger
  • Curry powder, turmeric, garam masala
  • Diced tomatoes
  • Coconut milk or light coconut milk

How to Make: Sauté aromatics and spices. Add remaining ingredients. Cook for 10 minutes on high pressure, quick release. Serve with brown rice or quinoa.

Health Perks: Anti-inflammatory spices, and a rich taste without added fats.


Tips for Weight-Loss Friendly Lentil Cooking

  1. Skip Heavy Oils: Use a non-stick pot insert or minimal olive oil for sautéing.
  2. Boost with Greens: Add spinach, kale, or collard greens at the end of cooking.
  3. Use Low-Sodium Broth: Controls salt while enhancing flavor.
  4. Portion Smart: Divide into containers to avoid overeating.
  5. Add Acidity: A dash of lemon juice or vinegar brightens flavor and supports digestion.

Batch Cooking & Storage Tips

  • Refrigeration: Keeps well for 4-5 days.
  • Freezing: Portion into containers or silicone trays; freeze for up to 3 months.
  • Reheating: Use stovetop or microwave with a splash of water or broth.
  • Repurposing: Use leftovers as filling for wraps, stuffing for bell peppers, or over baked potatoes.

Final Thoughts

With the Instant Pot, healthy eating doesn’t have to be complicated or time-consuming. These lentil-based meals are proof that nutritious, weight-loss-friendly food can also be comforting, flavorful, and easy to prepare. Whether you’re a busy professional, a student, or just someone trying to eat better, lentils are a humble yet powerful ally in your kitchen.

Try a few of these recipes this week—your taste buds (and waistline) will thank you.

FAQs

1. Can I use canned lentils in these Instant Pot recipes?
Answer: While canned lentils are pre-cooked and don’t require pressure cooking, they can be added at the end of the Instant Pot cycle. Reduce the cook time and liquid slightly to prevent overcooking.

2. What type of lentils works best in the Instant Pot?
Answer: Green and brown lentils hold their shape well and are ideal for soups and stews. Red lentils cook faster and break down, making them perfect for curries and thicker dishes.

3. How much water or broth should I use per cup of lentils?
Answer: A standard ratio is 1 cup of lentils to 2.5–3 cups of liquid, depending on how brothy or thick you want the final result.

4. Are these recipes suitable for freezing and reheating?
Answer: Yes! All recipes are freezer-friendly. Cool completely before freezing in airtight containers. Reheat with a splash of water or broth to refresh the texture.

5. How can I make the lentils taste less bland?
Answer: Spices, aromatics (like garlic, onion, and ginger), and acidic finishers (lemon juice, vinegar) dramatically enhance lentil flavor. Sautéing spices before pressure cooking boosts depth.

6. Can I add meat or other proteins to these recipes?
Answer: Absolutely. Chicken, turkey, or lean ground meat can be browned using the Sauté function first, then pressure cooked with the lentils. Adjust liquid and timing slightly as needed.

7. Are these lentil dishes gluten-free?
Answer: Yes, lentils are naturally gluten-free. Just ensure that broth and spices used are certified gluten-free to avoid cross-contamination.

8. How do I avoid mushy lentils in the Instant Pot?
Answer: Stick to recommended cooking times (usually 10–15 minutes under high pressure) and do a natural pressure release. For firmer texture, reduce cook time by 2–3 minutes.

9. What should I serve with these lentil meals?
Answer: Serve over brown rice, quinoa, cauliflower rice, or roasted veggies. You can also enjoy them with whole grain flatbread or in lettuce wraps for a low-carb option.

10. Can I make these recipes oil-free?
Answer: Yes! Use water or vegetable broth to sauté aromatics instead of oil. This keeps the meals lighter without compromising on flavor.

Posted on 6 Comments

Plant-Based High-Protein Meal Prep Ideas: Using Lentils Instead of Chicken

LENTILS A HIGH-PROTEIN PLANT-BASED SUBSTITUTE FOR CHICKEN

Lentils, with their rich nutrient profile, versatility, and hearty texture, have long been celebrated in plant-based cooking. These tiny legumes are packed with protein, fiber, vitamins, and minerals, making them an ideal replacement for meat in a variety of dishes. Whether you’re looking to add more plant-based protein to your diet or simply seeking a healthier alternative to chicken, lentils offer a robust and satisfying solution. Their ability to absorb spices and flavors means they work beautifully in any recipe, from soups to salads to hearty entrées.

Let’s explore how you can incorporate lentils into your meal prep with 10 high-protein ideas that are perfect for replacing chicken in your favorite dishes. These recipes are not only delicious but also packed with nutrients to keep you fueled throughout the day.


1. Hearty Lentil Loaf

This plant-based twist on the classic meatloaf is just as hearty and satisfying as the original. Made with lentils, vegetables, and spices, it’s the perfect comfort food that’s both healthy and filling.

  • Serving Size: 200g
  • Macros (per serving): 280 calories, 18g protein, 30g carbs, 7g fat
  • Preparation time: 1 hour 10 minutes

Cooking Instructions:

  1. Sauté onions, garlic, and carrots until softened.
  2. Combine cooked lentils, sautéed vegetables, breadcrumbs, and your favorite spices in a food processor. Process until the mixture is well combined but still slightly chunky.
  3. Press the mixture into a loaf pan and bake at 375°F (190°C) until firm and golden, about 45 minutes.

Best Time to Eat: Lunch or dinner
Storage: Keep in an airtight container in the fridge for up to 4 days. Reheat before serving for best texture.


2. Curried Lentil Soup

This nourishing soup is the epitome of comfort food, with warming spices, lentils, and vegetables coming together to create a flavorful, protein-packed meal.

  • Serving Size: 300g
  • Macros (per serving): 220 calories, 13g protein, 36g carbs, 3g fat
  • Preparation time: 45 minutes

Cooking Instructions:

  1. Sauté onions, garlic, and ginger until fragrant. Add curry powder and turmeric and cook for another minute.
  2. Stir in chopped tomatoes, lentils, and vegetable broth. Simmer until the lentils are tender.
  3. For a creamy texture, blend the soup with an immersion blender or in a countertop blender.
  4. Add a squeeze of lemon juice to brighten the flavors.

Best Time to Eat: Lunch or dinner
Storage: Store in an airtight container in the refrigerator for up to 4 days. Reheat on the stovetop or microwave.


3. Lentil ‘Chicken’ Salad

This creamy, satisfying salad is a perfect plant-based substitute for chicken salad. The lentils provide a meaty texture, and with the addition of vegan mayo and fresh veggies, it’s a wholesome and flavorful dish.

  • Serving Size: 200g
  • Macros (per serving): 230 calories, 10g protein, 26g carbs, 10g fat
  • Preparation time: 25 minutes

Cooking Instructions:

  1. Mix cooked lentils with diced celery, red onion, vegan mayo, Dijon mustard, apple cider vinegar, and your favorite spices. Stir until fully combined.
  2. Serve it on its own, with crackers, or as a sandwich filling.

Best Time to Eat: Lunch or dinner
Storage: Keep in an airtight container in the fridge for up to 3 days. Best served chilled.


4. Lentil Bolognese

A protein-rich and satisfying twist on the classic Italian bolognese, this dish uses lentils as a meat replacement to soak up a rich, tomato-based sauce.

  • Serving Size: 250g
  • Macros (per serving): 280 calories, 15g protein, 45g carbs, 5g fat
  • Preparation time: 1 hour

Cooking Instructions:

  1. Sauté onions, garlic, and carrots in olive oil until soft.
  2. Add cooked lentils, tomatoes, and vegetable broth. Let it simmer for 25–30 minutes until the sauce thickens and the lentils are tender.
  3. Serve over whole wheat spaghetti and top with fresh basil or vegan parmesan.

Best Time to Eat: Lunch or dinner
Storage: Store in an airtight container in the fridge for up to 4 days. Reheat before serving.


5. Lentil Tacos

These flavor-packed tacos are a fantastic way to enjoy lentils in a casual, fun meal. Loaded with protein and topped with your favorite fixings, they’re an easy and satisfying option.

  • Serving Size: 3 tacos (approx. 200g)
  • Macros (per serving): 320 calories, 18g protein, 46g carbs, 6g fat
  • Preparation time: 30 minutes

Cooking Instructions:

  1. Sauté onions and garlic until fragrant, then add cooked lentils, vegetable broth, and taco seasoning. Simmer until the liquid is absorbed and the lentils are well coated.
  2. Serve the lentil mixture in tortillas and top with fresh toppings such as lettuce, tomato, avocado, and vegan cheese.

Best Time to Eat: Lunch or dinner
Storage: Store the lentil mixture in an airtight container in the fridge for up to 4 days. Assemble tacos just before serving.


6. Lentil ‘Chicken’ Nuggets

These crispy, golden lentil nuggets are a protein-packed snack or meal that’s perfect for a quick and satisfying bite.

  • Serving Size: 200g (approx. 6 nuggets)
  • Macros (per serving): 300 calories, 19g protein, 40g carbs, 8g fat
  • Preparation time: 45 minutes

Cooking Instructions:

  1. Combine cooked lentils, breadcrumbs, and spices in a food processor until the mixture is thick and sticky.
  2. Shape the mixture into nuggets and bake at 375°F (190°C) for 25–30 minutes until golden and crispy.

Best Time to Eat: Lunch, dinner, or as a snack
Storage: Keep in an airtight container in the fridge for up to 3 days. Reheat in the oven for best texture.


7. Lentil Stuffed Bell Peppers

These vibrant bell peppers are filled with a delicious mix of lentils, rice, and spices. They’re visually appealing, protein-packed, and perfect for a satisfying meal.

  • Serving Size: 2 stuffed halves (approx. 300g)
  • Macros (per serving): 310 calories, 14g protein, 58g carbs, 3g fat
  • Preparation time: 1 hour

Cooking Instructions:

  1. Cut bell peppers in half and remove seeds.
  2. Prepare a filling with cooked lentils, cooked rice, sautéed onions, garlic, diced tomatoes, and your favorite spices.
  3. Stuff the bell pepper halves with the lentil mixture and bake at 375°F (190°C) for 25–30 minutes until the peppers are tender.

Best Time to Eat: Lunch or dinner
Storage: Store in an airtight container in the fridge for up to 4 days. Reheat before serving.


8. Lentil Shepherd’s Pie

This comforting classic is transformed with lentils, making it a hearty, plant-based dish that’s just as satisfying as the original.

  • Serving Size: 250g
  • Macros (per serving): 350 calories, 18g protein, 45g carbs, 12g fat
  • Preparation time: 1 hour 30 minutes

Cooking Instructions:

  1. Sauté onions, carrots, and celery until soft.
  2. Stir in cooked lentils, vegetable broth, and your choice of herbs and spices. Let the mixture simmer until thickened.
  3. Top with mashed potatoes and bake at 375°F (190°C) for 20–25 minutes until the top is golden and bubbly.

Best Time to Eat: Dinner
Storage: Store in an airtight container in the fridge for up to 4 days. Reheat before serving.


9. Lentil ‘Chicken’ Stir-fry

A quick and easy stir-fry loaded with veggies and lentils, this dish is perfect for a busy weeknight meal.

  • Serving Size: 300g
  • Macros (per serving): 280 calories, 15g protein, 35g carbs, 9g fat
  • Preparation time: 30 minutes

Cooking Instructions:

  1. Stir-fry your favorite vegetables in a hot pan with a little oil.
  2. Add cooked lentils and your choice of stir-fry sauce, cooking until the vegetables are tender and everything is well coated.

Best Time to Eat: Lunch or dinner
Storage: Store in an airtight container in the fridge for up to 3 days. Reheat before serving.


10. Lentil ‘Chicken’ Wraps

These wraps are fresh, satisfying, and packed with protein. The perfect meal for lunch or a light dinner!

  • Serving Size: 1 wrap (approx. 200g)
  • Macros (per serving): 290 calories, 15g protein, 40g carbs, 8g fat
  • Preparation time: 20 minutes

Cooking Instructions:

  1. Sauté onions and garlic until fragrant. Add cooked lentils and spices, then simmer until well combined.
  2. Fill a wrap with the lentil mixture, lettuce, tomatoes, cucumber, and a dollop of vegan yogurt or your favorite dressing.

Best Time to Eat: Lunch
Storage: Prepare the lentil mixture in advance and store in the fridge for up to 3 days. Assemble wraps just before serving.


Wrap-Up:

These 10 high-protein lentil-based meals are perfect for meal prepping, offering variety, flavor, and nutrition without compromising on taste. From comforting soups to fresh wraps, lentils can easily replace chicken in many of your favorite dishes. Experiment with these recipes and make them your own by adding your preferred spices, veggies, and seasonings.

As always, we’d love to hear how you enjoy these dishes and any creative twists you add! Stay tuned for our next series where we’ll explore even more plant-based protein options. 🌱

FAQs for Plant-Based High-Protein Meal Prep Ideas Using Lentils

1. Can lentils really replace chicken in recipes?
Yes! Lentils are an excellent substitute for chicken in many recipes due to their high protein content, hearty texture, and ability to absorb flavors. They are especially great in dishes like soups, salads, tacos, and even nuggets.

2. How much protein do lentils contain?
Lentils are a great source of plant-based protein, offering approximately 18g of protein per cooked cup (about 200g). This makes them a perfect alternative for chicken in protein-packed meals.

3. Are lentils difficult to cook?
Not at all! Lentils are easy to cook and don’t require soaking like other beans. They can be cooked in 20-30 minutes, depending on the type of lentil. Red lentils cook faster, while green and brown lentils take a little longer.

4. How do I store lentil-based meal prep dishes?
Most lentil-based meals can be stored in an airtight container in the refrigerator for up to 4 days. If you want to keep meals for longer, consider freezing them for up to 3 months. Be sure to reheat thoroughly before eating.

5. Can I use canned lentils instead of dried lentils?
Yes, you can! Canned lentils are a convenient option, and they can be used as a substitute for cooked lentils in most recipes. Just be sure to drain and rinse them well to remove excess sodium.

6. Are lentils suitable for all dietary restrictions?
Lentils are naturally gluten-free and plant-based, making them suitable for vegan, vegetarian, and gluten-free diets. However, always check for any added ingredients in pre-packaged lentils (like canned lentils or pre-cooked lentil meals) to ensure they align with your dietary needs.

7. Can I add lentils to my existing chicken recipes?
Absolutely! Lentils can be easily swapped for chicken in many recipes. For example, you can add cooked lentils to a chicken salad, or use them instead of chicken in stir-fries, wraps, or tacos. Adjust the seasoning to fit the flavor profile of your dish.

8. How can I make lentil dishes more flavorful?
Lentils absorb flavors beautifully, so be sure to season them well with herbs, spices, and aromatics like garlic, onions, and ginger. Adding ingredients like lemon juice, tamari, coconut milk, or tomato paste can elevate their taste and make them even more delicious.

9. Are lentil-based meals high in fiber?
Yes! Lentils are a fantastic source of dietary fiber, which helps with digestion and can contribute to a feeling of fullness. On average, one cup of cooked lentils provides around 15-16g of fiber.

10. Can I freeze lentil-based dishes for later?
Yes, lentil dishes freeze very well. Make sure to cool them completely before placing them in an airtight container or freezer-safe bag. When ready to eat, simply thaw in the refrigerator overnight and reheat on the stove or in the microwave.