
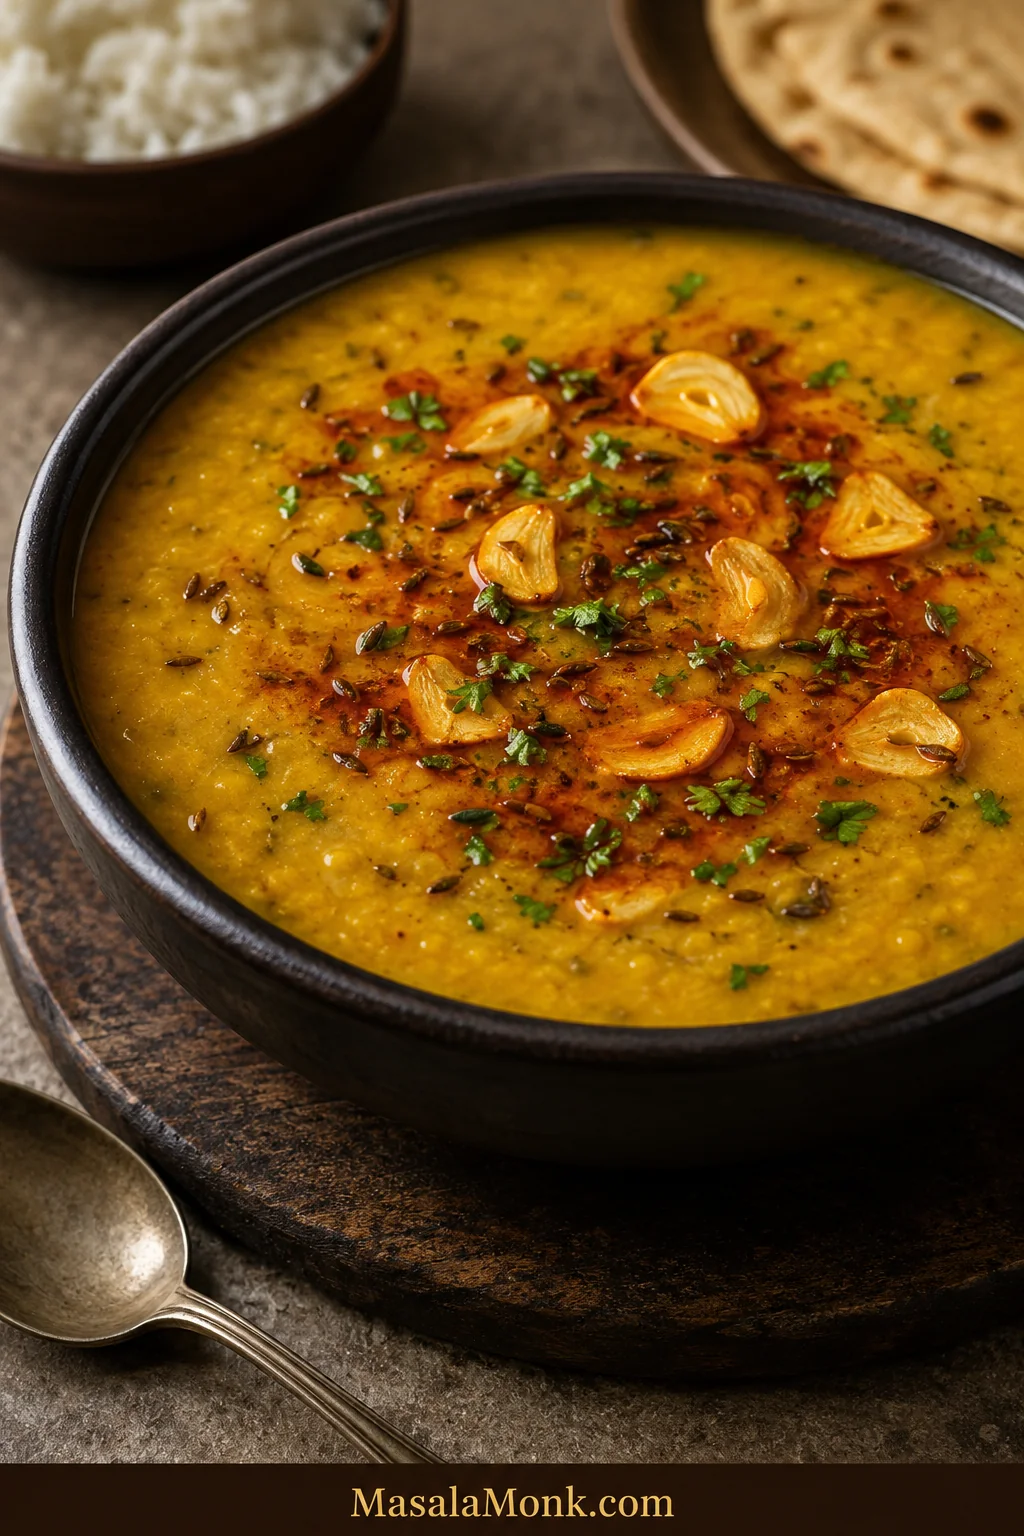
The final tadka announces dinner before the bowl reaches the table. Cumin crackles, garlic turns gold, and hot ghee carries the smell of red chilli across the kitchen. Underneath that dramatic finish, the dal has a quieter job: it should fall creamy from the spoon, with no watery separation, no gluey heaviness and no firm lentils interrupting each mouthful.
This Dal Tadka recipe gives you the familiar restaurant-style Punjabi yellow dal, along with the choices that shape it. Start with toor dal for the classic version, blend in a little yellow moong for a softer finish, and cook it in a pressure cooker, Instant Pot or heavy saucepan. The finished dal is creamy without feeling heavy, warmly spiced through the pot and bright with fresh cumin and garlic at the surface.
You will judge the lentils by how easily a grain crushes, the consistency by how the dal falls from the ladle and the tadka by the colour of the garlic—not by timing alone.
The disappointing bowl often contains all the right ingredients. Usually, one stage was rushed: the lentils came off the heat while still grainy, the tomato base remained raw, the consistency was never corrected, or the garlic crossed from golden to bitter while nobody was looking.
The MasalaMonk rule: the lentils decide when the dal is cooked; the final simmer decides its texture; the fresh tadka decides how memorable it tastes.
Quick Answer: How to Make Restaurant-Style Dal Tadka
Cook the dal: pressure-cook 1 cup toor dal (200 g) with 2¾ cups water (660 ml), turmeric and part of the salt.
In a stovetop cooker, cook for 8 minutes at pressure. In an Instant Pot, use 7 minutes for soaked dal or 8 minutes for unsoaked dal, followed by a full natural pressure release. Every grain should crush without resistance.
Build the body: whisk the lentils partly smooth, combine them with an onion-tomato masala cooked until glossy, then simmer with kasuri methi and enough hot water to reach a creamy, pourable consistency.
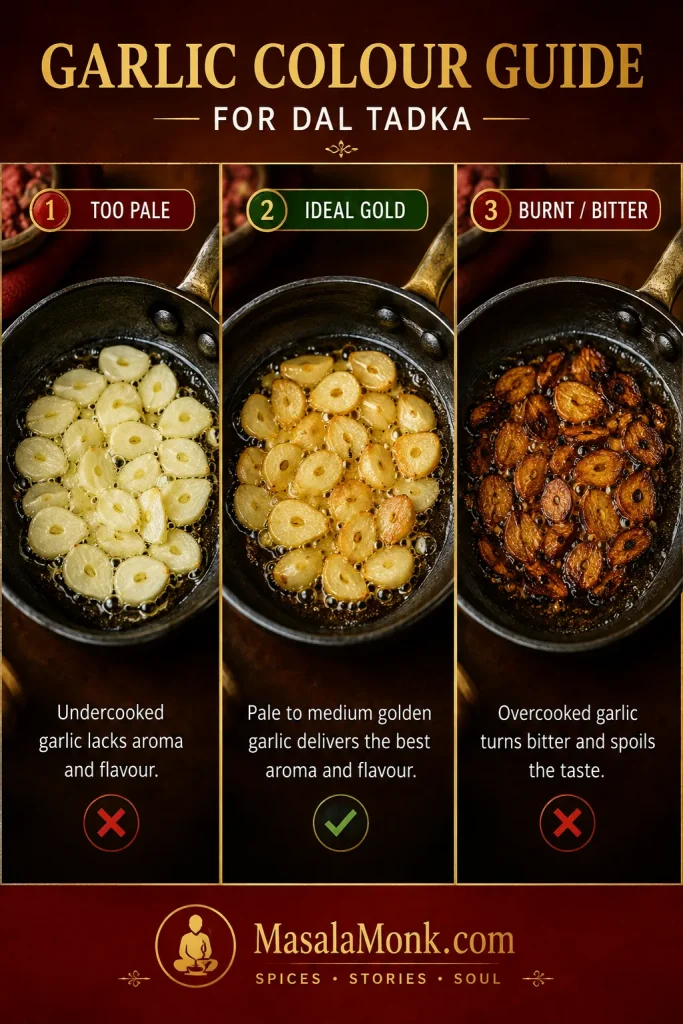
Finish at the table: bloom cumin in ghee, add evenly sliced garlic, then add dried chilli as the garlic begins colouring and hing for the final few seconds. Stop the garlic at pale-to-medium gold, remove the pan from the heat, add Kashmiri chilli powder and pour the tadka immediately.
Dal Tadka is also written as Dal Tarka or Tarka Dal. Tadka, tarka and chaunk all describe spices and aromatics bloomed in hot fat. This Punjabi version begins with toor/arhar dal.
Pick your finish
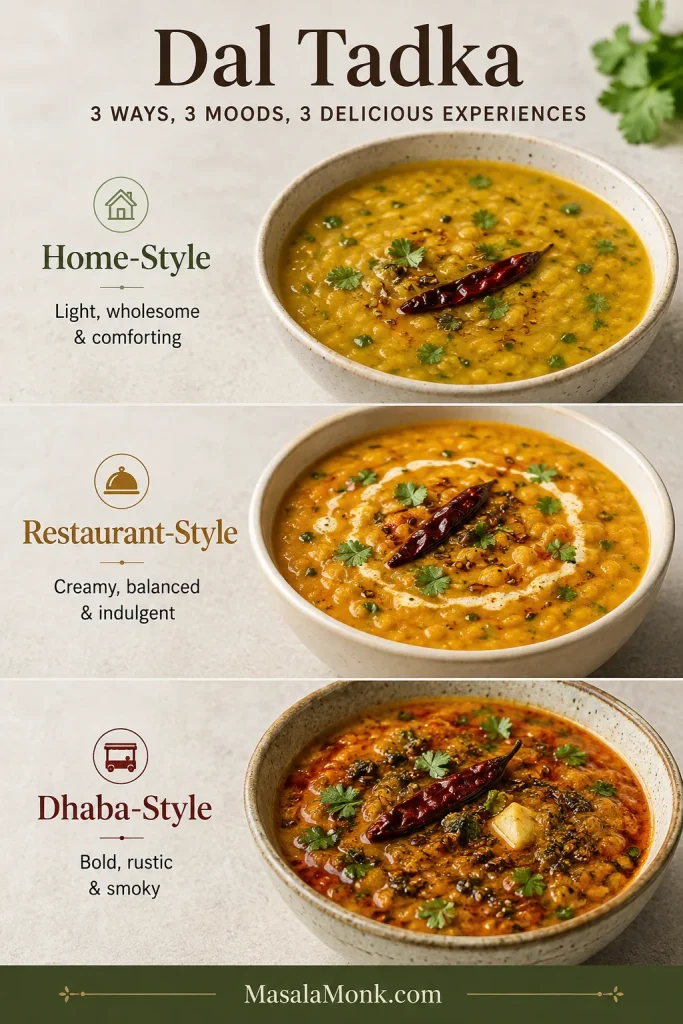
Choose your Dal Tadka style
One pot can feel light and comforting, creamy and restaurant-style, or bold and smoky. Decide before building the masala and tadka, because each style changes how far you cook the tomatoes, how thick you leave the dal and how much fat you use.
| Style | What it tastes like | How to finish it |
|---|---|---|
| Everyday home-style | Light, familiar and weeknight-friendly | Keep the dal a little loose; use about 1 tablespoon fat in the base and 1 tablespoon in the final tadka; cook the tomato only until softened; skip cream and smoke; finish with lemon |
| Restaurant-style | Creamy, rounded and aromatic with a glossy red tadka | Whisk the dal partly smooth, cook the tomato base thoroughly, use kasuri methi and make the full garlic-ghee tadka |
| Dhaba-style | Bolder, thicker, garlicky and slightly smoky | Use the full tadka, add extra sliced garlic, keep the dal slightly thicker and use the optional short dhungar |
Make it now
Restaurant-Style Dal Tadka Recipe
Soft toor dal is stirred into a glossy onion-tomato masala, loosened to a creamy pour, then finished with a fresh garlic-cumin tadka.
Recipe shortcuts: Ingredients · Instructions · Garlic tadka · Final balance
Timing and yield
Dietary note: Vegetarian; vegan with oil and no butter or cream; gluten-free when the hing is labelled gluten-free.
These windows overlap: chop while the cooker heats, then build the masala as the pressure releases. The total reflects the real clock rather than adding every line together.
Equipment
- 3–4 litre stovetop pressure cooker, 6-quart Instant Pot or a heavy 3–4 litre saucepan
- Medium frying pan or kadai for the onion-tomato masala
- Small, preferably deep tadka pan with a long handle; otherwise use your smallest heavy saucepan or frying pan
- Whisk, wooden spoon or dal ghutni
- Heatproof serving bowl and ladle
- Optional: natural charcoal, tongs and a small steel bowl for dhungar
Ingredients
For cooking the dal
- 1 cup toor/arhar dal (200 g / 7 oz), or ¾ cup toor plus ¼ cup yellow moong
- 2¾ cups water (660 ml) for pressure cooking
- ½ teaspoon turmeric
- 1¼ teaspoons fine salt (about 7–8 g), divided, plus more after tasting
- ½–1 cup hot water (120–240 ml), as needed after cooking
For the onion-tomato masala
- 1½ tablespoons ghee or neutral oil (22 ml)
- 1 teaspoon cumin seeds
- 1 medium onion, finely chopped (about 140 g / 5 oz)
- 10–12 g finely grated ginger (about 1 packed tablespoon)
- 4 garlic cloves, finely chopped or crushed (about 12 g)
- 1–2 green chillies; slit for gentler heat or finely chop to spread the heat through the dal
- 2 medium tomatoes, finely chopped or crushed (about 250 g / 9 oz)
- 1 teaspoon ground coriander
- ½ teaspoon Kashmiri chilli powder; use mild paprika only if Kashmiri chilli is unavailable
- ¼ teaspoon garam masala
- 1 teaspoon kasuri methi, crushed between your palms
For the final tadka and balance
- 1½ tablespoons ghee (22 ml), or oil for a vegan version
- 1 teaspoon cumin seeds
- 5 medium garlic cloves, thinly and evenly sliced, about 2 mm thick (about 15 g)
- 1–2 dried red chillies, broken in half
- Up to a scant ⅛ teaspoon hing/asafoetida, optional; use less when yours is strong or pure, and check compounded hing for wheat when cooking gluten-free
- ½ teaspoon Kashmiri chilli powder
- 2–3 tablespoons chopped coriander leaves/cilantro
- Lemon juice: 1–2 teaspoons, if the finished dal needs brightness
Optional for a richer or smoky finish
- Butter or cream: 1 tablespoon
- Dhungar: 1 piece natural lump charcoal, about 1 inch/2.5 cm, plus ½ teaspoon ghee
How the ingredients work together
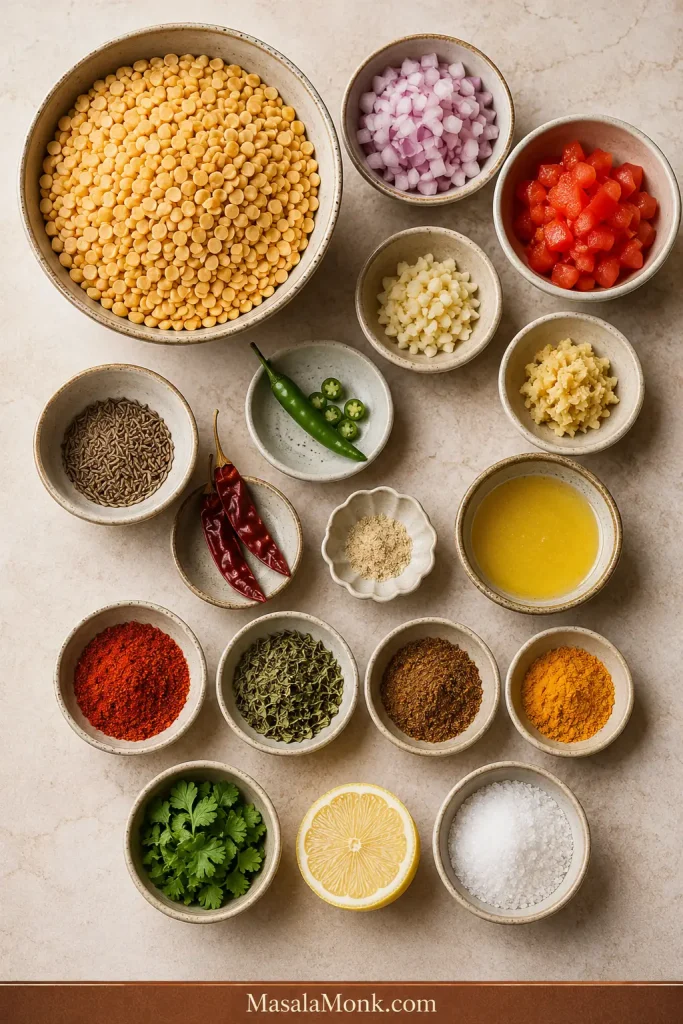
Use the waiting time: chop the onion, tomato, ginger and garlic while the cooker builds pressure. Cook the masala while the pressure releases. Measure the finishing-tadka ingredients before the garlic enters hot ghee; that last stage moves too quickly for cupboard hunting.
Instructions
1. Rinse and optionally soak the dal
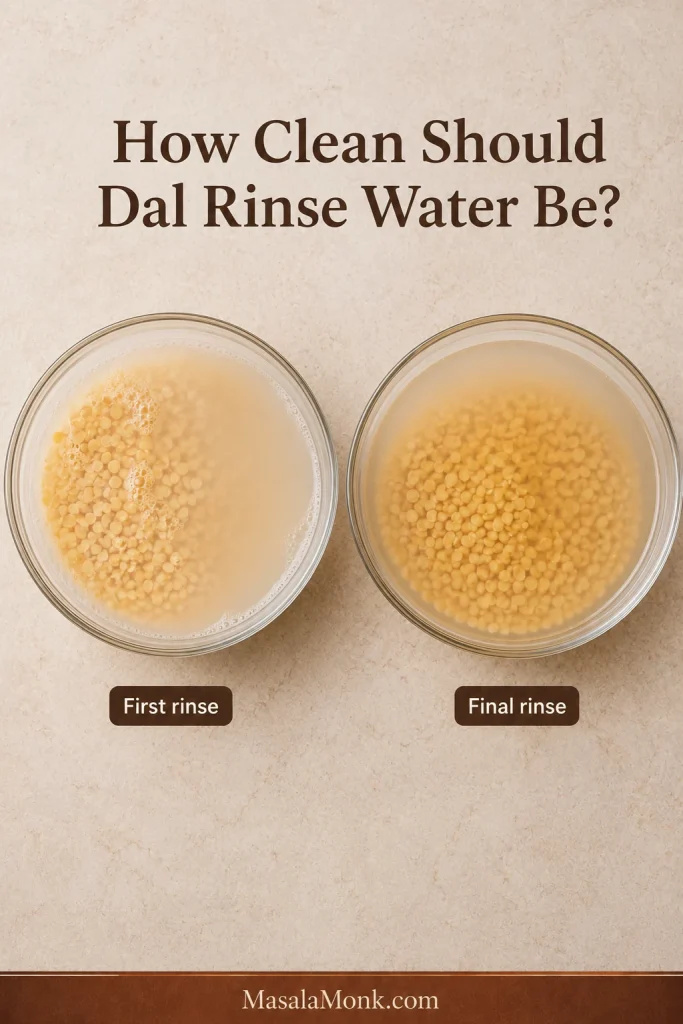
Put the dal in a bowl and rinse it three or four times, rubbing it gently between your fingers, until the water changes from very cloudy to lightly hazy. Drain well.
Soaking for 20–30 minutes is optional for a pressure cooker or Instant Pot, but it helps older lentils cook more evenly. If using an ordinary saucepan, soak toor dal for 1–2 hours; older lentils benefit from the longer end.
2. Cook until the lentils completely soften
Add the drained dal, 2¾ cups water, turmeric and ½ teaspoon salt to your cooker.
Choose your cooking method
- Stovetop pressure cooker: bring to full pressure over medium-high heat. Lower to medium and cook for 8 minutes; use 10 minutes for older, unsoaked lentils. Turn off the heat and let the pressure fall naturally. Cooker designs and burners vary, so use elapsed pressure time and the grain test rather than whistle count.
- Instant Pot: cook on High Pressure for 7 minutes when soaked or 8 minutes when unsoaked. Allow the pressure to release naturally until the float valve drops; do not force an immediate release for this starchy, expanding food.
- Saucepan: begin with 4 cups water instead of 2¾ cups. Bring to a boil, skim excessive foam, then simmer partly covered for 45–75 minutes after soaking. Stir occasionally and keep a kettle of hot water nearby; older lentils may need longer.
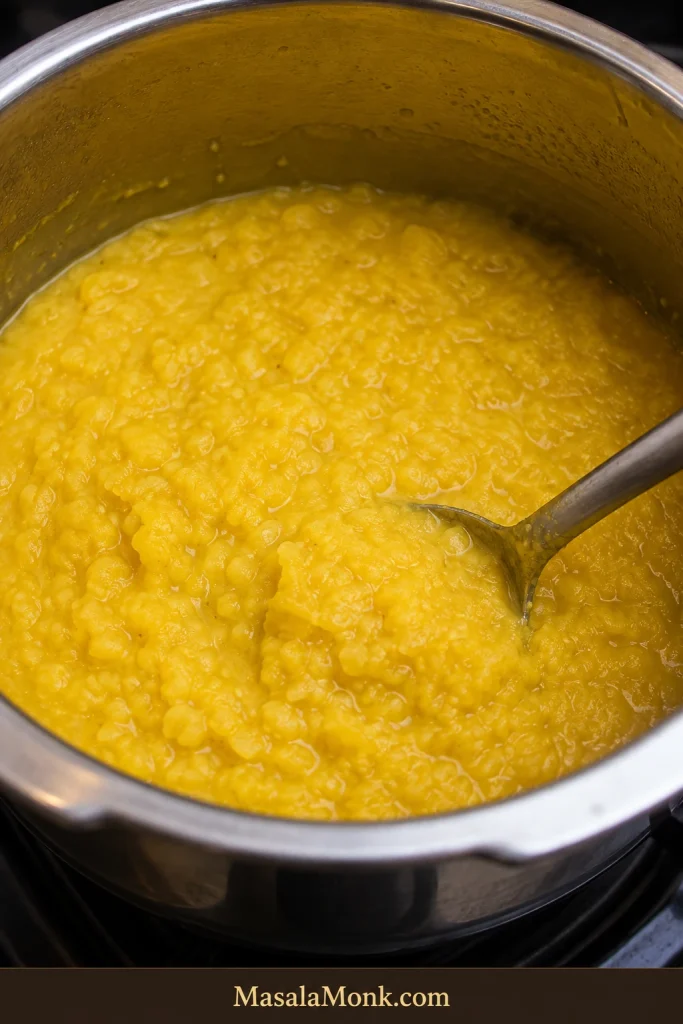
Pressure-cooker safety: follow the manual for your model. In an Instant Pot, keep lentils, water and other ingredients below the ½ fill line used for expanding or starchy foods; overfilling can obstruct the steam-release path. Never cover or obstruct the valve while pressure is releasing. For model-specific details, check the Instant Pot safety guidance (opens in a new tab).
Using another cooker? Compare pressure cooker, Instant Pot and saucepan timing.
Check the grain, not the clock
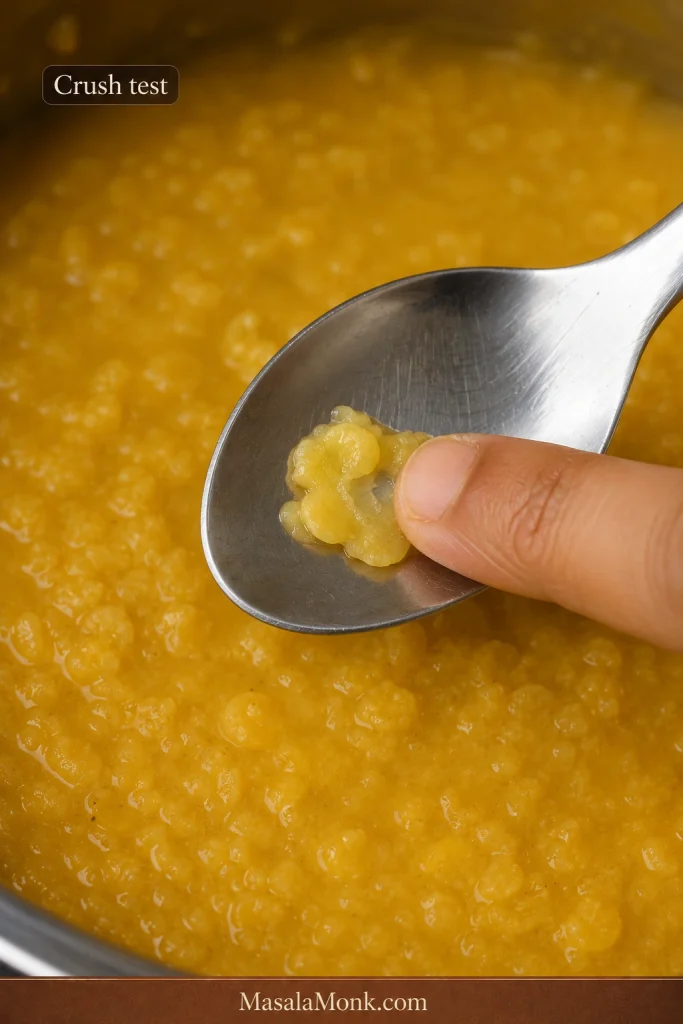
Lift out one grain, let it cool for a few seconds, then press it between your fingers—or crush it against the side of the pot with a spoon. It should collapse easily with no firm or chalky centre. If it still feels grainy, add a splash of hot water and cook it longer. Once the grain yields without resistance, the hardest part is done.
3. Whisk to a creamy texture
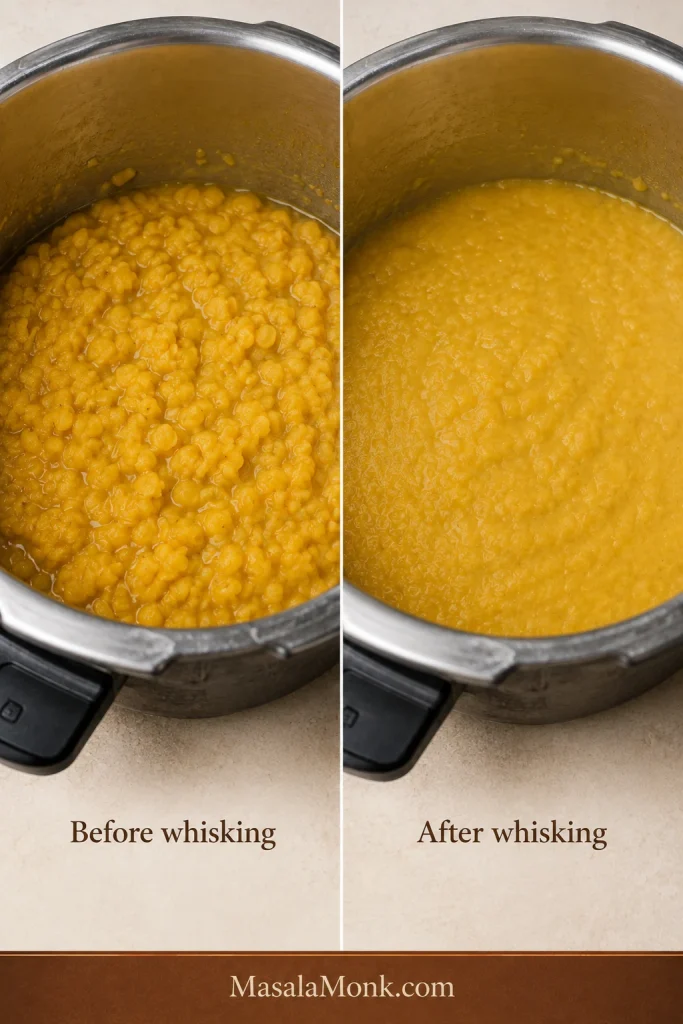
Whisk or mash the cooked dal for 20–30 seconds, breaking down most of the grains while leaving a little natural texture.
The cooker may open to dal far thicker than you expected. That is normal. Hold back the extra water for now; the masala adds moisture, and the final flow is easier to judge once everything is together.
4. Build the onion-tomato masala
Heat 1½ tablespoons ghee or oil in a medium pan over medium heat. Add the cumin. It should sizzle promptly and smell nutty within 15–20 seconds. If it sits silently, the fat is not hot enough.
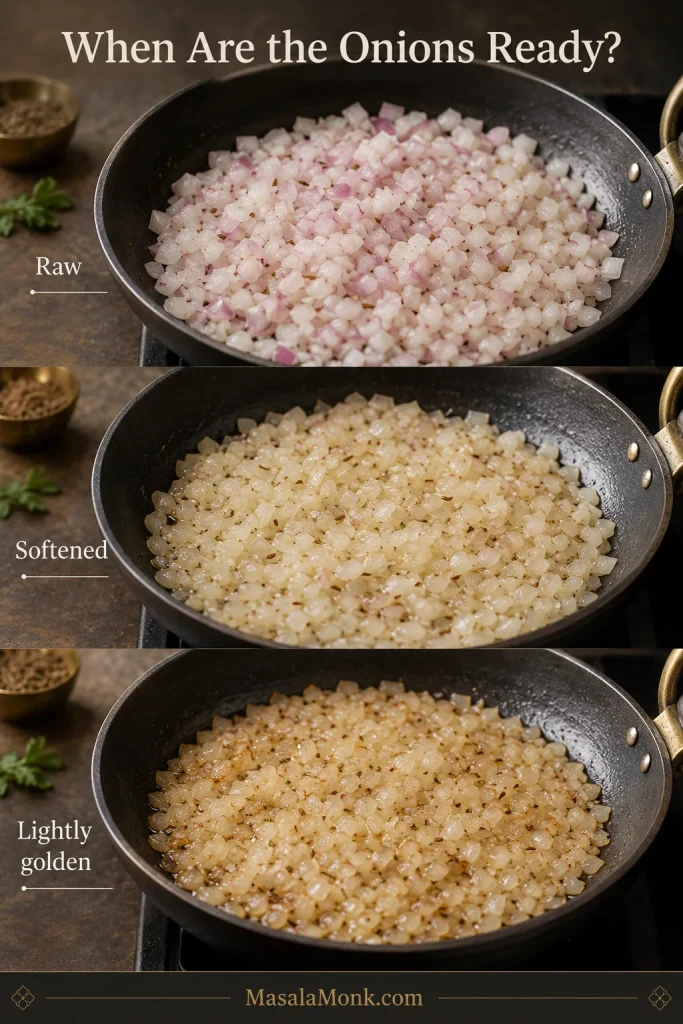
Add the onion with ⅛ teaspoon of the measured salt. Cook for 6–8 minutes, stirring regularly, until soft and golden at the edges and free of its raw sharpness.
Add the ginger, chopped garlic and green chilli. Cook for 60–90 seconds, until fragrant and the garlic begins turning pale gold.
Reduce the tomatoes until glossy
Add the tomatoes. Cook over medium heat for 7–10 minutes, stirring and pressing them against the pan, until they collapse into the onion, lose their raw smell and form a cohesive, glossy masala. Small beads of fat may appear around the edges.
The masala should smell rounder and sweeter now. This is the patient part: extra butter later cannot replace tomatoes that still taste raw.
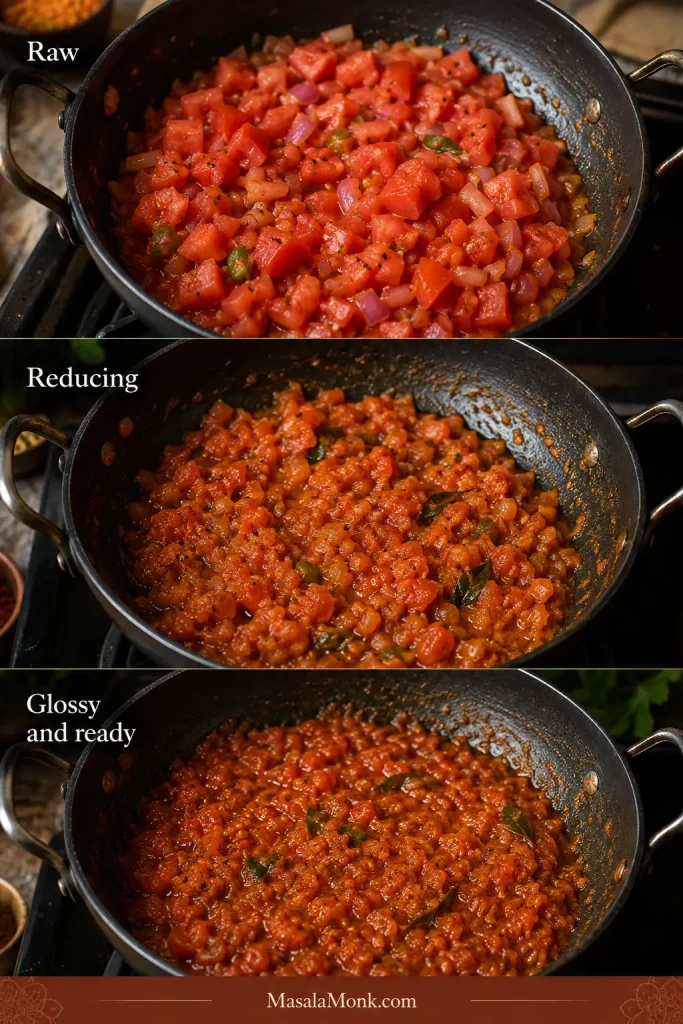
Lower the heat. Add ground coriander and the first ½ teaspoon Kashmiri chilli powder. Stir for 20–30 seconds. If the pan looks dry, add one tablespoon water rather than letting the spices scorch.
5. Combine, season and set the consistency
Pour the cooked dal into the masala pan, or scrape the masala into the cooker if that gives you more room. Stir until the colour and texture are even.
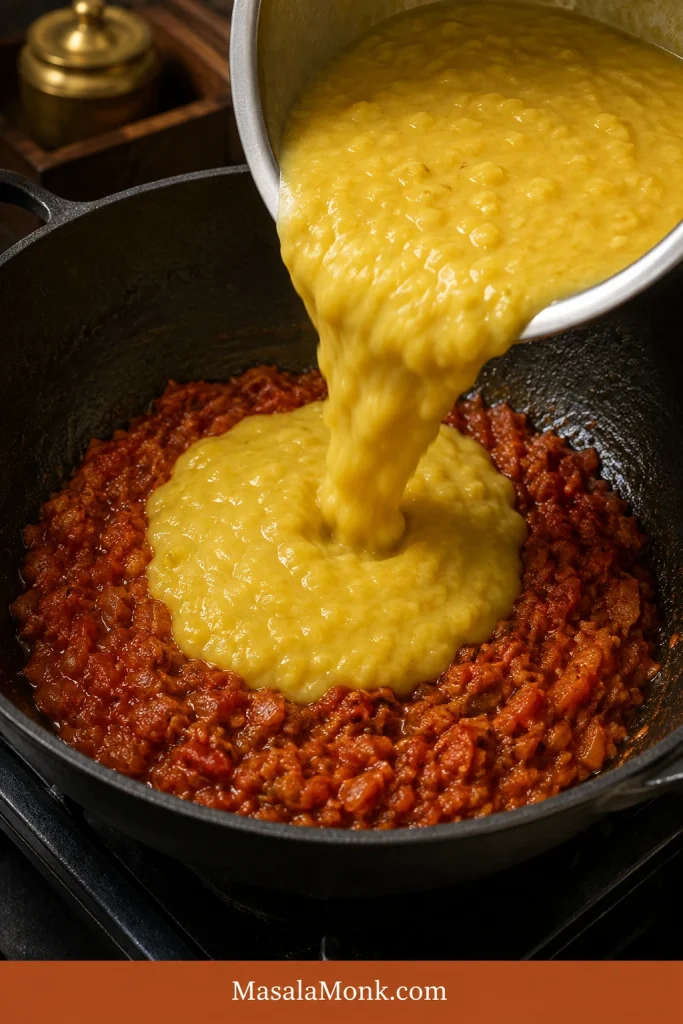
Add ½ cup hot water, the garam masala, crushed kasuri methi and ½ teaspoon of the measured salt. Reserve the final ⅛ teaspoon until after tasting. Bring the dal to a gentle simmer and cook uncovered for 4–6 minutes, stirring once or twice.
Set the final consistency
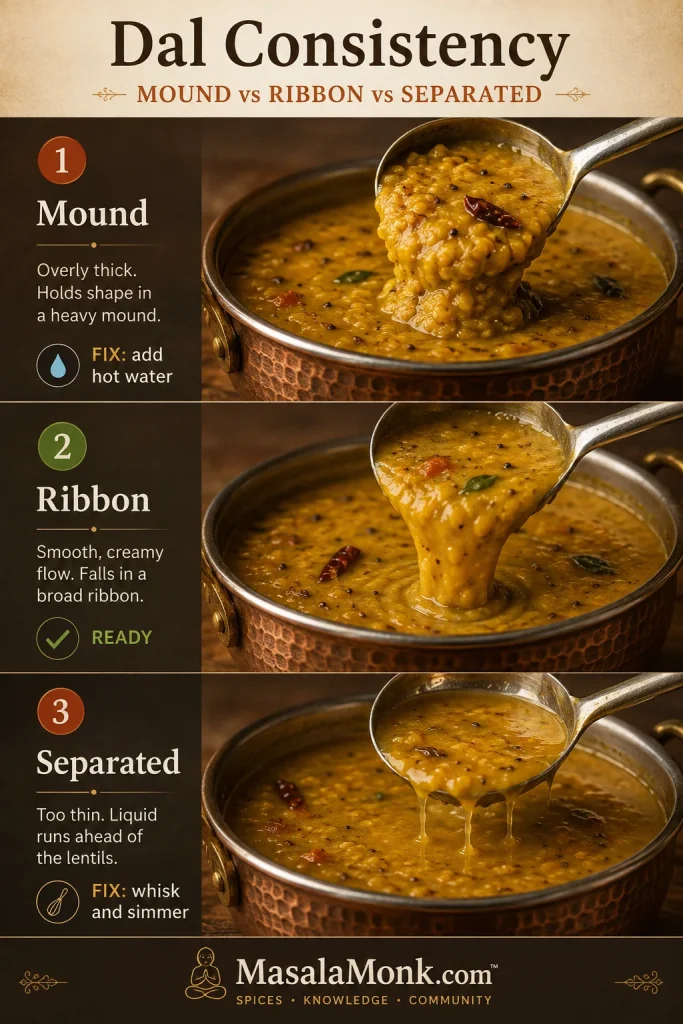
Judge the texture while the dal is hot. It should pour from a ladle in one creamy stream, then settle back into the pan. This flow carries the tadka through the dal instead of swallowing it.
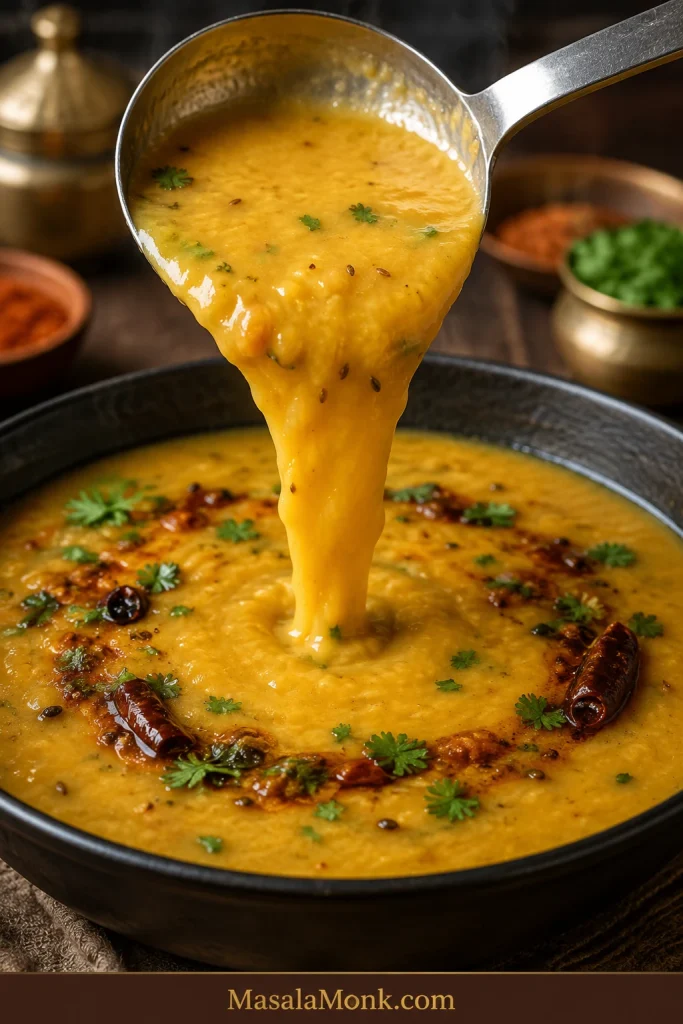
If the dal drops in a mound, add hot water in ¼-cup/60 ml increments. If clear liquid runs ahead of the lentils, whisk briefly and simmer uncovered until the mixture comes together. Stop while it is a little looser than you want at the table; it will thicken as it rests.
Still unsure about the texture? Use the visual Dal Tadka consistency guide.
Taste the dal before making the tadka: check the salt, tomato sharpness and body. Add the reserved ⅛ teaspoon salt if needed. If the tomato still tastes raw or sharp, simmer for another 2–3 minutes.
Stir in the optional butter or cream, then turn off the heat. Hold the lemon until after the tadka so you can judge the complete spoonful and keep dairy smooth. After the fresh tempering goes in, avoid prolonged simmering; it will flatten the aroma.
6. Make the garlic tadka
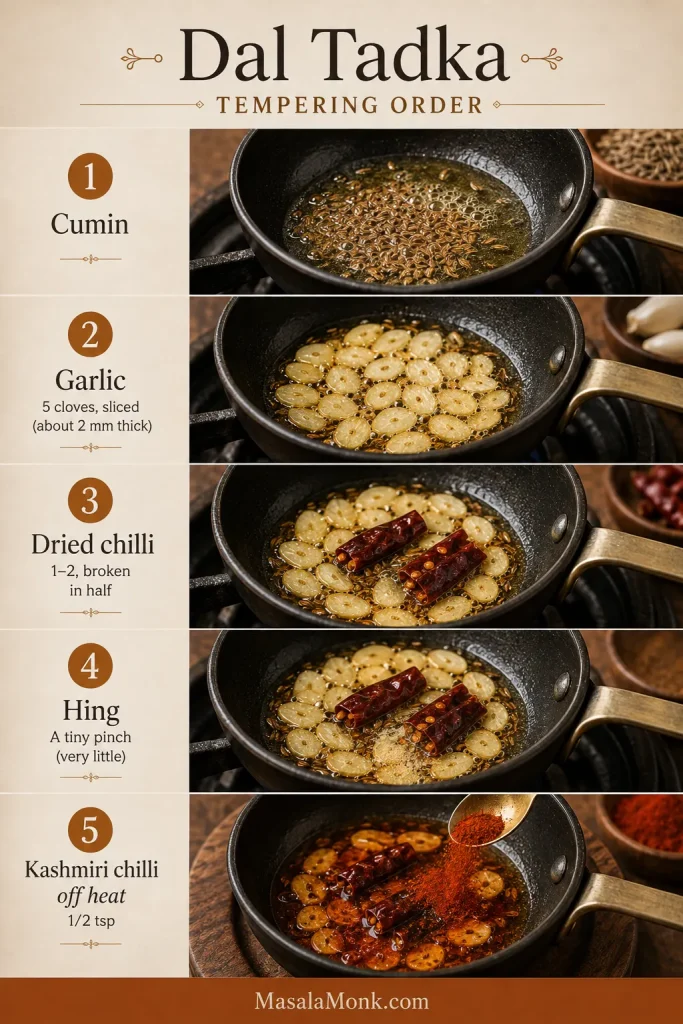
Put the serving bowl close to the stove and measure every tadka ingredient before heating the ghee. Once the garlic starts colouring, there is no useful pause button.
Heat 1½ tablespoons ghee in a small, deep pan over medium heat until fully melted and shimmering, but not smoking. Add the cumin seeds and let them sizzle actively for about 10–20 seconds.
Control the garlic colour
Add the evenly sliced garlic and reduce the heat to medium-low. Cook, swirling or stirring, until the edges begin to turn pale gold. Add the dried red chillies, then add the hing for the final 5–10 seconds. Pull the pan when the garlic is pale to medium gold; it will continue darkening in the hot ghee.
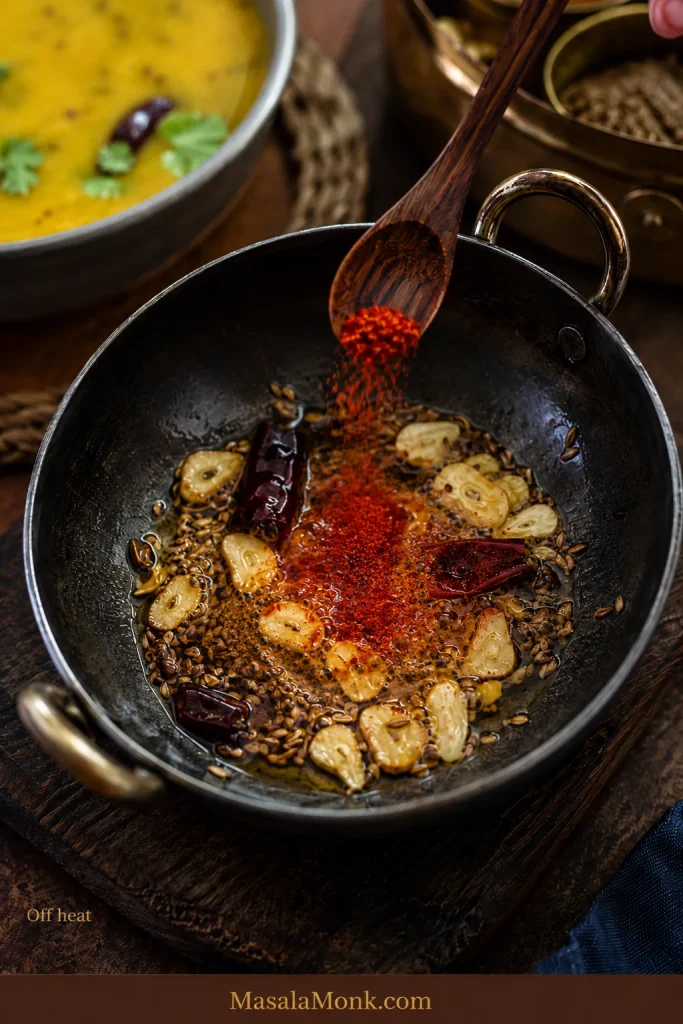
Bloom, pour and divide the tadka
With the pan off the heat, add ½ teaspoon Kashmiri chilli powder and swirl immediately. The ghee should turn red without the chilli powder blackening.
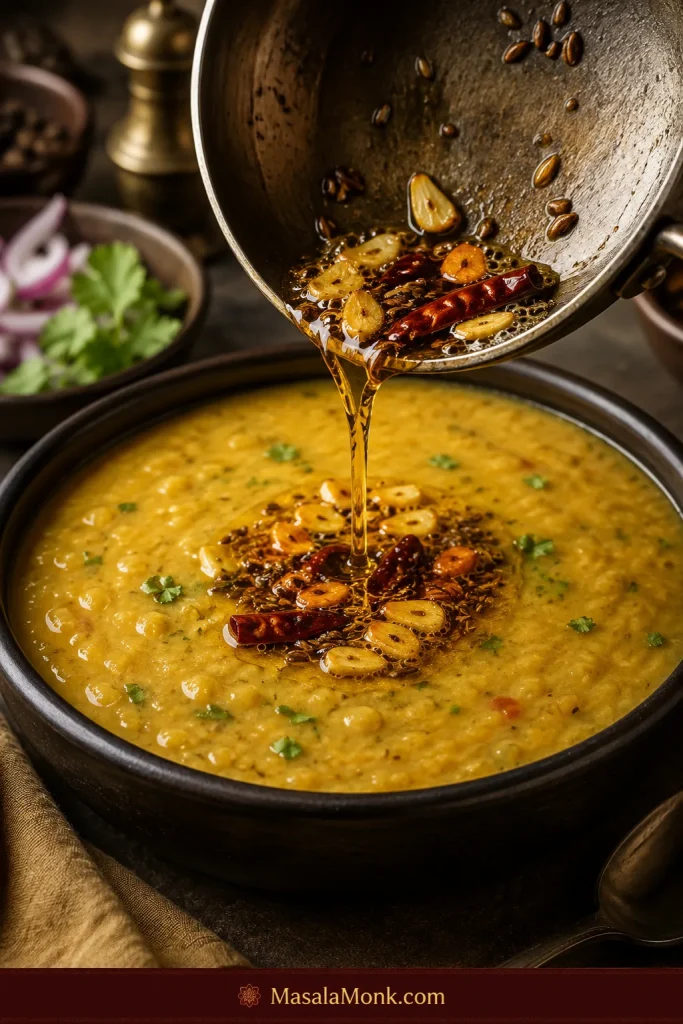
Pour about three-quarters of the sizzling tadka over the dal while the ghee is still hot and aromatic.
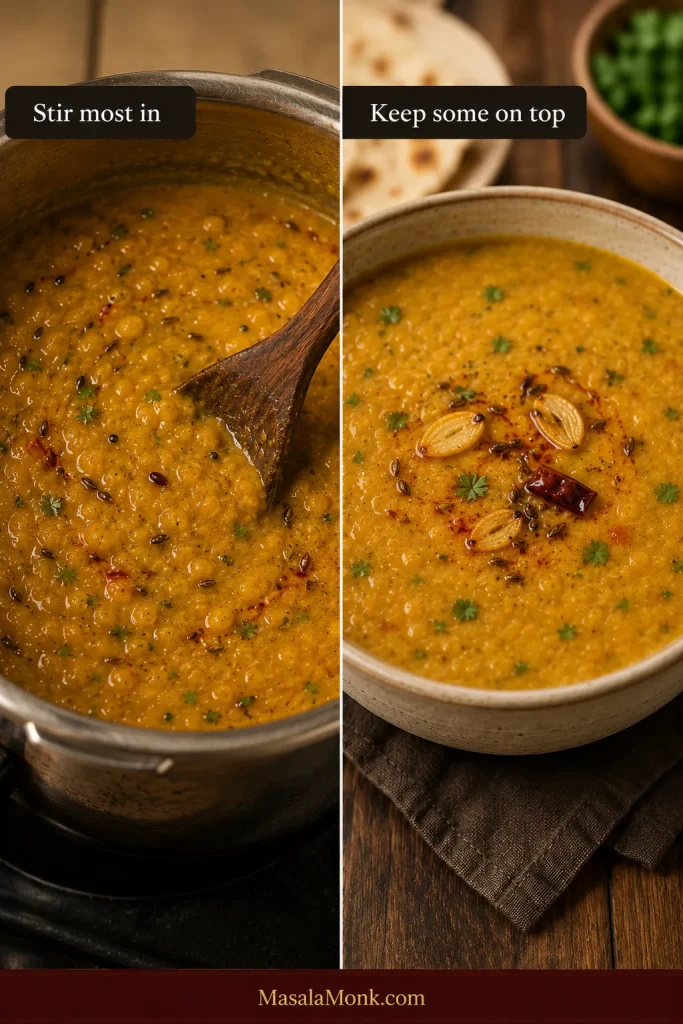
Stir once so most of the tempering travels through the pot, then spoon the remainder over the surface and finish with chopped coriander.
7. Let the tadka settle, then serve
Let the tadka sit for a moment, then taste a spoonful that catches both dal and tempering.
If the dal tightened while the tadka was cooking, gently stir in warm water one tablespoon at a time. Once the texture is right, add lemon ½ teaspoon at a time, up to 2 teaspoons, if the spoonful still needs lift.
Serve while the garlic is still fragrant and the red ghee remains visible. Dal continues thickening on the way to the table, so finish it slightly looser than the texture you want at serving. When rice is part of the meal, MasalaMonk’s guide to cooking rice covers basmati, stovetop, cooker and Instant Pot methods.
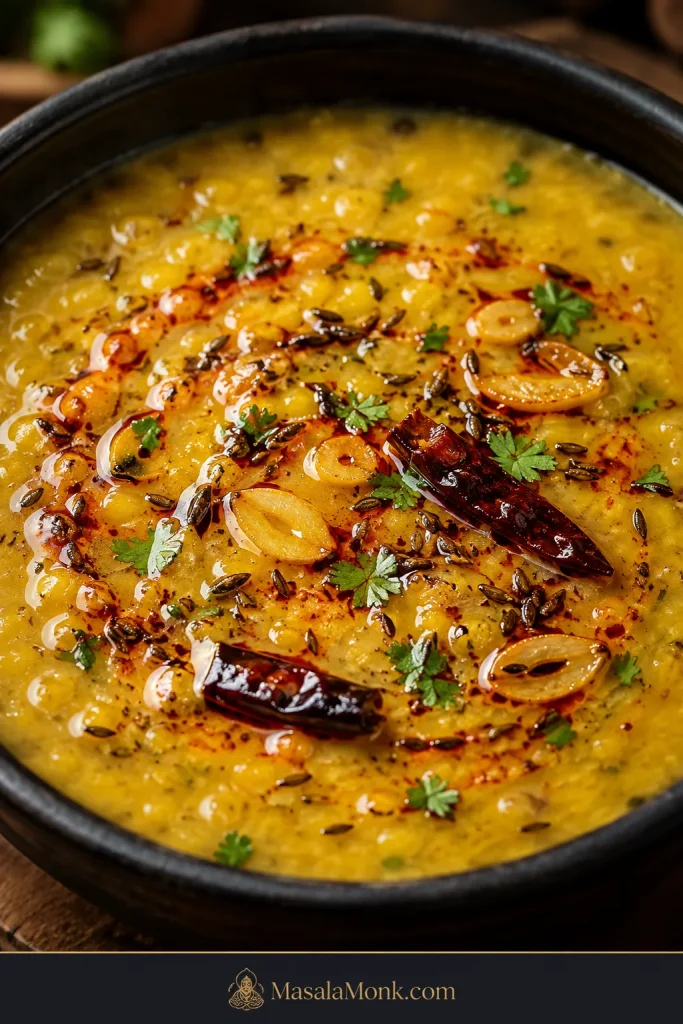
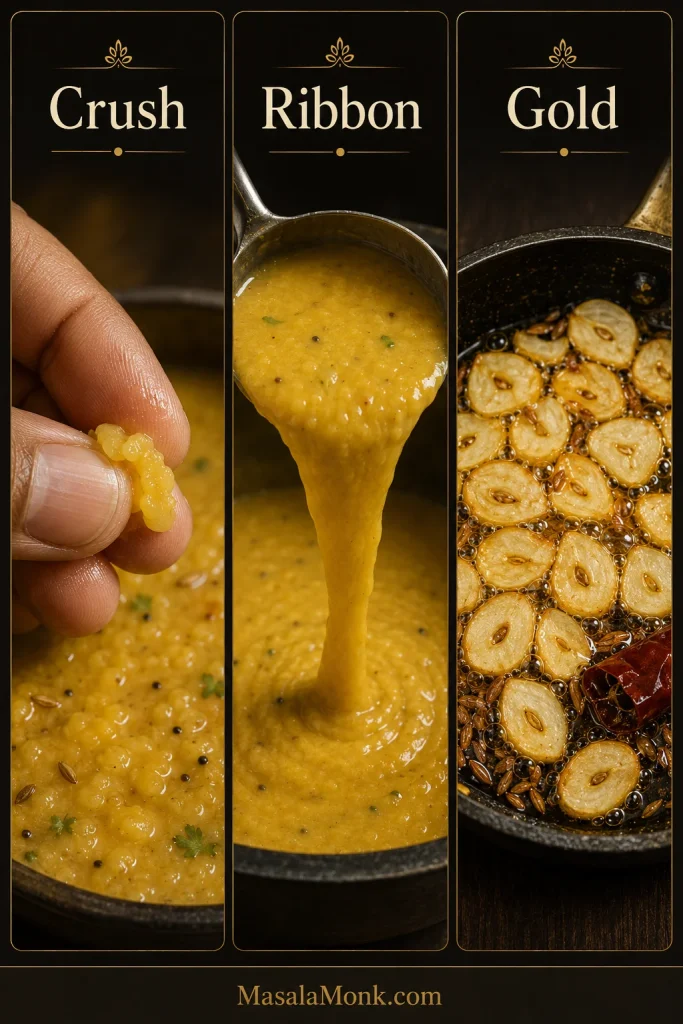
Crush. Ribbon. Gold. Crush one lentil: it should collapse. Lift one ladle: the dal should fall in a broad creamy ribbon. Look at the garlic: it should be golden. When all three agree, carry the dal to the table.
Make Dal Tadka work in your kitchen
The main recipe gets dinner on the table. The sections below help when your lentils are older, your cooker behaves differently or you prefer the dal lighter, thicker or smokier.
Cook and adjust
Rescue and finish
Which dal is used in Dal Tadka?
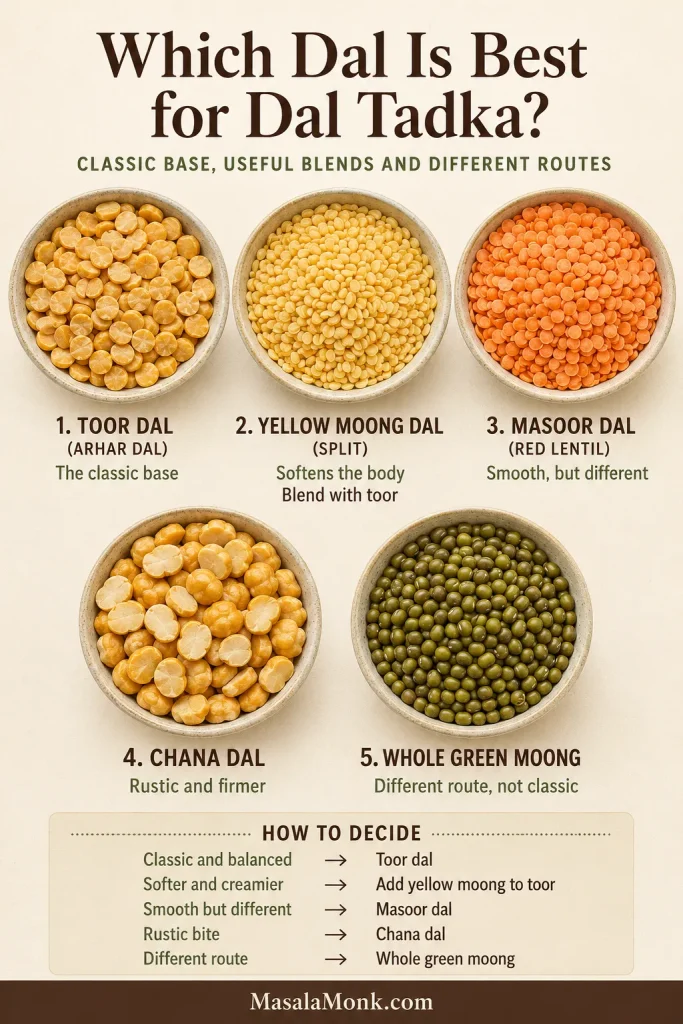
For a Punjabi-style Dal Tadka, toor dal is the most dependable starting point. It may also be labelled arhar dal, tur dal, tuvar dal or split pigeon peas. These names refer to the same lentil.
Some restaurants mix in yellow moong, masoor or a little chana dal. That does not make one version authentic and another wrong. It changes what the spoon feels like: moong softens the body, masoor breaks down quickly, and chana leaves a faint nutty texture.
How common dal blends change the texture
| Dal choice | Result | What changes |
|---|---|---|
| 100% toor/arhar dal | Classic, creamy and clean-tasting | Best default for this recipe |
| ¾ toor + ¼ yellow moong | Softer, lighter and slightly creamier | Cooks at a similar pace and is the easiest blend to use |
| ¾ toor + ¼ masoor | Very soft and cohesive because masoor breaks down earlier | Begin with the all-toor timing; let the toor grains decide doneness and expect to adjust the water |
| Toor with a little chana dal | Nutty with more visible texture | Soak first; chana dal decides the minimum cooking time |
| 100% yellow moong | Light, mild and quick-cooking | Produces a different everyday dal and deserves its own method |
| Whole green moong | Earthy, hearty and textured | Needs soaking and a longer cook; do not use as a direct swap here |
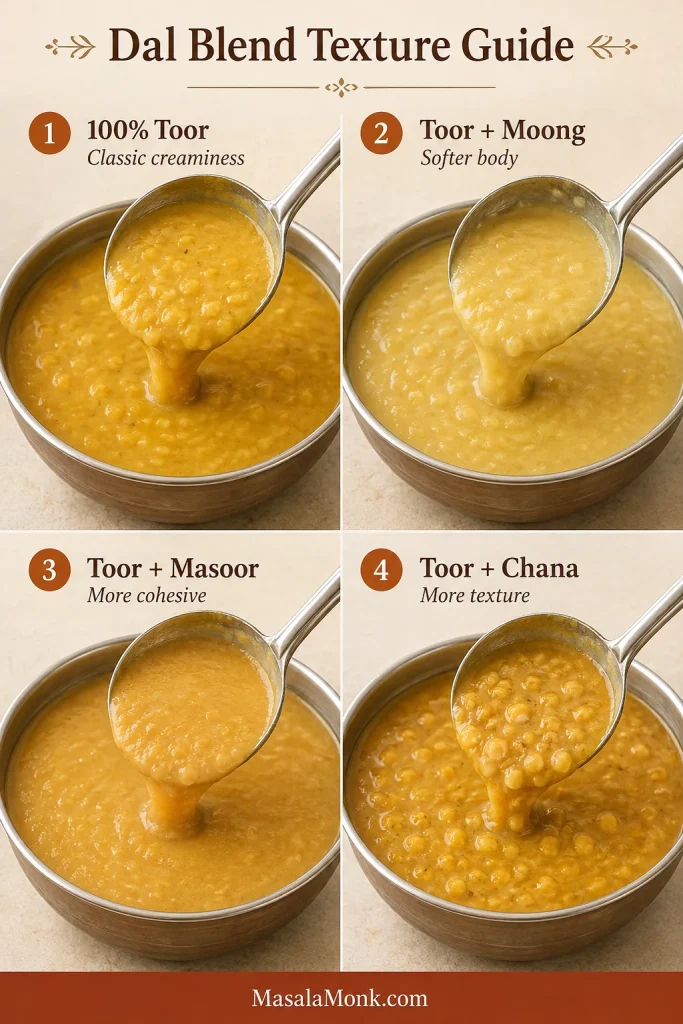
For the clearest starting point, use 200 g toor dal. For a softer blend, use 150 g toor plus 50 g yellow moong. Begin checking at the same time, then let the softened grain decide whether it needs longer.
Ingredients that shape the flavour
Garlic works twice. Chopped garlic melts into the masala, while evenly sliced garlic gives the fresh tempering its recognisable aroma and golden pieces.
Keep kasuri methi and garam masala in the background. One teaspoon kasuri methi gives the dal its warm restaurant-style aroma, while ¼ teaspoon garam masala deepens the base without taking over. If your blend smells flat, MasalaMonk’s homemade garam masala recipe explains how the whole-spice balance is built.
No kasuri methi? Skip it instead of replacing it with fresh fenugreek. The cumin-garlic tempering will still give the dal a satisfying finish.
Handle Kashmiri chilli and hing gently. Take the tadka pan off the flame before adding the chilli powder so it blooms red without scorching. Hing needs just the final few seconds in the hot fat, and strong or pure hing needs far less than a mild compounded product. For gluten-free Dal Tadka, check the label because some compounded asafoetida contains wheat flour.
Regional note: this Punjabi version is led by cumin and garlic. Mustard seeds and curry leaves are central to many other regional dals, especially in South Indian cooking, but this recipe does not need them.
Pressure cooker, Instant Pot or saucepan?
A stovetop pressure cooker is fastest, an Instant Pot asks for the least attention, and a saucepan lets you watch the lentils soften. Choose the method that fits how you like to cook; the grain test stays the same.
| Method | Soaking | Starting water | First timing window | Ready when |
|---|---|---|---|---|
| Stovetop pressure cooker | Optional 20–30 min | 2¾ cups / 660 ml | 8 min at pressure; 10 for older unsoaked dal; natural release | A grain collapses immediately with no chalky centre |
| Instant Pot | Optional 20–30 min | 2¾ cups / 660 ml | 7 min soaked or 8 min unsoaked; full natural release | The dal whisks creamy with almost no resistance |
| Heavy saucepan | 1–2 hr for toor | Begin with 4 cups / 950 ml | 45–75 min gentle simmer; older dal may need longer | No firm grains remain and the liquid no longer looks separate |
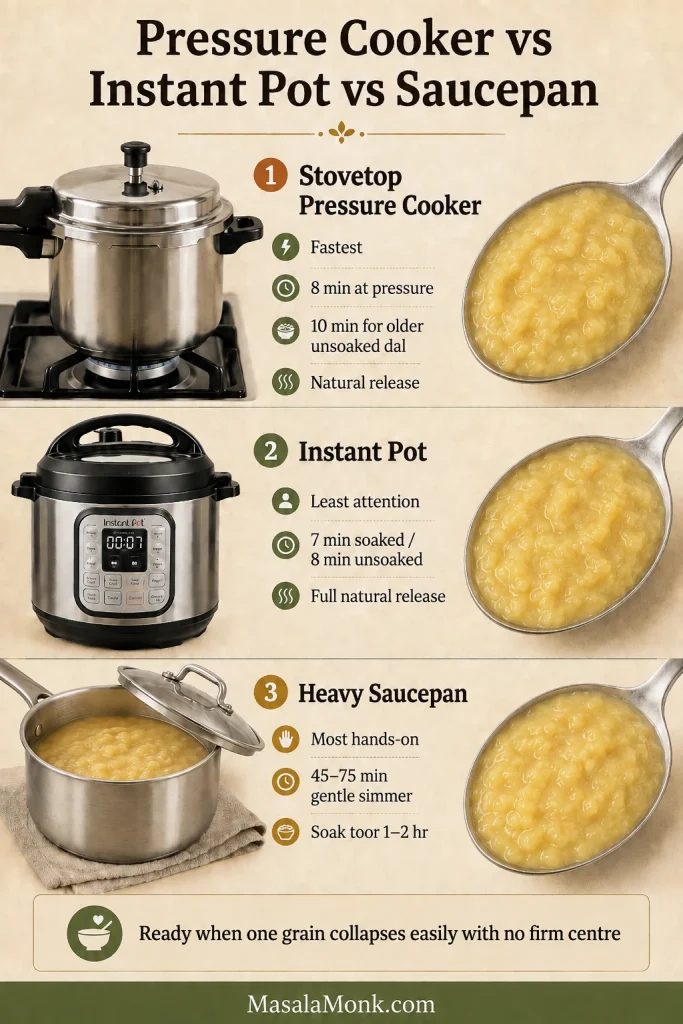
Cooker size, heat and lentil age vary; the softened grain gives the final answer.
Return to the cooking step · Check the final consistency
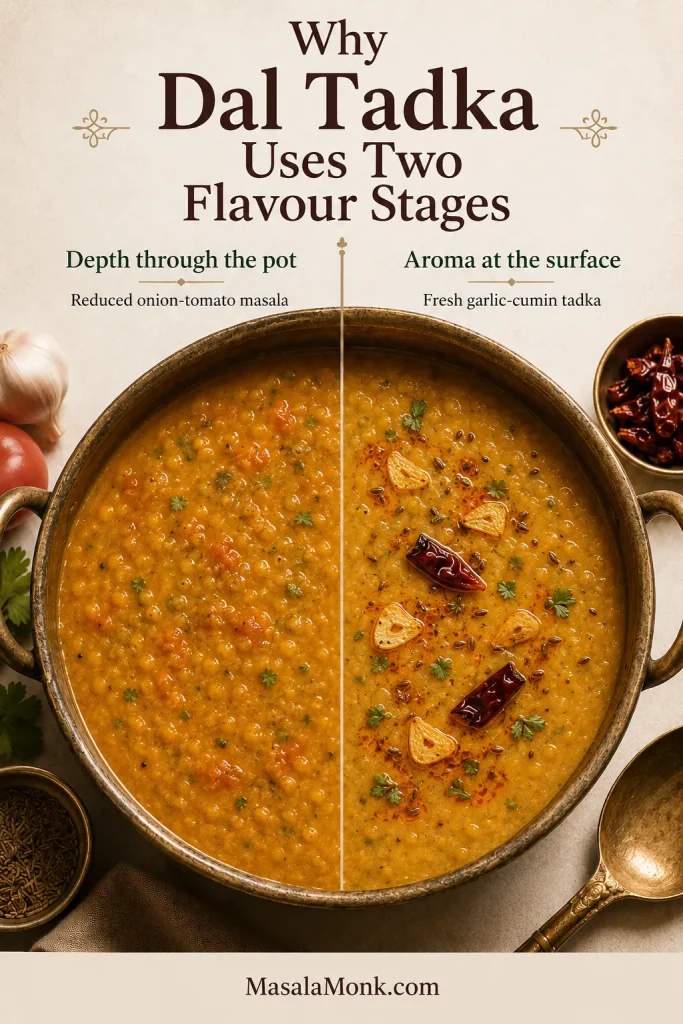
Why restaurant-style dal needs two flavour stages
Restaurant-style Dal Tadka tastes layered because each stage keeps its own job. Tender lentils create the creamy body. The reduced onion-tomato masala carries sweetness and savoury depth through every spoonful. The garlic-cumin tadka goes in at the end, while its aroma is still vivid. That is where the richness comes from—not oil floating on top.
How thick should Dal Tadka be?
The ideal texture depends on how you are serving it, but restaurant-style Dal Tadka should be creamy and pourable: cohesive on the spoon, then willing to flow back into the pot.
| What you see | What it means | What to do |
|---|---|---|
| Dal sits in a mound and barely moves | Too thick | Add hot water ¼ cup/60 ml at a time |
| Dal falls in a broad ribbon and settles slowly | Creamy restaurant-style flow | Stop adjusting; it will thicken slightly as it rests |
| Clear liquid runs ahead of lentil solids | Too thin or not yet cohesive | Whisk briefly and simmer uncovered |
| Dal feels creamy but turns stiff after 10 minutes | Normal cooling and starch thickening | Keep it slightly loose before serving |
Use the comparison below to identify the problem before adjusting. Change one thing at a time, then give the dal a moment to settle before judging again. For a sturdy flatbread such as MasalaMonk’s jowar-bajra roti, stop a little thicker; for rice, leave it looser. If dinner runs five minutes late, restore the flow just before serving.
Dal Tadka troubleshooting
Most disappointing pots are recoverable. Before reaching for more spice, ask which stage needs another minute. Grainy dal needs cooking, separated dal needs whisking and reduction, and a weak finish usually needs balance or a fresh tempering.
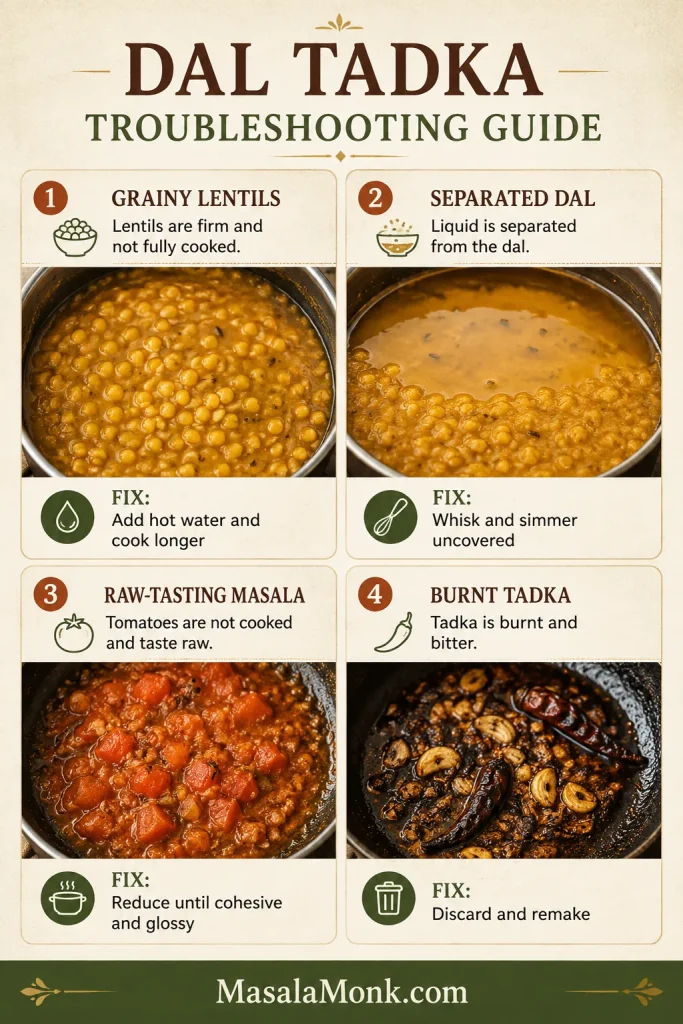
Fix texture and consistency problems
| Problem | Likely cause | Most useful fix |
|---|---|---|
| Watery or separated dal | Undercooked lentils, too much adjustment water or too little whisking | Confirm the grains are soft, whisk briefly and simmer uncovered; do not add flour or starch |
| Grainy dal | Old lentils, hard water or insufficient pressure time | Add ¼–½ cup hot water and pressure-cook 2–3 minutes more, or simmer covered until the grains collapse; if this repeats across batches, try filtered water |
| Dal became stiff while waiting | Normal starch thickening as it cools | Fold in warm water a tablespoon at a time; recheck salt only after the texture is right |
Fix flavour and tempering problems
| Problem | Likely cause | Most useful fix |
|---|---|---|
| Flat flavour | Too little salt or acidity, raw masala, or a tadka made too early | Check salt first, then add lemon by the teaspoon; cook raw tomato longer or make a small fresh tadka |
| Bitter tadka | Garlic or chilli powder burned | Discard and remake the small tadka; stop garlic at pale-to-medium gold and add chilli powder off heat |
| Too much oil on top | The tadka was too large for the amount of dal | Spoon off excess and loosen the dal if needed; use the lighter home-style quantity next time |
| Tomato tastes sharp or raw | The masala was combined too soon | Simmer before adding the final tadka until the raw smell disappears and the base looks cohesive |
| Garlic softened or disappeared | Uneven slices or all the tadka was stirred through early | Slice evenly, fry just before serving and reserve part of the tadka for the surface |
When the garlic and red ghee disappear into the pot, the problem is usually distribution rather than quantity. Stir most of the tadka through for flavour in every serving, but reserve a smaller portion for the surface so the freshest aroma and crispest garlic remain noticeable.
When the texture is right but the flavour is flat
When the texture is right but the flavour remains dull, taste in this order: salt, acidity, tomato reduction and tadka freshness. If the garlic is dark brown, the chilli smells scorched or the fat tastes bitter, remake the tempering. Two fresh minutes are better than letting burnt garlic follow every spoonful.
Back to the recipe card · Recheck consistency · Back to top ↑
How to make the dal dhaba-style
For bolder dhaba-style dal, change four things instead of doubling every spice.
- Keep the dal slightly thicker, but still loose enough to settle naturally.
- Add two extra sliced garlic cloves to the final tadka.
- Taste first; if the kasuri methi is too quiet, add up to another ½ teaspoon during the final simmer.
- Use a brief charcoal dhungar for smoke.
How to smoke the dal without making it bitter
The same brief charcoal method appears in MasalaMonk’s butter chicken recipe, but Dal Tadka needs a lighter exposure.
Working beneath strong ventilation, heat the 1-inch/2.5 cm piece of natural lump charcoal—not a self-lighting briquette—over a flame until it glows red in places and develops a light grey surface. Handle it only with tongs.
Put a small steel bowl in the centre of the finished dal and place the hot charcoal inside it without letting the charcoal touch the food. Drizzle ½ teaspoon ghee over the charcoal and immediately cover the pot.
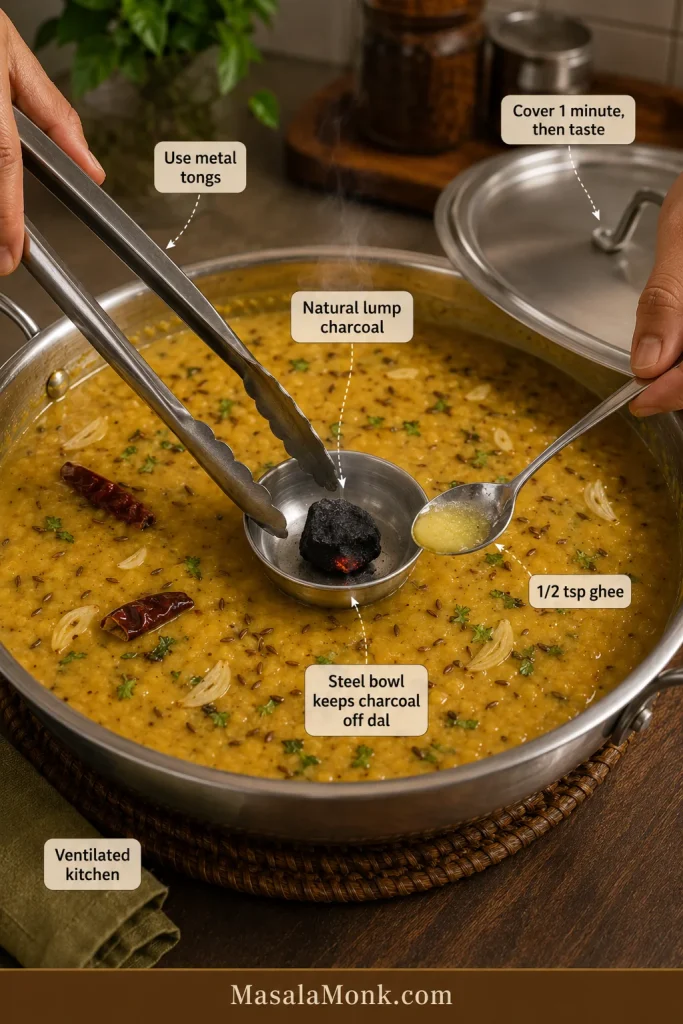
Start with 60 seconds. Uncover, remove the bowl and taste. Smoke is easy to add and impossible to remove. Repeat for one more minute if you deliberately want a stronger smoke.
Leave the used charcoal in a heatproof metal container until it is completely cold before disposal.
Back to the recipe card · Go to serving ideas · Back to top ↑
Useful variations
Once the lentils are tender and the tadka is fresh, the recipe is easy to adapt. Change one thing at a time so the garlic, tomato and spices still taste as though they belong together.
Vegan Dal Tadka
Use sunflower, rice bran, canola or another neutral oil for the masala and tadka, then skip butter and cream. Mustard oil gives the dal a sharper, more mustard-led flavour; choose it when that is the direction you want.
No-onion, no-garlic Dal Tadka
Skip the onion and garlic. Use ginger, cumin, tomato and kasuri methi, then finish with lemon. Use up to the full scant ⅛ teaspoon hing for a mild compounded product; use considerably less when it is strong or pure. A South Indian no-onion version may use mustard seeds, curry leaves and a different spice balance.
Lasooni or extra-garlic Dal Tadka
Add two or three extra garlic cloves to the final tadka and reserve the crispest slices for the top. For a gentler garlic flavour, use two cloves in the masala and four in the tadka. Fried garlic creates the recognisable lasooni aroma more clearly than simply adding more crushed garlic to the base.
Milder family version
Use one green chilli or omit it, choose mild Kashmiri chilli for colour and leave the dried chilli whole so it perfumes the ghee without releasing as much heat. Adults can add chilli at the table.
Fresh, lighter home-style version
Use 1 tablespoon oil in the masala and 1 tablespoon ghee or oil in the tadka. Cook the tomatoes for 3–5 minutes, until softened but still bright; skip cream and smoke, then finish with lemon and coriander. A crisp cucumber salad makes a natural cool contrast.
Dal Tadka vs Dal Fry: what is the difference?
Restaurants and home kitchens often use the names loosely, but the usual distinction is about technique.
| Feature | Dal Tadka | Dal Fry |
|---|---|---|
| Defining move | A fresh tempering is poured over or stirred into the finished dal | Cooked dal is simmered in a fried onion-tomato masala |
| Appearance | Often has visible ghee, garlic and chilli on top | Usually looks more uniformly mixed |
| Flavour emphasis | Fresh cumin, garlic and chilli aroma | Deeper cooked masala flavour |
| Can a recipe use both? | Yes | Yes |
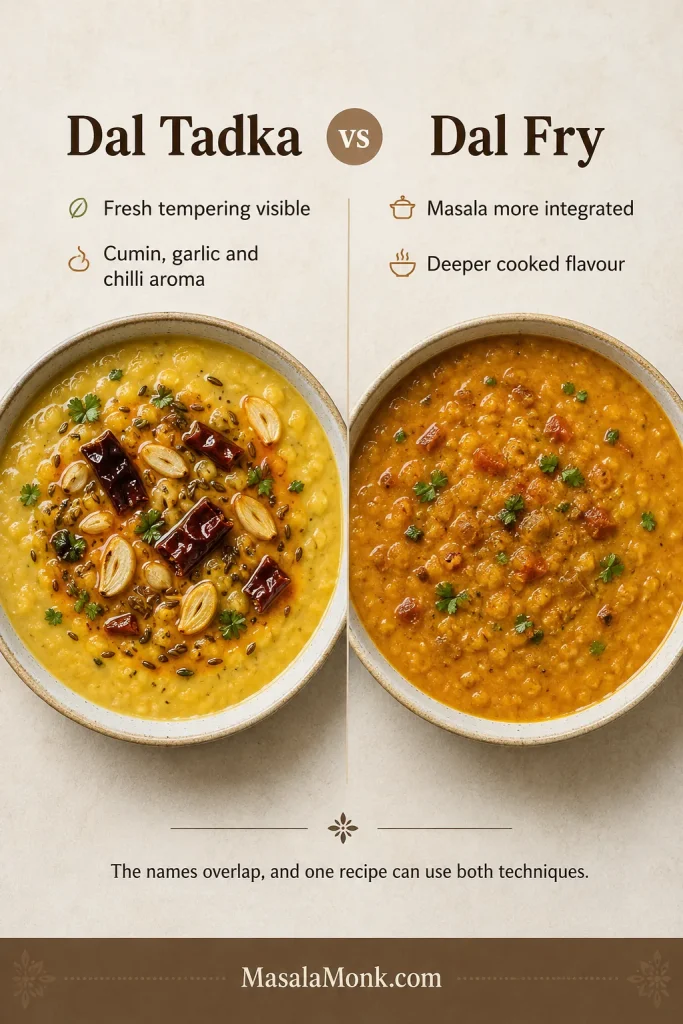
This recipe uses both a cooked masala base and a final tempering, a common restaurant-style approach. The fresh cumin, garlic and chilli on top make the dish unmistakably Dal Tadka.
What to serve with Dal Tadka
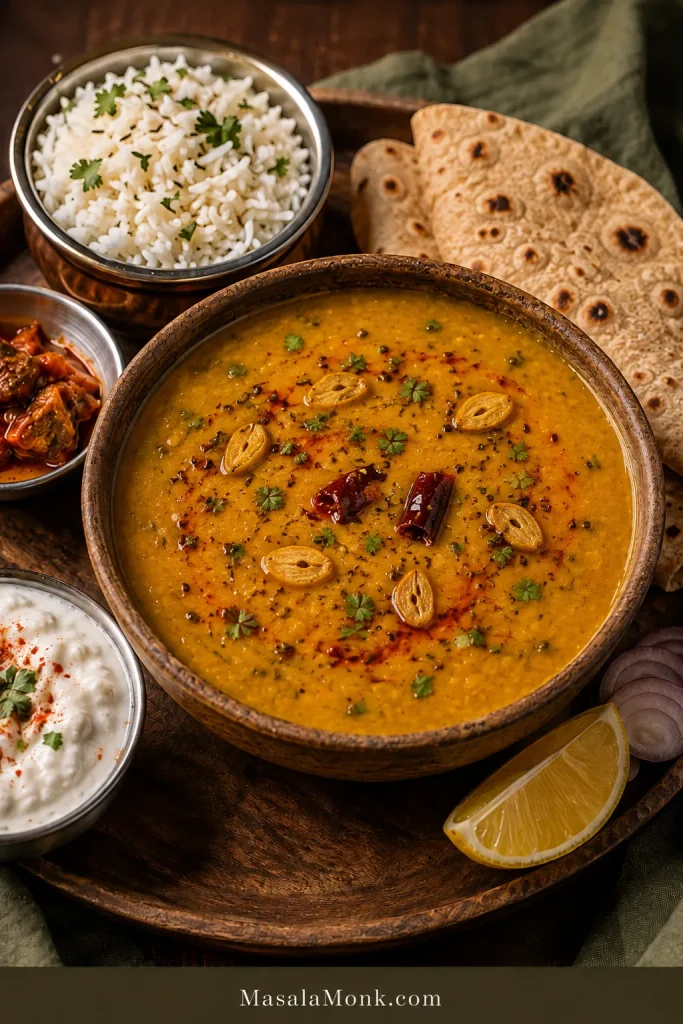
Dal Tadka can anchor a quiet weekday dinner or sit within a larger North Indian spread. For the simplest meal, rice, dal, curd and pickle are enough. With rotis, keep the dal slightly thicker and add a dry vegetable or cooling raita alongside.
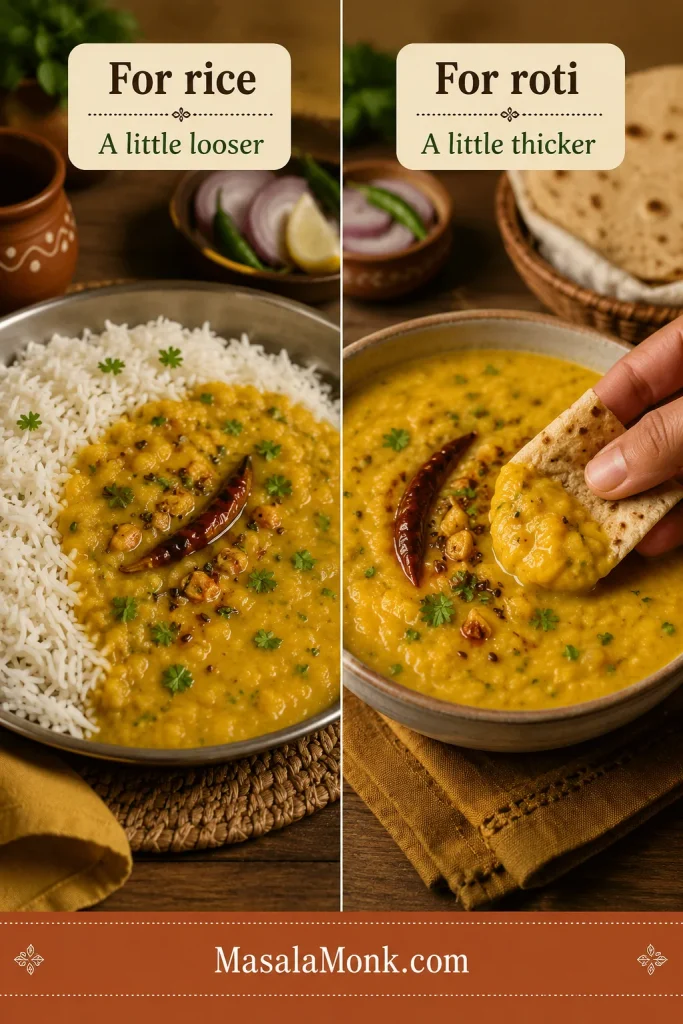
- With rice: basmati rice, jeera rice or plain steamed rice
- With bread: roti, phulka, naan, tandoori roti or paratha
- For contrast: cucumber raita, plain curd, sliced onion, lemon and pickle; MasalaMonk’s palak raita makes a more substantial cooling side
- For a fuller meal: a dry vegetable, papad and a fresh salad
Leave the dal looser for rice and slightly thicker for roti. That small adjustment changes how naturally it sits with the rest of the meal.
Make ahead, store and reheat
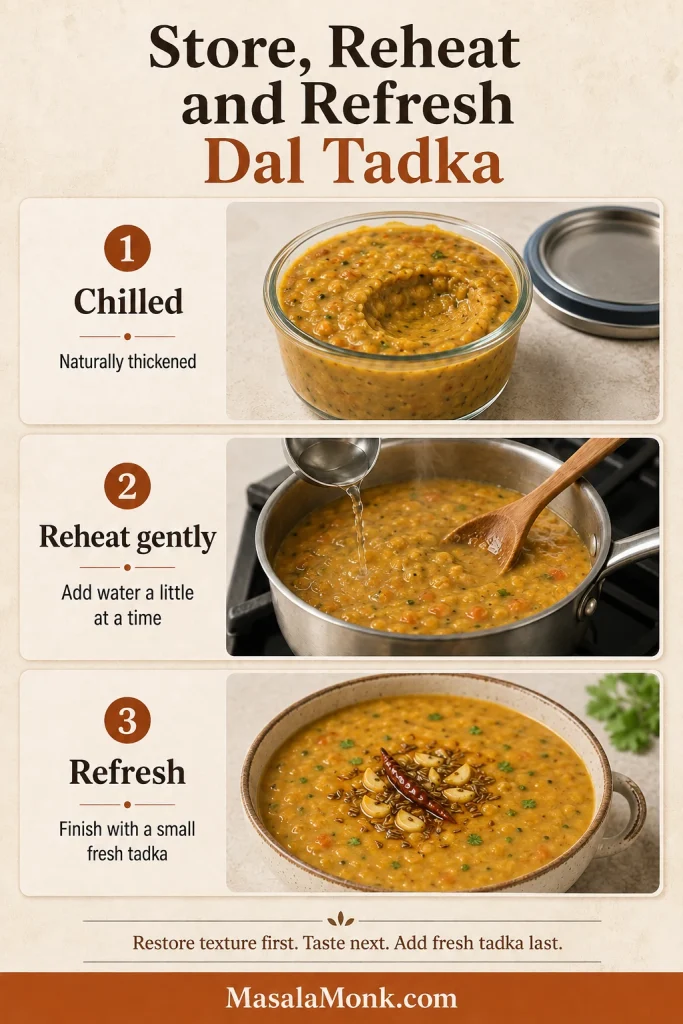
Dal is generous to tomorrow’s dinner, but its texture and aroma need different treatment: cool the base promptly, then restore the flow and make a fresh tadka when you reheat it.
Best make-ahead method
Cook the dal and onion-tomato base in advance, but hold back the serving-time tempering. Reheat the portion you need, restore the consistency, then check the salt and make a fresh tadka before serving. For Indian meal prep, store the base in portions and finish each one as it goes to the table.
Refrigerator
Transfer the dal to shallow covered containers and refrigerate at 40°F/4°C or below within two hours—or within one hour when the room is above 90°F/32°C. Use it within 3–4 days. These limits follow the USDA leftovers guidance (opens in a new tab). The dal will become substantially thicker as it chills.
Freezer
Freeze the cooked dal and masala base without the final tadka in meal-sized portions. For best texture and flavour, use within about 2–3 months. Thaw in the refrigerator—or reheat from frozen slowly in a saucepan—then add a new tadka before serving.
How to reheat without ruining the texture
Put the dal in a saucepan with a splash of water. Reheat gently, stirring as it loosens, until steaming hot throughout—165°F/74°C if you check with a thermometer. Add a little more as needed until the dal is creamy and pourable again. Restore the consistency first, then taste for salt and acidity because dilution changes both.
Back to the recipe card · Serving ideas · Back to top ↑
Frequently asked questions
Can I make Dal Tadka without a pressure cooker?
Yes. Soak the toor dal for 1–2 hours, begin with about 4 cups/950 ml water and simmer it in a heavy saucepan until every grain crushes easily. Expect roughly 45–75 minutes after soaking, and longer for particularly old lentils.
Can I use red lentils instead of toor dal?
You can make a good tarka dal with red lentils, but it will not behave exactly like this Punjabi toor-dal recipe. Red lentils cook faster, break down more completely and usually need less time.
Can I use packaged Dal Tadka masala?
Packaged Dal Tadka masala can work. Add it conservatively to the cooked onion-tomato base, and check whether the blend already contains salt, chilli, dried mango or kasuri methi before adding the recipe’s full seasoning. A packet can simplify the base; freshly bloomed cumin, garlic and chilli still give the finished dal its clearest aroma, so keep the fresh garlic tadka.
Can I make Dal Tadka without tomato?
Tomato is optional. Cook the onion until properly golden, then build the base with ginger, garlic and spices. The dal will be less red and slightly less sweet. Begin with ⅛ teaspoon amchur or 1 teaspoon lemon juice after tasting, then add more if needed.
Can I double the recipe?
Doubling works, provided the cooker remains within the manufacturer’s limit for expanding foods. In an Instant Pot, the combined lentils, water and other ingredients must stay below the ½ line. Ingredient quantities can double, but pressure time usually does not. Scale salt and chilli conservatively at first, then adjust after combining. A large batch is often better with two smaller tadkas than one overcrowded pan.
Return to the recipe card · Back to top ↑
The final tadka is worth waiting for
Cook the lentils ahead. Prepare the masala while the cooker releases. Adjust the consistency and hold the pot on low heat while the rest of dinner comes together.
But make the last tadka when the rice is fluffed, the rotis are coming off the tawa and everyone is almost ready to eat.
That brief rush of cumin, golden garlic and red chilli is not decoration. It is what turns a pot of lentils into the bowl people lean toward before it has even stopped sizzling.








