Posted on Leave a comment

Tomato Pie Recipe: Southern-Style, Cheesy and Never Soggy

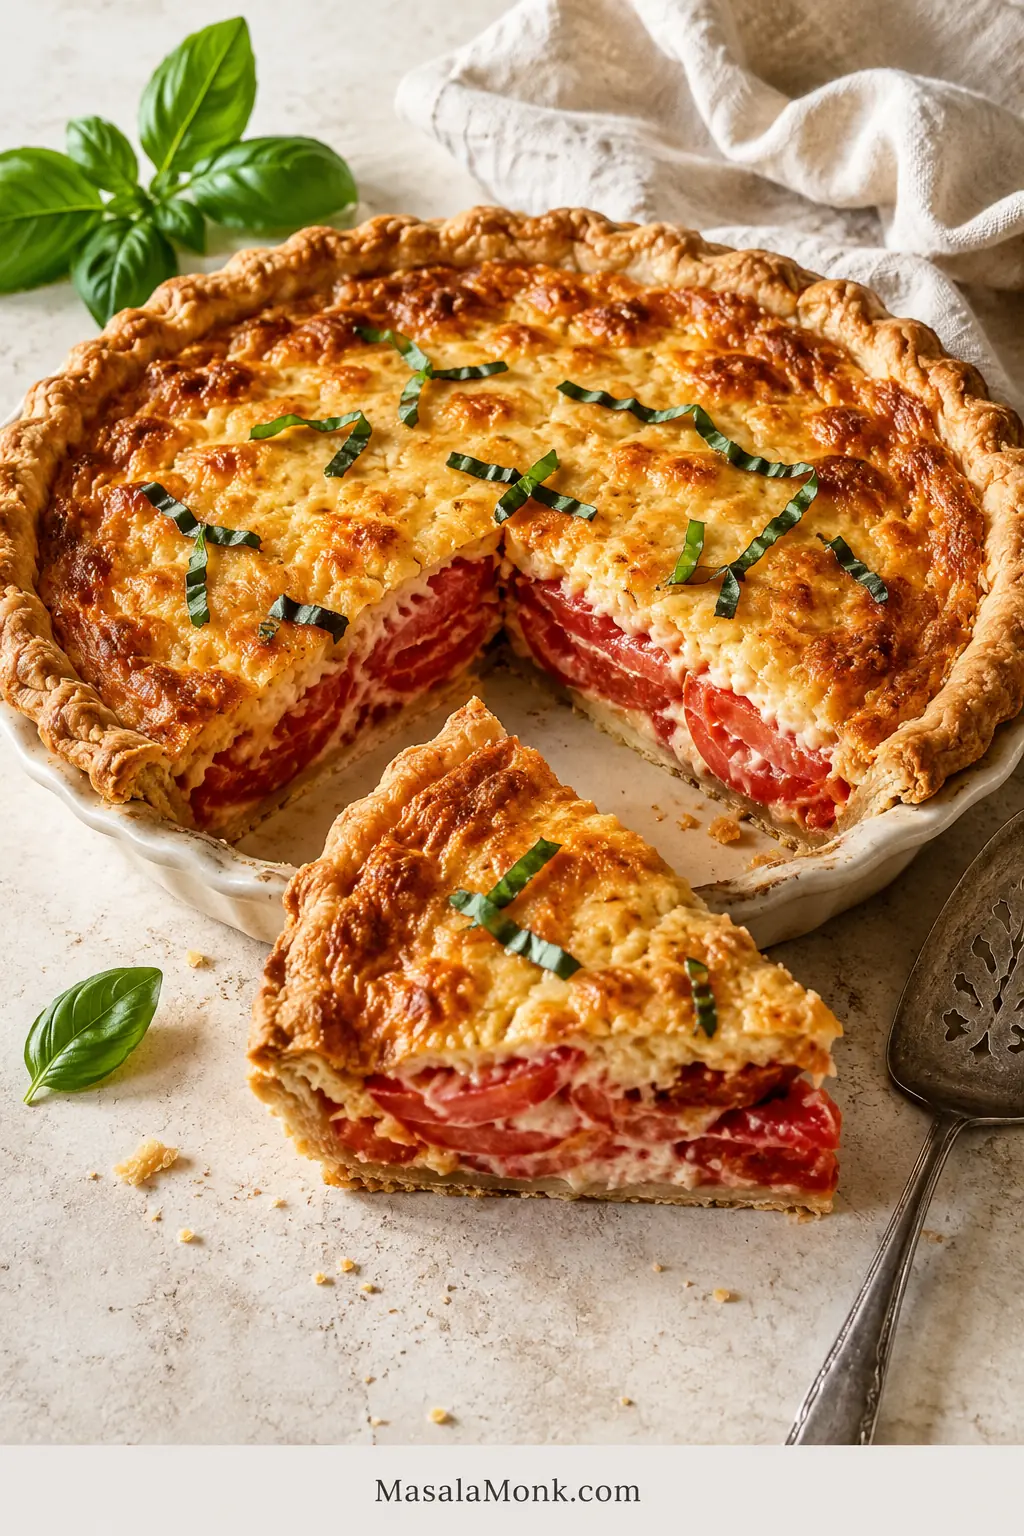
Whole Southern tomato pie with a golden crimped crust, browned cheese topping, fresh basil, and one wedge removed to reveal the red tomato filling.

The first slice tells you whether a tomato pie worked. The tomatoes should still taste unmistakably of summer, the cheese should be creamy and savory, and underneath it all there should be a crust flaky enough to matter—not pale pastry soaking in tomato juice.

This is the kind of pie to make when tomatoes are so ripe and fragrant that dinner can reasonably revolve around them. The aim is to concentrate that ripe tomato flavor while keeping enough water away from the pastry for the first wedge to come out looking—and eating—like a proper slice of pie.
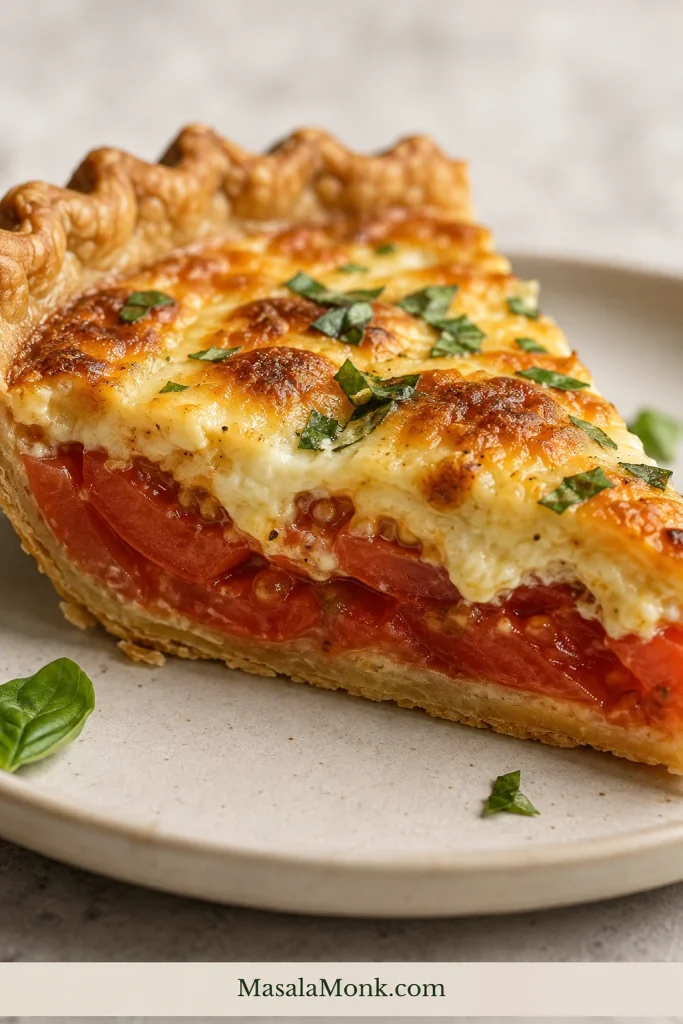
Close side view of a Southern tomato pie wedge showing an intact flaky bottom crust, red tomato layers, and browned creamy cheese topping.
A good slice keeps the flaky crust distinct beneath generous tomato and browned cheese.

So the tomatoes are lightly salted, blotted and roasted. The crust gets a head start in the oven and a thin layer of melted sharp cheddar before the tomatoes ever touch it. On top goes extra-sharp cheddar, Parmesan, fresh basil, Dijon and enough mayonnaise to make everything creamy while the tomatoes still taste like the reason you made the pie.

Jump to: Recipe · Keep It Crisp · Troubleshooting

Quick Answer: How to Make Tomato Pie Without a Soggy Crust

For a standard 9-inch / 23 cm pie, use about 2 lb / 900 g ripe tomatoes. Slice them ⅜–½ inch / 10–13 mm thick, lightly salt and blot them, then roast until slightly wrinkled and no longer wet-looking. Pre-bake the crust until the bottom is dry and lightly golden, then melt a thin layer of cheddar over it.

Arrange the tomatoes over the crust, add the cheese topping, and bake on the lower-third rack at 375°F / 190°C for about 30–35 minutes. Rest at least 30 minutes before slicing; closer to an hour gives cleaner wedges.

There are a few more steps here than in the quickest versions, but none is difficult. With one tomato tray, the tomatoes roast while the crust pre-bakes, so those two jobs finish at almost the same time.

Southern Tomato Pie Recipe With a Crisp Crust

This version keeps the tomatoes front and center: roasted just enough to deepen their flavor, layered over a pre-baked crust, then covered with a sharp, basil-flecked cheese topping that stays creamy without becoming heavy.

Yield: 1 standard 9-inch / 23 cm pie
Serves: 6 generous portions or 8 smaller portions
Hands-on time: about 30 minutes
Prep + bake: about 1¼–1½ hours
Rest: 30–60 minutes
Total time: about 2–2½ hours
Best served: warm or at room temperature
Timing note: Times assume you are starting with a prepared crust ready to blind-bake.

Equipment

  • Standard 9-inch / 23 cm pie plate, if using rolled dough
  • 1–2 large rimmed baking sheets
  • Parchment paper
  • Pie weights or dried beans, for rolled dough
  • Clean kitchen towels or paper towels
  • Wire cooling rack
  • Foil or a pie shield, optional

Ingredients
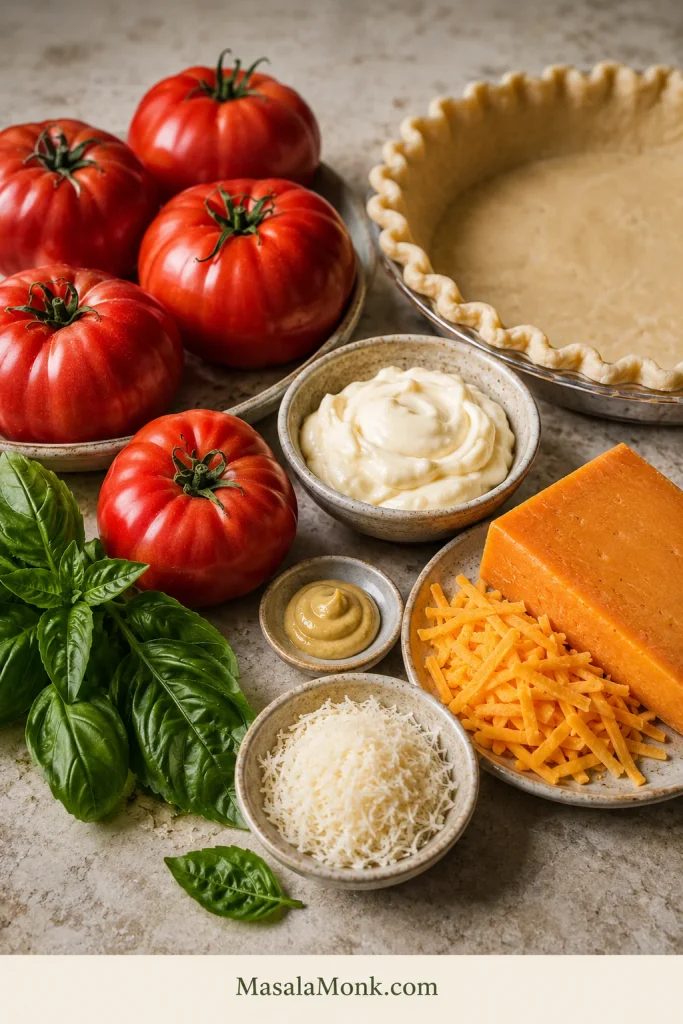
Ripe red tomatoes, pie crust, cheddar, Parmesan, mayonnaise, Dijon mustard, and fresh basil arranged together for Southern tomato pie.
Tomatoes bring the juiciness and acidity; cheddar, Parmesan and mayo add richness; Dijon and basil keep it bright.

For the Tomatoes

  • 2 lb / about 900 g ripe tomatoes, about 4–6 large tomatoes
  • ¾ teaspoon fine sea salt / about 4 g
  • ½ teaspoon freshly ground black pepper, divided

For the Crust and Bottom Cheese Layer

  • 1 prepared standard 9-inch / 23 cm pie crust, homemade or store-bought; not deep dish
  • 1½ oz / 40 g extra-sharp cheddar, finely grated

And for the Cheese Topping

  • 5½ oz / 160 g extra-sharp cheddar, freshly grated
  • 1 oz / 28 g Parmesan, finely grated; Pecorino Romano also works but is saltier
  • ½ cup / about 115 g mayonnaise
  • 1 teaspoon / 5 ml Dijon mustard
  • ¼ cup loosely packed fresh basil, torn or chopped, plus more for serving
  • Pinch of red-pepper flakes, optional

Shopping note: You need 7 oz / 200 g cheddar total. One standard 8 oz / 227 g block is enough for the whole pie with a little left over.

Instructions

Prep the Tomatoes and Crust

  1. Heat the oven. Position one rack in the upper half of the oven and another in the lower third. Heat to 425°F / 220°C conventional. Line a large rimmed baking sheet with parchment.
  2. Slice, salt and blot the tomatoes. Core them and cut into slices about ⅜–½ inch / 10–13 mm thick. Arrange them over clean kitchen towels or several layers of paper towel, sprinkle with the ¾ teaspoon / 4 g salt, and leave for 10–15 minutes. Blot firmly, then season with ¼ teaspoon black pepper. Very large rounds can be halved so the finished pie is easier to portion.
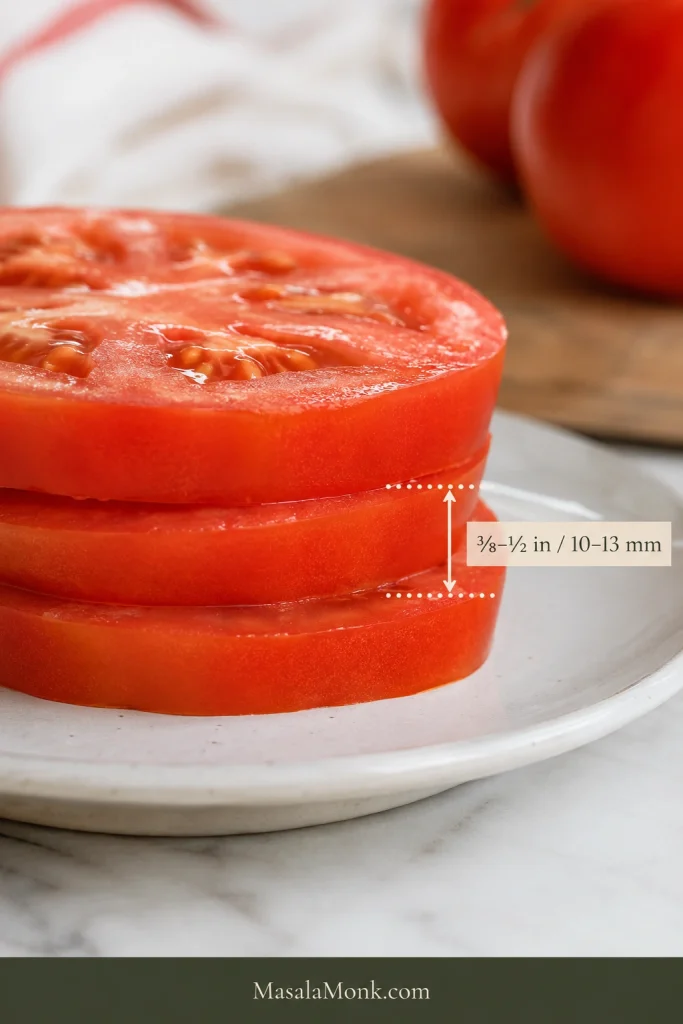
Side view of tomato slices with a measurement guide showing the target thickness of 3/8 to 1/2 inch, or 10 to 13 millimeters.
Aim for ⅜–½ inch / 10–13 mm: thick enough to stay substantial after roasting, but not so thick that moisture lingers.
  1. Prepare the crust and arrange the tomatoes.
    Using rolled dough? Fit it into a standard pie plate, crimp the edge, line it with parchment and fill with pie weights or dried beans.
    Using a preformed frozen shell? Keep it in its supplied pan. Follow its package directions for blind-baking; use weights only if those directions call for them.
    Arrange the blotted tomato slices on the baking sheet in one layer with a little breathing room between them. Avoid heavy overlap.
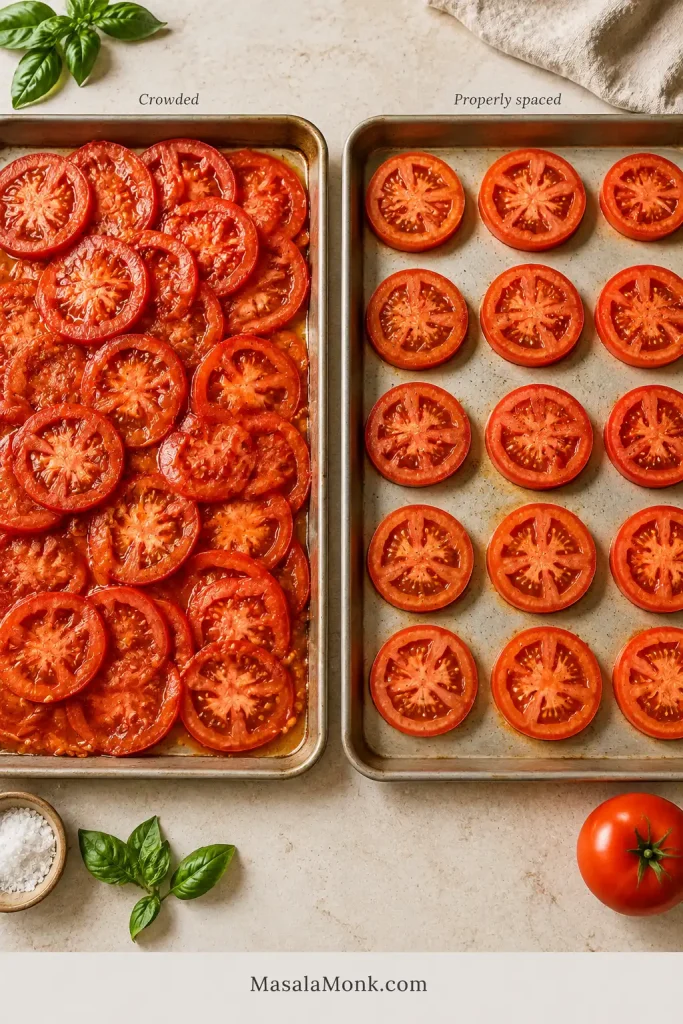
Two sheet pans compare overlapping tomato slices with tomato slices arranged in a single layer with space between them.
Leave breathing room between slices so steam can escape instead of collecting where tomatoes overlap.
  1. Roast the tomatoes while the crust pre-bakes. With one tomato tray, roast the tomatoes on the upper rack while the crust bakes below.
    Rolled crust: Bake it with the weights for 15–18 minutes.
    Preformed frozen shell: Follow its blind-baking time. It may finish before or after the tomatoes; that is fine.
    Need two tomato trays? Roast them first, rotating the pans if needed, then pre-bake the crust afterward. Giving the tomatoes space matters more than forcing the two jobs to overlap.
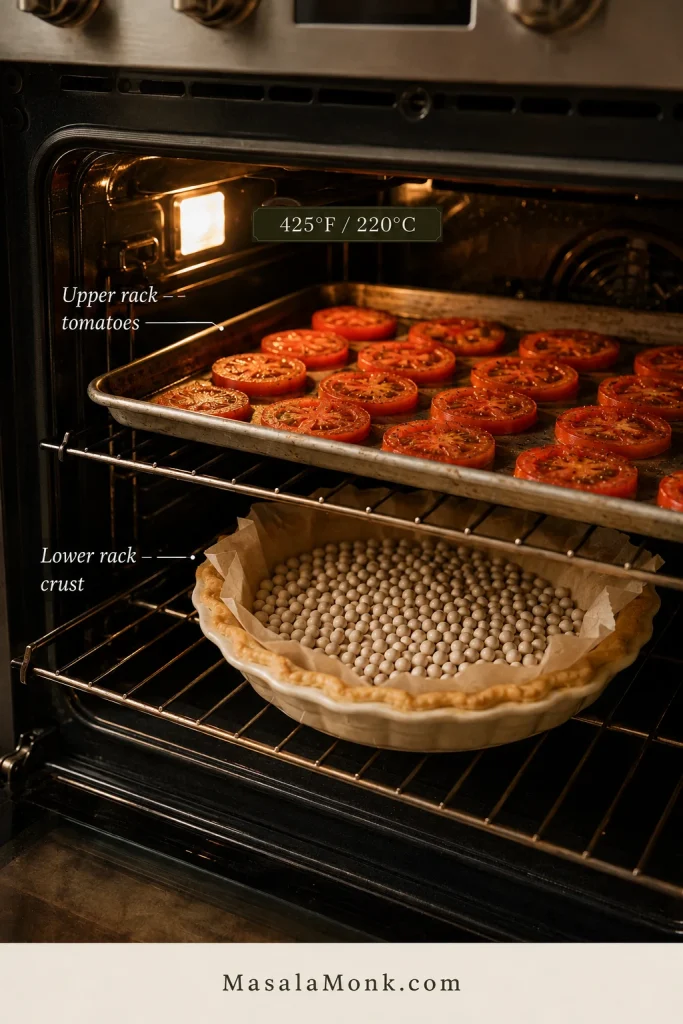
Home oven showing a tray of tomatoes roasting on the upper rack while a weighted pie crust blind-bakes on the lower rack at 425 degrees Fahrenheit.
With one tomato tray, use the upper rack for tomatoes and the lower rack for the crust so both jobs can happen at once.

Finish the Crust and Make the Topping

  1. Finish the crust and check the tomatoes.
    Crust: For rolled dough, carefully remove the parchment and weights, then return the empty shell to the lower rack for another 5–7 minutes. For a preformed frozen shell, continue according to its package directions as needed. Whichever crust you use, the base should be dry, set and lightly golden before filling. Pale, shiny or slightly translucent pastry needs more time.
    Tomatoes: Their color should be a little deeper, the edges slightly wrinkled and the cut surfaces more matte than glossy. Very little thin juice should remain on the pan. They should still look juicy, not dried out.
  2. Add the cheddar barrier and lower the oven. Scatter the 40 g cheddar over the hot crust and return it to the oven for about 3–5 minutes, until the cheese melts into a thin layer. Reduce the oven temperature to 375°F / 190°C conventional and keep one rack in the lower third.
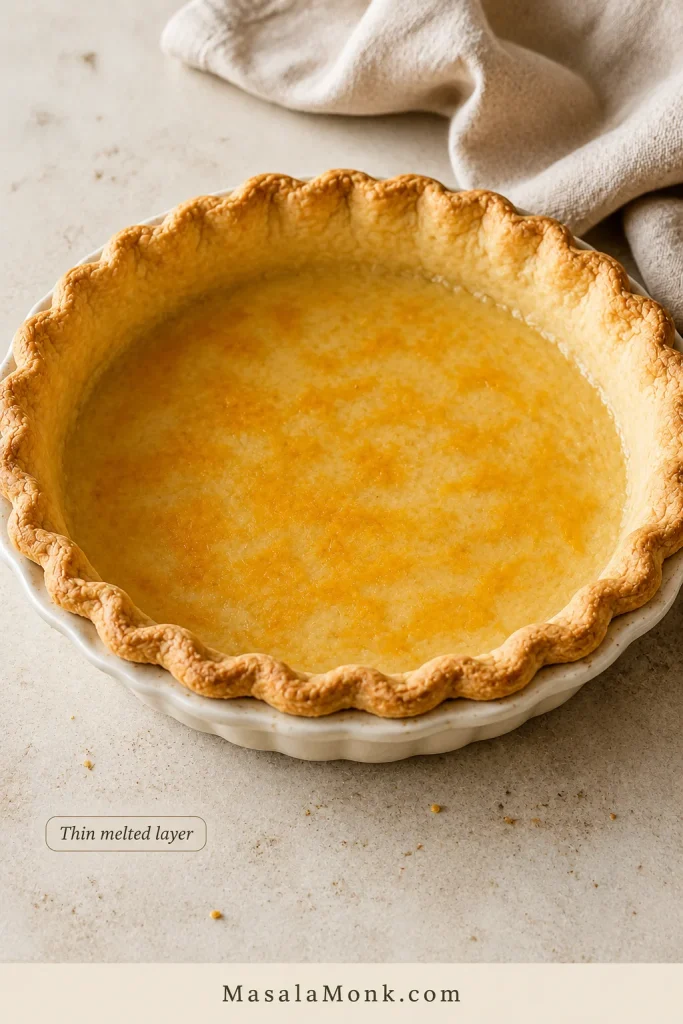
Close view inside an empty blind-baked pie shell with a thin layer of melted cheddar coating the bottom crust.
A thin melted cheddar layer adds another buffer between the pastry and the juicy tomato filling.
  1. Mix the topping. Combine the remaining 160 g cheddar, Parmesan, mayonnaise, Dijon, the remaining ¼ teaspoon black pepper and the basil. The mixture should be thick enough to hold its shape. Cheddar, Parmesan and mayonnaise already bring plenty of salt, so taste before adding any more.
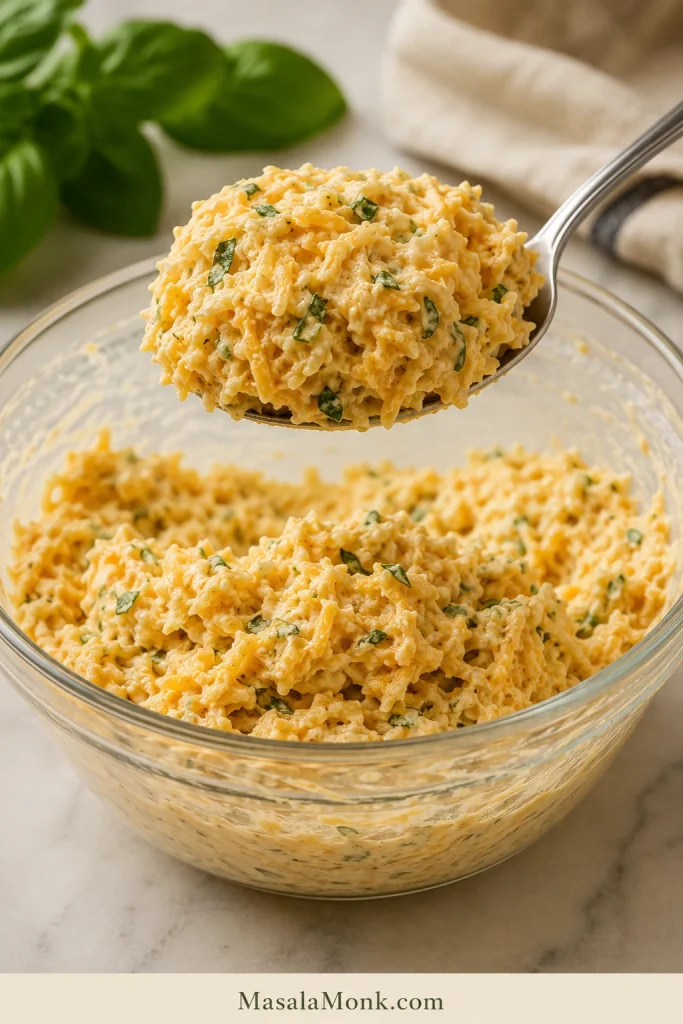
Spoon holding a thick mound of cheddar, Parmesan, mayonnaise, Dijon, and basil mixture above a bowl, with no dripping or cheese strands.
The topping should mound on the spoon and stay there—thick, cohesive and easy to dollop.

Assemble, Bake and Rest

  1. Assemble the pie. Arrange the roasted tomatoes over the cheese-lined base with light overlap. Blot any slice that has released a fresh puddle while waiting. Dollop the topping in small spoonfuls over the tomatoes, then gently spread or pat it into an even layer with the back of a spoon.
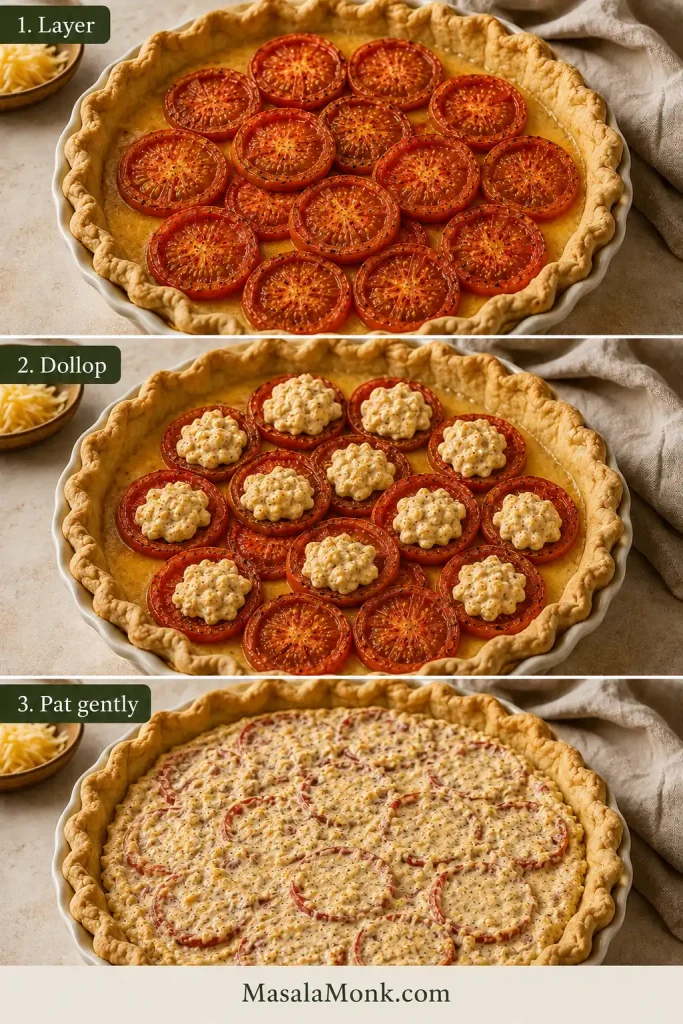
Three stages of tomato pie assembly showing roasted tomatoes layered in the crust, small spoonfuls of cheese topping added, and the topping gently spread.
Dollop first, then spread gently so the roasted tomato slices stay where you placed them.
  1. Bake until browned and set. Bake on the lower-third rack for about 30–35 minutes, beginning to check around 25 minutes. The crust should be deeply golden, the topping browned in patches, and small bubbles should appear around parts of the filling. Give the dish a gentle nudge. A little movement is fine; the filling should move together instead of sloshing. Shield the rim with foil if it browns before the center is ready.
  2. Rest and serve. Set the pie on a wire rack for at least 30 minutes. For cleaner wedges, give it closer to 45–60 minutes. Finish with a little fresh basil before serving.

Recipe Notes

  • Two-tray timing: Allow roughly another 20–30 minutes because the crust can no longer pre-bake alongside the tomatoes.
  • Using coarse kosher salt? Weigh it if possible; crystal size varies enough between brands to make a direct teaspoon conversion unreliable.
  • Very juicy heirlooms may need longer. Trust the tray rather than forcing every batch to finish at exactly 25 minutes.
  • Fan/convection ovens brown faster. Use your oven’s usual temperature adjustment and begin checking both tomatoes and crust early.
  • For cleaner slices, cut through the tomato skins first. A sharp serrated knife or very sharp chef’s knife helps keep a large slice from pulling the filling out with it.

Need something specific? Best Tomatoes · The Best Crust · Cheese & Mayo · Times & Doneness · Troubleshooting · Variations · Serving · Make Ahead

Why Tomato Pie Gets Soggy—and Five Ways to Keep the Crust Crisp

A soft crust can begin in several places. Too much water may come in with the tomatoes. The pastry may need more time before filling, or the bottom may not be browning strongly enough. Sometimes a well-baked pie is simply sliced while everything inside is still loose and steaming.

The crispest pies do not rely on one heroic trick. A handful of smaller choices add up.
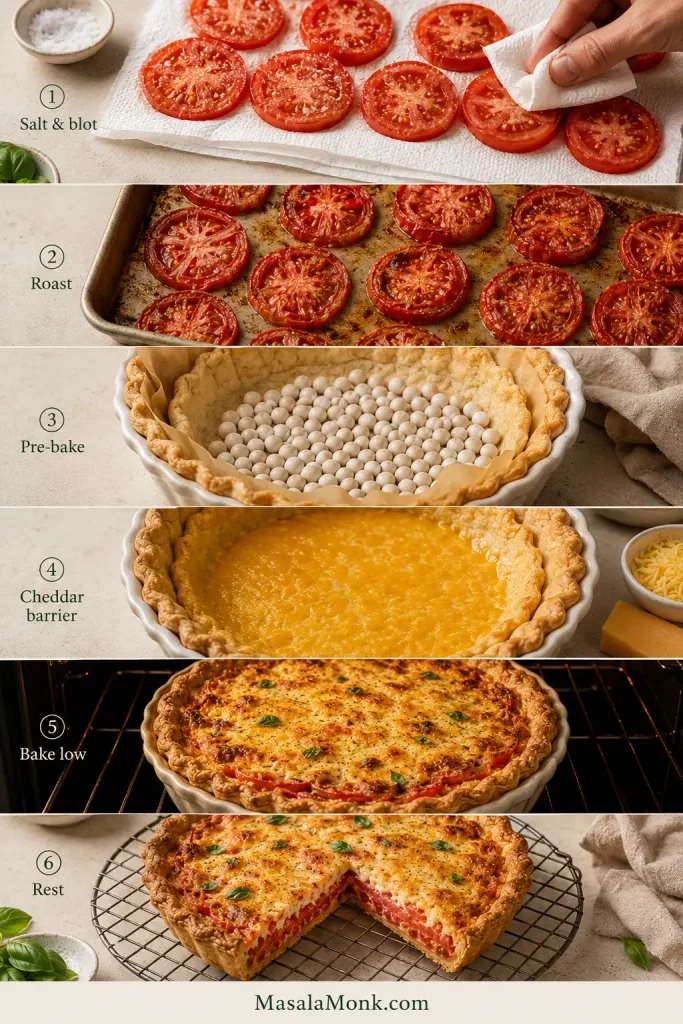
Tomato pie guide showing tomatoes salted and blotted, roasted, crust blind-baked, a thin cheddar barrier, a low-rack bake, and the finished pie resting.
Crispness comes from several small protections working together: blot, roast, pre-bake, add a thin cheese barrier, bake low and rest.
  1. Dry the tomatoes in two stages. A short salt-and-blot step removes easy surface water; roasting then drives off more moisture while concentrating the flavor.
  2. Give the crust a real head start. The base should already have color and structure before the tomatoes arrive.
  3. Add a thin cheese layer. Melted cheddar gives the crust another buffer against the tomato juices.
  4. Bake low in the oven. The lower rack encourages better browning underneath while the filling finishes.
  5. Let the pie rest. Cooling lets steam escape and gives the filling time to settle.

Together, those small choices make the difference between a pie that merely tastes good and one you can confidently lift from the dish and put on somebody’s plate.

Surface water is the easiest moisture to remove: salting draws it out, and blotting takes it away before roasting begins.
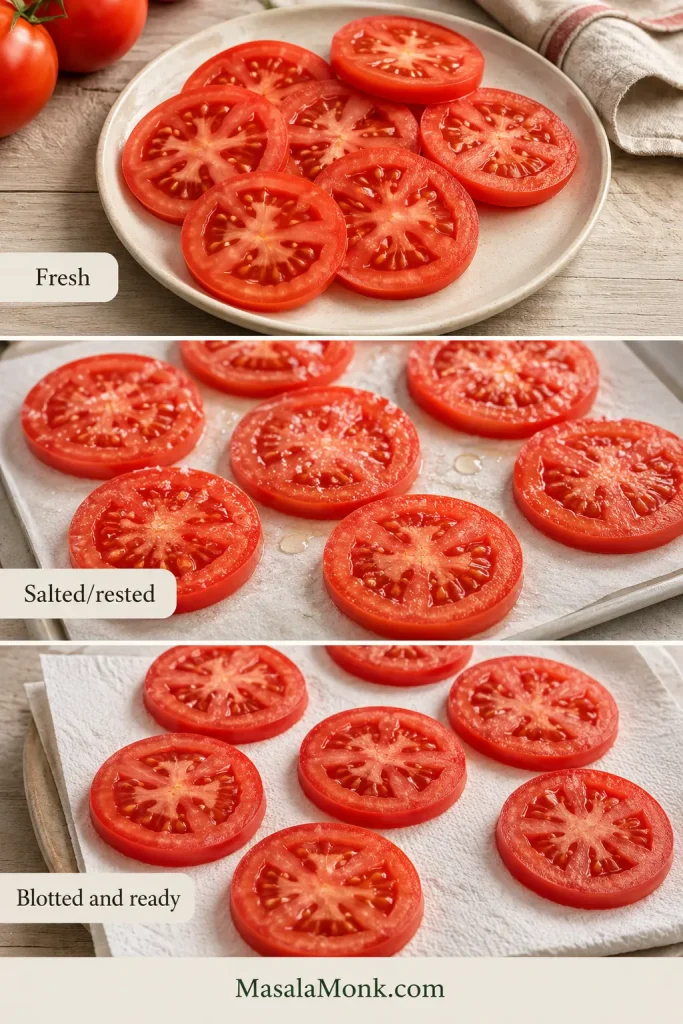
Three tomato-preparation stages showing fresh glossy slices, salted slices with beads of moisture, and blotted slices with visibly drier surfaces.
The beads that appear after salting are moisture you can blot away before the tomatoes ever reach the crust.

Best Tomatoes for Tomato Pie

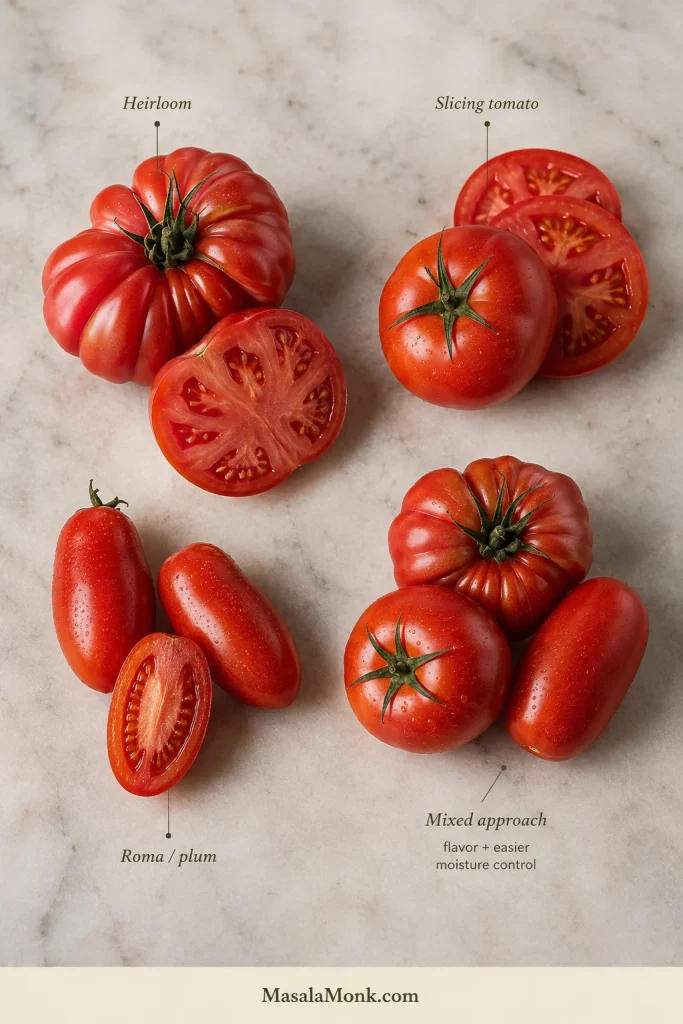
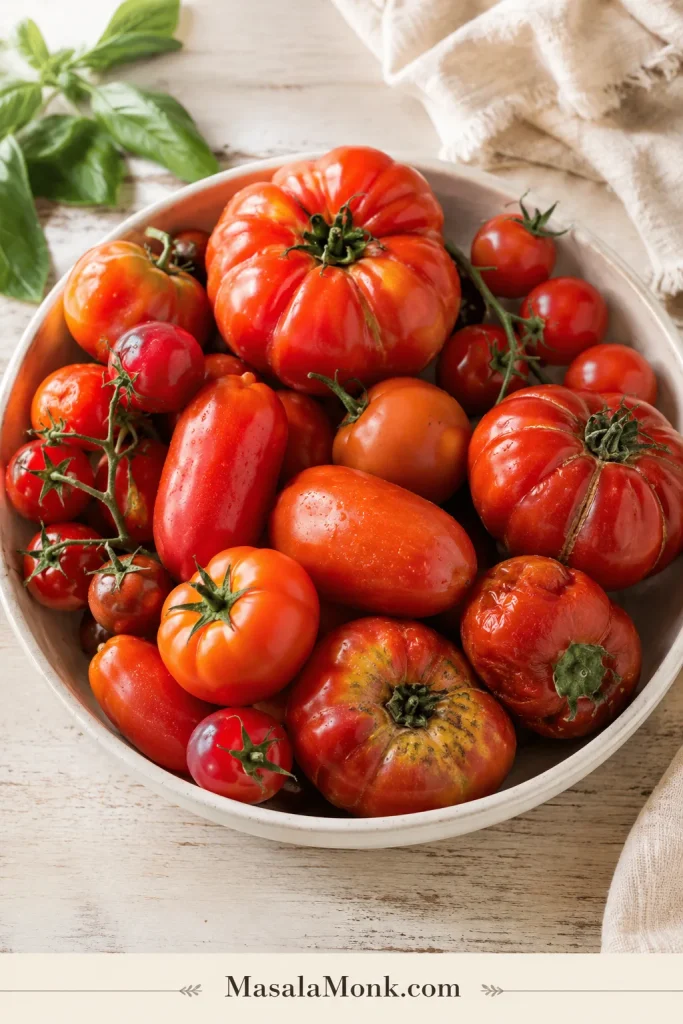
Four groups compare heirloom tomatoes, round slicing tomatoes, Roma or plum tomatoes, and a mixed combination of those tomato types.
Heirlooms bring big flavor but more juice; plum tomatoes are meatier; slicing tomatoes sit comfortably between the two.

For pie, tomato flavor matters—but so does how much water that tomato is carrying. Smell them. If they barely smell like tomatoes before you cut them, roasting will not suddenly give them peak-summer flavor.

TomatoBest ForMoisture RiskWhat to Know
HeirloomBig flavor and beautiful colorHighWonderful in season, but very juicy varieties may need extra roasting time.
Ripe slicing tomatoBest all-round choiceMediumGood balance of flavor, structure and availability.
Roma or plumEasiest moisture controlLowerMeatier flesh makes them forgiving, although flavor varies.
Mixed tomatoesFlavor plus reliabilityMediumMix flavorful heirlooms with firmer slicing or plum tomatoes when you want both character and easier moisture control.

What I Would Buy

If I were shopping specifically for this pie, I would choose ripe but still firm slicing tomatoes unless especially flavorful heirlooms were available.
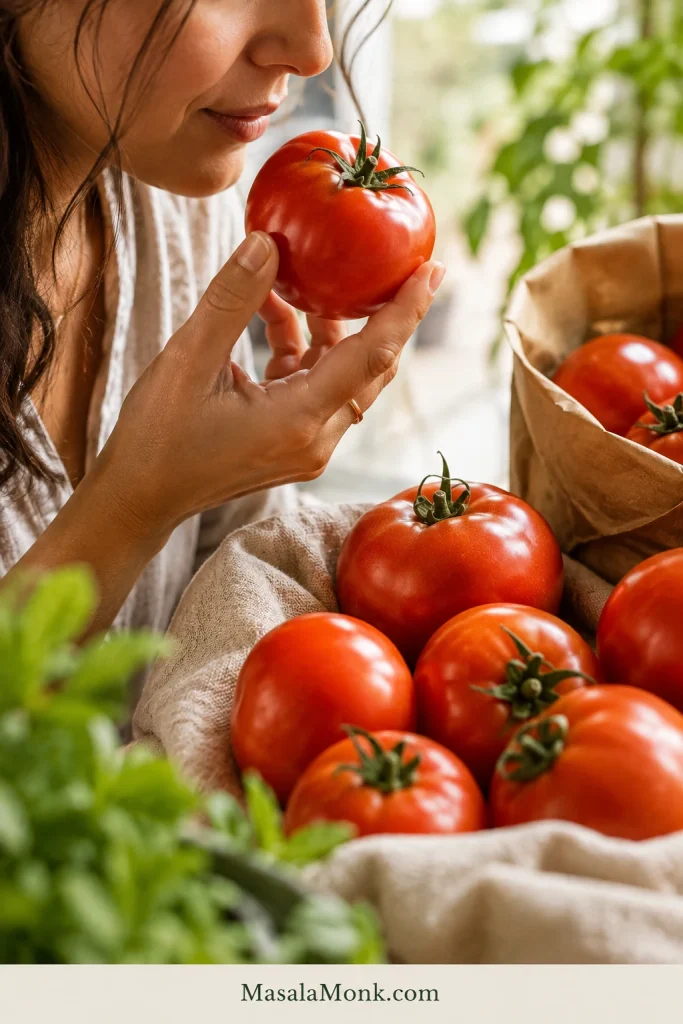
A hand holds a ripe red tomato near the nose while several firm red tomatoes rest nearby on linen and in a paper produce bag.
Choose tomatoes that smell ripe and give slightly under pressure without feeling soft or collapsed.

Peak-season heirlooms are worth using; just let their juiciness decide the roasting time. Mixing a few with meatier plum tomatoes also works well when you want plenty of flavor with a little less water to manage.

Roasting does more than solve a water problem. As excess juice cooks away, the tomatoes taste sweeter, deeper and more intensely like themselves. That concentrated flavor becomes the heart of the finished pie.
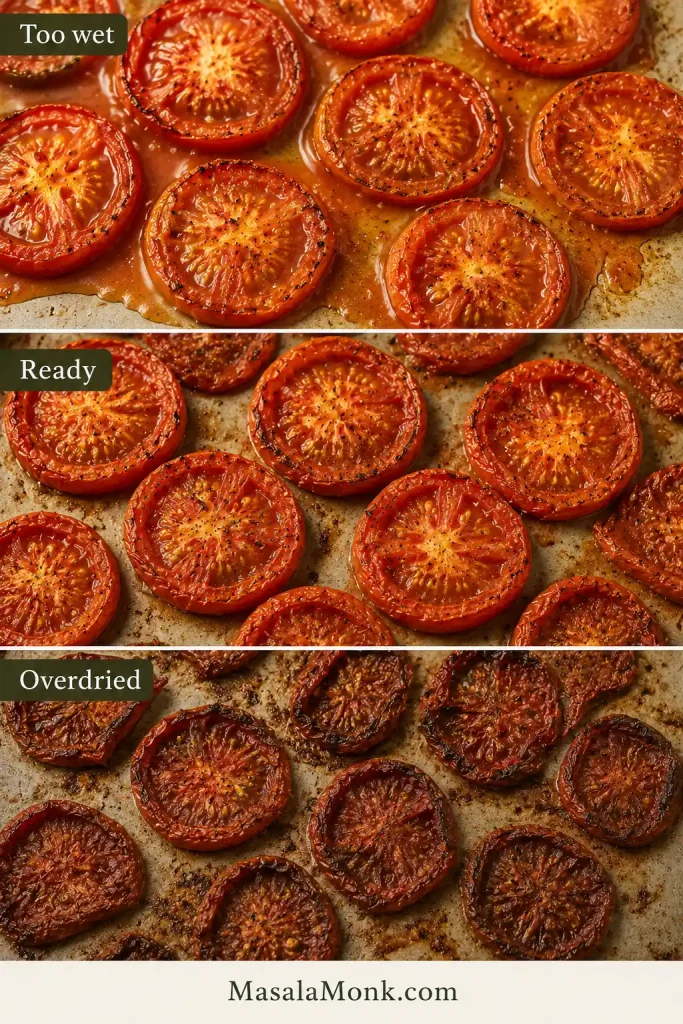
Three roasted tomato states labeled too wet, ready, and overdried, ranging from glossy and juicy to lightly wrinkled and then dark and shrunken.
Ready tomatoes stay red and plump with lightly wrinkled edges and a mostly matte surface—not glossy and watery, browned or shriveled.

If some of your tomatoes are already too soft or juicy to give you neat slices, they may be happier in fresh tomato soup, where their extra liquid can be cooked down instead of fought.

Cherry tomatoes can work, but they behave more like a variation than a direct substitute: once halved, they expose much more cut surface and do not create the same layered filling. Canned tomatoes are better saved for another recipe. This one really wants fresh tomatoes that can be sliced, roasted and layered.

The Best Crust

Use a standard 9-inch / 23 cm flaky pie crust, not deep dish. Homemade dough, refrigerated rolled pastry and a standard preformed frozen shell can all work. The base needs enough color and structure before the tomatoes arrive.
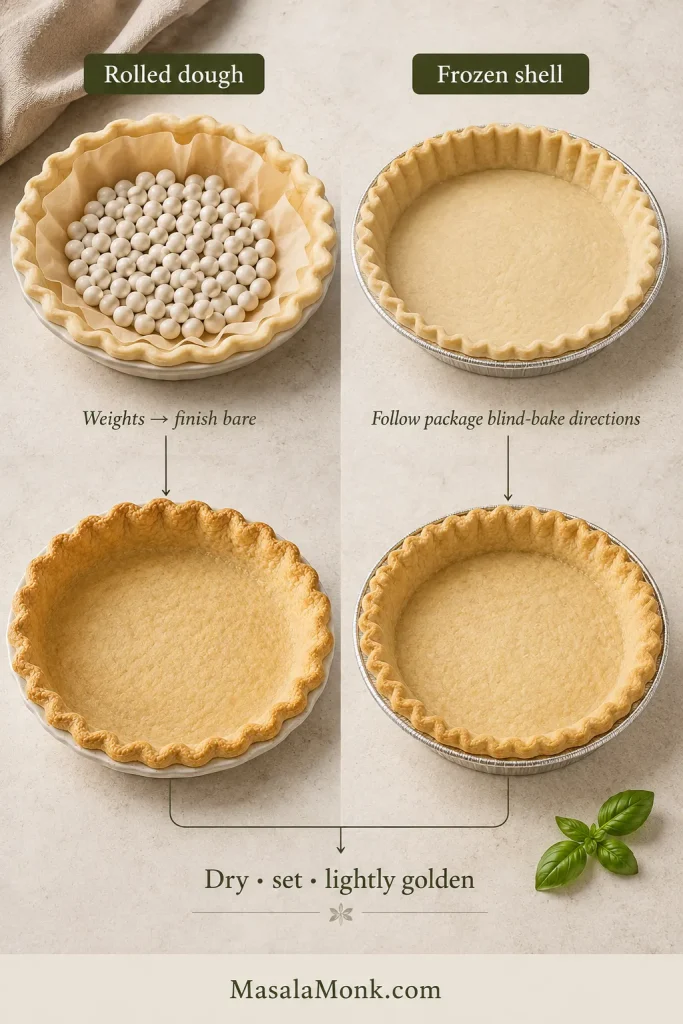
Two crust preparation routes compare rolled dough blind-baked with parchment and weights with a standard preformed frozen pie shell baked in its foil pan.
Rolled dough and a frozen shell can both work; what matters is a dry, well-set base before filling.

If store-bought crust gets tomato pie on the table, use it. The tomatoes matter much more here than whether you made the pastry yourself.

Do You Have to Blind-Bake the Crust?

For this recipe, yes. The shell gets a substantial head start so it is already baked across the bottom before it has to support a juicy filling.

Look underneath. Pale or slightly translucent pastry still needs more time. You want the bottom dry and lightly golden across the base, not just browned around the exposed rim.
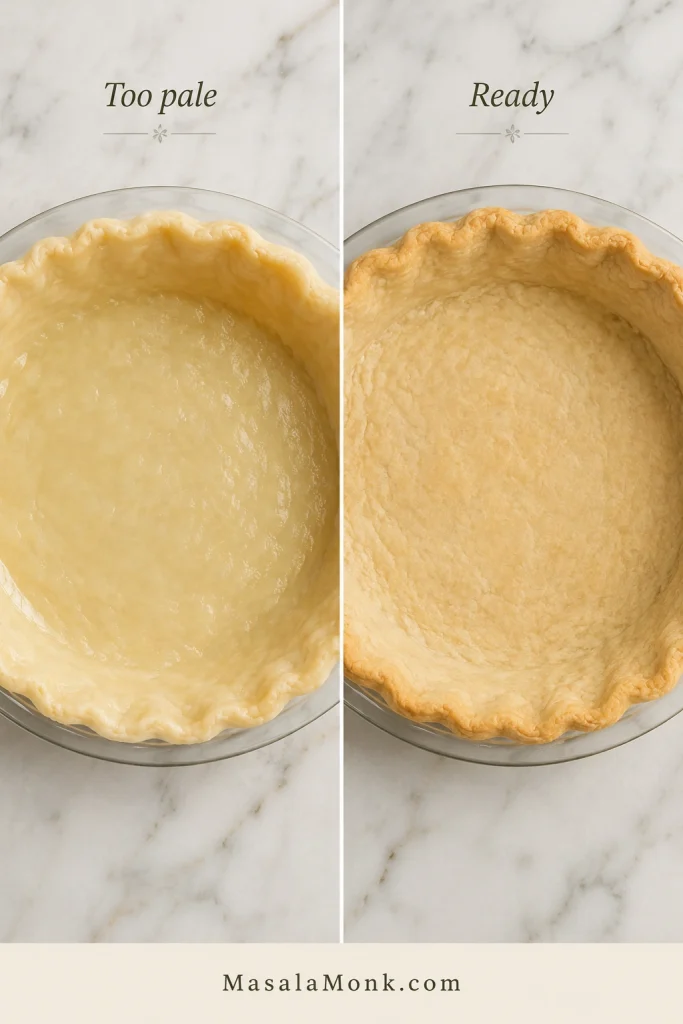
Two empty pie shells compared side by side: one pale and slightly glossy, the other dry, opaque, set, and lightly golden.
Look across the center, not just the rim: the base should be dry, opaque, firm and lightly golden, without shiny or translucent patches.

A crust baked this far does not disappear underneath the filling. You can still feel its flaky edge when you cut into the finished pie.

If you want to make the pastry yourself, this flaky homemade pie crust recipe makes enough dough for two single 9-inch crusts, so you can use one here and freeze the second.

Metal, glass and ceramic pie plates can all work. Metal heats quickly. Glass lets you inspect the underside. Thick ceramic usually heats more slowly, so follow the color of the pastry rather than the clock alone.

Best Cheese—and Why Mayo Matters

Extra-sharp cheddar gives the topping plenty of flavor without requiring an especially thick cheese layer. A little melts directly over the crust, while the rest forms the backbone of the topping. Parmesan adds a concentrated savory edge without bringing much extra water.

Pecorino Romano can stand in for Parmesan, but it is saltier. Taste before adding anything else salty, especially if bacon is also going into the pie.

Why Does Southern Tomato Pie Use Mayonnaise?
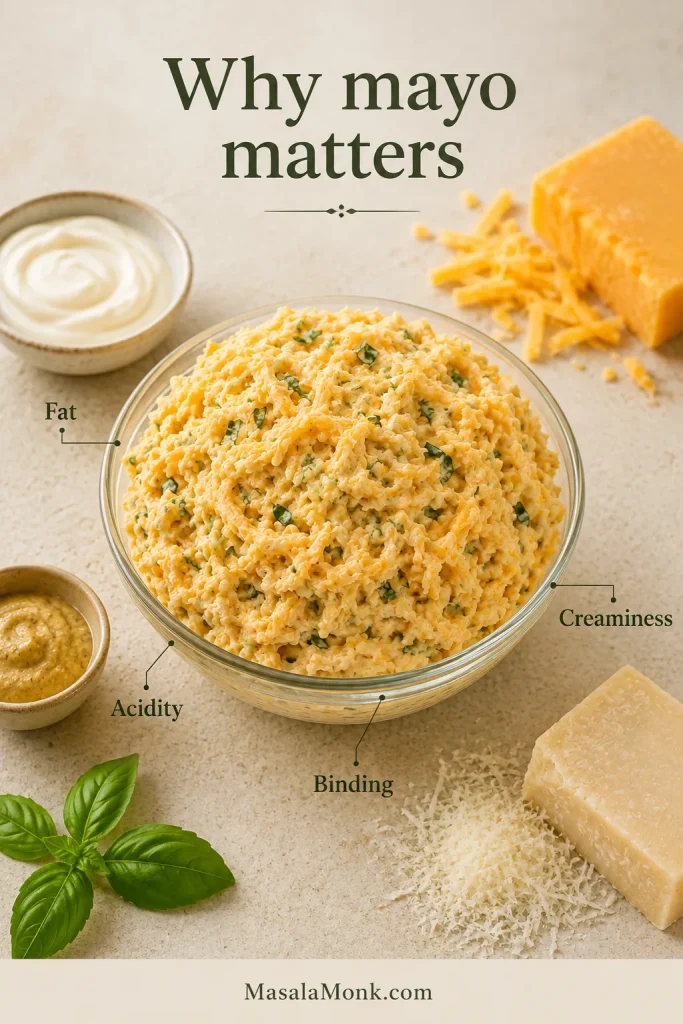
Bowl of cheddar and mayonnaise topping surrounded by mayonnaise, cheddar, Parmesan, Dijon, and basil, with callouts for fat, acidity, creaminess, and binding.
Mayo is part of the topping’s structure here, not a separate sauce or finishing condiment.

Mayonnaise brings fat, acidity, creaminess and enough binding to help the cheese topping hold together as it bakes. If you prefer making condiments from scratch, this homemade mayonnaise recipe explains the basic emulsion and gives you a classic mayo you can use here.

The creamy layer needs enough tang to sharpen the tomatoes. The topping should frame the filling, not bury it.

For more stretch, choose low-moisture mozzarella rather than fresh mozzarella. Treat it as a texture variation, not an exact cheddar substitution. Fresh mozzarella carries much more water. Gruyère gives the pie a nuttier, more savory character, while fontina melts into a softer, silkier layer.

How Long to Bake Tomato Pie: Times and Readiness Cues

The timer tells you when to start looking. The food tells you when to move on. Tomato variety, crust thickness, pie-dish material and oven calibration all affect the exact timing, so use the clock together with the visual cues below.
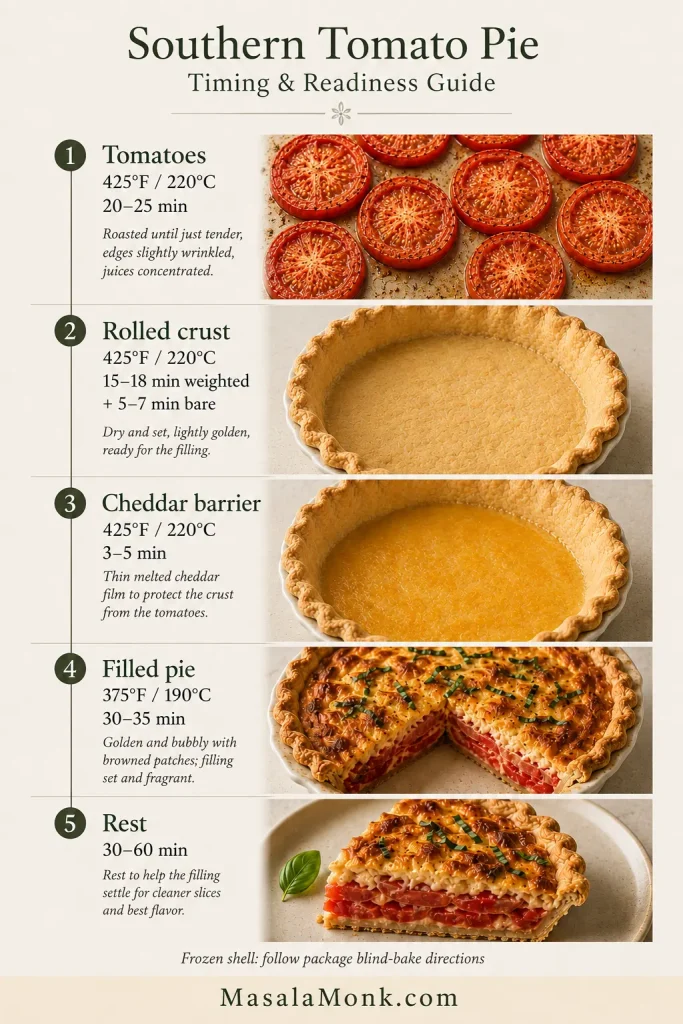
Vertical tomato pie timing guide showing roasted tomatoes, blind-baked crust, melted cheddar barrier, baked filled pie, and rested slice with temperatures and cooking times.
When your oven runs faster or slower than expected, these visual cues are the tie-breaker.
StageTemperatureStarting TimeReady When
Tomatoes425°F / 220°C20–25 minSlightly wrinkled, deeper in color, matte rather than wet-looking, very little thin juice
Weighted rolled crust425°F / 220°C15–18 minShell has set and the rim is beginning to color
Unweighted rolled crust425°F / 220°C5–7 minBase looks dry and lightly golden
Preformed frozen shellPer package directionsPer package directionsBase is dry, set and lightly golden
Cheddar barrier425°F / 220°C3–5 minCheese has melted into a thin layer
Filled pie375°F / 190°C30–35 minCrust deeply golden, topping browned in patches, gentle bubbling, center moves together
RestRoom temperature30–60 minFilling has settled enough for the kind of slice you want

By the end of the bake, the tomatoes should smell sweeter, the cheese will have browned in patches and the pastry should look unmistakably baked.
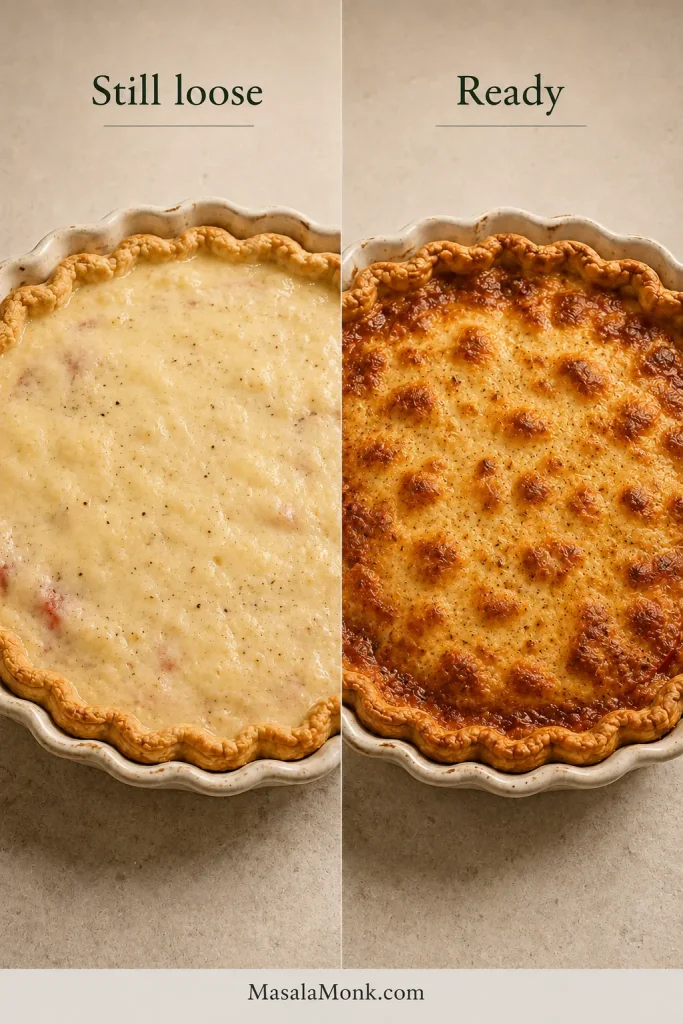
Two views of the same tomato pie during baking: one pale and glossy with a loose center, and one browned in patches with a cohesive, set filling.
A ready center may jiggle, but the filling should move together; loose liquid sloshing independently means it needs more time.

How Long Should It Cool?

The hardest part of this recipe may be leaving it alone once it comes out of the oven.

For a warm, softer wedge, about 30 minutes is enough. For clean slices at the table, give it closer to 45–60 minutes.
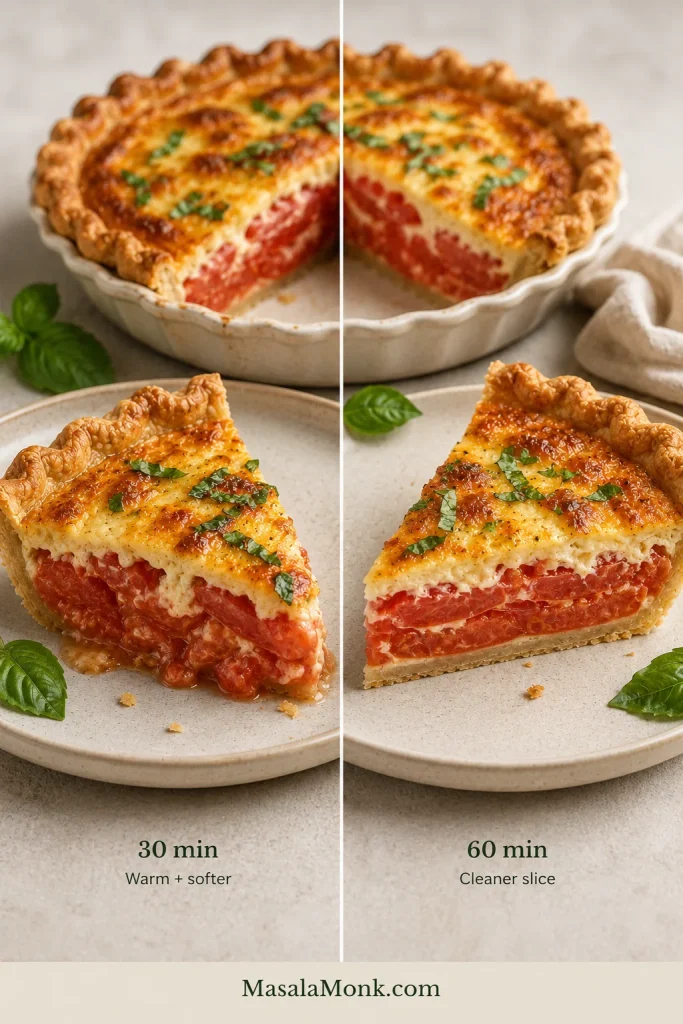
Two tomato pie wedges compare a warmer, softer slice after 30 minutes of resting with a cleaner, more firmly set slice after 60 minutes.
As the pie rests, the topping firms and the filling settles, so extra time buys a cleaner slice.

By then the kitchen will smell like toasted pastry, warm tomato, cheddar and basil, and the filling will have settled without going cold.

Tomato Pie Troubleshooting: What Went Wrong?

“Soggy” can mean several different things. Match the fix to what you actually see.
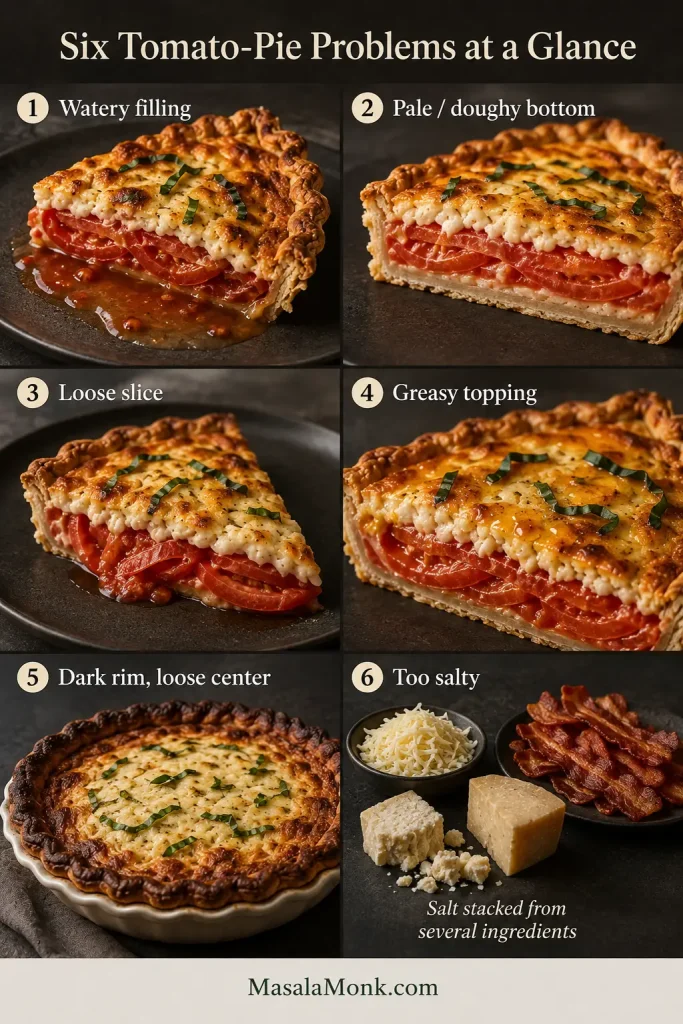
Six-panel tomato pie troubleshooting guide showing watery filling, pale bottom crust, loose filling, greasy topping, a dark rim with loose center, and several salty ingredients combined.
Start with where the problem appears—under the slice, in the filling, on top or around the rim—then match the fix.
What You SeeLikely CauseFix
Watery filling; tomato juice pools around the sliceTomatoes entered the pie too wetGive them more space or roasting time; blot slices that release juice while waiting
Pale, doughy bottom while the filling looks fineCrust needed more pre-baking or stronger bottom heatGive the base more color before filling and keep the filled pie low in the oven
Loose slice without much free liquidThe pie was cut too hotLet the filling settle longer before slicing
Clear or orange fat gathers on topToo many rich ingredients stacked togetherUse pesto modestly, drain bacon well and avoid another heavy cheese layer
Dark rim, loose centerCrust browned faster than the center cookedShield the rim with foil and keep baking
Harsh, overly salty toppingSalt from tomatoes, cheese and additions stacked upMeasure the tomato salt and taste before adding more when using Pecorino or bacon

Juice underneath? Think tomatoes. Oil on top? Think cheese, mayo, bacon or pesto. They can look similar once the pie is cut, but they need completely different fixes.
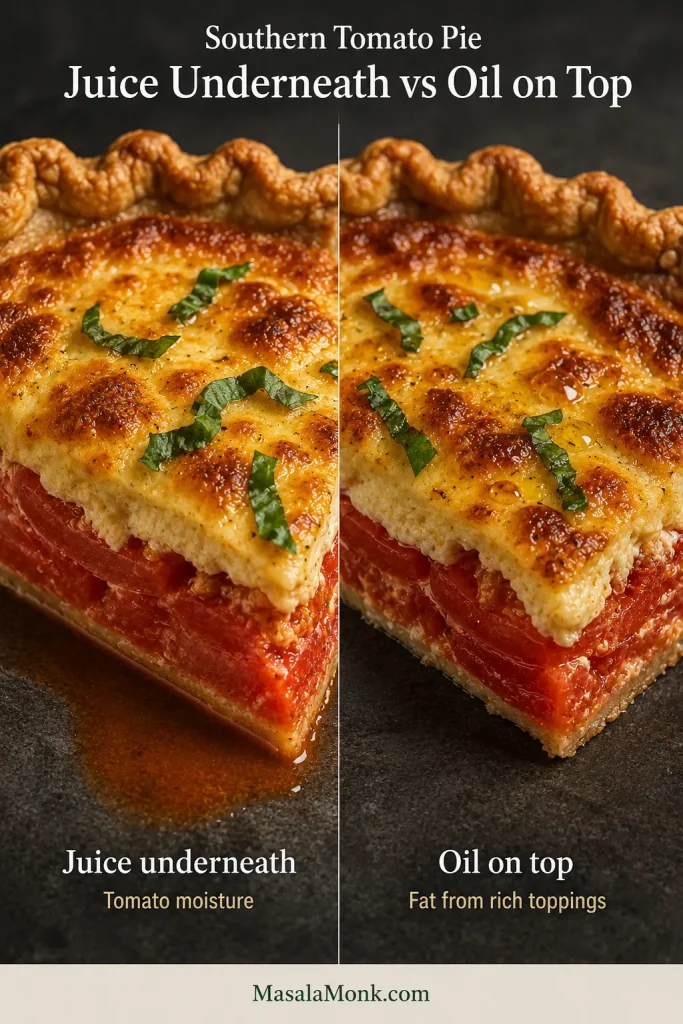
Close comparison of tomato pie with thin reddish juice pooling beneath a slice and amber oil droplets sitting on top of the browned cheese.
Tomato juice is usually thin and reddish; rendered fat looks clearer and amber-orange, often beading on the cheese first.

Ready to try again? Back to Recipe · Times & Doneness

What Makes This a Southern Tomato Pie?

Ripe fresh tomatoes, pastry and a creamy cheddar-mayo topping put this firmly in the Southern tomato-pie family. Basil, onion, bacon and other cheeses vary from one kitchen to another, but tomatoes, pastry and a rich cheese layer sit at the center of the dish.

The name can be confusing. Trenton/New Jersey and Utica tomato pies belong to pizza traditions, while green tomato pie can mean something entirely different: a sweet, spiced pie made with unripe tomatoes. This recipe is the Southern savory version.

Easy Variations

Every addition brings something besides flavor—especially water, fat or salt. Keep those three in mind and the basic balance of the pie is much easier to preserve.

With Bacon

Add crisp, well-drained bacon between the tomatoes and topping. If you want an easy small-batch method, this crispy air fryer bacon recipe renders the fat well and lets the strips firm up after cooking. Cool and drain the bacon before crumbling it into the pie, and remember that it brings plenty of salt of its own.
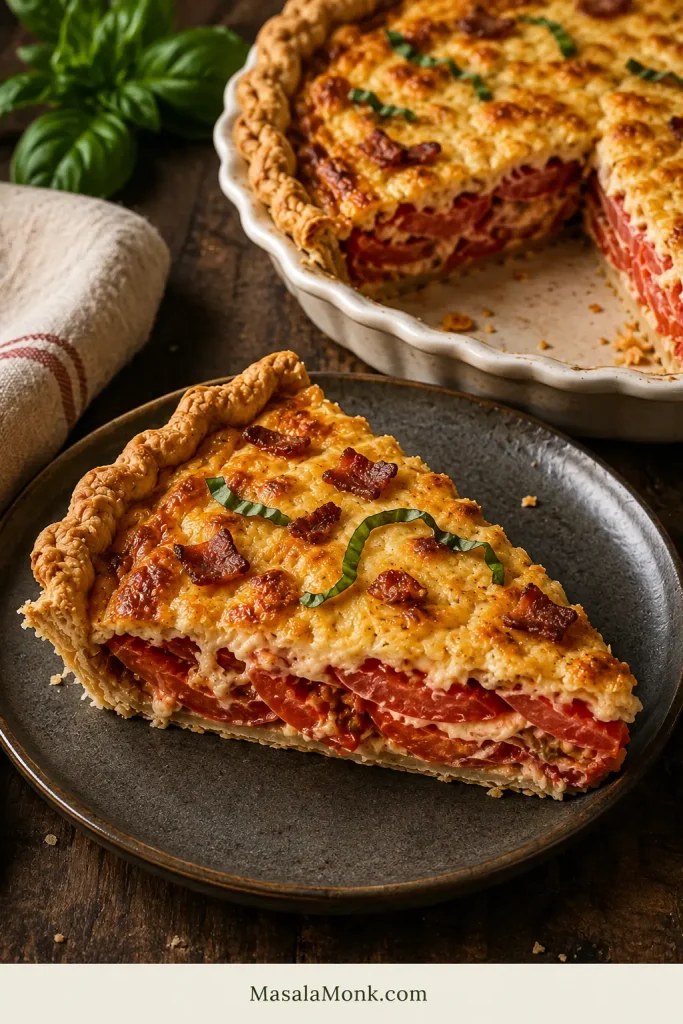
Southern tomato pie wedge with red tomato layers, creamy browned topping, flaky crust, basil, and a restrained amount of small crisp bacon pieces.
Scatter bacon so a few bites get a smoky, crisp accent without turning the whole pie heavy.

With Pesto

Use pesto sparingly. A classic basil pesto already contains olive oil, nuts and Parmesan, so a thick layer beneath the cheese topping can make the finished pie greasy. A thin smear is plenty. If what you mainly want is basil aroma, fresh leaves give you that lift with much less added fat.
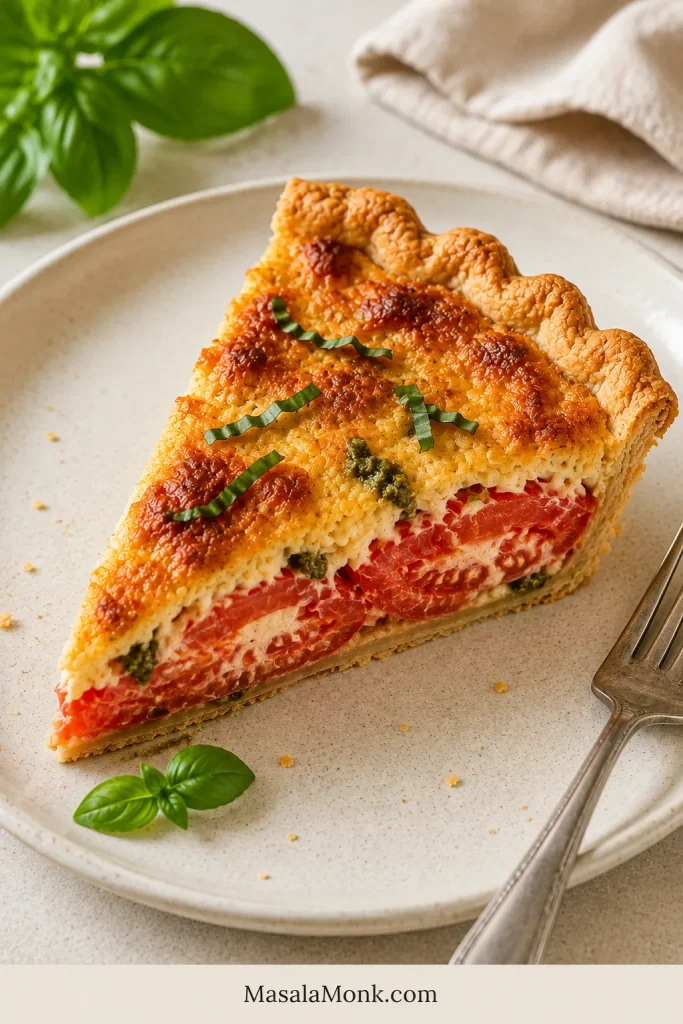
Southern tomato pie wedge with red tomato layers, browned cheese topping, flaky crust, basil, and a few small green pesto accents in the filling.
A little pesto goes a long way; keep it as a bright basil-garlic accent, not another rich layer.

Two smaller additions: Sautéed onion or shallot adds sweetness while shedding some of its moisture before it reaches the filling. A modest handful of fresh corn adds little bursts of sweetness and texture.

Can You Make It Without Mayo?

Yes, but do not simply leave the mayonnaise out of this recipe. Mayo supplies fat, acidity, creaminess and binding, so a completely mayo-free pie needs a topping formulated around another binder.

If it is mainly the mayo flavor you want to soften, sour cream can be part of a lower-mayo topping. I would not swap it cup for cup here, though; changing the binder changes the way the topping sets. For a completely mayo-free version, use a recipe built specifically for that style.

What to Serve With Tomato Pie

The pie is rich enough that something cool, crisp or sharp alongside it works especially well.

This cucumber salad with vinegar, dill and onion is a particularly good match because the crunch and acidity cut through the creamy cheese topping.
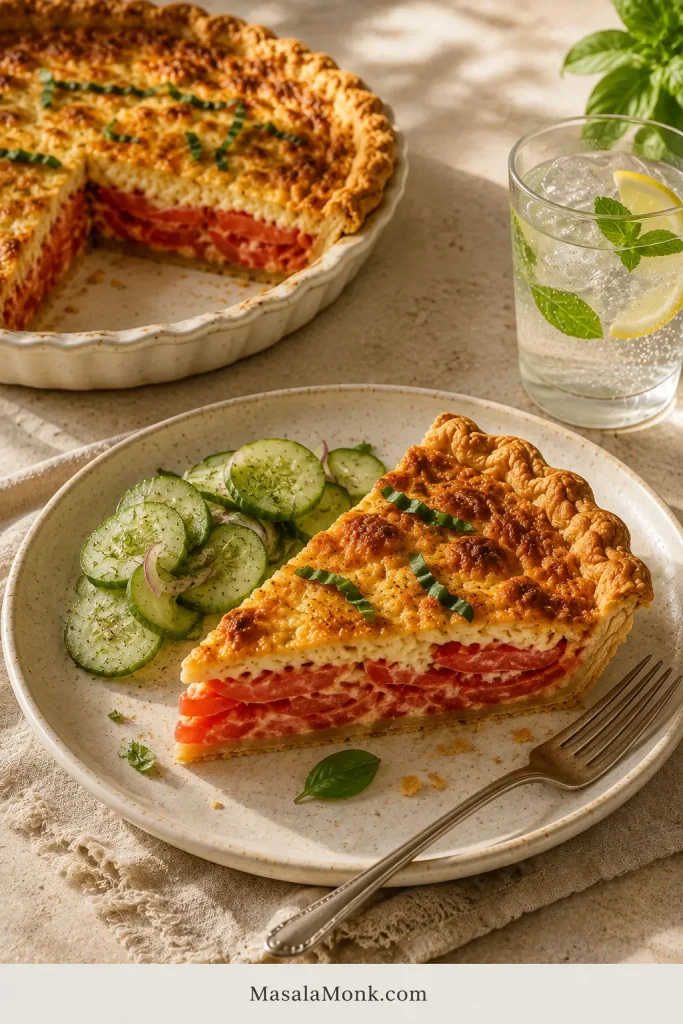
Southern tomato pie wedge served with cucumber salad and an iced lemon drink, with the remaining pie visible in the background under warm afternoon light.
Warm tomato pie, something crisp and cool, and a cold drink—that is summer lunch.
  • Green salad with a sharp vinaigrette
  • Green beans
  • Corn on the cob
  • Grilled chicken
  • Grilled shrimp
  • Fresh fruit or cold watermelon

For brunch, add eggs, fruit and a simple salad. For a summer lunch, a generous wedge and something cold and crunchy alongside it may be all you need.

Make Ahead, Store and Freeze

Make Ahead: What to Prep Early

If I were preparing this a day ahead, I would stop before assembly.

  • Roast the tomatoes and refrigerate them once cool.
  • Blind-bake the crust, let it cool completely and keep it covered.
  • Grate the cheddar and Parmesan and refrigerate them.
  • Stir the mayonnaise and Dijon together if you want one less job later, but leave the fresh basil whole until assembly.
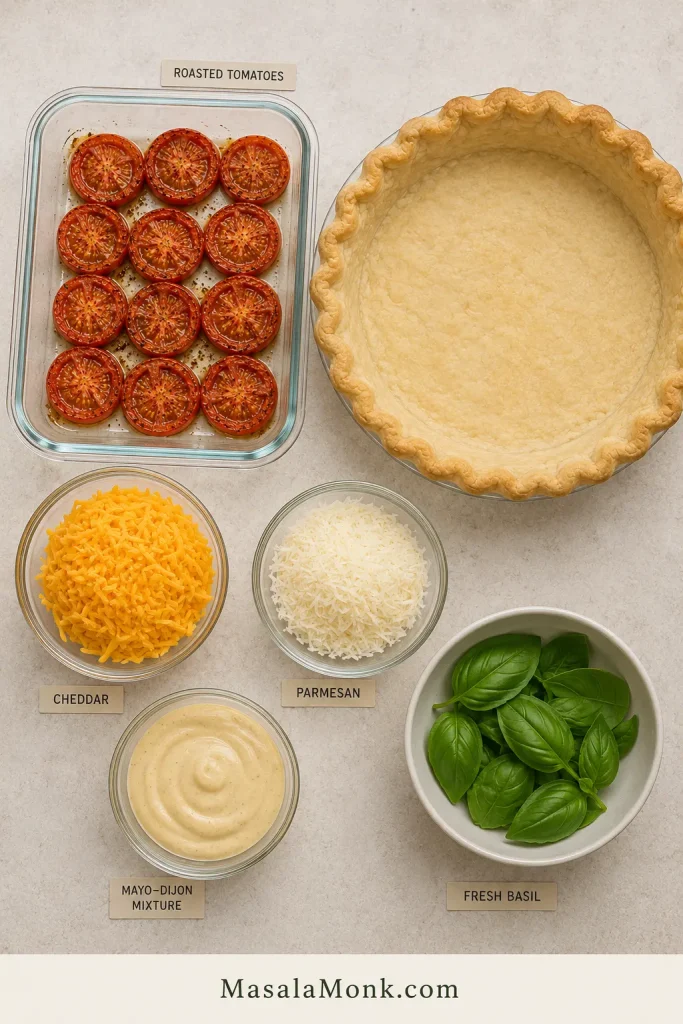
Overhead arrangement of lightly roasted tomato rounds, empty blind-baked crust, grated cheddar, Parmesan, mayo-Dijon mixture, and whole fresh basil kept separately.
Keep the components separate overnight so the crust stays dry and the basil stays fresh until assembly.

When you are ready to bake, take the roasted tomatoes from the refrigerator as you start preheating the oven so they can lose some of their chill. Melt the 40 g cheddar over the pre-baked crust, combine the remaining cheese and freshly cut basil with the mayo-Dijon mixture, then assemble the pie.

If the filling is still quite cold when it goes into the oven, the final bake may take a little longer. Follow the browned topping, gentle bubbling and center-movement cues rather than forcing it to finish at the usual minute mark.

Storing and Reheating Leftovers

After baking, keep the pie at room temperature for no more than 2 hours total, including cooling and serving time. If the surrounding temperature is above 90°F / 32°C, limit that to 1 hour. Refrigerate leftovers promptly, keep them covered and use them within 3–4 days. These timings follow USDA leftover-safety guidance.

For the best crust, warm slices in an oven or toaster oven at about 325–350°F / 165–175°C. Reheated leftovers should reach 165°F / 74°C in the center. A preheated sheet pan underneath the slice can help crisp the base again.
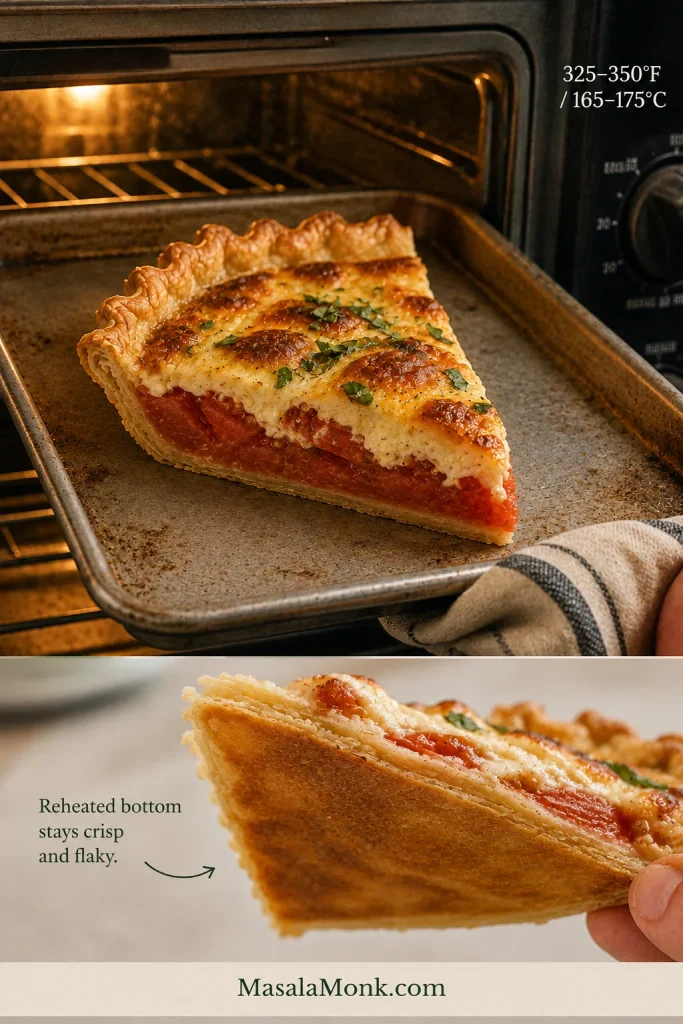
Leftover tomato pie wedge reheating on a metal sheet pan in the oven, with a close view of the thin golden, crisp pastry on the underside.
Reheat on a hot metal sheet pan to give the pastry direct bottom heat and help it crisp again.

The microwave is fine when speed matters, but expect softer pastry.

Freezing

You can freeze the pie, but it would not be my first choice if crust texture matters.

Tomatoes soften after freezing and thawing; Penn State Extension likewise recommends thawed frozen tomatoes for cooked uses rather than expecting fresh tomato texture. The pastry also tends to come back softer than it was freshly baked.

If you know in advance that you will not need the whole pie, preparing the components ahead and baking closer to serving usually gives you the better result.

Useful shortcuts: Back to Recipe · FAQ · Back to Top

FAQ

Do I need to peel the tomatoes? No. Roasting and baking soften the skins, and leaving them on helps the slices retain their shape. Peel them only if your tomatoes have unusually tough skins or you strongly dislike the texture.

Should I remove the seeds? Not routinely. The seed cavities contain plenty of juice, so removing some can help with exceptionally watery tomatoes, but roasting gives you a more consistent way to manage moisture.

Can I make it gluten-free? Yes. Use a reliable gluten-free pie crust and follow the same tomato-drying and pre-baking method. Check the crust manufacturer’s directions because gluten-free pastry can brown and handle differently from wheat-based pastry.

The Slice You Are Looking For

By the time the pie has rested, the cheese should have settled into the tomatoes and the crust underneath should still feel like part of the dish. Run the knife cleanly through the tomato skins and pastry, then lift the first wedge.

The bottom should come with it.
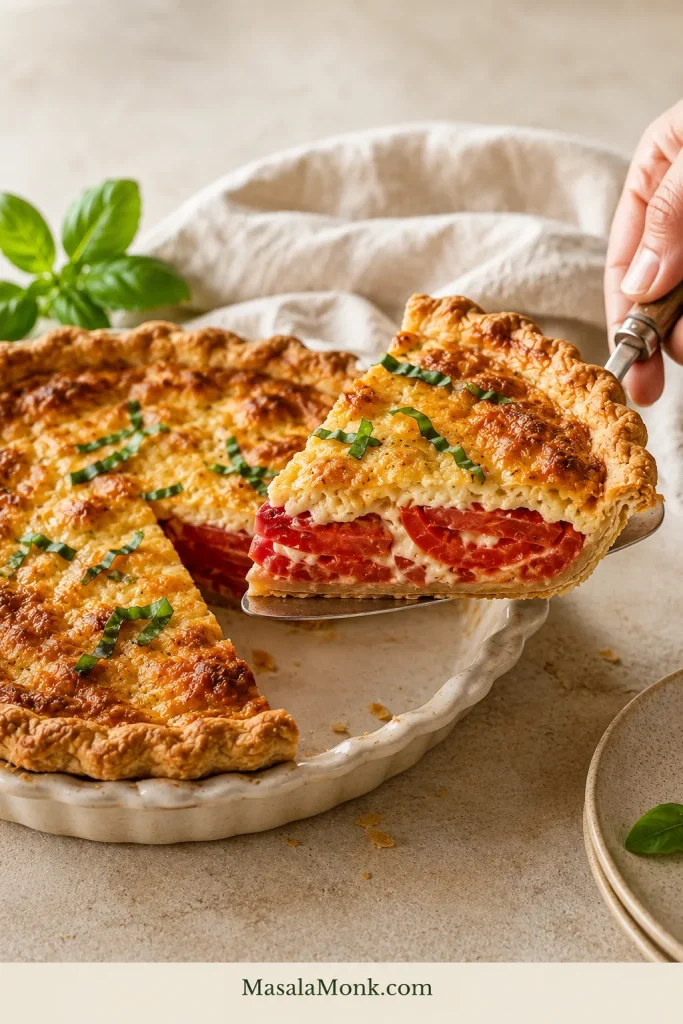
Hand lifting a clean wedge of Southern tomato pie on a server, with the thin flaky bottom crust attached and the remaining pie behind it.
The payoff: a clean wedge that lifts with its flaky bottom crust still attached.

You get flaky pastry underneath, concentrated ripe tomato through the middle, sharp creamy cheese on top and fresh basil cutting through the richness.

Nothing running across the plate. Nothing drowning anything else.

Just a very good Southern tomato pie.
Back to Recipe · Back to Top

Posted on Leave a comment

Dal Tadka Recipe: Restaurant-Style Punjabi Yellow Dal

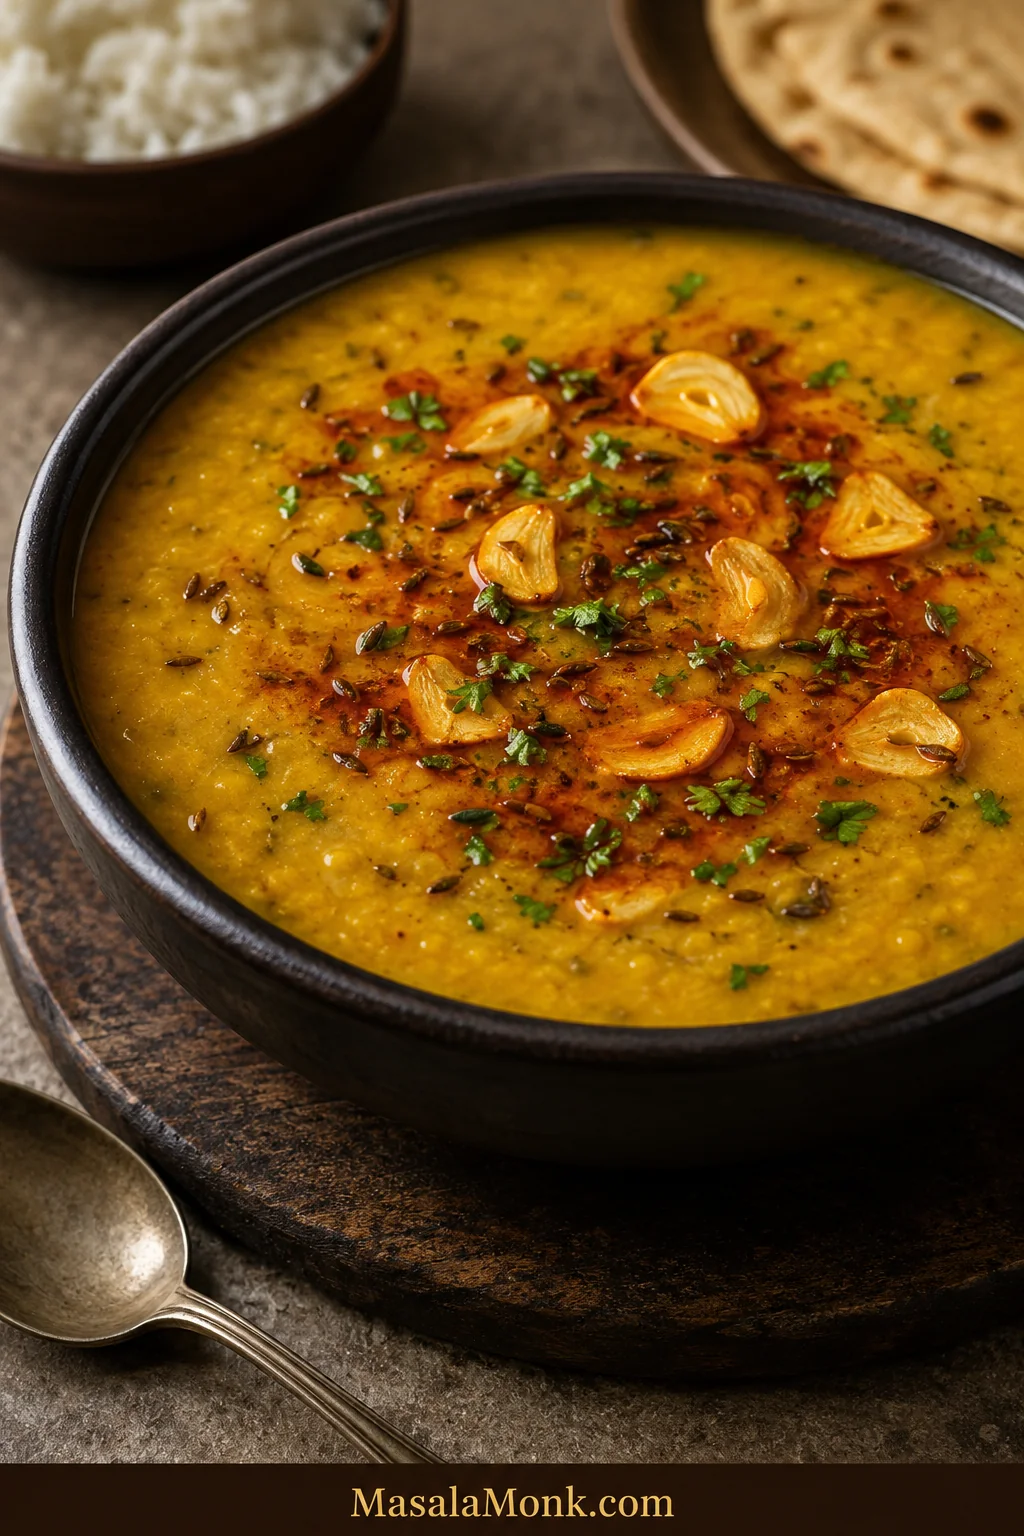
Creamy Punjabi Dal Tadka topped with red chilli ghee, thin golden garlic, cumin, dried chilli and coriander.

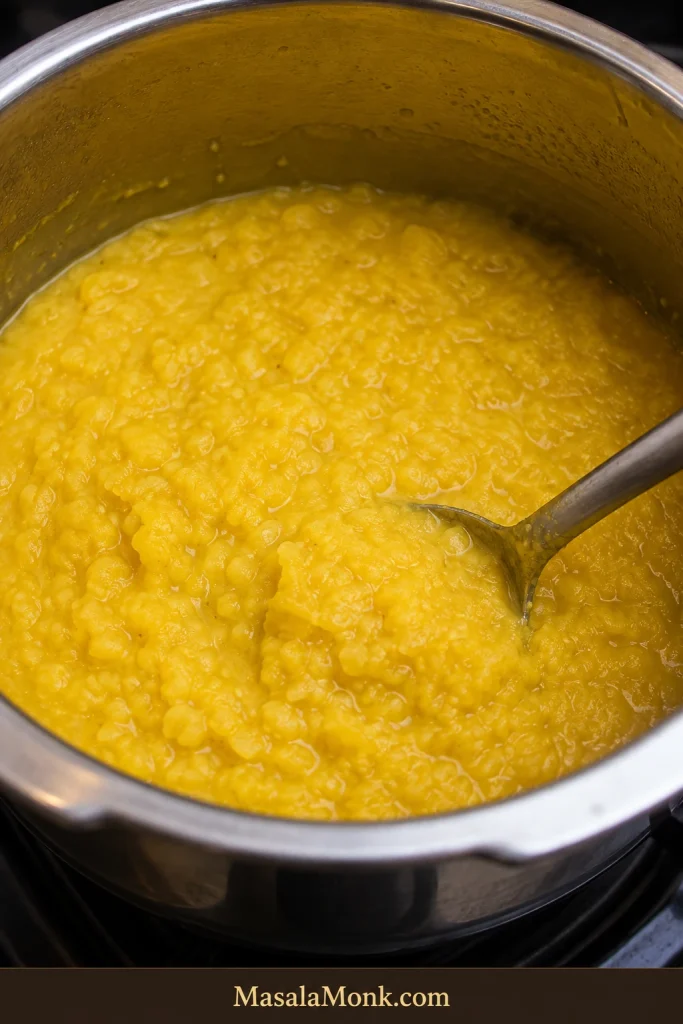
The final tadka announces dinner before the bowl reaches the table. Cumin crackles, garlic turns gold, and hot ghee carries the smell of red chilli across the kitchen. Underneath that dramatic finish, the dal has a quieter job: it should fall creamy from the spoon, with no watery separation, no gluey heaviness and no firm lentils interrupting each mouthful.
This Dal Tadka recipe gives you the familiar restaurant-style Punjabi yellow dal, along with the choices that shape it. Start with toor dal for the classic version, blend in a little yellow moong for a softer finish, and cook it in a pressure cooker, Instant Pot or heavy saucepan. The finished dal is creamy without feeling heavy, warmly spiced through the pot and bright with fresh cumin and garlic at the surface.
You will judge the lentils by how easily a grain crushes, the consistency by how the dal falls from the ladle and the tadka by the colour of the garlic—not by timing alone.
The disappointing bowl often contains all the right ingredients. Usually, one stage was rushed: the lentils came off the heat while still grainy, the tomato base remained raw, the consistency was never corrected, or the garlic crossed from golden to bitter while nobody was looking.

The MasalaMonk rule: the lentils decide when the dal is cooked; the final simmer decides its texture; the fresh tadka decides how memorable it tastes.

Quick Answer: How to Make Restaurant-Style Dal Tadka

Cook the dal: pressure-cook 1 cup toor dal (200 g) with 2¾ cups water (660 ml), turmeric and part of the salt.

In a stovetop cooker, cook for 8 minutes at pressure. In an Instant Pot, use 7 minutes for soaked dal or 8 minutes for unsoaked dal, followed by a full natural pressure release. Every grain should crush without resistance.

Build the body: whisk the lentils partly smooth, combine them with an onion-tomato masala cooked until glossy, then simmer with kasuri methi and enough hot water to reach a creamy, pourable consistency.

Finish at the table: bloom cumin in ghee, add evenly sliced garlic, then add dried chilli as the garlic begins colouring and hing for the final few seconds. Stop the garlic at pale-to-medium gold, remove the pan from the heat, add Kashmiri chilli powder and pour the tadka immediately.

Dal Tadka is also written as Dal Tarka or Tarka Dal. Tadka, tarka and chaunk all describe spices and aromatics bloomed in hot fat. This Punjabi version begins with toor/arhar dal.

Pick your finish

Choose your Dal Tadka style

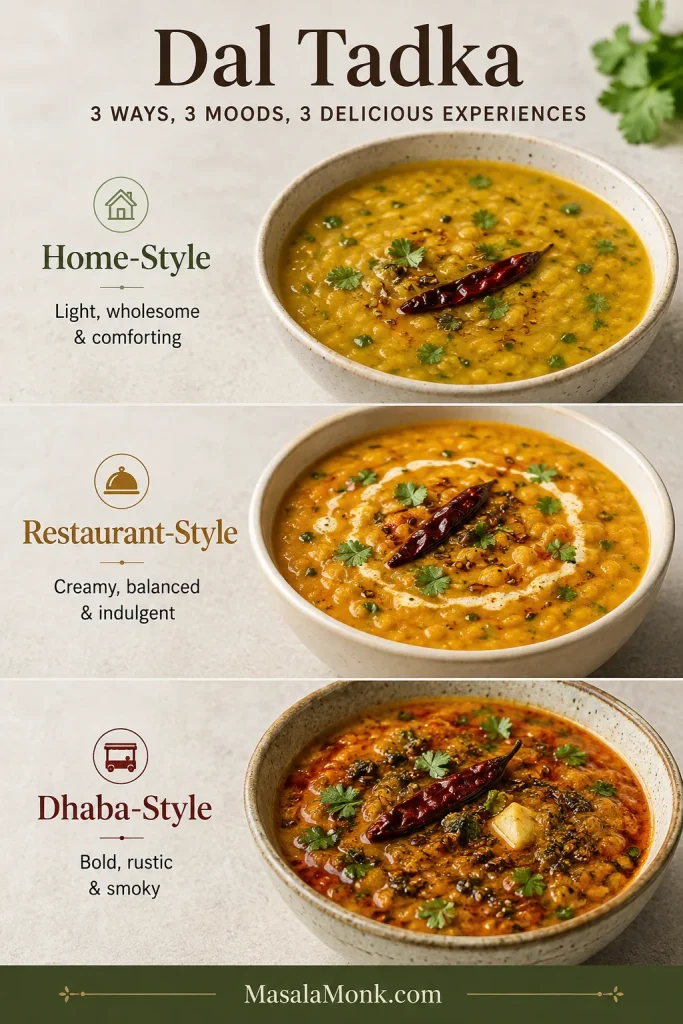
One pot can feel light and comforting, creamy and restaurant-style, or bold and smoky. Decide before building the masala and tadka, because each style changes how far you cook the tomatoes, how thick you leave the dal and how much fat you use.

StyleWhat it tastes likeHow to finish it
Everyday home-styleLight, familiar and weeknight-friendlyKeep the dal a little loose; use about 1 tablespoon fat in the base and 1 tablespoon in the final tadka; cook the tomato only until softened; skip cream and smoke; finish with lemon
Restaurant-styleCreamy, rounded and aromatic with a glossy red tadkaWhisk the dal partly smooth, cook the tomato base thoroughly, use kasuri methi and make the full garlic-ghee tadka
Dhaba-styleBolder, thicker, garlicky and slightly smokyUse the full tadka, add extra sliced garlic, keep the dal slightly thicker and use the optional short dhungar
Choose a lighter home-style, creamy restaurant-style or bolder dhaba-style finish.
Three bowls comparing lighter home-style, creamy restaurant-style and thicker dhaba-style Dal Tadka.
These are three finishes for the same base dal, adjusted through consistency, tomato reduction, garlic, fat and optional smoke.

Make it now

Restaurant-Style Dal Tadka Recipe

Soft toor dal is stirred into a glossy onion-tomato masala, loosened to a creamy pour, then finished with a fresh garlic-cumin tadka.

Recipe shortcuts: Ingredients · Instructions · Garlic tadka · Final balance

Timing and yield

Yield4 main-dish or 5 side servings (about 40–50 g dry dal per person)

PrepAbout 15–20 minutes

Active cookingAbout 20–30 minutes

Pressure cycleAbout 30–45 minutes, including heating and natural release

Total elapsedAbout 55–70 minutes, plus optional soaking

Saucepan totalAbout 80–110 minutes, plus soaking

Dietary note: Vegetarian; vegan with oil and no butter or cream; gluten-free when the hing is labelled gluten-free.

These windows overlap: chop while the cooker heats, then build the masala as the pressure releases. The total reflects the real clock rather than adding every line together.

Equipment

  • 3–4 litre stovetop pressure cooker, 6-quart Instant Pot or a heavy 3–4 litre saucepan
  • Medium frying pan or kadai for the onion-tomato masala
  • Small, preferably deep tadka pan with a long handle; otherwise use your smallest heavy saucepan or frying pan
  • Whisk, wooden spoon or dal ghutni
  • Heatproof serving bowl and ladle
  • Optional: natural charcoal, tongs and a small steel bowl for dhungar

Ingredients

For cooking the dal

  • 1 cup toor/arhar dal (200 g / 7 oz), or ¾ cup toor plus ¼ cup yellow moong
  • 2¾ cups water (660 ml) for pressure cooking
  • ½ teaspoon turmeric
  • 1¼ teaspoons fine salt (about 7–8 g), divided, plus more after tasting
  • ½–1 cup hot water (120–240 ml), as needed after cooking

For the onion-tomato masala

  • 1½ tablespoons ghee or neutral oil (22 ml)
  • 1 teaspoon cumin seeds
  • 1 medium onion, finely chopped (about 140 g / 5 oz)
  • 10–12 g finely grated ginger (about 1 packed tablespoon)
  • 4 garlic cloves, finely chopped or crushed (about 12 g)
  • 1–2 green chillies; slit for gentler heat or finely chop to spread the heat through the dal
  • 2 medium tomatoes, finely chopped or crushed (about 250 g / 9 oz)
  • 1 teaspoon ground coriander
  • ½ teaspoon Kashmiri chilli powder; use mild paprika only if Kashmiri chilli is unavailable
  • ¼ teaspoon garam masala
  • 1 teaspoon kasuri methi, crushed between your palms

For the final tadka and balance

  • 1½ tablespoons ghee (22 ml), or oil for a vegan version
  • 1 teaspoon cumin seeds
  • 5 medium garlic cloves, thinly and evenly sliced, about 2 mm thick (about 15 g)
  • 1–2 dried red chillies, broken in half
  • Up to a scant ⅛ teaspoon hing/asafoetida, optional; use less when yours is strong or pure, and check compounded hing for wheat when cooking gluten-free
  • ½ teaspoon Kashmiri chilli powder
  • 2–3 tablespoons chopped coriander leaves/cilantro
  • Lemon juice: 1–2 teaspoons, if the finished dal needs brightness

Optional for a richer or smoky finish

  • Butter or cream: 1 tablespoon
  • Dhungar: 1 piece natural lump charcoal, about 1 inch/2.5 cm, plus ½ teaspoon ghee

How the ingredients work together

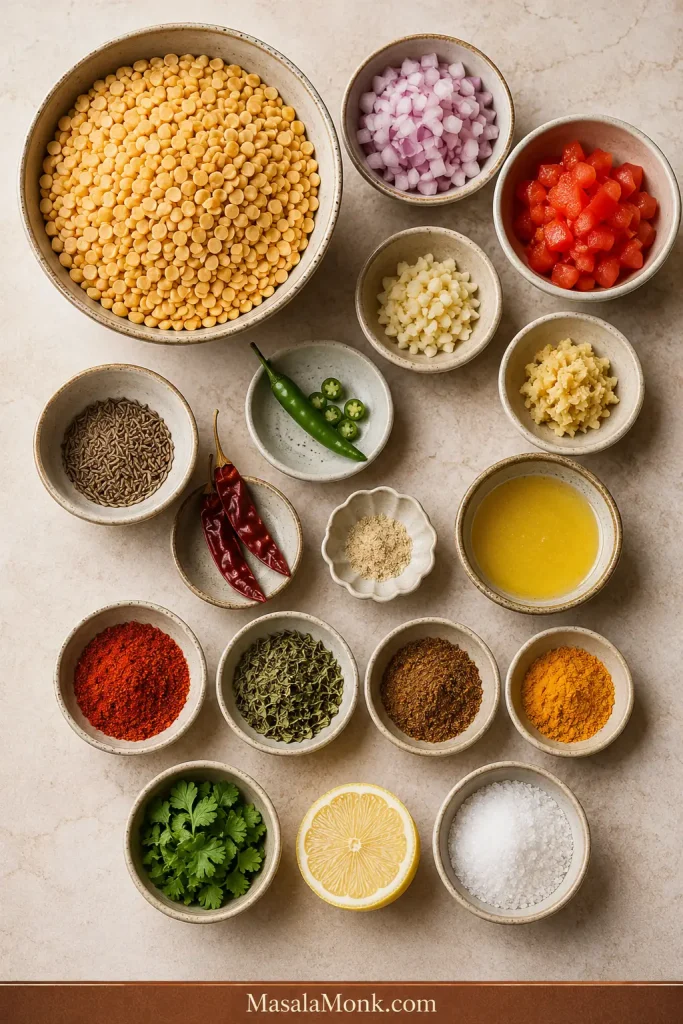
Toor dal, onion, tomatoes, garlic, ginger, cumin, chillies, spices, coriander, lemon and ghee arranged together.
Think of the ingredients in three layers: lentils create body, the masala supplies depth, and the final tadka carries aroma.

Use the waiting time: chop the onion, tomato, ginger and garlic while the cooker builds pressure. Cook the masala while the pressure releases. Measure the finishing-tadka ingredients before the garlic enters hot ghee; that last stage moves too quickly for cupboard hunting.

Instructions

1. Rinse and optionally soak the dal

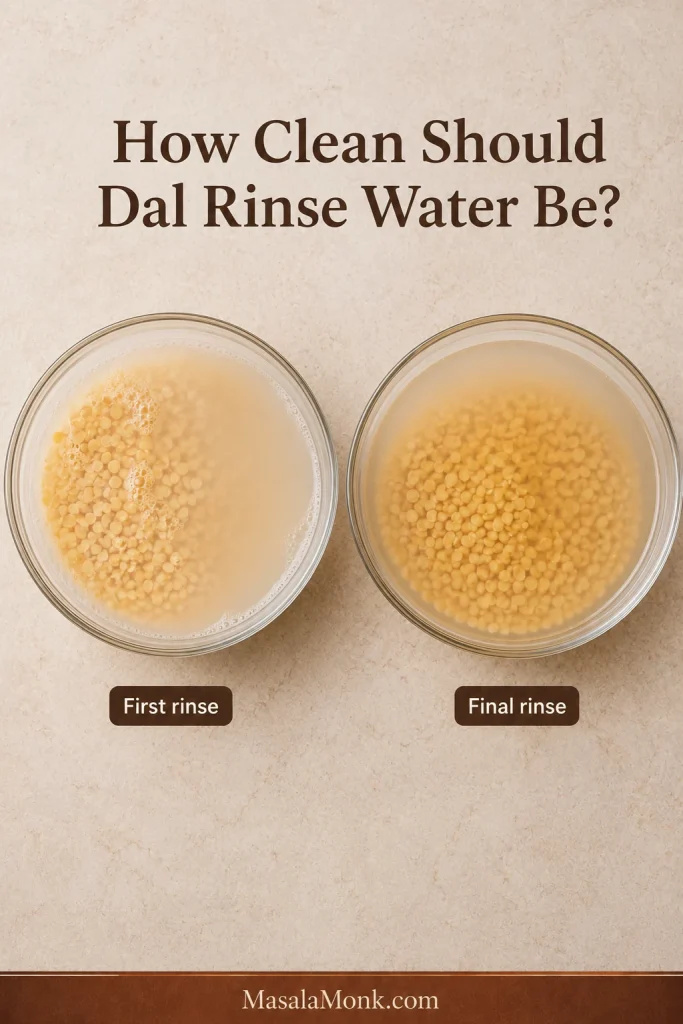
Put the dal in a bowl and rinse it three or four times, rubbing it gently between your fingers, until the water changes from very cloudy to lightly hazy. Drain well.

Soaking for 20–30 minutes is optional for a pressure cooker or Instant Pot, but it helps older lentils cook more evenly. If using an ordinary saucepan, soak toor dal for 1–2 hours; older lentils benefit from the longer end.

Two bowls showing very cloudy first-rinse water and lightly hazy water after repeatedly washing toor dal.
Lightly hazy water is enough; the goal is to remove obvious surface residue, not rinse until the water becomes perfectly transparent.

2. Cook until the lentils completely soften

Add the drained dal, 2¾ cups water, turmeric and ½ teaspoon salt to your cooker.

Choose your cooking method
  • Stovetop pressure cooker: bring to full pressure over medium-high heat. Lower to medium and cook for 8 minutes; use 10 minutes for older, unsoaked lentils. Turn off the heat and let the pressure fall naturally. Cooker designs and burners vary, so use elapsed pressure time and the grain test rather than whistle count.
  • Instant Pot: cook on High Pressure for 7 minutes when soaked or 8 minutes when unsoaked. Allow the pressure to release naturally until the float valve drops; do not force an immediate release for this starchy, expanding food.
  • Saucepan: begin with 4 cups water instead of 2¾ cups. Bring to a boil, skim excessive foam, then simmer partly covered for 45–75 minutes after soaking. Stir occasionally and keep a kettle of hot water nearby; older lentils may need longer.
Fully cooked toor dal in a steel pressure cooker, with swollen grains beginning to split and collapse.
Softness matters more than looseness here: water can be adjusted later, but firm lentil centres must be cooked out now.

Pressure-cooker safety: follow the manual for your model. In an Instant Pot, keep lentils, water and other ingredients below the ½ fill line used for expanding or starchy foods; overfilling can obstruct the steam-release path. Never cover or obstruct the valve while pressure is releasing. For model-specific details, check the Instant Pot safety guidance (opens in a new tab).

Using another cooker? Compare pressure cooker, Instant Pot and saucepan timing.

Check the grain, not the clock

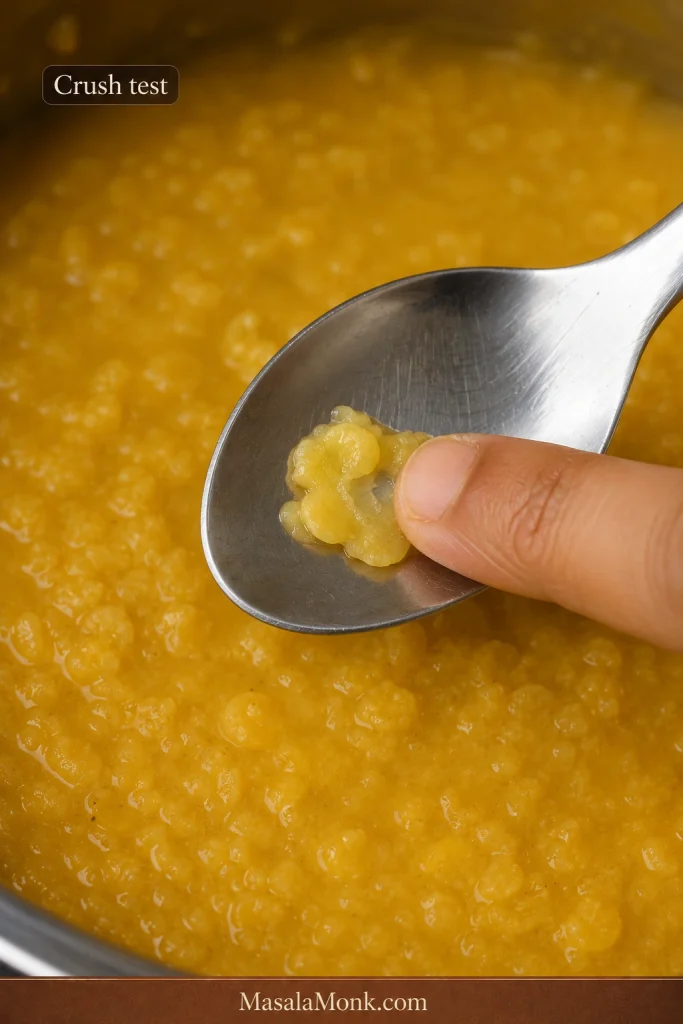
Lift out one grain, let it cool for a few seconds, then press it between your fingers—or crush it against the side of the pot with a spoon. It should collapse easily with no firm or chalky centre. If it still feels grainy, add a splash of hot water and cook it longer. Once the grain yields without resistance, the hardest part is done.

A cooked toor dal grain being pressed between fingertips and collapsing without a firm centre.
This single-grain test outranks the timer because older or drier lentils may need longer even when every measured quantity stays unchanged.

3. Whisk to a creamy texture

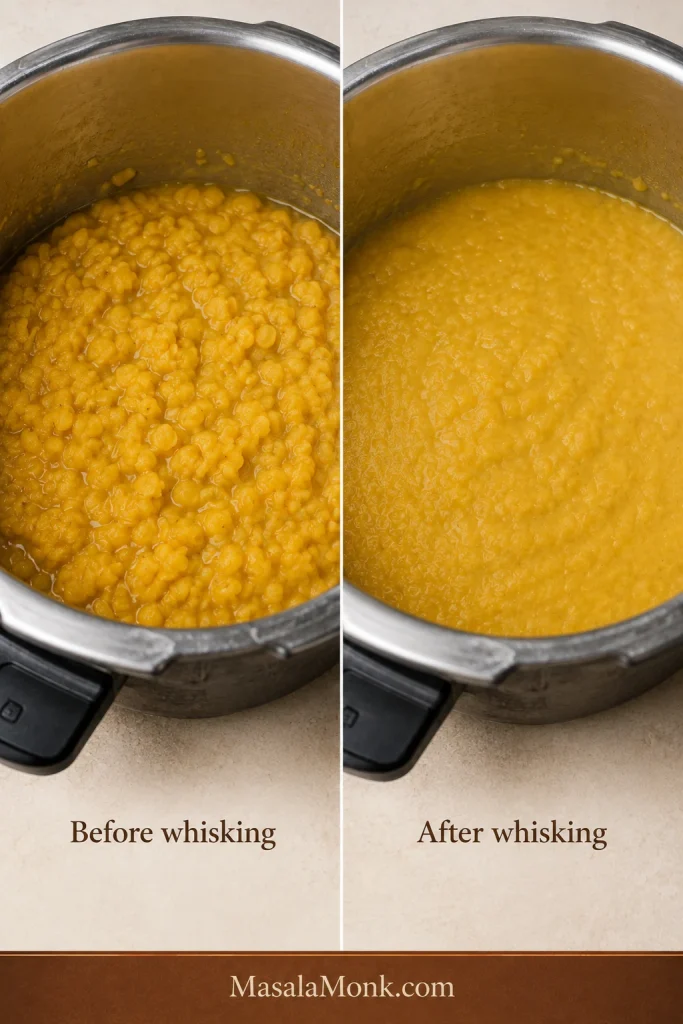
Whisk or mash the cooked dal for 20–30 seconds, breaking down most of the grains while leaving a little natural texture.

The cooker may open to dal far thicker than you expected. That is normal. Hold back the extra water for now; the masala adds moisture, and the final flow is easier to judge once everything is together.

Cooked dal with visible grains beside smoother whisked dal that still retains slight natural texture.
Whisking changes structure, not doneness: it makes softened grains cohesive, but it cannot rescue lentils that remain firm inside.

4. Build the onion-tomato masala

Heat 1½ tablespoons ghee or oil in a medium pan over medium heat. Add the cumin. It should sizzle promptly and smell nutty within 15–20 seconds. If it sits silently, the fat is not hot enough.

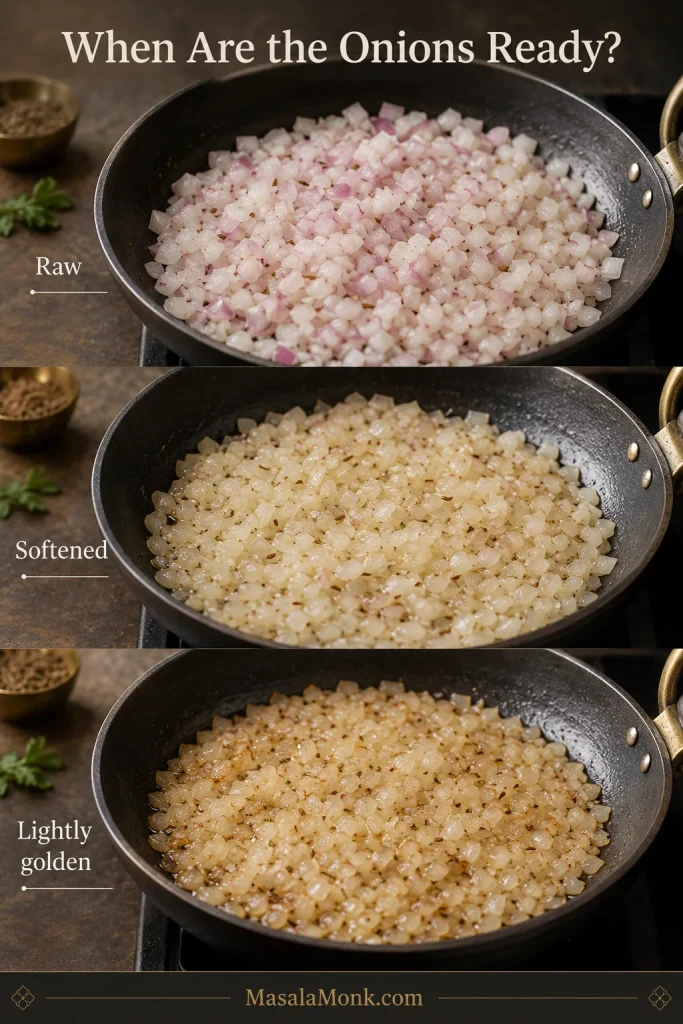
Add the onion with ⅛ teaspoon of the measured salt. Cook for 6–8 minutes, stirring regularly, until soft and golden at the edges and free of its raw sharpness.

Chopped onions shown raw, softened and finally translucent with lightly golden edges in a dark pan.
Edge colour is the safest stopping cue because it removes raw onion sharpness without introducing the heaviness of deep browning.

Add the ginger, chopped garlic and green chilli. Cook for 60–90 seconds, until fragrant and the garlic begins turning pale gold.

Reduce the tomatoes until glossy

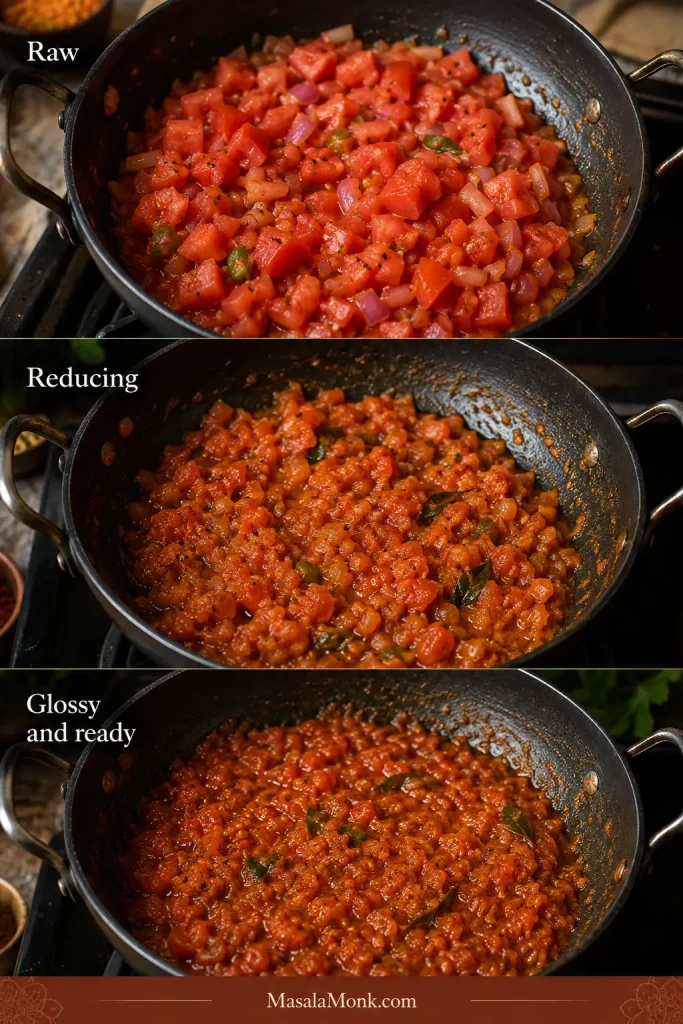
Add the tomatoes. Cook over medium heat for 7–10 minutes, stirring and pressing them against the pan, until they collapse into the onion, lose their raw smell and form a cohesive, glossy masala. Small beads of fat may appear around the edges.

The masala should smell rounder and sweeter now. This is the patient part: extra butter later cannot replace tomatoes that still taste raw.

Tomato masala progressing from watery chopped tomatoes to a thick, cohesive and glossy onion-tomato mixture.
Judge readiness by movement as well as colour: once done, tomato and onion move together instead of releasing watery liquid separately.

Lower the heat. Add ground coriander and the first ½ teaspoon Kashmiri chilli powder. Stir for 20–30 seconds. If the pan looks dry, add one tablespoon water rather than letting the spices scorch.

5. Combine, season and set the consistency

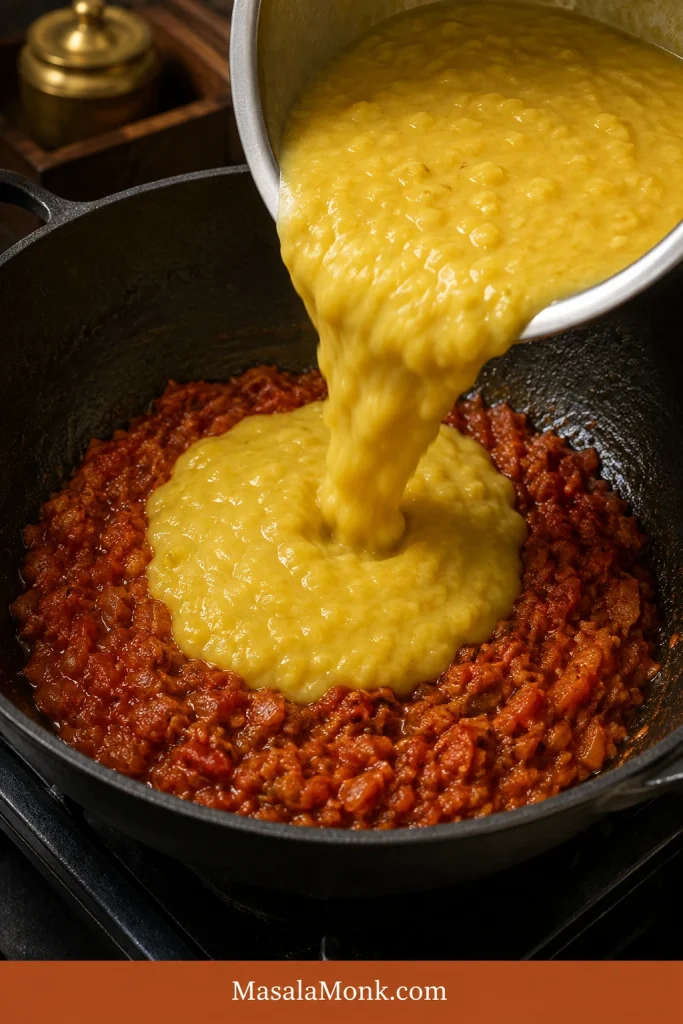
Pour the cooked dal into the masala pan, or scrape the masala into the cooker if that gives you more room. Stir until the colour and texture are even.

Soft yellow dal being poured into reduced onion-tomato masala in a dark cooking pan.
A brief simmer after combining lets the masala season the lentils evenly instead of remaining concentrated in isolated pockets.

Add ½ cup hot water, the garam masala, crushed kasuri methi and ½ teaspoon of the measured salt. Reserve the final ⅛ teaspoon until after tasting. Bring the dal to a gentle simmer and cook uncovered for 4–6 minutes, stirring once or twice.

Set the final consistency

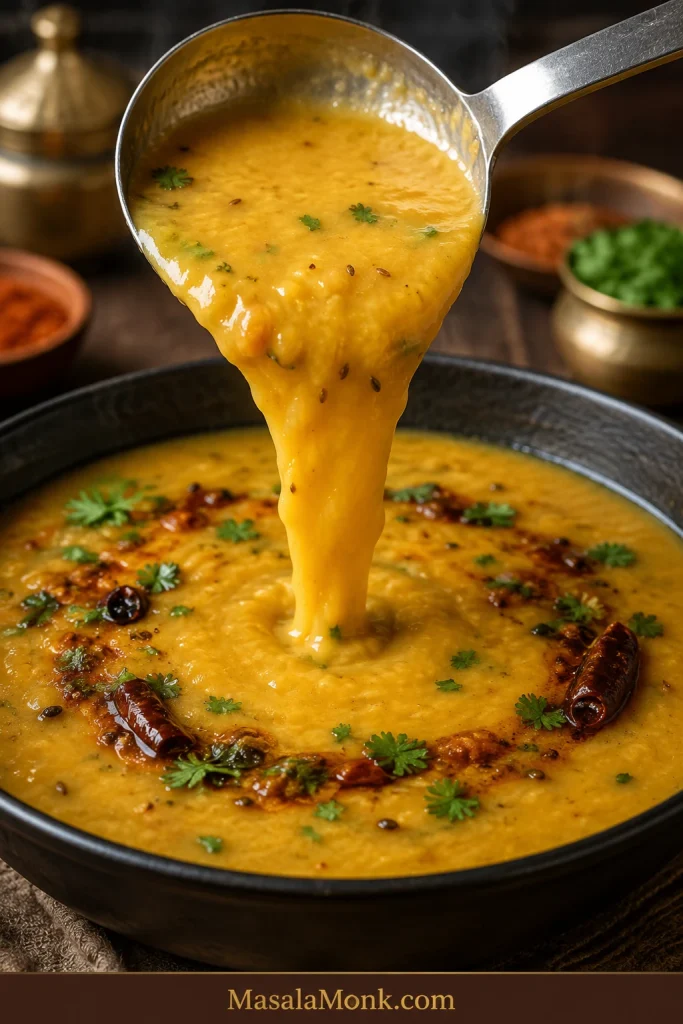
Judge the texture while the dal is hot. It should pour from a ladle in one creamy stream, then settle back into the pan. This flow carries the tadka through the dal instead of swallowing it.

Creamy yellow dal falling from a steel ladle into a pot in a broad, continuous ribbon.
Watch the ribbon’s leading edge: it should fall as one creamy stream rather than break into lumps or leak clear liquid.

If the dal drops in a mound, add hot water in ¼-cup/60 ml increments. If clear liquid runs ahead of the lentils, whisk briefly and simmer uncovered until the mixture comes together. Stop while it is a little looser than you want at the table; it will thicken as it rests.

Still unsure about the texture? Use the visual Dal Tadka consistency guide.

Taste the dal before making the tadka: check the salt, tomato sharpness and body. Add the reserved ⅛ teaspoon salt if needed. If the tomato still tastes raw or sharp, simmer for another 2–3 minutes.

Stir in the optional butter or cream, then turn off the heat. Hold the lemon until after the tadka so you can judge the complete spoonful and keep dairy smooth. After the fresh tempering goes in, avoid prolonged simmering; it will flatten the aroma.

6. Make the garlic tadka

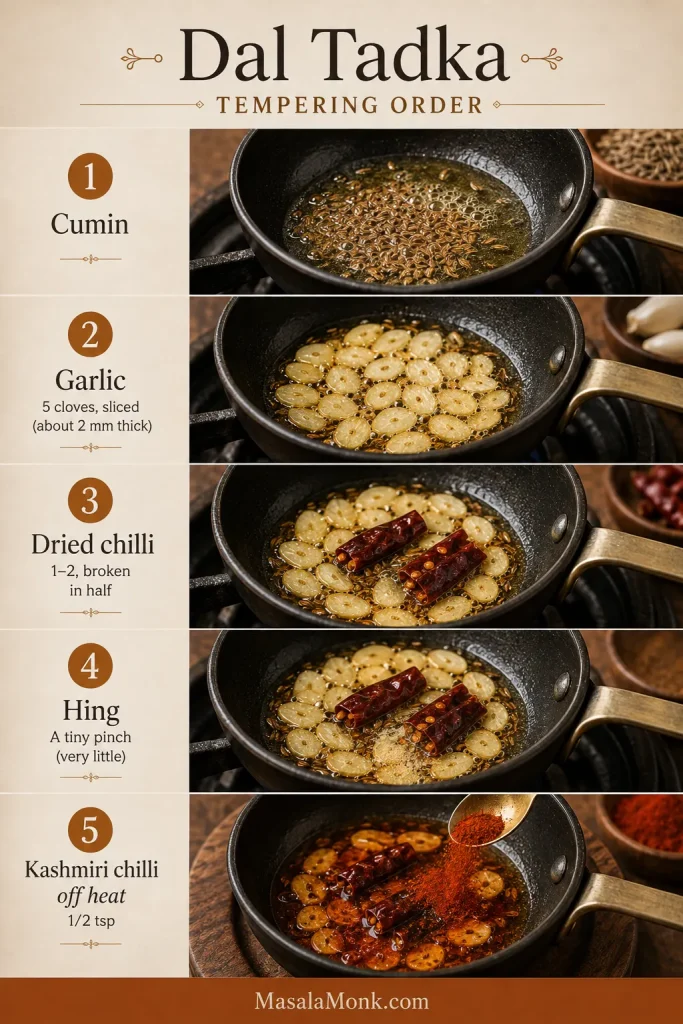
Five-step sequence showing cumin, sliced garlic, broken dried chilli, hing and Kashmiri chilli added off the heat.
The order follows heat tolerance: cumin needs the longest contact, garlic needs controlled browning, and chilli powder needs residual heat only.

Put the serving bowl close to the stove and measure every tadka ingredient before heating the ghee. Once the garlic starts colouring, there is no useful pause button.

Heat 1½ tablespoons ghee in a small, deep pan over medium heat until fully melted and shimmering, but not smoking. Add the cumin seeds and let them sizzle actively for about 10–20 seconds.

Control the garlic colour

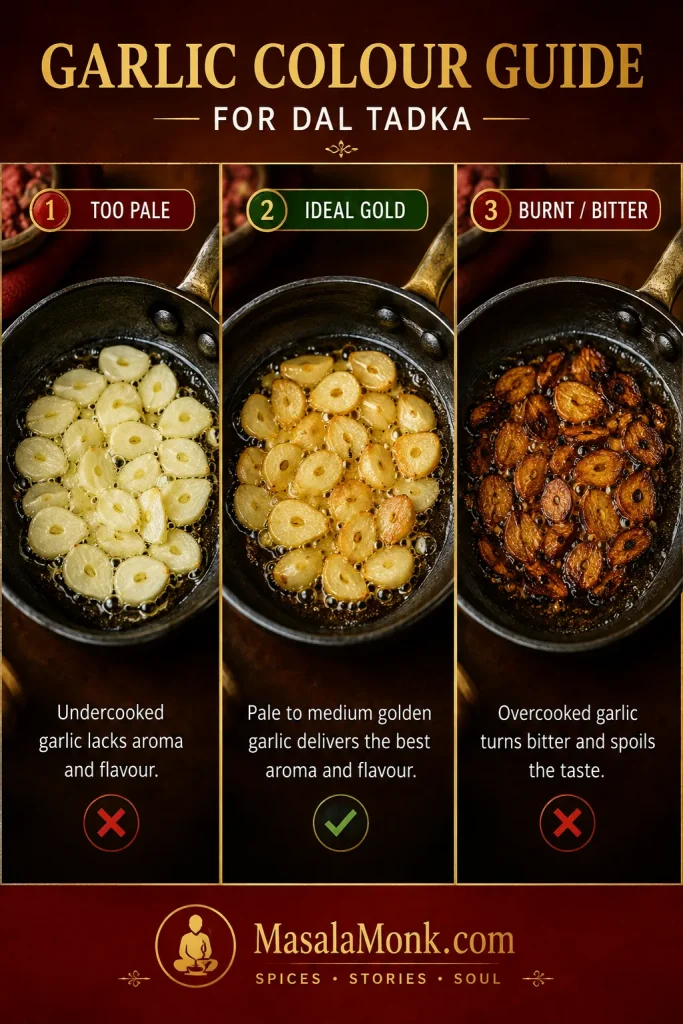
Add the evenly sliced garlic and reduce the heat to medium-low. Cook, swirling or stirring, until the edges begin to turn pale gold. Add the dried red chillies, then add the hing for the final 5–10 seconds. Pull the pan when the garlic is pale to medium gold; it will continue darkening in the hot ghee.

Three pans comparing pale garlic, evenly golden garlic and dark burnt garlic slices frying in ghee.
Garlic continues darkening after the pan leaves the flame, so stop one shade earlier than the colour wanted on the finished dal.
Bloom, pour and divide the tadka

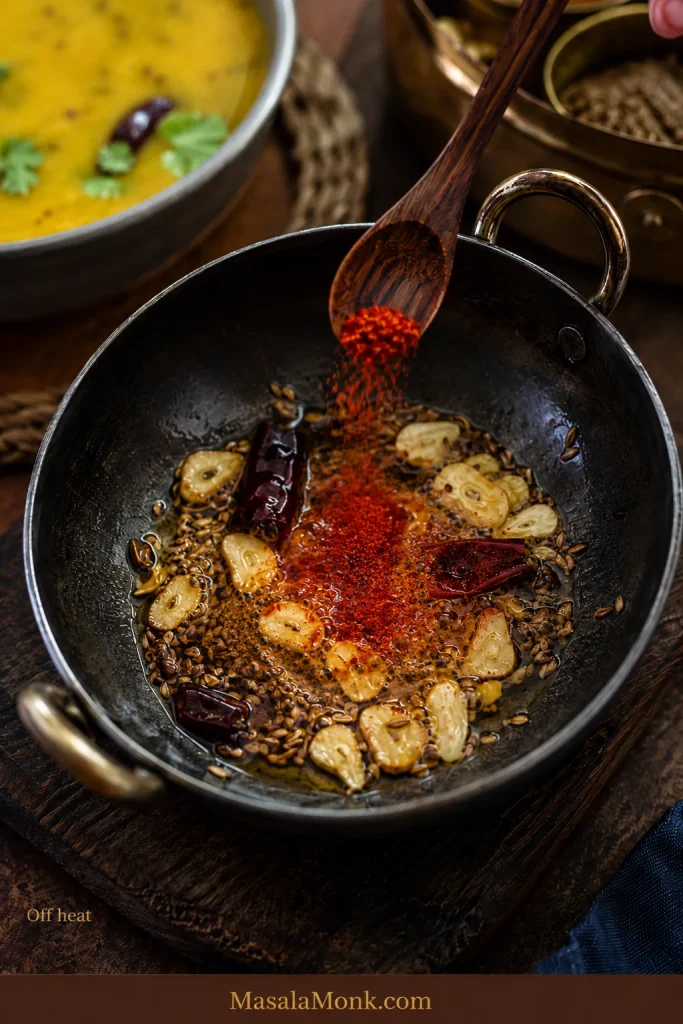
With the pan off the heat, add ½ teaspoon Kashmiri chilli powder and swirl immediately. The ghee should turn red without the chilli powder blackening.

Kashmiri chilli powder being added to hot ghee with cumin, golden garlic and dried chilli away from the burner.
Residual heat is enough to colour the ghee; returning the pan to the flame adds no benefit and can scorch the chilli powder.

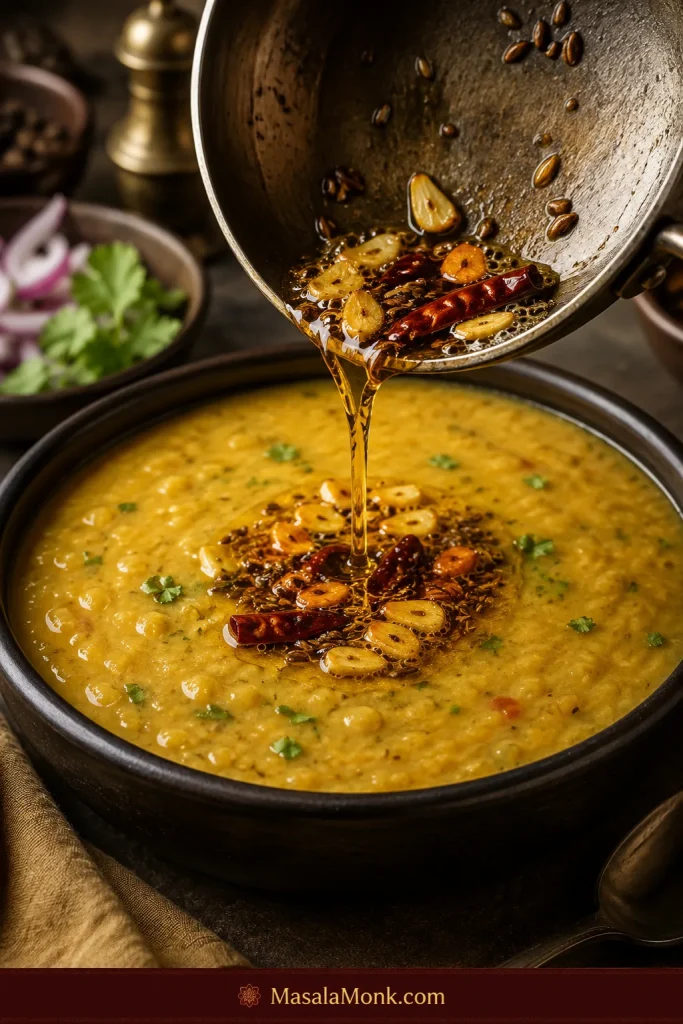
Pour about three-quarters of the sizzling tadka over the dal while the ghee is still hot and aromatic.

A small pan pouring red-gold ghee with cumin, sliced garlic and dried chilli over creamy yellow dal.
The brief crackle confirms the tadka is still hot enough to release aroma, although the surface should remain mostly creamy rather than oily.

Stir once so most of the tempering travels through the pot, then spoon the remainder over the surface and finish with chopped coriander.

7. Let the tadka settle, then serve

Let the tadka sit for a moment, then taste a spoonful that catches both dal and tempering.

If the dal tightened while the tadka was cooking, gently stir in warm water one tablespoon at a time. Once the texture is right, add lemon ½ teaspoon at a time, up to 2 teaspoons, if the spoonful still needs lift.

Serve while the garlic is still fragrant and the red ghee remains visible. Dal continues thickening on the way to the table, so finish it slightly looser than the texture you want at serving. When rice is part of the meal, MasalaMonk’s guide to cooking rice covers basmati, stovetop, cooker and Instant Pot methods.

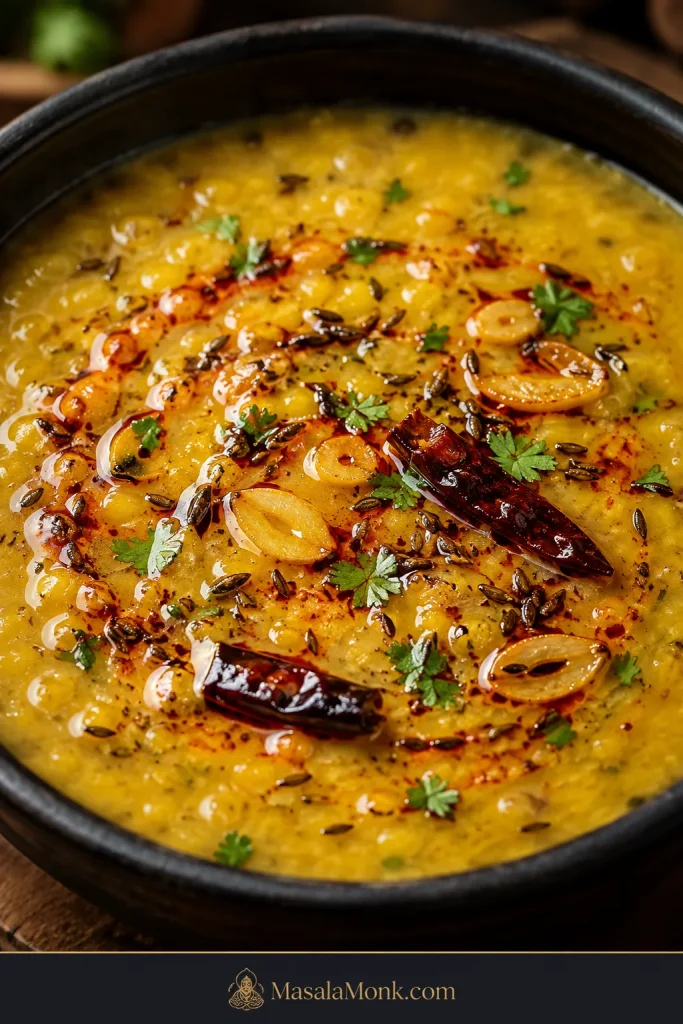
Close-up of creamy Dal Tadka with restrained red ghee, thin golden garlic, cumin, dried chilli and coriander.
Use the exposed yellow dal as a proportion check: if tempering hides most of the surface, the finish is heavier than necessary.

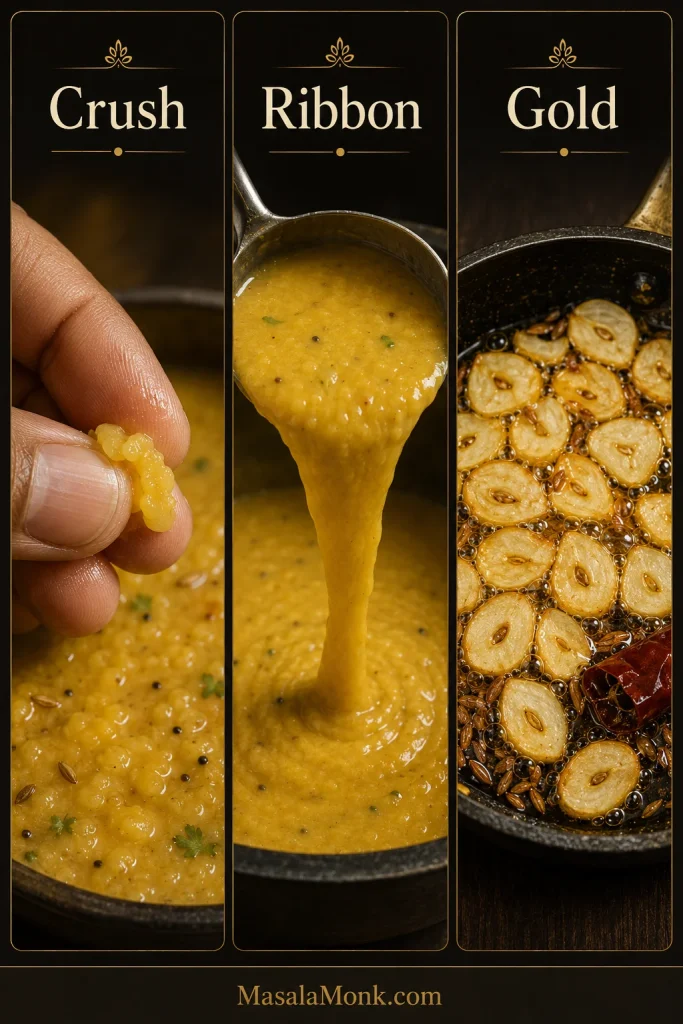
Crush. Ribbon. Gold. Crush one lentil: it should collapse. Lift one ladle: the dal should fall in a broad creamy ribbon. Look at the garlic: it should be golden. When all three agree, carry the dal to the table.

Three panels showing a soft lentil crushing, creamy dal ribboning from a ladle and sliced garlic frying until golden.
These checks isolate three failure points—lentil doneness, final consistency and tempering control—so a beautiful surface cannot hide an undercooked base.

Make Dal Tadka work in your kitchen

The main recipe gets dinner on the table. The sections below help when your lentils are older, your cooker behaves differently or you prefer the dal lighter, thicker or smokier.

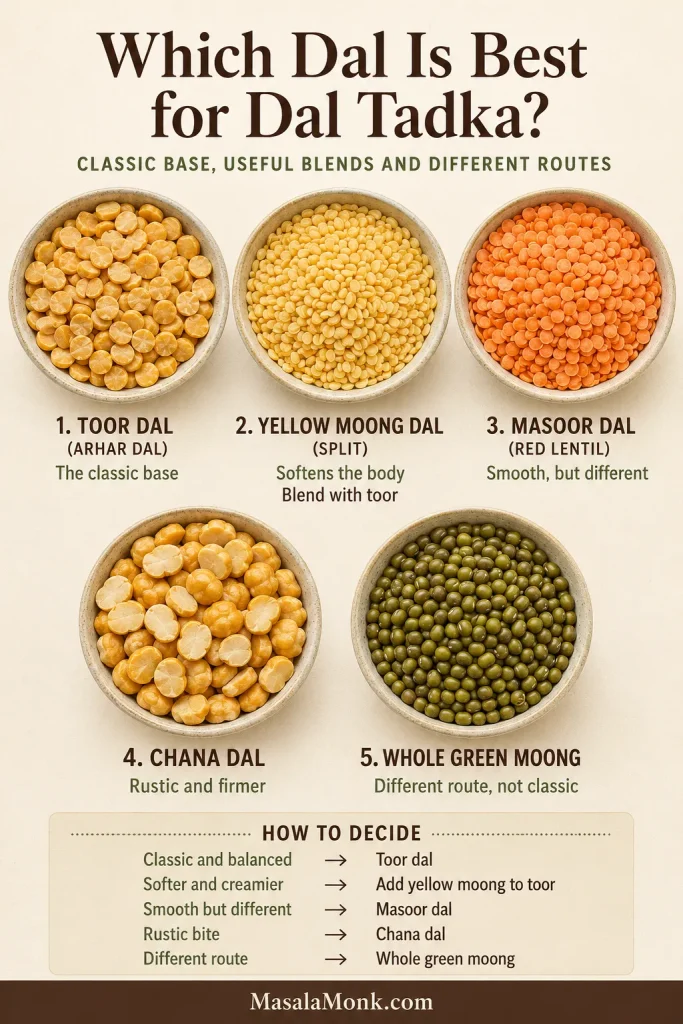
Which dal is used in Dal Tadka?

For a Punjabi-style Dal Tadka, toor dal is the most dependable starting point. It may also be labelled arhar dal, tur dal, tuvar dal or split pigeon peas. These names refer to the same lentil.

Some restaurants mix in yellow moong, masoor or a little chana dal. That does not make one version authentic and another wrong. It changes what the spoon feels like: moong softens the body, masoor breaks down quickly, and chana leaves a faint nutty texture.

Five labelled bowls containing toor dal, yellow moong, red masoor, chana dal and whole green moong.
Choose by spoon feel, not colour alone: toor stays classic, moong softens, masoor smooths and chana leaves more visible texture.

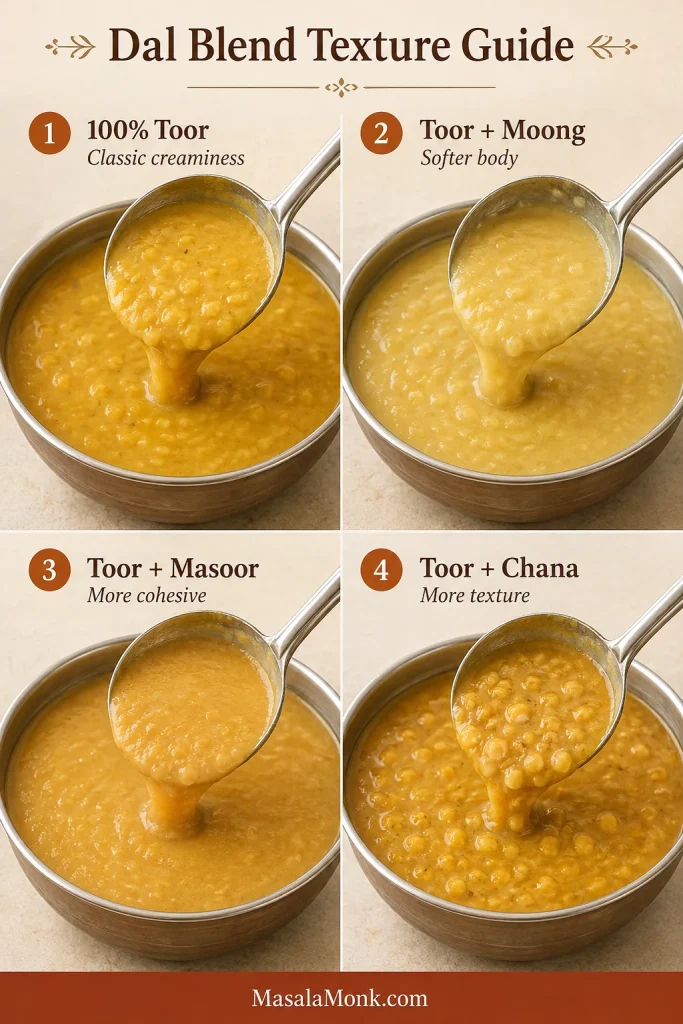
How common dal blends change the texture

Dal choiceResultWhat changes
100% toor/arhar dalClassic, creamy and clean-tastingBest default for this recipe
¾ toor + ¼ yellow moongSofter, lighter and slightly creamierCooks at a similar pace and is the easiest blend to use
¾ toor + ¼ masoorVery soft and cohesive because masoor breaks down earlierBegin with the all-toor timing; let the toor grains decide doneness and expect to adjust the water
Toor with a little chana dalNutty with more visible textureSoak first; chana dal decides the minimum cooking time
100% yellow moongLight, mild and quick-cookingProduces a different everyday dal and deserves its own method
Whole green moongEarthy, hearty and texturedNeeds soaking and a longer cook; do not use as a direct swap here
How common lentil choices change the texture and cooking behaviour of Dal Tadka.
Four panels comparing cooked all-toor, toor-moong, toor-masoor and toor-chana dal blends.
Blend ratios change the dal’s body before butter or cream is added, making lentil choice the recipe’s first texture decision.

For the clearest starting point, use 200 g toor dal. For a softer blend, use 150 g toor plus 50 g yellow moong. Begin checking at the same time, then let the softened grain decide whether it needs longer.

Ingredients that shape the flavour

Garlic works twice. Chopped garlic melts into the masala, while evenly sliced garlic gives the fresh tempering its recognisable aroma and golden pieces.

Keep kasuri methi and garam masala in the background. One teaspoon kasuri methi gives the dal its warm restaurant-style aroma, while ¼ teaspoon garam masala deepens the base without taking over. If your blend smells flat, MasalaMonk’s homemade garam masala recipe explains how the whole-spice balance is built.

No kasuri methi? Skip it instead of replacing it with fresh fenugreek. The cumin-garlic tempering will still give the dal a satisfying finish.

Handle Kashmiri chilli and hing gently. Take the tadka pan off the flame before adding the chilli powder so it blooms red without scorching. Hing needs just the final few seconds in the hot fat, and strong or pure hing needs far less than a mild compounded product. For gluten-free Dal Tadka, check the label because some compounded asafoetida contains wheat flour.

Regional note: this Punjabi version is led by cumin and garlic. Mustard seeds and curry leaves are central to many other regional dals, especially in South Indian cooking, but this recipe does not need them.

Pressure cooker, Instant Pot or saucepan?

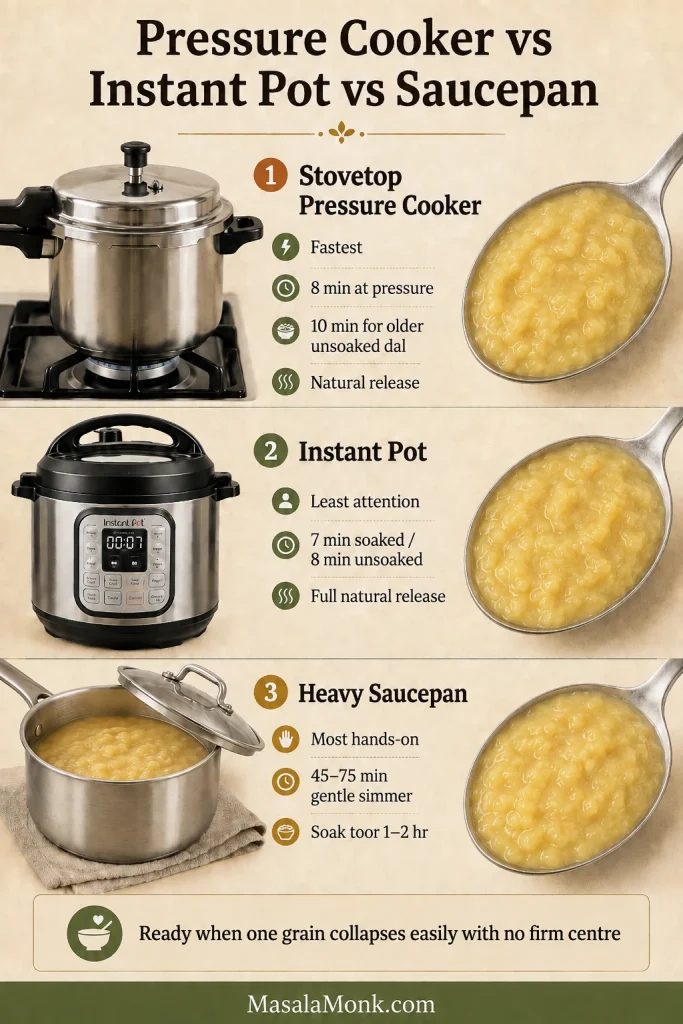
A stovetop pressure cooker is fastest, an Instant Pot asks for the least attention, and a saucepan lets you watch the lentils soften. Choose the method that fits how you like to cook; the grain test stays the same.

MethodSoakingStarting waterFirst timing windowReady when
Stovetop pressure cookerOptional 20–30 min2¾ cups / 660 ml8 min at pressure; 10 for older unsoaked dal; natural releaseA grain collapses immediately with no chalky centre
Instant PotOptional 20–30 min2¾ cups / 660 ml7 min soaked or 8 min unsoaked; full natural releaseThe dal whisks creamy with almost no resistance
Heavy saucepan1–2 hr for toorBegin with 4 cups / 950 ml45–75 min gentle simmer; older dal may need longerNo firm grains remain and the liquid no longer looks separate
Starting points for toor dal in a stovetop pressure cooker, Instant Pot or heavy saucepan.
Stovetop pressure cooker, Instant Pot and saucepan shown with spoonfuls of fully softened plain toor dal.
Pressure time and saucepan simmer time measure different things; compare these methods by attention and final softness rather than numbers alone.

Cooker size, heat and lentil age vary; the softened grain gives the final answer.

Return to the cooking step · Check the final consistency

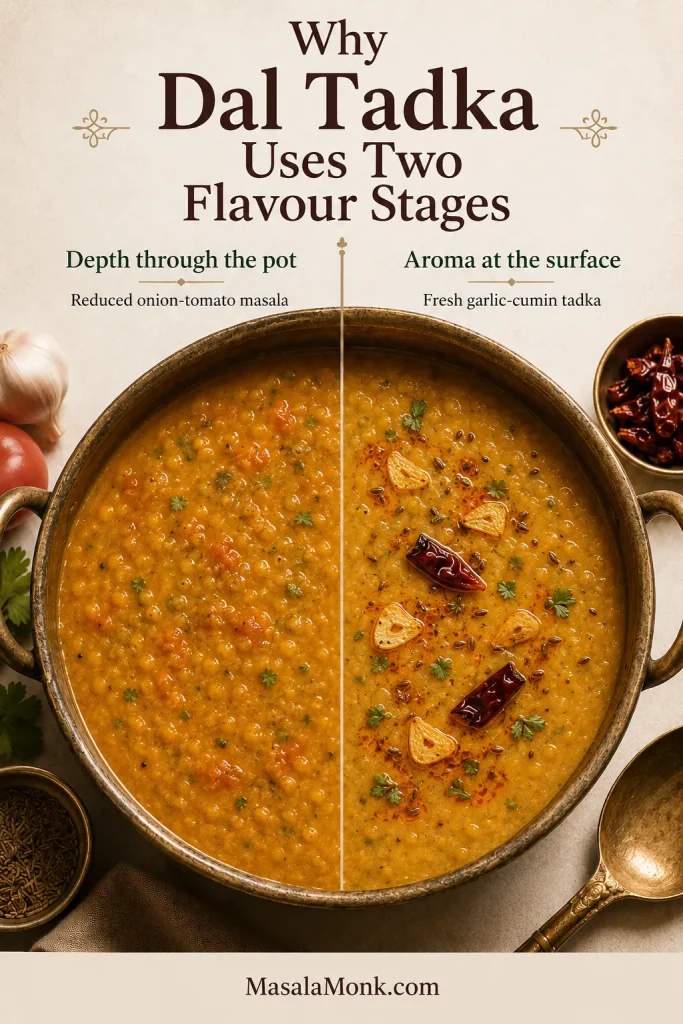
Why restaurant-style dal needs two flavour stages

Restaurant-style Dal Tadka tastes layered because each stage keeps its own job. Tender lentils create the creamy body. The reduced onion-tomato masala carries sweetness and savoury depth through every spoonful. The garlic-cumin tadka goes in at the end, while its aroma is still vivid. That is where the richness comes from—not oil floating on top.

Split pot showing onion-tomato masala mixed through dal and fresh garlic-cumin tadka visible at the surface.
Keep the final tadka out of a prolonged simmer: cooked masala tolerates time, but fresh garlic-cumin aroma quickly becomes quieter.

How thick should Dal Tadka be?

The ideal texture depends on how you are serving it, but restaurant-style Dal Tadka should be creamy and pourable: cohesive on the spoon, then willing to flow back into the pot.

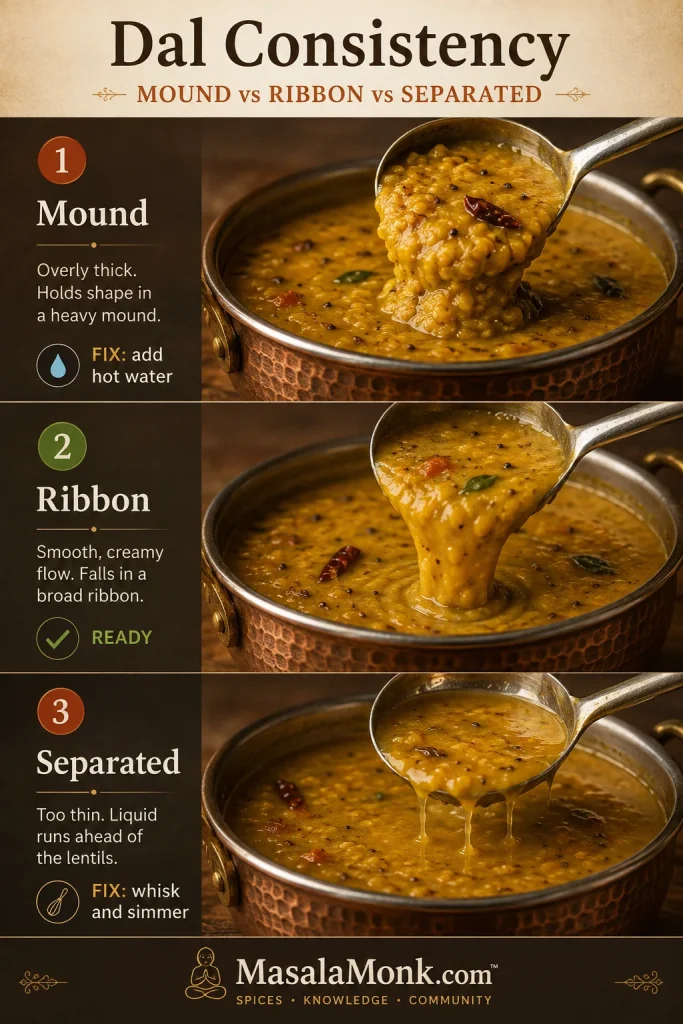
What you seeWhat it meansWhat to do
Dal sits in a mound and barely movesToo thickAdd hot water ¼ cup/60 ml at a time
Dal falls in a broad ribbon and settles slowlyCreamy restaurant-style flowStop adjusting; it will thicken slightly as it rests
Clear liquid runs ahead of lentil solidsToo thin or not yet cohesiveWhisk briefly and simmer uncovered
Dal feels creamy but turns stiff after 10 minutesNormal cooling and starch thickeningKeep it slightly loose before serving
Use the ladle flow—not thickness in the pot alone—to judge the final consistency.

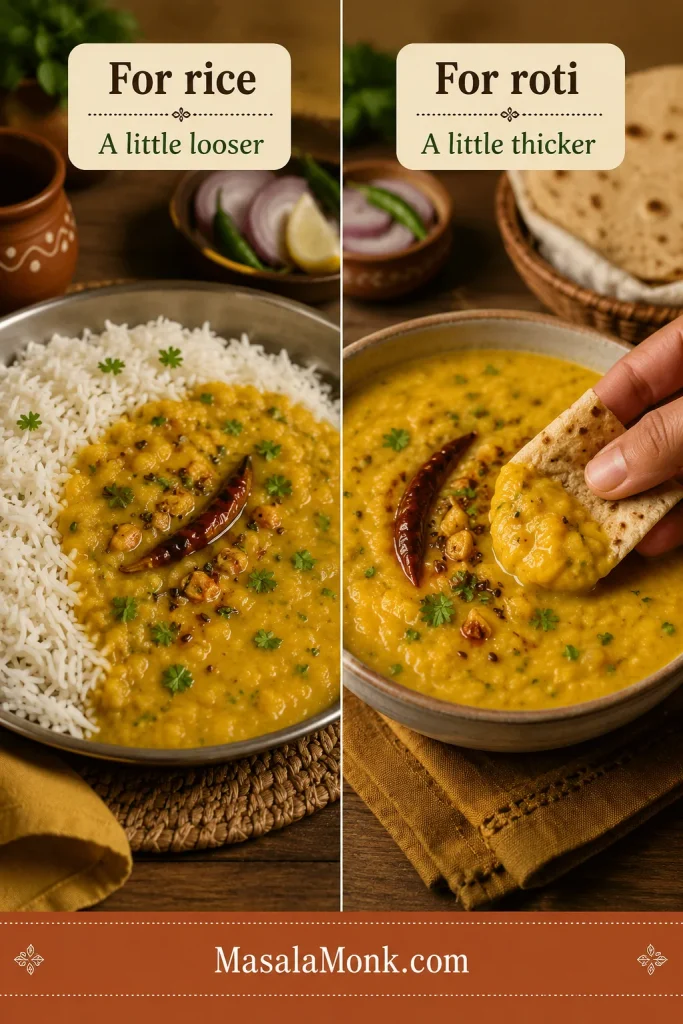
Use the comparison below to identify the problem before adjusting. Change one thing at a time, then give the dal a moment to settle before judging again. For a sturdy flatbread such as MasalaMonk’s jowar-bajra roti, stop a little thicker; for rice, leave it looser. If dinner runs five minutes late, restore the flow just before serving.

Three panels showing overly thick dal, correctly ribboning dal and separated dal with watery liquid ahead of the lentils.
The same bowl can be too thick or merely separated, so watch how it falls before deciding whether to add water or simmer.

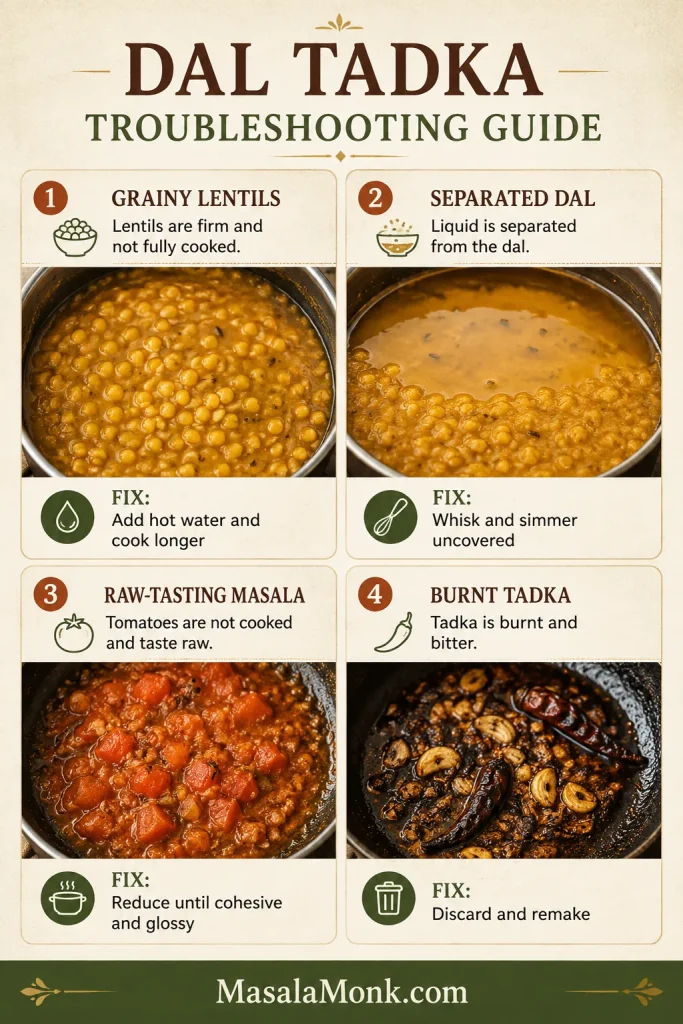
Dal Tadka troubleshooting

Most disappointing pots are recoverable. Before reaching for more spice, ask which stage needs another minute. Grainy dal needs cooking, separated dal needs whisking and reduction, and a weak finish usually needs balance or a fresh tempering.

Four panels showing grainy lentils, separated dal, raw tomato masala and burnt tadka with a fix for each.
Four visible failures point to different causes; diagnose the texture or colour first instead of automatically adding more spice, water or fat.

Fix texture and consistency problems

ProblemLikely causeMost useful fix
Watery or separated dalUndercooked lentils, too much adjustment water or too little whiskingConfirm the grains are soft, whisk briefly and simmer uncovered; do not add flour or starch
Grainy dalOld lentils, hard water or insufficient pressure timeAdd ¼–½ cup hot water and pressure-cook 2–3 minutes more, or simmer covered until the grains collapse; if this repeats across batches, try filtered water
Dal became stiff while waitingNormal starch thickening as it coolsFold in warm water a tablespoon at a time; recheck salt only after the texture is right
Correct the physical texture before changing the seasoning.

Fix flavour and tempering problems

ProblemLikely causeMost useful fix
Flat flavourToo little salt or acidity, raw masala, or a tadka made too earlyCheck salt first, then add lemon by the teaspoon; cook raw tomato longer or make a small fresh tadka
Bitter tadkaGarlic or chilli powder burnedDiscard and remake the small tadka; stop garlic at pale-to-medium gold and add chilli powder off heat
Too much oil on topThe tadka was too large for the amount of dalSpoon off excess and loosen the dal if needed; use the lighter home-style quantity next time
Tomato tastes sharp or rawThe masala was combined too soonSimmer before adding the final tadka until the raw smell disappears and the base looks cohesive
Garlic softened or disappearedUneven slices or all the tadka was stirred through earlySlice evenly, fry just before serving and reserve part of the tadka for the surface
Match the flavour problem to the stage that created it.

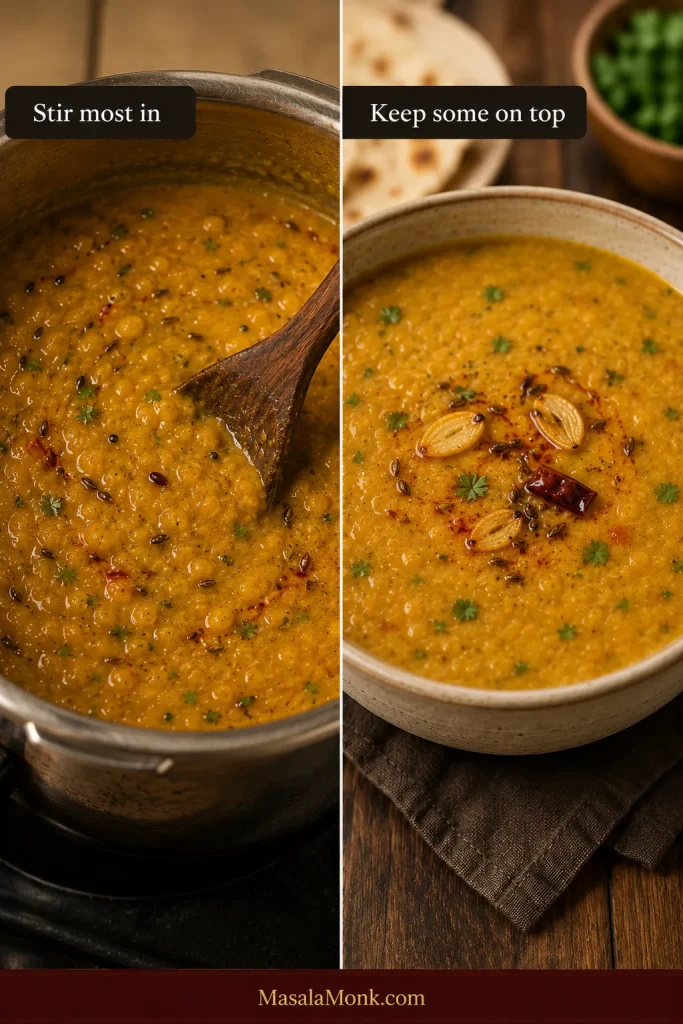
When the garlic and red ghee disappear into the pot, the problem is usually distribution rather than quantity. Stir most of the tadka through for flavour in every serving, but reserve a smaller portion for the surface so the freshest aroma and crispest garlic remain noticeable.

Split image showing tadka stirred through a pot of dal and a smaller portion left visible on the served bowl.
Dividing the tadka solves two jobs at once: flavour throughout the pot and a fresher aromatic layer at the surface.

When the texture is right but the flavour is flat

When the texture is right but the flavour remains dull, taste in this order: salt, acidity, tomato reduction and tadka freshness. If the garlic is dark brown, the chilli smells scorched or the fat tastes bitter, remake the tempering. Two fresh minutes are better than letting burnt garlic follow every spoonful.

Back to the recipe card · Recheck consistency · Back to top ↑

How to make the dal dhaba-style

For bolder dhaba-style dal, change four things instead of doubling every spice.

  1. Keep the dal slightly thicker, but still loose enough to settle naturally.
  2. Add two extra sliced garlic cloves to the final tadka.
  3. Taste first; if the kasuri methi is too quiet, add up to another ½ teaspoon during the final simmer.
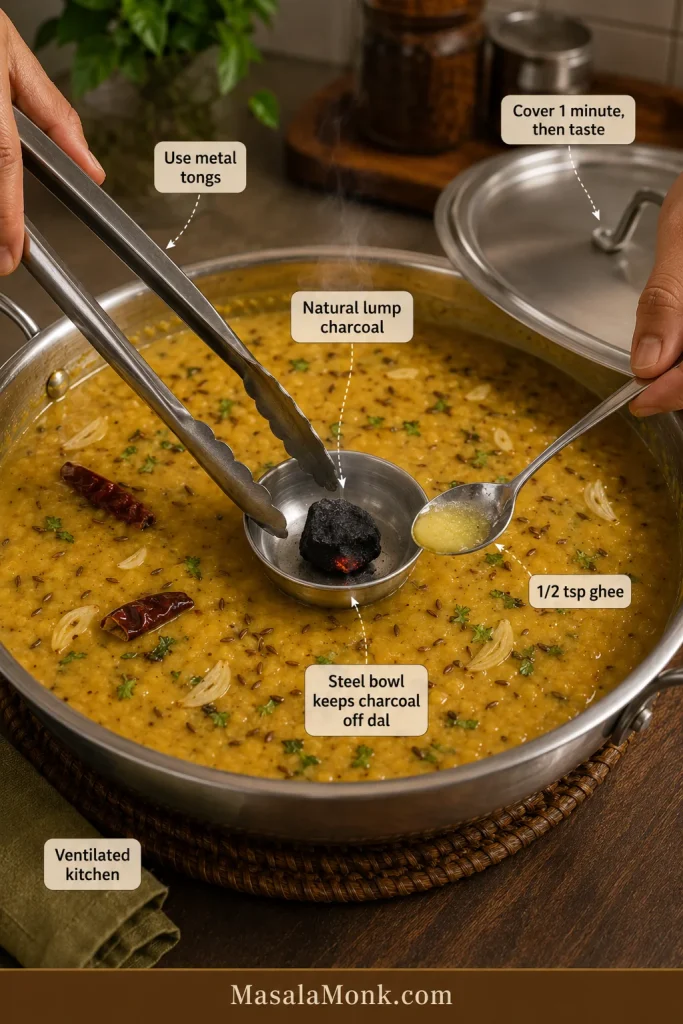
  4. Use a brief charcoal dhungar for smoke.

How to smoke the dal without making it bitter

The same brief charcoal method appears in MasalaMonk’s butter chicken recipe, but Dal Tadka needs a lighter exposure.

Working beneath strong ventilation, heat the 1-inch/2.5 cm piece of natural lump charcoal—not a self-lighting briquette—over a flame until it glows red in places and develops a light grey surface. Handle it only with tongs.

Put a small steel bowl in the centre of the finished dal and place the hot charcoal inside it without letting the charcoal touch the food. Drizzle ½ teaspoon ghee over the charcoal and immediately cover the pot.

Metal tongs holding hot charcoal in a steel bowl inside dal while a small spoon pours ghee over it.
Treat one minute as the first checkpoint, not a minimum target; smoke is easy to add, whereas oversmoked dal cannot be corrected.

Start with 60 seconds. Uncover, remove the bowl and taste. Smoke is easy to add and impossible to remove. Repeat for one more minute if you deliberately want a stronger smoke.

Leave the used charcoal in a heatproof metal container until it is completely cold before disposal.

Back to the recipe card · Go to serving ideas · Back to top ↑

Useful variations

Once the lentils are tender and the tadka is fresh, the recipe is easy to adapt. Change one thing at a time so the garlic, tomato and spices still taste as though they belong together.

Vegan Dal Tadka

Use sunflower, rice bran, canola or another neutral oil for the masala and tadka, then skip butter and cream. Mustard oil gives the dal a sharper, more mustard-led flavour; choose it when that is the direction you want.

No-onion, no-garlic Dal Tadka

Skip the onion and garlic. Use ginger, cumin, tomato and kasuri methi, then finish with lemon. Use up to the full scant ⅛ teaspoon hing for a mild compounded product; use considerably less when it is strong or pure. A South Indian no-onion version may use mustard seeds, curry leaves and a different spice balance.

Lasooni or extra-garlic Dal Tadka

Add two or three extra garlic cloves to the final tadka and reserve the crispest slices for the top. For a gentler garlic flavour, use two cloves in the masala and four in the tadka. Fried garlic creates the recognisable lasooni aroma more clearly than simply adding more crushed garlic to the base.

Milder family version

Use one green chilli or omit it, choose mild Kashmiri chilli for colour and leave the dried chilli whole so it perfumes the ghee without releasing as much heat. Adults can add chilli at the table.

Fresh, lighter home-style version

Use 1 tablespoon oil in the masala and 1 tablespoon ghee or oil in the tadka. Cook the tomatoes for 3–5 minutes, until softened but still bright; skip cream and smoke, then finish with lemon and coriander. A crisp cucumber salad makes a natural cool contrast.

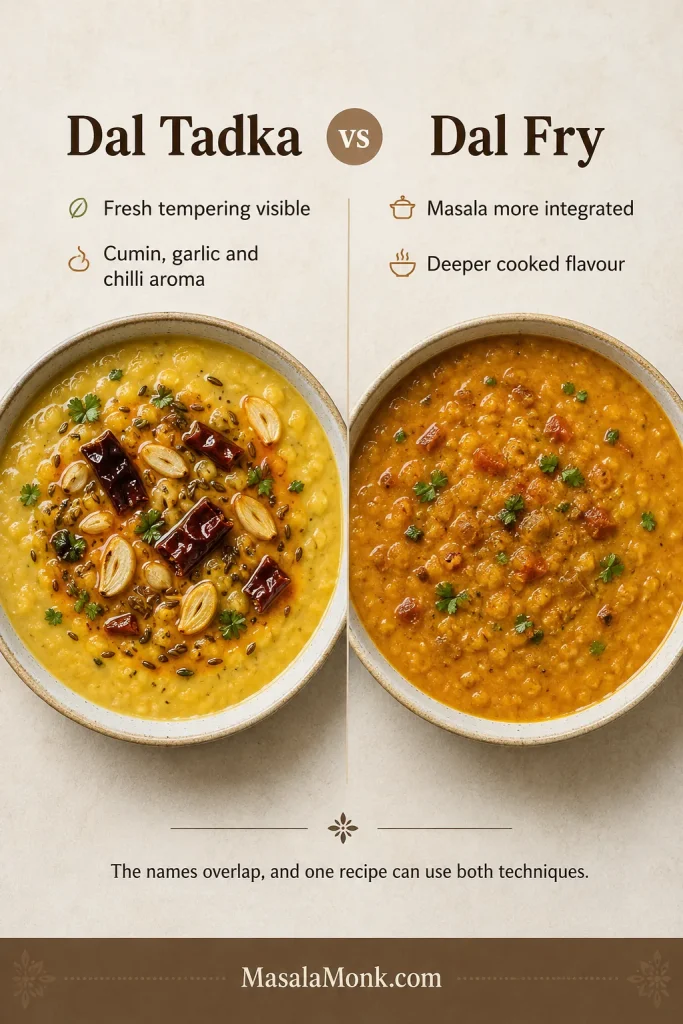
Dal Tadka vs Dal Fry: what is the difference?

Restaurants and home kitchens often use the names loosely, but the usual distinction is about technique.

FeatureDal TadkaDal Fry
Defining moveA fresh tempering is poured over or stirred into the finished dalCooked dal is simmered in a fried onion-tomato masala
AppearanceOften has visible ghee, garlic and chilli on topUsually looks more uniformly mixed
Flavour emphasisFresh cumin, garlic and chilli aromaDeeper cooked masala flavour
Can a recipe use both?YesYes
A final fresh tempering is the clearest practical cue for Dal Tadka.
Dal Tadka with visible surface tempering beside Dal Fry with masala mixed more evenly throughout.
Because one recipe can use both techniques, identify the difference by where the masala and fresh tempering do their work.

This recipe uses both a cooked masala base and a final tempering, a common restaurant-style approach. The fresh cumin, garlic and chilli on top make the dish unmistakably Dal Tadka.

What to serve with Dal Tadka

Dal Tadka can anchor a quiet weekday dinner or sit within a larger North Indian spread. For the simplest meal, rice, dal, curd and pickle are enough. With rotis, keep the dal slightly thicker and add a dry vegetable or cooling raita alongside.

Looser Dal Tadka served with basmati rice beside slightly thicker dal being scooped with roti.
Rice benefits from dal that flows between the grains, while roti needs enough body to stay on a torn piece without becoming paste-like.
  • With rice: basmati rice, jeera rice or plain steamed rice
  • With bread: roti, phulka, naan, tandoori roti or paratha
  • For contrast: cucumber raita, plain curd, sliced onion, lemon and pickle; MasalaMonk’s palak raita makes a more substantial cooling side
  • For a fuller meal: a dry vegetable, papad and a fresh salad

Leave the dal looser for rice and slightly thicker for roti. That small adjustment changes how naturally it sits with the rest of the meal.

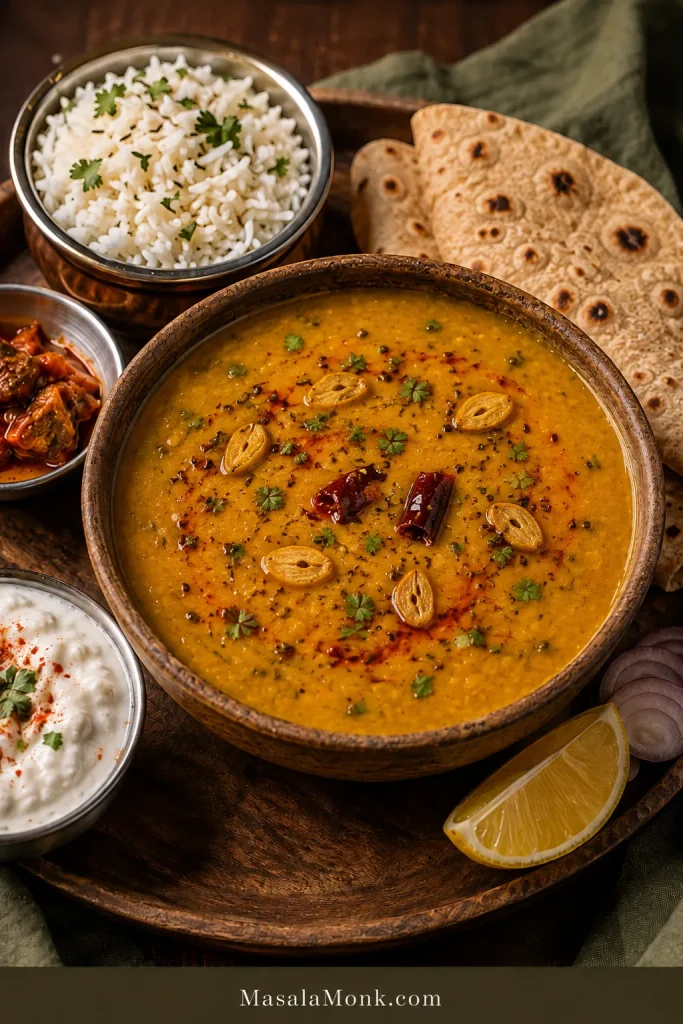
Dal Tadka served with basmati rice, rotis, raita, Indian pickle, lemon and sliced red onion.
Build contrast with one cooling side and one sharp side: raita softens the chilli, while pickle or lemon keeps the creamy dal lively.

Make ahead, store and reheat

Dal is generous to tomorrow’s dinner, but its texture and aroma need different treatment: cool the base promptly, then restore the flow and make a fresh tadka when you reheat it.

Best make-ahead method

Cook the dal and onion-tomato base in advance, but hold back the serving-time tempering. Reheat the portion you need, restore the consistency, then check the salt and make a fresh tadka before serving. For Indian meal prep, store the base in portions and finish each one as it goes to the table.

Refrigerator

Transfer the dal to shallow covered containers and refrigerate at 40°F/4°C or below within two hours—or within one hour when the room is above 90°F/32°C. Use it within 3–4 days. These limits follow the USDA leftovers guidance (opens in a new tab). The dal will become substantially thicker as it chills.

Freezer

Freeze the cooked dal and masala base without the final tadka in meal-sized portions. For best texture and flavour, use within about 2–3 months. Thaw in the refrigerator—or reheat from frozen slowly in a saucepan—then add a new tadka before serving.

How to reheat without ruining the texture

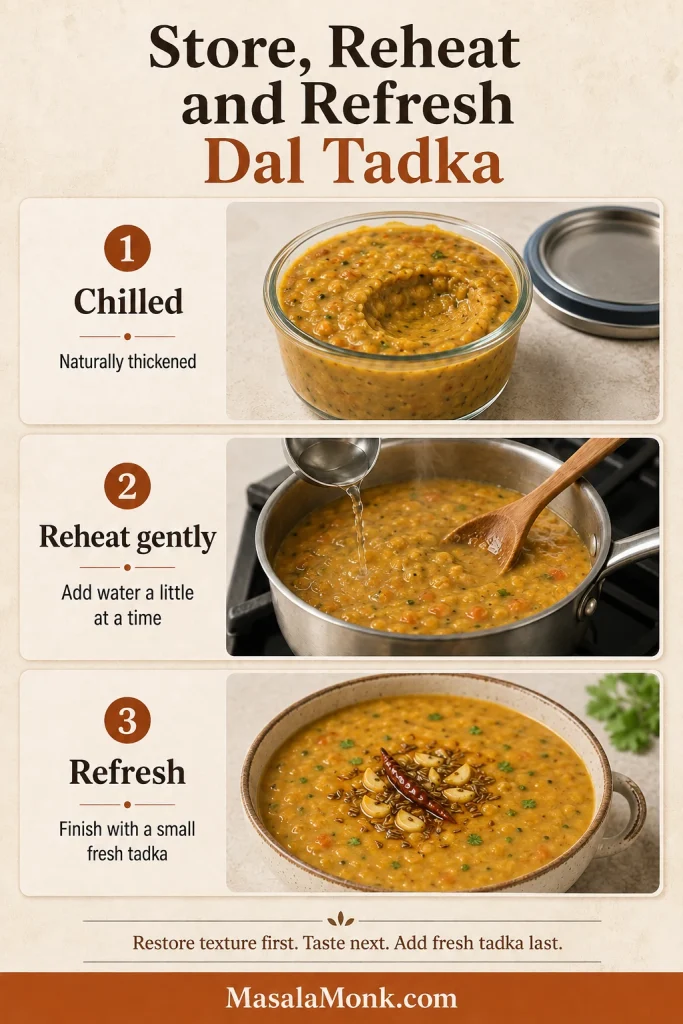
Put the dal in a saucepan with a splash of water. Reheat gently, stirring as it loosens, until steaming hot throughout—165°F/74°C if you check with a thermometer. Add a little more as needed until the dal is creamy and pourable again. Restore the consistency first, then taste for salt and acidity because dilution changes both.

Three stages showing chilled thick dal, gentle reheating with added water and refreshed dal finished with fresh tadka.
Restore the consistency before correcting salt or lemon because added water changes both; make the fresh tadka only after the texture is right.

Back to the recipe card · Serving ideas · Back to top ↑

Frequently asked questions

Can I make Dal Tadka without a pressure cooker?

Yes. Soak the toor dal for 1–2 hours, begin with about 4 cups/950 ml water and simmer it in a heavy saucepan until every grain crushes easily. Expect roughly 45–75 minutes after soaking, and longer for particularly old lentils.

Can I use red lentils instead of toor dal?

You can make a good tarka dal with red lentils, but it will not behave exactly like this Punjabi toor-dal recipe. Red lentils cook faster, break down more completely and usually need less time.

Can I use packaged Dal Tadka masala?

Packaged Dal Tadka masala can work. Add it conservatively to the cooked onion-tomato base, and check whether the blend already contains salt, chilli, dried mango or kasuri methi before adding the recipe’s full seasoning. A packet can simplify the base; freshly bloomed cumin, garlic and chilli still give the finished dal its clearest aroma, so keep the fresh garlic tadka.

Can I make Dal Tadka without tomato?

Tomato is optional. Cook the onion until properly golden, then build the base with ginger, garlic and spices. The dal will be less red and slightly less sweet. Begin with ⅛ teaspoon amchur or 1 teaspoon lemon juice after tasting, then add more if needed.

Can I double the recipe?

Doubling works, provided the cooker remains within the manufacturer’s limit for expanding foods. In an Instant Pot, the combined lentils, water and other ingredients must stay below the ½ line. Ingredient quantities can double, but pressure time usually does not. Scale salt and chilli conservatively at first, then adjust after combining. A large batch is often better with two smaller tadkas than one overcrowded pan.

Return to the recipe card · Back to top ↑

The final tadka is worth waiting for

Cook the lentils ahead. Prepare the masala while the cooker releases. Adjust the consistency and hold the pot on low heat while the rest of dinner comes together.

But make the last tadka when the rice is fluffed, the rotis are coming off the tawa and everyone is almost ready to eat.

That brief rush of cumin, golden garlic and red chilli is not decoration. It is what turns a pot of lentils into the bowl people lean toward before it has even stopped sizzling.

Posted on Leave a comment

Eggplant Parmesan Recipe: Crispy Baked Eggplant That Never Turns Soggy

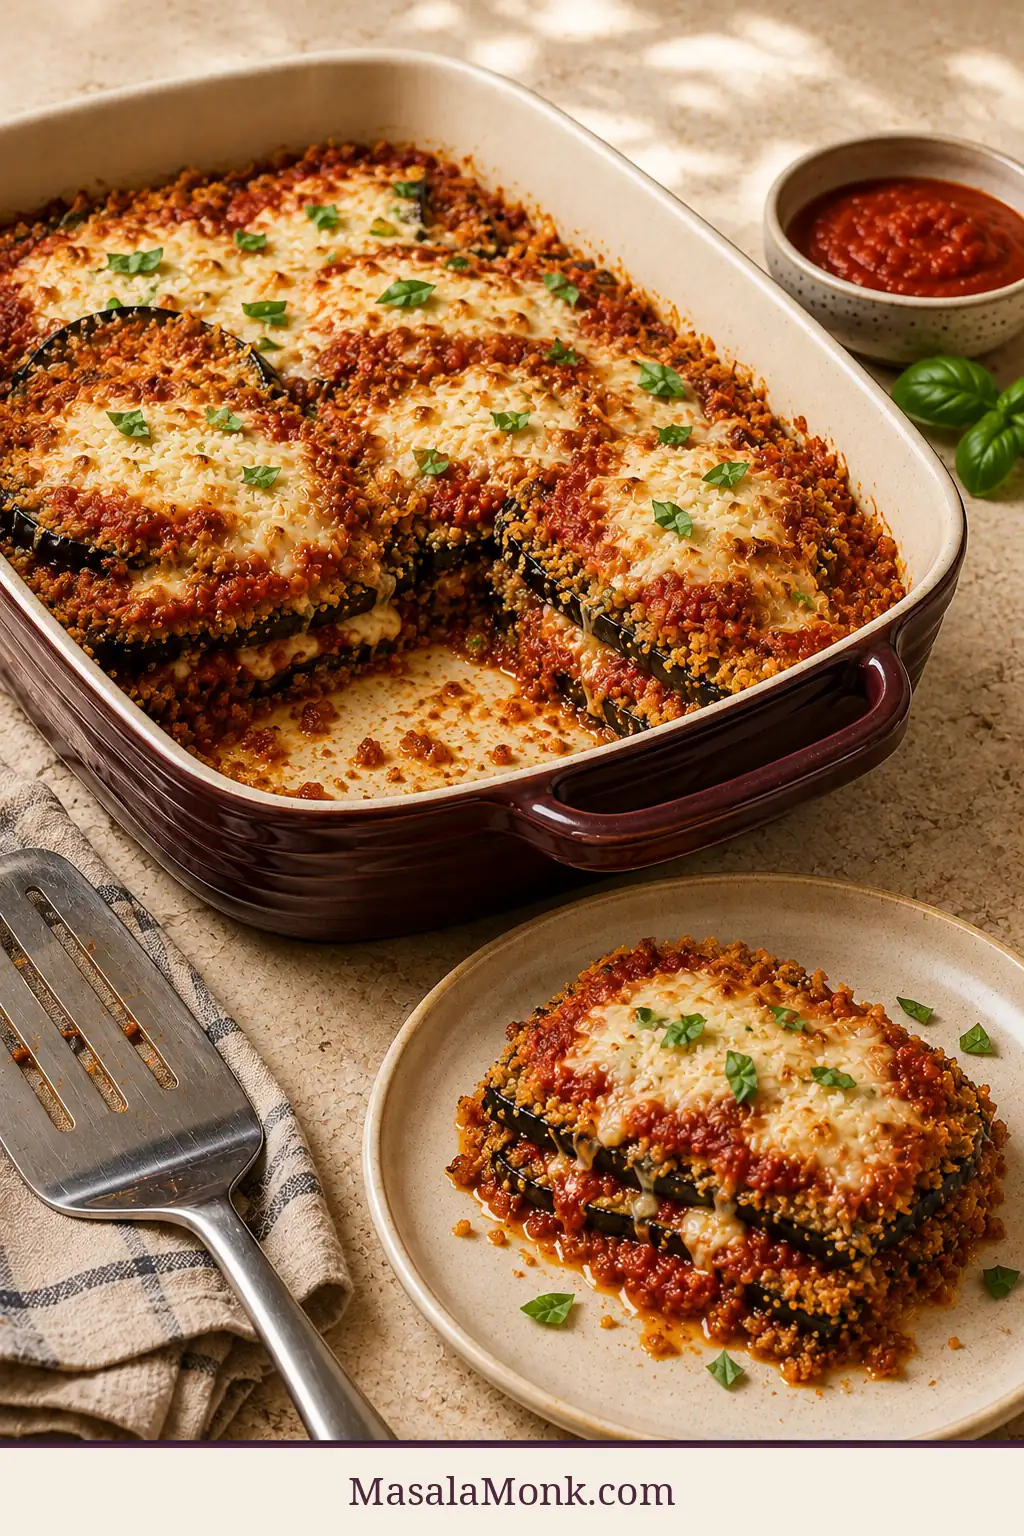
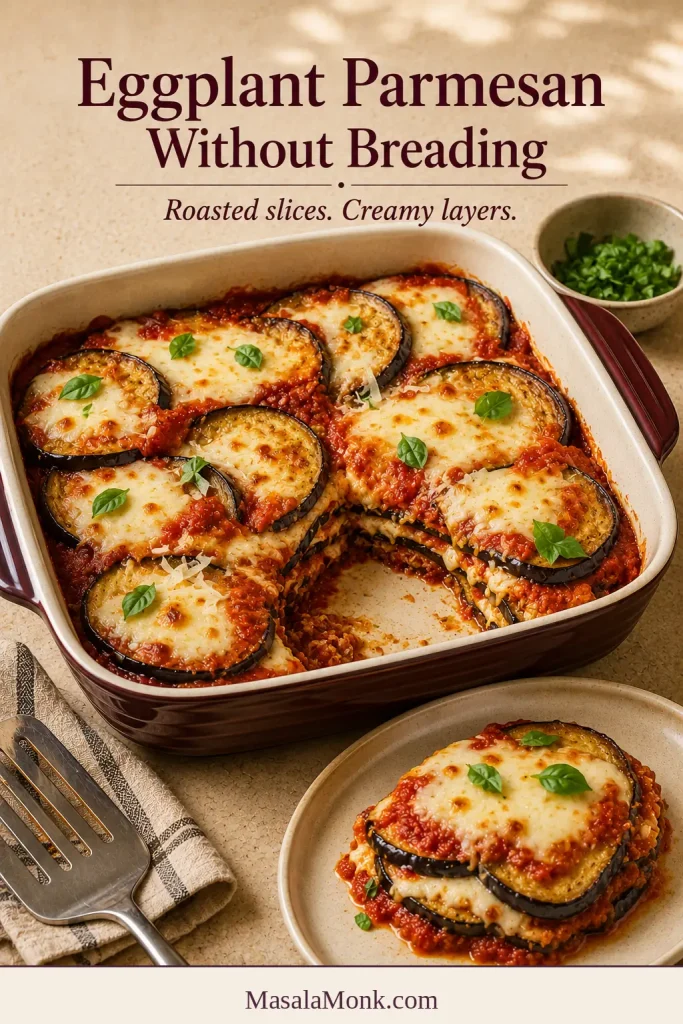
Baked Eggplant Parmesan in a burgundy casserole with one layered serving removed and plated beside it.

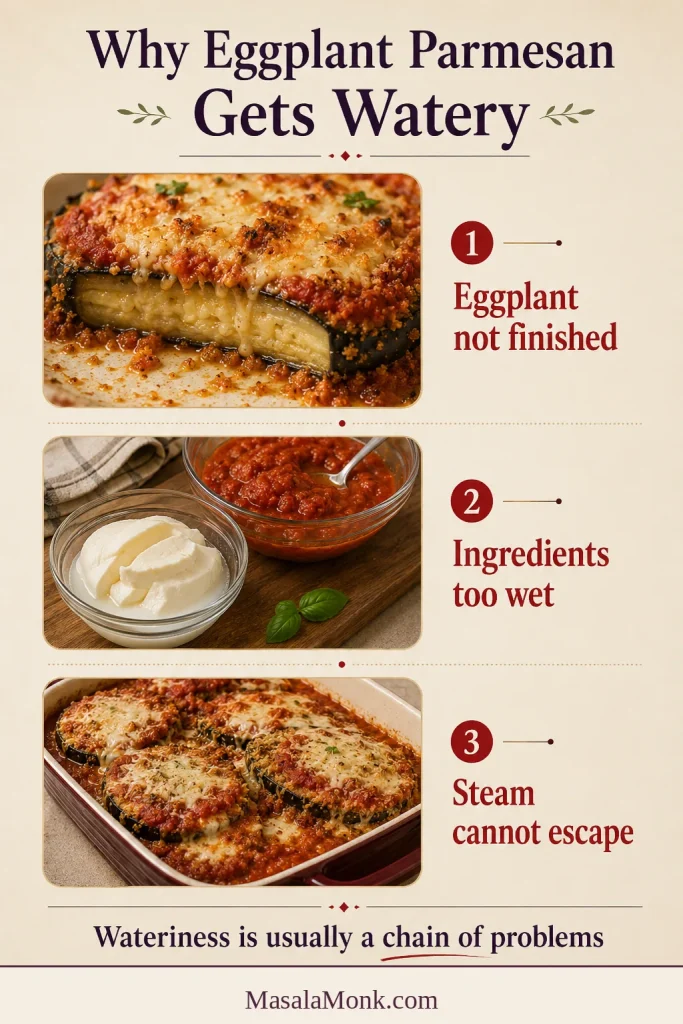
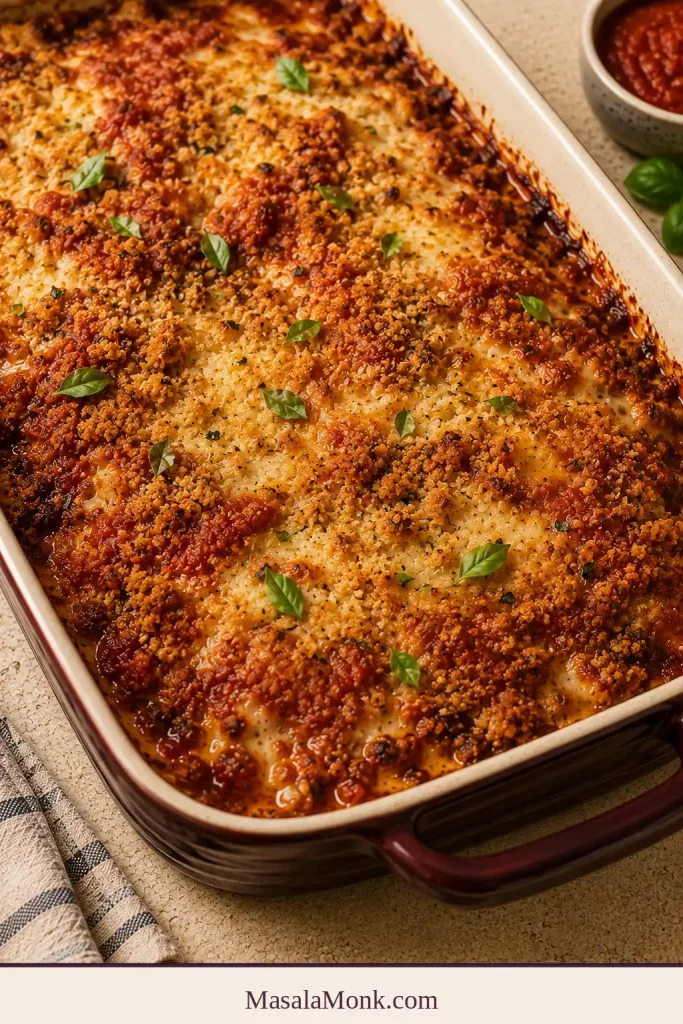
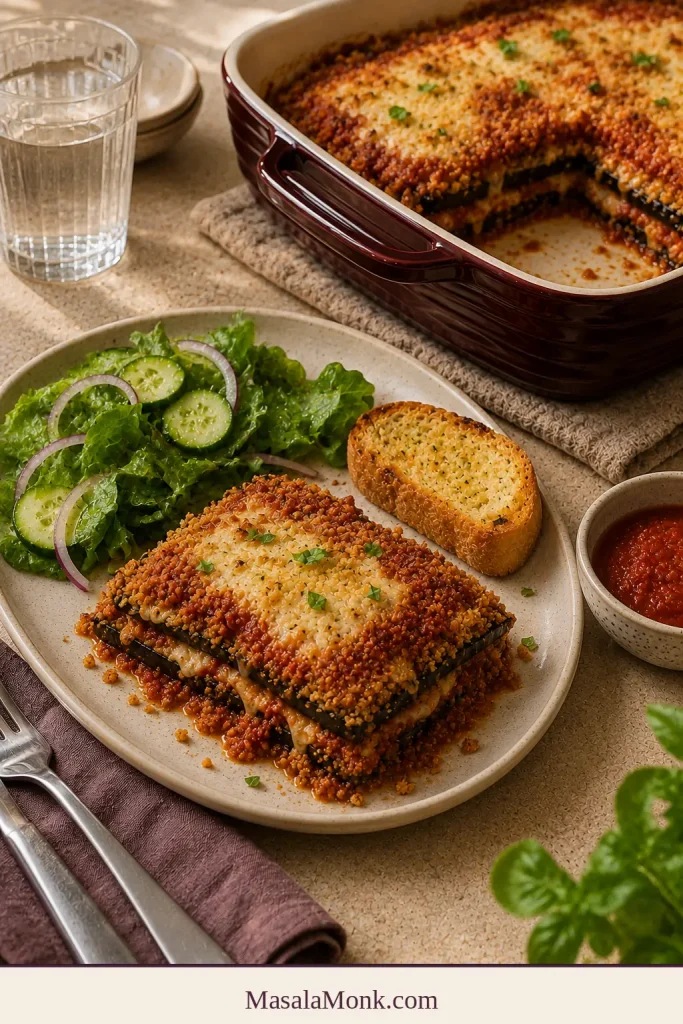
The first slice tells the truth. In a good baked Eggplant Parmesan, the spatula lifts a settled portion, mozzarella pulls between tender layers and a few Parmesan-panko edges still offer a light crunch. The disappointing version can look just as golden—until loose sauce gathers underneath and the breaded shell disappears into it.

This version keeps the familiar comfort of tomato, basil and melted cheese while baking the eggplant instead of frying it in batches. Even rounds are lightly salted, breaded and cooked until the centres turn silky and both sides are deeply golden. Only then are they layered with thick marinara and low-moisture mozzarella.

This is a weekend-worthy dinner for when you want each slice wrapped in its own browned Parmesan-panko crust without standing over a frying pan. That individual crust is what the extra handling buys you—not merely breadcrumbs scattered between the layers. It is not a 30-minute shortcut, but the work comes in manageable bursts and most of the elapsed time belongs to salting, baking and resting.

The MasalaMonk rule is simple: let the first bake finish the eggplant; let the final bake bring the casserole together.

Start here

The Method in One Minute

Cut the eggplant evenly, dry the surfaces well and bake the breaded slices with room around them until the crust is golden and the centres are fully tender. That first bake does the real cooking.

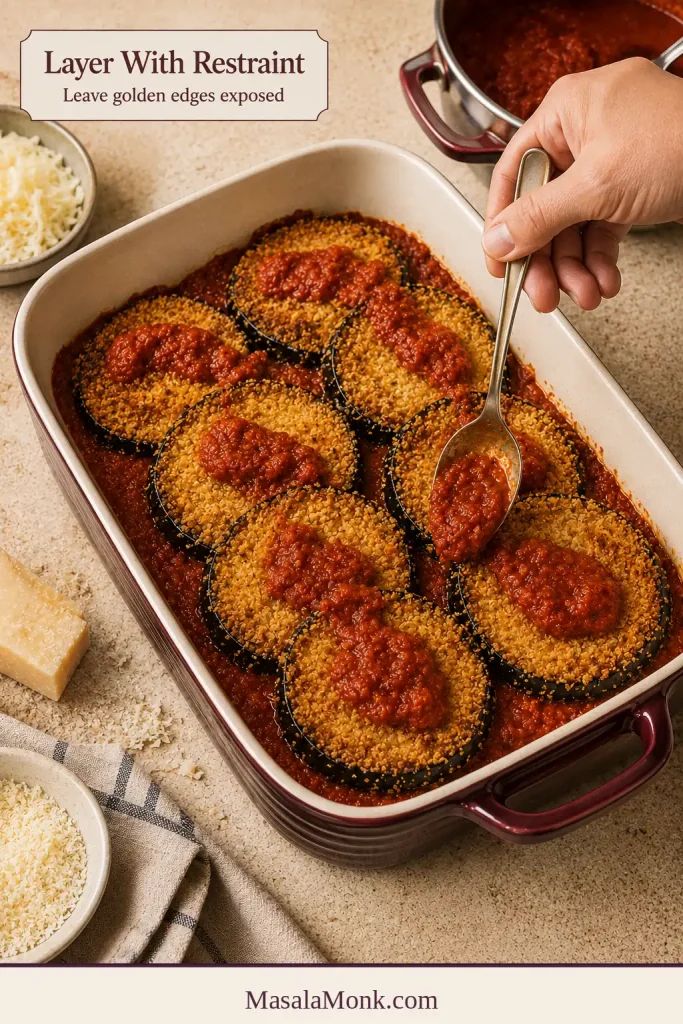
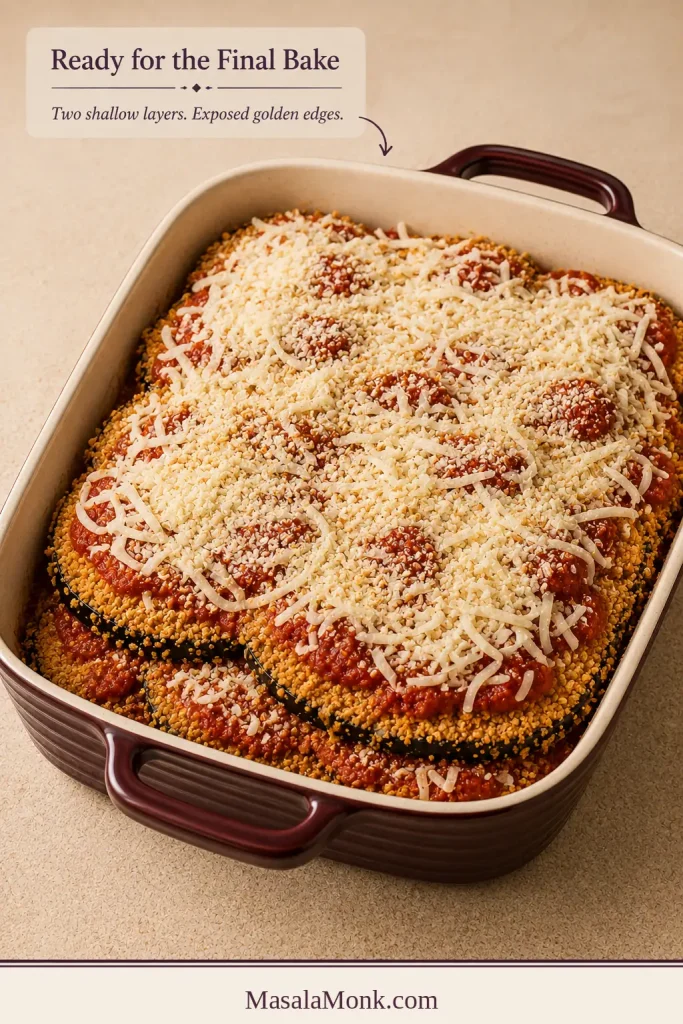
For assembly, use marinara thick enough to cling, low-moisture whole-milk mozzarella and only two shallow layers. Sauced breading naturally softens; the goal is a crust that stays distinct beneath the marinara, with crisp edges left exposed. Bake uncovered until the sauce bubbles around the edges, then give the pan 15 minutes to settle before lifting a serving.

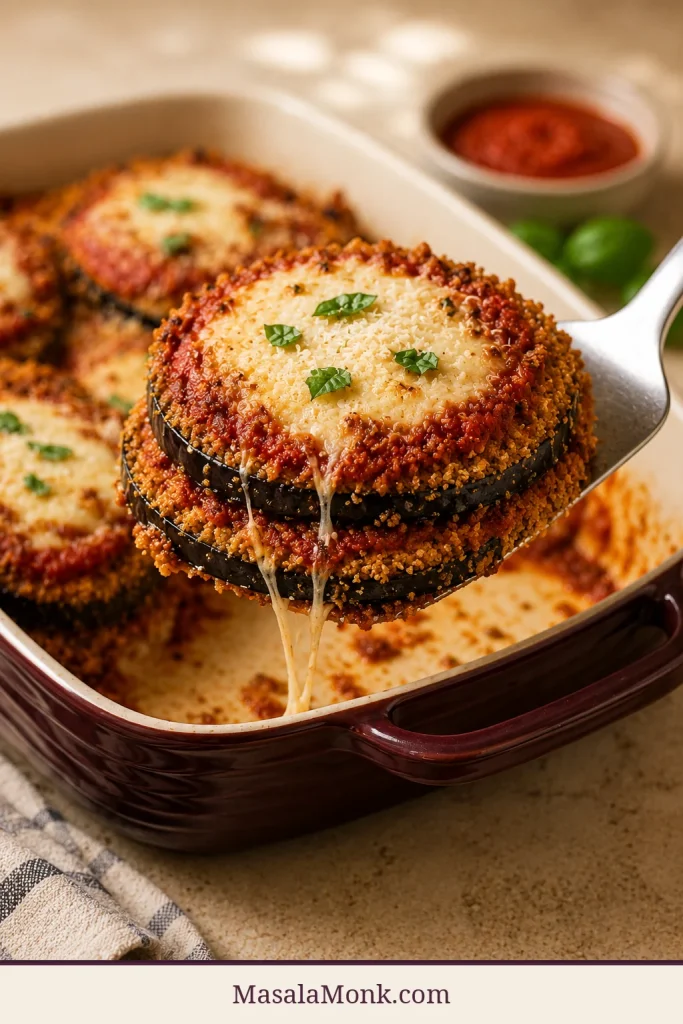
Spatula lifting a clean two-layer serving of Eggplant Parmesan with golden crumbs, tomato sauce and melted cheese.
A clean first slice depends less on adding more cheese than on fully cooking the eggplant before assembly and allowing the finished casserole time to settle.
How this method was built

This research-led recipe compares common baked, fried and sheet-pan approaches. It then works backward from the failures home cooks report most often: firm centres, slipping breading, pale crumbs, loose sauce and wet cheese. The method separates surface dryness from interior doneness, calibrates the sauce and cheese quantities to protect the layered texture, and pairs timing windows with visible, tactile and aroma cues because eggplants, pans and ovens vary.

Choose the Texture You Want

Those same breaded slices can become a saucy layered casserole or stay in one crisp sheet-pan layer. The recipe below follows the classic layered route.

On a phone, each finish appears as a stacked card.

FinishHow to build itWhat reaches the table
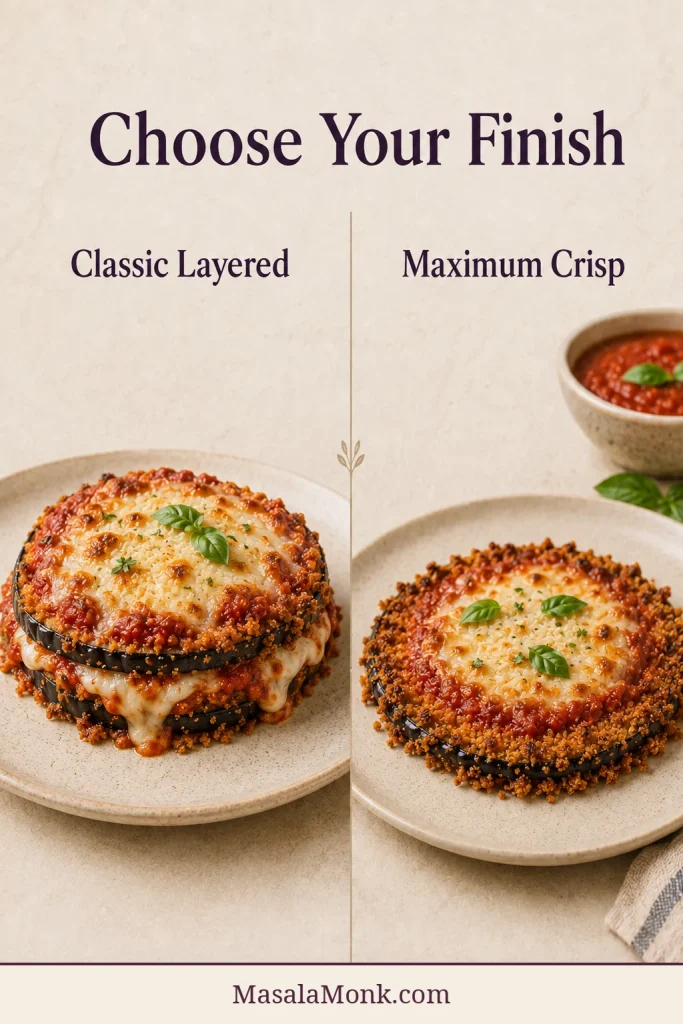
Classic layeredTwo shallow layers with measured sauce and cheese; leave a few breaded edges exposedA cohesive, saucy casserole with tender centres and crisp-edged contrast
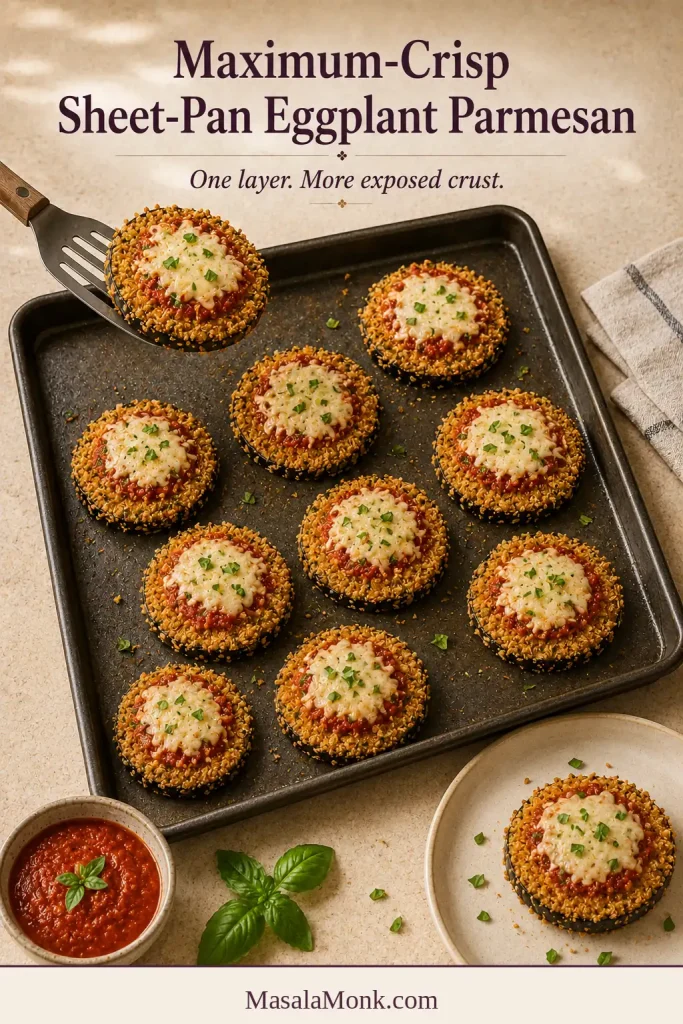
Maximum crispKeep the rounds in one layer, top each lightly and serve extra warm marinara alongsideMore browned crust, lighter topping and easy individual portions
Comparison of layered Eggplant Parmesan and a flatter maximum-crisp version with more exposed golden breading.
The classic layered version trades some exposed crust for saucy cohesion, whereas the sheet-pan finish keeps the rounds separate and preserves substantially more crisp breading.

Prefer the sheet-pan finish? The exact sauce and cheese amounts are in Variations.

Make it now

Crispy-Edged Baked Eggplant Parmesan Recipe

Slice the eggplant evenly, salt it lightly and coat it in flour, egg and Parmesan-seasoned panko. Bake until the centres are tender and the crumbs are deeply golden, then layer with thick marinara, whole-milk mozzarella, Parmesan and basil for a tomato-rich casserole that slices cleanly after resting.

Yield
6 generous or 8 smaller servings

Hands-on time
About 50–60 minutes

Passive salting
30 minutes

Eggplant bake
About 26–34 minutes

Assembly + final bake
About 28–32 minutes

Resting time
At least 15 minutes

Total elapsed time
About 2 hours 10 minutes to 2 hours 25 minutes

The timing windows overlap: prep and cleanup happen during salting and baking, so they are not meant to be added together. Timing assumes 28–36 slices fit across two half-sheet pans. Smaller pans or unusually numerous slices may require a second batch; add 26–34 minutes.

Equipment

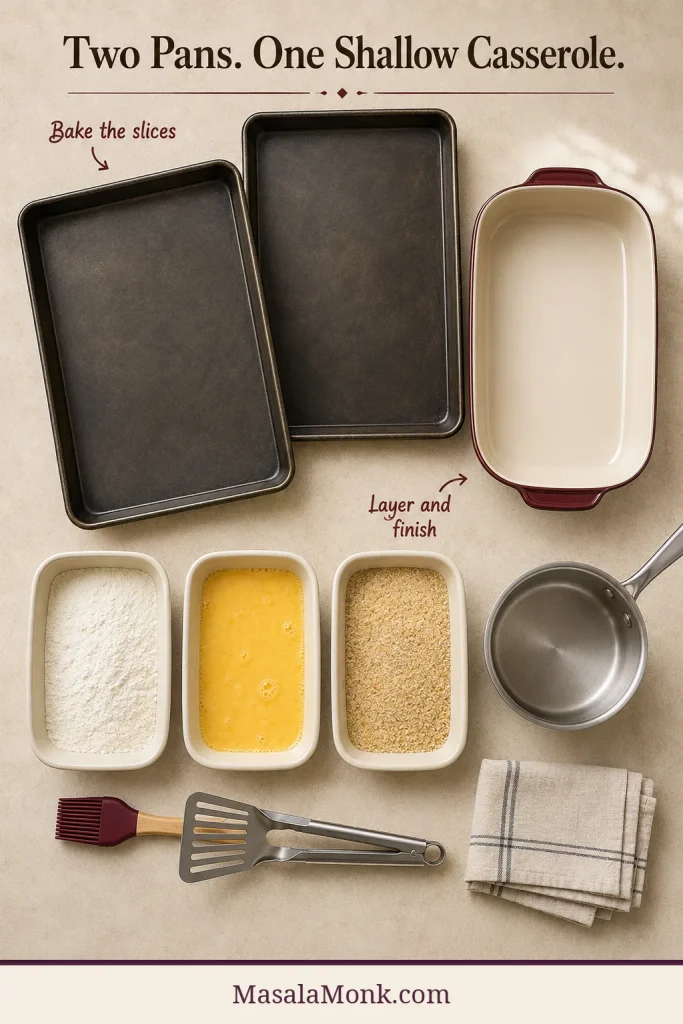
  • Two rimmed half-sheet pans, approximately 18 × 13 inches / 46 × 33 cm
  • One shallow 9 × 13-inch / 23 × 33 cm baking dish; choose metal or broiler-safe ceramic if you plan to brown the top beneath the broiler
  • Three wide, shallow bowls or dishes for breading
  • Sharp chef’s knife or guarded mandoline
  • Large thin spatula or turner
  • Wire cooling racks, useful but optional
  • Pastry brush or oil mister
Two sheet pans, shallow burgundy casserole, breading dishes, saucepan, brush and spatula arranged on a counter.
The sheet pans do the real cooking; the shallow casserole only brings the finished components together. That separation keeps the final bake brief and protects the breading.

Ingredients

For the breaded eggplant

  • 2 medium globe or Italian eggplants, about 2–2¼ pounds / 900 g–1 kg before trimming
  • 6 g fine sea salt, about 1 teaspoon; measure kosher salt by weight because crystal size differs by brand
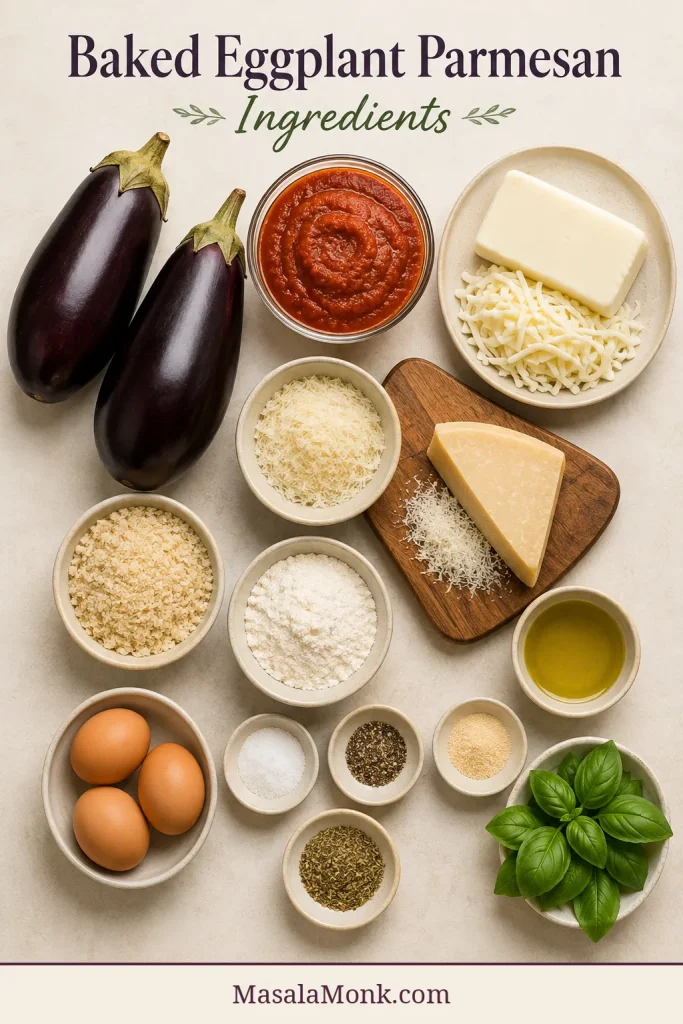
  • ¾ cup all-purpose flour, about 90 g
  • 3 large eggs, plus 1 additional egg only if needed for unusually broad rounds
  • 1 tablespoon water, 15 ml, plus 1 teaspoon / 5 ml for the optional extra egg
  • 2 cups panko breadcrumbs, about 120 g
  • 1 cup finely grated Parmesan, about 90 g
  • 1 teaspoon garlic powder
  • 1 teaspoon dried Italian seasoning
  • ½ teaspoon ground black pepper
  • 6 tablespoons olive oil, 90 ml, divided, plus a little more only if a second batch is needed

For assembling

  • 1 jar thick marinara sauce, 24 ounces / 680 g, about 2¾ cups / 660 ml, divided
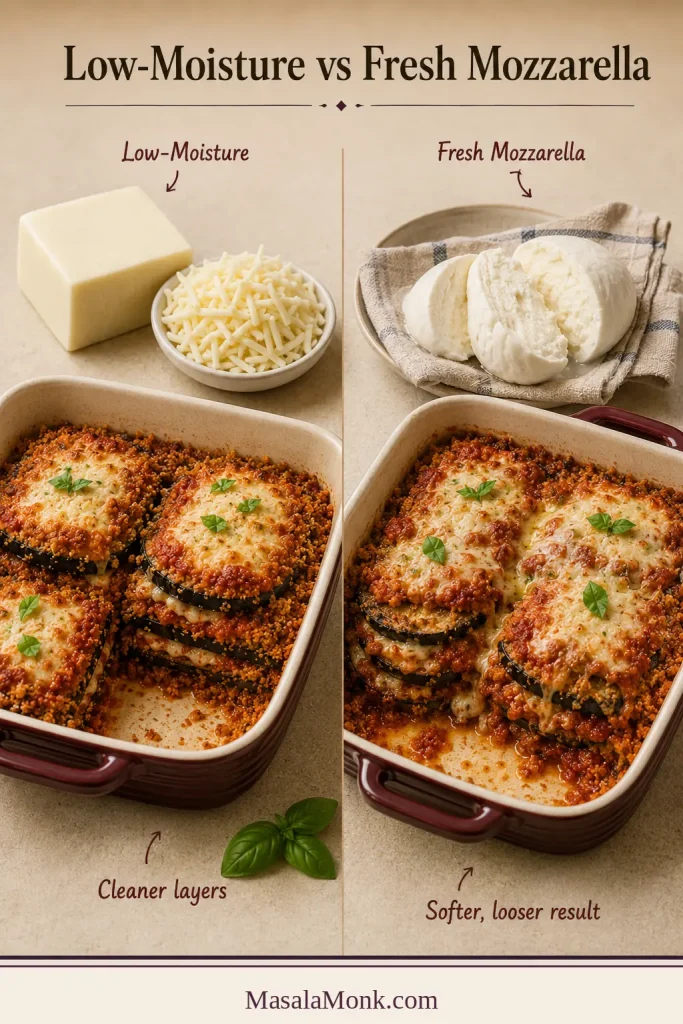
  • 10 ounces low-moisture whole-milk mozzarella, about 285 g, freshly shredded
  • ½ cup finely grated Parmesan, about 45 g
  • ½ cup loosely packed basil leaves, about 15 g, torn or thinly sliced
  • Ground black pepper, to finish

Use the waiting time

While the eggplant salts, shred the mozzarella and measure the breading. While the first side bakes, clear the breading station, tear the basil, set out the casserole dish and check whether the marinara needs reducing. Much of the elapsed time is waiting for salt or oven heat to do its work, not two hours of nonstop prep.

Instructions

Slice, salt and prepare the pans

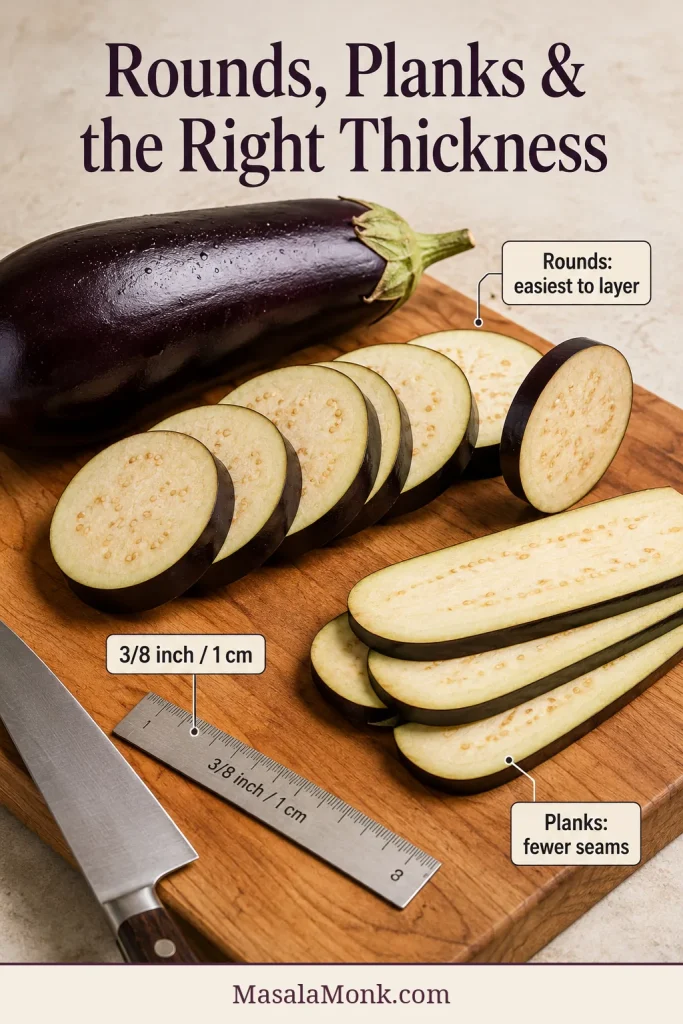
  1. Slice evenly. Trim the ends, then cut the eggplants into ⅜-inch / 1 cm rounds. Expect 28–36 usable slices, depending on their shape. Keep the thickness as consistent as possible.
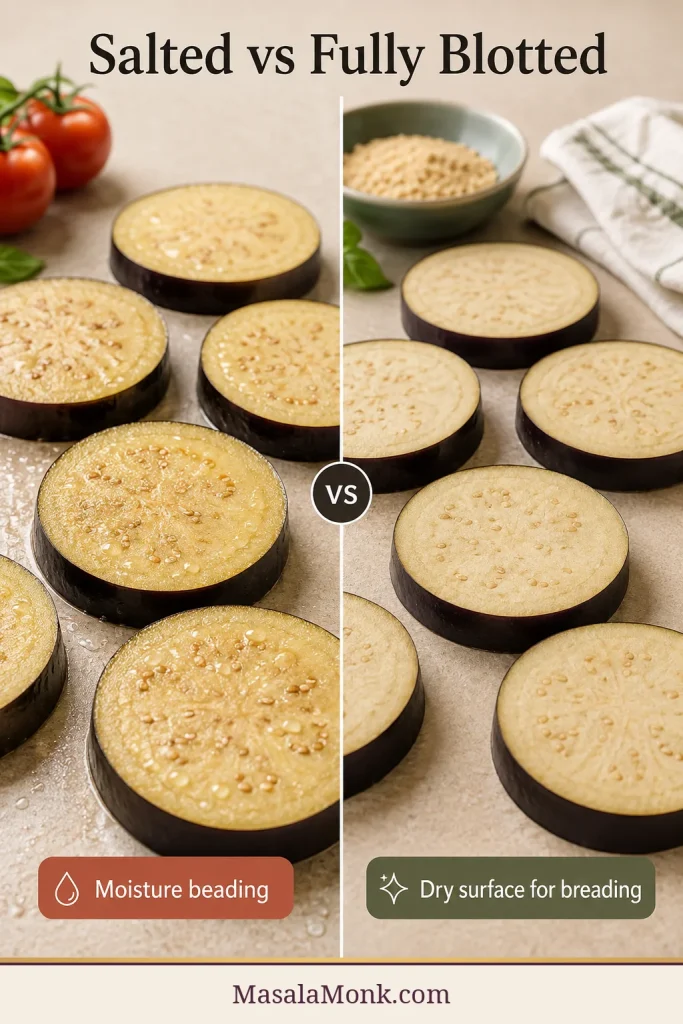
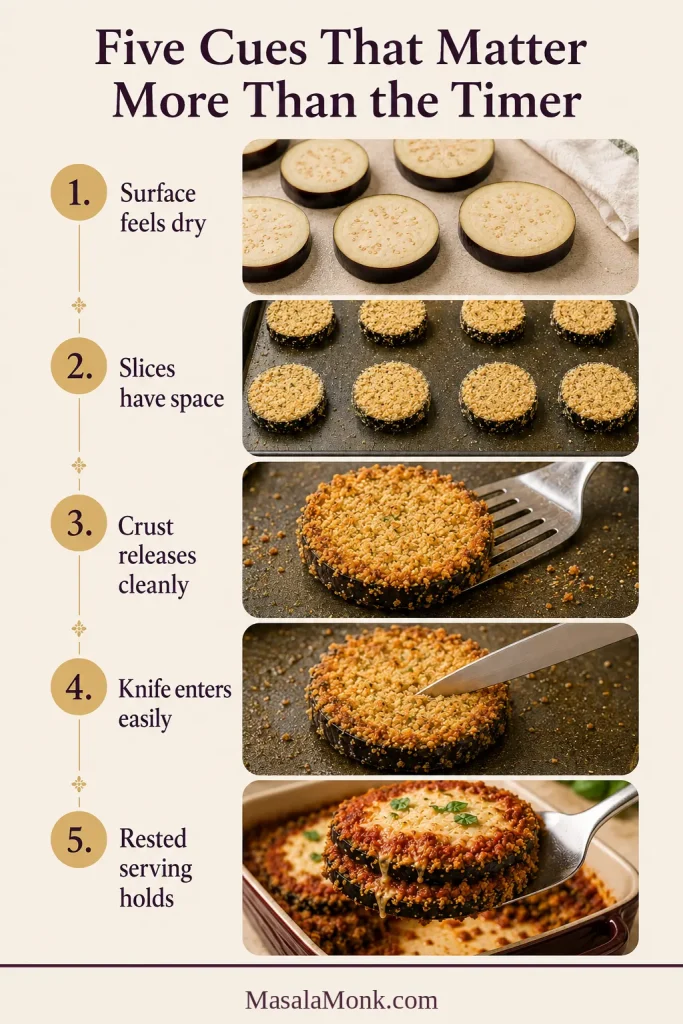
  2. Salt and dry. Arrange the rounds in a single layer. Sprinkle the measured salt lightly and evenly over both sides; do not build a visible salt crust. Leave for 30 minutes, then blot firmly with clean kitchen towels or paper towels until the surfaces feel dry. Do not rinse; remove visible moisture and any undissolved salt.
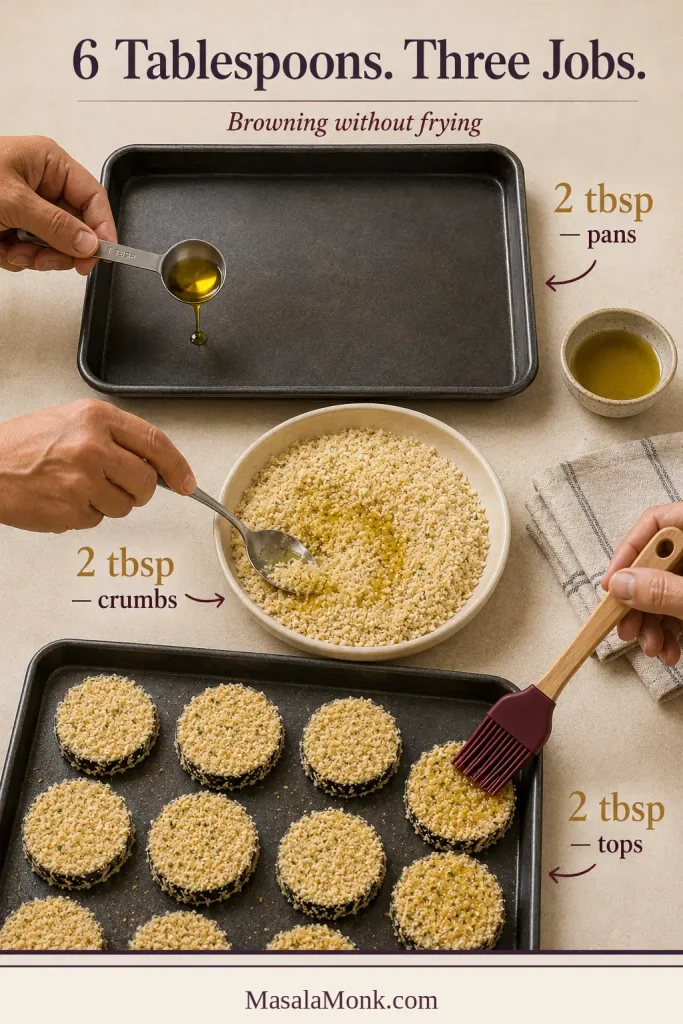
  3. Heat the oven. Position racks in the upper and lower thirds. Preheat to 425°F / 220°C conventional or 400°F / 200°C fan. Brush the two metal pans with 2 tablespoons / 30 ml olive oil in total. Plan on 14–18 rounds per pan.When smaller pans or unusually numerous slices leave overflow, keep those rounds unbreaded until the first batch is nearly done. Reuse the pans and add only a thin extra film of oil if they look dry.

Bread and oil the slices

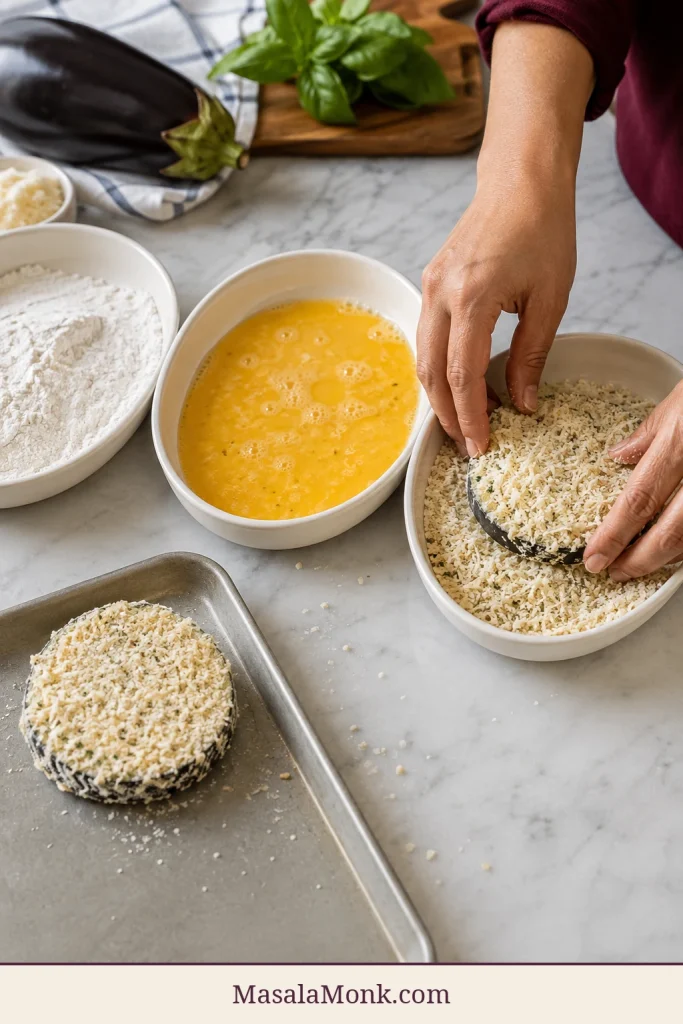
  1. Prepare three breading dishes. Put the flour in the first. Beat the eggs with 1 tablespoon / 15 ml water in the second. Combine panko, 1 cup / 90 g Parmesan, garlic powder, Italian seasoning and black pepper, then rub 2 tablespoons / 30 ml olive oil evenly through it.Keep half the crumb mixture aside and replenish the working dish as needed. This keeps the later slices away from damp, heavy clumps.
  2. Bread each slice. Coat lightly in flour and shake off the excess. Dip in egg and let the extra drip away. Press into the panko mixture on both sides.Transfer to the prepared pans with a little space around each round.If especially broad rounds use the egg wash early, beat the optional egg with 1 teaspoon / 5 ml water instead of stretching a thin, patchy coating over the final slices.
  3. Oil the tops. Brush or mist the remaining 2 tablespoons / 30 ml olive oil evenly over the breaded surfaces. Cover dry-looking crumb patches without creating pools.

Bake the breaded eggplant

  1. Bake the first side. Bake for 14–16 minutes. Wait until the crust has set before lifting a slice; forcing an under-browned coating from the metal can pull it away. Flip the slices, rotate both pans front to back and exchange their rack positions.
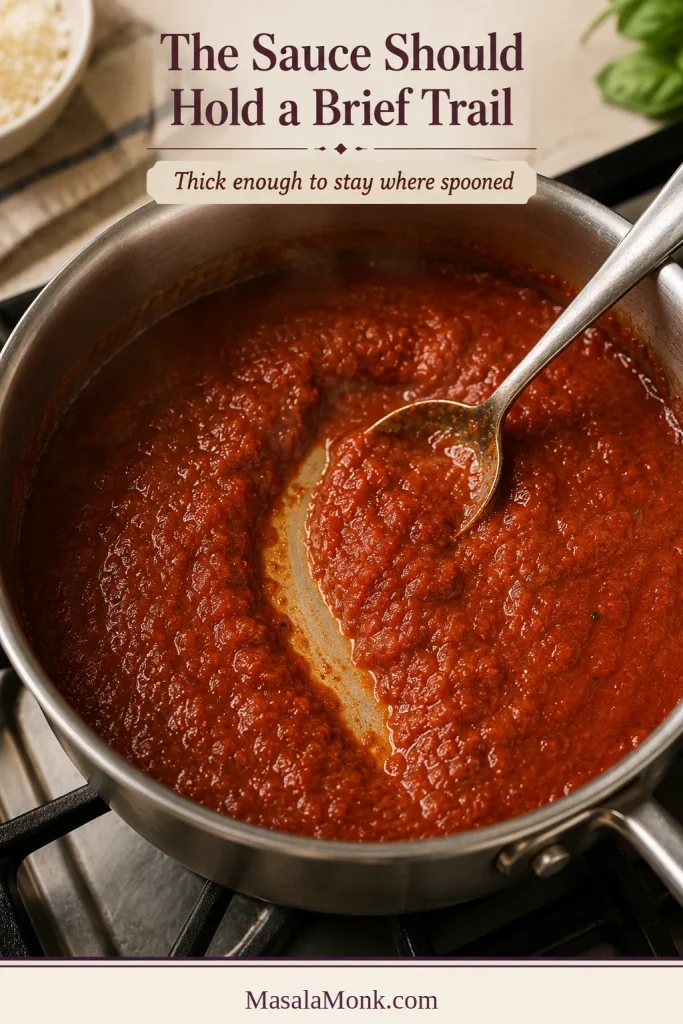
  2. Warm, taste and check the marinara. While the second side bakes, warm the sauce. If it looks loose, simmer uncovered until a spoon drawn across the pan leaves a trail for a moment before the sauce flows back. Taste it warm: it should be tomato-forward and balanced rather than markedly sweet or salty, since Parmesan and mozzarella will add more salt in the casserole.
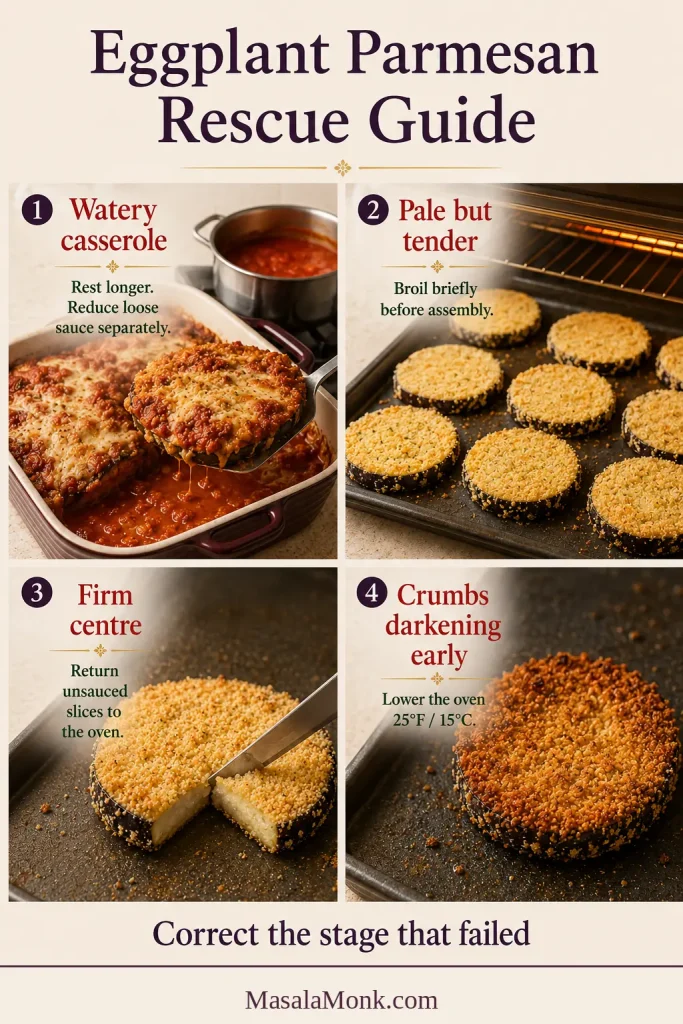
  3. Finish the eggplant. Bake the second side for 12–18 minutes. Check from 26 minutes total. Both sides should be deeply golden, a thin knife should enter the centre with little resistance and a lifted round should bend slightly without falling apart. Give any firm or pale slices longer before assembly.

Assemble, melt and rest

  1. Lower the oven and prepare the dish. Reduce to 400°F / 200°C conventional or 375°F / 190°C fan, then spread ½ cup / 120 ml sauce across the base of the baking dish.
  2. Build the first layer. Add half the eggplant in one slightly overlapping layer. Spoon over ¾ cup / 180 ml sauce in patches, leaving a few golden edges visible. Add half the mozzarella, ¼ cup / about 22 g Parmesan and half the basil. The leaves will soften and perfume the warm sauce. Reserve the remaining basil for serving.
  3. Complete the casserole. Add the remaining eggplant. Spoon over ¾ cup / 180 ml sauce without completely flooding every slice. Add the remaining mozzarella and Parmesan. Reserve the remaining ¾ cup / about 180 ml sauce for the table; jar yields vary slightly.
  4. Bake uncovered. Bake for 18–22 minutes. Begin checking at 18 minutes. The sauce should bubble at the edges and the mozzarella should be fully melted.
  5. Brown the top if needed. Broil for 1–3 minutes only when the cheese needs more colour, watching continuously. Use cookware rated for direct broiler heat; ordinary glass dishes should not go beneath the broiler.
  6. Rest and serve. Rest for at least 15 minutes—the melted cheese makes the wait difficult, but a clean serving is worth it. Finish with the reserved basil and black pepper, and serve the reserved sauce warm at the table.

Prefer more crunch? Keep the slices on their sheet pans and use the maximum-crisp finish instead of stacking them.

Why Eggplant Parmesan Gets Watery or Soggy

A watery Eggplant Parmesan is usually a chain of problems, not one bad step. The eggplant may still be undercooked, the sauce or cheese may carry too much liquid, or steam may be trapped by crowding, deep layers, covering or cutting too soon. Salting helps dry the surface, but it cannot replace a complete first bake or careful assembly.

Three-part visual explaining undercooked eggplant, wet ingredients and trapped steam as causes of watery Eggplant Parmesan.
Wateriness is cumulative. A slightly firm centre, marginally loose sauce and a little trapped steam can combine into a much wetter result than any one problem would cause alone.

On a phone, swipe sideways to see the cause and fix together.

What goes wrongWhy it mattersWhat helps
Uneven slicesThin rounds overcook while thick rounds stay firm and wetCut every slice to about ⅜ inch / 1 cm
Wet surface after saltingFlour turns pasty and the crust slipsBlot both sides firmly before breading
Crowded pansReleased moisture becomes trapped steamUse two large metal sheet pans
Incomplete first bakeThe sauced casserole has to finish cooking the vegetableBake until the centre is tender before assembly
Pale, dry crumbsThe coating absorbs sauce before it forms a browned shellDistribute a measured amount of oil evenly
Thin marinaraLoose water runs between the layersReduce sauce until it briefly holds a spoon trail
Fresh mozzarella liquidWhey loosens the sauce and softens the coatingUse low-moisture whole-milk mozzarella
Excess sauceEvery crumb becomes saturatedMeasure each layer and reserve sauce for serving
Deep or covered casseroleSteam cannot escapeBuild two shallow layers and bake uncovered
Cutting immediatelyHot sauce and cheese run before the layers settleRest for at least 15 minutes

Prepare the Eggplant

Peel only when the skin asks for it

Most medium eggplants can keep their skin; it helps the rounds survive breading, turning and layering. Peel fully or in alternating strips when the eggplant is oversized, the skin feels thick or you prefer especially soft layers.

Rounds are easiest; planks make tidier layers

Rounds are easier to bread, flip and portion, and their uneven edges leave more crust visible. Lengthwise planks create neater, lasagna-like layers. Either shape works as long as every piece lies flat on the sheet pan.

Whole eggplant with one-centimetre rounds and lengthwise planks arranged beside a knife and ruler.
Uniformity matters more than choosing rounds or planks. When every slice stays close to ⅜ inch / 1 cm, the whole batch reaches tenderness within a tighter checking window.

Keep the slices close to ⅜ inch / 1 cm

Consistency matters more than perfect geometry. Thin ¼-inch / 6 mm rounds cook quickly but can disappear into the casserole; thick ½-inch / 13 mm rounds need longer to soften. At ⅜ inch / 1 cm, the eggplant stays substantial and still becomes silky. Use a sharp knife or a guarded mandoline that can safely hold that setting.

Salt and blot for a drier breading surface

Modern eggplants are often mild, so the useful benefit here is practical rather than bitterness control. A measured 30-minute rest draws beads of liquid to the surface, lightly seasons the flesh and gives you a chance to remove that liquid before flour is applied.

Blot firmly and brush away visible salt; rinsing only creates another drying job. Very fresh eggplants may not need salting for bitterness, but this breaded casserole is calibrated around the full salt-and-blot step because it seasons the flesh and creates the driest, most dependable surface for flour. Keep it especially when the eggplants are older, softer, unusually large or quick to bead with liquid.

Salted eggplant rounds with visible moisture beads beside fully blotted rounds with dry, matte surfaces.
Salt reveals the moisture, but careful blotting determines whether the breading will hold. The surface is ready when it looks matte rather than wet or glossy.

Ingredients and What They Do

Eggplants, marinara, mozzarella, Parmesan, panko, flour, eggs, olive oil, basil and seasonings arranged overhead.
These ingredients form two systems: thick marinara and low-moisture mozzarella control liquid, while Parmesan, panko and olive oil build savoury browning without frying.

Eggplant

Choose medium globe or Italian eggplants with smooth, glossy skin, green caps and firm flesh that gives only slightly when pressed. Medium eggplants are generally easier to slice and cook evenly; very large ones are more likely to have developed seeds, thicker skin and a spongier centre.

Weight is more dependable than “two large eggplants.” About 2–2¼ pounds / 900 g–1 kg usually produces 28–36 rounds for two layers in a 9 × 13-inch dish. Eggplant shape varies, so keep any overflow for a second sheet-pan batch instead of packing the pans or casserole into a deep, steamy stack.

Flour, egg and panko

A thin dusting of flour absorbs the last surface moisture and gives the egg something dry to hold. A visible flour shell can turn into a pasty band beneath the crust.

Let extra egg drip away before moving the slice into the panko, then press the crumbs on gently. Panko gives the coating irregular, crisp edges; ordinary fine breadcrumbs also work, though the crust will be smoother, denser and less craggy. That dry-to-wet-to-crumb sequence keeps the coating attached in MasalaMonk’s homemade mozzarella sticks.

Hands pressing an eggplant round into Parmesan-panko beside shallow dishes of flour and beaten egg.
Keep one hand mainly for the egg and the other for flour and crumbs. This small habit slows clumping and keeps the final rounds as evenly coated as the first.

Parmesan and olive oil

Finely grated Parmesan distributes more evenly than large shreds, brings nutty savouriness and helps the panko brown.

Parmesan, marinara and mozzarella already bring salt, so the coating needs restraint. MasalaMonk’s Parmesan versus Parmigiano Reggiano guide can help when choosing between milder domestic Parmesan, sharper aged cheese and other hard grating options.

Baked crumbs need some fat. Oil is divided between the pan, panko and tops so the underside and exposed surface can colour. A loose drizzle leaves some crumbs dry and others greasy, so measured oil gives a more even crust.

Olive oil measured onto a sheet pan, mixed into crumbs and brushed over breaded eggplant rounds.
Dividing the olive oil creates three different forms of browning. Pouring it all onto the pans would leave the crumb mixture and upper surfaces comparatively dry and pale.

Choose marinara for flavour and body

Choose a marinara you enjoy by the spoonful, with enough acidity to balance the cheese and enough body to stay where it is spooned. A brief uncovered simmer not only removes excess water; it makes the tomato, garlic and herb flavours fuller so a measured amount still tastes generous. Drag a spoon across the saucepan: the track should remain visible briefly before the sauce flows back.

If liquid fills the trail immediately, keep simmering. MasalaMonk’s homemade marinara sauce makes 3–4 cups, leaving enough to thicken for the casserole and warm for the table.

Spoon drawn through thick marinara in a stainless saucepan, leaving a visible trail through the sauce.
This spoon trail marks the assembly threshold: the marinara is concentrated enough to cling, yet still loose enough to spread without dragging or disturbing the crust.

Why low-moisture mozzarella fits this version

Low-moisture whole-milk mozzarella gives a soft, full melt with less free liquid than fresh mozzarella. Part-skim cheese works but can set more firmly. Fresh mozzarella tastes delicate and milky, though its whey produces a softer casserole.

To replace the low-moisture mozzarella, use one 7–8-ounce / 200–225 g ball of fresh mozzarella. Slice or tear it, then drain it over towels for at least 30 minutes. Put about one-third between the layers and scatter the rest over the top. Keep the same final-bake checking window, but expect softer layers and a little more surface liquid. Pre-shredded low-moisture mozzarella also works, although anti-caking powders can make the melt slightly less fluid than cheese shredded from a block.

Comparison of low-moisture mozzarella with defined casserole layers and fresh mozzarella with a softer baked result.
Fresh mozzarella works best when most of it stays on top, where released moisture has less opportunity to loosen the middle layers. Low-moisture cheese remains the firmer option.

Vegetarian note: traditional Parmesan may be made with animal rennet. Strict vegetarians should choose a Parmesan-style hard cheese and mozzarella labelled as using microbial or vegetarian rennet.

Fresh basil brings a clean, peppery lift to the tomato and melted cheese. Tear some into the layers and save the brightest leaves for the rested casserole.

Five Cues That Matter More Than the Timer

Timers tell you when to look. These five cues show what readiness looks, feels and smells like when your oven or the eggplants behave differently.

Five-step visual showing dry eggplant, spaced breaded slices, clean crust release, a knife tenderness test and a rested serving.
The order matters: dry the surface, leave space, wait for release, confirm tenderness and then rest the finished casserole. Skipping an early cue usually weakens a later one.

1. Turn a damp cut surface into one that can hold a crust

After salting, press the rounds with clean towels until they no longer feel wet. This is not a ceremonial pat: flour clings to a dry surface instead of turning into glue.

Dust lightly with flour, let excess egg drip away and press on a modest layer of panko. By the final broad rounds, the egg wash may be running low and the working crumbs much clumpier than at the start. Replenishing both is easier than forcing a thin, patchy coating onto the last slices.

Raw eggplant round covered with a thin, even layer of Parmesan-panko crumbs on a sheet pan.
Thicker breading is not automatically crispier. A heavy coating can darken before the eggplant softens, whereas a thin shell browns with the slice rather than around it.

2. Give the crumbs room, oil and contact with metal

Room around each slice lets steam escape and gives the underside contact with hot metal. There is no prize for squeezing the last rounds onto a crowded pan. Dark pans colour faster; parchment may need extra time, and silicone mats can slow underside browning.

Breaded eggplant rounds arranged in one uncrowded layer on a dark sheet pan with space between them.
Steam is the invisible problem here. If neighbouring rounds touch or nearly touch, divide them between two pans rather than sacrificing browning for convenience.

3. Watch pale, rigid slices become golden and tender

A crust that is ready to turn usually releases with little persuasion. If it clings, give it another minute rather than tearing it away.

Spatula lifting a breaded eggplant round to reveal a golden underside while the upper surface remains pale.
Clean release is a doneness signal. Once the underside has formed a stable golden shell, the slice can be turned without leaving its coating attached to the pan.

Colour alone is not enough. A thin knife should pass through a thicker centre with little resistance, and the slice should bend slightly while staying intact. If the crumbs brown first, lower the oven by about 25°F / 15°C and keep going until the eggplant is tender.

Golden breaded eggplant round cut open as a knife enters its tender centre and a spatula supports it.
Use two signals together: browning confirms the coating is ready, while the knife test confirms the eggplant—not merely the crust—is fully cooked.

When the crust releases cleanly and the Parmesan smells toasted, the slices stop feeling like prepared ingredients and start feeling ready to eat.

4. Layer without hiding all the browning

Warm loose marinara until a spoon drawn across the saucepan leaves a brief trail. The measured sauce may look restrained as you assemble the dish. That restraint is deliberate: warm sauce at the table keeps the portions generous without soaking every breaded surface in the pan.

Hand spooning small patches of marinara over overlapping baked eggplant rounds with golden edges exposed.
Uneven coverage is intentional. The sauced areas keep the casserole generous, while the dry-looking perimeter is where crisp contrast survives the second bake.

A little breading left uncovered is intentional. Once the mozzarella melts and the sauce bubbles, those exposed crumbs provide the contrast.

5. Let the hot casserole settle before cutting

This is the moment to wait. As the casserole rests, the sauce gains body and the cheese stays with the layers, allowing a wide spatula to lift a complete serving.

Eggplant Parmesan Bake Time and Oven Temperature

Breaded eggplant needs 26–34 minutes at 425°F / 220°C conventional or 400°F / 200°C fan. The assembled casserole then needs 18–22 minutes at 400°F / 200°C conventional or 375°F / 190°C fan. The hotter first stage browns the coating and cooks the centres; the shorter second stage bubbles the sauce and melts the cheese.

On a phone, swipe sideways for both oven settings and doneness cues.

StageConventional ovenFan ovenBegin checkingReady when
Breaded eggplant425°F / 220°C400°F / 200°C26 minutes totalBoth sides are golden and the centre is fully tender
Assembled casserole400°F / 200°C375°F / 190°C18 minutesSauce bubbles at the edges and mozzarella is melted
Optional broilHighHighAfter 1 minuteCheese is browned without burnt panko
RestRoom temperatureRoom temperature15 minutesA lifted portion holds together
Unbaked layered Eggplant Parmesan with marinara, shredded cheese and exposed breaded edges in a burgundy casserole.
At this stage, the eggplant should already be tender enough to eat. The final bake now has one job: melt the cheese and unite the two shallow layers.

Pan colour, oven calibration and the eggplants themselves can shift the last few minutes. Use the times as checking windows, then let deep browning, easy knife entry and bubbling sauce decide.

Close-up of baked Eggplant Parmesan with browned cheese, tomato sauce, golden crumbs and scattered basil.
Look for gentle activity around the edges rather than a rolling boil across the centre. Quiet perimeter bubbling signals that the casserole is hot without excessive loose moisture.

Troubleshooting

ProblemLikely causeMost useful fix
The dish is wateryThin sauce, wet cheese, undercooked eggplant or cutting too soonReduce the sauce, use low-moisture mozzarella, bake the slices until tender and rest the casserole 15 minutes
The coating became completely softToo much sauce, deep layers or a covered final bakeUse measured sauce, build two layers and bake uncovered
The breading falls offWet eggplant, skipped flour or excess eggDry thoroughly, flour lightly and let egg drip before panko
The coating is paleToo little oil, crowding or weak contact with hot metalDistribute oil evenly, use two pans and continue until browned
Crumbs burn before the centre softensSlices are thick or the oven runs hotLower the temperature about 25°F / 15°C and continue until tender
The eggplant feels firm or spongyIt entered the casserole before the first bake was completeReturn unsauced slices to the oven; do not rely on the final bake
The finished dish is saltySurface salt, salty marinara and Parmesan accumulatedUse salt by weight, blot thoroughly and avoid extra seasoning before tasting
The cheese releases liquidFresh mozzarella was not drainedUse low-moisture cheese or drain fresh mozzarella for at least 30 minutes
The layers slide apartExcess sauce or insufficient restingReserve more sauce for serving and rest longer before cutting
The skin is toughThe eggplant was oversized or matureChoose medium eggplant or peel it in alternating strips
Four-part troubleshooting visual for watery casserole, pale tender slices, firm eggplant centres and crumbs browning too quickly.
Match the remedy to the failed stage. Once a casserole is assembled, removing or reducing loose liquid is often more effective than simply leaving everything in the oven longer.

Can a watery finished casserole be rescued?

Let it rest longer first; some apparent liquid thickens as the dish cools. When a large amount remains, lift portions with a slotted spatula and simmer any loose sauce separately before spooning it back over the plate.

Do not keep baking the whole casserole indefinitely. The sauce may reduce, but the eggplant and cheese can become dry before the centre stops looking loose.

What if the eggplant is tender but the coating is pale?

Shift the pan to a higher rack or broil briefly before assembly, watching continuously. Once sauce has been added, pale crumbs are much harder to correct.

Variations

Start with the breaded recipe above, then use the option that matches the texture or dietary change you need. Each variation lists only what changes.

Maximum-crisp sheet-pan Eggplant Parmesan

Keep the browned rounds in one layer. For the full batch, use up to 1½ cups / 360 ml marinara and 8 ounces / 225 g mozzarella—about 2–2½ teaspoons sauce and roughly 1 tablespoon shredded cheese per round. Return to a 400°F / 200°C oven for 5–7 minutes, then broil briefly only if needed.

Serve the remaining sauce warm alongside. Because the rounds are never stacked, more of the Parmesan-panko crust reaches the plate browned and distinct.

Breaded eggplant rounds baked separately on a sheet pan, each topped with a small amount of marinara and cheese.
Treat these as individually topped rounds, not miniature stacks. Keeping the sauce above the crust—and extra marinara at the table—protects the sheet-pan version’s main advantage.

Eggplant Parmesan without breading

Skip the flour, eggs and slice coating. Brush the rounds with 4 tablespoons / 60 ml olive oil in total. Roast at 425°F / 220°C conventional or 400°F / 200°C fan, turning once, until browned and fully tender. Assemble with 2 cups / 480 ml thick marinara, 8 ounces / 225 g mozzarella and ⅓ cup / 30 g Parmesan.

For crunch on top, combine ½ cup / 30 g panko with ¼ cup / 22 g Parmesan and 1 tablespoon / 15 ml olive oil. Scatter it over the final cheese layer. The result has creamy roasted eggplant and a crisp top rather than a crust around every slice. For a completely breadcrumb-free casserole, simply omit this topping.

Breadcrumb-free Eggplant Parmesan with roasted eggplant rounds, marinara and melted cheese in a burgundy casserole.
Without a crumb shell, thorough roasting becomes even more important. Browning the eggplant surfaces first prevents the smooth slices from turning slippery inside the sauced casserole.

Gluten-free Eggplant Parmesan

Gluten-free panko is the direct substitution and gives the closest result to the main recipe. Replace the flour with a gluten-free all-purpose blend and keep the same flour–egg–crumb order.

For allergy-led cooking, check the panko, flour blend, seasoning, marinara and cheeses for relevant allergen and cross-contact statements.

Egg-free Eggplant Parmesan

For an egg-free coating, skip the separate flour and egg dishes. Whisk ¾ cup / 180 ml dairy or unsweetened soy milk with ½ cup / 60 g all-purpose flour and 1 tablespoon / 8 g cornstarch. The mixture should be smooth and thin enough to drip slowly from a spoon. Add milk 1 tablespoon at a time if it becomes too thick.

Dip each dry eggplant round in the batter, let the excess drip, then press on the panko mixture. The coating is more fragile than an egg-bound crust, so turn it with a thin spatula only after the first side has set and browned.

Eggplant Parmesan with ricotta

Ricotta makes a creamier, more lasagna-like casserole. If that is the texture you enjoy, MasalaMonk’s baked ziti guide explores the same ricotta-and-mozzarella comfort-food lane in pasta form.

Mix 15 ounces / 425 g well-drained whole-milk ricotta with 1 large egg, ¼ cup / 22 g from the Parmesan reserved for assembly and black pepper. Spread it in a thin, even layer over the first layer of sauced eggplant.

Reduce the mozzarella to 6 ounces / 170 g and use the remaining ¼ cup / 22 g Parmesan on top. Keep only 2 cups / 480 ml sauce inside the casserole and rest it for about 20 minutes so the creamy layers cut more cleanly.

Small-batch Eggplant Parmesan

For two to four servings, use one medium eggplant weighing 1–1¼ pounds / 450–570 g and halve the remaining ingredients. For the breading station, beat 2 large eggs with 2 teaspoons / 10 ml water; expect a little to remain. An 8 × 8-inch / 20 × 20 cm dish usually holds two shallow layers.

The slice-baking temperatures stay the same. Begin checking the smaller assembled dish at about 15 minutes; its shallower centre usually heats sooner than a full 9 × 13-inch pan.

What to Serve With It

Eggplant Parmesan is rich enough to arrive at the centre of the table as the main event. Set down the rested pan and pass the warm reserved marinara. The centre pieces stay silky and saucy; the corners bring browned cheese and exposed crumbs. Something green, sharp or bread-like keeps bright tomato, milky mozzarella and nutty Parmesan from feeling heavy.

Plate with a rectangular serving of Eggplant Parmesan, cucumber salad, garlic bread and extra marinara.
Dress the salad sharply with lemon or vinegar and keep the bread portion modest. The plate needs freshness and crunch more than another rich or heavily sauced component.
  • Classic dinner: spaghetti, linguine or another simply dressed pasta for catching the extra sauce
  • Fresh contrast: a crisp cucumber salad, lemony greens or roasted broccoli
  • Comfort-food table: a homemade garlic bread loaf, crisp-edged focaccia or another crusty loaf for the last spoonful of marinara
  • Lighter plate: sautéed greens, salad or roasted vegetables instead of pasta
  • Tomorrow’s lunch: a reheated slice tucked into a toasted roll with a little extra sauce and basil
Two toasted Italian-roll halves filled with breaded Eggplant Parmesan, marinara and melted mozzarella.
Reheat the Eggplant Parmesan before it enters the roll rather than using the bread as the reheating vessel. Then add only enough warm marinara to moisten the filling.

When the casserole is already generously sauced, keep pasta simple. The plate needs contrast more than another heavy tomato-and-cheese component.

Make Ahead: Choose by Texture

Convenience and crispness move in opposite directions. Decide which matters more for this meal, then stop at the point that fits your plans.

Make-ahead visual showing sealed sauce, separately stored baked slices and cheese, a covered casserole and frozen components.
The real make-ahead decision is which surface you are willing to soften. Sauce can wait without penalty, while assembled breaded layers gradually exchange crispness for convenience.

On a phone, each make-ahead option appears as a stacked card.

Prepare it this farBest forWhat to expect
Make the marinara aheadSpreading the work across two daysThe finished texture stays the same
Bake slices and refrigerate separately for up to 1 dayGuests or a planned dinner when crust still mattersThe crispest make-ahead route
Assemble overnightDinner that only needs bakingA softer, more integrated casserole
Freeze baked slices separately for up to 2 monthsCrisper portions after reheatingMore assembly later, but stronger browned edges
Freeze the assembled casseroleThe easiest freezer mealSofter layers after baking

Store the components separately for the crispest result

Bake the breaded slices and cool them completely on wire racks, or on clean sheet pans with the slices turned once so condensation does not collect beneath them. Refrigerate for up to 1 day in shallow containers with parchment between layers. Store the sauce and shredded cheese separately.

Before assembly, return refrigerated slices to a 425°F / 220°C conventional or 400°F / 200°C fan oven for 6–10 minutes, beginning to check at 6 minutes. Refresh only until the coating feels dry and hot; then layer and complete the short final bake.

Can the casserole be assembled a day ahead?

Yes, but the breading will absorb moisture while it rests. Cover and refrigerate for up to 24 hours. The next day, bake uncovered at 375°F / 190°C conventional or 350°F / 175°C fan for 25–35 minutes, checking from 25 minutes. The centre should reach 165°F / 74°C. Follow the cookware manufacturer’s guidance before moving a chilled glass or ceramic dish into a hot oven.

This is the easiest day-ahead option, though the breading will be softer. Keep the components separate when browned crust matters most.

Storage, Freezing and Reheating

The portion methods below assume one piece equal to roughly one-sixth to one-eighth of the pan. Thick pieces, cold cookware and a colder starting temperature may add time, so check from the early end and heat the centre to 165°F / 74°C.

Storage and reheating visual with fridge and freezer limits plus oven, air-fryer, skillet and microwave methods.
Dry, circulating heat restores the exposed edges most effectively. A skillet concentrates crispness underneath, whereas the microwave warms fastest but leaves the breading softer.

Refrigerating leftovers

Divide leftovers into shallow containers and refrigerate within 2 hours of cooking—within 1 hour when the room or outdoor temperature is above 90°F / 32°C. Use refrigerated leftovers within three to four days, in line with USDA leftover-safety guidance.

The coating softens in storage, but dry heat can recover some texture around the exposed edges.

Freezing breaded eggplant slices separately

Cool the baked slices completely, freeze them in one layer until firm, then transfer to a freezer-safe container with parchment between layers. Freeze for up to two months for best quality. Reheat from frozen at 425°F / 220°C conventional or 400°F / 200°C fan for 12–18 minutes. Turn once and check from 12 minutes, then assemble when the slices are hot and the coating feels dry.

Freezing the assembled casserole

To freeze a complete dinner rather than separate components, wrap the unbaked casserole securely and freeze for up to two months for best quality. Thaw completely in the refrigerator, usually 24–48 hours, then bake uncovered at 375°F / 190°C conventional or 350°F / 175°C fan for about 35–45 minutes. Begin checking at 35 minutes and heat the centre to 165°F / 74°C.

Use a freezer-safe metal or suitable ceramic dish. Do not transfer an ice-cold glass dish directly to a hot oven because sudden temperature change can break it.

Reheating a fully cooked casserole

For a fully cooked casserole that has thawed in the refrigerator, cover loosely and reheat at 350°F / 175°C conventional or 325°F / 165°C fan for 25–35 minutes. Uncover for the final 10 minutes and heat the centre to 165°F / 74°C. Follow the cookware manufacturer’s temperature-change guidance, especially for glass or ceramic dishes.

How to reheat Eggplant Parmesan while bringing back some browned edges

  1. Oven or toaster oven: Reheat a refrigerated portion uncovered at 375°F / 190°C for about 15–20 minutes, beginning to check at 15 minutes. Tent loosely only near the end if the cheese darkens too quickly.
  2. Air fryer: Reheat one portion at 350°F / 175°C for about 5–8 minutes, checking at 5 minutes so the exposed coating refreshes before the cheese burns.
  3. Skillet: Warm over medium-low heat for about 8–12 minutes with the lid slightly ajar. The base can crisp, but trapped steam softens the top.
  4. Microwave: Heat in 60-second intervals, covered and vented, until hot. It is the fastest route but produces the softest breading.

Whichever method you use, reheat leftovers to 165°F / 74°C in the centre. Warm additional sauce separately and add it afterward; sauce poured over the portion first slows any return of crispness.

Baked Eggplant Parmesan vs. Italian Parmigiana

This is a breadcrumb-coated, oven-baked Italian-American Eggplant Parmesan. Each round is browned before it meets tomato sauce, mozzarella, Parmesan and basil, creating a crisp-edged coating without frying every batch in oil.

Traditional Italian parmigiana di melanzane, or melanzane alla parmigiana, is generally unbreaded and often fried before layering. Its softer, integrated texture is different from the deliberate panko crust here. Family and regional versions vary; La Cucina Italiana’s overview gives useful context. In the UK, both styles may be called aubergine Parmesan or aubergine parmigiana.

Frequently Asked Questions

Do you have to salt eggplant?

Salting is recommended for this breaded version because it seasons the flesh and gives the flour a drier, more dependable surface. Very fresh eggplants may not need it for bitterness, but the recipe is calibrated around the full 30-minute salt-and-blot step. Blot the rested slices rather than rinsing them.

Should you peel eggplant for Parmesan?

Usually not. Keep the skin on medium, tender eggplants; peel fully or in alternating strips when the skin feels thick or you want especially soft layers.

Why does Eggplant Parmesan turn watery?

Common causes include eggplant that was still firm inside, loose marinara, too much sauce, undrained fresh mozzarella, deep layers or cutting while the sauce and cheese are still loose. Salting helps the surface but cannot correct all of those factors.

Can you use fresh mozzarella?

Yes. Use one 7–8-ounce / 200–225 g ball, slice or tear it, then drain it over towels for at least 30 minutes. Put about one-third between the layers and the rest on top; expect a softer casserole than the low-moisture version.

Can Eggplant Parmesan be assembled the day before?

Yes. Cover and refrigerate it for up to 24 hours, then bake uncovered from cold at 375°F / 190°C conventional or 350°F / 175°C fan for 25–35 minutes, until the centre reaches 165°F / 74°C. The breading will be softer than when the components are stored separately.

The First Slice Is Worth the Wait

After all the salting, breading and turning, the reward arrives in the first lifted portion. The sauce stays with the layers, the eggplant cuts easily with the side of a fork, mozzarella stretches through the centre and browned crust still shows around the edges.

Cook first. Layer second. Once the eggplant reaches the sauce already golden and tender, the final bake becomes the easy part. The layered casserole gives saucy, family-style comfort; the sheet-pan finish protects every crunchy edge.

What usually gives you trouble with Eggplant Parmesan—wateriness, breading or timing?

Back to the top ↑

Posted on Leave a comment

Air Fryer Corn on the Cob Recipe: Juicy Kernels, Charred Edges, No Guesswork

Three buttered ears of air-fried corn on a cream platter, with plump golden kernels, scattered roasted patches and an air fryer behind them.

Air fryer corn on the cob should be one of the easiest sides you make all summer. You can skip the pot of boiling water, leave the grill unlit and cook only the number of ears dinner actually needs.

The confusing part is the timer. One recipe says six minutes, another says twelve, and a third keeps the corn cooking for nearly twenty. Thick ears may still feel firm after a fast recipe, while slim ears can turn wrinkled if you wait too long for dramatic black spots.

Air fry three or four average-thickness ears at 400°F / 200°C for 8–12 minutes, turning once. Test the thickest ear at eight minutes; one or two slim ears may be ready around 6–7 minutes.

The MasalaMonk rule: tenderness decides when the corn is cooked; extra time decides how deeply browned and charred it becomes.

Once a pierced kernel gives with gentle resistance and beads with juice, the ear can leave the basket. Add colour afterward, one minute at a time, for up to 3 extra minutes. Brush on the butter at the end so it melts between the hot rows instead of scorching beside the heating element.

Close-up of plump air-fried corn kernels with melted butter between the rows, small beads of moisture and a few browned spots.
Inspect the broad centre rows rather than the tapered tip, since the smaller end can colour and dry sooner.

Air Fryer Corn on the Cob Recipe

Fresh sweet corn with juicy kernels and lightly blistered edges. Check the thickest ear early and remove each one as soon as it becomes tender.

PrepAbout 5 minutes
Cook8–12 minutes
TotalAbout 13–17 minutes
Yield4 side servings
Temperature400°F / 200°C
First Check8 minutes

Want deeper roasted colour? Allow another 1–3 minutes after the kernels are tender.

Ingredients

For the Corn

  • 4 average-thickness ears of fresh sweet corn
  • 2 teaspoons neutral oil or olive oil
  • ½ teaspoon fine salt, about 3 g
  • ¼ teaspoon black pepper, optional

For Serving

  • 2 tablespoons unsalted butter, melted, 28 g / 1 oz
  • Lemon or lime wedges, optional
  • Additional salt and pepper, only after tasting
Four shucked corn ears with measured oil, salt, optional black pepper, melted butter, tongs and a pastry brush on a stone surface.
Properly oiled corn should have a faint sheen, not visible droplets; excess fat can pool between the rows instead of improving browning.

Equipment

  • Basket-style air fryer large enough to hold the corn in one layer
  • Tongs
  • Small bowl
  • Pastry or silicone brush
  • Knife and cutting board when the ears need trimming or halving

Method

  1. Prepare the corn. Remove the husks and silk. Trim the narrow tip or halve the ears only when needed to fit. Pat the kernels dry.
  2. Preheat if recommended for your model. Heat the air fryer to 400°F / 200°C for up to 3 minutes. Prepare the ears while the basket heats.
  3. Season lightly. Brush the ears with oil until they look lightly glossy rather than wet. Add the salt and optional pepper.
  4. Arrange the basket. Place the corn in one layer. A little touching is fine, but do not stack the ears or force them close to the upper element.
  5. Air fry. Cook at 400°F / 200°C and turn or roll the ears after 5–6 minutes.
  6. Test the thickest ear. At 8 minutes, pierce a kernel near the middle. Continue until the kernel looks full, releases a little juice and offers only gentle resistance.
  7. Choose the colour. Once tender, cook for another minute at a time when you want darker roasted patches. Stop after 3 additional minutes.
  8. Serve hot. Brush with melted butter, taste and add more seasoning only as needed.

Recipe notes:

  • Cooking only 1–2 slim ears? Start checking at 6–7 minutes.
  • Matching ear thickness is more useful than matching length.
  • Yellow, white and bicolour sweet corn all work. Freshness matters more than kernel colour.
  • Kosher salt crystals vary by brand, so begin lightly and adjust after adding butter.

How Long to Air Fry Corn on the Cob

For three or four average ears, air fry at 400°F / 200°C for 8–12 minutes. Turn at 5–6 minutes and test the thickest ear at 8.

Air fryers vary, so treat those times as checking points rather than guaranteed finishing times. Ear thickness and basket load explain most of the variation; if you are unsure what “tender” should look and feel like, use the visual doneness cues.

Timing guide comparing slim, average, thick and very thick corn ears with different first-check times and basket loads.
The listed minute starts the check; the thickest ear’s texture determines when the cook ends.

How to use this table: Start with the listed first-check time, test the thickest ear and continue only until its kernels are tender.

Air fryer corn cooking times by ear thickness and basket load
Your basket First check Typical range at 400°F / 200°C
1–2 slim ears 6–7 minutes 7–10 minutes
3–4 average-thickness ears 8 minutes 8–12 minutes; a closely fitted basket often lands near 10–12
1–2 noticeably thick ears 8–9 minutes 10–12 minutes
Very thick ears 10 minutes 12–15 minutes

How to Tell When the Corn Is Done

Otherwise-good corn often stays in the basket too long because someone is waiting for every row to turn dark. Colour can deepen after the centre is already cooked.

Underdone The kernels look matte, resist a fork and taste dense or starchy.
Ready to Serve The rows look full and glossy. A pierced kernel gives easily and beads with juice.
Overcooked The kernels begin to wrinkle or lose their plump shape, and the skins become noticeably tougher.

If one person wants deeper char, remove the other tender ears and leave theirs in a little longer. Dinner does not improve by making every cob wait for the darkest one.

Three corn ears showing matte undercooked kernels, plump glossy ready kernels and tightened, wrinkled overcooked kernels.
Because wrinkling cannot be reversed, pull a ready ear early instead of waiting for every cob to develop matching colour.

For more roasted colour without drier kernels, wait until the centre is tender, then continue uncovered. Turn frequently near the end and stop as soon as the blistered patches are as dark as you want.

Partially cooked corn being turned with metal tongs while a fork tests a kernel on the thickest ear.
Roll each ear onto a less-coloured side rather than simply nudging it; meanwhile, remove any thinner ear that becomes tender early.

Choosing, Preparing and Arranging the Corn

Start with ears that feel full and heavy, with close-fitting green husks and no badly dried or mushy tip. Older corn can taste starchier and remain less juicy even when the timing is right.

Fresh corn with a tight green husk and plump kernels beside an older ear with dry silk, loose husk and sunken rows.
When the husk cannot be opened, feel through it for firmly packed rows without soft gaps, missing kernels or a hollow tip.

Next, match the ears by thickness rather than length. Similar diameters are more likely to become tender together, while a tapered tip can make a substantial ear look slimmer than it really is.

A long slim ear, an average ear and a shorter thick ear of corn compared side by side with diameter guides.
A shorter thick ear can take longer than a long slim one, so compare the widest middle sections rather than overall size.

Sweet summer corn already brings most of the flavour; the air fryer’s job is to deepen the edges without taking the juice from the centre.

Remove the husks and stubborn silk, trim only what prevents the ear from fitting and pat the exposed kernels dry. Surface water must evaporate before browning can begin.

Corn being prepared by removing silk, trimming the narrow tip and patting the exposed kernels dry with a cloth.
A barely damp towel can help lift fine strands of silk; pat the kernels dry afterward so surface moisture does not delay browning.

Oil: A thin coating helps seasoning cling and encourages more even colour. Two teaspoons across four ears is enough. Oil-free corn still cooks.

Butter: Save it for the moment the ears leave the basket. It melts into the hot rows without risking burnt milk solids near the upper element.

Make the Ears Fit Without Crowding

Corn placed diagonally, trimmed at the narrow tip and halved crosswise to fit an air-fryer basket, with stacking marked incorrect.
Halving creates extra exposed ends for browning and can make a closely fitted basket easier to arrange.
  • Trim the narrow tip first. The tapered end may be all that prevents an ear from fitting.
  • Halve the ear when needed. A crosswise cut improves fit and may create more open airflow.
  • Keep the corn in one layer. Slight touching and diagonal placement are fine; stacking is not.
  • Leave room below the element. Do not force an oversized ear close to the upper heater.
  • Remove loose silk and husk. Lightweight dry pieces can move in the fan.

Save cheese, honey, sugar and fresh garlic for after cooking. They can scorch before the centre softens; instead, add them through one of the finishing options once the ears are tender.

Should You Use a Paper or Silicone Liner?

Liners make cleanup easier. Direct basket contact gives the exposed kernels better airflow and stronger browning, so the lower side may stay paler when a liner is used.

Corn compared in a bare perforated air-fryer basket and on a fitted liner, with loose parchment in an empty basket marked unsafe.
Use the bare air-fryer basket when underside colour matters most; choose a fitted liner when easier cleanup is the greater priority.

Never preheat loose parchment without food securing it. A lightweight sheet can lift toward the heating element. The guide to common air fryer mistakes goes further into crowding, wet food, blocked airflow and basket smoke.

Adjusting for Thick Ears and Different Air Fryers

Moving heat gives the exposed rows roasted, blistered patches as the centre warms. It creates more browning than a microwave, but it will not reproduce the smoke of corn cooked over charcoal or a live grill.

Air-fried corn with scattered browned patches compared with charcoal-grilled corn showing irregular char, smoke and glowing coals.
Choose the air fryer for controlled tenderness and convenient roasting; choose live fire when genuine smoke is central to the flavour.

Use 400°F / 200°C for the main method. Lower the heat only when the outside is colouring faster than the centre is softening.

400°F / 200°C — Main Method Best for average fresh ears and stronger roasted patches. Check early.
375–380°F / 190–195°C — Gentler Adjustment Use for very thick ears or a compact fryer that darkens the outside before the centre becomes tender.
An average corn ear cooked at 400°F or 200°C beside a thicker ear cooked at 375–380°F or 190–195°C.
Treat gentler air-fryer temperature as a correction for premature browning, not the default starting point for every batch.

How Different Air Fryer Styles Change the Timing

Corn arranged in a basket-style air fryer, a dual-drawer appliance and an oven-style air fryer with a tray.
Timings may shift between basket, dual-drawer and oven-style models; however, the same kernel texture cues still determine doneness.
  • Thick ears: allow more time for heat to reach the centre.
  • A full basket: expect the later end of the timing range.
  • A compact fryer: check sooner because the corn may sit closer to the element.
  • Dual drawers: inspect both sides separately; they may not finish together.
  • Oven-style fryer: allow a little longer and rotate the tray if one side colours faster.

A broil, max-crisp or extra-high setting is much more aggressive than Air Fry. Use it only as a brief finishing boost when the appliance manual permits it.

Once you find the timing that suits your machine, note the number and approximate thickness of the ears. That result will be more useful next time than trying to match somebody else’s exact minute.

Fresh, Frozen or Foil-Wrapped Corn

Fresh uncovered corn gives the strongest browning. Frozen corn needs time to shed its icy coating, while foil shifts the result toward soft, buttery and steamy.

Fresh uncovered, frozen uncovered and foil-wrapped corn shown before and after air frying with visibly different finished textures.
Foil is primarily a texture decision—not a speed shortcut—because trapped steam softens the kernels while limiting roasted colour.
Air fryer cooking times and textures for fresh uncovered corn, fresh foil-wrapped corn and frozen uncovered corn
Corn Method First check Usual time Texture
Fresh Uncovered 8 minutes 8–12 minutes Juicy with the strongest browning
Fresh Foil-wrapped 11 minutes 11–15 minutes Soft and steamy with little colour
Frozen Uncovered 12 minutes 12–15 minutes for half-cobs or average ears Tender with moderate colour

How to Air Fry Frozen Corn on the Cob

Frozen corn releases water as the ice melts. Butter and dry seasoning can slide away during that early stage, and the extra moisture slows browning.

Frozen corn shown frosty, then warmed until dry and finally brushed with butter or oil before further air frying.
After the warming stage, blot away any collected meltwater before seasoning; otherwise, the new coating may still slide from the corn.
  1. Arrange frozen half-cobs or average ears in one layer.
  2. Air fry at 400°F / 200°C.
  3. Turn once the outside has thawed and begun to dry.
  4. Test a kernel at 12 minutes.
  5. Continue until tender, usually 12–15 minutes. Large whole frozen ears may need longer.
  6. Add butter and seasoning once the corn is hot and no longer icy.

For better seasoning adhesion: warm the frozen corn for 8–10 minutes first. Once the icy surface has dried, brush with butter or oil, season and finish at 400°F / 200°C for another 3–5 minutes, or until tender. Then choose a buttery, spicy or tangy finish.

Thawed corn cooks faster than fully frozen corn. Start near the early end of the fresh-corn range and check frequently.

How to Air Fry Corn in Foil

Foil traps steam and butter around each ear, giving you softer kernels with much less roasted colour. Some manufacturers permit foil when food holds it securely; others advise against it.

Philips, for example, warns that foil or baking paper can restrict airflow or lift toward the heating element. Check the Philips Airfryer foil and paper guidance, then follow the manual for your own model.

Corn secured in foil inside an air fryer, loose foil marked unsafe and a hot packet being opened away from the body.
Even when foil is permitted, keep basket vents exposed so hot air can circulate instead of turning the appliance into a sealed steamer.
  1. Spread ½ tablespoon / 7 g butter over each fresh ear and season lightly. This butter replaces the 2 tablespoons used for serving in the main recipe.
  2. Wrap each ear securely without covering the entire basket base.
  3. Air fry at 400°F / 200°C, turning once.
  4. Test the corn at 11 minutes and expect 11–15 minutes.
  5. Open the packet away from your face because hot steam will escape.
  6. For more colour, remove the foil and cook uncovered for another 1–3 minutes.

Add lemon or lime after cooking for the brightest flavour.

Five Easy Ways to Season the Corn

Keep it buttery and simple when everyone wants something familiar, use chili-lime beside a rich main dish, choose Cajun seasoning for a peppery edge, or reach for lime and chaat masala when the plate needs something sharp and bright.

Before choosing a finish: each variation below seasons four ears and replaces the 2 tablespoons of serving butter in the main recipe. Bhutta-style corn uses no butter unless you choose to add it. When using Parmesan, Cajun seasoning or chaat masala, reduce or omit the salt added before cooking and adjust after tasting.

Bhutta-Style Lime and Chaat Masala

Use: 1 lime, 1 teaspoon chaat masala and ¼ teaspoon red chili powder. Butter is optional.

This is the brightest finish in the set—tangy, salty and hot rather than rich and buttery. Place the spices on the cut side of the lime, then rub it over the hot corn. The juice carries the seasoning between the rows.

Two spice-rubbed air-fried corn ears on a dark platter with roasted patches, cut lime, chaat masala and red chilli powder.
Apply the lime-and-spice rub after cooking so the citrus stays bright and the damp masala does not scorch against the hot basket.

Classic Butter and Pepper

Use: 2 tablespoons / 28 g melted butter, black pepper and salt to taste.

Brush the butter over the hot corn, add pepper and taste before adding more salt. Simple, sweet and buttery.

Garlic-Parmesan

Use: 2 tablespoons / 28 g melted butter, ½ teaspoon garlic powder, ¼ cup finely grated Parmesan and 1 tablespoon chopped parsley.

Mix the garlic into the butter, brush it over the corn, then add the Parmesan and parsley for a savoury, nutty finish.

Chili-Lime

Use: 2 tablespoons / 28 g melted butter, ½ teaspoon mild chili powder, plus the zest and juice of 1 lime.

Brush with chili butter, then add the lime zest and juice for a bright finish that cuts through richer main dishes.

Cajun Corn

Use: 2 tablespoons / 28 g melted butter and 1–1½ teaspoons Cajun seasoning.

Brush with butter, sprinkle lightly and taste before adding separate salt. The result is warm, peppery and lightly smoky.

What Went Wrong—and How to Fix It

Plump kernels that still feel hard or dense usually need more cooking. Pale but tender corn is ready—add colour only if you want it. Browned but firm corn needs gentler heat. If tender corn still tastes starchy, the ear may simply be older rather than undercooked.

Do not throw more time at every problem. Many batches can still be improved while dinner comes together.

Four air-fryer corn results showing hard or starchy, pale but tender, browned but firm, and dry wrinkled kernels with corrective guidance.
Use the first correction only when the centre is still hard or dense; tender corn that tastes starchy is more likely an age issue than a timing issue.

Texture and Doneness Problems

Air fryer corn troubleshooting for undercooked, pale, browned, dry and starchy kernels
What you see Why it happened What to do now
Kernels look plump but remain hard or starchy Thick ears, a full basket or too little cooking time Continue in 1–2-minute intervals and test the thickest ear again.
Corn is pale but tender Wet kernels, foil, a liner or limited airflow Serve it as it is, or uncover and create more space for another minute when you want deeper colour.
Corn is pale and firm It needs more cooking and better surface drying Continue uncovered and roll the ears once more.
The browned side is dark but the centre is firm The outside heated faster than the middle Lower the temperature to 375–380°F / 190–195°C and continue in short intervals.
Kernels are dry or wrinkled Too much time, slim ears or older corn Remove immediately. Butter adds richness but cannot replace lost moisture.
Kernels look full but still taste starchy The corn may have been older or less sweet before cooking Serve with butter and a bright seasoning; more cooking is unlikely to restore sweetness.

Uneven Browning, Seasoning and Smoke Problems

Air fryer corn troubleshooting for uneven cooking, burnt toppings, frozen seasoning and basket smoke
What you see Why it happened What to do now
One side is burning The ear is close to the element or was turned too late Roll the ear, lower the heat if needed and check more frequently.
Different ears are cooking at different speeds The batch contains mixed thicknesses Remove tender ears and leave the thicker ones to continue.
Butter, garlic, cheese or sugar is burning Delicate ingredients were added too early Remove badly burnt bits and add a fresh topping after cooking.
Seasoning slides off frozen corn The icy outside is melting Warm the corn first, then season it once the ears are hot and the surface has dried.
The basket is smoking Fat, sugary seasoning or old residue is reaching the base Stop the air fryer if smoke is heavy or persistent. Let it cool, remove burnt residue or excess fat, and clean the basket before continuing.

Make Ahead, Storage and Reheating

Air fryer corn is best as soon as it leaves the basket, while the kernels are hot and the blistered patches still taste roasted.

Cooked corn cooling, stored in a sealed glass container, reheated in an air fryer and reused in salad, tacos and chowder.
Reheat only the portion being served, then refresh it with butter, lime or seasoning rather than repeatedly drying the entire stored batch.
  • Prepare ahead: shuck the corn earlier in the day and refrigerate it tightly covered so the exposed kernels do not dry out.
  • Refrigerate: cool cooked corn promptly and store it in an airtight container for up to 3–4 days.
  • Reheat: air fry at 350°F / 175°C for 3–5 minutes, checking early.
  • Serve again: add a little fresh butter after reheating rather than warming the corn in a pool of butter.

Stop as soon as the centre is hot; extended reheating tightens the kernel skins. For broader refrigerator and freezer guidance, see the FoodSafety.gov cold-storage chart.

Have several ears left? Slice off the kernels for salsa, salads, tacos or grain bowls, or turn a larger amount into creamy vegetarian corn chowder.

What to Serve With Air Fryer Corn

For a cookout or summer dinner, make a bowl of crisp homemade coleslaw first and refrigerate it while the meal comes together. Air fry the corn last so the slaw stays cold and crunchy while the ears reach the table hot.

Garlic-Parmesan corn adds savoury richness beside juicy baked chicken breast, while classic butter and pepper keeps the plate familiar beside air fryer burgers.

Chili-lime corn works especially well with honey garlic salmon because the lime cuts through the sweet glaze.

For a vegetarian plate, pair bhutta-style corn with a sturdy black bean burger. Lime and chaat masala brighten the burger’s earthy filling.

When one finish will cover the whole batch, use the chart below to match the corn to the meal. For mixed preferences, season individual ears separately after cooking.

Five labelled corn finishes: bhutta-style, butter and pepper, garlic-Parmesan, chili-lime and Cajun.
Use this chart when all four ears will share one finish; for mixed preferences, season individual ears separately after cooking.

Frequently Asked Questions

Why Do Air-Fryer Corn Recipes Give Such Different Cooking Times?

Ear thickness, basket load, preheating, appliance shape and the desired amount of browning all affect the final time. Treat a published time as a first-check point, then stop when the thickest ear is tender and juicy.

For a single-screen recap, use this guide after identifying the approximate thickness and basket load. It condenses the checkpoints, while tenderness still decides the finish.

Air-fryer corn timing guide showing 400°F or 200°C, turning at 5–6 minutes and testing the thickest ear at 8 minutes.
A brief early basket check costs less than several unattended extra minutes, especially when slim and thick ears cook together.

Do You Need to Soak Corn Before Air Frying?

No. Soaking adds moisture to the exposed kernels and delays browning. Remove the husks and silk, dry the ears and cook them directly.

Do You Need to Boil or Microwave Corn First?

No. Fresh average ears cook completely in the air fryer. If very thick ears brown before the centre softens, lower the temperature to 375–380°F / 190–195°C and continue in short intervals.

Should You Salt Corn Before or After Air Frying?

A light seasoning before cooking gives the kernels a base layer of flavour. Reduce or omit it when the finish contains Parmesan, Cajun seasoning or chaat masala, then adjust after tasting.

Can You Cook More Than Four Ears?

Cook only as many ears as fit in one layer. For a larger batch, work in rounds and check the second batch slightly earlier because the air fryer is already fully hot.

This basket shows the practical limit: the ears may touch at narrow points, but the fuller middle sections still need open space for moving air.

Four raw corn ears arranged diagonally in one layer inside a black air-fryer basket, with small spaces between them.
The narrow ends may touch, but leave breathing room around the fuller middle sections where the ears occupy the most basket space.

Can You Air Fry Corn Without Oil?

Yes. Place dry, shucked ears directly in the basket and follow the fresh-corn timing. The kernels soften normally, though the exposed rows may brown less evenly and dry seasoning will not cling as readily.

Can You Air Fry Corn in the Husk?

Some appliances permit husk-on corn, but loose silk and dry husk can move toward the heating element. Because timing and appliance guidance vary, fully shucked corn is the more predictable choice for this recipe.

Once the rest of the meal is ready, bring the corn out last and let each person add butter, lime or spice at the table. The point is not matching every ear; it is serving each one while the kernels are still hot and juicy.

A summer dinner table with differently seasoned air-fryer corn, coleslaw, roasted chicken and two hands reaching toward the corn platter.
Serve the ears as soon as they are tender; finishing choices can happen at the table.

Tender First, Char Second

For three or four average fresh ears, begin at 400°F / 200°C and test the thickest ear at eight minutes. Turn once, stop when the kernels are juicy and tender, and add only a short final burst when you want darker roasted patches.

Bring the corn to the table while the butter is still disappearing between the rows. Some ears may be only lightly browned while others are more deeply blistered; tenderness is the part that matters.

How long did your corn need? Share the time below—and add your air-fryer model if you know it.

Posted on Leave a comment

Fresh Tomato Soup Recipe With Fresh Tomatoes: Easy Homemade Tomato Basil Soup

A bowl of smooth fresh tomato soup topped with basil and a cream swirl, with grilled cheese on the side.

Fresh tomato soup should taste bright, smooth, rich, and comforting — not watery, sour, thin, or like hot tomato juice. The goal is simple: take ripe fresh tomatoes, cook them down until they smell sweet and saucy, then blend them into the kind of cozy bowl you actually want to dip grilled cheese into.

This is the soup for the awkward tomato bowl: a few Roma tomatoes, a few garden tomatoes, one soft vine tomato, and cherry tomatoes that need to be used today. It works because you do not force those tomatoes into a fixed amount of liquid. You cook them down first, then loosen the soup after blending.

That makes this recipe useful even when your tomatoes are not identical — Roma, cherry, vine, garden, watery, soft, or mixed. The method keeps the soup from turning thin because the tomatoes get a chance to concentrate before the final broth goes in.

From there, the base recipe is simple; the extra sections are only there to help you adjust the tomatoes you have. Start with the stovetop method for speed, roast the tomatoes for deeper flavor, keep the bowl light, make it creamy, or turn it into tomato basil soup with fresh basil at the end.

Mixed Roma, vine, cherry, or garden tomatoes can still make smooth homemade tomato soup when the pot is reduced first and loosened later.

A bowl filled with mixed fresh tomatoes, including Roma, cherry, vine, and garden tomatoes.
Even mixed, soft, or uneven tomatoes can make excellent homemade tomato soup when they are cooked down first and loosened only after blending.

Cooking now? Start with the recipe card. Still deciding how to handle your tomatoes? Use the soup ratio, success cues, tomato guide, roasted method, or troubleshooting section before you begin.

Quick Answer: How to Make Tomato Soup With Fresh Tomatoes

To make tomato soup with fresh tomatoes, soften onion in olive oil or butter, add garlic and tomato paste, then add chopped ripe tomatoes, salt, pepper, and herbs. Simmer uncovered until the tomatoes collapse into their own juices and the flavor concentrates. Add broth gradually, blend until smooth, stir in fresh basil near the end, and finish with cream only if you want a richer bowl.

You are not rushing fresh tomatoes into soup; you are letting them collapse, sweeten, and turn saucy before you decide how much broth they need.

The most important rule is this: do not add all the broth too early. Your tomatoes may release more juice than mine, so hold some liquid back until after blending. That one habit keeps the soup full and spoonable instead of thin.

Next step: Need exact amounts? Jump to the recipe card. Still adjusting your tomatoes? Use the soup ratio first.

The Fresh Tomato Soup Ratio

For a balanced fresh tomato soup, use about 3 lb / 1.35 kg fresh tomatoes to 1 1/2 to 2 cups / 360 to 480 ml broth. Start with the lower amount, blend, then add more only if the soup needs loosening.

Before adding extra broth, use the ratio below as a starting point, especially when your fresh tomatoes are very juicy or unusually meaty.

A guide card showing the ratio for fresh tomato soup with 3 pounds of tomatoes and 1 1/2 to 2 cups of broth.
Start with this fresh tomato soup ratio, then adjust after blending because different tomatoes release very different amounts of juice.

Thicker soup

Use Roma or plum tomatoes, begin with 1 1/2 cups broth, and simmer uncovered before blending.

Lighter soup

Add the full 2 cups broth after blending, especially if the tomatoes are meaty and the soup feels too thick.

Watery tomatoes

Roast first or simmer longer. Let the tomato juices reduce before you loosen the soup.

Creamy soup

Keep the base slightly thick, then finish with cream or a no-cream thickener after blending.

If you remember only one thing: fresh tomatoes decide the broth, not the other way around.

The main method rule is simple: reduce the tomatoes first, then loosen the soup only after blending.

A guide card explaining that fresh tomatoes decide how much broth tomato soup needs.
Instead of forcing a fixed broth amount, let the tomatoes lead; juicy tomatoes need more reduction, while meatier tomatoes may need loosening later.

Still deciding? Compare the best tomatoes for soup, use the roasted method for watery tomatoes, or go straight to troubleshooting.

Recipe Card

Easy Homemade Tomato Soup With Fresh Tomatoes

A smooth, easy homemade tomato soup made with ripe fresh tomatoes, onion, garlic, tomato paste, basil, and optional cream. Use the stovetop method for speed or the roasted method for deeper flavor.

Prep Time
10 minutes
Cook Time
30 to 35 minutes
Total Time
40 to 45 minutes
Servings
6 bowls
Yield
About 7 cups
Tomatoes
About 8 to 10 medium tomatoes
Texture
Smooth, strain optional
Diet
Vegetarian if using vegetable broth; vegan option

Ingredients

  • 3 lb / 1.35 kg ripe fresh tomatoes, roughly chopped
  • 2 tablespoons olive oil, or 2 tablespoons / 28g butter
  • 1 medium onion, chopped, about 150g
  • 4 to 6 garlic cloves, minced
  • 2 tablespoons / about 30g tomato paste
  • 1 small carrot, chopped, or 1/2 red bell pepper, chopped, optional
  • 1 teaspoon fine salt, plus more to taste
  • 1/2 teaspoon black pepper
  • 1/2 teaspoon dried oregano or dried thyme
  • 1 1/2 to 2 cups / 360 to 480 ml vegetable broth or chicken broth
  • 1/2 cup loosely packed fresh basil leaves
  • 1/4 cup / 60 ml heavy cream, optional
  • 1 to 2 teaspoons sugar, honey, or maple syrup, only if the tomatoes taste too sharp; use sugar or maple syrup for vegan soup
  • Extra basil, cream, parmesan, croutons, olive oil, or black pepper, for serving

Equipment

  • Large pot or Dutch oven
  • Sharp knife and cutting board
  • Immersion blender, regular blender, or high-speed blender
  • Fine-mesh strainer, optional, for extra-smooth soup
  • Rimmed baking sheet, only if using the roasted method

Instructions

Cook Down the Tomatoes

  1. Soften the onion. Warm the olive oil or butter in a large pot or Dutch oven over medium heat. Cook the onion for 5 to 6 minutes, until soft, translucent, and lightly golden.
  2. Build the tomato base. Stir in the garlic for about 30 seconds. Spoon in the tomato paste and cook for 1 minute, stirring often, until it darkens slightly and smells rich.
  3. Tip in the tomatoes. Add the chopped tomatoes, carrot or red bell pepper if using, salt, pepper, and oregano or thyme. Stir well.
  4. Cook them down. Simmer uncovered for 20 to 25 minutes, stirring occasionally, until the tomatoes collapse and the mixture looks saucy. Splash in a little broth only if the pot starts to dry out.
  5. Pour in the first broth. Stir in 1 1/2 cups / 360 ml broth and simmer for about 5 minutes. Hold back the remaining broth until after blending.

Blend, Finish, and Serve

  1. Puree until smooth. Turn off the heat. Blend with an immersion blender until smooth, or blend carefully in batches in a regular blender. Vent the blender lid so steam can escape.
  2. Drop in the basil. Add the fresh basil and blend briefly again. For a fresher speckled finish, chop the basil and stir it in after blending instead.
  3. Finish the texture. Loosen with more broth if the soup is too thick. Simmer uncovered for a few minutes if it is too thin.
  4. Make it creamy, if desired. Stir in the cream over low heat. If the soup is very hot, mix a spoonful of soup into the cream first, then add it back to the pot. Do not boil hard after adding cream. Taste and adjust salt, pepper, and acidity.
  5. Serve. Ladle into bowls and finish with basil, black pepper, cream, parmesan, croutons, or olive oil.

Recipe Notes

  • Roma and plum tomatoes make the thickest soup. Garden tomatoes give great flavor but may need more simmering.
  • The broth range is flexible on purpose because Roma tomatoes, vine tomatoes, cherry tomatoes, and mixed garden-style tomatoes release different amounts of juice.
  • Before blending, the tomatoes should look collapsed and saucy, not like chopped tomatoes floating in liquid.
  • No peeling is required for everyday soup. Blend well, then strain only if you want an ultra-smooth finish.
  • If your broth is salty, start with 3/4 teaspoon salt and adjust after blending.
  • The listed cook time is for the stovetop method. Roasted method timing is about 55 to 65 minutes total.
  • For a vegan version, use olive oil, vegetable broth, and skip the cream or replace it with cashew cream, coconut milk, white beans, potato, or carrot.

This ingredient view shows why the short list still works: each item builds sweetness, depth, brightness, or body.

Fresh tomato soup ingredients arranged overhead, including tomatoes, onion, garlic, basil, tomato paste, broth, cream, oil, salt, and pepper.
Each ingredient has a clear job: onion builds sweetness, tomato paste adds depth, basil brightens the finish, and broth controls the final texture.

Success Cues

Use these cues more than the clock. Fresh tomatoes vary, but the signs of a good pot stay the same.

Tomatoes before blending

The tomatoes should look collapsed and saucy, not like chopped tomatoes floating in broth.

Puree before more broth

The puree should be smooth first. Loosen the soup only after you know how thick the blended base is.

Before serving

The soup should coat a spoon lightly, pour easily, and taste bright first, then soft and savory.

At the finish

Add basil late, keep cream gentle, and adjust salt after the soup is fully blended.

Look for this cue before blending: the tomatoes should be collapsed and saucy, not floating in loose liquid.

Fresh tomatoes cooked down in a pot until soft, thick, and saucy before blending.
Before blending, the tomatoes should look collapsed and saucy rather than loose and chunky; this cue is one of the best ways to avoid watery tomato soup.

Table of Contents

Need a tomato, texture, roasting, storage, or rescue answer? Jump to the section you need.

Fresh Tomato Soup vs Canned Tomato Soup

Fresh tomatoes do not behave like canned tomatoes, and that is exactly why this soup needs a gentler, more flexible method. Canned tomatoes are already cooked, concentrated, and fairly consistent. Fresh tomatoes are brighter and more seasonal, but they also bring their own water, sweetness, acidity, skin, and seeds.

That is why this recipe builds flavor before the pot gets too loose. The same reduction logic matters in this tomato sauce from fresh tomatoes, where the final texture depends on cooking off extra water before adjusting the finished dish.

For a thicker, pasta-ready version of tomato depth, this classic marinara sauce recipe stays in the sauce lane. This soup stays softer, smoother, and more spoonable.

Why This Fresh Tomato Soup Works

Fresh tomatoes give you that bright, just-cut flavor, but they also bring a lot of water with them. The soup gets its body before the blender comes out, while the tomatoes are still bubbling down into something sweeter and fuller.

By the time the blender comes out, the pot should already smell like tomato sauce becoming soup.

  • Onion softens the sharp edge of the tomatoes and adds natural sweetness.
  • Garlic gives the pot savory warmth without overpowering the fresh tomato flavor.
  • Tomato paste boosts color and depth, especially when the tomatoes are juicy or mild.
  • Uncovered simmering concentrates the base before the final texture is adjusted.
  • Fresh basil goes in late so the soup tastes fragrant, not dull.
  • Cream is optional, so the final bowl can be light, creamy, vegan, or dairy-free.

The Best Tomatoes for a Smooth, Flavorful Soup

Start with the tomatoes you have, then decide how much help they need. A soft tomato that smells sweet can still make a beautiful soup, even if it is past its salad-perfect moment.

Use the tomato guide below to decide whether your batch needs more simmering, more sweetness, or a roasted start.

A visual guide showing Roma, vine, garden, cherry, and mixed tomatoes for tomato soup.
Roma tomatoes give body, cherry tomatoes add sweetness, and mixed garden tomatoes bring complexity, so the best tomato choice depends on the flavor and texture you want.
Tomato Type Best Use What to Know
Roma or plum tomatoes Thicker fresh tomato soup Meaty, less watery, and excellent for a smooth soup base.
Vine tomatoes Everyday tomato soup Good balance of sweetness, juice, and acidity.
Garden tomatoes Fresh summer flavor Great when ripe, but may need longer cooking if very juicy.
Cherry tomatoes Sweet roasted tomato soup Sweet and juicy. Roast them or hold back more broth at first.
Overripe tomatoes Rich homemade soup Excellent if soft and fragrant, but avoid spoiled tomatoes.
Watery tomatoes Roasted or reduced soup Roast first or simmer uncovered to concentrate them.
Underripe tomatoes Not ideal They can make the soup sharp, pale, and bland.

The tomato does not have to be perfect. It just needs to taste ripe enough that you would still want another bite — sweet, juicy, and a little fragrant when you cut into it. If you are mixing tomato types, use that to your advantage: Roma tomatoes can thicken juicy garden tomatoes, while cherry tomatoes can add sweetness to sharper ones.

Tomatoes chosen? Review the soup ratio, then move to the stovetop method.

Ingredients That Make the Soup Taste Full

The ingredient list is short, so each ingredient has to pull its weight. The right balance keeps the soup from tasting watery, flat, or too acidic.

Fresh Tomatoes

Choose ripe tomatoes that feel heavy and smell sweet. Roma, plum, vine, garden, and cherry tomatoes all work, but they behave differently. Juicy tomatoes need more time. Meaty tomatoes make a thicker base more easily.

Onion and Garlic

Onion rounds out the acidity and gives the soup a softer base. Garlic adds that warm, savory smell that makes the pot feel fuller before you even blend it. Cook the onion first, then add the garlic briefly so it stays fragrant instead of bitter.

Tomato Paste

Tomato paste is the backup plan for tomatoes that are juicy, pale, or mild. Cook it for a minute before adding the tomatoes so it darkens slightly and makes the soup taste deeper.

Broth

Vegetable broth keeps the soup light and vegetarian. Chicken broth makes it a little more savory and old-fashioned, especially if you are serving it with grilled cheese. Add it in stages so the tomatoes can show you how much they need.

Fresh Basil

Fresh basil wakes up the bowl at the end. Add it late so the flavor stays green and fragrant. When basil is the flavor you want to push harder, this classic basil pesto guide gives you another way to use the same herb as a swirl, toast spread, or pasta sauce.

Dried basil can work, but it should go in earlier with the dried herbs. Fresh basil is more delicate, so save it for the finish.

Cream, Optional

Heavy cream softens the acidity and makes the soup richer, but it is not required. You can keep the bowl bright and light, or use no-cream options like carrot, potato, cashews, white beans, bread, or coconut milk.

Peeling, Seeding, and the Smooth-Soup Shortcut

You do not need to peel or seed tomatoes for everyday homemade tomato soup. Once the tomatoes are cooked until soft and blended well, most skins disappear into the bowl.

For a very smooth, restaurant-style bowl, blend fully, strain once, and finish with a small splash of cream over low heat. Straining removes seeds, tiny bits of skin, and any grainy texture without making you peel every tomato first.

A silky bowl does not require peeling every tomato; blend first, then strain only if the texture needs it.

Tomato soup being poured through a fine-mesh strainer, with seeds and skin bits left behind.
For silky tomato soup without peeling every tomato, blend first and strain afterward to catch seeds and tiny skin pieces.

Prefer rustic tomato soup? Blend only half the pot and leave the rest slightly chunky.

Choose the final texture here: leave some body for rustic soup or strain once for a smoother restaurant-style finish.

Two bowls comparing rustic tomato soup and smooth restaurant-style tomato soup.
For a rustic bowl, leave some texture behind; however, for a restaurant-style finish, blend thoroughly and strain once.

Once you know whether you want rustic or silky soup, the stovetop method is straightforward.

Texture chosen? Continue to how to make fresh tomato soup, or keep the visual cues nearby while you cook.

How to Make Fresh Tomato Soup

The stovetop method is the easiest place to start. It is fast, flexible, and lets you taste as you go.

1. Soften the Onion Until Sweet

Warm olive oil or butter in a large pot. Cook the onion until soft and lightly golden. Do not rush this part; it creates sweetness before the tomatoes go in.

At this stage, the onion should smell sweet and look translucent before the acidity of the tomatoes enters the pot.

Chopped onion softening in a Dutch oven with a wooden spoon.
Soften the onion until it smells sweet and turns translucent; this early step helps balance acidity before the fresh tomatoes go in.

2. Add Garlic and Tomato Paste

Let the garlic sizzle for about 30 seconds, then stir in the tomato paste. The paste should darken slightly and smell rich, almost like the tomato flavor is already getting deeper.

Cooking tomato paste briefly with the aromatics gives the soup deeper color and a fuller tomato base.

Tomato paste cooking with onion and garlic in a pot.
Briefly cooking tomato paste with onion and garlic deepens the base, so the finished soup tastes fuller even when the tomatoes are mild or extra juicy.

3. Collapse the Tomatoes

Tip in the chopped tomatoes, seasoning, and carrot or bell pepper if using. Simmer uncovered until the tomatoes collapse into their juices and the pot looks saucy.

Once the fresh tomatoes hit the pot, give them time to soften and concentrate before you decide how much broth they need.

Chopped fresh tomatoes being tipped from a bowl into a pot.
Add the fresh tomatoes before most of the broth so they can soften, concentrate, and build flavor before you decide how loose the soup should be.

4. Blend and Adjust

Pour in part of the broth, puree until smooth, then finish the texture. A good bowl should pour like cream but still taste like tomatoes first.

Add broth gradually after the tomato base has cooked down so the soup stays easier to control.

Broth being poured into a pot of concentrated cooked tomato mixture.
Once the tomatoes have cooked down, add broth gradually rather than all at once; that keeps fresh tomato soup full-bodied and easier to control.

After you get used to blending first and loosening after, you can use the same habit in other smooth soups too, like this butternut squash soup.

Safety cue: Hot soup expands in a blender. Work in batches, vent the lid, and cover the top with a towel so steam can escape.

When the soup is hot, work carefully and judge the thickness before adding more liquid or cream.

An immersion blender blending tomato soup inside a large pot.
Blend directly in the pot until smooth, then check the thickness before adding anything else because fresh tomato soup often loosens more than expected.

Cooking from the card? Return to the recipe card, or keep going for texture cues and variations.

What to Look For While the Soup Cooks

Tomatoes do not all behave the same, so use the timing as a guide and the texture as the final signal. The pot should smell sweeter before it looks smooth.

Stage What You Should See Why It Matters
Onion cooked Soft, translucent, and lightly golden This adds sweetness before the tomatoes go in.
Tomato paste cooked Darker red and fragrant This deepens the tomato flavor and color.
Tomatoes simmered Collapsed, saucy, and no longer floating in liquid This is where the soup starts getting body.
After blending Smooth, spoon-coating, and pourable You are aiming for soft body, not a thick paste.
Final soup Bright red-orange, balanced, and not grainy At this point, taste once more, then serve.

Aim for the texture shown here: smooth, spoon-coating tomato soup that still pours easily.

Smooth tomato soup lightly coating a spoon above the pot.
The right texture should coat a spoon lightly while still pouring easily, giving the soup a creamy feel without making it heavy.

Roasted Fresh Tomato Soup Method for Deeper Flavor

When to Roast Fresh Tomatoes

Roasting is the method to choose when your tomatoes taste good but not amazing yet. The oven pulls out sweetness, softens acidity, and gives the soup a deeper red, slightly jammy flavor before it ever reaches the blender.

It is especially useful when your tomatoes are watery, very juicy, mild, or garden-grown.

The roasted method takes longer than the stovetop version, but most of that time is hands-off. Plan on about 55 to 65 minutes total if you roast first.

Roasting helps watery or mild tomatoes taste sweeter and more concentrated before they become soup.

Roasted tomatoes, onions, garlic, and red pepper on a sheet pan.
Roasted fresh tomatoes create a deeper, sweeter soup because the oven concentrates their flavor before they reach the pot.

Roasting Setup

Use the same 3 lb / 1.35 kg fresh tomatoes. For roasting, use olive oil on the baking sheet. If you prefer butter, stir it into the pot after roasting instead. Cut medium tomatoes into halves or quarters. Leave the garlic cloves whole for roasting instead of mincing them, then squeeze the softened garlic out of the skins before blending.

How to Finish the Roasted Soup

  1. Heat the oven to 425°F / 220°C.
  2. Spread the tomatoes, onion, whole garlic cloves, and optional red bell pepper on a rimmed baking sheet.
  3. Toss with olive oil, salt, and pepper.
  4. Roast for 35 to 45 minutes, until the tomatoes are soft, jammy, and lightly browned at the edges.
  5. Transfer the roasted vegetables to a pot. Stir the tomato paste into the roasted juices and cook for 30 to 60 seconds.
  6. Pour in only 1 cup / 240 ml broth at first, then blend.
  7. Loosen gradually with more broth until the soup reaches your preferred thickness.
  8. Simmer for 5 to 10 minutes, blend until smooth, then add basil and blend briefly again. Finish with cream only if you want a richer roasted tomato basil soup.

The roasted tray should smell sweet and garlicky before it ever reaches the pot. If the baking sheet has a lot of tomato liquid, add those juices gradually instead of dumping everything in at once.

When transferring roasted tomatoes, add the tray juices thoughtfully so the roasted flavor stays strong without thinning the pot.

Roasted tomatoes and juices being transferred from a sheet pan into a pot.
Scrape the roasted tomatoes and tray juices into the pot, but add the liquid thoughtfully so the soup keeps its roasted flavor without thinning too much.

After roasting: Keep the bowl bright, make it creamy or dairy-free, turn it into tomato basil soup, or choose what to serve with it.

Creamy, No-Cream, and Vegan Options

Choose the Creaminess Level

Creaminess is not just about adding cream. It is about deciding how soft, rich, and mellow you want the final bowl to feel. Some bowls want the classic silkiness of dairy; others only need a carrot, a potato, or a handful of cashews to feel round.

Creamy Options and No-Cream Thickeners

Option How Much to Use Best For
Heavy cream 1/4 cup / 60 ml for light creaminess; 1/2 cup / 120 ml for richer soup Classic creamy tomato soup.
Half-and-half 1/4 to 1/2 cup / 60 to 120 ml Lighter everyday creamy soup.
Butter 1 tablespoon blended in at the end Silky texture without much cream.
Cashews 1/4 to 1/3 cup soaked cashews Dairy-free creamy body.
White beans 1/2 cup cooked white beans Thicker soup with more body.
Potato 1 small peeled potato, simmered with the tomatoes Thick, mild, no-cream soup.
Carrot 1 small carrot, cooked with the tomatoes Sweetness, body, and acidity balance.
Bread 1 small slice crusty bread, blended in Rustic creamy texture without cream.
Coconut milk 2 to 4 tablespoons Vegan creamy tomato soup.

Creaminess can come from dairy or from body-building ingredients like cashews, beans, potato, carrot, or bread.

A guide showing cashews, white beans, potato, carrot, and bread as no-cream thickener options for tomato soup.
For creamy tomato soup without cream, use cashews, beans, potato, carrot, or bread to add body while keeping the tomato flavor clear.

The best creamy version still tastes like fresh tomatoes first. Cream, butter, cashews, beans, potato, or bread should round the edges, not hide them.

The goal is a soup that feels softer on the spoon, not one that forgets it started with fresh tomatoes.

Add Dairy Gently

With dairy, add it after blending and keep the heat low. If the soup is very hot, stir a spoonful of soup into the cream first, then add it back to the pot.

Cream belongs at the end, over low heat, where it softens the tomato flavor without splitting or muting the soup.

Cream being swirled into a bowl of tomato soup.
Add cream gently at the end and keep the heat low; creamy tomato soup should taste softer and rounder, not muted or split.

Vegan Tomato Soup Adjustments

For vegan tomato soup, use olive oil instead of butter and vegetable broth instead of chicken broth. Skip the cream, or blend in cashews, white beans, potato, carrot, or coconut milk for body. If the soup tastes sharp, use carrot, roasted red pepper, or a tiny amount of maple syrup instead of honey.

Tomato Basil Soup Variation

To make this a fresh tomato basil soup, increase the basil to about 3/4 cup loosely packed fresh basil leaves. Add the basil near the end, then blend briefly. For a brighter finish, save a little chopped basil for the bowls.

Fresh basil should go in late so tomato basil soup keeps its green aroma and bright finish.

Fresh basil leaves being added to warm tomato soup.
Add basil at the end so tomato basil soup keeps its fresh green aroma; otherwise, long cooking can flatten both the color and flavor.

The basil should smell fresh the moment it hits the warm soup. If it cooks too long, that bright green lift disappears.

No fresh basil? Use 1/2 to 1 teaspoon dried basil and add it with the oregano or thyme. The flavor will be less fresh, but the soup will still be good. If basil is what you love most, save this pesto pasta recipe for another night — same fresh-herb comfort, completely different dinner.

Old-Fashioned Fresh Tomato Soup Variation

For an old-fashioned tomato soup texture, use butter instead of olive oil and add a light roux. After the onion softens, stir in 1 to 2 tablespoons flour and cook for 1 minute before adding the tomatoes and broth. Finish with a splash of milk or cream and a tiny pinch of sugar if the tomatoes are sharp.

This version is thicker, softer, and more diner-style, especially good with grilled cheese, buttered toast, or homemade croutons. It is for eating fresh, refrigerating, or freezing — not for canning.

This variation leans softer and creamier, with the kind of diner-style texture that suits toast or grilled cheese.

A bowl of old-fashioned creamy tomato soup topped with croutons and black pepper, with grilled cheese in the background.
For an old-fashioned tomato soup feel, go a little creamier and softer in flavor, then serve it with croutons, toast, or grilled cheese for classic comfort.

Once the base method is clear, you can adapt it to the appliance you actually want to use.

Adapt the Method for Instant Pot, Slow Cooker, or Blender

You do not need a separate recipe for every appliance. The same rule still matters: cook the tomatoes into something flavorful before you loosen the soup.

Method How to Adapt It
Instant Pot Sauté onion and garlic, deglaze well, then add tomatoes. Keep tomato paste off the bottom to reduce burn risk. Use 1 cup / 240 ml broth for pressure cooking, pressure cook 15 minutes, release naturally 5 to 10 minutes, then blend and loosen.
Slow cooker For best flavor, sauté onion, garlic, and tomato paste first. For the easiest version, add everything directly. Use only part of the broth. Cook on high for 3 to 4 hours or low for 5 to 8 hours, then blend and add basil and cream at the end.
High-speed blender Use it for the smoothest texture, especially if you do not want to peel tomatoes. When blending hot soup, work in batches, vent the lid, and cover the top with a towel.

These versions are there for convenience, but the best flavor still comes from the same small cues: softened onion, cooked tomato paste, tomatoes that smell sweeter, and final liquid added with care.

When you want the slow-cooker route but a much heartier dinner, this crock pot lasagna soup is the richer tomato-and-pasta version.

Before troubleshooting, check the mistakes most likely to make fresh tomato soup thin, dull, or unsafe to store.

A guide card listing common fresh tomato soup mistakes, including adding broth too early, boiling cream, adding basil too soon, and canning the soup as written.
These fresh tomato soup mistakes are easy to avoid: hold back broth, keep dairy gentle, add basil late, and do not can this recipe as written.

How to Fix Watery, Sour, or Bland Tomato Soup

Start With the Simple Fixes

Do not panic if the first taste is sharp, thin, or a little bland. Fresh tomatoes vary a lot, and most soup problems are easy to fix before the bowls hit the table. Salt wakes the flavor up, cream softens acidity, tomato paste deepens the base, and a few more minutes of simmering can rescue a thin pot.

Use this comparison to see the difference between loose tomato soup and the thicker spoon-coating texture you want.

A side-by-side comparison showing watery tomato soup and thicker tomato soup labeled just right.
If the soup looks watery, keep cooking or add body before serving; the goal is smooth tomato soup that feels spoon-coating, not loose and flat.

Common Tomato Soup Problems

Problem Why It Happens How to Fix It
Watery soup Tomatoes were very juicy or too much broth was added. Simmer uncovered, add tomato paste, roast tomatoes next time, or blend in potato, white beans, cashews, or a small piece of bread.
Sour soup Tomatoes were acidic or underripe. Add carrot, roasted red pepper, cream, butter, or a tiny amount of sugar or maple syrup.
Bland soup Not enough salt, tomato depth, or aromatics. Add salt gradually, more black pepper, tomato paste, basil, or roasted garlic.
Bitter soup Garlic burned, basil overcooked, or tomatoes were underripe. Avoid burnt garlic, add basil late, and balance with cream or carrot.
Thin soup Too much liquid or not enough body. Simmer longer, add potato, white beans, cashews, bread, or cream.
Too thick Soup reduced too much. Add broth or water slowly until the texture loosens.
Seedy soup Tomato seeds remained after blending. Strain the soup through a fine-mesh strainer.
Skins in soup Tomato skins did not fully blend. Blend longer, use a high-speed blender, or strain.
Pale soup Tomatoes were not deeply red or tomato paste was skipped. Use ripe red tomatoes and add tomato paste.
Grainy soup Soup was not blended enough or solids were fibrous. Blend longer and strain for a smoother finish.

After the troubleshooting table, this card gives quick fixes for watery, sour, bland, or grainy soup.

A guide card showing fixes for watery, sour, bland, and grainy tomato soup.
Most tomato soup problems can be fixed before serving: simmer watery soup, soften sour edges, deepen bland flavor, and blend or strain rough texture.

What Not to Overdo

Do not fix everything with sugar. A tiny amount can help sharp tomatoes, but better soup usually comes from ripe tomatoes, enough salt, tomato paste, proper simmering, and a little fat or cream when needed.

For a chunkier tomato-broth soup where beans naturally add body, this minestrone soup is a good next bowl to make.

Soup fixed? Return to the recipe card, choose what to serve with tomato soup, or check storage and freezing.

What to Serve With Tomato Soup

Tomato soup is built for crisp, toasted, cheesy, or herby sides. The best bowl has that red-orange glow, a little basil on top, and something crisp on the side for dipping.

A bowl of tomato soup becomes a fuller meal when you add something crisp, cheesy, herby, or fresh on the side.

Tomato soup served with grilled cheese, toast, croutons, and a fresh salad on a table.
Tomato soup becomes a fuller meal with crisp, cheesy, or herby sides, so grilled cheese, garlic toast, croutons, and a fresh salad all work especially well.
  • Grilled cheese sandwich
  • Garlic bread
  • Cheese toast
  • Croutons
  • Toasted sourdough
  • Basil pesto toast
  • Cucumber salad for a crisp, cool side
  • Parmesan and black pepper
  • Chili flakes or chili oil
  • A swirl of cream or olive oil

For the classic version, make grilled cheese and dip the crisp edges into the soup. The first dip should leave a little orange-red trail on the bread. To keep the bowl lighter, serve it with salad, toasted bread, and extra basil. For a more filling lunch that still stays fresh, pair it with this chickpea salad instead of making the soup heavier.

The grilled cheese dip is also a texture test: the soup should cling lightly instead of running off like water.

A grilled cheese sandwich being dipped into a bowl of tomato soup.
A good tomato soup should cling lightly to grilled cheese and leave a warm orange-red trail, which is another sign that the texture is right.

Storage, Freezing, and Reheating

  • Refrigerate: Store cooled soup in an airtight container for up to 4 days.
  • Freeze: Freeze for up to 3 months for best quality. For best texture, freeze before adding cream.
  • Reheat: Warm gently on the stovetop over medium-low heat, stirring often.
  • Adjust after reheating: Add a splash of broth or water if the soup thickens in the fridge or freezer.
  • Add cream later: If freezing, stir in cream after reheating rather than before freezing.

Freeze the soup in portions for quick lunches. Leave a little space at the top of the container because soup expands as it freezes.

Portion the soup before adding cream, then adjust the texture gently when reheating.

Fresh tomato soup stored in freezer-safe containers labeled for freezing, with a bowl of soup nearby.
Freeze fresh tomato soup before adding cream for the best reheated texture; later, warm it gently and loosen it with a splash of broth if needed.

For general leftover timing, FoodSafety.gov’s cold food storage chart lists soups and stews at 3 to 4 days in the refrigerator and 2 to 3 months in the freezer, which is why this recipe keeps the storage guidance conservative.

Cooking again later? Return to the recipe card, or jump back to the top of the post.

Canning Safety Note

This fresh tomato soup recipe is written for eating fresh, refrigerating, or freezing. It is not a tested shelf-stable canning recipe.

Keep the storage advice clear: fresh eating, refrigeration, and freezing are fine, but this is not a canning recipe.

A safety card stating not to can this soup as written and to use a tested canning recipe for shelf-stable soup.
This recipe is meant for fresh eating, refrigeration, or freezing, while shelf-stable tomato soup should come from a properly tested canning recipe.

Do not can this soup as written, especially if you add cream, milk, flour, cashews, bread, potato, white beans, pasta, rice, or other thickeners. Those ingredients can change density and heat penetration in home-canned soup. If you want pantry-stable tomato soup, follow a tested pressure-canning recipe from start to finish rather than adapting this one. The National Center for Home Food Preservation is a good place to start.

Fresh Tomato Soup FAQs

Do I need to peel tomatoes for tomato soup?

No. You do not need to peel tomatoes for everyday tomato soup. Blend well, then strain the soup if you want a very smooth finish.

How many fresh tomatoes do I need?

For about 6 bowls of soup, use 3 lb / 1.35 kg fresh tomatoes. This is usually around 8 to 10 medium tomatoes, depending on their size.

Can I use cherry, garden, or mixed tomatoes?

Yes. Cherry tomatoes add sweetness, garden tomatoes add fresh flavor, and mixed tomatoes work well together. If the mix is very juicy, cook it longer before adding more broth.

Why did my soup turn watery?

Tomato soup turns watery when the tomatoes are very juicy, the soup is not simmered long enough, or too much broth is added early. Simmer uncovered, add tomato paste, or roast the tomatoes next time for a thicker bowl.

How do you make fresh tomato soup less acidic?

Use ripe tomatoes, add carrot or roasted red bell pepper, and finish with cream, butter, or a small pinch of sugar if needed. Roasting the tomatoes also helps soften sharp acidity.

What if I do not have tomato paste?

You can still make the soup, but it may taste lighter and look paler. Cook the tomatoes longer, use the roasted method if possible, and add a little extra salt or a small knob of butter at the end for depth.

Should I add cream to fresh tomato soup?

Add cream if you want the soup softer, richer, and closer to classic creamy tomato soup. Skip it if you want the fresh tomato flavor to stay brighter. For no-cream body, use carrot, potato, cashews, white beans, bread, or extra simmering.

How do I make tomato basil soup with fresh tomatoes?

Make the base recipe, then add fresh basil near the end and blend briefly. For stronger basil flavor, use extra basil and garnish each bowl with chopped basil or basil oil.

Can this be made without onion or garlic?

Yes. Use carrot, celery, roasted red bell pepper, bay leaf, basil, black pepper, and olive oil or butter for flavor. For an Indian-style no onion no garlic version, an optional tiny pinch of hing can add savory depth.

How long does homemade tomato soup last?

Homemade tomato soup lasts up to 4 days in the refrigerator when stored in an airtight container.

Can I freeze fresh tomato soup?

Yes. Fresh tomato soup freezes well for up to 3 months for best quality. For the smoothest texture, freeze it before adding cream and stir in cream after reheating.

Can I can this tomato soup?

No. This is not a tested shelf-stable canning recipe. It is written for eating fresh, refrigerating, or freezing. Use a tested pressure-canning recipe if you want pantry-stable soup.

Final Thought

The best fresh tomato soup tastes like you caught the tomatoes at the right moment — ripe, sweet, a little messy, and worth turning into something warm. Cook them down until the pot smells saucy, blend until smooth, then let the tomatoes tell you how much broth they need. The final bowl should taste bright enough for summer, soft enough for comfort, and ready for grilled cheese.