Posted on — 1 Comment

Overnight Oats Recipe: Best Base Ratio, Easy Flavors, Storage & Texture Fixes

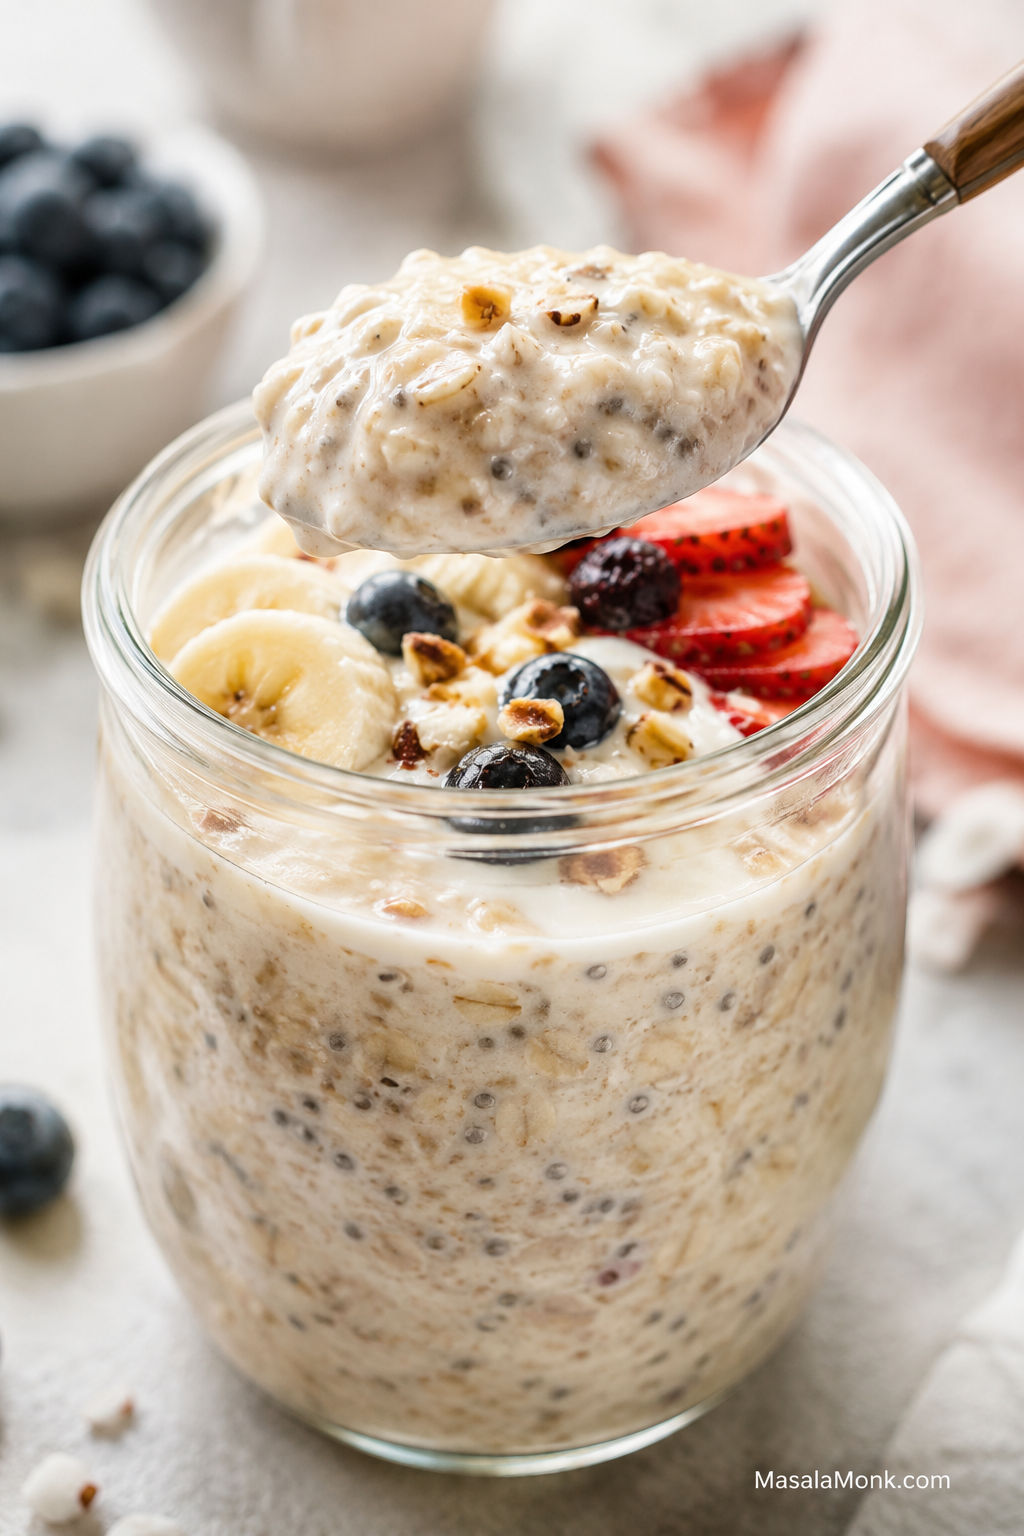
Creamy overnight oats in a glass jar with fresh fruit, nuts, and a spoon lifting a thick bite.

This overnight oats recipe gives you one dependable breakfast jar, then shows you exactly how to adjust it. Start with rolled oats, milk, yogurt or chia, a little sweetness, and a few hours in the fridge. By morning, the oats soften into a creamy, spoonable breakfast with just enough chew — not watery, not gluey, and not bland.

The real secret is not one rigid formula. The best overnight oats depend on the consistency you like: creamy with yogurt, thicker with chia, lighter without yogurt, looser with extra milk, or higher-protein with Greek yogurt and protein powder. Once you know the base, you can turn the same chilled oats into peanut butter, mango, chocolate, apple cinnamon, coffee, banana, berry, or matcha overnight oats without learning a new recipe every time.

The goal is simple: you should be able to mix a jar at night, understand why the texture works, and know exactly what to do in the morning if it needs more milk, more chia, better toppings, or a little extra flavor.

Overnight Oats Guide

Use this guide to get the base ratio right first, then adjust the creaminess, toppings, storage, and flavor so breakfast fits your morning instead of turning into a soggy fridge experiment.

Quick Answer: The Best Overnight Oats Ratio

The basic overnight oats ratio

The best all-purpose overnight oats ratio is ½ cup rolled oats + ½ cup milk + ¼ cup Greek yogurt or thick curd. In metric, that is about 40 g oats, 120 ml milk, and 60 g yogurt. This gives you creamy overnight oats that are soft, spoonable, and not too watery.

The no-yogurt ratio

For overnight oats without yogurt, go with ½ cup rolled oats + ⅔ cup milk + 1 tablespoon chia seeds. The extra milk helps the oats soften, while chia seeds thicken the mixture so it still feels creamy.

Best oats and chill time

Rolled oats or old-fashioned oats give the best bite. After mixing, let the jar rest for 5 minutes, then stir again before refrigerating to prevent chia clumps and dry pockets. Chill for at least 4 hours, though overnight, about 8 hours, gives the creamiest result.
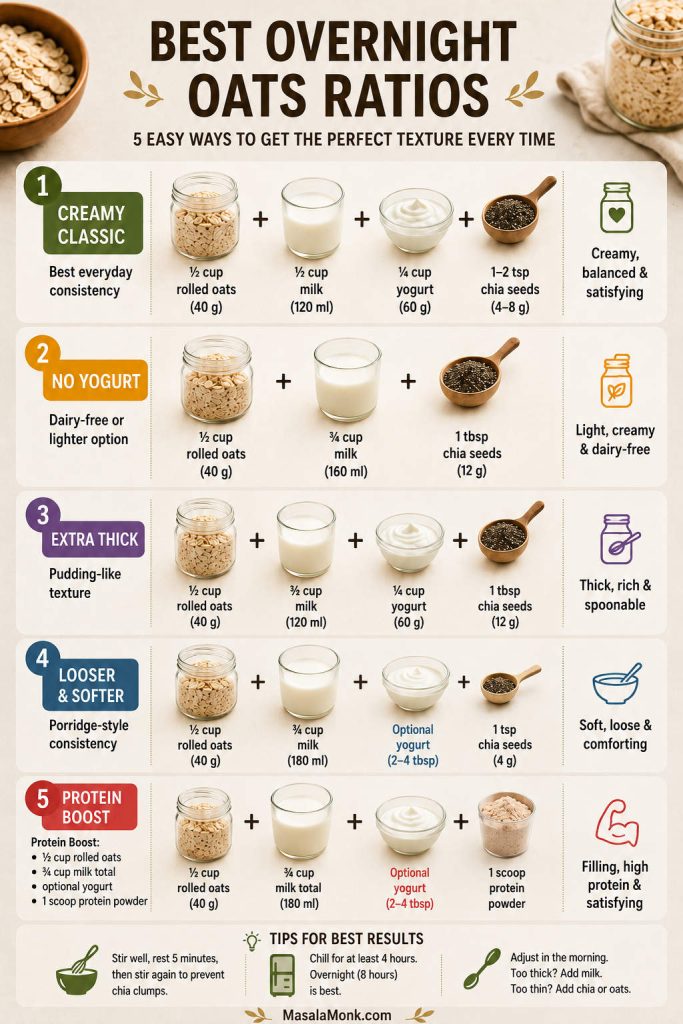
Overnight oats ratio guide showing creamy classic, no-yogurt, extra-thick, looser, and protein versions.
Use the classic overnight oats ratio as your starting point, then adjust milk, yogurt, chia seeds, or protein powder to make the jar thicker, looser, lighter, or more filling.

Ratio variations at a glance

StyleOatsLiquidYogurt / ChiaBest For
Creamy classic½ cup / 40 g½ cup / 120 ml¼ cup / 60 g yogurt + 1–2 tsp chiaBest default consistency
No yogurt½ cup / 40 g⅔ cup / 160 ml1 tbsp chiaDairy-free or lighter oats
Extra thick½ cup / 40 g½ cup / 120 ml¼ cup / 60 g yogurt + 1 tbsp chiaPudding-like oats
Looser½ cup / 40 g¾ cup / 180 mlOptional yogurt or 1 tsp chiaSofter porridge-style oats
Protein powder½ cup / 40 g¾ cup / 180 ml to start1 scoop protein + optional yogurtHigher-protein meal prep

Once you know the ratio, you can jump straight to the recipe card or use the troubleshooting guide if your oats usually turn too thick, watery, mushy, or clumpy. Using protein powder? The protein powder tips section explains why the jar may need extra milk after chilling.

Why This Overnight Oats Recipe Works

The method works because it balances three things: enough liquid to soften the oats, enough body to keep the breakfast creamy, and enough flavor so it does not taste flat by morning. Rolled oats absorb milk slowly, yogurt or curd adds creaminess, chia seeds help everything set, and a pinch of salt makes the sweet flavors taste brighter.

The second stir matters too. When oats, chia, yogurt, and milk sit for a few minutes, they begin to thicken. Stirring again before refrigerating spreads the chia seeds evenly and prevents dry oats or thick clumps from settling at the bottom. You can see the technique in the second-stir step.

That is what makes the core recipe flexible without feeling random. You can make it creamier with yogurt, thicker with chia, lighter with more milk, sweeter with ripe fruit, or more filling with protein powder or nut butter, while still keeping the same basic method.

Overnight Oats at a Glance

Before you start, here are the practical details that make the recipe easier to repeat.
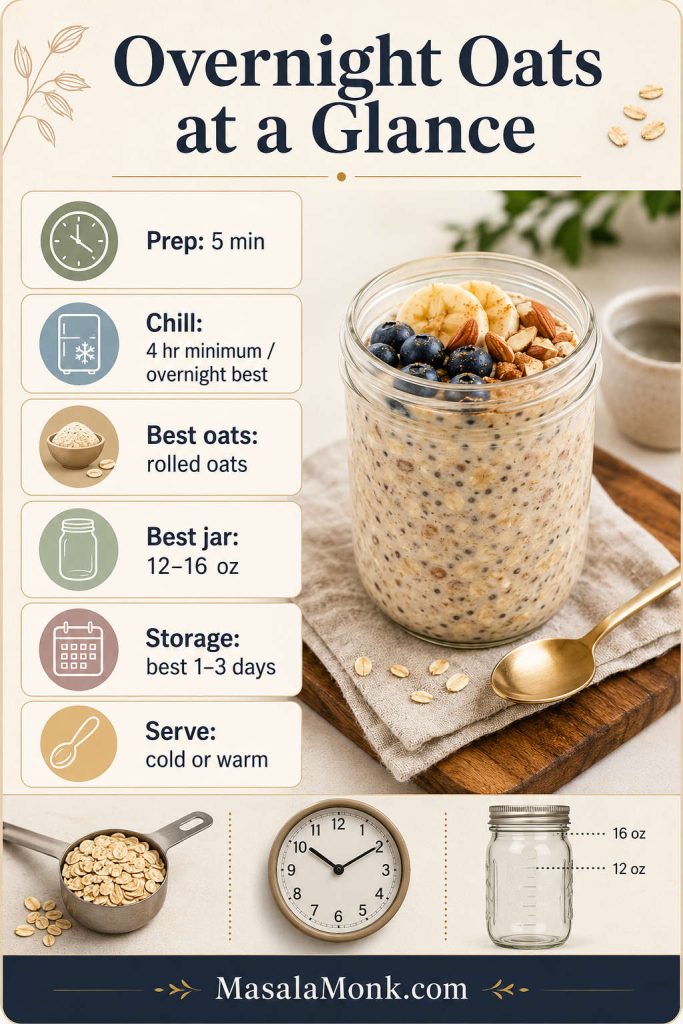
At-a-glance overnight oats guide with prep time, chill time, rolled oats, jar size, storage, and cold or warm serving notes.
Once the timing is clear, overnight oats become easy to repeat: mix in minutes, chill until creamy, and finish with toppings when you are ready to eat.
DetailBest Answer
Best oatsRolled oats or old-fashioned oats
Prep time5 minutes
Cook time0 minutes
Chill time4 hours minimum; overnight / 8 hours best
Best container size12–16 oz / 350–500 ml; 16 oz is best with toppings
Fridge temperature40°F / 4°C or below
Best storage windowBest in 1–3 days; plain oats usually 3–4 days
Eat cold or warm?Usually cold; can be warmed 30–60 seconds with a splash of milk

If you only want one version to try first, make the creamy classic below. It gives you enough body from yogurt, enough softness from milk, and just a little chia for structure without turning the oats stiff.

Overnight Oats Recipe Card

Creamy Overnight Oats Recipe

This overnight oats recipe is the dependable starting mix: creamy, lightly thickened, easy to flavor, and flexible enough for yogurt, curd, dairy-free milk, chia, fruit, nuts, or protein add-ins.

Prep Time5 minutes

Cook Time0 minutes

Chill Time4 hours minimum

Yield1 breakfast jar

Ingredients

  • ½ cup rolled oats or old-fashioned oats, about 40 g
  • ½ cup milk of choice, 120 ml / 4 fl oz
  • ¼ cup Greek yogurt or thick curd, about 60 g
  • 1–2 teaspoons chia seeds, about 4–8 g
  • 1–2 teaspoons maple syrup, honey, date syrup, or jaggery syrup, 5–10 ml
  • ¼ teaspoon vanilla extract
  • Pinch of fine salt
  • Fruit, nuts, seeds, nut butter, cinnamon, cocoa, coconut, or granola for topping

Instructions

  1. Add the oats, milk, yogurt or curd, chia seeds, sweetener, vanilla, and salt to a jar or lidded container.
  2. Stir very well, scraping the bottom and sides so there are no dry oats, chia clumps, or yogurt pockets.
  3. Let the mixture sit for 5 minutes, then stir again. This second stir helps the chia seeds spread evenly and gives a smoother result.
  4. Cover and refrigerate for at least 4 hours. For the best consistency, chill overnight.
  5. In the morning, stir again. If the oats are too thick, loosen with 1–3 tablespoons milk.
  6. Add fresh fruit, crunchy toppings, nuts, granola, or extra nut butter right before serving.

Recipe Notes

  • No yogurt? Combine ½ cup oats, ⅔ cup milk, and 1 tablespoon chia seeds, or see the no-yogurt ratio for the texture logic.
  • Want a thicker, pudding-like jar? Increase the chia seeds to 1 tablespoon.
  • Adding protein powder? Use 1 scoop and increase the milk by about ¼ cup / 60 ml; see the protein powder tips if your oats turn stiff or clumpy.
  • Need more sweetness? Taste in the morning and adjust then, so the jar does not become dessert-sweet overnight.
  • For the smoothest mix, stir everything in a bowl first, then transfer it to a jar after the second stir.
  • Need more topping guidance? Add crunchy toppings in the morning, or jump to when to add overnight oats toppings.
  • Nutrition varies by milk, yogurt, sweetener, and toppings. The base jar is generally more balanced when it includes yogurt or another protein source, while nut butter, granola, dried fruit, chocolate chips, and syrup can raise calories quickly.

Storage

Overnight oats taste best in the first 1–3 days. A plain sealed serving can usually keep for 3–4 days in the refrigerator at 40°F / 4°C or below. Add delicate fruit, nuts, seeds, and granola closer to serving for the best consistency.
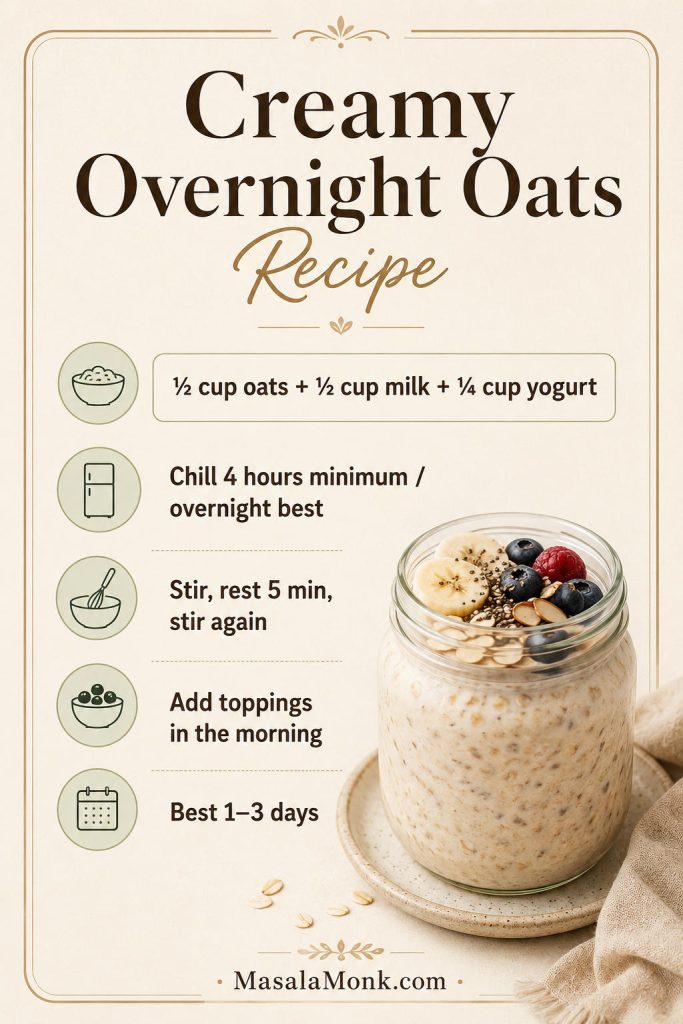
Saveable creamy overnight oats recipe card with oats, milk, yogurt, chill time, second stir tip, topping timing, and storage note.
This base overnight oats recipe gives you the formula to return to whenever you want a make-ahead breakfast without guessing the liquid, chill time, or topping timing.

Want to change the thickness? Use the ratio guide. Want to keep the same base but change the taste? Go to the flavor ideas.

First time making overnight oats? Start with the creamy classic ratio, keep toppings simple, and adjust the thickness in the morning. After one serving, you will know whether you prefer more milk, more chia, or less yogurt.

Overnight Oats Ratio Guide

The easiest way to build the base is to start with equal parts oats and milk, then decide whether you want yogurt, chia, or both. Yogurt makes the oats creamier and more filling. Chia does a different job: it makes the jar thicker and more pudding-like. Extra milk gives you a looser, softer consistency.

Creamy classic ratio

This is the version to start with if you are making overnight oats for the first time. For a creamy everyday texture, combine ½ cup rolled oats, ½ cup milk, and ¼ cup yogurt or curd. It gives you a satisfying breakfast without making the oats too stiff.

Yogurt vs No-Yogurt Overnight Oats

Go this route when you want dairy-free, vegan, or lighter overnight oats. Instead of yogurt, combine ½ cup rolled oats, ⅔ cup milk, and 1 tablespoon chia seeds. Chia replaces some of the body you would normally get from yogurt.
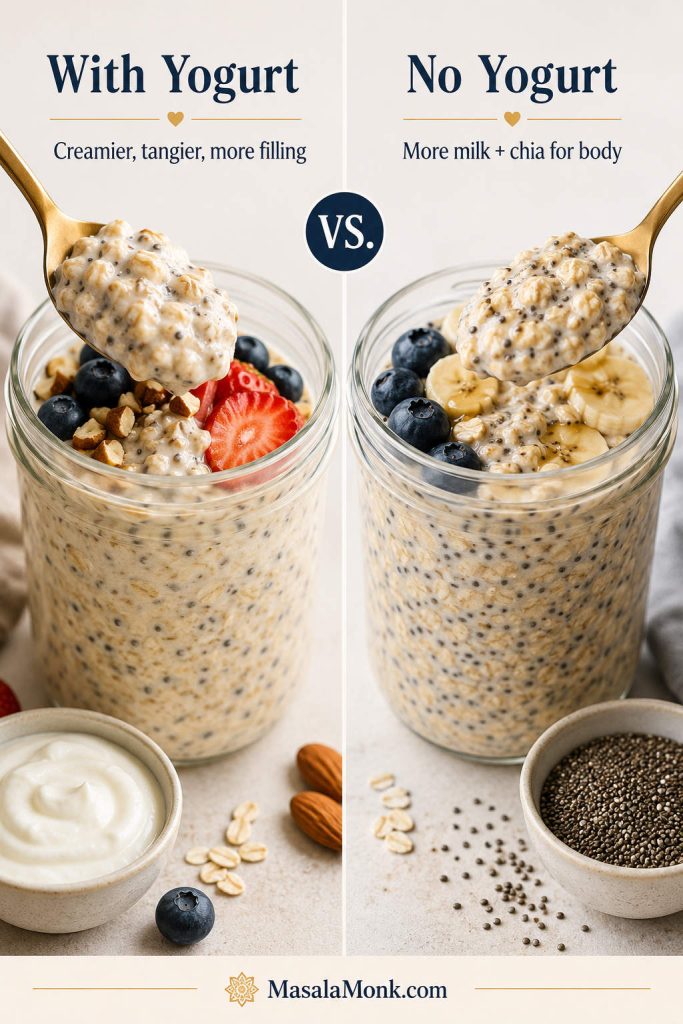
Side-by-side comparison of overnight oats with yogurt and no-yogurt overnight oats thickened with chia seeds.
Yogurt makes overnight oats creamier and tangier, while the no-yogurt version needs extra milk and chia seeds to stay thick and spoonable.

Extra-thick chia ratio

For a thicker, pudding-like result, keep the classic ratio but increase chia seeds to 1 tablespoon. This works especially well with cocoa, peanut butter, banana, and coffee flavors.

Looser porridge-style ratio

If you like softer oats with more movement, combine ½ cup oats and ¾ cup milk, with yogurt or chia kept optional. This version feels closer to chilled porridge.

Texture tip: Overnight oats thicken as they sit. A jar that looks slightly loose at night can be perfect by morning, while a jar with chia or protein powder may need extra milk after chilling.

Choose your overnight oats texture

There is no single perfect consistency. Some people want oats thick enough to hold a spoon upright, while others want something closer to chilled porridge. Use this as your shortcut.

If You Like…Best Adjustment
Thick, spoonable oatsAdd yogurt plus 1 tablespoon chia seeds.
Soft, loose oatsUse ¾ cup milk for every ½ cup oats.
Less tangUse less yogurt and more milk.
More natural sweetnessMix in mashed banana, mango, grated apple, berries, or applesauce.
More staying powerAdd Greek yogurt, soy milk, chia, protein powder, peanut butter, or nut butter.
A lighter breakfastUse milk plus chia instead of yogurt, and keep toppings simple.

If your oats still do not come out the way you like, the texture guide and fixes section will help you adjust the next batch.

How to Scale Overnight Oats for Meal Prep

For meal prep, mix the oats in a large bowl first, then divide them into jars. This is easier than trying to stir several full containers one by one, and it helps every serving taste consistent.
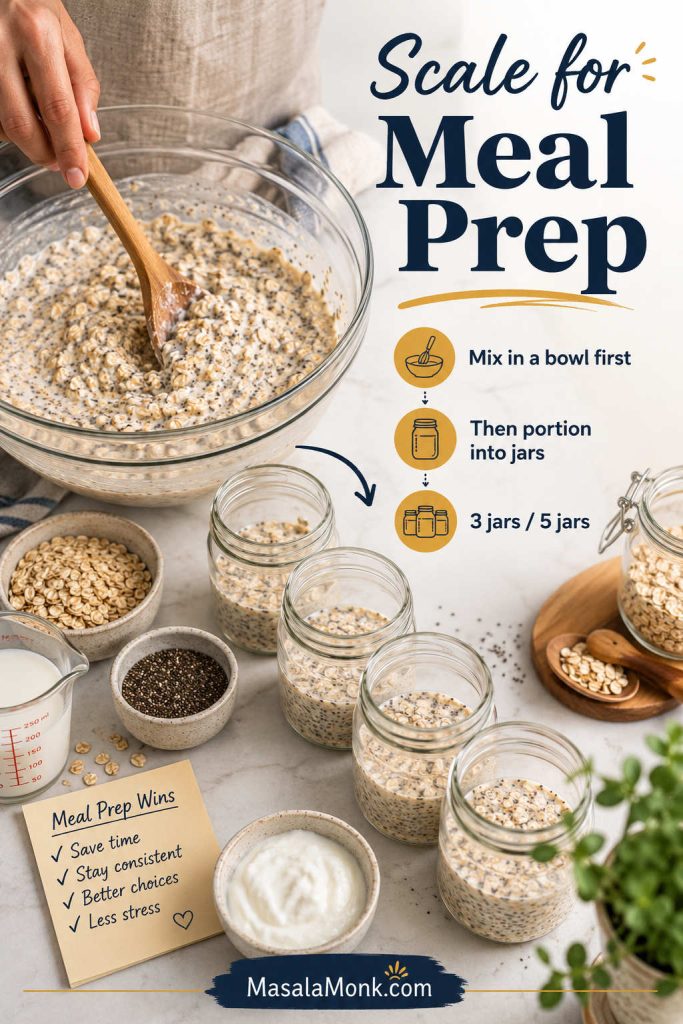
Large bowl of overnight oats being mixed and portioned into several jars for meal prep.
For overnight oats meal prep, mix the base in one bowl first and then divide it into jars, so every serving has the same texture and flavor.
ServingsRolled OatsMilkYogurt / CurdChia Seeds
1 jar½ cup / 40 g½ cup / 120 ml¼ cup / 60 g1–2 tsp
3 jars1½ cups / 120 g1½ cups / 360 ml¾ cup / 180 g1–2 tbsp
5 jars2½ cups / 200 g2½ cups / 600 ml1¼ cups / 300 g1½–3 tbsp

Equipment for Overnight Oats

You do not need special equipment, but the right container makes the oats easier to mix, store, and eat. A jar that is too small might technically hold the ingredients, but it will not give you much room to stir or add toppings.

Best Jar Size for Overnight Oats

Use the jar size as a texture tool, not just a container choice. A little extra room makes stirring easier and keeps fruit or crunchy toppings from spilling over.
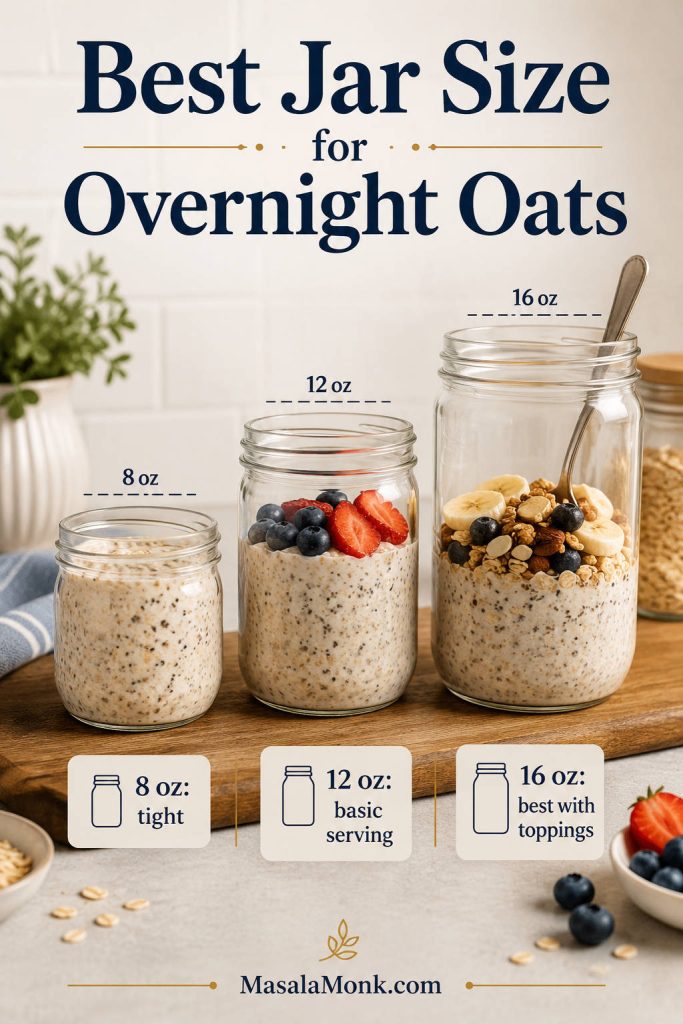
Jar size guide for overnight oats showing 8-ounce, 12-ounce, and 16-ounce jars with different fill levels.
A 12-ounce jar works for a basic serving, but a 16-ounce jar gives you more room to stir, add fruit, and keep toppings from spilling over.
  • Jar or lidded container: 12–16 oz / 350–500 ml for one serving.
  • 16 oz / 475–500 ml jar: best if you want room for fruit, nuts, yogurt, and stirring.
  • Mixing bowl: useful when making 3–5 servings at once.
  • Spoon or mini spatula: helpful for scraping the bottom and sides so chia seeds and oats do not clump.
  • Measuring cups and spoons: important until you know the consistency you like.
  • Microwave-safe bowl: optional, only if you plan to warm the oats.

Ingredients You Need for Overnight Oats

A good jar starts with a simple oat mixture, then gets its personality from fruit, spices, nuts, seeds, nut butter, cocoa, coffee, or coconut. Here is what each ingredient does.
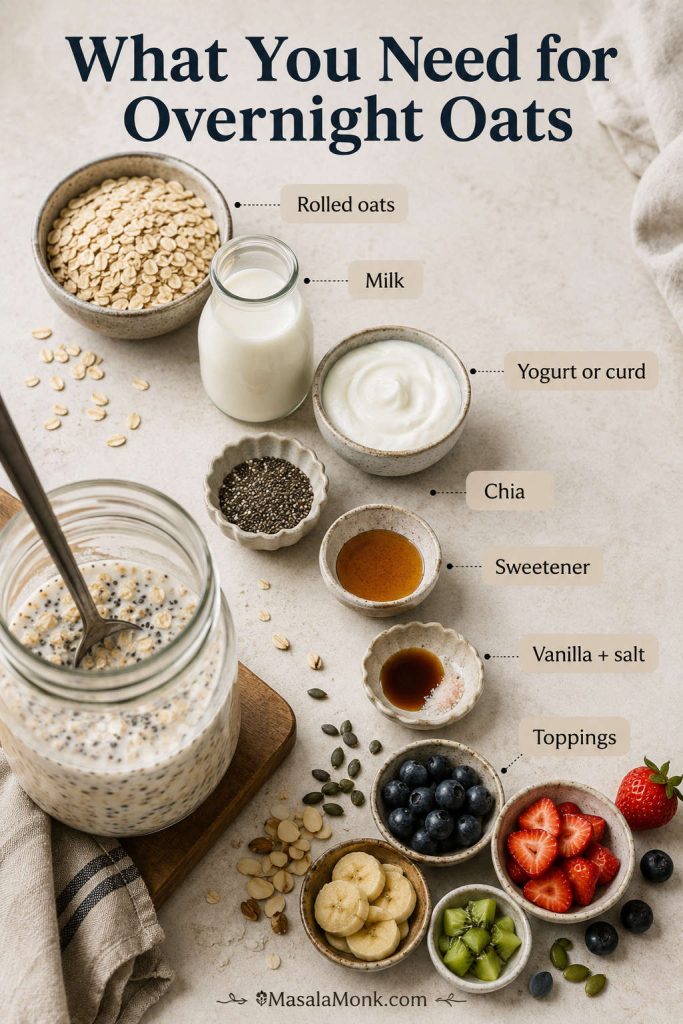
Overnight oats ingredients guide with rolled oats, milk, yogurt or curd, chia seeds, sweetener, vanilla, salt, and toppings.
The best overnight oats start with a simple base: rolled oats, liquid, something creamy or thickening, a little seasoning, and toppings added with purpose.

Rolled oats or old-fashioned oats

Rolled oats are the safest default because they soften well while keeping a little texture. Old-fashioned oats and rolled oats can usually be used the same way. For a deeper oat-type breakdown, see this MasalaMonk guide to oats types, nutrition, and differences.

For a quick comparison of rolled oats, quick oats, instant oats, steel-cut oats, and muesli in this recipe, see the best oats for overnight oats section below.

Milk

Dairy milk, oat milk, almond milk, soy milk, coconut milk, and cashew milk can all work. Soy milk and dairy milk add a little more protein. Oat milk and coconut milk make the breakfast creamier, while almond milk keeps it lighter.

Yogurt or thick curd

Greek yogurt or thick curd makes the oats creamier, tangier, and more filling. When your curd is very sour, use a smaller amount and balance it with fruit, vanilla, cinnamon, or a little sweetener.

Chia seeds

Chia seeds thicken the oats and help hold the liquid. Add 1–2 teaspoons for light thickening or 1 tablespoon for a pudding-like result. Too much chia can make the texture feel gluey, so increase it gradually.

If you like the thicker, pudding-style side of overnight oats, you may also enjoy these chia pudding recipes, which use chia as the main thickener rather than a small supporting ingredient.

Sweetener

Maple syrup, honey, date syrup, jaggery syrup, or a mashed ripe banana all work. Start light because fruit and toppings can add sweetness later.

Vanilla, salt, and spices

A tiny pinch of salt makes overnight oats taste less flat. Vanilla, cinnamon, cardamom, cocoa, nutmeg, ginger, or instant espresso powder can also change the flavor without changing the base method.

Toppings

Fruit, nuts, seeds, granola, coconut, peanut butter, almond butter, jam, chocolate chips, or roasted makhana can all work. Soft mix-ins can go in at night, while crunchy toppings are better in the morning. For a quick way to build a better jar, see the topping builder.

Build Better Overnight Oats Toppings

Choose toppings by purpose instead of adding everything at once. Freshness, crunch, creaminess, flavor, and texture each do a different job in the jar.
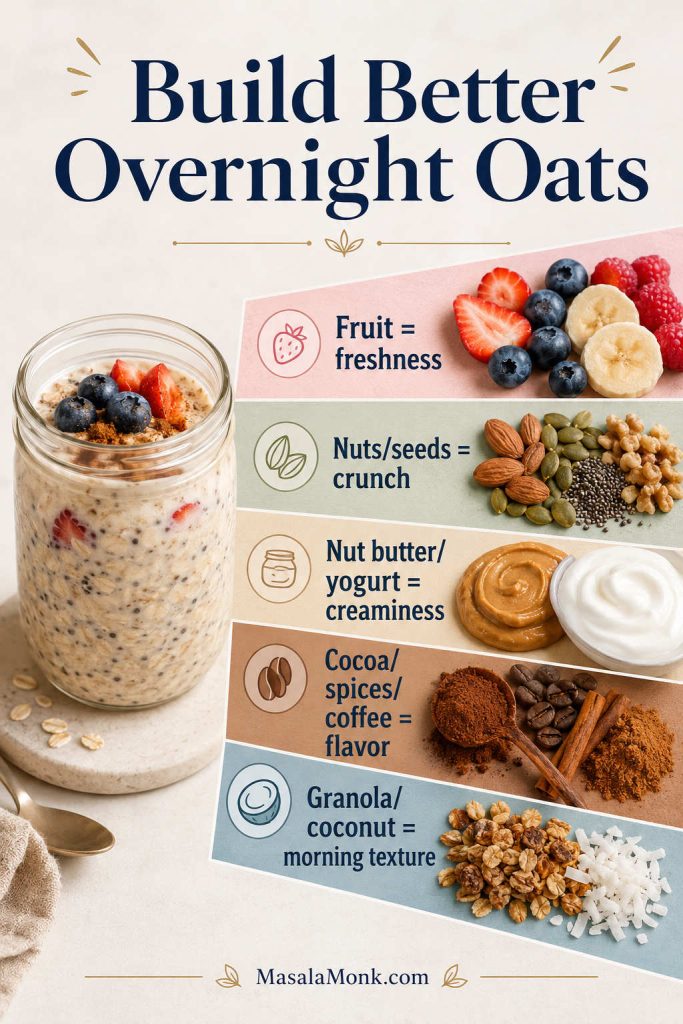
Overnight oats topping builder showing fruit, nuts, seeds, nut butter, yogurt, spices, granola, and coconut grouped by purpose.
Better toppings do a job: fruit adds freshness, nuts and seeds add crunch, and creamy extras like yogurt or nut butter make the jar more satisfying.

Best Oats for Overnight Oats

The best oats for overnight oats are rolled oats or old-fashioned oats. They absorb liquid evenly and become creamy without turning instantly mushy.
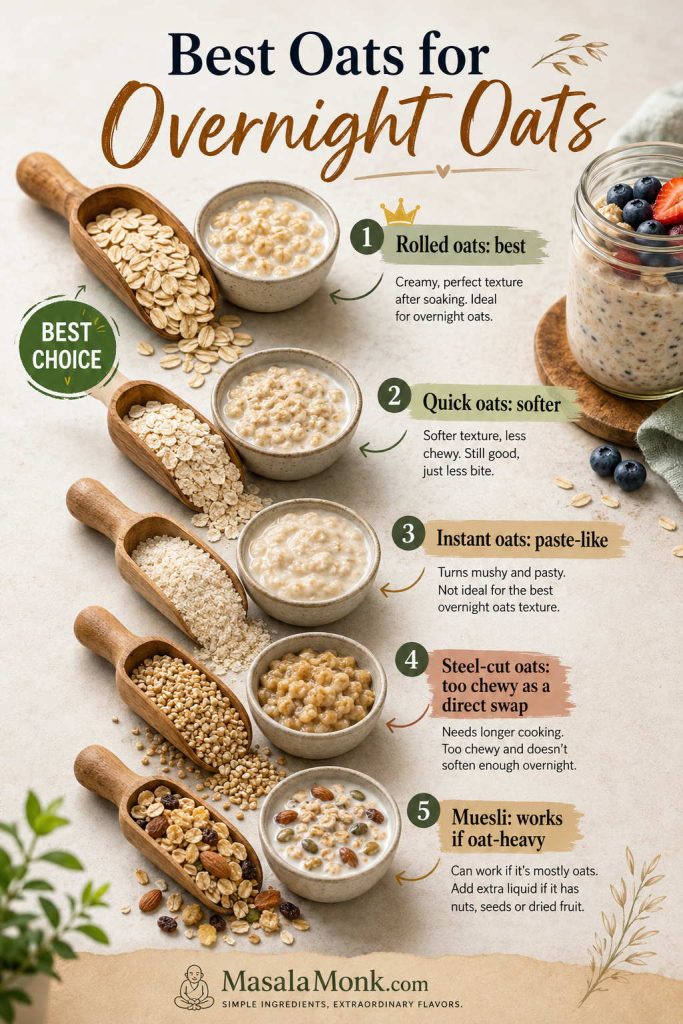
Guide to rolled oats, quick oats, instant oats, steel-cut oats, and muesli for making overnight oats.
Rolled oats are the safest choice for overnight oats because they soften evenly while still keeping enough texture to avoid turning mushy.
Oat TypeCan You Use It?TextureBest Use
Rolled oats / old-fashioned oatsYes, best choiceCreamy with light chewBest default method
Quick oatsYes, but softerVery soft, can turn mushyFast-soak jars or softer oats
Instant oatsOnly if neededSoft, sometimes paste-likeEmergency quick version
Steel-cut oatsNot a simple swapChewy, firm, sometimes toughSeparate steel-cut overnight method
MuesliYes, if oat-heavyMore varied textureNutty, fruit-filled jars

Rolled Oats vs Quick Oats vs Steel-Cut Oats

The soak changes each oat type differently. This comparison is useful when you want to understand why rolled oats are the safest default for this method.
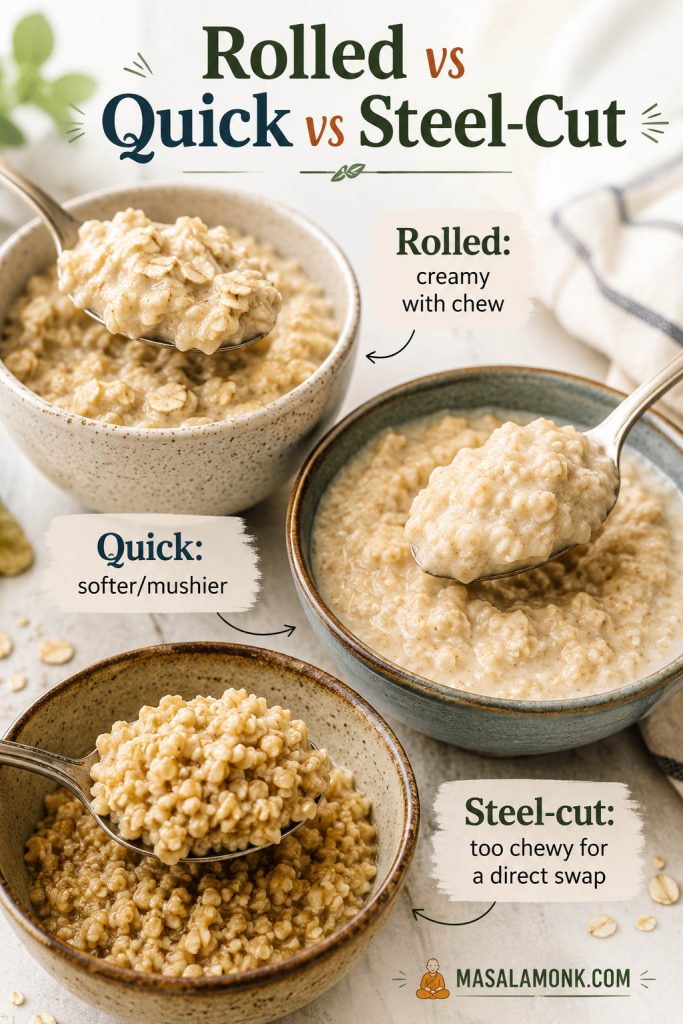
Comparison of soaked rolled oats, quick oats, and steel-cut oats showing different overnight oats textures.
Rolled oats give the best balance of creaminess and chew; quick oats soften more, while steel-cut oats stay too firm for a direct swap.

If you are choosing between rolled oats and steel-cut oats, this MasalaMonk comparison of steel-cut oats vs rolled oats explains the texture difference in more detail.

If your package says old-fashioned oats, this guide to old-fashioned oats and rolled oats will help clarify the naming.

How to Make Overnight Oats

The method is simple, but the small details matter. Stirring well, resting briefly, and stirring again helps prevent dry pockets, chia clumps, and protein powder lumps.
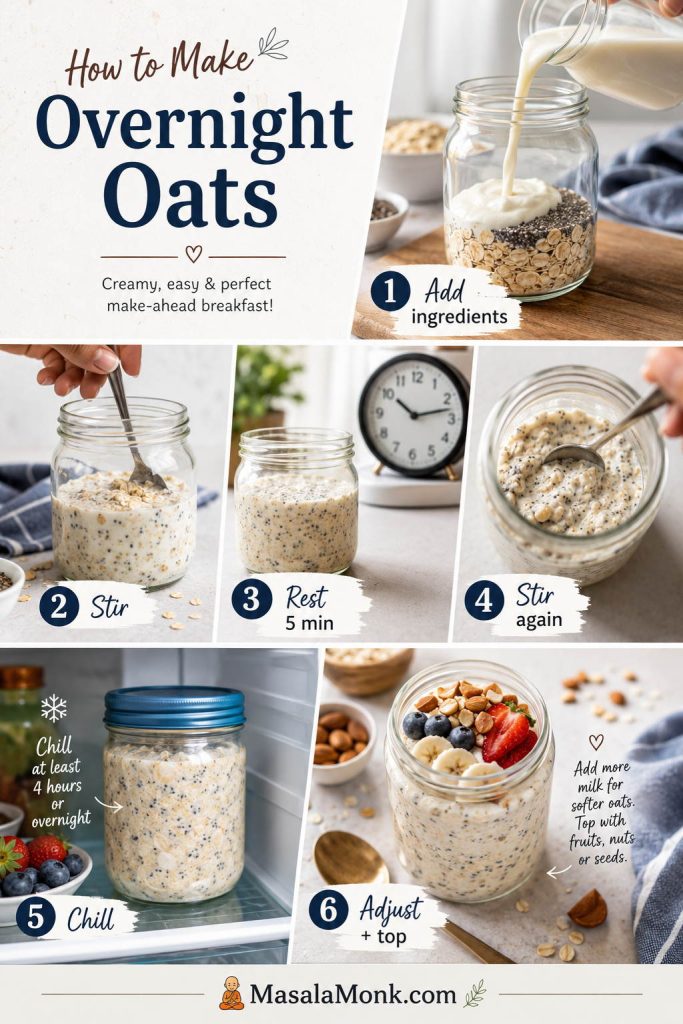
Step-by-step overnight oats method showing ingredients added, stirred, rested, stirred again, chilled, adjusted, and topped.
The overnight oats method is simple, but the rest-and-stir step helps prevent dry pockets and chia clumps before the jar goes into the fridge.

Step 1: Add the base ingredients

Add rolled oats, milk, yogurt or curd, chia seeds, sweetener, vanilla, and salt to a jar or bowl.

Step 2: Stir very well

Scrape the bottom and sides as you stir. Dry oats and chia seeds often hide in the corners of a jar, especially if the container is narrow.

Step 3: Rest for 5 Minutes, Then Stir Again

This second stir is the difference between creamy oats and a serving with clumps at the bottom. It is especially helpful when you use chia seeds, yogurt, cocoa, matcha, or protein powder.
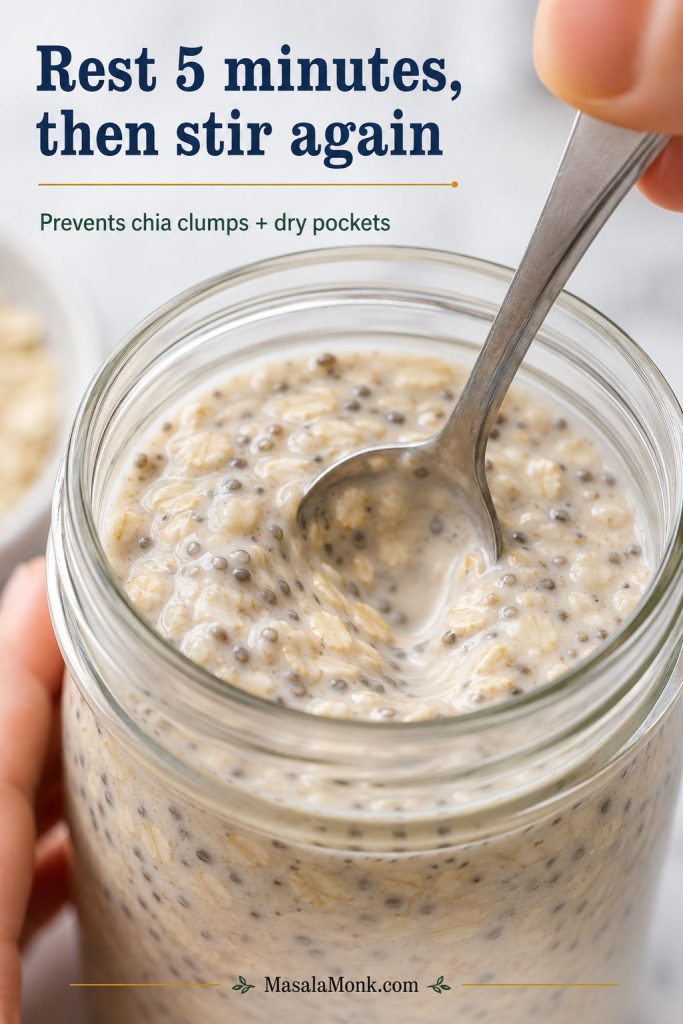
Close-up of overnight oats being stirred again after a short rest to prevent chia clumps and dry pockets.
After the first stir, let the jar sit for five minutes and stir again so chia seeds spread evenly and the oat mixture sets more smoothly.

Step 4: Cover and refrigerate

Chill for at least 4 hours. Overnight, or about 8 hours, gives the best consistency because the oats have more time to soften evenly.

Step 5: Stir and adjust in the morning

If the oats are too thick, add 1–3 tablespoons milk. If they are too loose, add a teaspoon of chia or a spoon of oats and let them sit a little longer.

Step 6: Add toppings

Add fresh banana, crisp apple, granola, toasted nuts, and other crunchy toppings right before eating so they keep their bite.

Overnight Oats Texture Guide

Good overnight oats should be creamy, not watery, gluey, or dry. The final consistency comes down to the oat type, liquid amount, yogurt, chia, and how long the mixture rests.
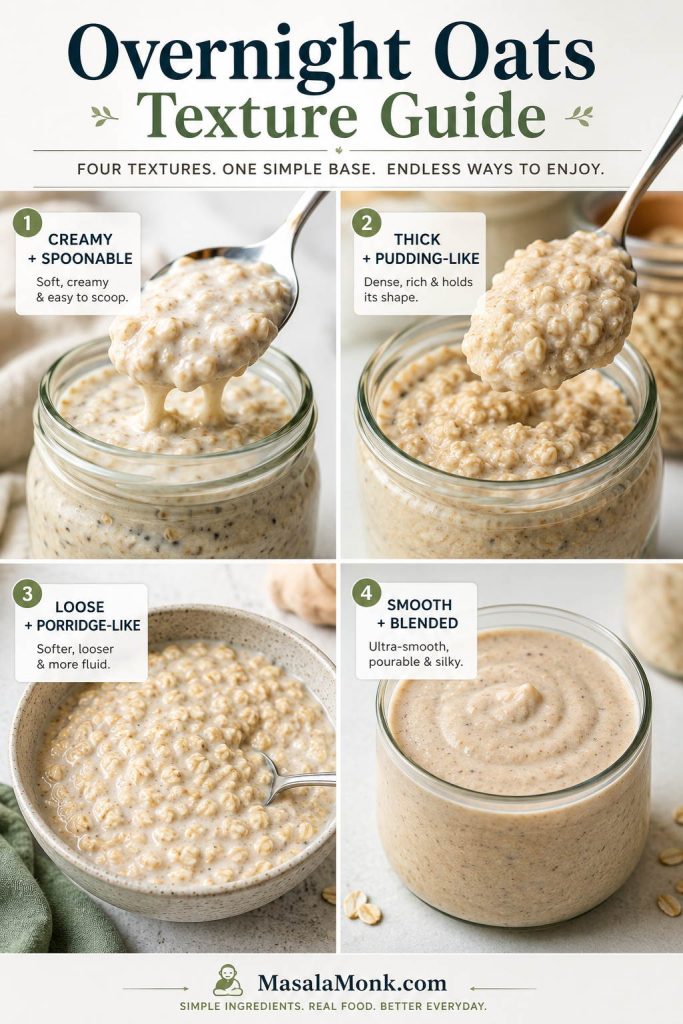
Overnight oats texture guide showing creamy, thick, loose, and smooth blended oat textures.
Texture is adjustable: yogurt makes oats creamier, chia seeds make them thicker, extra milk makes them looser, and blending makes the base smoother.
TextureHow to Get ItBest Ratio
Creamy and spoonableAdd yogurt or thick curd½ cup oats + ½ cup milk + ¼ cup yogurt
Thick and pudding-likeAdd yogurt plus more chia½ cup oats + ½ cup milk + ¼ cup yogurt + 1 tbsp chia
Loose and porridge-likeIncrease the liquid½ cup oats + ¾ cup milk
ChewierChoose thicker rolled oats and soak overnightKeep the classic ratio, avoid quick oats
Smooth/blendedBlend the mixture before chillingUse the classic ratio, then blend

If you are trying to fix a jar that already went wrong, start with the too thick vs too runny guide, then use the full overnight oats troubleshooting table.

Too Thick, Just Right, or Too Runny?

Before changing the whole recipe, check the texture first. Most jars only need a small correction with milk, oats, or chia seeds.
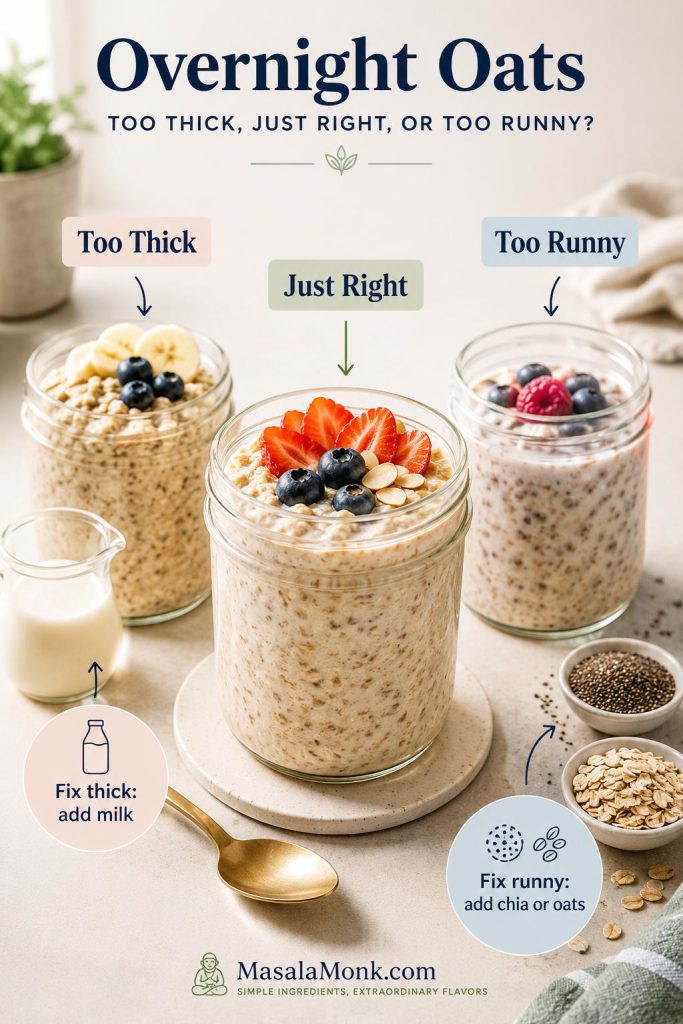
Overnight oats comparison showing too-thick, just-right, and too-runny textures with milk, chia, and oats as fixes.
Most overnight oats texture problems are easy to fix: add milk when the jar is too thick, or add chia seeds or oats when it is too loose.

How to Fix Overnight Oats

A disappointing jar is usually fixable. In practice, most bad overnight oats are not a recipe problem; they are a ratio or topping-timing problem. Too much chia needs milk, too much liquid needs oats or chia, bland oats need salt and flavor, and watery fruit usually means the toppings went in too early.
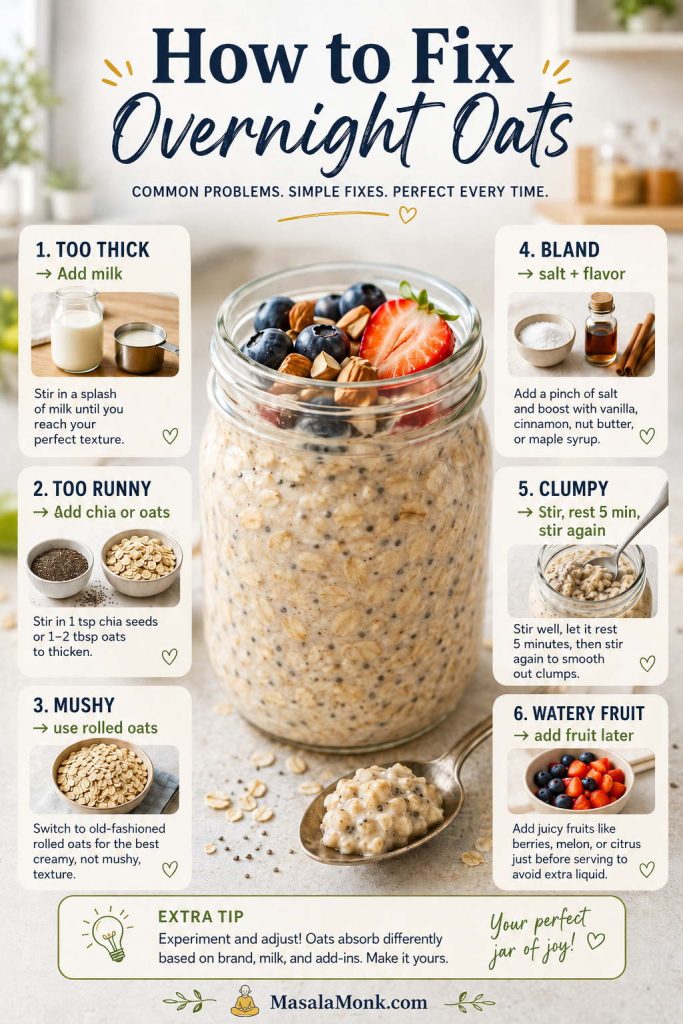
Troubleshooting board for overnight oats that are too thick, too runny, mushy, bland, clumpy, or watery from fruit.
A disappointing jar is usually fixable once you know whether the problem is liquid, thickener, oat type, flavor, stirring, or topping timing.
ProblemWhy It HappenedFix It NowNext Time
Too thickToo much chia, protein powder, or too little liquidStir in 1–3 tbsp milkReduce chia or add more milk
Too runnyToo much liquid or not enough soak timeAdd 1–2 tsp chia or 1–2 tbsp oats and restStart with less milk or more thickener
Too mushyQuick oats, instant oats, or too much liquidAdd crunchy toppingsChoose rolled oats
Too chewySteel-cut oats or not enough soak timeAdd milk and rest longerStick with rolled oats for this method
BlandNo salt, vanilla, fruit, spice, or enough sweetnessAdd salt, cinnamon, vanilla, and fruitSeason the mixture at night
Too sourToo much yogurt or very sour curdAdd milk, fruit, or a little sweetenerUse less yogurt or a milder curd
Chia clumpsNot stirred properlyBreak clumps with a spoon and loosen with milkStir, rest 5 minutes, stir again
Protein powder clumpsPowder was not mixed with enough liquidStir hard or blend brieflyMix protein powder with milk first
Watery fruit layerJuicy fruit was mixed in too earlyStir in chia or add thicker toppingAdd delicate fruit in the morning

15 Easy Overnight Oats Flavors

Once the ratio is right, the fun part is flavor. The easiest overnight oats flavors usually follow the same pattern: one main flavor, one creamy or crunchy element, and one fresh topping added in the morning. Start with these combinations, then adjust sweetness and thickness after chilling.
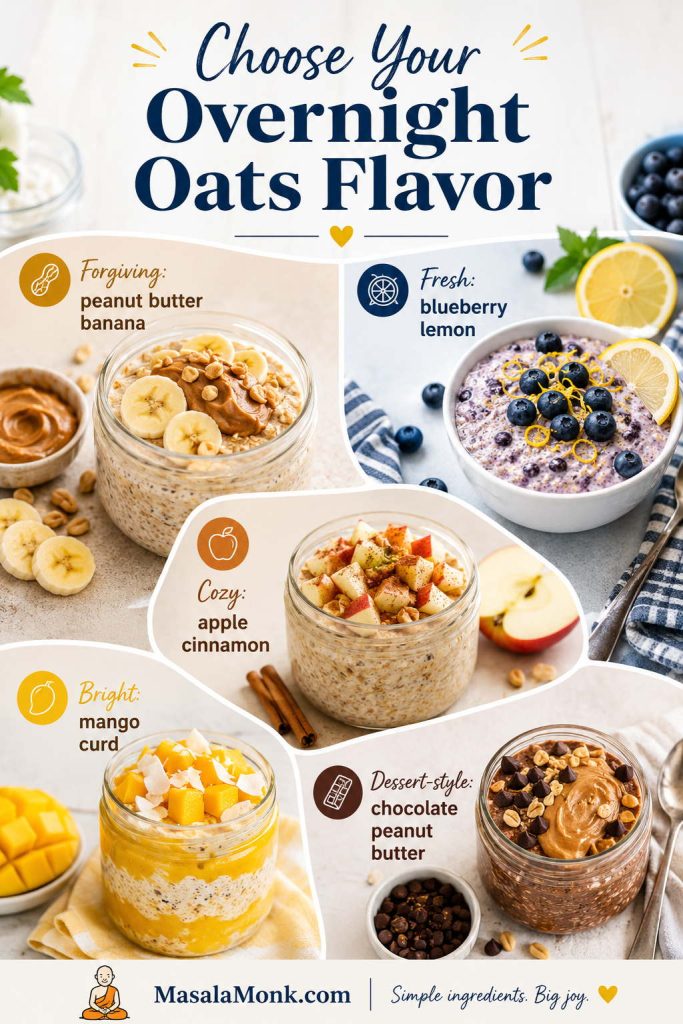
Overnight oats flavor chooser with peanut butter banana, blueberry lemon, apple cinnamon, mango curd, and chocolate peanut butter ideas.
Choose your first overnight oats flavor by mood: peanut butter banana is forgiving, apple cinnamon is cozy, mango curd is bright, and blueberry lemon feels fresh.

Best Flavors to Try First

If you are not sure where to start, choose by mood. Peanut butter banana is the most forgiving first jar because it hides small texture mistakes well. Mango curd tastes bright and lassi-like. Apple cinnamon feels cozy, especially when you add crisp apple in the morning. Chocolate peanut butter is the dessert-style option, while blueberry lemon keeps the jar fresher and lighter.
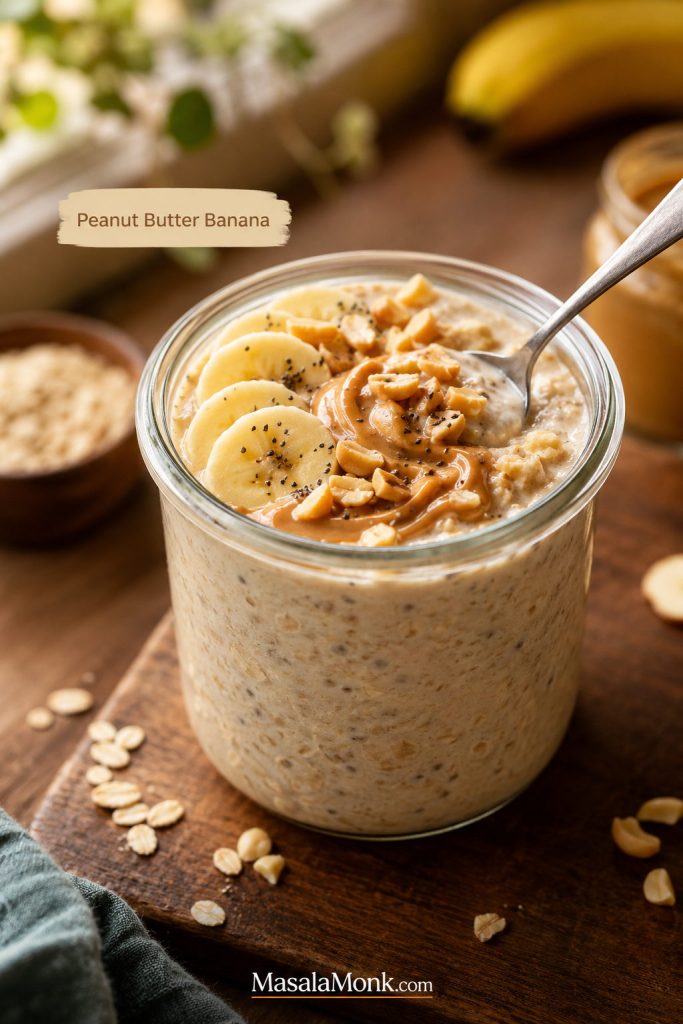
Peanut butter banana overnight oats topped with banana slices, peanut butter, crushed nuts, and chia seeds.
Peanut butter banana is one of the easiest overnight oats flavors because banana and nut butter both help the jar taste creamy and forgiving.

How to build better flavor

For a breakfast that tastes fresh, keep juicy fruit and crunchy toppings for the morning. For a more dessert-like jar, mix cocoa, coffee, cinnamon, peanut butter, mashed banana, or coconut into the oats before chilling so the flavor has time to settle.

Fruit-Forward Overnight Oats Flavors

Use this group when you want a brighter breakfast jar. Fruit flavors work best when juicy fruit and crunchy toppings are timed carefully.
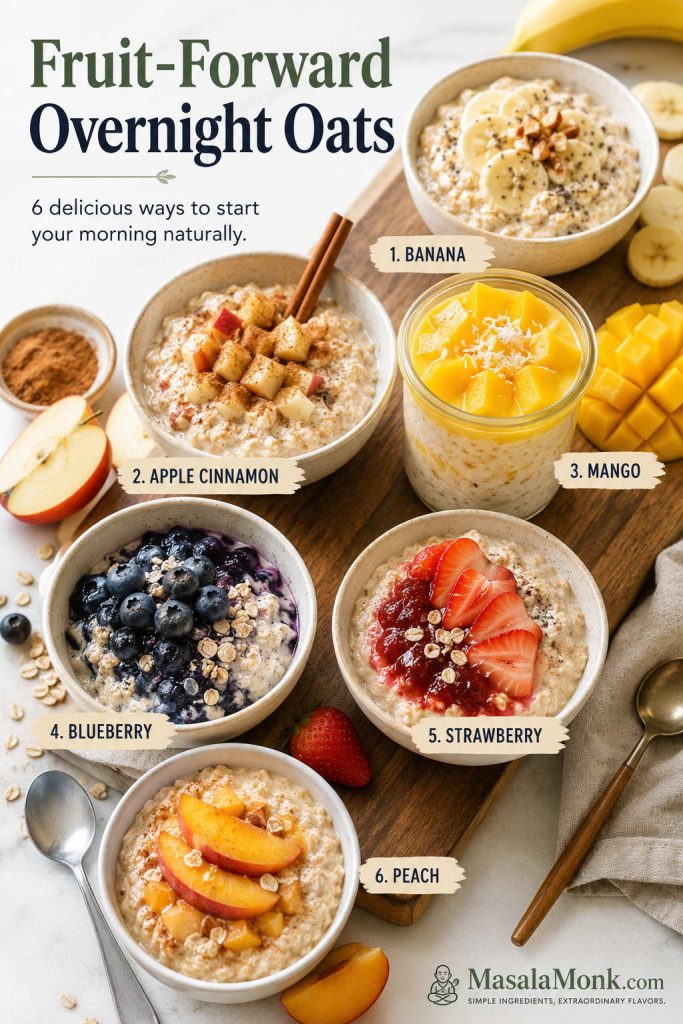
Fruit-forward overnight oats flavor board with banana, apple cinnamon, mango, blueberry, strawberry, and peach options.
Fruit-forward overnight oats taste best when juicy fruit and crunchy toppings are timed well, so the base stays creamy instead of turning watery.
FlavorMix In at NightAdd in the MorningTexture Note
BananaMashed ripe banana + cinnamonFresh banana slices, walnutsMashed banana thickens the oats
Apple cinnamonCinnamon + grated apple or applesauceDiced apple, walnuts, raisinsAdd crisp apple in the morning
MangoMango puree or chopped mangoFresh mango, coconut, pistachioThick curd gives a lassi-style feel
BlueberryFrozen or fresh blueberriesLemon zest, nuts, yogurt swirlFrozen berries release juice
StrawberryChopped strawberries or strawberry compoteFresh strawberries, granolaAdd granola only before eating
PeachChopped peach + cinnamonMore peach, almonds, granolaRipe peaches can loosen the oats

If fruit jars often turn watery or soft, the topping timing guide will help you decide what to mix in at night and what to add in the morning.

Apple Cinnamon Overnight Oats

This is the cozy option when you want spice and crunch. Add crisp apple close to serving so the topping stays fresh against the creamy oat base.
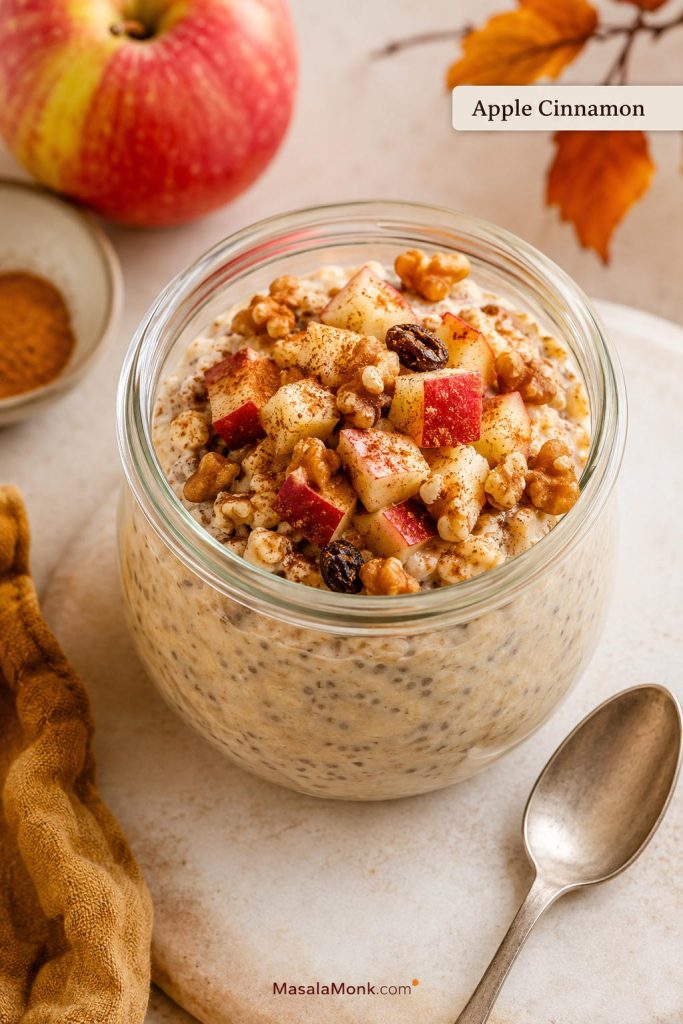
Apple cinnamon overnight oats topped with diced apple, cinnamon, walnuts, and raisins.
Apple cinnamon overnight oats work best when crisp apple is added close to serving, giving the creamy base a fresh bite and cozy flavor.

Mango Overnight Oats

Mango works especially well with thick curd or yogurt because the jar tastes bright, creamy, and lightly tangy without needing much extra sweetness.
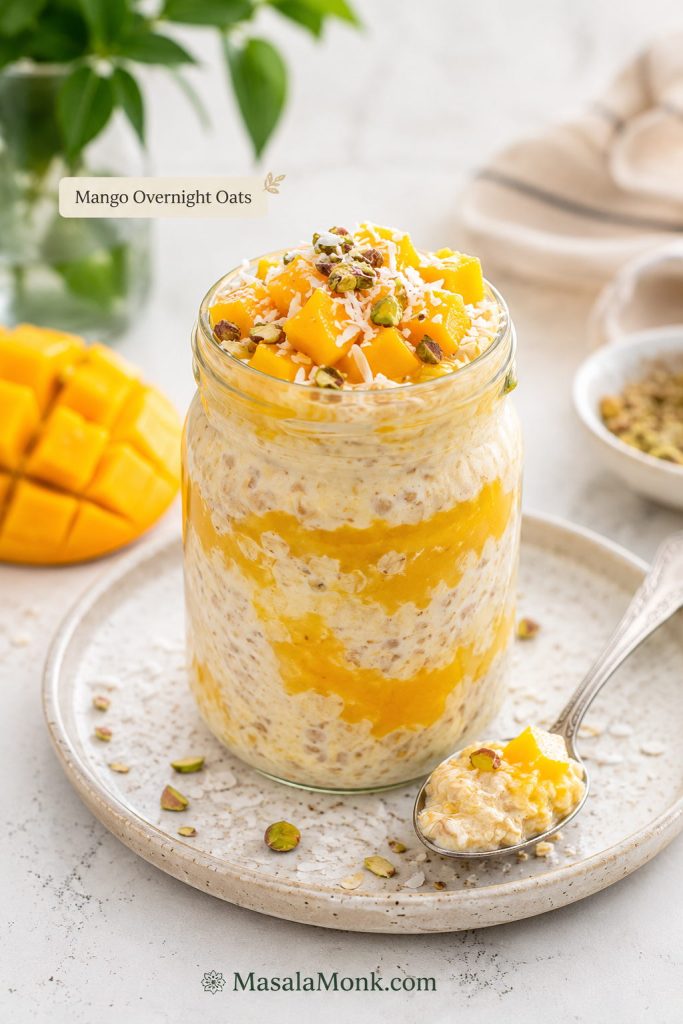
Mango overnight oats with creamy oats, mango puree, fresh mango cubes, coconut, and pistachios.
For mango overnight oats, stir mango puree into the base at night, then add fresh mango cubes in the morning for a brighter texture.

Blueberry Lemon Overnight Oats

Blueberry lemon is the fresh option, but the berries can release juice. Yogurt or chia helps keep the base creamy instead of watery.
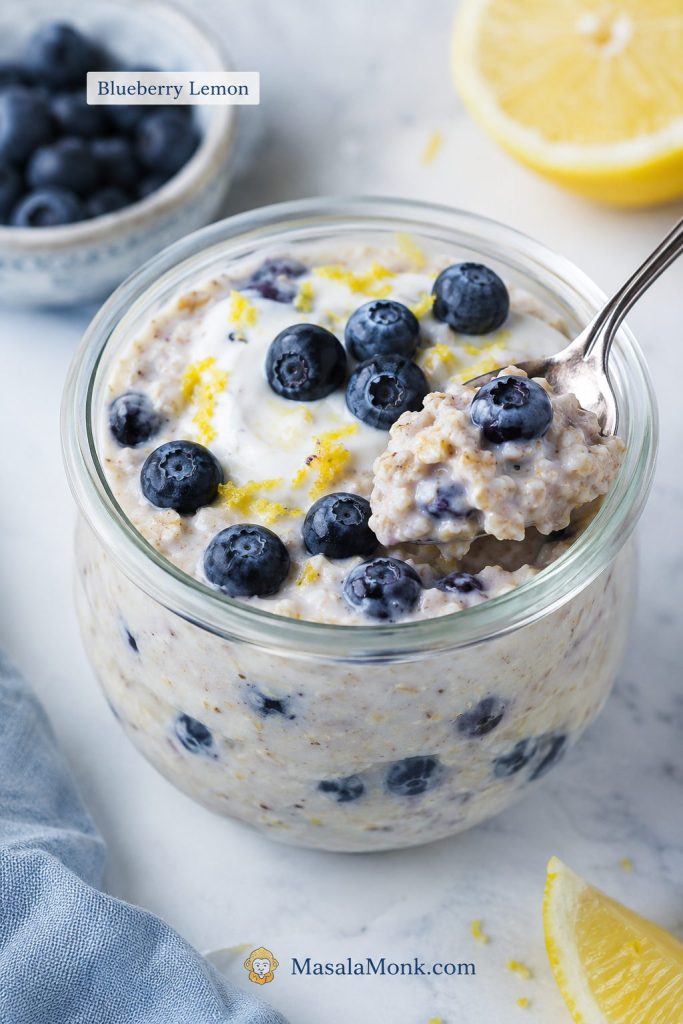
Blueberry lemon overnight oats with fresh blueberries, lemon zest, creamy oats, and a spoon lifting a bite.
Blueberry lemon keeps overnight oats fresh and bright, while yogurt or chia seeds help balance the juice released by the berries.

Chocolate, Coffee and Cozy Flavors

These flavors are richer, so balance matters. Bitter ingredients such as cocoa, coffee, and matcha need enough creaminess, salt, and gentle sweetness.
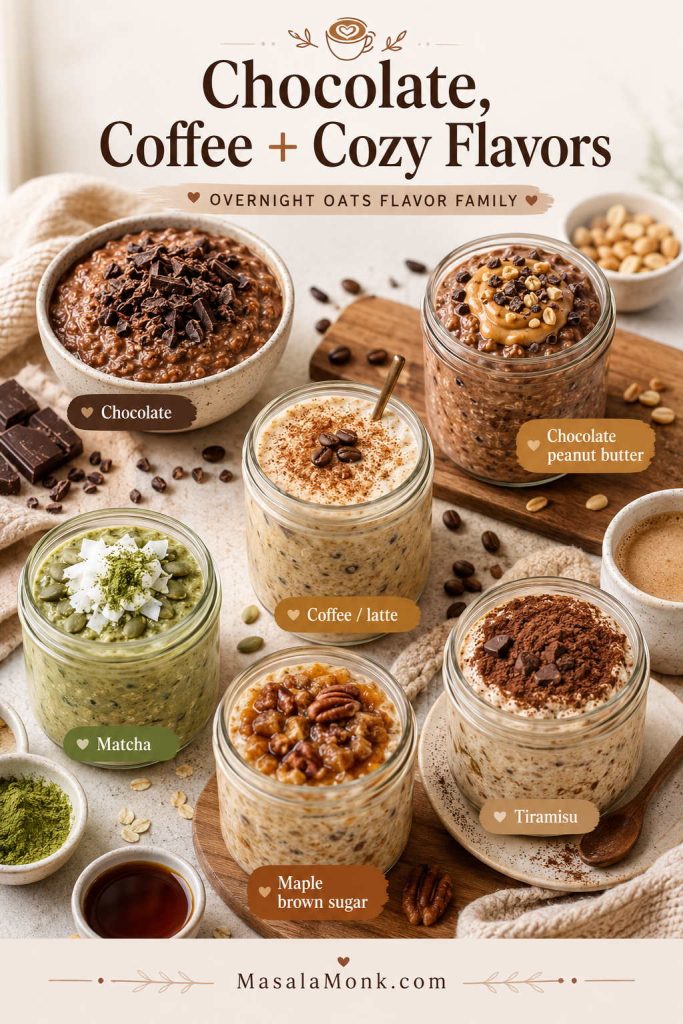
Chocolate, coffee, matcha, maple brown sugar, tiramisu, and chocolate peanut butter overnight oats flavor board.
Chocolate, coffee, matcha, and tiramisu-style overnight oats need enough creaminess, salt, and gentle sweetness to balance bitter flavors.
FlavorMix In at NightAdd in the MorningTexture Note
Chocolate1 tbsp cocoa + extra sweetenerChocolate chips, berries, nutsCocoa absorbs liquid
Chocolate peanut butterCocoa + peanut butterBanana, peanuts, dark chocolateUsually needs a splash more milk
Coffee / latteEspresso powder dissolved in milkCocoa, chocolate chips, yogurtAvoid too much bitter coffee
MatchaMatcha whisked into milkBanana, coconut, sesame, berriesWhisk matcha first to avoid clumps
Maple brown sugarMaple syrup + brown sugar + cinnamonPecans, walnuts, bananaKeep sweetness balanced
TiramisuEspresso + cocoa + vanillaYogurt layer, cocoa dustingUse strong coffee flavor carefully

Chocolate Peanut Butter Overnight Oats

Chocolate peanut butter tastes dessert-like, so keep the base balanced with enough milk and a pinch of salt rather than relying only on sweetness.
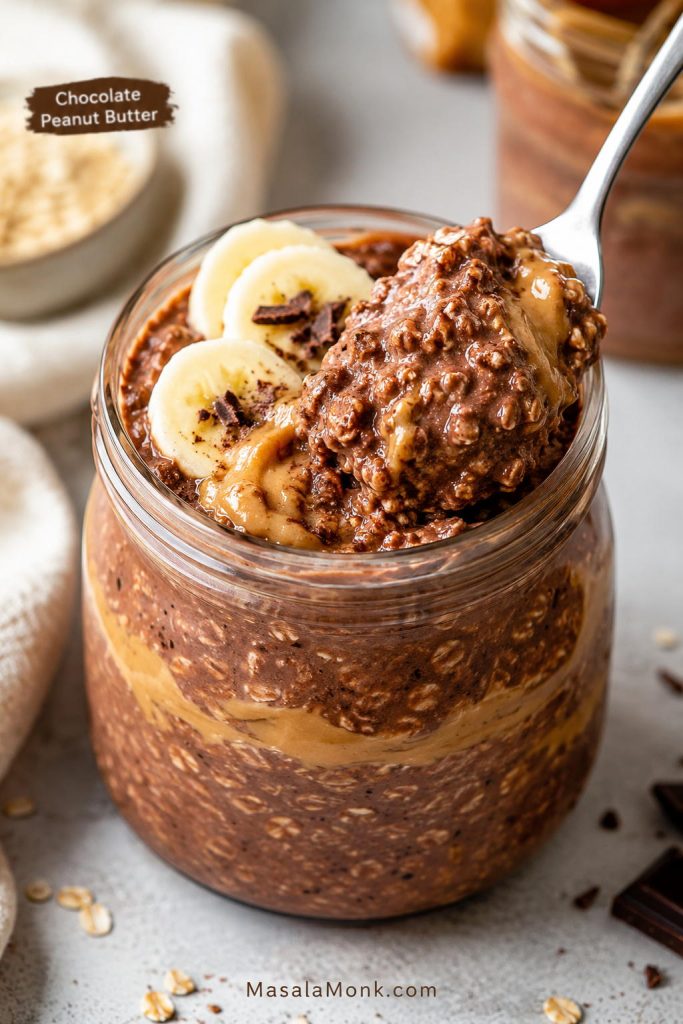
Chocolate peanut butter overnight oats with cocoa oats, peanut butter swirl, banana slices, and a spoon lifting a thick bite.
Because cocoa and peanut butter both thicken the oat mixture, this flavor often needs a small splash of milk after chilling.

Creamy, Nutty and Tropical Flavors

This flavor family is useful when you want a jar that feels richer and more filling. Creamy add-ins such as nut butter, coconut, yogurt, and seeds give the oats more body.
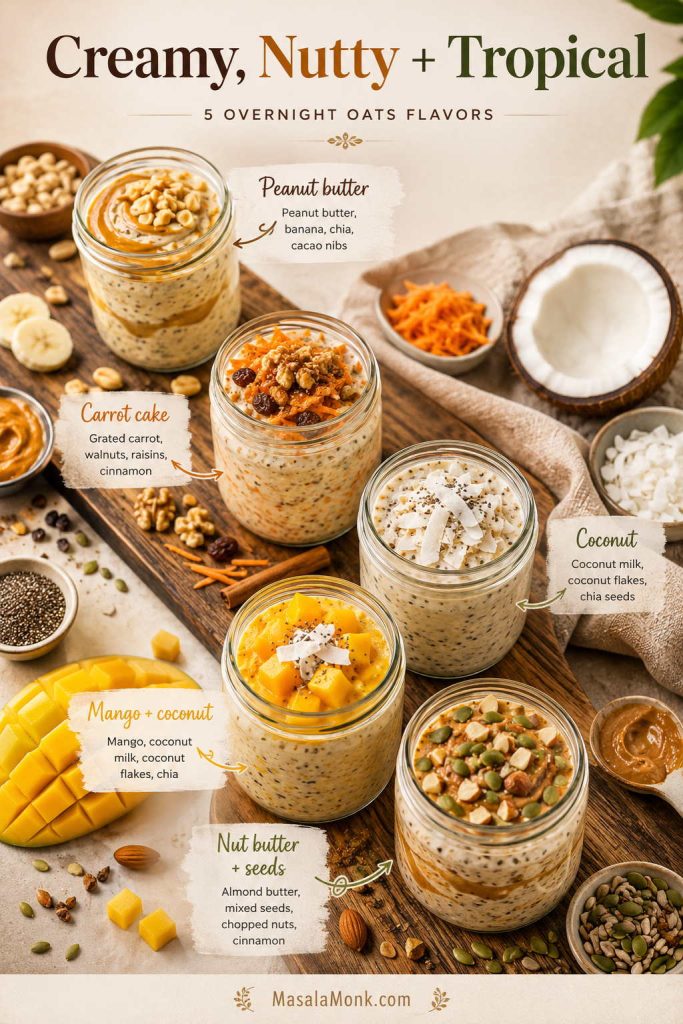
Creamy, nutty, and tropical overnight oats board with peanut butter, carrot cake, coconut, mango coconut, and nut butter seed ideas.
Nutty and tropical add-ins make overnight oats feel richer, especially when peanut butter, coconut, mango, seeds, or extra yogurt support the oat base.
FlavorMix In at NightAdd in the MorningTexture Note
Peanut butter1 tbsp peanut butter + cinnamonBanana slices, peanuts, extra drizzleAdd extra milk if thick
Carrot cakeGrated carrot + cinnamon + nutmegWalnuts, raisins, coconutYogurt makes it creamier
CoconutCoconut milk + shredded coconutMango, pineapple, toasted coconutRich coconut milk makes it thicker

If you are making overnight oats for the first time, peanut butter banana, apple cinnamon, mango curd, chocolate peanut butter, and blueberry lemon are the easiest flavors to get right. Coffee, matcha, and tiramisu are a little more sensitive because bitter ingredients need enough sweetness, salt, and creaminess to balance them. For more on why the peanut butter version is so satisfying, MasalaMonk’s guide to oatmeal and peanut butter is a useful companion read.

How to Make High-Protein Overnight Oats

For higher-protein overnight oats, build the serving with Greek yogurt, thick curd, soy milk, protein powder, blended cottage cheese or paneer, chia seeds, hemp seeds, peanut butter, or nut butter. For the base amounts before adding protein powder, use the quick ratio guide near the top of the post.
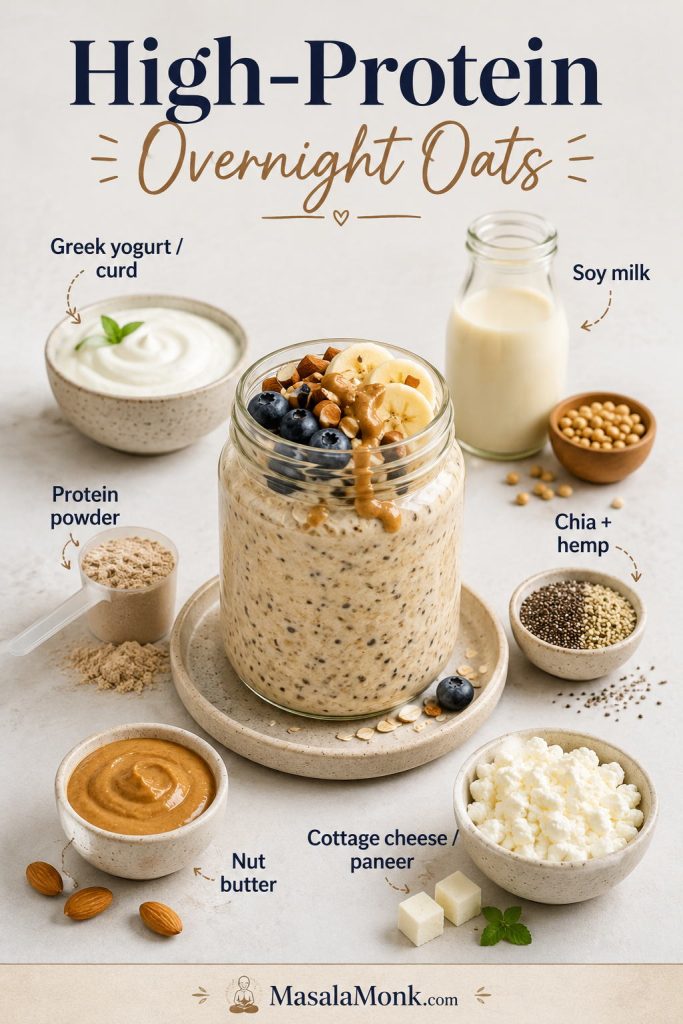
High-protein overnight oats guide with Greek yogurt or curd, soy milk, protein powder, chia, hemp, nut butter, and cottage cheese or paneer.
High-protein overnight oats work best when the base includes a creamy protein source and enough extra liquid to handle overnight thickening.

Protein Powder Overnight Oats Tips

Protein powder is the ingredient most likely to trick you. The jar may look perfect when you mix it, then turn thick and stiff by morning. Start with 1 scoop protein powder and about ¼ cup / 60 ml extra milk, then loosen again after chilling if needed.
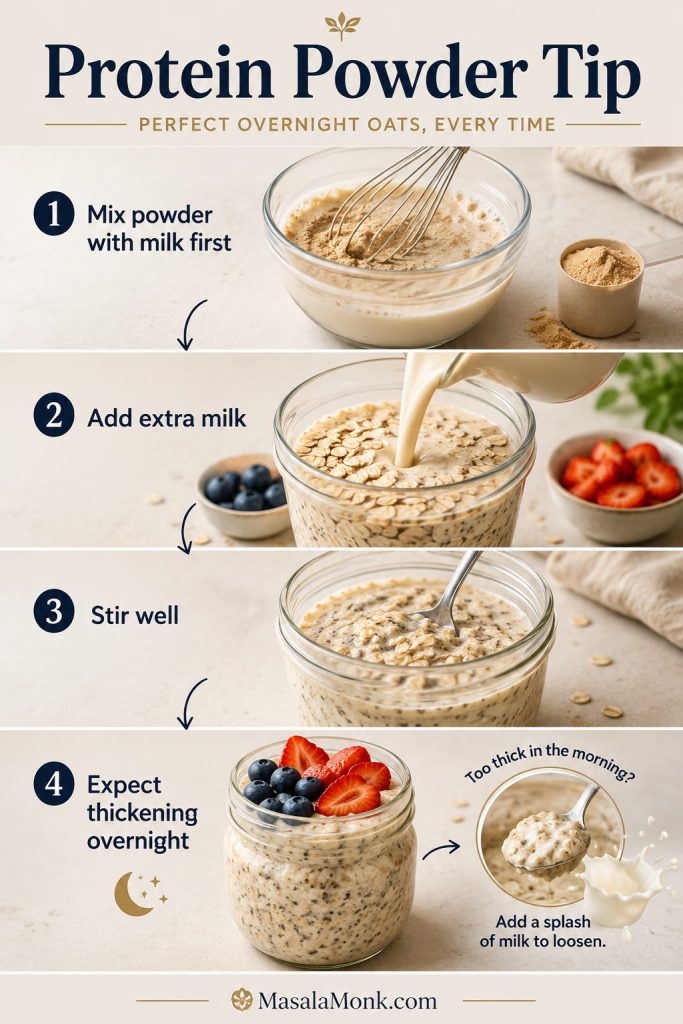
Protein powder overnight oats guide showing protein powder mixed with milk first, added to oats, stirred well, thickened overnight, and loosened with milk.
Protein powder thickens as it sits, so mixing it with milk first and adding extra liquid helps prevent clumps and stiffness by morning.

For a full protein-focused version with flavors, macro-friendly ideas, vegan options, and protein powder tips, use this MasalaMonk guide to high protein overnight oats. If you also like warm oats, this protein oatmeal guide covers hot oatmeal and proats-style breakfasts.

Vegan, Dairy-Free, Gluten-Free and No-Yogurt Overnight Oats

The core recipe is easy to adapt. Think of these as swaps, not separate recipes: the oat base stays the same, while the milk, thickener, sweetener, or creamy element changes depending on what you need. If you are skipping dairy, start with the no-yogurt ratio. If you are using water instead of milk, go straight to overnight oats with water, because that version needs extra help from chia, salt, and flavor.
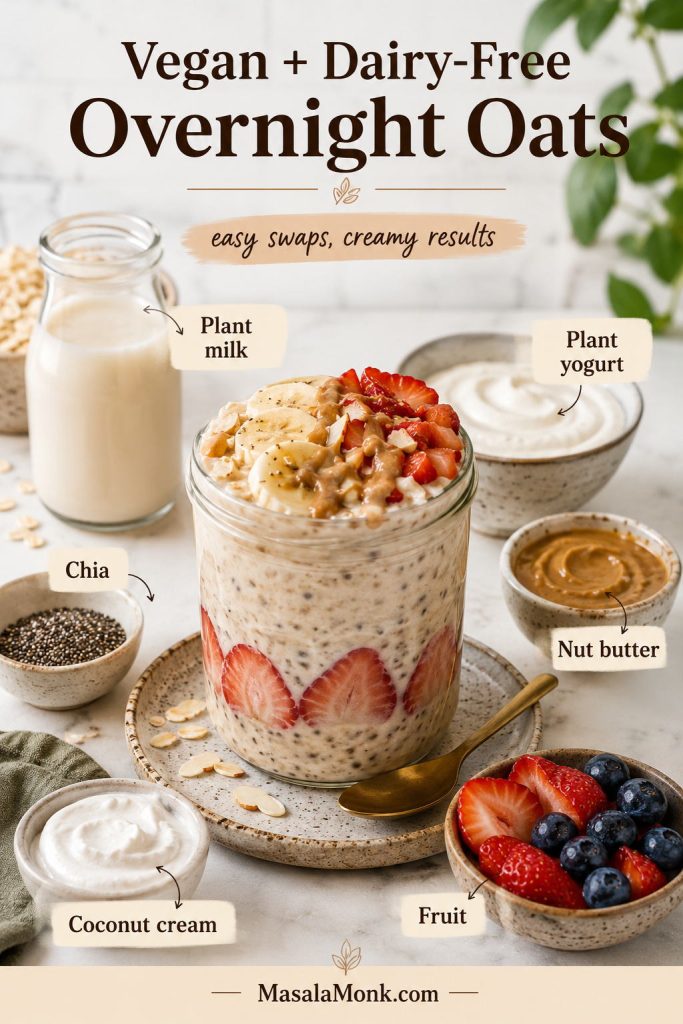
Vegan and dairy-free overnight oats with plant milk, plant yogurt, chia seeds, nut butter, coconut cream, and fruit.
Dairy-free overnight oats can still be creamy when plant milk is paired with chia seeds, plant yogurt, nut butter, coconut cream, or ripe fruit.

Vegan overnight oats

Choose plant milk, plant yogurt if desired, chia seeds, maple syrup or date syrup, and fruit. Oat milk, soy milk, almond milk, and coconut milk all work.

Dairy-free overnight oats

Almond milk, oat milk, soy milk, coconut milk, or cashew milk can replace dairy milk. For creaminess without dairy, add chia seeds, nut butter, coconut cream, mashed banana, or plant yogurt. MasalaMonk also has a guide to homemade oat milk if you want to make your own.

Gluten-free overnight oats

Choose certified gluten-free oats if you need the recipe to be gluten-free. Oats are naturally gluten-free, but cross-contact during processing is common, so the package label matters.

Overnight oats without yogurt

Combine ½ cup rolled oats, ⅔ cup milk, and 1 tablespoon chia seeds. Add nut butter, mashed banana, or coconut cream if you want a creamier result without yogurt.

For the full no-yogurt ratio and how it compares with yogurt-based oats, see the ratio guide above.

Overnight Oats with Water

You can make overnight oats with water, but water needs help. Combine ½ cup oats, ¾ cup water, 1 tablespoon chia seeds, a pinch of salt, vanilla or cinnamon, and something creamy like peanut butter, almond butter, coconut cream, mashed banana, or plant yogurt. Without one of those creamy add-ins, the oats can taste flat.
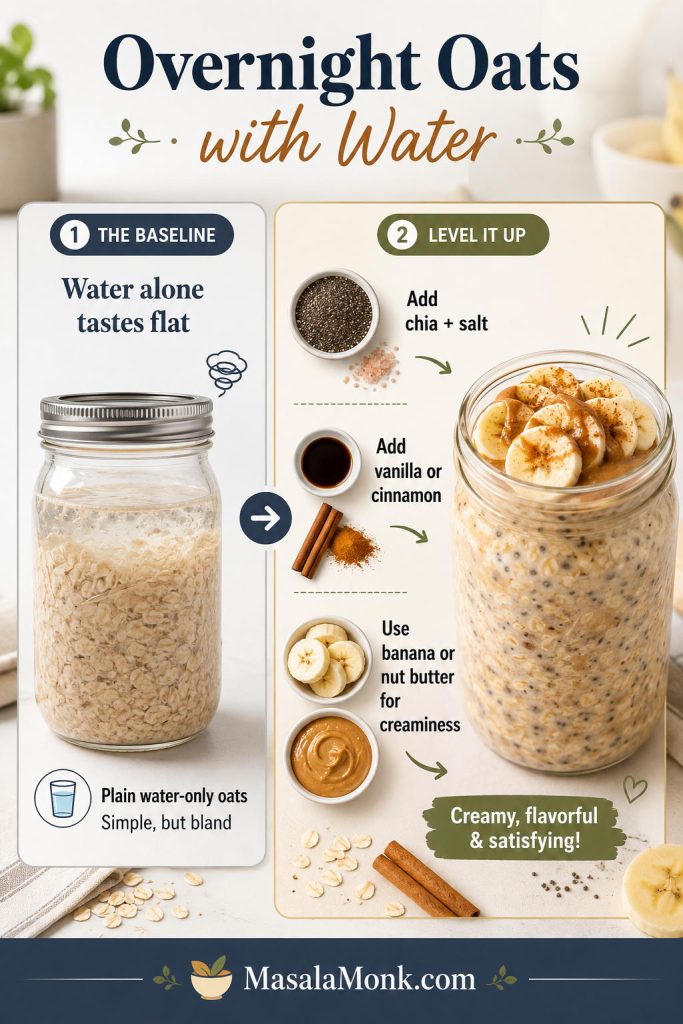
Overnight oats with water guide showing plain water oats improved with chia seeds, salt, vanilla, cinnamon, banana, and nut butter.
Water works for overnight oats, but it needs help from chia seeds, salt, flavor, and something creamy like banana or nut butter.

Keto-style no-oat overnight oats

Regular oats are not usually keto-friendly. For a keto-style breakfast jar, make a no-oat version with chia seeds, hemp hearts, flaxseed, coconut, and low-carb milk instead of rolled oats. It will not taste exactly like classic overnight oats, but it gives a similar chilled, spoonable breakfast format. If that is the direction you want, this keto chia pudding recipe is a better starting point than trying to force regular oats into a keto breakfast.

Are Overnight Oats Healthy for Weight Loss?

Overnight oats can fit a weight-loss breakfast when the serving has enough protein, fiber, and volume without turning into dessert. Oats give the mixture structure, chia adds fiber and thickness, yogurt or protein powder can make it more filling, and fruit adds sweetness without needing too much syrup.

No single breakfast causes weight loss on its own. Still, a well-built oats jar can make breakfast easier to control because the portions are measured ahead of time.

Oats also bring soluble fiber to the bowl, which is one reason they work so well in a make-ahead breakfast. Harvard’s Nutrition Source has a helpful overview of oats if you want the broader nutrition background.

The main thing is not letting a balanced breakfast jar accidentally turn into dessert. Nut butter, granola, chocolate chips, dried fruit, and syrup are all fine in the right amount, but they add up quickly when they all go into the same container. Keep the base balanced, add enough protein if you need more staying power, and choose toppings with intention.
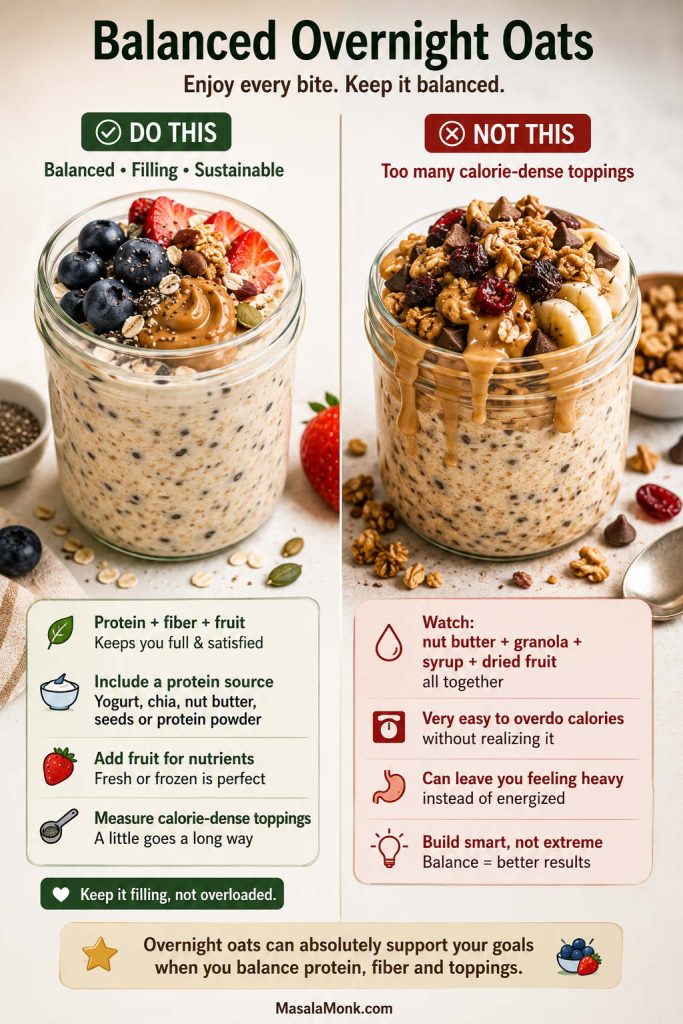
Balanced overnight oats compared with an overloaded jar containing extra nut butter, granola, syrup, dried fruit, and chocolate chips.
Overnight oats can support a balanced breakfast, but calorie-dense toppings add up quickly when nut butter, granola, syrup, dried fruit, and chocolate all go into one jar.
GoalBetter ChoiceWatch Out For
More fillingGreek yogurt, protein powder, chia, soy milkThin oats with only milk and fruit
Lower sugarBerries, apple, cinnamon, vanillaToo much syrup, jam, sweetened yogurt
More fiberChia, flax, berries, apple, oatsLow-fiber toppings only
Controlled caloriesMeasure nut butter, granola, nutsLarge handfuls of calorie-dense toppings

For more on oats, chia, and fullness-focused breakfasts, see MasalaMonk’s guide to oats and chia seeds for weight loss.

Meal Prep and Storage

Overnight oats are built for meal prep, but consistency changes over time. A plain mixture keeps better than a container loaded with fresh fruit, granola, and crunchy toppings.
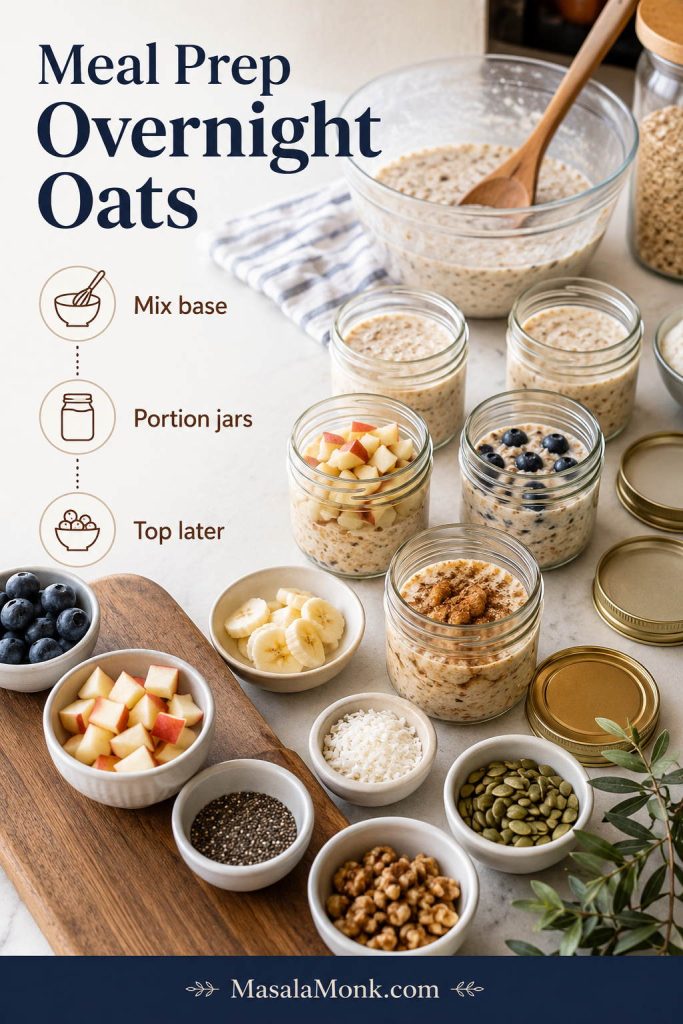
Meal prep overnight oats setup with several jars, a mixing bowl, lids, fresh fruit, nuts, seeds, and toppings kept separately.
For better meal-prep texture, store the oat base in jars and keep crunchy or delicate toppings separate until serving.

The biggest meal-prep mistake

The biggest mistake is adding every topping the night before. Soft mix-ins like cocoa, cinnamon, chia, yogurt, nut butter, jam, mashed banana, applesauce, or frozen berries can go in early. Crunchy toppings are different: fresh banana, crisp apple, granola, toasted nuts, and coconut chips are better added right before eating.

For quick topping timing, use the table below, or go back to the flavor ideas if you are planning several jars at once.

Best jar size for overnight oats

For one serving of overnight oats, a 12–16 oz / 350–500 ml jar works best. A 16 oz jar gives you enough space to stir properly and add toppings without overflowing.

Jar SizeHow It WorksBest Use
8 oz / 240 mlVery tight for a full servingSmall portions, snack jars, no bulky toppings
12 oz / 350 mlWorks for one basic servingSingle serving with light toppings
16 oz / 475–500 mlBest overall sizeOne serving with fruit, nuts, yogurt, and stirring room
Bowl or meal-prep containerMore room to mixBatch prep or family portions

How Long Do Overnight Oats Last?

Overnight oats taste best in the first 1–3 days. A plain sealed mixture can usually keep for 3–4 days in the fridge. Some servings may be fine longer, but fruit, yogurt, and toppings soften faster.
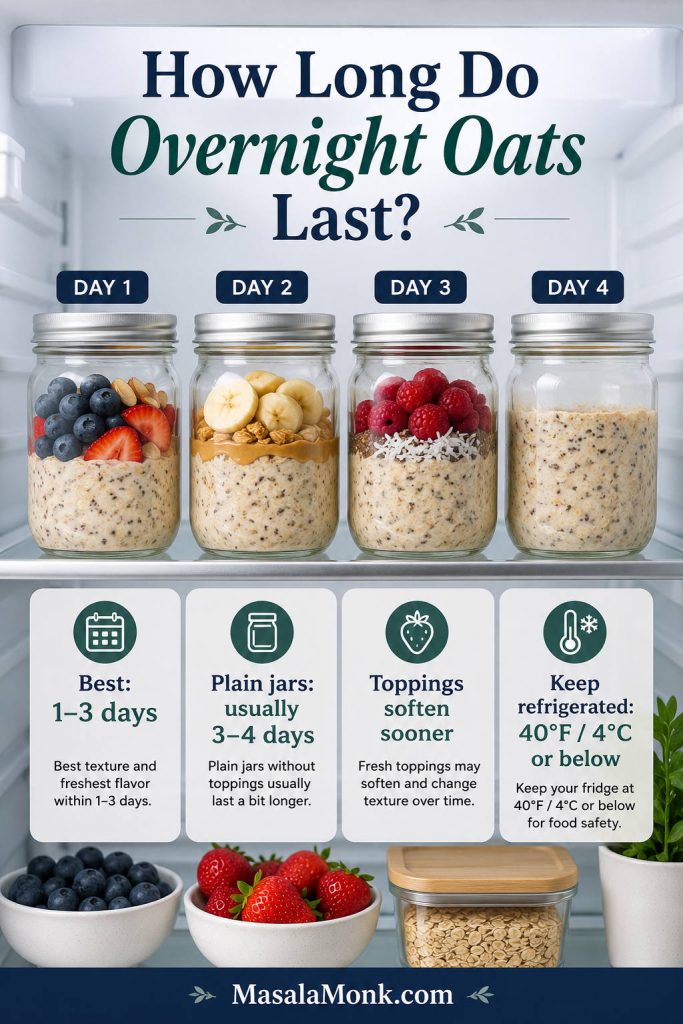
Overnight oats storage timeline showing jars for day 1 through day 4, best texture in 1 to 3 days, and refrigeration at 40°F or 4°C.
Overnight oats taste best in the first few days, especially when fresh fruit, nuts, and granola are added closer to serving.

Keep overnight oats refrigerated at 40°F / 4°C or below. For general food-safety guidance, the USDA recommends keeping refrigerators at 40°F or below and using refrigerated leftovers within a few days. You can read their refrigerator safety guidance here: USDA refrigerator safety basics.

When to Add Overnight Oats Toppings

The best overnight oats are usually built in two stages: flavor the oats at night, then add delicate or crunchy toppings in the morning. In short, crunch belongs in the morning.
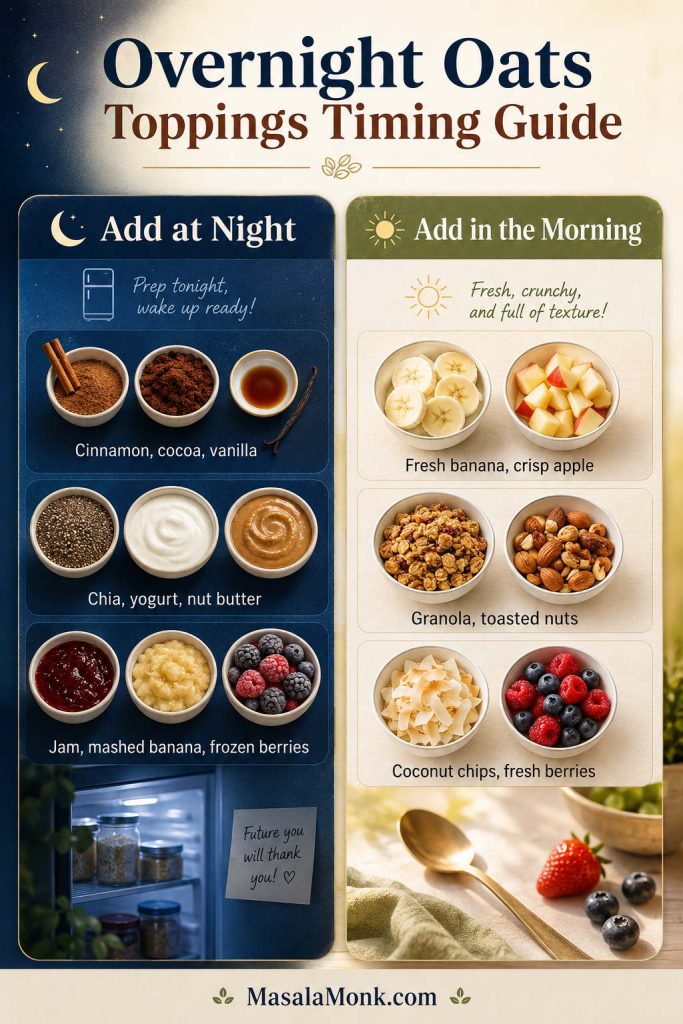
Overnight oats toppings timing guide showing soft mix-ins to add at night and fresh or crunchy toppings to add in the morning.
Soft mix-ins can go in at night, while fresh fruit and crunchy toppings usually taste better when added right before serving.
Add at NightAdd in the Morning
Cinnamon, cocoa, vanilla, chia, yogurt, nut butter, jam, mashed banana, applesauce, frozen berriesFresh banana, crisp apple, granola, toasted nuts, coconut chips, fresh berries, crunchy seeds, chocolate chips

If you like a little crunch on top, keep granola-style toppings separate until serving. For a make-ahead oat snack in the same pantry lane, these homemade granola bars use oats, nut butter, honey or dates, and seeds in a different meal-prep format.

Can You Freeze Overnight Oats?

You can freeze overnight oats, but the consistency is usually best when you freeze the plain mixture without delicate toppings. Leave headspace in the container because the mixture expands, thaw in the fridge, stir well, then add fresh fruit and crunchy toppings after thawing.
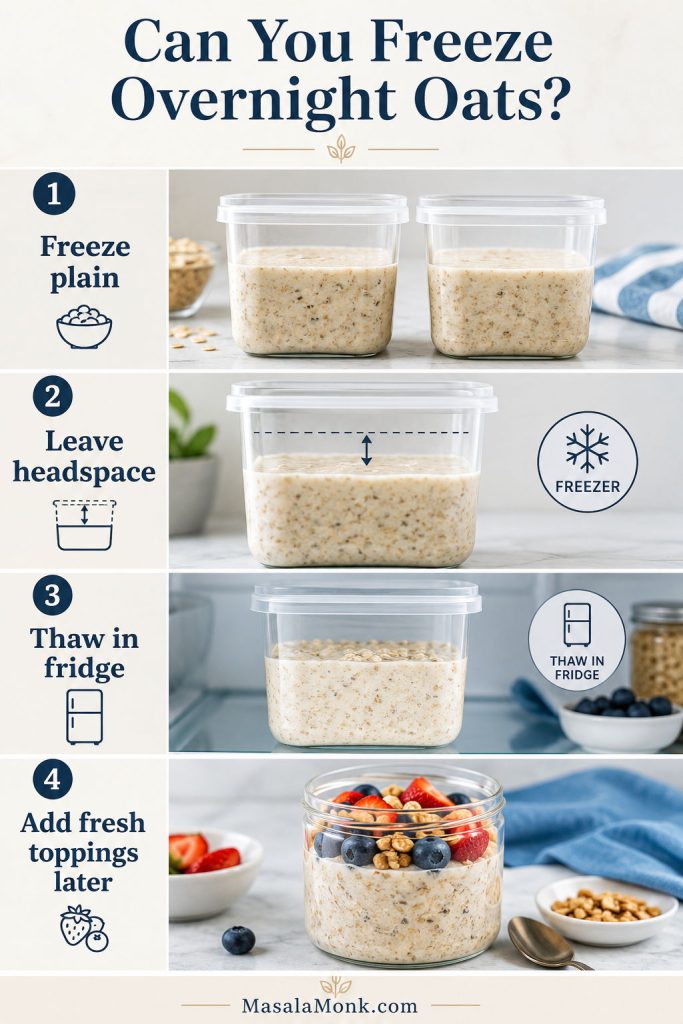
Freezing guide for overnight oats showing plain containers with headspace, thawing in the fridge, and fresh toppings added later.
Overnight oats freeze best when kept plain, with headspace in the container and fresh toppings added only after thawing.

Can You Warm Overnight Oats?

Yes. Overnight oats are usually eaten cold, but you can warm them. Transfer to a microwave-safe bowl or jar, add a splash of milk, and heat for 30–60 seconds, stirring once. Do not microwave a metal lid.
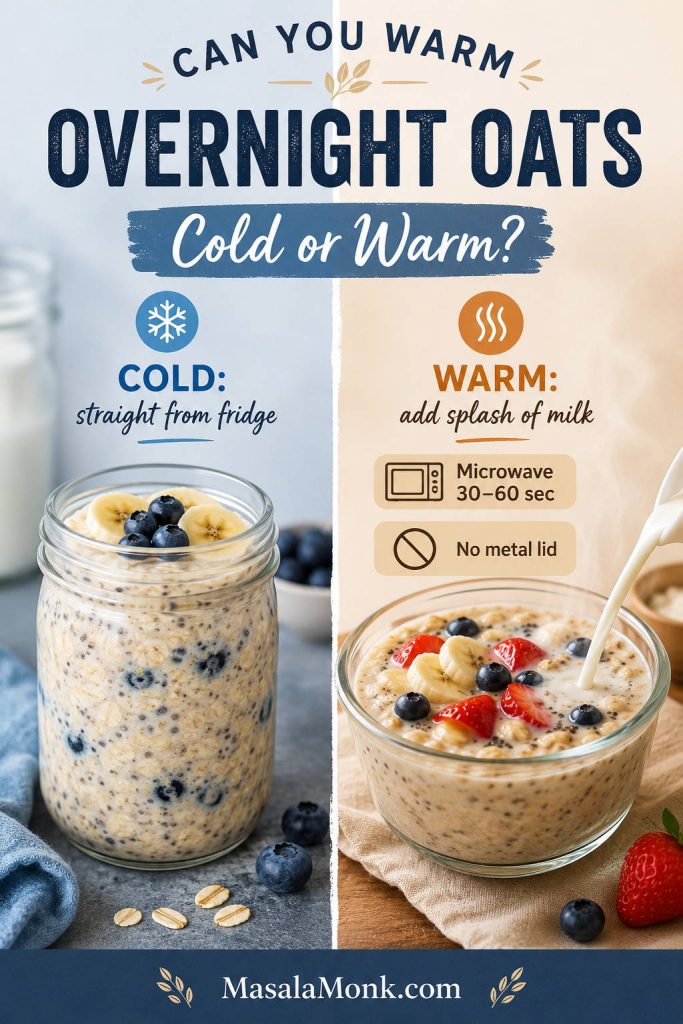
Cold versus warm overnight oats guide showing a chilled jar and warmed oats with a splash of milk, microwave timing, and no metal lid warning.
Overnight oats are usually eaten cold, although you can warm them gently with a splash of milk for a softer, cozier breakfast.

Overnight Oats FAQs

What is the best ratio for this overnight oats recipe?

The best starting ratio is ½ cup rolled oats, ½ cup milk, and ¼ cup yogurt or thick curd. For no-yogurt overnight oats, use ½ cup oats, ⅔ cup milk, and 1 tablespoon chia seeds. For more detail, see the ratio guide and texture guide above.

How long do overnight oats need to soak?

Plan on at least 4 hours. Ideally, give rolled oats an overnight rest of about 8 hours so they become creamier and more even.

Are overnight oats eaten cold or warm?

Most people eat overnight oats cold, straight from the fridge. You can also warm them for 30–60 seconds with a splash of milk when you want a softer, cozier breakfast.

How do you make overnight oats without yogurt?

Skip the yogurt and let chia do the thickening instead. A good no-yogurt ratio is ½ cup oats, ⅔ cup milk, and 1 tablespoon chia seeds.

Do overnight oats need chia seeds?

Chia seeds are helpful, but they are not required. Instead, you can use yogurt or slightly less liquid to keep the oats thick.

How do you make overnight oats with water?

Water works, but it needs help. Add chia seeds, salt, vanilla or cinnamon, and something creamy like nut butter, mashed banana, coconut cream, or plant yogurt so the oats do not taste flat.

Which oats are best for overnight oats?

Rolled oats or old-fashioned oats are best. Quick oats get softer, instant oats can become paste-like, and steel-cut oats need a different method.

What happens if you use steel-cut oats?

Steel-cut oats are not a direct swap here. They stay much chewier and need a longer soak or a separate preparation method.

How long do overnight oats last in the fridge?

They taste best in the first 1–3 days. A plain sealed mixture can usually keep for 3–4 days when refrigerated properly.

Do overnight oats freeze well?

They freeze best when kept plain. Freeze the oats without delicate fruit or crunchy toppings, leave headspace in the container, thaw in the fridge, stir well, and then add fresh toppings after thawing.

Are overnight oats good for weight loss?

They can be, especially when the serving includes protein, fiber, fruit, and measured toppings. Still, large amounts of nut butter, granola, syrup, dried fruit, and chocolate chips can raise calories quickly.

How do you add protein powder to overnight oats?

Add 1 scoop protein powder and increase the milk by about ¼ cup / 60 ml. Then stir very well, because protein powder can clump and thicken as it sits.

Why are my overnight oats too thick?

They may have too much chia, too much protein powder, or not enough liquid. As a quick fix, stir in 1–3 tablespoons milk before eating.

Why are my overnight oats watery?

They may have too much liquid, watery fruit, or not enough soaking time. To fix them, add chia seeds or a spoon of oats and let the mixture sit longer.

The Takeaway

Start with rolled oats, use enough liquid, season the mixture with a pinch of salt, and stir twice before chilling. Then, add delicate fruit and crunchy toppings closer to serving, and adjust the consistency in the morning instead of trying to get everything perfect the night before.

Once you like the base recipe, you can turn it into peanut butter overnight oats, apple cinnamon overnight oats, mango overnight oats, chocolate overnight oats, coffee overnight oats, or a higher-protein version without changing the basic method. And when you want a warm oat breakfast instead of a chilled jar, these oat pancakes are another easy way to use rolled oats for breakfast.
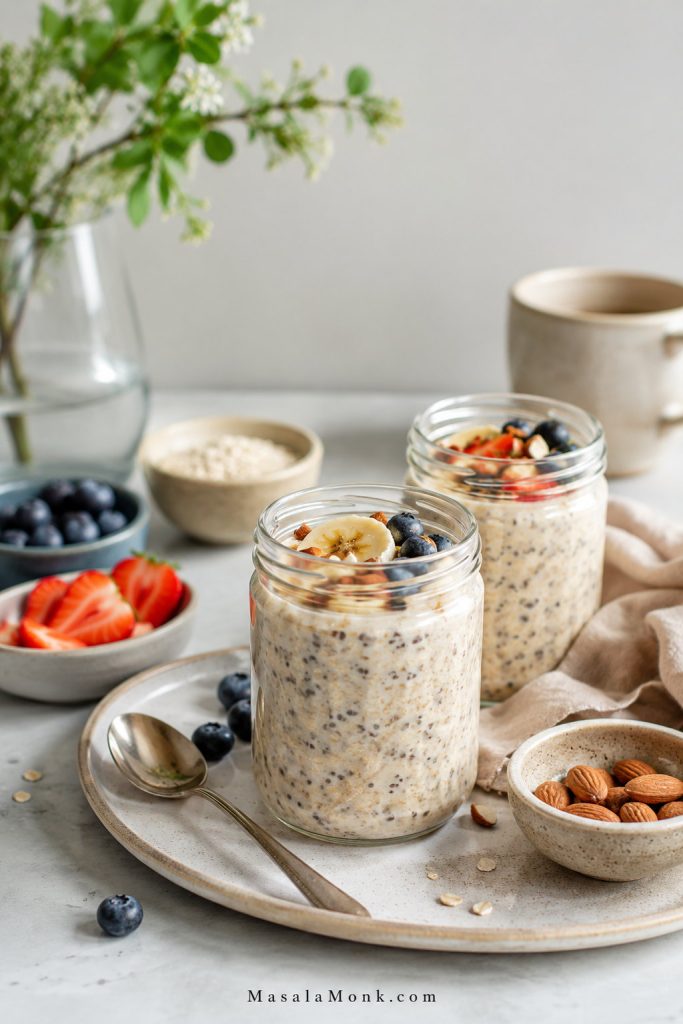
Finished overnight oats jars in a calm breakfast scene with fruit, nuts, spoon, small bowls, and creamy oat texture.
Once you understand the base, overnight oats become a flexible make-ahead breakfast you can adjust for texture, flavor, protein, and meal prep.

Back to top

Posted on — 7 Comments

Low Carb Chia Pudding Recipes

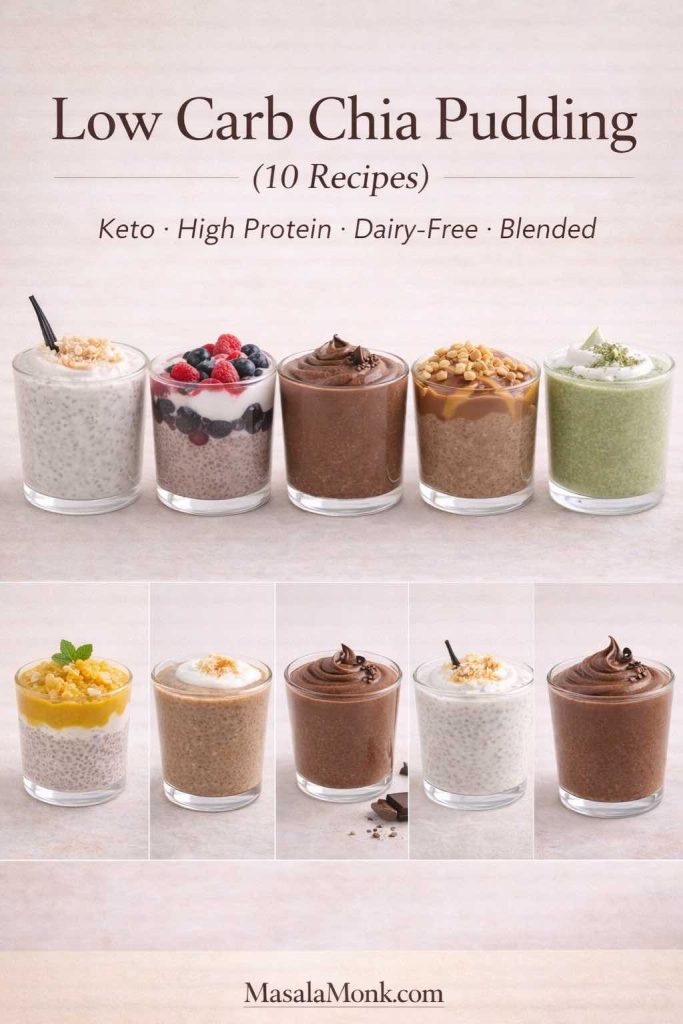
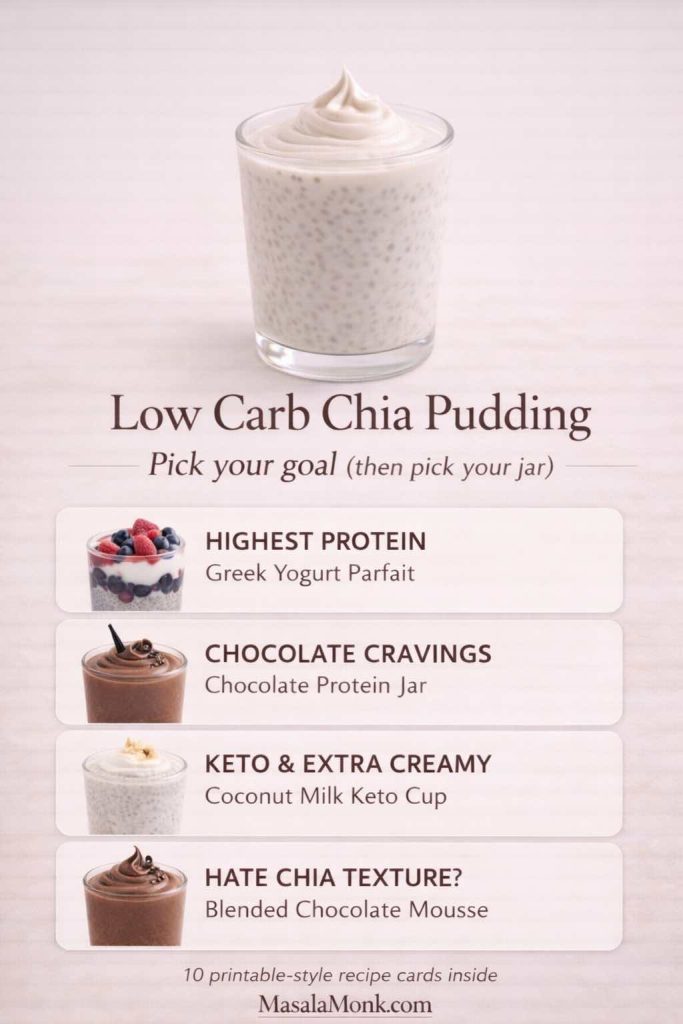
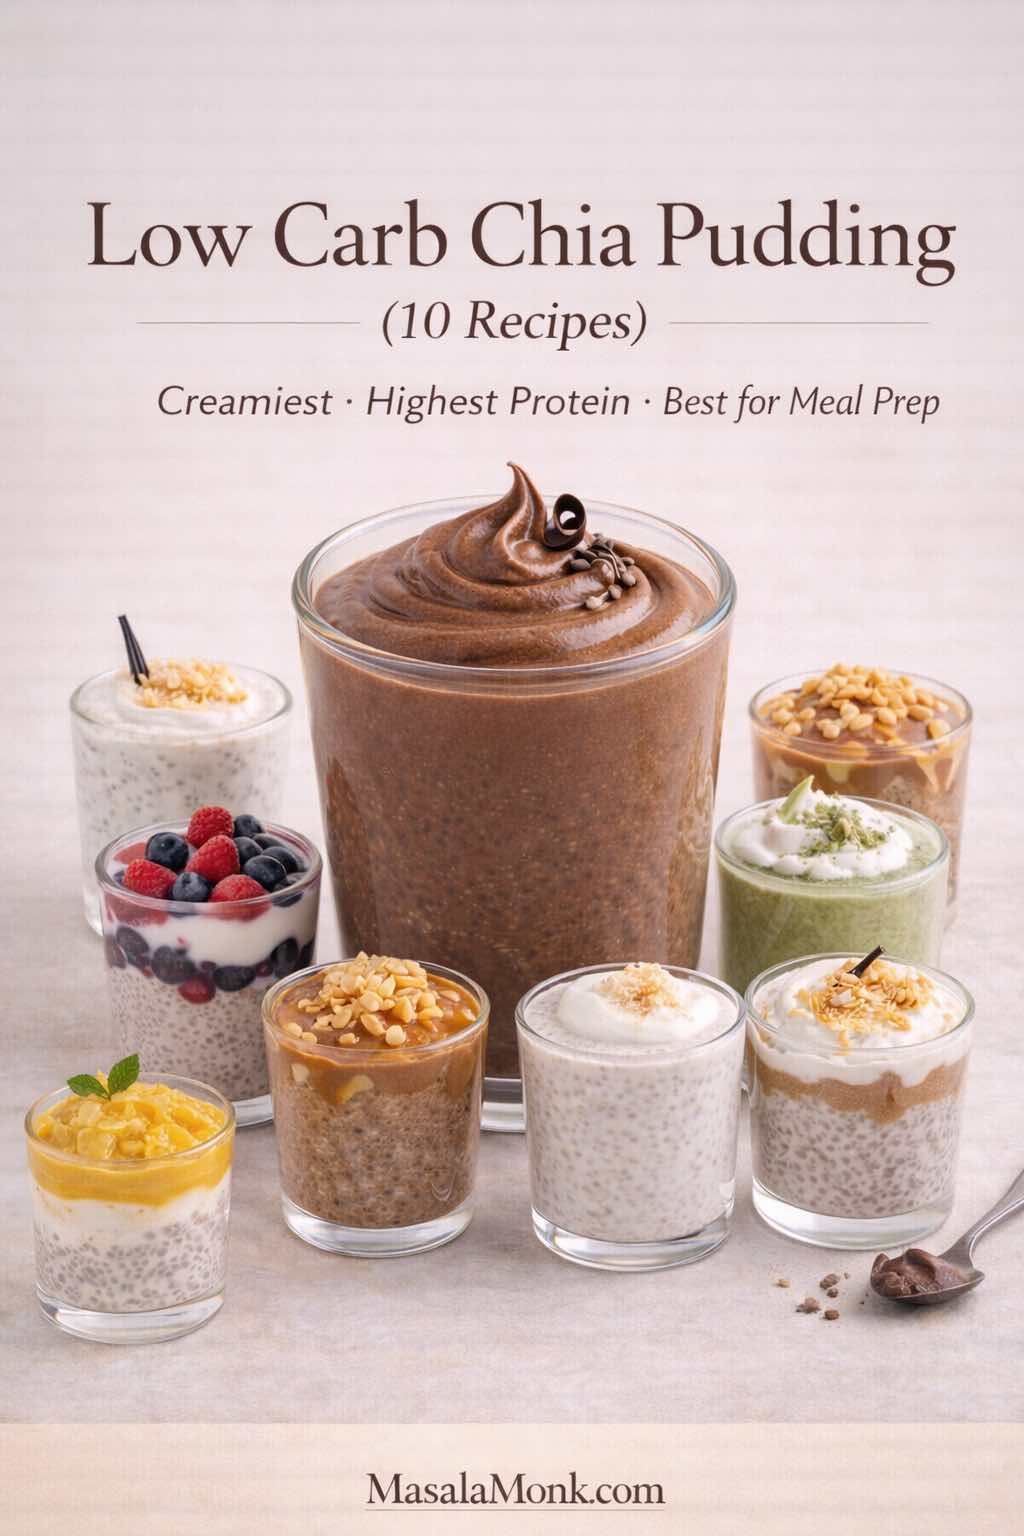
Cover image showing a premium glass jar of low carb chia pudding with a smooth whipped topping on a warm-cream seamless background. Editorial food photography style for “Low Carb Chia Pudding” featuring 10 recipes including keto, high protein, dairy-free, and blended options, with MasalaMonk.com branding.

This post was last updated on

Looking for low carb chia pudding recipes for weight loss? The most useful place to start is the pudding itself. Chia is not a fat burner, but a make-ahead serving can be easy to portion, simple to build with protein, and satisfying without relying on much added sugar. Here you can make it light with almond milk, thick and tangy with Greek yogurt, rich with coconut milk, chocolatey with protein powder, or completely smooth after blending.

Here for the thick Greek-yogurt chia pudding? Start with ¾ cup plain Greek yogurt + 3 tablespoons chia seeds + ¼ cup / 60 ml unsweetened almond milk or water. Stir again after 10 minutes, then chill for at least 2 hours. Jump to the full Greek yogurt chia pudding recipe ↓

Collage showing ten low carb chia pudding cups including vanilla, Greek yogurt, chocolate, peanut butter, matcha, mango, coconut and blended mousse variations.
All 10 chia pudding recipes at a glance—from thick Greek yogurt and keto coconut milk to chocolate protein pudding, fruit layers and smooth blended mousse.

You do not need to read this guide from top to bottom. Use the jumps above if you already know what you want, or use the table of contents to solve the ratio, liquid, protein, meal-prep, or troubleshooting question that brought you here.


Low Carb Chia Pudding for Weight Loss: What Actually Matters

Chia pudding is not a fat burner, and a jar does not cause weight loss by itself. What makes it useful in a weight-management routine is practical: chia is easy to portion ahead, it creates a substantial gel-like texture when hydrated, and it can be paired with protein-rich ingredients such as Greek yogurt or protein powder.

The rest of the jar matters just as much. Canned coconut milk, nut butter, nuts, granola, fruit, sweeteners, and large portions can quickly change both calories and carbohydrates. A chia pudding that replaces a less satisfying breakfast is a different situation from adding a rich pudding on top of everything else you already eat.

  • Start unsweetened: choose unsweetened almond milk, plain Greek yogurt, or an unsweetened coconut base when keeping added sugar low matters.
  • Add protein when the jar needs to function as a meal: Greek yogurt or a protein powder you already tolerate well are the easiest routes.
  • Measure calorie-dense toppings: nut butter, nuts, seeds, coconut and granola are easy to overserve.
  • Use fruit deliberately: berries are easy to portion; mango and apple work better as measured flavor accents when carbs matter.
  • Do not confuse “keto” or “low carb” with automatically low-calorie: coconut milk and nut butter can make an excellent low-carb pudding while still creating a very energy-dense jar.

That is the reason this guide includes several styles rather than one “perfect” weight-loss pudding: the best jar is the one whose portion, protein, texture, and toppings fit the rest of your day.


Why Chia Pudding Works So Well as a Breakfast

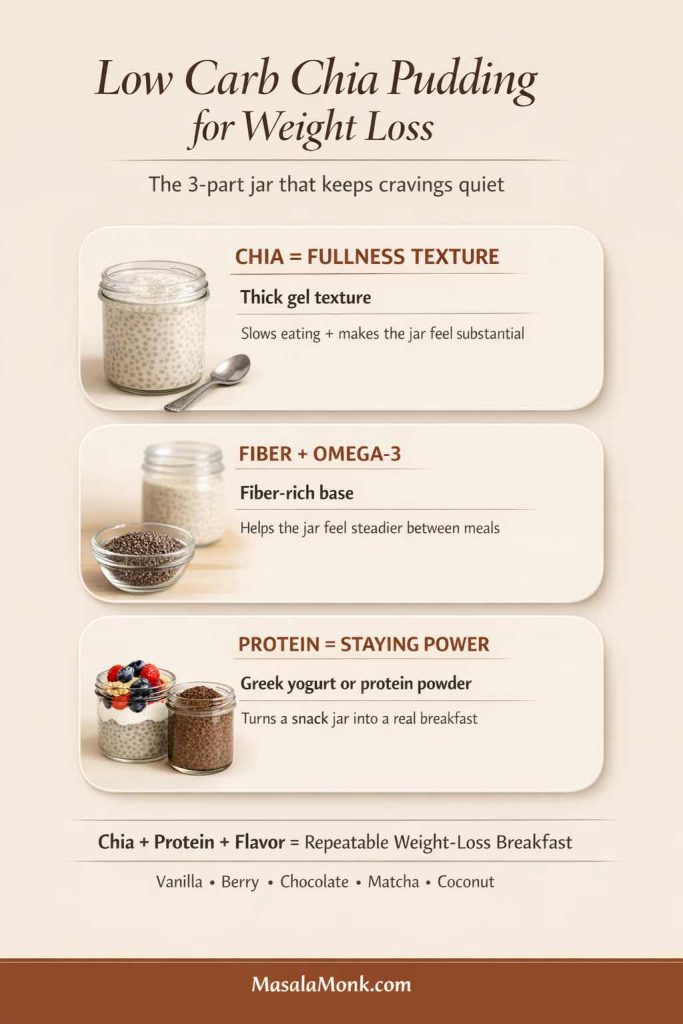
A good chia pudding does two practical things well: it gives you a breakfast you can prepare ahead, and it creates a thick, substantial texture from very little morning work. Chia seeds absorb liquid as they hydrate, while Greek yogurt, protein powder, nuts, or richer milks can make the finished jar feel more complete.

Infographic explaining how chia creates a thick gel texture and can be combined with protein such as Greek yogurt or protein powder.
Chia supplies the pudding structure; protein and the rest of the ingredients determine whether the jar behaves more like a snack or a full breakfast.
Chia seeds are naturally rich in fiber and contain alpha-linolenic acid, a plant-based omega-3 fat. For a useful evidence-based overview rather than exaggerated claims, see the Harvard Nutrition Source guide to chia seeds.

Protein is the easiest way to make the jar feel more meal-like

Plain chia and milk can work perfectly well as a snack, but Greek yogurt or protein powder gives you another lever when you want the jar to function as breakfast. Greek yogurt also changes the texture immediately: instead of waiting for milk alone to become pudding-like, you start with a thick, creamy base.
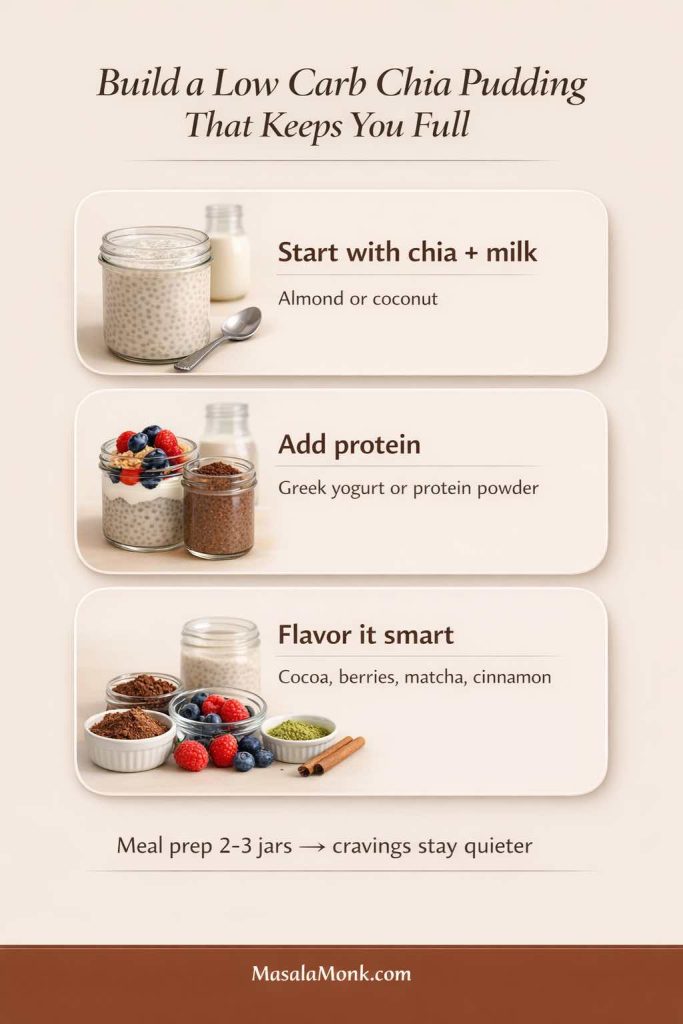
Three-step low carb chia pudding builder showing chia and milk, an optional protein addition, and flavor options such as cocoa, berries, matcha and cinnamon.
Think of the jar in three layers: chia + liquid for structure, an optional protein source for a more substantial breakfast, then flavors you genuinely want to eat.

Low Carb Chia Pudding Ratio: The Base Recipe That Prevents Clumps

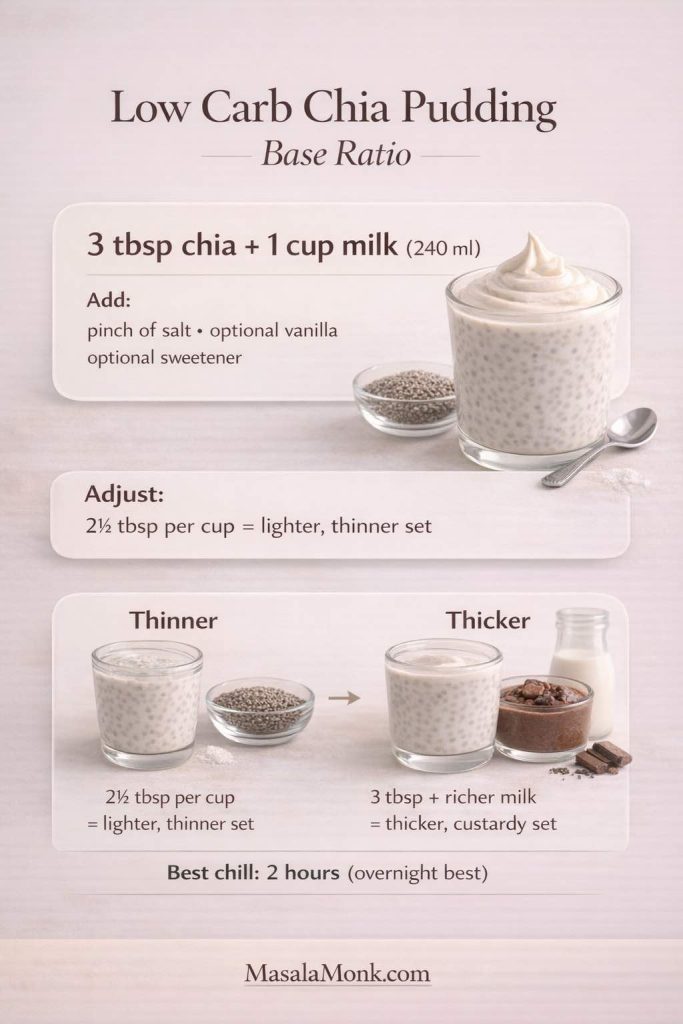
For a classic milk-based chia pudding, this is the dependable starting point:

  • 3 tablespoons chia seeds (roughly 30–35 g, depending on how you measure)
  • 1 cup / 240 ml liquid
  • Pinch of salt
  • ½ teaspoon vanilla, optional
  • Sweetener to taste, optional
Chia pudding ratio infographic showing 3 tablespoons chia seeds to 1 cup or 240 ml milk, with adjustments for thinner or thicker pudding.
Start with 3 tablespoons chia to 1 cup / 240 ml liquid. Use a little less chia for a softer set, or keep the full amount and use a richer liquid for a denser pudding.

The exact result changes with your liquid. Thin almond milk gives a lighter pudding, while canned coconut milk sets much richer. Greek yogurt needs far less added liquid because the yogurt already provides most of the body.

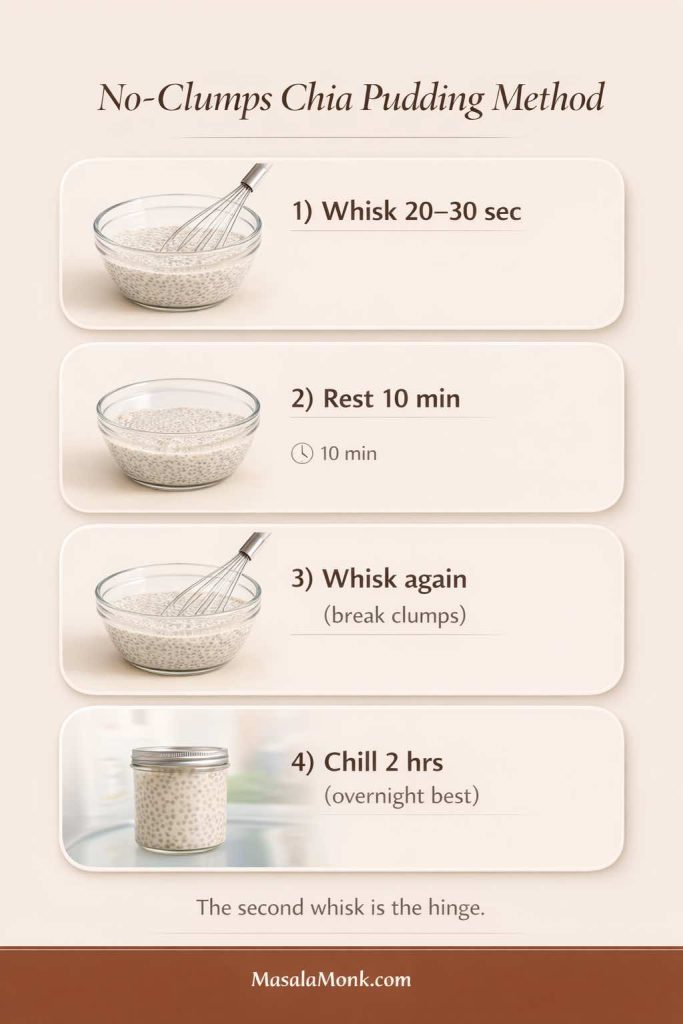
The stir-rest-stir method

  1. Whisk the liquid with vanilla, salt, sweetener, cocoa, protein powder, or other smooth flavorings first.
  2. Add the chia and whisk vigorously for 20–30 seconds.
  3. Let the mixture stand for 10 minutes.
  4. Whisk or stir thoroughly a second time.
  5. Cover and refrigerate for at least 2 hours; overnight gives the most settled texture.
No-clumps chia pudding method showing whisking, a 10-minute rest, a second whisk and a final chill.
The second stir is the important one: the seeds have started hydrating but have not fully set, so this is your chance to break up clusters before they become permanent.

Can you make quick chia pudding?

Yes, although “quick” still means giving chia time to hydrate. Follow the same method and chill for 30–45 minutes. The texture will be softer than an overnight jar. Greek yogurt is particularly useful when you want a thick pudding sooner because much of the thickness is already present before the chia sets.

Give the chia enough time to hydrate

Chia thickens because the seeds absorb liquid over time. For pudding, use them fully hydrated rather than judging the mixture immediately after stirring. If the texture still seems thin after 30 minutes, give it more time before adding extra seeds; the biggest change usually happens during the longer refrigerator rest.


Choosing Your Liquid: Almond Milk, Coconut Milk, Yogurt, Oat Milk & More

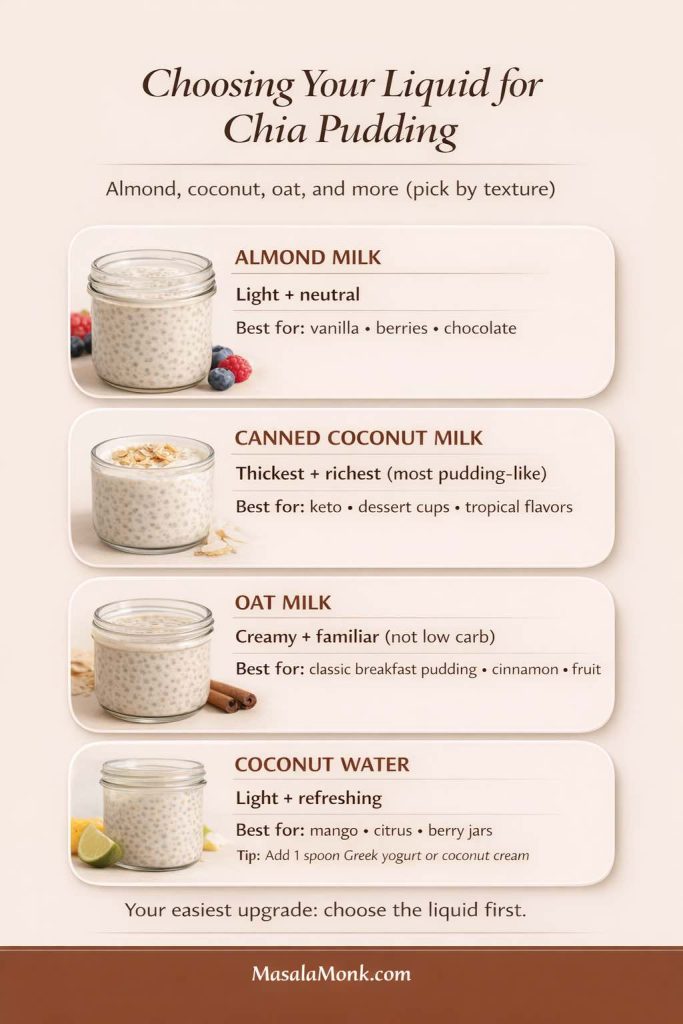
Your liquid controls far more than flavor. It changes thickness, richness, carbohydrate content, and how much additional chia you may need. Choose the liquid first, then fine-tune the jar.

Guide comparing almond milk, canned coconut milk, oat milk and coconut water for chia pudding, including texture and best-use notes.
Almond milk stays light, canned coconut milk gives the richest set, oat milk is creamy but usually higher in carbohydrate, and coconut water creates a lighter fruit-friendly chia gel.

Almond milk: light and versatile

Unsweetened almond milk is an easy low-carb base because its flavor stays out of the way. It works especially well with vanilla, chocolate, cinnamon, berries, matcha, and nut butter.

Canned coconut milk: richest and thickest

If you want a pudding that feels especially rich, canned coconut milk is hard to beat. Because brands vary in thickness, whisk in enough water to make the mixture comfortably pourable before adding chia. Very thick coconut milk can otherwise produce dense pockets before the seeds hydrate evenly.

Greek yogurt: thick before it even chills

Greek yogurt works differently from milk. Instead of using a full cup of liquid, start with yogurt and loosen it gradually. For our full high-protein version, ¾ cup Greek yogurt + ¼ cup / 60 ml water or unsweetened almond milk creates a creamy starting mixture before the chia goes in.

Jump to the Greek yogurt chia pudding recipe →

Oat milk: creamy, but usually not low carb

Oat milk produces a mild, familiar breakfast-pudding flavor. It can still be used with any of the methods in this guide, but check the nutrition label if keeping carbohydrates low is an important part of your goal.

Coconut water: light and fruit-friendly

Coconut water produces a much lighter gel than milk. It pairs particularly well with mango, lime and berries, but it will not taste as creamy unless you add a spoonful of Greek yogurt or coconut cream. If you would rather drink your chia than turn it into pudding, our Chia Seed Water guide uses a much lighter chia-to-liquid ratio and covers plain, lemon, coconut-water and overnight versions.

Dairy-Free Chia Pudding: The Easiest Swaps

Several recipes in this collection are naturally dairy-free when you use plant milk and skip optional Greek yogurt. Unsweetened almond milk is the lightest neutral base; canned coconut milk gives the richest dairy-free texture; and a lighter coconut-milk beverage works well for matcha, mango, apple-cinnamon, and gingerbread.

If you use protein powder in a dairy-free jar, check the ingredient label: whey and casein are dairy proteins, while many pea, soy, rice, and blended plant proteins are dairy-free.


High Protein Chia Pudding: Greek Yogurt, Protein Powder & Collagen

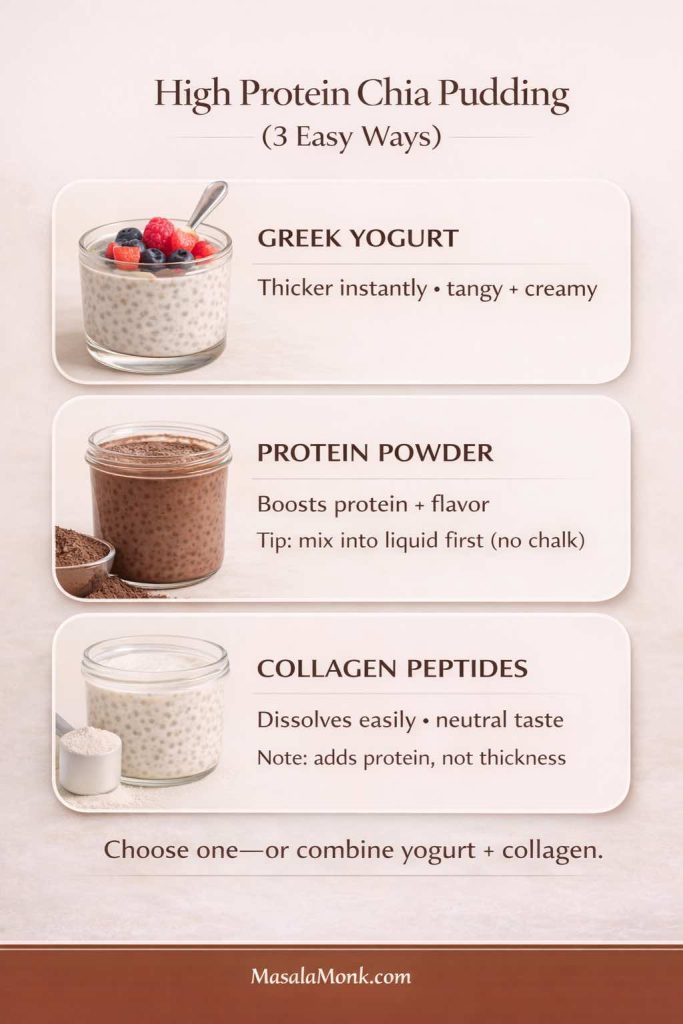
There are three straightforward ways to increase the protein in a chia jar. Greek yogurt gives you protein and immediate thickness. Protein powder can add more protein and flavor but needs to be dissolved well. Collagen peptides dissolve easily, although they do not thicken the pudding the way yogurt does. If collagen is part of your routine, Harvard Health has a measured overview of what collagen supplements can and cannot reasonably claim.

High protein chia pudding comparison showing Greek yogurt, protein powder and collagen peptides as three ways to add protein.
Greek yogurt changes both protein and texture; protein powder is a bigger flavor lever; collagen dissolves easily but contributes little to thickness.

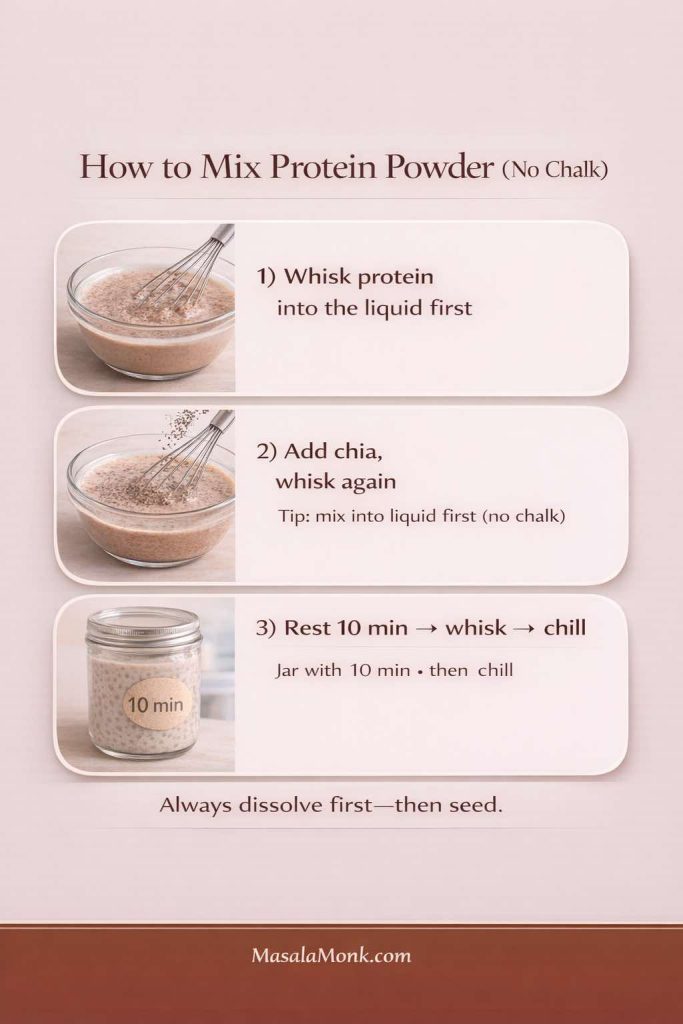
How to add protein powder without a chalky texture

Do not dump dry protein powder into a finished chia pudding. Whisk it completely into the milk first, then add the chia. If your powder is stubborn, make a smooth paste with a small amount of liquid before gradually whisking in the rest.

Keep extra liquid nearby: protein powders absorb liquid very differently. After the 10-minute rest, add 2–4 tablespoons milk if the mixture has become unusually thick before it goes into the refrigerator.

Three-step guide showing protein powder whisked into liquid first, followed by chia seeds and a final 10-minute rest and second stir.
For smooth protein chia pudding: dissolve the powder first, add the seeds second, then use the same 10-minute rest and second-stir method.

10 Low Carb Chia Pudding Recipes

Each recipe below makes roughly 2 small servings or 1 generous serving, depending on appetite and toppings. For meal prep, multiply the ingredients and portion the finished mixture into individual jars.

Low-carb vs keto: these recipes are not all equally low in carbohydrate. The unsweetened almond-milk, Greek-yogurt, chocolate, and coconut versions are the easiest to keep very low carb. Mango and apple are fruit-forward options; use the fruit as a measured accent if carbohydrate intake is a priority.

Goal-based chia pudding chooser showing Greek yogurt for highest protein, chocolate protein pudding for chocolate cravings, coconut milk for extra-creamy keto pudding and blended chocolate mousse for people who dislike whole chia texture.
Start with the result you want: Greek yogurt for thick and protein-forward, chocolate protein for cocoa cravings, coconut milk for the richest keto texture, or blended mousse if whole chia seeds are the problem.
If you want…Make this one
Thickest high-protein jarGreek Yogurt Chia Pudding
Simple everyday keto baseVanilla Almond Milk
Chocolate + proteinChocolate Protein
Chocolate dessert feelChocolate Peanut Butter
Fresh café-style flavorMatcha
Fruit-forwardMango
Cozy breakfastApple Cinnamon
Warm-spice dessert flavorGingerbread
Richest keto textureCoconut Milk
No whole-seed textureBlended Chocolate Mousse

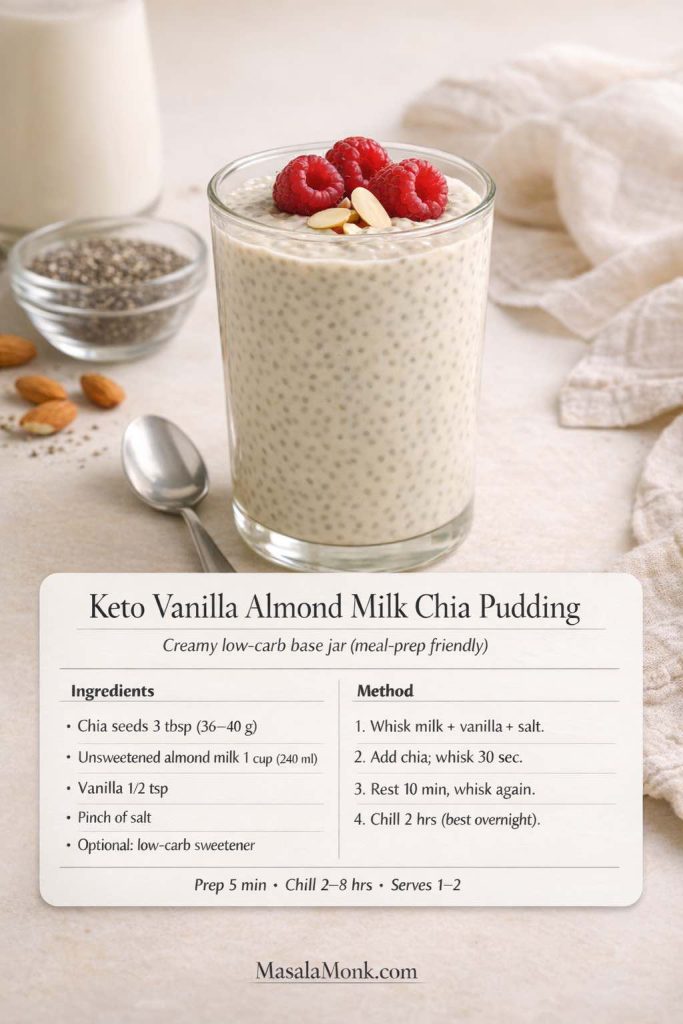
1) Keto Chia Pudding with Almond Milk

This is the easiest everyday low carb chia pudding to memorize. Vanilla keeps it neutral enough for berries, nuts, cocoa, cinnamon, or nut butter later.

Ingredients

  • 3 tablespoons chia seeds
  • 1 cup / 240 ml unsweetened almond milk
  • ½ teaspoon vanilla extract
  • Pinch of salt
  • Optional low-carb sweetener, to taste
Keto vanilla almond milk chia pudding topped with raspberries and sliced almonds.
The almond-milk jar is the useful blank canvas of the collection: light enough for fruit, but easy to make richer with yogurt, nuts or nut butter.

Method

  1. Whisk almond milk, vanilla, salt and sweetener, if using.
  2. Add the chia and whisk vigorously for 20–30 seconds.
  3. Rest 10 minutes, then whisk again.
  4. Cover and refrigerate for at least 2 hours or overnight.

Easy variations: add ½ teaspoon cinnamon; stir in 1 tablespoon unsweetened shredded coconut; or add 1–2 tablespoons Greek yogurt at serving time for a creamier finish.

For a deeper single-recipe treatment, see the keto chia pudding with almond milk.


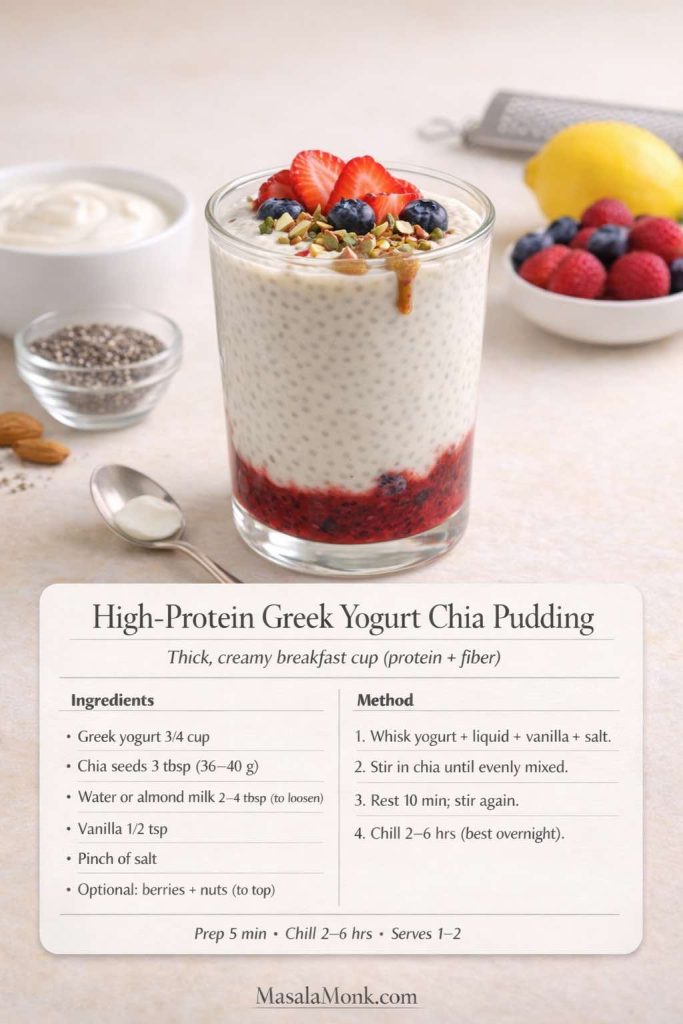
2) Chia Pudding with Greek Yogurt: High Protein & Ultra Creamy

If the chia pudding you want is thick, creamy and closer to cheesecake filling than a glass of soaked seeds, start here. Greek yogurt gives the jar body before the chia has even finished hydrating, while a small amount of liquid keeps the mixture creamy rather than pasty.

Ingredients

  • ¾ cup plain Greek yogurt
  • 3 tablespoons chia seeds
  • ¼ cup / 60 ml unsweetened almond milk or water, plus 1–2 tablespoons more after chilling if needed
  • ½ teaspoon vanilla extract
  • Pinch of salt
  • Optional sweetener, to taste
Thick high-protein Greek yogurt chia pudding layered with berries and topped with strawberries, blueberries, nuts and a small nut-butter drizzle.
This is the thickest protein-forward version in the collection: tangy Greek yogurt, hydrated chia and enough added liquid to keep the pudding creamy rather than stiff.

Method

  1. Whisk the Greek yogurt, vanilla, salt and ¼ cup / 60 ml water or almond milk until completely smooth.
  2. Stir in the chia seeds until evenly distributed.
  3. Rest for 10 minutes, then stir again so no dense chia pockets remain.
  4. Refrigerate for at least 2 hours. Overnight is fine.
  5. Stir before serving and add another 1–2 tablespoons liquid if you want it looser.

How thick should it look before chilling?

It should already be thick, but it should still move easily when stirred. If it looks like a stiff paste before going into the refrigerator, add another tablespoon or two of liquid. The chia will absorb more as it sits.

Can you use nonfat or regular yogurt?

Yes. Nonfat Greek yogurt works, although the finished pudding can taste a little sharper and less rich. Regular yogurt is thinner, so start with less added liquid and check the texture after hydration. Different yogurts vary enough that the final splash of liquid should be adjusted by texture rather than treated as an exact requirement.

Can you add protein powder too?

Yes. Whisk the protein powder into the yogurt and loosening liquid before adding chia. Protein powders absorb liquid differently, so expect to add another 1–3 tablespoons milk if the mixture becomes unusually stiff after the 10-minute rest.

Best toppings and variations

For a cheesecake-style jar, use vanilla, berries and a little lemon zest. For chocolate, whisk cocoa into the yogurt before adding chia. Peanut butter, chopped nuts, cacao nibs and a small berry layer all work well because they add contrast without turning the pudding watery.

If this thick, tangy, almost-cheesecake style is the chia pudding you actually want, keep going with our 10 Creative Chia Pudding Recipes. That collection branches into Greek-yogurt, cheesecake, chocolate, blueberry-lemon, mango and coconut-cream directions, so you can keep the texture you like and change the flavor.


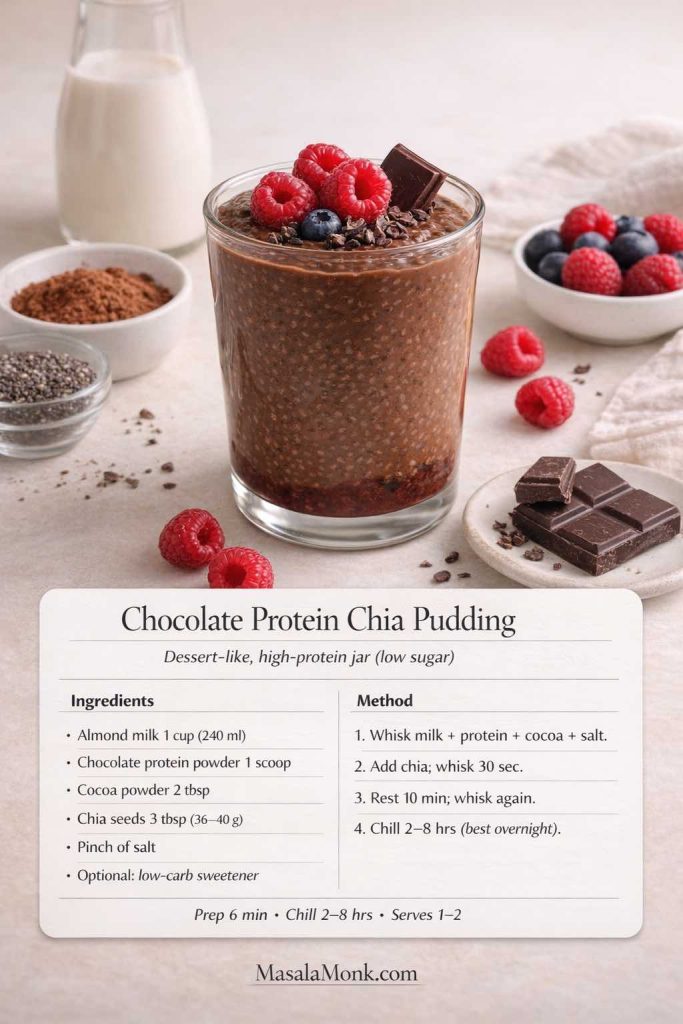
3) Chocolate Protein Chia Pudding

This is the jar to make when you want chocolate flavor without turning breakfast into a sugar-heavy dessert. The important technique is dissolving the protein powder and cocoa before the chia goes in.

  • 1 cup / 240 ml unsweetened almond milk or dairy milk
  • 1 scoop chocolate protein powder, or vanilla protein plus extra cocoa
  • 2 tablespoons cocoa or cacao powder
  • 3 tablespoons chia seeds
  • Pinch of salt
  • Optional sweetener, to taste
  • Optional: 1 tablespoon Greek yogurt for extra creaminess
  • 2–4 tablespoons extra milk, only if your protein powder makes the mixture unusually thick
Chocolate protein chia pudding topped with raspberries, cacao nibs and dark chocolate.
Cocoa and protein powder make this the most direct chocolate-for-breakfast jar in the collection.
  1. Whisk the milk, protein powder, cocoa, salt and sweetener until completely smooth.
  2. Add chia and whisk again.
  3. Rest 10 minutes, then stir thoroughly. If it already looks very thick, add 2–4 tablespoons extra milk.
  4. Refrigerate for at least 2 hours; overnight gives the most settled texture.

If it tastes chalky: whisk the protein powder with a small amount of milk into a smooth paste first, then gradually add the rest of the milk.


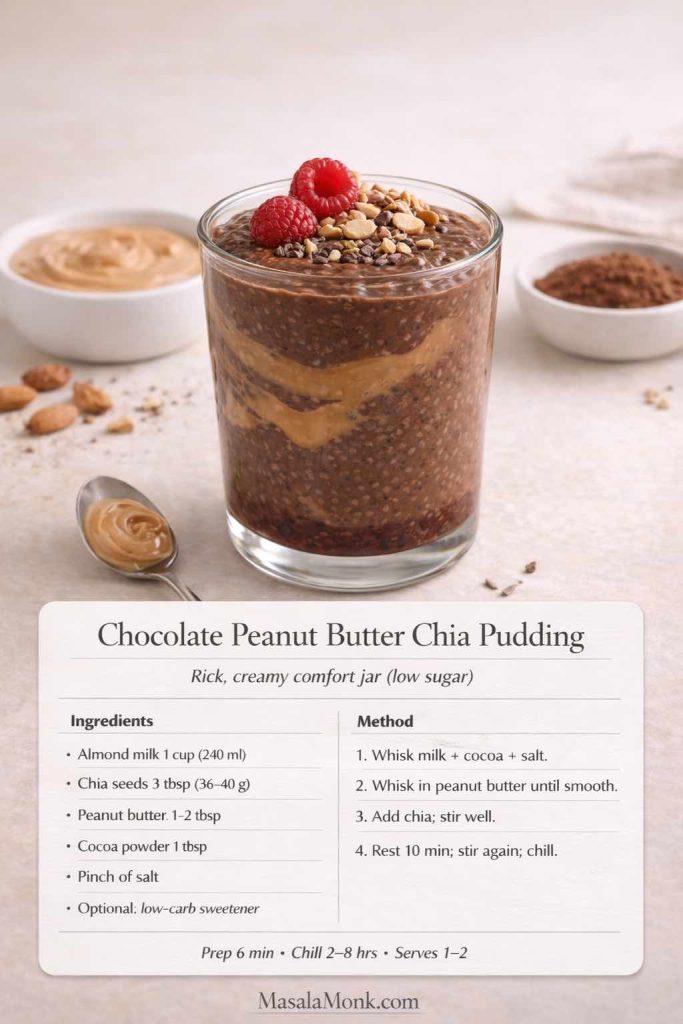
4) Chocolate Peanut Butter Chia Pudding

Peanut butter supplies richness and makes chocolate taste fuller even when you keep the pudding only lightly sweetened.

  • 1 cup / 240 ml almond milk or dairy milk
  • 3 tablespoons chia seeds
  • 1–2 tablespoons peanut butter
  • 1 tablespoon cocoa powder
  • Pinch of salt
  • Optional sweetener
Chocolate peanut butter chia pudding with a peanut butter swirl, raspberries, chopped peanuts and cacao nibs.
Chocolate and peanut butter create a richer dessert-style jar without needing much additional sweetness.
  1. Whisk milk, cocoa, salt and sweetener until smooth.
  2. Whisk in the peanut butter until evenly incorporated.
  3. Add chia, rest 10 minutes and stir again.
  4. Refrigerate for at least 2 hours.

A tiny splash of vanilla or pinch of cinnamon can make the cocoa taste deeper. Top with berries, roasted nuts or a few cacao nibs.


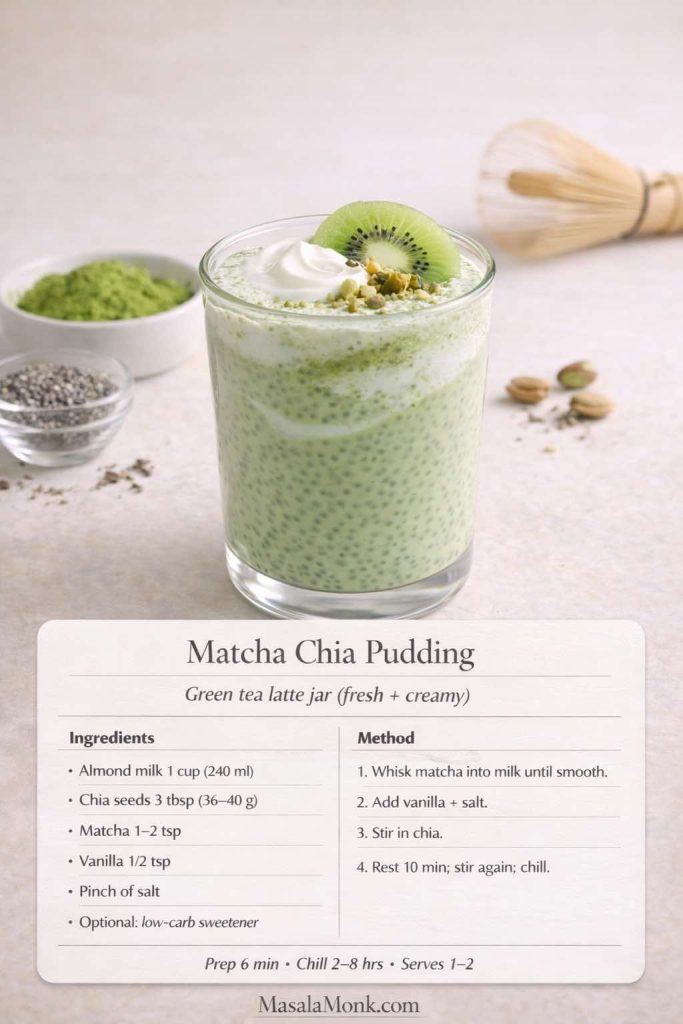
5) Matcha Chia Pudding

Matcha gives chia pudding a clean green-tea flavor that works especially well with vanilla and a small pinch of salt.

  • 1 cup / 240 ml unsweetened almond milk or light coconut-milk beverage
  • 3 tablespoons chia seeds
  • 1–2 teaspoons matcha powder
  • ½ teaspoon vanilla
  • Pinch of salt
  • Optional sweetener
Creamy matcha chia pudding topped with kiwi, pistachio and a small spoonful of yogurt.
Matcha creates a lighter, café-style change of pace between the richer chocolate and coconut puddings.
  1. Whisk or sift matcha into the milk until smooth.
  2. Add vanilla, salt and sweetener, if using.
  3. Add chia, rest 10 minutes, stir again and refrigerate.

If your matcha clumps, whisk it first with 1–2 tablespoons warm water to form a smooth paste. Matcha contains caffeine, so use less or enjoy it earlier in the day if you are sensitive to it.


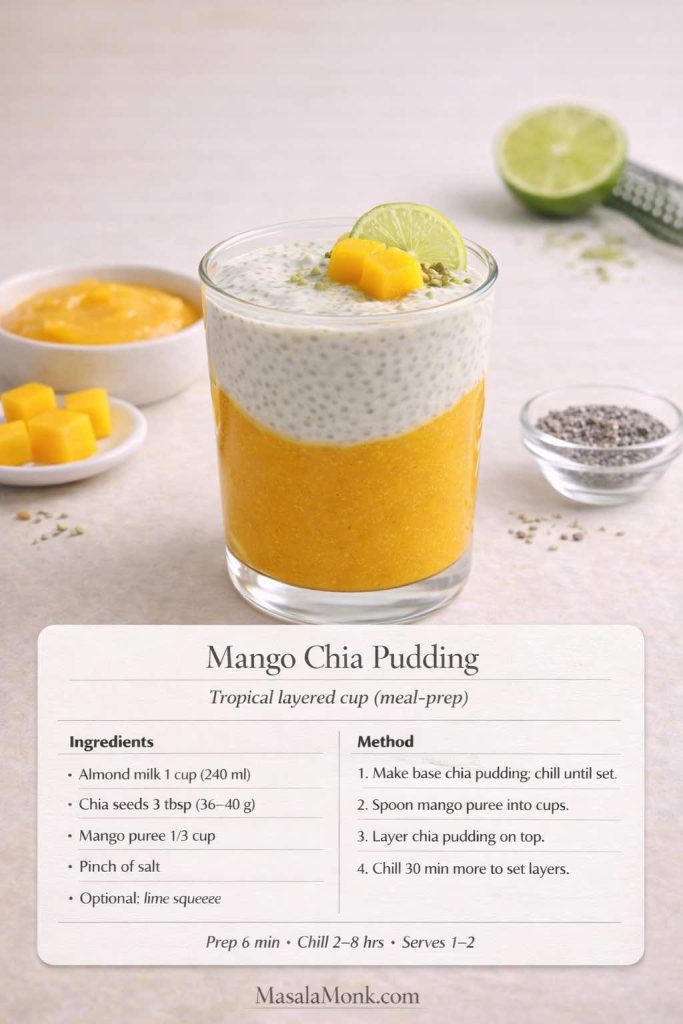
6) Mango Chia Pudding

Mango gives you plenty of flavor from a relatively small amount of fruit. Lime and a pinch of salt help the mango taste brighter, so you do not need to turn the whole jar into mango puree.

  • 1 cup / 240 ml almond milk or coconut-milk beverage
  • 3 tablespoons chia seeds
  • ⅓ cup mango puree or finely diced mango
  • Pinch of salt
  • Optional squeeze of lime
Layered mango chia pudding with bright mango puree, creamy chia pudding, mango pieces and lime.
Layering the mango rather than mixing a large quantity through the whole jar gives you strong tropical flavor without overwhelming the chia base.
  1. Make the chia base with milk, chia and salt.
  2. Chill until set.
  3. Fold in the mango just before eating, or layer the puree at the bottom of the jar.
  4. Finish with lime, if using.

If the tropical-fruit direction is what you like, try our pineapple chia pudding next. It uses the same two-stir logic but goes deeper on pineapple, yogurt, texture, and how to keep the pudding spoonable rather than watery.


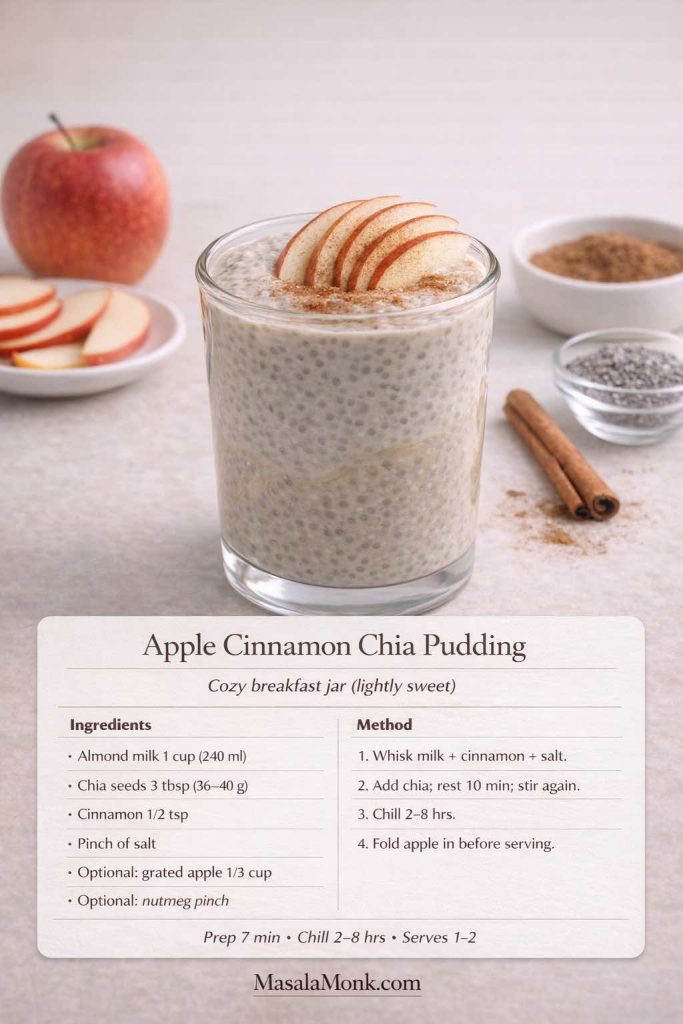
7) Apple Cinnamon Chia Pudding

This version gets most of its cozy character from cinnamon, vanilla and nutmeg, so the apple can stay a relatively small accent.

  • 1 cup / 240 ml unsweetened almond milk
  • 3 tablespoons chia seeds
  • ½ teaspoon cinnamon
  • Pinch of salt
  • Optional: ⅓ cup grated apple
  • Optional: pinch of nutmeg
Apple cinnamon chia pudding topped with thin apple slices and cinnamon.
For the freshest texture, add grated apple shortly before serving rather than letting it sit in the pudding for several days.
  1. Whisk milk, cinnamon, salt and nutmeg.
  2. Add chia, rest 10 minutes, stir again and chill.
  3. Fold in grated apple shortly before serving.

Stricter low-carb version: skip the apple and use cinnamon, vanilla and chopped pecans for a cinnamon-pecan jar.


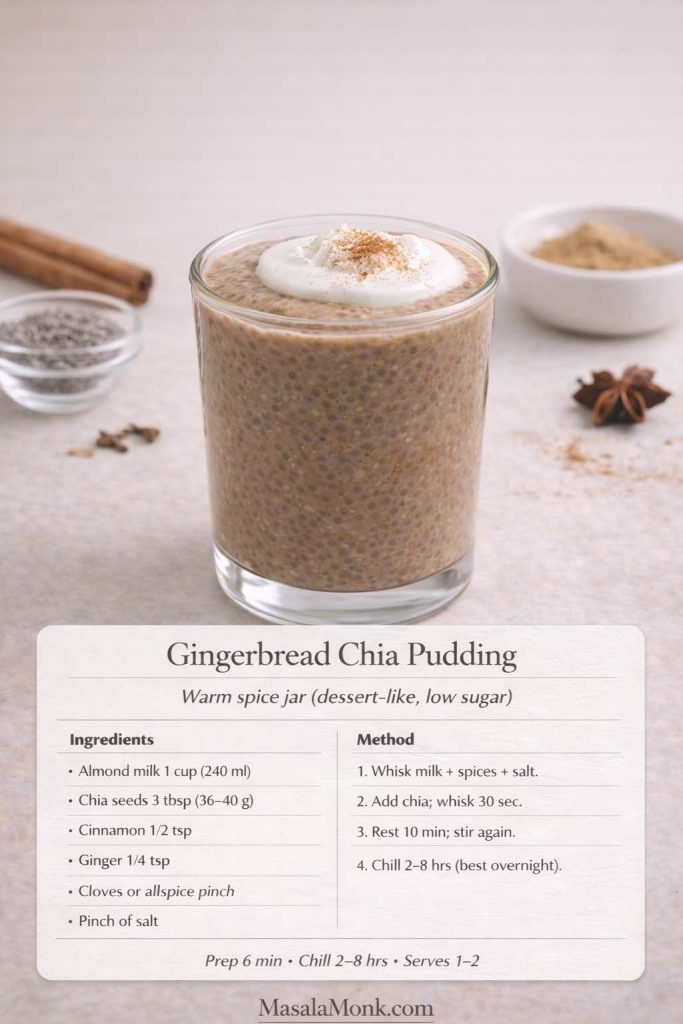
8) Gingerbread Chia Pudding

Gingerbread chia pudding is about warm-spice flavor rather than a health halo: cinnamon, ginger and cloves turn the same neutral base into something that feels much more dessert-like.

  • 1 cup / 240 ml almond milk or coconut-milk beverage
  • 3 tablespoons chia seeds
  • ½ teaspoon cinnamon
  • ¼ teaspoon ground ginger
  • Pinch of cloves or allspice
  • Pinch of salt
  • Optional sweetener
Gingerbread chia pudding topped with yogurt and cinnamon.
Warm spices transform a basic chia-and-milk jar without needing a complicated ingredient list.
  1. Whisk the spices, salt and sweetener into the milk.
  2. Add chia, rest 10 minutes, stir again and refrigerate.
  3. Serve with chopped nuts, Greek yogurt or coconut cream.

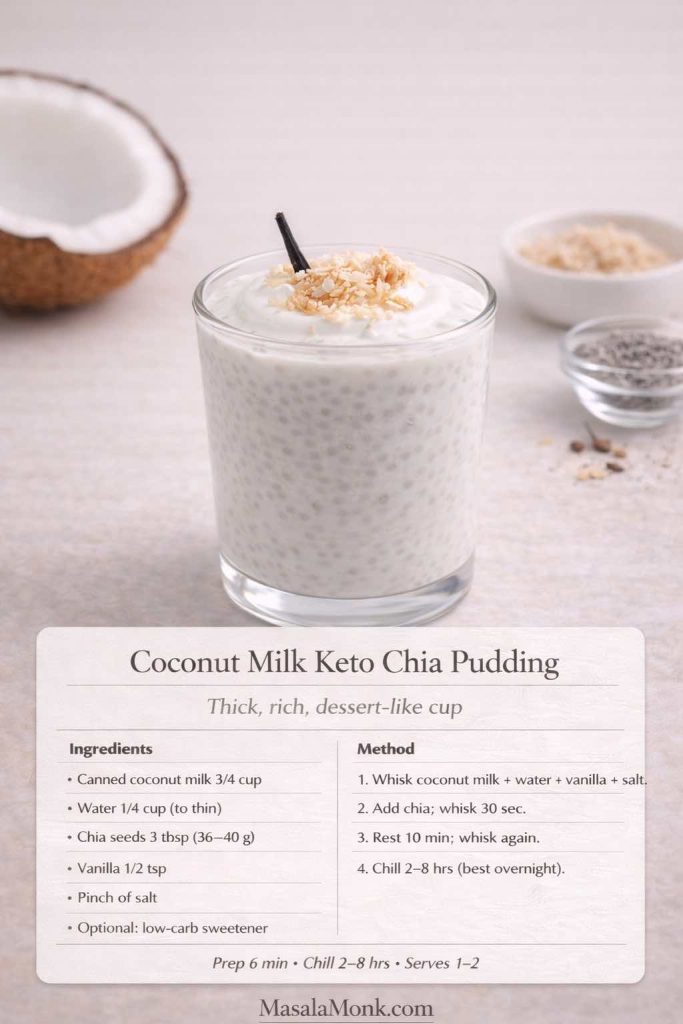
9) Keto Chia Pudding with Coconut Milk

This is the richest milk-based pudding in the collection. Canned coconut milk gives you much more body than almond milk, but thinning it slightly helps the chia hydrate evenly.

  • 3 tablespoons chia seeds
  • ¾ cup / 180 ml canned coconut milk
  • ¼ cup / 60 ml water, plus more if needed
  • ½ teaspoon vanilla
  • Pinch of salt
  • Optional sweetener
Rich coconut milk keto chia pudding topped with toasted coconut and vanilla.
Canned coconut milk produces the densest, richest milk-based chia pudding in this collection.
  1. Whisk coconut milk, water, vanilla, salt and sweetener until smooth.
  2. Add chia, rest 10 minutes and stir again.
  3. Refrigerate for at least 2 hours.
  4. If it becomes extremely thick overnight, loosen it with a splash of water before serving.

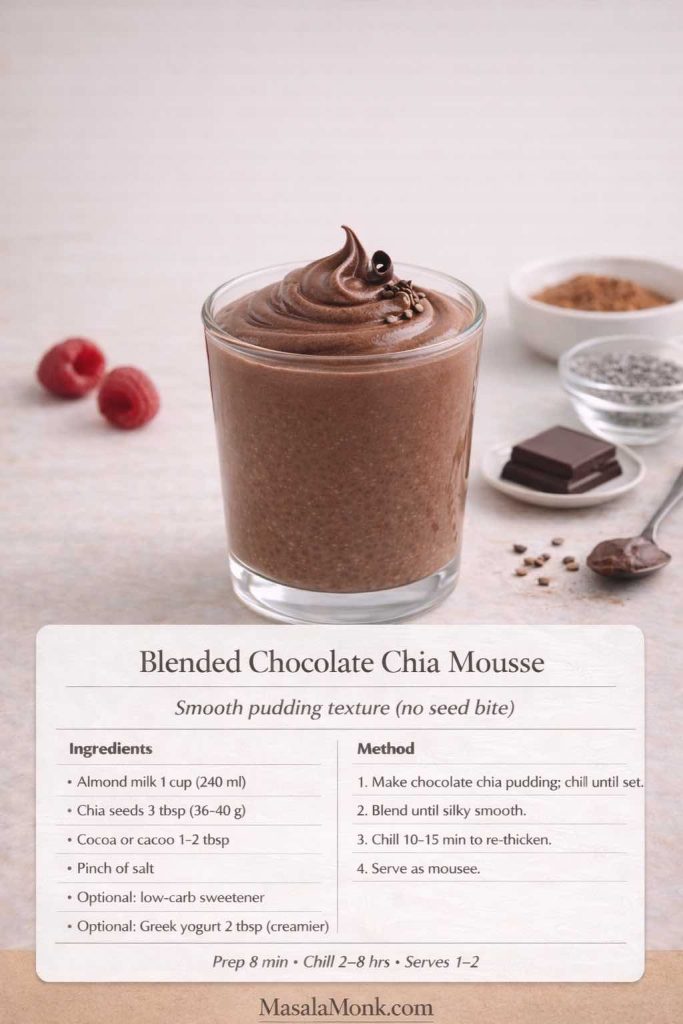
10) Blended Chia Pudding: Smooth Chocolate Mousse

If the idea of chia appeals to you but the whole-seed texture does not, this is the recipe worth trying. Let the chia hydrate first, then blend the finished pudding until glossy and smooth.

  • 1 cup / 240 ml almond milk or dairy milk
  • 3 tablespoons chia seeds
  • 1–2 tablespoons cocoa or cacao powder
  • Pinch of salt
  • Optional sweetener
  • Optional: 1 tablespoon peanut butter or 2 tablespoons Greek yogurt
Silky blended chocolate chia mousse topped with dark chocolate and cacao nibs.
Hydrate first and blend second: that is what changes chia from a seedy pudding into a much smoother mousse-like texture.
  1. Make a standard chocolate chia pudding and refrigerate it for at least 2 hours.
  2. Blend until completely smooth and glossy.
  3. Add Greek yogurt or peanut butter if you want a richer finish.
  4. Chill for another 10–15 minutes before serving.

If protein powder is part of the recipe, blending after the chia has set can also smooth out small powdery pockets.

Whichever flavor you choose, texture is the part most likely to need adjusting. The fixes below are designed so you can rescue the pudding you already made instead of starting over.


Chia Pudding Troubleshooting: Runny, Too Thick, Lumpy or Bland

Most disappointing chia pudding can be traced to the ratio, hydration time, stirring pattern, or the thickness of the liquid you started with. Fix the texture before abandoning the jar.

ProblemWhat probably happenedWhat to do now
Runny after 2+ hoursToo much liquid, too little chia, or very thin milkAdd 1 teaspoon chia at a time, stir well and chill another 30–60 minutes.
Too thick or pastyRich coconut milk, thick yogurt, extra protein powder, or too much chiaStir in milk or water 1 tablespoon at a time until creamy.
Large chia clumpsThe seeds settled together before fully hydratingBreak them up thoroughly; next time use the 10-minute second stir.
Seeds still crunchyNot enough hydration time or liquidAdd a small splash of liquid and give the pudding more time.
Protein powder tastes chalkyPowder was added after the chia or not dissolved firstBlend the pudding, or next time dissolve powder completely before adding seeds.
Watery fruit layerJuicy fruit sat in the jar too longKeep berries and other watery toppings separate until serving.
Flavor is flatNot enough salt, aroma, richness or acidityAdd a pinch of salt plus vanilla, cinnamon, cocoa, nut butter, citrus zest or berries.
You hate the seed textureThe pudding may be fine; the texture simply is not for youBlend it into chocolate chia mousse.

One important correction: if a milk-based pudding is only slightly soft at the 30-minute mark, do not keep throwing chia into it. Give it the full two hours first. Chia continues absorbing liquid as it rests.


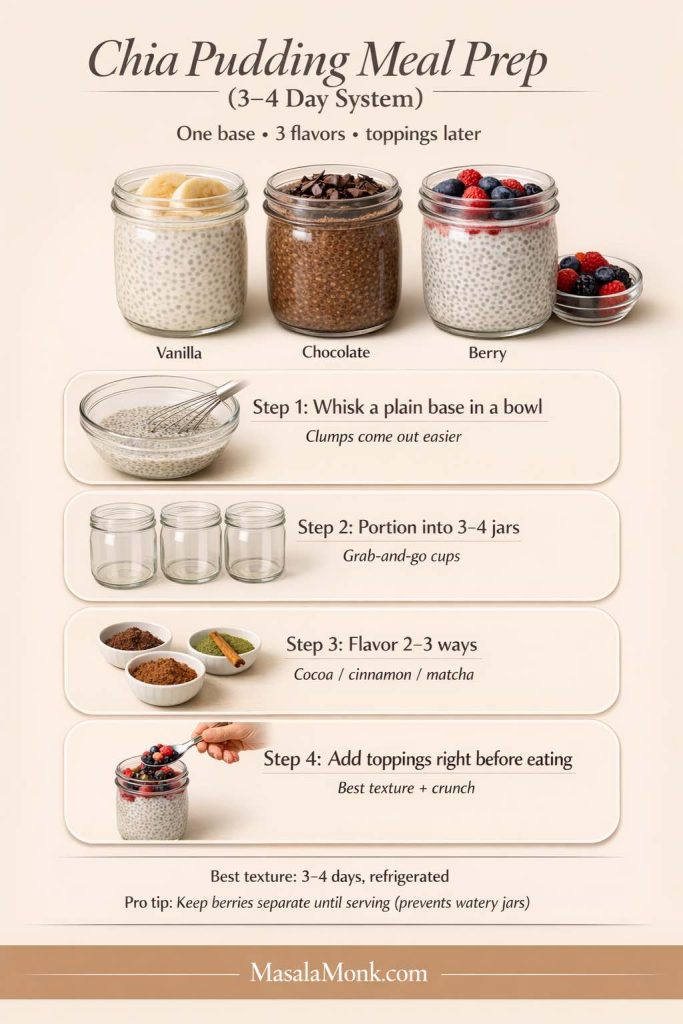
Chia Pudding Meal Prep & Storage

The easiest way to meal prep chia is to make one plain base and create several flavors from it rather than mixing four completely separate recipes.

  • Whisk the base in a bowl where you can easily break up clumps.
  • Do the 10-minute second stir.
  • Portion into three or four jars.
  • Flavor the jars in different directions—vanilla, cocoa, matcha, cinnamon, yogurt.
  • Keep crunchy toppings and watery fruit separate until serving.
Chia pudding meal-prep system showing one base divided into several jars and flavored with vanilla, chocolate and berries, with toppings kept separate until serving.
One base, several flavors, toppings added later: this is much easier to repeat than making a completely different pudding every morning.

For quality, most chia puddings are best eaten within about 3–4 days when refrigerated. Yogurt- and milk-based versions should stay cold, and fruit is usually best added closer to serving. Follow normal refrigerated food-safety practices and discard anything that develops an unusual smell, appearance or signs of spoilage.

If what you really enjoy is the make-it-tonight, grab-it-tomorrow routine rather than chia specifically, our high protein overnight oats give you the same fridge-ready breakfast rhythm with oats, yogurt, protein-powder and dairy-free routes.


How to Make Chia Pudding Taste Better

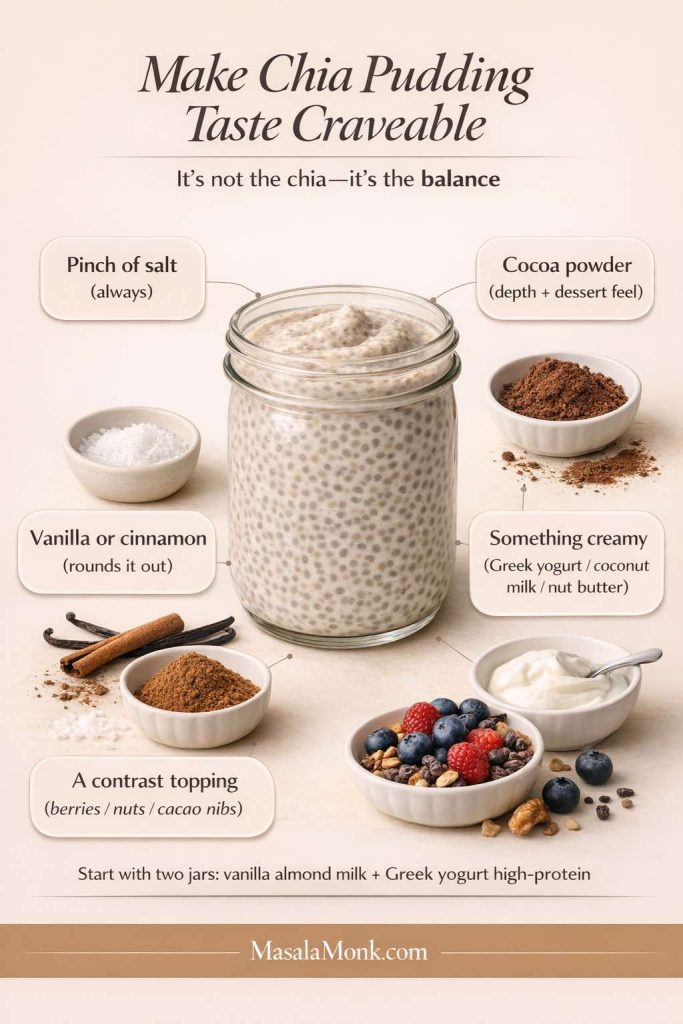
If chia pudding tastes like a health chore, the problem is usually not the chia. A plain mixture of seeds and unsweetened milk needs flavor structure just like any other pudding.

  • Salt: a small pinch makes chocolate, vanilla, fruit and nut butter taste fuller.
  • Vanilla or warm spice: vanilla, cinnamon, ginger or nutmeg give the jar aroma without requiring much sweetness.
  • Depth: cocoa, cacao or matcha create a strong flavor identity.
  • Creaminess: Greek yogurt, canned coconut milk or nut butter changes both flavor and mouthfeel.
  • Contrast: berries, chopped nuts, toasted coconut and cacao nibs stop every spoonful feeling the same.
  • Acidity: lemon or lime zest can make fruit flavors brighter.
Flavor-balance guide for chia pudding showing salt, vanilla or cinnamon, cocoa, creamy ingredients and contrasting toppings.
Good chia pudding needs the same things other desserts do: seasoning, aroma, richness and contrast.

If you are making chia pudding for the first time, a useful two-jar experiment is one vanilla almond-milk jar and one Greek-yogurt jar. You will immediately learn whether you prefer a lighter gel-style pudding or a thicker, tangier texture.


Frequently Asked Questions

1) What is the best chia pudding ratio?

For a milk-based pudding, start with 3 tablespoons chia seeds to 1 cup / 240 ml liquid. Use a little less chia for a softer pudding. Greek-yogurt chia pudding uses a different ratio because yogurt already supplies most of the thickness.

2) How long does chia pudding need to set?

Give it at least 2 hours for a dependable set. A 30–45 minute quick version is possible but softer. Overnight works especially well for meal prep.

3) Why is my chia pudding watery?

It may need more time, more chia, or a better second stir. If it is still runny after at least two hours, add about 1 teaspoon chia, stir thoroughly and chill for another 30–60 minutes.

4) Why is my chia pudding too thick?

Thick Greek yogurt, canned coconut milk, protein powder and slightly heavy chia measurements can all produce an unexpectedly dense pudding. Stir in water or milk a tablespoon at a time until it becomes creamy again.

5) How do I stop chia seeds clumping together?

Whisk immediately after adding the seeds, then stir or whisk again after about 10 minutes. That second stir redistributes the seeds just as they begin to gel.

6) Can I make chia pudding with Greek yogurt and no milk?

Yes. Use water instead of milk to loosen the yogurt. Start with ¾ cup Greek yogurt, 3 tablespoons chia and ¼ cup / 60 ml water, then add another tablespoon or two after chilling if the pudding is too stiff.

7) Is Greek yogurt better than regular yogurt for chia pudding?

Neither is inherently better, but they behave differently. Greek yogurt is thicker and generally higher in protein, so it gives a firmer pudding. Regular yogurt starts looser, meaning you may need less added liquid or slightly more chia.

8) Can I add protein powder to chia pudding?

Yes. For the smoothest texture, dissolve the protein powder in the milk or yogurt mixture before adding the chia seeds. Because powders absorb liquid differently, keep a little extra milk nearby and adjust after the 10-minute rest.

9) Can I make chia pudding with almond milk?

Yes. Unsweetened almond milk is one of the easiest bases for low carb chia pudding because its flavor is mild and it works well with vanilla, cocoa, cinnamon, berries, matcha and nut butter.

10) Can I make chia pudding with coconut milk?

Yes. Canned coconut milk makes an especially rich pudding. If the coconut milk is very thick, dilute it with a little water before adding chia so the seeds hydrate evenly.

11) Can I make chia pudding with oat milk?

Yes. Oat milk creates a mild, creamy pudding, although many oat milks contain substantially more carbohydrate than unsweetened almond milk, so check the label if low carb is your priority.

12) Can I make dairy-free chia pudding?

Yes. Use unsweetened almond milk, coconut milk, or another dairy-free milk you enjoy. If adding protein powder, check whether it contains whey or casein; those are dairy proteins.

13) Can I make blended chia pudding?

Yes, and it is one of the best solutions if you dislike whole chia seeds. Let the pudding hydrate first, then blend until smooth. Cocoa, peanut butter or Greek yogurt can make the result even more mousse-like.

14) What is the easiest three-ingredient chia pudding?

A simple version is chia seeds + unsweetened almond milk + vanilla. Another is chia + coconut milk + cocoa. Add a pinch of salt if possible; it makes a surprisingly large difference to the finished flavor.

15) Can I use frozen berries in chia pudding?

Yes. Thawed berries release juice, which can be useful as a swirl or compote-style layer. For meal prep, keep very juicy berries separate until serving if you do not want them loosening the pudding.

16) How can I sweeten chia pudding without much sugar?

Start by improving flavor before simply increasing sweetness. Vanilla, cinnamon, cocoa, nut butter, coconut milk, berries, citrus zest and a pinch of salt can all make the pudding taste more complete. If you use a low-carb sweetener, add only enough to suit your taste.

17) Is chia pudding keto-friendly?

It can fit many low-carb or ketogenic eating patterns when made with ingredients such as unsweetened almond milk or coconut milk and appropriate toppings. The final carbohydrate content depends on your milk, yogurt, fruit, sweetener and serving size, so check the ingredients you actually use rather than relying on the word “keto” alone.

18) How long does chia pudding last in the fridge?

For quality, aim to eat most homemade chia pudding within about 3–4 days, refrigerated. Keep toppings such as nuts separate for crunch and add juicy fruit later if you want the pudding to stay thick.

19) Which chia pudding should I make first?

If you want the simplest base, start with vanilla almond milk chia pudding. If you came for the thick, creamy version, make the Greek yogurt chia pudding. And if chia’s seed texture has always bothered you, go directly to the blended chocolate mousse.

Posted on — 3 Comments

Food for Constipation Relief & Gut Health : 6 High-Fiber Sandwiches

High-fiber sandwich on whole-grain bread with hummus, spinach, kiwi and carrot sticks; chia seeds and a water glass suggest hydration for digestion.

Constipation is exhausting, but lunch can actually help. These high-fiber sandwiches are built the way your gut prefers: sturdy whole-grain bread for gentle bulk, creamy legume spreads for steady fiber, seed “gel boosters” for softness, and juicy produce for moisture. Moreover, they’re practical—quick to assemble, easy to repeat, and sized to deliver meaningful fiber without feeling heavy.

Now, how much fiber do most adults need? A realistic daily target sits around 25–38 g. However, jumping there overnight can backfire. Instead, increase gradually—about 5 g extra per day each week—and pair each meal with fluids so fiber can actually hold water and move comfortably (see this concise intake overview and NIDDK hydration guidance). Meanwhile, short habits matter: drink a glass of water with your sandwich, then take a 10–15-minute walk. Little by little, those simple moves add up to relief.

Because details determine outcomes, every recipe below was designed with fiber grams, moisture, and texture in mind. In other words, the builds aren’t random—they’re engineered for comfort, regularity, and flavor you’ll actually crave tomorrow.

Also Read: Hemorrhoids High Fiber Diet: Best Foods, What to Avoid, and a 7-Day Plan


How much fiber these sandwiches deliver & of what kinds?

First, how much: each sandwich aims to contribute roughly 12–20 g of fiber toward your day. Which means, two thoughtfully built high-fiber sandwiches can cover most of what you need, leaving breakfast and snacks to top you up gently.

Second, which kinds: not all fibers behave the same, so the layers do different jobs.

  • Viscous, soluble fibers make a soft gel that holds water in the stool, which often makes passing easier. You’ll get these from oats and barley (thanks to β-glucans), plus chia and ground flax (rich in mucilage). we have used oat/barley-leaning breads, avocado-chia mixes, and flax-boosted hummus throughout. If you’re curious about the mechanics, here’s a clear look at β-glucans and stool-softening and a friendly explainer on chia’s mucilage-rich fiber.
  • Insoluble fibers—from bran, leafy greens, and vegetable skins—add gentle bulk and help speed transit. As a result, grated carrots, greens, and crunchy slaws live inside the sandwich, not just on the side, so every bite pulls its weight.
  • Moisture is the multiplier. Because fiber needs water to work, spreads are creamy, fillings are juicy, and sauces are built in rather than left out. Additionally, we suggest sipping water with the meal, since fluids help fiber function.

Finally, how the recipes are structured: each sandwich states its intent (relief or maintenance), lists realistic portions, and includes make-ahead notes, smart swaps, and small finishing touches. Therefore, you can choose what fits today—and repeat it tomorrow—without turning lunch into a project.

Also Read: Prune Juice & Prunes for Constipation: What Works, How Much, and When to Seek Help


Why High-Fiber Sandwiches help (and how to build them)

Put simply, sandwiches make fiber doable. They bundle the right textures (soft + crisp), the right moisture (creamy + juicy), and the right amounts (measured slices and scoops) into a meal you can repeat tomorrow. Moreover, the format nudges consistency—arguably the most important factor for regularity.

They’re effortless to measure—and easy to stick with

Whole-grain slices are pre-portioned, spreads are spoonable, and veg layers are visible. Making it easy for you to assemble, eat, and actually hit useful daily fiber targets with minimal guesswork. If you like to prep once and assemble fast, this MasalaMonk idea for lentil meal-prep (as a sandwich filling) shows how a single batch can anchor multiple sandwiches during the week.

Moisture is built in by design

Dry, dense meals can backfire. We have ensured, each of these high-fiber sandwiches are built in a way that anchors moisture inside the bread: creamy hummus or yogurt-tahini underlayers, avocado folded with seeds, and juicy produce (carrot, greens, citrus segments) on top. That layering keeps bites slick rather than pasty, which, in turn, supports comfortable stool texture. If you like dairy or dairy-free yogurt as a base, a quick example is this hung curd spinach sandwich—the same idea powers our “Green Goddess” stack.

Layer order actually helps transit

Then start with a creamy spread to “seal” the crumb; next, add your fiber engine (chickpeas, lentils, or black beans) so it clings; in the end, finish with watery produce for slip. Additionally, a squeeze of lemon or a spoon of salsa adds acidity and fluid without heaviness. Small choices like these often determine whether a sandwich just sits—or genuinely supports movement.

Seeds add gentle gel—without bulky portions

A teaspoon of chia or finely ground flax disappears into spreads yet changes texture meaningfully after a glass of water. In brief, chia’s soluble, mucilage-rich fiber is well-documented (concise overview, open-access review; see also a broader nutrient profile in this MDPI review of chia’s composition: open access). For flax specifics you can use in everyday cooking, here’s a MasalaMonk primer: flax seeds for strong digestion.

The hand-held format supports satiety and travel

Because each of these high-fiber sandwiches pairs intact grains with legumes and produce, you get slower digestion and steadier fullness; which means, you’re less likely to graze later. For a clear big-picture explainer on fiber’s roles (beyond “roughage”), Harvard’s Nutrition Source summarizes the two fiber types and their effects.

Gentle routines amplify the effect

Right after eating, your body’s gastrocolic reflex naturally increases colon motility—so a brief 10–15-minute walk can nudge momentum in the right direction. For a plain-language primer, see Cleveland Clinic’s overview of the gastrocolic reflex. Moreover, even light movement supports regularity; their constipation guide underscores that exercise can stimulate the intestines. If symptoms persist despite these habits, the NIDDK’s constipation page outlines when to speak with a clinician.

Build template (at a glance)

  • Bread (2 slices): 100% whole-grain or sprouted; look for ≥3–4 g fiber per slice.
  • Spread (2–4 tbsp): hummus, white-bean mash, or yogurt-tahini; optionally stir in 1 tsp chia or ground flax.
  • Engine (⅓–½ cup): chickpeas, lentils, or black beans; lightly mash so it anchors.
  • Produce (heaped): grated carrot + leafy greens + a juicy element (cucumber, tomato, or citrus).
  • Finish: lemon or vinegar splash; herbs; pepper. Additionally, sip water and, if possible, take a short walk afterward.

For background reading that ties food choices to gut comfort more broadly (in case you want to deepen the “why”), this MasalaMonk primer on gut inflammation and digestive health connects everyday plant foods with a calmer baseline—useful context for readers who like understanding the bigger picture.

Also Read: Teas for Digestion, Bloating, and Gut Health.


How to Use These High-Fiber Sandwiches

When constipation drags on, lunch is often the easiest place to add high fiber foods for constipation relief—without cooking an entire pot of anything. In practice, plant based foods high in fiber (beans, chickpeas, lentils, leafy greens) plus high fiber fruits and vegetables for constipation (kiwi, pear, apple, carrots) work together; as a result, you get both moisture and bulk. Along the way, foods rich in soluble fiber—like oats, barley, chia, and ground flax—form a gentle gel that supports softer stools and calmer bellies. Because you asked for a high fiber plant based diet approach, every sandwich below is fully plant-forward, practical for weekdays, and aligned with high fiber foods for gut health, colon health, and everyday digestive health. For hydration cues that make this even easier, see NIDDK’s diet & constipation guidance; for grain choices that add viscous fiber, here’s a friendly β-glucan overview.

Format you’ll see below: brief “why,” a clear ingredient list, step-by-step method, fiber-forward upgrades, and make-ahead tips—so these fiber rich foods for bowel movement become an easy habit, not homework.


1) Hummus–Kiwi–Greens “Softener” — flagship of High-Fiber Sandwiches (Relief)

Estimated fiber: ~17 g • Taste & texture: cool, fresh, silky
When to choose it: stools feel dry; you want gentle moisture without heaviness

Why it works (quickly yet gently)
This is a purpose-built combo of foods that are rich in soluble fiber and high fiber fruits for constipation. Specifically, creamy hummus (legumes = plant based foods high in fiber) and a teaspoon of ground flax (mucilage) create a moist base; then, thin-sliced kiwi and a mound of grated carrot supply juicy volume. Resulting in every bite that stays soft, which supports easier bowel movements and overall gut health. If you’d like a plain-English primer on adding flax safely, skim flax seeds for strong digestion; if you prefer the science on chia/flax-style gels, here’s a concise chia fiber review for later.

Infographic of a high-fiber hummus–kiwi–spinach sandwich for constipation relief, with step-by-step method, 17g fiber badge, hydration reminder, and MasalaMonk.com footer.
Moist hummus + ground flax soften; kiwi and grated carrot add fluid; whole-grain bread supplies gentle bulk. Aim for ~17 g fiber here and drink water with the meal for best effect.

Ingredients (serves 1)

  • 2 slices 100% whole-grain bread (≥3–4 g fiber/slice; oats or barley in the mix add foods rich in soluble fiber)
  • Hummus, 4 tbsp (legume base = high fiber foods for digestive health)
  • Ground flaxseed, 1 tsp (stirred into the spread)
  • Kiwi, 1 medium, thin-sliced (one of the most convenient high fiber fruits for constipation)
  • Baby spinach, big handful (leafy greens = fiber rich foods for gut health)
  • Carrot, finely grated, ½ cup (insoluble lift for bowel movement comfort)
  • Lemon juice, black pepper, tiny pinch of salt

Method

  1. In a small bowl, whisk lemon into the hummus; then stir in ground flax until creamy.
  2. Spread the mixture edge-to-edge on both slices; afterwards, pile on spinach, layer kiwi, and shower with grated carrot.
  3. Season with pepper and a pinch of salt; and then, close gently and press once with your palm.

Fiber-forward upgrades (choose 1–2, not all)

  • Add 2–3 tbsp chickpeas into the hummus; which will make you push the legume count higher for a plant based high fiber diet day.
  • Scatter 1 tsp chia over the carrot before closing; helping you nudge the soluble fiber profile without adding bulk.
  • Swap bread for a dense oat-bran or barley loaf to increase β-glucans (i.e., foods rich in soluble fiber)—see β-glucan basics.

Make-ahead & serving

  • Grate carrot the night before; store sealed so it stays juicy.
  • Assemble within 10 minutes of eating (kiwi looks and tastes brightest right away).
  • Serve with a full glass of water; thus, the high fiber foods to ease constipation you just ate can actually hold fluid as intended.
  • On very sensitive days, replace raw spinach with tender arugula for similar benefits and gentler texture.

Why it fits the brief
This sandwich champions high fiber foods for constipation relief without heaviness—because moisture, viscosity, and volume are layered on purpose. In turn, you’ll notice comfort during the afternoon rather than bloat

Also Read: Peppermint Tea for IBS and Bloating: Natural Relief Backed by Tradition


2) Lentil “Sloppy-Joe” Toastie — cozy High-Fiber Sandwich (Relief with staying power)

Estimated fiber: ~19–20 g • Taste & texture: warm, savory, cohesive
When to choose it: you need relief and long-lasting satiety

Why it works (comfort + momentum)
Here you combine two plant based foods high in fiber—a white-bean mash and saucy lentils—with a crunchy layer of broccoli slaw. Which helps you get soluble-leaning moisture from tomato-braised lentils and insoluble lift from brassica shreds. Because the filling is warm and glossy, this tastes indulgent; nevertheless, it is textbook high fiber foods for bowel movements, colon health, and all-day digestive health. Prefer batch cooking? This lentil meal-prep filling anchors several sandwiches across the week—convenient for a high fiber plant based diet.

Infographic of a Lentil ‘Sloppy-Joe’ Toastie high-fiber sandwich for constipation relief and satiety—white-bean mash base, tomato-braised lentils, broccoli slaw, step-by-step method, and 19–20 g fiber badge.
Warm, saucy lentils + creamy white-bean mash keep the filling moist, while broccoli slaw adds insoluble lift. Press 2–3 min/side for a cohesive, ~19–20 g fiber sandwich—drink water with the meal to help the soluble fibers gel.

Ingredients (serves 1)

  • 2 slices sprouted-grain bread (≥3–4 g fiber/slice; excellent high fiber foods for gut health)
  • White-bean mash, 3 tbsp (blend white beans + lemon + olive oil + pinch salt)
  • Cooked lentils, ½ cup (core legume in any plant based high fiber diet)
  • Broccoli slaw, ½ cup (insoluble crunch from stems + a little prebiotic fiber)
  • Tomato paste, onion, garlic, smoked paprika, olive oil, splash vinegar (for sauce)

Method

  1. Warm a small pan; sauté onion and garlic until tender; then add tomato paste and smoked paprika.
  2. Stir in lentils with 2–3 tbsp water and a splash of vinegar; simmer 3–4 minutes until thick, glossy, and spoonable.
  3. Spread white-bean mash on both bread slices; afterwards, pile on the lentils; then crown with broccoli slaw.
  4. Press in a grill pan or sandwich press 2–3 minutes per side until toasty outside and steamy inside.

Fiber-forward upgrades (pick what fits your day)

  • Fold 1 tsp ground flax into the bean mash; in practice, you add foods that are rich in soluble fiber without changing flavor.
  • Replace one slice with an oat-bran slice for extra β-glucans (again, high fiber foods for colon health).
  • Add 2 tbsp grated carrot to the slaw for more insoluble volume (i.e., fiber rich fruits and vegetables for constipation in practice).

Make-ahead & serving

  • Simmer a bigger batch of lentils on Sunday; cool quickly and refrigerate up to 4 days (or freeze flat in bags).
  • Keep slaw dry until assembly so it stays crisp; alternatively, dress slaw lightly with lemon just before toasting.
  • Serve with a sliced apple or pear (skin on): those are easy fiber rich fruits for constipation that travel well.
  • Hydrate alongside; that helps the sandwich’s foods rich in soluble fiber can do their gel-forming job.

Why it fits the brief
Because it layers legumes two ways, this toastie moves from “filling” to truly high fiber foods to ease constipation. Moreover, it stays moist, which many readers find is the missing piece in at-home “healthy” & high-fiber sandwiches.

Also read: The Ultimate Guide to Lentils: Types, Benefits, and Recipes


3) Barley–Chickpea “Salad” Sandwich — herby High-Fiber Sandwich (Maintenance)

Estimated fiber: ~17 g • Taste & texture: cool, herby, packable
When to choose it: you want balance, not “power relief,” especially on workdays

On days you want reliability rather than “power relief,” this build blends foods rich in soluble fiber (barley’s β-glucans) with legume bulk from chickpeas. Consequently, you get a gentle gel plus comfortable volume—exactly what high fiber foods for digestive health should deliver. If you’re curious about the science behind β-glucans and softness, here’s a clear overview.

Infographic of a Barley–Chickpea ‘Salad’ Sandwich for maintenance: mashed avocado–chia base with chickpeas, cooked barley, celery and dill on whole-grain bread; 3-step method, 17 g fiber badge, and hydration reminder.
Balanced, packable fiber: barley’s β-glucans for gentle softness, chickpeas for comfortable bulk, and an avocado–chia base to keep moisture. Spread thickly on rye/whole-grain (3–4 g fiber/slice) and sip water to help soluble fibers work.

Ingredients (serves 1)

  • 2 slices rye or 100% whole-grain bread (≥3–4 g fiber/slice; supports high fiber foods for gut health)
  • Avocado, ¼ fruit, mashed (creamy base for moisture)
  • Chia seeds, 1 tsp (disappears into the mash; classic foods rich in soluble fiber) — background: chia’s mucilage review
  • Cooked chickpeas, ⅓ cup (plant based foods high in fiber)
  • Cooked barley, ¼ cup (β-glucans for stool comfort)
  • Celery (finely diced), dill, lemon, pepper, small pinch salt

Method

  1. Mash avocado with lemon; then stir in chia and chopped dill until glossy.
  2. Fold in chickpeas, barley, and celery; afterwards, season to taste.
  3. Spread thickly; after that, close and press lightly for a tidy, travel-worthy sandwich.

Fiber-forward upgrades

  • Add 2 tbsp grated carrot for extra insoluble lift—useful among high fiber fruits and vegetables for constipation.
  • Swap one slice for an oat-bran slice to nudge β-glucans (again, foods rich in soluble fiber).
  • For herb lovers, a handful of parsley adds polyphenols without changing fiber math.

Make-ahead & serving

  • Mix the filling up to 48 hours ahead; which means, weekday assembly takes 2 minutes.
  • Serve with apple slices (skin on) for simple fiber rich fruits for constipation and satisfying crunch.
  • Sip water alongside; therefore, the sandwich’s soluble fibers can actually do their job.

Why it fits the brief
This is a dependable high fiber plant based diet lunch: creamy, not dry; hearty, not heavy; and quietly supportive for bowel movements, colon health, and long-term gut health.

Also Read: Chickpeas’ Instead of ‘Sardines’: 5 High Protein Plant-Based Meal Prep Ideas


4) Pear–Walnut “Green Goddess” Stack — bright High-Fiber Sandwich (Gentle maintenance)

Estimated fiber: ~12–13 g • Taste & texture: juicy, herb-bright, light
When to choose it: you want support without heaviness

Why it works (light yet helpful)
Some days you want a lift without intensity. Here, juicy pear (skin on) brings pectin, leafy greens add volume, and a yogurt-tahini herb sauce keeps everything moist. Ultimately you get high fiber foods for constipation relief that feel bright rather than dense—ideal for easy digestive health.

Infographic of a Pear–Walnut ‘Green Goddess’ high-fiber sandwich for gentle maintenance—yogurt-tahini herb sauce, thin-sliced pear (skin on), arugula, and walnuts; 3-step method with a 12–13 g fiber badge.
Light yet effective: pear pectin provides soft, juicy fiber; greens add comfortable volume; yogurt-tahini keeps moisture so bites stay bright—not heavy. Aim for ~12–13 g fiber here and sip water to help soluble fibers do their job.

Ingredients (serves 1)

  • 2 slices oat-bran or whole-grain bread (≥3–4 g fiber/slice)
  • Yogurt-tahini-herb sauce (yogurt + tahini + lemon + herbs)
  • ½ pear, thin-sliced, skin on (simple high fiber fruits for constipation)
  • Arugula or spinach, big handful (fiber rich foods for gut health)
  • Walnuts, 1 tbsp (pleasant crunch)
  • Lemon zest, black pepper

Method

  1. Whisk yogurt, tahini, herbs, and lemon until creamy; then spread generously.
  2. Layer pear, greens, and walnuts; afterwards, finish with zest and pepper.
  3. Close gently; press once to set the layers.

Fiber-forward upgrades

  • Add thin cucumber or tomato slices for extra juiciness (i.e., high fiber fruits and vegetables for constipation that also boost moisture).
  • Stir 1 tsp ground flax into the sauce to tilt toward foods rich in soluble fiber—basic primer: flax for digestion.
  • Prefer curd? The texture tactic mirrors this hung curd spinach sandwich.

Make-ahead & serving

  • The sauce keeps 3–4 days; making weekday builds stay fast.
  • Serve with a small bowl of berries for additional fiber rich fruits for constipation that don’t weigh you down.
  • Drink water; subsequently, the pectin and seed gels work more comfortably.

Why it fits the brief
Although gentle, the stack still qualifies as high fiber foods for bowel movements, and, importantly, it supports colon health without the heaviness that sometimes derails weekday lunches.

Also Read: Bananas for Constipation: Ripe vs Green, Timing & What Works


5) Black Bean–Avocado Salsa Melt — cozy High-Fiber Sandwich (Relief + comfort)

Estimated fiber: ~18.5–19 g • Taste & texture: warm, saucy, satisfying
When to choose it: you need soothing relief and an easy win at dinner

Why it works (warm, saucy, effective)
This is comfort food with a purpose. Black beans (core to any plant based high fiber diet) supply both soluble and insoluble fiber; avocado keeps things lush; and fresh salsa provides juicy acidity so the sandwich never feels dry. Meaning, you get high fiber foods to ease constipation that also satisfy.

Infographic of a Black Bean–Avocado Salsa Melt for constipation relief—sprouted-grain bread with mashed avocado, black beans, fresh salsa and optional cheese; 3-step method, 18.5–19 g fiber badge.
Warm, saucy relief: black beans deliver soluble + insoluble fiber, avocado keeps bites lush, and salsa adds juicy acidity so the sandwich never eats dry. Toast until just melty; aim for ~18.5–19 g fiber and sip water to help fiber work comfortably.

Ingredients (serves 1)

  • 2 slices sprouted-grain bread (≥3–4 g fiber/slice; great for high fiber foods for gut health)
  • Avocado, ¼ fruit, mashed
  • Black beans, ½ cup (lightly mashed so they cling)
  • Fresh tomato-onion salsa, ¼ cup (or tomato-lime if onion-sensitive)
  • Optional: thin slice cheddar or plant cheese
  • Lime, cumin, pinch salt

Method

  1. Mash avocado with lime and a pinch of cumin; spread from edge to edge.
  2. Spoon on black beans; then add salsa; top with cheese if using.
  3. Toast or grill until warmed through and a little melty.

Fiber-forward upgrades

  • Stir 1 tsp ground flax into the avocado to lean toward foods rich in soluble fiber.
  • Add 2 tbsp grated carrot for extra insoluble support (a staple among high fiber fruits and vegetables for constipation).
  • Swap one slice for oat-bran bread to increase β-glucans.

Make-ahead & serving

  • Beans keep 3–4 days; meanwhile, mash just before assembly for best texture.
  • Serve with orange segments or cucumber spears; which makes you add fluid and crunch that amplify results.
  • Hydrate; in turn, these fiber rich foods for bowel movement do their job more comfortably.

Why it fits the brief
It’s a weeknight win: cozy, fast, and firmly in the lane of high fiber foods for colon health and everyday digestive health.

Also Read: 10 Creative Chia Pudding Recipes for Every Taste


6) Tempeh–Kimchi Gut-Health Reuben — tangy High-Fiber Sandwich (Maintenance + microbiome)

Estimated fiber: ~14 g • Taste & texture: savory-tangy, deli-style
When to choose it: things are moving, and you want to keep the gut ecosystem happy

Why it works (tangy and sustaining)
Once things are moving, pairing plant based foods high in fiber with fermented vegetables is a smart way to maintain momentum. Tempeh offers satisfying protein and fiber; kimchi or sauerkraut adds acidity, moisture, and live cultures; as a result, you get high fiber foods for gut health in a deli-style package. For more combinations, browse Probiotic-Rich Sandwiches.

Infographic of a Tempeh–Kimchi Gut-Health Reuben: whole-grain rye with sautéed tempeh, kimchi (or sauerkraut), spinach, and yogurt-mustard; 3 simple steps, 14 g fiber badge, hydration cue.
Steady maintenance, deli-style: fiber-rich tempeh plus fermented kimchi/kraut bring moisture, acidity, and live cultures; rye adds whole-grain fiber. Grill lightly to meld. Tip—stir 1 tsp chia into the sauce or add tomato slices for extra softness and juiciness; sip water alongside.

Ingredients (serves 1)

  • 2 slices whole-grain rye (≥3–4 g fiber/slice)
  • Tempeh, ~100 g, sliced and sautéed
  • Kimchi or sauerkraut, ¼ cup
  • Spinach, big handful
  • Yogurt-mustard (or a dairy-free version)

Method

  1. Sear tempeh in a thin film of oil until browned; then set aside.
  2. Spread yogurt-mustard on bread; afterwards, layer tempeh → kimchi → spinach.
  3. Grill lightly to warm and meld the layers.

Fiber-forward upgrades

  • Add thin tomato slices for juicy slip (handy within high fiber fruits and vegetables for constipation).
  • Stir 1 tsp chia into the yogurt-mustard for a small soluble nudge (again, foods that are rich in soluble fiber).
  • Prefer milder ferments? Use kraut and a dab of pickle brine for acidity without heat.

Make-ahead & serving

  • Cook tempeh 2–3 days ahead; consequently, weekday assembly is trivial.
  • Serve with carrot sticks and apple wedges (skin on) for easy fiber rich fruits for constipation and crunch.
  • Water alongside, then a brief walk; helping the meal support predictable bowel movements.

Why it fits the brief
This one keeps the momentum you’ve built—supporting colon health and digestive health while staying firmly in the high fiber plant based diet lane.

Also Read: Optimize Digestion with These 5 Fruit Juice Recipes


Sidekicks that make High-Fiber Sandwiches even more effective

Kiwifruit (1–2/day)—slice one into Sandwich #1 and enjoy the second on the side. Trials show kiwi improves bowel movements and overall comfort (kiwi RCT overview; gold-kiwi RCT).

Prunes or prune juice—start with 4–6 prunes or ½–1 cup prune juice alongside lunch or dinner. Practical “how much/when” is covered here: prune juice & prunes for constipation. For clinical context, review the trial where prunes beat psyllium in mild–moderate cases.

Chia or ground flax add-ins—a teaspoon whisked into spreads boosts softness without heaviness. Chia’s mucilage is well documented (chia fiber review), and flax blends easily into hummus or avocado (see flax seeds for strong digestion).

Hydration reminder—fluids help fiber function; thus, pair every High-Fiber Sandwich with water or herbal tea (NIDDK guidance).

Also Read: Psyllium Husk (Isabgol/Ispaghula) Side Effects: Risks, Benefits & How to Take It Safely


A day that shows how High-Fiber Sandwiches fit together

Breakfast
Oat-bran toast with avocado + ground flax; sliced kiwi on the side. (Fluids help fiber work—keep a glass of water nearby: NIDDK guidance.)

Lunch
Hummus–Kiwi–Greens “Softener.”

Snack
Whole-grain pita with hummus and grated carrot; sip water.

Dinner
Black Bean–Avocado Salsa Melt.

After meals
A 10–15-minute walk—especially helpful after dinner.

Weekly rotation

  • Power relief days: Lentil Toastie (#2) + Hummus–Kiwi (#1).
  • Steady maintenance days: Barley–Chickpea (#3) + Pear–Walnut (#4).
  • Microbiome-minded days: Tempeh–Kimchi (#6) with a side of berries.

Because the builds repeat cleanly, you’ll hit helpful fiber totals consistently without chasing supplements.

Also Read: Hummus Veggie Sandwich: A Nutritious and Delicious Delight


Shopping once, eating well all week (repeatable High-Fiber Sandwiches)

These staples keep a high fiber plant-based diet effortless across the week.

Breads & grains

  • 100% whole-grain or sprouted sandwich bread (≥3–4 g fiber/slice)
  • Rye; oat-bran loaves
  • Barley (pearled or hulled)

Legumes & spreads

  • Hummus; canned or cooked chickpeas, lentils, black beans; white beans for mash

Seeds & flavor

  • Chia; ground flaxseed; tahini; plain yogurt (dairy or plant-based)
  • Lemons, dill, cumin, smoked paprika, black pepper, olive oil, vinegar

Produce

  • Kiwifruit, pears, apples, oranges, berries, prunes
  • Spinach/greens, carrots, broccoli slaw, cucumbers, tomatoes, onions
  • Kimchi or sauerkraut

Batch tips

  • Cook barley on Sunday; chill and portion for quick fold-ins.
  • Freeze cooked beans flat in bags; they thaw in minutes.
  • Keep a tiny “fiber station” (chia, ground flax) in reach so you never forget the add-ins.
  • Pre-shred carrots and wash greens to make assembly truly five minutes.

Also Read: The Best Greens for Gut Health and Digestive Wellness


Gentle ramp-up (comfort matters with High-Fiber Sandwiches)

If you’re coming from a low-fiber baseline, jumping to 30+ grams immediately can feel rough. Therefore, increase gradually—about 5 g per day each week—and keep fluids steady. On a day that feels gassy, reduce raw brassicas, emphasize oats, barley, chia/flax, and use ripe pears or kiwi for a softer profile; subsequently, bring the extra crunch back as comfort improves. For a neutral reference on intake ranges, most adults do well around 25–38 g/day (scale up gradually: concise intake overview).

Also Read: Top 10 Foods for Gut Health


Put it all together (and keep repeating)

Ultimately, relief comes from meals that are moist, fibrous, and easy to repeat. These six High-Fiber Sandwiches were engineered for exactly that: whole-grain bread for steady bulk, legume spreads for satisfying depth, chia or ground flax for gentle gel, and fruit-veg add-ins—kiwi, pear, apple, carrots, greens—for softness and volume. Add water, take a short walk, and give it a few consistent days. Consequently, your gut will notice; meanwhile, your schedule won’t suffer; and, importantly, your lunches will finally pull their weight.

For quick reference when you need an extra nudge, bookmark prune juice & prunes for constipation; for fermented add-ins that pair well with High-Fiber Sandwiches, explore probiotic-rich sandwiches.

FAQs

1) What makes these High-Fiber Sandwiches good for constipation relief?

Because they combine foods rich in soluble fiber (oats, barley, chia, ground flax) with insoluble sources (bran, leafy greens, vegetable skins), they add moisture and gentle bulk together. Consequently, stools hold water, bowel movements become easier, and overall digestive health feels steadier. Meanwhile, the format is practical—so you actually repeat it.

2) How many grams of fiber should I aim for with a high fiber plant based diet?

Most adults do well around 25–38 g per day. That said, increase gradually. For example, add about 5 g per day each week and space it across meals. In practice, two High-Fiber Sandwiches can provide a big share, while breakfast and snacks top up the rest.

3) Which ingredients are the best high fiber foods for constipation relief inside a sandwich?

Start with plant based foods high in fiber: chickpeas, lentils, and black beans. Then, add foods that are rich in soluble fiber—chia, ground flax, oats, and barley—for gel-forming softness. Finally, tuck in high fiber fruits and vegetables for constipation like kiwi, pear, apple (skin on), carrots, and leafy greens for comfortable volume.

4) Are there specific fiber rich fruits for constipation that work especially well between bread?

Yes—pears and apples (with the skin), berries, and kiwi slot neatly into layers. Moreover, citrus segments and grated carrot add juiciness without heaviness. In turn, those choices support bowel movements while keeping sandwiches fresh and bright.

5) What bread should I pick for high fiber foods for gut health?

Choose 100% whole-grain or sprouted loaves that list whole grain first and give at least 3–4 g fiber per slice. Better yet, rotate rye, oat-bran, and barley-forward breads to keep textures interesting and to boost foods rich in soluble fiber via β-glucans.

6) I feel gassy when I jump into a plant based high fiber diet. What should I tweak?

First, slow the ramp—add fiber gradually. Next, emphasize moist builds with foods that are rich in soluble fiber (chia, ground flax, oats, barley) and slightly reduce raw brassicas for a few days. Subsequently, bring crunch back as comfort improves. Hydration and a brief walk after meals often help.

7) How can I hydrate wisely so high fiber foods to ease constipation actually work?

Pair each sandwich with a full glass of water. Additionally, use juicy layers—tomato, cucumber, citrus segments—to keep bites moist. Consequently, soluble fibers can form the soft gel that supports smoother bowel movements.

8) What are smart add-ins for high fiber foods for colon health?

Sprinkle 1 teaspoon of chia or finely ground flax into spreads; fold beans into hummus; or add a spoon of barley or oat-bran to legume salads. Therefore, you raise soluble fiber without making the sandwich bulky or dry.

9) Can I keep these High-Fiber Sandwiches fully vegan?

Absolutely. In fact, a high fiber plant based diet is the default here. Use hummus, white-bean mash, avocado-chia spreads, and yogurt-style dairy-free sauces. Meanwhile, tempeh, kimchi, and sauerkraut bring plant-forward protein and tang that support gut health.

10) What are easy meal-prep moves so my high fiber foods for digestive health stick all week?

Batch-cook lentils and chickpeas; chill barley; pre-grate carrots; wash greens; and keep ground flax and chia within arm’s reach. Consequently, assembly takes five minutes, and you’ll actually repeat the habit.

11) How do I balance high fiber foods for bowel movements with a sensitive stomach?

Begin with softer, moist builds: creamy spreads, thin-sliced fruit, and tender greens. Moreover, keep portions moderate, chew thoroughly, and add a short post-meal walk. On balance, that trio supports comfort while still moving fiber intake upward.

12) Are raw veggies mandatory, or can I still get high fiber foods for constipation relief with gentler textures?

You can. Lightly sautéed onions/peppers, roasted carrots, or softened greens still count. In practice, you’ll retain fiber while improving tolerance. Therefore, choose textures your gut likes and keep moisture high.

13) Which spreads quietly raise foods rich in soluble fiber without changing flavor?

Hummus mixed with 1 tsp ground flax, avocado blended with 1 tsp chia, or yogurt-tahini whisked with oat-bran. Subsequently, you’ll notice creamier bites and better stool softness—without extra weight.

14) Do I need fruit at every meal to hit high fiber foods for gut health targets?

Not necessarily, but it helps. For instance, one high fiber fruits for constipation choice (pear, apple, berries, or kiwi) inside or beside a sandwich boosts totals and adds moisture. Meanwhile, legumes and whole-grain bread carry the rest.

15) What’s the simplest “starter” High-Fiber Sandwich if I’m brand-new to this?

Begin with whole-grain bread, hummus + 1 tsp ground flax, thin-sliced pear or apple, and a handful of spinach. Therefore, you’ll get foods rich in soluble fiber plus gentle bulk in a mild, friendly package.

16) How do I keep high fiber foods for colon health from feeling dry or dense?

Layer moisture at every step: creamy spread, juicy produce, and a quick acidity hit (lemon, vinegar, salsa). Consequently, the sandwich eats soft, not stodgy—and your bowel movements tend to follow suit.

17) Are there kid-friendly options that still count as plant based foods high in fiber?

Yes: mashed black beans with mild salsa and avocado on soft whole-grain bread; chickpea “salad” with finely diced cucumber; or thin pear slices with yogurt-tahini. Moreover, cutting sandwiches into small squares improves traction with picky eaters.

18) How can I vary flavors yet stay within high fiber foods for digestive health?

Rotate breads (rye, oat-bran, sprouted), spreads (hummus, white-bean, avocado-chia), and high fiber fruits and vegetables for constipation (pear, apple, kiwi, carrot, greens). In turn, you’ll keep taste buds happy while the fiber keeps working.

19) Do these ideas help if I’m focused on high fiber foods for gut health beyond constipation?

Generally, yes. While everyone’s different, a steady mix of soluble and insoluble fiber plus plant diversity often supports gut health and overall comfort. Nevertheless, adjust portions and textures to your tolerance.

20) What’s a quick checklist before I make any High-Fiber Sandwiches?

Whole-grain bread (3–4 g fiber/slice) ✅
Legume base (⅓–½ cup) ✅
Seed booster (1 tsp chia or ground flax) ✅
Juicy produce (heaped) ✅
Water alongside + brief walk ✅
Therefore, you’ve covered high fiber foods for constipation relief and set up a predictable, comfortable day.

Posted on — Leave a comment

Foods to Avoid with Diverticulitis: Flare Diet + What to Eat After

Magazine-style portrait cover showing bowls of popcorn, nuts, chia, coffee and sauces with title “Foods to Avoid with Diverticulitis” and MasalaMonk.com footer

Foods to avoid with diverticulitis is the question everyone asks first, especially during a painful flare. Because the colon is inflamed, the safest route is to reduce roughage short-term, then step back up to a sustainable eating pattern as symptoms settle. To keep this both practical and evidence-based, the plan below follows the clinical arc you’ll see in the diverticulitis diet guidance from Mayo Clinic and the patient-friendly lists on the low-fiber diet page at MedlinePlus.

Free download: Grab the foods to avoid with diverticulitis printable guide (clear → low fiber → reintroduce) — download the PDF here.

However, before we map your meals, it helps to define the playing field. Diverticulosis refers to small pouches in the colon; diverticulitis is when those pouches become inflamed or infected. The day-to-day diet changes more with diverticulitis than with diverticulosis, because a flare typically needs gentler textures and lower fiber for a short time. For a quick overview of both conditions, bookmark diverticulosis and diverticulitis at MedlinePlus, then come back here to put the plan into action.

⚠️ Educational information — not medical advice.
This article is for general education only and does not replace advice from your own clinician. Do not start, stop, or delay medical care because of what you read here. If you have a flare, worsening pain, fever, vomiting, or other urgent symptoms, contact your healthcare provider or local emergency services.


The 3-Phase Path That Makes Eating Simpler (and Safer)

Because the bowel needs rest first and fiber later, think in phases. This structure reduces guesswork, prevents “forever bans,” and gives you a clear way to reintroduce foods after the worst has passed. Before you start, save the foods to avoid with diverticulitis one-page checklist for quick reference — FREE PDF download.

Phase 1: Clear Liquids (Short and Purposeful)

At the peak of pain, you’ll start with clear liquids so your gut can calm down. That means broth, strained soups, gelatin, pulp-free juices, oral rehydration solution, tea, and water. Use the official clear-liquid diet list at MedlinePlus when you’re unsure what “counts” as clear. Because this stage is only to reduce irritation, keep it brief unless your clinician advises otherwise.

Pptional “full liquids” bridge (if solids still feel rough) : A short, clinician-guided step on full liquids (strained creamy soups, milkshakes, puddings) can help some people between Phases 1 and 2. MedlinePlus

Phase 2: Low-Fiber (48–72 Hours for Many People)

As soon as symptoms begin easing, transition to low-fiber choices: eggs, poached fish, tender chicken, white toast, plain pasta, white rice, peeled/cooked vegetables, applesauce, and yogurt or cottage cheese if tolerated. The aim here is small, gentle meals, typically five to six times per day, so you’re nourished without overloading the bowel. For precise “allowed/avoid” lists, rely on the low-fiber diet guide at MedlinePlus.

Phase 3: Step-Up and Reintroduce (Bridge Back to Normal)

Once pain and tenderness subside, begin adding fiber back—slowly. Start with soft fruits (for instance, a ripe banana), oatmeal, well-cooked vegetables, and lighter grains. As you feel more normal, scale toward your long-term pattern. If you want a quick reassurance that this progression is standard, skim the Mayo Clinic overview of the diverticulitis diet.

Also Read: Fiber in Food.

⚠️ Educational information only — not medical advice. Always consult your clinician for diagnosis, treatment, and personalized diet guidance.


Foods to Avoid with Diverticulitis During a Flare (Temporary List)

This is the section most readers jump to, so let’s be direct. The following foods to avoid with diverticulitis apply during an active flare and early recovery. They are not permanent bans; they’re temporary guardrails that reduce irritation while the colon heals. Prefer a quick checklist? Download the FREE PDF and keep it handy during your flare.

Foods to Avoid with Diverticulitis: Whole Grains and Bran

Although whole grains are fantastic after recovery, they’re too fibrous during a flare. Replace brown rice, whole-wheat breads, bran cereals, and quinoa with refined grains—white rice, white toast, plain pasta—for a short stretch. The low-fiber diet list at MedlinePlus shows the exact swaps.

Foods to Avoid with Diverticulitis: Raw Skins, Tough Salads, and Corn

Raw skins and hearty salads add texture you don’t want right now. Choose peeled, cooked, or canned fruit/veg (packed in water or juice). If you want help picking fruit by phase and texture, use our internal explainer Fruits and Diverticulitis: What You Can and Can’t Eat to make practical choices you’ll actually enjoy.

Foods to Avoid with Diverticulitis: Beans and Legumes (For Now)

Legumes are high-fiber and often gas-forming, so press pause during the flare. Later, when you’re stepping up, you can reintroduce in small portions—for example, puréed lentil soup—and gauge comfort.

Foods to Avoid with Diverticulitis: Nuts, Seeds, and Popcorn (During the Flare)

This one causes the most confusion. During the flare, skip rough, seedy textures; nevertheless, the old instruction to avoid these forever is outdated. Current gastroenterology guidance does not recommend routine avoidance between flares. For clarity and confidence, do read the AGA clinical guidance on acute diverticulitis and a simple myth explainer from Cleveland Clinic.

Foods to Avoid with Diverticulitis: Very Spicy Sauces (If They Aggravate Symptoms)

Capsaicin tolerance is individual. If hot sauces, red-chile curries, or extra-spicy pickles worsen cramping or urgency, shelve them for now. Later, re-introduce gradually.

Foods to Avoid with Diverticulitis: Carbonated Drinks and Alcohol (If They Bloat or Hurt)

Some people feel fine; others notice more gas or discomfort. Treat these as optional avoids during the flare and early recovery. Then, test small reintroductions.

Foods to Avoid with Diverticulitis: Tough, Fatty, or Fried Foods

Heavily fried items and tough cuts of meat can linger and irritate. Choose poached fish, omelets, soft tofu, or tender chicken prepared simply. For small meal frameworks, see the diverticulitis diet overview at Mayo Clinic.

If you want a second perspective while you’re still in the flare, our related article What Are the 10 Foods to Avoid with Diverticulitis? acts as a quick reminder list you can consult when your energy is low.

⚠️ Educational information only — not medical advice. Always consult your clinician for diagnosis, treatment, and personalized diet guidance.


The Big Myth: “No Nuts, Seeds, or Popcorn Ever Again”

Because this myth is so persistent, it deserves its own short section. For years, people were told that nuts, seeds, and popcorn could lodge in diverticula and cause attacks. However, modern guidance and prospective data do not support this. After a flare has resolved, there is no need for routine avoidance. To understand the shift in thinking, here are two straightforward references:

Practically, that means treat nuts, seeds, and popcorn as foods to avoid with diverticulitis only during an active flare, then reintroduce them cautiously once you’re well.


Building Flare-Friendly Plates (Then Stepping Back Up)

Now that you know the foods to avoid with diverticulitis in the heat of the moment, here’s how to build real meals and move forward without guesswork.

Day 0–1: Clear Liquids with Purpose

Sip broth, pulp-free juices, oral rehydration solution, tea, gelatin, and water. Space fluids evenly, and don’t push this phase longer than advised. If you need a simple checkpoint, the clear-liquid diet list from MedlinePlus is easy to scan when you’re tired.

Day 2–3: Low-Fiber Meals in Small, Frequent Portions

Think two ounces of protein + one low-fiber side, several times a day:

  • Soft scrambled eggs with white toast
  • Poached fish with white rice and peeled, cooked carrots
  • Lactose-free yogurt or cottage cheese if tolerated
  • Applesauce or plain custard for easy dessert

When in doubt, recheck the low-fiber diet page at MedlinePlus for examples. Do read out post on How to Eat 100 Grams of Protein a Day.

Day 4–6: Step-Up Starts

Add ripe banana, oatmeal (if comfortable), well-cooked vegetables, and lighter grain swaps (for instance, part white/part brown). The Mayo Clinic diverticulitis diet overview is a helpful reassurance that you’re on the expected path.

Day 7–10: Toward Maintenance

Reintroduce beans via puréed soups first, then small portions of whole beans; add soft salads and raw fruit skins only when comfortable. If spicy food, carbonated drinks, or alcohol seem irritating, rein them in and try again later. For a balanced perspective on individual “trigger” stories, have a look at the short Q&A on no universal trigger foods in the Mayo Clinic expert answers.

⚠️ Educational information only — not medical advice. Always consult your clinician for diagnosis, treatment, and personalized diet guidance.


Between Flares: Fiber, Fluids, and a Pattern You Can Live With

After you recover, shift your focus from foods to avoid with diverticulitis to foods that keep you regular and comfortable: whole grains, beans, fruits, vegetables, and nuts and seeds—added gradually, with plenty of water. For a quick primer on why fiber matters (and how different types act), use The Nutrition Source by Harvard’s explanation of Fiber and its types.

Because readers often ask about produce first, it helps to provide a guided path. If you want a practical, food-by-food tour that slots into everyday Indian meals and snacks, do read our internal article Fruits and Diverticulitis: What You Can and Can’t Eat. That piece shows how to move from cooked/peeled items back to crunchy, raw, high-fiber favorites without a panic spiral every time you crave a salad.


Fiber Supplements: When (and How) to Use Them

Food first is ideal; nevertheless, some people benefit from a soluble fiber supplement after symptoms settle. Psyllium is often best tolerated. Crucially, go low and slow:

  • Start with 1 rounded teaspoon daily for 3–4 days
  • Increase to 2 teaspoons if comfortable
  • Then move to 1 tablespoon, paired with a full glass of water each time

Talking about Psyllium, do read Psyllium Husk (Isabgol/Ispaghula) Side Effects: Risks, Benefits & How to Take It Safely.

This dovetails with a gentle food reintroduction. It’s also consistent with individualized recovery advice in the AGA guidance on acute diverticulitis.

Readers also ask about flax and chia. During a flare, they’re simply too fibrous. Later, they can be excellent additions—especially ground flax for its soluble fraction. If you want approachable, phase-aware ideas, link to our how-to with recipes: How to Incorporate Flax Seeds. Moreover, if you enjoy chia puddings, wait until you’re clearly in remission, then begin with half portions and extra fluids. In the meantime, do explore our post on 10 Creative Chia Pudding Recipes for Every Taste.


Specific Foods People Ask About

Bananas (A Gentle Bridge Food)

A ripe banana is often a friendly step-up fruit once you leave strict low-fiber eating. Because texture and tolerance both matter, advance at your comfort speed. Do read more about How Much Potassium Is in a Banana? Nutrition Facts, Comparisons & Benefits.

Leafy Salads, Cabbage, Lettuce, and Corn

These can be later-phase reintroductions. Start with cooked, finely chopped cabbage or soft lettuce blends, keep portions small, and observe your response before scaling up.

Coffee, Chocolate, Very Spicy Food, Carbonation, and Alcohol

Because individual tolerance varies so much, the best approach is limit if they aggravate symptoms, then retest in small amounts. This avoids needless permanent bans while respecting what your body tells you. For balance and clarity, you can link readers to the concise reminder of “no universal trigger foods” in Mayo Clinic’s expert answers.

Nuts, Seeds, and Popcorn (After Recovery)

Again, they are foods to avoid with diverticulitis during a flare, not forever. In remission, no routine avoidance is advised. Provide readers with confidence by linking to AGA guidance and Cleveland Clinic’s myth explainer.

⚠️ Educational information only — not medical advice. Always consult your clinician for diagnosis, treatment, and personalized diet guidance.


Why This Approach Beats Rigid “Never” Lists

First, the phase model is how major institutions guide patients to calm a flare and transition safely. A short stint on clear liquids, a handful of days on low-fiber, then a gradual climb back to fiber is exactly what you’ll see outlined in the Mayo Clinic diverticulitis diet and the MedlinePlus low-fiber diet.

Second, permanent bans on nuts, seeds, and popcorn aren’t supported by current evidence. After recovery, no routine avoidance is recommended—show readers the shift with the AGA management guidance and the plain-English overview from Cleveland Clinic.

Finally, personalization matters. There is no single list of foods that prevents attacks in everyone. A balanced message—limit what bothers you, progress slowly, hydrate well—is more realistic and more humane. If someone needs a succinct reminder of that point, link to Mayo Clinic’s expert Q&A on trigger foods.


When to Call Your Clinician (and What to Watch)

Diet helps, but medical care is critical if you have fever, severe pain, vomiting, or worsening symptoms, or if things don’t improve after a few days of the clear-to-low-fiber approach. A plain-language condition overview is here: Diverticulitis at MedlinePlus. Use it as your “when in doubt” reference. After the immediate problem is under control, shift focus to daily habits—fiber (added slowly), fluids, movement, sleep, and stress regulation—because those patterns usually matter more than any single food.


Free download: Grab the foods to avoid with diverticulitis printable guide (clear → low fiber → reintroduce) — download the PDF here.


Recap You Can Act On Today

⚠️ Education only. This article is not a substitute for professional medical advice, diagnosis, or treatment. Always speak with your healthcare provider about your specific situation.


FAQs

1) What are the top foods to avoid with diverticulitis during a flare?

During an active flare, temporarily avoid high-roughage items such as whole grains and bran cereals; raw fruit and vegetable skins; large raw salads and corn; beans and lentils; nuts, seeds, and popcorn; very spicy, capsaicin-heavy sauces; carbonated drinks and alcohol if they aggravate you; and tough, fatty, or heavily fried foods. Then, as symptoms settle, reintroduce fiber gradually.

2) How long should I follow a clear-liquid phase before moving on?

Briefly. Use clear liquids for a short window—typically one to two days—until severe pain eases and you can tolerate more. Next, progress to a low-fiber phase for a few days, and finally transition back toward your usual, higher-fiber pattern as comfort returns.

3) What does a low-fiber day actually look like?

Think small, gentle meals 5–6 times per day: soft scrambled eggs with white toast, poached fish with white rice and well-cooked peeled vegetables, yogurt or cottage cheese if tolerated, and simple desserts like applesauce or custard. Portion control plus hydration helps you advance smoothly.

4) Are nuts, seeds, and popcorn permanently foods to avoid with diverticulitis?

No. During a flare, yes—skip rough, seedy textures. However, after symptoms resolve, routine long-term avoidance isn’t generally recommended. Instead, reintroduce slowly, note your tolerance, and drink plenty of fluids as you bring back fiber.

5) Is coffee one of the foods to avoid with diverticulitis?

It depends. Caffeine can stimulate the gut in some people. During a flare, you might limit or pause coffee; afterwards, reintroduce gradually and observe your body’s response. Similarly, chocolate can be stimulating for some but well tolerated by others—personalization is key.

6) Are bananas okay, or should they go on my list of foods to avoid with diverticulitis?

Ripe bananas are often gentle during the step-up phase after clears and low-fiber. Start with small portions, then scale as tolerated. Green or very firm bananas can be more fibrous, so add those later in recovery.

7) What about chia or flax seeds?

During a flare, avoid them—they’re very high in fiber. Later, introduce small amounts (e.g., a teaspoon of ground flax) with additional fluids. Increase slowly over several days; if gas or discomfort occurs, pause and retry later.

8) Are dairy products safe during a flare?

Many people tolerate simple, lower-lactose options such as yogurt or cottage cheese during the low-fiber phase. Nevertheless, if dairy worsens bloating or cramps for you, skip it temporarily and use other protein sources like eggs, tofu, or tender chicken.

9) Which grains are best right after a flare?

Begin with refined grains—white rice, plain pasta, white toast, cream of wheat—because they’re lower in fiber and gentler on an irritated bowel. Then, step up to oats, blended grains, and eventually whole grains as you feel better.

10) Are beans always foods to avoid with diverticulitis?

Only during the flare. Beans and lentils are fiber-rich and can cause gas early on. Later, consider puréed legume soups in small servings before returning to intact beans; go slowly to limit discomfort.

11) Do carbonated drinks and alcohol belong on my personal “avoid” list?

Sometimes. Bubbles may increase bloating; alcohol may aggravate symptoms for some. During a flare, it’s reasonable to limit both. Subsequently, reintroduce cautiously—try smaller portions, sip with food, and monitor how you feel.

12) Should I worry about black pepper or spices?

Milder seasonings and black pepper are often fine. Very spicy, capsaicin-heavy dishes can bother an irritable gut, especially during a flare. Therefore, reduce heat temporarily; then, as you improve, titrate spice back to taste.

13) What’s a simple 10-day progression I can follow?

  • Days 0–1: clear liquids.
  • Days 2–3: low-fiber meals in small, frequent portions.
  • Days 4–6: step-up foods such as ripe banana, oatmeal (if tolerated), and well-cooked vegetables.
  • Days 7–10: begin transitioning toward maintenance—gradually add whole grains, small portions of beans, and raw textures as comfortable.

14) How much water should I drink while I reintroduce fiber?

Hydration matters. As you add fiber, increase fluids to help stool move comfortably. A steady intake spread through the day generally works better than large, infrequent gulps.

15) Which fiber supplements are best after recovery?

Many people find soluble fiber—especially psyllium—well tolerated once symptoms resolve. Start low (e.g., a teaspoon daily), increase slowly over several days, and always pair with a full glass of water. Avoid starting supplements during an acute flare.

16) Can I follow a low FODMAP diet for diverticulitis?

Low FODMAP is designed for IBS symptom management, not specifically for diverticulitis. Even so, some individuals use it in remission to troubleshoot gas and bloating. If you try it, do so with professional guidance and still aim for adequate fiber over time.

17) Are leafy salads, cabbage, and corn automatically foods to avoid with diverticulitis?

During the flare, yes—because raw, high-fiber, or tough textures can irritate. However, after you improve, you can reintroduce these foods—first cooked and finely chopped, then gradually less processed—as your tolerance allows.

18) Do oats and oatmeal help or hurt?

It varies. Oatmeal is often a friendly bridge food in the step-up phase; it contains soluble fiber that can be soothing for some. Nonetheless, if it causes bloating, try smaller portions or wait a few days before trying again.

19) What about cheese, butter, and ghee?

Butter and ghee are fats without fiber; a little may be fine, though large amounts or very greasy meals can feel heavy. Many cheeses are tolerable in the low-fiber phase, but if you experience cramping or loose stools, reduce or pause and reassess later.

20) Are potatoes, crackers, or plain toast acceptable early on?

Yes—plain, low-fiber versions are common in the low-fiber phase. For instance, peeled mashed potatoes, plain salted crackers, and white toast often work well. Later, shift to higher-fiber choices as you recover.

21) Are foods to avoid with diverticulitis different from foods to avoid with diverticulosis?

Yes. Diverticulitis (active inflammation) calls for temporary low-fiber eating. Diverticulosis (no active inflammation) usually benefits from a higher-fiber pattern to support regularity and stool form. In short: flare = gentler textures; remission = fiber forward.

22) Do I need a “printable list of foods to avoid with diverticulitis” for the fridge?

It can help. A one-page checklist that separates flare foods (temporary avoids and allowed items) from remission foods (fiber-forward staples) reduces decision fatigue and makes shopping easier—especially when you’re not feeling your best.

23) How can I personalize the list of foods to avoid with diverticulitis?

Track your response. Keep a brief notes app or card for two weeks as you reintroduce foods. Record what you ate, portion size, timing, water intake, and how you felt. Because sensitivity is individual, your personal “avoid for now” list may be shorter—or longer—than someone else’s.

24) What’s the single biggest mistake people make?

Staying on clear liquids or ultra-low-fiber foods too long. That can leave you fatigued and constipated once the flare settles. Progress—cautiously but consistently—through the phases so you’re moving toward a sustainable, fiber-inclusive pattern.

25) When should I call my clinician instead of tweaking food?

Immediately seek medical advice if pain worsens, fever develops, you’re vomiting, you cannot keep fluids down, or you’re not improving after a few days of phased eating. Diet is supportive, but medical care comes first when red flags appear.

26) Can I exercise while advancing my diet?

Light movement—gentle walks, easy stretching—often aids regularity and comfort once acute pain decreases. Nevertheless, avoid strenuous core work during a flare. Resume normal activity gradually as you feel better.

27) Will probiotics help, or are they on the list of foods to avoid with diverticulitis?

They’re not foods, and evidence is mixed. Some people feel better with a simple probiotic in remission; others notice no change. If you experiment, introduce one product at a time, keep notes, and stop if symptoms worsen.

28) How do I bring back flavor without triggering symptoms?

Start with mild seasonings—ginger, turmeric, cumin, fresh herbs, a squeeze of lemon—rather than very hot chilies. Additionally, choose moist cooking methods (poaching, braising, steaming) to keep proteins tender and easy to digest.

29) What’s a smart “first grocery list” after a flare?

White rice, plain pasta, white bread, eggs, tender fish or chicken, yogurt or lactose-free alternatives, peeled/cooked vegetables, applesauce, ripe bananas, oatmeal (if tolerated), broth, oral rehydration solution, and plenty of still water. Next, add higher-fiber staples as you step up.

30) Bottom line: what should I remember about foods to avoid with diverticulitis?

During a flare, prioritize gentle textures and temporarily avoid roughage; then, as symptoms ease, reintroduce fiber slowly with solid hydration. Over time, aim for a balanced, higher-fiber pattern that you can maintain—always guided by your own tolerance and your clinician’s advice.

Posted on — 2 Comments

Best Nuts and Seeds for Weight Loss (Chia, Flax, Almonds & More)

The Role of Nuts & Seeds in Weight Management and Overall Health

If you’re trying to shed pounds naturally, eating the best nuts and seeds for weight loss can give you a real advantage. For years, many people avoided these foods, believing their high fat and calorie content would lead to weight gain. However, modern research tells a different story.

Studies from Harvard and the University of South Australia show that including nuts in a calorie-controlled diet not only supports weight loss but often leads to greater fat loss compared to diets without nuts. Seeds like chia and flax add even more benefits, thanks to their fiber and omega-3 fatty acids, which keep you full and improve metabolism.

In this comprehensive guide, we’ll explore the top nuts and seeds for weight loss, why they work, how to eat them, and the science behind their benefits. By the end, you’ll know exactly how to make these tiny nutritional powerhouses a smart part of your weight-loss journey.


Why Nuts and Seeds Help With Weight Loss

Nuts and seeds are nutrient-dense, combining protein, fiber, and healthy fats. This unique balance explains why they support fat loss instead of hindering it:

Best nuts and seeds for weight loss – almonds, walnuts, pistachios, peanuts, chia seeds, flax, pumpkin, sesame, and sabja – high in protein, fiber, and healthy fats for appetite control and metabolism.
Quick snapshot: Nuts and seeds are rich in protein, fiber, and healthy fats — helping reduce cravings, boost metabolism, and support weight management.
  1. Satiety & Reduced Appetite
    Their high fiber and protein slow digestion and keep you full, reducing cravings for processed snacks.
  2. Incomplete Calorie Absorption
    Research shows that not all calories in nuts are absorbed. For example, the metabolizable energy of walnuts is about 21% lower than what food labels suggest (Health.com).
  3. Improved Metabolism
    Healthy fats (especially omega-3s) support metabolic health, while protein helps preserve lean muscle during fat loss.
  4. Research Evidence
    • A Harvard study tracking 145,000 adults found that eating half a handful of nuts daily reduced obesity risk by 16%.
    • A 2024 systematic review showed nut-enriched diets led to 1.4–7.4 kg more weight loss than nut-free diets.
    • Meta-analyses confirm that nut consumption does not lead to weight gain (PMC).

📊 Nutritional Comparison: Nuts & Seeds (per 100 g)

FoodCaloriesProteinFiberFatKey Nutrients
Chia Seeds48617 g34 g31 gOmega-3s, Calcium, Magnesium
Flax Seeds53418 g27 g42 gLignans, Omega-3s, Fiber
Pumpkin Seeds (Pepitas)55930 g6 g49 gMagnesium, Zinc, Iron
Cumin Seeds37518 g11 g22 gIron, Antioxidants
Sesame Seeds57318 g12 g50 gCalcium, Magnesium, Lignans
Sabja (Basil) Seeds44220 g40 g25 gFiber, Iron, Plant Compounds
Almonds57921 g12.5 g50 gVitamin E, Magnesium
Walnuts65415 g7 g65 gOmega-3s (ALA), Antioxidants
Pistachios56020 g10 g45 gB6, Potassium, Lutein
Peanuts56725 g8.5 g49 gFolate, Niacin, Protein
Brazil Nuts65914 g7.5 g67 gSelenium, Magnesium
Macro Nutrition Comparison of Popular Nuts and Seeds discussed in this blog post.

💡 Insights at a Glance

  • Highest Protein: Pumpkin seeds (30 g/100 g).
  • Highest Fiber: Sabja (40 g/100 g), chia (34 g/100 g).
  • Highest Omega-3s: Flax, chia, walnuts.
  • Lowest Calories (comparatively): Chia and Sabja, though still energy-dense.
  • Nutrient Powerhouses: Brazil nuts (selenium), pumpkin seeds (magnesium & zinc), almonds (vitamin E).

Best Seeds for Weight Loss

Seeds may be tiny, but when it comes to nutrition, they pack an enormous punch. High in fiber, protein, and healthy fats, they help control appetite, stabilize blood sugar, and provide essential micronutrients that support metabolism. Incorporating the best seeds for weight loss into your daily diet is an easy, natural way to enhance fat loss while improving overall health.

Below, we’ll explore the top science-backed seeds that aid weight management — and how to use them.

Best seeds for weight loss – chia, flax, pumpkin, and sabja seeds with benefits like high fiber, omega-3 fatty acids, appetite control, and digestive support.
Top seeds for weight loss: Chia for fiber, flax for omega-3s, pumpkin for curbing cravings, and sabja for cooling digestion and satiety.

🌱 Chia Seeds for Weight Loss

Chia seeds are one of the most popular seeds for weight loss — and for good reason. Just two tablespoons provide nearly 10 grams of fiber, which expands in the stomach and slows digestion, creating a feeling of fullness that reduces overeating.

Chia seeds are also rich in omega-3 fatty acids, protein, calcium, and magnesium, making them a nutrient-dense addition to any diet. Their ability to absorb water (up to 10x their weight) makes them particularly effective in appetite control.

👉 A Harvard Nutrition Guide highlights chia as an easy way to add fiber and omega-3s to meals without significantly raising calorie intake.

How to Eat Chia Seeds

  • Mix 1–2 tablespoons into smoothies or yogurt.
  • Prepare overnight chia pudding with milk or plant-based alternatives.
  • Soak in water for 20 minutes to make chia water, a simple pre-meal appetite suppressant.

💡 Tip: Always soak chia seeds before eating large amounts to prevent digestive discomfort.

For some creative Chia Pudding recipes, do read out post: 10 Creative Chia Pudding Recipes for Every Taste

🌱 Flax Seeds for Weight Loss

Flax seeds (or linseeds) are another fiber powerhouse, providing both soluble and insoluble fiber that promotes satiety and digestive health. They’re also rich in lignans, plant compounds with antioxidant and hormone-balancing effects.

Studies suggest flax may help lower cholesterol and support fat metabolism, making them a great addition to weight-loss diets.

How to Eat Flax Seeds

  • Always consume ground flax seeds (whole seeds may pass through undigested).
  • Add 1–2 tablespoons to oatmeal, pancakes, or baked goods.
  • Blend into protein shakes or smoothies.

💡 Tip: Store ground flax seeds in the fridge to prevent oxidation and preserve nutrients.

Do Read: How to Incorporate Flax Seeds for Weight Loss: Tips, Recipes, and Nutritional Benefits

🌱 Pumpkin Seeds for Weight Loss

Pumpkin seeds, also known as pepitas, are nutrient-dense and packed with protein, magnesium, zinc, and antioxidants. They help regulate blood sugar, support muscle mass, and improve satiety — all important for weight loss.

A gastroenterologist cited in Economic Times recommends pumpkin seeds for their ability to balance blood sugar levels and provide affordable nutrition.

How to Eat Pumpkin Seeds

  • Snack on roasted pumpkin seeds.
  • Add to salads, soups, or stir-fries.
  • Include in homemade trail mix or granola bars.

💡 Tip: Stick to a handful (¼ cup) to keep calories in check.

Also Read: The Benefits of Pumpkin Seeds for Weight Loss and Blood Sugar Control

🌱 Cumin Seeds for Weight Loss

While often used as a spice, cumin seeds have gained attention for potential weight-loss benefits. Some small trials suggest cumin may aid fat reduction and improve cholesterol when included in calorie-controlled diets.

How to Use Cumin Seeds

  • Brew cumin water: soak 1 teaspoon of seeds overnight, strain, and drink in the morning.
  • Add to soups, stews, or roasted vegetables for extra flavor and digestive support.

💡 Tip: Cumin should complement a balanced diet — it’s not a standalone solution for fat loss.

Also Read: Harness the Power of Cumin Seeds for Weight Loss: Unveiling the Potential

🌱 Sesame Seeds for Weight Loss

Sesame seeds are calorie-dense, but they provide calcium, magnesium, and lignans that support metabolic health. They are often consumed in the form of tahini, a sesame paste used in Mediterranean and Middle Eastern cooking.

How to Eat Sesame Seeds

  • Sprinkle toasted sesame seeds on stir-fries, noodles, or salads.
  • Use tahini as a base for salad dressings or dips like hummus.

💡 Tip: A teaspoon or two goes a long way — moderation is key due to calorie density.

Read More: Sesame Seeds for Weight Loss: Exploring the Nutritional Benefits, Cooking Methods, and Incorporation into a Healthy Diet

🌱 Sabja (Basil) Seeds for Weight Loss

Sabja seeds, also called tukmaria or basil seeds, are similar to chia in their ability to swell up in liquid. Rich in fiber and plant compounds, they slow digestion, promote fullness, and support gut health.

They’re a traditional ingredient in Indian summer drinks and desserts, prized for their cooling effect and digestive benefits.

How to Eat Sabja Seeds

  • Soak 1–2 teaspoons in water for 15 minutes before use.
  • Add to lemon water, smoothies, or milk-based drinks like falooda.

💡 Tip: Always soak sabja seeds before consuming — eating them dry can be a choking hazard.


✅ Summary: Seeds for Weight Loss

SeedKey BenefitsHow to EatPortion Size
ChiaHigh fiber, omega-3s, appetite controlPudding, smoothies, chia water1–2 tbsp/day
FlaxFiber, lignans, cholesterol-loweringGround in oats, baking, shakes1–2 tbsp/day
PumpkinProtein, magnesium, blood sugar supportRoasted snack, salads¼ cup/day
CuminMay aid fat metabolismCumin water, spice for meals1 tsp/day
SesameCalcium, lignans, flavor boostTahini, salad topping1–2 tsp/day
Sabja (Basil)Fiber, fullness, gut healthSoaked in water or drinks1–2 tsp/day
Table showing various seeds and how to consume them for weight loss.

🥜 Best Nuts for Weight Loss

Nuts often get a bad reputation because of their calorie and fat content, but science consistently shows the opposite: when eaten in moderation, they can support weight management. Rich in protein, fiber, and healthy fats, nuts keep you full, regulate blood sugar, and may even help your body burn calories more efficiently.

A Harvard study found that people who ate a handful of nuts daily had a 16% lower risk of obesity compared to those who rarely ate them. Another systematic review confirmed that nut consumption does not cause weight gain — and may enhance weight loss in calorie-controlled diets.

Here are the best nuts for weight loss, backed by research.

Best nuts for weight loss – almonds, walnuts, pistachios, peanuts, and Brazil nuts – rich in protein, fiber, omega-3s, and essential minerals to support fat loss and appetite control.
Top nuts for weight loss: Almonds to control hunger, walnuts for omega-3s, pistachios for low-calorie snacking, peanuts for affordable protein, and Brazil nuts for selenium and metabolism support.

🌰 Almonds

Almonds are one of the most effective nuts for weight management. They provide 6 grams of protein, 14 grams of healthy fats, and 3.5 grams of fiber per ounce (23 almonds), which helps curb hunger and stabilize blood sugar.

A study in the International Journal of Obesity found that participants on almond-enriched low-calorie diets lost 62% more weight compared to those on nut-free diets.

How to Eat Almonds for Weight Loss

  • Snack on a small handful (about 23 almonds).
  • Chop and add to oatmeal or yogurt.
  • Use almond butter (natural, no sugar added) on whole-grain toast.
💡 Tip: Almonds are calorie-dense. Stick to 1–2 servings daily.

Read More: Almonds for Weight Loss and Belly Fat Reduction: How to Eat, How Many to Eat, When to eat, and Why to Eat

🌰 Walnuts

Walnuts are unique because they’re rich in alpha-linolenic acid (ALA), a plant-based omega-3 fatty acid that supports brain and metabolic health. They may also help control appetite at a neurological level.

A study published in Diabetes, Obesity and Metabolism found that walnuts activate brain regions that regulate hunger and cravings (Harvard Health).

How to Eat Walnuts for Weight Loss

  • Eat 3–4 walnut halves as a snack.
  • Add to salads, oatmeal, or baked goods.

💡 Tip: Walnuts are rich but calorie-dense — limit to 1 oz per day.

Do Read: Walnuts and Weight Loss: Nurturing Health with Nature’s Powerhouse

🌰 Pistachios

Pistachios are one of the lowest-calorie nuts, with about 160 calories per ounce (49 nuts). They also provide 6 grams of protein and 3 grams of fiber, making them filling despite their small calorie load.

Nutritionists highlight that eating pistachios can help reduce visceral fat (harmful fat around organs), thanks to their healthy fat and antioxidant profile (EatingWell).

How to Eat Pistachios for Weight Loss

  • Snack on pistachios in the shell (slows eating, encourages mindful snacking).
  • Crush and use as a topping for yogurt, salads, or fish dishes.

💡 Tip: Choose unsalted, dry-roasted pistachios to avoid excess sodium.

Also Read: Pistachios and Weight Loss: The Green Powerhouse for a Healthy You

🌰 Peanuts

Although technically legumes, peanuts are nutritionally similar to tree nuts and are one of the most affordable sources of plant-based protein.

A review of randomized controlled trials found that peanut consumption does not lead to weight gain and may improve satiety when included in balanced diets (PMC).

How to Eat Peanuts for Weight Loss

  • Enjoy boiled or roasted peanuts as a snack.
  • Use natural peanut butter (no added sugar or oils) on whole-grain bread.
  • Add peanuts to stir-fries for crunch and protein.

💡 Tip: Avoid flavored or candied peanuts, which often contain added sugars and oils.

Do Read: Peanuts and Weight Loss: Separating Fact from Fiction

🌰 Brazil Nuts

Brazil nuts are among the best dietary sources of selenium, an essential mineral for thyroid health and metabolism. Just one nut provides your daily requirement.

However, too many can cause selenium toxicity, so they should be consumed sparingly.

How to Eat Brazil Nuts for Weight Loss

  • Eat 1–2 nuts per day.
  • Add to homemade nut mixes for variety.

💡 Tip: Think of Brazil nuts as a supplement, not a snack to eat by the handful.

Also Read: Brazil Nut Bliss: 5 Rich and Creamy Dinner Meal Replacement Shakes for a Keto Feast


✅ Summary: Nuts for Weight Loss

NutKey BenefitsHow to EatPortion Size
AlmondsHigh protein, fiber, supports weight loss in studiesSnack, oatmeal, almond butter23 almonds (1 oz)
WalnutsOmega-3 fats, appetite control, brain healthSnack, salads, oatmeal1 oz (7 halves)
PistachiosLowest-calorie nut, reduces visceral fatIn-shell snack, toppings49 pistachios (1 oz)
PeanutsAffordable protein, improves satietyBoiled, roasted, peanut butter1 oz (28 peanuts)
Brazil NutsSelenium for metabolism, thyroid health1–2 dailyVery small serving
Table showing various nuts and how to consume them for weight loss.

🥜 Peanut Butter and Other Nut Butters for Weight Loss

Nut butters can be an excellent addition to a weight-loss diet — but only if you choose the right kind. While some store-bought spreads are loaded with added sugars, hydrogenated oils, and salt, natural nut butters provide a nutrient-dense balance of protein, fiber, and healthy fats that support satiety and energy.

A tablespoon of natural peanut butter offers about 4 grams of protein, 2 grams of fiber, and 8 grams of healthy fats — enough to keep you full and energized without spiking blood sugar. In fact, a Harvard article highlights peanut butter as a smart snack when paired with whole foods like fruit or whole-grain bread.

🥜 Peanut Butter for Weight Loss

Peanut butter is the most popular nut butter, and when consumed in moderation, it can support fat loss by:

  • Reducing cravings due to protein and fat content.
  • Stabilizing blood sugar when paired with complex carbs.
  • Offering a portable, versatile snack option.

👉 Best choice: Natural or organic peanut butter with only peanuts (and maybe salt) in the ingredient list. Avoid “low-fat” versions, as they often add sugar.

Learn now How to make the Best Peanut Butter at Home.

🌰 Almond Butter

Almond butter is slightly higher in vitamin E, magnesium, and monounsaturated fats compared to peanut butter, making it a heart-healthy alternative. It may be especially useful for those who want a lower-carb option while still boosting protein intake.

Do Read: Almond Butter for Diabetes: Creamy, Clean & Blood Sugar Friendly

🌰 Other Nut Butters

  • Cashew Butter: Creamy and mild, though lower in protein compared to peanuts or almonds. Best in moderation.
  • Mixed Nut Butters: Provide a variety of nutrients and flavors, though calories remain high.
  • Hazelnut Butters: Often sold sweetened (e.g., chocolate spreads), which should be avoided for weight loss.

✅ Tips for Using Nut Butters in a Weight-Loss Diet

  • Stick to 1–2 tablespoons per serving (about 90–180 calories).
  • Pair with fiber-rich foods like apple slices, celery sticks, or whole-grain toast.

  • Use as a smoothie base instead of sweetened syrups.

  • Avoid heavily processed or flavored nut butters marketed as “healthy” but packed with sugar.

💡 Key Takeaway: Peanut butter, almond butter, and other natural nut butters can be part of a weight-loss-friendly snack strategy. The key is choosing minimally processed versions and controlling portions.


Best Way to Eat Nuts and Seeds for Weight Loss

Knowing which nuts and seeds support weight loss is only half the battle — the other half is learning how to eat them correctly. Because nuts and seeds are calorie-dense, the secret lies in portion control, timing, and smart pairings.

Infographic showing the best way to eat nuts and seeds for weight loss with serving sizes (nuts, seeds, nut butters), best times to eat (breakfast, snacks, post-workout, evening), and easy ways to add them (chia pudding, smoothies, energy bites, salad toppers, peanut butter with fruit).
The best way to eat nuts and seeds for weight loss: right portions, right timing, and simple swaps that make a big difference. Easy ways to add them – chia pudding, smoothies, energy bites, salad toppers, peanut butter with fruit, etc.

✅ Serving Sizes Matter

  • Nuts: 1 ounce (about a small handful or 23 almonds, 49 pistachios, or 14 walnut halves). This equals roughly 160–180 calories.
  • Seeds: 1–2 tablespoons daily (chia, flax, pumpkin, sesame, or sabja).
  • Nut Butters: 1–2 tablespoons (90–180 calories).

👉 Moderation is essential. Eating too many can lead to calorie surplus, which counteracts weight-loss efforts.

⏰ Best Times to Eat Nuts and Seeds

  • Breakfast: Add chia, flax, or almonds to oats, yogurt, or smoothies for a filling start.
  • Snacks: Replace chips or cookies with pistachios or peanuts for a protein boost.
  • Post-Workout: A smoothie with nut butter and seeds supports muscle repair.
  • Evening: A small serving of walnuts or pumpkin seeds can curb late-night cravings without spiking blood sugar.

🍴 Easy Ways to Add Them to Your Diet

  • Chia Pudding: Soak 2 tbsp chia in milk overnight, top with berries.
  • Almond & Date Energy Bites: Blend almonds, dates, and a sprinkle of flax.
  • Flax Smoothie: Add 1 tbsp ground flax to banana or berry smoothies.
  • Pumpkin Seed Salad Topper: Sprinkle roasted seeds over greens for crunch.
  • Peanut Butter Snack: Pair 1 tbsp natural peanut butter with apple slices or celery.

💡 Key Takeaway: Eating the best nuts and seeds for weight loss doesn’t mean endless handfuls — it means choosing the right portions, adding them to meals strategically, and using them as healthy replacements for processed snacks.


🌟 Other Health Benefits Beyond Weight Loss

While nuts and seeds are excellent for weight control, their benefits extend far beyond fat loss. Packed with essential nutrients, these tiny foods support overall health and disease prevention.

🧠 Rich in Magnesium

Many nuts and seeds — especially almonds, cashews, and pumpkin seeds — are excellent sources of magnesium, a mineral that supports energy production, blood sugar control, and muscle function. Low magnesium intake has been linked to higher risks of obesity and type 2 diabetes (NIH).

Do Read: Magnesium Deficiency? Add These 5 Foods to Your Diet

❤️ Heart and Metabolic Health

The healthy fats in nuts and seeds — particularly monounsaturated and polyunsaturated fats — help reduce LDL (“bad”) cholesterol and improve cardiovascular health. A large review published in the Journal of Nutrition found that regular nut consumption lowered the risk of heart disease by 15–23% (Journal of Nutrition).

💪 Omega-3 Fatty Acids

Walnuts, flax, and chia seeds are rich in plant-based omega-3 fatty acids, which help reduce inflammation, support brain health, and improve metabolic function. The Times of India highlights chia and flax seeds as some of the best vegetarian omega-3 sources.

Also Read: How Omega-3 Fatty Acids Help Fight Chronic Inflammation?

🛡️ Antioxidants and Plant Compounds

Sesame, flax, and chia seeds provide lignans and other antioxidants that fight oxidative stress, supporting hormonal balance and long-term disease prevention. Nuts like pistachios and walnuts also supply polyphenols with anti-inflammatory benefits (Verywell Health).

💡 Key Takeaway: Adding nuts and seeds to your diet not only helps with weight loss but also improves heart health, reduces inflammation, and provides long-lasting energy — making them a cornerstone of a balanced, healthy lifestyle.


🔬 Science-Backed Evidence: What Research Says

The role of nuts and seeds in weight management isn’t just a diet trend — it’s supported by decades of scientific research. Here are some of the strongest studies that back their benefits:

📉 Nuts and Lower Obesity Risk

A large-scale study from Harvard tracked nearly 145,000 adults over four years. Results showed that eating a handful of nuts daily was linked to a 16% lower risk of obesity and less long-term weight gain compared to people who rarely ate nuts.

⚖️ Nut-Inclusive Diets Enhance Weight Loss

A 2024 review published in Nutrition Research Reviews found that adding nuts like almonds, pistachios, and walnuts to calorie-restricted diets resulted in 1.4 to 7.4 kg more weight loss compared to similar diets without nuts (Health.com).

Similarly, a University of South Australia study confirmed across multiple trials that nut-inclusive weight-loss diets are at least as effective — and often more effective — than nut-free approaches.

🔥 Fewer Calories Absorbed Than Labels Suggest

Not all the calories in nuts are absorbed by the body. A study on walnuts found that their metabolizable energy was 21% lower than the standard calorie count listed on nutrition labels (Health.com). This means your body actually digests fewer calories than expected.

✅ No Evidence of Weight Gain from Nuts

Meta-analyses and randomized controlled trials consistently show that nut consumption does not cause weight gain. In fact, when nuts replace processed snacks, they support better weight control (PMC).

💡 Bottom Line: The science is clear — far from being fattening, nuts and seeds are proven allies in weight management, helping reduce obesity risk, enhance fat loss, and improve long-term health.


❓ FAQs About Nuts, Seeds, and Weight Loss


🥜 Are nuts fattening or good for weight loss?

Despite being high in calories, nuts are not fattening when eaten in moderation. Studies show that regular nut consumption does not lead to weight gain and may actually support fat loss thanks to their protein, fiber, and healthy fats (PMC).


🥗 Which nuts are best for weight loss?

Almonds, pistachios, and walnuts are among the best nuts for weight loss. They’re high in protein and fiber, help control appetite, and have been linked to reduced body fat in multiple studies (Harvard Health).


🌱 Which seeds are best for weight loss?

Chia seeds, flax seeds, and pumpkin seeds are top choices. They’re rich in fiber and omega-3s, which slow digestion, promote fullness, and support metabolism (Healthline).


🥄 How many almonds should I eat per day for weight loss?

A small handful — about 23 almonds (1 ounce) — is considered an ideal daily portion. This provides enough protein and fiber to support satiety without adding excess calories.


🥤 How should I eat chia seeds for weight loss?

Soak 1–2 tablespoons of chia seeds in water or milk for 15–20 minutes before eating. Popular options include chia pudding, chia smoothies, or simple chia water taken before meals (Harvard Health).


🍞 Can peanut butter help with weight loss?

Yes — if it’s natural peanut butter with no added sugar or oils, and eaten in moderation. Stick to 1–2 tablespoons paired with fruit or whole-grain toast for a filling snack (Harvard Health).


⚖️ Are seeds better than nuts for weight loss?

Both are beneficial. Seeds (like chia and flax) offer more fiber per serving, while nuts (like almonds and pistachios) are higher in protein. Including a mix of both provides the best balance for weight control and overall health.


🏁 Conclusion

Nuts and seeds are often misunderstood — many people avoid them for fear of gaining weight, but research shows the opposite. When eaten in moderation, the best nuts and seeds for weight loss — from chia and flax seeds to almonds, pistachios, and walnuts — are powerful tools for controlling hunger, boosting metabolism, and improving overall health.

These tiny foods provide the perfect balance of protein, fiber, and healthy fats, which keep you full for longer and help you avoid unhealthy snacking. On top of that, they offer additional benefits like heart protection, blood sugar control, and essential nutrients such as magnesium and omega-3 fatty acids.

The key is portion control and smart usage: a handful of nuts or a few tablespoons of seeds can go a long way. Swap processed snacks for natural options like chia pudding, almond butter on whole-grain toast, or roasted pumpkin seeds, and you’ll feel the difference in your energy, cravings, and weight goals.

👉 Start small today: add a tablespoon of chia to your breakfast or swap chips for a handful of pistachios. Over time, these small, sustainable choices can transform your health — one bite at a time.