Posted on — 7 Comments

Low Carb Chia Pudding Recipes

Cover image showing a premium glass jar of low carb chia pudding with a smooth whipped topping on a warm-cream seamless background. Editorial food photography style for “Low Carb Chia Pudding” featuring 10 recipes including keto, high protein, dairy-free, and blended options, with MasalaMonk.com branding.

This post was last updated on

Looking for low carb chia pudding recipes for weight loss? The most useful place to start is the pudding itself. Chia is not a fat burner, but a make-ahead serving can be easy to portion, simple to build with protein, and satisfying without relying on much added sugar. Here you can make it light with almond milk, thick and tangy with Greek yogurt, rich with coconut milk, chocolatey with protein powder, or completely smooth after blending.

Here for the thick Greek-yogurt chia pudding? Start with ¾ cup plain Greek yogurt + 3 tablespoons chia seeds + ¼ cup / 60 ml unsweetened almond milk or water. Stir again after 10 minutes, then chill for at least 2 hours. Jump to the full Greek yogurt chia pudding recipe ↓
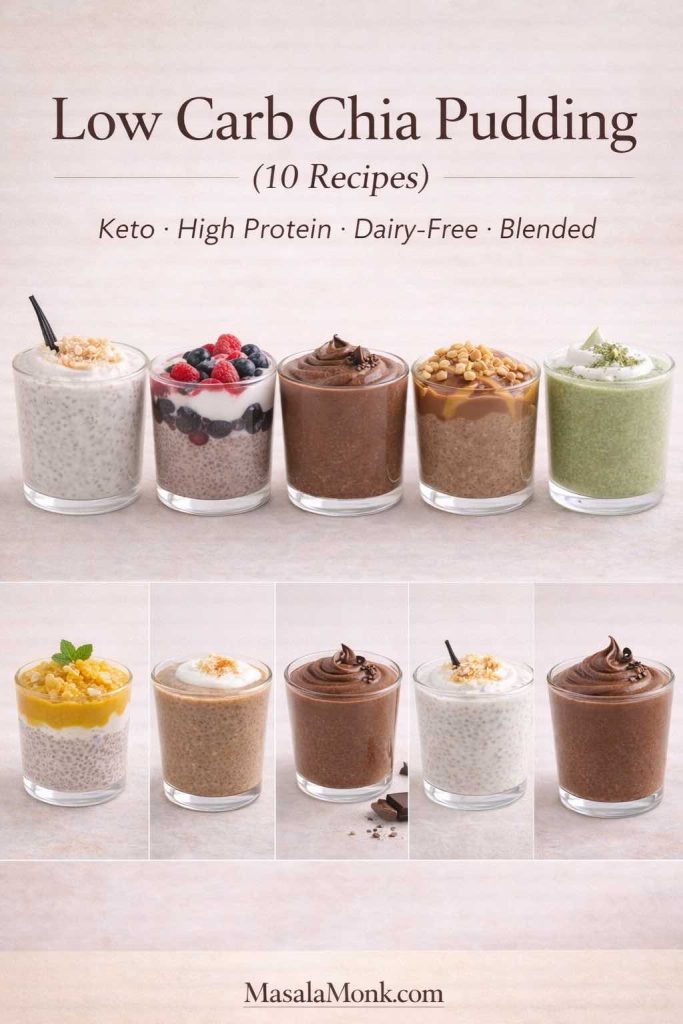
Collage showing ten low carb chia pudding cups including vanilla, Greek yogurt, chocolate, peanut butter, matcha, mango, coconut and blended mousse variations.
All 10 chia pudding recipes at a glance—from thick Greek yogurt and keto coconut milk to chocolate protein pudding, fruit layers and smooth blended mousse.

You do not need to read this guide from top to bottom. Use the jumps above if you already know what you want, or use the table of contents to solve the ratio, liquid, protein, meal-prep, or troubleshooting question that brought you here.


Low Carb Chia Pudding for Weight Loss: What Actually Matters

Chia pudding is not a fat burner, and a jar does not cause weight loss by itself. What makes it useful in a weight-management routine is practical: chia is easy to portion ahead, it creates a substantial gel-like texture when hydrated, and it can be paired with protein-rich ingredients such as Greek yogurt or protein powder.

The rest of the jar matters just as much. Canned coconut milk, nut butter, nuts, granola, fruit, sweeteners, and large portions can quickly change both calories and carbohydrates. A chia pudding that replaces a less satisfying breakfast is a different situation from adding a rich pudding on top of everything else you already eat.

  • Start unsweetened: choose unsweetened almond milk, plain Greek yogurt, or an unsweetened coconut base when keeping added sugar low matters.
  • Add protein when the jar needs to function as a meal: Greek yogurt or a protein powder you already tolerate well are the easiest routes.
  • Measure calorie-dense toppings: nut butter, nuts, seeds, coconut and granola are easy to overserve.
  • Use fruit deliberately: berries are easy to portion; mango and apple work better as measured flavor accents when carbs matter.
  • Do not confuse “keto” or “low carb” with automatically low-calorie: coconut milk and nut butter can make an excellent low-carb pudding while still creating a very energy-dense jar.

That is the reason this guide includes several styles rather than one “perfect” weight-loss pudding: the best jar is the one whose portion, protein, texture, and toppings fit the rest of your day.


Why Chia Pudding Works So Well as a Breakfast

A good chia pudding does two practical things well: it gives you a breakfast you can prepare ahead, and it creates a thick, substantial texture from very little morning work. Chia seeds absorb liquid as they hydrate, while Greek yogurt, protein powder, nuts, or richer milks can make the finished jar feel more complete.
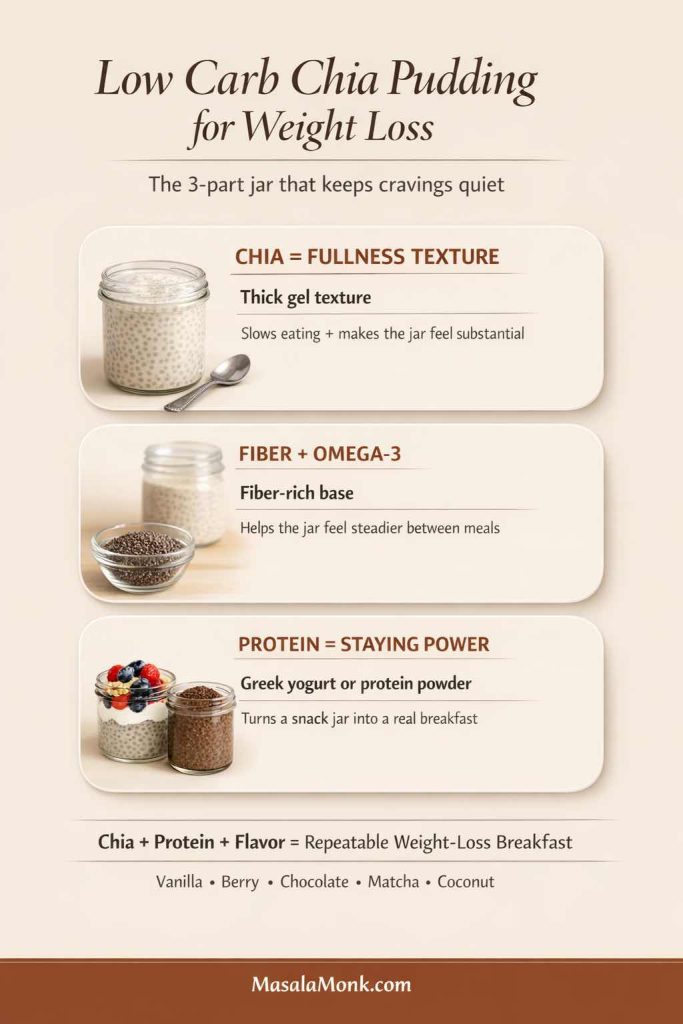
Infographic explaining how chia creates a thick gel texture and can be combined with protein such as Greek yogurt or protein powder.
Chia supplies the pudding structure; protein and the rest of the ingredients determine whether the jar behaves more like a snack or a full breakfast.

Chia seeds are naturally rich in fiber and contain alpha-linolenic acid, a plant-based omega-3 fat. For a useful evidence-based overview rather than exaggerated claims, see the Harvard Nutrition Source guide to chia seeds.

Protein is the easiest way to make the jar feel more meal-like

Plain chia and milk can work perfectly well as a snack, but Greek yogurt or protein powder gives you another lever when you want the jar to function as breakfast. Greek yogurt also changes the texture immediately: instead of waiting for milk alone to become pudding-like, you start with a thick, creamy base.
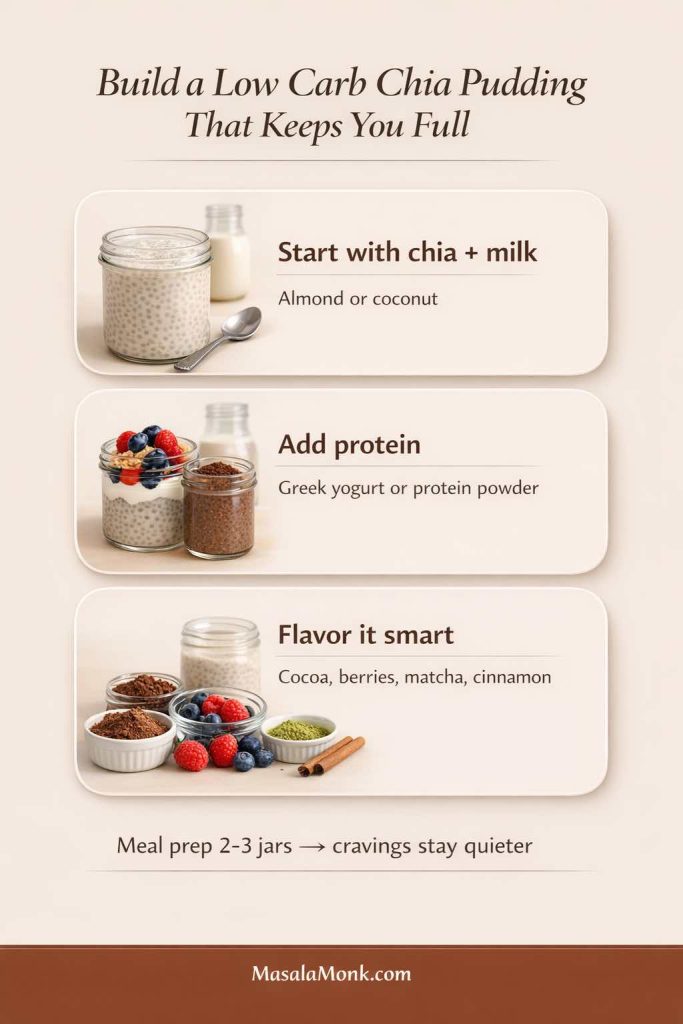
Three-step low carb chia pudding builder showing chia and milk, an optional protein addition, and flavor options such as cocoa, berries, matcha and cinnamon.
Think of the jar in three layers: chia + liquid for structure, an optional protein source for a more substantial breakfast, then flavors you genuinely want to eat.

Low Carb Chia Pudding Ratio: The Base Recipe That Prevents Clumps

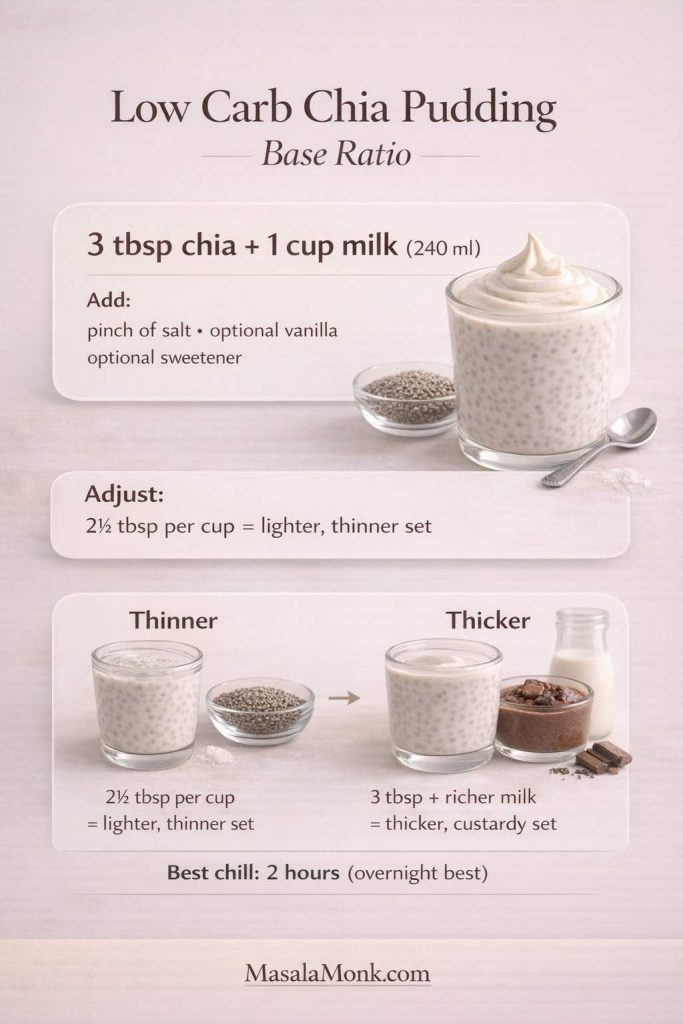
For a classic milk-based chia pudding, this is the dependable starting point:

  • 3 tablespoons chia seeds (roughly 30–35 g, depending on how you measure)
  • 1 cup / 240 ml liquid
  • Pinch of salt
  • ½ teaspoon vanilla, optional
  • Sweetener to taste, optional
Chia pudding ratio infographic showing 3 tablespoons chia seeds to 1 cup or 240 ml milk, with adjustments for thinner or thicker pudding.
Start with 3 tablespoons chia to 1 cup / 240 ml liquid. Use a little less chia for a softer set, or keep the full amount and use a richer liquid for a denser pudding.

The exact result changes with your liquid. Thin almond milk gives a lighter pudding, while canned coconut milk sets much richer. Greek yogurt needs far less added liquid because the yogurt already provides most of the body.

The stir-rest-stir method

  1. Whisk the liquid with vanilla, salt, sweetener, cocoa, protein powder, or other smooth flavorings first.
  2. Add the chia and whisk vigorously for 20–30 seconds.
  3. Let the mixture stand for 10 minutes.
  4. Whisk or stir thoroughly a second time.
  5. Cover and refrigerate for at least 2 hours; overnight gives the most settled texture.
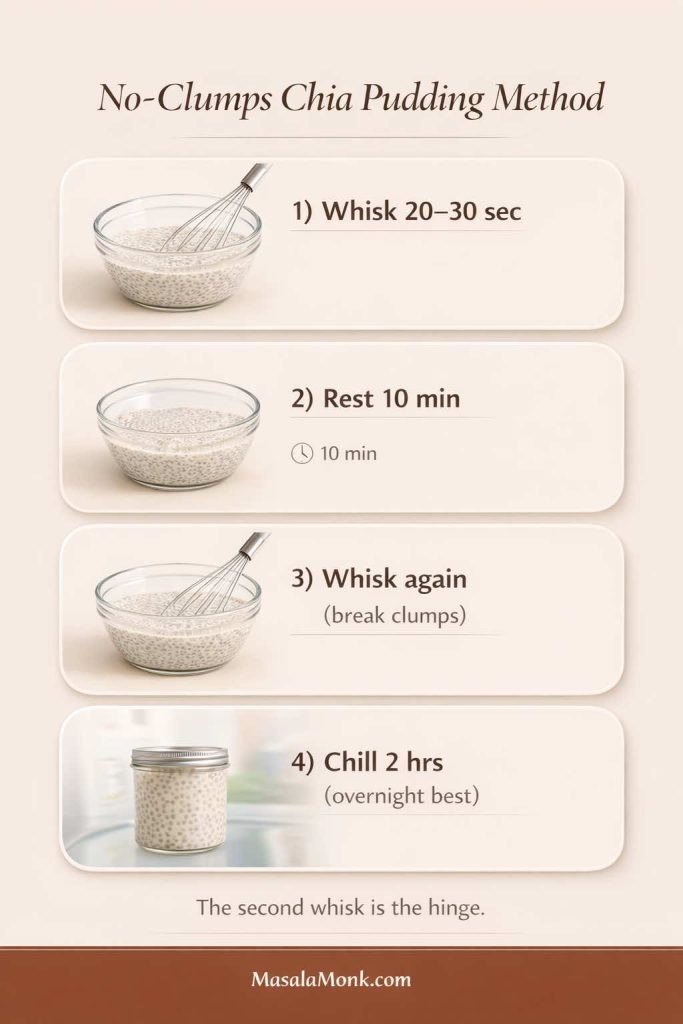
No-clumps chia pudding method showing whisking, a 10-minute rest, a second whisk and a final chill.
The second stir is the important one: the seeds have started hydrating but have not fully set, so this is your chance to break up clusters before they become permanent.

Can you make quick chia pudding?

Yes, although “quick” still means giving chia time to hydrate. Follow the same method and chill for 30–45 minutes. The texture will be softer than an overnight jar. Greek yogurt is particularly useful when you want a thick pudding sooner because much of the thickness is already present before the chia sets.

Give the chia enough time to hydrate

Chia thickens because the seeds absorb liquid over time. For pudding, use them fully hydrated rather than judging the mixture immediately after stirring. If the texture still seems thin after 30 minutes, give it more time before adding extra seeds; the biggest change usually happens during the longer refrigerator rest.


Choosing Your Liquid: Almond Milk, Coconut Milk, Yogurt, Oat Milk & More

Your liquid controls far more than flavor. It changes thickness, richness, carbohydrate content, and how much additional chia you may need. Choose the liquid first, then fine-tune the jar.
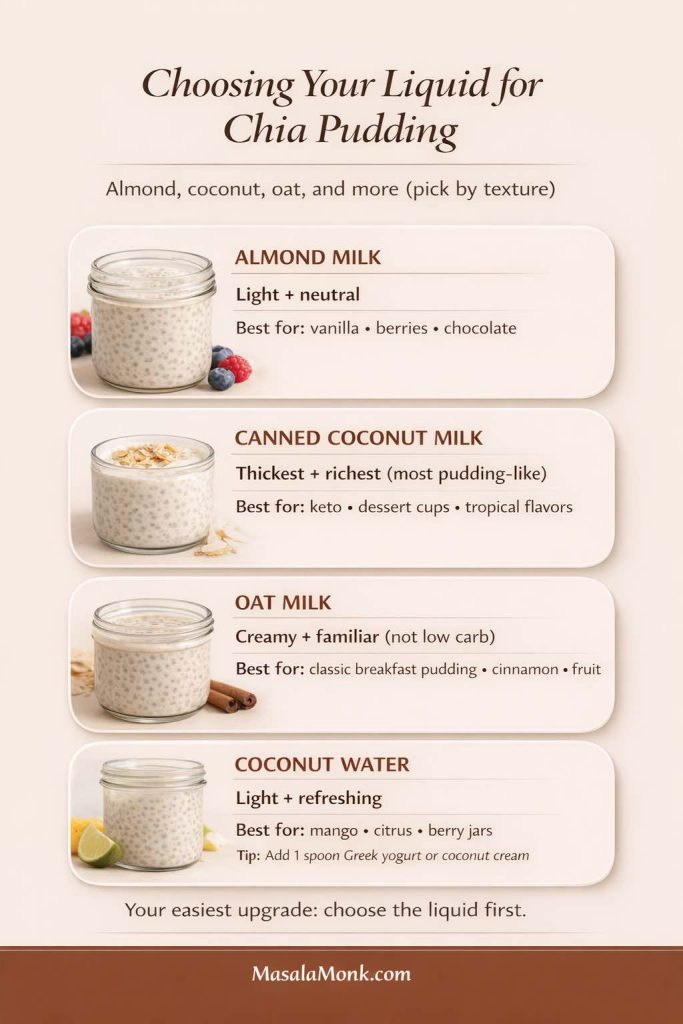
Guide comparing almond milk, canned coconut milk, oat milk and coconut water for chia pudding, including texture and best-use notes.
Almond milk stays light, canned coconut milk gives the richest set, oat milk is creamy but usually higher in carbohydrate, and coconut water creates a lighter fruit-friendly chia gel.

Almond milk: light and versatile

Unsweetened almond milk is an easy low-carb base because its flavor stays out of the way. It works especially well with vanilla, chocolate, cinnamon, berries, matcha, and nut butter.

Canned coconut milk: richest and thickest

If you want a pudding that feels especially rich, canned coconut milk is hard to beat. Because brands vary in thickness, whisk in enough water to make the mixture comfortably pourable before adding chia. Very thick coconut milk can otherwise produce dense pockets before the seeds hydrate evenly.

Greek yogurt: thick before it even chills

Greek yogurt works differently from milk. Instead of using a full cup of liquid, start with yogurt and loosen it gradually. For our full high-protein version, ¾ cup Greek yogurt + ¼ cup / 60 ml water or unsweetened almond milk creates a creamy starting mixture before the chia goes in.

Jump to the Greek yogurt chia pudding recipe →

Oat milk: creamy, but usually not low carb

Oat milk produces a mild, familiar breakfast-pudding flavor. It can still be used with any of the methods in this guide, but check the nutrition label if keeping carbohydrates low is an important part of your goal.

Coconut water: light and fruit-friendly

Coconut water produces a much lighter gel than milk. It pairs particularly well with mango, lime and berries, but it will not taste as creamy unless you add a spoonful of Greek yogurt or coconut cream. If you would rather drink your chia than turn it into pudding, our Chia Seed Water guide uses a much lighter chia-to-liquid ratio and covers plain, lemon, coconut-water and overnight versions.

Dairy-Free Chia Pudding: The Easiest Swaps

Several recipes in this collection are naturally dairy-free when you use plant milk and skip optional Greek yogurt. Unsweetened almond milk is the lightest neutral base; canned coconut milk gives the richest dairy-free texture; and a lighter coconut-milk beverage works well for matcha, mango, apple-cinnamon, and gingerbread.

If you use protein powder in a dairy-free jar, check the ingredient label: whey and casein are dairy proteins, while many pea, soy, rice, and blended plant proteins are dairy-free.


High Protein Chia Pudding: Greek Yogurt, Protein Powder & Collagen

There are three straightforward ways to increase the protein in a chia jar. Greek yogurt gives you protein and immediate thickness. Protein powder can add more protein and flavor but needs to be dissolved well. Collagen peptides dissolve easily, although they do not thicken the pudding the way yogurt does. If collagen is part of your routine, Harvard Health has a measured overview of what collagen supplements can and cannot reasonably claim.
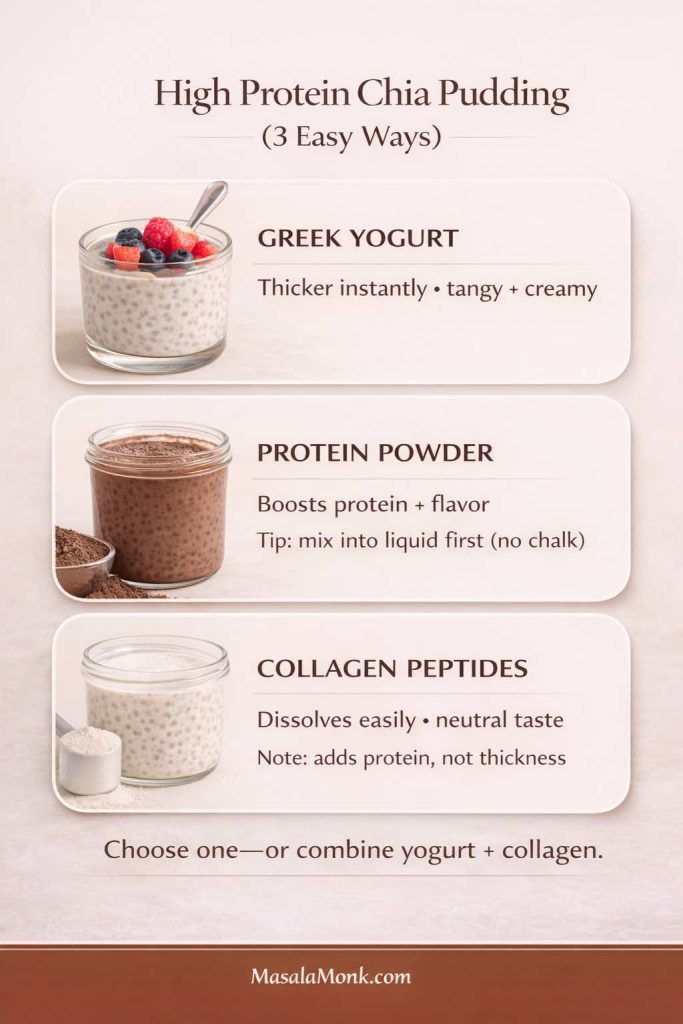
High protein chia pudding comparison showing Greek yogurt, protein powder and collagen peptides as three ways to add protein.
Greek yogurt changes both protein and texture; protein powder is a bigger flavor lever; collagen dissolves easily but contributes little to thickness.

How to add protein powder without a chalky texture

Do not dump dry protein powder into a finished chia pudding. Whisk it completely into the milk first, then add the chia. If your powder is stubborn, make a smooth paste with a small amount of liquid before gradually whisking in the rest.

Keep extra liquid nearby: protein powders absorb liquid very differently. After the 10-minute rest, add 2–4 tablespoons milk if the mixture has become unusually thick before it goes into the refrigerator.
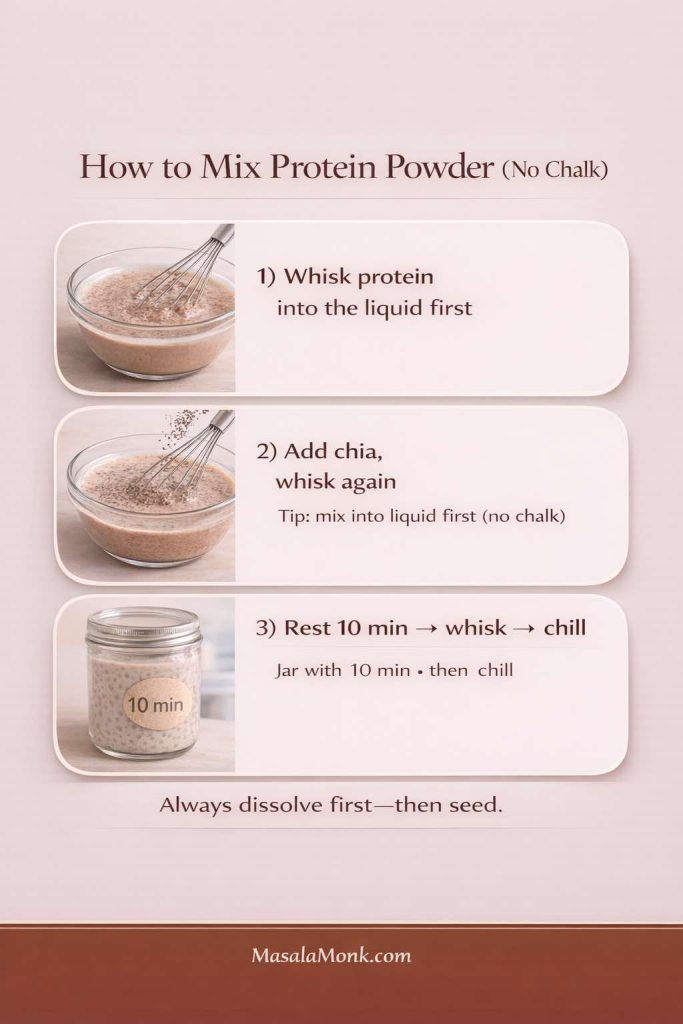
Three-step guide showing protein powder whisked into liquid first, followed by chia seeds and a final 10-minute rest and second stir.
For smooth protein chia pudding: dissolve the powder first, add the seeds second, then use the same 10-minute rest and second-stir method.

10 Low Carb Chia Pudding Recipes

Each recipe below makes roughly 2 small servings or 1 generous serving, depending on appetite and toppings. For meal prep, multiply the ingredients and portion the finished mixture into individual jars.

Low-carb vs keto: these recipes are not all equally low in carbohydrate. The unsweetened almond-milk, Greek-yogurt, chocolate, and coconut versions are the easiest to keep very low carb. Mango and apple are fruit-forward options; use the fruit as a measured accent if carbohydrate intake is a priority.
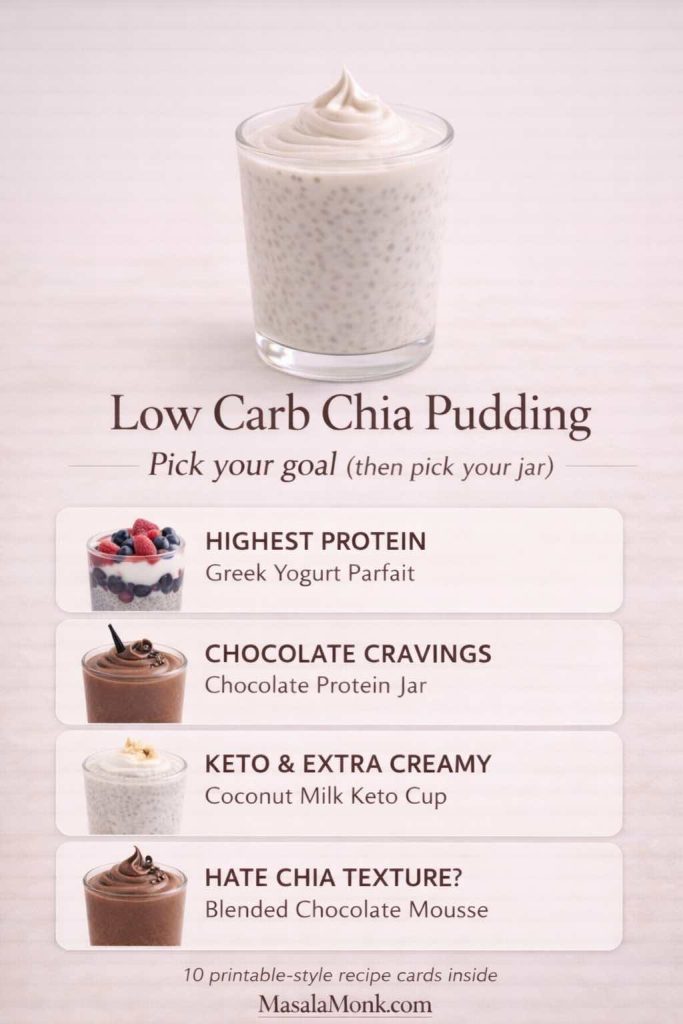
Goal-based chia pudding chooser showing Greek yogurt for highest protein, chocolate protein pudding for chocolate cravings, coconut milk for extra-creamy keto pudding and blended chocolate mousse for people who dislike whole chia texture.
Start with the result you want: Greek yogurt for thick and protein-forward, chocolate protein for cocoa cravings, coconut milk for the richest keto texture, or blended mousse if whole chia seeds are the problem.
If you want…Make this one
Thickest high-protein jarGreek Yogurt Chia Pudding
Simple everyday keto baseVanilla Almond Milk
Chocolate + proteinChocolate Protein
Chocolate dessert feelChocolate Peanut Butter
Fresh café-style flavorMatcha
Fruit-forwardMango
Cozy breakfastApple Cinnamon
Warm-spice dessert flavorGingerbread
Richest keto textureCoconut Milk
No whole-seed textureBlended Chocolate Mousse

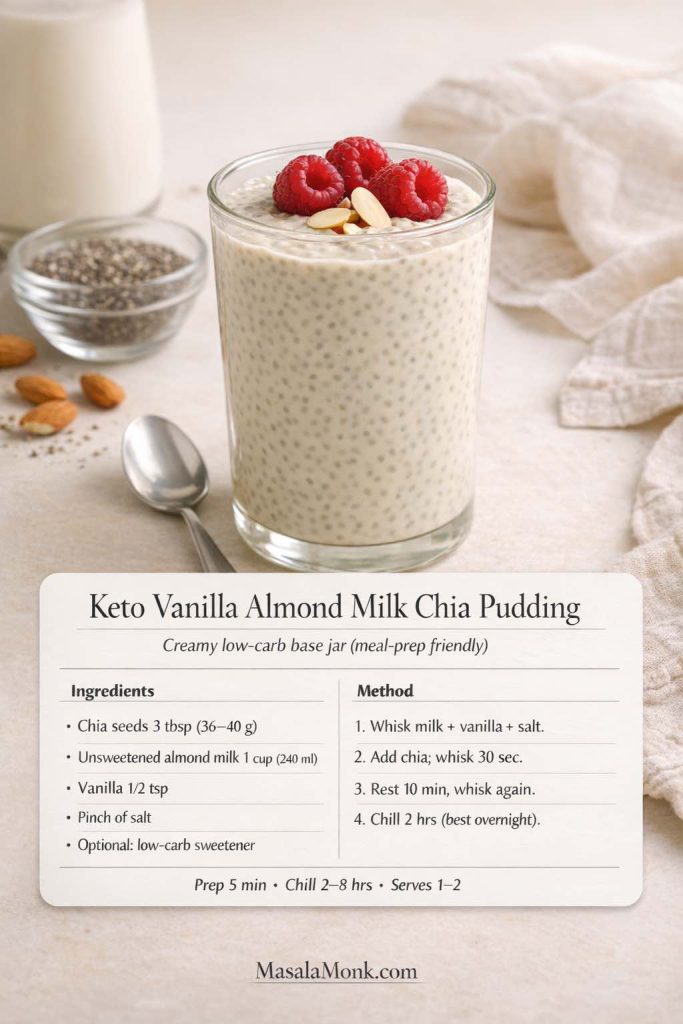
1) Keto Chia Pudding with Almond Milk

This is the easiest everyday low carb chia pudding to memorize. Vanilla keeps it neutral enough for berries, nuts, cocoa, cinnamon, or nut butter later.

Ingredients

  • 3 tablespoons chia seeds
  • 1 cup / 240 ml unsweetened almond milk
  • ½ teaspoon vanilla extract
  • Pinch of salt
  • Optional low-carb sweetener, to taste
Keto vanilla almond milk chia pudding topped with raspberries and sliced almonds.
The almond-milk jar is the useful blank canvas of the collection: light enough for fruit, but easy to make richer with yogurt, nuts or nut butter.

Method

  1. Whisk almond milk, vanilla, salt and sweetener, if using.
  2. Add the chia and whisk vigorously for 20–30 seconds.
  3. Rest 10 minutes, then whisk again.
  4. Cover and refrigerate for at least 2 hours or overnight.

Easy variations: add ½ teaspoon cinnamon; stir in 1 tablespoon unsweetened shredded coconut; or add 1–2 tablespoons Greek yogurt at serving time for a creamier finish.

For a deeper single-recipe treatment, see the keto chia pudding with almond milk.


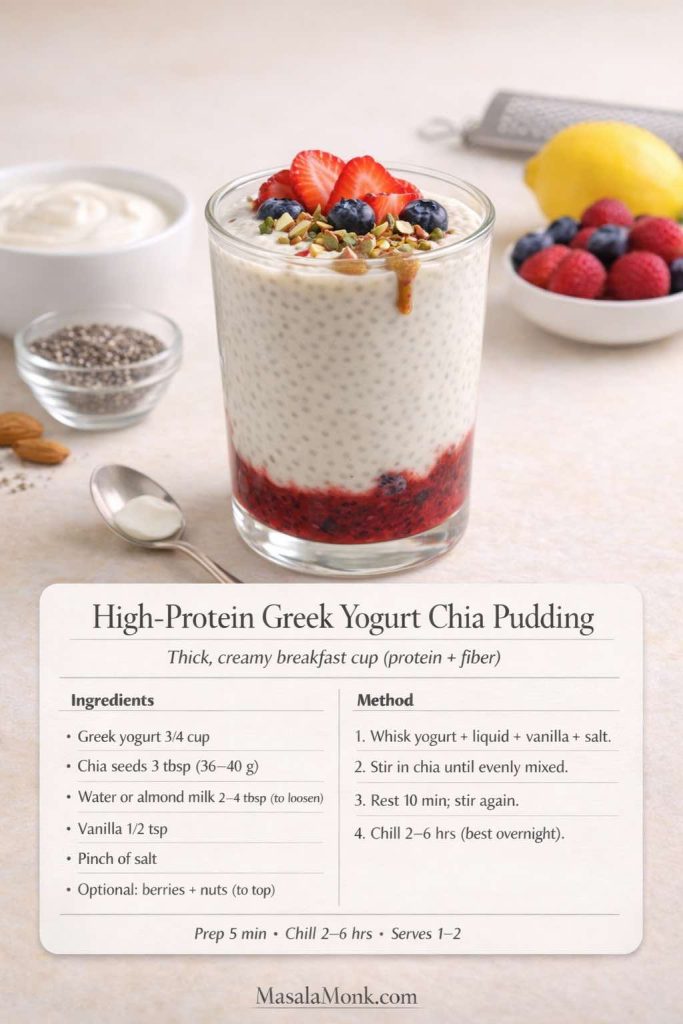
2) Chia Pudding with Greek Yogurt: High Protein & Ultra Creamy

If the chia pudding you want is thick, creamy and closer to cheesecake filling than a glass of soaked seeds, start here. Greek yogurt gives the jar body before the chia has even finished hydrating, while a small amount of liquid keeps the mixture creamy rather than pasty.

Ingredients

  • ¾ cup plain Greek yogurt
  • 3 tablespoons chia seeds
  • ¼ cup / 60 ml unsweetened almond milk or water, plus 1–2 tablespoons more after chilling if needed
  • ½ teaspoon vanilla extract
  • Pinch of salt
  • Optional sweetener, to taste
Thick high-protein Greek yogurt chia pudding layered with berries and topped with strawberries, blueberries, nuts and a small nut-butter drizzle.
This is the thickest protein-forward version in the collection: tangy Greek yogurt, hydrated chia and enough added liquid to keep the pudding creamy rather than stiff.

Method

  1. Whisk the Greek yogurt, vanilla, salt and ¼ cup / 60 ml water or almond milk until completely smooth.
  2. Stir in the chia seeds until evenly distributed.
  3. Rest for 10 minutes, then stir again so no dense chia pockets remain.
  4. Refrigerate for at least 2 hours. Overnight is fine.
  5. Stir before serving and add another 1–2 tablespoons liquid if you want it looser.

How thick should it look before chilling?

It should already be thick, but it should still move easily when stirred. If it looks like a stiff paste before going into the refrigerator, add another tablespoon or two of liquid. The chia will absorb more as it sits.

Can you use nonfat or regular yogurt?

Yes. Nonfat Greek yogurt works, although the finished pudding can taste a little sharper and less rich. Regular yogurt is thinner, so start with less added liquid and check the texture after hydration. Different yogurts vary enough that the final splash of liquid should be adjusted by texture rather than treated as an exact requirement.

Can you add protein powder too?

Yes. Whisk the protein powder into the yogurt and loosening liquid before adding chia. Protein powders absorb liquid differently, so expect to add another 1–3 tablespoons milk if the mixture becomes unusually stiff after the 10-minute rest.

Best toppings and variations

For a cheesecake-style jar, use vanilla, berries and a little lemon zest. For chocolate, whisk cocoa into the yogurt before adding chia. Peanut butter, chopped nuts, cacao nibs and a small berry layer all work well because they add contrast without turning the pudding watery.

If this thick, tangy, almost-cheesecake style is the chia pudding you actually want, keep going with our 10 Creative Chia Pudding Recipes. That collection branches into Greek-yogurt, cheesecake, chocolate, blueberry-lemon, mango and coconut-cream directions, so you can keep the texture you like and change the flavor.


3) Chocolate Protein Chia Pudding

This is the jar to make when you want chocolate flavor without turning breakfast into a sugar-heavy dessert. The important technique is dissolving the protein powder and cocoa before the chia goes in.

  • 1 cup / 240 ml unsweetened almond milk or dairy milk
  • 1 scoop chocolate protein powder, or vanilla protein plus extra cocoa
  • 2 tablespoons cocoa or cacao powder
  • 3 tablespoons chia seeds
  • Pinch of salt
  • Optional sweetener, to taste
  • Optional: 1 tablespoon Greek yogurt for extra creaminess
  • 2–4 tablespoons extra milk, only if your protein powder makes the mixture unusually thick
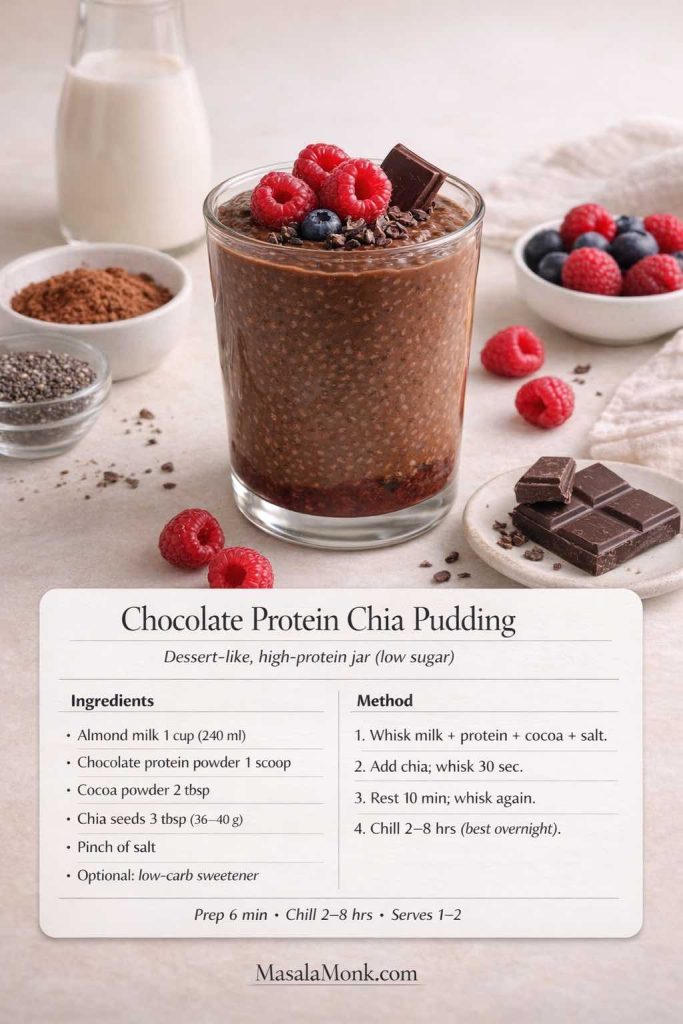
Chocolate protein chia pudding topped with raspberries, cacao nibs and dark chocolate.
Cocoa and protein powder make this the most direct chocolate-for-breakfast jar in the collection.
  1. Whisk the milk, protein powder, cocoa, salt and sweetener until completely smooth.
  2. Add chia and whisk again.
  3. Rest 10 minutes, then stir thoroughly. If it already looks very thick, add 2–4 tablespoons extra milk.
  4. Refrigerate for at least 2 hours; overnight gives the most settled texture.

If it tastes chalky: whisk the protein powder with a small amount of milk into a smooth paste first, then gradually add the rest of the milk.


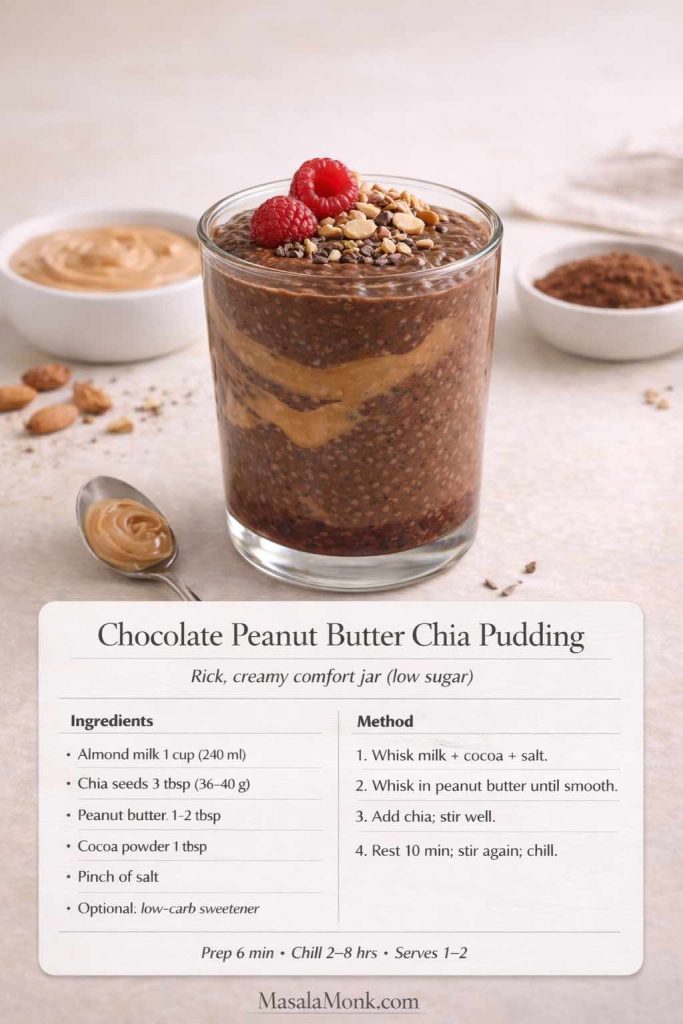
4) Chocolate Peanut Butter Chia Pudding

Peanut butter supplies richness and makes chocolate taste fuller even when you keep the pudding only lightly sweetened.

  • 1 cup / 240 ml almond milk or dairy milk
  • 3 tablespoons chia seeds
  • 1–2 tablespoons peanut butter
  • 1 tablespoon cocoa powder
  • Pinch of salt
  • Optional sweetener
Chocolate peanut butter chia pudding with a peanut butter swirl, raspberries, chopped peanuts and cacao nibs.
Chocolate and peanut butter create a richer dessert-style jar without needing much additional sweetness.
  1. Whisk milk, cocoa, salt and sweetener until smooth.
  2. Whisk in the peanut butter until evenly incorporated.
  3. Add chia, rest 10 minutes and stir again.
  4. Refrigerate for at least 2 hours.

A tiny splash of vanilla or pinch of cinnamon can make the cocoa taste deeper. Top with berries, roasted nuts or a few cacao nibs.


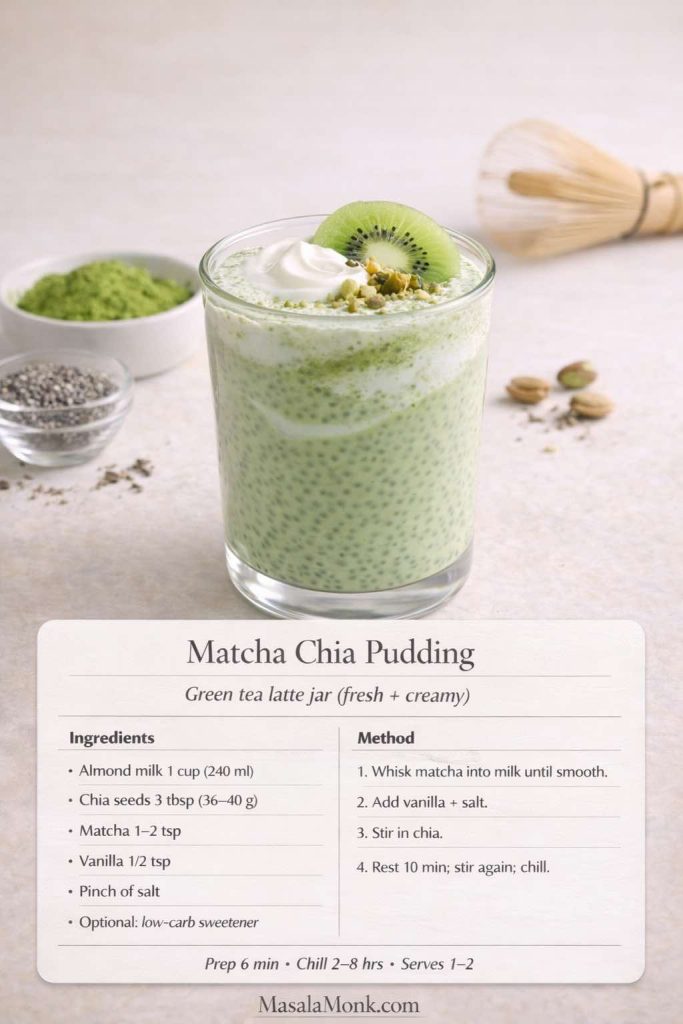
5) Matcha Chia Pudding

Matcha gives chia pudding a clean green-tea flavor that works especially well with vanilla and a small pinch of salt.

  • 1 cup / 240 ml unsweetened almond milk or light coconut-milk beverage
  • 3 tablespoons chia seeds
  • 1–2 teaspoons matcha powder
  • ½ teaspoon vanilla
  • Pinch of salt
  • Optional sweetener
Creamy matcha chia pudding topped with kiwi, pistachio and a small spoonful of yogurt.
Matcha creates a lighter, café-style change of pace between the richer chocolate and coconut puddings.
  1. Whisk or sift matcha into the milk until smooth.
  2. Add vanilla, salt and sweetener, if using.
  3. Add chia, rest 10 minutes, stir again and refrigerate.

If your matcha clumps, whisk it first with 1–2 tablespoons warm water to form a smooth paste. Matcha contains caffeine, so use less or enjoy it earlier in the day if you are sensitive to it.


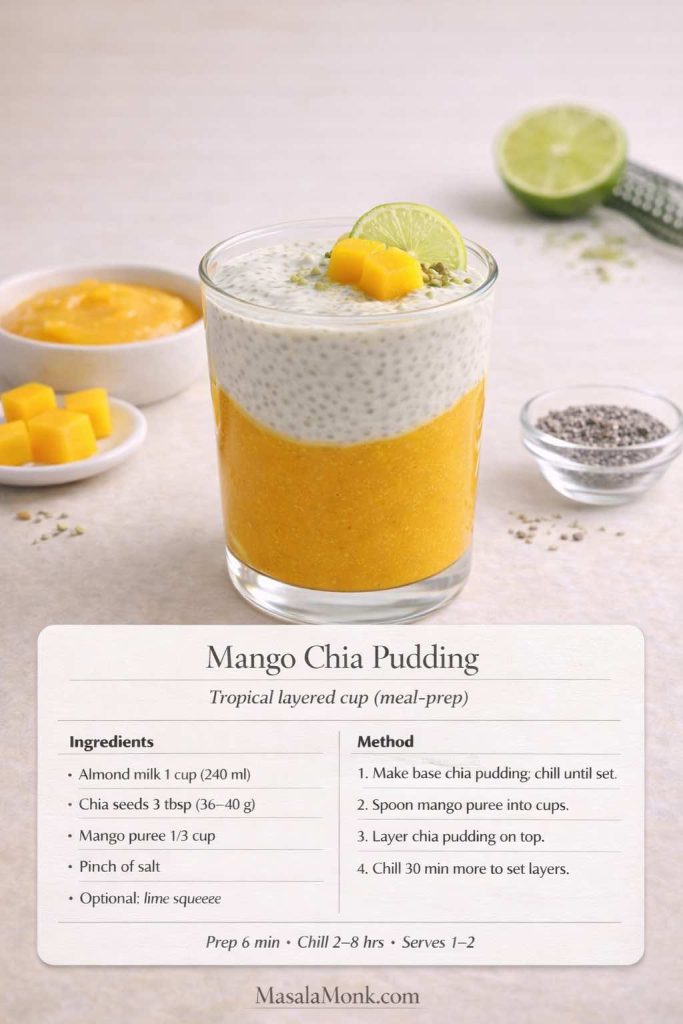
6) Mango Chia Pudding

Mango gives you plenty of flavor from a relatively small amount of fruit. Lime and a pinch of salt help the mango taste brighter, so you do not need to turn the whole jar into mango puree.

  • 1 cup / 240 ml almond milk or coconut-milk beverage
  • 3 tablespoons chia seeds
  • ⅓ cup mango puree or finely diced mango
  • Pinch of salt
  • Optional squeeze of lime
Layered mango chia pudding with bright mango puree, creamy chia pudding, mango pieces and lime.
Layering the mango rather than mixing a large quantity through the whole jar gives you strong tropical flavor without overwhelming the chia base.
  1. Make the chia base with milk, chia and salt.
  2. Chill until set.
  3. Fold in the mango just before eating, or layer the puree at the bottom of the jar.
  4. Finish with lime, if using.

If the tropical-fruit direction is what you like, try our pineapple chia pudding next. It uses the same two-stir logic but goes deeper on pineapple, yogurt, texture, and how to keep the pudding spoonable rather than watery.


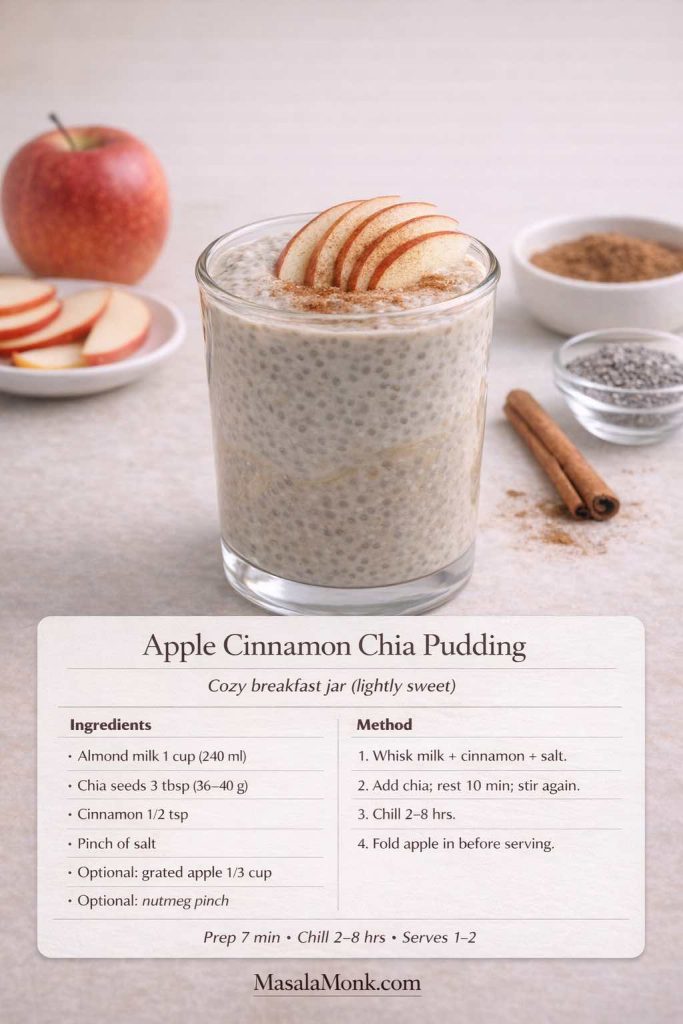
7) Apple Cinnamon Chia Pudding

This version gets most of its cozy character from cinnamon, vanilla and nutmeg, so the apple can stay a relatively small accent.

  • 1 cup / 240 ml unsweetened almond milk
  • 3 tablespoons chia seeds
  • ½ teaspoon cinnamon
  • Pinch of salt
  • Optional: ⅓ cup grated apple
  • Optional: pinch of nutmeg
Apple cinnamon chia pudding topped with thin apple slices and cinnamon.
For the freshest texture, add grated apple shortly before serving rather than letting it sit in the pudding for several days.
  1. Whisk milk, cinnamon, salt and nutmeg.
  2. Add chia, rest 10 minutes, stir again and chill.
  3. Fold in grated apple shortly before serving.

Stricter low-carb version: skip the apple and use cinnamon, vanilla and chopped pecans for a cinnamon-pecan jar.


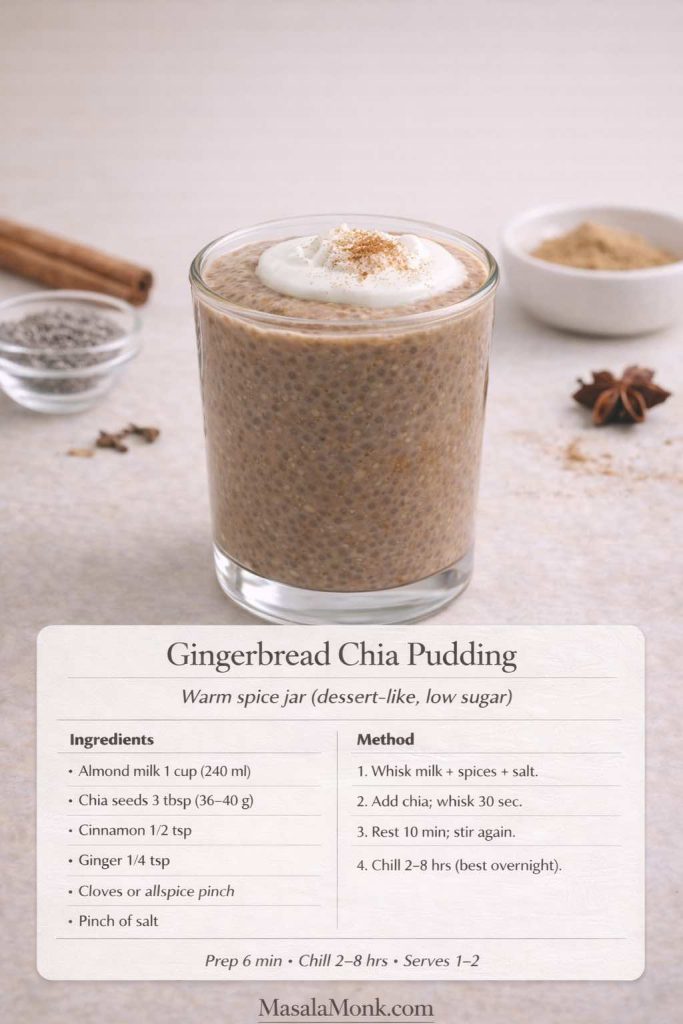
8) Gingerbread Chia Pudding

Gingerbread chia pudding is about warm-spice flavor rather than a health halo: cinnamon, ginger and cloves turn the same neutral base into something that feels much more dessert-like.

  • 1 cup / 240 ml almond milk or coconut-milk beverage
  • 3 tablespoons chia seeds
  • ½ teaspoon cinnamon
  • ¼ teaspoon ground ginger
  • Pinch of cloves or allspice
  • Pinch of salt
  • Optional sweetener
Gingerbread chia pudding topped with yogurt and cinnamon.
Warm spices transform a basic chia-and-milk jar without needing a complicated ingredient list.
  1. Whisk the spices, salt and sweetener into the milk.
  2. Add chia, rest 10 minutes, stir again and refrigerate.
  3. Serve with chopped nuts, Greek yogurt or coconut cream.

9) Keto Chia Pudding with Coconut Milk

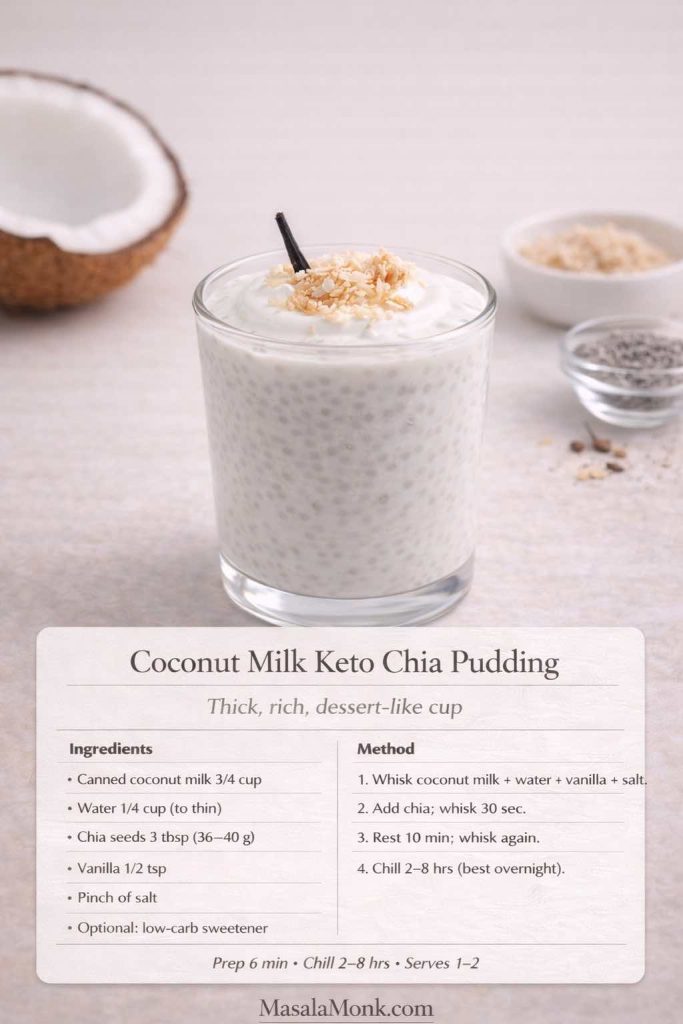
This is the richest milk-based pudding in the collection. Canned coconut milk gives you much more body than almond milk, but thinning it slightly helps the chia hydrate evenly.

  • 3 tablespoons chia seeds
  • ¾ cup / 180 ml canned coconut milk
  • ¼ cup / 60 ml water, plus more if needed
  • ½ teaspoon vanilla
  • Pinch of salt
  • Optional sweetener
Rich coconut milk keto chia pudding topped with toasted coconut and vanilla.
Canned coconut milk produces the densest, richest milk-based chia pudding in this collection.
  1. Whisk coconut milk, water, vanilla, salt and sweetener until smooth.
  2. Add chia, rest 10 minutes and stir again.
  3. Refrigerate for at least 2 hours.
  4. If it becomes extremely thick overnight, loosen it with a splash of water before serving.

10) Blended Chia Pudding: Smooth Chocolate Mousse

If the idea of chia appeals to you but the whole-seed texture does not, this is the recipe worth trying. Let the chia hydrate first, then blend the finished pudding until glossy and smooth.

  • 1 cup / 240 ml almond milk or dairy milk
  • 3 tablespoons chia seeds
  • 1–2 tablespoons cocoa or cacao powder
  • Pinch of salt
  • Optional sweetener
  • Optional: 1 tablespoon peanut butter or 2 tablespoons Greek yogurt
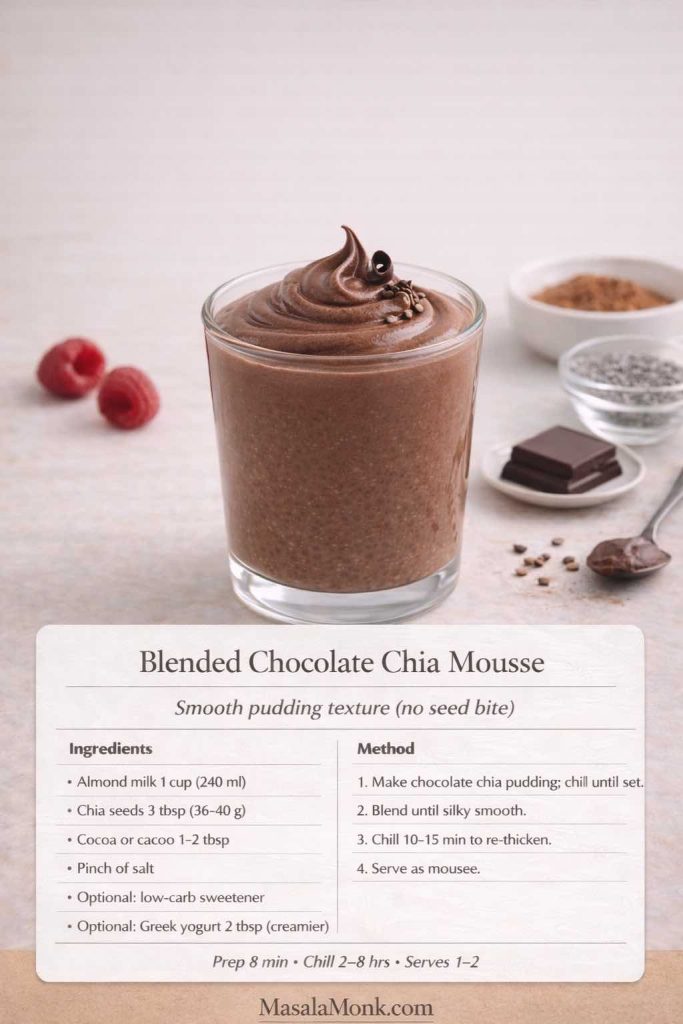
Silky blended chocolate chia mousse topped with dark chocolate and cacao nibs.
Hydrate first and blend second: that is what changes chia from a seedy pudding into a much smoother mousse-like texture.
  1. Make a standard chocolate chia pudding and refrigerate it for at least 2 hours.
  2. Blend until completely smooth and glossy.
  3. Add Greek yogurt or peanut butter if you want a richer finish.
  4. Chill for another 10–15 minutes before serving.

If protein powder is part of the recipe, blending after the chia has set can also smooth out small powdery pockets.

Whichever flavor you choose, texture is the part most likely to need adjusting. The fixes below are designed so you can rescue the pudding you already made instead of starting over.


Chia Pudding Troubleshooting: Runny, Too Thick, Lumpy or Bland

Most disappointing chia pudding can be traced to the ratio, hydration time, stirring pattern, or the thickness of the liquid you started with. Fix the texture before abandoning the jar.

ProblemWhat probably happenedWhat to do now
Runny after 2+ hoursToo much liquid, too little chia, or very thin milkAdd 1 teaspoon chia at a time, stir well and chill another 30–60 minutes.
Too thick or pastyRich coconut milk, thick yogurt, extra protein powder, or too much chiaStir in milk or water 1 tablespoon at a time until creamy.
Large chia clumpsThe seeds settled together before fully hydratingBreak them up thoroughly; next time use the 10-minute second stir.
Seeds still crunchyNot enough hydration time or liquidAdd a small splash of liquid and give the pudding more time.
Protein powder tastes chalkyPowder was added after the chia or not dissolved firstBlend the pudding, or next time dissolve powder completely before adding seeds.
Watery fruit layerJuicy fruit sat in the jar too longKeep berries and other watery toppings separate until serving.
Flavor is flatNot enough salt, aroma, richness or acidityAdd a pinch of salt plus vanilla, cinnamon, cocoa, nut butter, citrus zest or berries.
You hate the seed textureThe pudding may be fine; the texture simply is not for youBlend it into chocolate chia mousse.

One important correction: if a milk-based pudding is only slightly soft at the 30-minute mark, do not keep throwing chia into it. Give it the full two hours first. Chia continues absorbing liquid as it rests.


Chia Pudding Meal Prep & Storage

The easiest way to meal prep chia is to make one plain base and create several flavors from it rather than mixing four completely separate recipes.

  • Whisk the base in a bowl where you can easily break up clumps.
  • Do the 10-minute second stir.
  • Portion into three or four jars.
  • Flavor the jars in different directions—vanilla, cocoa, matcha, cinnamon, yogurt.
  • Keep crunchy toppings and watery fruit separate until serving.
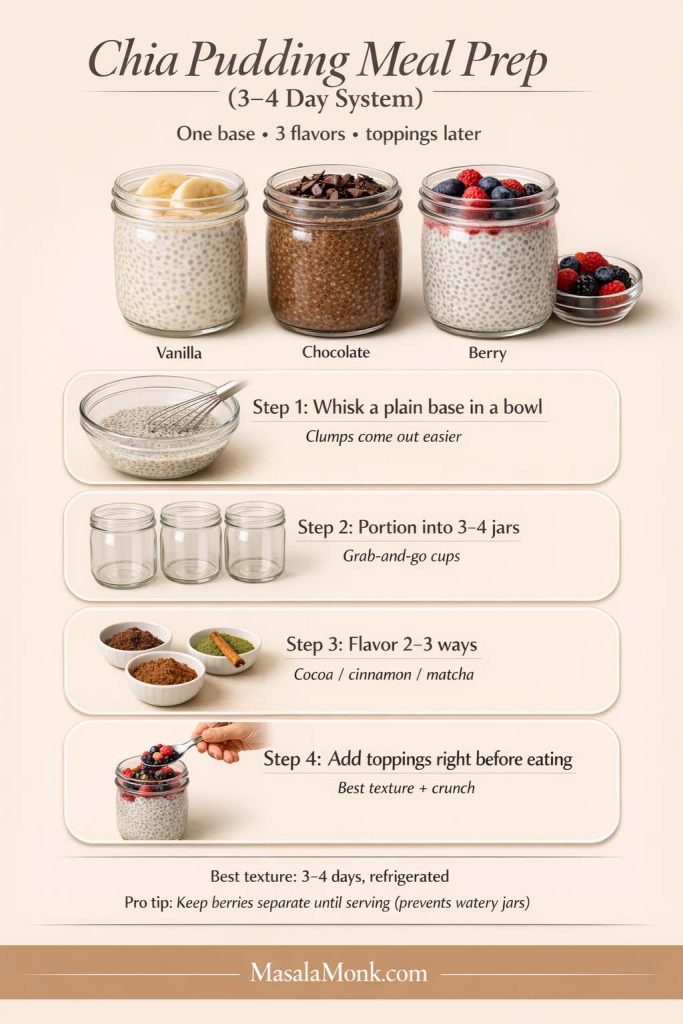
Chia pudding meal-prep system showing one base divided into several jars and flavored with vanilla, chocolate and berries, with toppings kept separate until serving.
One base, several flavors, toppings added later: this is much easier to repeat than making a completely different pudding every morning.

For quality, most chia puddings are best eaten within about 3–4 days when refrigerated. Yogurt- and milk-based versions should stay cold, and fruit is usually best added closer to serving. Follow normal refrigerated food-safety practices and discard anything that develops an unusual smell, appearance or signs of spoilage.

If what you really enjoy is the make-it-tonight, grab-it-tomorrow routine rather than chia specifically, our high protein overnight oats give you the same fridge-ready breakfast rhythm with oats, yogurt, protein-powder and dairy-free routes.


How to Make Chia Pudding Taste Better

If chia pudding tastes like a health chore, the problem is usually not the chia. A plain mixture of seeds and unsweetened milk needs flavor structure just like any other pudding.

  • Salt: a small pinch makes chocolate, vanilla, fruit and nut butter taste fuller.
  • Vanilla or warm spice: vanilla, cinnamon, ginger or nutmeg give the jar aroma without requiring much sweetness.
  • Depth: cocoa, cacao or matcha create a strong flavor identity.
  • Creaminess: Greek yogurt, canned coconut milk or nut butter changes both flavor and mouthfeel.
  • Contrast: berries, chopped nuts, toasted coconut and cacao nibs stop every spoonful feeling the same.
  • Acidity: lemon or lime zest can make fruit flavors brighter.
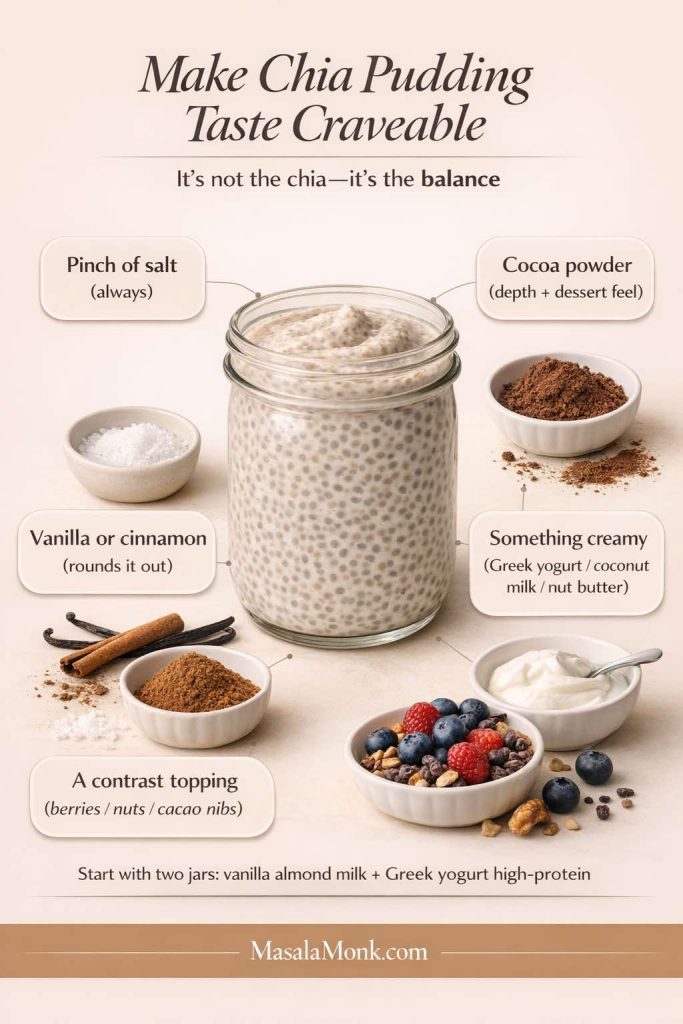
Flavor-balance guide for chia pudding showing salt, vanilla or cinnamon, cocoa, creamy ingredients and contrasting toppings.
Good chia pudding needs the same things other desserts do: seasoning, aroma, richness and contrast.

If you are making chia pudding for the first time, a useful two-jar experiment is one vanilla almond-milk jar and one Greek-yogurt jar. You will immediately learn whether you prefer a lighter gel-style pudding or a thicker, tangier texture.


Frequently Asked Questions

1) What is the best chia pudding ratio?

For a milk-based pudding, start with 3 tablespoons chia seeds to 1 cup / 240 ml liquid. Use a little less chia for a softer pudding. Greek-yogurt chia pudding uses a different ratio because yogurt already supplies most of the thickness.

2) How long does chia pudding need to set?

Give it at least 2 hours for a dependable set. A 30–45 minute quick version is possible but softer. Overnight works especially well for meal prep.

3) Why is my chia pudding watery?

It may need more time, more chia, or a better second stir. If it is still runny after at least two hours, add about 1 teaspoon chia, stir thoroughly and chill for another 30–60 minutes.

4) Why is my chia pudding too thick?

Thick Greek yogurt, canned coconut milk, protein powder and slightly heavy chia measurements can all produce an unexpectedly dense pudding. Stir in water or milk a tablespoon at a time until it becomes creamy again.

5) How do I stop chia seeds clumping together?

Whisk immediately after adding the seeds, then stir or whisk again after about 10 minutes. That second stir redistributes the seeds just as they begin to gel.

6) Can I make chia pudding with Greek yogurt and no milk?

Yes. Use water instead of milk to loosen the yogurt. Start with ¾ cup Greek yogurt, 3 tablespoons chia and ¼ cup / 60 ml water, then add another tablespoon or two after chilling if the pudding is too stiff.

7) Is Greek yogurt better than regular yogurt for chia pudding?

Neither is inherently better, but they behave differently. Greek yogurt is thicker and generally higher in protein, so it gives a firmer pudding. Regular yogurt starts looser, meaning you may need less added liquid or slightly more chia.

8) Can I add protein powder to chia pudding?

Yes. For the smoothest texture, dissolve the protein powder in the milk or yogurt mixture before adding the chia seeds. Because powders absorb liquid differently, keep a little extra milk nearby and adjust after the 10-minute rest.

9) Can I make chia pudding with almond milk?

Yes. Unsweetened almond milk is one of the easiest bases for low carb chia pudding because its flavor is mild and it works well with vanilla, cocoa, cinnamon, berries, matcha and nut butter.

10) Can I make chia pudding with coconut milk?

Yes. Canned coconut milk makes an especially rich pudding. If the coconut milk is very thick, dilute it with a little water before adding chia so the seeds hydrate evenly.

11) Can I make chia pudding with oat milk?

Yes. Oat milk creates a mild, creamy pudding, although many oat milks contain substantially more carbohydrate than unsweetened almond milk, so check the label if low carb is your priority.

12) Can I make dairy-free chia pudding?

Yes. Use unsweetened almond milk, coconut milk, or another dairy-free milk you enjoy. If adding protein powder, check whether it contains whey or casein; those are dairy proteins.

13) Can I make blended chia pudding?

Yes, and it is one of the best solutions if you dislike whole chia seeds. Let the pudding hydrate first, then blend until smooth. Cocoa, peanut butter or Greek yogurt can make the result even more mousse-like.

14) What is the easiest three-ingredient chia pudding?

A simple version is chia seeds + unsweetened almond milk + vanilla. Another is chia + coconut milk + cocoa. Add a pinch of salt if possible; it makes a surprisingly large difference to the finished flavor.

15) Can I use frozen berries in chia pudding?

Yes. Thawed berries release juice, which can be useful as a swirl or compote-style layer. For meal prep, keep very juicy berries separate until serving if you do not want them loosening the pudding.

16) How can I sweeten chia pudding without much sugar?

Start by improving flavor before simply increasing sweetness. Vanilla, cinnamon, cocoa, nut butter, coconut milk, berries, citrus zest and a pinch of salt can all make the pudding taste more complete. If you use a low-carb sweetener, add only enough to suit your taste.

17) Is chia pudding keto-friendly?

It can fit many low-carb or ketogenic eating patterns when made with ingredients such as unsweetened almond milk or coconut milk and appropriate toppings. The final carbohydrate content depends on your milk, yogurt, fruit, sweetener and serving size, so check the ingredients you actually use rather than relying on the word “keto” alone.

18) How long does chia pudding last in the fridge?

For quality, aim to eat most homemade chia pudding within about 3–4 days, refrigerated. Keep toppings such as nuts separate for crunch and add juicy fruit later if you want the pudding to stay thick.

19) Which chia pudding should I make first?

If you want the simplest base, start with vanilla almond milk chia pudding. If you came for the thick, creamy version, make the Greek yogurt chia pudding. And if chia’s seed texture has always bothered you, go directly to the blended chocolate mousse.

Posted on — 1 Comment

Ozempic Diet Plan PDF Included for FREE

woman having a dental check up

Understanding the Role of Ozempic
Ozempic, or semaglutide, is not just another medication on the shelf. It’s a groundbreaking treatment primarily designed for type 2 diabetes management. But its benefits don’t stop there. Many individuals have reported a noticeable weight loss while on Ozempic, making it a multifaceted medication that addresses both diabetes and obesity.

The Symbiotic Relationship Between Ozempic and Diet
Every medication interacts with our body, and our diet can influence this interaction. With Ozempic, the foods you consume can:

  • Amplify the drug’s effectiveness.
  • Help in reducing or managing potential side effects.
  • Contribute to overall health, complementing the drug’s benefits.

The Aim of This Guide
Navigating the world of dietary choices while on medication can be daunting. This guide is crafted to simplify that journey. By marrying the specifics of Ozempic with a tailored meal plan, we aim to provide a roadmap for those seeking to optimize their health while on this medication.


Day 1 – Embarking on Your Ozempic Dietary Journey


🍳 Breakfast: Setting the Tone for the Day

  • Green Power Smoothie Bowl: A creamy blend of spinach, avocado, and blueberries, enriched with chia seeds and almond milk. Garnish with a handful of granola and freshly sliced bananas for that extra crunch and natural sweetness.
    • Dietary Insight: This breakfast option is fiber-rich, ensuring a gradual release of sugars, which is harmonious with Ozempic’s function.

🥗 Lunch: Balancing Nutrition and Flavor

  • Mediterranean Grilled Chicken Salad: Tender slices of grilled chicken breast paired with mixed greens, cherry tomatoes, cucumber, olives, and a sprinkle of feta cheese. Drizzle with a dressing made from olive oil, lemon zest, and a hint of oregano.
    • Dietary Insight: The protein from the chicken aids muscle health, while the greens and veggies offer a spectrum of vitamins and minerals.

🍞 Snack: Sustained Energy Release

  • Creamy Almond Butter on Whole Grain Toast: A generous spread of almond butter on a toasted slice of whole grain bread, perhaps with a drizzle of honey for those with a sweet tooth.
    • Dietary Insight: The combination of healthy fats from the almond butter and complex carbs from the bread ensures energy without abrupt blood sugar spikes.

🍲 Dinner: A Wholesome End to the Day

  • Asian-inspired Quinoa and Vegetable Stir-Fry: A colorful mix of bell peppers, broccoli, and snap peas sautéed with fluffy quinoa in a light olive oil base. Season with fresh garlic, ginger, and a splash of low-sodium soy sauce for that authentic Asian flavor.
    • Dietary Insight: Quinoa, being a complete protein and rich in fiber, is an excellent grain choice, especially for those on Ozempic.

🍵 Nightcap: Tranquility in a Cup

  • Golden Chamomile Tea: Steep a chamomile tea bag with a pinch of turmeric for a warm, calming beverage to conclude the day.
    • Dietary Insight: Chamomile is renowned for its soothing properties, promoting relaxation and aiding sleep.

The above chapters provide a foundational understanding of Ozempic’s role and how diet intertwines with its functionality. The detailed Day 1 meal plan offers a balanced approach to eating while on the medication. The subsequent chapters will further explore meal plans for the upcoming days, interspersed with insights and tips to enhance the Ozempic experience through mindful eating.

📥 Get Your PDF Guide – Ozempic Diet Plan PDF – here’s the link to download this guide as a PDF.


Day 2 – Diversifying Your Diet


🍳 Breakfast: A Fresh Start

  • Tropical Fruit Parfait: Layer Greek yogurt with slices of mango, pineapple, and kiwi. Top with a sprinkle of coconut flakes and a handful of walnuts.
    • Dietary Insight: The probiotics in Greek yogurt promote gut health, while the tropical fruits offer a burst of vitamins and antioxidants.

🥗 Lunch: A Trip to the Mediterranean

  • Falafel Wrap with Tzatziki: Homemade falafels wrapped in a whole grain tortilla with lettuce, tomatoes, and a generous dollop of tzatziki sauce.
    • Dietary Insight: Chickpeas, the primary ingredient in falafels, are rich in protein and fiber, ensuring a steady energy release.

🍞 Snack: Crunch and Munch

  • Veggie Sticks with Hummus: Sliced cucumber, bell peppers, and carrots paired with a tangy roasted red pepper hummus.
    • Dietary Insight: This snack is low in calories but high in nutrients, making it perfect for those mid-day hunger pangs.

🍲 Dinner: Comfort in a Bowl

  • Lentil and Vegetable Soup: A hearty mix of lentils, carrots, celery, and onions simmered in a tomato-based broth with a hint of rosemary and thyme.
    • Dietary Insight: Lentils are a powerhouse of protein and fiber, making this soup both filling and nutritious.

🍵 Nightcap: Soothing Warmth

  • Lavender Infused Green Tea: A calming blend of green tea leaves with a hint of lavender.
    • Dietary Insight: Green tea is rich in antioxidants, while lavender is known for its relaxation properties.

📥 Get Your PDF Guide – Ozempic Diet Plan PDF – here’s the link to download this guide as a PDF.


Day 3 – Exploring New Flavors


🍳 Breakfast: A Berry Good Morning

  • Mixed Berry Oatmeal: Slow-cooked oats with a medley of strawberries, blueberries, and raspberries. Drizzle with a touch of maple syrup or honey.
    • Dietary Insight: Oats are a fantastic source of soluble fiber, which can help stabilize blood sugar levels.

🥗 Lunch: An Italian Affair

  • Spinach and Ricotta Stuffed Pasta Shells: Jumbo pasta shells filled with a creamy blend of spinach and ricotta cheese, baked in a rich marinara sauce.
    • Dietary Insight: Spinach is packed with iron and calcium, while ricotta offers a dose of protein.

🍞 Snack: Sweet Indulgence

  • Dark Chocolate and Almond Clusters: Melted dark chocolate mixed with whole almonds, then cooled to form bite-sized clusters.
    • Dietary Insight: Dark chocolate is rich in antioxidants, and almonds provide healthy fats and protein.

🍲 Dinner: A Taste of the Sea

  • Grilled Salmon with Asparagus and Quinoa: A fillet of salmon grilled to perfection, served with steamed asparagus and fluffy quinoa.
    • Dietary Insight: Salmon is a great source of omega-3 fatty acids, which can help reduce inflammation.

🍵 Nightcap: A Classic Choice

  • Chamomile and Mint Tea: A blend of chamomile flowers and fresh mint leaves steeped to create a refreshing beverage.
    • Dietary Insight: Mint aids digestion, making this a perfect drink to wind down the day.

📥 Get Your PDF Guide – Ozempic Diet Plan PDF – here’s the link to download this guide as a PDF.

Day 4 – Embracing Plant Power


🍳 Breakfast:
Avocado Toast with Poached Eggs: Whole grain toast topped with mashed avocado and a perfectly poached egg. Sprinkle with some chia seeds for an added crunch.

  • Dietary Insight: Avocado is rich in healthy fats that can help stabilize blood sugar levels, while eggs provide a protein boost.

🥗 Lunch:
Quinoa and Roasted Veggie Salad: A medley of roasted bell peppers, zucchini, and cherry tomatoes mixed with cooked quinoa. Drizzle with a lemon vinaigrette.

  • Dietary Insight: Quinoa is a complete protein and a great source of fiber, making it an excellent choice for sustained energy.

🍞 Snack:
Edamame Beans: Steamed and lightly salted, these are a protein-packed snack.

  • Dietary Insight: Edamame beans are rich in protein and can help keep you full between meals.

🍲 Dinner:
Stuffed Bell Peppers: Bell peppers filled with a mixture of brown rice, black beans, corn, and diced tomatoes. Baked to perfection.

  • Dietary Insight: This meal is a balanced combination of complex carbs, protein, and veggies.

📥 Get Your PDF Guide – Ozempic Diet Plan PDF – here’s the link to download this guide as a PDF.


Day 5 – Going Global


🍳 Breakfast:
Chia Seed Pudding with Tropical Fruits: Overnight chia seed pudding topped with slices of kiwi, mango, and a sprinkle of shredded coconut.

  • Dietary Insight: Chia seeds are rich in omega-3 fatty acids and fiber, promoting heart and gut health.

🥗 Lunch:
Thai Basil Stir Fry: A mix of chicken, bell peppers, green beans, and onions stir-fried in a tangy Thai basil sauce. Serve with jasmine rice.

  • Dietary Insight: This dish offers a balance of protein, veggies, and carbs, ensuring a steady release of energy.

🍞 Snack:
Dried Seaweed Sheets: A crunchy, salty snack that’s low in calories.

  • Dietary Insight: Seaweed is rich in iodine, which supports thyroid function.

🍲 Dinner:
Moroccan Chickpea Stew: A hearty stew made with chickpeas, tomatoes, carrots, and a blend of Moroccan spices.

  • Dietary Insight: Chickpeas are a great source of protein and fiber, making this dish both nutritious and filling.

📥 Get Your PDF Guide – Ozempic Diet Plan PDF – here’s the link to download this guide as a PDF.


Day 6 – Comfort Foods Made Healthy


🍳 Breakfast:
Banana Pancakes: Fluffy pancakes made with mashed bananas and whole wheat flour. Top with a drizzle of honey and fresh berries.

  • Dietary Insight: Using bananas adds natural sweetness, reducing the need for added sugars.

🥗 Lunch:
Zucchini Noodles with Pesto: Spiralized zucchini noodles tossed in a fresh basil pesto sauce. Top with grilled chicken or tofu for added protein.

  • Dietary Insight: Zucchini noodles are a low-carb alternative to traditional pasta, making them a great choice for those watching their blood sugar levels.

🍞 Snack:
Cottage Cheese with Pineapple Chunks: A creamy, tangy snack that’s rich in protein.

  • Dietary Insight: Cottage cheese is a slow-digesting protein source, making it an excellent snack to keep you full.

🍲 Dinner:
Lentil Shepherd’s Pie: A twist on the classic, using lentils as the base and topped with a creamy mashed cauliflower crust.

  • Dietary Insight: Lentils provide a protein and fiber boost, while cauliflower is a low-carb alternative to traditional mashed potatoes.

📥 Get Your PDF Guide – Ozempic Diet Plan PDF – here’s the link to download this guide as a PDF.


Day 7 – A Fresh Start


🍳 Breakfast:
Berry Smoothie Bowl: A thick blend of mixed berries, Greek yogurt, and a splash of almond milk. Top with granola, sliced almonds, and a drizzle of honey.

  • Dietary Insight: Berries are packed with antioxidants, and Greek yogurt provides a protein punch to kickstart your day.

🥗 Lunch:
Mediterranean Chickpea Salad: A refreshing mix of chickpeas, cucumbers, cherry tomatoes, olives, and feta cheese. Toss with olive oil, lemon juice, and fresh herbs.

  • Dietary Insight: This salad is a fiber powerhouse, ensuring steady blood sugar levels and prolonged satiety.

🍞 Snack:
Hummus and Veggie Sticks: Creamy hummus served with sliced cucumbers, bell peppers, and carrot sticks.

  • Dietary Insight: Hummus, made from chickpeas, is a protein-rich snack that pairs perfectly with crunchy veggies.

🍲 Dinner:
Grilled Salmon with Asparagus: A fillet of salmon grilled to perfection, served with a side of roasted asparagus and a lemon-herb sauce.

  • Dietary Insight: Salmon is rich in omega-3 fatty acids, which are beneficial for heart health and reducing inflammation.

📥 Get Your PDF Guide – Ozempic Diet Plan PDF – here’s the link to download this guide as a PDF.

Understanding the Importance of Diet with Ozempic


The Ozempic-Diet Connection:
Ozempic, while a revolutionary drug for managing type 2 diabetes and promoting weight loss, works best when paired with a balanced diet. The food choices you make can either amplify or diminish the drug’s effectiveness.

Balancing Carbs and Protein:
For those on Ozempic, it’s crucial to balance carbohydrate intake with protein. This ensures steady blood sugar levels and helps manage potential side effects like diarrhea or stomach issues.

Hydration is Key:
Staying hydrated can alleviate some of the gastrointestinal side effects associated with Ozempic. Aim for at least 8 glasses of water a day, and consider adding hydrating foods like cucumbers and watermelon to your diet.

Listening to Your Body:
Every individual’s reaction to Ozempic can vary. It’s essential to listen to your body and adjust your diet accordingly. If certain foods exacerbate side effects, consider eliminating or reducing them.

Seeking Professional Guidance:
If you’re unsure about the best diet to pair with Ozempic, consider consulting with a nutritionist or dietitian. They can provide personalized advice tailored to your needs and health goals.


Tips for Managing Side Effects Through Diet


1. Combatting Nausea:
🍏 Opt for Bland Foods: Foods like toast, rice, and applesauce can be easier on the stomach when feeling nauseous.
🍵 Ginger Tea: Ginger has natural properties that can help soothe an upset stomach.

2. Addressing Diarrhea:
🍌 Bananas: Rich in pectin, they can help absorb excess water in the intestines.
🍚 White Rice: It acts as a binding food and can provide relief.

3. Alleviating Constipation:
🥦 Increase Fiber Intake: Foods like broccoli, beans, and whole grains can promote regular bowel movements.
💧 Stay Hydrated: Drinking plenty of water can help soften stools.

4. Reducing Heartburn and Acid Reflux:
🍅 Limit Acidic Foods: Tomatoes, citrus fruits, and spicy foods can exacerbate heartburn.
🥛 Almond Milk: A soothing alternative to regular milk, which can sometimes trigger acid reflux.


Conclusion – The Synergy of Ozempic and Diet


The Power of Combination:
Ozempic, when combined with a balanced diet, can be a potent tool in managing type 2 diabetes and facilitating weight loss. It’s not just about the medication but also about the lifestyle choices that accompany it.

Individualized Approach:
Remember, everyone’s body is unique. What works for one person might not work for another. It’s essential to listen to your body, monitor how it reacts, and adjust your diet accordingly.

Seeking Continuous Guidance:
As you continue your journey with Ozempic, regular check-ins with your healthcare provider are crucial. They can provide insights, adjust dosages, and offer guidance on dietary changes.


Frequently Asked Questions (FAQs) about Ozempic and Diet


Q: Can I drink alcohol while on Ozempic?
While occasional moderate drinking might be acceptable, it’s essential to consult with your healthcare provider. Alcohol can affect blood sugar levels and might interfere with the medication’s effectiveness.

Q: Are there any specific foods I should avoid entirely?
There’s no strict “no” list, but it’s recommended to limit foods that can spike blood sugar levels, such as sugary snacks and beverages. Also, if you notice any food-exacerbating side effects, it’s best to avoid them.

Q: Can I follow a keto or low-carb diet with Ozempic?
Many patients on Ozempic find success with low-carb diets. However, it’s crucial to ensure you’re getting all necessary nutrients. Always consult with a nutritionist or doctor before starting any strict diet.

Q: How does caffeine affect Ozempic?
There’s no direct interaction between caffeine and Ozempic. However, excessive caffeine can impact blood sugar levels, so it’s best to consume in moderation.

Q: I’ve heard about the “Ozempic weight loss plateau.” What is it?
Some users report a period where weight loss slows down or stops after initial success. This plateau can be due to various reasons, including dietary choices. It’s essential to maintain a balanced diet and consult with your healthcare provider if you experience this.


Resources and Further Reading


📚 Comprehensive Guide to Ozempic
For those who want a deep dive into the world of Ozempic, beyond just the dietary aspects, we recommend our comprehensive guide. It covers everything from the science behind the medication to personal stories and expert opinions.

🍏 Diet and Diabetes
Understanding the intricate relationship between what you eat and how it affects your blood sugar is crucial. This recommended reading provides insights into the glycemic index, carb counting, and more.

🔗 Useful Links

📖 Personal Stories and Blogs
Hearing from others can be both enlightening and comforting. Check out these blogs and personal accounts from individuals navigating their journey with diabetes and Ozempic.


Download and Share


📥 Get Your PDF Guide – Ozempic Diet Plan PDF
As promised, here’s the link to download this guide as a PDF. It’s designed for easy reading, with clickable links and a layout optimized for both mobile and desktop.

🌍 Share the Knowledge
If you found this guide helpful, please consider sharing it with friends, family, or anyone you think might benefit. Every share helps us reach more people and spread valuable information.

💌 Stay Updated
For the latest updates, articles, and resources related to Ozempic, diabetes, and diet, consider subscribing to our newsletter. We promise to keep our content relevant and spam-free.

Conclusion and Key Takeaways


🌟 A Holistic Approach to Health with Ozempic
While Ozempic offers a promising solution for many with type 2 diabetes, it’s essential to remember that medication is just one piece of the puzzle. A balanced diet, regular exercise, and consistent monitoring are equally crucial. This guide has provided a roadmap for those on Ozempic to navigate their dietary choices, but it’s essential to tailor these suggestions to individual needs and preferences.

🍽️ Diet is Personal
What works for one person might not work for another. It’s essential to listen to your body, monitor your blood sugar levels, and adjust your diet accordingly. If certain foods cause spikes or drops in your blood sugar, it’s crucial to take note and modify your intake.

🤝 Seek Support
Managing diabetes and adjusting to medications like Ozempic can be challenging. But remember, you’re not alone. Reach out to support groups, healthcare professionals, and loved ones for guidance and encouragement.

📈 Stay Informed
The world of medicine and nutrition is ever-evolving. Stay updated with the latest research, findings, and recommendations related to Ozempic and diabetes management.


Your Journey Ahead


🚀 Embrace the Journey
Starting on Ozempic and adapting to a new diet plan can feel overwhelming. But view it as an opportunity—a chance to learn more about your body, make healthier choices, and improve your overall well-being.

📝 Track Your Progress
Consider maintaining a food and symptom diary. It can help you identify patterns, understand how different foods affect you, and make necessary adjustments.

🌱 Growth Mindset
Challenges and setbacks might occur, but they’re all part of the journey. Embrace a growth mindset, learn from every experience, and remember that every step, no matter how small, is progress.

💌 We’re Here for You
At MasalaMonk, we’re committed to providing valuable resources and support. Whether you have questions, feedback, or just need someone to talk to, our community is here for you.


With this, we wrap up our comprehensive guide on the Ozempic eating plan. Remember, the journey to health is a marathon, not a sprint. Take it one day at a time, stay informed, seek support, and believe in yourself. You’ve got this! 🌟

📋 Frequently Asked Questions (FAQs) – Ozempic and Diet

💊 About the Medication

Q1: What is Ozempic, and how does it work?
Ozempic (semaglutide) is a GLP-1 receptor agonist used primarily to manage type 2 diabetes. It works by increasing insulin secretion, decreasing glucagon secretion, slowing gastric emptying, and promoting a sense of fullness—often leading to weight loss.

Q2: Is Ozempic only for people with diabetes?
While it’s FDA-approved for type 2 diabetes, Ozempic is also prescribed off-label for weight management in individuals with or without diabetes. However, any use should be under medical supervision.


🥗 Diet and Nutrition

Q3: Do I need to follow a special diet while on Ozempic?
There’s no strict diet required, but following a balanced, nutrient-rich meal plan helps enhance the effectiveness of Ozempic and minimizes side effects like nausea, bloating, or diarrhea.

Q4: Can I eat carbohydrates while taking Ozempic?
Yes, but focus on complex carbs with a low glycemic index (like whole grains, lentils, and vegetables). Pairing carbs with protein and fiber helps maintain stable blood sugar levels.

Q5: Is a low-carb or keto diet safe with Ozempic?
Many find success with a low-carb or moderate-carb diet. However, extreme keto diets should only be followed under professional guidance to ensure nutritional adequacy and safety.

Q6: How important is hydration?
Very. Staying hydrated can help reduce common side effects like nausea and constipation. Aim for at least 8 cups of water daily, and include water-rich foods like cucumbers, berries, and watermelon.


😌 Managing Side Effects with Diet

Q7: What should I eat to reduce nausea?
Stick to bland, low-fat foods such as toast, bananas, or applesauce. Ginger tea or ginger chews may help ease nausea naturally.

Q8: How can I manage constipation?
Increase fiber intake (leafy greens, lentils, chia seeds), hydrate well, and consider adding fermented foods like yogurt or kefir to support digestion.

Q9: What foods worsen Ozempic side effects?
Greasy, fried, or highly processed foods may worsen nausea or cause bloating. Spicy or acidic foods can increase the risk of heartburn.


🍷 Lifestyle Considerations

Q10: Can I drink alcohol while taking Ozempic?
Alcohol should be consumed in moderation and only if approved by your healthcare provider. It can affect blood sugar and may exacerbate gastrointestinal side effects.

Q11: Does caffeine interfere with Ozempic?
There’s no known direct interaction, but excess caffeine can cause dehydration or stomach irritation, so moderation is key.

Q12: Will I stop losing weight after a while?
Yes, a weight loss plateau is common. If this happens, review your diet, increase physical activity, and consult your provider for possible dosage adjustments or behavioral strategies.


🧭 General Guidance

Q13: Do I need to exercise while on Ozempic?
Exercise isn’t mandatory but strongly recommended. Physical activity helps manage blood sugar, improves cardiovascular health, and supports weight loss goals.

Q14: Should I count calories while using Ozempic?
Calorie tracking can be helpful but isn’t required. Prioritize nutrient density and portion control. Listen to your body’s natural hunger cues—Ozempic often helps regulate appetite.

Q15: Is this guide a substitute for medical advice?
No. This guide is informational and should complement, not replace, personalized medical or nutritional advice. Always consult your healthcare provider for tailored recommendations.

Posted on — 7 Comments

5 Keto Electrolyte Drink: Homemade DIY Recipes

scrabble tiles surrounded by white flowers on a marbled surface

Following a ketogenic, or keto, diet means you’re focused on consuming foods high in healthy fats and low in carbohydrates. This dietary switch allows your body to enter a metabolic state called ketosis, where it burns fat for energy. However, this dietary shift can sometimes lead to an imbalance of electrolytes in the body, leading to what is commonly known as the “keto flu”. Stay on top of your game with these five homemade electrolyte drink recipes designed specifically for people following a keto diet.

Why Are Electrolytes Important?

Electrolytes, such as sodium, potassium, and magnesium, are essential for maintaining fluid balance, nerve function, and muscle contractions in the body. When you’re on a keto diet, your body tends to lose electrolytes more rapidly due to increased water loss, making it even more essential to replenish them regularly.

1. Zesty Lemon Keto Electrolyte Drink

A low-carb drink that’s refreshing and packed with essential electrolytes. The tangy flavor of lemon is balanced with the sweetness of a keto-approved sweetener.

Recipe Ingredients:

  • Juice of 1 lemon
  • 2 cups of water
  • A pinch of sea salt
  • 1/4 teaspoon of a keto-friendly sweetener like Erythritol

What’s Good in It:

  • Lemon: Provides vitamin C and adds a refreshing flavor to the drink.
  • Sea Salt: An excellent source of sodium, an essential electrolyte often lost on a keto diet.
  • Erythritol: A natural, keto-friendly sweetener that does not affect blood sugar levels.

Directions:

  1. Squeeze the juice of one lemon into a glass.
  2. Add the water, sea salt, and erythritol.
  3. Stir well until the sweetener is fully dissolved and enjoy your low-carb electrolyte drink.

2. Keto-friendly Coconut Water Refresher

A simple yet potent electrolyte drink harnessing the natural electrolyte balance found in coconut water.

Recipe Ingredients:

  • 2 cups of unsweetened coconut water
  • Juice of 1 lime
  • A pinch of sea salt

What’s Good in It:

  • Coconut Water: A natural source of electrolytes, especially potassium.
  • Lime: Provides vitamin C and adds a refreshing flavor to the drink.
  • Sea Salt: An excellent source of sodium.

Directions:

  1. Pour the coconut water into a glass.
  2. Squeeze in the juice of one lime and add a pinch of sea salt.
  3. Stir well and enjoy this tropical keto-friendly electrolyte drink.

3. Keto Avocado Smoothie

A creamy and filling smoothie packed with healthy fats and fiber. Perfect as a pre-workout snack or a quick breakfast on the go.

Recipe Ingredients:

  • 1 ripe avocado
  • 2 cups of unsweetened almond milk
  • A pinch of sea salt
  • 1/4 teaspoon of a keto-friendly sweetener like Stevia

What’s Good in It:

  • Avocado: A powerhouse of healthy fats, fiber, and essential nutrients, including potassium.
  • Almond Milk: A low-carb milk alternative that’s high in calcium.
  • Sea Salt: An excellent source of sodium.
  • Stevia: A natural, keto-friendly sweetener that does not affect blood sugar levels.

Directions:

  1. Slice the avocado and add it to a blender along with the almond milk, sea salt, and stevia.
  2. Blend until smooth and creamy.
  3. Pour into a glass and enjoy this satisfying keto smoothie.

4. Berry Delicious Keto Electrolyte Drink

A fruity and refreshing drink that’s loaded with antioxidants and essential electrolytes.

Recipe Ingredients:

  • 1 cup of mixed berries (strawberries, blueberries, raspberries)
  • 2 cups of water
  • A pinch of sea salt
  • 1/4 teaspoon of a keto-friendly sweetener like Erythritol

What’s Good in It:

  • Berries: Low in carbs but high in fiber and antioxidants.
  • Sea Salt: An excellent source of sodium, an essential electrolyte often lost on a keto diet.
  • Erythritol: A natural, keto-friendly sweetener that does not affect blood sugar levels.

Directions:

  1. Add the mixed berries into a blender along with the water, sea salt, and erythritol.
  2. Blend until smooth.
  3. Pour into a glass and enjoy this antioxidant-rich keto electrolyte drink.

5. Cucumber Mint Keto Cooler

A hydrating and cooling electrolyte drink that’s perfect for hot summer days or post-workout hydration.

Recipe Ingredients:

  • 1 cucumber
  • A handful of fresh mint leaves
  • 2 cups of water
  • A pinch of sea salt
  • 1/4 teaspoon of a keto-friendly sweetener like Stevia

What’s Good in It:

  • Cucumber: High in water content and a good source of several essential minerals.
  • Mint: Known for its cooling properties and aids in digestion.
  • Sea Salt: An excellent source of sodium.
  • Stevia: A natural, keto-friendly sweetener that does not affect blood sugar levels.

Directions:

  1. Slice the cucumber and add it to a blender along with the mint leaves, water, sea salt, and stevia.
  2. Blend until smooth.
  3. Pour into a glass and enjoy this refreshing keto cooler.

Journey of Wellness Continues

We appreciate your interest in our Keto-friendly homemade electrolyte drink recipes. Your quest for a healthier living doesn’t stop here, we’ve curated more resources tailored to your needs:

  1. Delve into our Post-Workout Electrolyte Drink Recipes. These replenishing drinks will aid in your recovery after strenuous physical activity.
  2. For individuals dealing with diabetes, it’s crucial to maintain a balanced diet. Our Diabetic-friendly Electrolyte Drink Recipes take into consideration your specific nutritional requirements.
  3. Whether it’s a religious observance or a health-conscious choice, fasting can be a transformative experience. Aid your journey with our Fasting-friendly Electrolyte Drink Recipes.
  4. Dehydration is a common issue, especially during the summer months. Stay hydrated with our DIY Natural Electrolyte Drinks for Dehydration.
  5. Lastly, don’t forget to return to the source, our master guide on Natural Homemade Electrolyte Drink DIY Recipes, which inspired this whole series.

Frequently Asked Questions

1. What are the benefits of homemade electrolyte drinks for a keto diet? Homemade electrolyte drinks can help replenish electrolytes lost due to the diuretic effect of the ketogenic diet. They can prevent symptoms like fatigue, headaches, and muscle cramps, commonly known as the “keto flu”.

2. Can these keto electrolyte drinks help with weight loss? Yes, these drinks can support your weight loss efforts on a ketogenic diet. They help maintain hydration and provide essential minerals, keeping your energy levels up so you can stick to your exercise and diet regimen.

3. Why do we need to add sea salt to these homemade keto electrolyte drinks? Sea salt is rich in sodium, a critical electrolyte that the body needs for maintaining fluid balance, nerve function, and muscle contractions. When on a keto diet, the body tends to lose sodium, making it crucial to add to your drinks.

4. Can I use any other sweeteners in these drinks? Yes, any keto-friendly sweeteners like Erythritol, Stevia, or Monk Fruit can be used as per your preference. However, remember to adjust the quantity as per the sweetness level of the sweetener.

5. Why is coconut water used in some of these recipes? Coconut water is a natural source of several electrolytes, especially potassium, making it an excellent addition to a homemade electrolyte drink. However, ensure to use unsweetened coconut water to maintain the low-carb nature of the ketogenic diet.

6. Can I replace the water with another liquid in these recipes? Yes, as long as you ensure the substitute is low-carb and keto-friendly. For example, unsweetened almond milk or other nut milks can be a good alternative.

7. What other fruits and vegetables can I add to these drinks? Low-carb fruits and vegetables such as spinach, kale, zucchini, and strawberries can be great additions. However, always ensure to maintain the overall carb count of the drink within your daily limits.

8. Are these homemade electrolyte drinks a meal replacement? No, these drinks are not designed to be meal replacements. They are meant to help supplement your electrolyte intake while on a ketogenic diet.

9. How often should I consume these homemade keto electrolyte drinks? This depends on your individual needs, activity levels, and how you feel. It’s advisable to listen to your body and adjust your intake accordingly. Some people may benefit from a drink a day, while others may need more.

10. Can these keto electrolyte drinks help prevent muscle cramps? Yes, maintaining a proper balance of electrolytes, especially sodium, potassium, and magnesium, can help prevent muscle cramps, which are common when starting a keto diet.

11. Can I consume these drinks if I’m not on a ketogenic diet? Yes, these drinks are beneficial for everyone, not just those on a ketogenic diet. They can help maintain hydration and replenish electrolytes lost during workouts or hot weather. However, if you’re not following a low-carb diet, you may adjust the recipes, like using regular sweeteners instead of keto-friendly ones.

12. Is it safe for kids and pregnant women to consume these homemade keto electrolyte drinks? These drinks are generally safe, but it’s always best to consult with a healthcare provider. For kids, you might want to adjust the sweetness and replace sea salt with a pinch of regular salt for a milder taste.

13. Can these keto electrolyte drinks help with keto flu symptoms? Yes, they can help alleviate keto flu symptoms like headaches, fatigue, and dizziness by replenishing lost electrolytes and maintaining hydration.

14. What’s the best time to consume these homemade keto electrolyte drinks? These drinks can be consumed at any time of the day. However, they can be particularly beneficial when consumed pre or post-workout to replenish lost electrolytes or first thing in the morning to kick start hydration.

15. Can I store these homemade electrolyte drinks? Yes, you can store these drinks in the fridge for up to 24 hours. However, it’s always best to consume them fresh to ensure maximum nutrient availability.

16. Can I add protein powder to these drinks? Yes, adding a scoop of low-carb protein powder can turn these drinks into a protein-rich post-workout recovery aid. Make sure to choose a keto-friendly protein powder.

17. Can I consume these drinks during a fast? Yes, you can consume these drinks during a fasting period as long as they do not exceed your allowed caloric intake during the fasting window. It’s best to check with your fasting guidelines or consult with a health professional.

18. Why do some of these recipes use almond milk? Unsweetened almond milk is a great low-carb, dairy-free alternative that is suitable for a ketogenic diet. It also provides additional creaminess to drinks.

19. Can I add ice to these drinks? Yes, you can add ice to these drinks to make them more refreshing, especially during the hot summer months.

20. Why are berries used in some of these keto electrolyte drinks? Berries like strawberries, blueberries, and raspberries are low in carbs but high in fiber and antioxidants, making them a great addition to a keto electrolyte drink.

Conclusion

Maintaining a proper electrolyte balance is crucial when following a keto diet. With these five homemade keto-friendly electrolyte drinks, you can stay hydrated and energetic, all while enjoying delicious flavors.

Blog Tags: Keto diet, homemade electrolyte drink, DIY electrolyte drink, keto hydration, health and wellness, low-carb recipes

Posted on — Leave a comment

5 Delicious Beef Recipes for Your Weight Loss Keto Plan

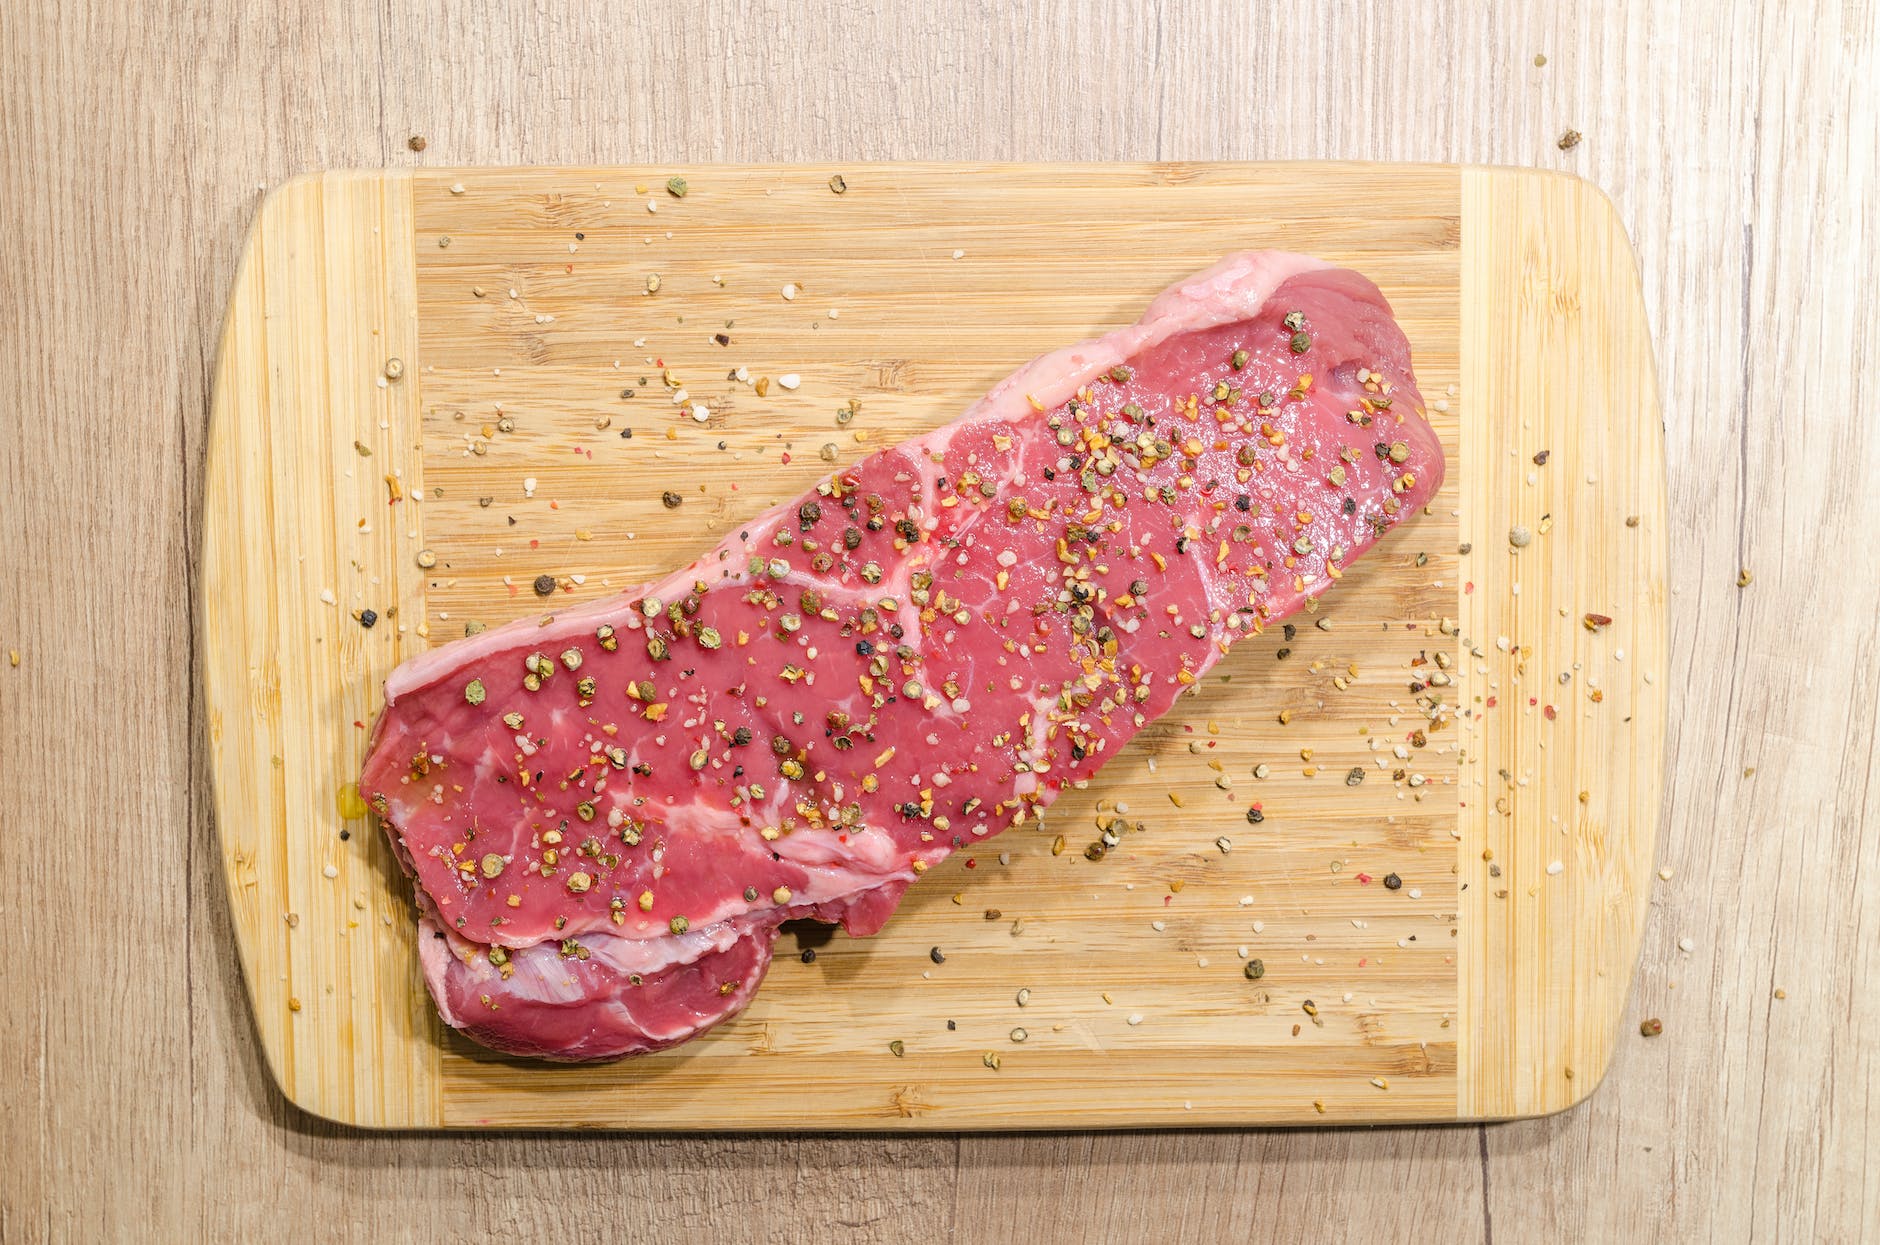
flat lay photography of slice of meat on top of chopping board sprinkled with ground peppercorns

Hello, keto enthusiasts! If you’re a fan of beef and looking for delicious recipes to add to your weight loss keto plan, you’re in for a treat. Beef is a rich source of protein and essential nutrients, making it an excellent choice for those following a ketogenic diet. Join us as we explore five mouthwatering beef recipes that not only promote weight loss but also satisfy your taste buds. Get ready to enjoy the flavors of succulent beef while staying on track with your keto goals. Let’s dive in! 🥩🍽️

1. Steak and Vegetable Skewers: Fire up the grill and indulge in a flavorful and satisfying meal with steak and vegetable skewers. Cut beef steak into cubes and marinate them with your favorite keto-friendly herbs and spices. Alternate the steak cubes with a colorful array of low-carb vegetables like bell peppers, zucchini, and mushrooms on skewers. Grill until the steak is cooked to your desired level of doneness and the vegetables are tender and slightly charred. These skewers are not only visually appealing but also packed with protein and essential nutrients from both the beef and vegetables.

2. Beef and Broccoli Stir-Fry: Whip up a quick and delicious beef and broccoli stir-fry that will satisfy your Chinese food cravings without derailing your keto plan. Slice beef into thin strips and stir-fry with garlic, ginger, and a splash of low-sodium soy sauce or coconut aminos. Add broccoli florets and cook until the beef is cooked through and the broccoli is crisp-tender. This dish is not only low in carbs but also loaded with protein and fiber, thanks to the beef and broccoli combination. Serve it over cauliflower rice for a complete keto-friendly meal.

3. Beef Taco Lettuce Wraps: Enjoy the flavors of a classic Mexican dish without the carbs by creating beef taco lettuce wraps. Brown ground beef in a skillet and season it with keto-friendly taco seasoning, such as chili powder, cumin, and paprika. Fill large lettuce leaves with the seasoned beef and top with your favorite low-carb toppings, such as diced tomatoes, shredded cheese, and a dollop of sour cream. These lettuce wraps offer a satisfying crunch and all the deliciousness of a traditional taco while keeping your carb intake in check.

4. Beef and Cauliflower Shepherd’s Pie: Indulge in a comforting and hearty meal with a keto twist by making a beef and cauliflower shepherd’s pie. Brown ground beef with onions, garlic, and herbs, then top it with a creamy layer of mashed cauliflower instead of the traditional mashed potatoes. Bake until the cauliflower is golden and bubbling. This keto-friendly version of shepherd’s pie provides all the flavors and textures you love, with the added bonus of being low in carbs and high in fiber from the cauliflower.

5. Korean-Style Beef Bulgogi: Experience the bold and vibrant flavors of Korean cuisine with a keto-friendly twist by preparing beef bulgogi. Thinly slice beef and marinate it in a mixture of soy sauce or coconut aminos, sesame oil, garlic, and ginger. Cook the marinated beef in a hot skillet until caramelized and tender. Serve it with a side of sautéed low-carb vegetables like bok choy or cabbage for a complete meal. This dish offers a perfect balance of savory, sweet, and umami flavors that will keep your taste buds delighted.

Tips for Cooking Beef on Your Keto Journey 🥩🍽️

To make the most of your beef recipes while following a ketogenic diet, consider the following tips:

  1. Choose Quality Beef: Opt for grass-fed or pasture-raised beef whenever possible. These cuts of beef tend to be leaner and contain higher levels of omega-3 fatty acids, conjugated linoleic acid (CLA), and vitamins. Quality beef not only offers better nutritional value but also contributes to the overall flavor and tenderness of your dishes.
  2. Mindful Portion Control: While beef is a great source of protein and healthy fats, it’s important to practice portion control to manage your calorie intake. Be aware of the recommended serving sizes and adjust accordingly. Pair your beef dishes with a generous serving of low-carb vegetables to add volume and fiber to your meal while keeping your portions in check.
  3. Experiment with Cuts: Explore different cuts of beef to add variety to your keto meals. From tenderloin to ribeye to brisket, each cut offers a unique flavor profile and texture. Experiment with different cuts to find your favorites and explore new recipes that showcase the best qualities of each cut.
  4. Lean vs. Fatty Cuts: While fatty cuts like ribeye or chuck offer a rich flavor, opting for leaner cuts like sirloin or tenderloin can help control your fat intake if you’re looking to manage your calorie balance. Incorporate a mix of lean and fatty cuts to strike a balance and enjoy a range of flavors and textures.
  5. Meal Prep: Consider incorporating beef recipes into your meal prep routine. Cook large batches of beef dishes and portion them out for convenient meals throughout the week. This saves time and ensures you always have a keto-friendly option on hand when hunger strikes.

In Conclusion: Savor the Flavors of Beef on Your Keto Journey 🥩🍽️

Beef can be a delicious and satisfying addition to your weight loss keto plan. From succulent steak skewers to flavorful stir-fries and comforting shepherd’s pie, there are numerous ways to incorporate beef into your keto-friendly meals. By choosing quality cuts, practicing portion control, and experimenting with different recipes, you can enjoy the flavors and benefits of beef while staying on track with your keto goals. So, fire up the grill, grab your skillet, and savor the goodness of beef on your keto journey. Bon appétit! 🥩🍽️