This breakfast burrito recipe gives you the kind of burrito that actually feels worth waking up for: soft scrambled eggs, crisp-edged potatoes or hash browns, melted cheese, and a filling that stays inside the tortilla. Make them hot from the skillet this morning, or wrap a batch so tomorrow’s breakfast is already handled.
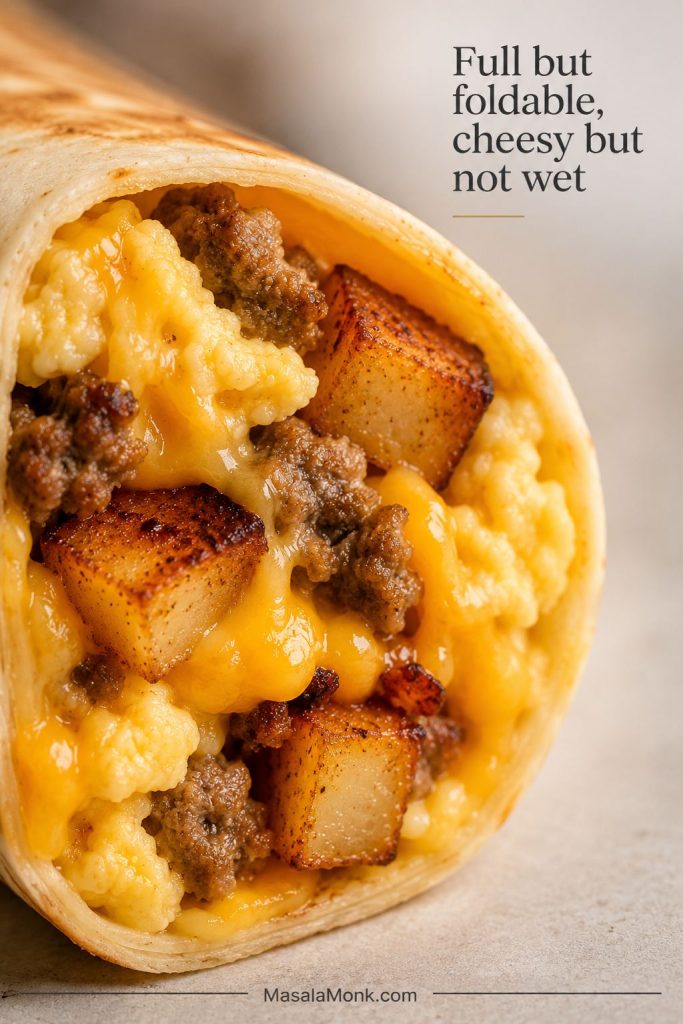
The goal is simple: a burrito that is full but still foldable, cheesy but not wet, freezer-friendly but not sad after reheating. That comes down to a few small choices: a large, flexible tortilla, cooked and seasoned fillings, browned potatoes, soft eggs, cheese in the right place, and sauce used smartly.
Below, you will get the main 6-burrito method, a simple per-burrito formula, folding tips, freezer instructions, reheating methods, filling ideas, sauce options, high-protein swaps, and fixes for cracked tortillas, rubbery eggs, cold centers, and filling that spills out.
What You’ll Find in This Breakfast Burrito Recipe Guide
Quick Answer: What Goes in a Breakfast Burrito?
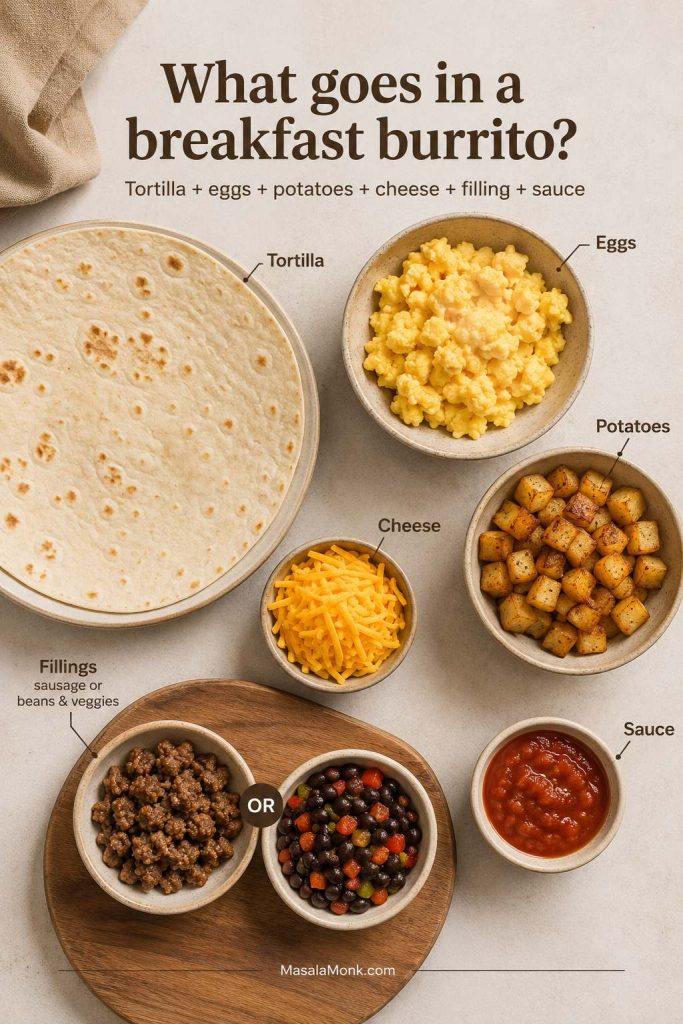
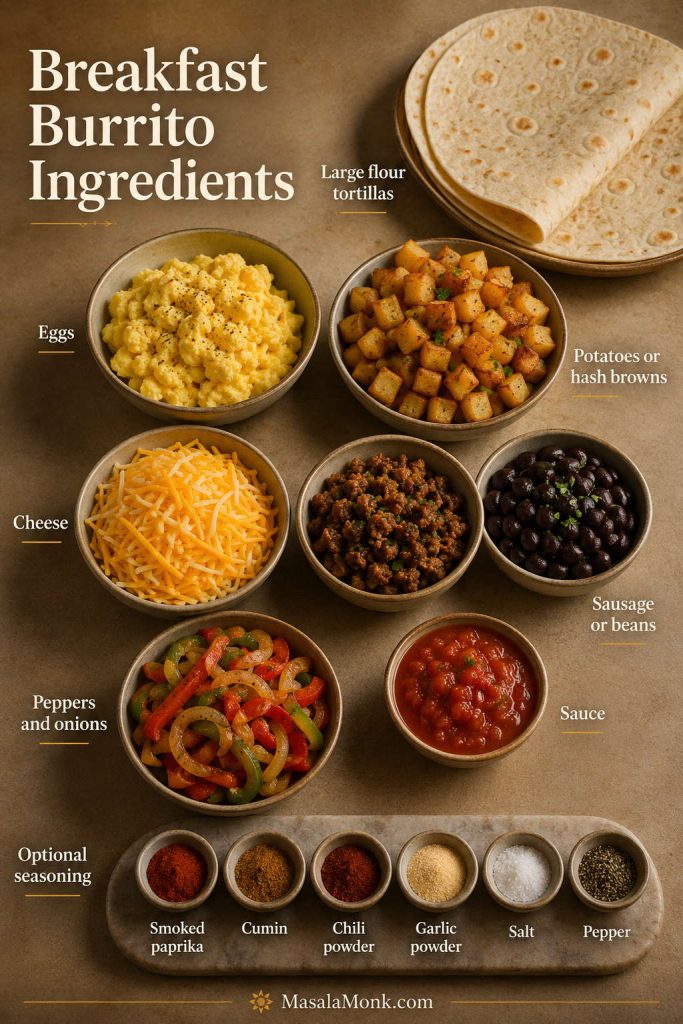
A good breakfast burrito starts with a large flour tortilla, gently cooked eggs, crisp potatoes or hash browns, cheese, and a flavorful filling such as sausage, bacon, chorizo, black beans, peppers, onions, steak, chicken, or vegetables.
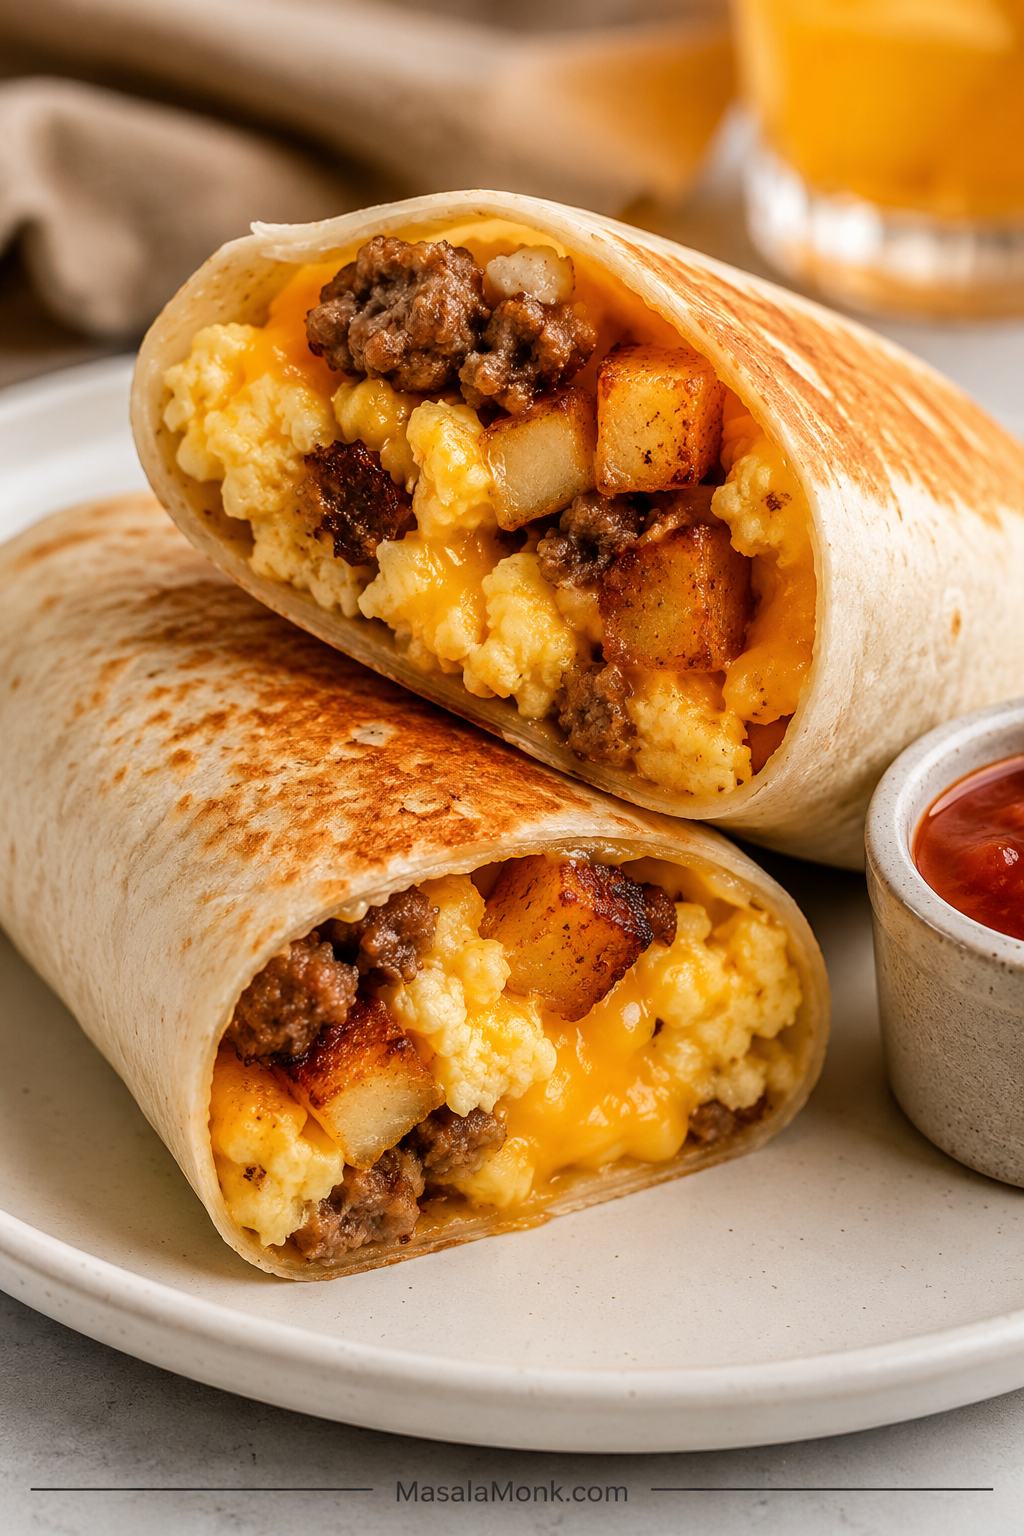
What the Finished Burrito Should Look Like
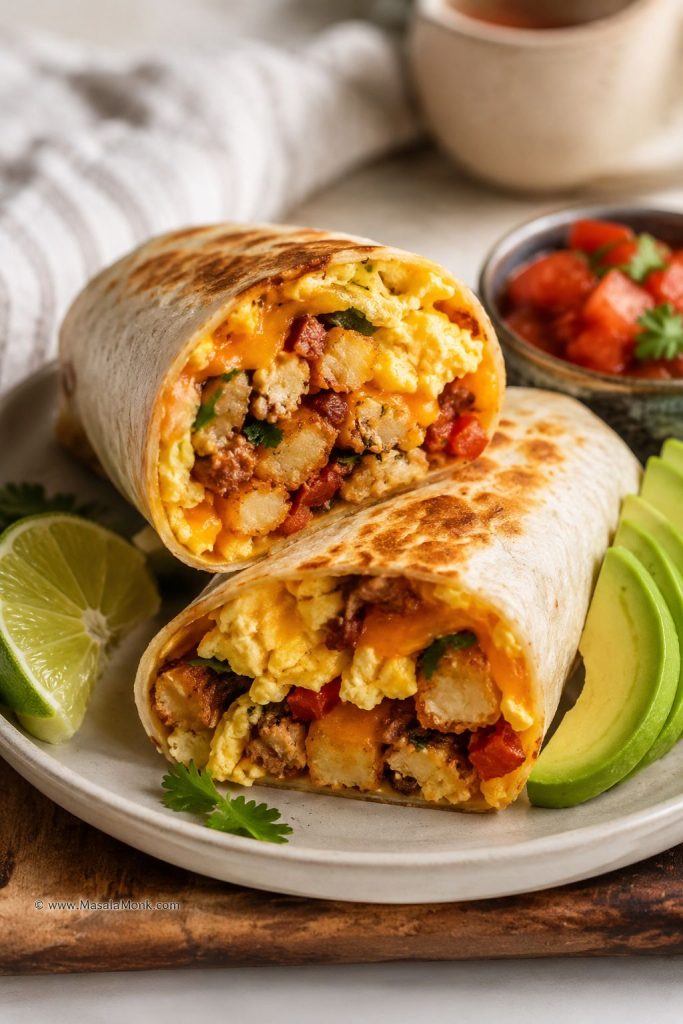
The finished burrito should be full enough to feel satisfying but not so packed that the tortilla tears. Look for a warm tortilla, soft eggs, browned potatoes, melted cheese, and a filling line that stays compact when sliced or reheated.
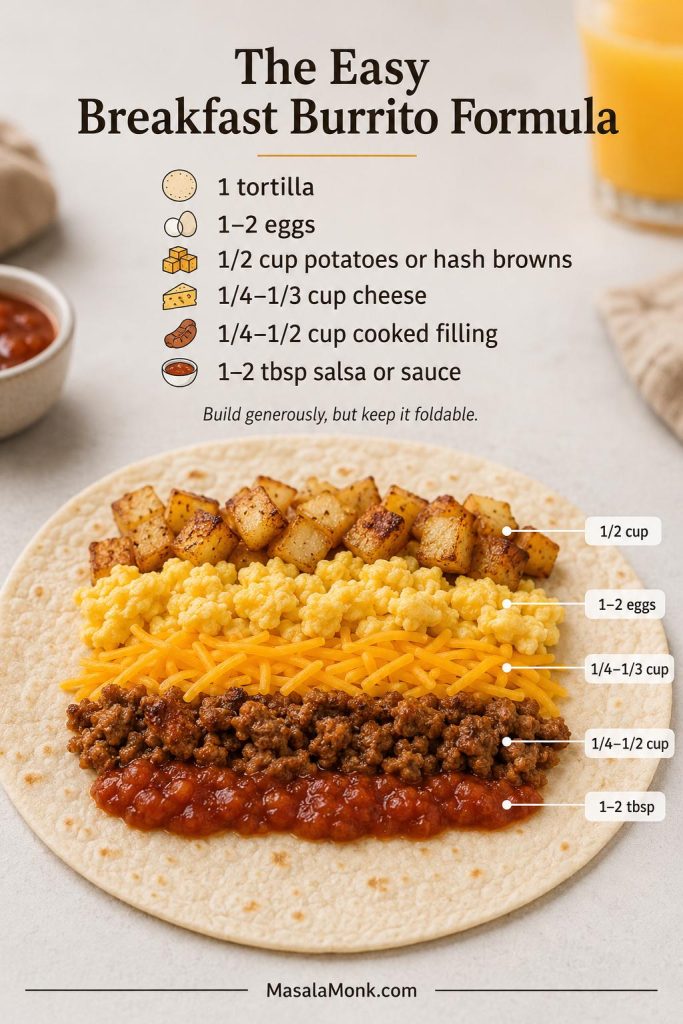
The Easy Breakfast Burrito Formula
For one large burrito, use 1 large tortilla, 1–2 eggs, about ½ cup cooked potatoes or hash browns, ¼–⅓ cup cheese, ¼–½ cup cooked meat, beans, or vegetables, and 1–2 tablespoons salsa or sauce. That formula is the easiest way to build a burrito that feels generous without fighting the tortilla.
| For 1 Breakfast Burrito | Best Amount | Why It Matters |
|---|---|---|
| Large flour tortilla | 1 tortilla, 10–12 inch / 25–30 cm | Large tortillas fold better and hold more filling without tearing. |
| Eggs | 1–2 large eggs | Soft eggs give the burrito body without making it dry. |
| Potatoes or hash browns | About ½ cup cooked | A crisp potato layer makes the burrito hearty and breakfast-like. |
| Cheese | ¼–⅓ cup shredded | Cheese adds flavor, melts into the filling, and helps hold it together. |
| Protein, beans, or vegetables | ¼–½ cup cooked | Add sausage, bacon, chorizo, steak, chicken, beans, peppers, onions, or another cooked filling here. |
| Sauce or salsa | 1–2 tablespoons | Use lightly inside fresh burritos; serve on the side for freezer burritos. |
Best First Version to Make
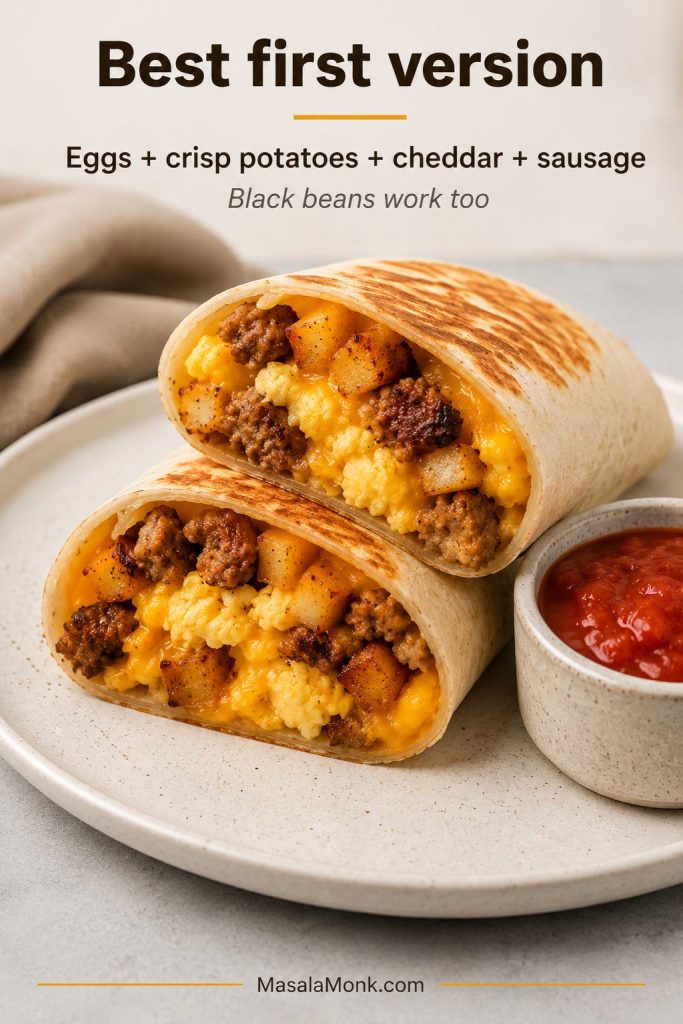
Best first version: Start with eggs, crisp hash browns or diced potatoes, cheddar or Monterey Jack, and breakfast sausage or black beans. Add salsa or hot sauce on the side. Once that base works, bacon, chorizo, steak, chicken, tofu scramble, and extra vegetables are easy swaps.
At a Glance
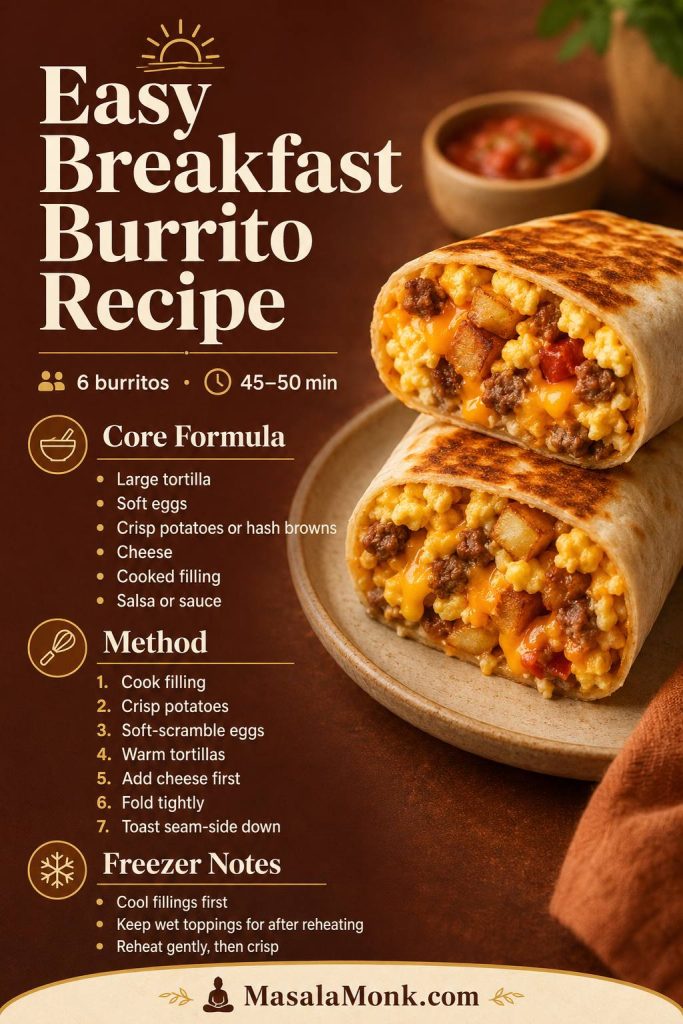
At a glance: This recipe makes 6 breakfast burritos in about 45–50 minutes. Use 10–12 inch flour tortillas, about ½ cup cooked potatoes or hash browns per burrito, and a skillet toast for the best texture. They keep 3–4 days in the fridge and freeze best without wet toppings inside.
Why This Breakfast Burrito Recipe Works
The best breakfast burritos are not just full; they are balanced. You want enough egg to feel soft and breakfasty, enough potato to make it hearty, enough cheese to hold everything together, and just enough sauce to wake it up without soaking the tortilla.
Once the base is right, the filling is where the recipe becomes fun. Use breakfast sausage for a classic burrito, bacon for a smoky version, chorizo for heat, black beans for a vegetarian breakfast burrito, or a mix of eggs, egg whites, beans, and lean meat for a high-protein breakfast burrito.
Most importantly, the small details matter: warming the tortilla before folding, cooking the potato layer until browned, pulling eggs from the heat before they dry out, placing cheese down first, cooling fillings before freezing, and reheating gently so the eggs stay soft instead of rubbery.
Ready to cook? The full 6-burrito method is below. After the recipe card, you will find deeper notes on ingredients, folding, freezer storage, sauces, high-protein options, and troubleshooting.
Easy Breakfast Burrito Recipe
This breakfast burrito recipe makes 6 hearty burritos with soft eggs, browned potatoes or hash browns, cheese, and your choice of sausage, bacon, chorizo, beans, steak, chicken, or vegetables.
Ingredients
- 6 large flour tortillas, 10–12 inch / 25–30 cm
- 8 large eggs, about 400 g without shells
- 2 tablespoons milk, sour cream, or Greek yogurt, optional / 30 ml
- 1–1¼ lb potatoes or frozen hash browns / 450–570 g
- 10–12 oz breakfast sausage or chorizo before cooking / 280–340 g, or 8–10 oz cooked bacon, steak, or chicken / 225–280 g, or 1 drained 15 oz can black beans or pinto beans / about 240 g drained
- For a vegetable version: 1½–2 cups cooked peppers, onions, mushrooms, spinach, or mixed vegetables / about 225–300 g cooked
- 1½–2 cups shredded cheddar, Monterey Jack, or pepper jack / 170–225 g
- 2–3 tablespoons oil or butter / 30–45 ml
- ½ cup salsa, hot sauce, or burrito sauce, mostly for serving / 120 ml
- ¾–1¼ teaspoons salt total, divided / 4–7 g
- ½ teaspoon black pepper / 1–2 g
- ½ teaspoon smoked paprika, ½ teaspoon cumin, ½ teaspoon chili powder, and ¼ teaspoon garlic powder, optional
- ¼–½ cup chopped green onion or cilantro, optional / 10–20 g
Step-by-Step Method
- Cook the protein or vegetables. Brown raw sausage or chorizo in a large skillet, or warm cooked bacon, steak, chicken, beans, peppers, onions, or your chosen filling. Then, drain excess fat or liquid and transfer to a plate.
- Crisp the potatoes. Add 2 tablespoons oil or butter to the skillet. Cook diced potatoes for 12–15 minutes, stirring only occasionally, until tender inside and golden outside. Frozen shredded hash browns usually need 7–10 minutes in a thin layer. Season with salt, pepper, and optional smoked paprika, cumin, chili powder, or garlic powder.
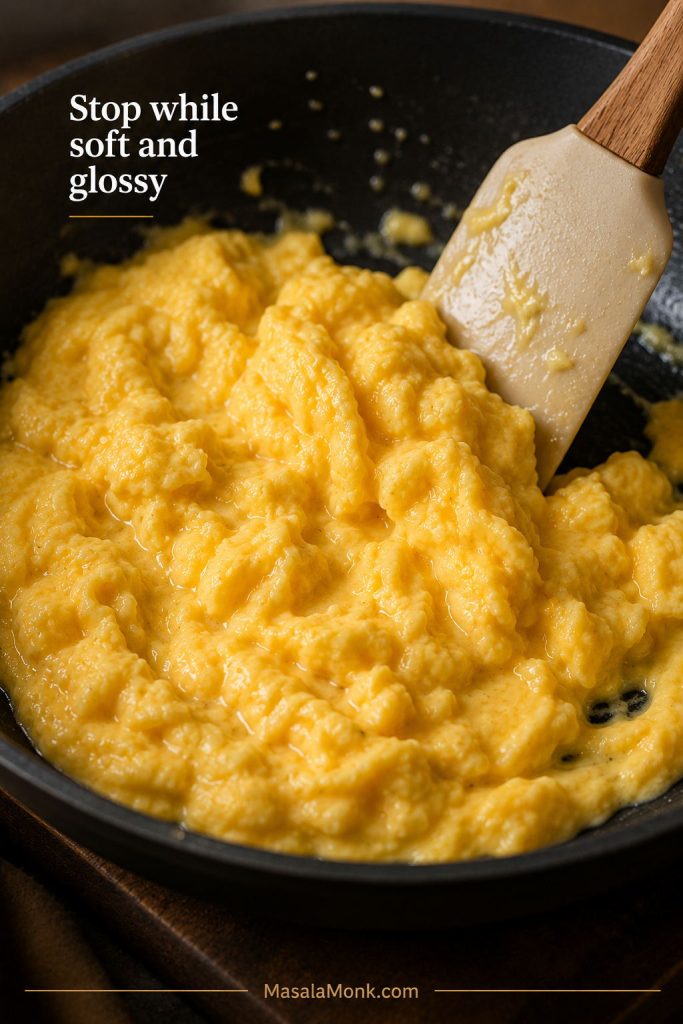
- Scramble the eggs softly. Whisk eggs with milk, sour cream, or Greek yogurt if using. Cook over medium-low heat for 2–4 minutes, stirring slowly, until the eggs are just set but still glossy. Transfer them to a plate right away so they do not keep cooking in the hot pan.
- Warm the tortillas. Microwave tortillas under a damp paper towel for 15–30 seconds, or warm each one briefly in a dry skillet.
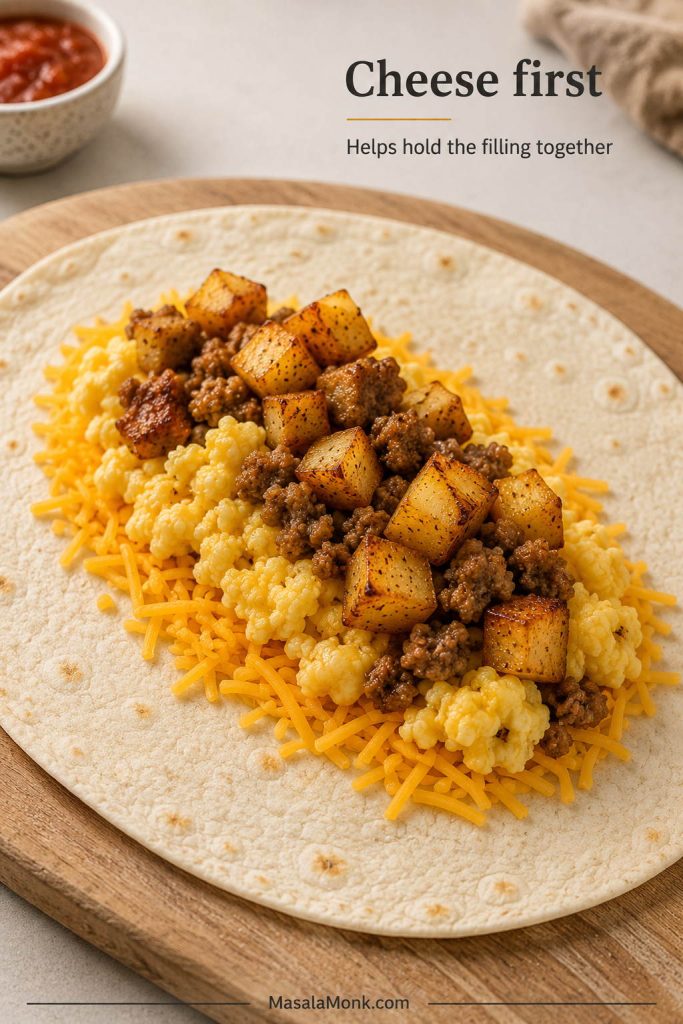
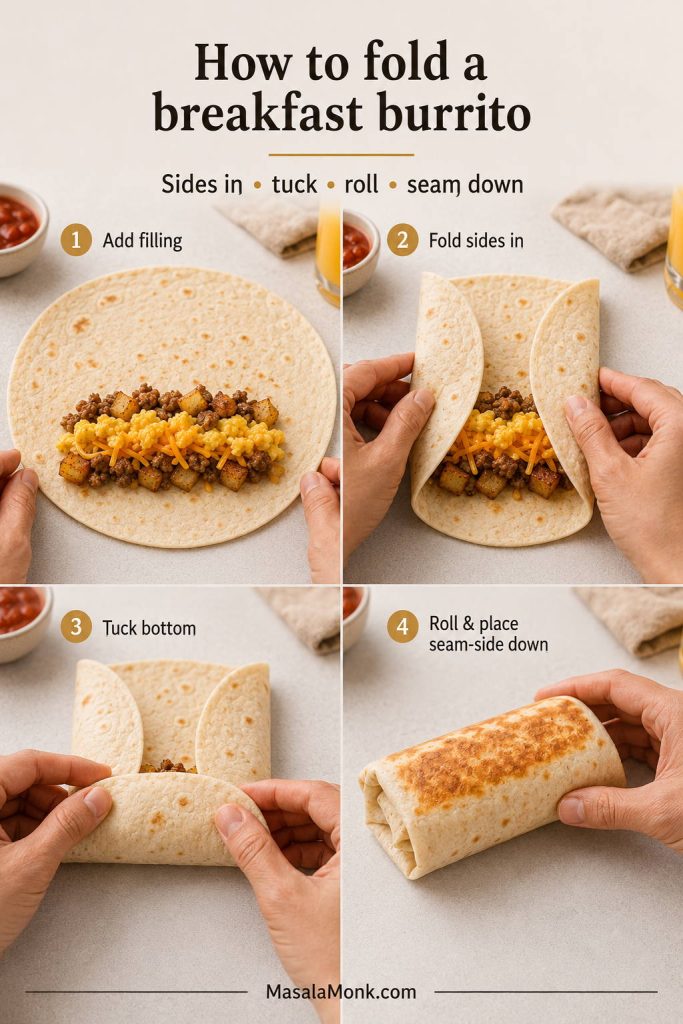
- Fill the burritos. Place a tortilla on a board. Add cheese first, then potatoes, eggs, protein or beans, and optional herbs. Keep the filling in a narrow strip slightly below the center.
- Fold tightly. Fold the left and right sides inward, pull the bottom flap over the filling, tuck it snugly, and roll forward into a tight burrito.
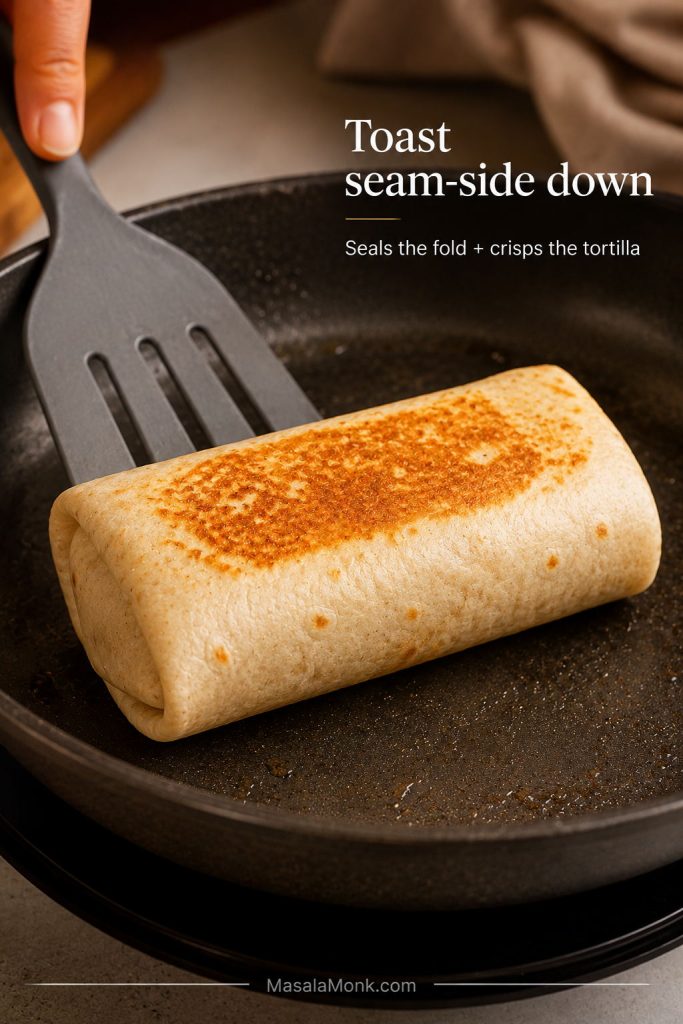
- Toast seam-side down. Place the burrito seam-side down in a dry skillet over medium heat. Toast for 1–2 minutes per side, until golden and sealed.
- Serve. Serve hot with salsa, chipotle crema, avocado crema, hot sauce, or green chile sauce on the side.
Recipe Notes
- Start with ¾ teaspoon salt total if using bacon, chorizo, seasoned sausage, salty cheese, or canned beans. Add more only after tasting the cooked filling.
- For freezer burritos, cool the eggs, potatoes, and filling before wrapping.
- For freezer burritos, keep wet and fresh toppings for serving after reheating.
- For a higher-protein version, use 10–12 eggs, egg whites, black beans, turkey sausage, chicken sausage, tofu scramble, or cottage cheese in the eggs.
- For a vegetarian version, use eggs, black beans, crisp potatoes, peppers, onions, cheese, and salsa.
How to Scale the Recipe
The base recipe makes 6 burritos, which is a good size for one family breakfast or a few make-ahead meals. For a bigger freezer batch, double the filling and assemble 12 burritos while everything is already cooked and ready.
| Batch Size | Eggs | Potatoes / Hash Browns | Protein or Beans | Cheese |
|---|---|---|---|---|
| 6 burritos | 8 eggs | 1–1¼ lb / 450–570 g | 10–12 oz raw sausage/chorizo, 8–10 oz cooked meat, or 1 drained can beans | 1½–2 cups / 170–225 g |
| 12 burritos | 16 eggs | 2–2½ lb / 900 g–1.1 kg | 20–24 oz raw sausage/chorizo, 1–1¼ lb cooked meat, or 2 drained cans beans | 3–4 cups / 340–450 g |
For a larger batch, you can also roast the potatoes, peppers, and onions on a sheet pan, then cook the eggs separately while the vegetables finish. A full sheet-pan method deserves its own recipe, but this shortcut helps when you are making 12 burritos at once.
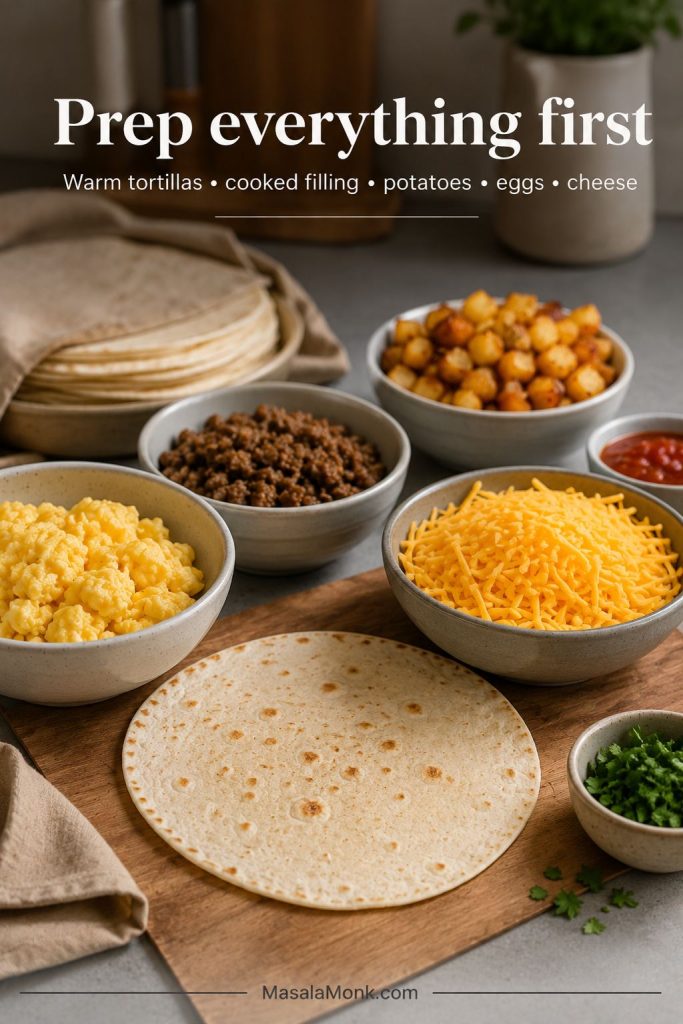
Breakfast Burrito Assembly Line
Before you start rolling, set up the tortillas, eggs, potatoes, cheese, and filling in one place. This keeps the portions more even, helps the tortillas stay warm, and makes it easier to build several breakfast burritos without overfilling the last few.
Breakfast Burrito Ingredients: What Matters Most
This is a forgiving recipe, but the small choices matter. Once the tortilla is warm, the potatoes are browned, the eggs are soft, and the wet toppings are controlled, you can swap the meat, beans, cheese, vegetables, or sauce without losing the structure of the burrito.
Large Flour Tortillas
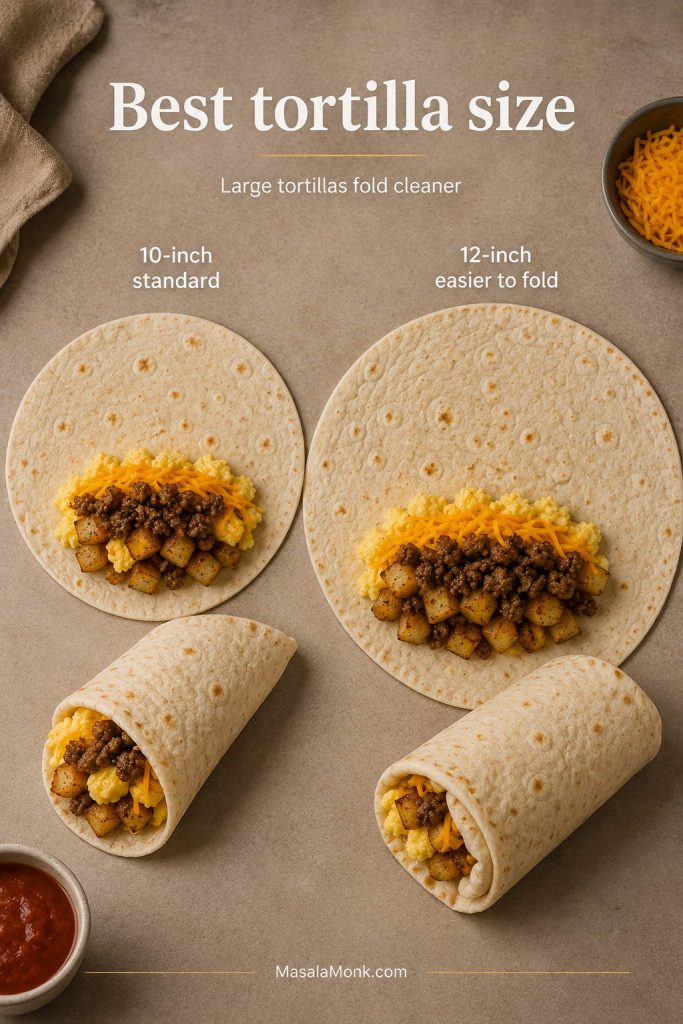
A large, flexible tortilla is the difference between a burrito that rolls cleanly and one that cracks before breakfast even starts. Aim for 10 inches for a standard burrito, or 12 inches if you like a generous filling or are still getting comfortable with folding.
Before filling, warm the tortillas. Stack them under a damp paper towel and microwave for 15–30 seconds, or warm each tortilla briefly in a dry skillet. That way, the tortilla bends around the filling instead of tearing.
Eggs
Scrambled eggs are the heart of the burrito. For 6 burritos, this recipe uses 8 large eggs, which gives enough egg to feel breakfast-forward without making every bite too heavy. For a bigger, higher-protein version, use 10–12 eggs or replace some whole eggs with egg whites.
Texture matters more than most people think. Cook the eggs over medium-low heat and stop while they are still soft and slightly glossy. Dry eggs become firm after folding, and they get even tougher if you reheat the burritos later.
Potatoes or Hash Browns
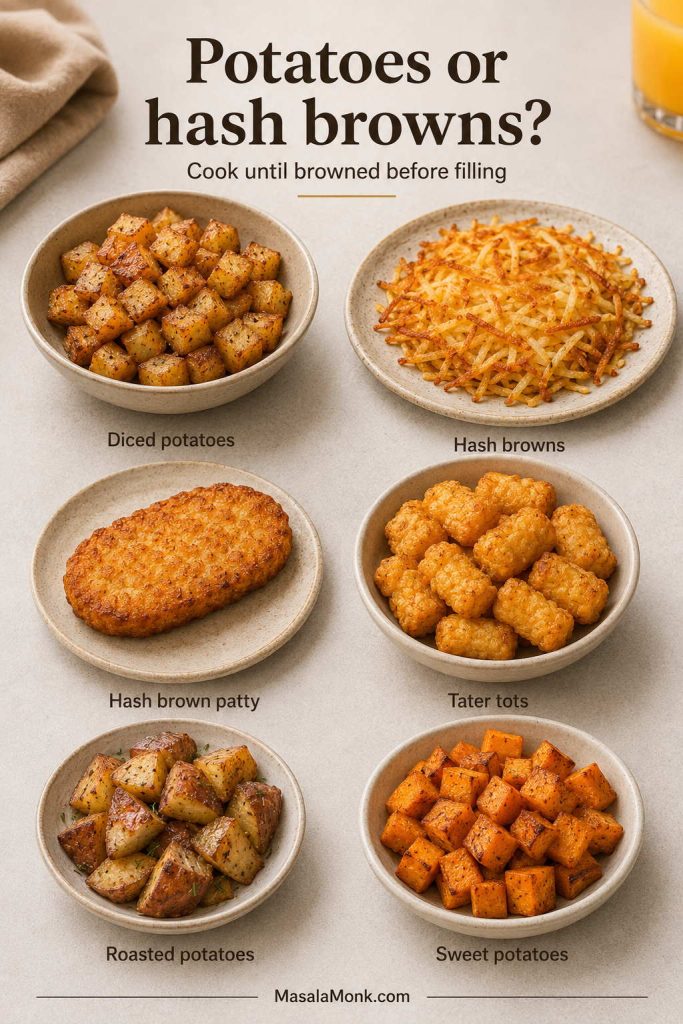
Potatoes and hash browns give the burrito its hearty breakfast texture, but they need to be cooked properly before they go inside. The best choice depends on whether you want diced potatoes, shredded hash browns, patties, tots, or a roasted potato shortcut.
Why the Potato Layer Matters
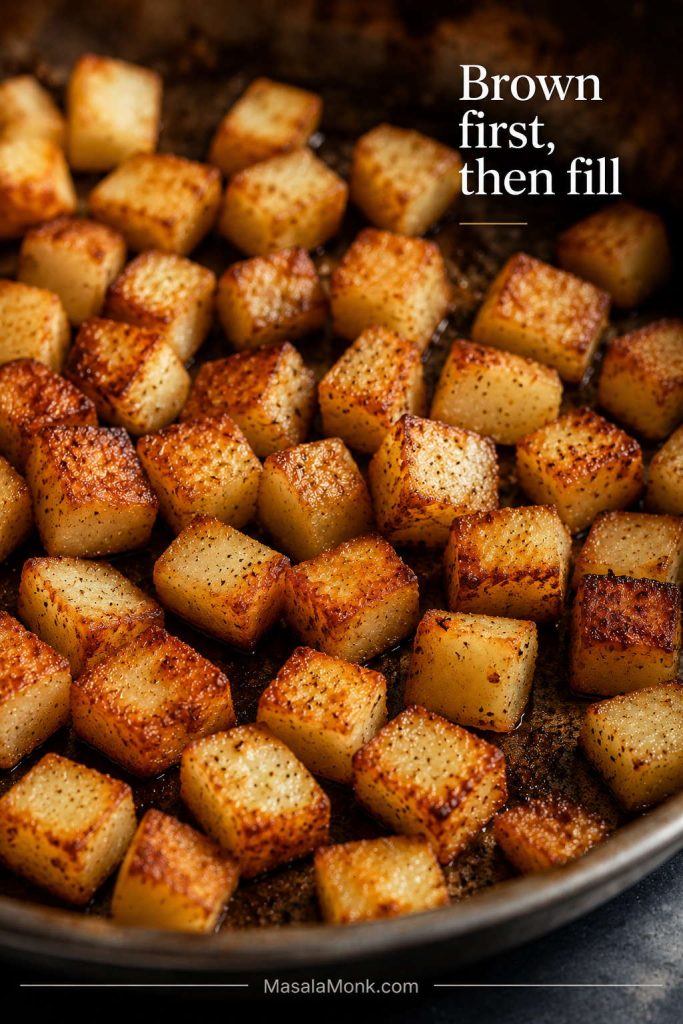
The potatoes are what make this feel like a proper breakfast burrito instead of scrambled eggs wrapped in a tortilla. Get them browned first, and the whole burrito tastes more satisfying. Diced potatoes, frozen shredded hash browns, hash brown patties, tater tots, leftover roasted potatoes, and sweet potatoes can all work.
Do not rush the potato layer. Once the edges are browned, the filling has the texture that keeps the burrito from tasting soft all the way through. For each burrito, use about ½ cup cooked potatoes or hash browns.
Fresh Grated Potatoes
If you grate fresh potatoes, squeeze them in a clean kitchen towel before cooking. Removing excess moisture helps the potatoes brown instead of steaming in the pan.
Roasted Potatoes for Breakfast Burritos
If you prefer roasting, spread diced potatoes on a sheet pan with oil, salt, pepper, and seasoning. Roast at 425°F / 220°C for 22–28 minutes, flipping once, until the centers are tender and the edges are browned.
Hash Browns and Shortcut Potatoes
If you are starting with frozen shredded potatoes, patties, or homemade grated potatoes, this MasalaMonk guide to crispy air fryer hash browns has useful timing and texture cues you can borrow before filling the burritos.
| Potato Option | Amount for 6 Burritos | Best Method |
|---|---|---|
| Diced russet or yellow potatoes | 1–1¼ lb / 450–570 g | Dice small and pan-fry for 12–15 minutes, or roast at 425°F / 220°C for 22–28 minutes. |
| Frozen shredded hash browns | 16–20 oz / 450–570 g | Cook in a thin layer for 7–10 minutes until browned; press out excess moisture if needed. |
| Hash brown patties | 6 patties | Cook until crisp, then use one patty per burrito. |
| Tater tots | About 20 oz / 570 g | Bake or air-fry until crisp, then crush lightly before filling. |
| Leftover roasted potatoes | About 3 cups | Re-crisp in a skillet before adding to the burritos. |
| Sweet potatoes | 1–1¼ lb / 450–570 g | Roast with smoked paprika, cumin, chili powder, or pepper. |
Cheese
Cheddar, Monterey Jack, pepper jack, mozzarella, or a Mexican-style cheese blend all work. Cheese adds flavor, but it also helps bind the filling and creates a light barrier between the tortilla and the warm eggs or potatoes.
For the best fold, add cheese to the tortilla first, then layer the warm filling over it. The heat from the eggs and potatoes softens the cheese while the burrito is folded and toasted.
Sausage, Bacon, Chorizo, Beans, or Vegetables
The main recipe works with many fillings. Breakfast sausage gives you the most classic version, bacon makes it smoky, chorizo adds heat, steak makes it hearty, chicken sausage keeps it lighter, and black beans with peppers make a filling vegetarian burrito.
Whatever you choose, cook and drain it before assembly. Otherwise, wet fillings make burritos harder to fold and easier to tear, especially if you plan to freeze them.
Simple Breakfast Burrito Seasoning
For a quick breakfast burrito seasoning, use ½ teaspoon smoked paprika, ½ teaspoon cumin, ½ teaspoon chili powder, ¼ teaspoon garlic powder, and a pinch of black pepper. Sprinkle it over the potatoes, sausage, beans, or vegetables rather than only adding seasoning to the eggs. Because each layer is seasoned, the burrito tastes better from end to end.
Salsa, Sauce, and Toppings
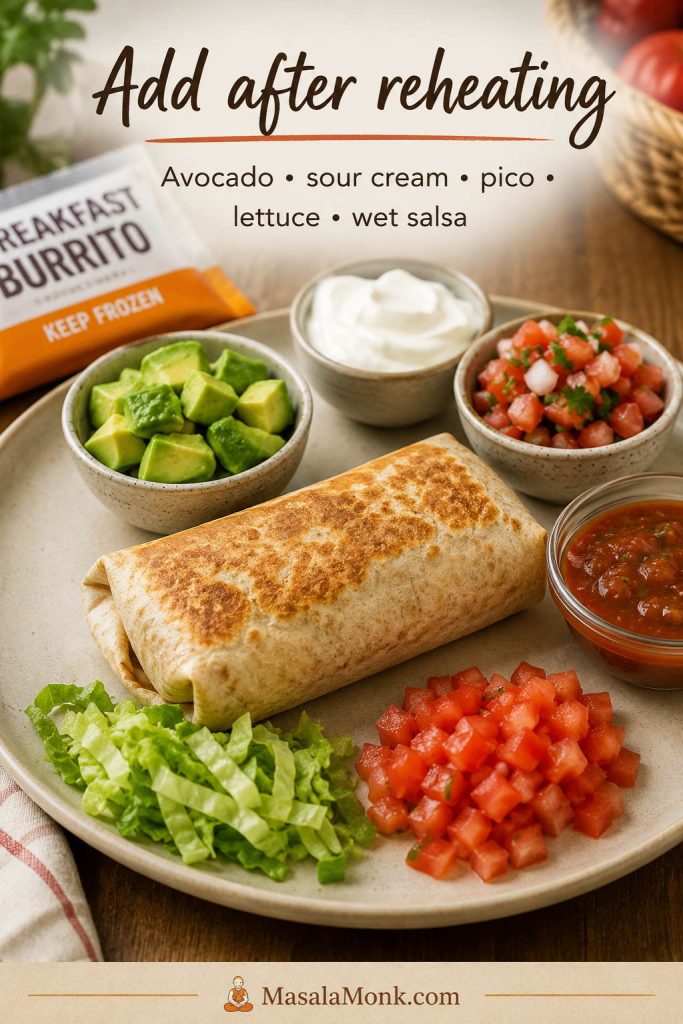
Sauce tastes better after reheating than it does trapped inside a freezer wrap. For fresh burritos, a small spoonful of salsa, hot sauce, chipotle crema, avocado crema, green chile sauce, or sour cream lime sauce can go inside. For freezer burritos, save sauce for the side and add it after warming.
Fresh avocado, pico de gallo, sour cream, lettuce, raw tomato, and watery salsa taste good, but they are not ideal inside freezer burritos. Instead, add them after reheating for better texture.
Helpful Equipment
You do not need special equipment for this method, but a few tools make the process easier: a large skillet or cast-iron pan for the filling, a flexible spatula for soft eggs, a sheet pan if you are cooling fillings for freezer burritos, foil or parchment for wrapping, and a freezer bag or airtight container for storage.
How to Fold a Breakfast Burrito
Folding is where many breakfast burritos go wrong. The filling may be good, but if the tortilla is cold, small, or overstuffed, the burrito cracks, unrolls, or spills from both ends.
If your burritos have cracked, leaked, or fallen apart before, it probably was not the filling idea that failed. It was usually the tortilla temperature, filling shape, or moisture level.
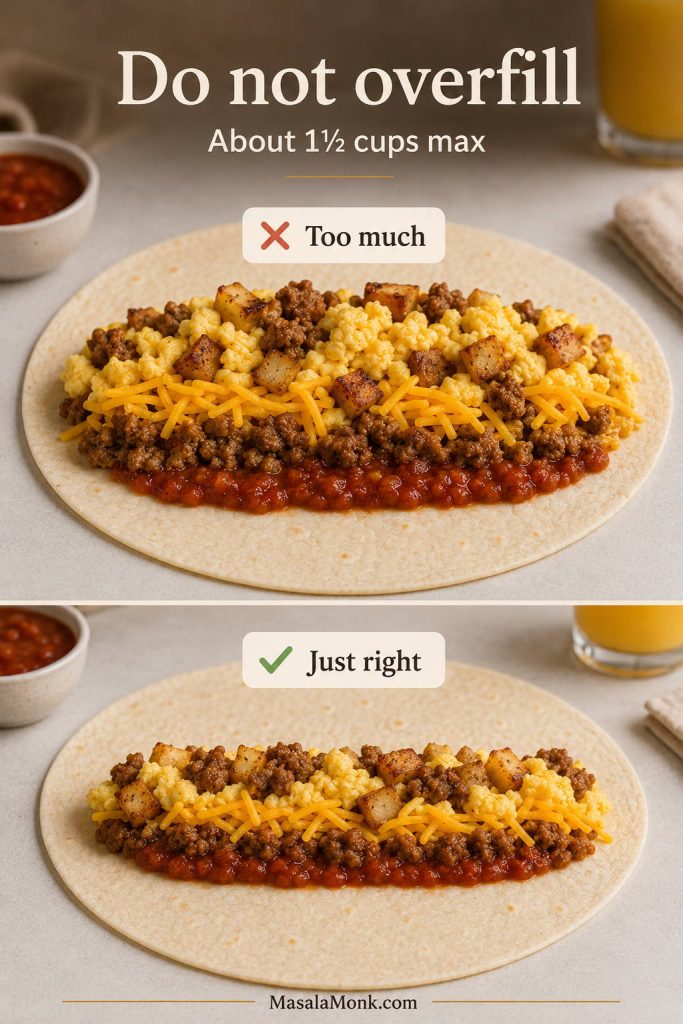
Start with a warm 10–12 inch flour tortilla. Next, place the filling in a narrow strip just below the center of the tortilla, not in a big mound. Fold the left and right sides inward first. Then, pull the bottom edge up and over the filling, tuck it tightly under the filling, and roll forward until closed.
How Much Filling Is Too Much?
As a rough limit, keep the total filling to about 1½ cups per 10–12 inch tortilla. More than that can make the burrito bulky, split the tortilla, or keep the ends from closing. If you want a bigger burrito, use a larger tortilla instead of forcing more filling into a smaller one.
Set the burrito seam-side down right away. If you are eating it fresh, toast it seam-side down in a skillet to seal the fold and give the outside a lightly crisp finish.
Folding rule: Warm tortilla, narrow filling line, sides in first, bottom flap over, tuck tightly, roll forward, then toast seam-side down.
Should You Toast a Breakfast Burrito?
Toasting is worth it if you are eating the burrito right away. It seals the seam, melts the cheese, warms the tortilla, and gives the outside a better texture. A soft wrapped burrito is fine for packed breakfasts, but a toasted breakfast burrito feels more finished.
Because this recipe uses warm fillings and shredded cheese, even a short skillet toast helps everything come together. It also makes the burrito easier to pick up without the seam opening.
| Finish | Best For | How to Do It |
|---|---|---|
| Skillet toast | Best everyday texture | Toast seam-side down for 1–2 minutes per side over medium heat. |
| Oven finish | Several burritos at once | Bake at 425°F / 220°C for 8–10 minutes, until hot and lightly crisp. |
| Broiler finish | Fast browning | Broil on low for 3–6 minutes, watching closely so tortillas do not burn. |
| Sandwich press | Compact, crisp burritos | Press gently until the outside is golden and the cheese melts. |
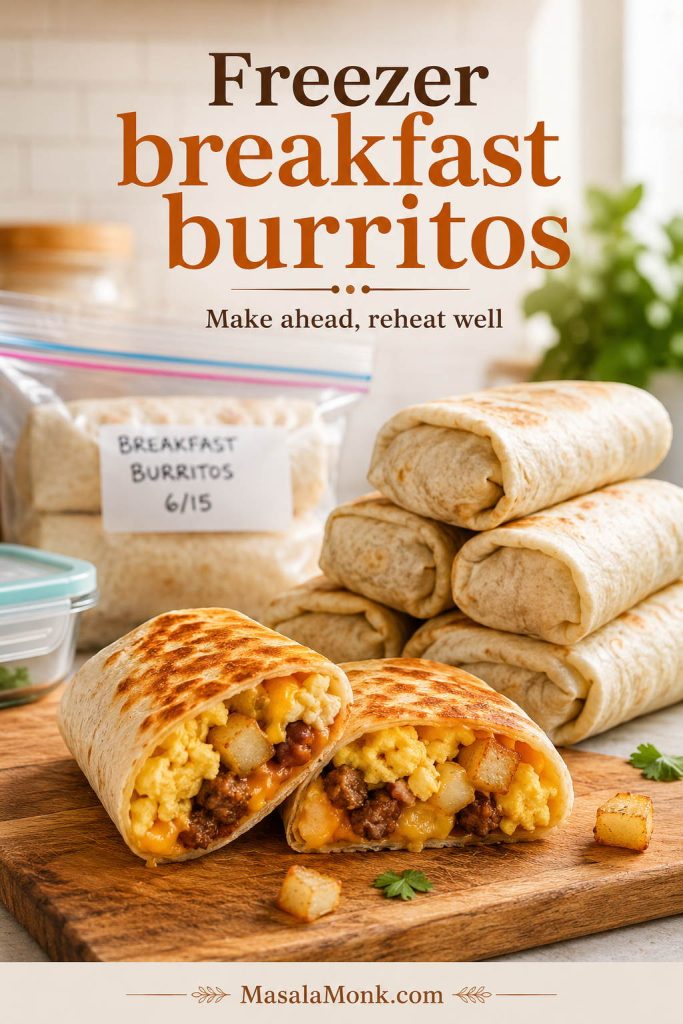
How to Make Freezer Breakfast Burritos
Freezer breakfast burritos are brilliant when they work and disappointing when they do not. The difference is usually steam and sauce. Let the fillings cool, keep wet toppings out, wrap tightly, and reheat gently so the eggs stay soft and the tortilla does not turn limp.
The goal is to freeze a burrito that still tastes like breakfast after reheating, not a steamed tortilla with dry eggs inside.
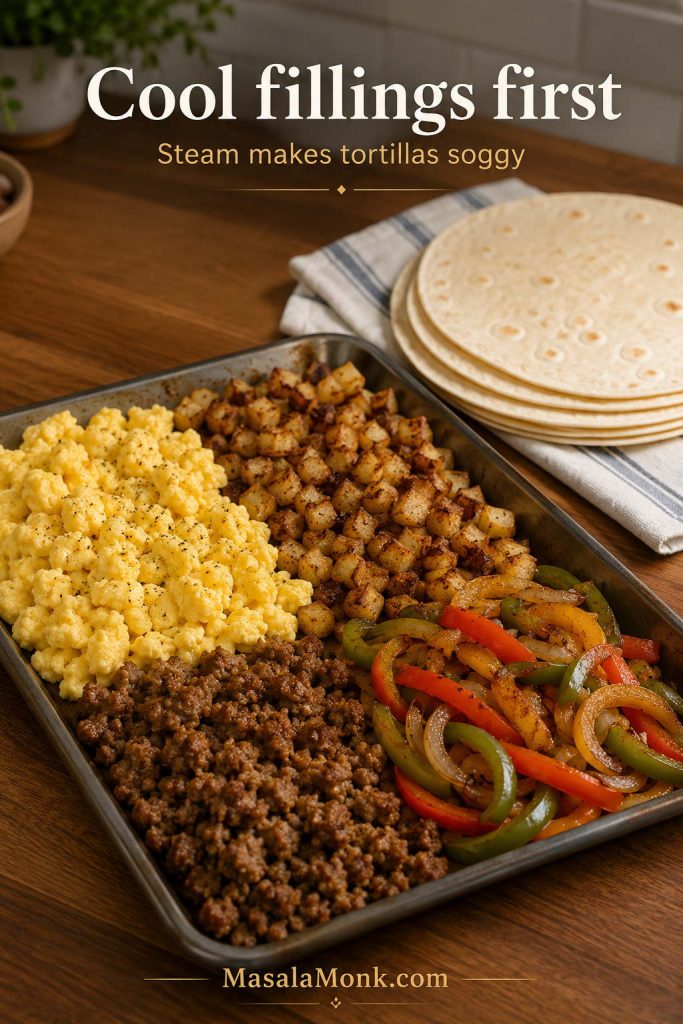
Cool the Filling First
Hot eggs, potatoes, and sausage release steam. If you wrap them immediately, that steam gets trapped inside the tortilla and softens it. For freezer burritos, spread the cooked fillings on a plate or sheet pan and let them cool until warm, not hot, before assembling.
What Not to Put Inside Before Freezing
Some ingredients taste better added after reheating. Keep fresh avocado, guacamole, sour cream, watery salsa, pico de gallo, lettuce, raw tomato, and very wet sauces out of the burritos before freezing. Otherwise, they can turn watery, dull, or mushy after thawing.
Better freezer fillings include eggs, cheese, cooked sausage, bacon, chorizo, beans, potatoes, hash browns, cooked peppers, and cooked onions.
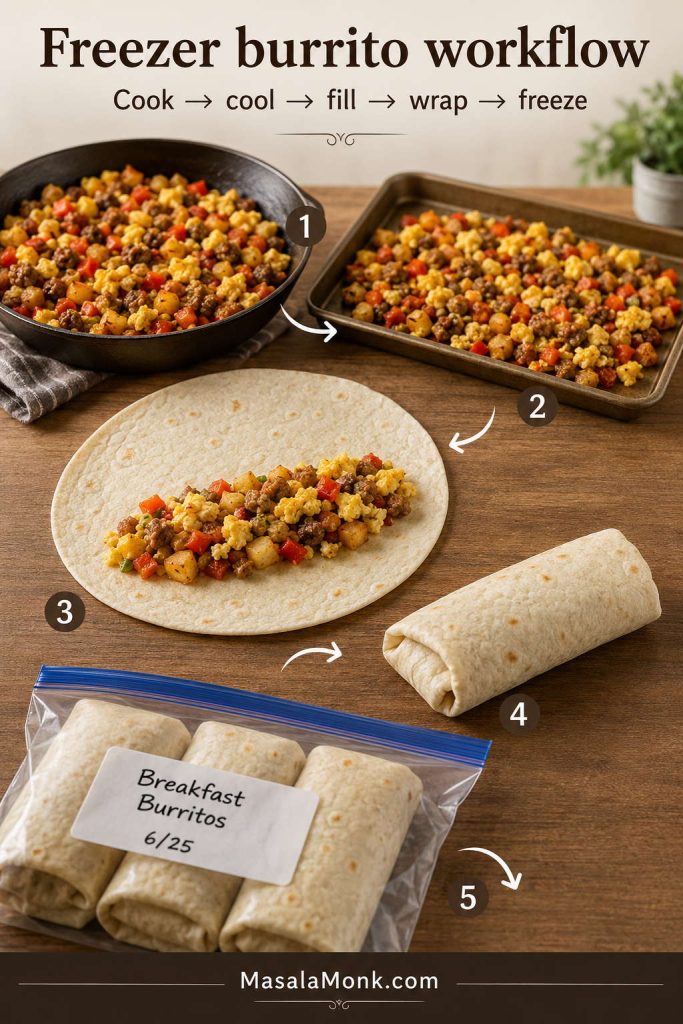
Freezer Breakfast Burrito Workflow
- Cook the protein, potatoes, and eggs separately.
- Spread the hot fillings on a plate or sheet pan so steam can escape.
- Warm the tortillas so they fold without cracking.
- Add cheese first, then potatoes, eggs, and protein or beans.
- Fold tightly and place each burrito seam-side down.
- Wrap each burrito in parchment or foil.
- Place wrapped burritos in a freezer bag, label, and freeze flat.
- Reheat gently, then add salsa, crema, avocado, or fresh toppings after warming.
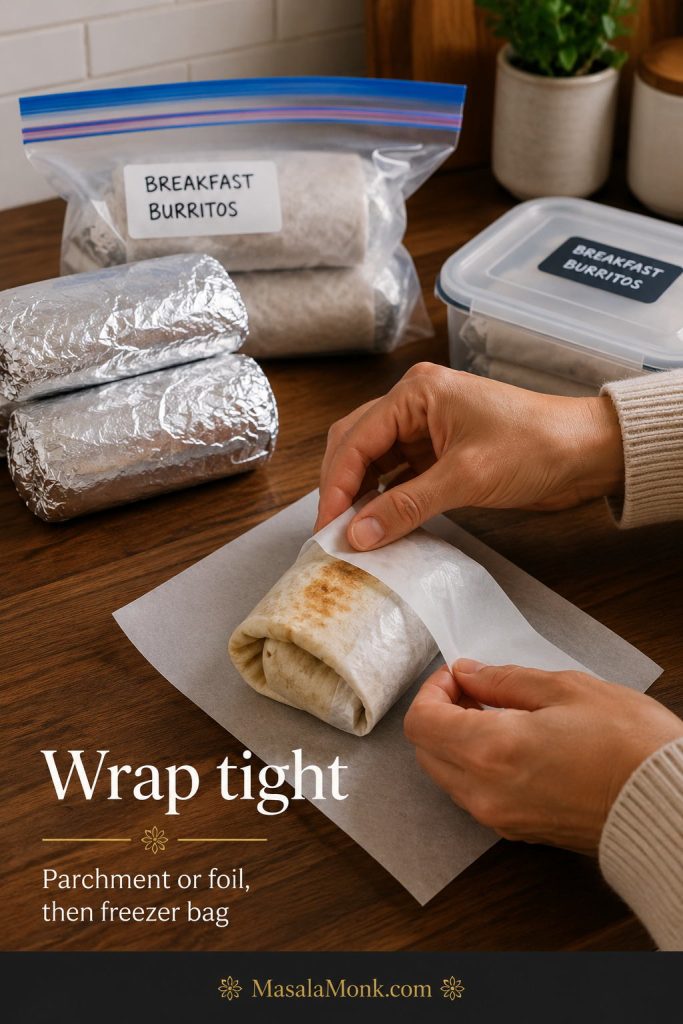
How to Wrap Breakfast Burritos for the Freezer
Wrap each cooled burrito tightly in parchment or foil. Then, place the wrapped burritos in a freezer bag or airtight container. Foil helps protect the shape, but a freezer bag gives better protection from freezer air.
Label the bag with the filling and date. Breakfast burritos are best within 2–3 months for texture, depending on how well they are wrapped.
How to Reheat Breakfast Burritos
The best everyday method is microwave plus skillet: warm the center first, then crisp the outside. The microwave alone is fastest, but it can make the tortilla chewy. The oven or toaster oven gives better texture when reheating several burritos.
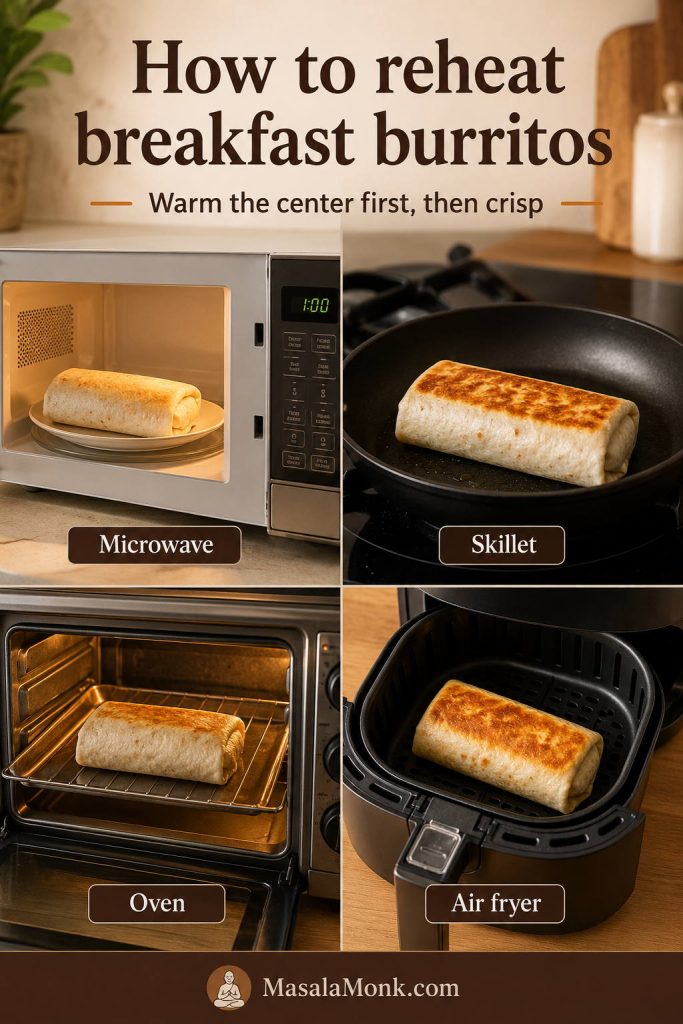
| Situation | Best Method | Exact Guidance |
|---|---|---|
| Fresh burrito, eating now | Skillet | Toast seam-side down for 1–2 minutes per side. |
| Refrigerated burrito | Microwave + skillet | Microwave 45–90 seconds, then crisp in a skillet for 1–2 minutes per side. |
| Frozen burrito, fastest | Microwave | Remove foil, wrap in a paper towel, defrost at 50% power for 3–5 minutes, then heat on full power for 1–2 minutes more. |
| Frozen burrito, best oven texture | Oven or toaster oven | Heat foil-wrapped at 350°F / 175°C for 45–55 minutes, until hot in the center. |
| Thawed burrito, oven | Oven or toaster oven | Heat at 400°F / 200°C for 15–20 minutes. |
| Frozen burrito, air fryer | Air fryer | Remove foil or parchment. Heat at 350°F / 175°C for 15–20 minutes, checking the center. |
| Thawed burrito, air fryer | Air fryer | Heat at 350°F / 175°C for 8–12 minutes. |
| Crisp finish | Skillet | After warming, toast 1–2 minutes per side over medium heat. |
Microwave and Skillet Reheating Method
For the best everyday texture, warm the burrito first so the center is hot, then finish it in a skillet so the tortilla gets lightly crisp again. This is especially helpful for refrigerated burritos and thawed freezer burritos because the microwave handles the center while the skillet fixes the outside.
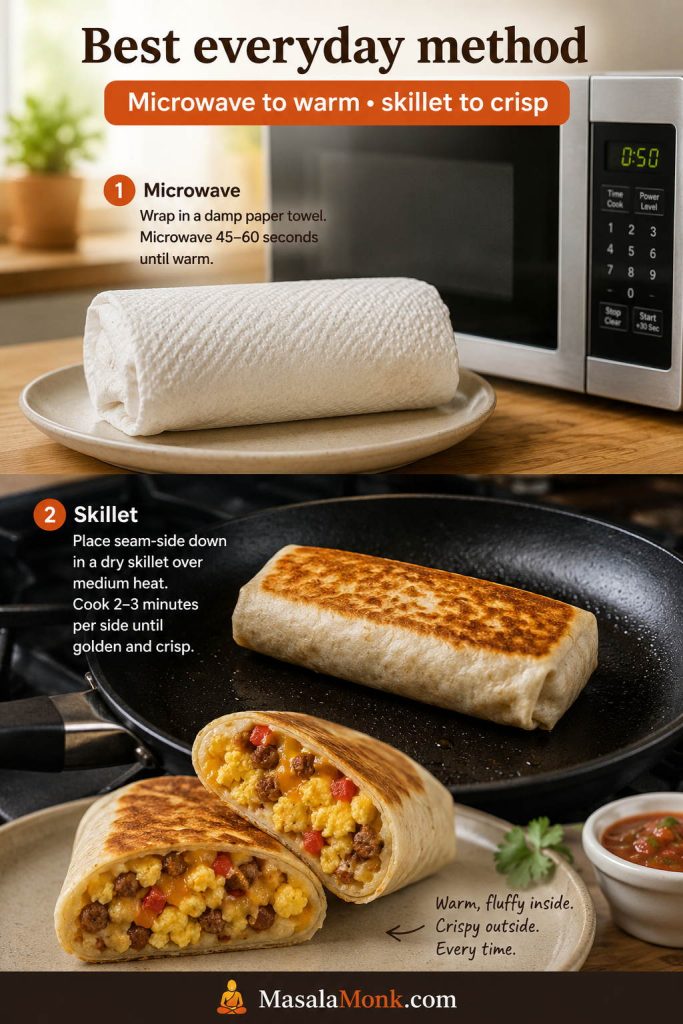
For food safety, reheat leftovers until hot throughout. If checking with a thermometer, the center should reach 165°F / 74°C. You can read more about safe leftover handling from the USDA leftover food safety guide.
Breakfast Burrito Filling Ideas
Once the basic breakfast burrito recipe formula is clear, the burritos become easy to customize. Keep the same structure: tortilla, cheese, eggs, potatoes or hash browns, a flavorful filling, and sauce on the side or added lightly inside.
Choose Your Breakfast Burrito Version
Quick chooser: Want classic? Use sausage, eggs, potatoes, and cheddar. Want smoky? Use bacon, hash browns, and chipotle crema. Want spicy? Use chorizo, potatoes, and salsa verde. Want meatless? Use eggs, black beans, peppers, onions, and cheese. Want high-protein? Use eggs or egg whites, beans, turkey sausage, cottage cheese, or tofu scramble.
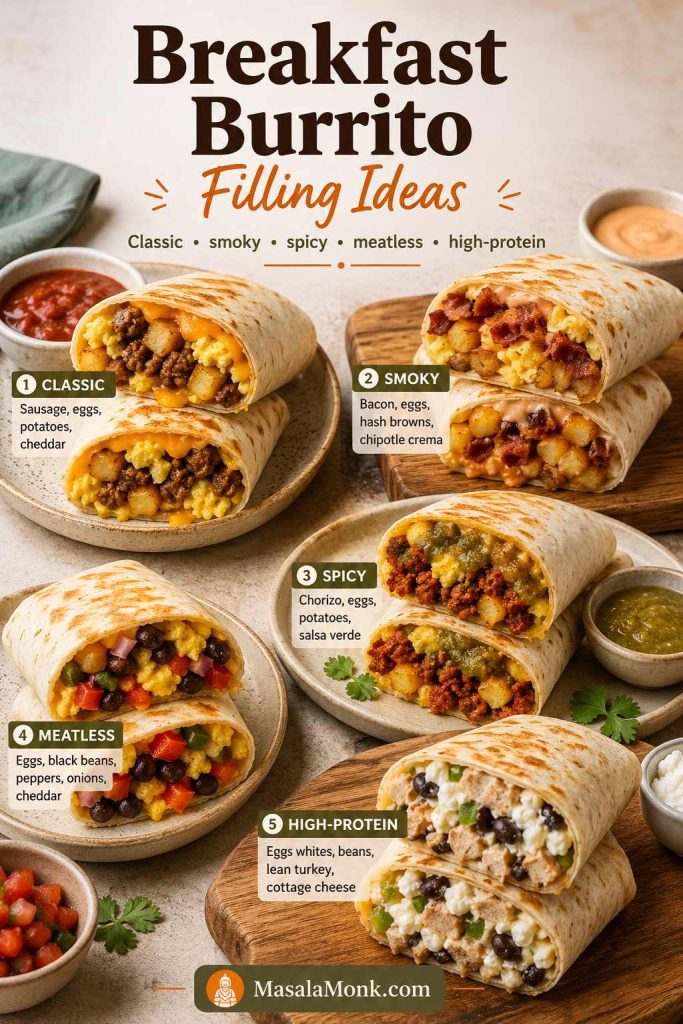
Breakfast Burrito Variation Table
| Variation | Filling | Best Sauce | Notes |
|---|---|---|---|
| Sausage Breakfast Burrito | Eggs, breakfast sausage, potatoes, cheddar | Salsa or hot sauce | The most classic version and a good first recipe. |
| Bacon Hash Brown Burrito | Eggs, bacon, hash browns, cheddar | Chipotle crema | Smoky, crisp, and very brunch-friendly. |
| Chorizo Breakfast Burrito | Eggs, chorizo, potatoes, Monterey Jack | Salsa verde | Spicy and rich; drain the chorizo well before filling. |
| Steak and Egg Breakfast Burrito | Steak, eggs, potatoes, cheese | Salsa roja or hot sauce | Hearty and high-protein, especially good with leftover steak. |
| Chicken Breakfast Burrito | Chicken sausage or shredded chicken, eggs, potatoes | Avocado crema | A lighter meat option that still feels filling. |
| Vegetarian Breakfast Burrito | Eggs, black beans, potatoes, peppers, onions, cheese | Salsa or avocado crema | Meatless but still hearty because of beans and potatoes. |
| Vegan Breakfast Burrito | Tofu scramble, beans, potatoes, salsa, vegan cheese | Salsa or vegan crema | Add avocado after reheating if freezing. |
| High-Protein Breakfast Burrito | Eggs, egg whites, turkey sausage, beans, cottage cheese | Salsa or Greek yogurt sauce | Best for meal prep and macro-friendly breakfasts. |
| Freezer-Friendly Burrito | Eggs, potatoes, cheese, sausage or beans | Sauce on the side | Avoid wet toppings inside before freezing. |
Sausage Breakfast Burrito
Use cooked breakfast sausage, soft eggs, golden potatoes, and cheddar or Monterey Jack. Before assembly, drain the sausage so the tortilla does not get greasy. This is the best classic version to make first.
Bacon Breakfast Burrito
Cook bacon until crisp, chop it, and pair it with eggs, hash browns, and cheddar. Bacon works especially well with chipotle crema, hot sauce, or a small spoonful of salsa.
Chorizo Breakfast Burrito
Chorizo brings spice and richness. Cook it fully, drain off extra fat, and balance it with eggs, potatoes, cheese, and salsa verde. Because chorizo is strongly seasoned, taste before adding extra salt.
Steak and Egg Breakfast Burrito
Use thinly sliced cooked steak or leftover steak with eggs, potatoes, cheese, and salsa roja. This version feels more filling and higher-protein, so it works well as a brunch or post-workout breakfast.
Chicken Breakfast Burrito
Use chicken sausage, shredded cooked chicken, or chopped grilled chicken with eggs, potatoes, cheese, and avocado crema. Since chicken has a milder flavor than bacon or chorizo, season the potatoes and sauce well.
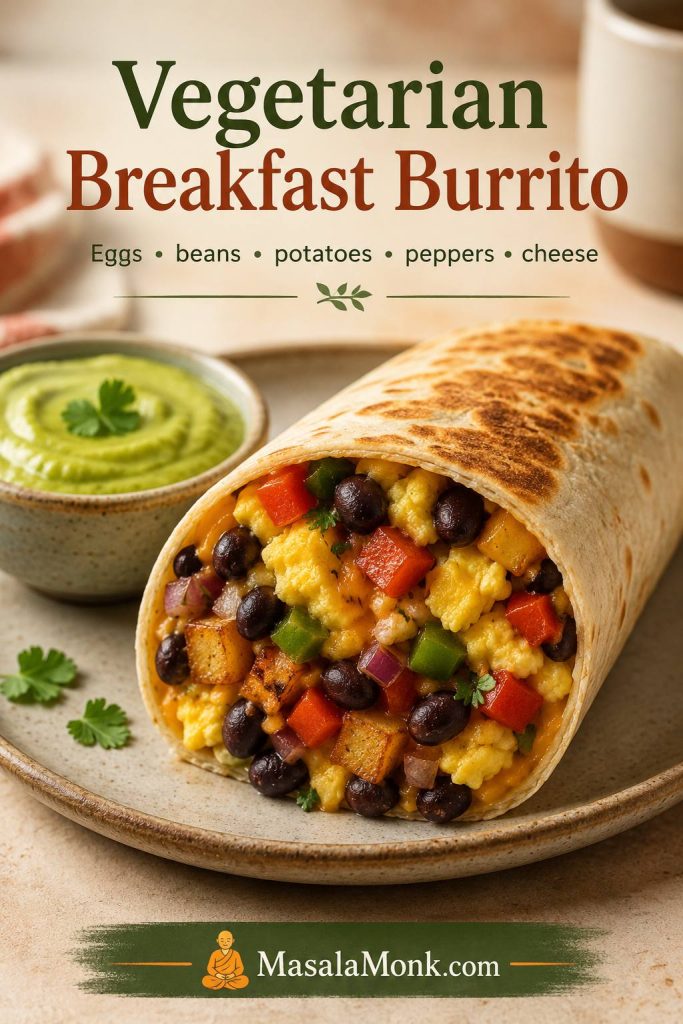
Vegetarian Breakfast Burrito
Use eggs, black beans or pinto beans, crisp potatoes, peppers, onions, cheese, and salsa. The beans replace meat while adding protein, fiber, and a creamy texture against the browned potatoes.
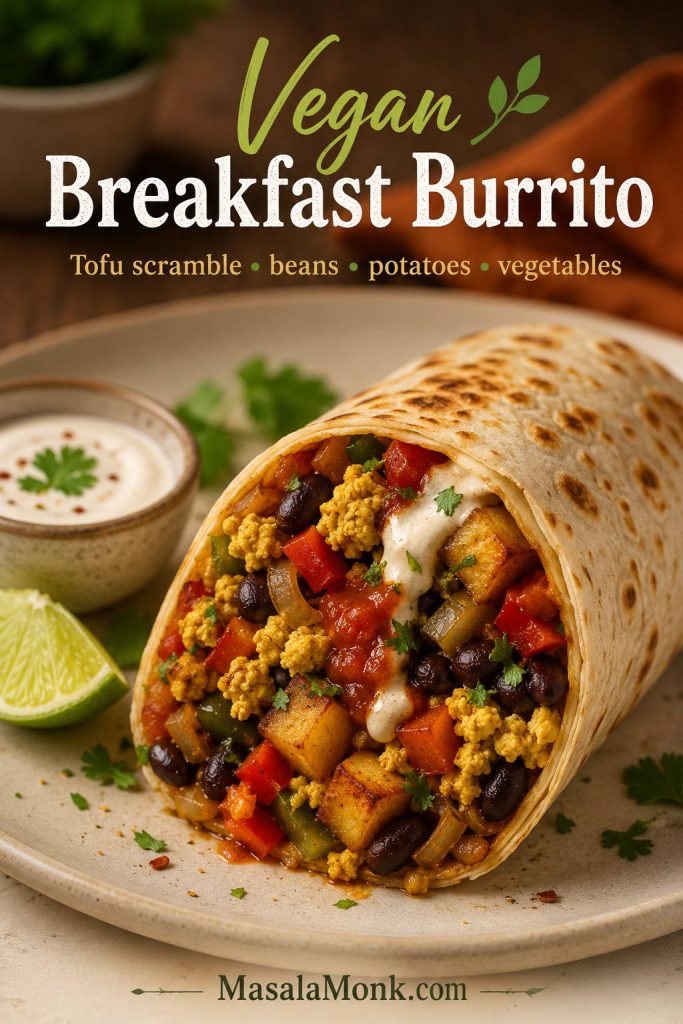
Vegan Breakfast Burrito
Use tofu scramble instead of eggs, then add black beans, crisp potatoes, salsa, sautéed peppers, onions, and vegan cheese or cashew queso. If freezing, keep avocado and fresh greens out of the burrito and add them after reheating. For more savory plant-based breakfast ideas, MasalaMonk’s guide to using tofu instead of eggs is a natural companion.
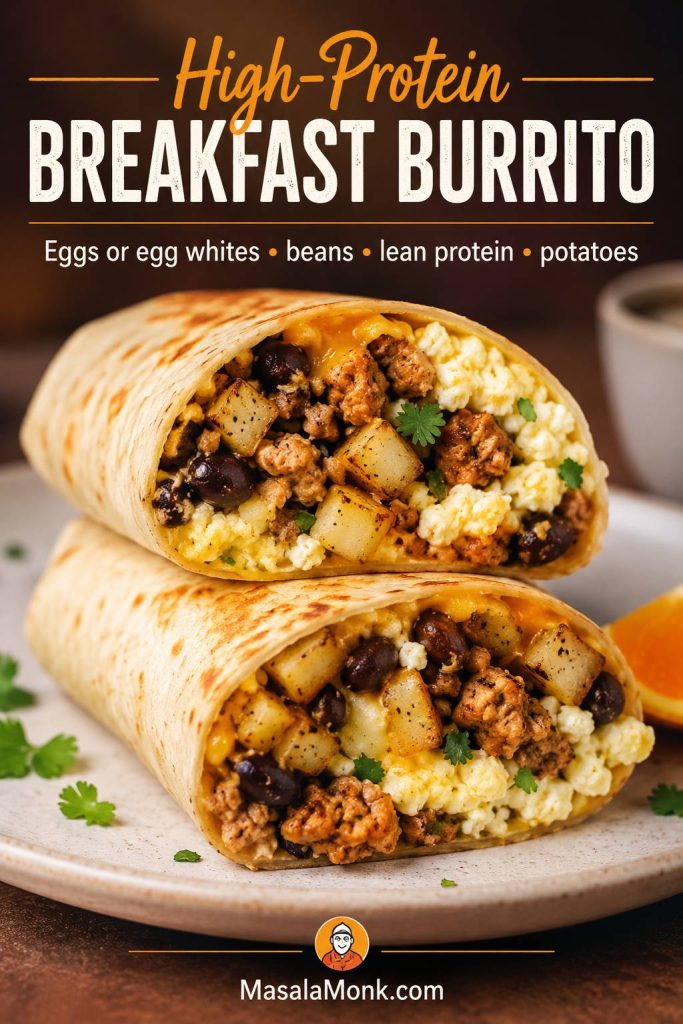
High-Protein Breakfast Burrito
For a high-protein breakfast burrito, use extra eggs or egg whites, black beans, turkey sausage, chicken sausage, steak, tofu scramble, or cottage cheese-enriched eggs. Still, keep the potatoes if you want the burrito to taste like breakfast instead of a plain protein wrap.
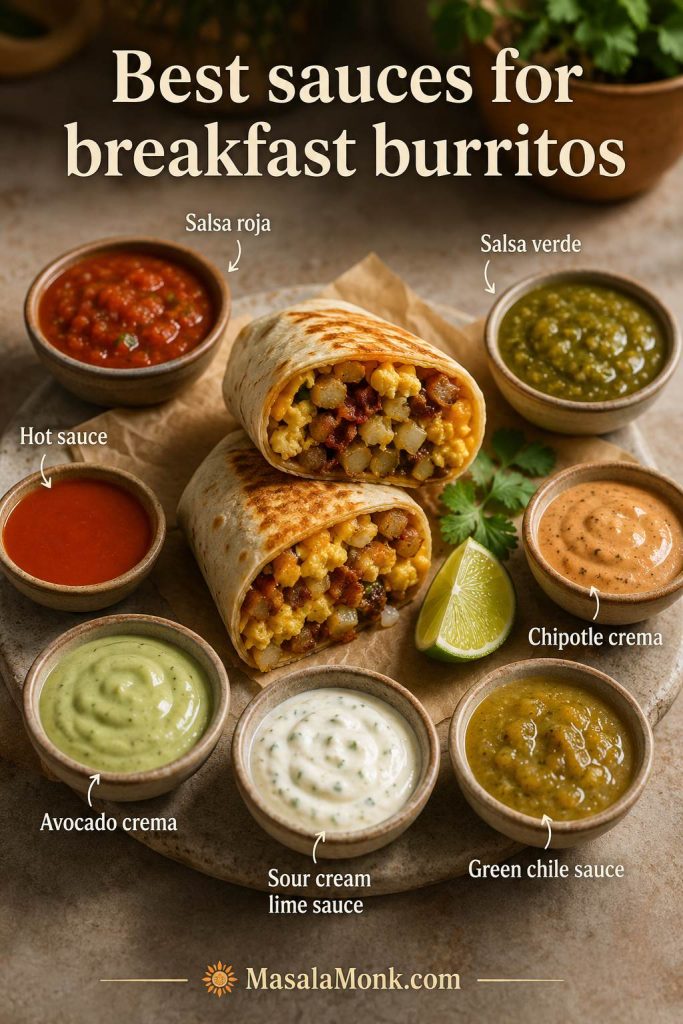
Best Sauces for Breakfast Burritos
A dry breakfast burrito tastes like meal prep. A good sauce makes it feel like breakfast you actually wanted. The trick is using enough salsa, crema, or hot sauce to brighten the eggs and potatoes without making the tortilla wet.
This recipe works with several sauces, so choose based on the filling. For example, chorizo is great with salsa verde, bacon works beautifully with chipotle crema, and vegetarian burritos taste brighter with avocado crema or salsa.
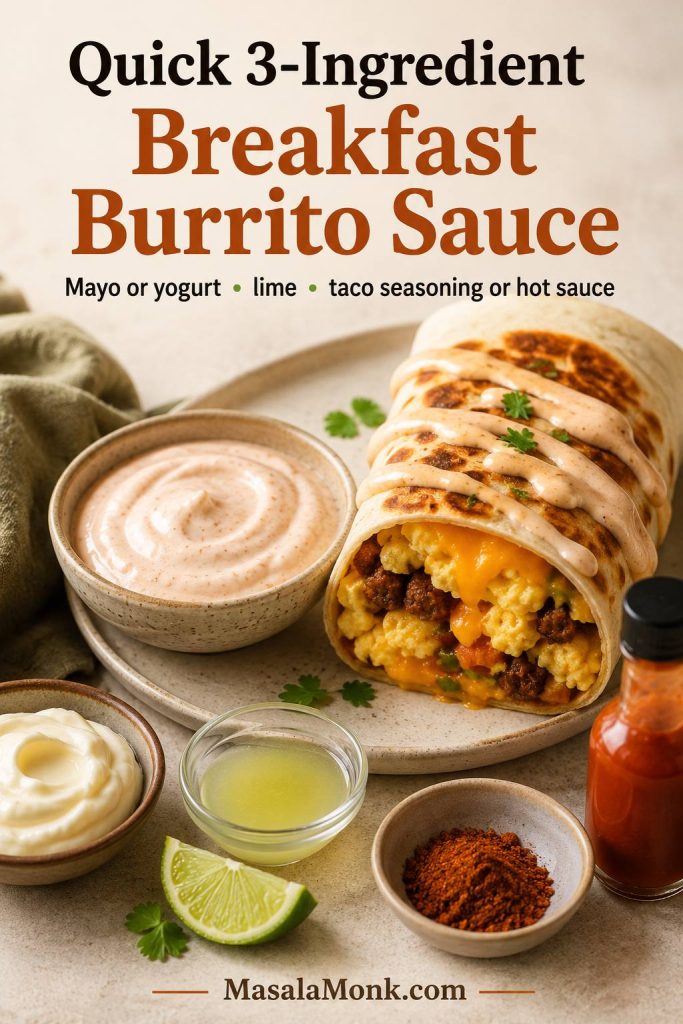
Quick 3-Ingredient Breakfast Burrito Sauce
For the fastest sauce, stir together 3 tablespoons mayonnaise or Greek yogurt, 1 tablespoon lime juice, and 1–2 teaspoons taco seasoning or hot sauce. It is not as smoky as chipotle crema, but it gives the burrito a creamy, tangy finish in less than 2 minutes.
| Sauce | Best With | Use Inside or On the Side? |
|---|---|---|
| Salsa roja | Sausage, bacon, steak, eggs | Lightly inside fresh burritos; side for freezer burritos |
| Salsa verde | Chorizo, potatoes, vegetarian burritos | Best on the side or added after reheating |
| Hot sauce | Almost any breakfast burrito | Inside or on the side, but use lightly |
| Chipotle crema | Bacon, hash browns, chicken, steak | Side for freezer burritos |
| Avocado crema | Vegetarian, chicken, spicy burritos | Add after reheating for best texture |
| Sour cream lime sauce | Classic egg and potato burritos | Fresh serving only; not ideal inside freezer burritos |
| Green chile sauce | Egg, potato, sausage, and cheese burritos | Best spooned over or served on the side |
For an egg-free creamy sauce, use thick yogurt, sour cream, or an egg-free mayo base. MasalaMonk’s eggless mayonnaise recipe is a useful starting point if you want a creamy breakfast burrito sauce without using eggs in the condiment.
Quick Chipotle Crema for Breakfast Burritos
For a smoky creamy sauce, mix 1 cup Greek yogurt, sour cream, or crema with 1 minced chipotle pepper in adobo, 1 tablespoon adobo sauce, 2 teaspoons lime juice, ¼ teaspoon garlic powder, and salt to taste. Blend for a smooth sauce or whisk if the chipotle is finely minced. If you like building sauces from a creamy base, MasalaMonk’s homemade mayo guide has more spicy mayo and garlic mayo ideas that can be adapted for burritos.
How to Make a Healthy or High-Protein Breakfast Burrito
A high-protein breakfast burrito should still taste like breakfast, not like a dry protein wrap. Keep the potatoes or hash browns for texture, then build more protein around them with eggs, egg whites, beans, turkey sausage, chicken sausage, steak, tofu scramble, or cottage cheese-enriched eggs.
For a lighter version, use whole eggs plus egg whites, add black beans or pinto beans, choose turkey sausage or chicken sausage, use a whole-wheat or high-fiber tortilla, and keep the sauce bright rather than heavy. A little sharp cheddar can also give more flavor than a lot of mild cheese.
High-protein formula: Use 1 whole egg + 2 egg whites, ¼–½ cup beans, 2–3 oz lean meat or tofu, ¼ cup cheese or cottage cheese, and ½ cup potatoes or vegetables per burrito.
| Goal | Best Move |
|---|---|
| More protein | Add egg whites, black beans, turkey sausage, chicken sausage, steak, tofu scramble, or cottage cheese-enriched eggs. |
| Lower calories | Use less cheese, lean protein, more peppers and onions, and sauce on the side. |
| More fiber | Add black beans, pinto beans, a whole-wheat tortilla, spinach, peppers, or onions. |
| Still satisfying | Keep about ½ cup potatoes or hash browns instead of removing the carb layer completely. |
A higher-protein burrito works well with 2 eggs or 1 egg plus egg whites per burrito, ¼–½ cup beans, and turkey sausage, chicken sausage, steak, tofu scramble, or cottage cheese-enriched eggs. If you are building more protein-focused breakfasts across the week, this high-protein oatmeal guide gives another breakfast format using oats, yogurt, egg whites, cottage cheese, tofu, or protein powder.
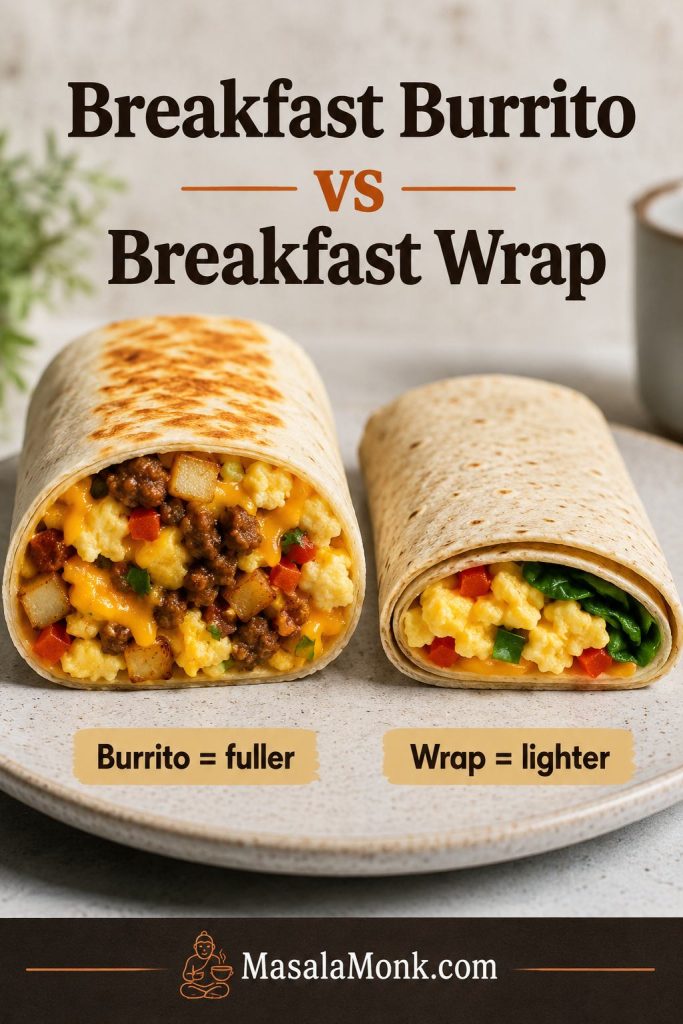
Breakfast Burrito vs Breakfast Wrap
A breakfast burrito is usually larger, fuller, and folded closed on both ends. It often includes eggs, potatoes or hash browns, cheese, and a hearty filling. A breakfast wrap is usually lighter, flatter, and easier to toast, with fewer fillings or a more sandwich-like shape.
A lighter breakfast wrap works best with less potato, less cheese, a thinner layer of eggs, and a smaller amount of filling. A true breakfast burrito needs a large tortilla and enough filling so every bite has eggs, potatoes, cheese, and something flavorful. If you are deciding between a burrito, wrap, toast, or egg-and-cheese build, MasalaMonk’s breakfast sandwich ideas can help you choose a smaller, faster format for busy mornings.
Breakfast Burrito Troubleshooting
When breakfast burritos go wrong, it is usually not because the idea is bad. It is usually one of three things: too much moisture, a cold or small tortilla, or fillings that were overcooked before they ever went inside. Once you know which one caused the problem, the fix is usually simple.
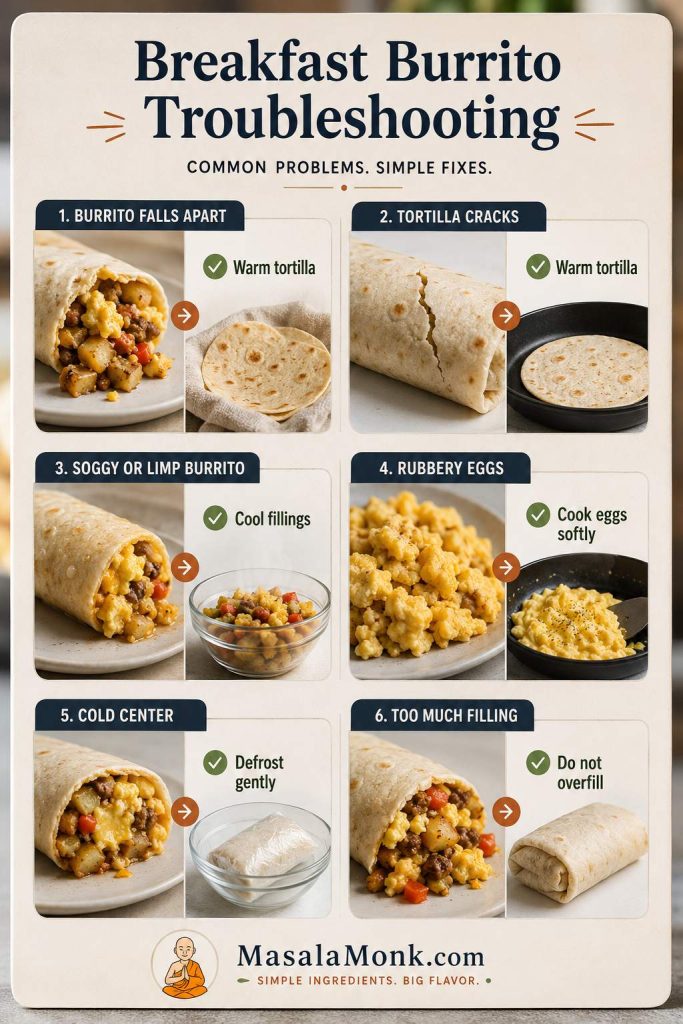
| Problem | Likely Cause | Fix |
|---|---|---|
| Burrito falls apart | Too much filling or tortilla too small | Use a 10–12 inch tortilla and keep filling in a narrow strip. |
| Tortilla cracks | Cold or dry tortilla | Warm under a damp paper towel for 15–30 seconds before folding. |
| Burrito turns wet or limp | Hot filling, watery salsa, or wet toppings inside | Cool fillings first and keep sauce, sour cream, and avocado on the side. |
| Eggs turn rubbery | Eggs overcooked before folding or overheated during reheating | Cook eggs softly and reheat gently. |
| Potatoes are mushy | Pan overcrowded or potatoes under-browned | Cook in a thin layer until golden before adding to burritos. |
| Filling tastes bland | Only the eggs were seasoned | Season potatoes, eggs, and protein separately. |
| Cheese does not melt | Cheese added too late or filling not warm enough | Add cheese first, then warm fillings, and toast the burrito. |
| Frozen burrito is cold in the center | Outside heated faster than the middle | Defrost first, microwave at lower power, or oven-reheat longer. |
| Tortilla gets chewy in microwave | Over-microwaved or uncovered | Use a damp paper towel and finish in a skillet for better texture. |
| Burrito feels too bulky | Too much potato or filling | Use about ½ cup potatoes and ¼–½ cup protein or beans per tortilla. |
What to Serve with Breakfast Burritos
Breakfast burritos are filling enough on their own, but the right sides make them feel more complete. Serve them with salsa, hot sauce, avocado, fruit, roasted potatoes, a simple salad, or extra beans. For brunch, add lime wedges, pickled onions, sliced jalapeños, or a bowl of chipotle crema for dipping.
If you are serving a crowd, keep the burritos warm in a low oven, then set out sauces and toppings separately. This keeps the tortillas from softening too much and lets everyone choose their own heat level.
Storage, Freezing, and Reheating
Leftover breakfast burritos keep well in the refrigerator for 3–4 days. For longer storage, wrap them individually and freeze them for best quality within 2–3 months.
In the fridge, wrap each burrito in foil or parchment and keep it in an airtight container. For the freezer, wrap each cooled burrito tightly, then place the wrapped burritos in a freezer bag. After that, reheat until hot throughout and add sauce, avocado, sour cream, or fresh salsa only after warming.
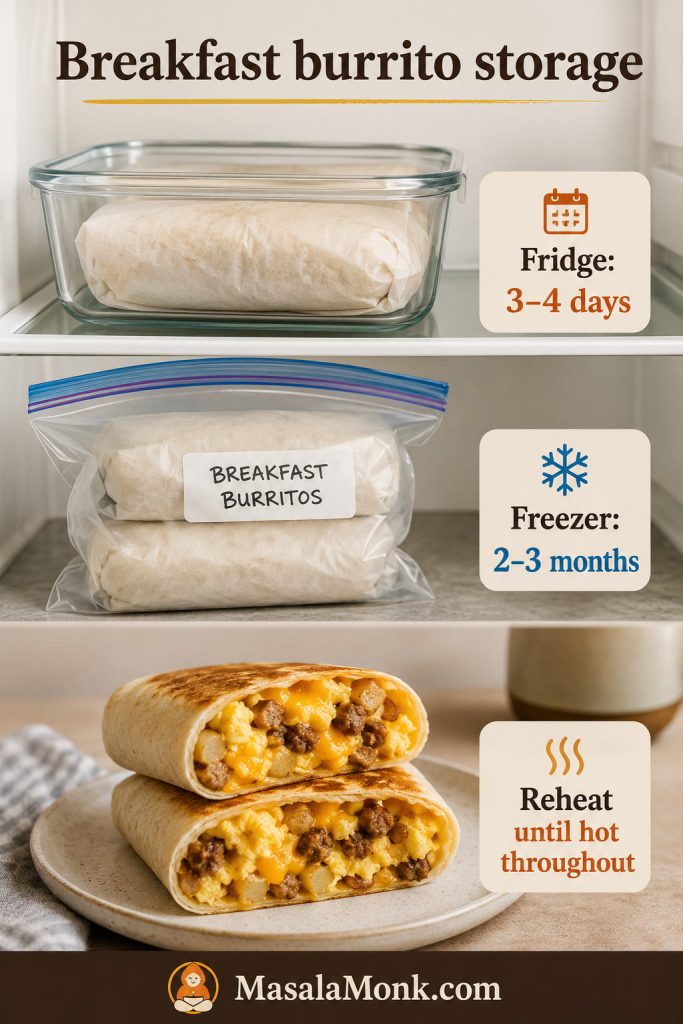
This recipe is best when reheated gently rather than blasted on high heat from frozen. For a broader reference on refrigerator and freezer timing across eggs, cooked dishes, meats, and prepared foods, the FoodSafety.gov cold food storage chart is also useful.
Best make-ahead move: Freeze the burritos without wet toppings, then serve with salsa, crema, hot sauce, avocado, or pico de gallo after reheating.
Once you understand the formula, breakfast burritos become one of the easiest breakfasts to repeat: warm tortilla, soft eggs, crisp potatoes, melted cheese, a flavorful filling, and sauce used smartly. Make them fresh when you want a hot skillet breakfast, or wrap a batch for the freezer so a real breakfast is ready on busy mornings instead of another rushed compromise.
Final Breakfast Burrito Serving Idea
When you are ready to serve, keep the burrito warm and add the fresh toppings at the end. Salsa, avocado, crema, hot sauce, lime, or pico de gallo all taste better when they finish the burrito instead of sitting inside during storage.
FAQs
What goes in a breakfast burrito?
A classic breakfast burrito recipe usually includes a large flour tortilla, scrambled eggs, potatoes or hash browns, cheese, and a filling such as sausage, bacon, chorizo, beans, peppers, onions, steak, chicken, or vegetables. Salsa or sauce is usually served inside lightly or on the side.
What size tortilla is best for breakfast burritos?
For most home cooks, 10 inches is the smallest size I would use for a proper breakfast burrito. A 12-inch tortilla is easier if you like a generous filling or are still learning to fold tightly. Smaller tortillas usually crack, tear, or leave the ends open.
Do breakfast burritos need potatoes or hash browns?
Potatoes are not required, but they make breakfast burritos more filling and give the inside better texture. Diced potatoes, shredded hash browns, hash brown patties, tater tots, and leftover roasted potatoes all work.
How do you keep breakfast burritos from getting soggy?
The biggest fix is moisture control. Let hot fillings cool before wrapping, use cheese as the first layer, and keep watery salsa, sour cream, avocado, raw tomato, and wet sauces on the side if the burritos are going into the fridge or freezer.
Should salsa go inside a breakfast burrito?
A small spoonful of salsa can go inside a fresh burrito. For freezer burritos, keep salsa on the side and add it after reheating so the tortilla does not turn wet.
How do you fold a breakfast burrito?
Warm the tortilla first, place the filling in a narrow strip, fold the sides inward, pull the bottom flap over the filling, tuck it tightly, and roll forward. Then, toast seam-side down to help seal it.
Should you toast a breakfast burrito?
Toasting improves the texture and helps seal the fold. Place the burrito seam-side down in a skillet and cook for 1–2 minutes per side until the outside is lightly golden.
How long do breakfast burritos last in the fridge?
Breakfast burritos keep well in the refrigerator for 3–4 days when wrapped and stored in an airtight container. After reheating, add fresh toppings like avocado, sour cream, or salsa.
How do you freeze breakfast burritos?
Cool the fillings first, assemble the burritos without wet toppings, wrap each one tightly in parchment or foil, then place them in a freezer bag or airtight container. Label with the date and use within 2–3 months for best texture.
What should you leave out of freezer breakfast burritos?
Leave out fresh avocado, guacamole, sour cream, watery salsa, pico de gallo, lettuce, and raw tomato. These are better added after reheating because they can turn watery or mushy in the freezer.
How do you reheat frozen breakfast burritos?
The fastest method is to remove the foil, wrap the burrito in a paper towel, defrost it in the microwave at 50% power, and then heat until hot. For better texture, warm it first and then crisp it in a skillet. When reheating several burritos, the oven gives more even heat.
How do you make a high-protein breakfast burrito?
Use more eggs or egg whites, add black beans, choose turkey sausage, chicken sausage, steak, tofu scramble, or cottage cheese-enriched eggs, and use a higher-fiber tortilla. Keep the potatoes if you still want it to feel like a real breakfast burrito.
How do you make a vegetarian breakfast burrito?
Use scrambled eggs, black beans or pinto beans, crisp potatoes or hash browns, sautéed peppers and onions, cheese, and salsa. Together, beans and potatoes keep the burrito filling even without meat.
What sauce is best for breakfast burritos?
Salsa, hot sauce, chipotle crema, avocado crema, green chile sauce, and sour cream lime sauce all work well. For freezer burritos, serve sauce on the side or add it after reheating.
What is the difference between a breakfast burrito and a breakfast wrap?
A breakfast burrito is usually larger, fuller, and folded closed, often with eggs, potatoes, cheese, and a hearty filling. A breakfast wrap is often lighter, flatter, and easier to toast with fewer fillings.


