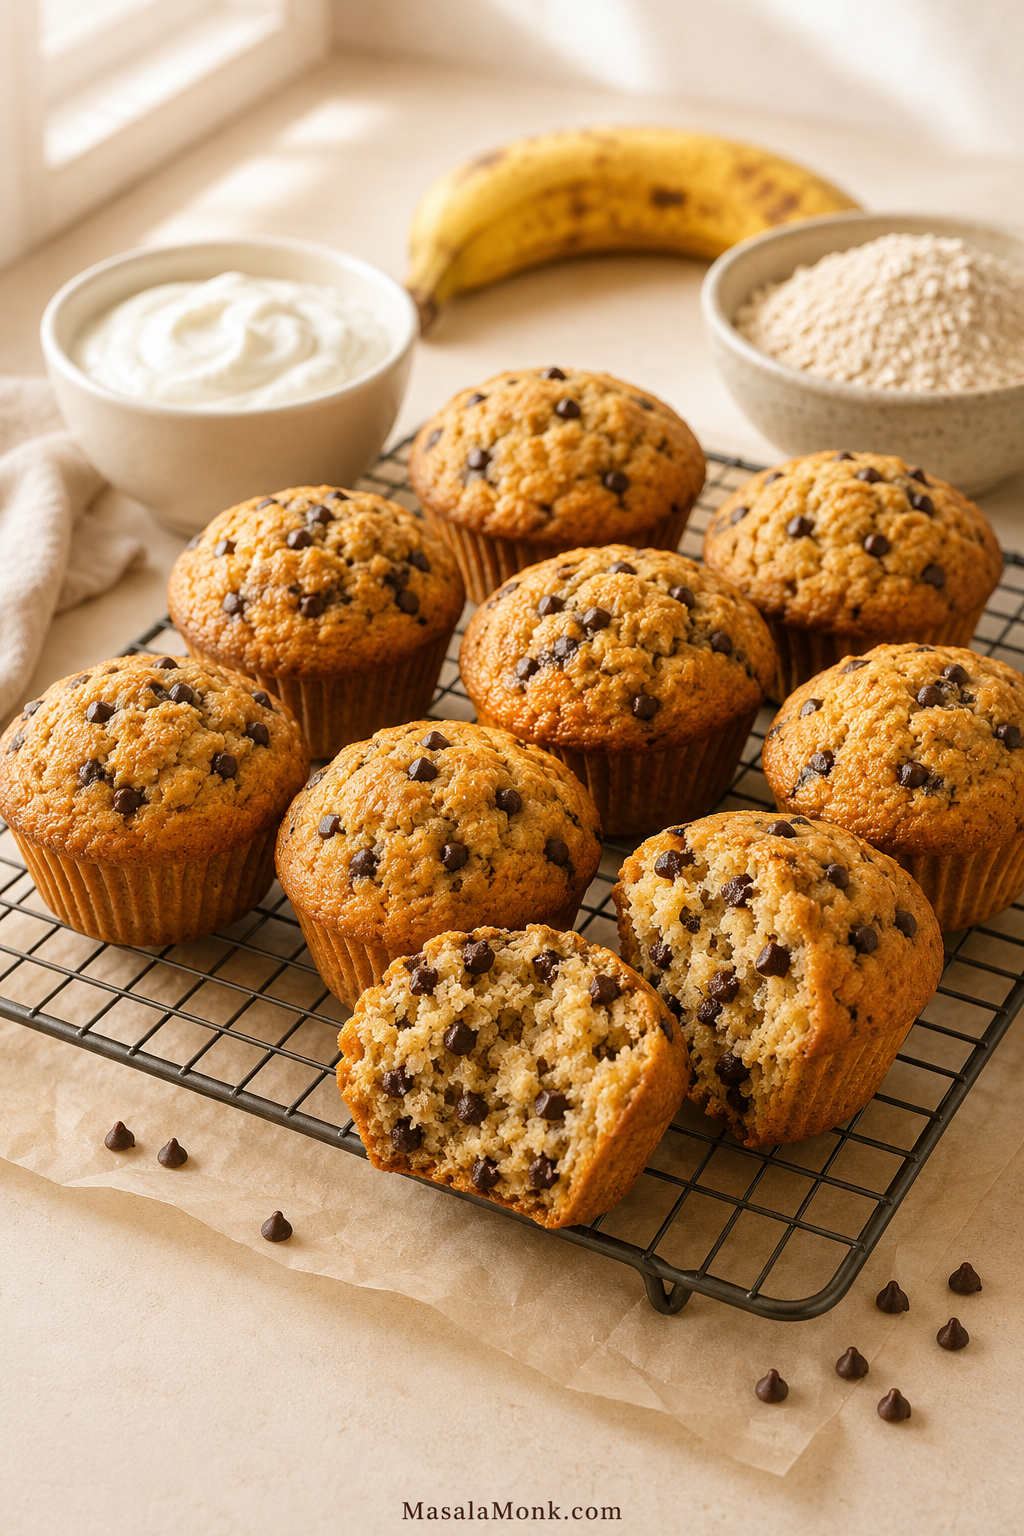
Too many high protein muffins sound better than they taste. They promise easy breakfast meal prep and extra protein, then come out dry, rubbery, chalky, or heavy enough to feel like a compromise. This recipe is built the other way around: soft first, moist first, useful first.
The goal is a muffin you actually want to eat with coffee, not a “healthy” muffin you tolerate because it has protein. Greek yogurt, a reasonable amount of protein powder, oat flour or whole wheat flour, and banana or applesauce all work together to keep the crumb tender.
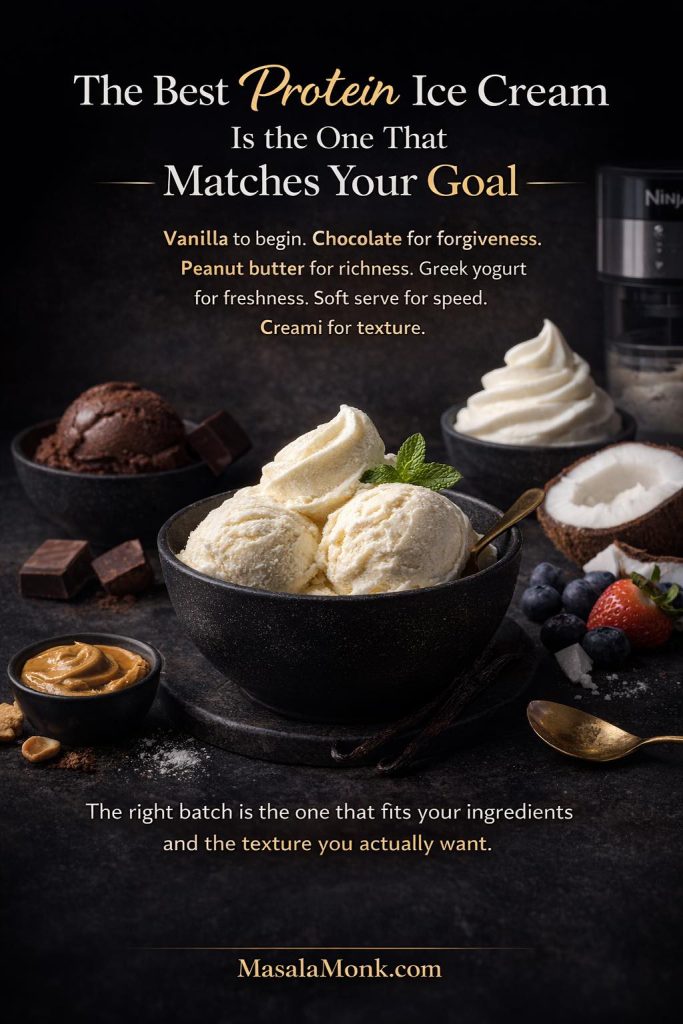
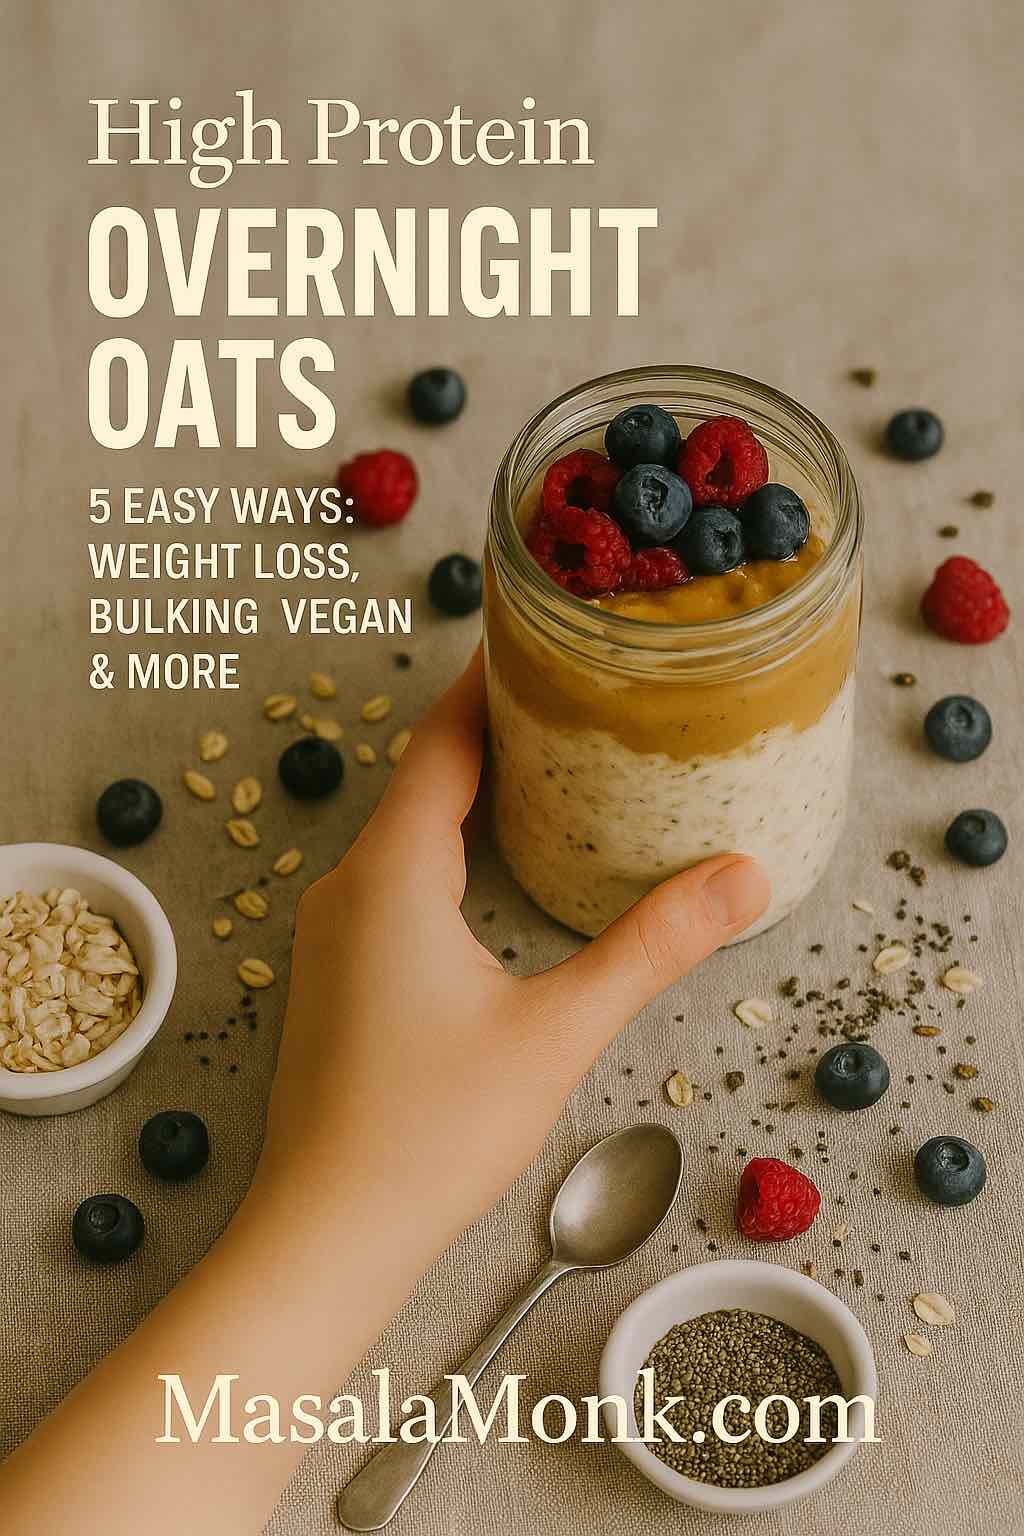
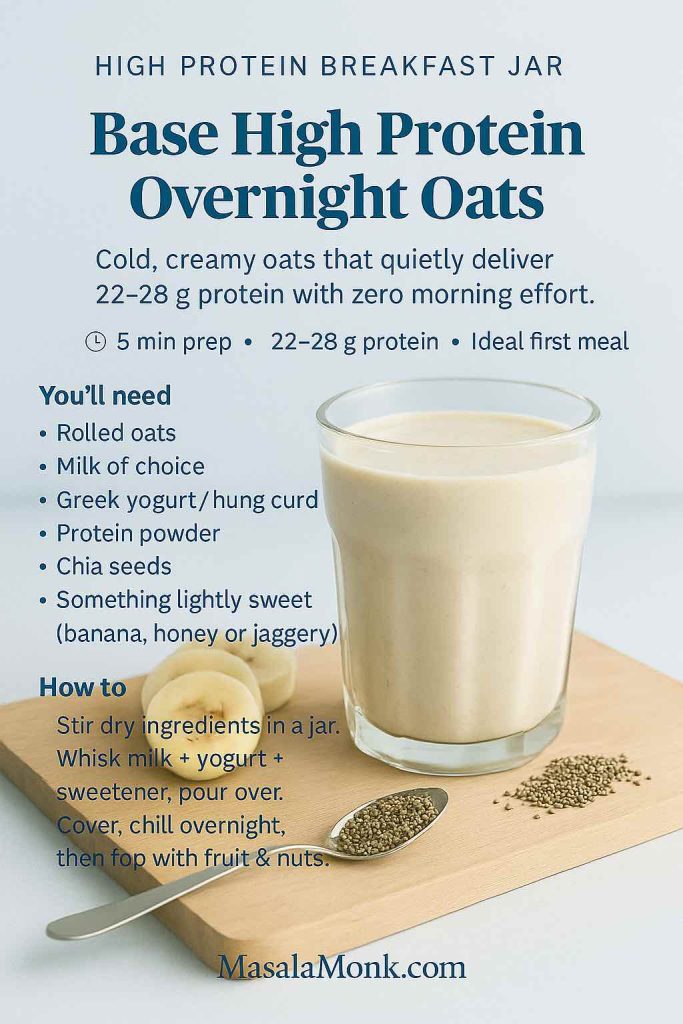
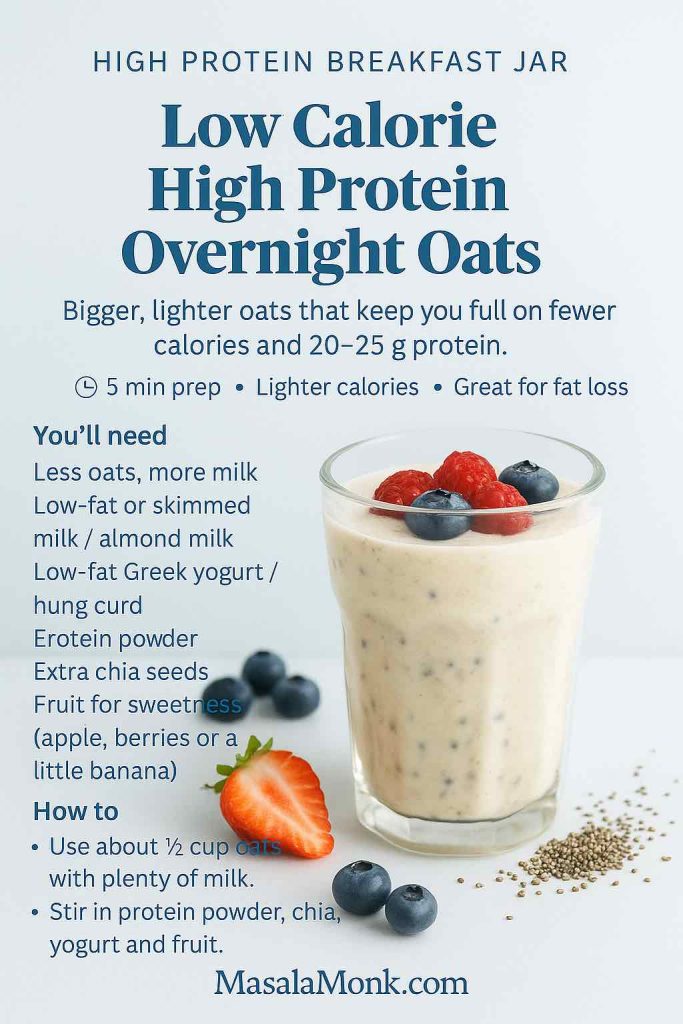
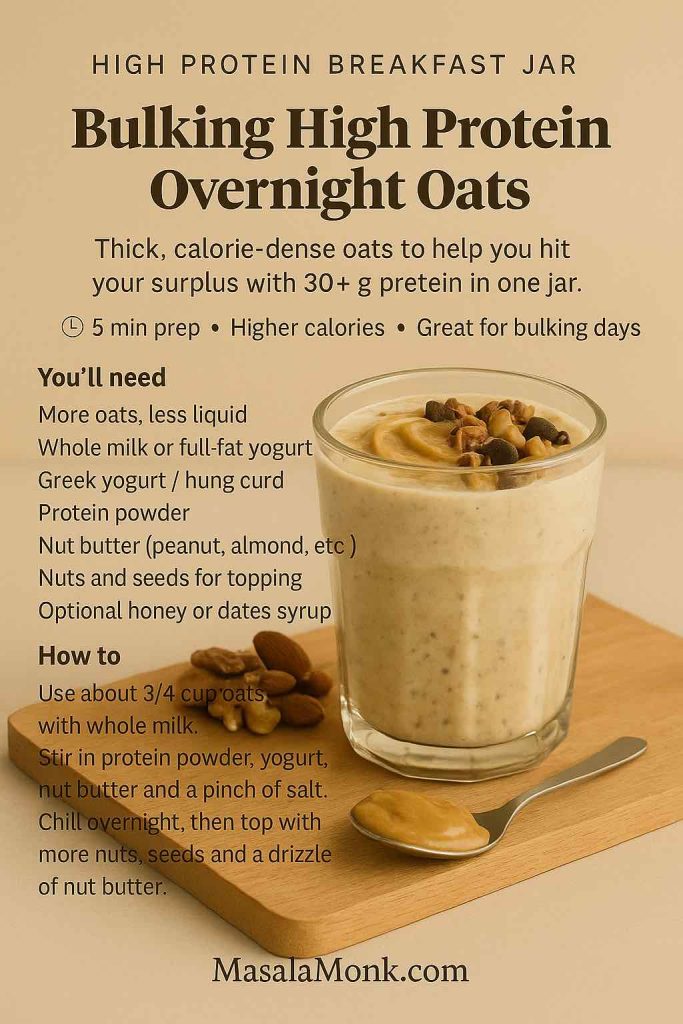
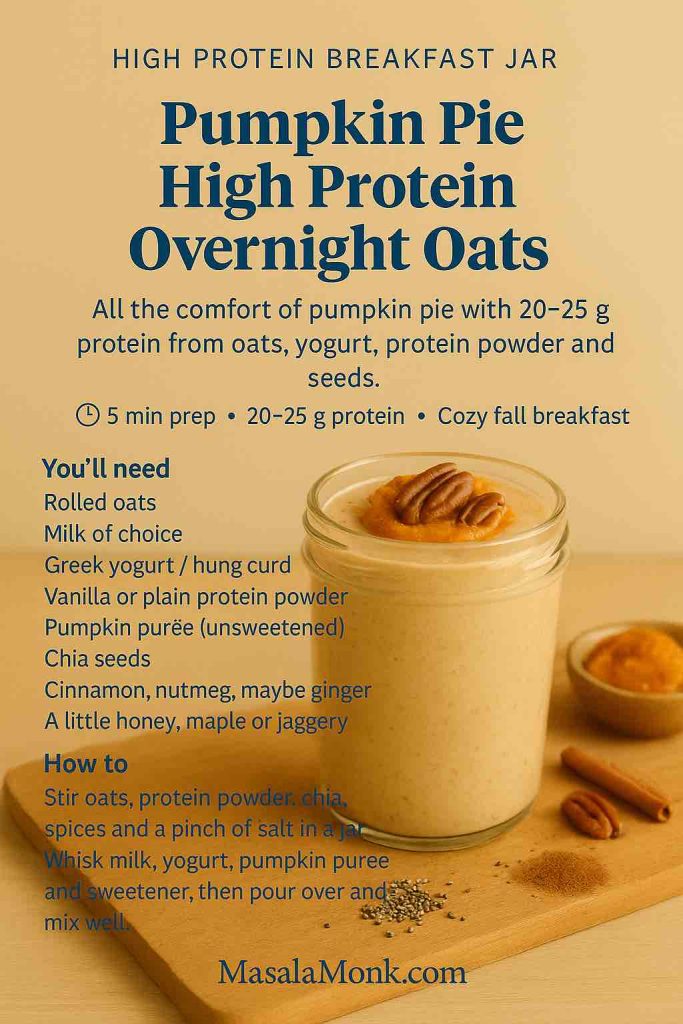
If you like make-ahead breakfasts in this same lane, you may also like these high protein overnight oats for a no-bake option.
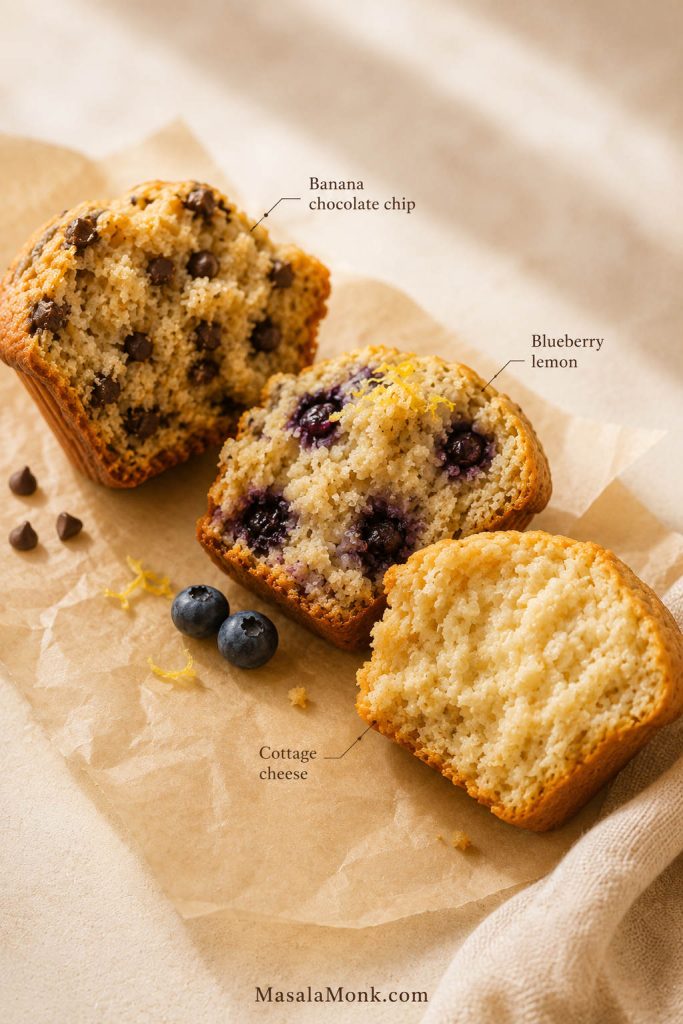
Use the base recipe once, then make it fit your mornings: banana chocolate chip when you want cozy, blueberry lemon when you want fresh, pumpkin when you want softer and spiced, or cottage cheese when you want extra moisture without relying only on protein powder.
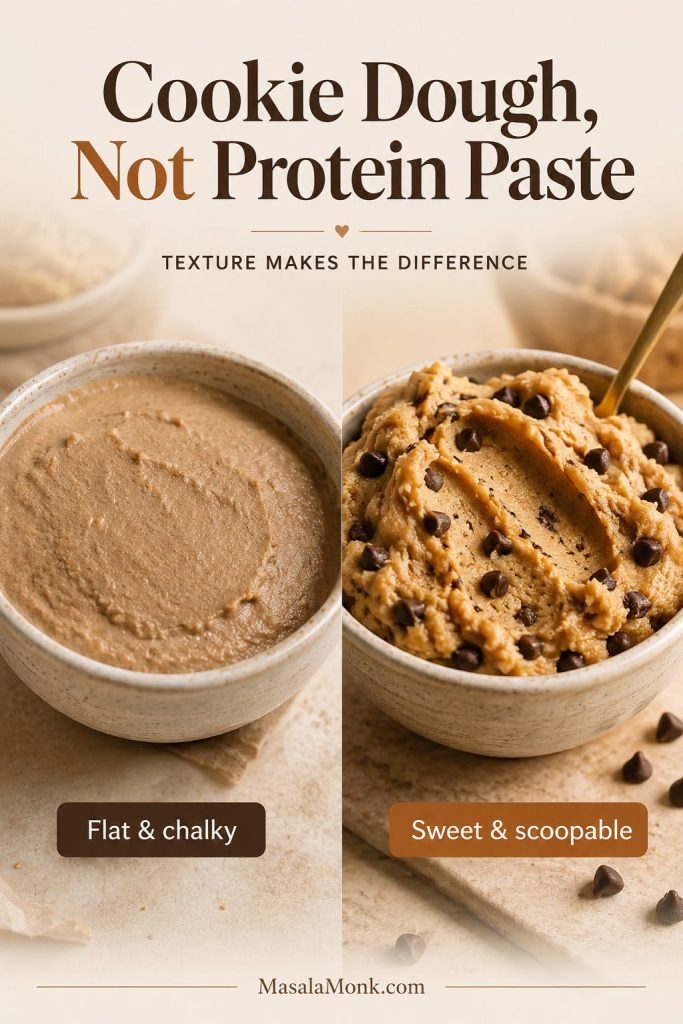
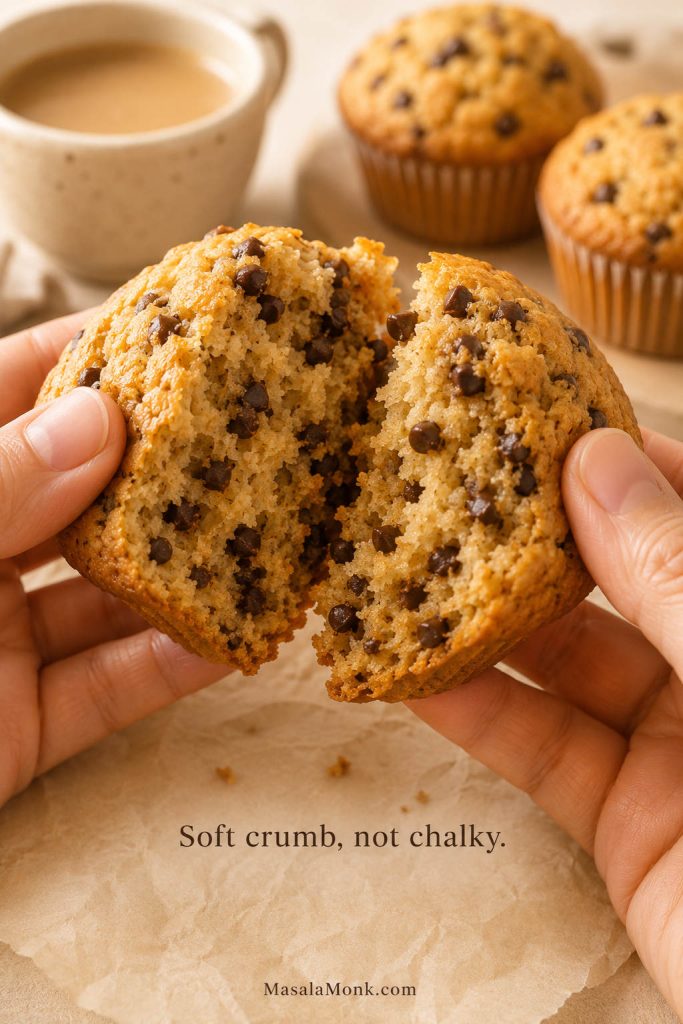
Soft Crumb, Not Chalky
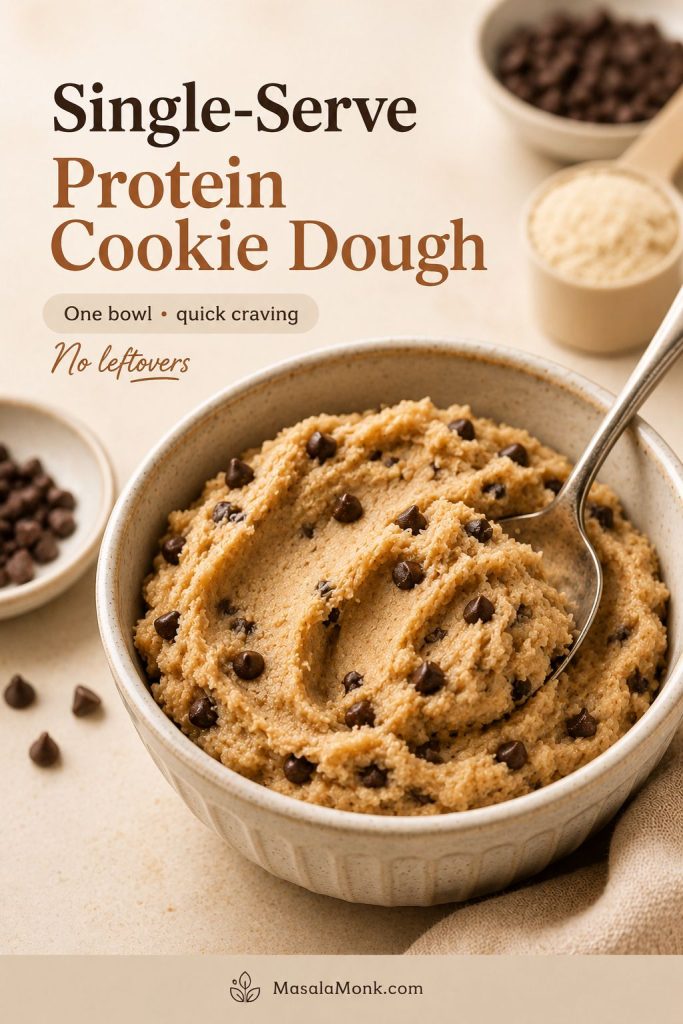
Jump to Recipe CardJump to Protein Powder TipsJump to Troubleshooting
Already know you want to bake? Use the jump button to go straight to the recipe card. If you want to avoid dry protein muffins, read the batter and protein powder notes first.
Table of Contents
Use this guide to make soft protein muffins, choose the right protein base, fix texture problems, and store them for easy breakfasts or snacks.
Variations & Storage
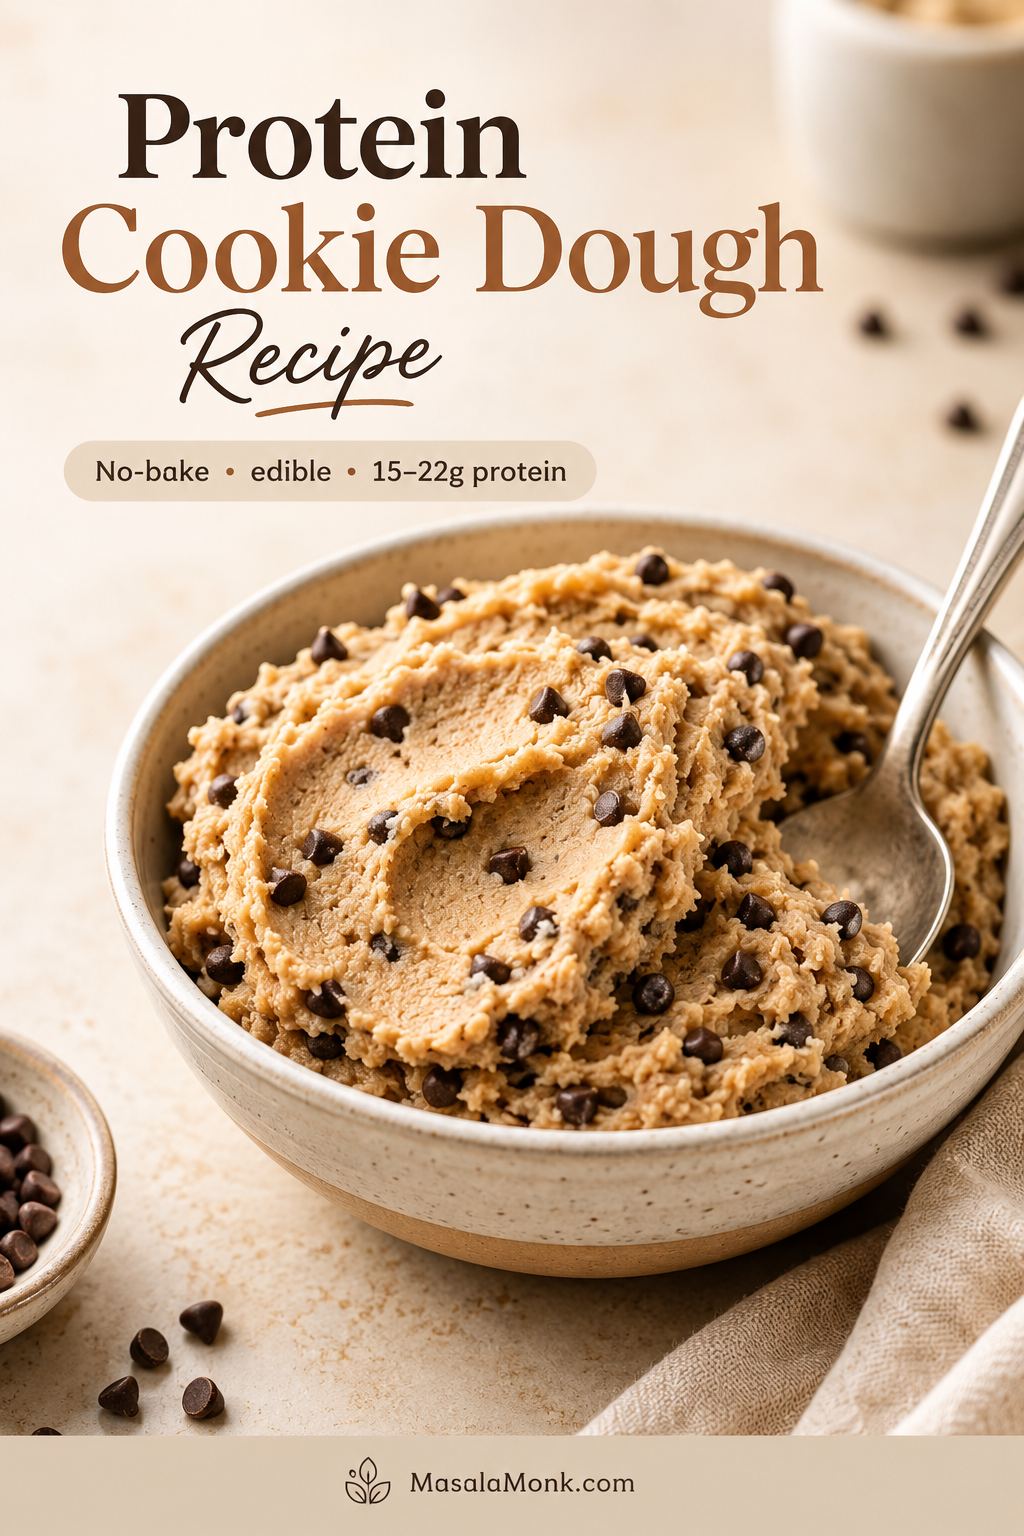
Quick Answer: How Do You Make High Protein Muffins?
To make high protein muffins, combine flour or oat flour, protein powder, Greek yogurt, eggs, banana or applesauce, a little maple syrup or honey, leavening, and enough milk to make a sturdy muffin batter. After that, bake in a lined muffin tin until the tops spring back lightly and a toothpick comes out clean or with a few moist crumbs.
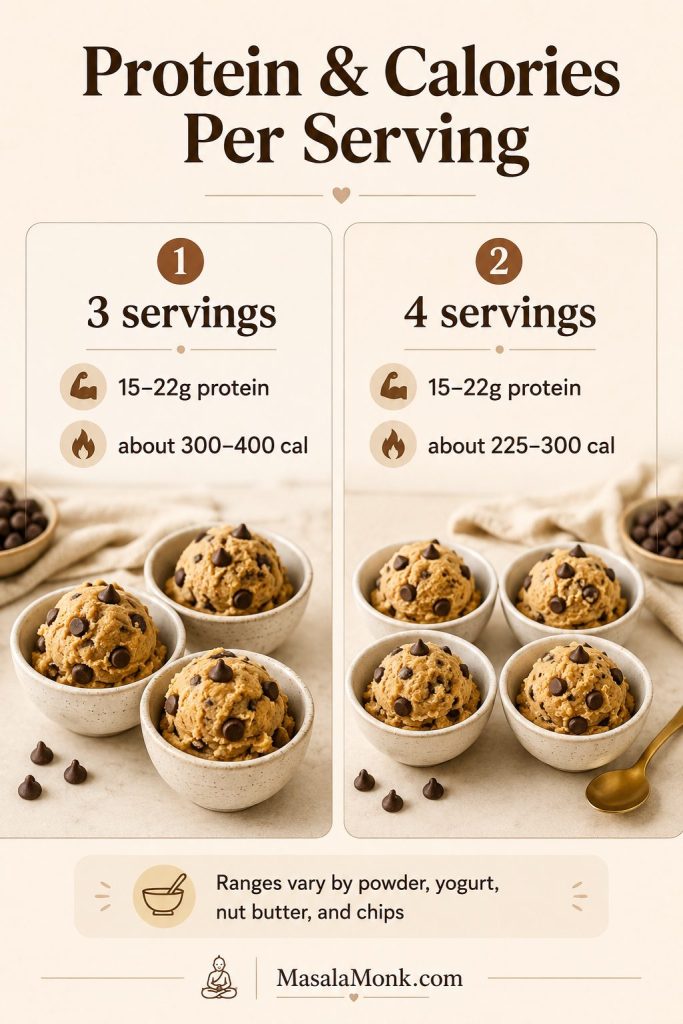
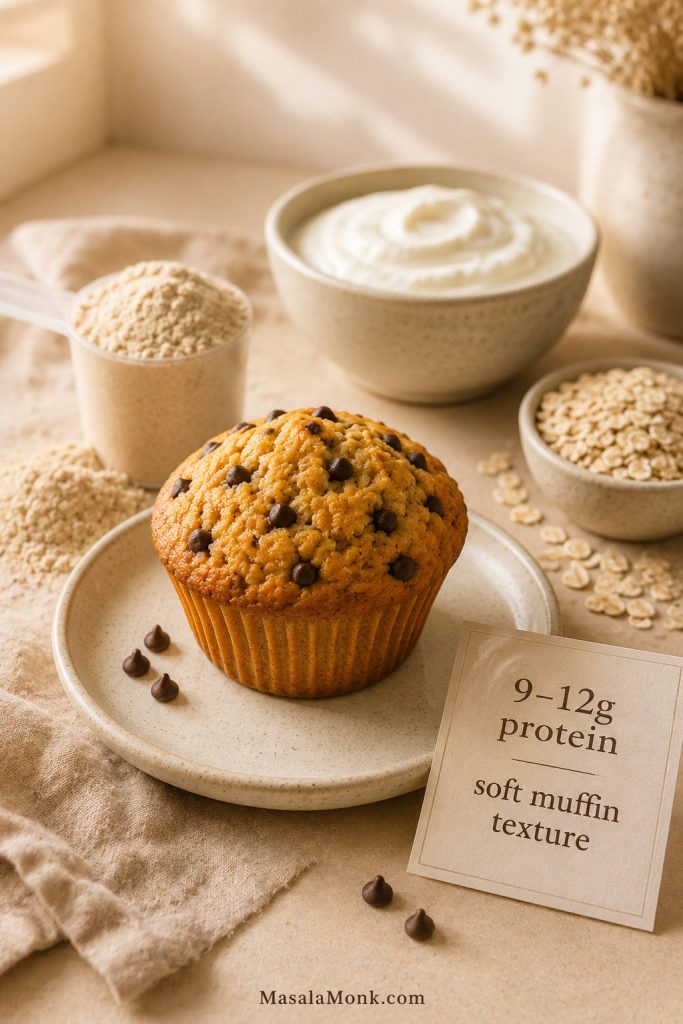
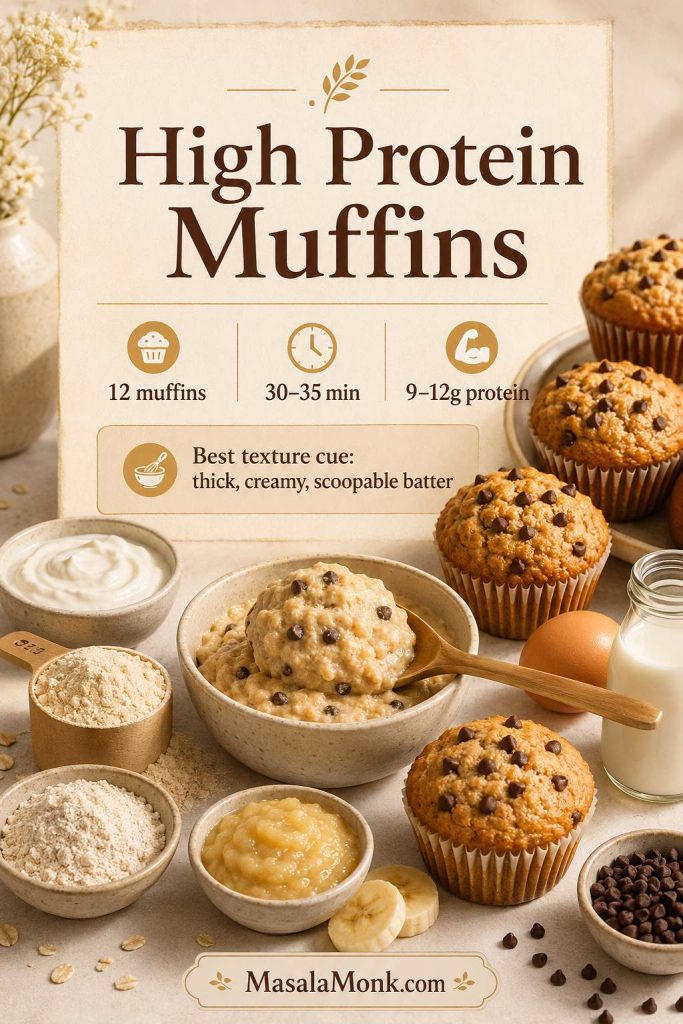
This recipe makes 12 muffins. The exact protein number depends on your protein powder, yogurt, flour, and mix-ins. Most batches land around 9–12 grams of protein per muffin, which makes them more filling without pushing the texture into dry, dense, or chalky territory.
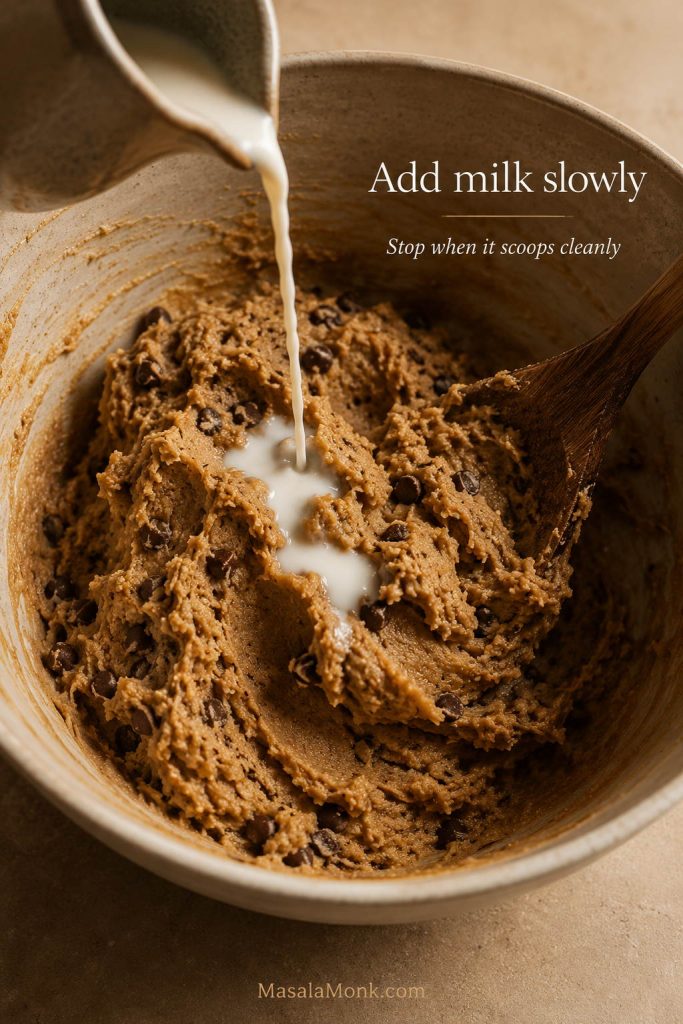
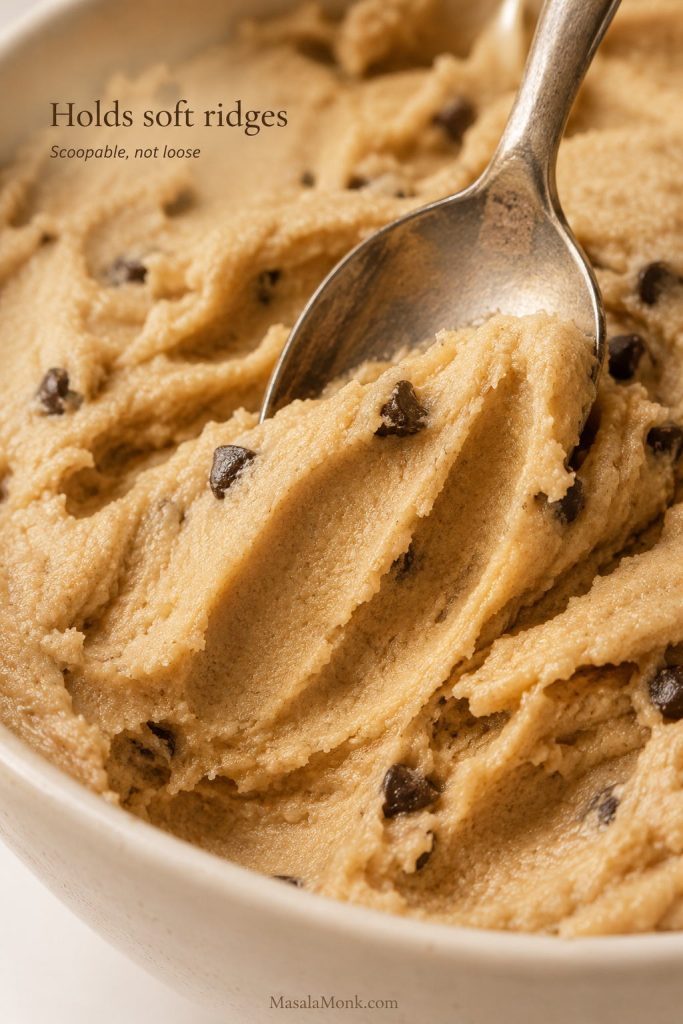
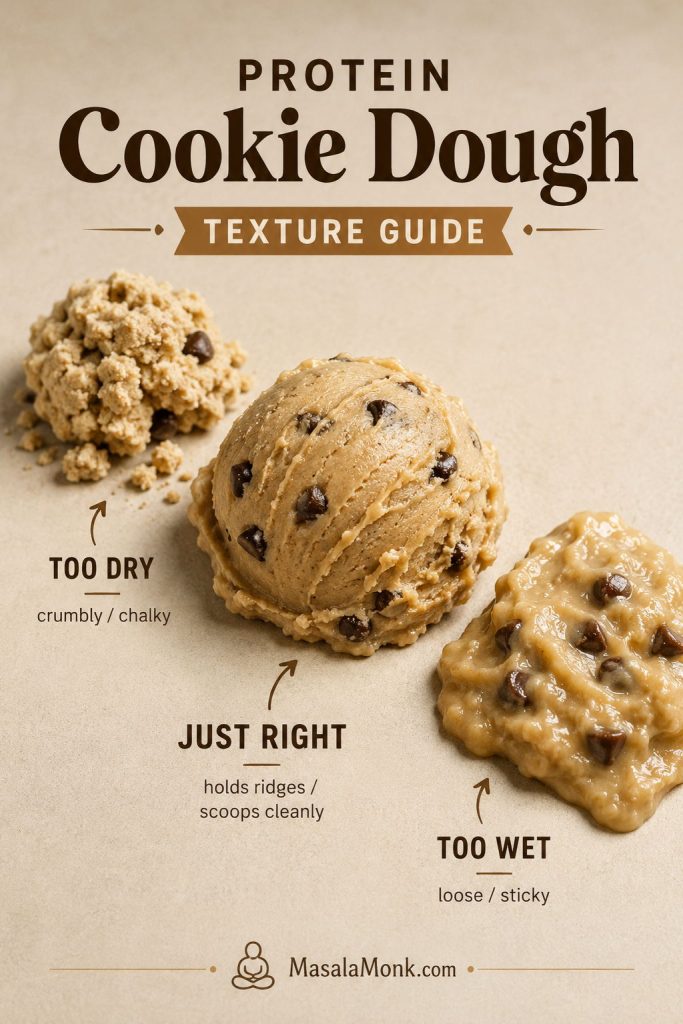
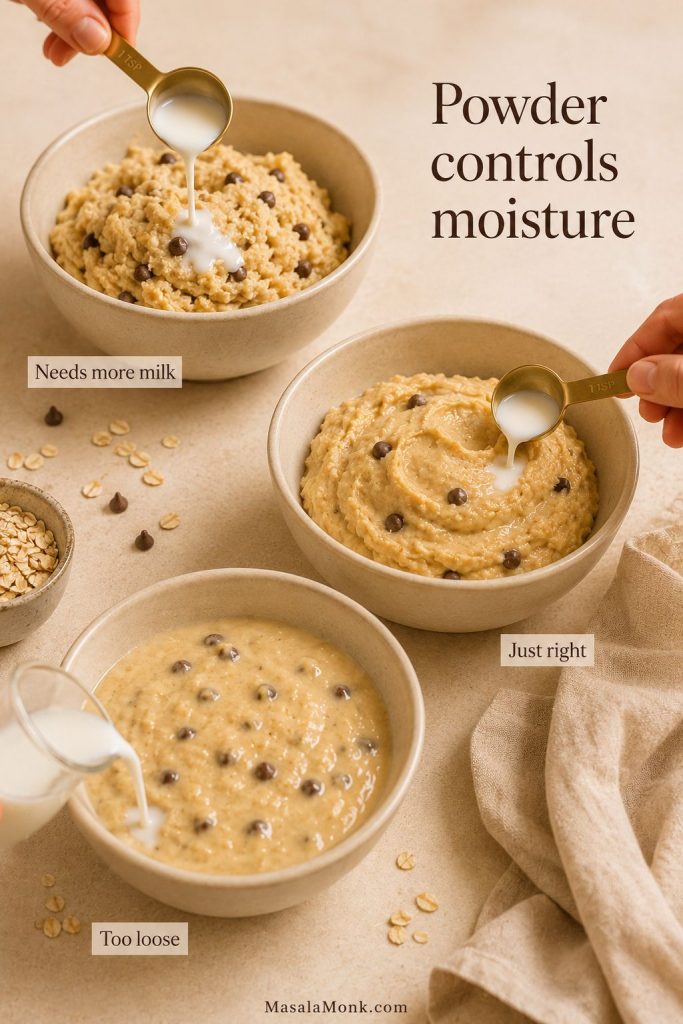
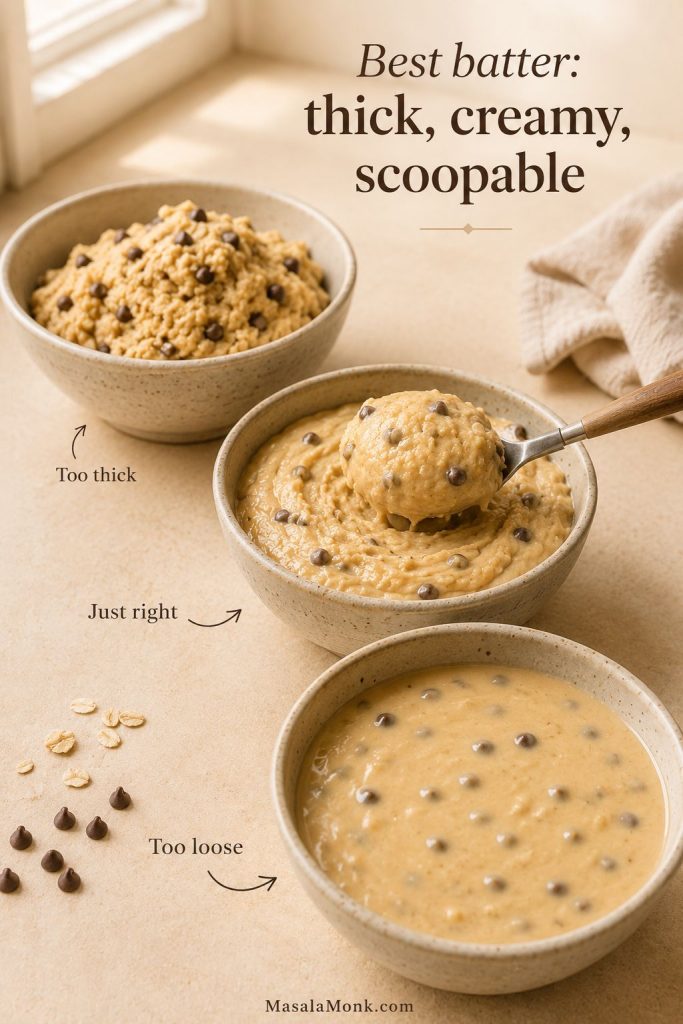
Texture rule: the batter should be thick enough to scoop, but not dry or crumbly. When it looks stiff, loosen it gradually with milk before baking.
If you are ready to bake, jump to the recipe card. If your past protein muffins turned dry or rubbery, read the protein powder tips and troubleshooting guide first.
High Protein Muffins at a Glance
| Yield | 12 muffins |
|---|---|
| Total time | About 30–35 minutes |
| Protein | About 9–12g per muffin, depending on protein powder, yogurt, flour, and mix-ins |
| Texture | Tender, lightly hearty, and muffin-like |
| Best first protein base | Greek yogurt + vanilla protein powder |
| Best no-powder path | Greek yogurt, cottage cheese, eggs, oats, nut butter, and seeds |
| Oven | 375°F / 190°C for 5 minutes, then 350°F / 175°C until done |
| Storage | Fridge 4–5 days, freezer up to 3 months |

What They Should Taste Like
These are not cupcake-style muffins, and they are not meant to taste like dry protein bars either. Instead, the crumb should be soft and lightly hearty, with enough moisture from Greek yogurt and banana or applesauce to keep each bite tender.
With banana, the muffins lean cozy and breakfast-like. Applesauce gives a more neutral base, which works better with blueberries, chocolate chips, lemon zest, or pumpkin spice. Either way, the muffin should feel satisfying without tasting like a protein powder project.
The best batch should feel like a real breakfast muffin first: warm, tender, lightly sweet, and satisfying enough that you would eat it even without counting the protein. If you add mini chocolate chips, they should give little sweet pockets in the crumb. If you choose blueberries, the muffin should feel fresher and brighter, not wet or gummy.
How Each Version Should Look Inside
Different mix-ins change the color and flavor of the crumb, but they should not change the goal: a tender muffin that still feels soft after cooling.
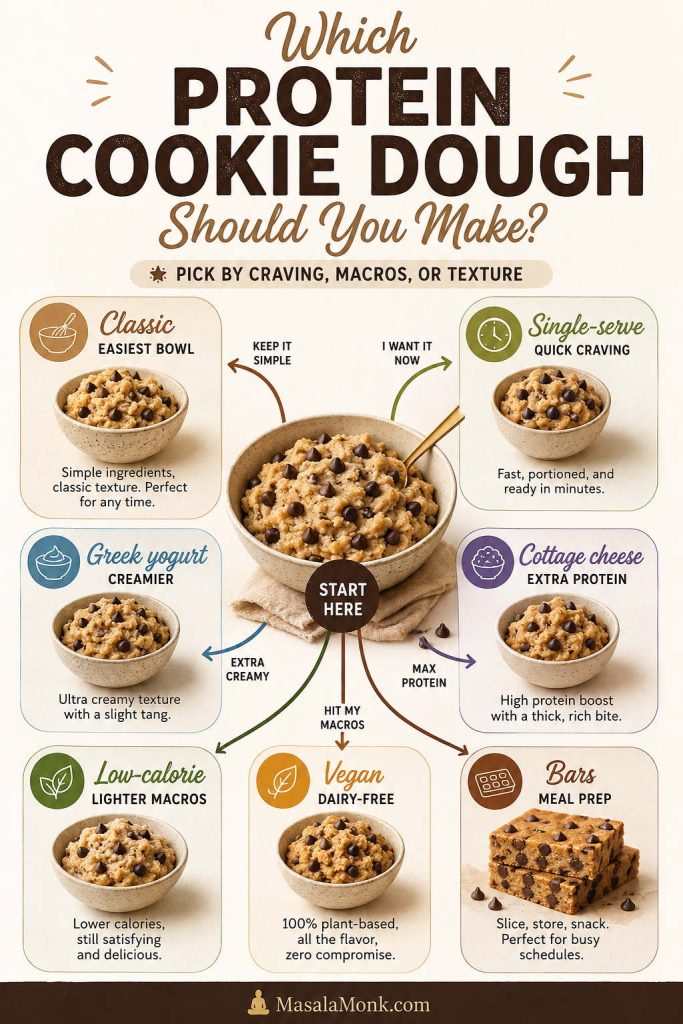
Choose Your Muffin Path
There is no single “right” way to make a higher-protein muffin. Some days you may want the extra boost from protein powder. Other times, you may want a more natural muffin built around Greek yogurt, cottage cheese, eggs, and oats. Use this table to choose the version that fits your kitchen and your taste.
| Path | Best for | Main protein source | Texture note |
|---|---|---|---|
| Protein powder muffins | Higher protein with simple ingredients | Vanilla protein powder + Greek yogurt | Needs enough moisture so the crumb stays soft. |
| No-powder protein muffins | Readers who dislike protein powder taste | Greek yogurt, eggs, oats, hemp hearts, nut butter | Softer and more natural, but usually lower in protein per muffin. |
| Cottage cheese protein muffins | Moist, filling breakfast muffins | Blended cottage cheese + eggs | Very moist; needs proper baking and cooling so the centers set. |
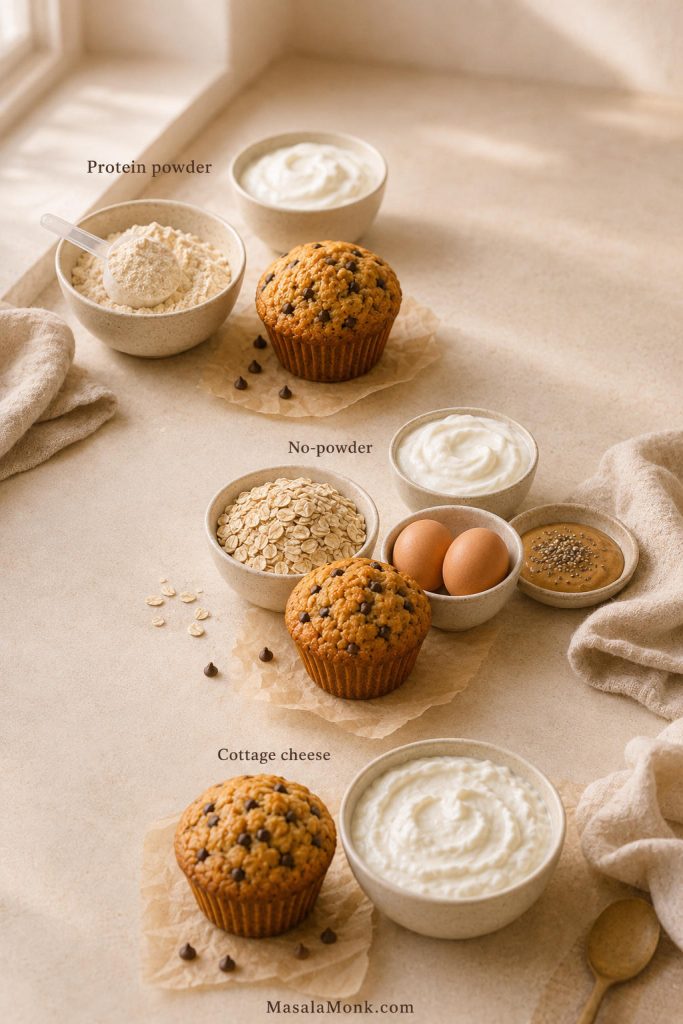
Once you choose your path, use the protein powder notes for the main version, the no-powder section for real-food protein muffins, or the cottage cheese variation if you want extra moisture.
Why This High Protein Muffin Recipe Works
Greek yogurt keeps the crumb moist
Greek yogurt is one of the most useful ingredients here because it adds protein and moisture at the same time. It also helps balance the drying effect of protein powder, especially if you are using whey or a very absorbent plant-based powder.
Greek yogurt also gives the recipe a real-food protein base instead of making the entire muffin depend on powder. It is naturally protein-rich, and Harvard Health includes Greek yogurt among useful protein sources, which is why it works so well in breakfast recipes that need both moisture and staying power.

Protein powder adds structure, but not too much
The fastest way to ruin protein muffins is to treat protein powder like regular flour. It absorbs liquid, changes the structure of the batter, and can make muffins firm when used too heavily. So this recipe uses enough protein powder to support the high-protein goal without letting it take over the texture.
A hotter oven start helps muffins rise
Start the muffins at a slightly higher oven temperature, then finish them lower. That short hot start encourages lift, while the gentler finish helps the center bake through without drying out the edges.
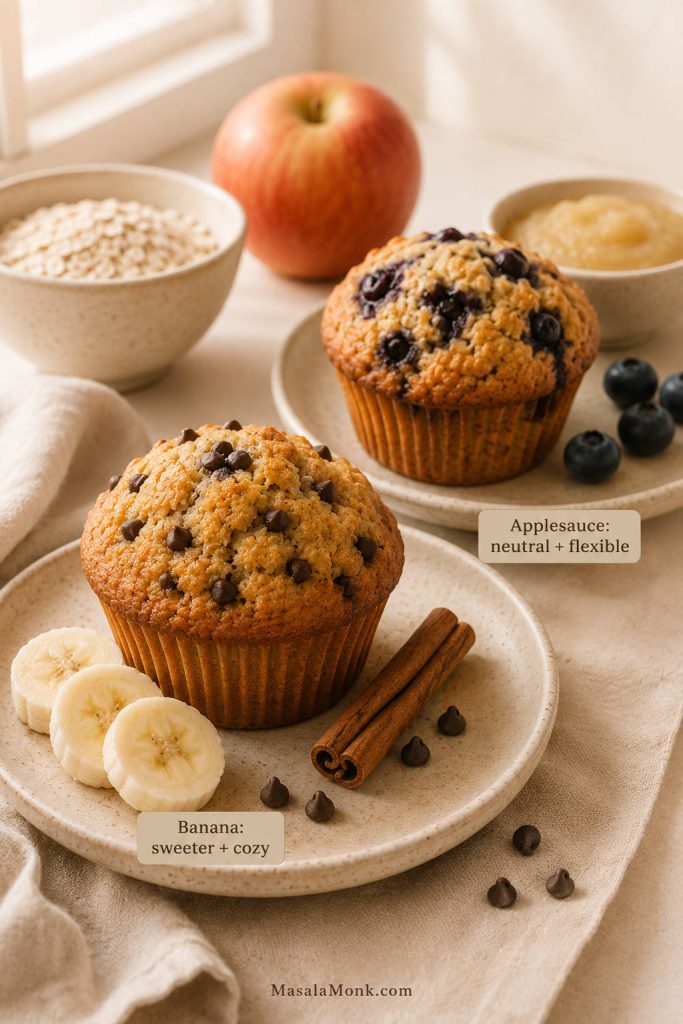
Banana or applesauce protects the texture
Mashed banana gives the muffins a naturally sweeter breakfast flavor. If you want a more neutral base, use unsweetened applesauce instead. Both add moisture, which is especially helpful in a protein-rich batter.
A little fat makes them taste like real muffins
Low-fat protein muffins often taste dry because too many softening ingredients are removed at once. That is why a modest amount of oil or melted butter helps the crumb stay tender, especially after refrigeration or freezing.
How Much Protein Should a Protein Muffin Have?
A realistic protein muffin can land anywhere from about 7g to 14g protein per muffin depending on the formula. Protein-powder versions can go higher, but the texture often becomes harder to protect. For this base recipe, the goal is about 9–12g protein per muffin with a soft, repeatable texture.
For exact numbers, use the labels on your own protein powder, yogurt, flour, and milk. Treat the nutrition estimate as a helpful range, not a fixed number. You can also look up individual ingredients in USDA FoodData Central if you want a more precise calculation.
That matters because a muffin with 20g protein is not automatically better if it tastes tough, chalky, or too lean. For most home bakers, the better target is a muffin that gives more protein than a regular muffin while still being enjoyable enough to make again.
Useful rule: a slightly lower-protein muffin that tastes good is more valuable than an ultra-high-protein muffin nobody wants to eat.
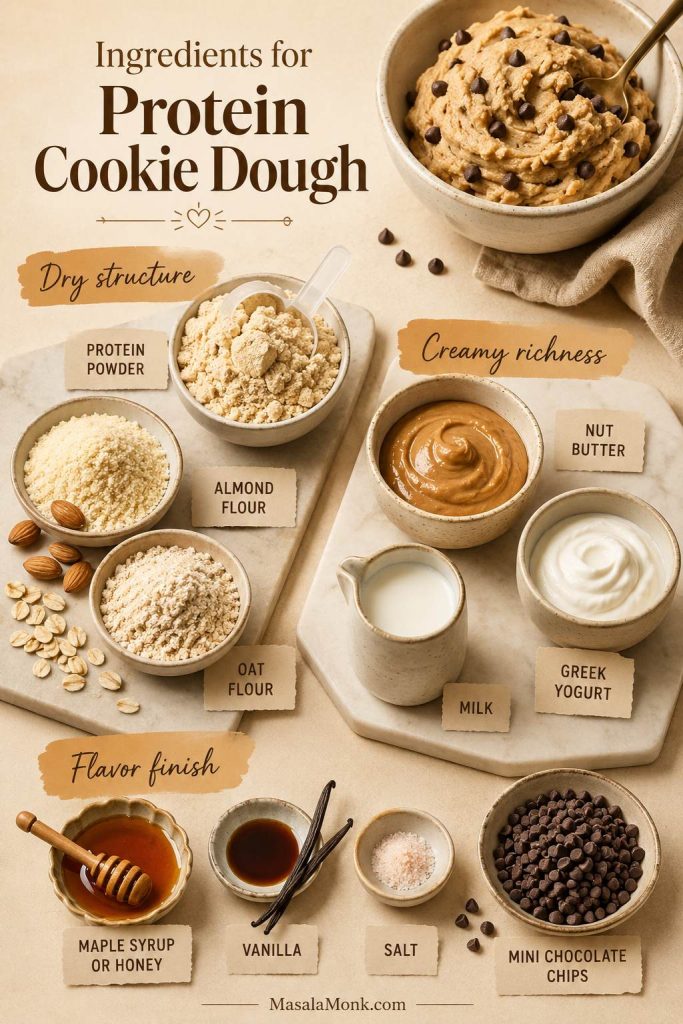
Ingredients for High Protein Muffins
Best first version to make
Best first batch: start with oat flour, almond flour, vanilla protein powder, plain Greek yogurt, mashed banana, neutral oil, and mini chocolate chips. That version gives the easiest balance of flavor, moisture, and texture. Once you like the base, try applesauce, blueberries, pumpkin, or cottage cheese.
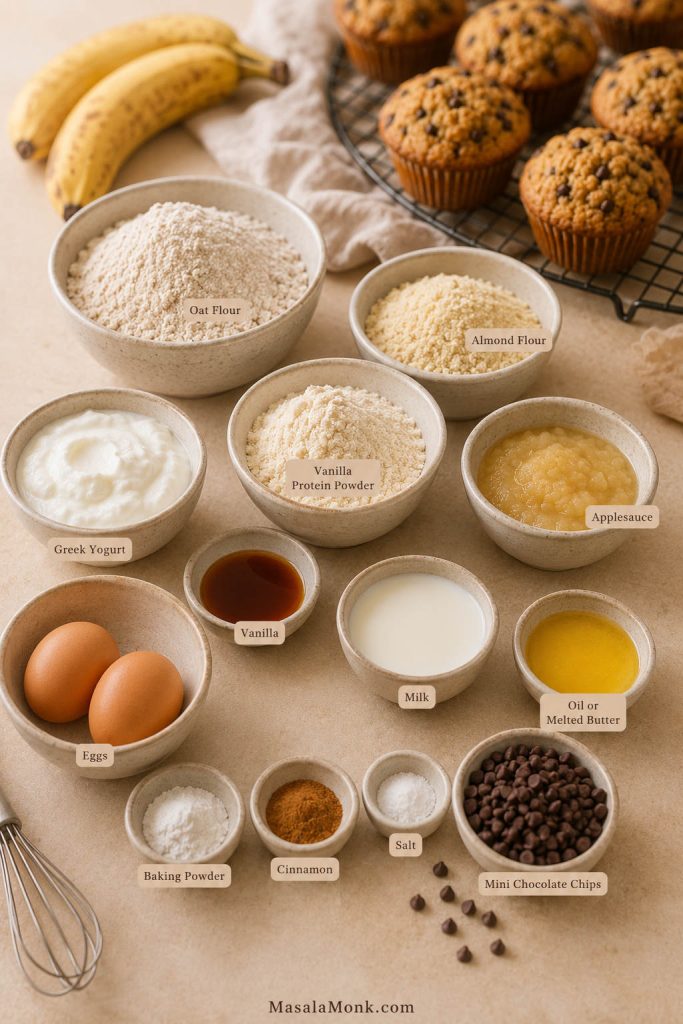
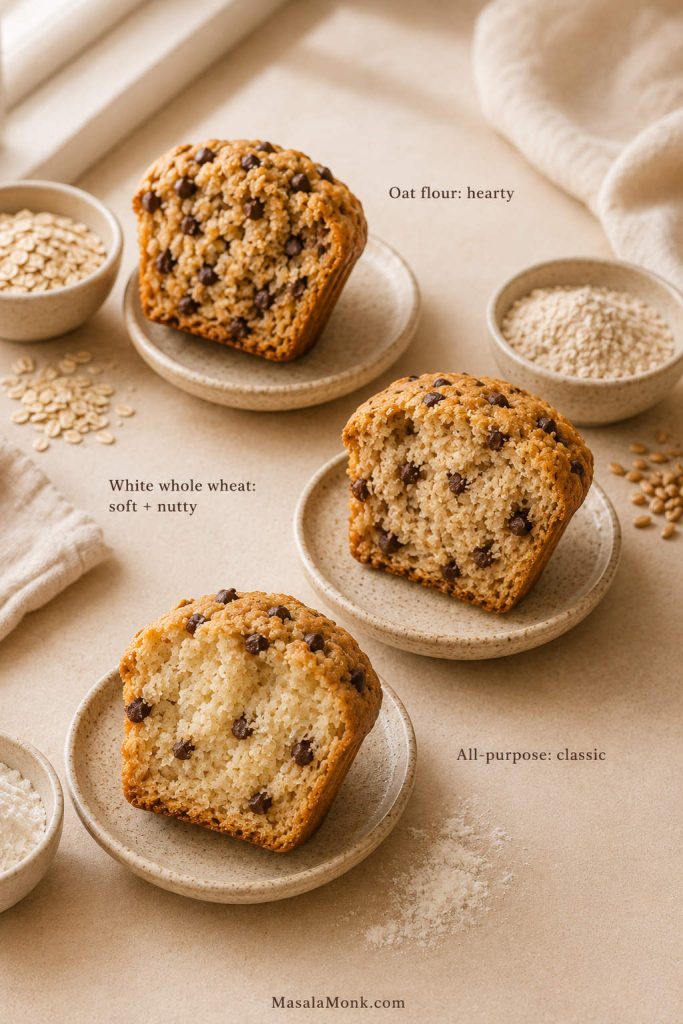
Oat flour, white whole wheat flour, or all-purpose flour
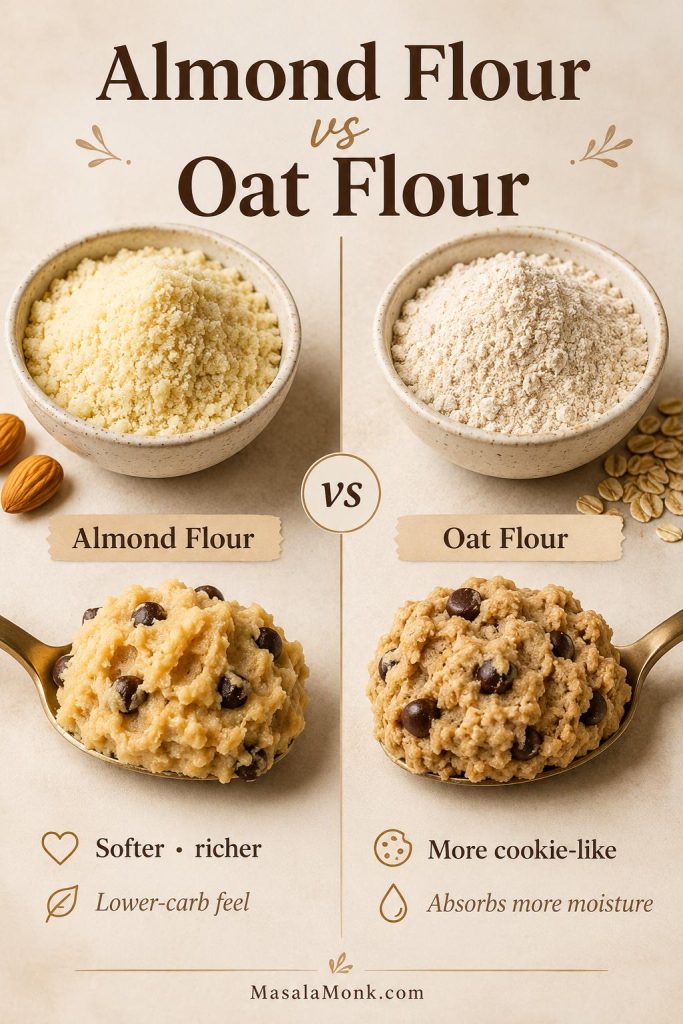
Oat flour gives these muffins a wholesome breakfast feel. White whole wheat flour gives a slightly nutty but still soft muffin. All-purpose flour gives the most classic texture. For the base recipe, use 100g oat flour or 120g all-purpose or white whole wheat flour.
If oats are your favorite breakfast base, this guide to high protein oatmeal has more ideas for using oats with yogurt, protein powder, cottage cheese, seeds, and nut butter.
Almond flour or extra oat flour
A small amount of almond flour adds tenderness and helps keep the muffin from tasting too lean. If you do not want to use almond flour, use extra oat flour instead. Avoid replacing all the flour with almond flour unless you are using a recipe designed for that structure.
Protein powder
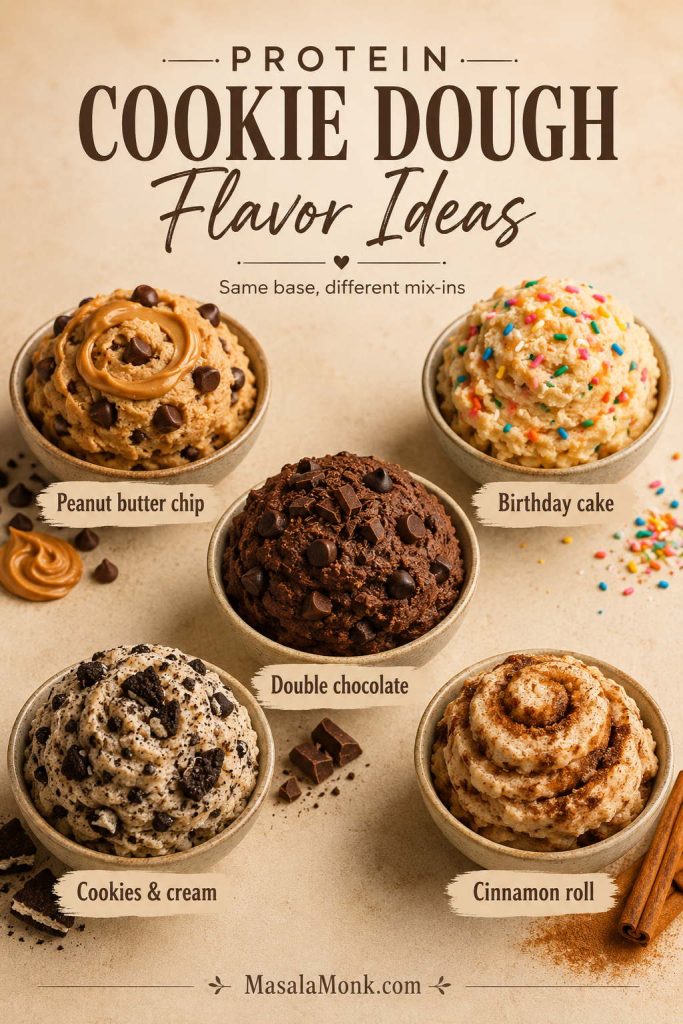
Vanilla protein powder is the easiest choice because it adds sweetness and flavor. Plain protein powder can work, but the muffins may need more vanilla, cinnamon, sweetener, or mix-ins. For example, chocolate protein powder works best in chocolate chip, double chocolate, or banana chocolate versions.
Greek yogurt
Use plain Greek yogurt. Full-fat or 2% yogurt gives the softest result, but nonfat Greek yogurt also works. If the batter looks too stiff after mixing, add a small splash of milk until it loosens.
Banana or applesauce
Use mashed ripe banana for a banana-forward muffin. If you want a more neutral base, use unsweetened applesauce instead. Banana gives more flavor and sweetness; applesauce keeps the muffin more flexible for blueberry, chocolate chip, or pumpkin variations.
Eggs, milk, and oil
Eggs give structure, milk adjusts the batter, and a little oil or melted butter keeps the crumb tender. Think of the milk as an adjustment, not a fixed amount. Start with less, then add only what the batter needs.
Mix-ins
Mini chocolate chips, blueberries, chopped walnuts, lemon zest, cinnamon, pumpkin spice, and diced strawberries can all work. Keep mix-ins to about ½–¾ cup so the muffins bake evenly.
Flavor and sweetness
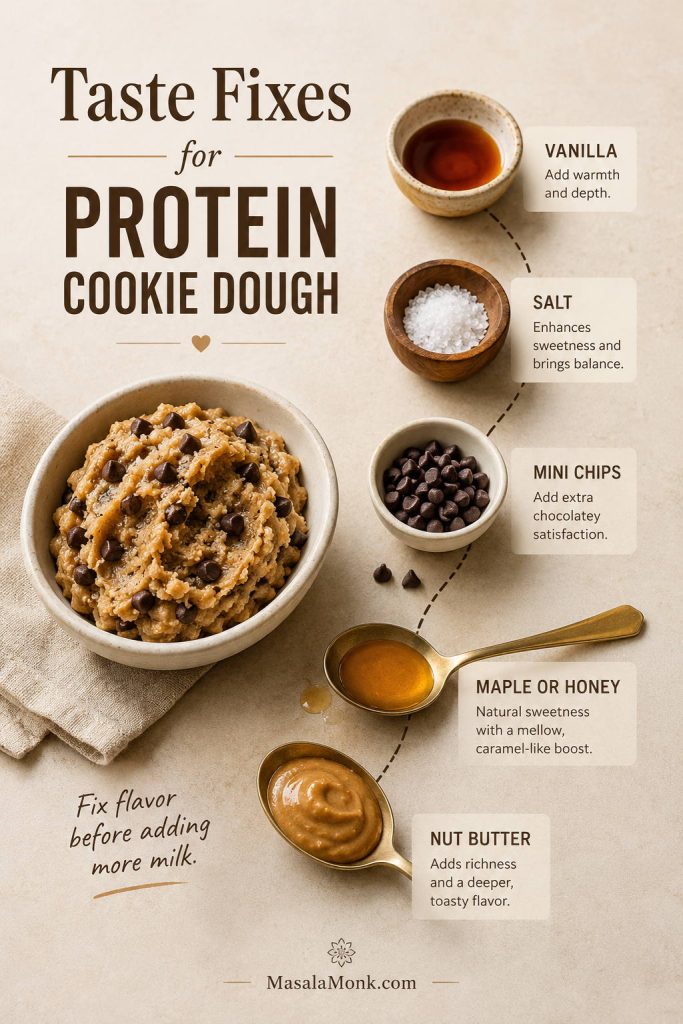
Protein powder, oats, and Greek yogurt can mute sweetness once baked. If your protein powder is plain or lightly sweetened, use the full amount of maple syrup or honey and do not skip the vanilla, cinnamon, or salt. For a more treat-like muffin, mini chocolate chips usually help more than extra sweetener because they give little pockets of flavor in every bite.
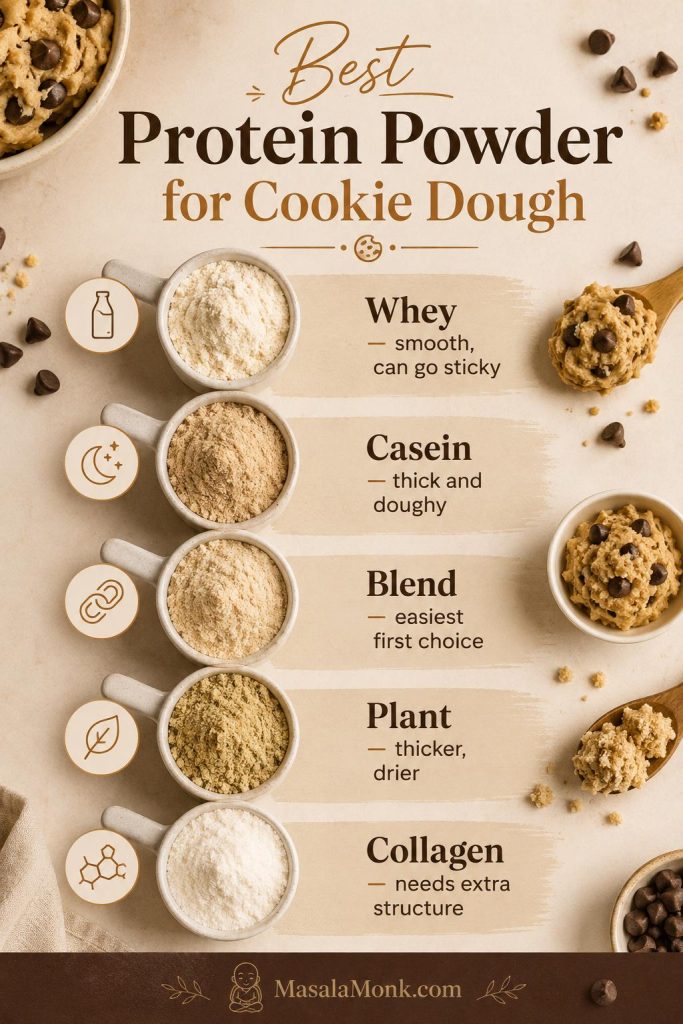
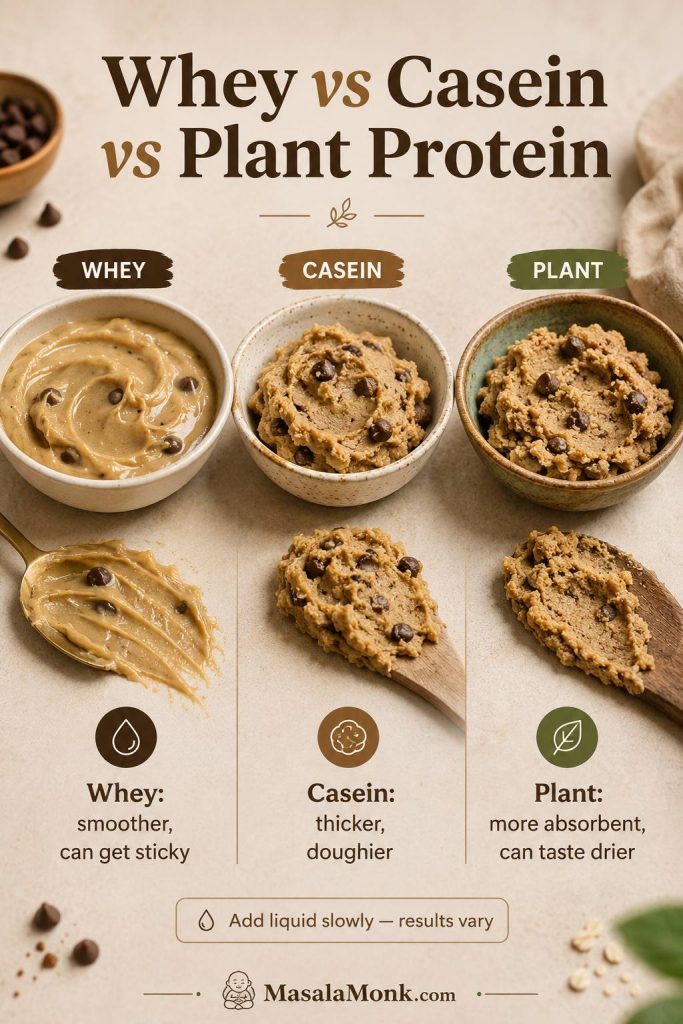
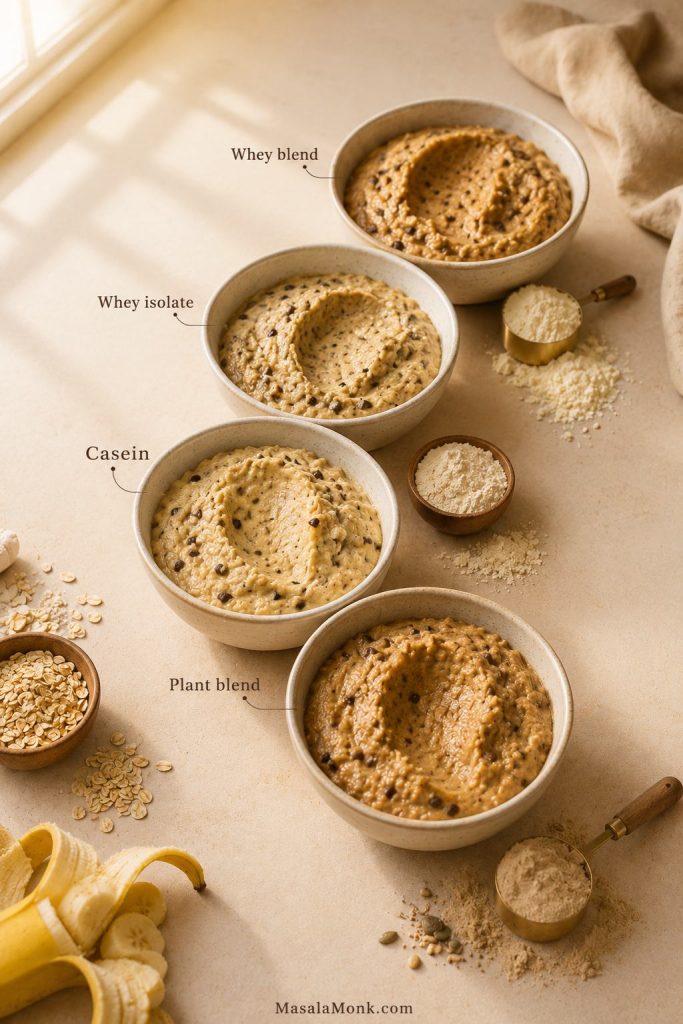
Best Protein Powder for Muffins
Protein powder can make muffins better, but it can also make them dry if the batter is not balanced. Different powders absorb liquid differently, so use the batter texture as your final guide.
This is the part that decides whether your muffins taste like breakfast or like a protein bar in muffin form. The same recipe can turn out soft with one powder and dry with another, so the batter matters more than brand loyalty.
| Protein powder type | What to expect in muffins | Best adjustment |
|---|---|---|
| Whey isolate | Can bake firm or dry if overused. | Add extra yogurt or milk and check early for doneness. |
| Whey blend | Usually easier than pure isolate and works well in muffin batter. | Start with the recipe amount of milk, then adjust if needed. |
| Casein | Absorbs a lot of liquid and can make the batter sturdy. | Loosen gradually with milk until the batter is easy to scoop. |
| Pea protein | Good structure, but can become dense or earthy. | Use enough flavor, moisture, and gentle mixing. |
| Plant protein blend | Often reliable, but brands vary widely in absorption. | Judge by batter texture, not just the printed amount of milk. |
| Collagen | Not ideal as the only protein powder replacement. | Use as a partial boost, not a full swap for flour or protein powder. |
How protein powder changes batter moisture
Protein powder rule: do not keep adding protein powder just to raise the number. Once protein powder becomes too large a share of the dry ingredients, muffins turn tough, dry, or heavy. A better muffin with 9–12g protein is more useful than a 20g muffin nobody wants to eat.
As a practical starting point, avoid replacing more than about one-third of the dry ingredient base with protein powder unless the recipe has been specifically built for that much powder. The more powder you add, the more moisture, fat, flavor, and careful baking you usually need.
Check the batter texture before baking
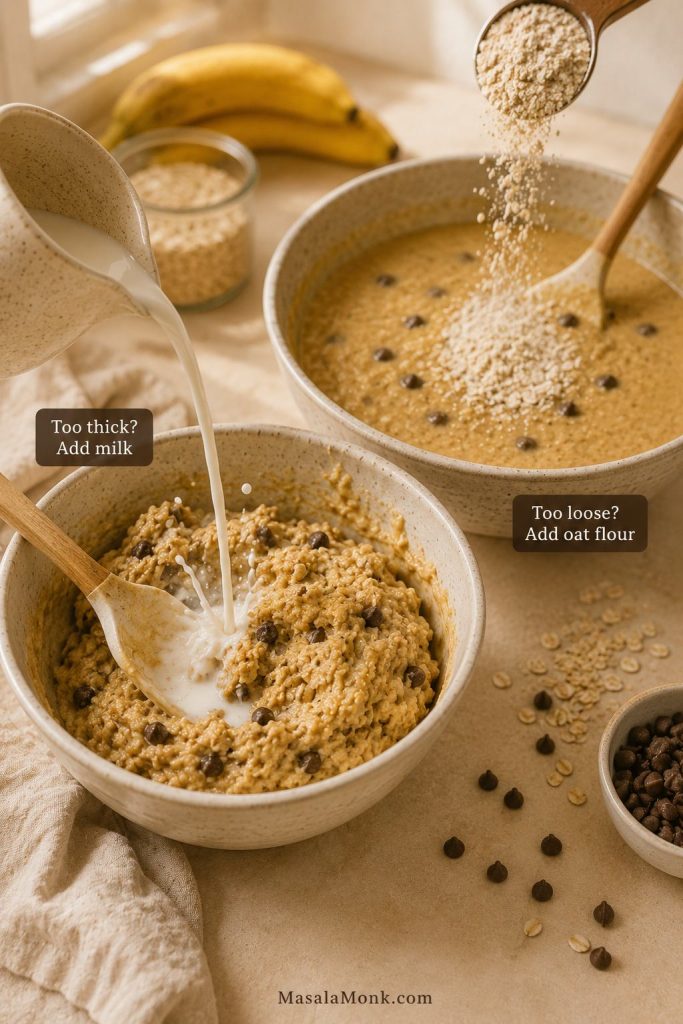
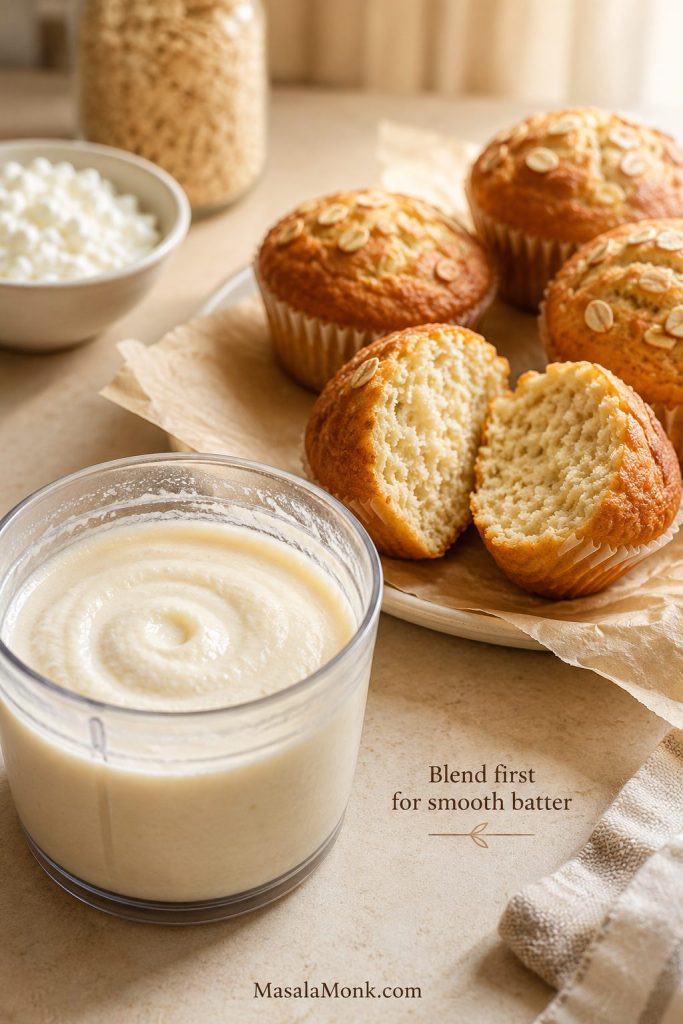
Before you bake: if the batter looks like cookie dough, it needs more milk. If it pours like pancake batter, it needs oat flour and a short rest. The sweet spot is thick, creamy, and scoopable.
If your batter already looks too stiff or too loose, fix it here before filling the pan. For finished muffins that came out dry, dense, or rubbery, jump to troubleshooting.
How to fix thick or loose batter
This is the best moment to fix the batter. If it does not look scoopable, check the batter texture guide before filling the muffin tin.
Step-by-Step Method
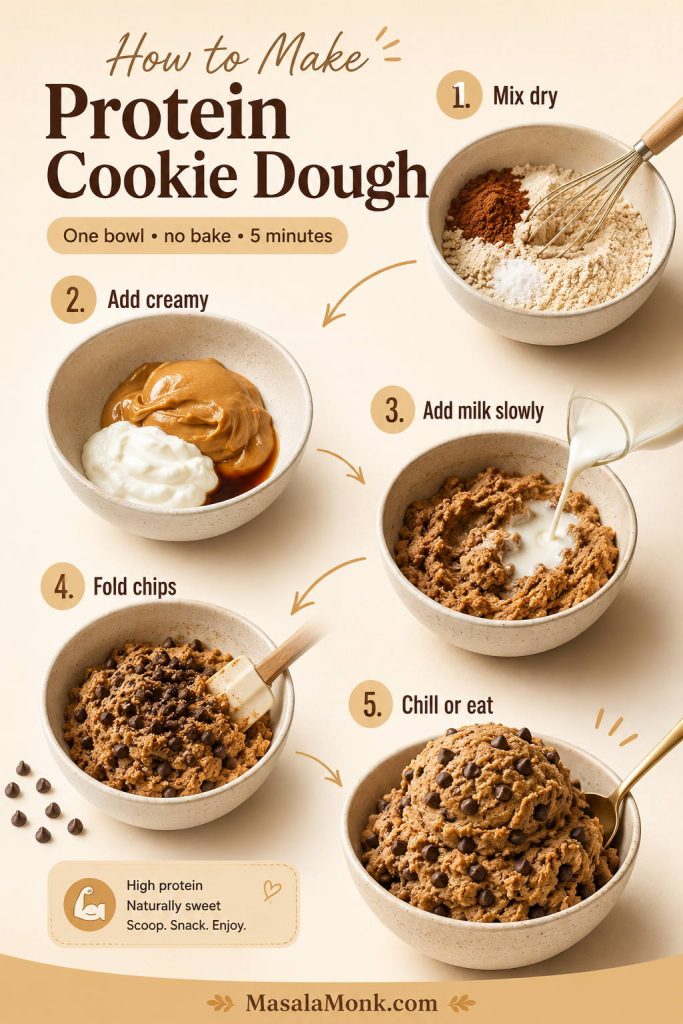
1. Mix the dry ingredients
In a large bowl, whisk together the flour or oat flour, almond flour or extra oat flour, protein powder, baking powder, baking soda, salt, and cinnamon. Whisking first helps distribute the protein powder and leavening evenly.
2. Whisk the wet ingredients
In a separate bowl, whisk the Greek yogurt, eggs, mashed banana or applesauce, maple syrup or honey, oil or melted butter, milk, and vanilla. The mixture should look smooth and creamy.
3. Combine gently
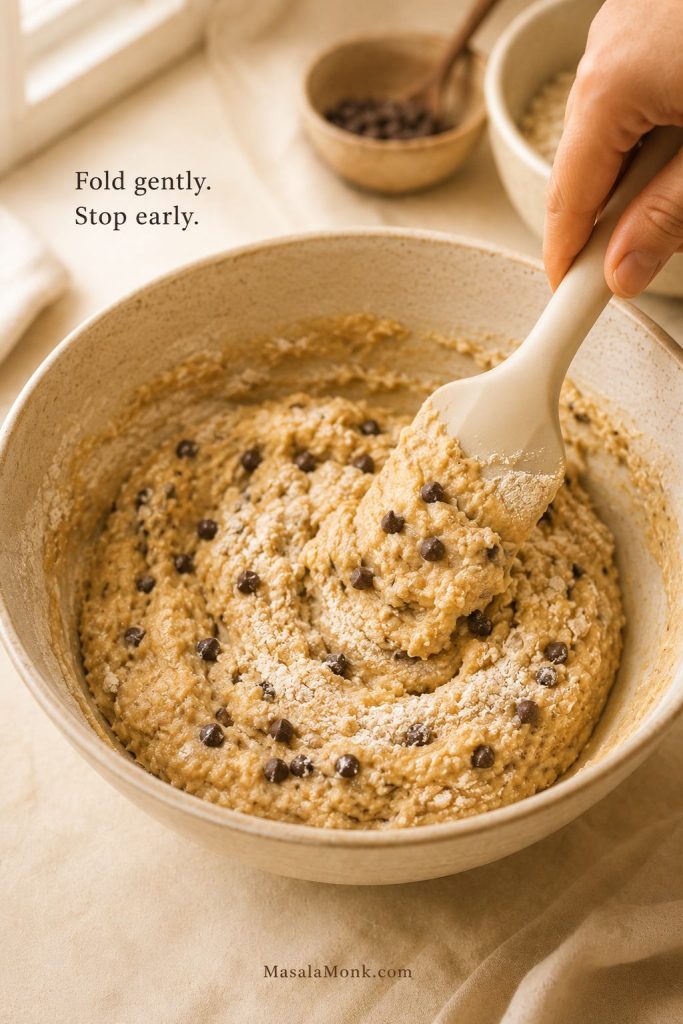
Add the wet ingredients to the dry ingredients and fold with a spatula. Stop when no dry streaks remain. Do not worry if the mixture looks a little sturdier than regular muffin batter; that is normal here.
This is the point where the recipe either stays tender or starts getting tough. A few tiny lumps are fine; a perfectly smooth batter is not the goal.
4. Check and fix the batter texture
The batter should be creamy, scoopable, and easy to portion. It should mound slightly on a spoon but still spread slowly when scooped into the muffin cup. If it looks dry or crumbly, add a small splash of milk. If it pours like pancake batter, add oat flour 1 tablespoon at a time and let it rest for 5 minutes.
5. Let the batter rest if needed
If using oat flour, casein, pea protein, or a thick plant protein blend, let the batter rest for 5 minutes before scooping. Some powders hydrate slowly, so a short rest can make the final texture more even. If it becomes too stiff after resting, loosen it with 1–2 tablespoons of milk.
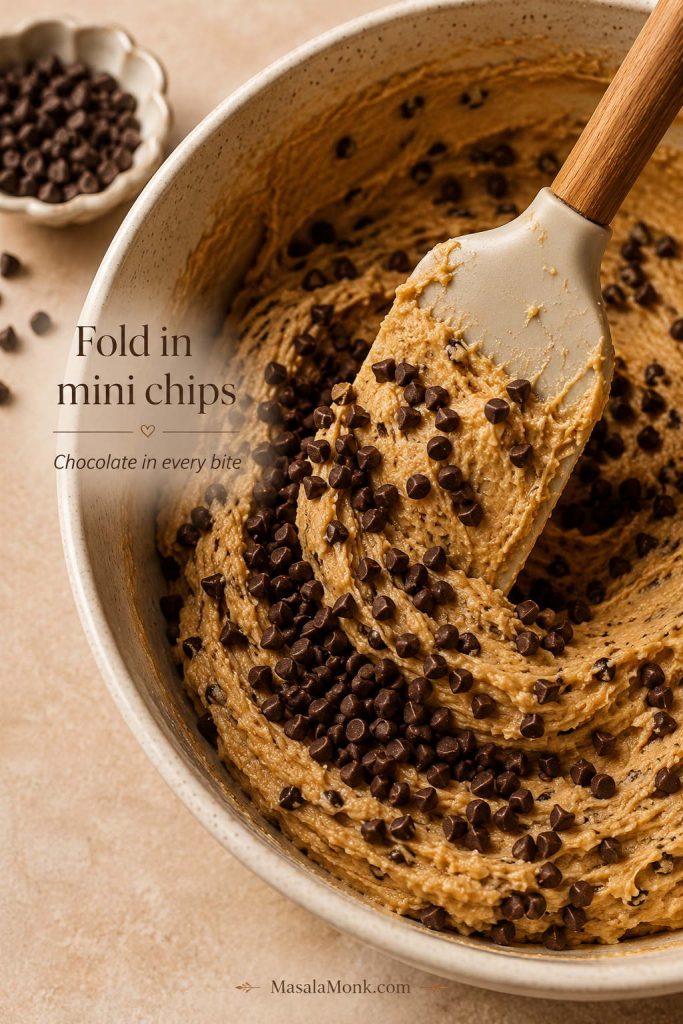
6. Fold in mix-ins
Fold in chocolate chips, blueberries, nuts, or other mix-ins gently. Overmixing at this point can make the muffins dense.
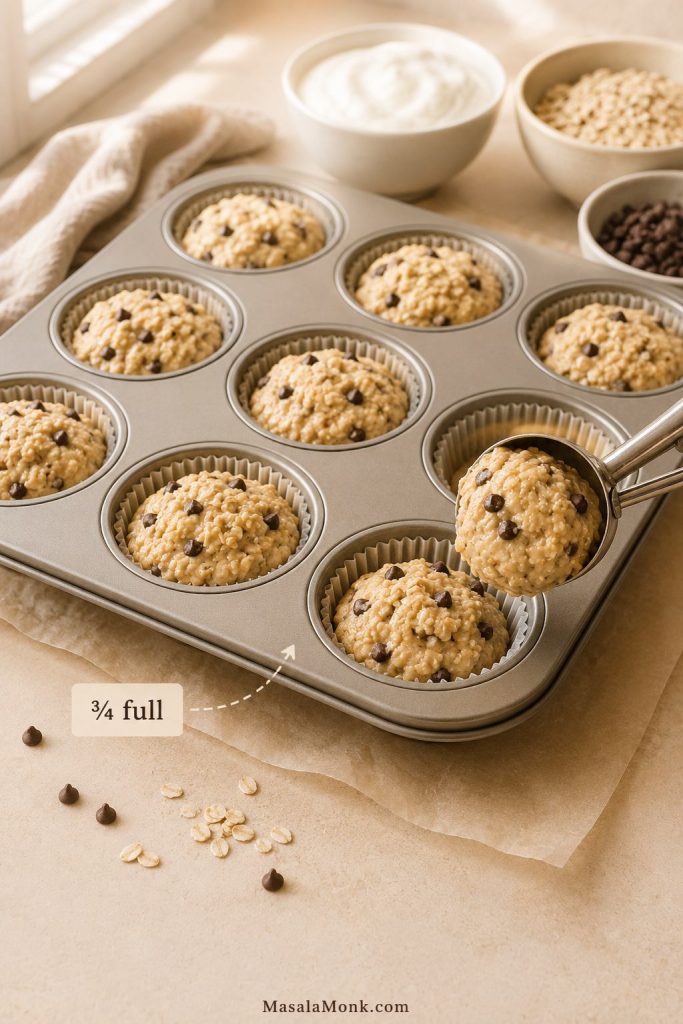
7. Fill the muffin tin
Line a 12-cup muffin tin and lightly spray the liners. Fill each cup about ¾ full for regular muffins, or slightly fuller for taller tops.
8. Bake and cool
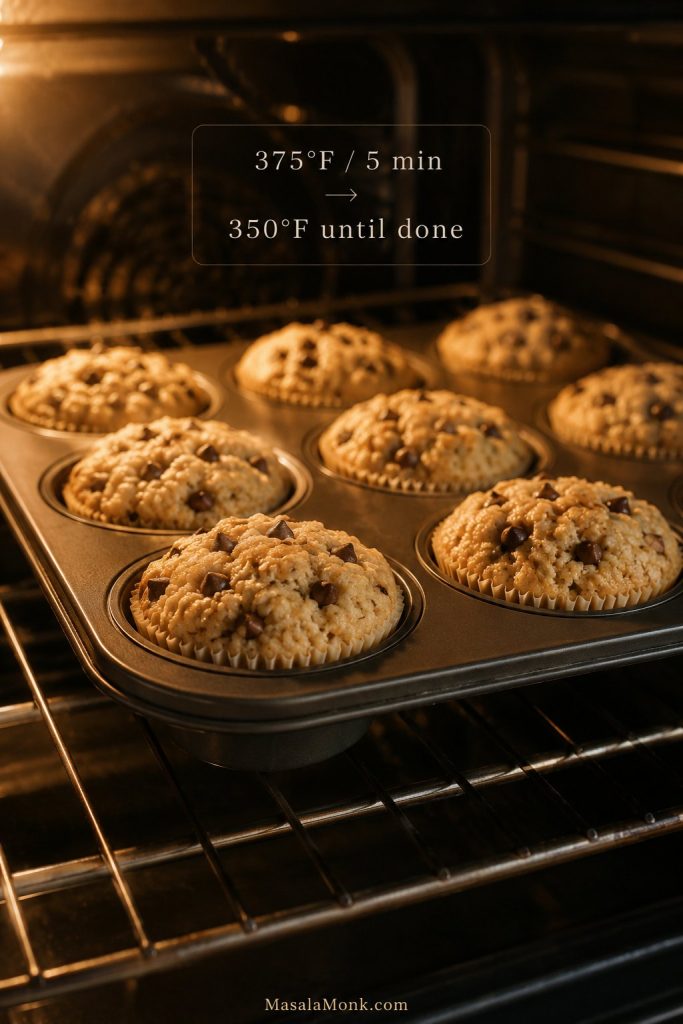
Bake at the higher starting temperature first, then reduce the oven temperature without opening the door. After that, let the muffins cool in the pan for 10 minutes before moving them to a rack. A little patience here pays off because the centers continue to settle as they cool.
Bake Time, Temperature, and Doneness
For the best balance of lift and moisture, start the muffins at 375°F / 190°C for 5 minutes. Then reduce the oven to 350°F / 175°C and bake for another 12–17 minutes, depending on your oven, muffin tin, protein powder, and mix-ins.
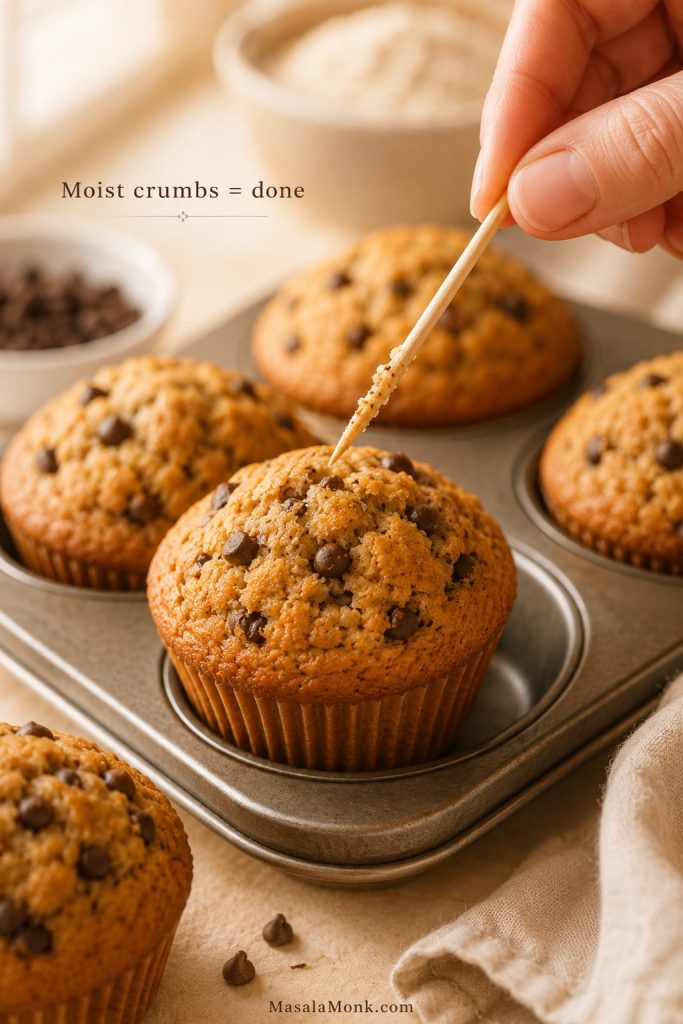
How to check doneness
The muffins are done when the tops spring back lightly and a toothpick inserted in the center comes out clean or with a few moist crumbs. Do not wait until the tops feel hard. Instead, pull them when they are just set because they continue to firm up as they cool.
A good batch should rise slightly, feel soft when pressed, and smell warm and lightly sweet. The tops should not feel hard when they leave the oven. If they do, the batch likely baked a few minutes too long.
Cool before storing
Do not skip cooling: these muffins can seem slightly soft in the center when hot. Give them 10 minutes in the pan and more time on a rack before judging the final texture.
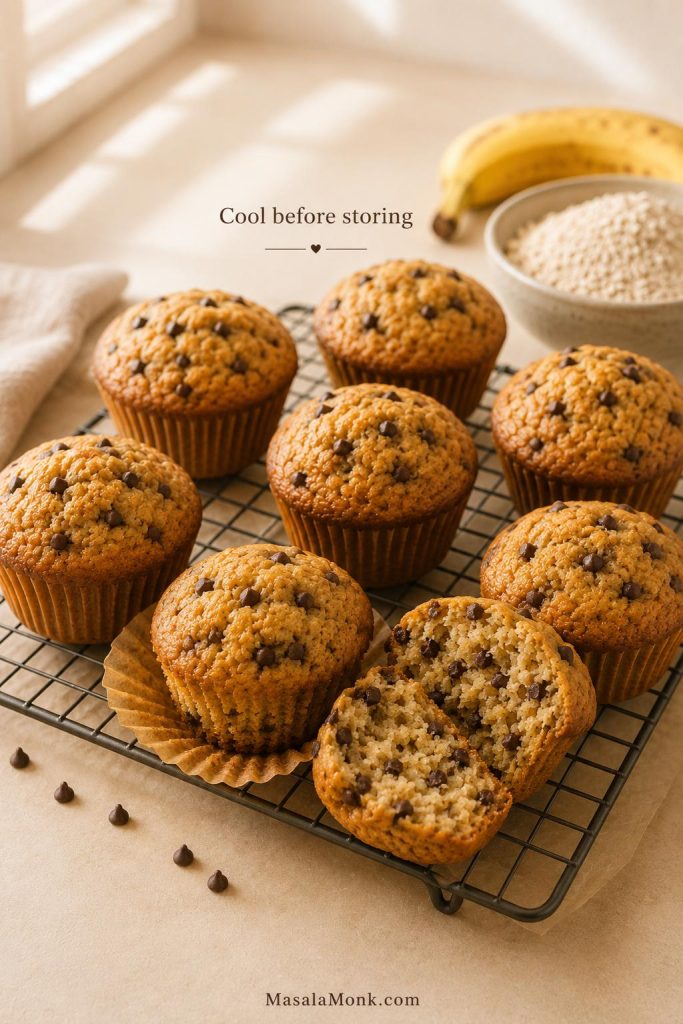
After baking, let the muffins cool before judging the final crumb. Then use the storage and freezing tips if you are making them for meal prep.
Easy Muffin Variations
Use the base recipe as a flexible formula. The mixture should be sturdy enough to scoop, but still soft enough to settle into the muffin cups. Adjust with milk if your protein powder makes it too stiff.
Choose the version based on what you want the muffin to feel like: banana for cozy breakfast, blueberry for fresh and bright, chocolate chip for snack prep, oatmeal for a heartier morning muffin, and pumpkin for a softer fall batch.
Best first variation: banana chocolate chip is the easiest crowd-pleaser. Blueberry lemon is fresher, pumpkin is softer, and cottage cheese is best when you want extra moisture without relying only on protein powder.
For the easiest first batch, start with banana chocolate chip. For a brighter version, try blueberry lemon; for extra moisture, use the cottage cheese version.
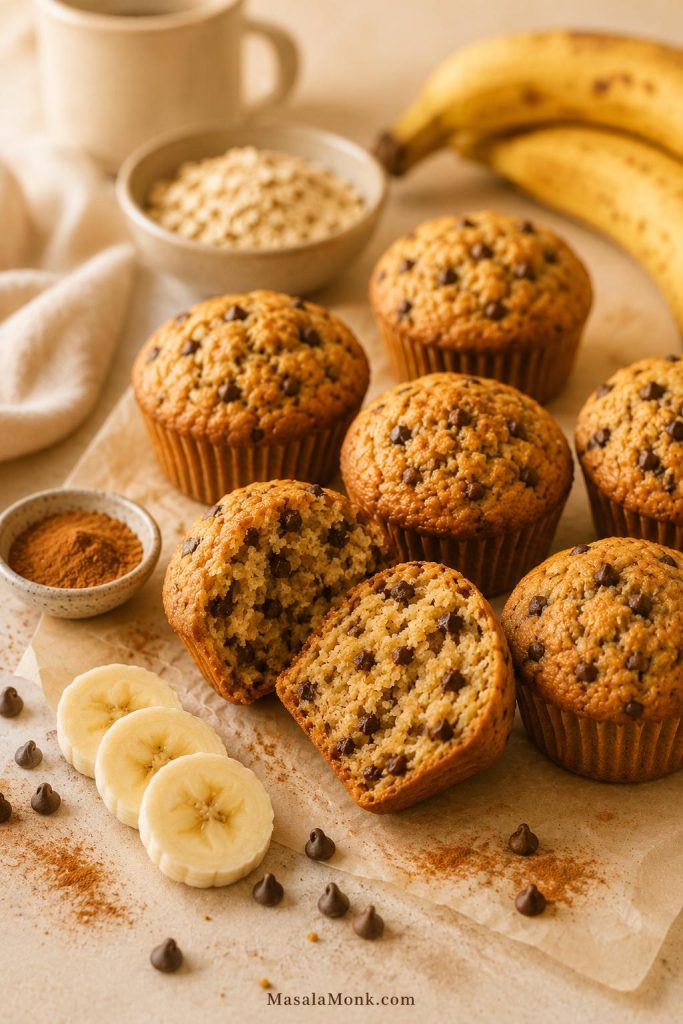
Banana protein muffins
Choose this when you want the coziest version. Mashed ripe banana makes the muffins taste closer to banana bread, especially with cinnamon and mini chocolate chips.
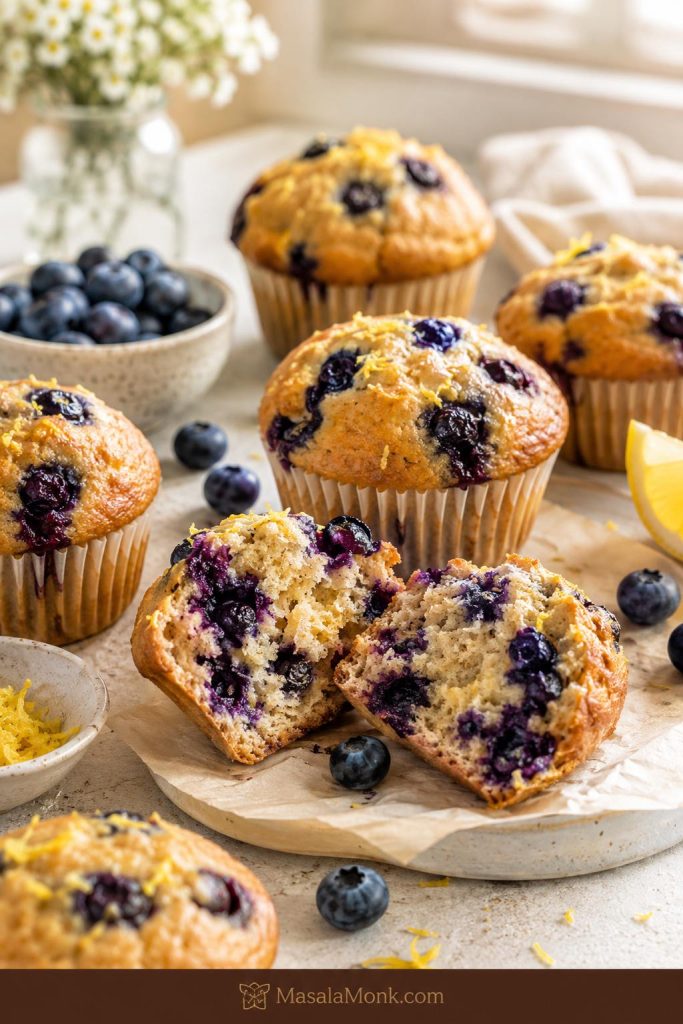
Blueberry protein muffins
Choose this when you want something fresher and brighter. Applesauce keeps the base neutral, while blueberries and lemon zest make the muffins feel more like a morning bakery muffin.
Chocolate chip protein muffins
Choose this when you want the batch to feel more like a snack than a strict breakfast. Mini chips spread through the crumb better, so you get chocolate in more bites without overloading the batter.
Oatmeal protein muffins
For a heartier breakfast muffin, use oat flour and a small amount of rolled oats. Avoid steel-cut oats here because they will not soften properly in a standard muffin bake.
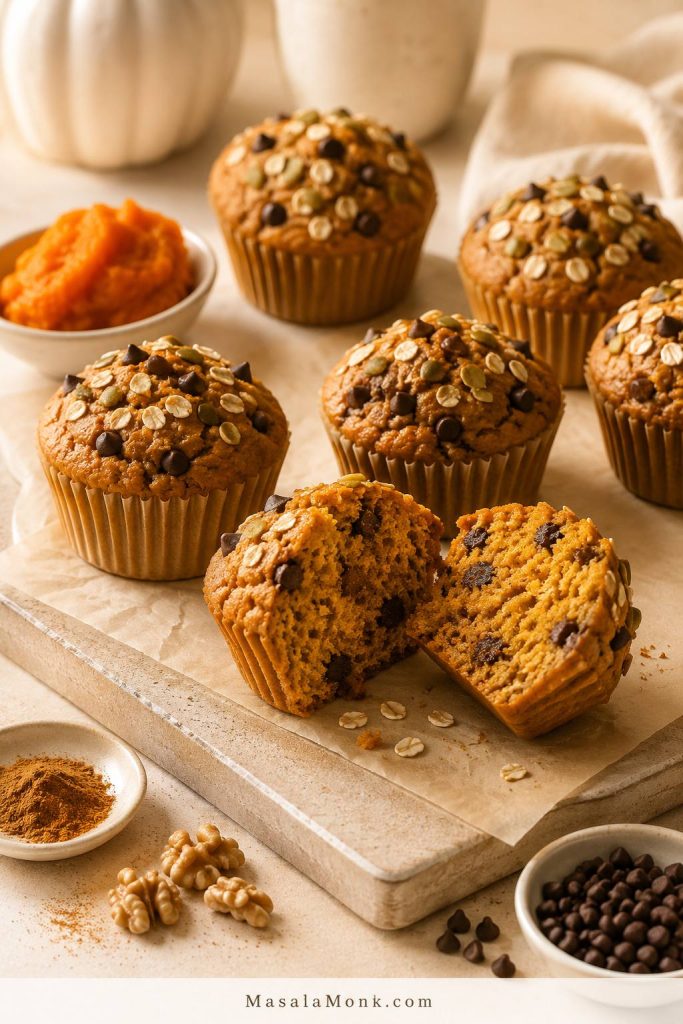
Pumpkin protein muffins
To make a fall-style batch, replace the banana or applesauce with pumpkin puree, add pumpkin pie spice, and use chocolate chips or walnuts. Because pumpkin adds a lot of moisture, these muffins may need the longer end of the bake window.
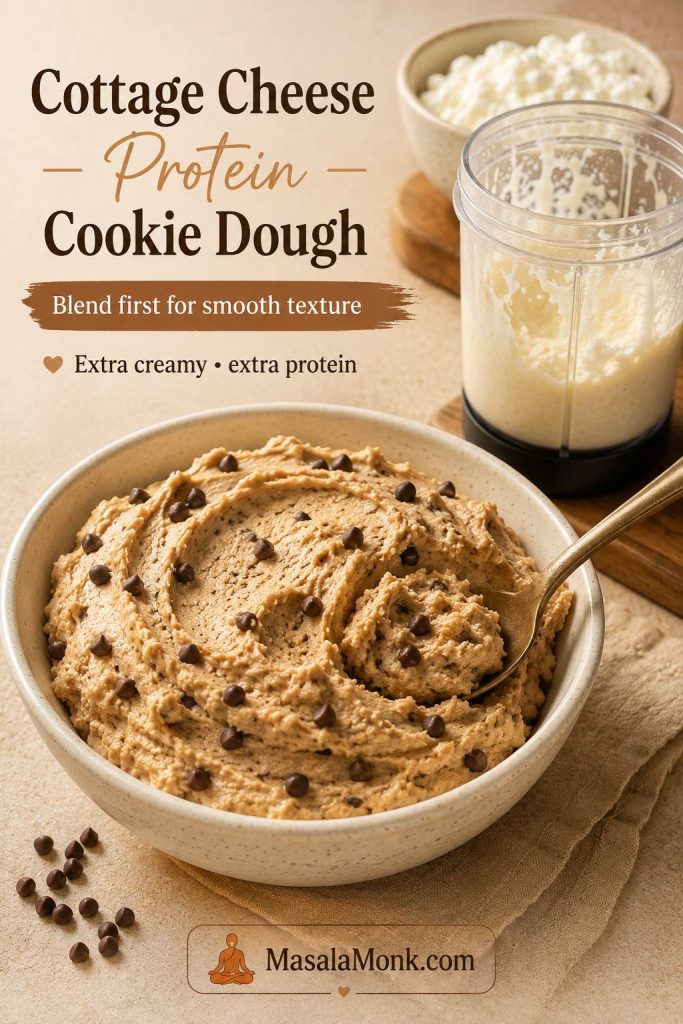
Cottage cheese protein muffins
Choose this when you want extra moisture and a softer center. This is the best cottage cheese protein muffin direction if you want more real-food protein without making the batch depend only on powder. Blend the cottage cheese into the wet ingredients first so the batter bakes smooth instead of curdy.
For more breakfast ideas using the same ingredient, see cottage cheese for breakfast.
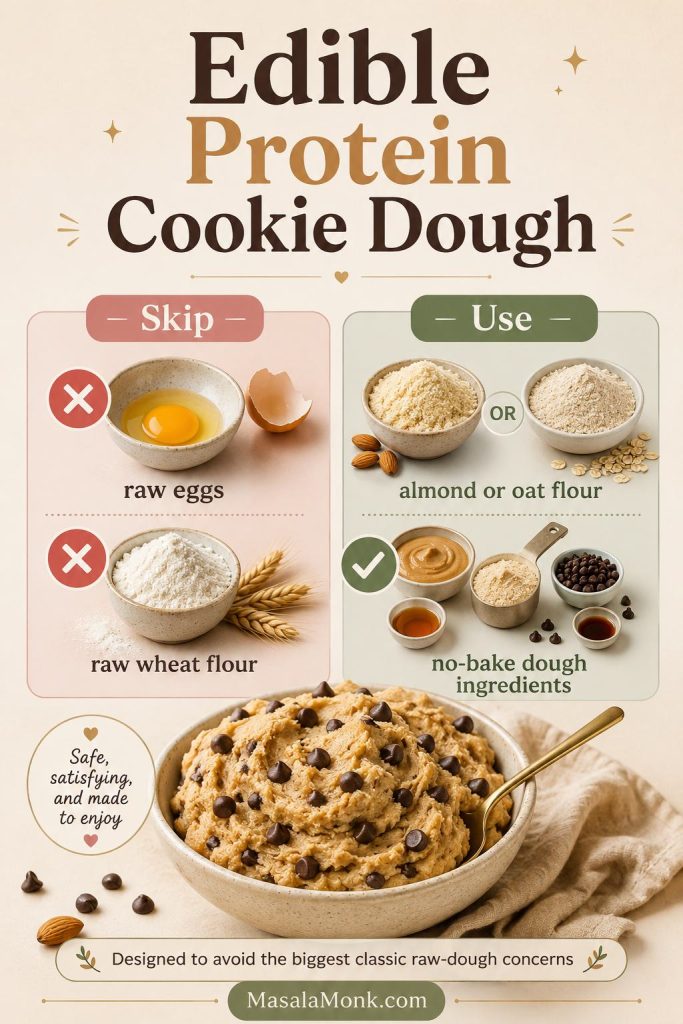
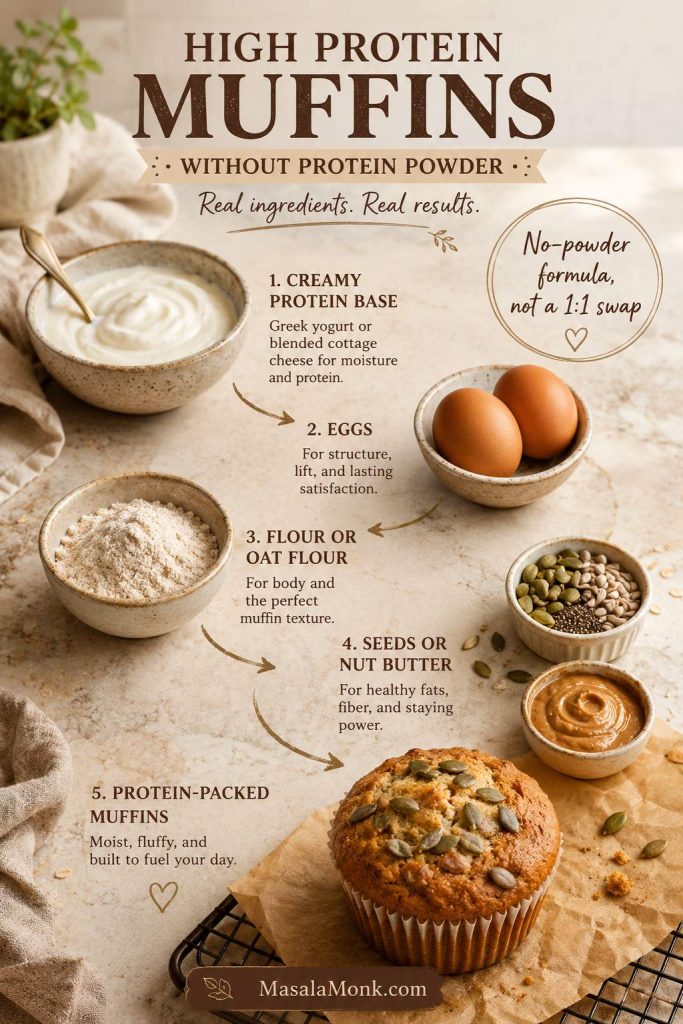
How to Make High Protein Muffins Without Protein Powder
You can make protein-rich muffins without protein powder, but the recipe needs a different strategy. For a no-powder batch, think in parts: a creamy protein base, eggs for structure, flour for body, and a little fat, seeds, or nut butter for staying power.
Important: this is not a direct one-for-one swap. If you simply remove the protein powder from the main recipe, the batter balance changes. Use the no-powder formula below instead.
If you are using protein powder after all, return to the main recipe card. If you want to avoid powder completely, follow the no-powder formula below rather than removing the powder from the main batter.
Best no-powder formula
For muffins without protein powder, start with a structure that balances moisture, lift, body, and staying power:
- Creamy protein base: ¾–1 cup Greek yogurt or blended cottage cheese
- Structure: 2 eggs
- Body: 1 cup oat flour + 1 cup all-purpose or white whole wheat flour
- Staying power: ¼–½ cup hemp hearts or nut butter
- Moisture and flavor: banana or applesauce
- Lift: 2 teaspoons baking powder + ½ teaspoon baking soda
- Balance: ½ teaspoon salt
This will usually give less protein than a protein-powder muffin. The flavor is often more natural, though, and the texture can be softer.
The same idea works in other breakfast batters too. These oat pancakes use oats, cottage cheese, and high-protein options in a way that feels very similar: simple ingredients, better texture, and no need to rely only on protein powder.
Best real-food protein options
| Ingredient | How it helps | Best use |
|---|---|---|
| Cottage cheese | Adds protein and moisture. | Blend with wet ingredients for a smooth muffin. |
| Greek yogurt | Adds protein and keeps the crumb soft. | Use in banana, blueberry, and chocolate chip muffins. |
| Eggs | Add structure and protein. | Useful in almost every muffin formula. |
| Oats or oat flour | Add breakfast texture and slow-digesting carbs. | Best for oatmeal and banana protein muffins. |
| Nut butter | Adds fat, flavor, and some protein. | Best in banana, chocolate, and peanut butter muffins. |
| Hemp, flax, or chia | Adds protein, fiber, and texture. | Use in small amounts so the muffins do not turn heavy. |
For the best no-powder result, use cottage cheese or Greek yogurt as part of the wet base rather than treating them like simple add-ins. They help the batter stay moist while adding protein in a more natural way.
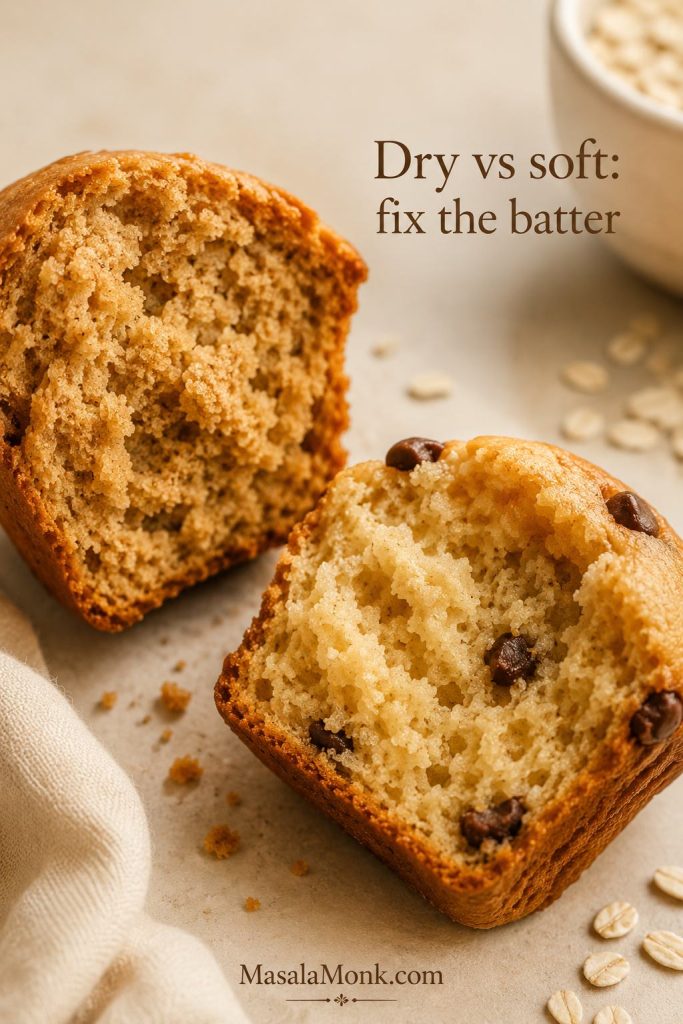
Troubleshooting: Why Are My Protein Muffins Dry, Dense, or Rubbery?
Most protein muffin problems are not disasters. They are signals. Dry muffins, sticky centers, flat tops, and chalky flavor usually mean the batter needed a little more moisture, less mixing, or a shorter bake.
If your first batch is not perfect, do not treat it like a failure. Protein muffin batter is more sensitive than regular muffin batter because protein powder, oats, yogurt, and cottage cheese all hold moisture differently. Most problems can be fixed by changing the liquid, mixing less, or pulling the muffins from the oven a little earlier.
The batter usually tells you what it needs. A stiff batter needs a little milk. A loose batter needs oat flour and a short rest. Finally, flat flavor usually needs more vanilla, cinnamon, salt, fruit, or chocolate next time.
Dry vs moist: read the crumb
If the problem started before baking, go back to the batter texture cue. If the muffins looked fine going in but came out dry, check the bake time and doneness notes.
Protein muffin troubleshooting guide
Use the tables below like a quick diagnosis: find what happened, then adjust the next batch before changing the whole recipe.
Texture problems
| Problem | Likely reason | Fix |
|---|---|---|
| Dry muffins | Too much protein powder, not enough moisture, or overbaking. | Add more yogurt or milk next time and check the muffins earlier. |
| Rubbery texture | The batter was overmixed after the wet and dry ingredients were combined. | Fold gently and stop as soon as the batter comes together. |
| Chalky taste | The protein powder flavor is too strong or too much powder was used. | Use a better-tasting powder, add cinnamon or vanilla, or reduce the powder slightly. |
| Wet center | Too much fruit, yogurt, or cottage cheese; muffins may also need more cooling. | Bake 2–4 minutes longer and let the muffins cool fully before storing. |
Baking and pan problems
| Problem | Likely reason | Fix |
|---|---|---|
| Flat tops | The oven was not hot enough at the start or the batter was too thin. | Use the hot-start method and keep the batter thick enough to hold shape. |
| Muffins stick to liners | Low-fat, high-protein batters often cling to paper liners. | Spray the liners lightly or use silicone muffin cups. |
| Blueberries sink | The berries were too wet, too large, or folded into thin batter. | Toss berries with a little flour and keep the batter thick. |
Batter and flavor fixes
| Problem | Likely reason | Fix |
|---|---|---|
| Batter too thick | The protein powder absorbed more liquid than expected. | Add milk gradually until the batter softens. |
| Batter too thin | Too much yogurt, fruit, or milk was added. | Add oat flour 1 tablespoon at a time and let the batter rest for 5 minutes. |
| Muffins taste “healthy” in a bad way | Not enough flavor against the protein powder. | Add cinnamon, vanilla, banana, chocolate chips, lemon zest, or a pinch more salt. |
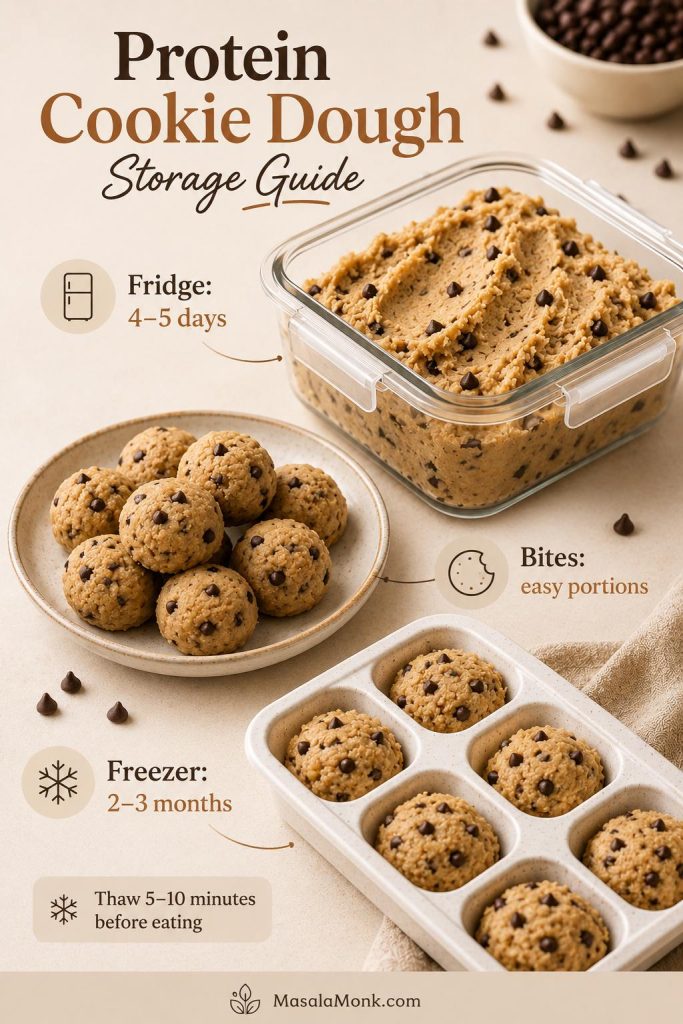
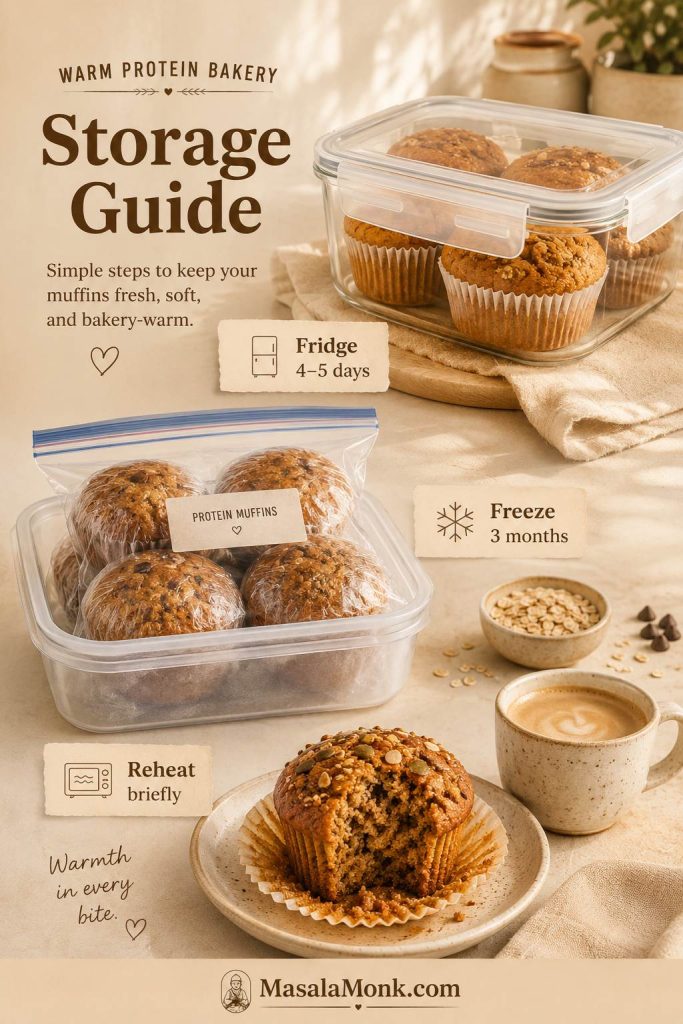
How to Store and Freeze Protein Muffins
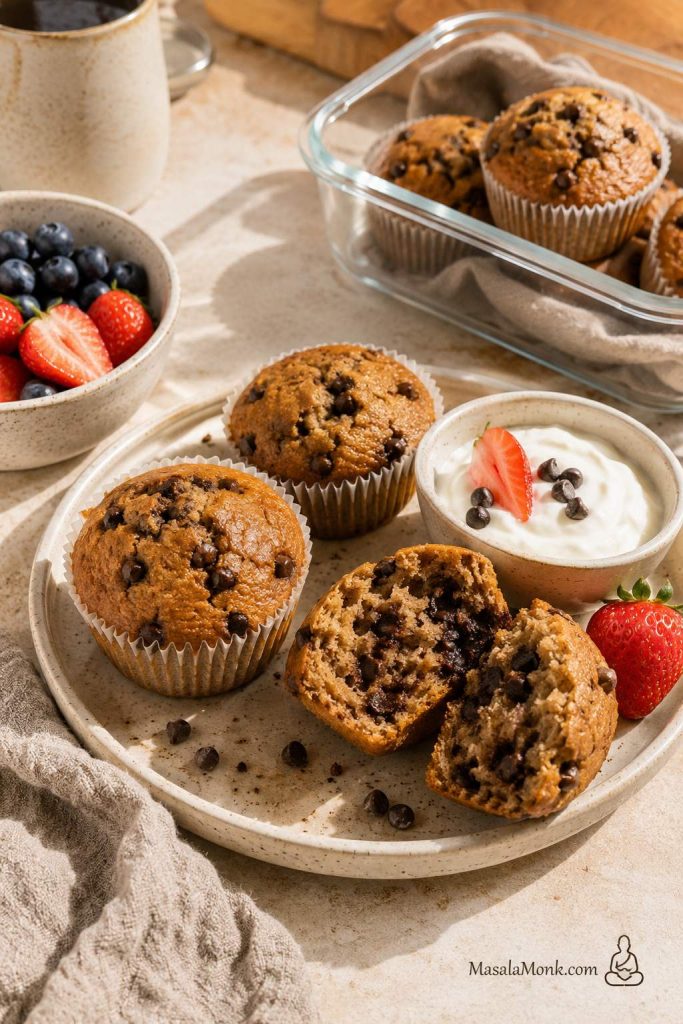
These muffins are at their best once fully cooled, which makes them useful for breakfast prep. Bake a batch, cool them completely, then keep a few in the fridge and freeze the rest for mornings when you want something filling without cooking.
For another freezer-friendly breakfast that works well on busy mornings, these freezer-friendly breakfast burritos are a savory option to keep alongside muffins.
Meal prep tip: save the base recipe once, then change only the fruit, mix-ins, and protein powder adjustment. The batter texture should stay the same even when the flavor changes.
Storage times
| Storage method | How long | Best tip |
|---|---|---|
| Room temperature | Same day, or overnight if your kitchen is cool | For longer storage, refrigerate because these muffins are moist and yogurt-based. |
| Refrigerator | 4–5 days | Store in an airtight container with a paper towel to absorb moisture. |
| Freezer | Up to 3 months | Freeze individually, then move to a freezer bag or airtight container. |
| Reheating | 15–45 seconds | Microwave briefly until just warm, not hot and tough. |
What to Serve with High Protein Muffins
These muffins work well as a quick breakfast, lunchbox item, pre-workout bite, or afternoon snack. For a fuller breakfast, serve one with Greek yogurt, fruit, boiled eggs, cottage cheese, nut butter, or a smoothie.
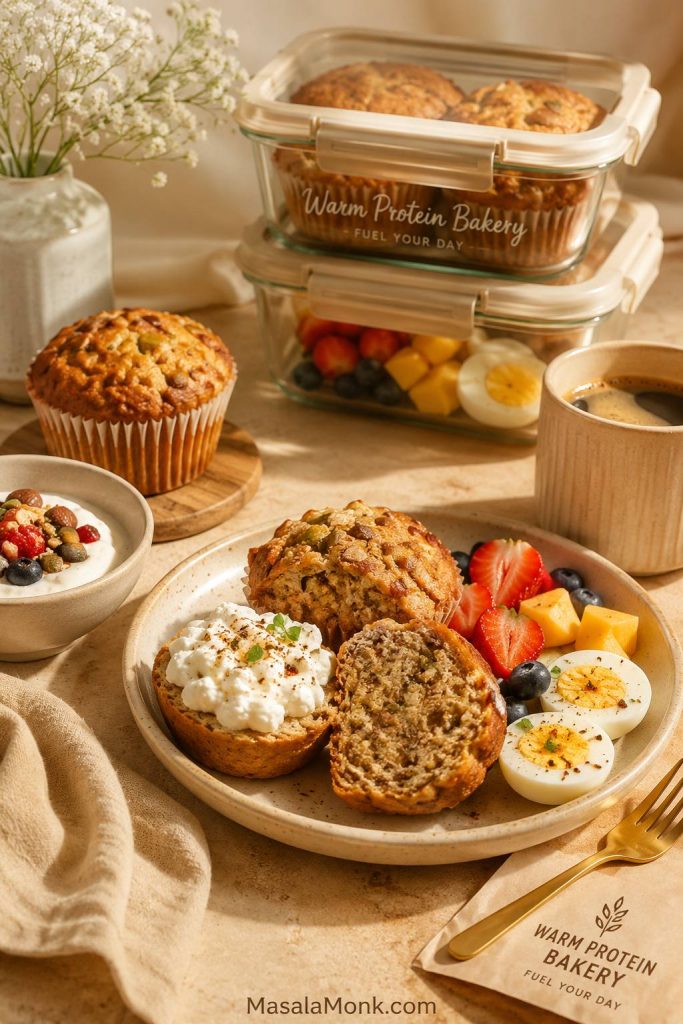
When you want a softer, bakery-style breakfast, warm one muffin briefly and split it with a little butter, peanut butter, or almond butter.
For snack prep, pair this recipe with healthy oat protein bars so you have both baked muffins and grab-and-go bars ready for the week.
Once you understand the batter, this becomes an easy recipe to repeat. Keep the base the same, change the fruit or mix-ins, and you have a breakfast muffin that can move from weekday meal prep to a weekend coffee plate without feeling like “diet food.”
For your own next batch, note the protein powder you used and how much milk the batter needed. Once you know that one detail, this recipe becomes easy to repeat with banana, blueberries, chocolate chips, pumpkin, or cottage cheese.
Ready to bake? The full recipe card below gives you the exact amounts, bake time, and adjustment notes. If your protein powder is very absorbent, start with the lower milk amount and add more only after mixing.
High Protein Muffins Recipe Card
A flexible, meal-prep friendly muffin base made with Greek yogurt, protein powder, oat flour or whole wheat flour, and banana or applesauce. Use the notes below to adjust the batter for your protein powder and favorite mix-ins.
Equipment
- 12-cup muffin tin
- Muffin liners or silicone muffin cups
- Mixing bowls
- Whisk
- Rubber spatula
- ¼ cup scoop or spoon
- Wire cooling rack
Ingredients
Dry ingredients
- 1 cup oat flour, 100g, for the default breakfast-style version
- Flour swap: use 1 cup all-purpose or white whole wheat flour, 120g, for a softer classic muffin texture
- ½ cup almond flour, about 50–55g, for extra tenderness
- Almond-free swap: use ½ cup extra oat flour instead
- ½ cup vanilla protein powder, about 50–60g
- 2 teaspoons baking powder
- ½ teaspoon baking soda
- ½ teaspoon fine salt
- 1 teaspoon cinnamon
Wet ingredients
- ¾ cup plain Greek yogurt, about 180g
- ½ cup mashed ripe banana or unsweetened applesauce, about 120g
- 2 large eggs
- ⅓ cup maple syrup or honey, about 80ml
- 3 tablespoons neutral oil or melted butter, about 45ml
- 3–6 tablespoons milk, about 45–90ml, starting with 3 tablespoons and adding more only if the batter looks too stiff
- 2 teaspoons vanilla extract
Optional mix-ins
- ½ cup mini chocolate chips
- ½–¾ cup blueberries
- ½ cup chopped walnuts or pecans
- 1 tablespoon lemon zest for blueberry muffins
- ½ teaspoon pumpkin pie spice for a warmer flavor
Instructions
- Preheat the oven. Preheat to 375°F / 190°C. Line a 12-cup muffin tin and lightly spray the liners.
- Mix the dry ingredients. In a large bowl, whisk together the flour, almond flour or extra oat flour, protein powder, baking powder, baking soda, salt, and cinnamon.
- Mix the wet ingredients. In a second bowl, whisk Greek yogurt, mashed banana or applesauce, eggs, maple syrup or honey, oil or melted butter, 3 tablespoons milk, and vanilla.
- Combine gently. Add the wet ingredients to the dry ingredients. Fold with a spatula until just combined.
- Adjust the batter. The batter should be sturdy but not dry. If it looks stiff, add a small splash of milk. If it looks too loose, add oat flour 1 tablespoon at a time and rest for 5 minutes.
- Rest if needed. If using oat flour, casein, pea protein, or a very absorbent plant protein powder, let the batter rest for 5 minutes before scooping.
- Add mix-ins. Fold in chocolate chips, blueberries, nuts, or other mix-ins. Do not overmix.
- Fill the muffin tin. Divide the batter between 12 muffin cups, filling each about ¾ full.
- Bake with a hot start. Bake at 375°F / 190°C for 5 minutes. Without opening the oven, reduce the temperature to 350°F / 175°C and bake for 12–17 more minutes.
- Check for doneness. The muffins are done when the tops spring back lightly and a toothpick comes out clean or with a few moist crumbs.
- Cool properly. Cool in the pan for 10 minutes, then transfer to a wire rack. Let the muffins cool before storing.
Recipe Notes
- Best texture cue: the batter should mound on a spoon but still spread slowly in the muffin cup.
- Protein powder varies: if your batter looks dry, add milk gradually before baking.
- Banana version: use mashed ripe banana instead of applesauce.
- Neutral base: use applesauce and vanilla protein powder.
- Softer muffins: avoid overbaking and give the muffins enough cooling time.
- Sticking prevention: use silicone liners or spray paper liners lightly.
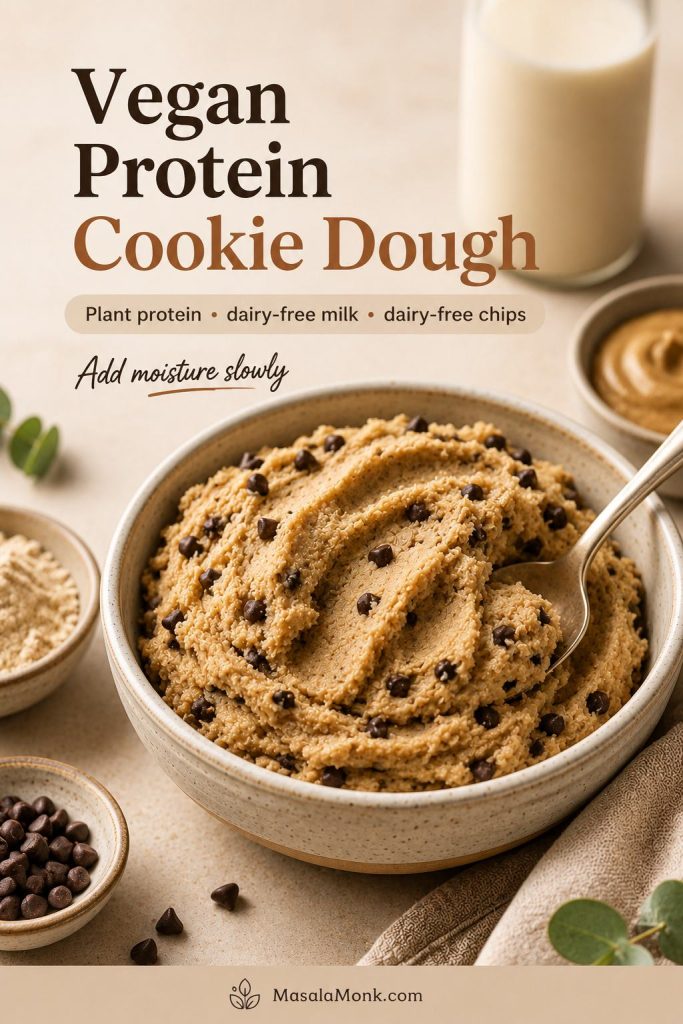
- Dairy-free batch: use thick dairy-free yogurt and a plant-based protein powder, then adjust the milk as needed.
Approximate Nutrition
Approximate per muffin, based on 12 muffins: 180–230 calories, 9–12g protein, 20–28g carbohydrates, 6–10g fat, and 2–4g fiber. Exact numbers vary by protein powder, yogurt, flour, sweetener, milk, and mix-ins.
Storage
Store fully cooled muffins in an airtight container in the refrigerator for 4–5 days, or freeze for up to 3 months. Reheat briefly in the microwave until just warm.
FAQs About High Protein Muffins
How much protein is in each muffin?
Each muffin has about 9–12 grams of protein depending on the protein powder, yogurt, flour, milk, eggs, and mix-ins you use. For the most accurate number, calculate using the exact brands and amounts in your kitchen.
What if I do not want to use protein powder?
A no-powder version needs a slightly different formula built around cottage cheese, Greek yogurt, eggs, oats, nut butter, or seeds. Simply removing the protein powder from this recipe will change the flour-to-liquid balance.
Which protein powder works best for muffins?
A vanilla whey blend or plant-based blend is the easiest starting point. Whey isolate can bake dry if used heavily, while casein and some plant powders may need extra milk because they absorb more liquid.
Why did my protein muffins turn dry?
Dry muffins usually come from too much protein powder, not enough liquid, overbaking, or using a powder that absorbs heavily. Next time, add more yogurt or milk and check the muffins earlier.
Why is my batter thicker than regular muffin batter?
Protein powder, oat flour, and Greek yogurt all make the batter sturdier than a classic muffin batter. It should still be scoopable, not dry. Let it rest for 5 minutes, then loosen with a small splash of milk if needed.
Does oat flour work in this recipe?
Oat flour works well and gives the muffins a breakfast-style flavor. The texture will be slightly heartier than all-purpose flour. If the batter gets too stiff, add a little more milk.
How should I freeze and reheat them?
Cool the muffins fully, freeze them individually, then move them to a freezer bag or airtight container for up to 3 months. To reheat, microwave briefly from frozen or thaw overnight in the fridge.
How do I make a dairy-free version?
Choose a thick dairy-free yogurt and a plant-based protein powder. Because plant-based powders often absorb more liquid, add milk gradually until the batter looks sturdy but workable.
Blueberries or chocolate chips: which works better?
Both work well, but they give different results. Blueberries make the muffins feel fresher and more breakfast-like, while mini chocolate chips make them feel more snackable. Keep mix-ins around ½–¾ cup so the muffins bake evenly.
How do I know when they are done?
The tops should spring back lightly, and a toothpick should come out clean or with a few moist crumbs. Pull them before they feel firm and dry because they continue to set as they cool.
Are these filling enough for breakfast?
They can be, especially when paired with fruit, Greek yogurt, cottage cheese, eggs, or coffee. On their own, they are more filling than a regular muffin because they include protein-rich ingredients and a more substantial crumb.
If you try these, leave a note with the protein powder you used, whether you chose banana or applesauce, and how much milk your batter needed. Those little details often help the next reader get a softer batch on the first try.