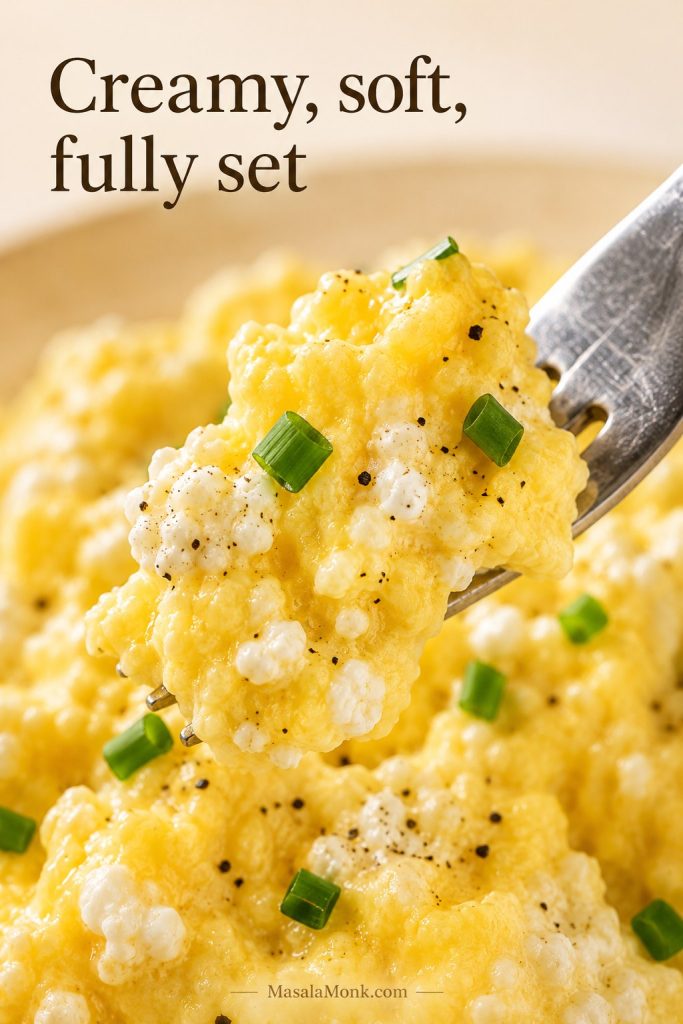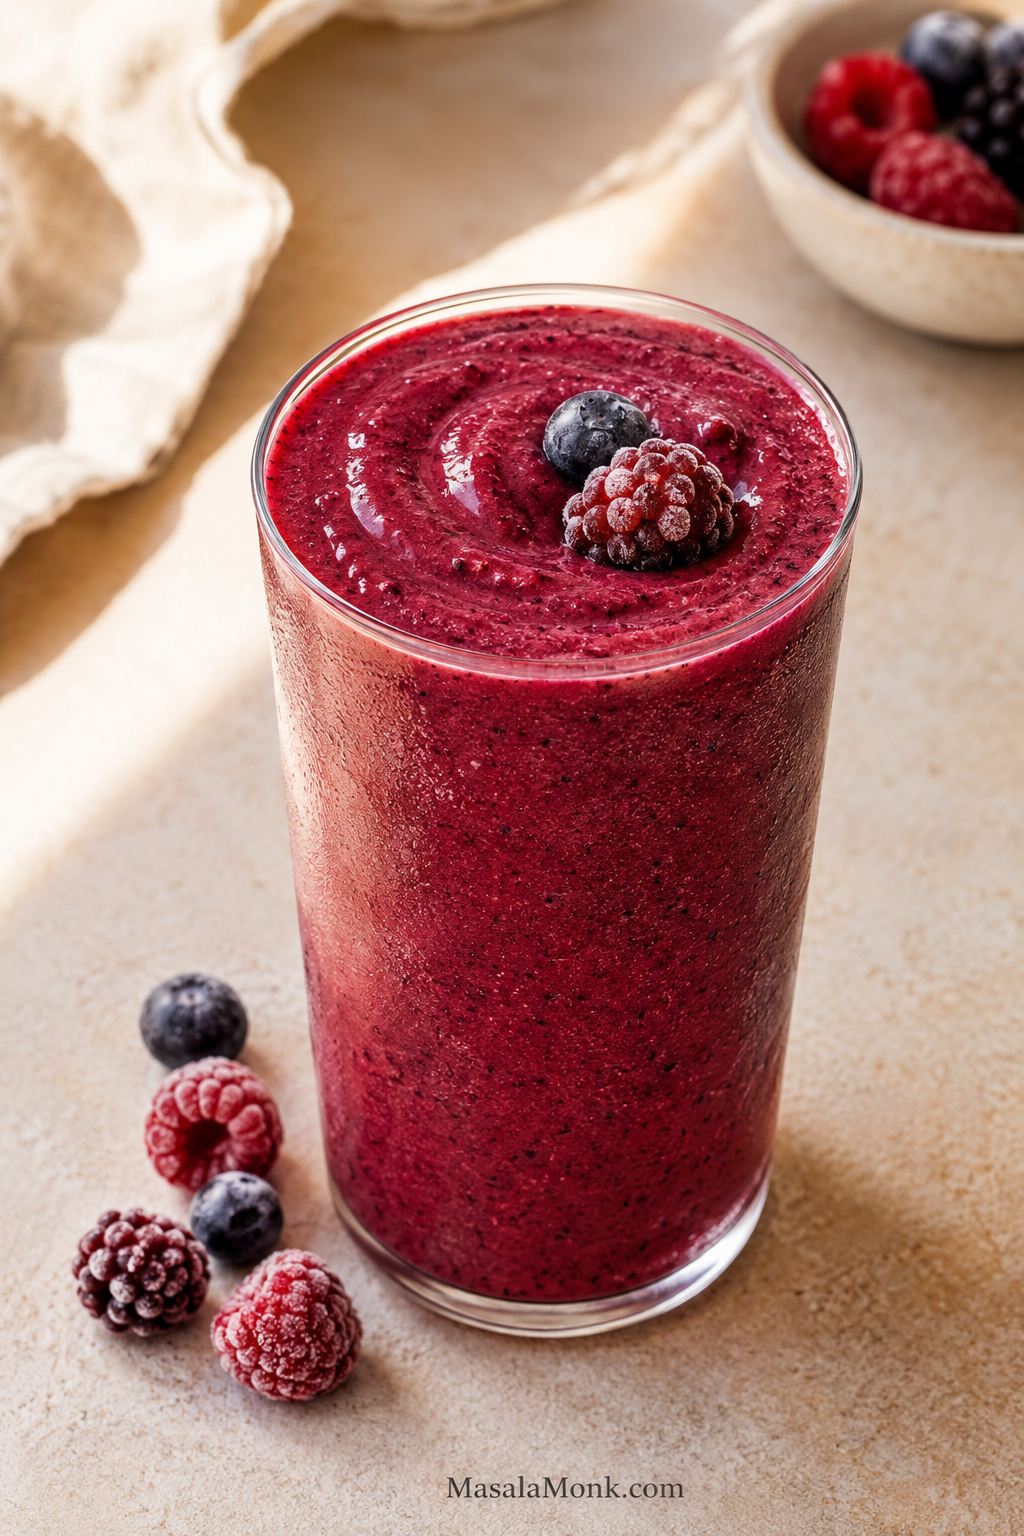
A good berry smoothie should taste like real berries first: cold, creamy, bright, and thick enough to pour slowly. It should feel like a real breakfast or snack, not a glass of watered-down fruit milk.
This berry smoothie recipe starts with one reliable base, then shows you how to adjust it for the way smoothies actually happen at home: a frozen berry bag, half a banana, a spoon of yogurt, almond milk, protein powder, spinach, oats, chia, or whatever needs using up in the fridge.
The main rule is simple: start with frozen berries and less liquid than you think. Once the blender starts moving, you can always loosen the smoothie. If it turns watery first, you have to build the texture back with more frozen fruit or another thickener.
In this guide
Quick Answer: The Best Berry Smoothie Ratio
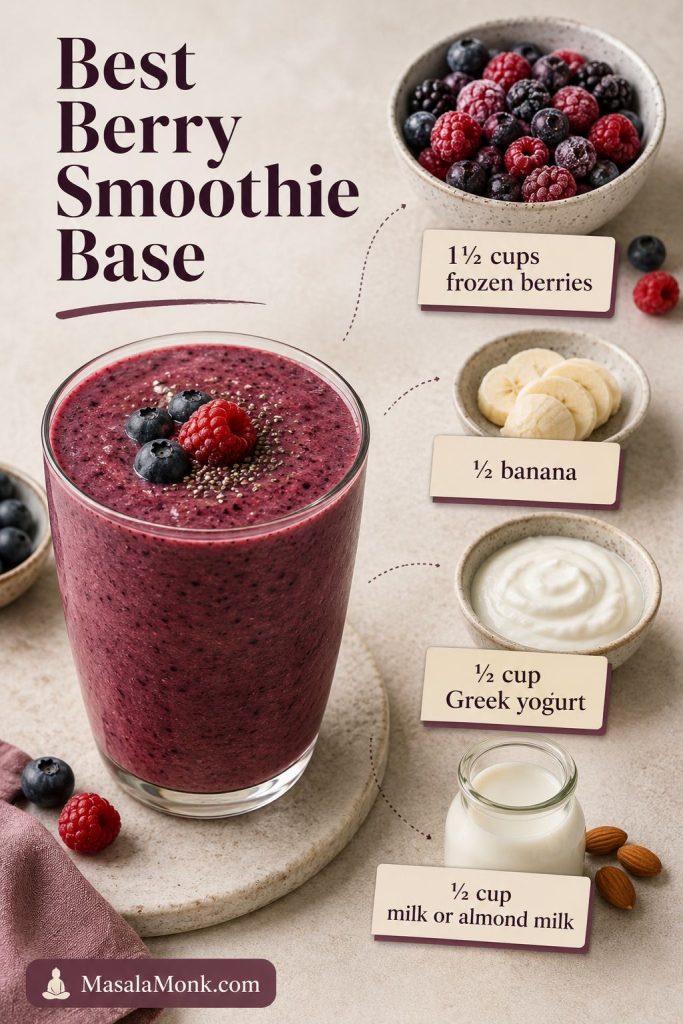
For a thick, drinkable berry smoothie, blend 1 1/2 cups frozen berries, 1/2 banana, 1/2 cup Greek yogurt, and 1/2 cup milk or almond milk. Add the liquid first, then the yogurt and banana, then the frozen berries. Blend until smooth, adding more liquid 1 tablespoon at a time only if the blender stalls.
Frozen berries make the thickest, coldest smoothie because they chill the drink and build texture at the same time. Fresh berries work beautifully when they are sweet and in season, but they usually need help from frozen banana, yogurt, oats, chia, or a small amount of ice.
At a glance: 5 minutes, no cooking, about 2 cups / 475 ml total. Use 1/2 cup / 120 ml liquid for a thick drinkable smoothie, or 2–5 tablespoons / 30–75 ml for a spoonable smoothie bowl.
When the ratio is right, the smoothie tastes cold and full, not watered down — the kind of breakfast you can drink slowly instead of rushing through.
Need to adjust the texture? Jump to the smoothie ratio guide or the troubleshooting section.
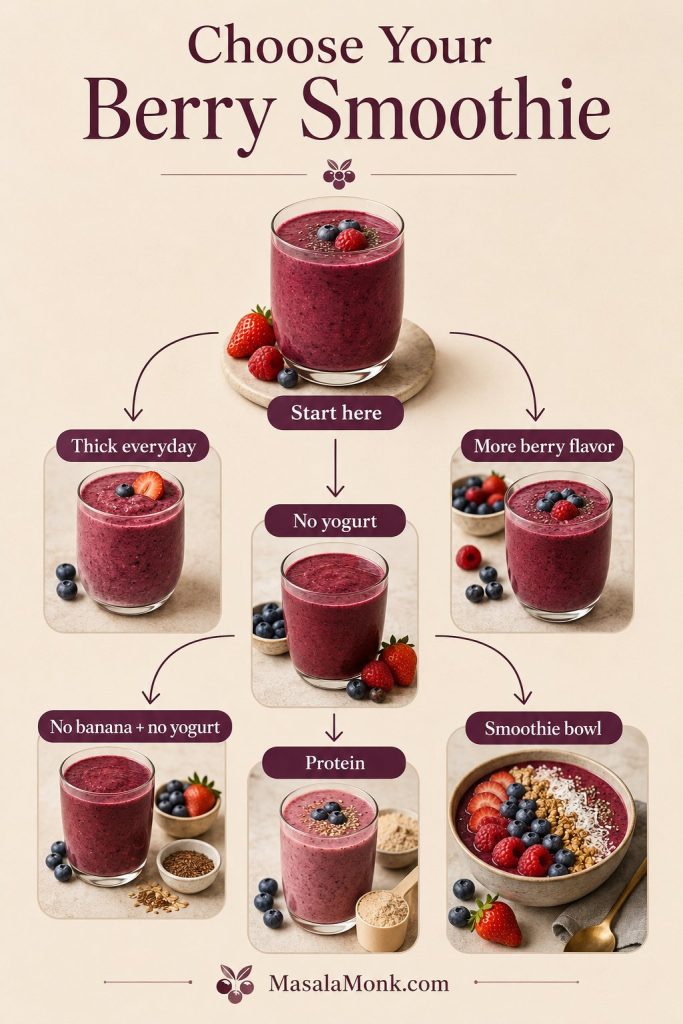
Choose Your Berry Smoothie Version
Use this quick table when you know what you want but do not want to read every variation first.
| What you want | Make this version |
|---|---|
| Thick everyday smoothie | Classic berry smoothie |
| Stronger berry flavor | No-banana berry smoothie |
| Dairy-free or no yogurt | No-yogurt berry smoothie |
| No banana and no yogurt | Almond butter + oats/chia version |
| More filling | Berry protein smoothie |
| Hidden greens | Spinach berry smoothie |
| Spoonable breakfast | Berry smoothie bowl |
Why This Berry Smoothie Works
This recipe works because it treats a smoothie like a flexible ratio instead of a rigid formula. Berries bring the flavor, frozen fruit brings thickness, yogurt or banana brings creaminess, and the liquid decides whether the final texture is slow-pouring, light, or spoonable.
That is why the same freezer bag can give you either a thin, forgettable drink or a smoothie that feels cold, full, and breakfast-worthy. The difference is not complicated technique; it is starting with enough frozen fruit and not flooding the blender before the texture has a chance.
Ice makes a smoothie colder, but it can also water down the berry flavor as it melts. Frozen berries do the job better because they add chill, flavor, and thickness at the same time. For a deeper look at why frozen fruit often gives smoothies better body, see this fresh vs frozen fruit smoothie test.
The texture goal: A good berry smoothie should pour slowly, not splash like juice. If it is thin, add frozen fruit. If the blender sounds angry, add liquid one tablespoon at a time.
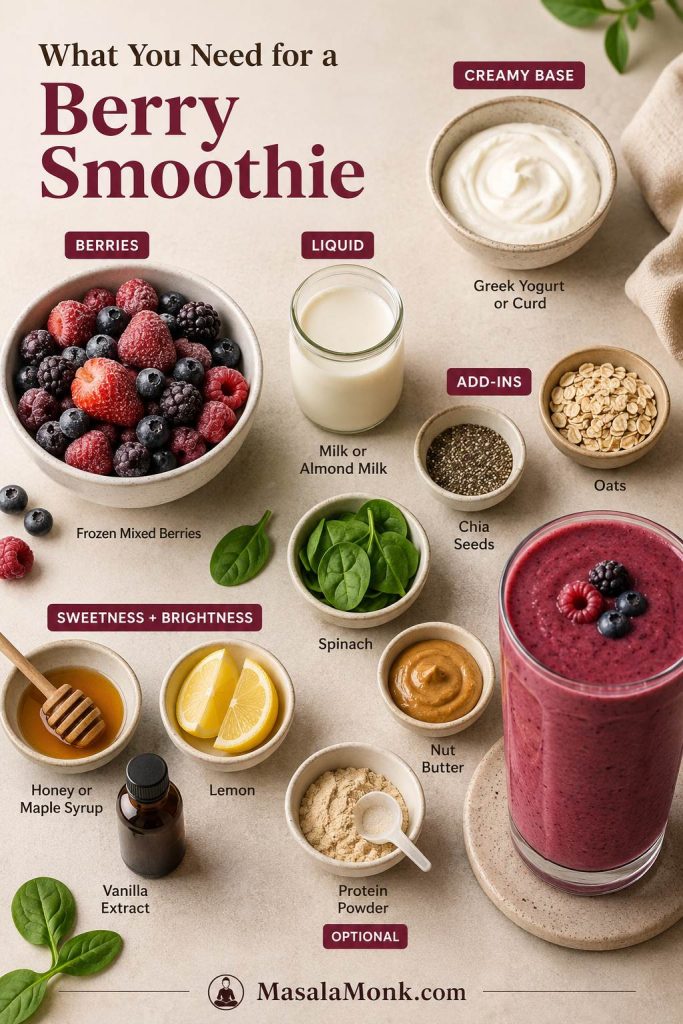
Ingredients That Control Flavor and Texture
You only need a few ingredients, but each one changes the result. Choose the berries first, then decide whether you want banana, yogurt, dairy-free liquid, protein, greens, or a thicker breakfast-style smoothie.
If you already know your main constraint, jump straight to the no-banana version, no-yogurt version, or protein smoothie.
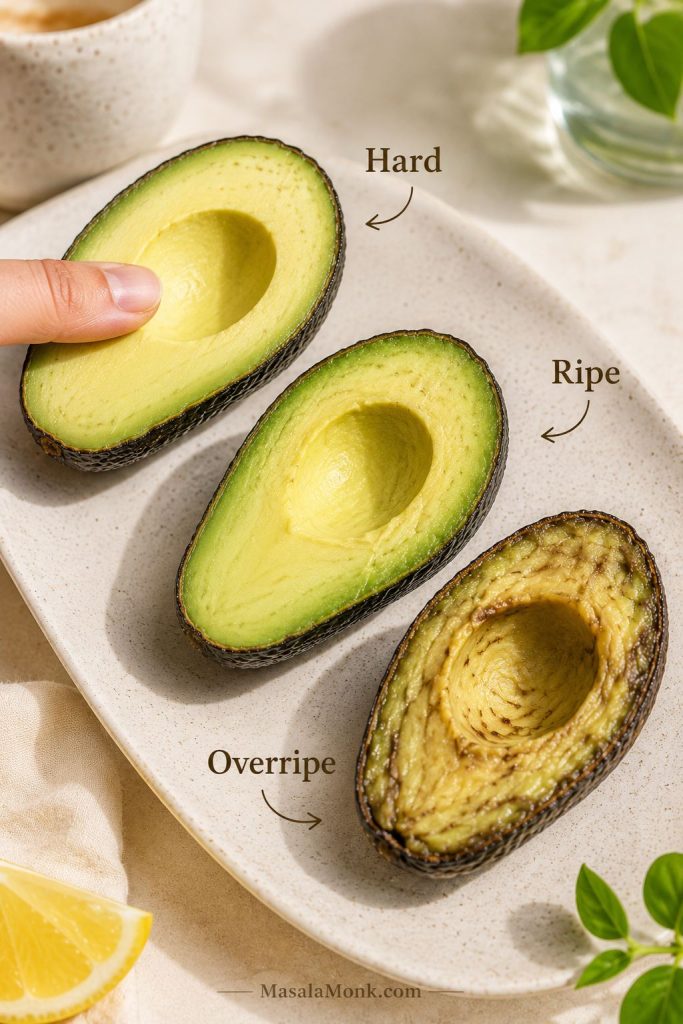
Fresh vs Frozen Berries
Frozen berries are the easiest choice for a thick smoothie. They are already cold, blend into a frosty texture, and reduce the need for ice. A frozen mixed berry bag with strawberries, blueberries, raspberries, and blackberries is usually the most convenient option.
Fresh berries are best when they are sweet and juicy. Since they are not frozen, they usually make a thinner smoothie, so use them with frozen banana, Greek yogurt, oats, chia, a handful of frozen berries, or a little ice when you want more thickness.
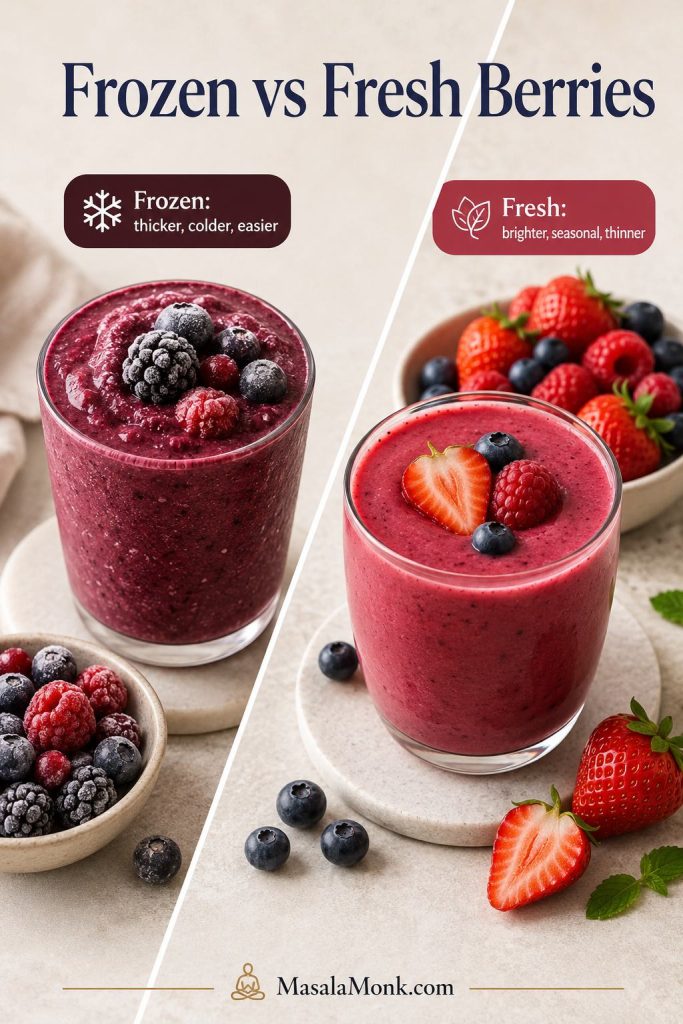
Do not thaw frozen berries first unless your blender is struggling badly. Thawed berries release juice, and that extra juice can make the smoothie thinner.
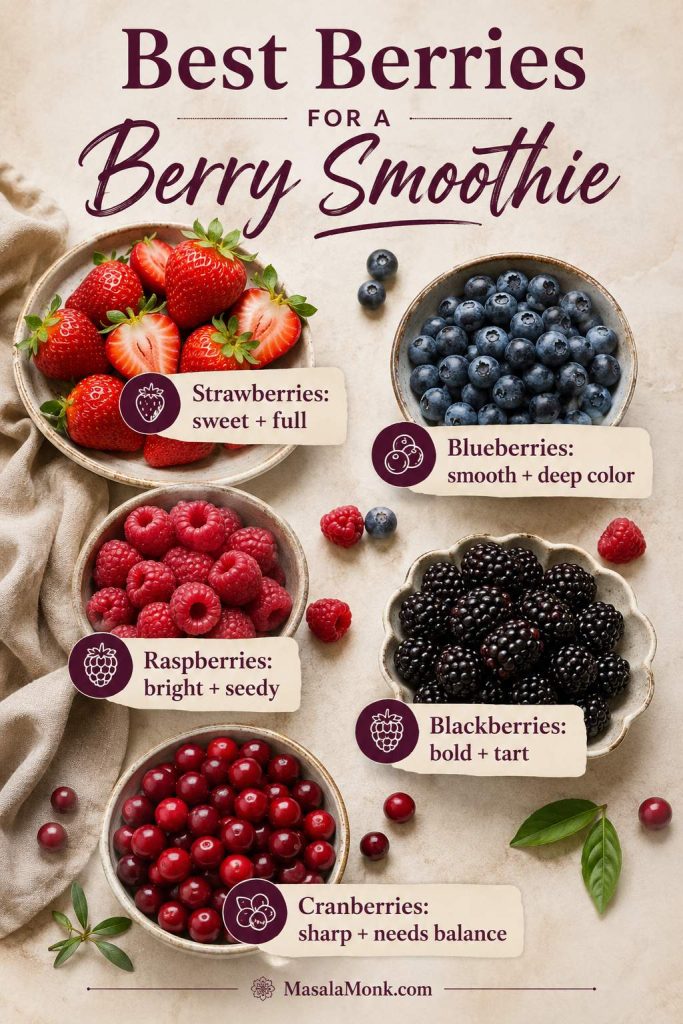
Best Berries for a Smoothie
Different berries behave differently in the blender. This is why one mixed berry smoothie can taste sweet and creamy, while another turns tart, seedy, or flat.
| Berry | What It Adds | Watch Out For |
|---|---|---|
| Strawberries | Sweetness, body, and classic smoothie flavor | Can taste mild if the smoothie has too much liquid |
| Blueberries | Deep color, mild sweetness, and smoother texture | Can taste flat without lemon juice or a little sweetness |
| Raspberries | Bright tart flavor and strong berry aroma | Can be seedy and sharp |
| Blackberries | Deep berry flavor and bold color | Can be seedy and tart |
| Cranberries | Sharp, tangy berry flavor | Usually need banana, dates, honey, or juice to balance them |
If your smoothie tastes sharp or gritty, the berry mix may be the reason, not your method. A strawberry-blueberry-heavy blend is usually the safest everyday choice; raspberry-blackberry-heavy blends are more vivid, but they need more balancing.
For the smoothest texture, lean on strawberries and blueberries more than raspberries or blackberries. If seeds bother you, blend longer or strain only when needed.
Taste before adding sweetener if your blend has plenty of strawberries or banana. For gentle sweetness, try banana or vanilla first. If the smoothie is still sharp, add a date, honey, or maple syrup. Use juice only when you want a sweeter, fruit-drink style smoothie.
For kids or anyone who prefers a softer, sweeter smoothie, use a strawberry-heavy berry mix, vanilla yogurt, or a small splash of apple or orange juice.
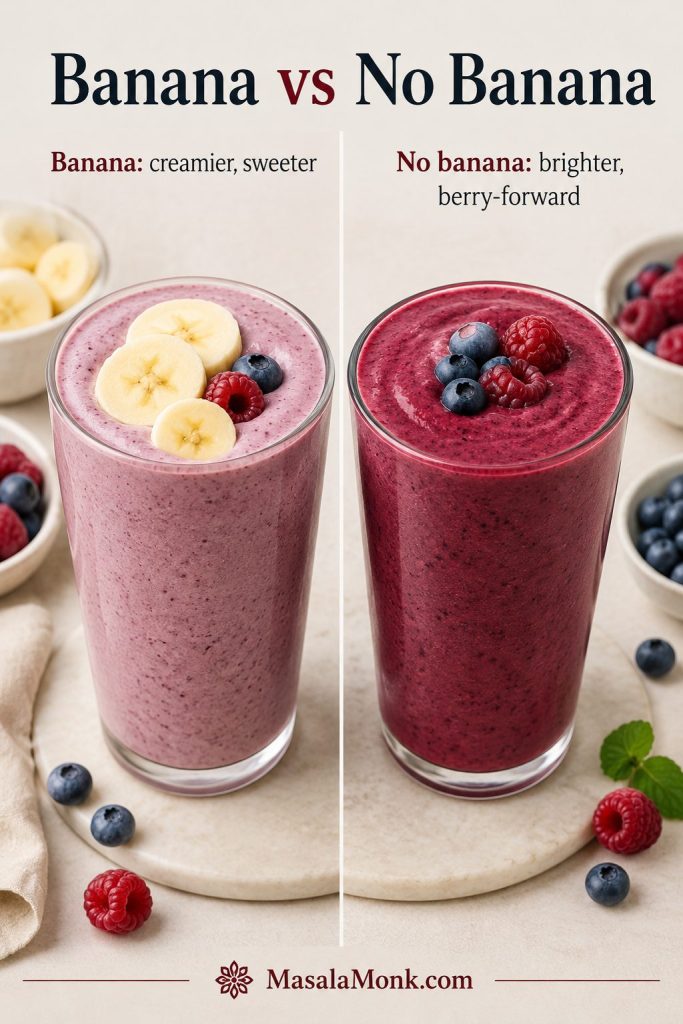
Banana or No Banana
Banana adds natural sweetness and a creamy texture. Half a banana is enough for balance; a full banana makes the drink sweeter, thicker, and more banana-forward.
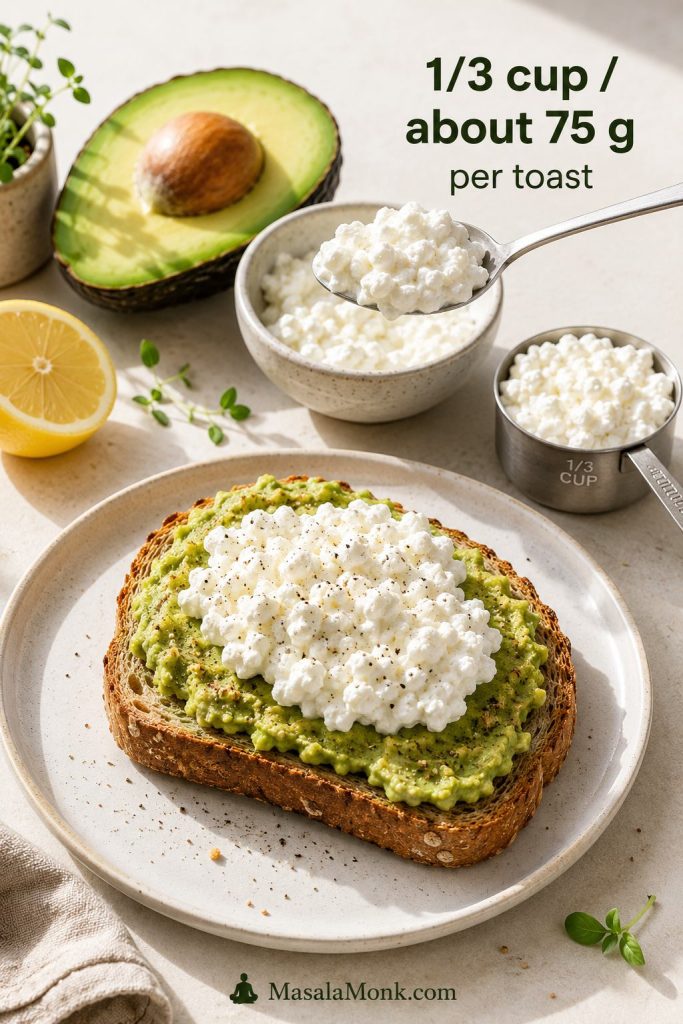
If you want the smoothie to taste mostly like berries, stay closer to half a banana. Skip it completely when you want a brighter color, sharper berry flavor, or no banana taste at all. To keep a no-banana smoothie creamy, use Greek yogurt, coconut yogurt, avocado, almond butter, oats, chia, or extra frozen berries.
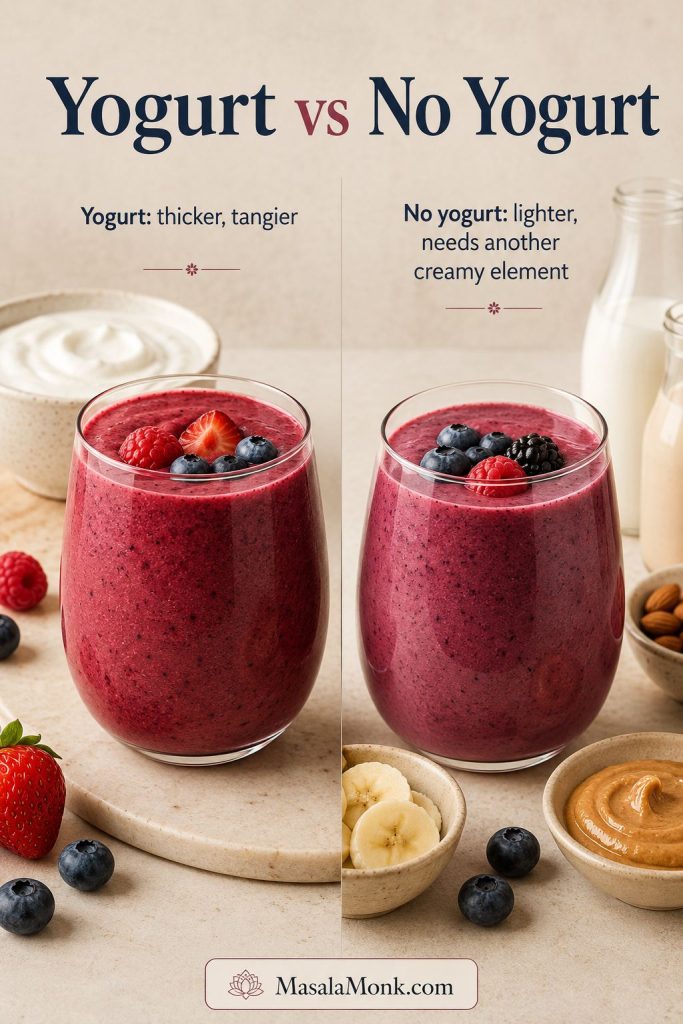
Yogurt or No Yogurt
Greek yogurt is the easiest route to a thick, creamy smoothie with a little extra staying power. Regular yogurt works too, but it is looser, so you may need slightly less liquid. Plain yogurt keeps the flavor breakfast-like; vanilla yogurt makes it softer and sweeter.
If you are using homemade curd, choose a thick, well-set curd and start with slightly less liquid. If the curd is loose or watery, strain it for 15–20 minutes or reduce the milk by 2–3 tablespoons.
Without yogurt, use banana, almond butter, oats, chia, coconut yogurt, avocado, coconut milk, or extra frozen fruit so the drink does not taste like berries blended with thin milk.
Should You Add Ice?
Use frozen berries instead of ice whenever possible. Frozen berries chill the smoothie while keeping the flavor full. Ice can help when you are using fresh fruit, but too much can make the drink taste diluted.
Add ice only when you are using fresh berries and need the smoothie to be colder or thicker. Start with a small handful, not a full cup.
Best Liquids to Use
Your liquid sets the mood of the glass. Milk and oat milk make the smoothie rounder, almond milk keeps it lighter, coconut water feels more refreshing, and juice pushes it sweeter.
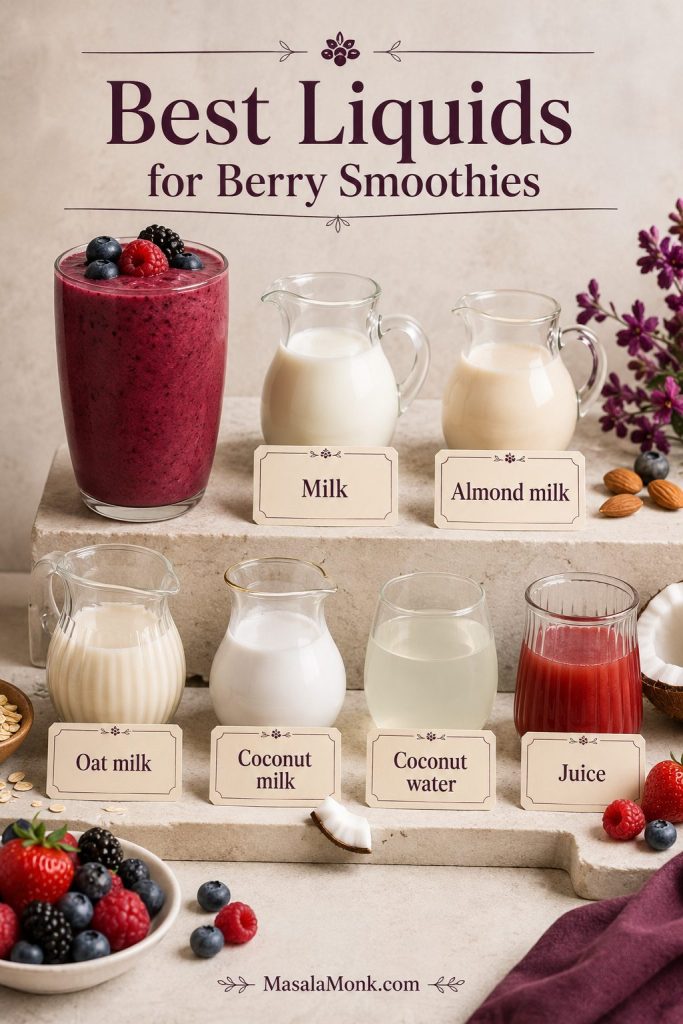
| Liquid | Best For | Watch Out For |
|---|---|---|
| Milk | Creamy classic berry smoothie | Can feel heavier with yogurt |
| Almond milk | Light dairy-free smoothie | Less creamy than dairy milk |
| Oat milk | Creamier dairy-free smoothie | Can soften the bright berry flavor |
| Coconut milk | Rich dairy-free smoothie | Can taste coconut-forward |
| Coconut water | Refreshing lighter smoothie | Thinner, less creamy texture |
| Orange or apple juice | Sweeter fruit smoothie | Can become too sweet quickly |
| Cranberry juice | Tart berry-forward smoothie | May need banana or honey |
| Water | Emergency low-calorie option | Can taste thin or flat |
If you are unsure, start with milk for creaminess or almond milk for a lighter dairy-free version. Use juice only when the berries are very tart, because it can quickly push the smoothie into sweeter, dessert-like territory. If coconut milk is your usual smoothie base, this guide to coconut milk nutrition and glycemic impact is a useful deeper read.
Optional Add-Ins
Think of these as small levers, not a shopping list. Add one or two at a time so the berries still taste like the main event.
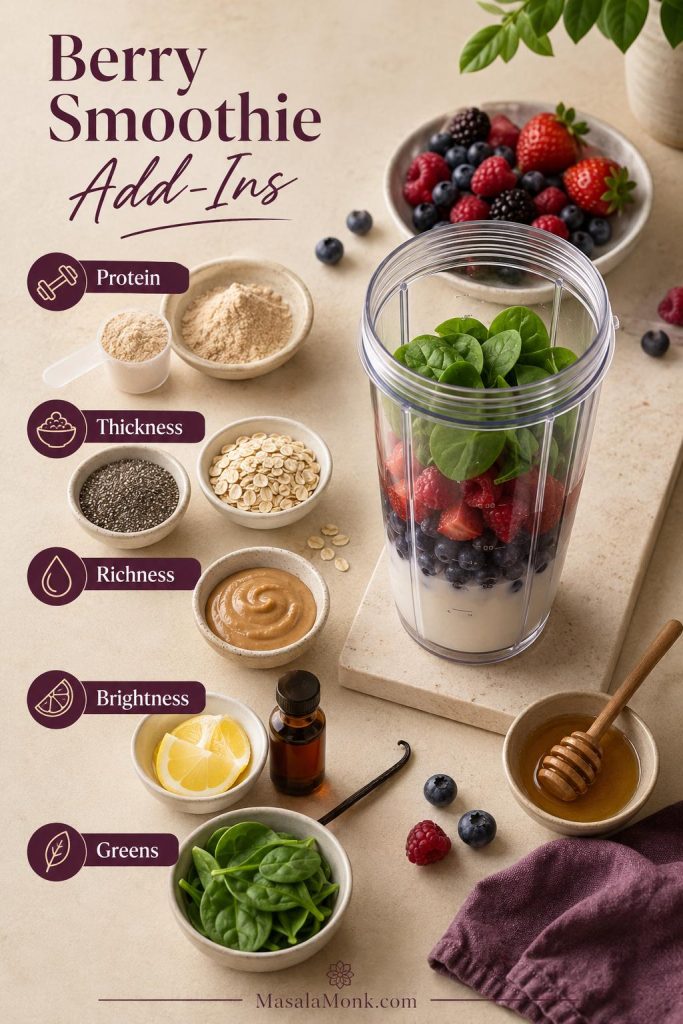
- Protein powder: use 1 scoop and add extra liquid if needed.
- Chia seeds: add 1 teaspoon to 1 tablespoon for thickness and texture.
- Oats: add 1 to 2 tablespoons for a breakfast smoothie feel. If you are choosing between rolled, quick, instant, or steel-cut oats, this guide to oats types, nutrition, and differences explains how each one behaves.
- Nut butter: add 1 tablespoon for richness. For more nut-based smoothie ideas, these nut-infused smoothie recipes are a natural next read.
- Spinach: add 1 cup baby spinach for a smoothie that still tastes mostly like berries.
- Lemon juice: add 1 teaspoon to brighten a dull smoothie.
- Vanilla: add 1/4 teaspoon for a softer, dessert-like flavor.
- Honey, maple syrup, or dates: use only if the berries are tart.
- Tiny pinch of salt: useful when the smoothie tastes flat rather than fruity.
Start with the base smoothie, then add one thing for the job you need: oats for breakfast fullness, chia for thickness, nut butter for richness, or protein powder for a more filling drink.
Equipment
You do not need complicated equipment, but the blender and ingredient order matter more than people think.
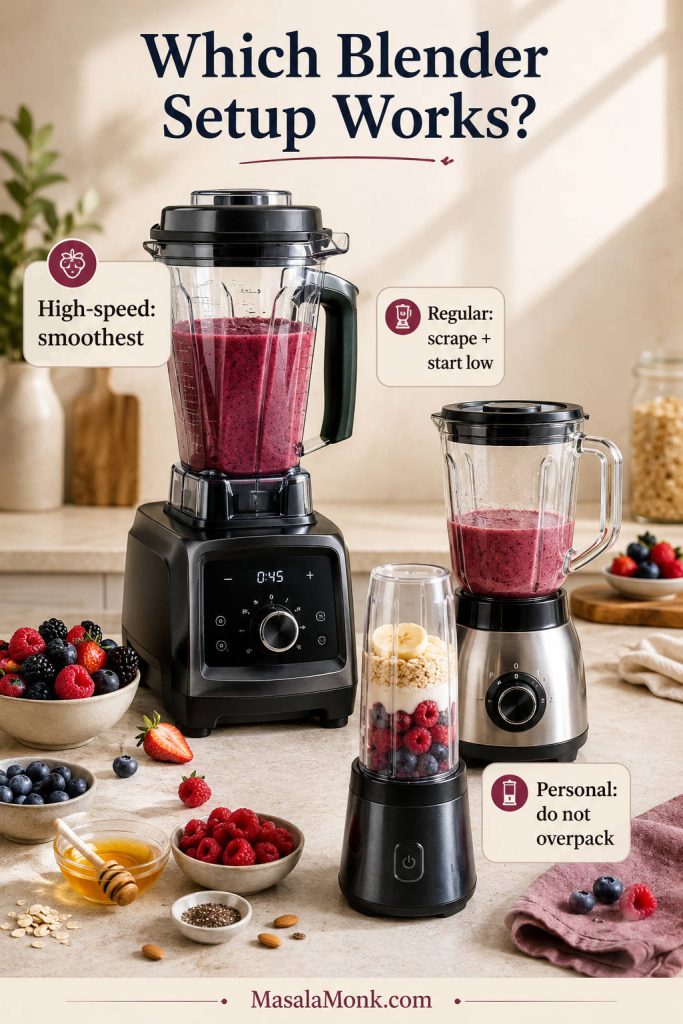
- Blender: A high-speed blender gives the smoothest texture, especially with frozen berries and frozen banana.
- Regular blender: Works well if you add liquid first, use sliced banana, pause to scrape, and add liquid slowly.
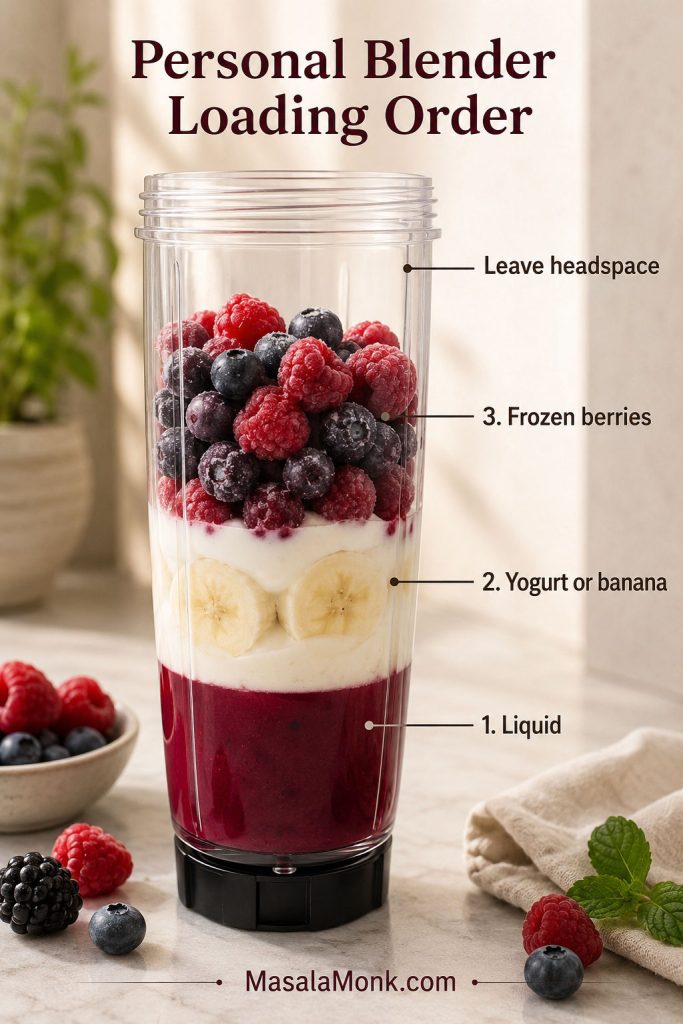
- Personal blender: Good for single servings, but avoid overfilling the cup with frozen fruit.
- Spatula: Helpful for thick frozen blends and smoothie bowls.
- Tamper: Useful for smoothie bowls because they use very little liquid.
- Measuring cups and spoons: Helpful because smoothies are ratio-sensitive.
A regular blender can still make a good smoothie. Add the liquid first, avoid overpacking the jar with frozen fruit, and pause to scrape before adding extra liquid.
For a personal blender, do not pack the cup too tightly with frozen fruit. Add liquid first, then yogurt or banana, then berries, and leave enough headspace for the mixture to move.
For the full blending sequence, see how to make a berry smoothie.
Personal Blender Loading Order
Use this loading order when you are making a single-serving smoothie in a cup-style blender.
How to Make a Berry Smoothie
The method is simple, but this is where most watery smoothies are either prevented or created: the order and the liquid amount matter.
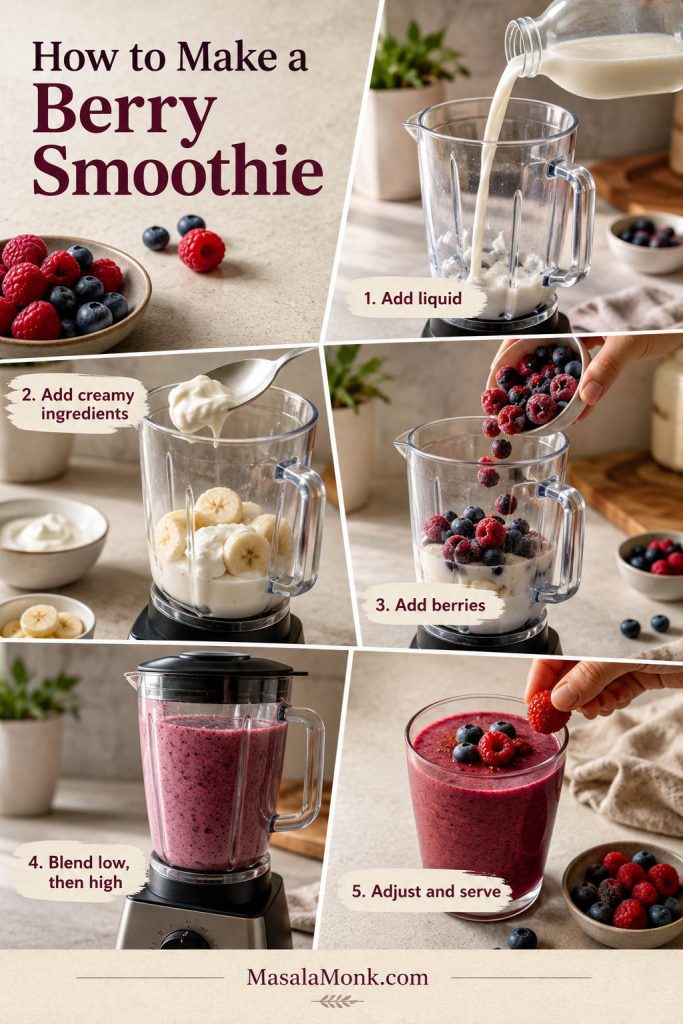
- Add the liquid first. Pour milk, almond milk, oat milk, coconut water, or juice into the blender jar.
- Add the creamy ingredients. Add yogurt, banana, nut butter, oats, chia, or protein powder.
- Add the berries last. Frozen berries should sit on top so the blender can pull liquid through the softer ingredients first.
- Blend low, then high. Start on low speed to break up the frozen fruit, then increase to high until smooth.
- Adjust slowly. If the blender stalls, add more liquid 1 tablespoon / 15 ml at a time.
- Serve right away. Berry smoothies are best cold, thick, and freshly blended.
Regular blender tip: If the blender struggles, stop and scrape before adding more liquid. Add just enough liquid to get the blades moving, then let the blender do the work.
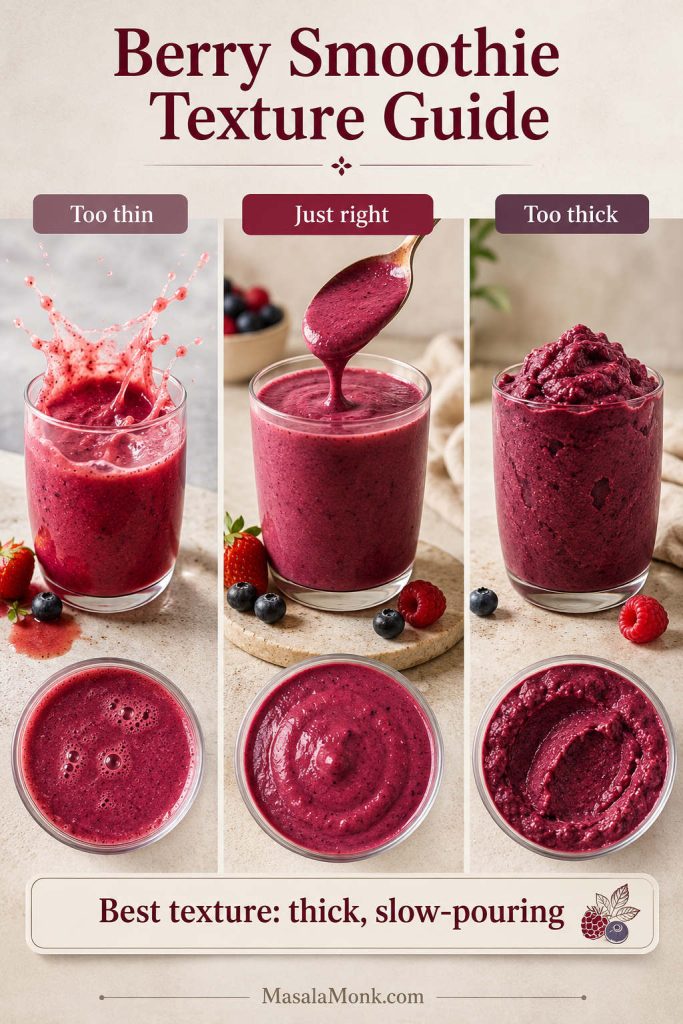
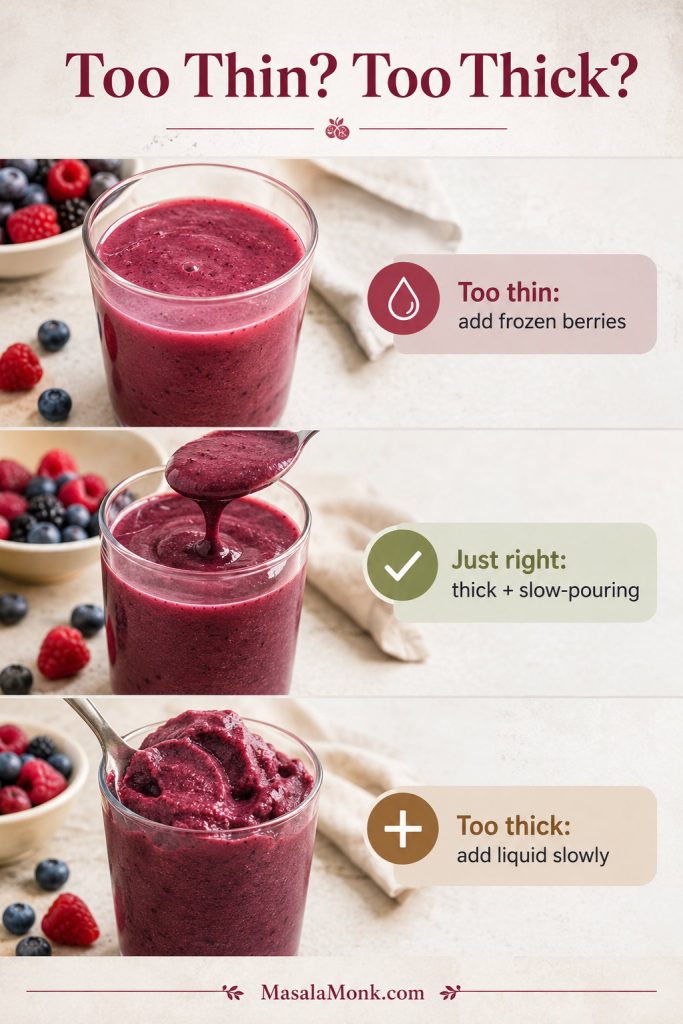
Berry Smoothie Texture Guide
Use this visual checkpoint before changing the recipe. First decide whether the smoothie is too thin, just right, or too thick to blend.
Smoothie Ratio Guide
Use this guide when you know the texture you want but are not sure how much liquid, fruit, or creaminess to use. A drinkable smoothie needs more liquid than a smoothie bowl. A protein smoothie often needs extra liquid because powder, oats, and chia thicken as they blend.
Choose Your Smoothie Texture
Start by deciding whether you want a lighter sip, a thick drinkable smoothie, a protein version, or a spoonable bowl. That choice tells you whether to loosen the blend or keep the liquid low.
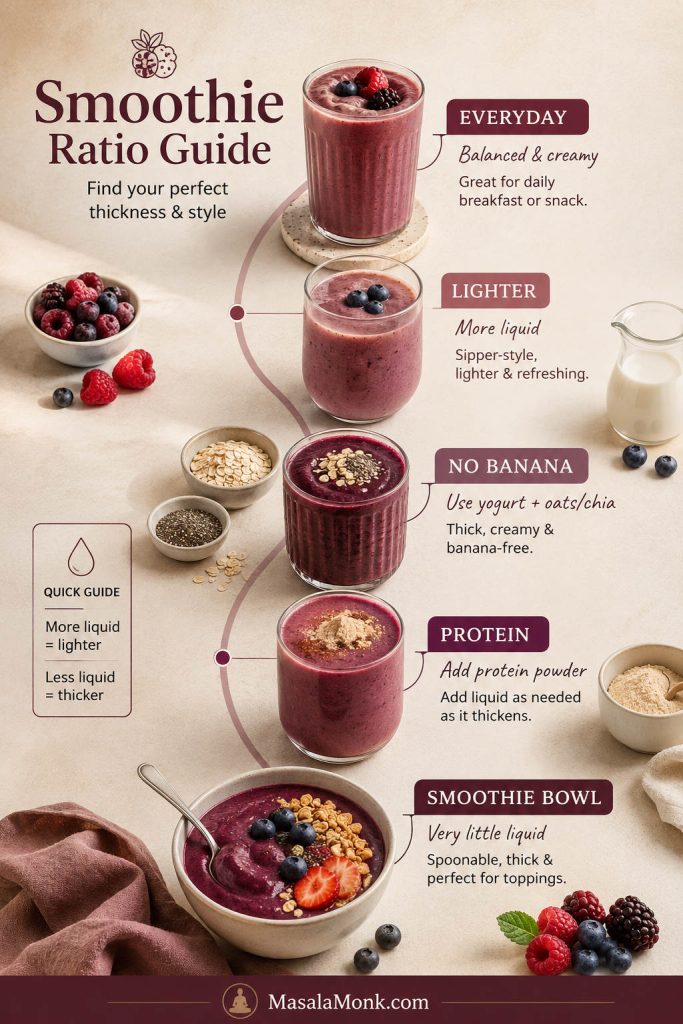
Berry Smoothie Ratios by Style
Use the table as a practical starting point, then adjust after the first blend.
| Style | Berries | Creamy Ingredient | Liquid | Best For |
|---|---|---|---|---|
| Thick drinkable smoothie | 1 1/2 cups / 225 g frozen berries | 1/2 banana + 1/2 cup / 120 g yogurt | 1/2 cup / 120 ml to start | Best everyday version |
| Lighter smoothie | 1 cup / 150 g berries | 1/4 to 1/2 cup yogurt | 3/4 to 1 cup / 180–240 ml | Thinner, easier to sip |
| No-banana smoothie | 1 1/2 cups / 225 g frozen berries | 1/2 cup / 120 g Greek yogurt + oats or chia | 1/2 to 3/4 cup / 120–180 ml | Berry-forward flavor |
| No-yogurt smoothie | 1 1/2 cups / 225 g frozen berries | 1 medium banana or 1 tbsp almond butter | 1/2 to 3/4 cup / 120–180 ml | Dairy-free option |
| No banana + no yogurt | 1 1/2 cups / 225 g frozen berries | 1 tbsp almond butter + 1 tbsp oats or chia | 1/2 to 3/4 cup / 120–180 ml | Vegan-style berry smoothie |
| Protein smoothie | 1 to 1 1/2 cups berries | Greek yogurt or 1 scoop protein powder | 3/4 to 1 cup / 180–240 ml | Breakfast or post-workout |
| Smoothie bowl | 1 heaping cup frozen berries | 1 frozen banana | 2 to 5 tbsp / 30–75 ml | Thick spoonable bowl |
Think of this as a starting point, not a rulebook. Your berries, blender, and yogurt will vary a little, so the first blend is just the beginning. Blend once, taste once, then make one small adjustment at a time.
Once you know the texture you want, jump to the recipe card or check the quick smoothie fixes if your first blend needs adjusting.
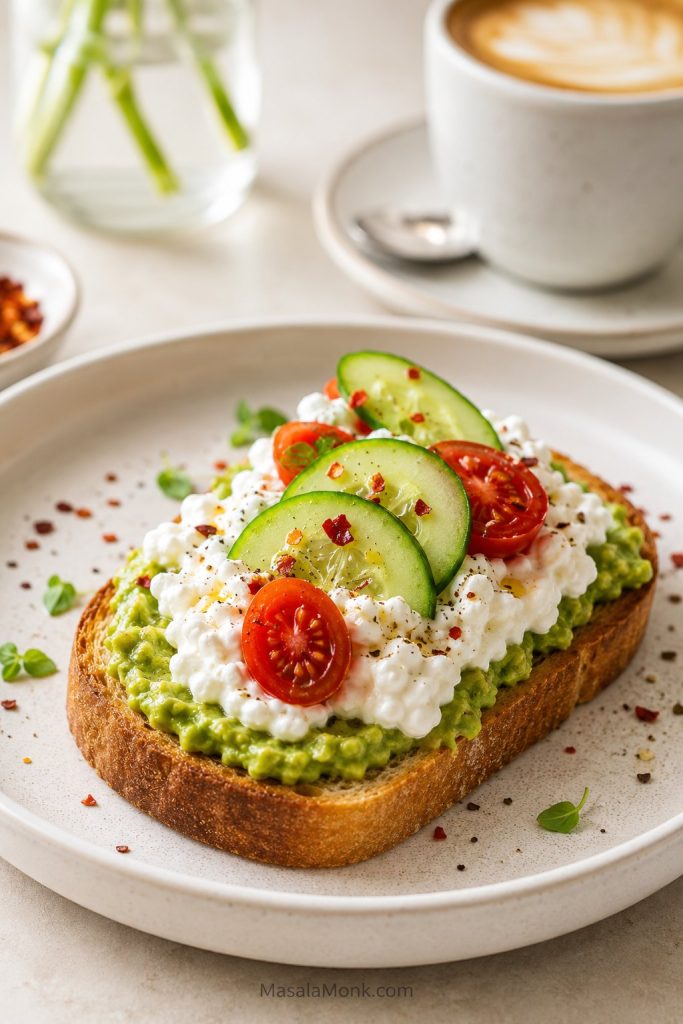
Mixed Berry Smoothie
A mixed berry smoothie is the easiest “open the freezer and make something good” version because a frozen berry bag already gives you sweetness, tartness, color, and aroma. Strawberries add body, blueberries soften the flavor, raspberries brighten it, and blackberries make it deeper.
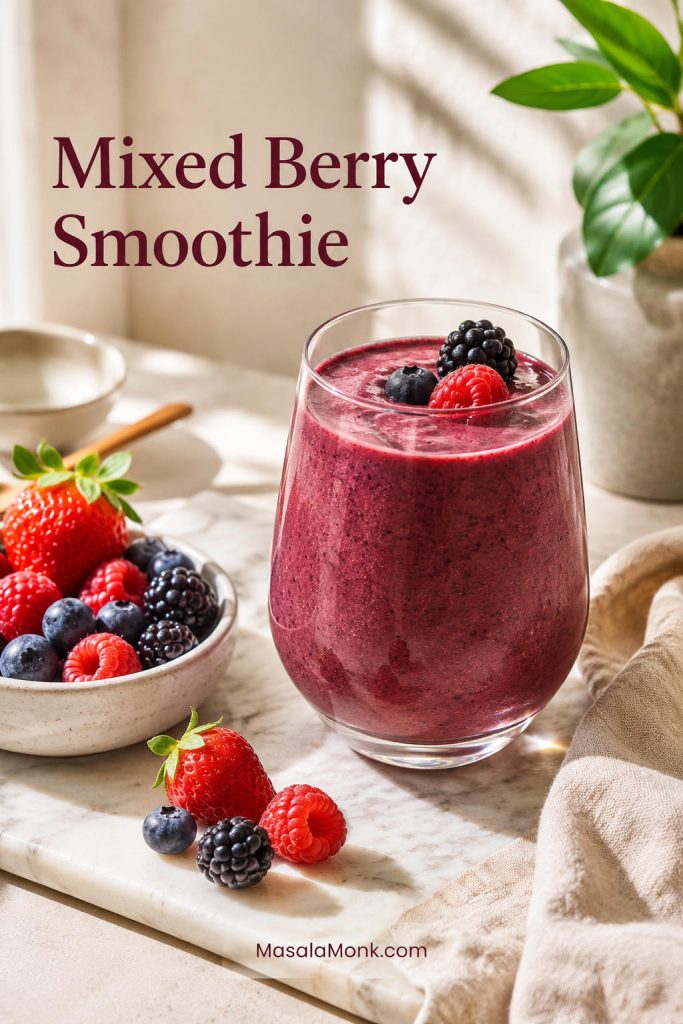
- 1 1/2 cups frozen mixed berries, about 225 g / 8 oz
- 1/2 banana, about 55–60 g
- 1/2 cup Greek yogurt or plain yogurt, about 120 g / 4 oz
- 1/2 cup milk or almond milk, 120 ml / 4 fl oz
- 1 teaspoon honey or maple syrup, only if needed
It is the easiest everyday blend for breakfast, snack time, or a quick cold drink when you want the berries to do most of the work.
Frozen Berry Smoothie
This is the freezer-bag version for the coldest, thickest smoothie without adding ice. Use the berries straight from the freezer so the drink stays frosty and berry-forward instead of thin and diluted.
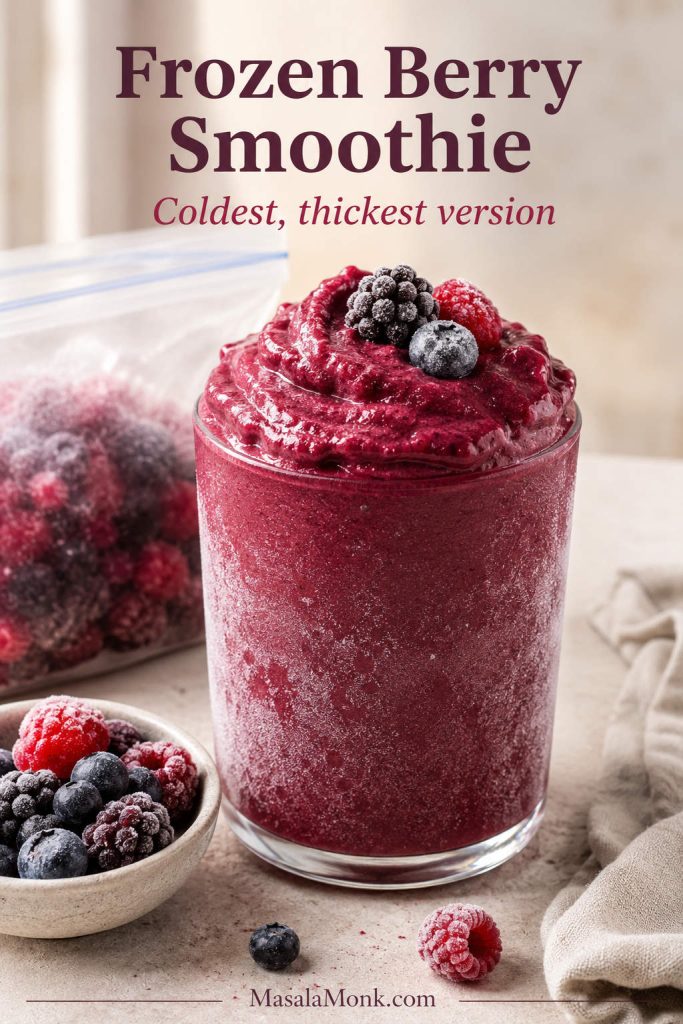
For 1 1/2 cups / 225 g frozen berries, 1/2 cup / 120 ml liquid gives you a thick, slow-pouring start. Scrape once before loosening the blend.
Texture rule: More frozen fruit makes the smoothie thicker. More liquid makes it thinner. Start thick, then loosen it slowly.
Strawberry Banana Berry Smoothie
Strawberry banana is the classic smoothie flavor because banana makes strawberries taste sweeter and creamier. To keep it berry-forward, use more strawberries than banana and add a small handful of mixed berries for depth.
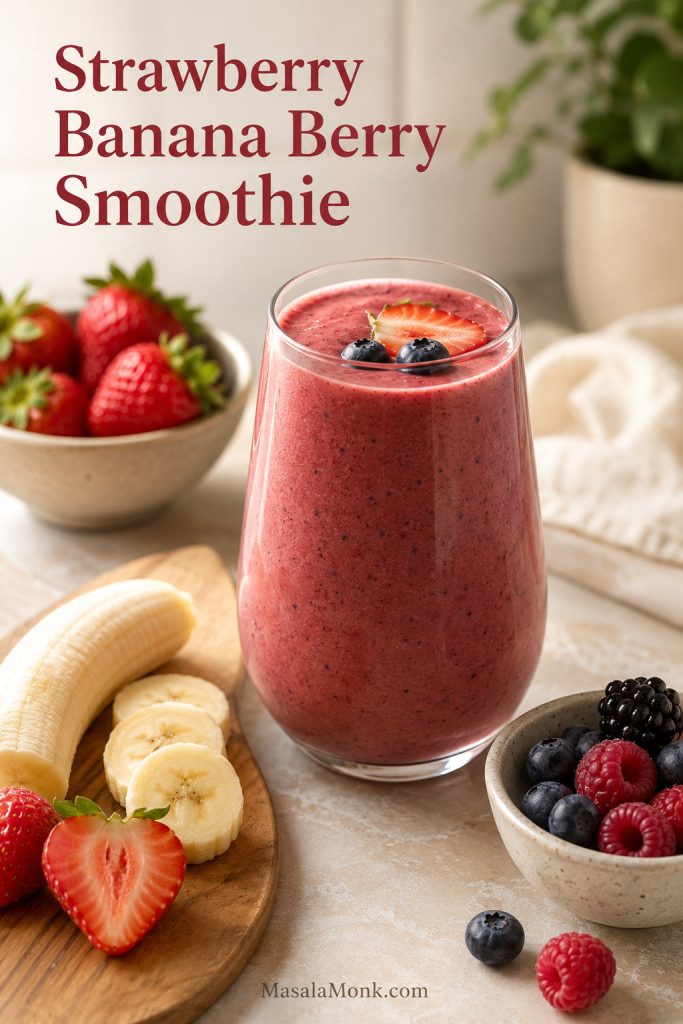
- 1 cup frozen strawberries, about 150 g
- 1/2 cup mixed berries, about 75 g
- 1 small banana or 1/2 large banana, about 100–120 g peeled
- 1/2 cup yogurt, about 120 g / 4 oz
- 1/2 to 3/4 cup milk or almond milk, 120–180 ml
If you are leaning more toward strawberries than mixed berries, our strawberry smoothie recipes give you more ways to build that flavor.
Berry Smoothie Without Banana
You can make a thick smoothie without banana. This is the better version if you have ever made a berry smoothie and wondered why it mostly tasted like banana.
When you want the berries to stay sharp, bright, and clearly in charge, blend:
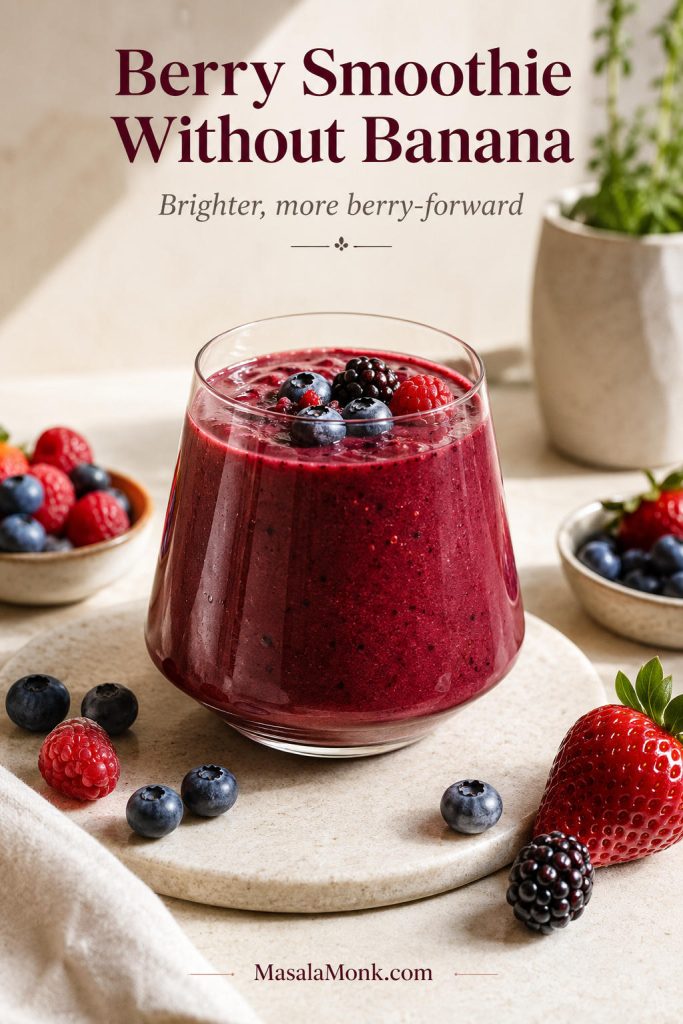
- 1 1/2 cups frozen berries, about 225 g / 8 oz
- 1/2 cup Greek yogurt or coconut yogurt, about 120 g / 4 oz
- 1 tablespoon almond butter, about 15–16 g, or 1 to 2 tablespoons oats
- 1/2 to 3/4 cup milk, almond milk, or oat milk, 120–180 ml
- 1 teaspoon honey or maple syrup, optional
The result is brighter, cleaner, and more berry-forward. It is especially good with sweet blueberries, strawberries, or a mixed berry blend that leans heavily on strawberries.
If you are also skipping yogurt, use the no banana + no yogurt version instead.
Berry Smoothie Without Yogurt
No yogurt in the fridge is not a problem. The goal is still creamy, not thin — just without the tang of yogurt.
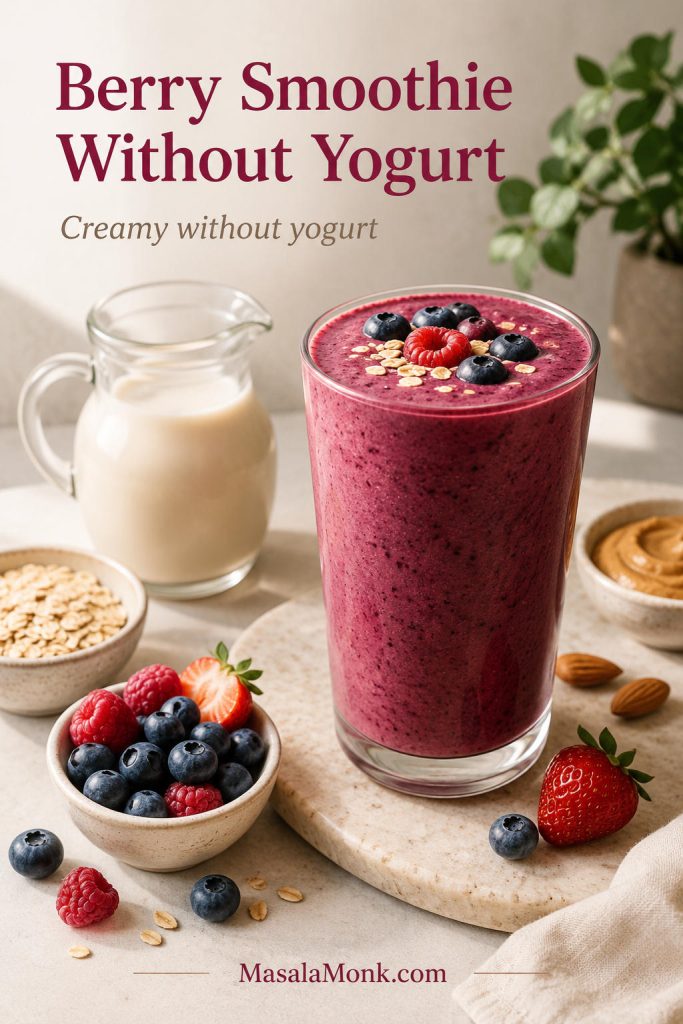
- 1 1/2 cups frozen berries, about 225 g / 8 oz
- 1 medium banana, about 100–120 g peeled
- 1/2 cup almond milk, oat milk, coconut milk, or dairy milk, 120 ml / 4 fl oz
- 1 tablespoon chia, oats, or almond butter if you want more fullness
- 1 teaspoon lemon juice, optional
For a dairy-free version, use almond milk, oat milk, or coconut milk. Coconut yogurt also works if you want the thickness of yogurt without dairy.
If you are skipping both yogurt and banana, jump to the no banana + no yogurt version.
Berry Smoothie Without Banana or Yogurt
This is the trickiest version because you are removing the two ingredients that usually make a berry smoothie soft and creamy. Almond butter gives richness, while oats or chia help the drink feel fuller without pushing the berries into the background.
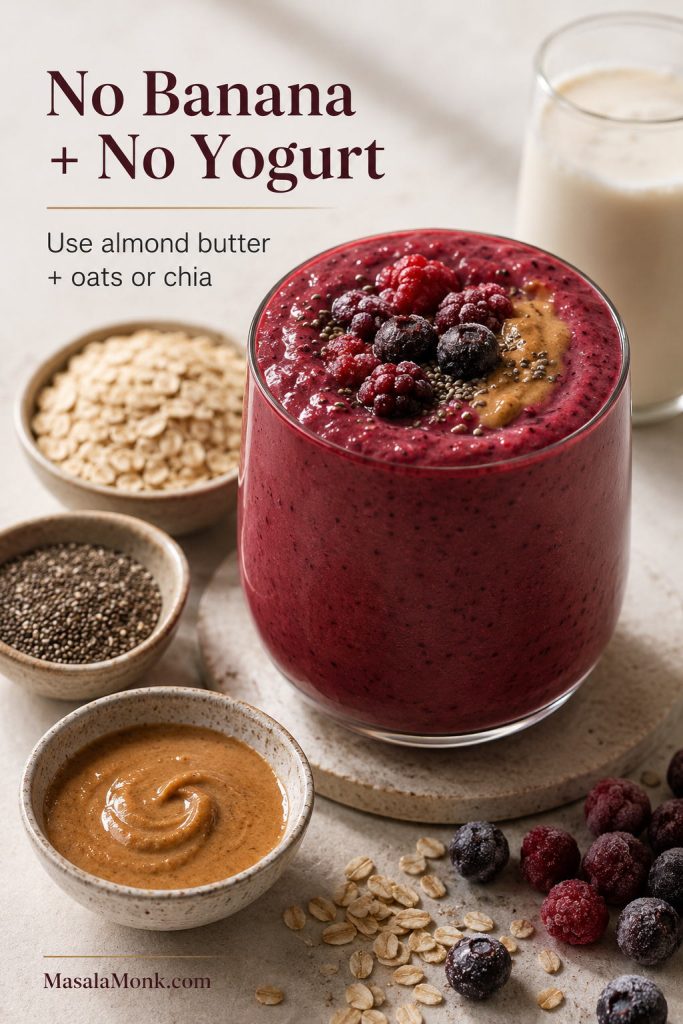
- 1 1/2 cups frozen berries, about 225 g / 8 oz
- 1/2 to 3/4 cup almond milk or oat milk, 120–180 ml
- 1 tablespoon almond butter, about 15–16 g
- 1 tablespoon oats or chia seeds, about 6–12 g depending on which you use
- 1 teaspoon honey, maple syrup, or 1 soft date, optional
If it tastes sharp instead of fruity, add a little more almond butter, a date, or a splash of sweeter liquid.
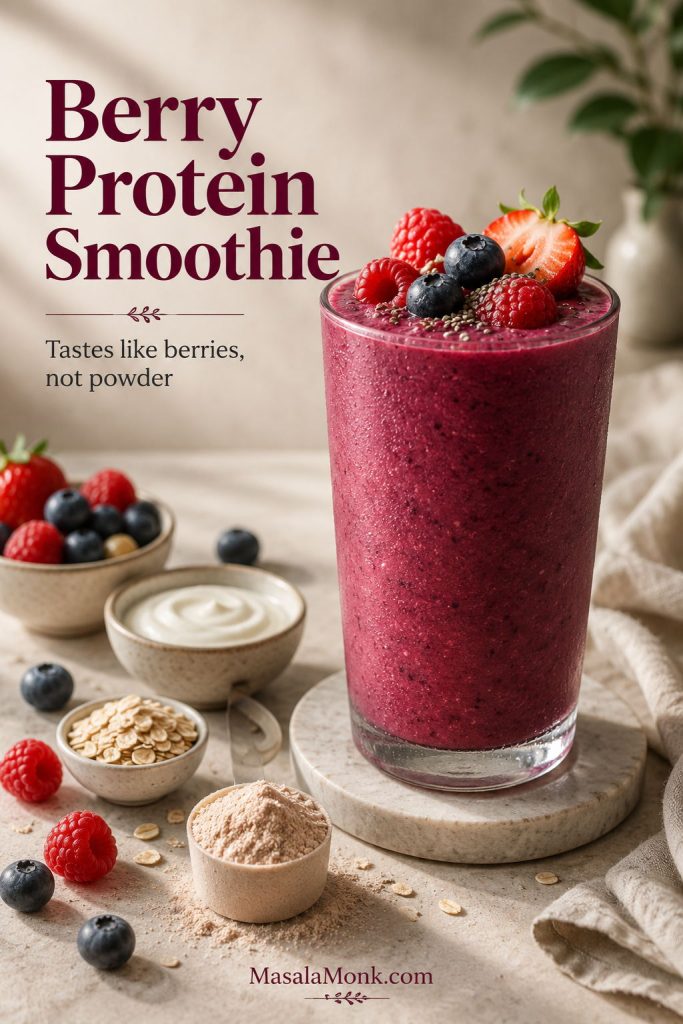
Berry Protein Smoothie
The best berry protein smoothie should still taste like berries, not like protein powder with fruit added to hide it. Greek yogurt, protein powder, milk, chia, and oats can all help, but the flavor should stay berry-first.
| Protein Style | Use This | Liquid Adjustment |
|---|---|---|
| Greek yogurt protein smoothie | 1/2 to 3/4 cup Greek yogurt | Start with 1/2 cup milk |
| Protein powder smoothie | 1 scoop vanilla or unflavored protein powder | Use 3/4 cup liquid to start |
| High-fiber protein smoothie | Greek yogurt + chia or oats | Add liquid slowly because chia and oats thicken |
| No-powder protein smoothie | Greek yogurt + milk + chia | Keep texture creamy, not chalky |
For a balanced berry protein smoothie, blend 1 1/2 cups / 225 g frozen berries, 1/2 banana / 55–60 g, 1/2 cup / 120 g Greek yogurt or 1 scoop protein powder, and 3/4 cup / 180 ml milk or almond milk.
Protein powder scoop sizes vary, so use the serving size on your package. Vanilla protein powder gives a softer, dessert-style flavor. Unflavored protein keeps the berries more noticeable, but it can taste chalkier if the smoothie is too thick. If that happens, loosen it with a little milk, then add a few extra berries or a spoon of yogurt to bring the flavor back.
For mornings when you want protein but prefer a warm spoonable breakfast, this high-protein oatmeal guide uses oats, yogurt, protein powder, seeds, and nut butter in a more filling bowl format.
Spinach Berry Smoothie
This is the greens version for people who still want the smoothie to taste like berries. Baby spinach is milder than kale and blends more smoothly.
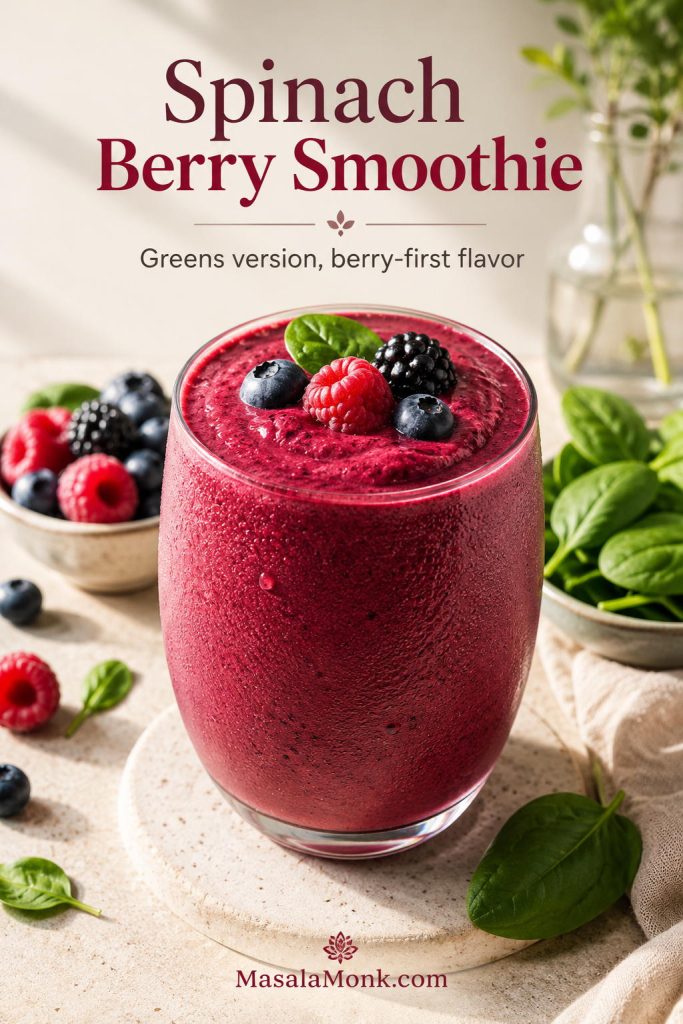
With enough berries, spinach should disappear into the background. Blend the spinach with the liquid first, then add the berries, banana or yogurt, and any add-ins.
- 1 cup baby spinach, about 30 g
- 1/2 to 3/4 cup milk or almond milk, 120–180 ml
- 1 1/2 cups frozen berries, about 225 g / 8 oz
- 1/2 banana / 55–60 g or 1/2 cup Greek yogurt / about 120 g
- 1 teaspoon honey or maple syrup, optional
The berries should stay in charge of the flavor. If the smoothie tastes too green, add a little lemon juice, more berries, or half a banana.
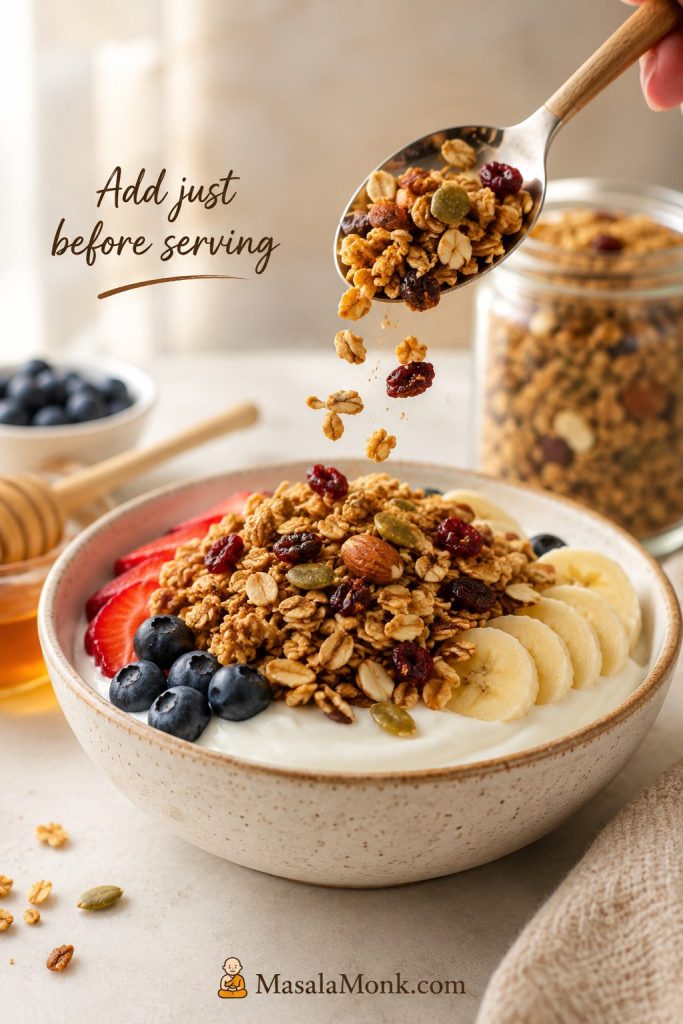
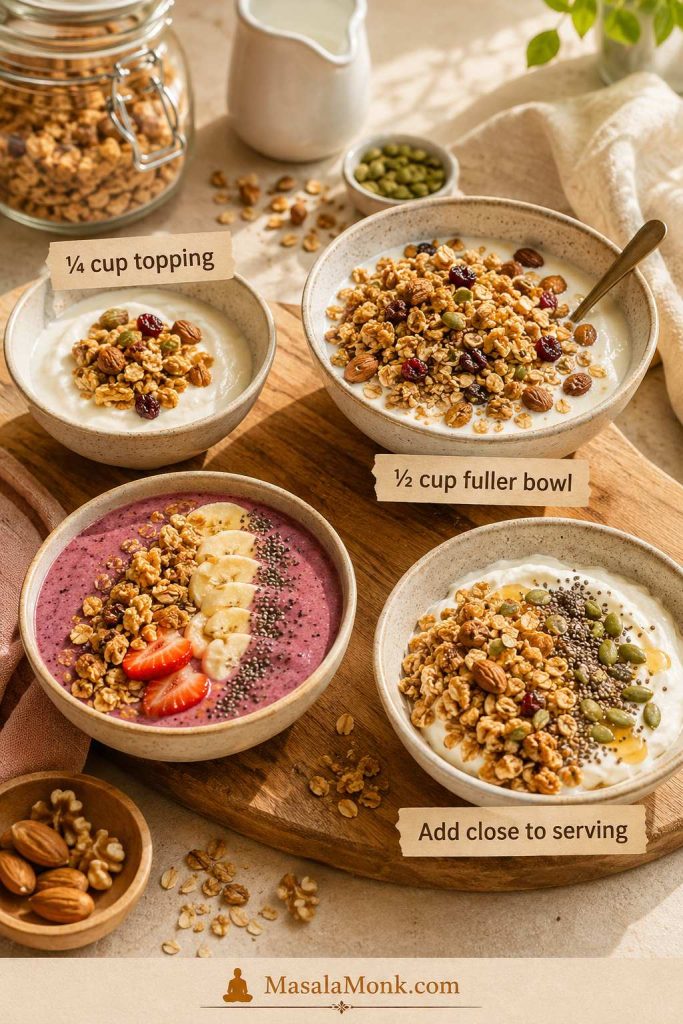
Berry Smoothie Bowl
This is the version for mornings when you want a spoon, toppings, and something cold that still feels like breakfast. A berry smoothie bowl uses only a few tablespoons of liquid, so the texture lands closer to soft serve than a drink.
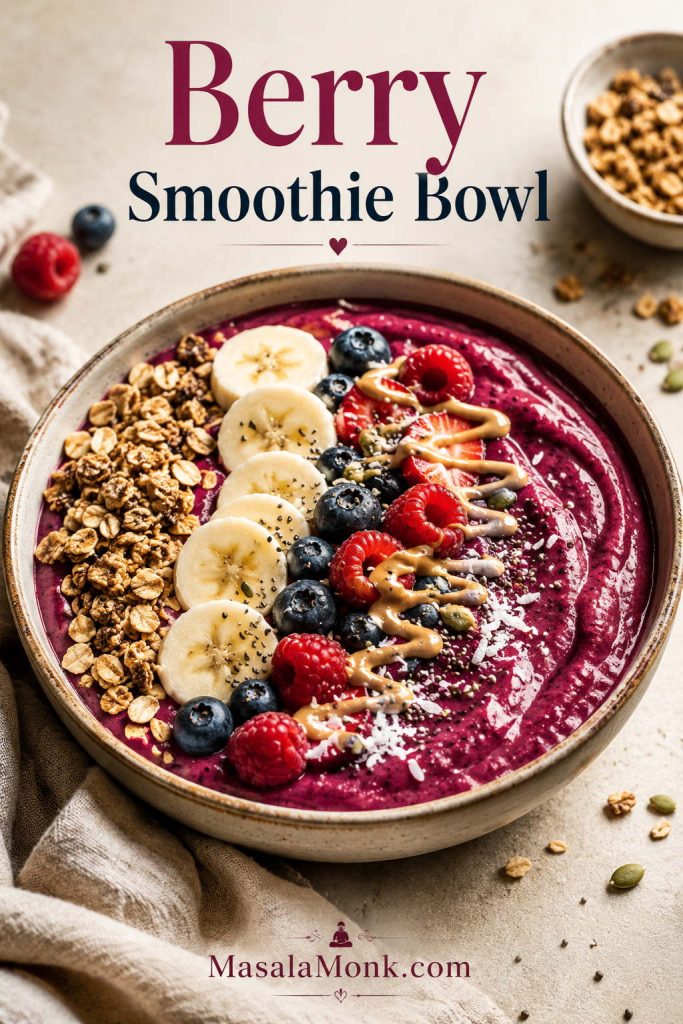
- 1 heaping cup frozen berries, about 150–180 g
- 1 frozen banana, about 100–120 g peeled
- 2 to 5 tablespoons milk, almond milk, or oat milk, 30–75 ml
- Optional: 1/2 scoop protein powder
Start with 2 tablespoons liquid and blend slowly, scraping down the sides as needed. The bowl is ready when it mounds on a spoon and the granola sits on top instead of sinking. If it pours like a drink, blend in more frozen fruit.
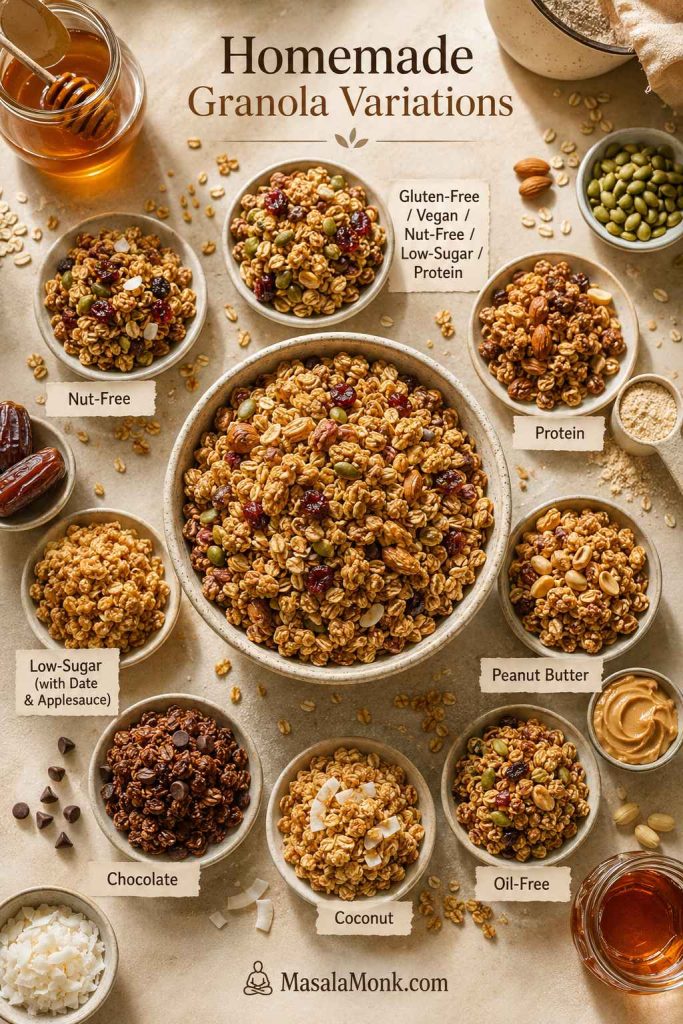
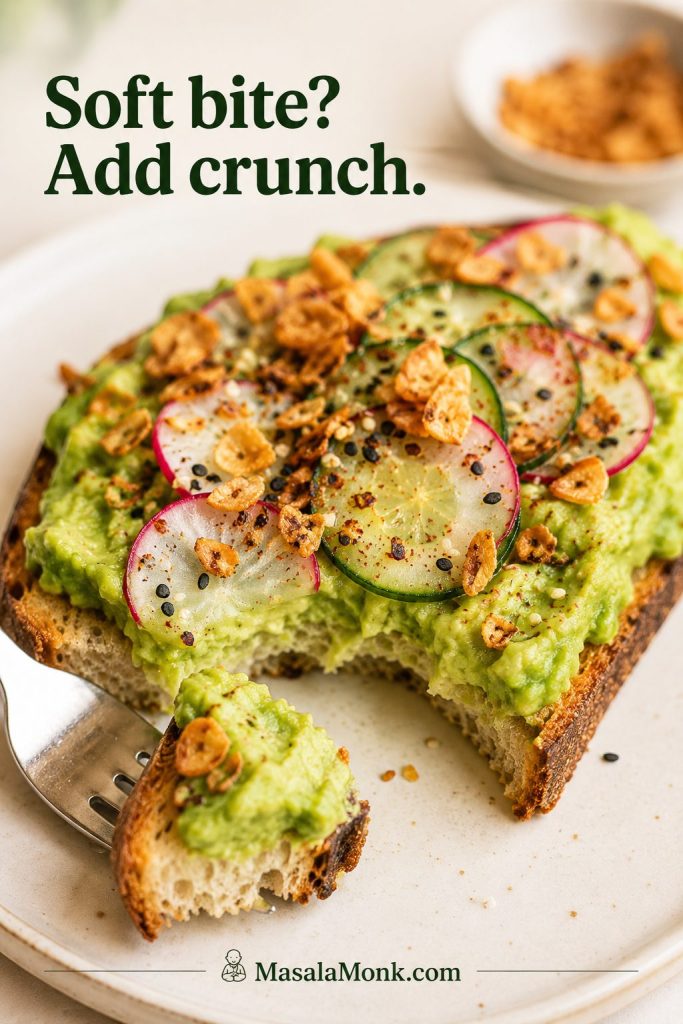
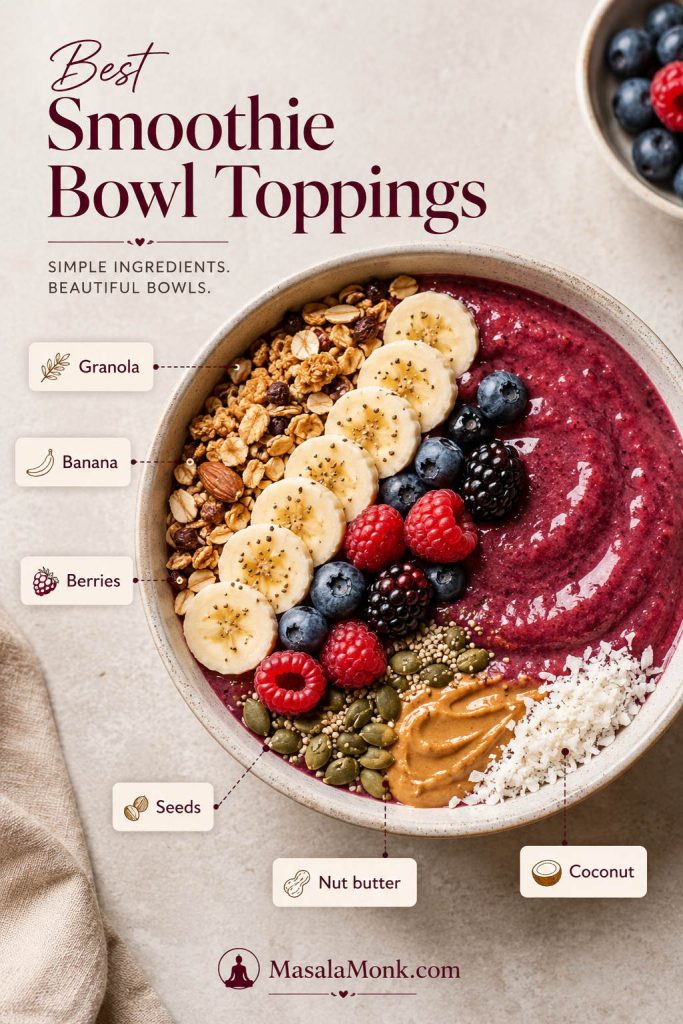
Best Smoothie Bowl Toppings
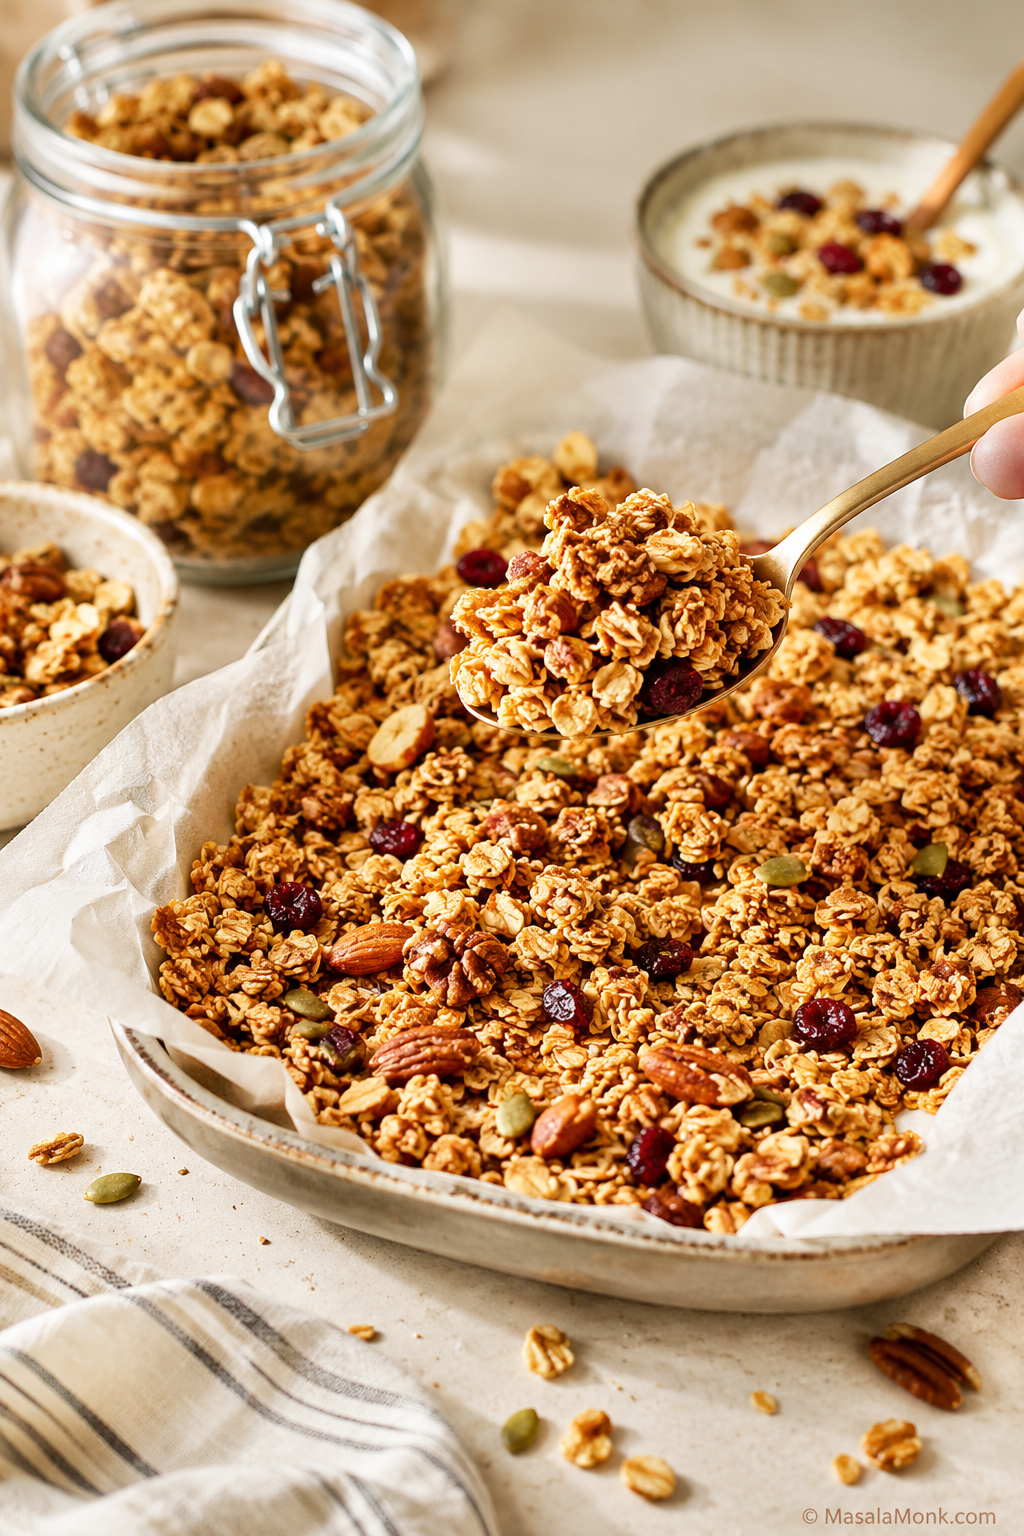
For crunch, add granola, coconut, chopped nuts, cacao nibs, or toasted seeds. A spoonful of homemade granola works especially well because it gives a thick smoothie bowl contrast instead of disappearing into the fruit. For freshness, add sliced banana or extra berries. For staying power, add chia, hemp seeds, peanut butter, almond butter, or a spoonful of Greek yogurt.
If your bowl turns pourable instead of spoonable, jump to the thin or thick smoothie fix.
If you like brighter fruit smoothies, this berry base also pairs naturally with a mango smoothie recipe.
Berry Smoothie vs Smoothie Bowl vs Açai Bowl
A berry smoothie is built to sip from a glass. A smoothie bowl uses similar ingredients with much less liquid, so it becomes thick enough for a spoon.
An açai bowl is related, but it is a separate recipe. It usually starts with frozen açai puree or a frozen açai packet, frozen fruit, and very little liquid. If you want that deeper açai flavor with toppings like granola, banana, berries, coconut, and nut butter, follow an açai bowl recipe rather than simply adding more liquid to a smoothie.

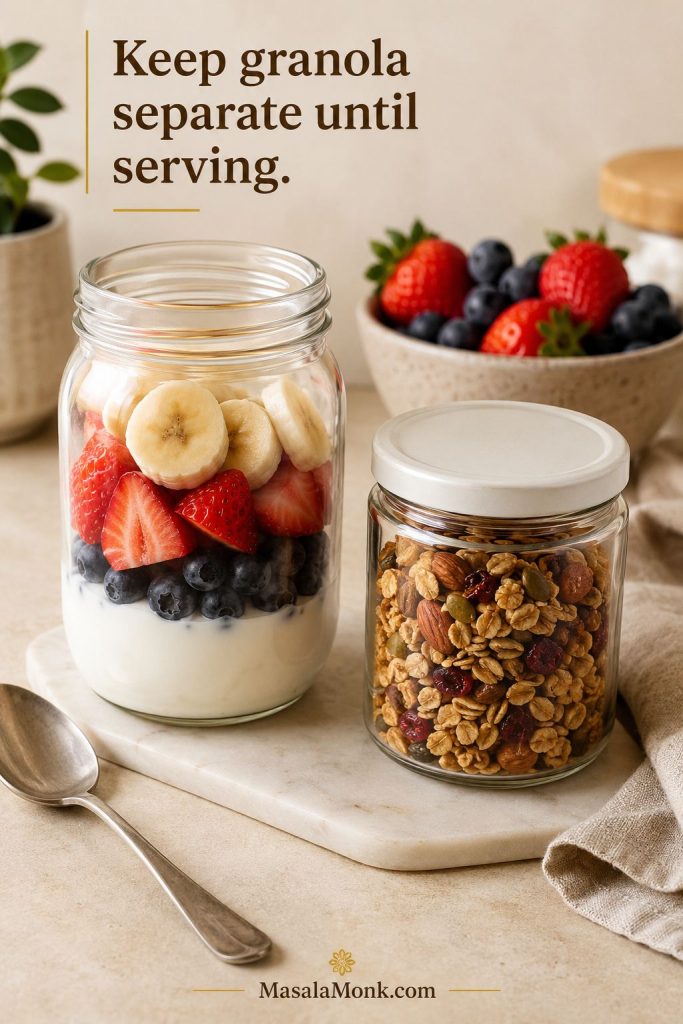
Make-Ahead Berry Smoothies and Freezer Packs
This smoothie tastes best right after blending, while it is still cold and thick. However, rushed mornings are real, so the best make-ahead move is not storing a finished smoothie. It is making freezer packs so the fresh blend still takes less than a minute.
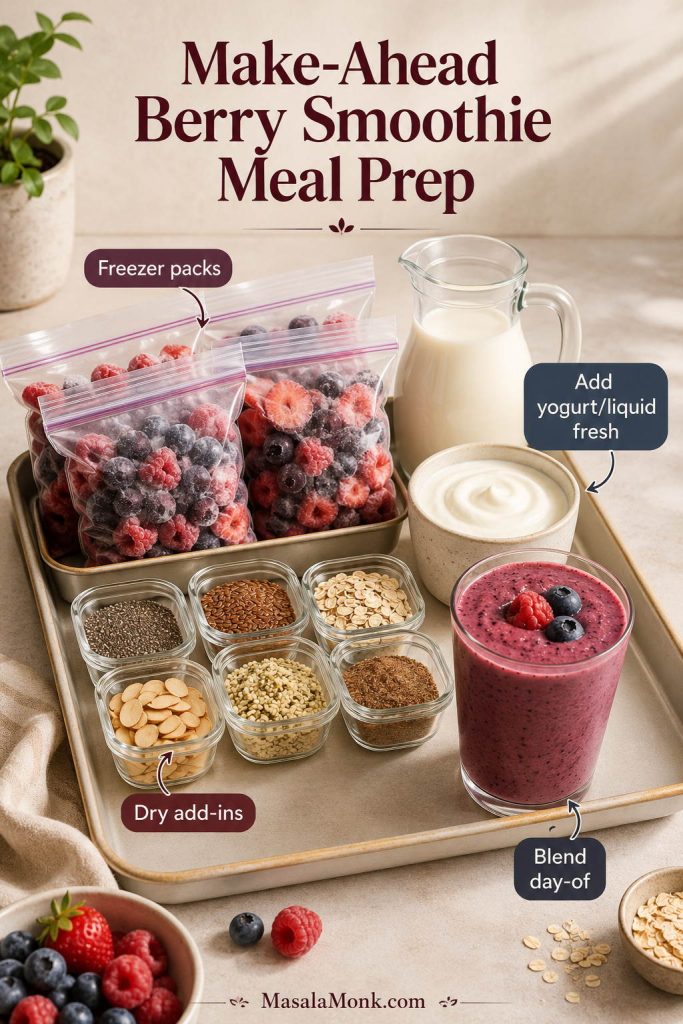
Freezer Smoothie Packs
Add the berries, banana, and any dry add-ins like oats, chia, or protein powder to a freezer-safe bag or container. When ready to blend, add the frozen pack to the blender with yogurt and liquid.
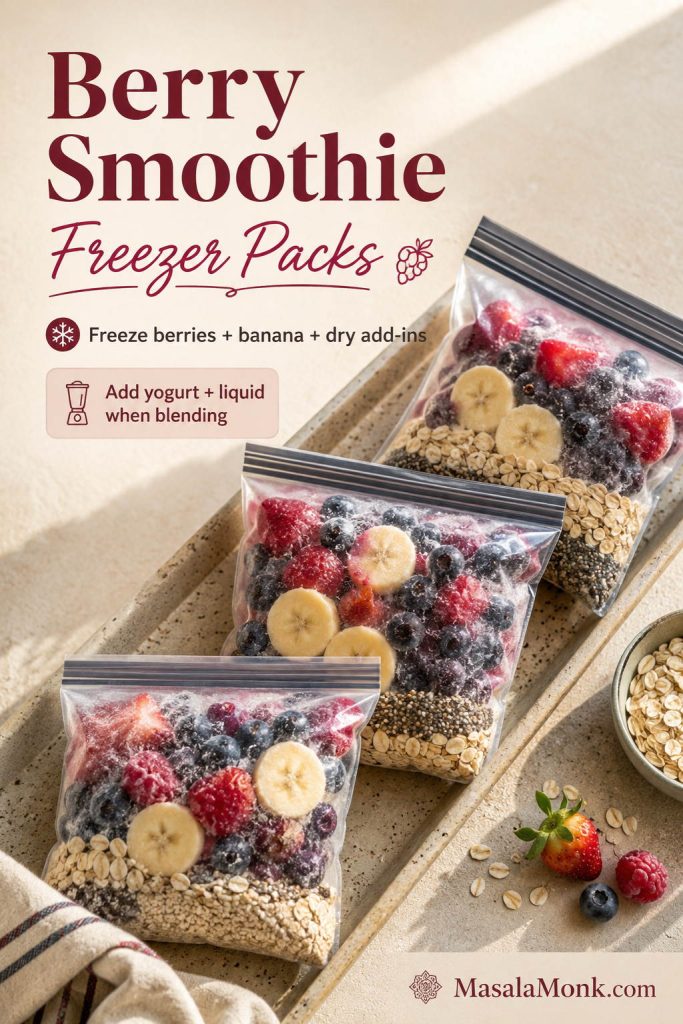
- 1 1/2 cups frozen berries, about 225 g / 8 oz
- 1/2 sliced banana, about 55–60 g
- 1 tablespoon oats or chia, optional
- 1 scoop protein powder, optional
When blending, add 1/2 cup / 120 g yogurt and 1/2 cup / 120 ml milk or almond milk. Add more liquid only if needed.
If a stored smoothie separates or thins out, see how to store a berry smoothie or the troubleshooting section.
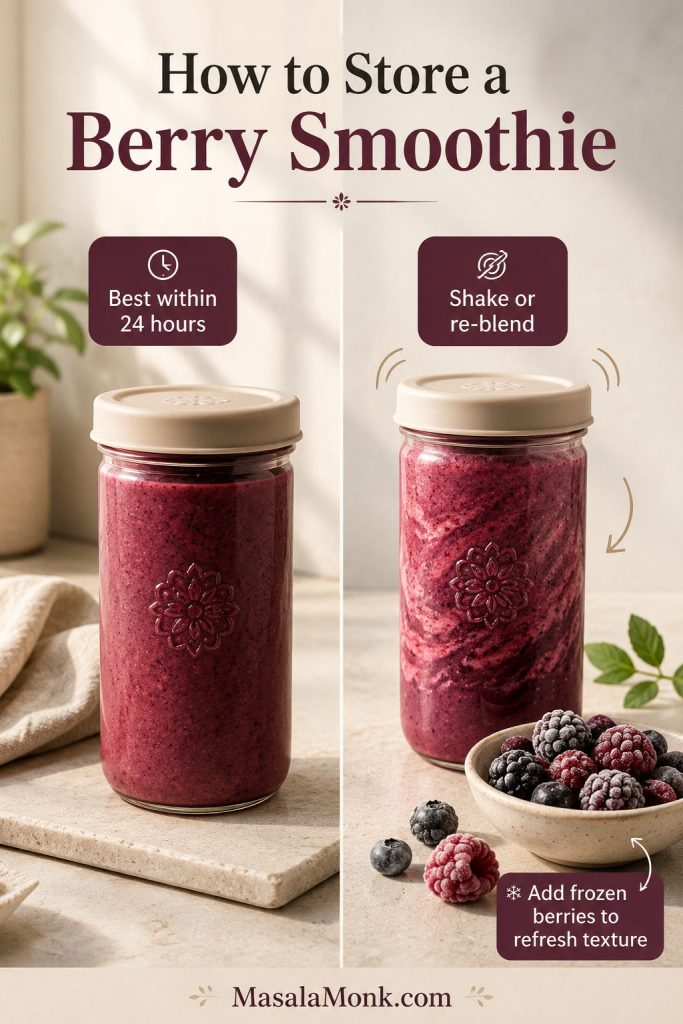
Storing a Blended Smoothie
If you need to store a blended smoothie, keep it covered in the fridge and drink it within 24 hours. It may separate or thin out, so shake or re-blend before serving. For better texture, add a few frozen berries before re-blending.
If you want a no-blender breakfast that follows the same ratio-and-texture logic, this overnight oats recipe is another make-ahead option built around creamy texture, storage, and easy fixes.
Troubleshooting: Too Thin, Too Tart, or Too Thick
This is where a smoothie goes from random to reliable. If the first blend is too thin, too tart, too seedy, or too thick to move, you almost never need to start over. You just need the right fix.
For a clean starting formula, go back to the quick answer ratio or use the recipe card.
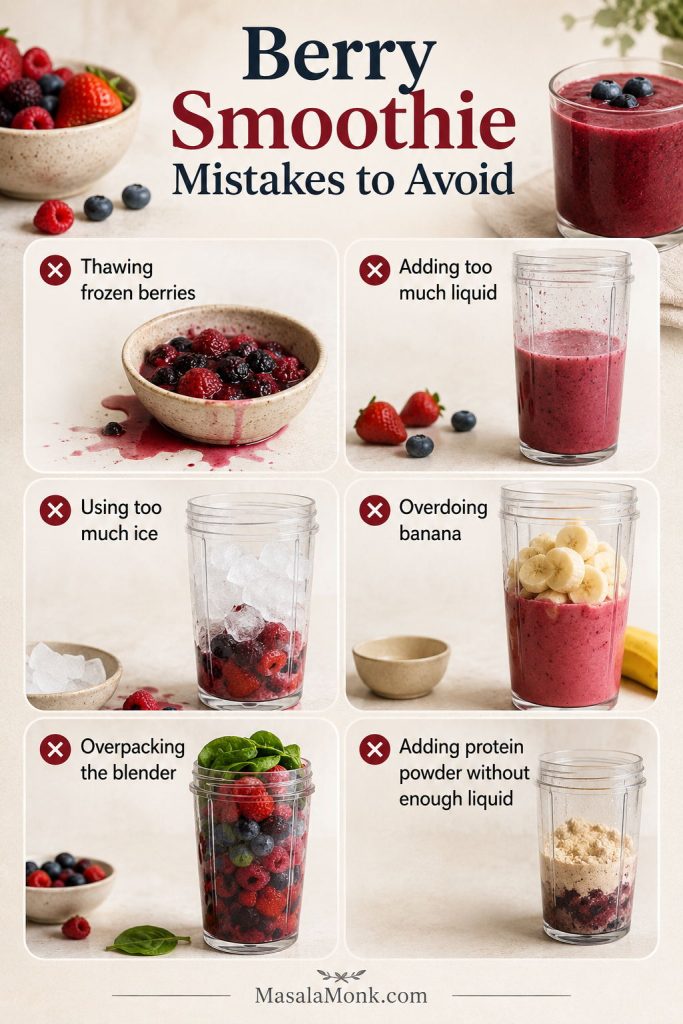
Berry Smoothie Mistakes to Avoid
Do not add lots of ice to rescue a smoothie that has been sitting too long. Ice can make the flavor watery. Re-blend with frozen berries or frozen banana instead.
Quick Smoothie Fixes
Use this quick guide when the smoothie is already in the blender and you need to decide what to change next.
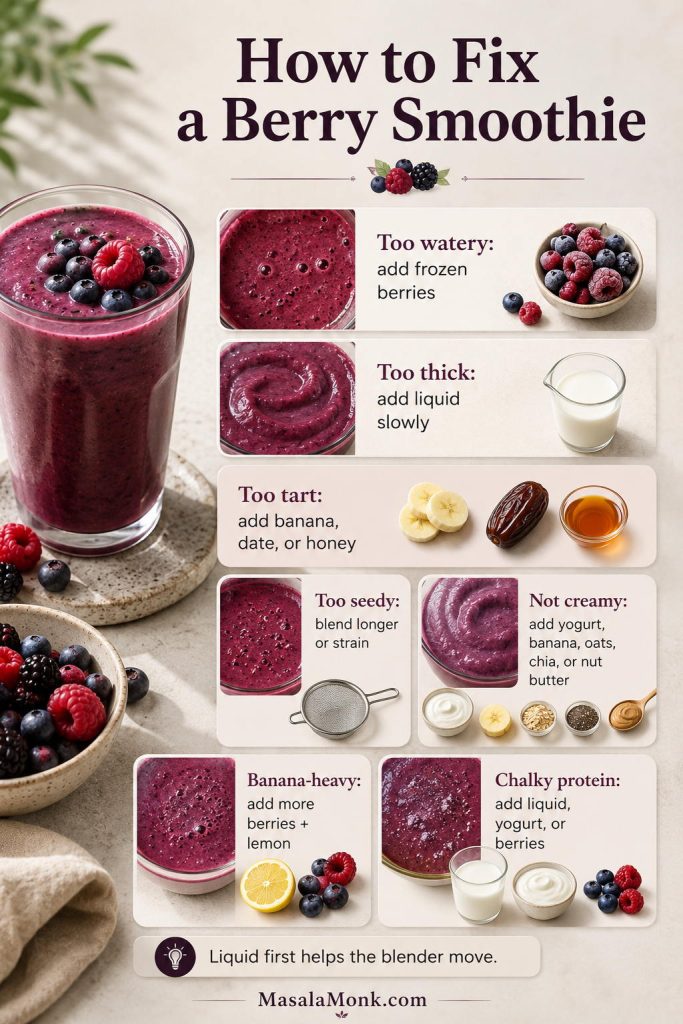
| Problem | Why It Happens | How to Fix It |
|---|---|---|
| Too watery | Too much liquid or thawed berries | Add frozen berries, frozen banana, Greek yogurt, oats, or chia |
| Too thick to blend | Not enough liquid for the blender | Add liquid 1 tablespoon / 15 ml at a time |
| Too tart | Berries are sour or yogurt is tangy | Add banana, vanilla, honey, maple syrup, dates, or sweeter juice |
| Too sweet | Too much banana, juice, or sweetened yogurt | Add lemon juice, plain yogurt, or more tart berries |
| Bland or flat | Too much liquid or mild berries | Add lemon juice, vanilla, a tiny pinch of salt, or more berries |
| Too seedy | Raspberries or blackberries are seed-heavy | Blend longer, use more blueberries/strawberries, or strain if needed |
| Too icy | Too much ice or not enough creamy ingredient | Use frozen fruit instead of ice; add banana, yogurt, or nut butter |
| Not creamy | Berries + liquid only | Add banana, Greek yogurt, avocado, oats, chia, or almond butter |
| Green bits from spinach | Spinach added with everything at once | Blend spinach with liquid first, then add fruit |
| Tastes like banana, not berries | Too much banana for the berry amount | Use 1/2 banana instead of a full banana and add more berries |
| Protein smoothie tastes chalky | Too much powder or not enough liquid/creaminess | Add yogurt, extra berries, or more liquid 1 tablespoon at a time |
How to Fix a Thin or Thick Berry Smoothie
If the texture is the only problem, use this focused repair guide before changing the flavor.
How to Fix a Sour or Dull Berry Smoothie
If the texture is right but the flavor feels sharp or flat, adjust sweetness and brightness instead of adding more liquid.
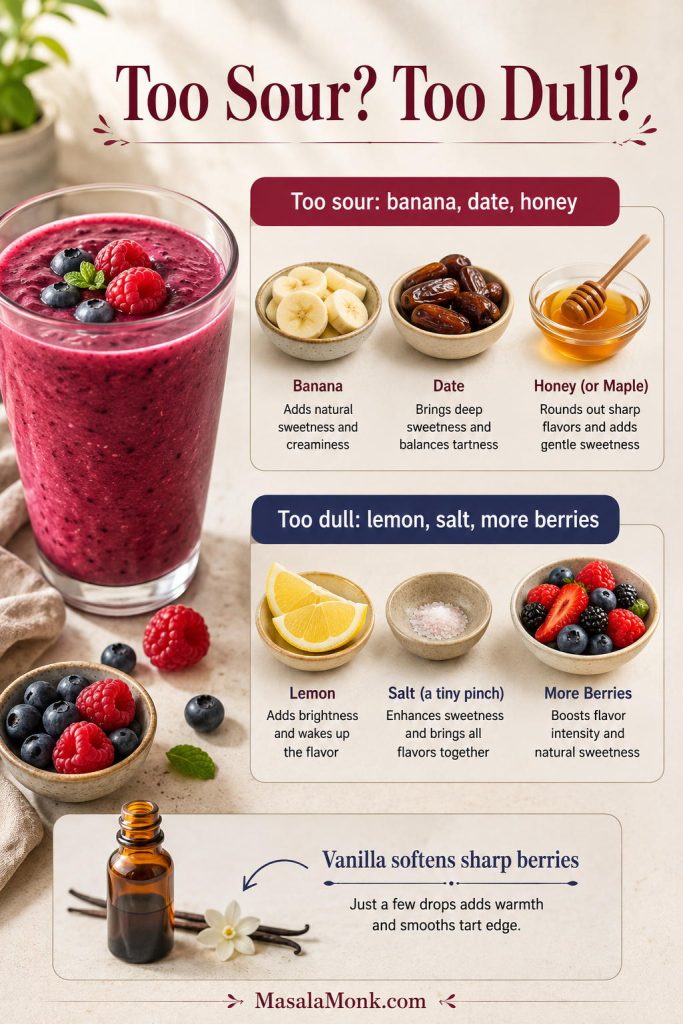
Best Rescue Move
Most smoothie problems are fixable in the blender. The only real mistake is adding a lot of liquid before you know what the texture needs.
Once you get the texture right, the flavor feels cleaner too: colder berries, less dilution, and a smoothie that tastes like fruit instead of sweet milk.
Berry Smoothie Recipe Card
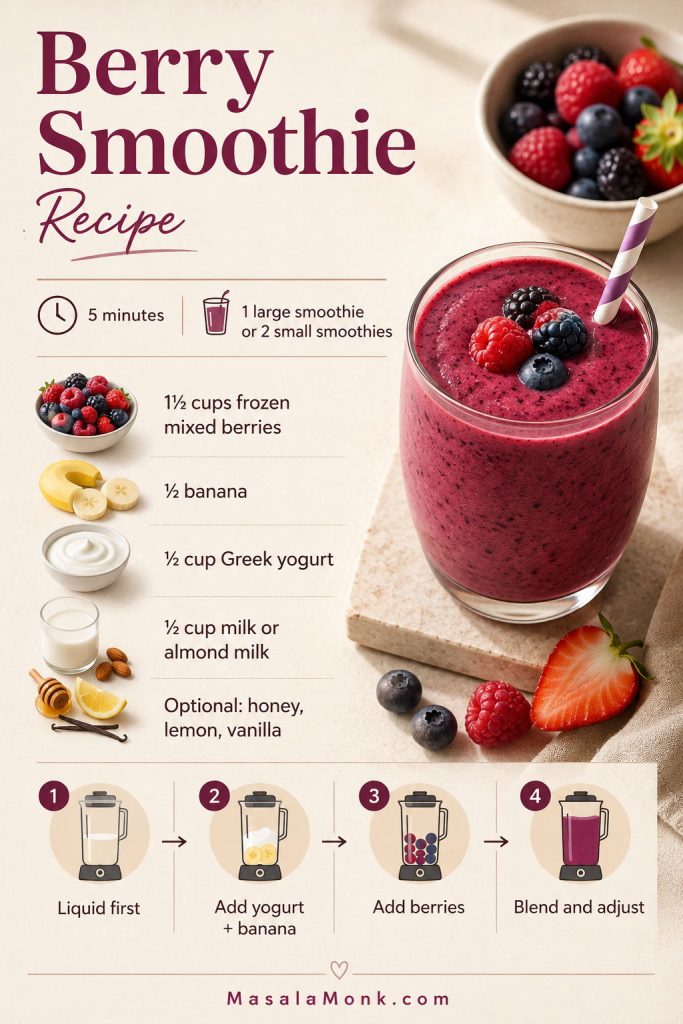
Classic Berry Smoothie
This is the reliable base version: thick, creamy, berry-forward, and easy to adjust with or without banana, yogurt, protein powder, or greens.
Ingredients
- 1 1/2 cups frozen mixed berries, about 225 g / 8 oz
- 1/2 medium banana, about 55–60 g / 2 oz
- 1/2 cup Greek yogurt or plain yogurt, about 120 g / 4 oz
- 1/2 cup milk or almond milk, 120 ml / 4 fl oz, plus more as needed
- 1 to 2 teaspoons honey or maple syrup, optional
- 1 teaspoon lemon juice, optional
- 1/4 teaspoon vanilla extract, optional
Instructions
- Add the milk or almond milk to the blender first.
- Add the yogurt, banana, honey or maple syrup, lemon juice, and vanilla if using.
- Add the frozen berries last.
- Blend on low speed to start, then increase to high until thick and creamy.
- If the blender stalls, add more liquid 1 tablespoon / 15 ml at a time.
- Taste and adjust. Add lemon juice if it tastes flat, sweetener if it is too tart, or more frozen berries if it is too thin.
- Pour into a glass and serve immediately.
Notes
- Dairy-free: use almond milk, oat milk, coconut milk, or coconut yogurt.
- No banana: use yogurt, oats, chia, avocado, almond butter, or extra frozen berries.
- No yogurt: use banana, nut butter, oats, chia, avocado, or coconut milk.
- Protein: add 1 scoop protein powder and start with 3/4 cup liquid.
- Smoothie bowl: use only 2 to 5 tablespoons liquid and scrape as you blend.
FAQs
Can I use frozen mixed berries straight from the bag?
Yes. Use them straight from the freezer for the thickest texture. Do not thaw them unless your blender cannot handle frozen fruit.
Frozen berries or fresh berries: which works better?
Frozen berries are better for thickness. Fresh berries taste best in season, but usually need frozen banana, yogurt, or a little ice to avoid a thinner drink.
Can I use curd instead of Greek yogurt?
Yes. Use thick, well-set curd and reduce the milk slightly. Loose curd can make the smoothie thinner and tangier.
Why does my berry smoothie taste sour?
Your berry mix may be heavy on raspberries, blackberries, or cranberries. Add banana, vanilla, a date, honey, maple syrup, or a sweeter liquid.
Milk or yogurt: what gives the best texture?
Milk makes the smoothie easier to drink; yogurt makes it thicker and creamier. For balance, use 1/2 cup yogurt with 1/2 cup milk or almond milk.
What can replace yogurt in a berry smoothie?
Use banana, almond butter, oats, chia, coconut yogurt, avocado, or extra frozen berries. The goal is to replace yogurt’s creaminess, not just remove it.
What can replace banana in a berry smoothie?
Use Greek yogurt, coconut yogurt, avocado, oats, chia, almond butter, or extra frozen berries. Replace both banana’s sweetness and its creamy texture.
What works if I want no banana and no yogurt?
Use frozen berries, almond milk or oat milk, almond butter, and oats or chia seeds. Almond butter adds richness; oats or chia add thickness.
Why did my smoothie turn watery?
Usually, there is too much liquid, thawed fruit, or not enough frozen fruit. Add frozen berries, frozen banana, Greek yogurt, oats, or chia.
Can I make this in a personal blender?
Yes. Add liquid first, then yogurt or banana, then frozen berries. Do not pack the cup too tightly; leave room for the mixture to move.
Is ice necessary, or are frozen berries enough?
Frozen berries are usually enough. They chill and thicken the smoothie without diluting the flavor. Use ice only with fresh berries when you need extra chill.
How much protein powder should I add?
Use 1 scoop of vanilla or unflavored protein powder. Since powder thickens the smoothie, start with 3/4 cup liquid and adjust after blending.
What makes a smoothie bowl thick enough for toppings?
Use very little liquid. Blend frozen berries, frozen banana, and 2 to 5 tablespoons milk or almond milk until thick enough to spoon.
What is the best way to prep berry smoothies ahead?
Make freezer smoothie packs instead of storing finished smoothies. Freeze berries, banana, and dry add-ins together, then blend with yogurt and liquid.