Posted on Leave a comment

Roasted Brussels Sprouts Recipe: Crispy, Caramelized & Easy

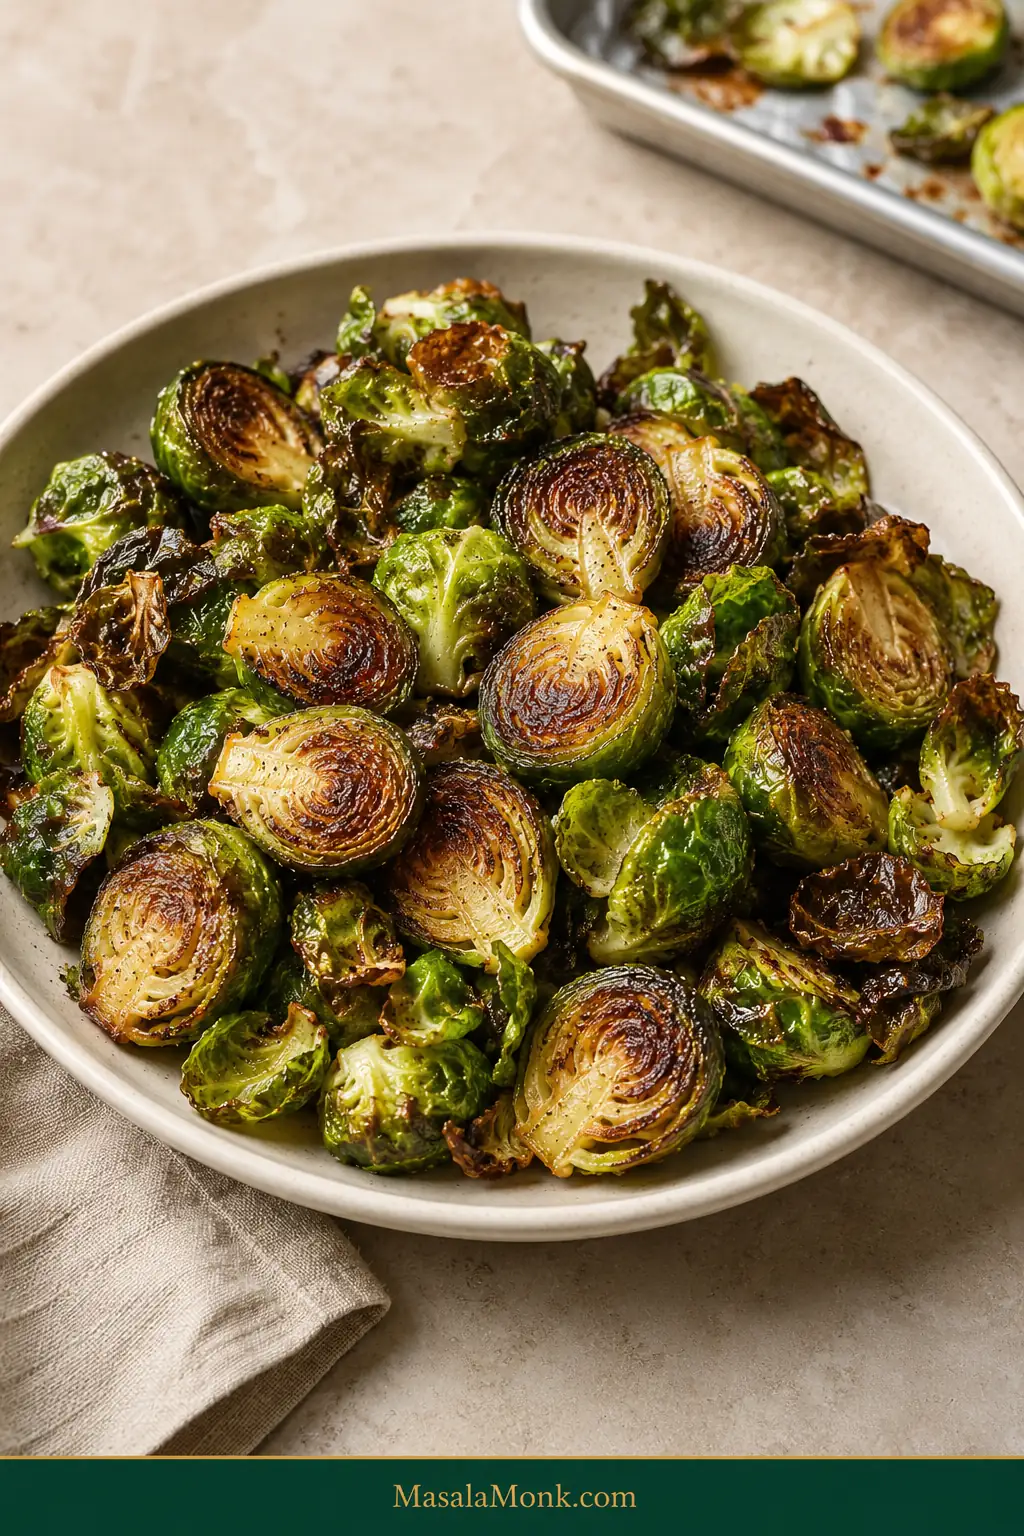
Cream bowl filled with roasted Brussels sprouts with mahogany-brown cut sides, crisp dark-green outer leaves and tender green centers.

Roasted Brussels sprouts are at their best when the flat sides turn mahogany-brown and caramelized, the outer leaves become crisp, and the centers stay tender without collapsing into mush.

If the Brussels sprouts you remember were pale, soft, and aggressively cabbage-like, the surprise is how different they taste once they get real color: nuttier, faintly sweet, and much harder to stop picking from the pan.

All you need is fresh Brussels sprouts, olive oil, salt, pepper, a roomy sheet pan, and a 425°F / 220°C oven. Here, “crispy” means crisp edges and deeply browned surfaces around a tender center—not a sprout that crunches dry all the way through like a chip.
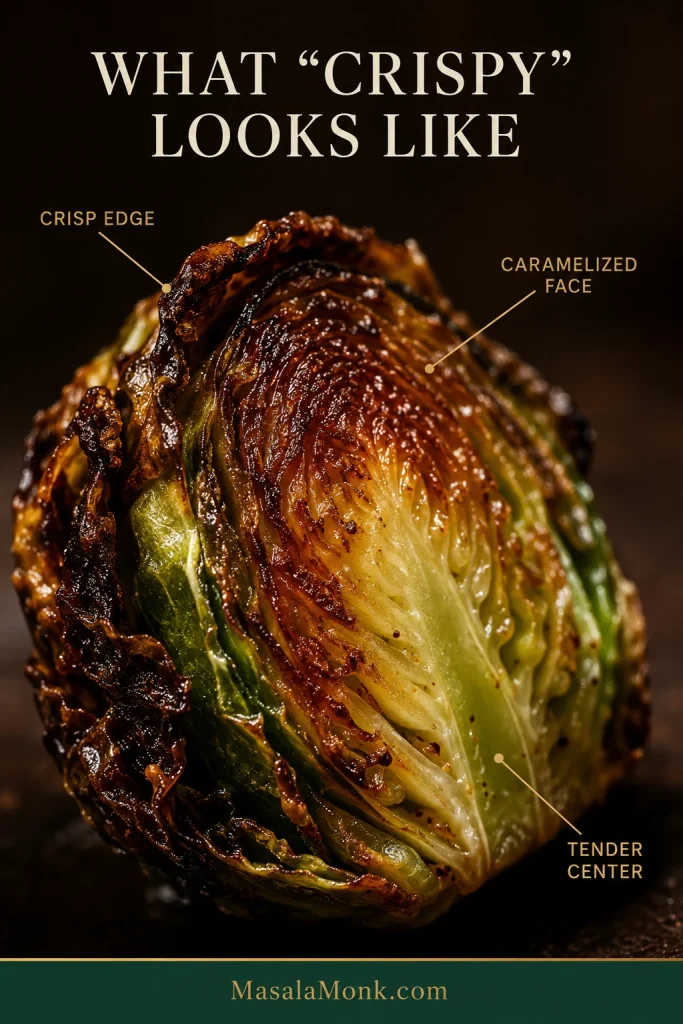
Close-up roasted Brussels sprout with labels pointing to a crisp curled edge, caramelized brown face and tender layered green center.
Crisp edges and a tender center can exist in the same bite; thin outer leaves lose moisture much faster than the dense middle.

Quick Answer: How to Roast Brussels Sprouts

  1. Heat: Set the oven to 425°F / 220°C.
  2. Rinse and dry: Rinse the whole sprouts under running water, then dry them very well.
  3. Cut: Halve average Brussels sprouts lengthwise and quarter unusually large ones.
  4. Season: For 1½ lb / 24 oz / 680 g sprouts, use 2 tbsp / 30 ml olive oil, ½ tsp fine sea salt / about 3 g, and ¼ tsp black pepper.
  5. Arrange: Spread them in one uncrowded layer with the cut sides facing down.
  6. Roast: Start checking at 17–18 minutes. Most average-size sprouts finish around 20–25 minutes. Stop when the undersides are richly browned and the centers have the texture you enjoy.

Let the clock tell you when to look. Let color and tenderness tell you when to stop.

Roasted Brussels Sprouts Recipe

Prep time: 10 minutes
Roast time: about 20–25 minutes
Total time: about 30–35 minutes
Yield: 4 generous side servings or about 6 smaller holiday portions
Oven: 425°F / 220°C

As written, the recipe is naturally vegan and gluten-free.

Equipment

  • Large rimmed half-sheet pan, about 13 × 18 in / 33 × 46 cm
  • Chef’s knife
  • Cutting board
  • Large mixing bowl
  • Clean kitchen towel or paper towels

If your baking sheet is much smaller, roast the sprouts in batches or divide them between two pans. Packing everything onto one sheet works against the browning we want.

Ingredients

  • 1½ lb / 24 oz / 680 g fresh Brussels sprouts
  • 2 tbsp / 30 ml extra-virgin olive oil
  • ½ tsp fine sea salt / about 3 g, plus more to taste
  • ¼ tsp freshly ground black pepper
  • Lemon wedges, optional

Method

Preheat and Prep the Brussels Sprouts

  1. Heat the oven to 425°F / 220°C. Set a rack around the middle of the oven.
  2. Rinse and dry the sprouts while they are still whole. Rinse them under running water—there’s no need to soak them—then dry them very well with a clean kitchen towel or paper towels.
  3. Trim and cut. Slice off only the dry end of each stem; leave enough attached to hold the leaves together. Remove yellow or badly damaged outer leaves. Halve average sprouts lengthwise through the stem and quarter unusually large ones the same way. Set aside any clean leaves that fall free; they cook much faster than the larger pieces, so roast them separately or add them only near the end when you can watch them closely.
  4. Season. Toss the cut sprouts with the olive oil, salt, and pepper until every piece has a light glossy coating. There should be no puddles of oil left in the bowl.

Arrange, Roast and Finish

  1. Give them room. Spread the sprouts in one layer with visible space around most pieces.
  2. Turn the cut sides down. Put the largest flat face of each halved or quartered sprout directly against the baking sheet.
  3. Roast without fussing with them. Begin looking at 17–18 minutes. Average-size sprouts usually finish around 20–25 minutes, although small sprouts, dark pans, and hot-running ovens can move faster.
  4. Check the food, not just the timer. They are ready when the undersides have developed deep color and a knife or fork enters the centers with the amount of resistance you prefer.
  5. Taste while hot. Add another pinch of salt if needed and finish with lemon or one of the flavor ideas later in the post.

Serve soon after roasting for the crispest edges.
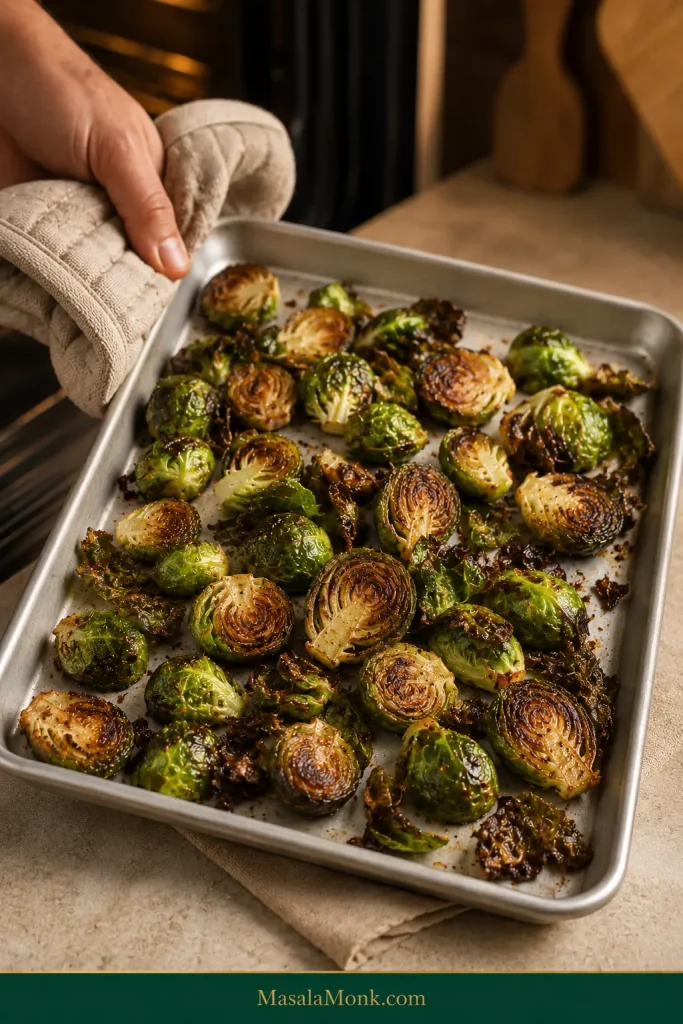
Sheet pan of freshly roasted Brussels sprouts with browned cut surfaces, green centers and several dark crisp loose leaves.
Judge the largest sprouts, not the loose leaves. Thin leaves can turn very dark before the larger halves are tender.

Cooking right now? The recipe above is enough.

In This Guide

MAKE THEM WELL

CONTROL THE RESULT

PLAN & SERVE

5 Rules for Crispy, Caramelized Brussels Sprouts

The recipe tells you what to do. These five ideas explain why it works.

1. Similar thickness helps everything cook at the same pace. Heat takes longer to reach the middle of a thick piece, which is why an oversized sprout can darken outside while staying hard inside.

2. Dry surfaces brown sooner. Water has to evaporate before strong browning can get underway. The FDA recommends rinsing fresh produce under running water. There’s no need to soak the sprouts; once rinsed, thorough drying is what matters for roasting.

3. Oil should form a light coating. Dry patches brown poorly, while puddled oil can leave the tray heavy and greasy.
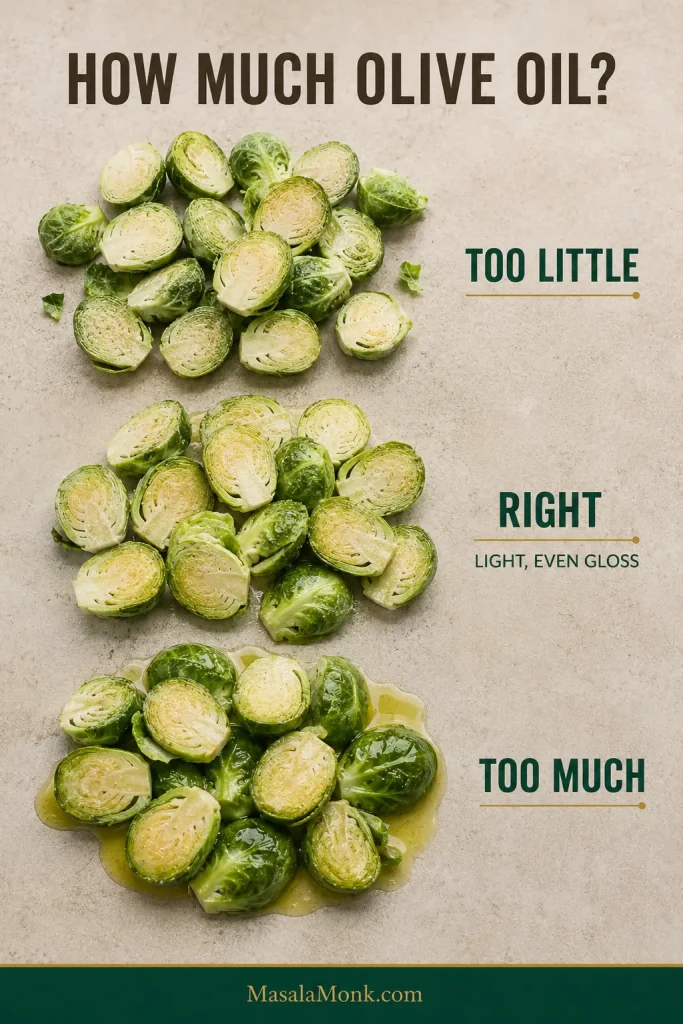
Three groups of cut raw Brussels sprouts showing too little oil, a thin even coating and excessive oil pooling underneath.
Aim for a thin, even gloss. Dry patches brown unevenly; excess oil pools and makes the tray feel heavy.

4. Crowding traps steam. Moisture escapes around well-spaced pieces. Crowd the pan and that moisture gets trapped around the sprouts.

Double the ingredients, not the pan density.

Doubling. Use two sheet pans rather than crowding one. If the pans roast on separate racks, swap their positions top-to-bottom and rotate them front-to-back partway through if your oven browns unevenly.

5. Flat contact builds the deepest color. The broad cut face gives each sprout a large surface to caramelize directly against the hot baking sheet.
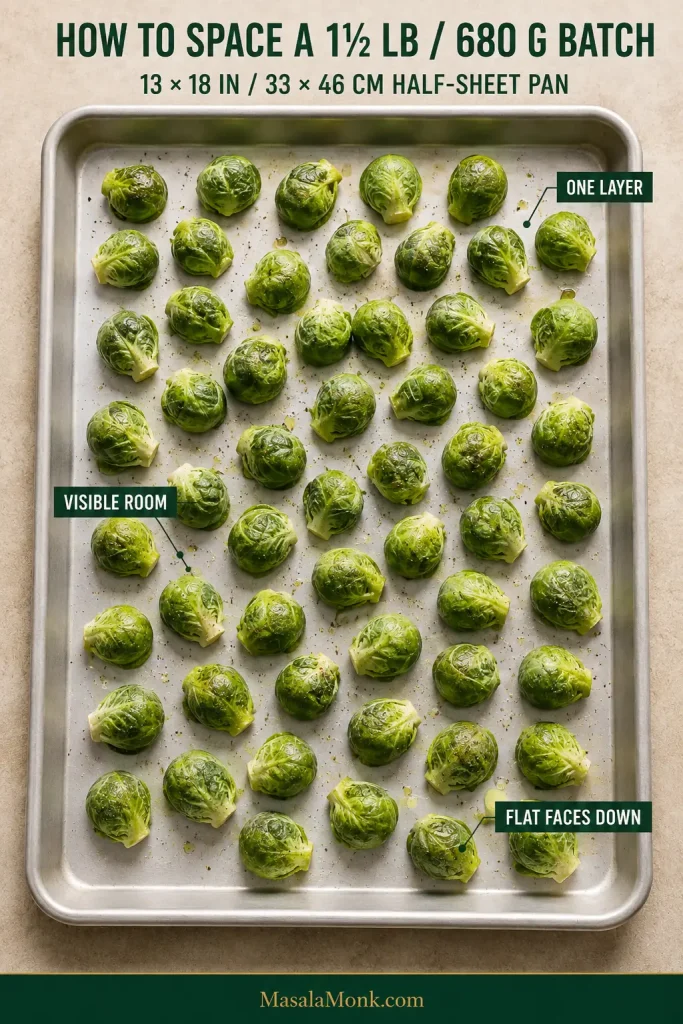
Overhead half-sheet pan with Brussels sprouts arranged in one uncrowded layer, leaving gaps between pieces and keeping flat cut sides against the metal.
Visible gaps let moisture escape, while flat cut sides maximize pan contact. Both matter for strong, even browning.

How to Choose and Cut Brussels Sprouts

When you have a choice, look for firm, fresh-looking Brussels sprouts with tight green leaves. A reasonably similar size range makes even roasting easier, although real bags rarely cooperate perfectly.

Halve average sprouts and quarter very large ones. Tiny sprouts can stay whole, though they give you less flat surface for caramelization. Aim for roughly similar cooking thickness even when the pieces are not identical.

Trim conservatively. Cutting away only the dry stem tip leaves enough of the base intact to keep the layers from falling apart as you halve or quarter them.
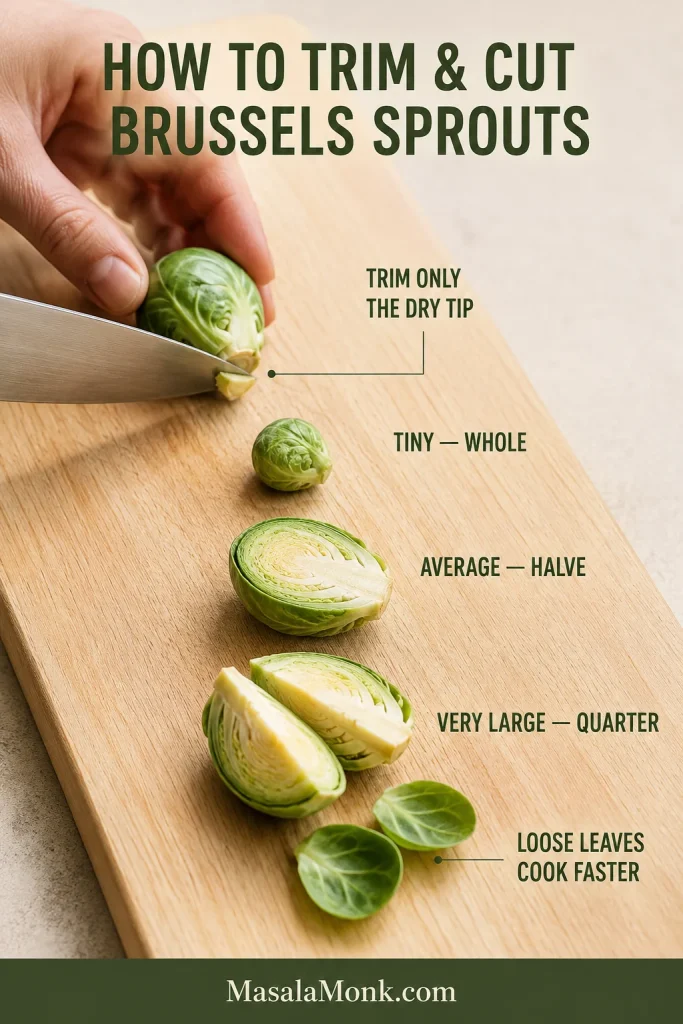
Cutting board showing a dry stem tip being trimmed, a small whole Brussels sprout, a medium sprout halved through the stem, a large sprout quartered and several loose leaves.
Quarter the biggest sprouts so their centers keep pace with smaller halves. Match cooking thickness, not perfect size.

How to Know When Brussels Sprouts Are Done

Once they’re roasting, the sprouts themselves tell you more than the timer does.

  • Look underneath. The cut face should be deep golden brown through mahogany, not pale green with a few tan spots.
  • Look at the edges. The exposed outer leaves should be crisp and brittle in places. A few very dark tips are fine when they taste roasted and nutty rather than acrid.
  • Test the middle. Slide in the tip of a small knife or fork. The sprout should be tender while still holding its shape.
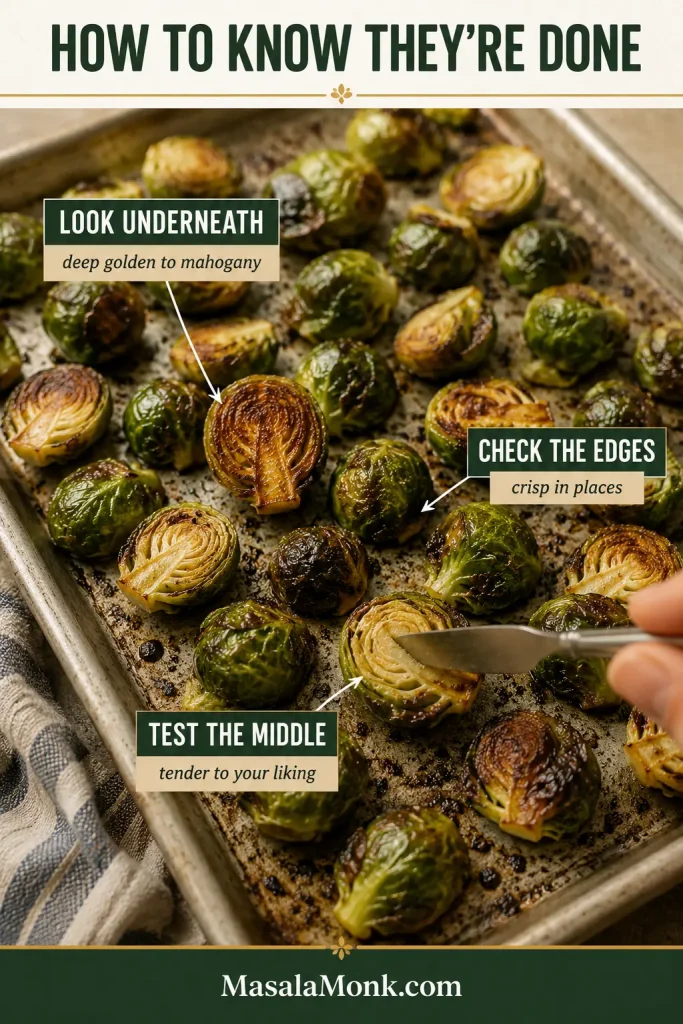
Roasted Brussels sprouts on a sheet pan with one piece turned over to show its browned underside and another being tested in the center with a utensil.
Test one of the largest pieces. If its underside is richly browned and its center is tender enough, the tray is ready.

Choose the Center You Like

Pull the tray once the outside is well browned but the middle still offers a little resistance if you enjoy a firmer bite. Leave the sprouts a little longer if you prefer the center soft and almost creamy.

There is no single perfect center here. The right stopping point is the one you actually enjoy eating.
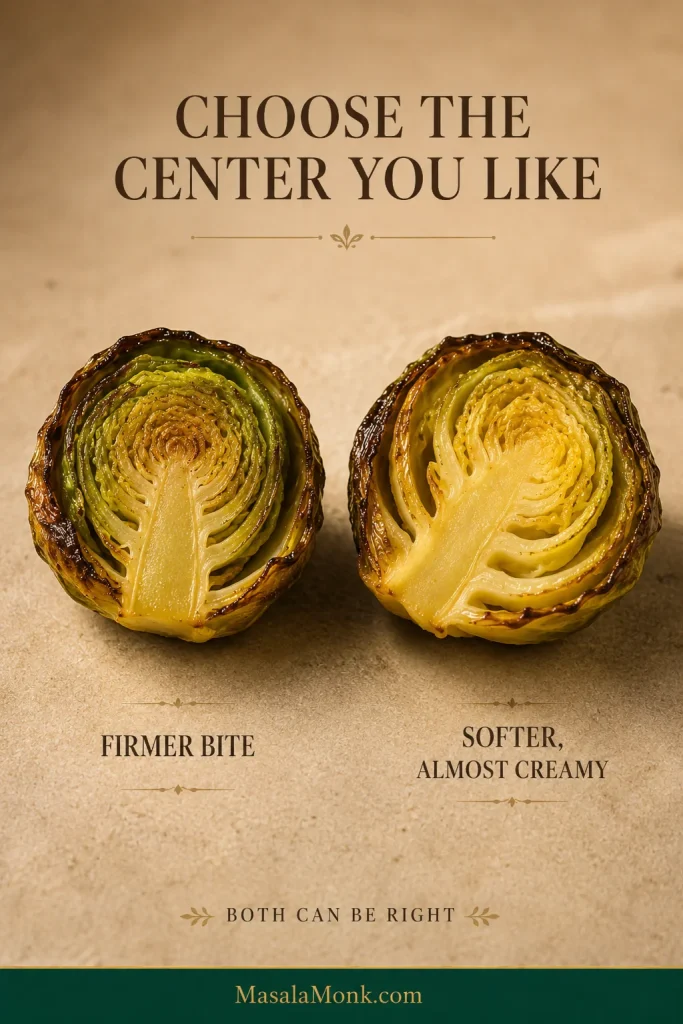
Two opened roasted Brussels sprouts showing a tighter, greener firmer center beside a softer, more relaxed center.
Both can be properly roasted. Pull the tray earlier for more bite, or leave it longer for a softer, almost creamy center.

Deeply caramelized is not the same as burned. Properly browned sprouts smell nutty and sweet-savory. Burned ones taste acrid or charcoal-bitter and may be dry through the middle. If they already taste good, there is no prize for chasing one more shade of brown.
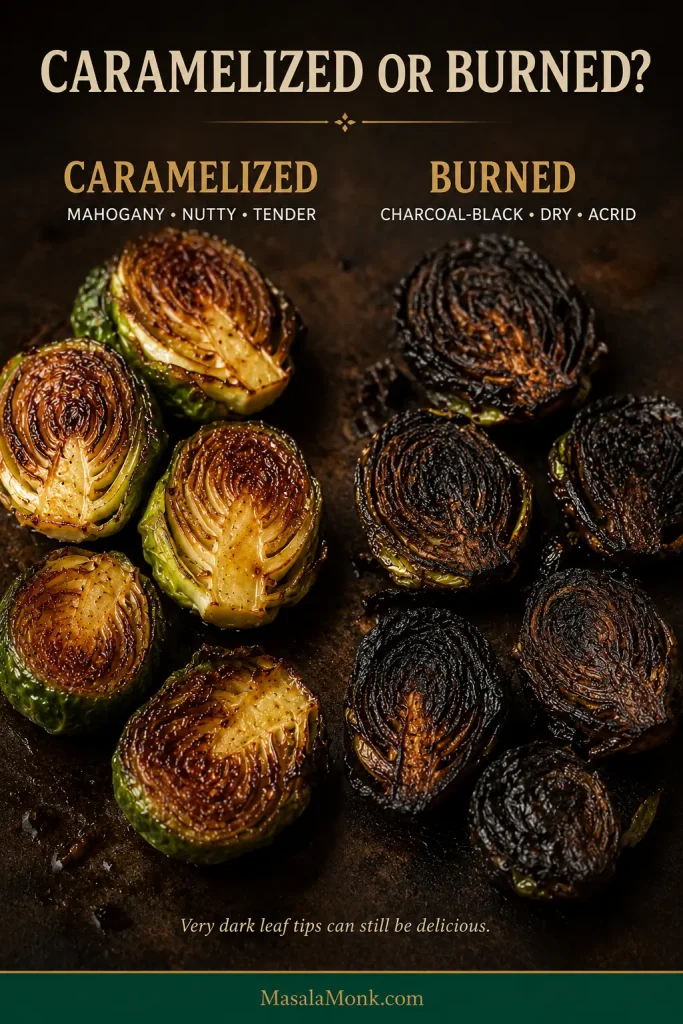
Brussels sprout halves comparing deep mahogany caramelization with dry, charcoal-black burned surfaces.
Judge the broad cut face more than one black leaf tip. Mahogany is caramelized; dry, charcoal-black flesh has gone too far.

A good tray has contrast: brittle little edges, a burnished underside, and a center that gives when you bite into it.
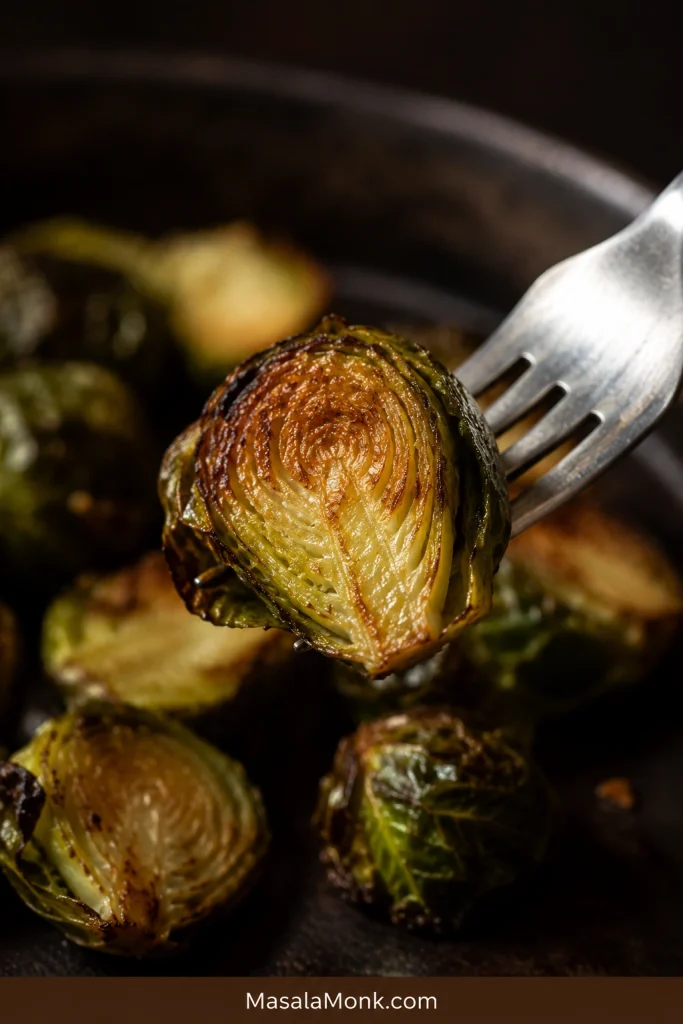
Fork holding a roasted Brussels sprout half with a deeply caramelized exterior, curled crisp leaf and tender green center.
Serve promptly for the strongest contrast between brittle edges and the softer interior; crispness fades as moisture redistributes after roasting.

The same doneness cues work at every oven temperature. What changes is how quickly the exterior develops color relative to how quickly the middle softens.

Best Temperature for Roasting Brussels Sprouts

Lower heat gives the centers more time to soften before deep color develops; hotter roasting builds that color faster. 425°F / 220°C gives a particularly useful balance for this method.

Another dish sometimes gets to decide the oven temperature, especially during a holiday meal. The sprouts can still work; their appearance and tenderness simply become even more important than the clock.

OvenCompared With 425°FWhat to Expect
350°F / 175°CSubstantially slowerCenters soften well before deep color develops
375°F / 190°CSlowerGentler, more gradual browning
400°F / 205°CSomewhat slowerA reliable middle ground
425°F / 220°CDefault methodStart checking at 17–18 minutes; often ready around 20–25 minutes
450°F / 230°CFasterRapid, darker browning with less margin before thin edges scorch

These are relative guides, not alternate exact timers. Sprout size, baking-sheet material, oven behavior, and the tenderness you prefer all move the endpoint.
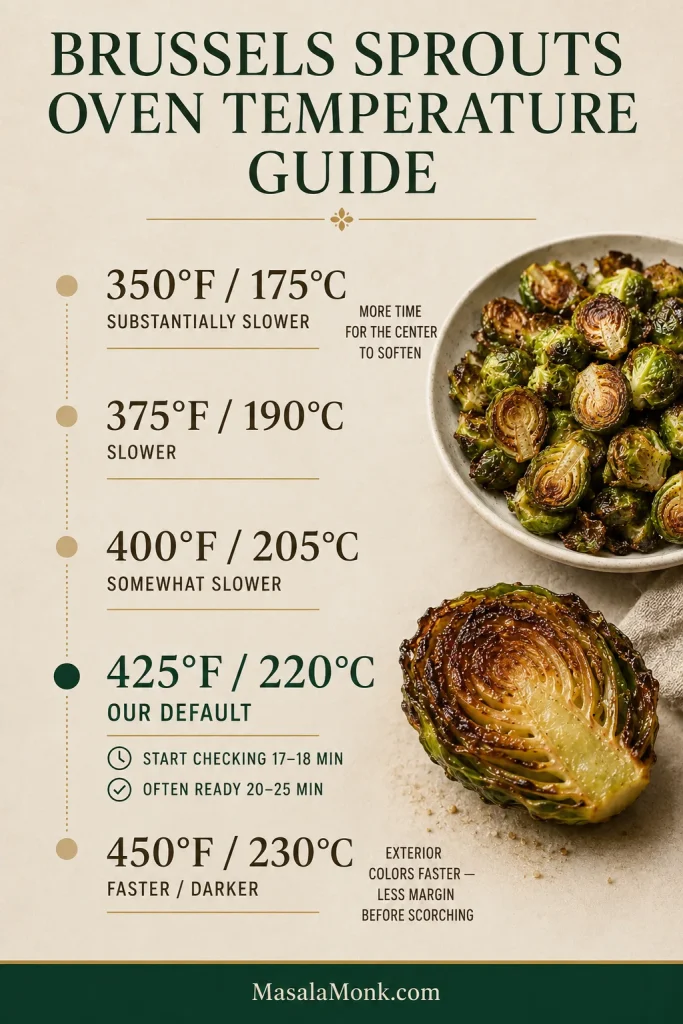
Temperature guide for roasting Brussels sprouts from 350°F to 450°F, highlighting 425°F as the default with a first check at 17–18 minutes.
Think of temperature as a trade-off: lower heat favors gradual softening, while higher heat builds exterior color faster. 425°F balances both.

Using a toaster oven? Keep it at 425°F / 220°C on the bake setting, use a small enough batch to leave real space between the pieces, and start watching around 15 minutes. Depending on sprout size and the appliance, a small batch may take roughly 15–25 minutes.

When Another Dish Sets the Oven Temperature

If scalloped potatoes already have the oven at 375°F / 190°C, leave it there and let the sprouts take longer rather than forcing a separate oven schedule for one side dish.

Small Roasting Choices That Change the Result

You don’t need to flip the sprouts. Leaving the flat sides against the baking sheet gives them uninterrupted contact and deeper caramelization. For a firmer center, pulling the tray sooner is the simpler adjustment.
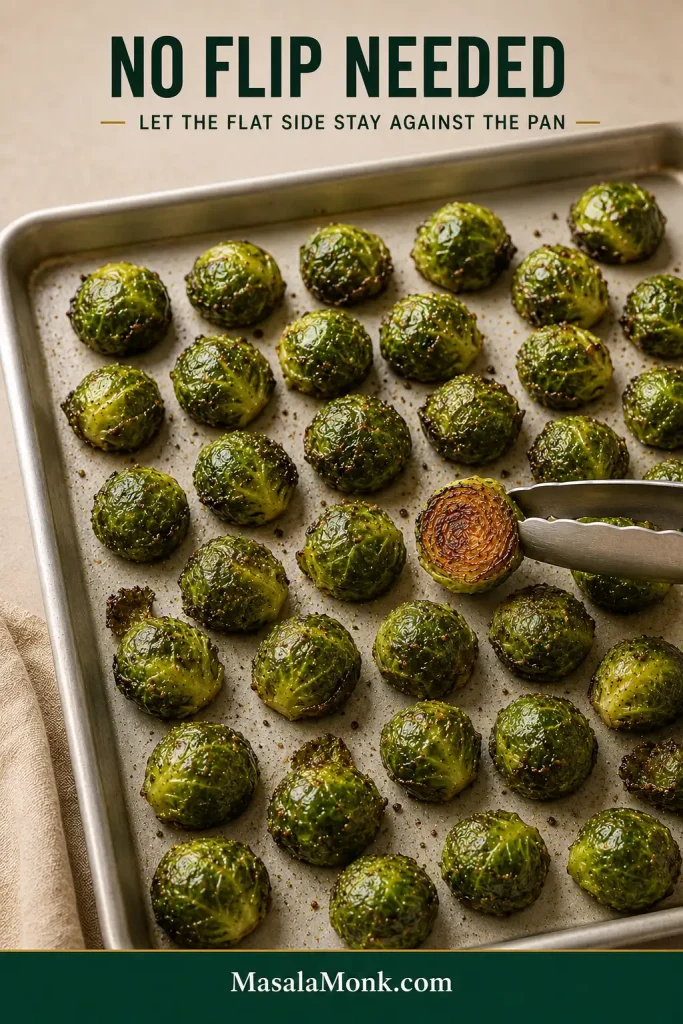
Roasted Brussels sprouts resting rounded-side up on a sheet pan while one piece is turned to reveal its dark caramelized underside.
Near the end, lift one representative sprout. A deeply caramelized pan-contact face means the rest can stay undisturbed.

A bare, light-colored aluminum sheet pan gives strong, predictable contact browning. Parchment is perfectly workable when easier cleanup matters, though the underside may color a little more gently. Dark pans tend to brown the bottoms faster.
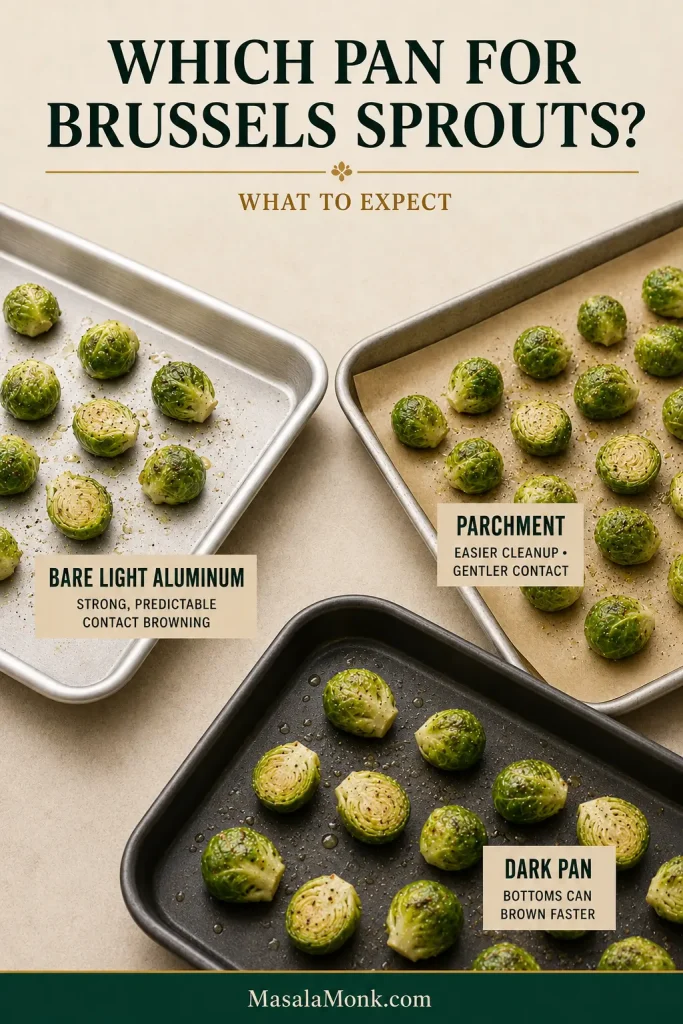
Brussels sprouts shown on three roasting surfaces: bare light aluminum, parchment paper and a clean dark metal baking pan.
If bottoms darken before centers soften, parchment or a lighter pan can give you more margin without changing the whole method.

Starting with a room-temperature sheet pan is enough for this method. Preheating can give the bottoms a head start. Blanching or steaming first can give the centers a head start before high-heat browning, which is why some restaurant-style methods use it. You don’t need that extra step for this straightforward roasted version.

Should You Marinate Brussels Sprouts Before Roasting?

For the crispest result, skip a wet marinade. Extra liquid delays browning, while sugary marinades can darken before the centers are tender. Roast with oil and dry seasonings, then add balsamic, citrus, honey, maple, or another wet finish afterward. For exact starting amounts, jump to the measured flavor finishes. If you do marinate them, drain off the excess before roasting.

Already tender but still too pale? A brief turn under the broiler can add the missing color. Stay nearby—the thin outer edges can move from beautifully browned to genuinely burned very quickly.

Brussels Sprouts Troubleshooting

Brussels sprouts that refuse to crisp are usually too wet, too crowded, not making enough contact with the baking sheet, or not getting enough heat. The appearance of the tray usually tells you which problem you have.
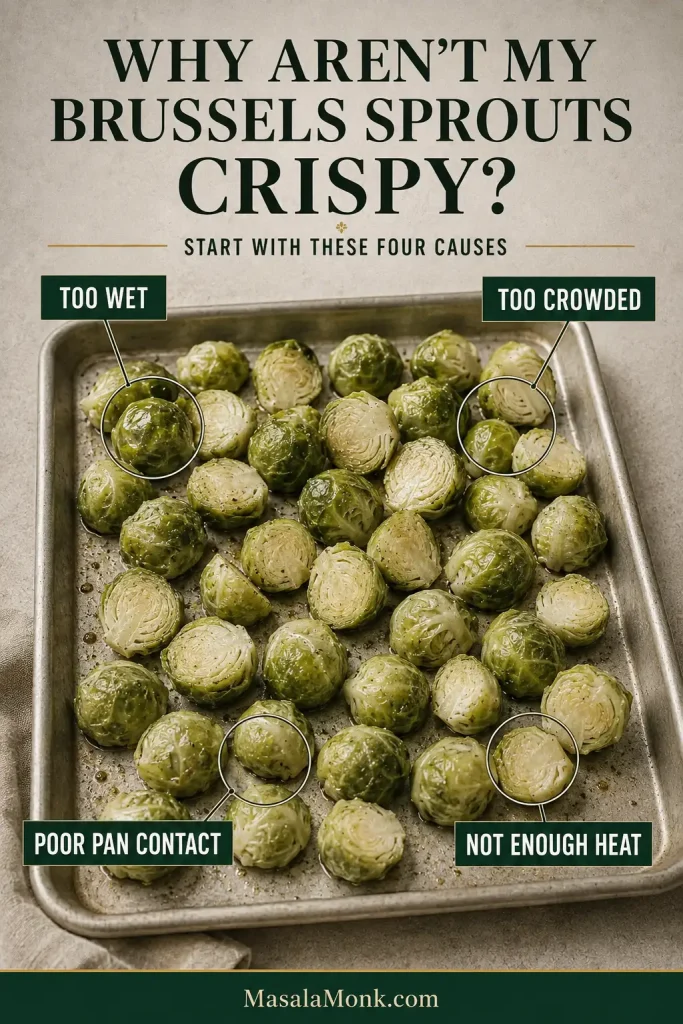
Pale Brussels sprouts on a sheet pan with callouts for excess moisture, overcrowding, poor pan contact and insufficient heat.
A crowded tray can stay pale long after the centers soften. Spread the sprouts out before simply adding more time.

The Most Common Problems

  • Pale and soft — Spread the pieces out and keep roasting if they still have some structure. A wet or crowded tray needs more time before strong browning begins. A larger sheet and drier sprouts will help on the next batch.
  • Tender but still pale — They have cooked through without developing enough contact color. A brief broil can rescue this batch; keeping the flat faces in direct contact with the baking sheet helps the next one.
  • Dark outside but hard in the middle — Remove any finished pieces and return the hard ones to the oven. Very large sprouts are the usual culprit, so cut those outliers smaller next time.
  • Too soft — They have simply passed the center texture you prefer. They may still taste excellent; on the next tray, trust the center earlier.
  • Greasy instead of crisp — Lift the sprouts from the excess oil with tongs or a slotted spatula. On another batch, stop adding oil once the surfaces are lightly glossy rather than wet.
  • Outer leaves scorched before the centers were ready — Remove anything that tastes acrid. A hot-running oven, dark pan, or especially small pieces can all make the outside brown too fast, so check those first on the next tray.
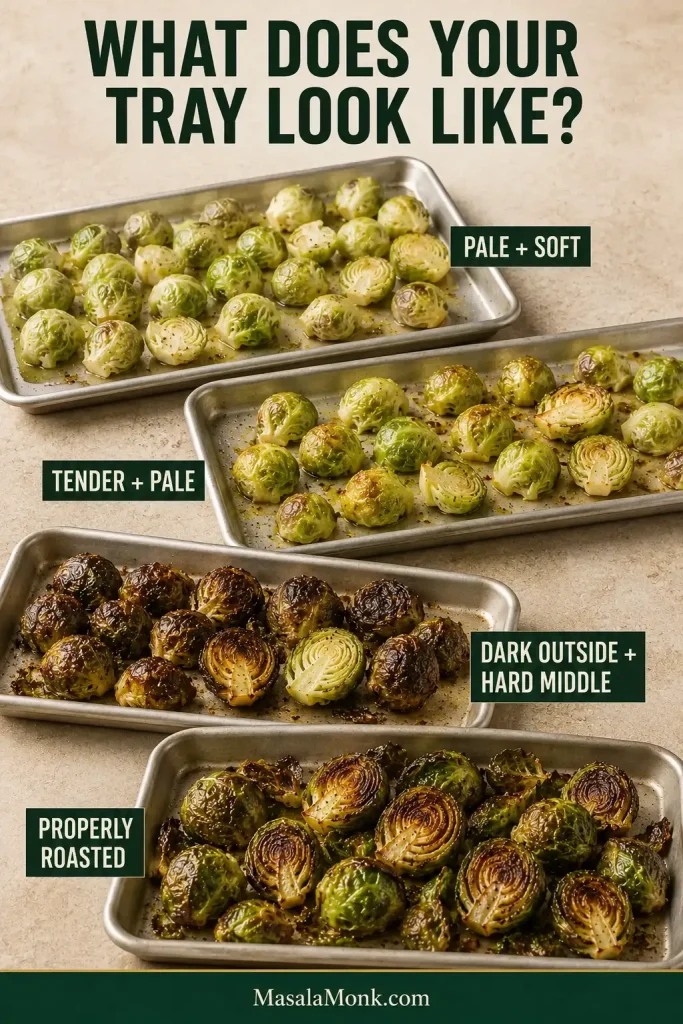
Four Brussels sprout outcomes labeled pale and soft, tender and pale, dark outside with a hard middle, and properly roasted.
Match the fix to the result: tender-but-pale needs more browning; dark outside with a firm center usually means pieces were too thick.

A Few Less Common Problems

  • Strong cabbage or sulfur smell — The sprouts have spent too long cooking gently in a moist environment. Spread them out and continue uncovered if they still need cooking; once tender, serve promptly and brighten them with lemon.
  • Bitter but not burned — Check the salt first, then try lemon, Parmesan, balsamic, or a restrained sweet finish. A little more caramelization can also take the edge off that bitterness.
  • Acrid or charcoal-bitter — That is actual burning. Discard the worst pieces and pull the next tray sooner. If the bottoms are scorching much faster than the rest of the sprouts, use parchment or switch to a lighter-colored baking sheet.
  • A double batch came out soft — Too many sprouts probably shared one baking sheet. Move half the batch to a second sheet pan if dinner can wait a few more minutes; use two pans from the beginning next time.

When food in your oven consistently finishes much earlier or later than recipes suggest, a simple oven thermometer can tell you whether the temperature inside matches the number on the dial.

Restaurant-Crispy vs Straight Oven Roasting

A home-roasted tray can be beautifully browned and still not crunch like a restaurant appetizer. Some restaurant versions are blanched, fried, cooked twice, or finished with considerably more fat and aggressive heat.

That does not make the oven version a failure. Once the centers taste good, stop roasting rather than sacrificing them in pursuit of a texture this simple method was never meant to produce.
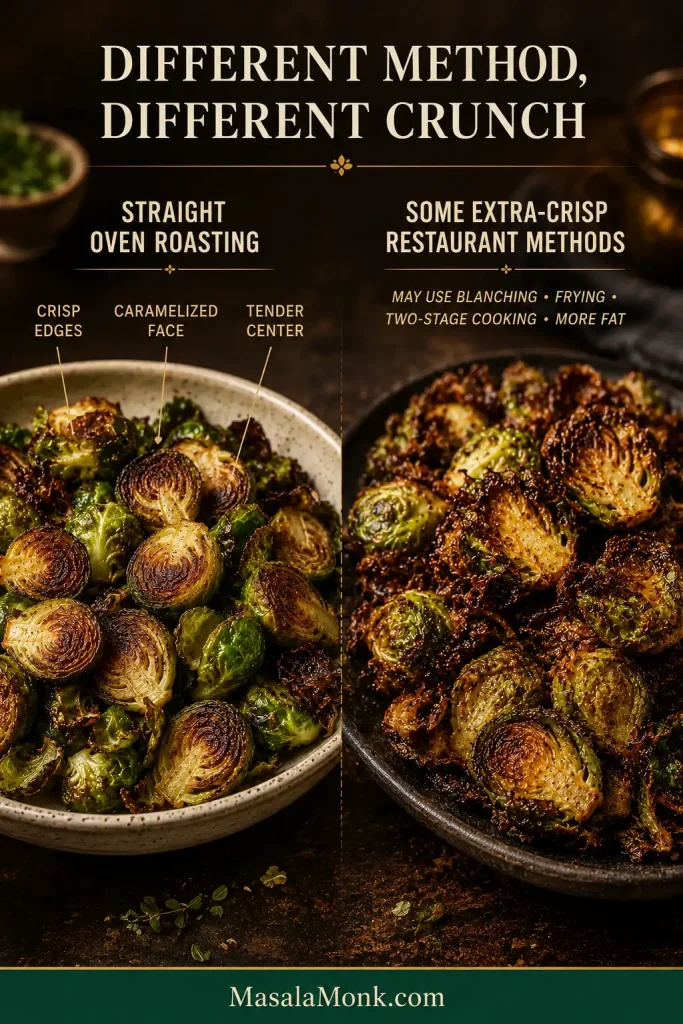
Comparison of straight oven-roasted Brussels sprouts with tender centers beside extra-crisp restaurant-style sprouts with rougher, crunchier exteriors.
Restaurant-level crunch often comes from an extra cooking stage. More oven time alone can dry the centers before matching that texture.

Choose Your Finish

Once the sprouts are roasted, this is where the tray gets personal. Olive oil, salt, and pepper are enough on their own, but a small finish can take the same batch in a brighter, cheesier, sweeter, tangier, or spicier direction.

Not sure where to start? Use lemon and Parmesan. Lemon wakes up the deep roasted flavor, while Parmesan adds salt and nuttiness without covering the sprouts in sauce.
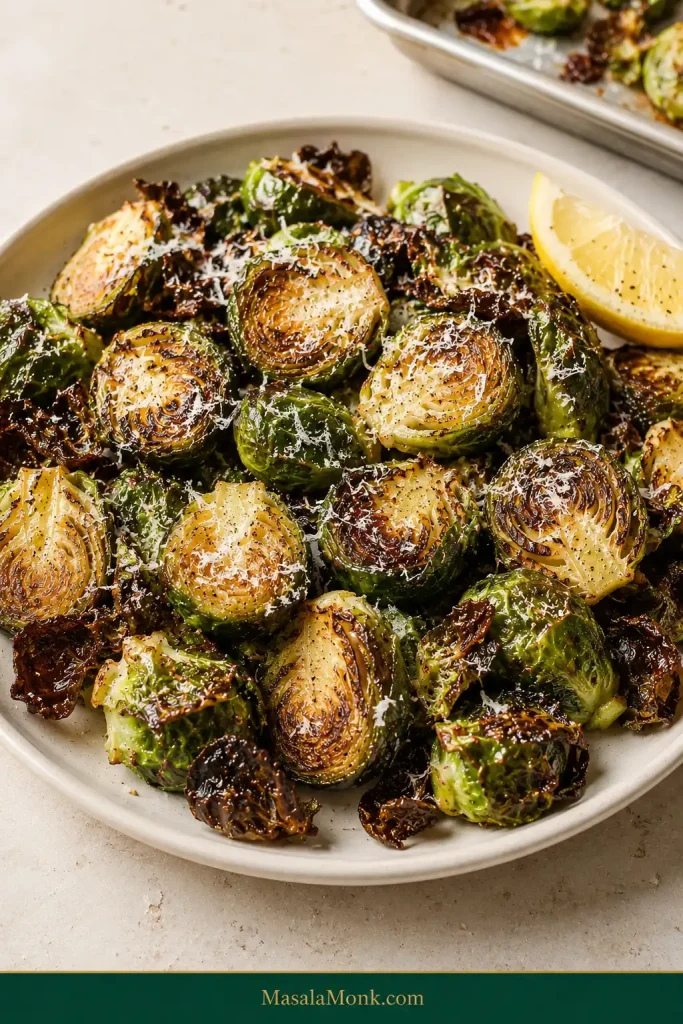
Plate of roasted Brussels sprouts lightly coated with finely grated Parmesan and served with fresh lemon.
Add Parmesan while the sprouts are hot so it clings, then finish with lemon to keep the acidity bright and the edges crisp.

Measured Flavor Finishes

These are conservative starting amounts for the 1½ lb / 680 g batch. Once you know your favorite finish, adjust freely.

FinishStarting AmountWhen to Add
Lemon1 tbsp / 15 ml fresh lemon juiceAfter roasting; add more to taste
Parmesan¼ cup / about 20 g finely grated ParmesanToss with the sprouts while hot; taste before adding more salt
Garlic powder½ tsp / about 1.5 gAdd with the salt and pepper before roasting
Balsamic vinegar1 tbsp / 15 mlDrizzle over the finished sprouts
Honey or maple syrup1 tbsp / 15 mlAdd after roasting and toss
Red-pepper flakes¼ tsp / about 0.5 gAdd before roasting

With balsamic, honey, or maple, think finish, not bath. You want enough to complement the caramelized surfaces without soaking the crisp edges.
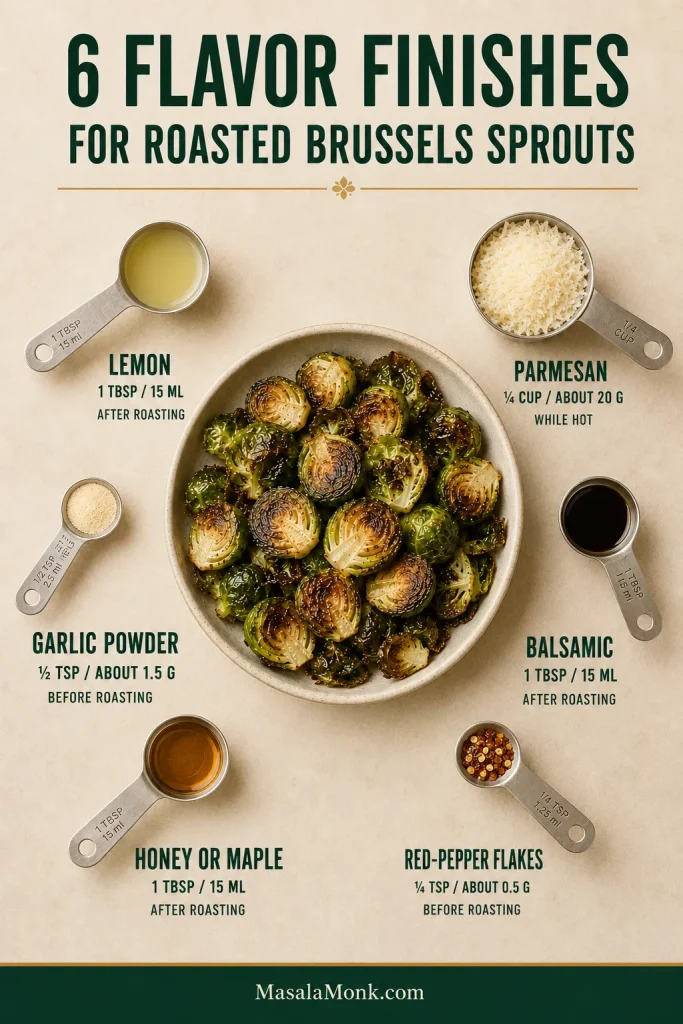
Roasted Brussels sprouts surrounded by measured lemon juice, Parmesan, garlic powder, balsamic vinegar, honey or maple syrup, and red-pepper flakes with amounts and timing.
Dry seasonings can roast with the sprouts; wet finishes are easier to control afterward. Start lightly and add more if needed.

For another vegetable that takes honey, maple, and garlic especially well, try roasted carrots. For sweet heat, use a light drizzle of hot honey sauce instead of plain honey.

What to Serve With Roasted Brussels Sprouts

Their deep roasted flavor and nutty caramelized edges make Brussels sprouts easy to pair with both simple proteins and richer mains.

For a weeknight dinner, serve them beside baked chicken breast or honey garlic salmon. Lemon or Parmesan is especially good when the main dish already brings a sweeter glaze.

On a holiday table, roasted Brussels sprouts also fit naturally beside ham, turkey, stuffing, scalloped potatoes, or mashed potatoes. When the rest of the plate is rich, a bright lemon or restrained balsamic finish keeps the sprouts lively.
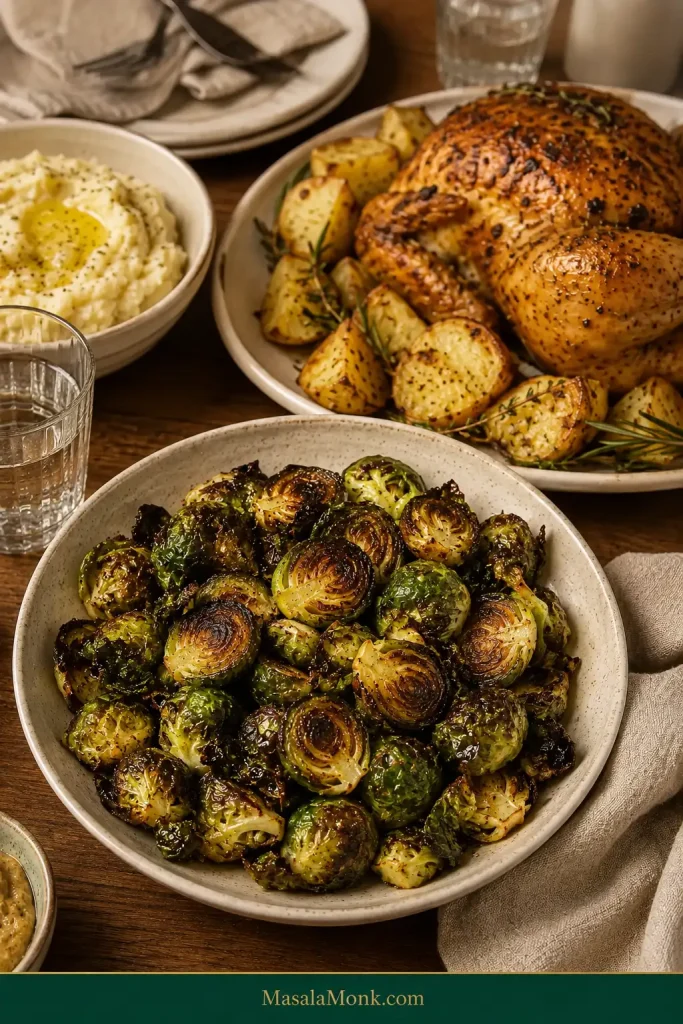
Dinner table with a prominent bowl of roasted Brussels sprouts served beside roast chicken, potatoes and other simple side dishes.
Let the main dish guide the finish. Rich or sweet mains usually pair best with brighter lemon or savory Parmesan.

Can I Substitute Frozen Brussels Sprouts?

Not if you’re after the crisp edges and tender centers you get with this method. Frozen Brussels sprouts can certainly be roasted, but freezing changes their structure and they release much more moisture as they heat.

Use fresh sprouts for the method on this page. Frozen Brussels sprouts are better treated as their own roasting method rather than dropped into these timings and expected to behave the same way.
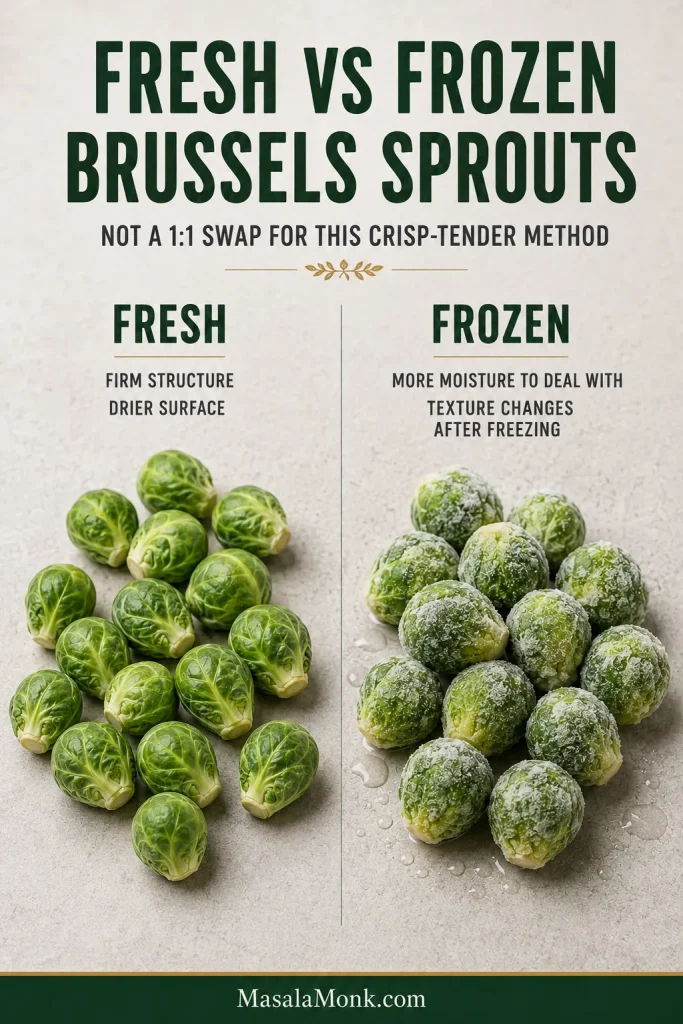
Fresh firm Brussels sprouts beside frosted frozen Brussels sprouts with visible moisture around the frozen vegetables.
Frozen sprouts release more moisture and have a softer structure, so they need their own roasting strategy rather than fresh-sprout timing.

Make Ahead, Store and Reheat

Prep Ahead and Transport

Prep ahead. Rinse and dry the sprouts, then trim and cut them up to 1 day ahead and refrigerate them covered. Keep them unseasoned until you are ready to roast. If they look damp after refrigeration, pat them dry again before adding the olive oil, salt, and pepper.

Roasting ahead is possible, but the edges are best straight from the oven. For Thanksgiving, Christmas, or another busy meal, doing the knife work early and roasting close to serving is usually the better compromise.

When something like honey glazed ham already controls the oven, use the temperature guide above rather than squeezing the Brussels sprouts onto a smaller, crowded tray just to speed them up.

Taking them somewhere? Hot sprouts soften when trapped under a lid or tight foil. Roast close to serving when possible; otherwise cool and refrigerate them promptly, transport them chilled, and reheat uncovered at your destination. Without reheating, expect softer edges.
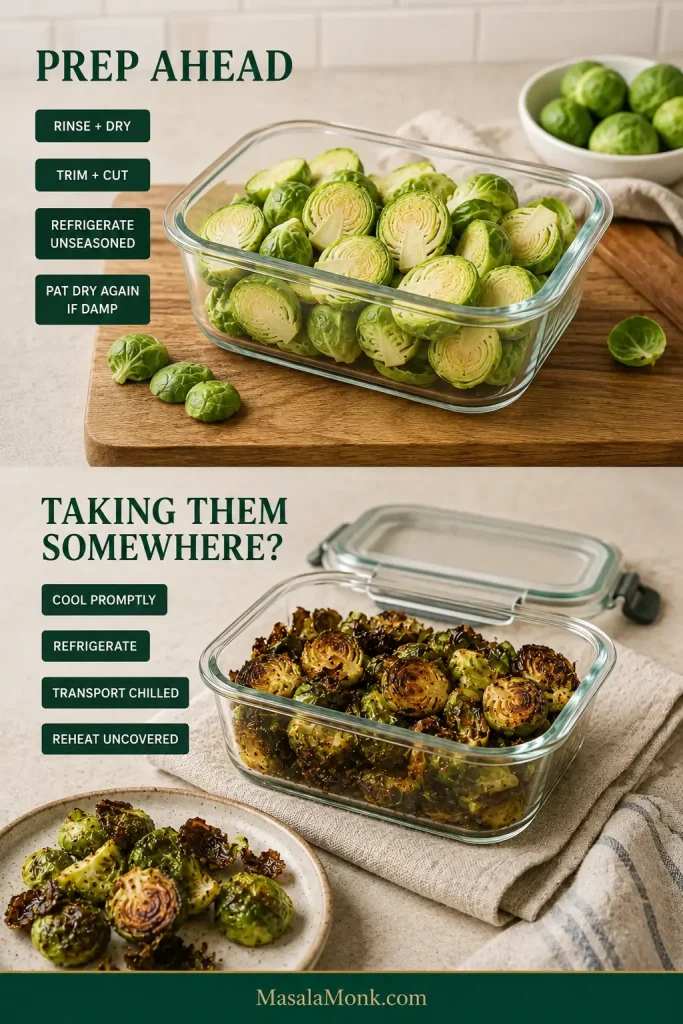
Guide showing dry cut raw Brussels sprouts stored unseasoned in glass and roasted Brussels sprouts prepared for chilled transport and uncovered reheating.
Do the knife work ahead, not the roasting. Keep cut sprouts dry and unseasoned until the last moment for better browning.

Store and Reheat Brussels Sprouts

Storage. Refrigerate cooked Brussels sprouts promptly and use them within 3–4 days, in line with USDA leftovers guidance.

Oven reheating. Spread the sprouts over a baking sheet and warm them at 375°F / 190°C for about 5–10 minutes, until hot and beginning to crisp again.

Air-fryer reheating. For a small batch, use 375°F / 190°C for about 3–5 minutes. Already-dark edges can move quickly, so watch them near the end.

The microwave is fastest, but it softens the exterior. That may be perfectly acceptable for Tuesday lunch; it simply won’t recreate a tray fresh from the oven.
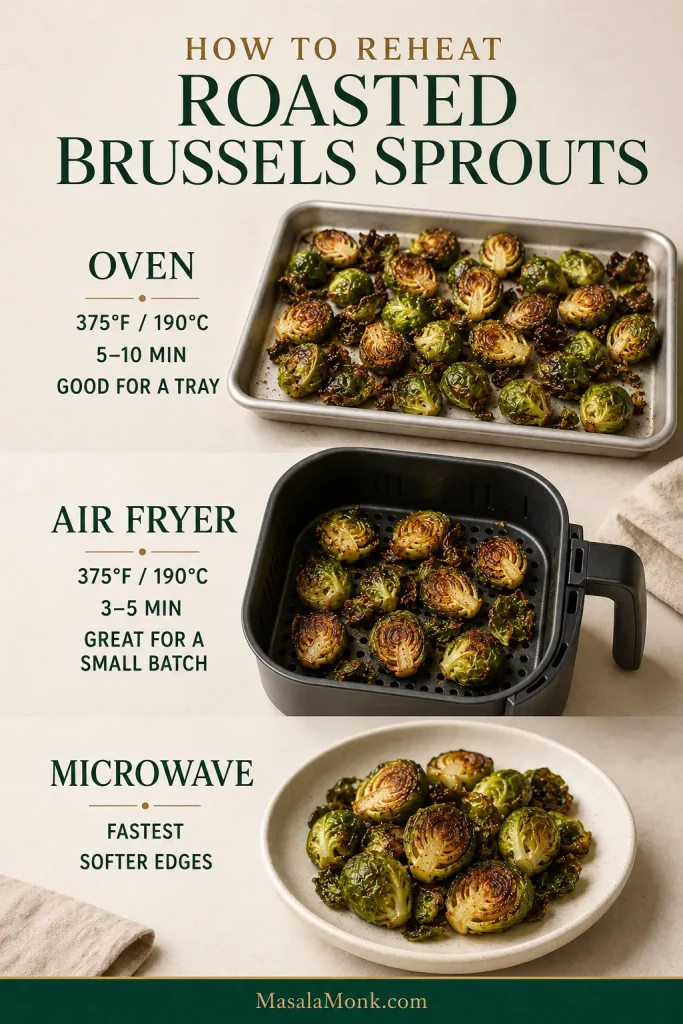
Reheating guide showing Brussels sprouts on an oven tray, in an air-fryer basket and in a microwave serving bowl with the corresponding method guidance.
Reheat in a shallow layer so moisture can escape. A deep pile steams itself before the exterior has much chance to crisp again.

Use the Leftovers

Leftovers are also good chopped into grain bowls, salads, pasta, or eggs, where softer edges aren’t a problem.
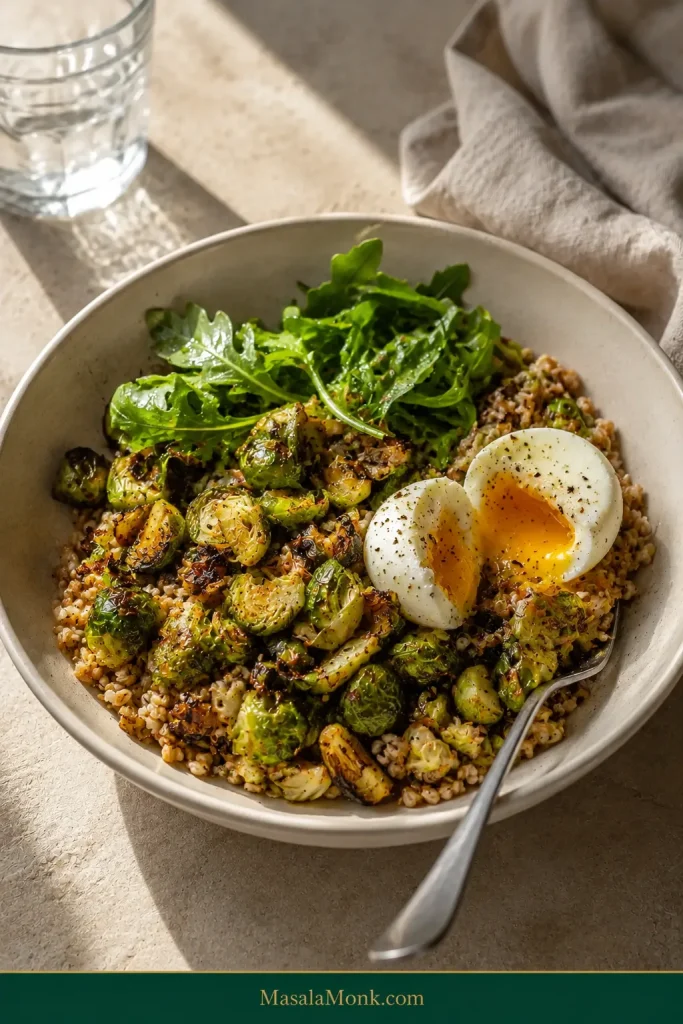
Grain bowl containing chopped roasted Brussels sprouts, cooked grains, leafy greens and a soft-boiled egg with a runny yolk.
Softer leftovers belong naturally in grain bowls, pasta, eggs and salads, where the changed texture becomes part of the meal.

Once You Know What to Look For

After a tray or two, you probably will not need this recipe beside you anymore. You will recognize the moment the Brussels sprouts are ready.

Serve them hot—and if a few crisp little leaves disappear before the pan reaches the table, that is entirely understandable.
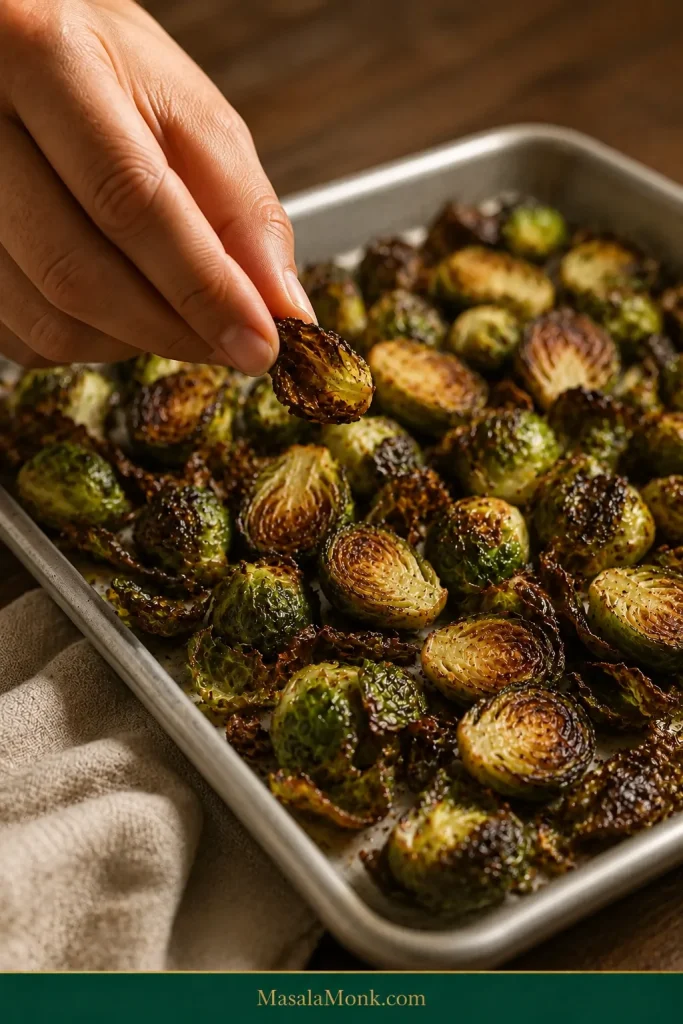
Hand picking up a crisp roasted Brussels sprout piece from a sheet pan filled with deeply browned sprouts and loose crispy leaves.
Posted on Leave a comment

Air Fryer Zucchini Recipe: Tender, Browned and Not Mushy

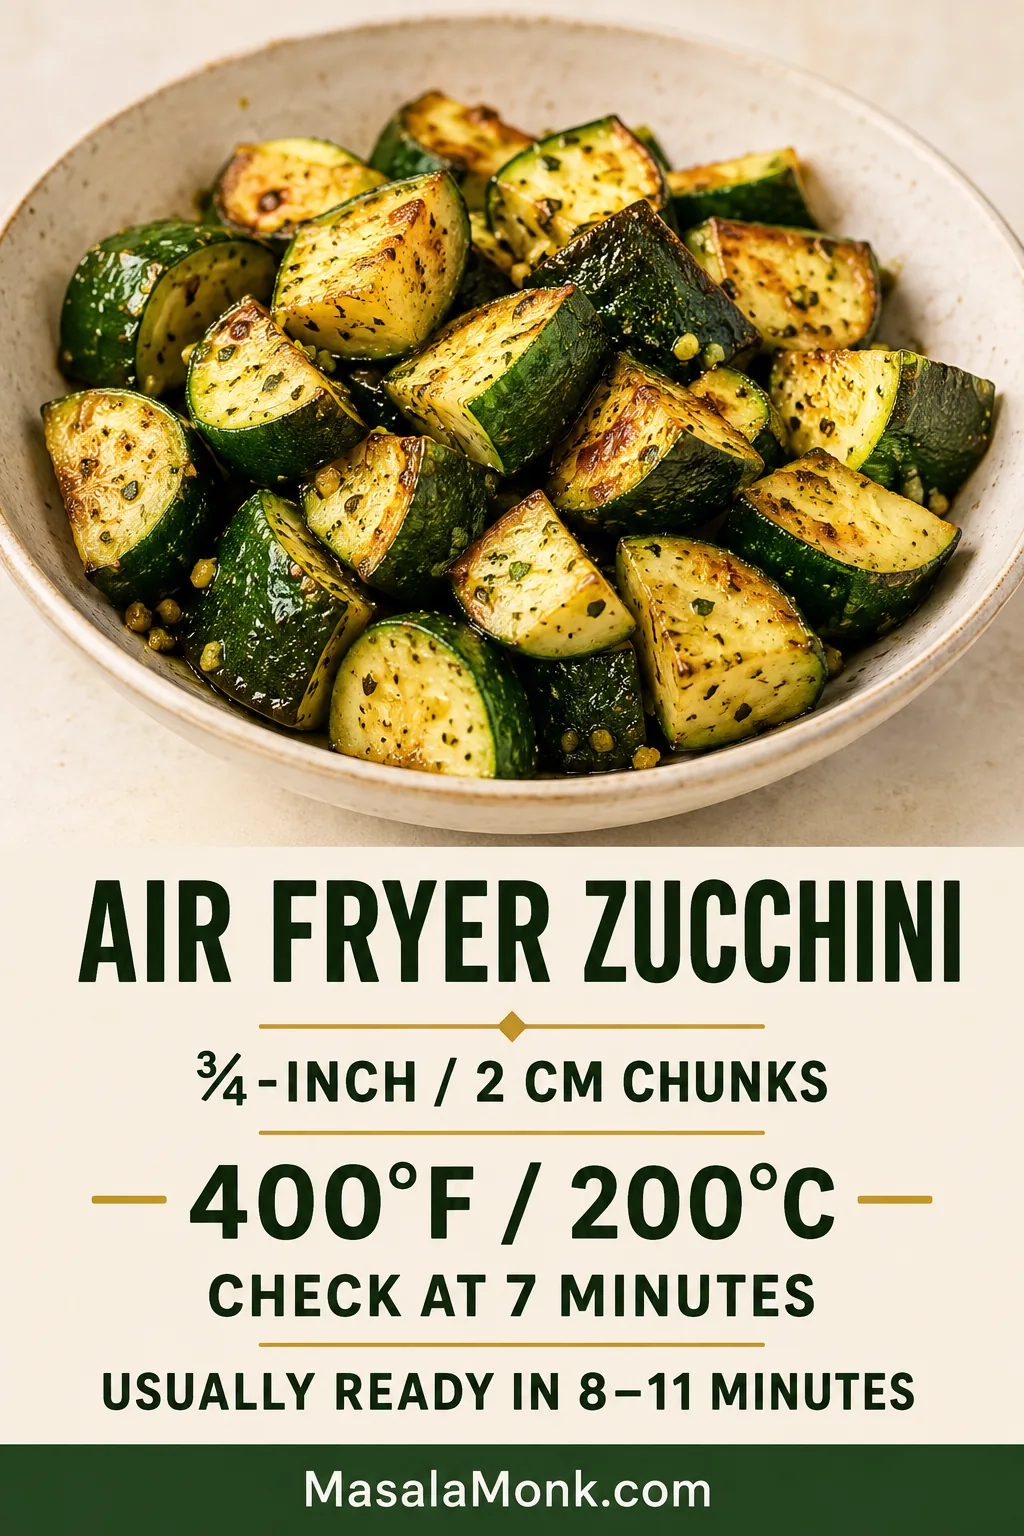
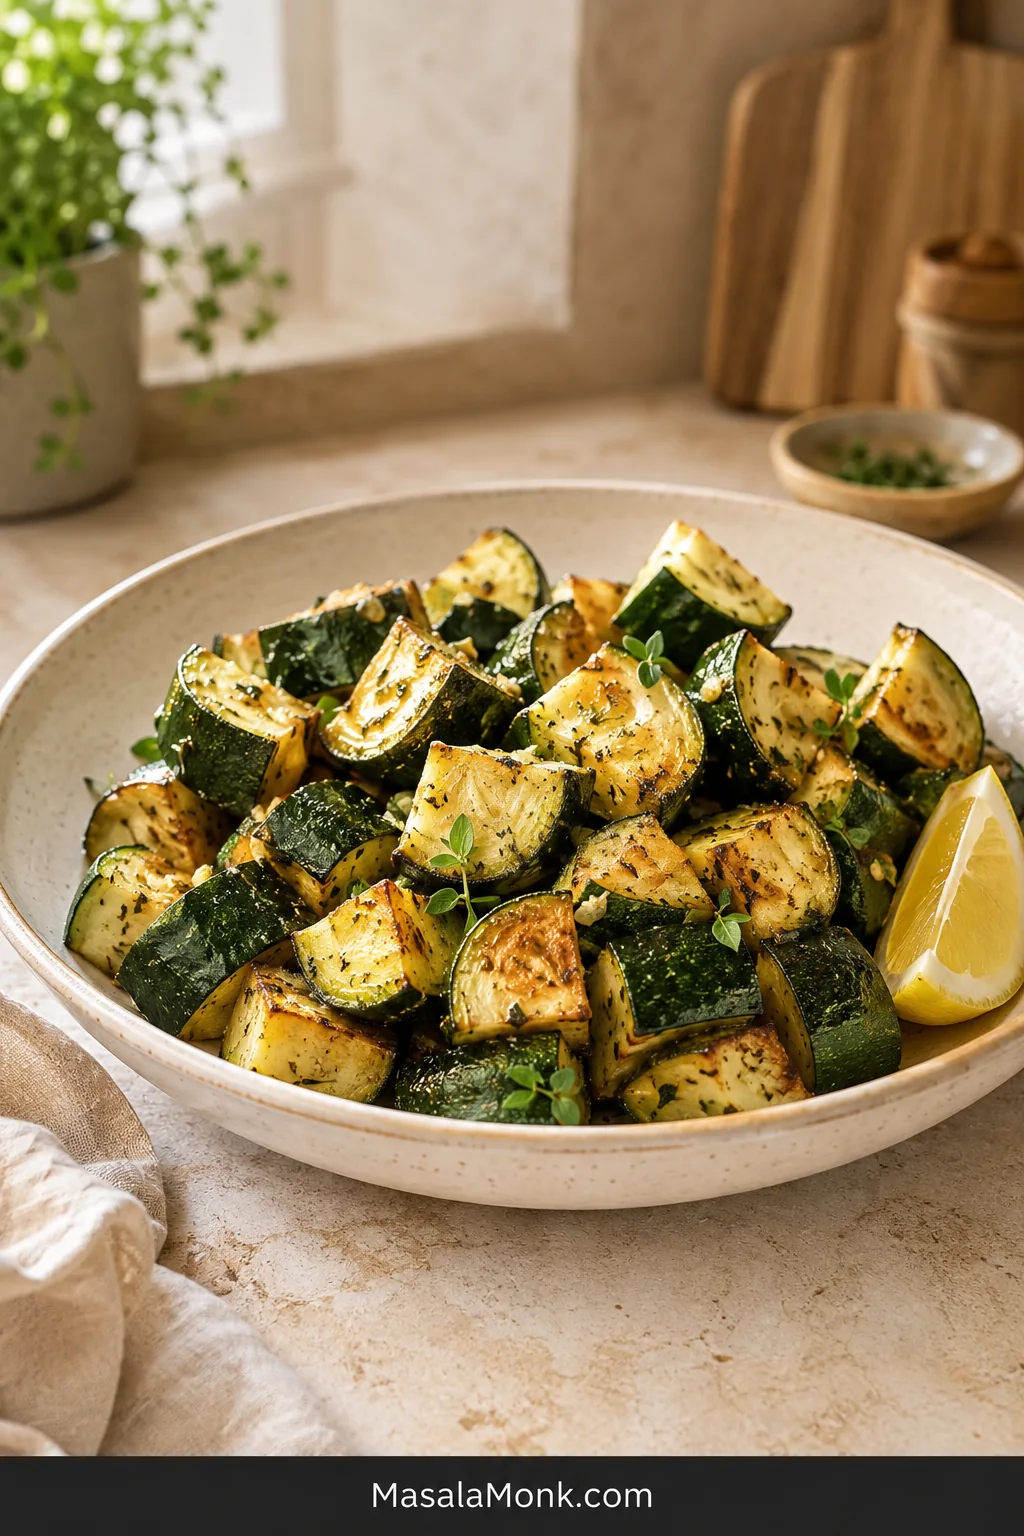
Ivory bowl filled with browned zucchini chunks with intact green skin, scattered herbs and a lemon wedge on a pale stone surface.

Good air fryer zucchini has a small, easy-to-spot window. The cut faces have started to bronze, the edges look roasted instead of wet, and the center is tender without folding when lifted with a fork.

Some nights dinner needs one last thing—something green, hot and bright that does not ask for another pan or a bowl of breading. Zucchini, called courgette in the UK, fills that gap when it gets enough heat and breathing room.

This is air fryer zucchini without breading, flour or egg. The goal is not to dry the vegetable until it crunches like a chip; it is to brown the outside while the middle still tastes fresh and juicy. For thin Parmesan rounds or panko-coated pieces, use the separate crispy zucchini chips recipe.

Quick Answer

Cut 1 lb / 454 g small or medium zucchini into ¾-inch / 2 cm chunks. Coat with 2 teaspoons / 10 ml oil, add the dry seasonings and spread the pieces loosely in a preheated 400°F / 200°C air fryer.

Cook undisturbed for 5 minutes, shake well and begin checking at 7 minutes. Many basket-style air fryers finish this cut in about 8–11 minutes. Remove the zucchini when several faces are golden, the surfaces no longer look watery and a fork enters with a little resistance.

Cut thick. Cook hot. Check early.

Vertical timing guide showing ¾-inch zucchini pieces, a temperature of 400°F, a first check at 7 minutes and an expected cooking range of 8–11 minutes.
How long to air fry zucchini depends on basket shape, load and fan strength. Use the stated range for your first batch, then remember where your own machine landed.

Air Fryer Zucchini Recipe

Thick zucchini chunks with browned corners and tender centers that still hold their shape. The base version is lightly garlicky and gently herbal, with fresh zucchini sweetness and an optional squeeze of lemon.

Active prep: About 8–10 minutes · Cook time: 8–11 minutes per batch

Total time: About 20 minutes for one batch; preheating overlaps with prep · Temperature: 400°F / 200°C

Yield: Serves 4 alongside a main course, or 2 as a generous vegetable portion

Small basket: Allow another 9–12 minutes if the zucchini needs two batches.

Dietary note: The base recipe is vegan and dairy-free, with no flour or breadcrumbs. Check packaged seasoning labels when strict gluten avoidance matters.

Equipment

  • Basket-style or oven-style air fryer
  • Sharp knife and cutting board
  • Mixing bowl
  • Measuring spoons or a digital kitchen scale
  • Silicone-tipped tongs or a small flexible spatula

Ingredients

  • 1 lb / 454 g small or medium zucchini, usually 2 to 3 depending on size
  • 2 teaspoons / 10 ml olive oil or avocado oil
  • 1 teaspoon Italian seasoning, or ½ teaspoon dried oregano
  • ½ teaspoon garlic powder
  • ¼ teaspoon ground black pepper
  • 3 g salt, or about ½ teaspoon fine salt when not weighing
  • 1 teaspoon / 5 ml lemon juice, optional, added after cooking
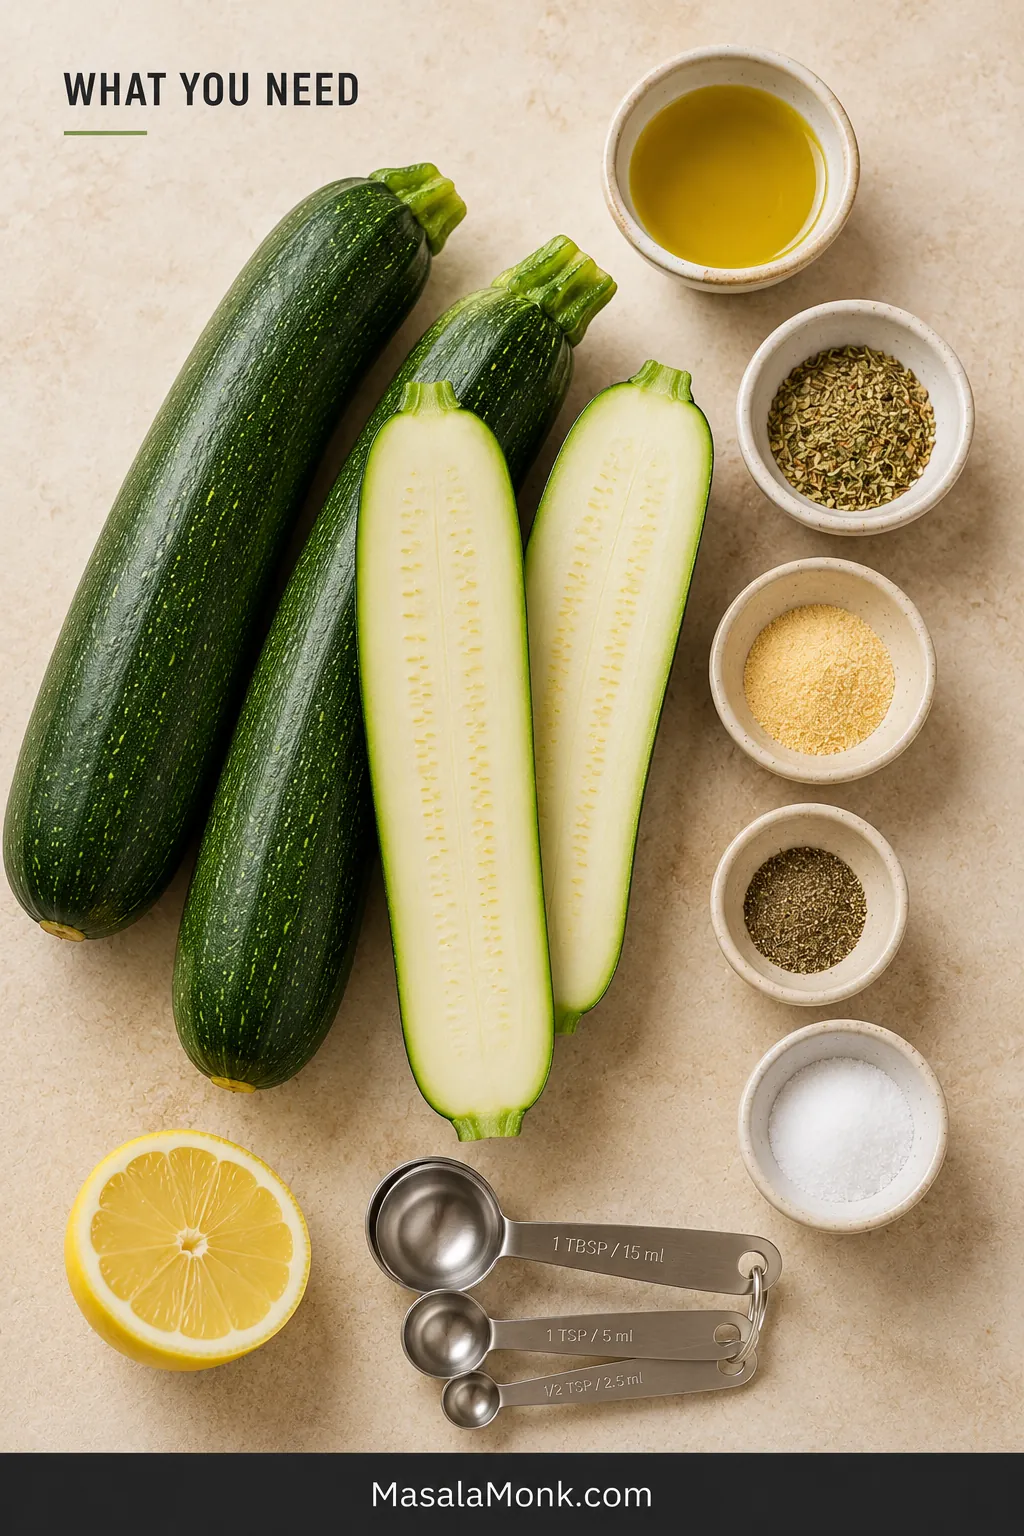
Overhead arrangement of zucchini, oil, Italian seasoning, garlic powder, black pepper, salt, lemon and measuring spoons on a warm cream surface.
For air fryer zucchini without breading, two teaspoons of oil are enough to help the seasonings cling. Extra oil cannot compensate for wet zucchini or restricted airflow.

Method

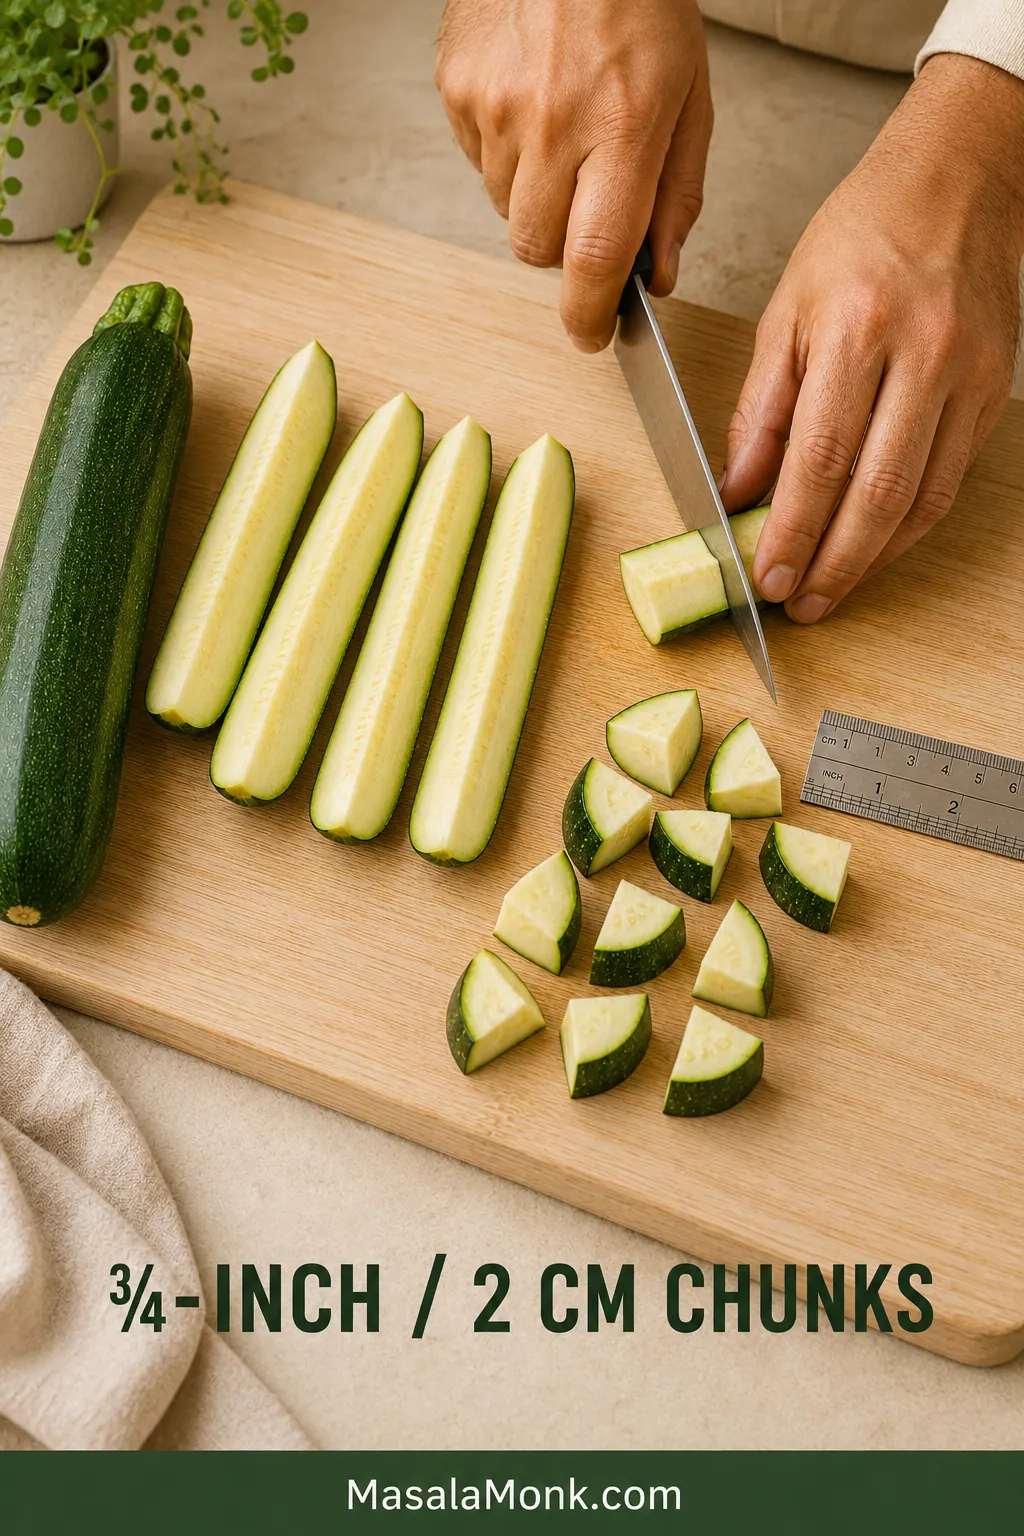
  1. Dry and cut the zucchini. Wash it, dry the skin well and trim the ends. Quarter each zucchini lengthwise, then cut the long quarters crosswise into ¾-inch / 2 cm chunks. Blot any visibly wet sides.
  2. Preheat the air fryer. Heat it to 400°F / 200°C for 3 to 5 minutes, unless the machine preheats automatically or its instructions recommend starting from cold.
  3. Oil the zucchini. While the air fryer heats, toss the chunks with the oil until they carry a thin, even sheen.
  4. Season just before cooking. Add the Italian seasoning, garlic powder, pepper and salt. Toss again and move the zucchini straight into the hot basket. If you salted an oversized zucchini earlier, omit the salt here and adjust only after cooking.
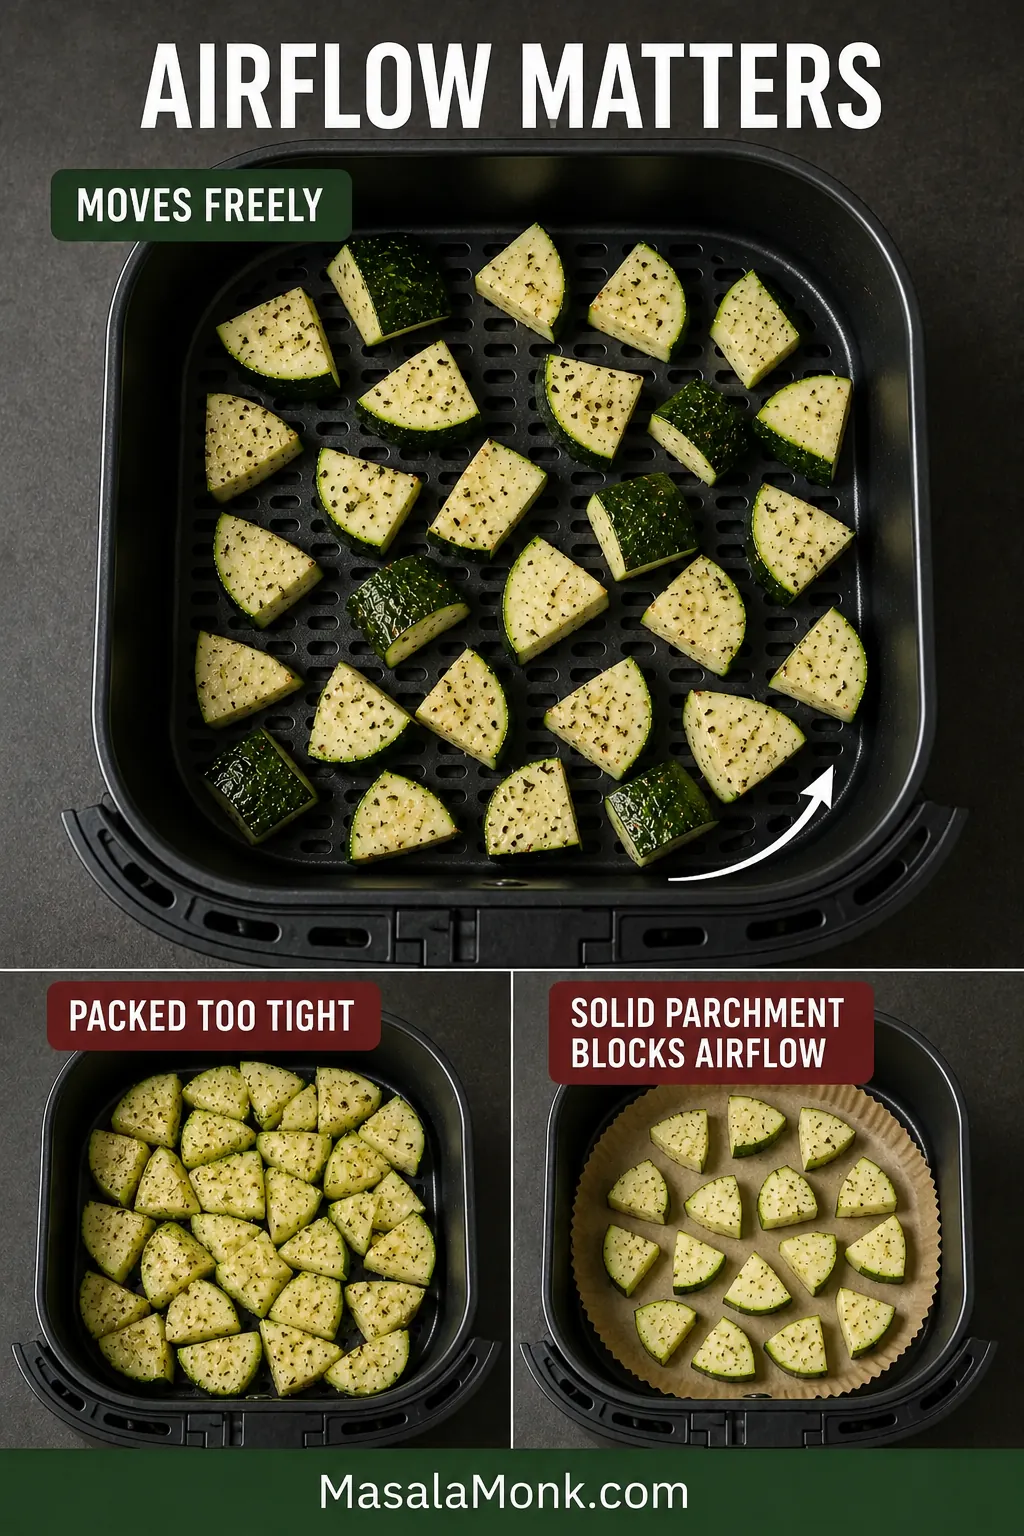
  5. Spread the pieces loosely. A little touching is fine, but the chunks should shift when the basket is shaken. Divide them into two batches when needed.
  6. Cook undisturbed for 5 minutes. This gives the surfaces touching the basket time to begin browning.
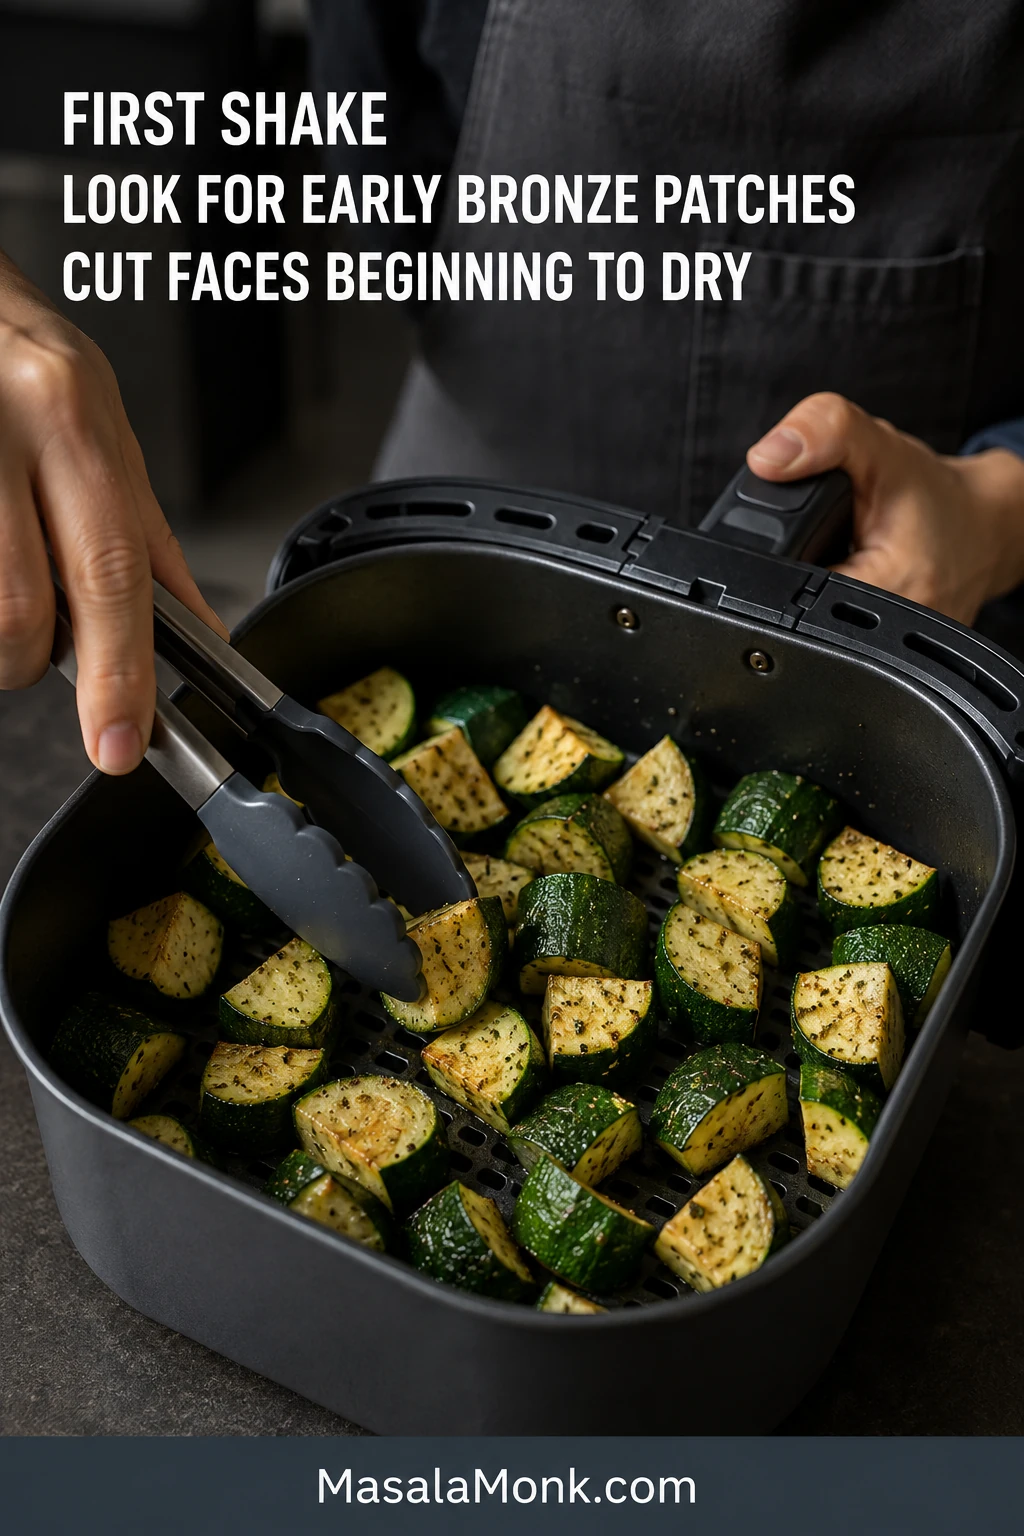
  7. Shake well. The zucchini will not look finished yet. Look for the first bronze patches and cut faces beginning to dry—the signs that the basket is roasting rather than steaming. Turn any pieces still resting on one pale face.
  8. Begin checking at 7 minutes. Give the zucchini another minute or two as needed. Remove it when several corners are golden, the cut sides no longer look wet and a fork enters with light resistance. For side-by-side cues, see how to tell when air fryer zucchini is done.
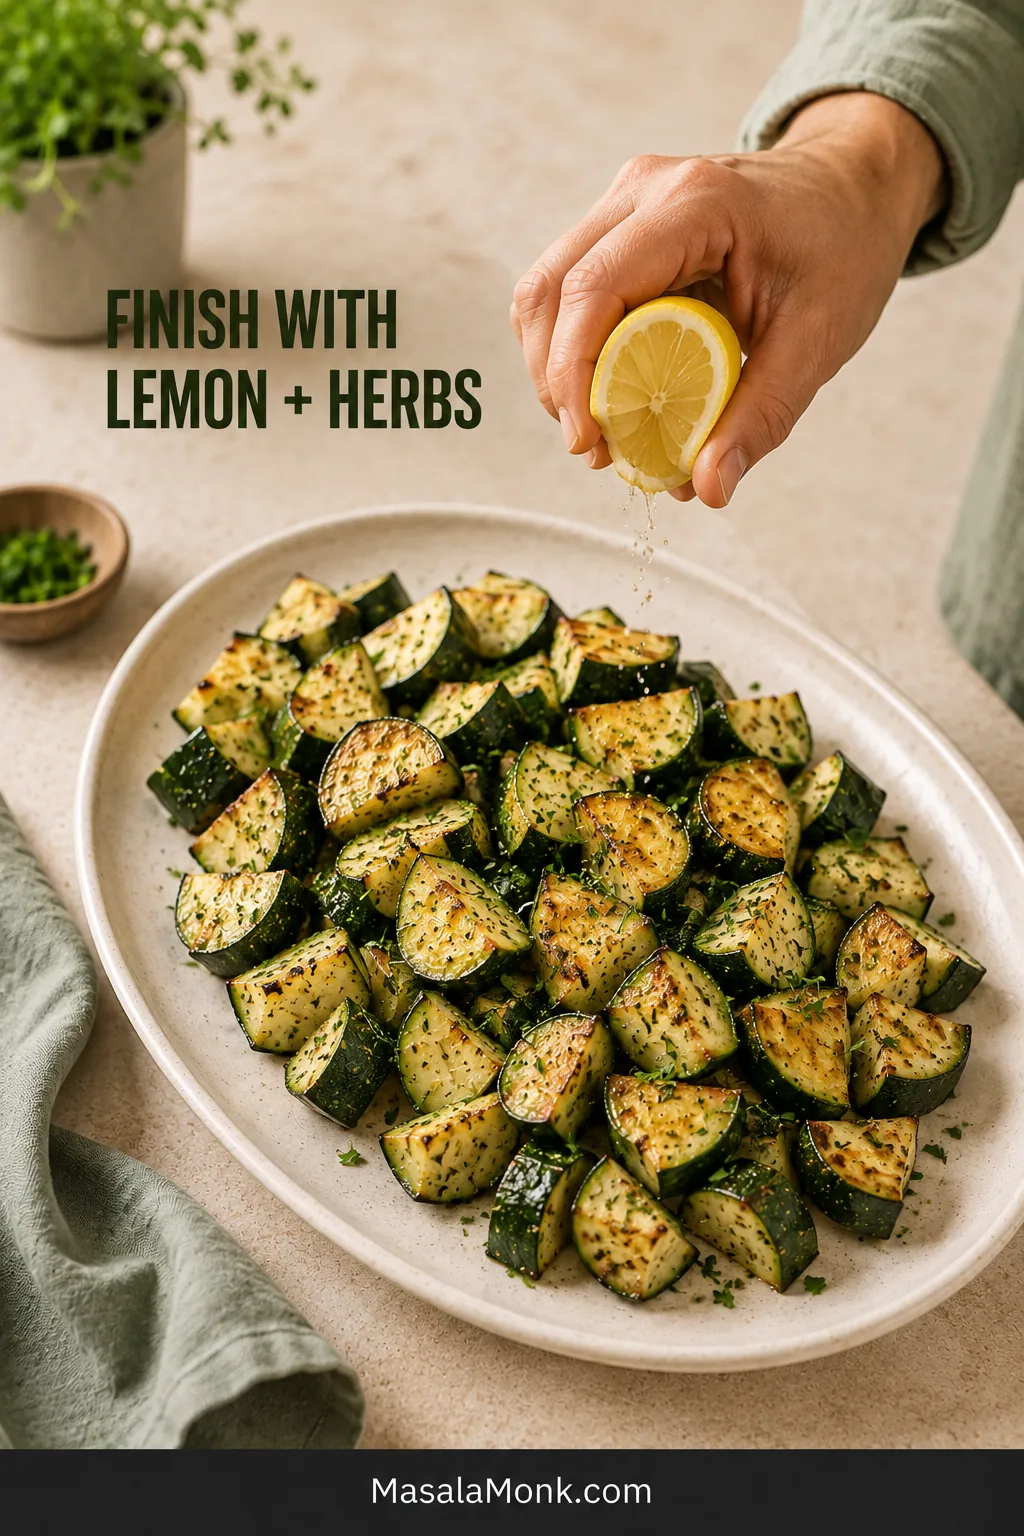
  9. Finish and serve. Transfer the zucchini to a broad, uncovered plate. Add lemon juice or fresh herbs while it is hot.

Success Cues and Second-Batch Timing

Cook turning partially cooked zucchini in an open air fryer basket, with early brown patches visible on several pieces.
One deliberate shake is usually more useful than repeatedly opening the machine. Turn the pale faces, redistribute any clustered pieces and give the heat time to recover.

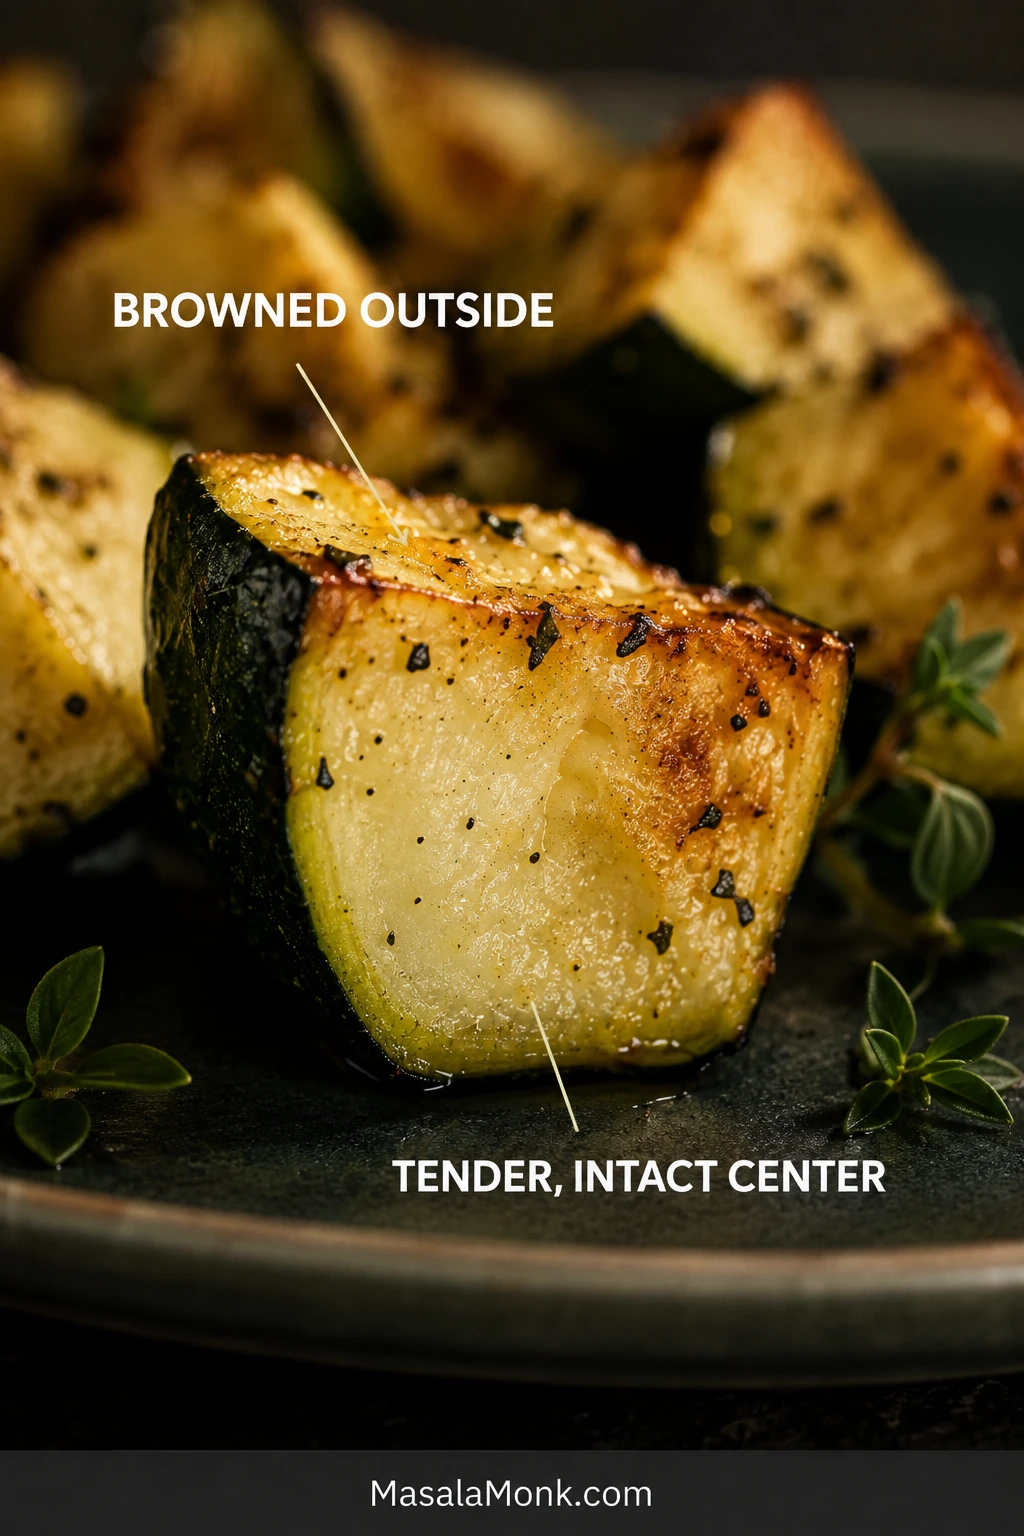
What success smells and feels like: The basket should smell garlicky and lightly roasted. Lift one piece: it should hold its shape while the fork meets only slight resistance in the center.

A little moisture in the center is the point. A puddle underneath is not.

Close-up of a browned zucchini chunk cut open to show dark green skin and a pale, moist, intact center.
Still uncertain? Cut open one of the largest chunks. A moist center that holds together is desirable; waterlogged flesh that slumps or releases liquid has moved beyond the ideal window.

Cooking two batches: Keep the first batch uncovered. When the second is nearly ready, return the first batch to the air fryer for 30–60 seconds only if it has cooled noticeably.

If your zucchini tends to come out pale, watery or softer than expected, four variables usually explain it.

Four Things to Control Before Cooking

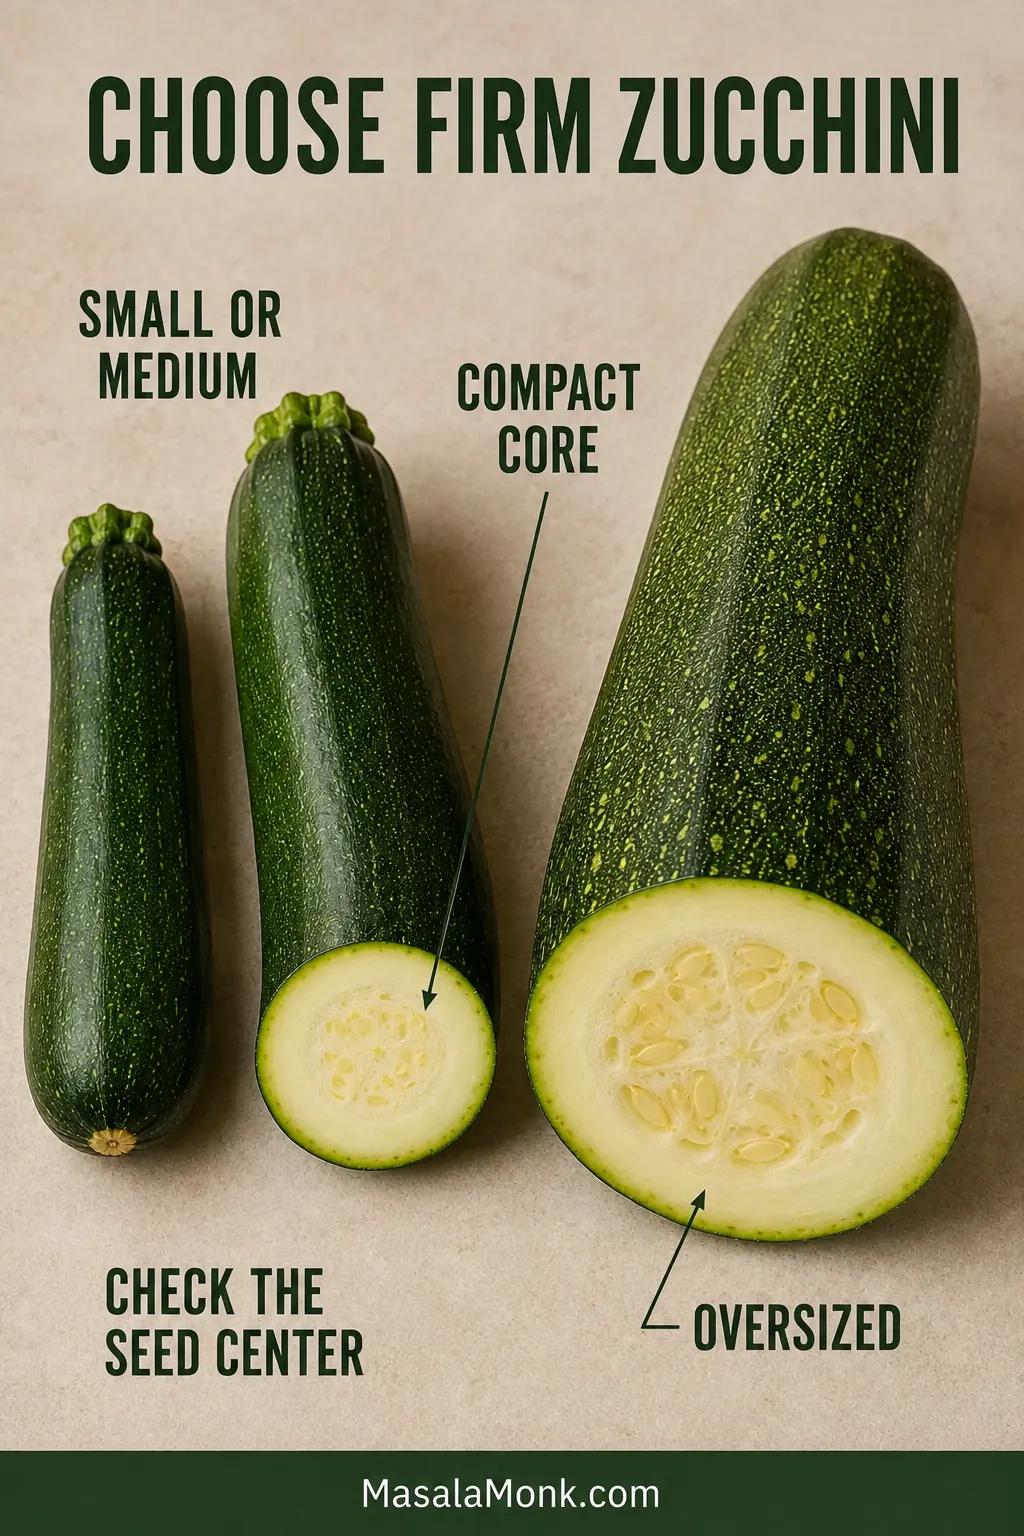
1. Start with firm zucchini

Small and medium zucchini are usually easiest to air fry because their flesh is firm and their seed cores are compact. Choose vegetables that feel heavy for their size, with smooth skin and no broad soft patches.

With an oversized garden zucchini, scoop away broad seeds surrounded by loose, spongy flesh. If the remaining pieces still look unusually wet, sprinkle them with about half the measured salt, rest for 10 minutes and blot thoroughly. Add more salt only after cooking and tasting.

Small, medium and oversized zucchini displayed side by side, with compact seed cores in the smaller vegetables and a broad, loose center in the largest.
An oversized zucchini is still useful. Air fry the firm outer flesh, then save a loose or heavily seeded center for soup, curry or a blended vegetable sauce.

2. Cut thick, even chunks

Quarter the zucchini lengthwise, then cut across those long quarters. This shape gives the hot air several edges to brown without leaving the middle so thin that it folds.

Hands cutting a lengthwise zucchini quarter into ¾-inch chunks on a wooden board, with whole zucchini, cut quarters and a ruler nearby.
Match thickness more closely than shape. Pieces with similar thickness soften at a similar rate even when their outlines are not perfectly identical.

The tapered ends naturally make smaller pieces. Check those first and take them out when ready. The larger chunks can continue for another minute.

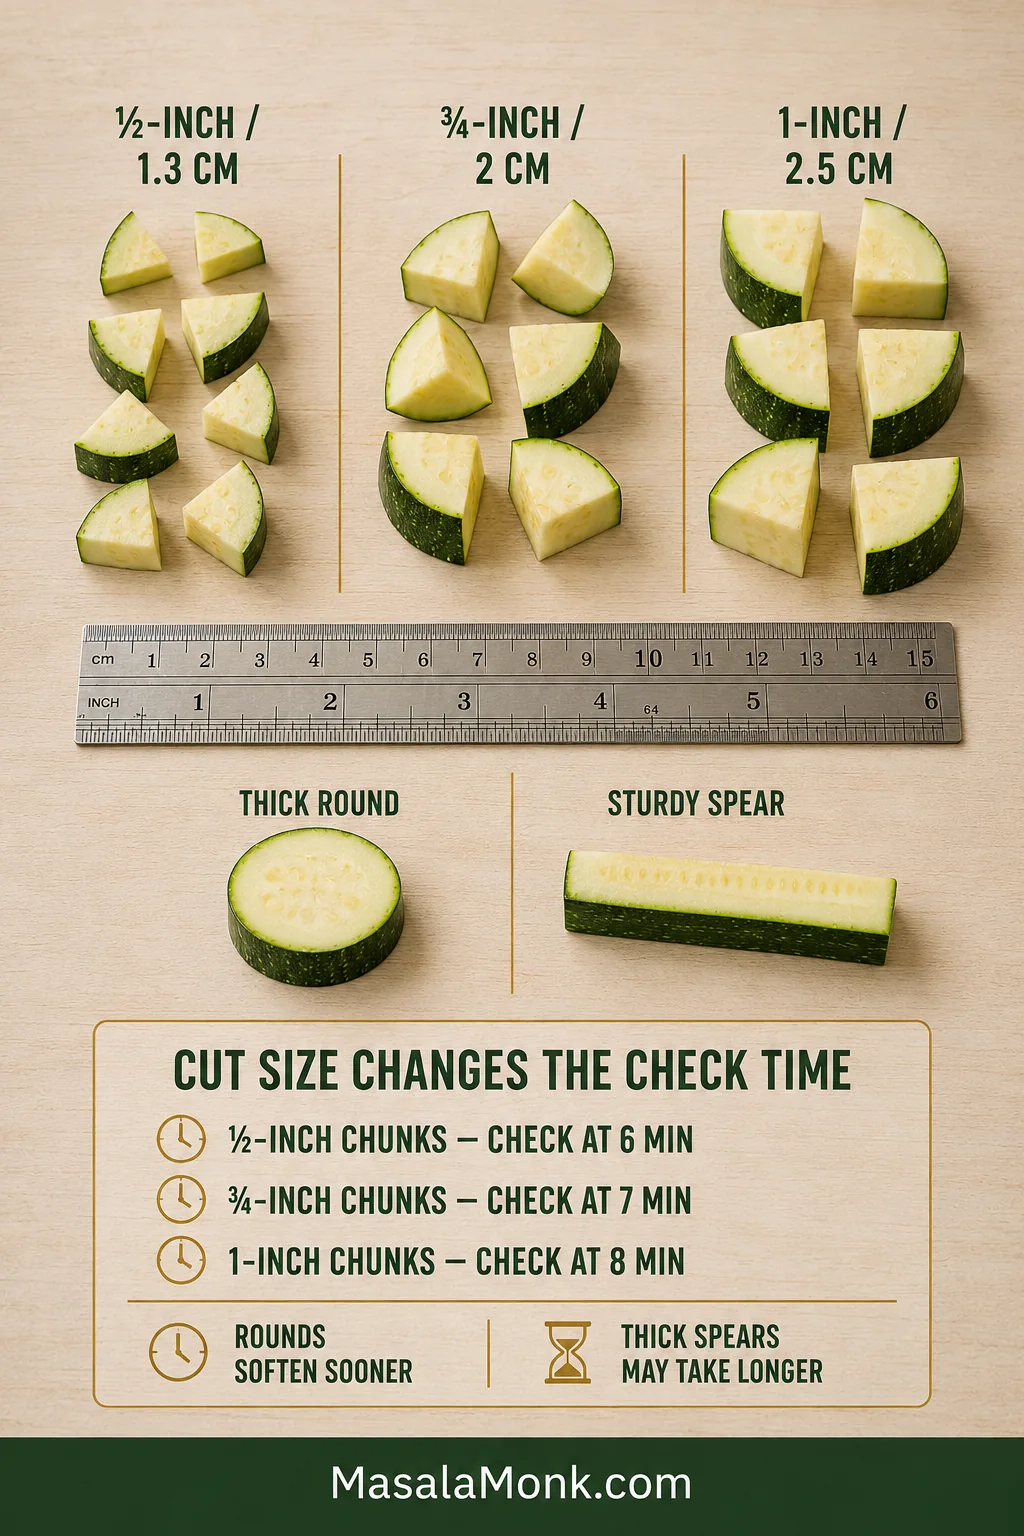
CutFirst checkWhat to expect
½-inch / 1.3 cm chunks6 minutesFast cooking; remove smaller pieces promptly
¾-inch / 2 cm chunks7 minutesThe balanced everyday cut used in this recipe
1-inch / 2.5 cm chunks8 minutesA firmer, juicier middle; continue as needed

Thick rounds or spears can also work. Rounds expose broader cut faces and usually soften sooner, while sturdy spears may need slightly longer depending on their width.

Guide comparing ½-inch, ¾-inch and 1-inch zucchini pieces beside a ruler, along with a thick round and a sturdy spear.
Choose the cut for the meal: chunks make the most forgiving side, sturdy spears suit dipping, and thick rounds cook quickly but lose structure sooner.

To prepare ahead, refrigerate the cut zucchini in a dry, covered container. Blot it before cooking and wait to add the seasonings.

3. Dry the surface and season late

Blot any cut faces that look glossy with water. A thin coat of oil helps the seasonings cling and encourages the exposed edges to brown instead of drying into leathery patches.

Two raw zucchini pieces shown side by side, one glossy with surface moisture and one matte after blotting with a paper towel.
Blot after cutting, not only after washing. Newly exposed zucchini flesh can develop a fresh sheen of moisture even when the outer skin was dried thoroughly.

Season when the air fryer is already hot. Moving the salted pieces directly into the basket gives them less time to release water before cooking begins.

Flavor note: Garlic powder and dried herbs can cook with the zucchini. Add lemon, lime and fresh herbs afterward so their flavor stays bright.

Hands tossing lightly oiled zucchini chunks in a metal bowl while dry seasoning falls across their surfaces.
The mixing bowl should look nearly dry after tossing. Oil pooling beneath the zucchini signals more than the batch needs.

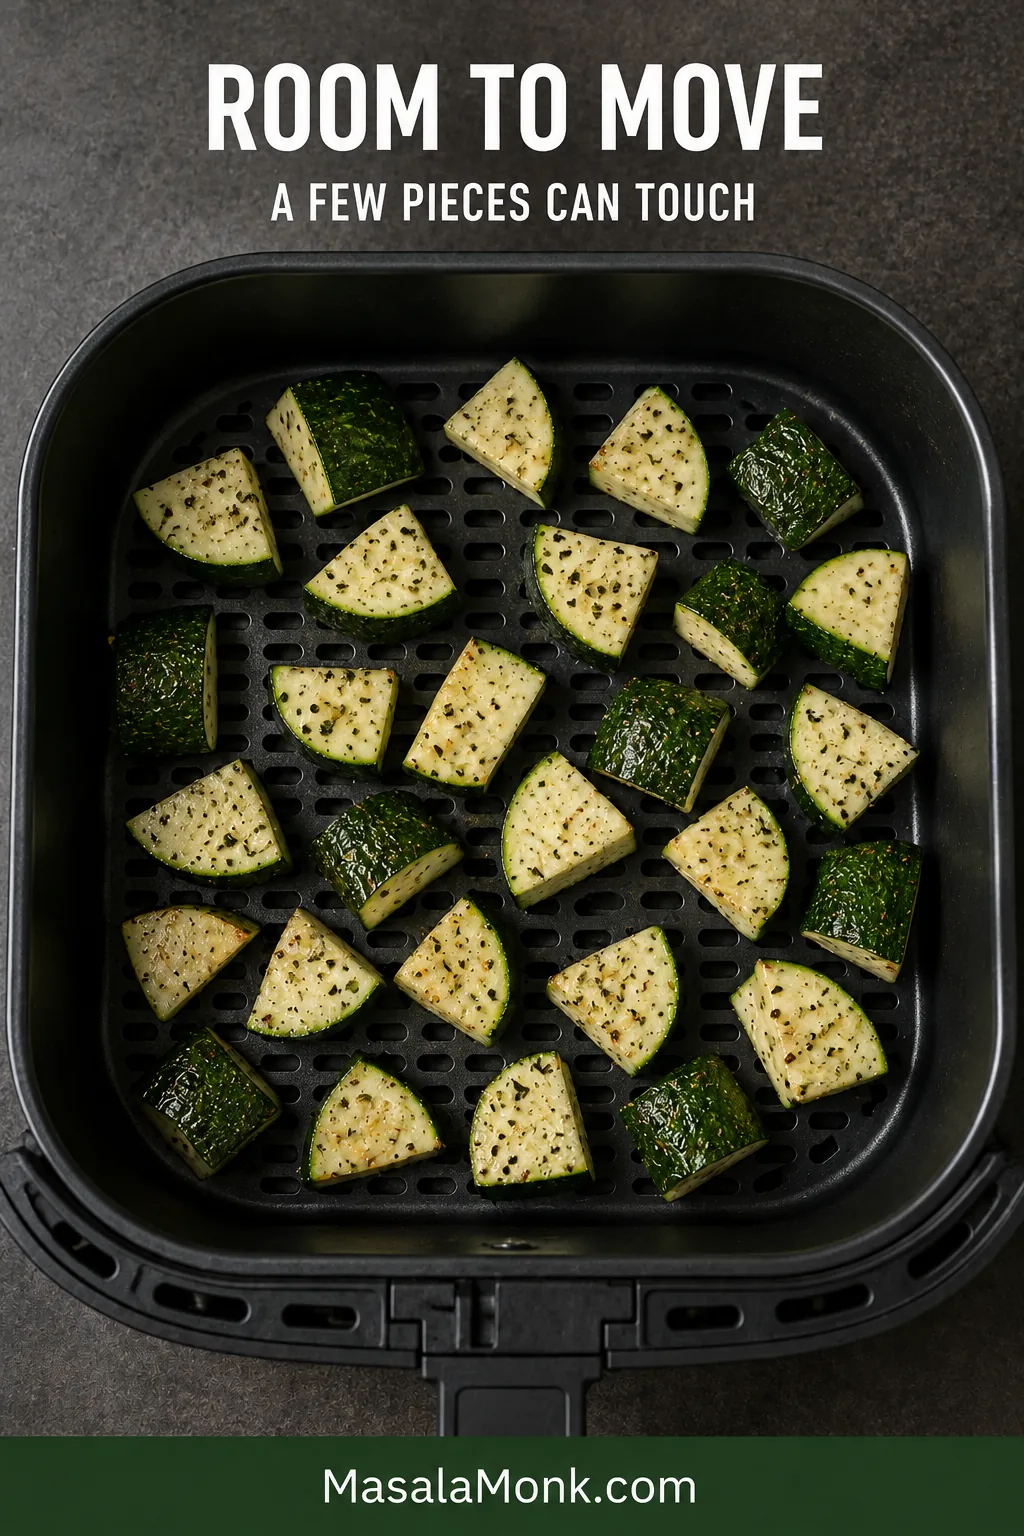
4. Leave room for the hot air

What matters is the flat cooking area, not the capacity printed on the box. A few pieces can touch, but the load should redistribute when the uncooked basket is gently shaken. If it moves as one packed mass, divide it into two batches.

Seasoned raw zucchini chunks arranged loosely in one layer inside a perforated air fryer basket, with visible gaps and basket holes between them.
One smaller, freely moving batch often browns faster than an overloaded basket that must first evaporate trapped moisture. Capacity matters less than usable flat space.

If several foods come out pale or uneven in your machine—not only zucchini—these common air fryer mistakes and fixes cover crowding, preheating, oil and halfway turning in more detail.

Solid parchment can block airflow beneath the zucchini. Cook directly in a clean basket, or use only a properly secured perforated liner approved for your machine.

Guide comparing loosely arranged zucchini, an overcrowded air fryer basket and solid parchment covering the basket perforations.
Some basket holes should remain visible, but movement matters most. If the zucchini shifts as one packed mass instead of redistributing, divide the batch.

Once these four details are in place, zucchini stops feeling unpredictable. It becomes the kind of side you can start while the rest of dinner finishes.
Time, Temperature and Doneness

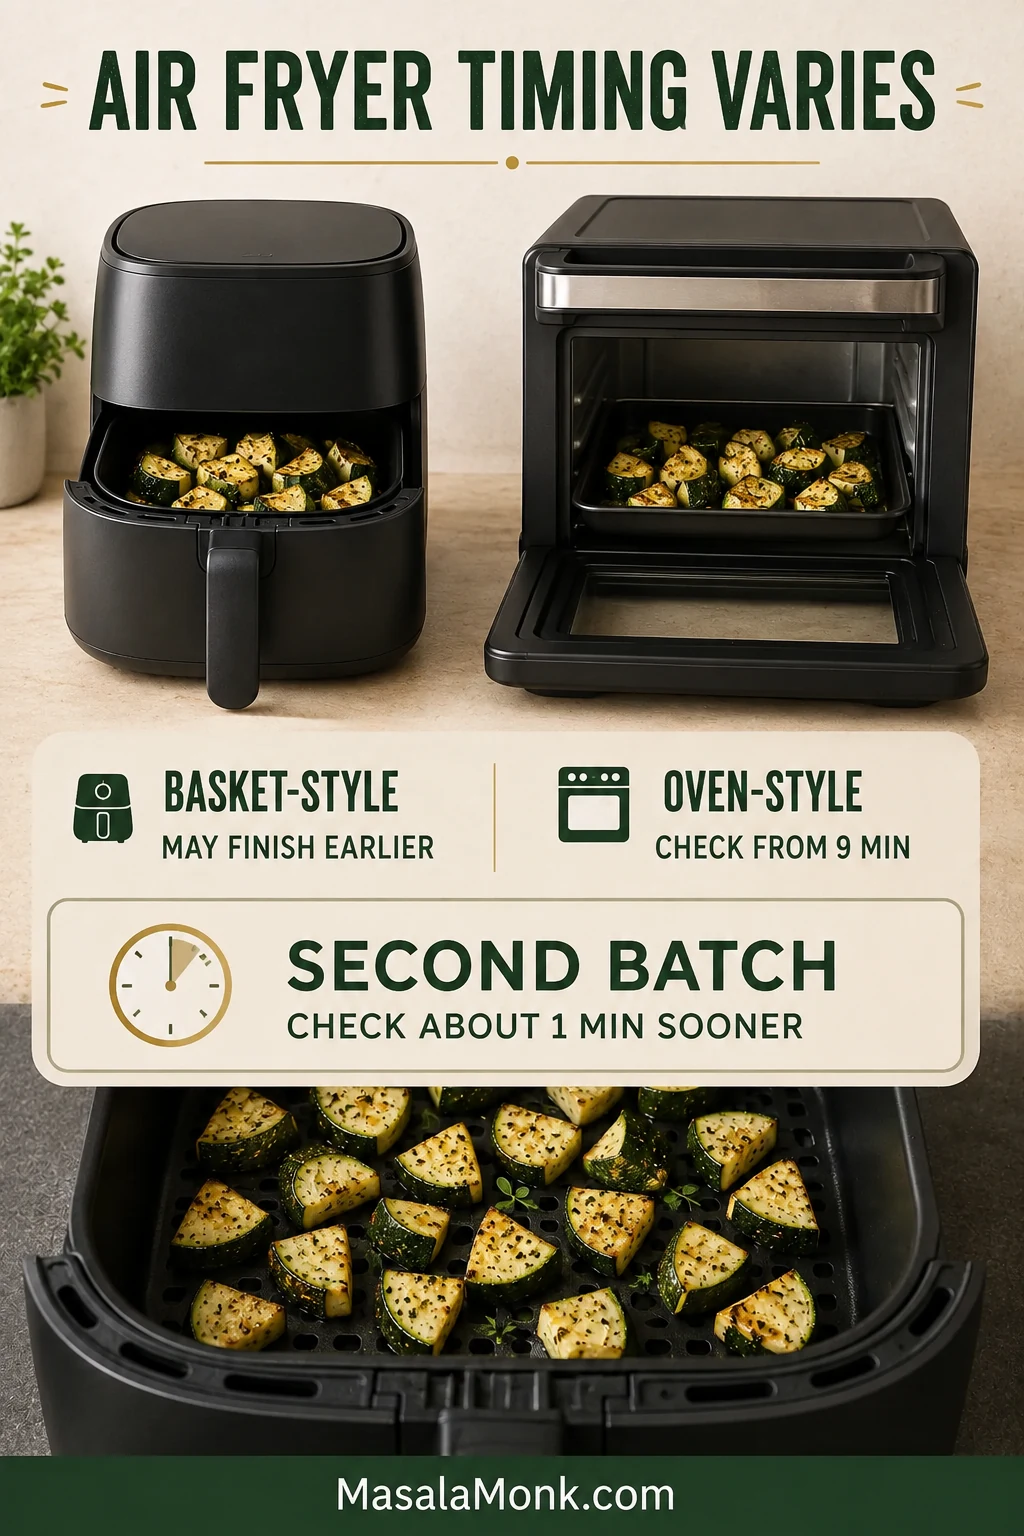
Treat the recipe’s 8–11-minute cooking time as a checking range, not a guaranteed finish. Basket shape, load size and fan strength determine where your zucchini falls within it.

Compact basket machines may finish early. Oven-style air fryers often need several extra minutes, so inspect them from around 9 minutes and turn pieces whose undersides remain pale. A later batch may cook faster because the chamber is already thoroughly hot.

Timing guide comparing a basket-style air fryer, an oven-style air fryer and a second batch cooked in an already heated basket.
Write down the finish time of the first successful batch in your machine. That personal benchmark will be more dependable next time than any universal minute count.

How to Tell When Air Fryer Zucchini Is Done

If your zucchini needs ten minutes while another recipe promises seven, nothing has gone wrong. The timer should tell you when to check. The zucchini should tell you when to stop.

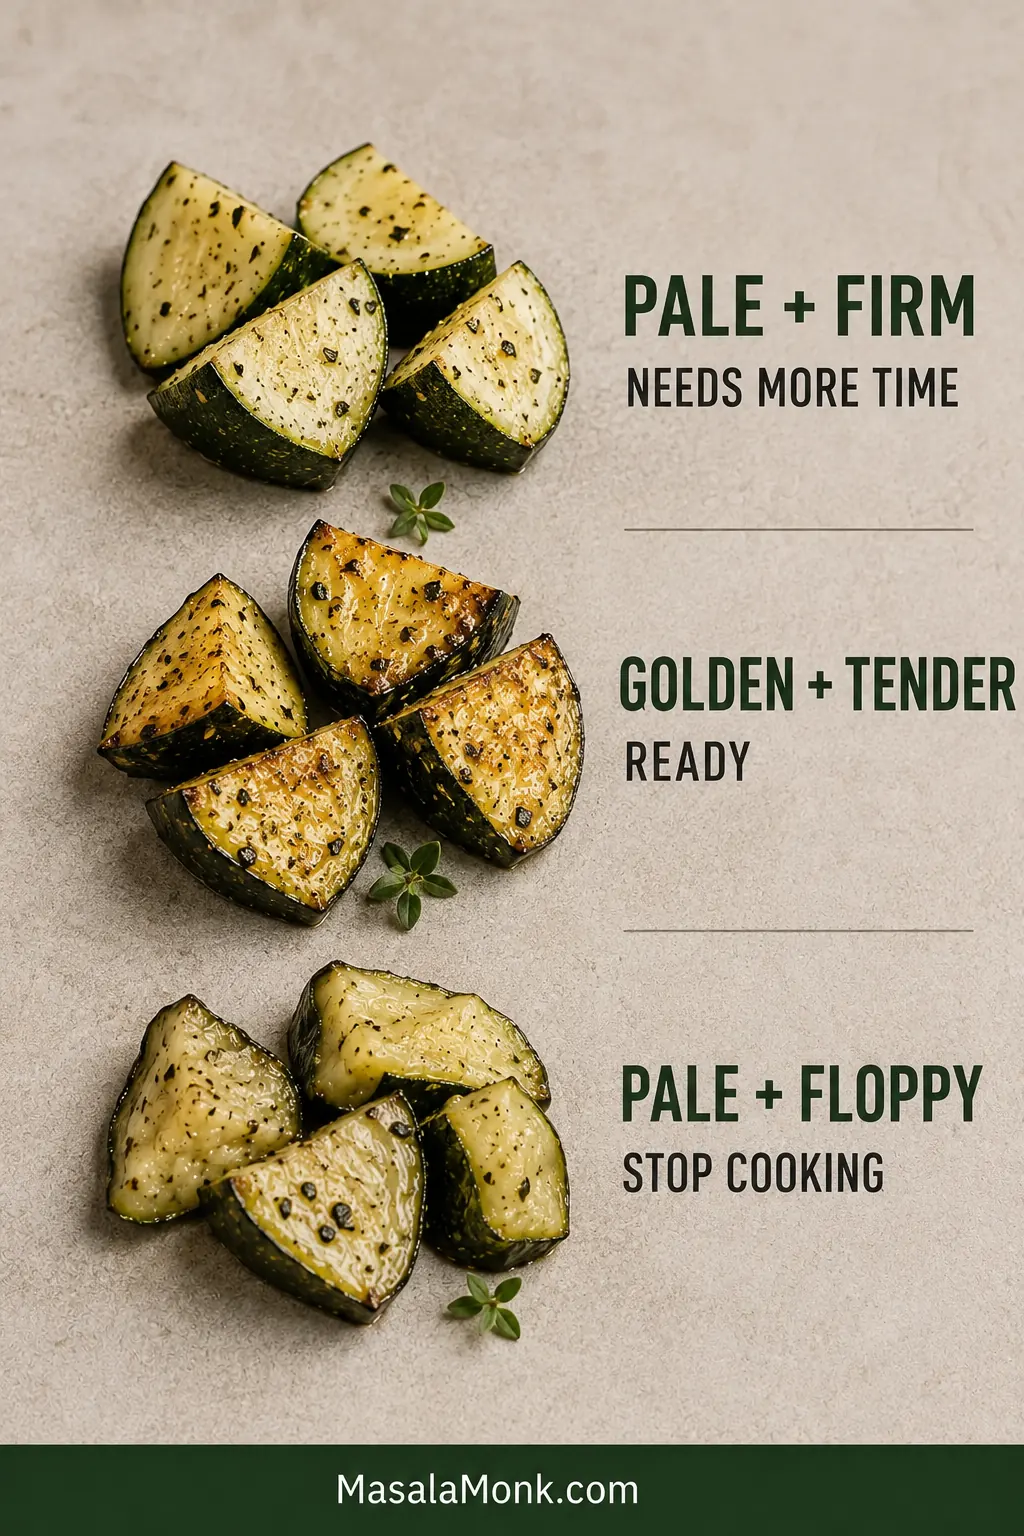
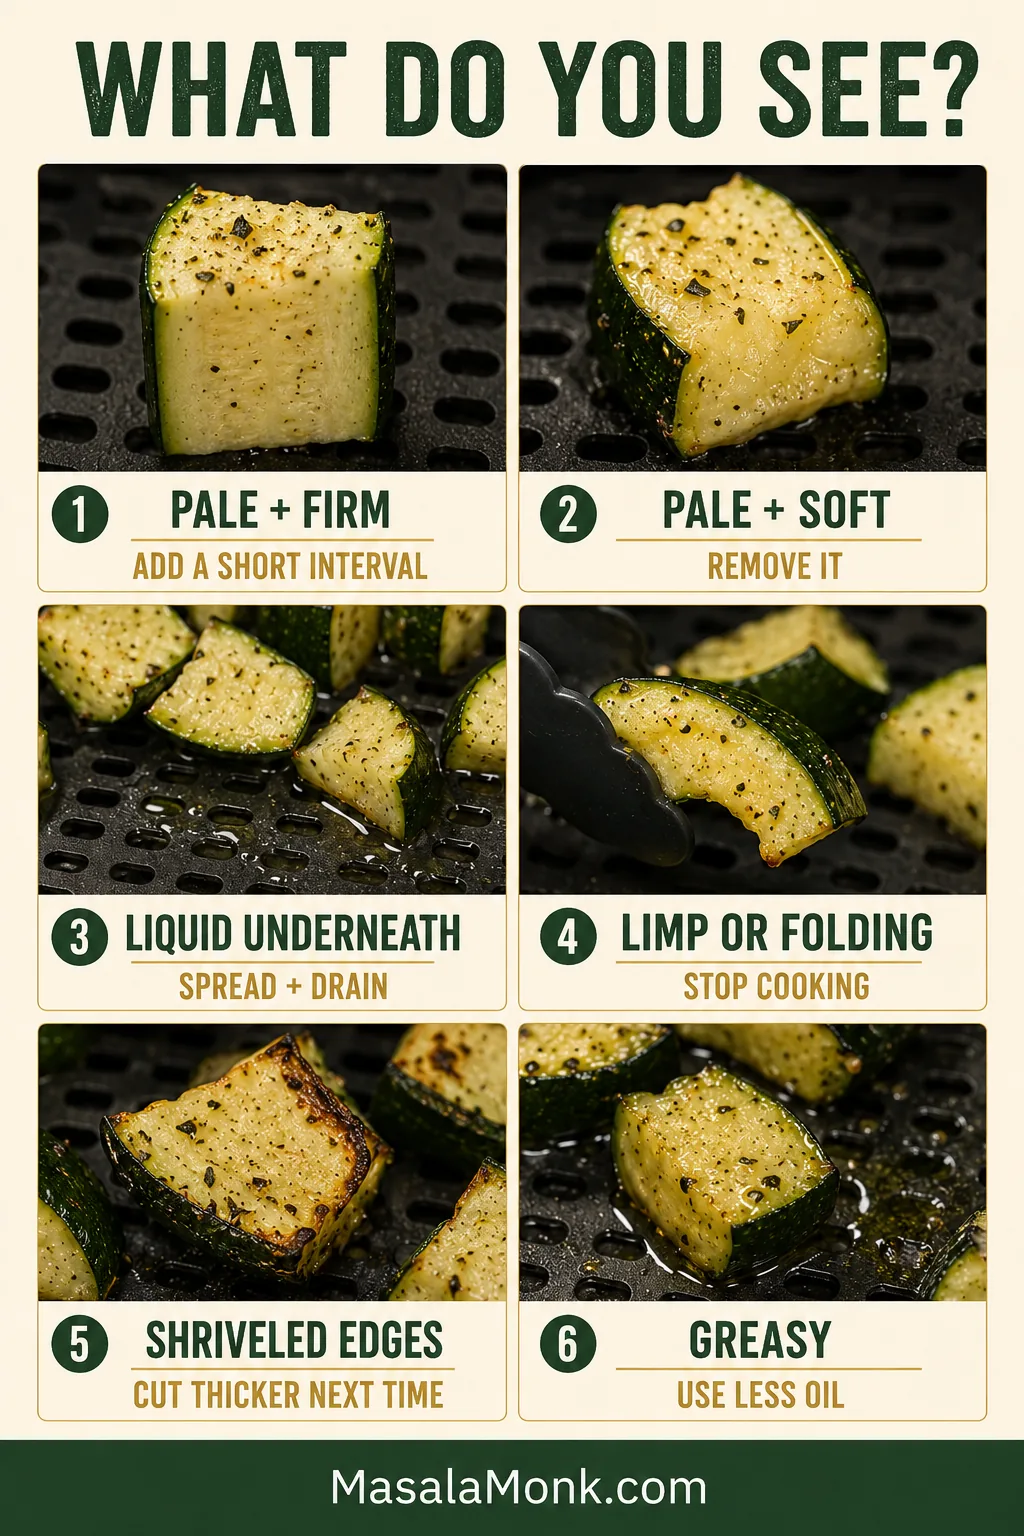
Before adding another minute, check one piece: Pale and firm means it needs more time. Golden and tender means it is ready. Pale and floppy usually means extra cooking will not improve the texture.

Three zucchini doneness states showing pale firm pieces, golden tender pieces and pale floppy pieces with a recommended action for each.
Air fryer zucchini doneness will not always be uniform. Remove the early winners and let only the firmer, paler pieces continue for another brief interval.

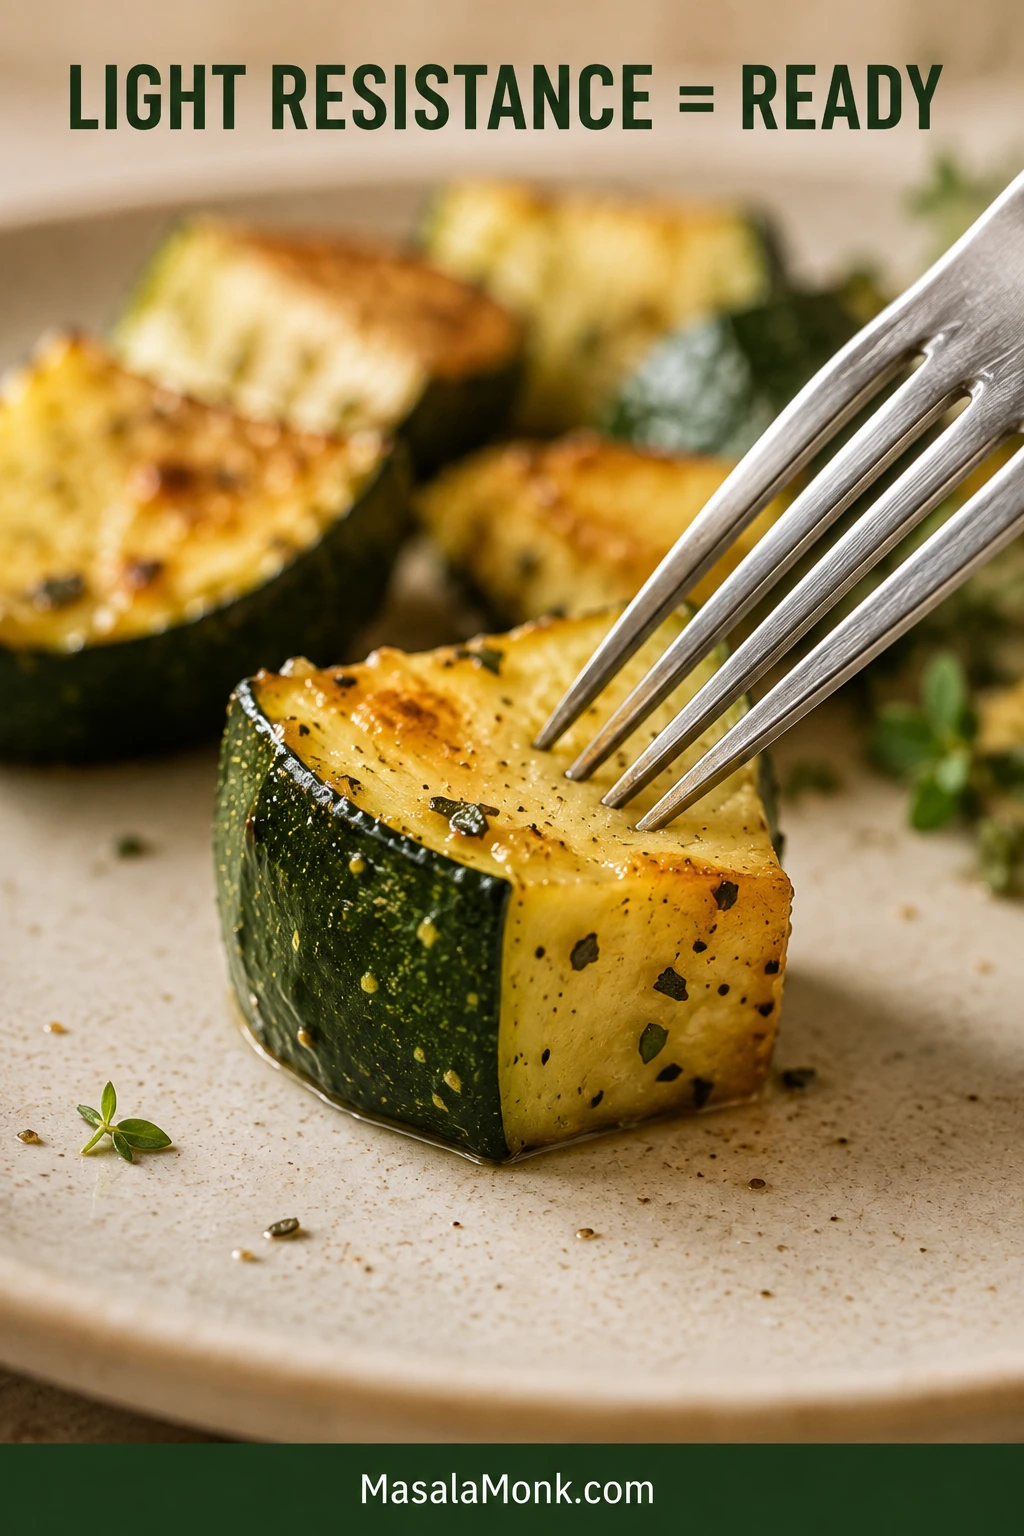
Look for several golden faces rather than identical color on every side. The cut surfaces should no longer look wet, and a fork should enter easily while still meeting a little resistance in the middle.

Dinner fork pressing gently into a browned zucchini chunk that remains upright on a neutral plate.
Test one of the thickest pieces rather than the darkest one. If its center gives gently without collapsing, the smaller pieces are already ready to leave the basket.

Already soft, wet or uneven? Use the troubleshooting guide before adding more time.

Fixing Soft, Wet or Uneven Zucchini

Even a softer batch is usually still usable. Stop cooking before it collapses further, then serve it promptly or fold it into pasta, rice or a sauced dish.
Six-part troubleshooting guide comparing pale, soft, watery, limp, shriveled and greasy air fryer zucchini.
When diagnosing soggy air fryer zucchini, judge texture before color. Firm pieces may need more heat; already-soft pieces need to come out, whatever shade they are.

Pale but already soft

This usually means the zucchini became tender before it received enough heat or airflow to brown. Likely causes: an overloaded basket, a cold start, weak oven-style airflow or excess surface moisture. Do now: remove it once tender; more time may only make it softer. Next time: reduce the load, dry the pieces carefully and preheat where appropriate.

Wet or sitting in liquid

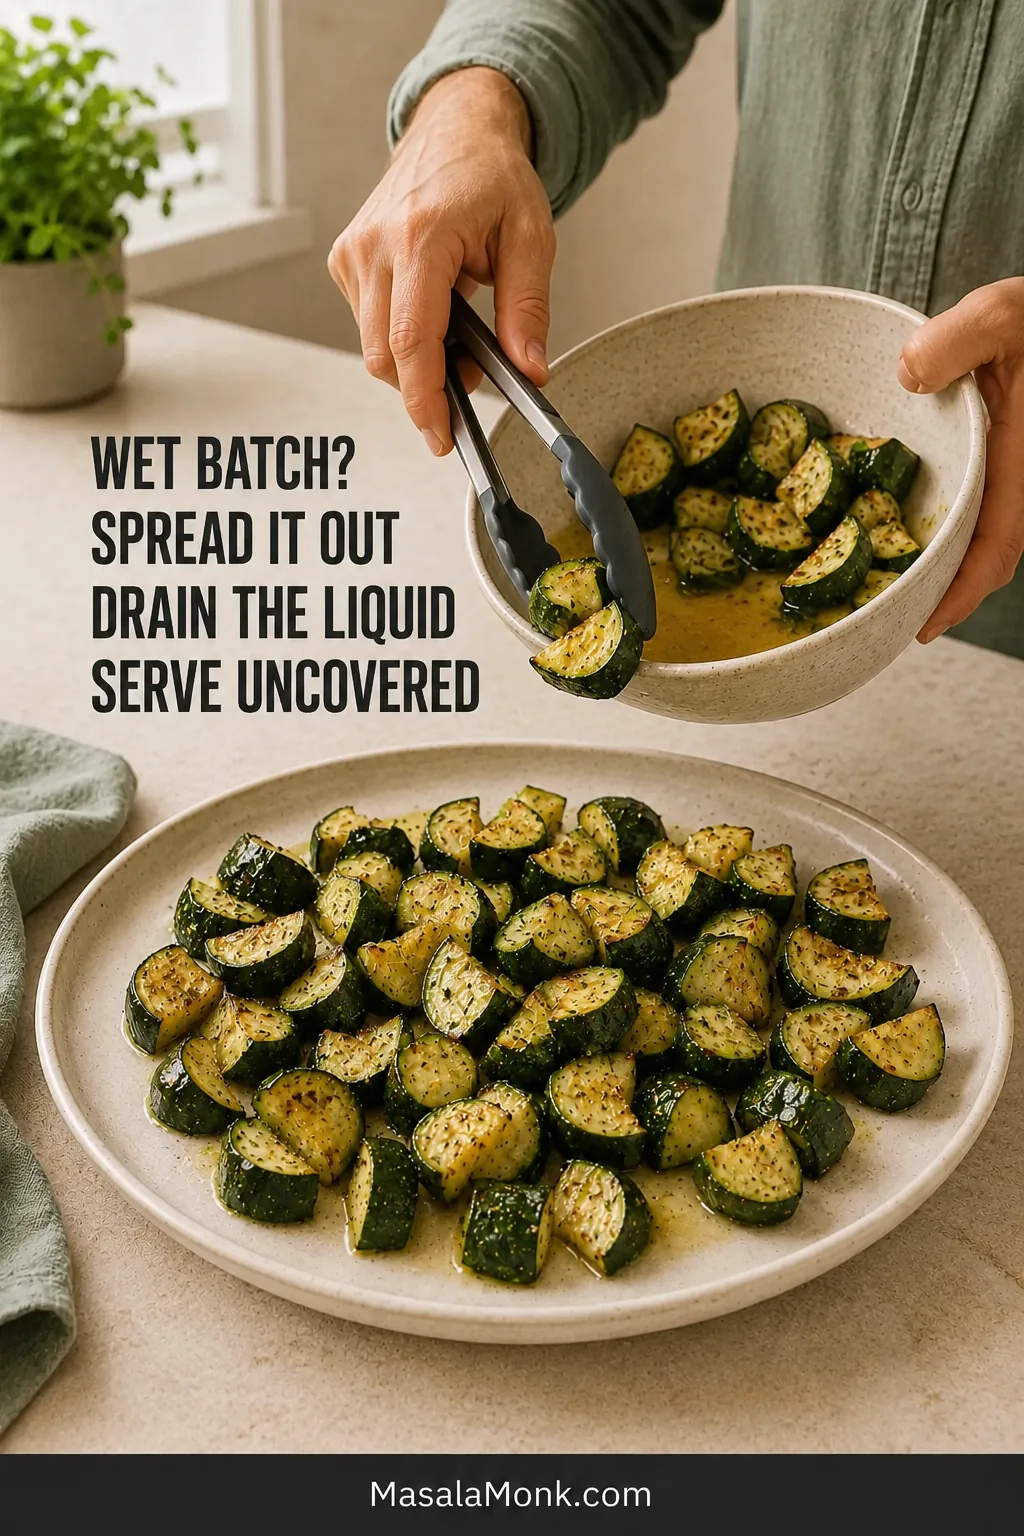
Water was released faster than the basket could evaporate it. Move the zucchini to a wide, uncovered plate and drain any liquid that has collected. Common causes include wet cut sides, early salting, a packed basket or transferring the hot pieces into a narrow or covered bowl.

Cook transferring wet zucchini from a narrow bowl with pooled liquid onto a broad uncovered platter using silicone-tipped tongs.
Spreading the batch prevents further steaming, but it cannot rebuild lost structure. Do not return floppy zucchini to the air fryer merely to chase darker color.

If the zucchini was oversized and seedy, scoop out the loose center next time. Otherwise, reduce the load, blot the pieces and season only when the air fryer is ready.

Limp or folding in half

The zucchini’s structure has already started to break down. Thin pieces, cooking past tenderness, leaving the finished batch in the hot basket or giving a second batch the same timing in an already-hot chamber can all cause it.

Remove it immediately and serve it now instead of chasing more color. Next time, cut thicker and watch the second batch a minute sooner.

Other common problems

  • Shriveled edges: Use thicker pieces, a measured coat of oil and an earlier check.
  • Burned seasoning: Use a lighter coating of spices and add Parmesan or delicate finishes near the end.
  • Taking much longer: A cold start, dense load, larger cut or oven-style appliance may be slowing the batch. Keep checking in short intervals.
  • Seasoning fell off: Dry the zucchini, add oil before the dry ingredients and avoid repeated shaking.
  • Greasy zucchini: Measure the oil and reduce it when cooking less than one pound.
  • Softened on the plate: Use a broad uncovered dish and add wet sauces at the table.
Once the texture is under control, changing the flavor is the easy part.

Air Fryer Zucchini Variations

Choose your finish: Keep the garlic-and-herb version simple, add Parmesan for nutty browned edges, or finish the zucchini with chaat masala and lime.
FinishBest when you wantKey adjustment
Everyday unbreadedGolden edges and a tender middleUse the base recipe
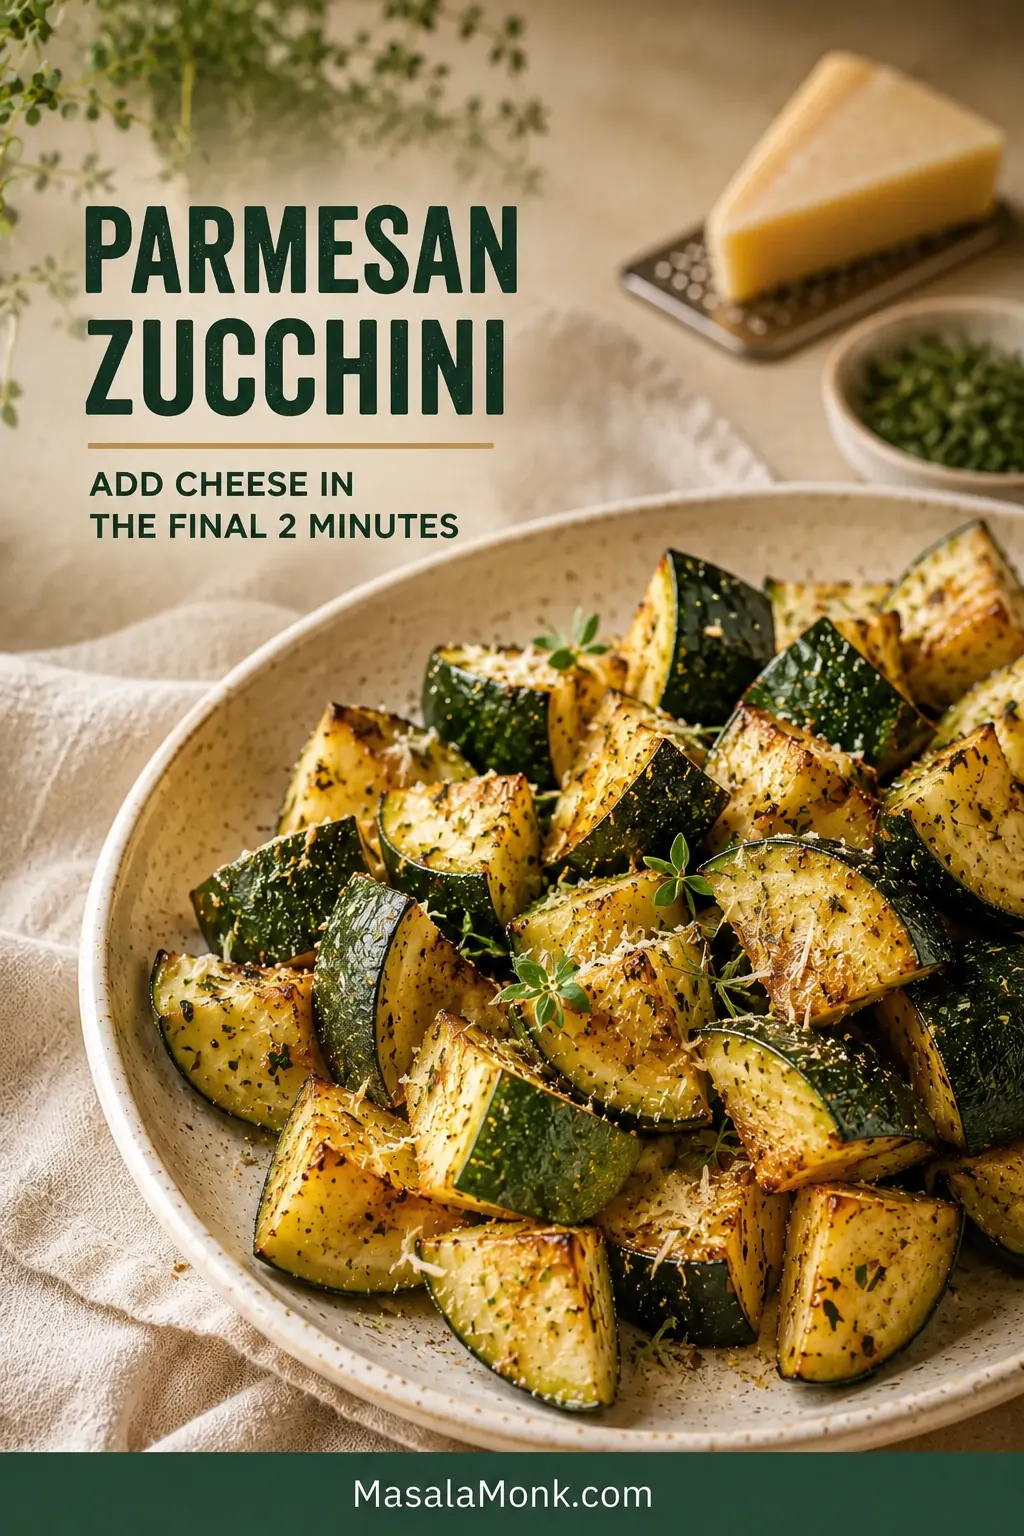
ParmesanSavory, nutty browned cornersReduce the salt and add cheese near the end
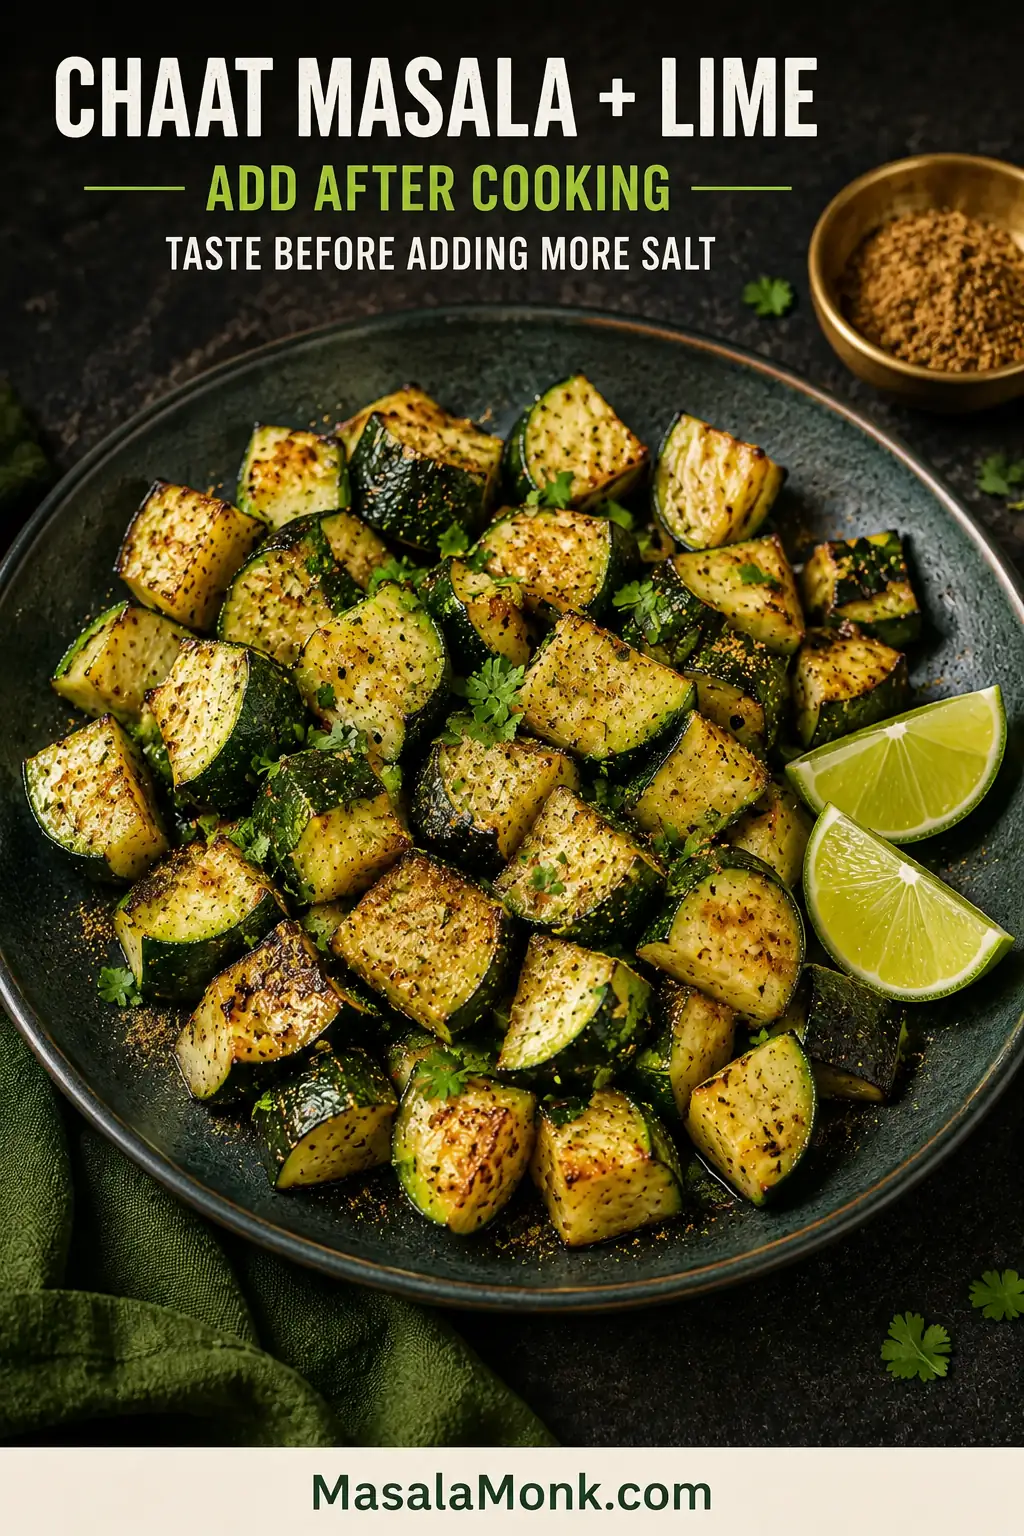
Chaat masala and limeTangy, bright flavorSkip the Italian herbs; add chaat masala, lime and cilantro after cooking
Very low oilMinimal added fatExpect lighter browning and slightly drier edges
Thin chips or breaded friesA crisp coatingUse the separate chips method

Using little or no oil: The zucchini will brown less evenly and may develop drier edges. Dry it carefully, keep the basket loose and check it sooner than the standard version. A fine oil spray offers a useful middle ground.
Side-by-side bowls comparing evenly browned zucchini cooked with the standard amount of oil and paler zucchini with drier edges cooked with little or no oil.
Air fryer zucchini without oil needs closer attention at the small tapered pieces. Their exposed edges may dry before the larger chunks develop much color.

Parmesan Zucchini

Use half the salt in the base recipe. During the final 2 minutes, add 2 tablespoons / about 10 g finely grated Parmesan. Sprinkle it over the zucchini, return the basket and avoid shaking again.

The cheese should catch on the corners and smell nutty as it browns. For an easier finish, sprinkle Parmesan over the zucchini on the serving plate instead.

Browned zucchini chunks lightly coated with finely grated Parmesan, with a cheese wedge and metal grater in the background.
For Parmesan air fryer zucchini, use finely grated cheese rather than coarse shreds. The smaller particles cling to the corners and melt before they have time to scorch.

Beside garlic Parmesan broccoli pasta, keep the zucchini lightly seasoned and add only a light dusting of cheese at the table.

Chaat Masala and Lime Zucchini

Omit the Italian seasoning, but keep the garlic powder and black pepper. Reduce the fine salt to ¼ teaspoon.

After cooking, sprinkle the hot zucchini with ½ teaspoon chaat masala, add 1 teaspoon / 5 ml lime juice and finish with a small handful of chopped cilantro. Taste before adding more because chaat masala blends vary in salt and intensity.

Dark plate of browned zucchini finished with chaat masala, lime wedges and chopped cilantro beside a small bowl of spice.
Chaat masala, lime and cilantro belong after cooking, when their flavor stays vivid. Taste before adding more salt because seasoning blends vary widely.

The tangy spice and bright lime work especially well beside dal and rice, chickpeas or cubes of soft homemade paneer.

Zucchini and Yellow Squash

Yellow summer squash can cook in the same basket when the pieces are similar in size. Softer or seedier chunks may finish first, so take them out and let the firmer pieces continue.

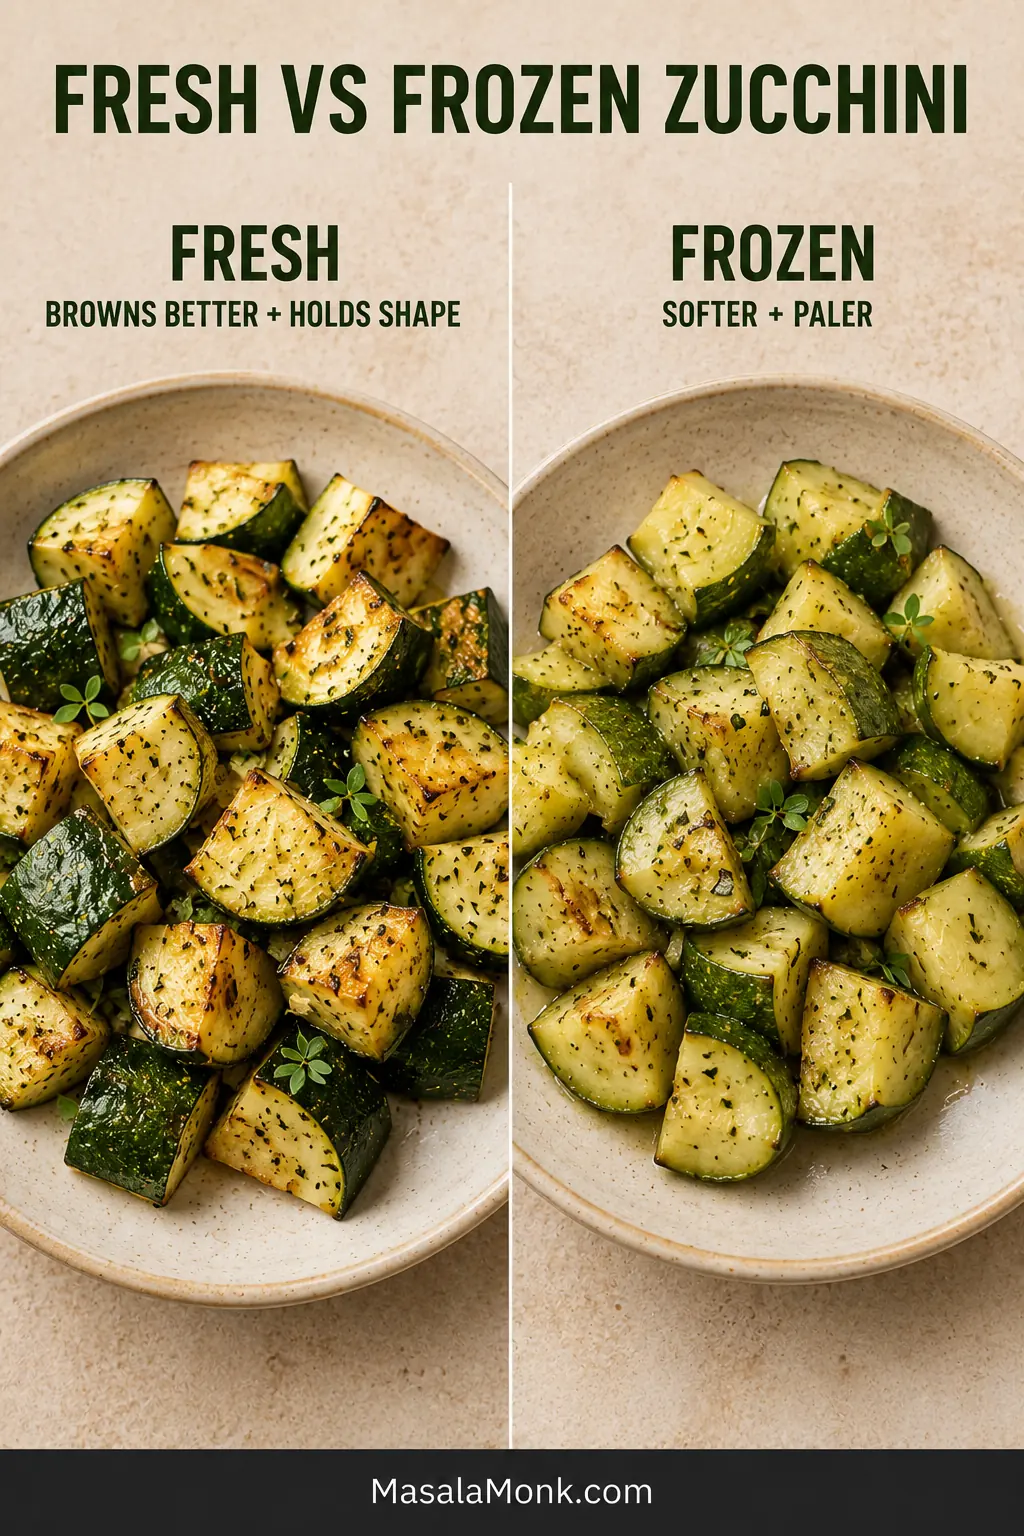
Can You Air Fry Frozen Zucchini?

Yes, but it will be softer, paler and less distinctly roasted than fresh zucchini. Frozen pieces release more water and lose structure quickly.

Use fresh zucchini when you want browned chunks that hold their shape. Save frozen zucchini for soup, curry, pasta sauce, casseroles or blended vegetable sauces where softness belongs.

Side-by-side bowls showing browned, firm fresh zucchini and paler, softer zucchini cooked from frozen.
Treat frozen zucchini in the air fryer as an ingredient rather than a roasted side. Its softer texture becomes far less noticeable once folded into a curry, soup or sauce.

Freezing fresh zucchini at home? The National Center for Home Food Preservation’s summer-squash guidance explains how to blanch, cool and pack it safely.

What to Serve With Air Fryer Zucchini

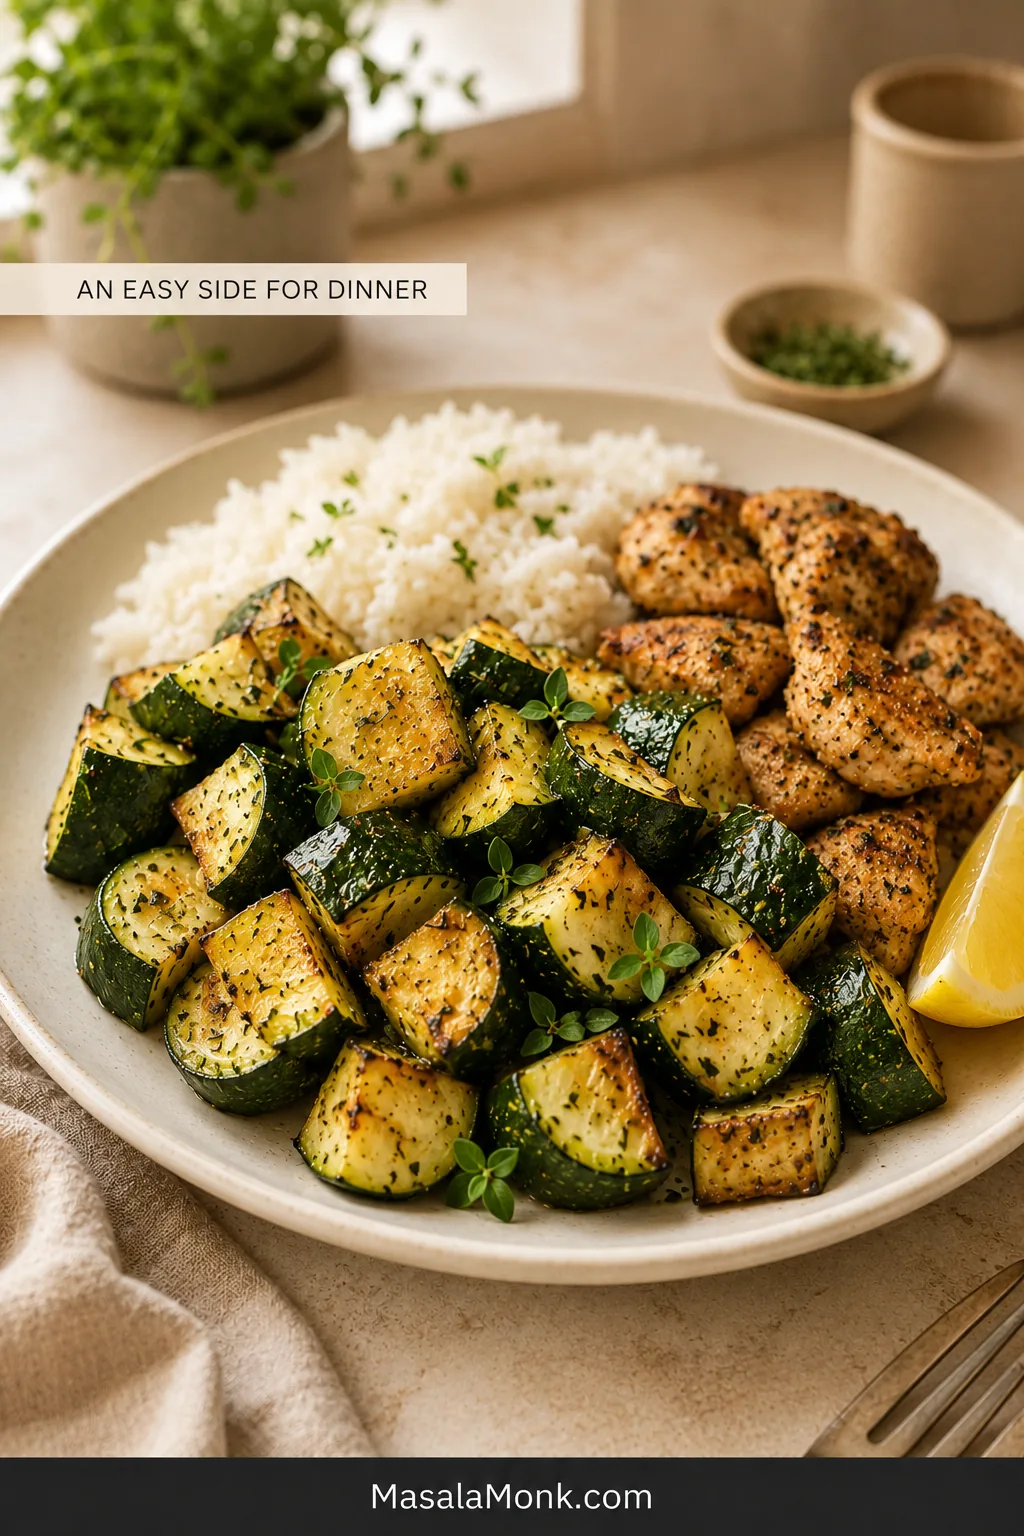
Once the texture is right, this is the kind of side that quietly fits around almost anything already planned for dinner. Spoon the zucchini beside rice or potatoes and juicy air fryer chicken breast, salmon, paneer or tofu. Squeeze lemon over the whole plate and add a little salt at the table.

Hand squeezing lemon over browned zucchini spread across a broad white platter and finished with fresh herbs.
Add lemon and fresh herbs after cooking so their flavor stays bright. A broad platter lets steam escape instead of softening the browned surfaces.

With a richer main such as honey garlic salmon, keep the zucchini lemony and herb-led. For a vegetarian bowl, layer it with warm grains, chickpeas or paneer, plenty of herbs and a cool yogurt or tahini sauce.

Weeknight dinner plate with a generous serving of browned zucchini, white rice and seasoned chicken pieces on a warm neutral table.

Wondering what to serve with air fryer zucchini? Plate it last and keep gravy, dressing or wetter sauces alongside it so the browned surfaces remain distinct longer.

Once chilled, fold leftovers into a chickpea salad, wrap or pasta bowl. Add them close to serving so they do not sit in dressing and soften further.

When the air fryer is already occupied—or a softer vegetable side suits dinner better—the skillet mushroom and zucchini stir-fry is a useful stovetop alternative.

How to Store and Reheat Air Fryer Zucchini

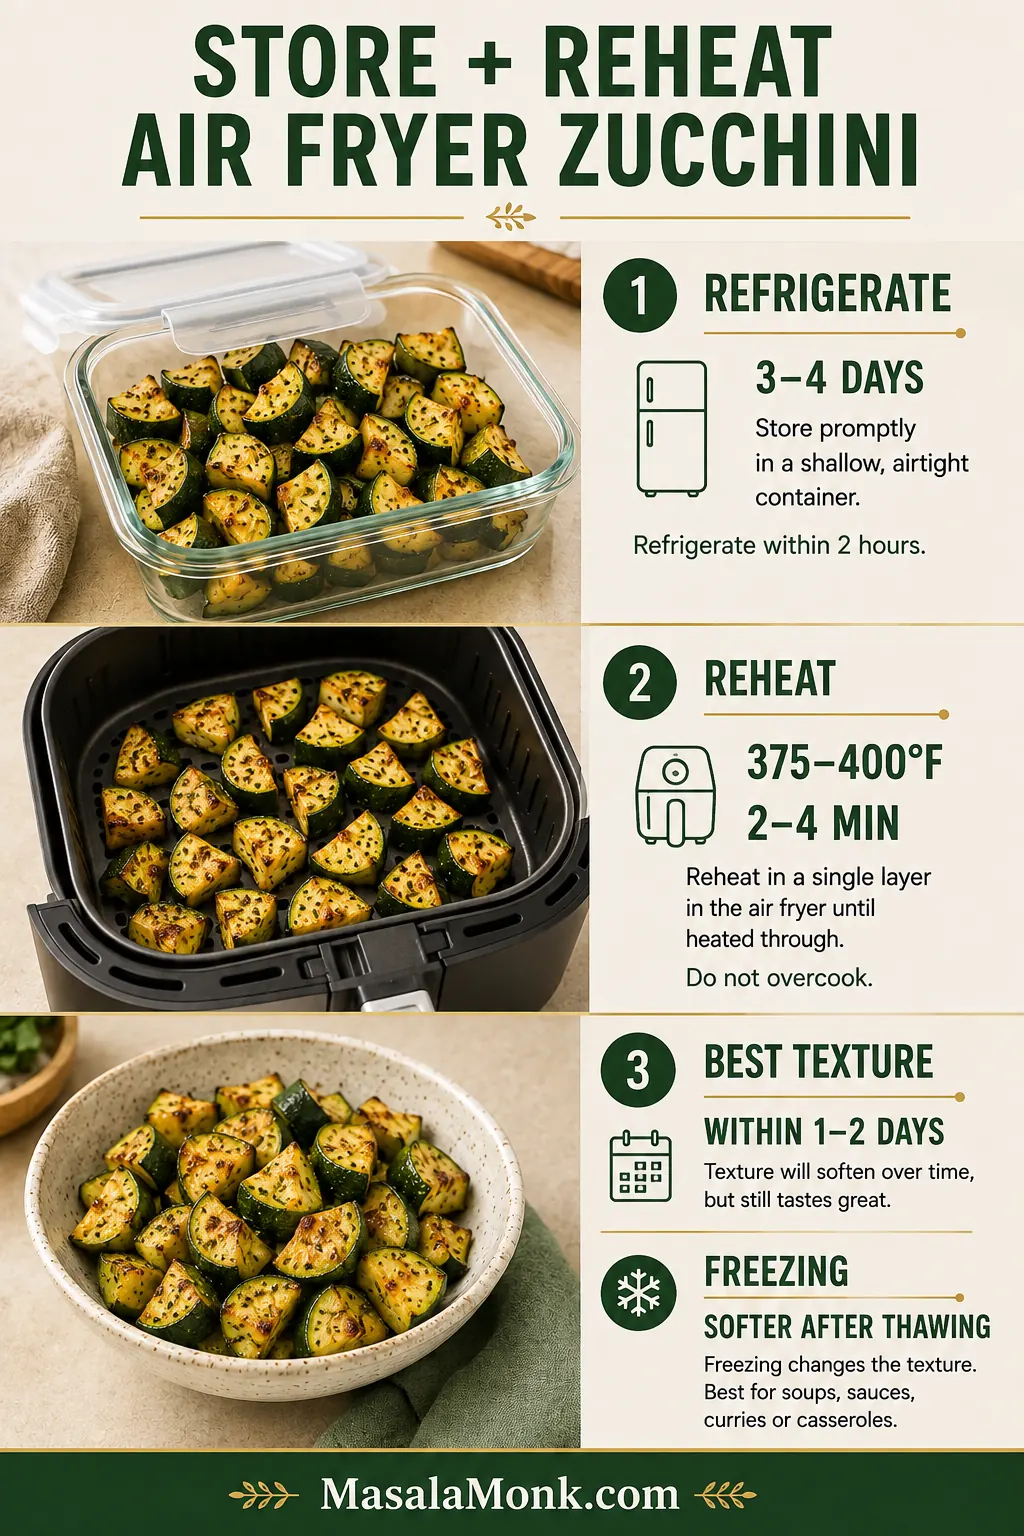
Transfer leftovers promptly to a shallow covered container and refrigerate them within two hours. The zucchini does not need to cool completely before going into the refrigerator.

Use it within 3 to 4 days, following the USDA’s leftovers and food-safety guidance. For the best texture, eat it during the first day or two.

Vertical storage guide showing zucchini in a shallow lidded container, a single layer reheating in an air fryer and notes about refrigeration and freezing.
For the best way to reheat air fryer zucchini, warm only the portion you need in one layer. Add reserved lemon, herbs or cheese after reheating—not before storage.

Reheating

Arrange the zucchini in one layer and reheat at 375–400°F / 190–200°C for approximately 2 to 4 minutes. Check early; the goal is to reheat it, not cook the center a second time.

The microwave is convenient, although the zucchini will be softer. Heat it in short intervals. Freezing cooked zucchini will not preserve its roasted texture; use thawed leftovers in soup, sauce, curry or a casserole.

Food-safety note: Reheat leftovers until hot throughout. If you check with a thermometer, USDA recommends reheating leftovers to 165°F / 74°C.

Frequently Asked Questions

Do you need to peel zucchini before air frying?

No. The skin is edible, adds color and helps the chunks stay intact. Leave it on unless it is unusually tough or damaged.

Do you need to preheat the air fryer?

Preheating gives the zucchini a hot start and makes the checking range more predictable. Skip it only when your machine preheats automatically or its manufacturer recommends starting from cold.

Should zucchini be salted before air frying?

Salt small or medium zucchini immediately before air frying, not well in advance. Only oversized, visibly watery zucchini benefits from a 10-minute salted rest followed by thorough blotting.

Why did my air fryer zucchini turn soggy?

Common causes include thin pieces, a crowded basket, wet surfaces, a cold start, salting too early, overcooking or trapping steam after cooking. Use the full troubleshooting guide to match the visible symptom with the right correction.

How long does zucchini take at 400°F?

Begin checking thick chunks at 7 minutes. Many preheated basket-style machines will finish them between 8 and 11 minutes. See the time and temperature guide for oven-style machines, second batches and visual stopping cues.

Can you air fry zucchini rounds or spears?

Yes. Keep rounds and spears fairly thick and inspect them early. Rounds usually soften faster because they expose broad cut faces, while sturdy spears may take closer to the chunk timing. See the cut-size and shape guide for the visual comparison. Use the separate zucchini chips method for very thin or breaded pieces.

When the zucchini looks ready before the timer does, trust your fork. Take it out and let dinner continue.

Posted on Leave a comment

Yum Yum Sauce Recipe

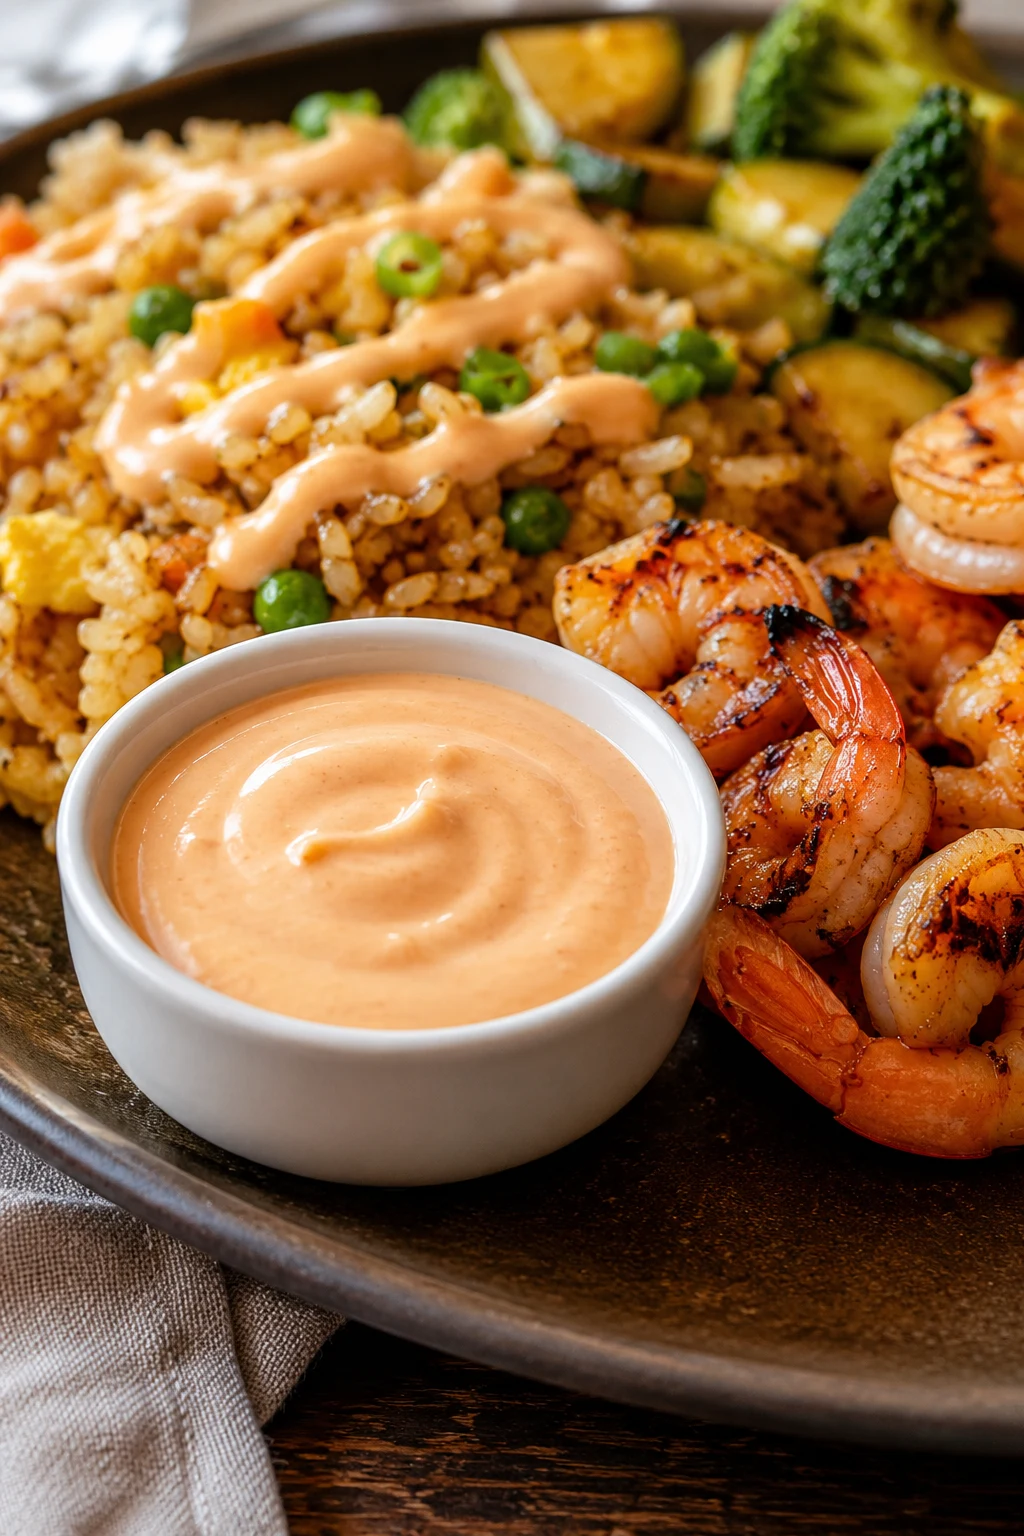
A small white cup of pale pink-orange yum yum sauce served with shrimp fried rice, grilled shrimp, broccoli, zucchini, and hibachi-style vegetables.

This yum yum sauce is the cool, creamy, pale pink-orange sauce people remember from the hibachi plate before anything else. It is a little sweet, a little tangy, rich enough for dipping, and somehow good on almost everything at the table.

Yum yum sauce is a mayo-based hibachi-style sauce made with ketchup or tomato paste, rice vinegar, sugar, garlic powder, onion powder, paprika, and water. It takes about 5 minutes to whisk together, then the fridge does the final work.

Make the simple ketchup version first. Once it chills, you can tune it sweeter, tangier, richer, thinner, or spicier without guessing. Ketchup gives you the friendly first batch; tomato paste gives you the deeper, less sweet version you try once you know what you like.

The goal is not just copying one restaurant bottle. It is to give you the sauce people keep reaching for: creamy but not heavy, sweet but not sugary, thin enough to drizzle, and bold enough to make rice, shrimp, chicken, and vegetables taste finished.

Keep it nearby when dinner is moving toward shrimp, vegetables, or a quick shrimp fried rice plate.

Quick Answer: How to Make Yum Yum Sauce

To make yum yum sauce, whisk mayonnaise with ketchup, rice vinegar, sugar, garlic powder, onion powder, paprika, a pinch of salt, and enough water to make it smooth. Ketchup gives the easiest sweet, pale pink-orange version. Tomato paste can replace ketchup when you want a deeper, less sweet sauce.

You can use it immediately if dinner is ready, but it tastes more like steakhouse-style yum yum sauce after chilling. Thirty minutes helps, 2 hours is better, and overnight gives the smoothest flavor. Stir before serving and thin with a little water if you want it pourable enough for fried rice, shrimp, chicken, vegetables, or bowls.

This sauce is often called hibachi white sauce, Japanese white sauce, shrimp sauce, pink sauce, or Japanese steakhouse sauce. It is best understood as an American hibachi-style restaurant sauce, not a traditional Japanese condiment.

Already cooking? Go straight to the recipe card, or use the texture guide if you need dip, drizzle, or dressing consistency.

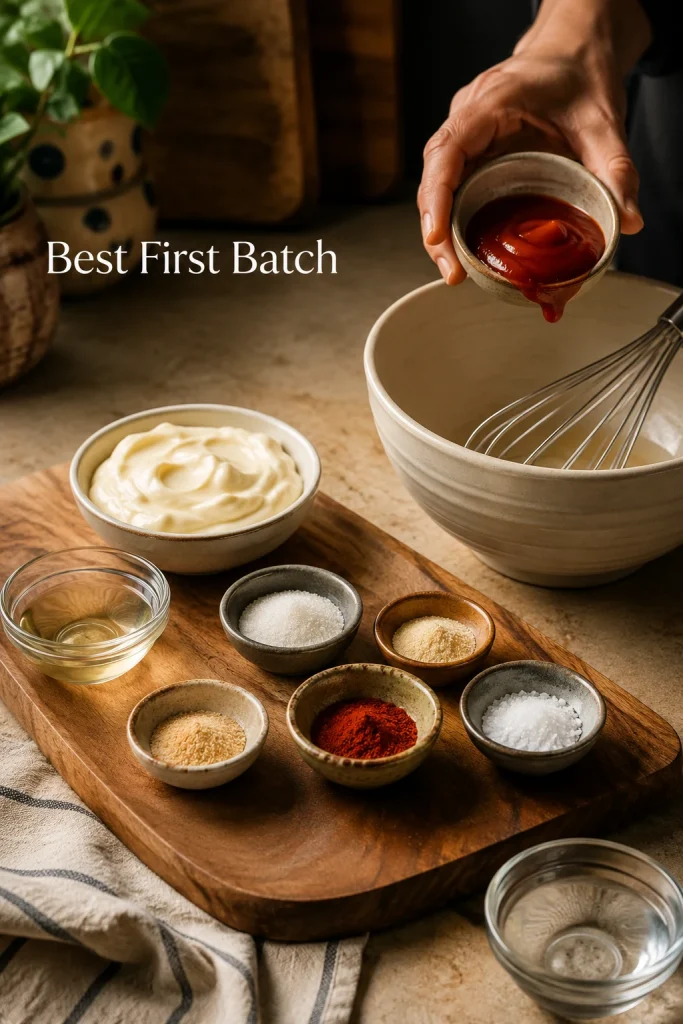
Best first batch: Use 1 cup mayo, 2 tablespoons ketchup, 2 teaspoons rice vinegar, 1 teaspoon sugar, 1 teaspoon garlic powder, ½ teaspoon onion powder, ½ teaspoon paprika, a pinch of salt, and 1 to 2 tablespoons water. Chill for 30 minutes. This gives you the classic sweet, creamy hibachi-style version before you start adjusting.

Ingredients for yum yum sauce arranged on a kitchen counter, including mayonnaise, ketchup, rice vinegar, sugar, garlic powder, onion powder, paprika, salt, water, a whisk, and a mixing bowl.
Start with the ketchup version when making your first batch because it gives the easiest sweet baseline before you adjust tang, heat, or richness.

Yum Yum Sauce at a Glance

Best default versionRegular mayo, ketchup, rice vinegar, sugar, garlic powder, onion powder, paprika, salt, and water
Active time5 minutes
Minimum total time35 minutes, including a 30-minute chill
Best flavorAfter 2 hours or overnight
YieldAbout 1¼ to 1½ cups / 300 to 360 ml, depending on thinning
Texture goalThick enough to dip, smooth enough to drizzle after thinning
Best withShrimp, fried rice, chicken, steak bites, vegetables, fries, spring rolls, rice bowls, wraps, and burgers
StorageUp to 1 week in an airtight container in the refrigerator

Yum Yum Sauce Recipe

This easy yum yum sauce starts thick and creamy, then thins into the pale pink-orange drizzle people love with fried rice, shrimp, chicken, vegetables, steak bites, fries, spring rolls, and hibachi-style bowls. The main recipe uses ketchup for the easiest first batch. Tomato paste, Kewpie mayo, butter, and heat are included as optional upgrades when you want a richer steakhouse-style sauce.

Active Time5 minutes
Cook Time0 minutes
Chill Time30 minutes minimum, 2 hours recommended
Minimum Total Time35 minutes
Best FlavorAfter 2 hours or overnight
YieldAbout 1¼ to 1½ cups / 300 to 360 ml
Serving Size2 tablespoons / 30 ml
Servings10 to 12
EquipmentMixing bowl, whisk, measuring spoons, airtight jar, optional squeeze bottle

Ingredients

  • 1 cup mayonnaise / about 230 g
  • 2 tablespoons ketchup / about 30 g
  • 2 teaspoons rice vinegar / 10 ml
  • 1 teaspoon sugar / 4 g
  • 1 teaspoon garlic powder / about 3 g
  • ½ teaspoon onion powder / about 1 g
  • ½ teaspoon paprika or smoked paprika / about 1 g
  • 1 to 2 tablespoons water / 15 to 30 ml, plus more as needed
  • Pinch of salt, to taste

Optional Restaurant-Style Add-Ins

  • Use 1 tablespoon tomato paste / 15 to 16 g instead of ketchup for a deeper, less sweet sauce.
  • Add 1 tablespoon melted cooled butter / 14 g for a silkier, richer finish.
  • Use Kewpie mayo instead of regular mayo for a fuller, more savory base.
  • Add a pinch of cayenne or ½ teaspoon sriracha for gentle heat.
  • If using tomato paste instead of ketchup, increase sugar to 2 teaspoons / 8 g.

Instructions

  1. Add the mayonnaise, ketchup, rice vinegar, sugar, garlic powder, onion powder, paprika, and a pinch of salt to a mixing bowl.
  2. Whisk until the sauce is smooth and evenly colored, with no streaks of tomato or spice.
  3. Add water 1 tablespoon at a time until the sauce reaches your preferred thickness.
  4. If using butter, let the melted butter cool slightly, then whisk it into the sauce. Do not add hot butter directly to the mayo.
  5. Taste lightly, but do not over-adjust yet. The flavor becomes smoother after chilling.
  6. Cover and refrigerate for at least 30 minutes. For better flavor, chill for 2 hours or overnight.
  7. Stir again before serving. Thin with another teaspoon or two of water if needed.

Recipe Notes

  • The ketchup version is sweeter, easier, and the best place to start.
  • The tomato paste version is deeper, less sweet, and better when you want the richer steakhouse-style finish.
  • Thick dip texture needs about 1 tablespoon water. Drizzle texture usually needs 2 to 3 tablespoons water. A looser dressing-style sauce can take up to 4 tablespoons.
  • To double the recipe, double everything except the water. Add water slowly at the end until the texture looks right.
  • Store in an airtight jar in the refrigerator for up to 1 week.
  • Freezing is not recommended because mayo-based sauces can separate after thawing.

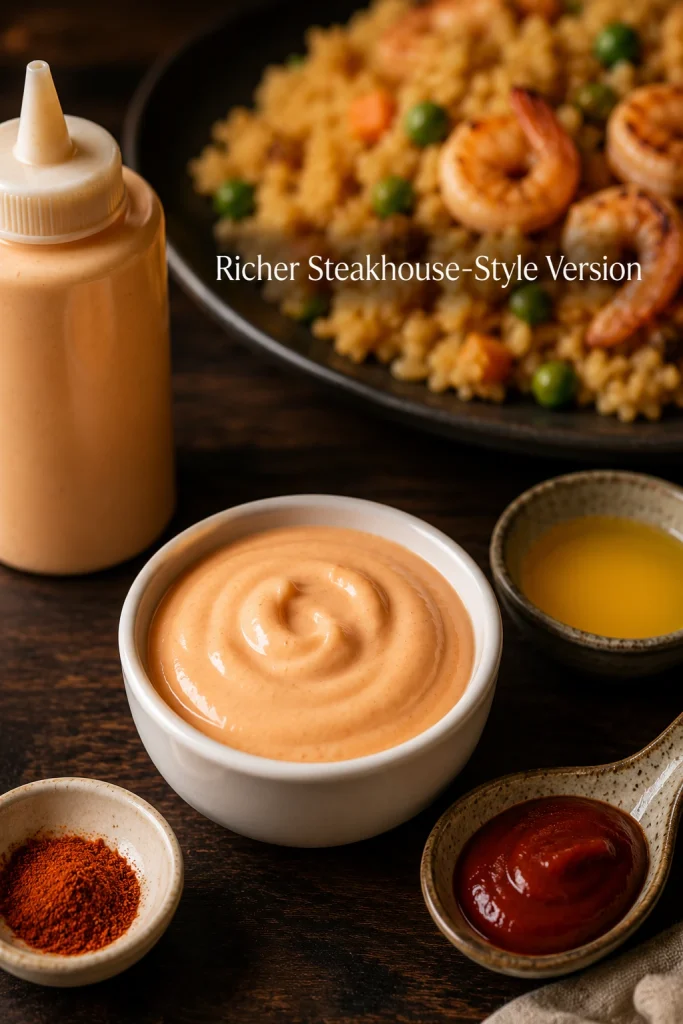
Closest restaurant-style version: Use Kewpie mayo, 1 tablespoon tomato paste instead of ketchup, 2 teaspoons sugar, 1 tablespoon cooled melted butter, 2 tablespoons water, and a tiny pinch of cayenne. Chill for at least 2 hours before serving.

Rich pale pink-orange yum yum sauce with a squeeze bottle, tomato paste, melted butter, cayenne, and fried rice with shrimp in the background.
For a richer steakhouse-style sauce, tomato paste, cooled melted butter, and a tiny pinch of heat make the flavor rounder.

Before You Start

Start with the ketchup version if this is your first batch. It tastes familiar right away: sweet, creamy, lightly tangy, and close to the sauce-cup flavor people remember from hibachi dinners. Try tomato paste next time if you want deeper color, stronger tomato flavor, and less sweetness.

If it tastes like plain mayo after the first whisk, do not panic. That is normal before the sauce rests. A freshly mixed batch can taste sharper than expected, so give it 30 minutes before you start fixing things that may not be broken.

Yum yum sauce is a finishing sauce, not a pan sauce. Add it after cooking, not while the food is simmering or frying. For a sauce that cooks with the food, use this stir fry sauce recipe instead.

Choose Your Version: Classic, Richer, Spicy, or Lighter

The best version depends on what you want from the sauce tonight. Ketchup gives you the familiar sweet hibachi-night flavor. Tomato paste makes it deeper and less sweet. Kewpie and butter push it richer. Yogurt makes it lighter for bowls, even though it moves away from the classic copycat feel.

VersionUse ThisWhat It Tastes Like
Classic easy sauceMayo + ketchup + rice vinegar + sugar + garlic powder + paprikaFamiliar, gently sweet, family-friendly
Deeper sauceMayo + tomato paste + a little extra sugarLess sweet, deeper in color, more concentrated
Richer steakhouse-style sauceKewpie mayo + tomato paste + cooled melted butterSmoother, fuller, more savory
Spicy versionAdd cayenne, sriracha, sambal, or chili garlic sauceCreamy with gentle to medium heat
Keto or lower-sugar sauceTomato paste instead of ketchup + keto sweetenerTangier, less sweet, still creamy
Lighter bowl sauceHalf mayo + half Greek yogurtBrighter, lighter, better for bowls than copycat flavor

For a completely different quick dip in the same weeknight-sauce family, this peanut sauce recipe is better when you want something nutty, salty-sweet, and built for noodles or spring rolls.

Ketchup vs Tomato Paste

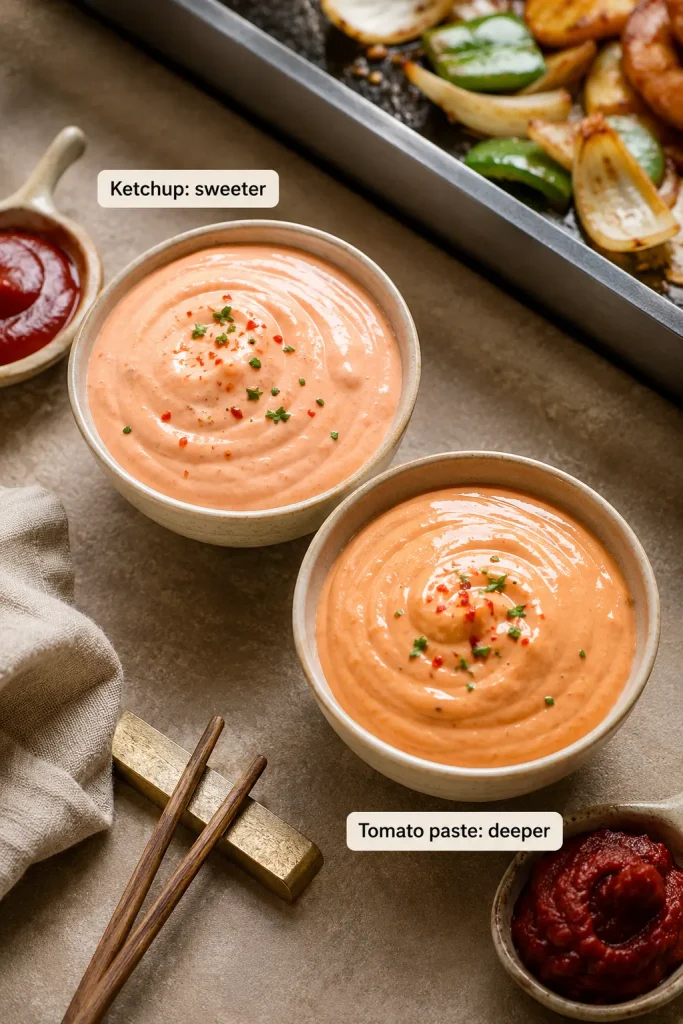
Stuck between ketchup and tomato paste? Use this as the simple rule: use ketchup for the easy sweet version and tomato paste for the deeper, less-sweet version.

Two bowls of yum yum sauce comparing a lighter ketchup version with a deeper tomato paste version, with ketchup and tomato paste nearby.
Choose ketchup for a sweeter yum yum sauce, or tomato paste for a deeper, less-sweet restaurant-style flavor.
Use Ketchup WhenUse Tomato Paste When
You want the easiest versionYou want a deeper flavor
You prefer a sweeter sauceYou want less sweetness
You want a brighter pale pink-orange colorYou want a more concentrated tomato taste
You are making it for kids or family mealsYou are making a keto or lower-sugar version
You want a softer, familiar flavorYou want a richer steakhouse-style base

Ketchup usually needs less sugar. Tomato paste usually needs a little more. Taste after chilling.

Ingredients You Need

The core yum yum sauce ingredients are mayonnaise, ketchup or tomato paste, rice vinegar, sugar, garlic powder, onion powder, paprika, water, and salt. Butter and heat are optional.

Mayonnaise

Mayonnaise is the body of the sauce. Use one you already like, because its flavor comes through. Regular mayo works well. Kewpie tastes richer and slightly more savory. Light mayo or avocado oil mayo can work if you like the flavor, but the sauce may taste sharper or thinner. If using Miracle Whip, reduce the sugar and vinegar because it is already sweeter and tangier.

Ketchup or Tomato Paste

Ketchup gives the sauce that familiar hibachi-night sweetness. Tomato paste is the version you try when you want it to taste a little less sweet and a little more grown-up.

Rice Vinegar

Rice vinegar cuts through the richness of the mayo and keeps the sauce from tasting flat. It is mild enough to brighten the sauce without making it harsh.

Sugar

A little sugar gives the sauce its familiar sweet finish. Ketchup already contains sweetness, so the ketchup version needs less. Tomato paste is less sweet, so it usually needs a little more.

Garlic Powder, Onion Powder, and Paprika

Garlic powder and onion powder give savory depth without raw garlic bite. Paprika gives the sauce its warm color and keeps the flavor from feeling plain. Smoked paprika adds a deeper note that works well with grilled chicken, fried rice, shrimp, or steak bites.

Butter and Water

Butter is optional. Add it when you want the sauce to feel fuller and more like the little cup from a steakhouse; skip it when you want a brighter drizzle for rice or vegetables. Water decides whether the sauce behaves like a dip, drizzle, or dressing. Add it slowly because a small amount changes the consistency quickly.

Why This Recipe Works

This sauce works because every small ingredient fixes one common problem. Vinegar keeps the mayo from tasting heavy. Tomato gives color and tang. Sugar rounds the edges. Garlic powder, onion powder, and paprika make it taste like more than seasoned mayo. Water turns it from a thick dip into the soft ribbon people want over fried rice, shrimp, chicken, and vegetables.

The rest time matters too. After chilling, the garlic powder softens, the paprika settles into the mayo, and the vinegar stops tasting sharp. After 30 minutes it tastes more blended; after 2 hours it tastes closer to the steakhouse-style sauce people remember.

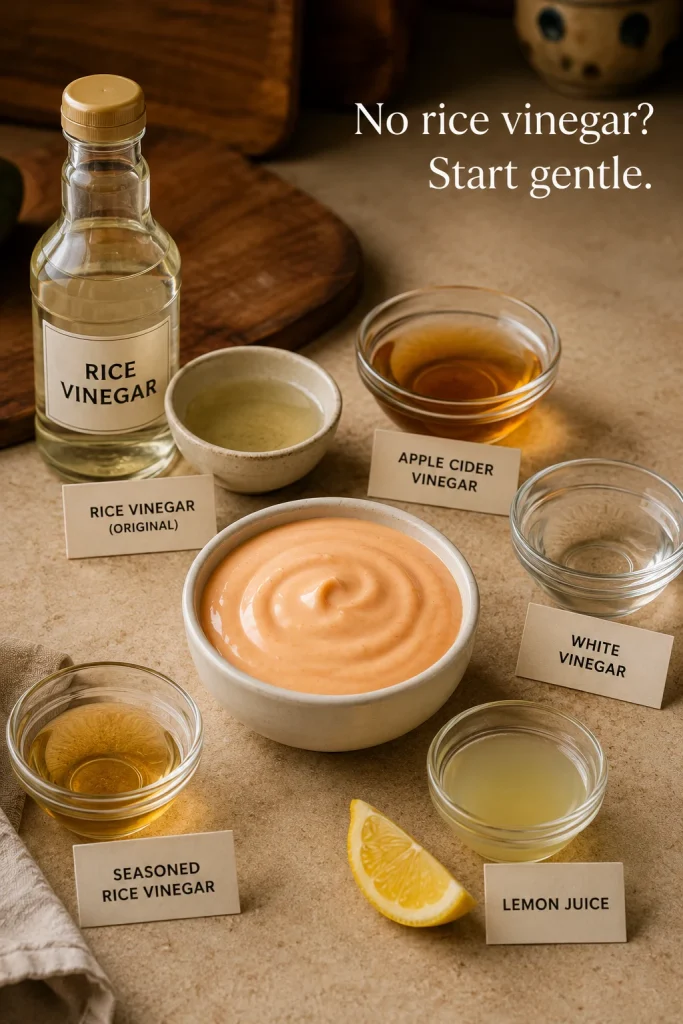
No Rice Vinegar? Use These Instead

Rice vinegar is mild and slightly sweet, which is why it works well here. Rice vinegar is usually milder than sharp white vinegar; for example, Kikkoman lists its rice vinegar at 4.2% acidity. If you need a swap, use another gentle acid and adjust slowly.

A bowl of yum yum sauce surrounded by rice vinegar, apple cider vinegar, white vinegar, lemon juice, seasoned rice vinegar, lemon wedges, and small labeled cards.
When replacing rice vinegar, start small; apple cider vinegar, white vinegar, lemon juice, and seasoned rice vinegar all sharpen the sauce differently.
SubstituteHow to Use It
Apple cider vinegarUse the same amount. It is slightly fruitier and a little sharper.
White vinegarUse a little less at first because it can taste sharper.
Lemon juiceUse the same amount for a fresher, brighter sauce.
Seasoned rice vinegarUse the same amount, but reduce the sugar slightly because it may already be sweetened.
MirinUse a small splash for sweetness and depth, but do not rely on it as the only acid.

Avoid strong vinegars like balsamic or malt vinegar. They can overpower the mayo and tomato. Whichever swap you use, start small, let the sauce rest, and adjust after the flavor settles.

Butter or No Butter?

No, yum yum sauce does not need butter. A good sauce can be made with mayo, ketchup or tomato paste, vinegar, sugar, seasonings, and water. Butter is optional; it makes the sauce richer and silkier, but the sauce still works without it.

Add butter if you want a fuller, sauce-cup style finish. Skip it if you want a brighter sauce for fried rice, spring rolls, or vegetables. If you use butter, melt it gently and let it cool until warm, not hot, before whisking it into the mayo.

How to Make Yum Yum Sauce

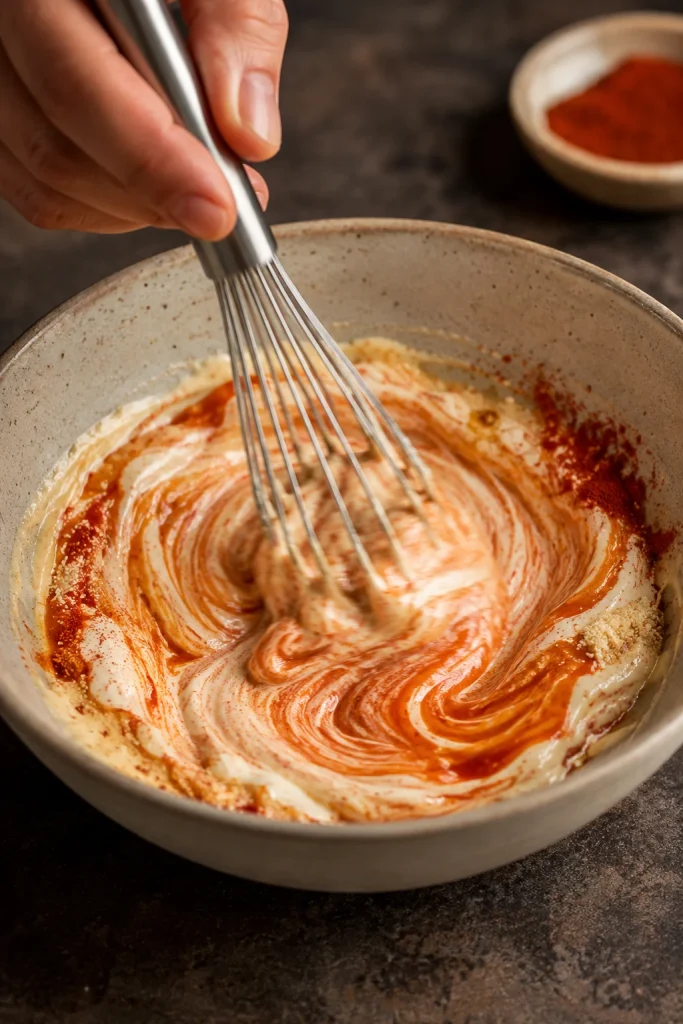
Add the mayo, ketchup, vinegar, sugar, garlic powder, onion powder, paprika, and salt to a bowl. Whisk until the sauce is completely smooth and there are no streaks of tomato or spice left in the mayo.

A hand whisking mayonnaise, ketchup, vinegar, sugar, garlic powder, onion powder, paprika, and salt in a ceramic bowl to make yum yum sauce.
Once the mayo, ketchup, vinegar, sugar, and spices turn evenly colored, the sauce is ready to chill and settle.

Thin the sauce with water. Start with 1 tablespoon for a thick dip. Add more water 1 teaspoon to 1 tablespoon at a time until it reaches the texture you want. If you are adding butter, make sure it is warm, not hot, before whisking it in.

Finished Sauce Texture

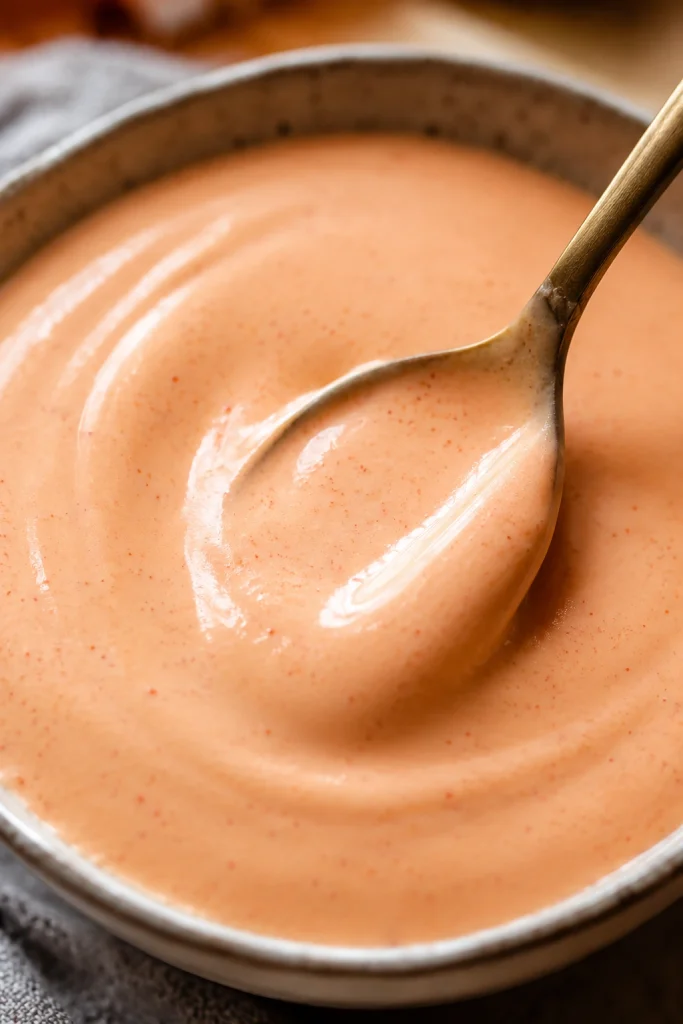
Once the sauce is fully whisked, check the spoon trail before you start changing the flavor. The texture should look glossy and smooth, not stiff or grainy.

A close-up of smooth pale pink-orange yum yum sauce in a bowl, with a spoon dragging through the glossy surface.
A good finished sauce should leave a glossy spoon trail; if it looks stiff or heavy, loosen it slowly with water.

Taste the sauce, but do not make aggressive adjustments right away. Freshly mixed sauce often tastes more mayo-forward than the finished version. Cover and refrigerate it for at least 30 minutes, then stir and taste again.

A Few Things Not to Rush

  • Do not add all the water at once. The sauce can go from thick dip to thin dressing quickly.
  • Do not add hot butter directly to mayo. Let it cool first so the sauce stays smooth.
  • Do not cook the finished sauce in fried rice or stir-fry. Add it after cooking.
  • Do not use strong vinegars like balsamic or malt vinegar. They take the sauce in a completely different direction.

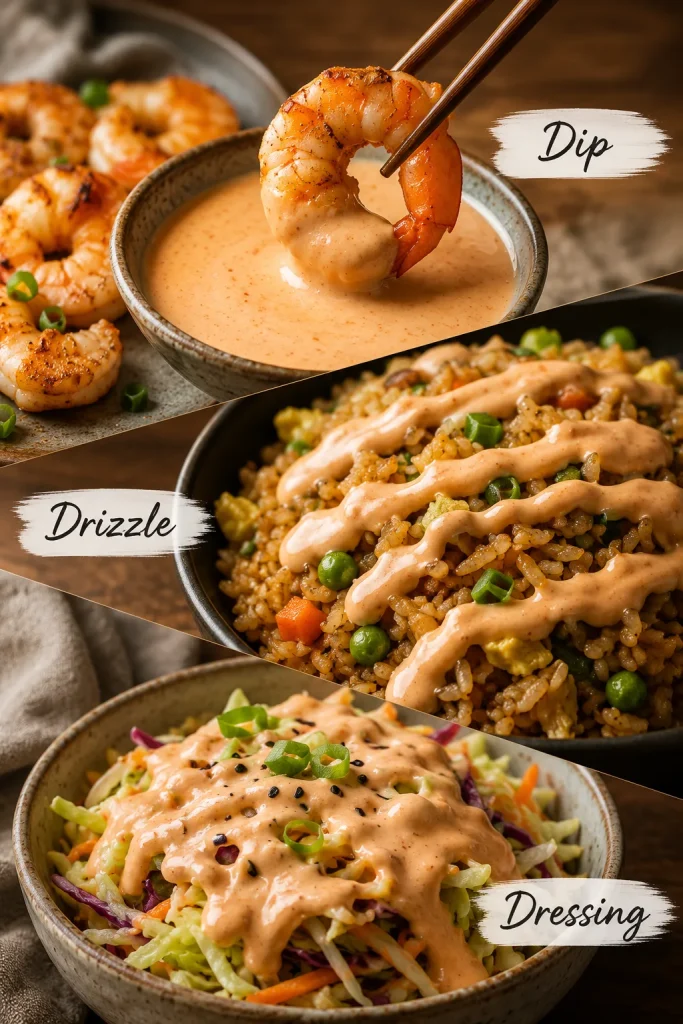
Best Texture: Dip, Drizzle, or Dressing

The right texture depends on the plate. Fries need a thick dip. Fried rice needs a loose ribbon. Shrimp can go either way.

A three-part texture guide showing yum yum sauce as a thick dip with shrimp, a drizzle over fried rice, and a dressing over a slaw-style bowl.
Instead of using one texture for everything, keep it thick for dipping, looser for rice, and lightest for bowls or slaw.
TextureWater AmountBest For
Thick dip1 tablespoon / 15 mlShrimp, fries, nuggets, spring rolls, dumplings, roasted potatoes
Drizzle sauce2 to 3 tablespoons / 30 to 45 mlFried rice, chicken bowls, hibachi shrimp, steak bites, vegetables
Dressing-style sauce3 to 4 tablespoons / 45 to 60 ml, plus a little extra vinegarSalads, slaws, grain bowls, cold noodle bowls

The sauce should fall softly from a spoon for rice, but cling after one dip for shrimp, fries, and spring rolls. If you are serving it with hot fried rice, make it slightly thinner than you think; the rice will make a thick sauce feel heavier. If the sauce is for fries or spring rolls, stop thinning early so it clings to crispy edges.

Serving ideas: jump to fried rice, shrimp, bowls, or crispy snacks.

Why Yum Yum Sauce Tastes Better After Chilling

You can use the sauce immediately, but it tastes better after chilling. Right after mixing, the mayo, vinegar, tomato, sugar, and spices can taste separate. The sauce may also taste more mayo-forward than expected.

After 30 minutes in the fridge, the garlic powder and onion powder soften into the sauce. The paprika and tomato blend into the fat. The vinegar becomes less sharp, and the sweetness tastes less raw. After 2 hours, the flavor usually lands much closer to the hibachi-style sauce people remember from restaurants.

If you have time, make it the night before. Overnight chilling gives the smoothest flavor. If the sauce has been in the fridge overnight, let it sit for 5 to 10 minutes and stir before serving. It should be cool, not icy-thick.

Jump to recipe · Texture guide · Back to top

Hibachi White Sauce, Japanese White Sauce, and Shrimp Sauce

If you have ever searched for “that white sauce from hibachi,” this is probably the sauce you meant. In many American hibachi and Japanese steakhouse-style restaurants, this creamy sauce is called yum yum sauce, hibachi white sauce, Japanese white sauce, shrimp sauce, pink sauce, or Japanese steakhouse sauce.

The names come from how people use it. Some remember it with shrimp, some with fried rice, and some from the little sauce cups at a steakhouse. Even though it is often called white sauce, most homemade versions are pale peach or pink-orange because of ketchup, tomato paste, and paprika.

There is no single official formula. The goal is the familiar balance: cool mayo base, gentle sweetness, mild tang, pale tomato color, and enough water to make it dip-friendly or drizzle-friendly.

Homemade vs Store-Bought Yum Yum Sauce

Store-bought yum yum sauce is useful when you just want a squeeze bottle in the fridge. The problem is that bottled versions can swing too sweet, too salty, too thin, or too much like a generic mayo dressing.

Homemade is better when you want the sauce to match the plate: thicker for fries, looser for fried rice, sweeter for kids, tangier for shrimp, richer for steakhouse-style bowls. You can also make gluten-free, vegan, keto, or lighter versions more easily when you control the ingredients.

What to Eat with Yum Yum Sauce

Think of this as a cool finishing sauce. It works anywhere you want something creamy enough to soften heat, bright enough to wake up rice, and rich enough to cling to crispy snacks. This is the drizzle that makes plain rice, shrimp, and vegetables feel like hibachi night at home.

UseBest Texture
Fried riceLoose drizzle
ShrimpThick dip or light drizzle
Chicken bowlsDrizzle
Fries and nuggetsThick dip
Spring rolls and dumplingsThick dip
Burgers, wraps, and tacosSpread texture
Salads and slawsDressing-style

Fried Rice and Hibachi Plates

On fried rice and hibachi-style plates, keep it loose enough to fall from a spoon. You want pale, creamy streaks across hot rice, not a heavy scoop sitting on top. Add the sauce after cooking so the rice stays fluffy and the sauce stays smooth.

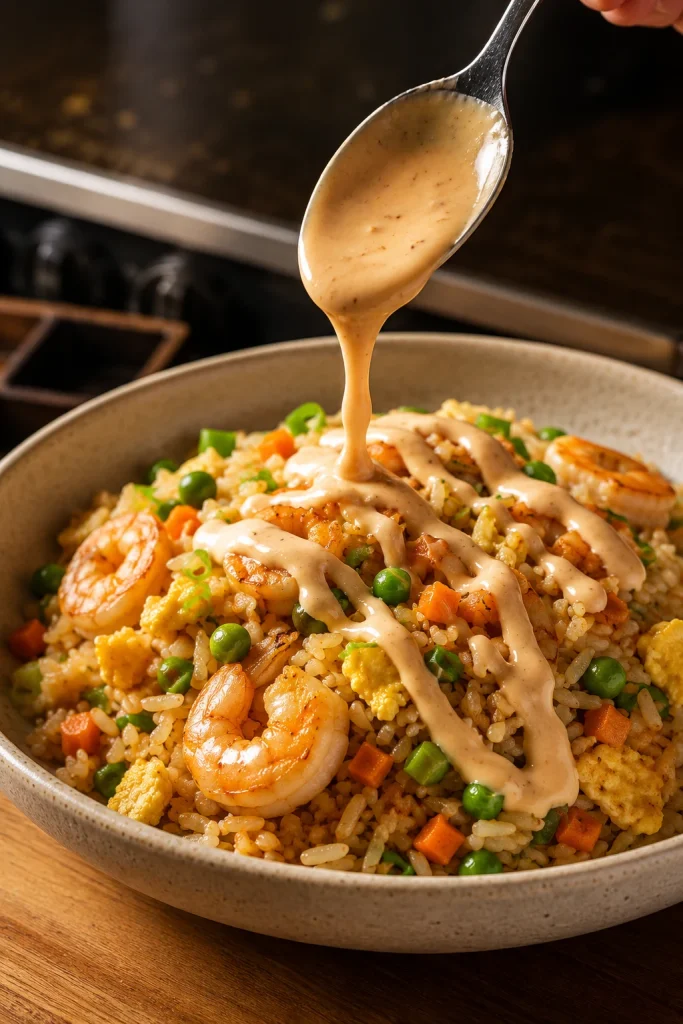
Yum yum sauce being spooned in ribbons over shrimp fried rice with egg, peas, carrots, scallions, and visible rice grains.
Drizzle the sauce after cooking fried rice so the grains stay fluffy and the cool sauce does not turn oily.

Shrimp, Seafood, and Chicken

Shrimp can go either way: thick as a dip or slightly loosened as a drizzle. For shrimp, the sauce should be thick enough to cling after one dip. If the protein is already rich or fried, add a little extra vinegar to the sauce for balance.

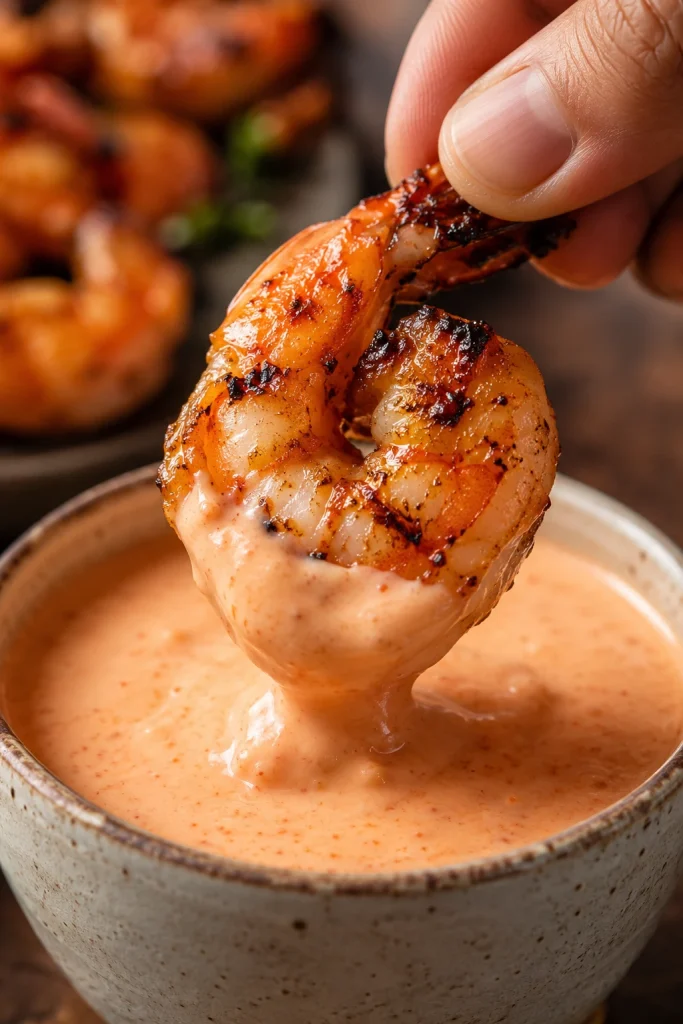
A grilled shrimp held by fingers and dipped into thick pale pink-orange yum yum sauce in a ceramic bowl.
Hibachi shrimp sauce works best as a thicker dip that clings after one swipe instead of sliding off the shrimp.

For another quick shrimp dinner with a brighter lemon-garlic direction, keep this shrimp scampi recipe nearby. If the meal is more fried fish than hibachi shrimp, this homemade tartar sauce is the better match.

Chicken, Steak Bites, and Hibachi Vegetables

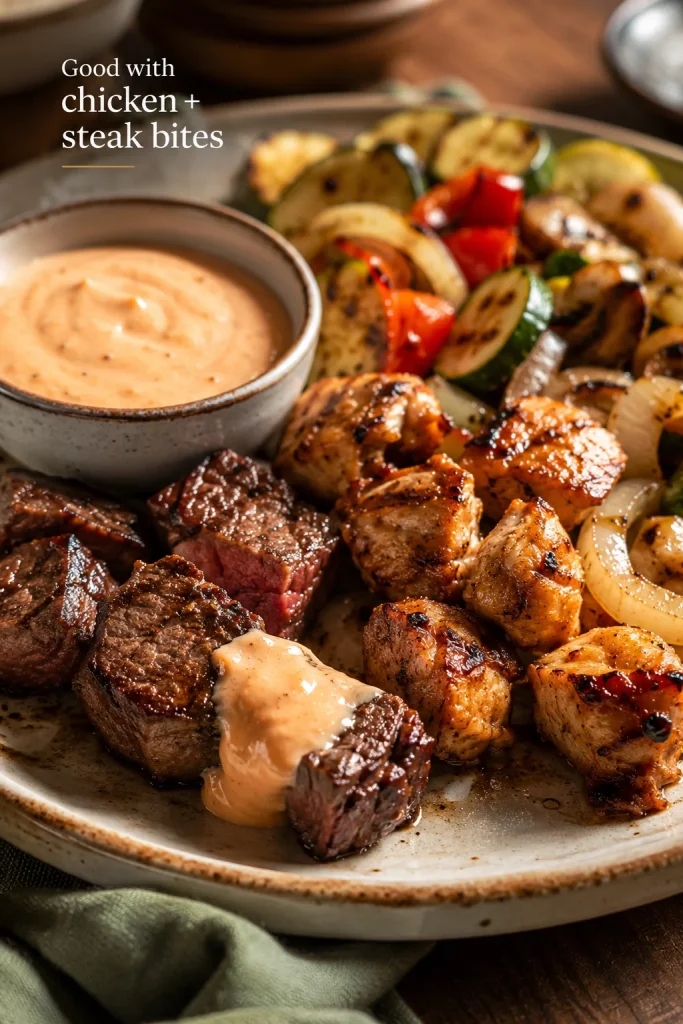
Chicken and steak bites are best with a cool, smooth sauce that softens charred edges without hiding the grilled flavor.

A plate of grilled chicken pieces, steak bites, hibachi-style vegetables, and a bowl of pale pink-orange yum yum sauce, with sauce on one piece of steak.
Beyond shrimp, a cool hibachi-style sauce helps balance grilled chicken, steak bites, onions, zucchini, and peppers.

Bowls, Wraps, and Rice Meals

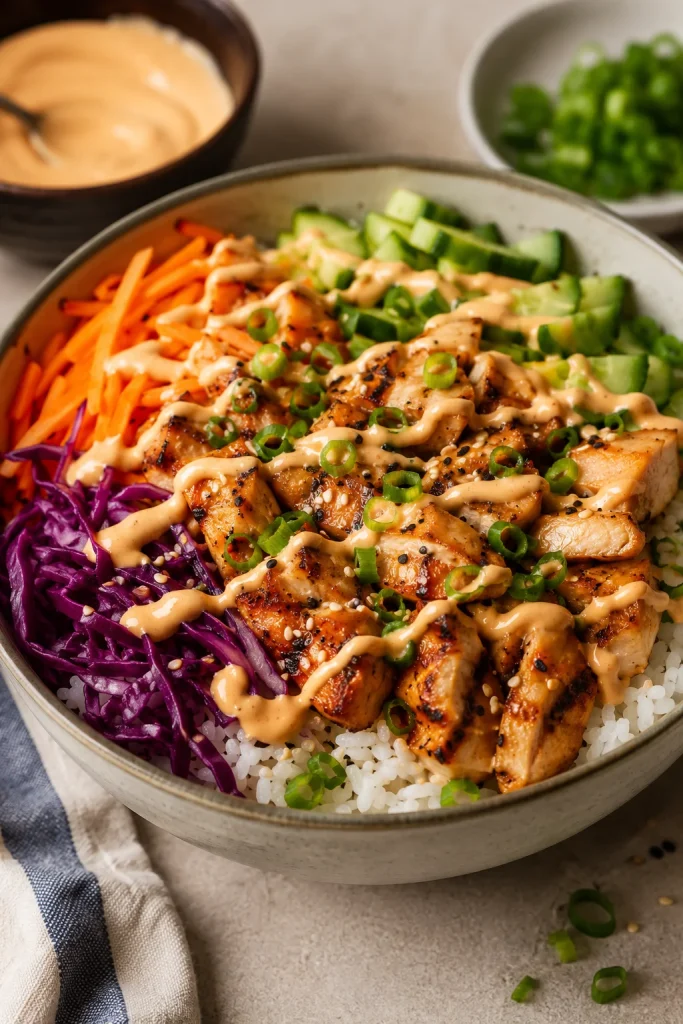
Bowls need a smoother drizzle. A spoonful can make a simple bowl feel finished, especially when there is warm rice, crunchy cucumber, cabbage, lettuce, carrots, grilled chicken, shrimp, beef, tofu, or crispy vegetables.

A rice bowl with grilled chicken, white rice, cucumber, purple cabbage, carrots, scallions, sesame seeds, and yum yum sauce drizzled across the top.
In rice bowls, a light drizzle adds flavor without covering the crunch of cucumber, cabbage, and carrots.

A seafood rice bowl can borrow the build from this salmon bowl recipe. With beef and rice, use it as a cool creamy contrast beside a saucy Korean beef bowl.

Fries, Spring Rolls, Dumplings, and Snacks

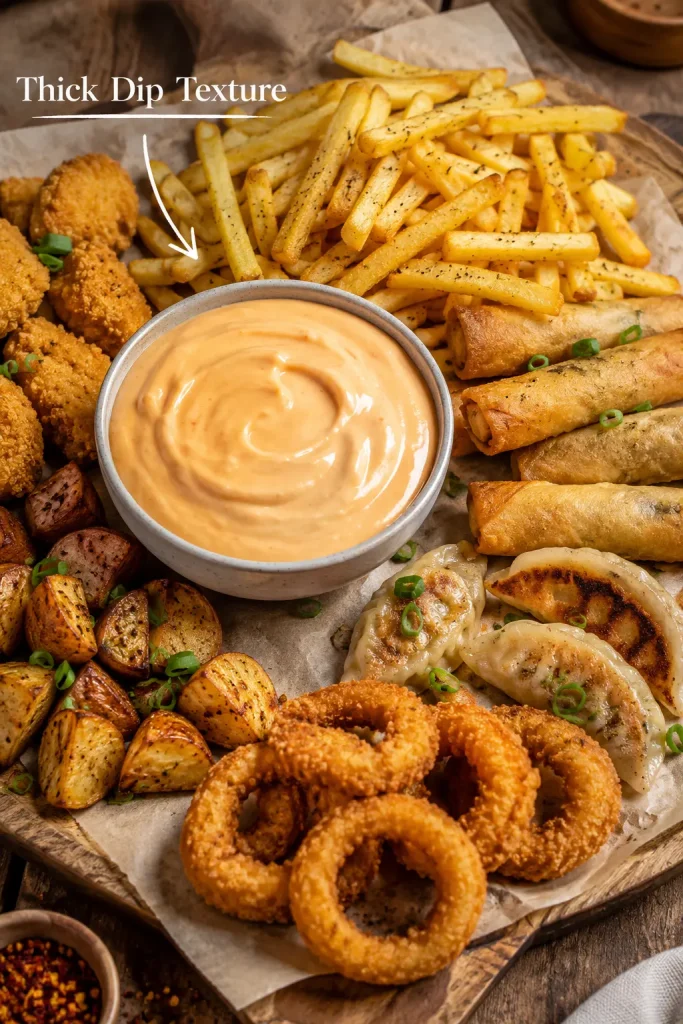
Crispy snacks are where the thicker version wins. Start with only 1 tablespoon water so the sauce clings to fries, nuggets, spring rolls, dumplings, potstickers, onion rings, roasted potatoes, and other crunchy bites instead of sliding back into the bowl.

A snack board with a bowl of thick yum yum sauce surrounded by fries, spring rolls, dumplings, nuggets, roasted potatoes, and onion rings.
Crispy snacks need a thicker sauce, so fries, spring rolls, dumplings, nuggets, and onion rings can catch it on their edges.

With spring rolls and fries, keep it spoonable and thick so every crispy edge catches some sauce. A crisp snack plate works well beside crispy veg spring rolls, fries, dumplings, or roasted potatoes.

Sandwiches, Burgers, and Tacos

As a burger, taco, or sandwich spread, keep it thicker than drizzle texture so it stays where you put it. It pairs especially well with crunchy lettuce, cucumber, cabbage, grilled chicken, shrimp, or crispy tofu.

Yum Yum Sauce Variations

Make the main version first if you can. Once you know the baseline, these variations help you make it spicier, richer, lighter, vegan, gluten-free, or lower in sugar.

Spicy Yum Yum Sauce

Add cayenne, sriracha, sambal, chili garlic sauce, or your favorite hot sauce. A pinch of cayenne gives gentle heat. About ½ to 1 teaspoon sriracha makes the sauce noticeably spicy. If it becomes too hot, add more mayo and a small pinch of sugar.

For a hotter fruit-and-chili direction that goes further than yum yum sauce, save this mango habanero sauce recipe for tacos, wings, shrimp, grilled chicken, paneer, tofu, or vegetables.

Kewpie Mayo Version

Kewpie mayo makes the sauce richer, smoother, and slightly more savory. It is a good choice if you want a fuller steakhouse-style flavor. Regular mayo still works well, especially when balanced with vinegar, tomato, garlic powder, paprika, and rest time.

Gluten-Free Version

This sauce can be made gluten-free if every packaged ingredient you use is labeled gluten-free. Check the mayo, ketchup, tomato paste, vinegar, hot sauce, and spice blends. If you add soy sauce, chili garlic sauce, or another condiment, choose a gluten-free version.

Vegan Version

Use vegan mayo in place of regular mayo. Skip the butter or use vegan butter. Sugar, maple syrup, or another sweetener can round out the flavor. Vegan mayo gives a more classic result than yogurt-style bases because it keeps the sauce creamy and rich.

Keto or Lower-Sugar Version

Tomato paste is usually the cleaner low-sugar base because ketchup brings sweetness before you even add a sweetener. Replace the sugar with a keto-friendly sweetener, then taste after chilling because some sweeteners can feel sharper before the sauce rests.

Low-Calorie or Greek Yogurt Version

The half-mayo, half-yogurt version is the sweet spot. It still tastes like a creamy sauce, while a full-yogurt version tastes more like a tangy bowl dressing. Use it for bowls, salads, slaws, or lighter chicken-and-rice plates rather than a strict hibachi copycat.

No-Mayo Version

You can make a no-mayo version with Greek yogurt, sour cream, vegan sour cream, or blended cashew cream, but it becomes a different sauce. To keep it balanced, add tomato, vinegar, sweetener, and seasoning in small amounts, then let it rest before adjusting again.

Troubleshooting Yum Yum Sauce

Most “failed” yum yum sauce is not actually failed. It usually just needs a short rest, a tiny splash of acid, or a spoonful of mayo to bring it back. If the flavor still feels off after chilling, the fix is usually small.

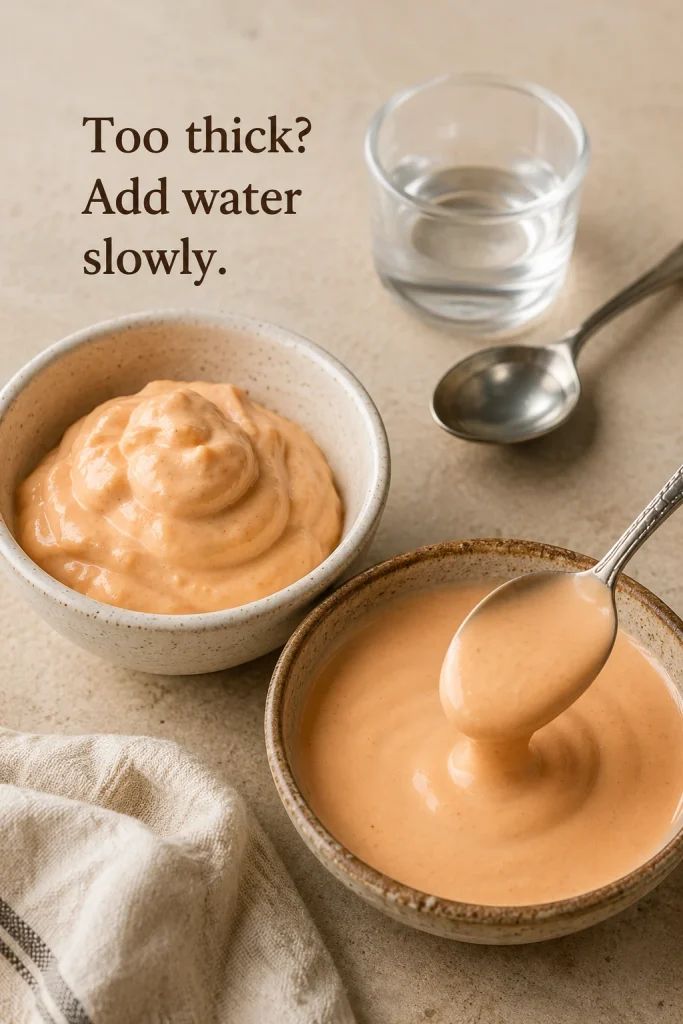
Yum yum sauce texture comparison showing a too-thick mound-like sauce beside a smoother drizzle texture, with water and a spoon nearby.
If the sauce is too thick, add water one teaspoon at a time until it changes from a mound to a smooth drizzle.
ProblemHow to Fix It
It tastes too much like mayoChill first. Then add a little more vinegar, paprika, garlic powder, ketchup or tomato paste, and a small pinch of sugar.
Too sweetAdd rice vinegar, lemon juice, or a pinch of salt.
Sharp or tangyAdd more mayo and a tiny pinch of sugar.
Thick and heavyAdd water 1 teaspoon at a time until it loosens.
Thin or runnyAdd mayo 1 tablespoon at a time until it thickens.
Looks too paleAdd a little more tomato paste, ketchup, or paprika.
Looks too orangeAdd more mayo.
Not steakhouse-style enoughUse Kewpie mayo, add the optional cooled butter, and chill the sauce longer.
Too spicyAdd mayo and a small pinch of sugar.
Tastes flatAdd salt, onion powder, garlic powder, or a tiny splash of rice vinegar.

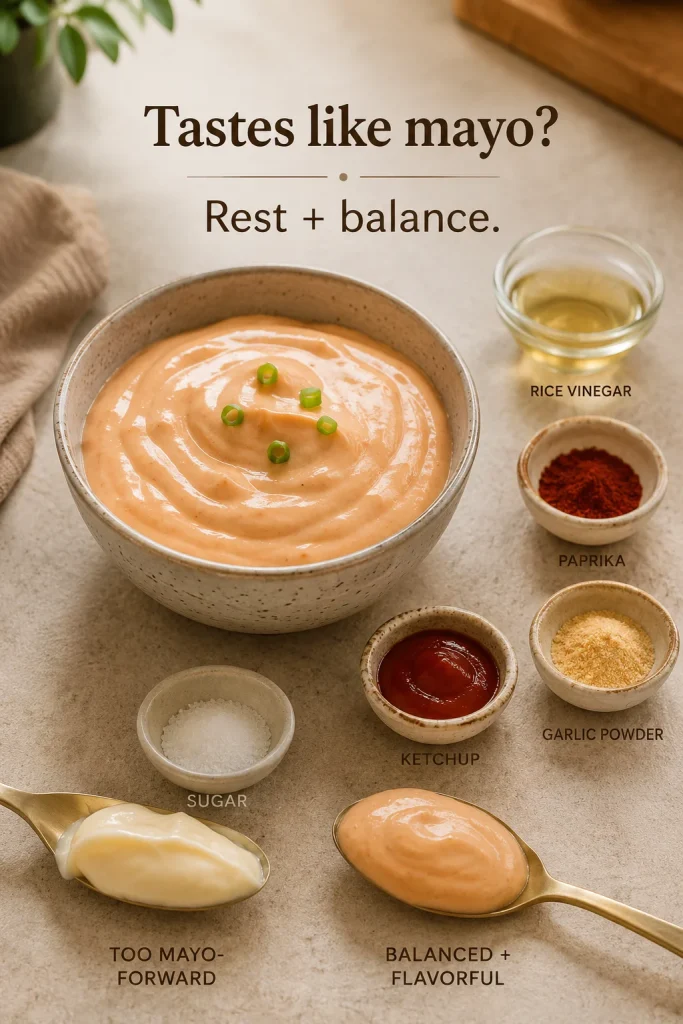
When It Tastes Too Much Like Mayo

A mayo-heavy sauce usually needs rest and small balancing moves, not a full restart.

A bowl of yum yum sauce with rice vinegar, paprika, garlic powder, ketchup, sugar, and two spoons comparing a mayo-forward sauce with a more balanced sauce.
When the sauce tastes mayo-heavy, rest it first; then balance it with rice vinegar, ketchup or tomato paste, paprika, garlic, and sweetness.

Storage and Make-Ahead

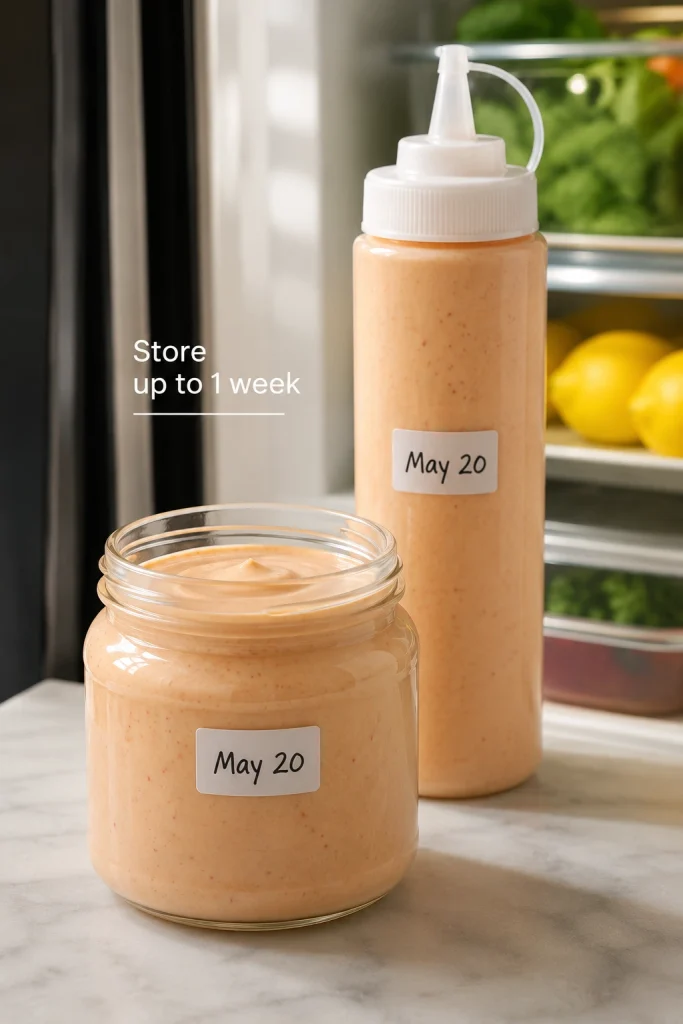
Store yum yum sauce in an airtight jar or covered container in the refrigerator for up to 1 week. Stir it before serving because the sauce may thicken slightly as it chills.

A glass jar and squeeze bottle filled with pale pink-orange yum yum sauce on a kitchen counter beside an open refrigerator, with date labels.
Refrigerate homemade yum yum sauce in a jar or squeeze bottle, then stir before serving because it thickens as it chills.

This is a good make-ahead sauce. The flavor is better after at least 30 minutes and usually best after 2 hours or overnight. If you are serving it for a hibachi-style dinner, make the sauce first and let it chill while you prepare the rice, shrimp, chicken, or vegetables.

A squeeze bottle is helpful when you want the restaurant-style drizzle over rice and shrimp. For storage, a jar is easier to clean.

Keep the sauce refrigerated and do not leave it sitting out for long periods. This is not a shelf-stable sauce and it is not meant for canning. For general food safety, FoodSafety.gov recommends refrigerating perishable foods within 2 hours and keeping the refrigerator at 40°F / 4°C or below.

If you use Greek yogurt, vegan mayo, homemade mayo, or any ingredient with a shorter use-by date, follow the shortest storage time. Freezing is not recommended because mayo-based sauces can separate and turn grainy after thawing.

Make-ahead tip: Make the sauce first when you start dinner. By the time the rice, shrimp, chicken, or vegetables are ready, the flavor will already be smoother. It is one of those small prep steps that makes tomorrow’s rice bowl easier before tomorrow even starts.

Jump to recipe · Troubleshooting · Back to top

FAQs

What is yum yum sauce made of?

Yum yum sauce is usually made with mayonnaise, ketchup or tomato paste, vinegar, sugar, garlic powder, paprika, and water. Some versions also include butter, onion powder, cayenne, sriracha, mirin, or hot sauce.

Is yum yum sauce actually Japanese?

Not traditionally. It is best known as an American hibachi-style sauce served at many Japanese steakhouse-style restaurants.

Is yum yum sauce the same as hibachi white sauce?

Usually, yes. Many restaurants and home cooks use those names for the same creamy mayo-based sauce.

Is yum yum sauce the same as spicy mayo?

No. Spicy mayo is usually mayo mixed with sriracha or another hot sauce. Yum yum sauce has more rounded flavor from tomato, vinegar, sugar, garlic powder, paprika, and water.

Can I make yum yum sauce without tomato paste?

Yes. Use ketchup instead. For this recipe, 2 tablespoons ketchup gives the easiest sweet, pale pink-orange sauce. Because ketchup is already sweet, start with only 1 teaspoon sugar and adjust after chilling.

Is this Benihana-style yum yum sauce?

It is a homemade hibachi-style sauce in the same creamy, sweet-tangy family, but restaurant formulas vary. For the closest restaurant-style version, use Kewpie mayo, tomato paste, cooled melted butter, a tiny pinch of heat, and a 2-hour chill.

What can I use instead of rice vinegar?

Use apple cider vinegar, white vinegar, lemon juice, or seasoned rice vinegar. White vinegar is sharper, so start with a little less. Seasoned rice vinegar may already contain sugar, so reduce the sugar slightly.

Does yum yum sauce need butter?

No. Butter is optional. It adds richness and a silkier texture, but the sauce still works without it. If using butter, cool it before whisking it into the mayo.

Why does my yum yum sauce taste like mayo?

Freshly mixed sauce often tastes mayo-forward before it rests. Chill it for at least 30 minutes, then add a little more vinegar, paprika, garlic powder, tomato, and sugar if needed.

Is yum yum sauce good on fried rice?

Yes. Thin it to drizzle texture and add it after cooking, not in the pan. It gives hot fried rice a creamy, tangy finish without making the rice soggy.

What does yum yum sauce go with?

It goes well with shrimp, fried rice, chicken, steak, vegetables, rice bowls, fries, spring rolls, dumplings, nuggets, burgers, wraps, and roasted potatoes.

Is yum yum sauce gluten-free?

It can be gluten-free if every packaged ingredient you use is labeled gluten-free. Check mayo, ketchup, vinegar, hot sauce, spice blends, and any add-ins.

How long does homemade yum yum sauce last?

It keeps for up to 1 week in an airtight container in the refrigerator. Stir before serving and discard it if it smells off, changes texture, or has been left out too long.

Can you freeze yum yum sauce?

Freezing is not recommended. Mayo-based sauces can separate, turn watery, or become grainy after thawing. Make a fresh batch and store it in the refrigerator instead.

How do I make yum yum sauce spicy?

Add cayenne, sriracha, sambal, chili garlic sauce, or hot sauce. Start small, chill the sauce, and taste again before adding more.

Jump to recipe · Storage · Back to top

Posted on Leave a comment

Easy Garlic Aioli Recipe: Garlic Mayo, Traditional Aioli & Uses

Bowl of creamy garlic aioli served with fries, a burger, shrimp, lemon wedges, roasted vegetables, and garlic on a wooden table.

You want a creamy garlic sauce for fries, burgers, sandwiches, seafood, or roasted vegetables, and then the internet immediately turns it into an argument: traditional garlic and oil, garlic mayo, or the restaurant version that calls itself “real.” The useful answer is simpler. The word can mean different things depending on the kitchen, so this recipe gives you the easy creamy version first, then shows you the traditional version too.

This easy garlic aioli recipe starts with mayonnaise, fresh garlic, lemon juice, Dijon mustard, and salt, but what you really get is the cool, creamy dip you want beside hot fries, the garlicky swipe that makes a burger taste finished, and the lemony sauce that wakes up seafood. For the older, sharper, more classic style, there is also a traditional garlic-and-oil method later in the post.

No need to shame either style. Mayo aioli is fast, stable, and weeknight-friendly; traditional aioli is sharper, more technical, and more olive-oil-forward. Choose the one that fits the food, then adjust from there.

The aioli rule is simple: it should taste bright first, garlicky second, and creamy all the way through.

Make It Now · Full Recipe · Which Version? · Garlic Control · Traditional Aioli · Vegan & Eggless · Flavor Variations · What to Serve It With · Troubleshooting

Make It Now

Need the sauce now? Mix this version first, then use the rest of the post only if you want to adjust the garlic, make it vegan, try a flavor variation, or go traditional from scratch.

Fast Garlic Aioli Ratio

Fast ratio: ¾ cup mayo + 3 grated garlic cloves + 1 tablespoon lemon juice + ½ teaspoon Dijon mustard + ¼ teaspoon salt.

Rest 10 minutes, then taste. Brighten with lemon if it feels heavy, soften the bite with more mayo if the garlic is too sharp, and add salt if it tastes flat.

Recipe ratio card showing mayonnaise, grated garlic, lemon, Dijon mustard, salt, and a whisk on a light stone surface.
Start with mayo, garlic, lemon, Dijon, and salt, then let the sauce rest briefly. That short pause helps the garlic aioli taste smoother and more balanced.

Using it for fries? Go a little bolder. On sandwiches, keep it smoother and milder. With seafood, let lemon lead before the garlic takes over. A small bowl of this can make plain fries, leftover chicken, roasted vegetables, or a simple sandwich feel intentional.

Need a different path? Jump to garlic control, vegan and eggless options, flavor variations, or traditional aioli.

Quick Answer: What Is Aioli?

Aioli is a garlic sauce. Traditionally, it is garlic and oil emulsified with salt and sometimes lemon. In modern recipe use, garlic aioli often means a creamy sauce made by stirring garlic, lemon, and seasonings into mayonnaise.

Both meanings are common. Traditional aioli tastes sharper and more olive-oil-forward; mayo aioli tastes creamier, milder, and more familiar. For fries, burgers, sandwiches, seafood, roasted vegetables, and party dips, the easy mayo version is the best place to start.

Most fixes are simple: acid lifts, mayo softens, salt sharpens, rest settles, and roasted garlic mellows.

Still deciding which style fits your food? The version guide makes that choice easier.

Which Aioli Version Should You Make?

Use this as a decision guide, not a rulebook. For everyday fries, burgers, and sandwiches, the mayo version is the easiest answer. When garlic and oil should be the star, choose traditional aioli. Egg-free, vegan, smoky, spicy, and mellow paths are there when the table needs them.

Choose thisWhen you wantBest with
Easy garlic aioli with mayoFast, creamy, reliable garlic sauceFries, burgers, sandwiches, seafood, wraps
Traditional aioliSharper garlic-and-oil flavorArtichokes, grilled vegetables, roasted potatoes, seafood
Vegan mayo aioliFast egg-free creamy dipFries, sandwiches, wraps, party platters
Soy-milk or aquafaba aioliPlant-based sauce from scratchBowls, vegetables, vegan sandwiches
Roasted garlic aioliSweeter, softer garlicSandwiches, potatoes, grilled cheese, vegetables
Chipotle or sriracha aioliSmoky or spicy heatTacos, burgers, fries, shrimp
Lemon-dill aioliBrighter seafood finishSalmon, crab cakes, shrimp, fish tacos

Easy Garlic Aioli Recipe

Start with this version. It gives you the creamy garlic sauce people expect with fries, burgers, sandwiches, and seafood, but with enough lemon and garlic control to keep it from tasting heavy or harsh. This is the one to make when the fries are already hot and you just need a dip that tastes intentional.

Perfect technique is not the point here. Good garlic, enough lemon, and a few minutes of patience matter more. The first bite should feel cool and creamy, then bright with lemon, then warm with garlic.

Here is the key move: let grated garlic sit with lemon juice and salt before you whisk in the mayonnaise. During that short rest, the raw edge softens and the flavor spreads through the bowl. After 10 minutes, the garlic should taste rounder but still present. If it tastes perfect immediately after mixing, remember that it may taste stronger later.

Start with 3 cloves for balance, 5 for a bolder dip, or roasted garlic for something sweeter and softer. If your cloves are very large, begin with 2 to 3 and add more after tasting.

Recipe Details

  • Prep time: 5 to 8 minutes
  • Garlic rest: 10 to 15 minutes
  • Optional chill: 20 to 30 minutes
  • Total time: 15 to 20 minutes without chilling; about 40 minutes with optional chill
  • Yield: scant 1 cup
  • Servings: 12 to 16 tablespoons
  • Equipment: small bowl, whisk or spoon, microplane or garlic press, optional fine mesh strainer

Garlic Aioli Ingredients

Ingredients for garlic aioli including mayonnaise, garlic cloves, lemon halves, Dijon mustard, salt, pepper, and a small whisk.
In a short ingredient list, every flavor has a job: garlic brings heat, lemon lifts the mayo, Dijon adds depth, and salt pulls the aioli together.
IngredientUS amountMetric amount
Mayonnaise¾ cupabout 180 ml / 165 to 170 g
Fresh garlic, grated or pressed3 to 5 small-to-medium clovesabout 9 to 15 g
Fresh lemon juice1 tablespoon, plus more to taste15 ml
Dijon mustard½ teaspoon, optional2.5 ml
Fine salt¼ teaspoon to startabout 1.5 g
Black pepper⅛ teaspoona small pinch
Lemon zest½ teaspoon, optionaloptional
Olive oil1 teaspoon, optional5 ml

Method

Step 1: Grate or press the garlic

Grate, press, or very finely paste the garlic. Smoother garlic makes a smoother sauce and gives the finished aioli a cleaner bite.

Hand grating a peeled garlic clove on a microplane over a small bowl with lemon and mayonnaise nearby.
Grated garlic blends more evenly than chopped garlic. As a result, the sauce tastes bold without leaving harsh little pieces in the finished aioli.

Step 2: Mix the garlic, lemon, Dijon, and salt

Add the garlic, lemon juice, Dijon mustard, and salt to a small bowl. This is where the raw garlic starts turning into a balanced sauce base.

Step 3: Rest the garlic mixture

Let the mixture rest for 10 to 15 minutes so the lemon can soften the raw bite before the mayonnaise goes in.

Grated garlic resting in lemon juice and salt in a small bowl with a lemon half, spoon, and salt dish nearby.
Before the mayo goes in, lemon juice and salt soften the raw garlic edge. This step is small, but it makes the finished garlic aioli taste cleaner.

Step 4: Whisk in the mayonnaise

Whisk in the mayonnaise until the dip looks smooth and creamy. Scrape the sides of the bowl so the garlic and lemon flavor spreads evenly.

Mayonnaise being whisked into a garlic and lemon mixture in a bowl with garlic cloves and lemon nearby.
Whisk the mayo into the rested garlic mixture until the sauce looks smooth and glossy. Then taste again, because garlic and lemon settle as they mix.

Finished Garlic Aioli Texture

Before you chill or serve it, check the texture. The sauce should look creamy and thick enough to hold its shape on a spoon.

Close-up of creamy garlic aioli in a bowl with a spoon showing thick, glossy texture and small pepper flecks.
A good aioli should hold a spoon trail, yet still spread easily. That middle texture is why it works for fries, sandwiches, burgers, and bowls.

Step 5: Taste and adjust

Taste after resting. Brighten with more lemon, round it out with more mayo, or sharpen the flavor with another pinch of salt.

Step 6: Chill or serve

Serve right away, or chill for 20 to 30 minutes for a thicker, rounder texture.

Chilled Garlic Aioli Texture

After chilling, the dip will thicken slightly and usually taste less sharp. If you are making it ahead, err slightly mild on the garlic and adjust again before serving.

Chilled garlic aioli in a bowl with a spoon groove showing thicker texture, with garlic and lemon nearby.
Chilling thickens the sauce and rounds off some of the garlic bite. Before serving, stir it once and adjust with lemon or salt if needed.

To make it milder and extra smooth, strain the garlic-lemon mixture before whisking the flavored lemon juice into the mayonnaise. You will still get garlic flavor, but without little garlic pieces or a strong raw bite.

Taste and Adjust

Taste after the 10-minute rest, not before. Garlic gets louder as it sits, so a sauce that feels gentle at first can become bolder by the time it reaches the table. Serving guests? Start with 3 cloves and build up only after tasting.

  • Sharp garlic bite: soften it with more mayo or a longer rest.
  • Heavy finish: wake it up with lemon juice a few drops at a time.
  • Sour edge: round it out with another spoonful of mayo.
  • Flat flavor: season with salt, Dijon, or a tiny bit more garlic.
  • Thick texture: loosen with water or lemon juice ½ teaspoon at a time.
  • Mild flavor: add more grated garlic or lemon zest.

How to Adjust Garlic Aioli

Use small changes and taste between each one. A little lemon, mayo, salt, or rest can change the whole bowl.

Garlic aioli adjustment guide with a bowl of aioli, lemon wedge, spoonful of mayonnaise, salt, and simple fix labels.
Fix the flavor by changing one thing at a time: lemon for lift, mayo for softness, salt for focus, and rest for a calmer raw garlic bite.

Maximum garlic is not the goal. You want a dip bright enough to cut through rich food, creamy enough to cling, and garlicky enough that it has a reason to exist.

How to Control the Garlic Bite

This sauce is simple, but garlic decides whether it tastes balanced, bold, sweet, sharp, or too aggressive. Garlic is the one ingredient here that can make the sauce sing or take over the room, so choose the style that fits how you plan to serve it.

Raw, Roasted, Grated, or Pasted Garlic

Different garlic prep changes the same aioli base quickly, so pick the garlic style before adding more cloves.

Garlic control comparison with grated garlic, roasted garlic, garlic paste with salt, and small bowls of aioli.
The garlic choice controls the mood of the sauce. Use grated garlic for punch, roasted garlic for sweetness, and garlic paste for a smoother aioli.

Mild vs Bold Garlic Aioli

Start mild for people, bold for potatoes. Fries and roasted potatoes can handle strong garlic. Sandwiches, burgers, wraps, and fish tacos usually need a gentler spread. Serving a shared dipping bowl? Keep the base gentle and put hot sauce, chili crisp, extra lemon, or grated garlic on the side. If you want a brighter herb-driven dip instead of a creamy garlic one, MasalaMonk’s green chutney recipe gives you that cilantro-mint-lime direction.

Two serving areas showing mild garlic aioli with sandwiches and vegetables and bold garlic aioli with fries and roasted potatoes.
For a shared table, keep the first bowl mild. After that, make a bolder aioli for fries, potatoes, or grilled food that can handle extra garlic.
  • Balanced sauce: start with 3 garlic cloves.
  • Bolder dip: use 5 cloves and grate them finely.
  • Mellow flavor: rest raw garlic in lemon juice for 10 to 15 minutes.
  • Smooth garlic taste: strain the garlic-lemon mixture before adding mayo.
  • Sweeter sauce: use roasted garlic instead of raw garlic.
  • Seafood version: let lemon and herbs lead before raw garlic power.

Why This Aioli Works

This aioli works because it treats garlic like a powerful ingredient, not just a flavoring. Freshly cut garlic can be hot, sharp, and harsh. Lemon and salt tame that raw edge before the mayo goes in, so the final dip tastes like one smooth sauce instead of mayonnaise with garlic stirred through it.

Dijon mustard fills the gap between sharp and creamy. You should not taste mustard first; you should just notice that the sauce feels finished. A short chill thickens the dip and gives the flavors time to settle.

  • Lemon rest: softens raw garlic and spreads the flavor.
  • Mayo base: gives stable body without building an emulsion from scratch.
  • Dijon and salt: make the dip taste complete instead of just creamy.

Ingredient Notes and Smart Swaps

With only a few ingredients, there is nowhere for tired garlic or bland mayo to hide. The base gives creaminess, the garlic gives identity, the lemon gives lift, and the salt pulls the whole thing together.

Mayonnaise

Choose a mayonnaise you already like. This is not the place for a mayo you tolerate but never enjoy; the base flavor follows you into every bite. Full-fat mayo gives the richest garlic aioli and the best dipping texture. Light mayo works, though the result may taste tangier and less full. To build the base from scratch, start with MasalaMonk’s homemade mayo recipe, then add garlic, lemon, Dijon, and salt.

Garlic

Fresh garlic gives the cleanest flavor, but the way you prepare it changes the result. The same three cloves can taste mellow, sharp, or almost spicy depending on how you cut them. Grated garlic tastes strongest and blends smoothly. Pressed garlic is easy and punchy. Minced garlic gives a more rustic texture. Roasted garlic turns the sauce sweeter and softer. Garlic powder works in an emergency, but it will not taste as fresh.

Roasted Garlic Aioli

Roasted garlic makes aioli sweeter and rounder, but it can also make the sauce feel less bright. After adding it, taste for lemon again before deciding the sauce is finished.

Roasted garlic cloves being added to a bowl of creamy aioli with a roasted garlic bulb, lemon, and garlic nearby.
Roasted garlic aioli tastes sweeter, softer, and less sharp than the raw version. To keep it lively, finish with enough lemon to balance the richness.
Garlic formBest forFlavor result
Grated garlicClassic garlic aioliStrong, smooth, bold
Pressed garlicQuick aioliPunchy and easy
Minced garlicRustic dipChunkier, less smooth
Roasted garlicSandwiches, potatoes, vegetablesSweet, mellow, less sharp
Garlic powderEmergency shortcutMilder, less fresh

Lemon Juice

Fresh lemon juice is best because it tastes bright without becoming harsh. The lemon should lift the sauce, not turn it sour. Vinegar can work when lemon is not available, but start with less because vinegar can make the sauce sharper.

Dijon Mustard

Dijon mustard is optional, but useful. It adds depth and helps the sauce taste more complete. Use just enough to support the garlic and lemon. The dip should not taste like mustard unless you are making a mustard variation.

Olive Oil

A teaspoon of olive oil adds a little restaurant-style richness. A heavy pour can make the dip greasy, especially when the mayonnaise is already rich. Keep it small unless you are making the traditional garlic-and-oil version.

Small-Batch Garlic Aioli

Need enough for one burger, one sandwich, one small plate of fries, or one snack bowl? Mix ¼ cup mayo, ¼ to ½ teaspoon grated or pressed garlic, 1 teaspoon lemon juice, a tiny dab of Dijon, salt, and pepper. Let it sit for 5 to 10 minutes before tasting.

Small bowl of garlic aioli served with a sandwich half, fries, lemon wedge, garlic clove, and spoon on a wooden board.
Make a small batch when you only need aioli for one sandwich, one burger, or one plate of fries. It gives you fresh flavor without leftover sauce sitting around.

This is useful for a quick sandwich spread, a breakfast sandwich, a grilled cheese upgrade, or a dipping sauce when leftovers are not needed.

Using Store-Bought Mayo

Store-bought mayo is the fastest path to restaurant-style garlic aioli. Use the same base ratio from the main recipe, then adjust after the 10-minute rest: more garlic for a bolder dip, lemon for lift, or another spoonful of mayo if the bite feels too sharp.

Split scene showing plain mayonnaise with garlic and lemon on one side and finished garlic aioli with fries and a sandwich on the other.
Store-bought mayo is only the starting point. Fresh garlic, lemon, salt, and a little resting time turn it into a brighter garlic aioli.

This is the easiest way to upgrade a sandwich, burger, wrap, or dipping platter without buying a separate bottle of aioli.

Traditional Aioli from Scratch

Choose traditional aioli when you want garlic and oil to be the star: sharper, richer, more Mediterranean, and more technique-driven. Choose the mayo version when you want a fast, stable dip or spread for everyday food.

The classic version is not simply garlic mayonnaise. At its most basic, it is garlic and oil emulsified into a thick sauce, often with salt and lemon juice. Some home versions use egg yolk to make the emulsion more stable and easier to whisk.

The garlic-and-oil path is less forgiving because you are building the sauce, not seasoning an already-stable base. Its flavor is sharper, more garlicky, more olive-oil-forward, and less creamy than the easy mayo path. It works beautifully with grilled vegetables, artichokes, seafood, roasted potatoes, or a Mediterranean-style plate.

This is the version to make when you want the sauce to feel like part of a Mediterranean platter, not just a creamy dip on the side.

Traditional Aioli Mortar and Pestle

The mortar-and-pestle method makes the garlic and oil feel more direct than the mayo shortcut, so expect a sharper and more rustic sauce.

Traditional aioli being made in a mortar and pestle with garlic paste, coarse salt, olive oil, bread, potatoes, and artichokes nearby.
Traditional aioli is sharper and more olive-oil-forward because it begins with garlic, salt, and oil instead of prepared mayonnaise.

If you enjoy sauce technique, the same patience with fat, acid, and emulsion shows up in MasalaMonk’s béarnaise sauce recipe, though that sauce uses butter and egg yolk instead of garlic and oil.

Easier Traditional-Style Aioli with Egg Yolk

This is not the oldest purist version, but it is the easiest traditional-style path for most home cooks. The egg yolk helps the garlic and oil emulsify into a thicker, glossier sauce.

Egg yolk aioli mixture being whisked in a glass bowl while olive oil is poured in a thin stream, with garlic and lemon nearby.
Egg yolk gives traditional-style aioli more stability, but patience still matters. Add the oil slowly until the mixture turns thick, glossy, and emulsified.

Egg-Yolk Aioli Ingredients

IngredientUS amountMetric amount
Garlic2 clovesabout 6 g
Salt¼ teaspoonabout 1.5 g
Egg yolk1 largeabout 18 g
Lemon juice1 to 2 teaspoons5 to 10 ml
Dijon mustard½ teaspoon, optional2.5 ml
Mild extra-virgin olive oil¼ cup60 ml
Neutral oil3 tablespoons45 ml
WaterA few drops as neededAs needed

If raw egg is a concern, anyone avoiding it — including children, pregnant people, older adults, or immunocompromised guests — should choose the mayo-based version, vegan mayo version, or no-egg path.

Method

  1. Mash or grate the garlic with salt until it forms a paste. A mortar and pestle is traditional, but a microplane and bowl also work.
  2. Whisk in the egg yolk, lemon juice, and Dijon mustard if using.
  3. Start adding the oil drop by drop while whisking constantly. Do not rush the first few tablespoons.
  4. Once the mixture thickens and looks glossy, add the remaining oil in a very thin stream.
  5. When the sauce gets too thick, whisk in a few drops of water or lemon juice.
  6. Taste and adjust with salt, lemon, or a few more drops of oil.

The first oil addition is the most important part. Too much oil too quickly can split the emulsion. A damp kitchen towel wrapped into a ring under the bowl helps keep it steady while you whisk. Using a measuring cup with a spout also makes slow pouring easier.

The sauce should turn glossy and thicker as the oil goes in. If it starts looking loose or greasy, stop adding oil and whisk until it tightens before continuing.

No-Egg Traditional Aioli

To make no-egg traditional aioli, mash 3 to 4 garlic cloves with a generous pinch of salt until you have a sticky paste. Add mild olive oil very slowly, drop by drop at first, while grinding or whisking constantly. As the paste tightens, use a few drops of lemon juice or water to loosen it and help the sauce come together.

This older-style method is sharper and more garlic-forward than the egg-yolk path. It may look thicker, rougher, or less glossy than mayo aioli, especially on the first try. That is normal. If it refuses to thicken, turn it into a rustic garlic oil dip instead of forcing it; it will still be delicious with bread, potatoes, grilled vegetables, or seafood.

Rustic no-egg traditional aioli in a shallow bowl with olive oil, bread slices, roasted potatoes, artichokes, lemon, garlic, and salt.
No-egg traditional aioli can stay looser and more rustic than the mayo version. Serve it like a garlicky olive-oil dip with bread, potatoes, or artichokes.

For a milder classic sauce, use a mix of mild olive oil and neutral oil. Strong extra-virgin olive oil can taste bitter or peppery, especially when blended aggressively. With an immersion blender, blend the neutral oil first and stir in the olive oil by hand at the end.

Back to top · Jump to recipe

Vegan, Eggless, No-Mayo, and Lighter Options

Choose this section when regular mayo does not fit the people at your table. You can still make a creamy garlic dip, a sharper no-mayo sauce, or a lighter bowl drizzle without losing the main garlic-lemon idea.

These versions are about hospitality, not compromise. Regular mayonnaise usually contains egg. Vegan mayo is egg-free. Greek yogurt is lighter, but it is not dairy-free. Traditional egg-yolk aioli contains raw egg, while no-egg traditional aioli and vegan versions avoid egg entirely. For a dedicated egg-free creamy base, use MasalaMonk’s eggless mayonnaise recipe and follow the same garlic-lemon balance.

Best Eggless Aioli Base to Use

If you are using vegan mayo, follow the same fast aioli ratio and swap the base. If you want no mayo at all, use the traditional aioli section as your starting point.

Four-panel guide showing vegan mayo, soy milk, aquafaba, and cashews with small bowls of vegan or eggless aioli.
Vegan aioli changes depending on the base. Vegan mayo gives the closest shortcut texture, while soy milk, aquafaba, and cashews create different eggless styles.
  • Closest to the main recipe: vegan mayo.
  • From-scratch vegan emulsion: unsweetened soy milk.
  • Creamy bowl sauce: cashews.
  • No-egg traditional path: garlic, salt, oil, and patience.

Use this table to pick the right base, not to make every version.

Vegan Aioli Base Ratios

OptionQuick ratioBest use
Vegan mayo shortcut¾ cup vegan mayo + 3 garlic cloves + 1 tbsp lemon + saltFast vegan dip or spread
Soy-milk vegan aioli½ cup unsweetened soy milk + 1 cup oil + garlic + lemon or vinegar + saltFrom-scratch vegan emulsion
Aquafaba aioli3 tbsp aquafaba + ½ to ¾ cup neutral oil + garlic + lemon or vinegar + mustardEggless aioli-style sauce
Cashew aioli-style sauce1 cup soaked cashews + ½ to ¾ cup water + garlic + lemon + saltCreamy vegan bowl sauce
Lightened garlic aioli½ cup Greek yogurt + ¼ cup mayo + garlic + lemon + Dijon + saltLighter dip for vegetables, chicken, potatoes, wraps, and bowls
No-mayo traditional aioliGarlic paste + salt + slow olive oil + lemon or waterSharper traditional-style sauce

Plain unsweetened soy milk matters here. Sweetened or flavored plant milk will pull the sauce in the wrong direction before the garlic even has a chance. Vegan mayo tastes closest to the main recipe. Soy milk and aquafaba behave more like emulsions. Cashew aioli is creamy and bowl-friendly, but less like classic aioli.

The Greek yogurt version is tangier and less rich than classic garlic aioli. It works especially well as a dip or bowl sauce. For another cool, garlicky yogurt-based sauce, MasalaMonk’s Greek tzatziki sauce recipe is a better fit when you want cucumber, dill, and a lighter Mediterranean finish.

Back to top · Jump to recipe

Aioli Flavor Variations

Once the base tastes right, the variations should feel easy, not like twelve new recipes. You are giving the same sauce a new mood: smoky for tacos, lemony for seafood, mustardy for burgers, herby for vegetables, spicy for fries.

Best Aioli Variations to Start With

Six bowls of aioli variations on a dark board, including orange spicy aioli, lemon-dill aioli, roasted garlic aioli, dark garlic aioli, and herb aioli.
Once the base aioli is balanced, flavor variations are easy. Chipotle, sriracha, lemon-dill, roasted garlic, black garlic, and herb versions each fit different meals.

If you only try three, make chipotle aioli for tacos and fries, lemon-dill aioli for seafood, and roasted garlic aioli for sandwiches and potatoes. Those three cover smoky, bright, and mellow.

Aioli Variation Ratios

VariationAdd to 1 cup baseGood with
Chipotle aioli1 tbsp adobo or 1 to 2 tsp chipotle powder + 1 tbsp limeTacos, burgers, fries
Sriracha aioli2 tbsp sriracha + 1 tbsp limeShrimp, chicken, fries
Spicy aioli1 to 2 tsp hot sauce, chili paste, or chili crispWraps, sandwiches, fries
Dill aioli1 to 2 tbsp fresh dill + ½ tsp lemon zestSalmon, crab cakes, potatoes
Lemon garlic aioli½ to 1 tsp lemon zest + 1 tsp lemon juiceSeafood, asparagus, chicken
Black garlic aioli3 to 5 mashed black garlic clovesBurgers, fries, roasted vegetables
Mustard aioli1 to 2 tbsp Dijon or whole-grain mustardSandwiches, burgers, potatoes
Truffle aioli¼ to ½ tsp truffle oil or 1 to 2 tsp truffle pasteFries, burgers, mushrooms
Cilantro lime aioli2 tbsp cilantro + 1 tbsp lime + ½ tsp lime zestFish tacos, grain bowls, wraps
Roasted garlic aioli1 to 2 tbsp roasted garlic pastePotatoes, sandwiches, vegetables
Salsa aioli¼ cup well-drained salsa + 1 tsp limeTacos, nachos, burgers
Calabrian chili aioli1 to 2 tbsp chopped Calabrian chilies or paste + lemonSandwiches, fries, grilled vegetables

Chipotle and sriracha both get stronger after a short rest, so begin with less heat and build from there. For fruitier heat, borrow the sweet-hot idea from MasalaMonk’s mango habanero sauce recipe and add it lightly to the aioli base.

Drain salsa first so salsa aioli does not turn watery. If you already have a bright mango salsa, drain it well before folding a spoonful into aioli. For truffle aioli, use a light hand; too much can overpower the garlic and lemon.

Once you pick a flavor, the serving chart will help match it to fries, burgers, seafood, vegetables, or bowls.

What Tastes Best with Aioli?

Start with the food in front of you. Fries want a thick, bold aioli that clings to the crispy edges. Burgers want a smooth spread that does not fight the meat. Seafood wants lemon first, garlic second. Roasted vegetables can handle deeper flavors like black garlic, roasted garlic, herbs, or chili.

What to Serve with Garlic Aioli

Wooden board with garlic aioli, fries, slider, shrimp, croquettes, roasted vegetables, potato wedges, sandwich pieces, lemon, and herbs.
Use garlic aioli wherever food needs creaminess, brightness, and a little bite. Fries, sliders, shrimp, potatoes, roasted vegetables, and sandwiches all work well.

Best Aioli Pairings by Food

Use this as a flavor-matching chart, not a rulebook.

FoodServe withWhy it works
French friesGarlic, truffle, spicyClings to salty fries and cuts through the crunch
Sweet potato friesChipotle, srirachaBalances sweetness with smoke or heat
BurgersGarlic, mustard, chipotleAdds the creamy layer that makes the burger feel finished
Fish tacosChipotle, cilantro limeBrings creaminess, acid, and fresh heat
SalmonLemon dillCuts through rich fish without hiding it
ShrimpLemon garlic, srirachaGives cool brightness against sweet shrimp
Crab cakesLemon dillAdds a creamy seafood-friendly finish
ArtichokesTraditional, lemonTurns each leaf into a rich, garlicky bite
Chicken sandwichGarlic, spicyTurns a dry sandwich into a finished one
Grilled cheeseGarlic, roasted garlicAdds savory depth without needing another filling
Breakfast sandwichGarlic herbWorks with eggs, cheese, and toasted bread
BLTRoasted garlicSoft garlic plays well with tomato and bacon
Roasted vegetablesBlack garlic, herbAdds depth to sweet, browned edges
Potato saladGarlic aioli mixed with mayo or yogurtMakes creamy salads taste brighter and less flat
Deviled eggsGarlic aioli in place of some mayoDeepens the filling without making it heavy
Grain bowlsVegan, cilantro limeTurns grains and vegetables into a real meal

Garlic Aioli for Fries

Classic garlic aioli is the safest first batch for fries because it is thick, creamy, and bold enough to cling to crisp edges.

Hand dipping a golden French fry into thick creamy garlic aioli with lemon, garlic, pepper, and more fries in the background.
Fries need a thicker aioli so the sauce catches on crisp edges instead of sliding off. Keep it creamy, spoonable, and bright.

Garlic Aioli for Burgers

For burgers, a thick garlic, mustard, or chipotle version works especially well with a simple burger patty recipe.

Garlic aioli being spread with a knife on a toasted burger bun with a burger patty, lettuce, tomato, onion, lemon, and garlic nearby.
On burgers, aioli should be a thin, even spread. That way, it adds garlic flavor and moisture without covering up the patty or toppings.

Use the same base with crispy homemade French fries, roasted potatoes, burgers, grilled chicken, or sandwiches.

Chicken and seafood both love this sauce, but in different ways. On chicken, use it as the creamy layer in one of these chicken sandwich recipes, especially with spicy, roasted garlic, or mustard variations. For tacos, the chipotle and cilantro-lime versions fit naturally with MasalaMonk’s shrimp tacos recipe.

Seafood usually wants the lemony side of aioli. Lemon dill aioli is a natural dip for salmon croquettes. Fried fish can go either way: aioli gives you the garlicky option, while MasalaMonk’s tartar sauce recipe gives you the classic pickle-caper direction.

Dip, Spread, or Drizzle

The same sauce can work as a dip, spread, or drizzle with small texture changes. Fries need enough thickness to drag through crispy edges. Seafood tastes better when lemon arrives before the garlic. Sandwiches need a smooth spread, not a garlic bomb.

Three-panel guide showing garlic aioli used as a fry dip, spread on bread, and drizzled over a vegetable and grain bowl.
One sauce can become a dip, spread, or drizzle with small texture changes. Keep it thick for fries, smooth for buns, and looser for bowls or vegetables.
  • Dip: use the aioli as written and chill it before serving.
  • Sandwich spread: keep it thick, smooth, and not too garlicky.
  • Drizzle: add water or lemon juice ½ teaspoon at a time.
  • Bowl sauce: loosen with lemon juice, water, or yogurt.
  • Burger sauce: keep it thick and add mustard, chipotle, black garlic, or roasted garlic.

Thin aioli slowly. A little liquid changes the texture quickly. If the sauce looks loose after thinning, stop adding liquid and let it chill before fixing again. When the creamy version gets too loose, stir in more mayonnaise. With traditional aioli, add more oil only when the emulsion is stable. For a lighter dipping plate, thick garlic aioli works with crunchy vegetables or MasalaMonk’s crispy zucchini chips.

Need to reset the base? Go back to the main garlic aioli recipe. If the texture has already gone too far, use the troubleshooting table.

How to Store Aioli Without Losing Freshness

A short rest improves the flavor, but storage depends on the base. Aioli should still taste fresh, cold, and awake — not like something forgotten at the back of the fridge. Mayo-based garlic aioli is easiest to make ahead. Traditional raw egg aioli is more delicate. No-egg traditional aioli tastes best fresh.

Best Storage Window by Version

VersionStorage guidance
Mayo-based garlic aioliBest within 2 to 4 days for fresh garlic flavor; some versions may keep up to about a week if handled cleanly and kept cold
Homemade raw egg/yolk aioliUse pasteurized eggs when available; refrigerate and use within 3 to 4 days
No-egg traditional aioliBest fresh; use within 24 hours for best texture
Vegan soy-milk aioliRefrigerate airtight for 4 to 7 days
Cashew-style vegan aioliRefrigerate for about 1 week; re-blend if needed
Mayo or egg emulsionDo not freeze when texture matters

Keep aioli refrigerated until serving. Stir before using because garlic, lemon, and oil can settle slightly. At parties, keep the main container cold and refill a smaller bowl as needed; the sauce tastes better that way, and it is safer.

As a general safety habit, do not leave aioli at room temperature for more than 2 hours, and shorten that window when the room is very warm. FoodSafety.gov explains the 2-hour rule for perishable foods. Freezing is not recommended for mayo-based or egg-based aioli because the emulsion can break when thawed. Cashew-style vegan aioli handles freezing better, but the texture may still need a quick blend after thawing.

Troubleshooting Aioli

Most aioli problems are fixable. Decide what is wrong first: sharp garlic, flat flavor, loose texture, or a broken emulsion. Then fix only that problem. Mayo-based aioli is forgiving; the traditional garlic-and-oil path needs slower oil, steadier whisking, and more patience.

Aioli Troubleshooting Guide

Four-panel aioli troubleshooting guide showing sharp garlic ingredients, thick aioli, thin aioli, and a split emulsion with whisk and egg yolk.
Troubleshoot aioli by naming the problem first. Sharp garlic, thick sauce, thin sauce, and a split emulsion each need a different fix.

Quick Fixes for Common Aioli Problems

ProblemFix
Sharp garlic biteRest longer, add more mayo, use roasted garlic next time, or strain the garlic-lemon mixture
Flat flavorAdd salt, lemon juice, Dijon, or a tiny bit more garlic
Salt pushed too farAdd more mayo, yogurt, or a small splash of lemon when it also tastes heavy
Texture too thickAdd lemon juice or water a few drops at a time
Texture too thinAdd more mayo for the creamy version; for traditional aioli, keep emulsifying slowly
Traditional aioli splitStop adding oil, whisk hard, or start with a new yolk and slowly whisk the broken sauce into it
Olive oil tastes bitterUse milder olive oil or blend with neutral oil; avoid high-speed blending with strong extra-virgin olive oil
Bitter even without olive oilCheck for old garlic, sprouted garlic, too much raw garlic, or too much lemon pith/zest
Vegan aioli will not thickenUse unsweetened soy milk, keep oil and milk at a similar temperature, and blend in a narrow cup
Garlic chunks are unpleasantGrate, press, paste, or strain the garlic before mixing

When traditional aioli breaks, do not throw it away immediately. Start with a fresh egg yolk in a clean bowl, then slowly whisk the broken sauce into the yolk as if it were the oil. Add it gradually and stop when the texture begins to loosen too much.

Back to top · Jump to recipe

FAQs

Is aioli just garlic mayonnaise?

Traditional aioli is not garlic mayonnaise. It is a garlic-and-oil emulsion. Many modern garlic aioli recipes use mayonnaise as a shortcut because it is fast, creamy, stable, and familiar.

What is the difference between aioli and mayo?

Traditional aioli is built around garlic and oil, while mayonnaise is usually made from oil, egg yolk, and acid. Mayo-based garlic aioli combines mayonnaise with garlic, lemon, and seasonings to create a quick modern version. Real Simple has a useful explainer on aioli vs mayo.

How do you turn mayo into aioli?

Stir grated garlic, lemon juice, Dijon mustard, salt, and pepper into mayonnaise, then let it rest for 10 to 15 minutes. Start with ¾ cup mayo, 3 garlic cloves, 1 tablespoon lemon juice, ½ teaspoon Dijon, and ¼ teaspoon salt.

How much garlic should you use in aioli?

Use 3 small-to-medium cloves for balanced garlic aioli, 5 cloves for a bold dip, and 1 to 2 cloves for a milder sandwich spread. Resting the garlic in lemon juice helps soften the raw bite.

Do you need egg to make aioli?

No. Some traditional methods use only garlic and oil. Many from-scratch home versions use egg yolk because it helps the sauce emulsify more easily. Vegan aioli can be made with vegan mayo, soy milk, aquafaba, or cashews.

Can you make aioli without mayo?

Yes. Make traditional aioli by emulsifying garlic with oil, salt, and lemon, with or without egg yolk. Vegan no-mayo versions can use soy milk, aquafaba, or cashews as the base.

How long does homemade aioli last?

Mayo-based garlic aioli is best within 2 to 4 days for fresh garlic flavor, though some versions may keep longer when refrigerated and handled cleanly. Traditional raw egg aioli is best used within 3 to 4 days. No-egg traditional aioli tastes best fresh.

Why did my traditional aioli split?

Traditional aioli usually splits when oil is added too quickly or the emulsion is not stable yet. Add oil drop by drop at the beginning, whisk constantly, and repair a broken sauce by slowly whisking it into a fresh yolk.

Why does aioli taste bitter?

Bitterness can come from strong olive oil, high-speed blending, old or sprouted garlic, too much raw garlic, or lemon pith. Choose milder oil, fresh garlic, and a smaller garlic amount for a smoother sauce.

How do you make garlic aioli less strong?

Use fewer cloves, rest the garlic in lemon juice, add more mayo, or strain the garlic out. Roasted garlic gives the mildest, sweetest result, especially for sandwiches or shared dipping bowls.

What is the best aioli for fries?

Classic garlic aioli is the safest first choice for fries because it is thick, creamy, and bold enough to cling. For sweet potato fries or loaded fries, chipotle, sriracha, truffle, or spicy aioli works especially well.

Make the mayo version once, then pay attention to the bite: more lemon for seafood, more garlic for fries, roasted garlic for sandwiches, herbs for vegetables, heat for tacos. Once you learn that balance, aioli stops being a recipe you look up and becomes the sauce you know how to make.

Posted on Leave a comment

Spring Roll Recipe: Crispy Veg Spring Rolls with Wrappers, Filling & Sauce

Crispy vegetable spring rolls on a plate with sweet chili sauce, green chutney, and one roll cut open to show the filling.

These spring rolls are for the moment you want that crackly first bite: a thin golden wrapper, hot vegetable filling, and a bright little dip waiting on the side. The goal is simple: crisp, not greasy; full, not bursting; flavorful, not watery.

They feel easy until you are standing there with wet filling, wrappers drying at the edges, and oil getting hotter by the second. The good news is that they are not difficult once you know what usually goes wrong. This recipe keeps the process steady with five checks: dry filling, thin wrappers, snug fold, thick seal, and steady hot oil.

This repeatable home method uses store-bought thin wrappers, ginger-garlic vegetables, clear wrapping cues, and a light golden shell that cracks when served hot.

When the wrapper is right, it breaks before it bends. The filling stays hot and savory inside, the edges stay crisp for those first few minutes, and the dip makes the next bite feel brighter.

Dry filling, covered wrappers, steady oil — that is the whole spring roll game.

Quick Answer: How to Make Crispy Spring Rolls

A spring roll is a filled roll made with a thin wrapper and vegetables, noodles, tofu, meat, or seafood. In this recipe, spring roll means the crispy fried version made with thin wheat wrappers and a cooked vegetable filling.

For crisp rolls, use thin spring roll wrappers and a cooked vegetable filling that is glossy, cooled, and free of loose liquid. Add about 2 heaped tablespoons filling to each standard 8-inch wrapper, roll snugly, seal with flour or cornstarch paste, and fry at 175–185°C / 350–365°F until golden and lightly blistered.

The most important thing is not perfect rolling. It is starting with filling that has stopped steaming, wrappers that stay covered, and oil that bubbles steadily. Get those right, and the rest becomes much easier.

  • Wrapper: thin frozen spring roll sheets or wheat spring roll wrappers.
  • Filling cue: glossy vegetables, no puddle in the pan, and no heavy steam.
  • Frying range: 175–185°C / 350–365°F for freshly wrapped rolls.
  • Filling amount: about 2 heaped tablespoons for an 8-inch / 20–22 cm wrapper.
  • Make-ahead: freeze homemade uncooked rolls on a tray, then cook from frozen.

That is the whole rhythm: dry filling, flexible sheets, a firm seal, and oil hot enough to crisp before the wrapper can soak.

Texture cue: The finished roll should crack before it bends, with filling that stays tucked inside instead of steaming the wrapper soft.

A hand holding a bitten crispy spring roll with cabbage and carrot filling visible inside the golden wrapper.
Use the first bite as your test: the wrapper should crack cleanly, while the hot vegetable filling stays tucked inside.

Ready to cook now? Jump to the recipe card. Still choosing wrappers? Jump to wrappers.

Recipe: Crispy Veg Spring Rolls

This Indo-Chinese style vegetable spring rolls recipe makes 18–22 crispy rolls with a savory cooked filling and thin golden wrappers. Keep the filling cool, the wrappers covered, and the oil steady. After the first few rolls, your hands find the rhythm and the batch moves quickly.

The filling is vegetarian as written and can also be vegan if your wrappers and sauces are vegan.

Prep time30 minutes
Cook time20 minutes
Cooling time10–15 minutes
Total time60–65 minutes
Yield18–22 spring rolls
Serves4–6 as a snack or appetizer
StyleCrispy veg spring rolls / Indo-Chinese inspired
Main methodDeep fried

The timing above includes cooling. Spread the filling on a wide plate or tray so steam escapes faster and the wrappers stay dry.

Cook’s Notes for the Best Texture

  • Cool the filling fully before wrapping.
  • Keep unused wrappers covered with a damp towel.
  • Seal with a thick flour or cornstarch paste, not a watery one.
  • Fry one test roll first if unsure, then cook in small batches and drain on a rack.

Ingredients

For the spring roll filling

  • 20 thin spring roll wrappers, about 8 inches / 20–22 cm square, plus a few extra if your pack has them
  • 200g cabbage, finely shredded, about 3 packed cups
  • 80–100g carrot, julienned or thickly grated, about ¾–1 cup
  • ½ cup capsicum / bell pepper, thinly sliced
  • ½ cup finely sliced French beans or bean sprouts
  • ½ cup spring onions, whites and greens separated
  • 3–4 garlic cloves, finely minced
  • 1 tablespoon ginger, finely minced
  • 1 tablespoon neutral oil for stir-frying the filling
  • 1½–2 tablespoons soy sauce
  • 1–1½ tablespoons vinegar
  • 1–2 teaspoons red chili sauce or green chili sauce, optional
  • ½ teaspoon white pepper or black pepper
  • ½–1 teaspoon sugar, optional, to balance the seasoning
  • ½–1 cup cooked, cooled, roughly chopped noodles, optional
  • Salt only after tasting, because soy sauce, wrappers, and dipping sauces already add salt

The yield depends on wrapper size and filling amount. With the full 1 cup noodles, you may get closer to 22 rolls.

For sealing

  • 2 tablespoons all-purpose flour or cornstarch
  • 2–3 tablespoons water, or enough to make a thick paste

For frying

  • Neutral oil for deep frying, such as sunflower, peanut, canola, rice bran, or another suitable high-heat frying oil

Avoid strongly flavored oils for frying because they can overpower the ginger, garlic, soy, and vegetable filling.

Method

1. Make the sealing paste

Mix the flour or cornstarch with water to make a thick, smooth paste. It should be spreadable, not runny. Keep it nearby while wrapping. Plain water can work with some wrappers, but paste is safer for fried rolls.

2. Cook the filling

Heat 1 tablespoon oil in a wok, kadai, or wide pan over medium-high to high heat. Add the garlic, ginger, and spring onion whites. Stir for a few seconds until aromatic, but do not let the garlic brown too much.

Add the cabbage, carrot, capsicum, and beans or sprouts. Stir-fry on high heat for 2–4 minutes, just until the vegetables soften slightly but still keep some crunch.

Add soy sauce, vinegar, chili sauce if using, pepper, and sugar if needed. Toss well. Add cooked noodles now, if using. Chop long noodles roughly before adding them so they do not pull the filling out when you bite.

Continue cooking until the vegetables smell savory and gingery and there is no visible liquid at the bottom of the pan. Drag a spatula through the filling; if liquid runs back into the space, cook it a little longer. The filling should be glossy and flavorful, not saucy.

Taste and adjust the seasoning. Go light on extra salt because the wrappers and dipping sauces add more. Add spring onion greens at the end. Transfer the filling to a plate or tray and let it cool to room temperature before wrapping.

3. Prepare the wrappers

Thaw frozen spring roll wrappers according to the package instructions. Keep the wrapper stack covered with a clean damp towel while you work; this one small habit prevents most cracking and tearing.

The sheets should feel soft and flexible, not dry, cracked, or sticky. If they stick together, wait a few more minutes after thawing instead of pulling hard. Avoid microwaving frozen wrappers unless the package says it is safe, because they can turn steamy, sticky, and easier to tear.

4. Fill and fold

Place one wrapper on the counter like a diamond, with one corner pointing toward you. Add about 2 heaped tablespoons of cooled filling just below the center. Fold the bottom corner over the filling, tuck gently, fold the left and right corners inward, then roll tightly toward the top corner. Brush the final corner with sealing paste and press to close. Place the roll seam-side down.

The first roll is allowed to look a little awkward. Keep going; the next few usually get neater.

Keep finished rolls covered while you wrap the rest. Exposed wrappers dry quickly, especially in a warm kitchen.

5. Fry until crisp

Heat 2–3 inches of oil in a deep pan to 175–185°C / 350–365°F. Lower the rolls gently into the oil, away from your body. Fry one test roll first if you want to check the seal and oil temperature before committing the whole batch. If it browns evenly and stays closed, the rest of the batch is ready.

Fry 3–5 rolls at a time, depending on pan size. Do not crowd the pan; too many rolls drop the oil temperature and can make the wrappers oily. Turn gently and fry until golden, crisp, and lightly blistered, about 3–5 minutes.

The oil should sizzle steadily. When the rolls brown too slowly, let the oil move closer to 185°C / 365°F before adding more. If they brown too fast, lower the heat and give the oil a moment to settle. Homemade frozen rolls that have not been cooked yet should start closer to 190°C / 375°F, because they drop the oil temperature quickly. When frozen rolls brown before the center is hot, lower the heat slightly after the first minute.

Remove with tongs or a slotted spoon and drain on a wire rack or paper towel-lined plate. The best rolls feel light when you lift them and sound crisp when they touch the rack. Serve hot with sweet chili sauce, soy-vinegar dip, Schezwan-style sauce, green chutney, peanut chutney, or another spring roll dipping sauce.

Success cue: Most spring roll problems trace back to five details: dry filling, thin wrappers, snug folding, thick paste, and steady oil.

A spring roll success formula guide listing dry filling, thin wrappers, snug fold, thick seal, and steady hot oil.
Use this as your final check before wrapping so the rolls fry crisp instead of soggy, oily, or burst.

What Kind of Spring Rolls Are These?

This recipe is for the crispy, fried kind of spring roll: thin wheat wrappers, cooked vegetable filling, and a golden shell that cracks when hot. It is not the soft fresh rice paper version.

For this recipe, choose thin wheat spring roll wrappers or frozen spring roll sheets. Rice paper is better for fresh rolls, and egg roll wrappers make a thicker, chewier roll. The important thing is not only the name on the packet; it is how the wrapper behaves once it hits heat.

Wrapper cue: Use the wrapper that matches the roll you want. Thin wheat wrappers give the crisp fried version in this recipe.

A comparison of thin spring roll wrappers, rice paper sheets, and thicker egg roll wrappers.
Choose thin wheat spring roll wrappers for a light fried shell, because rice paper and egg roll wrappers behave very differently.
TypeWrapperCooked?Best for
Crispy spring rollsThin wheat spring roll wrappersFried, air fried, or bakedCrunchy snacks, appetizers, party food
Fresh rice paper rolls / summer rollsRice paper sheetsNoFresh rolls with herbs, noodles, vegetables, shrimp, tofu, or peanut sauce
Egg rollsThicker egg roll wrappersUsually friedHeavier American-Chinese style rolls
LumpiaThin lumpia wrappersUsually friedFilipino-style crisp rolls

If the names still feel confusing, this spring roll vs summer roll vs egg roll explainer gives a simple comparison.

Why This Spring Roll Recipe Works

Now that the recipe path is clear, the rest of the guide is about making each step easier: the filling, the wrapper, the fold, and the heat.

A good spring roll is not only about ingredients. It is a balance of three small things: filling that does not steam, wrappers that stay flexible, and oil hot enough to set the shell before it turns greasy.

The best rolls are not just crunchy. They have contrast: a thin shell that cracks, vegetables that still have bite, and a dip sharp enough to make the next roll tempting.

The filling dries out before it goes inside

Loose moisture is the enemy of that crackly shell. Quick stir-frying cooks off extra water while keeping the vegetables lightly crunchy.

Cooling stops the wrapper from steaming

Warm filling creates steam. Steam trapped inside a sealed wrapper can soften the roll or make it burst in the oil. Letting the filling rest gives you a cleaner wrap.

Thin wrappers create the crackly shell

For this crispy version, thin wheat spring roll wrappers are not optional — they are what give the roll its light, crackly shell. Thicker egg roll wrappers work differently and give a chewier, heavier result.

A snug fold keeps the roll calm in hot oil

A neatly folded roll fries more evenly and is less likely to open in the oil. Snug is better than squeezed; too much pressure can tear the wrapper.

Helpful Tools for Crisp Spring Rolls

Use what you have. Spring rolls do not need fancy equipment; the useful tools simply help with the three real jobs: cooking moisture out, keeping wrappers flexible, and letting steam escape after frying.

  • Wok, kadai, or wide pan: for cooking moisture out of the filling quickly.
  • Deep heavy pan: for steadier frying heat.
  • Frying thermometer: the easiest way to stay around 175–185°C / 350–365°F.
  • Wire rack: keeps fried rolls crisp by letting steam escape.
  • Damp towel: keeps wrappers flexible while you work.

Spring Roll Ingredients and Filling Formula

The filling should taste bright and savory on its own, because the wrapper only adds crunch; it does not fix a flat filling. You should smell ginger, garlic, soy, and vinegar before you turn off the heat. If the filling tastes dull now, it will taste dull inside the wrapper too.

The formula is simple: crunch, aroma, salt, acid, heat, and a little body. Cabbage and carrot bring texture, ginger and garlic build aroma, soy sauce adds depth, vinegar keeps the fried wrapper from feeling heavy, pepper and chili sauce add bite, and optional noodles make the filling fuller.

Ingredient cue: Build the filling around crunch, aroma, salt, acid, and heat so the rolls taste bright before they reach the dip.

Shredded cabbage, carrot, capsicum, beans, spring onions, garlic, ginger, sauces, and spring roll wrappers arranged on a board.
Start the vegetable spring roll filling with crunchy vegetables and aromatics, then use soy sauce and vinegar for that Indo-Chinese flavor.
  • Crunch: cabbage, carrot, capsicum, beans, sprouts, and spring onions.
  • Aroma: ginger, garlic, and spring onion whites.
  • Umami: soy sauce for depth and salt.
  • Brightness: vinegar to balance the fried shell.
  • Heat: pepper and optional chili sauce for Indo-Chinese snack-shop flavor.
  • Body: a small amount of cooked, cooled, roughly chopped noodles, if you want a fuller filling.

The same soy-garlic-ginger balance is useful beyond this recipe too; this stir fry sauce recipe works well for noodles, vegetables, tofu, chicken, shrimp, and quick weeknight bowls.

Best Wrappers for Crispy Spring Rolls

Once you know which kind of roll you are making, wrapper choice becomes simple. Use thin wheat spring roll wrappers or frozen spring roll sheets for this recipe. Rice paper is for fresh rolls, and egg roll wrappers make a thicker, heavier roll.

Thin sheets give a delicate shatter; thicker wrappers make the roll heavier and chewier.

Wrapper typeUse for this recipe?What to know
Thin wheat spring roll wrappersYesBest choice for crispy fried spring rolls.
Frozen spring roll sheetsYesCommon in Indian and Asian grocery stores. Thaw while sealed.
Lumpia wrappersYes, when availableThin and crisp, though size and texture may vary.
Rice paperNot for this main methodBest for fresh summer rolls. Fried rice paper rolls need a different technique.
Egg roll wrappersNot idealThicker, heavier, and chewier than spring roll wrappers.
Homemade spring roll sheetsPossibleUseful if already made thin and flexible.

Homemade spring roll sheets can work when they are thin and flexible, but they are a separate project. For this recipe, store-bought frozen sheets are easier and more reliable.

If you cannot find spring roll wrappers, lumpia wrappers are the closest substitute. Thaw frozen wrappers while they are still sealed so they do not dry out. Once opened, cover the stack with a clean damp towel, separate one sheet at a time, and cover the rest again immediately.

How to Tell If Wrappers Are Ready

A good wrapper should feel easy in your hands: soft enough to bend, dry enough to separate, and strong enough to roll without splitting. If the sheet fights you, wait. A wrapper that is still too cold or too dry will tear before it rolls.

Readiness cue: A wrapper should separate cleanly and bend easily. If it cracks, it is too dry or still too cold.

A thin square spring roll wrapper being lifted from a stack to show its flexible texture.
A flexible wrapper is easier to fold, seal, and fry; if the sheet cracks while lifting, it may tear during rolling.

For a deeper look at why rice paper packages are sometimes confusingly labeled as “spring roll skin,” Viet World Kitchen has a helpful rice paper buying guide.

Wrappers sorted? Move to the filling, where moisture matters most.

How to Make Spring Roll Filling That Is Not Watery

After the wrapper, the filling is the next place the recipe succeeds or fails. Raw vegetables release water inside the wrapper, which is why the filling is cooked first. When that moisture stays trapped, the rolls can burst, leak, or turn oily while frying.

Moisture Cues Before Wrapping

Moisture cue: The filling can be bold and glossy, but it should never be wet enough to leave a puddle.

A side-by-side comparison of wet spring roll filling and dry cooked spring roll filling.
Moisture causes trouble fast: wet filling can soften, leak, or burst, while dry cooled filling helps the rolls fry crisp and clean.

Cook the filling quickly over high heat. The vegetables should soften slightly but not collapse. Once the sauces go in, keep tossing until the pan looks almost clean when you push the filling aside. Flavor can be bold, but the mixture should not be saucy.

Visual cue: The filling is ready when it looks glossy but not saucy. Push it aside in the pan before wrapping.

Cooked vegetable spring roll filling pushed aside in a pan with no loose liquid visible.
Before the filling goes into wrappers, push it aside in the pan; if liquid runs back, the mixture needs a little more cooking.

Slightly wet filling needs another minute over high heat. A tiny pinch of cornstarch can help bind moisture, but the better fix is usually cooking the liquid off.

When the filling is right, it smells sharp from vinegar, warm from ginger and garlic, and savory enough that it tastes good before it ever reaches the wrapper.

After cooking, spread the mixture on a plate or tray and let the steam escape. Do not wrap while it is still warm. Trapped steam can soften the wrapper and make the rolls burst during frying.

Cooling cue: Spread the filling out instead of leaving it piled up, so steam escapes before the wrappers touch it.

Cooked spring roll filling spread on a tray to cool, with wrappers nearby under a towel.
Once cooked, spread the filling thinly so steam escapes quickly; cooler filling protects delicate spring roll wrappers from softening.

Before You Wrap, Check This

  • The filling is cool, not warm.
  • There is no liquid at the bottom of the plate or tray.
  • The wrappers bend without cracking.
  • The sealing paste is thick, not runny.
  • A damp towel is ready for the unused wrappers.

When all five are true, you are ready to wrap. Anything off? Fix it now; this is much easier than rescuing rolls in hot oil.

Checklist passed? Check how much filling to add before folding.

How Much Filling Goes in Each Spring Roll?

Overfilling is tempting, but it causes rolls to split. Underfilling makes them hollow and oily. Each one should feel like a small firm parcel, not a stuffed pillow.

Wrapper sizeFilling amount
6-inch wrapperAbout 1–1½ tablespoons
8-inch / 20–22 cm wrapperAbout 2 heaped tablespoons
10-inch wrapperAbout 3 tablespoons

For standard 8-inch wrappers, about 2 heaped tablespoons of cooled filling is usually enough. When in doubt, underfill the first two rolls. A slightly slimmer roll fries better than a swollen one that splits.

Correct Filling Amount

Amount cue: The filling should sit below the center of the wrapper with enough empty space left for folding and sealing.

A square spring roll wrapper placed like a diamond with two heaped tablespoons of vegetable filling near the bottom.
With an 8-inch wrapper, two heaped tablespoons of filling keeps the spring roll full without making it bulky or hard to seal.

Shape cue: A roll that looks swollen before frying is usually too full. Slimmer rolls fry cleaner and split less.

A guide comparing an overfilled spring roll wrapper with a correctly filled spring roll wrapper.
If a spring roll looks swollen before frying, it is already more likely to split; leave enough wrapper space for a tight close.

Amount looks right? Move to folding.

How to Fold Spring Rolls

Folding is easier when the filling is cool and the wrapper is soft. Work with one sheet at a time and keep the rest covered.

  1. Place one wrapper on the counter like a diamond, with one corner pointing toward you.
  2. Add the filling just below the center.
  3. Fold the bottom corner over the filling.
  4. Tuck gently once so the filling sits snugly inside.
  5. Fold the left and right corners inward.
  6. Roll tightly toward the top corner.
  7. Brush the final corner with sealing paste.
  8. Press to seal and place the roll seam-side down.

Folding Sequence

First fold cue: Start with a gentle tuck, not a hard squeeze, so the wrapper stays smooth and the filling stays compact.

Hands folding the bottom corner of a spring roll wrapper over the vegetable filling.
First, pull the bottom corner over the filling and tuck it gently, creating a firm base before the side folds.

Side fold cue: Bring the corners in evenly so there are fewer open edges for oil to find.

Hands folding the side corners of a spring roll wrapper inward over the filling.
Next, bring both side corners inward so the filling stays contained and the roll has fewer chances to leak.

Folding cue: Once the fold pattern makes sense, repeat the same light-fill, firm-tuck, neat-fold rhythm for the whole tray.

A four-step guide showing how to fill, tuck, fold the sides, and seal spring rolls.
Once you understand the fold, the process becomes repeatable: fill lightly, tuck firmly, fold neatly, seal well, and move on.

The roll should feel snug but not stretched. If the wrapper is pulling tight before you seal it, there is too much filling.

Torn wrapper? Patch it with a small scrap and paste, then use that roll as the test piece. The first one is allowed to look a little awkward. A secure seal matters more than a perfect shape, and the next few usually get neater as your hands find the rhythm.

Sealing and Resting Before Frying

Seal cue: The paste should be thick enough to hold the final edge closed without running down the wrapper.

Thick sealing paste being brushed onto the final corner of a spring roll wrapper.
Use thick flour or cornstarch paste on the final edge, since a stronger seal holds better once the rolls hit hot oil.

Resting cue: Keep each wrapped roll seam-side down while the rest of the batch is finished.

Uncooked spring rolls arranged seam-side down on a tray with wrappers and filling nearby.
After sealing, rest each roll seam-side down; the gentle pressure helps the closed edge stay secure before frying.

After the first few, the motion becomes simple: fill, tuck, fold, seal, repeat. The tray starts filling up, the rolls look neater, and the frying suddenly feels much less intimidating.

Wrapped and sealed? Go to frying while the wrappers are still flexible.

How to Fry Spring Rolls So They Stay Crispy

This is the part where the rolls change from neat little parcels into the snack everyone starts reaching for. Once they are wrapped, the oil temperature decides whether they turn crackly or greasy. They need hot oil, but not smoking oil. Cool oil makes wrappers absorb oil before they crisp. Oil that is too hot browns the outside before the center heats evenly.

Use the temperature range as your guardrail, then watch the oil and listen to the sizzle. It should sound active but not angry. Rolls should sizzle steadily, not sit quietly and soak, and not brown the second they touch the oil.

SituationTemperatureWhat it means
Freshly wrapped spring rolls175–185°C / 350–365°FBest range for crisp, golden rolls.
Homemade frozen rolls, uncookedAbout 190°C / 375°FThe frozen rolls drop the oil temperature quickly.
Too coolBelow 170°C / 340°FRolls can become oily and pale.
Too hotAbove 190°C / 375°FWrappers brown too fast and may blister aggressively.

Temperature and Bubble Cues While Frying

Temperature cue: Use 175–185°C / 350–365°F for fresh rolls so the wrapper crisps before it absorbs too much oil.

Oil temperature guide showing three spring rolls: pale and oily when too cool, golden at 175–185°C / 350–365°F, and too dark when too hot.
Fresh spring rolls crisp best at 175–185°C / 350–365°F, where the wrapper gets even color without darkening too fast.

Bubble cue: Look for steady bubbling around the wrapper, not a quiet soak and not an angry boil.

Golden spring rolls frying in hot oil with steady bubbles around the wrappers.
During frying, watch the bubbles: steady bubbling means crisping, quiet oil suggests heaviness, and violent bubbling can brown the wrapper too fast.

Use 2–3 inches of oil or enough for the rolls to float. Fry in small batches and turn gently. In a medium pan, 3–5 at a time is usually safer than a crowded batch.

A thermometer is best. Without one, dip the handle of a wooden spoon or a chopstick into the oil. Small, steady bubbles around it usually mean the oil is ready. Violent bubbling or smoke means the oil is too hot.

What the First Test Roll Tells You

  • Opens in oil: the seal is weak or the paste is too thin.
  • Browns too fast: the oil is too hot.
  • Turns pale and oily: the oil is too cool.
  • Bursts: the filling is wet, warm, or overpacked.

That first roll tells you everything: whether the seal holds, whether the oil is hot enough, and whether the filling stayed dry. Once it comes out crisp, the rest of the batch feels easy.

Test cue: One roll can save the batch by showing whether the seal holds and the oil is in range.

A single uncooked spring roll being lowered into hot oil with metal tongs.
Fry one test roll before the full batch; it quickly reveals whether the filling, seal, and oil temperature are ready.

Drain fried rolls on a wire rack when possible. A rack lets steam escape and keeps the wrappers crisp. Paper towels also work, but avoid stacking hot rolls on top of each other. Give them a minute on the rack, then serve while the shell still sounds crisp when you move it.

Drain and Check the Shell

Draining cue: Airflow matters after frying too. A rack lets steam escape instead of trapping it under the rolls.

Freshly fried spring rolls draining on a wire rack over a tray.
After frying, use a wire rack when possible; it lets steam escape instead of collecting underneath and softening the shell.

Texture cue: The best shell looks thin, golden, and lightly blistered rather than thick, smooth, or oily.

Close-up of a golden spring roll wrapper with a lightly blistered crisp surface and small flakes.
Look for this lightly blistered surface: it signals a thin wrapper that fried hot enough to crisp without soaking up excess oil.

Want a lighter version? See air fryer spring rolls.

Back to top

Air Fryer Spring Rolls and Baked Spring Rolls

Deep frying gives the crispiest, most delicate result. Think of the air fryer version as a lighter, weeknight-friendly roll, not an exact copy of the deep-fried one. It can still be crisp, but it will not have the same delicate blistered shell.

Deep Fried vs Air Fryer Texture

Texture comparison: Deep frying gives the most blistered shell, while the air fryer trades some delicacy for convenience.

A comparison of a deep-fried spring roll and an air fryer spring roll with different wrapper textures.
Deep frying gives the most delicate blistered shell, while air frying gives a lighter finish that still works for easier home cooking.

Preheat the air fryer if your model recommends it. A hot basket helps the wrapper start crisping sooner instead of drying out slowly.

MethodTemperatureTimeBest cue
Deep fry175–185°C / 350–365°F3–5 minutesGolden, crisp, lightly blistered wrapper.
Air fryer, standard rolls190–200°C / 375–400°F10–15 minutesCrisp outside, lightly browned, flipped halfway.
Air fryer, thicker rolls180°C / 355°F16–20 minutesCooked through without burning outside.
Oven-baked200°C / 400°F20–25 minutesCrisp edges and golden patches.
Homemade frozen rolls, uncooked200°C / 400°F12–16 minutes, plus more if neededHot center and crisp wrapper.

Store-bought frozen spring rolls are often smaller or partially cooked, so they may air fry faster. Follow the package timing and use the same cues: hot center, crisp wrapper, and no cold spots.

Air Fryer Setup That Crisps Evenly

For the air fryer, brush or spray the rolls lightly with oil on all sides. Arrange them in a single layer with space between each one. Flip halfway through cooking. Dry-looking wrappers usually need a little more oil coating.

Air fryer cue: Arrange rolls in one layer with space between them, then use a light oil coating for better browning.

Spring rolls arranged in a single layer inside an air fryer basket with space between each roll.
Space is the first trick for air fryer spring rolls; a single layer helps hot air reach the wrapper from all sides.

For the most blistered shell, use the deep-fry method.

If air-fried rolls brown unevenly or stay soft in patches, this guide to common air fryer mistakes is worth checking, especially for crowding, airflow, and oil coating.

For baked rolls, place them on a rack set over a tray when available. Brush or spray with oil and bake until crisp-edged and golden. Turn once for more even browning.

Best Sauces for Spring Rolls

The dip is not just extra. It is what makes the second bite as exciting as the first. A good dip resets the bite: it cuts the oil, wakes up the filling, and makes the next roll feel lighter than the last.

Put the sauce close to the platter, because the first few rolls usually disappear before the next batch is out of the oil.

MoodDipBest with
Street-style sweet heatSweet chili sauceCrispy vegetable spring rolls
Sharp and saltySoy-vinegar-garlic dipChinese-style spring rolls
Indo-Chinese spicySchezwan-style sauceVeg, chicken, or noodle rolls
Indian snack plateGreen chutneyFried snacks and veg rolls
Creamy and richPeanut chutney or peanut sauceTofu rolls, fresh rice paper rolls, and some vegetable rolls

Sauce cue: Pick a dip that cuts through the fried shell instead of making the bite feel heavier.

Crispy spring rolls served with sweet chili, soy-vinegar, Schezwan, green chutney, and peanut dipping sauces.
Choose a spring roll sauce by contrast: sweet chili adds heat, soy-vinegar adds sharpness, and chutney keeps each bite fresh.

Quick soy-vinegar dipping sauce

For a quick soy-vinegar dipping sauce, mix 2 tablespoons soy sauce, 1 tablespoon vinegar, 1 small grated garlic clove, ½ teaspoon sugar, chili oil or chili flakes to taste, and 1 tablespoon finely chopped spring onion. Taste and add more vinegar if you want it sharper.

Fresh chutney option

For an Indian-style fresh dip, green chutney brings coriander, mint, chili, lemon, and ginger brightness that cuts beautifully through fried spring rolls.

Peanut sauce note

Peanut sauce is excellent with fresh rice paper rolls, tofu rolls, and summer rolls. With crispy spring rolls, it works best when you want a richer, creamier dip rather than a sharp chili sauce. For a thicker Indian-style peanut dip, this tangy spicy peanut chutney gives the rolls a creamy, nutty, slightly sharp contrast without needing a heavy mayo-style sauce.

Making these ahead? Jump to freezing and reheating.

Spring Roll Variations

Once you understand the dry-filling rule, variations stop feeling risky. The filling can change; the moisture rule does not. Cook the filling, let excess liquid evaporate, cool it, then wrap.

  • Vegan spring rolls: use vegan wrappers and keep the filling vegetable, mushroom, tofu, or noodle-based.
  • Mushroom spring rolls: add sliced mushrooms, but cook them until their moisture evaporates.
  • Chicken spring rolls: add cooked shredded chicken or cooked minced chicken; do not add wet gravy.
  • Shrimp or prawn spring rolls: use chopped cooked shrimp or prawns, pat dry if needed, and avoid wet sauce.
  • Tofu spring rolls: press the tofu first, then brown it lightly or crumble it into the vegetable mixture.
  • Noodle spring rolls: use cooked, cooled, roughly chopped noodles. Too many noodles make the filling heavy.
  • Fresh rice paper rolls: use rice paper, fresh herbs, noodles, vegetables, tofu, shrimp, or chicken. Do not fry this version.

Meat, seafood, or tofu should be cooked before wrapping unless a specific recipe is designed for raw filling. Spring rolls fry quickly, so the wrapper can brown before a raw filling cooks safely and evenly.

Make Ahead, Freezing, and Reheating

These are good for prep, but timing matters. The filling can be made ahead. Wrapped uncooked rolls should either be cooked soon or frozen, because moisture from the filling can soften the wrappers over time.

This is the part that makes spring rolls party-friendly: the messy work can happen earlier, and the crisping can happen when everyone is ready to eat. Frying from frozen also keeps the wrappers from sitting around and slowly softening.

  • Filling only: refrigerate for 1 day once cool. Bring closer to room temperature before wrapping and drain off any collected moisture.
  • Wrapped uncooked rolls: refrigerate for 2–4 hours if needed, but cook them soon for the best texture.
  • Wrapped uncooked frozen rolls: freeze on a tray until firm, then transfer to a freezer-safe bag or container.
  • Cooked leftovers: reheat in an air fryer or oven at 180–200°C / 350–400°F until hot and crisp.

Freezing cue: Freeze uncooked rolls separately first, then bag or box them once firm.

Uncooked spring rolls spaced apart on a parchment-lined tray with a freezer-safe container nearby.
To freeze spring rolls properly, firm them up on a tray first; once solid, they store neatly and cook more evenly later.

Freeze homemade uncooked rolls for up to 2–3 months for best quality. If stacking, use parchment between layers so they do not stick together. Fry or air fry from frozen without thawing, because thawing can make the wrappers wet and sticky.

Use the microwave only when crunch does not matter. It heats the filling, but it softens the wrapper.

Spring Roll Substitutions and Method Swaps

Most swaps are safe once you know what they change: wrapper texture, moisture level, or cooking method.

SwapWorks?What changes
Rice paperNot for this main methodUse it for fresh rolls unless following a separate fried rice paper technique.
Egg roll wrappersIn a pinchThe rolls will be thicker, heavier, and chewier.
Frozen vegetablesOnly if cooked dryThey release more moisture and can make the filling soggy.
Air fryerYesLighter result, less blistered shell, needs oil coating.
Homemade spring roll sheetsYes, if thin and flexibleMore work and less predictable than store-bought frozen wrappers.

The safest swap is the one that keeps the roll thin, dry, and quick-cooking. Once the wrapper gets thicker or the filling gets wetter, the texture changes too.

Spring Roll Troubleshooting

Most spring roll problems are not mysterious. They usually come from moisture, filling amount, sealing, or oil temperature. A soggy or burst roll does not mean the recipe failed. Do not judge the whole batch by one bad roll; the first failure usually tells you exactly what to change.

ProblemLikely causeFix
Spring rolls are soggyWet filling, warm filling, or cool oilCook filling until the pan looks dry, let it cool, and fry hotter.
Rolls burst while fryingOverfilled roll, trapped steam, or loose wrappingUse less filling, let it stop steaming first, and roll more securely.
Wrappers tearWrappers dried out or were handled roughlyKeep wrappers covered and use gentle pressure.
Rolls open in the oilWeak seal or watery pasteUse a thicker paste and place rolls seam-side down.
Spring rolls are oilyOil too cool or pan overcrowdedFry fewer at a time and keep oil in the correct range.
Outside browns too fastOil too hotLower heat slightly and keep the oil below 190°C / 375°F.
Air fryer rolls look dryNot enough oil on the wrapperBrush or spray lightly with oil before air frying.
Filling tastes flatNot enough acid, pepper, or aromaticsAdd vinegar, pepper, chili sauce, garlic, or spring onion.

Troubleshooting cue: Match the symptom to the cause before changing the whole recipe.

Troubleshooting guide for spring rolls: soggy means wet filling or cool oil, burst means overfilled or warm filling, oily means oil too cool, torn means dry wrapper, and flat means it needs acid or aromatics.
Use the symptom as your clue: soggy, burst, oily, torn, and flat spring rolls each point to a different fix.

Need the full method again? Jump back to the recipe card.

Back to top

Spring Roll Recipe FAQs

Are spring rolls the same as rice paper rolls?

No. These crispy rolls use thin wheat-based wrappers and are cooked. Rice paper rolls are softer, fresh rolls made with soaked rice paper sheets.

What wrappers are best for crispy spring rolls?

Thin wheat spring roll wrappers or frozen spring roll sheets are best. Rice paper is for fresh rolls, while egg roll wrappers make a thicker, chewier fried roll.

How do you keep spring rolls from getting soggy?

Cook the filling until there is no loose liquid, let it cool before wrapping, avoid overfilling, fry in hot oil, and do not stack the rolls while hot.

Why did my spring rolls burst while frying?

They usually burst because the filling was too wet, too warm, or packed too tightly. Weak sealing can also make rolls open in the oil.

What temperature should oil be for spring rolls?

Freshly wrapped rolls do best around 175–185°C / 350–365°F. Homemade frozen rolls that have not been cooked yet can start closer to 190°C / 375°F.

How long do you fry spring rolls?

Freshly wrapped crispy spring rolls usually take 3–5 minutes at 175–185°C / 350–365°F, depending on wrapper thickness, filling amount, and batch size.

Can you pan fry spring rolls instead of deep frying?

Yes, but use enough oil to coat the bottom of the pan generously and turn the rolls carefully. They can still crisp, but the browning will usually be less even than deep frying.

Do you cook the filling before wrapping spring rolls?

Yes. Raw vegetables release too much water inside the wrapper. A quick stir-fry seasons them and keeps the finished rolls crisper.

How long do spring rolls take in the air fryer?

Standard homemade air fryer spring rolls usually take 10–15 minutes at 190–200°C / 375–400°F. Brush or spray them lightly with oil and flip halfway.

Should spring rolls be frozen before or after frying?

Freeze homemade spring rolls before frying for the best make-ahead texture. Fry or air fry them from frozen without thawing.

What sauce goes best with spring rolls?

Sweet chili sauce is the easiest match. Soy-vinegar-garlic dip, Schezwan-style sauce, green chutney, and peanut chutney also work well.

Before You Fry Your Next Batch

Once the filling is dry, the wrappers stay covered, and the oil is steady, the recipe becomes simple.

The first batch may not look perfect. That is fine. As you understand the filling, wrapper, fold, and oil, every batch gets cleaner, crisper, and easier.

A good batch rarely waits politely on the platter. Serve the spring rolls while the wrappers still crackle, with a bright dip close by. That contrast — hot filling, crisp shell, sharp sauce — is the reason they disappear so quickly from the plate.

Serving cue: Serve the rolls while the shell still crackles and the sauce is close enough for every bite.

Crispy spring rolls on a serving platter with dipping sauces, scattered vegetables, and a hand reaching for one.
Serve spring rolls hot, before the wrappers lose their crackle; the best bite is crisp shell, savory filling, and bright sauce together.

Back to recipe card · Back to top