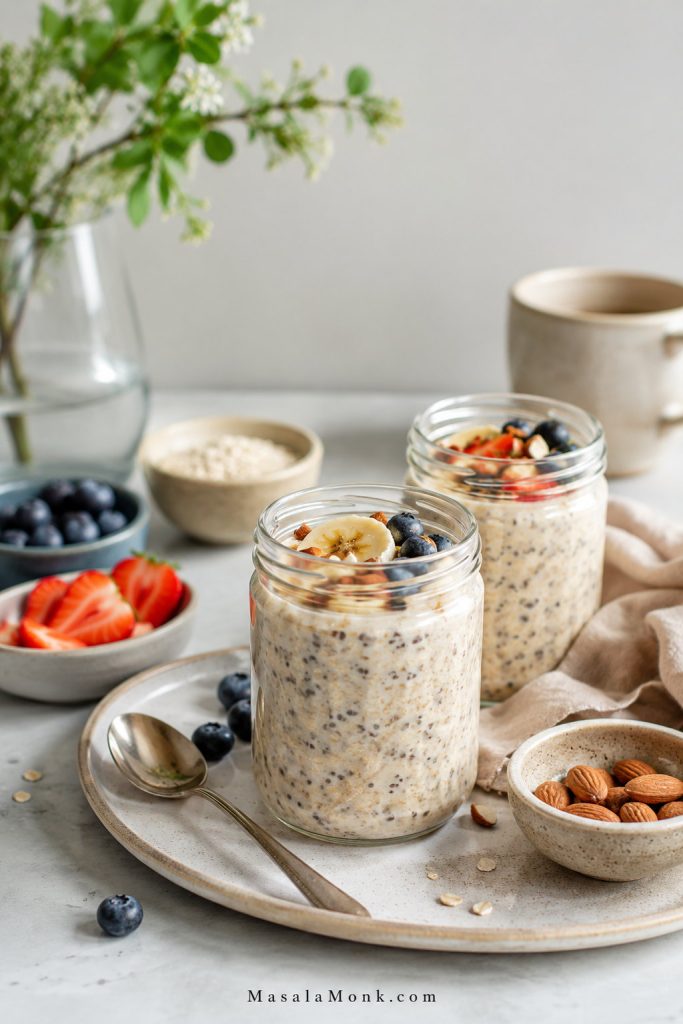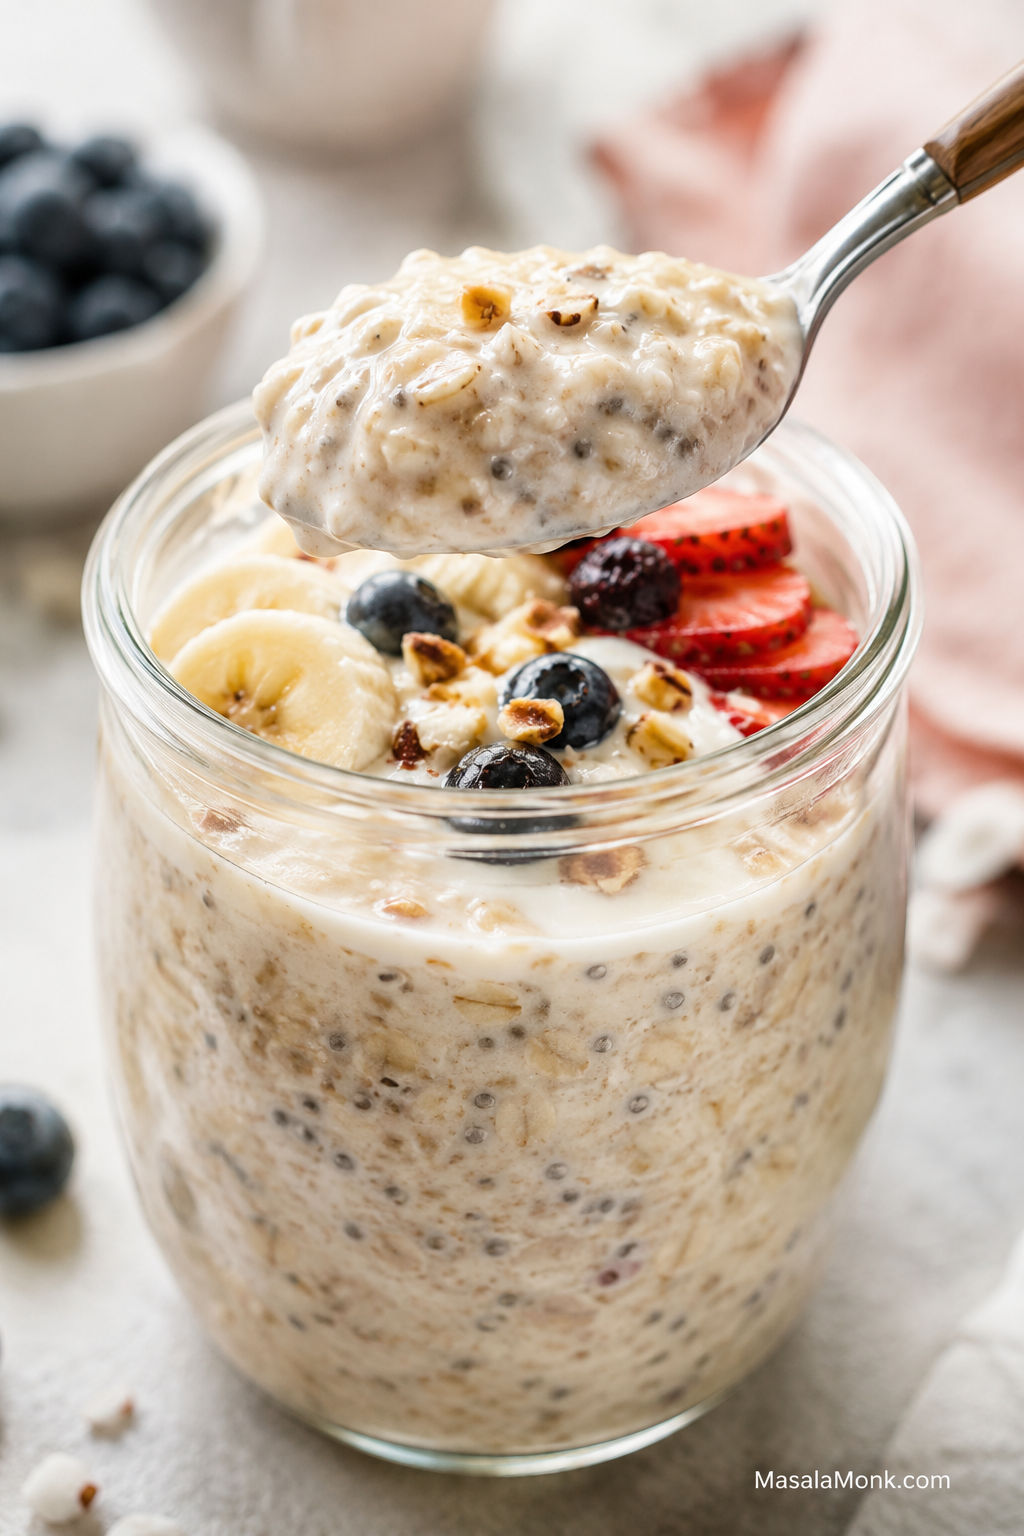
This overnight oats recipe gives you one dependable breakfast jar, then shows you exactly how to adjust it. Start with rolled oats, milk, yogurt or chia, a little sweetness, and a few hours in the fridge. By morning, the oats soften into a creamy, spoonable breakfast with just enough chew — not watery, not gluey, and not bland.
The real secret is not one rigid formula. The best overnight oats depend on the consistency you like: creamy with yogurt, thicker with chia, lighter without yogurt, looser with extra milk, or higher-protein with Greek yogurt and protein powder. Once you know the base, you can turn the same chilled oats into peanut butter, mango, chocolate, apple cinnamon, coffee, banana, berry, or matcha overnight oats without learning a new recipe every time.
The goal is simple: you should be able to mix a jar at night, understand why the texture works, and know exactly what to do in the morning if it needs more milk, more chia, better toppings, or a little extra flavor.
Overnight Oats Guide
Use this guide to get the base ratio right first, then adjust the creaminess, toppings, storage, and flavor so breakfast fits your morning instead of turning into a soggy fridge experiment.
Base Recipe
Method & Texture
Quick Answer: The Best Overnight Oats Ratio
The basic overnight oats ratio
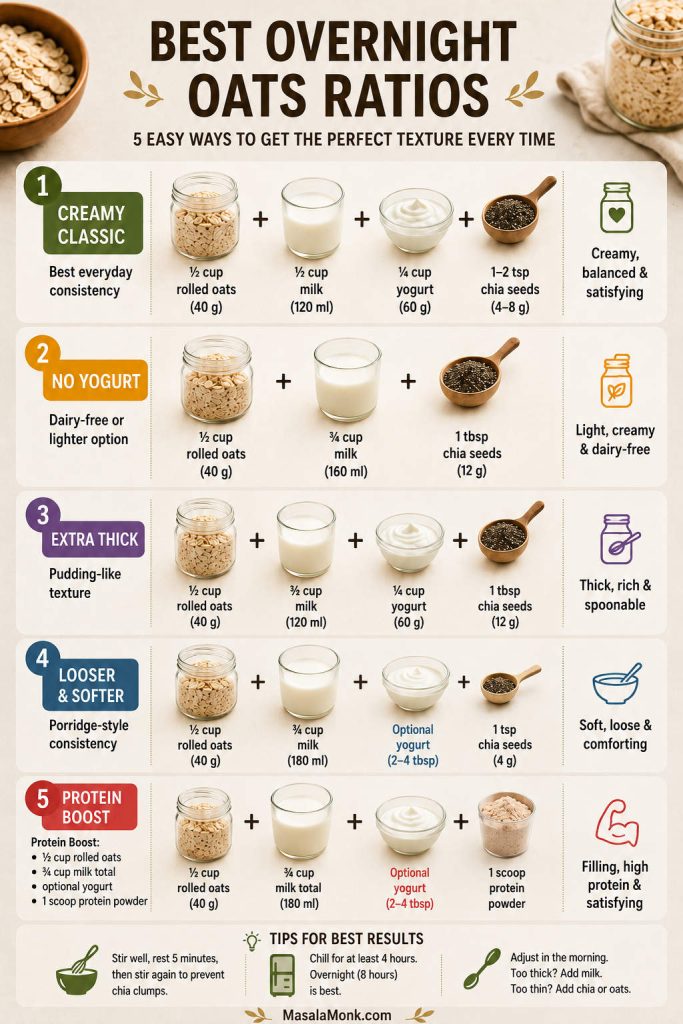
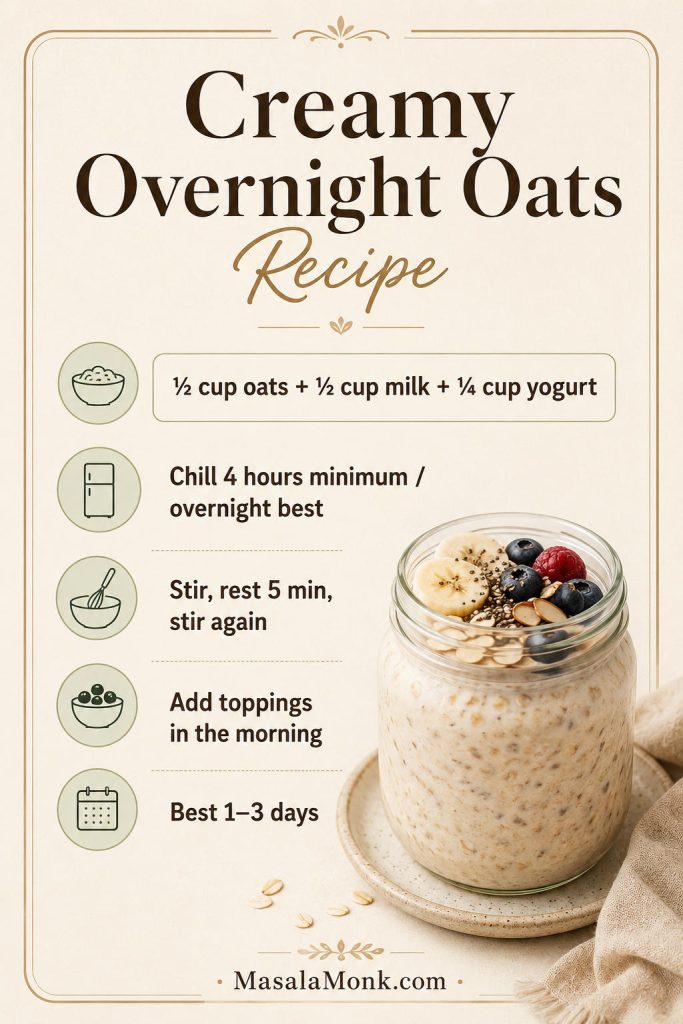
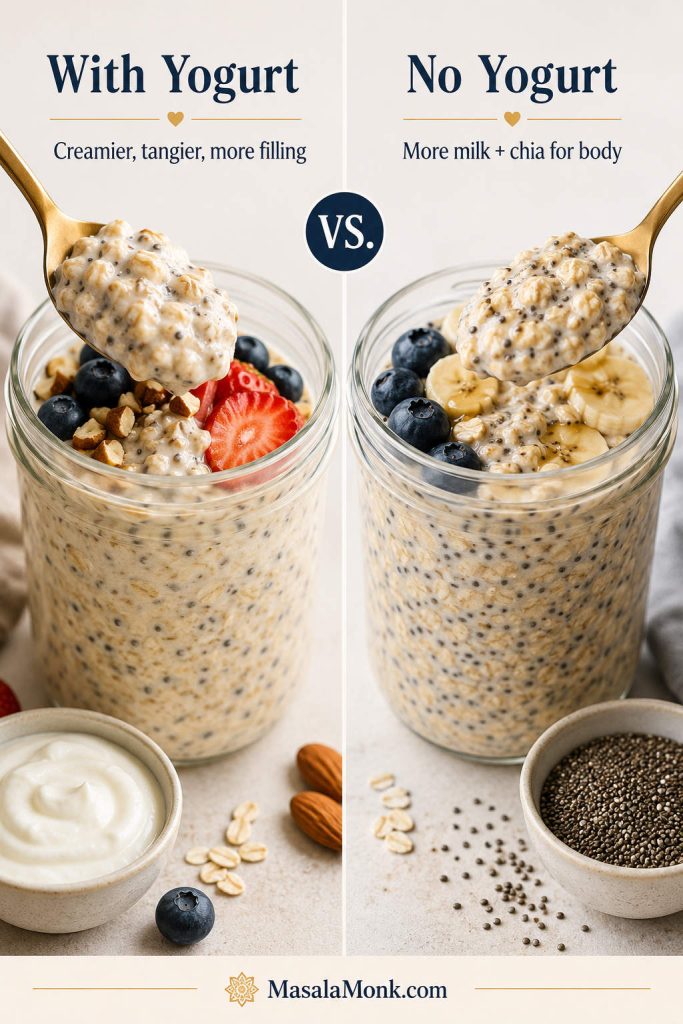
The best all-purpose overnight oats ratio is ½ cup rolled oats + ½ cup milk + ¼ cup Greek yogurt or thick curd. In metric, that is about 40 g oats, 120 ml milk, and 60 g yogurt. This gives you creamy overnight oats that are soft, spoonable, and not too watery.
The no-yogurt ratio
For overnight oats without yogurt, go with ½ cup rolled oats + ⅔ cup milk + 1 tablespoon chia seeds. The extra milk helps the oats soften, while chia seeds thicken the mixture so it still feels creamy.
Best oats and chill time
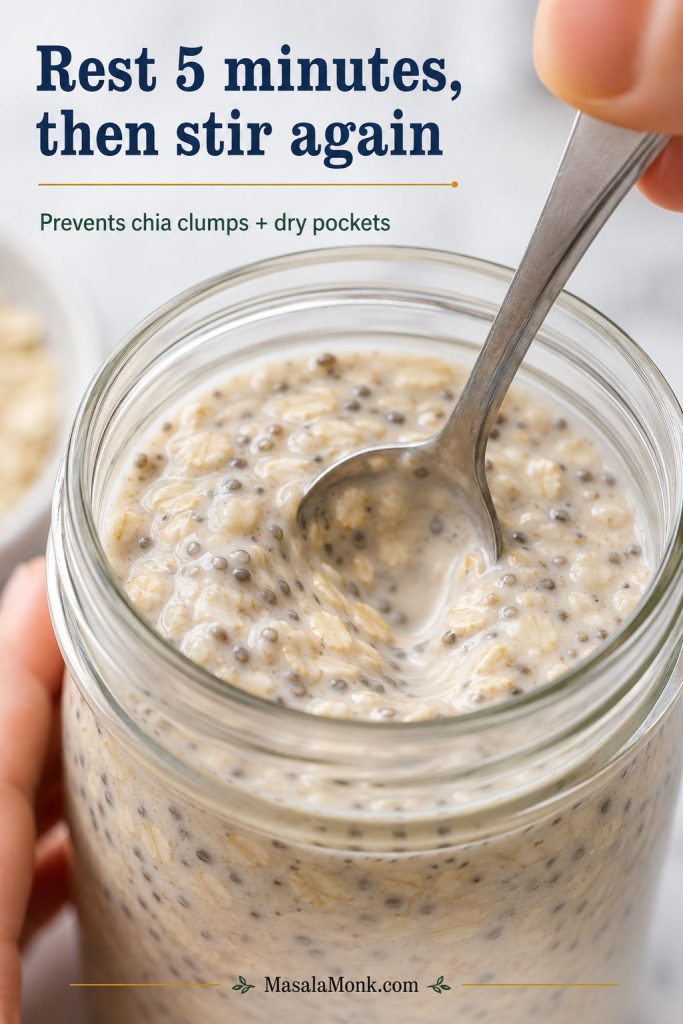
Rolled oats or old-fashioned oats give the best bite. After mixing, let the jar rest for 5 minutes, then stir again before refrigerating to prevent chia clumps and dry pockets. Chill for at least 4 hours, though overnight, about 8 hours, gives the creamiest result.
Ratio variations at a glance
| Style | Oats | Liquid | Yogurt / Chia | Best For |
|---|---|---|---|---|
| Creamy classic | ½ cup / 40 g | ½ cup / 120 ml | ¼ cup / 60 g yogurt + 1–2 tsp chia | Best default consistency |
| No yogurt | ½ cup / 40 g | ⅔ cup / 160 ml | 1 tbsp chia | Dairy-free or lighter oats |
| Extra thick | ½ cup / 40 g | ½ cup / 120 ml | ¼ cup / 60 g yogurt + 1 tbsp chia | Pudding-like oats |
| Looser | ½ cup / 40 g | ¾ cup / 180 ml | Optional yogurt or 1 tsp chia | Softer porridge-style oats |
| Protein powder | ½ cup / 40 g | ¾ cup / 180 ml to start | 1 scoop protein + optional yogurt | Higher-protein meal prep |
Once you know the ratio, you can jump straight to the recipe card or use the troubleshooting guide if your oats usually turn too thick, watery, mushy, or clumpy. Using protein powder? The protein powder tips section explains why the jar may need extra milk after chilling.
Why This Overnight Oats Recipe Works
The method works because it balances three things: enough liquid to soften the oats, enough body to keep the breakfast creamy, and enough flavor so it does not taste flat by morning. Rolled oats absorb milk slowly, yogurt or curd adds creaminess, chia seeds help everything set, and a pinch of salt makes the sweet flavors taste brighter.
The second stir matters too. When oats, chia, yogurt, and milk sit for a few minutes, they begin to thicken. Stirring again before refrigerating spreads the chia seeds evenly and prevents dry oats or thick clumps from settling at the bottom. You can see the technique in the second-stir step.
That is what makes the core recipe flexible without feeling random. You can make it creamier with yogurt, thicker with chia, lighter with more milk, sweeter with ripe fruit, or more filling with protein powder or nut butter, while still keeping the same basic method.
Overnight Oats at a Glance
Before you start, here are the practical details that make the recipe easier to repeat.

| Detail | Best Answer |
|---|---|
| Best oats | Rolled oats or old-fashioned oats |
| Prep time | 5 minutes |
| Cook time | 0 minutes |
| Chill time | 4 hours minimum; overnight / 8 hours best |
| Best container size | 12–16 oz / 350–500 ml; 16 oz is best with toppings |
| Fridge temperature | 40°F / 4°C or below |
| Best storage window | Best in 1–3 days; plain oats usually 3–4 days |
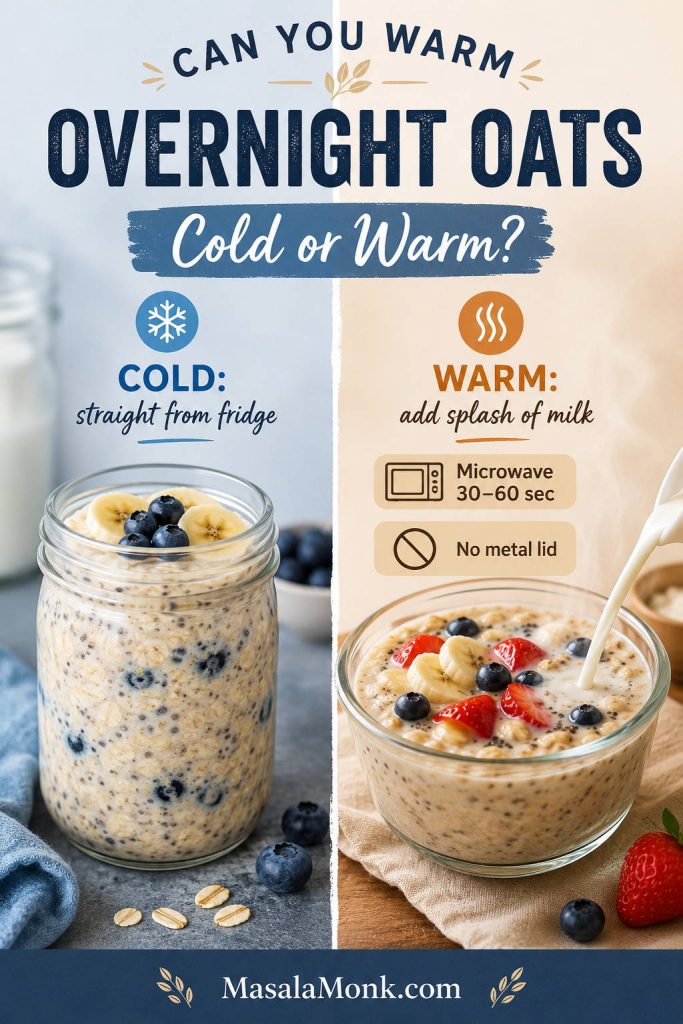
| Eat cold or warm? | Usually cold; can be warmed 30–60 seconds with a splash of milk |
If you only want one version to try first, make the creamy classic below. It gives you enough body from yogurt, enough softness from milk, and just a little chia for structure without turning the oats stiff.
Overnight Oats Recipe Card
Creamy Overnight Oats Recipe
This overnight oats recipe is the dependable starting mix: creamy, lightly thickened, easy to flavor, and flexible enough for yogurt, curd, dairy-free milk, chia, fruit, nuts, or protein add-ins.
Ingredients
- ½ cup rolled oats or old-fashioned oats, about 40 g
- ½ cup milk of choice, 120 ml / 4 fl oz
- ¼ cup Greek yogurt or thick curd, about 60 g
- 1–2 teaspoons chia seeds, about 4–8 g
- 1–2 teaspoons maple syrup, honey, date syrup, or jaggery syrup, 5–10 ml
- ¼ teaspoon vanilla extract
- Pinch of fine salt
- Fruit, nuts, seeds, nut butter, cinnamon, cocoa, coconut, or granola for topping
Instructions
- Add the oats, milk, yogurt or curd, chia seeds, sweetener, vanilla, and salt to a jar or lidded container.
- Stir very well, scraping the bottom and sides so there are no dry oats, chia clumps, or yogurt pockets.
- Let the mixture sit for 5 minutes, then stir again. This second stir helps the chia seeds spread evenly and gives a smoother result.
- Cover and refrigerate for at least 4 hours. For the best consistency, chill overnight.
- In the morning, stir again. If the oats are too thick, loosen with 1–3 tablespoons milk.
- Add fresh fruit, crunchy toppings, nuts, granola, or extra nut butter right before serving.
Recipe Notes
- No yogurt? Combine ½ cup oats, ⅔ cup milk, and 1 tablespoon chia seeds, or see the no-yogurt ratio for the texture logic.
- Want a thicker, pudding-like jar? Increase the chia seeds to 1 tablespoon.
- Adding protein powder? Use 1 scoop and increase the milk by about ¼ cup / 60 ml; see the protein powder tips if your oats turn stiff or clumpy.
- Need more sweetness? Taste in the morning and adjust then, so the jar does not become dessert-sweet overnight.
- For the smoothest mix, stir everything in a bowl first, then transfer it to a jar after the second stir.
- Need more topping guidance? Add crunchy toppings in the morning, or jump to when to add overnight oats toppings.
- Nutrition varies by milk, yogurt, sweetener, and toppings. The base jar is generally more balanced when it includes yogurt or another protein source, while nut butter, granola, dried fruit, chocolate chips, and syrup can raise calories quickly.
Storage
Overnight oats taste best in the first 1–3 days. A plain sealed serving can usually keep for 3–4 days in the refrigerator at 40°F / 4°C or below. Add delicate fruit, nuts, seeds, and granola closer to serving for the best consistency.
Want to change the thickness? Use the ratio guide. Want to keep the same base but change the taste? Go to the flavor ideas.
First time making overnight oats? Start with the creamy classic ratio, keep toppings simple, and adjust the thickness in the morning. After one serving, you will know whether you prefer more milk, more chia, or less yogurt.
Overnight Oats Ratio Guide
The easiest way to build the base is to start with equal parts oats and milk, then decide whether you want yogurt, chia, or both. Yogurt makes the oats creamier and more filling. Chia does a different job: it makes the jar thicker and more pudding-like. Extra milk gives you a looser, softer consistency.
Creamy classic ratio
This is the version to start with if you are making overnight oats for the first time. For a creamy everyday texture, combine ½ cup rolled oats, ½ cup milk, and ¼ cup yogurt or curd. It gives you a satisfying breakfast without making the oats too stiff.
Yogurt vs No-Yogurt Overnight Oats
Go this route when you want dairy-free, vegan, or lighter overnight oats. Instead of yogurt, combine ½ cup rolled oats, ⅔ cup milk, and 1 tablespoon chia seeds. Chia replaces some of the body you would normally get from yogurt.
Extra-thick chia ratio
For a thicker, pudding-like result, keep the classic ratio but increase chia seeds to 1 tablespoon. This works especially well with cocoa, peanut butter, banana, and coffee flavors.
Looser porridge-style ratio
If you like softer oats with more movement, combine ½ cup oats and ¾ cup milk, with yogurt or chia kept optional. This version feels closer to chilled porridge.
Texture tip: Overnight oats thicken as they sit. A jar that looks slightly loose at night can be perfect by morning, while a jar with chia or protein powder may need extra milk after chilling.
Choose your overnight oats texture
There is no single perfect consistency. Some people want oats thick enough to hold a spoon upright, while others want something closer to chilled porridge. Use this as your shortcut.
| If You Like… | Best Adjustment |
|---|---|
| Thick, spoonable oats | Add yogurt plus 1 tablespoon chia seeds. |
| Soft, loose oats | Use ¾ cup milk for every ½ cup oats. |
| Less tang | Use less yogurt and more milk. |
| More natural sweetness | Mix in mashed banana, mango, grated apple, berries, or applesauce. |
| More staying power | Add Greek yogurt, soy milk, chia, protein powder, peanut butter, or nut butter. |
| A lighter breakfast | Use milk plus chia instead of yogurt, and keep toppings simple. |
If your oats still do not come out the way you like, the texture guide and fixes section will help you adjust the next batch.
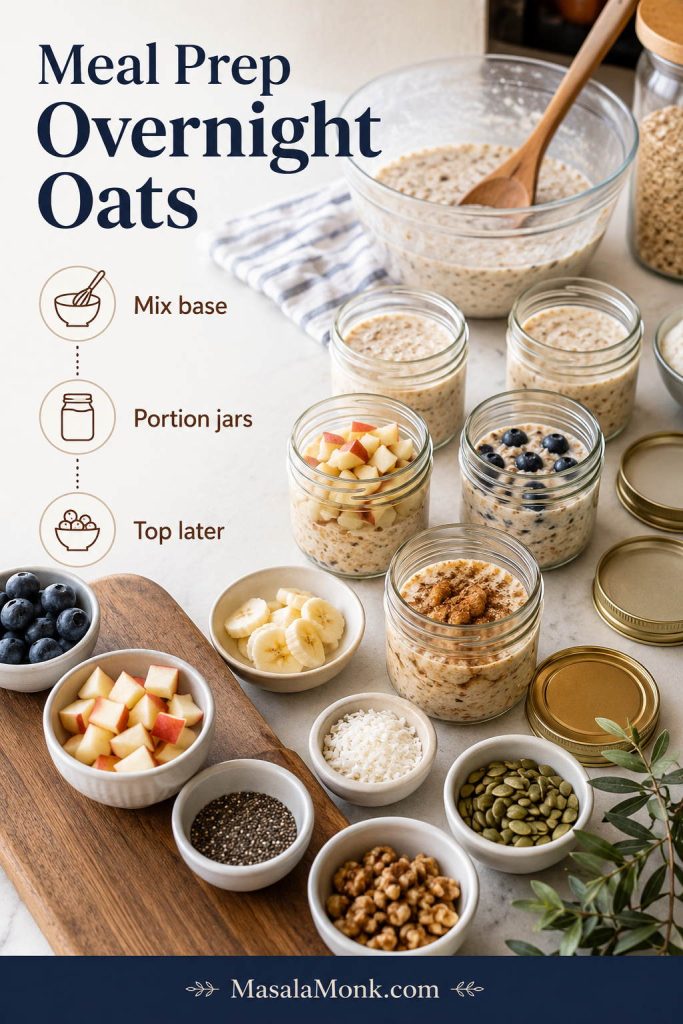
How to Scale Overnight Oats for Meal Prep
For meal prep, mix the oats in a large bowl first, then divide them into jars. This is easier than trying to stir several full containers one by one, and it helps every serving taste consistent.
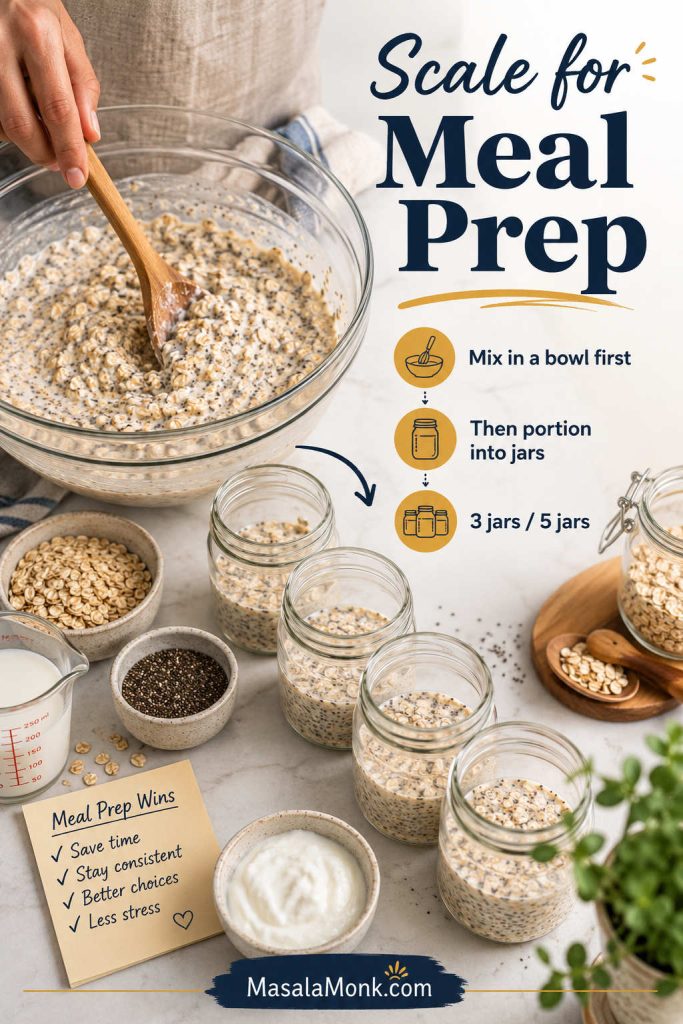
| Servings | Rolled Oats | Milk | Yogurt / Curd | Chia Seeds |
|---|---|---|---|---|
| 1 jar | ½ cup / 40 g | ½ cup / 120 ml | ¼ cup / 60 g | 1–2 tsp |
| 3 jars | 1½ cups / 120 g | 1½ cups / 360 ml | ¾ cup / 180 g | 1–2 tbsp |
| 5 jars | 2½ cups / 200 g | 2½ cups / 600 ml | 1¼ cups / 300 g | 1½–3 tbsp |
Equipment for Overnight Oats
You do not need special equipment, but the right container makes the oats easier to mix, store, and eat. A jar that is too small might technically hold the ingredients, but it will not give you much room to stir or add toppings.
Best Jar Size for Overnight Oats
Use the jar size as a texture tool, not just a container choice. A little extra room makes stirring easier and keeps fruit or crunchy toppings from spilling over.
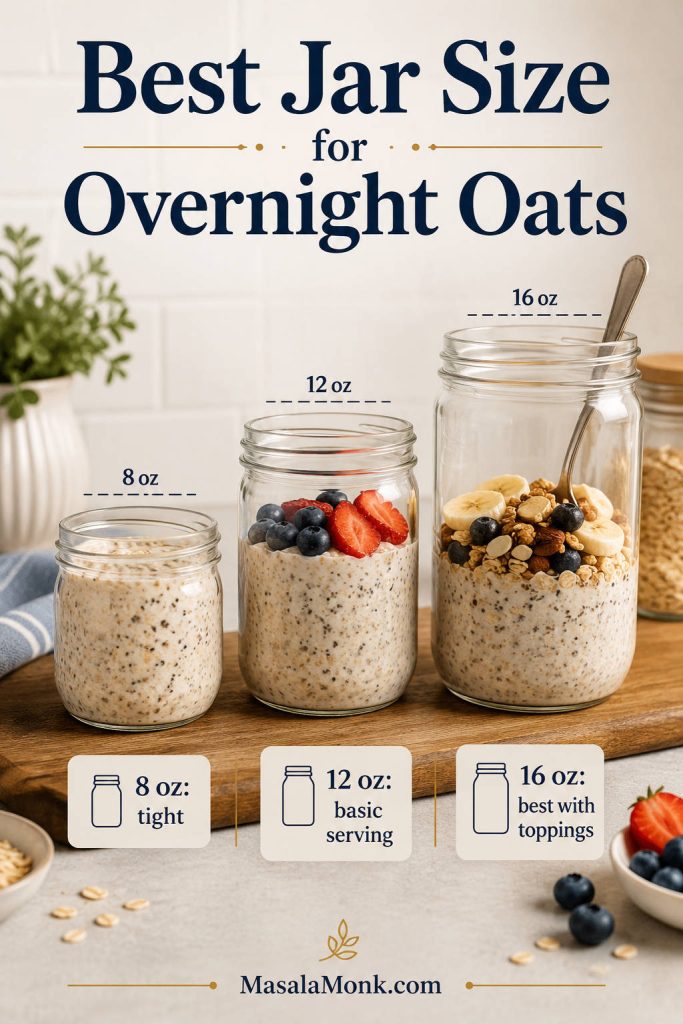
- Jar or lidded container: 12–16 oz / 350–500 ml for one serving.
- 16 oz / 475–500 ml jar: best if you want room for fruit, nuts, yogurt, and stirring.
- Mixing bowl: useful when making 3–5 servings at once.
- Spoon or mini spatula: helpful for scraping the bottom and sides so chia seeds and oats do not clump.
- Measuring cups and spoons: important until you know the consistency you like.
- Microwave-safe bowl: optional, only if you plan to warm the oats.
Ingredients You Need for Overnight Oats
A good jar starts with a simple oat mixture, then gets its personality from fruit, spices, nuts, seeds, nut butter, cocoa, coffee, or coconut. Here is what each ingredient does.
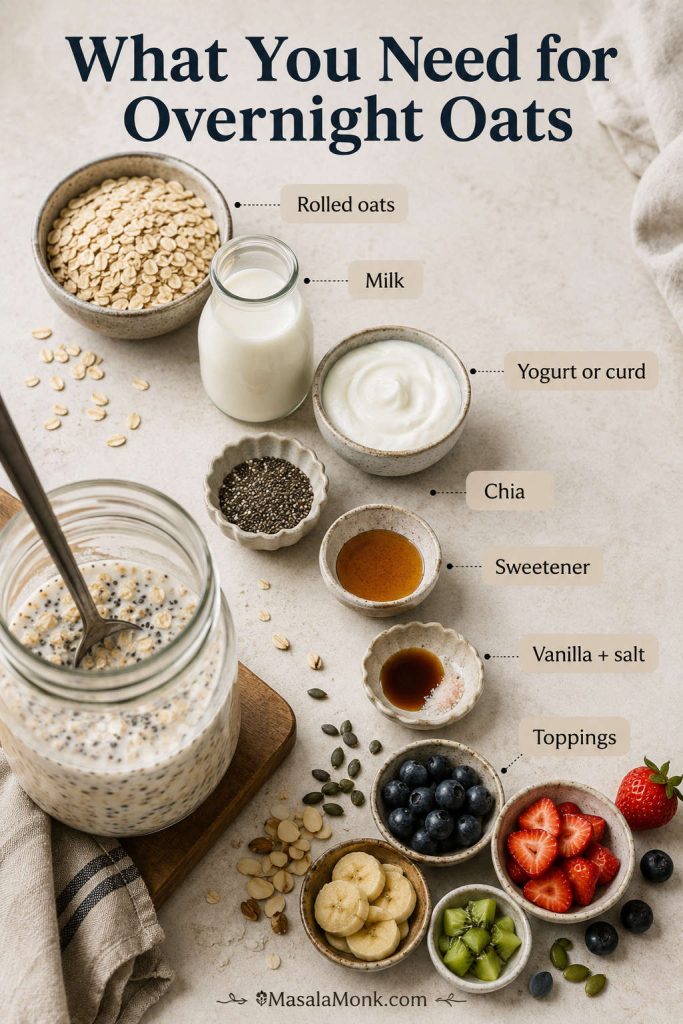
Rolled oats or old-fashioned oats
Rolled oats are the safest default because they soften well while keeping a little texture. Old-fashioned oats and rolled oats can usually be used the same way. For a deeper oat-type breakdown, see this MasalaMonk guide to oats types, nutrition, and differences.
For a quick comparison of rolled oats, quick oats, instant oats, steel-cut oats, and muesli in this recipe, see the best oats for overnight oats section below.
Milk
Dairy milk, oat milk, almond milk, soy milk, coconut milk, and cashew milk can all work. Soy milk and dairy milk add a little more protein. Oat milk and coconut milk make the breakfast creamier, while almond milk keeps it lighter.
Yogurt or thick curd
Greek yogurt or thick curd makes the oats creamier, tangier, and more filling. When your curd is very sour, use a smaller amount and balance it with fruit, vanilla, cinnamon, or a little sweetener.
Chia seeds
Chia seeds thicken the oats and help hold the liquid. Add 1–2 teaspoons for light thickening or 1 tablespoon for a pudding-like result. Too much chia can make the texture feel gluey, so increase it gradually.
If you like the thicker, pudding-style side of overnight oats, you may also enjoy these chia pudding recipes, which use chia as the main thickener rather than a small supporting ingredient.
Sweetener
Maple syrup, honey, date syrup, jaggery syrup, or a mashed ripe banana all work. Start light because fruit and toppings can add sweetness later.
Vanilla, salt, and spices
A tiny pinch of salt makes overnight oats taste less flat. Vanilla, cinnamon, cardamom, cocoa, nutmeg, ginger, or instant espresso powder can also change the flavor without changing the base method.
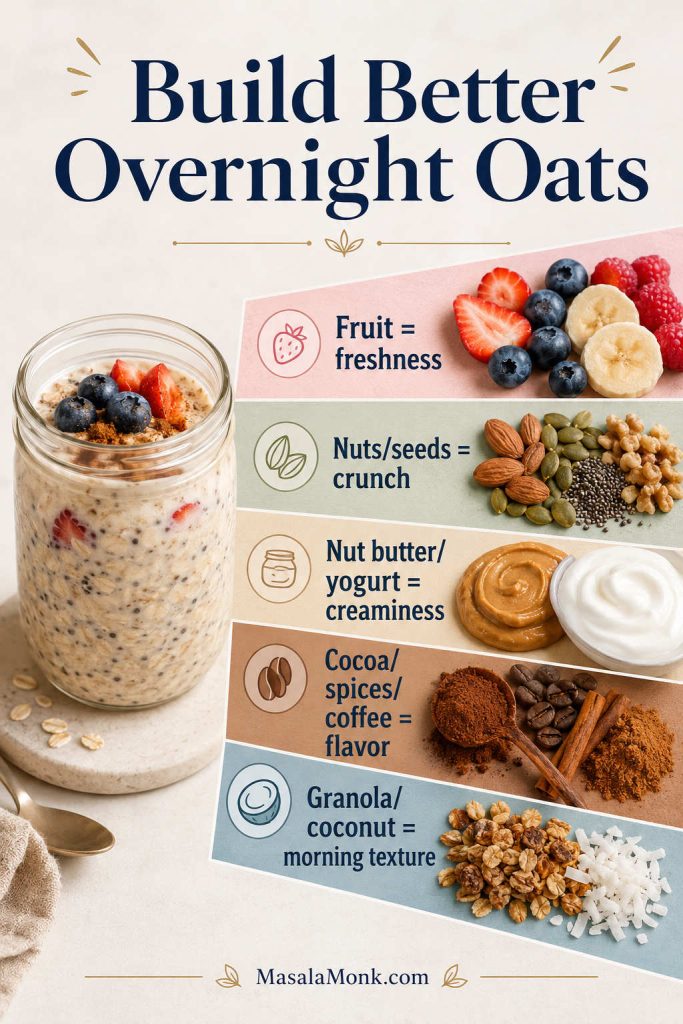
Toppings
Fruit, nuts, seeds, granola, coconut, peanut butter, almond butter, jam, chocolate chips, or roasted makhana can all work. Soft mix-ins can go in at night, while crunchy toppings are better in the morning. For a quick way to build a better jar, see the topping builder.
Build Better Overnight Oats Toppings
Choose toppings by purpose instead of adding everything at once. Freshness, crunch, creaminess, flavor, and texture each do a different job in the jar.
Best Oats for Overnight Oats
The best oats for overnight oats are rolled oats or old-fashioned oats. They absorb liquid evenly and become creamy without turning instantly mushy.

| Oat Type | Can You Use It? | Texture | Best Use |
|---|---|---|---|
| Rolled oats / old-fashioned oats | Yes, best choice | Creamy with light chew | Best default method |
| Quick oats | Yes, but softer | Very soft, can turn mushy | Fast-soak jars or softer oats |
| Instant oats | Only if needed | Soft, sometimes paste-like | Emergency quick version |
| Steel-cut oats | Not a simple swap | Chewy, firm, sometimes tough | Separate steel-cut overnight method |
| Muesli | Yes, if oat-heavy | More varied texture | Nutty, fruit-filled jars |
Rolled Oats vs Quick Oats vs Steel-Cut Oats
The soak changes each oat type differently. This comparison is useful when you want to understand why rolled oats are the safest default for this method.
If you are choosing between rolled oats and steel-cut oats, this MasalaMonk comparison of steel-cut oats vs rolled oats explains the texture difference in more detail.
If your package says old-fashioned oats, this guide to old-fashioned oats and rolled oats will help clarify the naming.
How to Make Overnight Oats
The method is simple, but the small details matter. Stirring well, resting briefly, and stirring again helps prevent dry pockets, chia clumps, and protein powder lumps.

Step 1: Add the base ingredients
Add rolled oats, milk, yogurt or curd, chia seeds, sweetener, vanilla, and salt to a jar or bowl.
Step 2: Stir very well
Scrape the bottom and sides as you stir. Dry oats and chia seeds often hide in the corners of a jar, especially if the container is narrow.
Step 3: Rest for 5 Minutes, Then Stir Again
This second stir is the difference between creamy oats and a serving with clumps at the bottom. It is especially helpful when you use chia seeds, yogurt, cocoa, matcha, or protein powder.
Step 4: Cover and refrigerate
Chill for at least 4 hours. Overnight, or about 8 hours, gives the best consistency because the oats have more time to soften evenly.
Step 5: Stir and adjust in the morning
If the oats are too thick, add 1–3 tablespoons milk. If they are too loose, add a teaspoon of chia or a spoon of oats and let them sit a little longer.
Step 6: Add toppings
Add fresh banana, crisp apple, granola, toasted nuts, and other crunchy toppings right before eating so they keep their bite.
Overnight Oats Texture Guide
Good overnight oats should be creamy, not watery, gluey, or dry. The final consistency comes down to the oat type, liquid amount, yogurt, chia, and how long the mixture rests.
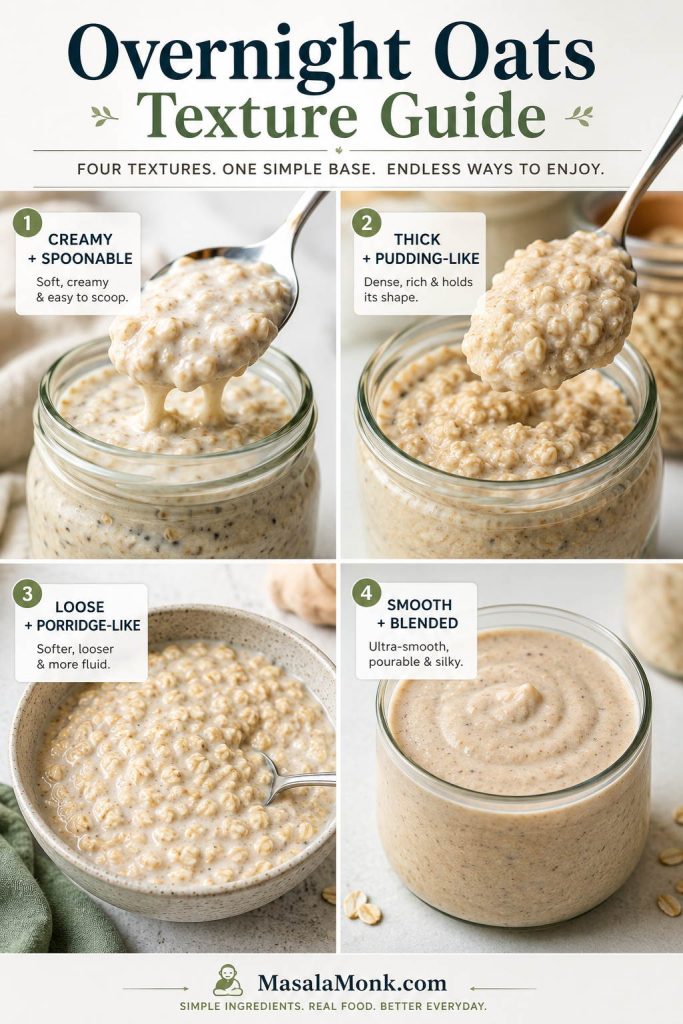
| Texture | How to Get It | Best Ratio |
|---|---|---|
| Creamy and spoonable | Add yogurt or thick curd | ½ cup oats + ½ cup milk + ¼ cup yogurt |
| Thick and pudding-like | Add yogurt plus more chia | ½ cup oats + ½ cup milk + ¼ cup yogurt + 1 tbsp chia |
| Loose and porridge-like | Increase the liquid | ½ cup oats + ¾ cup milk |
| Chewier | Choose thicker rolled oats and soak overnight | Keep the classic ratio, avoid quick oats |
| Smooth/blended | Blend the mixture before chilling | Use the classic ratio, then blend |
If you are trying to fix a jar that already went wrong, start with the too thick vs too runny guide, then use the full overnight oats troubleshooting table.
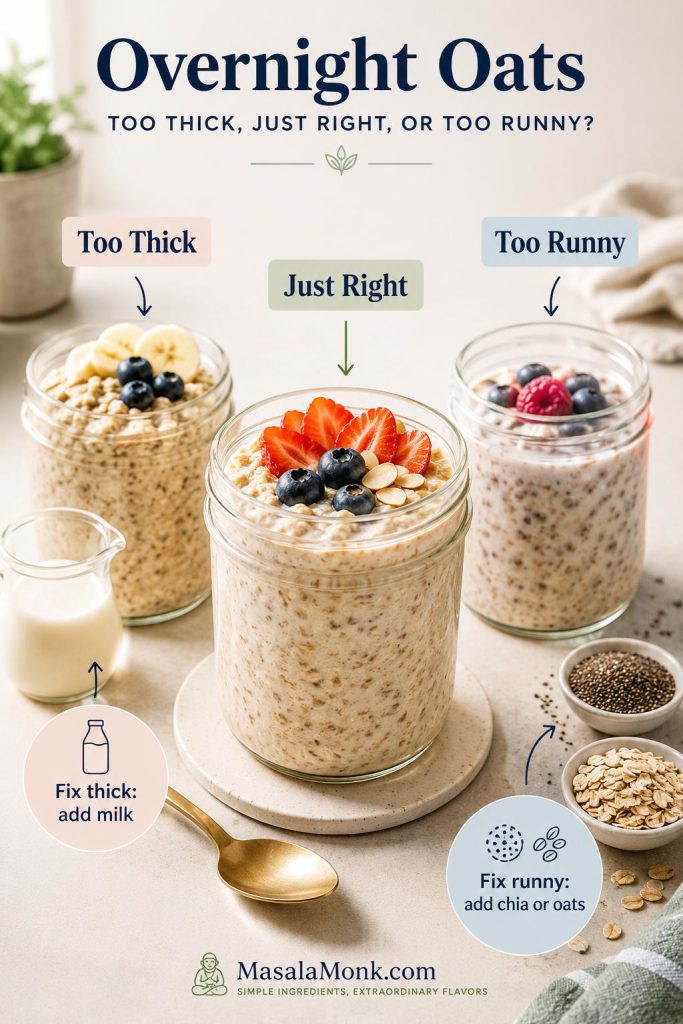
Too Thick, Just Right, or Too Runny?
Before changing the whole recipe, check the texture first. Most jars only need a small correction with milk, oats, or chia seeds.
How to Fix Overnight Oats
A disappointing jar is usually fixable. In practice, most bad overnight oats are not a recipe problem; they are a ratio or topping-timing problem. Too much chia needs milk, too much liquid needs oats or chia, bland oats need salt and flavor, and watery fruit usually means the toppings went in too early.
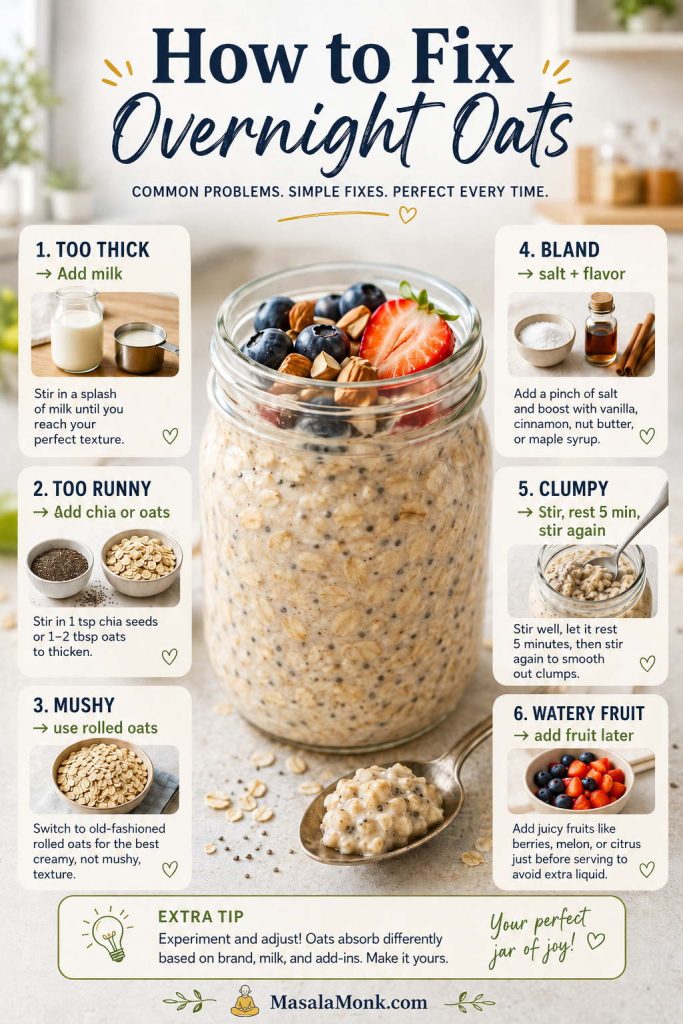
| Problem | Why It Happened | Fix It Now | Next Time |
|---|---|---|---|
| Too thick | Too much chia, protein powder, or too little liquid | Stir in 1–3 tbsp milk | Reduce chia or add more milk |
| Too runny | Too much liquid or not enough soak time | Add 1–2 tsp chia or 1–2 tbsp oats and rest | Start with less milk or more thickener |
| Too mushy | Quick oats, instant oats, or too much liquid | Add crunchy toppings | Choose rolled oats |
| Too chewy | Steel-cut oats or not enough soak time | Add milk and rest longer | Stick with rolled oats for this method |
| Bland | No salt, vanilla, fruit, spice, or enough sweetness | Add salt, cinnamon, vanilla, and fruit | Season the mixture at night |
| Too sour | Too much yogurt or very sour curd | Add milk, fruit, or a little sweetener | Use less yogurt or a milder curd |
| Chia clumps | Not stirred properly | Break clumps with a spoon and loosen with milk | Stir, rest 5 minutes, stir again |
| Protein powder clumps | Powder was not mixed with enough liquid | Stir hard or blend briefly | Mix protein powder with milk first |
| Watery fruit layer | Juicy fruit was mixed in too early | Stir in chia or add thicker topping | Add delicate fruit in the morning |
15 Easy Overnight Oats Flavors
Once the ratio is right, the fun part is flavor. The easiest overnight oats flavors usually follow the same pattern: one main flavor, one creamy or crunchy element, and one fresh topping added in the morning. Start with these combinations, then adjust sweetness and thickness after chilling.
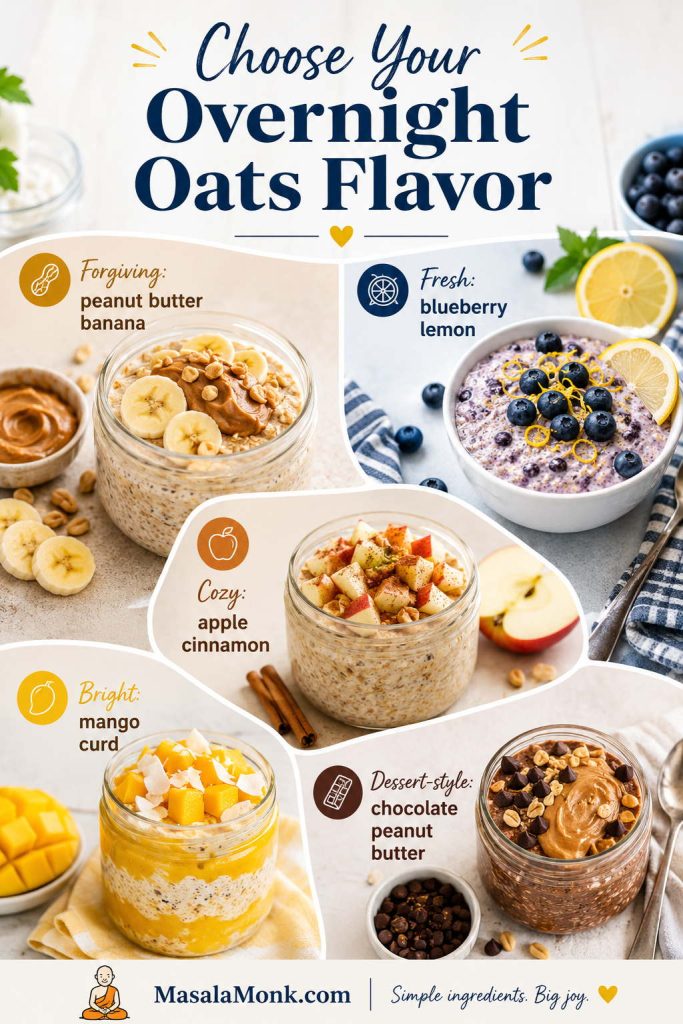
Best Flavors to Try First
If you are not sure where to start, choose by mood. Peanut butter banana is the most forgiving first jar because it hides small texture mistakes well. Mango curd tastes bright and lassi-like. Apple cinnamon feels cozy, especially when you add crisp apple in the morning. Chocolate peanut butter is the dessert-style option, while blueberry lemon keeps the jar fresher and lighter.
How to build better flavor
For a breakfast that tastes fresh, keep juicy fruit and crunchy toppings for the morning. For a more dessert-like jar, mix cocoa, coffee, cinnamon, peanut butter, mashed banana, or coconut into the oats before chilling so the flavor has time to settle.
Fruit-Forward Overnight Oats Flavors
Use this group when you want a brighter breakfast jar. Fruit flavors work best when juicy fruit and crunchy toppings are timed carefully.
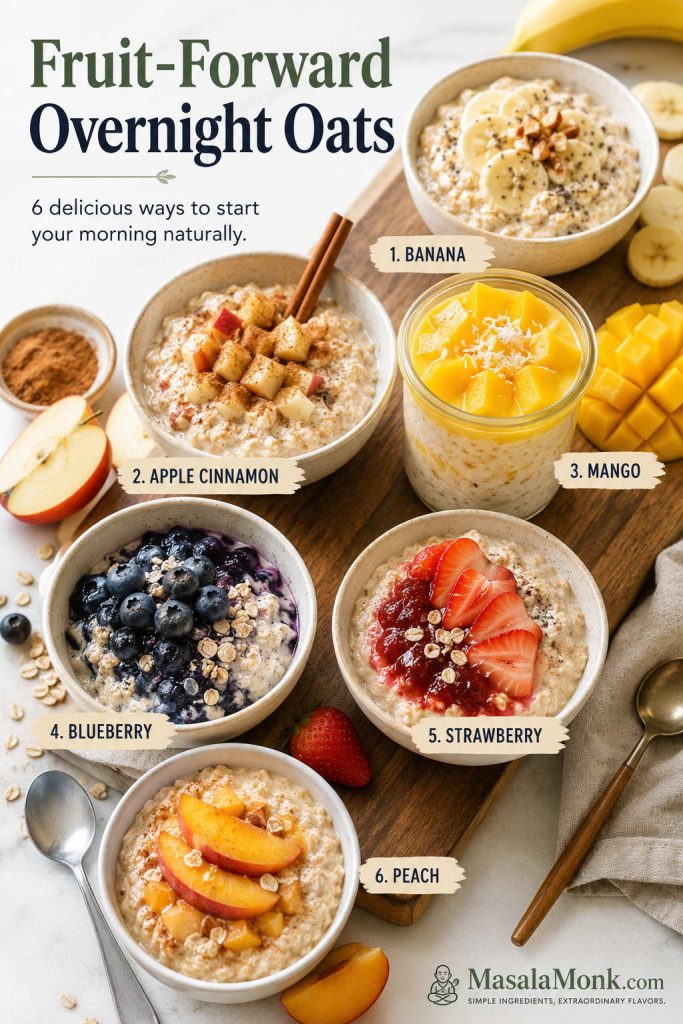
| Flavor | Mix In at Night | Add in the Morning | Texture Note |
|---|---|---|---|
| Banana | Mashed ripe banana + cinnamon | Fresh banana slices, walnuts | Mashed banana thickens the oats |
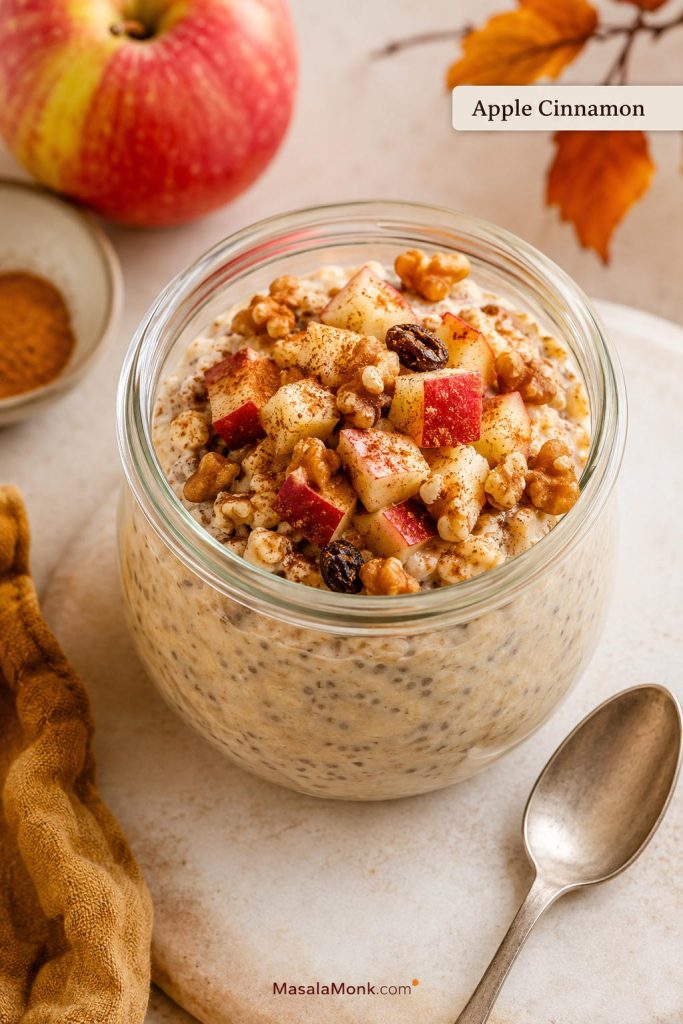
| Apple cinnamon | Cinnamon + grated apple or applesauce | Diced apple, walnuts, raisins | Add crisp apple in the morning |
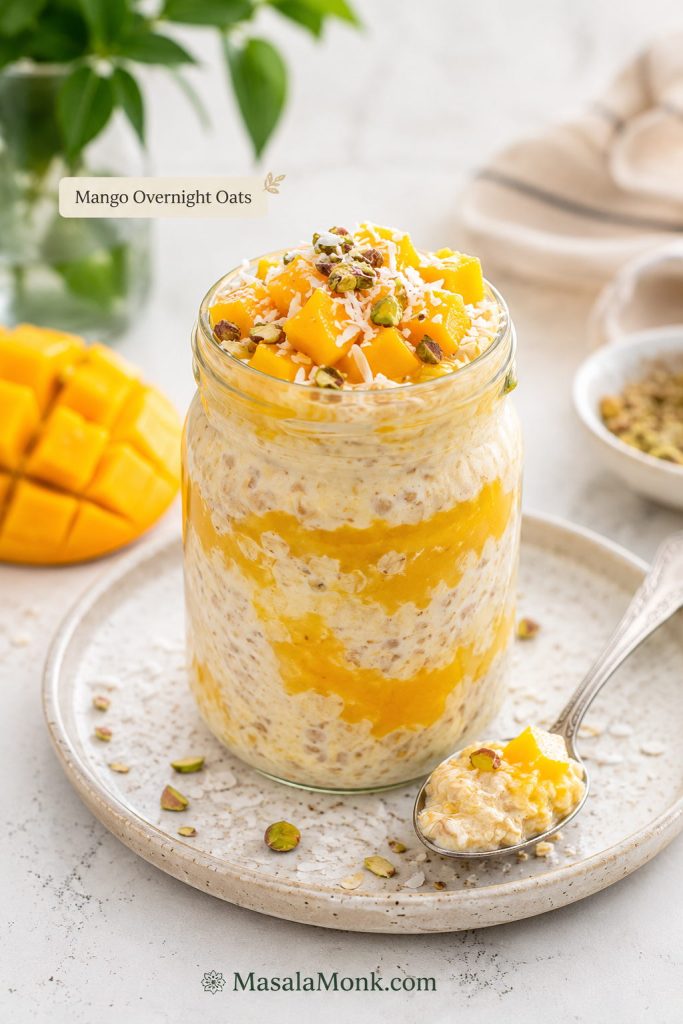
| Mango | Mango puree or chopped mango | Fresh mango, coconut, pistachio | Thick curd gives a lassi-style feel |
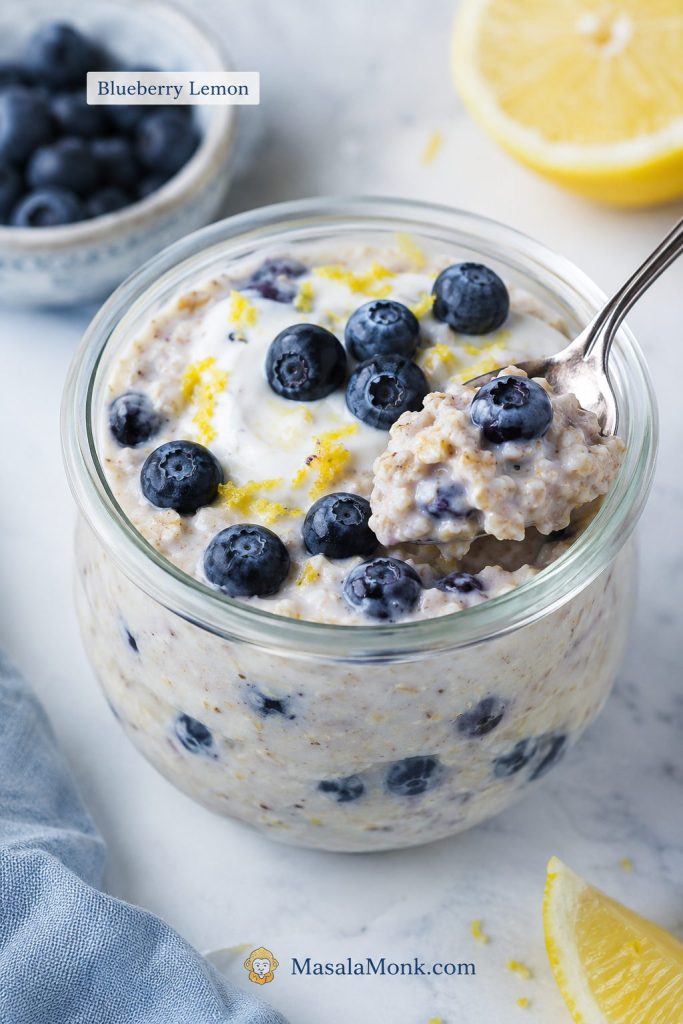
| Blueberry | Frozen or fresh blueberries | Lemon zest, nuts, yogurt swirl | Frozen berries release juice |
| Strawberry | Chopped strawberries or strawberry compote | Fresh strawberries, granola | Add granola only before eating |
| Peach | Chopped peach + cinnamon | More peach, almonds, granola | Ripe peaches can loosen the oats |
If fruit jars often turn watery or soft, the topping timing guide will help you decide what to mix in at night and what to add in the morning.
Apple Cinnamon Overnight Oats
This is the cozy option when you want spice and crunch. Add crisp apple close to serving so the topping stays fresh against the creamy oat base.
Mango Overnight Oats
Mango works especially well with thick curd or yogurt because the jar tastes bright, creamy, and lightly tangy without needing much extra sweetness.
Blueberry Lemon Overnight Oats
Blueberry lemon is the fresh option, but the berries can release juice. Yogurt or chia helps keep the base creamy instead of watery.
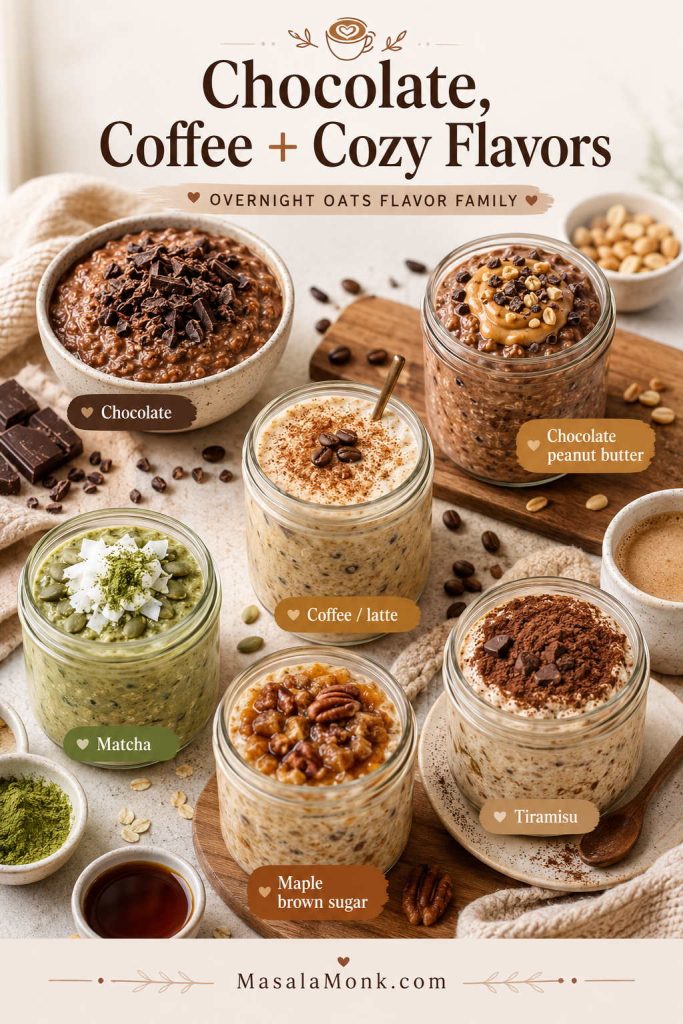
Chocolate, Coffee and Cozy Flavors
These flavors are richer, so balance matters. Bitter ingredients such as cocoa, coffee, and matcha need enough creaminess, salt, and gentle sweetness.
| Flavor | Mix In at Night | Add in the Morning | Texture Note |
|---|---|---|---|
| Chocolate | 1 tbsp cocoa + extra sweetener | Chocolate chips, berries, nuts | Cocoa absorbs liquid |
| Chocolate peanut butter | Cocoa + peanut butter | Banana, peanuts, dark chocolate | Usually needs a splash more milk |
| Coffee / latte | Espresso powder dissolved in milk | Cocoa, chocolate chips, yogurt | Avoid too much bitter coffee |
| Matcha | Matcha whisked into milk | Banana, coconut, sesame, berries | Whisk matcha first to avoid clumps |
| Maple brown sugar | Maple syrup + brown sugar + cinnamon | Pecans, walnuts, banana | Keep sweetness balanced |
| Tiramisu | Espresso + cocoa + vanilla | Yogurt layer, cocoa dusting | Use strong coffee flavor carefully |
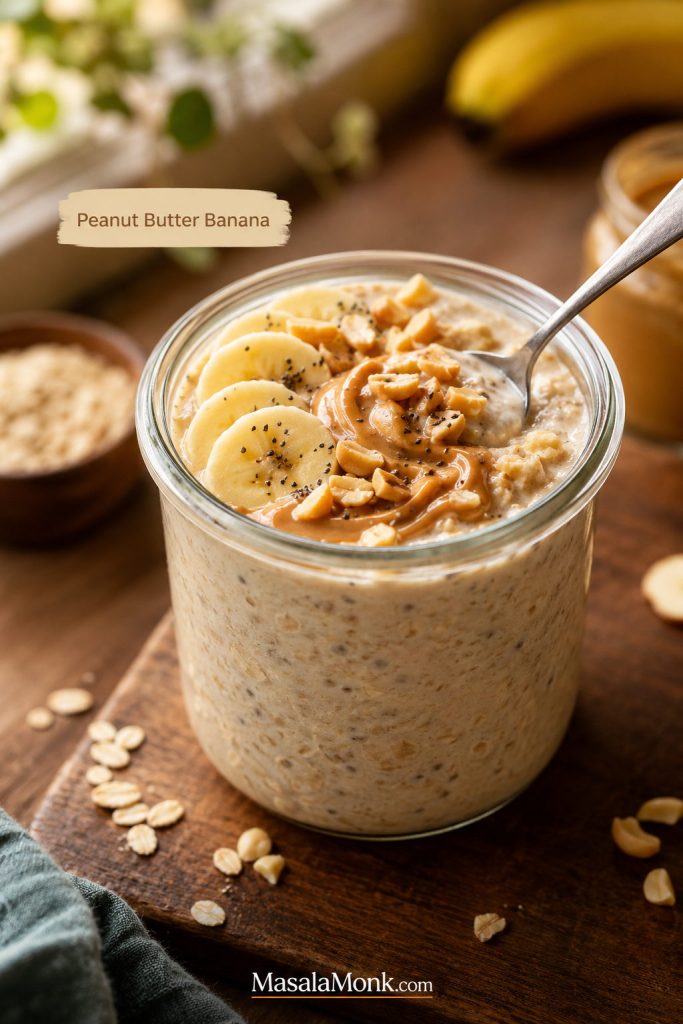
Chocolate Peanut Butter Overnight Oats
Chocolate peanut butter tastes dessert-like, so keep the base balanced with enough milk and a pinch of salt rather than relying only on sweetness.

Creamy, Nutty and Tropical Flavors
This flavor family is useful when you want a jar that feels richer and more filling. Creamy add-ins such as nut butter, coconut, yogurt, and seeds give the oats more body.
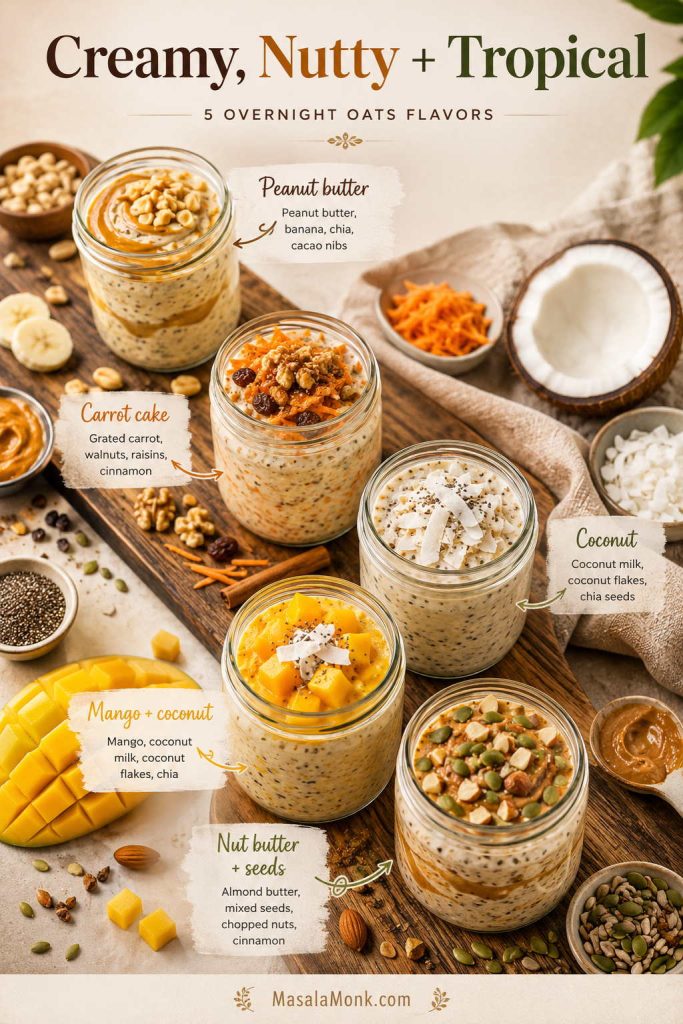
| Flavor | Mix In at Night | Add in the Morning | Texture Note |
|---|---|---|---|
| Peanut butter | 1 tbsp peanut butter + cinnamon | Banana slices, peanuts, extra drizzle | Add extra milk if thick |
| Carrot cake | Grated carrot + cinnamon + nutmeg | Walnuts, raisins, coconut | Yogurt makes it creamier |
| Coconut | Coconut milk + shredded coconut | Mango, pineapple, toasted coconut | Rich coconut milk makes it thicker |
If you are making overnight oats for the first time, peanut butter banana, apple cinnamon, mango curd, chocolate peanut butter, and blueberry lemon are the easiest flavors to get right. Coffee, matcha, and tiramisu are a little more sensitive because bitter ingredients need enough sweetness, salt, and creaminess to balance them. For more on why the peanut butter version is so satisfying, MasalaMonk’s guide to oatmeal and peanut butter is a useful companion read.
How to Make High-Protein Overnight Oats
For higher-protein overnight oats, build the serving with Greek yogurt, thick curd, soy milk, protein powder, blended cottage cheese or paneer, chia seeds, hemp seeds, peanut butter, or nut butter. For the base amounts before adding protein powder, use the quick ratio guide near the top of the post.
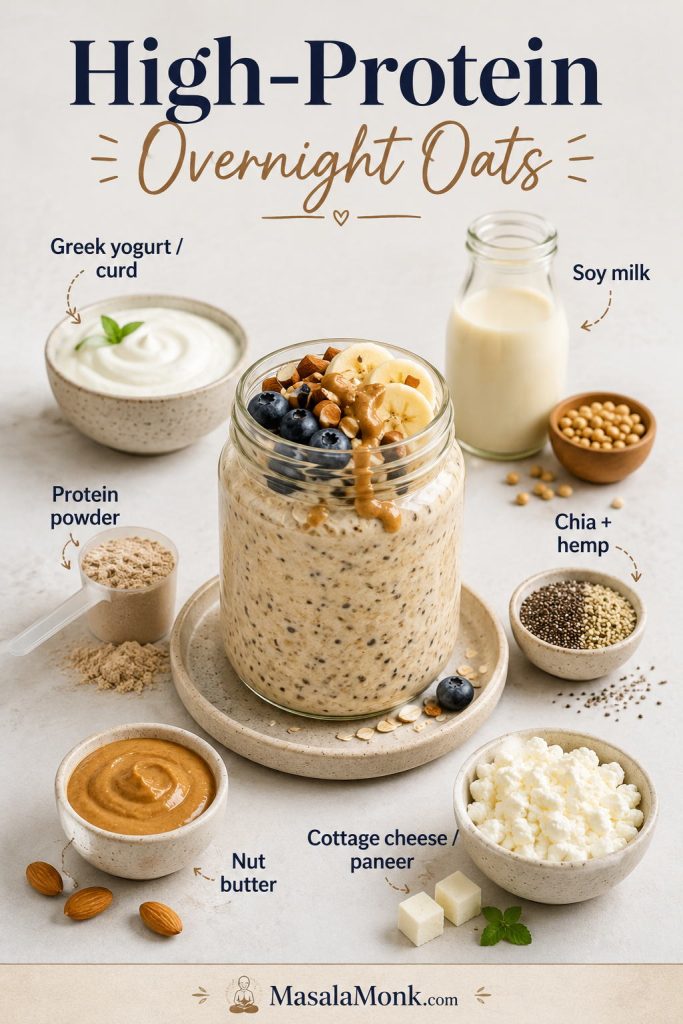
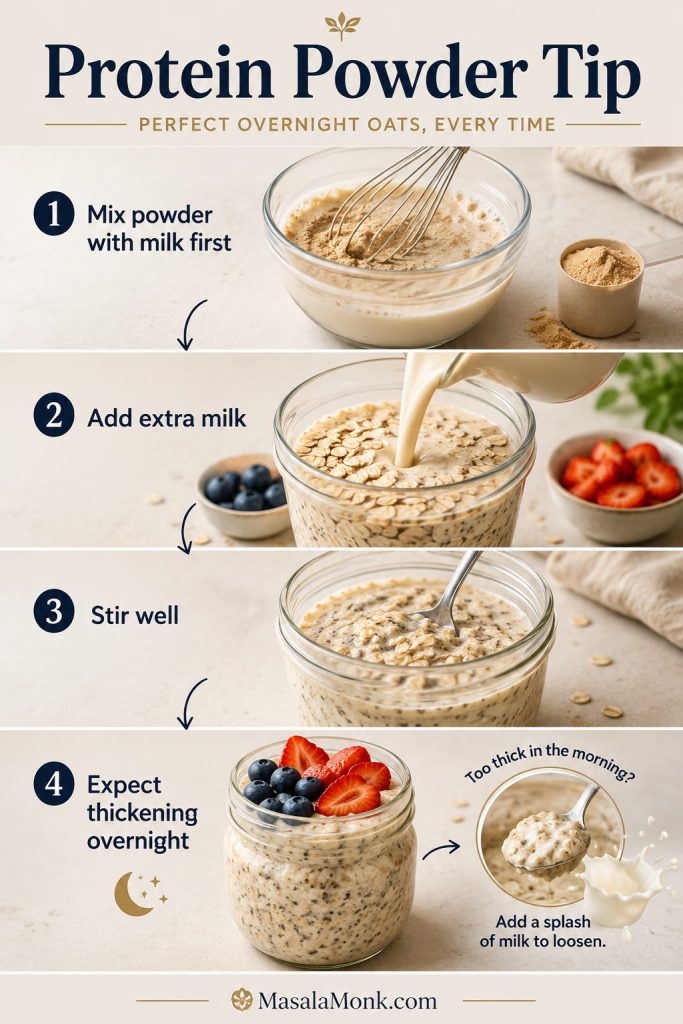
Protein Powder Overnight Oats Tips
Protein powder is the ingredient most likely to trick you. The jar may look perfect when you mix it, then turn thick and stiff by morning. Start with 1 scoop protein powder and about ¼ cup / 60 ml extra milk, then loosen again after chilling if needed.
For a full protein-focused version with flavors, macro-friendly ideas, vegan options, and protein powder tips, use this MasalaMonk guide to high protein overnight oats. If you also like warm oats, this protein oatmeal guide covers hot oatmeal and proats-style breakfasts.
Vegan, Dairy-Free, Gluten-Free and No-Yogurt Overnight Oats
The core recipe is easy to adapt. Think of these as swaps, not separate recipes: the oat base stays the same, while the milk, thickener, sweetener, or creamy element changes depending on what you need. If you are skipping dairy, start with the no-yogurt ratio. If you are using water instead of milk, go straight to overnight oats with water, because that version needs extra help from chia, salt, and flavor.
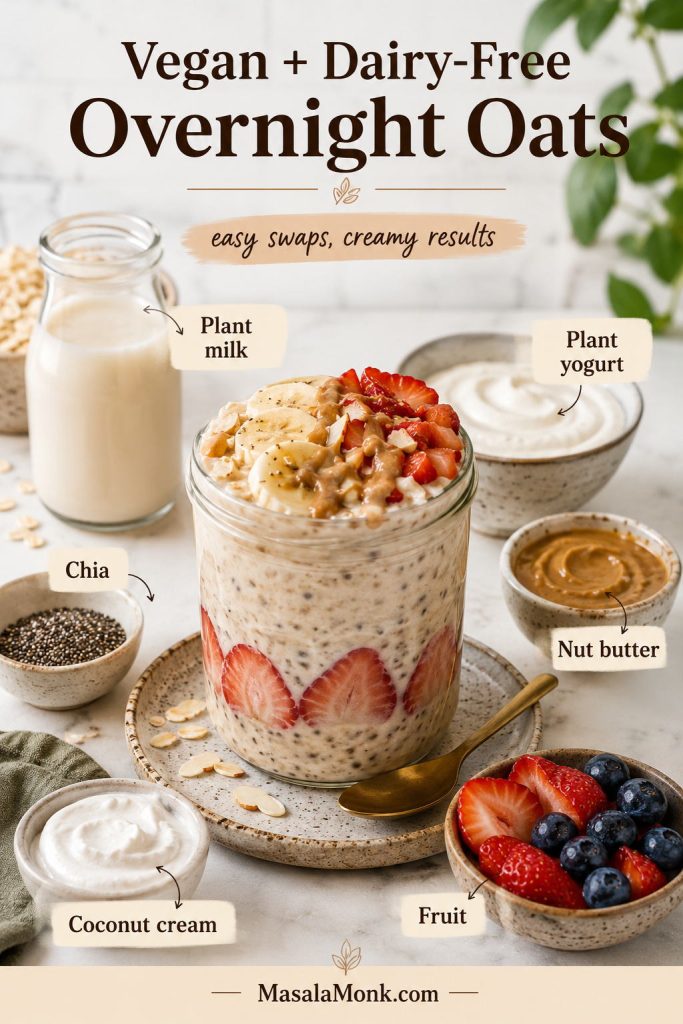
Vegan overnight oats
Choose plant milk, plant yogurt if desired, chia seeds, maple syrup or date syrup, and fruit. Oat milk, soy milk, almond milk, and coconut milk all work.
Dairy-free overnight oats
Almond milk, oat milk, soy milk, coconut milk, or cashew milk can replace dairy milk. For creaminess without dairy, add chia seeds, nut butter, coconut cream, mashed banana, or plant yogurt. MasalaMonk also has a guide to homemade oat milk if you want to make your own.
Gluten-free overnight oats
Choose certified gluten-free oats if you need the recipe to be gluten-free. Oats are naturally gluten-free, but cross-contact during processing is common, so the package label matters.
Overnight oats without yogurt
Combine ½ cup rolled oats, ⅔ cup milk, and 1 tablespoon chia seeds. Add nut butter, mashed banana, or coconut cream if you want a creamier result without yogurt.
For the full no-yogurt ratio and how it compares with yogurt-based oats, see the ratio guide above.
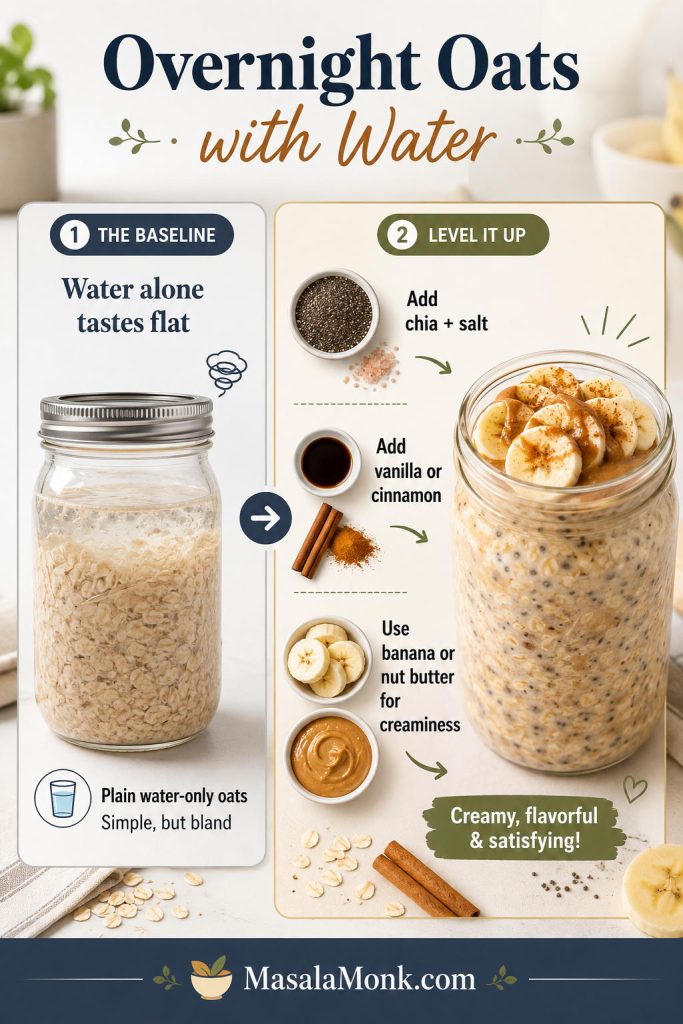
Overnight Oats with Water
You can make overnight oats with water, but water needs help. Combine ½ cup oats, ¾ cup water, 1 tablespoon chia seeds, a pinch of salt, vanilla or cinnamon, and something creamy like peanut butter, almond butter, coconut cream, mashed banana, or plant yogurt. Without one of those creamy add-ins, the oats can taste flat.
Keto-style no-oat overnight oats
Regular oats are not usually keto-friendly. For a keto-style breakfast jar, make a no-oat version with chia seeds, hemp hearts, flaxseed, coconut, and low-carb milk instead of rolled oats. It will not taste exactly like classic overnight oats, but it gives a similar chilled, spoonable breakfast format. If that is the direction you want, this keto chia pudding recipe is a better starting point than trying to force regular oats into a keto breakfast.
Are Overnight Oats Healthy for Weight Loss?
Overnight oats can fit a weight-loss breakfast when the serving has enough protein, fiber, and volume without turning into dessert. Oats give the mixture structure, chia adds fiber and thickness, yogurt or protein powder can make it more filling, and fruit adds sweetness without needing too much syrup.
No single breakfast causes weight loss on its own. Still, a well-built oats jar can make breakfast easier to control because the portions are measured ahead of time.
Oats also bring soluble fiber to the bowl, which is one reason they work so well in a make-ahead breakfast. Harvard’s Nutrition Source has a helpful overview of oats if you want the broader nutrition background.
The main thing is not letting a balanced breakfast jar accidentally turn into dessert. Nut butter, granola, chocolate chips, dried fruit, and syrup are all fine in the right amount, but they add up quickly when they all go into the same container. Keep the base balanced, add enough protein if you need more staying power, and choose toppings with intention.
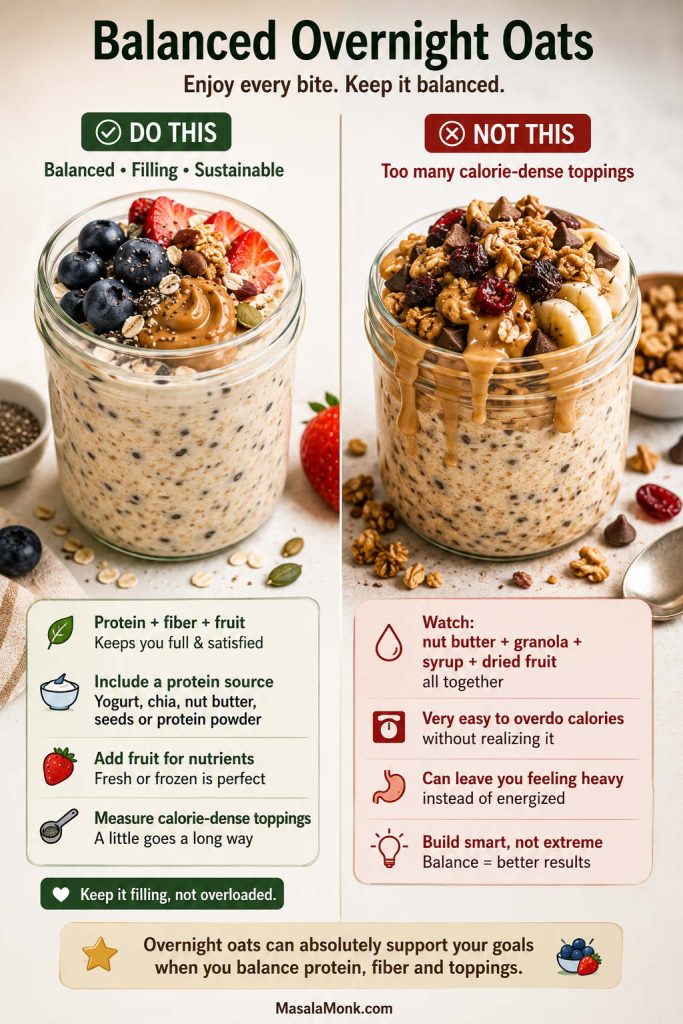
| Goal | Better Choice | Watch Out For |
|---|---|---|
| More filling | Greek yogurt, protein powder, chia, soy milk | Thin oats with only milk and fruit |
| Lower sugar | Berries, apple, cinnamon, vanilla | Too much syrup, jam, sweetened yogurt |
| More fiber | Chia, flax, berries, apple, oats | Low-fiber toppings only |
| Controlled calories | Measure nut butter, granola, nuts | Large handfuls of calorie-dense toppings |
For more on oats, chia, and fullness-focused breakfasts, see MasalaMonk’s guide to oats and chia seeds for weight loss.
Meal Prep and Storage
Overnight oats are built for meal prep, but consistency changes over time. A plain mixture keeps better than a container loaded with fresh fruit, granola, and crunchy toppings.
The biggest meal-prep mistake
The biggest mistake is adding every topping the night before. Soft mix-ins like cocoa, cinnamon, chia, yogurt, nut butter, jam, mashed banana, applesauce, or frozen berries can go in early. Crunchy toppings are different: fresh banana, crisp apple, granola, toasted nuts, and coconut chips are better added right before eating.
For quick topping timing, use the table below, or go back to the flavor ideas if you are planning several jars at once.
Best jar size for overnight oats
For one serving of overnight oats, a 12–16 oz / 350–500 ml jar works best. A 16 oz jar gives you enough space to stir properly and add toppings without overflowing.
| Jar Size | How It Works | Best Use |
|---|---|---|
| 8 oz / 240 ml | Very tight for a full serving | Small portions, snack jars, no bulky toppings |
| 12 oz / 350 ml | Works for one basic serving | Single serving with light toppings |
| 16 oz / 475–500 ml | Best overall size | One serving with fruit, nuts, yogurt, and stirring room |
| Bowl or meal-prep container | More room to mix | Batch prep or family portions |
How Long Do Overnight Oats Last?
Overnight oats taste best in the first 1–3 days. A plain sealed mixture can usually keep for 3–4 days in the fridge. Some servings may be fine longer, but fruit, yogurt, and toppings soften faster.
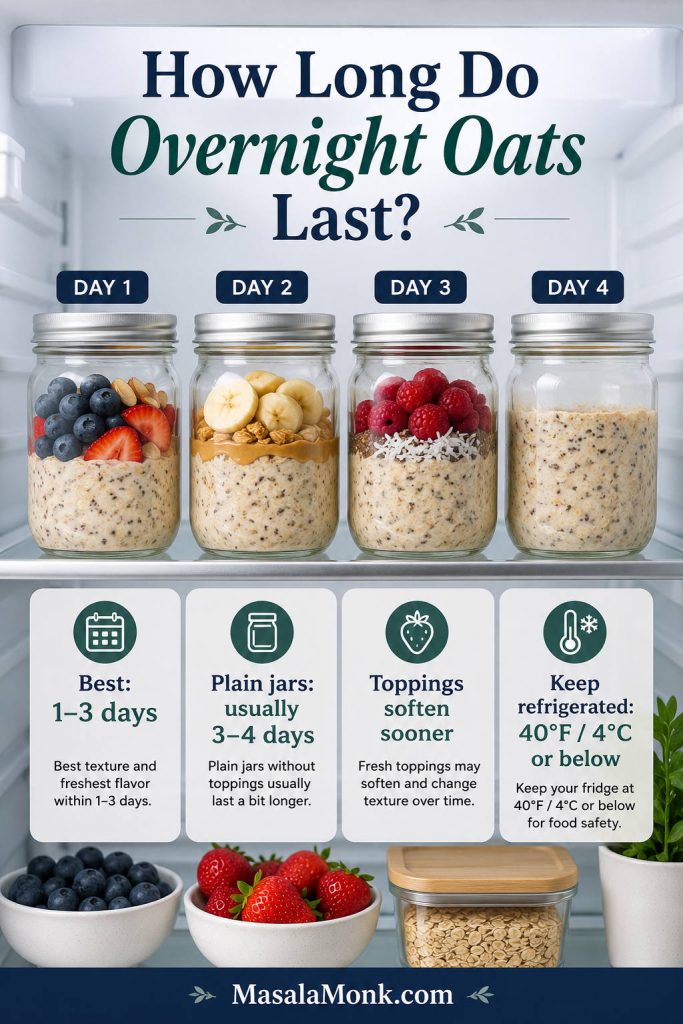
Keep overnight oats refrigerated at 40°F / 4°C or below. For general food-safety guidance, the USDA recommends keeping refrigerators at 40°F or below and using refrigerated leftovers within a few days. You can read their refrigerator safety guidance here: USDA refrigerator safety basics.
When to Add Overnight Oats Toppings
The best overnight oats are usually built in two stages: flavor the oats at night, then add delicate or crunchy toppings in the morning. In short, crunch belongs in the morning.
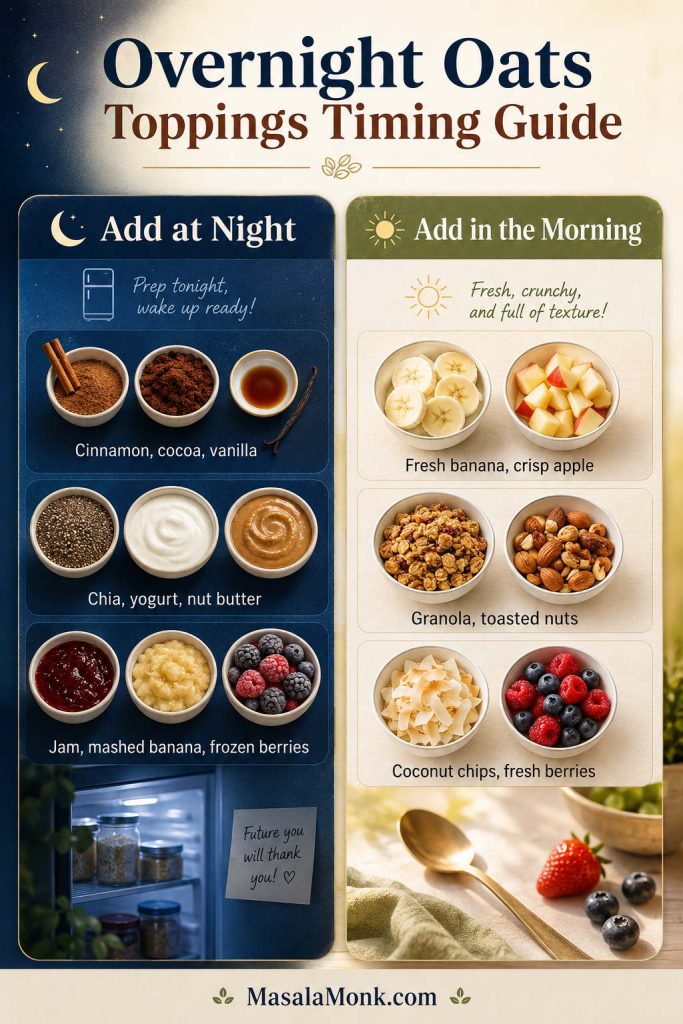
| Add at Night | Add in the Morning |
|---|---|
| Cinnamon, cocoa, vanilla, chia, yogurt, nut butter, jam, mashed banana, applesauce, frozen berries | Fresh banana, crisp apple, granola, toasted nuts, coconut chips, fresh berries, crunchy seeds, chocolate chips |
If you like a little crunch on top, keep granola-style toppings separate until serving. For a make-ahead oat snack in the same pantry lane, these homemade granola bars use oats, nut butter, honey or dates, and seeds in a different meal-prep format.
Can You Freeze Overnight Oats?
You can freeze overnight oats, but the consistency is usually best when you freeze the plain mixture without delicate toppings. Leave headspace in the container because the mixture expands, thaw in the fridge, stir well, then add fresh fruit and crunchy toppings after thawing.

Can You Warm Overnight Oats?
Yes. Overnight oats are usually eaten cold, but you can warm them. Transfer to a microwave-safe bowl or jar, add a splash of milk, and heat for 30–60 seconds, stirring once. Do not microwave a metal lid.
Overnight Oats FAQs
What is the best ratio for this overnight oats recipe?
The best starting ratio is ½ cup rolled oats, ½ cup milk, and ¼ cup yogurt or thick curd. For no-yogurt overnight oats, use ½ cup oats, ⅔ cup milk, and 1 tablespoon chia seeds. For more detail, see the ratio guide and texture guide above.
How long do overnight oats need to soak?
Plan on at least 4 hours. Ideally, give rolled oats an overnight rest of about 8 hours so they become creamier and more even.
Are overnight oats eaten cold or warm?
Most people eat overnight oats cold, straight from the fridge. You can also warm them for 30–60 seconds with a splash of milk when you want a softer, cozier breakfast.
How do you make overnight oats without yogurt?
Skip the yogurt and let chia do the thickening instead. A good no-yogurt ratio is ½ cup oats, ⅔ cup milk, and 1 tablespoon chia seeds.
Do overnight oats need chia seeds?
Chia seeds are helpful, but they are not required. Instead, you can use yogurt or slightly less liquid to keep the oats thick.
How do you make overnight oats with water?
Water works, but it needs help. Add chia seeds, salt, vanilla or cinnamon, and something creamy like nut butter, mashed banana, coconut cream, or plant yogurt so the oats do not taste flat.
Which oats are best for overnight oats?
Rolled oats or old-fashioned oats are best. Quick oats get softer, instant oats can become paste-like, and steel-cut oats need a different method.
What happens if you use steel-cut oats?
Steel-cut oats are not a direct swap here. They stay much chewier and need a longer soak or a separate preparation method.
How long do overnight oats last in the fridge?
They taste best in the first 1–3 days. A plain sealed mixture can usually keep for 3–4 days when refrigerated properly.
Do overnight oats freeze well?
They freeze best when kept plain. Freeze the oats without delicate fruit or crunchy toppings, leave headspace in the container, thaw in the fridge, stir well, and then add fresh toppings after thawing.
Are overnight oats good for weight loss?
They can be, especially when the serving includes protein, fiber, fruit, and measured toppings. Still, large amounts of nut butter, granola, syrup, dried fruit, and chocolate chips can raise calories quickly.
How do you add protein powder to overnight oats?
Add 1 scoop protein powder and increase the milk by about ¼ cup / 60 ml. Then stir very well, because protein powder can clump and thicken as it sits.
Why are my overnight oats too thick?
They may have too much chia, too much protein powder, or not enough liquid. As a quick fix, stir in 1–3 tablespoons milk before eating.
Why are my overnight oats watery?
They may have too much liquid, watery fruit, or not enough soaking time. To fix them, add chia seeds or a spoon of oats and let the mixture sit longer.
The Takeaway
Start with rolled oats, use enough liquid, season the mixture with a pinch of salt, and stir twice before chilling. Then, add delicate fruit and crunchy toppings closer to serving, and adjust the consistency in the morning instead of trying to get everything perfect the night before.
Once you like the base recipe, you can turn it into peanut butter overnight oats, apple cinnamon overnight oats, mango overnight oats, chocolate overnight oats, coffee overnight oats, or a higher-protein version without changing the basic method. And when you want a warm oat breakfast instead of a chilled jar, these oat pancakes are another easy way to use rolled oats for breakfast.