Posted on — Leave a comment

Sambar Recipe – Authentic South Indian Sambar for Idli, Dosa & Rice

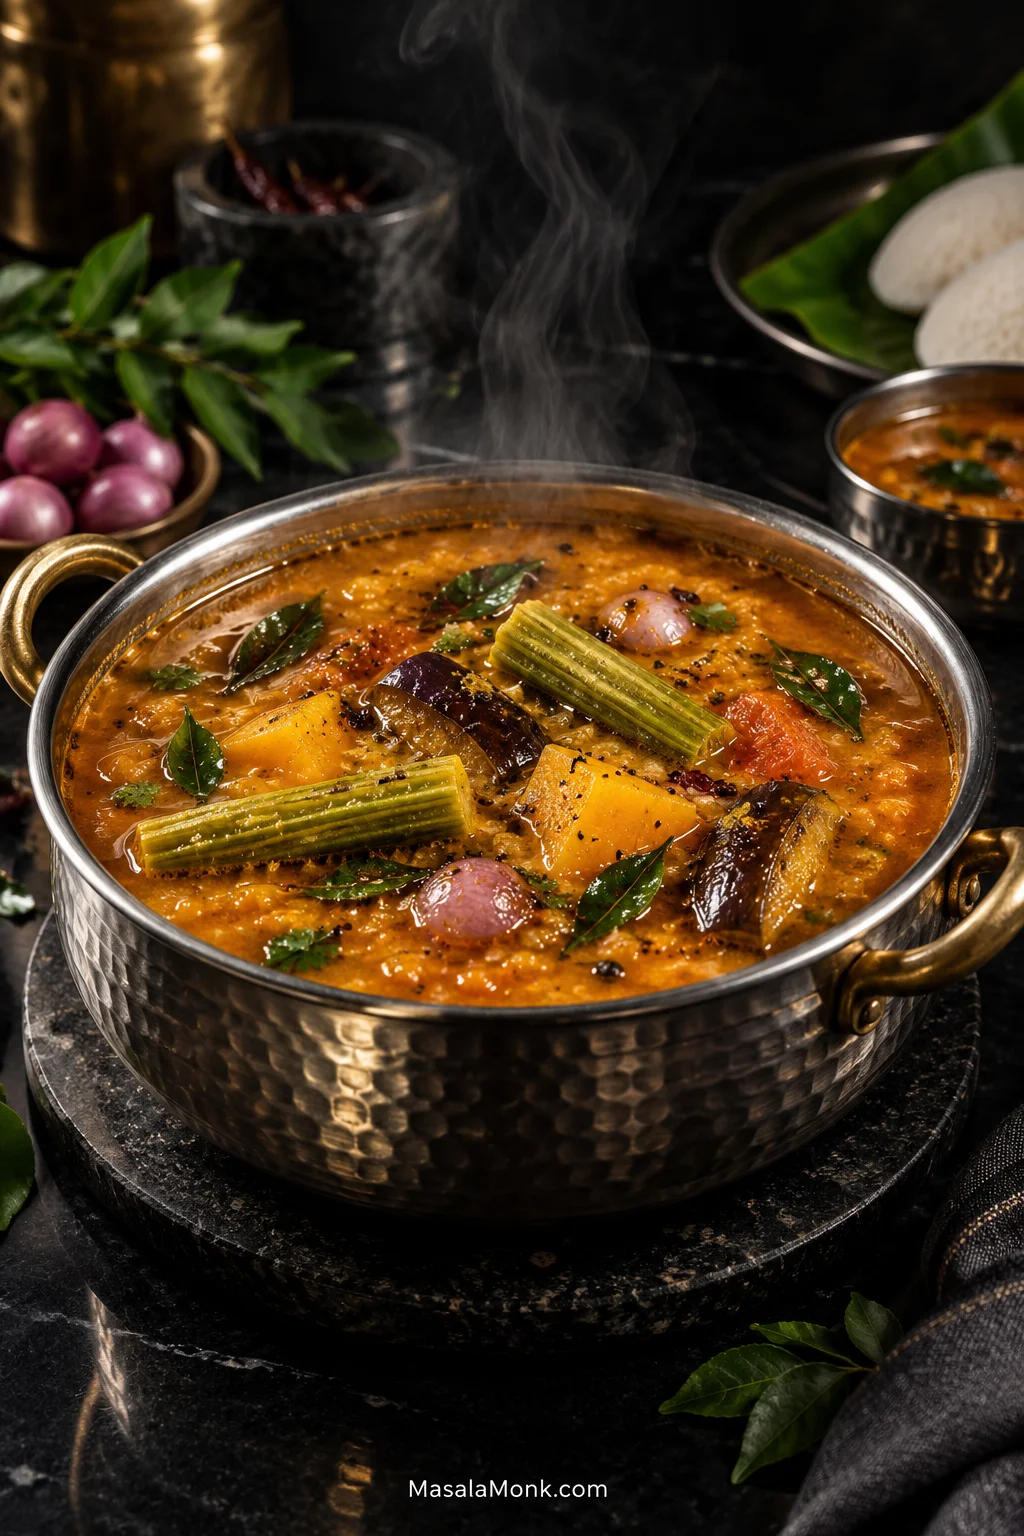
Steaming sambar in a metal pot with drumstick, pumpkin, eggplant, shallots, curry leaves, mustard seeds and dried chilli visible in the orange lentil broth.

This sambar recipe makes a South Indian lentil-and-vegetable stew with soft toor dal, vegetables, tamarind, sambar powder and a fragrant final tadka (tempering). A good sambar tastes savoury and lentil-rich, then tangy from tamarind, with curry leaves and toasted spices rising above the broth. The chilli heat can be mild or quite assertive depending on the sambar powder.

Keep it a little fuller and it can sit at the centre of a rice meal. Loosen the same sambar for idli or medu vada and the broth sinks into every porous bite. That ability to move with the meal is part of what makes sambar so useful in a home kitchen.

The frustrating version is the one that contains all the “right” ingredients and still tastes mostly like dal. Or it comes out chilli-hot but flat, sharply sour, watery, or full of pumpkin and brinjal that disappeared while the carrots were still catching up. The method below focuses on the few things that actually decide whether the sambar comes together.

Sambar is more vegetable-heavy and tangy than a simple dal, while rasam is usually much thinner and more pepper-forward. There is no single formula that represents every South Indian region or household, so this version is a dependable mixed-vegetable method rather than a claim to represent every style. You may also see the name written as sambhar.

The Sambar Rule

Balance the sambar before reaching for more powder.

A hot but flat-tasting sambar rarely needs another spoonful of chilli-heavy masala first. Check the salt and tamarind. Make sure the dal has cooked completely, the vegetables are tender and the broth has not been diluted too far.

Once the dal is soft and the tang tastes right, don’t fuss over every last detail. Sambar is everyday food. It has plenty of room to adjust.


Everyday South Indian Sambar Recipe

Serves4
DifficultyEasy; vegetable timing is the main trick
Hands-onAbout 25–30 minutes
TotalAbout 60 minutes; typically 50–65 minutes depending on the dal and vegetables
ConsistencyMedium-thick for rice; loosen for idli, dosa or vada

With rice, count on four generous servings. Beside idli, dosa or vada, the same amount naturally feeds more.

Equipment

  • Stovetop pressure cooker or Instant Pot
  • 3–4-litre (3–4-quart) saucepan or kadai with a lid
  • Small tadka pan
  • Knife and cutting board
  • Ladle or wooden spoon
  • Whisk, dal masher or potato masher
  • Small strainer for tamarind, optional

Ingredients
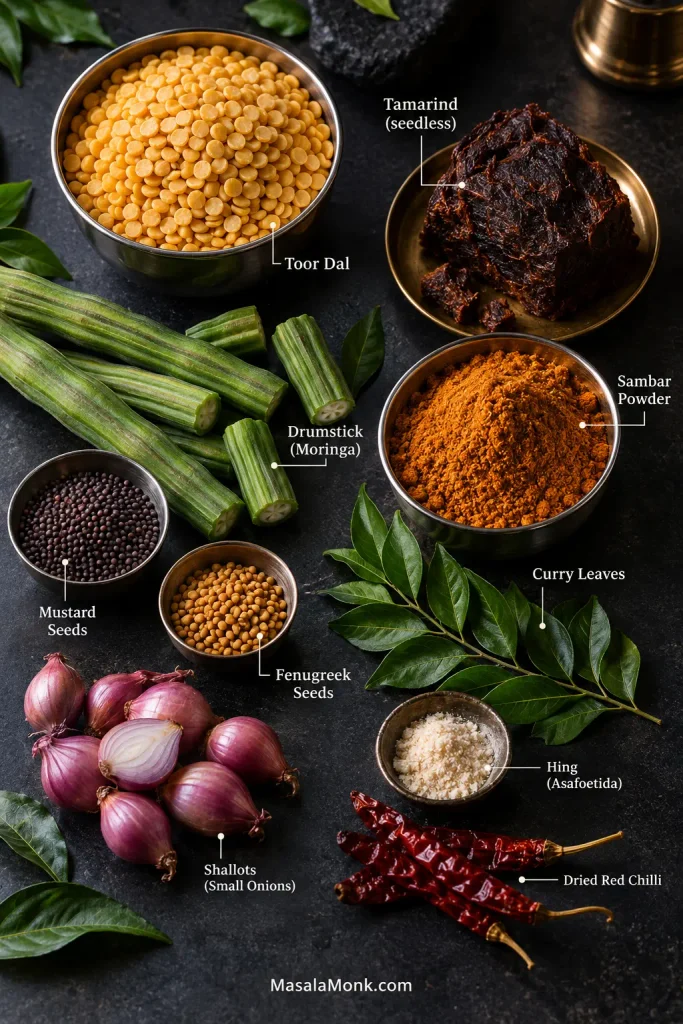
Labeled sambar ingredients including toor dal, seedless tamarind, sambar powder, moringa pods, curry leaves, mustard seeds, fenugreek seeds, shallots, asafoetida and dried red chillies.
These ingredients are not interchangeable sources of “more flavour.” Toor dal builds the base, tamarind changes acidity, sambar powder brings the spice profile, while mustard, fenugreek, curry leaves and hing contribute aromas that extra chilli cannot replace.

Dal

  • 100 g toor dal (tur, tuvar or arhar dal; split pigeon peas), about ½ US cup
  • 420 ml water (1¾ cups)
  • ¼ teaspoon ground turmeric

Vegetables and Sambar Base

Use about 350 g (12 oz) vegetables in total, including the shallots, plus the tomato.

  • 100 g drumstick (moringa pod), roughly 1–2 medium pods, cut into 5 cm (2-inch) pieces; lightly scrape very tough mature fresh pods if needed
  • 70 g carrot, about 1 small carrot, cut into small chunks
  • 70 g pumpkin, cut into larger chunks
  • 50 g brinjal (eggplant/aubergine), cut into chunks
  • 60 g small onions or shallots, roughly 6–8 small shallots, peeled
  • 100 g tomato, about 1 small to medium tomato, chopped
  • 240 ml water (1 cup) to start the vegetables, plus a splash more if needed
  • 15 g (½ oz) seedless tamarind block
  • 120 ml hot water (½ cup) for soaking the tamarind
  • 1–1½ tablespoons sambar powder
  • 1 teaspoon jaggery, optional
  • 1 teaspoon fine salt to start, divided, plus more to taste
  • 120–300 ml hot water (½–1¼ cups) for the final consistency
  • 2 tablespoons chopped coriander leaves (cilantro), optional

Bottled tamarind paste and concentrate can be far stronger than block tamarind. There is no dependable spoon-for-spoon conversion, so use less to begin with.

Tempering

  • 1 tablespoon gingelly (Indian sesame) oil, neutral oil or ghee; not toasted sesame oil
  • ½ teaspoon black or brown mustard seeds
  • Small pinch fenugreek seeds, roughly 6–10 seeds
  • 1 dried red chilli, broken in half
  • 10–12 curry leaves
  • ⅛ teaspoon hing (asafoetida)

A useful cooking baseline: 100 g dry toor dal : about 350 g vegetables : 15 g block tamarind : 1–1½ tablespoons sambar powder. Taste the tamarind and powder rather than treating those last two numbers as law.

How to Make Sambar

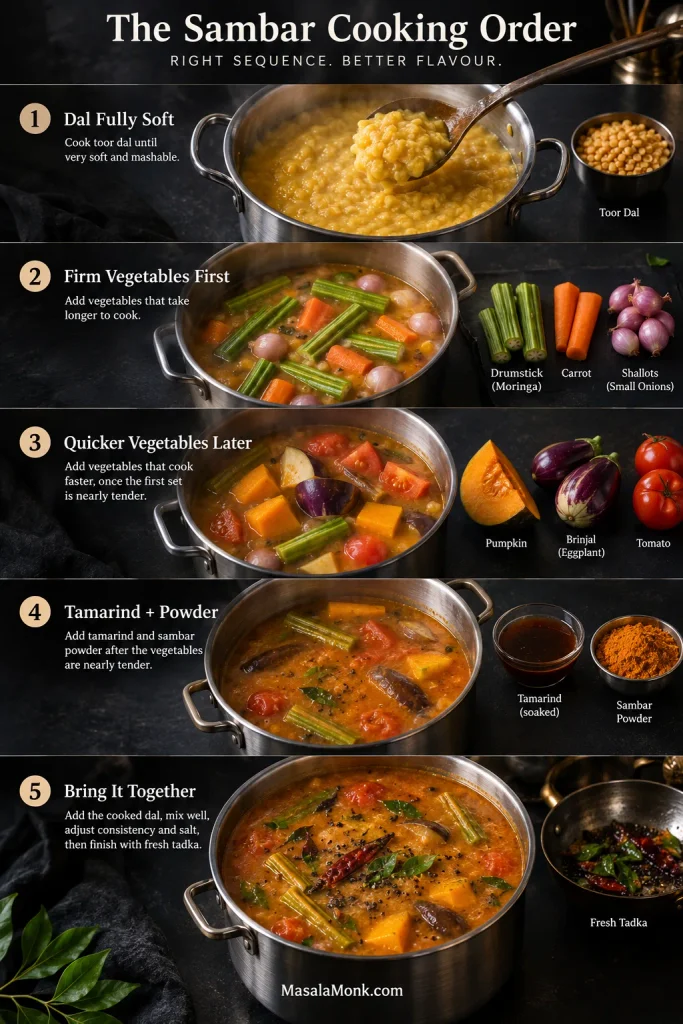
Five-stage sambar cooking guide showing fully softened toor dal, firm vegetables cooked first, quicker vegetables added later, tamarind and sambar powder added near the end, then dal and fresh tadka combined.
This sambar recipe is easier to control when you treat the order as texture management. In particular, letting firmer vegetables soften before acidic tamarind enters gives them a better chance to cook through; meanwhile, delaying pumpkin and brinjal helps them stay intact.

Cook the Dal and Build the Vegetable Base

  1. Cook the dal until completely soft. Rinse the toor dal well. Combine it with 420 ml (1¾ cups) water and turmeric. Bring a stovetop cooker to pressure, reduce the heat as needed to maintain pressure and cook for about 8–10 minutes. Let the pressure settle naturally. Press a grain against the side of the cooker; it should smear into a paste with no chalky centre.
  2. Start the firm vegetables. Put the shallots, carrot and drumstick in a saucepan or kadai with 240 ml (1 cup) water and a pinch taken from the measured salt. Cover and simmer for about 6–8 minutes. Check once and add a small splash of water if the pan begins to dry. The carrot should be getting close to tender.
  3. Meanwhile, make the tamarind extract. Soak the tamarind in 120 ml (½ cup) hot water for 10–15 minutes. Squeeze well and strain. Keep some extract aside rather than assuming it all belongs in the sambar.
  4. Add pumpkin, brinjal and tomato. Stir them into the firm vegetables and simmer for about 3–4 minutes. The tomato should begin to slump into the broth, while the pumpkin and brinjal become almost tender without collapsing.
  5. Add tamarind and sambar powder. Stir in about two-thirds of the tamarind extract and 1 tablespoon sambar powder. Simmer gently for 4–6 minutes. Pay more attention to the pan than the clock: the tomato should no longer taste raw, the sharp smell of fresh tamarind should have faded and the powder should no longer taste dusty.

Balance, Finish and Rest the Sambar

  1. Stir in the mashed dal. Give everything another 1–2 minutes together. Press a piece of pumpkin with the side of the ladle; it should yield without disappearing into the broth.
  2. Taste for salt, sourness and spice. Add the rest of the measured salt, then taste. Use more reserved tamarind when the sambar needs extra tang. A mild powder may need up to another ½ tablespoon. Add jaggery only if you want a faint sweet-sour note.
  3. Loosen it only at the end. Add hot water in 60 ml (¼ cup) increments. Keep the sambar fuller for rice and more flowing for idli, dosa or vada. Pour a ladleful back into the pan: the mashed dal and broth should fall together instead of separating into thick lentils and thin water.
  4. Finish with the tadka. Heat the oil or ghee in a small pan and add the mustard seeds. Once they crackle, add the fenugreek and dried chilli. Add the curry leaves; when they hiss and begin to crisp at the edges, stir in the hing and immediately pour the tadka over the sambar. Burnt tadka is worth remaking; thirty seconds of fresh tempering is better than a bitter pot.
  5. Rest for 5–10 minutes. Stir and taste once more. The sambar may need a splash of hot water or another pinch of salt after resting. Finish with coriander if using.

Instant Pot: cook the rinsed dal, 420 ml water and turmeric on High Pressure for 9 minutes. Allow 10–15 minutes of natural pressure release before venting any remaining pressure.

How to Know When Sambar Is Ready

Ladle some up. The mashed dal should seem part of the broth rather than settling separately underneath it. By now, the sharp raw edge of the tamarind has mellowed. A carrot piece gives when pressed with a spoon, while pumpkin and brinjal remain visible instead of dissolving into the pan.
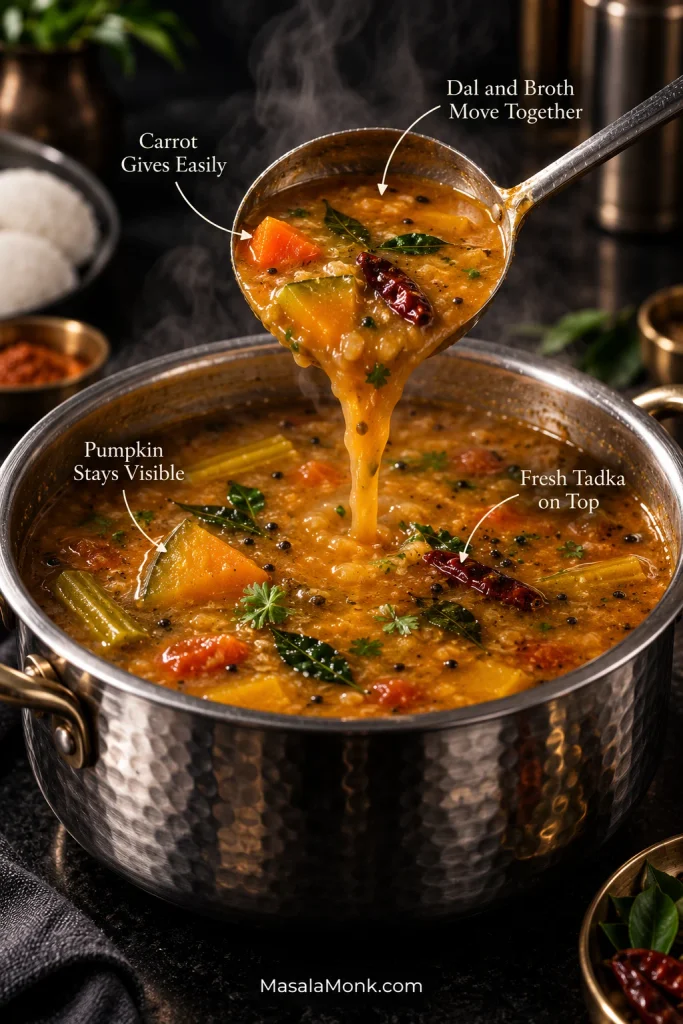
Ladle lifting finished sambar above a metal pot, with callouts showing integrated dal and broth, tender carrot, intact pumpkin and fresh mustard seed and curry leaf tadka.
No single cue proves the sambar is ready. Instead, look for several things at once: integrated broth, properly tender vegetables and a fresh aromatic finish. When those agree, the clock matters much less.

Pour the ladleful back. The broth and dal should move together. Then smell the sambar: fresh mustard, curry leaves and hing should reach you before the spoon does.

At that point, all it really needs is hot rice.
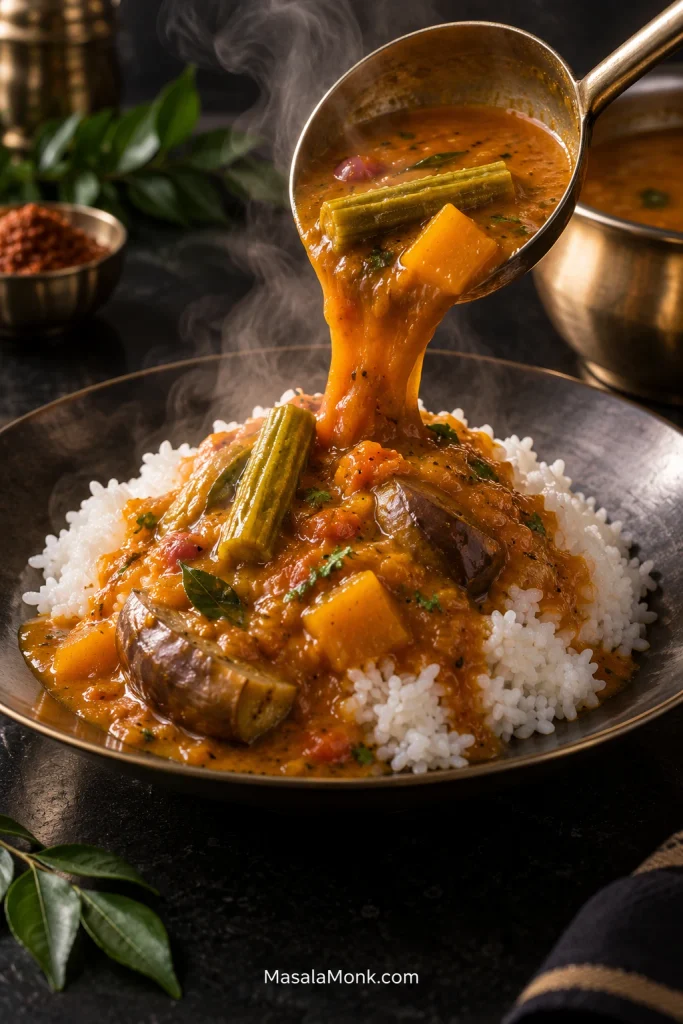
Hot sambar being poured over white rice, with drumstick, pumpkin, eggplant, shallots and curry leaves visible in the lentil and vegetable stew.
Judge sambar for rice on the plate rather than in the pot. It should spread slowly through the grains and carry vegetables with it; if thin broth immediately collects underneath, the consistency has probably gone too far.

Dal, Tamarind and Sambar Powder

Toor dal is the standard base here. The same lentil may be sold as tur dal, tuvar dal, arhar dal or split pigeon peas. Cook it until the grains practically disappear when mashed. Older dal may simply need more time. Moong dal makes a lighter sambar; masoor changes both the flavour and texture more noticeably.

Tamarind is less predictable. A pale seedless block may be mild, while a darker aged block can push the sambar sour much sooner. Bottled concentrates vary even more. Fresh tamarind changes as it simmers too: its sharp raw acidity settles into the broth instead of sitting on top of the other flavours.

Sambar powder varies just as much. Some blends lean towards coriander and roasted spices; others announce themselves mostly through chilli. Old powder can remain hot after much of its fragrance has faded.

Homemade sambar powder gives you more control over both the roast and the chilli level.

Jaggery is optional; the final tadka matters much more to this version. Some Karnataka and Udupi sambars lean sweeter, while many other styles use little or no jaggery.

Best Vegetables for Sambar

Good sambar vegetables include drumstick, shallots, carrot, pumpkin, brinjal, green beans, radish, okra and bottle gourd. Three or four are plenty. There is no prize for emptying the whole vegetable drawer into one pan.

Drumstick gives the broth a distinctive green, gently earthy flavour. Pumpkin brings sweetness and can melt slightly into the liquid at the edges. Brinjal absorbs the seasoned broth and turns silky, while carrot and beans give the spoon something firmer to find.

When to Add Vegetables to Sambar

VegetableWhat it bringsWhen to add it
Drumstick (moringa)Earthy-green flavour; scents the brothFirm-vegetable stage
CarrotMild sweetness with a firmer biteFirm-vegetable stage
Small onions or shallotsSweet-savoury onion flavourFirm-vegetable stage
Green beansFresh green flavour and biteFirm-vegetable stage
Radish (mullangi)Peppery biteFirm-vegetable stage
PotatoMild starchiness; makes the bowl heartierFirm-vegetable stage
Bottle gourdMild flavour with juicy, tender piecesAfter the firm vegetables have started
PumpkinGentle sweetness; can soften into the broth at the edgesQuick-vegetable stage
Brinjal (eggplant)Silky pieces that absorb the brothQuick-vegetable stage
Okra (bhindi)Earthy-green flavour; turns silkySauté separately; add near the end

A good mixed combination might use drumstick, pumpkin, brinjal and small onions. Carrot, beans, eggplant and onion are easier to find in many supermarkets. Even onion, tomato and one substantial vegetable can make a satisfying sambar.

Cut for cooking time instead of symmetry. Smaller carrot pieces and larger pumpkin chunks have a much better chance of becoming tender together.
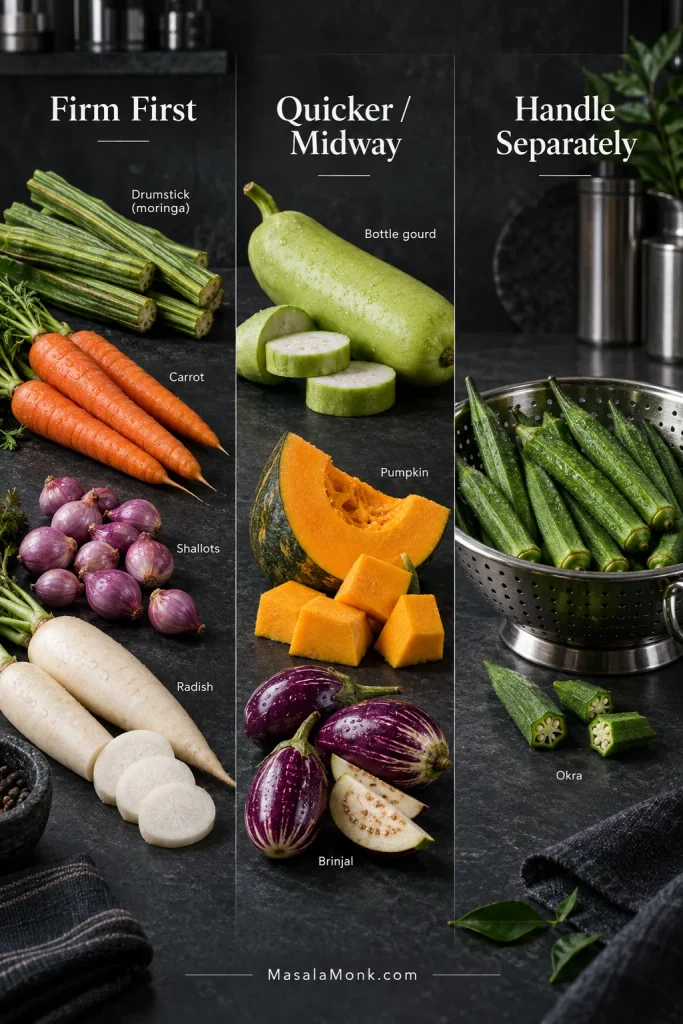
Vegetable timing guide showing drumstick, carrot, shallots and radish under Firm First; bottle gourd, pumpkin and eggplant under Quicker or Midway; and okra under Handle Separately.
This sambar recipe is easy to adapt when you swap vegetables by cooking speed rather than by name. Once you understand the slow, medium and quick groups, it becomes much easier to use whatever vegetables are in the kitchen.

Frozen drumstick can go straight into the simmer. No drumstick at all? Use the other vegetables and carry on.

Outside India, remember that drumstick means moringa pod, brinjal means eggplant or aubergine, hing means asafoetida, and toor/tur/tuvar/arhar are names for split pigeon peas. If drumstick is new to you, scrape or suck the soft flesh and seeds from the cooked pod and leave the fibrous outer shell behind.

Cooking with these vegetables now? Return to the step-by-step method.

Pressure Cooker, Instant Pot or Stovetop?

Choose the method according to what matters tonight: distinct vegetables, fewer dishes or speed.

MethodBest when…Trade-off
Dal and vegetables separateYou want the clearest vegetable texturesTwo vessels
Instant Pot, dal onlyYou want hands-off, repeatable dal cookingVegetables still simmer separately
Same cooker, used in stagesYou want fewer dishes without pressure-cooking tender vegetablesDal waits briefly in a bowl
True one-pot pressure methodSpeed and cleanup matter mostSofter vegetables
StovetopYou do not have a pressure cookerLongest dal cooking time

On the stovetop, soaking the dal for 1–2 hours can shorten the wait, although it is not essential. Simmer until the lentils mash without resistance; depending on their age, that may take 35–50 minutes or longer.

Sambar for Rice, Idli, Dosa and Vada

Keep sambar medium to medium-thick for rice and more flowing for idli, dosa or vada. Thin is fine; watery is not. Even when loosened, the mashed dal should travel with the broth.
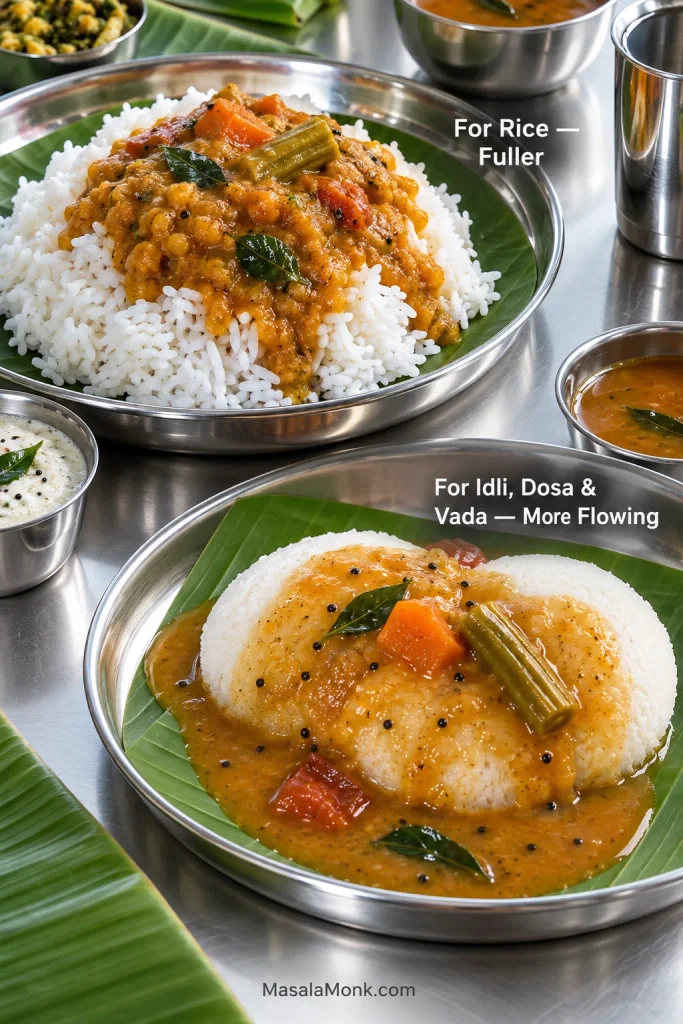
Two stainless-steel plates compare thicker sambar coating white rice with more flowing sambar surrounding and soaking into soft idlis on banana leaf.
Make the final consistency decision late. It is easy to loosen sambar gradually for idli, dosa or vada; by contrast, correcting an over-thinned pot requires more simmering, which can soften the vegetables further.

With rice, spoon enough sambar over the top that the grains are coated instead of sitting dry underneath the vegetables. A dry poriyal or thoran on the side is often all the contrast the plate needs; papad, pickle and curd can round things out. This guide covers fluffy steamed rice if you need the base sorted too.

With idli, don’t be stingy. Pour the sambar over, leave the idli for a moment so the broth can soak in, then add more at the table. The separate soft idli recipe covers batter, fermentation and steaming.

Dosa wants a flowing sambar that’s easy to scoop or dip. Medu vada is even better when the outside begins to absorb the broth while the centre keeps a little of its texture. A cool South Indian coconut chutney works naturally alongside all three.

Pongal and upma are comfortable companions too. Change the pour according to the plate, not the basic balance of the sambar.

A true tiffin sambar can differ in much more than water. Some versions use moong dal or a dal blend, potato and shallots, fresh-ground masala, coconut, fried gram or a more obvious sweet note. It is its own recipe family, not diluted rice sambar.

What You Can Substitute—and What Changes

Leaving out drumstick changes one note. Replacing tamarind changes the direction of the whole sambar. No drumstick? Carrot, beans, pumpkin, brinjal and shallots can carry it perfectly well; you simply lose the characteristic moringa note.

Tomato, raw mango and other sour ingredients appear in regional sambars, but they bring their own flavour instead of imitating tamarind spoon for spoon. Treat them as a different direction for the dish, not an exact conversion.

No sambar powder? A simple emergency blend for this four-serving sambar recipe is about 2 teaspoons ground coriander, ½ teaspoon ground cumin, ¼–½ teaspoon chilli powder and a very small pinch of ground fenugreek. It moves the broth in the right direction; it does not reproduce a full roasted sambar podi. For the fuller version, use the homemade sambar powder recipe. Fresh-ground arachuvitta sambar follows another route entirely.

Curry leaves and hing shape the top notes of the finished sambar. Missing either changes the smell, but extra chilli or masala will not replace them. A simple version with few substantial vegetables also works; start with less water because the vegetables would normally contribute moisture of their own.

Why Sambar Recipes Can Look Completely Different

One recipe contains coconut. Another has no onion. One is noticeably sweet; another uses no jaggery. A third does not use packaged powder at all. Regional sambar styles vary across South India in sweetness, tang, vegetables, spice blends and serving context.

These labels point towards recipe families, not rigid formulas.

  • Everyday or rice sambar: broadly the family this recipe belongs to—dal, vegetables, tamarind and a familiar sambar-spice base.
  • Idli or tiffin sambar: usually more flowing and sometimes built with different dal, vegetables or fresh masala.
  • Arachuvitta sambar: uses freshly roasted and ground spices, often with coconut.
  • Udupi sambars: often use freshly ground spice-and-coconut mixtures; sweetness varies by recipe.
  • Kerala sambars: some styles, including varutharacha preparations, use roasted coconut and a different spice structure.
  • Sambar sadam: cooks rice and the sambar base together into a distinct one-pot dish.

Vegetable-led branches go further from there, including vengaya sambar built around small onions and mullangi sambar with radish. Authenticity makes more sense when it is attached to a place, household or particular style.

Fix My Sambar

Tastes like plain dal? Check salt and tamarind. Hot but flat? Stop adding powder. Watery? Reduce it or add mashed dal. Bitter? Suspect the tadka.

Change one thing at a time. Throwing salt, tamarind, powder and water into the pan together only hides which adjustment actually worked.

Flavour Problems
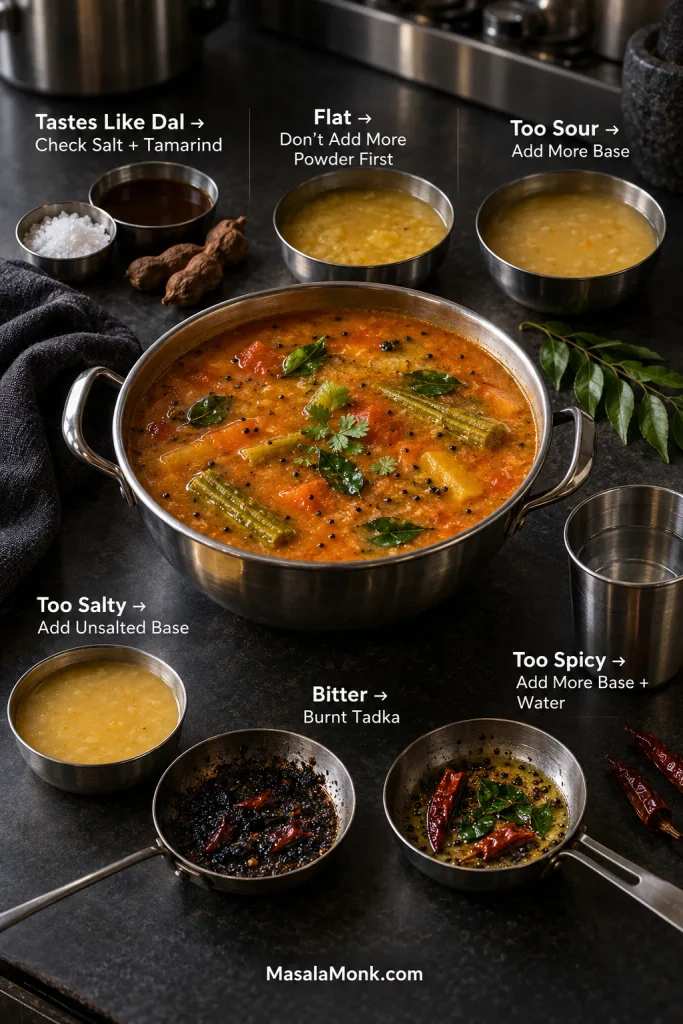
Sambar flavour troubleshooting visual showing fixes for sambar that tastes like plain dal, tastes flat, is too sour, too salty, too spicy or bitter from burnt tadka.
Flavour problems are easier to fix when you separate heat from seasoning. A sambar can be very spicy and still need salt, acidity or concentration, so adding more sambar powder may intensify the wrong thing.
ProblemLikely causeWhat to do
Tastes like dal, not sambarWeak sourness, too little salt or the sambar has not simmered together long enoughCheck salt and tamarind, then give it a brief simmer before changing anything else
Bland or flatToo much water, too little salt, stale powder or weak tadkaCorrect the salt first; reduce an over-diluted sambar; refresh the tadka when its fragrance is weak
Very hot but flavourlessChilli-heavy powder is bringing heat without much flavourLeave the powder alone and check tamarind, salt, concentration and tadka
Too sourToo much tamarind or a particularly strong productAdd unsoured cooked dal or sambar base, then rebalance the seasoning
Too saltyToo much salt or too much reductionAdd unsalted cooked dal/base and a little hot water. Sugar or extra tamarind will not remove excess salt
Too sweetToo much jaggeryAdd unsweetened base and cautiously restore sourness and spice
Too spicyStrong powder, extra chilli or bothAdd more dal/base and a little hot water, then taste again
BitterBurnt fenugreek, chilli or tadkaDiscard burnt tempering before it reaches the sambar; severe burnt bitterness is difficult to hide
Raw tamarind tasteTamarind has not simmered enoughGive it a few more gentle minutes until the sharp raw smell fades
Dusty spice tasteSambar powder needs more cooking or has gone staleSimmer a little longer; replace very dull old powder next time

Texture and Cooking Problems

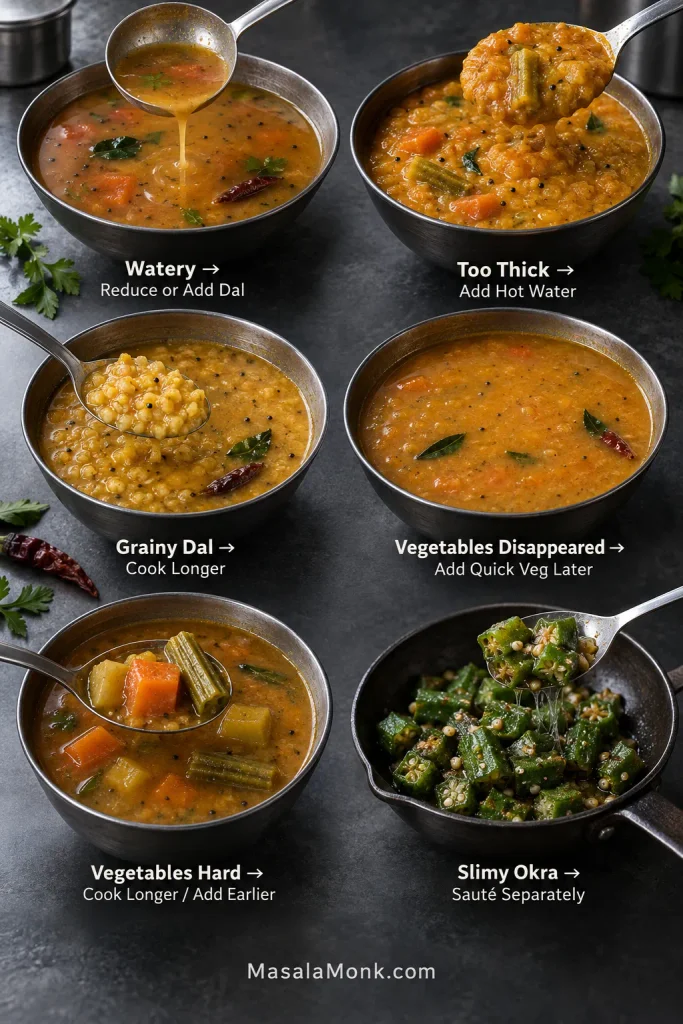
Sambar texture troubleshooting guide showing watery sambar, overly thick sambar, grainy dal, vegetables cooked until they disappear, vegetables left too firm and slimy okra.
Some texture mistakes are reversible and others are not. Thick sambar can be loosened easily; however, collapsed vegetables cannot regain their shape, which is why vegetable timing matters more than chasing an exact number of minutes.
ProblemLikely causeWhat to do
WateryToo much liquid or too little mashed dalSimmer uncovered or add more cooked dal
Too thickHigh dal concentration or normal thickening as it coolsAdd hot water in 60 ml (¼ cup) increments
Dal stays grainyOlder lentils or insufficient cookingCook longer; soaking can help older dal
Vegetables disappearFirm and quick-cooking vegetables spent the same amount of time in the panAdd pumpkin and eggplant later next time
Vegetables stay hardPieces are too large, firm vegetables started late or tamarind went in too soonKeep simmering; start the firm vegetables earlier next time
Okra is very slimyToo much mucilage entered the brothSauté the okra separately before adding it
Tadka smells weakOil was not hot enough, spices were stale or the tempering sat too longMake a small fresh tadka and pour it over hot sambar

Don’t chase the colour either. Tamarind, chilli, vegetables and sambar powder all shift the final shade. If the sambar tastes balanced, don’t fix it just because another photograph looks redder or darker.

Storing, Reheating and Freezing Sambar

Sambar thickens in the refrigerator as the dal keeps absorbing liquid. The flavours often settle nicely overnight too.

Cool leftovers promptly and refrigerate them in a covered container. The USDA leftovers guidance recommends using refrigerated leftovers within 3–4 days.

How to Reheat Sambar for Idli or Rice

A little hot water brings cold, thickened sambar back quickly. Taste after loosening it because the water softens the salt and tang too. A small fresh tadka can make yesterday’s sambar smell newly made again.
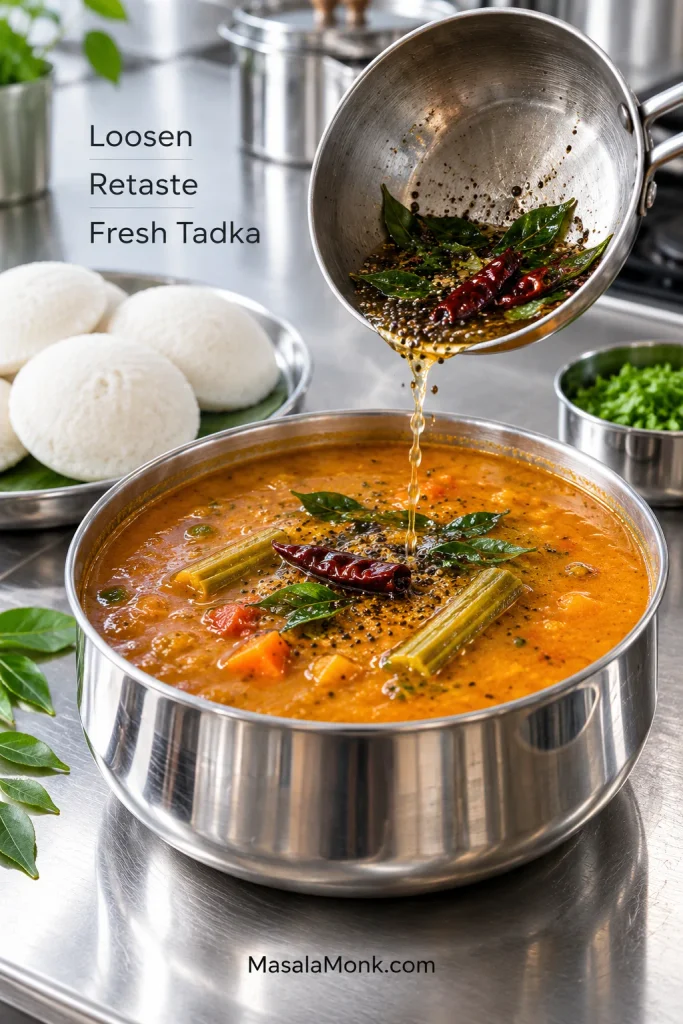
Fresh mustard seed, curry leaf and dried chilli tadka being poured into reheated sambar in a steel pot, with white idlis waiting beside it.
For leftovers, reheat only as much sambar as you need when possible. Gentle reheating protects already-soft vegetables, while a small fresh tadka restores aromas that fade during chilling and reheating.

Freeze finished sambar in meal-sized portions for roughly 2–3 months for best quality. Thaw overnight in the refrigerator when practical. Eggplant and other tender vegetables become softer after freezing. Freeze the cooked dal on its own when you’d rather add fresh vegetables to a future sambar.

Dietary and Ingredient Notes

  • Vegan: use oil instead of ghee for the tadka.
  • Gluten-free: the basic dish can be gluten-free, but check packaged sambar powder and commercial hing when strict avoidance matters. Some compounded asafoetida products contain wheat flour or another carrier.
  • No onion or garlic: entirely possible; many household, temple and regional versions omit one or both. This no-onion, no-garlic peanut chutney also works well beside idli and dosa.

Back to recipe · Back to top


Your vegetables will change, one packet of sambar powder will be hotter than another, and one block of tamarind will be sharper than the next. That’s normal.

Keep the sambar a little fuller and spoon it over hot rice tonight. Loosen the leftovers tomorrow morning and let them soak into soft idli.
Posted on — Leave a comment

Dal Tadka Recipe: Restaurant-Style Punjabi Yellow Dal

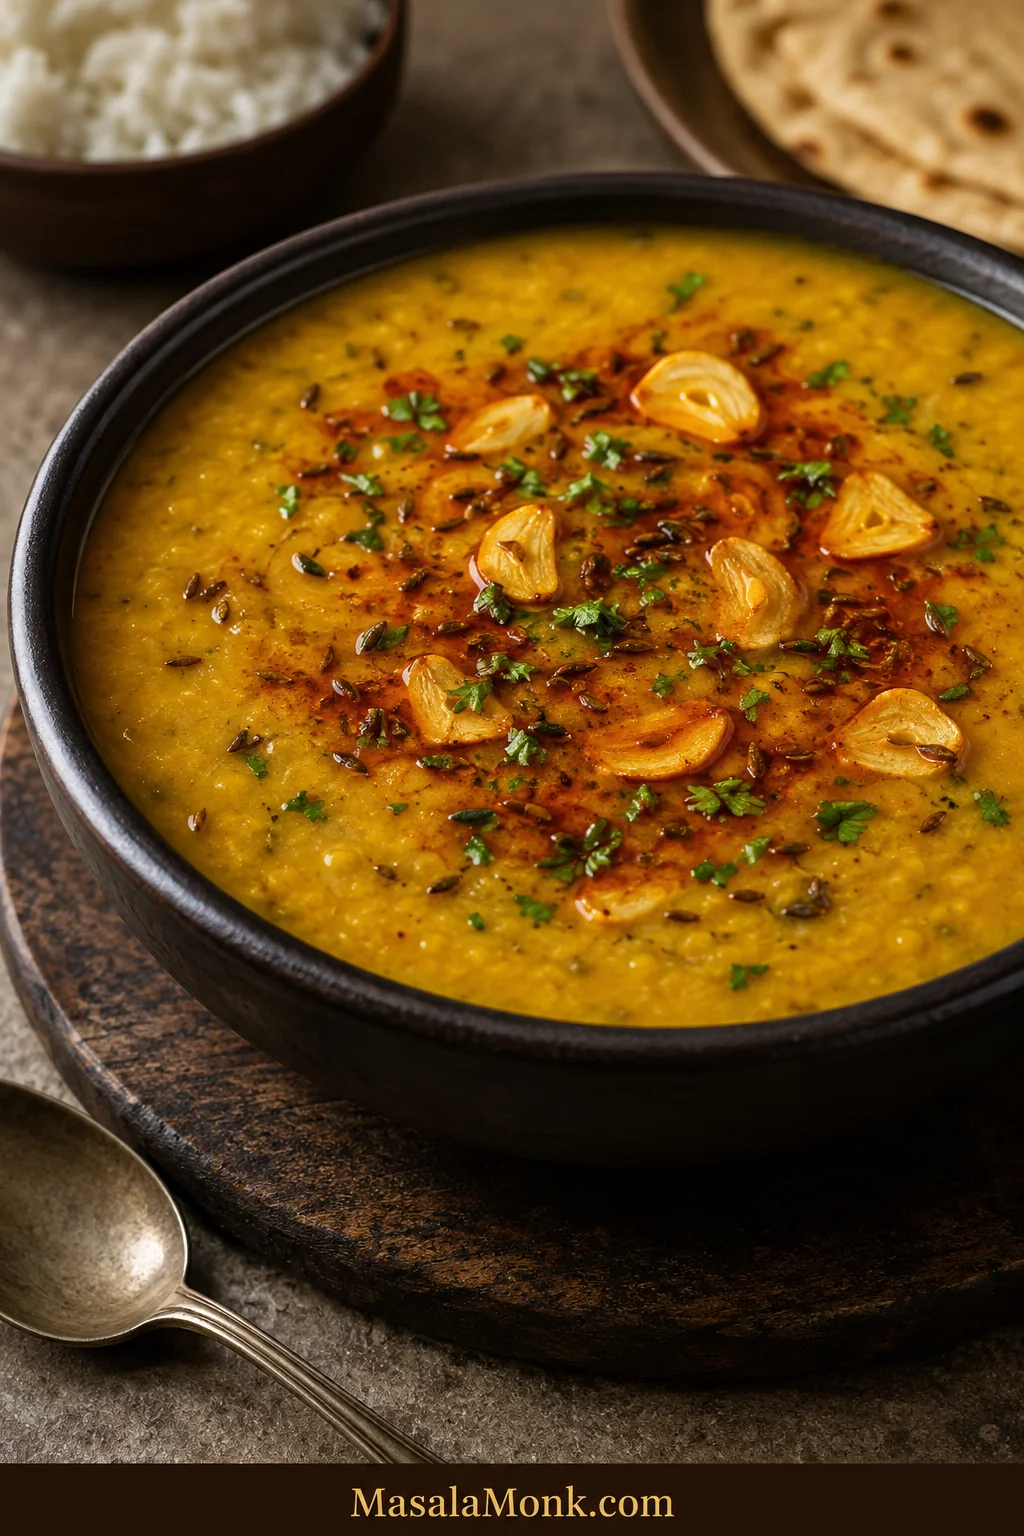
Creamy Punjabi Dal Tadka topped with red chilli ghee, thin golden garlic, cumin, dried chilli and coriander.

The final tadka announces dinner before the bowl reaches the table. Cumin crackles, garlic turns gold, and hot ghee carries the smell of red chilli across the kitchen. Underneath that dramatic finish, the dal has a quieter job: it should fall creamy from the spoon, with no watery separation, no gluey heaviness and no firm lentils interrupting each mouthful.

This Dal Tadka recipe gives you the familiar restaurant-style Punjabi yellow dal, along with the choices that shape it. Start with toor dal for the classic version, blend in a little yellow moong for a softer finish, and cook it in a pressure cooker, Instant Pot or heavy saucepan. The finished dal is creamy without feeling heavy, warmly spiced through the pot and bright with fresh cumin and garlic at the surface.

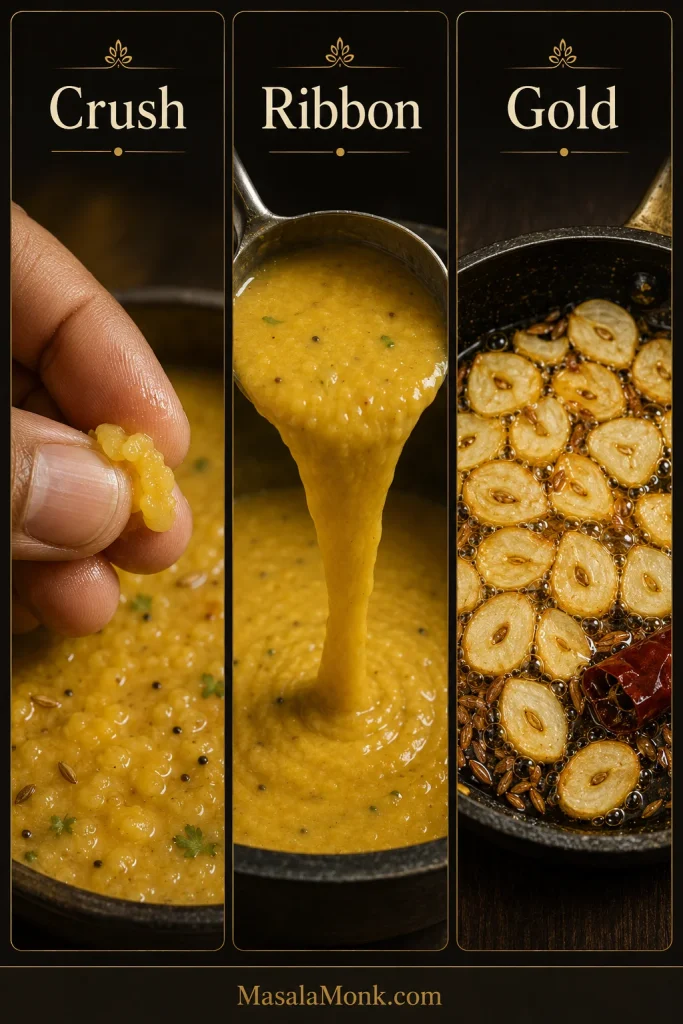
You will judge the lentils by how easily a grain crushes, the consistency by how the dal falls from the ladle and the tadka by the colour of the garlic—not by timing alone.

The disappointing bowl often contains all the right ingredients. Usually, one stage was rushed: the lentils came off the heat while still grainy, the tomato base remained raw, the consistency was never corrected, or the garlic crossed from golden to bitter while nobody was looking.

The MasalaMonk rule: the lentils decide when the dal is cooked; the final simmer decides its texture; the fresh tadka decides how memorable it tastes.

Quick Answer: How to Make Restaurant-Style Dal Tadka

Cook the dal: pressure-cook 1 cup toor dal (200 g) with 2¾ cups water (660 ml), turmeric and part of the salt.

In a stovetop cooker, cook for 8 minutes at pressure. In an Instant Pot, use 7 minutes for soaked dal or 8 minutes for unsoaked dal, followed by a full natural pressure release. Every grain should crush without resistance.

Build the body: whisk the lentils partly smooth, combine them with an onion-tomato masala cooked until glossy, then simmer with kasuri methi and enough hot water to reach a creamy, pourable consistency.

Finish at the table: bloom cumin in ghee, add evenly sliced garlic, then add dried chilli as the garlic begins colouring and hing for the final few seconds. Stop the garlic at pale-to-medium gold, remove the pan from the heat, add Kashmiri chilli powder and pour the tadka immediately.

Dal Tadka is also written as Dal Tarka or Tarka Dal. Tadka, tarka and chaunk all describe spices and aromatics bloomed in hot fat. This Punjabi version begins with toor/arhar dal.

Pick your finish

Choose your Dal Tadka style

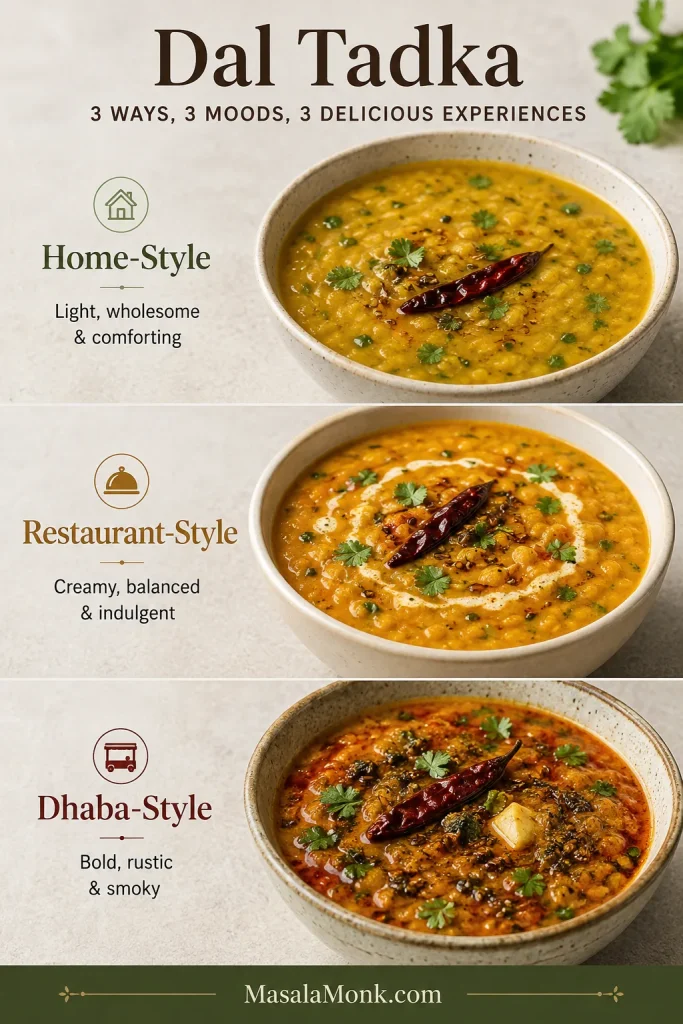
One pot can feel light and comforting, creamy and restaurant-style, or bold and smoky. Decide before building the masala and tadka, because each style changes how far you cook the tomatoes, how thick you leave the dal and how much fat you use.

StyleWhat it tastes likeHow to finish it
Everyday home-styleLight, familiar and weeknight-friendlyKeep the dal a little loose; use about 1 tablespoon fat in the base and 1 tablespoon in the final tadka; cook the tomato only until softened; skip cream and smoke; finish with lemon
Restaurant-styleCreamy, rounded and aromatic with a glossy red tadkaWhisk the dal partly smooth, cook the tomato base thoroughly, use kasuri methi and make the full garlic-ghee tadka
Dhaba-styleBolder, thicker, garlicky and slightly smokyUse the full tadka, add extra sliced garlic, keep the dal slightly thicker and use the optional short dhungar
Choose a lighter home-style, creamy restaurant-style or bolder dhaba-style finish.
Three bowls comparing lighter home-style, creamy restaurant-style and thicker dhaba-style Dal Tadka.
These are three finishes for the same base dal, adjusted through consistency, tomato reduction, garlic, fat and optional smoke.

Make it now

Restaurant-Style Dal Tadka Recipe

Soft toor dal is stirred into a glossy onion-tomato masala, loosened to a creamy pour, then finished with a fresh garlic-cumin tadka.

Recipe shortcuts: Ingredients · Instructions · Garlic tadka · Final balance

Timing and yield

Yield4 main-dish or 5 side servings (about 40–50 g dry dal per person)

PrepAbout 15–20 minutes

Active cookingAbout 20–30 minutes

Pressure cycleAbout 30–45 minutes, including heating and natural release

Total elapsedAbout 55–70 minutes, plus optional soaking

Saucepan totalAbout 80–110 minutes, plus soaking

Dietary note: Vegetarian; vegan with oil and no butter or cream; gluten-free when the hing is labelled gluten-free.

These windows overlap: chop while the cooker heats, then build the masala as the pressure releases. The total reflects the real clock rather than adding every line together.

Equipment

  • 3–4 litre stovetop pressure cooker, 6-quart Instant Pot or a heavy 3–4 litre saucepan
  • Medium frying pan or kadai for the onion-tomato masala
  • Small, preferably deep tadka pan with a long handle; otherwise use your smallest heavy saucepan or frying pan
  • Whisk, wooden spoon or dal ghutni
  • Heatproof serving bowl and ladle
  • Optional: natural charcoal, tongs and a small steel bowl for dhungar

Ingredients

For cooking the dal

  • 1 cup toor/arhar dal (200 g / 7 oz), or ¾ cup toor plus ¼ cup yellow moong
  • 2¾ cups water (660 ml) for pressure cooking
  • ½ teaspoon turmeric
  • 1¼ teaspoons fine salt (about 7–8 g), divided, plus more after tasting
  • ½–1 cup hot water (120–240 ml), as needed after cooking

For the onion-tomato masala

  • 1½ tablespoons ghee or neutral oil (22 ml)
  • 1 teaspoon cumin seeds
  • 1 medium onion, finely chopped (about 140 g / 5 oz)
  • 10–12 g finely grated ginger (about 1 packed tablespoon)
  • 4 garlic cloves, finely chopped or crushed (about 12 g)
  • 1–2 green chillies; slit for gentler heat or finely chop to spread the heat through the dal
  • 2 medium tomatoes, finely chopped or crushed (about 250 g / 9 oz)
  • 1 teaspoon ground coriander
  • ½ teaspoon Kashmiri chilli powder; use mild paprika only if Kashmiri chilli is unavailable
  • ¼ teaspoon garam masala
  • 1 teaspoon kasuri methi, crushed between your palms

For the final tadka and balance

  • 1½ tablespoons ghee (22 ml), or oil for a vegan version
  • 1 teaspoon cumin seeds
  • 5 medium garlic cloves, thinly and evenly sliced, about 2 mm thick (about 15 g)
  • 1–2 dried red chillies, broken in half
  • Up to a scant ⅛ teaspoon hing/asafoetida, optional; use less when yours is strong or pure, and check compounded hing for wheat when cooking gluten-free
  • ½ teaspoon Kashmiri chilli powder
  • 2–3 tablespoons chopped coriander leaves/cilantro
  • Lemon juice: 1–2 teaspoons, if the finished dal needs brightness

Optional for a richer or smoky finish

  • Butter or cream: 1 tablespoon
  • Dhungar: 1 piece natural lump charcoal, about 1 inch/2.5 cm, plus ½ teaspoon ghee

How the ingredients work together

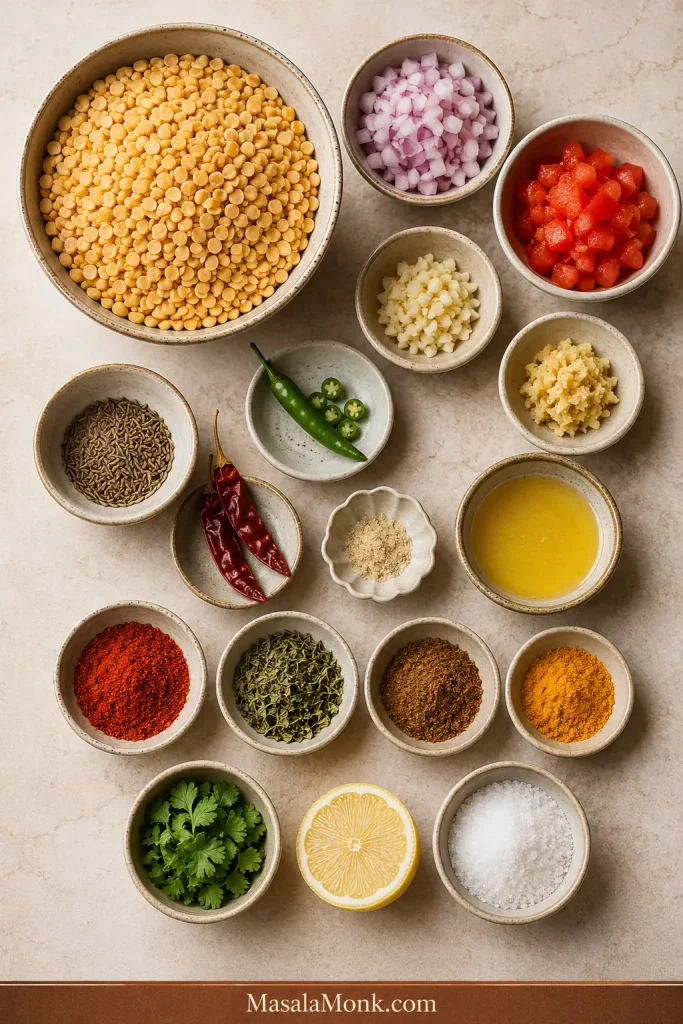
Toor dal, onion, tomatoes, garlic, ginger, cumin, chillies, spices, coriander, lemon and ghee arranged together.
Think of the ingredients in three layers: lentils create body, the masala supplies depth, and the final tadka carries aroma.

Use the waiting time: chop the onion, tomato, ginger and garlic while the cooker builds pressure. Cook the masala while the pressure releases. Measure the finishing-tadka ingredients before the garlic enters hot ghee; that last stage moves too quickly for cupboard hunting.

Instructions

1. Rinse and optionally soak the dal

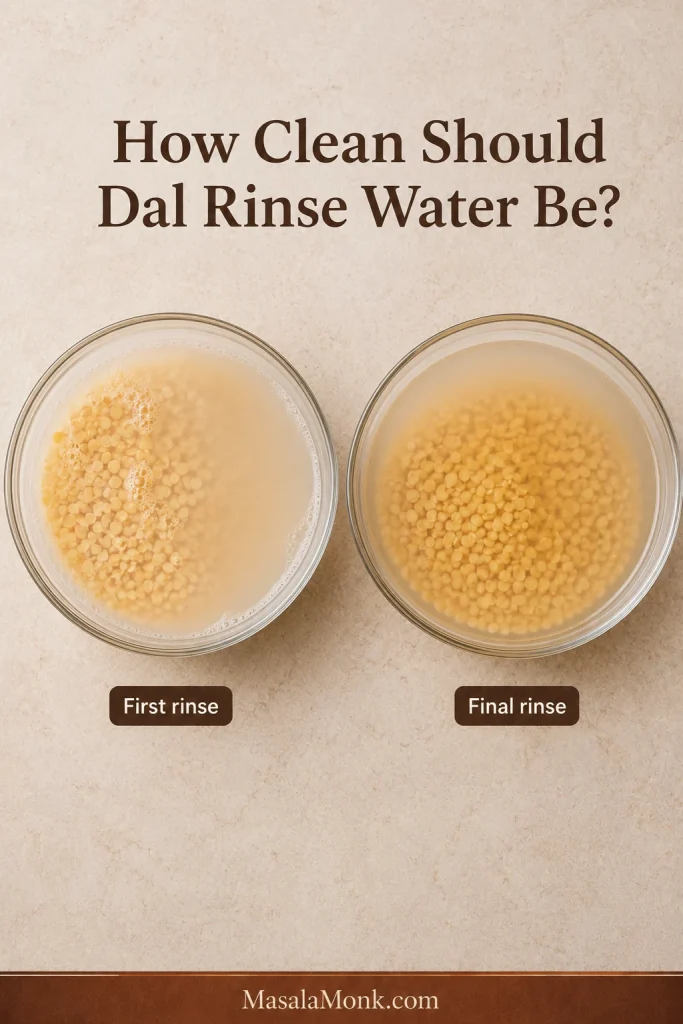
Put the dal in a bowl and rinse it three or four times, rubbing it gently between your fingers, until the water changes from very cloudy to lightly hazy. Drain well.

Soaking for 20–30 minutes is optional for a pressure cooker or Instant Pot, but it helps older lentils cook more evenly. If using an ordinary saucepan, soak toor dal for 1–2 hours; older lentils benefit from the longer end.

Two bowls showing very cloudy first-rinse water and lightly hazy water after repeatedly washing toor dal.
Lightly hazy water is enough; the goal is to remove obvious surface residue, not rinse until the water becomes perfectly transparent.

2. Cook until the lentils completely soften

Add the drained dal, 2¾ cups water, turmeric and ½ teaspoon salt to your cooker.

Choose your cooking method
  • Stovetop pressure cooker: bring to full pressure over medium-high heat. Lower to medium and cook for 8 minutes; use 10 minutes for older, unsoaked lentils. Turn off the heat and let the pressure fall naturally. Cooker designs and burners vary, so use elapsed pressure time and the grain test rather than whistle count.
  • Instant Pot: cook on High Pressure for 7 minutes when soaked or 8 minutes when unsoaked. Allow the pressure to release naturally until the float valve drops; do not force an immediate release for this starchy, expanding food.
  • Saucepan: begin with 4 cups water instead of 2¾ cups. Bring to a boil, skim excessive foam, then simmer partly covered for 45–75 minutes after soaking. Stir occasionally and keep a kettle of hot water nearby; older lentils may need longer.
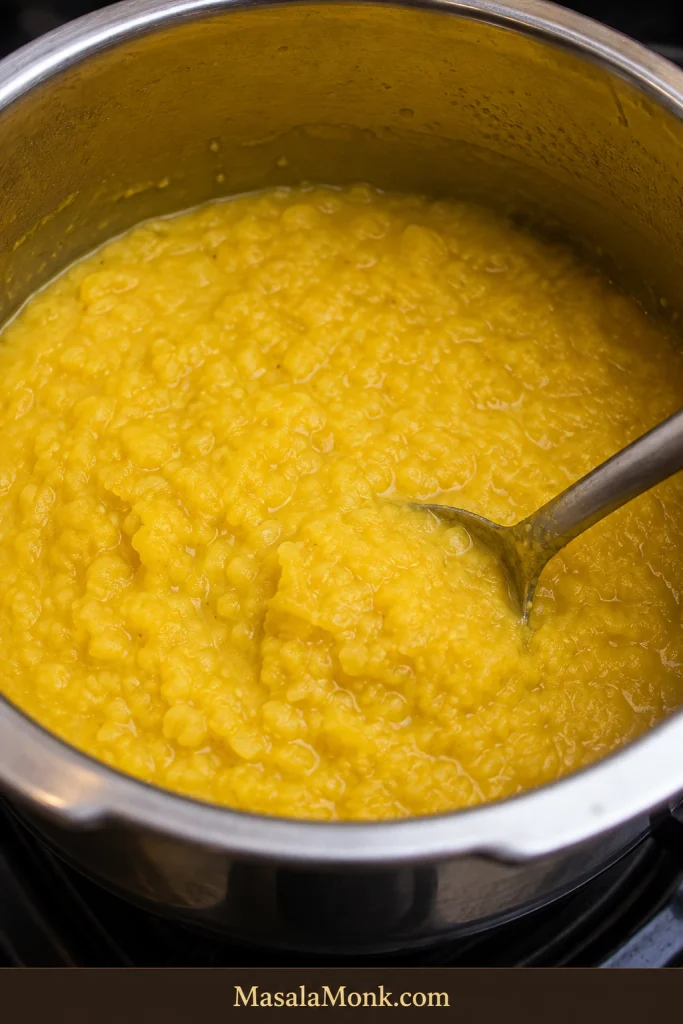
Fully cooked toor dal in a steel pressure cooker, with swollen grains beginning to split and collapse.
Softness matters more than looseness here: water can be adjusted later, but firm lentil centres must be cooked out now.

Pressure-cooker safety: follow the manual for your model. In an Instant Pot, keep lentils, water and other ingredients below the ½ fill line used for expanding or starchy foods; overfilling can obstruct the steam-release path. Never cover or obstruct the valve while pressure is releasing. For model-specific details, check the Instant Pot safety guidance (opens in a new tab).

Using another cooker? Compare pressure cooker, Instant Pot and saucepan timing.

Check the grain, not the clock

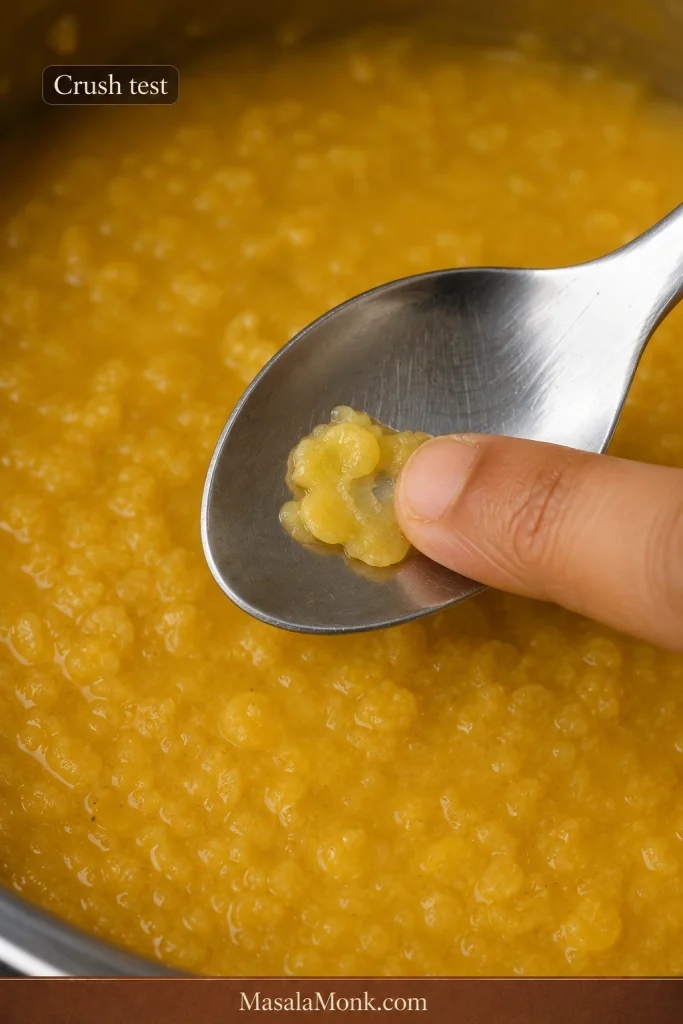
Lift out one grain, let it cool for a few seconds, then press it between your fingers—or crush it against the side of the pot with a spoon. It should collapse easily with no firm or chalky centre. If it still feels grainy, add a splash of hot water and cook it longer. Once the grain yields without resistance, the hardest part is done.

A cooked toor dal grain being pressed between fingertips and collapsing without a firm centre.
This single-grain test outranks the timer because older or drier lentils may need longer even when every measured quantity stays unchanged.

3. Whisk to a creamy texture

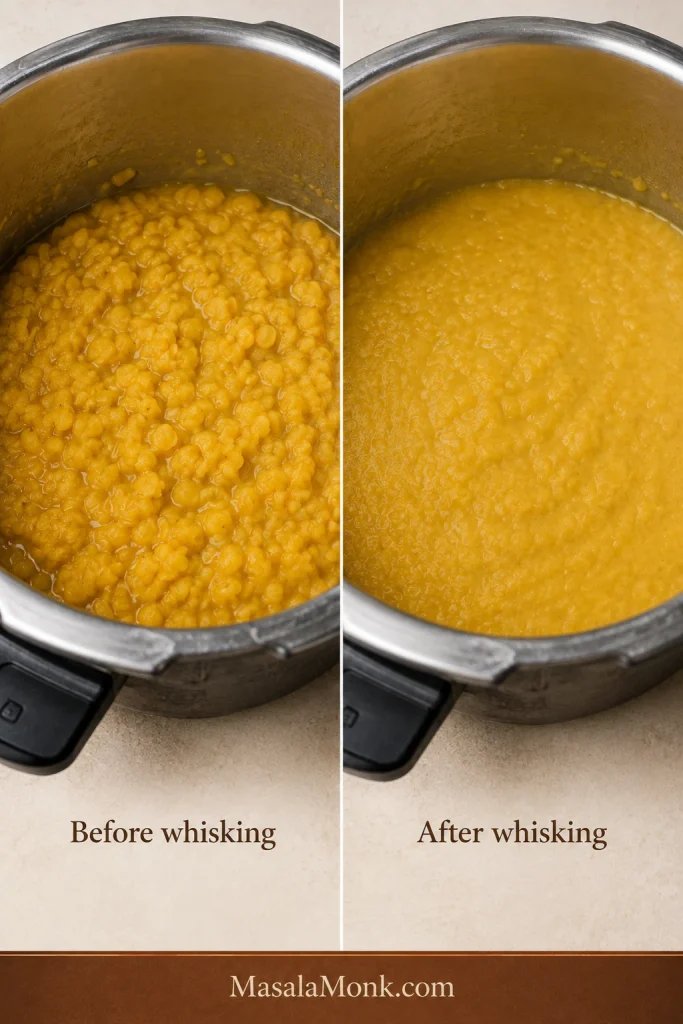
Whisk or mash the cooked dal for 20–30 seconds, breaking down most of the grains while leaving a little natural texture.

The cooker may open to dal far thicker than you expected. That is normal. Hold back the extra water for now; the masala adds moisture, and the final flow is easier to judge once everything is together.

Cooked dal with visible grains beside smoother whisked dal that still retains slight natural texture.
Whisking changes structure, not doneness: it makes softened grains cohesive, but it cannot rescue lentils that remain firm inside.

4. Build the onion-tomato masala

Heat 1½ tablespoons ghee or oil in a medium pan over medium heat. Add the cumin. It should sizzle promptly and smell nutty within 15–20 seconds. If it sits silently, the fat is not hot enough.

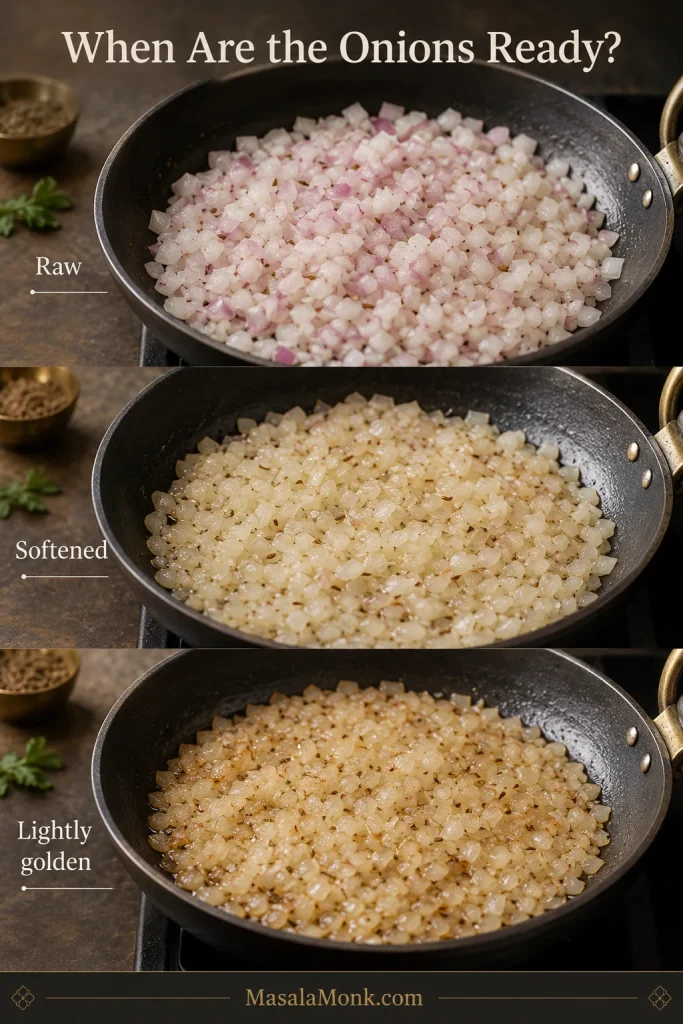
Add the onion with ⅛ teaspoon of the measured salt. Cook for 6–8 minutes, stirring regularly, until soft and golden at the edges and free of its raw sharpness.

Chopped onions shown raw, softened and finally translucent with lightly golden edges in a dark pan.
Edge colour is the safest stopping cue because it removes raw onion sharpness without introducing the heaviness of deep browning.

Add the ginger, chopped garlic and green chilli. Cook for 60–90 seconds, until fragrant and the garlic begins turning pale gold.

Reduce the tomatoes until glossy

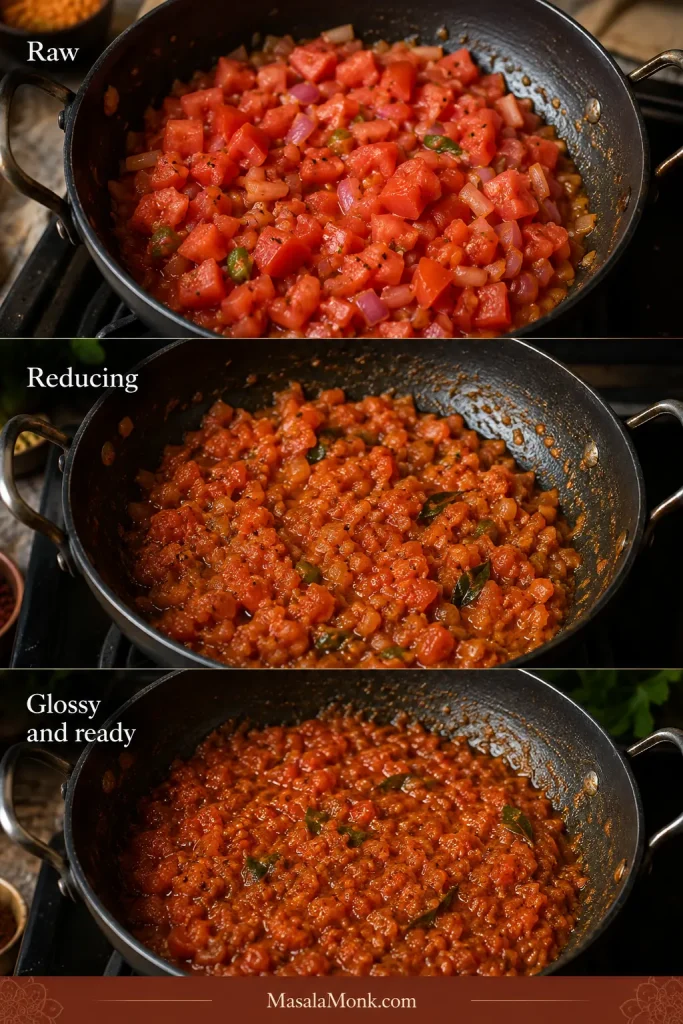
Add the tomatoes. Cook over medium heat for 7–10 minutes, stirring and pressing them against the pan, until they collapse into the onion, lose their raw smell and form a cohesive, glossy masala. Small beads of fat may appear around the edges.

The masala should smell rounder and sweeter now. This is the patient part: extra butter later cannot replace tomatoes that still taste raw.

Tomato masala progressing from watery chopped tomatoes to a thick, cohesive and glossy onion-tomato mixture.
Judge readiness by movement as well as colour: once done, tomato and onion move together instead of releasing watery liquid separately.

Lower the heat. Add ground coriander and the first ½ teaspoon Kashmiri chilli powder. Stir for 20–30 seconds. If the pan looks dry, add one tablespoon water rather than letting the spices scorch.

5. Combine, season and set the consistency

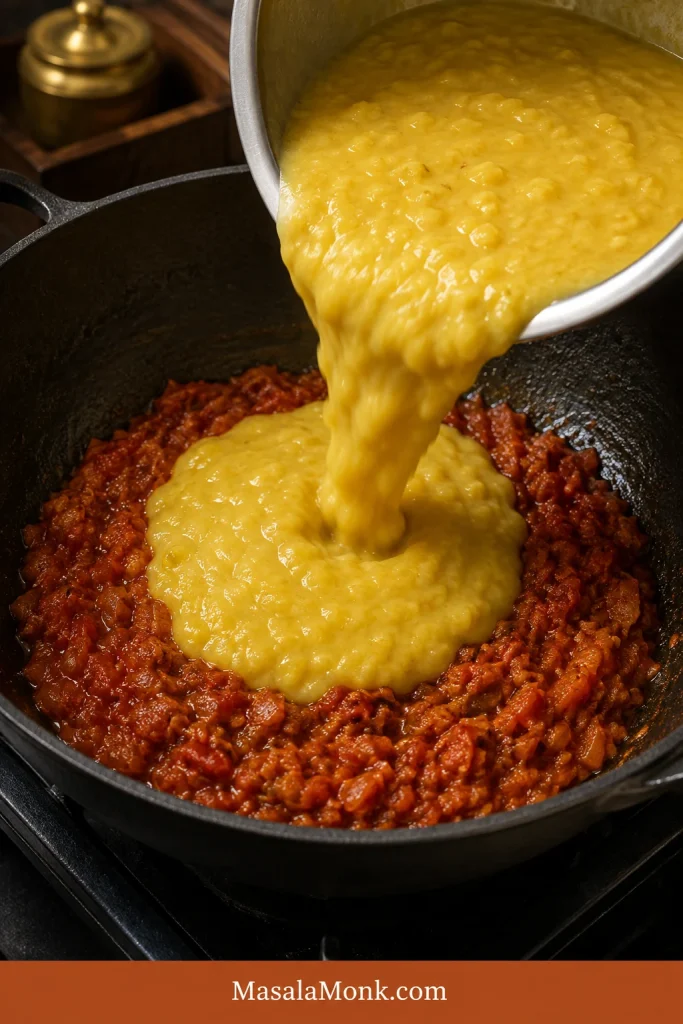
Pour the cooked dal into the masala pan, or scrape the masala into the cooker if that gives you more room. Stir until the colour and texture are even.

Soft yellow dal being poured into reduced onion-tomato masala in a dark cooking pan.
A brief simmer after combining lets the masala season the lentils evenly instead of remaining concentrated in isolated pockets.

Add ½ cup hot water, the garam masala, crushed kasuri methi and ½ teaspoon of the measured salt. Reserve the final ⅛ teaspoon until after tasting. Bring the dal to a gentle simmer and cook uncovered for 4–6 minutes, stirring once or twice.

Set the final consistency

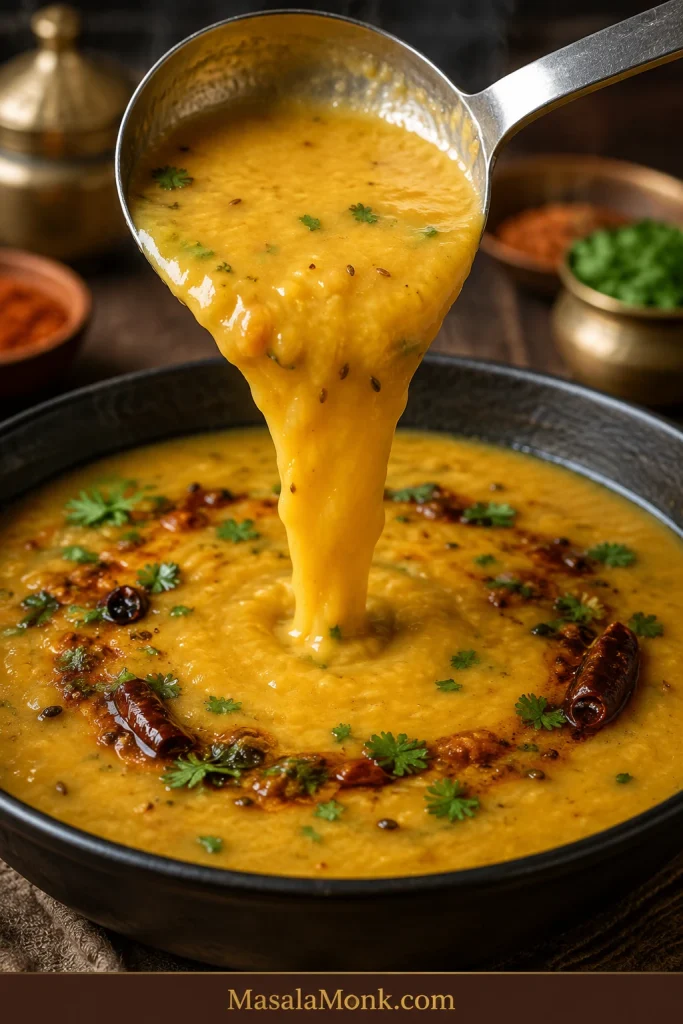
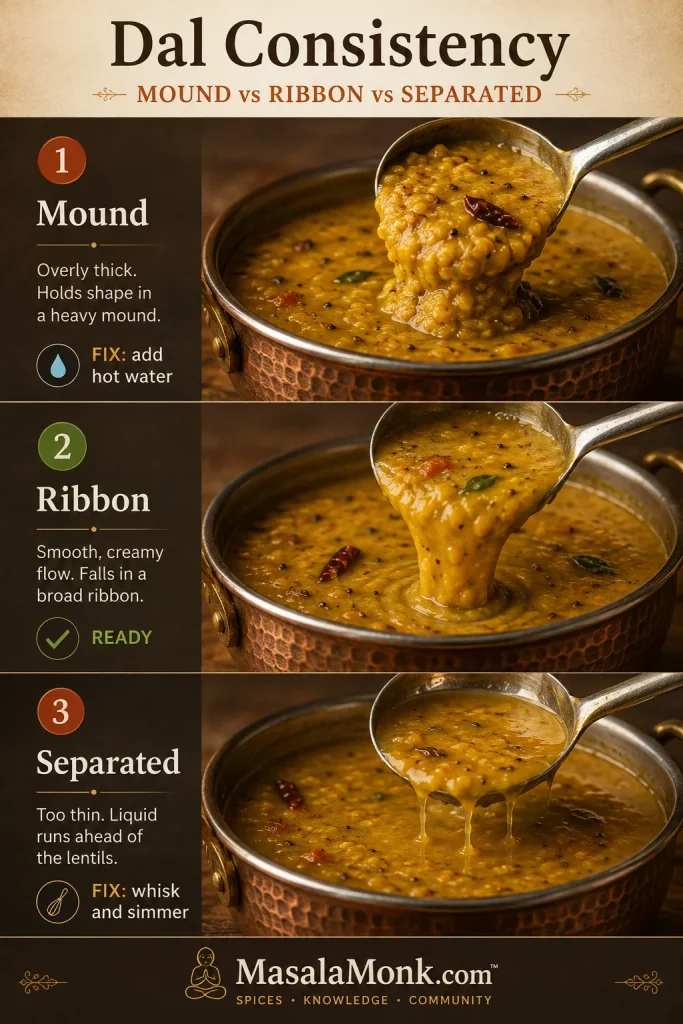
Judge the texture while the dal is hot. It should pour from a ladle in one creamy stream, then settle back into the pan. This flow carries the tadka through the dal instead of swallowing it.

Creamy yellow dal falling from a steel ladle into a pot in a broad, continuous ribbon.
Watch the ribbon’s leading edge: it should fall as one creamy stream rather than break into lumps or leak clear liquid.

If the dal drops in a mound, add hot water in ¼-cup/60 ml increments. If clear liquid runs ahead of the lentils, whisk briefly and simmer uncovered until the mixture comes together. Stop while it is a little looser than you want at the table; it will thicken as it rests.

Still unsure about the texture? Use the visual Dal Tadka consistency guide.

Taste the dal before making the tadka: check the salt, tomato sharpness and body. Add the reserved ⅛ teaspoon salt if needed. If the tomato still tastes raw or sharp, simmer for another 2–3 minutes.

Stir in the optional butter or cream, then turn off the heat. Hold the lemon until after the tadka so you can judge the complete spoonful and keep dairy smooth. After the fresh tempering goes in, avoid prolonged simmering; it will flatten the aroma.

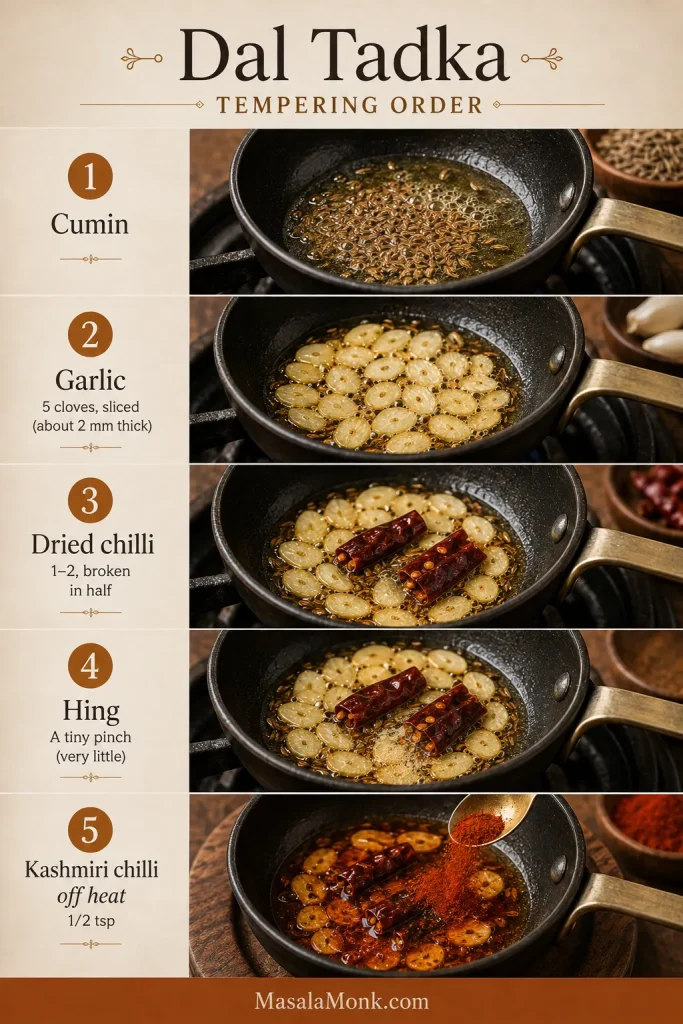
6. Make the garlic tadka

Five-step sequence showing cumin, sliced garlic, broken dried chilli, hing and Kashmiri chilli added off the heat.
The order follows heat tolerance: cumin needs the longest contact, garlic needs controlled browning, and chilli powder needs residual heat only.

Put the serving bowl close to the stove and measure every tadka ingredient before heating the ghee. Once the garlic starts colouring, there is no useful pause button.

Heat 1½ tablespoons ghee in a small, deep pan over medium heat until fully melted and shimmering, but not smoking. Add the cumin seeds and let them sizzle actively for about 10–20 seconds.

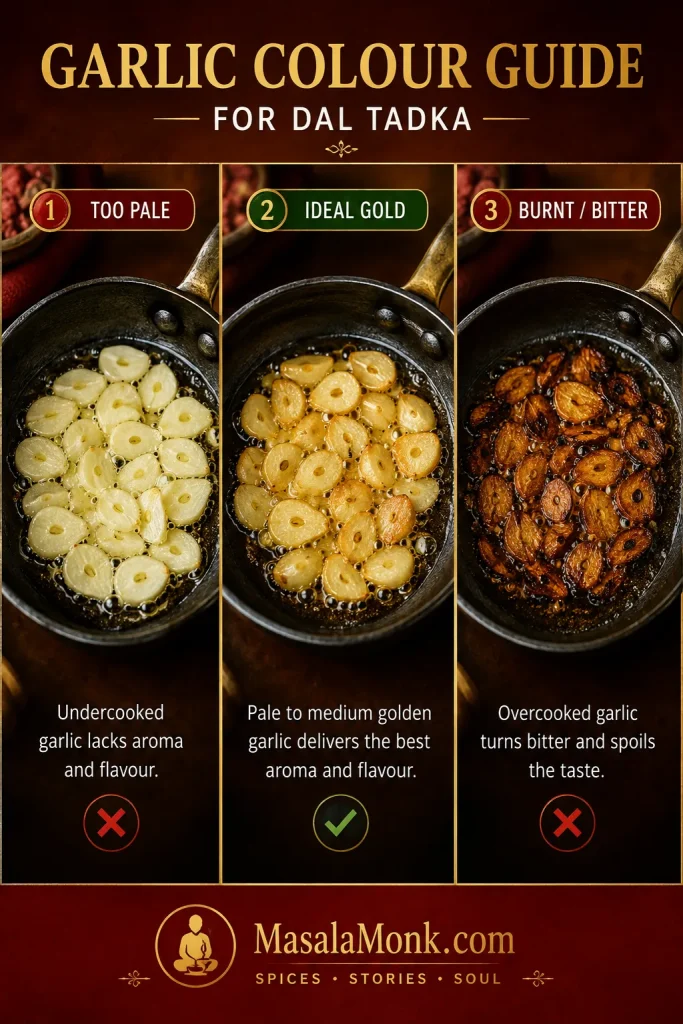
Control the garlic colour

Add the evenly sliced garlic and reduce the heat to medium-low. Cook, swirling or stirring, until the edges begin to turn pale gold. Add the dried red chillies, then add the hing for the final 5–10 seconds. Pull the pan when the garlic is pale to medium gold; it will continue darkening in the hot ghee.

Three pans comparing pale garlic, evenly golden garlic and dark burnt garlic slices frying in ghee.
Garlic continues darkening after the pan leaves the flame, so stop one shade earlier than the colour wanted on the finished dal.
Bloom, pour and divide the tadka

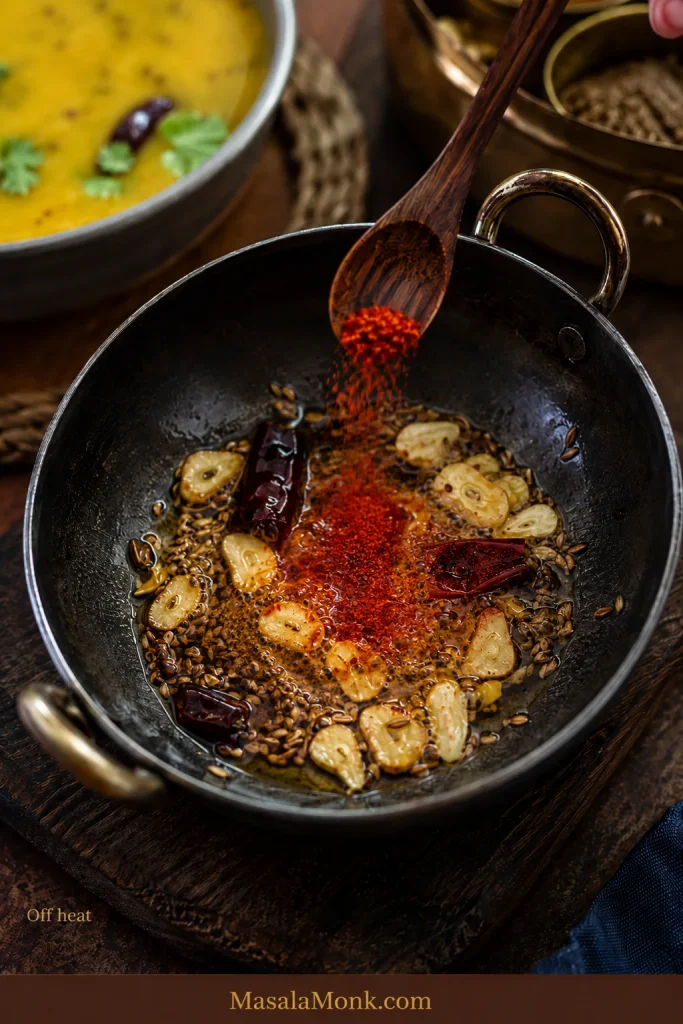
With the pan off the heat, add ½ teaspoon Kashmiri chilli powder and swirl immediately. The ghee should turn red without the chilli powder blackening.

Kashmiri chilli powder being added to hot ghee with cumin, golden garlic and dried chilli away from the burner.
Residual heat is enough to colour the ghee; returning the pan to the flame adds no benefit and can scorch the chilli powder.

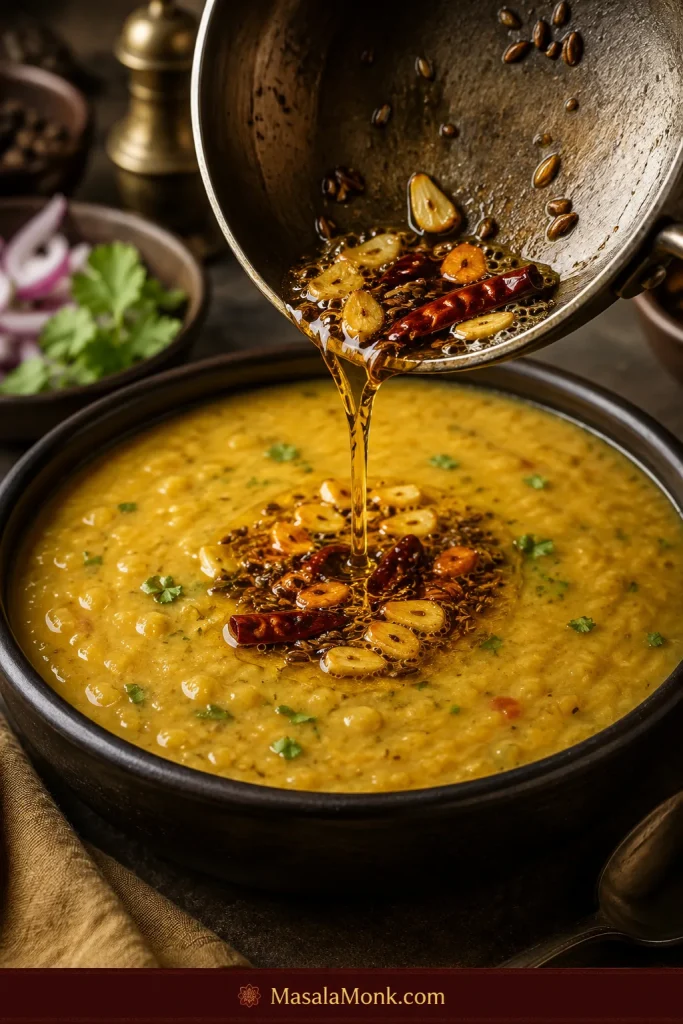
Pour about three-quarters of the sizzling tadka over the dal while the ghee is still hot and aromatic.

A small pan pouring red-gold ghee with cumin, sliced garlic and dried chilli over creamy yellow dal.
The brief crackle confirms the tadka is still hot enough to release aroma, although the surface should remain mostly creamy rather than oily.

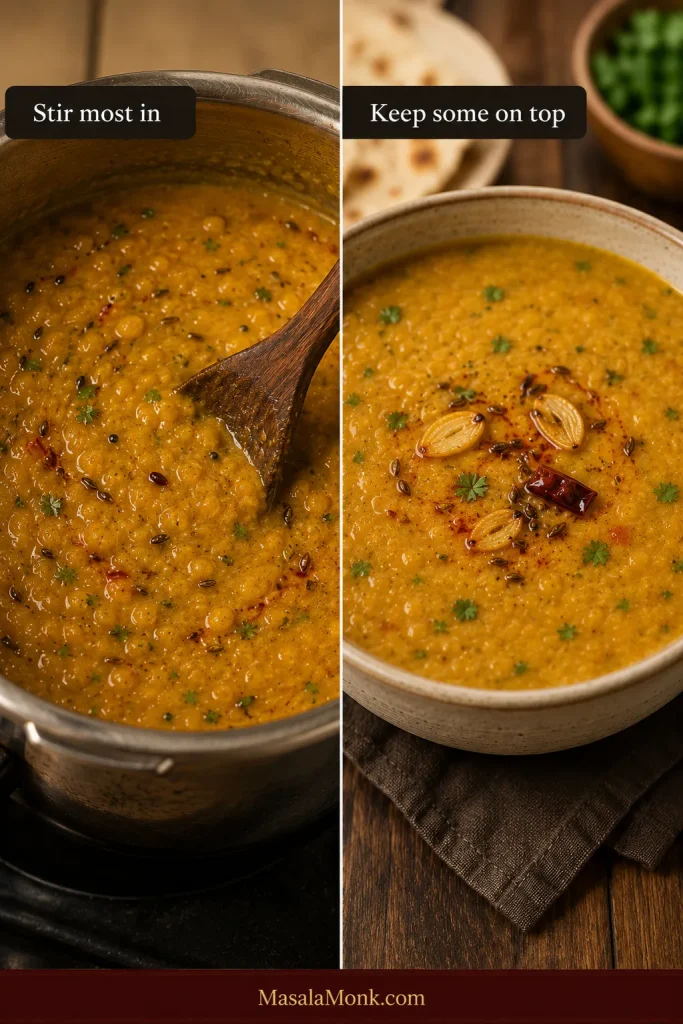
Stir once so most of the tempering travels through the pot, then spoon the remainder over the surface and finish with chopped coriander.

7. Let the tadka settle, then serve

Let the tadka sit for a moment, then taste a spoonful that catches both dal and tempering.

If the dal tightened while the tadka was cooking, gently stir in warm water one tablespoon at a time. Once the texture is right, add lemon ½ teaspoon at a time, up to 2 teaspoons, if the spoonful still needs lift.

Serve while the garlic is still fragrant and the red ghee remains visible. Dal continues thickening on the way to the table, so finish it slightly looser than the texture you want at serving. When rice is part of the meal, MasalaMonk’s guide to cooking rice covers basmati, stovetop, cooker and Instant Pot methods.

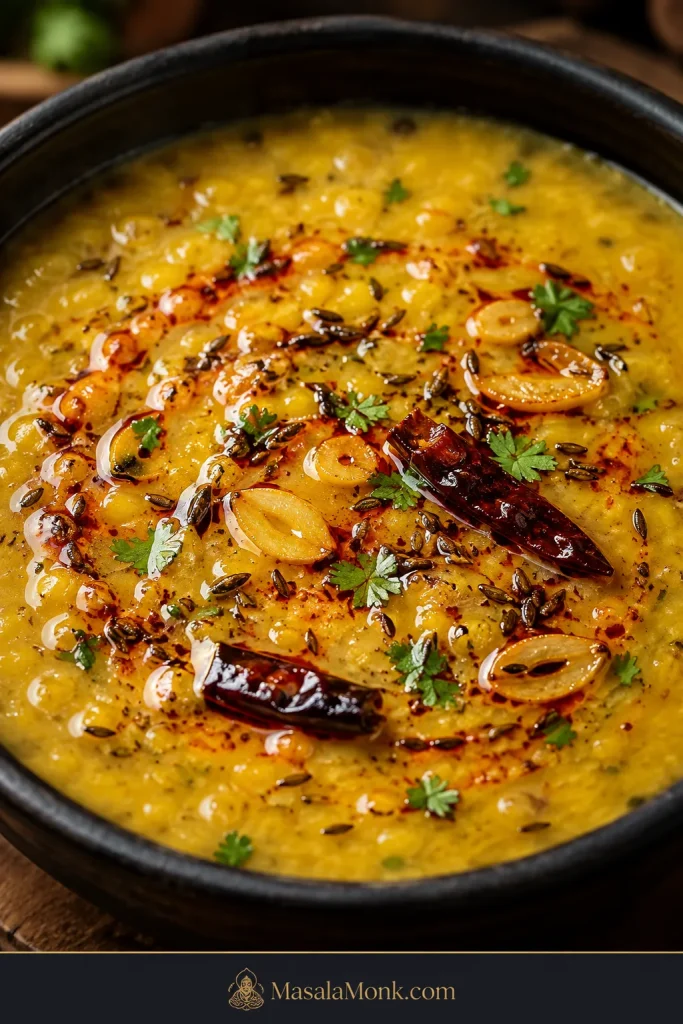
Close-up of creamy Dal Tadka with restrained red ghee, thin golden garlic, cumin, dried chilli and coriander.
Use the exposed yellow dal as a proportion check: if tempering hides most of the surface, the finish is heavier than necessary.

Crush. Ribbon. Gold. Crush one lentil: it should collapse. Lift one ladle: the dal should fall in a broad creamy ribbon. Look at the garlic: it should be golden. When all three agree, carry the dal to the table.

Three panels showing a soft lentil crushing, creamy dal ribboning from a ladle and sliced garlic frying until golden.
These checks isolate three failure points—lentil doneness, final consistency and tempering control—so a beautiful surface cannot hide an undercooked base.

Make Dal Tadka work in your kitchen

The main recipe gets dinner on the table. The sections below help when your lentils are older, your cooker behaves differently or you prefer the dal lighter, thicker or smokier.

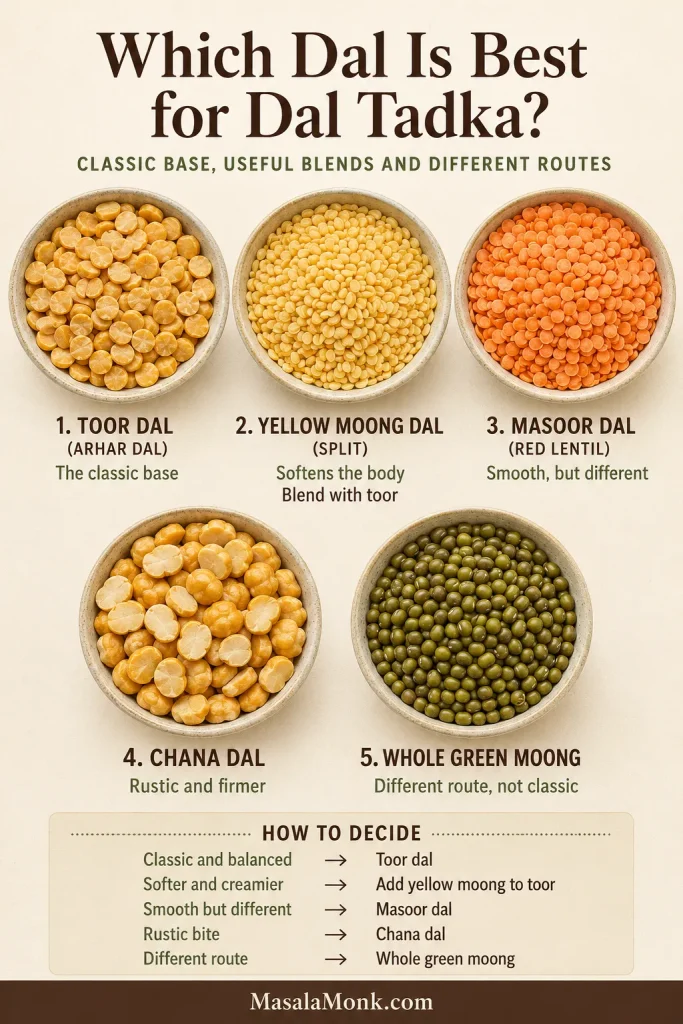
Which dal is used in Dal Tadka?

For a Punjabi-style Dal Tadka, toor dal is the most dependable starting point. It may also be labelled arhar dal, tur dal, tuvar dal or split pigeon peas. These names refer to the same lentil.

Some restaurants mix in yellow moong, masoor or a little chana dal. That does not make one version authentic and another wrong. It changes what the spoon feels like: moong softens the body, masoor breaks down quickly, and chana leaves a faint nutty texture.

Five labelled bowls containing toor dal, yellow moong, red masoor, chana dal and whole green moong.
Choose by spoon feel, not colour alone: toor stays classic, moong softens, masoor smooths and chana leaves more visible texture.

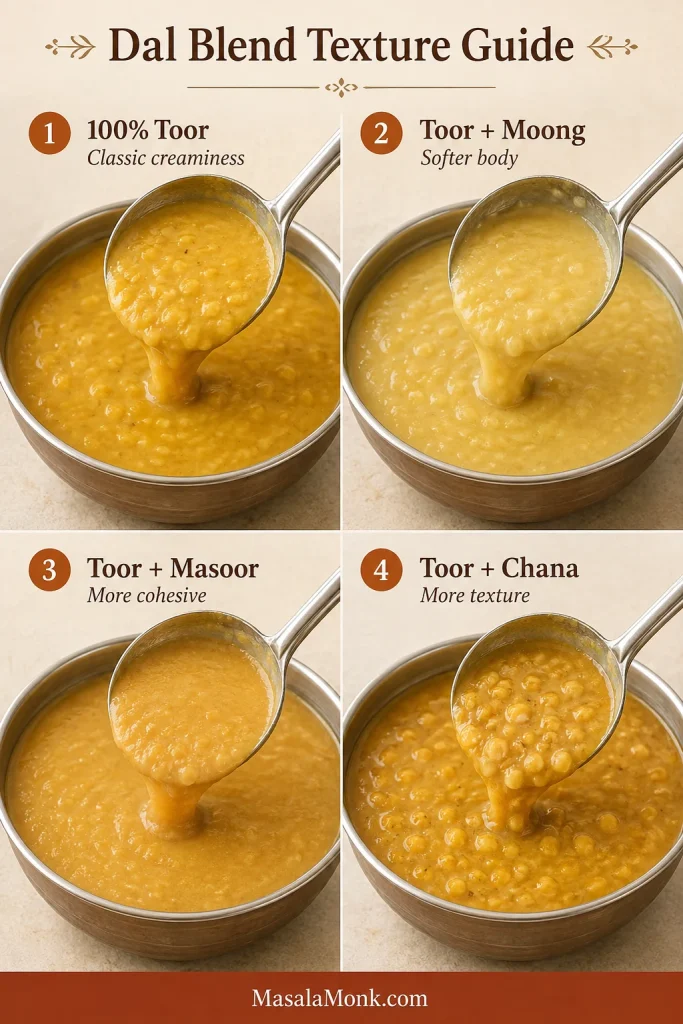
How common dal blends change the texture

Dal choiceResultWhat changes
100% toor/arhar dalClassic, creamy and clean-tastingBest default for this recipe
¾ toor + ¼ yellow moongSofter, lighter and slightly creamierCooks at a similar pace and is the easiest blend to use
¾ toor + ¼ masoorVery soft and cohesive because masoor breaks down earlierBegin with the all-toor timing; let the toor grains decide doneness and expect to adjust the water
Toor with a little chana dalNutty with more visible textureSoak first; chana dal decides the minimum cooking time
100% yellow moongLight, mild and quick-cookingProduces a different everyday dal and deserves its own method
Whole green moongEarthy, hearty and texturedNeeds soaking and a longer cook; do not use as a direct swap here
How common lentil choices change the texture and cooking behaviour of Dal Tadka.
Four panels comparing cooked all-toor, toor-moong, toor-masoor and toor-chana dal blends.
Blend ratios change the dal’s body before butter or cream is added, making lentil choice the recipe’s first texture decision.

For the clearest starting point, use 200 g toor dal. For a softer blend, use 150 g toor plus 50 g yellow moong. Begin checking at the same time, then let the softened grain decide whether it needs longer.

Ingredients that shape the flavour

Garlic works twice. Chopped garlic melts into the masala, while evenly sliced garlic gives the fresh tempering its recognisable aroma and golden pieces.

Keep kasuri methi and garam masala in the background. One teaspoon kasuri methi gives the dal its warm restaurant-style aroma, while ¼ teaspoon garam masala deepens the base without taking over. If your blend smells flat, MasalaMonk’s homemade garam masala recipe explains how the whole-spice balance is built.

No kasuri methi? Skip it instead of replacing it with fresh fenugreek. The cumin-garlic tempering will still give the dal a satisfying finish.

Handle Kashmiri chilli and hing gently. Take the tadka pan off the flame before adding the chilli powder so it blooms red without scorching. Hing needs just the final few seconds in the hot fat, and strong or pure hing needs far less than a mild compounded product. For gluten-free Dal Tadka, check the label because some compounded asafoetida contains wheat flour.

Regional note: this Punjabi version is led by cumin and garlic. Mustard seeds and curry leaves are central to many other regional dals, especially in South Indian cooking, but this recipe does not need them.

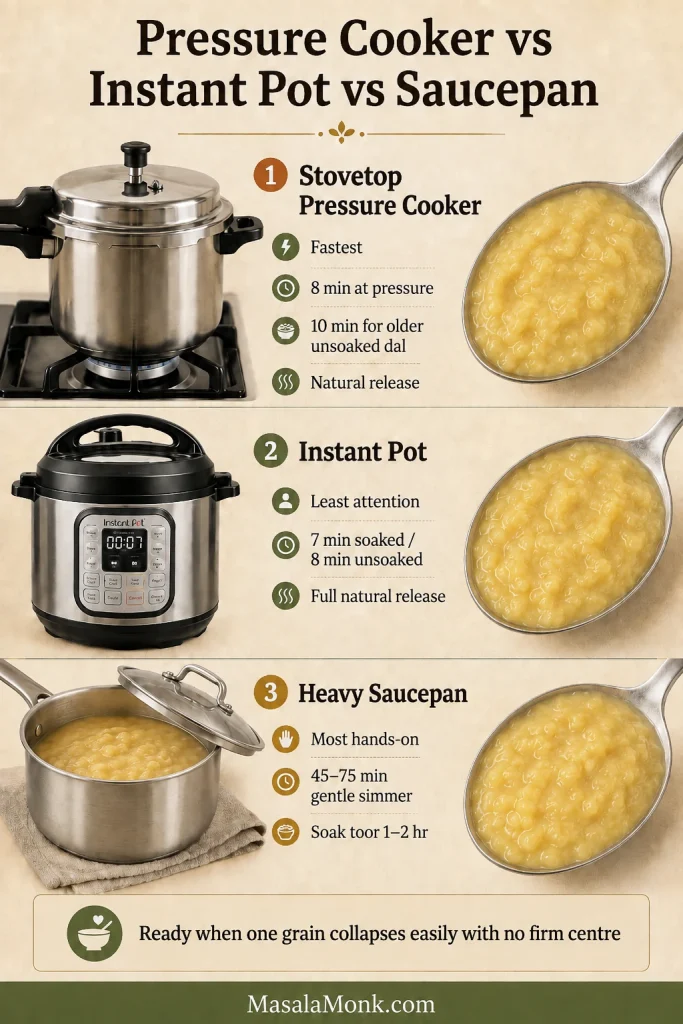
Pressure cooker, Instant Pot or saucepan?

A stovetop pressure cooker is fastest, an Instant Pot asks for the least attention, and a saucepan lets you watch the lentils soften. Choose the method that fits how you like to cook; the grain test stays the same.

MethodSoakingStarting waterFirst timing windowReady when
Stovetop pressure cookerOptional 20–30 min2¾ cups / 660 ml8 min at pressure; 10 for older unsoaked dal; natural releaseA grain collapses immediately with no chalky centre
Instant PotOptional 20–30 min2¾ cups / 660 ml7 min soaked or 8 min unsoaked; full natural releaseThe dal whisks creamy with almost no resistance
Heavy saucepan1–2 hr for toorBegin with 4 cups / 950 ml45–75 min gentle simmer; older dal may need longerNo firm grains remain and the liquid no longer looks separate
Starting points for toor dal in a stovetop pressure cooker, Instant Pot or heavy saucepan.
Stovetop pressure cooker, Instant Pot and saucepan shown with spoonfuls of fully softened plain toor dal.
Pressure time and saucepan simmer time measure different things; compare these methods by attention and final softness rather than numbers alone.

Cooker size, heat and lentil age vary; the softened grain gives the final answer.

Return to the cooking step · Check the final consistency

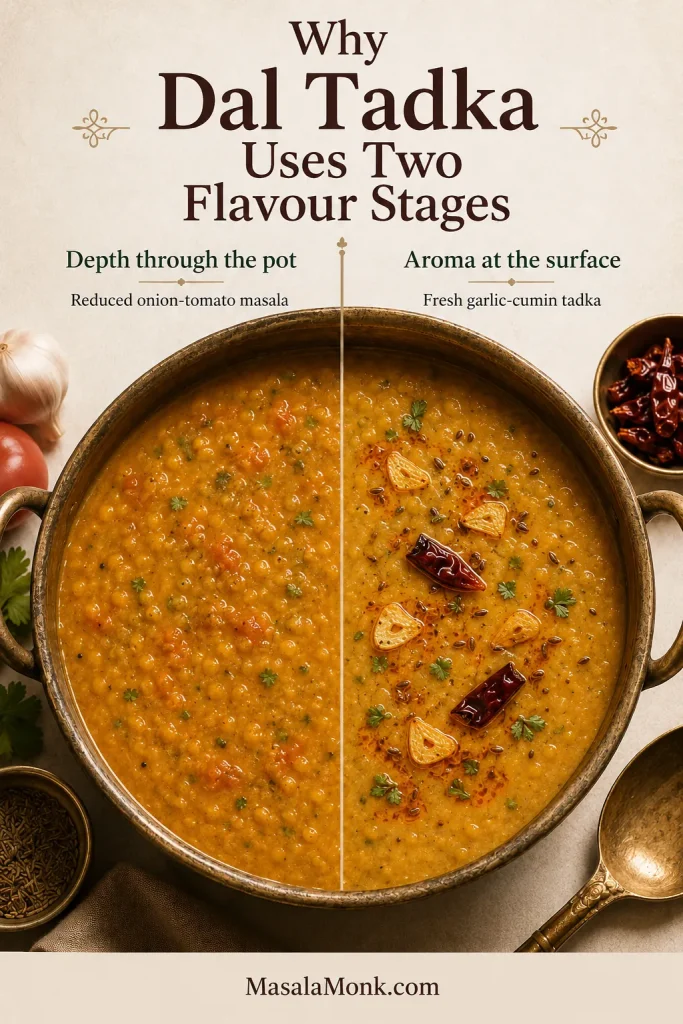
Why restaurant-style dal needs two flavour stages

Restaurant-style Dal Tadka tastes layered because each stage keeps its own job. Tender lentils create the creamy body. The reduced onion-tomato masala carries sweetness and savoury depth through every spoonful. The garlic-cumin tadka goes in at the end, while its aroma is still vivid. That is where the richness comes from—not oil floating on top.

Split pot showing onion-tomato masala mixed through dal and fresh garlic-cumin tadka visible at the surface.
Keep the final tadka out of a prolonged simmer: cooked masala tolerates time, but fresh garlic-cumin aroma quickly becomes quieter.

How thick should Dal Tadka be?

The ideal texture depends on how you are serving it, but restaurant-style Dal Tadka should be creamy and pourable: cohesive on the spoon, then willing to flow back into the pot.

What you seeWhat it meansWhat to do
Dal sits in a mound and barely movesToo thickAdd hot water ¼ cup/60 ml at a time
Dal falls in a broad ribbon and settles slowlyCreamy restaurant-style flowStop adjusting; it will thicken slightly as it rests
Clear liquid runs ahead of lentil solidsToo thin or not yet cohesiveWhisk briefly and simmer uncovered
Dal feels creamy but turns stiff after 10 minutesNormal cooling and starch thickeningKeep it slightly loose before serving
Use the ladle flow—not thickness in the pot alone—to judge the final consistency.

Use the comparison below to identify the problem before adjusting. Change one thing at a time, then give the dal a moment to settle before judging again. For a sturdy flatbread such as MasalaMonk’s jowar-bajra roti, stop a little thicker; for rice, leave it looser. If dinner runs five minutes late, restore the flow just before serving.

Three panels showing overly thick dal, correctly ribboning dal and separated dal with watery liquid ahead of the lentils.
The same bowl can be too thick or merely separated, so watch how it falls before deciding whether to add water or simmer.

Dal Tadka troubleshooting

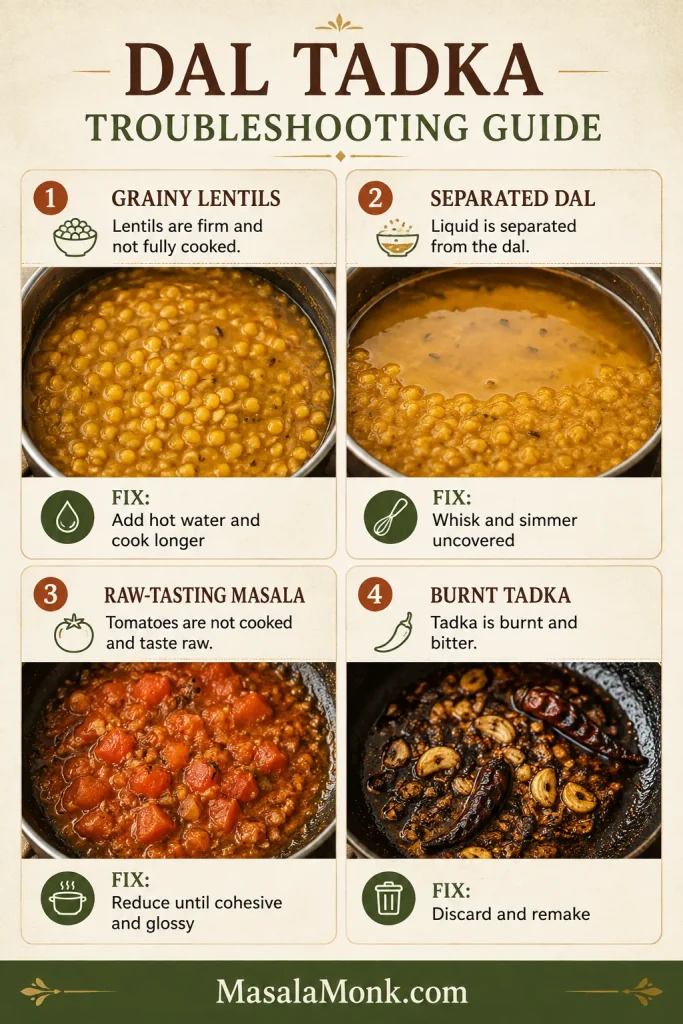
Most disappointing pots are recoverable. Before reaching for more spice, ask which stage needs another minute. Grainy dal needs cooking, separated dal needs whisking and reduction, and a weak finish usually needs balance or a fresh tempering.

Four panels showing grainy lentils, separated dal, raw tomato masala and burnt tadka with a fix for each.
Four visible failures point to different causes; diagnose the texture or colour first instead of automatically adding more spice, water or fat.

Fix texture and consistency problems

ProblemLikely causeMost useful fix
Watery or separated dalUndercooked lentils, too much adjustment water or too little whiskingConfirm the grains are soft, whisk briefly and simmer uncovered; do not add flour or starch
Grainy dalOld lentils, hard water or insufficient pressure timeAdd ¼–½ cup hot water and pressure-cook 2–3 minutes more, or simmer covered until the grains collapse; if this repeats across batches, try filtered water
Dal became stiff while waitingNormal starch thickening as it coolsFold in warm water a tablespoon at a time; recheck salt only after the texture is right
Correct the physical texture before changing the seasoning.

Fix flavour and tempering problems

ProblemLikely causeMost useful fix
Flat flavourToo little salt or acidity, raw masala, or a tadka made too earlyCheck salt first, then add lemon by the teaspoon; cook raw tomato longer or make a small fresh tadka
Bitter tadkaGarlic or chilli powder burnedDiscard and remake the small tadka; stop garlic at pale-to-medium gold and add chilli powder off heat
Too much oil on topThe tadka was too large for the amount of dalSpoon off excess and loosen the dal if needed; use the lighter home-style quantity next time
Tomato tastes sharp or rawThe masala was combined too soonSimmer before adding the final tadka until the raw smell disappears and the base looks cohesive
Garlic softened or disappearedUneven slices or all the tadka was stirred through earlySlice evenly, fry just before serving and reserve part of the tadka for the surface
Match the flavour problem to the stage that created it.

When the garlic and red ghee disappear into the pot, the problem is usually distribution rather than quantity. Stir most of the tadka through for flavour in every serving, but reserve a smaller portion for the surface so the freshest aroma and crispest garlic remain noticeable.

Split image showing tadka stirred through a pot of dal and a smaller portion left visible on the served bowl.
Dividing the tadka solves two jobs at once: flavour throughout the pot and a fresher aromatic layer at the surface.

When the texture is right but the flavour is flat

When the texture is right but the flavour remains dull, taste in this order: salt, acidity, tomato reduction and tadka freshness. If the garlic is dark brown, the chilli smells scorched or the fat tastes bitter, remake the tempering. Two fresh minutes are better than letting burnt garlic follow every spoonful.

Back to the recipe card · Recheck consistency · Back to top ↑

How to make the dal dhaba-style

For bolder dhaba-style dal, change four things instead of doubling every spice.

  1. Keep the dal slightly thicker, but still loose enough to settle naturally.
  2. Add two extra sliced garlic cloves to the final tadka.
  3. Taste first; if the kasuri methi is too quiet, add up to another ½ teaspoon during the final simmer.
  4. Use a brief charcoal dhungar for smoke.

How to smoke the dal without making it bitter

The same brief charcoal method appears in MasalaMonk’s butter chicken recipe, but Dal Tadka needs a lighter exposure.

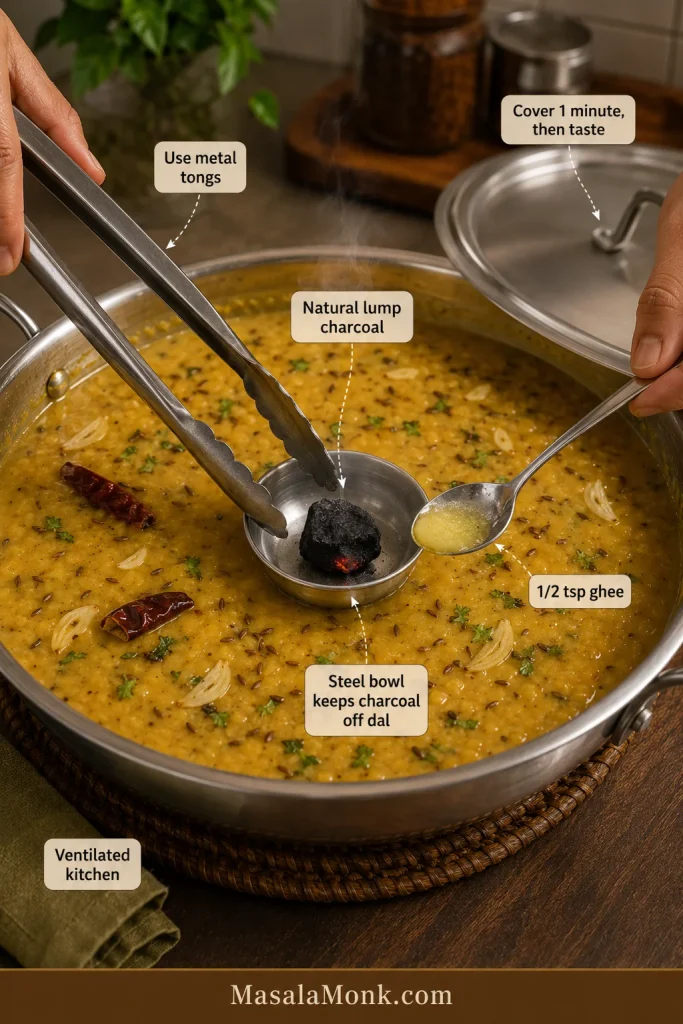
Working beneath strong ventilation, heat the 1-inch/2.5 cm piece of natural lump charcoal—not a self-lighting briquette—over a flame until it glows red in places and develops a light grey surface. Handle it only with tongs.

Put a small steel bowl in the centre of the finished dal and place the hot charcoal inside it without letting the charcoal touch the food. Drizzle ½ teaspoon ghee over the charcoal and immediately cover the pot.

Metal tongs holding hot charcoal in a steel bowl inside dal while a small spoon pours ghee over it.
Treat one minute as the first checkpoint, not a minimum target; smoke is easy to add, whereas oversmoked dal cannot be corrected.

Start with 60 seconds. Uncover, remove the bowl and taste. Smoke is easy to add and impossible to remove. Repeat for one more minute if you deliberately want a stronger smoke.

Leave the used charcoal in a heatproof metal container until it is completely cold before disposal.

Back to the recipe card · Go to serving ideas · Back to top ↑

Useful variations

Once the lentils are tender and the tadka is fresh, the recipe is easy to adapt. Change one thing at a time so the garlic, tomato and spices still taste as though they belong together.

Vegan Dal Tadka

Use sunflower, rice bran, canola or another neutral oil for the masala and tadka, then skip butter and cream. Mustard oil gives the dal a sharper, more mustard-led flavour; choose it when that is the direction you want.

No-onion, no-garlic Dal Tadka

Skip the onion and garlic. Use ginger, cumin, tomato and kasuri methi, then finish with lemon. Use up to the full scant ⅛ teaspoon hing for a mild compounded product; use considerably less when it is strong or pure. A South Indian no-onion version may use mustard seeds, curry leaves and a different spice balance.

Lasooni or extra-garlic Dal Tadka

Add two or three extra garlic cloves to the final tadka and reserve the crispest slices for the top. For a gentler garlic flavour, use two cloves in the masala and four in the tadka. Fried garlic creates the recognisable lasooni aroma more clearly than simply adding more crushed garlic to the base.

Milder family version

Use one green chilli or omit it, choose mild Kashmiri chilli for colour and leave the dried chilli whole so it perfumes the ghee without releasing as much heat. Adults can add chilli at the table.

Fresh, lighter home-style version

Use 1 tablespoon oil in the masala and 1 tablespoon ghee or oil in the tadka. Cook the tomatoes for 3–5 minutes, until softened but still bright; skip cream and smoke, then finish with lemon and coriander. A crisp cucumber salad makes a natural cool contrast.

Dal Tadka vs Dal Fry: what is the difference?

Restaurants and home kitchens often use the names loosely, but the usual distinction is about technique.

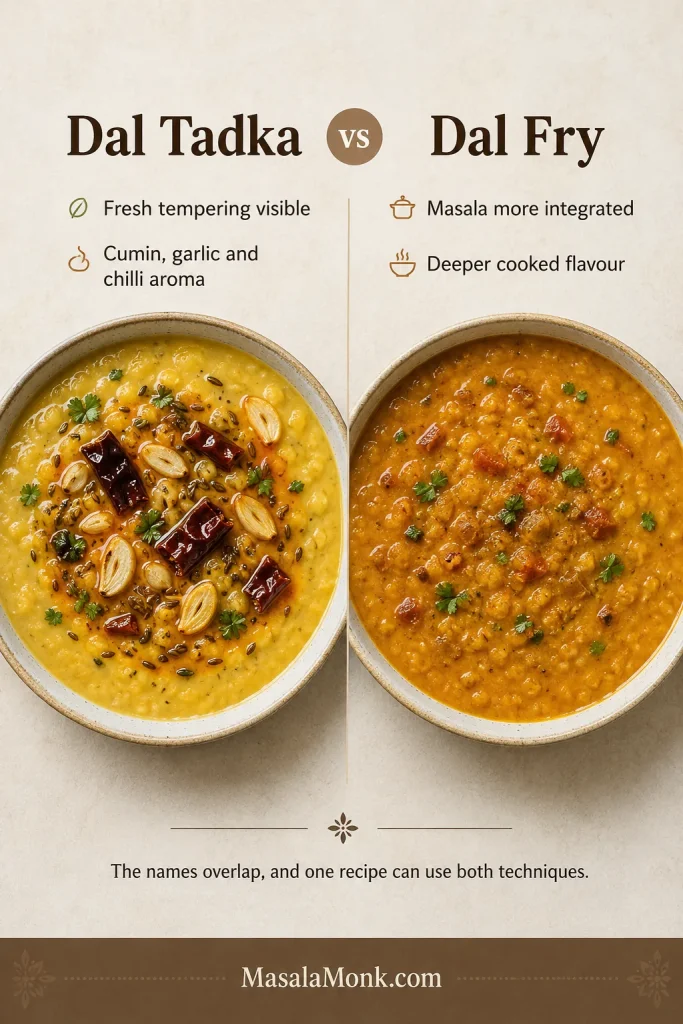
FeatureDal TadkaDal Fry
Defining moveA fresh tempering is poured over or stirred into the finished dalCooked dal is simmered in a fried onion-tomato masala
AppearanceOften has visible ghee, garlic and chilli on topUsually looks more uniformly mixed
Flavour emphasisFresh cumin, garlic and chilli aromaDeeper cooked masala flavour
Can a recipe use both?YesYes
A final fresh tempering is the clearest practical cue for Dal Tadka.
Dal Tadka with visible surface tempering beside Dal Fry with masala mixed more evenly throughout.
Because one recipe can use both techniques, identify the difference by where the masala and fresh tempering do their work.

This recipe uses both a cooked masala base and a final tempering, a common restaurant-style approach. The fresh cumin, garlic and chilli on top make the dish unmistakably Dal Tadka.

What to serve with Dal Tadka

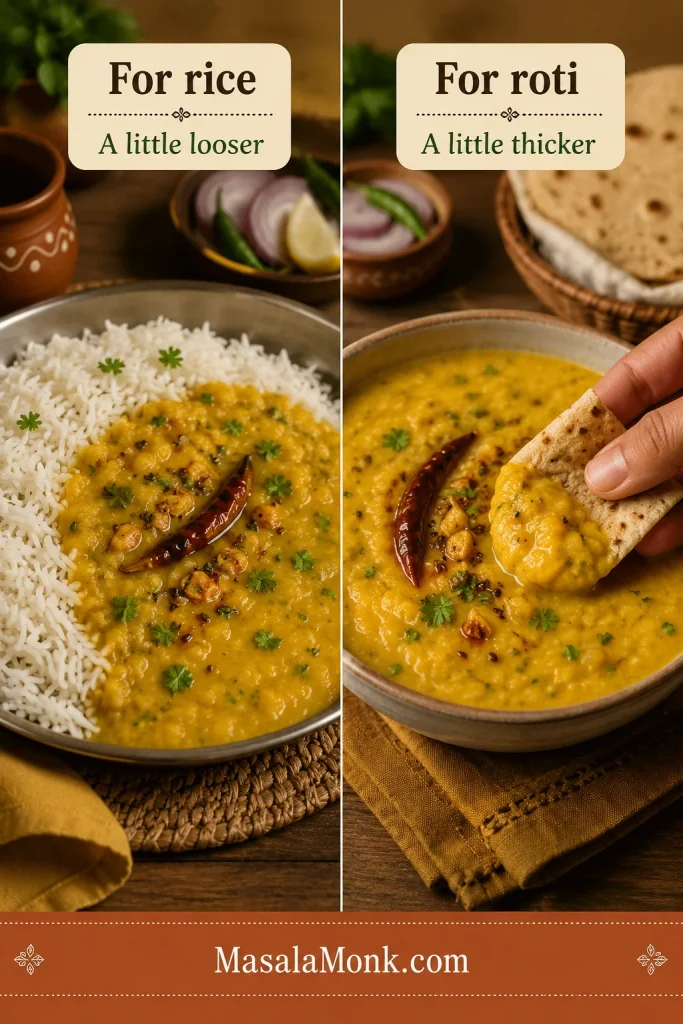
Dal Tadka can anchor a quiet weekday dinner or sit within a larger North Indian spread. For the simplest meal, rice, dal, curd and pickle are enough. With rotis, keep the dal slightly thicker and add a dry vegetable or cooling raita alongside.

Looser Dal Tadka served with basmati rice beside slightly thicker dal being scooped with roti.

Rice benefits from dal that flows between the grains, while roti needs enough body to stay on a torn piece without becoming paste-like.

  • With rice: basmati rice, jeera rice or plain steamed rice
  • With bread: roti, phulka, naan, tandoori roti or paratha
  • For contrast: cucumber raita, plain curd, sliced onion, lemon and pickle; MasalaMonk’s palak raita makes a more substantial cooling side
  • For a fuller meal: a dry vegetable, papad and a fresh salad

Leave the dal looser for rice and slightly thicker for roti. That small adjustment changes how naturally it sits with the rest of the meal.

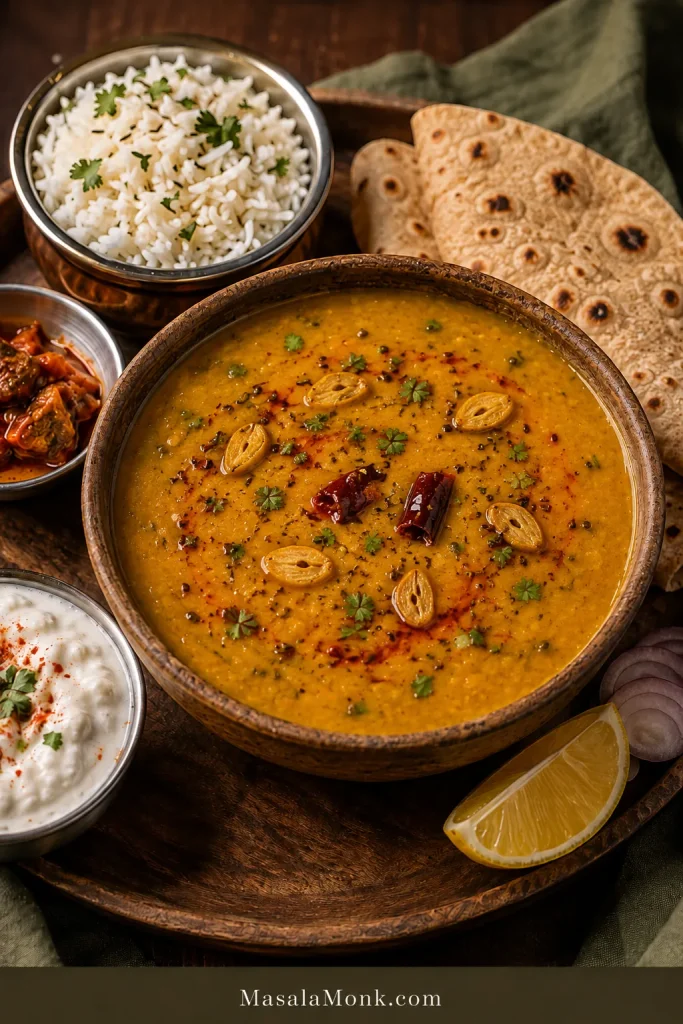
Dal Tadka served with basmati rice, rotis, raita, Indian pickle, lemon and sliced red onion.
Build contrast with one cooling side and one sharp side: raita softens the chilli, while pickle or lemon keeps the creamy dal lively.

Make ahead, store and reheat

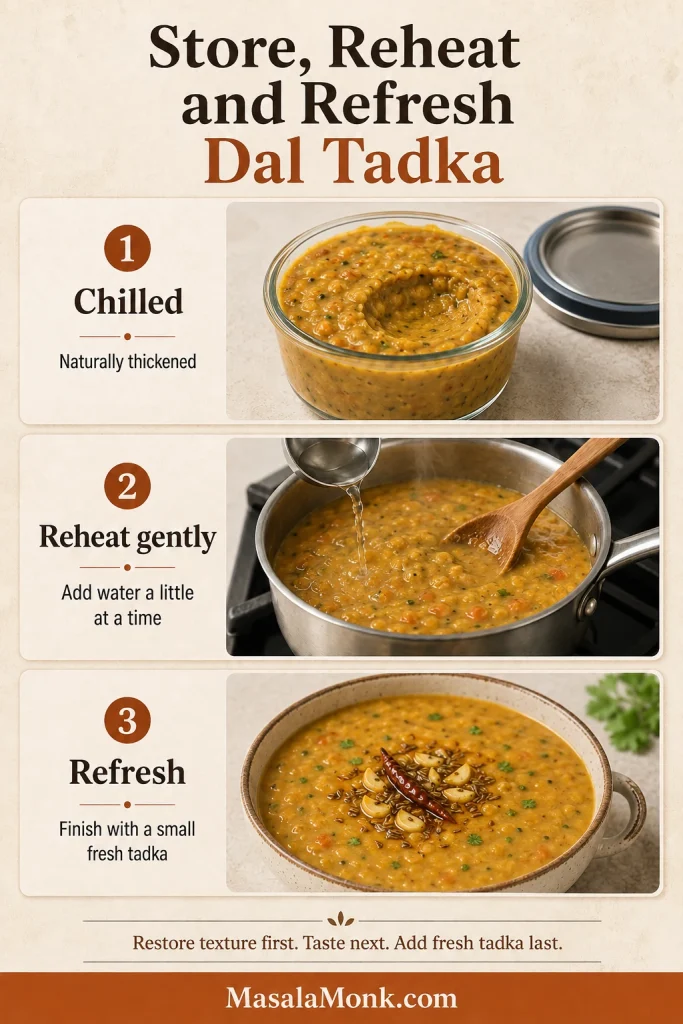
Dal is generous to tomorrow’s dinner, but its texture and aroma need different treatment: cool the base promptly, then restore the flow and make a fresh tadka when you reheat it.

Best make-ahead method

Cook the dal and onion-tomato base in advance, but hold back the serving-time tempering. Reheat the portion you need, restore the consistency, then check the salt and make a fresh tadka before serving. For Indian meal prep, store the base in portions and finish each one as it goes to the table.

Refrigerator

Transfer the dal to shallow covered containers and refrigerate at 40°F/4°C or below within two hours—or within one hour when the room is above 90°F/32°C. Use it within 3–4 days. These limits follow the USDA leftovers guidance (opens in a new tab). The dal will become substantially thicker as it chills.

Freezer

Freeze the cooked dal and masala base without the final tadka in meal-sized portions. For best texture and flavour, use within about 2–3 months. Thaw in the refrigerator—or reheat from frozen slowly in a saucepan—then add a new tadka before serving.

How to reheat without ruining the texture

Put the dal in a saucepan with a splash of water. Reheat gently, stirring as it loosens, until steaming hot throughout—165°F/74°C if you check with a thermometer. Add a little more as needed until the dal is creamy and pourable again. Restore the consistency first, then taste for salt and acidity because dilution changes both.

Three stages showing chilled thick dal, gentle reheating with added water and refreshed dal finished with fresh tadka.
Restore the consistency before correcting salt or lemon because added water changes both; make the fresh tadka only after the texture is right.

Back to the recipe card · Serving ideas · Back to top ↑

Frequently asked questions

Can I make Dal Tadka without a pressure cooker?

Yes. Soak the toor dal for 1–2 hours, begin with about 4 cups/950 ml water and simmer it in a heavy saucepan until every grain crushes easily. Expect roughly 45–75 minutes after soaking, and longer for particularly old lentils.

Can I use red lentils instead of toor dal?

You can make a good tarka dal with red lentils, but it will not behave exactly like this Punjabi toor-dal recipe. Red lentils cook faster, break down more completely and usually need less time.

Can I use packaged Dal Tadka masala?

Packaged Dal Tadka masala can work. Add it conservatively to the cooked onion-tomato base, and check whether the blend already contains salt, chilli, dried mango or kasuri methi before adding the recipe’s full seasoning. A packet can simplify the base; freshly bloomed cumin, garlic and chilli still give the finished dal its clearest aroma, so keep the fresh garlic tadka.

Can I make Dal Tadka without tomato?

Tomato is optional. Cook the onion until properly golden, then build the base with ginger, garlic and spices. The dal will be less red and slightly less sweet. Begin with ⅛ teaspoon amchur or 1 teaspoon lemon juice after tasting, then add more if needed.

Can I double the recipe?

Doubling works, provided the cooker remains within the manufacturer’s limit for expanding foods. In an Instant Pot, the combined lentils, water and other ingredients must stay below the ½ line. Ingredient quantities can double, but pressure time usually does not. Scale salt and chilli conservatively at first, then adjust after combining. A large batch is often better with two smaller tadkas than one overcrowded pan.

Return to the recipe card · Back to top ↑

The final tadka is worth waiting for

Cook the lentils ahead. Prepare the masala while the cooker releases. Adjust the consistency and hold the pot on low heat while the rest of dinner comes together.

But make the last tadka when the rice is fluffed, the rotis are coming off the tawa and everyone is almost ready to eat.

That brief rush of cumin, golden garlic and red chilli is not decoration. It is what turns a pot of lentils into the bowl people lean toward before it has even stopped sizzling.

Posted on — 4 Comments

Are Lentils Good for Weight Loss? Benefits, Recipes, and Science Explained

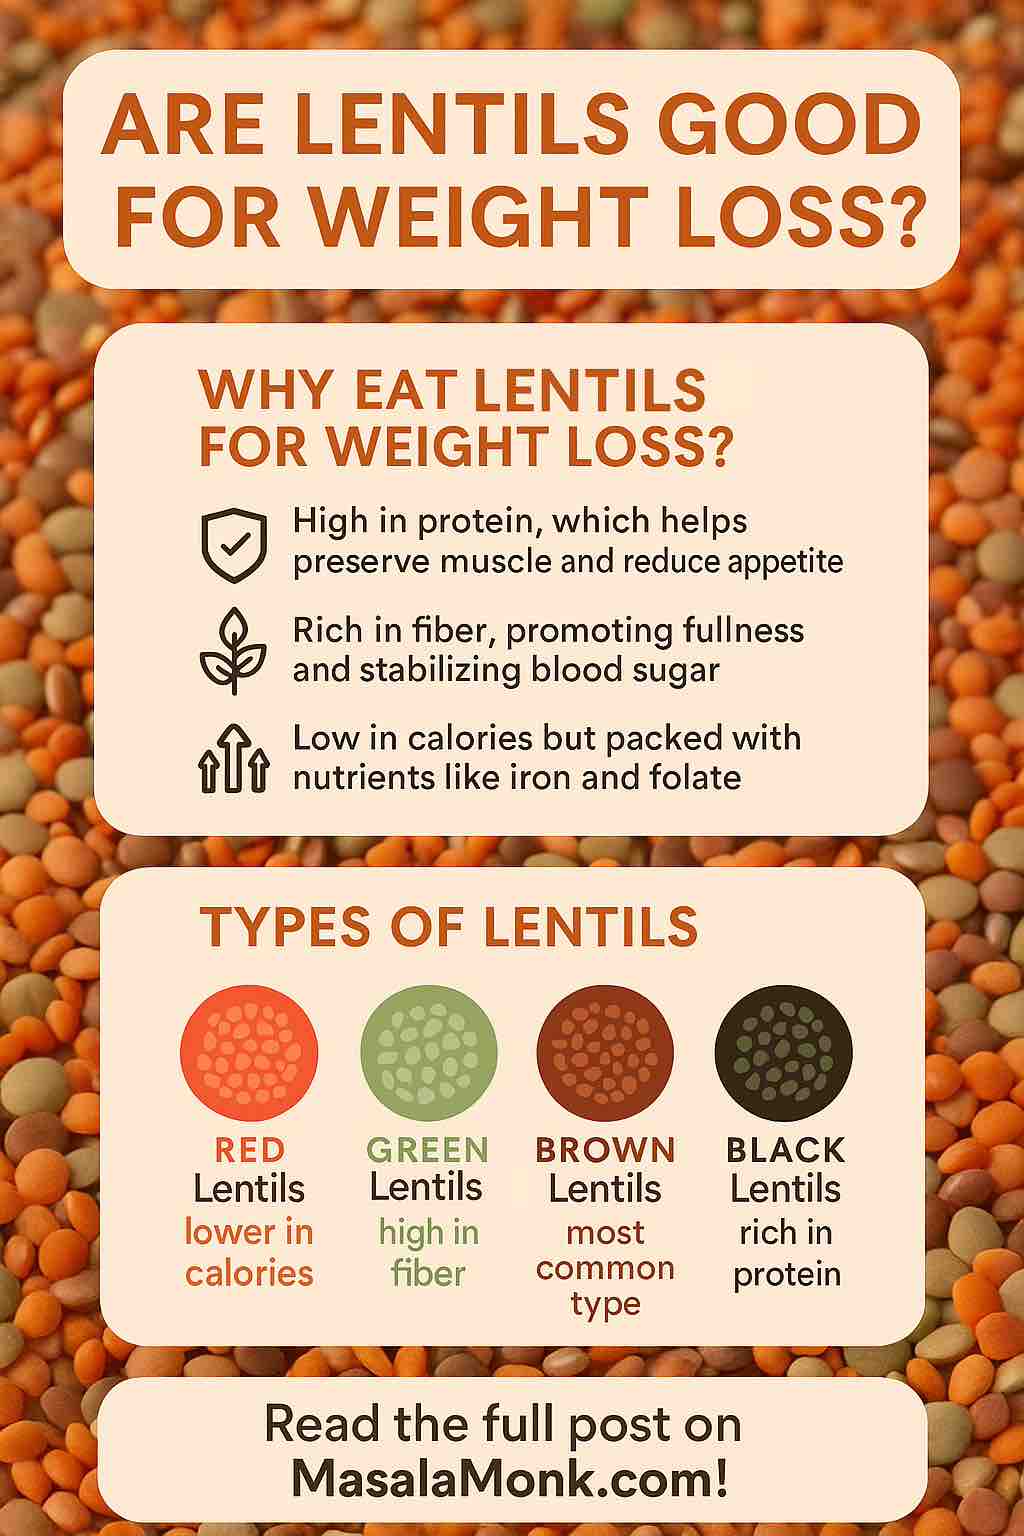
ARE LENTILS GOOD FOR WEIGHT LOSS? WHY EAT LENTILS FOR WEIGHT LOSS?

Lentils have been a dietary staple around the world for thousands of years, valued for their affordability, quick cooking time, and dense nutritional profile. In recent years, however, they’ve gained special recognition for their potential to support weight loss and fat reduction. So if you’ve ever wondered, “Are lentils good for weight loss?” or “Can lentils help you shed fat naturally?”, you’re not alone. These questions have become increasingly common as more people turn to whole foods for sustainable health results.

In this post, we’ll walk you through everything you need to know about lentils and weight loss—starting with the science behind their nutritional benefits, then moving into the best lentil types, cooking tips, and practical ways to incorporate them into your daily meals. Along the way, we’ll also answer common questions and share low-calorie lentil recipes that align with your weight management goals.

By the end, you’ll understand why lentils are often called a superfood for weight loss—and how you can use them strategically in your diet without worrying about unwanted weight gain.

My Person experience 147 Kgs to 90 Kgs: 3 Lentils for Fat Loss Win.


Why Lentils Are a Hidden Gem for Weight Loss

Let’s start with the basics. Lentils are small, mighty legumes packed with nutrients. But what makes them especially powerful for weight loss is their low calorie density, high fiber, and protein content. These three factors work together to keep you full, satisfied, and energized without overeating.

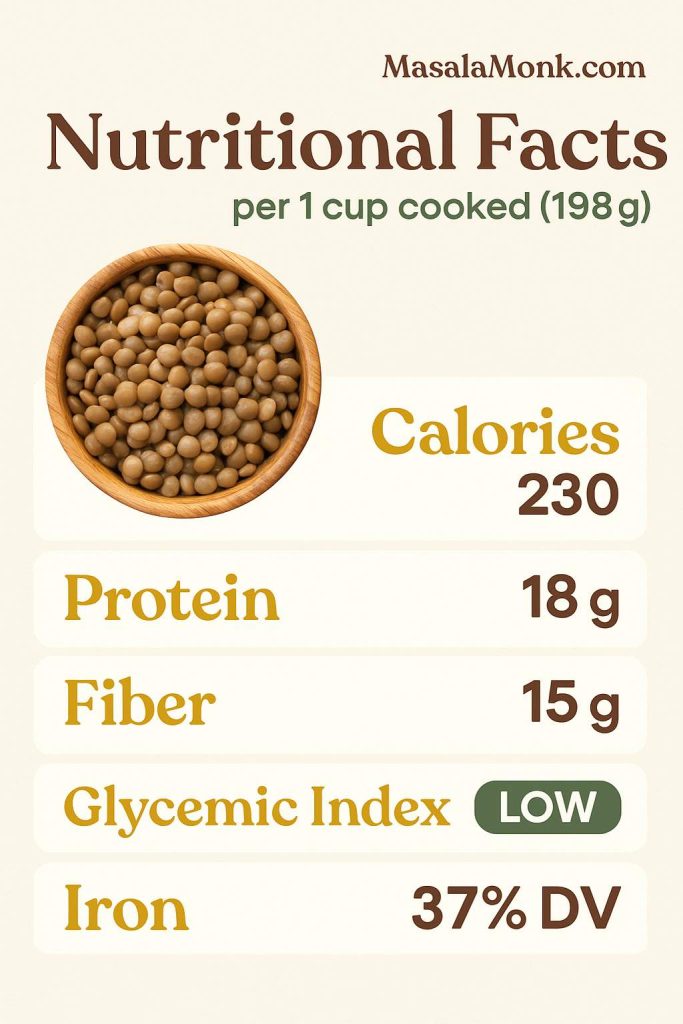
One cup of cooked lentils provides 230 calories, 18 grams of protein, and 15 grams of fiber — a simple way to stay full while losing weight.
Infographic showing nutritional facts of lentils per 1 cup cooked: 230 calories, 18g protein, 15g fiber, low glycemic index, and rich in iron.

A Look at the Numbers

Here’s what one cup (about 198 grams) of cooked lentils offers:

  • Calories: ~230
  • Protein: ~18 grams
  • Fiber: ~15 grams
  • Fat: Less than 1 gram
  • Glycemic Index: Low (21–30 depending on type)

In simple terms: You get a lot of food volume and nutrients, for relatively few calories. That’s a winning combo for weight loss.


Nutritional Profile of Lentils: Why They’re Great for Weight Loss

Before exploring how lentils affect weight loss directly, it’s important to understand their nutritional foundation.

1. Calorie Content

Lentils are relatively low in calories compared to many other protein-rich foods. For instance, one cup (about 198 grams) of cooked lentils provides approximately 230 calories. This makes them an excellent choice for those looking to reduce their calorie intake without sacrificing satisfaction or fullness.

2. High Protein Content

Protein plays a crucial role in weight loss because it helps maintain lean muscle mass while promoting satiety. Lentils offer around 18 grams of protein per cooked cup, which is impressive for a plant-based source. As a result, they serve as a smart alternative to animal proteins, especially for vegetarians and vegans focused on weight management.

3. Fiber-Rich Food

Another key benefit of lentils is their fiber content. A single cooked cup delivers about 15 grams of dietary fiber. This not only slows digestion and extends the feeling of fullness but also helps regulate blood sugar levels. Together, these effects can reduce overeating and curb unhealthy snacking—two essential factors in successful fat loss.

4. Low Glycemic Index

Lentils have a low glycemic index (GI), which means they release glucose into the bloodstream gradually. This helps maintain steady energy levels and reduces fat storage associated with insulin spikes. It’s especially beneficial for individuals managing insulin resistance or type 2 diabetes, which are commonly linked to excess weight.

5. Rich in Micronutrients

Beyond macronutrients, lentils provide a variety of essential vitamins and minerals that support metabolic health. These include:

  • Iron, which aids in energy production and oxygen transport
  • Magnesium, important for metabolism and muscle function
  • Folate, which supports cell repair and DNA synthesis
  • Potassium, which regulates fluid balance and blood pressure

These nutrients work together to support healthy metabolism and energy balance, both of which are foundational for sustainable weight loss.

Summary: Why Lentils Are Nutrient-Dense for Weight Loss

  • Low in calories (230 per cooked cup)
  • High in protein (18g) to promote satiety and preserve muscle
  • Packed with fiber (15g) to aid digestion and reduce cravings
  • Low glycemic index to support blood sugar control
  • Rich in essential vitamins and minerals that fuel metabolism

Taken together, these attributes make lentils one of the best foods for healthy, long-term weight loss.


Are Lentils Good for Weight Loss? What Does the Science Say?

So, are lentils truly good for weight loss? The evidence strongly suggests they are.

How Lentils Promote Weight Loss

Lentils support fat loss through several mechanisms. First, their combination of protein and fiber increases satiety, helping you feel full longer and reduce overall calorie intake. Second, the fiber slows digestion and stabilizes blood sugar levels, preventing insulin spikes that lead to fat storage and sugar cravings.

Additionally, lentils contain prebiotic fibers that feed beneficial gut bacteria. An increasingly large body of research links a healthy gut microbiome with better weight regulation, reduced inflammation, and improved metabolic health.

Lentils are also low in caloric density, which means you can eat satisfying portions without consuming excessive calories. This makes them a great option for people who want to feel full while still creating a calorie deficit.

What the Research Really Says About Lentils and Weight Loss

When it comes to losing weight in a healthy, sustainable way, lentils offer more than just nutrition—they’re backed by science. From supporting satiety and gut health to regulating blood sugar and improving metabolic markers, here’s what the research shows.

Lentils Can Help You Eat Less Without Feeling Hungry

A systematic review and meta-analysis found that eating just one serving of pulses like lentils per day helped people lose weight—without making any other dietary changes. Participants also experienced improved cholesterol levels, further reinforcing lentils’ heart-healthy benefits.

Smiling young woman eating a healthy lentil salad, with overlay text saying ‘Stay Full, Snack Less — Protein + Fiber keep hunger away for hours’.
Enjoying a fresh lentil salad — protein and fiber together help you stay full and snack less.

They Improve Blood Sugar and Inflammation

In a 2024 clinical trial, adults at higher metabolic risk who replaced meat with lentils saw notable improvements in their blood sugar response and inflammation markers—without reporting digestive discomfort. You can read more about that here.

Fiber and Resistant Starch Support Your Gut and Metabolism

Lentils are rich in both soluble and insoluble fiber, as well as resistant starch—components that help stabilize blood sugar, prolong fullness, and feed beneficial gut bacteria. According to Harvard’s School of Public Health, these properties make lentils a powerful tool in managing weight and improving digestion over time.

Lentils vs. Animal Protein: Why It Matters

Unlike red meat or cheese, lentils contain no cholesterol, are low in fat, and offer more fiber per gram. That’s why the Cleveland Clinic lists lentils as one of the best plant-based proteins for improving heart health and supporting weight loss.

Higher Fiber = Lower Risk of Disease and Death

A large 2022 study involving over 86,000 adults found that higher dietary fiber intake—including from lentils—was linked to significantly reduced risk of death from heart disease and cancer. For the full breakdown, check the Health.com report.


Which Lentils Are Best for Weight Loss?

While all lentils are healthy, some varieties may be slightly more effective for supporting weight loss due to their specific nutritional profiles.

Red Lentils

These cook quickly and have a soft texture, making them ideal for soups and purees. They’re slightly lower in calories and still provide a solid amount of protein and fiber.

If you’re looking for easy ways to use them, don’t miss these red lentil recipes that support weight loss.

Green Lentils

Known for holding their shape after cooking, green lentils are excellent in salads and side dishes. They typically contain more fiber and slightly more protein compared to red lentils.

Brown Lentils

As the most commonly available type, brown lentils are highly versatile. They have a balanced ratio of protein to fiber and work well in stews, curries, and mixed dishes.

Black Lentils (Beluga)

These small, shiny lentils are dense in protein, fiber, and antioxidants. They also have the lowest caloric content per gram, making them especially nutrient-dense for those focused on weight loss.

You can explore some of our favorite black lentil recipes designed for weight loss.

Which Lentil is Best?

If you’re targeting maximum fiber and protein per serving, green and black lentils are excellent choices. However, all lentil types contribute positively to a weight loss plan. Feel free to choose based on your preferred flavor, texture, or recipe.


How to Eat Lentils for Weight Loss

Your preparation method can significantly influence how lentils support your weight loss goals.

Portion Control

Aim for one to two cups of cooked lentils per day to ensure you’re getting adequate protein and fiber without consuming too many calories. Keep in mind that lentils expand as they cook—one cup of dry lentils yields roughly 2.5 cups cooked.

Cooking Tips

Stick to healthy preparation methods. Avoid frying or using cream-based sauces, and instead opt for boiling, pressure cooking, or simmering in broth. Flavor them with herbs, spices, lemon juice, or low-calorie sauces.

You can also pair lentils with nutrient-dense, non-starchy vegetables like spinach, bell peppers, or cucumbers to add bulk and enhance their fat-burning benefits.

Eating Lentils Daily

Adding lentils to your meals every day can help reduce appetite, improve blood sugar stability, and promote steady energy throughout the day. Many people report feeling fuller and more satisfied when lentils are a regular part of their diet.


Healthy Recipe Ideas to Enjoy Lentils and Lose Weight

One of the best things about lentils—besides their nutrition—is how incredibly versatile and delicious they are. Whether you’re craving something warm and comforting, light and refreshing, or even something with a bit of a spicy kick, there’s a lentil recipe that fits. Here are some easy, healthy ideas to get you started.

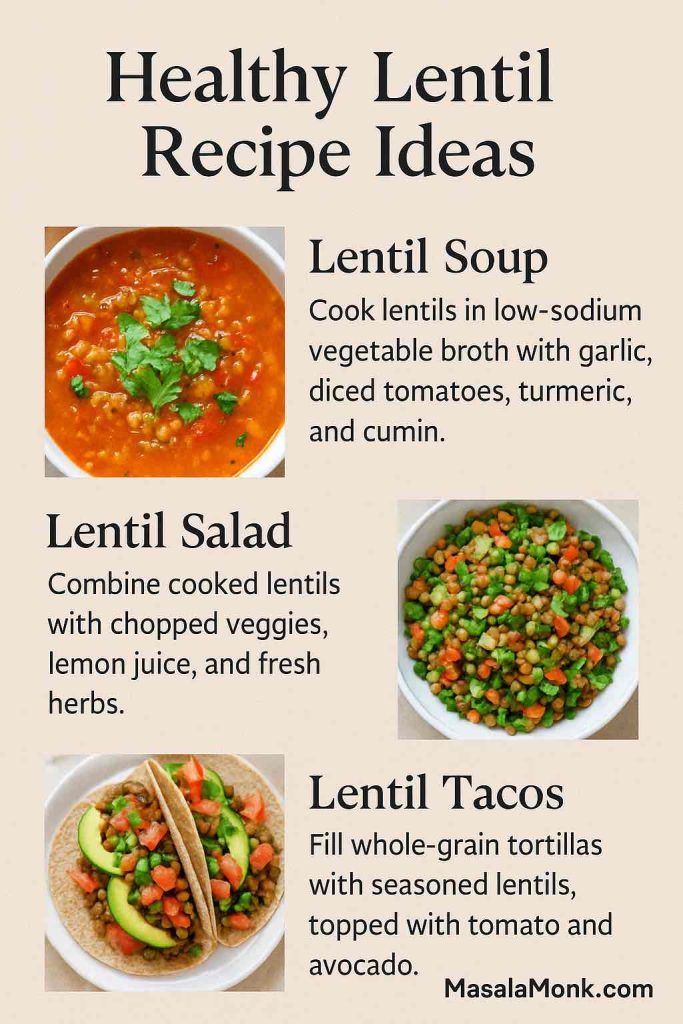
Recipe graphic showing three healthy lentil dishes: lentil soup cooked with tomatoes and spices, a colorful lentil salad with vegetables, and whole-grain tortillas filled with seasoned lentils and avocado.
Healthy lentil recipes made simple — from cozy lentil soup to refreshing salad and nourishing lentil tacos.

Lentil Soup (Comfort in a Bowl)

When you’re in the mood for something hearty and nourishing, lentil soup is a perfect choice. Start with a base of low-sodium vegetable broth, then add in diced tomatoes, chopped onions, garlic, and your favorite vegetables. To give it depth and warmth, season generously with spices like turmeric, cumin, paprika, and black pepper. Let it simmer until everything is tender and fragrant. It’s the kind of meal that feels like a hug on a cold day—and it just so happens to be great for your waistline, too.

For more inspiration, check out our vegan lentil soup recipes for weight loss.

Lentil Salad (Light, Fresh & Filling)

If you prefer something cooler and crisp, lentil salad is quick to throw together and endlessly customizable. Mix cooked green or brown lentils with chopped cucumbers, tomatoes, bell peppers, and red onions. Then drizzle with fresh lemon juice and olive oil, and toss in some fresh herbs like parsley or cilantro. For extra flavor, add a pinch of cumin or a splash of apple cider vinegar. It’s a refreshing meal or side that keeps you full without weighing you down.

Lentil Tacos (Plant-Based and Packed with Flavor)

Looking for a fun and creative way to use lentils? Try turning them into taco filling! Cook lentils with onions, garlic, cumin, chili powder, and a bit of tomato paste or crushed tomatoes. Once thickened, scoop the mixture into crisp lettuce wraps or whole-grain tortillas. Top with shredded cabbage, avocado slices, fresh salsa, or a dollop of Greek yogurt. It’s a satisfying, protein-rich dinner that even meat-lovers will enjoy—plus it’s completely customizable.

Lentil Curry (Rich, Warming, and Satisfying)

Nothing beats a cozy lentil curry when you want something deeply satisfying but still healthy. Red or brown lentils work especially well here. Sauté garlic, onions, and ginger in a bit of oil, then add curry powder, cumin, and turmeric. Stir in crushed tomatoes and your lentils, and let everything simmer until soft and creamy. You can toss in some spinach or cauliflower for added fiber and nutrients. Serve with a small portion of brown rice or enjoy it on its own for a one-pot, plant-powered meal.


Lentil Diet Plans and Tips for Weight Loss

Incorporating lentils into your daily meals doesn’t have to be complicated. In fact, once you get into the rhythm of it, they can become the foundation of a delicious, nutrient-dense eating routine that supports steady, sustainable fat loss.

To help you get started, here’s a simple one-day sample meal plan that shows how easy it is to make lentils a part of your day. Of course, you can mix and match ingredients to suit your tastes, and feel free to swap in seasonal produce or different proteins as needed.

For those who like to prep ahead, here are some plant-based high-protein lentil meal prep ideas that work beautifully for weight loss.

🥣 Breakfast: Light, Energizing, and Fiber-Filled

Begin your day with a breakfast that’s both light and satisfying. A fruit and nut bowl is a great place to start—think sliced banana, berries, a handful of almonds or walnuts, and maybe a sprinkle of chia or flax seeds for added fiber. This kind of meal helps regulate your appetite and sets the stage for more mindful eating throughout the day.

Alternatively, if you’re someone who prefers to drink their breakfast, a smoothie is a fantastic option. Blend almond milk or oat milk with a scoop of protein powder, frozen berries, spinach, and a spoonful of nut butter or flaxseed. It’s quick, refreshing, and keeps you fueled all morning.

🥗 Lunch: Refreshing, Filling, and Balanced

By midday, you’ll want something that’s hearty enough to fill you up, yet balanced enough to avoid that post-lunch slump. A lentil salad checks all the boxes. Start with a base of cooked green or brown lentils, and add in chopped cucumber, cherry tomatoes, red onion, and mixed greens. Then drizzle on a dressing of lemon juice and olive oil for a fresh, zesty flavor.

For an extra protein boost, consider adding grilled tofu, a boiled egg, or lean grilled chicken. This kind of lunch offers the perfect mix of fiber, protein, and healthy fats to carry you through the afternoon without cravings.

🥕 Snack: Crunchy, Satisfying, and Guilt-Free

Rather than letting hunger sneak up on you later in the day, plan ahead with a simple, wholesome snack. Raw vegetables like carrots, bell peppers, or cucumber slices pair well with a few tablespoons of hummus. If you’re in the mood for something crunchy, try roasted chickpeas or a small handful of almonds or pumpkin seeds.

Not only do these snacks satisfy your taste buds, but they also help keep your energy levels steady between meals—so you’re less likely to overeat at dinner.

🍛 Dinner: Comforting, Nutrient-Dense, and Easy to Prepare

As the day winds down, dinner should be comforting yet light enough to support restful digestion and sleep. A bowl of lentil soup or a gently spiced lentil curry makes for the perfect evening meal. Use ingredients like garlic, onion, tomatoes, ginger, turmeric, and cumin to boost both flavor and health benefits.

To round out your plate, add a serving of steamed vegetables—such as broccoli, zucchini, or spinach—and if you need a little more substance, include a small portion of whole grains like brown rice or quinoa. This combination is not only delicious but also deeply nourishing and naturally supportive of your weight loss goals.

Key Tips

  • Balance your meals by combining lentils with healthy fats and lean proteins
  • Stay hydrated, especially when increasing your fiber intake
  • Vary your meals to avoid boredom and improve nutrient diversity
  • Exercise regularly to maximize fat loss
  • Watch portions, even with healthy foods

Want More Lentil Inspiration?

If you’re excited to start cooking with lentils but want a bit more variety or meal prep guidance, we’ve got you covered. Whether you’re into comforting soups, quick salads, or prepping ahead for the week, these posts will give you fresh, weight-loss-friendly ideas.

Explore These Reader Favorites:

These posts are full of practical tips, balanced meal ideas, and step-by-step recipes to keep your lentil journey exciting and effective.


Can You Eat Only Lentils?

Lentils are highly nutritious, but eating only lentils isn’t advisable for the long term. Your body requires a wide range of nutrients that only a varied diet can provide. For best results, use lentils as a base and build your meals around them using other whole foods.


Nutrition Chart of Common Types of Lentils (per 1 cup cooked, ~198g):

Type of LentilCaloriesProtein (g)Fiber (g)Carbs (g)Fat (g)Iron (% DV)Glycemic Index
Red Lentils23017.815.639.90.837%Low (21–29)
Green Lentils23018.015.639.00.835%Low (22–30)
Brown Lentils23018.015.039.90.836%Low (29–32)
Black Lentils (Beluga)18024.017.930.00.740%Very Low (~21)
Yellow Lentils (Split Moong)21014.015.438.00.728%Moderate (~32–35)
Masoor Dal (Split Red Lentils)23018.015.640.00.837%Low (21–29)

⚠️ Note:

  • Nutritional values can vary slightly by source, preparation method, and origin of lentils.
  • %DV (Daily Value) is based on a 2,000-calorie diet.
  • Glycemic Index (GI) estimates are approximate and vary depending on processing and how lentils are cooked.

Key Takeaways:

  • Best for Weight Loss (Fiber + Protein): Black lentils (Beluga)
  • Most Versatile: Brown and green lentils (hold shape well, good for salads and soups)
  • Quickest Cooking & Best for Soups/Purees: Red lentils and Masoor dal
  • Gentlest on Digestion: Yellow lentils (Split Moong)

If you’re curious how to cook Beluga or Black Lentil creatively, don’t miss our guide on Beluga lentil benefits and recipes for fat loss.


Common Questions and Myths About Lentils and Weight Loss

Are lentils fattening?

Not at all. Lentils are naturally low in fat and calories, and they’re packed with fiber and protein—both of which actually help prevent overeating. As long as you’re not adding heavy cream or frying them in oil, lentils are one of the least “fattening” foods you can eat.

Can lentils cause weight gain?

Only if you’re consistently eating more calories than your body needs—including from lentils. But on their own, lentils are unlikely to cause weight gain. In fact, most people find that lentils help them feel full on fewer calories, which makes weight gain less likely.

Are lentils really good for weight loss?

Yes, absolutely. Lentils support weight loss in multiple ways—they keep you full, stabilize your blood sugar, and offer a high amount of protein and fiber without a lot of calories. Plus, they’re inexpensive and easy to prepare, which makes healthy eating more sustainable.

Is dal good for weight loss?

It can be! Dal—essentially lentil stew—is great for weight loss when made with minimal oil and plenty of vegetables. Use spices like cumin, turmeric, and coriander to add flavor without the extra calories. Just avoid adding too much ghee, butter, or fried toppings.

How much lentils should I eat per day to lose weight?

Around 1 to 2 cups of cooked lentils per day is a good target. That gives you enough fiber and protein to feel full and satisfied without going overboard on calories.

Can I eat lentils every day?

Yes, and many people do. Lentils are gentle on digestion, easy to cook, and work well in a variety of meals. Just be sure to also eat a range of other foods—like vegetables, fruits, whole grains, and healthy fats—for balanced nutrition.

Which lentils are best for weight loss?

Green and black lentils are often considered the best for weight loss because they’re slightly higher in fiber and protein. But all lentils—red, brown, yellow—are good choices, so feel free to mix it up based on what you enjoy eating.

What’s the best way to cook lentils for fat loss?

Boiling or pressure cooking is best. Avoid frying or adding high-calorie ingredients like cream or lots of oil. Instead, season with herbs, lemon, garlic, or low-sodium broth for flavor without the calories.

Do lentils help with belly fat?

Lentils won’t “target” belly fat specifically, but because they help reduce overall calorie intake and improve blood sugar balance, they can support full-body fat loss—including belly fat—when combined with a healthy diet and regular exercise.

What happens if I eat lentils for 30 days?

Most likely, you’ll feel more full, snack less, and notice more stable energy levels. Some people even report weight loss just from swapping processed carbs with lentil-based meals. Just be sure to keep meals balanced with other nutrient-rich foods.

Are lentils high in carbs?

They do contain carbohydrates, but they’re complex carbs paired with fiber and protein—which means they’re digested slowly and don’t cause blood sugar spikes. Unlike refined carbs, lentils keep you full and energized.

Can I eat lentils at night?

Yes, lentils are a great dinner option. Their fiber and protein can actually help prevent late-night snacking. Just keep portions reasonable and avoid pairing them with heavy, oily foods.

What’s healthier—lentils or rice?

Both can be part of a healthy diet, but lentils generally offer more protein, fiber, and nutrients per calorie. That said, combining lentils with small portions of whole grains like brown rice or quinoa gives you a balanced, satisfying meal.

Can lentils help reduce sugar cravings?

They can! Because they stabilize blood sugar and promote satiety, lentils help curb the cravings that come from energy crashes. Try having a lentil-based lunch and see how much more stable your afternoon energy feels.

Do I need to soak lentils?

Not always. Most lentils (especially red and yellow varieties) don’t require soaking. However, soaking can help reduce cooking time and may improve digestion for some people.

A rustic bowl filled with cooked lentils with bold text overlay reading ‘Lentils for Weight Loss’ highlighting how lentils are affordable, nutritious, and backed by science.
Lentils for weight loss — affordable, nutritious, and backed by science at MasalaMonk.

Final Thoughts: Why Lentils Are a Weight Loss Superfood

Lentils combine all the key qualities that support weight loss:

  • Low in calories yet nutrient-dense
  • High protein to preserve muscle and reduce appetite
  • Rich fiber to control hunger and stabilize blood sugar
  • Versatile and easy to incorporate into many meals
  • Affordable and accessible for most diets

In summary, lentils offer a unique combination of nutrients that make them ideal for weight loss: they’re low in calories, yet rich in protein and fiber, which helps keep you full and satisfied.

Unlike many processed weight-loss products, lentils are natural, unprocessed, and incredibly versatile. Whether you prefer soups, salads, curries, or tacos, lentils can easily be integrated into your meals without sacrificing flavor or nutrition.

Moreover, their high fiber content aids digestion, their low glycemic index stabilizes blood sugar, and their impressive micronutrient profile supports your metabolism. All things considered, lentils are not just weight-loss-friendly—they’re one of the most effective, affordable, and accessible foods for anyone looking to lose weight in a healthy, sustainable way.

So, whether you’re starting your weight loss journey or looking to optimize your current diet, lentils deserve a place on your plate. By including lentils regularly in your diet—whether as soups, salads, curries, or snacks—you can enhance fullness, reduce overall calorie intake, and promote healthy fat loss without feeling deprived.