
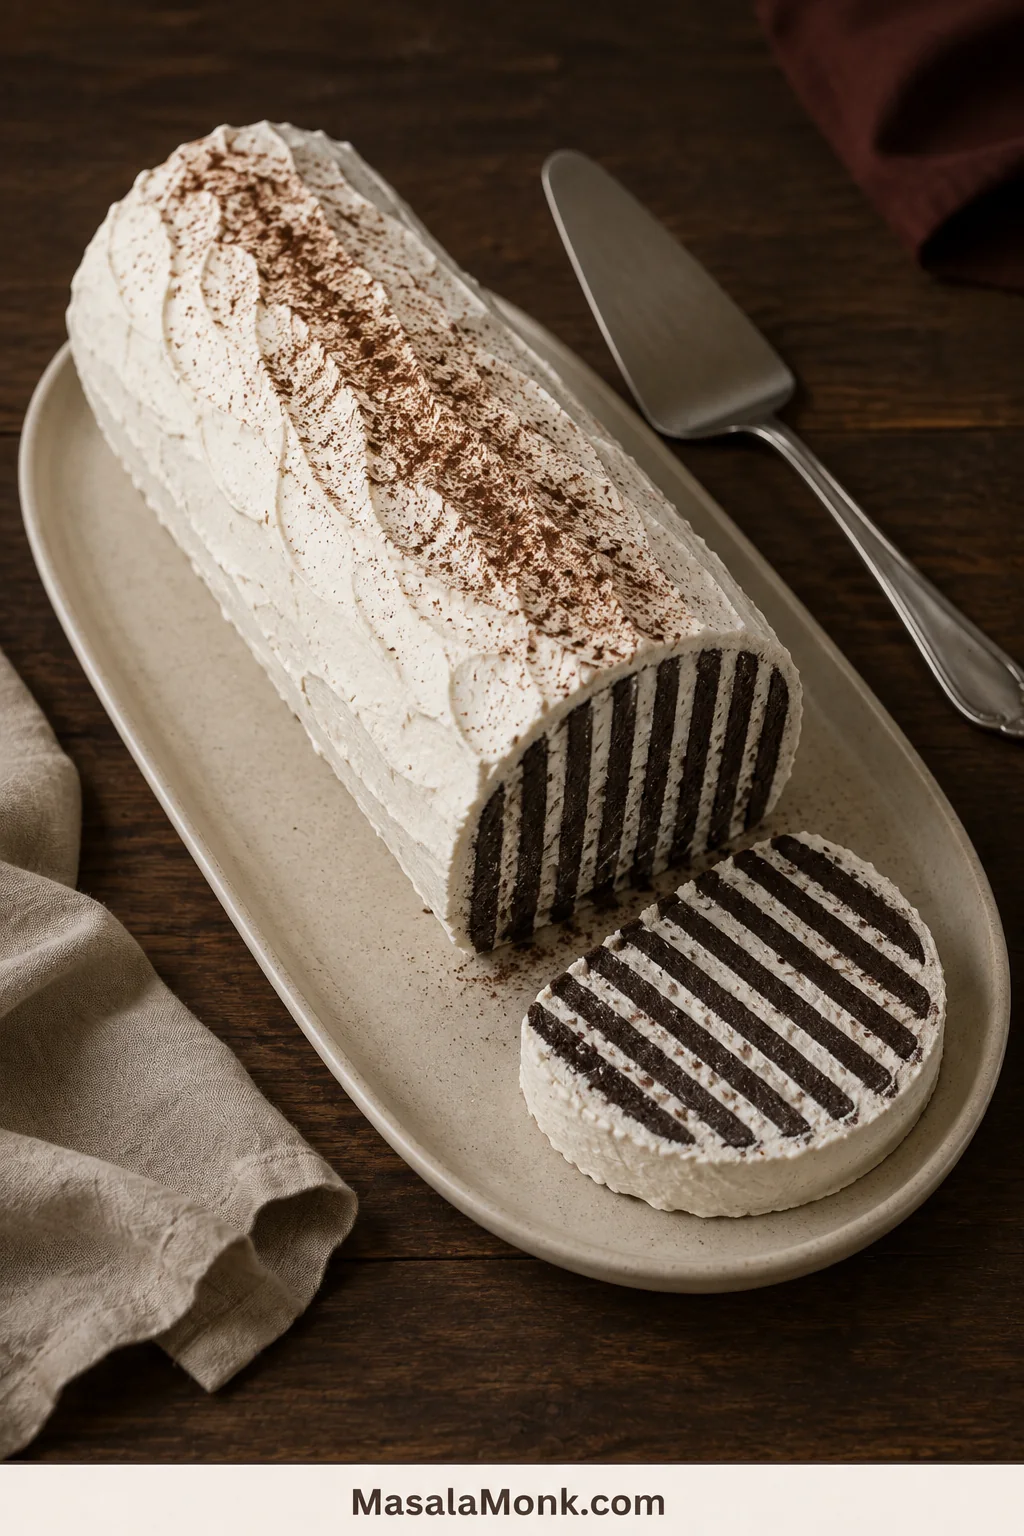
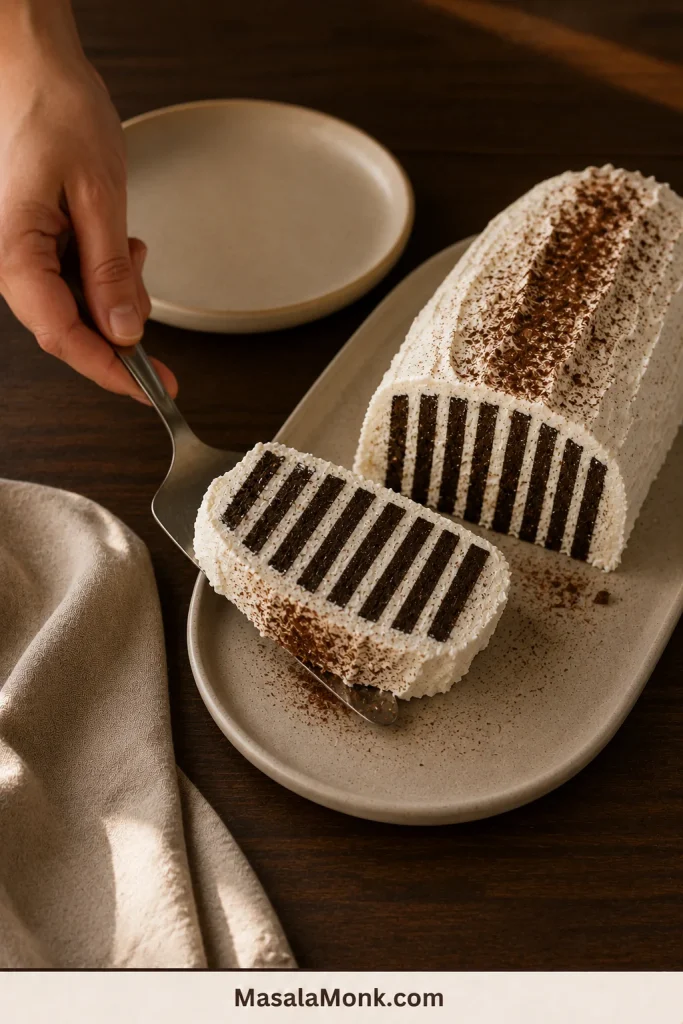
Thin chocolate cookies and whipped cream do not look much like cake when they first meet on the platter. Leave them together in the refrigerator, though, and the cookies soften into tender chocolate layers while every diagonal slice opens into dark-and-white stripes.
The complication begins in the cookie aisle. Nabisco Famous Chocolate Wafers were discontinued, and the cookie named in the old refrigerator-roll recipe is no longer waiting on every supermarket shelf. One replacement softens beautifully. Another stays crunchy through the middle. A filled cookie may soften well enough but leave the finished cake far sweeter than the one people remember.
This classic icebox cake recipe brings the old chocolate-wafer roll back with the cookies available now. The original branded wafer may be gone, but the method was never dependent on a logo.
Quick Answer: How to Make Classic Icebox Cake
Layer 9 oz / 255 g thin chocolate wafer cookies with lightly sweetened whipped cream, join short stacks into a log and coat the outside with cream set aside before assembly. With five basic ingredients, no oven and about 35–40 minutes of active work, most of the preparation can be finished the day before.
Chill the coated cake for 45–60 minutes with nothing touching the cream, then cover it loosely and refrigerate for at least eight more hours. Most substitute cookies soften more fully after 10–12 hours.
It is ready when a thin knife passes through the center without meeting a hard cookie layer, dry crack or sharp crunch.
Refrigerator, not freezer: The cookies need time beside the whipped cream so they can absorb moisture and become cake-like. Freeze only after they have fully softened in the refrigerator.
Choose the Format Before You Start
A freestanding log needs thin cookies that can stand upright without a pan. Wider, thicker or filled cookies can still make an excellent refrigerator cake, but they usually need a format that supports them while they soften.
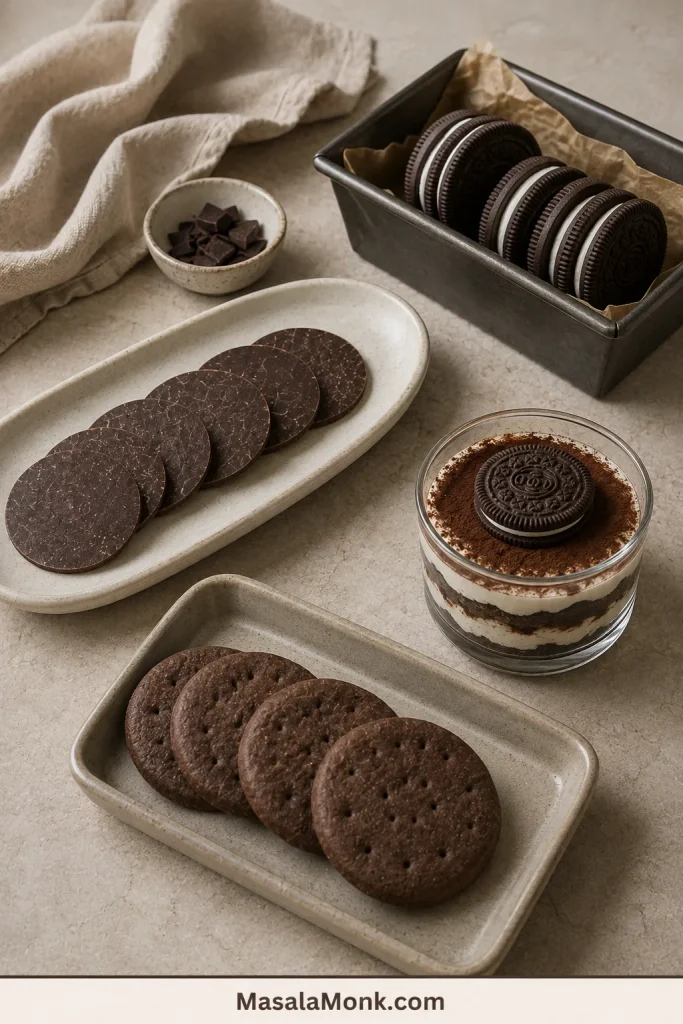
Which cookie do you have—or which style of cake do you want? In the classic version, whipped cream does both jobs: it softens the cookies and holds the log together.
| What you have or want | Best route |
|---|---|
| Thin, plain chocolate wafers | Follow the classic log formula below. |
| Oreo Thins | Jump to the Oreo Thin quantities after the main recipe. |
| Chocolate Maria biscuits or chocolate graham crackers | These wider biscuits soften more evenly in a layered pan cake. See the chocolate wafer substitute guide for the most suitable format. |
| Regular Oreos | Use a layered Oreo icebox cake designed for full sandwich cookies rather than forcing them into the classic log. |
| Pudding, cream cheese or condensed milk | Choose a richer layered icebox dessert rather than the classic whipped-cream roll. |
Classic Chocolate Wafer Icebox Cake
Recipe at a Glance
An old-fashioned chocolate-wafer log with lightly sweetened whipped cream, a long refrigerator rest and striped slices revealed by cutting diagonally across the cookies.
| Active preparation | 35–40 minutes |
|---|---|
| Surface-firming chill | 45–60 minutes |
| Covered refrigerator time | At least 8 hours; usually 10–12 hours |
| Total time | About 9½–14 hours |
| Yield | About 10–14 diagonal slices, depending on cookie size, cutting angle and slice thickness |
| Finished size | Usually an 8–12-inch / 20–30-cm log; use a platter at least 4 inches / 10 cm longer |
Why This Simple Formula Works
Heavy cream provides both the moisture that softens the cookies and enough body to hold the log together. Powdered sugar dissolves quickly without leaving a gritty texture, vanilla rounds out the cocoa, and a small amount of salt keeps the cream from tasting flat.
Before you begin: Clear a level refrigerator shelf and set out the platter, cookies and spreading tools. If the kitchen is warm, chill the bowl and whisk for 10–15 minutes.
Do not worry if the freshly coated log looks a little rustic. The cream becomes easier to tidy once chilled, and the striped interior is what matters most.
Equipment
- Electric hand mixer or stand mixer, plus a large mixing bowl
- Kitchen scale, measuring cups and measuring spoons
- Flexible spatula and small offset spatula or butter knife
- Long serving platter
- Thin paring knife and sharp, smooth-edged slicing knife
- Covered cake carrier or plastic wrap
Ingredients
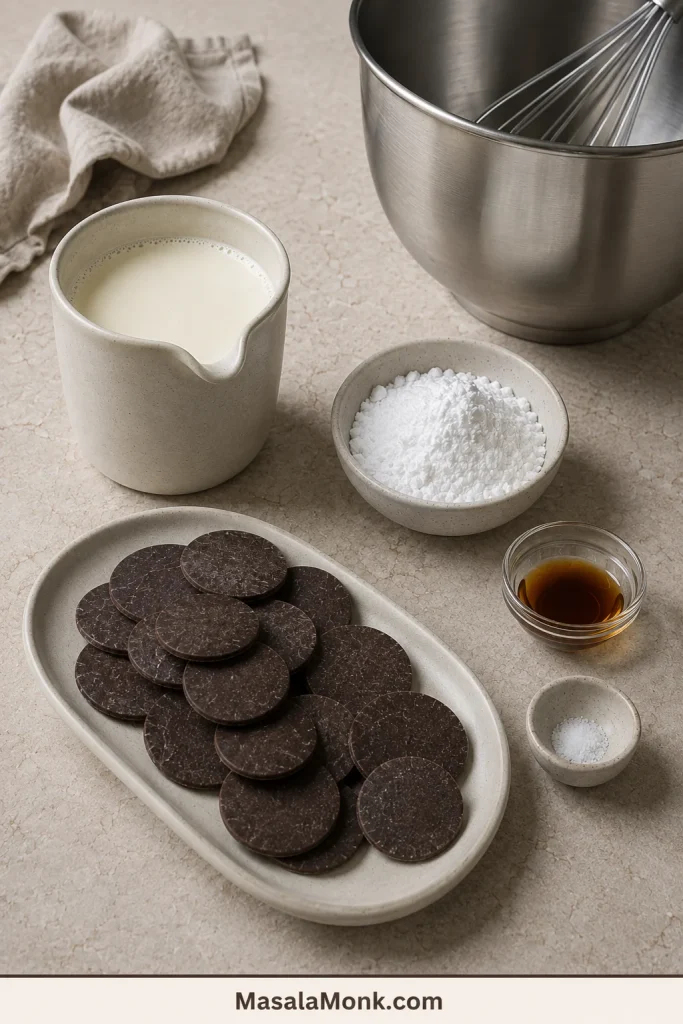
- 9 oz / 255 g thin, flat, unfilled chocolate wafer cookies, usually about 30–50 depending on brand, diameter and thickness
- 2 cups / 475 ml cold heavy cream, about 475 g
- 2 tablespoons / about 15 g powdered sugar
- 1 teaspoon / 5 ml vanilla extract
- ⅛ teaspoon fine salt
- Unsweetened cocoa powder, finely crushed chocolate cookies or dark chocolate curls, optional, for finishing
Prefer a sweeter cream? Increase the powdered sugar to 3 tablespoons / about 23 g. The smaller amount keeps the cream closer to the restrained sweetness of the old refrigerator roll.
Instructions
Whip the Cream and Prepare the Platter
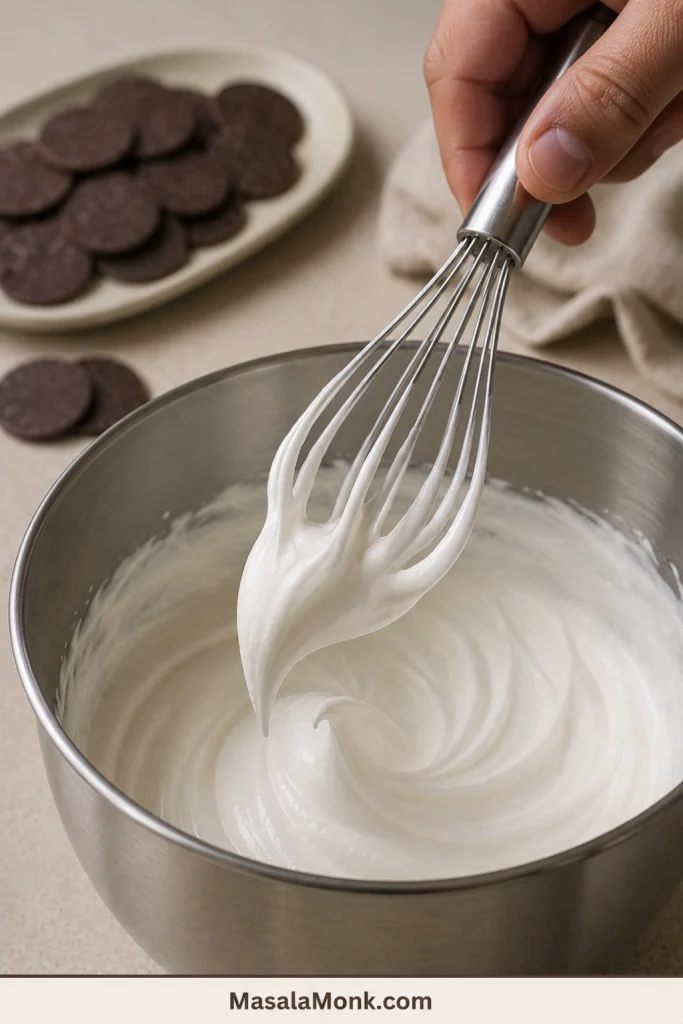
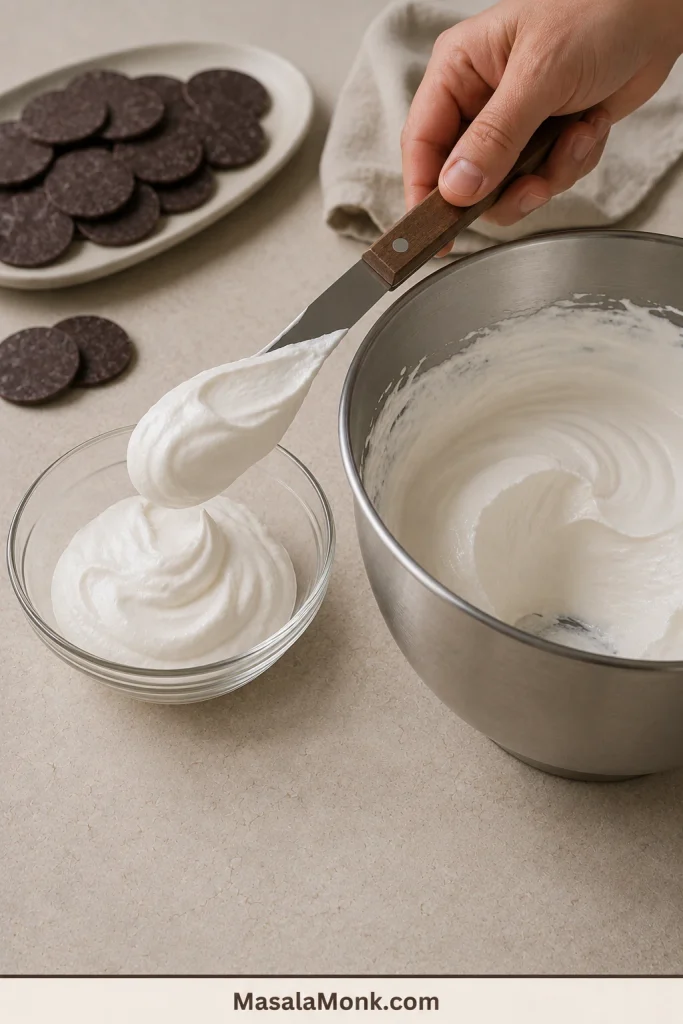
- Whip the cream. Combine the cold heavy cream, powdered sugar, vanilla and salt. Begin on low speed, then increase gradually to medium-high. Stop when the whisk leaves clear trails and a lifted peak stands with a slight bend. The cream should still look glossy and move under the spatula without running. For more control, finish the last few strokes by hand.
- Set aside the cream for coating. Reserve roughly one-third of the whipped cream—about 1½ loosely spooned cups—for the platter anchor, both ends and the outside of the log. Use the rest between the cookies.
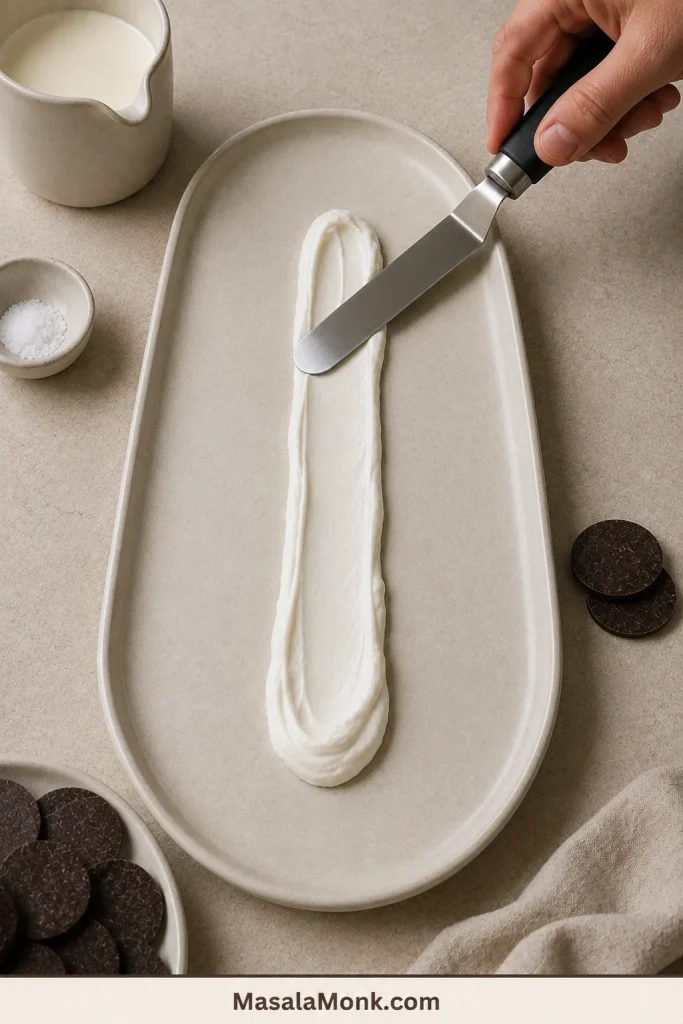
- Make the anchor. Spread an 8-inch / 20-cm stripe of the coating cream down the center of the platter. Extend it as you add stacks if the finished log grows longer.
Build and Coat the Cookie Log
- Straighten the log. Look along its length and gently adjust any obvious bends while the cream is still soft. Fill visible cracks with small amounts of the cream set aside for coating.
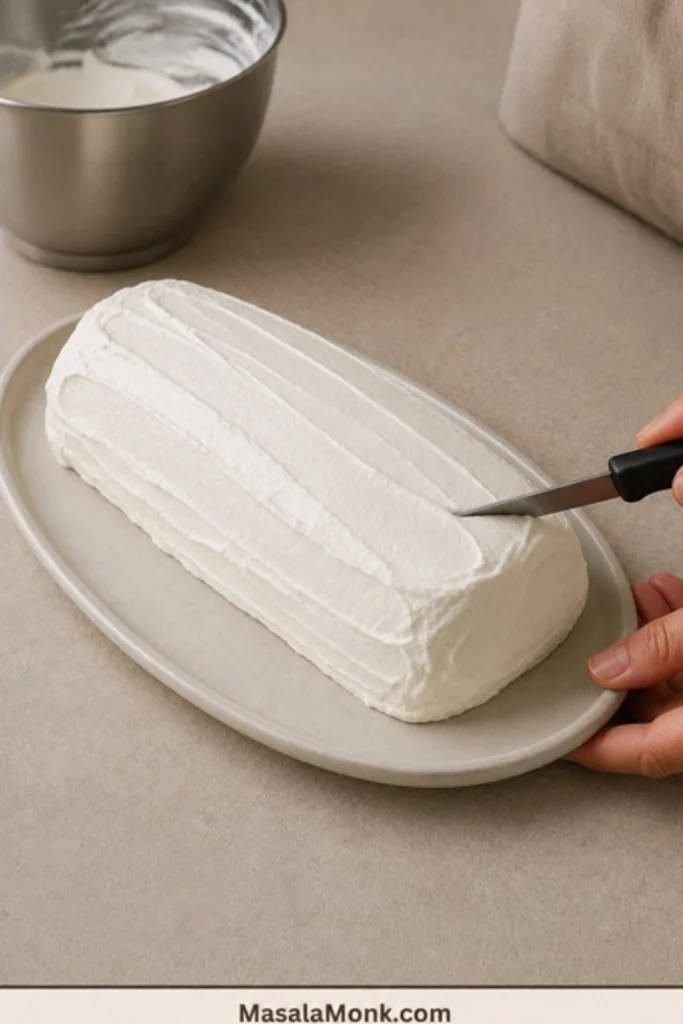
- Coat the outside. Spread the remaining coating cream over the top, sides and both ends. Work along the length of the cake so the stacks remain aligned. You may have a spoonful or two left.
Chill and Serve
- Let the surface firm. Refrigerate for 45–60 minutes with nothing touching the cream. If the platter needs protection, place it inside a tall cake carrier whose lid sits well above the coating. Once the cream no longer smears easily, clean any marks from the platter with a damp paper towel.
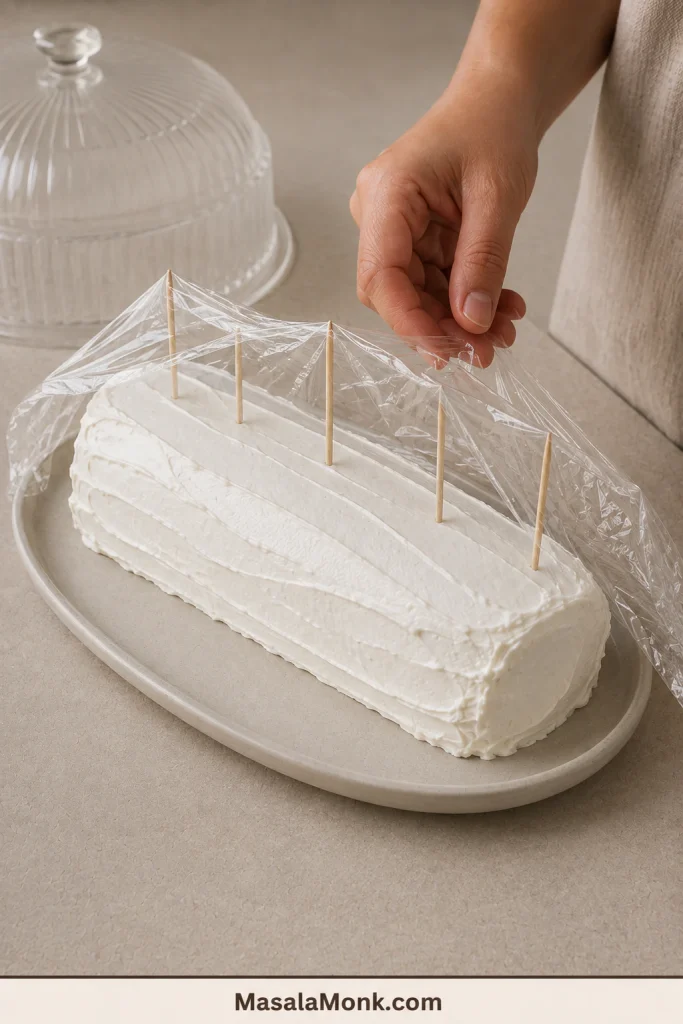
- Cover without touching the cream. Keep the cake in its carrier or drape plastic wrap above the surface. Without a carrier, place a few toothpicks along the top to support the wrap.
- Leave the covered cake to soften. Refrigerate for at least eight more hours. Begin checking the center then, although many substitutes need closer to 10–12 hours. Slide a thin paring knife into the center from the back side of the log, where the small test mark will not show. It should pass through without a hard stop, dry crack or sharp crunch.
- Garnish and slice. Add cocoa, cookie crumbs or chocolate curls shortly before serving. Cut the cold log at roughly 45 degrees into ¾–1-inch / 2–2.5-cm slices, wiping the blade between cuts.
For a darker finish, drizzle a little homemade chocolate syrup beside each slice after cutting. Adding it before the long rest can streak the cream.
What a Good Slice Feels Like
The cream should stay cool and airy while the cookies become tender enough to cut with the side of a fork. They should lose their snap but keep their dark cocoa character. You should still see every stripe, and the slice should remain together on the way to the plate without feeling stiff, frozen or heavy.
Recipe Notes
- Use weight first. Modern cookie packages vary too much for “one package” to remain reliable.
- A little extra cream is useful. Running out before the outside is covered is much harder to fix than having a spoonful left.
- Broken cookies are usable. Place cracked wafers inside a short stack and patch small gaps with cream. Save badly shattered pieces for the garnish.
- Slice directly from the refrigerator. A warm coating loses support, while cookies that are still firm can push cream outward.
- If the cream becomes too firm: Fold in one tablespoon cold unwhipped heavy cream at a time until it spreads smoothly. This may rescue cream that has only just begun to overwhip, but it cannot reverse fully separated cream.
Adapt the Recipe
Using Oreo Thins Instead
- Cookies: 8½–9 oz / 240–255 g Oreo Thins, approximately 33–35 cookies
- Heavy cream: 1½ cups / 355 ml, about 355 g
- Powdered sugar: 0–1 tablespoon / 0–8 g
- Vanilla and salt: ¾ teaspoon / about 4 ml vanilla and a small pinch of salt
- For a freestanding log: Set aside roughly one-third of the whipped cream—about 1–1¼ loosely spooned cups—for the anchor and outside. Spread about one heaped teaspoon between cookies.
- Refrigerator time: begin checking after 10 hours; around 12 hours usually gives the most even texture
- What to expect: a shorter, sweeter log with wider chocolate-and-cream stripes
For a freestanding Oreo Thin log, leave the filling intact, reduce the added sugar and follow the same short-stack method. Use only enough cream to fill the cookies and coat the outside neatly.
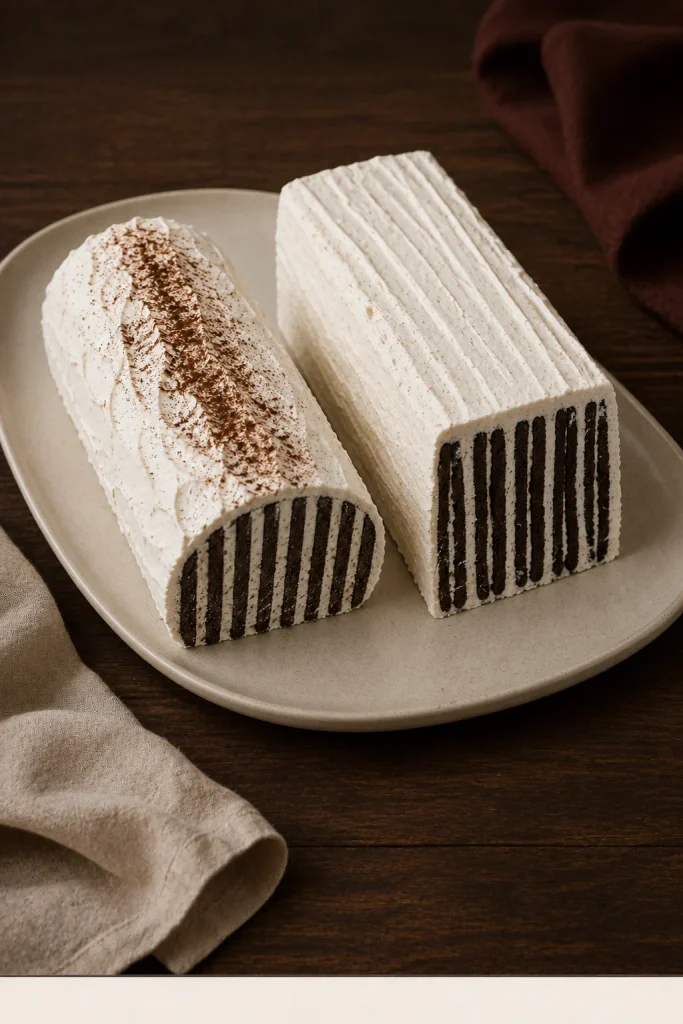
Classic Wafer Log vs Oreo Thin Loaf
These versions differ in both cookie structure and support. Plain wafers form a delicate freestanding log, while filled Oreo Thins benefit from a loaf pan and produce wider pale bands.
How to Make Oreo Thin Icebox Cake in a Loaf Pan
Use the Oreo Thin quantities above and a 9×5-inch loaf pan. The pan supports the cake on four sides and is easier to transport than a long platter log.
Prepare the Pan and Cream Base
Line the pan before the cream is whipped so the overhang is ready when assembly begins. A thin coating across the base is enough to stop the first stack from shifting.
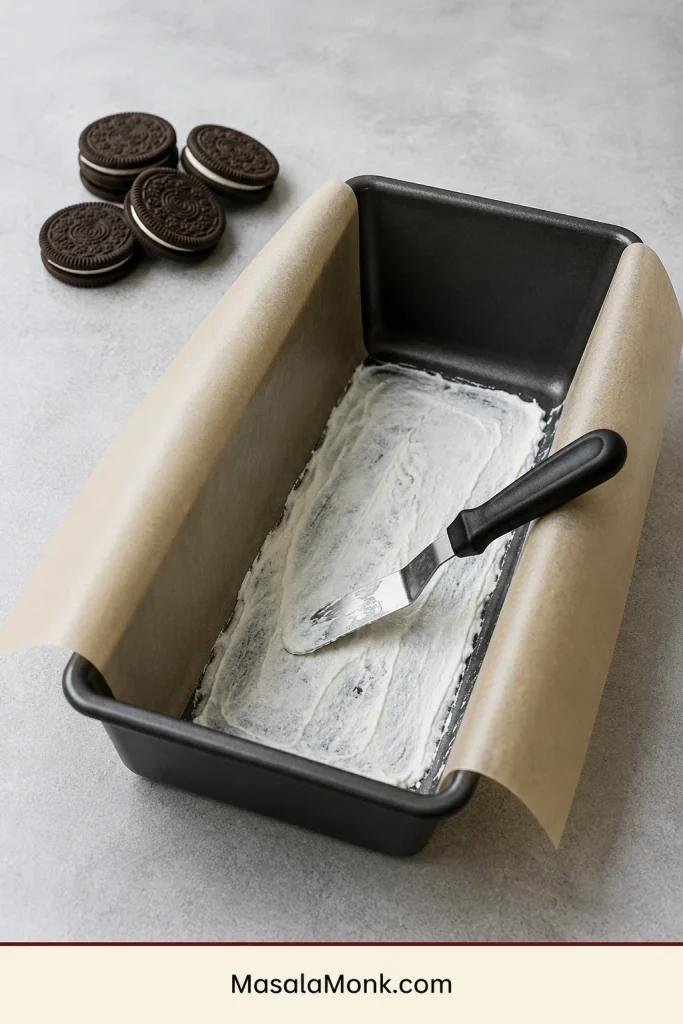
- Line the pan with plastic wrap or parchment, leaving enough overhang to lift the finished cake.
- Spread a thin layer of whipped cream across the bottom. For this version, do not reserve the large outside portion used for the log. Hold back only enough cream to fill the side gaps and cover the exposed surface.
Build and Position the Cookie Stacks
Make compact groups before placing them in the pan. The stacks should run from one short end toward the other, rather than forming parallel rows across the width.
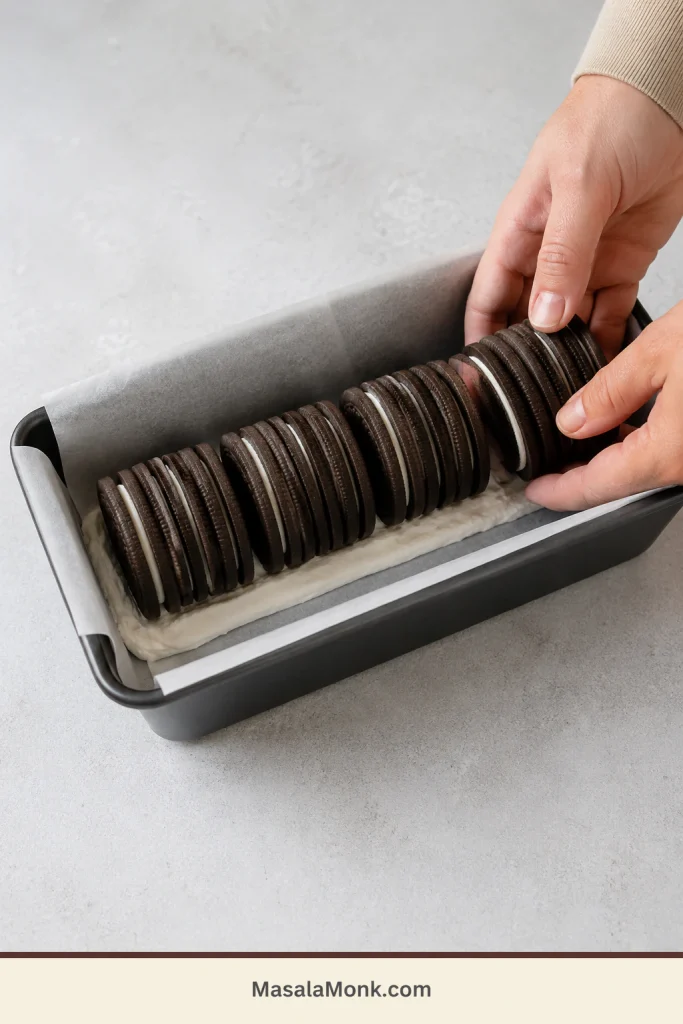
- Make four short stacks of eight Oreo Thins, spreading about one heaped teaspoon of cream between each cookie.
- Stand the first stack on edge at one short end of the pan. Join the remaining stacks end to end so the cookies run along the length of the pan.
Fill, Chill and Release the Loaf
- Fill visible gaps around the stacks with cream, then cover the exposed surface. Tap the pan two or three times on a folded kitchen towel so the cream settles around the cookies.
- Cover and refrigerate for about 12 hours, or until a thin knife passes through the center without meeting a crisp layer.
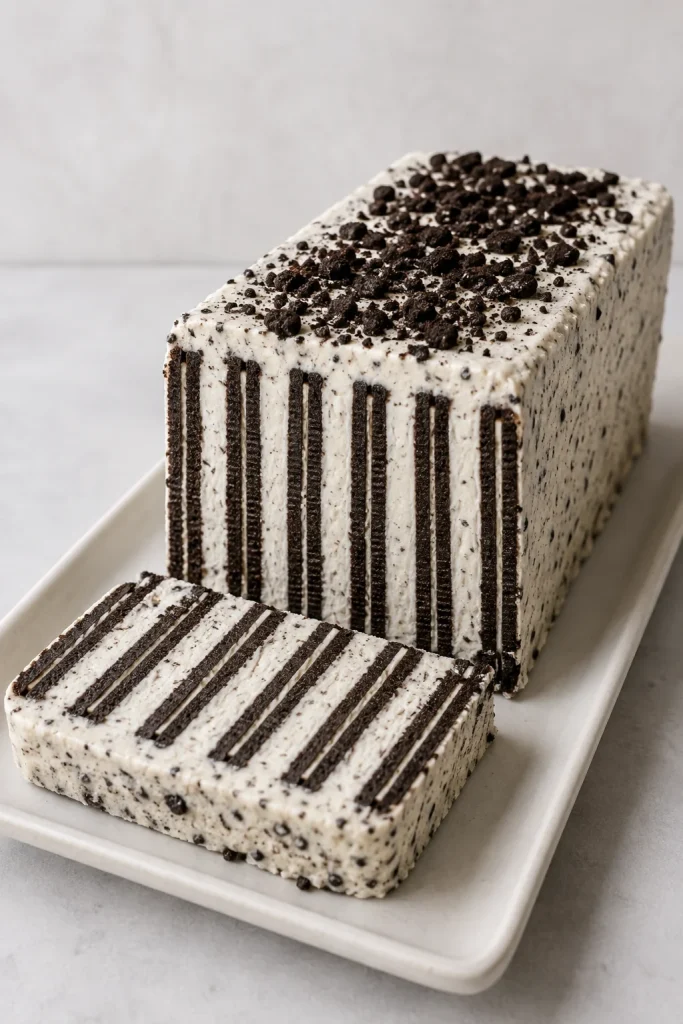
- Lift or invert the cake onto a platter, remove the lining and crush any remaining cookies over the top.
Release it while cold. A thoroughly chilled loaf holds its rectangular shape more cleanly as the lining is peeled away.
Half Batch or Larger Crowd
Half batch: Use 4½ oz / 128 g plain wafers, 1 cup / 240 ml / about 240 g heavy cream, 1 tablespoon / about 8 g powdered sugar, ½ teaspoon vanilla and a pinch of salt. Set aside roughly one-third of the whipped cream—about ¾ loosely spooned cup—for the anchor and coating. Expect about 5–7 slices.
Double batch: Make two normal logs instead of one very long cake. Two shorter logs are easier to cover, transport, chill and slice.
Once the format is clear, the basic method becomes simple. From here, the guide explains what makes this the classic log, how different cookies behave and how to judge the deepest layers.
What Makes This the Classic Icebox Cake?
An icebox cake is assembled instead of baked. Crisp cookies sit against a moist filling until they become tender and sliceable. Its layers remain visible, but a fork meets something much closer to cake than cookie.
Historically, the dessert was promoted as Famous Chocolate Refrigerator Roll. Today, it is also known as chocolate wafer cake, chocolate refrigerator cake or zebra icebox cake.
It is not an ice cream cake or British chocolate fridge cake, where crushed biscuits are mixed with melted chocolate and butter. Pudding- and cream-cheese-based icebox cakes belong to the same broad no-bake family, but they need different ratios.
A similar transformation happens in no-bake banana pudding, where cookies soften as the layered dessert rests. Here, whipped cream creates a lighter cake that can stand upright and reveal clean stripes when sliced.
Choose the Right Chocolate Cookie
For the classic log, choose a thin, plain chocolate wafer or follow the Oreo Thin adjustment. Thicker and sweeter cookies can still work, but they change both the flavor and the waiting time.
Compare the best chocolate wafer substitutes, including plain wafers, Oreo Thins, brownie crisps and homemade options, in the complete cookie guide.
Cookie Anatomy Changes the Cake
A sandwich cookie does not behave like a single wafer with a little extra sweetness. Its second shell and filling add thickness, change the moisture path and alter the balance between cookie and cream.
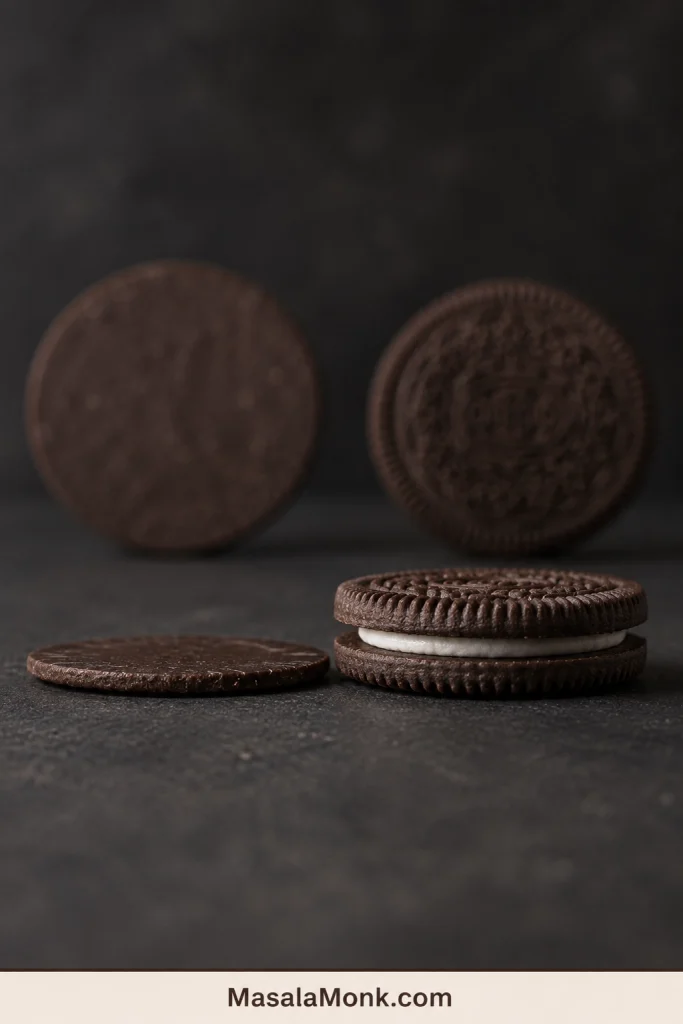
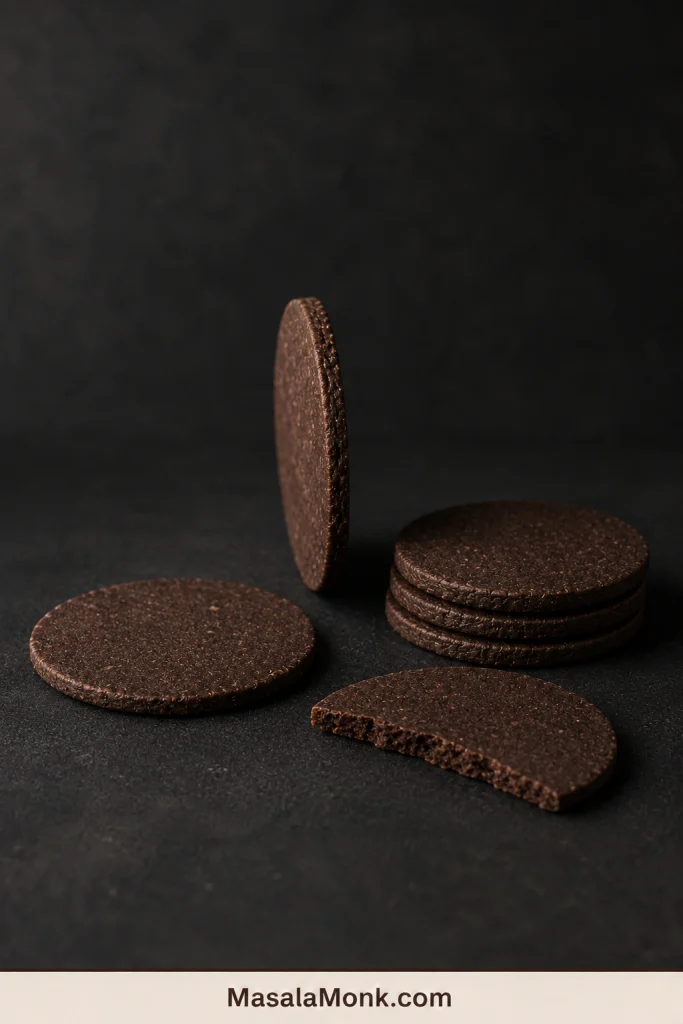
What a Suitable Chocolate Wafer Looks Like
- Thin and flat: ideally close to ⅛ inch / 3 mm, without waffle-like layers
- Crisp and dry: firm enough to absorb cream gradually
- Uncoated: a chocolate shell can slow moisture absorption
- Unfilled or lightly filled: thick filling changes both sweetness and softening time
| Cookie route | What to expect | Adjustment |
|---|---|---|
| Thin, unfilled dark-chocolate wafers | Closest to the classic flavor and narrow stripe pattern | Follow the main recipe. |
| Oreo Thins | Sweeter, shorter log with wider stripes | Follow the separate Oreo Thin quantities. |
| Other thin, crisp chocolate cookies | Thin brands may behave much like the classic wafer | Reduce the sugar if the cookie is sweet or filled. Allow more refrigerator time if it is thicker. |
| Chocolate Maria biscuits or chocolate graham crackers | Wider, milder layers that suit a pan dessert | Use a layered pan-cake format designed for wider biscuits. |
| Regular Oreos or filled waffle wafers | Too much filling or uneven softening for the classic log | Use a recipe designed for that particular cookie. |
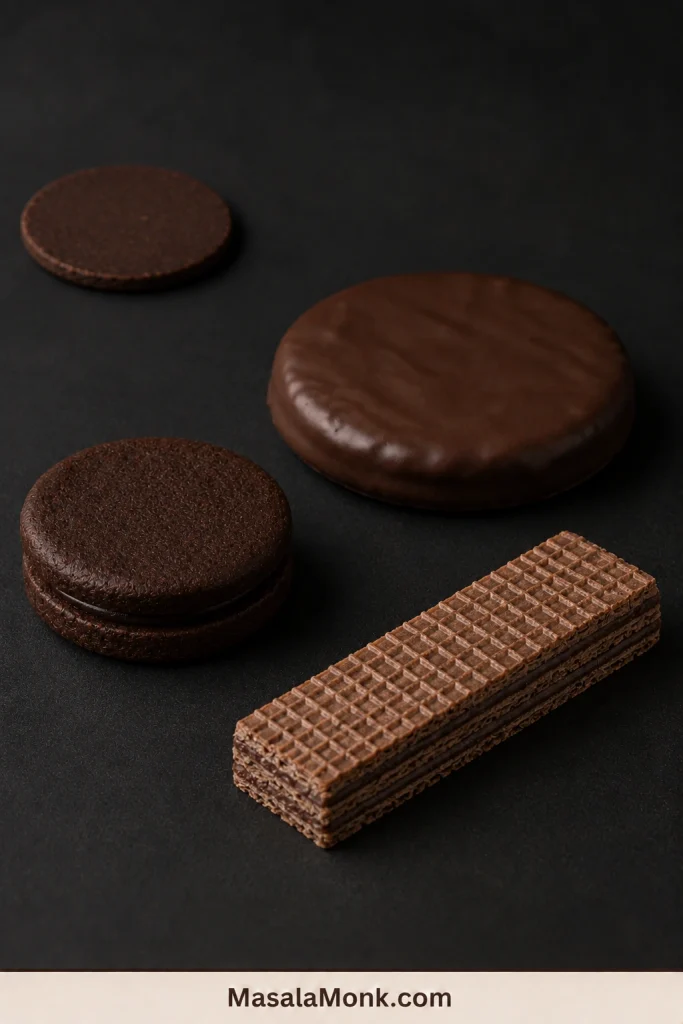
Cookies That Fight the Classic Log
Coatings, thick fillings and layered interiors can interrupt the steady movement of moisture from cream into cookie. A pan may support these cookies physically, but it cannot make an unsuitable texture behave like a thin plain wafer.
Why Weight Matters More Than “One Package”
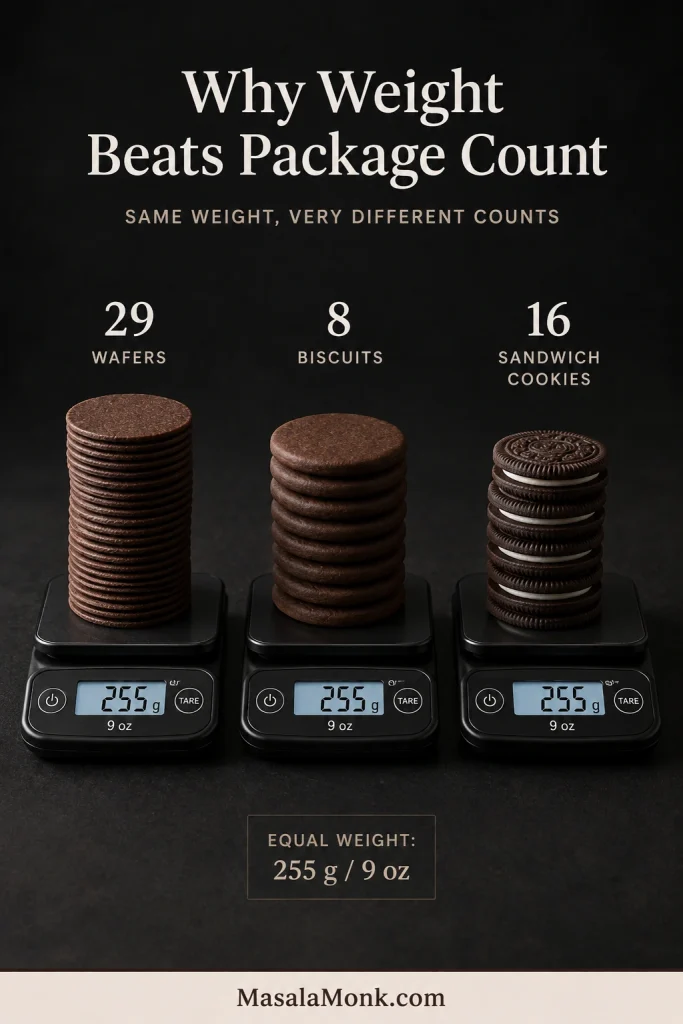
Nine ounces of cookies may mean around 30 pieces for one brand and close to 50 for another. Diameter and thickness change the count dramatically.
Use 9 oz / 255 g for the classic version. Weight controls the overall cookie-to-cream balance; count mainly helps estimate the length of the finished log.
Visual Guide to a Neat, Stable Icebox-Cake Log
The finished cake looks precise, but assembly becomes manageable when each visual decision is made in the right order. These cues show what to look for before the log disappears beneath its final coating.
Whip and Reserve the Cream
Lift the whisk and watch the tip of the peak. It should stand clearly, then bend slightly instead of collapsing into the bowl or breaking into rough clumps.
Separate the coating portion first. Move roughly one-third of the whipped cream into a second bowl before the first cookie is filled, so the outside cannot be short-changed later.
Build the Base and Short Stacks
Match the anchor to the stack. The cream stripe should support the cookie edges without spreading into a wide bed around them.
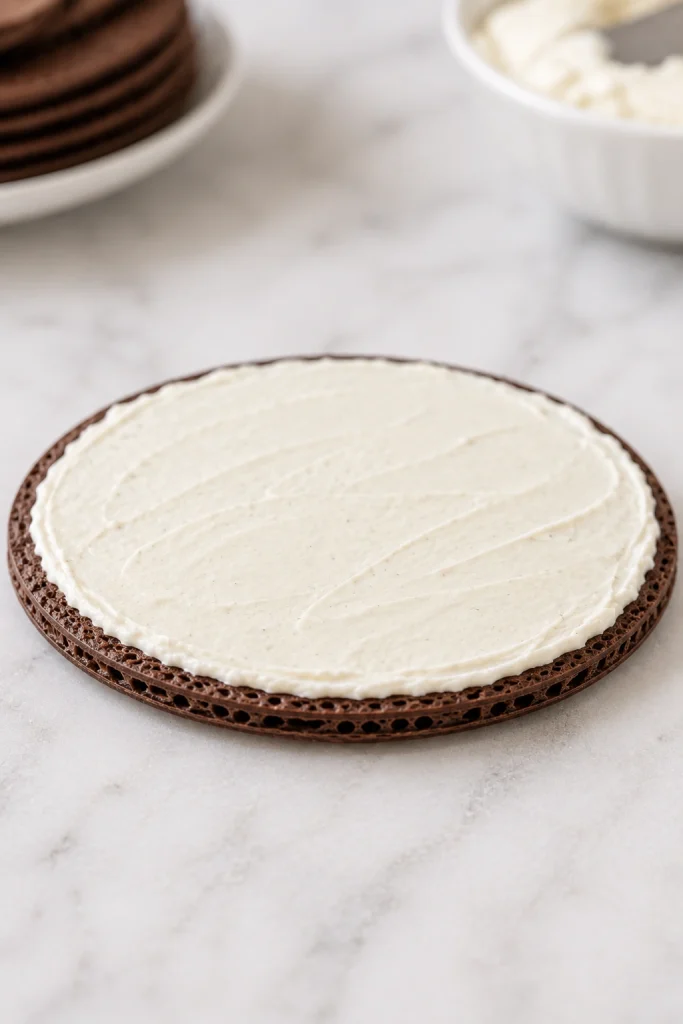
Look for contact, not bulk. A controlled layer reaching almost to the edge gives the wafer moisture across its full face without creating heavy cream gaps.
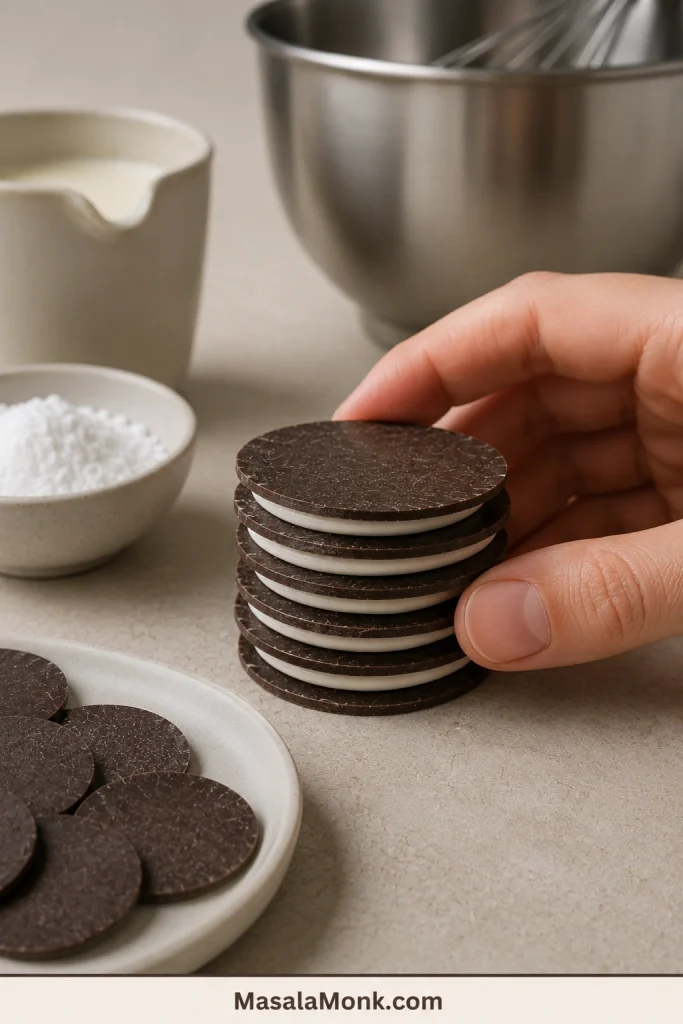
Stop each stack while it still feels easy to hold. Five or six cookies make a compact unit that can be turned and positioned without twisting the layers.
Join and Straighten the Log
Put cream between the groups as well as between individual cookies. The connection between short stacks needs the same moisture contact as every other layer.
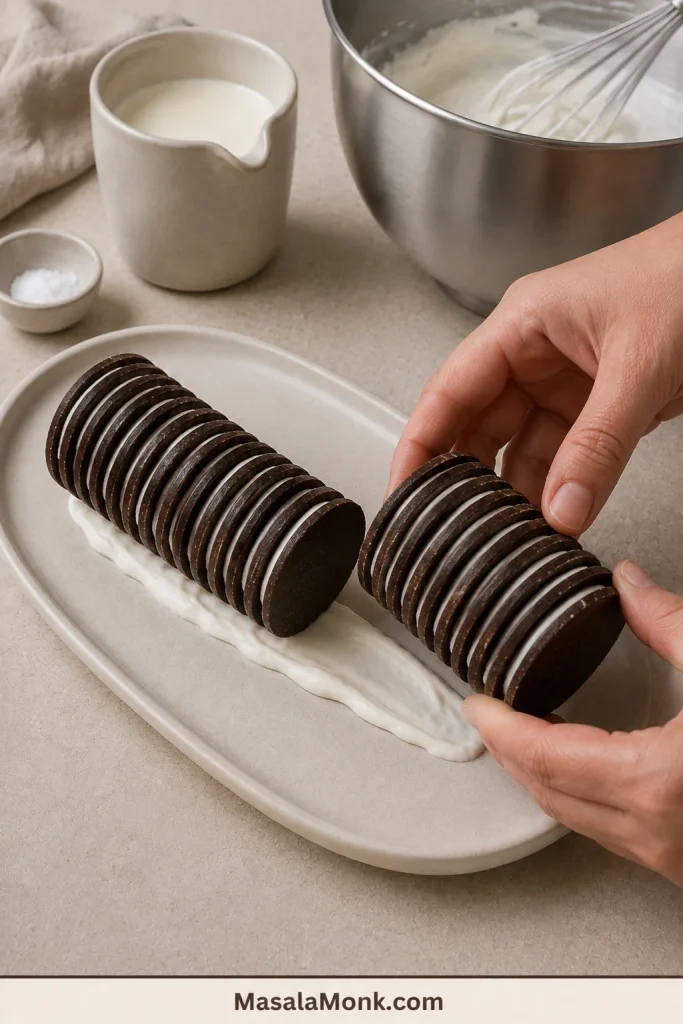
Correct the line before coating. View the log from one end, support the curve with one hand and make small adjustments rather than compressing the cookies.
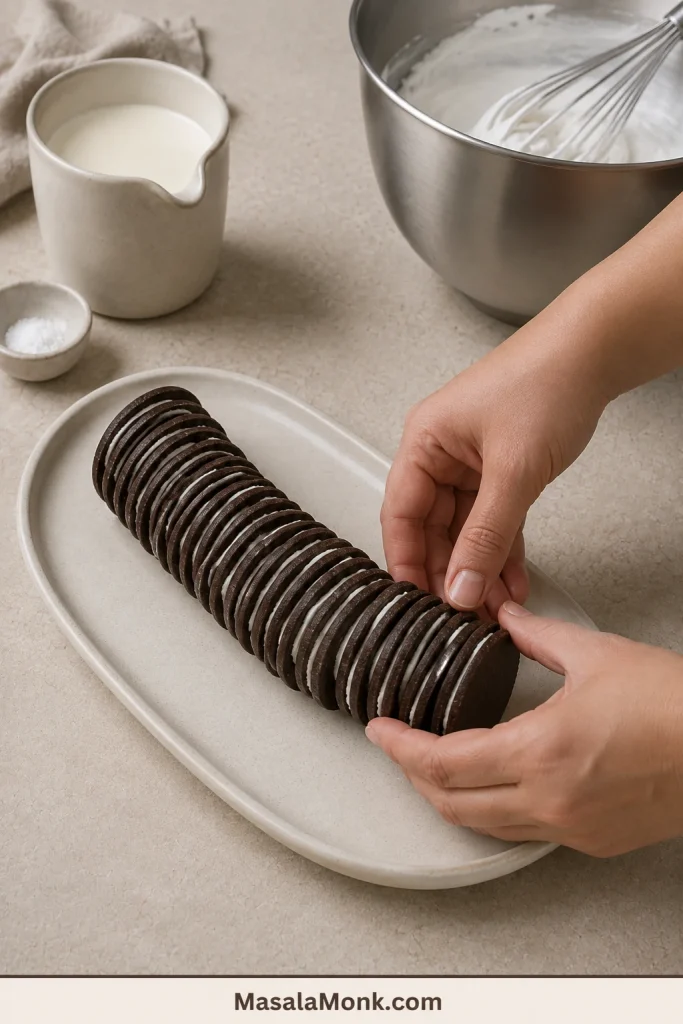
Coat and Protect the Surface
Cover every exposed wafer edge. The first coat can keep its natural spatula ridges, provided no dry cookie remains visible through the cream.
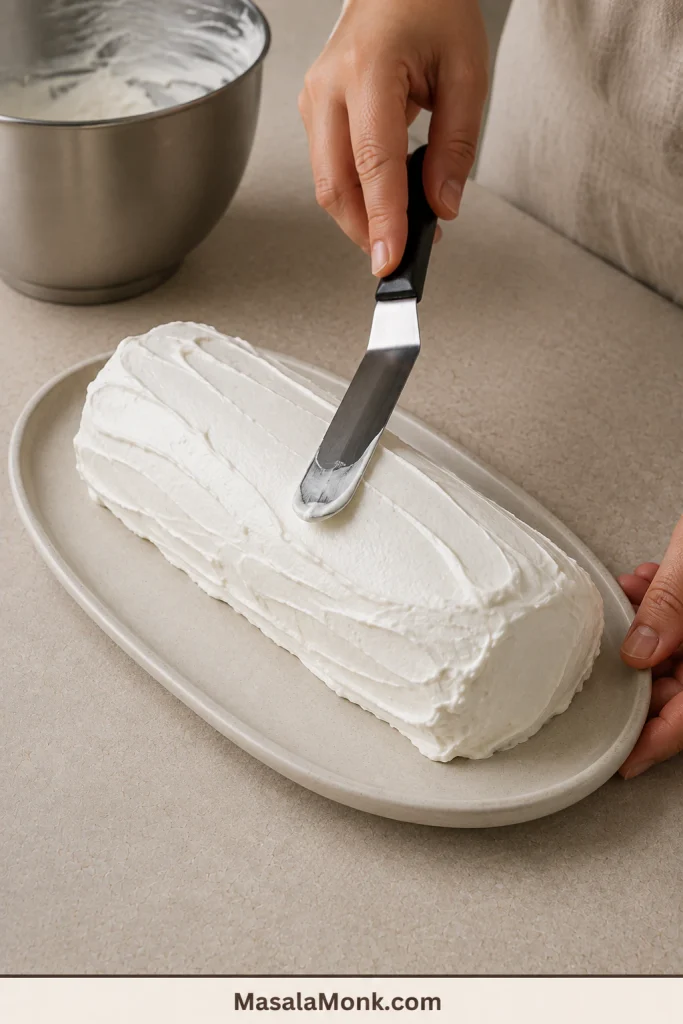
Test the coating, not the center, after the short chill. The surface is firm enough to cover when a light touch no longer pulls up a wet ridge.
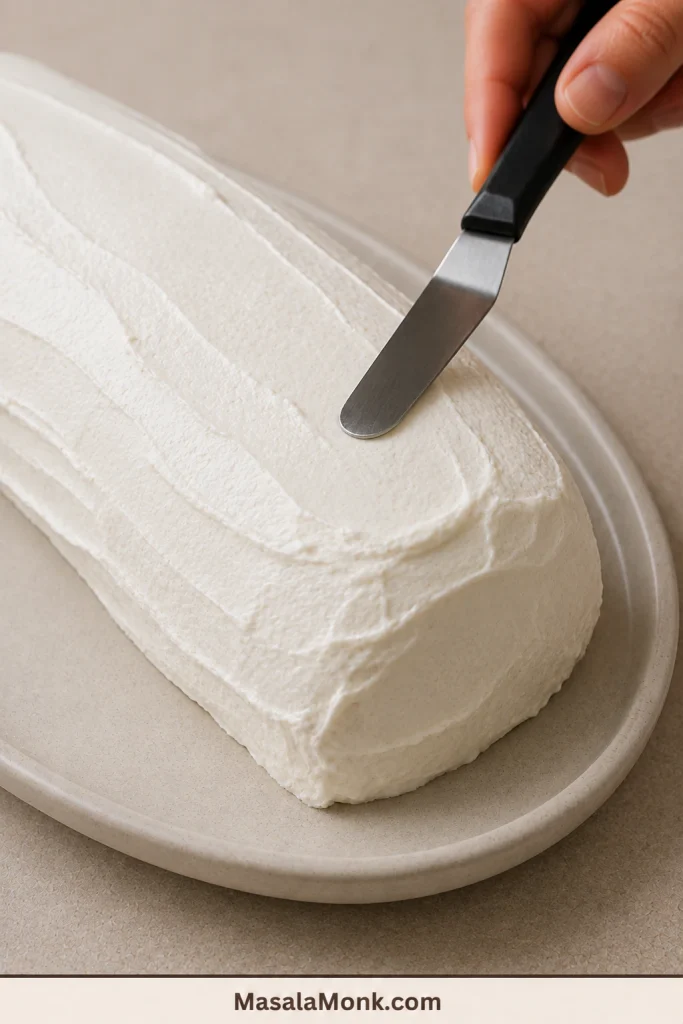
Protect the air space above the cake. A tall carrier is simplest; otherwise, toothpicks can keep loose plastic wrap from settling onto the cream.
How Long Does Icebox Cake Need to Chill?
The ends soften before the center, so a log can look ready while the deepest cookies still hold a crisp core.
The Two Chilling Stages Do Different Jobs
First, the uncovered 45–60-minute rest settles the whipped-cream coating. After the surface firms, the covered overnight rest gives moisture time to travel through every cookie layer.
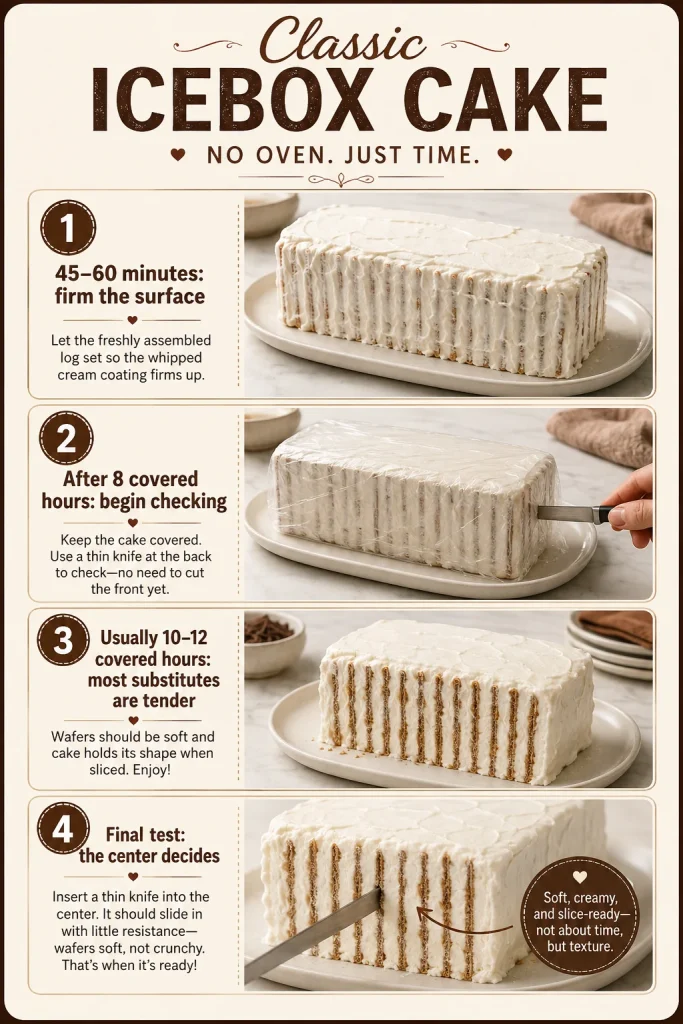
Why do many old recipes say four hours? The original Famous Wafers were unusually thin, and classic refrigerator-roll instructions commonly called for a four-hour rest. Modern substitutes vary much more in thickness, filling and coating, so four hours should be treated as old-package guidance rather than a promise for every substitute.
| Cookie and format | Begin checking | Ready when |
|---|---|---|
| Thin plain chocolate wafers | After 8 hours; most need 10–12 | No hard layer remains in the center |
| Oreo Thins | After 10 hours; usually around 12 | The shell and filling cut as one tender layer |
| Other crisp chocolate cookies | Around 12 hours; very thin cookies may soften sooner, while thicker ones can need 18–24 | The knife passes without pushing the layers apart |
| Thicker homemade wafers | Allow up to 24 hours | No dry baked crunch remains |
How to Know the Cake Is Ready
Judge the middle, not an end slice. Moisture reaches the exposed ends sooner, so a soft outer section does not prove that the deepest wafers are tender.
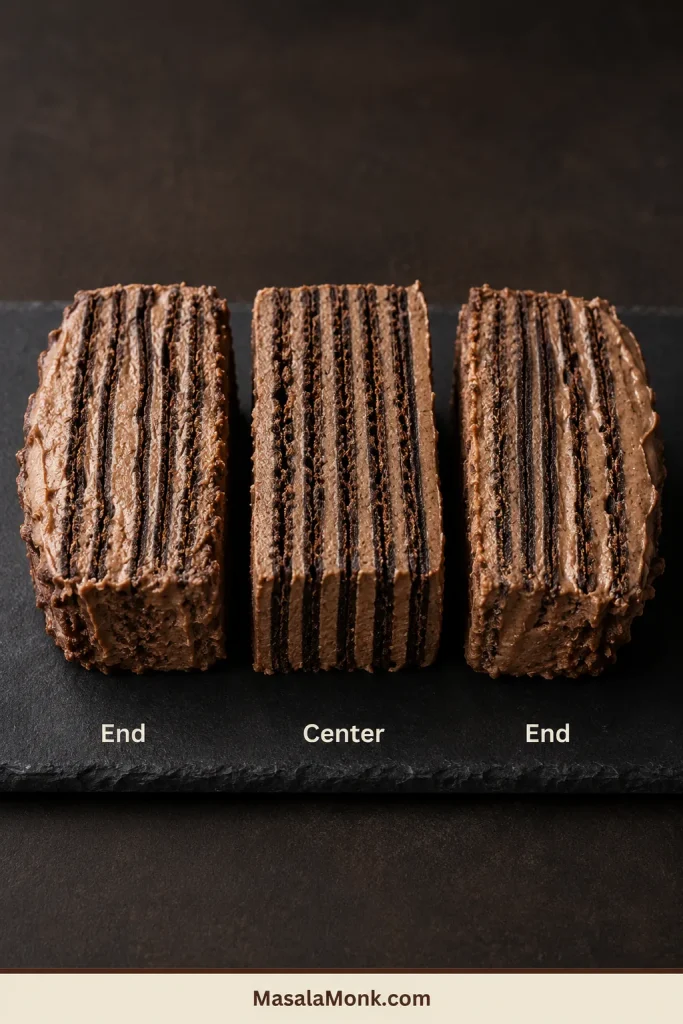
- A thin knife passes through the center without a hard stop.
- No dry crack or sharp cookie crunch is audible.
- Visible chocolate layers remain distinct.
- Cold cream stays stable instead of becoming soft or runny.
If the center is still hard, cover the cake again and give it another two to four hours. It is probably early, not ruined.
Icebox Cake Troubleshooting
A cracked cookie, uneven log or slightly rough coating does not ruin this dessert. Most appearance problems disappear beneath the final cream, and many texture problems can still be corrected.
Cream and Assembly Problems
Before changing the recipe, identify the condition of the whipped cream. Loose, correctly whipped and overwhipped cream behave differently on the platter and need different fixes.
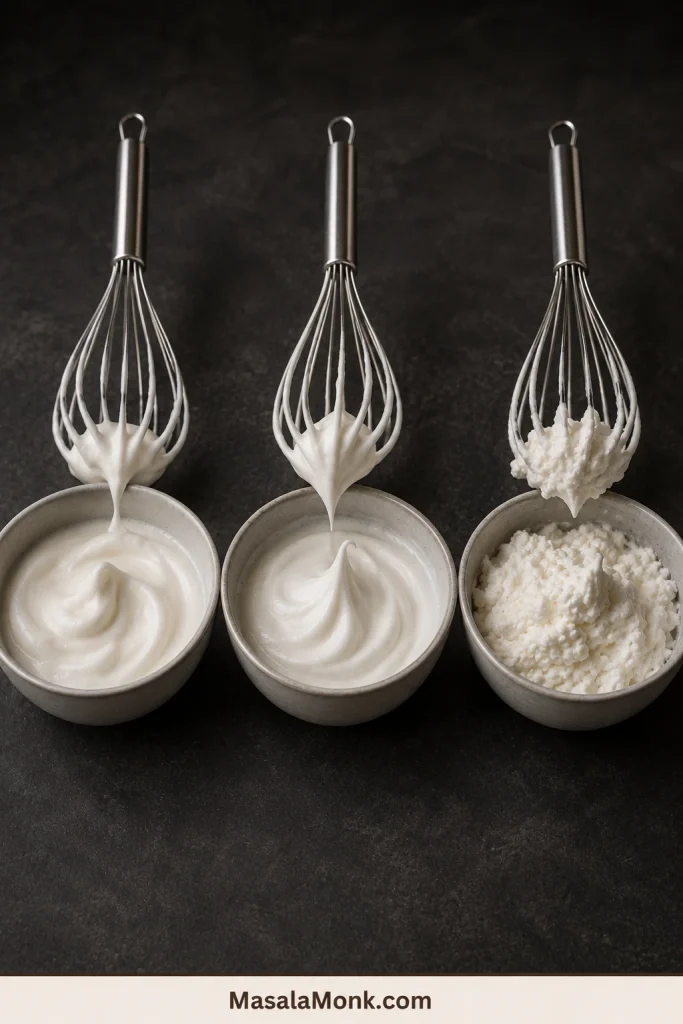
| Problem | Likely reason | What to do |
|---|---|---|
| The log slides apart | The cream is too soft or the platter has no cream anchor | Chill briefly, then straighten it gently. For the next cake, whip the cream until it holds its shape but still looks glossy. |
| The cream looks grainy | It was whipped too far | Fold in a little cold unwhipped heavy cream if it has not separated. |
| The cream is loose or watery | It has warmed, remains underwhipped or does not contain enough fat to hold peaks | When the cream has warmed, chill it for 10–15 minutes and whisk briefly. Cold but underwhipped cream only needs further whisking. Low-fat cream that cannot hold peaks must be replaced with cold heavy cream. |
| The outside is torn | The covering touched the cream before it had set | Patch the area with a little newly whipped cream. Let the coating firm before covering. |
Chilling, Texture and Slicing Problems
Texture gives a faster diagnosis than appearance alone. Compare the deepest layers: tender cookies yield cleanly, crunchy cookies resist, and gummy cookies compress into a pasty band.
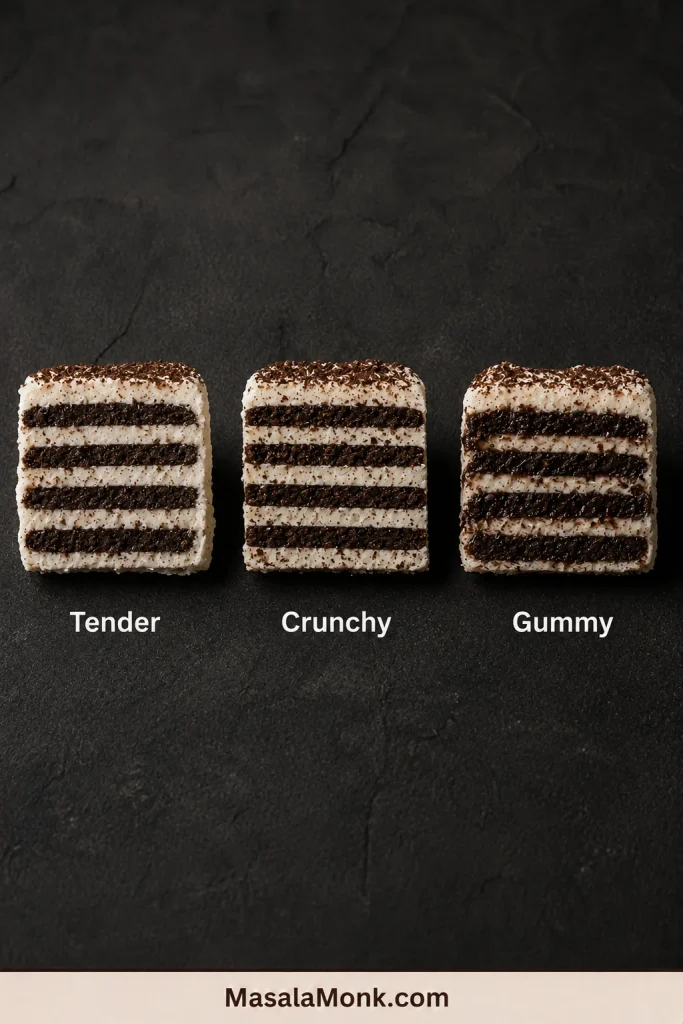
| Problem | Likely reason | What to do |
|---|---|---|
| The center is still crunchy | The cookie is thick, the cream did not reach the edges or the cake was served early | Cover and chill another 2–4 hours. If you make it again, use a thinner cookie or spread the cream closer to the edge. |
| The cake tastes too sweet | A filled cookie was paired with the full sugar amount | Serve with bitter cocoa or unsweetened cream. Reduce or omit sugar when using filled cookies. |
| The cookies become gummy | Layered waffle wafers or heavily filled cookies softened unevenly | Once those wafers turn gummy, more chilling will not restore the classic texture. Use a thin, flat and dry chocolate cookie for the next cake. |
| The stripes look weak or narrow | Too much cream was spread between cookies, or the log was cut too squarely across the layers | Keep the cake very cold and cut more diagonally across the log so the blade passes through several cookie layers. Use thinner, even cream layers when making another log. |
| The cake slumps while slicing | The coating is warm, the cream is soft or the inner cookies are still firm | Return the cake to the refrigerator before trying again. |
How to Reveal the Zebra Stripes
Once the center is tender, the diagonal cut creates the stripe pattern people remember.
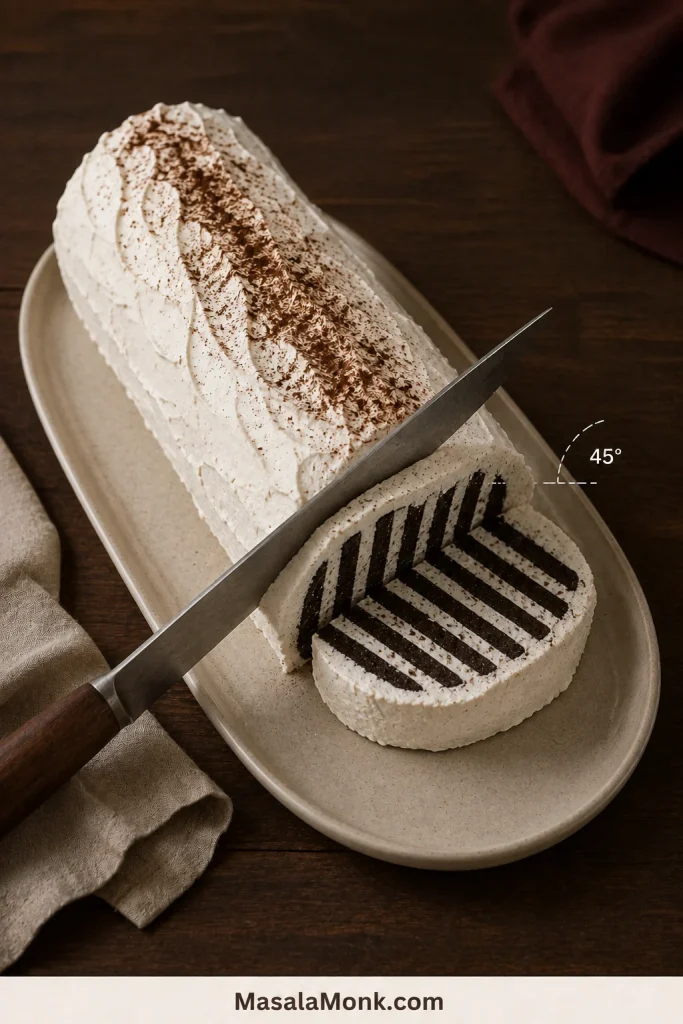
- Keep the cake refrigerated until you are ready to cut.
- Use a long, sharp, smooth-edged knife.
- Position the blade at roughly 45 degrees to the log.
- Cut slices about ¾–1 inch / 2–2.5 cm thick.
- Wipe the blade between cuts so cream from one slice does not blur the next.
- Support the first slice with a small spatula. The first one is usually the awkward piece, and that is normal.
For especially neat slices, warm the blade briefly in hot water and dry it completely before cutting. Do not leave the warm knife against the whipped-cream coating.
Make Ahead, Transport, Store and Freeze
The waiting time is when the cookies become cake. Making it ahead also means dessert is already settled when everything else still needs attention.
The day before: Assemble the log, let the coating firm for 45–60 minutes, then cover loosely and refrigerate.
Before serving: Check the deepest layers, smooth any marked cream and add the garnish.
For the best texture: Serve within about two days, while the cream tastes fresh and the stripes remain distinct.
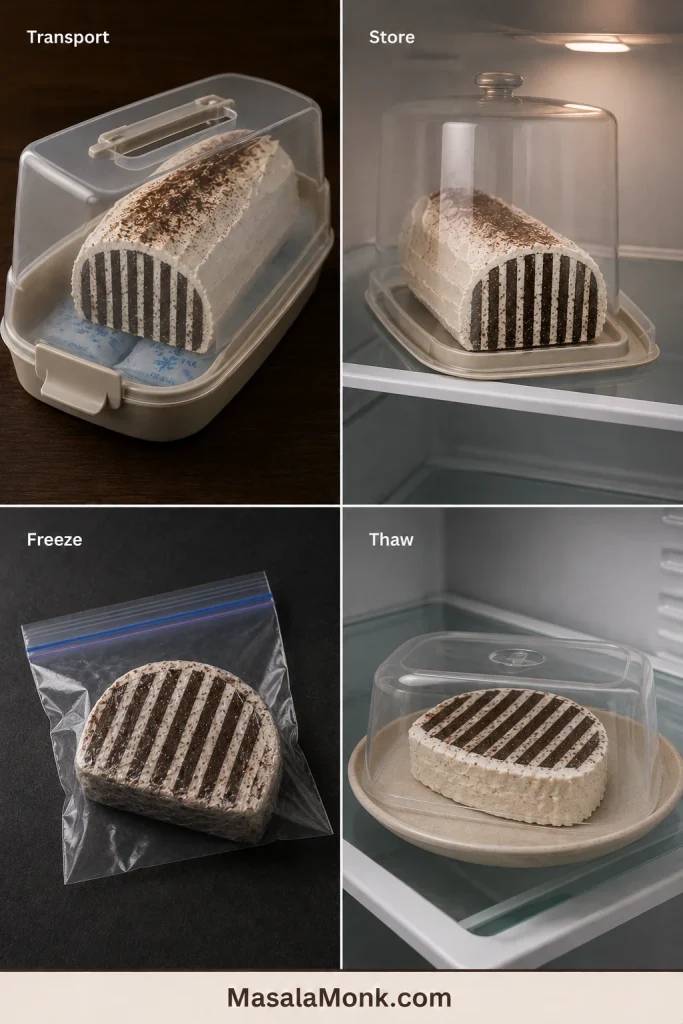
How to Store Leftovers
Keep the cake covered in a refrigerator at or below 40°F / 4°C, following the FDA’s cold-storage guidance. Store it away from strongly scented foods because whipped cream can absorb refrigerator odors. Use refrigerated leftovers within three days.
How to Transport It
Keep the cake on its original platter inside a covered carrier. Set the carrier flat over chilled ice packs, avoid tilting it during the journey and return it to a refrigerator as soon as you arrive.
How to Freeze It
Let the cookies soften fully in the refrigerator before freezing. Wrap the whole cake well, or place parchment between individual slices before wrapping them. Freeze for up to one month and thaw in the refrigerator until the cake is sliceable.
Do not leave a whipped-cream cake at room temperature for more than two hours. In weather above 90°F / 32°C, shorten that window to one hour.
Make It Work With What You Can Find
Change only the part you need to change—the cream, the cookie or the final texture—because each adjustment affects the cake differently.
Cool Whip Instead of Fresh Whipped Cream
One 8 oz / 227 g tub can work if you keep the filling and outside coating thin. For more comfortable coverage, use about 10–12 oz / 285–340 g thawed frozen whipped topping from a larger tub.
With 8 oz / 227 g, keep the filling layers thin and apply a light outer coat. Using 10–12 oz / 285–340 g leaves more room to finish the entire log comfortably.
Frozen whipped topping is already sweetened, so omit the powdered sugar. Expect a sweeter, slightly firmer result than the fresh-cream version. Aerosol canned whipped cream loses its volume too quickly for assembly.
Gluten-Free Chocolate Cookies
For a thin, plain gluten-free chocolate crisp, begin with the classic 9 oz / 255 g cookie weight and cream formula. Reduce the sugar if the cookie is filled or noticeably sweet, and begin checking by 10–12 hours. Continue chilling until the center is tender.
Check every packaged ingredient and preparation surface against your dietary requirements, especially when serving someone with celiac disease or a serious allergy.
Can You Add Mascarpone, Cream Cheese or Gelatin?
These ingredients change the texture and require their own ratios. For the classic refrigerator roll, use the lightly sweetened whipped cream in the main recipe rather than adding them casually.
When you want a taller, denser cream-cheese filling, use a recipe designed for it, such as no-bake cheesecake, rather than treating cream cheese as a direct swap.
Homemade Chocolate Wafers
Homemade wafers give you control over cocoa flavor, sweetness and thickness, but they remove the no-bake advantage. Roll them close to ⅛ inch / 3 mm thick, cool them completely and allow extra refrigerator time if they bake up thicker than a packaged wafer.
See the homemade chocolate wafer recipe and thickness guide for cocoa choices, dough method and store-bought alternatives.
Frequently Asked Questions
What can I use instead of Nabisco Famous Chocolate Wafers?
Choose a thin, flat, crisp chocolate cookie. Unfilled dark-chocolate wafers give the closest classic result, while Oreo Thins and other thin chocolate crisps can work with the adjustments above.
Can I use Oreo Thins for icebox cake?
Yes. For 33–35 Oreo Thins, use 1½ cups / 355 ml heavy cream and little or no added sugar. Leave the filling intact and refrigerate the covered cake for about 12 hours.
Can I use Cool Whip instead of whipped cream?
Yes. One 8 oz tub can work with very thin layers, while 10–12 oz / 285–340 g gives more comfortable coverage. Omit the powdered sugar.
How long does icebox cake need to chill?
After the 45–60-minute surface-firming chill, cover and refrigerate for at least eight more hours. Most substitute cookies soften more fully after 10–12 hours.
Does icebox cake go in the refrigerator or freezer?
Refrigerate it first so the cookies can soften beside the cream. Freeze only after the cookies have fully softened in the refrigerator.
Why is chocolate wafer cake cut diagonally?
The cookies stand upright along the log. Cutting across them at an angle reveals several chocolate-and-cream layers in every slice.
The First Slice
By the next day, crisp chocolate cookies have become tender stripes held inside cold whipped cream. The first diagonal slice still feels like a reveal, even when everyone at the table knows exactly what is coming.
Tell us the exact cookie brand you used, whether it was plain or filled, and how many hours it needed after covering. Your note may help the next person standing in the cookie aisle.








