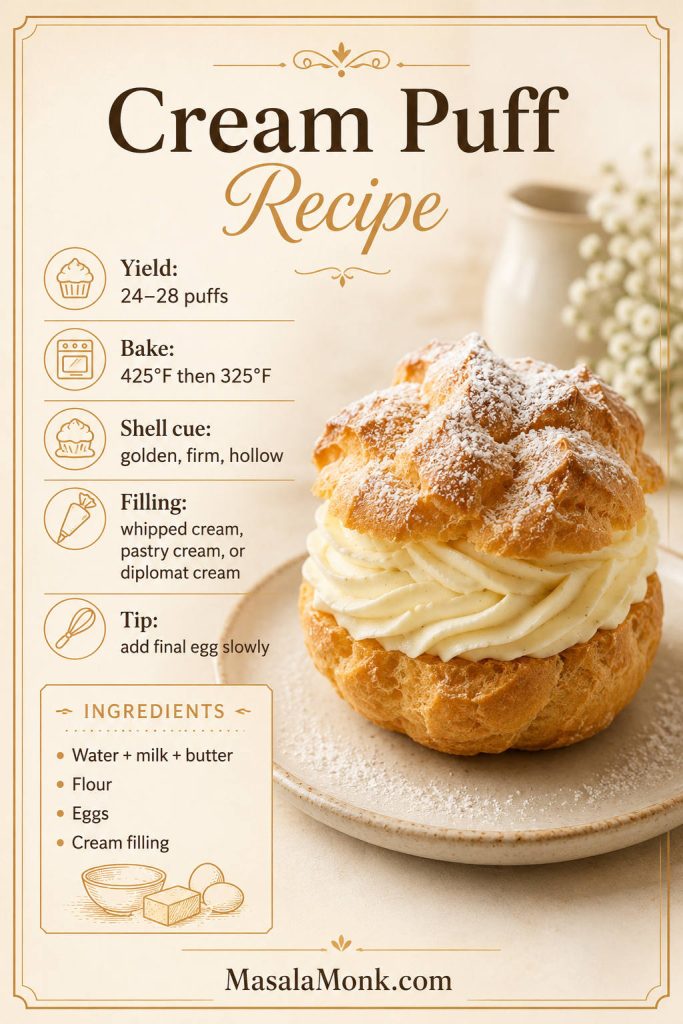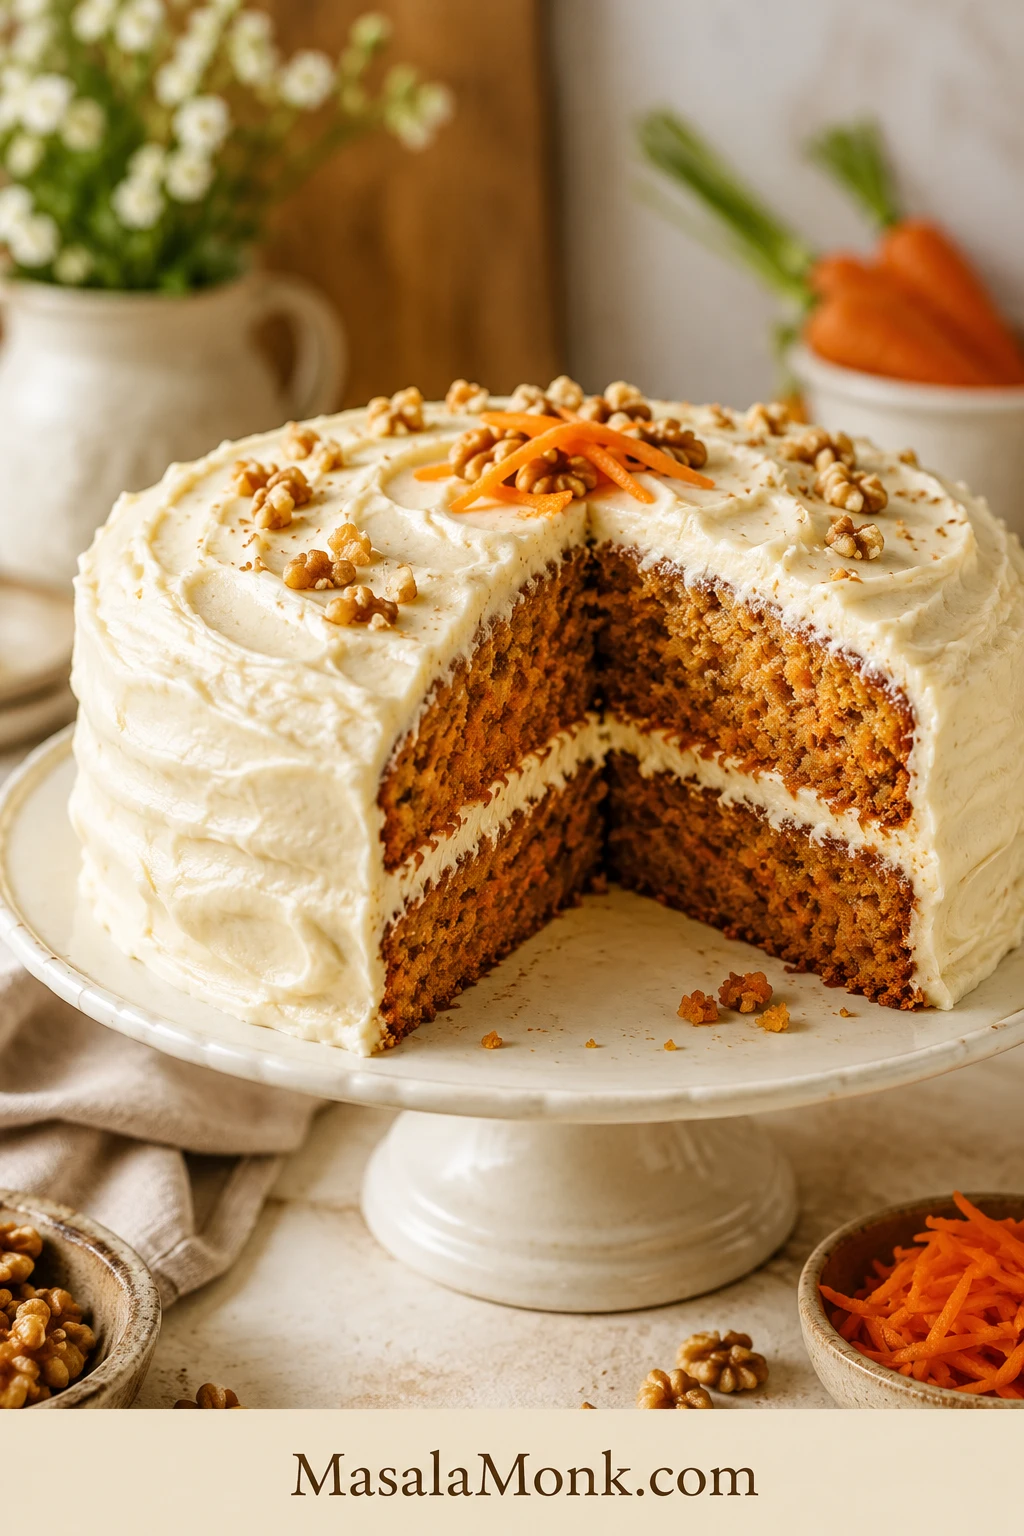
Carrot cake should be soft under the fork, warmly spiced, full of carrot, and rich with cream cheese frosting. It should not be greasy, dry, heavy, or so crowded with add-ins that the carrot disappears.
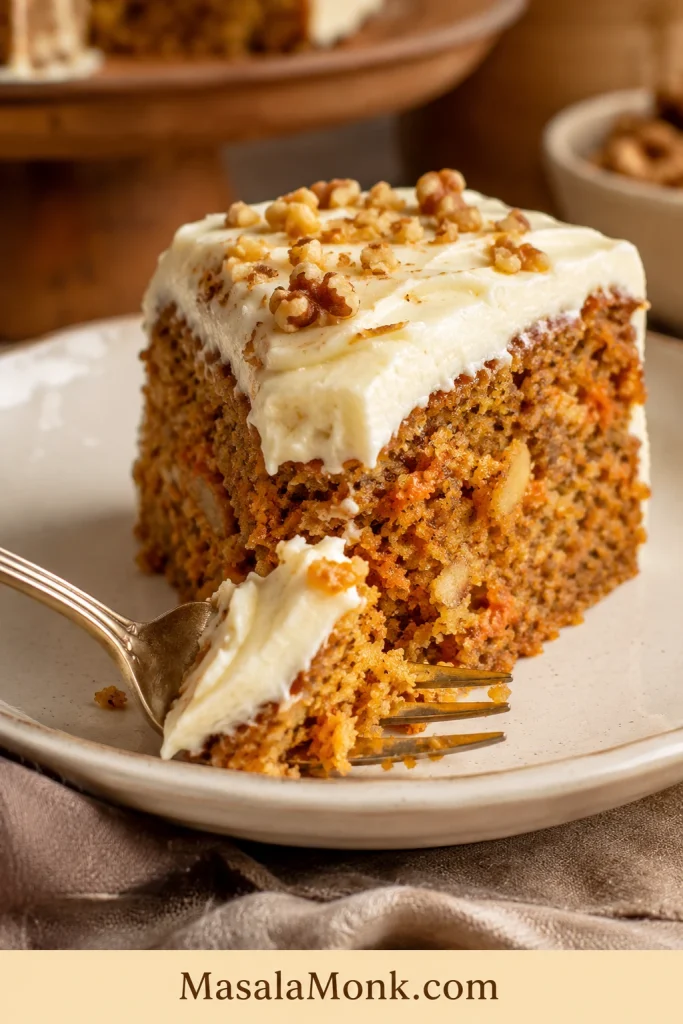
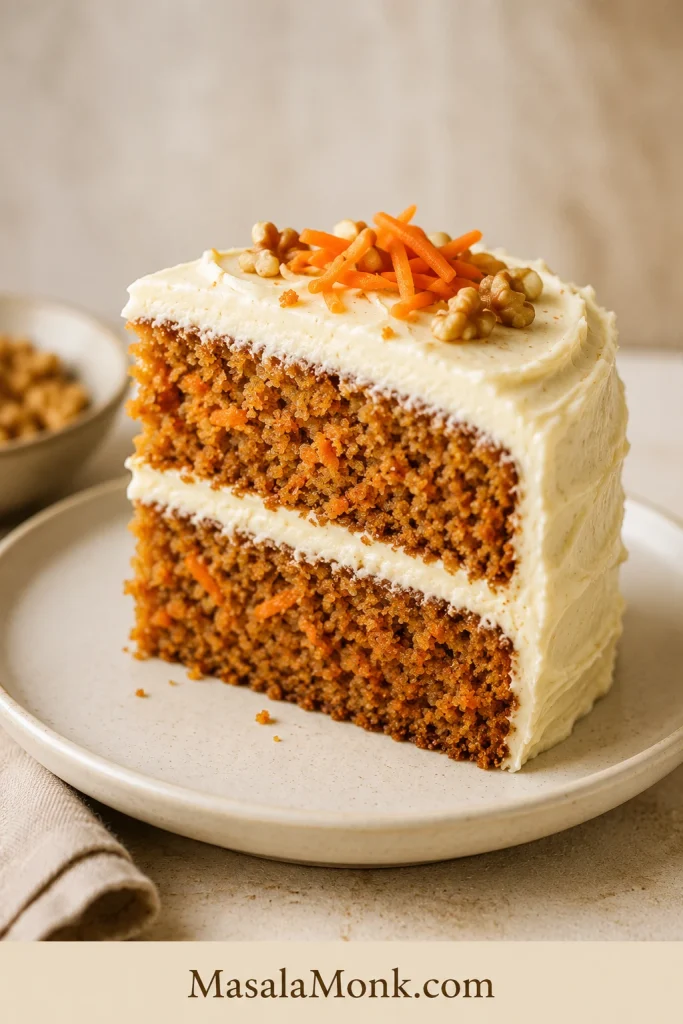
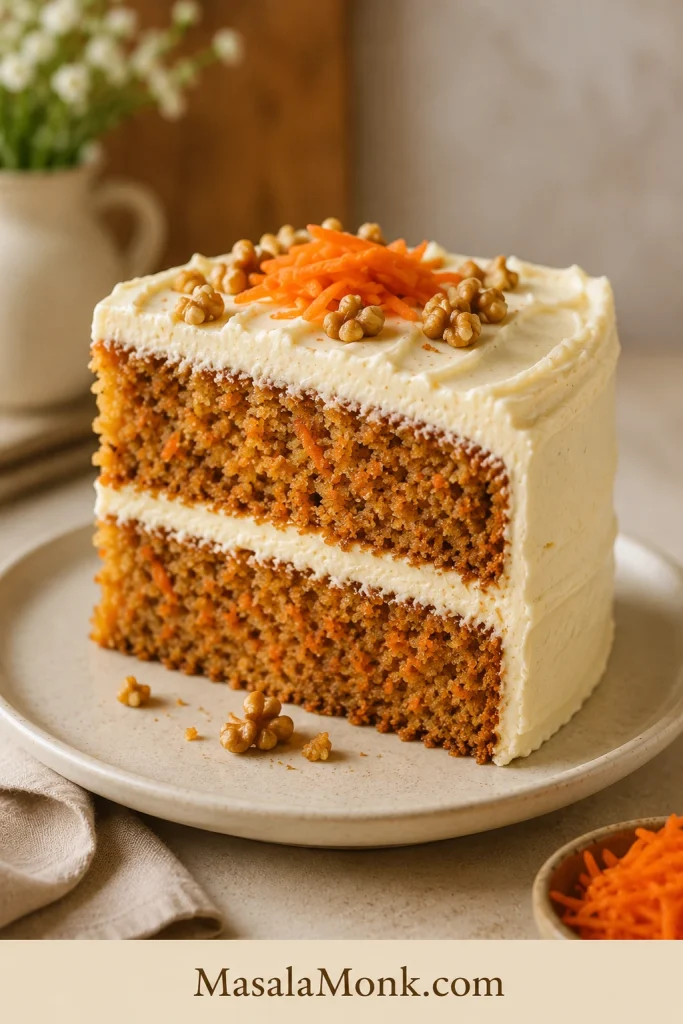
The best version gives you a fork-tender crumb, little orange flecks in every slice, warm spice that does not bully the carrot, and frosting thick enough to stay where you put it. This carrot cake recipe is built around those details: fresh grated carrots, oil for softness, brown sugar for depth, a little applesauce or yogurt for a tender crumb, and a classic cream cheese frosting that slices cleanly.
Carrot cake people rarely agree on everything, so this recipe starts with the classic cake and then helps you choose the pineapple, nuts, raisins, pan size, and frosting texture that fit your table.
Make it as a two-layer cake, a simple 9×13 sheet cake, or cupcakes. Add nuts, skip raisins, bake it a day ahead, chill it overnight, or freeze the layers for later. A slightly rustic carrot cake is still a beautiful carrot cake. The frosting does not need to be perfect; it just needs to be thick, tangy, and spread over fully cooled layers.
Quick Answer: How Do You Make Moist Carrot Cake?
Moist carrot cake comes from oil, brown sugar, fresh grated carrots, careful flour measurement, and the right bake time. This recipe also uses applesauce or plain yogurt to keep the crumb soft without making the cake oily.
Grate the carrots yourself; dry bagged shreds do not soften into the crumb the same way. Fold the batter gently once the flour goes in. Bake until the center springs back and a toothpick shows clean crumbs or a few moist crumbs. A clean toothpick is good; a bone-dry toothpick is a warning.
Texture cue: Fork pressure should show tenderness without collapse.
Ready to bake? Jump to the recipe card, or compare pineapple vs no pineapple before you start.
Carrot Cake at a Glance
| Style | Classic carrot-spice cake with optional pineapple |
| Texture | Soft, moist, sliceable, not oily |
| Frosting | Thick cream cheese frosting |
| Main pan | Two 9-inch round cake pans |
| Easiest pan | 9×13 sheet cake pan |
| Oven | 350°F / 180°C / 160°C fan |
| Bake time | 28–35 minutes for 9-inch layers |
| Best carrots | Freshly grated, medium-fine |
| Make ahead | Excellent baked or frosted 1 day ahead |
| Best for | Birthdays, Easter, holidays, potlucks, family dessert |
Need the practical details? Go to the recipe card, pan size guide, or cream cheese frosting fixes.
Carrot Cake Recipe Card
Easy Moist Carrot Cake With Cream Cheese Frosting
This is a classic two-layer carrot cake made with fresh grated carrots, brown sugar, oil, warm spices, and thick cream cheese frosting. The classic version does not rely on pineapple, but an old-fashioned pineapple variation is included in the notes. New to layer cakes? Use the same batter in a 9×13 pan and frost only the top.
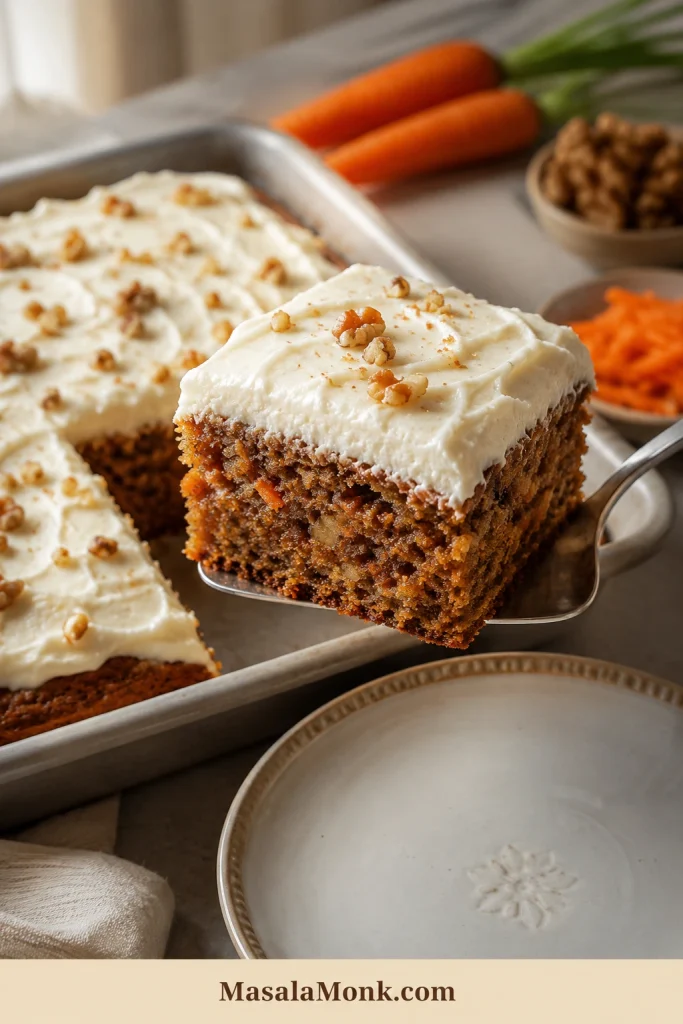
Layer cue: Use this slice to check tidy layers after chilling.
| Prep Time | 30 minutes |
| Cook Time | 28–35 minutes |
| Cooling and Frosting Time | 1 hour 30 minutes |
| Total Time | About 2½ hours |
| Yield | 12 slices |
| Difficulty | Easy to moderate |
| Main Pan | Two 9-inch round cake pans |
| Beginner Pan | 9×13 sheet cake pan |
| Oven Temperature | 350°F / 180°C / 160°C fan |
| Doneness Cue | Center springs back; toothpick shows clean or moist crumbs |
Equipment
- Two 9-inch round cake pans or one 9×13 pan
- Parchment paper
- Box grater or food processor with grating disc
- Large mixing bowls
- Whisk
- Rubber spatula
- Electric hand mixer or stand mixer for frosting
- Cooling rack
- Offset spatula or butter knife
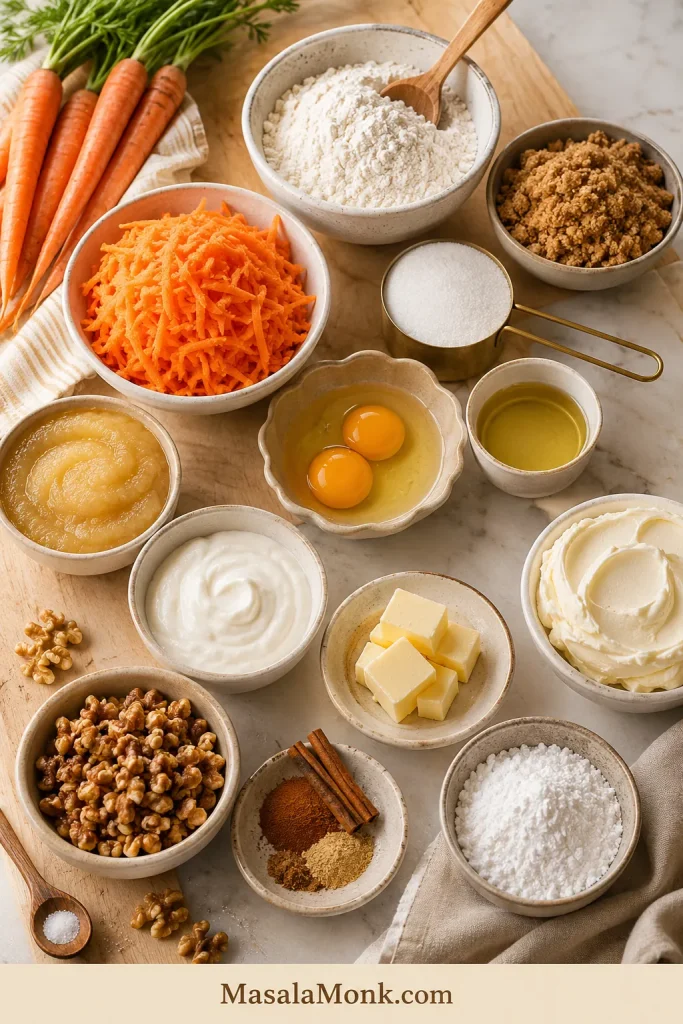
Cake Ingredients
Ingredient cue: These ingredients carry moisture, spice, structure, and frosting stability.
| Ingredient | Amount |
|---|---|
| All-purpose flour / maida | 2¼ cups / 270g |
| Baking powder | 2 teaspoons |
| Baking soda | 1 teaspoon |
| Fine salt | ¾ teaspoon |
| Ground cinnamon | 2 teaspoons |
| Ground ginger | ¾ teaspoon |
| Ground nutmeg | ¼ teaspoon |
| Ground cloves or allspice | Pinch, optional |
| Light brown sugar, packed | 1¼ cups / 250–260g |
| Granulated sugar | ½ cup / 100g |
| Neutral oil | 1 cup / 240ml / 8 fl oz |
| Unsweetened applesauce or plain yogurt | ½ cup / 120g |
| Large eggs, room temperature | 4 |
| Vanilla extract | 2 teaspoons |
| Freshly grated carrots | 3 cups / 300g / 10.5 oz |
| Chopped walnuts or pecans | ¾ cup / 85–100g, optional |
| Raisins | ½ cup / 70–80g, optional |
Cream Cheese Frosting Ingredients
| Ingredient | Amount |
|---|---|
| Full-fat block cream cheese, softened | 16 oz / 454g |
| Unsalted butter, softened | ¾ cup / 170g / 6 oz |
| Powdered sugar / icing sugar, sifted | 3 to 4 cups / 360–480g |
| Vanilla extract | 2 teaspoons |
| Fine salt | Pinch |
Instructions
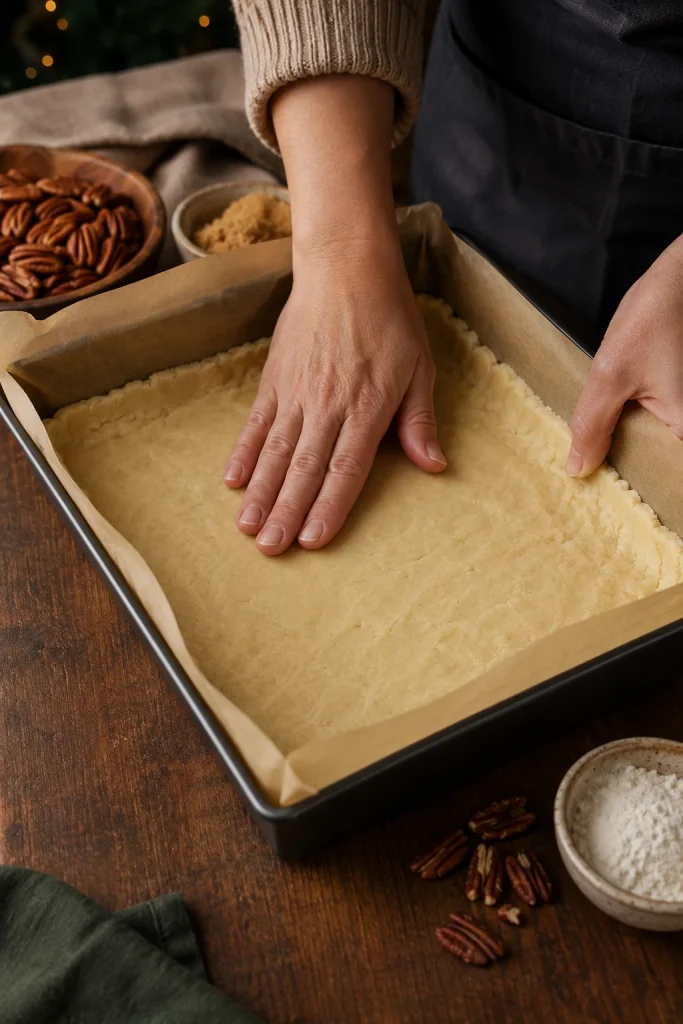
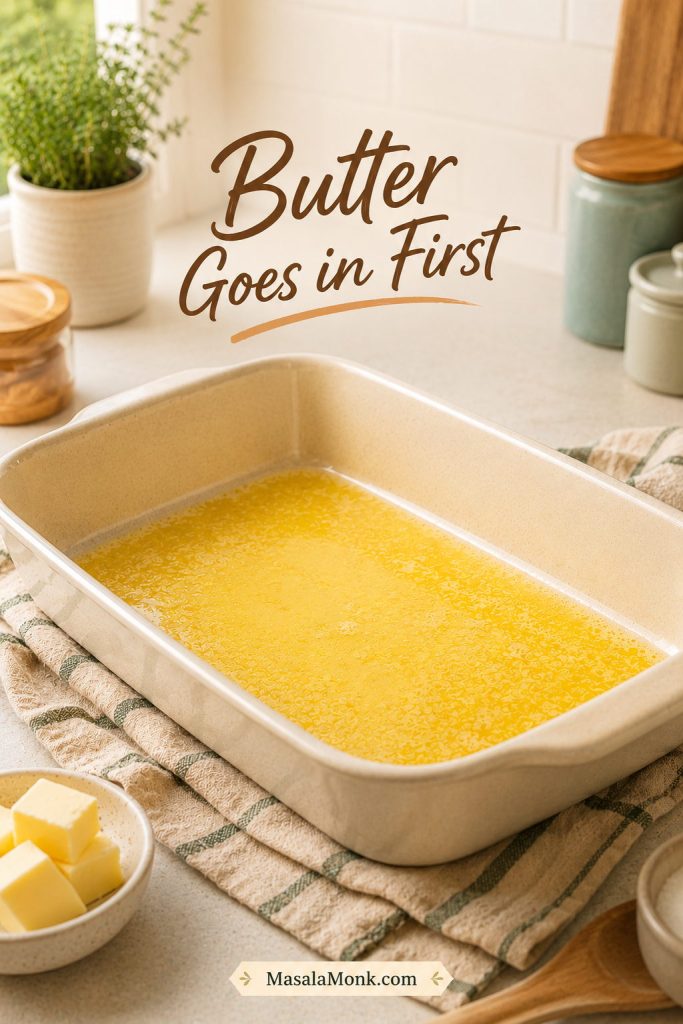
- Prepare the pans. Preheat to 350°F / 180°C. Grease two 9-inch round pans and line the bottoms with parchment.
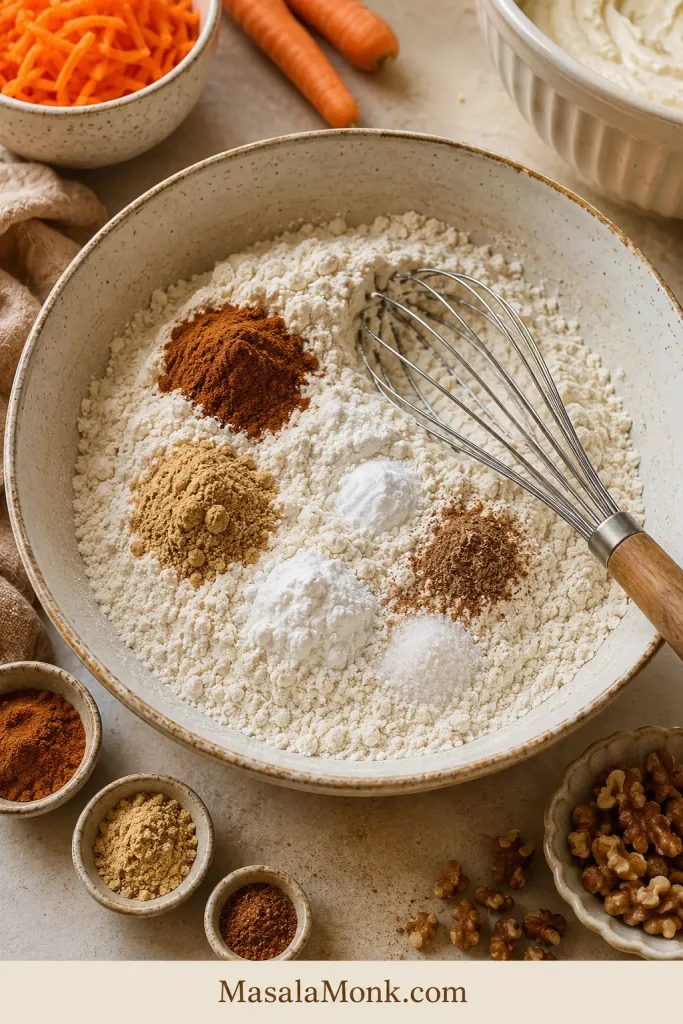
- Whisk the dry ingredients. In a large bowl, combine the flour, baking powder, baking soda, salt, cinnamon, ginger, nutmeg, and optional cloves or allspice.
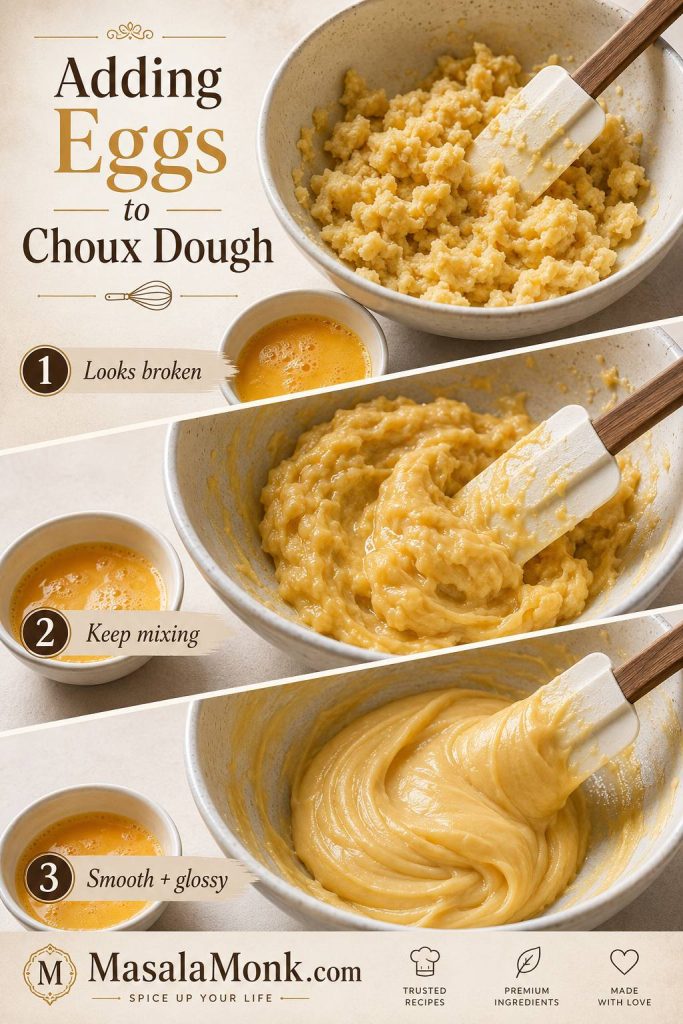
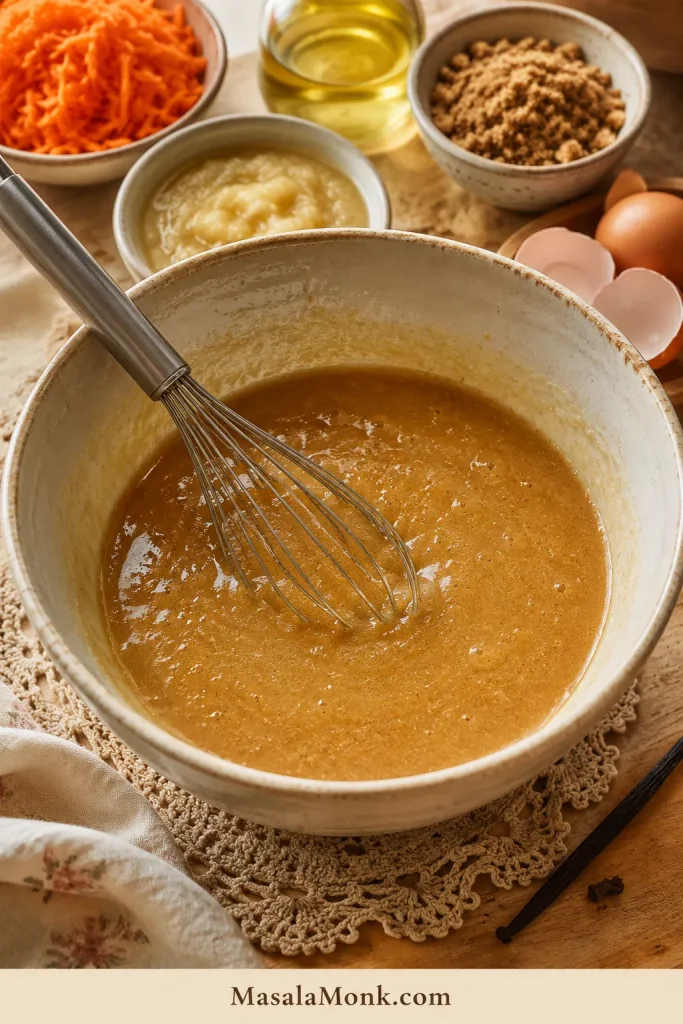
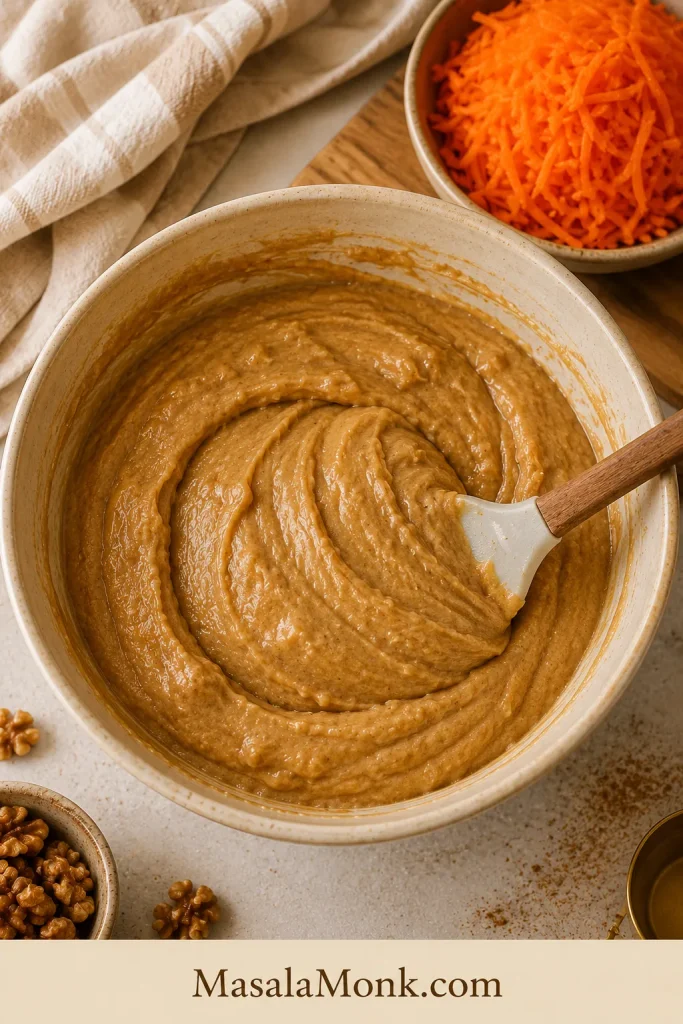
- Whisk the wet ingredients. In another bowl, whisk the sugars, oil, applesauce or yogurt, eggs, and vanilla until smooth and glossy.
- Combine gently. Add the dry ingredients to the wet ingredients. Fold with a spatula until only a few flour streaks remain. Do not beat.
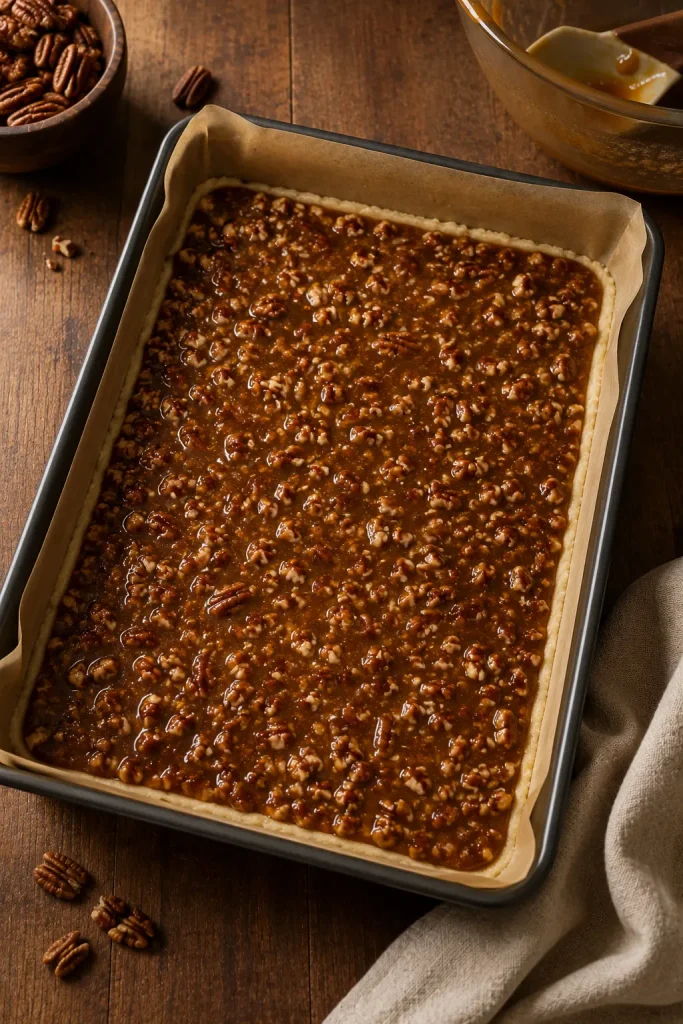
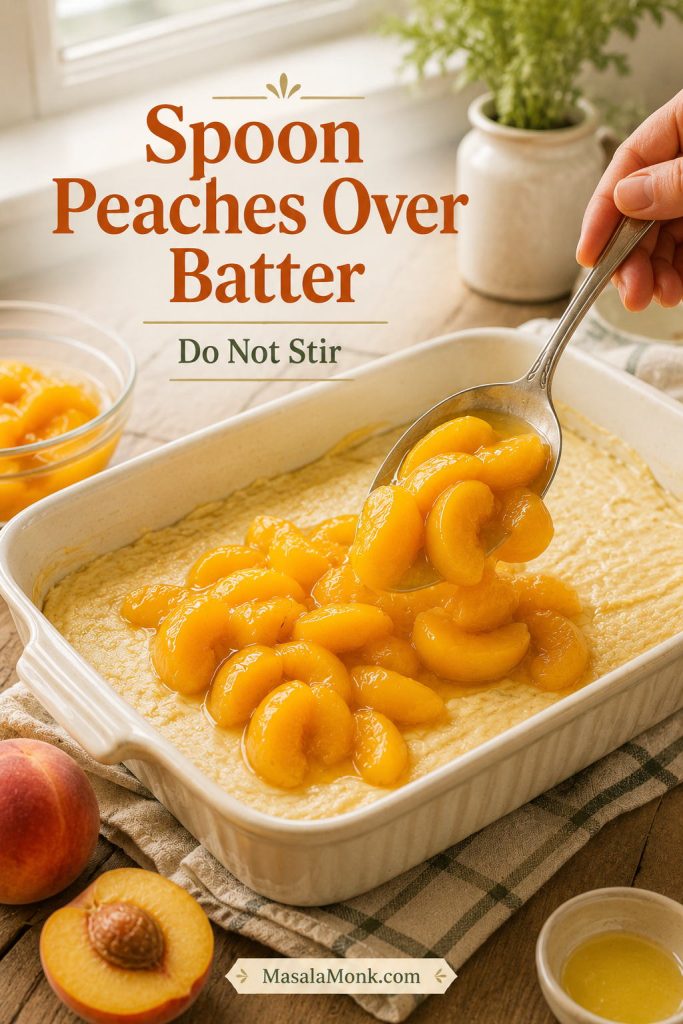
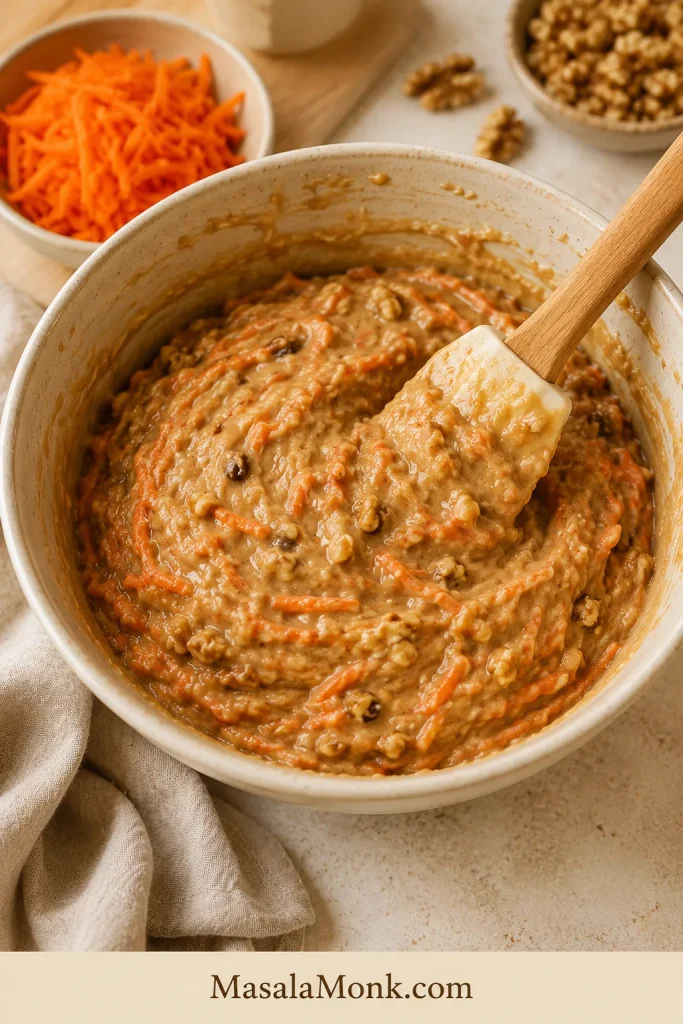
- Add carrots and mix-ins. Fold in grated carrots, then nuts, raisins, or well-drained pineapple if using. The batter should look thick, glossy, and evenly loaded.
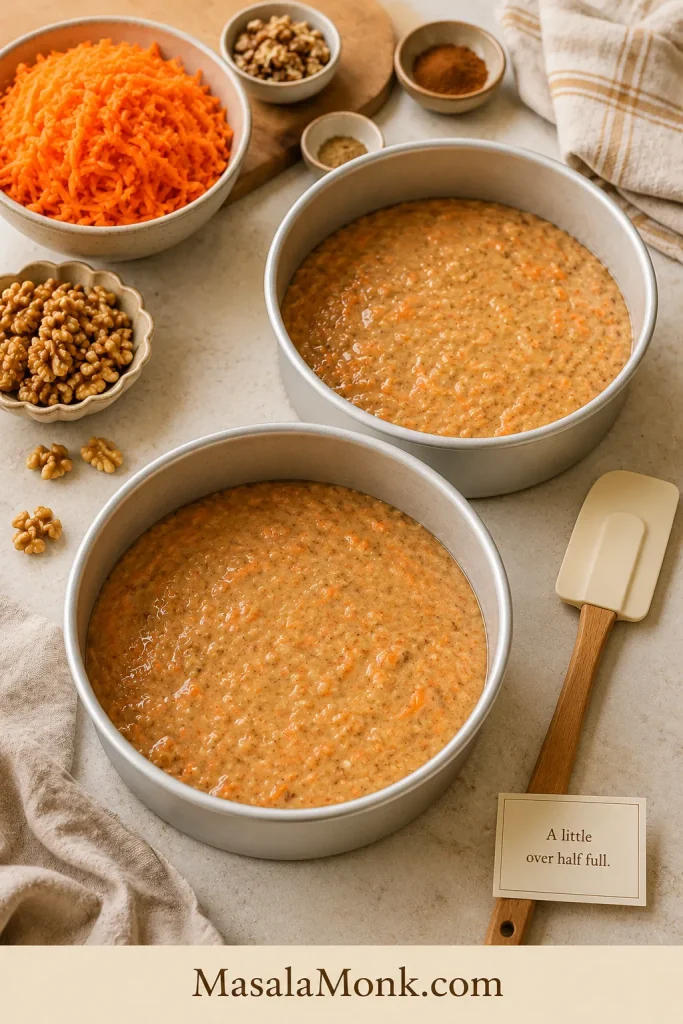
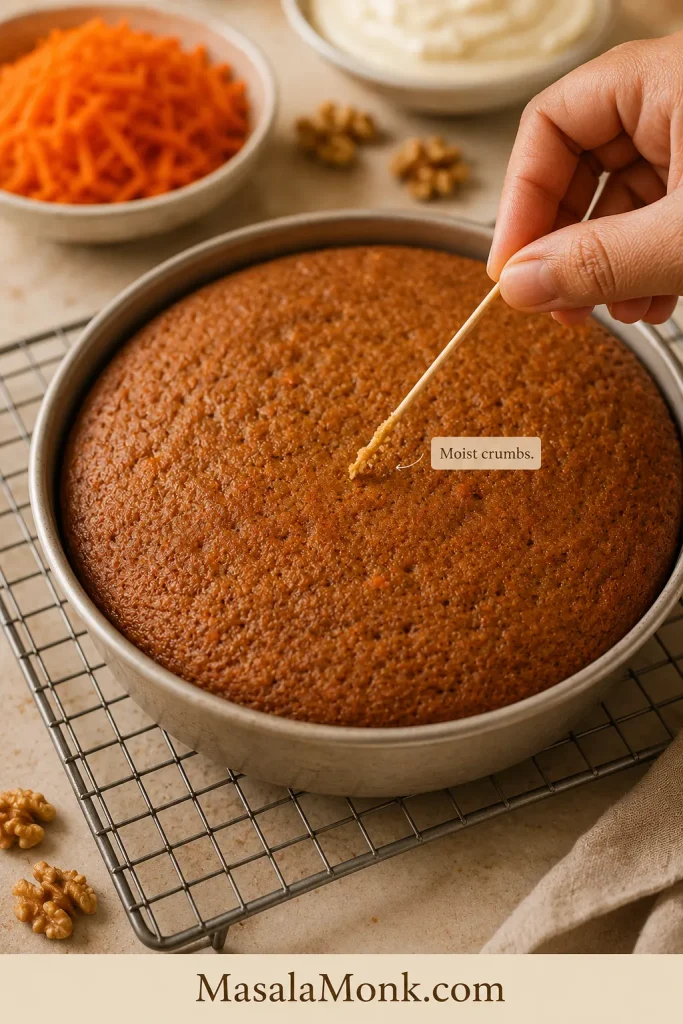
- Bake. Divide the batter between the pans. Each 9-inch pan should be a little over half full. Bake for 28 to 35 minutes, until the centers spring back and a toothpick shows clean or moist crumbs.
- Cool fully. Let the layers sit in the pans for 15 minutes, then turn them onto a rack. Wait until completely cool before frosting.
- Make the frosting. Beat the butter until smooth. Mix in cream cheese. Add 3 cups powdered sugar, vanilla, and salt, then beat until thick and fluffy. For firmer frosting, add more sugar.
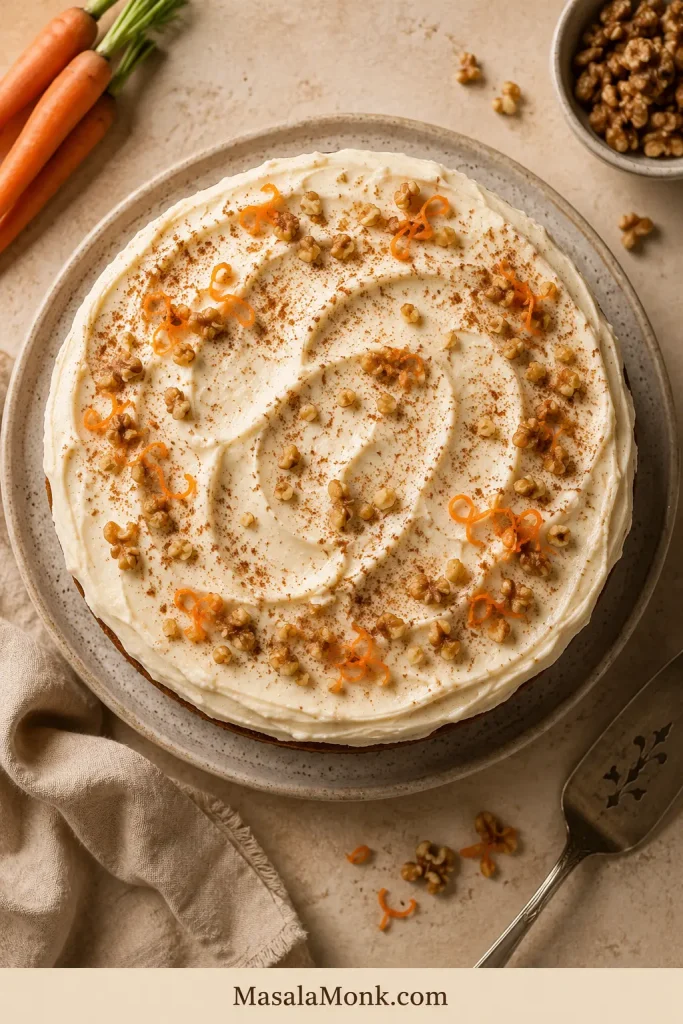
- Frost the cake. Place one cooled layer on a stand. Spread frosting over the top, add the second layer, then frost the top and sides.
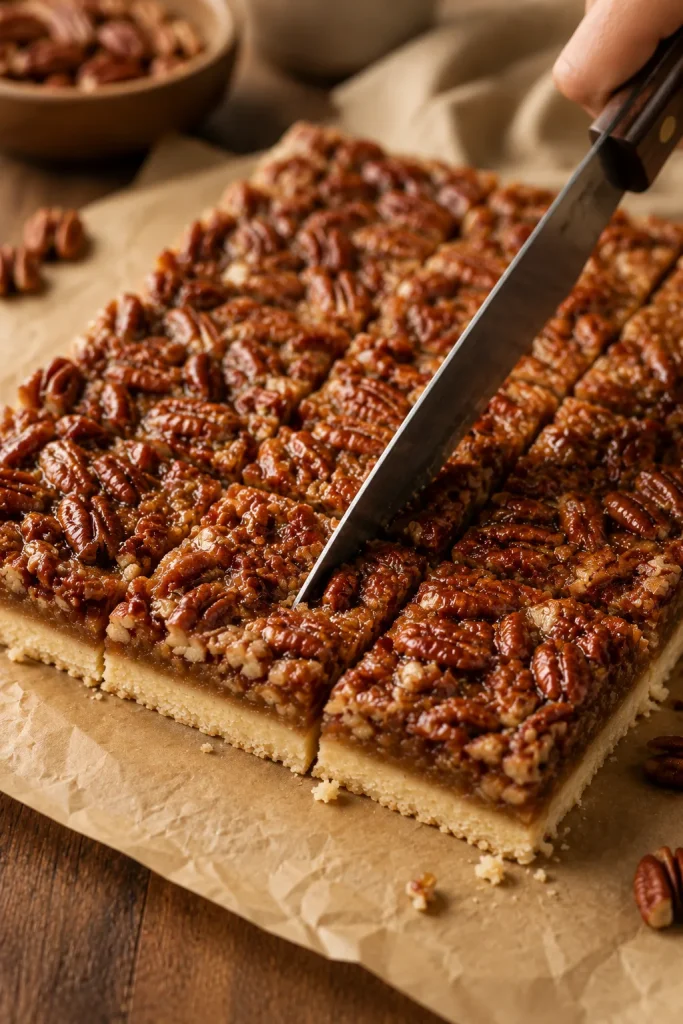
- Chill before slicing. Refrigerate the frosted cake for about 30 minutes. Wipe the knife between cuts for neat slices.
Recipe Notes
- No mixer needed for the cake: Use a whisk and spatula for the batter. A mixer is only helpful for the frosting.
- Best beginner version: Bake this as a 9×13 sheet cake if you do not want to stack and frost layers.
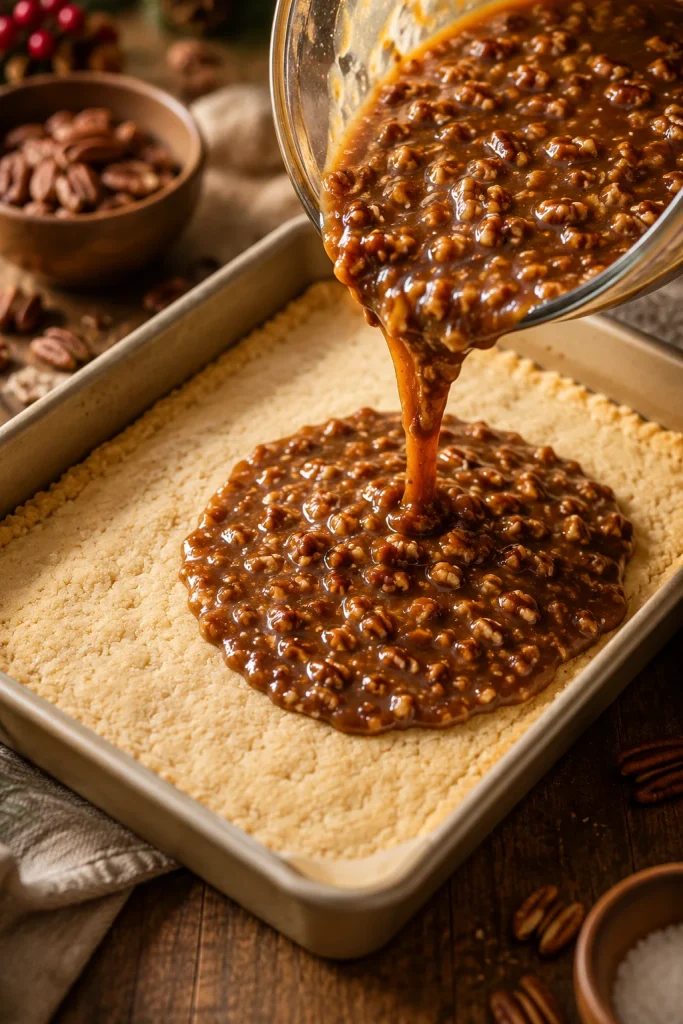
- Pineapple carrot cake: Add ½ cup / 120g well-drained crushed pineapple and reduce applesauce or yogurt to ¼ cup / 60g. Drain well so the center does not turn gummy.
- 9×13 sheet cake: Bake at the same temperature for about 35 to 45 minutes.
- Sheet cake frosting: Use all the frosting for a thick bakery-style top, or hold some back for a lighter layer.
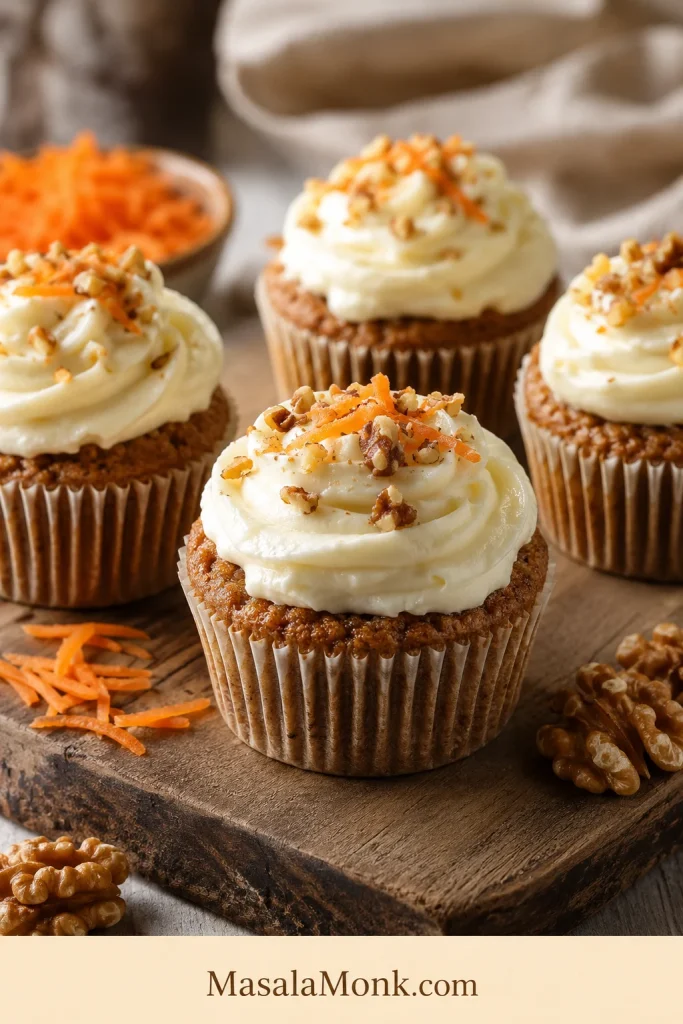
- Cupcakes: This full batch makes about 24 standard cupcakes. Fill liners about ⅔ full and bake for 18 to 22 minutes.
- Loaf cake: Do not pour the full batch into one 9×5 pan. Use about half the batter in one loaf pan, or divide the full batch between two loaf pans.
- Frosting sweetness: Use 3 cups powdered sugar for a tangier frosting and 4 cups for a firmer, sweeter finish.
- Best crumb: Grate the carrots fresh and do not squeeze them dry.
- Do not frost warm cake: Warm layers will loosen the frosting and can make the cake slide.
- Make-ahead: Bake and frost the cake 1 day ahead, then refrigerate. Let slices sit out briefly before serving.
What to expect: the batter will be thick enough to mound slightly in the bowl but loose enough to spread into the pans with a spatula. Baked layers feel tender while warm, and chilled cake slices more cleanly than a freshly frosted one. The crumb should be soft and moist, not wet or oily.
Make This Carrot Cake When
This is the cake for the person who wants carrot cake to taste like carrot cake: soft, spiced, tangy on top, and still good from the fridge the next day.
- Classic carrot cake, but moist without a greasy crumb.
- A carrot-spice cake that can go pineapple or no pineapple.
- No mixer needed for the batter.
- Clear choices for nuts, raisins, pan size, make-ahead baking, and frosting texture.
- A gathering cake that can rest in the fridge overnight.
- Fresh carrot flavor, not just spice cake with a few shreds mixed in.
It is the kind of cake that feels at home on an Easter table, a birthday stand, a potluck tray, or under foil in the fridge waiting for tomorrow’s second slice.
Make-ahead cue: Chilled cake slices cleaner once the frosting sets.

If you like this kind of easy, cozy fruit cake but want something unfrosted, this fresh apple cake is a softer, simpler bake for another day.
The Easiest Way to Make This Carrot Cake
If layer cakes make you nervous, start with the 9×13 version. It is not a lesser cake; it is the same soft, spiced carrot cake with the pressure removed.
Sheet cake cue: Same batter, one pan, frosting only on top.
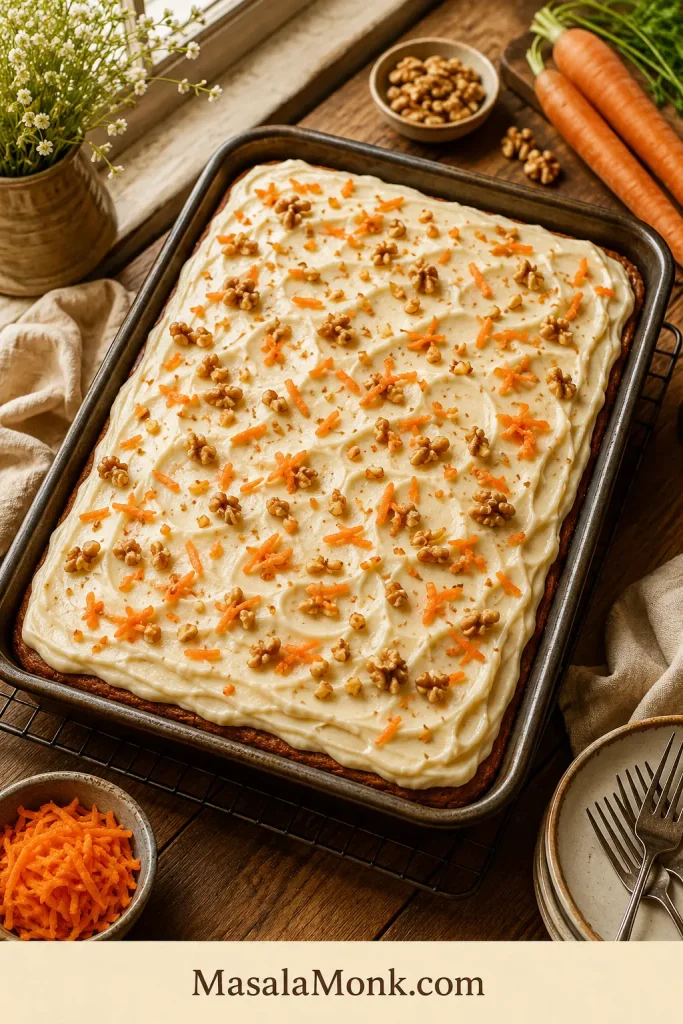
You use the same batter, bake it in one pan, spread frosting over the top, and skip the stacking, side-frosting, and layer-sliding worries. A sheet cake is not the backup plan. It is the low-stress version.
Beginner path: make the batter by hand, bake it in a 9×13 pan, cool completely, spread frosting over the top, chill, and slice. No layer cake skills needed.
Serving cue: A sheet cake square should show cake texture, not just frosting.
Making the sheet cake version? Check the pan size and bake time guide, or go straight to the recipe card.
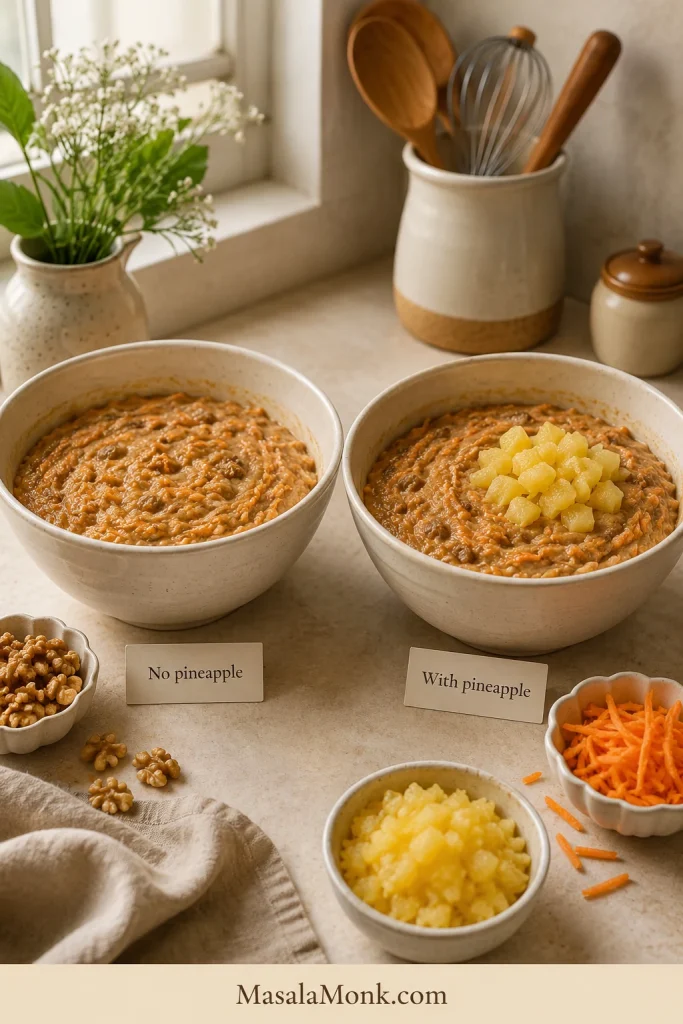
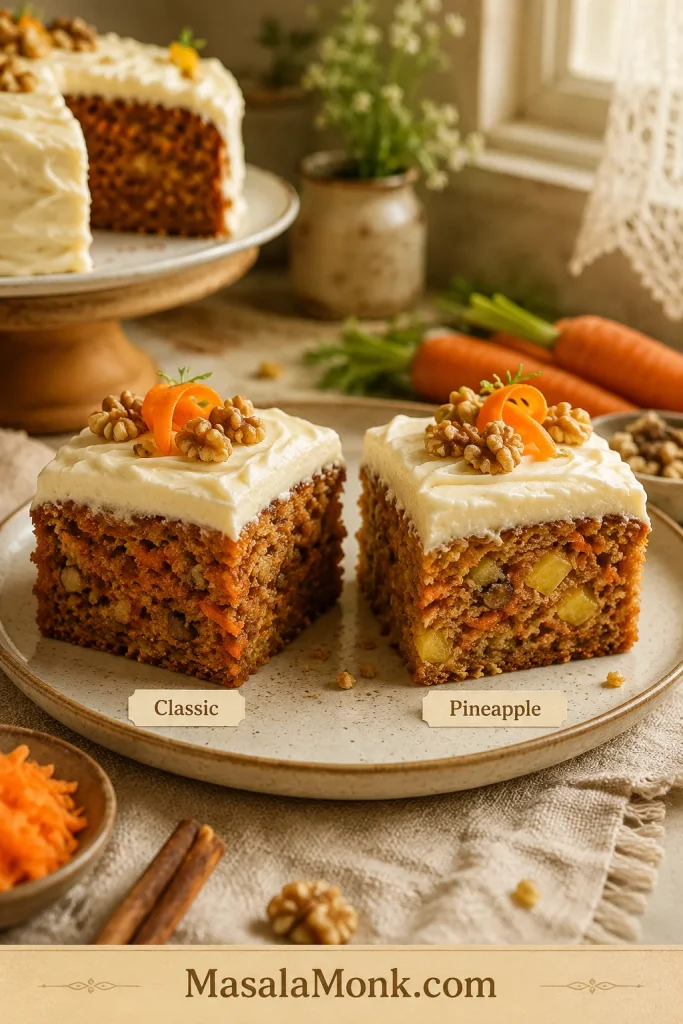
Pineapple or No Pineapple?
I like this cake best without pineapple first, because the carrot and spice stay clearer. That gives you a soft, sliceable carrot cake with a classic cream cheese frosting finish.
Pineapple carrot cake is not better or worse. It is a different mood: sweeter, softer, fruitier, and more old-fashioned. If that is what you want, use a small amount of well-drained crushed pineapple and reduce the applesauce or yogurt so the batter does not become too wet.
This is the carrot cake fork in the road: cleaner carrot-spice flavor, or fruitier old-fashioned comfort. Pineapple can make the cake softer and fruitier, but it should not turn the batter into a puddle.
Choice cue: Compare classic carrot-spice flavor with the softer pineapple version.
| Choice | Best For | What to Do |
|---|---|---|
| No pineapple | Classic carrot-spice flavor | Make the recipe as written |
| With pineapple | Old-fashioned, fruitier cake | Add ½ cup / 120g drained crushed pineapple and reduce applesauce/yogurt to ¼ cup / 60g |
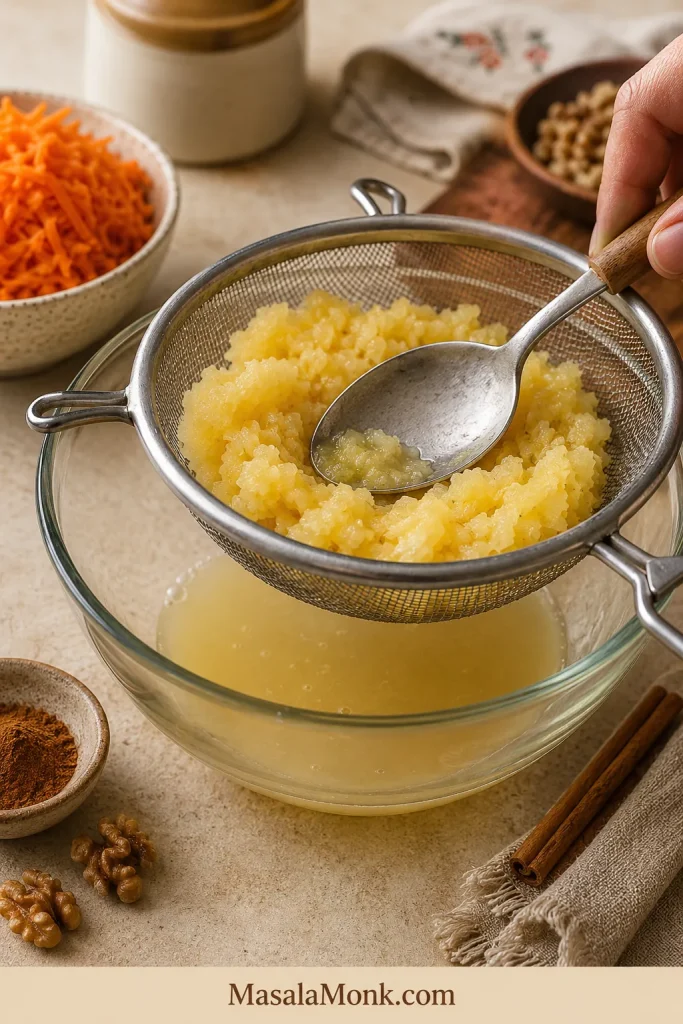
Use canned crushed pineapple for the easiest result. Drain it well. Leave the pineapple juice out here; this batter is balanced for drained fruit, not extra liquid.
Moisture cue: Drain pineapple so flavor stays and excess juice leaves.
Using pineapple? Review the add-in balance and gummy-center fixes, or return to the recipe card.
Why This Carrot Cake Works
Carrot cake has to do something many cakes do not: taste good cold from the fridge and soft again once it sits out. That is why this recipe leans on oil, brown sugar, carrots, and a little applesauce or yogurt.
A full oil-only carrot cake can be very soft, but sometimes greasy. Reducing the oil too much makes the crumb feel lighter at first and drier later. This version uses oil for softness, then applesauce or yogurt for extra moisture without pushing the cake into oily territory.
Oil Keeps the Crumb Soft
Butter gives cakes flavor, but oil keeps carrot cake softer once it is cold. That matters because a frosted carrot cake should be refrigerated, and a good slice should still taste tender the next day.
Brown Sugar Makes It Deeper
Brown sugar brings moisture and a gentle caramel flavor. White sugar keeps the sweetness clean, but brown sugar gives the crumb its warmer bakery-style depth.
The Carrots Do Real Work
The carrots are not decoration here. They soften into the crumb, leave little orange flecks in every slice, and help the cake stay tender long after it cools.
Applesauce or Yogurt Keeps the Texture Balanced
Applesauce gives a slightly sweeter, softer crumb. Plain yogurt brings gentle tang and tenderness. Both help the cake stay soft without asking oil to do all the work.
If you like the soft apple-spice side of that moisture trick, this applesauce cake uses applesauce more directly in a simple 9×13 cake.
The Frosting Balances the Spice
Carrot cake needs tang. Cream cheese frosting cuts through the sweetness, softens the spice, and makes the cake feel complete instead of just sweet.
Frosting cue: Simple swirls suit carrot cake better than fussy decoration.
Ingredients That Matter
Carrots
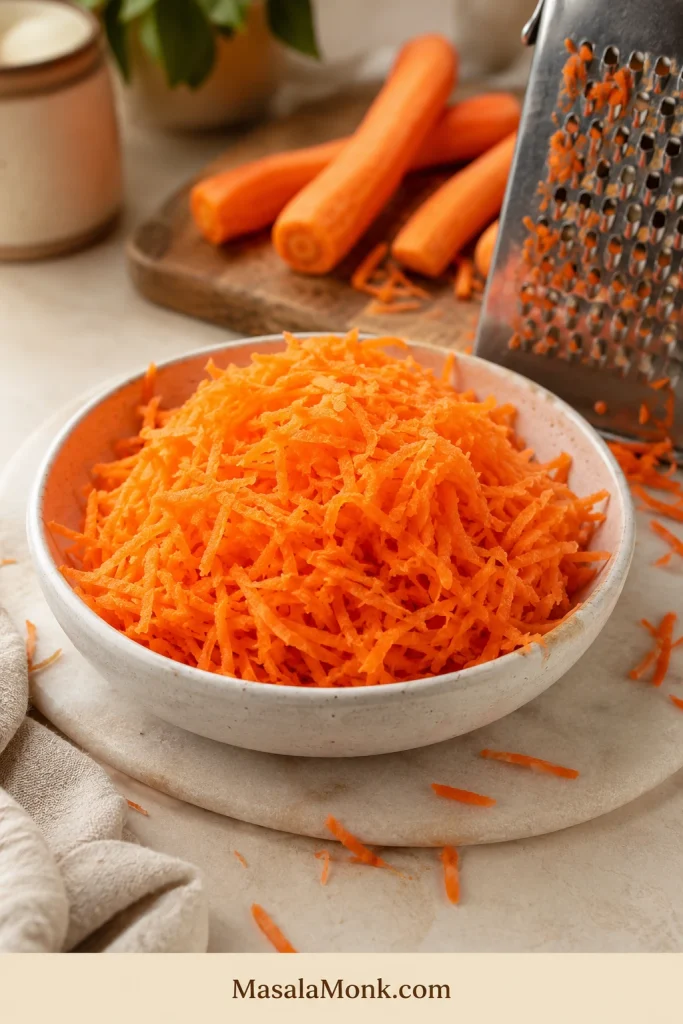
Fresh carrots are worth the few extra minutes. Use medium-fine shreds and do not squeeze them dry.
Oil
A neutral oil keeps the flavor classic. Sunflower, canola, vegetable, avocado, or light olive oil all work. Strong olive oil can be used if you enjoy the flavor, but it will make the cake taste less traditional.
Applesauce or Plain Yogurt
Use unsweetened applesauce for a slightly softer, sweeter crumb. Use plain yogurt if you want a little more tang. Both work, so choose the one that fits your pantry.
Sugar
Use more brown sugar than white sugar. Brown sugar gives depth, while the smaller amount of white sugar keeps the sweetness from tasting heavy.
Spices
Cinnamon is the base. Ginger adds warmth, nutmeg adds depth, and a tiny pinch of clove or allspice makes the cake taste rounder. Keep the stronger spices light so the carrot does not get buried.
Eggs
Room-temperature eggs blend more easily into the oil and sugar, so use them if you have time. Cold eggs will still work; just whisk the wet mixture a little longer until it looks smooth.
Flour
Too much flour is one of the easiest ways to make carrot cake dry. Weigh it if you can, or use the spoon-and-level method instead of scooping straight from the bag. King Arthur Baking’s guide to measuring flour is useful if you want a quick refresher.
Cream Cheese
Use full-fat block cream cheese for frosting. If block cream cheese is hard to find, choose the firmest full-fat cream cheese available and avoid very soft spreadable tubs. Soft cream cheese can make frosting loose, especially in warm kitchens.
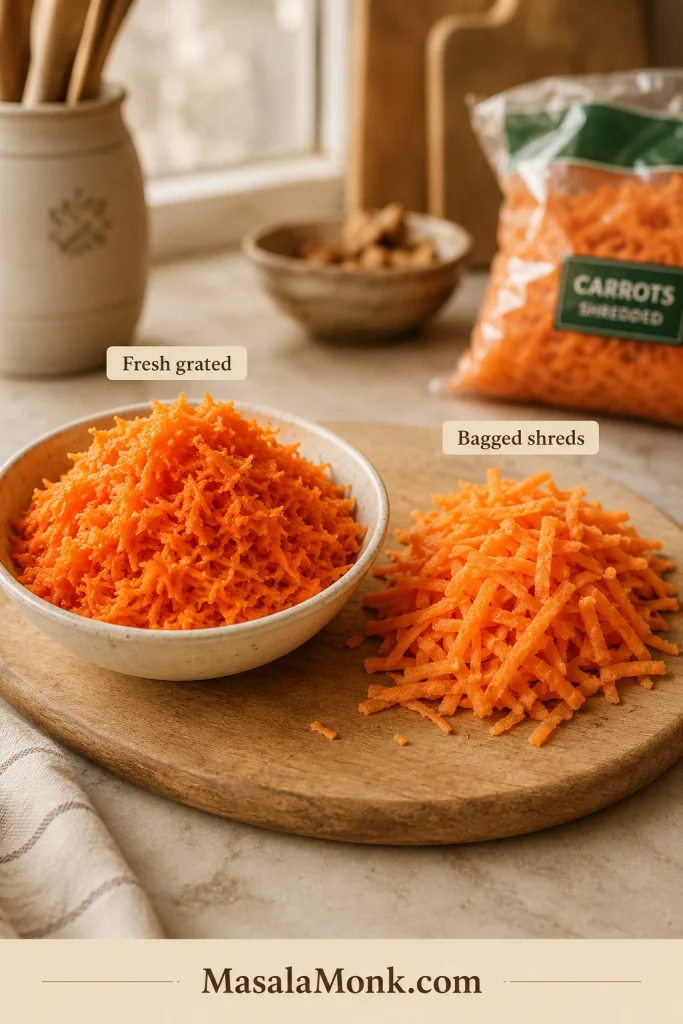
Freshly Grated Carrots vs Pre-Shredded Carrots
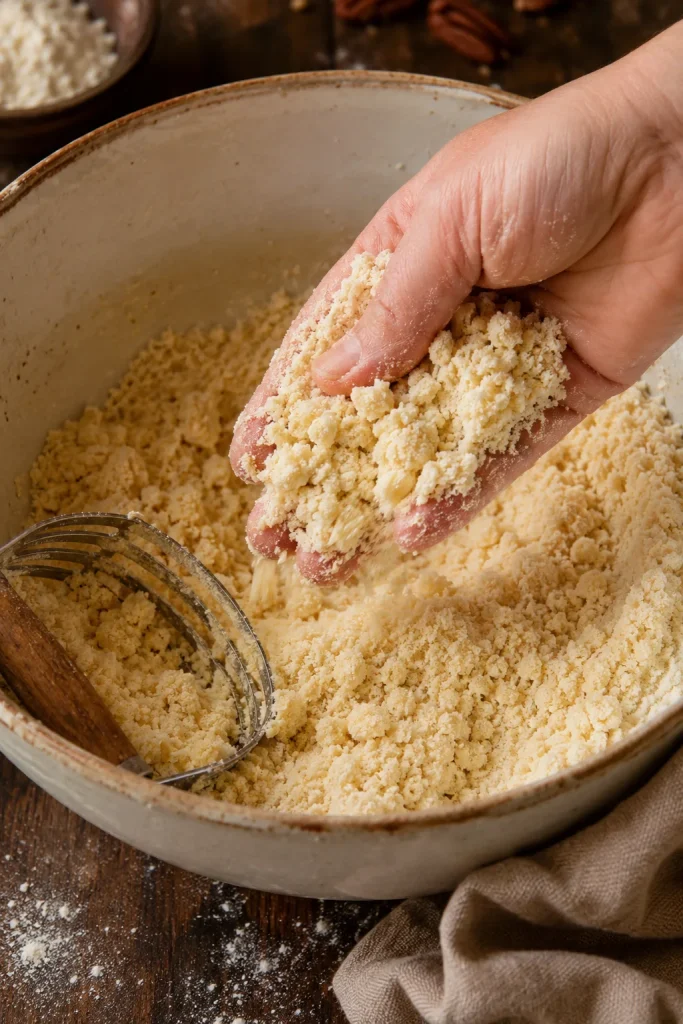
Freshly grated carrots are one of the biggest success details in carrot cake. Bagged shreds save a few minutes, but they ask the cake to do too much work. They are often dry and thick, so they can stay chewy instead of melting into the crumb.
Carrot texture cue: Fresh shreds soften; thick packaged shreds can stay chewy.
Grate the carrots on the medium or fine holes of a box grater. A food processor with a grating disc also works, but if the shreds are very long or thick, pulse them once or twice so they distribute more evenly.
Carrot cake rule: the carrot should feel moist and tender before it goes into the batter. Do not squeeze it dry; that moisture is part of the cake’s softness.
For this recipe, you need about 3 cups, 300g, or 10.5 oz of grated carrots. That is usually about 4 to 5 medium carrots, depending on size.
Carrot cue: Medium-fine shreds add moisture and visible orange flecks.
Once the carrots are grated, choose your nuts, raisins, coconut, or pineapple add-ins, then follow the step-by-step method.
Nuts, Raisins, Coconut and Other Add-Ins
This is where carrot cake can get crowded fast. The cake still needs to taste like carrot, spice, and cream cheese frosting — not like a crowded trail mix cake.
Mix-in cue: Let nuts, raisins, coconut, or pineapple support the carrot.
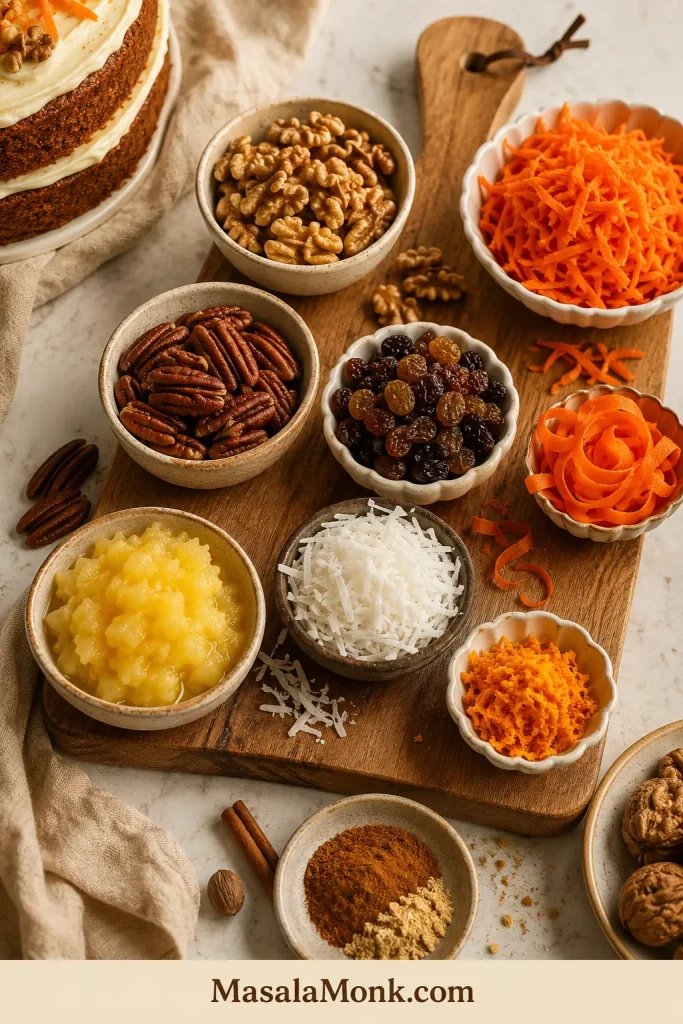
Keep total add-ins, not counting the carrots, to about 1½ cups. Walnuts or pecans add crunch, raisins add chewy sweetness, orange zest brightens the spice, shredded coconut makes the cake more old-fashioned, and pineapple makes it fruitier. Choose the two or three that actually make sense for your table.
When using pineapple, choose either nuts or raisins, or keep both modest, so the batter does not become overloaded. The carrot should lead; the add-ins should behave.
Balance cue: Keep add-ins controlled so the crumb stays light.
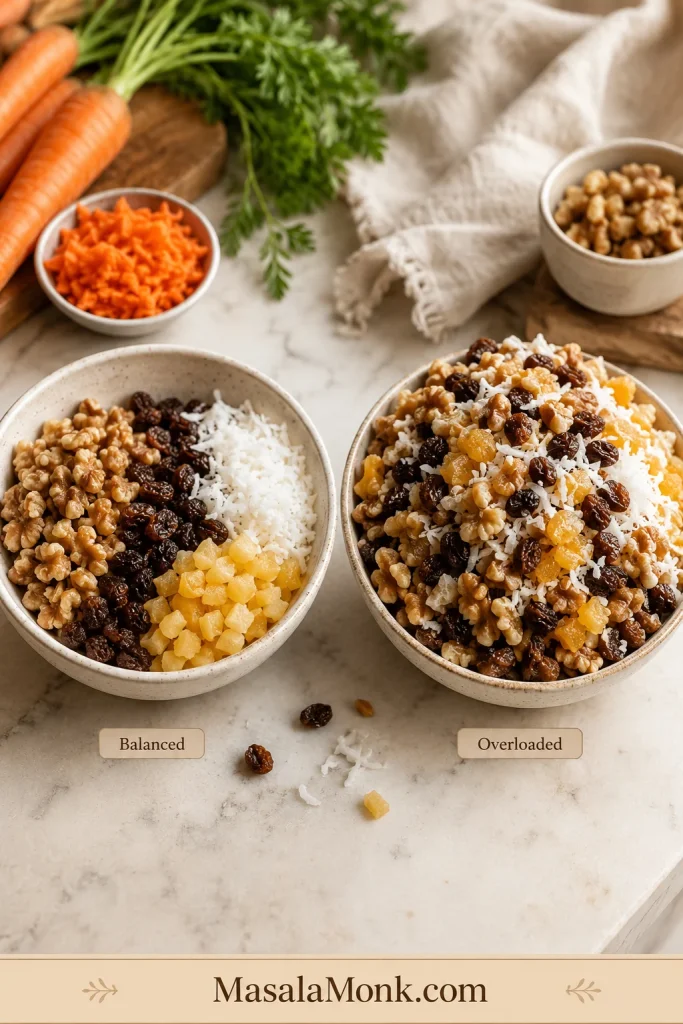
If your family has strong opinions about raisins, believe them. Raisins are optional. Family peace is not.
If you are baking for a group, the safest path is nuts optional, raisins optional, and pineapple optional. Those three choices divide carrot cake people more than almost anything else.
How to Make Carrot Cake
The cake batter does not need a mixer. The frosting is the only part where an electric mixer helps.
1. Prepare the Pans
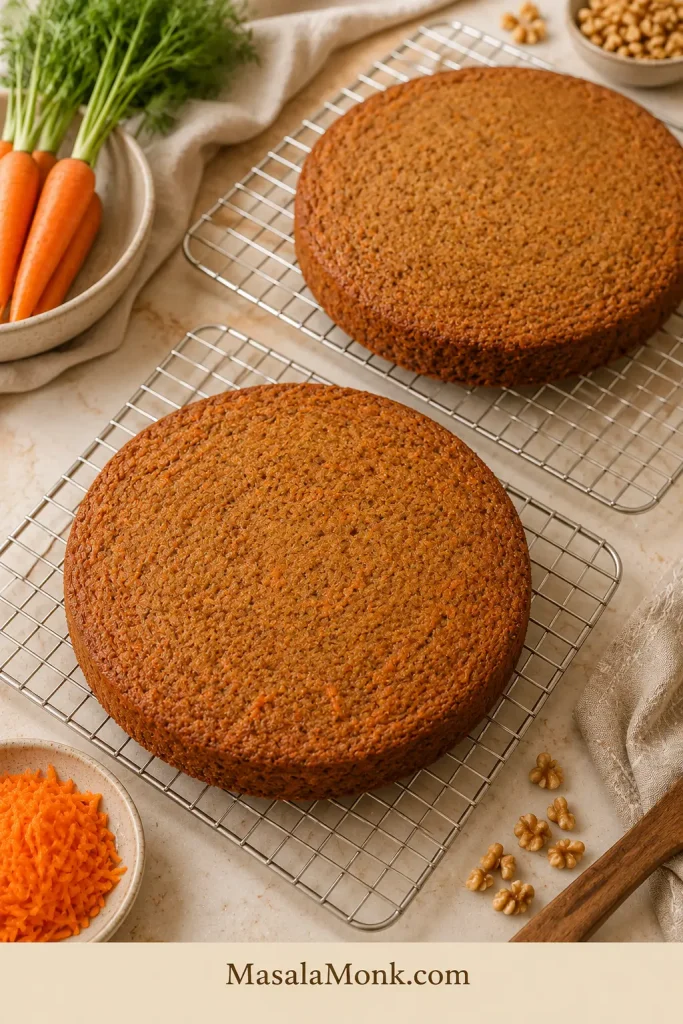
Grease two 9-inch round cake pans and line the bottoms with parchment paper. Carrot cake is soft and moist, so parchment helps the layers release cleanly.
2. Whisk the Dry Ingredients
Whisk the flour, baking powder, baking soda, salt, cinnamon, ginger, nutmeg, and optional clove or allspice. This spreads the leavening and spices evenly before the wet ingredients go in.
Spice cue: Whisk dry ingredients so spice and leavening spread evenly.
3. Whisk the Wet Ingredients
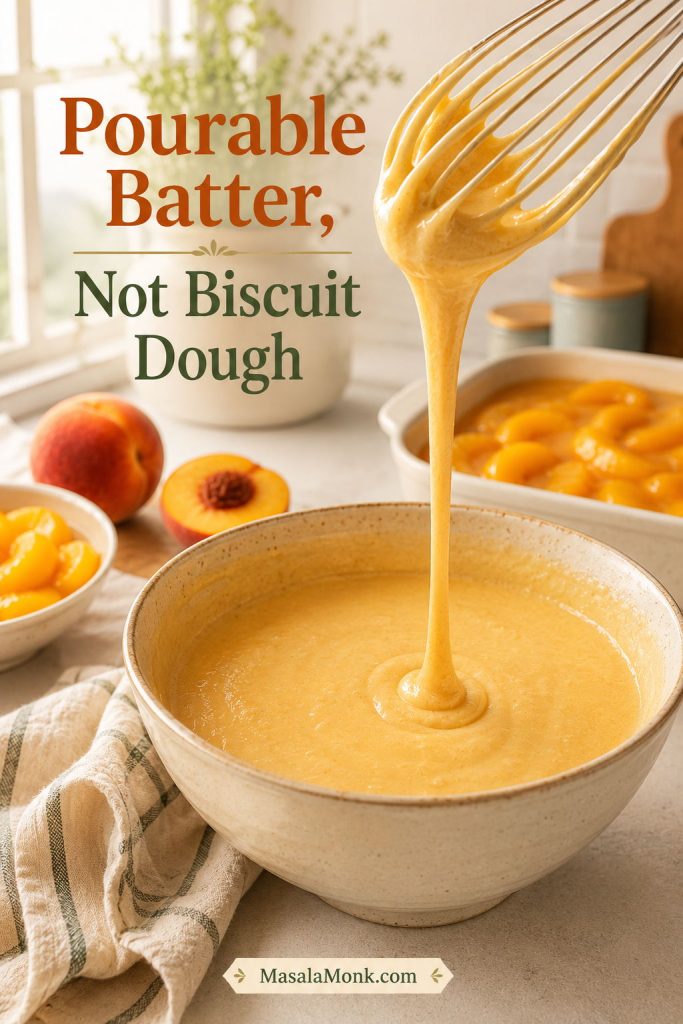
In another bowl, whisk the brown sugar, white sugar, oil, applesauce or yogurt, eggs, and vanilla. The mixture should look glossy, smooth, and slightly thick. If the eggs are cold, whisk a little longer so everything blends evenly.
Wet mix cue: A glossy base makes gentle folding easier.
4. Fold the Batter Gently
Add the dry ingredients to the wet ingredients and fold gently. Stop when only a few flour streaks remain. Add the carrots, nuts, raisins, or drained pineapple if using, then fold just until evenly combined.
Batter base cue: Thick, unified batter is ready for carrots.
Look for a thick, glossy batter. After the carrots go in, it will look fuller and heavier than a vanilla cake batter. That is normal. Carrot cake batter is supposed to look loaded, but it should still spread easily into the pans.
Folding cue: Loaded but spreadable is the right final batter texture.
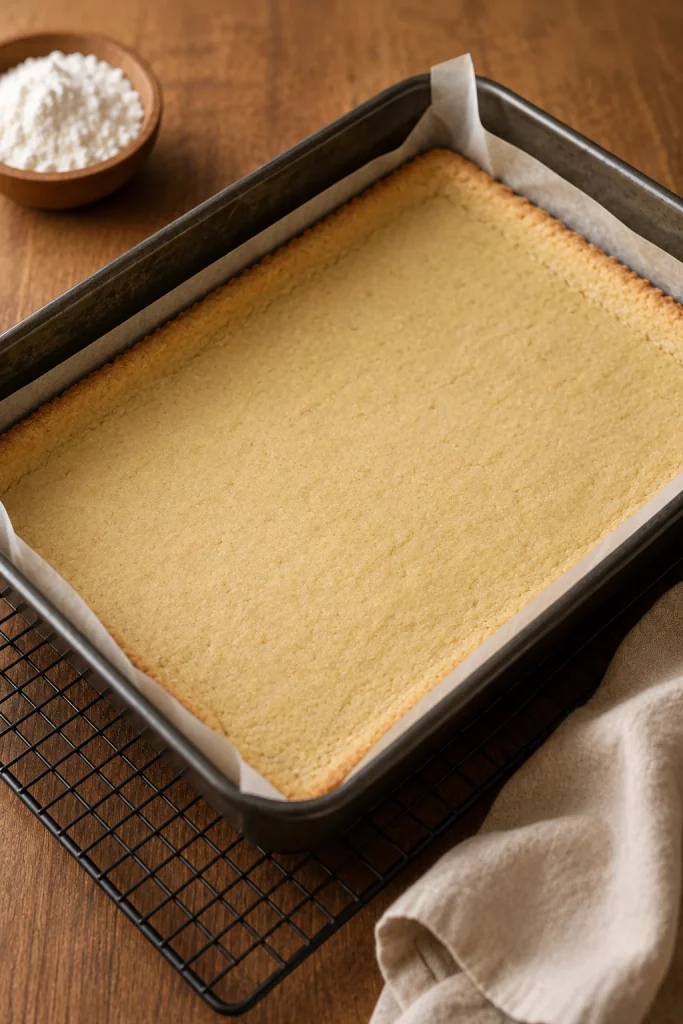
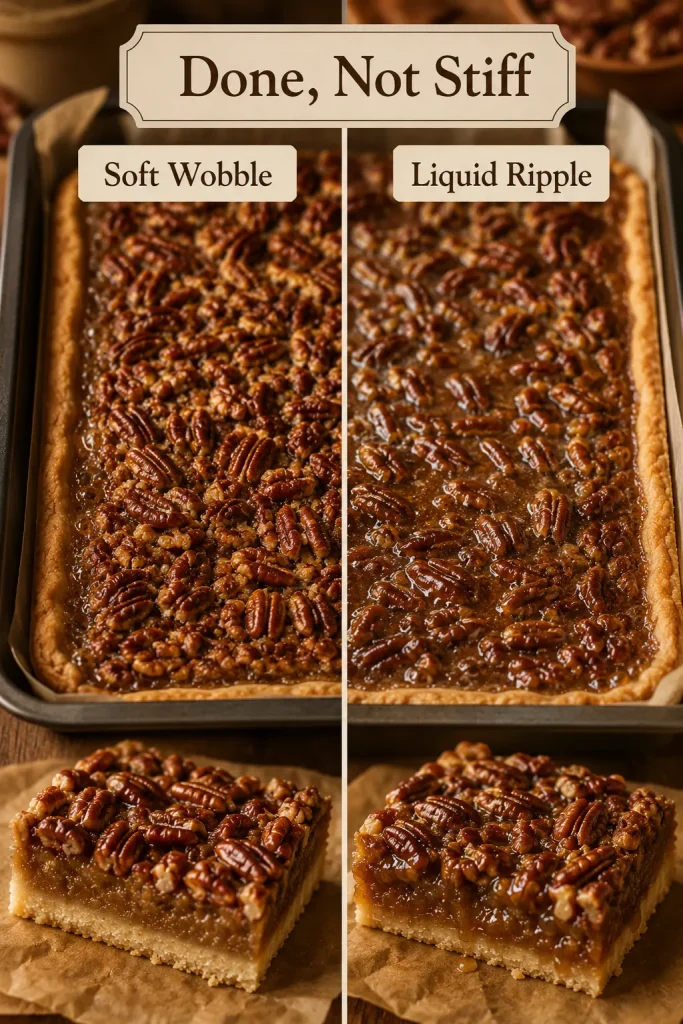
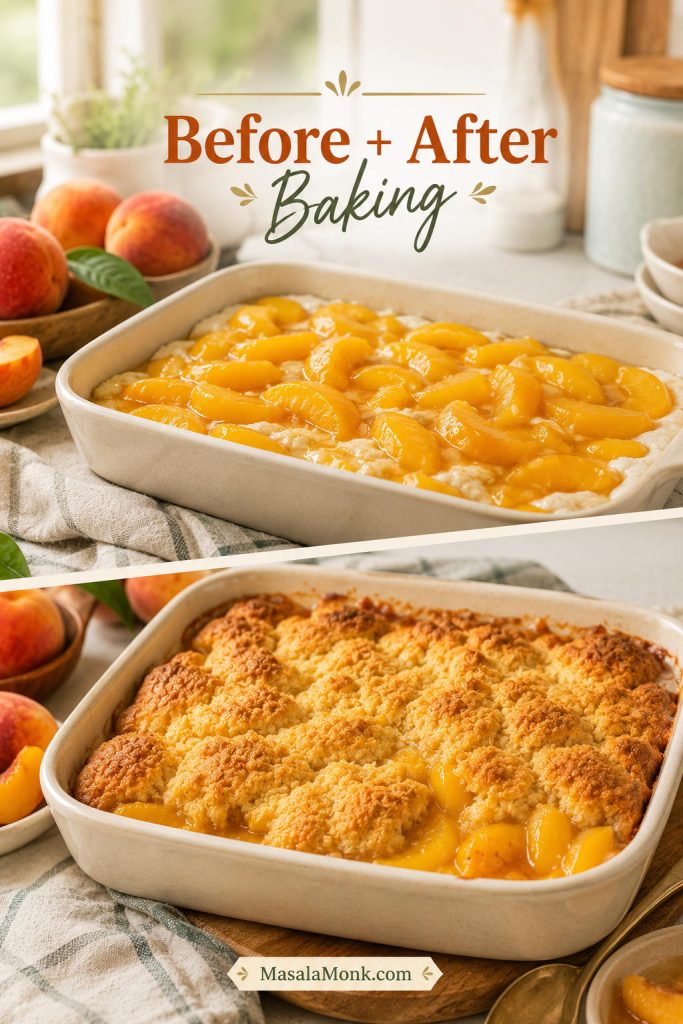
5. Bake Until the Center Is Set
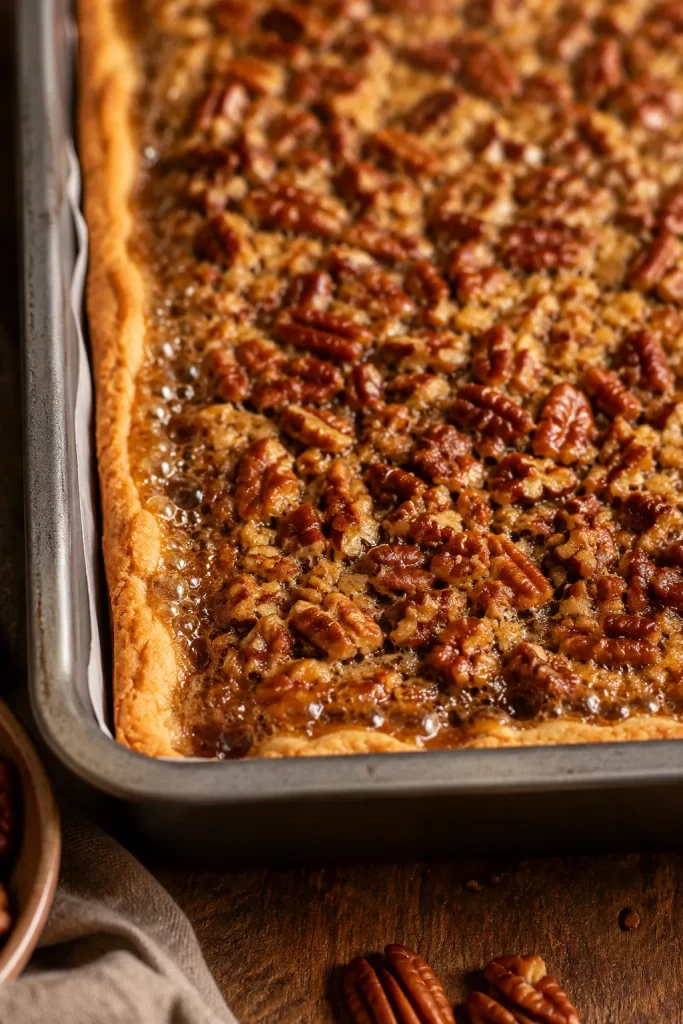
Divide the batter between the pans and bake at 350°F / 180°C for 28 to 35 minutes. The edges should look set, the center should spring back lightly, and the kitchen should smell like cinnamon, brown sugar, and warm carrots.
Pan fill cue: A little over half full leaves room for rise.
Do not wait for a bone-dry toothpick. Clean crumbs or a few moist crumbs mean the cake is ready. Wet batter on the toothpick means the center needs more time.
Doneness cue: Moist crumbs are done; wet batter needs more time.
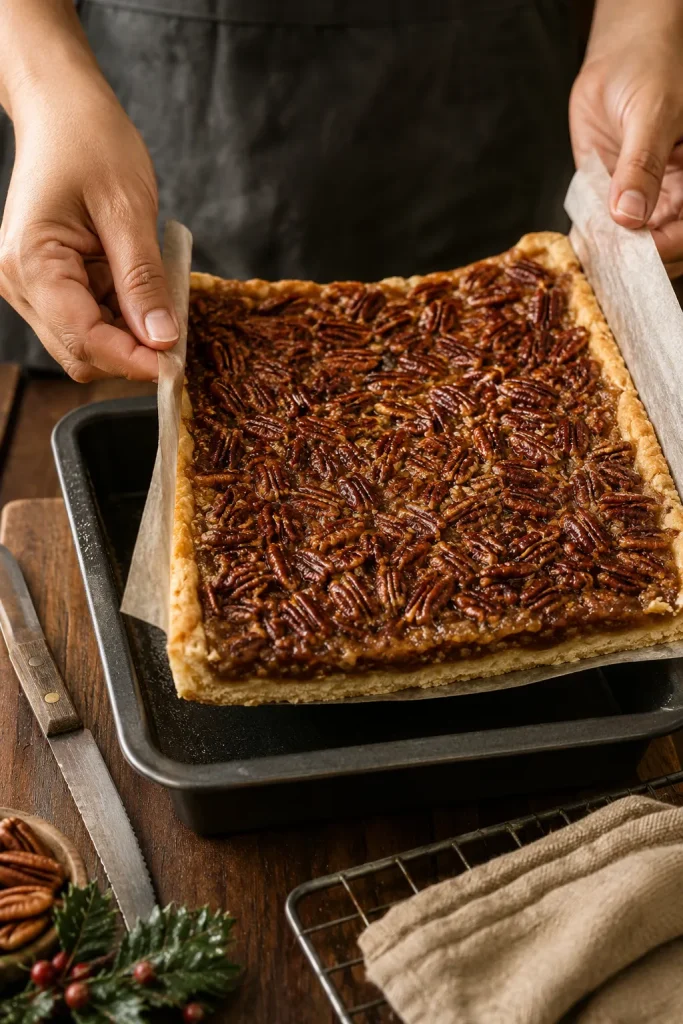
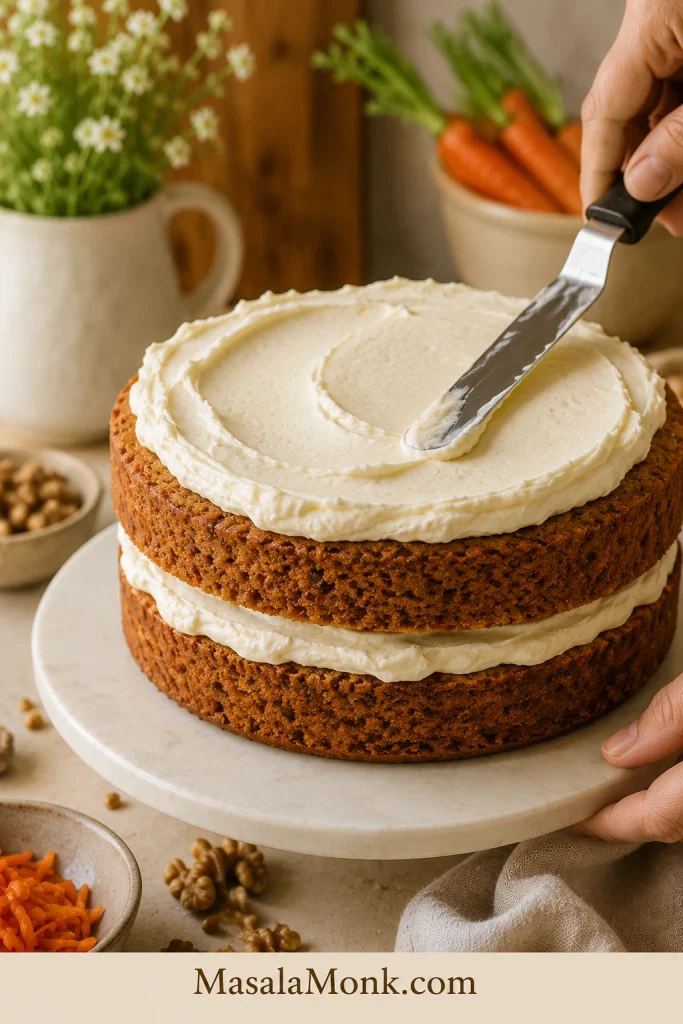
6. Cool Completely Before Frosting
Let the cakes cool in the pans for 15 minutes, then turn them out onto a rack. Warm carrot cake layers are tender and a little fragile, so give them time. Cooling is not dead time here; it is part of getting clean slices.
Layer rest cue: Fully cooled layers protect the frosting and structure.
If the warm layers feel soft, do not panic. Carrot cake firms as it cools, especially once it has been frosted and chilled.
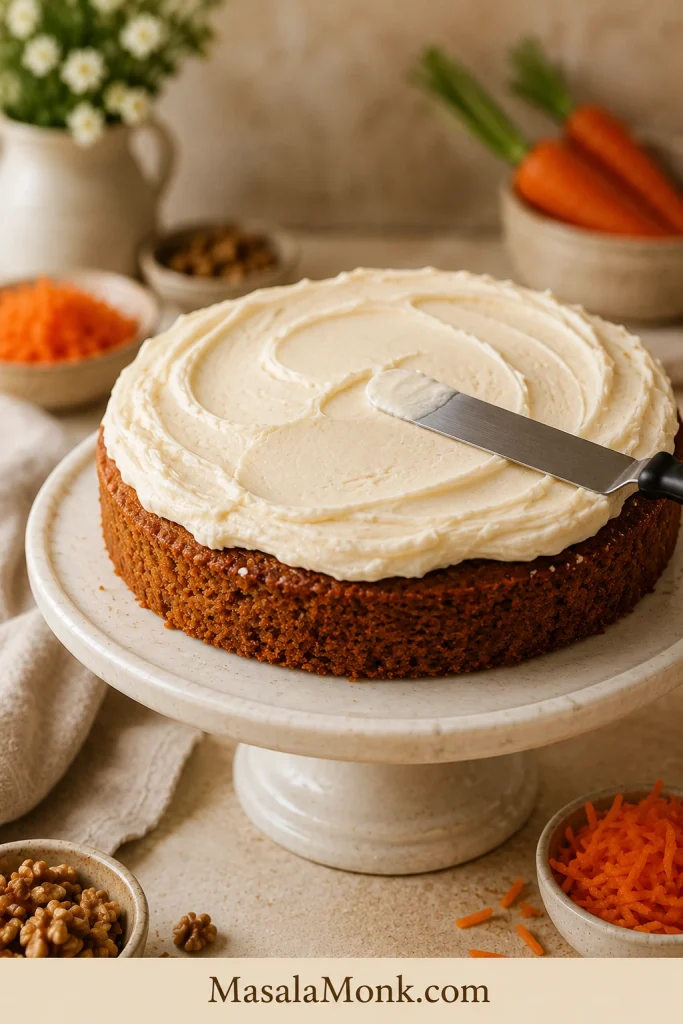
7. Frost, Chill and Slice
Spread frosting between the layers, then cover the top and sides. Chill the frosted cake for about 30 minutes before slicing if you want cleaner cuts and neater layers.
Filling cue: An even middle layer keeps the cake level.
Before baking, double-check the pan size guide. When you decorate, review the cream cheese frosting tips.
Pan Size, Time and Doneness Guide
The main recipe is written for two 9-inch round cake pans. You can use the same batter in other formats, but the bake time changes because the depth of the batter changes.
The clock matters, but the center of the cake matters more. Use the times below as a guide, then trust the spring-back and toothpick cues.
Timing cue: Use pan times, then trust the center.
Pan Times by Format
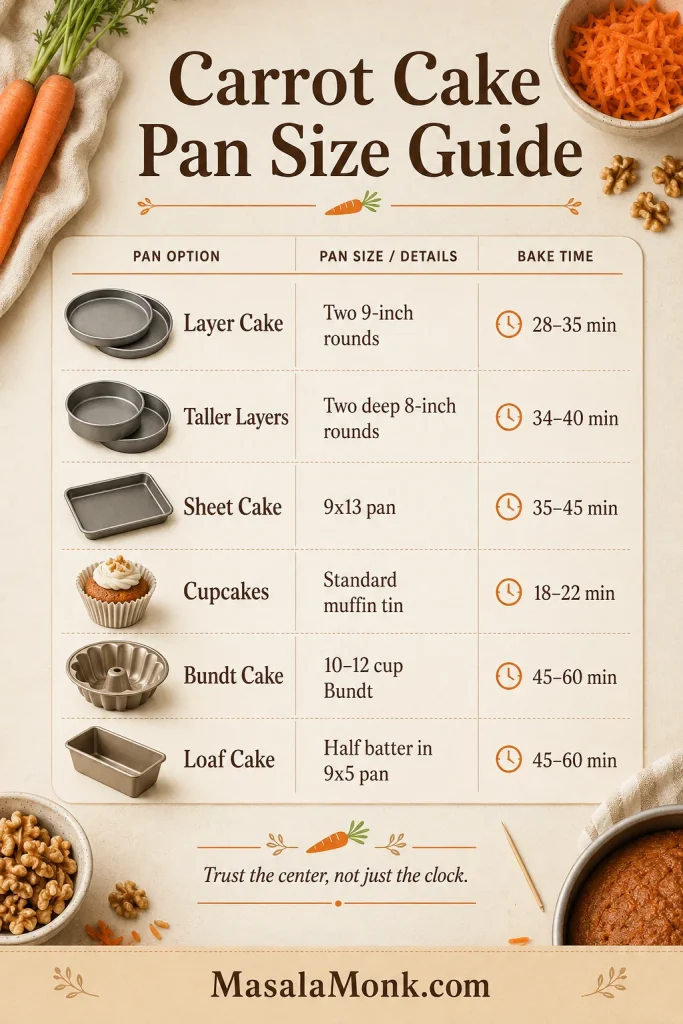
| Format | Pan | Oven | Approx. Time | Best Doneness Cue |
|---|---|---|---|---|
| Layer cake | Two 9-inch rounds | 350°F / 180°C | 28–35 min | Center springs back; toothpick has moist crumbs |
| Taller layer cake | Two deep 8-inch rounds | 350°F / 180°C | 34–40 min | Center should not wobble |
| Sheet cake | 9×13-inch pan | 350°F / 180°C | 35–45 min | Middle springs back lightly |
| Cupcakes | Standard muffin tin | 350°F / 180°C | 18–22 min | Tops spring back; tester has crumbs |
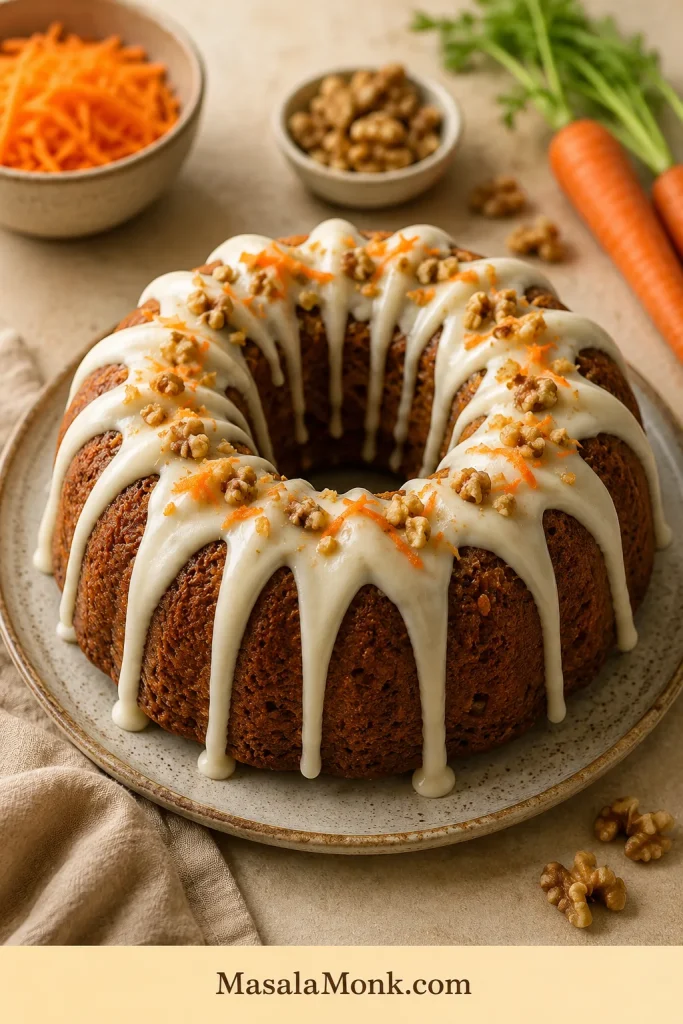
| Bundt cake | 10–12 cup Bundt pan | 350°F / 180°C | 45–60 min | Long tester comes out clean |
| Loaf cake | One 9×5 pan with half batter, or two 9×5 pans for full batter | 350°F / 180°C | 45–60 min | Deep center fully set |
Cupcake cue: Fill liners two-thirds full for neat rise.
Loaf, Bundt and Deep-Pan Notes
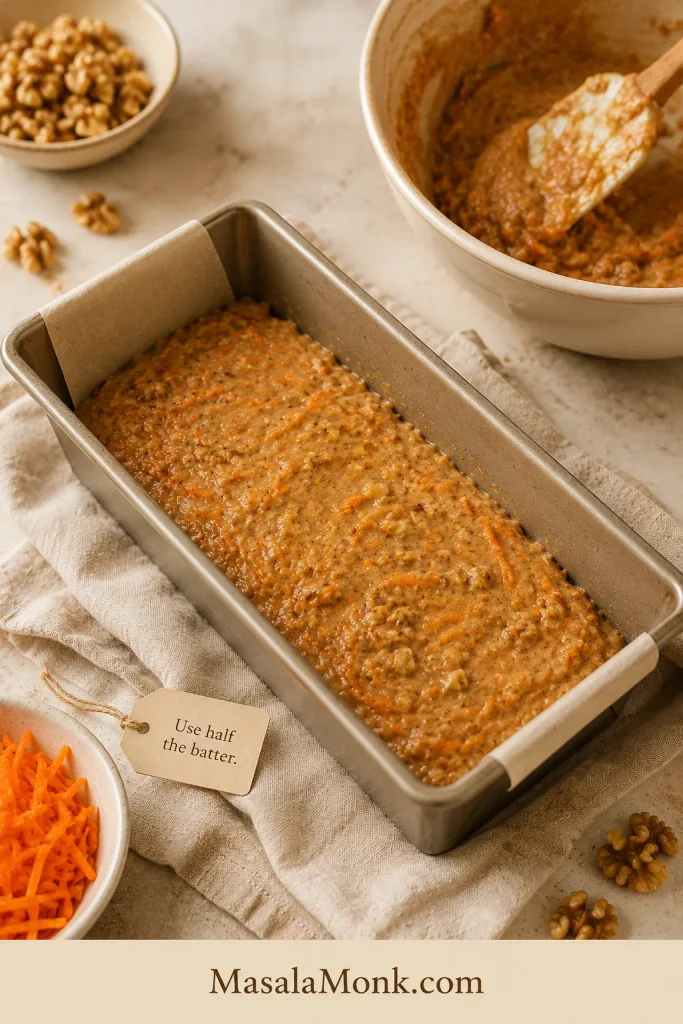
Do not pour the full batch into one 9×5 loaf pan. It is too much batter for one standard loaf and can overflow or bake unevenly. Use half the batter for one loaf, or divide the full batch between two loaf pans. Start checking around 45 minutes, then keep baking until the deep center is fully set.
Loaf cue: Use half the batter for one 9×5 loaf.
If using 8-inch round pans, choose deep pans and do not fill them to the rim. Taller layers need more time in the center, so check for spring-back instead of relying only on the clock.
For a Bundt cake, grease the pan very well, dust it lightly with flour, and let the cake cool for 15 to 20 minutes before turning it out. A soft carrot cake needs a little help releasing cleanly from a detailed pan.
Bundt cue: Grease well, cool briefly, then release gently.
For a simpler carrot-based tea cake rather than a frosted layer cake, this wholewheat carrot orange tea cake is a lighter direction.
Using a different pan? After checking the timing, return to the recipe card or review common carrot cake problems.
Cream Cheese Frosting That Slices Cleanly
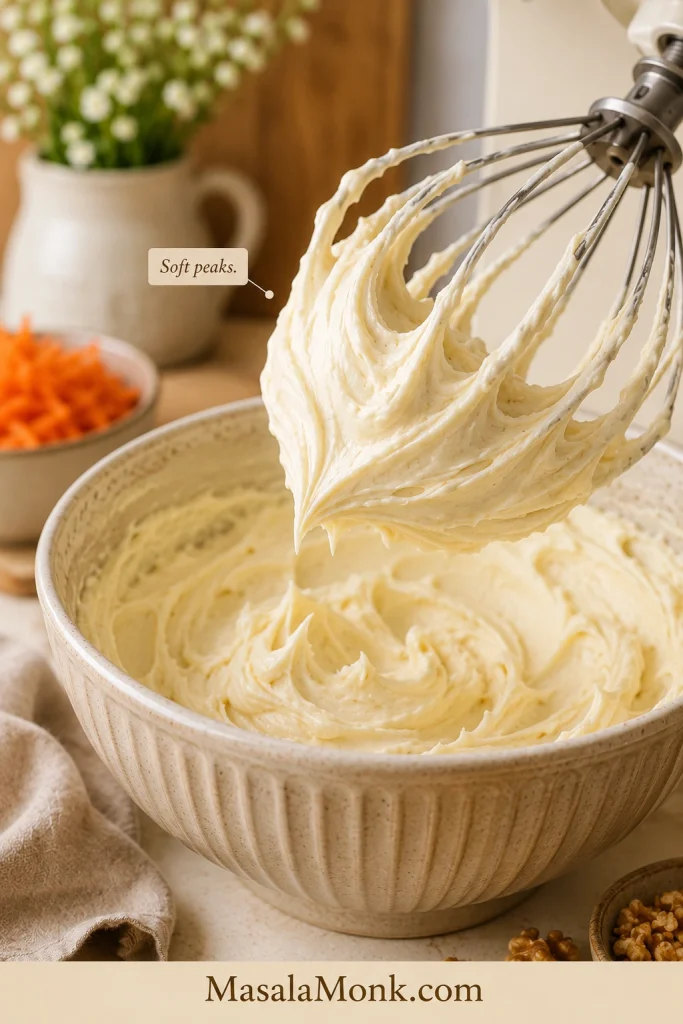
Good cream cheese frosting is tangy, thick, and spreadable. It should hold soft ridges, cover the cake generously, and stay in place when you cut into it.
Frosting texture cue: Soft peaks show the frosting is ready.
The biggest rule is to use full-fat block cream cheese, or the firmest full-fat cream cheese you can find. Tub-style cream cheese is softer and can make the frosting runny. The butter and cream cheese should be softened, but not melted or greasy.
Assembly cue: Frost cool layers slowly; chill if they shift.
How to Keep Cream Cheese Frosting Thick
- Use full-fat block cream cheese or the firmest full-fat cream cheese available.
- Avoid whipped, spreadable, or very soft tub-style cream cheese.
- Let butter and cream cheese soften, but do not let them melt.
- Sift powdered sugar before adding it.
- Add powdered sugar gradually until the frosting is thick enough.
- Chill the frosting for 15 to 20 minutes if it feels loose.
- Cool the cake completely before frosting.
- Chill the frosted cake before slicing for the cleanest layers.
Cream cheese frosting is softer than buttercream, so do not try to force it to behave on a warm counter. If the frosting slumps, chill it for a few minutes and come back to it. That is not a failure; that is just cream cheese being cream cheese.
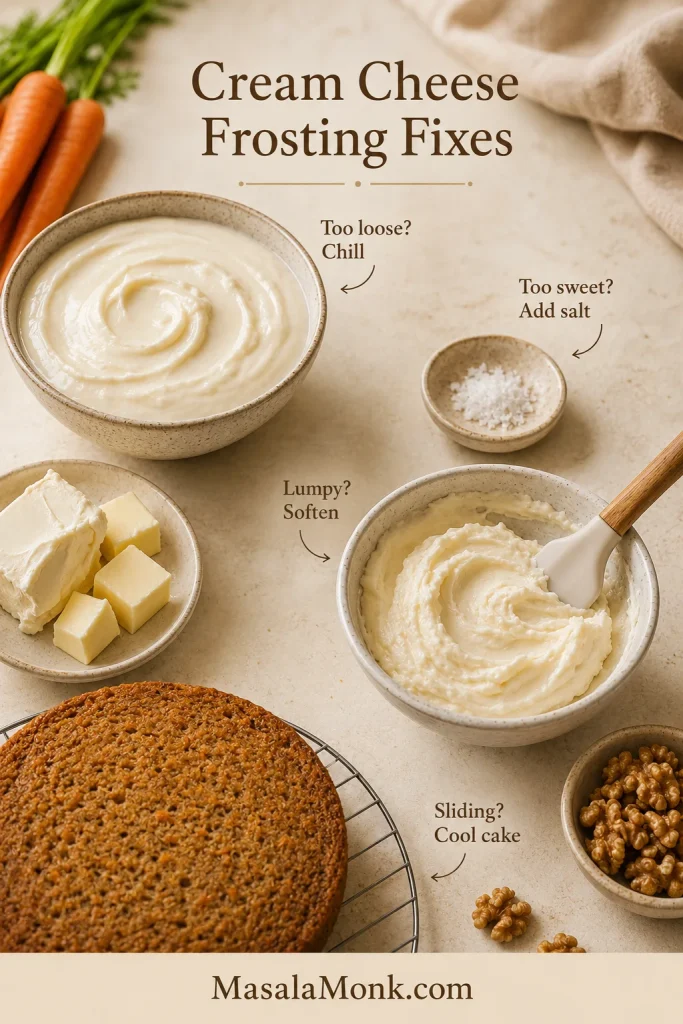
Quick Frosting Fixes
- Runny frosting: chill it for 15 to 20 minutes, then beat again. Use firmer full-fat cream cheese next time.
- Too sweet: add a pinch of salt or a little more cream cheese.
- Lumpy: the butter or cream cheese was probably too cold. Let it soften slightly, then beat again.
- Sliding layers: the cake or frosting is too warm. Cool the cake fully and chill before slicing.
- Too stiff: let the frosting sit briefly, then beat until spreadable.
Frosting cue: when you lift the beater, the frosting should hold soft peaks for a few seconds before relaxing. If it looks shiny, loose, or slumps quickly, it is asking for the fridge.
Frosting fix cue: Chill loose frosting and keep cake layers cool.
Once you understand the texture, the same idea works in other flavors. For a chocolate version for cupcakes, brownies, or a different cake, this chocolate cream cheese frosting follows the same thick, spreadable idea.
Prefer a sweeter butter-based frosting without cream cheese? See this buttercream frosting guide. On carrot cake, though, cream cheese frosting is still the classic finish.
If the frosting is loose or the layers are sliding, jump to troubleshooting. Otherwise, go back to the recipe card.
How to Make It Taste Like Bakery Carrot Cake
A good bakery-style carrot cake is not only sweet. It has a soft crumb, enough spice to smell warm before the first bite, visible carrot flecks, and frosting that feels generous without sliding everywhere.
- Grate the carrots fresh. This gives the cake better moisture and texture than dry bagged shreds.
- Use the full amount of salt and spice. Under-spiced carrot cake tastes flat once frosting is added.
- Do not under-frost it. Cream cheese frosting is part of the classic carrot cake experience.
- Chill before slicing. A cold, set cake gives cleaner bakery-style slices.
- Make it a day ahead. The spice settles and the frosting firms, especially if the cake is refrigerated overnight.
- Add nuts for texture. Walnuts or pecans make the cake feel more like a traditional bakery slice.
- Add pineapple only if you want that old-fashioned style. It makes the cake fruitier and sweeter, not automatically better for every version.
Resting time is the quiet detail. The cake is good the day it is made, but the spice and frosting taste more settled after a night in the fridge. A chilled slice cuts cleanly, then softens back into that tender carrot-cake texture as it sits on the plate.
Slicing cue: Chilling firms frosting for cleaner cuts.
Make Ahead, Storage and Freezing
Carrot cake is a very good make-ahead cake. The spices settle, the crumb stays soft, and the frosting firms enough for cleaner slices.
Make Ahead
You can bake the cake layers 1 day ahead. Cool them completely, wrap them well, and keep them at room temperature if unfrosted. If your kitchen is hot or humid, refrigerate the wrapped layers instead.
You can also frost the whole cake 1 day ahead and refrigerate it. Let slices sit out briefly before serving so the crumb and frosting soften.
Storage
Because of the cream cheese frosting, frosted carrot cake should be stored in the refrigerator. Keep it covered so the cut edges do not dry out. The FDA food-safety guidance also lists cakes with cream cheese frosting among creamy desserts that should be kept refrigerated.
For the best texture, let slices sit at room temperature for 20 to 30 minutes before serving. The frosting softens slightly and the cake tastes more tender.
Freezing
Unfrosted carrot cake layers freeze well. Wrap each cooled layer tightly in plastic wrap, then in foil or a freezer-safe bag. Freeze for up to 2 months. Thaw overnight in the refrigerator before frosting.
Frosted slices can also be frozen. Freeze the slices until firm, wrap them well, then thaw in the refrigerator. Let them sit out briefly before eating so the crumb and frosting soften.
Baking later? Return to the recipe card, or go back to the top of the post.
Fix Common Carrot Cake Problems
If something goes wrong, it is usually fixable next time. Most carrot cake problems come from dry carrots, too much flour, overmixing, overbaking, wet add-ins, or frosting while the cake is still warm.
Troubleshooting cue: Match each problem to the likely cause and fix.
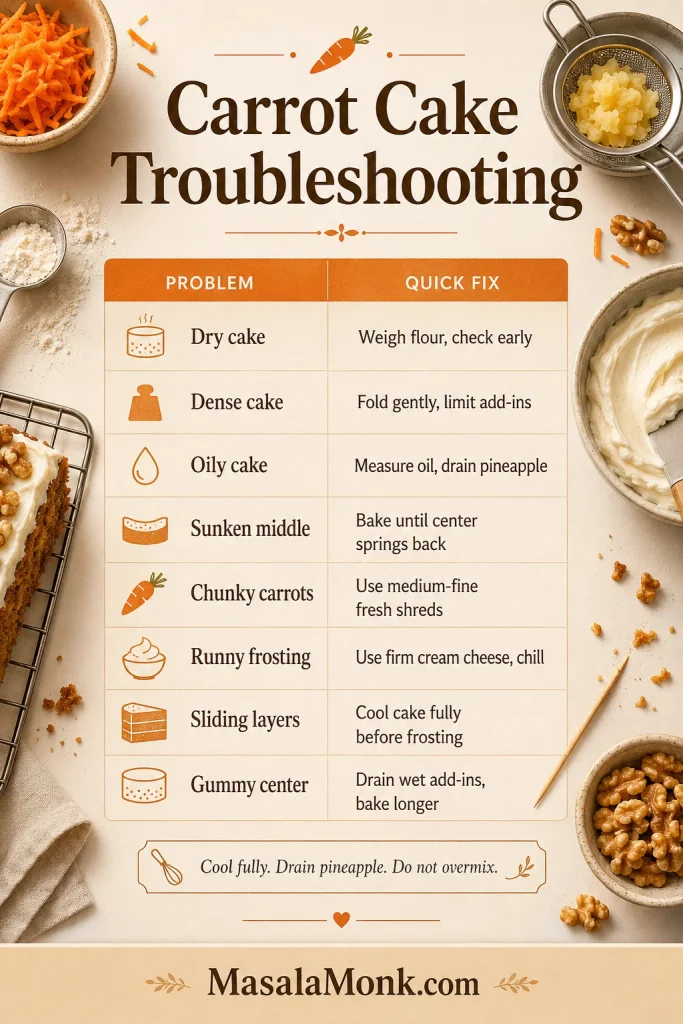
| Problem | Likely Reason | Fix |
|---|---|---|
| Cake is dry | Too much flour, overbaking, or dry carrot shreds | Weigh flour, check early, use moist medium-fine carrot shreds |
| Cake is dense | Overmixed batter or too many add-ins | Fold gently and keep add-ins controlled |
| Cake is oily | Too much oil or wet pineapple | Measure oil carefully and drain pineapple well |
| Middle sank | Underbaked cake or oven opened early | Bake until the center springs back lightly |
| Carrots stayed chunky | Shreds were too thick or too dry | Use medium-fine fresh grated carrots |
| Frosting is runny | Tub cream cheese, warm butter, or not enough powdered sugar | Use firm full-fat cream cheese and chill the frosting |
| Layers are sliding | Cake or frosting too warm | Cool fully and chill before slicing |
| Cake tastes flat | Not enough salt or spice | Use the full salt and spice amounts |
| Cake is gummy | Too much wet add-in or underbaking | Drain pineapple, do not overdo applesauce/yogurt, bake until set |
Carrot Cake vs Pineapple Carrot Cake vs Hummingbird Cake
A lot of carrot cake confusion comes from recipes that overlap with other cakes. If you are here for carrot cake, the carrot should still be the main flavor. Pineapple, coconut, raisins, and nuts should support the cake, not turn it into a different dessert.
Think of it this way: classic carrot cake is carrot and spice first; pineapple carrot cake is the fruitier old-fashioned cousin; hummingbird cake belongs to banana and pineapple. They can all be wonderful, but they are not the same craving.
Flavor cue: Classic tastes spice-forward; pineapple leans fruitier.
| Recipe | Main Identity | How It Differs |
|---|---|---|
| Classic carrot cake | Fresh grated carrots, warm spice, cream cheese frosting | This is the main recipe here |
| Pineapple carrot cake | Carrot cake with crushed pineapple | Sweeter, fruitier, more old-fashioned |
| Hummingbird cake | Banana, pineapple, pecans, spice | More tropical and banana-led |
| Spice cake | Warm spices, usually no carrots | Softer spice-only profile |
| Carrot loaf | Smaller tea cake format | Better with a loaf-specific formula |
| Carrot cupcakes | Individual carrot cakes | Usually better with a slightly lighter cupcake structure |
The carrot should lead; the pineapple, nuts, and raisins should only back it up. This recipe stays in the classic carrot cake lane first.
Choose the Version That Fits What You Need
Some carrot cake cravings need a different recipe, not just a different pan. This batter handles layers, sheet cake, cupcakes, Bundt, and careful loaf baking, but eggless, vegan, gluten-free, keto, and baked-oat versions need their own structure.
| Need | Best Version | Why |
|---|---|---|
| Easiest beginner bake | 9×13 carrot cake sheet cake | No stacking, trimming, or side frosting |
| Party portions | Carrot cake cupcakes | Faster baking and easier serving |
| Tea-time cake | Carrot cake loaf | Smaller cake, easier storage, better with a loaf-specific formula |
| Breakfast-style option | Carrot cake muffins | Less frosting, easier to portion |
| No eggs | Eggless carrot cake | Needs a different binding and rising structure |
| No dairy or eggs | Vegan carrot cake | Needs egg-free batter and vegan frosting logic |
| No gluten | Gluten-free carrot cake | Gluten-free flour absorbs moisture differently |
| Low sugar or low carb | Keto or sugar-free carrot cake | Needs a separate flour and sweetener system |
| Meal prep breakfast | Carrot cake baked oats | Different intent, texture, and ingredients |
| Old-fashioned fruitier cake | Pineapple carrot cake | Crushed pineapple changes the flavor and moisture |
Egg-free and dairy-free cakes behave differently. This vegan chocolate cake guide shows how much the structure changes once eggs and dairy leave the batter.
If you need eggless, vegan, gluten-free, keto, or sugar-free, start with a recipe built for that need. Those cakes rely on different structure, and they turn out better when they are designed that way from the start.
Carrot Cake Recipe FAQ
What is the secret to moist carrot cake?
Use oil, brown sugar, fresh grated carrots, careful flour measurement, and the right bake time. Applesauce or yogurt adds extra softness without making the cake greasy.
Should carrots be grated fine or coarse for carrot cake?
Medium-fine grated carrots work best. Very coarse carrots can stay chunky, while very fine carrots can disappear too much. Freshly grated carrots are better than bagged pre-shredded carrots.
Do I need to peel carrots before grating them?
Peeling is optional if the carrots are clean and tender. If the skins are rough, dirty, or bitter, peel the carrots first.
Is carrot cake better with oil or butter?
Oil is usually better for carrot cake because it keeps the crumb soft after refrigeration. Butter adds flavor, but it can make chilled cake feel firmer.
Does carrot cake need pineapple?
No. This version stays moist without pineapple. Add it only if you want a fruitier, old-fashioned cake.
Can I leave out raisins or nuts?
Yes. Raisins and nuts are optional. Leave either one out without changing the batter. If you remove both, the cake will taste cleaner and softer, with more focus on carrot, spice, and frosting.
Why did my carrot cake turn out dense?
Dense carrot cake usually comes from overmixing, too much flour, too many add-ins, or underbaking. Fold gently and bake until the center springs back.
Why is my cream cheese frosting runny?
Runny cream cheese frosting usually comes from very soft cream cheese, overly warm butter, or not enough powdered sugar. Use firm full-fat cream cheese and chill the frosting briefly if it feels loose.
Does carrot cake need to be refrigerated?
Yes, frosted carrot cake should be refrigerated because of the cream cheese frosting. Let slices sit out for 20 to 30 minutes before serving for the best texture.
Can carrot cake be made ahead?
Yes. Bake the layers 1 day ahead or frost the whole cake 1 day ahead and refrigerate it.
Can I bake this as cupcakes or a sheet cake?
Yes. For cupcakes, fill liners ⅔ full and bake for 18 to 22 minutes. A 9×13 sheet cake takes about 35 to 45 minutes.
Can I bake this carrot cake in a loaf pan?
Yes, but do not put the full batter in one loaf pan. Use about half the batter in one 9×5 loaf pan, or divide the full batter between two loaf pans. Bake until the deep center is fully set.
Can I make this carrot cake eggless, vegan or gluten-free?
For best results, use a dedicated eggless, vegan, or gluten-free carrot cake recipe. Those versions need different binding, moisture, and structure than the classic recipe.
Ready to bake now? Go back to the carrot cake recipe card, review pan sizes, or check frosting fixes.
Carrot cake rewards small details: fresh carrots, enough spice, measured flour, a gentle hand with the batter, and frosting that is thick enough to hold. Get those right and the cake becomes soft, cozy, sliceable, and reliable enough for birthdays, Easter, holidays, potlucks, or any day that needs a proper slice of cake.
This is not a fussy cake. It is a generous one — the kind that tastes even better after a quiet night in the fridge and somehow disappears one thin “just a little” slice at a time.
A good carrot cake wins quietly: warm spice, soft crumb, tangy frosting, orange flecks in every slice, and the kind of second piece people go back for after they said they were full.
If you make this carrot cake, leave a comment with your version — layer cake or sheet cake, pineapple or no pineapple, nuts or no nuts, raisins or no raisins — and how it turned out. Carrot cake people have strong opinions, and your notes help the next baker choose their version.