Posted on Leave a comment

Spice Cake Recipe

9x13 spice cake in a baking pan with cream cheese frosting and one square lifted out to show the brown crumb.

Spice cake should taste like cinnamon in the air, brown sugar in the crumb, and just enough ginger, nutmeg, allspice, and cloves to make the whole kitchen smell like something good is cooling on the counter. A good version is fragrant and tender, not dry, dusty, or vaguely cinnamon-flavored.

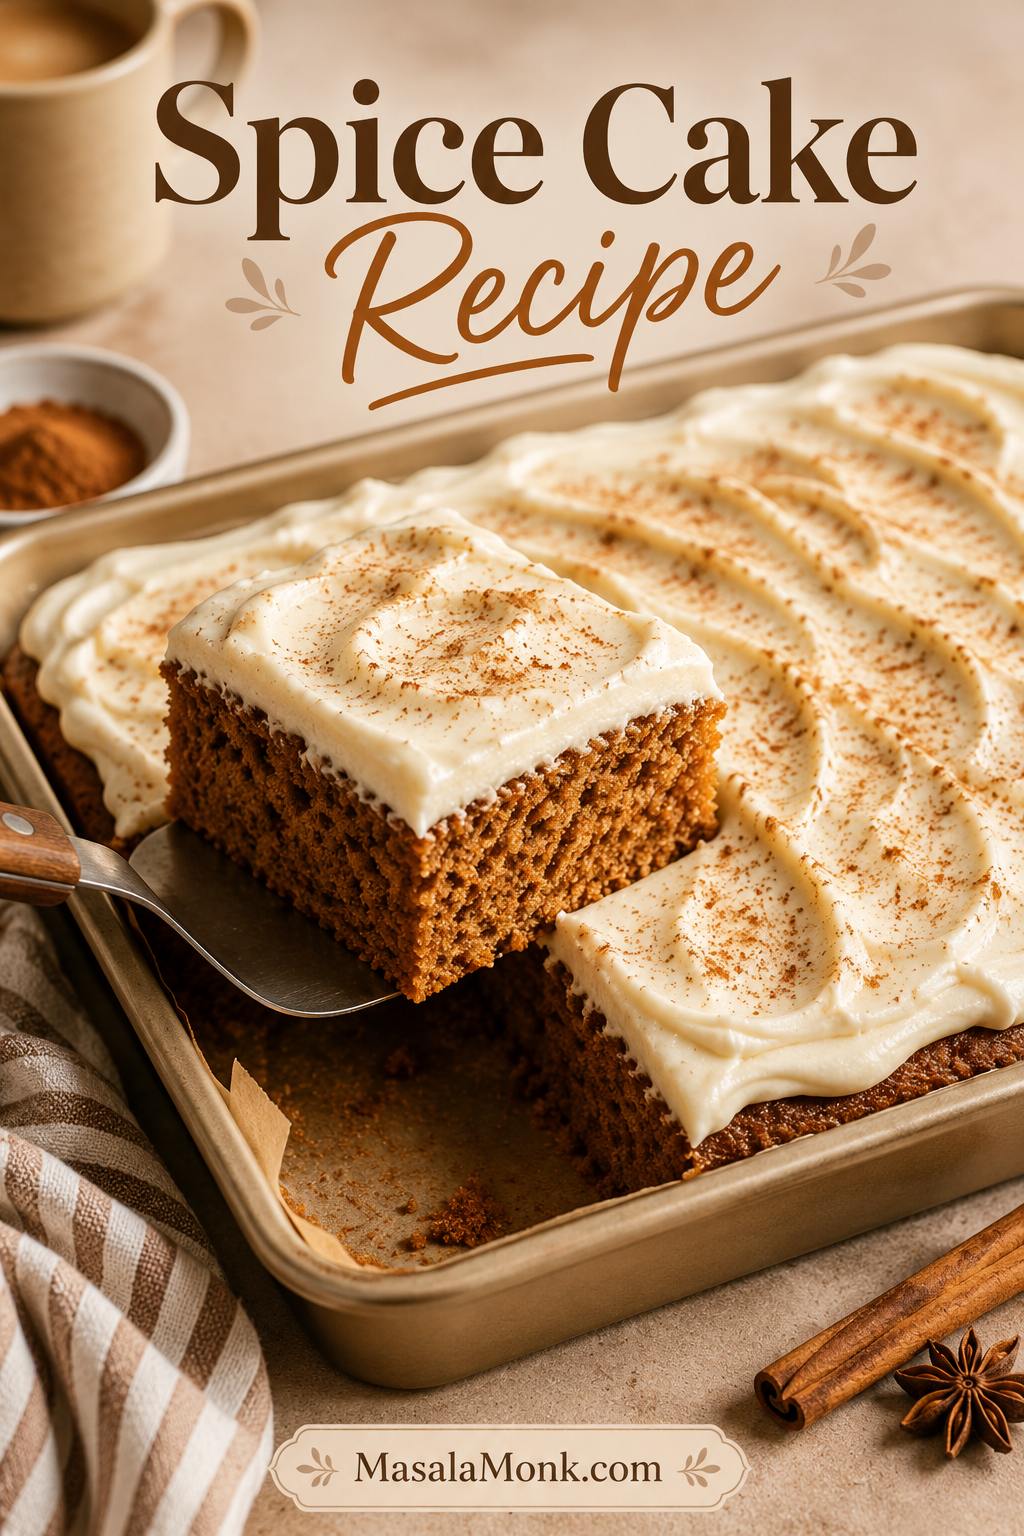
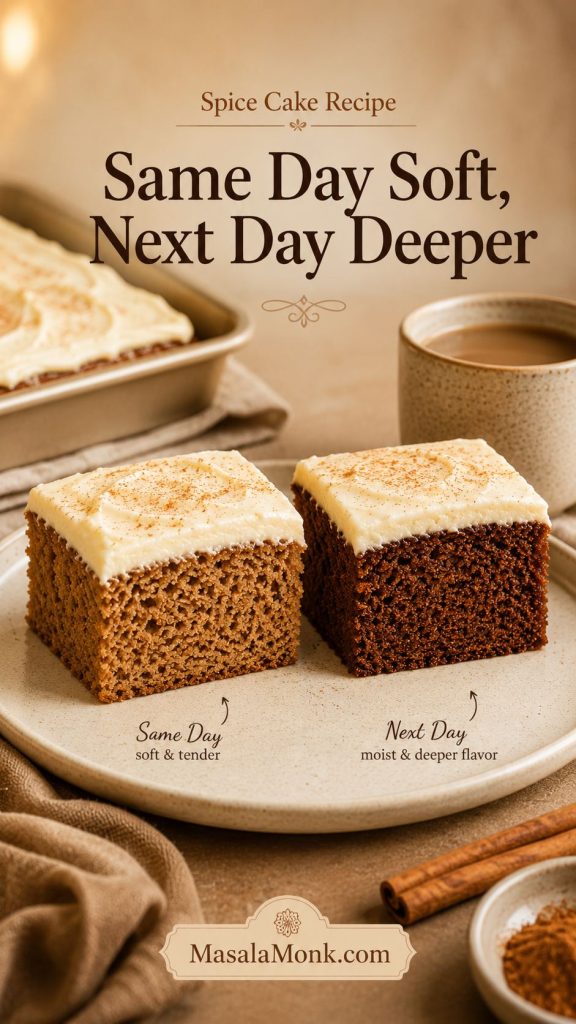
This spice cake recipe is a no-fuss 9×13 sheet cake designed around the two things that matter most: a tender brown-sugar crumb and cream cheese frosting that stays where you spread it. It is soft and fragrant the day you bake it, then deeper and more settled once the spices rest overnight.

It is made from scratch, but it does not ask for layer-cake precision. The batter comes together with two bowls, a whisk, and a spatula; the only mixer you need is for the frosting. Bake it in the pan, cool it fully, frost it generously, and cut it into spiced squares for coffee, potlucks, chilly afternoons, or a simple holiday dessert.

When you cut into it, the slice should be warmly brown, soft under the fork, and sturdy enough to hold a generous swipe of frosting. The cake should taste complete before anything goes on top; the cream cheese frosting is there to brighten it, not hide dryness.

Close-up of a frosted spice cake square showing a moist brown crumb and cream cheese frosting on top.
Look for a tender, even crumb like this; a truly moist spice cake should hold together cleanly while still looking soft inside.

Quick Answer: What Is Spice Cake?

Spice cake is a brown-sugar cake flavored with baking spices such as cinnamon, ginger, nutmeg, allspice, and cloves. It is warmly spiced, not chili-hot. The “spice” comes from aromatic baking spices, not heat.

It is softer and sweeter than gingerbread, less fruit-forward than applesauce cake, and less chunky than carrot cake. The usual finish is cream cheese frosting because its tang cuts through the cinnamon-heavy crumb and brown sugar.

For the easiest homemade version, bake spice cake in a 9×13-inch metal pan at 350°F / 177°C. The slice should smell like cinnamon and ginger, cut cleanly, and hold the cream cheese frosting without feeling heavy. For the exact flavor balance, see the spice blend section.

Spice Cake at a Glance

Prep time20–25 minutes
Bake time35–40 minutes in a metal 9×13 pan; glass or ceramic may take longer
Cooling timeAt least 2 hours before frosting
Total timeAbout 3 hours, including cooling
Default pan9×13-inch baking pan
Oven350°F / 177°C
Yield12 large or 16 smaller slices
TextureSliceable, tender, fragrant
FinishCream cheese frosting

Why You’ll Love This 9×13 Spice Cake

  • Old-fashioned flavor comes through clearly. Cinnamon leads, but ginger, nutmeg, allspice, and cloves give every slice deeper fall-bakery flavor.
  • Real-life baking is the point. No stacked layers, no piping, no stand mixer for the cake — just a 9×13 pan and frosted squares you can serve straight from the pan.
  • Soft coffee slices still hold up for potlucks. Each square cuts cleanly, but still feels tender under the fork.
  • The cream cheese frosting makes it feel special. It adds cool tang, keeps the brown sugar in check, and turns a simple sheet cake into something holiday-table friendly.
  • Patience pays off. The same-day slice is soft and fragrant, but the next-day slice tastes deeper once the spices settle. For make-ahead timing, see the storage and freezing tips.

Same-Day Soft, Next-Day Deeper

This is the main make-ahead advantage of spice cake: the crumb stays soft while the cinnamon, ginger, nutmeg, and cloves taste more settled after a night of rest.

Two frosted spice cake squares on a plate labeled same day and next day, showing a lighter fresh slice and a darker settled slice.
Same day, the cake tastes soft and freshly spiced; by the next day, the cinnamon, ginger, nutmeg, and cloves settle into a deeper flavor.

What Is Spice Cake?

Spice cake is a cake where the main flavor comes from a baking-spice blend rather than chocolate, vanilla, fruit, or nuts. The batter usually includes brown sugar, a tenderizing ingredient such as buttermilk or sour cream, and enough fat to keep the cake enjoyable after it cools.

It belongs near gingerbread, carrot cake, pumpkin cake, and applesauce cake, but the point here is simpler: a spice-led crumb, not fruit, vegetables, heavy molasses, or pumpkin.

If you have ever wondered whether spice cake is just gingerbread, carrot cake without carrots, or applesauce cake without apples, this is the quick difference.
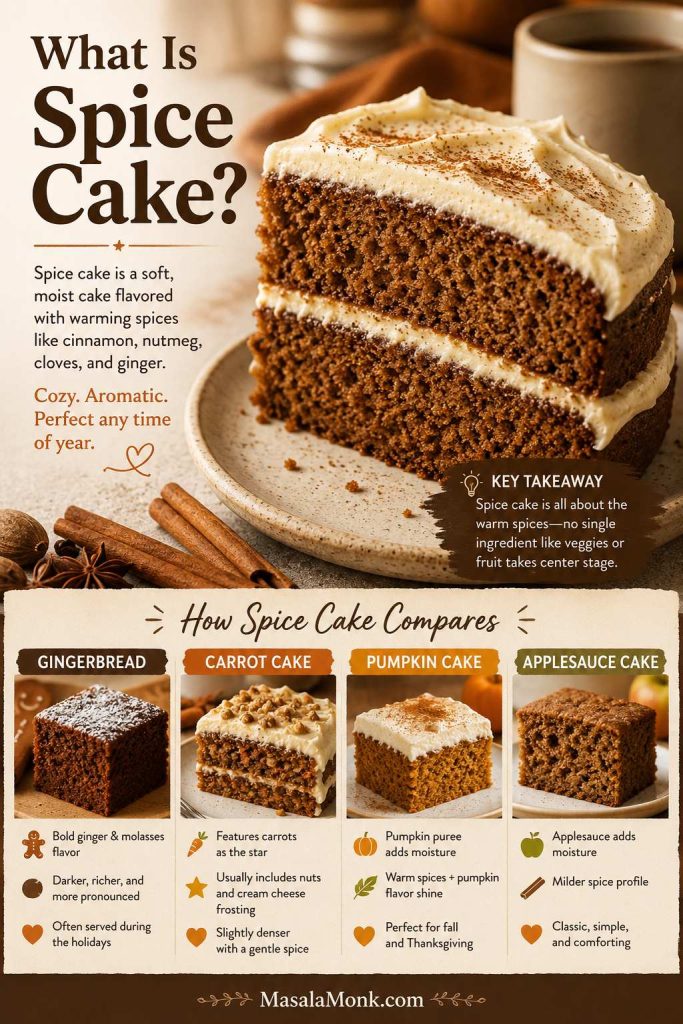
Spice cake guide with a frosted slice and smaller comparison sections for gingerbread, carrot cake, pumpkin cake, and applesauce cake.
Unlike carrot cake, pumpkin cake, or gingerbread, spice cake gets its main character from warm baking spices rather than one dominant fruit, vegetable, or molasses note.
CakeMain identityHow it differs from spice cake
Spice cakeBaking spicesSpice-led, usually with brown sugar and tangy frosting.
GingerbreadGinger and molassesDarker, sharper, and usually more molasses-heavy.
Carrot cakeGrated carrot and spiceOften includes carrots, nuts, raisins, pineapple, or coconut.
Applesauce cakeApple moisture and spiceSofter and more apple-led. For that direction, see our applesauce cake recipe.
Pumpkin spice cakePumpkin purée and spiceWetter, denser, and more seasonal because pumpkin changes the batter.
Chai cakeTea, cardamom, and chai spicesBetter baked as a separate chai cake, where the tea and cardamom can lead properly.

The best version does not taste like a spice cabinet. It tastes like brown sugar, warmth, and a soft square you want with coffee.

The Best Spice Blend for This Cake

The best spice cake blend is cinnamon, ginger, nutmeg, allspice, and a small amount of cloves. Cinnamon should lead; cloves should stay in the background.

Cinnamon gives the familiar warmth, but ginger, nutmeg, allspice, and cloves make the flavor deeper and more complete. Without those supporting spices, the cake can smell good in the oven but taste a little flat once sliced.

Spice blend guide with labeled bowls of cinnamon, ginger, nutmeg, allspice, cloves, and cardamom for spice cake.
Cinnamon should lead the spice blend, while ginger, nutmeg, allspice, cloves, and optional cardamom add warmth, depth, and balance.
SpiceWhat it addsHow strong to go
CinnamonThe familiar warm base.Use the most of this.
GingerBrightness and gentle heat.Enough to notice, not enough to become gingerbread.
NutmegRounded bakery-style flavor.Use lightly; too much can taste perfumed.
AllspiceDepth and an old-fashioned note.A little makes the cake taste fuller.
ClovesDeep background warmth.Use sparingly because it is powerful.
Cardamom, optionalFragrance and lift.Use lightly so the cake still tastes familiar.

That balance is what makes the cake smell cozy in the oven but still taste rounded once it cools. Allspice is not a spice blend; it is a single spice with a flavor that hints at cinnamon, clove, and nutmeg, so let it support the blend rather than dominate it.

Can you use pumpkin pie spice? Pumpkin pie spice works as a shortcut, though the flavor depends on the blend. For a homemade blend, see our pumpkin pie spice guide.

Why This Cake Stays Moist

The goal is a cake that still tastes good after it cools — and, ideally, tastes even more settled the next day. This version uses oil for lasting softness, a little butter for flavor, applesauce for moisture, and buttermilk for tenderness.

Why both oil and butter? A butter-only cake has wonderful aroma when warm, but it can firm up more after cooling. An oil-only cake stays softer, but it can taste flatter. Using both gives the cake a round old-fashioned flavor while keeping the inside from turning tight.

Applesauce and buttermilk support that texture without turning the cake into applesauce cake or a tangy yogurt cake. This is also why the base does not use shredded apple: the cake stays spice-led, while the applesauce quietly helps with moisture. Together, the ingredients create brown-sugar depth without gingerbread heaviness, and a slice that stays clean rather than greasy or gummy.
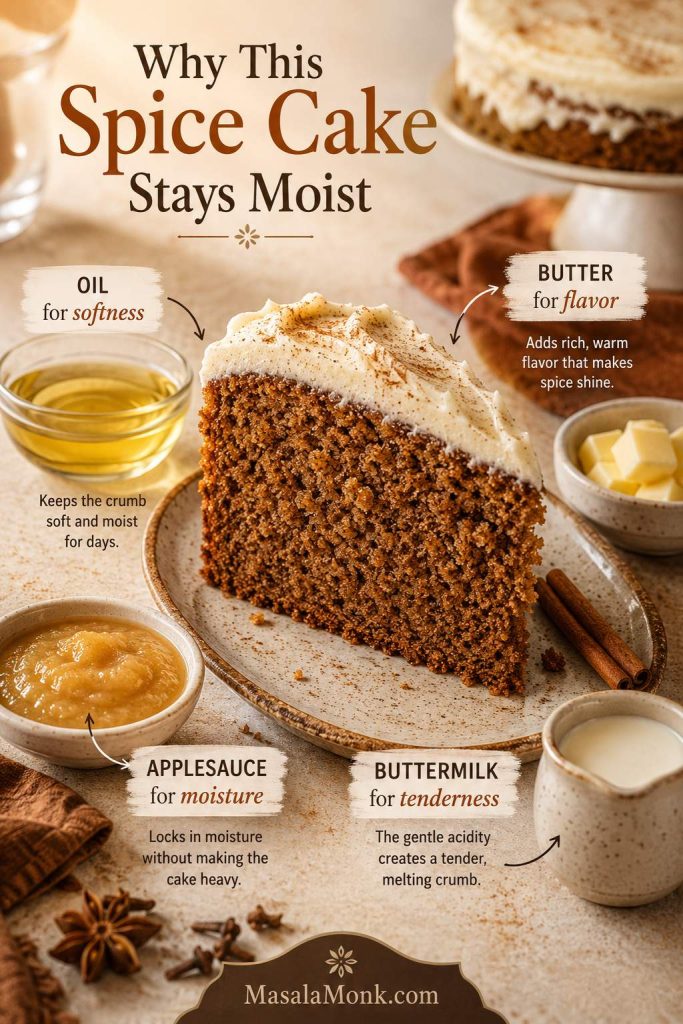
Moisture guide showing a frosted spice cake square with oil, butter, applesauce, and buttermilk callouts around it.
Instead of depending on one “secret” ingredient, this moist spice cake uses oil for softness, butter for flavor, applesauce for moisture, and buttermilk for tenderness.
IngredientWhy it matters
OilKeeps the cake softer after cooling.
ButterAdds old-fashioned flavor and aroma.
ApplesauceSupports moisture without making the cake apple-led.
ButtermilkBalances sweetness and keeps the texture tender.
Brown sugarAdds depth and a mild molasses note.
Cream cheese frostingAdds tang so the cake tastes rich but not cloying.

What Each Ingredient Does in This Spice Cake

The recipe works because the ingredients have different jobs. Keep the measurements steady, especially flour and wet ingredients, and the cake will be much easier to bake well. Once these pieces are balanced, the cake tastes like more than cinnamon — it has brown-sugar depth, spice warmth, and enough softness to still be good after cooling.

Labeled spice cake ingredients including flour, brown sugar, oil, butter, applesauce, buttermilk, eggs, vanilla, molasses, and spices.
The best spice cake ingredients work as a team: brown sugar deepens flavor, warm spices define the cake, and the wet ingredients keep the crumb soft.

For the Cake

All-purpose flour: Measure by weight if possible. Too much flour is one of the fastest ways to make a dry cake, and measuring flour by weight is the most reliable option. If using cups, spoon flour into the cup and level it instead of scooping directly from the bag.

Baking powder and baking soda: They give lift while working with the acidity in the buttermilk, applesauce, and brown sugar. Make sure both are fresh.

Salt, vanilla, and spices: Salt sharpens the brown sugar, vanilla rounds the flavor, and the spice blend gives the cake its identity.

Brown sugar: Light brown sugar keeps the flavor milder. Dark brown sugar gives a deeper molasses note. Either works, but pack it firmly when measuring by cup.

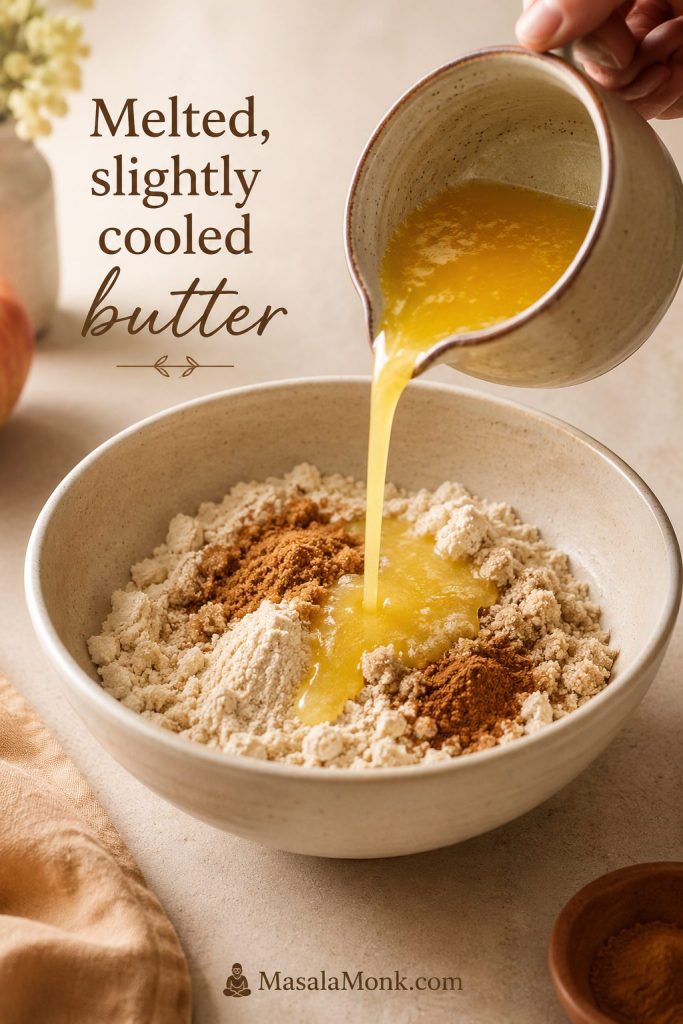
Oil and melted butter: Oil helps after cooling; butter adds flavor. Let the melted butter cool slightly before mixing so it does not warm the eggs.

Applesauce, buttermilk, and eggs: Applesauce helps the cake stay soft, buttermilk keeps it from tasting flat, and eggs help it rise and slice cleanly. Use them close to room temperature when possible so the batter blends smoothly.

Molasses, optional: A tablespoon of molasses makes the cake darker and the flavor deeper. Keep the rest of the wet ingredients as written if you use it.

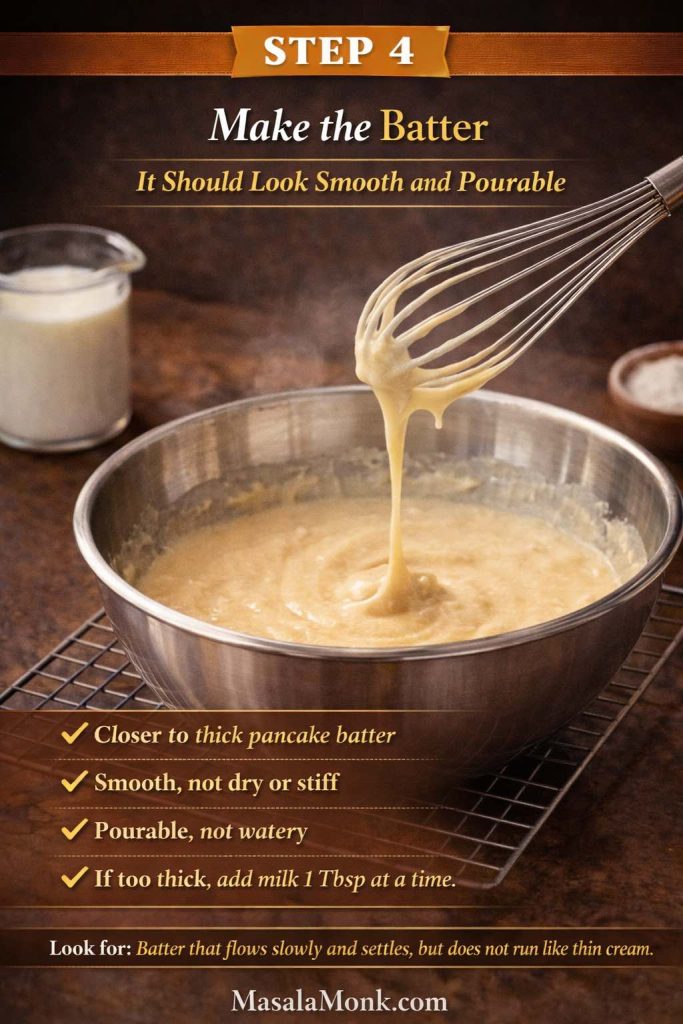
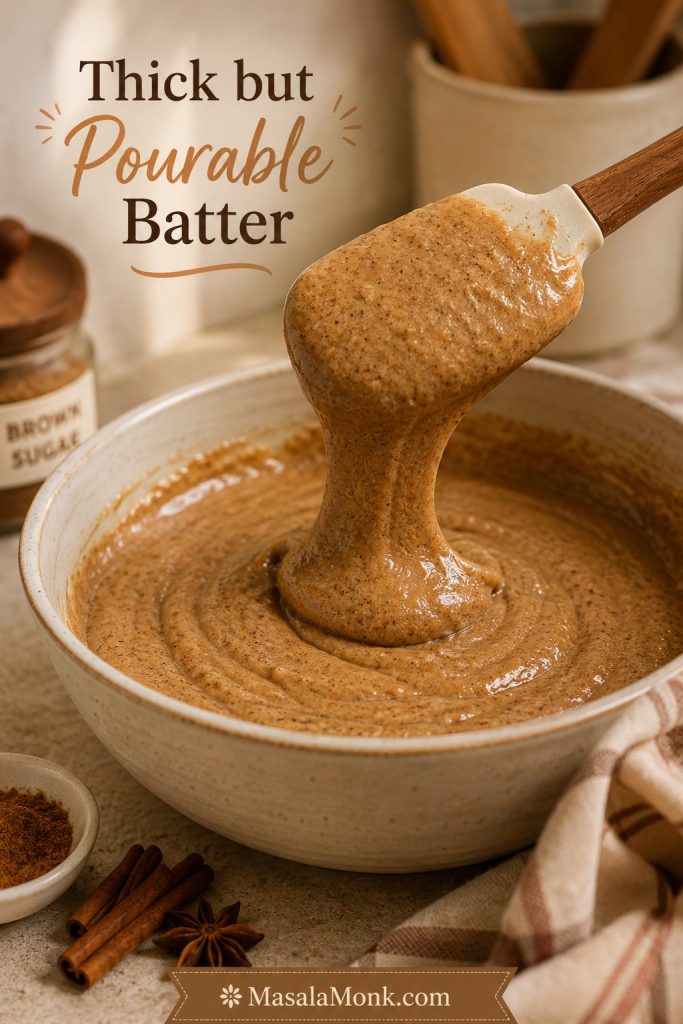
Batter cue: The batter should be thick but pourable, glossy, and lightly speckled with spices. A few tiny applesauce flecks are fine. Stop when the flour disappears; this batter is meant to stay thick and glossy, not whipped.

For the Cream Cheese Frosting

Block cream cheese: Use full-fat block cream cheese, not spreadable tub cream cheese. Tub cream cheese often makes frosting loose and runny.

Butter and powdered sugar: The butter should be softened but not greasy. Start with the lower amount of powdered sugar for a softer frosting, then add more only if you need it firmer.

Vanilla, salt, and optional lemon juice: Vanilla adds warmth, salt keeps the frosting from tasting flat, and a little lemon juice brightens the cream cheese tang.

How to Bake It Without Drying It Out

The batter is supposed to be thick, not airy. The cake is supposed to come out with moist crumbs, not a bone-dry tester. And the frosting only spreads cleanly if the cake is fully cool.

Do not worry if the batter looks thicker than vanilla cake batter; that is normal here. You do not need a stand mixer for the cake itself. A whisk, a spatula, and two bowls are enough; save the hand mixer for the frosting.

Step-by-step spice cake guide showing dry ingredients, wet ingredients, batter, baked 9x13 cake, and frosting being spread.
Because this is a simple two-bowl spice cake, the biggest wins are mixing gently, spreading the batter evenly, and waiting until the cake is cool before frosting.

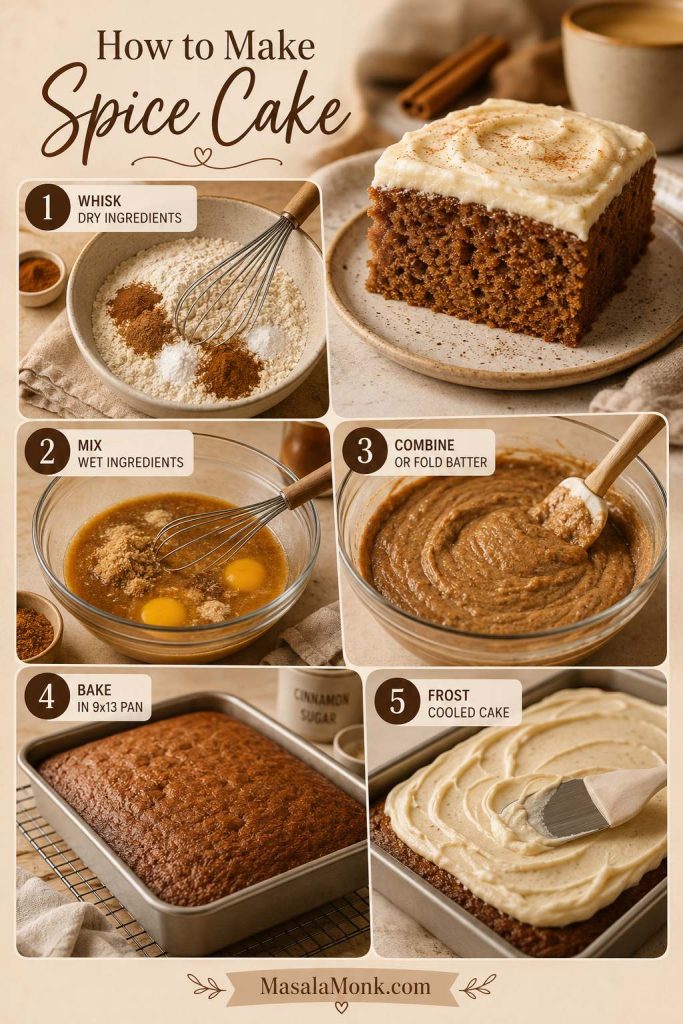
1. Prepare the Pan So the Cake Releases Cleanly

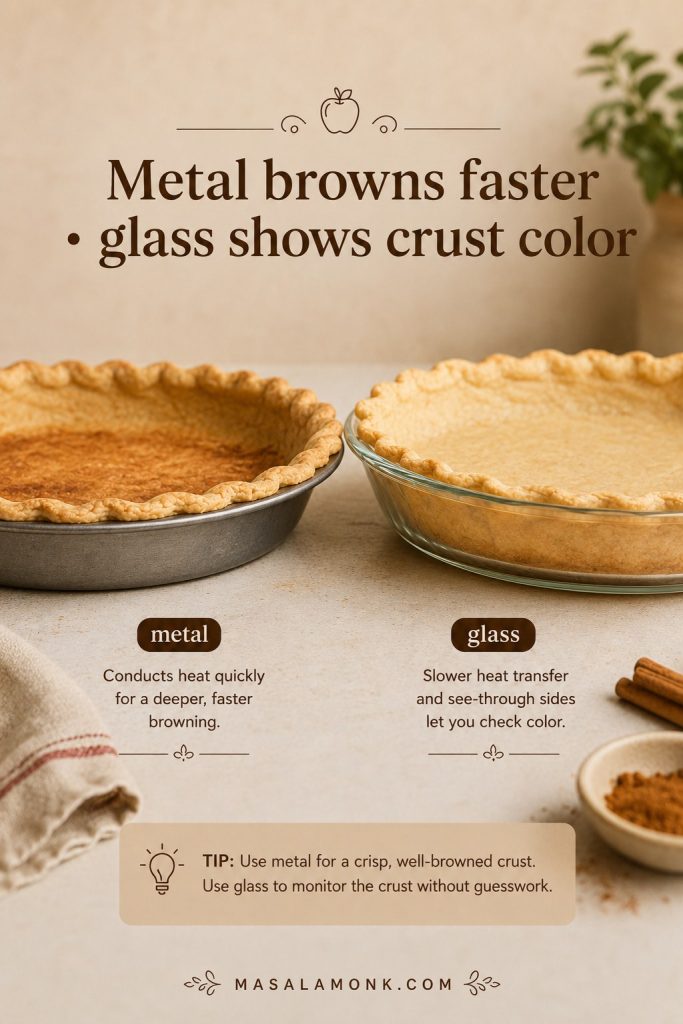
Heat the oven to 350°F / 177°C. Grease a 9×13-inch baking pan. A metal pan usually bakes most evenly. For easier lifting and cleaner slices, line the pan with parchment paper, leaving a little overhang on two sides. If you plan to serve the cake directly from the pan, parchment is optional.

2. Whisk the Spices Evenly Into the Flour

In a large bowl, whisk the flour, baking powder, baking soda, salt, cinnamon, ginger, nutmeg, allspice, cloves, and optional cardamom. The dry mix should look evenly tan from the spices. Take a few extra seconds here; evenly mixed spices mean every slice tastes balanced instead of giving you one bland bite and one clove-heavy bite.

3. Mix the Wet Ingredients Until Glossy

In another bowl, whisk the brown sugar, oil, melted butter, applesauce, buttermilk, eggs, vanilla, and optional molasses until smooth. The wet mix should look glossy. The melted butter should be slightly cooled, and the eggs, applesauce, and buttermilk should not be fridge-cold. If the butter forms tiny bits, the cake will usually still bake, but the batter mixes more evenly when the ingredients are closer in temperature.

4. Fold Gently So the Cake Stays Tender

Pour the wet mixture into the dry ingredients. Fold with a spatula or whisk gently until no dry flour pockets remain. The batter should look thick, glossy, and pourable. Once no flour streaks remain, you have done enough; next, use the doneness cues instead of overbaking for a dry tester.

Spice cake batter lifting from a spatula over a mixing bowl, showing a thick glossy pourable texture.
Once the batter looks thick, glossy, and pourable, stop mixing; continuing too long can make the finished spice cake dense.

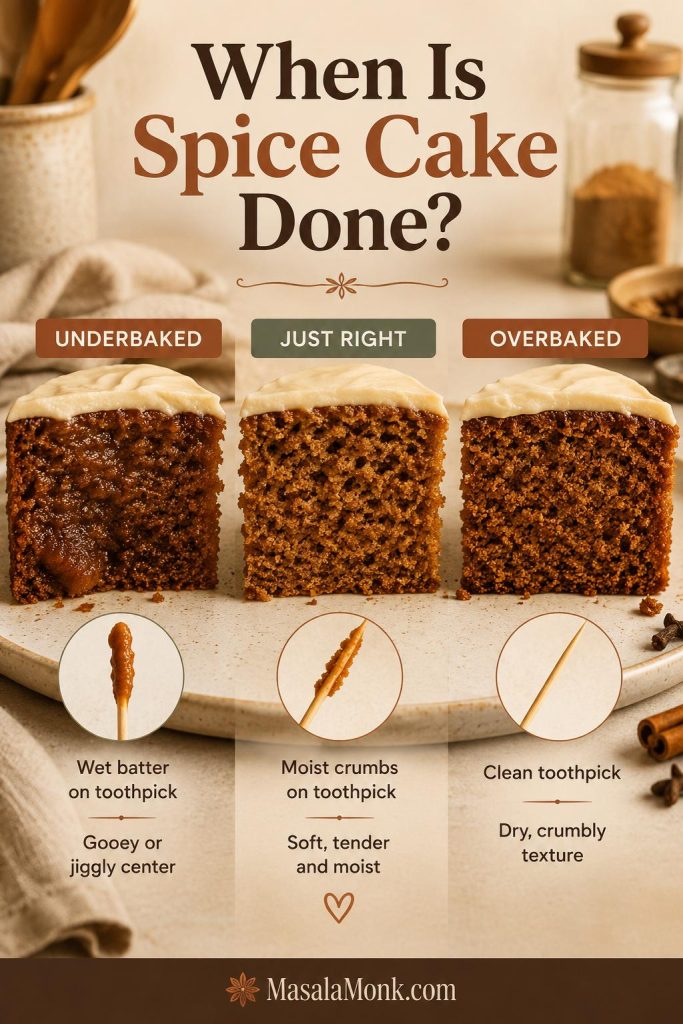
5. Bake Until the Center Is Set but Still Moist

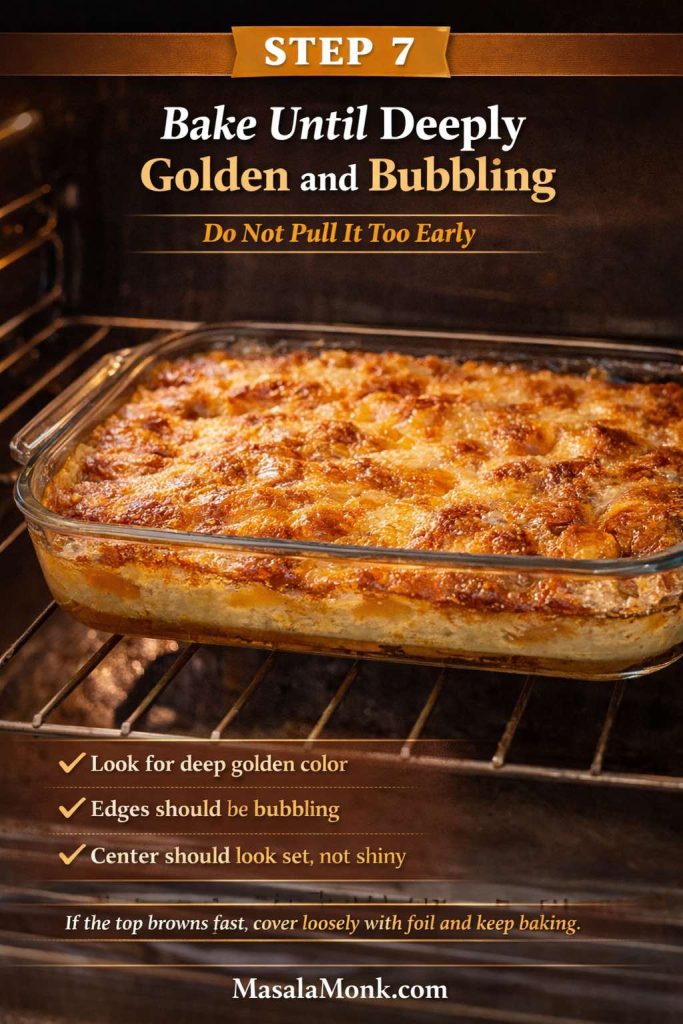
Spread the batter into the prepared pan and smooth the top. Bake for 35–40 minutes in a metal pan, checking near the 33-minute mark. Glass or ceramic pans may take a little longer. This is the point where the kitchen starts smelling better than the effort you put in, but trust the center of the cake more than the edges.

The cake is done when the center springs back lightly, the edges are just beginning to pull from the pan, and a toothpick inserted into the middle comes out with a few moist crumbs.

Look for moist crumbs, not a dry tester. A few crumbs mean the cake will stay softer once it cools.

Doneness guide comparing underbaked, just-right, and overbaked spice cake pieces with toothpick crumb examples.
A few moist crumbs on the toothpick are ideal; however, waiting for a completely dry tester can push spice cake toward overbaked.

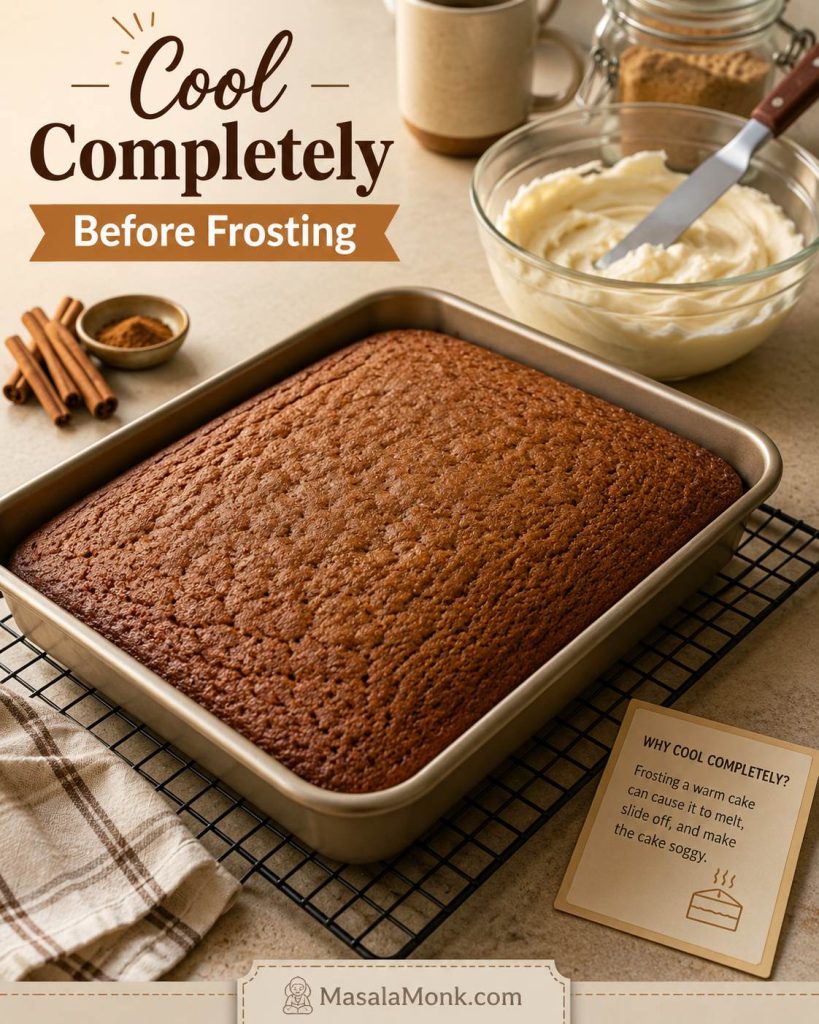
6. Cool Fully Before Frosting

Let the cake cool in the pan. For a 9×13 cake, plan on at least 2 hours of cooling before frosting. The center should feel room temperature, not just the surface. The wait feels annoying, but it keeps the cream cheese frosting smooth instead of melty.
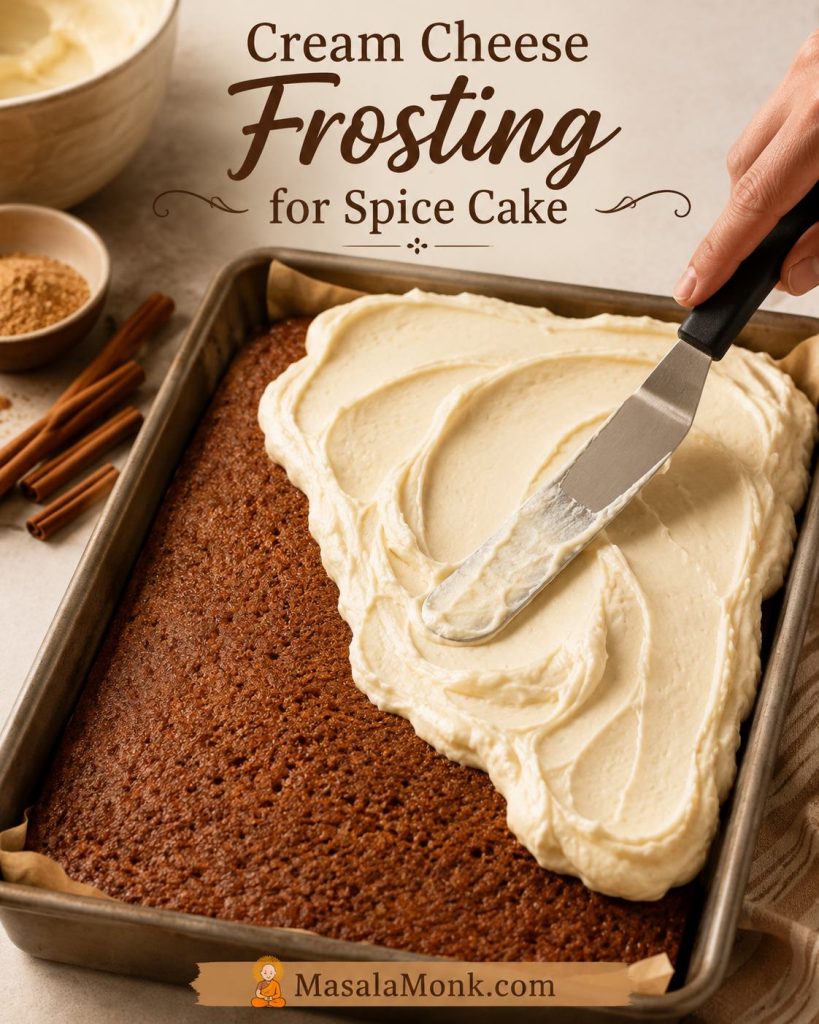
Unfrosted spice cake cooling in a 9x13 pan on a wire rack with a bowl of frosting and spatula nearby.
Before adding cream cheese frosting, let the 9×13 spice cake cool completely so the frosting stays smooth, thick, and spreadable instead of melting into the crumb.

7. Frost and Slice

Spread the frosting over the cooled cake. It should hold soft swoops without running. For clean slices, chill the cake for 20–30 minutes before cutting. For the best eating texture, let refrigerated slices sit briefly at room temperature before serving.

Cream Cheese Frosting for Spice Cake

Cream cheese frosting is the classic finish because it adds tang, not just sweetness. It cuts through the brown sugar and spice so the cake tastes rich without feeling heavy.

Cream cheese frosting being spread with an offset spatula over a cooled spice cake in a rectangular pan.
Cream cheese frosting works especially well here because its cool tang balances brown sugar, cinnamon, ginger, and cloves without making the cake too sweet.

The best bite is warm spice first, then brown sugar, then that cool cream-cheese tang at the end. For a 9×13 cake, you only need a generous spreadable layer. Brown butter cream cheese frosting makes it more special, caramel leans sweeter and richer, maple gives it an old-fashioned fall flavor, and a simple vanilla glaze works better for Bundt or loaf cake. For a tea-cake finish, skip the frosting and dust the top with powdered sugar.

Want the special-occasion version? Brown the butter, cool it until soft but not melted, then use it in the frosting for a deeper, nutty finish.

If you want a non-cream-cheese option for cupcakes or a sweeter celebration-style finish, our buttercream frosting recipe is the better direction.

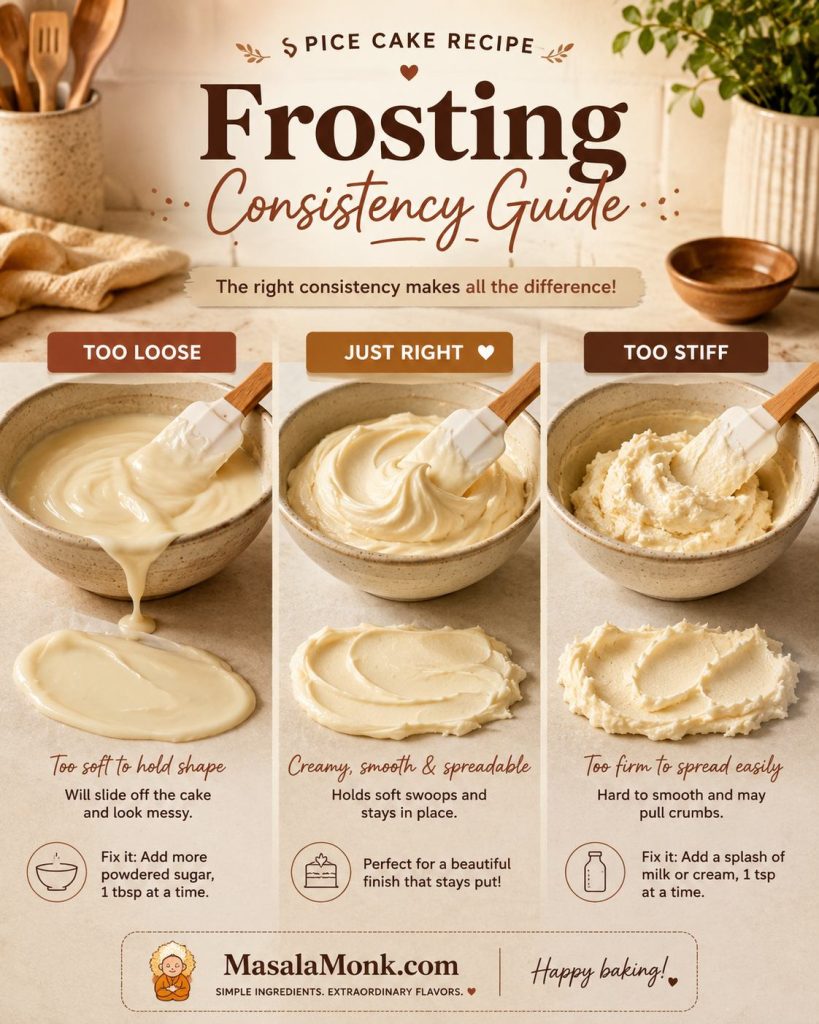
How to Keep the Frosting Smooth

  • Use full-fat block cream cheese, not tub cream cheese.
  • Soften the cream cheese and butter, but keep them cool enough that they are not shiny or greasy.
  • Beat the cream cheese first until smooth, then add the butter and beat again.
  • Add powdered sugar gradually. Start with 2½ cups for a softer frosting; add more if you need it firmer.
  • Add a pinch of salt and a little lemon juice to balance sweetness.
  • If the frosting becomes too soft, chill it for 15–20 minutes, then beat briefly again.
  • Make sure the cake is fully cool before spreading it on top. If it still turns loose, use the troubleshooting fixes.
Frosting consistency guide with three bowls showing too loose, just right, and too stiff cream cheese frosting textures.
If frosting is too loose, it slides; if it is too stiff, it pulls crumbs, so aim for a creamy texture that holds soft swoops.

Pan Sizes: 9×13, Layers, Bundt, Loaf, and Cupcakes

This recipe is written first as a 9×13 sheet cake; the layer, Bundt, loaf, and cupcake notes are adaptations, not the main promise.

A 9×13 sheet cake is the easiest version, but the same flavor can work in other formats if you watch the fill level and start checking early. If you are baking for a potluck, stay with the 9×13. It is the least fussy version and the one most likely to disappear square by square.

Pan size guide with a large 9x13 spice cake and smaller examples of round layers, Bundt cake, cupcakes, and loaf cake.
The 9×13 pan gives the easiest spice cake slices; however, the batter can also work in layers, Bundt pans, cupcakes, or a loaf when you adjust carefully.

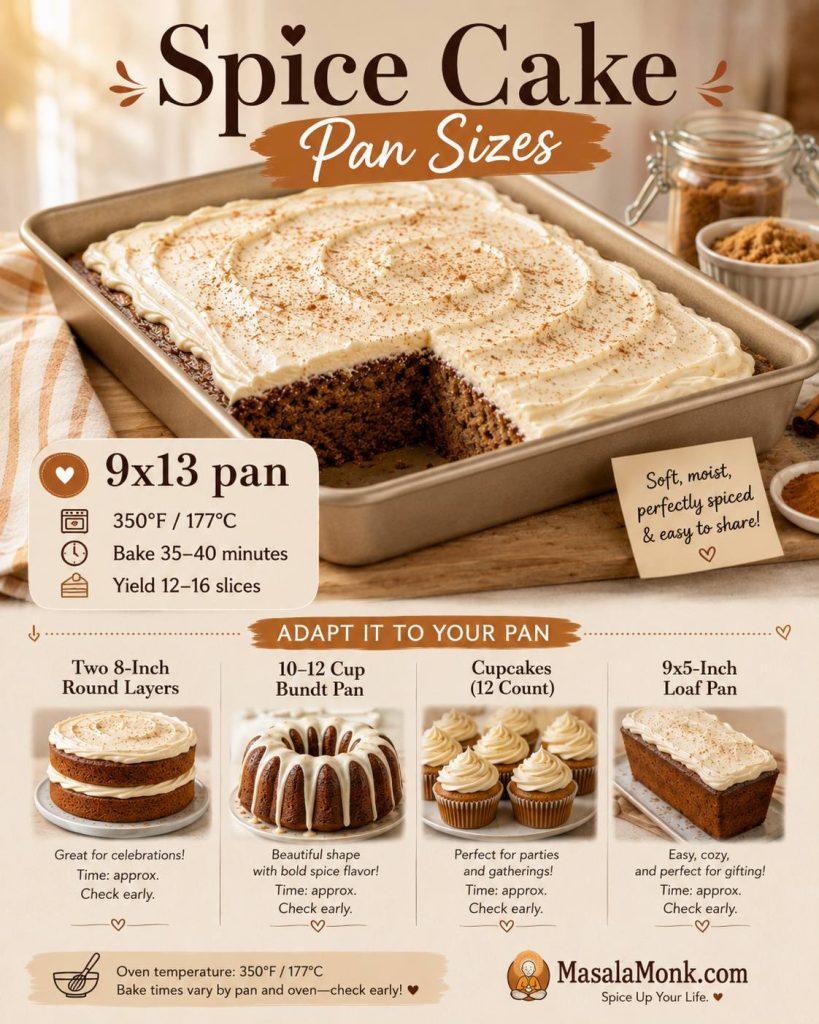
Spice Cake Baking Times by Pan

FormatPanOvenApprox. bake timeNotes
Sheet cake9×13-inch metal pan350°F / 177°C35–40 minEasiest default. Glass or ceramic may take longer.
Layer cakeTwo 9-inch rounds350°F / 177°C26–32 minLine pans with parchment; make extra frosting.
Layer cakeTwo 8-inch rounds350°F / 177°C32–38 minLayers will be deeper, so check centers carefully.
Bundt cake10–12 cup Bundt pan350°F / 177°C50–65 minFill no more than two-thirds to three-quarters full.
CupcakesStandard muffin tin350°F / 177°C18–21 minFill cups about two-thirds full.
Loaf cake9×5-inch loaf pan, filled no more than two-thirds full350°F / 177°C48–55 minThis full recipe makes more batter than one loaf, so bake extra batter as cupcakes or use a second loaf pan.

Use the times as starting points, not promises. The cake is ready when the center springs back and a toothpick shows moist crumbs.

Bundt Cake Release Tip

Bundt cake tip: Use baking spray with flour, or brush the pan with softened butter and dust it with flour. Get into every groove. Let the baked cake rest in the pan for 10–15 minutes before turning it out.

How to Make Boxed Spice Cake Mix Taste Homemade

Boxed spice cake mix can work when time is short. Use milk instead of water, add ½ cup sour cream or applesauce, boost the spices, and finish with homemade cream cheese frosting. For the from-scratch version, jump to the full recipe card.
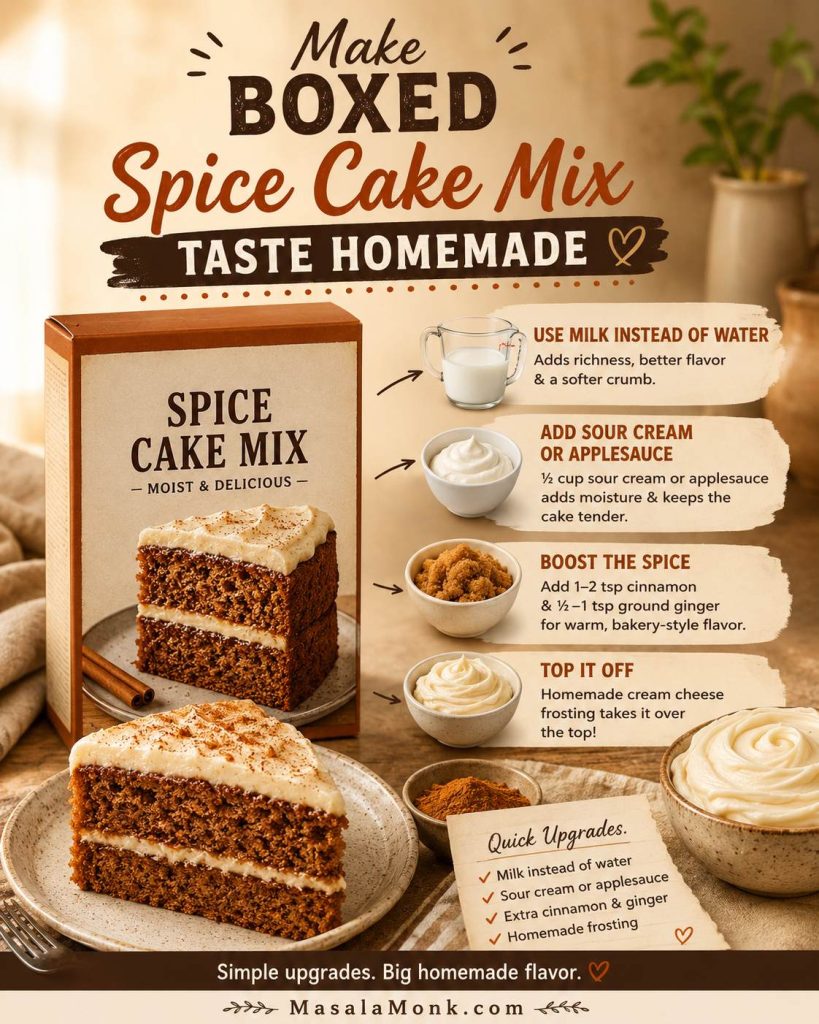
Boxed spice cake mix upgrade guide with milk, sour cream or applesauce, extra spices, and cream cheese frosting suggestions.
For a shortcut version, boxed spice cake mix tastes more homemade when you use dairy, boost the warm spices, and finish with real cream cheese frosting.
Replace or addHow muchWhy it helps
Milk instead of waterUse the same amount listed on the boxGives richer flavor.
Sour cream, yogurt, or applesauceUp to ½ cupHelps the cake taste less box-mix dry.
Cinnamon + ginger½ tsp cinnamon + ¼ tsp gingerWarms up a mild spice mix.
Homemade cream cheese frostingUse the frosting from this recipeThe biggest upgrade for flavor and texture.

Keep the upgrades modest. Too much extra moisture can make the center heavy, especially if you also add pumpkin or fruit. The from-scratch cake is still the better version when flavor and texture matter; the boxed version is the quick shortcut.

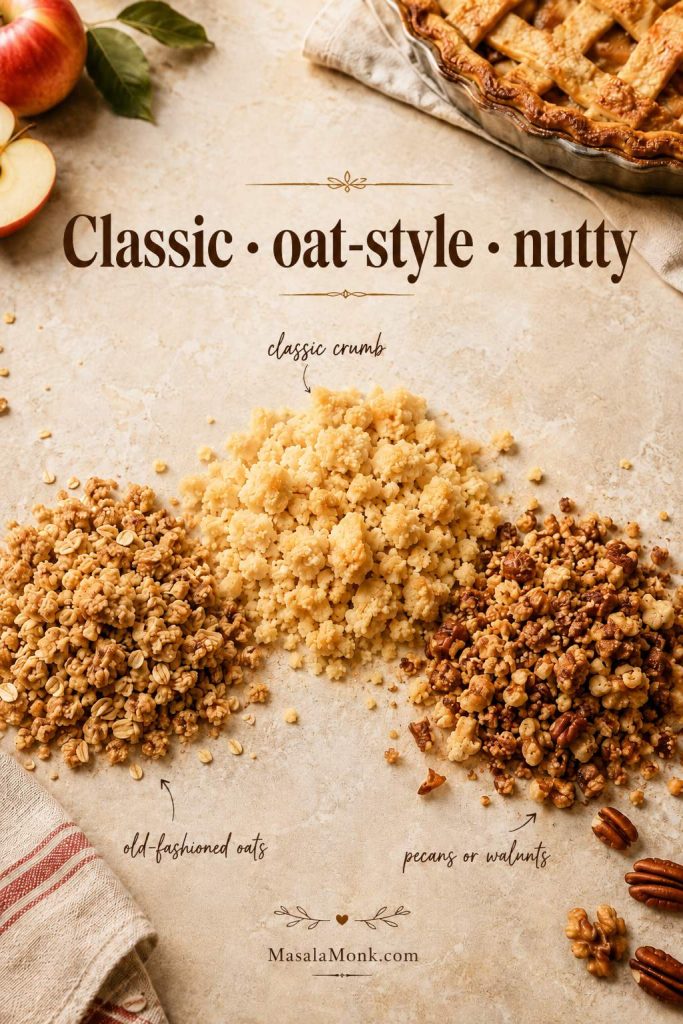
Variations: Apple, Molasses, Nuts, Raisins, Chai, and More

Choose the version based on the slice you want: classic and cozy, deeper with molasses, fruitier with apple, or nutty with a little crunch. The cake stays most reliable when you change one major thing at a time; if you add fruit or extra moisture, keep the gummy-center fixes in mind.
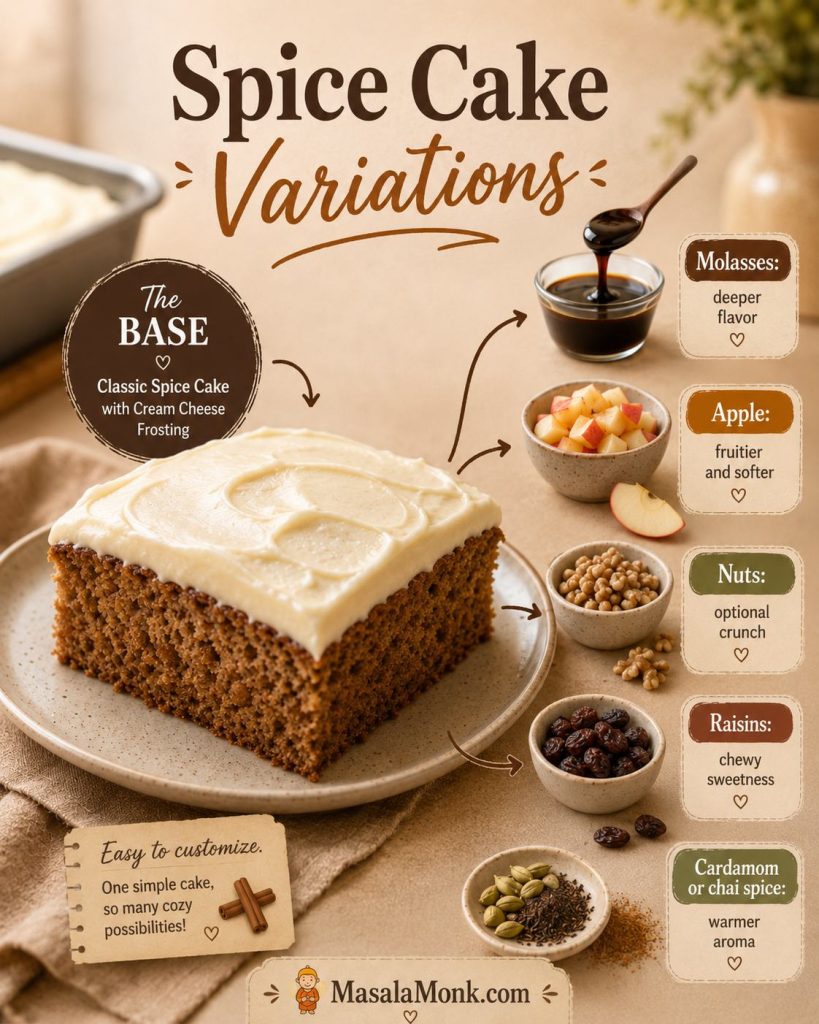
Spice cake variations guide with a plain frosted cake square and optional molasses, apple, nuts, raisins, and cardamom or chai spice cues.
Start with the plain frosted base cake, then choose one variation if you want deeper molasses flavor, fruitier apple notes, optional crunch, raisins, or warmer aroma.
VariationAmountKeep in mind
Molasses1 tablespoonToo much pushes the cake toward gingerbread.
Chopped apple1 cup, finely choppedMore can make the center gummy.
Nuts¾ cupToast and cool first for better flavor.
Raisins½–¾ cupSoak if dry, then drain and pat dry.
Cardamom¼ teaspoonToo much can taste perfume-like.

Molasses gives the deepest old-fashioned version, chopped apple makes the cake softer and fruitier, and toasted nuts are the easiest way to add contrast without changing the batter much. These are small changes, not a second recipe; the safest upgrades are the ones that add flavor without shifting the batter’s moisture too far.

For a chai-style direction, add the cardamom and a tiny pinch of black pepper. If you want tea-forward flavor, that becomes a separate chai cake rather than classic spice cake.

Gluten-Free and Eggless Notes

A good 1:1 gluten-free baking flour may work, especially if it contains xanthan gum, but expect a slightly more fragile cake and let it cool fully before slicing.

I would not make this exact batter eggless by simply removing the eggs. For best results, use an eggless spice cake formula designed around yogurt, vinegar and baking soda balance, or another tested binder.

What to Serve with Spice Cake

For a coffee slice, serve the cake plain with its cream cheese frosting and a hot cup of coffee or black tea. For a holiday dessert, add brown butter frosting, toasted pecans, or a light caramel drizzle. If you are taking it to a potluck, keep it in the 9×13 pan, chill until the top sets, and slice before serving.

Frosted spice cake square on a plate with coffee or chai, whipped cream, vanilla ice cream, and optional toasted nuts nearby.
To make a simple slice feel dessert-ready, serve spice cake with coffee, chai, whipped cream, vanilla ice cream, or optional toasted nuts on the side.

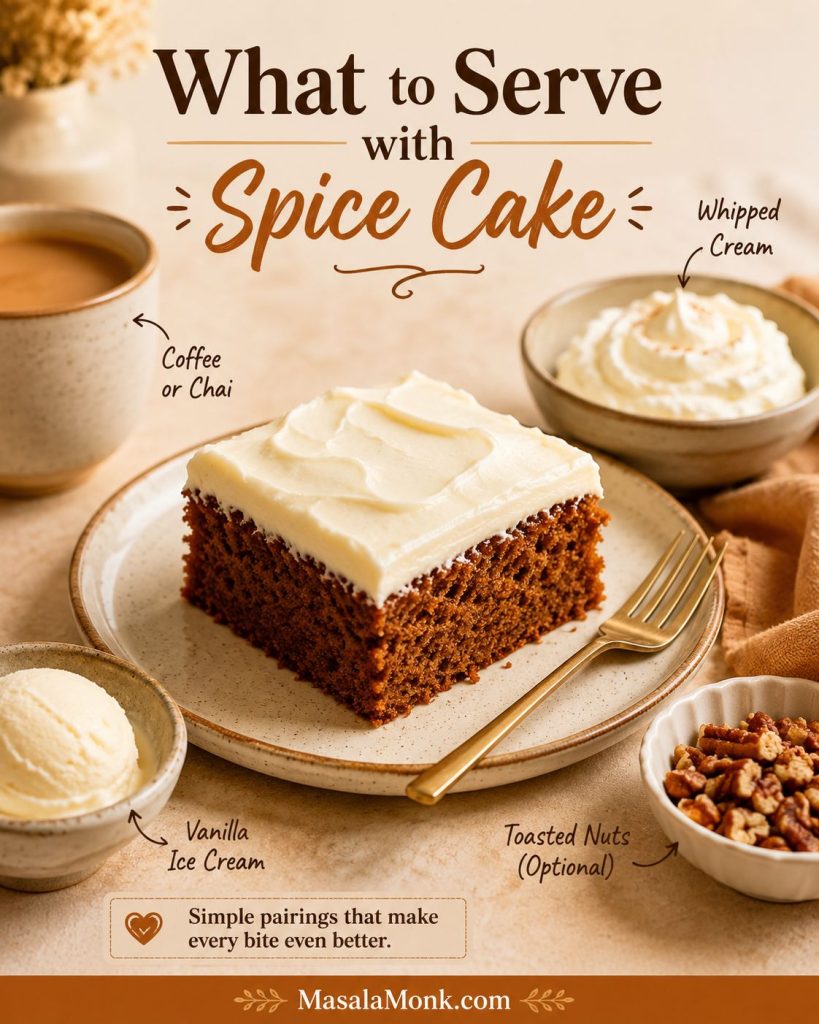
That is the sweet spot of this cake: casual enough for a weekday coffee slice, but dressed up enough once the cream cheese frosting goes on.

For a lighter finish, skip the frosting and serve the cake with homemade whipped cream or powdered sugar. For a fall dinner, a scoop of vanilla ice cream or a spoon of warm apple compote makes it feel more like dessert without much extra work.

Storage, Freezing, and Make-Ahead Tips

This is a good make-ahead dessert because the spices settle and deepen after a few hours. The next-day slice, cold from the fridge for a few minutes and then softened on the plate, is one of the quiet pleasures of this cake.

Cream-cheese-frosted spice cake should be refrigerated within 2 hours and stored covered for 3–4 days. Refrigerate it sooner if your kitchen is hot. For general food-storage safety, see the FDA’s food storage guidance.
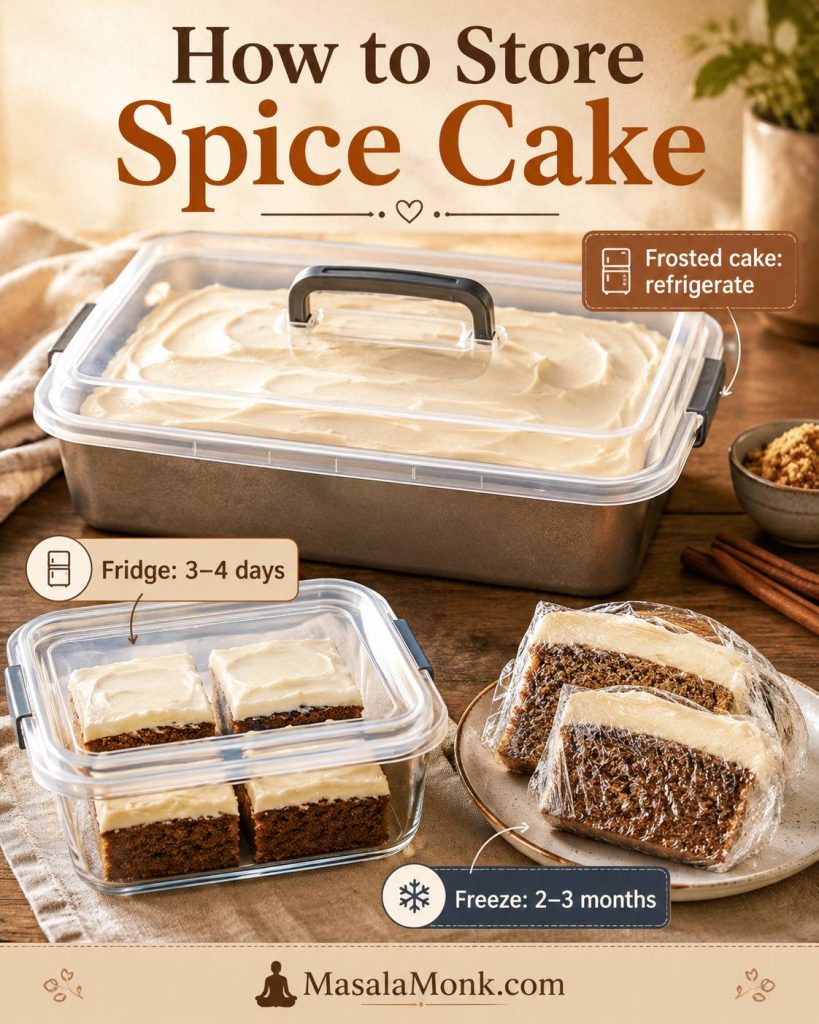
Storage guide showing frosted spice cake in a covered pan, slices in an airtight container, and wrapped slices for freezing.
Because the cake has cream cheese frosting, refrigerate frosted slices; for longer storage, wrap individual pieces well before freezing.
SituationBest method
Unfrosted cakeWrap tightly and keep at room temperature for 1–2 days.
Frosted cakeCover tightly or store in an airtight container and refrigerate for 3–4 days.
Make aheadBake one day ahead, cool completely, cover, and frost before serving or the next day.
Freezing unfrosted cakeWrap tightly and freeze for up to 2–3 months.
Freezing frosted slicesFreeze uncovered until firm, then wrap tightly. Thaw in the refrigerator; frosting texture may soften slightly.
Serving from fridgeLet slices sit briefly at room temperature so the cake and frosting soften.

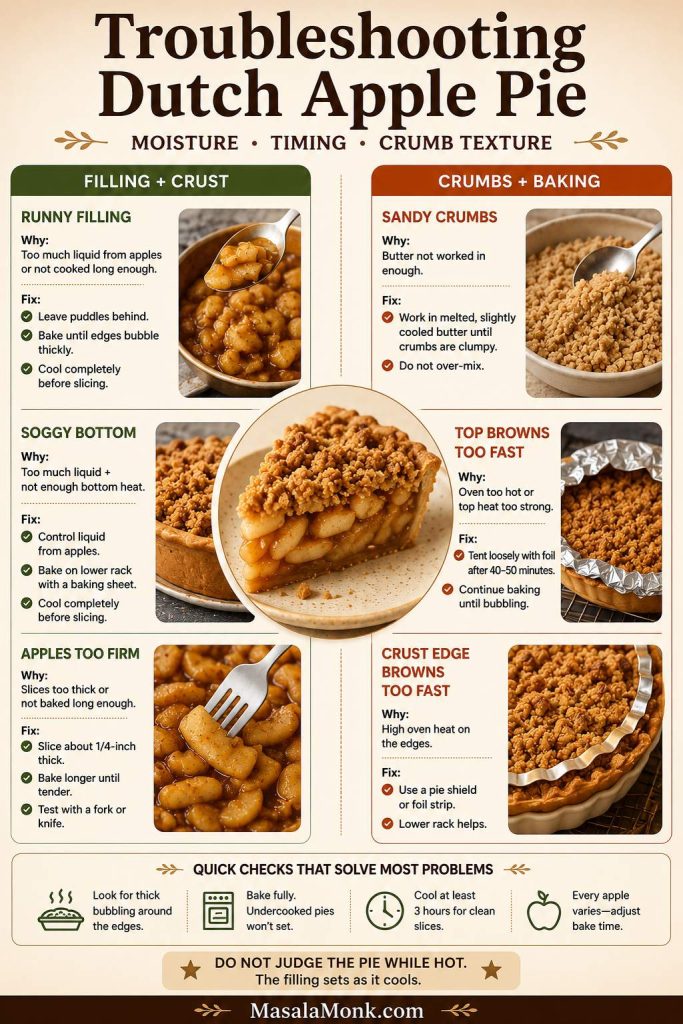
Troubleshooting Dry, Dense, Gummy, or Sunken Cake

Most baking mistakes are not disasters; they are clues. If something went wrong, start with what you can fix now, then adjust the next bake.

Cake Texture Problems

Dry, dense, gummy, oily, or sunken spice cake usually comes back to flour measurement, mixing, bake time, pan choice, or add-ins. Use this table to rescue the current cake and improve the next one.
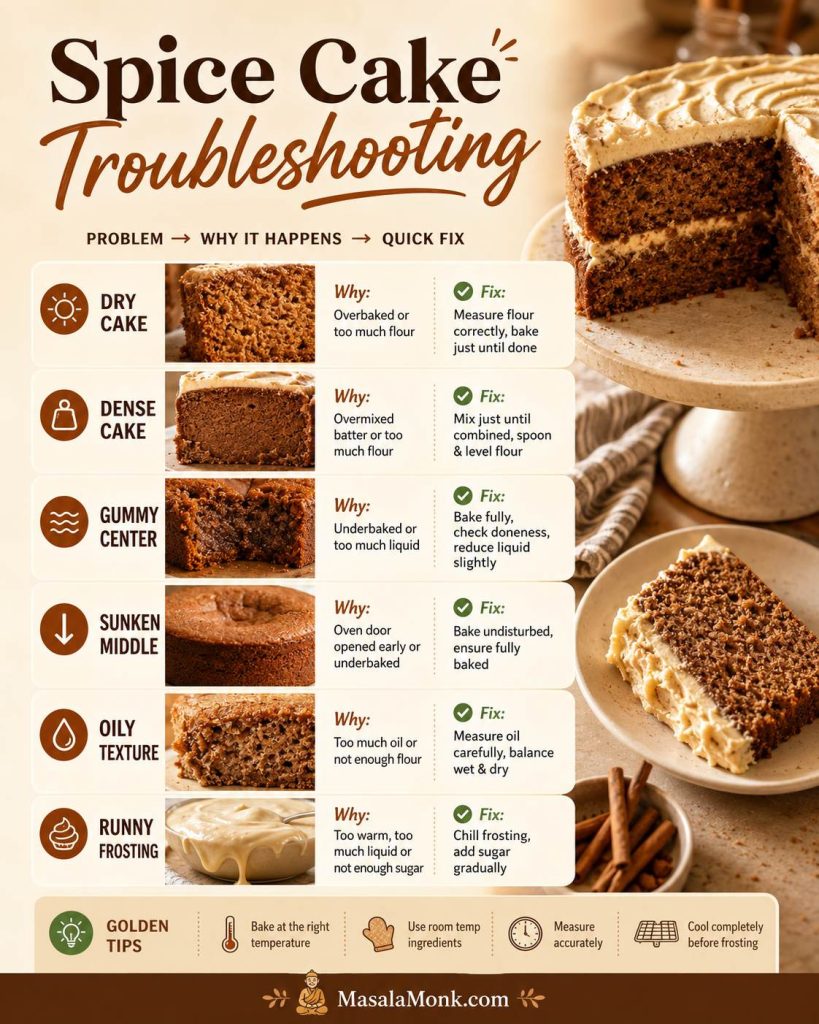
Troubleshooting guide listing dry cake, dense cake, gummy center, sunken middle, oily texture, and runny frosting with quick fixes.
When spice cake turns dry, dense, gummy, oily, sunken, or messy, the cause usually comes back to baking time, mixing, measuring, or frosting temperature.
ProblemFix nowFix next time
Dry cakeServe with extra frosting, whipped cream, caramel, or warm apple compote.Measure flour by weight and pull the cake when the toothpick has moist crumbs.
Dense or heavy cakeLet slices come to room temperature and serve with coffee, whipped cream, or a lighter topping so the cake feels less heavy.Stop when no flour streaks remain; use room-temperature wet ingredients.
Gummy centerIf unfrosted and still warm, return it to the oven loosely covered.Use a metal 9×13 pan, keep add-ins modest, and check the true center.
Cake tastes oilyChill before slicing and serve with tangy frosting to balance richness.Measure oil in a liquid cup and bake until the center is set.
Sunken middleIf the center is underbaked, avoid serving that part; cut clean squares from the set edges and frost or dust them lightly.Check leavening freshness and avoid opening the oven early.
Bland spice flavorAdd a light cinnamon dusting or serve with brown butter frosting.Use fresh spices and consider the optional molasses.

Cream Cheese Frosting Problems

Frosting issues are usually easier to fix than cake texture problems. Temperature matters most: warm cake melts frosting, while overly soft cream cheese or butter can make the frosting loose.

ProblemFix nowFix next time
Runny frostingChill 15–20 minutes, then beat briefly; add powdered sugar if needed.Use block cream cheese and cooler butter.
Frosting melts on cakeChill the cake until the frosting firms, then smooth it again.Cool the cake completely before frosting.

Before You Bake the Next Spice Cake

Before you bake: measure the flour carefully, use fresh spices, mix gently after adding flour, and let the cake cool completely before frosting. Those four details prevent most spice cake problems.

Once those basics are handled, this is a forgiving cake: mix it gently, bake it until the center is just set, cool it fully, and frost it right in the pan. No layers, no piping, no drama — just spiced squares that taste better than the effort they ask from you.

Moist 9×13 Spice Cake Recipe

This 9×13 spice cake is the easy pan version: warmly spiced, brown-sugary, simple to slice, and finished with a generous cream cheese frosting.

Serve it when you want the comfort of carrot cake or gingerbread, but without shredded vegetables, heavy molasses flavor, or layer-cake fuss.

Recipe card for moist 9x13 spice cake showing a frosted cake square, baking temperature, bake time, yield, and storage reminder.
Use this quick reference before baking so the key details stay clear: 9×13 pan, 350°F oven, 35–40 minutes, 12–16 slices, and cream cheese frosting.
Prep Time
25 minutes
Cook Time
35–40 minutes
Cooling Time
At least 2 hours
Total Time
About 3 hours
Yield
12–16 slices

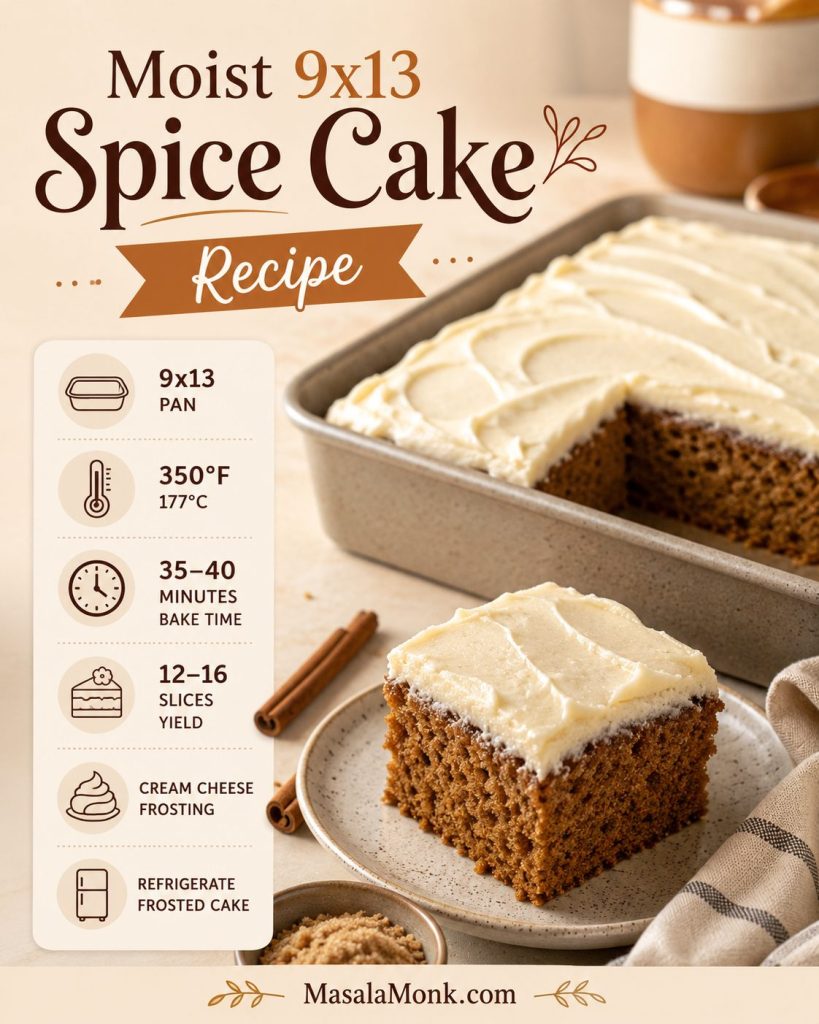
Timing: Plan on about 25 minutes prep, 35–40 minutes baking, and at least 2 hours cooling; total time is about 3 hours before serving. Bake time is based on a metal 9×13 pan; glass or ceramic pans may need a few extra minutes.

Equipment

  • 9×13-inch baking pan, preferably metal
  • 2 mixing bowls
  • Whisk
  • Spatula
  • Hand mixer or stand mixer for frosting
  • Cooling rack
  • Parchment paper, optional
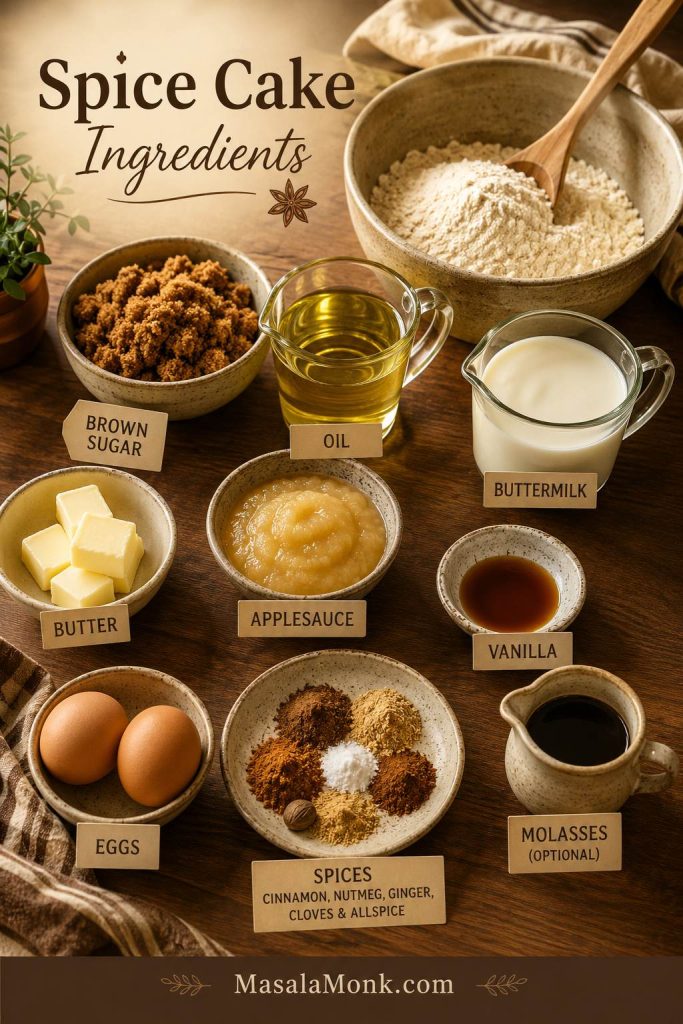
Ingredients

For the Spice Cake

  • 2½ cups all-purpose flour / 313 g
  • 1½ teaspoons baking powder
  • ½ teaspoon baking soda
  • ¾ teaspoon fine salt
  • 2½ teaspoons ground cinnamon
  • 1 teaspoon ground ginger
  • ¾ teaspoon ground nutmeg
  • ½ teaspoon ground allspice
  • ¼ teaspoon ground cloves
  • ¼ teaspoon ground cardamom, optional
  • 1½ cups packed brown sugar / 300 g
  • ½ cup neutral oil / 120 ml
  • ¼ cup unsalted butter, melted and slightly cooled / 57 g
  • ½ cup unsweetened applesauce, room temperature if possible / 120 g
  • ¾ cup buttermilk, room temperature / 180 ml
  • 3 large eggs, room temperature
  • 2 teaspoons vanilla extract
  • 1 tablespoon molasses, optional / 20 g

For the Cream Cheese Frosting

  • 8 oz block cream cheese, softened / 226 g
  • ½ cup unsalted butter, softened / 113 g
  • 2½–3 cups powdered sugar / 300–360 g, sifted if lumpy
  • 1 teaspoon vanilla extract
  • Pinch of salt
  • 1 teaspoon lemon juice, optional, for extra tang

Instructions

  1. Prepare the oven and pan. Heat the oven to 350°F / 177°C. Grease a 9×13-inch baking pan and line with parchment if you want to lift the cake out for slicing.
  2. Mix the dry ingredients. In a large bowl, whisk the flour, baking powder, baking soda, salt, cinnamon, ginger, nutmeg, allspice, cloves, and optional cardamom until evenly combined.
  3. Mix the wet ingredients. In a separate bowl, whisk the brown sugar, oil, melted butter, applesauce, buttermilk, eggs, vanilla, and optional molasses until smooth. The eggs, applesauce, and buttermilk should not be fridge-cold.
  4. Combine. Pour the wet ingredients into the dry ingredients. Fold gently until no dry flour pockets remain. The batter should be thick but pourable. Stop once no flour streaks remain.
  5. Bake. Spread the batter into the prepared pan. Bake for 35–40 minutes in a metal pan, or until the center springs back lightly and a toothpick inserted into the middle comes out with a few moist crumbs. Glass or ceramic pans may take longer.
  6. Cool. Let the cake cool completely before frosting, at least 2 hours for a 9×13 cake. Warm cake will melt the frosting.
  7. Make the frosting. Beat the cream cheese until smooth. Add the butter and beat again. Add 2½ cups powdered sugar, vanilla, salt, and optional lemon juice. Beat until creamy and spreadable, then stop. Add more powdered sugar if you want a firmer frosting.
  8. Frost and serve. Spread frosting over the cooled cake. Chill briefly for cleaner slices, then serve. Let refrigerated slices sit at room temperature for a softer cake.

Recipe Notes

  • Buttermilk substitute: Add 2 teaspoons lemon juice or vinegar to a measuring cup, then add milk until you reach ¾ cup total. Stir and let stand for 5–10 minutes before using.
  • No applesauce? Replace it with the same weight of plain full-fat yogurt or sour cream.
  • Frosting amount: The frosting quantity is enough for a generous 9×13 sheet cake layer. For a layer cake or piping, make 1½ to 2 times the frosting.
  • Clean slices: Frost only after the cake is fully cool, then chill the frosted cake for 20–30 minutes before cutting.
  • Storage: Because this cake has cream cheese frosting, refrigerate the frosted cake within 2 hours. Store covered in the refrigerator for 3–4 days and let slices sit briefly at room temperature before serving.
  • Layer cake: Divide between two greased and parchment-lined 9-inch round pans and start checking around 26 minutes.
  • Cupcakes: Fill liners two-thirds full and bake for about 18–21 minutes.
  • Bundt cake: Use a 10–12 cup Bundt pan, grease it thoroughly, and do not overfill. Start checking around 50 minutes.
  • Loaf cake: Fill a 9×5-inch loaf pan no more than two-thirds full. This full recipe makes more batter than one loaf, so bake extra batter as cupcakes or use a second loaf pan.
  • Salted butter: You can use salted butter in the cake or frosting; reduce the added salt slightly.

FAQs About Spice Cake

What makes spice cake different from carrot cake?

Spice cake is defined by baking spices. Carrot cake is defined by grated carrot and often includes nuts, raisins, pineapple, or coconut. The two can share cinnamon, ginger, and nutmeg, but carrot cake has a vegetable-based texture and spice cake does not need carrots.

Which spices are best in spice cake?

Cinnamon, ginger, nutmeg, allspice, and cloves are the classic mix. Cinnamon should lead, cloves should stay subtle, and the spices should be fresh.

Is spice cake hot or spicy?

Think cinnamon warmth, not chili heat. The flavor comes from baking spices, not hot pepper.

Is spice cake the same as gingerbread?

No. Gingerbread is usually darker, more ginger-forward, and more molasses-heavy. Spice cake is softer, sweeter, and more balanced across several spices.

What is the difference between spice cake and pumpkin spice cake?

Spice cake is led by the spice blend itself. Pumpkin spice cake includes pumpkin purée, which changes the moisture, density, color, and flavor of the batter.

Can I use pumpkin pie spice instead of individual spices?

Pumpkin pie spice works as a shortcut. Replace the listed spices with a good blend, knowing the final flavor depends on that blend.

Can I make spice cake without applesauce?

Plain full-fat yogurt or sour cream can replace the applesauce in the same amount. The cake will be slightly tangier and a little less apple-soft, but it will still have enough moisture if the rest of the recipe stays unchanged.

Can I make spice cake ahead of time?

This is actually a good make-ahead cake. Bake it one day ahead, cool it completely, cover it well, and frost it the next day or before serving. The spices often taste more settled after the cake rests overnight.

What frosting goes best with spice cake?

Cream cheese frosting is the classic choice because it adds tang, not just sweetness. A vanilla glaze works better for Bundt or loaf cake.

Why did my spice cake turn out dry?

The most common reasons are too much flour, overbaking, or waiting until the toothpick comes out completely dry. Measure flour by weight if possible and remove the cake when the center is set but the toothpick still has a few moist crumbs.

Can spice cake be baked as cupcakes?

It works well as cupcakes. Fill standard liners about two-thirds full and bake at 350°F / 177°C for about 18–21 minutes. Start checking early because cupcakes dry out faster than a sheet cake.

Should cream cheese frosted spice cake be refrigerated?

Cream-cheese-frosted spice cake should be refrigerated within 2 hours and stored covered for 3–4 days. Let slices sit briefly at room temperature before serving.

When the cake is soft, the spices are fresh, and the frosting has that little cream-cheese tang, this is the kind of simple dessert that disappears slice by slice from the pan. It belongs with coffee, on holiday tables, and on ordinary weekends when cake sounds like a perfectly good plan.

If you try it, I would love to know whether your favorite slice was same-day soft or next-day spiced and settled.

Back to top

Posted on Leave a comment

Cream Puff Recipe

Golden cream puffs filled with vanilla cream and dusted with powdered sugar on an ivory plate.

Cream puffs look like bakery-case magic, but the dough is built from simple ingredients: water, milk, butter, flour, eggs, and a little patience. The best cream puffs feel light and crisp when you pick them up, then give way to soft vanilla cream inside. The real secret is knowing what the choux pastry should look like before it goes into the oven.

This cream puff recipe gives you golden choux pastry shells, a vanilla cream filling, and the practical cues that help the puffs rise, hollow out, and stay crisp enough to fill. You will learn when the dough is ready, how dark the shells should bake, what cream to use inside, why cream puffs collapse, and how to make them ahead without ending up with soggy pastry.

The reward is the contrast: a crisp, airy shell on the outside and cool vanilla cream tucked into the center. The method may feel strange the first time, especially when the dough looks rough, then smooth, then briefly broken after the eggs go in. That is normal. Once you understand the texture cues, cream puffs become much less intimidating.

Quick Answer: How to Make This Cream Puff Recipe

Cream puffs are made from choux pastry, a cooked dough that rises because steam expands inside it. To make them, cook water, milk, butter, sugar, salt, and flour into a thick paste, then beat in eggs gradually until the dough is glossy, smooth, and ready for the piping bag.

Pipe the dough into small mounds, bake until the shells puff and turn golden, then vent and dry them so they stay hollow. Once the shells cool completely, fill them with whipped cream, pastry cream, diplomat cream, custard, or ice cream.

The biggest mistake is underbaking. The shells need enough time to dry and set, not just enough time to puff. If they come out pale and soft, they may look done for a moment, then collapse as they cool.

Quick success cue: cream puff shells should be golden, light for their size, hollow inside, and dry enough to hold their shape before you add the filling.

Cream Puff Recipe Snapshot

Yield:
24–28 medium cream puffs
Prep time:
35–45 minutes
Bake time:
30–35 minutes
Cooling and drying:
30–45 minutes
Total with whipped cream:
About 1 hour 45 minutes to 2 hours, depending on cooling time
Total with pastry cream:
About 4 hours, including chilling
Main technique:
Choux pastry
Easiest first filling:
Vanilla whipped cream

Whipped cream is the easiest filling for a first batch because it takes only a few minutes. Pastry cream gives a more classic pastry-shop result. Diplomat cream, which is pastry cream folded with whipped cream, tastes richer while still feeling soft and airy.

What Are Cream Puffs?

Cream puffs are round pastry shells made from choux pastry and filled after baking. Unlike cake batter or cookie dough, choux pastry is first cooked on the stovetop. That cooked flour paste is mixed with eggs, piped into mounds, and baked.

In the oven, the moisture in the dough turns into steam. That steam pushes the dough outward, creating a hollow center. Once the outside sets and dries, the shell can hold cream inside.

Cream puffs are often filled with sweetened whipped cream, vanilla pastry cream, custard, diplomat cream, chocolate cream, strawberry cream, or ice cream. The shell itself is only lightly sweet, so the filling gives the dessert most of its flavor.

Cream Puffs vs Profiteroles vs Éclairs

These desserts are closely related because they all use choux pastry, but they are not exactly the same.

Comparison of round cream puffs, small profiteroles with chocolate sauce, and long chocolate-glazed éclairs.
Cream puffs, profiteroles, and éclairs all start with choux pastry; however, their shape, filling, and finish decide whether they feel like a cream-filled dessert, an ice cream dessert, or a glazed pastry.
Dessert Shape Usual Filling Common Finish
Cream puffs Round, medium shells Whipped cream, pastry cream, diplomat cream Powdered sugar, chocolate, or ganache
Profiteroles Small round puffs Ice cream, pastry cream, or whipped cream Chocolate sauce
Éclairs Long choux shells Pastry cream Chocolate glaze
Croquembouche Stacked cream puffs Usually pastry cream Caramel or spun sugar

For this recipe, we are focusing on classic round cream puffs. However, once you understand the dough, the same choux pastry technique opens the door to profiteroles, éclairs, gougères, and croquembouche.

In other words, this is the base skill. Learn the shell once, and a whole family of bakery-style desserts becomes easier.

Are Cream Puffs Made with Puff Pastry?

Classic cream puffs are made with choux pastry, not puff pastry.

The names are easy to confuse, but the doughs behave very differently. Choux pastry is cooked on the stovetop, mixed with eggs, piped into mounds, and baked into hollow shells. Puff pastry is a laminated dough made with many layers of butter and dough, so it bakes into flaky layers instead of hollow centers.

Hollow choux pastry cream puff shell compared with flaky puff pastry layers.
Classic cream puffs use choux pastry, not puff pastry, because choux bakes into hollow shells while puff pastry separates into flaky layers.

If you came here expecting flaky pastry filled with cream, you may be thinking of cream horns, mille-feuille, cream slices, or puff pastry danish. For classic bakery-style cream puffs, use choux pastry. For a different kind of buttery pastry dough, this apple pie crust recipe is a useful cold-butter comparison.

Cream Puff Recipe Ingredients

Cream puffs use everyday ingredients, but the measurements and order matter. Choux pastry is less forgiving than a casual cake batter because too much moisture or too much egg can make the shells spread instead of rise.

Ingredients for cream puffs including flour, eggs, butter, milk, water, sugar, salt, heavy cream, powdered sugar, and vanilla.
These simple cream puff ingredients become reliable only when the flour paste is cooked well, the eggs are added gradually, and the shells bake long enough to dry.

For the Choux Pastry Shells

  • ½ cup / 120 ml water
  • ½ cup / 120 ml whole milk
  • ½ cup / 113 g unsalted butter, cut into pieces
  • 1 tsp granulated sugar
  • ¼ tsp fine salt
  • 1 cup / 125 g all-purpose flour, spooned and leveled if using cups
  • 4 large eggs, room temperature, beaten and added gradually

The water helps create steam, the milk adds flavor and color, and the eggs help the shells puff and set. The flour weight matters, so use a scale if you can. A loosely scooped cup and a packed cup can behave very differently in choux pastry, which is why 125 g is the safest target.

The egg amount also needs judgment. Egg size, flour measurement, and how much moisture cooks out of the paste can all change the final texture. Start with the recipe amount, but add the final egg slowly. You may not need every drop if the dough already passes the V-shape test.

If you are unsure where to stop, use the V-shape dough cue before adding the last bit of egg.

For the Whipped Cream Filling

  • 2 cups / 480 ml cold heavy cream
  • 3–4 Tbsp powdered sugar
  • 1–2 tsp vanilla extract
  • Pinch of salt, optional

Powdered sugar dissolves quickly and gives a smooth filling. Granulated sugar also works, but the cream may need a little more whipping time.

For the Pastry Cream Option

For a richer custard-filled version, make pastry cream ahead and chill it fully before piping.

  • 2 cups / 480 ml whole milk
  • 4 large egg yolks
  • ½ cup / 100 g granulated sugar
  • ¼ cup / 30 g cornstarch
  • 2 Tbsp / 28 g unsalted butter
  • 2 tsp vanilla extract or vanilla bean paste
  • Pinch of salt

This gives a thick, pipeable custard-style filling. Pastry cream needs time to cool, so make it before the shells or several hours ahead.

Optional Toppings

  • powdered sugar
  • melted chocolate
  • chocolate ganache
  • caramel drizzle
  • fresh berries
  • sliced strawberries
  • toasted almonds

For the cleanest first version, dust the filled puffs with powdered sugar just before they go to the table.

Equipment You Need

You do not need bakery equipment to make cream puffs, but a few tools make the process easier.

Must-Have Equipment

  • medium saucepan
  • wooden spoon or sturdy silicone spatula
  • mixing bowl or stand mixer
  • baking sheet
  • parchment paper
  • wire rack

Helpful Equipment

  • piping bag
  • ½-inch round piping tip or large star tip
  • zip-top bag as a backup piping bag
  • skewer, toothpick, or small knife for venting
  • small scoop for even mounds

A piping bag gives the neatest shape, but you can still make cream puffs with a zip-top bag or two spoons. The shape may be less even, but the recipe will work as long as the dough texture and bake are right.

Best Cream for Cream Puffs

The shell gets the most attention, but the filling is what most people remember. The right cream for cream puffs depends on whether you want easy, classic, stable, rich, or light.

Filling chooser for cream puffs with whipped cream, stabilized cream, pastry cream, diplomat cream, and ice cream.
The best cream for cream puffs depends on timing: whipped cream is easiest, pastry cream is classic, diplomat cream feels balanced, and stabilized cream holds better for serving trays.
Filling Best For Texture Make-Ahead Strength
Whipped cream First batch, easiest version Light and airy Short hold
Stabilized whipped cream / mascarpone cream Parties and dessert trays Light but firmer Better hold
Pastry cream Classic custard-filled cream puffs Rich and custardy Very good
Diplomat cream Most balanced filling Creamy, light, stable Good
Pudding shortcut Emergency easy filling Sweet and thick Decent
Ice cream Profiterole-style dessert Cold and creamy Fill right before serving

For a first batch, whipped cream is the easiest choice because it is quick, light, and does not need cooking. For a more classic pastry-shop result, pastry cream works better. When you want something rich but still soft and airy, diplomat cream is the best middle ground.

Still deciding? The cream puff filling comparison below shows how whipped cream, pastry cream, and diplomat cream behave differently.

Cream Puff Filling: Whipped Cream vs Pastry Cream vs Diplomat Cream

Keep the shell technique the same, then choose the filling based on the dessert you want. Whipped cream makes the puffs feel light and delicate; pastry cream gives them a richer bakery-style center.

Whipped cream, pastry cream, and diplomat cream shown as different cream puff filling textures.
Once the choux shells are baked, the filling changes the whole dessert: whipped cream keeps it light, pastry cream makes it richer, and diplomat cream gives a softer middle ground.

Whipped Cream Filling

Start with whipped cream when you want the simplest filling. It tastes light, sweet, and clean, and you can make it in a few minutes while the shells cool.

It is best for first-time cream puffs, light desserts, same-day serving, cut-and-fill cream puffs, berries, and powdered sugar finishes. Plain whipped cream softens faster than pastry cream, so assemble the puffs near serving time. A strawberry shortcake has the same serve-soon logic because whipped cream and fresh fruit soften as they sit.

Mascarpone or Cream Cheese Whipped Cream

For a cream filling that still tastes light but holds better, beat 2 cups / 480 ml cold heavy cream with 3–4 Tbsp powdered sugar, 1 tsp vanilla, and 4 oz / 113 g softened mascarpone or cream cheese. Beat the mascarpone or cream cheese first until smooth, then slowly add the cold cream and whip until the filling holds medium-stiff peaks.

Mascarpone gives a cleaner, creamier flavor. Cream cheese adds a light tang and a slightly thicker texture.

Mascarpone whipped cream and cream cheese whipped cream compared as stabilized cream puff fillings.
Mascarpone gives stabilized whipped cream a clean, creamy taste, while cream cheese adds gentle tang and a firmer texture for cream puffs that need to sit longer.

This is not as classic as pastry cream, but it is very practical for parties because it pipes well and holds longer than plain whipped cream.

Pastry Cream Filling

Pastry cream is a cooked custard-style filling made with milk, egg yolks, sugar, cornstarch, butter, and vanilla. It gives cream puffs a richer center and holds better than plain whipped cream.

To make it, heat the milk until steaming. In a separate bowl, whisk egg yolks, sugar, cornstarch, and salt until smooth. Slowly whisk some hot milk into the yolk mixture, then return everything to the saucepan. Cook, whisking constantly, until thick and bubbling. Off the heat, whisk in butter and vanilla. Cover with plastic wrap directly on the surface and chill until cold.

For more pastry cream technique, Sally’s Baking Addiction has a detailed pastry cream guide.

Diplomat Cream Filling

Diplomat cream is pastry cream folded with whipped cream. It tastes rich without feeling heavy, which makes it one of the nicest fillings for cream puffs you plan to share.

For a practical filling, use 2 cups chilled pastry cream and 1 cup / 240 ml cold heavy cream whipped to medium peaks. Whisk the chilled pastry cream until smooth, then gently fold in the whipped cream. The filling should be soft, creamy, and pipeable, not loose or runny.

Pudding Shortcut Filling

For the easiest shortcut, use thick vanilla pudding, chill it well, then fold in a little whipped cream for a lighter texture. It will not taste as fresh as homemade pastry cream, but it works when you need a fast, kid-friendly filling.

Cream Puff Filling Texture Guide

Before choosing a filling, look at how each option holds shape. Thicker fillings are easier to pipe and help the choux shells stay crisp longer.

Cream puff filling texture guide with whipped cream, pastry cream, diplomat cream, and pudding shortcut.
Texture matters as much as flavor here; a cream puff filling should hold a spoon or piping line without running into the shell.

Which Filling Should You Choose?

  • Easiest first batch: whipped cream
  • Classic custard-style center: pastry cream
  • Most balanced texture: diplomat cream
  • Party tray: mascarpone whipped cream, stabilized whipped cream, or pastry cream
  • Kid-friendly shortcut: whipped cream or pudding filling
  • Profiterole-style dessert: ice cream
Most balanced choice: whipped cream is easiest, pastry cream is classic, but diplomat cream gives the strongest mix of lightness, richness, and stability.

How to Make Choux Pastry for Cream Puffs

Choux pastry is the heart of this recipe. The dough starts on the stovetop, where the flour is cooked with hot liquid and butter. After that, eggs are added gradually to create a glossy, slow-moving dough. For a deeper technical look at why choux rises with steam, Serious Eats has a useful guide to choux pastry.

The method feels unusual the first time, but every stage has a clear cue.

Step 1: Melt the Butter with Water, Milk, Sugar, and Salt

Add the water, milk, butter, sugar, and salt to a medium saucepan. Warm over medium heat until the butter melts completely and the liquid reaches a boil.

Do not rush this step with high heat. You want the butter fully melted before the flour goes in, so the dough forms evenly.

Step 2: Add the Flour All at Once

Add the flour in one go and start stirring immediately. The mixture will look rough and lumpy at first. Keep stirring. Within a short time, it will come together into a thick paste.

This paste is called the panade. It should pull away from the sides of the pan and begin forming a ball.

Step 3: Cook the Flour Paste

Keep cooking and stirring the paste for 1–3 minutes. A thin film may form on the bottom of the pan, and the dough should look cohesive rather than wet or greasy.

Cooking the paste for another minute or two drives off extra moisture before the eggs go in. If the paste stays too wet, the dough may become too loose and spread on the tray instead of puffing upward.

The panade is ready when it forms a smooth ball, pulls away from the sides, leaves a light film on the bottom, no longer looks wet with loose butter, and feels thick when stirred. At this point, the dough should feel sturdy and slightly resistant, not loose or oily.

Choux panade in a saucepan pulling away from the sides and leaving a thin film on the pan.
When the choux panade pulls away from the saucepan and leaves a thin film, it has cooked off enough moisture to give the eggs a stronger base.

Step 4: Cool Slightly Before Adding Eggs

Transfer the hot paste to a mixing bowl or the bowl of a stand mixer. Let it cool for a few minutes until it is warm but no longer steaming hot.

If the dough is too hot, it can scramble the eggs. You do not need it cold; just let the harsh heat come down.

Step 5: Add the Eggs Gradually

Beat the eggs lightly in a separate bowl if you want maximum control. Add about three eggs first, one at a time or in several additions, mixing well after each addition. Then add the final beaten egg a spoonful at a time.

At first, the dough may look broken, slippery, or curdled. Do not panic. Keep mixing and it will come back together. This is where patience matters more than speed.

Three stages of adding eggs to choux dough, from broken-looking dough to smooth glossy dough.
Choux dough can look broken when the eggs first go in; however, steady mixing brings it back to the smooth, glossy texture needed for cream puff shells.

The final egg is where the texture can change quickly. You may not need every drop, so stop when the dough is glossy, smooth, thick, and able to hold a piped shape.

Before you pipe, check the V-shape dough cue; it is the easiest way to avoid loose cream puff dough.

Important: do not blindly add all the egg if the dough already looks right. Choux pastry is ready when it falls from the spatula in a thick V shape and still holds its shape when piped.

How to Know Choux Dough Is Ready

This is the checkpoint that saves cream puffs from turning flat.

Finished choux dough should be smooth, glossy, thick, soft enough to fall slowly from a spatula, and firm enough to hold height on the baking sheet.

Choux Dough V-Shape Test

The best cue is the V-shape test. Lift the spatula from the dough. The dough should slowly fall and leave a thick V-shaped ribbon hanging from the spatula. Once you see that ribbon, the dough suddenly feels less mysterious.

Glossy choux dough falling from a spatula in a thick V-shaped ribbon.
The V-shape test shows when choux dough is ready: thick enough to pipe, glossy enough to expand, and not so loose that it spreads.

If the dough stands in a stiff peak and refuses to fall, it needs a little more egg. If it puddles or runs off the spatula like batter, it has gone too far.

Choux Dough Texture Guide

Use the visual differences below before adding more egg. The goal is dough that moves slowly, shines lightly, and still holds a mound when piped.

Choux dough texture guide showing too stiff, just right, and too runny dough in separate bowls.
Choux dough should be glossy and pipeable while still holding shape; too stiff can limit rise, while too runny can make the shells spread.

Just Right

The dough is glossy, smooth, and slow-moving. When piped, the mound holds its height and only relaxes slightly.

Too Stiff

The dough looks dry, rough, or heavy. It may hold a sharp peak and resist falling from the spatula. Add more beaten egg, one spoonful at a time.

Too Runny

The dough spreads quickly and cannot hold a piped mound. This usually means too much egg was added, the flour paste was not cooked enough, or the flour measurement was too low.

Runny choux is hard to fix perfectly. You can bake it, but the puffs may spread more. Next time, save the final egg for texture adjustment and stop at the V-shape stage.

Once the dough holds shape, move on to piping the cream puff shells.

How to Pipe Cream Puff Shells

Line your baking sheets with parchment paper. Transfer the choux dough to a piping bag fitted with a ½-inch round tip or large star tip.

Pipe mounds about 1½–2 inches wide, leaving 2–3 inches of space between them. Cream puffs expand as they bake, and crowded dough can merge together.

If the tops have sharp peaks, smooth them gently with a damp fingertip. Peaks can burn before the rest of the shell finishes baking.

After the mounds are evenly spaced and the peaks are smoothed, the next important cue is baking the shells until they set.

Piping cream puff shells on parchment with spacing marks and a fingertip smoothing a sharp peak.
Even piping helps cream puff shells bake at the same rate; meanwhile, enough spacing and smoothed peaks prevent crowded, uneven, or burnt-tipped puffs.

No Piping Bag?

Use a zip-top bag with one corner snipped off, or use a small scoop and spoon. The puffs may look more rustic, but even mounds will still bake well.

The main goal is consistency. Similar-size puffs bake at the same rate. If some are tiny and others are huge, the small ones may dry out before the larger ones are fully hollow.

How to Bake Cream Puff Shells So They Rise and Stay Hollow

Cream puffs need heat for lift and enough time for structure. A shell that puffs beautifully but comes out too early can still collapse as it cools.

Before and After Baking Cream Puff Shells

Use the transformation from soft piped dough to puffed golden shells as a quick check that the oven heat is doing its job.

Piped choux dough mounds shown beside baked golden cream puff shells.
Choux pastry transforms in the oven as steam expands inside the dough, turning soft piped mounds into light, hollow cream puff shells.
  1. Preheat the oven to 425°F / 218°C.
  2. Bake the piped shells for 10 minutes.
  3. Reduce the oven to 325°F / 163°C without opening the oven door.
  4. Bake for 20–25 minutes more, until the shells are golden, firm, and dry.
  5. Turn the oven off.
  6. Poke or slit each shell to release steam.
  7. Return the shells to the turned-off oven with the door cracked for 10–20 minutes.
  8. Cool completely before filling.

Do not open the oven during the early rise. A sudden drop in heat can collapse the structure before the outside sets.

Cream Puff Shell Color Guide

The shells are ready when they feel light, firm, dry, and hollow. If they still look pale or feel soft, give them more time. A properly baked shell usually has a deeper golden color than many first-time bakers expect.

Cream puff shell color guide showing too pale, just right, and too dark baked shells.
Color is a doneness clue in cream puff shells; if they stay pale, the structure may not be dry enough to hold after cooling.

If the shells look pale, check this color guide before taking them out; underbaked choux is one of the most common reasons cream puffs collapse.

Remember: the goal is not only puffing. The goal is puffing, setting, and drying. That is what keeps the shells hollow after cooling.

How to Check One Hollow Cream Puff Shell

If you are unsure, sacrifice one shell before removing the whole tray. Split it open. The inside should be mostly hollow and not wet or doughy. A little soft webbing is normal, but the shell should not feel raw.

If the center looks damp, bake a little longer or give the shells more drying time in the turned-off oven.

Split cream puff shell showing a hollow, dry interior ready for filling.
A hollow cream puff shell means the choux pastry rose and dried properly, giving you enough space for whipped cream, pastry cream, or diplomat cream.

Once the shells are hollow and cool, continue to filling the cream puffs.

What Successful Cream Puffs Look and Feel Like

Successful cream puff shells should feel light when you lift them. The outside should be firm and dry, the inside should be hollow enough for filling, and the color should be golden rather than pale.

Tray of successful cream puff shells with callouts for golden color, light texture, hollow center, and dry structure.
This tray shows the visual standard to aim for: golden shells that feel light, hold their shape, and are ready for a cool vanilla cream center.

This is the moment where the recipe starts feeling like a real bakery project: a tray full of airy shells, ready for cold cream and a dusting of powdered sugar. Fill one, dust it, and taste it before serving the rest. That first crisp shell and cool cream center is the payoff for all the careful dough cues.

How to Fill Cream Puffs

Only fill cream puffs after the shells are fully cool. Warm shells melt the filling and create steam, which can make the pastry soft.

Cut-and-fill and bottom-fill methods for adding cream to cream puff shells.
Cut-and-fill is the easiest method for home bakers, while bottom-filling gives cream puffs a cleaner pastry-shop look.

Cut-and-Fill Method

This is the easiest and prettiest method for home serving. Slice off the top third of each shell, pipe or spoon cream into the hollow center, then place the top back on. Dust with powdered sugar or drizzle with chocolate.

This method works especially well with whipped cream, diplomat cream, berries, and decorative swirls.

Bottom-Fill Method

For a cleaner pastry-shop look, make a small hole in the bottom of each shell with a knife, skewer, or piping tip. Pipe pastry cream or diplomat cream into the shell until it feels slightly heavier.

This method is best for pastry cream, custard, or thicker fillings.

When Should You Fill Cream Puffs?

For the crispest bite, wait until the shells are cool and the filling is ready before assembling. Once filled, they soften in the refrigerator because the cream slowly releases moisture into the pastry.

Planning for a party? Use the make-ahead cream puffs timeline so the shells stay crisp.

Timeline showing bake, cool, fill, and serve steps for cream puffs.
The best filling window comes after the shells cool completely and before the tray sits too long, so the pastry keeps its crisp edge.

If you need to work ahead, bake the shells ahead and fill them later.

Mini Cream Puffs

Mini cream puffs use the same dough, but they are piped smaller and bake a little faster. They are perfect for parties, dessert trays, birthdays, brunch spreads, and bite-size holiday desserts.

Mini cream puffs arranged on a dessert tray with powdered sugar and visible vanilla cream filling.
Mini cream puffs use the same choux pastry technique, but their bite-size shape makes them especially useful for parties, dessert trays, and make-ahead serving.
  • Use the same dough and oven temperature.
  • Pipe 1-inch mounds.
  • Leave room between them.
  • Start checking 4–6 minutes earlier than regular puffs.
  • Keep the venting and drying step, even if the drying time is slightly shorter.
  • Fill from the bottom with a small round tip.
  • Assemble when you are ready to serve.
  • Expect about 40–50 mini cream puffs, depending on size.

Mini puffs can dry faster because they are small, but they can also overbrown faster. Look for the same signs: golden color, firm sides, light weight, and a hollow interior.

Do not skip the drying step just because they are small. A mini puff can still collapse if it is underbaked or trapped with steam inside.

Cream Puff Variations

Once you understand the basic shell, the filling and topping can change easily.

Cream puff variations guide showing strawberry, apple, chocolate, profiteroles, and craquelin versions.
Once you can make hollow choux shells, the same base can become strawberry cream puffs, chocolate puffs, apple-topped puffs, profiteroles, or craquelin-style pastries.

Strawberry Cream Puffs

Add sliced strawberries inside the cream puffs or fold finely chopped strawberries into whipped cream. You can also use strawberry pastry cream or strawberry diplomat cream. Fresh strawberries release juice, so assemble these just before the tray goes out.

Chocolate Cream Puffs

Fill the shells with chocolate pastry cream, chocolate whipped cream, or vanilla cream with a chocolate ganache topping. Chocolate cream puffs are especially good with bottom-filled shells and a glossy chocolate finish.

Chocolate cream puffs filled with chocolate cream and topped with glossy ganache.
Chocolate cream puffs bring a richer finish to the same golden choux shell, with glossy ganache and soft cream for a more indulgent dessert direction.

Apple Cream Puffs

For an apple dessert version, keep the choux shells crisp and use a small spoonful of thick, cooled apple pie filling as a topping or plate sauce rather than packing the shell with wet fruit. Add the cream first, then spoon the apple filling over just before serving.

Choux au Craquelin

Choux au craquelin has a thin cookie-like dough placed on top of each choux mound before baking. It creates a crackly, more polished top and can help the puffs rise more evenly.

This is optional. You do not need craquelin for the base recipe, but it is a beautiful upgrade once you are comfortable with the dough.

Choux au craquelin pastries with golden crackly tops on a parchment-lined tray.
Choux au craquelin adds a thin cookie-like topping to choux pastry, giving the shells a more even rise and a crisp bakery-style surface.

Ice Cream Puffs / Profiteroles

Fill cooled shells with small scoops of ice cream and top with warm chocolate sauce. Serve immediately, because the ice cream will soften the shells quickly. For a dairy-free tropical version, coconut ice cream makes a fun profiterole-style filling.

Profiteroles filled with vanilla ice cream and topped with glossy chocolate sauce.
Profiteroles are closely related to cream puffs, but they are often filled with ice cream and finished with warm chocolate sauce.

Croquembouche

Croquembouche is a tower of cream puffs held together with caramel. It is a separate advanced dessert, but it starts with the same basic choux pastry skill.

Cream Puff Recipe Troubleshooting

Most cream puff problems come back to moisture, egg quantity, oven timing, or assembling too early. Start with this quick diagnosis, then use the detailed fixes below.

Cream puff troubleshooting guide showing collapsed puffs, runny dough, doughy centers, soggy shells, no rise, and eggy taste fixes.
This troubleshooting guide turns common cream puff failures into visual checks: dough texture, shell color, steam release, and filling timing.
Problem Likely Cause Fix Next Time
Cream puffs collapsed Underbaked shells, oven opened early, trapped steam, or dough too wet Bake until firm and dry, do not open early, vent shells, and dry in the turned-off oven
Dough is runny Too much egg, panade not cooked enough, or too little flour Save the final egg for texture adjustment and stop at the V-shape test
Puffs did not rise Oven not hot enough, dough too loose, or panade too wet Preheat fully, cook the paste properly, and use visual dough cues
Centers are doughy Underbaked, shells too large, or not dried after baking Bake longer, pipe evenly, vent, and dry in the oven
Shells are soggy after filling Filled too early, filling too loose, or shells not fully cooled Fill near serving time and use pastry cream or stabilized cream for longer hold
Shells taste eggy Underbaked shells, too much egg, or pale pastry Bake until dry and golden, and use the dough test before adding all the egg

If your issue is dough texture, start with the choux dough test. If the shells collapse or taste eggy, go back to the shell color guide and baking cues.

Why Did My Cream Puffs Collapse?

Cream puffs usually collapse because they were underbaked, the oven was opened too early, the dough was too wet, or the shells were not vented and dried.

Fix it by baking until the shells are firm and dry, not just lightly colored. Vent steam with a small slit or hole, then let the shells dry in the turned-off oven with the door cracked.

A pale shell is usually an unstable shell.

Why Didn’t My Cream Puffs Rise?

If cream puffs do not rise, the dough may have been too runny, the panade may not have been cooked enough, or the oven may not have been hot enough at the start.

Make sure the liquid reaches a boil before adding flour, cook the flour paste for 1–3 minutes, and preheat the oven fully before baking. The piped dough should hold its mound shape before it goes into the oven.

Why Is My Choux Dough Runny?

Runny choux dough usually means too much egg was added or the flour paste stayed too wet. Egg size, humidity, and flour measurement can all affect the final texture.

The fix is prevention: add the last egg in small spoonfuls and stop when the dough is glossy, thick, and able to hold shape. If the dough already passes the V-shape test, do not force in the rest of the egg.

Why Are My Cream Puffs Doughy Inside?

Doughy centers mean the shells need more baking or drying time. Large puffs can also stay moist inside if they brown too quickly on the outside.

Bake until the shells feel light and firm, then vent and dry them in the turned-off oven. If one shell looks questionable, break it open and check the interior before removing the whole batch.

Why Are My Cream Puffs Soggy After Filling?

Filled cream puffs soften because cream adds moisture to the shell. This happens faster with plain whipped cream than with pastry cream or stabilized cream.

Fill near serving time, cool the shells fully before filling, and use a thicker filling if you need them to sit longer.

Why Do My Cream Puffs Taste Eggy?

An eggy taste often comes from underbaked shells, too much egg in the dough, or not enough filling balance. Cream puff shells should be baked until dry and golden, not pale and soft.

Adding vanilla to the filling and using the right amount of sugar also helps balance the egg-rich dough.

Make-Ahead, Storage, and Freezing for Cream Puffs

Cream puffs are best assembled close to serving, but the shells are very make-ahead friendly. The key is to store shells and filling separately whenever possible.

Best Make-Ahead Timeline for Cream Puffs

When What to Do
1 day ahead Bake the shells, cool them fully, and store them airtight.
Several hours ahead Make pastry cream, diplomat cream, or stabilized whipped cream and chill it.
30–60 minutes before serving Re-crisp shells if needed, then let them cool completely.
Right before serving Fill, dust with powdered sugar, and serve.
Make-ahead cream puff timeline showing baked shells, filling, re-crisping, cooling, and final filling.
Make-ahead cream puffs work best when the shell, filling, re-crisping, and final dusting happen as separate steps instead of one rushed assembly.

Making Cream Puff Shells Ahead

This is the best way to work ahead. Bake the shells, cool them completely, and store them in an airtight container for up to 1 day. If they soften, re-crisp them briefly in the oven, then cool again before filling.

Making Choux Dough Ahead

Freshly piped and baked choux gives the most reliable rise. You can refrigerate the dough briefly, but it may stiffen and become harder to pipe evenly.

For best results, especially if you are new to choux pastry, bake the dough soon after mixing. If you want to work farther ahead, freezing piped mounds is usually more reliable than holding a bowl of finished dough in the fridge.

Freezing Cream Puff Shells and Piped Choux Dough

Piped unbaked choux can be frozen on a tray, then transferred to a freezer bag or container. Bake from frozen, adding a few extra minutes as needed.

This is useful for future batches, but the first time you make cream puffs, bake them fresh so you can learn how the dough behaves.

Freezing guide with unfilled cream puff shells in a container, piped choux dough on a tray, and baked shells cooling on a rack.
Unfilled cream puff shells and piped choux dough freeze better than filled cream puffs, because cream softens the pastry once it is added.

Refrigerating Filled Cream Puffs

Filled cream puffs should be refrigerated, but they taste best the same day. The longer they sit, the more the shells soften.

Pastry cream and diplomat cream hold better than plain whipped cream, but even those fillings will eventually soften the pastry.

Freezing Cream Puff Shells

Unfilled shells freeze better than filled cream puffs.

Freeze cooled, unfilled shells in an airtight container. Thaw at room temperature, re-crisp briefly in the oven if needed, cool completely, then fill.

How to Re-Crisp Cream Puff Shells

Place unfilled shells in a low oven until they feel dry again. Let them cool fully before filling. Do not fill warm shells, or the cream may melt and loosen.

Cream Puff Recipe

Recipe at a Glance

Cream Puff Recipe

Description: Golden choux pastry shells filled with vanilla cream. These cream puffs are crisp outside, hollow inside, and beginner-friendly when you follow the dough and baking cues.

Yield
24–28 cream puffs
Prep Time
40 minutes
Bake Time
30–35 minutes
Cooling/Drying Time
30–45 minutes
Total Time
About 1 hour 45 minutes to 2 hours with whipped cream, depending on cooling time
Method
Baked choux pastry
Cream puff recipe card with yield, baking temperatures, shell cues, filling options, and key ingredients beside a filled cream puff.
Keep this cream puff recipe card nearby for the decisions that matter most: egg texture, oven timing, hollow shells, and the right filling for your schedule.

Ingredients

For the Choux Pastry Shells

  • ½ cup / 120 ml water
  • ½ cup / 120 ml whole milk
  • ½ cup / 113 g unsalted butter, cut into pieces
  • 1 tsp granulated sugar
  • ¼ tsp fine salt
  • 1 cup / 125 g all-purpose flour, spooned and leveled if using cups
  • 4 large eggs, room temperature, beaten; add gradually and use only as much as needed

For the Whipped Cream Filling

  • 2 cups / 480 ml cold heavy cream
  • 3–4 Tbsp powdered sugar
  • 1–2 tsp vanilla extract
  • Pinch of salt, optional
  • Optional for a sturdier filling: 4 oz / 113 g mascarpone or softened cream cheese

Optional Pastry Cream Filling

  • 2 cups / 480 ml whole milk
  • 4 large egg yolks
  • ½ cup / 100 g granulated sugar
  • ¼ cup / 30 g cornstarch
  • 2 Tbsp / 28 g unsalted butter
  • 2 tsp vanilla extract or vanilla bean paste
  • Pinch of salt

Optional Topping

  • Powdered sugar, for dusting
  • Melted chocolate or ganache, optional

Instructions

Make the Choux Dough

  1. Preheat the oven. Preheat to 425°F / 218°C. Line baking sheets with parchment paper.
  2. Start the choux base. Add water, milk, butter, sugar, and salt to a medium saucepan. Warm over medium heat until the butter melts and the liquid reaches a boil.
  3. Add the flour. Add the flour all at once and stir immediately with a wooden spoon or sturdy spatula.
  4. Cook the paste. Keep stirring for 1–3 minutes, until the dough forms a ball, pulls from the sides, and leaves a light film on the pan.
  5. Cool slightly. Transfer the dough to a mixing bowl or stand mixer bowl. Let it cool for a few minutes until warm but not steaming hot.
  6. Add most of the eggs. Mix in about 3 beaten eggs gradually, mixing well after each addition. The dough may look broken at first, then smooth out.
  7. Adjust with the last egg. Add the last beaten egg a spoonful at a time. Stop when the dough is smooth, glossy, thick, and falls from the spatula in a thick V shape. You may not need every drop.

Pipe and Bake the Shells

  1. Pipe the shells. Transfer dough to a piping bag and pipe 1½–2 inch mounds, spacing them 2–3 inches apart. Smooth sharp peaks with a damp fingertip.
  2. Bake hot first. Bake at 425°F / 218°C for 10 minutes. Do not open the oven.
  3. Lower the heat. Reduce oven temperature to 325°F / 163°C without opening the oven. Bake 20–25 minutes more, until shells are golden, firm, and dry.
  4. Vent and dry. Turn the oven off. Poke or slit each shell to release steam, then return shells to the turned-off oven with the door cracked for 10–20 minutes.
  5. Cool completely. Transfer shells to a wire rack and cool fully before filling.

Make the Filling

  1. Make the whipped cream filling. Beat cold heavy cream, powdered sugar, vanilla, and optional salt until medium-stiff to stiff peaks form. For a sturdier version, beat the mascarpone or cream cheese smooth first, then slowly add the cold cream and whip to medium-stiff peaks.
  2. Or make pastry cream. Heat milk until steaming. Whisk egg yolks, sugar, cornstarch, and salt in a bowl. Slowly whisk in some hot milk, then return everything to the saucepan. Cook, whisking constantly, until thick and bubbling. Off heat, whisk in butter and vanilla. Cover directly on the surface and chill fully before piping.
  3. For diplomat cream. Whisk 2 cups chilled pastry cream until smooth, then fold in 1 cup whipped cream until light and ready to pipe.

Fill and Serve

  1. Fill the cream puffs. Slice shells and pipe cream inside, or fill from the bottom with a piping bag.
  2. Finish and serve. Dust with powdered sugar or drizzle with chocolate. Serve soon after filling for the crispest texture.

Notes

  • Do not open the oven during the early rise.
  • Use the last egg as a texture adjustment. You may not need every drop.
  • Golden, firm, dry shells hold better than pale shells.
  • Assemble near serving time for the best texture.
  • Use whipped cream for the easiest filling, pastry cream for classic custard-filled puffs, or diplomat cream for a richer but still airy center.
  • For a more stable whipped cream filling, beat in 4 oz / 113 g mascarpone or softened cream cheese before slowly adding the cold cream.
  • You may have a little pastry cream left over depending on how generously you fill the shells.

FAQs

What is the secret to good cream puffs?

Good cream puffs come from properly cooked choux dough, gradual egg addition, a hot oven start, and enough baking time for the shells to dry and set. The dough should be glossy and able to hold shape before baking, and the shells should be firm before cooling.

Why do cream puffs collapse after baking?

They usually collapse because they were underbaked, the oven was opened too early, the dough was too wet, or the shells were not vented and dried. Bake until the shells are firm, release steam, and let them dry before cooling fully.

Is whipped cream or pastry cream better for beginners?

Whipped cream is easier for a first batch because it does not need cooking. Pastry cream tastes more classic and holds better, but it needs extra time to cook and chill.

What should a baked cream puff look like inside?

The inside should be mostly hollow, dry enough to hold filling, and not wet or doughy. A little soft webbing inside the shell is normal, but it should not feel raw.

How far ahead can I fill cream puffs?

For the crispest texture, fill them just before the tray goes out. If you need to work ahead, bake the shells and prepare the filling separately, then assemble closer to the time you plan to serve them.

How do I keep cream puffs crisp for a party?

Bake and cool the shells ahead, store them airtight, re-crisp them if needed, and fill them shortly before the tray goes out. Pastry cream or stabilized whipped cream will hold better than plain whipped cream.

Can I make cream puffs without a piping bag?

A zip-top bag with the corner snipped works, and you can also use a spoon or scoop. A piping bag gives cleaner, more even shells, but the recipe can still work without one.

Are cream puffs and profiteroles the same?

They are closely related because both use choux pastry. Cream puffs are usually larger and filled with cream, while profiteroles are often smaller and served with ice cream or chocolate sauce.

Freezing Cream Puff Shells

Unfilled cream puff shells freeze well. Thaw them at room temperature, re-crisp briefly in the oven if needed, cool fully, then fill.

Why is my cream puff dough too runny?

Runny choux dough usually means too much egg was added, the flour paste was not cooked long enough, or the flour measurement was too low. Use the final egg as a texture adjustment and stop when the dough forms a thick V from the spatula.

Can I use puff pastry for cream puffs?

Classic cream puffs use choux pastry, not puff pastry. Puff pastry creates flaky layers, while choux pastry creates hollow shells that can be filled with cream.

Final Thoughts

Cream puffs feel intimidating until you understand the texture cues. Cook the dough long enough to remove extra moisture, add the eggs gradually, and give the shells enough oven time to dry and hold their shape.

Once the choux shells are hollow and dry, the rest is flexible. Fill them with whipped cream for the easiest version, pastry cream for a classic custard center, or diplomat cream when you want something light, rich, and stable.

Serve them soon after filling, and you get exactly what a good cream puff should be: crisp pastry, soft cream, and a dessert that feels far more impressive than the ingredient list suggests. Once you can make one batch of hollow choux shells, you can change the filling, size, topping, and finish without relearning the whole recipe.

That is the quiet confidence this recipe gives you: one reliable shell, many possible desserts.

Back to top ↑
Posted on 1 Comment

Dutch Apple Pie Recipe

Deep-dish Dutch apple pie with golden crumb topping and a clean slice removed, showing apple filling and bottom crust.

This Dutch apple pie recipe is for the slice everyone wants: a flaky bottom crust, tender cinnamon apples that still hold their shape, and a buttery brown-sugar crumb topping that bakes into golden clusters. It is easier than a lattice apple pie, richer than a plain crumble, and sturdy enough to slice cleanly once it cools.

If you have seen this dessert called apple crumb pie, apple crumble pie, or apple pie with crumb topping, you are in the right place. Although the names overlap, the structure is simple: one bottom crust, a generous apple filling, and a thick layer of cinnamon crumbs on top.

A Sliceable Dutch Apple Pie, Not a Runny Scoop

The method below is built for the problems that usually ruin this kind of pie: a soft bottom crust, apples that shrink under the crumbs, and topping that browns before the center is done. A hot-start bake, lower oven rack, firm apple blend, and full cooling window give the pie its best chance to bake through and slice neatly.

When it works, every forkful gives you the whole point of the pie: flaky crust underneath, soft spiced apples in the middle, and golden buttery crumbs on top.

This is the version to make when you want the comfort of apple crisp, the structure of pie, and a slice that can actually stand up on a plate.

Clean Slice Cue

Clean slice cue: For a slice that stands up on the plate, let the filling settle before cutting. Serve it warm if you like, but not bubbling-hot from the oven.
Clean slice of Dutch apple pie on a plate, showing bottom crust, apple filling, and crumb topping.
Cooling turns the apple layer from loose and glossy into a filling that can hold a clean slice.

Why the Layers Matter

Layer cue: Before baking, check the three jobs: heat for the crust, structure from the apples, and enough butter for clustered crumbs.
Dutch apple pie slice with callouts showing flaky crust, tender apple filling, and golden crumb topping.
Use the layers as a quick check: structure below, tender apples in the middle, and clustered crumbs on top.

Quick Answer

This Dutch apple pie recipe is built around a single-crust apple pie topped with buttery crumbs instead of a second sheet of pastry. For the best homemade version, use about 3 lb / 48 oz / 1.35 kg firm apples sliced 1/4 inch / 6 mm thick. Add them to a chilled single crust in a 9-inch deep-dish pie plate, cover with crumb topping, and bake for 55–65 minutes.

The most reliable oven schedule is 400°F / 200°C for 20 minutes, then 375°F / 190°C for 35–45 minutes more. The pie is done when the topping is golden, the filling bubbles around the edges, and the apples are tender. Let it cool for at least 3 hours before slicing so the filling sets.

Formula cue: Keep the short version in mind before baking: firm apples, even slices, a hot-start oven, and a full cooling window.
Quick answer board showing firm apples, chilled crust, crumb topping, hot-start baking, and cooling time for Dutch apple pie.
When these four cues are in place, the pie has a better chance of baking through without turning loose or runny.

Need more help before baking? Check the best apples, crumb topping, or bake time sections before you start.

Why This Dutch Apple Pie Works

This pie is simple, but a few small details make the difference between a clean slice and a runny scoop. Too much loose apple juice softens the crust, too little butter makes the topping sandy, and soft apples can collapse before the filling sets. The method here keeps those problems in check so you get tender apples, crisp-edged crumbs, and slices that hold together.

Five Details That Protect the Pie

  • A hot-start bake gives the crust a head start. The first 20 minutes at 400°F / 200°C helps the bottom crust set before the apples release too much liquid.
  • Apples with structure keep the filling from collapsing. Granny Smith with Honeycrisp, Braeburn, or Pink Lady gives tartness, sweetness, and shape.
  • Flour thickens the apple juices gently. It gives the filling a classic apple pie texture without turning the center gummy.
  • Melted, slightly cooled butter makes easy crumb clumps. The topping holds together without needing a pastry cutter.
  • A full cooling window gives cleaner slices. The pie tastes wonderful warm, but it slices much better after the filling has had time to settle.

The method works because the protections stack: cold crust, sturdy apples, lower oven rack, hot-start bake, and enough cooling time. Skip one and the pie can still work; skip several and you are much more likely to get a soggy bottom or runny filling.

The Method at a Glance

Method cue: This recipe protects the usual weak spots: a soft bottom crust, collapsed apples, over-browned crumbs, and filling that runs when sliced too soon.
Method board showing cold crust, sturdy apples, lower oven rack, hot-start bake, and cooling time for Dutch apple pie.
Those safeguards work together, so the pie does not depend on one perfect step to bake and slice well.

If you are here because apple pies often turn runny or soft on the bottom, the two most useful sections are how to prevent a soggy bottom and troubleshooting Dutch apple pie.

What Is Dutch Apple Pie?

Dutch apple pie is the crumb-topped cousin of classic apple pie: the same bottom crust and spiced apple filling, but with buttery streusel instead of a second pastry crust. That makes it easier to assemble because you do not have to roll, lattice, vent, or seal a pastry top.

What makes this pie distinct is the topping. It bakes into buttery clumps with crisp edges and a soft cinnamon-brown-sugar center. Meanwhile, the apples underneath soften and release enough juice to make a saucy filling without turning into applesauce.

A chilled bottom crust gives structure, firm apples keep the filling shapely, and the cinnamon crumbs bring the buttery texture that makes this pie so comforting. That is why the top eats a little like apple crisp while the bottom still feels like pie.

Pie vs crisp cue: If the topping reminds you of apple crisp, that is the point. The difference is underneath: Dutch apple pie has a bottom crust, while apple crisp usually does not.
Dutch apple pie slice compared with apple crisp, showing that Dutch apple pie has a bottom crust while apple crisp does not.
Dutch apple pie and apple crisp share a buttery crumb feel, but the bottom crust changes everything. That crust gives the dessert structure, sliceability, and a true pie identity.

Dutch Apple Pie vs Apple Crumble Pie vs Apple Crumb Pie

These names are often used for similar desserts, especially in home baking. The main idea is the same: apples, a bottom crust, and a crumb topping instead of a second pastry crust.

Name Usually Means What to Expect
Dutch apple pie Apple pie with a bottom crust and crumb topping The most common name for this style of pie
Apple crumb pie Apple pie with a crumb topping Same basic dessert, with emphasis on the topping
Apple crumble pie Apple pie with a crumble-style topping Often used when the topping is thicker or more rustic
Apple crisp Baked apples with a crisp or oat-style topping, usually without pie crust More of a baked fruit dessert than a pie

This version is a Dutch apple pie, but it also fits what many bakers mean by apple crumb pie or apple crumble pie: a flaky crust, tender apples, and a generous crumb topping.

Name cue: Searchers use these names differently, but most are looking for the same dessert style: apples in a bottom crust with a crumb, crumble, or streusel-style top.
One crumb-topped apple pie slice labeled Dutch apple pie, apple crumb pie, and apple crumble pie to show overlapping names.
The names often overlap, especially in home baking. Whether someone says Dutch apple pie, apple crumb pie, or apple crumble pie, they usually mean apples, bottom crust, and a crumb-style top.

Ingredients for Dutch Apple Pie

The ingredient list is short, but each part has to pull its weight. The crust needs to stay cold, the apples need enough structure, the filling needs just enough thickener, and the topping needs enough butter to bake into real crumbs instead of loose sugar-flour dust.

Ingredient cue: This recipe does not rely on a long ingredient list. Instead, the results come from handling the basics well: cold dough, firm apples, bright lemon, warm spice, flour, brown sugar, and butter.
Ingredients for Dutch apple pie including apples, pie crust, butter, flour, brown sugar, lemon, vanilla, cinnamon, and nutmeg.
The best results come from simple ingredients handled well: cold dough for structure, firm apples for shape, lemon for brightness, and butter for clustered crumbs.

One Bottom Pie Crust

You need one chilled 9-inch pie crust. Homemade crust gives the best flavor and flake, but a good store-bought crust works if you are focused on the apple filling and crumb topping.

If you want a fully homemade base, use this apple pie crust recipe. For this style, you only need a single bottom crust, not a double crust.

Crust cue: Because there is no top pastry crust, the bottom crust has to carry the slice. Keep it chilled before filling so it has a better chance to set in the oven.
Single unbaked bottom pie crust in a deep-dish pie plate with crimped edges.
Since there is no top pastry crust, the bottom crust has to do the structural work while the crumb layer brings the buttery finish.

Using a shallow pie plate instead of deep-dish? Check the pan-size notes before adding all the apples.

Firm Apples

Use firm baking apples that hold their shape. Granny Smith gives tart structure, while Honeycrisp, Braeburn, Pink Lady, or Golden Delicious can round out the flavor.

The best all-purpose blend is 2 lb Granny Smith plus 1 lb Honeycrisp, Braeburn, or Pink Lady. For a sweeter pie, use half Granny Smith and half Honeycrisp or Golden Delicious.

For a deeper apple-by-apple breakdown, see this guide to the best apples for apple pie.

Peel the Apples for the Smoothest Filling

Peeling gives the smoothest, most classic filling. You can leave the skins on if you like a more rustic pie, but the slices will feel chewier and the skins may separate slightly from the softened apple flesh.

Sugar, Lemon, Flour, and Spices

Granulated sugar sweetens the apples, brown sugar adds warmth, lemon juice brightens the filling, and flour helps thicken the juices as the pie bakes. Cinnamon is essential, while a little nutmeg gives the filling a classic bakery-style aroma.

All-purpose flour works best here because it gives a classic apple pie texture. Cornstarch can work in many fruit fillings, but it can become gummy when overused in a long-baked apple pie.

Buttery Crumb Topping

The crumb layer is made with flour, brown sugar, a little granulated sugar, cinnamon, salt, and melted butter. Once mixed, it should hold together in soft clumps when squeezed. If it looks dusty or powdery, it needs to be worked together a little more.

Best Apples for Dutch Apple Pie

Apple Varieties That Hold Shape

Apple choice cue: A good apple blend needs both flavor and structure. Start with tart Granny Smith, then add one sweet-firm apple so the filling tastes balanced and still holds shape.
Apple selection board for Dutch apple pie with Granny Smith, Honeycrisp, Braeburn, Pink Lady, and Golden Delicious apples.
The best apple blend gives you both flavor and structure. Start with tart Granny Smith, then add a sweet-firm apple such as Honeycrisp, Braeburn, or Pink Lady.

The best apples are firm, flavorful varieties that can survive a long bake without collapsing. Because this pie spends nearly an hour in the oven, avoid soft, mealy, or overripe apples that break down too quickly.

Apple Best Use Flavor / Texture
Granny Smith Best tart backbone Firm, sharp, holds shape well
Honeycrisp Best sweet-tart partner Juicy, crisp, fragrant
Braeburn Best balanced baking apple Sweet-tart, firm, aromatic
Pink Lady Best bright flavor Tart-sweet, firm, lively
Golden Delicious Best softer sweet blend apple Mellow, sweet, less tart

Avoid very soft, mealy, or overripe apples here. They may taste fine raw, but they can collapse during the long bake and leave you with a flatter, wetter filling.

Apple structure cue: Soft apples can taste fine raw but collapse during a long bake. For this pie, firmer slices give you a filling that stays tender instead of turning flat and watery.
Firm apple slices holding shape compared with softer collapsed apple slices after baking.
Apples that taste good raw do not always bake well. For this long-baked apple pie, firm slices are safer because they soften without collapsing into a watery layer.

Slice the apples about 1/4 inch / 6 mm thick. Very thin slices soften faster but can turn compact and jammy. Thick slices can stay firm even when the crust and topping are done.

Slice Thickness for Even Baking

Slice thickness cue: The goal is not paper-thin slices or chunky wedges. Aim for even 1/4-inch slices so the apples soften at the same pace as the crust and crumb topping bake.
Apple slice thickness guide for Dutch apple pie showing too-thin slices, quarter-inch slices, and thick slices.
Even 1/4-inch apple slices bake more predictably. Thin slices can turn jammy, while thick slices may stay too firm after the crust and crumbs are already done.

If your apples are extra juicy or you want neater slices, compare the raw, pre-cooked, and canned filling options before assembling the pie.

Apple Crumb Topping for Dutch Apple Pie

The crumble layer is not just decoration. It is the main reason this pie tastes different from a regular apple pie: buttery, cinnamon-scented, lightly crisp on top, and soft enough underneath to melt into the apples. The goal is chunky crumbs, not loose sugar-flour dust.

Crumb topping cue: The topping should already look like real crumbs before it goes into the oven. If it looks like dry flour and sugar, keep working in the butter until clusters form.
Chunky brown-sugar crumb topping scattered over sliced apples in an unbaked Dutch apple pie.
Once those clumps toast, they become the signature golden top of an apple crumb pie.

For one 9-inch deep-dish pie, use:

  • 1 cup / 4.4 oz / 125 g all-purpose flour
  • 1/2 cup / 3.5 oz / 100 g packed light brown sugar
  • 2 tablespoons / 0.9 oz / 25 g granulated sugar
  • 1 teaspoon ground cinnamon
  • 1/4 teaspoon fine salt
  • 1/2 cup / 4 oz / 113 g unsalted butter, melted and cooled slightly
  • Optional: 1/2 cup / 2 oz / 55–60 g chopped pecans or walnuts

Stir the dry ingredients first, then add the melted butter. Mix until the topping forms damp crumbs. It should not look like loose flour, and it should not become one greasy paste. When squeezed, it should hold together, then break into chunky crumbs.

Melted Butter vs Cold Butter

Melted butter is easiest for this style of topping because it quickly coats the flour and sugar. Let it cool slightly before mixing. Boiling-hot butter can make the crumbs pasty or greasy instead of clumpy.

Butter cue: Melted butter is the easy route here, but it should be slightly cooled. Boiling-hot butter can make the topping pasty instead of crumbly.
Melted butter being poured into a flour, brown sugar, and cinnamon crumb topping mixture.
Slightly cooled butter coats the flour and sugar without turning the mixture greasy.

Oats or No Oats?

Classic Dutch apple pie often uses a flour-based topping without oats. For a more apple-crisp-style texture, replace 1/4 cup / 1 oz / 30 g of the flour with 1/4 cup / 0.9 oz / 25 g old-fashioned oats. Do not use instant oats; they can make the topping feel dusty.

Nuts or No Nuts?

Pecans or walnuts add crunch and a deeper toasted flavor. Leave them out for a smoother, more classic crumb topping, or add them when you want the pie to feel richer and more holiday-ready.

Variation cue: Keep the classic flour crumb for the most traditional Dutch apple pie texture. Add oats for a more apple-crisp feel, or nuts when you want extra toasted crunch.
Classic crumb topping, oat-style crumb topping, and nutty crumb topping variations for Dutch apple pie.
Classic crumbs keep the pie closer to a traditional Dutch apple pie. However, oats make the topping feel more like apple crisp, while nuts add toasted crunch.

Crumb Topping Texture Guide

Texture cue: Use the crumb texture as a quick check before assembly. Sandy topping needs more mixing, while greasy topping needs a brief chill so the crumbs separate again.
Crumb topping texture guide showing dry crumbs, just-right clumpy crumbs, and greasy pasty crumbs.
If the topping looks sandy, keep working in the butter; if it looks greasy, chill it briefly so the crumbs can separate again.
What You See What It Means How to Fix It
Dry and sandy The butter has not been worked in enough Press the mixture with your fingers until clumps form
Wet and pasty The butter was too hot or the topping was overmixed Chill 10 minutes, then break into crumbs
Huge greasy chunks The topping was over-compressed Break apart gently before adding to the pie
Browning too fast The topping is exposed to heat before the apples are done Tent loosely with foil once golden
Soft after storage The pie was covered warm or refrigerated Reheat slices uncovered in the oven
Crumb topping cue: The topping should feel like damp, clumpy sand. Keep mixing and pressing when it will not hold together after a squeeze. A greasy mixture only needs a brief chill before you break it back into crumbs.

For sandy, greasy, or overly dark crumbs, the troubleshooting section gives quick fixes without changing the whole recipe.

The Pan and Tools That Matter Most

You do not need anything fancy. The three tools worth caring about most are a deep-dish pie plate, a rimmed baking sheet, and something to protect the crust edges if they brown early.

  • 9-inch deep-dish pie plate: holds the full 3 lb / 48 oz / 1.35 kg apple filling.
  • Rimmed baking sheet: catches drips and gives the pie a stable surface in the oven.
  • Foil or pie shield: protects the crust edge or crumbs if they brown before the apples are tender.
  • Large mixing bowl: gives the apples room to coat evenly with sugar, flour, lemon, and spices.
  • Small mixing bowl: keeps the topping separate until assembly.
  • Rolling pin: needed if you are using homemade pie crust.
  • Apple peeler, corer, or sharp knife: helps keep the slices even.
  • Instant-read thermometer: optional, but useful if you want a doneness cue beyond color and bubbling.

A metal pie plate browns the bottom crust more quickly, while glass lets you see the crust color but heats more slowly. With glass, the lower rack and full bake time matter even more.

Choosing Metal or Glass

Pan cue: Your pie plate changes how the bottom crust bakes. Metal gives the crust faster heat, while glass lets you check color but often needs the full bake time.
Metal and glass pie plates compared for Dutch apple pie, with crust-browning cues.
Metal gives the bottom crust a faster start, which helps browning. Glass lets you watch the crust color, but it usually needs the full bake time to perform well.

Using a Regular 9-Inch Pie Plate?

The amounts here are sized for a deep-dish 9-inch pie plate. For a shallow or standard-depth plate, use about 2 1/2 lb / 40 oz / 1.1 kg apples instead of the full 3 lb. Do not force every apple slice into the crust; an overfilled shallow pie can overflow, bake unevenly, and soften the bottom crust.

Pan-size cue: The apple amount depends on the depth of your plate. A deep-dish pan can take the full 3 pounds, but a shallow 9-inch plate needs less filling to bake cleanly.
Deep-dish pie plate and regular 9-inch pie plate compared with different apple filling amounts.
A deep-dish pie plate can handle more apples. In a shallow 9-inch plate, reduce the filling so the pie bakes evenly instead of overflowing or softening the bottom crust.

You can also use slightly less crumb topping if the pie is very full. Place the pie on a rimmed baking sheet and start checking for doneness around 50 minutes.

How to Make Dutch Apple Pie

Once the crust is cold, the apples are sliced evenly, and the crumbs hold together when squeezed, the assembly is straightforward. The main thing is to keep the crust chilled and give the pie enough time in the oven for the filling to bubble.

Step 1: Roll and Chill the Crust

Roll one pie crust into a 12-inch circle and fit it into a 9-inch deep-dish pie plate. Trim and crimp the edges, then chill the crust while you prepare the apples and crumb topping.

Chilling gives the bottom crust a better chance to set before the apple juices release fully.

Step 1 cue: Start with the crust cold and shaped before you deal with the filling. That gives the dough structure before the apples release moisture.
Hands crimping an unbaked pie crust in a deep-dish pie plate for Dutch apple pie.
A cold, crimped crust gives the pie a stronger base before the apples release moisture and the crumb topping begins to brown.

Step 2: Peel, Core, and Slice the Apples

Peel and core the apples, then slice them about 1/4 inch / 6 mm thick. Keep the slices as even as possible so they soften at the same rate.

Step 2 cue: Even slicing is more important than perfect-looking slices. When the apple pieces are similar in thickness, they soften together instead of baking unevenly.
Peeled apples being sliced evenly with a knife for Dutch apple pie filling.
Even apple slices soften at the same pace. As a result, the filling bakes more evenly and avoids the mix of mushy pieces and underbaked chunks.

Step 3: Toss the Apple Filling

In a large bowl, toss the sliced apples with granulated sugar, brown sugar, flour, lemon juice, cinnamon, nutmeg, salt, and vanilla. Let the mixture sit for 10 minutes while you make the topping.

Step 3 cue: Coat the slices evenly before they go into the crust. Flour, sugar, lemon, and spice need to reach the apples throughout the bowl, not sit in dry patches.
Apple slices tossed in a bowl with sugar, flour, lemon, cinnamon, nutmeg, salt, and vanilla.
Even coating matters because the flour cannot thicken the apple juices properly if it stays in dry patches at the bottom of the bowl.

That short rest lets the sugar begin drawing moisture from the apples. A little syrup in the bottom of the bowl is normal; if the slices are sitting in a visible puddle, lift the apples into the crust and leave most of that liquid behind.

Liquid control cue: After the apples rest, some syrup is normal. When you see a real puddle, spoon the apples into the crust and leave the extra liquid behind.
Spoon lifting spiced apple slices from a bowl with syrup pooled at the bottom.
This is the moment to protect the crust: spoon in the apples, not the full syrup at the bottom of the bowl.

This liquid-control step is also one of the easiest ways to avoid a soft crust; for the full prevention list, see how to keep Dutch apple pie from getting soggy.

Step 4: Make the Crumb Topping

Stir flour, brown sugar, granulated sugar, cinnamon, and salt in a bowl. Add melted, slightly cooled butter and mix until the topping forms chunky crumbs. When squeezed in your hand, it should hold together, then break apart easily.

Step 4 cue: The squeeze test tells you if the topping is ready. It should hold together in your hand, then break apart into irregular brown-sugar crumbs over the apples.
Hand squeezing Dutch apple pie crumb topping to show clumps that hold together and crumble apart.
Use the squeeze test before topping the pie. The mixture should hold together in your hand, then break into chunky brown-sugar crumbs over the apples.

Now place a rack in the lower third of the oven and heat the oven to 400°F / 200°C. The lower rack gives the bottom crust more direct heat, while the crumbs still brown from above.

Oven rack cue: Use the lower rack for stronger bottom heat, and keep the pie on a rimmed baking sheet to catch bubbling juices.
Dutch apple pie on a rimmed baking sheet being placed on the lower oven rack.
Think of the rimmed sheet as support and insurance: it steadies the pie, catches drips, and lets the bottom crust get stronger heat.

Step 5: Fill the Pie

Spoon the apples into the chilled crust, mounding them slightly in the center. Do not worry if the apples sit a little high before baking; they settle as they soften. Scatter the crumb topping over the apples and press it just lightly enough to stay in place without compacting it.

Assembly cue: A slight apple mound is fine before baking because the slices settle in the oven. Scatter the crumbs gently so the topping stays textured instead of packed flat.
Dutch apple pie crust filled with mounded apple slices while crumb topping is scattered over the top.
Mound the apples gently, then scatter the crumbs without pressing hard; that way, the filling can settle while the topping keeps its texture.

Step 6: Bake Hot, Then Lower the Heat

Place the assembled pie on a rimmed baking sheet and bake at 400°F / 200°C for 20 minutes. Without removing the pie, reduce the oven temperature to 375°F / 190°C and bake for 35–45 minutes more.

If the crumbs or crust edges brown too quickly, usually after the first 30–35 minutes, tent the pie loosely with foil. Do not seal it tightly, or trapped steam can soften the top.

Foil cue: Use foil as a shield, not a lid. A loose tent protects the crumbs and crust edge without sealing in steam.
Dutch apple pie on a baking sheet with foil loosely tented over the browned crumb topping.
The foil should hover over the pie, protecting the top while still letting steam escape.

Not sure whether the pie is fully baked? Use the bake time and doneness cues before pulling it from the oven.

Step 7: Cool Before Slicing

Cool the pie for at least 3 hours before slicing. As the pie cools, the filling keeps thickening. The pie can be warm when served, but not straight-from-the-oven hot if you want clean slices.

Cooling cue: When the pie comes out of the oven, the filling is still setting. Give it the cooling window so the apple layer thickens before you cut into it.
Finished Dutch apple pie cooling on a wire rack with golden crumb topping and an intact crust.
Treat cooling as part of the recipe; this is when the filling becomes sliceable.

How Long to Bake Dutch Apple Pie

A deep-dish pie made with raw sliced apples usually needs 55–65 minutes total bake time.

Two-Temperature Bake Schedule

Bake-time cue: The two-temperature bake has a purpose: strong heat first for the crust, then gentler heat so the apples can finish without scorching the crumb topping.
Dutch apple pie bake time guide showing 400°F for 20 minutes, 375°F for 35 to 45 minutes, and cooling for 3 hours.
The two-temperature bake gives the pie a better balance: strong heat first for the crust, then gentler heat so the apples finish without scorching the crumbs.
Stage Temperature Time What It Does
Hot start 400°F / 200°C 20 minutes Gives the crust a head start and begins browning
Gentle finish 375°F / 190°C 35–45 minutes Softens apples and thickens filling without burning topping
Cooling Room temperature At least 3 hours Lets the filling settle for cleaner slices

Do not pull the pie just because the crumbs look golden. The filling also needs to bubble and the apples need to feel tender; otherwise, the crust and topping may look done while the center still needs time.

Look for golden brown crumbs, bubbling juices around the edges, and apples that feel tender when pierced with a thin knife. An instant-read thermometer is optional, but the center of the filling should be about 190–200°F / 88–93°C.

Doneness Cues Beyond Color

Doneness cue: Golden crumbs are only part of the test. Look for bubbling edges and tender apples before pulling the pie from the oven.
Dutch apple pie doneness guide showing golden crumbs, bubbling edges, tender apples, and a center temperature of 190 to 200°F.
Color is only the first clue; bubbling edges and tender apples confirm the filling has had enough time to thicken.

Should You Par-Bake the Crust for Dutch Apple Pie?

You can usually skip par-baking for this raw-apple Dutch apple pie recipe as long as the crust gets three protections: a cold start, a lower oven rack, and enough total bake time. The apples need nearly an hour in the oven anyway, so the bottom crust has time to cook through.

Par-baking becomes more helpful when the filling is already cooked, canned, or unusually wet. In those cases, the filling may not need as much oven time after assembly, so the crust benefits from a head start.

Par-bake cue: Par-baking is not a blanket rule for this pie. Raw apples need a long bake anyway, while cooked, canned, or very wet fillings may need extra crust protection.
Par-bake decision guide showing raw apples usually do not need par-baking, while pre-cooked, canned, or very juicy fillings may benefit from it.
Par-baking depends on the filling. Raw apples need the long bake, while pre-cooked or canned filling may benefit from giving the crust a head start.
Situation Par-Bake? Why
Raw apple filling, this recipe Usually no The long bake gives the crust enough time to cook
Pre-cooked apple filling Helpful The filling is already soft, so the assembled pie may bake for less time
Canned apple pie filling Helpful Canned filling is soft, sweet, and already thickened
Very juicy apples Optional Par-baking adds extra protection against a soft bottom crust
Glass pie plate More helpful Glass heats more slowly than metal
Metal pie plate Less necessary Metal conducts heat faster and helps the bottom crust brown

How to Keep Dutch Apple Pie from Getting Soggy

A soggy bottom usually comes from one of three places: too much loose apple juice, not enough heat under the crust, or slicing before the filling has settled. This style of pie is especially vulnerable because it has a juicy fruit filling and only one crust.

Three Causes to Control

Soggy-bottom cue: A soft bottom crust usually comes from too much loose apple juice, not enough heat under the pie, or slicing before the filling has set. Control those three points and the pie becomes easier to trust.
Soggy-bottom prevention board showing liquid control, lower oven rack baking, and cooling time for Dutch apple pie.
Use this as a quick pre-bake check: manage liquid first, then rely on lower-rack heat and cooling time.
  • Chill the crust before filling. Cold dough holds its structure better in the oven.
  • Choose apples with structure. Soft apples collapse quickly and release more liquid.
  • Do not pour in all pooled apple juice. Spoon in the apples, but leave excess liquid behind if the bowl is very wet.
  • Use enough thickener. Flour helps bind the juices as the pie bakes.
  • Bake on a lower rack. This gives the bottom crust more direct heat.
  • Use a rimmed baking sheet. It catches drips and keeps the pie stable.
  • Give the filling a full cooling window. Cutting too early makes even a well-baked pie look runny.
  • Do not cover while warm. Trapped steam softens the crumb layer and crust.

Optional Crust Barrier

For an extra barrier against fruit juices, King Arthur Baking suggests using a thin layer of “crust dust” on the bottom crust before adding fruit filling. It is optional, but useful if you often struggle with soggy pie bottoms. You can read their technique here: King Arthur Baking’s crust dust method.

Raw Apples vs Pre-Cooked Apple Filling

All three routes can work, but they give you different pies. Fresh apple slices taste brighter and more classic, pre-cooked filling slices more neatly, and canned filling is the fastest shortcut when you want the crumb-topped version with less prep.

Filling route cue: The filling route changes the final pie. Fresh slices taste brighter, cooked filling can slice more neatly, and canned apple pie filling is the fastest shortcut.
Three bowls comparing raw spiced apple slices, pre-cooked apple filling, and canned apple pie filling.
Choose fresh slices for brighter flavor, pre-cooked filling for neater pieces, or canned apple pie filling when time matters most.
Method Best For Tradeoff
Raw sliced apples Easiest classic pie More shrinkage and more juice management
Pre-cooked apple filling Neater slices, make-ahead baking, less gap under topping Extra step; filling must cool before going into crust
Canned apple pie filling Fastest shortcut Softer, sweeter, less fresh-tasting

I use raw apples here because the full 55–65 minute bake gives them enough time to soften while keeping the flavor fresher and less jammy. Even slices, enough thickener, and visible bubbling are the keys.

Pre-cooked filling is better when you want less shrinkage, fewer hollow gaps under the topping, or cleaner slices for a holiday table. It is also useful if you want to make the filling ahead. Just cool it completely before adding it to the crust; warm filling can melt the butter in the dough and make the bottom crust heavy.

If you want the make-ahead route, use cooled homemade filling from this apple pie filling recipe.

Dutch Apple Pie with Canned Apple Pie Filling

Canned apple pie filling works when you want the shortcut version, but it needs a lighter hand. Because it is already sweetened, softened, and thickened, skip the flour, reduce the sugar, and wake it up with lemon juice, cinnamon, and a small pinch of salt.

Shortcut cue: Canned filling is already soft, sweet, and thickened, so it needs balance more than more sugar. Lemon, cinnamon, and salt make the shortcut taste brighter.
Canned apple pie filling in a bowl with lemon juice, cinnamon, and a pinch of salt added.
Canned apple pie filling works better after a few small fixes. Lemon brightens it, cinnamon warms it, and a pinch of salt balances the sweetness.

If you are using canned filling because you need a faster pie, the par-bake section is worth checking before you assemble it.

How to Adjust Canned Apple Pie Filling

  • Use about 2 cans, 20–21 oz each, for one 9-inch pie.
  • Do not add the flour from the raw-apple filling.
  • Skip most or all of the added sugar in the apple layer.
  • Brighten the flavor with 1 tablespoon / 0.5 fl oz / 15 ml lemon juice.
  • Stir in 1/2 teaspoon cinnamon if the filling tastes flat.
  • Balance the sweetness with a small pinch of salt.
  • Use the same brown-sugar crumb topping listed above.
  • Consider par-baking the crust because canned filling needs less time in the oven.
  • If your pie plate is shallow, do not force in both full cans; leave a little behind rather than overfilling.

Bake Time for the Shortcut Version

A canned-filling version may bake closer to 45–55 minutes, depending on the crust, pan, and whether the filling went in cold or at room temperature. Bake until the crumb topping is golden and the filling bubbles. Cool fully before slicing, because canned filling can look thick while hot but loosen once cut.

For a full shortcut pie, see this apple pie with apple pie filling.

If you have extra filling after baking, it can also go into easy desserts like this apple cinnamon roll bake with apple pie filling.

How to Serve Dutch Apple Pie: Warm, Room Temperature, or Reheated

Dutch apple pie is best after it has cooled long enough to slice cleanly. Serve it at room temperature, gently warmed, or with vanilla ice cream if you want the contrast of warm apples and cold cream. A small drizzle of caramel works too, but the pie is already sweet enough that it does not need much.

For the cleanest slices, cool the pie completely first, then rewarm individual pieces in a 325°F / 160°C oven for 10–15 minutes before serving.

Planning this for Thanksgiving or a holiday table? The make-ahead and reheating section gives the cleanest workflow.

Make Ahead, Storage, Freezing, and Reheating

Dutch apple pie is best the day it is baked, after it has cooled enough to slice cleanly. You can still make several parts ahead, which is helpful for Thanksgiving, fall dinners, and holiday baking days.

Make-ahead cue: For a holiday workflow, do not wrap or freeze the pie while it is hot. Bake it, cool it fully, then freeze or reheat uncovered when needed.
Make-ahead workflow showing pie dough and crumbs prepared ahead, baked pie cooling, frozen pie storage, and reheating uncovered.
For the smoothest holiday workflow, prepare the dough and crumbs early, then bake the pie fully before freezing or reheating.

What to Prep Ahead

Part Make-Ahead / Storage What Matters
Pie dough Refrigerate 2–3 days or freeze up to 3 months Let it soften slightly before rolling
Crumb topping Refrigerate up to 2 days Break into crumbs again before using
Raw apple filling Best made the same day Apples release liquid as they sit
Cooked apple filling Refrigerate 2–3 days Cool completely before filling crust
Baked pie Room temperature up to 2 days; refrigerate leftovers 3–4 days Keep loosely covered once fully cool
Baked pie, frozen Freeze fully cooled pie up to 2–3 months Thaw overnight in the refrigerator, then reheat uncovered at 325°F / 160°C
Reheating 325°F / 160°C for 15–20 minutes Reheat uncovered to help the topping crisp

For a holiday workflow, make the pie dough and crumb topping ahead, then bake the pie the day before you need it. Let it cool fully, keep it loosely covered, and rewarm slices or the whole pie uncovered before serving.

Freezing and Reheating the Baked Pie

For the best texture, freeze the pie after baking and cooling. Wrap it well once completely cool, freeze for up to 2–3 months, thaw overnight in the refrigerator, and reheat uncovered so the buttery crumbs can crisp back up. An unbaked pie can be frozen too, but raw apples release more liquid as they thaw, so the baked-and-cooled route is easier to control.

Can You Make Dutch Apple Pie the Day Before Thanksgiving?

Yes. Bake the pie the day before, cool it completely, and keep it loosely covered. Reheat it uncovered at 325°F / 160°C until warmed through. The crumb topping is crispest the day the pie is baked, but reheating uncovered helps bring back some texture.

Refrigeration is useful after the first couple of days, but it will soften the crumb topping. For the best texture, reheat slices in the oven instead of the microwave.

For food-safety storage guidance, Iowa State University Extension notes that fruit pies made with sugar can be stored at room temperature for up to two days, then refrigerated for additional storage. See their pie storage guidance here: ISU Extension pie storage guide.

Troubleshooting Dutch Apple Pie

Do not judge the pie while it is still hot. Many problems that look serious right out of the oven, especially loose filling, improve as the pie cools and the juices thicken.

Most real issues come down to moisture, timing, or crumb texture. Once you know which one caused the problem, the fix is usually simple.

Troubleshooting cue: Most problems trace back to moisture, timing, or crumb texture. Match the symptom first, then adjust the next bake.
Troubleshooting guide for Dutch apple pie showing fixes for runny filling, soggy bottom, firm apples, sandy crumbs, over-browned topping, and browned crust edges.
Match the symptom first, then adjust moisture, timing, or crumb texture without rebuilding the whole recipe.

Filling and Crust Problems

Problem Likely Cause Fix
Soggy bottom crust Too much apple juice, underbaked crust, or pie cut too soon Use lower rack, hot start, sturdy apples, and a full cooling window
Runny filling Not enough thickener, underbaked apples, or sliced while too hot Bake until bubbling and let the filling fully settle before slicing
Apples stay too firm Slices too thick or bake time too short Slice 1/4 inch / 6 mm thick and bake until the juices bubble
Large gap under the crumbs Raw apples shrank during baking Mound the apples slightly, slice them evenly, or use cooled pre-cooked filling
Filling tastes flat Apples were very sweet or the filling needed more balance Add lemon juice and a pinch of salt next time

Crumb Topping and Baking Problems

Problem Likely Cause Fix
Crumb topping is sandy Butter was not worked into the dry ingredients enough Press the mixture into clumps, then break it into crumbs
Crumb topping is greasy Butter was too hot or the topping was overmixed Chill the topping for 10 minutes, then crumble it again
Topping burns before apples soften Top heat is too strong or the pie needs a longer bake Tent loosely with foil after the crumbs turn golden
Crust edge burns The edge was exposed too long Use foil or a pie shield after the first 20–30 minutes
Pie overflows Pie plate was too shallow or the filling had too much liquid Use a deep-dish plate, leave excess juice behind, and bake on a rimmed sheet

Most of these problems are easy to prevent once you control moisture, heat, and cooling time. With sturdy apples, a cold crust, and a full cooling window, the oven does most of the work; the reward is a pie that smells like cinnamon, cuts cleanly, and still tastes like real apples.

Before you slice: The pie should look settled, not loose and bubbling-hot. The crumbs will be golden, the apple juices will have thickened around the edges, and the filling will hold better after a full cooling window.

Dutch Apple Pie Recipe

This deep-dish Dutch apple pie has tender spiced apples, a flaky bottom crust, and a buttery brown-sugar crumb topping that bakes into golden clusters.

Yield1 deep-dish 9-inch pie
Servings8–10
Prep Time35 minutes
Bake Time55–65 minutes
Cooling Time3 hours
Total TimeAbout 4 hours 30–40 minutes
Oven400°F, then 375°F
Pan9-inch deep-dish pie plate

Ingredients

Crust

  • 1 unbaked 9-inch pie crust, chilled

Apple Filling

  • 3 lb / 48 oz / 1.35 kg firm apples, peeled, cored, and sliced 1/4 inch / 6 mm thick
  • 1/2 cup / 3.5 oz / 100 g granulated sugar
  • 2 tablespoons / 0.9 oz / 25 g packed light brown sugar
  • 3 tablespoons / 0.85 oz / 24 g all-purpose flour
  • 1 tablespoon / 0.5 fl oz / 15 ml fresh lemon juice
  • 1 1/2 teaspoons ground cinnamon
  • 1/4 teaspoon ground nutmeg
  • 1/4 teaspoon fine salt
  • 1 teaspoon / 5 ml vanilla extract
  • Optional: 1 tablespoon / 0.5 oz / 14 g melted unsalted butter

Crumb Topping

  • 1 cup / 4.4 oz / 125 g all-purpose flour
  • 1/2 cup / 3.5 oz / 100 g packed light brown sugar
  • 2 tablespoons / 0.9 oz / 25 g granulated sugar
  • 1 teaspoon ground cinnamon
  • 1/4 teaspoon fine salt
  • 1/2 cup / 4 oz / 113 g unsalted butter, melted and cooled slightly
  • Optional: 1/2 cup / 2 oz / 55–60 g chopped pecans or walnuts

Instructions

  1. Prepare the crust. Roll the pie dough into a 12-inch circle and fit it into a 9-inch deep-dish pie plate. Trim, crimp, and chill while you prepare the filling.
  2. Slice the apples. Peel, core, and slice apples about 1/4 inch / 6 mm thick.
  3. Make the filling. In a large bowl, toss apples with granulated sugar, brown sugar, flour, lemon juice, cinnamon, nutmeg, salt, vanilla, and melted butter if using. Let sit for 10 minutes; leave behind excess pooled liquid if the bowl looks very wet.
  4. Make the crumb topping. In another bowl, mix flour, brown sugar, granulated sugar, cinnamon, and salt. Add melted cooled butter and stir until clumpy crumbs form. Add nuts if using.
  5. Prepare the oven. Place a rack in the lower third of the oven and heat to 400°F / 200°C. Set a rimmed baking sheet nearby for baking the pie.
  6. Fill the crust. Spoon apples into the chilled crust, leaving behind excess pooled liquid if the bowl is very wet. Mound apples slightly in the center.
  7. Add topping. Sprinkle crumb topping evenly over the apples. Press lightly so the crumbs sit in place without compacting them.
  8. Bake. Place the pie on the rimmed baking sheet. Bake at 400°F / 200°C for 20 minutes. Reduce heat to 375°F / 190°C and bake 35–45 minutes more, until the topping is golden and the filling bubbles around the edges.
  9. Protect if needed. If the crumbs or crust edges brown too quickly, usually after the first 30–35 minutes, tent loosely with foil.
  10. Cool. Let the pie cool at least 3 hours before slicing.

Notes

  • Best apple blend: Use 2 lb Granny Smith plus 1 lb Honeycrisp, Braeburn, or Pink Lady.
  • Regular pie plate: For a shallow 9-inch pie plate, use about 2 1/2 lb / 40 oz / 1.1 kg apples.
  • Do not overfill: Extra apples in a shallow plate can cause overflow and a softer bottom crust.
  • Very juicy apples: Use 1 extra tablespoon / about 0.3 oz / 8 g flour and be strict about leaving pooled liquid behind.
  • Optional butter in filling: Add it for a slightly richer apple layer, or leave it out for a cleaner fruit flavor.
  • Salted butter: If using salted butter in the crumb topping, reduce the added salt to a small pinch.
  • Oat crumb variation: Replace 1/4 cup / 1 oz / 30 g flour with 1/4 cup / 0.9 oz / 25 g old-fashioned oats.
  • Canned filling shortcut: Use 2 cans of apple pie filling, skip the flour and most added sugar in the apple layer, and consider par-baking the crust.
  • Cleaner slices: Cool completely, then rewarm individual pieces before serving.

FAQs

What makes Dutch apple pie different from regular apple pie?

Dutch apple pie has a bottom crust and a crumb or streusel topping. Regular apple pie usually has a second pastry crust on top, either solid, vented, or arranged as a lattice.

Is Dutch apple pie the same as apple crumb pie or apple crumble pie?

In many home-baking recipes, yes. Apple crumb pie and apple crumble pie usually emphasize the crumb layer, while Dutch apple pie is the more common name for the full pie style with a bottom crust, apple filling, and streusel-style top.

Should the apples be cooked before baking?

Raw apples work well in this recipe because the pie bakes long enough for them to soften. Pre-cooked apples are useful when you want less shrinkage, fewer gaps under the topping, or a make-ahead filling.

Should the crust for this Dutch apple pie recipe be par-baked?

For the raw-apple version, par-baking is usually not required. A chilled crust, hot-start bake, and lower oven rack are enough for most pies. Par-baking is more useful with canned filling, pre-cooked filling, glass pie plates, or very juicy apples.

Do I have to peel the apples?

Peeling gives the smoothest, most classic filling. Unpeeled apples work if you like a rustic texture, but the skins can feel chewy after baking.

Why is there a gap under my crumb topping?

A gap usually means the raw apples shrank while baking. Mound the apples slightly, slice them evenly, and avoid overly soft apples. For the most compact filling, use cooled pre-cooked apple filling.

Why did my crumb topping turn sandy?

The butter probably was not worked into the flour and sugar enough. Press the mixture between your fingers until it forms clumps before sprinkling it over the apples.

How long should Dutch apple pie cool before slicing?

Give it at least 3 hours. The filling thickens as it cools, so a pie that would run if sliced hot can still cut beautifully later.

Can I bake Dutch apple pie the day before Thanksgiving?

Yes. Bake it the day before, cool it completely, and keep it loosely covered. Reheat uncovered at 325°F / 160°C before serving if you want the pie warm and the crumbs a little crisper.

Can I use canned apple pie filling?

Canned apple pie filling works well for a shortcut version, especially when you brighten it with lemon juice and balance the sweetness with a pinch of salt. Use about two 20–21 oz cans for a 9-inch pie, skip most added sugar, and do not add flour to the filling.

What is the best way to reheat Dutch apple pie?

Reheat slices uncovered in a 325°F / 160°C oven for 15–20 minutes. The oven helps revive the crumb topping better than the microwave.

If you make this pie, I’d love to know which apple blend you used. Did you go classic with Granny Smith and Honeycrisp, or sweeter with Golden Delicious?

Back to top

Posted on 8 Comments

Peach Cobbler with Canned Peaches (Dessert Recipe)

Peach cobbler with canned peaches can look every bit as inviting as it tastes, and this cover image captures exactly that warm, buttery, golden comfort. If you are craving an easy homemade dessert that feels classic without needing fresh peaches, this recipe delivers. Read the full post for the full peach cobbler with canned peaches recipe, step-by-step method, tips to keep it from turning watery, and plenty of serving ideas. Save it, share it, and come back when you need a simple peach dessert that still feels special.

There is something deeply reassuring about a warm fruit dessert, and this peach cobbler with canned peaches belongs squarely in that comforting category. It asks very little from you, yet it still manages to feel generous, homemade, and worthy of setting down in the middle of the table while everyone leans in for a closer look. Peach cobbler has always had that kind of charm. It fits just as naturally at a casual family dinner as it does at a holiday meal, and it carries that wonderful mix of ease and nostalgia that makes people reach for another spoonful almost before the first one is finished.

Even so, cobbler can become oddly complicated once real life enters the picture. Fresh peaches are wonderful when they are ripe, fragrant, and abundant, but they are not always in season, and they are certainly not always ready when you are ready. Frozen peaches can help, although they bring their own texture questions. Canned peaches, by contrast, are already peeled, already sliced, already soft, and already sitting in the pantry waiting for you. That is exactly why a good peach cobbler with canned peaches deserves a permanent place in your dessert rotation.

This peach cobbler with canned peaches is a buttery batter-style cobbler baked in a 9×13-inch dish at 350°F until the top turns deeply golden and the fruit bubbles around the edges. Better still, this is not a “good enough for now” version of cobbler. When the fruit is drained properly, the sweetness is balanced, and the topping is given the right structure, a canned peach cobbler can taste every bit as cozy and satisfying as the kind people remember from church suppers, family reunions, summer weekends, and old-fashioned Sunday dinners.

Peach cobbler with canned peaches recipe at a glance

Before we get into the richer details, here is the shape of the recipe in simple terms.

  • Serves 8 to 10
  • Prep time: about 15 minutes
  • Bake time: 40 to 50 minutes
  • Resting time: 20 minutes
  • Oven temperature: 350°F
  • Baking dish: 9×13-inch
  • Style: buttery batter-style peach cobbler
  • Best fruit: canned peaches in juice or light syrup

Those details matter because they set expectations early. The dessert is not fussy, though it does ask for a little care. Once you know the pan size, the temperature, and the texture you are aiming for, the rest becomes much easier.

Recipe card for peach cobbler with canned peaches showing a plated serving with vanilla ice cream, ingredient measurements, bake time, prep time, pan size, and simple method steps, including the tip to drain canned peaches first for the best texture.
This peach cobbler with canned peaches recipe card gives you the full bake at a glance: ingredient measurements, prep and bake time, pan size, and the simple method that keeps the cobbler buttery, golden, and easy to follow. It is especially helpful if you want a quick visual reference while baking or a saveable guide for later. Just as importantly, it highlights one of the biggest texture tips in the whole post: drain the canned peaches first for the best cobbler.

Why this peach cobbler with canned peaches feels worth making

It solves the real-life version of dessert

For many home cooks, the easiest route to a truly reliable cobbler is not through perfect fresh fruit at all. It is through a well-made peach cobbler with canned peaches recipe that understands how to turn pantry ingredients into something warm, golden, and worth sharing. That is what this recipe sets out to do.

Rather than giving you a vague shortcut and hoping everything works out, it walks you into the process in a way that helps the dessert come out buttery on top, tender underneath, and pleasantly peachy without tipping into a watery mess. Along the way, it answers the practical questions that actually matter when canned fruit is involved. Should you drain the peaches? Can you use peaches in syrup? How sweet should the batter be? What makes the difference between a simple peach cobbler with canned peaches and one that tastes flat or overly sweet? Most importantly, how do you make something that feels homemade even when the peaches came from a can?

Small decisions make the biggest difference

The answer lies in a handful of choices done well. A little draining. A measured hand with liquid. Enough butter to give the cobbler a rich base. A batter that stays tender rather than heavy. A baking time that allows the topping to turn properly golden. A rest at the end so the filling can settle instead of running across the plate.

None of those choices is difficult. Taken together, however, they change everything. They are the reason one cobbler tastes like a rushed pantry dessert while another tastes warm, balanced, and fully intentional. Because of that, this recipe does not ask for perfection. It simply asks for care in the places where care matters most.

A recipe that meets several cravings at once

So whether you were hoping for an easy peach cobbler with canned peaches, a homemade peach cobbler using canned peaches, an old fashioned peach cobbler recipe with canned peaches, or simply a dependable dessert you can make without waiting for peach season, you are in exactly the right place.

This version is warm, practical, and generous. It tastes like the kind of dessert someone made because they wanted everybody at the table to feel looked after. That quality is part of what makes cobbler so enduring. It is not only about sweetness. It is also about comfort, familiarity, and the quiet pleasure of setting down something that feels both humble and deeply welcome.

Also Read: Avocado Chocolate Mousse Recipe

Why this peach cobbler with canned peaches belongs in your kitchen

It removes the friction that keeps dessert from happening

A good cobbler earns its place not because it is flashy, but because it is useful in the loveliest possible way. It solves dessert without ever feeling like a compromise, turning ingredients you already have into something that fills the house with the smell of butter, vanilla, and fruit. Before long, there is every reason to pull out the ice cream, set the kettle on for coffee, or call people into the kitchen because something wonderful is coming out of the oven.

This particular peach cobbler recipe with canned peaches is especially useful because it removes several of the friction points that make fruit desserts feel like too much work on an ordinary day. No peeling is required, no blanching is needed, and there is no need to guess whether the peaches are ripe enough, sweet enough, or still stubbornly firm in the middle. Instead, the fruit is ready to go, which lets you focus on the part that matters most: turning those peaches into a cobbler that tastes rich, balanced, and deeply comforting.

It keeps the homemade feeling intact

Just as importantly, this recipe does not lean on artificial shortcuts that strip away the homemade feel. It is not a dump cake, although that style certainly has its place, nor is it a biscuit mix cobbler, even if that option can be helpful on a rushed day. Rather than becoming a three ingredient peach cobbler with canned peaches where convenience pushes the dessert too far from its roots, this version keeps the process easy while still delivering the warmth and character of a true cobbler.

A few ordinary pantry ingredients are all it takes to build a batter-style topping that rises around the fruit and turns into that soft, buttery, golden layer people associate with a classic cobbler. Accordingly, the result still feels easy, but it also feels cooked, considered, and made on purpose.

It gives you ease without sacrificing character

That balance is the real appeal here. You get the ease people want from a quick peach cobbler with canned peaches without losing the warmth and tenderness that make cobbler feel special in the first place. Nothing about it is fussy, yet the dessert still tastes intentional. The method is simple, though never bare, and the final result is easy enough for a weeknight, welcome at a potluck, and entirely worthy of the words homemade and old-fashioned.

It changes the way you think about pantry fruit

There is another reason this kind of recipe matters: it lets you make peace with the pantry in a much more satisfying way. Too often, canned fruit gets pushed into the category of emergency ingredient, something you use only because fresh is not available. In truth, canned peaches can be a gift. They are consistent, soft, and ready.

When used carefully, they give you a filling that already has the tenderness cobbler wants. What they need is a recipe that understands their strengths and corrects their weaknesses. That is what this one does. It does not apologize for the pantry. It makes the pantry feel smart.

Also Read: Falafel Recipe: Crispy Homemade, Air Fryer and Baked Falafel

Can you really make excellent peach cobbler with canned peaches?

Yes, and a peach cobbler with canned peaches can taste fully homemade

You absolutely can, and not in a reluctant, second-best sort of way. A peach cobbler with canned peaches can come out golden at the edges, soft in the middle, fragrant with vanilla and cinnamon, and beautifully spoonable. With the right handling, it tastes homemade, feels old-fashioned, and becomes exactly the kind of dessert people ask about after dinner.

That matters, because many cooks begin with quiet doubts. They assume canned peaches will only ever produce a serviceable dessert, never a memorable one. Yet cobbler does not demand perfect fruit. It demands warm fruit, balanced sweetness, and a topping that bakes into something tender and rich. Canned peaches can absolutely deliver on that promise when they are treated properly.

Why people hesitate

The hesitation usually comes from a reasonable place. Canned fruit is packed with liquid, sometimes syrupy liquid, and cobbler is notoriously unforgiving when too much moisture gets into the pan. Because of that, it is easy to imagine the whole thing turning soupy, over-sweet, or strangely flat.

That is not really a canned peach problem so much as a handling problem. Once you understand how to treat the fruit, the rest becomes straightforward. In other words, the problem is rarely the peach itself. The problem is almost always what the extra liquid does to the batter and the bake.

The short answer

Yes, canned peaches work beautifully in cobbler as long as they are drained well, sweetened thoughtfully, and baked long enough for the topping to fully set. Peaches packed in juice or light syrup are usually the easiest to manage, while heavy syrup peaches often need a bit more draining and a lighter hand with sugar.

The small act of control that changes the outcome

Peaches packed in juice or light syrup are often the easiest option because they give you more control. Heavy syrup peaches can still work, though they ask for a little restraint elsewhere. Either way, the crucial step is not simply dumping the can into the dish.

The peaches need to be drained and given a moment to shed excess liquid. From there, you can decide whether the fruit needs a little of its own juices added back in. Sometimes it does. Quite often, it does not. That small act of control is one of the main reasons this canned peach cobbler recipe turns out juicy rather than watery.

From fallback ingredient to smart ingredient

So the better question is not whether you can use canned peaches. The better question is how to use them so the cobbler tastes like you meant it to, not like you settled for it. Once that shift happens, canned peaches stop feeling like a fallback and start feeling like one of the smartest ways to make cobbler well.

If you enjoy baking that balances comfort with a little practical know-how, you might also like the way MasalaMonk’s tres leches cake recipe approaches a crowd-pleasing dessert: generous, clear, and deeply reader-friendly.

Also Read: Mango Margarita Recipe (Frozen or On the Rocks)

What Kind of Peach Cobbler with Canned Peaches Is This?

Cobbler is one word for several traditions

One of the quiet confusions around cobbler is that the word sounds singular while the desserts themselves are not. Ask five people what peach cobbler should be, and you may get five different answers. Some want a biscuit topping with distinct mounds of dough. Others expect a more cake-like layer that rises around the fruit. Some think of cobbler as nearly pie-like, while others fold it into the broader family of fruit bakes that includes crisp, crumble, buckle, and slump.

That variety is part of the charm, but it can also make recipes feel unclear. A person expecting a biscuit cobbler may be surprised by a batter-style one. Someone hoping for a crisp may wonder where the oat topping went. Clarity helps.

This is a batter-style peach cobbler with canned peaches

This recipe is a batter-style peach cobbler with canned peaches, and that tells you what to expect before you even pick up the flour. Rather than heading into biscuit territory, cake mix territory, or the world of oat-topped crisps and streusel-like crumbles, you are making the kind of cobbler that pours into the pan, welcomes the peaches over the top, and bakes into a soft, buttery layer around the fruit.

What this cobbler is not

It is not a biscuit cobbler with separate rounds on top, and it is not a cake mix peach cobbler with canned peaches that behaves more like a dump cake. Nor is it a peach crisp with oats or a crumble with a streusel topping. Instead, it lands in that cozy middle where the batter rises around the fruit and creates a spoonable dessert with golden edges and a tender center.

Comparison graphic showing the difference between peach cobbler, peach crisp, and dump cake, with three dessert panels highlighting a soft batter-style cobbler, a crumbly oat-topped peach crisp, and a more uniform cake-mix style dump cake.
Not every baked peach dessert is the same, and this comparison makes the differences easier to see at a glance. Peach cobbler has a softer batter-style topping that feels juicy and spoonable, peach crisp has a more textured crumb topping often made with oats, and dump cake has a more uniform cake-mix style top. If you have ever wondered why a peach cobbler with canned peaches looks and bakes differently from a crisp or a dump cake, this guide helps clarify it quickly before you bake.

Why canned peaches work especially well in this style

That style works especially well when the peaches come from a can. Because the fruit is already soft, it nestles into the batter without needing much encouragement. The batter, in turn, rises gently as it bakes, creating those lovely areas where the top is crisp at the edge and soft closer to the fruit.

The whole dessert ends up feeling rustic, warm, and familiar. It does not need decorative flourishes to feel complete. Instead, it leans on contrast: juicy fruit, soft topping, rich edges, warm spice, and just enough sweetness to make the peaches feel fuller without drowning them.

Why one recipe can satisfy several cravings

That distinction also helps explain why this version satisfies so many closely related cravings at once. It works beautifully as an easy peach cobbler recipe with canned peaches, while still delivering the comfort and fullness of a homemade peach cobbler with canned peaches. For anyone who grew up with batter-style Southern cobblers, it may even strike the same familiar note as a southern peach cobbler with canned peaches, especially when served warm with vanilla ice cream melting into the corners.

For a broader look at how cobbler styles differ, King Arthur Baking’s piece on different peach cobbler styles is genuinely helpful. It explains why one person’s “real cobbler” may look very different from another’s. That said, the method here stays reassuringly simple: buttery batter, drained peaches, no stirring, patient bake.

Also Read: Sourdough Pizza Dough Recipe (Crispy Crust & Easy Pizza Base)

Ingredients for Homemade Peach Cobbler with Canned Peaches

The recipe ingredients

Here is the full ingredient list with amounts that make the method easier to follow.

Photoreal ingredient card for peach cobbler with canned peaches showing sliced peaches, reserved peach liquid, flour, sugar, milk, butter, baking powder, salt, vanilla, cinnamon, and nutmeg with measured labels and MasalaMonk.com footer branding.
This ingredients card for peach cobbler with canned peaches shows the full ingredient lineup at a glance, from sliced canned peaches and reserved peach liquid to flour, sugar, milk, butter, vanilla, and warm baking spices. It is especially useful before you start mixing, because it helps you quickly check the measured ingredients for the buttery batter and peach filling without scanning the whole recipe line by line. For readers who like a visual prep reference, this makes the recipe easier to organize, save, and follow.
  • 2 cans sliced peaches, about 15 ounces each, drained
  • 1/4 to 1/3 cup reserved peach liquid, only if needed
  • 1 cup all-purpose flour, about 120 grams
  • 3/4 to 1 cup granulated sugar, 150 to 200 grams, depending on the peaches
  • 1 1/2 teaspoons baking powder
  • 1/4 teaspoon salt
  • 1 cup milk, 240 ml
  • 1/2 cup unsalted butter, 113 grams
  • 1 teaspoon vanilla extract
  • 1/2 teaspoon ground cinnamon
  • Pinch of nutmeg, optional

Nothing about this ingredient list is extravagant. That is part of the charm. The dessert relies on ordinary baking staples arranged with a little care, which is exactly why it feels so approachable.

The peaches and the topping base

The peaches provide the fruit body of the dessert. Because they are already soft, they do not need much from the oven besides warmth and enough time for their juices to settle into the batter around them.

Flour gives the topping structure. It should not be heavy or dense, which is why all-purpose flour works beautifully here. Baking powder lifts the batter, turning it from a flat liquid into the tender golden top that defines this cobbler style. Milk loosens everything into a pourable consistency and helps the topping bake into something soft and tender rather than stiff.

The ingredients that bring balance

Sugar sweetens both the topping and, indirectly, the whole dessert. However, the exact amount can and should respond to your peaches. Fruit packed in heavy syrup needs less additional sugar than fruit packed in juice. That is one of the easiest ways to keep a peach cobbler made from canned peaches from becoming cloying.

Salt matters more than it may first appear. A small amount keeps the sweetness lively rather than one-note. Vanilla and cinnamon round everything out. They do not need to shout. Their job is simply to make the whole dessert smell and taste more complete.

The ingredient that gives peach cobbler with canned peaches its richest edges

Butter does several jobs at once. It enriches the flavor, supports browning, and creates the sort of edge texture people love most in a cobbler—the places where the topping goes almost crisp before giving way to softer spoonfuls underneath.

That buttery edge is one of the quiet pleasures that makes cobbler feel homemade in a deeper way. It is not only about sweetness or fruit. It is also about those golden corners, those slightly richer bites, and that unmistakable smell when butter and batter meet heat at the bottom of the dish.

Also Read: Balti Paneer Gravy (Restaurant-Style, Creamy + Bold Recipe)

The Best Canned Peaches for Peach Cobbler

A peach cobbler with canned peaches can only be as balanced as the fruit allows, so it is worth taking a moment to understand what you are opening.

Choosing the right canned peaches can make a big difference in how your peach cobbler tastes and bakes. This guide compares peaches packed in juice, light syrup, and heavy syrup, and also covers when jarred peaches can work. If you want the cleanest peach flavor and the easiest sweetness control, peaches in juice are usually the best choice. Light syrup is still a very good option, while heavy syrup needs more draining and a lighter hand with added sugar. Save this before shopping so your peach cobbler with canned peaches starts with the right fruit.

How Many Cans for Peach Cobbler with Canned Peaches?

For a standard 9×13-inch peach cobbler with canned peaches, two 15-ounce cans of sliced peaches usually give the best fruit-to-topping balance. If your cans are unusually full or the slices are packed loosely, adjust by eye so the batter is comfortably covered without being overloaded.

Peaches packed in juice

Canned peaches in juice are often the easiest and cleanest choice. They taste fruity rather than syrupy, which means the cobbler has a better chance of tasting like peaches instead of sugar. They also let you add sweetness where you want it rather than accepting whatever intensity came in the can.

Peaches packed in light syrup

Peaches packed in light syrup are also a very good option. They have a little more built-in sweetness, though not usually so much that the dessert becomes overwhelming. In many kitchens, these are the happy middle ground.

Peaches packed in heavy syrup

Heavy syrup peaches can still be used successfully. However, they benefit from extra draining and a lighter hand with sugar in the batter. If that adjustment is ignored, the final result can feel both too sweet and too loose, which is one of the most frustrating combinations in a cobbler.

Jarred peaches

You may also see jarred peaches from time to time. If you have been wondering about peach cobbler with jarred peaches, they can work in much the same way as canned peaches, provided the fruit is soft and the liquid is handled carefully. The same principle applies: drain first, assess later.

Slice size and texture

If the peaches are sliced evenly and not too thin, so much the better. Very soft or broken slices are not a disaster, though they will create a more jammy filling. That can be lovely in its own way, especially if what you want is comfort rather than presentation.

Also Read: Mojito Recipe (Classic) + Ratios, Pitcher, Mocktail & Easy Variations

Do You Drain Canned Peaches for Peach Cobbler?

Yes. Not always to the point of dryness, but yes, you should drain them.

This is one of the most important decisions in the recipe, and it is the main reason so many cobblers either succeed beautifully or miss the mark. Too much liquid in the pan makes it difficult for the batter to rise and set properly. The topping may remain pale or gummy. The peaches may bubble furiously and still never seem to settle. The dessert may smell wonderful and yet spoon out like sweet soup.

How Long to Drain Canned Peaches for Peach Cobbler

Drain the peaches for 5 to 10 minutes before using them. If they are packed in heavy syrup, lean toward the longer end. You are not trying to dry them out completely. Instead, you are removing enough excess liquid to keep the cobbler from becoming watery.

Infographic showing how to keep peach cobbler with canned peaches from getting watery by draining canned peaches for 5 to 10 minutes, adding syrup back only if needed, baking until deep golden, and resting for 20 minutes before serving.
Wondering why peach cobbler with canned peaches sometimes turns runny? This guide shows the steps that make the biggest difference: drain the peaches well, add syrup back only if the fruit needs it, bake until the top is deeply golden, and let the cobbler rest before serving. It is one of the easiest ways to keep a canned peach cobbler rich, buttery, and beautifully spoonable instead of watery. Save this as a quick visual reference before baking.

When to add some liquid back

Draining gives you control. Once the peaches sit in a colander for several minutes, you can see what you are actually working with. If they still look glossy and juicy, that is often all you need. If they look strangely dry, reserve a few tablespoons of their liquid and add it back with intention rather than by accident.

Why this matters so much

This is the point at which a homemade peach cobbler using canned peaches starts to feel more like actual cooking and less like a shortcut. You are not obeying the can. You are reading the fruit and adjusting accordingly.

For the same reason, you do not want to treat every can the same way. Juice-packed peaches behave differently from peaches in heavy syrup. A fruit cup’s worth of extra liquid may seem harmless, yet it changes the cobbler dramatically. A measured hand is kinder to the final dessert than generosity in this particular case.

Also Read: Paloma Recipe: 12 Paloma Cocktail Drinks

How to make peach cobbler with canned peaches

This is where everything comes together. The process is easy, though not careless. Each step builds on the one before it, and none of them is difficult.

Step-by-step infographic showing how to make peach cobbler with canned peaches in 8 easy steps, including draining peaches, melting butter, mixing batter, adding peaches, baking until golden, and resting before serving.
This step-by-step peach cobbler with canned peaches guide turns the full method into a quick visual roadmap, from draining the peaches and melting butter to baking until deeply golden and letting the cobbler rest before serving. It is especially useful if you want to see the flow of the recipe at a glance before starting, and it reinforces the small technique details that make the biggest difference in texture, color, and overall success.

Step 1: Drain the peaches for 5 to 10 minutes

Open the peaches and pour them into a colander set over the sink or a bowl. Leave them there while you prepare the batter and preheat the oven. If the peaches are in heavy syrup, letting them sit a little longer is helpful. At this stage, you are not trying to dry them out completely; you are simply removing the excess that would otherwise flood the cobbler.

If you like, save a small amount of the drained liquid. It may come in handy later, although quite often you will discover the fruit does not need it.

This Step 1 peach cobbler with canned peaches technique card shows one of the most important moves in the whole recipe: drain the peaches for 5 to 10 minutes before they go into the dish. That small step helps control excess syrup, keeps the batter from getting flooded, and gives you a cobbler that bakes up juicy, golden, and spoonable instead of watery. If the peaches are packed in heavy syrup, draining well matters even more.

Step 2: Heat the oven to 350°F and melt the butter in a 9×13-inch baking dish

Place the butter in the baking dish and let it melt in the warming oven. This is one of those tiny old-fashioned moves that makes the finished dessert feel richer and more complete. The butter coats the bottom of the pan, helps the batter spread, and creates beautifully browned edges.

Meanwhile, because the dish is warming and the butter is melting, you can make the batter without feeling rushed.

Step 2 peach cobbler with canned peaches technique card showing butter melting in a hot glass baking dish in the oven, with guidance that the butter should fully melt and coat the dish evenly before the batter is added.
This Step 2 peach cobbler with canned peaches technique card shows why melting the butter directly in the baking dish matters before the batter goes in. That hot buttery base helps the batter spread properly, encourages rich golden edges, and gives the cobbler more of the classic buttery texture people expect from an old-fashioned batter-style peach cobbler. It is a small step, but it sets up the structure of the whole dessert.

Step 3: Mix the dry ingredients

In a bowl, whisk together the flour, baking powder, salt, cinnamon, and nutmeg if you are using it. Mixing the dry ingredients first keeps everything evenly distributed, which matters more than people often realize. A pocket of baking powder in one corner and none in another is not the kind of rustic touch anybody actually wants.

Step 3 peach cobbler with canned peaches technique card showing flour, sugar, baking powder, salt, and spice being whisked together in a bowl before adding the liquid ingredients.
This Step 3 peach cobbler with canned peaches technique card shows why whisking the dry ingredients first is worth doing before the milk and vanilla go in. It helps distribute the baking powder, salt, sugar, and spice more evenly through the batter, which gives the cobbler a more consistent rise, better texture, and fewer clumps or uneven pockets in the finished topping. It may look like a small step, but it helps set up a smoother, more reliable batter-style peach cobbler from the very beginning.

Step 4: Combine the wet ingredients and make the batter

In a separate bowl or large measuring cup, stir together the milk, vanilla, and sugar. Once the sugar is largely dissolved, add the dry mixture and stir just until the batter comes together.

What the batter should feel like

The batter should be smooth and pourable, closer to thick pancake batter than to cream. If it looks too stiff, add 1 tablespoon of milk at a time until it loosens slightly. If it seems unusually thin, let it stand for 1 to 2 minutes so the flour can hydrate before deciding whether it needs adjustment.

Step 4 peach cobbler with canned peaches technique card showing smooth, pourable batter in a mixing bowl, with guidance that the batter should be thick like pancake batter, not stiff and not watery.
This Step 4 peach cobbler with canned peaches batter guide shows the texture you want before the batter goes into the baking dish: smooth, thick, and pourable, closer to pancake batter than to thin cream. It is a useful visual checkpoint if you have ever wondered whether your cobbler batter is too thick or too loose, because getting this consistency right helps the topping bake up tender, buttery, and evenly set instead of dense or heavy.

Step 5: Pour the batter over the melted butter and do not stir

Remove the dish from the oven carefully. The butter should be fully melted and fragrant. Pour the batter evenly over the butter. Do not stir. That instruction matters because the layered arrangement is part of what helps the topping form as it should.

This Step 5 peach cobbler with canned peaches technique card shows one of the most important parts of the recipe: pour the batter over the melted butter and do not stir. That layering is what helps create the classic buttery batter-style cobbler texture, with tender topping, rich golden edges, and juicy peaches settling in as the dessert bakes. If you have ever wondered why some cobblers turn out heavy or lose that old-fashioned texture, this is one of the key moments that makes the difference.

Step 6: Spoon the peaches over the batter

Scatter the drained peaches across the surface of the batter. Try to distribute them fairly evenly so every part of the cobbler gets some fruit. If the peaches look as though they need a little moisture, drizzle over just 1 to 3 tablespoons of reserved liquid. The important point is restraint. The peaches should look glossy and comfortable, not submerged.

This Step 6 peach cobbler with canned peaches technique card shows how the fruit should be added before baking: spoon the drained peaches evenly over the batter, keep the surface well covered without crowding, and add back only a little reserved liquid if the peaches seem dry. It is a helpful visual for getting the fruit-to-batter balance right, which is one of the biggest keys to a cobbler that bakes up juicy, golden, and spoonable instead of watery.

Step 7: Bake for 40 to 50 minutes, until deeply golden and bubbling

Slide the dish into the oven and bake for about 40 to 50 minutes. Start checking at around 40 minutes, but let color and bubbling guide you more than the clock. The cobbler is ready when the top is deeply golden, the edges are bubbling, and the center looks set rather than pale or shiny.

If it browns quickly on top but still seems underdone in the middle, lay a piece of foil loosely over the dish and keep going. It is far better to protect the top than to remove the cobbler too early.

Step 7 peach cobbler with canned peaches doneness guide showing a baked cobbler in the oven with a deeply golden top, bubbling edges, and a set center to show when the cobbler is ready to come out.
This Step 7 peach cobbler with canned peaches doneness guide shows the visual cues that matter most before you pull the dish from the oven: a deeply golden top, bubbling edges, and a center that looks set rather than pale or shiny. It is especially helpful if you want to judge doneness by sight instead of relying only on the timer, because this is one of the biggest differences between a cobbler that turns out rich, buttery, and beautifully spoonable and one that comes out underbaked or too loose.

Step 8: Rest for at least 20 minutes before serving

This may be the most underrated step in the whole recipe. Let the cobbler sit for at least 20 minutes once it comes out of the oven. During that time, the juices settle, the topping firms gently, and the whole dessert becomes more coherent. The difference between immediately scooped cobbler and properly rested cobbler is surprisingly large.

Once it has rested, serve it warm.

Step 8 peach cobbler with canned peaches technique card showing the baked cobbler resting for 20 minutes before serving so the filling can settle and the dessert becomes spoonable instead of runny.
This Step 8 peach cobbler with canned peaches technique card shows why resting the cobbler before serving matters so much. Giving it at least 20 minutes lets the filling settle, helps the center firm up, and makes the dessert easier to scoop without turning watery or loose. It is one of the simplest ways to get a peach cobbler that feels richer, more cohesive, and beautifully spoonable when it finally reaches the table.

What the Batter for Peach Cobbler with Canned Peaches Should Look Like

Recipes often tell you what to do without telling you what to look for. That can make even easy recipes feel uncertain. With this peach cobbler with canned peaches recipe, a few visual cues are especially helpful.

This peach cobbler batter guide shows the visual cues that matter most while baking: a pourable batter before the cobbler goes into the oven, golden edges with a softer center midway through baking, and a deeply golden top with a set center when the cobbler is done. It is a helpful reference if you are making peach cobbler with canned peaches and want to judge doneness by sight instead of guessing from the clock alone. Save it for the next time you want a cobbler that looks right, bakes evenly, and finishes beautifully.

Before baking

The batter should be pourable but not thin. It should spread with minimal encouragement when poured into the buttered dish, yet it should not race to the edges like cream. Think of something soft enough to settle but substantial enough to hold itself.

The peaches should look juicy, not dripping. After draining, they should glisten a bit. They should not sit in a puddle.

Halfway through baking

Halfway through baking, the cobbler will look uneven in a good way. The edges usually rise and color first. The center may still seem softer and paler. Resist the urge to panic at that stage. Cobbler often looks unfinished until it suddenly does not.

When the cobbler is done

Your peach cobbler with canned peaches is ready when the top is deep golden rather than pale, the edges bubble clearly, and the center looks set instead of shiny or wet. A spoon dipped into the middle should lift soft topping, not raw batter.

After resting

Once rested, each spoonful should hold a little shape before giving way. It is still cobbler, so it is not meant to slice like a cake, yet it should not pour either. That balance is exactly what makes it so satisfying.

Also Read: Tapas Recipe With a Twist: 5 Indian-Inspired Small Plates

Why this easy peach cobbler with canned peaches tastes homemade

Homemade flavor is not magic. More often than not, it comes from restraint and care. This recipe tastes homemade because nothing about it is trying too hard. The peaches remain the star. The cinnamon is present but not overwhelming. The vanilla softens the edges of the sweetness rather than turning the whole thing into dessert perfume. The butter is generous enough to matter without drowning the fruit.

Just as importantly, the sweetness, butter, and fruit stay in balance. In many rushed versions, the fruit is too sweet, the topping too bland, or the liquid so uncontrolled that the whole dessert seems muddled. Here, the batter has enough salt to stay lively. The topping bakes long enough to develop color. The peaches stay juicy but not chaotic. Those choices give the dessert definition.

There is also something undeniably homemade about a cobbler that knows what it is. It does not try to be a pie. It does not lean on packets or mixes for identity. Instead, it becomes what cobbler has always promised to be: warm fruit under a golden topping, ready to be spooned into bowls while everyone hovers nearby.

How to keep peach cobbler with canned peaches from getting watery

A watery cobbler is disappointing not only because of texture, but also because it steals confidence from the cook. The dessert may smell wonderful. The top may look promising. Then the spoon goes in, and all at once the fruit floods the bowl. Fortunately, this is usually preventable.

Watery peach cobbler with canned peaches is usually caused by too much liquid, underbaking, or cutting into it too soon. This troubleshooting guide shows the four steps that make the biggest difference: drain the peaches well, add syrup back only if the fruit needs it, bake until the cobbler is deeply golden and set, and let it rest before serving. Keep this visual nearby when baking if you want a peach cobbler that stays juicy, rich, and spoonable without turning soupy.

To avoid a watery cobbler

Drain the peaches well, add reserved liquid only a tablespoon or two at a time, bake until the top is deeply golden and the center looks set, and let the cobbler rest before serving. Those four steps solve most texture problems before they begin.

The first safeguard: draining

It is impossible to say too often because it matters that much. If you pour peaches and all their liquid directly into the pan, you are gambling. Sometimes the dessert will still set. Sometimes it will not. Draining takes the odds firmly in your favor.

The second safeguard: restraint with liquid

If the peaches need some moisture back, add it by the tablespoon rather than by instinctive splashing. A little can make the filling lush. Too much makes it loose.

The third safeguard: full baking time

Do not underbake the cobbler. A pale top and an under-set center are invitations to watery spoonfuls. Let the dessert become deeply golden and visibly bubbling before you call it done.

The fourth safeguard: proper rest

Fruit desserts are not at their most stable the instant they leave the oven. They need a little time to collect themselves. Give them that time.

The fifth safeguard: balanced sweetness

Peaches in heavy syrup often create the illusion that more sugar equals more flavor. In reality, too much sugar can make the filling taste exaggerated and somewhat slick. A more balanced sweetness lets the fruit and topping hold their shape better in flavor as well as texture.

If you want another thoughtful take on peach cobbler structure and fruit handling, King Arthur Baking’s Southern-style peach cobbler recipe is a useful reference.

Also Read: Air Fryer Salmon Recipe (Time, Temp, and Tips for Perfect Fillets)

Making this old fashioned peach cobbler recipe with canned peaches feel even more classic

This recipe already lands in a very comforting, old-fashioned place. Even so, there are a few ways to nudge it further in that direction if that is the mood you want.

This old-fashioned peach cobbler with canned peaches tips card shows the small details that give a pantry-friendly cobbler a richer homemade feel. Draining the peaches well, using vanilla and cinnamon with a light hand, baking until the top is deeply golden, and letting the cobbler rest before serving all help the dessert taste more balanced, buttery, and comforting. It is a useful quick-reference guide if you want your peach cobbler with canned peaches to feel less like a shortcut and more like a true old-fashioned dessert.
A few small choices make a canned peach cobbler feel far more old-fashioned: drain the peaches well, keep the vanilla and cinnamon gentle, bake until the top turns deeply golden, and let the cobbler rest before serving. Those details help the fruit taste brighter, the topping feel more buttery, and the whole dessert come across as warm, balanced, and truly homemade rather than rushed.

Deepen the warmth

A touch of brown sugar in place of some of the white sugar can deepen the flavor and make the dessert feel slightly more rustic. Extra cinnamon can do the same, though too much will flatten the peach flavor rather than enhance it, so keep it gentle. A tiny bit of nutmeg is especially lovely when you want warmth without obvious spice.

Serve it simply

Warm cobbler in simple bowls has a charm all its own. A scoop of vanilla ice cream is classic for good reason. If you are in the mood to make the pairing extra special, MasalaMonk’s guide on how to make ice cream with a KitchenAid mixer is a natural companion.

Let the edges go a little darker

You can also lean old-fashioned by baking the cobbler until the edges get a bit deeper in color than you might first think necessary. Those darker buttery spots are often the most delicious parts of the pan.

Also Read: Fish and Chips Reimagined: 5 Indian Twists (Recipe + Method)

How this recipe compares with quick, simple, and shortcut versions

There is a reason phrases like quick peach cobbler with canned peaches and simple peach cobbler with canned peaches sound so appealing. They promise a dessert that fits into real life. This recipe honors that spirit, although it does not strip the process down to the point where the dessert loses character.

Biscuit mix and Bisquick versions

Yes, you can make a peach cobbler with biscuit mix, and a Bisquick canned peach cobbler is certainly possible too. Those versions can be useful when speed matters most. Still, they tend to produce a different topping character and a more shortcut-style flavor than a batter-style cobbler like this one.

This Bisquick vs from-scratch peach cobbler with canned peaches comparison helps you see the trade-off before you bake. A from-scratch batter cobbler gives you the more classic homemade feel, buttery golden edges, and better control over sweetness, while a Bisquick version can save time and cut down on pantry steps. If you have been deciding between a quicker shortcut and a more old-fashioned batter-style cobbler, this guide makes the difference much easier to understand at a glance.

Cake mix and dump cake versions

Cake mix versions, dump cake versions, and recipes built around astonishing brevity all have their place. A cake mix peach cobbler with canned peaches can be comforting in its own right. So can a peach dump cake with canned peaches. Yet those desserts move farther away from the tender, integrated topping that makes a classic batter-style cobbler feel so homemade.

Three-way comparison infographic showing cake mix peach cobbler vs dump cake vs classic cobbler, explaining that classic cobbler has a from-scratch batter-style topping, cake mix cobbler has a more cake-like shortcut topping, and dump cake is the easiest pantry-style dessert.
This cake mix peach cobbler vs dump cake vs classic cobbler comparison makes the shortcut differences much easier to understand before you bake. A classic cobbler gives you the most old-fashioned batter-style texture, a cake mix cobbler leans more cakey and convenience-driven, and dump cake is the easiest pantry dessert of the three. If you have been deciding between a true peach cobbler with canned peaches and the quicker cake-mix or dump-cake routes, this guide helps you see exactly how the texture, method, and overall feel change from one version to the next.

Why this middle ground works so well

All this recipe really asks for is a bowl, a whisk, a baking dish, and a handful of pantry ingredients. Special equipment is unnecessary, advanced technique is not required, and the process does not turn the kitchen upside down. Even so, that small bit of extra effort gives you something far more satisfying than many three-ingredient or four-ingredient versions manage: a better topping, deeper flavor, and much better control over the fruit.

Three-way comparison infographic showing 3-ingredient vs 4-ingredient vs from-scratch peach cobbler, explaining that the 3-ingredient version is fastest, the 4-ingredient version is a simple pantry dessert, and the from-scratch version gives the best buttery old-fashioned texture.
This 3-ingredient vs 4-ingredient vs from-scratch peach cobbler comparison helps you see how the shortcut spectrum changes the final dessert. A 3-ingredient peach cobbler is the fastest route and often the most shortcut-style, a 4-ingredient version gives you a little more control while still staying easy, and a from-scratch peach cobbler with canned peaches delivers the best flavor, texture, and old-fashioned buttery feel. If you have been deciding between quick convenience and a more homemade result, this guide makes the trade-offs much easier to understand at a glance.

What about frozen peaches?

Frozen peaches work well in cobbler, though they usually need thawing and draining first. Because they release moisture differently from canned peaches, they belong more naturally in their own recipe framework. The same is true for peach cobbler using frozen peaches or peach cobbler recipe using frozen peaches. The spirit is similar, but the details deserve their own treatment.

Comparison infographic showing canned peaches vs frozen peaches for peach cobbler, explaining that canned peaches are already peeled and sliced and easiest for this recipe, while frozen peaches should be thawed and drained because they release more moisture.
This canned vs frozen peaches for peach cobbler comparison helps you choose the right fruit before you bake. Canned peaches are the easiest fit for this recipe because they are already peeled, sliced, and pantry-friendly, while frozen peaches can work well too but usually need thawing, draining, and a little more moisture control. If you have ever wondered which option gives you the smoothest path to a juicy, not watery, peach cobbler, this guide makes the trade-offs much easier to see at a glance.

Easy Variations on Peach Cobbler with Canned Peaches Recipe

One of the nicest things about a good cobbler base is that it can flex without losing itself.

Lemon zest

A little lemon zest can brighten peaches that taste dull or flat. This is especially helpful if the fruit feels sweet but not particularly peachy.

Photoreal peach cobbler with canned peaches variations guide showing four versions: classic cinnamon vanilla, brown sugar, lemon bright, and peach berry, with golden cobbler topping, glossy peach filling, and MasalaMonk.com branding.
This peach cobbler with canned peaches variations guide shows four easy ways to change the flavor without losing the buttery, old-fashioned cobbler feel. From classic cinnamon vanilla and deeper brown sugar notes to a brighter lemon version and a peach berry twist, it helps readers see how flexible the base recipe can be before they start baking. It works especially well here because the section is about easy variations, and this card turns those ideas into a quick visual reference readers can save, compare, and come back to later.

Brown sugar

A spoonful or two of brown sugar can make the topping feel richer and more caramel-like.

Almond extract

A bit of almond extract, used sparingly, can lend a lovely bakery note. Use much less than you would vanilla because it is powerful.

Mixed berries

A few raspberries or blueberries scattered among the peaches can make the filling feel summery and a little more vivid, though the cobbler will then become a peach-forward mixed fruit dessert rather than a pure peach version.

A slightly thicker filling

If you prefer a slightly thicker fruit layer, toss the drained peaches with 1 to 2 teaspoons of cornstarch before adding them to the batter. Many cobblers do not need this if the fruit has been drained properly and the bake is given enough time, but it can be helpful with particularly soft fruit.

Also Read: Ravioli Recipe Reinvented: 5 Indian-Inspired Twists on the Italian Classic

What to serve with peach cobbler with canned peaches

Warm peach cobbler knows how to carry a dessert course on its own, but the right accompaniments make it feel even more complete.

Wondering what to serve with peach cobbler with canned peaches? This old fashioned serving guide shows the classic pairings that make a warm cobbler feel even more special: a scoop of vanilla ice cream, a little whipped cream, and a hot cup of coffee on the side. Use it as a quick visual reminder when you want your peach cobbler to feel cozy, generous, and beautifully served for family dinner, holidays, or an easy dessert night at home.

Vanilla ice cream with peach cobbler with canned peaches

Vanilla ice cream is the classic choice for obvious reason. The cream softens the sweetness, the cold contrasts beautifully with the warm topping, and the melting edges mingle with the fruit in a way that feels almost unfairly good. If you like homemade pairings, MasalaMonk’s guide to making ice cream at home is a lovely place to wander next.

Whipped cream

Whipped cream is another easy option, especially if you want something lighter than ice cream. Softly whipped cream with very little sugar lets the cobbler remain the center of attention.

Coffee with this peach cobbler with canned peaches

Coffee is wonderful beside peach cobbler, particularly in cooler weather or after dinner. A warm mug turns the whole dessert into more of an occasion. If that sounds appealing, MasalaMonk’s cappuccino recipe makes an especially nice pairing.

Iced coffee or brighter drinks

On a warmer day, or if you are serving cobbler after lunch, something chilled can feel more refreshing. In that case, these iced coffee recipes are an easy next stop.

If you are serving the cobbler at a summer gathering and want a brighter drink on the table, a fresh cocktail can make the whole dessert spread feel more playful. MasalaMonk’s Paloma recipe or mojito recipe would suit that mood beautifully.

Also Read: Croquettes Recipe: One Master Method + 10 Popular Variations

Storing and reheating leftovers of peach cobbler with canned peaches

Leftover cobbler is one of life’s small luxuries. The texture changes a little, of course. The topping softens as it sits. Even so, the flavor remains lovely, and a gently reheated bowl the next day can be unexpectedly perfect.

Photoreal storage and reheating guide for peach cobbler with canned peaches showing four steps: cool completely, cover and refrigerate, enjoy within 2 to 3 days, and reheat gently in the microwave or oven, with MasalaMonk.com branding in the footer.
This storage and reheating guide for peach cobbler with canned peaches shows the simple steps that help leftovers stay as enjoyable as possible: let the cobbler cool completely, cover and refrigerate it once fully cooled, enjoy it within 2 to 3 days, and reheat gently before serving. It is especially useful if you want a quick visual reminder after baking, because peach cobbler tastes wonderful the next day too, but the topping softens over time and reheating method makes a difference. Microwave works for speed, while the oven helps recover some of the cobbler’s texture.

How long peach cobbler with canned peaches keeps

Once the cobbler has cooled, cover it and refrigerate it. It is best within 2 to 3 days. If you plan to eat it within a day or two, the pan can stay as it is. For longer storage within that short window, individual portions make reheating simpler.

How to reheat peach cobbler with canned peaches

The microwave works well enough for convenience, especially if you are warming a single serving. If you want the top to recover a little of its edge, the oven is better. Warm the cobbler gently until heated through rather than blasting it at a high temperature.

A brief food-safety note

For broader kitchen guidance, the FDA’s pages on safe food handling and safe food storage are useful references. Not every recipe needs those reminders, yet dessert made with fruit and dairy-based batter is still food that deserves proper care.

Also Read: How to Make a Flax Egg (Recipe & Ratio for Vegan Baking)

More desserts to make when this cobbler puts you in a baking mood

Once a warm fruit dessert comes out well, there is often a pleasant temptation to keep going. If that mood strikes, there are several rich, substantive MasalaMonk recipes that fit beautifully into the same comforting, reader-friendly spirit.

For something milky, generous, and celebration-ready, the tres leches cake recipe is a natural next bake. If you want a dessert with crisp edges and a different kind of warmth, homemade churros are deeply satisfying. If chocolate sounds more tempting than fruit, these vegan chocolate cake recipes offer another inviting direction.

The point is not to rush away from cobbler. Quite the opposite. It is to enjoy the way one good homemade dessert often opens the door to another.

Final thoughts on making a peach cobbler with canned peaches

Peach cobbler with canned peaches works because it meets you where you are while still giving you something that feels warm, generous, and deeply real. There is no need to wait for a perfect season, insist on ideal fruit, or treat dessert like a performance. Instead, a few pantry ingredients, a little care with the liquid, and enough patience to let butter, flour, peaches, and heat do what they have always done so beautifully together are enough to produce something genuinely comforting.

The result is the kind of dessert that earns its keep. It is easy enough for an ordinary evening, lovely enough for company, and comforting enough to make the kitchen feel briefly softer and kinder. That is no small thing.

So the next time you see canned peaches in the pantry and wonder whether they can become something more than a backup ingredient, let the answer be yes. With the right recipe, they can turn into a peach cobbler with canned peaches that tastes homemade, an easy peach cobbler with canned peaches recipe you return to without hesitation, or the kind of old fashioned canned peach cobbler that disappears from the table faster than expected. More than that, they can become the sort of dessert that reminds you how often the simplest things, handled well, are the ones that stay with people longest.

Also Read: Pork Tenderloin in Oven (Juicy, Easy, 350°F or 400°F) Recipe

FAQs about Peach Cobbler with Canned Peaches

1. Can you make peach cobbler with canned peaches?

Absolutely. A well-made peach cobbler with canned peaches can turn out buttery, golden, soft around the fruit, and every bit as comforting as a version made with fresh peaches. In fact, canned peaches make the recipe easier and more consistent because the fruit is already peeled, sliced, and tender.

2. Do you drain canned peaches for peach cobbler?

Yes, draining the peaches is usually the better choice. Otherwise, too much liquid can leave the cobbler watery and overly sweet. After draining, you can always add back a small amount of the peach liquid if the fruit looks too dry, but starting with control gives you a much better result.

3. What canned peaches are best for peach cobbler?

Canned peaches packed in juice or light syrup are usually the best option. They give you enough sweetness and moisture without making the dessert heavy or syrupy. Peaches in heavy syrup can still work, though you will usually want to drain them very well and reduce the sugar in the recipe slightly.

4. Can I use peaches in heavy syrup for peach cobbler?

Yes, you can. Even so, they need a little more care. Drain them thoroughly, taste the fruit, and use less added sugar in the batter if needed. That way, the peach cobbler with canned peaches still tastes balanced rather than overly sweet.

5. Why is my peach cobbler with canned peaches watery?

Most often, a watery cobbler comes down to too much liquid, not enough baking time, or skipping the resting period. If the peaches are not drained well, the batter struggles to set properly. Likewise, if the cobbler is pulled from the oven too early, the center may stay loose. Letting it rest after baking also helps the filling settle.

6. How do I keep peach cobbler with canned peaches from getting soggy?

Start by draining the peaches well. After that, avoid pouring all the syrup or juice back into the dish. Bake the cobbler until the top is deeply golden and the edges are bubbling, then let it rest before serving. Those small steps keep the topping tender without turning it soggy.

7. Can I make an easy peach cobbler with canned peaches ahead of time?

Yes, although cobbler is usually at its best on the day it is baked. If needed, you can make it earlier in the day and reheat it gently before serving. The flavor stays lovely, while the topping may soften a little as it sits.

8. Can I make a homemade peach cobbler using canned peaches that still tastes old-fashioned?

Definitely. The key is not the source of the peaches alone, but how the cobbler is built around them. A buttery batter, balanced sweetness, warm spice, and proper baking time go a long way toward making the dessert taste homemade and old-fashioned rather than rushed.

9. What is the difference between peach cobbler with canned peaches and peach crisp?

The difference is mostly in the topping. Peach cobbler with canned peaches has a soft batter-style or biscuit-style topping, depending on the recipe. Peach crisp, by comparison, usually has a crumbly topping made with butter, flour, sugar, and often oats. Cobbler feels softer and more spoonable, whereas crisp leans more crumbly and textured.

10. Can I make peach cobbler with canned peaches without fresh peaches at all?

Yes, completely. That is one of the best things about this dessert. You do not need fresh peaches for the recipe to work beautifully. As long as the canned peaches are drained well and the liquid is handled carefully, the cobbler can taste warm, juicy, and fully finished.

11. Can I turn this into an old fashioned peach cobbler recipe with canned peaches?

Yes, very easily. To give the cobbler more of an old-fashioned feel, keep the flavors simple, use a little cinnamon and vanilla, and bake it until the edges are richly golden. Serving it warm with vanilla ice cream also helps create that classic cobbler experience.

12. Can I use self-rising flour in peach cobbler with canned peaches?

You can, although you will need to adjust the recipe. Since self-rising flour already contains leavening and salt, it should replace both the all-purpose flour and part of the baking powder-and-salt structure. If you use it without adjusting anything else, the topping may not bake the way you expect.

13. Can I make peach cobbler with canned peaches and biscuit mix instead?

Yes, you can, and many people do. A peach cobbler made with biscuit mix or a Bisquick canned peach cobbler usually has a slightly different flavor and texture from a batter-style cobbler. It can still be good, but it will not have quite the same homemade character as a from-scratch version.

14. Is cake mix peach cobbler with canned peaches the same as regular cobbler?

Not exactly. A cake mix peach cobbler with canned peaches is usually closer to a dump cake in style. It is quicker and more shortcut-driven, whereas a traditional batter-style cobbler has a softer, more integrated topping. Both can be delicious, though they are different desserts.

15. How long does peach cobbler with canned peaches last in the fridge?

Usually, it keeps well for 2 to 3 days when covered and refrigerated. The topping will soften over time, but the flavor remains very good. Reheating individual portions before serving often brings back some of the warmth and comfort that make cobbler so appealing.

16. Can I freeze peach cobbler with canned peaches?

Yes, although the texture is best when freshly baked or gently reheated after refrigeration. Freezing is possible, but the topping may soften more after thawing. Even then, the dessert can still be very enjoyable, especially if warmed before serving.

17. What should I serve with peach cobbler with canned peaches?

Vanilla ice cream is the classic answer, and for good reason. Whipped cream is another lovely option. On cooler evenings, coffee pairs beautifully with peach cobbler, while warmer days may call for something chilled alongside it.

18. Why does my peach cobbler topping stay pale?

Usually, that happens when the cobbler needs more time in the oven or when the liquid level is too high. A proper bake gives the topping enough time to rise, brown, and set. If the top is coloring too slowly, keep baking until the edges are clearly golden and the center looks finished.

19. Can I make a simple peach cobbler with canned peaches less sweet?

Certainly. The easiest way is to reduce the sugar slightly, especially if the peaches are packed in syrup. Choosing peaches in juice or light syrup also helps keep the dessert more balanced from the start.

20. Is peach cobbler with canned peaches good for holidays and potlucks?

Very much so. Since the recipe is easy to scale, easy to transport, and familiar to most people, it works especially well for gatherings. Better yet, it holds onto that homemade, comforting feel that makes cobbler such a welcome dessert on any table.