Posted on Leave a comment

Lemon Curd Recipe: Silky, Tart, Easy & Perfect for Cakes, Tarts and Desserts

A glass jar of glossy homemade lemon curd with fresh lemons, lemon zest, and a spoonful lifted above the jar.

Lemon curd looks fancy, but the whole trick is gentle heat and knowing when to stop. When it works, it is glossy, buttery, tart-sweet, and bright enough to make cakes, tarts, toast, cheesecake, cookies, yogurt, pancakes, scones, and quick desserts feel finished.

It can feel risky because the same few ingredients can turn silky or stressful depending on heat and timing. This recipe is built around the real questions that come up at the stove: why is it runny, will the eggs scramble, is it thick enough, and can it actually work as a cake filling or tart filling?

The goal is not just to make lemon curd. It is to know whether your jar is soft enough for scones, thick enough for tarts, and stable enough for the cake, cookie, or dessert you actually want to make.

Quick Answer: How to Make Lemon Curd

Lemon curd is a smooth lemon custard-style spread made with lemon juice, lemon zest, sugar, eggs, and butter. Whisk everything together before heating, cook gently over low to medium-low heat until it coats the back of a spoon or reaches about 170°F / 77°C, then strain and chill until thick and glossy.

For tarts, mini tarts, cookies, or simple cake filling, cook a little closer to 175°F / 79–80°C without letting the mixture boil. It always looks softer while warm, so judge the final texture after it has cooled properly.

The flavor lands bright and lemony, but not harsh: tart enough to cut through cream and cake, smooth enough to spoon over scones or pancakes.

Recipe at a Glance

DetailBest answer
YieldAbout 1 1/4 cups / 20 tablespoons
Main methodStovetop, low heat, constant whisking
Best temperatureAbout 170°F / 77°C
Thicker target175°F / 79–80°C, without boiling
Active timeAbout 20 minutes
Chill time2 hours minimum
Make-ahead timingMake 1 day ahead for cakes, tarts, cookies, and neat dessert layers
Lemons neededUsually 2 to 3 medium lemons for 1/2 cup / 120 ml juice
Egg ratio1 large whole egg + 3 large egg yolks
Finished textureGlossy, spoon-coating, thick after chilling

Recipe Card

Recipe type: Dessert spread, filling, and sauce

Yield: About 1 1/4 cups / 20 tablespoons lemon curd

Prep time: 10 minutes
Cook time: 8 to 10 minutes
Chill time: 2 hours minimum
Total time: About 2 hours 20 minutes, including chilling

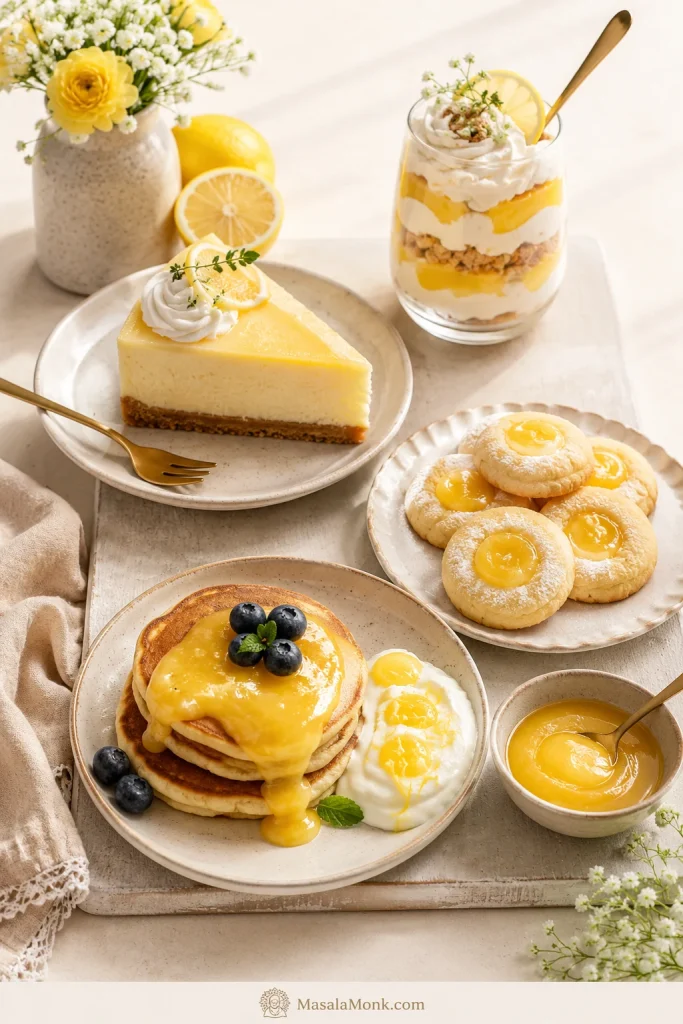
Best for: toast, scones, tarts, mini tarts, cake filling, cupcakes, cookies, cheesecake, yogurt, pancakes, crepes, pavlova, ice cream, and quick desserts

Ingredients

IngredientAmount
Fresh lemon juice1/2 cup / 120 ml / 4 fl oz
Finely grated lemon zest1 tablespoon, from about 2 lemons
Granulated sugar1/2 cup / 100 g for tart curd, or 2/3 cup / 135 g for sweeter curd
Large whole egg1
Large egg yolks3
Unsalted butter, cold and cubed6 tablespoons / 85 g / 3 oz
Fine salt1/8 teaspoon

Lemon note: You will usually need 2 to 3 medium lemons for 1/2 cup / 120 ml juice. Zest the lemons before juicing them.

Sugar note: Choose the lower amount if the curd will be paired with frosting, cream, meringue, or sweet cake. Go higher if you want a softer, sweeter spread for toast, scones, or pancakes.

Method

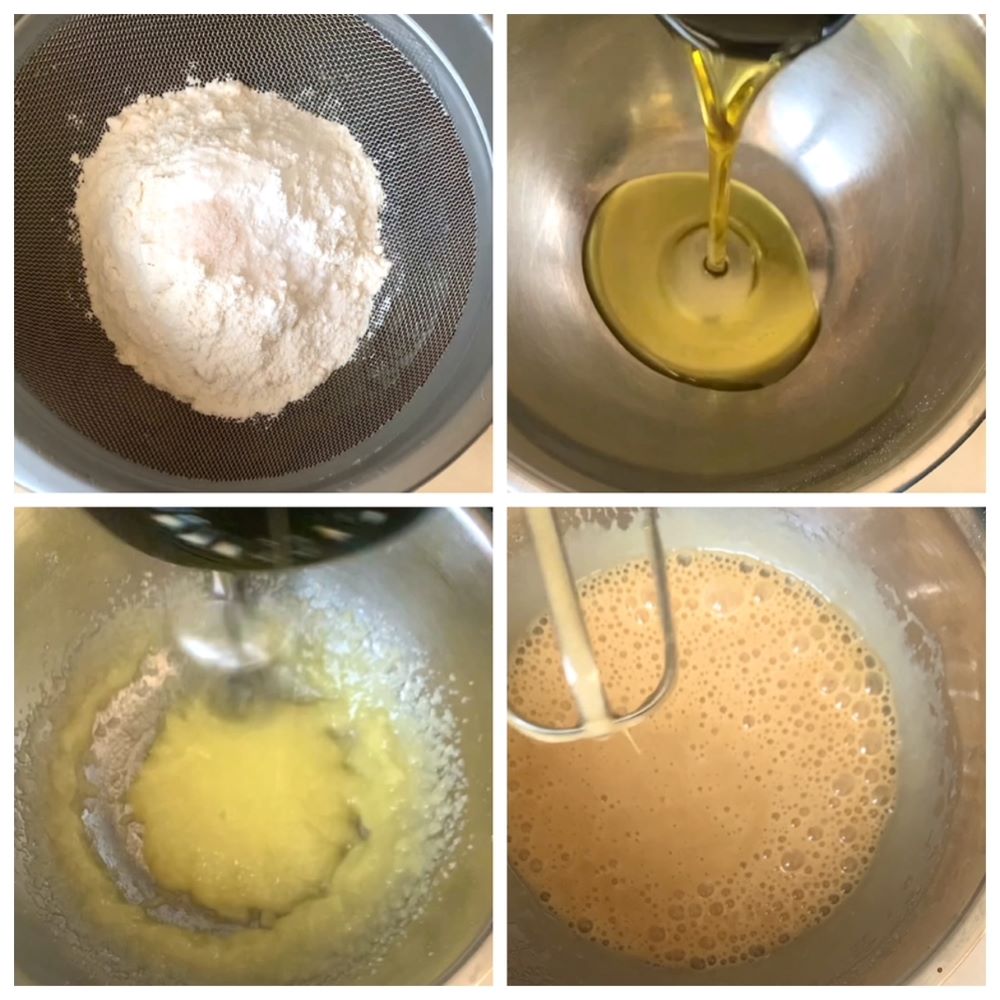
  1. Zest the lemons first, then juice them. Measure out 1/2 cup / 120 ml lemon juice.
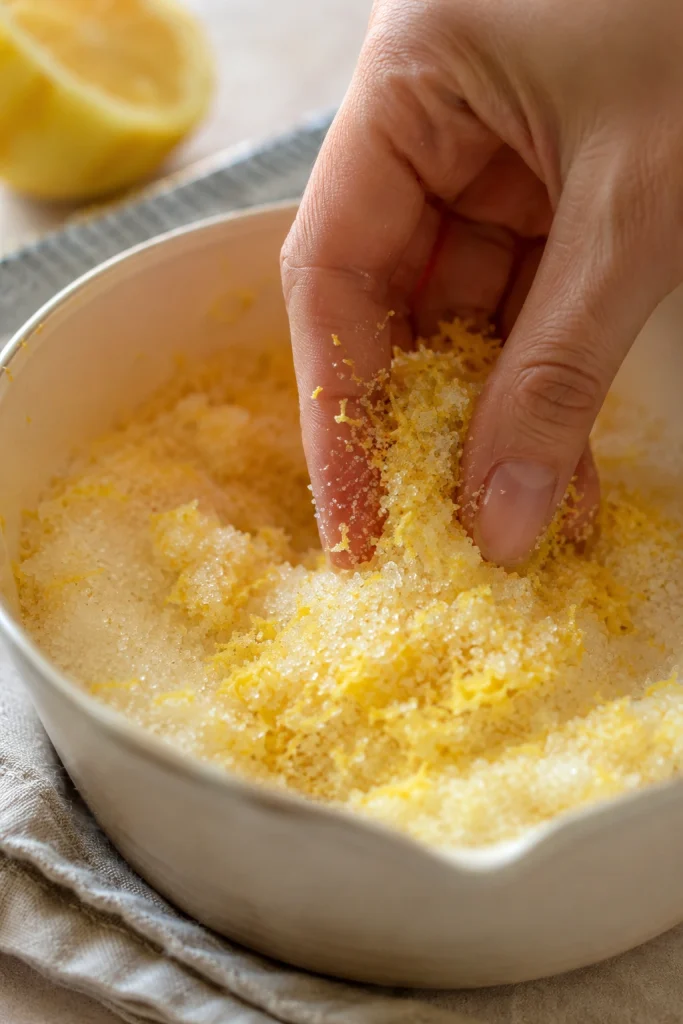
  2. Add the zest and sugar to a small heavy-bottom saucepan. Rub them together with your fingertips for about 30 seconds, until the sugar smells fragrant and lemony.
  3. Whisk in the whole egg, egg yolks, lemon juice, and salt before turning on the heat.
  4. Place the pan over low to medium-low heat. Cook while whisking constantly, scraping the base and corners of the pan.
  5. Continue for 8 to 10 minutes, until the mixture coats the back of a spoon. Aim for about 170°F / 77°C, or closer to 175°F / 79–80°C for a thicker curd. Do not boil.
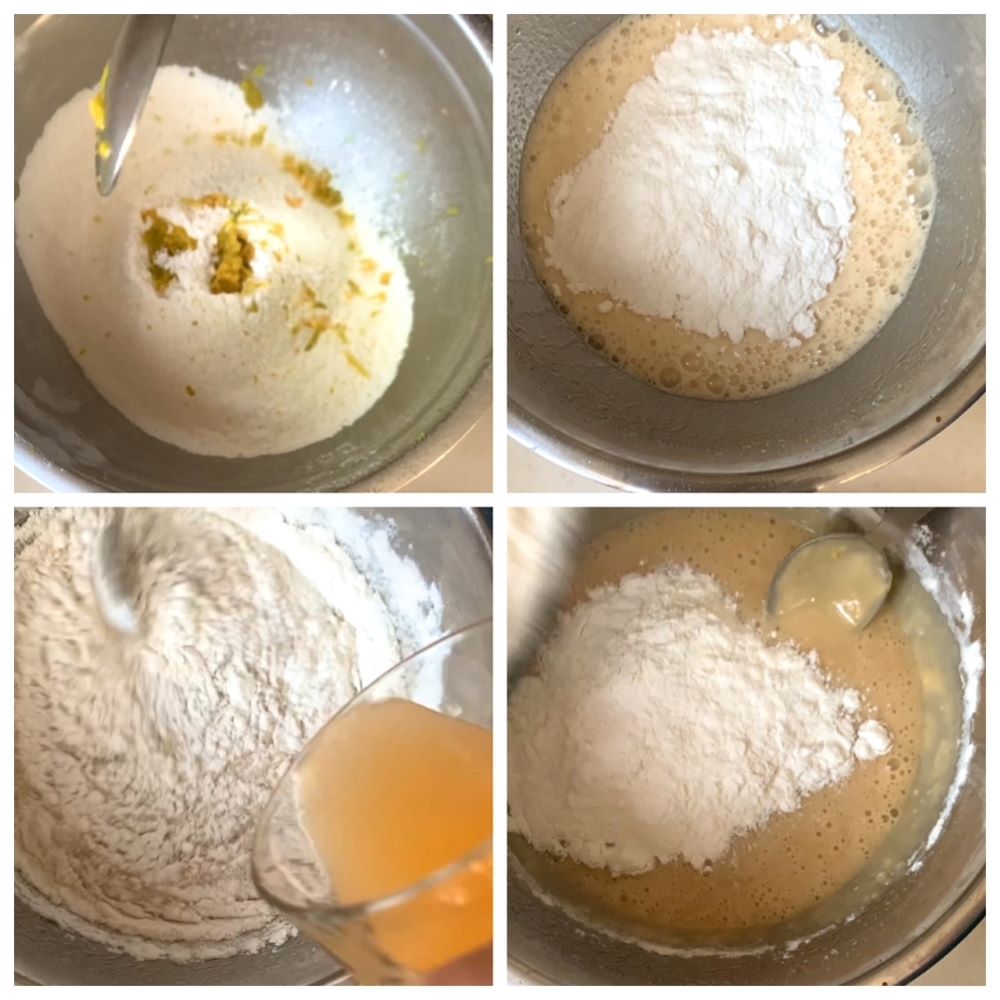
  6. Remove from the heat. Whisk in the cold cubed butter, a few pieces at a time, until glossy and smooth.
  7. Strain through a fine mesh sieve into a heatproof bowl or jar.
  8. Press parchment or plastic wrap directly onto the surface. Cool slightly, then refrigerate for at least 2 hours, or until thick.

Recipe note: The pan gets the curd most of the way there, but the refrigerator finishes the texture. Judge the final thickness after chilling.

Visual cue: A balanced batch starts with fresh lemon juice, fragrant zest, rich yolks, butter, sugar, and salt.

Measured lemon curd ingredients arranged in bowls, including lemon juice, lemon zest, sugar, one whole egg, egg yolks, butter, and salt.
A short ingredient list leaves nowhere for weak flavor to hide, so fresh lemon juice, fragrant zest, rich yolks, butter, sugar, and salt all matter.

Cooking now? Check doneness cues · choose the right texture · fix common problems

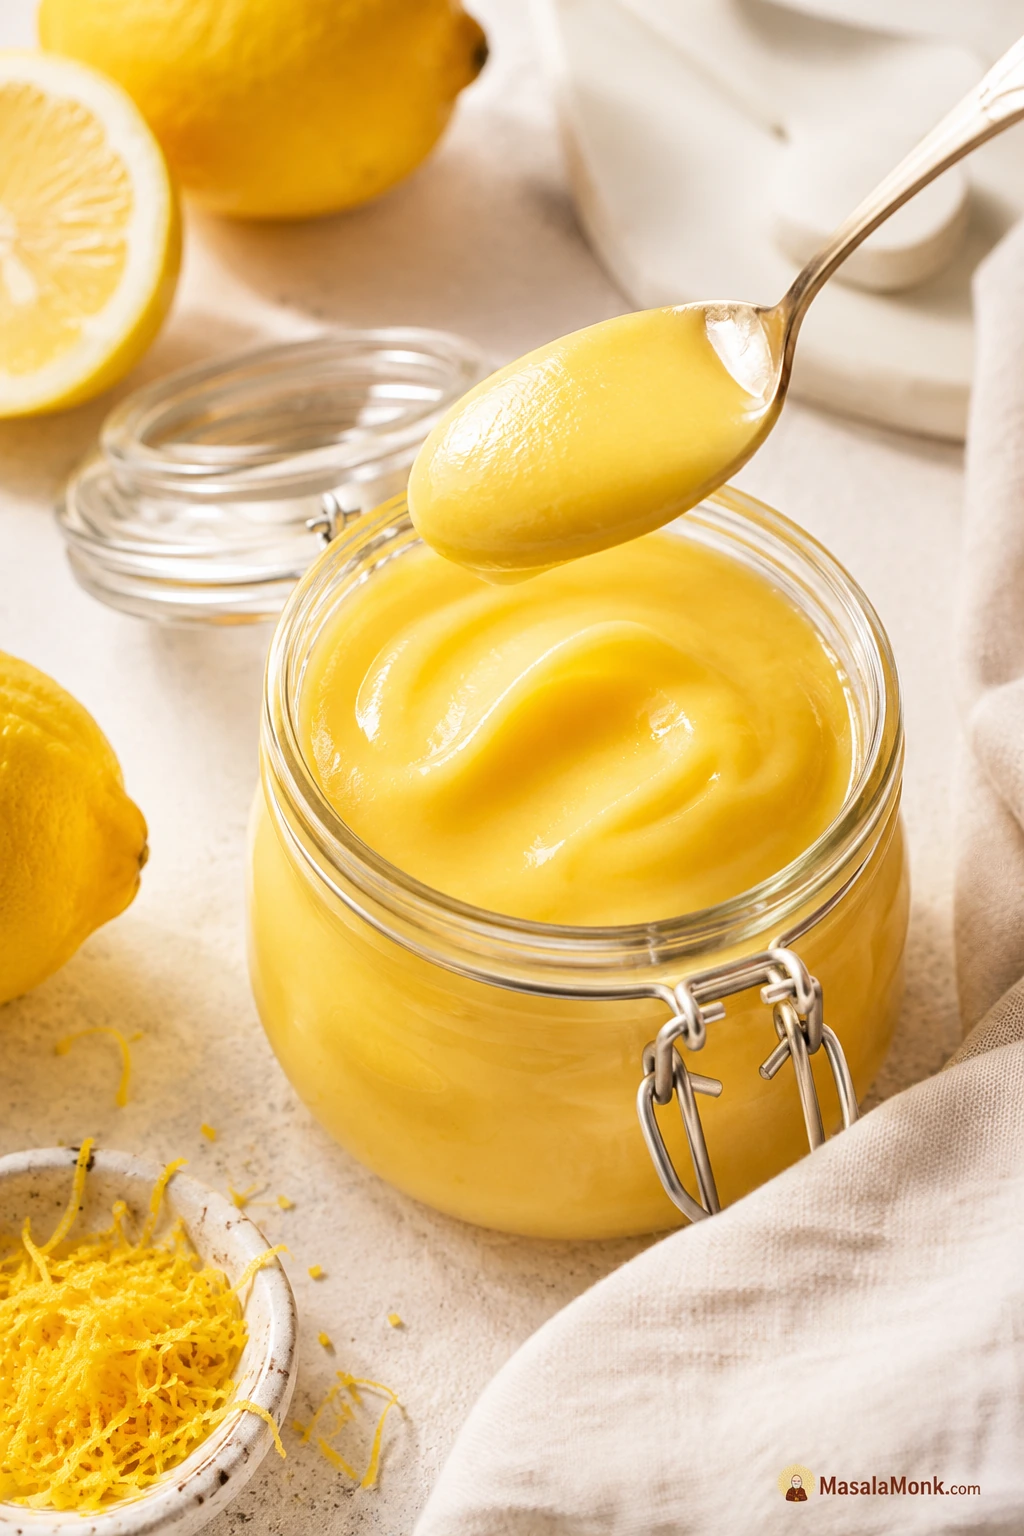
After chilling, the finished curd mounds softly on a spoon, shines on top, and tastes bright first, then buttery and smooth at the end.

Most Useful Sections

Why This Works

This recipe uses one whole egg plus three yolks. The whole egg gives structure, while the extra yolks make the texture rich, smooth, and thick enough for more than just spreading on toast.

Fresh lemon juice gives sharp brightness, but zest gives the deeper citrus aroma that makes the flavor pop. Rubbing zest into sugar releases lemon oils before the mixture reaches the stove.

The 170°F / 77°C target gives the eggs enough heat to thicken the curd without pushing the mixture into boiling or scrambling. Cold butter added off the heat makes it glossy, and straining catches zest, tiny egg bits, or any uneven texture so the finished batch tastes silky.

Ingredients and Why They Matter

Fresh Lemon Juice

This is one of those recipes where fresh lemons really earn their place. Bottled lemon juice can taste flat, bitter, or harsh because there is nowhere for that flavor to hide.

Measure the juice after squeezing. Lemons vary in size and sharpness, and too much juice can make the batch loose or overly sour.

Lemon Zest

The zest is where the curd gets its real lemon perfume. Grate only the yellow outer skin and avoid the white pith underneath, which can taste bitter.

Always zest before juicing. Then rub the zest into the sugar so the fragrant oils spread through the whole batch.

Sugar

Sugar balances the acidity of the lemons and helps the eggs cook into a smooth custard-like texture. Choose the lower amount for a sharper curd and the higher amount for a sweeter dessert-style spread.

Whole Egg and Egg Yolks

Eggs thicken the mixture. The whole egg gives structure, while the yolks give richness, color, and a smoother set. Large eggs work best here; smaller eggs can make the finished batch set a little softer.

Butter

Butter turns the sharp lemon custard into something glossy, rounded, and spoonable. Add it cold and cubed after the pan comes off the heat so it melts in smoothly.

Salt

You should not notice the salt; it simply makes the lemon taste cleaner and more complete.

Whole Eggs vs Yolks in Lemon Curd

Different recipes use different egg ratios. The right choice depends on whether you want a soft spread, a rich tart filling, or an all-purpose curd that can do both.

Egg choiceTextureBest for
Whole eggs onlyLighter, softer, slightly looserToast, scones, yogurt, pancakes
Egg yolks onlyRicher, thicker, more custardyTarts, fillings, layered desserts
Whole egg + yolksBalanced, silky, stableBest all-purpose lemon curd

The whole egg plus yolk combination gives this recipe its useful texture: rich enough for desserts, but still soft enough to spread after chilling.

Helpful equipment: A fine zester, citrus juicer, heavy-bottom saucepan, whisk, silicone spatula, fine mesh sieve, and heatproof bowl or jar make the process easier. An instant-read thermometer is optional, but helpful for precise doneness.

Choose a nonreactive pan, such as stainless steel or enamel-coated cookware. Avoid uncoated aluminum or copper, which can react with acidic lemon juice and affect the flavor.

Stovetop vs Double Boiler

A double boiler is the gentlest method because the bowl is heated by steam instead of direct contact with the burner. It is helpful if you are nervous about scrambling the eggs, but it is slower.

A heavy-bottom saucepan is faster and works well when the heat stays low and the whisk keeps moving. This recipe uses the saucepan method because it is practical, quick, and reliable once you know the doneness cues.

MethodBest forWatch out for
Heavy-bottom saucepanFast, everyday lemon curdNeeds low heat and constant whisking
Double boilerBeginners, nervous cooks, gentle cookingTakes longer to thicken
MicrowaveSmall quick batchesUneven heat; higher risk of curdling if rushed

How to Make Lemon Curd

1. Zest and Juice the Lemons

Zest the lemons before cutting them. Once lemons are juiced, they become harder to hold and zest cleanly. Use a fine grater and stop as soon as you reach the white pith.

After juicing, measure out 1/2 cup / 120 ml juice. Measuring matters because extra juice can make the curd too loose or too sharp.

2. Rub the Zest Into the Sugar

Add the zest and sugar to the saucepan. Use your fingertips to rub them together until the sugar smells strongly of lemon. This takes less than a minute and makes the final flavor brighter.

Visual cue: Rub the zest into the sugar before heating so the citrus oils flavor the whole batch.

Fingers rubbing finely grated lemon zest into sugar in a bowl before making lemon curd.
Rubbing lemon zest into sugar wakes up the citrus oils and gives homemade lemon curd a fuller aroma before any heat is added.

3. Whisk Before Heating

Add the whole egg, egg yolks, lemon juice, and salt. Mix until smooth before the pan goes on the stove. Starting with an even mixture helps the eggs cook evenly.

Visual cue: Whisk the mixture smooth before it goes on the stove.

Lemon curd ingredients whisked smooth in a stainless steel saucepan before cooking.
Whisk before heating so the eggs thicken evenly instead of forming streaks or small cooked bits.

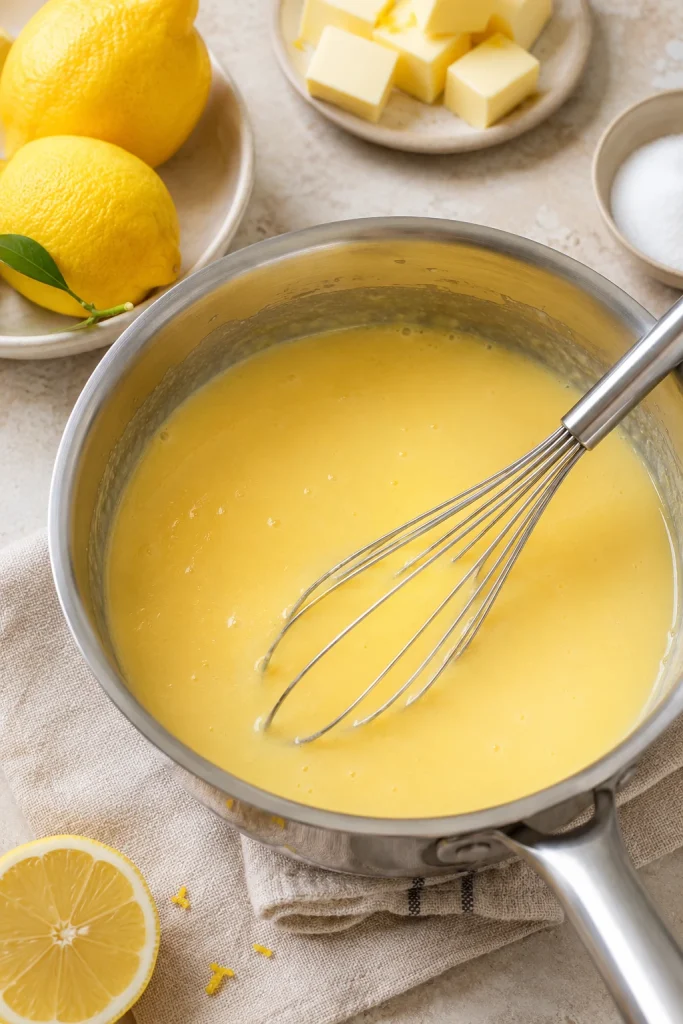
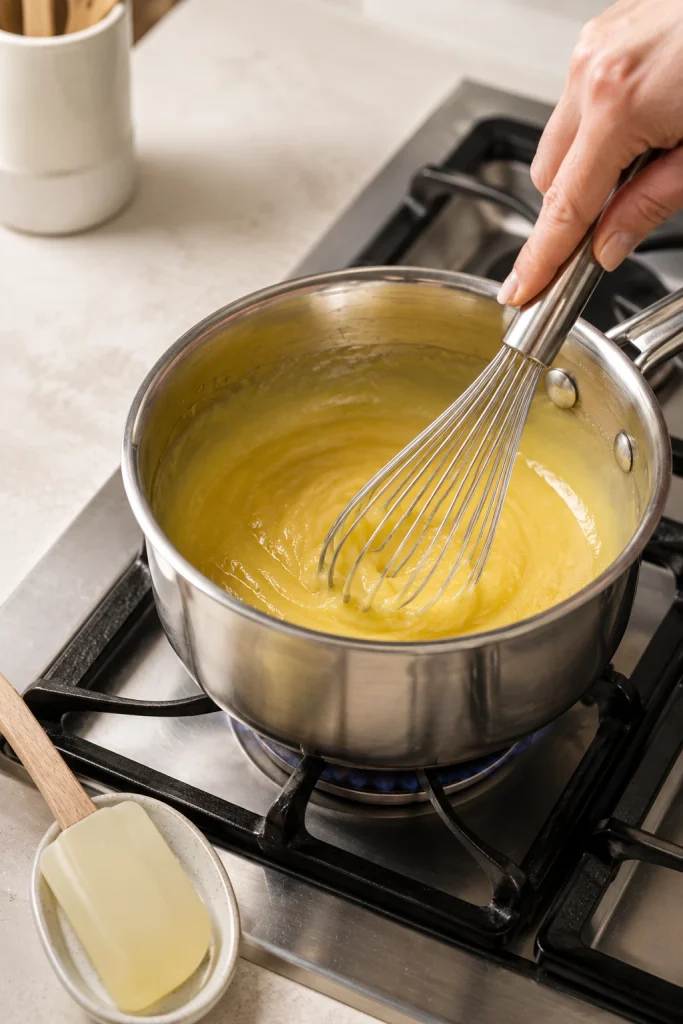
4. Cook Low and Slow

Place the pan over low to medium-low heat. Whisk constantly, making sure to reach the edges and bottom of the pan. At first, the mixture will look thin and loose.

Visual cue: The pan should look calm, not boiling; steady whisking is what thickens the curd safely.

Lemon curd being whisked in a saucepan on a stovetop over gentle heat.
Gentle heat is your safety net: slow cooking gives the eggs time to thicken the lemon curd without scrambling.

Do not worry if it feels like nothing is happening for the first few minutes. That is normal. The change usually comes near the end, when the mixture turns glossier, feels heavier on the whisk, and starts leaving soft trails.

Visual cue: Watch the curd turn from loose and thin to glossy with soft whisk trails.

Two pans of lemon curd showing an early thin mixture beside a thicker glossy curd with whisk trails.
Watch the body of the mixture, not just the clock: it moves from loose and thin to glossy, heavier, and able to leave soft whisk trails.

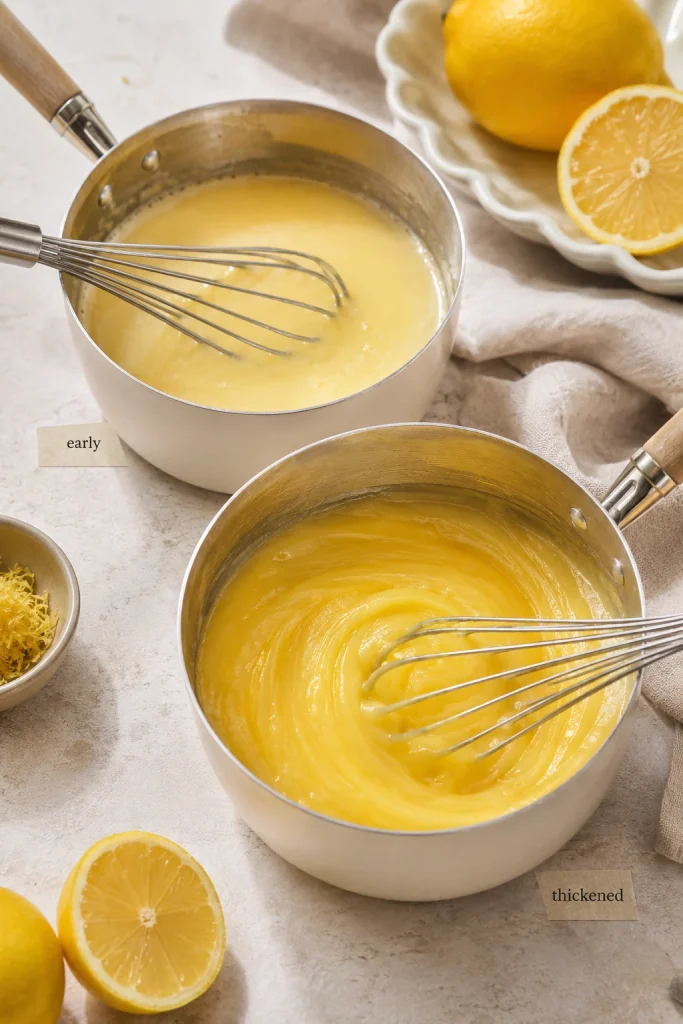
This is the moment to slow down, not turn up the heat. If the curd looks almost right but not quite there, give it another minute over gentle heat.

5. Stop at the Right Texture

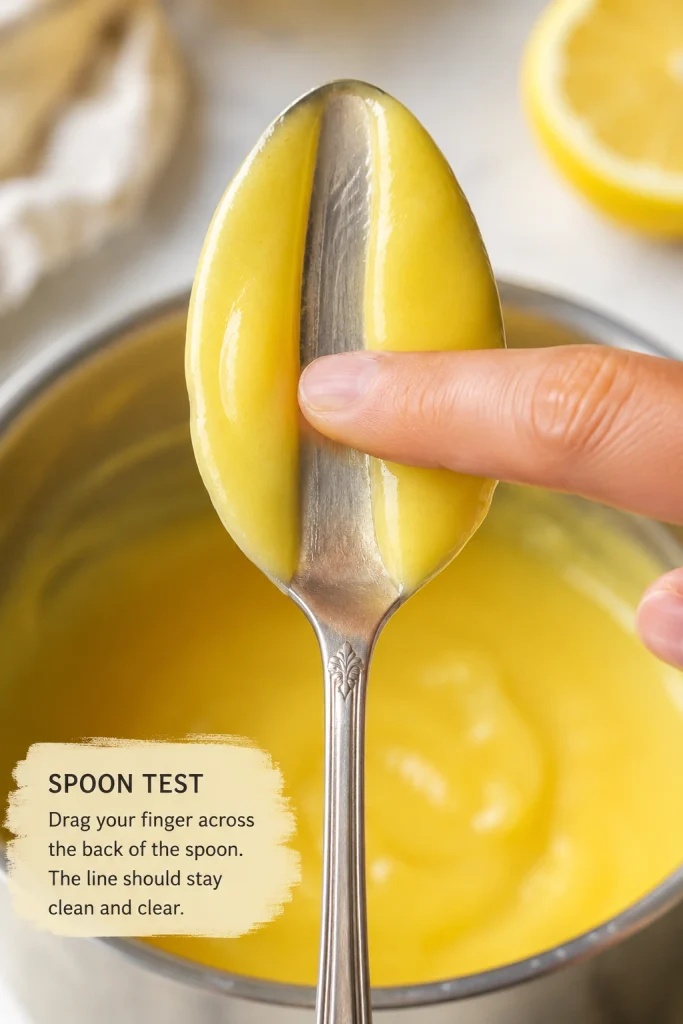
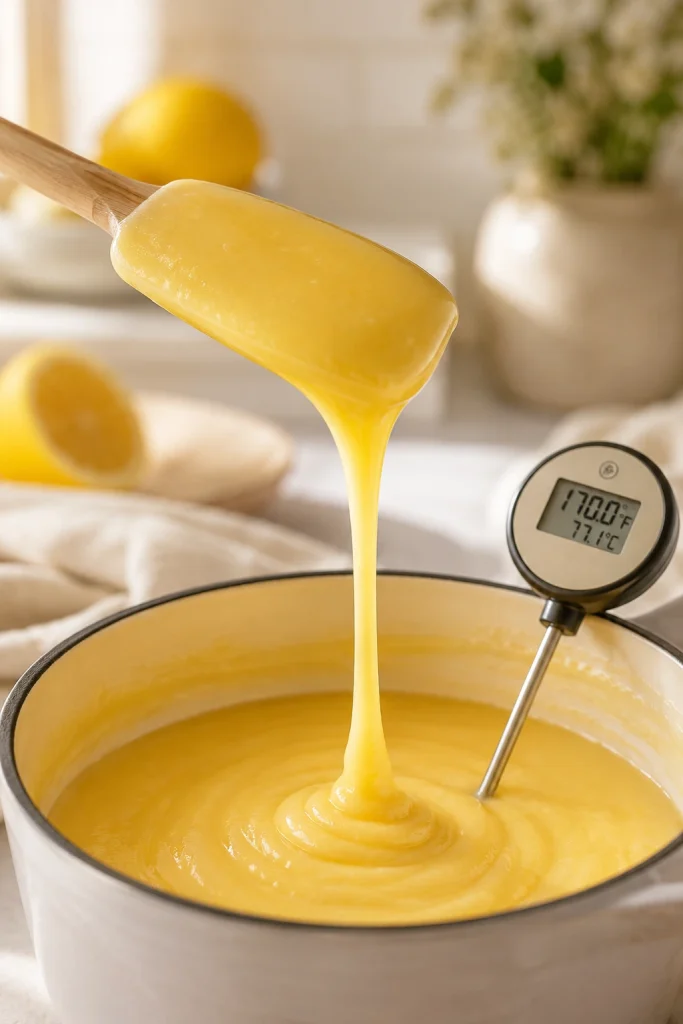
The curd is ready when it coats the back of a spoon and holds a clean line when you run a finger through it. If you are using a thermometer, aim for about 170°F / 77°C.

What the spoon test should show

A finger dragging through lemon curd on the back of a spoon, leaving a clean line that holds.
Use the spoon test when the curd is close; if the path stays open, it has enough body to finish setting as it cools.

For tart shells, mini tarts, cookies, or simple cake filling, you can cook it a little closer to 175°F / 79–80°C. Keep the heat gentle and do not let it boil.

The thermometer is a guide, not the only test. If the mixture has reached temperature but still looks watery, keep it over gentle heat a little longer until it coats the spoon.

6. Add Butter Off the Heat

Remove the pan from the heat. Whisk in the cold butter cubes a few pieces at a time. The curd turns glossy, smooth, and slightly richer as the butter melts in.

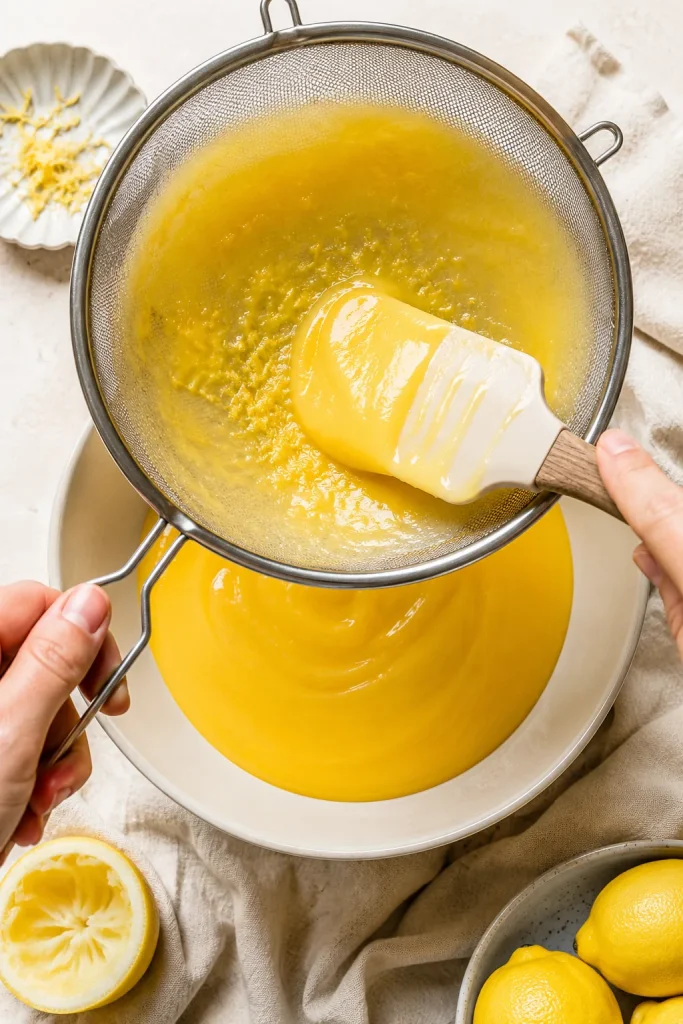
7. Strain the Lemon Curd

Pour the warm curd through a fine mesh sieve into a clean heatproof bowl or jar. The sieve is your safety net: it catches zest, tiny egg bits, and any uneven texture so the finished batch still tastes silky.

Texture cue: Straining while warm catches zest and tiny cooked bits before the curd goes into jars.

Warm lemon curd being pushed through a fine mesh sieve into a bowl, with small bits caught in the sieve.
The sieve is final texture insurance, catching zest and tiny cooked bits before the curd goes into cakes, tarts, or jars.

8. Cover and Chill

Press parchment or plastic wrap directly against the surface so a skin does not form. Chill for at least 2 hours before judging the final thickness.

Visual cue: The cover should touch the surface so a skin does not form as the curd cools.

Fresh lemon curd in a bowl covered with plastic wrap pressed directly against the surface.
Protect the surface while it cools; direct contact keeps the top smooth, especially when the curd will be used as a filling or topping.

How to Know It Is Done

Doneness is the part that makes lemon curd feel risky. Look for texture first: it should coat a spoon, fall in a thick ribbon, and move like warm loose pudding when you tilt the pan.

Doneness cueWhat to look for
Spoon testIt coats the back of a spoon and holds a clean line when you run a finger through it.
Whisk trailThe whisk briefly leaves trails before the mixture settles back in.
TextureGlossy, slightly heavier on the whisk, and no longer watery.
TemperatureAbout 170°F / 77°C for smooth curd; up to 175°F / 79–80°C for thicker curd.
After chillingIt mounds softly before slowly relaxing.

How to use temperature with texture

Thick lemon curd falling in a ribbon from a spatula while a thermometer in the curd reads about 170 degrees Fahrenheit.
Pair temperature with texture: near 170°F is helpful, but the curd should also fall in a slow, glossy ribbon.

Underdone curd looks shiny but thin and slips off the spoon quickly. Overheated curd may bubble hard, smell eggy, or show tiny cooked-egg specks.

How to tell runny curd from thick curd

A comparison of runny undercooked lemon curd and properly thickened lemon curd dripping from spoons into bowls.
If lemon curd seems runny, watch how it moves: thin curd races off the spoon, while properly cooked curd drops slowly and settles into soft folds.

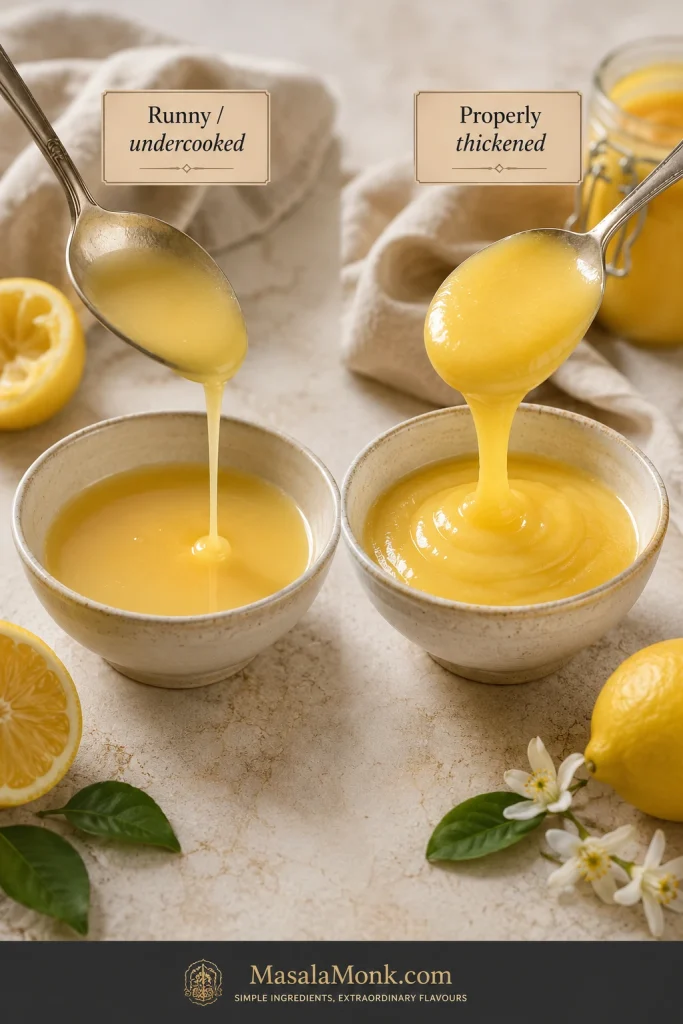
This is the point where many people stop too early. Give it the extra minute it needs, but keep the heat gentle.

7 Rules That Prevent Lemon Curd Failure

  • Keep the heat gentle; high heat can scramble the eggs before the mixture thickens.
  • Do not let it boil. Hard bubbling is a sign to lower the heat.
  • Measure the lemon juice so the balance stays right.
  • Trust texture as much as temperature.
  • Let the refrigerator finish the set before judging thickness.
  • Use a thin layer inside a frosting dam for cakes.
  • Treat homemade curd as a refrigerator recipe, not a shelf-stable preserve.

Not sure where the curd is going? Match thickness to use · use it in cake · fix runny or lumpy curd

Once the curd is cooked and chilled, the next question is where it is going. Cakes, tarts, cookies, and spoonable desserts all need slightly different handling.

How Thick Should Lemon Curd Be?

Warm lemon curd is ready when it coats a spoon and looks glossy; after chilling, it thickens into a soft mound. Before you judge the batch, decide where it is going: a soft curd is perfect for toast, scones, and yogurt, while cakes, tart shells, cookies, and clean slices need a curd that sets thicker after chilling.

Which lemon curd texture works for which use
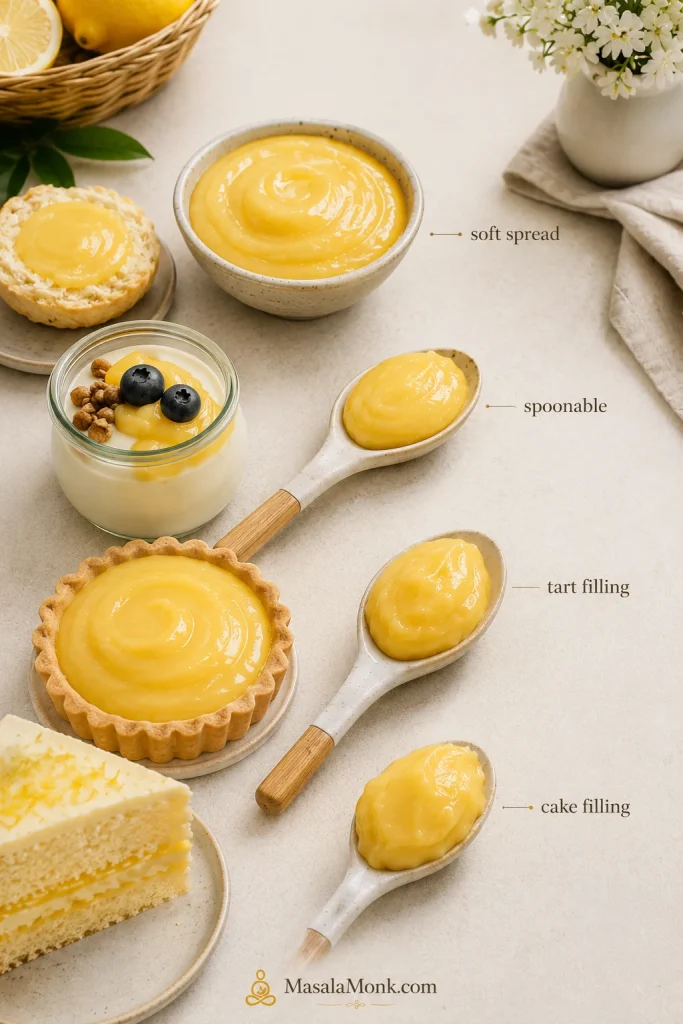
A lemon curd texture guide showing soft spread, spoonable topping, tart filling, and cake filling textures with bowls, spoons, and dessert examples.
The right lemon curd texture depends on the job: looser for spreading, spoonable for toppings, thicker for tarts, and cold and stable for cake filling.
UseBest textureWhat to do
Toast, scones, pancakesSoft and spreadableThe standard recipe works well once chilled.
Yogurt or ice creamGlossy and spoonableStir before spooning over.
Tart shellsSmooth and sliceableCook slightly thicker and strain well.
Mini tartsThick and neatFill once the curd has set.
Cake fillingThick, cold, stableMake ahead, then use inside a frosting dam.
CupcakesSpoonable but not runnyFill only after cupcakes are completely cool.
CookiesThick and jammyA set, spoonable batch works best for thumbprints or sandwich cookies.
Cheesecake toppingSmooth and spreadableStir gently before spreading.

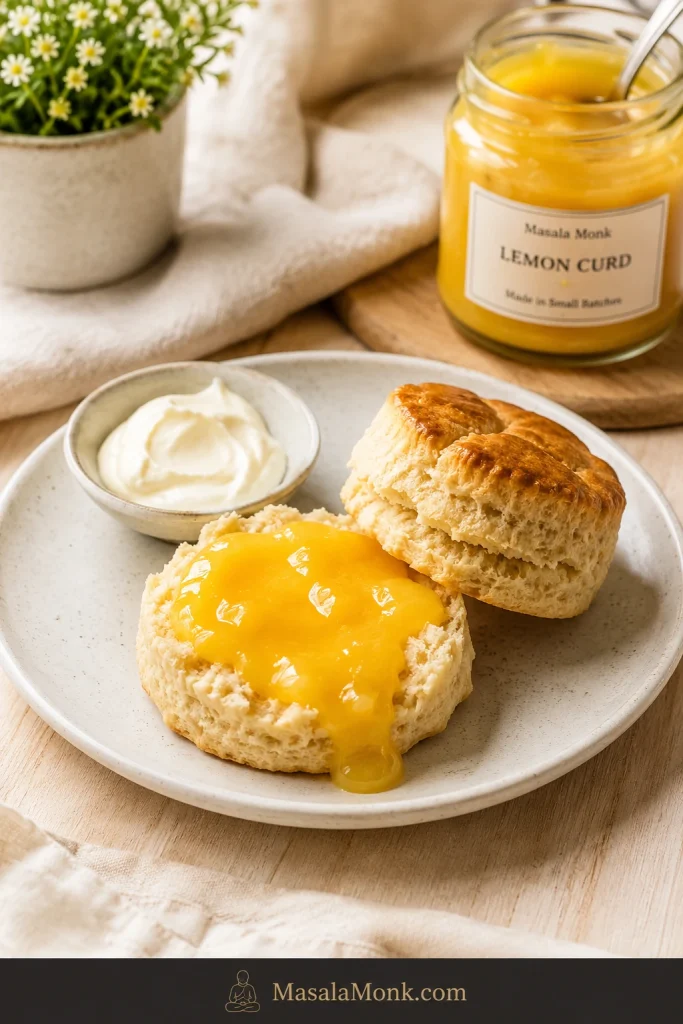
For a classic tea-table pairing, a soft spoonful belongs beside easy English scones, where the tender crumb gives the tart filling somewhere to settle without turning heavy.

Visual cue: A softer lemon curd is ideal for scones, toast, pancakes, and yogurt.

A split English scone topped with soft lemon curd, with cream and a jar of curd nearby.
On scones and toast, softness is a strength; this spreadable lemon curd gives bright flavor without needing the firmness required for tarts or cake layers.

Choose your dessert path: cake filling · tarts and mini tarts · cheesecake, cookies, and quick desserts

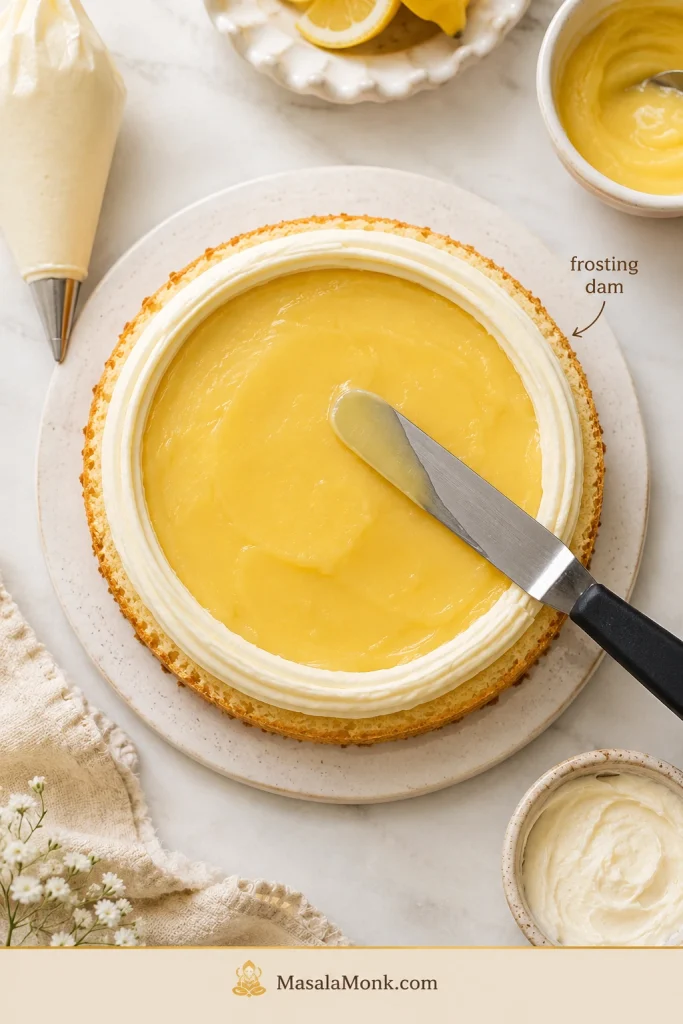
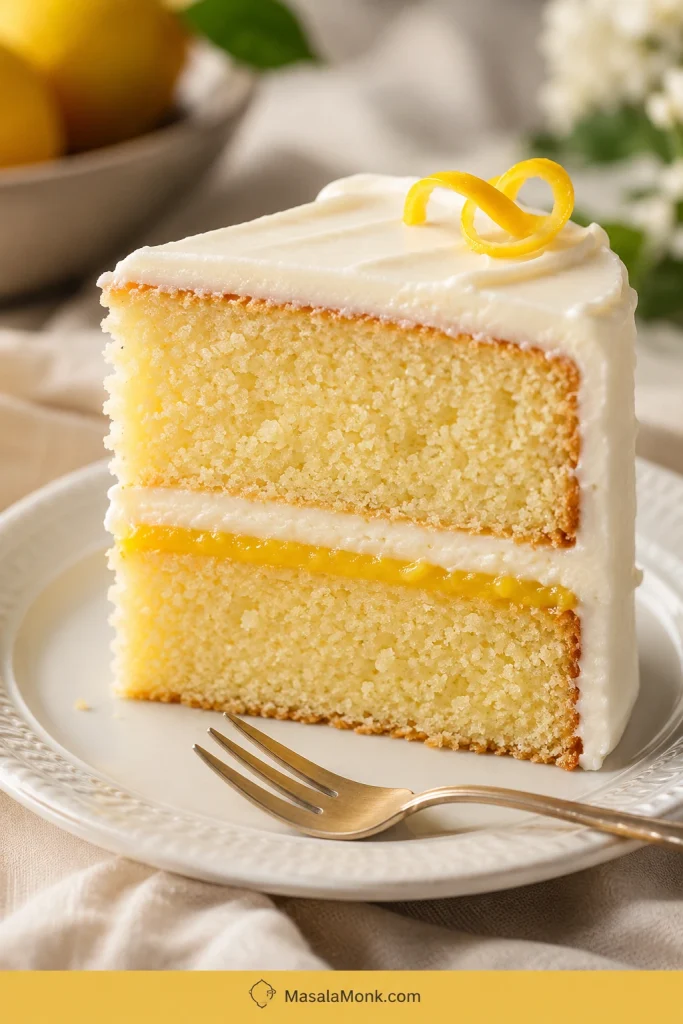
Lemon Curd Cake Filling

Cake is where lemon curd needs the most boundaries. Spread thinly, it is beautiful. Treated like frosting, it can slide.

Yes, lemon curd works as cake filling when it is fully chilled, spread thinly, and held inside a frosting dam.

This curd works well with vanilla cake, lemon cake, coconut cake, almond cake, sponge cake, white chocolate frosting, cream cheese frosting, or buttercream frosting. The rule is simple: keep it cold, keep the layer thin, and keep it inside the frosting border.

Pipe a ring of buttercream, cream cheese frosting, or whipped ganache around the edge of the cake layer. Spread the curd inside that border. This keeps the filling from squeezing out when the cake is stacked.

How to hold lemon curd inside cake layers

A cake layer filled with lemon curd inside a piped frosting dam, with an offset spatula smoothing the curd.
Inside a layer cake, remember the visual rule: frosting around the edge, curd inside the border, and only a thin layer between cake layers.

If the cake has more than two layers, soft frosting, warm weather, or a long travel time, treat lemon curd as a flavor layer, not the structural filling. When lemon needs to be the main support in a tall cake, use a dedicated lemon filling instead.

How Much to Use in Cake

Cake sizeApproximate amount per filling layerNote
6-inch cake1/4 to 1/3 cupUse a thin layer inside a frosting dam.
8-inch cake1/3 to 1/2 cupKeep the layer even and away from the edge.
9-inch cakeAbout 1/2 cupBest with a sturdy frosting border.
Cupcakes1 to 2 teaspoons eachFill only after the cupcakes are fully cool.

These amounts are guides, not strict rules. Softer cakes and softer frostings need a thinner layer.

Visual cue: In cake, a thin chilled layer gives flavor without making slices slide.

A slice of layer cake with white frosting and a thin yellow lemon curd layer between the cake layers.
A clean cake slice shows why restraint matters: a thin chilled layer adds lemon flavor while cake and frosting keep the structure.

Lemon Curd vs Lemon Filling

Lemon curd is a buttery egg-thickened lemon custard; lemon filling is usually thicker, more stable, and often starch-thickened. The difference matters most when you need structure.

If you need a pipeable filling, a tall cake filling, or a dessert that must sit out longer, choose a starch-stabilized lemon filling instead of classic curd.

NeedBetter choiceWhy
Toast, scones, yogurt, pancakesLemon curdSoft, glossy, and spreadable
Tart shellsThicker lemon curdBright flavor with a smooth, sliceable texture
CupcakesChilled curd or lemon fillingBoth can work if the texture is thick enough
Layer cakeThick curd inside a frosting damWorks when used cold and not overfilled
Tall celebration cakeStable lemon fillingBetter structure for height and clean slices
Warm-weather cakeStable lemon fillingLess likely to soften or slide
Pipeable bakery-style fillingLemon fillingUsually thicker and more controlled

When to use curd and when to use filling

A side-by-side guide comparing smooth lemon curd with thicker lemon filling in bowls and tart shells.
Choose by function: lemon curd brings buttery brightness, while lemon filling is better when height, travel, or sharp slices matter.

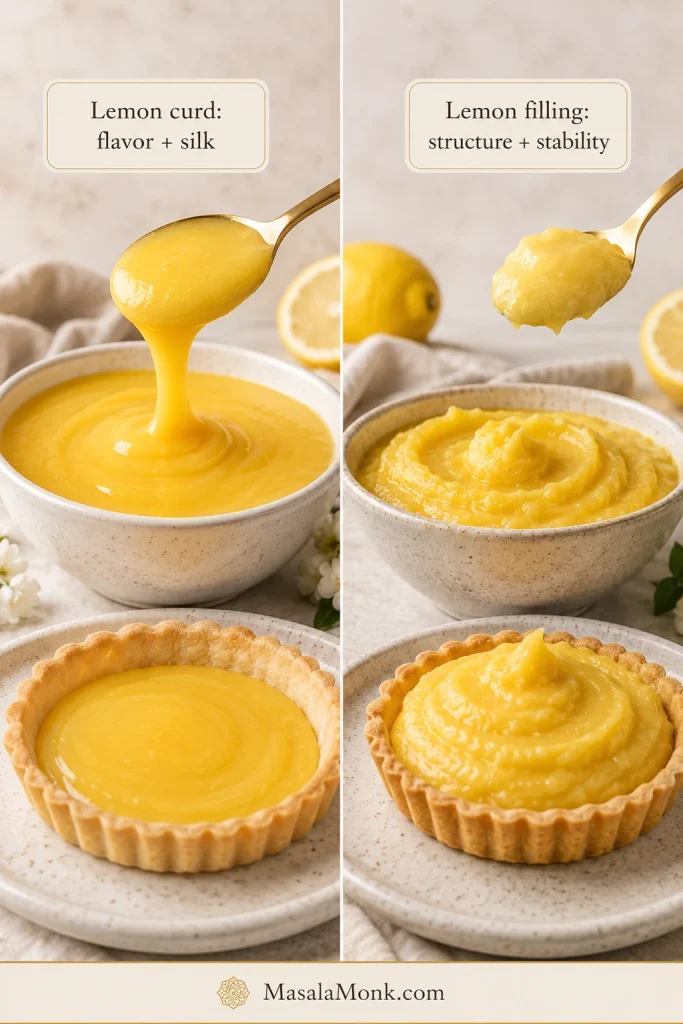
Think of curd as flavor and silk; think of filling as structure. In a simple home cake, chilled curd can work beautifully inside a frosting dam. For a tall cake, wedding-style cake, or dessert that needs very sharp slices, use a dedicated lemon filling instead.

Using It in Tarts and Mini Tarts

Lemon curd is excellent in tart shells because it gives you a bright, creamy filling without making a separate pastry cream. Strain it well for the glossiest finish.

Start with fully baked and fully cooled tart shells. Fill them while the curd is cooled but still spreadable, or spoon in chilled curd and smooth the top with an offset spatula.

Mini tarts work best once the filling has set because it spoons or pipes more neatly. For a tart that slices cleanly, cook the curd slightly thicker and chill the filled tart before serving.

Visual cue: A slightly thicker, fully chilled curd gives cleaner tart tops and slices.

Mini lemon curd tarts and a clean slice of lemon tart with glossy yellow filling on a light stone surface.
In lemon tarts and mini tarts, the curd needs more set than a breakfast spread; that thicker chill gives neat tops and cleaner slices.

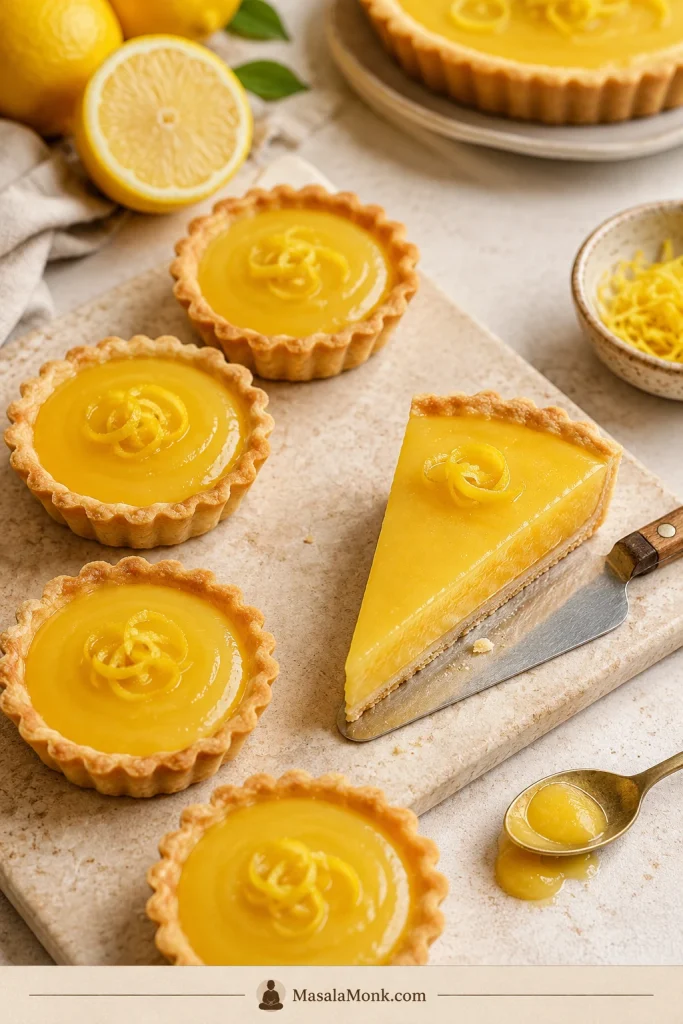
If you are comfortable with simple tart assembly, the same crisp-base thinking appears in this apple tart recipe: keep the pastry base crisp, the filling controlled, and the final texture clean.

Pie, Cheesecake, Cookies and Desserts

Once the texture is right, lemon curd can become a layer, topping, swirl, filling, or quick dessert shortcut.

Pie

Use lemon curd as a tart-sweet layer in cream pies, no-bake pies, or layered desserts. It works beautifully as a flavor layer, but a classic lemon meringue pie usually needs a dedicated pie filling because it has to slice cleanly and hold under meringue.

Cheesecake

Spread it over cheesecake as a topping, swirl it lightly into the filling, or use it as a thin layer between cheesecake and whipped cream. It works especially well with a no bake cheesecake, where the bright curd cuts through the creamy filling and keeps each bite from feeling too heavy.

Cookies

For thumbprint cookies, sandwich cookies, or shortbread cookies, use a thicker batch. Filled cookies look cleanest when the curd is added after baking unless the cookie recipe is designed to bake with a filling. For a gluten-free cookie base, almond flour cookies are a natural direction because their tender, nutty texture pairs well with sharp lemon.

Quick Desserts

Spoon it into yogurt parfaits, fold a little into homemade whipped cream, layer it with crushed cookies, drizzle it over pound cake, or serve it with pavlova and berries. A small amount adds brightness, creaminess, and that sharp lemon finish.

What to Make With Lemon Curd

Once the jar is chilled, it becomes a shortcut to brightness: breakfast, cake, cream, cookies, and simple desserts all get a sharper finish.

CategoryIdeas
BreakfastToast, scones, pancakes, waffles, yogurt, crepes
CakesLayer cake, lemon cake, vanilla cake, cupcakes, loaf cake, sponge cake
Tarts and piesMini tarts, tart shells, lemon tart, cream pie layers
CookiesThumbprint cookies, sandwich cookies, shortbread bars
No-bake dessertsParfaits, cheesecake topping, whipped cream layers, ice cream topping
Plated dessertsPavlova, pound cake, angel food cake, crepes, meringues

Visual cue: One chilled jar can brighten cheesecakes, cookies, parfaits, pancakes, yogurt, and whipped cream.

Lemon curd served with cheesecake, thumbprint cookies, a whipped cream parfait, pancakes, and yogurt.
Once chilled, one jar can work across desserts: sharpen cheesecake, fill cookies, layer parfaits, brighten pancakes, swirl yogurt, or lift whipped cream.

For a fruit-and-cream dessert, borrow the same assemble-at-serving idea used in classic strawberry shortcake: keep the base, fruit, cream, and curd separate until the last minute so nothing turns soggy.

With breakfast, a spoonful of chilled curd is excellent over almond flour pancakes, especially when you want something brighter than syrup.

Microwave Lemon Curd Shortcut

The stovetop method gives the best control, especially the first time you make lemon curd. The microwave can work for a quick small batch, but it asks for patience in short bursts.

Microwave timing varies by wattage, so texture matters more than exact minutes. Use the spoon test instead of trusting the clock alone.

  1. Start with a large microwave-safe glass bowl because the mixture can rise as it heats.
  2. Whisk the lemon juice, zest, sugar, eggs, and salt together until smooth.
  3. Microwave in 30-second bursts, whisking well after each burst.
  4. Once the mixture begins to thicken, switch to 10 to 15-second bursts.
  5. Stop when it coats a spoon. Do not let it boil over or scramble.
  6. Whisk in the butter, strain through a fine mesh sieve, then chill.

The microwave method is fast, but less forgiving because the heat is uneven. For the smoothest, most controlled result, use the stovetop method.

Vegan, Eggless, Dairy-Free and Gluten-Free Notes

Classic lemon curd is made with eggs and butter, so vegan and eggless versions need a different method. They are not just a simple egg swap.

  • Dairy-free: plant-based butter can work, but flavor and texture may change depending on the brand.
  • Eggless: usually needs cornstarch or another thickener to replace the eggs.
  • Vegan: usually uses lemon juice, zest, sugar, plant milk, starch, and plant butter or coconut-based fat.
  • Gluten-free: classic curd is usually naturally gluten-free, but check all ingredients and avoid cross-contact if needed.
  • Sugar-free or keto: needs separate testing because sweeteners behave differently from sugar.

If you need a vegan or egg-free version, choose a recipe designed for that method. The texture, thickening system, and cooking behavior are different from classic curd.

Troubleshooting Lemon Curd

Most lemon curd problems look worse than they are. The fix depends on whether the batch is undercooked, overheated, or simply not chilled yet.

How to diagnose lemon curd problems

A lemon curd troubleshooting guide showing runny curd, lumpy curd, egg specks in a sieve, and a stainless steel pan for avoiding metallic taste.
Most lemon curd problems point back to heat, timing, chilling, or cookware, so diagnose the texture before giving up on the batch.

Fix Texture Problems First

ProblemWhy it happenedWhat to do
Runny curdIt was undercooked or has not chilled long enough.Reheat gently and cook until it coats a spoon or reaches about 170°F / 77°C. Chill fully.
Runny after chillingIt was undercooked, even if it looked slightly thick while warm.Reheat gently, cook to spoon-coating texture, then chill again.
Lumpy textureThe eggs cooked too quickly or the heat was too high.Strain immediately through a fine mesh sieve. Use lower heat next time.
Eggy tasteThe eggs overheated or cooked too aggressively.Strain well. Next time, cook lower and whisk constantly.
Grainy textureThe sugar did not dissolve evenly or the heat was uneven.Rub zest into sugar, whisk well before heating, cook gently, and strain after cooking.
Split curdThe heat was too high or the butter did not emulsify smoothly.Whisk vigorously off heat, then strain. Next time, add butter gradually off heat.

Fix Flavor, Skin, and Cookware Issues

ProblemWhy it happenedWhat to do
Too tartThe lemons were very sharp or the lower sugar amount was used.Use the sweeter sugar amount next time. Serve this batch with cream, yogurt, cake, or meringue.
Too sweetThe lemons were mild or the higher sugar amount was used.Add more zest next time for stronger lemon flavor instead of adding too much extra juice.
Skin on topIt cooled uncovered.Press parchment or plastic wrap directly onto the surface while cooling.
Metallic tasteA reactive pan or bowl may have affected the flavor.Use stainless steel, enamel-coated cookware, or heatproof glass.

Even if the batch is not perfect, do not throw it away too quickly. A slightly thin curd can often be cooked a little longer, and a slightly lumpy one can often be rescued with a sieve.

Batch rescued? Recheck doneness cues · store the finished curd · return to the recipe card

Storage and Freezing

Homemade lemon curd is a refrigerator recipe, not a shelf-stable preserve. Store it in a clean airtight jar or container and keep it chilled.

Think of it like a chilled custard-style spread: clean jar, cold fridge, clean spoon.

How to store lemon curd safely

Two jars of homemade lemon curd labeled fridge and freezer, with blank date lines, a lemon, linen, and a spoon nearby.
Date the jar and keep it cold; homemade lemon curd behaves like a custard-style spread, so clean handling matters as much as flavor.

If you want tested preservation guidance, the National Center for Home Food Preservation has specific lemon curd freezing and canning guidance.

  • Refrigerator: keep for about 1 to 2 weeks, depending on freshness and handling.
  • Freezer: freeze in an airtight freezer-safe container for longer storage.
  • Thawing: thaw overnight in the refrigerator.
  • After thawing: stir gently before using.
  • Serving: always use a clean spoon so the curd stays fresh longer.

Let the curd cool slightly before sealing the jar fully, so condensation does not collect inside. For food-safety storage temperatures, use a refrigerator at 40°F / 4°C or below; FoodSafety.gov’s cold food storage chart uses that same refrigerator temperature benchmark.

Keep it chilled until serving, especially because it contains eggs and butter.

FAQ

Why did my lemon curd turn runny?

It was probably undercooked or not chilled long enough. Reheat gently until it coats a spoon, then chill again.

How do you thicken lemon curd?

Cook it gently until it coats the back of a spoon. For a thicker texture, cook closer to 175°F / 79–80°C without boiling, then chill until fully set.

What temperature should lemon curd reach?

A good target is about 170°F / 77°C. For tarts or cake filling, cook closer to 175°F / 79–80°C without letting it boil.

How many lemons do you need?

Usually 2 to 3 medium lemons for 1/2 cup / 120 ml juice. Zest them before juicing so they are easier to handle.

Do you need a double boiler?

No. A double boiler gives extra protection, but a heavy-bottom saucepan works well with low heat and constant whisking.

Whole eggs or egg yolks: which is better?

Use whole eggs for a lighter curd and yolks for a richer, thicker one. This recipe uses both for a balanced all-purpose texture.

Should lemon curd be strained?

Yes. Straining while warm is the easiest way to remove zest, tiny egg bits, and uneven texture.

How long does homemade lemon curd last?

It usually keeps for about 1 to 2 weeks in the refrigerator in a clean airtight container.

Can you freeze lemon curd?

Yes. Freeze it in an airtight freezer-safe container, thaw overnight in the refrigerator, then stir gently before using.

Is lemon curd the same as lemon filling?

Not always. Lemon curd is buttery and custard-like, while lemon filling is often thicker, more stable, or starch-thickened.

Does lemon curd work as cake filling?

Yes, if it is cold, thick, and used thinly inside a frosting dam. For tall cakes or very clean slices, use a more stable lemon filling.

Why does lemon curd taste metallic?

A metallic taste can come from reactive cookware. Use stainless steel, enamel-coated cookware, or heatproof glass.

Final Tips for Smooth Lemon Curd

  • Zest before juicing.
  • Measure the lemon juice.
  • Rub zest into sugar for stronger lemon flavor.
  • Cook gently and whisk constantly.
  • Stop when it coats a spoon and looks glossy.
  • Use temperature as a guide, not the only test.
  • Strain warm, then chill before using as filling.

Good lemon curd should taste bright, smooth, and alive with lemon. Keep the heat gentle, trust the spoon test, and let the refrigerator finish the texture. Once you know what properly thickened curd looks and feels like, it stops being fussy and becomes one of the easiest ways to make toast, cakes, pancakes, cookies, whipped cream, and simple desserts taste finished.

Make it now: jump back to the recipe card · back to top

Posted on Leave a comment

Apple Cake Recipe: Easy Fresh Apple Cake with Cinnamon

Square of fresh apple cake on a cream plate with visible apple pieces and a fork nearby.

When you want the comfort of apple pie without making pie dough, this is the cake to bake. It is a no-mixer fresh apple cake with tender cinnamon apple pieces, a soft sheet-cake texture, and clear doneness cues so the middle bakes through instead of turning heavy.

The batter is simple, the apples do most of the work, and the pan keeps everything easy to slice. Most of the prep is just peeling and dicing the apples; after that, you whisk, fold, spread, bake, and let the cake settle before cutting into cozy apple-filled squares.

This is the cake you make when the apples are already sitting on the counter and you want the house to smell like you tried harder than you did. It has an old-fashioned snack-cake feel: simple batter, warm cinnamon, soft apple pieces, and no frosting required.

Not applesauce cake, not canned-filling cake, and not apple dump cake — this is fresh apple comfort with snack-cake effort: clean slices you can eat warm tonight and again with coffee tomorrow.

Quick Answer: What Is Apple Cake?

Apple cake is a cinnamon-spiced cake made with fresh diced apples folded into the batter. This version bakes in a 9×13 pan, uses oil and yogurt or sour cream so the cake stays tender after it cools, and slices into soft apple-filled squares.

For the most reliable result, use 360–400 g prepared apple pieces, dice them into ⅜–½ inch / 1–1.25 cm pieces, keep the batter thick and scoopable, and bake until the center of the pan is fully set. A few moist crumbs on the tester are good; shiny wet batter means the cake needs more time.

Think of it in three simple rules: measured apples, thick scoopable batter, and enough time for the middle to bake and rest.

Make This Apple Cake When

  • There are 2–3 apples on the counter and dessert should not require pie dough.
  • A no-mixer cake sounds better than a weekend baking project.
  • Apple crisp feels too spoonable and you want clean, sliceable squares.
  • Fresh apple pieces matter more than applesauce or canned filling.
  • One cake needs to work warm after dinner and again the next day with coffee.

Fresh Apple Cake Recipe Card

Easy No-Mixer Fresh Apple Cake

A hand-mixed fresh apple cake with cinnamon, brown sugar, and tender 9×13 slices full of soft apple pieces. It is easy enough for a weekday bake, sturdy enough for a potluck, and warm enough for dessert.

Prep Time25 minutes, mostly peeling and dicing apples
Bake Time42–52 minutes
Cooling Time30 minutes
Servings12 large squares or 16 smaller squares
DifficultyEasy, no mixer
Pan9×13-inch / 23×33 cm light metal baking pan preferred
Best ApplesHoneycrisp, Granny Smith, Pink Lady, Fuji, Braeburn, or any crisp firm apple you enjoy eating raw
Best Doneness SignCenter of the pan no longer jiggles; tester shows moist crumbs, not wet batter

Before you start: Dice the apples first. Once the wet and dry ingredients are mixed, the batter should go into the oven soon so the leavening can work properly and the apples do not sit too long in the batter.

Ingredients

For the apple cake

  • 2 1/2 cups all-purpose flour, spooned and leveled, or 313 g
  • 2 teaspoons baking powder
  • 1/2 teaspoon baking soda
  • 3/4 teaspoon fine salt
  • 2 teaspoons ground cinnamon
  • 1/4 teaspoon ground nutmeg, optional
  • 3 large eggs, at room temperature
  • 3/4 cup neutral oil, such as sunflower, canola, or vegetable oil, or 180 ml
  • 3/4 cup packed light brown sugar, or 150 g
  • 1/2 cup granulated sugar, or 100 g
  • 1/2 cup plain yogurt or sour cream, or 120 g
  • 2 teaspoons vanilla extract
  • 3 cups peeled, cored, diced apples, or 360–400 g prepared apple pieces
  • 1/2 cup chopped walnuts or pecans, optional, or 55–60 g

Optional finishes

  • Powdered sugar
  • Cinnamon sugar topping
  • Vanilla glaze
  • Brown sugar glaze
  • Caramel drizzle
  • Vanilla ice cream or whipped cream

Instructions

Prepare the Pan, Apples, and Batter

  1. Prepare the oven and pan. Heat the oven to 350°F / 177°C. Grease a 9×13-inch / 23×33 cm light metal baking pan. Line with parchment, leaving a little overhang, if you want easier lifting and cleaner slices.
  2. Prepare the apples. Peel, core, and dice the apples into ⅜–½ inch / 1–1.25 cm pieces. Keep the pieces fairly even so they soften at the same rate.
  3. Mix the dry ingredients. In a medium bowl, whisk together the flour, baking powder, baking soda, salt, cinnamon, and nutmeg.
  4. Mix the wet ingredients. In a large bowl, whisk the eggs, oil, brown sugar, granulated sugar, yogurt or sour cream, and vanilla until smooth.
  5. Combine the batter. Add the dry ingredients to the wet ingredients. Fold gently with a spatula until no dry streaks remain. Do not overmix.
  6. Fold in the apples. Add the diced apples and nuts, if using. Fold until evenly distributed. The batter will be thick and scoopable.

Bake, Check, Cool, and Finish

  1. Spread into the pan. Scrape the batter into the prepared pan and nudge it evenly into the corners with a spatula. It should not pour like pancake batter.
  2. Bake. Bake for 42–52 minutes, or until the top is golden, the center of the pan no longer jiggles, and a tester inserted into the middle comes out with moist crumbs rather than wet batter. Start checking at 42 minutes.
  3. Check carefully. If the tester hits an apple piece, try another spot. For extra confidence, the thickest area should read about 200–205°F / 93–96°C on an instant-read thermometer.
  4. Cool before slicing. Let the cake cool in the pan for at least 30 minutes. This helps the cake settle around the apple pieces.
  5. Finish and serve. Dust with powdered sugar, add one of the finishes below, or serve plain. Warm squares are softer; room-temperature squares cut cleaner.

Glass pan note: If using a glass or ceramic baking dish, reduce the oven to 325°F / 165°C and expect the cake to take longer. Glass can brown the edges before the middle finishes, so check the center carefully.

If the top browns early: Loosely tent the pan with foil and keep baking until the cake feels set in the middle.

Crumb topping note: If you add the crumb topping from the finish section, start checking at the same time but expect the cake to need a few extra minutes.

Here is the finished sheet-cake shape you are aiming for: a shallow 9 by 13-inch apple cake that cuts into soft, apple-filled squares.

Fresh apple cake baked in a parchment-lined 9 by 13-inch metal pan with one square removed and apple pieces visible in the crumb.
Because the batter is full of fruit, a 9 by 13-inch pan keeps it shallow enough to bake evenly and cut into clean squares.

Apple Cake at a Glance: What Matters Most

Best pan9×13-inch / 23×33 cm light metal pan
Apples360–400 g prepared diced apples
Apple size⅜–½ inch / 1–1.25 cm pieces
BatterThick, scoopable, and easy to spread with a spatula
Done whenCenter no longer jiggles and tester shows moist crumbs
Best first bakePlain or cinnamon sugar; use 360 g apples if they are very juicy

Timing note: The bake window is intentionally flexible because apples, pan material, and ovens vary. Trust the center of the cake first, then the timer.

Thick cinnamon apple cake batter with diced apples lifted on a spatula from a mixing bowl.
Look for batter that clings to the spatula before it goes in the pan; that thickness keeps diced apples suspended through the crumb.

Ready to bake? Go back to the recipe card, or continue to why this apple cake works.

Why This Apple Cake Works

This cake works because it balances apple moisture with enough structure to bake into clean squares. Fresh apples bring flavor and tenderness, but they also release juice in the oven. The recipe keeps that moisture in check with measured apples, a shallow pan, and a batter sturdy enough to hold the fruit instead of collapsing around it.

This is the kind of cake that does not need decorating to feel generous.

This is not a show-off cake. Square by square, it disappears: one warm piece after dinner, another small piece with coffee, and one more the next day when the cinnamon has settled into the apples.

Why the pan matters: Fresh diced apples add moisture and weight to the batter. A shallow rectangular pan gives the cake enough surface area to bake through while staying tender. If you change the pan, apple amount, or topping, trust what the cake looks and feels like more than the clock.

ChoiceWhat it does
Oil instead of butterKeeps the cake softer after cooling
Brown sugar + cinnamonGives warm apple-pie flavor without pie dough
Yogurt or sour creamAdds tenderness and balances sweetness
9×13 panKeeps the apple-heavy batter shallow enough to bake evenly
Diced applesGives pockets of fruit without flooding the cake
Hand mixingKeeps the batter gentle and helps avoid a tough cake

Fresh Apple Cake vs Applesauce Cake vs Apple Dump Cake

Apple desserts overlap, but they do not behave the same way in the oven. Here, the main apple flavor comes from chopped apples folded into the batter. That makes it different from applesauce cake, where applesauce softens the texture, and different from apple dump cake, where canned filling and cake mix do most of the work.

Bowls labeled fresh diced apples, applesauce, and canned apple filling arranged on a light surface.
For this fresh apple cake, diced apples keep the texture chunky and tender, while applesauce or canned filling changes the dessert completely.

If you want spoonable, bubbling apple filling under a buttery cake-mix topping, that is apple dump cake territory. This recipe is for slices, so it needs fresh diced apples and cake batter that can bake around them.

TypeWhat it usesTextureBest for
Fresh apple cakeDiced fresh applesSoft cake with visible apple piecesEveryday baking, dessert, coffee, potlucks
Applesauce cakeApplesauce in the batterSmoother, softer, spice-cake-likePantry baking and moist snack cake
Apple dump cakeCanned apple filling, cake mix, and butterSpoonable, cobbler-like shortcut dessertFast desserts with almost no prep
Apple crumb cakeApple cake plus streusel toppingCoffee-cake style with a crumbly topBreakfast-dessert crossover and holiday baking

If you want apple pieces in a cinnamon cake, stay with this recipe. If you want a smoother spice cake where applesauce provides most of the moisture, choose applesauce cake. Canned apple filling is better saved for shortcut bakes like apple pie with apple pie filling.

If you want to make your own thick fruit base for pies, crisps, and freezer desserts, use this apple pie filling recipe instead of folding cooked filling into this fresh apple cake batter.

Apple Cake Ingredients and Why They Matter

The ingredient list is simple, but every choice is doing a job: tender texture, warm spice, clean slices, and enough body to hold the apples without weighing down the cake.

Fresh Apples

Use firm apples that hold some shape in the oven. Honeycrisp, Granny Smith, Pink Lady, Fuji, Braeburn, and Jonagold all work well. If those named apples are not available, use any crisp, firm apple that tastes good raw. Avoid mealy or overripe apples; they bring moisture without much flavor.

The goal is little pockets of apple that taste soft and bright, not damp patches in the cake. For this recipe, use 360–400 g peeled, cored, diced prepared apple pieces. That is usually about 2–3 medium apples after peeling and coring, depending on size.

If your apples are very juicy, stay closer to 360 g. If they are firm and crisp, 400 g works well. You do not need perfect cubes; just keep the pieces close enough in size that they bake at the same pace.

All-Purpose Flour

All-purpose flour gives the batter enough body to hold the apple pieces. If possible, weigh the flour. If using cups, spoon the flour into the measuring cup and level it off. Scooping directly from the bag can pack in too much flour and make the cake dry.

Oil

Oil keeps the cake plush after cooling, which matters because apple cake is often even better the next day. The slice should still feel tender with coffee, not firm or dry from the fridge.

Butter gives richer flavor, but it can make cakes feel firmer once they sit. Neutral oil is the easier choice here because it stays gentle behind the apples and cinnamon.

Brown Sugar and Granulated Sugar

Brown sugar gives the cake a soft, caramel-like warmth that makes the apples taste rounder. Granulated sugar keeps the texture lighter, so the cake stays cozy without feeling heavy.

Eggs

Eggs help the cake rise, set, and slice cleanly. Room-temperature eggs mix more smoothly into the batter, but do not worry if you forget. Just whisk the wet ingredients well before adding the flour.

Yogurt or Sour Cream

Yogurt or sour cream keeps the cake tender and balances the sweetness, especially if your apples are very sweet. It should disappear into the batter, not make the cake taste tangy. If your Greek yogurt is very thick, regular plain yogurt or sour cream will give the easiest batter.

Cinnamon and Warm Spice

Cinnamon is what makes the cake smell like dessert before it even comes out of the oven. Nutmeg is optional, but a small amount adds warmth. You can also use homemade apple pie spice if you want a rounder spice blend with cinnamon, nutmeg, allspice, or ginger.

If the warm-spice side of this cake is what you love most, a soft 9×13 spice cake is the cleaner direction when you want the same cozy flavor without apple pieces.

Vanilla

Vanilla rounds the edges so the cake tastes warm and complete instead of just sweet and spiced. It is a small addition, but it helps the apple, cinnamon, and brown sugar feel fuller.

Best Apples for Apple Cake

Firm, flavorful apples make the most balanced apple cake. A mix of sweet and tart apples gives the best flavor. If you only have one kind, choose an apple that tastes bright raw and still feels crisp when you cut it.

Board of firm apple varieties for baking, including Honeycrisp, Granny Smith, Pink Lady, and Fuji or Braeburn.
Choose firm baking apples so they soften into juicy pockets without watering down the cinnamon batter.

Many firm baking apples that work well in pie also work well in cake, but the goal is different. In pie, apples need to hold slices in a filling. In cake, the pieces should soften without flooding the batter. For a deeper apple-by-apple breakdown, see our guide to the best apples for apple pie and use the same firm, flavorful logic here.

AppleFlavorWhy it works
HoneycrispSweet-tartJuicy, crisp, and flavorful; use the lower apple amount if very juicy
Granny SmithTartBalances the sweetness and holds shape well
Pink LadySweet-tartFirm texture and bright flavor
FujiSweetGood for a sweeter, milder cake
BraeburnSweet-tartBakes well and has good apple flavor
JonagoldBalancedSoftens nicely but still brings flavor

Avoid apples that are mealy, bruised, overripe, or very soft. They can make the cake taste dull and the inside feel damp. If your apples are very sweet, a pinch more salt or a tart apple mixed in can make the flavor brighter.

Next step: Once you choose the apples, jump to how to cut apples for cake so the pieces bake through evenly.

Should Apples Be Chopped, Grated, Sliced, or Canned for Apple Cake?

Diced apples are best for this recipe. They give the cake visible fruit pieces while still letting the middle bake through. Aim for ⅜–½ inch / 1–1.25 cm pieces. Smaller pieces disappear; larger pieces can stay too firm or make the cake harder to slice.

Peeled diced apple pieces on a cutting board with a knife, ruler, measuring spoon, and label showing 3/8 to 1/2-inch pieces.
Cut the apples into small, even 3/8 to 1/2-inch pieces so they soften by the time the center sets.
  • Diced fresh apples: best balance of apple texture and even baking.
  • Grated apples: not ideal here because they release more moisture and can make the cake heavier.
  • Thin sliced apples: better for French, German, or invisible apple cake styles.
  • Canned apple pie filling: better for dump cake, pie, or shortcut apple desserts.

Peeling gives the softest texture. You can leave thin-skinned apples unpeeled for a rustic cake, but the skins will be noticeable in the finished slice.

The Best Pan and Tools for Apple Cake

You do not need a stand mixer for this apple cake. A bowl, whisk, spatula, knife, and rectangular baking pan are enough.

This is not a strict one-bowl cake, but it is fully hand-mixed: one bowl for dry ingredients, one for wet, then everything folds together with a spatula.

Hands whisking eggs, oil, brown sugar, yogurt, and vanilla in a bowl with diced apples and flour nearby.
Hand-whisk the wet ingredients until smooth; then fold gently once the flour goes in so the cake stays tender.

A light metal 9×13 pan is the easiest choice because it helps the cake bake through before the edges overbrown.

  • 9×13-inch / 23×33 cm baking pan: light metal is the easiest default.
  • Parchment paper: optional, but useful for cleaner lifting. Leave overhang if you want to lift the cake out of the pan.
  • Foil: helpful if the top browns before the cake is set in the middle.
  • Wire rack: helps the cake cool evenly.
  • Instant-read thermometer: optional, but useful if you often worry about doneness.

How to Make Apple Cake

Nothing here is fussy. The only real discipline is folding gently, spreading the batter evenly, and giving the cake enough time to finish.

Start with the pan and apples. Grease the pan, line it with parchment if you want cleaner lifting, then peel, core, and dice the apples into even pieces. Once the batter is mixed, it should go into the oven without sitting around for too long.

Whisk the dry ingredients in one bowl and the wet ingredients in another. When you combine them, switch to a spatula and fold gently. The batter should be thick enough that you have to nudge it into the corners — that sturdiness helps the apples stay suspended instead of sinking into a heavy layer.

Thick apple cake batter with diced apples being spread into a 9 by 13-inch metal pan with a spatula.
Once the apples are folded in, spread the thick batter into the corners instead of trying to pour it like a thin cake batter.

Fold in the apples until they are evenly spread through the batter. Scrape everything into the pan, smooth the top, and bake until the top is golden and the center is set. If the top gets dark before the cake is done, cover the pan loosely with foil and keep baking.

Let the cake cool for at least 30 minutes before slicing. Warm apple cake is lovely, but very hot apple cake is fragile. That short rest is what turns a soft bake into clean squares.

How to Know Apple Cake Is Done

Apple cake is generous, but it does ask you to check the middle instead of trusting the golden top alone. Because apple pieces stay moist, a tester can also look misleading if it goes straight through a piece of fruit.

Apple cake is done when:

  • Golden, set top.
  • Center of the pan no longer jiggles.
  • Light spring-back when touched.
  • A toothpick comes out with moist crumbs, not wet batter.
  • A thin knife inserted into the cake does not reveal raw batter.
  • The thickest area reads about 200–205°F / 93–96°C on an instant-read thermometer, if using one.
Golden baked apple cake in a 9 by 13-inch metal pan cooling on a wire rack.
A golden top is a good first clue; however, the center should also feel set before the cake comes out of the oven.

If the tester hits an apple piece, check another spot near the center. Moist apple is fine. Wet batter is not. When in doubt, give the cake a few more minutes, especially if you are baking in glass or if your apples were very juicy.

Moist Crumbs vs Wet Batter

Use the center of the pan for the most reliable doneness check. The tester should come out with soft crumbs, not a glossy streak of raw batter.

Thin metal cake tester with moist crumbs held over a baked apple cake in a metal pan.
This is the texture you want on the tester: moist crumbs, not shiny batter.

For a broader baking-science look at doneness cues, King Arthur Baking has a useful guide on how to tell when cake is done. For this apple cake, the most useful signs are a set center, moist crumbs, and no shiny wet batter.

Once you know what a finished center looks like, the gummy-center problem becomes much easier to avoid.

How to Avoid a Gummy Apple Cake Center

A good apple cake should feel soft and plush, not damp. If the middle turns gummy, it usually means the apples gave off more moisture than the batter could set around.

Common causes include too many apples, pieces that are too large, a deep pan, underbaking, or slicing while the cake is still too hot. To fix it, do not overload the apples, keep the batter sturdy, and make sure the middle has truly set before you slice.

Side view of a fresh apple cake square showing diced apple pockets, soft crumb, and a set center.
A good slice should look moist and soft, but it should still hold together without a wet line through the center.

How to keep the middle soft, not gummy

  • Measure the apples. Use 360–400 g prepared apple pieces, not a heaping bowlful.
  • Dice evenly. Keep pieces around ⅜–½ inch / 1–1.25 cm.
  • Use a shallow pan. A deeper pan makes the cake harder to bake through.
  • Keep the batter sturdy. Scoopable batter helps hold the apples.
  • Fold gently. Once the flour goes in, avoid aggressive mixing.
  • Do not trust top color alone. A golden top can still hide an underbaked middle.
  • Tent if needed. If the top browns early, cover loosely with foil and continue baking.
  • Cool before cutting. The cake sets more as it rests.

The finished cake should feel tender, set, and sliceable rather than damp or raw in the middle. A few moist crumbs on the tester are good. Shiny wet batter means it needs more time.

This sounds like a lot, but it mostly comes down to measured apples, scoopable batter, and patience before slicing. Once those are in place, the cake is much easier than the troubleshooting section makes it sound.

Apple Cake Pan Size Guide

The pan decides how relaxed this cake feels in the oven. A shallow 9×13-inch / 23×33 cm pan gives the apple-heavy batter room to bake evenly, which makes it the most forgiving choice for this recipe.

Light metal and glass baking pans of apple cake shown side by side with temperature labels.
A light metal pan gives the most forgiving bake; glass or ceramic usually needs a lower temperature and a little more time.
PanRecommendationWhat to expect
9×13-inch / 23×33 cmEasiest defaultMost even bake, easy slices, lower gummy-center risk
9-inch squareWorksThicker cake; may need extra time
9-inch roundWorksPrettier presentation, slightly thicker cake
Loaf panBetter as a separate recipeDeeper batter means higher risk of an underbaked middle
Bundt panBetter as a separate recipeNeeds longer baking and very careful greasing
Muffin tinPossibleShorter bake time and more muffin-like texture
Slow cookerNot for this recipeBetter suited to apple dump cake or spoon desserts

For a light metal 9×13 pan, bake at 350°F / 177°C. With glass or ceramic, use 325°F / 165°C and expect a longer bake because the edges can brown before the middle finishes.

Once the apples are measured and the pan is right, the recipe is very forgiving. The batter is supposed to need a spatula, the apples soften as they bake, and the cake settles into clean squares as it cools.

Choose Your Apple Cake Finish

Plain apple cake is the quiet everyday version. Cinnamon sugar gives it a lightly crisp snack-cake top. Glaze, crumb topping, or caramel turns it into dessert.

For the first bake, serve it plain or use cinnamon sugar. Use brown sugar glaze when you want the cake to feel like it belongs on a dessert table.

Hands sifting cinnamon sugar over thick apple cake batter with diced apples in a 9 by 13-inch metal pan.
Cinnamon sugar is the easiest finish when you want a warm, fragrant top without making streusel or a separate glaze.
If you want…Use this finish
Everyday snack cakeServe plain or dust with powdered sugar
Cozy cinnamon topSprinkle cinnamon sugar before baking
Dessert-table versionDrizzle with vanilla or brown sugar glaze
Fall/holiday flavorAdd caramel drizzle
Coffee cake feelAdd a crumb topping
Old-fashioned styleFold in walnuts, pecans, or raisins

Plain, Cinnamon Sugar, or Glaze?

Choose the finish based on how you plan to serve the cake. Plain is best for everyday snacking, cinnamon sugar gives the top warmth and texture, and glaze makes the same cake feel more like dessert.

Three apple cake squares on a wooden board labeled plain, cinnamon sugar, and glaze.
Match the finish to the moment: plain for snacking, cinnamon sugar for extra warmth, or glaze for a more dessert-like apple cake.

Exact Finishing Formulas

  • Cinnamon sugar topping: Mix 2 tablespoons granulated sugar with 1/2 teaspoon cinnamon. Sprinkle over the batter before baking.
  • Simple vanilla glaze: Whisk 1 cup powdered sugar with 1–2 tablespoons milk and 1/2 teaspoon vanilla until pourable. Drizzle over the cooled cake.
  • Brown sugar glaze: Warm 3 tablespoons butter, 1/3 cup brown sugar, 1 tablespoon milk or cream, and a pinch of salt until smooth. Cool slightly, then drizzle over the cake.
  • Simple crumb topping: Mix 1/2 cup flour, 1/3 cup brown sugar, 1 teaspoon cinnamon, and 4 tablespoons cold cubed butter until crumbly. Scatter over the batter before baking.
  • Caramel finish: Use a light drizzle of caramel sauce after cooling, especially if serving with vanilla ice cream.

The plain version is quiet and cozy, the glazed version feels like company came over, and the cinnamon sugar version gives the top a little sparkle without turning the cake into a project.

Crumb topping can add a few minutes to the bake time because it insulates the top. If what you really want is pie structure with a buttery crumb topping, Dutch apple pie is the better direction.

Apple Cake Variations

Use the base recipe as your everyday version, then change the finish or mix-ins depending on the mood.

  • Everyday: Add the cinnamon sugar topping for a lightly crisp, cozy top.
  • Dessert table: Cool the cake fully, then drizzle with brown sugar glaze.
  • Old-fashioned: Fold in 1/2 cup chopped walnuts, pecans, or drained soaked raisins.
  • Coffee cake feel: Add the simple crumb topping from the finish section.
  • Warm spice: Use apple pie spice instead of cinnamon and nutmeg, or add a small pinch of ginger and allspice.
  • Separate recipe needed: Eggless, vegan, and gluten-free apple cakes need their own structure because eggs, dairy, and flour all help this version bake around the apples.

Fresh Apple Cake, Crumb Cake, Dump Cake, or French Apple Cake?

Apple cake means different things in different kitchens. Some versions are buttery and elegant, some are rustic tea cakes, some are crumb-topped, and some are almost all apple with just enough batter to hold the slices together.

  • Soft apple-filled squares: make this fresh apple cake.
  • Crumbly coffee-cake top: make apple crumb cake.
  • Buttery round cake with sliced apples: look toward French or German apple cake.
  • Shortcut spoon dessert: make apple dump cake.
  • Mostly apple slices: make invisible apple cake.
  • Tall oil-based holiday cake: Jewish apple cake is a different lane.

Apple Cake Troubleshooting

If something goes wrong, it is usually small and fixable. Fresh apple cake problems almost always come back to apple moisture, pan depth, flour measurement, or bake time — not a complicated technique.

ProblemLikely causeFix nowFix next time
Middle feels too softToo many apples, underbaking, or pan too deepTent with foil and bake 5–8 minutes moreUse 360–400 g apples and a shallow pan
Top browns before middle setsOven runs hot or top heat is strongCover loosely with foil and keep bakingUse a lower rack or reduce heat slightly if your oven runs hot
Dry cakeToo much flour, overbaking, or too little fatServe warm with glaze, cream, or ice creamWeigh flour if possible and start checking earlier
Apples sankApple pieces too large or batter too looseServe as-is; the flavor will still be goodDice apples smaller and keep the batter scoopable
Cake sank slightlyUnderbaked cake or overmixed batterCool fully before slicingBake until fully set and fold gently after adding flour
Bland flavorMild apples, not enough salt, or too little spiceAdd glaze, caramel, or cinnamon sugar before servingUse tart apples, enough cinnamon, salt, and vanilla
Cake crumbles when slicedSliced while too hotLet it cool longer, then cut with a sharp knifeWait at least 30 minutes before slicing
Glaze melted into the cakeCake was still warmLet it cool and add a second thin drizzleCool completely before glazing

The good news is that this cake is forgiving once the apple amount and pan size are right. Most fixes are small: a few more minutes in the oven, a little less apple next time, a lighter hand with the flour, or more patience before slicing.

How to Store Apple Cake

This is one of those cakes that rewards patience. The first slice is warm and soft; the next-day slice is deeper, tidier, and full of settled apple-cinnamon flavor.

  • Room temperature: Store covered for 1–2 days if your kitchen is cool.
  • Refrigerator: Store covered for 4–5 days.
  • Freezer: Freeze individual squares wrapped well for up to 2–3 months.
  • To reheat: Warm a slice briefly in the microwave or cover and heat in a low oven until just warm.
Apple cake squares wrapped in parchment, stored in a container, and served on a small plate.
Wrap squares before freezing so they thaw faster, stay neater, and let you warm only the pieces you need.

If the cake has a glaze, the top may soften during storage. For the cleanest finish, store the cake plain and add powdered sugar, glaze, or caramel shortly before serving.

How to Serve Apple Cake

Serve it casually with coffee, or warm a square just enough that the apple pieces soften again and the cinnamon smells fresh. Warm squares are softer and more dessert-like; room-temperature squares cut cleaner and feel more like snack cake.

A plain square with coffee is the quiet version; a warm square with ice cream is dessert.

Apple cake served two ways, with one square beside coffee and another square topped with vanilla ice cream.
Serve it with coffee when you want a cozy snack cake, or warm a square with vanilla ice cream when dessert is the goal.
  • Dust with powdered sugar for the simplest finish.
  • Serve warm with vanilla ice cream.
  • Add whipped cream for a softer dessert.
  • Drizzle with caramel sauce for a richer fall flavor.
  • Serve with custard for a British-style apple dessert feel.
  • Pair with coffee or tea for an afternoon cake.
  • Add a spoonful of yogurt if serving it as a breakfast-style snack cake.

More Apple Desserts to Try

Fresh apple cake sits in the middle of the apple-dessert world: easier than pie, more sliceable than apple crisp, less fussy than apple tart, and fruitier than applesauce cake.

Choose apple crisp when you want spoonable fruit and oats, apple tart when you want something prettier, Dutch apple pie when you want crumb topping with pie structure, and applesauce cake when you want a smoother pantry-style cake. Stay here when you want soft fresh-apple squares with no pie dough.

If you want a shortcut apple dessert instead of a from-scratch cake, this Apple Cinnamon Roll Bake with Apple Pie Filling is a better match for canned filling and refrigerated dough.

Apple Cake FAQ

What apples are best for apple cake?

Firm apples are best because they soften without turning watery. Honeycrisp, Granny Smith, Pink Lady, Fuji, Braeburn, and Jonagold all work well. If those are not available, use any crisp, firm apple that tastes good raw.

Do you peel apples for apple cake?

Peeling gives the softest texture. Thin-skinned apples can stay unpeeled for a rustic cake, but the skins will be noticeable in the finished slices.

Can you use canned apple pie filling in apple cake?

Not for this fresh apple cake. Canned apple pie filling is already cooked, sweetened, and thickened, so it changes the texture of the batter and can make the cake heavy. Use fresh diced apples here, and save canned filling for apple dump cake, shortcut bakes, or pie.

Why is my apple cake wet in the middle?

A wet middle usually means the cake needed more time, the pan was too deep, or the apples released more moisture than the batter could handle. Use measured diced apples, bake in a shallow rectangular pan, and check the center rather than judging by the top alone.

How small should apples be cut for apple cake?

Cut apples into ⅜–½ inch / 1–1.25 cm pieces. That size gives visible apple pockets while still allowing the cake to bake through evenly.

Is apple cake better with oil or butter?

For this style, oil is the easier choice because it keeps the cake softer after cooling. Butter gives richer flavor, but it can make the cake feel firmer once it sits.

Can you make apple cake ahead of time?

Yes. Apple cake is a good make-ahead dessert because the flavor deepens as it sits. Bake it a day ahead, store it covered, and add powdered sugar, glaze, or caramel shortly before serving.

Should apple cake be refrigerated?

It can sit at room temperature for 1–2 days if covered and kept in a cool kitchen. For longer storage, refrigerate it for 4–5 days. You can also freeze wrapped squares for 2–3 months.

What is the difference between apple cake and applesauce cake?

The main difference is where the apple moisture comes from. Fresh apple cake uses chopped apples, so the slices have visible fruit pieces. Applesauce cake uses applesauce in the batter, which creates a smoother, softer, spice-cake-like texture.

Does this apple cake work in a loaf pan?

A loaf pan is not the best choice for this exact recipe because the batter is deeper and more likely to stay wet in the middle. A 9×13 pan is more forgiving. For a loaf, use a dedicated apple loaf cake recipe with adjusted quantities and bake time.

Can apple cake be frozen?

Yes. Freeze individual squares wrapped tightly for 2–3 months. Thaw at room temperature or in the refrigerator, then warm briefly if you want the cake to taste closer to freshly baked.

Final Note

If you make it, notice which finish your table likes best: plain, cinnamon sugar, glaze, or caramel. Apple cake has a funny way of becoming “your” version after the first bake.

The best version gives you what apple pie promises, without the pie dough: tender apples, warm cinnamon, a soft cake, and clean squares you can eat warm tonight and again with coffee tomorrow.

Posted on Leave a comment

Spice Cake Recipe

9x13 spice cake in a baking pan with cream cheese frosting and one square lifted out to show the brown crumb.

Spice cake should taste like cinnamon in the air, brown sugar in the crumb, and just enough ginger, nutmeg, allspice, and cloves to make the whole kitchen smell like something good is cooling on the counter. A good version is fragrant and tender, not dry, dusty, or vaguely cinnamon-flavored.

This spice cake recipe is a no-fuss 9×13 sheet cake designed around the two things that matter most: a tender brown-sugar crumb and cream cheese frosting that stays where you spread it. It is soft and fragrant the day you bake it, then deeper and more settled once the spices rest overnight.

It is made from scratch, but it does not ask for layer-cake precision. The batter comes together with two bowls, a whisk, and a spatula; the only mixer you need is for the frosting. Bake it in the pan, cool it fully, frost it generously, and cut it into spiced squares for coffee, potlucks, chilly afternoons, or a simple holiday dessert.

When you cut into it, the slice should be warmly brown, soft under the fork, and sturdy enough to hold a generous swipe of frosting. The cake should taste complete before anything goes on top; the cream cheese frosting is there to brighten it, not hide dryness.

Close-up of a frosted spice cake square showing a moist brown crumb and cream cheese frosting on top.
Look for a tender, even crumb like this; a truly moist spice cake should hold together cleanly while still looking soft inside.

Quick Answer: What Is Spice Cake?

Spice cake is a brown-sugar cake flavored with baking spices such as cinnamon, ginger, nutmeg, allspice, and cloves. It is warmly spiced, not chili-hot. The “spice” comes from aromatic baking spices, not heat.

It is softer and sweeter than gingerbread, less fruit-forward than applesauce cake, and less chunky than carrot cake. The usual finish is cream cheese frosting because its tang cuts through the cinnamon-heavy crumb and brown sugar.

For the easiest homemade version, bake spice cake in a 9×13-inch metal pan at 350°F / 177°C. The slice should smell like cinnamon and ginger, cut cleanly, and hold the cream cheese frosting without feeling heavy. For the exact flavor balance, see the spice blend section.

Spice Cake at a Glance

Prep time20–25 minutes
Bake time35–40 minutes in a metal 9×13 pan; glass or ceramic may take longer
Cooling timeAt least 2 hours before frosting
Total timeAbout 3 hours, including cooling
Default pan9×13-inch baking pan
Oven350°F / 177°C
Yield12 large or 16 smaller slices
TextureSliceable, tender, fragrant
FinishCream cheese frosting

Why You’ll Love This 9×13 Spice Cake

  • Old-fashioned flavor comes through clearly. Cinnamon leads, but ginger, nutmeg, allspice, and cloves give every slice deeper fall-bakery flavor.
  • Real-life baking is the point. No stacked layers, no piping, no stand mixer for the cake — just a 9×13 pan and frosted squares you can serve straight from the pan.
  • Soft coffee slices still hold up for potlucks. Each square cuts cleanly, but still feels tender under the fork.
  • The cream cheese frosting makes it feel special. It adds cool tang, keeps the brown sugar in check, and turns a simple sheet cake into something holiday-table friendly.
  • Patience pays off. The same-day slice is soft and fragrant, but the next-day slice tastes deeper once the spices settle. For make-ahead timing, see the storage and freezing tips.

Same-Day Soft, Next-Day Deeper

This is the main make-ahead advantage of spice cake: the crumb stays soft while the cinnamon, ginger, nutmeg, and cloves taste more settled after a night of rest.

Two frosted spice cake squares on a plate labeled same day and next day, showing a lighter fresh slice and a darker settled slice.
Same day, the cake tastes soft and freshly spiced; by the next day, the cinnamon, ginger, nutmeg, and cloves settle into a deeper flavor.

What Is Spice Cake?

Spice cake is a cake where the main flavor comes from a baking-spice blend rather than chocolate, vanilla, fruit, or nuts. The batter usually includes brown sugar, a tenderizing ingredient such as buttermilk or sour cream, and enough fat to keep the cake enjoyable after it cools.

It belongs near gingerbread, carrot cake, pumpkin cake, and applesauce cake, but the point here is simpler: a spice-led crumb, not fruit, vegetables, heavy molasses, or pumpkin.

If you have ever wondered whether spice cake is just gingerbread, carrot cake without carrots, or applesauce cake without apples, this is the quick difference.

Spice cake guide with a frosted slice and smaller comparison sections for gingerbread, carrot cake, pumpkin cake, and applesauce cake.
Unlike carrot cake, pumpkin cake, or gingerbread, spice cake gets its main character from warm baking spices rather than one dominant fruit, vegetable, or molasses note.
CakeMain identityHow it differs from spice cake
Spice cakeBaking spicesSpice-led, usually with brown sugar and tangy frosting.
GingerbreadGinger and molassesDarker, sharper, and usually more molasses-heavy.
Carrot cakeGrated carrot and spiceOften includes carrots, nuts, raisins, pineapple, or coconut.
Applesauce cakeApple moisture and spiceSofter and more apple-led. For that direction, see our applesauce cake recipe.
Pumpkin spice cakePumpkin purée and spiceWetter, denser, and more seasonal because pumpkin changes the batter.
Chai cakeTea, cardamom, and chai spicesBetter baked as a separate chai cake, where the tea and cardamom can lead properly.

The best version does not taste like a spice cabinet. It tastes like brown sugar, warmth, and a soft square you want with coffee.

The Best Spice Blend for This Cake

The best spice cake blend is cinnamon, ginger, nutmeg, allspice, and a small amount of cloves. Cinnamon should lead; cloves should stay in the background.

Cinnamon gives the familiar warmth, but ginger, nutmeg, allspice, and cloves make the flavor deeper and more complete. Without those supporting spices, the cake can smell good in the oven but taste a little flat once sliced.

Spice blend guide with labeled bowls of cinnamon, ginger, nutmeg, allspice, cloves, and cardamom for spice cake.
Cinnamon should lead the spice blend, while ginger, nutmeg, allspice, cloves, and optional cardamom add warmth, depth, and balance.
SpiceWhat it addsHow strong to go
CinnamonThe familiar warm base.Use the most of this.
GingerBrightness and gentle heat.Enough to notice, not enough to become gingerbread.
NutmegRounded bakery-style flavor.Use lightly; too much can taste perfumed.
AllspiceDepth and an old-fashioned note.A little makes the cake taste fuller.
ClovesDeep background warmth.Use sparingly because it is powerful.
Cardamom, optionalFragrance and lift.Use lightly so the cake still tastes familiar.

That balance is what makes the cake smell cozy in the oven but still taste rounded once it cools. Allspice is not a spice blend; it is a single spice with a flavor that hints at cinnamon, clove, and nutmeg, so let it support the blend rather than dominate it.

Can you use pumpkin pie spice? Pumpkin pie spice works as a shortcut, though the flavor depends on the blend. For a homemade blend, see our pumpkin pie spice guide.

Why This Cake Stays Moist

The goal is a cake that still tastes good after it cools — and, ideally, tastes even more settled the next day. This version uses oil for lasting softness, a little butter for flavor, applesauce for moisture, and buttermilk for tenderness.

Why both oil and butter? A butter-only cake has wonderful aroma when warm, but it can firm up more after cooling. An oil-only cake stays softer, but it can taste flatter. Using both gives the cake a round old-fashioned flavor while keeping the inside from turning tight.

Applesauce and buttermilk support that texture without turning the cake into applesauce cake or a tangy yogurt cake. This is also why the base does not use shredded apple: the cake stays spice-led, while the applesauce quietly helps with moisture. Together, the ingredients create brown-sugar depth without gingerbread heaviness, and a slice that stays clean rather than greasy or gummy.

Moisture guide showing a frosted spice cake square with oil, butter, applesauce, and buttermilk callouts around it.
Instead of depending on one “secret” ingredient, this moist spice cake uses oil for softness, butter for flavor, applesauce for moisture, and buttermilk for tenderness.
IngredientWhy it matters
OilKeeps the cake softer after cooling.
ButterAdds old-fashioned flavor and aroma.
ApplesauceSupports moisture without making the cake apple-led.
ButtermilkBalances sweetness and keeps the texture tender.
Brown sugarAdds depth and a mild molasses note.
Cream cheese frostingAdds tang so the cake tastes rich but not cloying.

What Each Ingredient Does in This Spice Cake

The recipe works because the ingredients have different jobs. Keep the measurements steady, especially flour and wet ingredients, and the cake will be much easier to bake well. Once these pieces are balanced, the cake tastes like more than cinnamon — it has brown-sugar depth, spice warmth, and enough softness to still be good after cooling.

Labeled spice cake ingredients including flour, brown sugar, oil, butter, applesauce, buttermilk, eggs, vanilla, molasses, and spices.
The best spice cake ingredients work as a team: brown sugar deepens flavor, warm spices define the cake, and the wet ingredients keep the crumb soft.

For the Cake

All-purpose flour: Measure by weight if possible. Too much flour is one of the fastest ways to make a dry cake, and measuring flour by weight is the most reliable option. If using cups, spoon flour into the cup and level it instead of scooping directly from the bag.

Baking powder and baking soda: They give lift while working with the acidity in the buttermilk, applesauce, and brown sugar. Make sure both are fresh.

Salt, vanilla, and spices: Salt sharpens the brown sugar, vanilla rounds the flavor, and the spice blend gives the cake its identity.

Brown sugar: Light brown sugar keeps the flavor milder. Dark brown sugar gives a deeper molasses note. Either works, but pack it firmly when measuring by cup.

Oil and melted butter: Oil helps after cooling; butter adds flavor. Let the melted butter cool slightly before mixing so it does not warm the eggs.

Applesauce, buttermilk, and eggs: Applesauce helps the cake stay soft, buttermilk keeps it from tasting flat, and eggs help it rise and slice cleanly. Use them close to room temperature when possible so the batter blends smoothly.

Molasses, optional: A tablespoon of molasses makes the cake darker and the flavor deeper. Keep the rest of the wet ingredients as written if you use it.

Batter cue: The batter should be thick but pourable, glossy, and lightly speckled with spices. A few tiny applesauce flecks are fine. Stop when the flour disappears; this batter is meant to stay thick and glossy, not whipped.

For the Cream Cheese Frosting

Block cream cheese: Use full-fat block cream cheese, not spreadable tub cream cheese. Tub cream cheese often makes frosting loose and runny.

Butter and powdered sugar: The butter should be softened but not greasy. Start with the lower amount of powdered sugar for a softer frosting, then add more only if you need it firmer.

Vanilla, salt, and optional lemon juice: Vanilla adds warmth, salt keeps the frosting from tasting flat, and a little lemon juice brightens the cream cheese tang.

How to Bake It Without Drying It Out

The batter is supposed to be thick, not airy. The cake is supposed to come out with moist crumbs, not a bone-dry tester. And the frosting only spreads cleanly if the cake is fully cool.

Do not worry if the batter looks thicker than vanilla cake batter; that is normal here. You do not need a stand mixer for the cake itself. A whisk, a spatula, and two bowls are enough; save the hand mixer for the frosting.

Step-by-step spice cake guide showing dry ingredients, wet ingredients, batter, baked 9x13 cake, and frosting being spread.
Because this is a simple two-bowl spice cake, the biggest wins are mixing gently, spreading the batter evenly, and waiting until the cake is cool before frosting.

1. Prepare the Pan So the Cake Releases Cleanly

Heat the oven to 350°F / 177°C. Grease a 9×13-inch baking pan. A metal pan usually bakes most evenly. For easier lifting and cleaner slices, line the pan with parchment paper, leaving a little overhang on two sides. If you plan to serve the cake directly from the pan, parchment is optional.

2. Whisk the Spices Evenly Into the Flour

In a large bowl, whisk the flour, baking powder, baking soda, salt, cinnamon, ginger, nutmeg, allspice, cloves, and optional cardamom. The dry mix should look evenly tan from the spices. Take a few extra seconds here; evenly mixed spices mean every slice tastes balanced instead of giving you one bland bite and one clove-heavy bite.

3. Mix the Wet Ingredients Until Glossy

In another bowl, whisk the brown sugar, oil, melted butter, applesauce, buttermilk, eggs, vanilla, and optional molasses until smooth. The wet mix should look glossy. The melted butter should be slightly cooled, and the eggs, applesauce, and buttermilk should not be fridge-cold. If the butter forms tiny bits, the cake will usually still bake, but the batter mixes more evenly when the ingredients are closer in temperature.

4. Fold Gently So the Cake Stays Tender

Pour the wet mixture into the dry ingredients. Fold with a spatula or whisk gently until no dry flour pockets remain. The batter should look thick, glossy, and pourable. Once no flour streaks remain, you have done enough; next, use the doneness cues instead of overbaking for a dry tester.

Spice cake batter lifting from a spatula over a mixing bowl, showing a thick glossy pourable texture.
Once the batter looks thick, glossy, and pourable, stop mixing; continuing too long can make the finished spice cake dense.

5. Bake Until the Center Is Set but Still Moist

Spread the batter into the prepared pan and smooth the top. Bake for 35–40 minutes in a metal pan, checking near the 33-minute mark. Glass or ceramic pans may take a little longer. This is the point where the kitchen starts smelling better than the effort you put in, but trust the center of the cake more than the edges.

The cake is done when the center springs back lightly, the edges are just beginning to pull from the pan, and a toothpick inserted into the middle comes out with a few moist crumbs.

Look for moist crumbs, not a dry tester. A few crumbs mean the cake will stay softer once it cools.

Doneness guide comparing underbaked, just-right, and overbaked spice cake pieces with toothpick crumb examples.
A few moist crumbs on the toothpick are ideal; however, waiting for a completely dry tester can push spice cake toward overbaked.

6. Cool Fully Before Frosting

Let the cake cool in the pan. For a 9×13 cake, plan on at least 2 hours of cooling before frosting. The center should feel room temperature, not just the surface. The wait feels annoying, but it keeps the cream cheese frosting smooth instead of melty.

Unfrosted spice cake cooling in a 9x13 pan on a wire rack with a bowl of frosting and spatula nearby.
Before adding cream cheese frosting, let the 9×13 spice cake cool completely so the frosting stays smooth, thick, and spreadable instead of melting into the crumb.

7. Frost and Slice

Spread the frosting over the cooled cake. It should hold soft swoops without running. For clean slices, chill the cake for 20–30 minutes before cutting. For the best eating texture, let refrigerated slices sit briefly at room temperature before serving.

Cream Cheese Frosting for Spice Cake

Cream cheese frosting is the classic finish because it adds tang, not just sweetness. It cuts through the brown sugar and spice so the cake tastes rich without feeling heavy.

Cream cheese frosting being spread with an offset spatula over a cooled spice cake in a rectangular pan.
Cream cheese frosting works especially well here because its cool tang balances brown sugar, cinnamon, ginger, and cloves without making the cake too sweet.

The best bite is warm spice first, then brown sugar, then that cool cream-cheese tang at the end. For a 9×13 cake, you only need a generous spreadable layer. Brown butter cream cheese frosting makes it more special, caramel leans sweeter and richer, maple gives it an old-fashioned fall flavor, and a simple vanilla glaze works better for Bundt or loaf cake. For a tea-cake finish, skip the frosting and dust the top with powdered sugar.

Want the special-occasion version? Brown the butter, cool it until soft but not melted, then use it in the frosting for a deeper, nutty finish.

If you want a non-cream-cheese option for cupcakes or a sweeter celebration-style finish, our buttercream frosting recipe is the better direction.

How to Keep the Frosting Smooth

  • Use full-fat block cream cheese, not tub cream cheese.
  • Soften the cream cheese and butter, but keep them cool enough that they are not shiny or greasy.
  • Beat the cream cheese first until smooth, then add the butter and beat again.
  • Add powdered sugar gradually. Start with 2½ cups for a softer frosting; add more if you need it firmer.
  • Add a pinch of salt and a little lemon juice to balance sweetness.
  • If the frosting becomes too soft, chill it for 15–20 minutes, then beat briefly again.
  • Make sure the cake is fully cool before spreading it on top. If it still turns loose, use the troubleshooting fixes.
Frosting consistency guide with three bowls showing too loose, just right, and too stiff cream cheese frosting textures.
If frosting is too loose, it slides; if it is too stiff, it pulls crumbs, so aim for a creamy texture that holds soft swoops.

Pan Sizes: 9×13, Layers, Bundt, Loaf, and Cupcakes

This recipe is written first as a 9×13 sheet cake; the layer, Bundt, loaf, and cupcake notes are adaptations, not the main promise.

A 9×13 sheet cake is the easiest version, but the same flavor can work in other formats if you watch the fill level and start checking early. If you are baking for a potluck, stay with the 9×13. It is the least fussy version and the one most likely to disappear square by square.

Pan size guide with a large 9x13 spice cake and smaller examples of round layers, Bundt cake, cupcakes, and loaf cake.
The 9×13 pan gives the easiest spice cake slices; however, the batter can also work in layers, Bundt pans, cupcakes, or a loaf when you adjust carefully.

Spice Cake Baking Times by Pan

FormatPanOvenApprox. bake timeNotes
Sheet cake9×13-inch metal pan350°F / 177°C35–40 minEasiest default. Glass or ceramic may take longer.
Layer cakeTwo 9-inch rounds350°F / 177°C26–32 minLine pans with parchment; make extra frosting.
Layer cakeTwo 8-inch rounds350°F / 177°C32–38 minLayers will be deeper, so check centers carefully.
Bundt cake10–12 cup Bundt pan350°F / 177°C50–65 minFill no more than two-thirds to three-quarters full.
CupcakesStandard muffin tin350°F / 177°C18–21 minFill cups about two-thirds full.
Loaf cake9×5-inch loaf pan, filled no more than two-thirds full350°F / 177°C48–55 minThis full recipe makes more batter than one loaf, so bake extra batter as cupcakes or use a second loaf pan.

Use the times as starting points, not promises. The cake is ready when the center springs back and a toothpick shows moist crumbs.

Bundt Cake Release Tip

Bundt cake tip: Use baking spray with flour, or brush the pan with softened butter and dust it with flour. Get into every groove. Let the baked cake rest in the pan for 10–15 minutes before turning it out.

How to Make Boxed Spice Cake Mix Taste Homemade

Boxed spice cake mix can work when time is short. Use milk instead of water, add ½ cup sour cream or applesauce, boost the spices, and finish with homemade cream cheese frosting. For the from-scratch version, jump to the full recipe card.

Boxed spice cake mix upgrade guide with milk, sour cream or applesauce, extra spices, and cream cheese frosting suggestions.
For a shortcut version, boxed spice cake mix tastes more homemade when you use dairy, boost the warm spices, and finish with real cream cheese frosting.
Replace or addHow muchWhy it helps
Milk instead of waterUse the same amount listed on the boxGives richer flavor.
Sour cream, yogurt, or applesauceUp to ½ cupHelps the cake taste less box-mix dry.
Cinnamon + ginger½ tsp cinnamon + ¼ tsp gingerWarms up a mild spice mix.
Homemade cream cheese frostingUse the frosting from this recipeThe biggest upgrade for flavor and texture.

Keep the upgrades modest. Too much extra moisture can make the center heavy, especially if you also add pumpkin or fruit. The from-scratch cake is still the better version when flavor and texture matter; the boxed version is the quick shortcut.

Variations: Apple, Molasses, Nuts, Raisins, Chai, and More

Choose the version based on the slice you want: classic and cozy, deeper with molasses, fruitier with apple, or nutty with a little crunch. The cake stays most reliable when you change one major thing at a time; if you add fruit or extra moisture, keep the gummy-center fixes in mind.

Spice cake variations guide with a plain frosted cake square and optional molasses, apple, nuts, raisins, and cardamom or chai spice cues.
Start with the plain frosted base cake, then choose one variation if you want deeper molasses flavor, fruitier apple notes, optional crunch, raisins, or warmer aroma.
VariationAmountKeep in mind
Molasses1 tablespoonToo much pushes the cake toward gingerbread.
Chopped apple1 cup, finely choppedMore can make the center gummy.
Nuts¾ cupToast and cool first for better flavor.
Raisins½–¾ cupSoak if dry, then drain and pat dry.
Cardamom¼ teaspoonToo much can taste perfume-like.

Molasses gives the deepest old-fashioned version, chopped apple makes the cake softer and fruitier, and toasted nuts are the easiest way to add contrast without changing the batter much. These are small changes, not a second recipe; the safest upgrades are the ones that add flavor without shifting the batter’s moisture too far.

For a chai-style direction, add the cardamom and a tiny pinch of black pepper. If you want tea-forward flavor, that becomes a separate chai cake rather than classic spice cake.

Gluten-Free and Eggless Notes

A good 1:1 gluten-free baking flour may work, especially if it contains xanthan gum, but expect a slightly more fragile cake and let it cool fully before slicing.

I would not make this exact batter eggless by simply removing the eggs. For best results, use an eggless spice cake formula designed around yogurt, vinegar and baking soda balance, or another tested binder.

What to Serve with Spice Cake

For a coffee slice, serve the cake plain with its cream cheese frosting and a hot cup of coffee or black tea. For a holiday dessert, add brown butter frosting, toasted pecans, or a light caramel drizzle. If you are taking it to a potluck, keep it in the 9×13 pan, chill until the top sets, and slice before serving.

Frosted spice cake square on a plate with coffee or chai, whipped cream, vanilla ice cream, and optional toasted nuts nearby.
To make a simple slice feel dessert-ready, serve spice cake with coffee, chai, whipped cream, vanilla ice cream, or optional toasted nuts on the side.

That is the sweet spot of this cake: casual enough for a weekday coffee slice, but dressed up enough once the cream cheese frosting goes on.

For a lighter finish, skip the frosting and serve the cake with homemade whipped cream or powdered sugar. For a fall dinner, a scoop of vanilla ice cream or a spoon of warm apple compote makes it feel more like dessert without much extra work.

Storage, Freezing, and Make-Ahead Tips

This is a good make-ahead dessert because the spices settle and deepen after a few hours. The next-day slice, cold from the fridge for a few minutes and then softened on the plate, is one of the quiet pleasures of this cake.

Cream-cheese-frosted spice cake should be refrigerated within 2 hours and stored covered for 3–4 days. Refrigerate it sooner if your kitchen is hot. For general food-storage safety, see the FDA’s food storage guidance.

Storage guide showing frosted spice cake in a covered pan, slices in an airtight container, and wrapped slices for freezing.
Because the cake has cream cheese frosting, refrigerate frosted slices; for longer storage, wrap individual pieces well before freezing.
SituationBest method
Unfrosted cakeWrap tightly and keep at room temperature for 1–2 days.
Frosted cakeCover tightly or store in an airtight container and refrigerate for 3–4 days.
Make aheadBake one day ahead, cool completely, cover, and frost before serving or the next day.
Freezing unfrosted cakeWrap tightly and freeze for up to 2–3 months.
Freezing frosted slicesFreeze uncovered until firm, then wrap tightly. Thaw in the refrigerator; frosting texture may soften slightly.
Serving from fridgeLet slices sit briefly at room temperature so the cake and frosting soften.

Troubleshooting Dry, Dense, Gummy, or Sunken Cake

Most baking mistakes are not disasters; they are clues. If something went wrong, start with what you can fix now, then adjust the next bake.

Cake Texture Problems

Dry, dense, gummy, oily, or sunken spice cake usually comes back to flour measurement, mixing, bake time, pan choice, or add-ins. Use this table to rescue the current cake and improve the next one.

Troubleshooting guide listing dry cake, dense cake, gummy center, sunken middle, oily texture, and runny frosting with quick fixes.
When spice cake turns dry, dense, gummy, oily, sunken, or messy, the cause usually comes back to baking time, mixing, measuring, or frosting temperature.
ProblemFix nowFix next time
Dry cakeServe with extra frosting, whipped cream, caramel, or warm apple compote.Measure flour by weight and pull the cake when the toothpick has moist crumbs.
Dense or heavy cakeLet slices come to room temperature and serve with coffee, whipped cream, or a lighter topping so the cake feels less heavy.Stop when no flour streaks remain; use room-temperature wet ingredients.
Gummy centerIf unfrosted and still warm, return it to the oven loosely covered.Use a metal 9×13 pan, keep add-ins modest, and check the true center.
Cake tastes oilyChill before slicing and serve with tangy frosting to balance richness.Measure oil in a liquid cup and bake until the center is set.
Sunken middleIf the center is underbaked, avoid serving that part; cut clean squares from the set edges and frost or dust them lightly.Check leavening freshness and avoid opening the oven early.
Bland spice flavorAdd a light cinnamon dusting or serve with brown butter frosting.Use fresh spices and consider the optional molasses.

Cream Cheese Frosting Problems

Frosting issues are usually easier to fix than cake texture problems. Temperature matters most: warm cake melts frosting, while overly soft cream cheese or butter can make the frosting loose.

ProblemFix nowFix next time
Runny frostingChill 15–20 minutes, then beat briefly; add powdered sugar if needed.Use block cream cheese and cooler butter.
Frosting melts on cakeChill the cake until the frosting firms, then smooth it again.Cool the cake completely before frosting.

Before You Bake the Next Spice Cake

Before you bake: measure the flour carefully, use fresh spices, mix gently after adding flour, and let the cake cool completely before frosting. Those four details prevent most spice cake problems.

Once those basics are handled, this is a forgiving cake: mix it gently, bake it until the center is just set, cool it fully, and frost it right in the pan. No layers, no piping, no drama — just spiced squares that taste better than the effort they ask from you.

Moist 9×13 Spice Cake Recipe

This 9×13 spice cake is the easy pan version: warmly spiced, brown-sugary, simple to slice, and finished with a generous cream cheese frosting.

Serve it when you want the comfort of carrot cake or gingerbread, but without shredded vegetables, heavy molasses flavor, or layer-cake fuss.

Recipe card for moist 9x13 spice cake showing a frosted cake square, baking temperature, bake time, yield, and storage reminder.
Use this quick reference before baking so the key details stay clear: 9×13 pan, 350°F oven, 35–40 minutes, 12–16 slices, and cream cheese frosting.
Prep Time
25 minutes
Cook Time
35–40 minutes
Cooling Time
At least 2 hours
Total Time
About 3 hours
Yield
12–16 slices

Timing: Plan on about 25 minutes prep, 35–40 minutes baking, and at least 2 hours cooling; total time is about 3 hours before serving. Bake time is based on a metal 9×13 pan; glass or ceramic pans may need a few extra minutes.

Equipment

  • 9×13-inch baking pan, preferably metal
  • 2 mixing bowls
  • Whisk
  • Spatula
  • Hand mixer or stand mixer for frosting
  • Cooling rack
  • Parchment paper, optional

Ingredients

For the Spice Cake

  • 2½ cups all-purpose flour / 313 g
  • 1½ teaspoons baking powder
  • ½ teaspoon baking soda
  • ¾ teaspoon fine salt
  • 2½ teaspoons ground cinnamon
  • 1 teaspoon ground ginger
  • ¾ teaspoon ground nutmeg
  • ½ teaspoon ground allspice
  • ¼ teaspoon ground cloves
  • ¼ teaspoon ground cardamom, optional
  • 1½ cups packed brown sugar / 300 g
  • ½ cup neutral oil / 120 ml
  • ¼ cup unsalted butter, melted and slightly cooled / 57 g
  • ½ cup unsweetened applesauce, room temperature if possible / 120 g
  • ¾ cup buttermilk, room temperature / 180 ml
  • 3 large eggs, room temperature
  • 2 teaspoons vanilla extract
  • 1 tablespoon molasses, optional / 20 g

For the Cream Cheese Frosting

  • 8 oz block cream cheese, softened / 226 g
  • ½ cup unsalted butter, softened / 113 g
  • 2½–3 cups powdered sugar / 300–360 g, sifted if lumpy
  • 1 teaspoon vanilla extract
  • Pinch of salt
  • 1 teaspoon lemon juice, optional, for extra tang

Instructions

  1. Prepare the oven and pan. Heat the oven to 350°F / 177°C. Grease a 9×13-inch baking pan and line with parchment if you want to lift the cake out for slicing.
  2. Mix the dry ingredients. In a large bowl, whisk the flour, baking powder, baking soda, salt, cinnamon, ginger, nutmeg, allspice, cloves, and optional cardamom until evenly combined.
  3. Mix the wet ingredients. In a separate bowl, whisk the brown sugar, oil, melted butter, applesauce, buttermilk, eggs, vanilla, and optional molasses until smooth. The eggs, applesauce, and buttermilk should not be fridge-cold.
  4. Combine. Pour the wet ingredients into the dry ingredients. Fold gently until no dry flour pockets remain. The batter should be thick but pourable. Stop once no flour streaks remain.
  5. Bake. Spread the batter into the prepared pan. Bake for 35–40 minutes in a metal pan, or until the center springs back lightly and a toothpick inserted into the middle comes out with a few moist crumbs. Glass or ceramic pans may take longer.
  6. Cool. Let the cake cool completely before frosting, at least 2 hours for a 9×13 cake. Warm cake will melt the frosting.
  7. Make the frosting. Beat the cream cheese until smooth. Add the butter and beat again. Add 2½ cups powdered sugar, vanilla, salt, and optional lemon juice. Beat until creamy and spreadable, then stop. Add more powdered sugar if you want a firmer frosting.
  8. Frost and serve. Spread frosting over the cooled cake. Chill briefly for cleaner slices, then serve. Let refrigerated slices sit at room temperature for a softer cake.

Recipe Notes

  • Buttermilk substitute: Add 2 teaspoons lemon juice or vinegar to a measuring cup, then add milk until you reach ¾ cup total. Stir and let stand for 5–10 minutes before using.
  • No applesauce? Replace it with the same weight of plain full-fat yogurt or sour cream.
  • Frosting amount: The frosting quantity is enough for a generous 9×13 sheet cake layer. For a layer cake or piping, make 1½ to 2 times the frosting.
  • Clean slices: Frost only after the cake is fully cool, then chill the frosted cake for 20–30 minutes before cutting.
  • Storage: Because this cake has cream cheese frosting, refrigerate the frosted cake within 2 hours. Store covered in the refrigerator for 3–4 days and let slices sit briefly at room temperature before serving.
  • Layer cake: Divide between two greased and parchment-lined 9-inch round pans and start checking around 26 minutes.
  • Cupcakes: Fill liners two-thirds full and bake for about 18–21 minutes.
  • Bundt cake: Use a 10–12 cup Bundt pan, grease it thoroughly, and do not overfill. Start checking around 50 minutes.
  • Loaf cake: Fill a 9×5-inch loaf pan no more than two-thirds full. This full recipe makes more batter than one loaf, so bake extra batter as cupcakes or use a second loaf pan.
  • Salted butter: You can use salted butter in the cake or frosting; reduce the added salt slightly.

FAQs About Spice Cake

What makes spice cake different from carrot cake?

Spice cake is defined by baking spices. Carrot cake is defined by grated carrot and often includes nuts, raisins, pineapple, or coconut. The two can share cinnamon, ginger, and nutmeg, but carrot cake has a vegetable-based texture and spice cake does not need carrots.

Which spices are best in spice cake?

Cinnamon, ginger, nutmeg, allspice, and cloves are the classic mix. Cinnamon should lead, cloves should stay subtle, and the spices should be fresh.

Is spice cake hot or spicy?

Think cinnamon warmth, not chili heat. The flavor comes from baking spices, not hot pepper.

Is spice cake the same as gingerbread?

No. Gingerbread is usually darker, more ginger-forward, and more molasses-heavy. Spice cake is softer, sweeter, and more balanced across several spices.

What is the difference between spice cake and pumpkin spice cake?

Spice cake is led by the spice blend itself. Pumpkin spice cake includes pumpkin purée, which changes the moisture, density, color, and flavor of the batter.

Can I use pumpkin pie spice instead of individual spices?

Pumpkin pie spice works as a shortcut. Replace the listed spices with a good blend, knowing the final flavor depends on that blend.

Can I make spice cake without applesauce?

Plain full-fat yogurt or sour cream can replace the applesauce in the same amount. The cake will be slightly tangier and a little less apple-soft, but it will still have enough moisture if the rest of the recipe stays unchanged.

Can I make spice cake ahead of time?

This is actually a good make-ahead cake. Bake it one day ahead, cool it completely, cover it well, and frost it the next day or before serving. The spices often taste more settled after the cake rests overnight.

What frosting goes best with spice cake?

Cream cheese frosting is the classic choice because it adds tang, not just sweetness. A vanilla glaze works better for Bundt or loaf cake.

Why did my spice cake turn out dry?

The most common reasons are too much flour, overbaking, or waiting until the toothpick comes out completely dry. Measure flour by weight if possible and remove the cake when the center is set but the toothpick still has a few moist crumbs.

Can spice cake be baked as cupcakes?

It works well as cupcakes. Fill standard liners about two-thirds full and bake at 350°F / 177°C for about 18–21 minutes. Start checking early because cupcakes dry out faster than a sheet cake.

Should cream cheese frosted spice cake be refrigerated?

Cream-cheese-frosted spice cake should be refrigerated within 2 hours and stored covered for 3–4 days. Let slices sit briefly at room temperature before serving.

When the cake is soft, the spices are fresh, and the frosting has that little cream-cheese tang, this is the kind of simple dessert that disappears slice by slice from the pan. It belongs with coffee, on holiday tables, and on ordinary weekends when cake sounds like a perfectly good plan.

If you try it, I would love to know whether your favorite slice was same-day soft or next-day spiced and settled.

Back to top

Posted on 1 Comment

Applesauce Cake Recipe

Frosted applesauce cake in a 9x13 metal pan with one square removed and plated in front, showing a soft brown crumb and cream cheese frosting.

Applesauce cake usually starts with one very specific craving: a soft, warmly spiced cake that feels old-fashioned without being dry, heavy, or fussy. This applesauce cake recipe is built around that craving, but also around the problems that can sneak in. Applesauce sounds like it should guarantee moisture, yet the middle can still turn gummy, the edges can dry out, the spices can taste flat, or the frosting can melt because the cake was still warm underneath.

The goal here is to prevent those problems before they happen. This easy applesauce cake bakes in a 9×13 pan with unsweetened applesauce, brown sugar, neutral oil, eggs, vanilla, cinnamon, ginger, nutmeg, and a small pinch of clove or allspice. Applesauce keeps the cake moist, while oil keeps the crumb tender after it cools.

The flavor is apple-spice rather than fresh-apple-chunk cake: cinnamon first, brown sugar underneath, gentle apple in the background, and a tangy cream cheese finish if you frost it. Think of it as an old-fashioned snack cake dressed up just enough for dessert. Dust it with powdered sugar when you want something simple with coffee, or fold in raisins and walnuts when you want the kind of cake that tastes like it came from an older recipe box.

Close-up of a frosted applesauce cake square on a cream plate with a fork pressing into the soft crumb.
A fork should slide into the slice easily, but the cake should still hold its shape. That balance is what separates a tender applesauce cake from one with a gummy middle.

Applesauce Cake at a Glance

Most reliable pan 9×13-inch light metal baking pan.
Oven temperature 350°F / 175°C for metal pans; 325°F / 165°C for glass.
Bake time About 30–35 minutes, depending on pan and oven.
Applesauce texture Unsweetened, smooth, and not watery.
Texture goal Moist and tender, not wet or gummy.
Flavor profile Warm apple-spice cake with gentle apple flavor.
Topping choices Cinnamon cream cheese frosting, powdered sugar, or vanilla glaze.
Yield 15–16 squares.
Storage Refrigerate once frosted with cream cheese.
Make-ahead Bake one day ahead and frost after cooling.
At-a-glance applesauce cake guide showing a frosted cake square with cues for pan size, oven temperature, bake time, texture, and topping options.
Start with the reliable 9×13 setup: 350°F, about 30 to 35 minutes, and a center check that matters more than browned edges.

What This Applesauce Cake Guide Covers

Use this guide for the full cake, frosting choices, pan swaps, shortcut options, storage, and the small baking decisions that keep this cake moist instead of gummy.

Quick Answer: Moist 9×13 Applesauce Cake

For a moist applesauce cake, bake a 9×13-inch pan at 350°F / 175°C for about 30 to 35 minutes. Use unsweetened applesauce, brown sugar, eggs, warm spices, vanilla, and a moderate amount of neutral oil. The cake is done when the center springs back lightly and a toothpick comes out clean or with a few moist crumbs.

The most important texture rule is simple: applesauce adds moisture, but it does not replace fat perfectly. A no-oil version may sound appealing, but it is much more likely to bake up dense, chewy, or gummy. A little oil gives the crumb softness, especially after the cake has cooled and rested.

Most reliable first bake: use unsweetened applesauce, 3/4 cup neutral oil, a light metal 9×13 pan, and let the cake cool completely before frosting. Once you know how the crumb should feel, you can adjust sweetness, frosting, add-ins, or oil level with more confidence.

Need the visual cues before baking? Jump to the Applesauce Cake Texture Checklist before you mix the batter.

Applesauce Cake Texture Checklist

Applesauce Smooth, thick, and not watery.
Batter Glossy, tan, thick but spoonable.
Pan Light metal 9×13 for the most even first bake.
Center Set and springy, with no jiggle.
Toothpick Clean or a few moist crumbs, not wet batter.
Frosting Only after the cake is fully cool.
Applesauce cake texture checklist showing thick applesauce, spoonable batter, a metal pan, a set cake center, a toothpick test, and a cooled frosted slice.
The best anti-gummy cues happen before and after baking: thick applesauce, spoonable batter, a set center, moist crumbs, and a fully cooled cake before frosting.

Once those cues make sense, go straight to how to make applesauce cake without a gummy center, or use the recipe card if you are ready to bake.

Why This Recipe Works

The texture comes down to balance: enough applesauce for moisture, enough oil for tenderness, and enough structure for clean slices. Applesauce gives the cake its soft, damp crumb and quiet apple flavor, but oil is what keeps that crumb tender after the pan cools. Eggs help it set cleanly, while brown sugar, cinnamon, and the supporting spices make the apple flavor feel fuller.

Applesauce and oil being added to cake batter with a finished applesauce cake slice in the background.
Applesauce gives the cake its soft, damp apple-spice crumb; however, the oil protects tenderness once the pan cools, so the slices stay plush instead of rubbery.

A 9×13 pan helps too. It gives the batter enough room to bake evenly, cools faster than a deep Bundt or loaf, and makes the finished cake easy to frost, slice, store, and share. This is the kind of pan cake that works for potlucks, after-school snacks, holiday tables, and casual weekends when you want the house to smell like cinnamon without building a layer cake.

Resting does this cake a favor. Warm spice cakes often taste fuller after a few hours because the cinnamon, applesauce, brown sugar, and vanilla have time to settle into the crumb. That makes this a useful make-ahead dessert, especially if you bake it one day and frost it the next.

There is one place where this recipe stays deliberately practical: it does not remove every bit of fat just because applesauce is in the batter. Applesauce can replace some oil or melted butter in certain bakes, but replacing too much can change the texture. Bon Appétit has a helpful explainer on using applesauce as an oil or butter replacement; the same lesson applies here. Applesauce brings moisture, but fat still matters for tenderness.

What Makes This an Old-Fashioned Applesauce Cake?

Old-fashioned applesauce cake is not just about the ingredient list. It is about the mood of the cake: simple pan, pantry ingredients, warm spice, soft crumb, and a flavor that feels better the next day. It should not need decoration to be good. A square dusted with powdered sugar should still feel complete.

The old-fashioned feeling stays, but the method gets a little more precise. The base cake is soft and spiced, the frosting is optional rather than mandatory, and the add-ins are flexible. In some families, raisins and walnuts are expected. Others want a plain soft square with powdered sugar. For dessert people, cream cheese frosting is what makes the cake feel complete. This recipe can handle all three camps.

Old-fashioned applesauce cake shown with frosted, powdered sugar, raisin-walnut, and plain sections in one pan.
One pan can satisfy several applesauce cake camps: frosted for dessert, powdered for old-fashioned simplicity, plain for snacking, or raisin-walnut for recipe-box flavor.

If you grew up with applesauce cake, you probably already know which camp your family was in: raisins, no raisins, nuts, no nuts, frosting, or just powdered sugar. This is also the kind of cake that behaves well in real kitchens. Cut it into neat squares for guests, or let people shave off uneven little pieces all day. It is exactly the sort of cake that quietly disappears from the pan before anyone admits they had a second slice.

Ingredients That Keep the Cake Moist

The ingredient list is simple; the texture depends on how you handle a few key choices. Use smooth unsweetened applesauce, measure the flour carefully, keep some oil in the batter, and make sure the spices still smell fresh before you add them. The batter should already smell cozy before it goes into the oven: cinnamon first, then brown sugar, vanilla, and that quiet apple note from the applesauce.

Ingredients for applesauce cake arranged around a 9x13 pan, including applesauce, flour, oil, eggs, sugars, spices, nuts, raisins, cream cheese, butter, and powdered sugar.
A simple pantry cake still depends on balance: watery applesauce slows the center, too much flour dries the crumb, and tired spices make the flavor fall flat.

Best Applesauce to Use

Unsweetened applesauce is the cleanest choice because the batter already has brown sugar and granulated sugar. Sweetened applesauce will work, but the cake can taste more sugary than balanced. Cinnamon applesauce can also work, although it gives you less control over the spice level.

Smooth applesauce gives the most even crumb, which is what you want if this is the kind of cake you plan to frost, slice, and carry to a table without fuss. Chunky applesauce makes the texture more rustic, but large pieces may create damp pockets unless the sauce is thick and the chunks are small. Homemade applesauce is fine as long as it is not watery. If it looks loose, simmer it briefly or drain off extra liquid before measuring.

Three bowls comparing smooth thick applesauce, watery applesauce, and chunky applesauce for baking applesauce cake.
Smooth, thick applesauce gives the most even crumb. However, watery applesauce can loosen the batter and make the center harder to bake through.

If your applesauce looks loose, keep the troubleshooting guide nearby so you know how to avoid a wet or gummy center.

Why This Recipe Uses Applesauce and Oil

Applesauce gives the cake moisture, fruit solids, and mild apple flavor. Oil brings fat, which keeps the crumb soft after baking. Because the batter uses both, the finished squares stay moist without turning rubbery. That balance matters most after cooling, when leaner versions can start to feel dense or chewy.

For a slightly lighter cake, reduce the oil from 3/4 cup to 1/2 cup and add 1/4 cup extra applesauce. The full amount gives the most plush first-bake texture, though. Do not remove all the oil unless you are comfortable with a denser, more snack-cake-style result.

For a lighter version, check the variations section before reducing the oil too aggressively.

Flour, Leavening, and Salt

All-purpose flour gives the cake enough structure to slice cleanly. Spoon and level the flour, or weigh it if you can. Too much flour is one of the easiest ways to lose the soft, snack-cake crumb that makes this recipe work.

This recipe uses both baking powder and baking soda. Baking powder helps lift the batter, while baking soda supports browning and works with the acidity in the applesauce and brown sugar. Salt is not optional here; it keeps the sweetness and spice from tasting flat.

Warm Spices for Old-Fashioned Flavor

Cinnamon does most of the work, but it should not be alone. Ginger adds warmth, nutmeg adds roundness, and a small amount of clove or allspice gives the cake that old-fashioned spice-cake finish. Keep the clove light. Too much can cover the applesauce flavor instead of supporting it.

Before mixing, smell your cinnamon. If it does not make you think of fall before the cake even bakes, it probably will not carry the flavor once it is in the batter. Applesauce is gentle, so the spice blend has to carry the aroma.

Warm spices including cinnamon, ginger, nutmeg, and clove being whisked into flour for applesauce cake.
Because applesauce has a gentle flavor, the spice blend does much of the aromatic work. Fresh cinnamon, ginger, nutmeg, and clove make the cake taste warmer and fuller.

Optional Raisins, Walnuts, and Pecans

Walnuts make the cake taste classic and slightly earthy. Pecans make it richer and sweeter. Raisins add soft little pockets of fruit, especially if they are soaked in hot water for 10 minutes and drained well before mixing.

To keep add-ins from sinking, toss them with a tablespoon of flour before folding them into the batter. If your table is divided on raisins, leave the batter plain and sprinkle nuts over only half the frosting. Raisins, walnuts, frosting, and powdered sugar all seem to create strong opinions around this cake, which is why a half-and-half pan works so well.

Applesauce cake batter with raisins partly folded in and walnuts and pecans shown nearby as add-in options.
Raisins, walnuts, and pecans are optional, but they change the whole mood of the cake. For divided tables, keep one side plain and add the old-fashioned extras to the other.

How to Make Applesauce Cake Without a Gummy Center

This is a stir-together cake, not a fussy layer cake. You do not need to cream butter, separate eggs, or use a mixer for the batter. The most important steps are preparing the pan, mixing gently, and baking until the center is truly set.

Already comfortable with the steps? Jump to the recipe card. Unsure how the center should look? Use the doneness cues before pulling the pan.

1. Prepare the Pan and Oven

Heat the oven to 350°F / 175°C. Grease a 9×13-inch light metal baking pan, or line it with parchment if you want to lift the cooled cake out for cleaner slices. A light metal pan gives the most reliable, even bake.

Hands smoothing parchment paper into a greased 9x13 metal baking pan before adding applesauce cake batter.
Preparing the pan before mixing saves trouble later. Parchment makes the cooled cake easier to lift, frost, slice, and serve cleanly.

When using a glass pan, reduce the oven temperature to 325°F / 165°C. Glass keeps radiating heat differently than metal, so the edges can race ahead while the center still needs time. The lower temperature gives the middle a better chance to catch up.

Light metal and glass baking pans compared for applesauce cake, with temperature cues for baking in each pan.
Metal and glass do not bake this cake the same way. A light metal 9×13 pan is the easiest first choice, while glass usually needs lower heat.

2. Whisk the Dry Ingredients

In a medium bowl, whisk the flour, baking powder, baking soda, salt, cinnamon, ginger, nutmeg, and clove or allspice. This spreads the leavening and spices evenly through the flour, so the cake rises well and does not end up with bitter pockets of baking soda or dull patches of spice.

Flour, baking powder, baking soda, salt, and warm spices being whisked together in a bowl for applesauce cake.
A quick whisk before the wet ingredients go in is small insurance; it keeps the rise, salt, and spice evenly spread through every square.

3. Mix the Applesauce, Oil, Eggs, Sugars, and Vanilla

In a larger bowl, whisk the applesauce, oil, eggs, brown sugar, granulated sugar, and vanilla until smooth. The mixture should look loose, glossy, and tan. Break up any lumps of brown sugar now, before the flour goes in.

Applesauce, oil, eggs, brown sugar, granulated sugar, and vanilla whisked into a glossy tan mixture.
Before the flour goes in, the wet mixture should look loose, glossy, and even. At this stage, break up any brown sugar lumps so they do not streak through the batter.

Room-temperature eggs blend more easily, but the cake will still work if you forget. Just whisk the wet ingredients until the eggs are fully incorporated and the mixture looks even. This is the point where the batter starts to smell like the cake you are hoping for: cinnamon, brown sugar, vanilla, and just enough apple to make it feel old-fashioned.

4. Combine Without Overmixing

Add the dry ingredients to the wet ingredients and fold just until the flour disappears. The batter should be thick but spoonable, not runny and not stiff like cookie dough. Stop as soon as it comes together. Overmixing develops the flour too much and can make the cake feel tough or gummy.

Thick tan applesauce cake batter lifting from a spatula and falling slowly back into the bowl.
Thick but spoonable batter is the sweet spot. If it pours too loosely, the middle of an applesauce cake can take longer to bake through.

Fold in walnuts, pecans, or raisins at the end if you are using them. Spread the batter evenly into the pan and smooth the top without pressing it down too firmly.

Applesauce cake batter being spread evenly into a 9x13 metal pan with an offset spatula.
Spread the batter evenly, then stop fussing with it. A level surface helps the center and edges bake at a similar pace.

5. Bake Until Moist, Not Gummy

Bake for 30 to 35 minutes, checking near the center around the 30-minute mark. The top should spring back lightly, and a toothpick inserted near the center should come out clean or with a few moist crumbs. Wet batter means the cake needs more time.

The center is the part that lies to you. The edges may look finished while the middle still needs a few more minutes. Since applesauce adds so much moisture, pulling the cake too early is the fastest route to a gummy square in the middle of the pan.

Finger gently pressing the center of a baked applesauce cake in a 9x13 pan to check that it springs back.
The edges often look done first, but the middle decides the cake’s texture. Press gently in the center and look for a light spring-back before pulling the pan.

Before removing the cake from the oven, compare it with the doneness cues so the edges do not trick you into underbaking the center.

6. Cool Completely Before Frosting

Let the cake cool completely before frosting. Cream cheese frosting melts quickly on a warm cake, and even a slightly warm center can make the frosting slide, soften, or turn greasy. If you are baking ahead, cool the cake, cover it, and frost it the next day.

Unfrosted applesauce cake cooling in a 9x13 metal pan on a wire rack with cream cheese frosting waiting nearby.
Cream cheese frosting behaves best on a fully cooled cake. Even a little trapped warmth can loosen the topping and blur those clean frosted squares.

Can You Make It in One Bowl?

You can make a one-bowl version, but two bowls are more reliable. Whisking the flour, leavening, salt, and spices separately helps the cake rise evenly and keeps the spice flavor consistent. For the easiest cleanup, use one medium bowl for the dry ingredients and one large bowl for everything else.

The visual recipe card below keeps the main bake cues close before the full printable-style details.

Saveable applesauce cake recipe card with a frosted cake square, 9x13 pan cue, oven temperature, bake time, applesauce and oil cue, and cream cheese frosting note.
This saveable cue card keeps the bake on track: use a 9×13 pan, keep the oven at 350°F, check around 30 minutes, and cool the cake before frosting.

Applesauce Cake Recipe Card

This easy 9×13 applesauce cake recipe has a soft, plush crumb, warm cinnamon-spice flavor, and just enough oil to stay tender after cooling. Frost it with cinnamon cream cheese frosting for a classic dessert finish, or leave it unfrosted for an old-fashioned snack cake.

Prep Time20 minutes
Cook Time30–35 minutes
Cooling Time1–1 1/2 hours
Yield15–16 squares

Equipment

  • 9×13-inch baking pan, preferably light metal
  • Mixing bowls
  • Whisk and silicone spatula
  • Measuring cups/spoons or kitchen scale
  • Toothpick, cake tester, or instant-read thermometer
  • Wire cooling rack
  • Hand mixer or stand mixer for frosting
  • Offset spatula, optional

Ingredients

For the Cake

  • 2 1/2 cups all-purpose flour, spooned and leveled, about 300–315g
  • 2 teaspoons baking powder
  • 1 teaspoon baking soda
  • 3/4 teaspoon fine salt
  • 1 tablespoon ground cinnamon
  • 1/2 teaspoon ground ginger
  • 1/2 teaspoon ground nutmeg
  • 1/4 teaspoon ground cloves or allspice
  • 2 cups smooth unsweetened applesauce, about 490–500g
  • 3/4 cup neutral oil, 180ml
  • 2 large eggs, room temperature if possible
  • 3/4 cup packed light brown sugar, about 150g
  • 1/2 cup granulated sugar, about 100g
  • 2 teaspoons vanilla extract
  • 3/4 cup chopped walnuts or pecans, optional
  • 1/2 cup raisins, optional

For the Cinnamon Cream Cheese Frosting

  • 8 oz brick-style cream cheese, softened, 226g
  • 6 tablespoons unsalted butter, softened, 85g
  • 2 1/2 to 3 cups powdered sugar, 300–360g
  • 1 teaspoon vanilla extract
  • 1/4 to 1/2 teaspoon cinnamon
  • Pinch of salt

Instructions

  1. Heat the oven. Preheat to 350°F / 175°C. Grease a 9×13-inch light metal baking pan or line it with parchment.
  2. Whisk the dry ingredients. In a medium bowl, whisk flour, baking powder, baking soda, salt, cinnamon, ginger, nutmeg, and cloves or allspice.
  3. Mix the wet ingredients. In a large bowl, whisk applesauce, oil, eggs, brown sugar, granulated sugar, and vanilla until smooth.
  4. Combine. Add the dry ingredients to the wet ingredients and fold just until no dry streaks remain. Fold in nuts or raisins if using.
  5. Bake. Spread the batter into the pan. Bake for 30 to 35 minutes, until the center no longer jiggles, springs back lightly, and a toothpick comes out clean or with a few moist crumbs.
  6. Cool. Let the cake cool completely in the pan before frosting.
  7. Make the frosting. Beat cream cheese and butter until smooth. Add powdered sugar, vanilla, cinnamon, and salt. Beat until creamy, using more powdered sugar for a thicker frosting.
  8. Frost and slice. Spread over the cooled cake, slice into squares, and serve.
Glass pan note: If baking in a glass 9×13 pan, reduce the oven to 325°F / 165°C and begin checking around 35 minutes. Glass can brown the edges before the center is fully set.
Using a different pan? Check the pan size and bake-time guide before adjusting the recipe.
Frosting note: Use brick-style cream cheese, not tub-style spread. Tub cream cheese is softer and can make the frosting loose.

How to Tell When the Cake Is Done

Do not pull the pan from the oven just because the edges look set. The center matters most. Look for three signs together: the top springs back lightly, the middle no longer jiggles, and a toothpick inserted near the center comes out clean or with a few moist crumbs.

Toothpick lifted from the center of applesauce cake with a few moist crumbs attached and no wet batter.
Moist crumbs mean the cake has baked through without drying out. Wet batter on the toothpick, however, means the center still needs more oven time.

A few soft crumbs are fine. Wet batter is not. Since applesauce keeps the batter moist, an underbaked center can seem acceptable while warm but turn dense and gummy as the cake cools. When in doubt, bake another 3 to 5 minutes and check again.

For extra precision, the center should be around 200–205°F / 93–96°C on an instant-read thermometer. You do not need to check this every time, but it helps if your oven runs cool, your pan is glass, or you are adapting the batter to a deeper pan.

Instant-read thermometer inserted into the center of applesauce cake showing a temperature around 202 degrees Fahrenheit.
An internal temperature around 200 to 205°F is a helpful backup check, especially when using glass, a deeper pan, or an oven that runs cool.

Cream Cheese Frosting, Glaze, or Powdered Sugar?

Cream cheese frosting is the classic dessert finish. The tang balances the brown sugar and warm spices, while the cinnamon ties the frosting back into the cake. Make this version when you want a soft square to feel like dessert rather than an everyday snack.

Cream cheese frosting ingredients for applesauce cake, including brick-style cream cheese, butter, powdered sugar, vanilla, and cinnamon.
Brick-style cream cheese gives the frosting more structure than tub-style spread. That small choice helps the topping stay creamy instead of loose or runny.

Powdered sugar makes the cake feel more old-fashioned. A thin vanilla glaze suits Bundt cakes and loaf cakes because it sets neatly and slices cleanly. No frosting at all works when you want the spice and applesauce flavor to stay in front.

The topping is where this cake changes personality, and it is also where families tend to have the strongest opinions. Frosted, it feels like dessert. Unfrosted, it feels like the kind of cake you cut in small squares with coffee, then somehow return to again before dinner. If the cake is for lunchboxes or a room-temperature table, powdered sugar or glaze is easier than cream cheese frosting.

Cream cheese frosting being spread in soft waves over a cooled 9x13 applesauce cake with an offset spatula.
Once the cake is fully cool, spread the frosting in soft waves rather than a thick slab. The topping should feel creamy without overwhelming the spice cake.

Applesauce Cake Topping Options

Four applesauce cake squares with different toppings: cream cheese frosting, vanilla glaze, powdered sugar, and plain.
The same applesauce cake can become dessert, coffee cake, lunchbox snack, or an old-fashioned plain square depending on how you finish the top.
Topping Best For Flavor
Cinnamon cream cheese frosting Classic dessert-style cake Tangy, creamy, warmly spiced
Brown butter cream cheese frosting Holiday or potluck version Nutty, rich, deeper
Powdered sugar Old-fashioned snack cake Simple and not too sweet
Vanilla glaze Bundt cake or loaf cake Sweet, neat, easy to slice
No frosting Breakfast, lunchbox, or coffee break More spice-forward

Applesauce Cake Pan Swaps and Bake-Time Changes

Start with the 9×13 Pan

A 9×13 pan is the most reliable first bake because the batter has room to set evenly. Deeper pans need more patience in the center, while wider pans bake faster and can dry out if you wait too long to check them.

Use the table below as a starting point, but let the center make the final call. This cake can look finished at the edges before the middle is ready, especially in glass, Bundt, or loaf pans.

Pan Size and Bake-Time Guide

Applesauce cake pan size guide showing a 9x13 pan, 8x8 pan, Bundt cake, loaf pan, and cupcakes.
The 9×13 pan is the easiest starting point, but once the batter moves into Bundt, loaf, cupcake, or smaller pans, depth changes the bake time.
Pan Oven Approximate Bake Time Notes
9×13 metal pan 350°F / 175°C 30–35 minutes Most reliable default for this recipe.
9×13 glass pan 325°F / 165°C 35–42 minutes Lower heat helps protect the edges.
8×8 half batch 350°F / 175°C 30–38 minutes Use half the batter or halve the recipe.
15×10 sheet pan 350°F / 175°C 18–22 minutes Thinner cake; check early.
Bundt pan 350°F / 175°C 45–60 minutes Grease very well and check the deepest part.
Two 8-inch round pans 350°F / 175°C 25–32 minutes Useful for a simple layer cake.
Cupcakes 350°F / 175°C 18–22 minutes Fill liners about two-thirds full.
Two 9×5 loaf pans 350°F / 175°C 50–60 minutes Tent loosely if the tops brown too quickly.

If changing the pan changes the texture, use the problem-solving guide to diagnose whether the cake needed more time, less moisture, or gentler mixing.

Bundt Pan Release Tips

Bundt pans need special care because moist cakes are more likely to stick in the ridges. Grease every detail of the pan carefully, let the cake cool before unmolding, and use a glaze instead of soft frosting. King Arthur Baking has a useful guide to preventing Bundt cakes from sticking if you bake in shaped pans often.

Variations and Easy Changes

Once the base cake is right, it can move in several directions without losing its soft crumb. The first bake teaches you what the texture should feel like; after that, these variations make more sense.

Applesauce cake variation guide showing powdered sugar snack cake, frosted dessert cake, raisin-walnut cake, shortcut cake, and crumb-topped cake.
Choose the version by mood: powdered sugar for snack cake, cream cheese frosting for dessert, raisins and walnuts for old-fashioned flavor, or crumb topping for coffee-cake style.
Version Choose It When What to Change
Less sweet You want a snack cake Skip frosting or use powdered sugar.
More dessert-like You want a potluck or holiday cake Use full oil and cream cheese frosting.
More old-fashioned You like recipe-box flavor Add raisins and walnuts.
Shortcut version You want almost no measuring Use cake mix, applesauce, and eggs.
Brunch-style You want coffee cake energy Use crumb topping and a light glaze.

Old-Fashioned Raisin-Walnut Version

Fold in 1/2 cup raisins and 3/4 cup chopped walnuts or pecans. Skip the frosting and dust the cooled cake with powdered sugar for a more old-fashioned coffee-cake feel, or keep the cream cheese frosting when you want a richer dessert.

This version feels closest to an older recipe-box cake: soft crumb, warm spice, little bites of fruit and nuts, and a flavor that deepens overnight. It is especially good with coffee or black tea.

Cake Mix Shortcut

This is not the same cake as the from-scratch version, but it is useful when you want the applesauce-spice idea with almost no measuring. For the simplest shortcut, use a 15.25 oz box of yellow or spice cake mix, 1 1/2 cups applesauce, and 3 large eggs. Bake in a greased 9×13 pan at 350°F until set, usually around 25 to 35 minutes depending on the mix and pan.

Applesauce cake mix shortcut setup with boxed cake mix, applesauce, eggs, cinnamon, and a frosted cake square.
A cake mix shortcut is useful when speed matters, although the texture will be different from the from-scratch applesauce cake.

The three-ingredient version wins on speed. The version with a little oil or melted butter tastes softer, richer, and less lean. For that style, add 2 to 4 tablespoons oil or melted butter and 1 to 2 teaspoons cinnamon.

If shortcut apple desserts are what you reach for most often, the same easy-bake mood also works in an apple cinnamon roll bake with apple pie filling, where refrigerated cinnamon rolls and apple filling turn into a warm 9×13 dessert.

Crumb Cake or Coffee Cake Style

To move this cake toward crumb cake, skip the cream cheese frosting and add a cinnamon brown sugar crumb topping before baking. Use a moderate layer of crumb at first because this batter is already moist. A very heavy topping can slow down the center and make the cake harder to bake evenly.

For a brunch-style version, add chopped nuts or oats to the crumb and finish with a thin vanilla glaze after cooling. Because the crumb topping changes how heat moves through the cake, check the center carefully and expect the bake time to shift slightly.

Bundt Cake Version

A Bundt version works well with vanilla glaze, maple glaze, or brown butter glaze. Grease every ridge of the pan, bake longer, and cool the cake before turning it out. The deepest part should be fully set before unmolding.

Applesauce Bundt cake with a thin glaze dripping down the ridges on a cream cake stand.
A Bundt version works best with careful pan greasing and a thin glaze. That way, the ridges stay visible and the cake releases more cleanly.

Gluten-Free or Almond Flour Version

For the closest gluten-free version, use a tested 1:1 gluten-free flour blend in place of the all-purpose flour. The texture may still be a little different, but the structure is more predictable than an almond flour swap.

Do not replace the flour with almond flour 1:1 in this batter. Almond flour needs different liquid, egg, and structure. Because applesauce already adds moisture, a casual almond flour swap can turn the cake oily, fragile, or gummy. For an almond flour version, use a formula written for almond flour from the start.

Vegan or Eggless Version

Eggless applesauce cake is possible, but this batter should not be converted by simply adding more applesauce. Applesauce is already the main moisture ingredient here, so using extra applesauce as an egg replacement can push the cake toward gummy.

For an egg-free version, start with a formula built that way from the beginning. This batter already gets so much moisture from applesauce that simply adding more can make the center heavy instead of soft.

Lighter or Lower-Sugar Version

For a lighter cake, use unsweetened applesauce, reduce the granulated sugar slightly, and serve the cake unfrosted or with a thin glaze. You can also cut the oil to 1/2 cup and add 1/4 cup extra applesauce, but the crumb will be a bit less plush.

Avoid removing all the oil on the first attempt. A little fat keeps the cake softer and prevents the texture from becoming rubbery. If you enjoy using applesauce in breakfast-style baking, it can also work as a moisture helper in recipes like oat pancakes, where softness and natural sweetness matter.

Common Applesauce Cake Problems and Fixes

When this cake disappoints, the problem usually comes from one of a few places: too much moisture, too much flour, not enough bake time, or overmixing. Once you know which one is working against you, the next pan is much easier to fix.

Texture, Bake-Time, and Flavor Problems

Troubleshooting board for applesauce cake showing gummy middle, dry edges, and melted frosting problems around a central frosted cake square.
A gummy middle, dry edges, or melted frosting usually points to one of four fixes: thicker applesauce, gentler mixing, more bake time, or longer cooling.
Problem Likely Cause Fix
Gummy middle Underbaked cake, watery applesauce, too much applesauce, or overmixed batter Bake until the center is fully set; use thick applesauce; mix only until combined.
Dry cake Too much flour or overbaking Spoon and level flour or use grams; start checking around 30 minutes.
Sank in the center Opened oven early or pulled the pan before the center set Do not open the oven too early; check the center, not just the edges.
Bland flavor Old spices, not enough salt, or too little vanilla Use fresh cinnamon and the full spice blend; do not skip the salt.
Weak apple flavor Applesauce flavor is naturally mild Expect spice-cake flavor with gentle apple in the background, or add a small amount of finely diced apple.

Pan, Add-In, and Frosting Problems

Problem Likely Cause Fix
Frosting melted Cake was still warm Cool completely before frosting.
Edges too dark Dark pan, glass pan, or overbaking Use a light metal pan or reduce heat for glass.
Nuts or raisins sank Add-ins were heavy or batter was loose Toss add-ins with 1 tablespoon flour before folding in.
Baking soda aftertaste Leavening was unevenly mixed or measured heavily Measure carefully and whisk the dry ingredients thoroughly.
Frosting too loose Tub cream cheese, warm butter, or too little powdered sugar Use brick cream cheese, softened butter, and add powdered sugar gradually.

Once you know what went wrong, return to the texture checklist before your next bake.

How to Store, Freeze, and Make Ahead

Unfrosted cake can be covered and stored at room temperature for about 2 days if your kitchen is cool. Once it has cream cheese frosting, refrigerate it. Let chilled slices sit at room temperature for 15 to 20 minutes before serving so the frosting softens and the crumb tastes tender again instead of cold and tight.

To freeze, wrap unfrosted squares tightly and freeze for up to 2 to 3 months. Thaw overnight in the refrigerator or at room temperature, then frost after thawing for the freshest texture.

This applesauce cake recipe is also easy to make ahead. Bake the cake one day ahead, cool it completely, cover it, and frost it the next day. The spice flavor often improves after resting because the cinnamon, brown sugar, and applesauce have time to settle into the crumb.

Storage guide showing a covered unfrosted applesauce cake pan, wrapped cake squares for freezing, and frosted slices in a container.
For make-ahead ease, freeze unfrosted squares and refrigerate anything with cream cheese frosting. Then let chilled slices soften before serving.

If you are baking ahead for a gathering, choose the topping from the frosting and topping guide after deciding how long the cake needs to sit out.

What to Serve with Applesauce Cake

This cake does not need much beside it. A square with coffee, black tea, chai, or cold milk is enough for an afternoon snack. If you want the whole table to lean into fall, a mug of healthy pumpkin spice latte keeps the cinnamon-and-spice mood going without adding another heavy dessert.

For dessert, serve it with vanilla ice cream, lightly whipped cream, caramel drizzle, or a few toasted walnuts scattered over the frosting. For brunch, cut it into smaller squares and keep the topping simple. Powdered sugar or a thin glaze works better than a heavy frosting when the cake is sharing the table with eggs, pancakes, fruit, and savory dishes.

For a fall dessert spread, pair this soft spice cake with pumpkin desserts, fruit crisps, or a shortcut pie like apple pie with apple pie filling. The cake brings warm spice and cream cheese frosting, while the pie brings flaky crust and glossy apple filling.

If you are making the apple side of the table from scratch, keep a batch of homemade apple pie filling ready for pies, waffles, pancakes, yogurt, or ice cream. It sits in a fruitier lane than this soft spice cake, so the two do not feel repetitive together.

Applesauce Cake FAQs

What does applesauce do in cake?

Applesauce adds moisture, mild apple flavor, and softness. However, it is not the same as fat. That is why this recipe uses applesauce and oil together for a tender crumb.

Sweetened or unsweetened applesauce?

Unsweetened applesauce is the better choice because it gives you control over the cake’s sweetness. Sweetened applesauce works, but the finished cake may taste sweeter than intended.

Oil or no oil: what happens?

You can reduce the oil, but removing it completely changes the texture. A no-oil version is usually denser and more likely to taste gummy. For the most reliable first bake, keep the oil.

Bundt pan timing

A Bundt pan works, but the bake time will be longer, usually around 45 to 60 minutes. Grease the pan very well, check the deepest part, and cool before turning it out.

Frosted or unfrosted?

Frosting is optional. Cream cheese frosting makes it feel like dessert, while powdered sugar, vanilla glaze, or no topping at all keeps it closer to an old-fashioned snack cake.

Why did the middle turn gummy?

The usual reasons are underbaking, watery applesauce, too much applesauce, not enough fat, or overmixing the batter. Bake until the center is fully set and fold the flour in gently.

Fresh apples: helpful or too wet?

A small amount of finely diced apple is fine, but do not add too much. Fresh apples release moisture as they bake, which can make the center wetter. For the first bake, keep the recipe focused on applesauce, then experiment later.

Homemade applesauce texture

Homemade applesauce works well as long as it is thick enough for baking. If it looks loose, simmer it briefly to thicken or drain off excess liquid before measuring. Smooth, thick applesauce gives the most reliable texture.

Make-ahead timing

This cake is a good make-ahead dessert. Bake it one day ahead, cool it completely, cover it, and frost it the next day. The spice flavor often improves after resting.

Applesauce instead of eggs?

Not in this recipe as a simple swap. Applesauce is already part of the batter, and adding more in place of eggs can make the cake too wet or gummy. Use a tested eggless formula if you need an egg-free version.

Final Thoughts

A good applesauce cake should feel simple, but not careless. The best version is soft in the middle, lightly spiced, easy to slice, and moist without being wet. That comes from treating it like the soft spice cake it is: enough moisture, enough tenderness, fresh spices, and enough patience for the center to set.

Serve it frosted when you want dessert, dust it with powdered sugar when you want something old-fashioned, or fold in raisins and walnuts when you want the cake to taste like it came from an older recipe box. Either way, this is the kind of 9×13 cake that quietly disappears one square at a time — first as dessert, then with coffee, then in those uneven little “just one more” slices everyone pretends do not count.

Back to top

Posted on 2 Comments

Orange Olive Oil Cake- Ridiculously Easy and Super Moist

Orange Olive Oil Cake is one of my favourite desserts. I mean who doesn’t like citrus flavours with a bit of sweetness. It is loaded with bright citrus flavour from orange and super moist texture from olive oil. This cake is so easy to make. It can be served with a sprinkle of powdered sugar or with a simple orange glaze or just as it is. It pairs beautifully with a coffee or espresso, doesn’t require any complicated technique or tools to make it and of course taste absolutely fantastic. 

I also happen to adore this Carrot and Orange Cake and this healthy Wholewheat Jaggery Banana Tea Cake

Olive Oil cakes gained an overnight popularity some years back when Kylie Jenner shared it on Instagram. Since then, the whole olive oil cake thing took on a whole life of its own and EVERYONE started baking olive oil cakes. There are tons of recipes on the internet but most of them use a lot of olive oil which makes the flavour too strong and the texture of the cake a bit too greasy. I prefer this recipe as there is a good balance of fat from olive oil and freshness from oranges. 

Does Olive Oil Cake taste like Olive Oil?

Olive oil cakes do not taste like olive oil. Infact it is there just to add richness and moisture to the cake. It gives cakes a wonderfully moist texture and a light, subtle flavour that pairs perfectly with other ingredients like fresh fruit and nuts. It is also a much healthy alternative to store-bought butter as it is rich in antioxidants and packed with good fats. It is great for people avoiding dairy or people who are lactose intolerant. You’ll want to use good quality extra virgin olive for this recipe or else you might just end up with an oily cake.

Ingredients Needed

For this Orange Olive Oil cake, you will need the following ingredients (exact quantities are provided in the recipe with step-by step instructions are below):

Olive oil: Of course! I used cold pressed extra virgin olive oil for this recipe. 

Fresh Unsweetened Orange Juice and Orange Zest: Fresh juice is always better than canned ones. It tastes better and is definitely a much healthier option than store-bought ones. You can use any orange.

Flour: I used a mix of wholewheat flour and all purpose flour. You can bake it with just all purpose flour alone or with just whole wheat flour. I have tried this cake with just wholewheat flour. The taste is excellent but it is slightly denser than the one with all purpose flour. So, I chose a mid way and went with half and half. 

Vanilla extract: Go for pure vanilla extract and not the essence. It tastes much better while the latter gives a very synthetic like flavour. 

Baking Soda and Baking Powder: These are leavening agents and must be used. Do not use baking soda or powder that is older than 1 year. 

Castor Sugar: You can also bake this cake with unprocessed sugar like palm sugar or coconut sugar. But do remember that this will alter the taste a bit because palm sugar does have an earthy and a rustic taste. I prefer white castor sugar for this recipe. 

Salt: Salt balances and accentuates the sweetness of the cake

Eggs: Eggs bring in that much needed texture, lightness and fluffiness. However, if you do not want to use eggs then substitute 1 egg with flaxmeal. 1 tsp ground roasted flaxseeds in 4 tbsps water. Let it sit for 10 minutes. Use this mixture in place of egg or use 1/4th cup of Greek yogurt for 1 egg. So, if the recipe calls for 2 eggs, then you will need half a cup or Greek yogurt. 

Cornstarch: This helps reduce the protein content in the flour, making the cake more tender. In some countries it is called cornflour.

Now, let’s see the full recipe 

Recipe

Ingredients: cup measurements 250 grams

Wet Ingredients 

  1. Olive Oil: 1/4th cup
  2. Orange Juice: 125 ml
  3. Sugar: 1/3rd cup (I do not like too sweet cakes. You can use 1/2 cup sugar if prefer sweeter 
  4. Eggs 2 large
  5. Vanilla Extract: 1/2 tsp
  6. Orange Zest: 1 tbsp

Dry Ingredients

  1. Wholewheat flour: 1/2 cup
  2. All Purpose Flour: 1/2 cup
  3. Salt: 1/4th tsp
  4. Baking Soda: 1/2 tsp
  5. Baking Powder: 1/2 tsp
  6. Cornstarch: 1 tbsp

Instructions 

  • Pre-heat oven to 180 C and line a 6” round pan with a parchment paper.
  • In a large bowl add olive oil and castor sugar. Whisk till well combined. Then add eggs one by one and whisk till it becomes foamy. 
  • Now add vanilla extract and whisk again for a minute. 
  • Sift in all the dry ingredients in a pan. Add orange zest and mix until well combined. 
  • Now add dry ingredients to wet ingredients in batches. Keep alternating between dry ingredients and orange juice. Add one batch of dry ingredients followed by little orange juice and then gently fold till combined. Keep repeating till all the dry ingredients are used up and the batter is well combined. Do not over mix the batter. 
  • Pour the batter into a prepared pan. Tap on the counter 2 or 3 times to clear air pockets. 
  • Bake in the preheated oven for 40 minutes or till toothpick inserted at the centre comes out clean with moist crumbs attached. 
  • Allow it to cool in the pan for 10 minutes then demould by running a knife along the edges. The cake will come out smoothly. 
  • Allow it to cool completely on wire rack before dusting it with powdered sugar or glazing it. 
  • Note: This cake stays fresh at room temperature for 2 days. Wrap it with butter paper and store it in a container with a lid.

Do give this recipe a shot. You do not need another orange cake recipe after this one, I promise. If you try this recipe, do give us a shout out. Just click a picture and tag us on @masala.monk or use the hashtag #MasalaMonkRecipe and share on Instagram and Facebook. We would love to hear from you. 🙂