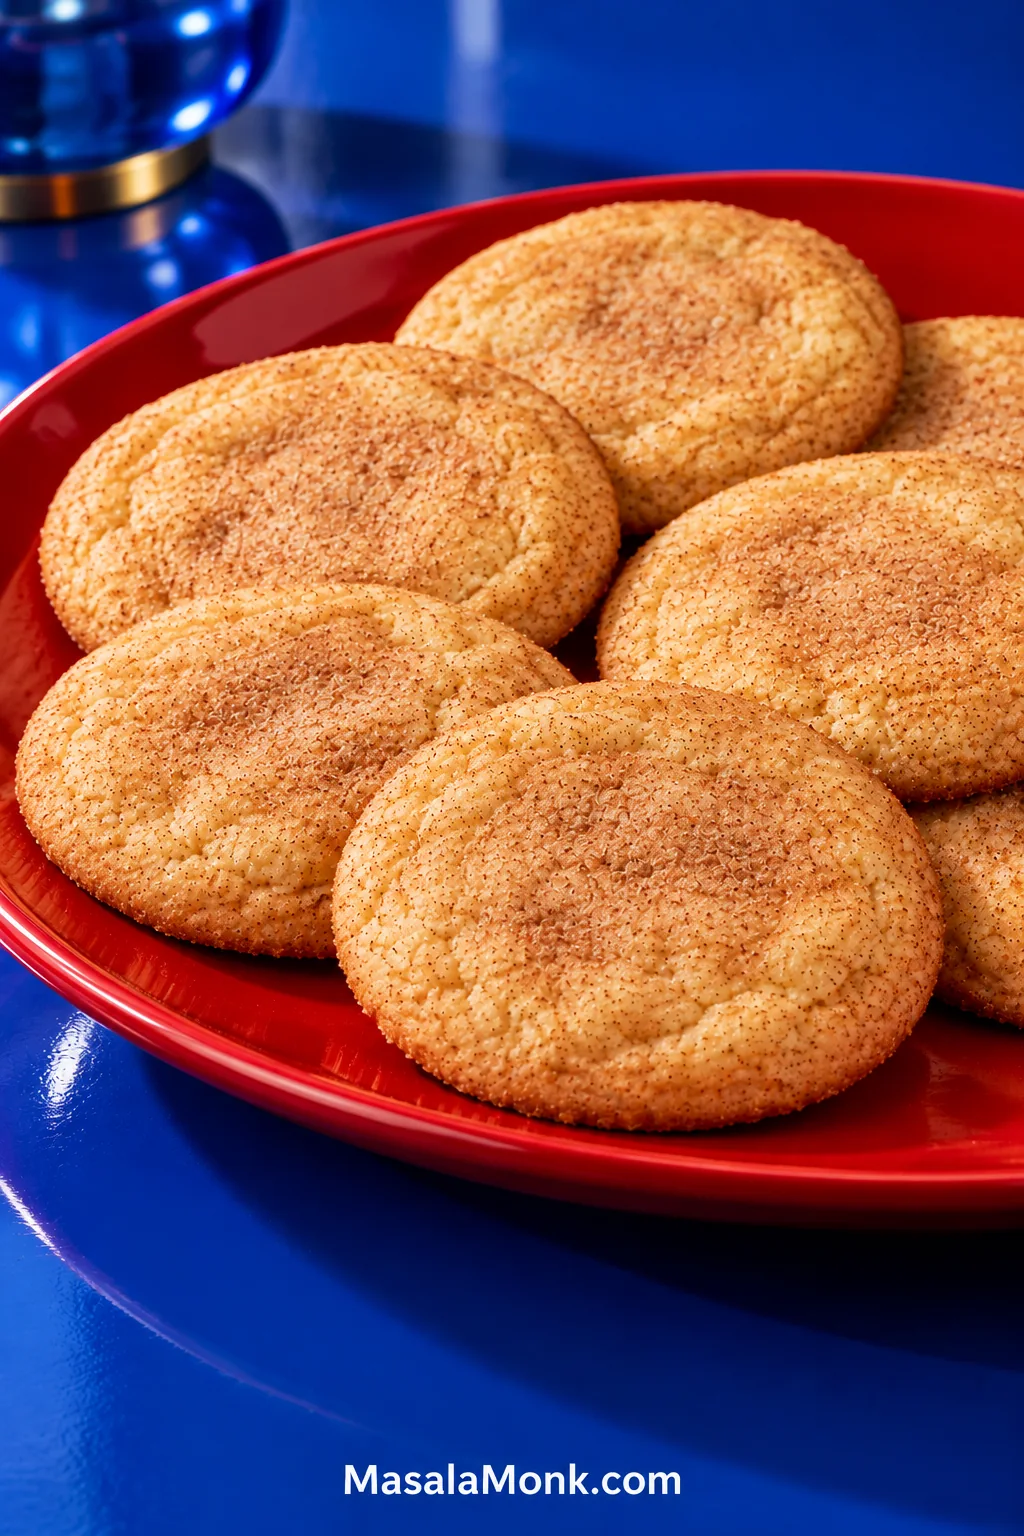
Posted on Leave a comment

Overnight French Toast Casserole: Easy Make-Ahead Baked French Toast

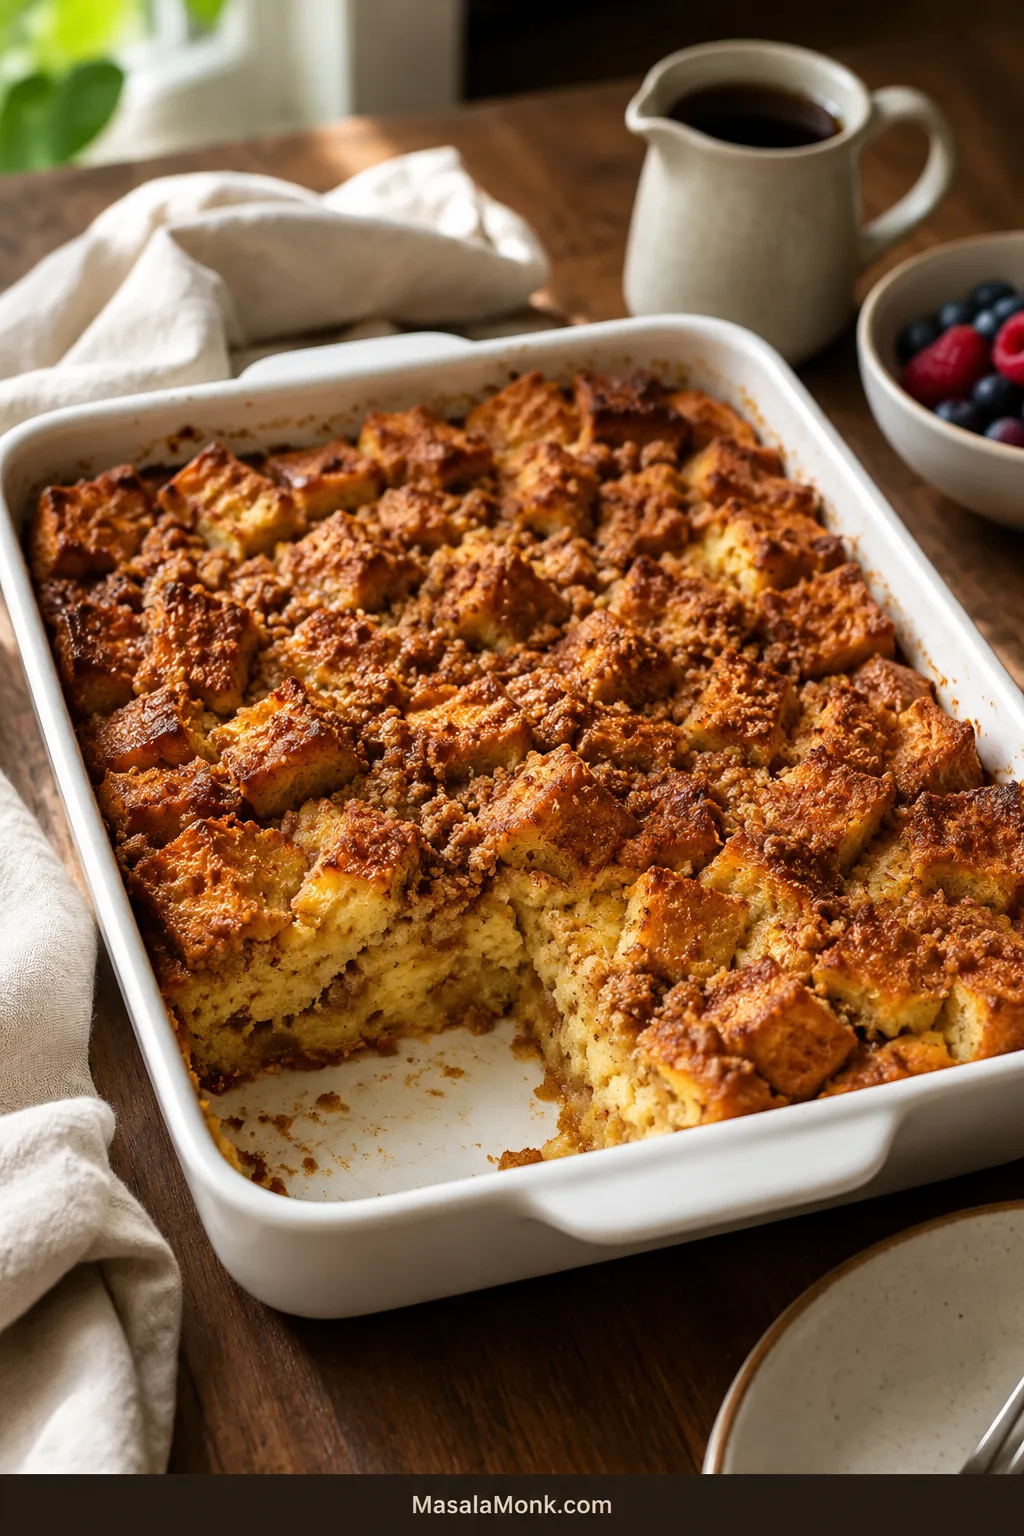
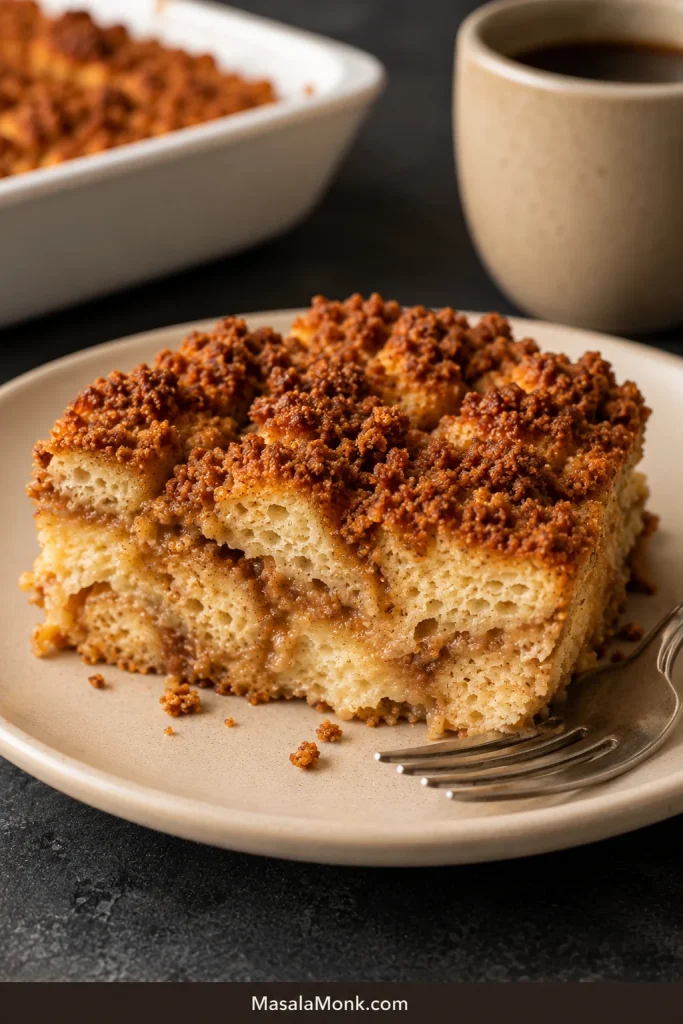
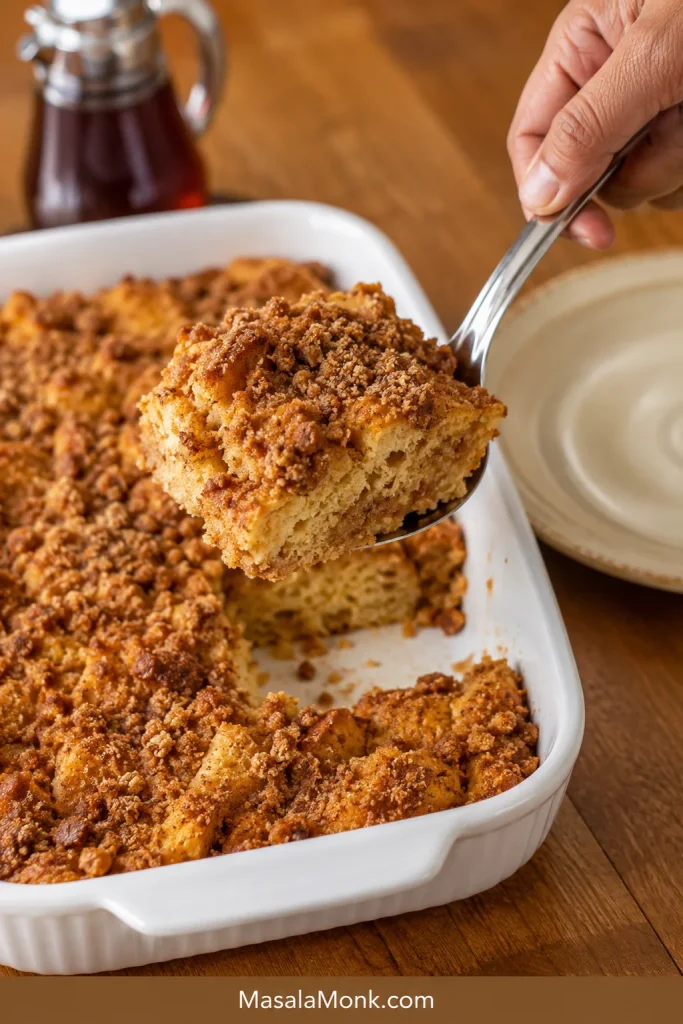
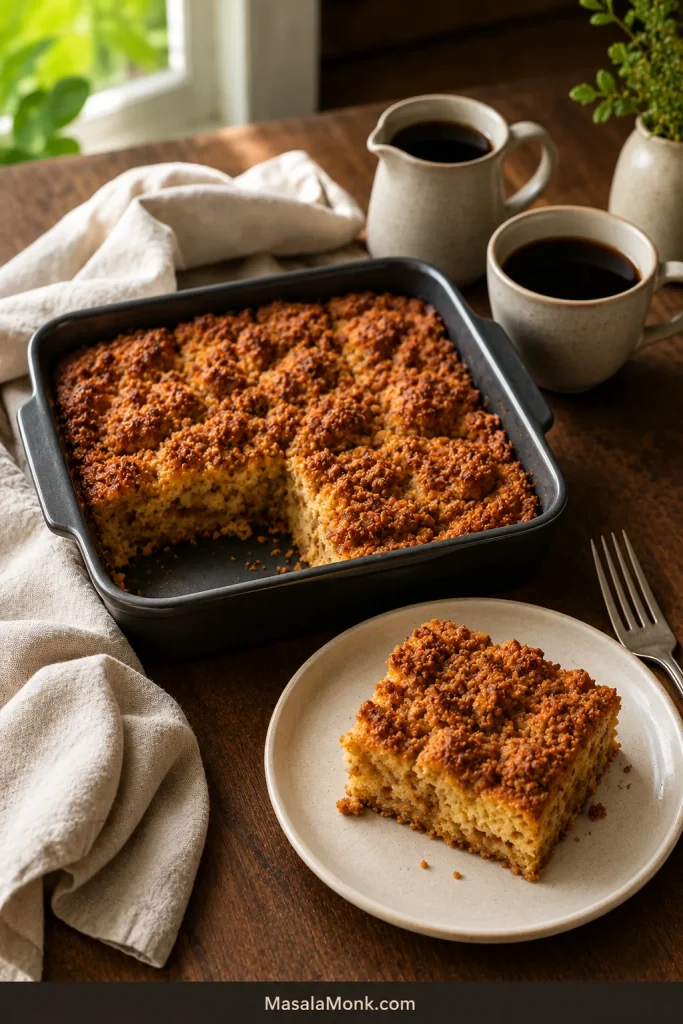
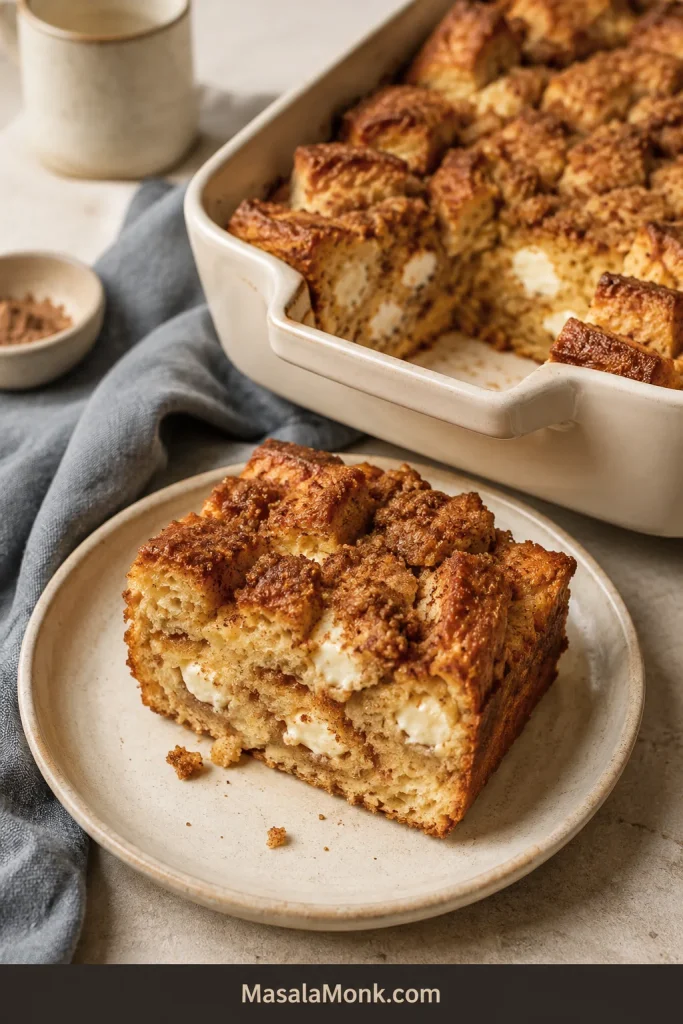
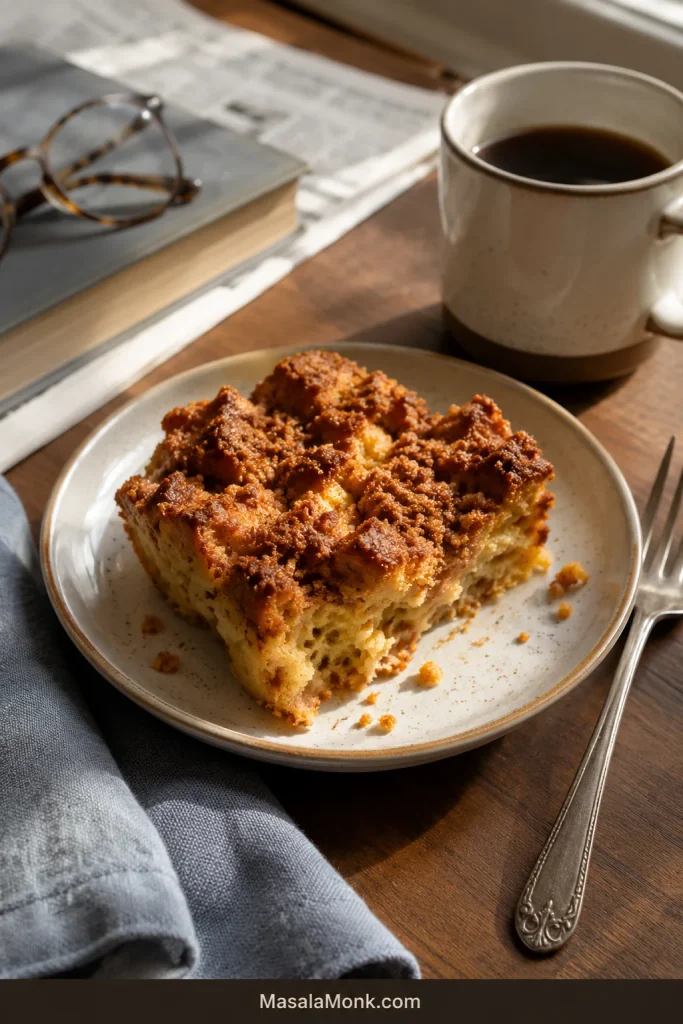
Overnight French toast casserole with golden cinnamon streusel and one serving removed from the baking dish.

By the time the oven begins to warm, breakfast should already be decided. The bread has spent the night soaking in cinnamon-vanilla custard, the streusel is cold and crumbly, and the morning work is little more than scattering the topping, baking the pan and pouring the coffee.

The easy morning only pays off when an overnight French toast casserole comes out properly: crisp and buttery across the top, tender where the bread has absorbed the custard, and set enough that the first spoonful holds together. Here, the bread is weighed rather than guessed, the sweetness stays balanced, and the middle—not merely the golden topping—decides when the pan is ready.

Day-old French bread absorbs the custard without collapsing, which makes it the easiest loaf to use here. Brioche, challah, sourdough, plain Texas toast and sturdy gluten-free bread can also work with a few adjustments. Once the bread amount, pan depth and final doneness are right, the method is highly forgiving.

Start here

The Version to Make First

Use 16 oz / 450 g day-old French bread—about 10–12 loosely filled cups after cutting it into 1-inch / 2.5 cm pieces. Soak it overnight in a mixture of 8 eggs, 2 cups / 480 ml whole milk and ½ cup / 120 ml half-and-half or cream. Keep the streusel cold and separate until morning.

Bake in a standard 9×13-inch / 23×33 cm dish at 350°F / 175°C. Begin checking near 40 minutes; many pans finish in approximately 45–55 minutes. The topping should be golden, the middle should look set rather than fluid, and the thickest central area should reach at least 160°F / 71°C.

The clock tells you when to check; the center tells you when to stop.

This is the texture to aim for: recognizable bread pieces held together by softly set custard, with a crisp top and no liquid collecting beneath the serving.

Slice of overnight French toast casserole with crisp cinnamon streusel, distinct bread pieces and a softly set custardy center
The cut face should show moist seams between recognizable bread pieces—not a smooth pudding layer or a dry, cake-like crumb.

Make it tonight

Overnight French Toast Casserole Recipe

A make-ahead French toast bake with cinnamon-vanilla custard, crisp exposed bread edges and a cold brown sugar streusel added just before baking. It is moderately sweet on its own, leaving room for warm maple syrup at the table.

Recipe at a Glance

  • Yield: 10 standard servings, 8 generous servings or up to 12 smaller brunch portions
  • Active preparation: About 20 minutes at night, plus 5 minutes in the morning
  • Chilling: 8–12 hours
  • Bake and rest: Approximately 45–55 minutes, plus 10 minutes
  • Total elapsed time: Approximately 9–13½ hours, mostly unattended
  • Pan: Standard 9×13-inch / 23×33 cm dish, about 3 quarts / 2.8 liters
  • Oven: 350°F / 175°C
  • Doneness: The center looks set, a thin knife shows no raw custard, and the thickest area reaches at least 160°F / 71°C

Equipment

  • Standard 9×13-inch / 23×33 cm baking dish, about 3 quarts / 2.8 liters
  • Large mixing bowl and whisk
  • Serrated bread knife and cutting board
  • Kitchen scale
  • Measuring cups and spoons
  • Rimmed sheet pan if the bread needs drying
  • Foil
  • Instant-read thermometer, recommended

Ingredients

For the Bread and Custard

  • 16 oz / 450 g French bread, preferably day-old, about 10–12 loosely filled cups after cutting
  • 8 large eggs
  • 2 cups / 480 ml whole milk
  • ½ cup / 120 ml half-and-half or heavy cream
  • ⅓ cup / 70 g packed light brown sugar
  • 1 tablespoon / 15 ml vanilla extract
  • 2 teaspoons ground cinnamon
  • ¼ teaspoon ground nutmeg
  • ¾ teaspoon fine salt
  • Unsalted butter or nonstick cooking spray, for the dish

For the Cinnamon Streusel

  • ½ cup / 60 g all-purpose flour
  • ⅓ cup / 70 g packed light brown sugar
  • 1 teaspoon ground cinnamon
  • Pinch of fine salt
  • 6 tablespoons / 85 g cold unsalted butter, cut into small cubes
  • ½ cup / about 55 g chopped pecans, optional

For Serving

  • Warm maple syrup
  • Fresh berries, sliced apples or another fresh fruit
  • Powdered sugar, optional

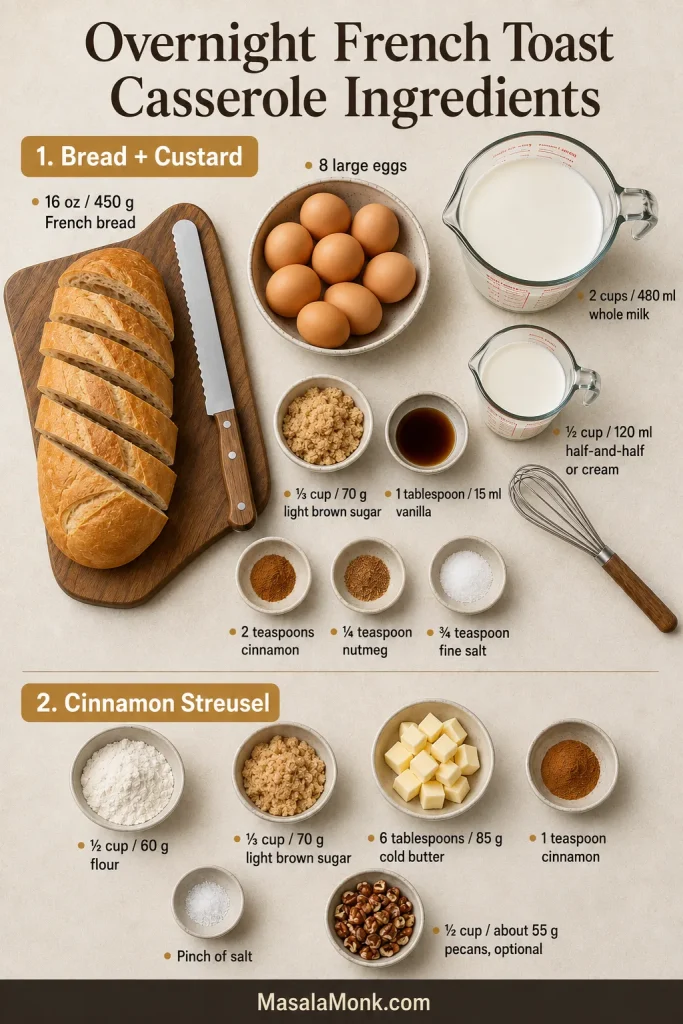
Measure the custard and streusel ingredients separately before beginning, especially the two portions of brown sugar.

Measured French bread, eggs, milk, cream, brown sugar, spices, flour, cold butter and optional pecans arranged for French toast casserole.
Keep the two brown-sugar portions separate: one sweetens the cinnamon-vanilla custard, whereas the second combines with flour and cold butter to form the streusel.

Instructions

Before Bed

  1. Prepare the dish. Butter the base, sides and especially the corners of a standard 9×13-inch / 23×33 cm baking dish generously. Custard-soaked bread can cling where the pan is only lightly coated. Nonstick cooking spray can be used instead.
  2. Cut the bread. Cut the French bread into pieces around 1 inch / 2.5 cm. Keep the crusts unless they are unusually hard or thick; they add structure and create some of the crispest exposed edges. If the bread is fresh and soft, dry it using the method in the notes, then let it cool.
  3. Fill the pan loosely. Spread the bread through the dish. The pan should look comfortably full, with the pieces sitting loosely instead of being pressed into a dense layer.
  4. Whisk the custard. Whisk the eggs until the whites and yolks are fully blended. Add the milk, half-and-half or cream, brown sugar, vanilla, cinnamon, nutmeg and salt. Continue whisking until the sugar is mostly dissolved and no visible streaks of egg white remain.
Coat, Cover and Chill
  1. Coat the bread. Pour the custard in stages, pausing to turn the pieces gently so the liquid reaches the middle and corners. Press lightly until the dry edges touch the custard. Packing the bread down firmly can make the casserole dense.
  2. Check the pan. The bread should look well moistened, with a little custard visible near the bottom. It should not be floating in a deep pool.
  3. Cover and refrigerate. Cover tightly and refrigerate for 8–12 hours.
  4. Make the streusel. Mix the flour, brown sugar, cinnamon and salt. Work in the cold butter until it is coated and the topping contains fine crumbs with a few pea-sized clumps. Mix in the pecans when using, then cover and refrigerate separately.

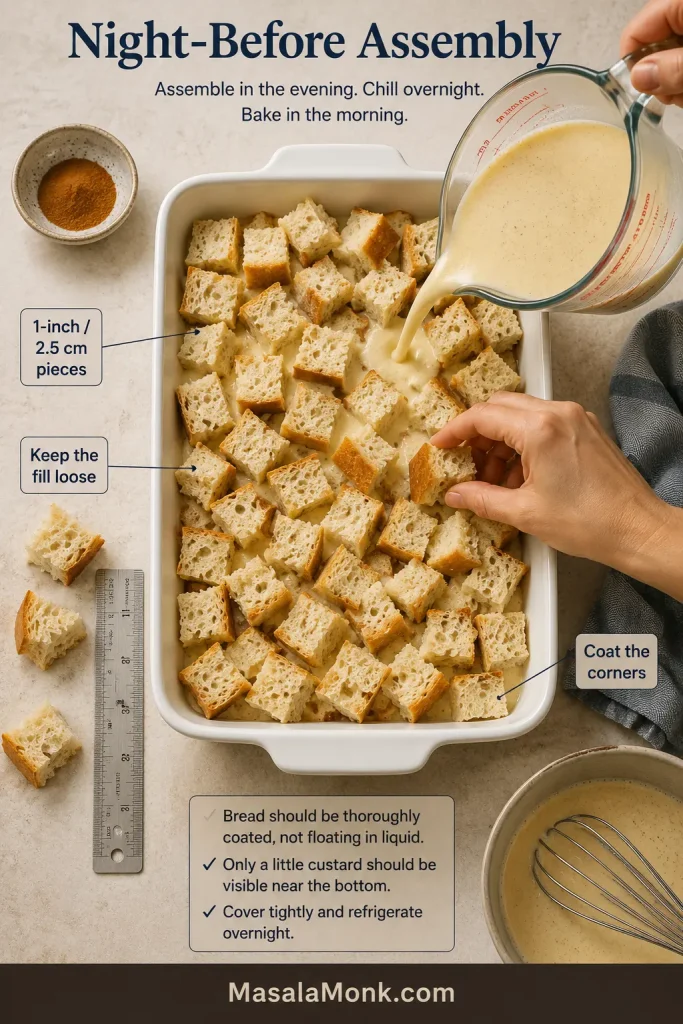
Before covering the pan, make sure the bread still sits loosely, looks evenly moistened and rises above the small amount of custard at the base.

Overhead assembly guide showing evenly cut bread loosely arranged in a white baking dish while custard is poured between the pieces.
Pour the custard in several passes, pausing between them; dry-looking corners and pale upper surfaces reveal where the next pour should go.

The Next Morning

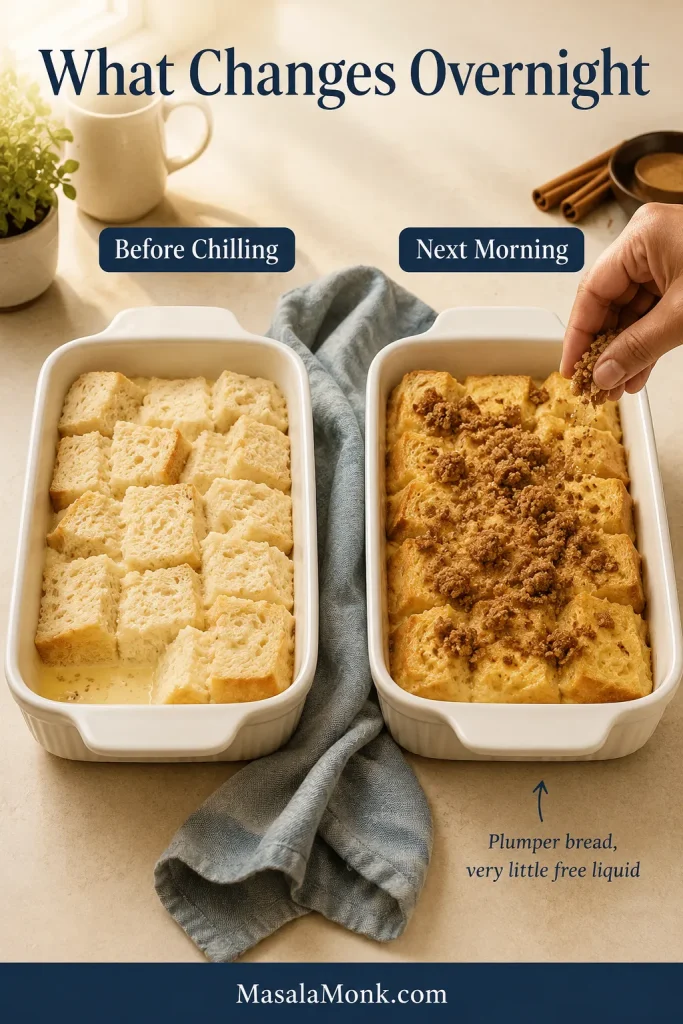
By morning, the bread should look fuller and darker with custard, while the dish remains stable rather than sloshing when moved.

Two baking dishes compare freshly assembled French toast casserole with an overnight-soaked pan being topped with cold streusel.
Check the corners as well as the center: pale, dry pieces there suggest the custard was not distributed evenly before chilling.
  1. Heat the oven. Preheat to 350°F / 175°C. A metal pan can come out of the refrigerator while the oven heats. For glass or ceramic, first check the cold-bakeware guidance below.
  2. Check the overnight absorption. The pieces should look plumper and slightly darker with custard. A little liquid may remain visible low in the pan, but pressing the top should not make it surge across the dish.
  3. Add the topping. Uncover the dish and scatter the cold streusel over the bread. Leave a few edges exposed so they can crisp.
  4. Bake. Place the dish on the center rack and begin checking around 40 minutes.
Protect the Top and Check the Center
  1. Protect the top when needed. If the streusel and exposed bread are deeply golden while the center is still loose, tent the dish with foil and continue baking.
  2. Check the center. The edges should look puffed, and the middle should no longer appear shiny or liquid. Insert a thin knife through an area with less streusel; it should show moist crumbs, not raw custard.
  3. Confirm the temperature. The thickest central area should reach at least 160°F / 71°C. Melted butter and brown sugar may cling to the knife even when the custard underneath is set.
  4. Rest before serving. Let the pan stand for 10 minutes. Use that time to warm the maple syrup, put out the fruit and call everyone to the table.

Cold Glass and Ceramic Bakeware

Avoid exposing very cold glass or ceramic bakeware to sudden high heat unless the manufacturer specifically approves refrigerator-to-oven use. Letting the dish stand while the oven preheats may reduce the temperature difference, but it does not replace the manufacturer’s instructions. A metal pan avoids this thermal-shock concern.

Success Notes

  • Fresh bread: Dry the pieces at 300°F / 150°C for 10–15 minutes, turning once. Very soft, freshly baked bread may need up to 20 minutes. Stop while the pieces remain pale.
  • Without cream: Replace the half-and-half or heavy cream with an equal amount of whole milk.
  • Dairy-free: Use 2½ cups / 600 ml oat milk and plant-based butter; see the complete dairy-free adaptation below.
  • Gluten-free: Use 450 g sturdy gluten-free bread and 1:1 gluten-free flour in the streusel; see the complete gluten-free adaptation below.
  • Nut-free: Leave out the pecans. No replacement is needed.
  • Same-day version: Dry the bread thoroughly and soak it for 45–60 minutes before baking.
  • Sweetness: Keep the casserole moderately sweet and add more maple syrup at the table.

After a 10-minute rest, the casserole should scoop cleanly enough for the plate while still looking soft between the bread pieces.

A serving spoon lifts a tender portion of French toast casserole from a white baking dish, exposing the moist center beneath the topping.
A broad serving spoon supports the tender base better than a narrow utensil, helping the rested casserole reach the plate without splitting through the middle.

Cooking now? The recipe above is all you need. Keep reading when you want help choosing bread, shortening the soak, scaling the pan or rescuing a soggy center.

Day-old bread has enough dryness to absorb the custard while still holding its shape. Weighing the loaf makes sure there is enough bread for the custard, and a shallow 9×13-inch dish gives the center time to set before the edges dry. When the top looks ready first, a thermometer removes the remaining guesswork.

The Best Bread for French Toast Casserole

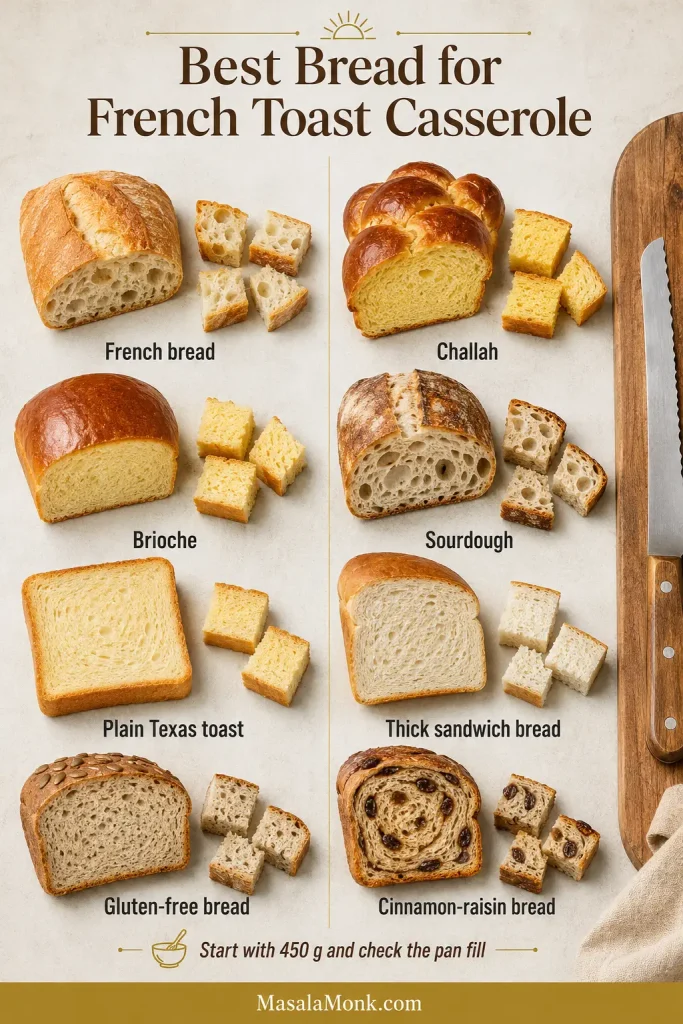
French bread has an open crumb that accepts the custard, while its crust and firmer interior help the pieces hold their shape overnight. With another type of loaf, start with 450 g and use the pan’s fill level as the final check. The cut pieces should loosely fill the dish to approximately the same level as 10–12 cups of French bread.

French bread, challah, brioche, sourdough, Texas toast, sandwich bread, gluten-free bread and cinnamon-raisin bread arranged for comparison.
Use the loaf lineup as a texture map: chewy, open crumbs tolerate a long soak, while soft enriched breads need more drying and gentler handling.

How Each Bread Changes the Casserole

BreadResultHandling
French breadClear bread-and-custard contrast with crisp exposed edgesUse day-old bread or dry fresh pieces briefly
ChallahA softer, richer result with a slightly eggier flavorDry well; when noticeably sweet, reduce the custard sugar to ¼ cup / 50 g
BriocheA very buttery, tender resultDry thoroughly; when sweetened, reduce the custard sugar to ¼ cup / 50 g
SourdoughFirmer pieces with a light tangAllow the full overnight soak; especially good for a less-sweet pan
Plain Texas toastA soft, familiar casserole with even piecesUse plain thick-cut bread—not prepared garlic toast—and dry it when very fresh
Thick sandwich breadA softer bake with less contrast from the crustsDry well and leave the pieces loose in the pan
Gluten-free breadResults vary considerably by brand and loaf densityChoose a sturdy loaf, weigh it, dry it well and turn gently
Cinnamon-raisin breadBuilt-in spice, sweetness and pockets of dried fruitUse ¼ cup / 50 g custard sugar and reduce the custard cinnamon to 1 teaspoon

No special bakery loaf is required. The bread already in your kitchen can usually work once you know whether it needs a little drying first.

Croissants soften and compress much faster than French bread. They need their own bread-to-custard ratio, so they are not a direct swap in this recipe.

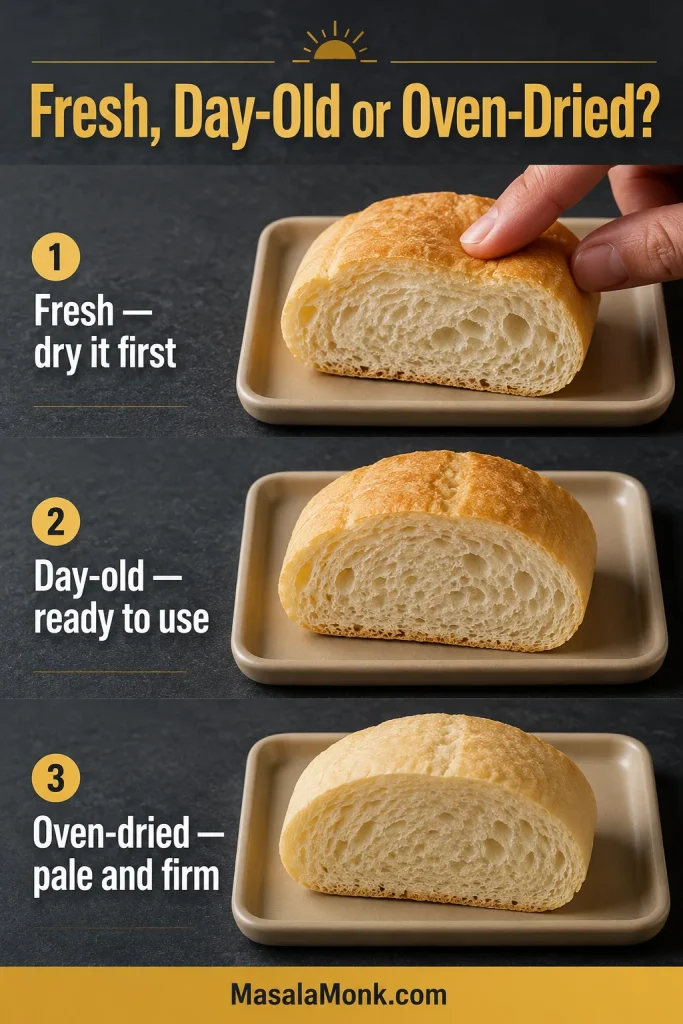
Fresh, Stale or Oven-Dried?

Day-old bread usually needs no extra drying. If the loaf has become very hard, trim any unusually tough crust and allow the full overnight soak.

Fresh bread should feel dry and slightly firm on the outside while the pieces still give when squeezed. Spread it over a rimmed sheet pan and bake at 300°F / 150°C for 10–15 minutes, turning once. Very soft bread may need up to 20 minutes. Keep the pieces pale instead of toasting them brown, then let them cool before adding the eggs.

The same French bread compared when fresh and soft, day-old and resilient, and pale after oven-drying.
The oven-dried sample should look almost unchanged; the useful difference is a dry, firm surface that absorbs custard without compressing.

What the Custard Ingredients Do

Eggs set the custard around the bread. Whole milk gives it enough richness without making the casserole unusually heavy, while a smaller amount of cream makes the baked custard richer and more tender. Whisk the eggs first so visible streaks of white do not bake into firm patches.

  • Whole milk: Gives the custard body while keeping the casserole breakfast-like.
  • Half-and-half or cream: Adds richness and a softer finish.
  • Unsweetened oat milk: Gives the custard more body than most everyday plant milks.
  • Unsweetened almond milk: Produces a lighter result.
  • Evaporated milk: Can replace up to half of the whole milk for a richer dairy flavor.

Brown sugar brings a light caramel note without turning the casserole fully into dessert. Vanilla and cinnamon supply the familiar French toast aroma, nutmeg adds warmth underneath, and salt keeps the whole pan from tasting flat.

How Long Should French Toast Casserole Soak?

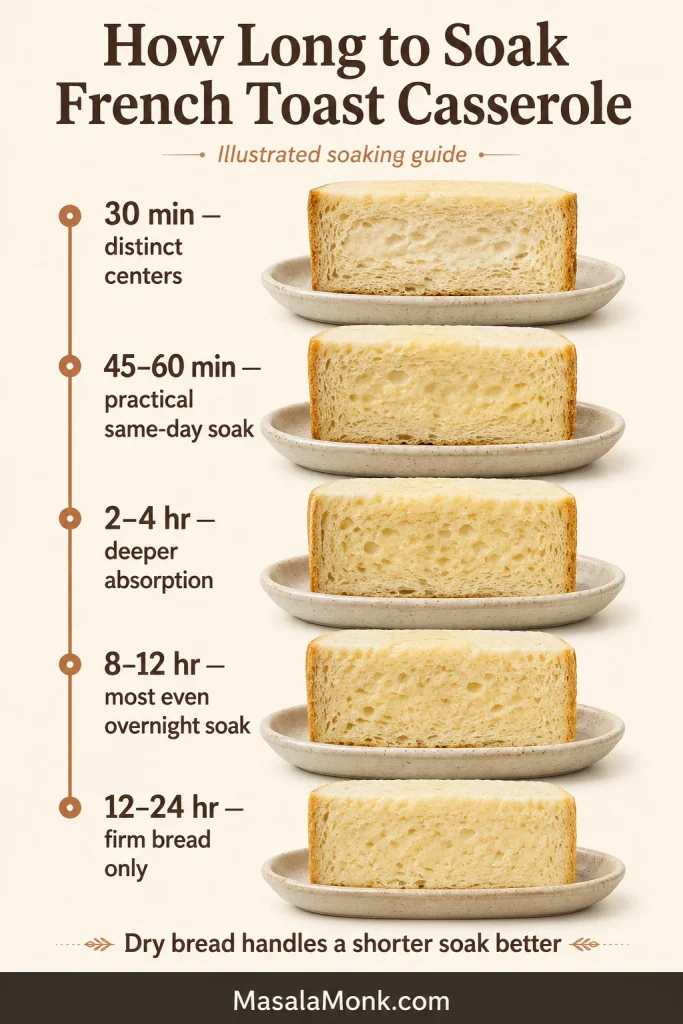
Soak the casserole for 8–12 hours when you can. That gives the custard time to reach the center of the bread and leaves almost nothing to do in the morning. Thoroughly dried bread can still produce a good same-day version after 45–60 minutes.

Illustrated timeline comparing bread absorption after 30 minutes, one hour, several hours, overnight and up to 24 hours.
The change is gradual rather than dramatic: longer soaking narrows the pale dry core while the bread still keeps its edges.
Soaking timeWhen it worksWhat to expect
30 minutesWhen time is very short and the bread has been dried thoroughlyMore distinct bread centers and less complete absorption
45–60 minutesA practical same-day casseroleGood results when the bread is dried and turned once
2–4 hoursFirm or moderately dry breadThe custard reaches farther into the center of each piece
8–12 hoursThe easiest overnight scheduleVery little morning work and the most consistent soak
12–24 hoursFirm, dry French bread or sourdoughUsually workable; softer breads may begin losing their shape

Before Refrigerating: Three Assembly Checks

This is the last real bit of work for the night. Three details make the biggest difference once the pan is covered.

  • Keep the bread pieces similar in size. Pieces around 1 inch / 2.5 cm absorb at a similar rate. Tiny pieces can compact into a soft layer, while oversized chunks may remain dry inside.
  • Whisk the eggs completely. Blend the whites and yolks before adding the dairy and flavorings so firm patches of egg white do not appear in the finished custard.
  • Distribute the custard throughout the pan. Add it in stages and turn the bread gently so the upper pieces and corners receive their share.

None of these checks has to be perfect. When the bread is well coated, the pan is not swimming in custard and the center is allowed to finish baking, the casserole is very forgiving.

In the Morning: Bake Until the Center Is Set

By morning, the pieces should look plumper and slightly darker with custard. A little liquid may remain low in the pan, but the dish should not slosh when nudged. Scatter over the cold streusel and begin baking uncovered so the exposed bread edges and topping can crisp.

As the streusel turns deep gold, cinnamon, vanilla and warm butter begin to fill the kitchen. By then, the smell has usually reached the rest of the house.

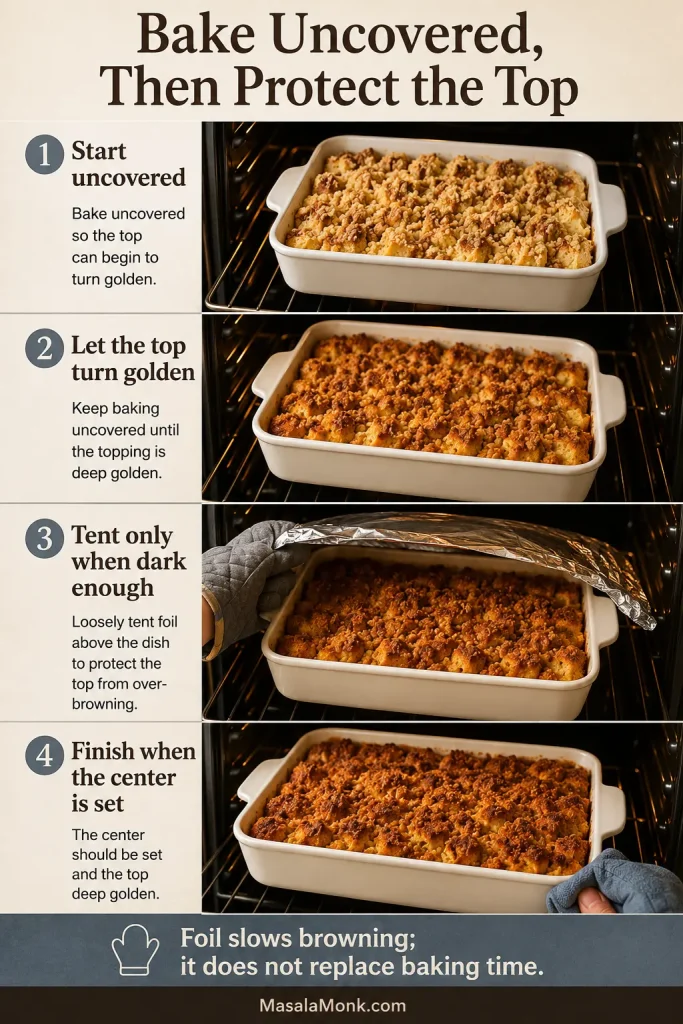
A golden top can look ready while the middle still needs time. Once the surface is dark enough, a loose foil tent lets the center continue baking without taking the streusel any further.

Four-stage guide showing French toast casserole starting uncovered, browning, loosely tented with foil and finishing fully baked.
A loose foil tent should sit above the streusel instead of pressing against it, slowing browning while preserving the crumbly surface.

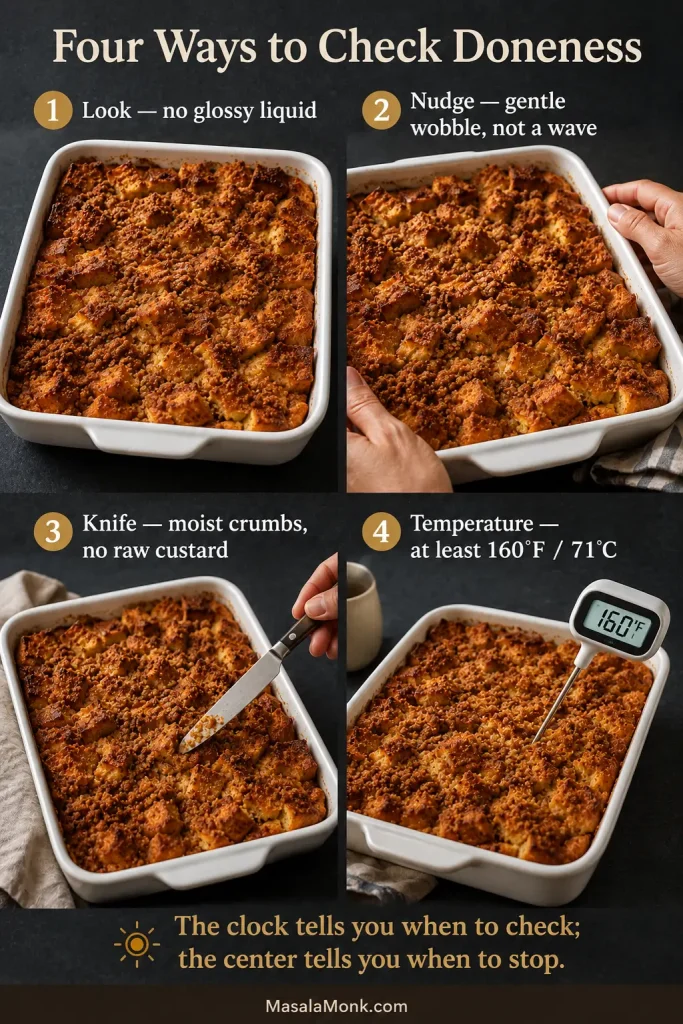
How to Tell When the Casserole Is Done

  • Look: The center no longer appears glossy or filled with liquid custard.
  • Nudge the dish: A gentle wobble through the center is fine; a flowing wave means it needs longer.
  • Use a thin knife: Moist crumbs are expected. Raw custard coating the knife means the casserole needs more time.
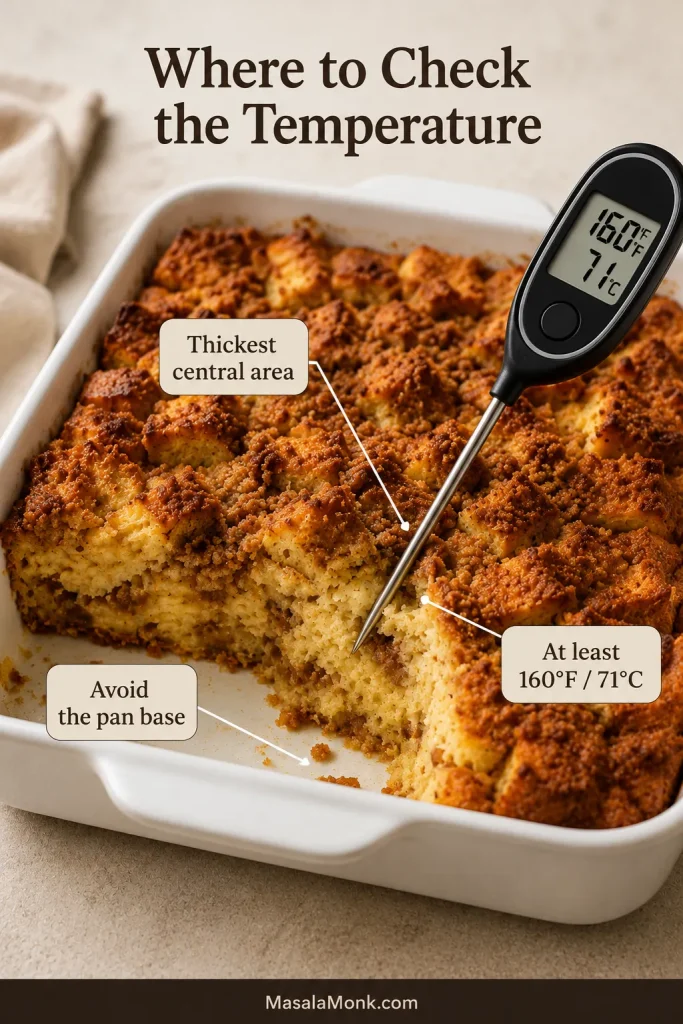
  • Check the temperature: Insert an instant-read thermometer into the thickest central area, avoiding the base of the dish.
Doneness guide showing the casserole’s appearance, gentle wobble, knife test and a thermometer reading 160 degrees Fahrenheit or 71 degrees Celsius.
To tell when French toast casserole is done, use the cues in order—look, nudge, knife and temperature—so the oven loses as little heat as possible between checks.

The USDA recommends 160°F / 71°C for casseroles and other dishes containing eggs (opens in a new tab). Let that temperature confirm what you can already see: a set center, no flowing wave and no raw custard on the knife.

Instant-read thermometer inserted into the thick center of French toast casserole without touching the ceramic pan.
Angle the thermometer into solid bread and custard in the thickest central area; an air gap or contact with the hot dish can produce a misleading reading.

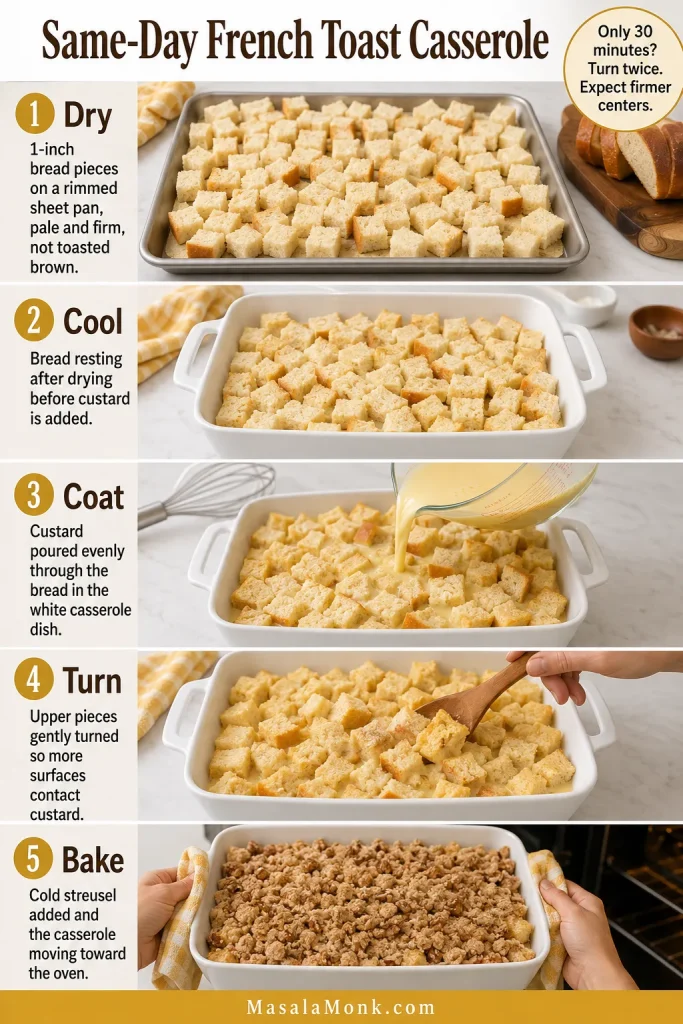
Forgot Last Night? Use the Same-Day Method

Remembered after waking? A full overnight soak is no longer possible, but the morning does not have to become a scramble. Thoroughly dried bread gives a shorter soak a much better chance to work.

  1. Cut the bread into pieces around 1 inch / 2.5 cm.
  2. Dry it using the oven method above, allowing up to 20 minutes when the bread is especially fresh and soft.
  3. Cool the bread before adding the egg mixture.
  4. Toss thoroughly so every piece makes contact with the custard.
  5. Let the assembled casserole stand for 45–60 minutes.
  6. Turn the upper pieces gently once midway through the soak.
  7. Add the streusel and bake using the same center-of-the-pan cues as the overnight version.
Five-step guide showing bread being dried, cooled, coated with custard, gently turned and topped before same-day baking.
For same-day French toast casserole, cool the dried bread before adding custard; otherwise, trapped steam can soften the surface you just worked to dry.

The casserole will still bake up warm and crisp-topped; the bread will simply keep more of its individual shape.

The 30-Minute Backup

Dry the bread thoroughly, keep the pieces close to 1 inch and turn them twice during the short soak. Those two turns help more of the surface meet the custard before the pan goes into the oven.

Whether the bread soaked for an hour or overnight, the same moisture cues determine whether the center finishes custardy or remains wet.

How to Keep French Toast Casserole From Getting Soggy

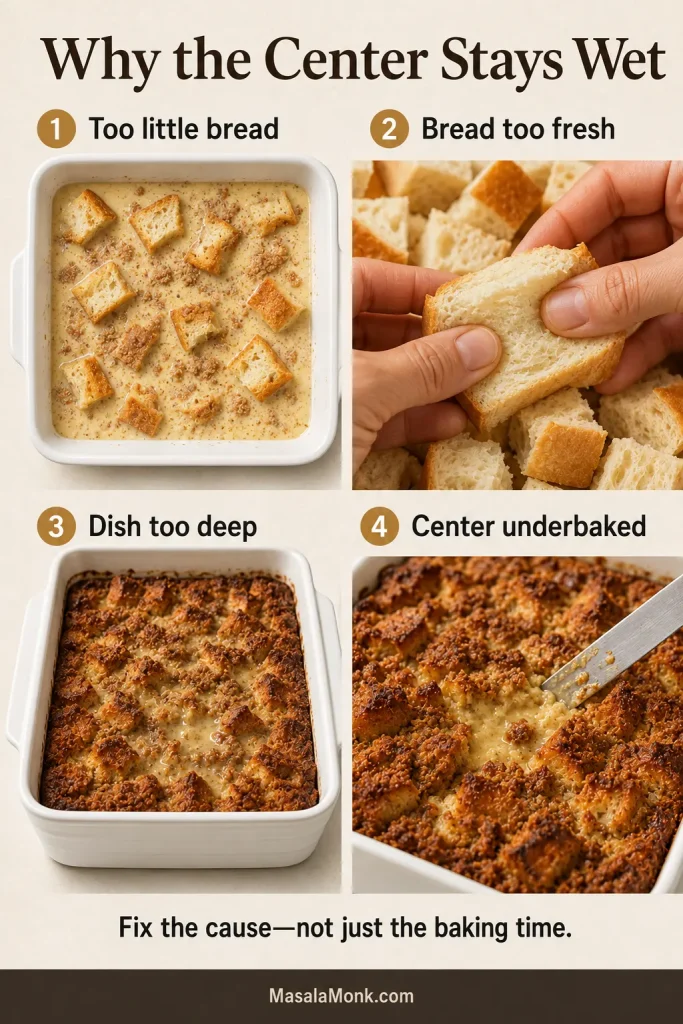
Softness belongs in the dish. Free liquid does not. Most soggy pans come back to four causes.

  • Too little bread. An unusually small loaf leaves more custard than the pan can absorb. Use the full 16 oz / 450 g.
  • Bread that was too soft or moist. Very fresh pieces lose their shape more easily during a long soak. Dry them until the surface feels firm but remains pale.
  • A dish that is too deep. The edges can finish before enough heat reaches the middle. Two standard pans are more dependable than one very deep casserole.
  • A center that needed more baking. A brown top does not guarantee that the custard underneath has set. Cover the surface with foil when it is dark enough and continue until the middle passes the visual, knife and temperature checks.
Four-panel guide showing too little bread, overly soft fresh bread, a deep casserole dish and a golden but underbaked center.
Before changing the egg-and-milk ratio, check the four more likely causes of a wet French toast casserole: bread quantity, starting moisture, pan depth and center doneness.

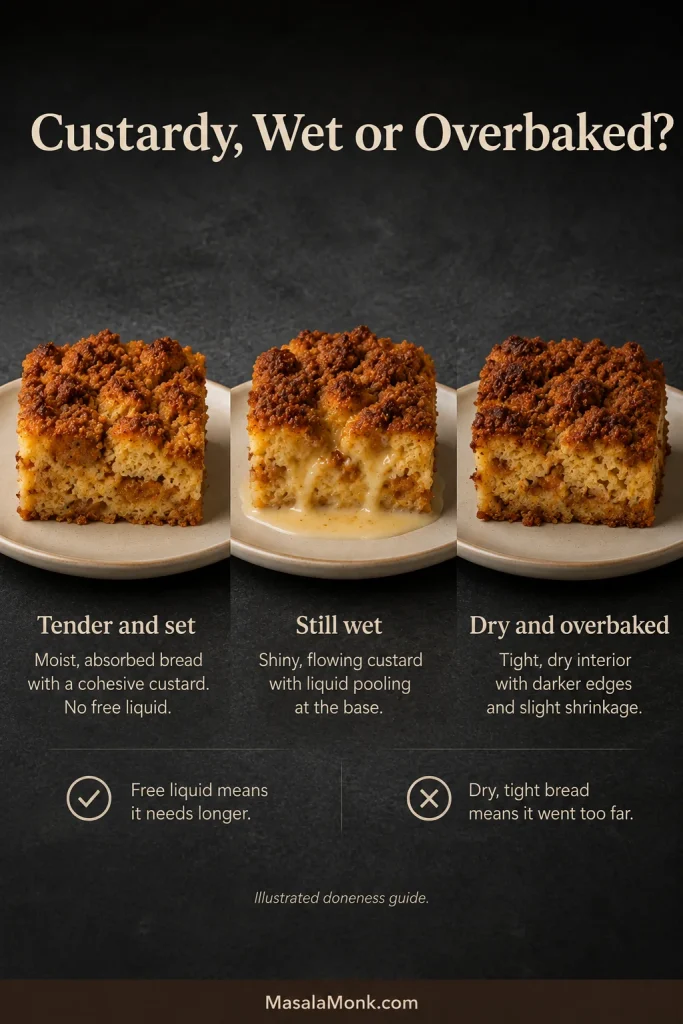
Custardy or Still Wet?

Custardy means the bread is tender and moist, with no liquid collecting around the serving spoon. Still wet means custard flows when the dish moves or coats a knife in the center.

Three servings compare French toast casserole that is properly set, still wet with visible liquid and dry from overbaking.
Compare the cut faces: the correct center glistens lightly and holds, the wet sample slumps, and the overbaked sample fractures.

Dietary Adaptations

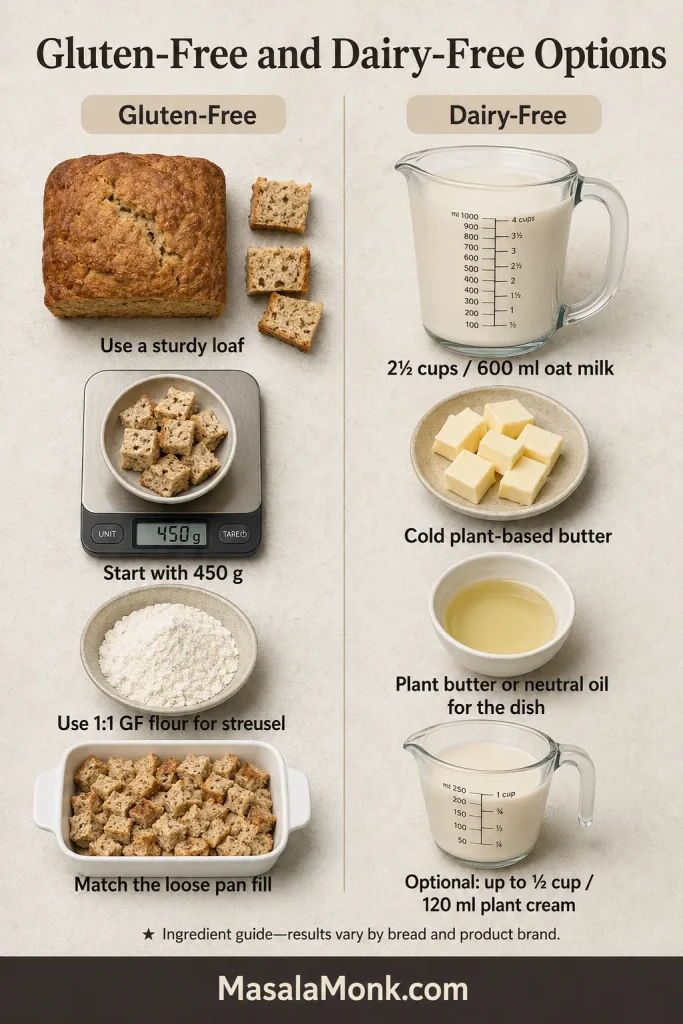
These adaptations work best when the substitutes preserve the original structure: sturdy bread by weight, enough body in the custard and a firm fat that can still form streusel crumbs.

Gluten-free bread, a scale reading 450 grams, gluten-free flour, oat milk, plant-based butter, oil and optional plant cream.
For gluten-free and dairy-free French toast casserole, keep the structure intact: weigh the bread, use oat milk for body and choose firm plant butter for crisp streusel.

Gluten-Free

Use a certified gluten-free loaf and replace the all-purpose flour in the streusel with ½ cup / 60 g 1:1 gluten-free baking flour. Begin with 450 g bread and check that the pieces loosely fill the pan to roughly the same level as 10–12 cups of French bread.

A thick, sturdy loaf usually holds up better overnight than thin packaged slices. When cooking for someone with celiac disease or significant cross-contact concerns, check the certification of all packaged ingredients.

Dairy-Free

Use 2½ cups / 600 ml unsweetened oat milk. Replace the streusel butter with an equal weight of cold, firm plant-based butter, and grease the dish with plant-based butter or neutral oil. For a richer custard, replace up to ½ cup / 120 ml of the oat milk with an unsweetened plant-based cream suitable for cooking.

Egg-Free or Vegan

Eight eggs do most of the setting in this recipe, so replacing them changes the whole custard—not only the flavor. A general egg replacer is unlikely to hold a full 9×13-inch casserole together on its own. Begin with a vegan baked-French-toast custard designed for a full casserole. This vegan French toast guide explains several egg-free custard approaches and how each one helps the mixture set.

Pan Size, Servings and Scaling

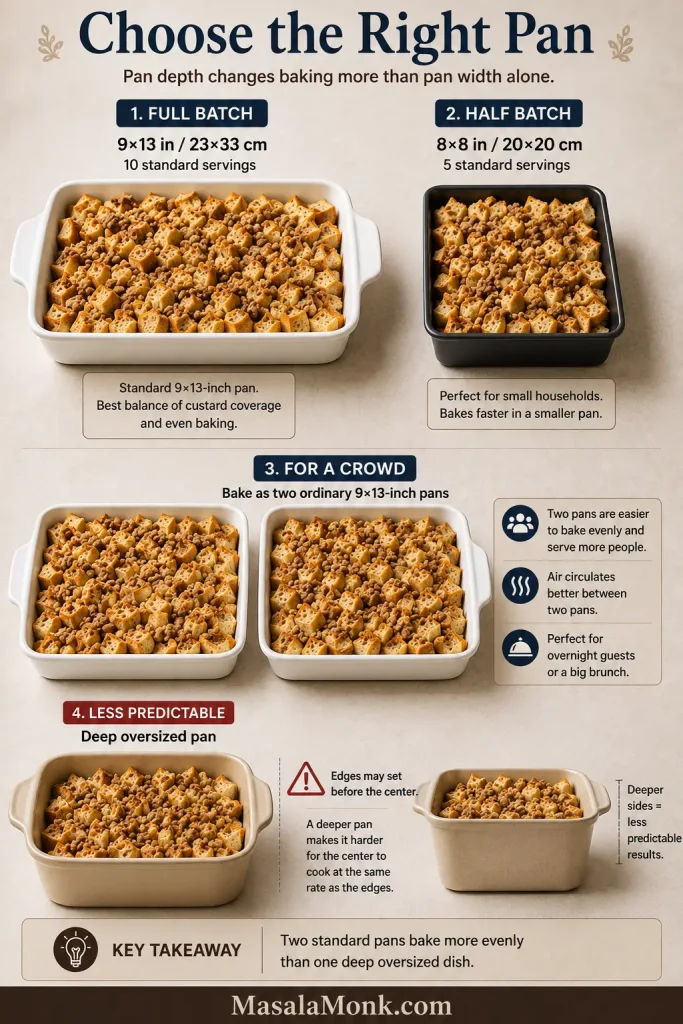
A half batch suits a smaller table and still leaves room for one easy breakfast the following day. For a larger gathering, two ordinary pans bake more consistently and are easier to serve than one extra-deep casserole.

A 9-by-13-inch dish, an 8-by-8-inch pan, two crowd-size pans and one deeper casserole dish compared by size.
The side profile matters more than the footprint alone: a deeper custard layer needs longer for heat to reach its center.
SetupYieldBegin checkingWatch for
9×13-inch full batch10 standard servings, 8 generous or up to 12 smaller brunch portionsAbout 40 minutesThe center setting before the top becomes too dark
8×8-inch / 20×20 cm half batch5 standard, 4 generous or up to 6 smaller portionsAbout 30 minutesMany dishes finish around 35–45 minutes
Two 9×13-inch pans20 standard servings, or 16–24 depending on the menuCheck each pan on its ownOne pan finishing several minutes before the other
One deeper oversized batchVaries with dish sizeLater than the standard batchThe edges setting before the center

Half Batch for an 8×8-Inch / 20×20 cm Dish

Quick guide: This smaller pan makes 5 standard, 4 generous or up to 6 smaller servings. Begin checking at 30 minutes; many half batches finish in approximately 35–45 minutes.

Half-batch French toast casserole in a dark square pan with servings removed and one portion plated for a smaller breakfast.
A half-batch French toast casserole still bakes at 350°F / 175°C; only the quantity and checking time change, so resist lowering the oven temperature.

Follow the same night-before assembly, morning topping and center-doneness cues as the full recipe.

  • 8 oz / 225 g bread
  • 4 large eggs
  • 1 cup / 240 ml whole milk
  • ¼ cup / 60 ml half-and-half or cream
  • 2 tablespoons plus 2 teaspoons / 35 g brown sugar
  • 1½ teaspoons vanilla
  • 1 teaspoon cinnamon
  • ⅛ teaspoon nutmeg
  • ⅜ teaspoon fine salt, or ¼ teaspoon plus ⅛ teaspoon

For the smaller streusel, use ¼ cup / 30 g flour, 35 g brown sugar, ½ teaspoon cinnamon, a pinch of salt, 3 tablespoons / 43 g butter and ¼ cup / about 28 g pecans when using.

Baking Two Pans for a Crowd

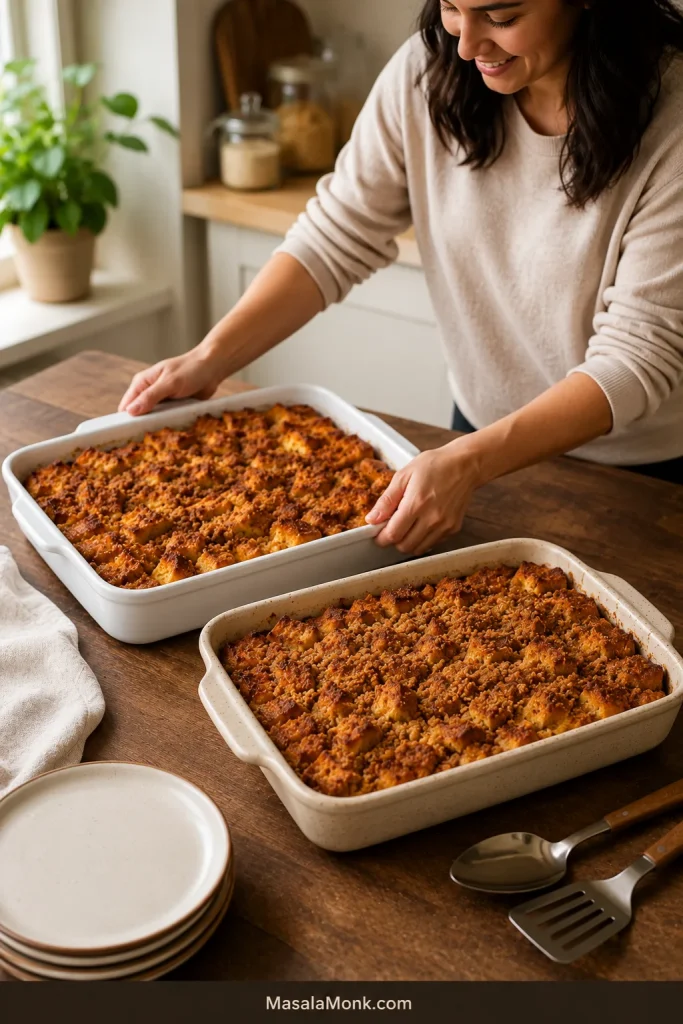
Leave space around both pans for airflow and rotate their positions when the oven browns unevenly. When guests are staying over, two pans also let breakfast reach the table without anyone cooking individual batches at the stove.

Two rectangular pans of golden French toast casserole arranged with space between them in a bright kitchen.
Treat two pans as separate bakes: rotate only when needed and remove each pan when its own center reaches doneness.

When the table needs one sweet pan and one savory pan, this breakfast casserole with hash browns can also be assembled ahead.

Blueberry, Apple and Cream Cheese Variations

Blueberry

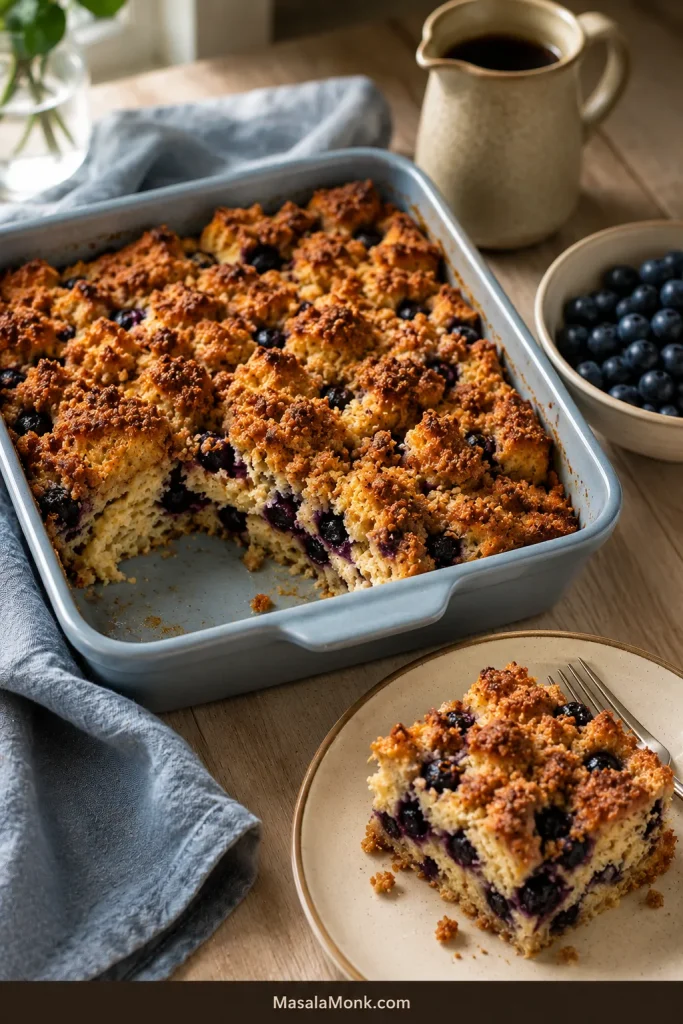
Blueberries add tart, juicy pockets against the cinnamon custard and brown sugar topping. Scatter 1 cup / 140 g through the bread. Fresh blueberries hold their shape better and release less juice. Frozen berries also work; add them straight from the freezer and expect the surrounding bread to become slightly softer.

Blueberry French toast casserole in a blue-grey dish with berries visible inside the bread beneath golden streusel.
For blueberry French toast casserole, tuck berries between several bread layers instead of piling them on top, reducing scorched fruit and concentrated pockets of juice.

Apple-Cinnamon

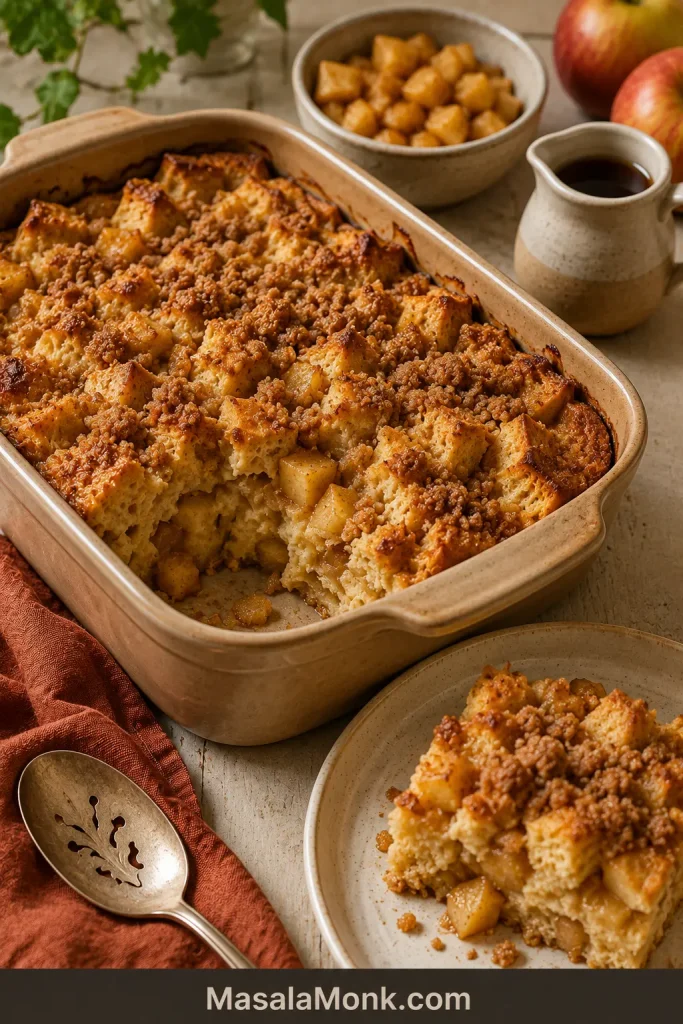
Soft cinnamon apples make the casserole warmer, fruitier and especially well suited to an autumn or holiday brunch. Cook 1½ cups / approximately 180–200 g peeled, diced apples in 1 tablespoon / 14 g butter with a pinch of cinnamon until just tender but still holding their shape. Cool them on a plate before distributing them through the bread.

Apple-cinnamon French toast casserole with small cooked apple pieces visible inside the bread and in a plated serving.
Spread the cooked, cooled apples through several shallow layers; this gives every serving fruit without creating one heavy pocket that weakens the custard structure.

Cream Cheese

Cream cheese adds small tangy pockets that break up the sweetness of the custard and streusel. Use 4–6 oz / 115–170 g cold full-fat block cream cheese, cut into small pieces. Tuck them throughout the bread so every serving gets a few creamy pockets. Avoid whipped or spreadable tub cream cheese, which brings more moisture.

French toast casserole with small white cream-cheese pockets distributed between defined bread pieces beneath a golden topping.
Keep the cream-cheese pieces smaller than a walnut so they stay scattered instead of melting into one heavy stripe.

Less-Sweet Version

For a more breakfast-like pan, reduce the brown sugar in the custard to ¼ cup / 50 g and leave the crisp streusel unchanged.

What to Serve With French Toast Casserole

The casserole is rich, soft and sweet enough that the best sides usually bring freshness, salt or a crisper texture. Air-fryer hash browns add crisp potatoes without competing for oven space.

  • Fresh fruit: Berries, orange segments, melon or lightly tart apples brighten the plate.
  • Maple syrup: Warm it separately so each person can decide how sweet the serving should be.
  • Eggs: Soft scrambled eggs or a simple egg bake make the meal feel more balanced.
  • Breakfast meat: Bacon or breakfast sausage provides a salty contrast to the cinnamon topping.
  • Holiday main: Sliced honey glazed ham works especially well for Christmas or Easter brunch.
  • Yogurt: Plain or lightly sweetened yogurt adds tang and pairs naturally with berries.
  • Coffee or tea: Often the only other thing a quiet weekend breakfast needs.
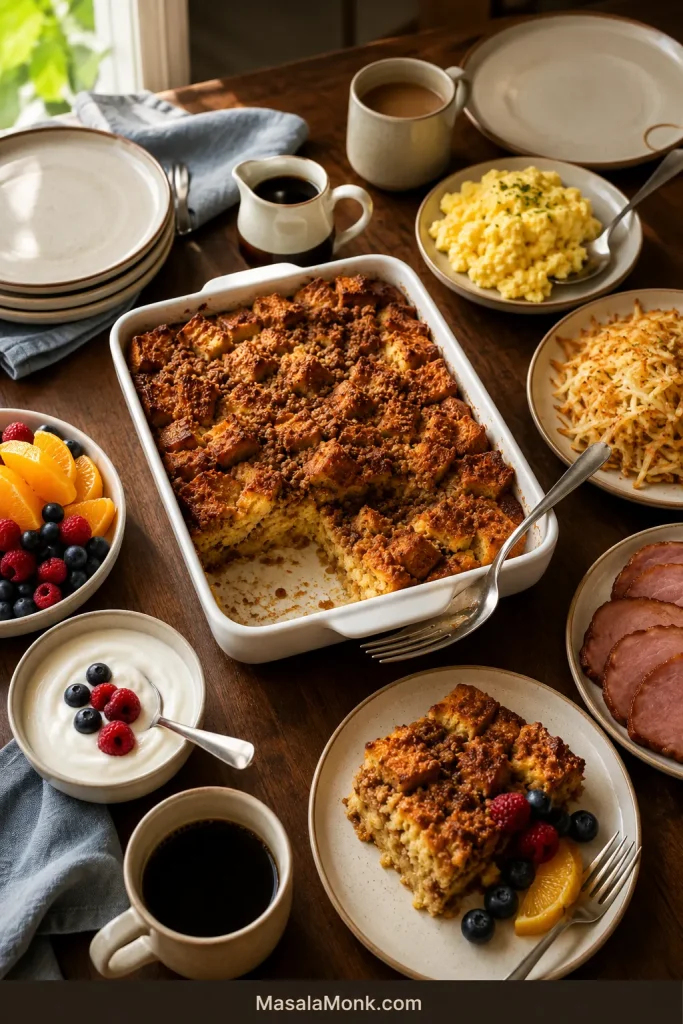
Brunch table with French toast casserole, fruit, yogurt, scrambled eggs, hash browns, sliced ham, maple syrup and coffee.
Build the brunch around contrast: pair the soft, sweet casserole with at least one fresh side, one crisp side and one savory side, then serve maple syrup separately.

For a holiday spread with more than one sweet centerpiece, homemade cinnamon rolls can also be prepared the night before.

For a buffet, cut smaller portions first; people can always return for another spoonful. When the casserole is the main event, plan on eight generous servings.

Leftovers, Freezing and Reheating

The top softens in the refrigerator, but a little dry heat brings back enough crispness to make leftovers worth looking forward to.

Refrigerate or Freeze

Leftovers. Refrigerate within two hours of serving, then keep in covered containers for 3–4 days. The USDA leftovers guidance (opens in a new tab) recommends rapid cooling, covered storage and reheating leftovers to 165°F / 74°C.

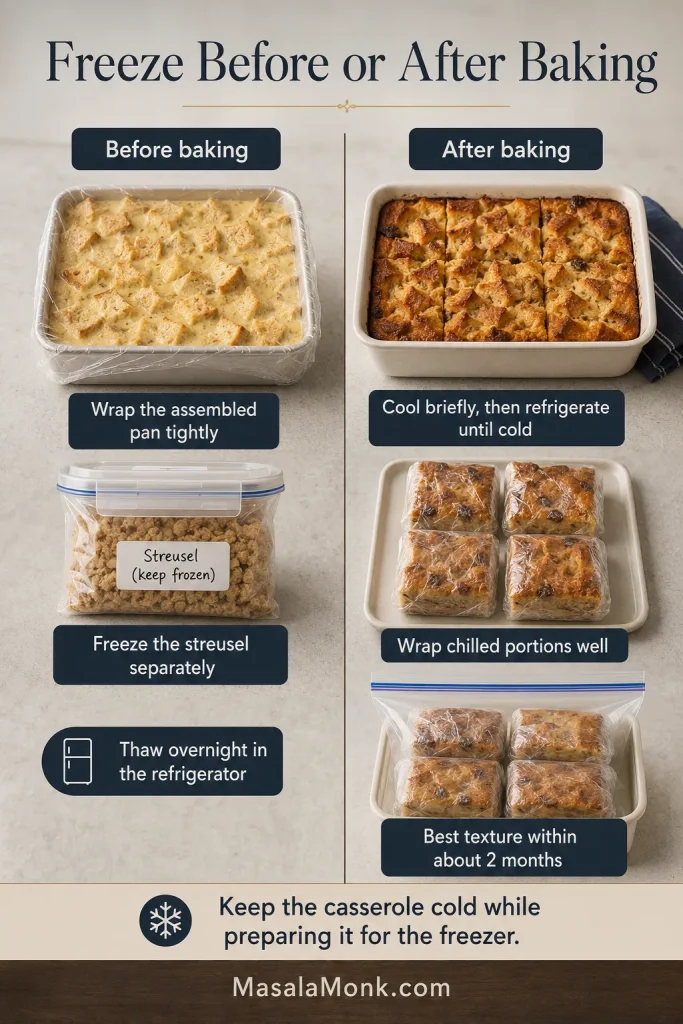
Freeze before baking. Assemble the bread and custard in a freezer-safe pan, wrap tightly and freeze the streusel separately. Thaw overnight in the refrigerator before topping and baking. Follow the cold-bakeware guidance in the recipe when choosing the pan.

Freeze after baking. Let the casserole cool briefly, then cut it into portions and refrigerate until cold. Wrap the chilled portions well and freeze for up to about two months for the best texture.

Freezing guide showing an unbaked wrapped casserole with separate streusel and baked portions chilled, wrapped and placed in a freezer bag.
To freeze French toast casserole before baking, keep the streusel separate; after baking, chill individual portions before wrapping so less condensation becomes trapped inside.

Reheat One Portion or Several

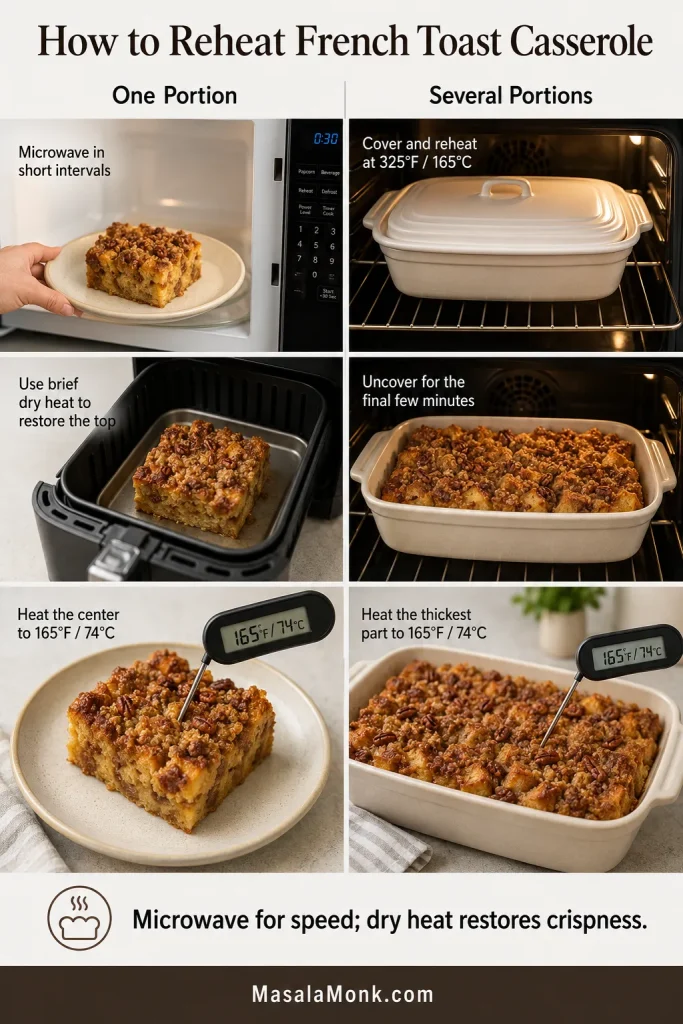
One portion. Microwave in 30-second intervals until nearly heated through. To restore the top, begin checking after about 2 minutes in a 350°F / 175°C air fryer or after about 5 minutes in a conventional oven. Confirm that the center has reached 165°F / 74°C before serving.

Several portions. Cover and reheat at 325°F / 165°C. Begin checking after 15 minutes and continue until the thickest part reaches 165°F / 74°C. Uncover for the final few minutes to refresh the streusel.

Guide showing one casserole portion microwaved and crisped separately, alongside several portions reheated covered and then uncovered in the oven.
Heat and crisp are separate jobs: covered or microwave heating warms the center, while a brief uncovered finish refreshes the streusel.

For the best second breakfast, chill the remaining casserole promptly and reheat only the portion you plan to serve.

Reheated French toast casserole serving with a crisp cinnamon topping beside coffee, a fork, glasses and a book in morning light.
A chilled portion reheated once can bring back enough crispness for an easy second breakfast.

Troubleshooting Overnight French Toast Casserole

Most problems are recoverable: cover a dark top, give a loose center more time, or revive dry pieces with warm syrup.

ProblemFix it nowNext time
Center is wetReturn the casserole to the oven and continue baking. Add a loose foil tent only if the top is already brown enoughUse the stated bread weight and check the thickest area; time alone can mislead
Top is dark but center is looseCover loosely with foil and continue bakingKeep the pan on the center rack and begin checking earlier
Casserole is dryServe with warm syrup, fruit or yogurtUse the full custard amount and remove the pan once the center is set
Flavor is overly eggyTart fruit and maple syrup can make the egg flavor less noticeableAvoid adding extra eggs, and whisk the custard thoroughly before pouring
Edges are rubberyTrim only the driest edge when servingBegin checking sooner, especially in dark metal pans
Some bread is still drySpoon warm syrup over those piecesPour in stages and turn the bread during assembly
Bread collapsed into mushLet the casserole rest longer, then serve it by the spoonful instead of cutting clean portions. Add fresh fruit or toasted pecans for contrastUse firmer or better-dried bread and avoid adding extra liquid
Streusel disappearedAdd a light dusting of cinnamon sugar after bakingRefrigerate the topping separately and add it in the morning

Frequently Asked Questions

Can I assemble it more than one night ahead?
Firm, dry French bread or sourdough can usually remain refrigerated for up to about 24 hours. Softer breads may begin losing their shape, so 8–12 hours remains the usual target.

Can I bake it directly from the refrigerator?
Check the manufacturer’s guidance before moving cold glass or ceramic bakeware into a hot oven. A metal pan avoids that thermal-shock concern.

Should French toast casserole bake covered or uncovered?
Bake this streusel-topped version uncovered so the exposed bread and topping can crisp. If the top becomes dark before the center is set, tent it loosely with foil and continue baking.

Breakfast Is Waiting

The cinnamon streusel and soft vanilla custard make this pan feel special, but the real reward happened the night before. The bread was cut, the eggs were whisked and most of the kitchen was already cleaned while the morning was still hours away.

Now the top is crisp, the center is properly set and breakfast can be carried to the table all at once. No skillet line, no stack growing cold while the next pieces cook—just one warm casserole and a morning that began with the difficult part already handled.

What bread did you use? Tell us whether you made the casserole overnight or used the same-day method—and what you might add next time.

↑ Back to the top

Posted on Leave a comment

Apple Cake Recipe: Easy Fresh Apple Cake with Cinnamon

Square of fresh apple cake on a cream plate with visible apple pieces and a fork nearby.

When you want the comfort of apple pie without making pie dough, this is the cake to bake. It is a no-mixer fresh apple cake with tender cinnamon apple pieces, a soft sheet-cake texture, and clear doneness cues so the middle bakes through instead of turning heavy.

The batter is simple, the apples do most of the work, and the pan keeps everything easy to slice. Most of the prep is just peeling and dicing the apples; after that, you whisk, fold, spread, bake, and let the cake settle before cutting into cozy apple-filled squares.

This is the cake you make when the apples are already sitting on the counter and you want the house to smell like you tried harder than you did. It has an old-fashioned snack-cake feel: simple batter, warm cinnamon, soft apple pieces, and no frosting required.

Not applesauce cake, not canned-filling cake, and not apple dump cake — this is fresh apple comfort with snack-cake effort: clean slices you can eat warm tonight and again with coffee tomorrow.

Quick Answer: What Is Apple Cake?

Apple cake is a cinnamon-spiced cake made with fresh diced apples folded into the batter. This version bakes in a 9×13 pan, uses oil and yogurt or sour cream so the cake stays tender after it cools, and slices into soft apple-filled squares.

For the most reliable result, use 360–400 g prepared apple pieces, dice them into ⅜–½ inch / 1–1.25 cm pieces, keep the batter thick and scoopable, and bake until the center of the pan is fully set. A few moist crumbs on the tester are good; shiny wet batter means the cake needs more time.

Think of it in three simple rules: measured apples, thick scoopable batter, and enough time for the middle to bake and rest.

Make This Apple Cake When

  • There are 2–3 apples on the counter and dessert should not require pie dough.
  • A no-mixer cake sounds better than a weekend baking project.
  • Apple crisp feels too spoonable and you want clean, sliceable squares.
  • Fresh apple pieces matter more than applesauce or canned filling.
  • One cake needs to work warm after dinner and again the next day with coffee.

Fresh Apple Cake Recipe Card

Easy No-Mixer Fresh Apple Cake

A hand-mixed fresh apple cake with cinnamon, brown sugar, and tender 9×13 slices full of soft apple pieces. It is easy enough for a weekday bake, sturdy enough for a potluck, and warm enough for dessert.

Prep Time25 minutes, mostly peeling and dicing apples
Bake Time42–52 minutes
Cooling Time30 minutes
Servings12 large squares or 16 smaller squares
DifficultyEasy, no mixer
Pan9×13-inch / 23×33 cm light metal baking pan preferred
Best ApplesHoneycrisp, Granny Smith, Pink Lady, Fuji, Braeburn, or any crisp firm apple you enjoy eating raw
Best Doneness SignCenter of the pan no longer jiggles; tester shows moist crumbs, not wet batter

Before you start: Dice the apples first. Once the wet and dry ingredients are mixed, the batter should go into the oven soon so the leavening can work properly and the apples do not sit too long in the batter.

Ingredients

For the apple cake

  • 2 1/2 cups all-purpose flour, spooned and leveled, or 313 g
  • 2 teaspoons baking powder
  • 1/2 teaspoon baking soda
  • 3/4 teaspoon fine salt
  • 2 teaspoons ground cinnamon
  • 1/4 teaspoon ground nutmeg, optional
  • 3 large eggs, at room temperature
  • 3/4 cup neutral oil, such as sunflower, canola, or vegetable oil, or 180 ml
  • 3/4 cup packed light brown sugar, or 150 g
  • 1/2 cup granulated sugar, or 100 g
  • 1/2 cup plain yogurt or sour cream, or 120 g
  • 2 teaspoons vanilla extract
  • 3 cups peeled, cored, diced apples, or 360–400 g prepared apple pieces
  • 1/2 cup chopped walnuts or pecans, optional, or 55–60 g

Optional finishes

  • Powdered sugar
  • Cinnamon sugar topping
  • Vanilla glaze
  • Brown sugar glaze
  • Caramel drizzle
  • Vanilla ice cream or whipped cream

Instructions

Prepare the Pan, Apples, and Batter

  1. Prepare the oven and pan. Heat the oven to 350°F / 177°C. Grease a 9×13-inch / 23×33 cm light metal baking pan. Line with parchment, leaving a little overhang, if you want easier lifting and cleaner slices.
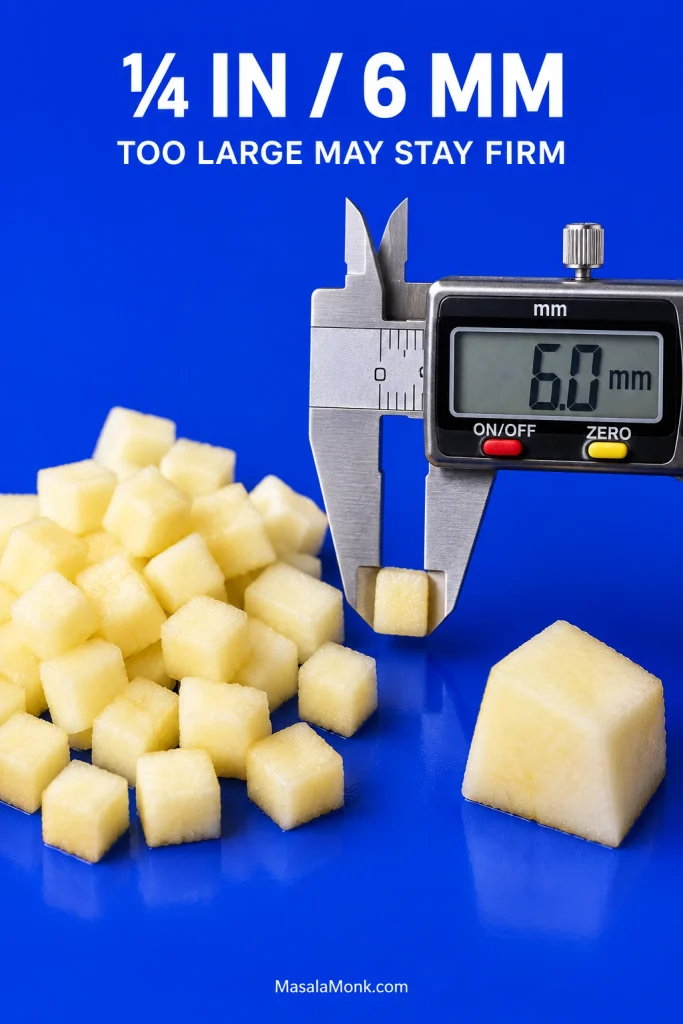
  2. Prepare the apples. Peel, core, and dice the apples into ⅜–½ inch / 1–1.25 cm pieces. Keep the pieces fairly even so they soften at the same rate.
  3. Mix the dry ingredients. In a medium bowl, whisk together the flour, baking powder, baking soda, salt, cinnamon, and nutmeg.
  4. Mix the wet ingredients. In a large bowl, whisk the eggs, oil, brown sugar, granulated sugar, yogurt or sour cream, and vanilla until smooth.
  5. Combine the batter. Add the dry ingredients to the wet ingredients. Fold gently with a spatula until no dry streaks remain. Do not overmix.
  6. Fold in the apples. Add the diced apples and nuts, if using. Fold until evenly distributed. The batter will be thick and scoopable.

Bake, Check, Cool, and Finish

  1. Spread into the pan. Scrape the batter into the prepared pan and nudge it evenly into the corners with a spatula. It should not pour like pancake batter.
  2. Bake. Bake for 42–52 minutes, or until the top is golden, the center of the pan no longer jiggles, and a tester inserted into the middle comes out with moist crumbs rather than wet batter. Start checking at 42 minutes.
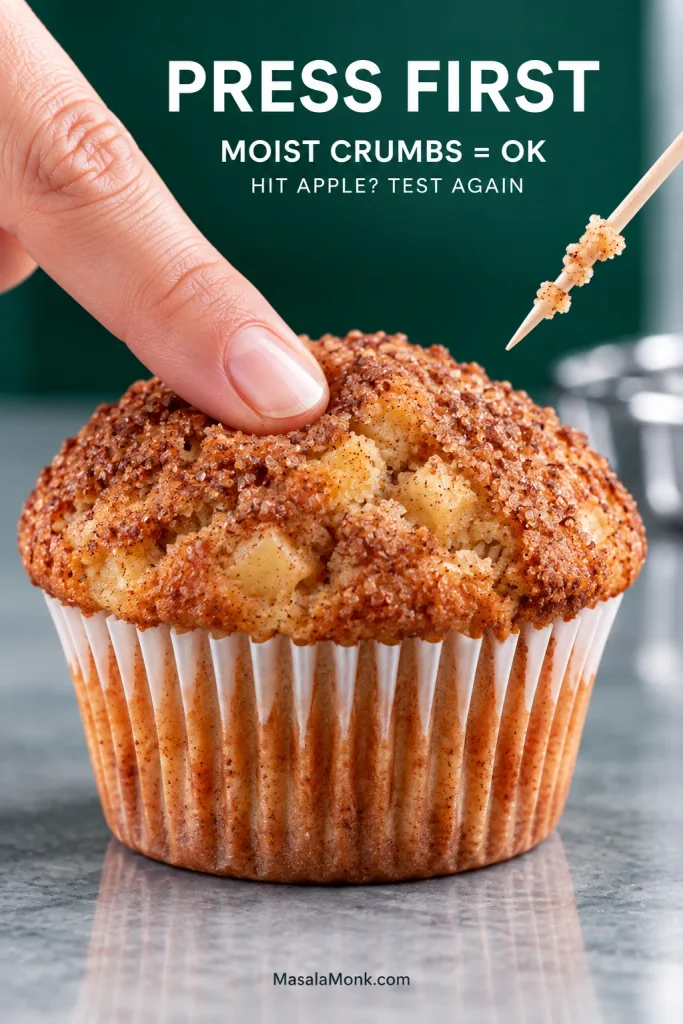
  3. Check carefully. If the tester hits an apple piece, try another spot. For extra confidence, the thickest area should read about 200–205°F / 93–96°C on an instant-read thermometer.
  4. Cool before slicing. Let the cake cool in the pan for at least 30 minutes. This helps the cake settle around the apple pieces.
  5. Finish and serve. Dust with powdered sugar, add one of the finishes below, or serve plain. Warm squares are softer; room-temperature squares cut cleaner.

Glass pan note: If using a glass or ceramic baking dish, reduce the oven to 325°F / 165°C and expect the cake to take longer. Glass can brown the edges before the middle finishes, so check the center carefully.

If the top browns early: Loosely tent the pan with foil and keep baking until the cake feels set in the middle.

Crumb topping note: If you add the crumb topping from the finish section, start checking at the same time but expect the cake to need a few extra minutes.

Here is the finished sheet-cake shape you are aiming for: a shallow 9 by 13-inch apple cake that cuts into soft, apple-filled squares.

Fresh apple cake baked in a parchment-lined 9 by 13-inch metal pan with one square removed and apple pieces visible in the crumb.
Because the batter is full of fruit, a 9 by 13-inch pan keeps it shallow enough to bake evenly and cut into clean squares.

Apple Cake at a Glance: What Matters Most

Best pan9×13-inch / 23×33 cm light metal pan
Apples360–400 g prepared diced apples
Apple size⅜–½ inch / 1–1.25 cm pieces
BatterThick, scoopable, and easy to spread with a spatula
Done whenCenter no longer jiggles and tester shows moist crumbs
Best first bakePlain or cinnamon sugar; use 360 g apples if they are very juicy

Timing note: The bake window is intentionally flexible because apples, pan material, and ovens vary. Trust the center of the cake first, then the timer.

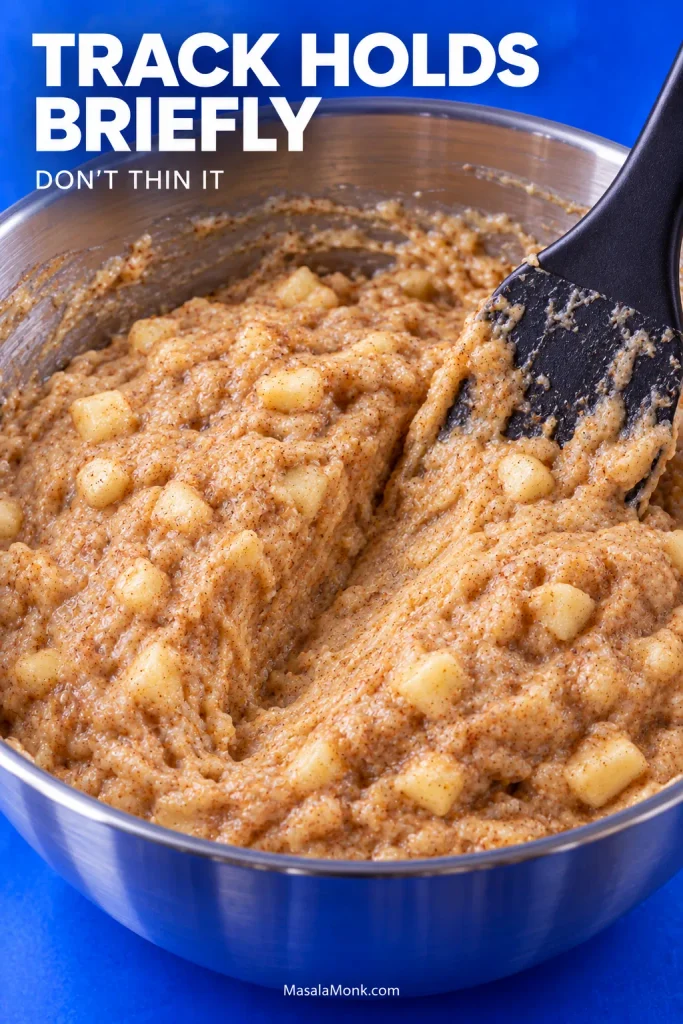
Thick cinnamon apple cake batter with diced apples lifted on a spatula from a mixing bowl.
Look for batter that clings to the spatula before it goes in the pan; that thickness keeps diced apples suspended through the crumb.

Ready to bake? Go back to the recipe card, or continue to why this apple cake works.

Why This Apple Cake Works

This cake works because it balances apple moisture with enough structure to bake into clean squares. Fresh apples bring flavor and tenderness, but they also release juice in the oven. The recipe keeps that moisture in check with measured apples, a shallow pan, and a batter sturdy enough to hold the fruit instead of collapsing around it.

This is the kind of cake that does not need decorating to feel generous.

This is not a show-off cake. Square by square, it disappears: one warm piece after dinner, another small piece with coffee, and one more the next day when the cinnamon has settled into the apples.

Why the pan matters: Fresh diced apples add moisture and weight to the batter. A shallow rectangular pan gives the cake enough surface area to bake through while staying tender. If you change the pan, apple amount, or topping, trust what the cake looks and feels like more than the clock.

ChoiceWhat it does
Oil instead of butterKeeps the cake softer after cooling
Brown sugar + cinnamonGives warm apple-pie flavor without pie dough
Yogurt or sour creamAdds tenderness and balances sweetness
9×13 panKeeps the apple-heavy batter shallow enough to bake evenly
Diced applesGives pockets of fruit without flooding the cake
Hand mixingKeeps the batter gentle and helps avoid a tough cake

Fresh Apple Cake vs Applesauce Cake vs Apple Dump Cake

Apple desserts overlap, but they do not behave the same way in the oven. Here, the main apple flavor comes from chopped apples folded into the batter. That makes it different from applesauce cake, where applesauce softens the texture, and different from apple dump cake, where canned filling and cake mix do most of the work.

Bowls labeled fresh diced apples, applesauce, and canned apple filling arranged on a light surface.
For this fresh apple cake, diced apples keep the texture chunky and tender, while applesauce or canned filling changes the dessert completely.

If you want spoonable, bubbling apple filling under a buttery cake-mix topping, that is apple dump cake territory. This recipe is for slices, so it needs fresh diced apples and cake batter that can bake around them.

TypeWhat it usesTextureBest for
Fresh apple cakeDiced fresh applesSoft cake with visible apple piecesEveryday baking, dessert, coffee, potlucks
Applesauce cakeApplesauce in the batterSmoother, softer, spice-cake-likePantry baking and moist snack cake
Apple dump cakeCanned apple filling, cake mix, and butterSpoonable, cobbler-like shortcut dessertFast desserts with almost no prep
Apple crumb cakeApple cake plus streusel toppingCoffee-cake style with a crumbly topBreakfast-dessert crossover and holiday baking

If you want apple pieces in a cinnamon cake, stay with this recipe. If you want a smoother spice cake where applesauce provides most of the moisture, choose applesauce cake. Canned apple filling is better saved for shortcut bakes like apple pie with apple pie filling.

If you want to make your own thick fruit base for pies, crisps, and freezer desserts, use this apple pie filling recipe instead of folding cooked filling into this fresh apple cake batter.

Apple Cake Ingredients and Why They Matter

The ingredient list is simple, but every choice is doing a job: tender texture, warm spice, clean slices, and enough body to hold the apples without weighing down the cake.

Fresh Apples

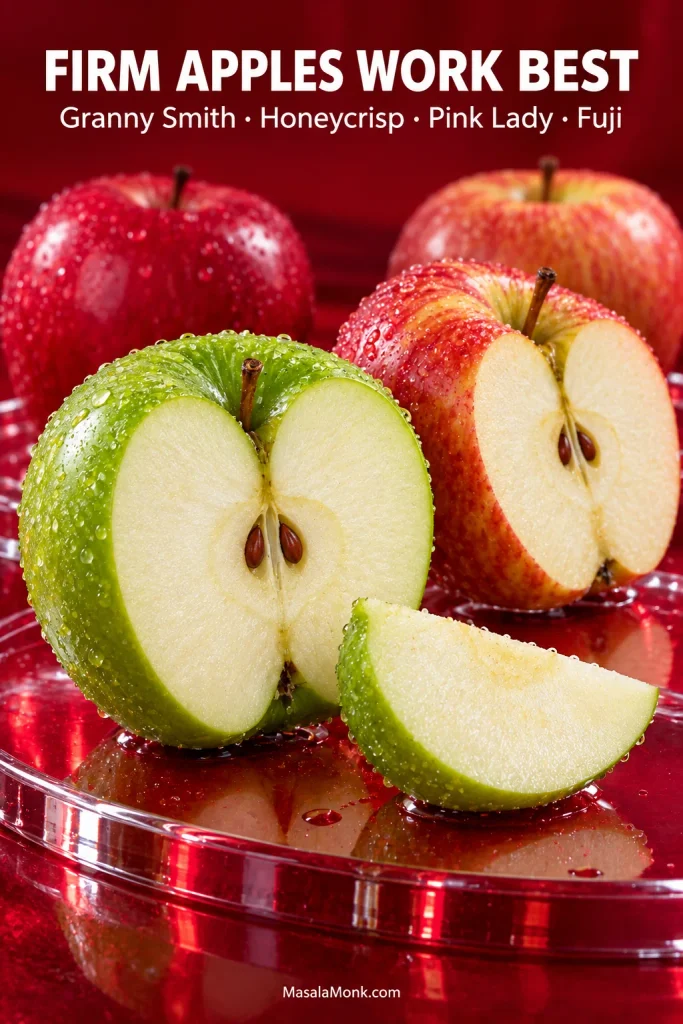
Use firm apples that hold some shape in the oven. Honeycrisp, Granny Smith, Pink Lady, Fuji, Braeburn, and Jonagold all work well. If those named apples are not available, use any crisp, firm apple that tastes good raw. Avoid mealy or overripe apples; they bring moisture without much flavor.

The goal is little pockets of apple that taste soft and bright, not damp patches in the cake. For this recipe, use 360–400 g peeled, cored, diced prepared apple pieces. That is usually about 2–3 medium apples after peeling and coring, depending on size.

If your apples are very juicy, stay closer to 360 g. If they are firm and crisp, 400 g works well. You do not need perfect cubes; just keep the pieces close enough in size that they bake at the same pace.

All-Purpose Flour

All-purpose flour gives the batter enough body to hold the apple pieces. If possible, weigh the flour. If using cups, spoon the flour into the measuring cup and level it off. Scooping directly from the bag can pack in too much flour and make the cake dry.

Oil

Oil keeps the cake plush after cooling, which matters because apple cake is often even better the next day. The slice should still feel tender with coffee, not firm or dry from the fridge.

Butter gives richer flavor, but it can make cakes feel firmer once they sit. Neutral oil is the easier choice here because it stays gentle behind the apples and cinnamon.

Brown Sugar and Granulated Sugar

Brown sugar gives the cake a soft, caramel-like warmth that makes the apples taste rounder. Granulated sugar keeps the texture lighter, so the cake stays cozy without feeling heavy.

Eggs

Eggs help the cake rise, set, and slice cleanly. Room-temperature eggs mix more smoothly into the batter, but do not worry if you forget. Just whisk the wet ingredients well before adding the flour.

Yogurt or Sour Cream

Yogurt or sour cream keeps the cake tender and balances the sweetness, especially if your apples are very sweet. It should disappear into the batter, not make the cake taste tangy. If your Greek yogurt is very thick, regular plain yogurt or sour cream will give the easiest batter.

Cinnamon and Warm Spice

Cinnamon is what makes the cake smell like dessert before it even comes out of the oven. Nutmeg is optional, but a small amount adds warmth. You can also use homemade apple pie spice if you want a rounder spice blend with cinnamon, nutmeg, allspice, or ginger.

If the warm-spice side of this cake is what you love most, a soft 9×13 spice cake is the cleaner direction when you want the same cozy flavor without apple pieces.

Vanilla

Vanilla rounds the edges so the cake tastes warm and complete instead of just sweet and spiced. It is a small addition, but it helps the apple, cinnamon, and brown sugar feel fuller.

Best Apples for Apple Cake

Firm, flavorful apples make the most balanced apple cake. A mix of sweet and tart apples gives the best flavor. If you only have one kind, choose an apple that tastes bright raw and still feels crisp when you cut it.

Board of firm apple varieties for baking, including Honeycrisp, Granny Smith, Pink Lady, and Fuji or Braeburn.
Choose firm baking apples so they soften into juicy pockets without watering down the cinnamon batter.

Many firm baking apples that work well in pie also work well in cake, but the goal is different. In pie, apples need to hold slices in a filling. In cake, the pieces should soften without flooding the batter. For a deeper apple-by-apple breakdown, see our guide to the best apples for apple pie and use the same firm, flavorful logic here.

AppleFlavorWhy it works
HoneycrispSweet-tartJuicy, crisp, and flavorful; use the lower apple amount if very juicy
Granny SmithTartBalances the sweetness and holds shape well
Pink LadySweet-tartFirm texture and bright flavor
FujiSweetGood for a sweeter, milder cake
BraeburnSweet-tartBakes well and has good apple flavor
JonagoldBalancedSoftens nicely but still brings flavor

Avoid apples that are mealy, bruised, overripe, or very soft. They can make the cake taste dull and the inside feel damp. If your apples are very sweet, a pinch more salt or a tart apple mixed in can make the flavor brighter.

Next step: Once you choose the apples, jump to how to cut apples for cake so the pieces bake through evenly.

Should Apples Be Chopped, Grated, Sliced, or Canned for Apple Cake?

Diced apples are best for this recipe. They give the cake visible fruit pieces while still letting the middle bake through. Aim for ⅜–½ inch / 1–1.25 cm pieces. Smaller pieces disappear; larger pieces can stay too firm or make the cake harder to slice.

Peeled diced apple pieces on a cutting board with a knife, ruler, measuring spoon, and label showing 3/8 to 1/2-inch pieces.
Cut the apples into small, even 3/8 to 1/2-inch pieces so they soften by the time the center sets.
  • Diced fresh apples: best balance of apple texture and even baking.
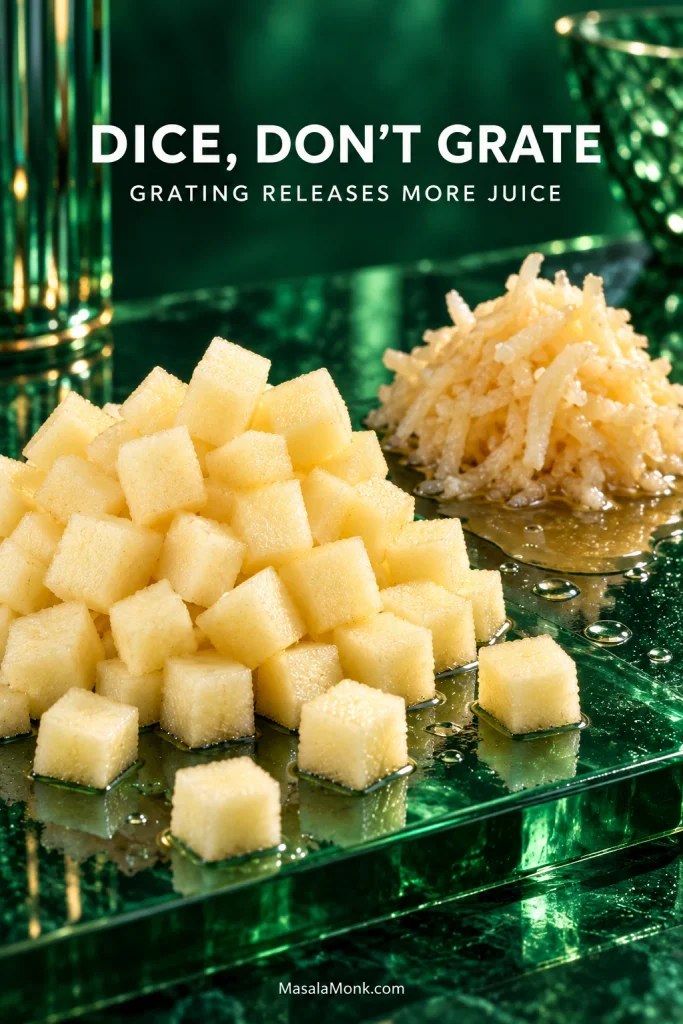
  • Grated apples: not ideal here because they release more moisture and can make the cake heavier.
  • Thin sliced apples: better for French, German, or invisible apple cake styles.
  • Canned apple pie filling: better for dump cake, pie, or shortcut apple desserts.

Peeling gives the softest texture. You can leave thin-skinned apples unpeeled for a rustic cake, but the skins will be noticeable in the finished slice.

The Best Pan and Tools for Apple Cake

You do not need a stand mixer for this apple cake. A bowl, whisk, spatula, knife, and rectangular baking pan are enough.

This is not a strict one-bowl cake, but it is fully hand-mixed: one bowl for dry ingredients, one for wet, then everything folds together with a spatula.

Hands whisking eggs, oil, brown sugar, yogurt, and vanilla in a bowl with diced apples and flour nearby.
Hand-whisk the wet ingredients until smooth; then fold gently once the flour goes in so the cake stays tender.

A light metal 9×13 pan is the easiest choice because it helps the cake bake through before the edges overbrown.

  • 9×13-inch / 23×33 cm baking pan: light metal is the easiest default.
  • Parchment paper: optional, but useful for cleaner lifting. Leave overhang if you want to lift the cake out of the pan.
  • Foil: helpful if the top browns before the cake is set in the middle.
  • Wire rack: helps the cake cool evenly.
  • Instant-read thermometer: optional, but useful if you often worry about doneness.

How to Make Apple Cake

Nothing here is fussy. The only real discipline is folding gently, spreading the batter evenly, and giving the cake enough time to finish.

Start with the pan and apples. Grease the pan, line it with parchment if you want cleaner lifting, then peel, core, and dice the apples into even pieces. Once the batter is mixed, it should go into the oven without sitting around for too long.

Whisk the dry ingredients in one bowl and the wet ingredients in another. When you combine them, switch to a spatula and fold gently. The batter should be thick enough that you have to nudge it into the corners — that sturdiness helps the apples stay suspended instead of sinking into a heavy layer.

Thick apple cake batter with diced apples being spread into a 9 by 13-inch metal pan with a spatula.
Once the apples are folded in, spread the thick batter into the corners instead of trying to pour it like a thin cake batter.

Fold in the apples until they are evenly spread through the batter. Scrape everything into the pan, smooth the top, and bake until the top is golden and the center is set. If the top gets dark before the cake is done, cover the pan loosely with foil and keep baking.

Let the cake cool for at least 30 minutes before slicing. Warm apple cake is lovely, but very hot apple cake is fragile. That short rest is what turns a soft bake into clean squares.

How to Know Apple Cake Is Done

Apple cake is generous, but it does ask you to check the middle instead of trusting the golden top alone. Because apple pieces stay moist, a tester can also look misleading if it goes straight through a piece of fruit.
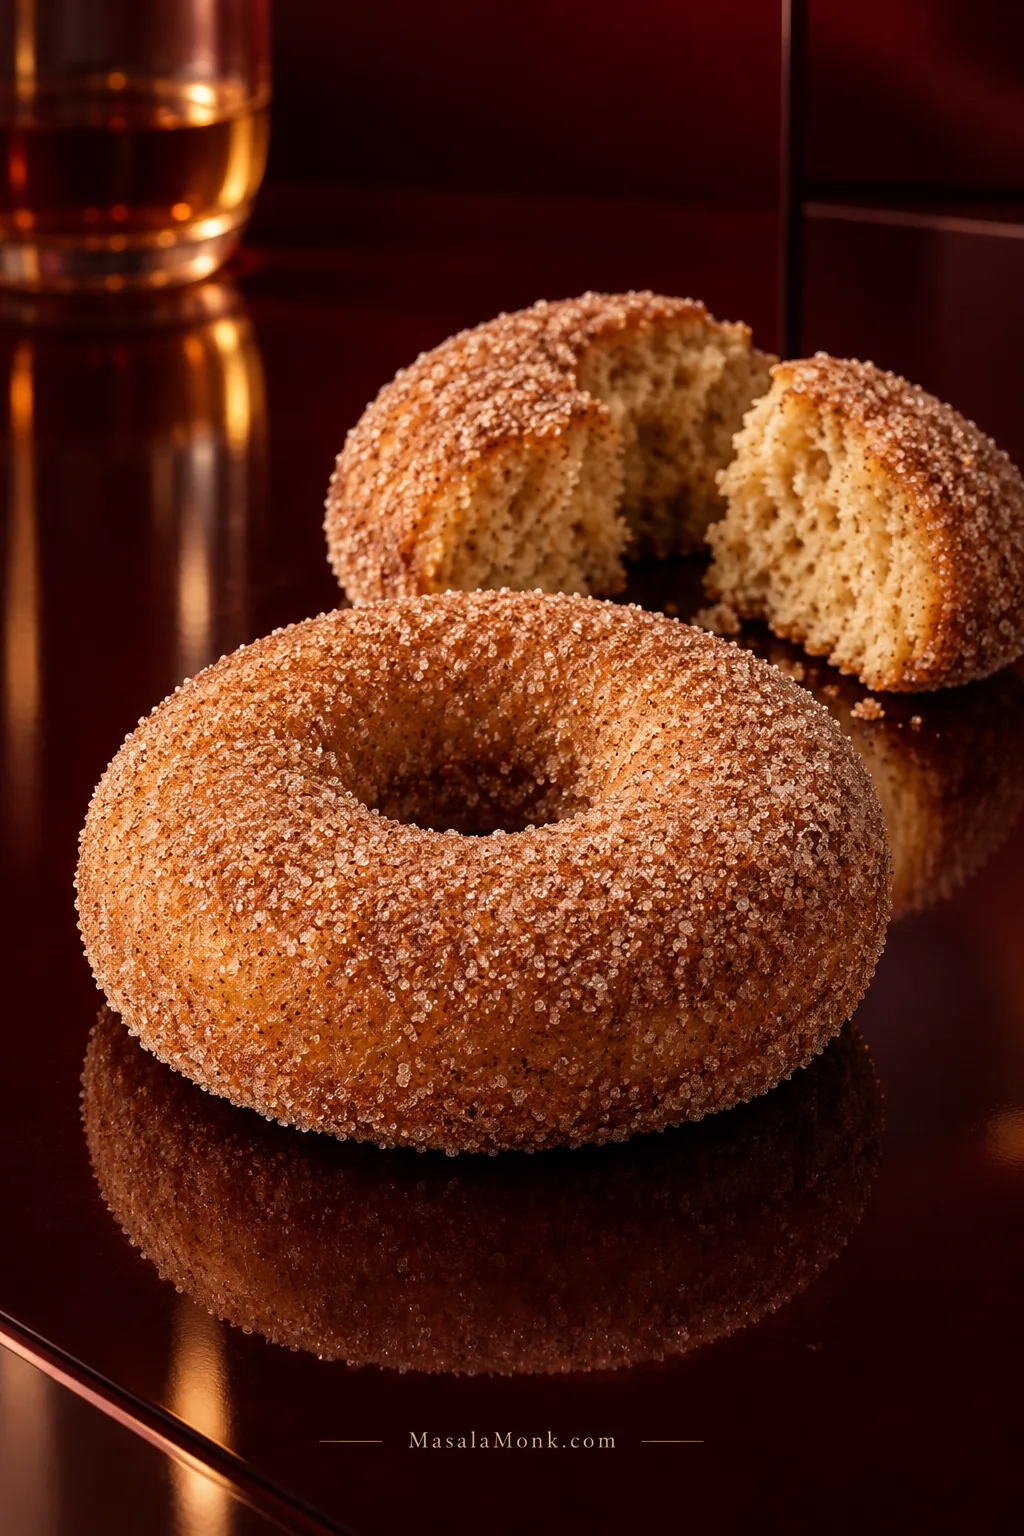
Apple cake is done when:

  • Golden, set top.
  • Center of the pan no longer jiggles.
  • Light spring-back when touched.
  • A toothpick comes out with moist crumbs, not wet batter.
  • A thin knife inserted into the cake does not reveal raw batter.
  • The thickest area reads about 200–205°F / 93–96°C on an instant-read thermometer, if using one.
Golden baked apple cake in a 9 by 13-inch metal pan cooling on a wire rack.
A golden top is a good first clue; however, the center should also feel set before the cake comes out of the oven.

If the tester hits an apple piece, check another spot near the center. Moist apple is fine. Wet batter is not. When in doubt, give the cake a few more minutes, especially if you are baking in glass or if your apples were very juicy.

Moist Crumbs vs Wet Batter

Use the center of the pan for the most reliable doneness check. The tester should come out with soft crumbs, not a glossy streak of raw batter.

Thin metal cake tester with moist crumbs held over a baked apple cake in a metal pan.
This is the texture you want on the tester: moist crumbs, not shiny batter.

For a broader baking-science look at doneness cues, King Arthur Baking has a useful guide on how to tell when cake is done. For this apple cake, the most useful signs are a set center, moist crumbs, and no shiny wet batter.

Once you know what a finished center looks like, the gummy-center problem becomes much easier to avoid.

How to Avoid a Gummy Apple Cake Center

A good apple cake should feel soft and plush, not damp. If the middle turns gummy, it usually means the apples gave off more moisture than the batter could set around.

Common causes include too many apples, pieces that are too large, a deep pan, underbaking, or slicing while the cake is still too hot. To fix it, do not overload the apples, keep the batter sturdy, and make sure the middle has truly set before you slice.

Side view of a fresh apple cake square showing diced apple pockets, soft crumb, and a set center.
A good slice should look moist and soft, but it should still hold together without a wet line through the center.

How to keep the middle soft, not gummy

  • Measure the apples. Use 360–400 g prepared apple pieces, not a heaping bowlful.
  • Dice evenly. Keep pieces around ⅜–½ inch / 1–1.25 cm.
  • Use a shallow pan. A deeper pan makes the cake harder to bake through.
  • Keep the batter sturdy. Scoopable batter helps hold the apples.
  • Fold gently. Once the flour goes in, avoid aggressive mixing.
  • Do not trust top color alone. A golden top can still hide an underbaked middle.
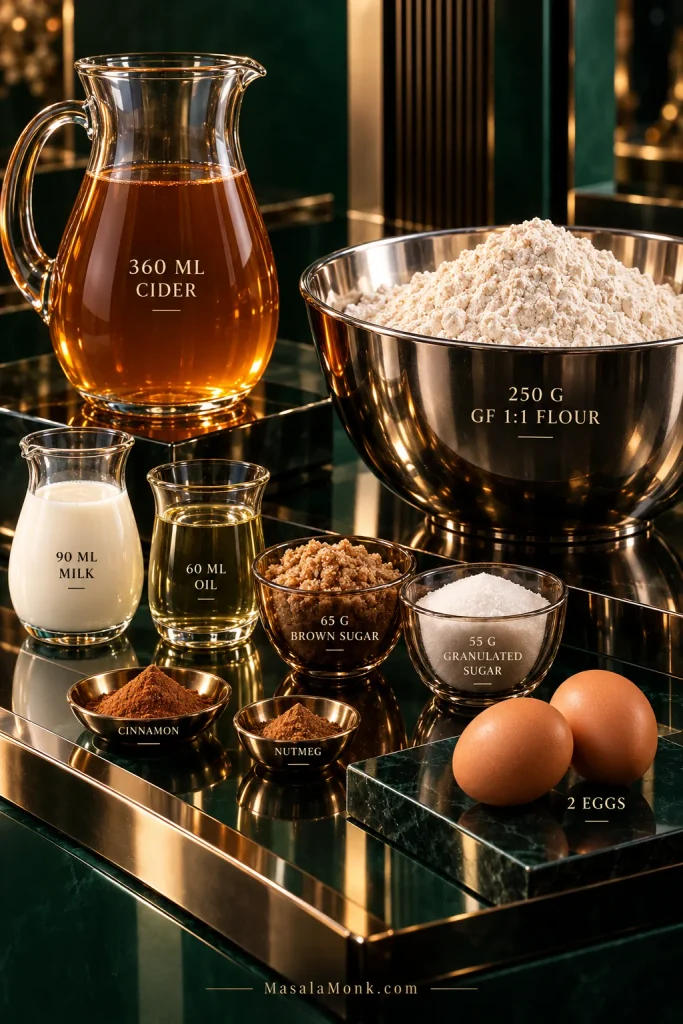
  • Tent if needed. If the top browns early, cover loosely with foil and continue baking.
  • Cool before cutting. The cake sets more as it rests.

The finished cake should feel tender, set, and sliceable rather than damp or raw in the middle. A few moist crumbs on the tester are good. Shiny wet batter means it needs more time.

This sounds like a lot, but it mostly comes down to measured apples, scoopable batter, and patience before slicing. Once those are in place, the cake is much easier than the troubleshooting section makes it sound.

Apple Cake Pan Size Guide

The pan decides how relaxed this cake feels in the oven. A shallow 9×13-inch / 23×33 cm pan gives the apple-heavy batter room to bake evenly, which makes it the most forgiving choice for this recipe.

Light metal and glass baking pans of apple cake shown side by side with temperature labels.
A light metal pan gives the most forgiving bake; glass or ceramic usually needs a lower temperature and a little more time.
PanRecommendationWhat to expect
9×13-inch / 23×33 cmEasiest defaultMost even bake, easy slices, lower gummy-center risk
9-inch squareWorksThicker cake; may need extra time
9-inch roundWorksPrettier presentation, slightly thicker cake
Loaf panBetter as a separate recipeDeeper batter means higher risk of an underbaked middle
Bundt panBetter as a separate recipeNeeds longer baking and very careful greasing
Muffin tinPossibleShorter bake time and more muffin-like texture
Slow cookerNot for this recipeBetter suited to apple dump cake or spoon desserts

For a light metal 9×13 pan, bake at 350°F / 177°C. With glass or ceramic, use 325°F / 165°C and expect a longer bake because the edges can brown before the middle finishes.

Once the apples are measured and the pan is right, the recipe is very forgiving. The batter is supposed to need a spatula, the apples soften as they bake, and the cake settles into clean squares as it cools.

Choose Your Apple Cake Finish

Plain apple cake is the quiet everyday version. Cinnamon sugar gives it a lightly crisp snack-cake top. Glaze, crumb topping, or caramel turns it into dessert.

For the first bake, serve it plain or use cinnamon sugar. Use brown sugar glaze when you want the cake to feel like it belongs on a dessert table.

Hands sifting cinnamon sugar over thick apple cake batter with diced apples in a 9 by 13-inch metal pan.
Cinnamon sugar is the easiest finish when you want a warm, fragrant top without making streusel or a separate glaze.
If you want…Use this finish
Everyday snack cakeServe plain or dust with powdered sugar
Cozy cinnamon topSprinkle cinnamon sugar before baking
Dessert-table versionDrizzle with vanilla or brown sugar glaze
Fall/holiday flavorAdd caramel drizzle
Coffee cake feelAdd a crumb topping
Old-fashioned styleFold in walnuts, pecans, or raisins

Plain, Cinnamon Sugar, or Glaze?

Choose the finish based on how you plan to serve the cake. Plain is best for everyday snacking, cinnamon sugar gives the top warmth and texture, and glaze makes the same cake feel more like dessert.

Three apple cake squares on a wooden board labeled plain, cinnamon sugar, and glaze.
Match the finish to the moment: plain for snacking, cinnamon sugar for extra warmth, or glaze for a more dessert-like apple cake.

Exact Finishing Formulas

  • Cinnamon sugar topping: Mix 2 tablespoons granulated sugar with 1/2 teaspoon cinnamon. Sprinkle over the batter before baking.
  • Simple vanilla glaze: Whisk 1 cup powdered sugar with 1–2 tablespoons milk and 1/2 teaspoon vanilla until pourable. Drizzle over the cooled cake.
  • Brown sugar glaze: Warm 3 tablespoons butter, 1/3 cup brown sugar, 1 tablespoon milk or cream, and a pinch of salt until smooth. Cool slightly, then drizzle over the cake.
  • Simple crumb topping: Mix 1/2 cup flour, 1/3 cup brown sugar, 1 teaspoon cinnamon, and 4 tablespoons cold cubed butter until crumbly. Scatter over the batter before baking.
  • Caramel finish: Use a light drizzle of caramel sauce after cooling, especially if serving with vanilla ice cream.

The plain version is quiet and cozy, the glazed version feels like company came over, and the cinnamon sugar version gives the top a little sparkle without turning the cake into a project.

Crumb topping can add a few minutes to the bake time because it insulates the top. If what you really want is pie structure with a buttery crumb topping, Dutch apple pie is the better direction.

Apple Cake Variations

Use the base recipe as your everyday version, then change the finish or mix-ins depending on the mood.

  • Everyday: Add the cinnamon sugar topping for a lightly crisp, cozy top.
  • Dessert table: Cool the cake fully, then drizzle with brown sugar glaze.
  • Old-fashioned: Fold in 1/2 cup chopped walnuts, pecans, or drained soaked raisins.
  • Coffee cake feel: Add the simple crumb topping from the finish section.
  • Warm spice: Use apple pie spice instead of cinnamon and nutmeg, or add a small pinch of ginger and allspice.
  • Separate recipe needed: Eggless, vegan, and gluten-free apple cakes need their own structure because eggs, dairy, and flour all help this version bake around the apples.

Fresh Apple Cake, Crumb Cake, Dump Cake, or French Apple Cake?

Apple cake means different things in different kitchens. Some versions are buttery and elegant, some are rustic tea cakes, some are crumb-topped, and some are almost all apple with just enough batter to hold the slices together.

  • Soft apple-filled squares: make this fresh apple cake.
  • Crumbly coffee-cake top: make apple crumb cake.
  • Buttery round cake with sliced apples: look toward French or German apple cake.
  • Shortcut spoon dessert: make apple dump cake.
  • Mostly apple slices: make invisible apple cake.
  • Tall oil-based holiday cake: Jewish apple cake is a different lane.

Apple Cake Troubleshooting

If something goes wrong, it is usually small and fixable. Fresh apple cake problems almost always come back to apple moisture, pan depth, flour measurement, or bake time — not a complicated technique.

ProblemLikely causeFix nowFix next time
Middle feels too softToo many apples, underbaking, or pan too deepTent with foil and bake 5–8 minutes moreUse 360–400 g apples and a shallow pan
Top browns before middle setsOven runs hot or top heat is strongCover loosely with foil and keep bakingUse a lower rack or reduce heat slightly if your oven runs hot
Dry cakeToo much flour, overbaking, or too little fatServe warm with glaze, cream, or ice creamWeigh flour if possible and start checking earlier
Apples sankApple pieces too large or batter too looseServe as-is; the flavor will still be goodDice apples smaller and keep the batter scoopable
Cake sank slightlyUnderbaked cake or overmixed batterCool fully before slicingBake until fully set and fold gently after adding flour
Bland flavorMild apples, not enough salt, or too little spiceAdd glaze, caramel, or cinnamon sugar before servingUse tart apples, enough cinnamon, salt, and vanilla
Cake crumbles when slicedSliced while too hotLet it cool longer, then cut with a sharp knifeWait at least 30 minutes before slicing
Glaze melted into the cakeCake was still warmLet it cool and add a second thin drizzleCool completely before glazing

The good news is that this cake is forgiving once the apple amount and pan size are right. Most fixes are small: a few more minutes in the oven, a little less apple next time, a lighter hand with the flour, or more patience before slicing.

How to Store Apple Cake

This is one of those cakes that rewards patience. The first slice is warm and soft; the next-day slice is deeper, tidier, and full of settled apple-cinnamon flavor.

  • Room temperature: Store covered for 1–2 days if your kitchen is cool.
  • Refrigerator: Store covered for 4–5 days.
  • Freezer: Freeze individual squares wrapped well for up to 2–3 months.
  • To reheat: Warm a slice briefly in the microwave or cover and heat in a low oven until just warm.
Apple cake squares wrapped in parchment, stored in a container, and served on a small plate.
Wrap squares before freezing so they thaw faster, stay neater, and let you warm only the pieces you need.

If the cake has a glaze, the top may soften during storage. For the cleanest finish, store the cake plain and add powdered sugar, glaze, or caramel shortly before serving.

How to Serve Apple Cake

Serve it casually with coffee, or warm a square just enough that the apple pieces soften again and the cinnamon smells fresh. Warm squares are softer and more dessert-like; room-temperature squares cut cleaner and feel more like snack cake.

A plain square with coffee is the quiet version; a warm square with ice cream is dessert.

Apple cake served two ways, with one square beside coffee and another square topped with vanilla ice cream.
Serve it with coffee when you want a cozy snack cake, or warm a square with vanilla ice cream when dessert is the goal.
  • Dust with powdered sugar for the simplest finish.
  • Serve warm with vanilla ice cream.
  • Add whipped cream for a softer dessert.
  • Drizzle with caramel sauce for a richer fall flavor.
  • Serve with custard for a British-style apple dessert feel.
  • Pair with coffee or tea for an afternoon cake.
  • Add a spoonful of yogurt if serving it as a breakfast-style snack cake.

More Apple Desserts to Try

Fresh apple cake sits in the middle of the apple-dessert world: easier than pie, more sliceable than apple crisp, less fussy than apple tart, and fruitier than applesauce cake.

Choose apple crisp when you want spoonable fruit and oats, apple tart when you want something prettier, Dutch apple pie when you want crumb topping with pie structure, and applesauce cake when you want a smoother pantry-style cake. Stay here when you want soft fresh-apple squares with no pie dough.

If you want a shortcut apple dessert instead of a from-scratch cake, this Apple Cinnamon Roll Bake with Apple Pie Filling is a better match for canned filling and refrigerated dough.

Apple Cake FAQ

What apples are best for apple cake?

Firm apples are best because they soften without turning watery. Honeycrisp, Granny Smith, Pink Lady, Fuji, Braeburn, and Jonagold all work well. If those are not available, use any crisp, firm apple that tastes good raw.

Do you peel apples for apple cake?

Peeling gives the softest texture. Thin-skinned apples can stay unpeeled for a rustic cake, but the skins will be noticeable in the finished slices.

Can you use canned apple pie filling in apple cake?

Not for this fresh apple cake. Canned apple pie filling is already cooked, sweetened, and thickened, so it changes the texture of the batter and can make the cake heavy. Use fresh diced apples here, and save canned filling for apple dump cake, shortcut bakes, or pie.

Why is my apple cake wet in the middle?

A wet middle usually means the cake needed more time, the pan was too deep, or the apples released more moisture than the batter could handle. Use measured diced apples, bake in a shallow rectangular pan, and check the center rather than judging by the top alone.
How small should apples be cut for apple cake?

Cut apples into ⅜–½ inch / 1–1.25 cm pieces. That size gives visible apple pockets while still allowing the cake to bake through evenly.

Is apple cake better with oil or butter?

For this style, oil is the easier choice because it keeps the cake softer after cooling. Butter gives richer flavor, but it can make the cake feel firmer once it sits.

Can you make apple cake ahead of time?

Yes. Apple cake is a good make-ahead dessert because the flavor deepens as it sits. Bake it a day ahead, store it covered, and add powdered sugar, glaze, or caramel shortly before serving.

Should apple cake be refrigerated?

It can sit at room temperature for 1–2 days if covered and kept in a cool kitchen. For longer storage, refrigerate it for 4–5 days. You can also freeze wrapped squares for 2–3 months.

What is the difference between apple cake and applesauce cake?

The main difference is where the apple moisture comes from. Fresh apple cake uses chopped apples, so the slices have visible fruit pieces. Applesauce cake uses applesauce in the batter, which creates a smoother, softer, spice-cake-like texture.

Does this apple cake work in a loaf pan?

A loaf pan is not the best choice for this exact recipe because the batter is deeper and more likely to stay wet in the middle. A 9×13 pan is more forgiving. For a loaf, use a dedicated apple loaf cake recipe with adjusted quantities and bake time.

Can apple cake be frozen?

Yes. Freeze individual squares wrapped tightly for 2–3 months. Thaw at room temperature or in the refrigerator, then warm briefly if you want the cake to taste closer to freshly baked.

Final Note

If you make it, notice which finish your table likes best: plain, cinnamon sugar, glaze, or caramel. Apple cake has a funny way of becoming “your” version after the first bake.

The best version gives you what apple pie promises, without the pie dough: tender apples, warm cinnamon, a soft cake, and clean squares you can eat warm tonight and again with coffee tomorrow.

Posted on Leave a comment

Spice Cake Recipe

9x13 spice cake in a baking pan with cream cheese frosting and one square lifted out to show the brown crumb.

Spice cake should taste like cinnamon in the air, brown sugar in the crumb, and just enough ginger, nutmeg, allspice, and cloves to make the whole kitchen smell like something good is cooling on the counter. A good version is fragrant and tender, not dry, dusty, or vaguely cinnamon-flavored.

This spice cake recipe is a no-fuss 9×13 sheet cake designed around the two things that matter most: a tender brown-sugar crumb and cream cheese frosting that stays where you spread it. It is soft and fragrant the day you bake it, then deeper and more settled once the spices rest overnight.

It is made from scratch, but it does not ask for layer-cake precision. The batter comes together with two bowls, a whisk, and a spatula; the only mixer you need is for the frosting. Bake it in the pan, cool it fully, frost it generously, and cut it into spiced squares for coffee, potlucks, chilly afternoons, or a simple holiday dessert.

When you cut into it, the slice should be warmly brown, soft under the fork, and sturdy enough to hold a generous swipe of frosting. The cake should taste complete before anything goes on top; the cream cheese frosting is there to brighten it, not hide dryness.

Close-up of a frosted spice cake square showing a moist brown crumb and cream cheese frosting on top.
Look for a tender, even crumb like this; a truly moist spice cake should hold together cleanly while still looking soft inside.

Quick Answer: What Is Spice Cake?

Spice cake is a brown-sugar cake flavored with baking spices such as cinnamon, ginger, nutmeg, allspice, and cloves. It is warmly spiced, not chili-hot. The “spice” comes from aromatic baking spices, not heat.

It is softer and sweeter than gingerbread, less fruit-forward than applesauce cake, and less chunky than carrot cake. The usual finish is cream cheese frosting because its tang cuts through the cinnamon-heavy crumb and brown sugar.

For the easiest homemade version, bake spice cake in a 9×13-inch metal pan at 350°F / 177°C. The slice should smell like cinnamon and ginger, cut cleanly, and hold the cream cheese frosting without feeling heavy. For the exact flavor balance, see the spice blend section.

Spice Cake at a Glance

Prep time20–25 minutes
Bake time35–40 minutes in a metal 9×13 pan; glass or ceramic may take longer
Cooling timeAt least 2 hours before frosting
Total timeAbout 3 hours, including cooling
Default pan9×13-inch baking pan
Oven350°F / 177°C
Yield12 large or 16 smaller slices
TextureSliceable, tender, fragrant
FinishCream cheese frosting

Why You’ll Love This 9×13 Spice Cake

  • Old-fashioned flavor comes through clearly. Cinnamon leads, but ginger, nutmeg, allspice, and cloves give every slice deeper fall-bakery flavor.
  • Real-life baking is the point. No stacked layers, no piping, no stand mixer for the cake — just a 9×13 pan and frosted squares you can serve straight from the pan.
  • Soft coffee slices still hold up for potlucks. Each square cuts cleanly, but still feels tender under the fork.
  • The cream cheese frosting makes it feel special. It adds cool tang, keeps the brown sugar in check, and turns a simple sheet cake into something holiday-table friendly.
  • Patience pays off. The same-day slice is soft and fragrant, but the next-day slice tastes deeper once the spices settle. For make-ahead timing, see the storage and freezing tips.

Same-Day Soft, Next-Day Deeper

This is the main make-ahead advantage of spice cake: the crumb stays soft while the cinnamon, ginger, nutmeg, and cloves taste more settled after a night of rest.

Two frosted spice cake squares on a plate labeled same day and next day, showing a lighter fresh slice and a darker settled slice.
Same day, the cake tastes soft and freshly spiced; by the next day, the cinnamon, ginger, nutmeg, and cloves settle into a deeper flavor.

What Is Spice Cake?

Spice cake is a cake where the main flavor comes from a baking-spice blend rather than chocolate, vanilla, fruit, or nuts. The batter usually includes brown sugar, a tenderizing ingredient such as buttermilk or sour cream, and enough fat to keep the cake enjoyable after it cools.

It belongs near gingerbread, carrot cake, pumpkin cake, and applesauce cake, but the point here is simpler: a spice-led crumb, not fruit, vegetables, heavy molasses, or pumpkin.

If you have ever wondered whether spice cake is just gingerbread, carrot cake without carrots, or applesauce cake without apples, this is the quick difference.

Spice cake guide with a frosted slice and smaller comparison sections for gingerbread, carrot cake, pumpkin cake, and applesauce cake.
Unlike carrot cake, pumpkin cake, or gingerbread, spice cake gets its main character from warm baking spices rather than one dominant fruit, vegetable, or molasses note.
CakeMain identityHow it differs from spice cake
Spice cakeBaking spicesSpice-led, usually with brown sugar and tangy frosting.
GingerbreadGinger and molassesDarker, sharper, and usually more molasses-heavy.
Carrot cakeGrated carrot and spiceOften includes carrots, nuts, raisins, pineapple, or coconut.
Applesauce cakeApple moisture and spiceSofter and more apple-led. For that direction, see our applesauce cake recipe.
Pumpkin spice cakePumpkin purée and spiceWetter, denser, and more seasonal because pumpkin changes the batter.
Chai cakeTea, cardamom, and chai spicesBetter baked as a separate chai cake, where the tea and cardamom can lead properly.

The best version does not taste like a spice cabinet. It tastes like brown sugar, warmth, and a soft square you want with coffee.

The Best Spice Blend for This Cake

The best spice cake blend is cinnamon, ginger, nutmeg, allspice, and a small amount of cloves. Cinnamon should lead; cloves should stay in the background.

Cinnamon gives the familiar warmth, but ginger, nutmeg, allspice, and cloves make the flavor deeper and more complete. Without those supporting spices, the cake can smell good in the oven but taste a little flat once sliced.

Spice blend guide with labeled bowls of cinnamon, ginger, nutmeg, allspice, cloves, and cardamom for spice cake.
Cinnamon should lead the spice blend, while ginger, nutmeg, allspice, cloves, and optional cardamom add warmth, depth, and balance.
SpiceWhat it addsHow strong to go
CinnamonThe familiar warm base.Use the most of this.
GingerBrightness and gentle heat.Enough to notice, not enough to become gingerbread.
NutmegRounded bakery-style flavor.Use lightly; too much can taste perfumed.
AllspiceDepth and an old-fashioned note.A little makes the cake taste fuller.
ClovesDeep background warmth.Use sparingly because it is powerful.
Cardamom, optionalFragrance and lift.Use lightly so the cake still tastes familiar.

That balance is what makes the cake smell cozy in the oven but still taste rounded once it cools. Allspice is not a spice blend; it is a single spice with a flavor that hints at cinnamon, clove, and nutmeg, so let it support the blend rather than dominate it.

Can you use pumpkin pie spice? Pumpkin pie spice works as a shortcut, though the flavor depends on the blend. For a homemade blend, see our pumpkin pie spice guide.

Why This Cake Stays Moist

The goal is a cake that still tastes good after it cools — and, ideally, tastes even more settled the next day. This version uses oil for lasting softness, a little butter for flavor, applesauce for moisture, and buttermilk for tenderness.

Why both oil and butter? A butter-only cake has wonderful aroma when warm, but it can firm up more after cooling. An oil-only cake stays softer, but it can taste flatter. Using both gives the cake a round old-fashioned flavor while keeping the inside from turning tight.

Applesauce and buttermilk support that texture without turning the cake into applesauce cake or a tangy yogurt cake. This is also why the base does not use shredded apple: the cake stays spice-led, while the applesauce quietly helps with moisture. Together, the ingredients create brown-sugar depth without gingerbread heaviness, and a slice that stays clean rather than greasy or gummy.

Moisture guide showing a frosted spice cake square with oil, butter, applesauce, and buttermilk callouts around it.
Instead of depending on one “secret” ingredient, this moist spice cake uses oil for softness, butter for flavor, applesauce for moisture, and buttermilk for tenderness.
IngredientWhy it matters
OilKeeps the cake softer after cooling.
ButterAdds old-fashioned flavor and aroma.
ApplesauceSupports moisture without making the cake apple-led.
ButtermilkBalances sweetness and keeps the texture tender.
Brown sugarAdds depth and a mild molasses note.
Cream cheese frostingAdds tang so the cake tastes rich but not cloying.

What Each Ingredient Does in This Spice Cake

The recipe works because the ingredients have different jobs. Keep the measurements steady, especially flour and wet ingredients, and the cake will be much easier to bake well. Once these pieces are balanced, the cake tastes like more than cinnamon — it has brown-sugar depth, spice warmth, and enough softness to still be good after cooling.

Labeled spice cake ingredients including flour, brown sugar, oil, butter, applesauce, buttermilk, eggs, vanilla, molasses, and spices.
The best spice cake ingredients work as a team: brown sugar deepens flavor, warm spices define the cake, and the wet ingredients keep the crumb soft.

For the Cake

All-purpose flour: Measure by weight if possible. Too much flour is one of the fastest ways to make a dry cake, and measuring flour by weight is the most reliable option. If using cups, spoon flour into the cup and level it instead of scooping directly from the bag.

Baking powder and baking soda: They give lift while working with the acidity in the buttermilk, applesauce, and brown sugar. Make sure both are fresh.

Salt, vanilla, and spices: Salt sharpens the brown sugar, vanilla rounds the flavor, and the spice blend gives the cake its identity.

Brown sugar: Light brown sugar keeps the flavor milder. Dark brown sugar gives a deeper molasses note. Either works, but pack it firmly when measuring by cup.

Oil and melted butter: Oil helps after cooling; butter adds flavor. Let the melted butter cool slightly before mixing so it does not warm the eggs.

Applesauce, buttermilk, and eggs: Applesauce helps the cake stay soft, buttermilk keeps it from tasting flat, and eggs help it rise and slice cleanly. Use them close to room temperature when possible so the batter blends smoothly.

Molasses, optional: A tablespoon of molasses makes the cake darker and the flavor deeper. Keep the rest of the wet ingredients as written if you use it.

Batter cue: The batter should be thick but pourable, glossy, and lightly speckled with spices. A few tiny applesauce flecks are fine. Stop when the flour disappears; this batter is meant to stay thick and glossy, not whipped.

For the Cream Cheese Frosting

Block cream cheese: Use full-fat block cream cheese, not spreadable tub cream cheese. Tub cream cheese often makes frosting loose and runny.

Butter and powdered sugar: The butter should be softened but not greasy. Start with the lower amount of powdered sugar for a softer frosting, then add more only if you need it firmer.

Vanilla, salt, and optional lemon juice: Vanilla adds warmth, salt keeps the frosting from tasting flat, and a little lemon juice brightens the cream cheese tang.

How to Bake It Without Drying It Out

The batter is supposed to be thick, not airy. The cake is supposed to come out with moist crumbs, not a bone-dry tester. And the frosting only spreads cleanly if the cake is fully cool.

Do not worry if the batter looks thicker than vanilla cake batter; that is normal here. You do not need a stand mixer for the cake itself. A whisk, a spatula, and two bowls are enough; save the hand mixer for the frosting.

Step-by-step spice cake guide showing dry ingredients, wet ingredients, batter, baked 9x13 cake, and frosting being spread.
Because this is a simple two-bowl spice cake, the biggest wins are mixing gently, spreading the batter evenly, and waiting until the cake is cool before frosting.

1. Prepare the Pan So the Cake Releases Cleanly

Heat the oven to 350°F / 177°C. Grease a 9×13-inch baking pan. A metal pan usually bakes most evenly. For easier lifting and cleaner slices, line the pan with parchment paper, leaving a little overhang on two sides. If you plan to serve the cake directly from the pan, parchment is optional.

2. Whisk the Spices Evenly Into the Flour

In a large bowl, whisk the flour, baking powder, baking soda, salt, cinnamon, ginger, nutmeg, allspice, cloves, and optional cardamom. The dry mix should look evenly tan from the spices. Take a few extra seconds here; evenly mixed spices mean every slice tastes balanced instead of giving you one bland bite and one clove-heavy bite.

3. Mix the Wet Ingredients Until Glossy

In another bowl, whisk the brown sugar, oil, melted butter, applesauce, buttermilk, eggs, vanilla, and optional molasses until smooth. The wet mix should look glossy. The melted butter should be slightly cooled, and the eggs, applesauce, and buttermilk should not be fridge-cold. If the butter forms tiny bits, the cake will usually still bake, but the batter mixes more evenly when the ingredients are closer in temperature.

4. Fold Gently So the Cake Stays Tender

Pour the wet mixture into the dry ingredients. Fold with a spatula or whisk gently until no dry flour pockets remain. The batter should look thick, glossy, and pourable. Once no flour streaks remain, you have done enough; next, use the doneness cues instead of overbaking for a dry tester.

Spice cake batter lifting from a spatula over a mixing bowl, showing a thick glossy pourable texture.
Once the batter looks thick, glossy, and pourable, stop mixing; continuing too long can make the finished spice cake dense.

5. Bake Until the Center Is Set but Still Moist

Spread the batter into the prepared pan and smooth the top. Bake for 35–40 minutes in a metal pan, checking near the 33-minute mark. Glass or ceramic pans may take a little longer. This is the point where the kitchen starts smelling better than the effort you put in, but trust the center of the cake more than the edges.

The cake is done when the center springs back lightly, the edges are just beginning to pull from the pan, and a toothpick inserted into the middle comes out with a few moist crumbs.

Look for moist crumbs, not a dry tester. A few crumbs mean the cake will stay softer once it cools.

Doneness guide comparing underbaked, just-right, and overbaked spice cake pieces with toothpick crumb examples.
A few moist crumbs on the toothpick are ideal; however, waiting for a completely dry tester can push spice cake toward overbaked.

6. Cool Fully Before Frosting

Let the cake cool in the pan. For a 9×13 cake, plan on at least 2 hours of cooling before frosting. The center should feel room temperature, not just the surface. The wait feels annoying, but it keeps the cream cheese frosting smooth instead of melty.

Unfrosted spice cake cooling in a 9x13 pan on a wire rack with a bowl of frosting and spatula nearby.
Before adding cream cheese frosting, let the 9×13 spice cake cool completely so the frosting stays smooth, thick, and spreadable instead of melting into the crumb.

7. Frost and Slice

Spread the frosting over the cooled cake. It should hold soft swoops without running. For clean slices, chill the cake for 20–30 minutes before cutting. For the best eating texture, let refrigerated slices sit briefly at room temperature before serving.

Cream Cheese Frosting for Spice Cake

Cream cheese frosting is the classic finish because it adds tang, not just sweetness. It cuts through the brown sugar and spice so the cake tastes rich without feeling heavy.

Cream cheese frosting being spread with an offset spatula over a cooled spice cake in a rectangular pan.
Cream cheese frosting works especially well here because its cool tang balances brown sugar, cinnamon, ginger, and cloves without making the cake too sweet.

The best bite is warm spice first, then brown sugar, then that cool cream-cheese tang at the end. For a 9×13 cake, you only need a generous spreadable layer. Brown butter cream cheese frosting makes it more special, caramel leans sweeter and richer, maple gives it an old-fashioned fall flavor, and a simple vanilla glaze works better for Bundt or loaf cake. For a tea-cake finish, skip the frosting and dust the top with powdered sugar.

Want the special-occasion version? Brown the butter, cool it until soft but not melted, then use it in the frosting for a deeper, nutty finish.

If you want a non-cream-cheese option for cupcakes or a sweeter celebration-style finish, our buttercream frosting recipe is the better direction.

How to Keep the Frosting Smooth

  • Use full-fat block cream cheese, not tub cream cheese.
  • Soften the cream cheese and butter, but keep them cool enough that they are not shiny or greasy.
  • Beat the cream cheese first until smooth, then add the butter and beat again.
  • Add powdered sugar gradually. Start with 2½ cups for a softer frosting; add more if you need it firmer.
  • Add a pinch of salt and a little lemon juice to balance sweetness.
  • If the frosting becomes too soft, chill it for 15–20 minutes, then beat briefly again.
  • Make sure the cake is fully cool before spreading it on top. If it still turns loose, use the troubleshooting fixes.
Frosting consistency guide with three bowls showing too loose, just right, and too stiff cream cheese frosting textures.
If frosting is too loose, it slides; if it is too stiff, it pulls crumbs, so aim for a creamy texture that holds soft swoops.

Pan Sizes: 9×13, Layers, Bundt, Loaf, and Cupcakes

This recipe is written first as a 9×13 sheet cake; the layer, Bundt, loaf, and cupcake notes are adaptations, not the main promise.

A 9×13 sheet cake is the easiest version, but the same flavor can work in other formats if you watch the fill level and start checking early. If you are baking for a potluck, stay with the 9×13. It is the least fussy version and the one most likely to disappear square by square.

Pan size guide with a large 9x13 spice cake and smaller examples of round layers, Bundt cake, cupcakes, and loaf cake.
The 9×13 pan gives the easiest spice cake slices; however, the batter can also work in layers, Bundt pans, cupcakes, or a loaf when you adjust carefully.

Spice Cake Baking Times by Pan

FormatPanOvenApprox. bake timeNotes
Sheet cake9×13-inch metal pan350°F / 177°C35–40 minEasiest default. Glass or ceramic may take longer.
Layer cakeTwo 9-inch rounds350°F / 177°C26–32 minLine pans with parchment; make extra frosting.
Layer cakeTwo 8-inch rounds350°F / 177°C32–38 minLayers will be deeper, so check centers carefully.
Bundt cake10–12 cup Bundt pan350°F / 177°C50–65 minFill no more than two-thirds to three-quarters full.
CupcakesStandard muffin tin350°F / 177°C18–21 minFill cups about two-thirds full.
Loaf cake9×5-inch loaf pan, filled no more than two-thirds full350°F / 177°C48–55 minThis full recipe makes more batter than one loaf, so bake extra batter as cupcakes or use a second loaf pan.

Use the times as starting points, not promises. The cake is ready when the center springs back and a toothpick shows moist crumbs.

Bundt Cake Release Tip

Bundt cake tip: Use baking spray with flour, or brush the pan with softened butter and dust it with flour. Get into every groove. Let the baked cake rest in the pan for 10–15 minutes before turning it out.

How to Make Boxed Spice Cake Mix Taste Homemade

Boxed spice cake mix can work when time is short. Use milk instead of water, add ½ cup sour cream or applesauce, boost the spices, and finish with homemade cream cheese frosting. For the from-scratch version, jump to the full recipe card.

Boxed spice cake mix upgrade guide with milk, sour cream or applesauce, extra spices, and cream cheese frosting suggestions.
For a shortcut version, boxed spice cake mix tastes more homemade when you use dairy, boost the warm spices, and finish with real cream cheese frosting.
Replace or addHow muchWhy it helps
Milk instead of waterUse the same amount listed on the boxGives richer flavor.
Sour cream, yogurt, or applesauceUp to ½ cupHelps the cake taste less box-mix dry.
Cinnamon + ginger½ tsp cinnamon + ¼ tsp gingerWarms up a mild spice mix.
Homemade cream cheese frostingUse the frosting from this recipeThe biggest upgrade for flavor and texture.

Keep the upgrades modest. Too much extra moisture can make the center heavy, especially if you also add pumpkin or fruit. The from-scratch cake is still the better version when flavor and texture matter; the boxed version is the quick shortcut.

Variations: Apple, Molasses, Nuts, Raisins, Chai, and More

Choose the version based on the slice you want: classic and cozy, deeper with molasses, fruitier with apple, or nutty with a little crunch. The cake stays most reliable when you change one major thing at a time; if you add fruit or extra moisture, keep the gummy-center fixes in mind.

Spice cake variations guide with a plain frosted cake square and optional molasses, apple, nuts, raisins, and cardamom or chai spice cues.
Start with the plain frosted base cake, then choose one variation if you want deeper molasses flavor, fruitier apple notes, optional crunch, raisins, or warmer aroma.
VariationAmountKeep in mind
Molasses1 tablespoonToo much pushes the cake toward gingerbread.
Chopped apple1 cup, finely choppedMore can make the center gummy.
Nuts¾ cupToast and cool first for better flavor.
Raisins½–¾ cupSoak if dry, then drain and pat dry.
Cardamom¼ teaspoonToo much can taste perfume-like.

Molasses gives the deepest old-fashioned version, chopped apple makes the cake softer and fruitier, and toasted nuts are the easiest way to add contrast without changing the batter much. These are small changes, not a second recipe; the safest upgrades are the ones that add flavor without shifting the batter’s moisture too far.

For a chai-style direction, add the cardamom and a tiny pinch of black pepper. If you want tea-forward flavor, that becomes a separate chai cake rather than classic spice cake.

Gluten-Free and Eggless Notes

A good 1:1 gluten-free baking flour may work, especially if it contains xanthan gum, but expect a slightly more fragile cake and let it cool fully before slicing.

I would not make this exact batter eggless by simply removing the eggs. For best results, use an eggless spice cake formula designed around yogurt, vinegar and baking soda balance, or another tested binder.

What to Serve with Spice Cake

For a coffee slice, serve the cake plain with its cream cheese frosting and a hot cup of coffee or black tea. For a holiday dessert, add brown butter frosting, toasted pecans, or a light caramel drizzle. If you are taking it to a potluck, keep it in the 9×13 pan, chill until the top sets, and slice before serving.

Frosted spice cake square on a plate with coffee or chai, whipped cream, vanilla ice cream, and optional toasted nuts nearby.
To make a simple slice feel dessert-ready, serve spice cake with coffee, chai, whipped cream, vanilla ice cream, or optional toasted nuts on the side.

That is the sweet spot of this cake: casual enough for a weekday coffee slice, but dressed up enough once the cream cheese frosting goes on.

For a lighter finish, skip the frosting and serve the cake with homemade whipped cream or powdered sugar. For a fall dinner, a scoop of vanilla ice cream or a spoon of warm apple compote makes it feel more like dessert without much extra work.

Storage, Freezing, and Make-Ahead Tips

This is a good make-ahead dessert because the spices settle and deepen after a few hours. The next-day slice, cold from the fridge for a few minutes and then softened on the plate, is one of the quiet pleasures of this cake.

Cream-cheese-frosted spice cake should be refrigerated within 2 hours and stored covered for 3–4 days. Refrigerate it sooner if your kitchen is hot. For general food-storage safety, see the FDA’s food storage guidance.

Storage guide showing frosted spice cake in a covered pan, slices in an airtight container, and wrapped slices for freezing.
Because the cake has cream cheese frosting, refrigerate frosted slices; for longer storage, wrap individual pieces well before freezing.
SituationBest method
Unfrosted cakeWrap tightly and keep at room temperature for 1–2 days.
Frosted cakeCover tightly or store in an airtight container and refrigerate for 3–4 days.
Make aheadBake one day ahead, cool completely, cover, and frost before serving or the next day.
Freezing unfrosted cakeWrap tightly and freeze for up to 2–3 months.
Freezing frosted slicesFreeze uncovered until firm, then wrap tightly. Thaw in the refrigerator; frosting texture may soften slightly.
Serving from fridgeLet slices sit briefly at room temperature so the cake and frosting soften.

Troubleshooting Dry, Dense, Gummy, or Sunken Cake

Most baking mistakes are not disasters; they are clues. If something went wrong, start with what you can fix now, then adjust the next bake.

Cake Texture Problems

Dry, dense, gummy, oily, or sunken spice cake usually comes back to flour measurement, mixing, bake time, pan choice, or add-ins. Use this table to rescue the current cake and improve the next one.
Troubleshooting guide listing dry cake, dense cake, gummy center, sunken middle, oily texture, and runny frosting with quick fixes.
When spice cake turns dry, dense, gummy, oily, sunken, or messy, the cause usually comes back to baking time, mixing, measuring, or frosting temperature.
ProblemFix nowFix next time
Dry cakeServe with extra frosting, whipped cream, caramel, or warm apple compote.Measure flour by weight and pull the cake when the toothpick has moist crumbs.
Dense or heavy cakeLet slices come to room temperature and serve with coffee, whipped cream, or a lighter topping so the cake feels less heavy.Stop when no flour streaks remain; use room-temperature wet ingredients.
Gummy centerIf unfrosted and still warm, return it to the oven loosely covered.Use a metal 9×13 pan, keep add-ins modest, and check the true center.
Cake tastes oilyChill before slicing and serve with tangy frosting to balance richness.Measure oil in a liquid cup and bake until the center is set.
Sunken middleIf the center is underbaked, avoid serving that part; cut clean squares from the set edges and frost or dust them lightly.Check leavening freshness and avoid opening the oven early.
Bland spice flavorAdd a light cinnamon dusting or serve with brown butter frosting.Use fresh spices and consider the optional molasses.

Cream Cheese Frosting Problems

Frosting issues are usually easier to fix than cake texture problems. Temperature matters most: warm cake melts frosting, while overly soft cream cheese or butter can make the frosting loose.

ProblemFix nowFix next time
Runny frostingChill 15–20 minutes, then beat briefly; add powdered sugar if needed.Use block cream cheese and cooler butter.
Frosting melts on cakeChill the cake until the frosting firms, then smooth it again.Cool the cake completely before frosting.

Before You Bake the Next Spice Cake

Before you bake: measure the flour carefully, use fresh spices, mix gently after adding flour, and let the cake cool completely before frosting. Those four details prevent most spice cake problems.

Once those basics are handled, this is a forgiving cake: mix it gently, bake it until the center is just set, cool it fully, and frost it right in the pan. No layers, no piping, no drama — just spiced squares that taste better than the effort they ask from you.

Moist 9×13 Spice Cake Recipe

This 9×13 spice cake is the easy pan version: warmly spiced, brown-sugary, simple to slice, and finished with a generous cream cheese frosting.

Serve it when you want the comfort of carrot cake or gingerbread, but without shredded vegetables, heavy molasses flavor, or layer-cake fuss.

Recipe card for moist 9x13 spice cake showing a frosted cake square, baking temperature, bake time, yield, and storage reminder.
Use this quick reference before baking so the key details stay clear: 9×13 pan, 350°F oven, 35–40 minutes, 12–16 slices, and cream cheese frosting.
Prep Time
25 minutes
Cook Time
35–40 minutes
Cooling Time
At least 2 hours
Total Time
About 3 hours
Yield
12–16 slices

Timing: Plan on about 25 minutes prep, 35–40 minutes baking, and at least 2 hours cooling; total time is about 3 hours before serving. Bake time is based on a metal 9×13 pan; glass or ceramic pans may need a few extra minutes.

Equipment

  • 9×13-inch baking pan, preferably metal
  • 2 mixing bowls
  • Whisk
  • Spatula
  • Hand mixer or stand mixer for frosting
  • Cooling rack
  • Parchment paper, optional

Ingredients

For the Spice Cake

  • 2½ cups all-purpose flour / 313 g
  • 1½ teaspoons baking powder
  • ½ teaspoon baking soda
  • ¾ teaspoon fine salt
  • 2½ teaspoons ground cinnamon
  • 1 teaspoon ground ginger
  • ¾ teaspoon ground nutmeg
  • ½ teaspoon ground allspice
  • ¼ teaspoon ground cloves
  • ¼ teaspoon ground cardamom, optional
  • 1½ cups packed brown sugar / 300 g
  • ½ cup neutral oil / 120 ml
  • ¼ cup unsalted butter, melted and slightly cooled / 57 g
  • ½ cup unsweetened applesauce, room temperature if possible / 120 g
  • ¾ cup buttermilk, room temperature / 180 ml
  • 3 large eggs, room temperature
  • 2 teaspoons vanilla extract
  • 1 tablespoon molasses, optional / 20 g

For the Cream Cheese Frosting

  • 8 oz block cream cheese, softened / 226 g
  • ½ cup unsalted butter, softened / 113 g
  • 2½–3 cups powdered sugar / 300–360 g, sifted if lumpy
  • 1 teaspoon vanilla extract
  • Pinch of salt
  • 1 teaspoon lemon juice, optional, for extra tang

Instructions

  1. Prepare the oven and pan. Heat the oven to 350°F / 177°C. Grease a 9×13-inch baking pan and line with parchment if you want to lift the cake out for slicing.
  2. Mix the dry ingredients. In a large bowl, whisk the flour, baking powder, baking soda, salt, cinnamon, ginger, nutmeg, allspice, cloves, and optional cardamom until evenly combined.
  3. Mix the wet ingredients. In a separate bowl, whisk the brown sugar, oil, melted butter, applesauce, buttermilk, eggs, vanilla, and optional molasses until smooth. The eggs, applesauce, and buttermilk should not be fridge-cold.
  4. Combine. Pour the wet ingredients into the dry ingredients. Fold gently until no dry flour pockets remain. The batter should be thick but pourable. Stop once no flour streaks remain.
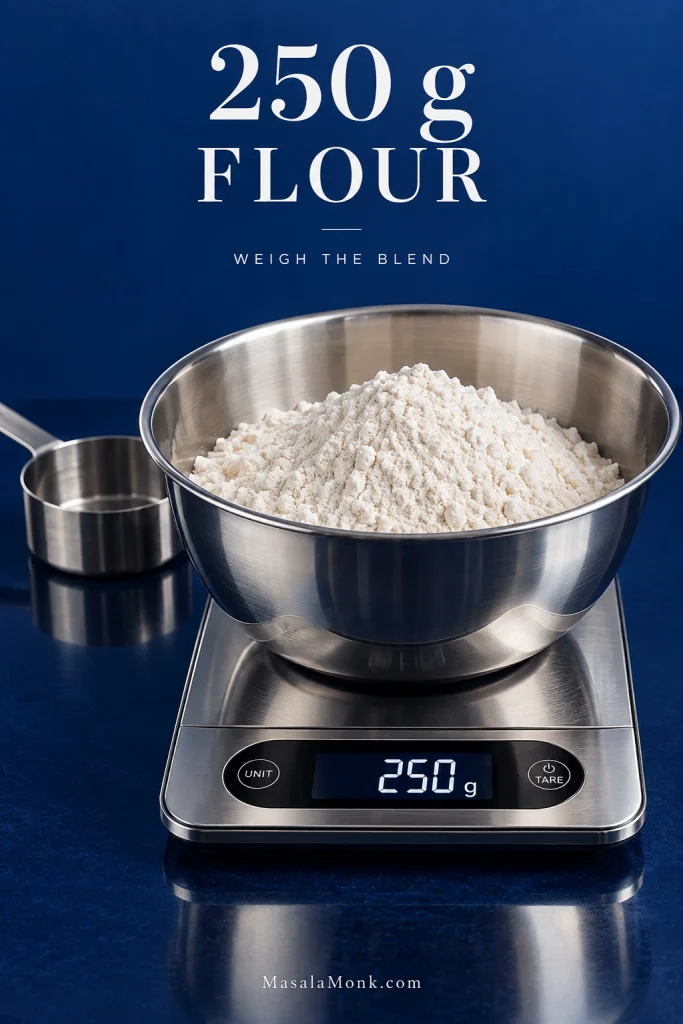
  5. Bake. Spread the batter into the prepared pan. Bake for 35–40 minutes in a metal pan, or until the center springs back lightly and a toothpick inserted into the middle comes out with a few moist crumbs. Glass or ceramic pans may take longer.
  6. Cool. Let the cake cool completely before frosting, at least 2 hours for a 9×13 cake. Warm cake will melt the frosting.
  7. Make the frosting. Beat the cream cheese until smooth. Add the butter and beat again. Add 2½ cups powdered sugar, vanilla, salt, and optional lemon juice. Beat until creamy and spreadable, then stop. Add more powdered sugar if you want a firmer frosting.
  8. Frost and serve. Spread frosting over the cooled cake. Chill briefly for cleaner slices, then serve. Let refrigerated slices sit at room temperature for a softer cake.

Recipe Notes

  • Buttermilk substitute: Add 2 teaspoons lemon juice or vinegar to a measuring cup, then add milk until you reach ¾ cup total. Stir and let stand for 5–10 minutes before using.
  • No applesauce? Replace it with the same weight of plain full-fat yogurt or sour cream.
  • Frosting amount: The frosting quantity is enough for a generous 9×13 sheet cake layer. For a layer cake or piping, make 1½ to 2 times the frosting.
  • Clean slices: Frost only after the cake is fully cool, then chill the frosted cake for 20–30 minutes before cutting.
  • Storage: Because this cake has cream cheese frosting, refrigerate the frosted cake within 2 hours. Store covered in the refrigerator for 3–4 days and let slices sit briefly at room temperature before serving.
  • Layer cake: Divide between two greased and parchment-lined 9-inch round pans and start checking around 26 minutes.
  • Cupcakes: Fill liners two-thirds full and bake for about 18–21 minutes.
  • Bundt cake: Use a 10–12 cup Bundt pan, grease it thoroughly, and do not overfill. Start checking around 50 minutes.
  • Loaf cake: Fill a 9×5-inch loaf pan no more than two-thirds full. This full recipe makes more batter than one loaf, so bake extra batter as cupcakes or use a second loaf pan.
  • Salted butter: You can use salted butter in the cake or frosting; reduce the added salt slightly.

FAQs About Spice Cake

What makes spice cake different from carrot cake?

Spice cake is defined by baking spices. Carrot cake is defined by grated carrot and often includes nuts, raisins, pineapple, or coconut. The two can share cinnamon, ginger, and nutmeg, but carrot cake has a vegetable-based texture and spice cake does not need carrots.

Which spices are best in spice cake?

Cinnamon, ginger, nutmeg, allspice, and cloves are the classic mix. Cinnamon should lead, cloves should stay subtle, and the spices should be fresh.

Is spice cake hot or spicy?

Think cinnamon warmth, not chili heat. The flavor comes from baking spices, not hot pepper.

Is spice cake the same as gingerbread?

No. Gingerbread is usually darker, more ginger-forward, and more molasses-heavy. Spice cake is softer, sweeter, and more balanced across several spices.

What is the difference between spice cake and pumpkin spice cake?

Spice cake is led by the spice blend itself. Pumpkin spice cake includes pumpkin purée, which changes the moisture, density, color, and flavor of the batter.

Can I use pumpkin pie spice instead of individual spices?

Pumpkin pie spice works as a shortcut. Replace the listed spices with a good blend, knowing the final flavor depends on that blend.

Can I make spice cake without applesauce?

Plain full-fat yogurt or sour cream can replace the applesauce in the same amount. The cake will be slightly tangier and a little less apple-soft, but it will still have enough moisture if the rest of the recipe stays unchanged.

Can I make spice cake ahead of time?

This is actually a good make-ahead cake. Bake it one day ahead, cool it completely, cover it well, and frost it the next day or before serving. The spices often taste more settled after the cake rests overnight.

What frosting goes best with spice cake?

Cream cheese frosting is the classic choice because it adds tang, not just sweetness. A vanilla glaze works better for Bundt or loaf cake.

Why did my spice cake turn out dry?

The most common reasons are too much flour, overbaking, or waiting until the toothpick comes out completely dry. Measure flour by weight if possible and remove the cake when the center is set but the toothpick still has a few moist crumbs.

Can spice cake be baked as cupcakes?

It works well as cupcakes. Fill standard liners about two-thirds full and bake at 350°F / 177°C for about 18–21 minutes. Start checking early because cupcakes dry out faster than a sheet cake.

Should cream cheese frosted spice cake be refrigerated?

Cream-cheese-frosted spice cake should be refrigerated within 2 hours and stored covered for 3–4 days. Let slices sit briefly at room temperature before serving.

When the cake is soft, the spices are fresh, and the frosting has that little cream-cheese tang, this is the kind of simple dessert that disappears slice by slice from the pan. It belongs with coffee, on holiday tables, and on ordinary weekends when cake sounds like a perfectly good plan.

If you try it, I would love to know whether your favorite slice was same-day soft or next-day spiced and settled.

Back to top

Posted on Leave a comment

Apple Pie Spice Recipe

Glass jar of homemade apple pie spice beside sliced apples, cinnamon sticks, a spoonful of spice, and apple pie on a warm kitchen surface.

This apple pie spice recipe is for the moment when a dessert calls for apple pie spice and the jar is missing. You do not need to abandon the pie, run to the store, or guess your way through every warm spice in the cabinet. In five minutes, you can mix a small homemade pantry blend that makes apples smell like dessert before they even reach the oven.

The base is simple: cinnamon, nutmeg, allspice, and ginger. That is enough for apple pie, apple pie filling, apple crisp, muffins, oatmeal, pancakes, cider, baked apples, coffee, and simple apple desserts. If you like a deeper aroma, you can add a couple of stronger accents, but the recipe works beautifully without them.

This is an apple-first, cinnamon-forward, unsweetened apple pie spice blend: warm enough for pie, soft enough not to bury the apples. The goal is not to make apples taste like a spice cabinet. The goal is to make them smell warmer, taste rounder, and still finish like apples.

Quick Answer: What Spices Are in Apple Pie Spice?

Apple pie spice is a dry blend of warm ground spices, usually cinnamon, nutmeg, and allspice, with ginger in many homemade versions. Cardamom and cloves can add depth, but they are accents, not requirements. If a recipe says apple pie seasoning or apple pie spice mix, you can usually use this blend the same way.

At a glance:

  • Ratio to remember: 12 parts cinnamon, 2 parts nutmeg, 1 part allspice, and 1 part ginger.
  • Need 1 teaspoon now? Use the emergency 3-spice substitute: ¾ teaspoon cinnamon, a scant ¼ teaspoon nutmeg, and a small pinch of allspice.
  • Unsweetened blend: No sugar in the jar, so it works in pie filling, oatmeal, drinks, toppings, muffins, and baking.
  • Baking a full pie? Start with 1½–2 teaspoons in the filling.
Apple pie spice at-a-glance guide with a spice jar and four points: 12:2:1:1 ratio, 1 teaspoon emergency substitute, unsweetened blend, and 1½ to 2 teaspoons for pie.
Use this apple pie spice quick guide when you need the essentials fast: the ratio, the 1-teaspoon substitute, the unsweetened note, and the starting amount for a full pie.

Apple Pie Spice Recipe

Make the base blend first. It is unsweetened, works for most apple desserts without any specialty spices, and can be used in fillings, drinks, toppings, oatmeal, muffins, and baked apples. The measurements do not need to feel fussy: keep cinnamon dominant, keep cloves optional, and the blend will work.

Prep Time5 minutes
Cook Time0 minutes
Total Time5 minutes
YieldAbout ⅓ cup, slightly more with optional spices

Base Blend

  • 4 tablespoons ground cinnamon
  • 2 teaspoons ground nutmeg
  • 1 teaspoon ground allspice
  • 1 teaspoon ground ginger

Optional Add-Ins for the Full Batch

  • ½ teaspoon ground cardamom
  • ¼ teaspoon ground cloves

Approximate metric yield: about 16 teaspoons for the base blend, or about 16¾ teaspoons with both optional spices. That is about 80–85 ml, or roughly 36–43 g / 1.3–1.5 oz by weight, depending on spice density. Use spoon measurements first; gram amounts are estimates because ground spices vary by brand, grind, and age.

Equipment

  • Measuring spoons
  • Small mixing bowl
  • Mini whisk, fork, or spoon
  • Clean airtight 4 fl oz spice jar for the full batch

Method

  1. Measure the base spices into a small bowl.
  2. Add cardamom or cloves if using.
  3. Whisk until the color looks even, breaking up clumps with the back of a spoon. If the spices are very clumpy, sift them first.
  4. Transfer to a clean, dry, airtight spice jar. Close and shake briefly if you want to make sure everything is evenly mixed.
  5. Label with the month you mixed it and store in a cool, dark, dry pantry away from the stove, oven, sunlight, and steam.

Homemade Apple Pie Spice Recipe Card

Keep this card as a measuring reference after you read the method; it gives the full batch amounts in one quick view.

Homemade apple pie spice recipe card showing 4 tablespoons cinnamon, 2 teaspoons nutmeg, 1 teaspoon allspice, 1 teaspoon ginger, a glass jar, and a spoon.
This homemade apple pie spice card keeps the full blend easy to measure, then reminds you to store the finished mix away from heat and steam.

Why This Ratio Works

This ratio is a strong default because it keeps cinnamon in charge, gives enough nutmeg and allspice to taste like pie, and leaves sharper spices optional so the apples stay bright.

Apple Pie Spice Ratio Guide

The simple ratio is easier to use than a long list of rules: keep cinnamon dominant, then let the smaller spices round out the apples.

Apple pie spice ratio guide showing 12 parts cinnamon, 2 parts nutmeg, 1 part allspice, and 1 part ginger with spice piles and a jar.
The 12:2:1:1 apple pie spice ratio is easy to remember: cinnamon does the main work, while nutmeg, allspice, and ginger support the apple flavor in smaller amounts.

Cinnamon carries the familiar apple-pie aroma. Nutmeg adds classic bakery warmth. Allspice rounds out the middle. Ginger keeps the mix from tasting flat. A good blend should disappear into the filling: apple first, warmth second.

Homemade also lets you keep cloves low, skip cardamom if you do not love it, and avoid sugar in the storage jar. That is the real advantage: you can make the blend support the dessert instead of forcing every apple recipe into the same store-bought flavor.

Before you store the finished mix, smell it. A balanced blend should smell mostly like cinnamon with a warm, rounded finish. Sharp, clove-heavy, or dusty notes are signs to adjust the mix before it goes into the jar.

Freshly grated nutmeg can taste louder than pre-ground nutmeg, especially in a simple apple filling, so start slightly lighter than the recipe amount if you grate it fresh.

Small Batch for 1–2 Pies

This is the batch to make when you do not want a full pantry jar. It gives you about 4 teaspoons, enough for two standard pies, or one pie plus extra for cider, oatmeal, or a cinnamon sugar topping. For one 9-inch pie, start with 1½–2 teaspoons in the filling.

  • 1 tablespoon ground cinnamon
  • ½ teaspoon ground nutmeg
  • ¼ teaspoon ground allspice
  • ¼ teaspoon ground ginger
  • Optional: a tiny pinch of cardamom or cloves

This small batch follows the same base ratio as the full recipe. It is also a good way to test the flavor before making more. If it smells too sharp, skip the cloves next time. If it tastes flat in a cooked filling, add a little more ginger or allspice.

Small Batch Apple Pie Spice Guide

This smaller blend is also a low-risk way to test whether you prefer a softer, brighter, or deeper apple spice flavor.

Small batch apple pie spice guide showing 1 tablespoon cinnamon, ½ teaspoon nutmeg, ¼ teaspoon allspice, and ¼ teaspoon ginger measured into a bowl.
This small batch keeps the same apple pie spice balance as the full recipe, but it makes just enough for one or two pies.

For a half batch of the full pantry blend, simply cut the main recipe in half and store it in a 2 fl oz spice jar.

How to Adjust the Flavor

Once you understand what each spice adds, you can adjust the mix without worrying that you have ruined it. Keep cinnamon in charge, then use the other spices to make the flavor rounder, brighter, or deeper.

How Each Spice Changes the Blend

Use the visual first, then the table below, so the blend feels easier to adjust by smell and taste.

Apple pie spice flavor guide showing cinnamon as the backbone, nutmeg for warmth, allspice for depth, ginger for lift, and a note to keep cloves tiny.
Adjust the blend by knowing each spice’s job: cinnamon softens, nutmeg warms, allspice deepens, ginger lifts, and clove should stay in the background.
SpiceAddsAdjust carefully when…
Ground cinnamonMain apple-pie flavor and the backbone of the mix.Use a little more for casual recipes if the blend smells weak; make a fresh batch for an important pie.
Ground nutmegClassic pie-shop warmth and a slightly sweet, nutty aroma.Use less with freshly grated nutmeg or very delicate apple desserts.
Ground allspiceRounded depth. Despite the name, allspice is one spice, not a spice mix.Use a little more if the blend tastes flat; use less if it tastes heavy.
Ground gingerBrightness and gentle heat.Use more for lift; skip it if you want a softer, simpler flavor.
Ground cardamomA fragrant bakery note in small amounts.Use only as an accent; too much can pull the blend away from classic apple pie.
Ground clovesDeep, sharp warmth.The clove rule: if you can identify clove before baking, you probably used too much.

Good to know: You do not need every warm spice in the cabinet. For the most familiar pantry flavor, keep the mix mostly cinnamon, nutmeg, and allspice, then add ginger if you like a little extra warmth.

3 Ways to Make It

Choose by what you want the apples to do: classic and familiar, simple and store-bought-style, or deeper and more bakery-like. There is no single official version, so use the one that fits your pantry and the dessert in front of you.

VersionFormulaYieldBest for
Classic homemade4 tbsp cinnamon + 2 tsp nutmeg + 1 tsp allspice + 1 tsp gingerAbout 16 tspPies, crisps, muffins
Store-bought-style3 tsp cinnamon + ¾ tsp nutmeg + ½ tsp allspiceAbout 4¼ tspThree-spice substitute
More aromaticClassic homemade blend + ½ tsp cardamom + ¼ tsp clovesAbout 16¾ tspRicher crisps, cider, muffins

Three Apple Pie Spice Versions

This side-by-side view helps you choose a classic, simpler, or more aromatic blend before you start baking.

Three apple pie spice variations showing classic homemade, store-bought-style, and more aromatic blends in bowls with apples and spices.
Choose the version based on the dessert: classic homemade for everyday baking, store-bought-style for a simple substitute, or more aromatic for richer crisps and cider.

Use the store-bought-style version the same way you would use the full blend, but expect a simpler, more classic flavor. Use the aromatic version only when a deeper spice note will not overpower the apples.

How Much to Use

The easiest mistake with apple pie spice is not making the blend; it is adding too much of a good blend. Start lower than your instincts tell you. Once apples warm up with sugar, lemon, and butter, the spices bloom, and a mix that seemed quiet in the bowl can suddenly taste much louder.

Start Low, Then Taste After Heating

For cooked apple pie filling, cider, or a stovetop apple topping, let the mixture heat for a few minutes before deciding whether to add more. Heat changes the flavor quickly: cinnamon becomes rounder, nutmeg gets warmer, and clove or ginger can become more noticeable.

Older spice blends may need a slightly larger pinch in casual recipes like oatmeal, pancakes, or cider. However, for a pie you care about, a fresh batch is better than trying to rescue tired spices with a heavier hand.

Quick Usage Amounts

UseStart withQuick note
9-inch apple pie1½–2 tspLower end for brighter apple flavor.
6 medium applesAbout 1½ tspGood for raw sliced apples before baking.
5–6 cups apple pie filling1½–2 tspPerfect for homemade apple pie filling.
Apple crisp or crumble1–2 tspAdd some to fruit and a pinch to topping. Try this apple crisp recipe.
Apple muffins or quick bread1–2 tsp per batchUse more for rich batters.
Pancakes or waffles½–1 tsp per batchWorks with applesauce or grated apple.
Oatmeal, yogurt, or smoothie bowls⅛–¼ tsp per servingMix with honey, maple, or apples.
Hot apple cider¼–½ tsp per mugWhisk with hot liquid first.
Coffee, latte, or cocoaTiny pinch to ⅛ tspExpect a little settling unless blended.
Baked applesAbout ¼ tsp per appleMix with butter, sugar, oats, or nuts.
Cinnamon sugar topping¼ tsp per 1 tbsp sugarUse on toast, pancakes, or pie scraps.
Guide showing how much apple pie spice to use in pie, apple crisp, muffins, and drinks, with small food examples for each use.
Apple pie spice tastes stronger depending on how it is used. Baked fruit and batters can handle more, while drinks and toppings usually need only a tiny pinch.

When to use less: Reduce the spice in recipes where the apples are meant to taste very fresh, tart, or floral, such as simple raw apple salads or lightly sweetened compotes. A pinch is enough there.

A Useful Pie Benchmark

For a store-bought benchmark, McCormick’s easy apple pie recipe uses 1½ teaspoons apple pie spice for a full pie with about 8 cups of sliced apples. That makes 1½ teaspoons a safe starting point for many full pies, with 2 teaspoons useful when the filling is richer or the apple volume is higher.

Adjust for the Apples and Crust

For a full apple pie, the spice amount also depends on the apples. Sweet apples often need lemon and a balanced hand with warm spices, while very tart apples can handle more depth. For a deeper apple-by-apple breakdown, see this guide to the best apples for apple pie.

When this mix goes into a pie with homemade pastry, keep the filling warmly spiced but not overpowering. A buttery apple pie crust makes heavy spice taste even heavier, so the filling should still finish like apples.

Substitutions When You’re Missing a Spice

Most missing-spice problems are smaller than they feel in the moment. Apple pie spice is a support flavor, not the whole recipe, so one missing spice should not stop the dessert. The safest emergency substitute is cinnamon plus a smaller amount of nutmeg and allspice. After that, adjust based on what you have.

Need 1 Teaspoon Apple Pie Spice Right Now?

Use this quick fix when the jar is missing and you need enough spice to keep baking today. It will not taste as layered as the full blend, but it gives cinnamon and nutmeg a rounder pie-spice finish.

Emergency substitute for 1 teaspoon apple pie spice showing ¾ teaspoon cinnamon, scant ¼ teaspoon nutmeg, and a pinch of allspice.
When the jar is missing mid-recipe, this 1-teaspoon apple pie spice substitute gives you enough cinnamon, nutmeg, and allspice to keep baking without overcomplicating the fix.

Missing-Spice Fixes

ProblemWhat to do
Need 1 tsp apple pie spiceUse the emergency 3-spice substitute: ¾ tsp cinnamon + scant ¼ tsp nutmeg + pinch allspice.
No nutmegUse a little extra allspice or ginger. Mace can also work in a tiny amount if you have it.
No allspiceUse cinnamon + nutmeg + tiny pinch cloves.
No gingerSkip it. The mix will still taste familiar.
No cardamomSkip it. It is only an accent.
No clovesSkip them. Cloves are easy to overdo.
Only have cinnamonUse cinnamon, then add vanilla, lemon, brown sugar, maple, or butter.
Have pumpkin pie spiceUse 1:1; use about ¾ amount if it smells clove- or ginger-heavy.
Missing spice guide for apple pie spice showing substitutions for no nutmeg, no allspice, only cinnamon, and pumpkin pie spice.
Missing one spice does not have to stop an apple dessert. Instead, use the closest backup and let the apples, sugar, lemon, and butter carry the rest of the flavor.

If you are baking today, close enough is usually enough; the apples, sugar, lemon, and butter will carry the dessert. If a recipe says apple pie seasoning instead of apple pie spice, use this blend the same way.

That tiny emergency pinch of allspice matters because it gives cinnamon and nutmeg a rounder pie-spice flavor without making you stop and run to the store. Chai spice can also work in some apple desserts, but use it carefully because it may taste stronger, more cardamom-forward, or slightly peppery.

Can You Use Cinnamon Instead?

Yes, but the flavor will be simpler. Cinnamon gives the main apple-pie aroma, so it is the best single-spice backup. If cinnamon is all you have, use it, then add vanilla, lemon, brown sugar, maple syrup, or butter in the dessert to make the flavor feel fuller.

Can You Make It Without Cinnamon?

You can make a warm apple seasoning without cinnamon, but it will not taste like classic apple pie spice. Cinnamon is the defining flavor in most versions.

For one pie, try a cinnamon-free apple seasoning with ½ teaspoon allspice, ¼ teaspoon ginger, ⅛ teaspoon nutmeg, and a tiny pinch of cardamom. Use it carefully and treat it as a cinnamon-free apple spice blend, not an exact flavor match.

Can You Make It Without Nutmeg?

Yes. Use cinnamon, allspice, and ginger. If you have mace, use a tiny pinch because mace is related to nutmeg and has a similar warm, aromatic quality. The flavor will be slightly less classic, but it will still work in apple pie filling, apple crisp, muffins, oatmeal, pancakes, and baked apples.

Apple Pie Spice vs Pumpkin Pie Spice

Apple pie spice and pumpkin pie spice are similar warm blends, and in everyday baking they can often replace each other. The difference is usually the flavor direction. Apple pie spice tends to be softer and more cinnamon-forward so the apple flavor stays bright and fruit-forward. Pumpkin pie spice is often deeper, warmer, and more ginger- or clove-forward because pumpkin needs stronger spice support.

Apple Pie Spice vs Pumpkin Pie Spice Comparison

BlendUsually tastes likeBest use
Apple pie spiceSofter, cinnamon-forward, apple-focused.Apple pie, filling, crisp, oatmeal, cider.
Pumpkin pie spiceDeeper, often ginger- or clove-forward.Pumpkin pie, pumpkin bread, lattes, cookies.
SubstitutionUsually works 1:1.Use about ¾ amount if it smells strong.
Apple pie spice versus pumpkin pie spice comparison showing two spice jars, apples, pumpkin, and a note to use ¾ amount if pumpkin spice smells strong.
Apple pie spice is usually softer and more apple-focused than pumpkin pie spice. Therefore, if your pumpkin blend smells clove- or ginger-heavy, start with about three-quarters of the amount.

Choose apple pie spice when the apple should stay the star. Pumpkin pie spice works better when you want a deeper, heavier spice flavor. When your pumpkin pie spice smells strongly of clove or ginger, start with about ¾ of the amount called for, then add more after smelling the mixed filling or tasting a cooked filling, cider, or topping.

If you already keep homemade pumpkin pie spice in your pantry, this apple version is still worth making because it gives you a gentler mix for apple pie filling, apple crisp, oatmeal, and everyday baking.

Where This Blend Works Best

Think of this blend as a warm base note. It belongs wherever apples need a little roundness, but the amount changes depending on whether the spice is baked, simmered, sprinkled, or stirred into a drink.

Apple Desserts

Cooked apples can handle more spice because heat softens the edges and lets cinnamon, nutmeg, and allspice settle into the filling.

Apple Pie Filling

Apple pie filling is the clearest test for this blend because the spices bloom as the apples cook. Start with the usage amounts above, warm the filling, and then decide whether it needs more spice.

Apple pie spice being added to glossy apple pie filling in a pan with a wooden spoon, sliced apples, a spice jar, and a measuring spoon nearby.
Cooked apple pie filling helps you judge the blend quickly because heat makes cinnamon, nutmeg, and allspice bloom.
  • Apple pie filling: Use 1½–2 teaspoons for 5–6 cups of filling.
  • Shortcut apple pie: Add a small pinch if prepared filling tastes flat, especially in a shortcut pie made with ready-made or homemade filling.
  • Classic apple pie: Use it in the filling with firm apples, lemon, sugar, and a buttery crust.
  • Dutch apple pie: Season the apples, not the crumb topping heavily. The topping already brings butter and brown sugar, so too much spice in both layers can make the pie taste dull. This works naturally in a Dutch apple pie style filling.
  • Apple tart: Use a lighter hand than you would in pie filling. A small pinch is enough for a thin easy puff pastry apple tart, where the apples and pastry should still taste bright.
  • Apple crisp or crumble: Season the fruit more than the topping. The topping already has butter, sugar, and browning, so a smaller pinch there is usually enough.
  • Baked apples: Mix with butter, brown sugar, oats, or chopped nuts before stuffing apples.

Breakfast and Snacks

  • Pancakes with apples: Stir a small pinch into warm apple topping for pancakes with stewed cinnamon apples, especially when you want breakfast to taste a little like dessert.
  • Oatmeal: Stir in a small pinch with apples, maple syrup, and nuts.
  • Muffins and quick bread: Whisk the spice into the dry ingredients so it spreads evenly through the batter.
  • Apple cinnamon roll bakes: Add a small amount to apple pie filling before layering it with cinnamon rolls, especially in an apple cinnamon roll bake with apple pie filling.

Apple Crisp, Muffins, and Quick Breads

Apple crisp and crumble taste better when most of the spice goes into the fruit, where it can bloom as the apples bake. Muffins and quick breads work best when the blend is whisked into the dry ingredients before the wet ingredients go in.

Apple pie spice used in baking with apple crisp, muffin batter, a spice jar, and dry ingredients being whisked with spice.
This baking guide separates two common uses: fruit desserts need spice in the apples first, while batters need the blend mixed evenly before baking.

Drinks and Toppings

Start tiny in drinks. Ground spices do not dissolve the way syrup does, so they need heat, fat, sugar, or blending to taste smooth.

  • Hot apple cider: Simmer gently with apple juice or cider, orange peel, and a little sweetener if needed. Strain before serving if you want a smoother mug.
  • Coffee, latte, or cocoa: Use a tiny pinch with milk, cream, or maple syrup so the spice has something to cling to.
  • Cinnamon sugar topping: Mix ¼ teaspoon apple pie spice with 1 tablespoon sugar. Keep the spice low because this topping is direct, not baked into a filling.
Apple pie spice used in drinks and toppings with hot cider, coffee, a bowl of spice, and notes for tiny pinch, simmer and strain, blend with milk or maple, and keep spice low.
A tiny pinch goes further in drinks and toppings because the spice is not hidden inside a filling or batter.

How to Store It So It Stays Fragrant

Ground spices do not fail loudly; they fade quietly. Once the mix is made, storage decides whether it stays fragrant.

Keep the finished seasoning in a clean, dry, airtight spice jar or container in a cool, dark pantry or cabinet. Keep it away from the stove, oven, dishwasher, sunny windows, and any place where steam or heat can reach it. Do not shake the jar directly over a steaming pot; steam is one of the fastest ways to make ground spices clump and fade.

For best flavor, use it within 6–12 months. It may remain usable longer if stored dry, but the aroma and flavor will fade over time. If the blend smells flat when you open it, it will probably taste flat in your pie or crisp too.

Do not add brown sugar to the stored mix if you want a pure spice blend. Brown sugar is useful in pie filling, crisp topping, and cinnamon sugar, but it can clump during storage and turns the blend into a sweetened topping rather than a flexible seasoning.

Best jar size

This recipe makes about 80–85 ml, so use a 4 fl oz spice jar for the full batch. A 2 fl oz spice jar is better for a half batch, not the full recipe.

Freshness test

Open the jar and smell the blend. It should smell warm, sweet, and clearly spiced. If you have to work hard to smell anything, use a little more in casual recipes like oatmeal or pancakes, but consider making a fresh batch before using it in a holiday pie.

Storage and Troubleshooting Cues

Use the smell test before important baking: flat spices need replacing, while sharp blends usually need softer cinnamon or fewer strong accents next time.

Storage and troubleshooting guide for homemade apple pie spice showing a jar in a pantry with notes for cool dark dry storage, 4 fluid ounce jar, no steam, reduce clove, and fresher spices.
Use storage as part of the recipe: a dry jar protects aroma, while heat and steam make ground spices fade faster.

Common Mistakes to Avoid

  • Using too much clove: If the blend smells sharp before you bake with it, it will taste even stronger in a warm filling. Keep cloves to a pinch or skip them.
  • Treating cardamom as required: Cardamom is beautiful, but it is not the test of whether this recipe works. A no-cardamom version is completely normal.
  • Adding sugar to the spice mix: Keep the stored blend unsweetened so you can use it in pies, drinks, oatmeal, toppings, and baking without locking it into one sweetness level.
  • Using tired or poorly stored spices: Heat, steam, and age weaken spice blends. Smell the cinnamon and nutmeg before making the full batch.
  • Overspicing mild apple desserts: If the filling smells more like clove or nutmeg than apple, use less spice next time and add a little extra lemon or apple to rebalance the batch.

When in doubt, make the mix softer rather than sharper. You can always add a pinch more, but it is much harder to pull harsh clove or heavy nutmeg back out of a pie filling.

FAQs About Apple Pie Spice

What is apple pie spice made of?

Most blends start with cinnamon, nutmeg, and allspice. Ginger is common in homemade versions because it adds brightness. Cardamom and cloves are optional accents for a deeper aroma.

What is the ratio for apple pie spice?

A good basic ratio is about 12 parts cinnamon, 2 parts nutmeg, 1 part allspice, and 1 part ginger. That keeps the blend cinnamon-forward, rounded, and still apple-friendly.

Is apple pie spice the same as apple pie seasoning?

Yes, in most recipes. Those names usually point to the same kind of dry spice blend for apple pie, apple crisp, apple filling, and other apple desserts.

What can I use instead of apple pie spice?

For a quick emergency substitute, use ¾ teaspoon cinnamon, a scant ¼ teaspoon nutmeg, and a small pinch of allspice for every 1 teaspoon apple pie spice. It is not the exact full blend, but it gets you close enough to keep baking.

Does apple pie spice have sugar in it?

Usually, no. A traditional apple pie spice blend is just ground spices; sweetness comes later from the filling, topping, drink, or dessert you add it to.

Can I add apple pie spice directly to coffee?

You can, but start with a tiny pinch. Ground spices do not dissolve like syrup, so they may settle at the bottom unless you blend them with milk, cream, sugar, or maple syrup first.

Why does my homemade apple pie spice taste bitter or sharp?

It usually has too much clove, too much nutmeg, or old spices that have turned dusty. Add more cinnamon to soften the blend, or make a fresh batch with the sharper spices kept very low.

Is allspice the same thing?

No. Allspice is one ground spice. Apple pie spice is a blend. Allspice helps the blend taste rounded, but it is not the whole mixture.

How much should I use in apple pie?

For a standard 9-inch apple pie, start with 1½–2 teaspoons in the filling. Use the lower amount if your blend contains cloves or if the recipe already has cinnamon and nutmeg.

Can pumpkin pie spice replace it?

Usually, yes. If the pumpkin pie spice smells strongly of clove or ginger, start with about ¾ of the amount called for, then add more after smelling the mixed filling or tasting a cooked filling.

Final Thoughts

A good apple pie spice recipe should feel like a shortcut, not another project. It should make the pie feel easier before you even peel the apples.

Keep cinnamon as the base, let nutmeg and allspice round it out, and use the stronger spices only as accents. The best version is the one that makes your apples taste more like themselves. The blend should smell warm when you open it, taste rounded in the filling, and melt into the dessert rather than announce itself.

After one batch, you will probably know your house version: brighter with ginger, softer without cloves, or deeper with cardamom. Use 1½–2 teaspoons for a pie, keep the rest dry and dark, and let the jar do what it is meant to do: make apples taste warmer without stealing the show.

Back to top ↑

Posted on Leave a comment

Easy Apple Crisp Recipe with Oats

Baked apple crisp in a cream dish with golden oat topping, glossy cinnamon apples, and vanilla ice cream.

This easy apple crisp recipe is for the night when you want the house to smell like cinnamon, butter, and brown sugar without making pie crust. The apples bake down into glossy cinnamon juices, the oat topping turns craggy and golden, and the corners get just crisp enough that someone always tries to claim them first.

It gives you the cozy part of apple pie with much less work: no rolling dough, no chilling crust, and no worrying about perfect slices. Better still, this crisp is forgiving. An 8×8, 9×9, or 9×13 pan can all work with the right scaling, and you can slice the apples thin for a softer filling or chop them for more bite.

It is the kind of dessert that works on a random weeknight with apples you already have, but it also earns its place on a fall table, Thanksgiving spread, or potluck when pie feels like too much. And although it is good plain, it becomes the version people remember when vanilla ice cream melts into the cinnamon juices and catches in the oat topping.

The promise here is simple: the right apple amount, a generous brown sugar oat topping, clear doneness cues, and pan guidance for both small family desserts and bigger holiday-style bakes.

Most importantly, this version helps you avoid the usual apple crisp problems: watery filling, underbaked apples, sandy topping, or a pan that tastes like baked apples with a thin sprinkle of oats. The goal is warm fruit underneath, crisp topping on top, and enough structure that every scoop feels complete.

Serving tip: A good apple crisp should give you warm apples, oat crumble, and just enough glossy cinnamon juice for vanilla ice cream to melt into.

Warm apple crisp with oats served in a bowl with a spoonful of cinnamon apples and melting vanilla ice cream.
Apple crisp with oats gives you the comfort of apple pie without crust work, while the crumble topping keeps the method simple and forgiving.

Quick Answer: What Makes a Good Apple Crisp?

A good apple crisp recipe has tender apples, a buttery oat topping, and enough thickener to keep the filling spoonable instead of watery. For a standard 8×8 or 9×9-inch baking dish, use about 2 1/2 pounds / 1.1 kg apples, which is about 8 cups sliced or chopped apples. For a larger holiday pan, see the apple crisp pan guide. Toss the apples with lemon, brown sugar, cinnamon, vanilla, and a little flour or cornstarch.

Then cover the apples with a topping made from old-fashioned oats, flour, brown sugar, cold butter, cinnamon, and salt. Bake at 350°F / 175°C until the apple juices are bubbling and the topping is golden. Finally, let the crisp rest for 15–20 minutes before serving so the filling thickens instead of running across the bowl.

Apple Crisp at a Glance

Best pan8×8 or 9×9 inch
Apples2 1/2 lb / 1.1 kg
Oven350°F / 175°C
Bake time45–55 minutes

Texture cue: the crisp is done when the fruit is actively bubbling, the topping is golden and craggy, and a knife slides into the apples without resistance.

The no-guesswork formula: 8 cups apples, a generous oat topping, active bubbling, and a 15–20 minute rest. Those four details prevent most watery, underbaked, or thin-topped crisps.

No-guesswork apple crisp formula showing apples, oat topping, bubbling filling, and resting time.
For a no-guesswork apple crisp, start with enough apples, a generous oat layer, active bubbling, and a short rest before serving.

The two checks before you pull it from the oven: First, the apple juices should bubble at the edges and toward the center, not just around the sides. Second, the topping should look golden and craggy, with a few deeper brown-sugar edges. If the topping is brown but the middle still looks quiet, cover loosely with foil and keep baking a little longer.

Apple crisp doneness guide showing bubbling apple filling and golden brown oat topping.
A brown top is only half the cue; the apple filling also needs to bubble so the juices thicken properly.

Why This Apple Crisp Recipe Works

A good apple crisp is not just baked apples with crumbs on top. The filling has to bubble long enough for the juices to thicken, and the topping has to stay loose enough to brown instead of steaming against the fruit. This recipe is built around those two cues: glossy apple juices and a craggy, buttery oat topping.

Most disappointing apple crisps fail in the same few ways. The apples stay firm, the filling runs across the bowl, the topping turns sandy, or there simply is not enough crumble to make every scoop satisfying. So the goal here is simple: enough apples to feel generous, enough topping to cover every serving, and enough thickener to turn the cinnamon juices glossy instead of soupy.

Apple crisp mistakes board showing runny filling, sandy crumbs, firm apples, and too little crumble.
Runny filling, sandy crumbs, firm apples, and too little crumble usually trace back to prep, butter temperature, or bake time.

Cold butter is the key to the crumble. It helps the oats, flour, brown sugar, cinnamon, and salt bake into rough crumbs instead of melting into the apples. A small amount of flour or cornstarch in the filling catches the apple juices as they bubble, so the crisp sets up after a short rest.

It also gives you enough crumble. Apple crisp should not look like apples with a little dusting on top. The brown-sugar crumbs are part of the dessert, and the larger clumps are not mistakes; they are the pieces people go looking for.

Equipment You’ll Need

You do not need special equipment for this crisp, but the right dish makes the bake more predictable. The pan matters more than the tool list; a very deep dish bakes differently from a shallow metal pan, even with the same ingredients. A ceramic, glass, or light-colored metal baking dish works best for the main recipe because it gives the apples enough time to soften before the topping gets too dark.

  • 8×8 or 9×9-inch baking dish: best for the base recipe.
  • Large mixing bowl: for tossing the apples evenly with sugar, lemon, spice, and thickener.
  • Medium bowl: for the oat topping.
  • Pastry cutter, fork, or clean hands: for working cold butter into the topping.
  • Peeler, knife, and cutting board: for prepping the apples.
  • Rimmed baking sheet: useful under the dish in case the apple juices bubble over.
  • Foil: helpful if the surface browns before the apples are tender.

The rimmed baking sheet is optional, but it is one of those small things you are grateful for if the apple juices start bubbling over at the edges.

Dish note: Glass and ceramic dishes give a steady, even bake. Metal pans can brown the edges faster. Cast iron works too, although it holds heat aggressively, so watch the top near the end of baking.

Ingredients for Apple Crisp with Oats

You only need fresh apples, butter, oats, sugar, and pantry baking ingredients. The list is simple, but the small choices matter: cold butter instead of soft, old-fashioned oats instead of instant oats, and enough lemon and salt to keep the filling from tasting flat.

Apple crisp ingredients arranged on a baking surface, including apples, oats, brown sugar, butter, lemon, cinnamon, and flour.
Every ingredient has a job: apples bring body, oats add texture, lemon brightens the filling, and cold butter helps the crumble bake properly.

For the Apple Filling

Sliced apples being mixed with lemon juice, brown sugar, cinnamon, and thickener for apple crisp filling.
Coating the apples evenly helps the sugar, spice, lemon, and thickener work through the whole filling instead of settling in patches.
  • Apples: Use about 2 1/2 pounds / 1.1 kg apples before peeling and coring. This gives you about 8 cups sliced or chopped apples.
  • Lemon juice: Brightens the apples and keeps the filling from tasting flat.
  • Brown sugar: Adds caramel warmth. Use less if your apples are very sweet and a little more if they are very tart.
  • Flour or cornstarch: Use 2 tablespoons flour in the apple layer, or 1 tablespoon cornstarch for a glossier, slightly clearer filling.
  • Cinnamon: The main spice. It should be present but not dusty or overpowering.
  • Nutmeg: Optional, but a small pinch makes the filling taste warmer.
  • Vanilla: Softens the sharpness of the apples and sugar.
  • Salt: Makes the apples and topping taste more balanced.

Before it bakes, the filling should taste bright. If the apples taste flat in the bowl, they will taste flat after baking too, so do not skip the lemon juice and salt.

For the Brown Sugar Oat Topping

Hands mixing cold butter into oats, brown sugar, flour, and cinnamon for apple crisp topping.
Cold butter helps the oat topping bake into rough, buttery crumbs instead of melting into the apple layer.
  • Old-fashioned rolled oats: Best for a classic crisp texture.
  • All-purpose flour: Helps the topping hold together in buttery crumbs.
  • Brown sugar: Gives the topping its caramel flavor and golden color.
  • Cinnamon: Ties the topping to the apple filling.
  • Cold butter: The most important topping detail. Cold butter creates crumbly pieces instead of a greasy layer.
  • Salt: Keeps the topping from tasting only sweet.
  • Chopped nuts, optional: Pecans or walnuts add crunch, but the recipe works beautifully without them.

At this point, the topping should taste like a brown sugar oatmeal cookie before it ever goes into the oven. That is the flavor you want baking into the top layer.

No scale? Use about 8 cups of sliced or chopped apples for the base recipe. Very large apples may give you that amount with only 4–5 apples, while smaller apples may take 7–8.

Best Apples for Apple Crisp

The best apples for apple crisp hold their shape while baking and bring enough tartness to balance the brown sugar topping. In most cases, a mix is better than one apple variety because you get both structure and flavor.

Best apples for apple crisp guide with Granny Smith, Honeycrisp, Pink Lady, Braeburn, and Golden Delicious apples.
The best apples for apple crisp usually come from a mix: one firm tart apple for structure and one sweeter apple for aroma.

For an easy blend, use Granny Smith + Honeycrisp. Granny Smith apples bring tartness and structure, while Honeycrisp apples add sweetness and a juicy bite. Braeburn, Pink Lady, Golden Delicious, and Jonagold also work well.

Easy Apple Mixes for Apple Crisp

Apple mix guide for apple crisp showing different apple pairings for tart, sweet, deep, and soft fillings.
Choose the apple mix by texture and flavor: tarter, sweeter, deeper, or softer and more spoonable.
Apple Mix Best For Flavor and Texture
Granny Smith + Honeycrisp Best default mix Tart, sweet, juicy, and sturdy
Granny Smith + Pink Lady Tarter apple crisp Bright, firm, and less sweet
Honeycrisp + Golden Delicious Sweeter family-style crisp Softer, sweeter, and very cozy
Braeburn + Granny Smith Deeper baked flavor Warm, aromatic, and balanced
Golden Delicious + a firm tart apple Softer, saucier filling Good when you want a more spoonable dessert

If you use a local apple variety that bakes well, tell us which one. Apple crisp is one of those recipes where regional apples can completely change the flavor, and the underrated local ones are often the most interesting.

Once you choose the apples, the cut matters too; see the sliced vs chopped apple guide before you prep the fruit.

By contrast, very soft apples can break down quickly under a long bake. They still taste good, but they may create a saucier, almost applesauce-like filling and make the bottom of the crisp wetter.

Firm apple slices holding their shape beside softer apples breaking down into saucier apple crisp filling.
Firm apples help apple crisp hold its shape, while softer apples create a saucier filling; mixing varieties gives better balance.
Apple Best Use What to Expect
Granny Smith Best tart backbone Firm, bright, less sweet
Honeycrisp Best sweet-tart flavor Juicy, aromatic, holds well
Pink Lady Balanced crisp filling Tangy, firm, colorful
Braeburn Warm baked flavor Sweet-tart and sturdy
Golden Delicious Softer, sweeter filling Good when mixed with tart apples
Red Delicious Not recommended Often too soft and mild after baking

For a deeper apple breakdown, the best apples for apple pie guide is also useful for apple crisp because the same basic rule applies: choose apples that taste good after baking and do not collapse too quickly.

Should Apples Be Sliced or Chopped for Apple Crisp?

Hands preparing sliced and chopped apples for apple crisp with examples of softer and chunkier filling textures.
Sliced apples bake into a softer, layered filling, while chopped apples keep more bite in each spoonful.

Both work, but they give different textures. Thin slices bake into a softer, more layered filling. Chunks give more bite and make the dessert feel fruitier. Either way, even cutting matters because uneven apples can leave you with mushy small pieces and firm large pieces in the same pan.

Cut-size tip: Keep slices and chunks even so the apple crisp filling bakes at the same pace.

Apple slice and chunk size guide showing even pieces for apple crisp preparation.
Even apple pieces bake at the same pace, which helps prevent mushy bits and underbaked chunks in the same pan.
Cut Best Size Result
Slices 1/4–1/2 inch thick Softer, layered, classic spoon-dessert texture
Chunks 1/2–3/4 inch More apple bite and a chunkier filling
Very thick pieces Over 3/4 inch May stay firm unless baked longer

For the most classic texture, use mostly slices with a few slightly thicker pieces mixed in. As a result, some apples soften into the cinnamon juices, while others stay tender enough to bite.

Old-Fashioned Oats vs Quick Oats for Apple Crisp

Oat choice: Old-fashioned oats give the topping more visible texture, while quick oats make the crumble finer and softer.

Old-fashioned oats, quick oats, and instant oats compared for apple crisp topping texture.
Old-fashioned oats give apple crisp a chewy-crisp topping; quick oats make it finer and softer, while instant oats can turn powdery.

Old-fashioned rolled oats are the best oats for apple crisp. They hold their shape in the oven and give the topping the chunky, crisp texture people expect. Quick oats can work in an emergency, but they make a softer, finer topping. Instant oats are too powdery, and steel-cut oats are too hard for this kind of topping.

Oat Type Use in Apple Crisp? Result
Old-fashioned rolled oats Yes, best choice Classic crisp topping with good texture
Quick oats Yes, only if needed Softer, finer topping with less chew
Instant oats Not ideal Can become too soft or powdery
Steel-cut oats No Too hard and chewy for this topping

That little bit of chew is what makes apple crisp feel like apple crisp instead of baked apples with crumbs. Old-fashioned oats stay visible, toasty, and slightly chewy, so the topping has more texture than a plain crumble.

For a version without oats, make a flour-butter-brown-sugar crumble topping instead. That leans closer to apple crumble than classic apple crisp, and it needs slightly different handling because the topping does not have the same chewy oat structure. You can also jump to the apple crisp without oats variation below.

How to Make Apple Crisp

Method overview: The recipe is easiest when you follow the same order every time: prep, mix, crumble, scatter, bake, and rest.

Step-by-step apple crisp guide showing apple prep, filling, crumble topping, baking, and resting.
The method works best in order: prep the apples, coat the filling, make the crumble, scatter it loosely, bake until bubbling, and rest.

1. Prep the Apples

First, preheat the oven to 350°F / 175°C. Lightly butter an 8×8 or 9×9-inch baking dish, and place it on a rimmed baking sheet if the dish is quite full.

Next, peel the apples for a softer, more classic dessert texture. For a more rustic crisp with extra texture, leave the skins on. Core the apples, then cut them into even slices or chunks.

  • Thin slices: softer, more layered filling
  • 1/2-inch chunks: more apple bite and texture
  • Uneven pieces: some apples may turn mushy while others stay firm

2. Mix the Apple Filling

Add the apples to a large bowl with lemon juice, brown sugar, flour or cornstarch, cinnamon, nutmeg, vanilla, and salt. Then toss until the apples are evenly coated. The thickener should disappear into the juices and sugar instead of sitting in dry patches.

Apple crisp filling being mixed until apple pieces are coated with cinnamon, brown sugar, lemon, and thickener.
Mix until the thickener disappears into the apple juices so the filling bakes glossy instead of floury.

After mixing, spread the apples into the prepared baking dish. Do not worry if the dish looks full; the apples shrink as they bake.

3. Make the Oat Topping

In a separate bowl, mix the oats, flour, brown sugar, cinnamon, and salt. Add cold cubed butter. Then use your fingers, a fork, or a pastry cutter to rub the butter into the dry ingredients.

The mixture should look like uneven, buttery crumbs, not dry flour and not a smooth paste. When you squeeze a handful, it should hold together in rough clumps, then break apart easily. Leave some larger clumps on purpose; those become the crispest brown-sugar bites after baking.

Hand holding moist oat crumbs for apple crisp topping before baking.
The oat topping should form rough crumbs that hold together lightly, then break apart before baking.

If the mixture still looks dusty, keep working in the butter. Dry crumbs bake up floury. If it looks wet or greasy before baking, the butter has softened too much; chill the bowl for 10 minutes before sprinkling the oat mixture over the apples.

Warm kitchen tip: In a warm kitchen, cube the butter and chill or freeze it for 5–10 minutes before making the topping. Cold butter helps the oat topping bake into distinct crumbs instead of melting into the apples.

Cold butter cubes compared with softened butter for making apple crisp topping.
If the butter softens, chill the topping briefly; cold butter keeps the crumble distinct instead of greasy.

4. Add the Topping

Scatter the oat mixture evenly over the apples. Do not press it down firmly. A loose crumb layer allows heat to move through the apples while the surface browns.

Oat crumble topping being scattered loosely over apple filling in a baking dish.
Scatter the topping loosely rather than pressing it down, so heat reaches the apples while the surface browns.

5. Bake Until Bubbling

Bake for 45–55 minutes, or until the oat layer is golden and the apple juices are visibly active beneath the surface. That heat is what wakes up the flour or cornstarch and turns the juices glossy instead of loose.

Apple crisp bubbling in the oven with golden oat topping in a cream baking dish.
Active bubbling is the doneness cue that tells you the filling has enough heat for the thickener to work.

If the surface browns too quickly before the apples are tender, loosely cover the dish with foil and continue baking. Do not seal the foil tightly, because trapped steam can soften the crumb layer. If the crisp still looks off, use the troubleshooting chart before you pull it from the oven.

6. Let It Rest Before Serving

Once the crisp comes out of the oven, let it rest for at least 15–20 minutes before scooping. This short rest helps the juices settle so the filling is glossy and spoonable instead of runny.

Freshly baked apple crisp resting on a cooling rack with a 15 to 20 minute rest cue.
That short wait after baking is not wasted time; it helps the hot apple juices thicken so the first scoop does not collapse into the bowl.

Should Apple Crisp Be Baked Covered or Uncovered?

Bake apple crisp uncovered so the oat layer can brown and crisp. If the surface turns dark before the apples are tender, cover the dish loosely with foil for the last 10–15 minutes. Do not cover it from the beginning unless your oven runs very hot.

Once the apples are coated and the crumble is ready, the hardest part is already done. From here, the oven does most of the work: softening the apples, thickening the juices, and turning those rough oat clumps into the bites everyone wants first.

Easy Apple Crisp Recipe with Oats

Easy Apple Crisp Recipe with Oats

This easy apple crisp bakes tender cinnamon apples under a generous brown sugar oat topping, with clear doneness cues so the filling turns glossy instead of watery. Serve it warm with vanilla ice cream, especially if you want the corner pieces to disappear first.

Prep Time20 minutes
Cook Time45–55 minutes
Rest Time15 minutes
Servings6–8

Ingredients

For the apple filling

  • 2 1/2 lb / 1.1 kg apples, weighed before peeling and coring; about 8 cups sliced or chopped apples
  • 1 tablespoon / 15 ml lemon juice
  • 1/3 cup / 65 g packed light brown sugar, or up to 1/2 cup / 100 g for very tart apples
  • 2 tablespoons / 16 g all-purpose flour, or 1 tablespoon / 8 g cornstarch
  • 1 teaspoon ground cinnamon
  • 1/4 teaspoon ground nutmeg, optional
  • 1 teaspoon / 5 ml vanilla extract
  • 1/4 teaspoon fine salt

For the oat topping

  • 1 cup / 90 g old-fashioned rolled oats
  • 3/4 cup / 95 g all-purpose flour
  • 3/4 cup / 150 g packed light brown sugar
  • 1 teaspoon ground cinnamon
  • 1/4 teaspoon fine salt
  • 1/2 cup / 113 g cold unsalted butter, cut into small cubes
  • Optional: 1/2 cup / 55–60 g chopped pecans or walnuts

Instructions

  1. Preheat the oven to 350°F / 175°C. Lightly butter an 8×8 or 9×9-inch baking dish. Place the dish on a rimmed baking sheet if it is very full.
  2. Add the apples to a large bowl. Toss with lemon juice, brown sugar, flour or cornstarch, cinnamon, nutmeg, vanilla, and salt until evenly coated.
  3. Spread the apple mixture into the prepared baking dish.
  4. In another bowl, stir together the oats, flour, brown sugar, cinnamon, and salt.
  5. Add the cold cubed butter. Rub it into the oat mixture with your fingers, a fork, or a pastry cutter until the topping forms moist crumbs and rough clumps.
  6. Sprinkle the topping evenly over the apples. Do not press it down firmly.
  7. Bake for 45–55 minutes, until the topping is golden and the apple juices are bubbling at the edges and toward the center.
  8. If the topping browns before the apples are tender, cover loosely with foil and continue baking.
  9. Let the crisp rest for 15–20 minutes before serving. Serve warm, plain or with vanilla ice cream.

Notes

  • Use old-fashioned oats for the best topping texture.
  • The crisp is not done just because the topping is brown. Look for bubbling juices near the center too.
  • If the topping looks powdery before baking, work in the butter a little more or add 1–2 teaspoons extra cold butter.
  • If using a 9×9 pan, check a few minutes early because it is slightly shallower than an 8×8.
  • Use less sugar for sweet apples and more for very tart apples.
  • For a glossier filling, use cornstarch instead of flour.
  • For a thicker filling, let the crisp cool for at least 20 minutes before scooping.
Saveable apple crisp recipe card with baked apple crisp, vanilla ice cream, apples, oats, bake time, and rest time.
Keep the base formula simple: 2½ pounds of apples, 350°F, old-fashioned oats, and a proper rest before serving.

Finished texture: The best scoop holds glossy apples and crumble together without leaving a watery puddle behind.

Spoon lifting glossy apple crisp filling with golden oat crumble from a warm bowl.
The ideal spoonful holds tender apples, glossy cinnamon juices, and enough crumble to give every bite texture.

Apple Crisp Pan Guide: 8×8, 9×9, and 9×13

Pan size changes the depth of the apples, the bake time, and how much crumble you need. A deeper crisp feels softer and more spoonable, while a wider dish gives the oat layer more exposure and more golden edges.

Apple crisp pan size guide comparing 8x8, 9x9, and 9x13 baking dishes.
Use the pan guide before you bake, because a deeper dish needs more time while a wider dish exposes more crumble to direct heat.
Pan Size Apple Amount Topping Amount Bake Time Best For
8×8 inch 2–2 1/2 lb / 900 g–1.1 kg Use full recipe 45–55 minutes Deeper family-style crisp
9×9 inch 2 1/2 lb / 1.1 kg Use full recipe 45–55 minutes Best balanced default
9×13 inch 3 1/2–4 lb / 1.6–1.8 kg Use 1 1/2x topping 50–60 minutes Holidays, potlucks, larger families

How to Make a 9×13 Apple Crisp

A 9×13 apple crisp is the version to make for a holiday table, potluck, or family dinner where people will go back for seconds. The trick is not just adding more apples; the topping has to scale too, or the pan tastes like baked apples with a thin oat sprinkle.

Large 9x13 apple crisp in a glass baking dish with golden oat topping and spooned cinnamon apple filling.
For a 9×13 apple crisp, scaling the crumble matters as much as scaling the apples; otherwise, each serving can feel thin on top.

For a 9×13-inch apple crisp, increase the recipe so the pan still has enough fruit and topping. Otherwise, a thin layer of apples can dry out, while a thin topping makes the crisp feel unfinished.

Ingredient 9×13 Amount
Apples 3 1/2–4 lb / 1.6–1.8 kg, about 11–12 cups sliced or chopped
Lemon juice 1 1/2 tablespoons / 22 ml
Brown sugar for filling 1/2 cup / 100 g, or less for sweet apples
Flour for filling 3 tablespoons / 24 g, or 1 1/2 tablespoons cornstarch
Old-fashioned oats 1 1/2 cups / 135 g
Flour for topping 1 cup plus 2 tablespoons / about 140 g
Brown sugar for topping 1 cup plus 2 tablespoons / about 225 g
Cold butter 3/4 cup / 170 g
Bake time 50–60 minutes at 350°F / 175°C

For the 9×13 version, give the middle of the pan enough time to catch up with the edges, then rest it at least 20 minutes before serving. A larger pan holds more hot apple juice, so the short wait makes each scoop cleaner.

Pan texture tip: Think of dish size as a texture decision, not only a volume decision.

Deep pan and wide pan apple crisp comparison showing different apple depth and golden topping exposure.
Think of pan size as a texture choice: deeper dishes give a softer fruit layer, while wider dishes create more browned crumble and edges.

If you make this in a different dish size, share the pan and bake time. Someone else will absolutely be standing in their kitchen with a deep ceramic dish or shallow glass pan wondering if it will work.

Popular Apple Crisp Variations

This apple crisp recipe uses fresh apples and oats, but the basic ratio is flexible. Once you understand the filling, topping, and doneness cues, you can adjust the crisp for prepared apple pie filling, no oats, gluten-free flour, cranberries, pears, caramel, nuts, or a dairy-free topping.

Apple crisp variations with caramel, cranberry, pear, nuts, maple, and no-oat crumble servings.
Start with the classic version, then choose the variation by purpose: caramel for richness, cranberry for tartness, nuts for crunch, or no oats for a softer crumble.

Start with the base apple crisp recipe, then choose the variation based on what you want the crisp to do: caramel makes it richer, cranberries make it sharper for a holiday table, pears make the fruit layer softer, nuts add crunch, and gluten-free or dairy-free swaps make the same base recipe work for more people.

Apple Crisp with Apple Pie Filling

Apple pie filling being spooned into a baking dish with oat topping nearby for shortcut apple crisp.
Apple pie filling makes a shortcut apple crisp possible, but fresh apples give you more control over sweetness and texture.

Use apple pie filling when you need a shortcut crisp with no peeling or slicing. Because the filling is already sweetened and thickened, skip the fresh-apple sugar, flour, lemon, and spice mixture. Spread 5–6 cups filling in the dish, add the oat topping, and bake until bubbling.

Homemade filling gives you more control over sweetness and texture. This apple pie filling recipe works for pies, crisps, hand pies, turnovers, and toppings, so it is useful to keep around when apples are in season.

Apple Crisp Without Oats

Brown sugar crumble being scattered over sliced apples for apple crisp without oats.
Choose the no-oat version when you want a finer brown-sugar crumble instead of the chewy texture that oats bring to classic apple crisp.

For a no-oat version, make a flour, brown sugar, butter, and cinnamon crumble topping. The texture is closer to apple crumble: buttery and tender rather than chewy-crisp. Keep the butter cold and work it in until the topping forms rough crumbs, not a smooth paste.

Caramel Apple Crisp

Caramel apple crisp served with vanilla ice cream and caramel sauce drizzled over the top.
Drizzle caramel over each serving instead of loading the filling with it, so the apples stay balanced.

For caramel apple crisp, use the base recipe and drizzle caramel over each serving instead of stirring a lot of caramel into the filling. That keeps the apples from becoming overly sweet or sticky while still giving you the caramel-apple flavor people expect.

Apple Cranberry Crisp

Apple cranberry crisp with ruby cranberries, sliced apples, and golden oat crumble in a cream baking dish.
Cranberries add tartness and color, making apple cranberry crisp especially useful for fall dinners and holiday menus.

Add 3/4 to 1 cup fresh or frozen cranberries to the apples for a sharper holiday-style crisp. Because cranberries are tart, taste the apple mixture before baking and add 1–2 extra tablespoons of sugar if needed.

Apple Pear Crisp

Apple pear crisp being assembled with chopped apples, pears, cinnamon, and oat crumble in a baking dish.
Apple pear crisp works best with firm pears and tart apples together, because the pears add softness while the apples keep the flavor bright.

Replace about one-third of the apples with firm pears. Keep some tart apples in the mix so the filling does not taste flat. Softer pears can work, but they will make the filling more delicate and saucy.

Apple Crisp with Nuts

Add 1/2 cup chopped pecans or walnuts to the topping for extra crunch. If the nuts start browning before the apples are tender, cover the dish loosely with foil near the end of baking.

Maple Apple Crisp

Replace 1–2 tablespoons of the filling sugar with maple syrup for a deeper fall flavor. Do not add too much extra liquid; maple should support the apples, not make the filling loose.

Individual Apple Crisps

Individual apple crisps baked in white ramekins with golden oat topping and one serving topped with vanilla ice cream.
Individual apple crisps bake faster than a full pan, so start checking early and serve while the topping still has texture.

Divide the filling and topping among small ramekins and bake until the fruit bubbles and the topping is golden. Start checking around 25–30 minutes because smaller portions bake faster.

No-Peel Apple Crisp

Leave the skins on if your apples have thin, pleasant skins and you like a more rustic texture. Peel thick-skinned or waxy apples for a softer, more classic filling.

Gluten-free and dairy-free tip: Keep the base method, but choose certified gluten-free oats and a firm plant-based butter stick so the crumble still works.

Gluten-free and dairy-free apple crisp swaps with oats, cornstarch or gluten-free flour, plant-based butter, apples, and a finished serving.
For gluten-free or dairy-free apple crisp, keep the method the same but choose certified gluten-free oats and a firm plant-based butter stick.

Gluten-Free Apple Crisp

For a gluten-free apple crisp, use certified gluten-free oats and replace the flour with a gluten-free blend or cornstarch in the filling. The topping can use gluten-free all-purpose flour, oat flour, or almond flour, depending on the texture you want.

Dairy-Free Apple Crisp

Use a good plant-based butter stick instead of a soft tub spread. A firmer vegan butter works better because it can be cut into the topping and form crumbs, while softer spreads can make the topping greasy.

Lower-Sugar Apple Crisp

To make a lower-sugar apple crisp, start with naturally sweet apples and reduce the sugar in the apple layer first. Still, keep some sugar in the topping because it helps with browning, flavor, and crisp texture.

Apple Crisp vs Apple Crumble vs Dutch Apple Pie

Apple crisp, apple crumble, and Dutch apple pie all live in the same cozy dessert family, but the topping and crust make them different.

Apple crisp, apple crumble, and Dutch apple pie compared with oat topping, crumb topping, and a pie slice with crust.
This comparison helps readers choose the dessert they actually want: chewy oat-topped crisp, softer crumble, or a sliceable Dutch apple pie with crust.
Dessert Has Oats? Has Crust? Texture
Apple crisp Usually yes No Chewy, crumbly, oat-topped
Apple crumble Usually no No Softer, buttery crumb topping
Dutch apple pie Usually no oats Yes, bottom crust Slices like pie with a crumb top

For the crumb-topped pie version, see this Dutch apple pie recipe. For the easiest spoon dessert, stay with apple crisp.

Troubleshooting Apple Crisp

Most apple crisp problems can be fixed or at least improved. If the apples are underbaked, the dish can go back in the oven. If the oat layer is pale, give it more uncovered time. A runny-looking filling may simply need time to rest; hot apple juices thicken as they cool.

Quick Fixes Before You Serve It

Trying to save it right now? If the topping is pale or powdery, put the crisp back in the oven uncovered. If the apples are still firm but the topping is already dark, cover loosely with foil and keep baking. If the filling looks runny, let it rest 20 minutes before deciding it failed; apple juices thicken as they cool.

Apple crisp troubleshooting guide showing fixes for watery filling, pale topping, powdery crumbs, firm apples, and fast browning.
When apple crisp goes wrong, match the fix to the texture: rest runny filling, bake pale topping longer, add cold butter to dry crumbs, or cover fast-browning topping loosely.

Apple Crisp Troubleshooting Chart

Problem Likely Cause How to Fix It
Apple crisp is watery Very juicy apples, too little thickener, underbaking, or not enough resting time Use flour or cornstarch, bake until bubbling, and rest 15–20 minutes before serving
Crumb layer is soggy Butter was too warm, crisp was covered while hot, or it was underbaked Use cold butter, bake until golden, and reheat uncovered
Crumb layer is dry or floury Not enough butter worked into the topping Rub butter in until the mixture forms moist crumbs and clumps
Crumb layer is greasy Butter was too soft or melted before baking Use cold cubed butter; chill the topping briefly in a warm kitchen
Apples are still firm Apple pieces were too thick or the crisp needed more time Slice apples thinner next time; cover loosely with foil and continue baking
Apple crisp is too sweet Sweet apples plus too much sugar Use more tart apples, reduce filling sugar, and add lemon juice
Apple crisp tastes flat Not enough salt, lemon, or spice Add enough salt to both layers and use lemon juice in the apples

If your crisp came out watery, too firm, or softer than expected, drop the apple variety and pan size in the comments. Those two clues usually explain what happened and make it much easier to adjust the next batch.

How Do You Keep Apple Crisp from Getting Watery?

Use a small amount of flour or cornstarch in the apple layer, cut the apples evenly, and bake until the juices are actively bubbling. The bubbling matters because the thickener needs heat to do its job. After baking, let the crisp rest before serving so the juices can settle.

How Do You Keep the Topping Crisp?

Use cold butter, do not overmix the topping into a paste, and do not cover the crisp while it is still hot. If the problem is leftover texture rather than fresh-baked texture, see storage and reheating.

Can You Put Apple Crisp Back in the Oven?

Yes. If the apples are still firm, the topping is pale, or the filling has not bubbled, return the dish to the oven at 350°F / 175°C. If the topping is already brown, cover it loosely with foil and keep baking until the apples are tender.

Make Ahead, Storage, Freezing, and Reheating

Leftover texture tip: Chill the extra crisp safely, then reheat single portions uncovered when you want the oat topping to recover some crunch.

Apple crisp leftovers stored in a covered glass container and reheated uncovered in an oven.
For better leftover texture, keep the extra crisp chilled and reheat single portions uncovered so the oat topping has a chance to crisp again.

Can You Make Apple Crisp Ahead?

Yes. For the best texture, prepare the apple filling and topping separately, refrigerate them, and assemble right before baking. This keeps the topping crumbly. If the whole dish is assembled ahead, the topping can absorb moisture from the apples and bake up softer.

How to Store Apple Crisp

Let the apple crisp cool after serving, then cover and refrigerate leftovers within 2 hours. Store in the refrigerator for 3–4 days. The topping softens as it sits, but the flavor stays good. For general leftover safety, the USDA recommends refrigerating leftovers promptly and using refrigerated leftovers within 3–4 days.

How to Reheat Apple Crisp

For the best topping texture, reheat apple crisp uncovered in a 325°F / 160°C oven until warm. Small portions can also be reheated in an air fryer. The microwave works for speed, but it softens the topping. For the best next-day texture, reheat only what you plan to eat and keep the rest covered in the fridge; repeated reheating softens the oat layer faster.

Can You Freeze Apple Crisp?

Yes, although the topping is best when baked fresh. You can freeze baked apple crisp tightly wrapped, then thaw overnight in the refrigerator and reheat uncovered. You can also freeze the apple filling and topping separately for a fresher result later.

What to Serve with Apple Crisp

Apple crisp is best warm, after a short rest, because the filling has time to settle while the topping still has texture. Vanilla ice cream is the classic pairing because the cold cream melts into the cinnamon apples. Whipped cream, caramel sauce, Greek yogurt, or a spoonful of custard also work.

For a holiday dessert table, apple crisp is easier to serve than pie because it does not need neat slices. Spoon it into bowls, add ice cream, and let the topping do the work.

For another soft, cozy apple dessert that starts with prepared filling, this apple cinnamon roll bake with apple pie filling is closer to a brunch-style bake than a crisp, but it scratches the same cinnamon-apple craving.

FAQs About Apple Crisp

Do you have to peel apples for apple crisp?

No. Peeled apples give a softer, more classic dessert texture. Unpeeled apples add color and texture. If the apple skins are thick or waxy, peeling is usually better.

Is it better to slice or chop apples for apple crisp?

Slices give you a softer, more layered filling, almost like the inside of apple pie. Chunks give you more bite and make the crisp feel fruitier. The best middle ground is thin slices with a few thicker pieces mixed in, so the filling has both softness and texture.

Can quick oats be used instead of old-fashioned oats?

Quick oats work if that is what you have, but they make the topping finer and softer, more like an oatmeal crumble than a chunky crisp. For the best golden, craggy topping, old-fashioned rolled oats are still the better choice.

Why is my apple crisp runny?

Apple crisp is usually runny because the apples were very juicy, the filling did not have enough thickener, the center did not bake long enough, or the crisp was served too soon. Bake until the filling is visibly bubbling, then let it rest for 15–20 minutes so the juices can thicken.

Why is my apple crisp topping powdery?

Powdery topping usually means the butter was not worked in enough. The oat mixture should look like moist crumbs and rough clumps before it goes over the apples. If it still looks dusty, rub in a little more cold butter before baking.

Can apple crisp be made with canned apples?

Yes, but canned apples are softer than fresh apples, so the filling will be more tender and less structured. Drain canned apples well, reduce added sugar if they are packed in syrup, and expect a softer scoop. Apple pie filling also works, although it is already sweetened and thickened, so it needs a shortcut-style method.

For a true shortcut pie rather than a crisp, this apple pie with apple pie filling keeps the focus on prepared filling inside a crust.

What is the difference between apple crisp and apple crumble?

Apple crisp usually has oats in the topping, which gives it more chew and texture. Apple crumble usually leans on flour, butter, and sugar without oats, so the topping is softer and more crumbly. The names overlap in everyday baking, but oats are the easiest clue.

How do you know when apple crisp is done?

The topping should be golden, the filling should be visibly active beneath the surface, and the apples should be tender when pierced with a knife. If the topping is brown but the apples are still firm, cover loosely with foil and bake longer.

Should apple crisp be served warm or cold?

Apple crisp is best warm after a short rest, when the cinnamon juices have settled but the topping still has texture. Cold leftovers are still delicious, especially for breakfast-style snacking, but the topping will be softer.

Can you double apple crisp?

Yes. For a 9×13-inch pan, use 3 1/2–4 pounds / 1.6–1.8 kg apples and increase the topping by about 1 1/2 times. The pan is wider, not just bigger, so give the middle enough time to bake through before serving.

Final Thoughts

Apple crisp is one of those desserts that proves simple baking can still feel generous. You do not need a perfect crust, a fancy pan, or a long ingredient list. You just need apples that hold their shape, cold butter in the topping, enough salt and lemon to wake up the filling, and the patience to let the juices bubble before you pull the pan from the oven.

Serve it warm, give it a few minutes to settle, and add vanilla ice cream if that is the kind of night you want. Then watch what happens to the corner pieces.

What apple mix did you use: Granny Smith and Honeycrisp, Pink Lady and Braeburn, or something local? Leave your combination in the comments, especially if you found an underrated apple that bakes beautifully.

That is the difference between a loose, forgettable apple dessert and a warm, spoonable crisp with a topping people quietly chase around the pan.

Back to top ↑