Posted on Leave a comment

Tinola Recipe: Filipino Chicken Tinola / Tinolang Manok with Papaya or Sayote

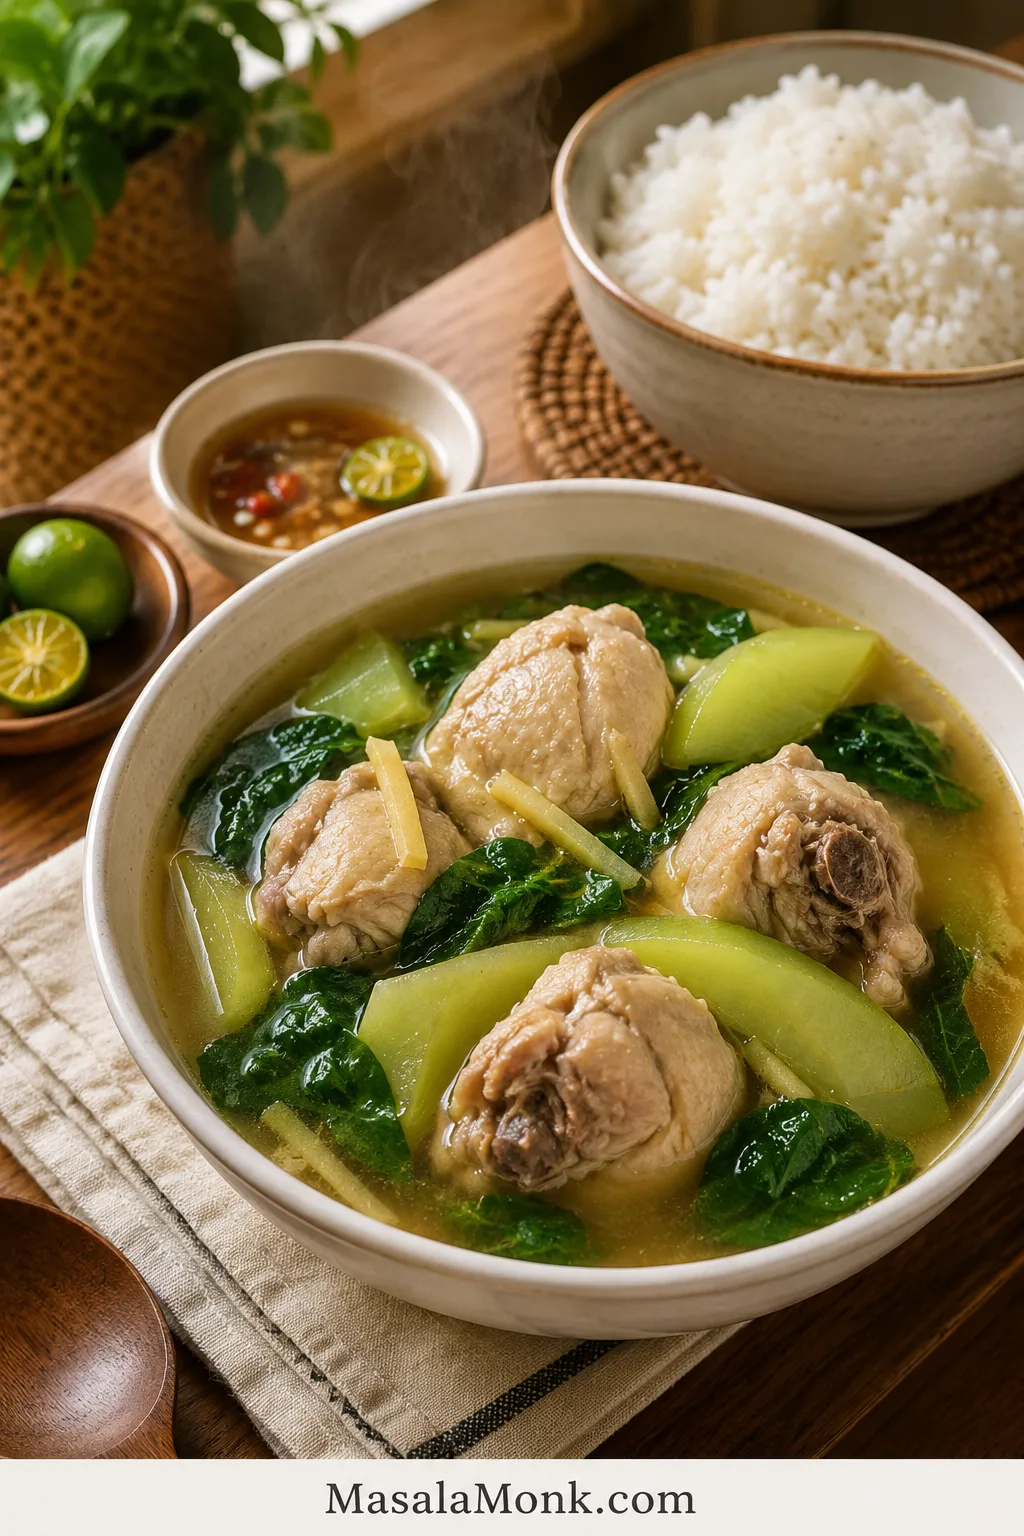
Bowl of Chicken Tinola with golden broth, bone-in chicken, green papaya or sayote wedges, leafy greens, steamed rice, calamansi, and dipping sauce.

Tinola is the kind of Filipino chicken soup that feels light and restorative, but still filling when poured over rice. In a good pot, the broth is clear, gingery, and savory, the chicken is tender, and the green papaya or sayote softens without falling apart.

It is the kind of soup that feels right when you want something gentle, but not empty — warm broth, tender chicken, fresh greens, and rice that soaks up every spoonful.

This Tinola recipe, also called Chicken Tinola or Tinolang Manok, is made with bone-in chicken, fresh ginger, garlic, onion, fish sauce, green papaya or sayote, and leafy greens like malunggay, dahon ng sili, spinach, or pechay.

This version keeps the flavor classic, but it also works in real kitchens: sayote if you cannot find green papaya, spinach if malunggay is not available, and clear timing cues so the soup tastes full instead of flat.

Most importantly, it is built around the two things that make or break Tinola: a broth that tastes gingery and full, not watery, and vegetables that turn tender without collapsing.

Quick Answer: What Is Tinola?

Tinola is a Filipino broth-based dish. The most common version is Tinolang Manok, which means Chicken Tinola. It is usually made with chicken, ginger, garlic, onion, fish sauce, green papaya or sayote, and leafy greens such as malunggay or dahon ng sili.

In English, Chicken Tinola is best described as a Filipino ginger chicken soup. It is usually eaten as a main dish with rice, not just as a starter soup.

  • Best chicken: bone-in thighs, drumsticks, wings, or mixed cuts.
  • Flavor base: fresh ginger, fish sauce, garlic, and onion.
  • Vegetable choice: green papaya for a softer classic feel, or sayote for a firmer bite.
  • Best greens: malunggay or dahon ng sili if available; spinach, pechay, or bok choy if not.
  • Best cooking cue: simmer gently until the chicken is tender and reaches 165°F / 74°C.

Make It Now

Have your chicken, ginger, and vegetables ready? Use this quick path, then follow the recipe card for exact amounts.

  1. Sauté ginger, garlic, and onion until fragrant.
  2. Add chicken and cook until the surface loses its raw color.
  3. Add fish sauce before the liquid so the chicken is seasoned early.
  4. Simmer gently until the chicken is tender.
  5. Add your chosen vegetable near the end, then finish with greens.

Classic but flexible: classic Tinola often means chicken, ginger, patis, green papaya, and malunggay or dahon ng sili. But Tinola is also a home dish, so many cooks use sayote when papaya is hard to find, spinach when malunggay is unavailable, and chicken broth or rice wash when the chicken needs a little help. The point is not to make the pot rigid; it is to keep the soup gingery, savory, clear, and good with rice.

A good pot of Tinola should feel simple, but not thin. The broth should taste like the chicken, ginger, and patis had time to become one thing, not like separate ingredients floating in hot water. That is why this recipe builds the flavor early and waits before adding the vegetables.

Save this Tinola rule: ginger early, patis before broth, chicken until tender, papaya or sayote late, greens last.

Tinola Recipe Card

Filipino Chicken Tinola / Tinolang Manok

This Chicken Tinola recipe keeps the two common problems away: watery broth and vegetables that fall apart before the chicken is tender. The chicken is seasoned early, the simmer stays gentle, and the vegetables go in when the meat is nearly ready.

Prep Time15 minutes
Cook Time45 minutes
Total Time1 hour
Servings4 to 6
MethodStovetop
CuisineFilipino
Main Equipment5 to 6 quart / 4.7 to 5.7 L pot or Dutch oven

Ingredients

  • 2 to 2 1/2 lb / 900 g to 1.1 kg bone-in chicken pieces, such as thighs, drumsticks, wings, or mixed cuts
  • 1 1/2 to 2 tablespoons neutral oil / 22 to 30 ml
  • 1 medium onion, sliced
  • 4 garlic cloves, minced or crushed
  • 45 to 60 g / 1 1/2 to 2 oz fresh ginger, sliced, julienned, or lightly smashed
  • 2 to 3 tablespoons fish sauce / patis / 30 to 45 ml, plus more to taste
  • 6 cups water, low-sodium chicken broth, or rice wash / 1.4 L
  • 350 to 500 g / 12 to 18 oz green papaya or sayote/chayote, peeled and cut into wedges. Remove seeds if using papaya.
  • 2 packed cups / 60 to 90 g malunggay, dahon ng sili, spinach, pechay, or bok choy
  • 1/2 teaspoon black pepper, plus more to taste
  • Salt, only if needed after tasting

Optional Ingredients

  • 1 chicken cube, only if using water and you want a stronger shortcut broth
  • Calamansi or lime, for serving
  • Fresh chili, for heat
  • Extra fish sauce, for serving
  • 1 stalk lemongrass, bruised, for a fragrant variation

Instructions

  1. Prep the chicken and vegetables. Cut the chicken into similar-sized pieces if needed. Peel your chosen vegetable. If using green papaya, remove the seeds. Cut the pieces into 1 1/2 to 2 inch wedges.
  2. Sauté the aromatics. Heat oil in a large pot over medium heat. Add onion, garlic, and ginger. Cook for 2 to 3 minutes, stirring often, until fragrant and softened. The pot should smell warm and clearly gingery.
  3. Add the chicken. Cook for 5 to 7 minutes, turning occasionally, until the chicken loses its raw color and begins to lightly brown on the surface.
  4. Season early. Add 2 tablespoons fish sauce and stir well. Cook for 1 to 2 minutes so the fish sauce coats the chicken and aromatics.
  5. Add liquid and skim. Pour in water, broth, or rice wash. Bring to a boil, then skim off foam or scum from the surface.
  6. Simmer gently. Lower the heat, cover partially, and simmer for 25 to 35 minutes, or until the chicken is tender and reaches 165°F / 74°C internally.
  7. Add the vegetables. Simmer for 5 to 12 minutes, depending on the size and firmness of the pieces, until fork-tender but not mushy.
  8. Finish with greens. Add malunggay, dahon ng sili, spinach, pechay, or bok choy. Cook for 1 to 2 minutes, or turn off the heat and cover until the greens wilt.
  9. Taste and serve. Adjust with more fish sauce, salt, black pepper, calamansi, or chili. Serve hot with steamed rice.

Recipe Notes

  • Bone-in thighs and drumsticks are the easiest choice if you want tender chicken and a fuller broth.
  • The pot should smell clearly of ginger before the liquid goes in.
  • Green papaya gives a softer, slightly sweet, more classic feel. Sayote stays firmer and fresher.
  • Delicate greens need only enough heat to wilt. Fold them in at the end so they stay bright.
  • A chicken cube can rescue a weak pot, especially if you are using plain water or lean chicken. Start with less fish sauce if you add one, then adjust at the end.

What Good Tinola Should Taste Like

A good bowl of Tinola tastes light, gingery, savory, and balanced. The soup is not heavy, but it has enough seasoning and chicken flavor to make you want to spoon it over rice.

The easiest test is the rice: spoon a little broth over hot rice. If it tastes warm, gingery, and savory without needing rescue, the pot is ready.

  • Ginger tastes noticeable, warm, and fresh.
  • Fish sauce gives depth without making the soup taste fishy.
  • Chicken turns tender, especially near the bone.
  • Green papaya softens more; sayote keeps a slightly firmer bite.
  • The greens taste fresh, not dull or overcooked.

Why This Tinola Recipe Works

This recipe is built to solve two common Tinola problems: broth that tastes watery and vegetables that turn mushy. The fix is not complicated. Start the flavor before the liquid goes in, simmer the chicken gently, then add the pieces only when the meat is nearly tender.

  • The flavor starts before the broth. Ginger, garlic, and onion cook in oil first so the soup has a warm aromatic base.
  • Fish sauce seasons the chicken early. Salt can season Tinola, but patis gives the broth its rounded, savory depth.
  • The simmer stays gentle. A steady simmer helps the chicken turn tender without making the liquid rough or cloudy.
  • The vegetables go in late. Do not add them just because the broth is boiling. Add them when the chicken is already nearly tender.
  • The greens stay fresh. Finish with them at the end so the soup keeps a bright green finish.

The simple idea: build flavor before the broth, wait for the chicken to turn tender, then add the vegetables and greens in stages. That is the difference between flat Tinola and a bowl you want to spoon over rice.

The rule below is the whole Tinola method in one glance: build ginger and patis early, give the chicken time, then protect the vegetables and greens at the end.

Five-step Chicken Tinola cooking rule showing ginger early, patis before broth, chicken until tender, vegetables late, and greens last.
Follow this Tinola order to build flavor and protect texture: ginger early, patis before broth, chicken until tender, vegetables late, and greens last.

Ingredients Explained

Think of the ingredients in layers: ginger for warmth, chicken for body, fish sauce for depth, papaya or sayote for texture, and greens for freshness. Once those layers make sense, the recipe becomes much easier to adjust without losing what makes Tinola taste like Tinola.
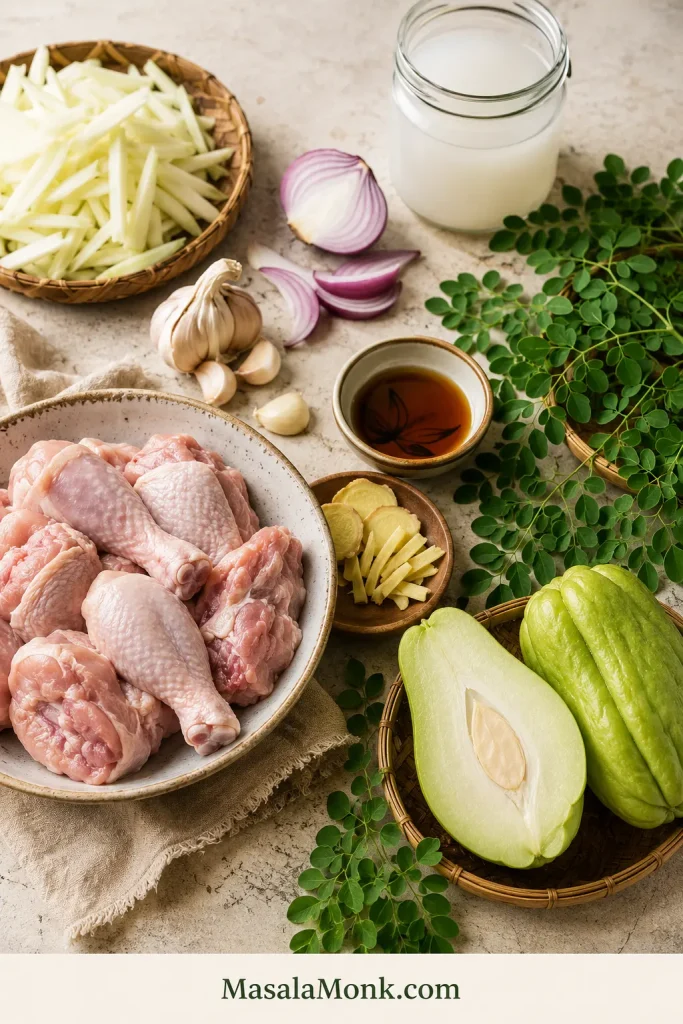
Chicken Tinola ingredients on a board, including bone-in chicken, ginger, garlic, onion, fish sauce, green papaya, sayote, malunggay leaves, and rice wash.
These Tinola ingredients each have a job: chicken gives body, ginger brings warmth, patis adds savory depth, and papaya or sayote gives the soup its gentle bite.

Chicken

Bone-in chicken gives Tinola the kind of body that plain water cannot create on its own. Thighs, drumsticks, wings, or a whole chicken cut into serving pieces all work well.

Boneless thighs can work if you want a faster version, but the broth will be lighter. Chicken breast is lean, but it can dry out if boiled hard or cooked too long. Use a gentle simmer and check it earlier if breast meat is what you have.

Ginger

Ginger is the backbone of Tinola. A small token slice is not enough. Use about 45 to 60 g / 1 1/2 to 2 oz fresh ginger for a full pot. Slice it, julienne it, or lightly smash it so it releases flavor into the oil and broth.

When the ginger hits the oil, the pot should smell sharp, warm, and awake. A weak aroma usually means the final broth will taste weak too. If the ginger feels shy, the Tinola will too.

Garlic and Onion

Garlic and onion round out the ginger. Cook them just until fragrant and softened before the chicken goes in; they do not need to brown deeply.

Fish Sauce / Patis

Fish sauce is where the broth starts getting its backbone. Let it hit the hot pot before the water goes in, and it seasons the chicken instead of just floating salty on top later.

Give it a minute in the hot pot so the sharp edge cooks off and the soup starts with depth instead of last-minute saltiness.

Water, Chicken Broth, or Rice Wash

Water works well if you use bone-in chicken, enough ginger, and proper seasoning. Low-sodium chicken broth gives a stronger shortcut flavor. Rice wash, sometimes called hugas bigas, gives the soup a little more body and a softer feel.

If using rice wash, use the second rinse rather than the first. The second rinse is usually cleaner while still giving the soup a little body. Use rice wash when you want a softer, slightly fuller broth; use water or low-sodium broth when you want a cleaner, lighter-tasting pot.

A chicken cube can rescue a weak pot, especially if you are using plain water or lean chicken. Use it if you need it, but let ginger, chicken, and fish sauce do most of the work.
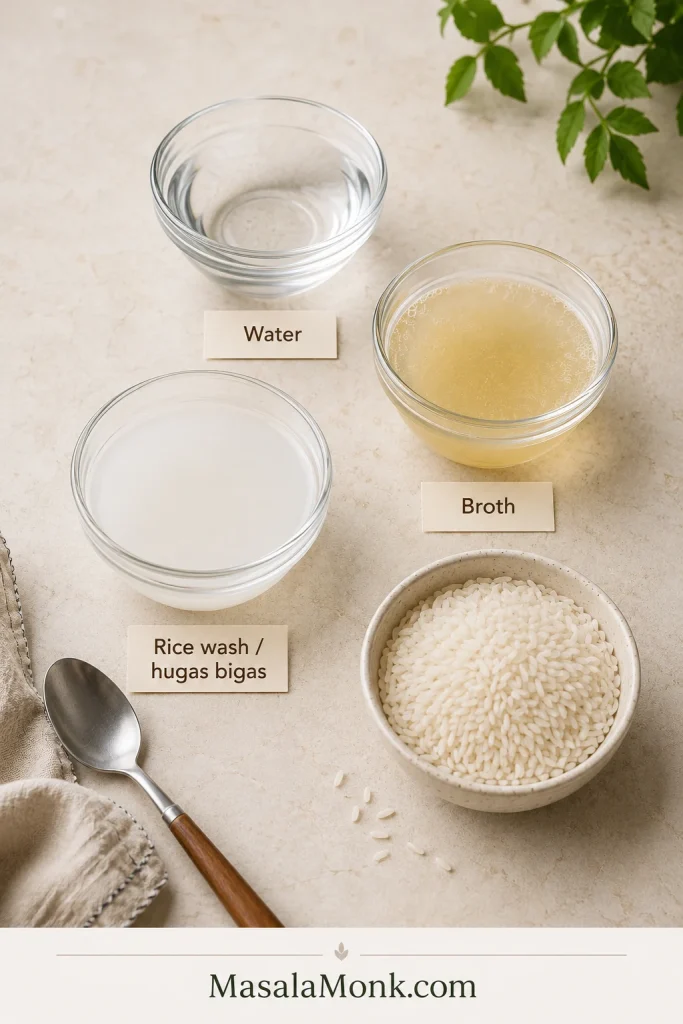
Three bowls labeled water, broth, and rice wash or hugas bigas, with uncooked rice nearby for making Chicken Tinola.
Rice wash, or hugas bigas, gives Tinola a softer body; meanwhile, plain water keeps it light, and broth adds shortcut depth.

Green Papaya or Sayote

Green papaya and sayote are both common in Tinola. Papaya becomes softer and slightly sweet, while sayote, also called chayote, stays firmer with a milder, fresher flavor.

Use the one your market gives you. Tinola is forgiving as long as the broth is gingery and the vegetable goes in at the right time.

Leafy Greens

Malunggay and dahon ng sili are classic Tinola greens. Spinach, pechay, and bok choy are practical substitutes. The exact leaf matters less than the timing.

Add something green and fresh at the end, then stop before the leaves lose their brightness.

Shopping Tip

Filipino markets may have the classic leaves and green papaya. At a regular supermarket, sayote/chayote and spinach can still get you a good, comforting pot.

Best Chicken Cuts for Tinola

The chicken cut matters because Tinola is not only about the meat — it is also about what the meat gives back to the pot.

Bone-in thighs, drumsticks, wings, or mixed cuts are the most forgiving choices for this soup because they can simmer without drying out.

Chicken CutBest ForNotes
Bone-in thighsBest flavor and tendernessThe easiest all-round choice.
DrumsticksBudget-friendly family mealsEasy to serve and good for broth.
WingsExtra collagen and bodyGreat mixed with thighs or drumsticks.
Whole chicken, cut upTraditional family-style potGives different textures in one soup.
Boneless thighsFaster weeknight versionLess broth depth, but still flavorful.
Chicken breastLean versionCan dry out; simmer gently and avoid overcooking.

Chicken should reach 165°F / 74°C internally. FoodSafety.gov lists 165°F / 74°C as the safe minimum internal temperature for chicken, turkey, and other poultry. See the safe minimum internal temperature chart.

Best all-round choice: use bone-in thighs and drumsticks. They give the soup enough flavor, cook evenly, and stay tender even if the pot simmers a little longer.

If you bought a larger pack of thighs and want a dry, crispy dinner another night, this air fryer chicken thighs recipe uses the same reliable cut in a completely different way.

Green Papaya vs Sayote

For many cooks, the first big choice is green papaya or sayote.

Green papaya gives the bowl a softer, more classic feel. Sayote keeps a firmer, cleaner bite. Neither one ruins the dish, so choose based on what you can find and what texture you like.
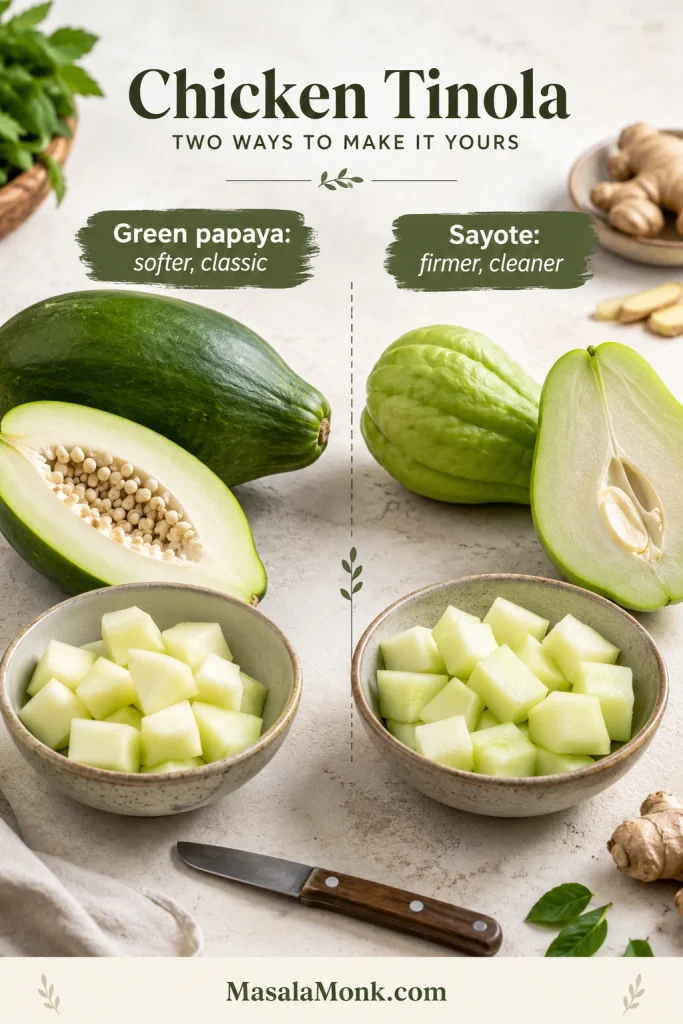
Green papaya and sayote shown side by side with whole and cut pieces for comparing vegetables used in Chicken Tinola.
Green papaya makes Tinola softer and more classic, while sayote stays firmer, cleaner, and easier to find in many markets.
OptionTextureFlavorBest For
Green papayaSoft-tender and absorbs brothMild, slightly sweetA more classic Tinola feel
Sayote / chayoteFirmer and cleanerMild, fresh, neutralEasy supermarket version
Semi-ripe papayaSofter and sweeterNoticeably sweetUse only if you intentionally want a sweeter soup
UpoSoft and wateryDelicateAvailable substitute
KalabasaCreamier and sweeterRicher, less classicA variation, not the default
Labanos / daikonFirm and slightly pepperySharperWorks in a pinch

If you want a clearer, more ginger-forward bowl, sayote is a very good choice. For the softer texture many people associate with Tinola, use green papaya.

If you buy a whole green papaya and have extra left after Tinola, you can use it in a fresh salad like this raw papaya salad.

Cut whichever one you use into wedges large enough to hold their shape. Add the pieces only after the chicken is nearly tender. If they go in too early, they can turn mushy before the chicken is done.

Tinola Greens: Malunggay, Dahon ng Sili, Spinach, Pechay, or Bok Choy

Traditional Tinola often uses malunggay or dahon ng sili. Outside the Philippines, those can be harder to find. Spinach, pechay, bok choy, or watercress will not make the soup wrong — they simply make it more practical for your kitchen.
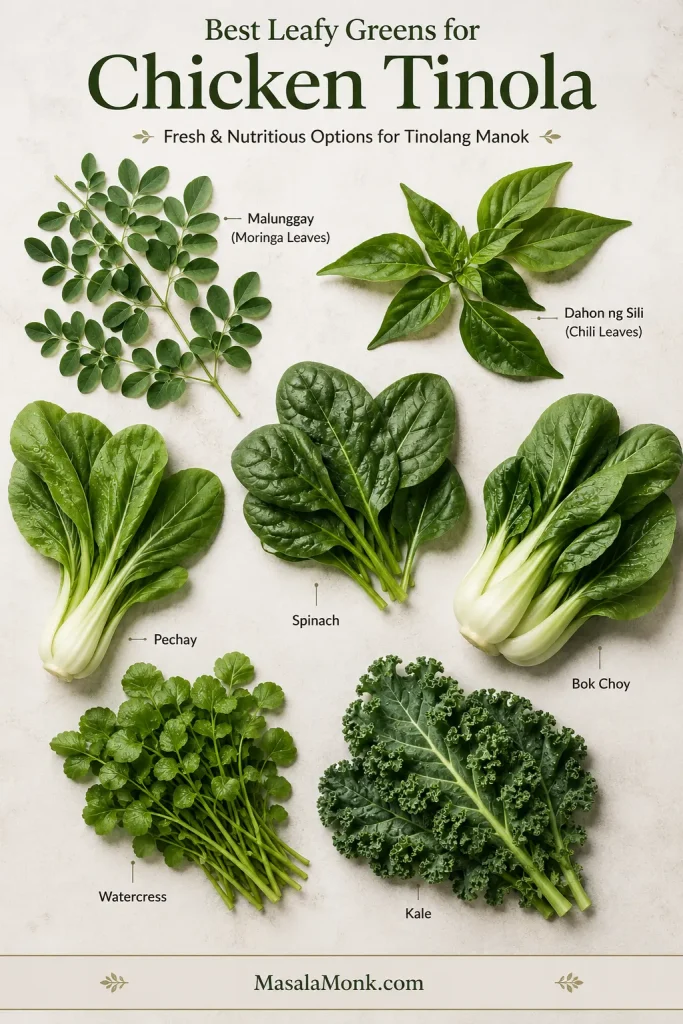
Labeled guide board of Tinola greens, including malunggay, dahon ng sili, spinach, pechay, bok choy, watercress, and kale.
Malunggay and dahon ng sili are classic Tinola greens; however, spinach, pechay, bok choy, watercress, or kale can still work when timed well.
GreenTraditional?FlavorHow to Add
Malunggay / moringaYesEarthy, green, slightly bitterLast 1 to 2 minutes
Dahon ng sili / chili leavesYesMildly pepperyLast 1 to 2 minutes
SpinachSubstituteSoft and mildOff heat or last 1 minute
Pechay / bok choySubstituteMild with more bodyStems first, leaves last
KaleSubstituteStronger and chewierSimmer 2 to 4 minutes
WatercressSubstitutePeppery and freshLast minute

Do not add delicate greens too early. The leaves should still look alive, not dull. If you are using bok choy or pechay, add the thicker stems first and the leaves later. With spinach, turn off the heat and let the leaves wilt gently.

Equipment and Pot Size

Tinola is a simple one-pot soup, but the pot still matters. Use a pot wide enough that the chicken can sit in the aromatics before the liquid goes in. If the pot is too crowded, the chicken steams instead of picking up flavor from the ginger, garlic, onion, and fish sauce.

  • 5 to 6 quart / 4.7 to 5.7 L pot or Dutch oven: roomy enough for bone-in chicken, broth, papaya or sayote, and greens without boiling over.
  • Wide spoon or ladle: useful for skimming foam, scum, and extra oil from the surface.
  • Tongs: helpful for turning chicken pieces while they cook with the aromatics.
  • Instant-read thermometer: the most reliable way to check that chicken reaches 165°F / 74°C.

A smaller pot can still work, but keep the simmer gentle and watch the liquid level once the vegetables go in.

Cooking Time by Stage

Tinola is simple, but timing decides whether the bowl tastes clean and tender or flat and overcooked.
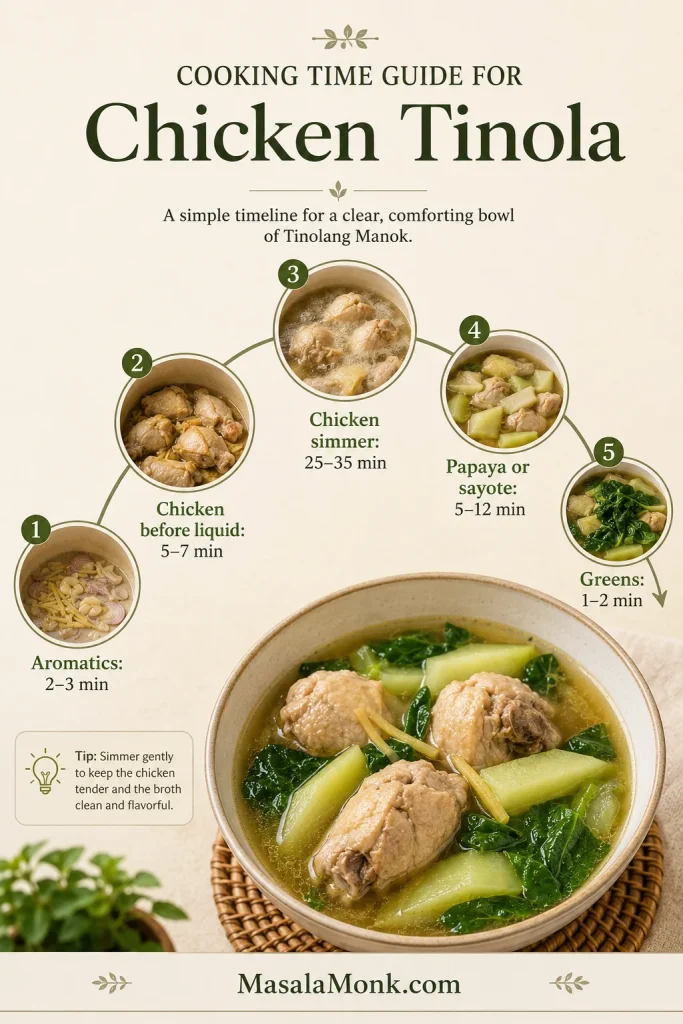
Cooking time guide for Chicken Tinola showing aromatics for 2 to 3 minutes, chicken before liquid for 5 to 7 minutes, chicken simmer for 25 to 35 minutes, papaya or sayote for 5 to 12 minutes, and greens for 1 to 2 minutes.
Good Tinola is mostly timing: aromatics first, chicken long enough to tenderize, vegetables near the end, and greens for the final minute.
StageApproximate TimeWhat to look for
Sauté ginger, garlic, and onion2 to 3 minutesAromatics smell warm, sharp, and fragrant.
Cook chicken before liquid5 to 7 minutesChicken loses raw color and lightly browns on the surface.
Fish sauce with chicken1 to 2 minutesFish sauce coats the chicken and smells savory.
Chicken simmer25 to 35 minutesChicken is tender and reaches 165°F / 74°C.
Papaya or sayote5 to 12 minutesPieces are fork-tender but still hold shape.
Leafy greens1 to 2 minutesLeaves are just wilted and still fresh-tasting.

Timing note: in most home pots, bone-in thighs and drumsticks begin turning tender around 30 minutes after the broth starts simmering. Sayote often softens faster than thick green papaya wedges, so start checking the vegetables at 5 minutes. Spinach wilts best off heat, while pechay and bok choy work better when the stems go in before the leaves.

Native chicken or very large bone-in pieces may need more time before the vegetables go in. Wait until the meat is already turning tender, or the pieces may overcook before the chicken is ready.

Back to top ↑

Step-by-Step Tinola Method

Once the aromatics are fragrant, the rest of the soup is mostly about patience: simmer the chicken gently, then add the vegetables when the meat is nearly tender.

1. Prep the Chicken and Vegetables

Pat the chicken dry if it is very wet. If the pieces are very uneven, cut larger pieces down so they cook more evenly.

Peel the green papaya or sayote. If using green papaya, remove the seeds. Cut the vegetable into 1 1/2 to 2 inch wedges so the pieces can simmer without falling apart.

2. Sauté Ginger, Garlic, and Onion

Heat oil in a large pot over medium heat. Add the onion, garlic, and ginger. Cook for 2 to 3 minutes, stirring often.

The aromatics should smell warm, sharp, and fragrant. This is where the soup starts becoming Tinola, so do not rush past the ginger.
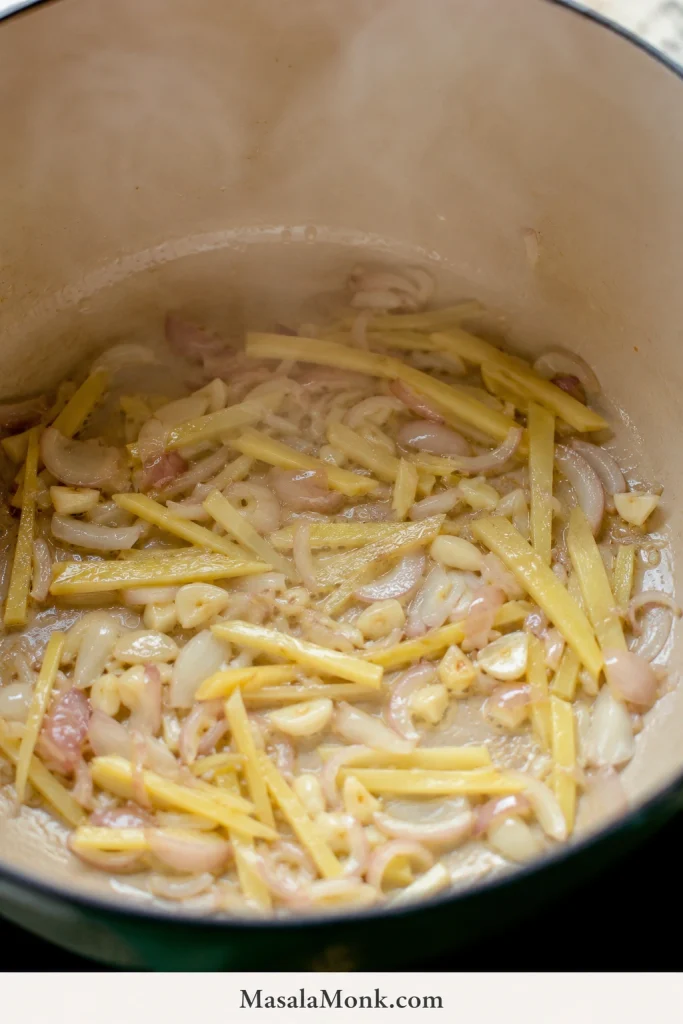
Sliced ginger, garlic, and onion sautéing in oil inside a pot for Chicken Tinola.
Start with ginger, garlic, and onion before adding water; as a result, the broth begins with aroma instead of tasting flat later.

3. Add the Chicken and Lightly Brown It

Add the chicken pieces to the pot. Cook for 5 to 7 minutes, turning occasionally. The chicken does not need a deep brown crust, but the surface needs to lose its raw color and pick up some flavor from the aromatics.

This step gives the soup more depth than simply boiling raw chicken in water.
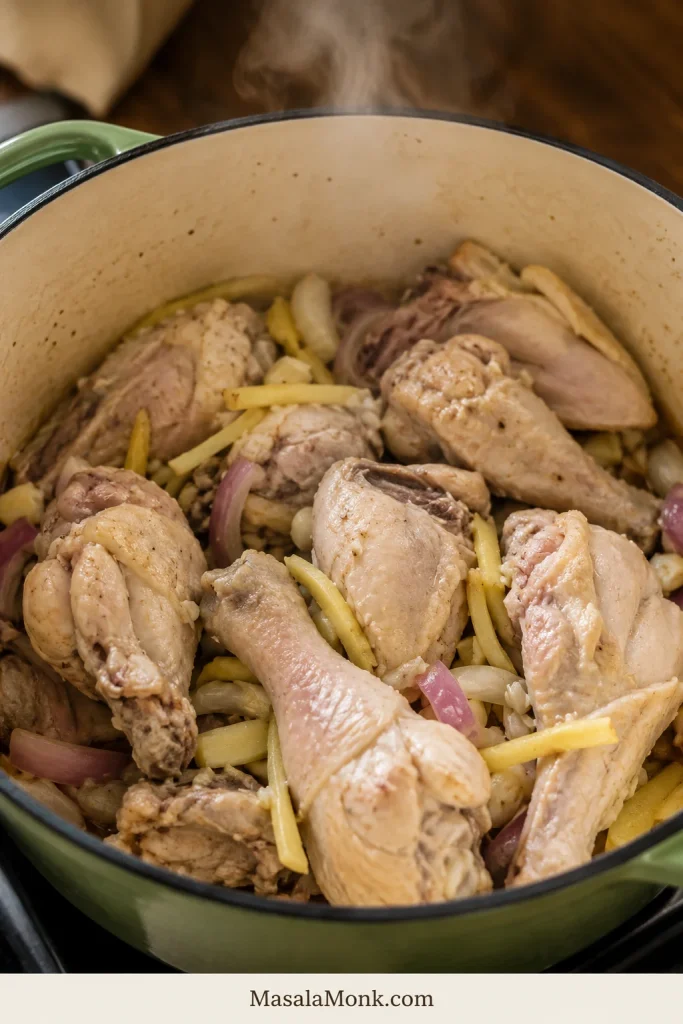
Bone-in chicken pieces cooking with sliced ginger, garlic, and onion in a pot before broth is added.
Cooking chicken with ginger and aromatics before the liquid goes in helps the meat season early and gives Tinola a fuller broth.

4. Add Fish Sauce Early

Add 2 tablespoons fish sauce and stir well. Let it cook with the chicken for 1 to 2 minutes before adding the liquid.

This gives the meat and aromatics a savory base. You can always add more fish sauce at the end, but adding some early helps the flavor cook into the soup instead of sitting only on the surface.
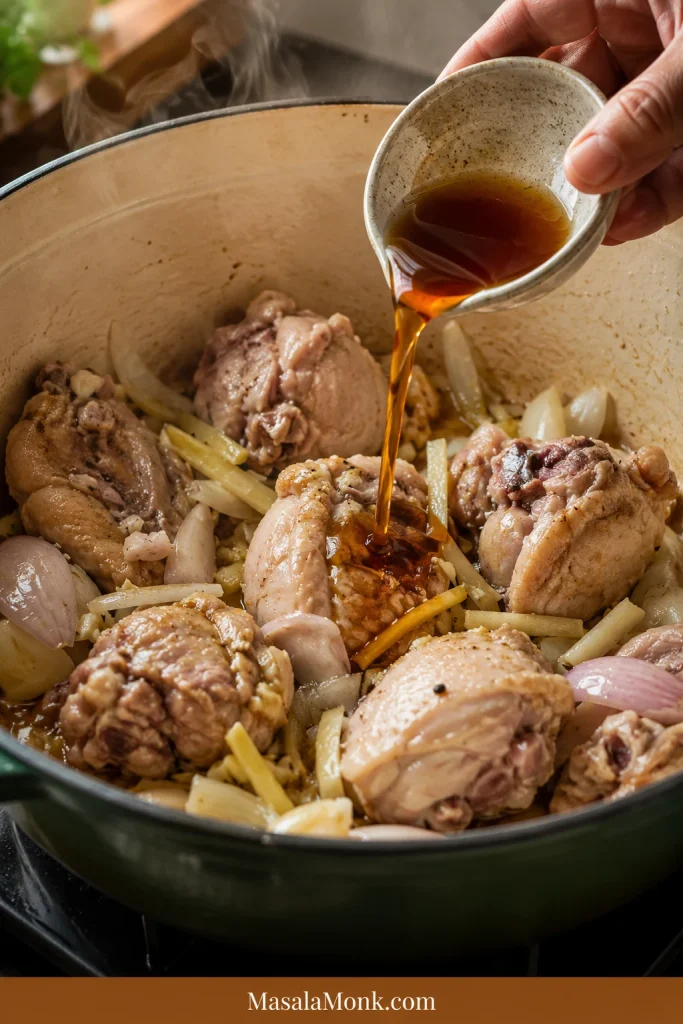
Fish sauce being poured into a pot with bone-in chicken, ginger, garlic, and onion before any broth is added.
Add patis before the broth, not after everything is diluted; this lets the chicken and aromatics absorb savory depth from the start.

5. Add Liquid, Boil, and Skim

Pour in 6 cups water, chicken broth, or rice wash. Bring the pot to a boil. As foam rises, skim it off with a wide spoon or ladle.

Skimming at this stage keeps the liquid clearer. It is much easier to remove foam before the vegetables and greens go in.
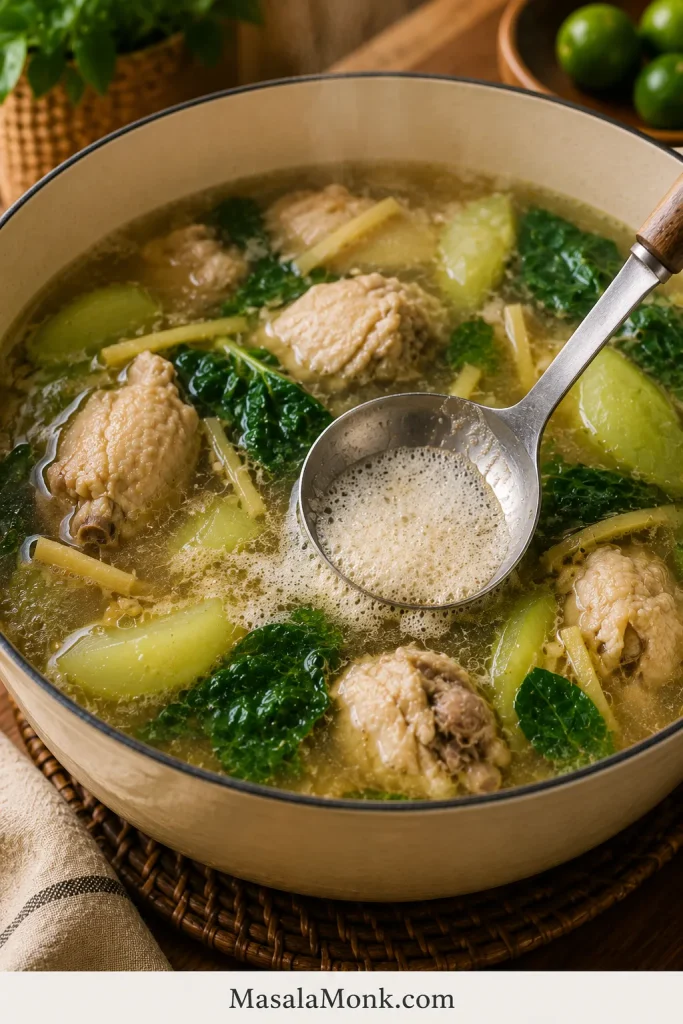
Ladle skimming foam from the surface of Chicken Tinola broth with chicken, ginger, greens, and vegetable pieces in the pot.
Skim the foam after the first boil, then lower the heat; this keeps Tinola broth cleaner without overworking the chicken.

6. Simmer Until the Chicken Is Tender

Lower the heat to a gentle simmer. Cover the pot partially and cook for 25 to 35 minutes, or until the chicken is tender and reaches 165°F / 74°C internally.

The chicken should feel tender near the bone. Avoid a hard boil. A rough boil can make the broth cloudy and the chicken tougher.

7. Add Green Papaya or Sayote

Add the green papaya or sayote once the chicken is nearly tender. Do not add them just because the broth is boiling; wait until the meat has already started giving flavor back to the pot. Simmer for 5 to 12 minutes, depending on how large and firm the pieces are.

Look for tender edges with enough firmness in the center that the wedges do not collapse in the bowl. If they start breaking apart, they have gone too far.
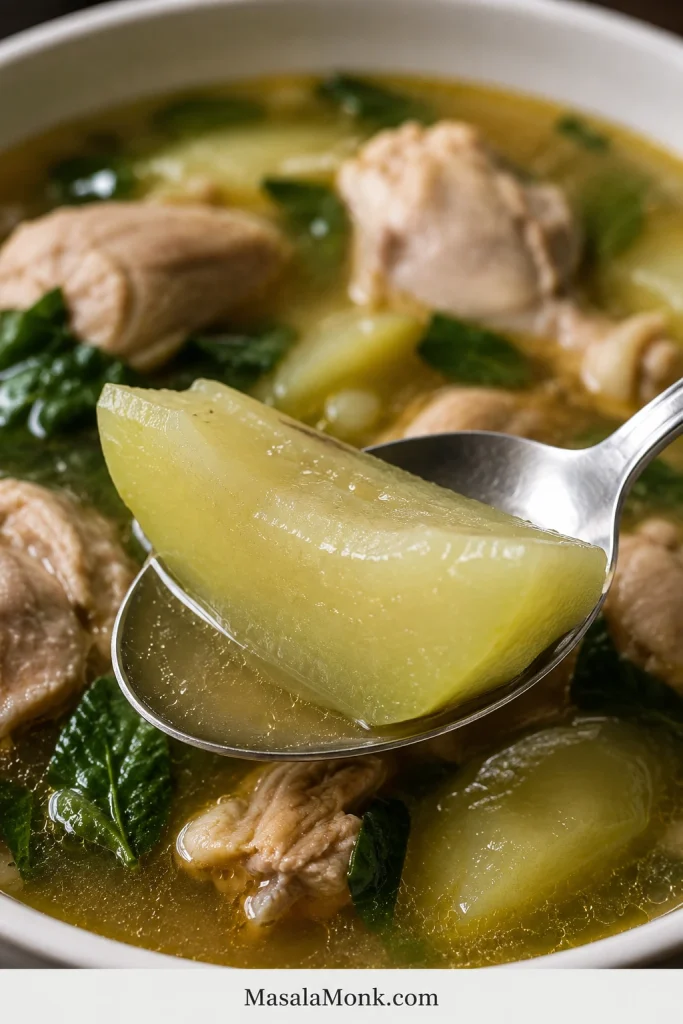
Spoon lifting an intact green papaya or sayote wedge from Chicken Tinola broth, with chicken and greens in the background.
Add papaya or sayote near the end so the edges soften while the pieces still hold their shape in the bowl.

8. Add the Greens at the End

Add malunggay, dahon ng sili, spinach, pechay, or bok choy near the end. Delicate leaves need only 1 to 2 minutes. Spinach can often be added off heat and covered until wilted.

Pull them off the heat while they are still bright and just wilted. If they look dull and tired, they have cooked too long.
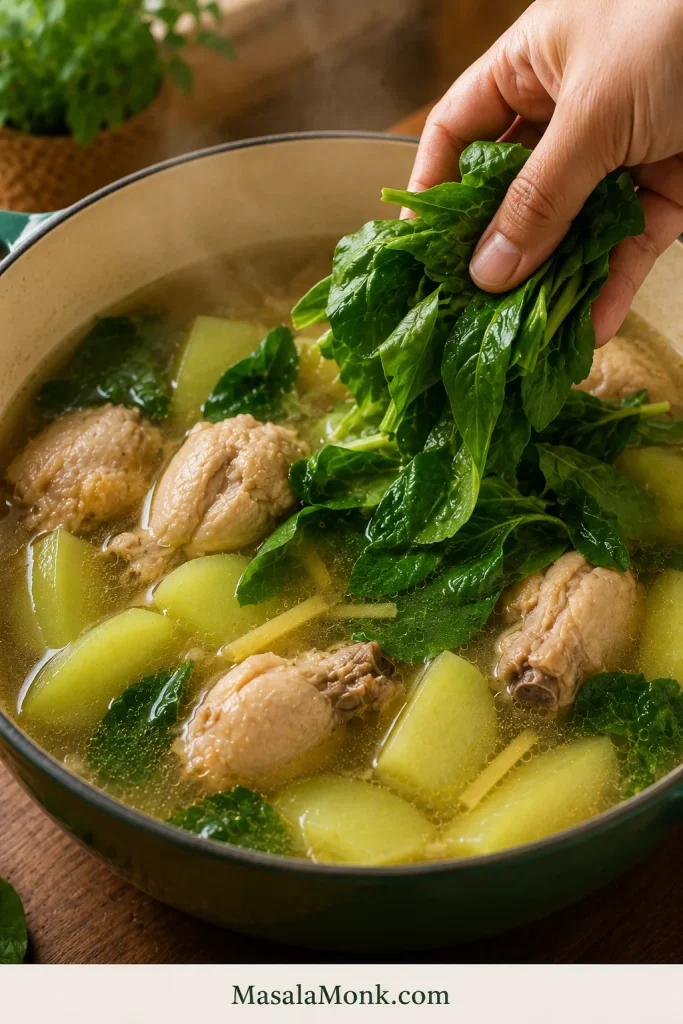
Hand adding fresh leafy greens to a pot of Chicken Tinola with broth, chicken pieces, and green vegetable wedges.
Greens go in last because they only need enough heat to wilt; that way, Chicken Tinola stays fresh, bright, and not overcooked.

9. Taste and Serve

Taste the soup before serving. Adjust with more fish sauce, salt, black pepper, calamansi, or chili.

The test is the rice: spoon a little broth over hot rice. If it tastes warm, gingery, and savory without needing rescue, the pot is ready. The broth can taste a touch stronger from the spoon than it does in the bowl, because rice softens everything.

Timing cue: add the vegetables after the chicken is mostly tender, not at the beginning. That one choice keeps the pieces from collapsing before the chicken is done.

Fix Bland Tinola Broth

Bland Tinola is frustrating because it can look right before it tastes right — clear broth, chicken, greens, rice — but the spoonful feels empty.

It usually means one of four things: not enough ginger, not enough fish sauce, weak boneless chicken, or too much liquid without final seasoning.

The fix is usually not more salt alone. Tinola needs ginger warmth, chicken flavor, fish sauce depth, and a final taste before serving.
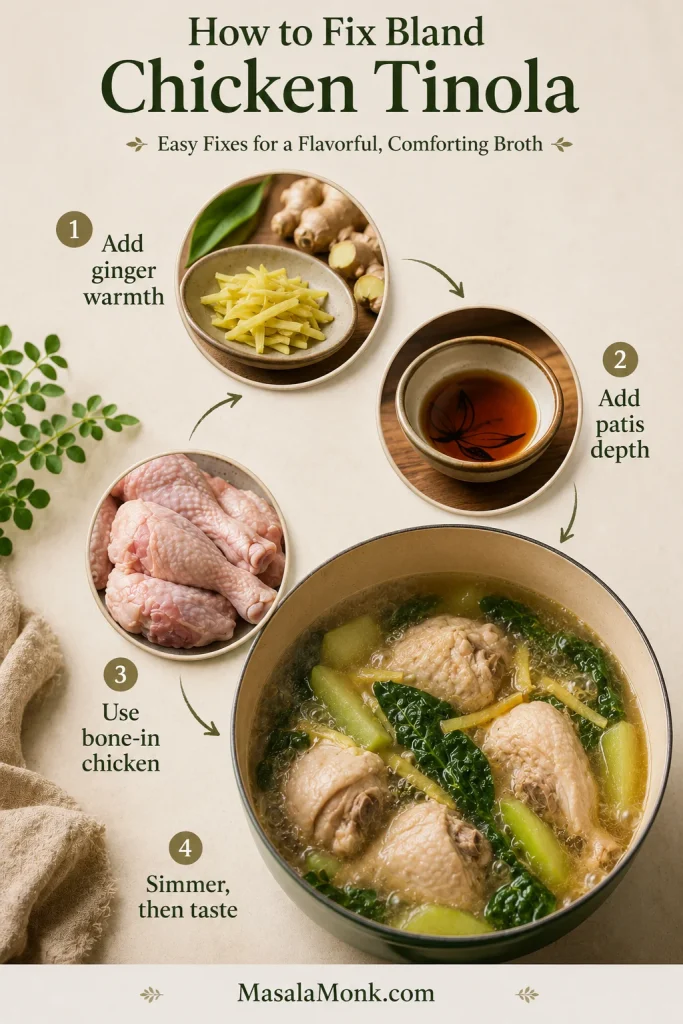
Troubleshooting guide for bland Chicken Tinola broth with ginger, fish sauce, bone-in chicken, and a simmering pot.
When Chicken Tinola tastes thin, fix the base first: strengthen the ginger, deepen with patis, simmer the chicken properly, then taste again.
  • Use bone-in chicken. It gives the broth more body than boneless breast.
  • Use enough fresh ginger. Tinola should smell warm and gingery before the liquid even goes in.
  • Sauté the aromatics first. Do not just boil everything together from the start.
  • Add fish sauce before simmering. Let it coat the chicken and aromatics.
  • Simmer gently. This keeps the chicken tender and the soup balanced.
  • Skim foam and extra oil. This improves both flavor and appearance.
  • Taste at the end. The soup may need more patis, salt, pepper, calamansi, or chili.

If your Tinola has ever tasted like hot water with chicken in it, start with ginger and patis before reaching for more salt. A few extra minutes of gentle simmering can also help the chicken give more back to the pot.

Fast fix for bland Tinola: simmer a few fresh ginger slices in the broth for 5 minutes, add a small splash of fish sauce, then taste again. If the soup still feels thin, let it simmer uncovered for a few minutes to concentrate slightly.

Keep Tinola Broth Clear

Clear Tinola broth comes from gentle cooking and good timing. Bring the liquid to a boil first, then skim off the foam or scum that rises to the surface. After that, lower the heat to a gentle simmer.
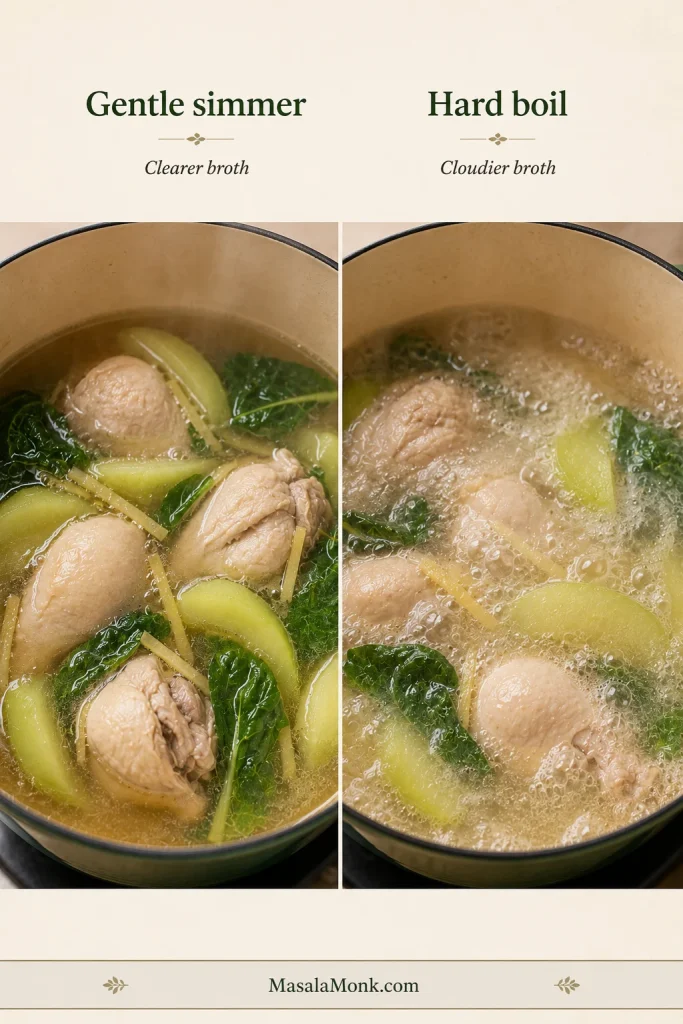
Comparison graphic showing gentle simmer with clearer Chicken Tinola broth beside hard boil with cloudier broth and stronger bubbling.
A gentle simmer keeps Tinola calmer and clearer; by contrast, a hard boil can make the broth cloudy and the chicken tougher.
  • Boil first, then skim. Remove foam while the surface is still easy to see.
  • Lower the heat after skimming. A gentle simmer keeps the broth calmer.
  • Use a wide spoon or ladle. It is easier to lift off scum and extra oil without stirring everything back in.
  • Finish with greens at the end. Delicate leaves stay brighter when they are not boiled for long.
  • Avoid hard boiling the chicken. Rough heat can make the liquid cloudy and the meat tougher.
  • Stop stirring aggressively once foam rises. Let it collect on the surface so you can skim it cleanly.
  • Pull delicate leaves before they turn dull. Fresh-looking greens make the whole bowl feel cleaner.

A home pot of Tinola does not need restaurant-perfect clarity. Skim what you can, keep the simmer gentle, and focus on a broth that tastes balanced and aromatic.

Tinola Ingredients in Tagalog and English

Tinola recipes often move between English, Tagalog, and market names, especially when you are shopping outside the Philippines. If you are shopping at a Filipino market, reading a family recipe, or watching a Tagalog cooking video, these are the ingredient names you are most likely to see.
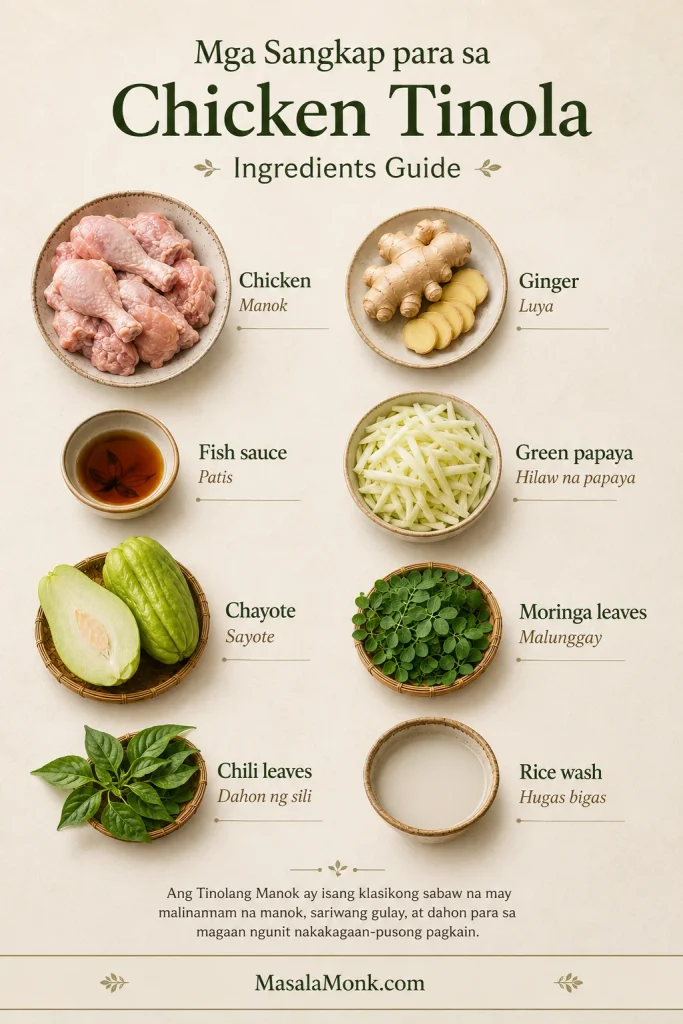
Tagalog-English ingredient guide for Chicken Tinola showing chicken as manok, ginger as luya, fish sauce as patis, green papaya as hilaw na papaya, chayote as sayote, moringa leaves as malunggay, chili leaves as dahon ng sili, and rice wash as hugas bigas.
This Tagalog-English Tinola guide makes shopping and recipe reading easier, especially for manok, luya, patis, sayote, malunggay, and hugas bigas.
EnglishFilipino / Common Name
ChickenManok
GingerLuya
GarlicBawang
OnionSibuyas
Fish saucePatis
Green papayaHilaw na papaya
ChayoteSayote
Moringa leavesMalunggay
Chili leavesDahon ng sili
Rice washHugas bigas
Black pepperPaminta

A short Tagalog-style procedure would be:

Paano lutuin: igisa ang luya, bawang, sibuyas at manok; lagyan ng patis; pakuluan hanggang lumambot; idagdag ang papaya o sayote; tapusin sa malunggay o dahon ng sili.

In English: sauté ginger, garlic, onion, and chicken; season with fish sauce; simmer until tender; add papaya or sayote; finish with malunggay or chili leaves.

Serving Suggestions

Tinola is usually served as a main dish with steamed rice. The broth is often spooned over rice, so it needs enough flavor to carry the meal.

  • Steamed white rice
  • Extra fish sauce / patis on the side
  • Calamansi or lime
  • Fresh chili
  • Black pepper
  • A small dipping sauce of patis and calamansi

The broth does not need to taste salty by itself; it needs to wake up when it hits hot rice. If the soup tastes slightly strong alone but perfect over rice, you are in the right zone.
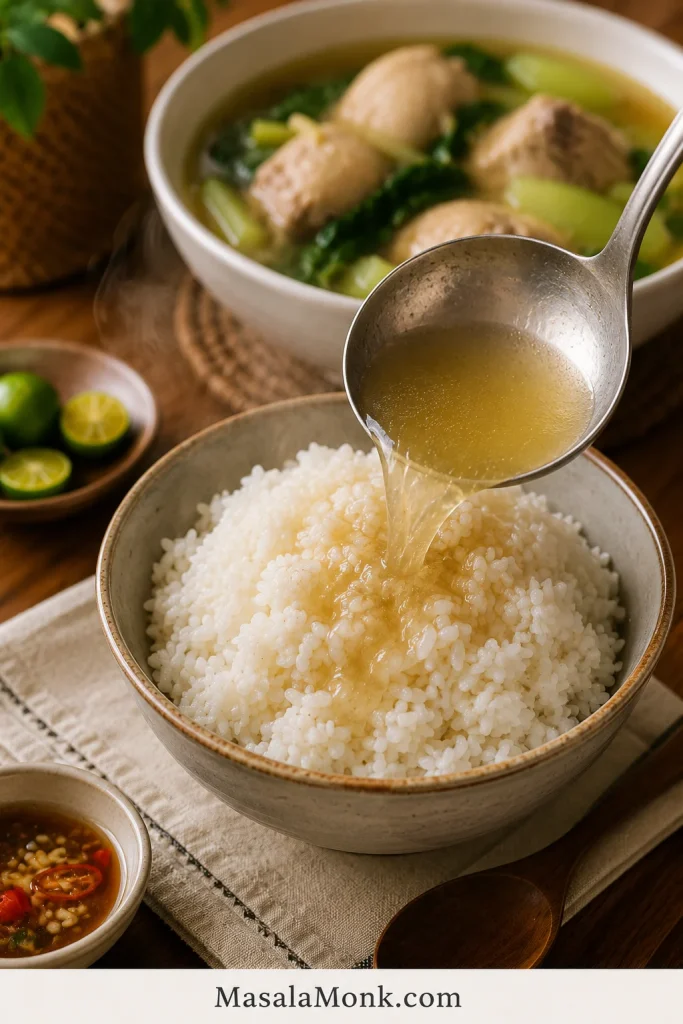
Golden Chicken Tinola broth being poured from a ladle over steamed white rice, with a bowl of Tinola in the background.
The rice test is simple: once the broth touches hot rice, it should taste rounded, savory, and alive — not weak or watery.

For another Filipino chicken classic, make Chicken Adobo on a different night. Adobo is darker, tangier, and braised, while Tinola is lighter, gingery, and broth-based.

For a Filipino vegetable dish that also belongs with rice, try Pinakbet Tagalog, a savory mix of tender vegetables and bagoong.

Tinola is especially good when you want something warm, light, and restorative. It is the kind of soup that feels gentle but still satisfying.

Storage, Freezing, and Reheating

Let leftover Tinola cool, then transfer it to an airtight container and refrigerate within 2 hours.

  • Refrigerator: store for up to 3 days.
  • Freezer: freeze the chicken and broth if needed, but expect the vegetables and greens to soften after thawing.
  • Best texture: freeze without the greens, then add fresh spinach, malunggay, pechay, or bok choy when reheating.
  • Reheating: warm gently on the stovetop until hot throughout. Reheated chicken should reach 165°F / 74°C.

Green papaya and sayote can soften after freezing, so expect a gentler texture if you freeze the finished soup.

Tinola Variations

Once the basic ginger broth method makes sense, you can adjust the vegetable, greens, broth, or protein. Keep the same quiet logic: build the flavor first, cook the main ingredient gently, and finish with the delicate pieces last.

Easy Swaps for This Recipe

  • Tinola with green papaya: softer, slightly sweet, and more classic in feel. Use firm green papaya, not ripe orange papaya.
  • Tinola with sayote: firmer, cleaner, and easy to find in many markets.
  • Tinola with malunggay: earthy, green, and traditional. Add it at the end.
  • Tinola with spinach or pechay: practical when malunggay or dahon ng sili are not available.
  • Tinola with rice wash: slightly fuller broth. Use the second rice rinse for a clearer flavor.

Variations That Cook a Little Differently

  • Native chicken Tinola: deeper flavor, but usually needs a longer simmer before the vegetables go in.
  • Instant Pot Tinola: pressure cook the chicken first, then add the vegetables separately so they do not overcook.
  • Fish or seafood Tinola: use the same ginger-broth idea, but cook fish or mussels briefly so they stay tender.
  • Tinola sa gata or golden Tinola: coconut milk, turmeric, or squash make the soup richer and less like the clear classic version.

Back to top ↑

Common Mistakes

MistakeWhat HappensFix
Using only boneless breastWeak broth and dry meatUse bone-in pieces, or simmer breast gently and check it early.
Not using enough gingerSoup tastes flatUse 45 to 60 g / 1 1/2 to 2 oz fresh ginger.
Adding fish sauce only at the endFlavor tastes salty but shallowAdd some before simmering, then adjust later.
Using a chicken cube with full fish sauceSoup becomes too saltyStart with less patis if using a cube, then adjust after simmering.
Adding too much waterSoup tastes thin even after seasoningUse about 6 cups liquid for 2 to 2 1/2 lb chicken, then simmer uncovered briefly if needed.
Boiling too hardCloudy broth and tougher chickenSkim first, then simmer gently.
Adding the vegetable too earlyPieces turn mushyAdd them after the chicken is nearly tender.
Overcooking greensDull, tired leavesFinish with greens at the end.
Not tasting before servingFinal soup tastes blandAdjust with patis, salt, pepper, calamansi, or chili.
Using ripe papaya by mistakeSoup becomes too sweetUse green papaya or switch to sayote.

FAQ

What is Tinola in English?

Tinola is often described in English as Filipino ginger chicken soup. The chicken version is called Tinolang Manok or Chicken Tinola.

What does Tinola mean?

Tinola generally refers to a Filipino broth-based dish. Tinolang Manok is the chicken version most people mean when they say Chicken Tinola.

Is Tinola the same as Tinolang Manok?

Tinola is the general dish. Tinolang Manok is the chicken version. Since chicken is the most common version, many people use Tinola and Tinolang Manok to mean the same thing.

What should Tinola taste like?

Tinola should taste light but not empty: gingery, savory, and good enough that the broth makes plain rice feel like a meal. If the soup tastes flat, it usually needs more patis, more ginger, or a few more minutes for the chicken to flavor the broth.

What are the main ingredients of Chicken Tinola?

The main ingredients are chicken, ginger, garlic, onion, fish sauce, water or broth, green papaya or sayote, and leafy greens such as malunggay, dahon ng sili, spinach, or pechay.

Do you use green papaya or sayote for Tinola?

Both work. Green papaya gives Tinola a softer, slightly sweet, more classic texture. Sayote stays firmer and tastes mild and fresh, which makes it useful when you want cleaner pieces in the bowl.

What can I substitute for green papaya in Tinola?

Sayote or chayote is the best substitute for green papaya. Upo, kalabasa, or labanos can work in some variations, but they change the flavor and texture.

What leaves are used in Tinola?

The classic choices are malunggay and dahon ng sili. When those are hard to find, spinach, pechay, bok choy, watercress, or kale can work. The important part is adding the greens late enough that they stay fresh.

What can I substitute for malunggay?

Spinach is the easiest substitute for malunggay. Pechay, bok choy, watercress, or kale can also work. Add delicate greens at the end so they do not overcook.

Can I use spinach, pechay, or bok choy in Tinola?

Yes. Spinach wilts quickly and can be added off heat. Pechay and bok choy work best when the thicker stems go in before the leaves.

What is dahon ng sili?

Dahon ng sili means chili leaves. They are used in some traditional Tinola recipes and give the soup a mild peppery green flavor.

What is the best chicken part for Tinola?

Bone-in thighs and drumsticks are the easiest all-round choice. They stay tender, add body to the broth, and are harder to overcook than breast meat.

How long should Tinola simmer?

Tinola usually simmers for about 25 to 35 minutes after the liquid is added, depending on the size of the chicken pieces. Add the vegetables near the end and cook for another 5 to 12 minutes.

How do you keep Tinola broth clear?

Bring the broth to a boil, skim off the foam, then lower the heat to a gentle simmer. Avoid hard boiling the soup for a long time.

Why does my Tinola taste bland?

Tinola tastes bland when the broth lacks ginger, patis, bone-in chicken flavor, or enough simmering time. More salt alone will not fix an empty broth; add ginger warmth, fish sauce depth, and enough time for the chicken to give flavor back to the pot.

Can I make Tinola without fish sauce?

You can, but fish sauce gives Tinola much of its savory depth. If avoiding fish sauce, use salt plus low-sodium chicken broth, and consider adding a little soy sauce or coconut aminos. The flavor will not be exactly traditional.

Can I freeze Chicken Tinola?

Chicken Tinola can be frozen, but the greens and vegetables may soften after thawing. For best results, freeze the chicken and broth, then add fresh greens when reheating.

What is the difference between Tinola and Nilagang Manok?

Tinola is a ginger-forward Filipino chicken soup usually made with fish sauce, green papaya or sayote, and leafy greens. Nilagang Manok is a simpler boiled chicken soup that often uses vegetables like cabbage, potatoes, or saba banana and does not have the same strong ginger profile.

Final Note
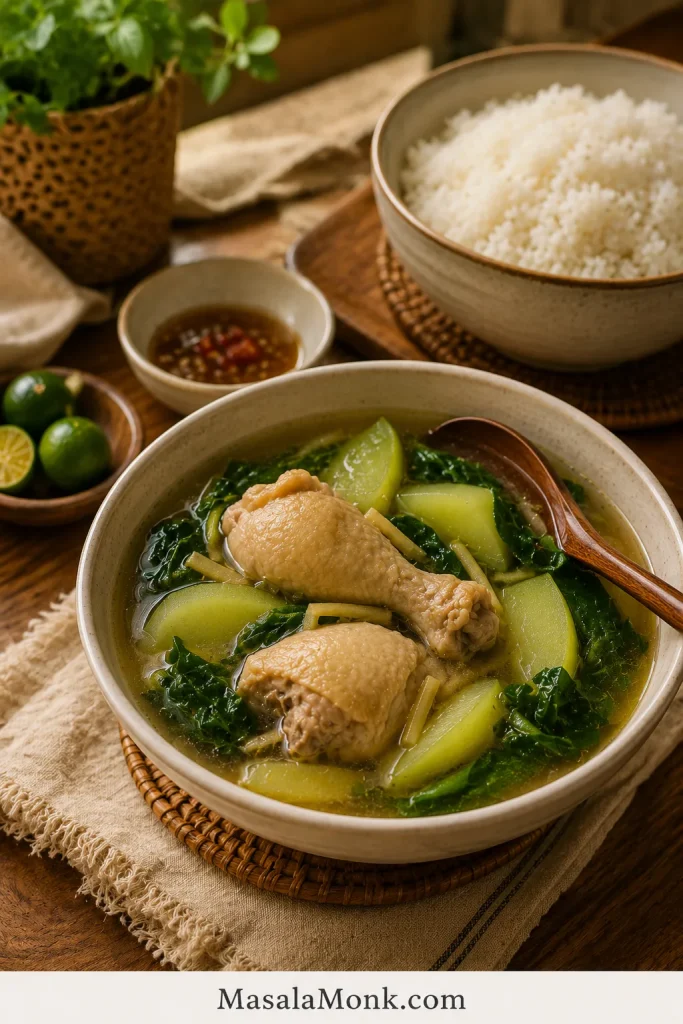
Served bowl of Chicken Tinola with ginger broth, bone-in chicken, green papaya or sayote, leafy greens, steamed rice, calamansi, and dipping sauce.
A finished bowl of Chicken Tinola should feel quiet but complete: warm broth, tender chicken, bright greens, and rice that makes the soup feel like dinner.

Tinola does not need to shout. No watery broth, no collapsed vegetables, no loud tricks — just generous ginger, chicken that has time to flavor the pot, patis added early, and greens folded in last. When those pieces come together, the soup tastes calm but complete: simple food that still feels cared for.

Back to top ↑

Posted on Leave a comment

Orange Marmalade Recipe: Easy, Bright, No Boxed Pectin

Clear glass jar of homemade orange marmalade with visible peel, a spoon lifting marmalade, buttered toast, and fresh oranges on a warm kitchen surface.

Orange marmalade sounds simple until you make it for the first time. Then the questions arrive all at once: how much peel should stay in, why does it taste bitter, does it need pectin, how do you know it has set, and what happens if it is still runny after cooling?

But a good batch is worth the small bit of patience. It makes the kitchen smell like orange peel and warm sugar, turns plain toast into something golden and deliberate, and gives you a jar that can brighten cakes, glazes, yogurt, cheese boards, and sauces for weeks.

This is not a giant traditional Seville marmalade project. It is a practical orange marmalade recipe for regular sweet oranges: real orange peel that softens instead of turning chewy, balanced bitterness, no boxed pectin, and a soft fridge/freezer set you can actually use.

The method is built for the kind of jar you want to open again: bright citrus, delicate peel, enough bittersweet edge to taste like marmalade, and a set that spreads instead of bouncing like jelly. The working formula is 900 g to 1 kg oranges, 1 lemon, 600 ml water, and 700 to 800 g sugar for about 4 cups of fridge/freezer marmalade.

Quick Answer: How Do You Make Orange Marmalade?

To make orange marmalade, scrub the oranges, slice the peel, simmer the peel in water until it gives easily, then add chopped orange flesh, lemon juice, and sugar. Boil the mixture at an active bubble until the syrup turns glossy and thick enough to pass the cold-plate test.

This is an orange peel marmalade, not a smooth orange jam: the peel is sliced, softened, and suspended in the final jar. You still get real marmalade texture, but the peel is cooked gently first so it tastes balanced instead of harsh.

No added pectin is required. The set comes from citrus peel, lemon, sugar, and reduction, with the cold plate showing you when the hot syrup will cool into a soft spread.

What Good Orange Marmalade Texture Looks Like

Use this visual before the first batch: it shows the difference between a loose orange syrup and a preserve with peel held through the body of the marmalade.

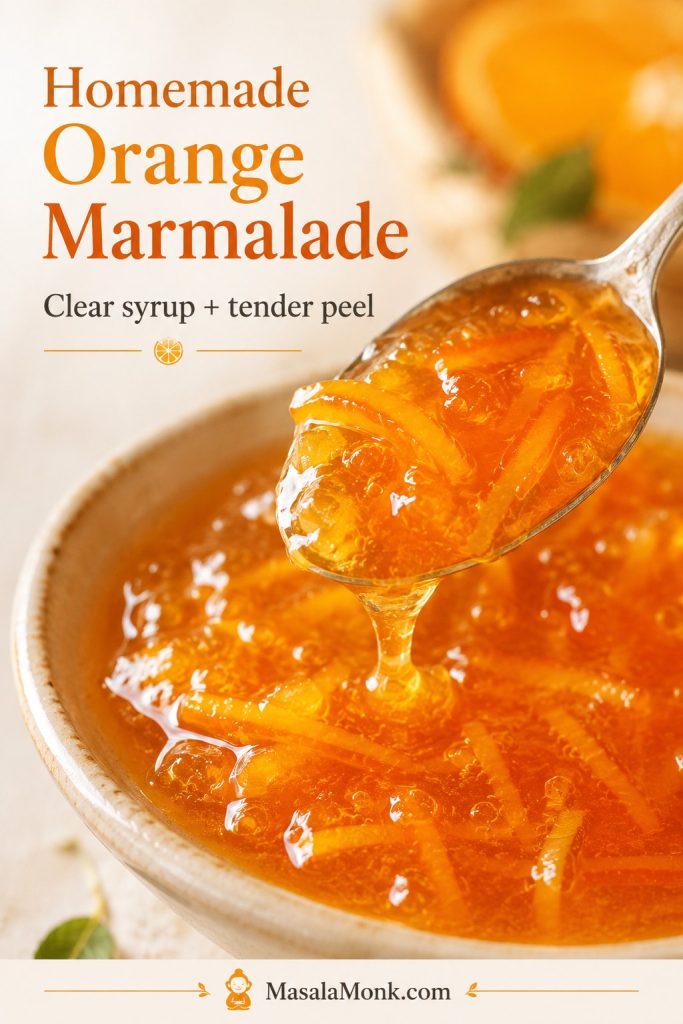
Close-up spoonful of orange marmalade showing clear amber syrup, tender orange peel strips, and a glossy spoonable texture.
Before you cook, notice the texture target. Good orange marmalade should look clear and glossy, with tender peel suspended through the syrup instead of floating in watery liquid.

At a Glance

Best forBeginners who want tender peel, bright citrus, and a soft set
Batch styleFridge/freezer marmalade, about 4 cups
Main fruitRegular sweet oranges, preferably thin-skinned
PectinNo added pectin in the main recipe
TextureSpoonable, glossy, with tender orange peel
Best testCold-plate wrinkle test
StorageRefrigerator or freezer by default
CanningUse a preservation-tested method for shelf-stable jars

This Recipe Is Best If…

Choose this version if you want one manageable fridge/freezer batch made with regular sweet oranges, real peel, no boxed pectin, and a soft set that spreads easily. For pantry canning, sugar-free marmalade, Seville-only marmalade, or smooth orange jam, use a method written for that style.

What Is Orange Marmalade?

Orange marmalade is a citrus preserve made with orange peel, orange pulp or juice, sugar, and water. The peel is the personality of marmalade: it brings texture, bitterness, aroma, and natural pectin support.

A good jar should be sweet, bright, glossy, and a little bitter. It should spread easily, but it should not run off toast like syrup. Orange juice alone makes more of a jelly-style base; marmalade needs peel to feel like marmalade.

At the table, it should make breakfast feel less automatic: bitter enough to wake up the butter, bright enough to cut through cream, and soft enough to drag across toast without tearing it.

Orange Marmalade vs Orange Jam

The simplest difference is peel. Orange marmalade includes citrus peel, while orange jam is usually smoother, sweeter, and less peel-forward. If you remove almost all the peel or blend the mixture until completely smooth, the result may still taste delicious, but it will feel closer to orange jam than classic marmalade.

If peel is the reason you avoid marmalade, do not start with thick-cut. Start with a fine shred. You may find you like marmalade more when the peel is tender, delicate, and spreadable rather than chunky and chewy.

Ingredients and Equipment for Homemade Orange Marmalade

Core Ingredients and What They Do

Start here if you want the recipe to make sense before you cook. These few ingredients control flavor, peel tenderness, natural set, and storage style.

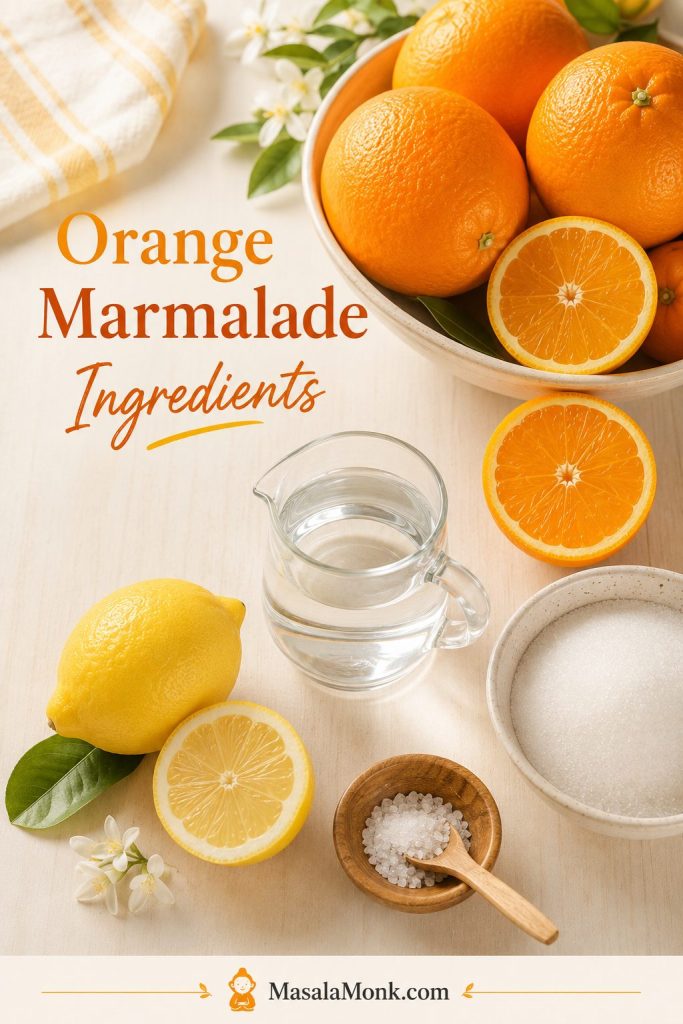
Oranges, lemon, sugar, water, and a small bowl of salt arranged on a light surface for making orange marmalade.
Because this orange marmalade recipe uses only a few ingredients, each one matters: oranges bring peel and flavor, lemon supports acidity, and sugar gives the preserve body.

Marmalade does not hide behind many ingredients. If the oranges are fragrant, the lemon is bright, and the peel is soft before the sugar goes in, the jar tastes alive.

The oranges bring flavor, peel, juice, and natural citrus pectin. Lemon is not just for flavor; its acidity helps that pectin work. Sugar gives the marmalade body, gloss, and keeping power. Water buys the peel time to soften before the syrup starts tightening.

IngredientAmount for this recipeWhy it matters
Regular sweet oranges900 g to 1 kg / about 2 to 2.2 lbProvide the citrus flavor, peel texture, juice, and natural pectin base.
Lemon1 medium lemon, juiced, about 2 to 3 tablespoons / 30 to 45 mlAdds brightness and acidity, which helps the natural pectin work.
Water600 ml / 2 1/2 cups, plus more if neededSoftens the peel before sugar is added and prevents scorching early on.
Sugar700 to 800 g / about 3 1/2 to 4 cupsSweetens, supports set, gives gloss, and improves keeping quality.
SaltA tiny pinch, optionalRounds the sweetness and makes the citrus taste brighter.

Sugar, Set, and Low-Sugar Boundaries

Which sugar amount should you choose? Use 700 g for a brighter, softer refrigerator marmalade. Use 800 g for a firmer, more classic set. If you reduce the sugar heavily in this natural-pectin recipe, expect a softer, shorter-keeping marmalade.

Sugar substitutes do not behave like sugar in regular marmalade. They may sweeten the fruit, but they do not provide the same set, gloss, or preservation. For very low-sugar or sugar-free marmalade, use a method designed for that style rather than simply swapping the sugar here.

Equipment You’ll Need

You do not need a professional preserving setup for this refrigerator marmalade. A few basics are enough: a digital scale, a large deep non-reactive pot, a sharp knife and board, two small freezer-safe plates for the cold-plate set test, and clean jars. A thermometer is helpful but optional; cheesecloth or muslin is only needed if you want to simmer seeds for extra natural pectin support.

For pantry storage, use proper water-bath canning equipment and a preservation-tested recipe. This main recipe is written first as a refrigerator or freezer marmalade.

Which Oranges Should You Use?

Best Sweet Oranges for a First Batch

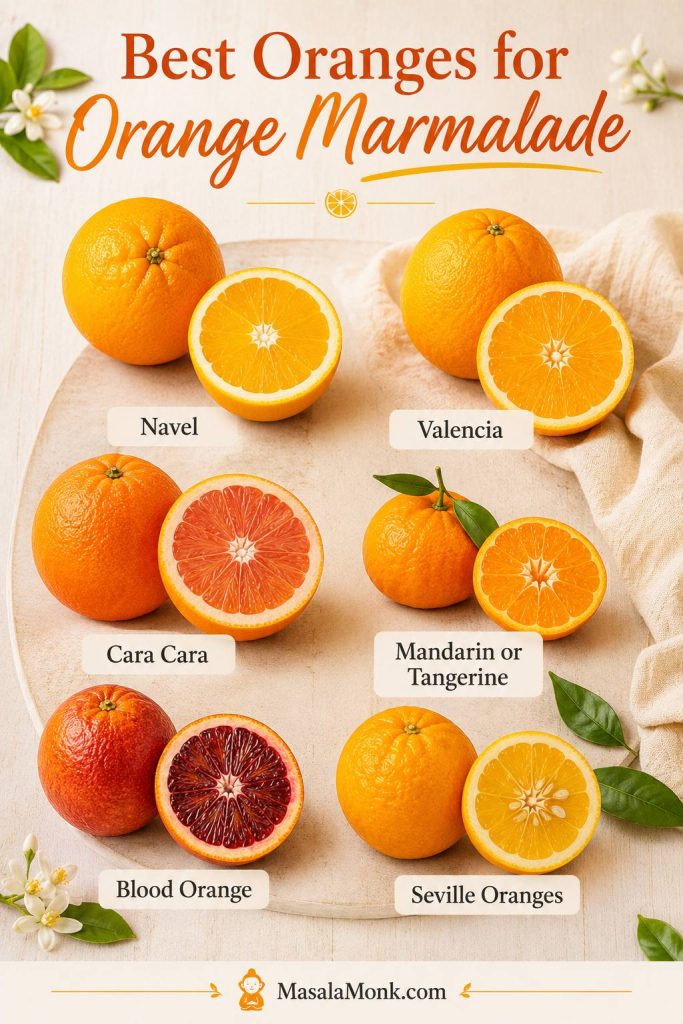
Use this guide before you shop: the orange variety changes sweetness, bitterness, color, and how beginner-friendly the finished jar feels.

Labeled guide showing navel, Valencia, Cara Cara, mandarin or tangerine, blood orange, and Seville oranges for marmalade.
The best oranges for marmalade depend on the flavor you want. Sweet oranges make a gentler beginner-friendly jar, while Seville oranges create a more traditional bitter-orange marmalade.

Choose oranges with fresh, fragrant peel. Thin-skinned fruit is easiest because it gives you delicate shreds without too much thick, bitter white pith.

Navel oranges are the simplest choice for most kitchens. Valencia oranges give a bright, juicy flavor. Cara Cara oranges make a softer, sweeter-tasting marmalade with a rosy citrus note. Mandarins and tangerines can work too, especially for a sweeter preserve, but they behave slightly differently because their peel is thinner and their flavor is less bitter.
Seville, Mandarins, and Other Marmalade Styles

Small sour oranges or calamondins make a sharper preserve. MasalaMonk also has a calamondin orange marmalade recipe for that more intense citrus style.
For most sweet-orange variations, keep the fruit weight the same and adjust by the set test rather than by the clock.

Orange typeFlavor and textureBest use
Navel orangesSweet, easy to find, usually seedlessBest beginner choice
Valencia orangesJuicy, bright, classic orange flavorSweet orange marmalade
Cara Cara orangesSweeter, softer, gently floralMilder marmalade
Mandarins or tangerinesThin peel, sweeter flavor, softer textureSmall-batch marmalade or jam-style spreads
Blood orangesDeep color, berry-like citrus noteSeasonal variation
Seville orangesBitter, aromatic, traditionalClassic bitter marmalade

This main recipe uses sweet oranges because they are easy to find and mild enough for a first batch. Seville oranges make a more traditional, bitter, aromatic jar, so treat them as a focused variation rather than a required ingredient.

The peel is going into the jar, so treat the outside of the orange like an ingredient. Remove stickers, rinse the fruit under running water, and scrub the peel well. Unwaxed or organic oranges are ideal if you can get them, but regular oranges can still work if they are washed thoroughly. Avoid bruised, moldy, or damaged fruit because marmalade concentrates the flavor of the whole orange.

How Thin Should You Cut the Orange Peel?

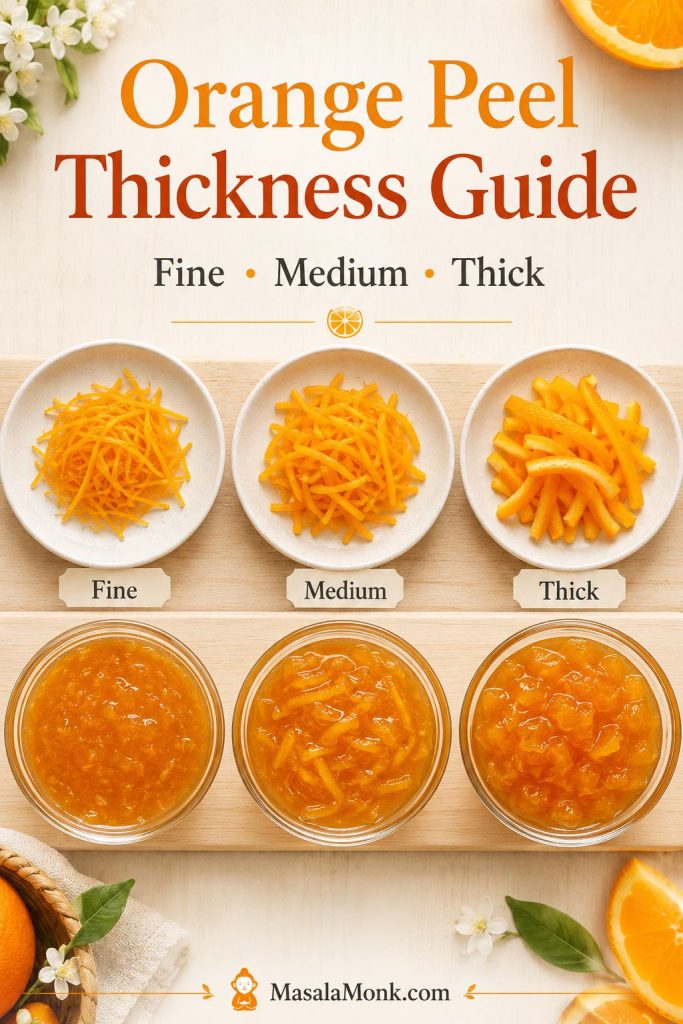
The peel is the personality of marmalade. Thin shreds feel delicate and spread easily. Medium shreds taste more classic. Thick-cut peel gives a stronger bitter bite and a more traditional feel, but it needs more time to soften.

Texture target: Choose the peel cut before you cook; the thinner the shred, the gentler and more spreadable the jar will feel.

Guide showing fine, medium, and thick orange peel strips with matching marmalade texture samples underneath.
Peel thickness changes the whole jar. Fine peel gives a softer breakfast-style marmalade, while thicker peel creates a stronger, more traditional bite.
Peel styleResultBest for
Fine shredTender, easy to spread, less chewyBeginners, toast, scones, yogurt
Medium shredClassic marmalade textureAll-purpose jars
Thick cutStronger bite, more bitterness, more chewTraditional marmalade lovers
Food processorRustic, quick, less elegantShortcut marmalade
Low-peelSweeter, softer, more jam-likePeople afraid of bitterness

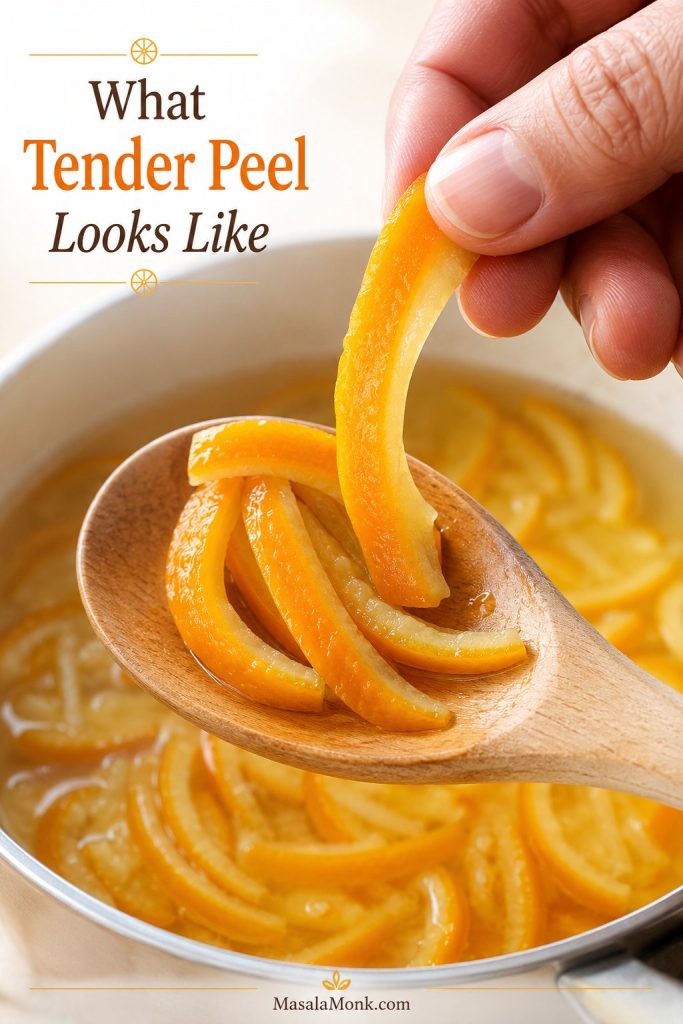
Tender peel is where good marmalade begins. Simmer the peel until it gives easily before adding sugar. Once sugar enters the pot, the peel is much less willing to soften. This is the difference between delicate shreds and chewy strips.

Can You Use a Food Processor?

Yes, but use it carefully. A food processor can save time, especially if you like a rustic marmalade, but it can also chop the peel unevenly or turn the fruit too pulpy. Pulse in short bursts and stop before the mixture becomes a puree.

A food processor version will taste good, but it may feel closer to orange jam if the peel disappears into the spread. Whole-orange methods are faster, but this separated-peel method gives you better control over bitterness, pith, and final texture. If your oranges have very thick pith, separating the peel is the safer choice.

Why This Method Works

This method is built around the places small-batch marmalade usually goes wrong: peel that stays chewy, syrup that refuses to set, and a pot that can move from bright citrus to overcooked sugar faster than expected.

What you doWhy it works
Soften the peel before adding sugarSugar slows further softening, so this prevents tough, chewy peel.
Add lemonAcidity helps natural citrus pectin work and keeps the flavor bright.
Dissolve sugar before boiling hardThis lowers the risk of graininess and scorching.
Boil after the peel is tenderWater evaporates, sugar concentrates, and the syrup gains body.
Test on a cold plateHot marmalade looks loose; the chilled test shows the final set more clearly.

Optional seed bag: If your oranges or lemon have seeds, you can tie the seeds and membranes in cheesecloth and simmer the bag with the fruit. Skip this for the simplest version; the marmalade can still set with peel, lemon, sugar, and proper cooking.

How to Make Orange Marmalade

The method below focuses on the cues that matter most: soft peel, syrupy body, and a set that holds after cooling. Aim for a jar with peel suspended through the syrup and a texture that spoons easily once cooled. If it bounces like jelly, it has gone too far. If it runs like syrup, it needs more cooking.

Your first batch does not need to be perfect to be useful. If it sets softly, spreads easily, and tastes bright once cooled, it is a successful jar.

Before You Start: 5 Small Safeguards

  • Let the peel soften before sugar goes in.
  • Use a deep pot because marmalade rises as it boils.
  • Judge the set from a chilled sample, not the hot pot.
  • Keep enough sugar if you want a classic set.
  • Treat this as fridge/freezer marmalade unless you follow tested canning guidance.

What you should see: first the peel softens; then the syrup looks thin and loose; later the bubbles slow, the spoonful lands heavier, and the peel starts to sit inside the syrup instead of floating in watery liquid.

Step 1: Prepare the fruit

Wash and scrub the oranges and lemon. Slice off the hard ends. Remove the orange peel in wide strips, then cut the peel into fine or medium shreds. Chop the orange flesh and save as much juice as possible. Remove seeds so they do not end up in the jar; save them only if you plan to use the optional seed bag.

Before you chop: This is where the marmalade gets its final texture, so keep the peel intentional instead of chopping everything into a pulp.

Hands cutting oranges on a wooden board with sliced peel strips, chopped orange flesh, and peeled fruit separated for marmalade.
Separating the peel from the fruit gives you more control over bitterness, texture, and tenderness, especially when making orange marmalade without boxed pectin.

Rustic shortcut: Instead of separating peel and flesh, you can slice the whole oranges very thinly and remove seeds as you go. This is faster, but the final texture is more rustic and may taste more bitter if the fruit has thick pith.

Step 2: Simmer the peel until tender

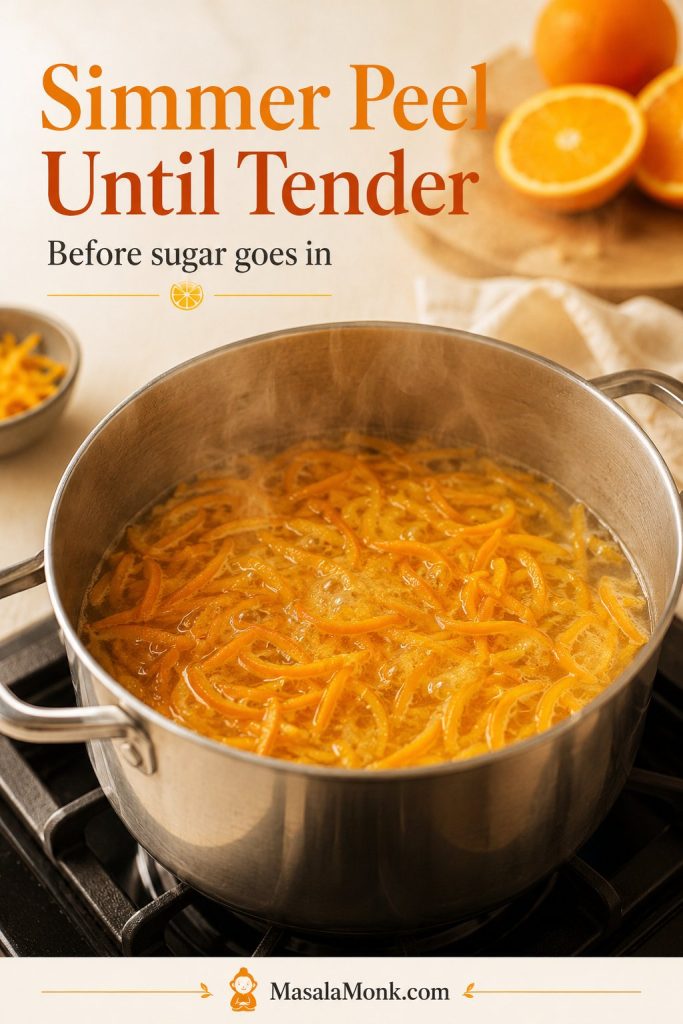
Put the sliced peel into a large heavy non-reactive saucepan with the water. Bring it to a boil, then reduce to a steady simmer. Simmer partly covered if the water is evaporating too fast; uncover once you start reducing after the sugar goes in. Cook until the peel is soft enough to squash between your fingers or cut against the side of the pot with a spoon. Depending on peel thickness, this may take 20 to 35 minutes.

Before sugar: At this point you are cooking the peel, not setting the marmalade. Give the strips time to relax before the syrup tightens.

Orange peel strips simmering in water inside a saucepan on the stovetop before sugar is added.
This is the quiet step that decides peel texture. If the strips still feel firm now, they will stay chewy in the finished orange marmalade.

This stage can feel slow, but it is where good marmalade is made. By the time the peel is ready, there should still be some liquid in the pot. If the pan is nearly dry, add a splash more water. If it looks very watery, simmer uncovered for a few extra minutes before adding sugar.

Look for this: Move on only when the peel gives easily. Sugar will sweeten the pot, but it will not magically soften chewy strips later.

Fingers bending a softened orange peel strip over a wooden spoon above a pot of simmered peel.
The peel is ready when it bends easily instead of snapping or feeling chewy. This small cue helps prevent tough peel in the finished marmalade.

Step 3: Add fruit, lemon, and sugar

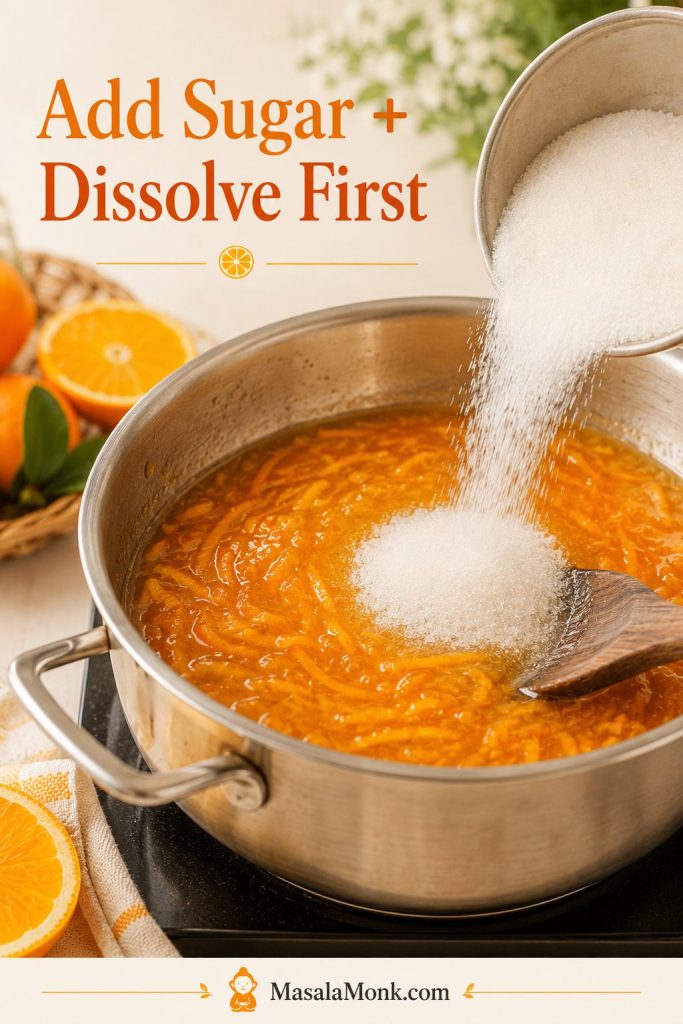
Add the chopped orange flesh, saved orange juice, lemon juice, and optional pinch of salt. If you are using a seed bag, add it now too. Stir in the sugar over medium heat until it dissolves fully. Letting the sugar disappear into the liquid before the hard boil helps prevent graininess and scorching.

Once sugar goes in: The mixture behaves more like syrup, so dissolve it fully before turning up the heat.

Sugar being poured into a pot of orange marmalade mixture with visible orange peel and a wooden spoon.
Once sugar enters the pot, the cooking changes quickly. Dissolving it fully first gives the marmalade a smoother syrup and lowers the risk of scorching.

Step 4: Boil until glossy and spoonable

Once the sugar has dissolved, increase the heat and cook the marmalade at a steady, active bubble rather than a violent boil. Use a pot with enough room because the mixture rises and spatters as it cooks. Stir often enough to prevent sticking, and stir more often near the end when the syrup thickens and the peel can catch on the bottom.

This is the point where marmalade can test your patience. It looks loose, the bubbles keep changing, and the urge to keep boiling is strong. Watch the texture instead: early bubbles are thin and watery; later, the syrup looks heavier, the peel turns more translucent, and the spoonful starts to cling lightly instead of splashing thinly.

Watch the bubbles: The bubbles are your early warning system. They move from thin and splashy to slower, heavier, and glossier as the syrup concentrates.

Three-stage guide showing orange marmalade at early watery bubbles, thicker reduction bubbles, and glossy near-set bubbles.
As the marmalade reduces, the bubbles change from light and watery to thicker and glossier. Watching that shift is often more useful than watching the clock.

After the sugar goes in, the boiling stage usually takes 20 to 35 minutes, depending on pot width, orange juiciness, and heat level. Wide pans reduce faster; narrower pots may take longer. Start testing before you think it is done, because hot marmalade always looks looser than cooled marmalade.

Stop when the chilled sample wrinkles softly, not when the pot looks stiff. If the syrup starts smelling deeply caramelized or darkens quickly, it is moving away from bright citrus and into cooked sugar.

Step 5: Rest and jar

If you used a seed bag, lift it out carefully just before jarring. Press it gently against the side of the pot with a spoon, using tongs if needed, then discard it. When the marmalade passes the cold-plate test, take it off the heat and let it rest for 5 to 10 minutes so the peel distributes more evenly.

If you jar immediately while the mixture is very fluid, the peel can float toward the top. That short rest helps the syrup settle just enough to hold the peel more evenly.

Foam is normal and does not mean the batch has failed. It is mostly trapped air from boiling. Skim it for a clearer jar, or leave a little if you do not mind a rustic finish. Spoon the marmalade into clean jars. Let refrigerator jars cool, then chill them. If you plan to freeze the marmalade, leave headspace so the preserve can expand. Pantry storage needs a reliable water-bath canning process from a tested source.

Before filling jars: A short rest before filling helps the peel stay more evenly distributed, especially in a soft-set fridge marmalade.

Spoon skimming foam from a pot of finished orange marmalade with a jar and funnel nearby for filling.
After boiling, let the marmalade settle briefly, skim excess foam, and then jar it. This helps the peel distribute more evenly and keeps the jars cleaner.

How to Know Orange Marmalade Has Set

Set is not a timer. It is a texture.

This is the moment people usually panic, but the cold plate is your calm button. Marmalade does not look fully set while it is still boiling. The pot will almost always look looser than you expect; that is why you test a cooled spoonful instead of arguing with the boiling syrup.

The Cold-Plate Test

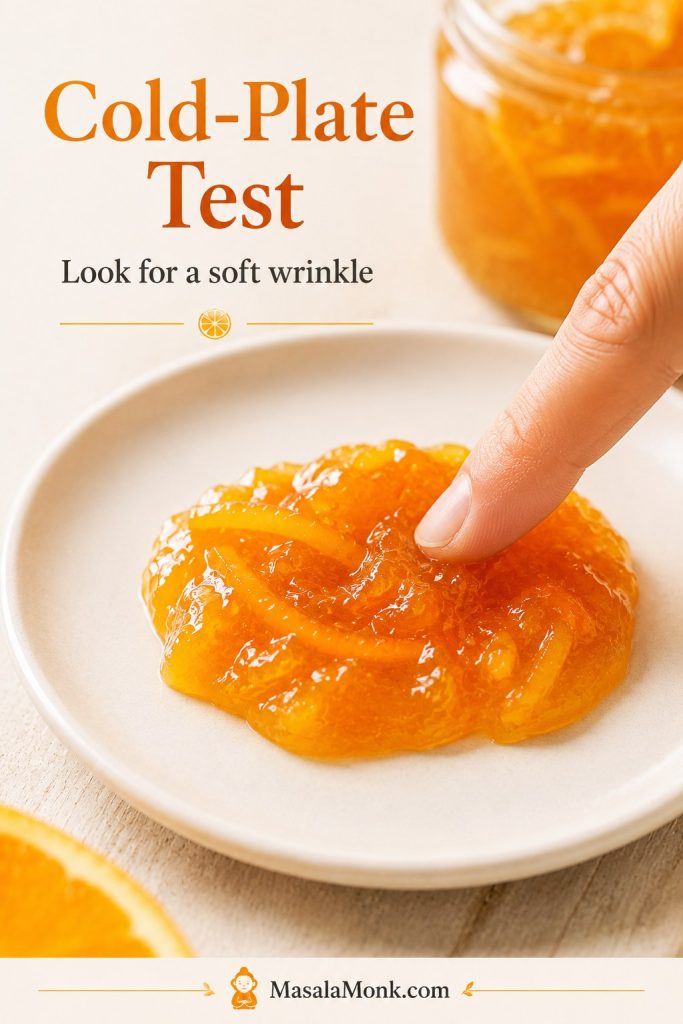
Before you start cooking, put two small plates in the freezer. When the marmalade looks clear and slightly thickened, spoon a little onto a cold plate. Wait about one minute, then push the edge with your finger. If the surface wrinkles softly and does not run back like syrup, the marmalade is ready.

Set check: The sample should wrinkle softly after chilling. If it snaps firm or feels rubbery, the batch has gone past the soft-set stage.

Finger pushing a spoonful of orange marmalade on a small white plate to check for a soft wrinkle.
The cold-plate test shows how hot marmalade will behave after cooling. Look for a soft wrinkle, not a rubbery or stiff set.

If it runs freely, cook for a few more minutes and test again. Use a clean cold plate each time if possible. Taste only after the marmalade cools a little; hot marmalade can taste sharper and sweeter in a way that does not represent the final jar.

Marmalade Setting Temperature: When to Stop Boiling

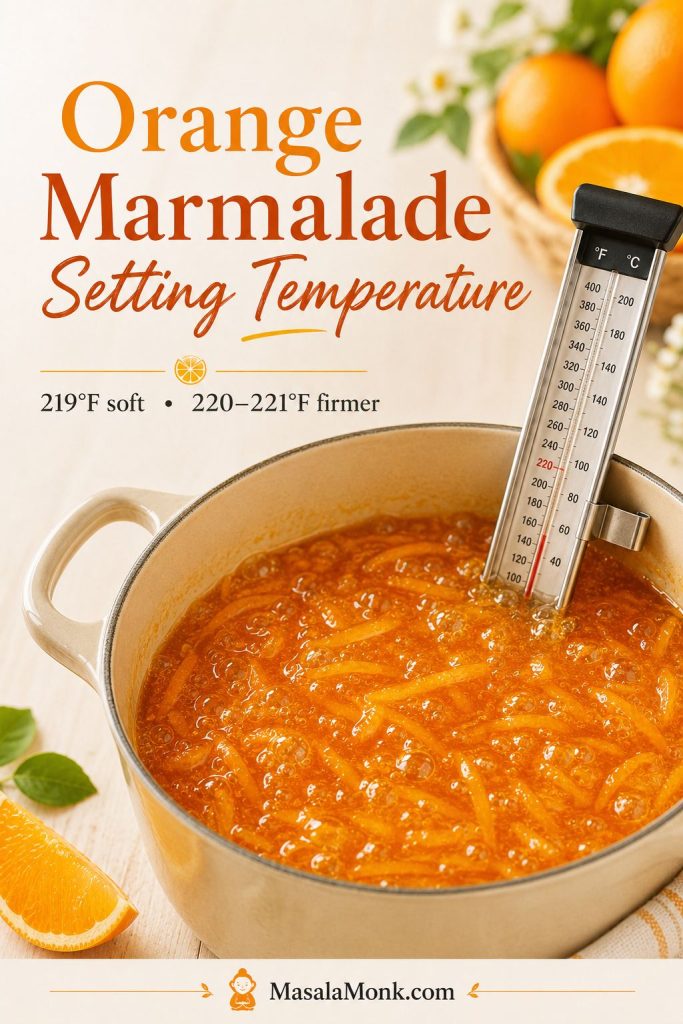
At sea level, many marmalades set near 220°F / 104.4°C, but the exact number shifts with altitude, batch size, fruit, and pot shape. Treat the thermometer as a cue, not the final judge. At higher elevations, trust the cold-plate test more than the number on the thermometer.

Thermometer check: Use the thermometer as a checkpoint, then confirm with a cooled sample so you do not overshoot a soft spreadable set.

Candy thermometer clipped into a pot of bubbling orange marmalade with visible peel and temperature guidance above.
A thermometer can guide you toward the set point, but it should not work alone. Pair the temperature reading with the cold-plate or spoon test for better judgment.
Temperature cueLikely texture
217°F / 103°CBrighter and looser; may still be runny depending on fruit and pot shape.
219°F / 104°CSoft-set range for many home batches; confirm with the cold-plate test.
220–221°F / 104.4–105°CFirmer, more classic set; watch closely so it does not become stiff.
Past this rangeHigher risk of dark flavor, chewy peel, or a set that is too firm.

Spoon Test: What Marmalade Looks Like When It Is Ready

Near the set point, the syrup looks more polished and falls from the spoon in heavier drops rather than thin streams. The peel also looks suspended in the syrup instead of floating in watery liquid.

Spoon check: Use this when the cold plate is not enough. Heavier drops and clinging peel tell you the syrup is gaining body.

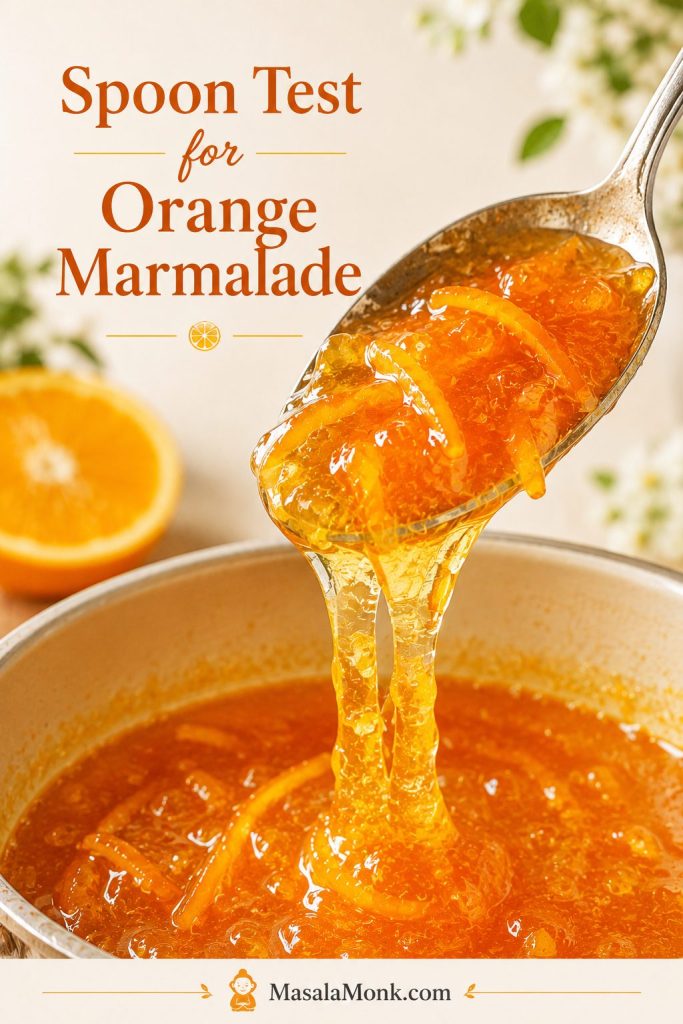
Spoon lifted above a pot of orange marmalade with thick glossy syrup and orange peel dripping slowly back into the pot.
The spoon test helps you read the syrup while it is still hot. Near the set point, the marmalade falls more slowly and the peel clings to the spoon.

Small-batch warning: fridge/freezer batches and wide pans can over-reduce quickly. Start testing early, especially once the mixture looks syrupy and thickened. It is easier to cook runny marmalade a little more than to rescue a jar that has gone too stiff.

What Runny, Just Right, and Too Stiff Look Like

Use this visual before troubleshooting. It helps you compare your jar to the texture you actually want, not just to a timer or temperature number.

Three bowls and spoons comparing runny orange marmalade, softly set marmalade, and overly stiff marmalade.
This texture guide helps you judge your own batch. Runny marmalade needs more cooking, just-right marmalade mounds softly, and too-stiff marmalade can be hard to spread.

Why This Orange Marmalade Sets Naturally

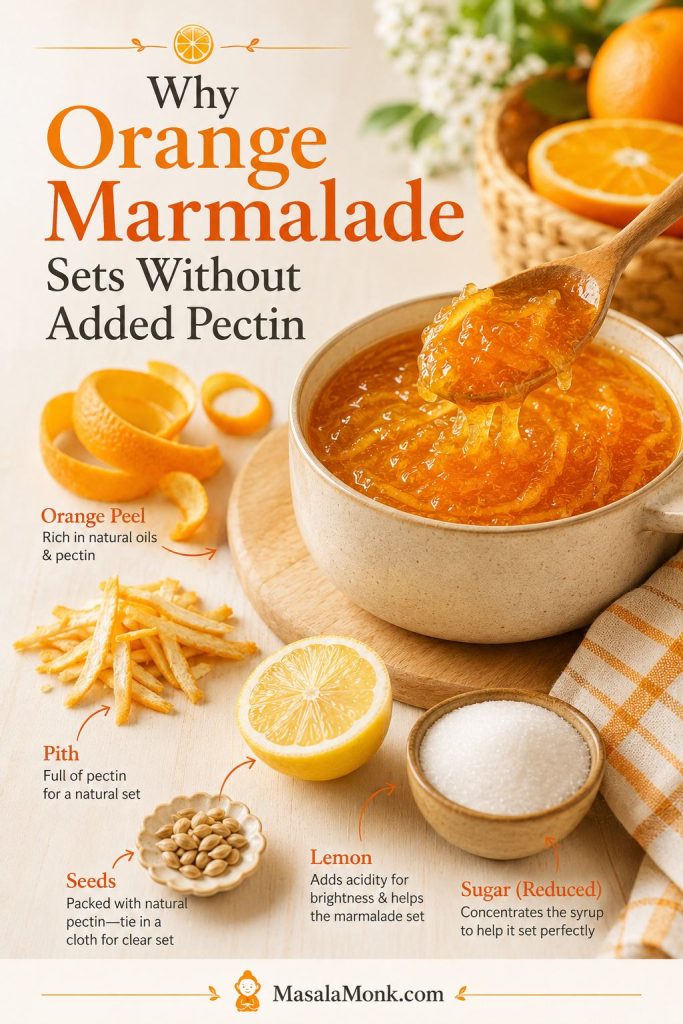
There is no added pectin in this recipe. Pectin is the fruit’s natural setting helper, and citrus keeps much of it in the peel, pith, seeds, and membranes. Think of the peel, pith, and seeds as the structure; the lemon as the acidity; and the sugar reduction as the syrup that lets everything hold together.

Natural set check: This recipe still has structure; it simply uses the fruit’s own pectin instead of a boxed packet.

Kitchen explainer showing orange peel and pith, lemon, sugar, boiling marmalade, and a finished jar to explain natural marmalade set.
No added pectin does not mean no structure. Orange peel, pith, lemon, sugar, boiling, and cooling all work together to create a soft marmalade set.

If you remove almost all the peel and pith, reduce the sugar heavily, or stop cooking too early, the marmalade may stay loose. Sugar also matters: it does not only sweeten the preserve; it helps the syrup thicken as water evaporates. If you enjoy this kind of small-batch preserve logic, MasalaMonk’s fig jam recipe also shows how fruit, sugar, and testing work together without making the process feel complicated.

How to Make Orange Marmalade Less Bitter

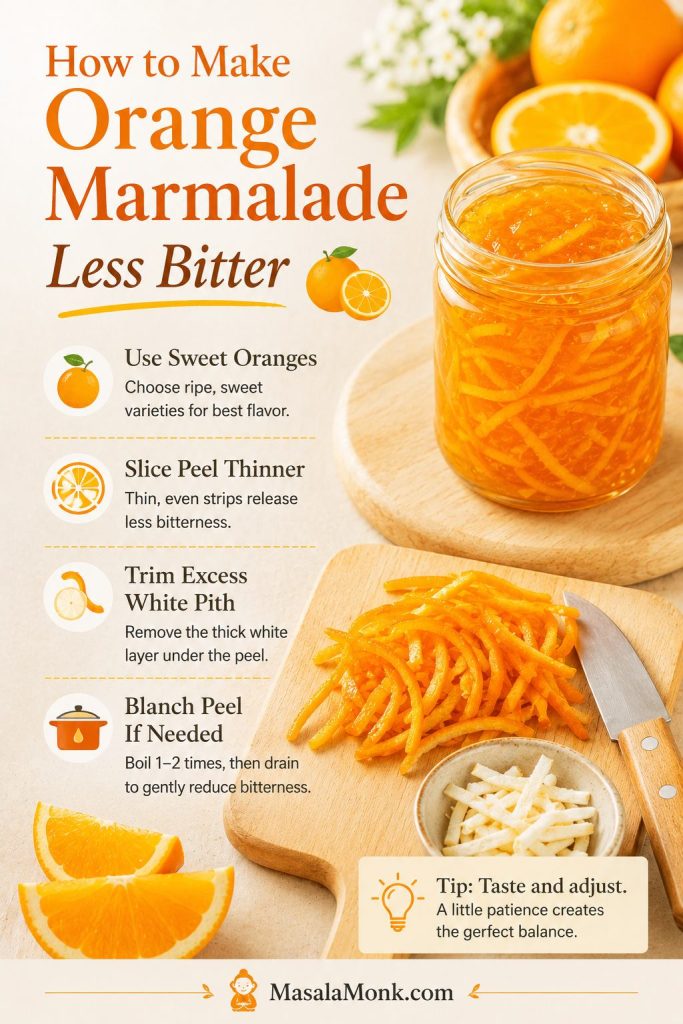
A little bitterness is the point; harsh bitterness is the problem. The right bitterness should make the orange taste deeper, not make the peel taste harsh or medicinal. For a milder jar, start with sweet oranges, slice the peel thinly, and avoid using too much thick white pith.

Flavor balance: Aim for orange depth, not harsh peel. The choices you make before boiling decide most of that balance.

Guide showing sweet oranges, thin orange peel strips, trimmed white pith, and blanching tips for less bitter orange marmalade.
Bitterness is part of marmalade, but it should not take over. Use sweeter oranges, thinner peel, and less thick white pith for a brighter, gentler jar.

The most important step is simmering the peel until it gives easily. This mellows the sharp edge and prevents chewy strips in the finished jar. Very bitter peel can be blanched once: cover it with water, boil for 2 minutes, drain, then continue with the recipe using fresh water.

Leave some pith for structure, though. Removing every trace of pith can make the marmalade sweeter, but it can also weaken the set. The goal is balance: trim thick, spongy excess pith when needed, but leave enough citrus structure for the marmalade to set. Judge bitterness after the marmalade cools; hot syrup can taste sharper than the final jar.

Orange Marmalade Troubleshooting

Marmalade is forgiving in a way that does not seem obvious while it is boiling. A loose jar can become sauce, a bitter jar can become glaze, and a firm jar can often be warmed back into usefulness. If something looks wrong, do not assume the batch is ruined; it usually tells you what it needs: more cooking, less heat, softer peel, or a different use for a jar that set too firmly.

Quick Fixes Before You Reboil

Fast fixes: runny marmalade can be cooked again, stiff marmalade can be loosened with a little hot water, bitter marmalade is best used in glazes or baking, and tough peel is mostly a next-time fix.

Common Marmalade Problems and Fixes

ProblemLikely reasonFix nowNext time
Marmalade is runnyUndercooked, too much water, low sugar, or weak pectinReturn it to the pot, boil again, and retest on a cold plateCook to a soft wrinkle and avoid reducing sugar too much
Marmalade is too stiffOvercooked or boiled past the set pointWarm gently with a spoonful or two of hot water until looserStop when the cold-plate test shows a soft wrinkle, not a firm rubbery set
Peel is toughSugar was added before the peel softenedUse the batch in glazes or sauces where texture matters lessSimmer peel until tender before adding sugar
Marmalade is too bitterToo much pith, bitter oranges, thick peel, or overcookingUse it in savory glazes, salad dressings, or bakingUse sweeter oranges, slice peel thinner, or blanch peel once
Sugar crystallizedSugar was not fully dissolved before boiling hardRewarm gently and stir; add a small splash of water if neededLet sugar dissolve over medium heat before a rolling boil
Marmalade darkened too muchCooked too long or heat was too high near the endUse darker marmalade in glazes, cheese boards, or baking if it tastes caramelized but not burntStart testing earlier and reduce heat slightly as it thickens
Peel floated to the topMarmalade was jarred immediately while very hot and looseStir the jar after partial cooling if using as fridge marmaladeLet marmalade rest 5 to 10 minutes before jarring

Once you understand this kind of cold-plate testing, the same logic helps with other small-batch preserves, like MasalaMonk’s cape gooseberry and mint jam.

Low-Sugar Orange Marmalade: What You Can and Cannot Reduce

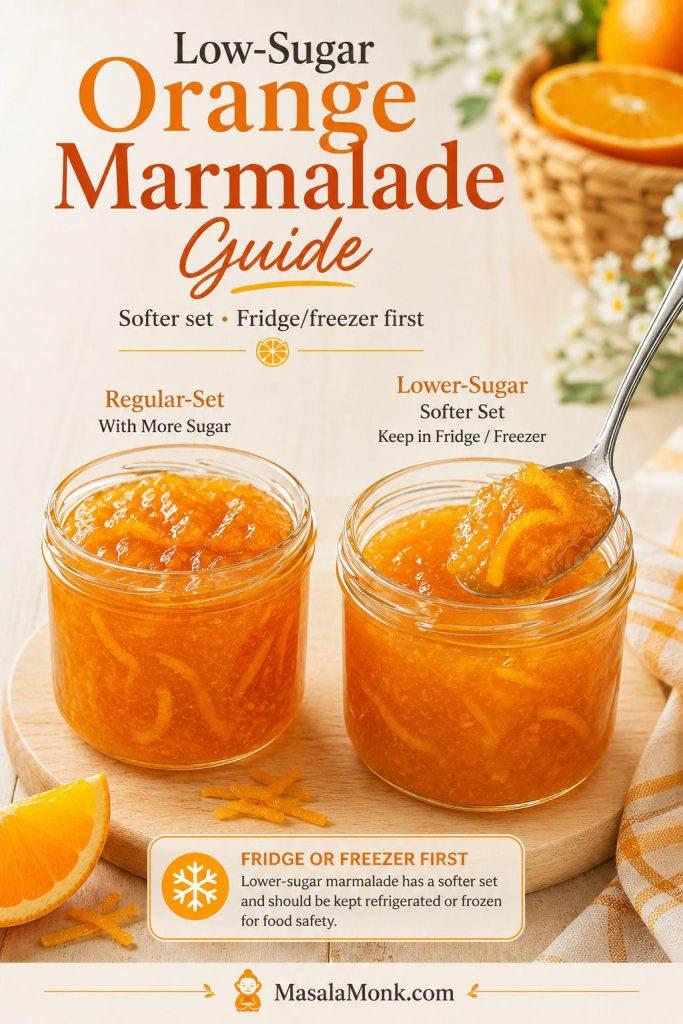
A slightly softer, lower-sugar fridge jar can still be lovely; it just needs to be treated as a different kind of marmalade. Think of it as a spoonable citrus spread rather than a classic pantry marmalade. You can reduce sugar a little for refrigerator storage if you accept a softer set, but it should not be treated like a traditional pantry preserve.

Lower-sugar reminder: Softer texture is not failure here; it is the expected tradeoff when you move away from classic marmalade sugar levels.

Two jars comparing regular-set orange marmalade and lower-sugar softer-set marmalade with a fridge or freezer storage reminder.
For lower-sugar marmalade, expect a softer spoonable texture rather than a firm classic set. Treat it as a fridge or freezer preserve unless using a tested method.

Very low-sugar marmalade is a separate style, not a simple subtraction. A very low-sugar or sugar-free orange marmalade usually needs special low/no-sugar pectin or a different method. For very low-sugar or sugar-free fruit spreads, the NCHFP reduced-sugar fruit spread guidance is a safer starting point than simply swapping sugar in a regular marmalade recipe.

For shelf-stable low-sugar jars, use a tested low-sugar canning recipe. Sugar substitutes do not give the same set or preservation as sugar in a regular marmalade recipe.

How to Store Orange Marmalade: Fridge, Freezer, and Safe Canning Notes

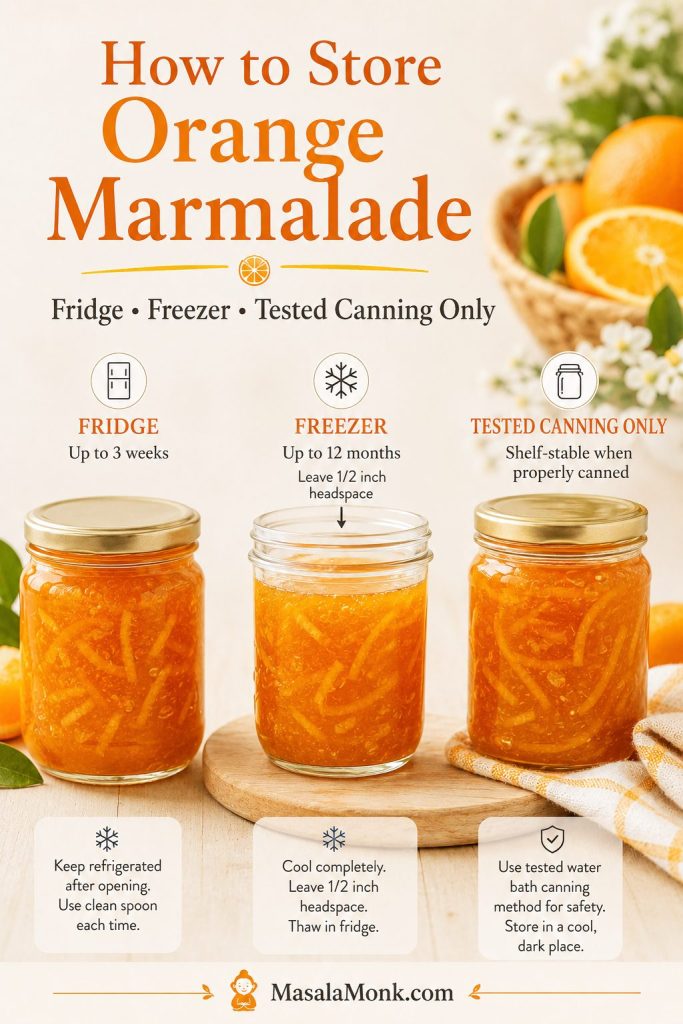
Fridge jar and pantry jar are not the same thing. This recipe is written first as a refrigerator or freezer orange marmalade, which keeps the method approachable and avoids pretending that every homemade jar is automatically shelf-stable.

Storage reminder: Choose the storage method before you fill the jars, because fridge, freezer, and pantry storage are not interchangeable.

Three jars of orange marmalade showing fridge storage, freezer storage with headspace, and tested canning-only pantry storage.
Fridge and freezer storage are simple for this small-batch marmalade. Pantry storage is a different process and needs tested canning instructions.

Refrigerator storage

Spoon the hot marmalade into clean jars, let it cool, then refrigerate. Use clean spoons when serving, and avoid leaving the jar out at room temperature for long stretches. For best quality, use refrigerated marmalade within 3 to 4 weeks, sooner if you reduced the sugar. Discard it if you see mold, bubbles, fermentation, or notice an off smell.

Freezer storage

Orange marmalade freezes well. Use freezer-safe jars or containers and leave headspace because the marmalade can expand as it freezes. Thaw in the refrigerator before using.

Shelf-stable canning

For shelf-stable marmalade, you need a tested formula, hot jars, correct headspace, proper lids, and the right boiling-water processing time for your jar size and elevation. The National Center for Home Food Preservation citrus marmalade guidance is a good authority to consult for jar preparation, headspace, and processing.

If you want pantry storage, use a proper water-bath canning method from the start.

Ways to Use Orange Marmalade

Orange marmalade is not only for toast, although toast with butter is still its natural home. The best marmalade is not just sweet orange spread; it is a ready-made balance of citrus oil, sugar, bitterness, and peel. That is why one spoonful can do the work of zest, juice, syrup, and glaze.

A good jar earns its space in the fridge because it keeps solving small problems: breakfast needs brightness, cake needs a bittersweet seam, chicken needs a glaze, and cheese needs contrast.

Use-it-up idea: Think of marmalade as citrus, sweetness, bitterness, and peel in one spoonful, then use it wherever a dish needs brightness and gloss.

Orange marmalade served with scones, cake glaze, savory glazed chicken, salad dressing, cheese, crackers, and a central jar.
A good jar of orange marmalade is useful far beyond toast. Try it as a cake glaze, savory glaze, salad dressing base, or cheese board pairing.

Quick orange marmalade formulas

  • Quick glaze: 2 tablespoons marmalade + 1 teaspoon mustard + a splash of vinegar.
  • Savory glaze: 2 tablespoons marmalade + 1 teaspoon soy sauce + 1 teaspoon vinegar + a pinch of chili or ginger.
  • Salad dressing: 1 tablespoon marmalade + 1 tablespoon vinegar + 2 tablespoons olive oil.
  • Cake glaze: warm marmalade with a splash of water or lemon juice until brushable.
  • Cheese board pairing: marmalade + sharp cheese + roasted nuts + crackers.

Breakfast ideas

Spread orange marmalade on toast, croissants, English muffins, pancakes, waffles, and biscuits. It is especially good with warm easy English scones, where the citrus peel cuts through butter, cream, or clotted cream.

For a weekend breakfast plate, use a smaller spoonful with almond flour pancakes, where the almond flavor pairs naturally with orange.

Baking ideas

Use it as a cake filling, loaf cake glaze, thumbprint cookie center, bread pudding accent, or tart layer. It works especially well with almond, chocolate, vanilla, and warm spices.

For a citrus-on-citrus dessert, try it with an orange olive oil cake. For a nutty pairing, add a thin glossy layer to an almond cake.

Savory glazes and sauces

Warm orange marmalade with mustard, vinegar, soy sauce, chili, garlic, or ginger to make a quick glaze for chicken, duck, pork, ham, salmon, carrots, or roasted vegetables. The sweet-bitter citrus flavor works beautifully with rich meats. For a classic citrus-meat pairing, MasalaMonk’s orange sauce for duck shows how orange, acidity, stock, and a little sweetness can stay savory rather than sticky.

Holiday, drinks, and cheese boards

Stir a spoonful into cranberry sauce for peel, gloss, and citrus depth; this cranberry sauce with orange juice is a natural pairing.

Marmalade can also sweeten cocktails, mocktails, hot tea, and sparkling citrus drinks. For drinks, treat it like a citrus syrup: shake or stir it well with lemon, orange juice, or soda so the peel and sugar dissolve into the drink instead of sitting at the bottom.

For a cheese board, serve marmalade with soft cheese, sharp cheddar, blue cheese, crackers, roasted nuts, and dried fruit. A slightly bitter jar is especially good here because it cuts through richness instead of making the board taste too sweet.

Orange Marmalade Variations

Once you understand the base method, the variation depends on what you want to change: sweetness, bitterness, color, spice, or gifting value.

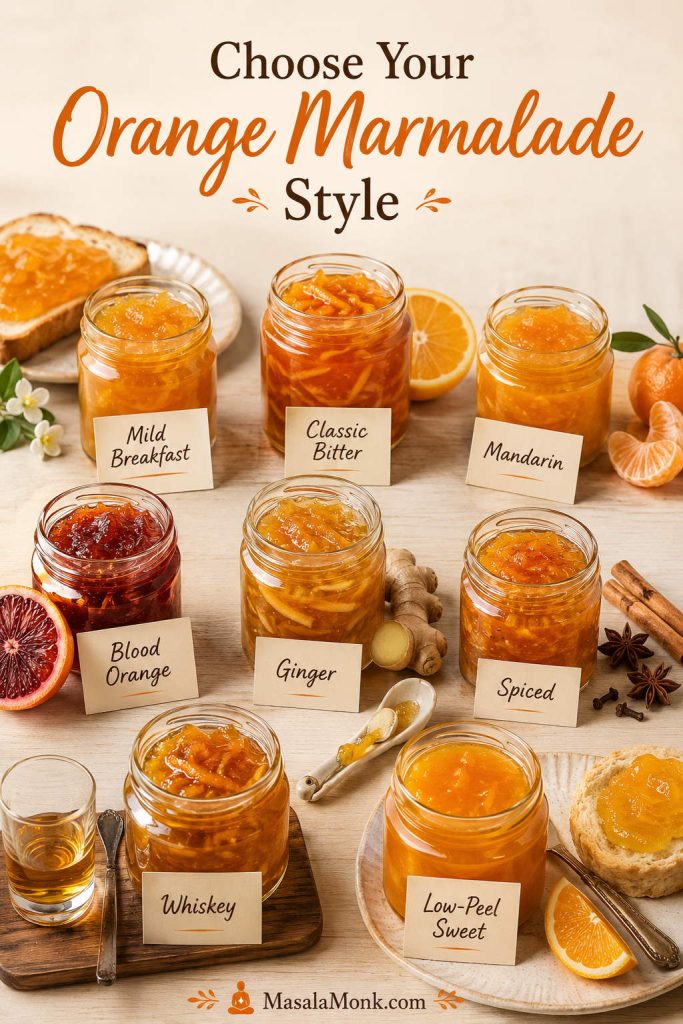
Choose Your Marmalade Style

  • Mild breakfast marmalade: sweet oranges, fine peel, and 700 g sugar.
  • Firmer classic set: sweet oranges or mixed citrus, medium peel, and 800 g sugar.
  • More bitter traditional flavor: Seville oranges or a Seville blend.
  • Sweeter soft spread: mandarins or tangerines.
  • Glaze or cheese-board jar: slightly stronger bitterness and medium peel.

Choose a style: Choose the version by mood and use: breakfast-soft, classic-bitter, ginger-warm, spiced-holiday, or low-peel sweet.

Multiple jars of orange marmalade variations labeled mild breakfast, classic bitter, mandarin, blood orange, ginger, spiced, whiskey, and low-peel sweet.
Once the base orange marmalade method makes sense, you can adjust the style toward sweeter, bitter, spiced, ginger, blood orange, or gifting-friendly versions.

Mandarin orange marmalade

Mandarins and tangerines are best when you want a softer, sunnier breakfast jar. Their peel is thinner and their flavor is naturally gentler, so the final marmalade feels less bitter than a classic Seville-style version.

Seville orange marmalade

Seville is for people who love marmalade’s bitter backbone: sharp, aromatic, and traditional. These oranges usually need enough sugar and careful use of seeds or membranes for natural pectin, so it is worth treating them as their own focused recipe.

Blood orange marmalade

Blood oranges are the dramatic color route: deeper, rosier, and lightly berry-like, but easier to over-darken if you cook them too far.

Orange ginger marmalade

Ginger pushes the jar toward toast, tea, winter baking, and savory glazes. Add finely grated fresh ginger or thin matchsticks of ginger during the final cooking stage.

Whiskey orange marmalade

Whiskey turns marmalade into a warmer gifting jar. Stir in a small splash after the marmalade comes off the heat. Keep it subtle: the goal is aroma and warmth, not a harsh alcohol taste.

Spiced orange marmalade

Spices make sense for holiday toast and cheese boards. Add a small piece of cinnamon, a few cloves, or a little star anise while the marmalade cooks, then remove the spices before jarring. Use a light hand so the spices support the orange instead of overpowering it.

Orange marmalade without peel

A low-peel version is better for a sweeter, softer spread, but it will be closer to orange jam than classic marmalade. Because peel and pith help with natural pectin, a no-peel version may need longer cooking, added pectin, or a softer-set expectation.

Orange Marmalade Recipe

If you remember only three things, remember these: soften the peel first, dissolve the sugar before the hard boil, and test the set on a cold plate.

The finished marmalade should be loose enough to spoon, with peel suspended in a clear, syrupy set. It will thicken more as it cools.

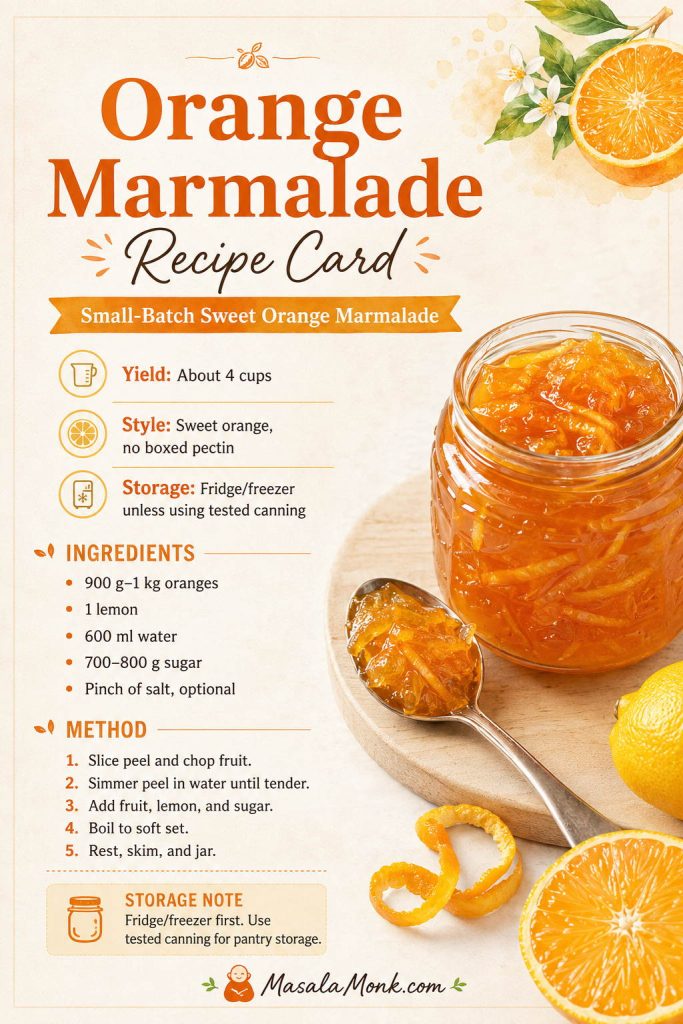
Small-Batch Sweet Orange Marmalade, No Boxed Pectin

This orange marmalade recipe uses regular sweet oranges, lemon, sugar, and water for a bittersweet, spoonable preserve with tender peel. It is written as a refrigerator or freezer marmalade, with separate canning safety notes if you want shelf-stable jars.

Prep time
20 to 25 minutes
Cook time
45 to 70 minutes
Total time
About 1 hour 10 minutes to 1 hour 35 minutes
Yield
About 4 cups

Before you start: Place two small plates in the freezer for testing, choose a large deep pot because marmalade bubbles up, and have clean jars ready.

Ingredients

  • 900 g to 1 kg regular sweet oranges, preferably thin-skinned, about 2 to 2.2 lb
  • 1 medium lemon, juiced, about 2 to 3 tablespoons / 30 to 45 ml
  • 600 ml water, about 2 1/2 cups, plus more if needed
  • 700 to 800 g sugar, about 3 1/2 to 4 cups
  • Tiny pinch of salt, optional

Method

Prepare and Soften the Peel
  1. Wash and prepare. Scrub the oranges and lemon well. Slice off the hard ends. Remove the orange peel in strips and cut it into fine or medium shreds. Fine peel gives the easiest spread; medium peel gives the most classic marmalade feel. Chop the orange flesh and save the juice. Remove seeds so they do not end up in the jar; save them only if you plan to use the optional seed bag.
  2. Simmer the peel. Add the sliced peel and water to a large heavy non-reactive saucepan. Bring to a boil, then simmer partly covered if the water is evaporating too quickly. Cook until the peel is soft enough to pinch or cut against the side of the pot with a spoon, about 20 to 35 minutes. Do not add sugar before this point.
  3. Check the liquid. When the peel is tender, there should still be some liquid in the pot. If it is nearly dry, add a splash more water. If it looks very watery, simmer uncovered for a few minutes before adding sugar.
  4. Add fruit and lemon. Add the chopped orange flesh, saved juice, lemon juice, and optional salt. If you are using a seed bag for extra natural pectin, add it now.
Boil, Test, Rest, and Store
  1. Dissolve the sugar. Stir in the sugar over medium heat until fully dissolved. Use 700 g for a softer fridge marmalade or 800 g for a firmer set.
  2. Boil to set. Increase the heat and cook at a steady, active bubble in a large deep pot, stirring often. Stir more often near the end as the syrup thickens. Start testing before it looks fully done, especially in a wide pan.
  3. Use the cold-plate test. Spoon a little marmalade onto a chilled plate, wait 1 minute, then push it gently. If it wrinkles softly, it is ready. Hot marmalade looks looser than cooled marmalade, so judge the chilled sample rather than the pot.
  4. Rest and jar. If using a seed bag, lift it out carefully, press it gently against the side of the pot, and discard. Remove the marmalade from heat and let it rest for 5 to 10 minutes. Skim foam if needed, then spoon into clean jars.
  5. Store safely. Spoon into clean jars, let cool at room temperature until no longer hot, then refrigerate. For freezing, leave headspace. Do not store this fridge/freezer version in the pantry unless you follow a tested water-bath canning method.

Recipe Notes

  • For a milder marmalade, use fine shreds of peel and sweet, thin-skinned oranges.
  • For a stronger, more traditional flavor, use some Seville orange or thicker peel.
  • If the peel tastes very bitter, blanch it once for 2 minutes, drain, then continue with the recipe.
  • If your fruit has seeds, you can simmer them in a small cheesecloth bag for extra natural pectin, but this is optional.
  • Yield can vary slightly depending on orange juiciness, pot width, and how far you reduce the syrup.
  • For pantry jars, follow tested canning guidance.

Saveable Orange Marmalade Recipe Card

Use the written recipe card above while cooking; this image is the quick visual version to save for your next batch.

Saveable orange marmalade recipe card with a jar of marmalade, ingredients, short method, yield, and fridge or freezer storage note.
Keep this recipe card handy when cooking. It brings the sweet-orange formula, soft-set method, and fridge/freezer storage reminder into one quick reference.

FAQs About Orange Marmalade

What is the difference between orange marmalade and orange jam?

Orange marmalade includes citrus peel, which gives it texture and a bittersweet edge. Orange jam is usually smoother, sweeter, and less peel-forward. If you blend the mixture completely or remove most of the peel, it will feel more like jam.

Do you need pectin for orange marmalade?

No boxed pectin is needed. Citrus naturally carries pectin in the peel, pith, seeds, and membranes; lemon, sugar, and cooking time help that pectin create a soft set. Low-sugar or no-peel versions may need extra pectin support.

Why did my orange marmalade not set?

It may be undercooked, too watery, too low in sugar, or short on natural pectin from peel and pith. Reboil it for a few minutes, then test again on a cold plate.

How do you fix runny marmalade?

Pour it back into a pot and bring it to a steady boil. Cook briefly, then test on a chilled plate. Stop when the cooled sample wrinkles softly.

Why is my marmalade bitter?

A little bitterness is normal; harsh bitterness is the problem. Too much thick pith, bitter fruit, thick-cut peel, or overcooking can make the jar taste too sharp.

How do you make marmalade less bitter?

Use sweet oranges, fine peel shreds, and only trim the thickest pith. Simmer the peel fully before sugar goes in. If the peel is very bitter, blanch it once for 2 minutes, drain, and continue with fresh water.

Which oranges are best for orange marmalade?

For beginner-friendly marmalade, use sweet, thin-skinned oranges such as navel, Valencia, or Cara Cara. Seville oranges are best for traditional bitter marmalade, while mandarins and tangerines make a sweeter, softer preserve.

Do I have to use Seville oranges?

No. Seville oranges are traditional, but this recipe is designed for regular sweet oranges. The result is milder, easier to shop for, and still properly marmalade-like.

Why is the peel in my marmalade tough?

Tough peel almost always means the sugar arrived too early. Simmer the peel until tender before adding sugar, because sugar slows further softening.

How long does homemade orange marmalade last?

Refrigerator marmalade is best used within 3 to 4 weeks, sooner if you reduced the sugar. Freezer marmalade lasts longer when packed with headspace in freezer-safe containers.

Is this orange marmalade safe for canning?

This fridge/freezer version should not be treated as pantry-safe by default. Orange marmalade can be canned when you use a tested formula and proper boiling-water processing, but do not simply jar this version and store it at room temperature.

What can I make with orange marmalade?

Use it on toast, scones, croissants, pancakes, yogurt, and oatmeal. It also works in cake fillings, thumbprint cookies, salad dressings, cheese boards, and savory glazes for chicken, duck, pork, ham, salmon, or roasted vegetables.

Can I make marmalade with less sugar?

You can reduce sugar slightly for a softer refrigerator jar. Very low-sugar or sugar-free marmalade needs a different method, often with special pectin, and should not be canned unless you use tested low-sugar canning guidance.

The first batch teaches you the rhythm: soften the peel, watch the bubbles slow, trust the cold plate, and stop before the jar gets stiff. After that, marmalade stops feeling fussy and starts feeling like one of those quiet kitchen skills that pays you back every time you open the fridge.

Back to top ↑

Posted on Leave a comment

Apple Pie Spice Recipe

Glass jar of homemade apple pie spice beside sliced apples, cinnamon sticks, a spoonful of spice, and apple pie on a warm kitchen surface.

This apple pie spice recipe is for the moment when a dessert calls for apple pie spice and the jar is missing. You do not need to abandon the pie, run to the store, or guess your way through every warm spice in the cabinet. In five minutes, you can mix a small homemade pantry blend that makes apples smell like dessert before they even reach the oven.

The base is simple: cinnamon, nutmeg, allspice, and ginger. That is enough for apple pie, apple pie filling, apple crisp, muffins, oatmeal, pancakes, cider, baked apples, coffee, and simple apple desserts. If you like a deeper aroma, you can add a couple of stronger accents, but the recipe works beautifully without them.

This is an apple-first, cinnamon-forward, unsweetened apple pie spice blend: warm enough for pie, soft enough not to bury the apples. The goal is not to make apples taste like a spice cabinet. The goal is to make them smell warmer, taste rounder, and still finish like apples.

Quick Answer: What Spices Are in Apple Pie Spice?

Apple pie spice is a dry blend of warm ground spices, usually cinnamon, nutmeg, and allspice, with ginger in many homemade versions. Cardamom and cloves can add depth, but they are accents, not requirements. If a recipe says apple pie seasoning or apple pie spice mix, you can usually use this blend the same way.

At a glance:

  • Ratio to remember: 12 parts cinnamon, 2 parts nutmeg, 1 part allspice, and 1 part ginger.
  • Need 1 teaspoon now? Use the emergency 3-spice substitute: ¾ teaspoon cinnamon, a scant ¼ teaspoon nutmeg, and a small pinch of allspice.
  • Unsweetened blend: No sugar in the jar, so it works in pie filling, oatmeal, drinks, toppings, muffins, and baking.
  • Baking a full pie? Start with 1½–2 teaspoons in the filling.
Apple pie spice at-a-glance guide with a spice jar and four points: 12:2:1:1 ratio, 1 teaspoon emergency substitute, unsweetened blend, and 1½ to 2 teaspoons for pie.
Use this apple pie spice quick guide when you need the essentials fast: the ratio, the 1-teaspoon substitute, the unsweetened note, and the starting amount for a full pie.

Apple Pie Spice Recipe

Make the base blend first. It is unsweetened, works for most apple desserts without any specialty spices, and can be used in fillings, drinks, toppings, oatmeal, muffins, and baked apples. The measurements do not need to feel fussy: keep cinnamon dominant, keep cloves optional, and the blend will work.

Prep Time5 minutes
Cook Time0 minutes
Total Time5 minutes
YieldAbout ⅓ cup, slightly more with optional spices

Base Blend

  • 4 tablespoons ground cinnamon
  • 2 teaspoons ground nutmeg
  • 1 teaspoon ground allspice
  • 1 teaspoon ground ginger

Optional Add-Ins for the Full Batch

  • ½ teaspoon ground cardamom
  • ¼ teaspoon ground cloves

Approximate metric yield: about 16 teaspoons for the base blend, or about 16¾ teaspoons with both optional spices. That is about 80–85 ml, or roughly 36–43 g / 1.3–1.5 oz by weight, depending on spice density. Use spoon measurements first; gram amounts are estimates because ground spices vary by brand, grind, and age.

Equipment

  • Measuring spoons
  • Small mixing bowl
  • Mini whisk, fork, or spoon
  • Clean airtight 4 fl oz spice jar for the full batch

Method

  1. Measure the base spices into a small bowl.
  2. Add cardamom or cloves if using.
  3. Whisk until the color looks even, breaking up clumps with the back of a spoon. If the spices are very clumpy, sift them first.
  4. Transfer to a clean, dry, airtight spice jar. Close and shake briefly if you want to make sure everything is evenly mixed.
  5. Label with the month you mixed it and store in a cool, dark, dry pantry away from the stove, oven, sunlight, and steam.

Homemade Apple Pie Spice Recipe Card

Keep this card as a measuring reference after you read the method; it gives the full batch amounts in one quick view.

Homemade apple pie spice recipe card showing 4 tablespoons cinnamon, 2 teaspoons nutmeg, 1 teaspoon allspice, 1 teaspoon ginger, a glass jar, and a spoon.
This homemade apple pie spice card keeps the full blend easy to measure, then reminds you to store the finished mix away from heat and steam.

Why This Ratio Works

This ratio is a strong default because it keeps cinnamon in charge, gives enough nutmeg and allspice to taste like pie, and leaves sharper spices optional so the apples stay bright.

Apple Pie Spice Ratio Guide

The simple ratio is easier to use than a long list of rules: keep cinnamon dominant, then let the smaller spices round out the apples.

Apple pie spice ratio guide showing 12 parts cinnamon, 2 parts nutmeg, 1 part allspice, and 1 part ginger with spice piles and a jar.
The 12:2:1:1 apple pie spice ratio is easy to remember: cinnamon does the main work, while nutmeg, allspice, and ginger support the apple flavor in smaller amounts.

Cinnamon carries the familiar apple-pie aroma. Nutmeg adds classic bakery warmth. Allspice rounds out the middle. Ginger keeps the mix from tasting flat. A good blend should disappear into the filling: apple first, warmth second.

Homemade also lets you keep cloves low, skip cardamom if you do not love it, and avoid sugar in the storage jar. That is the real advantage: you can make the blend support the dessert instead of forcing every apple recipe into the same store-bought flavor.

Before you store the finished mix, smell it. A balanced blend should smell mostly like cinnamon with a warm, rounded finish. Sharp, clove-heavy, or dusty notes are signs to adjust the mix before it goes into the jar.

Freshly grated nutmeg can taste louder than pre-ground nutmeg, especially in a simple apple filling, so start slightly lighter than the recipe amount if you grate it fresh.

Small Batch for 1–2 Pies

This is the batch to make when you do not want a full pantry jar. It gives you about 4 teaspoons, enough for two standard pies, or one pie plus extra for cider, oatmeal, or a cinnamon sugar topping. For one 9-inch pie, start with 1½–2 teaspoons in the filling.

  • 1 tablespoon ground cinnamon
  • ½ teaspoon ground nutmeg
  • ¼ teaspoon ground allspice
  • ¼ teaspoon ground ginger
  • Optional: a tiny pinch of cardamom or cloves

This small batch follows the same base ratio as the full recipe. It is also a good way to test the flavor before making more. If it smells too sharp, skip the cloves next time. If it tastes flat in a cooked filling, add a little more ginger or allspice.

Small Batch Apple Pie Spice Guide

This smaller blend is also a low-risk way to test whether you prefer a softer, brighter, or deeper apple spice flavor.

Small batch apple pie spice guide showing 1 tablespoon cinnamon, ½ teaspoon nutmeg, ¼ teaspoon allspice, and ¼ teaspoon ginger measured into a bowl.
This small batch keeps the same apple pie spice balance as the full recipe, but it makes just enough for one or two pies.

For a half batch of the full pantry blend, simply cut the main recipe in half and store it in a 2 fl oz spice jar.

How to Adjust the Flavor

Once you understand what each spice adds, you can adjust the mix without worrying that you have ruined it. Keep cinnamon in charge, then use the other spices to make the flavor rounder, brighter, or deeper.

How Each Spice Changes the Blend

Use the visual first, then the table below, so the blend feels easier to adjust by smell and taste.

Apple pie spice flavor guide showing cinnamon as the backbone, nutmeg for warmth, allspice for depth, ginger for lift, and a note to keep cloves tiny.
Adjust the blend by knowing each spice’s job: cinnamon softens, nutmeg warms, allspice deepens, ginger lifts, and clove should stay in the background.
SpiceAddsAdjust carefully when…
Ground cinnamonMain apple-pie flavor and the backbone of the mix.Use a little more for casual recipes if the blend smells weak; make a fresh batch for an important pie.
Ground nutmegClassic pie-shop warmth and a slightly sweet, nutty aroma.Use less with freshly grated nutmeg or very delicate apple desserts.
Ground allspiceRounded depth. Despite the name, allspice is one spice, not a spice mix.Use a little more if the blend tastes flat; use less if it tastes heavy.
Ground gingerBrightness and gentle heat.Use more for lift; skip it if you want a softer, simpler flavor.
Ground cardamomA fragrant bakery note in small amounts.Use only as an accent; too much can pull the blend away from classic apple pie.
Ground clovesDeep, sharp warmth.The clove rule: if you can identify clove before baking, you probably used too much.

Good to know: You do not need every warm spice in the cabinet. For the most familiar pantry flavor, keep the mix mostly cinnamon, nutmeg, and allspice, then add ginger if you like a little extra warmth.

3 Ways to Make It

Choose by what you want the apples to do: classic and familiar, simple and store-bought-style, or deeper and more bakery-like. There is no single official version, so use the one that fits your pantry and the dessert in front of you.

VersionFormulaYieldBest for
Classic homemade4 tbsp cinnamon + 2 tsp nutmeg + 1 tsp allspice + 1 tsp gingerAbout 16 tspPies, crisps, muffins
Store-bought-style3 tsp cinnamon + ¾ tsp nutmeg + ½ tsp allspiceAbout 4¼ tspThree-spice substitute
More aromaticClassic homemade blend + ½ tsp cardamom + ¼ tsp clovesAbout 16¾ tspRicher crisps, cider, muffins

Three Apple Pie Spice Versions

This side-by-side view helps you choose a classic, simpler, or more aromatic blend before you start baking.

Three apple pie spice variations showing classic homemade, store-bought-style, and more aromatic blends in bowls with apples and spices.
Choose the version based on the dessert: classic homemade for everyday baking, store-bought-style for a simple substitute, or more aromatic for richer crisps and cider.

Use the store-bought-style version the same way you would use the full blend, but expect a simpler, more classic flavor. Use the aromatic version only when a deeper spice note will not overpower the apples.

How Much to Use

The easiest mistake with apple pie spice is not making the blend; it is adding too much of a good blend. Start lower than your instincts tell you. Once apples warm up with sugar, lemon, and butter, the spices bloom, and a mix that seemed quiet in the bowl can suddenly taste much louder.

Start Low, Then Taste After Heating

For cooked apple pie filling, cider, or a stovetop apple topping, let the mixture heat for a few minutes before deciding whether to add more. Heat changes the flavor quickly: cinnamon becomes rounder, nutmeg gets warmer, and clove or ginger can become more noticeable.

Older spice blends may need a slightly larger pinch in casual recipes like oatmeal, pancakes, or cider. However, for a pie you care about, a fresh batch is better than trying to rescue tired spices with a heavier hand.

Quick Usage Amounts

UseStart withQuick note
9-inch apple pie1½–2 tspLower end for brighter apple flavor.
6 medium applesAbout 1½ tspGood for raw sliced apples before baking.
5–6 cups apple pie filling1½–2 tspPerfect for homemade apple pie filling.
Apple crisp or crumble1–2 tspAdd some to fruit and a pinch to topping. Try this apple crisp recipe.
Apple muffins or quick bread1–2 tsp per batchUse more for rich batters.
Pancakes or waffles½–1 tsp per batchWorks with applesauce or grated apple.
Oatmeal, yogurt, or smoothie bowls⅛–¼ tsp per servingMix with honey, maple, or apples.
Hot apple cider¼–½ tsp per mugWhisk with hot liquid first.
Coffee, latte, or cocoaTiny pinch to ⅛ tspExpect a little settling unless blended.
Baked applesAbout ¼ tsp per appleMix with butter, sugar, oats, or nuts.
Cinnamon sugar topping¼ tsp per 1 tbsp sugarUse on toast, pancakes, or pie scraps.
Guide showing how much apple pie spice to use in pie, apple crisp, muffins, and drinks, with small food examples for each use.
Apple pie spice tastes stronger depending on how it is used. Baked fruit and batters can handle more, while drinks and toppings usually need only a tiny pinch.

When to use less: Reduce the spice in recipes where the apples are meant to taste very fresh, tart, or floral, such as simple raw apple salads or lightly sweetened compotes. A pinch is enough there.

A Useful Pie Benchmark

For a store-bought benchmark, McCormick’s easy apple pie recipe uses 1½ teaspoons apple pie spice for a full pie with about 8 cups of sliced apples. That makes 1½ teaspoons a safe starting point for many full pies, with 2 teaspoons useful when the filling is richer or the apple volume is higher.

Adjust for the Apples and Crust

For a full apple pie, the spice amount also depends on the apples. Sweet apples often need lemon and a balanced hand with warm spices, while very tart apples can handle more depth. For a deeper apple-by-apple breakdown, see this guide to the best apples for apple pie.

When this mix goes into a pie with homemade pastry, keep the filling warmly spiced but not overpowering. A buttery apple pie crust makes heavy spice taste even heavier, so the filling should still finish like apples.

Substitutions When You’re Missing a Spice

Most missing-spice problems are smaller than they feel in the moment. Apple pie spice is a support flavor, not the whole recipe, so one missing spice should not stop the dessert. The safest emergency substitute is cinnamon plus a smaller amount of nutmeg and allspice. After that, adjust based on what you have.

Need 1 Teaspoon Apple Pie Spice Right Now?

Use this quick fix when the jar is missing and you need enough spice to keep baking today. It will not taste as layered as the full blend, but it gives cinnamon and nutmeg a rounder pie-spice finish.

Emergency substitute for 1 teaspoon apple pie spice showing ¾ teaspoon cinnamon, scant ¼ teaspoon nutmeg, and a pinch of allspice.
When the jar is missing mid-recipe, this 1-teaspoon apple pie spice substitute gives you enough cinnamon, nutmeg, and allspice to keep baking without overcomplicating the fix.

Missing-Spice Fixes

ProblemWhat to do
Need 1 tsp apple pie spiceUse the emergency 3-spice substitute: ¾ tsp cinnamon + scant ¼ tsp nutmeg + pinch allspice.
No nutmegUse a little extra allspice or ginger. Mace can also work in a tiny amount if you have it.
No allspiceUse cinnamon + nutmeg + tiny pinch cloves.
No gingerSkip it. The mix will still taste familiar.
No cardamomSkip it. It is only an accent.
No clovesSkip them. Cloves are easy to overdo.
Only have cinnamonUse cinnamon, then add vanilla, lemon, brown sugar, maple, or butter.
Have pumpkin pie spiceUse 1:1; use about ¾ amount if it smells clove- or ginger-heavy.
Missing spice guide for apple pie spice showing substitutions for no nutmeg, no allspice, only cinnamon, and pumpkin pie spice.
Missing one spice does not have to stop an apple dessert. Instead, use the closest backup and let the apples, sugar, lemon, and butter carry the rest of the flavor.

If you are baking today, close enough is usually enough; the apples, sugar, lemon, and butter will carry the dessert. If a recipe says apple pie seasoning instead of apple pie spice, use this blend the same way.

That tiny emergency pinch of allspice matters because it gives cinnamon and nutmeg a rounder pie-spice flavor without making you stop and run to the store. Chai spice can also work in some apple desserts, but use it carefully because it may taste stronger, more cardamom-forward, or slightly peppery.

Can You Use Cinnamon Instead?

Yes, but the flavor will be simpler. Cinnamon gives the main apple-pie aroma, so it is the best single-spice backup. If cinnamon is all you have, use it, then add vanilla, lemon, brown sugar, maple syrup, or butter in the dessert to make the flavor feel fuller.

Can You Make It Without Cinnamon?

You can make a warm apple seasoning without cinnamon, but it will not taste like classic apple pie spice. Cinnamon is the defining flavor in most versions.

For one pie, try a cinnamon-free apple seasoning with ½ teaspoon allspice, ¼ teaspoon ginger, ⅛ teaspoon nutmeg, and a tiny pinch of cardamom. Use it carefully and treat it as a cinnamon-free apple spice blend, not an exact flavor match.

Can You Make It Without Nutmeg?

Yes. Use cinnamon, allspice, and ginger. If you have mace, use a tiny pinch because mace is related to nutmeg and has a similar warm, aromatic quality. The flavor will be slightly less classic, but it will still work in apple pie filling, apple crisp, muffins, oatmeal, pancakes, and baked apples.

Apple Pie Spice vs Pumpkin Pie Spice

Apple pie spice and pumpkin pie spice are similar warm blends, and in everyday baking they can often replace each other. The difference is usually the flavor direction. Apple pie spice tends to be softer and more cinnamon-forward so the apple flavor stays bright and fruit-forward. Pumpkin pie spice is often deeper, warmer, and more ginger- or clove-forward because pumpkin needs stronger spice support.

Apple Pie Spice vs Pumpkin Pie Spice Comparison

BlendUsually tastes likeBest use
Apple pie spiceSofter, cinnamon-forward, apple-focused.Apple pie, filling, crisp, oatmeal, cider.
Pumpkin pie spiceDeeper, often ginger- or clove-forward.Pumpkin pie, pumpkin bread, lattes, cookies.
SubstitutionUsually works 1:1.Use about ¾ amount if it smells strong.
Apple pie spice versus pumpkin pie spice comparison showing two spice jars, apples, pumpkin, and a note to use ¾ amount if pumpkin spice smells strong.
Apple pie spice is usually softer and more apple-focused than pumpkin pie spice. Therefore, if your pumpkin blend smells clove- or ginger-heavy, start with about three-quarters of the amount.

Choose apple pie spice when the apple should stay the star. Pumpkin pie spice works better when you want a deeper, heavier spice flavor. When your pumpkin pie spice smells strongly of clove or ginger, start with about ¾ of the amount called for, then add more after smelling the mixed filling or tasting a cooked filling, cider, or topping.

If you already keep homemade pumpkin pie spice in your pantry, this apple version is still worth making because it gives you a gentler mix for apple pie filling, apple crisp, oatmeal, and everyday baking.

Where This Blend Works Best

Think of this blend as a warm base note. It belongs wherever apples need a little roundness, but the amount changes depending on whether the spice is baked, simmered, sprinkled, or stirred into a drink.

Apple Desserts

Cooked apples can handle more spice because heat softens the edges and lets cinnamon, nutmeg, and allspice settle into the filling.

Apple Pie Filling

Apple pie filling is the clearest test for this blend because the spices bloom as the apples cook. Start with the usage amounts above, warm the filling, and then decide whether it needs more spice.

Apple pie spice being added to glossy apple pie filling in a pan with a wooden spoon, sliced apples, a spice jar, and a measuring spoon nearby.
Cooked apple pie filling helps you judge the blend quickly because heat makes cinnamon, nutmeg, and allspice bloom.
  • Apple pie filling: Use 1½–2 teaspoons for 5–6 cups of filling.
  • Shortcut apple pie: Add a small pinch if prepared filling tastes flat, especially in a shortcut pie made with ready-made or homemade filling.
  • Classic apple pie: Use it in the filling with firm apples, lemon, sugar, and a buttery crust.
  • Dutch apple pie: Season the apples, not the crumb topping heavily. The topping already brings butter and brown sugar, so too much spice in both layers can make the pie taste dull. This works naturally in a Dutch apple pie style filling.
  • Apple tart: Use a lighter hand than you would in pie filling. A small pinch is enough for a thin easy puff pastry apple tart, where the apples and pastry should still taste bright.
  • Apple crisp or crumble: Season the fruit more than the topping. The topping already has butter, sugar, and browning, so a smaller pinch there is usually enough.
  • Baked apples: Mix with butter, brown sugar, oats, or chopped nuts before stuffing apples.

Breakfast and Snacks

  • Pancakes with apples: Stir a small pinch into warm apple topping for pancakes with stewed cinnamon apples, especially when you want breakfast to taste a little like dessert.
  • Oatmeal: Stir in a small pinch with apples, maple syrup, and nuts.
  • Muffins and quick bread: Whisk the spice into the dry ingredients so it spreads evenly through the batter.
  • Apple cinnamon roll bakes: Add a small amount to apple pie filling before layering it with cinnamon rolls, especially in an apple cinnamon roll bake with apple pie filling.

Apple Crisp, Muffins, and Quick Breads

Apple crisp and crumble taste better when most of the spice goes into the fruit, where it can bloom as the apples bake. Muffins and quick breads work best when the blend is whisked into the dry ingredients before the wet ingredients go in.

Apple pie spice used in baking with apple crisp, muffin batter, a spice jar, and dry ingredients being whisked with spice.
This baking guide separates two common uses: fruit desserts need spice in the apples first, while batters need the blend mixed evenly before baking.

Drinks and Toppings

Start tiny in drinks. Ground spices do not dissolve the way syrup does, so they need heat, fat, sugar, or blending to taste smooth.

  • Hot apple cider: Simmer gently with apple juice or cider, orange peel, and a little sweetener if needed. Strain before serving if you want a smoother mug.
  • Coffee, latte, or cocoa: Use a tiny pinch with milk, cream, or maple syrup so the spice has something to cling to.
  • Cinnamon sugar topping: Mix ¼ teaspoon apple pie spice with 1 tablespoon sugar. Keep the spice low because this topping is direct, not baked into a filling.
Apple pie spice used in drinks and toppings with hot cider, coffee, a bowl of spice, and notes for tiny pinch, simmer and strain, blend with milk or maple, and keep spice low.
A tiny pinch goes further in drinks and toppings because the spice is not hidden inside a filling or batter.

How to Store It So It Stays Fragrant

Ground spices do not fail loudly; they fade quietly. Once the mix is made, storage decides whether it stays fragrant.

Keep the finished seasoning in a clean, dry, airtight spice jar or container in a cool, dark pantry or cabinet. Keep it away from the stove, oven, dishwasher, sunny windows, and any place where steam or heat can reach it. Do not shake the jar directly over a steaming pot; steam is one of the fastest ways to make ground spices clump and fade.

For best flavor, use it within 6–12 months. It may remain usable longer if stored dry, but the aroma and flavor will fade over time. If the blend smells flat when you open it, it will probably taste flat in your pie or crisp too.

Do not add brown sugar to the stored mix if you want a pure spice blend. Brown sugar is useful in pie filling, crisp topping, and cinnamon sugar, but it can clump during storage and turns the blend into a sweetened topping rather than a flexible seasoning.

Best jar size

This recipe makes about 80–85 ml, so use a 4 fl oz spice jar for the full batch. A 2 fl oz spice jar is better for a half batch, not the full recipe.

Freshness test

Open the jar and smell the blend. It should smell warm, sweet, and clearly spiced. If you have to work hard to smell anything, use a little more in casual recipes like oatmeal or pancakes, but consider making a fresh batch before using it in a holiday pie.

Storage and Troubleshooting Cues

Use the smell test before important baking: flat spices need replacing, while sharp blends usually need softer cinnamon or fewer strong accents next time.

Storage and troubleshooting guide for homemade apple pie spice showing a jar in a pantry with notes for cool dark dry storage, 4 fluid ounce jar, no steam, reduce clove, and fresher spices.
Use storage as part of the recipe: a dry jar protects aroma, while heat and steam make ground spices fade faster.

Common Mistakes to Avoid

  • Using too much clove: If the blend smells sharp before you bake with it, it will taste even stronger in a warm filling. Keep cloves to a pinch or skip them.
  • Treating cardamom as required: Cardamom is beautiful, but it is not the test of whether this recipe works. A no-cardamom version is completely normal.
  • Adding sugar to the spice mix: Keep the stored blend unsweetened so you can use it in pies, drinks, oatmeal, toppings, and baking without locking it into one sweetness level.
  • Using tired or poorly stored spices: Heat, steam, and age weaken spice blends. Smell the cinnamon and nutmeg before making the full batch.
  • Overspicing mild apple desserts: If the filling smells more like clove or nutmeg than apple, use less spice next time and add a little extra lemon or apple to rebalance the batch.

When in doubt, make the mix softer rather than sharper. You can always add a pinch more, but it is much harder to pull harsh clove or heavy nutmeg back out of a pie filling.

FAQs About Apple Pie Spice

What is apple pie spice made of?

Most blends start with cinnamon, nutmeg, and allspice. Ginger is common in homemade versions because it adds brightness. Cardamom and cloves are optional accents for a deeper aroma.

What is the ratio for apple pie spice?

A good basic ratio is about 12 parts cinnamon, 2 parts nutmeg, 1 part allspice, and 1 part ginger. That keeps the blend cinnamon-forward, rounded, and still apple-friendly.

Is apple pie spice the same as apple pie seasoning?

Yes, in most recipes. Those names usually point to the same kind of dry spice blend for apple pie, apple crisp, apple filling, and other apple desserts.

What can I use instead of apple pie spice?

For a quick emergency substitute, use ¾ teaspoon cinnamon, a scant ¼ teaspoon nutmeg, and a small pinch of allspice for every 1 teaspoon apple pie spice. It is not the exact full blend, but it gets you close enough to keep baking.

Does apple pie spice have sugar in it?

Usually, no. A traditional apple pie spice blend is just ground spices; sweetness comes later from the filling, topping, drink, or dessert you add it to.

Can I add apple pie spice directly to coffee?

You can, but start with a tiny pinch. Ground spices do not dissolve like syrup, so they may settle at the bottom unless you blend them with milk, cream, sugar, or maple syrup first.

Why does my homemade apple pie spice taste bitter or sharp?

It usually has too much clove, too much nutmeg, or old spices that have turned dusty. Add more cinnamon to soften the blend, or make a fresh batch with the sharper spices kept very low.

Is allspice the same thing?

No. Allspice is one ground spice. Apple pie spice is a blend. Allspice helps the blend taste rounded, but it is not the whole mixture.

How much should I use in apple pie?

For a standard 9-inch apple pie, start with 1½–2 teaspoons in the filling. Use the lower amount if your blend contains cloves or if the recipe already has cinnamon and nutmeg.

Can pumpkin pie spice replace it?

Usually, yes. If the pumpkin pie spice smells strongly of clove or ginger, start with about ¾ of the amount called for, then add more after smelling the mixed filling or tasting a cooked filling.

Final Thoughts

A good apple pie spice recipe should feel like a shortcut, not another project. It should make the pie feel easier before you even peel the apples.

Keep cinnamon as the base, let nutmeg and allspice round it out, and use the stronger spices only as accents. The best version is the one that makes your apples taste more like themselves. The blend should smell warm when you open it, taste rounded in the filling, and melt into the dessert rather than announce itself.

After one batch, you will probably know your house version: brighter with ginger, softer without cloves, or deeper with cardamom. Use 1½–2 teaspoons for a pie, keep the rest dry and dark, and let the jar do what it is meant to do: make apples taste warmer without stealing the show.

Back to top ↑

Posted on Leave a comment

Beet Juice Recipe

Chilled glass of ruby-red homemade beet juice with ice, a small bottle of juice, and fresh beetroot, carrots, apple, lemon, ginger, and cucumber on a light kitchen surface.

Beet juice can go one of two ways. Made carelessly, it tastes earthy, heavy, and a little too close to drinking a glass of soil. Made with the right balance, it turns into a chilled, ruby-red juice that tastes lively, lightly sweet, tart, and just spicy enough from ginger.

This beet juice recipe is for that second version. It uses raw beetroot for color and depth, carrot and apple for natural sweetness, lemon for brightness, ginger for lift, and optional cucumber to make the whole glass easier to sip. The first taste should feel clear and awake, not muddy.

This is not straight beetroot juice. It is a balanced beet-carrot-apple juice designed to taste cool, tart, lightly sweet, and easy to finish.

You can make this beetroot juice recipe in a juicer for the smoothest texture, or in a blender if you do not own a juicer. The blender version needs water and proper straining, but it still works beautifully when you know what the mixture should look and feel like. It is especially helpful if you are making it for the first time, dislike plain beetroot juice, or want a balanced glass without added sugar.

No juicer at home? Skip to the blender method. Already ready to make it? Jump to the full recipe card.

Start with the quick recipe, then come back to the sections below when you want to adjust the flavor, make it without a juicer, store it safely, or understand what the health claims actually mean.

Beet Juice Recipe Guide

Use this as a quick recipe first, then as a troubleshooting guide whenever you want a smoother blender batch, a less earthy glass, or a safer way to store leftovers.

Quick Answer: How to Make Beet Juice

To make beet juice, juice or blend raw beetroot with carrot, apple, lemon, ginger, and optional cucumber. If using a juicer, feed the produce through the machine, then stir in the lemon juice and serve over ice. If using a blender, add cold water, blend until smooth, then strain through a nut milk bag, cheesecloth, or fine mesh strainer.

This beetroot juice recipe makes about 16–18 oz / 475–530 ml, enough for 2 standard 8 oz / 240 ml glasses or 3 smaller 5 oz / 150 ml servings. It takes about 10 minutes, uses no added sugar, and tastes brightest right after making. Here, beet juice and beetroot juice mean fresh juice made from raw red beetroot, not pickled beet brine, canned beet liquid, or beet powder mixed into water.

At-a-glance beet juice recipe graphic showing a glass of beet juice, 10 minutes, 16–18 ounces, two glasses, and no added sugar.
Since this fresh beet juice takes about 10 minutes and makes two glasses, it works best as a quick just-made drink rather than a big storage batch.

Easiest first glass: if your first memory of beet juice is something thick, muddy, or aggressively earthy, do not start with straight beetroot. Make the apple-beet-carrot version first, serve it over ice, then adjust lemon, cucumber, or ginger after tasting.

Split image comparing a darker straight beetroot juice with a brighter beginner-friendly apple, beet, carrot, lemon, ginger, and cucumber juice over ice.
When plain beetroot juice tastes too earthy, apple and carrot make the first glass gentler; then lemon, ginger, cucumber, and ice help it feel refreshing.

Still worried about the earthy flavor? See the taste fixes before you make your first batch.

Quick Beet Juice Formula

  • Base: 1 medium-large beetroot or 2 small beets, about 225–250 g / 8–9 oz
  • Balance: 2 carrots and 1 large apple for natural sweetness
  • Brightness: ½ lemon, about 15–20 ml juice
  • Lift: ½–1 inch fresh ginger, about 5–10 g
  • Lightness: ½ cucumber, optional, about 75–100 g / 3–4 oz
  • Blender only: ½–1 cup / 120–240 ml cold water
  • Serve: over ice, right after making

The 10-Minute Version

Juice or blend 1 beetroot, 2 carrots, 1 apple, ½ lemon, ½–1 inch ginger, and optional cucumber. If blending, add ½ cup / 120 ml cold water, blend for 45–60 seconds, strain well, and serve over ice. Add more water only if the blender needs help.

Serve it with breakfast, as an afternoon caffeine-free drink, or as a small pre-workout glass after you know how your body handles it.

Why This Beet Juice Recipe Works

The trick is not hiding the beetroot. It is balancing it. Beetroot gives the drink its deep color, earthy sweetness, and unmistakable flavor, but it needs the right supporting ingredients so the glass does not taste flat or muddy.

Carrot is the quiet helper here: it softens beetroot’s rooty edge without making the glass taste like fruit punch. Apple makes the drink more beginner-friendly. Lemon is the difference between a dull beet juice and one that tastes like it belongs in a glass with ice. Ginger adds a bright, spicy finish. Cucumber is the ingredient to add when the juice feels a little too serious, dense, or beet-forward.

For a beginner-friendly glass, keep beetroot to roughly one-third of the total produce volume and let carrot, apple, cucumber, and citrus do the balancing. If your batch tastes too rooty or heavy, it usually does not need sugar first. It needs acid, coldness, dilution, or a better mix.

Temperature matters too. Room-temperature juice tastes flatter and heavier than a chilled glass, so use refrigerated produce when possible or serve the finished glass over plenty of ice. The final drink should pour easily, taste lightly sweet and tart, and finish with gentle ginger warmth.

What Does Beet Juice Taste Like?

The drink tastes earthy, lightly sweet, mineral-like, and bold. That rooty note is the part people either love or struggle with. Straight beetroot juice can feel intense, especially if you are new to it.

The first sip of this version should be cool and lightly tart, with apple-carrot sweetness in the middle and gentle ginger warmth at the end. Juicer beet juice will feel thinner and clearer. The blender version, even after straining, may feel slightly fuller. Both should still pour like juice, not spoon like a smoothie.

Best beginner version: Use 1 small beet, 2 carrots, 1 apple, ½ lemon, ½ inch ginger, and ½ cucumber. This keeps the beet flavor present but not overpowering.

Once you like the base, adjust one thing at a time: more lemon for tartness, more apple for sweetness, more cucumber for lightness, or more ginger for heat.

Ingredients for the Best Beet Juice

The best glass needs contrast. You want enough beetroot for color and flavor, enough natural sweetness to soften the mineral notes, enough citrus to keep it crisp, and enough chill or cucumber to make it easy to sip.

Overhead layout of beet juice ingredients including cut beetroot, carrots, apple, lemon, ginger, cucumber, ice, and water for the blender method.
Each ingredient has a purpose: beetroot adds depth, carrot and apple soften the flavor, lemon lifts it, and ginger gives the juice a cleaner finish.
IngredientAmountWhy it matters
Raw red beetroot1 medium-large or 2 small beets, about 225–250 g / 8–9 ozThe base of the juice; gives color, earthy sweetness, and the classic beet flavor.
Carrots2 medium, about 120–150 g / 4–5 ozAdds natural sweetness and helps round out beetroot’s deeper edge.
Apple1 large, about 170–200 g / 6–7 ozMakes the juice more beginner-friendly and naturally sweet without added sugar.
Lemon½ lemon, about 15–20 ml juiceBrightens the juice and keeps the beet flavor from tasting flat.
Fresh ginger½–1 inch, about 5–10 gAdds warmth, sharpness, and a lively finish.
Cucumber, optional½ small cucumber, about 75–100 g / 3–4 ozLightens the flavor and makes the juice more refreshing.
Cold water½–1 cup / 120–240 ml, blender method onlyHelps the blender move and controls thickness. Do not add it when using a juicer.
IceAs neededMakes the finished glass more refreshing.

Juice yield varies by beet size, carrot freshness, apple variety, juicer type, and how firmly you press the pulp in the blender method. The amounts above usually make about 16–18 oz / 475–530 ml strained juice. A juicer usually gives the clearest yield without added water, while the blender version may make a little more volume because of the water, but with a slightly softer flavor.

Beetroot

Use raw red beets for the brightest color and crispest flavor. Scrub them well because beets grow in soil and often carry grit around the root end. Peeling is optional if the beets are tender-skinned and scrubbed well, but peel them if the skin is rough, bitter, waxed, or hard to clean.

How to Choose Beets for Juice

Choose firm, heavy beets with smooth skin and no soft, wrinkled, moldy, or badly bruised spots. Small to medium beets often taste sweeter and less woody than very large ones. If the beets come with greens attached, trim the greens off before storing, then scrub the roots well before peeling or cutting.

Produce guide showing firm fresh beets for juicing next to softer or wrinkled beets to avoid, with beet greens trimmed nearby.
Better beetroot juice starts before you juice anything, so choose firm, heavy, smooth roots and skip soft or wrinkled beets that can taste woody.

If your beets come with greens, save the tender leaves for cooking rather than adding a large handful to this juice. Beet greens can make the drink taste more grassy and bitter.

Carrot

Carrot is one of the easiest ways to make this drink taste better. It brings mellow sweetness without turning the glass into a fruit-heavy juice, and it also works beautifully in apple beet carrot juice, often called ABC juice. MasalaMonk’s guide to vitamins in carrots goes deeper into carrot juice, raw carrots, cooked carrots, and their key nutrients.

Apple

A crisp sweet-tart apple is ideal. Gala, Fuji, Honeycrisp, Pink Lady, or any good eating apple will work. Green apple gives a sharper, less sweet result. Red apple gives a softer, sweeter glass.

Lemon or Lime

Citrus makes the beet taste awake. Stir lemon juice in at the end if you are using a juicer, or peel the lemon and blend it with the produce if you are using a blender. Avoid blending too much white pith because it can make the drink bitter.

Ginger

Fresh ginger makes the flavor lighter and less heavy. Start with ½ inch if you are sensitive to heat. Use the full inch if you want a stronger beet ginger juice with a spicy finish.

Cucumber or Celery

Cucumber is optional, but it is one of the most useful ways to make the glass easier to drink. It increases the yield, cools the flavor, and gives the juice a more refreshing finish. Celery works too, though it tastes more savory and slightly salty. If you like the cucumber-lemon-ginger side of this recipe but want something lighter than juice, MasalaMonk’s guide to cucumber, lemon, and ginger water is a good companion.

Raw Beets vs Cooked Beets for Juice

Use raw beets for the most refreshing beet juice. Raw beetroot gives the drink a crisp, earthy-sweet flavor. Cooked beets are softer and sweeter, but they make the drink taste more like cooked beet puree than just-made juice.

Comparison image showing raw beets with bright beet juice and cooked beets with a softer, thicker blended beet drink.
Raw beets make the crispest beet juice, whereas cooked beets create a softer blended drink that tastes closer to beet puree.

If you only have cooked beets, you can blend them with apple, lemon, ginger, and cold water, then strain the mixture. However, cooked beets do not work well in most juicers, and they will not give the same lively flavor as raw beetroot.

Avoid pickled beets for this recipe unless you specifically want a vinegar-heavy drink. Pickled beet juice has a completely different flavor profile because it usually contains vinegar, salt, and sometimes sugar.

How to Make Beet Juice in a Juicer

The juicer method is the fastest way to make a smooth, clear glass. It gives you the crispest flavor because you do not need to dilute the produce with water.

Step-by-step juicer method showing beets and carrots being washed, chopped produce, beetroot going into a juicer, lemon added to juice, and beet juice served over ice.
Because the juicer presses the produce directly, this method gives a smoother, more concentrated glass without needing blender water.
  1. Wash and scrub the produce. Pay special attention to the beetroot and carrots.
  2. Trim the beetroot. Cut off the root end and any rough top area.
  3. Peel if needed. Peeling is optional for tender-skinned beets that have been scrubbed well. Peel rough, waxed, or dirty beets.
  4. Cut everything to fit the juicer chute. Do not force oversized beet chunks through the machine.
  5. Juice the beet, carrots, apple, cucumber, and ginger. Alternate hard and softer produce so the juicer runs smoothly.
  6. Stir in lemon juice. Adding lemon at the end keeps the citrus flavor lively.
  7. Serve over ice. Drink right away for the brightest taste.

The finished juice should pour easily and look deep ruby-red, not thick like puree. Fresh juice naturally separates as it sits, so stir or shake it before drinking. If the flavor tastes flat, add a little more lemon. If it feels too heavy, pour it over extra ice or add cucumber next time.

How to Make Beet Juice in a Blender Without a Juicer

If you came here wondering how to make beetroot juice without a juicer, the blender method is the easiest place to start. It asks for one extra step — straining — but that step is what turns a thick beet puree into something you actually want to sip.

Step-by-step blender method showing chopped beetroot, carrot, apple, cucumber, and ginger, water added to a blender, blended beet puree, straining, and a final glass of juice.
For the no-juicer method, the goal is not a thick smoothie; use just enough water to blend, then strain until the juice pours cleanly.

Still deciding between tools? Compare juicer vs blender beet juice before choosing your method.

  1. Chop the produce smaller than you would for a juicer. Dice the beetroot, carrot, apple, cucumber, and ginger so the blender can handle them.
  2. Add ½ cup / 120 ml cold water first. This helps the blades move without making the juice weak.
  3. Blend on high for 45–60 seconds. The mixture should look like a smooth, thick ruby puree.
  4. Add more water only if needed. If the blender stalls or groans, pause, scrape down the sides, and add water 2 tablespoons / 30 ml at a time, up to 1 cup / 240 ml total.
  5. Strain the mixture. Pour it into a nut milk bag, cheesecloth-lined strainer, or fine mesh strainer set over a bowl or jug.
  6. Let it sit briefly, then squeeze. Give it 2–5 minutes to drain, then press or squeeze to extract as much juice as possible.
  7. Serve over ice. Drink while the flavor is still lively.

How to Strain Beet Juice Smoothly

For blender beet juice, the straining step is where the texture changes from thick puree to a lighter drink. Give the pulp a few minutes to drain before squeezing, especially if you are using a nut milk bag.

Close-up of hands straining blended beet juice through a nut milk bag or fine mesh strainer into a bowl.
Straining is the step that turns blended beet puree into a lighter, smoother glass of drinkable beet juice.

Blender note: If your first batch looks more like a thick smoothie than juice, you have not failed. It just needs better straining, smaller beet pieces, or a little more patience while the pulp drains. If your blender is not very powerful, use the full 1 cup / 240 ml water and blend in two rounds if needed.

For a little more yield, add 2–3 tablespoons / 30–45 ml cold water to the squeezed pulp, stir or briefly blend again, then strain once more. Skip this second press if you want the strongest flavor.

If your batch is already too thick, watery, or sharp, jump to the troubleshooting guide.

Equipment Needed

Beet juice is simple, but it is not tidy. A little setup saves you from pink fingers, stained towels, and a blender that refuses to move. A juicer gives the smoothest glass, while a blender works well as long as you give it enough liquid and strain properly.

Kitchen counter with beet juice equipment including a juicer, blender, strainer, knife, cutting board, vegetable brush, glass bottle, towel, and fresh produce.
Set up the juicer or blender, strainer, cutting board, and bottle before you start; as a result, beet juice prep stays cleaner and faster.
  • Juicer: best for thin, smooth juice with no added water.
  • Blender: useful if you do not own a juicer; you will need water and a strainer.
  • Nut milk bag, cheesecloth, or fine mesh strainer: needed for the blender method.
  • Vegetable brush: helpful for scrubbing raw beets and carrots.
  • Washable cutting board and knife: important because beet juice stains.
  • Glass bottle or jar: useful if refrigerating leftovers.

Stain warning: Beet juice is beautiful in the glass and ruthless on white towels. Wipe spills quickly, rinse tools right away, and use gloves if you do not want pink fingers.

Juicer vs Blender: Which Method Is Better?

Both methods work, but they do not produce exactly the same drink. A juicer gives you a clearer, lighter result. A blender gives you more flexibility if you do not own a juicer, but you need water and straining.

Side-by-side comparison of beet juice made in a juicer and beet juice made in a blender with a strainer nearby.
Choose the juicer when you want the clearest texture, or use the blender when accessibility matters more than a perfectly light finish.
MethodBest forTextureProsCons
JuicerSmooth beet juiceThin, smooth, brightFast, no added water, smoothest juice textureRequires a juicer
Blender + strainerNo-juicer homesSlightly thicker but still juice-likeAccessible, flexible, works with common equipmentNeeds water and straining
Blender, unstrainedThicker blended drinkPulpy, smoothie-likeKeeps more fiber, less wasteNot a true clear juice
Beet powderConvenienceDepends on brand and mixingFast, shelf-stableNot the same flavor or texture as fresh beet juice

If you are deciding whether to buy a juicer, a cold press juicer is often preferred for fresh juice quality, while centrifugal juicers are usually faster and more affordable. MasalaMonk’s guide to cold press vs centrifugal juicers explains the difference in more detail.

Common Beet Juice Mistakes to Avoid

Most disappointing batches come from a few simple mistakes. Before you start, avoid these and the drink becomes much easier to love.

Four-panel beet juice mistakes graphic showing too much beet, too much water, skipping straining, and too much ginger.
Most disappointing batches come from balance issues: too much beet, water, pulp, or ginger can make the glass taste heavy, weak, thick, or harsh.
  • Using only beetroot as a beginner: a pure beetroot batch can taste too intense. Start with apple, carrot, lemon, and ginger.
  • Adding too much blender water: begin with ½ cup / 120 ml and add more only if the blender needs help.
  • Skipping the strainer: unstrained blender juice will be thick and pulpy, closer to a smoothie.
  • Overdoing sharp ingredients: too much ginger or citrus pith can make the juice harsh or bitter, so start small and use lemon juice or peeled citrus.

How to Make Beet Juice Taste Better

The main reason people give up on this drink is not the color or the effort. It is the taste. Beetroot is naturally earthy, so it needs brightness, sweetness, chill, or dilution to feel balanced.

Beet juice taste-fix graphic with lemon, cucumber, apple, and ice around a glass of beet juice.
A strong beet flavor usually needs contrast, not sugar; citrus, cucumber, apple, or ice can shift the drink from heavy to refreshing.
ProblemFix
Too earthyAdd more apple, orange, lemon, cucumber, or carrot.
Too sweetAdd lemon or lime, cucumber, celery, or a little extra ginger.
Too sharp from gingerUse ½ inch ginger instead of 1 inch next time. Dilute this batch with more apple, carrot, or cucumber juice.
Too thickUse a nut milk bag or cheesecloth and squeeze well. Add a little cold water if needed.
Too wateryUse less water next time. Start with ½ cup / 120 ml for blender juice and add only as needed.
Too bitterPeel citrus fully and avoid blending too much white pith.
Too strong for beginnersUse half a beet and increase the carrot or apple.
Not refreshingServe over ice or chill the juice before drinking.

The easiest beginner version is beetroot with both apple and carrot. The crispest version adds cucumber and lemon. The punchiest version leans on ginger and citrus. If the glass tastes flat, it almost always needs lemon. If it tastes heavy, it needs cucumber, ice, or less beet next time.

Remember this flavor rule: lemon fixes dullness, cucumber fixes heaviness, apple fixes harshness, and ice fixes almost everything.

Once the basic glass tastes right, the variations become much easier. You are not guessing anymore; you are choosing whether you want the drink sweeter, sharper, lighter, or stronger.

For the gentlest first variation, try the apple beet carrot juice version.

Best Beet Juice Variations

Once you know the base formula, this juice is easy to adjust. Use these variations as mini-recipes. The juicer method works as written. For the blender method, add ½–1 cup / 120–240 ml cold water and strain unless the variation says it is a smoothie.

Easy Beet Juice Combinations

VariationMini formulaBest for
Apple Beet Carrot Juice / ABC Juice1 beet + 1 apple + 2 carrots + ½ lemon + optional ½ inch gingerBeginner-friendly sweetness and a softer beet flavor
Beet Ginger Lemon Juice1 beet + 1 apple + ½ lemon + 5–10 g ginger + optional cucumberA sharper, livelier juice
Beet Orange Juice1 beet + 1 peeled orange + 1 carrot + 5 g gingerA citrusy breakfast-style glass
Beet Pineapple Juice1 beet + 1 cup pineapple chunks + ½ cucumber + ½ lemonA sweeter tropical version
Beet Pomegranate Juice1 beet + ½–¾ cup unsweetened pomegranate juice + ½ lemonA tart, deep red juice
Low-Sugar Beet Juice½–1 beet + ½ cucumber + 1 celery stalk + ½ lemon + ½ inch gingerA lighter vegetable-forward version
Beet Turmeric Ginger Juice1 beet + ½ inch ginger + small piece fresh turmeric or ¼ tsp ground turmeric + ½ lemonA strong, spicy flavor
Beet Juice ShotBeet + lemon + ginger + small apple piece if neededSmall 2–3 oz / 60–90 ml servings
Beet Juice SmoothieBeet juice or blended beet + banana or berries + yogurt or plant milkA thicker, more filling drink

Apple Beet Carrot Juice / ABC Juice

This is the safest first version if beetroot usually tastes too strong to you. Use a sweet apple for a softer drink or green apple for a sharper one. The carrot keeps the juice mellow, so the beet still shows up without taking over the glass. For more beetroot drink ideas, including beet-ginger-turmeric and ABC-style combinations, see MasalaMonk’s guide to the power of beetroot and beet juice.

Glass of apple beet carrot juice with fresh apple, beetroot, and carrots on a bright breakfast-style kitchen surface.
Apple beet carrot juice, often called ABC juice, is the gentlest variation because carrot and apple mellow beetroot’s earthy edge.

Beet Ginger Lemon Juice

This version is sharper and less sweet. It is the one to make when you want beet ginger juice with a brighter, spicier finish. Start with less ginger unless you already know you like the heat.

Glass of beet ginger lemon juice with fresh lemon wedges, lemon half, ginger slices, and beetroot nearby.
Beet ginger lemon juice is the sharper variation, so it works well when you want more citrus brightness and a warmer ginger finish.

Beet Orange Juice

Orange makes the drink rounder and more breakfast-friendly. Peel the orange well so the white pith does not make it bitter. This is a good choice when you want something sweeter than lemon but brighter than apple alone.

Beet Pineapple Juice

Pineapple gives this variation tropical sweetness that helps soften the deep beet flavor. Cucumber keeps the drink from becoming too syrupy. This is especially useful when you want the juice to taste more fruity and less vegetable-heavy.

Beet Pomegranate Juice

Pomegranate makes the juice tart, deep, and bold. For the easiest version, use unsweetened pomegranate juice. If using fresh pomegranate arils, blend gently and strain very well, or juice them only if your juicer handles pomegranate arils cleanly.

Low-Sugar Beet Juice

This version skips most of the fruit and uses cucumber, celery, lemon, and ginger for a cleaner vegetable-forward flavor. It will not taste as sweet as the apple-carrot version, but it is lighter and more refreshing.

Glass of low-sugar beet juice with beetroot, cucumber, celery, lemon, ginger, and a small green apple in a light kitchen scene.
For low-sugar beet juice, lean on cucumber, celery, lemon, and ginger; that way, the drink stays vegetable-forward without tasting flat.

Beet Turmeric Ginger Juice

This has a strong, spicy flavor. Use turmeric carefully because it can dominate the drink. Add black pepper only if you already like that taste; it is not needed for the recipe to work.

Beet Juice Shot

A beet shot is stronger and smaller than a full glass. Keep the beet, lemon, and ginger more concentrated, then use just enough apple to soften the edge if needed. Serve 2–3 oz / 60–90 ml at a time.

Beet Juice Smoothie

To turn this into a smoothie, do not strain the blended mixture. Add banana, berries, yogurt or plant milk, and a little ginger. A smoothie keeps more pulp and fiber, so it will be thicker and more filling than strained beet juice. For more smoothie-style ideas, MasalaMonk’s guide to high-iron smoothies and shakes includes beetroot-friendly combinations that lean more filling than juiced.

Flavor comes first. Once the drink is something you actually enjoy, then it makes sense to talk about where it fits in a routine.

Beet Juice Benefits, Without the Hype

Once the flavor is right, the next question is usually what this drink actually does for you. The honest answer is that beet juice can be useful, but it works best when you treat it as food, not as a miracle shot.

Think of this as a bright vegetable drink with a few smart use cases: a small pre-workout serving, a lower-sugar vegetable-forward version, or an occasional way to enjoy beets when you do not feel like eating them.

Calm beet juice benefits graphic with a glass of beet juice, beetroot, and cards reading food-first, no miracle shot, and start small.
Beet juice can fit into a healthy routine, although it is still best treated as a food-first drink rather than a miracle wellness shortcut.

Planning to drink it often? Read the safety notes before making beet juice a daily habit.

Beetroot is naturally colorful, plant-rich, and known for dietary nitrates. Much of the research interest comes from those nitrates and their possible effects on cardiovascular markers. You can read more about that research background on PubMed.

At the same time, juice is not the same as eating whole beets. When you juice and strain beets, carrots, and apples, you remove much of the fiber. That makes the drink lighter and easier to sip, but it also means it is less filling than whole vegetables or a smoothie.

If you care about…Best way to use this juice
Blood pressure interestKeep servings moderate and check with a qualified professional if you take medication or tend to run low.
Workout useTry a small strained serving first, not a huge pulpy glass right before training.
Weight-conscious drinkingUse cucumber, celery, lemon, ginger, less fruit, and no added sugar.
Daily nutritionRotate it with whole vegetables, smoothies, meals, and other drinks instead of making it your only “healthy” habit.
Detox-style flavorUse cucumber, celery, lemon, and ginger for a crisp, light glass without treating it as a cleanse.

For a broader look at whole beets beyond juice, MasalaMonk’s guide to what beets are good for covers beetroot as a food, not just as a drink.

Is Beet Juice Good for Weight Loss?

For weight-conscious readers, the most useful approach is a moderate, vegetable-forward drink — especially when you keep fruit lower and skip added sugar. It is not a fat-loss shortcut, but it can fit into a balanced routine when the portion and ingredients make sense.

The same idea applies to other “weight loss drink” combinations too. MasalaMonk’s article on pineapple, cucumber, and ginger for weight loss separates useful habits from miracle claims without treating the drink as a shortcut.

Lighter Beet Juice Formula

  • ½–1 beetroot
  • ½ cucumber
  • 1 celery stalk
  • ½ lemon
  • ½ inch ginger
  • Optional: ½ green apple if you need a little sweetness

This version is less sweet and more vegetable-forward. For more fullness, choose an unstrained beet smoothie instead of strained juice because the smoothie keeps more fiber.

Beet Juice and Blood Pressure

Beetroot contains dietary nitrates, which is why this drink often comes up in blood pressure conversations. Still, drinking it once in a while is different from turning it into a daily habit; regular use matters more if you already take medication or tend to run low.

Beetroot’s dietary nitrates can be converted in the body into nitric oxide, a compound involved in blood-vessel relaxation and blood flow, which is why beet juice appears in blood pressure research.

Educational graphic showing beet juice, beetroot, dietary nitrates converting to nitric oxide, and a simple blood-flow research cue.
The blood-pressure conversation around beetroot juice starts with dietary nitrates, so this is a research-aware food habit rather than a cure claim.

Any blood-pressure effect can vary by person, serving size, timing, and overall diet, so treat this as a food habit to discuss if it overlaps with medication or a medical condition.

If you have low blood pressure, take blood pressure medication, have kidney concerns, or manage a medical condition, treat regular beet juice as something to discuss with your healthcare professional rather than a casual daily habit.

For the broader caution list, see side effects and safety notes.

MasalaMonk has a deeper article on beets and blood pressure if you want a more focused discussion of fresh, canned, pickled, and juiced beets.

Is Beet Juice a Detox or Liver Cleanse?

If you like the word “detox” because you mean light, cold, vegetable-forward, and refreshing, beet juice can fit that mood. If you mean a drink that cleanses the liver, flushes toxins, or resets the body, it does not work that way.

Your liver and kidneys already do the work of filtering and processing waste. A glass of beet juice can be colorful and refreshing, but it should not be treated as a liver cleanse or cure.

For a detox-style flavor without the misleading promise, use beetroot, cucumber, celery, lemon, and ginger. It will taste crisp and clean, but it is still just a drink.

Beet Juice for Energy or Pre-Workout

Runners, cyclists, and workout-focused readers often pay attention to beet juice because of beetroot’s natural nitrate content. If you want to try it before exercise, start with a small serving first. Some people tolerate it easily; others find that a large or pulpy drink feels too heavy before movement.

Small glass of beet juice near running shoes, a water bottle, a workout mat, and fresh beetroot in natural morning light.
Before using beet juice as a pre-workout drink, try a small strained serving first so you can see how your stomach handles it.

For a pre-workout style version, keep the flavor bright and the texture light: beetroot, orange or apple, lemon, and ginger works well. If you are using the blender method, strain it thoroughly so the drink is easier to sip before exercise.

For performance use, many beetroot juice studies focus on nitrate dose and timing rather than casual sipping, so treat a small pre-workout glass as an experiment, not a guaranteed effect.

When to Drink Beet Juice and How Much to Start With

There is no single perfect time to drink beet juice. Choose the moment that fits how you want to use it and how your body responds. If you are new to this drink, start with a smaller serving because the flavor, color, and digestive effect can surprise people, especially if the glass is strong or ginger-heavy.

Timing and serving-size guide for beet juice with morning, afternoon, pre-workout cues and 5 ounce, 8 ounce, and 2–3 ounce serving sizes.
Start with 5 oz of beet juice, then adjust the timing and portion based on your routine, taste, digestion, and reason for drinking it.
  • Morning: a simple option with or after breakfast, especially if raw juice bothers your stomach on its own.
  • Afternoon: useful when you want something cool, colorful, and caffeine-free.
  • Before a workout: try a small strained serving first; avoid a large pulpy glass right before training.
  • Night: fine for many people, but skip it late if it bothers your digestion or makes you wake up to use the bathroom.
  • Daily: keep portions reasonable and rotate with whole vegetables, fruits, smoothies, meals, and other drinks.
  • Small serving: 5 oz / 150 ml
  • Standard serving: 8 oz / 240 ml
  • This recipe yield: about 16–18 oz / 475–530 ml
  • Beet shot: 2–3 oz / 60–90 ml

You do not need to turn beet juice into a daily project to enjoy it; a good glass now and then still counts. Occasional beet juice and daily beet juice are not the same decision, especially if you have blood pressure, kidney-stone, digestive, or blood sugar concerns.

After drinking beet juice, some people notice pink or red urine or stool. This is often called beeturia and can happen after eating or drinking beets. It is usually harmless, but if you are unsure whether the color is from beets or something else, or if you have pain or unusual symptoms, seek medical advice.

The sections below cover storage and safety because homemade beet juice is raw, deeply pigmented, and more concentrated than eating a few slices of beetroot.

Fresh Beets vs Canned Beets vs Beet Powder

Fresh raw beetroot gives the best glass: brighter color, clearer flavor, and a more refreshing finish. Canned, cooked, pickled, and powdered beets can help in a pinch, but they each move the drink away from that just-made taste.

Comparison of fresh beets with beet juice, canned beets in a can and bowl, and beet powder in a jar and wooden spoon.
Fresh beets give homemade beet juice the brightest flavor; however, canned beets and beet powder can still work when convenience matters more.
OptionCan you use it?Best use
Fresh raw beetsYes, best choiceMain beet juice recipe
Cooked beetsYes, blender onlyEmergency shortcut, softer flavor
Canned beetsPossibleBlended shortcut; check salt, sugar, and additives
Pickled beetsNot idealOnly if you want a vinegar-style drink
Beet powderDifferent productConvenience drink, not the same as fresh juice

If you use canned beets, drain them well and check the label. Some canned beets contain added salt or sugar, and pickled beets contain vinegar that will completely change the flavor. If you use beet powder, treat it as a separate convenience drink rather than a true fresh beet juice recipe.

What to Do With Beet Juice Pulp

Beet pulp is not glamorous, but it does not have to go straight into the bin. If you use a juicer or strain the blender mixture, you will have pulp left behind. It is fibrous and deeply colored, so use it in small amounts where the color and earthiness make sense. Think of it as a small add-in, not the main event.

  • Add small amounts to veggie patties or fritters.
  • Stir into soups or stews where the color makes sense.
  • Mix into muffins, quick breads, or pancakes.
  • Blend into hummus or bean dips.
  • Freeze in small portions for later cooking.
  • Compost it if you do not want to cook with it.

Remember that beet pulp stains. If the pulp includes ginger and lemon, use it in recipes where those flavors will not feel out of place.

How to Store Beet Juice

Just-made beet juice loses its sparkle quickly, so treat leftovers gently. It tastes best right after making, when the lemon is sharp, the ginger still tastes lively, and the beet flavor has not dulled. Because homemade raw juice is not pasteurized, it also needs careful storage if you are not drinking it right away.

Storage guide showing beet juice in a sealed glass bottle with a date label beside a glass of juice near an open refrigerator.
Since homemade raw juice is not pasteurized, the safest flavor window is short: chill it quickly, seal it well, and drink it soon.
  • Best flavor: drink immediately.
  • Best refrigerated quality: within 24 hours.
  • Maximum practical home storage: 24–48 hours in a clean airtight glass bottle in the refrigerator.
  • Room temperature: do not leave fresh juice out for more than 2 hours.
  • Refrigerator temperature: keep chilled at 40°F / 4°C or colder.
  • Serving after storage: shake or stir before drinking.
  • Discard if: it smells sour, fizzy, fermented, moldy, or off.

You can wash and chop the beetroot, carrot, apple, and cucumber a few hours ahead and refrigerate them in a covered container. Juice or blend just before serving for the liveliest flavor.

The FDA has a useful overview of fresh juice safety, especially because homemade raw juice is not pasteurized.

You can freeze beet juice in ice cube trays or small containers, but the flavor and texture will be less crisp after thawing. Frozen beet juice cubes are better for smoothies than for drinking plain.

Side Effects and Who Should Be Careful

For most people, a moderate glass is simply a colorful way to enjoy beetroot. Still, start small the first time, especially if you plan to drink it often. Beet juice has a strong color, strong flavor, and for some people, a strong digestive effect too.

Beet juice side effects graphic with a glass of beet juice and safety cards for start small, beeturia, oxalates, and blood pressure caution.
Start with a modest serving if beet juice is new to you, especially if oxalates, digestion, beeturia, or blood pressure changes are concerns.
  • Red or pink urine/stool: Beet juice can cause beeturia, a temporary red or pink color change after eating or drinking beets.
  • Kidney-stone concerns: Beets contain oxalates, so people prone to certain kidney stones should be cautious.
  • Low blood pressure or medication: If you take blood pressure medication or have low blood pressure, ask a healthcare professional before drinking beet juice regularly.
  • Digestive sensitivity: Start with a smaller serving if raw juices bother your stomach.
  • Blood sugar management: If you manage blood sugar, fruit-heavy beet juices may need smaller portions or more vegetable-forward formulas.

For more detail on oxalates and beetroot, see MasalaMonk’s guide to beetroot and kidney health.

Beet Juice Troubleshooting

Beet juice is forgiving if you know what to adjust. If the batch did not taste the way you expected, do not throw it out yet. Most problems are fixable with lemon, cucumber, ice, apple, or another pass through the strainer.

Troubleshooting guide for beet juice with panels for too earthy, too thick, too watery, and too sharp, plus lemon, cucumber, apple, and strainer cues.
A failed batch is usually adjustable: sharpen a dull glass, lighten a heavy one, dilute harsh ginger, or strain again for smoother texture.
IssueWhy it happenedFix nowFix next time
Too earthyToo much beet or not enough acid/sweetnessAdd lemon, orange, apple, or cucumber juiceUse less beet and more carrot/apple
Too thickBlender juice was not strained enoughStrain again through cheesecloth or a nut milk bagChop smaller, blend smoother, and squeeze pulp well
Too wateryToo much water in the blenderAdd lemon, ginger, or a little more fresh juiceStart with ½ cup / 120 ml water only
Too sharpToo much ginger or lemonDilute with apple, carrot, cucumber, or iceStart with ½ inch ginger
Too sweetToo much apple, orange, pineapple, or pomegranateAdd lemon, cucumber, celery, or gingerUse the low-sugar variation
Separates in the glassFresh juice naturally separatesStir or shakeThis is normal

FAQs About Beet Juice

These are the small questions that usually come up after the first batch.

Juicer or blender: which is better for beet juice?

A juicer makes lighter, smoother juice without added water. A blender works well if you do not own a juicer, but the juice needs water and straining.

How much water do you add when making beet juice in a blender?

Start with ½ cup / 120 ml cold water. Add more only if the blender needs help, up to 1 cup / 240 ml total. Too much water makes the juice taste thin.

How do you make beet juice without a juicer?

Blend chopped beetroot, carrot, apple, lemon, ginger, and cold water until smooth. Then strain through a nut milk bag, cheesecloth, or fine mesh strainer and squeeze the pulp well.

Should you use raw or cooked beets for juice?

Raw beets are best for fresh juice. Cooked beets can be blended in a pinch, but they taste softer and less crisp. They are not ideal for juicing.

Do you need to peel beetroot before juicing?

Peeling is optional if the beetroot is fresh, tender-skinned, and scrubbed very well. Peel it if the skin is rough, dirty, waxed, or bitter.

How many beets make one glass of juice?

One medium-large beet, about 225–250 g / 8–9 oz, combined with carrot, apple, lemon, and ginger usually makes about two standard glasses of mixed beet juice. A medium beet on its own may give roughly ⅓–½ cup juice in many home juicers, though freshness, size, and machine efficiency can change that noticeably.

Why does beet juice taste earthy?

Beetroot naturally has an earthy, mineral-like flavor. Apple, carrot, lemon, ginger, cucumber, orange, and pineapple all help balance that flavor.

How do you make beet juice sweeter without sugar?

Add apple, carrot, orange, pineapple, or pomegranate. Apple and carrot are the easiest everyday choices because they sweeten the drink without overpowering the beetroot.

Is it okay to drink beet juice every day?

You can drink it regularly if it suits you, but you do not need to make it a daily habit to enjoy the recipe. Keep portions moderate, especially if you have kidney-stone risk, low blood pressure, digestive sensitivity, blood sugar concerns, or take blood pressure medication.

What is the best time to drink beet juice?

Morning is simple, afternoon works when you want something cool and caffeine-free, and pre-workout use is best tested with a small strained serving before you make it a routine.

Why does beet juice turn urine or stool red?

Beets can turn urine or stool pink or red. This is common after eating or drinking beetroot. If you are unsure whether the color is from beets, or if you have pain or unusual symptoms, seek medical advice.

What should you know about beet juice and blood pressure?

Beetroot contains dietary nitrates, so occasional juice is one thing; a daily habit is worth discussing with your healthcare professional if you take blood pressure medication or tend to run low.

How long does homemade beet juice keep?

Homemade beet juice tastes best immediately. Refrigerate it in a clean airtight bottle and drink within 24 hours for best flavor, or within 24–48 hours at most.

Can you use canned beets in beet juice?

You can blend canned beets with water, apple, lemon, and ginger in a pinch, but the flavor will be softer and less fresh than raw beetroot. Check the can for added salt, sugar, or vinegar.

How do you turn this recipe into a beet juice shot?

For a beet shot, use less apple and cucumber, keep the beet, lemon, and ginger more concentrated, and serve just 2–3 oz / 60–90 ml at a time. Beet shots are intense, so start small.

Tried it with apple, orange, cucumber, or ginger? Share which version finally made beet juice work for you — the best fixes often come from small adjustments.

Beet Juice Recipe

This is the balanced base version: beetroot for color, carrot and apple for sweetness, lemon for brightness, ginger for lift, and cucumber if you want a cooler, easier sip.

Make it in a juicer for crisp, smooth juice, or use a blender and strain it. Once you like the base, adjust lemon, apple, cucumber, or ginger to make the glass sharper, sweeter, lighter, or spicier.

The finished juice should pour easily, taste sweet-earthy and tart, and finish with gentle ginger warmth.

Saveable beet juice recipe card with a glass of beet juice, beetroot, carrot, apple, lemon, ginger, 10 minutes, 16–18 ounce yield, and juicer or blender method.
Save this beet juice recipe formula for the essentials: beetroot, carrot, apple, lemon, and ginger, made in either a juicer or a blender.
Prep Time10 minutes
Total Time10 minutes
Servings2 glasses
YieldAbout 16–18 oz / 475–530 ml

Estimated nutrition: One 8 oz / 240 ml serving is roughly 135–150 calories, with about 32–36 g carbohydrates depending on produce size and juicing method. Most sweetness comes naturally from the apple, carrot, and beetroot. Strained juice has much less fiber than whole produce or an unstrained smoothie.

Equipment: juicer or blender, fine mesh strainer or nut milk bag, knife, cutting board, and a clean bottle or jar if storing.

Ingredients

  • 1 medium-large raw beetroot or 2 small beets, about 225–250 g / 8–9 oz
  • 2 medium carrots, about 120–150 g / 4–5 oz
  • 1 large apple, about 170–200 g / 6–7 oz
  • ½ lemon, about 15–20 ml juice
  • ½–1 inch fresh ginger, about 5–10 g
  • ½ small cucumber, optional, about 75–100 g / 3–4 oz
  • ½–1 cup cold water, blender method only, 120–240 ml
  • Ice, to serve

Juicer Method

  1. Wash and scrub the beetroot, carrots, apple, cucumber, lemon, and ginger.
  2. Trim the beetroot and peel it if the skin is rough, waxed, or not fully clean.
  3. Cut the beetroot, carrots, apple, cucumber, and ginger to fit your juicer chute.
  4. Juice the beetroot, carrots, apple, cucumber, and ginger, alternating hard and soft produce as needed.
  5. Stir in the lemon juice.
  6. Pour over ice and drink immediately.

Blender Method

  1. Chop the beetroot, carrots, apple, cucumber, and ginger into small pieces.
  2. Add them to a blender with ½ cup / 120 ml cold water and the lemon juice.
  3. Blend on high for 45–60 seconds, until smooth. Add more water only if needed, up to 1 cup / 240 ml total.
  4. Pour the mixture through a nut milk bag, cheesecloth-lined strainer, or fine mesh strainer.
  5. Let it drain for 2–5 minutes, then press or squeeze the pulp to extract the juice.
  6. Optional: add 2–3 tablespoons / 30–45 ml cold water to the squeezed pulp, stir or briefly blend, then strain once more for a little extra yield.
  7. Serve over ice.

Notes

  • For a milder glass, use half a beet and increase the apple or carrot.
  • Use green apple for a sharper juice or red apple for a sweeter one.
  • For a lighter flavor, add cucumber.
  • For a sharper flavor, use the full inch of ginger and extra lemon.
  • If using a blender, strain the mixture for true beet juice. Unstrained beet juice will be thicker and smoothie-like.
  • Drink immediately for best flavor, or refrigerate in a clean airtight glass bottle for 24–48 hours.
  • For regular use or medical concerns, read the safety section above.

Once the recipe is made, serve the juice cold, taste before adjusting, and keep the glass balanced enough that it feels like a drink you chose — not a health chore.

Hand placing a glass of homemade beet juice on a kitchen counter with a bottle of juice, beetroot, apple slices, ginger, and herbs nearby.
A good homemade beet juice should taste balanced enough to sip slowly, not like something you have to force down for health reasons.

Back to top

Posted on Leave a comment

Chai Latte Recipe

Creamy hot chai latte in a speckled mug with foam, cardamom pods, ginger, cinnamon sticks, cloves, peppercorns, and loose black tea on a warm neutral surface.

A good chai latte should smell like crushed cardamom and ginger before you even take the first sip. It should land creamy and smooth, but still taste like spiced black tea — not warm milk with cinnamon dust on top.

Many homemade versions go wrong in small ways: too much water, too little tea, gritty ground spices, or a bottled concentrate that tastes more like syrup than chai. Iced chai makes those problems even more obvious because melting ice weakens the drink quickly.

This chai latte recipe gives you the creamy drink many cafés call a chai latte or chai tea latte, but built with real chai logic: full-bodied tea first, warm spices next, and milk only after the tea and spices can hold their own.

The result is soft and café-style, but still tastes like cardamom, ginger, black tea, and warmth.

Quick Answer: How to Make a Chai Latte

To make a chai latte, simmer crushed spices in water for 3–5 minutes, steep black tea off heat or on very low heat for 4–5 minutes, strain, then mix ½ cup / 120 ml chai concentrate with ¾ cup / 180 ml steamed milk.

Sweeten with 1–2 teaspoons sugar, honey, maple syrup, or jaggery syrup to start, then add more after tasting for a sweeter coffeehouse-style cup. For iced chai, use ½ cup / 120 ml cold chai concentrate, ½ cup / 120 ml cold milk, and 1 cup / about 120–140g ice.

If you already have chai concentrate, the drink takes about 5 minutes. If you are making the base fresh, expect about 7 minutes for the tea-bag version and about 15 minutes for the whole-spice version.

Need the fastest path? Go to the tea-bag method. Want the best aroma? Use the whole-spice method. Making drinks for the week? Start with the make-ahead chai concentrate.

At a Glance

These are the numbers and choices that keep the drink from becoming pale, watery, or syrup-heavy.

Best teaAssam, CTC Assam, or another full-bodied black tea
Best milkWhole milk for richness; barista oat milk for dairy-free creaminess
Hot ratio½ cup / 120 ml chai base + ¾ cup / 180 ml milk
Iced ratio½ cup / 120 ml chai base + ½ cup / 120 ml milk + 1 cup / 120–140g ice
Final hot drinkAbout 10 oz / 300 ml
Fastest method2 chai tea bags steeped well
Best flavor methodWhole spices + loose black tea
Biggest mistakeAdding milk before the tea and spices taste strong enough

Once the ratio makes sense, the drink stops feeling fussy. You can make it stronger for ice, sweeter for a coffeehouse-style cup, less milky for dirty chai, or softer when you want a creamier evening drink.

Chai Latte Recipe at a Glance board showing best tea, best milk, hot ratio, iced ratio, fastest method, and the mistake of adding milk too early.
This chai latte recipe snapshot keeps the key choices in one place: tea, milk, hot ratio, iced ratio, timing, and the mistake that weakens the drink.

For the full hot, iced, creamier iced, and dirty chai measurements, see the chai-to-milk ratio guide.

Why This Recipe Works

In good chai, milk should round the flavor, not erase it. That is why the tea and spices are extracted before milk enters the picture. The tea-spice mixture should taste slightly more intense than the final drink because milk, ice, oat milk, and espresso all change the balance once they enter the cup.

  • The tea has body. The drink does not collapse into warm milk.
  • The spices are well extracted. Cardamom, ginger, cinnamon, cloves, and pepper actually show up in the cup.
  • The tea is not overboiled. Spices can simmer longer, but black tea turns bitter when pushed too hard.

The best check is simple: before milk, the chai should taste slightly too strong. After milk, it should taste balanced. If it tastes balanced before milk, it will taste weak after.

Chai Latte Mistakes That Make It Taste Weak

Most disappointing chai lattes fail before the milk is added. The tea is too dilute, the spices are barely extracted, or the drink is built over ice before the chai has enough flavor to survive dilution.

  • Too much water for one tea bag gives you color without enough body.
  • Boiling black tea hard for too long makes it bitter; simmer spices first, then steep tea gently.
  • Milk should come after the tea and spices have real flavor, not before.
  • Too-sweet concentrate needs unsweetened black tea, not only more milk.
  • If the tea already tastes weak, ice will only make the problem louder.
  • Ground spices are convenient, but they need a light hand and a good strain.

Already made a weak, bitter, gritty, or too-sweet cup? Jump to the troubleshooting guide for quick fixes.

The Best Chai-to-Milk Ratio

If you remember only one thing, remember this: milk hides weak tea. Start with a tea-forward chai concentrate, then soften it with milk.

The exact ratio matters more than the garnish. Once the base is right, cinnamon on top is optional.

Best Chai-to-Milk Ratio guide comparing hot chai latte, tea-forward hot latte, iced chai latte, creamier iced latte, and dirty chai latte measurements.
Ratios change by style: hot chai can take more milk, while iced chai needs a tighter balance before the ice starts melting.
DrinkChai concentrateMilkIceBest result
Hot chai latte½ cup / 120 ml¾ cup / 180 mlNoneCreamy and balanced
More tea-forward hot latte½ cup / 120 ml½ cup / 120 mlNoneMore tea-forward, less milky
Iced chai latte½ cup / 120 ml½ cup / 120 ml1 cup / 120–140gHolds up to ice
Creamier iced latte½ cup / 120 ml¾ cup / 180 ml1 cup / 120–140gSofter and milkier
Dirty chai latte½ cup / 120 ml½ cup / 120 mlOptionalAdd 1 espresso shot / 30 ml

Hot chai can handle a little more milk because there is no ice dilution. Iced chai needs a tighter ratio, so taste the base and milk before adding ice; it should taste a little more tea-forward than your final target.

Which Method Should You Use?

Pick your path first. You do not need every version today — just the one that fits the drink you want right now.

Reader situationBest pathWhy it works
I want one hot chai latte nowTea-bag methodReady in about 5–7 minutes with minimal equipment
I want the best homemade flavorWhole-spice methodFreshly crushed spices taste brighter and cleaner
I want iced chai all weekMake-ahead concentrateOne batch works for hot, iced, dirty, and Starbucks-style drinks
I want Starbucks-style iced chaiStore-bought or sweetened concentrate pathClosest to the coffeehouse concentrate-and-milk format
I want coffee in itDirty chai pathA well-spiced base keeps the coffee from taking over
I want dairy-freeWater-based base + oat or soy milkCreamy without dairy, and easier to heat gently

First time making it? Use the whole-spice single-serve method for the most fragrant cup. In a hurry, use the tea-bag method. For weekday drinks, make the concentrate batch.

How to Make Chai Latte at Home

All three methods follow the same principle: brew the chai first, then add milk. That is what keeps the finished drink creamy without becoming flat, pale, or watery.

How to Make It With Tea Bags

This is the version for the afternoon when you want comfort now, not a spice project.

Use this ratio for one quick cup

  • ½ cup / 120 ml water
  • 2 black-tea-based chai tea bags
  • ¾ cup / 180 ml milk
  • 1–2 teaspoons sugar, honey, maple syrup, or jaggery syrup to start
  • ¼ teaspoon vanilla, optional

Method

  1. Bring the water to a boil, then turn off the heat.
  2. Add the chai tea bags and steep for 4–5 minutes.
  3. Remove the tea bags gently. Do not squeeze them hard, or the drink may taste harsh.
  4. Warm the milk until steaming, not boiling.
  5. Froth the milk with a frother, whisk, French press, or jar.
  6. Pour the tea into a mug, add sweetener, then pour in the milk.
  7. Taste and adjust sweetness.

Two tea bags give the cup body without forcing one bag to oversteep into bitterness. Choose a black-tea-based chai bag, not a delicate herbal chai, unless you intentionally want a caffeine-free drink.

Step-by-step chai latte with tea bags guide showing boiling water, steeping two chai tea bags, warming milk, frothing milk, and combining the drink.
Tea bags are the fastest path, but using two bags and a controlled steep gives better flavor than forcing one bag to do all the work.

Whole-Spice Single-Serve Method

This is the cup to make when you have five extra minutes and want the kitchen to smell like chai, not just tea. Freshly crushed spices give a cleaner aroma and a deeper cup than most powdered spice blends.

For one large latte

  • ⅔ cup / 160 ml water
  • 2 teaspoons / about 4g loose black tea, or 2 black tea bags
  • 3–4 green cardamom pods
  • 1 small piece cinnamon stick, about 1 inch / 2.5 cm
  • 2 cloves
  • 3–4 black peppercorns
  • ½ inch / 5g fresh ginger, sliced or lightly crushed
  • ¾ cup / 180 ml milk
  • 1–2 teaspoons sugar, honey, maple syrup, or jaggery syrup to start
  • ¼ teaspoon vanilla, optional

Method

  1. Lightly crush the cardamom, cinnamon, cloves, peppercorns, and ginger.
  2. Add the spices and water to a small saucepan.
  3. Bring to a boil, then simmer for 3–5 minutes, until the water smells clearly of cardamom and ginger.
  4. Add the tea, turn off the heat or keep it very low, and steep for 4–5 minutes.
  5. For a deeper cup, let it sit off heat for another 2–3 minutes before straining.
  6. Strain into a mug. You should have about ½ cup / 120 ml dark, fragrant chai that tastes slightly too strong before milk.
  7. Warm the milk until steaming, then froth it.
  8. Combine the chai and milk. Sweeten to taste.

The timing matters. Spices can simmer longer, but black tea becomes bitter if boiled too hard for too long. Extract the spices first, then add the tea.

Whole-Spice Chai Latte Method board showing crushed spices, simmered spices, steeped black tea, strained chai base, frothed milk, and the final latte.
Let the spices bloom in water first; then steep the black tea gently so the whole-spice chai latte tastes aromatic instead of harsh.

Make-Ahead Chai Concentrate

Make-ahead chai concentrate keeps the hard part ready: a strong spiced tea base that can become a hot latte, iced chai, dirty chai, vegan chai, or Starbucks-style drink in minutes.

This batch starts with 2½–2⅔ cups / 600–640 ml water and yields about 2 cups / 480 ml concentrate after simmering, steeping, absorption, and straining. That is enough for about 4 lattes if you use ½ cup / 120 ml per drink.

If you are making this for iced chai, dirty chai, or different milk types, keep the batch unsweetened the first time. Sweeten each glass after mixing so you can adjust without weakening the tea.

Make-ahead chai concentrate in a glass jar with cardamom, ginger, cinnamon, black tea, and callouts for yield, storage time, and use per drink.
A jar of chai concentrate gives you a flexible base for hot chai lattes, iced chai, dirty chai, and dairy-free versions throughout the week.

Ingredients for 4 lattes

  • 2½–2⅔ cups / 600–640 ml water
  • 6–8 teaspoons / about 12–16g loose black tea, or 6–8 black tea bags
  • 10–12 green cardamom pods
  • 2 small cinnamon sticks, about 2–3 inches / 5–7.5 cm each
  • 5–6 cloves
  • 10–12 black peppercorns
  • 15–20g fresh ginger, sliced or crushed
  • 2–4 tablespoons sugar, optional
  • ½ teaspoon vanilla, optional

Method

  1. Lightly crush the cardamom, cinnamon, cloves, peppercorns, and ginger.
  2. Add the spices and water to a saucepan.
  3. Bring to a boil, then simmer for 3–5 minutes, until the water smells clearly spiced.
  4. Add the tea, turn off the heat or keep it very low, and steep for 4–5 minutes.
  5. Let the mixture sit off heat for another 5 minutes if you want a deeper concentrate.
  6. Strain through a fine mesh strainer.
  7. You should have about 2 cups / 480 ml. If you are only a little short, top it up with a splash of hot water. If you have much less, leave it as-is and use slightly less per drink.
  8. Stir in sugar while the chai is warm, if you want a sweetened batch.
  9. Add vanilla, if using.
  10. Cool completely, then refrigerate in a clean jar.

Sweetened or unsweetened? Sweeten the whole batch if everyone likes the same sweetness. Leave it unsweetened if you want to use it for lower-sugar drinks, dirty chai, different milk types, or people with different sweetness preferences.

After that, the daily choice is simple: tea bags for speed, whole spices for aroma, and a fridge jar when you want the same good cup tomorrow.

Chai Latte vs Masala Chai

A chai latte is not trying to replace masala chai. It borrows the tea-and-spice soul, then changes the format: more milk, a softer texture, easier iced versions, and a café-style feel. The mistake is not making it latte-like; the mistake is making it so milky that the chai disappears.

You may also see it called a chai tea latte. Technically, chai already means tea, but “chai tea latte” is the common café phrase for the same style of drink.

  • Masala chai: Indian spiced milk tea, usually simmered or boiled with tea, milk, spices, and sweetener. It is more direct, warming, and tea-forward.
  • Chai latte: spiced tea concentrate or brewed chai mixed with more milk. It is creamier, softer, and easier to serve hot or iced.
  • Dirty chai: chai latte with espresso. It keeps the creamy spiced base, but adds a coffee edge.
Split comparison of chai latte and masala chai, with a creamier cafe-style chai latte on one side and stronger stovetop masala chai on the other.
Masala chai is usually stronger and more direct, while a chai latte is softer, milkier, and easier to serve hot or iced.

For a more traditional stovetop cup, MasalaMonk’s masala chai masterclass goes deeper into Indian chai technique.

Ingredients That Matter

Here is how each ingredient changes the final cup: tea gives backbone, spices give warmth, milk turns it into a latte, and sweetener rounds the edges.

Tea

Start with a full-bodied black tea. Assam is excellent because it has the weight to stand up to milk, but any full-bodied black tea works. Loose tea usually gives a more robust result than delicate tea bags, though tea bags are perfect for the quick version.

If you have CTC Assam, it gives the most chai-shop-style body because it extracts quickly and stands up well to milk. Tea bags are fine for speed, but use two for one latte so the milk does not flatten the drink.

If your drink tastes weak, do not fix it by steeping one tea bag forever. Use more tea, less water, or crush the spices more thoroughly before simmering. Oversteeping can make the tea bitter without making the latte taste richer.

Best Tea for Chai Latte board showing Assam tea, CTC Assam, loose black tea, chai tea bags, and brewed tea as labeled tea choices.
Full-bodied black tea matters because delicate tea can disappear under milk; as a result, Assam, CTC Assam, and strong loose tea are safer choices.

Spices

The core spices are cardamom, cinnamon, cloves, black pepper, and ginger. Star anise is optional. Vanilla is also optional, but it gives the drink a softer finish.

  • Cardamom: gives the classic fragrant chai aroma.
  • Cinnamon: adds warmth and natural sweetness.
  • Cloves: bring depth, so use them carefully.
  • Black pepper: gives the drink a gentle lift.
  • Fresh ginger: makes the cup brighter and more warming.
  • Star anise: adds a polished spiced note, but too much can dominate.
Chai Latte Spices Guide with labeled cardamom, fresh ginger, cinnamon, cloves, black pepper, and optional star anise on a warm neutral background.
Cardamom gives fragrance, ginger adds heat, cinnamon rounds the cup, and a little pepper keeps the chai latte from tasting flat.

Milk

Choose milk for body, not just foam. Whole milk gives plushness, oat milk gives dairy-free creaminess, almond milk tastes lighter, soy milk foams well, and coconut milk changes the flavor completely.

MilkBest useWatch out for
Whole milkClassic hot chai latteCan taste heavy if the chai base is weak
2% milkCoffeehouse-style hot or iced chaiLess plush than whole milk
Barista oat milkVegan or iced chai latteCan soften spice slightly
Soy milkHot vegan chai with foamHeat gently to avoid splitting
Almond milkLighter iced chaiCan taste thin
Coconut milkCoconut chai variationCan dominate cardamom and ginger
Best Milk for Chai Latte comparison board showing whole milk, 2 percent milk, oat milk, soy milk, almond milk, and coconut milk with short use notes.
Choose milk for both body and flavor: whole milk feels plush, oat milk makes a creamy dairy-free chai latte, and almond milk needs a bolder brew.

Sweetener

Sugar keeps the sweetness clean, while brown sugar adds a warmer caramel note. Honey gives floral warmth, maple syrup works beautifully in dairy-free cups, and jaggery brings a deeper Indian-style sweetness. For a lower-sugar version, keep the tea and spice layer flavorful so the drink does not need extra syrup to feel complete.

Cold drinks need sweetness that dissolves easily, so vanilla syrup, brown sugar syrup, or simple syrup work better than dry sugar once the chai is chilled. Granulated sugar works best while the chai base is still warm.

  • White sugar: clean and classic.
  • Brown sugar: warm and caramel-like.
  • Honey: floral and cozy, best in hot drinks.
  • Maple syrup: soft and rounded, good for dairy-free drinks.
  • Jaggery: deeper, earthier, and more Indian-style.
  • Date syrup: rich and fruity for a no-refined-sugar version.
  • Vanilla syrup: sweeter and more coffeehouse-style.

Whole Spices, Ground Spices or Chai Mix?

Whole spices give the cleanest flavor and texture, but they need crushing and straining. Ground spices are fast, but they can settle at the bottom and make the drink feel gritty. Chai spice mix is convenient for busy mornings, but the result depends heavily on the blend.

For the smoothest cup, use whole spices and strain the concentrate. If using ground spices, chai powder, or a homemade chai masala, use a small amount and strain before adding milk.

Using ground spices? For one latte, start with ¼ teaspoon cinnamon, ⅛ teaspoon ground ginger, ⅛ teaspoon ground cardamom, and the tiniest pinch each of clove and black pepper. Simmer with the water, then strain before adding milk. A little sediment may remain, so use less than you think; ground spices turn intense and gritty fast.

Equipment You Need

You do not need an espresso machine. A saucepan and strainer are enough. A frother helps with the silky top, but you can still make a very good cup without one.

  • Small saucepan
  • Fine mesh strainer
  • Spoon or whisk
  • Milk frother, French press, immersion blender, or clean jar
  • Mortar and pestle, optional, for crushing whole spices

Froth Milk Without a Frother

No frother? Warm the milk, pour it into a clean jar with empty space at the top, close the lid tightly, and shake for 20–30 seconds. You can also pump warm milk in a French press for 15–20 seconds or whisk it hard in the saucepan.

For more no-machine milk foam tips, MasalaMonk’s cappuccino recipe is useful too.

Froth Milk Without a Frother guide showing jar shaking, French press pumping, whisking warm milk, a milk pitcher, and a finished chai latte.
A frother helps, but a jar, French press, or whisk can still give warm milk enough foam for a café-style finish.

How to Make an Iced Chai Latte

If your iced chai tastes good for two sips and watery by the fifth, the base was not strong enough before the ice went in. Cold dulls spice, ice dilutes tea, and milk softens the edges, so iced chai should taste a little too strong before the ice is added.

Tall glass of iced chai latte with ice, condensation, black tea leaves, cardamom pods, ginger, cinnamon, and a formula for chai, milk, and ice.
For iced chai latte, stir the cold chai and milk first; then add ice only after the flavor tastes slightly stronger than your final target.

Iced ratio

  • ½ cup / 120 ml cold chai concentrate
  • ½ cup / 120 ml cold milk
  • 1 cup / about 120–140g ice
  • Sweetener only if needed

Method

  1. Start with the cold chai base in a tall glass.
  2. Add cold milk and stir well.
  3. Taste before adding ice. It should taste a little more tea-forward than you want the final drink.
  4. Add ice last.
  5. Stir again and serve immediately.

How to Keep Iced Chai From Turning Watery

For iced chai that still tastes clear after a few minutes, taste the chai and milk before adding ice. If it already tastes perfect, it will usually taste weak once the ice starts melting.

Comparison graphic showing a pale weak iced chai labeled watery beside a darker strong iced chai labeled balanced after ice, with a tip to taste before adding ice.
Ice always dilutes the drink, so the best iced chai latte starts a little stronger and settles into balance as the glass chills.

For more weak, watery, or bitter chai fixes, see the troubleshooting table.

StyleConcentrateMilkIce
Classic iced chai latte½ cup / 120 ml½ cup / 120 ml1 cup / 120–140g
Creamier iced chai latte½ cup / 120 ml¾ cup / 180 ml1 cup / 120–140g
More tea-forward iced chai latte¾ cup / 180 ml concentrate½ cup / 120 ml milk1 cup / 120–140g

Iced chai is where body matters most: whole milk tastes round, 2% feels coffeehouse-balanced, barista oat gives dairy-free creaminess, and almond milk keeps the drink lighter.

For iced chai that still tastes alive after the ice melts: freeze leftover chai in an ice cube tray and use those cubes instead of plain ice.

Starbucks-Style Chai at Home

This is not an official Starbucks recipe, but it gives you the same sweet, cold, café-style comfort with more control over how much chai and how much sweetness you actually want.

2-Minute Starbucks-Style Iced Chai With Store-Bought Concentrate

For the fastest Starbucks-style iced chai, use ½ cup / 120 ml sweet chai concentrate, ½ cup / 120 ml cold milk, and 1 cup / 120–140g ice. Stir the concentrate and milk first, then add ice so the drink mixes evenly. If it tastes too sweet, cut the concentrate with unsweetened black tea instead of adding more milk.

Starbucks-style iced chai latte in a tall clear glass with ice, chai concentrate, milk, spice cues, and a homemade formula without any brand logos.
For a Starbucks-style iced chai latte at home, start with equal parts sweet chai concentrate and milk, then add ice last.

That is the coffeehouse shortcut. The home advantage is control: make the tea-spice base clear first, then sweeten only as much as you want.

For a less syrupy homemade version, use the make-ahead chai concentrate and sweeten each glass after mixing.

Hot coffeehouse-style ratio

  • ½ cup / 120 ml sweet chai concentrate
  • ¾ cup / 180 ml steamed milk
  • Foam on top, optional
  • Pinch cinnamon, optional

Using store-bought concentrate? Taste it first. If it is mostly sweet spice syrup, cut it with unsweetened black tea before adding more milk.

Dirty Chai Latte

A dirty chai latte is chai with espresso. It is the drink to make when you want the warmth of chai and the deeper edge of coffee in the same cup.

Dirty chai latte with espresso being poured into a creamy chai latte, plus a small espresso shot glass, loose black tea, cardamom, cinnamon, and ginger.
Espresso gives dirty chai its coffee edge, but the best cup still starts with a chai base that tastes spiced before the shot goes in.

Hot dirty chai ratio

  • ½ cup / 120 ml chai base
  • ½ cup / 120 ml steamed milk
  • 1 espresso shot / 30 ml
  • Sweetener to taste

Iced dirty chai ratio

  • ½ cup / 120 ml cold chai base
  • ½ cup / 120 ml cold milk
  • 1 espresso shot / 30 ml, cooled slightly
  • 1 cup / about 120–140g ice
  • 1 espresso shot / 30 ml: balanced dirty chai.
  • 2 espresso shots / 60 ml: double dirty chai with more coffee edge.
  • 2–3 tablespoons very strong coffee: gentle coffee note without an espresso machine.
  • Cold brew concentrate: smoother iced dirty chai.
  • Regular brewed coffee: milder and thinner coffee flavor.

Espresso does not hide weak chai; it exposes it. Start with a well-spiced base before adding coffee. No espresso machine? Use 2–3 tablespoons very strong brewed coffee for a gentle coffee note, or 2–3 oz strong coffee for a milder coffee-shop drink.

For the base measurement before espresso, use the dirty chai ratio or make a stronger batch from the chai concentrate section.

If you like chilled café drinks, MasalaMonk’s iced coffee recipes are useful when you want the coffee side of dirty chai.

Vegan, Dairy-Free and Lower-Sugar Versions

Vegan Chai Latte

Plant milk cannot rescue weak chai. For a vegan chai latte that still tastes full, make the tea-spice base with water first, then let oat milk, soy milk, almond milk, or coconut milk soften it.

  • Use ½ cup / 120 ml chai base.
  • Add ¾ cup / 180 ml oat milk for a hot vegan latte.
  • For iced, use ½ cup chai base + ½ cup oat milk + 1 cup ice.
  • Sweeten with sugar, maple syrup, brown sugar, jaggery, or date syrup; skip honey for a strictly vegan cup.

Oat milk gives the creamiest dairy-free cup, soy milk gives good body and foam, almond milk tastes lighter, and coconut milk works when you want coconut to become part of the flavor. Heat plant milk gently and avoid boiling it, because some dairy-free milks split or turn chalky when overheated.

Vegan chai latte made with oat milk, shown with a creamy chai mug, oats, an unbranded plant milk bottle, cardamom, cinnamon, cloves, and ginger.
Oat milk gives vegan chai latte a creamy body; even so, gentle heating matters because plant milks can split or turn chalky when overheated.

For how oat, soy, almond, coconut, and dairy milk behave in chai, use the milk guide above; for homemade oat milk, MasalaMonk’s easy homemade oat milk guide is the best starting point.

Lower-Sugar Version That Still Tastes Complete

Less sugar only works when the spice layer is doing its job. Keep the tea and spice layer full, sweeten by the teaspoon, and add ginger or cardamom before reaching for more syrup.

  • Make the base unsweetened.
  • Use full-bodied black tea and freshly crushed spices.
  • Sweeten the finished drink by the teaspoon after milk is added.

When the cup tastes flat, spice usually helps more than extra syrup. Add more ginger, cardamom, or a tiny pinch of salt before adding more sweetener.

Flavor Variations

Once the base is strong, variations are simple: change the milk, sweetener, or add-in without letting the chai disappear.

Vanilla Chai Latte

Add ¼ teaspoon vanilla extract to one hot drink, or use vanilla syrup for a sweeter coffeehouse-style cup.

Brown Sugar Chai Latte

Brown sugar gives the drink a warmer caramel note, especially in iced chai and dirty chai. Start with 1–2 teaspoons and adjust after the milk is added.

Iced Oat Milk Chai Latte

Equal parts cold chai concentrate and barista-style oat milk make the easiest iced oat milk version. Oat milk turns the drink creamy without dairy, but a little extra ginger or cardamom helps the spice stay clear.

Coconut Chai Latte

Coconut milk works best when you want its flavor to become part of the drink. Because coconut can dominate delicate spices, use a slightly stronger tea-spice base and consider adding extra ginger or cardamom.

Pumpkin Chai Latte

Add 1–2 tablespoons pumpkin purée and a small pinch of homemade pumpkin pie spice to the hot version. For a more classic fall drink, MasalaMonk’s healthy pumpkin spice latte is another useful guide.

Caffeine-Free Chai Latte

For a lower-caffeine cup, decaf black tea keeps the flavor closest to the original. Rooibos works for a naturally caffeine-free spiced latte, although it tastes softer and less tea-forward than black tea, so use extra ginger, cardamom, and cinnamon for a more chai-like flavor.

How to Store and Reheat Chai Concentrate

Let the chai base cool completely, then store it in a clean jar or bottle in the refrigerator for up to 5 days. Shake before using because fine spice particles may settle.

For longer storage, freeze the chai base in ice cube trays for up to 3 months. Frozen chai cubes are especially useful for iced chai because they chill the glass without watering down the flavor.

To reheat, warm the base gently on the stove or in the microwave. Heat the milk separately if you want better foam. Do not boil the finished drink after milk is added, because it can taste cooked and lose the fresh spice aroma.

Troubleshooting

If your first cup is not perfect, it is usually easy to rescue. Most failed chai lattes are not really failures — they are ratio problems. Once you know what is off, the fix is usually simple.

ProblemFix nowFix next time
WateryAdd more concentrate or a splash of unsweetened black teaUse less water, more tea, or frozen chai cubes for iced drinks
BitterAdd milk and a little sweetener to soften itSteep tea for less time and avoid boiling it hard
WeakAdd more chai base or a second steeped tea bagUse 2 tea bags, loose black tea, or freshly crushed spices
GrittyStrain again through a fine mesh strainerUse whole spices or less ground spice
Too sweetAdd unsweetened black tea, not just more milkStore the base unsweetened and sweeten each cup
Too spicy or pepperyAdd milk and a little sweetenerUse fewer peppercorns and cloves
Bland but not weakAdd ginger, cardamom, or a tiny pinch of saltUse fresher spices and crush them before simmering
Milk splitStop heating and strain if neededHeat plant milk gently and avoid boiling
Chai Latte Troubleshooting Guide listing watery, bitter, weak, gritty, too sweet, and split milk with fixes such as add more chai base and strain again.
Most chai latte problems come from small ratio, steeping, or straining mistakes; fortunately, the fix is usually quick once you know what changed.

Why does it taste watery?

This usually means the tea was too dilute before milk or ice was added. For iced chai, mix the base and milk first, taste, then add ice last.

Why does it taste bitter?

The tea may have steeped too long or boiled too hard. Simmer the spices first, then add the tea off heat or on very low heat for 4–5 minutes.

Why did the milk split?

The milk may have overheated, especially if it was plant milk. If using a thermometer, dairy milk is usually best around 140–155°F / 60–68°C. Without one, stop when the milk is steaming and hot to the touch, but not boiling. For plant milk, use gentle heat and stop before it bubbles hard.

FAQs

Is chai latte the same as masala chai?

Not exactly. Masala chai is usually a stovetop spiced milk tea with a more direct tea-and-spice flavor, while a chai latte is milkier, softer, and more latte-style.

What tea works best for this drink?

A full-bodied black tea works best, especially one with enough weight to hold up under milk. Assam is a great choice; CTC Assam gives the most chai-shop-style body if you have it.

Is chai latte coffee?

No. A regular chai latte is a tea drink made with spiced black tea and milk. If you add espresso, it becomes a dirty chai.

How much caffeine is in it?

It depends on the tea and steeping time. As a general reference, Mayo Clinic lists brewed black tea at about 48 mg caffeine per 8 oz / 237 ml serving. Dirty chai has more because espresso joins the cup too.

Is chai latte sweet?

It can be, especially when made with bottled concentrate. Homemade chai lets you keep sweetness separate from spice: make the tea-spice base clear first, then sweeten the finished drink by the teaspoon.

How do I make iced chai that is not weak?

Use equal parts cold chai base and milk, then add ice last. If it tastes perfect before ice, it will taste weak after five minutes. Frozen chai cubes help.

What makes it dirty chai?

Espresso makes it dirty chai. One shot gives a balanced coffee edge; two shots make it coffee-forward, so the chai base needs to be bold.

Can I make it without a frother?

Yes. Shake warm milk in a tightly closed jar, whisk it in the saucepan, pump it in a French press, or use an immersion blender. The foam will be softer than café foam, but the drink will still taste creamy.

Can I use store-bought chai concentrate?

Yes. Taste it first because bottled concentrates vary widely: some are tea-forward, while others are mostly sweet spice syrup. If yours is too sweet, dilute it with unsweetened black tea rather than only adding more milk.

Can I use chai powder or chai spice mix?

Yes, but use less than you think. Ground spices bloom quickly and settle easily, so simmer them with the tea base and strain before adding milk.

How long does homemade concentrate last?

It keeps in the refrigerator for up to 5 days in a clean jar. For longer storage, freeze the chai base in ice cube trays for up to 3 months.

Chai Latte Recipe Card

The card below gives you the most fragrant version first, because whole spices make the cup feel alive. The shortcuts are in the notes when speed matters more than ceremony.

Chai Latte Recipe Card with a finished latte, yield, total time, exact ingredients, and method steps for simmering spices, steeping tea, straining, frothing, and combining.
Keep this chai latte recipe card handy when you want the whole-spice version: simmer spices, steep tea gently, strain, froth, and combine.

Chai Latte Recipe: Whole-Spice Method

This recipe card uses the whole-spice method for the best flavor. The strained chai is your concentrate or chai base; tea-bag, iced, dirty chai, Starbucks-style, vegan, and make-ahead notes are below.

Yield1 large latte, about 10 oz / 300 ml
Prep Time5 minutes
Cook Time10 minutes
Total Time15 minutes

Ingredients

For the chai concentrate
  • ⅔ cup / 160 ml water
  • 2 black tea bags, or 2 teaspoons / about 4g loose black tea
  • 3–4 green cardamom pods
  • 1 small piece cinnamon stick, about 1 inch / 2.5 cm
  • 2 cloves
  • 3–4 black peppercorns
  • ½ inch / 5g fresh ginger, sliced or lightly crushed
  • 1–2 teaspoons sugar, honey, maple syrup, or jaggery syrup to start
  • ¼ teaspoon vanilla, optional
For the latte
  • ½ cup / 120 ml chai concentrate, from above
  • ¾ cup / 180 ml milk of choice
  • Extra sweetener, if needed
  • Pinch cinnamon, optional

Instructions

  1. Lightly crush the cardamom, cinnamon, cloves, peppercorns, and ginger.
  2. Add the spices and water to a small saucepan.
  3. Bring to a boil, then simmer for 3–5 minutes, until the water smells clearly of cardamom and ginger.
  4. Add the tea, turn off the heat or keep it very low, and steep for 4–5 minutes.
  5. Strain into a mug. You should have about ½ cup / 120 ml dark, fragrant chai that tastes slightly too strong before milk.
  6. Stir in sweetener while the chai is warm.
  7. Heat the milk until steaming but not boiling.
  8. Froth the milk using a frother, whisk, French press, or jar.
  9. Pour the milk into the chai.
  10. Taste and adjust sweetness. Finish with a pinch of cinnamon if desired.

Notes

  • Tea-bag shortcut: Steep 2 black-tea-based chai bags in ½ cup / 120 ml hot water for 4–5 minutes, then add ¾ cup / 180 ml steamed milk.
  • Iced chai: Use ½ cup / 120 ml cold chai base, ½ cup / 120 ml cold milk, and 1 cup / about 120–140g ice.
  • Dirty chai: Add 1 espresso shot / 30 ml, or 2 shots for a coffee-forward double dirty chai.
  • Starbucks-style: Use sweet chai base with milk; for iced, start with equal parts chai and milk before adding ice.
  • Vegan: Use oat or soy milk and avoid honey if you want it strictly vegan.
  • Low sugar: Keep the base unsweetened, then sweeten each cup lightly after mixing.
  • Milk temperature: Heat dairy milk to about 140–155°F / 60–68°C, or stop when steaming but not boiling.
  • Scaling and make-ahead: Double for 2 lattes. For more, use the make-ahead batch; refrigerate the base up to 5 days or freeze it up to 3 months.

Make-Ahead Concentrate for 4 Lattes

For 4 lattes, use the make-ahead concentrate formula. It yields about 2 cups / 480 ml, enough for 4 drinks at ½ cup / 120 ml per latte.

Once you learn to make the chai louder than the milk, the whole drink changes. It tastes creamy without going flat, sweet without turning syrupy, and spiced enough that the cardamom and ginger are still there at the last sip.

Back to top