Posted on Leave a comment

Slow Cooker Cottage Pie Recipe That Won’t Go Watery

A good slow cooker cottage pie should lift in generous spoonfuls, with creamy mash on top and glossy beef gravy underneath.

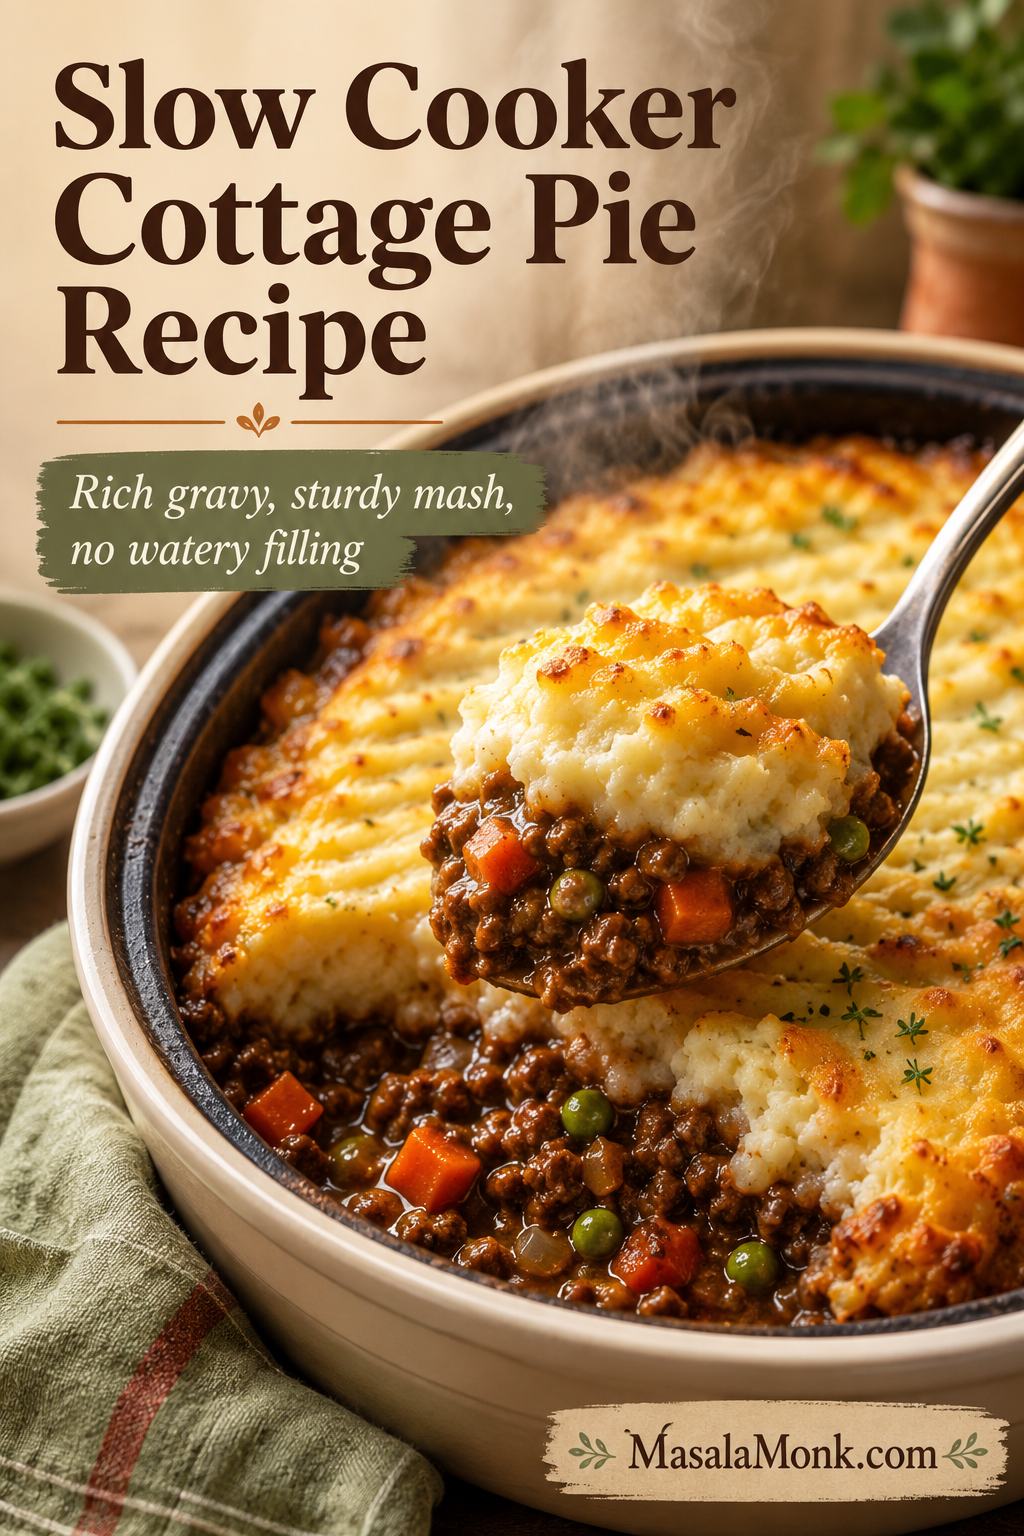
A slow cooker cottage pie should feel like the perfect low-effort comfort dinner: rich beef mince, sweet vegetables, savoury gravy, creamy mashed potatoes, and a meal that waits for you. But this is also one of those recipes where the slow cooker can quietly work against you.

The filling can turn watery because the lid traps steam. The mash can sink if the gravy is too loose. The top can stay pale because a slow cooker heats gently but does not brown like an oven. And if you skip browning the mince, the flavour and texture need a little extra help.

The method is still simple: cook the beef until the gravy is rich, add mash once the filling looks ready, then choose a soft slow-cooker top or a golden finish. The filling uses less liquid than an oven version, tightens before the mash goes on, and gets its peas near the end.

What you get is savoury beef gravy, buttery fork-ridged mash, sweet carrots and peas, and a cottage pie that still serves in generous spoonfuls. Keep it soft-topped and easy, or finish it under the grill, broiler, or in the oven for golden cheddar edges.

It is the kind of dinner that feels calm by the time you serve it: beef gravy underneath, soft potato on top, and no last-minute pan juggling. This is the slow cooker version built to stay rich and comforting instead of turning into beef stew under mashed potatoes.

In the UK, cottage pie usually means beef mince under mashed potato, while shepherd’s pie traditionally uses lamb. In US search terms, the same beef version is often called crockpot shepherd’s pie.

In This Slow Cooker Cottage Pie Guide

Can You Make Cottage Pie in a Slow Cooker?

Yes, you can make cottage pie in a slow cooker, but the filling needs to be thicker and more settled than a normal oven version before you add the mashed potato. A slow cooker traps moisture, so a cottage pie recipe that works beautifully in the oven can become loose and soupy if the same amount of stock or tomatoes is used under a slow-cooker lid.

The most reliable method is to cook the beef filling first, make sure the gravy is saucy but not loose, then add mashed potatoes only when the filling is ready for the topping. To get a browned top, finish the pie under the grill or broiler, or transfer the filling to an oven dish and bake it briefly.

In US search terms, this same method also works as a crockpot shepherd’s pie with ground beef; in UK terms, beef under mash is cottage pie.

Think of the recipe in this order: gravy first, mash second, golden top if you want it. That simple rule prevents most slow-cooker cottage pie problems.

Split image showing finished slow cooker cottage pie beside a spoon trail through glossy beef filling before the mash is added.
Yes, cottage pie works in a slow cooker; however, the beef layer needs to look saucy, not loose, before the mash goes on.

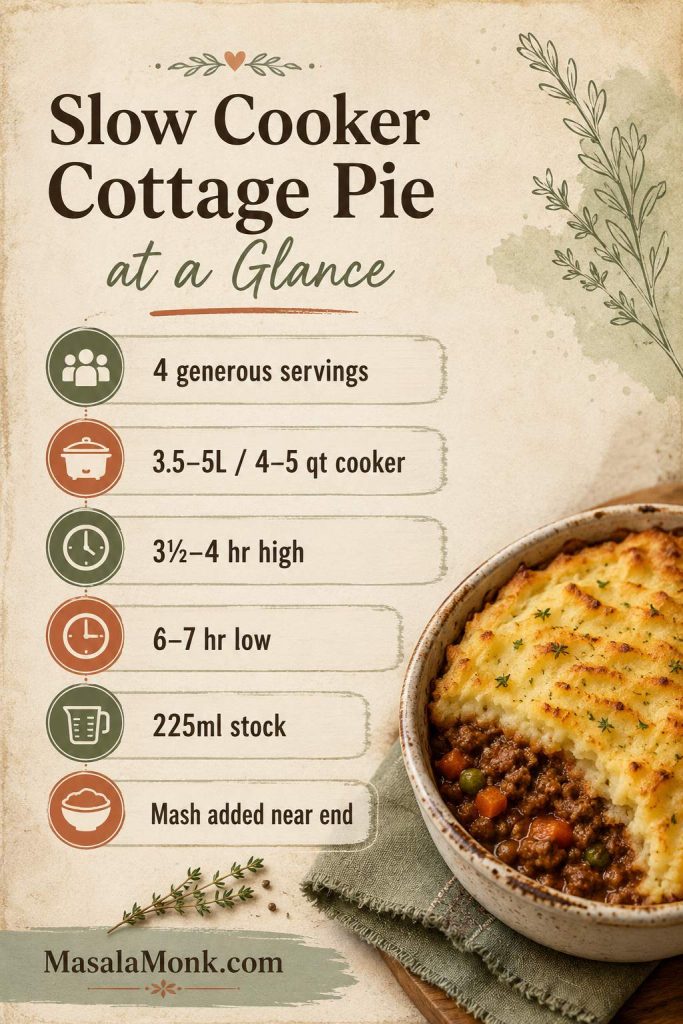
Slow Cooker Cottage Pie at a Glance

Yield
4 generous servings, or 5–6 moderate portions with sides
Slow cooker size
3.5–5L / 4–5 quart oval cooker
Filling cook time
3½–4 hours high or 6–7 hours low
Total time
About 4½–5½ hours on high
About 7–8½ hours on low

Main ingredient: 500g lean beef mince / about 1 lb 2 oz ground beef.

Default liquid: 225ml / scant 1 cup beef stock. Use about 200ml for mushrooms, frozen vegetables, or no-browning; use 100–150ml if adding chopped tomatoes.

Timing note: an oven or broiler finish is quicker; heating the mash through in the slow cooker takes longer.

Texture cue: the filling should be saucy but not loose, so the potato topping can rest neatly above the gravy.

Mash cue: the mashed potato should be creamy, steady, and easy to spread.

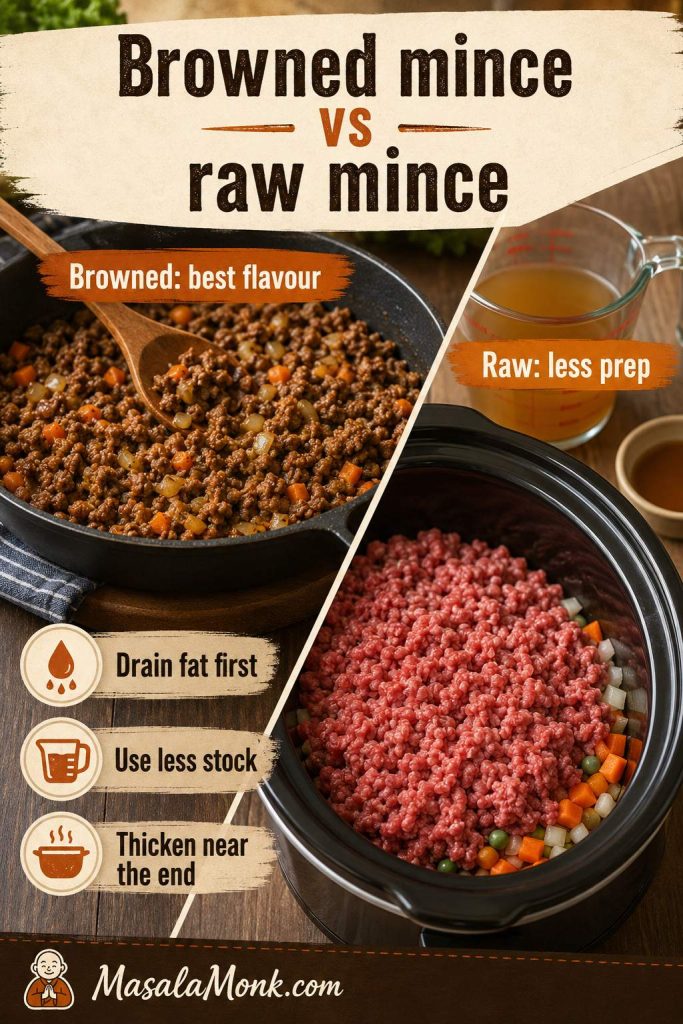
Flavour move: brown the mince first when you can, then drain excess fat before slow cooking.

Infographic summarizing slow cooker cottage pie servings, cooker size, cooking time, stock amount, and when to add mash.
These are the numbers that keep the recipe calm: modest stock, the right cooker size, and mash added near the end.

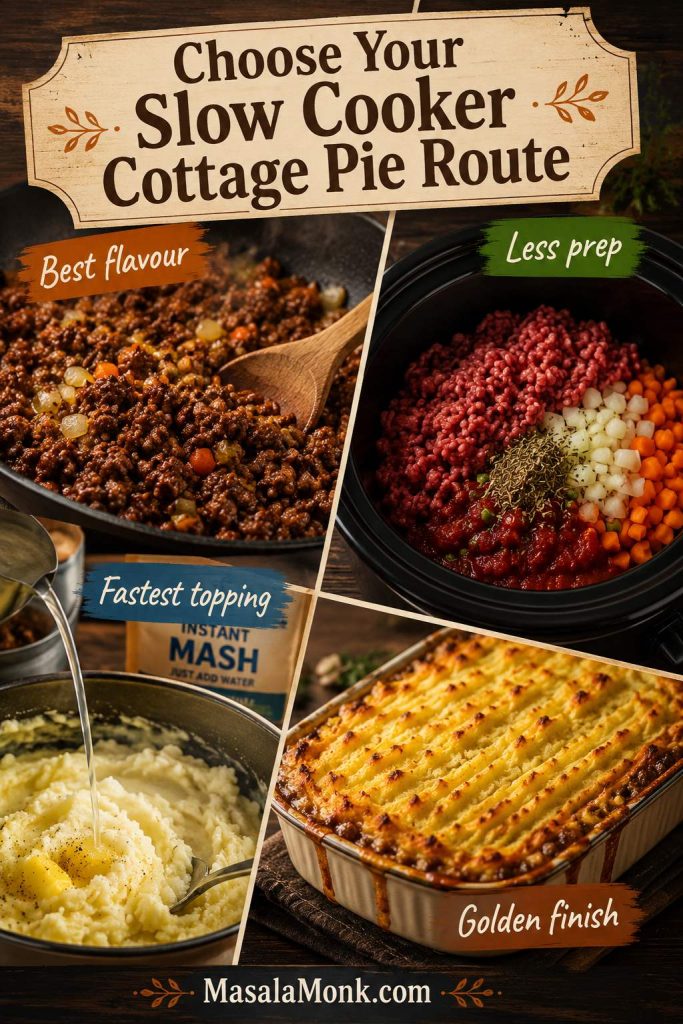
Choose Your Slow Cooker Cottage Pie Route

Use the browned-mince method for the best flavour, or choose one of the shortcuts below. Every version comes back to the same calm idea: make the filling glossy, not soupy, then add the topping.

RouteUse this ifHow to adjust
Best flavourYou can brown the minceUse the main method, drain fat, and thicken with flour from the start.
Raw-mince shortcutYou need less prepUse fresh, fully thawed lean mince, less stock, no flour at the start, and thicken near the end.
Instant-mash shortcutYou want the easiest toppingMake instant mash thicker than packet directions and add it only after the filling settles.
Golden-top versionYou want classic cottage pie textureSlow cook the filling, then finish safely under the grill, broiler, or in an oven dish.
Route chooser showing browned mince, raw mince shortcut, instant mash, and golden finish options for slow cooker cottage pie.
Choose the route that matches your night: browned mince for flavour, raw mince for ease, instant mash for speed, or a golden finish.

For the easiest weeknight version, use the raw-mince shortcut with frozen mixed vegetables and prepared or instant mash, then tighten the filling before topping. Shortcut routes count too: the goal is a savoury filling, a topping that stays put, and dinner that feels sorted.

Brown the mince when you have the energy, and choose the golden finish when you want that classic baked top. If this is your first time making it, note your slow cooker size and stock amount; those two details make the next batch easier to adjust. The full recipe card sits below the topping choices, and the Jump to Recipe button takes you there directly.

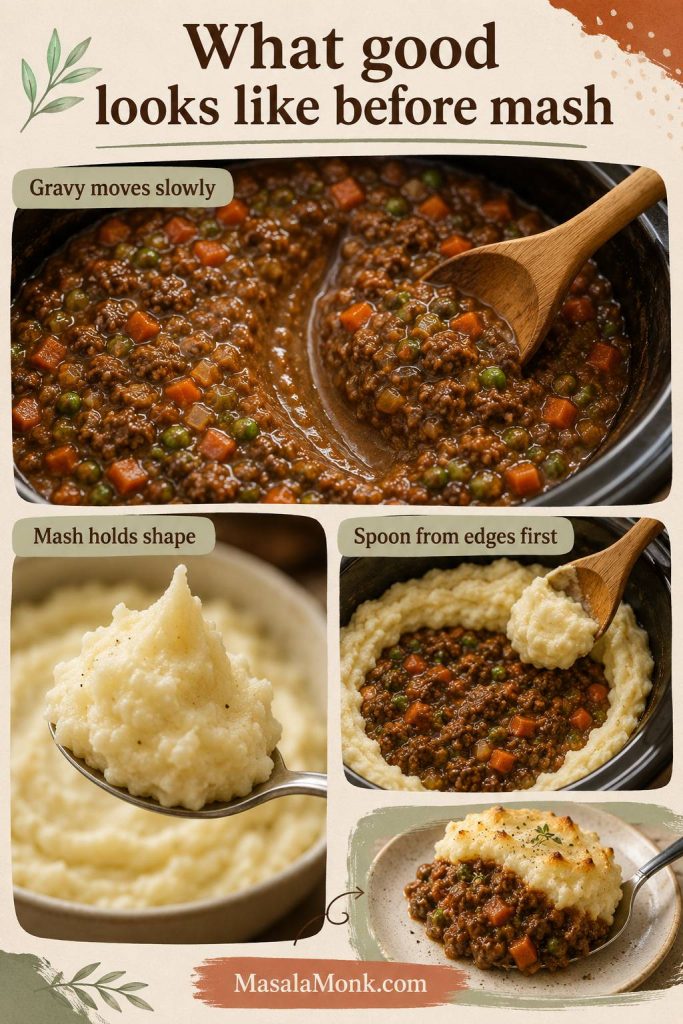
What Good Looks Like Before You Add the Mash

Here is what good looks like before the mash goes on, so you do not have to guess.

1. The gravy should move slowly

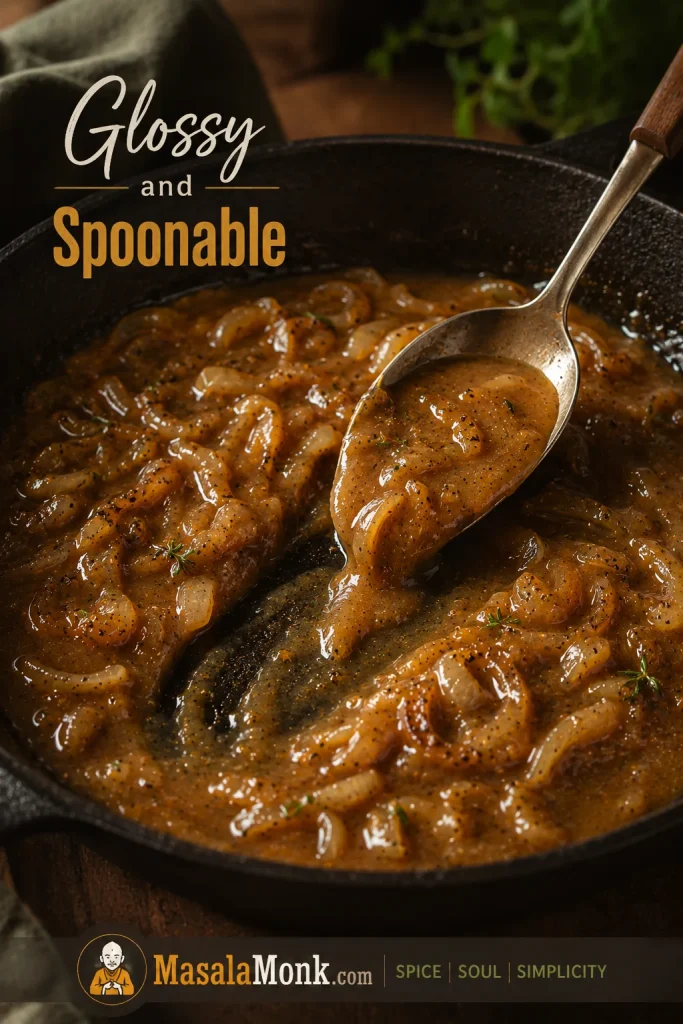
Drag a spoon through the beef filling. The gravy should leave a visible path for a second before slowly closing. If it floods back instantly, the filling needs more reduction or thickening.

2. The mash should hold its shape

Scoop the mash with a spoon. It should hold soft peaks and feel spreadable, not loose or pourable. Wet mash is one of the main reasons toppings sink.

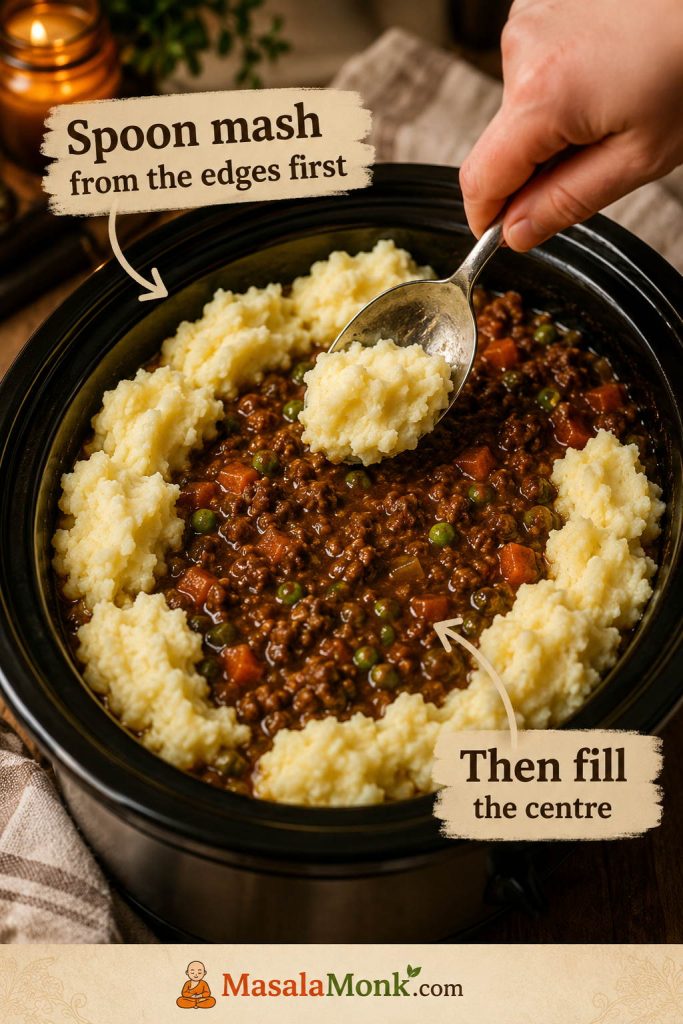
3. Add the topping gently

Add mash in small spoonfuls around the edges first, then fill the centre and spread gently. Dropping all the mash into the middle can push it through the filling.

What you’re looking for

A beef layer that holds together in deep spoonfuls, creamy mash that stays in place, and gentle topping. That is what keeps the finished pie from collapsing into stew.

Visual guide showing a spoon trail in cottage pie filling, mash holding its shape, and mashed potato being spooned around the edges.
Before topping, look for slow-moving gravy and mash with soft peaks; those two cues prevent most sinking problems.

If the gravy still looks loose, use the watery filling fixes; if the mash keeps disappearing into the beef, jump to the sinking mash fixes.

Ingredients for Slow Cooker Cottage Pie

Now that you know what the filling and mash should feel like, the ingredient choices make more sense: less loose liquid, a stronger gravy base, and mash that sits neatly on top. These are everyday cottage pie ingredients; the difference is not fancy shopping, but how the liquid and potatoes are handled.

The default version uses tomato purée or tomato paste rather than a full tin of chopped tomatoes, because the slow cooker does not reduce liquid like an oven or pan.

Ingredient board with beef mince, vegetables, tomato purée, beef stock, potatoes, peas, butter, milk, and cheddar for cottage pie.
In slow cooker cottage pie, ordinary ingredients work best when the stock stays modest and the mash is not too loose.

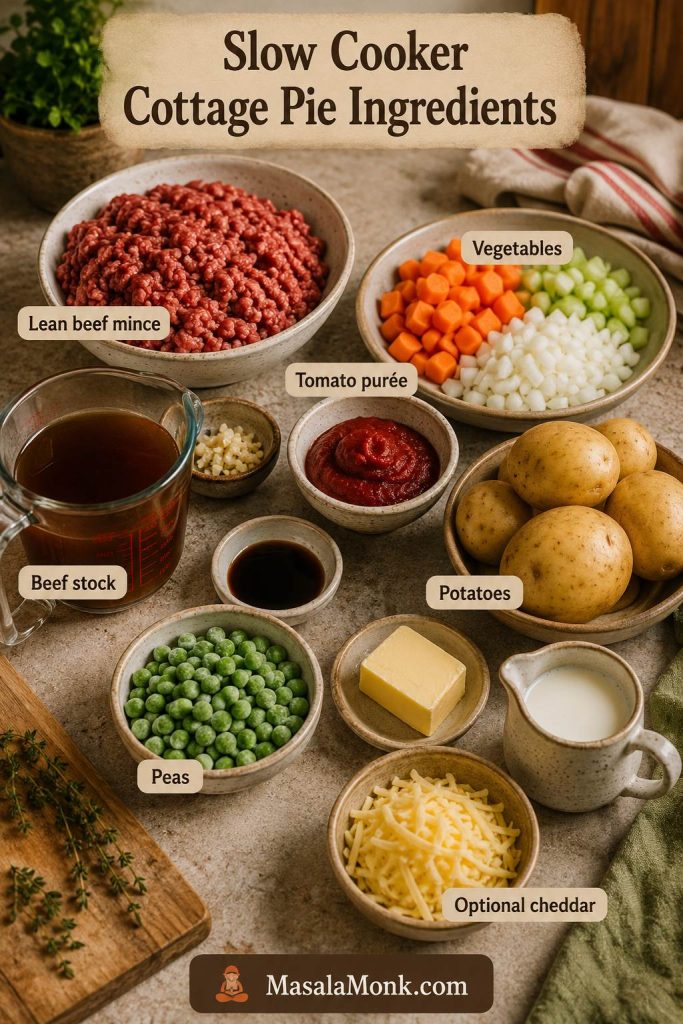
Beef filling ingredients

IngredientAmountNotes
Neutral oil or olive oil1 tsp, optionalUse only if cooking very lean mince in a dry pan.
Lean beef mince / ground beef500g / about 1 lb 2 ozUse 5–10% fat if possible. It gives flavour without making the slow cooker greasy.
Onion, finely diced1 largeAdds sweetness and helps build the gravy base.
Carrots, finely diced2 mediumClassic cottage pie sweetness and colour.
Celery, finely diced1–2 sticks / stalksBuilds a deeper savoury base.
Garlic2–3 clovesAdds depth without taking over.
Tomato purée / tomato paste2 tbspGives depth, colour, and savoury concentration without adding much water.
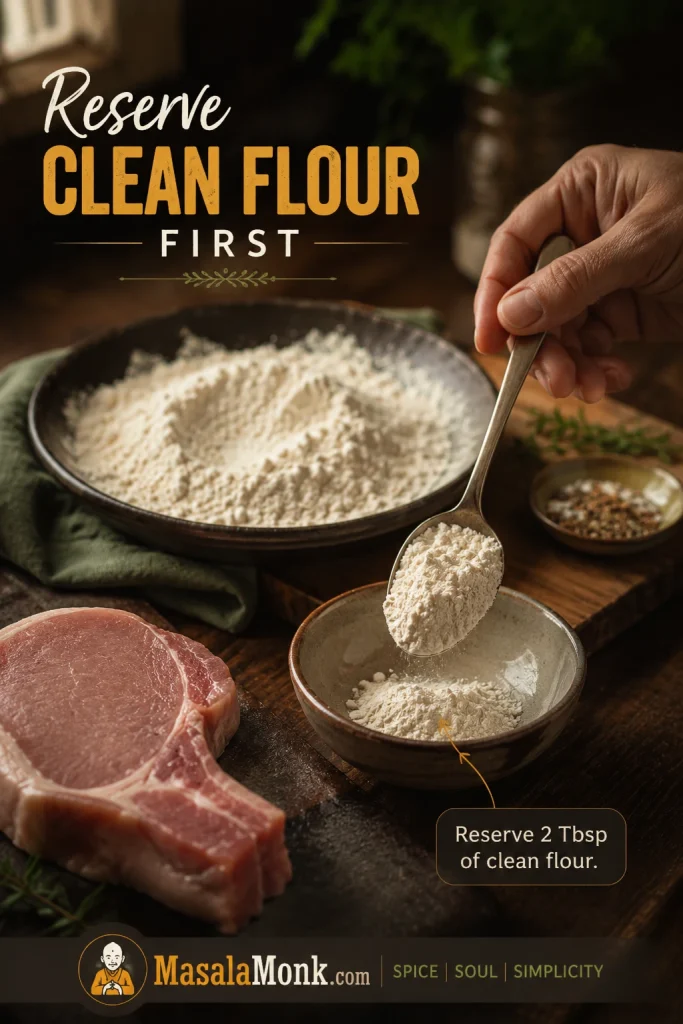
Plain flour / all-purpose flour2 tbspDefault thickener for the browned-mince method.
Beef stock225ml / scant 1 cupUse about 200ml for mushrooms, frozen mixed vegetables, or no-browning. If adding chopped tomatoes, reduce the stock to 100–150ml.
Worcestershire sauce1 tbspGives savoury, tangy depth.
Dried thyme or rosemary1 tspUse either, or a small mix of both.
Frozen peas100–150g / ¾–1 cupAdd near the end so they stay brighter.
Salt and black pepperTo tasteStart light if your stock is salty; adjust before adding the mash.

How Much Stock to Use in Slow Cooker Cottage Pie

Stock is the easiest place to control the finished texture. Start modest, then adjust for watery add-ins such as mushrooms, frozen vegetables, raw mince, or chopped tomatoes.

Stock guide showing a measuring jug and different stock amounts for default cottage pie, raw mince, frozen vegetables, mushrooms, and chopped tomatoes.
Because slow cookers trap moisture, adjusting the stock is one of the easiest ways to prevent watery cottage pie filling.

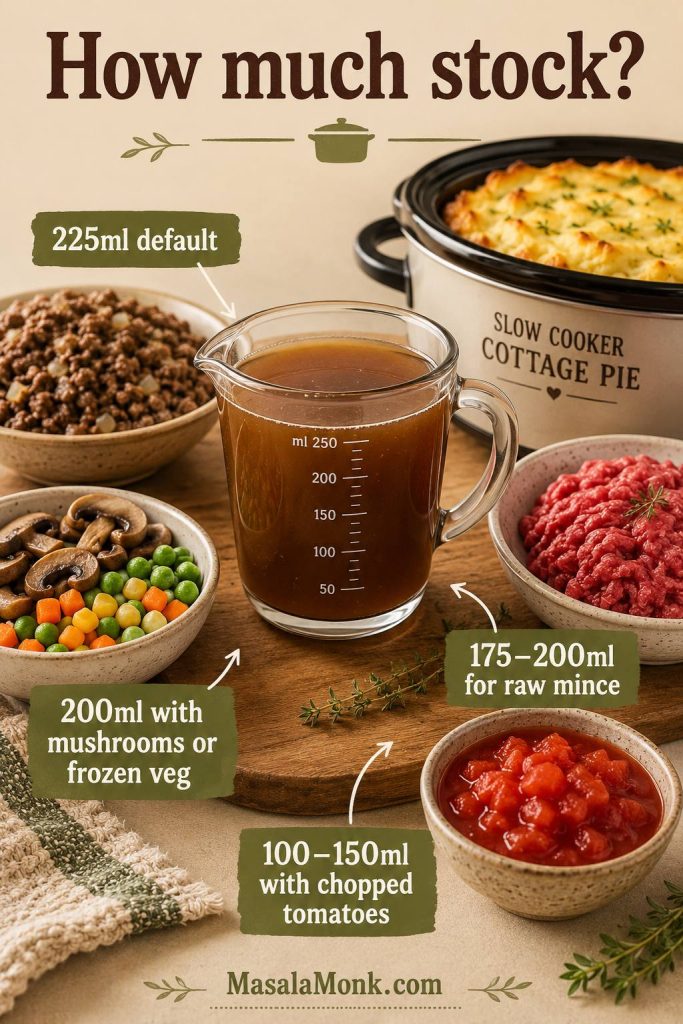
If you are using mushrooms, frozen vegetables, or chopped tomatoes, the watery filling section explains how to adjust the liquid before topping.

Optional flavour boosters and add-ins

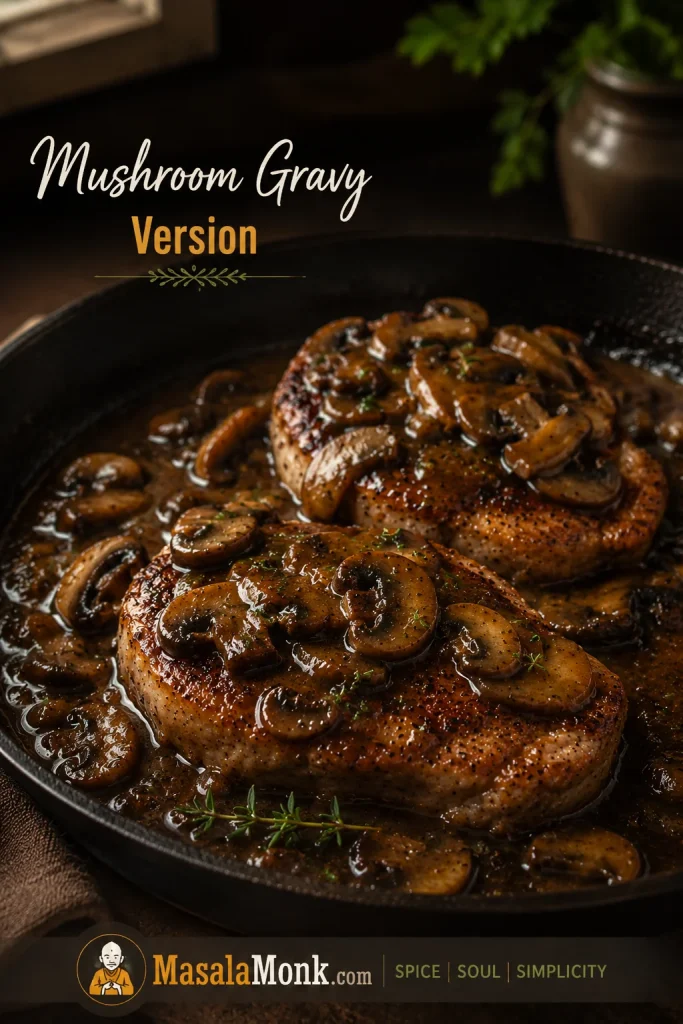
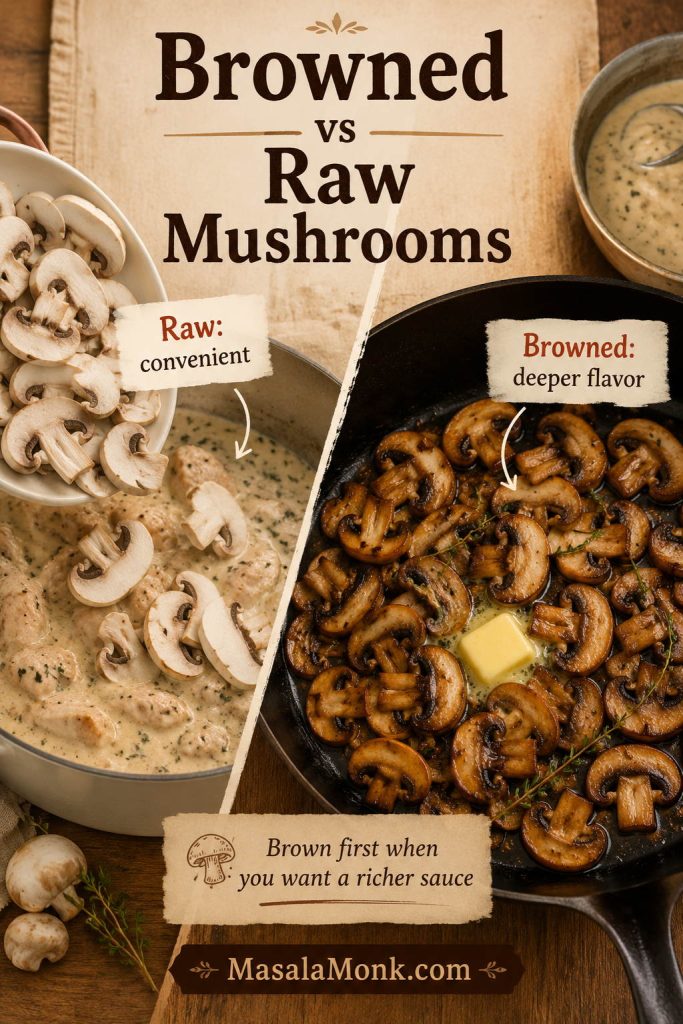
  • Mushrooms: add 100–150g finely chopped mushrooms with the vegetables for a deeper, meatier filling. Use slightly less stock because mushrooms release moisture.
  • Red wine: replace 50–100ml of the stock with red wine. Let it bubble briefly in the pan before slow cooking.
  • Brown sauce or mustard: add 1 teaspoon to 1 tablespoon for a sharper UK-style savoury note.
  • Chopped tomatoes: use 200g / about 7 oz chopped tomatoes if you want a tomato-rich filling, and reduce the stock to 100–150ml. Expect to thicken near the end if needed.
  • Frozen mixed vegetables: use them in place of peas and carrots if needed, but add them late or reduce the stock because they release water.

Optional thickener

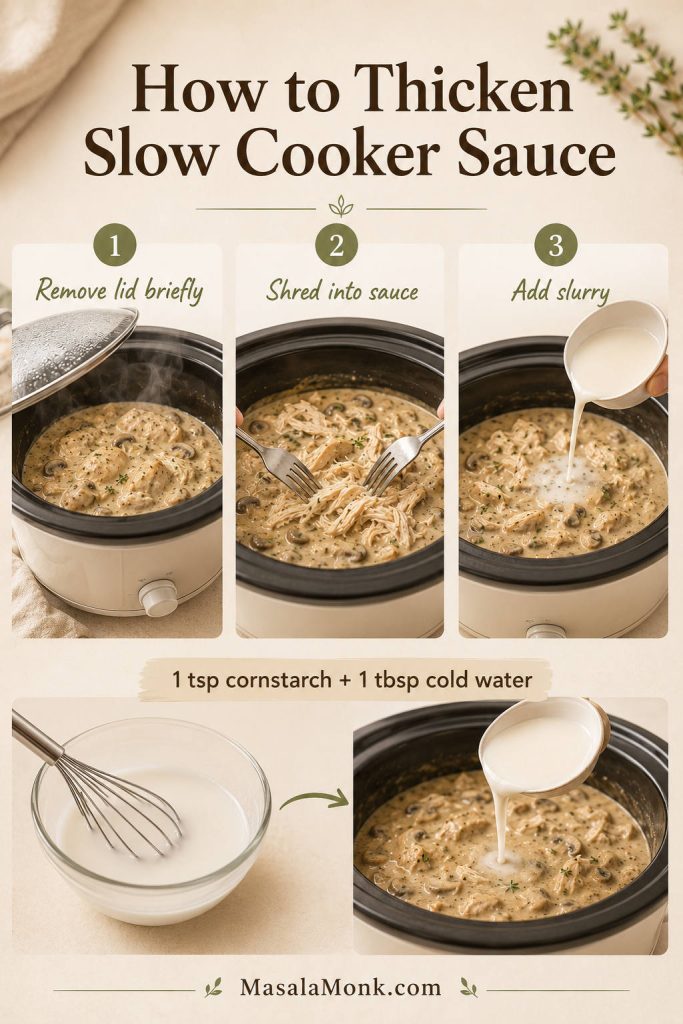
When the filling looks loose near the end, mix 1 tablespoon cornflour / cornstarch with 1 tablespoon cold water, stir it into the filling, and cook on high until the gravy tightens. For a quick UK-style option, you can use 1–2 teaspoons beef gravy granules instead, but taste before adding more because they add salt quickly.

Mashed potato topping ingredients

IngredientAmountNotes
Floury potatoes800–900g / 1 lb 12 oz–2 lbMaris Piper, King Edward, Russet, or Yukon Gold work well.
Butter30–45g / 2–3 tbspAdds flavour and helps the mash spread.
Milk60ml / ¼ cup, plus 1 tbsp at a time only if neededStart small. The mash should be creamy but not loose.
Cheddar, optional75–100g / ¾–1 cup gratedUse in the mash or on top for a cheesy finish.
Leftover, prepared, or instant mashAbout 4 cups / enough to coverWarm slightly if chilled, and keep it thicker than usual so it sits on the filling.
SaltTo tasteSeason the mash separately from the filling.

For a deeper guide to creamy potatoes that stay fluffy instead of gluey, use our garlic mashed potatoes recipe; the same steam-dry step helps this topping sit neatly on the filling.

Texture cue: the mash should hold soft peaks on a spoon. If it slides, pours, or feels like loose purée, it is too wet for this recipe. Steam-dry fresh potatoes and add milk gradually.

Slow Cooker Size and Equipment

A 3.5–5L / 4–5 quart oval slow cooker is ideal for this recipe. It keeps the beef layer deep enough while leaving enough surface area to spread the topping. A round slow cooker works too, but an oval insert makes the finished pie easier to serve.

Equipment guide showing an oval slow cooker, skillet, saucepan, masher, oven dish, measuring jug, bowl, fork, and thermometer.
An oval cooker gives the beef layer useful depth while leaving enough room to spread the potato evenly.
  • Large skillet or frying pan: for browning the mince and cooking the vegetables.
  • 3.5–5L / 4–5 quart slow cooker: best for the 500g beef version.
  • Large saucepan: for boiling potatoes.
  • Potato masher or ricer: for smooth mash that is steady enough to spread.
  • Small bowl: for mixing cornflour/cornstarch slurry if needed.
  • Oven dish: useful if you want a golden top and your slow-cooker insert is not oven-safe.
  • Instant-read thermometer: helpful for the raw-mince method.

Important insert safety note: only put a slow-cooker insert under the grill, broiler, or into the oven if the manufacturer says that exact insert is safe for that use. If there is any doubt, transfer the filling to an oven dish before topping and browning.

For the safest browning choices, check the finish options before putting any insert under direct heat.

The recipe is forgiving as long as the filling is not too loose and the topping is not too wet. Use less liquid than an oven cottage pie, adjust watery add-ins, and choose whether you want a soft slow-cooker top or a golden oven, grill, or broiler finish.

How to Make Slow Cooker Cottage Pie

The method looks detailed, but the cooking itself is simple: brown the beef if you can, let the slow cooker build the gravy, then top when the filling is ready. By the end, the carrots should be sweet, the gravy should smell deeply savoury, and the mash should sit proudly on top instead of sliding into the filling.

This is the kind of cottage pie that does not need perfect slices to feel right; it just needs a thick savoury base, warm potato, and enough gravy to make the greens on the side worth eating.

1. Brown the beef mince

Heat a large skillet or frying pan over medium-high heat. If you are using very lean mince or a dry pan, add 1 teaspoon oil first. Add the beef mince and break it into small crumbles with a wooden spoon. Let it brown properly instead of simply turning grey. A little colour on the beef gives the finished filling a deeper savoury flavour.

If the mince releases a lot of fat, spoon or drain off the excess before you continue. Slow cookers do not evaporate fat away, so this small step keeps the filling rich rather than greasy.

2. Add the vegetables

Add the onion, carrot, celery, garlic, and mushrooms if using. Cook for 4–5 minutes, stirring often, until the onion starts to soften and smell sweet. The vegetables do not need to be fully tender yet because they will finish in the slow cooker.

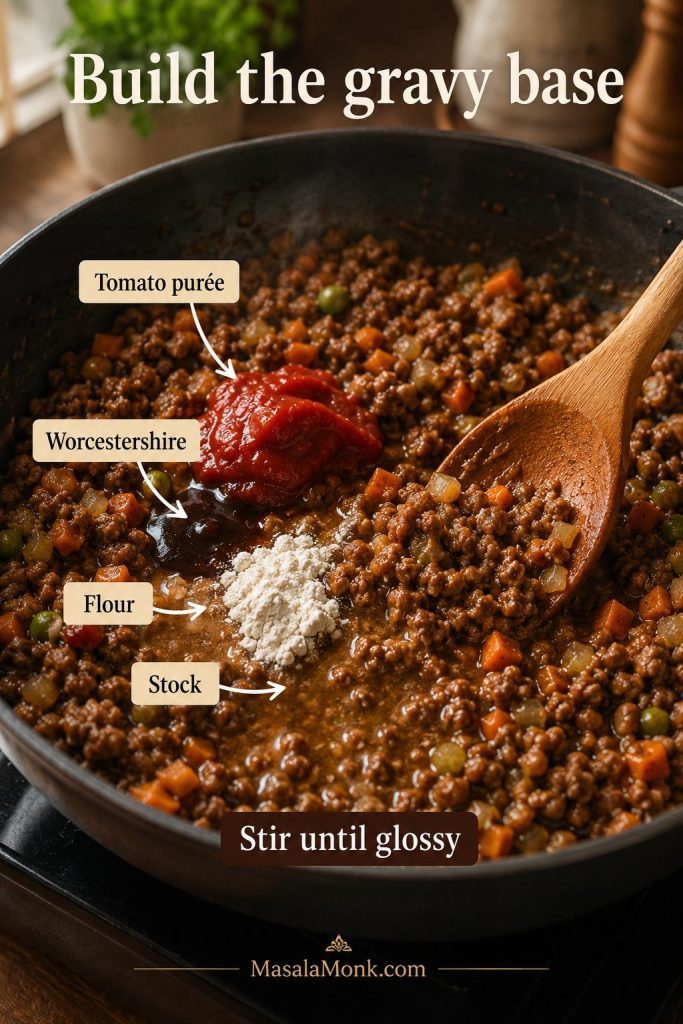
3. Build the gravy base

Stir in the tomato purée, Worcestershire sauce, thyme or rosemary, salt, and black pepper. Sprinkle over the flour and stir for 1 minute so it coats the mince and vegetables. This cooks off the raw flour taste and gives the gravy a smoother texture later.

Add the stock gradually, scraping the bottom of the pan as you stir. The mixture should become glossy and lightly saucy, not thin and soupy. If using wine, add it before the stock and let it bubble briefly.

Beef mince and vegetables being stirred in a skillet with tomato purée, Worcestershire sauce, flour, and stock.
This is where cooked mince becomes cottage pie filling: tomato purée, Worcestershire, flour, and stock create the gravy base.

4. Slow cook the filling

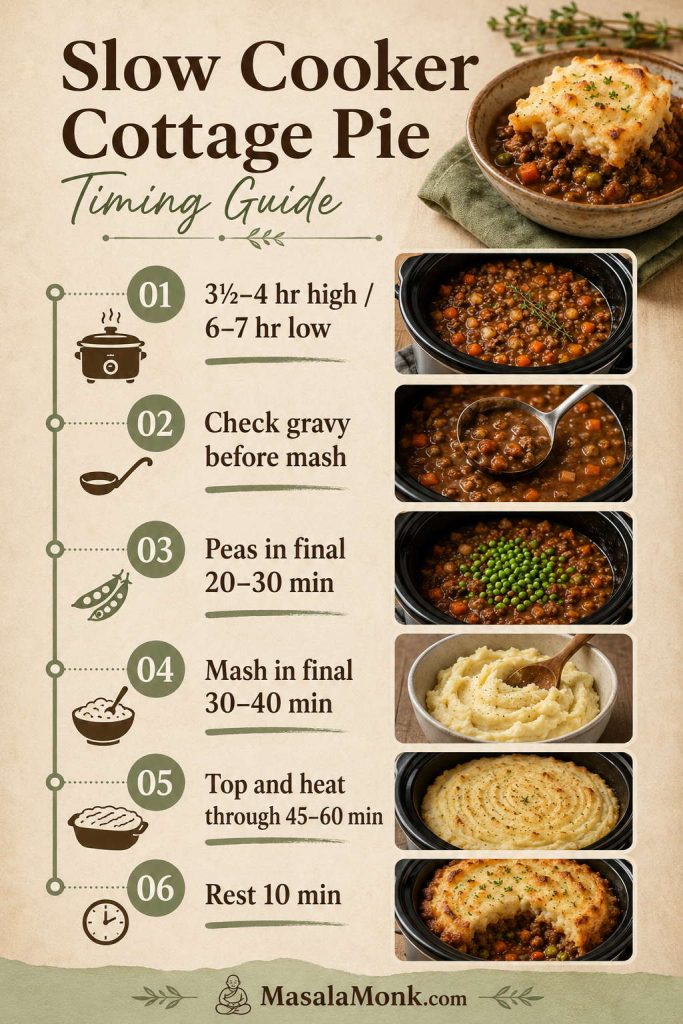
Transfer the beef mixture to the slow cooker. Cover and cook on high for 3½–4 hours or on low for 6–7 hours, until the vegetables are tender and the filling tastes rounded and savoury.

Start looking from 3 hours on high or 5½ hours on low if your slow cooker runs hot, has a wide insert, or the filling is sitting in a shallow layer. Try not to lift the lid too often early on, because each lift releases heat and can stretch the cooking time.

5. Look at the Gravy Before Adding Mash

Pause here before you add the mash; this one look makes the biggest difference. Stir the filling and drag a spoon through the centre. If the gravy leaves a visible trail for a second before slowly closing, the filling is ready for mash. The first spoonful should hold together but still look saucy.

When it is right, the filling should smell deeply savoury and look glossy rather than soupy, with carrots soft enough to melt into the gravy but still visible in each spoonful.

Close-up of a spoon trail through glossy beef mince filling in a slow cooker with peas, carrots, and onion visible.
Once a spoon trail lingers, the filling is ready for mash; if it floods back like soup, thicken it first.

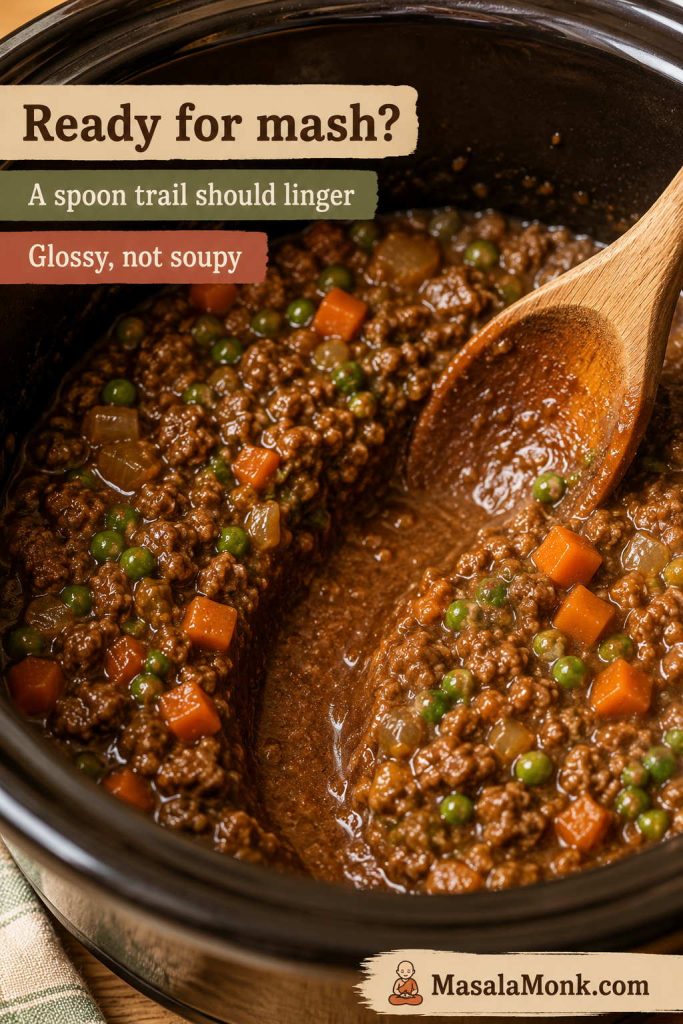
If the trail disappears immediately, use the quick fixes in How to Stop Slow Cooker Cottage Pie Going Watery before adding mash.

When the gravy floods back immediately, pause and give it a little help before topping. Mix 1 tablespoon cornflour or cornstarch with 1 tablespoon cold water, stir it into the filling, and cook on high for 20–30 minutes. If your slow cooker holds heat well, you can cook uncovered. If it cools quickly, leave the lid slightly ajar, or thicken a few ladles of liquid in a small pan and stir it back into the slow cooker.

This is also the best time to taste the filling. Add salt, pepper, Worcestershire sauce, or a little more tomato paste if it needs more depth. Once the mash goes on, adjusting the filling becomes harder.

Should You Add the Mash at the Start?

It is better to add the mash near the end, after the beef filling has cooked and settled. If mash goes on too early, condensation can soften it, bubbling gravy can break through it, and you lose the chance to fix a loose filling before topping.

6. Add the peas late

Stir in the frozen peas during the final 20–30 minutes of filling time. They will heat through quickly, stay brighter, and release less water into the gravy than they would if added at the beginning.

7. Make creamy mash that holds its shape

You can make the mash during the final 30–40 minutes of the filling time, then keep it warm and loosely covered until the filling is ready to top.

Boil the potatoes in salted water until tender. Drain well, then return them to the hot pan for 1–2 minutes so extra steam escapes. Mash with butter, then add 60ml / ¼ cup milk. Add more milk 1 tablespoon at a time only if the mash is too stiff to spread.

Three-part mashed potato comparison showing too loose mash, creamy steady mash, and too stiff mash for cottage pie topping.
The best mash for cottage pie is creamy and steady, because loose mash sinks while stiff mash drags through the filling.

If using cheddar, stir some into the mash or save it for the top. Warm mash spreads more easily than cold leftover mash, so if you are using leftovers, warm them slightly before topping the filling.

8. Spoon the mash gently over the filling

Add the mash in small spoonfuls around the edges of the slow cooker first, then fill the centre. Spread gently with a fork or spatula. Avoid dropping all the mash into the middle at once because that weight can push through the filling.

Hand spooning mashed potato around the edges of slow cooker cottage pie filling before filling the centre.
Start spooning mash around the edges, then fill the centre; the border helps the potato spread without diving into the gravy.

If the topping starts to sink, pause and use the mash-sinking fixes before spreading the rest.

Use a fork to make ridges on top. Those ridges catch heat and brown better if you finish the pie under the grill, broiler, or in the oven.

9. Finish and rest

For the easiest finish, cover and cook on high for 45–60 minutes until the mash is hot. For a golden top, either use a safe grill/broiler finish or transfer the filling to an oven dish and bake until browned.

The slow-cooker-only version is softer and homier; the oven-finished version gives you those golden ridges and bubbling edges that make cottage pie feel more like a proper baked dinner.

Let the cottage pie rest for 10 minutes before serving. Resting lets the gravy settle and the mash firm slightly, so the first spoonful comes out with creamy potato on top and glossy beef gravy underneath.

Slow Cooker Timing Table

Use this timing table as a guide for when to look at the filling, add peas, warm the mash, and decide how you want to finish the top.

StageHigh settingLow settingNotes
Beef filling3½–4 hours6–7 hoursStart looking earlier if your slow cooker runs hot or has a wide insert.
Thickening adjustment20–30 minutes on highSwitch to highUse slurry only if the filling looks loose.
PeasFinal 20–30 minutesFinal 20–30 minutesAdd late for better colour and texture.
Mash topping in slow cooker45–60 minutesNot idealUse high to heat the mash through.
Oven-dish finish200°C / 400°F for 20–25 minutesSameMost classic finish if your insert is not oven-safe.
Grill / broiler finish5–10 minutesSameOnly use a safe insert or separate oven dish.
Timeline infographic showing slow cooker cottage pie filling time, gravy check, peas, mash timing, topping heat-through, and resting time.
Keep the flow calm: cook the filling first, add peas late, make the mash near the end, then rest before serving.

Choosing the Finish: Soft, Golden, or Classic

The slow cooker is excellent at making the filling tender and savoury. The finish depends on what you want from the topping: easiest, golden, or most classic.

What to expect: a slow cooker will heat the mash, but it will not give you a crisp browned crust. For a soft family-style cottage pie, keep it in the slow cooker. For a classic golden top, use the oven, grill, or broiler.

Finish optionGood forResultKeep in mind
Slow cooker onlyLowest effort family dinnerHot, soft mash topping with rich filling underneathNo crisp or golden top
Grill / broilerGolden top without baking the whole dishBrowned fork ridges, melted cheese, better colourInsert must be safe for direct heat
Oven dishNeatest classic cottage pie finishBubbling filling, golden mash, easier servingUses one extra dish
Three cottage pie finish options showing soft slow-cooker mash, golden browned mash, and a classic baked finish.
The slow cooker gives a soft top, while a grill, broiler, or oven finish adds golden ridges and bubbling edges.

Most classic: slow cook the filling, transfer it to an oven dish, top with mash, and bake at 200°C / 400°F for 20–25 minutes. This gives bubbling gravy at the edges, golden fork ridges, and a potato topping that feels baked rather than steamed.

No-extra-dish option: grill or broil the topping in the slow-cooker insert only if the manufacturer says the insert is safe for direct heat.

Easiest option: keep everything in the slow cooker and cook on high until the mash is hot. The top will be soft, not golden, but the dinner will still be comforting and complete.

Once the gravy looks glossy and the mash is hot, the rest is just the kind of comfort you want: soft if you keep it in the slow cooker, golden if you finish it under heat.

Can You Put Raw Mince in Slow Cooker Cottage Pie?

Yes, you can put raw mince in slow cooker cottage pie, but browned mince gives better flavour, better texture, and lets you drain fat first. If you need the shortcut, use fresh, fully thawed lean mince, reduce the stock, break it up well, and thicken near the end.

Some nights, simply getting dinner into the slow cooker is enough. This shortcut is not the richest version, but it can still give you a useful, comforting cottage pie if you handle the liquid carefully.

Browned Mince vs Raw Mince

Both routes can work, but they need different handling. Browning builds deeper flavour and lets you drain fat first; meanwhile, raw mince needs less stock, careful stirring, and a final texture check.

Comparison image showing browned beef mince in a pan beside raw thawed mince and vegetables in a slow cooker.
Browned mince gives deeper flavour; meanwhile, the raw-mince shortcut needs less stock and a final thickening step.

Is This a Dump-and-Go Cottage Pie?

It can be close to dump-and-go, but not completely hands-off. Use raw thawed lean mince, frozen mixed vegetables, less stock, and prepared mash if you want the easiest version. Just give the filling one look near the end so you can thicken it before the mash goes on.

Raw-mince / no-browning method

  1. Use fresh, fully thawed lean mince. Avoid starting with frozen raw mince.
  2. Crumble the mince into the slow cooker instead of leaving it in a block.
  3. Add the onion, carrot, celery, and garlic.
  4. Whisk the tomato purée, Worcestershire sauce, herbs, and 175–200ml stock together, then pour it over the mince and vegetables.
  5. Skip the flour at the beginning because it can clump with raw mince and cold liquid.
  6. Cook on high for 1 hour, then stir well to break up clumps if you are nearby. Either continue on high until the total cooking time reaches 3½–4 hours, or switch to low and cook for another 5–6 hours, until the beef is cooked through and the vegetables are tender.
  7. Spoon off excess fat or liquid if needed.
  8. Thicken near the end with 1–2 tablespoons cornflour/cornstarch mixed with equal cold water.
  9. Add peas, check seasoning, then top with mash that is spreadable but not loose.
Raw mince slow cooker guide showing thawed beef mince, diced vegetables, reduced stock, tomato purée, thermometer, and cooked filling.
Raw mince is the shortcut route, but it still needs thawed lean beef, less stock, good stirring, and final thickening.

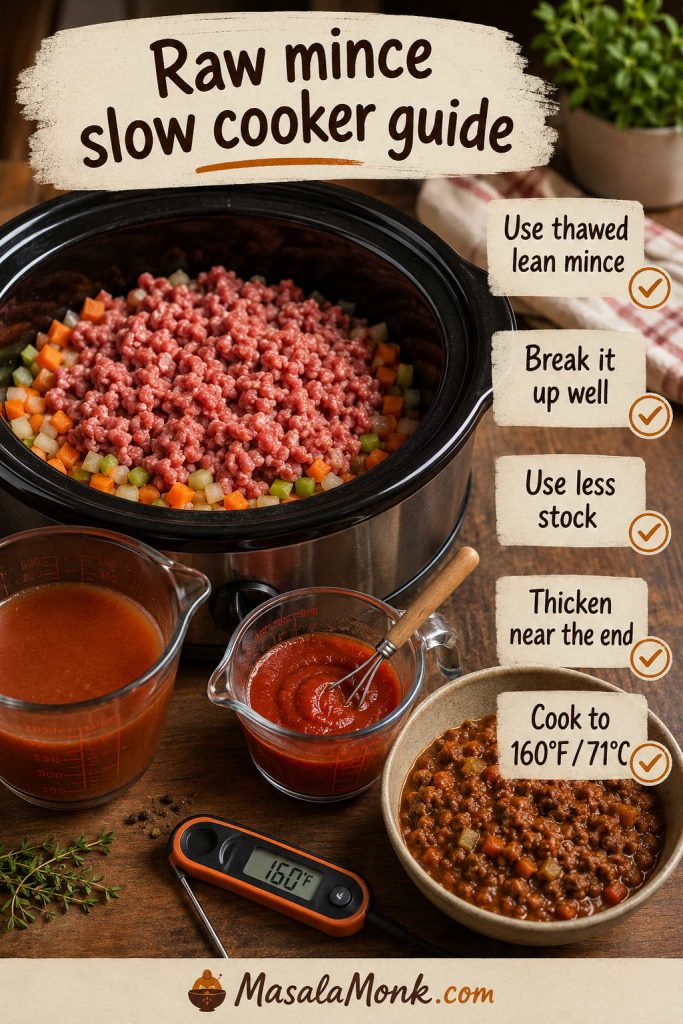
For peace of mind with the raw-mince option, use an instant-read thermometer if you have one. Ground beef should reach 160°F / 71°C, and for slow-cooker safety the USDA recommends thawing meat before it goes into a slow cooker: USDA slow cooker food safety guidance.

How to Stop Slow Cooker Cottage Pie Going Watery

Watery filling usually comes from too much stock, undrained fat, watery vegetables, or adding mash before the gravy has tightened.

Troubleshooting board comparing watery cottage pie filling with glossy settled filling and showing stock, drained fat, wet vegetables, and slurry.
Watery cottage pie usually comes from too much stock, undrained fat, or wet add-ins, so fix the filling before topping.

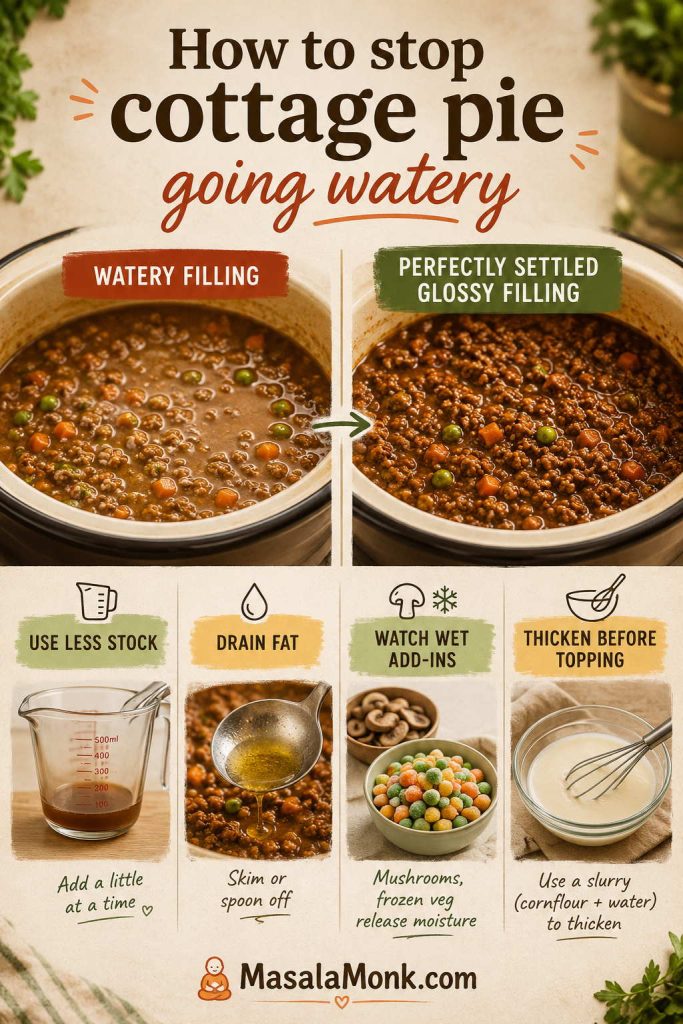
Use less stock than an oven recipe

For 500g beef mince, 225ml stock is the default for the browned method. Use about 200ml if you add mushrooms, frozen mixed vegetables, or raw mince. If adding 200g / about 7 oz chopped tomatoes, reduce the stock to 100–150ml. Use up to 250ml only if the mince is browned and drained and the filling genuinely looks dry.

Watch mushrooms, frozen veg, and chopped tomatoes

Mushrooms, frozen mixed vegetables, chopped tomatoes, and extra onions all bring moisture. They work well, but they need a lower stock amount or a little extra thickening near the end.

Drain the browned mince

Fat and liquid do not disappear in the slow cooker. Drain the mince if it releases a lot of fat, and spoon off any greasy layer before adding the mash.

Thicken before topping

If the filling is loose, thicken it first and use the spoon trail from earlier before adding the mash. Cornflour/cornstarch gives the cleanest fix; gravy granules are useful when you want a quick UK-style thickening shortcut.

Gravy Granules and Cottage Pie Packet Mix

Shortcut helpers can be useful, especially in UK-style cottage pie, but they still need careful liquid control and tasting before extra salt goes in.

Shortcut helper board showing gravy granules, packet mix, glossy beef filling, a measuring jug, and a tasting spoon.
Gravy granules and packet mix can help on busy nights; however, reduce the liquid slightly and taste before salting.

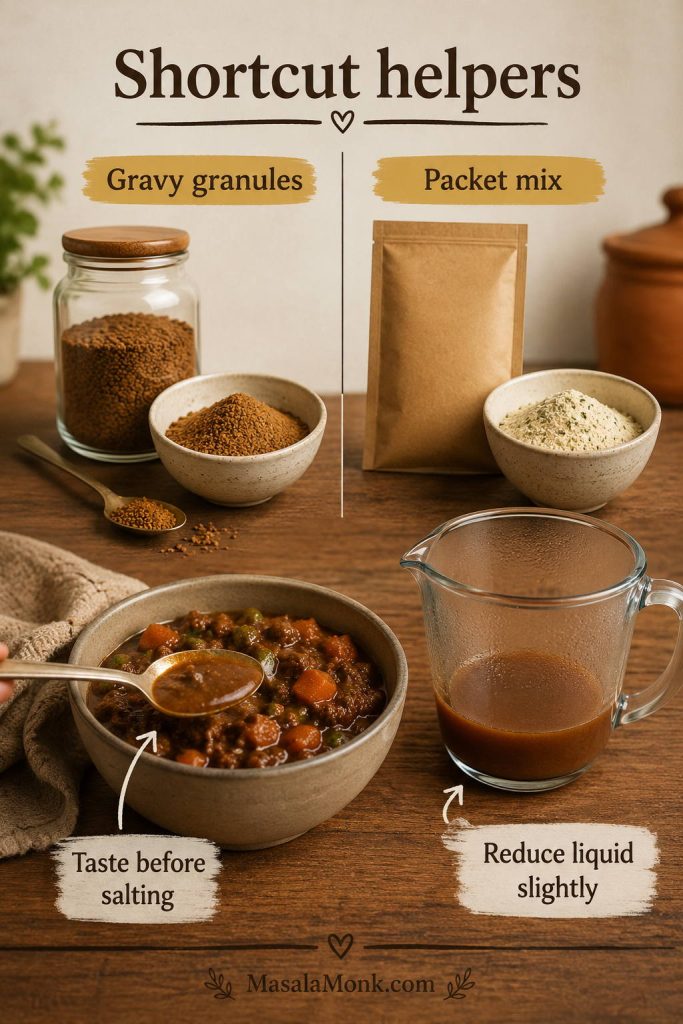
Can You Use Gravy Granules to Thicken It?

Yes. Gravy granules are useful when you want a quick UK-style thickening shortcut, not just when something has gone wrong. Start with 1–2 teaspoons, let the filling settle for a few minutes, then taste before adding more because they add salt quickly.

Can You Use a Cottage Pie Packet Mix?

Yes. Use the packet as the flavour base, but reduce the liquid slightly because the slow cooker will not evaporate it the way an oven or pan does. Taste before adding extra salt, and make sure the filling is settled enough for topping.

How to Stop the Mash Sinking

Mashed potato sinks when the filling is too loose, the mash is too wet, or the topping is added too heavily in one place. The fix is simple: thicken the filling first, use mash that holds its shape, and spoon from the edges inward.

Fix-it guide showing loose filling, wet mash, edge-first spooning, and finished mashed potato sitting on cottage pie.
If the mash sinks, the recipe is not ruined; next time, thicken the filling, use sturdier mash, and spoon from the edges inward.
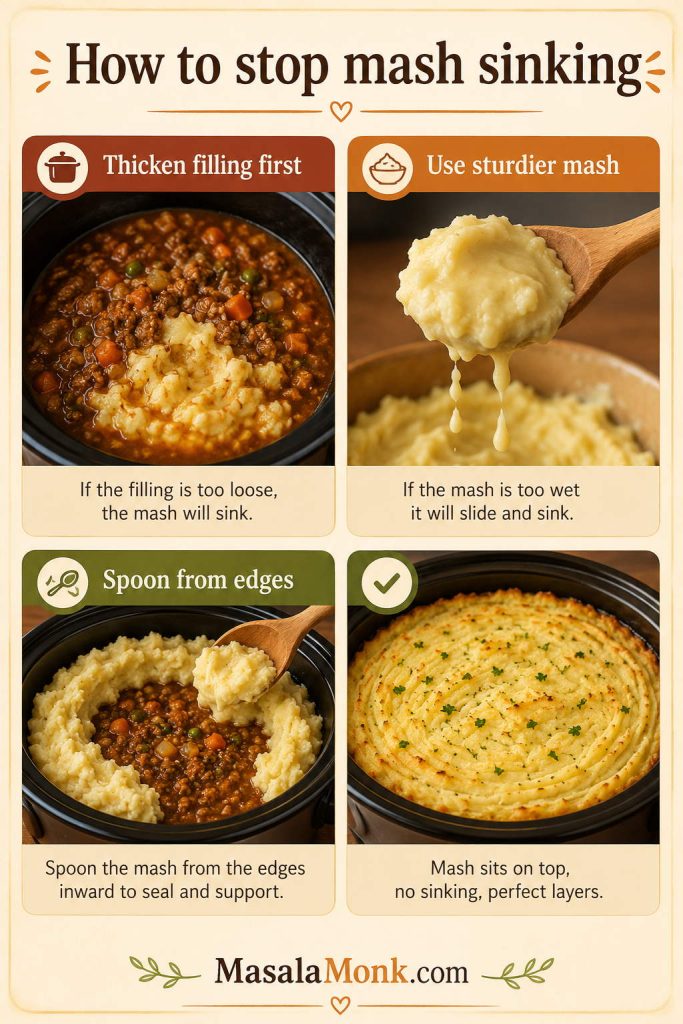
  • Let fierce bubbling settle. If the filling is bubbling aggressively, turn the slow cooker off for 10 minutes before topping.
  • Use sturdy mash. Steam-dry the potatoes and add milk slowly.
  • Start at the edges. The rim gives the potato a firmer starting point than the centre.
  • Spoon, then spread. Dot small mounds of mash across the surface before smoothing.

If the mash already sank: serve it as a rustic cottage pie bowl. It will not look neat, but the flavour is still there. Next time, thicken the filling first and spoon the topping from the edges inward.

Topping Options: Mash, Cheese, Sliced Potatoes, and Shortcuts

The topping can be classic, cheesy, leftover, instant, or sliced. Choose the one that matches the amount of effort you want and the finish you like best.

ToppingBest forKeep in mind
Fresh mashBest textureSteam-dry potatoes and add milk slowly.
Leftover mashConvenienceWarm before spreading so it does not pull at the filling.
Instant mashFastest shortcutMake it thicker than packet directions.
Cheesy mashGolden finishCan get salty if the filling is already well seasoned.
Sliced potatoesDifferent textureNeeds oven, grill, or broiler finish.
Sweet potato mashLighter, sweeter toppingHolds more moisture, so use less milk.
Topping options board showing fresh mash, cheesy mash, leftover mash, instant mash, sliced potatoes, sweet potato mash, and finished cottage pie.
Once the beef layer is glossy and spoonable, the topping becomes flexible: classic mash, cheese, leftovers, instant mash, sliced potatoes, or sweet potato.

Classic mashed potato

Classic mash is the most reliable all-purpose topping. Use floury potatoes, butter, a little milk, and salt. The texture should be spreadable without sinking, but not so stiff that it tears up the filling underneath.

Cheesy mash

Cheddar gives this cottage pie a more finished, oven-baked feel. Stir some into the mash or scatter it on top before grilling or broiling. Cheese also helps the fork ridges brown.

Leftover mash

Leftover mash is one of the easiest shortcuts. Warm it slightly before spreading so it is not fridge-cold and stiff. If it has dried out, beat in a small knob of butter or a splash of milk, but keep the texture thick enough to sit on the filling.

If you have more leftover mash than you need for topping, turn it into crisp snacks with our croquettes recipe.

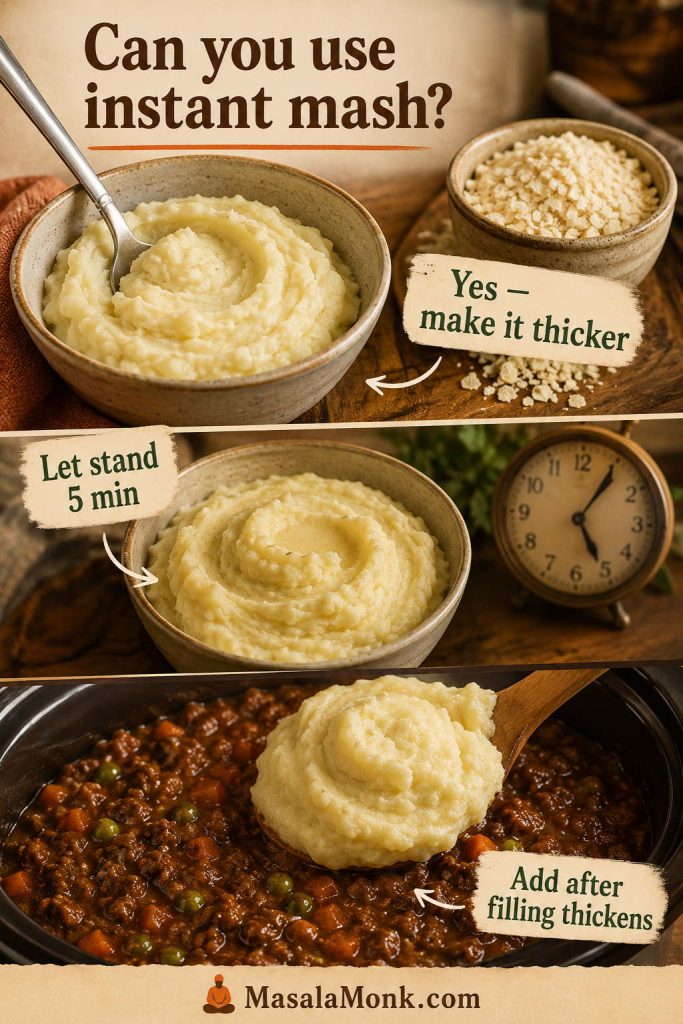
Can You Use Instant Mash for Slow Cooker Cottage Pie?

Yes, instant mash works for a shortcut version, but make it thicker than the packet directions suggest. Let it stand for 5 minutes before topping, and add a little grated cheese if it needs more structure. It is exactly the kind of shortcut that makes sense on a weeknight, especially when the beef filling is already rich and well seasoned.

Instant mash guide showing thick prepared instant mash, potato flakes, a timer, and mash being spooned over cottage pie filling.
Instant mash works as a cottage pie shortcut when it is thicker than usual and rested before it goes on.

Sliced potato topping

You can make slow cooker cottage pie with sliced potatoes, but it works best with an oven or grill finish. Slice the potatoes thinly, parboil if needed, layer them over a beef filling that holds together, brush with butter or oil, and finish until tender and golden. A slow cooker alone will soften sliced potatoes but will not make them crisp.

Sweet potato mash

Sweet potato mash gives the pie a sweeter, lighter feel. Because sweet potatoes hold more moisture than white potatoes, steam them well after cooking and use less milk. This works especially well for a lighter variation.

You should be able to scoop through soft potato into glossy beef gravy in a spoonful that lands on the plate as dinner, not soup. Use the recipe card below as the practical cook-through version.

Slow Cooker Cottage Pie Recipe Card

Description: A rich slow cooker cottage pie with savoury beef gravy, creamy mashed potatoes that sit neatly on top, optional cheddar, and an oven or grill finish for a golden top.

Before you top it: gravy first, mash second. The beef filling should briefly hold a spoon trail before the potato goes on. If it looks loose, thicken it first.

Need a shortcut or rescue? See raw mince, watery filling, instant mash, or golden finish before you start.

Prep time
25 minutes
Filling cook time
3½–4 hours high or 6–7 hours low
Total time
About 4½–5½ hours on high
About 7–8½ hours on low
Yield
4 generous servings

Timing note: an oven or broiler finish is quicker; heating the mash through in the slow cooker takes longer.

Equipment: 3.5–5L / 4–5 quart slow cooker, large skillet or frying pan, saucepan, potato masher or ricer, small bowl for slurry, and an oven dish if browning the top outside the slow cooker.

Ingredients

Beef filling

  • 1 tsp neutral oil or olive oil, optional, for very lean mince
  • 500g lean beef mince / ground beef, about 1 lb 2 oz
  • 1 large onion, finely diced
  • 2 medium carrots, finely diced
  • 1–2 celery sticks, finely diced
  • 2–3 garlic cloves, minced
  • 2 tbsp tomato purée / tomato paste
  • 1 tbsp Worcestershire sauce
  • 2 tbsp plain flour / all-purpose flour
  • 225ml beef stock / scant 1 cup
  • Stock adjustment: use about 200ml with mushrooms or frozen veg, 175–200ml for no-browning, or 100–150ml with chopped tomatoes
  • 1 tsp dried thyme or rosemary
  • 100–150g frozen peas / ¾–1 cup
  • Salt and black pepper, to taste, starting light if your stock is salty

Optional flavour boosters and add-ins

  • 100–150g mushrooms, finely chopped
  • 50–100ml red wine, replacing part of the stock
  • 1 tsp mustard or 1 tbsp brown sauce
  • 200g / about 7 oz chopped tomatoes, with stock reduced to 100–150ml

Optional thickener

  • 1 tbsp cornflour/cornstarch mixed with 1 tbsp cold water, only if the filling is loose near the end
  • For a UK-style shortcut, use 1–2 tsp beef gravy granules near the end, wait a few minutes, then taste before adding more because they add salt quickly.

Mash topping

  • 800–900g floury potatoes, peeled and cut into chunks
  • 30–45g butter / 2–3 tbsp
  • 60ml milk / ¼ cup, plus 1 tbsp at a time only if needed
  • 75–100g grated cheddar, optional
  • Or about 4 cups leftover, prepared, or instant mash, kept thicker than usual
  • Salt, to taste

Instructions

Cook the Beef Filling

  1. Brown the mince. Heat a large skillet over medium-high heat. Add 1 tsp oil if using very lean mince. Add the beef mince and cook until browned, breaking it into small crumbles. Drain excess fat.
  2. Add vegetables. Stir in onion, carrot, celery, garlic, and mushrooms if using. Cook for 4–5 minutes until beginning to soften.
  3. Build the gravy. Add tomato purée, Worcestershire sauce, herbs, salt, and pepper. Sprinkle over the flour and stir for 1 minute.
  4. Add stock. Pour in the beef stock gradually, scraping the pan and stirring until the mixture looks glossy. If using wine, add it before the stock and let it bubble briefly.
  5. Slow cook. Transfer to the slow cooker. Cover and cook on high for 3½–4 hours or low for 6–7 hours. Check earlier if your slow cooker runs hot.
  6. Check thickness. Stir the filling. Drag a spoon through it; the gravy should leave a brief path. If loose, stir in 1 tbsp cornflour/cornstarch mixed with 1 tbsp cold water and cook on high for 20–30 minutes.
  7. Add peas. Stir in frozen peas during the final 20–30 minutes of filling time. Taste and adjust seasoning.

Make the Mash and Finish

  1. Make mash. During the final 30–40 minutes of filling time, boil potatoes in salted water until tender. Drain, steam-dry for 1–2 minutes, then mash with butter and 60ml / ¼ cup milk. Add more milk 1 tablespoon at a time only if needed. Stir in some cheddar if using.
  2. Top the filling. Spoon mash over the beef filling in small mounds, starting around the edges. Spread gently and rough up the surface with a fork. Add cheddar on top if desired.
  3. Finish. For the easiest soft topping, cover and cook on high for 45–60 minutes. For a golden top, transfer to an oven dish and bake at 200°C / 400°F for 20–25 minutes, or grill/broil for 5–10 minutes only if your insert is safe for direct heat.
  4. Rest and serve. Let the cottage pie rest for 10 minutes before serving.

Recipe Notes

  • Best flavour: brown the mince when you can. It gives deeper flavour and lets you drain excess fat.
  • Raw-mince shortcut: skip the flour at the start, use fresh, fully thawed lean mince, reduce stock to 175–200ml, break the mince up well, whisk tomato purée into the stock before adding, and thicken near the end.
  • Chopped tomatoes: if using 200g / about 7 oz chopped tomatoes, reduce the stock to 100–150ml and check the filling before topping.
  • Shortcut mash: warm leftover or prepared mash slightly before spreading; make instant mash thicker than the packet directions.
  • Thickening options: cornflour/cornstarch slurry gives the cleanest fix; gravy granules also work but add salt quickly.
  • Slow-cooker insert warning: only grill/broil or oven-finish in the insert if the manufacturer says it is safe.

For a quick saveable reference, the image below keeps the core slow-cooker cottage pie numbers together without replacing the fuller method above.

Saveable recipe card for slow cooker cottage pie with a photo, serving count, beef mince amount, stock amount, timing, mash timing, and resting note.
Save the core slow cooker cottage pie numbers: 500g beef mince, 225ml stock, mash near the end, and 10 minutes of resting.

Why This Slow Cooker Cottage Pie Works

  • Less liquid: 225ml stock gives enough gravy for 500g beef mince without drowning the topping.
  • Tomato purée instead of a full tin of tomatoes: you get savoury depth without adding too much water.
  • Browning when possible: it builds flavour and lets you drain fat before slow cooking.
  • Flour first, slurry later: flour thickens the browned method from the start; cornflour/cornstarch rescues a loose filling near the end.
  • Late peas: they stay brighter and do not release water into the filling too early.
  • Steam-dried mash: extra steam leaves the potatoes, so the topping stays creamy but sturdy.

That same low-liquid thinking is useful in other slow-cooker dinners too; our slow cooker sausage casserole recipe uses the same idea to keep the sauce glossy instead of thin.

Fixes for Watery Filling, Sinking Mash, and Pale Topping

A loose filling is not a ruined dinner. Most slow-cooker cottage pie problems can be fixed with a little thickening, a short rest, or a gentler topping method.

ProblemFix nowFix next time
Filling is wateryAdd 1 tbsp cornflour/cornstarch mixed with 1 tbsp cold water. Gravy granules also work as a shortcut. Cook on high until thickened.Use less stock, drain browned mince, and reduce liquid for watery add-ins.
Mash sank into the fillingServe as a rustic beef-and-potato bowl.Thicken the filling first, then spoon the topping from the edges inward.
Filling tastes blandAdd salt, pepper, Worcestershire sauce, or a little more tomato paste.Brown the mince harder and use stronger beef stock.
Filling is greasySpoon fat from the surface before topping.Use lean mince and drain fat after browning.
Topping is paleFinish under the grill/broiler or transfer to an oven dish.Plan a golden finish from the beginning and use fork ridges on the mash.
Mash is glueyFold in a little butter and avoid overmixing.Use floury potatoes and mash by hand instead of overworking in a processor.
Mash is too looseStir in grated cheese or extra cooked potato if available.Steam-dry potatoes and add milk gradually.
Slow cooker is too fullRemove some filling before topping.Keep the slow cooker around half to two-thirds full for best cooking and topping space.

Variations and Scaling

These variations still follow the same core idea: keep the filling glossy, not soupy. When you add ingredients that release water or dilute flavour, adjust the stock and seasoning.

Budget version

To stretch the beef, add 100–150g cooked lentils or drained white beans, 100g finely chopped mushrooms, or 1 extra grated carrot. Reduce the stock by 25–50ml if adding mushrooms or frozen vegetables, and taste for extra Worcestershire sauce or tomato paste because stretch ingredients can soften the savoury flavour.

For a family-style version, dice or grate the vegetables small so they melt into the gravy rather than staying as large chunks.

Lighter version

Use 5% lean beef mince, 30g butter instead of 45g, skip extra cheese, and replace up to one-third of the potato with sweet potato if you like a sweeter topping. Add extra carrots, celery, or mushrooms, but keep the stock modest so the filling still feels hearty.

Crockpot shepherd’s pie with ground beef

For US-style crockpot shepherd’s pie, follow the same method with ground beef. You can also use frozen mixed vegetables and prepared mashed potatoes for a shortcut version, but make sure the beef layer holds together before adding the topping.

Lamb shepherd’s pie version

If using lamb mince, follow the same method but drain the fat carefully because lamb can be richer than beef. With lamb, the dish is traditionally called shepherd’s pie rather than cottage pie.

Guinness or red wine cottage pie

Replace part of the stock with Guinness or red wine for a deeper gravy. Use a modest amount and let it bubble briefly with the browned mince before slow cooking so the flavour becomes rounded rather than sharp.

Vegetarian or lentil cottage pie

For a vegetarian version, treat this as inspiration rather than a direct swap. Lentils and mushrooms need different liquid, so they deserve their own slow-cooker recipe.

Making a larger batch

If you want to make a larger crockpot cottage pie with 1kg / about 2 lb ground beef, use a 6–8 quart slow cooker and scale carefully. When scaling up, double the beef and vegetables, but be gentler with the liquid. You can always add more stock later; taking it back out is harder.

IngredientStandard recipeLarger version
Beef mince / ground beef500g / about 1 lb 2 oz1kg / about 2 lb
Slow cooker size3.5–5L / 4–5 quart6–8 quart
Stock225ml / scant 1 cupStart with 350ml / about 1½ cups, then add more only if needed
Flour2 tbsp3–4 tbsp
Potatoes800–900g1.5–1.8kg
Filling cook time3½–4 hours high or 6–7 hours lowCheck from 4 hours high or 7 hours low

If you add chopped tomatoes or a lot of mushrooms to a larger batch, reduce the stock further and check the filling before topping. For larger batches, the oven-dish finish is often easier than trying to brown a very full slow-cooker insert.

What to Serve with Slow Cooker Cottage Pie

This is already rich and filling, so the best sides are simple and fresh. For a classic plate, serve it with peas, steamed greens, cabbage, green beans, or roasted carrots. For a lighter plate, add a crisp salad with a sharp vinaigrette.

Serving spread with cottage pie, peas, greens, cabbage, green beans, salad, and chutney or relish.
Because cottage pie is rich and creamy, simple greens, peas, salad, or sharp chutney make the plate brighter and more balanced.

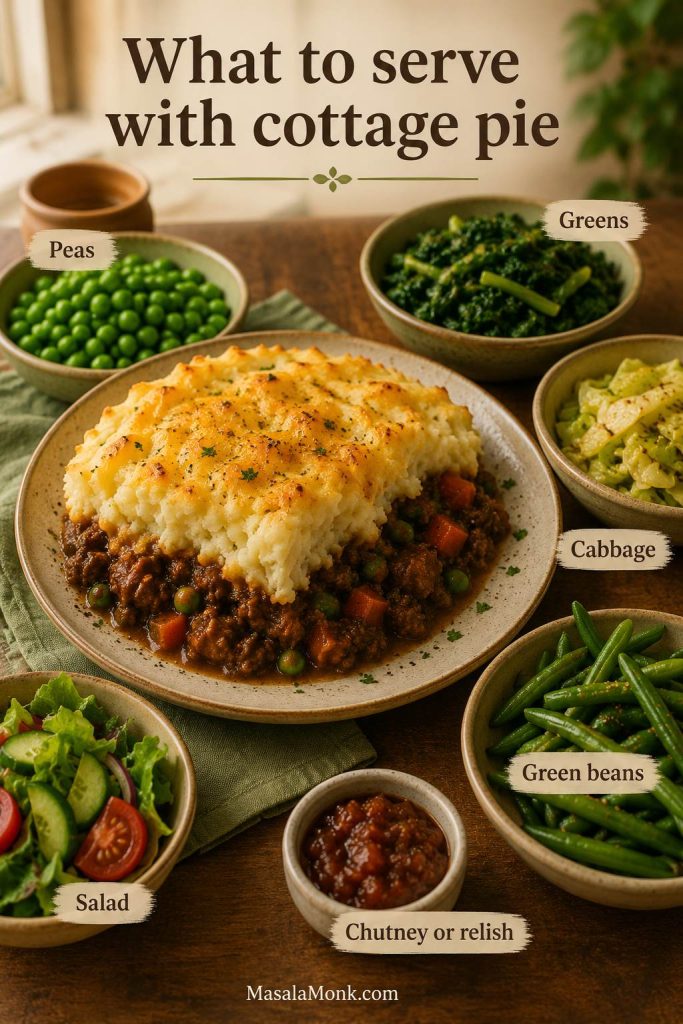
Pickled onions, chutney, or a spoonful of sharp relish also work well because they cut through the creamy mash and beef gravy. If the filling is a little looser and you are serving it more like a rustic cottage pie bowl, crusty bread is useful for catching the gravy.

It should feel generous rather than polished: creamy potato, glossy beef gravy, and enough structure to scoop without needing perfect slices.

Make Ahead, Storage, Freezing, and Reheating

Make Ahead and Freeze Slow Cooker Cottage Pie

The neatest make-ahead order is to prepare the beef filling first, chill it until it sets slightly, then top and finish later. Chilled filling is easier to cover neatly with mashed potato.

Make-ahead guide showing beef filling, mashed potato, freezer portions, and an assembled cottage pie dish ready to finish.
For the best make-ahead cottage pie texture, chill the filling first and freeze portions separately when possible.
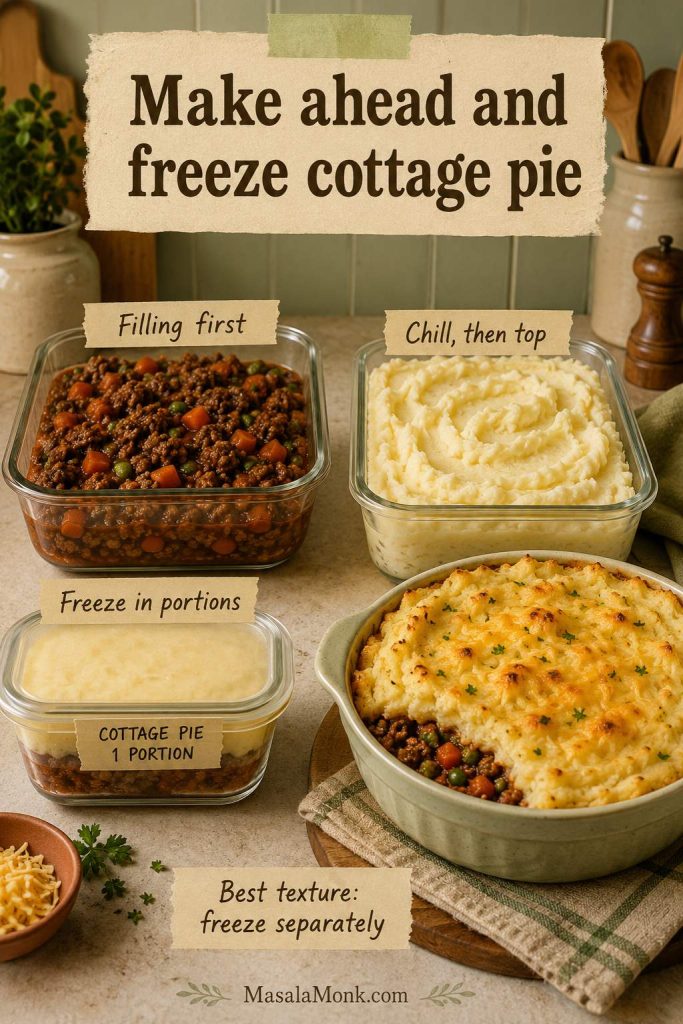
  1. Make the beef filling.
  2. Cool and refrigerate it in a covered container.
  3. Make the mash fresh, or use leftover mash.
  4. Reheat the filling until hot.
  5. Top with mash and finish in the slow cooker, oven, or under the grill/broiler.

Can you assemble the whole pie ahead?

Yes, you can assemble the whole pie ahead if the filling is cold and settled. Cover and refrigerate, then reheat until piping hot before serving. A fully assembled chilled pie reheats best in the oven or microwave; the slow cooker is better for keeping already-hot food warm than for reheating from fridge-cold.

Avoid putting a fridge-cold ceramic slow-cooker insert straight into a hot oven. Transfer the pie to an oven dish if you want an oven finish.

Fridge storage

Cool leftovers promptly, then store in an airtight container in the fridge for 3–4 days. Keep the pie covered so the mash does not dry out.

Freezing

For best texture, freeze the beef filling and mashed potato separately. You can freeze assembled cottage pie, but the potato topping may soften slightly after thawing. Freeze in meal-size portions so reheating is easier.

For another freezer-friendly slow-cooker dinner with clear cooker-size guidance, see our slow cooker pulled pork recipe.

How to Reheat Slow Cooker Cottage Pie

Reheat leftovers quickly in the microwave, oven, or on the hob until piping hot. Avoid using a slow cooker as the main method for reheating cold leftovers because it takes too long to move chilled food through the safe temperature range.

Reheating guide showing cottage pie warmed in the microwave, oven, and stovetop with a reminder to heat until piping hot.
Reheat cottage pie until piping hot, using the microwave for speed, the oven for the topping, or the stovetop for loose filling.

For reheating, the USDA safe temperature chart lists leftovers and casseroles at 165°F / 74°C: USDA safe temperature chart.

FAQs

Can I put raw mince in slow cooker cottage pie?

Yes, but treat it as the shortcut version, not the best-flavour version. Use fresh, fully thawed lean mince, reduce the stock, break the mince up well, and thicken the filling near the end. Browned mince still gives better flavour and lets you drain fat first.

Is slow cooker cottage pie dump-and-go?

It can be close, especially if you use raw thawed mince, frozen mixed vegetables, and prepared mash. However, the filling still needs one look near the end so you can thicken it before topping.

Should I add mash at the beginning or near the end?

Add the mash near the end. It gives you a chance to let the filling settle first, so the potatoes stay defined instead of softening into the gravy.

Why did my slow cooker cottage pie go watery?

The usual causes are too much stock, undrained mince fat, watery vegetables, or not enough thickening. The fix is usually simple: use less liquid than an oven cottage pie, then tighten the gravy before the mash goes on.

How do I stop mash sinking into cottage pie?

Use a beef filling that is saucy but not runny, mash that holds its shape, and a gentle topping method. Spoon the potatoes from the edges inward instead of dropping everything into the centre.

Can I use instant mash?

Yes. It is not the fanciest topping, but it is a useful weeknight shortcut if you make it thicker than the packet directions suggest. Let it stand for 5 minutes, then add it only after the filling has thickened.

Can I use gravy granules to thicken the filling?

Yes — they are a handy UK-style shortcut when the filling looks loose, but start small because gravy granules season as well as thicken. Use 1–2 teaspoons near the end, wait a few minutes, then taste before adding more.

Can I use a cottage pie packet mix?

Yes, but reduce the liquid slightly because the slow cooker will not evaporate it like an oven or hob. Taste before adding extra salt, and make sure the filling is settled and glossy before topping.

Can I make it with frozen mixed vegetables?

Yes, frozen mixed vegetables are fine, especially for a shortcut version, but they release water as they heat. Add them late or reduce the stock slightly so the filling holds together.

Can I make it ahead?

Yes. The easiest make-ahead path is filling first, then mash and finish later. If the pie is fully assembled and chilled, reheat it in the oven or microwave until piping hot rather than relying on the slow cooker from cold.

Can I freeze slow cooker cottage pie?

Yes. For the neatest texture, freeze the beef filling and mash separately. Assembled cottage pie also freezes, but the potato topping may soften a little after thawing.

How do I get a golden top?

Use a short grill, broiler, or oven finish after the filling is already hot. Fork ridges, a little butter, and optional cheddar help the top brown quickly, so you get colour without drying out the gravy underneath.

Once you understand the two big ideas — keep the filling glossy, not soupy, and keep the mash sturdy — slow cooker cottage pie becomes a forgiving dinner. Make it soft and simple in the slow cooker, or give it those golden fork ridges under the grill. Either way, it should land on the table as proper comfort.

Tried this with raw mince, instant mash, gravy granules, leftover mash, sliced potatoes, packet mix, or a grill finish? Leave a comment with your slow cooker size, liquid amount, and what you changed — it helps other readers choose the right version.

Back to top

Posted on Leave a comment

Cream of Mushroom Pork Chops Recipe

Cream of mushroom pork chops with glossy mushroom gravy, browned pork edges, sliced mushrooms, parsley, and mashed potatoes on a warm plate.

You are not here for a complicated pork chop dinner. You have pork chops, a can of cream of mushroom soup, and the hope that the gravy turns creamy while the pork stays juicy. This recipe keeps that old-school shortcut, then gives it better timing, better gravy, and fewer dry-pork surprises.

These cream of mushroom pork chops are built for a real weeknight: brown the pork, loosen condensed soup into mushroom gravy, simmer gently, and stop before the chops turn tough. It is cozy pantry cooking, handled with just enough care.

The simple formula is 4 pork chops, 1 can of condensed cream of mushroom soup, and ⅓ to ½ cup broth, milk, or water. Use ⅓ cup liquid for thicker gravy, ½ cup for a looser sauce, and chicken broth when you want fuller flavor without making the recipe harder.

The fast skillet version comes first because it is the easiest dinner for most nights. If you meant baked pork chops, crock pot pork chops, pork chops and rice, potatoes, stuffing, Campbell’s-style pork chops, or extra-smothered gravy, those notes are included too — because each version cooks differently.

Quick Answer: Cream of Mushroom Pork Chops with Mushroom Soup Gravy

To make cream of mushroom pork chops, brown 4 seasoned pork chops in a skillet, whisk 1 can of condensed cream of mushroom soup with ⅓ to ½ cup chicken broth, milk, or water, then simmer gently until the thickest chop reaches 145°F / 63°C. Rest for 3 minutes and spoon the creamy mushroom gravy over the top.

Good default: use ¾–1 inch pork chops, ⅓ cup chicken broth, a 12-inch skillet, and low heat once the soup goes in. That combination gives you golden-edged pork and gravy thick enough to settle into mashed potatoes, rice, or egg noodles.

Bare pantry version: pork chops, condensed cream of mushroom soup, ½ cup water, and black pepper. It tastes simpler and more nostalgic, but it still works when dinner just needs to happen.

Gravy can wait. Pork cannot. Let the gravy be flexible, but treat the pork like it has a deadline. If the chops are done before the sauce is perfect, move them out and fix the gravy by itself.

This is the kind of dinner where the gravy matters as much as the pork: thick enough for mashed potatoes, loose enough to spoon, and savory enough to make a plain side feel finished.

If you are not making the skillet version, jump to the baked version, crock pot version, or pork chops and rice version.

Skillet Recipe Snapshot

Use4 pork chops, preferably ¾–1 inch thick
Soup1 can condensed cream of mushroom soup, 10.5 oz / 298 g
Liquid⅓ cup broth for thick gravy; up to ½ cup milk, broth, or water for looser sauce
Optional upgrade8 oz mushrooms, ½ onion, garlic, Worcestershire, Dijon
MethodBrown chops, make mushroom gravy, simmer gently, rest before serving
TimeAbout 30 minutes for the skillet version
Doneness145°F / 63°C plus a 3-minute rest
Skillet recipe snapshot showing raw pork chops, cream of mushroom soup, broth, mushrooms, onion, herbs, and the formula four chops plus one can plus one-third to one-half cup liquid.
Keep the skillet formula simple: pork chops, one can of cream of mushroom soup, and just enough liquid to turn condensed soup into spoonable gravy.

Many old canned-soup pork chop recipes simmer everything by time. This version uses the same pantry shortcut but changes the control point: the gravy can be adjusted by texture, while the pork is cooked by temperature.

Cooking with chicken instead tonight? Our cream of mushroom chicken recipe uses the same cozy canned-soup idea, but the timing and doneness are built around chicken instead of pork.

At a Glance: Gear, Sides, and Watchouts

QuestionQuick answer
SkilletUse a 12-inch skillet if adding mushrooms and onions; a 10-inch skillet works for the simplest pantry version.
Helpful equipmentTongs, whisk or sturdy spoon, instant-read thermometer, and a plate for resting pork.
Method choiceUse the skillet for speed, the oven for covered bakes, and a casserole method for raw rice, potatoes, or stuffing.
Easy sidesMashed potatoes, rice, egg noodles, green beans, peas, broccoli, biscuits, or a sharp salad.
Biggest mistakes to avoidOvercooking thin chops, hard-boiling the sauce, adding too much liquid, and salting too early.

Skillet, Baked, Crock Pot, or Rice: Which Cream of Mushroom Pork Chops Version Should You Make?

The same can of soup can become several different dinners. A quick skillet meal, an oven bake, a slow cooker dinner, and pork chops with rice all sound similar, but they do not need the same amount of liquid or time. Pick the path first, then the recipe gets much easier.

If you want…Use this methodWatch out for
Fast creamy pork chopsMain skillet methodThin chops overcook quickly once they go back into the sauce.
The old-school canned-soup shortcutCampbell’s-style pork chopsWater is classic, but broth gives a more savory gravy.
Oven-baked pork chopsCovered baked versionDo not bake lean chops by the clock; check early.
Crock pot pork chopsSlow cooker versionVery thin boneless chops can dry out before they taste tender.
Rice versionCooked rice side or baked rice casseroleUncooked rice needs more liquid and longer covered heat than skillet pork.
Potato versionMashed potatoes side or covered potato bakeRaw potatoes must be sliced thin and cooked like a casserole.
Stuffing versionCovered stuffing bakeDry stuffing steals moisture unless it is hydrated first.
Extra gravy / smothered pork chopsSmothered variationLet the pork rest while you make the extra gravy rich.
Visual chooser showing skillet, baked, crock pot, rice, potato, stuffing, and smothered cream of mushroom pork chop versions.
Start by choosing the dinner path: skillet stays quick, baked and crock pot need longer heat, and rice, potatoes, or stuffing need their moisture planned from the beginning.

Easy distinction: the skillet recipe cooks pork chops in a creamy sauce. Rice, potatoes, stuffing, and slow-cooker versions also have to manage starch or long heat, so the moisture and timing change.

Why This Recipe Works

This recipe keeps the part people love — pork chops in creamy mushroom soup gravy — while fixing the parts that usually go wrong.

  • Browning gives the pork a savory edge. The mushroom gravy softens everything later, but the first sear keeps the chops from tasting flat.
  • The soup-to-liquid ratio stays controlled. Condensed soup needs a little help becoming gravy, not a whole pan of liquid.
  • Mushrooms and onion make the shortcut taste more like dinner. They are optional, but they add sweetness, texture, and deeper mushroom flavor.
  • A gentle simmer protects lean pork. Once the sauce goes in, slow bubbles are your friend. A hard boil is how creamy dinners turn tough.
  • A thermometer separates the pork from the gravy problem. Once the chops are done, the sauce can keep thickening without them.

The result is still the creamy canned-soup dinner people remember, but with browned edges, a spoonable sauce, and pork that does not need to hide under the gravy.

This is not a recipe that asks you to pretend a can of soup is fancy. It simply helps that can do its job better: make creamy gravy, keep dinner simple, and give the pork chops something comforting to sit in.

Ingredients for Pork Chops with Cream of Mushroom Soup

The ingredient list is short, which is exactly why the small choices matter. The soup brings the creamy base, the liquid sets the gravy texture, and the chop thickness decides how much breathing room you have before dinner goes from juicy to dry.

Ingredients for cream of mushroom pork chops, including pork chops, cream of mushroom soup, broth, mushrooms, onion, garlic, Worcestershire sauce, parsley, and black pepper.
Even with condensed soup, the flavor improves when mushrooms, onion, broth, and black pepper turn the shortcut into a real mushroom gravy.

Bare pantry version: pork chops + condensed cream of mushroom soup + water + black pepper. Better weeknight version: add chicken broth, mushrooms, onion, garlic, Worcestershire, and thermometer timing. Both are valid; one is just more layered.

Core Ingredients and Optional Upgrades

Split image comparing bare pantry pork chops with cream of mushroom soup, water, and pepper against an upgraded version with mushrooms, onion, garlic, broth, Worcestershire sauce, and parsley.
The bare pantry version works when dinner just needs to happen. Mushrooms, onion, broth, and a savory booster make the same shortcut taste fuller.
IngredientAmountWhy it matters
Pork chops4 chops, about 1½–2¼ lb / 680 g–1 kg totalBoneless or bone-in both work. Chops around ¾–1 inch thick are easiest to keep juicy.
Condensed cream of mushroom soup1 can, 10.5 oz / 298 gThe shortcut base for the creamy mushroom gravy. Low-sodium soup gives you more control if using broth or seasoning mix.
Chicken broth, milk, or water⅓–½ cup / 80–120 mlTurns condensed soup into sauce. Broth is savory, milk is creamy, water is classic.
Fresh mushrooms8 oz / 225 g, slicedOptional but recommended for deeper mushroom flavor and a more homemade texture.
Onion½ medium / 75–100 g, thinly sliced or dicedAdds sweetness and helps the sauce taste less like it came straight from the can.
Garlic2–3 cloves, mincedAdds savory depth; use garlic powder if that is what you have.
Oil + butter1 tablespoon eachOil helps sear the pork; butter helps sauté mushrooms and onion.
Black pepper½ teaspoon, plus more to tasteBalances the creamy sauce and keeps the flavor from tasting sleepy.
Worcestershire sauce1–2 teaspoons / 5–10 ml, optionalAdds a savory edge that makes the gravy taste fuller.
Dijon mustard1 teaspoon / 5 g, optionalAdds a small sharp note without making the sauce taste mustardy.
Parsley1–2 tablespoons, chopped, optionalFreshens the finished plate.

Salt note: start light. Condensed soup already brings salt, and the final gravy can get too salty if you also add regular broth, bouillon, onion soup mix, gravy mix, ranch seasoning, or seasoned salt. Taste the sauce before adding more.

Can You Skip the Fresh Mushrooms and Onion?

Pork chops, condensed soup, a little liquid, and black pepper will still get dinner on the table. Fresh mushrooms and onion make the gravy taste more layered, but the simple canned-soup version is the classic route. If you skip them, add garlic powder, Worcestershire sauce, or extra black pepper so the sauce does not taste flat.

How to Make It Taste Less Canned

The goal is not to hide the shortcut. It is to make the shortcut taste more like dinner.

  • Fastest fix: add black pepper and a splash of Worcestershire so the gravy tastes savory instead of flat.
  • Better fix: cook fresh mushrooms and onion until the mushroom water cooks off and the edges color.
  • Most flavorful fix: use chicken broth, properly browned mushrooms, and a tiny spoon of Dijon or a tablespoon or two of dry white wine for a less canned finish.
Three-level guide for making cream of mushroom pork chops taste less canned, with fastest fix, better fix, and most flavorful fix.
To make the shortcut taste less canned, layer flavor in stages: pepper first, then browned mushrooms and onion, then broth or a small savory booster.

Choosing Pork Chops That Stay Juicy

The pork chop you choose decides how forgiving this dinner will be. A thick chop gives you a little breathing room. A thin cutlet needs a short leash.

Pork chop selection guide showing thin cut, center cut, ribeye cut, bone-in center cut, and bone-in ribeye chops with thickness tips.
Chop thickness decides how forgiving this recipe feels; thin chops need a short simmer, while ¾–1 inch chops give the gravy time to come together.

Boneless Pork Chops

Boneless pork chops are the easiest choice when you want dinner fast. They brown neatly, sit nicely under the mushroom gravy, and slice cleanly on the plate. Just watch the timing, because thin boneless chops do not forgive a long simmer.

For a reliable result, use boneless chops that are about ¾ to 1 inch thick. They are thick enough to brown well and stay juicy, but not so thick that the sauce is finished long before the pork is cooked.

Bone-In Pork Chops

Bone-in pork chops are often more forgiving. The bone and surrounding fat help protect the meat, so these are a good choice if you are nervous about dry pork chops. They may need a few extra minutes near the bone, so check the temperature in the thickest meaty part without touching the bone.

If the gravy thickens before the meat near the bone is done, add a splash of broth and keep the simmer gentle. The sauce is more forgiving than the pork; you can loosen it, thicken it, or adjust it later.

Boneless vs Bone-In Pork Chops

Use this comparison when you are choosing between speed and forgiveness: boneless chops cook faster, while bone-in chops give the gravy a little more time before the meat dries out.

Boneless and bone-in pork chops shown side by side with creamy mushroom soup gravy and labels explaining that boneless is faster while bone-in is more forgiving.
Boneless pork chops are fast and convenient, while bone-in chops give you a little more forgiveness once the mushroom soup gravy starts simmering.

Pork Loin Chops with Cream of Mushroom Soup

Pork loin chops work well in this recipe when they are sliced into chops and are about ¾ to 1 inch thick. They are lean, so cook them by temperature rather than by a long simmer time.

A whole pork loin roast does not use this skillet timing, and pork tenderloin is a different cut entirely. If you have a roast instead of chops, use a roast-specific method like our slow cooker pork loin recipe.

Three-panel guide comparing pork loin chops, pork tenderloin, and pork loin roast, with notes that pork loin chops work for this recipe while tenderloin and loin roast cook differently.
Pork loin chops work when they are sliced as chops, but pork tenderloin and a whole pork loin roast need different cooking methods.

Thin Pork Chops and Pork Cutlets

Thin pork chops and pork cutlets need a very different rhythm. They brown quickly, cook quickly, and can go from tender to tough while you are still stirring the sauce.

For thin chops, sear briefly, make the sauce, then return them to the skillet only long enough to warm through and finish. Do not simmer thin pork chops for 20–30 minutes in cream of mushroom soup.

Side-by-side guide showing a thin pork chop and a thick pork chop with ruler cues and text explaining that thin chops cook fast while thick chops give more room.
Thin pork chops can finish before the gravy looks done, so check them early; thicker chops give you more room for browning, simmering, and sauce-building.

Frozen Pork Chops

Thaw frozen pork chops before making this skillet recipe. Thawed pork browns better, cooks more evenly, and does not release as much water into the pan. Frozen or half-thawed chops can make the sauce watery before the pork is cooked through.

Before simmering, check the pork chop timing guide so thin chops do not get thick-chop timing.

How to Make Pork Chops with Cream of Mushroom Soup in a Skillet

A 12-inch skillet is best if you are using mushrooms and onions. It gives the chops room to brown and the mushrooms space to release moisture, then brown instead of steam.

Step-by-step image showing pork chops being seared, mushrooms browning, gravy being built, pork chops simmering gently, resting, and serving.
Follow the skillet in stages: first build browning, then turn the soup into gravy, and finally let the pork rest before the sauce goes over the plate.

1. Pat the Pork Chops Dry and Season Lightly

Pat the pork chops dry with paper towels. Season both sides with black pepper, garlic powder or paprika if using, and only a small pinch of salt. Dry surfaces brown; wet surfaces steam.

2. Brown the Pork Chops

Heat the oil over medium-high heat. Add the pork chops in a single layer, working in batches if needed. Sear until the chops have golden edges instead of a gray steamed surface, about 3–5 minutes per side for ¾–1 inch chops.

Transfer the browned chops to a plate. They do not need to be fully cooked yet. You are building flavor before the creamy mushroom gravy goes in.

Pork chops searing in a skillet with golden-brown edges, pepper specks, and the text golden edges not gray steam.
A real sear gives mushroom gravy something savory to build on; pale steamed pork cannot add the same depth.

3. Cook the Mushrooms and Onion

Reduce the heat to medium. Add the butter, mushrooms, and onion. Mushrooms usually go through three stages: first they look dry, then they release water, then that water cooks off and the edges begin to brown. Do not rush this stage if you added fresh mushrooms; the moment their water cooks off and the edges start to brown is the moment the sauce stops tasting like plain condensed soup.

Sliced mushrooms and onions browned in a skillet with caramelized edges and the text wait for this stage.
Once mushrooms stop steaming and start browning, they bring the savory flavor that keeps cream of mushroom gravy from tasting flat.

4. Add Garlic and Make the Mushroom Gravy

Add the garlic and cook for about 30 seconds. Whisk in the condensed soup and ⅓ cup chicken broth, milk, or water. Add Worcestershire and Dijon if using. The sauce should be loose enough to spoon, but thick enough to coat the pork. Add more liquid a tablespoon at a time.

Cream of mushroom soup being stirred into browned mushrooms and pan drippings to make creamy mushroom gravy.
The soup becomes gravy when it loosens into browned mushrooms, pan juices, and just enough liquid to coat the pork.

5. Simmer the Pork Chops Gently

Return the pork chops and any plate juices to the skillet. Spoon gravy over the top, reduce the heat to medium-low, cover loosely, and simmer with slow, lazy bubbles. A rolling boil is too hard for lean pork and can make the gravy feel heavy.

Check the thickest part; when it reaches 145°F / 63°C, move the chops to a plate. If the gravy still needs work, fix the sauce without the pork in the pan.

Pork chops simmering gently in creamy mushroom gravy with small bubbles around the edges and text reading slow lazy bubbles.
At this stage, slow bubbles are enough; a hard boil can tighten the pork and make creamy mushroom gravy feel heavy instead of silky.

6. Rest, Taste, and Serve

Rest the pork chops for 3 minutes. While they rest, taste the mushroom gravy. Add black pepper, a splash of broth or milk, parsley, or a tiny squeeze of lemon if the sauce tastes too heavy.

Spoon the creamy gravy over the pork and give it somewhere to land: mashed potatoes, rice, egg noodles, biscuits, or green beans all make the plate feel complete. The sauce should settle over the chop and drift into the side, not run across the plate like soup.

Cream of Mushroom Pork Chops Recipe Card

Classic skillet cream of mushroom pork chops with tender pork, creamy mushroom gravy, optional mushrooms and onions, and enough sauce for potatoes, rice, noodles, or green beans.

Recipe note: once the chops are done, move them out of the skillet and finish the gravy separately if needed.

Prep Time
10 minutes
Cook Time
20 minutes
Total Time
30 minutes
Servings
4

Equipment

  • 12-inch skillet, preferably heavy-bottomed
  • Tongs
  • Whisk or sturdy spoon
  • Instant-read thermometer
  • Plate for resting the pork chops

Ingredients

  • 4 pork chops, about 1½–2¼ lb / 680 g–1 kg total, preferably ¾–1 inch thick
  • ½ teaspoon black pepper, plus more to taste
  • ½ teaspoon garlic powder or paprika, optional
  • Small pinch of salt, optional
  • 1 tablespoon oil / 15 ml
  • 1 tablespoon butter / 14 g
  • 8 oz / 225 g fresh mushrooms, sliced, optional but recommended
  • ½ medium onion / 75–100 g, thinly sliced or diced, optional but recommended
  • 2–3 garlic cloves, minced
  • 1 can condensed cream of mushroom soup, 10.5 oz / 298 g, regular or low-sodium
  • ⅓–½ cup / 80–120 ml chicken broth, milk, or water
  • 1–2 teaspoons Worcestershire sauce / 5–10 ml, optional
  • 1 teaspoon Dijon mustard / 5 g, optional
  • 1–2 tablespoons chopped parsley, optional

Instructions

  1. Pat the pork chops dry. Season both sides with black pepper, garlic powder or paprika if using, and only a small pinch of salt.
  2. Heat the oil in a 12-inch skillet over medium-high heat. Add pork chops in a single layer, browning in batches if needed.
  3. Sear until golden, about 3–5 minutes per side for ¾–1 inch chops. Transfer to a plate. The pork does not need to be fully cooked yet.
  4. Reduce heat to medium. Add butter, mushrooms, and onion. Cook 5–7 minutes, until the mushrooms release moisture and begin to brown.
  5. Add garlic and cook for 30 seconds.
  6. Whisk in condensed cream of mushroom soup and ⅓ cup broth, milk, or water. Add Worcestershire and Dijon if using. Add more liquid a splash at a time if you want looser gravy.
  7. Return pork chops and plate juices to the skillet. Spoon gravy over the chops. Reduce heat to medium-low, cover loosely, and simmer gently until the thickest part reaches 145°F.
  8. If the pork is done before the gravy is thick enough, move the chops to a plate and simmer the sauce uncovered by itself.
  9. Rest pork chops for 3 minutes. Taste gravy and adjust with pepper, parsley, or a splash of liquid if needed.
  10. Serve hot with mushroom gravy spooned over the top.

Notes

  • Use ⅓ cup liquid for thicker gravy and ½ cup for a looser sauce.
  • Chicken broth is a good default liquid; milk is creamier; water is the classic canned-soup version.
  • Thin pork chops cook fast. Check them early and do not simmer them like thick chops.
  • Bone-in chops may need a few extra minutes near the bone.
  • Once the soup is in the skillet, keep the heat low enough for slow bubbles.
  • For baked, crock pot, rice, potato, or stuffing versions, the method and timing change.

Need to adjust the sauce? Use the mushroom gravy fixes for watery, thick, or salty gravy.

Creamy Mushroom Gravy Success Cues: Not Watery, Not Pasty

A strong version should feel like gravy dinner, not soup poured over meat. When you cut into the chop, the inside should still look moist, and the sauce should drag slowly from the spoon into potatoes, rice, or noodles.

Sliced pork chop with creamy mushroom gravy, visible mushrooms, parsley, and mashed potatoes on a warm plate.
Look for juicy slices and gravy that settles into the side, so the plate feels creamy and complete instead of soupy.
Success cueWhat you wantWhat to fix
Gravy textureCoats a spoon and moves slowlyWatery ring around the pan or paste-like sauce
Pork textureSlices easily and looks moist insideDry, gray, tight meat from overcooking
FlavorSavory, creamy, mushroom-forwardToo salty, bland, or flat
Core fixAdjust the sauce after the chops are doneLeaving done pork in the pan while fixing gravy

How Long to Cook Pork Chops in Cream of Mushroom Soup

This is where most pork chop dinners are won or lost. The gravy can look perfect while a thin chop quietly overcooks, so timing has to follow thickness, not habit.

Timing by Pork Chop Thickness

Pork chop typeSear timeSauce simmer timeTiming note
Thin pork cutlets, about ¼ inch1–2 minutes per side1–3 minutesMost of the cooking happens during the sear. Check early.
½-inch boneless pork chops2–3 minutes per side3–5 minutesFast, but easy to overcook.
¾-inch boneless pork chops3–4 minutes per side4–7 minutesOne of the easiest sizes for this recipe.
1-inch boneless pork chops4–5 minutes per side6–10 minutesJuicier than thin chops; use a thermometer.
1-inch bone-in pork chops4–5 minutes per side8–12 minutesMay need a little longer near the bone.

Most forgiving range: ¾–1 inch chops are the easiest size for this recipe. They brown well, stay juicier than thin cutlets, and give the gravy enough time to come together. Thin ½-inch chops still work, but they need a short simmer. Bone-in chops are forgiving, but check the meat near the bone.

Pork chop timing guide showing thin, medium, and thick pork chops with cues to check the center and avoid relying only on time.
Timing depends on thickness, so use chop size as your guide and check the center instead of trusting the clock alone.

Temperature and Resting Note

Treat the table as a starting point, not a contract. Thin chops may finish during the sear; thicker bone-in chops may need more time near the bone. The thermometer gets the final vote: 145°F / 63°C plus a 3-minute rest, which matches FoodSafety.gov’s safe minimum internal temperature guidance for pork chops.

A slightly pink center is not automatically a problem when pork has reached temperature and rested. Dry, gray pork usually comes from chasing old timing habits instead of stopping at the right doneness.

The same temperature-first idea matters with other lean pork cuts; our pork tenderloin in oven guide uses that same rest-before-slicing approach.

5 Ways This Dinner Goes Wrong — and How to Avoid Them

Most cream of mushroom pork chop problems come from one of five small choices. Fix these before they happen and the whole dinner feels easier.

  • Do not cook thin chops like thick chops. They can turn tough before the gravy is done, so sear them briefly and return them only long enough to finish.
  • Do not boil the sauce hard. Once the soup goes in, keep slow bubbles so the pork stays tender and the gravy stays creamy.
  • Do not add all the liquid at once. Start with ⅓ cup and loosen gradually so the gravy does not turn soupy.
  • Do not salt heavily before tasting the soup. Condensed soup and seasoning mixes can make the final gravy too salty.
  • Do not fix gravy while finished pork keeps cooking. Move done chops out first, then thin, thicken, or reduce the sauce.
Common mistakes guide for cream of mushroom pork chops showing thin chops cooked too long, hard-boiled sauce, too much liquid, too much salt early, and fixing gravy while pork keeps cooking.
Most cream of mushroom pork chop problems start small: thin chops stay on too long, sauce boils too hard, liquid gets added too fast, or seasoning happens before tasting.

How to Make the Mushroom Gravy Creamy, Not Watery

The gravy should act like a blanket, not soup. It should coat the pork, slide slowly into mashed potatoes or rice, and taste savory instead of simply salty. Think of it as a mushroom cream sauce for pork chops: creamy enough to coat, but loose enough to spoon.

Mushroom Gravy Spoon Test

The easiest visual cue is the spoon: the gravy should cling lightly, then slide off slowly instead of running like broth or sitting like paste.

Spoon lifting creamy mushroom gravy with mushroom pieces and black pepper over a skillet of pork chops.
A good mushroom gravy coats the spoon, but still slides easily over pork chops and into whatever side you serve underneath.
  • Chicken broth gives the most savory, balanced mushroom gravy and is a reliable everyday default.
  • Milk makes the sauce softer and creamier, with a milder comfort-food flavor.
  • Water keeps the classic canned-soup taste and works well for the pantry version.
  • A small splash of white wine brightens the gravy when you are using fresh mushrooms and onion.

For one 10.5-ounce can of condensed cream of mushroom soup, start with ⅓ cup liquid if you want thick gravy. Use up to ½ cup when you want more sauce for rice, noodles, or potatoes. Add extra liquid in tablespoons, not big pours.

Too Thin, Just Right, or Too Thick Mushroom Gravy

Use the texture as your guide before serving. Thin gravy needs reducing, thick gravy needs a splash of liquid, and just-right gravy should look glossy and spoonable.

Three-part gravy texture guide showing too thin, just right, and too thick mushroom gravy on spoons and in bowls.
If the gravy looks watery, simmer it down; if it turns too thick, loosen it slowly until the sauce becomes glossy and spoonable again.

How to Thicken Mushroom Gravy

If the gravy is too thin, remove the pork chops and simmer the sauce uncovered until it coats a spoon. For a faster fix, whisk 1 teaspoon cornstarch with 1 tablespoon cold water, stir that slurry into the simmering gravy, and cook for a minute or two.

How to Thin Mushroom Gravy

If the gravy turns pasty, lower the heat and add broth, milk, or water a splash at a time. Stir until the sauce loosens and looks glossy again. A thick sauce is easy to fix as long as the pork is not still sitting in it over heat.

How to Keep the Gravy from Tasting Too Salty

Use low-sodium broth if your soup is salty, and be careful with onion soup mix, bouillon, gravy packets, ranch seasoning, or seasoned salt. If the finished sauce tastes too salty, soften it with milk, cream, unsalted broth, or sour cream, then serve it with plain potatoes, rice, noodles, or vegetables.

If the pork is already cooked and the sauce still needs help, use the troubleshooting guide instead of simmering the chops longer.

Campbell’s-Style Cream of Mushroom Pork Chops

This is the version many people remember: pork chops, condensed cream of mushroom soup, water, black pepper, and a short simmer. It is not fancy, and it does not need to be. The one upgrade worth keeping is temperature control instead of simmering by habit.

Campbell’s-style cream of mushroom pork chops in a skillet with browned pork chops, creamy mushroom gravy, mushrooms, parsley, and a generic soup bowl.
Campbell’s-style pork chops are the nostalgic shortcut version, but browning the meat and simmering gently make the gravy taste more like dinner.

Campbell’s-style shortcut: brown 4 pork chops, stir 1 can condensed cream of mushroom soup with ½ cup water, return the chops to the pan, cover, and simmer gently until the pork reaches 145°F. Rest 3 minutes before serving.

That simple brown-soup-simmer idea is also the classic pattern behind Campbell’s Tasty 2-Step Pork Chops.

Use the classic version when you want the childhood shortcut. Use the upgraded version when you want the same comfort with deeper flavor and better gravy texture.

Water, Broth, or Milk for Campbell’s-Style Pork Chops

VersionLiquid / add-insFlavor
Campbell’s-style classic½ cup waterNostalgic, simple, most like the old shortcut
Better weeknight version⅓–½ cup chicken brothSavory, fuller, still easy
Creamier version⅓–½ cup milkSofter, richer, milder
Less canned versionBroth + mushrooms + onion + WorcestershireMore homemade without losing the shortcut
Four-way comparison of cream of mushroom gravy made classic, with broth upgrade, creamier milk version, and less-canned upgrade.
Water gives the classic canned-soup flavor, broth adds savory depth, milk softens the sauce, and browned mushrooms make the shortcut taste more complete.

The thermometer is the reliability upgrade. The classic recipe tells you to simmer until done; this version gives the pork a clear stopping point.

Baked, Crock Pot, Rice, Potatoes, and Stuffing Versions

These versions are popular because they solve different dinner problems. The baked version is hands-off, the crock pot version waits for you, and rice, potatoes, or stuffing can turn pork chops into a full casserole. The tradeoff is that each version needs its own moisture and timing.

Baked Pork Chops with Cream of Mushroom Soup

Oven answer: brown the pork chops first, cover them with cream of mushroom soup gravy, bake covered at 350°F, and stop when the chops are just done. Keep the dish covered for a creamy bake; uncover only briefly if the gravy needs to reduce.

For many ¾–1 inch chops, start checking around 25 minutes after browning; thicker covered versions may take longer, but doneness decides.

  • Thin or ½-inch boneless chops need a short covered bake after a brief sear. Check early; they should not get thick-chop timing.
  • ¾–1 inch boneless chops are the most reliable baked version because they brown well and give the sauce time to heat through.
  • 1-inch bone-in chops make a cozier, more forgiving oven dinner, but check the meat near the bone.

Check early; baked chops can dry out if they sit too long after they are done. The oven should not become a holding place for already-finished lean pork.

Baked pork chops with cream of mushroom soup gravy in a casserole dish with mushrooms, onions, parsley, and foil partly lifted.
In a baked version, the covered dish protects the gravy. The main job is checking the pork before the oven turns it dry.

Crock Pot Cream of Mushroom Pork Chops

Slow cooker answer: use thawed thicker pork chops, condensed cream of mushroom soup, a little broth, and optional onion soup mix or mushrooms. For sliceable chops, start checking earlier; for fall-apart-style chops, many slow-cooker recipes run 6–8 hours on low. Very thin boneless chops are the riskiest choice, and the sauce can be thickened at the end if it looks loose.

A crock pot version is best treated as its own recipe, not as the skillet method stretched over several hours. Slow cookers trap liquid, so the gravy will usually be thinner than skillet gravy. Very thin boneless chops are convenient, but they can dry out before they become truly tender.

For a tangier slow-cooker pork chop dinner, our crock pot pork chops and sauerkraut goes in a different comfort-food direction.

  • Thin boneless chops: use the skillet method if possible because they dry out easily under long heat.
  • Thicker boneless chops: a better slow-cooker option because they give you more room before overcooking.
  • Bone-in chops: good if they fit in one layer; the bone helps protect the meat a little.
  • Loose sauce at the end: thicken it after the chops are cooked rather than cooking the pork longer.
Crock pot cream of mushroom pork chops with creamy gravy, mushrooms, onions, parsley, and a spoon lifting sauce from the slow cooker.
For crock pot cream of mushroom pork chops, thicker cuts and enough sauce matter because slow heat rewards moisture but can punish very thin chops.

Pork Chops and Rice with Cream of Mushroom Soup

Rice is where this recipe stops being a simple skillet dinner and starts behaving like a casserole. That is why the liquid changes so much.

For the quickest dinner, make the skillet pork chops first, then spoon the mushroom gravy over cooked rice.

Pork chops and rice casserole with creamy mushroom sauce, browned pork chops, visible rice, mushrooms, parsley, and a plated serving.
For pork chops and rice with cream of mushroom soup, decide early: serve skillet pork over cooked rice, or build a covered rice casserole from the start.

Cooked Rice Side vs Baked Rice Casserole

If you want…Do thisWhy
Skillet pork chops with riceCook rice separately and spoon mushroom gravy over itThe pork timing stays short and controlled.
One-pan pork chops and riceUse a covered baked casserole methodUncooked rice needs more liquid, tight coverage, and longer cooking.
Uncooked riceAdd enough broth/water and bake until rice is tenderA skillet sauce for pork chops does not contain enough liquid for raw rice.
Leftover cooked riceWarm separately or fold into the sauce after the pork is doneIt should heat through, not keep the pork cooking.
Split comparison showing cream of mushroom pork chops served over cooked rice on one side and baked rice casserole with pork chops on the other.
Cooked rice is the easiest side for skillet pork chops, while a baked rice casserole needs its liquid, cover, and timing planned from the beginning.

For the safest weeknight version, make the skillet pork chops and serve them over cooked rice. For a true pork chops and rice casserole, build that dish around the rice from the beginning.

Simple Baked Rice Starting Point

Simple baked rice direction: as a starting point for a casserole-style version, use 1 cup long-grain rice, 1 can condensed cream of mushroom soup, and about 1½ cups broth in a tightly covered dish, then bake at 350°F until the rice is tender and the pork is just done. If the pork finishes before the rice, lift the chops out and let the rice continue covered.

If adding rice to a slow cooker version, do not add it at the very beginning unless you are following a dedicated slow-cooker rice recipe. Rice can absorb too much liquid and turn mushy; add it later or serve the pork over separately cooked rice.

Pork Chops with Cream of Mushroom Soup and Potatoes

Easiest potato shortcut: serve the skillet version over mashed potatoes so the gravy has somewhere soft to land. For raw sliced potatoes, cut them thin, add enough liquid, cover tightly, and treat the dish like a casserole rather than a skillet pork chop recipe.

Pork chops with cream of mushroom gravy and a potato version with sliced golden potatoes in a casserole dish and on a plate.
Potatoes make the meal heartier; however, sliced potatoes need covered moisture and enough time, so they behave more like a casserole than a skillet add-in.

Pork Chops, Stuffing, and Cream of Mushroom Soup

Easiest stuffing shortcut: hydrate the stuffing first, then bake it covered with the pork and mushroom sauce. Dry stuffing should not be scattered into the pan because it will pull moisture from the gravy and make the whole dish feel dry.

Pork chops with stuffing and cream of mushroom gravy in a casserole dish with moist golden stuffing, mushrooms, onions, and parsley.
Stuffing needs moisture to stay soft, so treat this as a covered bake rather than a quick skillet add-in.

Easy Variations

Use these variations to change the flavor while keeping the same easy skillet rhythm.

Soup Swaps

  • Golden mushroom soup pork chops: use golden mushroom soup when you want a darker, tangier, more brown-gravy style sauce. It is less creamy than classic cream of mushroom.
  • Cream of chicken soup substitute: use cream of chicken when you want a milder sauce or do not have mushroom soup. Add sautéed mushrooms if you still want mushroom flavor.

Flavor Boosters

  • Onion soup mix: adds strong savory flavor, but use low-sodium soup or broth if possible because the gravy can get salty quickly.
  • Ranch seasoning: gives a tangy, family-style flavor. Start with less than a full packet and taste before adding more.
  • Worcestershire and Dijon: make the sauce taste fuller without changing the comfort-food feel.

Smothered Pork Chops with Cream of Mushroom Soup

For a smothered version, make extra gravy and use mushrooms, onions, and a little more liquid. Brown the chops, build the sauce, simmer gently, then remove the pork as soon as it is done. Reduce or thicken the gravy separately so the chops stay juicy while the sauce gets rich.

Smothered cream of mushroom pork chops with extra mushroom gravy, onions, sliced mushrooms, parsley, and mashed potatoes in the background.
Smothered cream of mushroom pork chops should feel extra saucy, with mushrooms and onions making the gravy rich enough to carry the whole plate.

Richer Finishes

  • Sour cream finish: take the skillet off the heat and stir in a spoonful of sour cream at the end for a tangier, creamier sauce.
  • Extra mushrooms and onions: double the mushrooms if you want the gravy to feel more homemade and less like a plain soup sauce.
  • Small splash of cream: useful if the sauce tastes sharp or salty and needs softening.

Double Batch for a Family Dinner

For 8 pork chops, use 2 cans of condensed cream of mushroom soup and about ⅔ to 1 cup liquid. Brown the pork in batches so it does not steam, then finish in a large skillet, braiser, or baking dish. Check chops individually because crowded pans do not cook evenly.

What to Serve with Cream of Mushroom Pork Chops

This is a gravy dinner, so give the gravy somewhere to land. The easiest sides are simple enough to carry the gravy or fresh enough to balance it.

  • Mashed potatoes: the classic choice when you want a cozy plate with plenty of mushroom gravy.
  • White rice or brown rice: easy, filling, and ideal when the rice is cooked separately from the skillet pork chops.
  • Egg noodles: a stroganoff-style direction without changing the recipe.
  • Green beans: crisp and fresh enough to balance the richness.
  • Peas: sweet, simple, and very good with salty-creamy mushroom gravy.
  • Broccoli: roasted or steamed, especially with extra black pepper on the sauce.
  • Biscuits: useful when you want a very cozy, gravy-heavy plate.
  • Simple salad: useful when the meal needs something bright and clean beside it.
Serving plate of cream of mushroom pork chops with mashed potatoes, rice, egg noodles, green beans, peas, and broccoli as side options.
Creamy mushroom pork chops pair best with sides that catch gravy or add freshness, such as mashed potatoes, rice, egg noodles, green beans, peas, or broccoli.

If the gravy tastes rich or salty, choose a plain side like rice, potatoes, noodles, or steamed vegetables. If the plate feels a little too beige, add green beans, peas, broccoli, or a sharp salad. Let the mushroom sauce be the comfort; let the side bring the lift.

Storage and Reheating

Store leftover pork chops with the mushroom gravy when possible. The sauce helps protect the meat from drying out in the fridge and makes reheating easier.

Storage questionQuick answer
FridgeStore in an airtight container for 3–4 days.
FreezerFreeze up to 2–3 months, though creamy gravy may look slightly separated after thawing.
Gentlest reheating methodWarm gently in a covered skillet over low heat with a splash of broth or milk.
MicrowaveUse lower power, cover loosely, and heat in short bursts.
What to avoidDo not boil leftovers hard; it tightens the pork and can make the sauce split.
Storage and reheating guide showing cream of mushroom pork chops in a glass container and a skillet with broth or milk being added to loosen the gravy.
Store the pork with its mushroom gravy when possible; later, a small splash of broth or milk helps the sauce loosen without boiling the meat again.

If the pork chops are thick, slicing them before reheating can help them warm faster and more evenly. Add a spoonful of extra gravy over the slices before serving. Reheat gently; boiling leftover pork in the sauce can make it tighter.

Troubleshooting the Pork Chops and Mushroom Gravy

The mistake section prevents problems. This section is for the moment when dinner is already in the pan and you need a fix. When the chops are already done, move them out first, then repair the gravy.

ProblemFix nowFix next time
Pork chops turned toughSlice thinly across the grain and spoon hot gravy over the slices.Use thicker chops, simmer gently, and check temperature earlier.
Sauce is too thickAdd broth, milk, or water a splash at a time over low heat.Start with ⅓ cup liquid, then adjust gradually.
Gravy looks wateryRemove pork and simmer the sauce uncovered until it coats a spoon.Thaw pork fully, pat dry, and avoid adding too much liquid at the start.
Gravy tastes too saltyStir in milk, cream, unsalted broth, or sour cream; serve with plain sides.Use low-sodium soup or broth and go easy on seasoning mixes.
Pork tastes blandAdd black pepper, Worcestershire, Dijon, parsley, or extra sautéed mushrooms to the gravy.Brown the pork harder and build more flavor before the soup goes in.
Troubleshooting guide showing fixes for watery gravy, thick sauce, salty gravy, dry pork, and bland flavor with mushroom gravy bowls, pork slices, liquid, browned mushrooms, and seasonings.
When dinner is already in the pan, protect the pork first; then simmer watery gravy, loosen thick sauce, dilute salty gravy, or spoon extra sauce over dry slices.

Ready to cook? Return to the recipe card or review the common mistakes before you start.

FAQs

How long do pork chops cook in cream of mushroom soup?

After browning, thin pork chops may need only 1–3 minutes in the sauce. Chops around ¾ to 1 inch thick usually need about 4–10 minutes, depending on whether they are boneless or bone-in. The thickest part should reach 145°F, followed by a 3-minute rest.

What temperature keeps pork chops juicy and safe?

Pork chops should reach 145°F / 63°C, followed by a 3-minute rest. That keeps the pork juicier than old-school overcooked chops while still giving you a safe finished dinner.

How much water do you add to cream of mushroom soup for pork chops?

For one 10.5-ounce can of condensed cream of mushroom soup, use ⅓ to ½ cup liquid. Use ⅓ cup for thicker gravy and ½ cup for a looser sauce. Water is classic, broth is more savory, and milk makes the sauce creamier.

Is milk, broth, or water best for the gravy?

Chicken broth is a good default because it makes the gravy taste more savory without much effort. Milk gives a softer, creamier sauce. Water gives the most classic Campbell’s-style flavor and is useful when the soup or seasoning mix is already salty.

Boneless or bone-in pork chops: which is better?

Boneless chops cook faster and are easiest for a quick skillet dinner. Bone-in chops are often more forgiving and can stay juicier, but they may need a little more time near the bone.

Thin pork chops keep drying out. What should I do?

Sear them briefly, make the sauce, then return them only long enough to warm through and finish. Very thin chops should not simmer like thick chops.

Skillet or oven: which method is easier?

The skillet is faster and gives you better control over the gravy. The oven is easier when you want a covered baked version or when you are adding rice, potatoes, or stuffing. Either way, brown the pork first when possible and cook by temperature.

Crock pot pork chops with cream of mushroom soup: what should I know?

Use thawed, thicker chops rather than very thin boneless chops. Slow cookers trap moisture, so the sauce may look loose at the end; thicken it after cooking if needed. For fall-apart-style chops, many slow-cooker recipes run longer, often 6–8 hours on low.

Can I cook rice in the same pan?

Not for the quick skillet method. Uncooked rice needs extra liquid, covered heat, and more time than skillet pork chops should spend cooking. Use cooked rice as a side, or make a covered baked casserole built around the rice.

Why did the pork chops turn tough?

They were probably too thin for the timing, simmered too hard, or cooked past the right doneness point. Creamy gravy helps the plate, but it cannot fully undo overcooked lean pork.

Final Thoughts

Cream of mushroom pork chops are not trying to be fancy. They earn their place because they ask so little and give back so much: browned pork, creamy mushroom gravy, and a plate that feels complete with rice, potatoes, noodles, or whatever simple side you already have.

Keep the gravy spoonable, keep the heat gentle, and stop while the chops are still juicy. That is the whole promise of this dinner: one can of soup, one skillet, and a plate of creamy mushroom pork chops that tastes like you gave it more effort than you did.

Back to top

Posted on Leave a comment

Smothered Pork Chops Recipe

Golden-brown smothered pork chops covered with onion gravy, served with mashed potatoes in a warm skillet-style setting.

The gravy is not the hard part of smothered pork chops. The hard part is keeping the pork tender by the time the gravy is rich.

That is where many smothered pork chop recipes go wrong. The pork browns nicely, the onions soften, the gravy starts to thicken — and then the chops sit in the pan a few minutes too long. If you have ever made a beautiful pan of gravy and still ended up with tough pork, this method is built around that exact problem.

This smothered pork chops recipe is built to avoid that. The chops are browned for flavor, removed before they overcook, then finished gently in onion gravy until they reach the right internal temperature. The sauce tastes like it belongs to the pork because everything happens in the same skillet, but the meat does not have to suffer while the pan catches up.

This is the version to use when you want rich onion gravy, tender pork chops, and clear timing instead of guesswork. Whether you make the classic onion-gravy version or take the cream-of-mushroom shortcut, the goal is the same: juicy pork, a smooth sauce, and a plate where every spoonful has somewhere good to land — over buttery potatoes, fluffy rice, egg noodles, or a biscuit dragged through the gravy.

Sliced smothered pork chop with a moist interior, glossy onion gravy, and soft cooked onions on the plate.
A sliced smothered pork chop tells the truth quickly: the meat should look moist before the sauce does any work.

If mashed potatoes are the plan, these garlic mashed potatoes are the kind of soft, buttery base that makes onion gravy feel like the whole point of dinner.

Quick Answer

To make smothered pork chops, season and lightly dredge ¾- to 1-inch pork chops, brown them briefly in a skillet, then remove them before they cook through. Soften onions in the same pan, cook 2 tablespoons of clean reserved flour into the onions, whisk in stock, and return the chops to finish gently in the gravy until they reach 145°F / 63°C. Rest for 3 minutes before serving.

Before dredging, reserve 2 tablespoons of clean flour for the sauce, and remember that the timing is built around the pork, not the gravy — sauce can keep cooking, but pork cannot uncook.

Four-step visual guide showing dredged pork chops, skillet browning, onion gravy, and a 145 degree thermometer check.
Brown the chops first, build the onion gravy next, and then finish gently to 145°F so the pork stays tender.

If your pork chops are thinner or thicker than ¾ to 1 inch, check the pork chop thickness chart before you start.

Smothered Pork Chops at a Glance

Use this as the quick map before you start: choose the right chop thickness, brown for flavor, finish gently, and check temperature before the sauce makes you lose track of the pork.

Need to KnowBest Answer
Good pork chops to buyBone-in or boneless chops, ¾ to 1 inch thick
Main methodBrown first, make the sauce, then finish gently
Internal temperature145°F / 63°C, then rest 3 minutes
Gravy styleOnion gravy for the main recipe; mushroom gravy or cream of mushroom for alternate paths
Texture targetGlossy and spoonable: thick enough to coat a spoon, loose enough to pool on potatoes or rice
Common mistakeBoiling the chops hard in the pan or treating thin chops like thick ones
Sides that workMashed potatoes, rice, egg noodles, biscuits, cornbread, green beans, collards

For the safest timing cue, use the doneness guide instead of judging only by gravy thickness.

Ingredients for smothered pork chops arranged on a prep surface, including pork chops, onions, garlic, flour, stock, cream, butter, and seasonings.
The ingredients are simple, but each one has a job: browning the chops, building the gravy, balancing salt, or finishing the sauce.

Smothered Pork Chops with Rich Onion Gravy

These smothered pork chops are browned in a skillet, finished gently in rich onion gravy, and served with enough sauce to soak into potatoes, rice, noodles, or biscuits without drowning the pork. Use bone-in or boneless chops, add mushrooms for a deeper gravy, or use the cream-of-mushroom shortcut when you want a thicker pantry-style dinner.

Prep Time
15 minutes
Cook Time
30 to 35 minutes
Total Time
45 to 50 minutes
Servings
4

Equipment: large 12-inch skillet, shallow dish, small bowl, tongs, whisk, instant-read thermometer

Ingredients

For the pork chops

  • 4 pork chops, bone-in or boneless, ¾ to 1 inch thick, about 1½ to 2 lb / 680 to 900 g total
  • 1 teaspoon kosher salt for the pork chops, or ¾ teaspoon fine salt, plus more only if needed for the gravy
  • ½ to 1 teaspoon black pepper, to taste
  • 1 teaspoon garlic powder
  • ½ teaspoon onion powder
  • ½ teaspoon smoked paprika, sweet paprika, or ground sage
  • ½ cup / 60 g all-purpose flour, reserving 2 tablespoons in a clean bowl before dredging
  • 2 tablespoons / 30 ml neutral oil
  • 2 tablespoons / 28 g butter

For the onion gravy

  • 1 large yellow onion, thinly sliced, about 180 to 220 g
  • 3 to 4 garlic cloves, minced
  • 2 cups / 480 ml low-sodium chicken stock or broth
  • ½ cup / 120 ml heavy cream or half-and-half
  • 1 teaspoon Worcestershire sauce, optional
  • 1 teaspoon fresh thyme leaves or ½ teaspoon dried thyme
  • Extra salt and black pepper, to taste
  • Chopped parsley, for serving

Salt note: Use the listed salt for the pork chops if you are making the homemade onion gravy with low-sodium stock. Use less salt if your stock is salted, or if you are making the cream-of-mushroom method. If you use condensed soup, onion soup mix, or a gravy packet, do not add extra salt until the very end.

Instructions

Brown the Pork Chops and Build the Gravy

  1. Dry and season the pork chops. Pat the pork chops dry with paper towels. Mix the salt, black pepper, garlic powder, onion powder, and paprika or sage. Season both sides. If time allows, rest the seasoned chops for 15 to 20 minutes before searing.
  2. Reserve clean flour for the sauce. Add the flour to a shallow dish, then remove 2 tablespoons to a small clean bowl before dredging. You will use that clean flour to thicken the sauce.
  3. Dredge lightly. Dredge each pork chop lightly in the flour left in the shallow dish, shaking off the excess. The coating should be thin, not heavy.
  4. Brown the chops. Heat the oil in a large skillet over medium-high heat. Add the pork chops in a single layer and brown for 3 to 4 minutes per side, just until golden. Do not cook them through. Transfer to a plate.
  5. Cook the onions. Reduce the heat to medium. Add the butter and sliced onion to the same skillet. Cook for 6 to 8 minutes, stirring often, until the onion softens, turns glossy, and begins to pick up golden edges. Add the garlic and cook for 30 seconds.
  6. Build the gravy. Sprinkle the reserved clean flour over the onions. Stir for 1 to 2 minutes so the flour loses its raw taste. Slowly whisk in the chicken stock, scraping up the browned bits from the bottom of the skillet. Add the Worcestershire sauce and thyme.

Finish the Pork Chops Gently

  1. Return the pork to the gravy. Add the pork chops and any plate juices back to the skillet. Reduce the heat to medium-low, cover partially, and cook until the thickest part reaches 140 to 143°F / 60 to 62°C, usually 4 to 7 minutes for ¾- to 1-inch chops.
  2. Add cream and bring the sauce together. Stir in the cream or half-and-half. Let the sauce barely bubble until glossy and the pork reaches 145°F / 63°C. If the pork gets there first, move it to a plate and finish the sauce separately.
  3. Rest and serve. Turn off the heat and let the pork chops rest for at least 3 minutes. Spoon the onion gravy over the chops and finish with parsley.

What Success Looks Like

The pork slices cleanly and stays juicy, the onions soften enough to melt into the gravy, and the sauce coats a spoon without sitting like paste. This timing is written for ¾- to 1-inch chops in a large 12-inch skillet; thinner chops need less time, and thicker chops need a thermometer more than they need guesswork.

When it works, the gravy feels generous instead of necessary — the pork is still juicy enough to stand on its own, and the sauce makes the whole plate better.

Success guide showing sliced juicy pork, soft onions, and spoonable gravy for smothered pork chops.
The finished skillet should show three signs at once: juicy pork, softened onions, and gravy that is spoonable but not pasty.

If the pork is already done but the sauce is not right, go straight to the troubleshooting table.

Why This Smothered Pork Chops Recipe Works

The trick is letting the pork and gravy keep different schedules. The chops brown first for flavor, then leave the pan before they overcook. That gives the onion gravy time to develop without making the pork wait too long.

The sauce is built in the same skillet, so the onions, garlic, flour, stock, and cream pick up the browned bits from the pork. That makes the pan sauce taste connected to the chops instead of like something poured over them afterward.

The flour and cream are timed carefully. A little clean reserved flour gives the gravy body, while cream goes in near the end so the sauce turns glossy without boiling hard or turning heavy.

Ingredients for Smothered Pork Chops

The ingredient list is simple, which is exactly why the small choices matter: the right chop, patient onions, and stock that does not turn the gravy too salty.

Pork Chops to Use

For the most forgiving skillet version, choose pork chops that are ¾ to 1 inch thick. Bone-in chops are usually more forgiving because the bone slows the cooking slightly. Boneless chops also work well, especially for weeknights, but they cook faster and need closer attention.

Thin pork chops need a quick sear and a short finish. Thick chops can be excellent, but they need a thermometer because the outside can look ready before the center is done.

Different pork chop cuts on butcher paper, including bone-in chops, boneless chops, thin chops, and thick chops.
Start with the right pork chop cut and thickness, because thin chops and thick chops need different timing in the same gravy.
Pork Chop TypeUse It ForWhat to Watch
Bone-in pork chopsForgiving, flavorful skillet resultsCheck temperature near the center, away from the bone
Boneless pork chopsEasy weeknight cookingCook quickly, so check early
Thin pork chopsQuick skillet dinnersUse a short sear and very short sauce finish
Thick pork chopsJuicier dinner-plate chopsCheck the center, not the clock
Shoulder or blade chopsSlower cooking methodsMay need more time to become tender

If you are using shoulder chops, blade chops, or thicker marbled chops, the slow-cooker method may be the better fit.

Have pork tenderloin instead? Pork tenderloin is a different cut and cooks differently from pork chops. Use this pork tenderloin in oven guide if your package says tenderloin.

Onion Gravy Ingredients

The onion gravy starts with butter, sliced onion, garlic, flour, stock, thyme, and a small amount of cream. Cook the onion until it is soft and lightly golden, not just warmed through. That is what gives the sauce a sweeter, deeper base.

Use low-sodium chicken stock if you can. The pork is seasoned, the sauce reduces slightly, and Worcestershire sauce adds more savory saltiness. Starting with low-sodium stock lets you control the final flavor.

Heavy cream gives the richest finish. Half-and-half makes the gravy a little lighter. For a brown onion gravy, leave the dairy out and add a splash more stock.

Why Flour Matters

Flour helps the pork brown and gives the gravy body. The trick is to use it lightly: a thin dusting on the chops, plus 2 tablespoons of clean reserved flour cooked into the onions before the stock goes in.

That short cooking step keeps the sauce smooth instead of raw or pasty.

How to Make Smothered Pork Chops

Everything good starts in the skillet: browned pork, softened onions, and the little browned bits that dissolve into the gravy. As you cook, watch for these cues.

1. Season and Dredge the Pork Chops

Pat the pork chops dry before seasoning. Dry meat browns better. Wet meat steams, and steamed pork chops do not build the same flavor in the pan.

Reserve Clean Flour Before Dredging

Before any raw pork touches the flour, reserve 2 tablespoons in a clean bowl for the gravy. That small step keeps the thickener separate and helps the sauce stay smooth.

Spoonful of flour being reserved in a clean bowl before raw pork chops are dredged in the remaining flour.
Reserve clean flour before dredging so the gravy thickener stays separate from flour that has touched raw pork.

Then season both sides and dredge lightly in the remaining flour. Shake off the excess so the coating looks like a thin dusting, not a breaded crust.

Pork chop lifted from a flour dish with a thin, even dusting of flour on the surface.
A thin flour coating helps the pork brown and gives onion gravy body, while too much flour can make the surface heavy.

2. Brown the Pork Chops Without Cooking Them Through

Use a heavy skillet if you have one. Heat the oil until it shimmers, then brown the chops in a single layer. If the pan is crowded, cook in batches; crowding traps steam and softens the crust.

The goal is golden color, not doneness. Once the chops are browned on both sides, move them to a plate. They will finish later in the gravy.

Pork chop browning in a skillet with tongs lifting one edge to show a golden sear.
Browning creates the flavor base; after that, the chops should leave the skillet before they cook through.

3. Cook the Onions in the Same Skillet

Reduce the heat to medium, add butter and sliced onion, and cook until the onions look soft and glossy with a few golden edges. If the pan looks dry, add a small splash of stock to loosen the browned bits. Add the garlic near the end.

At this point, the skillet should smell sweet, savory, and browned rather than sharp with raw onion.

Sliced onions cooking in a skillet until soft, glossy, and lightly golden with browned bits in the pan.
Let the onions turn soft, glossy, and lightly golden before adding liquid; otherwise, the gravy misses its sweet-savory base.

4. Make the Onion Gravy

Sprinkle the reserved clean flour over the onions and stir for 1 to 2 minutes. Slowly whisk in the chicken stock, scraping the bottom of the skillet so the browned bits dissolve into the pan sauce.

The gravy should move lazily, not boil hard — more like a slow, steady bubble than a pan trying to rush dinner.

Spoon dragging through glossy golden-brown onion gravy with visible soft onions in a skillet.
Look for onion gravy that coats the spoon yet still moves, so it can settle around the pork instead of sitting stiffly on top.

5. Finish the Pork Chops in Gravy

Return the pork chops and any plate juices to the skillet. Keep the heat gentle. When the pork is nearly done, add the cream and let the sauce come together until glossy.

If the pork reaches 145°F / 63°C before the gravy looks ready, move the chops to a plate and finish the sauce separately. The pork wins.

Seared pork chops gently simmering in onion gravy with small bubbles around the edge of the skillet.
Keep the sauce at a gentle bubble while the pork finishes, because hard boiling is where juicy pork chops start to tighten.

6. Rest and Serve

Let the pork chops rest for at least 3 minutes, then spoon the onion gravy over the top. On the plate, the pork slices cleanly and the gravy settles around it instead of sitting in a stiff mound.

Pork Chop Thickness and Cook Time Chart

Thickness matters more than most recipes admit. That is why the same skillet can give one cook juicy chops and another cook dry ones.

Pork chop thickness comparison with measurement cues for thin, standard, and thick pork chops.
Before you trust the clock, check the thickness; it is one of the biggest reasons smothered pork chops turn tender or dry.
Pork Chop TypeBrown FirstFinish in GravyKey Note
Thin boneless, about ½ inch1 to 2 minutes per side2 to 4 minutesCheck early; dries fast
Standard ¾ to 1 inch3 to 4 minutes per side5 to 8 minutesMost forgiving for juicy weeknight chops
Thick 1 to 1½ inch4 to 5 minutes per side10 to 15 minutesUse a thermometer
Slow-cooker chopsOptional 2 to 3 minutes per side3 to 6 hours on LOW, depending on cutThicker, more marbled chops stay softer

How to Know When Smothered Pork Chops Are Done

The safest and most reliable way to know when smothered pork chops are done is to use an instant-read thermometer. Check the thickest part of the chop. If the chop is bone-in, avoid touching the bone with the thermometer probe.

Pork chops should reach 145°F / 63°C, followed by a 3-minute rest. At that temperature, the center may still have a slight blush. That is normal when the pork has reached the right temperature and rested properly. For official guidance, see the FoodSafety.gov safe minimum internal temperature chart.

Instant-read thermometer in a smothered pork chop showing 145°F.
A thermometer keeps the gravy from distracting you; pull the pork at 145°F and let the chops rest before serving.

Gravy thickness and cooking time can guide you, but they should not be the final judge. Temperature is the tie-breaker.

Once the pork is rested, the dish should feel like one skillet, not pork plus sauce: soft onions, gravy that tastes like the browned pan, and chops juicy enough that the sauce feels generous instead of necessary.

Which Smothered Pork Chops Version Should You Make?

The onion gravy is the main path; the other versions are there for the nights when your pork chop cut, pantry, or schedule makes the choice for you.

Pork Chop CutBest MethodWhy
¾–1 inch bone-in chopsStovetop onion gravyForgiving, flavorful, and ideal for the main recipe
¾–1 inch boneless chopsStovetop or cream-of-mushroom skilletFast and practical, but check early
Thin boneless chopsStovetop onlyA short finish keeps them from drying out
Thick bone-in chopsStovetop or bakedNeeds gentle cooking and a thermometer
Shoulder or blade chopsSlow cookerBetter suited to longer cooking

Add mushrooms when you want deeper flavor. For the fastest pantry dinner, use condensed cream of mushroom soup. A more Southern-style plate works best when the onion gravy stays central and the cream stays lighter. Choose the slow cooker only when the chops are thick or marbled enough to handle it.

If your goal is shredded pork rather than whole chops in gravy, pork shoulder or pork butt is the better cut. For that style of dinner, use this slow cooker pulled pork method instead.

Smothered Pork Chops with Mushroom Gravy

For mushroom gravy, add 8 to 10 oz / 225 to 280 g sliced mushrooms after the onions have softened. Use 8 oz for a balanced mushroom gravy, or closer to 10 oz if you want it mushroom-forward.

Smothered pork chops covered with darker mushroom gravy and browned sliced mushrooms.
Browned mushrooms add depth to smothered pork chops, while watery mushrooms can leave the gravy flat and thin.

Cook the Mushrooms Until the Pan Looks Dry

Cook the mushrooms until the pan no longer looks wet. They should look browned in spots, not steamed. If you add flour and stock while the mushrooms are still wet, the sauce can taste thin and muted.

Comparison of wet mushrooms and browned mushrooms cooked until the pan looks mostly dry.
Cook mushrooms until the pan no longer looks wet; then the mushroom gravy can turn rich instead of diluted.

The mushroom version feels deeper and a little more steakhouse-style, with browned mushrooms giving the gravy extra savory weight — especially when the sauce lands on mashed potatoes or egg noodles.

Cream of Mushroom Smothered Pork Chops

Cream of mushroom smothered pork chops are the busy-night shortcut: creamy, pantry-friendly, nostalgic, and ready to spoon over rice or mashed potatoes. The method is forgiving as long as you control the salt and stop cooking the pork on time.

Pork chops in a creamy mushroom gravy with visible mushrooms and a thick beige sauce.
Cream of mushroom pork chops are the shortcut version, although they still need gentle heat so the pork stays tender.

To make this method, season and brown the pork chops as written. Cook the onions and garlic in the skillet, then whisk together:

  • 1 can condensed cream of mushroom soup, 10.5 oz / about 298 g
  • ½ cup / 120 ml chicken stock, milk, or half-and-half
  • ½ teaspoon black pepper or dried thyme
  • Optional: ½ cup sliced mushrooms, cooked first

Use Condensed Soup, Not Ready-to-Serve Soup

Use condensed cream of mushroom soup, not ready-to-serve soup. Add the soup mixture to the skillet, return the pork chops, and cook over low, steady heat until the pork reaches temperature. Taste before adding salt because condensed soup, stock, seasoning packets, and the pork coating can all add up quickly.

Comparison of thick condensed cream of mushroom soup and thinner ready-to-serve mushroom soup in separate bowls.
Use condensed soup for cream of mushroom pork chops; ready-to-serve soup is already diluted and can make the sauce too loose.

If the sauce is too thick, whisk in stock or milk a splash at a time. For a thin sauce, remove the pork chops once they are done and simmer the sauce uncovered for a few minutes.

If you are using the same canned-soup shortcut with chicken instead of pork, this cream of mushroom chicken recipe follows the same creamy comfort-dinner idea.

Southern-Style Smothered Pork Chops

For a Southern-style plate, lean into a flour-dredged chop, plenty of onion, a brown or lightly creamy gravy, and simple sides like rice, mashed potatoes, collard greens, green beans, biscuits, or cornbread.

Southern-style smothered pork chop with onion gravy, white rice, collard greens, and a piece of cornbread.
On a Southern-style plate, onion gravy belongs to everything: pork, rice, greens, and cornbread.

This is not a dainty sauce-on-the-side dinner. The gravy is part of the meal — it should run into the rice, soften the potatoes, or give a biscuit something to drag through.

To push this recipe in that direction, keep the onion gravy central and go lighter on the cream. Add a pinch of cayenne, a little Creole or Cajun seasoning, or a few dashes of hot sauce if you like heat. You can also add thinly sliced bell pepper with the onions for a sweeter, more old-school skillet flavor.

If you like this kind of rice-and-gravy comfort food, MasalaMonk’s red beans and rice recipe is another slow-simmered Southern-style dinner built around a saucy bowl.

If using a seasoned blend such as Creole seasoning, Cajun seasoning, seasoned salt, or an all-purpose spice mix, reduce the salt in the pork chop seasoning. Many blends are salty, and the gravy will concentrate that salt as it cooks.

Baked Smothered Pork Chops

Baked smothered pork chops are useful when your skillet is crowded or you want a gentler finish. The strongest baked version still starts on the stovetop: brown the chops first and make the gravy before baking, so the pork has flavor and moisture around it from the start.

Transfer the chops and gravy to a baking dish, cover tightly with foil or a lid, and bake at 350°F / 175°C until the pork reaches 145°F / 63°C.

Baked smothered pork chops in a ceramic dish with onion gravy, browned tops, and foil pulled back.
Baked smothered pork chops work best when the chops and gravy are browned first, then finished covered in the oven.
Chop ThicknessApproximate Covered Bake Time After SearingKey Check
Thin boneless chops, about ½ inch8 to 12 minutesCheck early
¾ to 1 inch chops15 to 20 minutesUse thermometer
1 to 1½ inch chops20 to 28 minutesCheck the center, not the clock

Keep the dish covered while the pork cooks. Uncover only at the end if the gravy is too loose, or remove the chops and reduce the gravy separately in a skillet.

Slow Cooker Smothered Pork Chops

The slow-cooker method is convenient and cozy, but it gives a softer, less browned result than the stovetop skillet version. Choose it when hands-off cooking matters more than crust, and use thicker, more forgiving chops so the pork stays tender.

Slow cooker filled with thick pork chops in creamy mushroom-onion gravy with a spoon lifting sauce.
Slow cooker smothered pork chops are most forgiving with thicker, more marbled chops that can handle longer cooking.

Best slow-cooker cuts: shoulder chops, blade chops, thick bone-in chops, or thicker marbled chops. Thin boneless loin chops are better on the stovetop.

Slow Cooker Sauce and Timing

For better flavor, brown the chops first. Then add sliced onions to a 5 to 6 quart slow cooker, place the chops on top, and pour the gravy mixture over them. Use a broth-and-cream-of-mushroom mixture for the easiest method, or use the homemade gravy base if you want more onion flavor.

For 4 thick chops, a simple slow-cooker sauce is 1 can condensed cream of mushroom soup, ½ cup / 120 ml low-sodium broth, ½ cup sliced onion, and 1 cup sliced mushrooms. For 6 to 8 chops, use 2 cans condensed soup and 1 to 1½ cups broth; start with the lower amount if your slow cooker tends to make watery sauces.

If the slow-cooker gravy is watery, remove the pork chops once they are done. Whisk 1 tablespoon cornstarch with 1 tablespoon cold water, stir the slurry into the slow cooker, and cook on HIGH for 10 to 20 minutes, or until the sauce thickens.

Have a larger pork roast instead of chops? Use a dedicated slow cooker pork loin method. A pork loin roast and individual pork chops do not cook on the same schedule.

How to Fix Smothered Pork Chop Problems

Most smothered pork chop problems come from one of three places: the pork is overcooked, the gravy was rushed, or the salt level was not controlled. The good news is that most sauce problems can be fixed after the pork is safely moved to a plate.

Quick Fixes for Pork and Gravy

Troubleshooting guide for dry pork chops, thin gravy, thick gravy, lumpy gravy, salty sauce, and watery slow-cooker gravy.
Most pork chop and gravy problems are easier to fix after the cooked pork comes out of the pan.
ProblemDo This NowDo This Next Time
Dry pork chopsSlice the chops, cover with hot gravy, and rest off heat for a few minutesUse thicker chops, finish gently, and stop at 145°F / 63°C
Tough pork chopsIf lean, serve with gravy; if shoulder-style, cook gently a little longerTreat lean chops and shoulder-style chops differently
Pork chops did not brownKeep going; the sauce will still carry flavorPat chops dry, use enough heat, and avoid crowding the pan
Thin gravyRemove chops, simmer uncovered, or add a small slurryCook the flour briefly, then add liquid slowly
Too-thick gravyWhisk in warm stock, milk, or half-and-half a splash at a timeKeep the sauce slightly loose before the pork goes back in
Lumpy gravyWhisk hard over low heat or strain the gravyAdd stock slowly while stirring
Floury gravyCook gently for a few more minutesCook the flour with the onions before adding stock
Mushroom gravy is wateryRemove chops and simmer uncovered until thickerCook mushrooms until the pan looks nearly dry before adding flour
Gravy looks curdledLower heat and whisk in a splash of warm stock or creamAdd dairy near the end and avoid boiling hard
Salty gravyAdd cream, milk, or unsalted stock; serve over plain starchUse low-sodium stock and reduce salt with canned soup
Watery slow-cooker gravyRemove chops, add slurry, and cook sauce on HIGHStart with less liquid and thicken at the end

Gravy Texture Guide

For a visual sauce check, compare the gravy before you adjust it with stock, milk, cream, or slurry.

Three spoons comparing onion gravy textures: too thin, just right, and too thick.
Aim for gravy that coats the spoon and drips slowly; that texture will pool softly instead of running away or clumping.

If the pork is already done, move it out first. Dry meat can be sliced and covered with hot gravy; thin, lumpy, salty, or separated sauce can be fixed separately over gentle heat without making the chops tougher.

What to Serve with Smothered Pork Chops

Smothered pork chops need a side that can catch the gravy, because the sauce is part of the meal.

The best plate is the one where the gravy has somewhere to go. It should sink into potatoes, run through rice, cling to noodles, or leave a biscuit with something to chase. That is when smothered pork chops stop feeling like pork with sauce and start feeling like a full comfort dinner.

Smothered Pork Chops with Mashed Potatoes

For the classic comfort plate, spoon the onion gravy over mashed potatoes while the sauce is still loose enough to settle into the edges.

Smothered pork chop with onion gravy served beside mashed potatoes and green beans.
Mashed potatoes are the classic base for pork chops with gravy because they catch the sauce without competing with it.

Smothered Pork Chops with Rice

If you are serving the chops over rice, this how to cook rice guide helps keep the grains fluffy instead of gummy under the gravy.

Southern-style smothered pork chop with onion gravy served over white rice with collard greens and cornbread.
Rice works beautifully with Southern-style smothered pork chops when the onion gravy is loose enough to season the grains.
Side DishWhy It Works
Mashed potatoesThe classic base for onion gravy
White rice or brown riceSimple, filling, and good for extra sauce
Egg noodlesTurns the meal into a cozy skillet dinner
BiscuitsGood for scooping up thick gravy
Green beansFresh contrast to the rich sauce
Roasted carrotsSweetness balances the savory gravy
Collard greens or sautéed greensEarthy, slightly bitter balance
CornbreadComfort-food pairing with a little sweetness
Applesauce or sautéed applesSweet contrast for a rich pork dinner
Side dishes for smothered pork chops, including mashed potatoes, rice, noodles, biscuits, green beans, cornbread, and apples.
Choose sides that give the gravy somewhere useful to go: potatoes, rice, noodles, biscuits, greens, cornbread, or apples.

Easy Plate Combinations

  • Classic comfort plate: smothered pork chops, mashed potatoes, green beans.
  • Southern-style plate: smothered pork chops, rice, collard greens, cornbread.
  • Weeknight skillet plate: pork chops and gravy, egg noodles, peas.
  • Cream-of-mushroom plate: creamy pork chops, rice or buttered noodles, roasted carrots.
  • Slow-cooker plate: pork chops with gravy, mashed potatoes, simple steamed vegetables.

Planning for leftovers? See storage and reheating before you pack the pork away.

Storage, Reheating, and Leftovers

Store leftover pork chops with the gravy, not separately. The sauce protects the meat in the refrigerator and gives you a better chance of reheating it without drying it out. Use an airtight container and refrigerate for up to 3 to 4 days.

For the best texture, reheat gently on the stovetop over low heat. Add a splash of stock, milk, or water to loosen the gravy. Leftovers are best sliced into the gravy so each piece warms gently instead of sitting as one thick chop.

Smothered pork chops stored in gravy in a glass container and sliced leftovers reheating in a skillet with added liquid.
Store leftovers with the gravy, then reheat gently with a splash of stock or milk to help the pork stay moist.

You can freeze smothered pork chops, although cream-based gravy may look slightly separated after thawing. Reheat slowly and whisk the sauce as it warms; a splash of stock or milk usually brings it back together.

Made this recipe? Leave a comment with the pork chop thickness you used — thin, standard, or thick — and whether you made onion gravy, mushroom gravy, or the cream-of-mushroom version. That detail helps the next cook judge timing before their chops overcook.

FAQs

Bone-in or boneless pork chops: which is better?

Bone-in pork chops are usually more forgiving and flavorful, but boneless pork chops work well if they are not too thin. Boneless chops cook faster, so check them earlier.

What temperature should smothered pork chops reach?

Smothered pork chops should reach 145°F / 63°C in the thickest part, followed by at least a 3-minute rest. Use a thermometer instead of judging only by color.

Should the skillet be covered while the pork cooks?

Cover the skillet partially while the chops finish in the gravy. This helps them cook gently without reducing the sauce too fast. If the sauce is too thin near the end, uncover the pan and simmer briefly after the chops are done.

How do I use cream of mushroom soup?

Use one 10.5 oz / 298 g can of condensed cream of mushroom soup and thin it with ½ cup / 120 ml stock, milk, or half-and-half. Go lighter on added seasoning because canned soup already brings salt and body.

Can smothered pork chops be dairy-free or gluten-free?

For a dairy-free version, skip the cream and use extra stock. The gravy will be lighter, but still savory and spoonable. For gluten-free gravy, use a gluten-free all-purpose flour blend for a light dredge, or skip the dredge and thicken the sauce with a cornstarch slurry after the chops are cooked.

Why are my smothered pork chops dry?

Dry chops usually mean the pork cooked too long, the heat was too high, or the chops were very thin. Brown them briefly, keep the sauce at a gentle bubble, and stop cooking when the thickest part reaches 145°F / 63°C.

How do I make smothered pork chop gravy thicker?

Remove the pork chops once they are done, then simmer the gravy uncovered. If it is still thin, stir in a small slurry made from 1 teaspoon cornstarch and 1 tablespoon cold water, then cook for 1 to 2 minutes.

What changes if my pork chops are thin?

Thin pork chops need a quick sear and a short finish. Make the gravy without them in the pan, then return them only for the final few minutes so they warm through without drying out.

Are pork loin chops the same as regular pork chops?

Pork loin chops are a type of pork chop and work well as long as they are not sliced too thin. Because they are lean, give them a quick sear, finish them gently, and use a thermometer so they do not overshoot.

What is the best make-ahead method?

Store the chops in the gravy and reheat gently over low heat. Add a splash of stock or milk if the gravy thickens in the refrigerator. Pork chops are still best freshly cooked, but storing them with sauce helps protect the meat.

Can I make brown onion gravy instead of creamy gravy?

For brown onion gravy, leave out the cream and use a little extra chicken stock. The sauce will taste more like a classic onion pan gravy: lighter, savory, and less creamy.

However you make them — skillet, baked, creamy, mushroom-rich, or slow-cooked — the win is the same: tender pork, a gravy that tastes like the pan, and a plate that feels finished before it ever reaches the table.

Back to top ↑

Posted on Leave a comment

Kielbasa and Potatoes Recipe

Cast iron skillet filled with browned kielbasa slices, golden potatoes, onions, bell peppers, parsley, and a small bowl of mustard.

Kielbasa and potatoes is the dinner you make when you have a ring of smoky sausage, a few potatoes, and no interest in turning the evening into a project. It is filling, inexpensive, and forgiving — the kind of skillet meal that still works when you have one pepper, half an onion, a handful of green beans, or nothing extra beyond the sausage and potatoes.

This kielbasa and potatoes recipe is built around one simple fix: the sausage browns much faster than the potatoes cook. When everything goes into the pan at once, the kielbasa can turn dry or rubbery before the potatoes are tender. Here, the sausage gets color first, the potatoes get time in those savory drippings, and everything comes back together at the end.

The result is a real weeknight dinner: crisp-edged potatoes, browned kielbasa, sweet onions, bell peppers, garlic, and a smoky seasoning that tastes cozy without needing a cream sauce or a casserole dish. Keep it classic, make it faster with a microwave potato shortcut, roast it on a sheet pan, turn it into a slow cooker meal, or add cabbage, sauerkraut, green beans, or cheese depending on what you have.

By the end, the potatoes should have browned corners, the sausage should be glossy at the edges, and the onions should be soft and sweet enough to make the whole pan taste like more than the sum of its parts.

The goal: a skillet that looks like a full dinner — browned sausage, golden potatoes, sweet onion, bell pepper, and enough color to feel complete.

Fork lifting a bite of kielbasa, potato, onion, and bell pepper from a skillet.
This easy kielbasa and potatoes skillet works because every bite has contrast: smoky sausage, tender potato, sweet onion, and a little pepper brightness.

Quick Answer: The Best Way to Make Kielbasa and Potatoes

The easiest way to make kielbasa and potatoes is in a large skillet. Brown sliced kielbasa first, move it to a plate, then cook diced potatoes in the sausage drippings until they are tender inside and golden around the edges. Add onions, peppers, garlic, and seasoning, then return the kielbasa at the end so it stays browned and juicy.

The timing matters: the kielbasa gets color quickly, while the potatoes need a longer turn in the pan.

Instructional image showing browned kielbasa on a plate and potatoes cooking in sausage drippings.
Brown kielbasa first so the potatoes can cook in the sausage drippings without drying out the meat. This timing move is what makes the skillet version work better than dumping everything in at once.

For the weeknight skillet version, use:

  • 14–16 oz / 400–450 g kielbasa
  • 1½ lb / 680 g potatoes
  • 1 medium onion, about 150–180 g
  • 1 large bell pepper, about 150 g
  • 2 tbsp oil
  • Garlic, smoked paprika, black pepper, and parsley

On a rushed night, microwave the potatoes for a few minutes before adding them to the skillet. For a more hands-off dinner, use the oven or sheet pan route. For soft comfort food instead of crisp potatoes, use the slow cooker.

Need to choose fast? Jump to the microwave potato shortcut, the sheet pan version, or the slow cooker method.

The main trick: do not make the kielbasa sit in the pan while the potatoes finish cooking. Brown the sausage, remove it, cook the potatoes properly, then bring the sausage back at the end.

Kielbasa and Potatoes at a Glance

Different approaches solve different dinner problems. The skillet gives you the best browning, the oven gives you a more hands-off meal, and the slow cooker gives you soft, cozy comfort. You do not need to use every variation here. The skillet recipe stands on its own; the extra sections are there for nights when your fridge points you in a different direction.

This is the kind of dinner that changes with the night: crisp skillet edges when you have time, soft slow-cooker comfort when you do not, and whatever vegetable is already in the fridge.

Method Use It For Approx. Total Time Texture
Skillet Kielbasa and Potatoes Go-to weeknight dinner 40–45 minutes Crisp-edged potatoes, browned sausage
Microwave Shortcut Skillet Fastest stovetop option 25–35 minutes Tender potatoes with browned edges
Oven / Sheet Pan Hands-off cooking and easy cleanup 35–45 minutes Roasted potatoes, lightly browned sausage
Air Fryer Crisp edges without heating the oven 20–25 minutes Crisp potatoes, browned sausage edges
Slow Cooker Dump-and-go comfort food 3–6 hours Soft and cozy, not crispy
Cabbage Variation Heartier one-pan meal 40–45 minutes Tender cabbage, smoky sausage, soft-crisp potatoes
Sauerkraut Variation Tangy, old-school flavor 40–45 minutes Softer, sharper, savory
Cheesy Casserole Richer comfort-food dinner 45–70 minutes Creamy, baked, cheesy
Method chooser showing skillet, oven, air fryer, and slow cooker versions of kielbasa and potatoes.
Choose the method based on the texture you want. The skillet gives the best browning, the oven is easier, the air fryer is crisp and fast, and the slow cooker turns kielbasa and potatoes into soft comfort food.

Texture check: the skillet route is for crisp edges; the slow cooker route is for a softer, cozier sausage-and-potato dinner.

Comparison of crisp skillet kielbasa and potatoes with a softer slow cooker version.
Skillet kielbasa and potatoes give you crisp edges, while the slow cooker gives you a softer, cozier meal. Both work well, but they are not meant to have the same texture.

Why This Kielbasa and Potatoes Recipe Works

The whole dish gets easier once you treat the sausage and potatoes differently. Kielbasa is often already cooked, so it only needs enough time to brown and heat through. Potatoes need longer. They need steam to soften inside and direct skillet heat to brown outside.

That is why the sausage goes first, but does not stay in the pan the whole time. It browns, leaves behind savory drippings, and comes out before it overcooks. Then the potatoes get their own stage: covered first so they soften, then uncovered so they can crisp. A little browning on the bottom of the pan is not failure; it is flavor waiting to be picked up by the potatoes.

The onions and peppers go in after the potatoes are mostly tender, so they soften into the pan without losing all their sweetness and color. Garlic and paprika go in near the end so they bloom quickly instead of burning.

It is still simple food. It just has better timing.

Ingredients You’ll Need

Because the ingredient list is short, balance matters more than quantity: salty smoked sausage, creamy potatoes, sweet onion, a little pepper brightness, and just enough mustard, vinegar, or hot sauce at the end to keep the pan from tasting heavy.

Ingredients for kielbasa and potatoes arranged on a dark surface, including sausage, potatoes, onion, pepper, garlic, paprika, mustard, and parsley.
A short ingredient list makes each choice matter more. In this kielbasa and potatoes skillet, sausage brings smoke, potatoes bring body, and mustard or vinegar keeps the rich pan from feeling flat.

Kielbasa

Use smoked kielbasa or Polish sausage, sliced into ½-inch rounds. Many packaged smoked kielbasa products sold in grocery stores are fully cooked, but always check the label. If you are using raw sausage, cook it fully before combining it with the potatoes.

Pork kielbasa gives the richest flavor and usually releases enough fat to help flavor the potatoes. Turkey or chicken kielbasa works too, but it is leaner, so add a little extra oil.

Potatoes

Yukon Gold, baby gold, or baby red potatoes are the easiest choices because they hold their shape while becoming creamy inside. Cut them small for skillet cooking. Large chunks are the main reason potatoes stay hard while the sausage overcooks.

Onion

A medium yellow or sweet onion gives the pan a savory base. Slice it if you want a rustic look, or chop it if you want everything to mix more evenly.

Bell Pepper

Bell pepper is optional, but it makes the dish feel more complete. Red peppers taste sweeter, green peppers taste sharper, and yellow or orange peppers sit somewhere in the middle.

Garlic and Seasoning

Garlic, smoked paprika, black pepper, and a little oregano or Italian seasoning are enough. Go easy on salt until the end because kielbasa can be salty.

Optional Finish

Dijon mustard, hot sauce, parsley, parmesan, or a tiny splash of apple cider vinegar can brighten the skillet right before serving. Mustard is especially good because it cuts through the richness of the sausage and potatoes.

Best Potatoes for Kielbasa and Potatoes

Potatoes are the only part of this dinner that can really slow you down, so it is worth getting the cut right before the pan gets hot. Choose a potato that can hold its shape, then cut it small enough to cook before the sausage dries out.

Potato guide showing Yukon Gold, baby gold, baby red, russet, and frozen diced potatoes.
Yukon Gold, baby gold, and baby red potatoes are the easiest choices for kielbasa and potatoes because they hold their shape and brown well. Russets can crisp nicely, but they need gentler handling.
Potato Type Use It For What to Know
Yukon Gold Most reliable all-purpose choice Creamy inside, holds shape well, browns nicely.
Baby Gold Potatoes Skillet or sheet pan Small, tender, and easy to cut into even pieces.
Baby Red Potatoes Skillet, oven, cabbage variation Hold their shape well and give a firmer bite.
Russet Potatoes Crispier edges Can break apart if over-stirred; cut evenly and handle gently.
Frozen Diced Potatoes Slow cooker or casserole Convenient, but not ideal for the crispiest skillet texture.

Potato Cut-Size Guide

Once the potatoes are cut correctly, the rest of the recipe becomes much easier. Smaller pieces cook faster and give you a better chance of golden edges.

Potato cut-size guide showing half-inch dice, three-quarter-inch chunks, one-inch chunks, and quarter-inch rounds.
Potato cut size decides how smoothly this recipe cooks. For the skillet version, ½-inch pieces are the safest choice because they soften before the sausage dries out.
Potato Cut Use It For What to Expect
½-inch dice Skillet method Fast, even cooking and crisp edges.
¾-inch chunks Skillet or oven Heartier bite, but needs more covered time.
1-inch chunks Sheet pan Good for roasting if spread in one layer.
¼-inch rounds Roasted or pan-fried style Browns quickly, but can break if stirred too much.
Halved baby potatoes Sheet pan Works if they are very small; quarter larger ones.

For the main skillet recipe, ½-inch pieces are the safest choice. Bigger chunks can work, but they usually need extra covered cooking time or a microwave head start. Hard potatoes usually mean one of three things: the pieces were too large, the pan was crowded, or the potatoes did not get enough covered time.

Hard-potato fix: cut smaller, cover longer, or use the microwave shortcut before browning.

Before-and-after image comparing large pale potato chunks with smaller browned potatoes in a kielbasa skillet.
Hard potatoes usually mean the pieces were too large, the pan was crowded, or the skillet was uncovered too soon. Cut smaller, cover longer, and let the potatoes finish before returning the sausage.

Best Kielbasa to Use

After the potatoes, the sausage choice mostly changes richness and how much fat you get in the pan. Smoked kielbasa is the easiest choice because it is flavorful, widely available, and often already cooked. If you are using raw sausage instead, cook it fully before combining it with the potatoes.

Choose by richness: pork gives the fullest drippings, while leaner sausage needs a little help from oil.

Four types of sliced sausage labeled pork, beef, turkey or chicken, and smoked sausage for kielbasa and potatoes.
Pork kielbasa gives the richest skillet flavor, but beef, turkey, chicken, or smoked sausage can all work. If the sausage is lean, add a little extra oil so the potatoes still brown properly.

For a deeper safety reference on sausage types and handling, the USDA has a helpful guide to sausages and food safety.

Check the package before cooking: many smoked kielbasa products are fully cooked, but raw sausage needs to be cooked through first.

Sliced kielbasa with a check-label reminder about fully cooked and raw sausage.
Many smoked kielbasa packages are fully cooked, but the label still matters. If the sausage is raw, cook it fully before combining it with the potatoes.
Type Flavor What Helps
Pork Kielbasa Rich, smoky, classic Usually releases enough fat to help flavor the potatoes.
Beef Kielbasa Hearty and smoky Great with mustard, cabbage, and sauerkraut.
Turkey Kielbasa Lighter and leaner Add extra oil because it will not render as much fat.
Chicken Kielbasa Mild and lighter Brown briefly and return at the end so it does not dry out.
Smoked Sausage Similar, depending on brand A good substitute if kielbasa is not available.

Using turkey or chicken kielbasa? Add enough oil for browning, then follow the same skillet timing.

Comparison of pork kielbasa with richer drippings and turkey kielbasa with added oil for cooking potatoes.
Pork kielbasa naturally seasons the pan with drippings. However, turkey or chicken kielbasa can still make a good kielbasa and potatoes dinner if you add enough oil for browning.

How to Make Kielbasa and Potatoes in a Skillet

The skillet is the go-to approach because it gives you browned sausage, golden potatoes, and a real dinner from one pan. Use a 12-inch heavy skillet or cast iron skillet if you have one. A lid helps the potatoes soften before you crisp them.

Ready to cook now? Skip ahead to the recipe card, or keep reading for the visual skillet method.

Brown the Kielbasa First

Heat 1 tablespoon oil in a large skillet over medium-high heat. Add the sliced kielbasa in a single layer and cook for 4–6 minutes, turning once or twice, until the edges are browned.

Kielbasa slices browning in a cast iron skillet with a utensil lifting one piece.
Browning the kielbasa first builds flavor quickly. Once the sausage has color, remove it so the potatoes can cook longer without turning the meat dry or rubbery.

You are not trying to cook it for a long time. You just want color, savory drippings, and browned edges. Once the kielbasa is browned but not shriveled, move it to a plate.

Move it out of the pan now: the potatoes still need time, and the kielbasa only needs to return once everything is nearly done.

Browned kielbasa on a plate beside a skillet of potatoes cooking in the pan drippings.
Removing the kielbasa is not an unnecessary extra step. It protects the sausage while the potatoes get the time and pan contact they need.

Cook the Potatoes Until Tender

Add the diced potatoes to the same skillet with the remaining oil. Stir so they pick up the sausage drippings. Add a small pinch of salt, then cover the skillet and cook over medium heat for 10–12 minutes.

Close-up of potato cubes cooking in glossy sausage drippings with browned bits in a cast iron skillet.
The sausage drippings season the potatoes before anything else goes back into the pan. Let the potatoes pick up those browned bits for deeper flavor and better skillet texture.

The lid matters. It traps enough steam to help the potatoes soften inside. When the pan looks dry or the potatoes are sticking hard, add 2 tablespoons of water or chicken stock. Use small splashes, not a big pour, so the pan does not turn soupy.

Crisp the Potatoes

Once the potatoes are nearly fork-tender, remove the lid. Let them cook uncovered for 6–8 minutes, stirring only occasionally. If you move them constantly, they will not brown as well.

Split cooking image showing potatoes covered to soften and uncovered to crisp.
Cover the potatoes first to soften the centers, then uncover the pan so the edges can brown. That two-stage method helps prevent both hard potatoes and pale, steamed potatoes.

Soft but pale potatoes need more direct contact with the pan. Potatoes that are browning too quickly but still hard in the middle need lower heat, a lid, and another tablespoon or two of water.

Add the Onions and Peppers

When the potatoes are mostly tender, add the onion and bell pepper. Cook for 4–5 minutes, until the vegetables soften but still have some shape.

Hand adding sliced onion and bell pepper to a skillet of partially cooked potatoes and kielbasa.
Onions and peppers work better after the potatoes have already started softening. That way, they add sweetness and color instead of collapsing before the skillet is finished.

This timing keeps the onions sweet and the peppers lively. If they go in at the beginning, they can turn limp before the potatoes are ready.

Season and Return the Kielbasa

Add the garlic, smoked paprika, oregano, and black pepper. Stir for 30–60 seconds, just until the paprika darkens slightly and the garlic smells warm. Then return the browned kielbasa to the skillet and toss everything together.

Kielbasa being returned to a skillet with potatoes, vegetables, garlic, and paprika.
Season near the end so the garlic and paprika bloom instead of burn. Then return the kielbasa just long enough to warm through and coat everything in the skillet flavor.

Cook for 2–3 minutes, until the kielbasa is hot throughout. The best bites have a little of everything: browned sausage edge, tender potato center, sweet onion, and just enough pepper or mustard to keep the skillet from feeling heavy. Taste before adding more salt, since some kielbasa brands are salty enough on their own.

Final texture check: the potatoes should look golden at the edges, and the kielbasa should look browned but not shriveled.

Finished skillet of browned kielbasa, golden potatoes, onions, and bell peppers with a serving spoon.
The finished skillet should have crisp-edged potatoes, browned sausage, and enough onion and pepper to keep the meal from feeling too heavy. Taste at the end before adding more salt.

Do not worry if your pan needs a small adjustment. Larger potatoes need more time, lean kielbasa needs a little more oil, and a crowded skillet needs patience. This is a forgiving dinner as long as you do not rush the potatoes or leave the sausage in the pan too long.

Faster Method: Microwave the Potatoes First

On a rushed night, give the potatoes a head start in the microwave before they go into the skillet. This is the easiest way to avoid the classic problem of browned sausage with hard potatoes.

Put the diced potatoes in a microwave-safe bowl with 2 tablespoons of water. Cover loosely and microwave for 4–5 minutes, just until the potatoes begin to soften. Drain well, then add them to the skillet after browning the kielbasa.

The microwave softens the centers; the skillet still gives the potatoes their browned edges.

Three-step microwave shortcut showing diced potatoes with water, a covered bowl, and potatoes going into a skillet.
A short microwave head start makes the skillet much faster. Just drain the potatoes well afterward so they can still brown in the pan instead of steaming.

You still get skillet browning, but the centers soften much faster. This shortcut is especially useful if your potato pieces are closer to ¾ inch than ½ inch.

If you are ready to cook, jump to the main recipe card. The sections after it are there for swaps, shortcuts, and different ways to use the same sausage-and-potato base.

Use this visual summary when you want the main skillet rhythm at a glance.

Recipe card image for kielbasa and potatoes with a skillet photo, yield, prep time, cook time, and method summary.
Keep the core rhythm simple: brown the kielbasa, cook the potatoes properly, add the vegetables, then bring the sausage back at the end. That sequence is the backbone of the recipe.

Kielbasa and Potatoes Recipe Card

This is the main skillet version: browned smoked sausage, golden-edged potatoes, sweet onion, bell pepper, garlic, and smoky seasoning. It is built for crisp edges, tender centers, and a finish you can brighten with mustard, hot sauce, or black pepper.

Yield4 servings
Prep Time10 minutes
Cook Time30–35 minutes
Total Time40–45 minutes

Equipment

  • 12-inch heavy skillet or cast iron skillet
  • Lid for the skillet
  • Cutting board
  • Sharp knife
  • Spatula

Ingredients

  • 14–16 oz / 400–450 g kielbasa, sliced into ½-inch rounds
  • 1½ lb / 680 g Yukon Gold, baby gold, or baby red potatoes, cut into ½-inch pieces
  • 2 tbsp olive oil or neutral cooking oil, divided
  • 1 medium onion, about 150–180 g, sliced or chopped
  • 1 large bell pepper, about 150 g, sliced or chopped
  • 2–3 garlic cloves, minced
  • 1 tsp smoked paprika
  • ½ tsp dried oregano or Italian seasoning
  • ½ tsp black pepper
  • ¼ tsp salt to start, plus more to taste
  • 2–4 tbsp chicken stock or water, only if needed
  • 1 tbsp chopped parsley, optional
  • 1–2 tsp Dijon mustard or a splash of hot sauce, optional for finishing

Instructions

  1. Brown the kielbasa. Heat 1 tablespoon oil in a large skillet over medium-high heat. Add the sliced kielbasa in a single layer and cook for 4–6 minutes, turning once or twice, until browned on the edges. Transfer to a plate.
  2. Start the potatoes. Add the remaining 1 tablespoon oil to the skillet. Add the diced potatoes and ¼ teaspoon salt. Stir to coat them in the oil and sausage drippings.
  3. Cover and cook. Reduce the heat to medium, cover the skillet, and cook the potatoes for 10–12 minutes, stirring once or twice. If the pan looks dry or the potatoes are sticking hard, add 2 tablespoons water or chicken stock.
  4. Crisp the potatoes. Remove the lid and continue cooking for 6–8 minutes, stirring occasionally, until the potatoes are fork-tender inside and golden on the edges. The potatoes should pierce easily with a fork before the kielbasa goes back in.
  5. Add onion and pepper. Stir in the onion and bell pepper. Cook for 4–5 minutes, until softened but not mushy.
  6. Season. Add garlic, smoked paprika, oregano, and black pepper. Cook for 30–60 seconds, just until fragrant.
  7. Return the kielbasa. Add the browned kielbasa back to the skillet and toss everything together. Cook for 2–3 minutes, until hot throughout.
  8. Finish and serve. Taste and adjust salt carefully. Finish with parsley, Dijon mustard, hot sauce, or extra black pepper.

Faster Potato Shortcut

Microwave the diced potatoes with 2 tablespoons water for 4–5 minutes before adding them to the skillet. Drain well, then brown them in the sausage drippings.

Notes

  • Use a large skillet. If the pan is too small, the potatoes will steam instead of brown.
  • If your potatoes are larger than ½ inch, microwave them first or expect a longer cook time.
  • If using turkey or chicken kielbasa, add a little extra oil because lean sausage does not release as much fat as pork kielbasa.
  • Do not add too much salt at the beginning. Kielbasa can be salty, so taste near the end.
  • For a cabbage variation, add 3–4 cups / 250–350 g sliced cabbage once the potatoes are almost tender.
  • For sauerkraut, use 1½–2 cups drained sauerkraut and add it after the potatoes are tender and browned.
  • For a sheet pan dinner, roast potatoes and vegetables first at 400°F / 200°C, then add kielbasa halfway through.
  • For an air fryer version, give the potatoes a head start before adding the kielbasa so the sausage does not overcook.

Timing guide: the main method works because each ingredient gets the right amount of pan time.

Timing guide for kielbasa and potatoes showing sausage browning, covered potatoes, uncovered potatoes, vegetables, and final finish.
This timing guide prevents the most common mistake: treating sausage and potatoes like they cook at the same speed. They do not, and the skillet tastes better when each step gets its own moment.

Once the skillet version makes sense, the rest is mostly about what kind of dinner you want: roasted and hands-off, soft and slow-cooked, sharper with sauerkraut, fuller with cabbage or green beans, or rich enough to become a cheesy casserole.

Oven and Sheet Pan Kielbasa and Potatoes

The sheet pan route is for nights when you want dinner mostly hands-off and do not mind a slightly softer sausage edge. The potatoes still need the head start, but the oven does most of the work.

For the sheet pan version, spread the food out so the potatoes roast instead of steam.

Sheet pan with kielbasa, potatoes, and peppers spread in one layer for oven roasting.
For the sheet pan version, spacing matters. A crowded tray steams, while a spread-out tray gives the potatoes a better chance to roast and brown.

Preheat the oven to 400°F / 200°C. Use a large 13×18-inch rimmed sheet pan. Cut the potatoes into ¾–1 inch pieces, then toss them with onion, bell pepper, 2–3 tablespoons oil, smoked paprika, black pepper, and ¼ tsp salt to start.

Spread everything in a single layer. If the pan is crowded, the potatoes will steam instead of roast. Use two pans if you are doubling the recipe, then check the spacing guide below.

Comparison of a crowded sheet pan that steams and a spaced sheet pan that roasts.
If sheet pan potatoes come out soft instead of roasted, crowding is usually the reason. Use a larger pan or divide the batch between two trays for better browning.

The same one-pan logic also works well in these sheet pan chicken fajitas, where peppers, onions, and high heat do most of the work.

Most Reliable Sheet Pan Timing

Roast the potatoes, onions, and peppers for 15–20 minutes first. Then add the sliced kielbasa, toss, and roast for another 10–15 minutes, until the potatoes are tender and the sausage is browned.

Hand adding sliced kielbasa to a sheet pan of partially roasted potatoes and vegetables.
Add the kielbasa halfway through the sheet pan method if you want the sausage browned but not dried out. The potatoes need the earlier head start.

Adding kielbasa later keeps it juicier. Adding it from the start gives deeper browning, but the sausage can get drier, especially if you are using turkey or chicken kielbasa.

Oven Choice Use It For Result
Add kielbasa from the start When you want deeper sausage color More browning, slightly drier texture.
Add kielbasa halfway through Most reliable sheet pan timing Juicier sausage, still browned.
Add lean kielbasa later Turkey or chicken kielbasa Less drying, better texture.

Air Fryer Kielbasa and Potatoes

The air fryer works best when you want crisp edges without heating the oven. It follows the same basic idea as the skillet and sheet pan versions: give the potatoes a head start, then add the kielbasa once the potatoes are partly tender.

Air fryer basket filled with crisp potatoes and browned kielbasa, with tongs lifting a bite.
The air fryer version works best in a single layer. The basket needs enough room for hot air to move around the potatoes and sausage.

Cut the potatoes into ½–¾ inch pieces, then toss them with oil, smoked paprika, black pepper, and a small pinch of salt. Air fry at 380–400°F / 190–200°C for about 10–12 minutes, shaking once.

Potatoes go first: this keeps the sausage from overcooking while the potatoes finish softening.

Partly cooked potatoes in an air fryer basket with kielbasa slices ready to be added later.
The air fryer method turns out better when the potatoes go in first. Add the sausage later so it browns at the edges without overcooking before the potatoes are tender.

Add sliced kielbasa and any quick-cooking peppers or onions, then air fry for another 6–10 minutes, shaking once or twice, until the potatoes are tender and the sausage is browned at the edges. Work in batches if your basket is small; crowded potatoes steam instead of crisp.

Air fryer comparison showing a crowded basket and a single-layer basket for kielbasa and potatoes.
The air fryer rewards space. When the basket is too full, the potatoes steam instead of crisp, so work in batches if needed.

Slow Cooker Kielbasa and Potatoes

The slow cooker version belongs in a different lane: soft, cozy comfort food instead of browned skillet edges. This is the low-effort version for busy days, but it should be judged as a tender potato-and-sausage supper, not a crispy skillet dinner.

What to Add to the Slow Cooker

A basic slow cooker batch can stay simple:

  • 14–16 oz / 400–450 g kielbasa, sliced
  • 1½–2 lb / 680–900 g potatoes, cut into ¾–1 inch chunks
  • 1 medium onion, chopped
  • ½ cup chicken broth to start, up to 1 cup if needed
  • Garlic, smoked paprika, black pepper, and ¼ tsp salt to start
  • Optional cabbage, carrots, or green beans
Slow cooker filled with tender potatoes and kielbasa, with a spoon lifting a soft serving.
Use the slow cooker when you want tender potatoes and smoky sausage with almost no hands-on work. The tradeoff is texture: this version is cozy and soft rather than browned and crisp.

How Long to Cook Slow Cooker Kielbasa and Potatoes

Cook on low for 5–6 hours or high for 3–4 hours, depending on the size of the potatoes and the strength of your slow cooker. If your slow cooker runs hot or you want a softer, more braised result, use the higher end of the broth range. If you are adding cabbage or frozen vegetables, stay closer to ½ cup broth because they release moisture as they cook.

For a little more sausage flavor, sear the kielbasa first before adding it to the slow cooker.

If you are already pulling out the slow cooker, this slow cooker sausage casserole recipe is another cozy sausage dinner with a saucier, softer finish.

Creamy Slow Cooker Option

For a creamy version, use frozen diced potatoes or par-cooked potatoes, then add cream soup, sour cream, milk, or cheese near the end. Stir dairy in late so it stays smoother.

Texture note: slow cooker kielbasa and potatoes will be soft and comforting. They will not have the crisp edges of a skillet or sheet pan version.

Texture comparison showing soft slow cooker kielbasa and potatoes with a crisp skillet reference.
The slow cooker and skillet solve different dinner moods. One gives soft comfort; the other gives browned potato edges, so choose based on the texture you want most.

Kielbasa, Cabbage, and Potatoes

When you want the skillet to feel more like an old-school, full-plate dinner, cabbage is the easiest add-in. It stretches the meal, turns sweet as it wilts, and works beautifully with smoky sausage.

Skillet of kielbasa, cabbage, and potatoes with mustard on the side.
Cabbage gives this skillet an old-school supper feel. It stretches the pan, adds a little sweetness, and works especially well with mustard on the side.

This is the variation that feels most like an old-school supper: smoky, filling, a little sweet from the cabbage, and good with mustard on the side.

For the main recipe amount, add 3–4 cups sliced cabbage, about 250–350 g. Add it once the potatoes are almost tender, not at the beginning. Pour in 2 tablespoons water or stock, cover the skillet, and cook until the cabbage softens.

Hand adding sliced cabbage to a skillet of browned potatoes, kielbasa, onions, and peppers.
Add cabbage after the potatoes have started to cook, not at the very beginning. That timing keeps the cabbage tender while giving the potatoes a better chance to brown.

For crisp-tender cabbage, cook it for 2–5 minutes. For softer cabbage, cook it for 6–8 minutes. The pan may look very full at first, but cabbage shrinks as it cooks. If your pan is already crowded, add the cabbage in two handfuls and let the first handful wilt before adding the rest.

Finish with black pepper, mustard, or a small splash of vinegar if the dish needs brightness.

Want a tangier version? Jump to kielbasa, sauerkraut, and potatoes.

If you want cabbage on the side instead of in the pan, this coleslaw recipe gives you the cold, creamy crunch that works especially well with smoky sausage and potatoes.

Kielbasa, Sauerkraut, and Potatoes

Use the sauerkraut version when you want the skillet sharper, tangier, and more old-school. It is especially good with mustard on the side, but because sauerkraut brings moisture and acidity, it should go in after the potatoes have already browned.

Skillet of browned kielbasa, potatoes, and sauerkraut with mustard and caraway nearby.
Sauerkraut gives the pan a tangy, mustard-friendly edge. Because it adds moisture, stir it in after the potatoes have browned.

For the main recipe amount, use 1½–2 cups drained sauerkraut. If you want crisp potatoes, do not add sauerkraut until the potatoes are already tender and browned. Added too early, the extra moisture can keep the potatoes from browning.

Well-drained sauerkraut being added from a bowl to browned potatoes and kielbasa in a skillet.
Drain sauerkraut well, then add it after the potatoes have color. However, if it tastes too sharp or salty, a light rinse can soften the flavor without losing the tang.

For a skillet variation, drain the sauerkraut well. For a softer, more braised dish, use a little of the sauerkraut liquid and cover the pan for a few minutes. If the sauerkraut tastes too sharp or salty, rinse it lightly and drain again before adding.

Mustard, caraway, thyme, sage, apple, and black pepper all work well with sauerkraut. The mustard keeps the skillet savory, while apple can soften the sharp edges.

Want a milder vegetable route? Jump to the green bean variation.

Kielbasa, Green Beans, and Potatoes

Green beans are the easiest way to make the skillet feel like a complete dinner without cooking a separate vegetable. Fresh beans keep it brighter, frozen beans make it easier, and canned beans work when you only need a quick, soft add-in.

Skillet of kielbasa, green beans, potatoes, onions, and peppers.
Green beans make this sausage and potato skillet feel like a fuller dinner without cooking a separate vegetable. Add them late enough that they stay green instead of turning dull and soft.

Choose the bean by texture: fresh stays snappier, frozen is easy, and canned should only be warmed through.

Guide comparing fresh, frozen, and canned green beans with a skillet of kielbasa and potatoes.
Fresh green beans give the best bite, frozen beans are convenient, and canned beans only need warming. Add each type at the right time for better texture.
Green Bean Type When to Add Result
Fresh Green Beans When potatoes are partly tender Brighter color, firmer bite.
Frozen Green Beans Near the end or on a sheet pan Easy, moist, slightly softer.
Canned Green Beans Last 2–3 minutes Soft; only needs warming.

Green beans should support the skillet, not water it down. Add them late enough that they stay green and the potatoes keep their browned edges.

For the stovetop version, add fresh green beans after the potatoes have started to soften. Frozen green beans can go in closer to the end. Canned green beans should be drained and stirred in only long enough to heat through.

For a creamy green-bean side instead of a skillet add-in, this green bean casserole recipe fits better.

Cheesy Kielbasa and Potato Casserole Variation

This is the version for the night when crisp edges matter less than a bubbling dish of sausage, potatoes, and melted cheese. It is richer and softer than the skillet, so the potato prep matters even more.

Cheesy kielbasa potato casserole in a baking dish with a spoon lifting sausage and potatoes.
The casserole path is for nights when you want melted cheese and softer comfort instead of skillet crispness. Par-cooked potatoes make the bake much more reliable.

Par-Cook the Potatoes First

The most important rule is to par-cook the potatoes. Do not rely on thick raw potato chunks to cook through in a short casserole bake. Use par-cooked diced potatoes, thinly sliced potatoes, frozen diced potatoes, or hash browns for a softer, easier approach.

Par-cooked potato chunks beside a casserole dish with a warning about thick raw chunks.
Cheese can melt before raw potato chunks finish cooking. Par-cooking the potatoes first helps the casserole turn tender in the center instead of uneven or crunchy.

How to Bake the Casserole

Brown the kielbasa in a skillet, then mix the sausage and potatoes with a creamy sauce or cheese sauce. Transfer everything to a greased 9×13-inch baking dish and bake at 350–375°F / 175–190°C until hot and bubbling.

Most par-cooked potato casseroles need about 25–40 minutes, depending on the depth of the dish and how soft the potatoes were before baking. If the potatoes need more time, cover the dish for the first part of baking. Uncover near the end, add shredded cheese if you like, and bake until the top is melted and lightly golden.

Best Cheese and Finish

Cheddar, Monterey Jack, and mozzarella all work, depending on whether you want sharpness, creaminess, or stretch.

If the cheesy, bubbly part is what you are craving, this tater tot casserole recipe goes even further into crispy-topped comfort food.

Looking for kielbasa potato soup? Soup is a different dinner. It needs broth, aromatics, potatoes, and often cream, cheese, cabbage, kale, corn, or carrots. This guide stays focused on the skillet version: browned sausage, golden potatoes, and one-pan comfort.

What to Serve with Kielbasa and Potatoes

This skillet can stand alone, especially when you add onions and peppers. Because kielbasa and potatoes are smoky, salty, and rich, the best sides usually do one of three things: add crunch, add acidity, or bring something fresh to the plate.

Skillet of kielbasa and potatoes served with mustard, pickles, salad, bread, and applesauce.
A smoky sausage-and-potato skillet tastes best with contrast on the plate. Pickles, mustard, salad, applesauce, or bread can add acidity, crunch, freshness, or softness.

Try it with:

  • A simple green salad with vinaigrette
  • Roasted broccoli or green beans
  • Steamed cabbage
  • Pickles or sauerkraut
  • Mustard on the side
  • Rye bread, crusty bread, or a warm slice of homemade garlic bread
  • Applesauce for a sweet contrast

If the skillet tastes heavy, start with mustard, pickles, sauerkraut, vinaigrette, applesauce, hot sauce, or more black pepper before adding anything creamy.

For another smoky sausage dinner in a creamier direction, try this kielbasa pasta recipe.

If you want something spoonable with beans and sausage, this red beans and rice recipe is a better fit.

Storage and Reheating

Let leftovers cool, then store them in an airtight container in the refrigerator. For best quality, eat them within 3–4 days. The USDA also recommends reheating leftovers to 165°F / 74°C; you can read more in their guide to leftovers and food safety.

To reheat on the stovetop, add the leftovers to a skillet with a small splash of water or oil. Cook over medium heat, stirring occasionally, until hot. This gives the potatoes a better texture than the microwave.

Leftovers are especially good as a breakfast hash. Reheat them in a skillet until the potatoes pick up fresh edges, then add a fried egg, mustard, hot sauce, or a few pickles on the side.

Leftover kielbasa and potatoes reheated as a breakfast hash with a fried egg on top.
Leftovers become more useful when you reheat them like a hash. A fried egg, mustard, or hot sauce turns yesterday’s skillet into an easy breakfast.

To reheat in the microwave, cover loosely and heat in short intervals, stirring between each one. The potatoes will be softer, but the smoky sausage-and-potato flavor will still be there.

Freezing is possible, but potatoes can become grainy or watery after thawing. If you do freeze leftovers, reheat them in a skillet or oven rather than expecting the same fresh-cooked texture.

Troubleshooting Kielbasa and Potatoes

Use this section when the skillet is technically cooked but something feels off: the potatoes are hard, the sausage is dry, the cabbage is watery, or the flavor needs brightness.

Troubleshooting board for kielbasa and potatoes showing fixes for hard potatoes, dry sausage, flat flavor, and watery cabbage.
Most kielbasa and potatoes problems come from timing, moisture, or balance. Cut potatoes smaller, return sausage late, brighten heavy flavor with acid, and add cabbage after the potatoes have a head start.

Texture and Browning Problems

Problem What Happened How to Fix It
Potatoes are still hard The pieces were too large, the pan was too crowded, or the skillet was uncovered too soon. Cover the skillet longer and add 1–2 tbsp water or stock. Next time, cut smaller or microwave first.
Sausage is dry or rubbery The kielbasa cooked too long while the potatoes were still softening. Brown the kielbasa first, remove it, and return it only at the end.
Potatoes are mushy The potatoes were over-stirred, overcooked, or too starchy. Use Yukon Gold, baby gold, or red potatoes. Stir less often once they begin to soften.
Potatoes are not browning The skillet is crowded, covered too long, or stirred too often. Remove the lid, spread the potatoes out, and let them sit between stirs.
The skillet is greasy The kielbasa released more fat than expected. Spoon off extra fat after browning the kielbasa, then continue with the potatoes.

Flavor and Add-In Fixes

Problem What Happened How to Fix It
The dish tastes flat or heavy The sausage and potatoes need acidity, heat, or freshness to balance the richness. Add mustard, vinegar, hot sauce, black pepper, pickles, sauerkraut, parsley, or a small splash of apple cider vinegar.
Garlic tastes burnt It was added too early or cooked over high heat. Add garlic near the end and cook it for only 30–60 seconds before returning the kielbasa.
Cabbage is watery Too much liquid was added or the cabbage cooked too long. Add cabbage late and use only a small splash of water or stock.
Sauerkraut is too sharp The sauerkraut was very acidic or too much liquid was included. Drain well, rinse lightly if needed, and balance with onion, mustard, or a little apple.
Slow cooker onions are crunchy The onion pieces were too large or added raw to a short cook. Dice them smaller or sauté them before adding to the slow cooker.

FAQs

Do you cook kielbasa or potatoes first?

Brown the kielbasa first, but only long enough to give it color and leave savory drippings in the pan. Then remove it, cook the potatoes, and return the kielbasa at the end so it heats through without becoming dry or rubbery.

How do you make potatoes cook faster in a skillet?

Cut them into ½-inch pieces and cover the skillet during the first part of cooking. For the fastest route, microwave the diced potatoes with a little water for 4–5 minutes, drain them, then brown them in the skillet.

Should I boil potatoes before frying them with kielbasa?

You do not have to boil them. Microwaving is usually easier and faster. If you already have boiled or leftover potatoes, you can use them; just brown them gently in the skillet so they do not fall apart.

What potatoes work best with kielbasa?

Yukon Gold, baby gold, and baby red potatoes are the most reliable choices because they hold their shape and brown well. Russets can work, but they are more likely to break apart if you stir them too often.

What can I use instead of bell peppers?

Use cabbage, green beans, mushrooms, carrots, or skip the pepper. Keep the onion if you can; it adds sweetness and helps balance the smoky sausage.

What seasoning goes best with kielbasa and potatoes?

Smoked paprika, garlic, black pepper, oregano, mustard, parsley, and a little hot sauce all work well. For sauerkraut variations, try mustard, caraway, thyme, sage, or apple.

Is kielbasa already cooked?

Many packaged smoked kielbasa products are fully cooked, but you should always check the label. Even when it is fully cooked, browning it in the skillet gives it much better flavor.

Is this better in a skillet or the oven?

Choose the skillet if you want the crispiest potatoes and deepest sausage browning. The oven is better for easier cleanup and less hands-on cooking. Save the slow cooker for a softer comfort-food version, not crisp edges.

Do canned potatoes work in this recipe?

Yes, but the texture will be softer. Drain them well and add them to the skillet after browning the kielbasa. Cook uncovered so they can pick up some color.

What about frozen diced potatoes?

Frozen diced potatoes work best in slow cooker meals or casseroles. For a skillet, thaw and pat them dry if possible so they brown instead of steaming.

How do I keep potatoes from sticking?

Use enough oil, let the skillet heat properly, and avoid moving the potatoes constantly. If the browned bits get too dark before the potatoes are tender, add a small splash of water or stock and cover the pan for a few minutes.

When should cabbage or sauerkraut go in?

Add cabbage once the potatoes are almost tender so it has time to wilt without getting watery. Add drained sauerkraut after the potatoes are cooked and browned so the extra moisture does not stop them from crisping.

How long do leftovers last?

Store leftovers in an airtight container in the refrigerator and use them within 3–4 days. Reheat until hot throughout, ideally to 165°F / 74°C.

Does kielbasa and potatoes freeze well?

It can be frozen, but the potatoes may soften or become slightly grainy after thawing. For the best texture, refrigerate leftovers and reheat them in a skillet within a few days.

If you make this skillet your own, tell us what went in — cabbage, sauerkraut, green beans, cheese, mustard, extra peppers, or just the classic sausage and potatoes. These are exactly the kinds of dinners people quietly customize every time they make them.

Back to top

Posted on 1 Comment

Cream of Mushroom Chicken Recipe

Cream of mushroom chicken served over mashed potatoes with sliced mushrooms, creamy sauce, black pepper, and fresh herbs.

This cream of mushroom chicken recipe is for the night when you have chicken in the fridge, a can of cream of mushroom soup in the pantry, and no patience for a complicated sauce. The goal is simple: tender chicken, creamy mushroom gravy, and a dinner that works with rice, egg noodles, mashed potatoes, biscuits, or whatever vegetable you already have.

This is the kind of dinner that feels like a shortcut while it cooks, but like comfort food once it hits the plate. It is not fancy food; it is the creamy, spoon-over-something meal you make when the day has been long and everyone still needs to eat.

Bake it when you want the easiest family dinner. Use the skillet when dinner needs to happen faster, the slow cooker when the meal should take care of itself, and the rice bake when chicken and rice should land in one dish.

The dish works best with condensed cream of mushroom soup, thin or evenly pounded chicken, and just enough milk or broth to turn the soup into a spoonable sauce. A thermometer keeps the chicken from drying out while still getting it safely to 165°F / 74°C.

Quick Answer: How to Make Cream of Mushroom Chicken

To make cream of mushroom chicken, season chicken breasts or thighs, place them in a baking dish, whisk condensed cream of mushroom soup with milk or low-sodium chicken broth, pour the sauce over the chicken, cover, and bake until the chicken reaches 165°F / 74°C. Uncover near the end if the sauce needs to thicken or cheese is going on top.

The result should be chicken that slices easily with creamy mushroom gravy you can spoon over rice, noodles, mashed potatoes, biscuits, or vegetables. This is still a low-effort dinner: about 10 minutes of prep, then the oven does most of the work.

The skillet version is faster, the slow cooker version is more hands-off, and the rice bake turns it into a one-dish meal. The trick is changing the liquid slightly for each method, so use the version guide or the soup and liquid ratios before switching methods.

Best first version: Bake thin chicken breasts or thighs with 1 can condensed cream of mushroom soup and ½ cup milk or broth at 375°F / 190°C. Cover first for moisture, then uncover near the end so the sauce thickens.
Quick answer board showing cream of mushroom chicken, chicken pieces, condensed soup, milk or broth, and covered baking instructions.
For the simplest version, build the dish in four parts: chicken, condensed cream of mushroom soup, a little milk or broth, and a covered bake.

For food safety, chicken should reach 165°F / 74°C in the thickest part; FoodSafety.gov lists poultry and casseroles at this internal temperature.

Which Version Should You Make?

Before you open the soup can, decide how dinner needs to work tonight. The same basic ingredients can become an easy oven dinner, a quick skillet meal, a slow cooker comfort dish, or a chicken-and-rice bake.

The one thing that changes most between versions is the soup-to-liquid ratio. The oven, skillet, slow cooker, and rice bake each need slightly different treatment, which is what keeps the chicken juicy and the sauce creamy instead of watery.

Choose This Version Best When Key Ratio
Baked cream of mushroom chicken You want the easiest family dinner with minimal prep. 1 can soup + ½ cup milk or broth
Skillet cream of mushroom chicken You want dinner faster and more control over the sauce. 1 can soup + ½–1 cup broth or milk
Slow cooker cream of mushroom chicken You want hands-off creamy chicken for rice, noodles, or potatoes. 2 cans soup + ½ cup liquid
Cream of mushroom chicken and rice You want a full one-dish meal. 1 can soup + 1 cup liquid + ¾ cup rice
Creamy chicken over egg noodles You want mushroom-sauce chicken without baking rice. Cook noodles separately and spoon sauce over them
Guide comparing baked, skillet, slow cooker, and chicken and rice versions of cream of mushroom chicken.
Instead of using one formula for every method, adjust the liquid for baked, skillet, slow cooker, and chicken-and-rice versions.

How Much Liquid to Add to Cream of Mushroom Soup

Use these ratios as starting points, then adjust until the sauce looks spoonable, not stiff and not soupy.

Version Condensed Soup Added Liquid Why It Works
Baked chicken 1 can / 10.5 oz / 298 g ½ cup / 120 ml milk or broth Creates a creamy, spoonable sauce without making the dish watery.
Skillet chicken 1 can / 10.5 oz / 298 g ½–1 cup / 120–240 ml broth or milk The sauce reduces as it simmers, so you can loosen or thicken it as needed.
Slow cooker chicken 2 cans / about 596 g total ½ cup / 120 ml broth or water The slow cooker traps moisture, so too much liquid makes the sauce thin.
Small chicken and rice bake 1 can / 10.5 oz / 298 g 1 cup / 240 ml liquid + ¾ cup rice Rice needs measured liquid and trapped steam to cook properly.
Large 9×13 rice bake 2 cans / about 596 g total 2 cups / 480 ml broth + 1¼ cups rice Better for a family-size casserole with more rice and chicken.
Liquid ratio guide for baked, skillet, slow cooker, and chicken and rice cream of mushroom chicken recipes.
Condensed soup gives the sauce body; however, each cooking method needs a different amount of liquid to stay creamy.

Once the ratio is right, everything gets easier: the chicken cooks gently, the sauce stays spoonable, and the sides do half the work. When you are ready to cook the oven version, go straight to the cream of mushroom chicken recipe card.

Water works in a pinch, but broth gives the dish more savory flavor and milk makes the sauce softer and creamier. Regular condensed soup, regular broth, cheese, and onion soup mix can all add salt, so taste before adding more.

Basic Oven Method at a Glance

Use this as the quick map before the full recipe card.

  1. Thin and season the chicken. Slice large breasts in half lengthwise or pound them evenly, then season lightly.
  2. Whisk the soup mixture. Mix condensed cream of mushroom soup with milk or broth until smooth.
  3. Cover and bake. Pour the mixture over the chicken, cover with foil, and bake so the meat stays moist.
  4. Uncover, check, and rest. Finish uncovered, cook to 165°F / 74°C, and rest before serving.
Four-step oven method for cream of mushroom chicken showing thin chicken, soup mixture, covered baking, and temperature check.
Once the chicken is even in thickness and the soup mixture is loosened, the oven version becomes simple and predictable.

Cream of Mushroom Chicken Recipe Card

This baked cream of mushroom chicken is the oven version to make first: tender chicken, condensed cream of mushroom soup, a little milk or broth, simple seasonings, and enough creamy mushroom sauce to spoon over rice, egg noodles, mashed potatoes, or vegetables.

Prep Time10 minutes
Cook Time30–35 minutes
Total Time40–45 minutes
Yield4 servings

Course: Dinner
Cuisine: American
Method: Baked
Equipment: 9×13-inch baking dish, foil, mixing bowl, instant-read thermometer

Ingredients

  • 1½ lb / 680 g boneless skinless chicken breasts or thighs
  • 1 can condensed cream of mushroom soup, 10.5 oz / 298 g
  • ½ cup / 120 ml milk or low-sodium chicken broth
  • ½ tsp garlic powder, divided
  • ½ tsp onion powder, divided
  • ½ tsp paprika, divided
  • ¼ tsp black pepper, divided, plus more to taste
  • 8 oz / 225 g sliced mushrooms, optional
  • ¼–½ cup / 60–120 g sour cream, optional
  • ¾–1 cup / 85–115 g shredded mozzarella, Monterey Jack, or cheddar, optional
  • Salt only after tasting, if needed

Instructions

  1. Heat oven to 375°F / 190°C. Lightly grease a 9×13-inch baking dish.
  2. Slice large chicken breasts in half lengthwise or pound them to an even thickness.
  3. Place the chicken in the baking dish. Sprinkle with about half of the garlic powder, onion powder, paprika, and black pepper.
  4. Scatter raw mushrooms around the chicken for convenience, or brown them first for deeper flavor and less extra moisture.
  5. In a bowl, whisk the condensed cream of mushroom soup with milk or broth and the remaining garlic powder, onion powder, paprika, and pepper until smooth. Whisk in sour cream now if using it for the baked version.
  6. Taste the sauce. Add salt only if it needs it. A flat-tasting sauce can take a little more pepper, paprika, thyme, garlic powder, or Dijon.
  7. Pour the sauce over the chicken and spread it so the chicken is mostly covered.
  8. Cover the dish tightly with foil.
  9. Bake for 25 minutes.
  10. Uncover and bake 5–10 minutes more, or until the chicken reaches 165°F / 74°C in the thickest part.
  11. Sprinkle cheese over the chicken during the uncovered finish if using it, then bake until melted.
  12. When the chicken is done but the sauce is still thin, move the chicken to a plate and thicken the sauce separately in a small pan, or in the baking dish only if your dish is stovetop-safe.
  13. Rest for 5 minutes before serving.
  14. Serve over rice, egg noodles, mashed potatoes, biscuits, broccoli, green beans, or roasted vegetables.

Notes

  • Use condensed cream of mushroom soup, not ready-to-eat mushroom soup.
  • Browned mushrooms give the sauce a deeper, less canned flavor.
  • Water works if that is all you have, but broth gives better flavor and milk makes the sauce creamier.
  • A cream of chicken swap works too: replace half or all of the cream of mushroom soup with condensed cream of chicken soup.
  • For skillet or slow cooker versions, add sour cream or cheese near the end over gentle heat for the smoothest finish.
Recipe card for cream of mushroom chicken with prep time, cook time, oven temperature, chicken, condensed soup, milk or broth, and method notes.
Save this basic baked cream of mushroom chicken formula first, then use the other sections when you want skillet, slow cooker, or rice variations.

Making a different version? Use the skillet method, slow cooker method, or chicken and rice bake so the liquid and timing stay right.

Why This Recipe Works

The baked version works because it solves two problems at once: thick chicken and loose sauce. Thin pieces cook before they dry out, while condensed soup gives the sauce enough body to stay creamy. A small splash of milk or broth loosens the canned base, covered baking protects the chicken, and the uncovered finish lets the sauce settle.

The real win is not making it fancy. It is keeping the chicken juicy and turning the canned soup into a sauce that tastes like it belongs on the plate.

Ingredient Notes That Keep It Creamy, Not Watery

Nothing here is precious. The point is knowing which shortcuts help and which ones make the dish watery, salty, or dry.

Ingredients for cream of mushroom chicken including chicken, condensed mushroom soup, milk or broth, mushrooms, seasonings, sour cream, and cheese.
A pantry base can still taste rounded when you add smart upgrades like broth, browned mushrooms, thyme, pepper, sour cream, or cheese.
  • Chicken: Boneless skinless breasts or thighs both work. Breasts give you a classic sliced dinner; thighs give you more forgiveness.
  • Condensed cream of mushroom soup: The word condensed matters because the soup starts thick and becomes sauce when you add liquid.
  • Milk, broth, or water: Broth gives savory depth, milk gives a softer creamy finish, and water works when that is all you have.
  • Fresh mushrooms: Raw mushrooms are convenient, but browned mushrooms add deeper flavor and release less water into the dish.
  • Sour cream: Use it for tang. Whisk it into the oven version before baking, or stir it into skillet and slow cooker versions near the end over gentle heat.
  • Cheese: Mozzarella, Monterey Jack, cheddar, Swiss, or Muenster can turn this into a richer family bake.
Taste before baking: Once the soup, liquid, and seasonings are mixed, taste the sauce before pouring it over the chicken. A bland sauce can take black pepper, garlic powder, paprika, thyme, or a small spoon of Dijon; a salty sauce does not need extra salt.

For the oven version, a 9×13-inch baking dish, foil, a mixing bowl, and an instant-read thermometer are enough. The stovetop route needs a lidded skillet, while the crockpot option works best in a 4–6 quart slow cooker.

Using Campbell’s or Any Condensed Mushroom Soup

Campbell’s condensed cream of mushroom soup works well here, and so do other condensed brands. The label matters less than the word condensed.

Condensed vs Ready-to-Eat Soup

Condensed soup is thick enough to become sauce when mixed with a small amount of milk, broth, or water. Ready-to-eat mushroom soup is already diluted, so it can make the dish watery unless you reduce or skip the added liquid.

Comparison of thick condensed cream of mushroom soup and thinner ready-to-eat mushroom soup.
Condensed cream of mushroom soup starts thick, while ready-to-eat soup is already diluted; that difference matters when you want a creamy sauce.

Low-sodium condensed soup gives you more control if you are also using broth, cheese, onion soup mix, or another salty ingredient.

The same cream-soup comfort logic shows up in MasalaMonk’s tuna noodle casserole recipe, where condensed soup turns into a creamy noodle bake.

Best Chicken to Use: Breasts, Thighs, or Cubed Chicken

That is really the whole chicken decision: breasts for a classic sliced dinner, thighs when you want more forgiveness, and cubed chicken when you want a faster skillet or casserole-style meal.

Chicken guide showing breasts, thighs, cubed chicken, and thinner cutlets for cream of mushroom chicken.
Your cut changes the result: breasts slice neatly, thighs stay juicy, and cubed chicken cooks quickly for skillet-style dinners.

Chicken Breasts

Chicken breasts work well when they are not too thick. Large breasts should be sliced in half lengthwise to make thinner cutlets, or pounded to an even thickness. This helps the chicken cook through before the sauce dries out.

For more detail on baking chicken breast without drying it out, see MasalaMonk’s baked chicken breast recipe.

Chicken Thighs

Boneless skinless thighs stay juicy even when the dish needs a few extra minutes. They are especially good for the slow cooker or chicken-and-rice versions because they can handle longer cooking better than thin breasts.

Cubed Chicken

Cubed chicken is useful for a quick skillet dinner or a casserole-style variation. It cooks faster and mixes easily with noodles or rice, though it does not give you the same sliced-chicken presentation as baked breasts or thighs.

Baked Cream of Mushroom Chicken

This is the version to make first. It gives you the classic creamy mushroom chicken experience without needing a skillet, a roux, or a separate sauce.

The best pan comes out bubbling around the edges, with mushroom gravy tucked around the chicken and enough creamy sauce to drag through rice, noodles, or mashed potatoes.

Before Baking

The dish should look assembled but not finished: chicken tucked into the mushroom mixture, mushrooms visible, and just enough sauce to coat the pan before it is covered.

Raw chicken breasts in a baking dish with cream of mushroom sauce, sliced mushrooms, foil, and a spoon nearby.
Before baking, the chicken should be coated and nestled into the mushroom mixture, not buried under too much liquid.

Baked Version at a Glance

Detail Best Answer
Oven temperature 375°F / 190°C
Baking dish 9×13-inch dish
Chicken 1½ lb / 680 g boneless skinless breasts or thighs
Soup 1 can condensed cream of mushroom soup, 10.5 oz / 298 g
Liquid ½ cup / 120 ml milk or low-sodium chicken broth
Covered bake 25 minutes
Uncovered finish 5–10 minutes
Safe internal temperature 165°F / 74°C
Resting time 5 minutes
Baked cream of mushroom chicken guide showing 375°F oven, covered baking, uncovered finish, 165°F temperature, and resting time.
Baked cream of mushroom chicken works best with a covered start, a short uncovered finish, and a thermometer check at 165°F.

Once this version is in the oven, there is not much left to do except make something for the sauce to land on.

Covered or Uncovered?

Cover the chicken for the first part of baking. The foil traps steam, keeps the meat moist, and prevents the sauce from drying out too quickly. The final uncovered minutes help looseness cook off and let cheese melt if you are using it.

Very thin pieces should be checked early. Thicker pieces need a thermometer more than they need a guessed time.

Comparison of covered and uncovered baked cream of mushroom chicken in a casserole dish.
Covering helps the chicken stay moist; afterward, uncovering lets the creamy mushroom sauce reduce just enough.
If the chicken is done but the sauce is thin: Do not keep baking the chicken just to thicken the sauce. Move the chicken to a plate, cover it loosely, and thicken the sauce in a small pan, or in the baking dish only if your dish is stovetop-safe.

What the Sauce Should Look Like

The finished sauce should be creamy and spoonable, thick enough to coat the chicken but loose enough to run into rice, noodles, or mashed potatoes. It should not be stiff like paste, and it should not run like soup.

A sauce that looks too thick before baking needs another splash of milk or broth. When the sauce looks watery but the chicken still needs time, uncover the dish for the last few minutes. Once the chicken is already at 165°F / 74°C, remove it and thicken the sauce separately instead of overbaking dinner.

Sauce texture guide for cream of mushroom chicken showing too thick, just right, and too thin sauces.
Look for sauce that coats a spoon without running like soup, since that texture will sit better on rice, noodles, or mashed potatoes.

In the oven version, ½ cup / 120 ml milk or broth per 10.5 oz / 298 g can of condensed soup is the safest starting point. The skillet version can handle more liquid because the pan sauce reduces as it simmers. The slow cooker needs less because the lid traps moisture as everything cooks. When the texture looks off, use the troubleshooting guide instead of guessing.

Skillet Cream of Mushroom Chicken

The skillet version is best when dinner needs to be faster and the sauce needs more hands-on control. It tastes a little more cooked, not just assembled, because the chicken and mushrooms get direct heat before the sauce comes together.

This is the version with the most dinner-pan flavor: a little browning, a little butter, and creamy mushroom sauce pulled together in the same skillet.

Skillet cream of mushroom chicken with seared chicken, browned mushrooms, creamy sauce, black pepper, and herbs.
The skillet version adds extra savory depth because the chicken and mushrooms brown before the cream sauce is finished.

Skillet Formula

  • 1½–2 lb / 680–900 g chicken
  • 1 tbsp oil or butter, for searing
  • 1 can condensed cream of mushroom soup, 10.5 oz / 298 g
  • ½–1 cup / 120–240 ml milk, water, or low-sodium chicken broth
  • 8 oz / 225 g sliced mushrooms, optional
  • Garlic powder, onion powder, paprika, black pepper, and herbs to taste

Oil helps the chicken sear without burning. A small knob of butter added with the mushrooms gives the pan a richer, rounder flavor.

Skillet Timing

Chicken Type Timing What to Watch
Thin chicken cutlets Sear 3–4 minutes per side, then simmer 5–8 minutes in sauce Check early so they do not dry out.
Boneless thighs Sear 4–5 minutes per side, then simmer 8–12 minutes in sauce They stay juicier and can handle a little longer cooking.
Cubed chicken Cook 8–12 minutes total, depending on cube size Stir often so the sauce coats the pieces evenly.
Skillet formula and timing guide for cream of mushroom chicken with cutlets, thighs, and cubed chicken.
Skillet cream of mushroom chicken cooks quickly, so cut size matters: thin cutlets, thighs, and cubed chicken all need different timing.

How to Make It in a Skillet

Season the chicken, then sear it in a large skillet until lightly browned on both sides. Add fresh mushrooms after removing the chicken briefly, then cook them until they release moisture and start to brown. Whisk in the condensed soup with enough broth or milk to make a sauce, then return the chicken to the pan.

Step-by-step skillet method showing seared chicken, browned mushrooms, sauce mixture, returned chicken, and gentle simmering.
Sear first, then simmer gently; that sequence builds flavor while keeping the chicken from drying out.

Cover and simmer gently until the chicken reaches 165°F / 74°C. A pan sauce that tightens too much only needs a tablespoon or two of milk or broth. A loose sauce needs the opposite: a few uncovered minutes so extra moisture can cook off. Use the sauce texture guide if you are unsure whether to loosen or reduce it. For a quick slurry, mix 1 tsp cornstarch with 1 tbsp cold water, then stir it into the simmering sauce. Sour cream should go in near the end over low heat so everything stays smooth.

Slow Cooker Cream of Mushroom Chicken

The slow cooker is best when you want tender, saucy chicken waiting for you later. It is less about speed and more about having creamy chicken ready when the rice, noodles, or potatoes are done.

Because the lid traps moisture, start with less liquid than you would use in the oven or skillet. Thawed chicken gives the most predictable timing and texture; frozen chicken releases more moisture and can make the sauce thin.

Slow cooker cream of mushroom chicken before and after cooking, with chicken, mushrooms, condensed soup, and creamy finished sauce.
Slow cooker cream of mushroom chicken needs a thicker starting mixture because the covered cooker creates its own moisture.

If you like this kind of hands-off chicken dinner, MasalaMonk’s crock pot chicken breast recipes has more ways to keep slow-cooked chicken juicy instead of dry.

Slow Cooker Formula

  • 1½–2 lb / 680–900 g chicken breasts or thighs
  • 2 cans condensed cream of mushroom soup, 10.5 oz / 298 g each
  • ½ cup / 120 ml low-sodium chicken broth or water
  • 8 oz / 225 g sliced mushrooms, optional
  • ½ packet onion soup mix, optional, only if you like a saltier old-school flavor
  • Sour cream or cheese near the end, optional
Slow cooker formula board for cream of mushroom chicken with chicken, condensed soup, broth or water, timing, and temperature.
Start the slow cooker with less liquid than the oven version, then adjust near the end if the sauce needs loosening or enrichment.

Cook on High for 3–4 hours or Low for 6–7 hours, until the chicken reaches 165°F / 74°C. Thighs handle the longer cook better than thin breasts. By the end, the chicken should be fork-tender and the sauce should taste like it has had time to settle into the meat.

Serve the pieces whole, or shred the chicken into the sauce if you want it to spoon over rice, noodles, or potatoes. Add sour cream or cheese near the end, not at the beginning, for the smoothest finish.

How to Thicken Slow Cooker Cream of Mushroom Chicken

A thin slow cooker sauce can be fixed by removing the lid for a short time, shredding the chicken into the sauce, or thickening it with a small slurry made from 1 tsp cornstarch and 1 tbsp cold water. Use this fix before the chicken overcooks.

Guide showing how to thicken slow cooker cream of mushroom chicken sauce by removing the lid, shredding chicken, or adding slurry.
If slow cooker sauce turns thin, you can fix it calmly with uncovered time, shredded chicken, or a small cornstarch slurry.

For another saucy crockpot chicken dinner, MasalaMonk’s slow cooker French onion chicken follows a similar comfort-food idea with onion gravy, cheese, and a base of noodles, potatoes, rice, or toast.

Cream of Mushroom Chicken and Rice

Rice can absolutely work here, but it needs its own formula. Dry rice needs extra liquid, trapped steam, and more time than the basic baked chicken version. Before you bake, scan the rice mistakes to avoid if you are using brown rice, instant rice, or thick chicken pieces.

Rice version rule: Use extra liquid, a tight foil cover, and longer baking time. The soup base alone is too thick to cook raw rice evenly.
Cream of mushroom chicken and rice casserole in a baking dish with tender rice, mushrooms, creamy sauce, and a serving spoon.
Cream of mushroom chicken and rice needs its own method, since dry rice requires extra liquid, trapped steam, and resting time.

Campbell’s classic one-dish chicken and rice bake follows this same condensed-soup pattern: condensed soup, measured liquid, uncooked long-grain white rice, and chicken baked together under a tight cover. You can see that reference here: Campbell’s One-Dish Chicken & Rice Bake.

Small Classic Chicken and Rice Bake

This smaller rice bake makes about 4 servings.

  • 1 can condensed cream of mushroom soup, 10.5 oz / 298 g
  • 1 cup / 240 ml water or low-sodium chicken broth
  • ¾ cup / about 140 g uncooked long-grain white rice
  • 1¼ lb / 565 g boneless skinless chicken breast or thighs
  • ¼ tsp paprika, plus pepper and garlic powder if desired

Mix the soup, liquid, rice, and seasoning in a greased baking dish. Place the chicken on top, cover tightly, and bake at 375°F / 190°C for about 45 minutes, or until the rice is tender and the chicken reaches 165°F / 74°C. Let it stand for 10 minutes before serving so the rice can finish absorbing the sauce.

Chicken and rice timing tip: Thicker chicken pieces or thighs work better for rice bakes because the rice needs longer to cook. Thin chicken breasts may finish before the rice is tender. When that happens, remove the chicken, keep the rice covered, and continue baking the rice until soft.

Larger 9×13 Family Rice Bake

A larger family-style casserole needs more soup, more rice, and more liquid.

  • 2 cans condensed cream of mushroom soup, 10.5 oz / 298 g each
  • 2 cups / 480 ml low-sodium chicken broth
  • 1¼ cups / about 230 g long-grain white rice
  • 1½–2 lb / 680–900 g chicken
  • Optional onion, thyme, Dijon, black pepper, or Parmesan

Cover tightly and bake at 350°F / 175°C for about 60 minutes. Check the rice, stir gently around the chicken if needed, add a splash of hot broth if the rice is still firm, then cover again and bake 10–15 minutes more. Rest 10 minutes before serving.

Chicken and Rice Formula Guide

Use the small bake when you want a compact dinner, and use the 9×13 formula when the casserole needs to feed more people without leaving the rice undercooked.

Formula guide for small and family-size cream of mushroom chicken and rice bakes with soup, liquid, rice, chicken, oven temperature, and time.
Use the right chicken-and-rice formula from the start, and you avoid the common problem of tender chicken with undercooked rice.

Rice Mistakes to Avoid

The rice version is forgiving once the steam is right, but it is less forgiving when the cover is loose or the liquid is guessed.

  • A loose cover will not trap enough steam. Rice needs a tight cover to soften properly.
  • Brown rice needs a different plan. It takes more time and usually more liquid than white rice.
  • Instant rice cooks too fast for this long bake. It can turn mushy unless you change the method.
  • Ready-to-eat soup can make the bake watery. It is already diluted, unlike condensed soup.
  • The chicken can finish before the rice. Check both before calling the dish done.
  • Resting matters. The rice absorbs the final sauce as it stands.
Chicken and rice mistakes guide showing loose cover, wrong rice, too little liquid, chicken done before rice, skipped resting time, and rice choices.
Long-grain white rice is the easiest choice; brown rice and instant rice need different liquid and timing to work well.

Serving the chicken over plain rice instead of baking rice in the dish? MasalaMonk’s how to cook rice guide is useful for getting fluffy grains that do not turn gummy under the sauce.

Cream of Chicken + Cream of Mushroom Variation

You can mix cream of chicken and cream of mushroom soup. Cream of chicken makes the sauce milder and more savory, while cream of mushroom adds deeper mushroom flavor. A 50/50 mix works especially well for larger bakes, chicken and rice, and slow cooker meals.

For a bigger casserole or crockpot dinner, try 1 can cream of mushroom soup and 1 can cream of chicken soup. Low-sodium versions are the safest choice because two condensed soups can make the dish salty fast.

Comparison of cream of mushroom soup, cream of chicken soup, and a 50 50 blend spooned over chicken.
Cream of mushroom brings deeper flavor, cream of chicken tastes milder, and a 50/50 blend gives a softer creamy sauce.

This same cream-soup swap logic also shows up in comfort casseroles like MasalaMonk’s green bean casserole recipe ideas, where condensed cream soup is part of the classic creamy base.

How to Make Cream of Mushroom Chicken Taste Better

The shortcut works as-is, but one or two small upgrades can make it taste more like a creamy mushroom dinner than plain canned soup.

The easiest upgrades are browned mushrooms for depth, broth for savoriness, and a small spoon of Dijon or thyme for balance.

Flavor upgrade board for cream of mushroom chicken with browned mushrooms, broth, thyme, Dijon, sour cream, cheese, pepper, and parsley.
Small upgrades like browned mushrooms, broth, Dijon, thyme, sour cream, cheese, pepper, and parsley make the shortcut taste more complete.

Browned vs Raw Mushrooms

Raw mushrooms can go straight into the dish, but browning them first gives the sauce more flavor and reduces the extra moisture that can loosen the pan.

Comparison of raw sliced mushrooms and browned mushrooms for cream of mushroom chicken.
Raw mushrooms keep prep easy; meanwhile, browned mushrooms add deeper flavor and reduce extra moisture in the sauce.
  • Brown fresh mushrooms first: This adds real mushroom flavor, cooks off extra moisture, and gives the sauce a deeper base.
  • Choose broth instead of water: Low-sodium chicken broth gives the dish more savory depth.
  • Add garlic and onion powder: These make the pantry version taste fuller.
  • Add thyme: Thyme works naturally with mushrooms and chicken.
  • Stir in a small spoon of Dijon: It cuts through the richness without making the dish taste mustardy.
  • Finish with sour cream: It gives the sauce a tangier, creamier finish. In skillet and slow cooker versions, add it near the end over gentle heat.
  • Melt cheese on top: Mozzarella, Monterey Jack, cheddar, Swiss, or Muenster can turn this into a cheesy baked chicken dinner.
  • Add black pepper and parsley at the end: This keeps the final plate from tasting too heavy.

What to Serve with Cream of Mushroom Chicken

The sauce is the point, so serve it with something that catches every spoonful: fluffy rice, buttered egg noodles, mashed potatoes, biscuits, broccoli, or green beans.

Side dish guide for cream of mushroom chicken with rice, egg noodles, mashed potatoes, biscuits, broccoli, and green beans.
The best sides give the sauce somewhere to go, whether you choose rice, egg noodles, mashed potatoes, biscuits, broccoli, or green beans.

Over Rice

Plain white rice is the easiest pairing. Brown rice, leftover rice, or seasoned rice also work, but keep them separate unless you are following a true chicken-and-rice bake formula.

Cream of mushroom chicken served over fluffy white rice with sliced mushrooms, creamy sauce, black pepper, and herbs.
Rice keeps this creamy chicken dinner simple, filling, and easy to serve on a busy weeknight.

Over Egg Noodles

Egg noodles make this feel like old-school chicken and gravy. Cook the noodles separately, then spoon the chicken and mushroom sauce over the top. Dry egg noodles should not go into the baking dish unless you are using a tested noodle-casserole formula.

Cream of mushroom chicken served over broad egg noodles with creamy mushroom sauce, chicken pieces, herbs, and a fork lifting a bite.
Broad egg noodles hold the mushroom sauce in their folds, so this version feels cozy without needing extra prep.

Over Mashed Potatoes

Mashed potatoes make the plate even cozier. If you want a creamy potato side that will hold the sauce without turning gluey, try MasalaMonk’s garlic mashed potatoes recipe.

Sliced cream of mushroom chicken served over mashed potatoes with mushrooms, creamy sauce, black pepper, and herbs.
Mashed potatoes make the richest plate because the soft potatoes hold the creamy mushroom sauce instead of letting it run.

With Vegetables

Green beans, broccoli, peas, carrots, roasted mushrooms, or a simple salad balance the richness. For a holiday-style comfort plate, serve it with green bean casserole, roasted vegetables, or a crisp side salad.

For a bigger comfort-food spread, MasalaMonk’s hashbrown casserole recipe also works as a creamy potato side, especially when the chicken is served with green beans or salad. Planning leftovers? The storage and reheating tips explain how to loosen the sauce again without drying out the chicken.

How to Fix Cream of Mushroom Chicken

Even when this dish goes a little sideways, it is usually fixable. Most problems are texture problems: the sauce is too thick, too watery, or too salty, while the chicken dries out because the pieces were too thick or cooked too long.

The usual culprits are ready-to-eat soup instead of condensed soup, too much liquid, a loose cover on rice, or thick chicken breasts that needed more time than the sauce did.

Common Sauce, Chicken, and Rice Fixes

Problem What Happened How to Fix It
Sauce is too thick or gluey Not enough liquid was added to the condensed soup. Add milk or broth 1–2 tbsp at a time until it is spoonable.
Sauce is watery Too much liquid was added, ready-to-eat soup was used, or raw mushrooms released extra moisture. When the chicken still needs time, bake uncovered 5–10 minutes. When the chicken is already done, remove it and thicken the sauce separately with a small slurry: 1 tsp cornstarch mixed with 1 tbsp cold water.
Sauce is too salty Condensed soup, broth, cheese, or onion soup mix added too much salt. Serve with rice, noodles, or potatoes to soften the saltiness. A spoonful of sour cream can also mellow the sauce. Next time, use low-sodium soup and broth.
Chicken is dry The pieces were too thick, uncovered too long, or cooked past 165°F / 74°C. Slice breasts thinner, cover while baking, check early, or use thighs.
Chicken is done but sauce is thin The sauce needs more time, but the chicken does not. Remove the chicken, cover it loosely, and thicken the sauce separately in a small pan.
Rice is undercooked The dish needed more steam, liquid, or time. Add ¼–½ cup hot broth, cover tightly again, and bake longer.
Rice is mushy Too much liquid or too much bake time. Use long-grain white rice, measure carefully, and rest the dish instead of overbaking.
Dish tastes bland The sauce was not boosted with enough seasoning or fresh ingredients. Add black pepper, garlic powder, onion powder, thyme, paprika, Dijon, or browned mushrooms.
Sauce splits when reheated It was reheated too aggressively. Reheat gently with a splash of milk or broth and stir slowly.
Troubleshooting guide for cream of mushroom chicken showing fixes for watery sauce, thick sauce, salty sauce, dry chicken, undercooked rice, and bland flavor.
Most cream of mushroom chicken problems are fixable once you know whether the issue is texture, salt, timing, or seasoning.

Storage, Freezing and Reheating

Store leftovers in an airtight container in the refrigerator for 3–4 days. Rice or noodles are best stored separately when possible so they do not soak up all the sauce.

To reheat, warm the chicken gently on the stovetop or in the microwave with a splash of milk or broth. The sauce thickens as it chills, so that splash of liquid helps bring it back to a spoonable texture.

You can freeze the cooked chicken and sauce, but the sauce may loosen or look slightly grainy after thawing. It is still usable; reheat gently and whisk in a splash of milk or broth to bring it back together.

Chicken-and-rice leftovers thicken more in the fridge because the rice keeps absorbing the sauce. Reheat them with a splash of broth or milk so the rice loosens instead of turning dry.

Storage guide for cream of mushroom chicken showing a fridge container, freezer bag, and reheating in a skillet with milk or broth.
Creamy leftovers thicken in the fridge, so reheat gently and add a splash of milk or broth to bring the sauce back.

Cream of Mushroom Chicken FAQs

How long should cream of mushroom chicken bake?

Thin boneless chicken breasts or thighs usually need about 25 minutes covered at 375°F / 190°C, then 5–10 minutes uncovered. Thickness matters more than the clock, so check that the chicken reaches 165°F / 74°C.

Covered or uncovered?

Cover the dish first so the chicken stays moist and the sauce does not dry out. Uncover near the end when the sauce needs to thicken or cheese is going on top.

Campbell’s soup vs other condensed brands

A standard 10.5 oz / 298 g can of Campbell’s condensed cream of mushroom soup works well, but other condensed brands work too. The important detail is that the soup is condensed, not ready-to-eat.

Chicken breasts vs thighs

Boneless skinless thighs are the more forgiving choice because they stay juicy even when the dish needs a few extra minutes. Breasts work well too, but they should be thin and even before baking.

How much liquid should I add to condensed soup?

For baked chicken, ½ cup / 120 ml milk or low-sodium broth per 10.5 oz / 298 g can makes a creamy sauce. Skillet chicken can take ½–1 cup / 120–240 ml because the pan sauce reduces as it simmers.

How to make it on the stove

The stovetop version works best with thin pieces because they cook quickly and stay tender. Sear them first, then simmer gently in the mushroom sauce until they reach 165°F / 74°C. A few uncovered minutes will tighten a loose pan sauce.

Homemade mushroom sauce instead of canned soup

This becomes a different style of recipe, but it can work. For a quick homemade mushroom cream sauce, start with 2 tbsp butter, 8 oz mushrooms, 1 minced garlic clove, 2 tbsp flour, 1 cup broth, and ½ cup milk or cream, then cook the chicken in that sauce. For the classic shortcut flavor, use condensed soup.

Adding rice safely

Rice can work beautifully, but treat it like its own bake, not a last-minute add-in. It needs extra liquid, trapped steam, and more time than the basic chicken version. Start with 1 can condensed soup, 1 cup / 240 ml water or broth, ¾ cup / about 140 g long-grain white rice, and about 1¼ lb / 565 g chicken.

Should you use frozen chicken?

Thawed chicken is the safer bet here because it cooks more evenly and keeps the sauce from turning watery. Frozen chicken can release a lot of moisture, especially in the oven or skillet, so thaw it first when you can.

Why the sauce turns watery

Watery sauce usually comes from too much liquid, ready-to-eat soup instead of condensed soup, raw mushrooms releasing moisture, or keeping the dish covered for the whole bake. Once the chicken is done, remove it and thicken the sauce separately with a small slurry made from 1 tsp cornstarch and 1 tbsp cold water.

Fixing a salty sauce

Condensed soup is already salty, and broth, cheese, or onion soup mix can add even more. Rice, noodles, or potatoes help soften the saltiness on the plate. A spoonful of sour cream can also mellow the sauce.

Best sides for creamy mushroom chicken

Rice, egg noodles, mashed potatoes, biscuits, broccoli, green beans, peas, carrots, and roasted mushrooms all work. The best side is something that catches the creamy mushroom sauce.

Slow cooker ratio

In the slow cooker, use less liquid than you might expect because the lid traps moisture. For 1½–2 lb / 680–900 g chicken, use 2 cans condensed cream of mushroom soup and about ½ cup / 120 ml broth or water. Cook on High for 3–4 hours or Low for 6–7 hours, until the chicken reaches 165°F / 74°C.

Final Thoughts

Start with the oven version first. Once you understand the soup-to-liquid ratio, the recipe bends to the night: faster in a skillet, easier in the slow cooker, or heartier with rice.

However you make it, the goal stays the same: juicy chicken, creamy mushroom gravy, and a dinner that asks very little from you but still feels like someone cared.

Back to top