Posted on Leave a comment

Slow Cooker Brisket Recipe: Tender Slices With Rich Onion Gravy

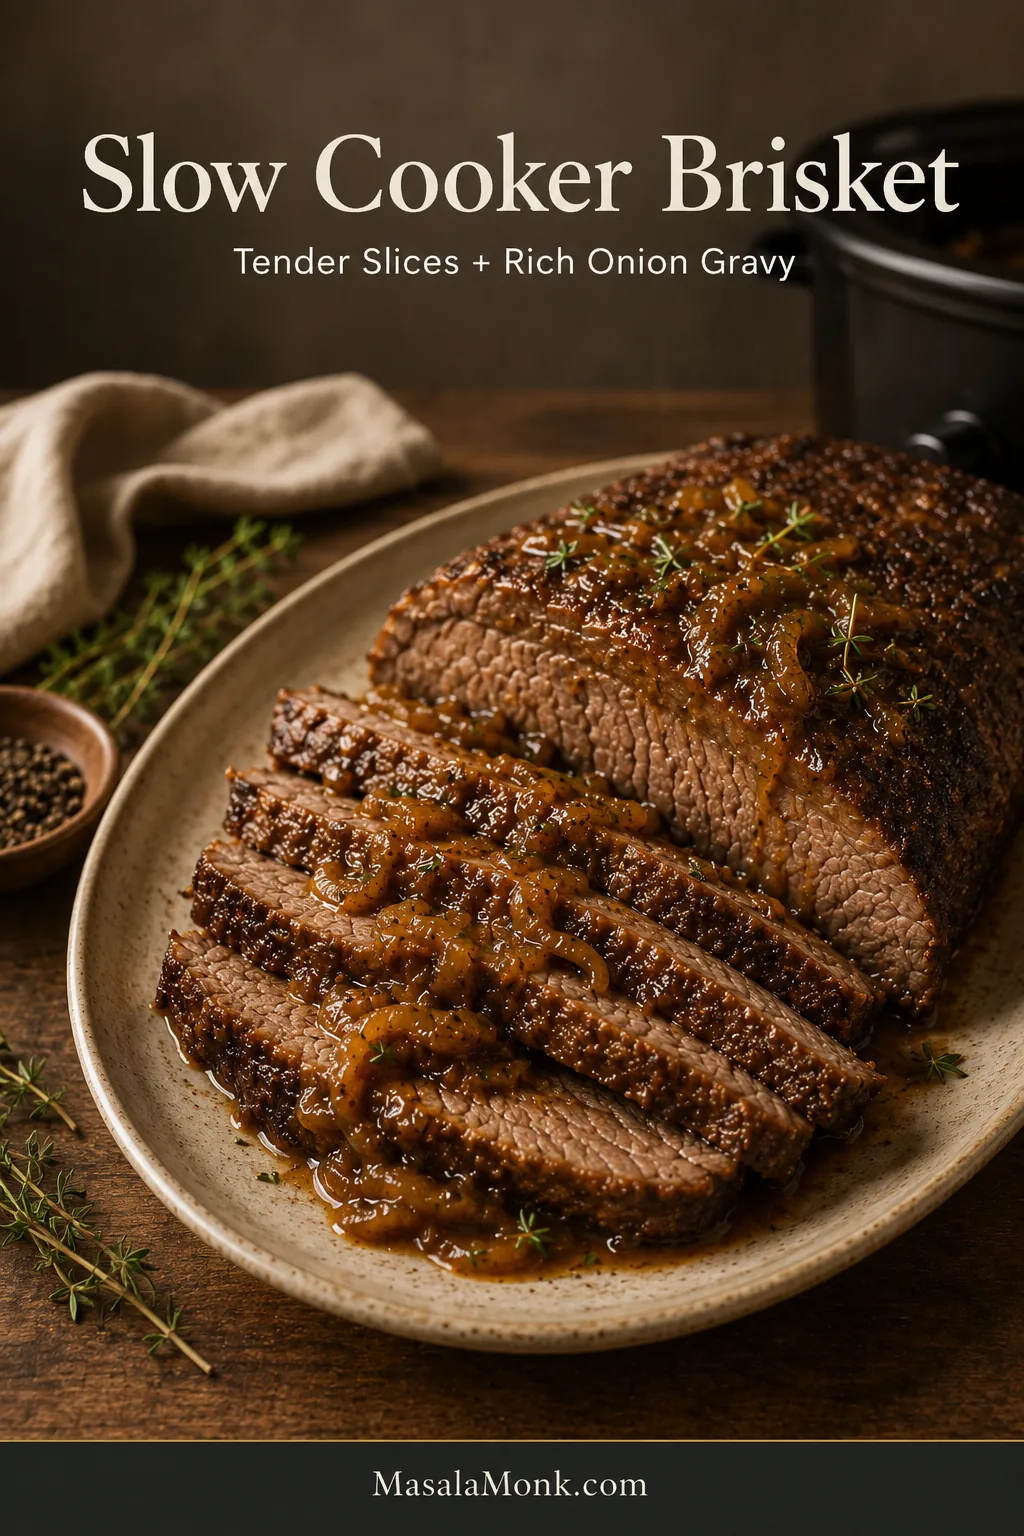
Overlapping slices of tender slow cooker brisket on a stoneware platter, partly covered with glossy brown onion gravy and softened onions.

Brisket asks for most of a day, so uncertainty near the end can feel bigger than it does with an ordinary roast. One piece is broad and relatively thin. Another is tied into a thick, compact joint. Both may weigh the same, yet one can become tender noticeably earlier than the other.

This slow cooker brisket is built for the result that suits gravy best: beef that feels deeply tender when sliced but holds together when lifted. The browned bits from the skillet deepen the cooking liquid, which is reduced into rich onion gravy rather than served as thin broth.

By the time the lid comes off, the onions should have softened into the dark cooking juices and the brisket should hold its shape. Dinner should smell as though the beef was fussed over all day, even though the slow cooker handled the long middle stretch.

The key moment comes near the end. A probe that felt springy half an hour earlier begins to slide into the thickest part with very little resistance, yet the brisket still lifts in one piece. The clock gives you a window; the probe gives you the answer. Aim for beef that is tender enough to yield, yet structured enough to slice.

Quick Answer: How to Make Tender Slow Cooker Brisket

Use a 3–3½ lb (1.4–1.6 kg) fresh, uncured brisket flat that fits comfortably in a 5–6 quart (about 5–6 L) slow cooker. Brown the beef and soften the onions in the same skillet, then add 1 cup (240 ml) low-sodium beef stock plus ½ cup (120 ml) red wine, dark ale, or more stock.

Cook on LOW for about 7½–9 hours, making the first tenderness check at 7 hours. Remove the brisket when a probe enters the thickest section easily and the meat holds together when lifted.

Rolled-joint guidance, LOW versus HIGH timing, and pull-apart and no-sear variations appear below.

The three decisions that matter most: judge the brisket by thickness as well as weight, keep the starting liquid controlled, and reduce the cooking juices for flavor before using starch for texture.

Choose Your Version

Decide whether you want neat slices, pull-apart meat, or less hands-on preparation. You can always cook sliceable brisket longer for pulling, but once it begins falling apart, it will not return to neat slices.

Your goalHow to make it
Recommended for neat slicesUse a flat-cut brisket, brown it first, cook on LOW, and remove it while it remains intact enough to slice.
Rolled brisket jointLeave the string on, allow for the thick center, and check it later than you would a thin flat.
Pull-apart brisketContinue cooking until the fibers separate readily, then shred and moisten with finished gravy.
No-sear shortcutSkip the skillet work, combine everything in the slow cooker, and give the finished liquid a longer stovetop reduction.

The recipe below follows the neat-slice version.

Slow Cooker Brisket With Rich Onion Gravy

A savory brisket cooked over browned onions, garlic, stock, and herbs until tender but still sliceable. The cooking liquid is skimmed and reduced before thickening, giving you deeply flavored onion gravy instead of diluted slow cooker broth.

Prep Time25 minutes
Skillet Time25 minutes
Slow Cooker Time7½–9 hours on LOW
Resting Time15–20 minutes
Gravy Time10–20 minutes
Hands-On Time1–1¼ hours
Total Time9–10½ hours
Servings6 generous or 8 moderate servings
Cooker Size5- to 6-quart (about 5–6 L) oval slow cooker or Crock-Pot
Texture and FinishTender and sliceable, with rich onion gravy

Equipment

Use an oval slow cooker or Crock-Pot, a large heavy skillet, tongs, two broad spatulas, and an instant-read thermometer. You will also need a cutting board, a sharp slicing knife, a wide saucepan, and a whisk.

A thin metal skewer helps assess resistance, but only a thermometer verifies temperature. A reliable sear or sauté function can replace the separate skillet. For the gravy, a spoon is enough to skim the fat; a separator, sieve, or immersion blender is optional.

Ingredients
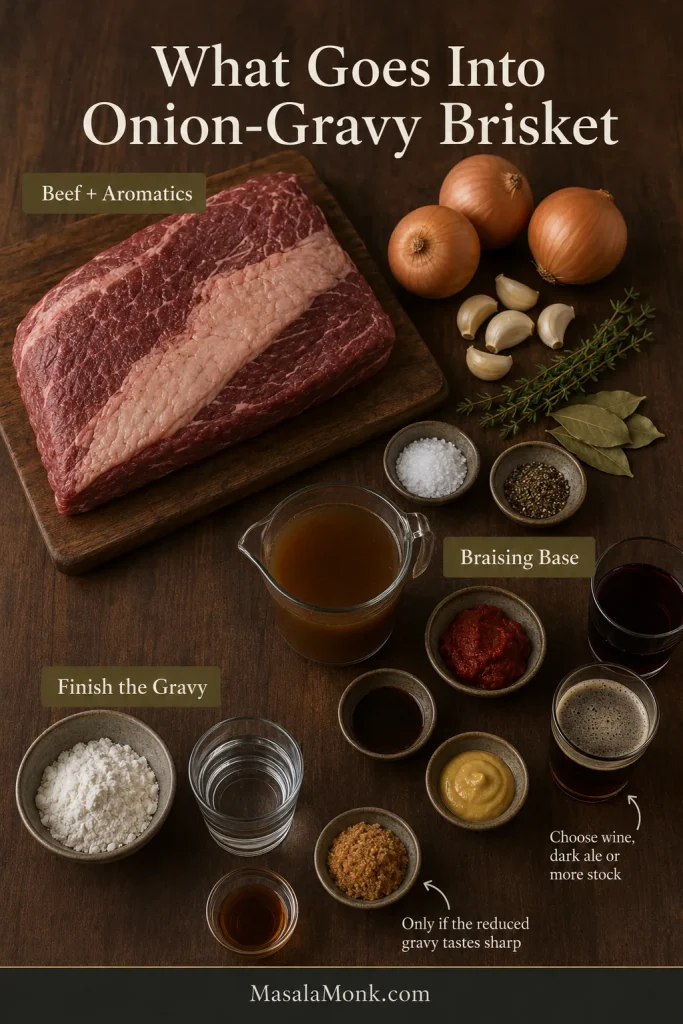
Raw brisket arranged with sliced onions, garlic, beef stock, red wine, dark ale, tomato paste, Dijon mustard, Worcestershire sauce and herbs.
The ingredients work in layers: browning builds depth, the braising liquid carries it, and final tasting decides how much acidity or starch the gravy needs.

For the Brisket

  • 3–3½ lb / 1.4–1.6 kg fresh, uncured beef brisket, preferably a flat or first cut for neat slices; a rolled joint also works, while a fattier point is better suited to pull-apart meat
  • 2 teaspoons fine salt, about 10–12 g, divided
  • 1 teaspoon coarsely ground black pepper
  • 2 tablespoons / 30 ml neutral cooking oil, divided

For the Onion Braising Base

  • 3 medium-large yellow or brown onions, about 16–19 oz / 450–550 g, sliced from root to tip
  • 5 large garlic cloves, finely chopped or crushed
  • 2 tablespoons / 34 g tomato paste
  • ½ cup / 120 ml dry red wine, dark ale, or additional low-sodium beef stock
  • 1 cup / 240 ml low-sodium beef stock
  • 1½ tablespoons / 22 ml Worcestershire sauce
  • 2 teaspoons / 10 g Dijon mustard
  • 1 teaspoon dried thyme or 6–8 fresh thyme sprigs
  • 2 bay leaves

And for Finishing the Gravy

  • Red wine vinegar: 1–2 teaspoons / 5–10 ml, as needed
  • Dark brown sugar: ¼–1 teaspoon, only if the reduced gravy tastes too sharp
  • Cornstarch: 1–2 tablespoons / 8–16 g, divided
  • Cold water: 1–2 tablespoons / 15–30 ml, divided
  • Additional salt and black pepper, as needed

Instructions

Prepare and Build the Braising Base

  1. Mark, trim, and season. Note the direction of the grain with a photo or shallow corner notch. Remove hard exterior fat and reduce any very thick fat cap to about ¼ inch / 6 mm. Pat the brisket dry, then season all sides with 1½ teaspoons of the salt and all the black pepper.
  2. Sear the brisket. Heat 1 tablespoon oil in a large skillet over medium-high heat. Brown the broad sides for 4–5 minutes each and the thick edges briefly, then transfer the brisket to a tray.
  3. Brown the onion base. Reduce the heat to medium. Add the remaining oil if needed, followed by the onions and up to the remaining ½ teaspoon salt; hold some back if the stock or Worcestershire tastes salty. Cook for 8–10 minutes until softened with golden edges. Add the garlic for 30 seconds, then cook the tomato paste for 1–2 minutes until it deepens to a rusty red.
  4. Deglaze and season the liquid. Add the wine, ale, or extra stock and scrape up the browned residue. If using wine or ale, let it bubble for 1–2 minutes. Stir in the 1 cup / 240 ml stock, Worcestershire sauce, Dijon, thyme, and bay leaves.

Slow Cook and Test for Tenderness

  1. Load the slow cooker. Transfer the onions and liquid to the cooker. For a flat: nestle it into the mixture with the lean underside down and fat side up. For a rolled joint: set it on its broadest stable side and leave heat-safe butcher’s string in place. Remove plastic wrapping, absorbent pads, clips, and non-heat-safe elastic netting. The top can remain exposed; don’t add extra stock simply to submerge the meat.
  2. Cook on LOW. Cover and cook a standard 3–3½ lb / 1.4–1.6 kg flat for about 7½–9 hours. Make the first tenderness check at 7 hours. For a tightly rolled joint, start checking around 7 hours; many finish between 7½ and 9 hours, although an especially thick joint or cooler-running cooker may need closer to 10 hours.
  3. Check the texture. Insert the thermometer probe—or a thin metal skewer if you are checking texture only—into the thickest section. Only the thermometer verifies temperature. If the meat feels firm and springy, close the lid and cook for another 30–45 minutes. The brisket is ready for slicing when the probe or skewer enters easily and the roast keeps its shape as you lift it.

Rest, Finish the Gravy, and Serve

  1. Rest the brisket. Move it to a cutting board with two broad spatulas, tent loosely with foil, and rest for 15–20 minutes.
  2. Finish the gravy. Remove the bay leaves and thyme stems, skim excess fat, and transfer the onions and liquid to a wide saucepan. Blend with an immersion blender or strain if desired, then simmer for about 10–20 minutes, until the liquid tastes richer, looks glossier, and briefly parts behind the spoon. Once the liquid tastes concentrated, taste the gravy. Add 1 teaspoon red wine vinegar if it tastes flat or heavy, then add more only if needed. Add a small pinch of brown sugar only if it tastes harsh or sharp, and adjust the salt and pepper. If the flavor is right but the gravy remains too thin, mix 1 tablespoon cornstarch with 1 tablespoon cold water. Whisk it in gradually and simmer for 1–2 minutes. If the gravy remains too thin, mix another tablespoon of cornstarch with another tablespoon of cold water and add only as much as needed.
  3. Slice and serve. Remove the string from a rolled joint. Cut the brisket about ¼ inch / 6 mm thick across the grain. Spoon over enough gravy to keep the slices glossy and serve the rest at the table.

Recipe Notes

  • For a 1⅔–2¼ lb / 750 g–1 kg flat: make the first check at about 6 hours on LOW. Many pieces finish around 7–8 hours, although a very thin flat may be ready sooner.
  • For HIGH: start testing the 3–3½ lb brisket around 4 hours and expect about 4½–6 hours.
  • For a no-sear version: omit the oil. Place the onions and seasoned beef directly in the cooker, whisk together the remaining braising ingredients, and pour them over the beef. Skipping the skillet saves about 25 minutes of active work, but the gravy will taste lighter and need a longer stovetop reduction.

Food-safety note: Fully thaw the brisket before slow cooking. See the USDA slow-cooker guidance for safe handling.

Why This Slow Cooker Brisket Method Works

A slow cooker surrounds brisket with gentle heat and moisture, but it can’t create a dark sear or concentrate gravy. Browning the beef, softening the onions, and cooking the tomato paste in a skillet build the roasted flavor the covered cooker cannot.

The starting liquid stays restrained because the beef and onions release more moisture as they cook. Meanwhile, gentle heat gives the brisket’s dense collagen time to soften into gelatin. Once that work is complete, continued cooking can dry the lean muscle fibers even while the meat becomes softer.

Remove the brisket as soon as it is tender enough to slice, then finish the cooking liquid separately. That lets you remove excess fat, evaporate water, and deepen the gravy without pushing the meat beyond its best slicing point.

How quickly it reaches that point depends heavily on the shape and thickness of the cut; use the cooking-time guide to decide when checking should begin.

Which Brisket Cut Should You Buy?

If the labels at the butcher counter are confusing, look at the shape before worrying about the name. Use fresh, uncured beef brisket—not corned beef brisket, which has already been cured in salty brine. A broad, even flat gives you the cleanest slices; a compact rolled joint simply needs more patience at the center.
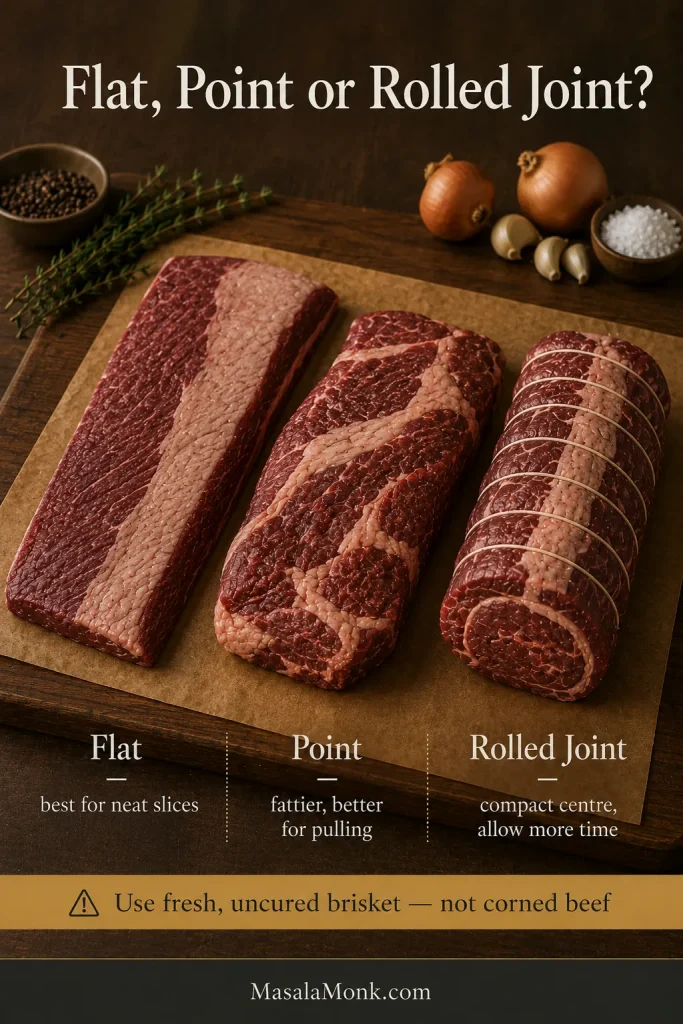
Three raw brisket cuts displayed side by side: a broad lean flat, a thicker marbled point and a compact tied rolled joint.
Compare shape and thickness at the butcher counter, not weight alone. Two equal-weight briskets can finish at very different times.

Flat Cut Versus Point Cut

Choose a flat or first cut for neat gravy-covered slices. It is broad and comparatively lean, so remove it once the probe glides in easily and the roast holds together.

Choose a point cut for richer, fattier meat or a pull-apart finish. Trim heavy exterior fat and skim the cooking liquid carefully.

Brisket Joint or Rolled Brisket

A tightly rolled joint may take longer than a heavier flat because heat must reach its thick center. Leave heat-safe butcher’s string in place while it cooks.

If the joint will not fit beneath the lid, unroll it or divide it into two large pieces and begin checking sooner.

Whole packer brisket: It contains both the flat and point and is usually too large for a household slow cooker. Use a smoker or oven method instead.

If the label says shoulder roast, chuck shoulder, arm roast, or shoulder clod, use the beef shoulder roast crock pot guide. Those cuts behave more like pot roast than brisket.

Brisket or Pot Roast?

Choose brisket for distinct slices and a narrower finish between firm and falling apart. Chuck breaks into soft chunks more readily; brisket keeps a visible grain and rewards slicing across it. For forgiving chuck roast with potatoes and carrots in the cooker, use MasalaMonk’s slow cooker pot roast recipe.

How Much Brisket per Person?

Allow about ½ lb (225 g) raw boneless brisket per adult with substantial sides. This recipe serves six generously or eight moderately; buy extra when leftovers are part of the plan.

Prepare the Brisket Before It Goes Into the Cooker

Remove only the hard excess fat, mark the grain while it is visible, and make sure the brisket fits beneath the lid.

Trim the Fat and Mark the Grain

Remove hard, waxy lumps and heavy edge deposits. Leave a reasonably even layer—about ¼ inch (6 mm) where practical—especially on a lean flat.

Photograph the direction of the raw muscle fibers or make a shallow notch across one corner. After cooking, slice perpendicular to those fibers so each bite is easier to chew.
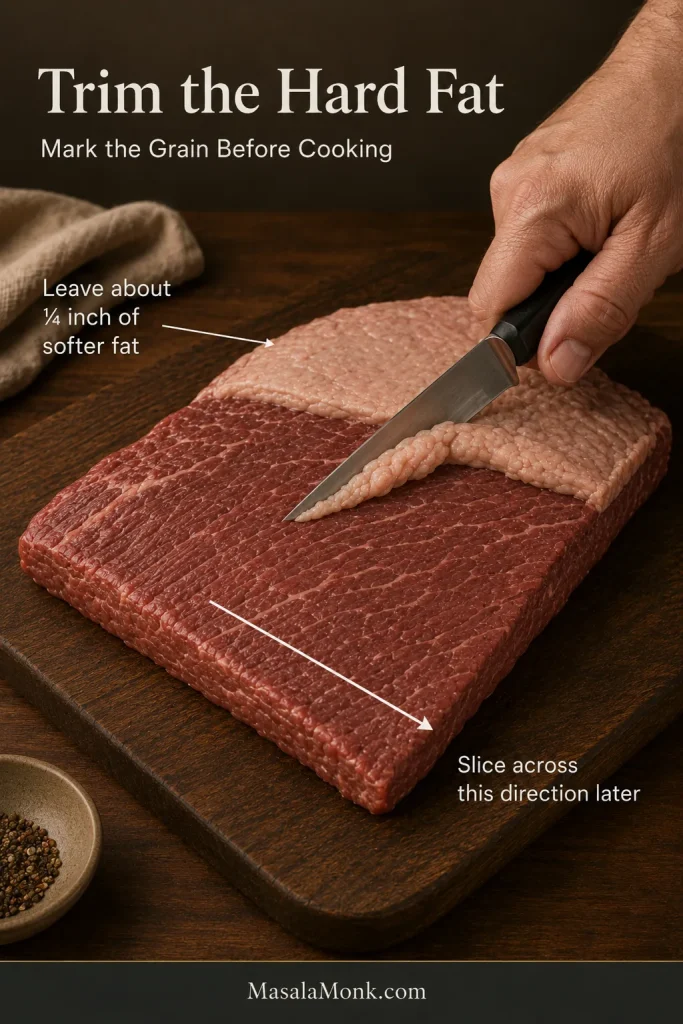
A hand trimming firm white exterior fat from raw brisket while arrows mark the muscle-grain direction for slicing after cooking.
Trim hard surface fat now, and mark the grain while it is easy to see. Both become harder to judge once the brisket is browned and sauced.

Does Brisket Need a Rub or Marinade?

No marinade is needed for tenderness; the long cook softens the connective tissue. The browned onions, garlic, Worcestershire, Dijon, and herbs provide enough seasoning for this gravy-based version. You may season several hours or a day ahead, but a sweet barbecue rub moves the dish toward a different style.
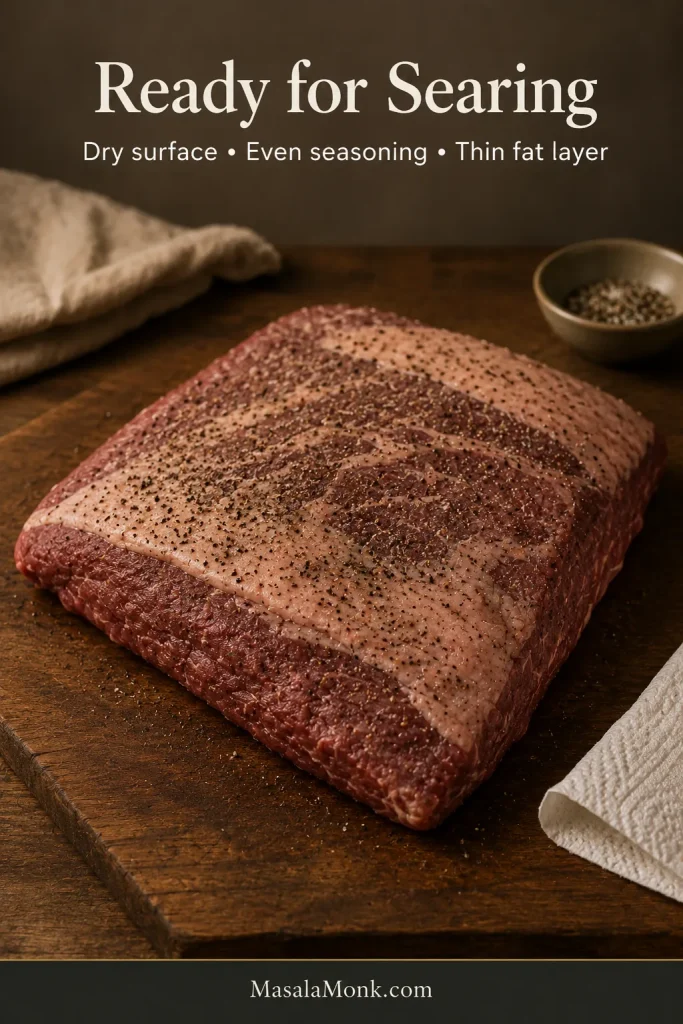
Raw brisket flat on a wooden board, patted dry and evenly seasoned with salt and coarse black pepper before searing.
Seasoning ahead is fine. Blot away any moisture before searing so the skillet browns the brisket instead of steaming it.

Make It Fit and Position It Correctly

The lid should close fully without resting on the meat, and the brisket should not be folded tightly against the sides. If necessary, cut it across its width into two large pieces, arrange them with little overlap, and begin checking at the standard-flat time; thinner pieces may finish first.

Set a flat fat-side up with the lean side nearer the onions and liquid. Place a rolled joint on its broadest stable side; secure placement and a closed lid matter more than exact fat-cap orientation.
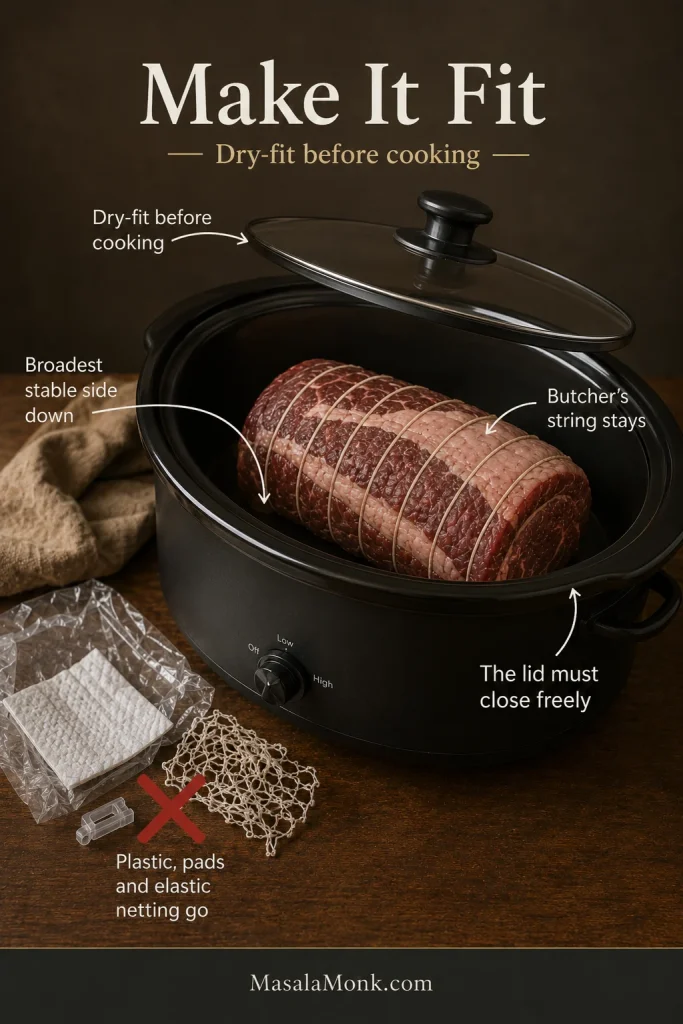
Tied rolled brisket positioned inside an oval slow cooker beneath a raised lid, with plastic wrapping, clips and elastic netting marked for removal.
A small rolled joint can cook more slowly than a heavier flat because heat must travel farther to reach its center.

Ingredients That Build the Brisket and Gravy

Three onions look generous in the skillet, but they collapse into the cooking liquid and give the finished gravy much of its body. Tomato paste adds depth, low-sodium stock leaves room for reduction, and Worcestershire, Dijon, and herbs round out the sauce without needing a packet mix.

Onions, Stock, and Tomato Paste

Slice the onions from root to tip so some texture remains through the long cook.

Low-sodium stock gives you room to reduce the gravy without making it harsh. Resist adding more simply because the top of the brisket remains exposed; the beef and onions will release additional moisture beneath the closed lid.
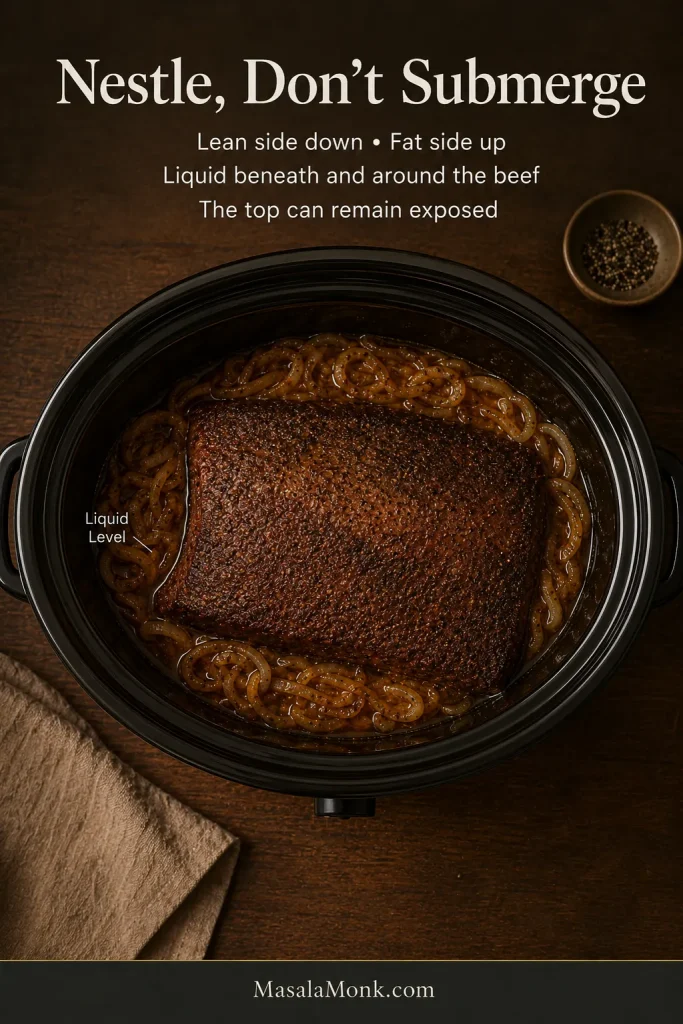
Seared brisket resting over softened onions in an oval slow cooker, with brown braising liquid below and around the meat but not covering its top.
The exposed top still cooks in the trapped steam, while the beef and onions release enough moisture to raise the liquid level naturally.

Tomato paste adds color, savory depth, and a little body without making the gravy taste tomato-heavy. Cook it until it darkens slightly so it loses its raw edge.

The Braising Liquid

Red wine gives the gravy darker fruit and acidity. Ale adds a rounder maltiness, while extra beef stock creates the most straightforward onion gravy. Keep the amount restrained: the wine or ale should deepen the sauce without becoming its main flavor.

Worcestershire brings savory depth and gentle acidity, while Dijon rounds the liquid without making the gravy taste strongly mustardy. Both become more concentrated during reduction, so taste again before serving.

Cornstarch adds body only after reduction has concentrated the flavor. Add it gradually so the gravy stays glossy rather than becoming pasty.

What Slow Cooker Brisket Should Look and Feel Like

The cues below show what each stage should look and feel like, especially when the clock cannot tell you enough.

The Crust and Onion Base

Pat the surface dry, then leave each broad side in the hot skillet until a deep crust forms and the meat releases more easily. Cook the onions until their raw smell softens and their edges turn golden.
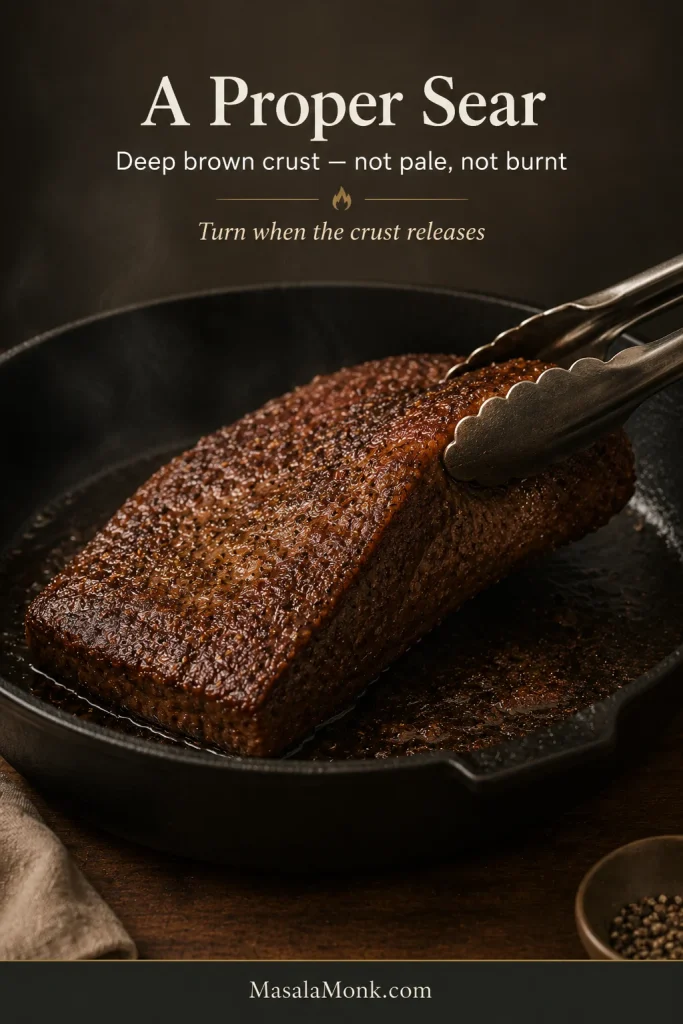
Brisket browning in a cast-iron skillet with a dark mahogany crust and browned fond, while metal tongs lift one edge.
Pale patches usually mean lingering moisture or weak contact with the skillet. Move the brisket only when needed so a deep crust can form.

Stir in the tomato paste until it changes from bright red to rusty red and begins sticking lightly to the pan. Pour in the wine, ale, or stock and scrape up the browned layer—those sticky bits belong in the gravy. If using wine or ale, let it bubble until its sharp alcoholic smell softens, then nestle the brisket into the onions.
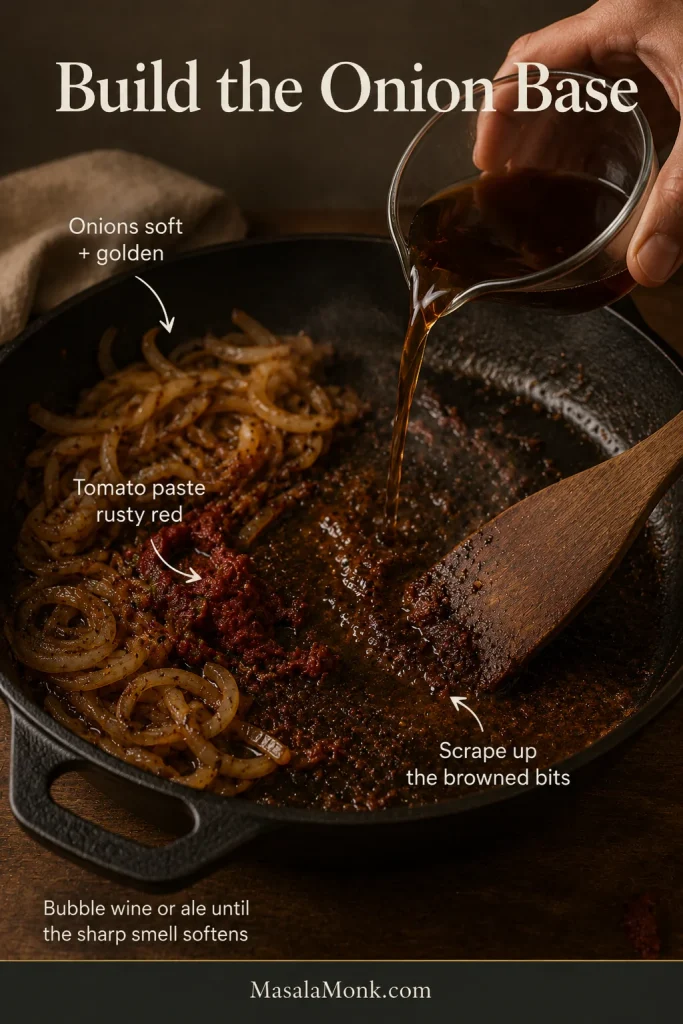
Golden sliced onions and darkened tomato paste in a skillet as liquid is poured in to loosen the browned residue from the pan.
Brown fond belongs in the gravy; black, bitter residue does not. Smell the pan before deglazing and leave genuinely burned patches behind.

The Tenderness Change to Watch For

The first tenderness check is often the least encouraging one. At the sliceable stage, the roast flexes when lifted, its edges remain attached, and any surface cracks stay narrow. As it moves toward pull-apart tenderness, those cracks widen and the fibers begin separating under light pressure.
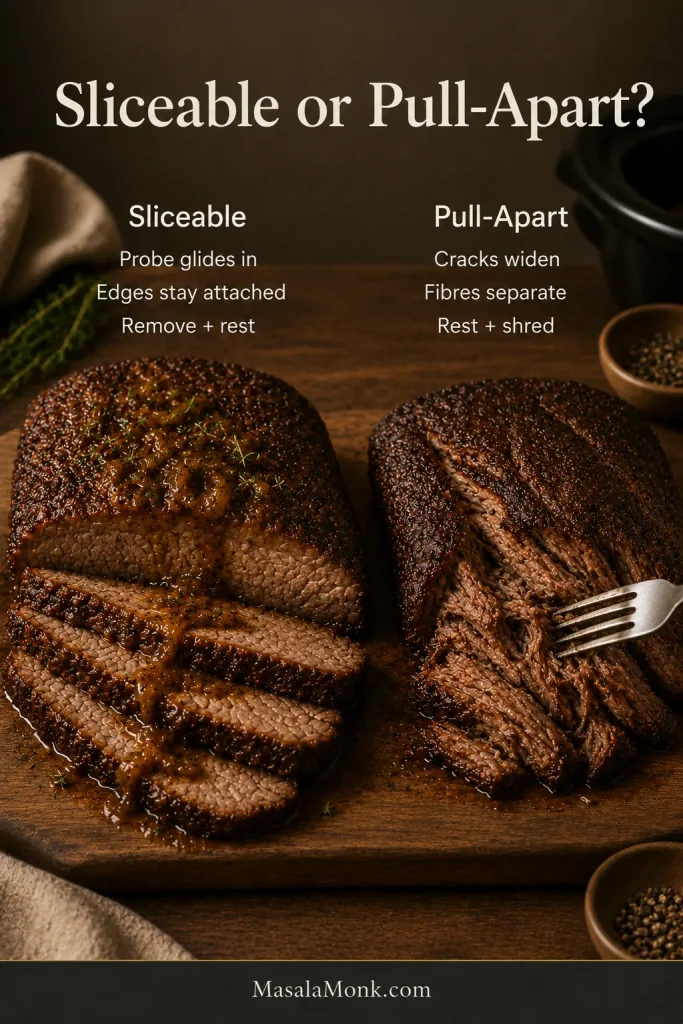
Side-by-side comparison of intact sliced brisket with attached edges and softer brisket separating into broad, moist pulled fibers.
Narrow cracks and attached edges point to clean slices. Widening seams show the brisket moving toward a moist pull-apart finish.

How Soft Brisket Should Slice

Support the softened brisket with two broad spatulas and rest it for 15–20 minutes. Slice across the grain; the first piece should bend without crumbling. Cut exceptionally soft meat a little thicker.
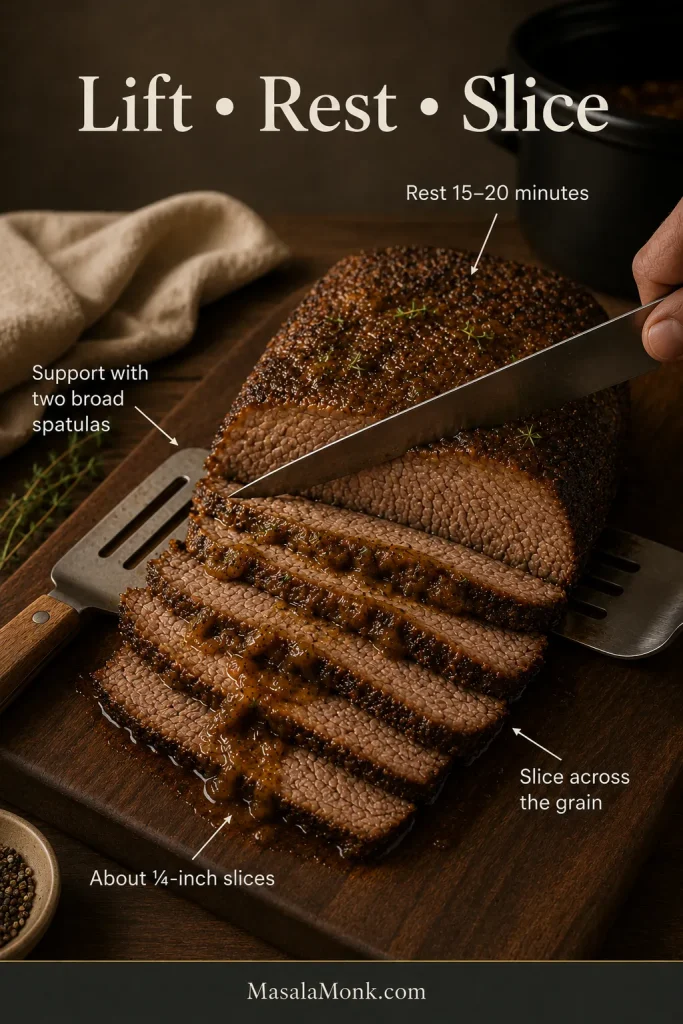
Rested brisket supported on a cutting board and carved across the grain into even slices with a long slicing knife.
Use long, gentle knife strokes. A blunt blade or heavy sawing motion can squash a very tender brisket before it reaches the plate.

The slow cooker brisket timing chart tells you when to begin looking for those changes.

How Long to Cook Brisket in a Slow Cooker

For a 3–3½ lb (1.4–1.6 kg) brisket flat, cook on LOW for about 7½–9 hours or HIGH for about 4½–6 hours. Begin checking at 7 hours on LOW or 4 hours on HIGH.

Cooking time changes with thickness, shape, fat content, starting temperature, cooker size, and how hot your slow cooker runs. A small rolled joint may take longer than a heavier broad flat because heat has farther to travel through its tightly rolled center.

There is no dependable minutes-per-pound or hours-per-kilogram formula for slow cooker brisket. Use the chart to decide when to make the first check, then let the resistance of the meat decide when to stop.

Open the lid briefly, test one or two places in the thickest section, and close it again quickly if the meat resists. Check again after another 30–45 minutes.

All times are approximate. Use the “Begin checking” column for your first tenderness test.

On a phone, swipe sideways to see all columns in the timing table.

BrisketSettingBegin checkingLikely window
Thin or small flat, 1⅔–2¼ lb / 750 g–1 kgLOW6 hours7–8 hours
Thin or small flat, 1⅔–2¼ lb / 750 g–1 kgHIGH3½ hours4–5 hours
Compact or rolled joint, 2¼–3⅓ lb / 1–1.5 kgLOW7 hours7½–9 hours; a very thick joint may need closer to 10 hours
Compact or rolled joint, 2¼–3⅓ lb / 1–1.5 kgHIGH4½ hours5–6½ hours
Standard flat, 3–3½ lb / 1.4–1.6 kgHIGH4 hours4½–6 hours

For a 4–5 lb (1.8–2.3 kg) brisket: use a 7–8 quart cooker and begin checking at about eight hours on LOW. Many thick whole briskets need roughly 9–11 hours. If you divide the brisket into thinner pieces, begin near the standard-flat window and remove each piece separately when tender.

What the Probe Is Telling You
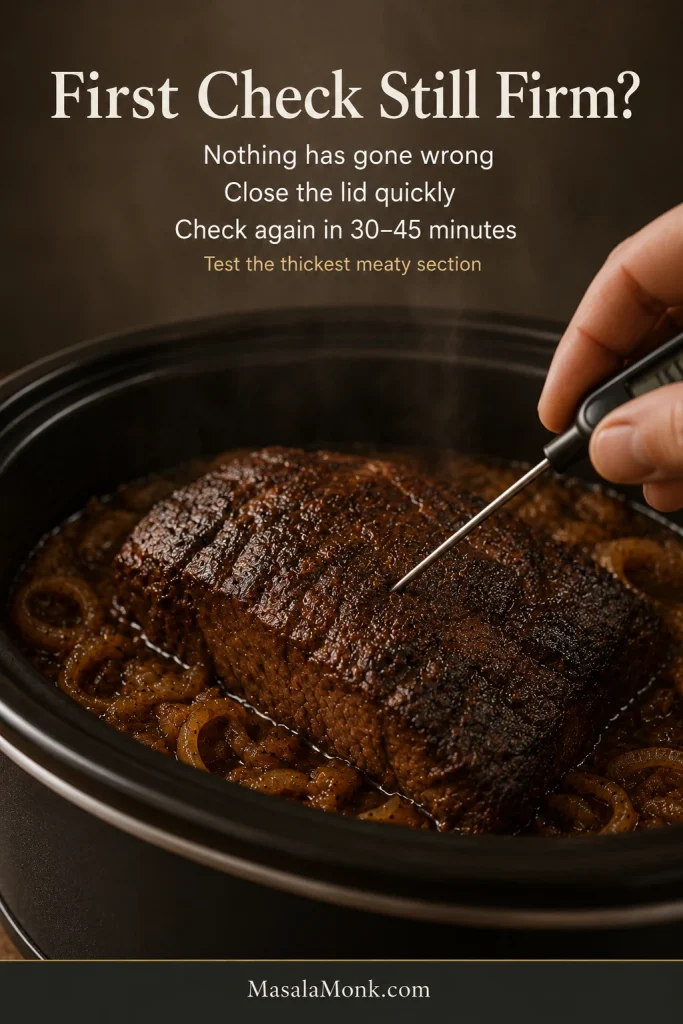
A thermometer probe entering the thickest center of browned brisket during an early tenderness check inside an onion-filled slow cooker.
Do not judge the brisket by one check. What matters is the change from firm and springy toward easier entry each time you test.
What you feelWhat it meansWhat to do
Firm resistance as the probe entersNeeds longerClose the lid and check again in 30–45 minutes
The probe glides into the thickest sectionTender and sliceableRemove the brisket and let it rest
The meat separates around the probePull-apart stageLift carefully, rest briefly, and shred

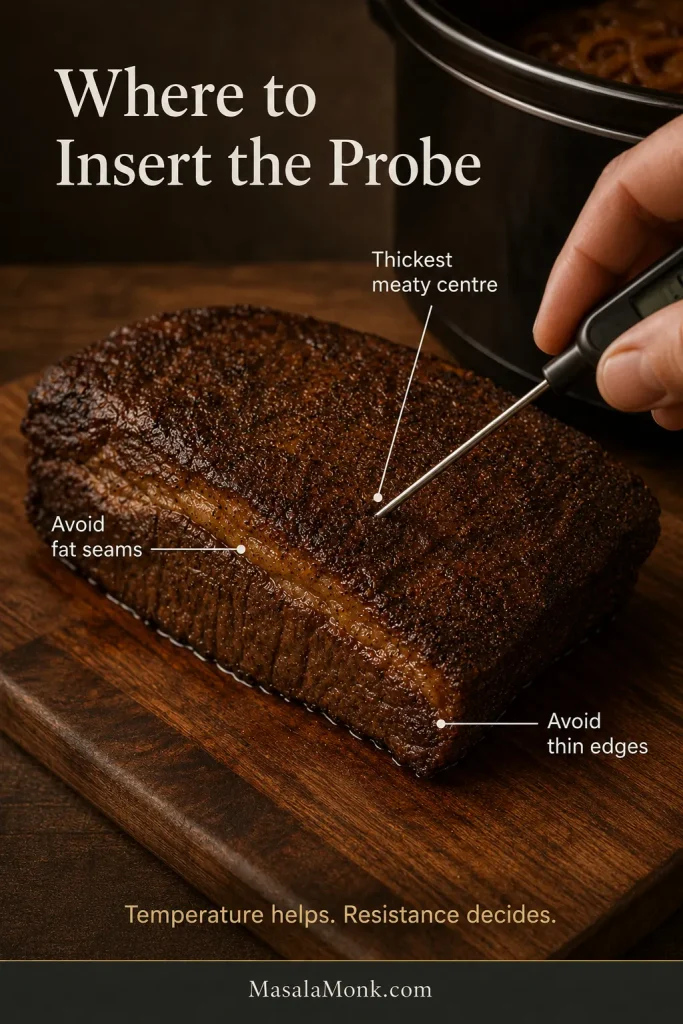
Where to Place the Probe

Probe inserted into the thickest meaty center of cooked brisket, with a fat seam and thin edge marked as misleading testing locations.
When readings disagree, trust the firmest result from the thick central meat. A soft fat seam or thin edge can be misleading.

Is LOW Better Than HIGH?

LOW is the more forgiving setting because it gives a lean flat a wider window between firm and overly soft. HIGH can produce good brisket when dinner needs to happen sooner, but it isn’t an exact half-time conversion.
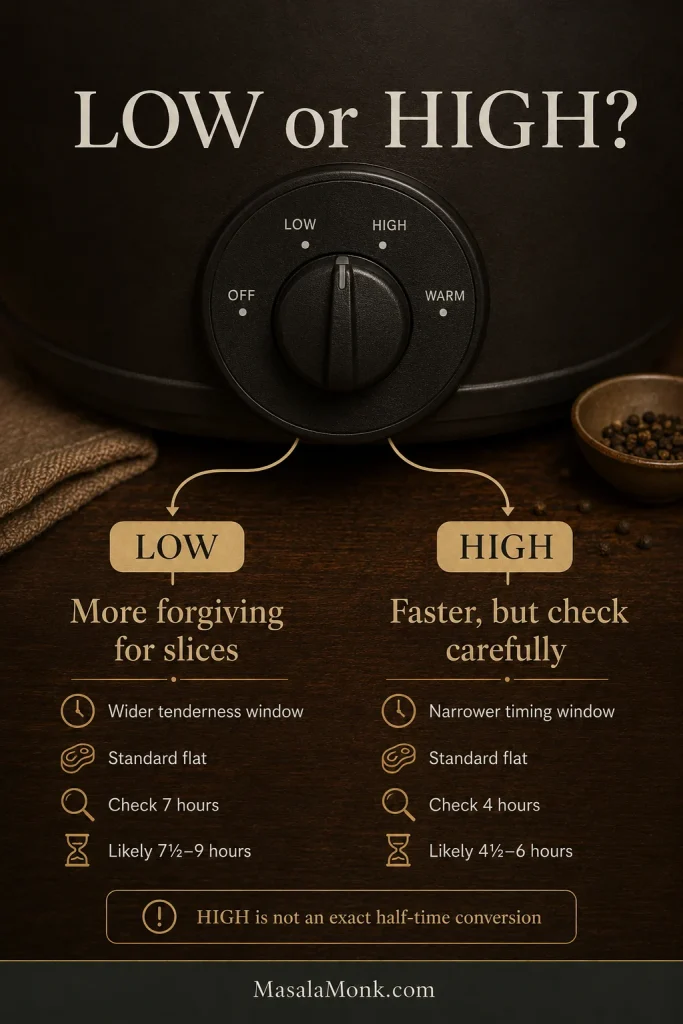
Comparison guide for cooking brisket on LOW and HIGH, with a slow-cooker dial and separate first-check and likely finishing windows.
HIGH narrows the final checking window because tenderness can change quickly near the end. Start early and stay close once the meat begins yielding.

What Internal Temperature Is Slow Cooker Brisket Done?

Begin checking brisket for tenderness around 185–190°F (85–88°C). Many pieces become probe-tender in the 190s to low 200s, but resistance—not temperature alone—decides when to remove them.

Whole beef roasts reach the USDA minimum safety benchmark at 145°F (63°C) followed by a three-minute rest. Brisket is normally still firm at that point because its connective tissue hasn’t softened enough.
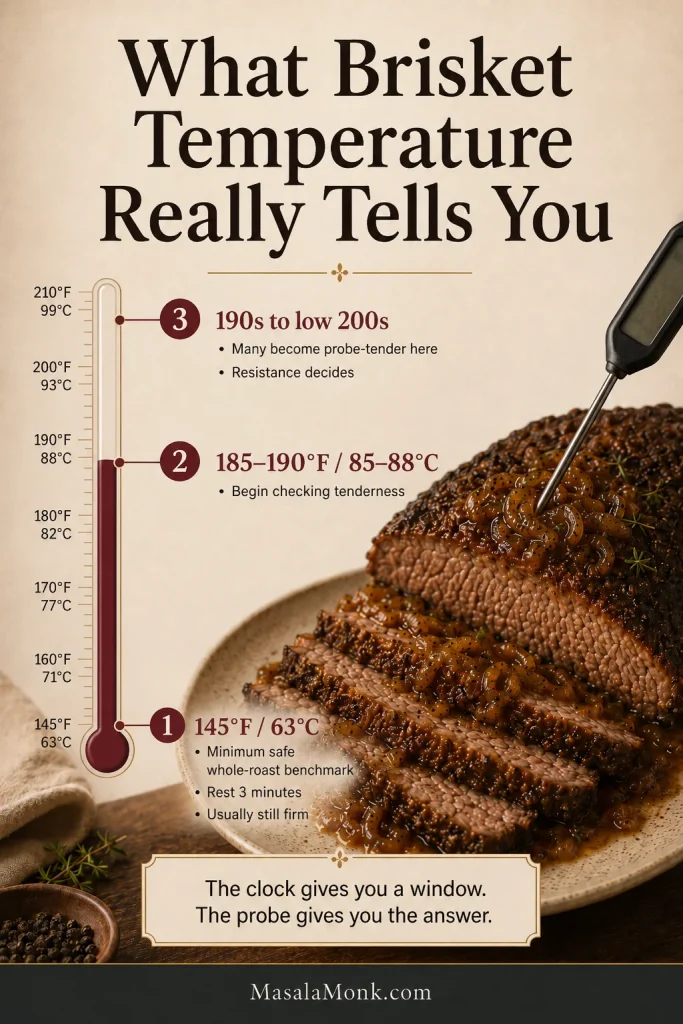
Vertical brisket temperature scale relating 145°F to beef safety, 185–190°F to tenderness checks and the 190s to low 200s to common finishing temperatures.
Temperature tells you when to start paying close attention. Probe feel still makes the final decision.

Can You Overcook Brisket in a Slow Cooker?

Yes. A brisket can become softer while its lean fibers become drier. Watch for these signs:

  • The brisket splits before it can be lifted from the cooker.
  • The fibers separate as soon as the surface is pressed.
  • Slices crumble into short strands instead of bending.
  • A lean flat feels soft but dry or cottony in the mouth.
  • The edges break down before you can carve the center.

An over-soft brisket works well shredded, moistened with finished gravy, and served in rolls, baked potatoes, or rice bowls.

Save the Slow Cooker Brisket Timing Guide

Prefer one visual reference for later? This chart brings together the first-check and likely cooking windows for flats and rolled joints on LOW or HIGH. Save it as a starting point, then let probe resistance decide the actual finish.
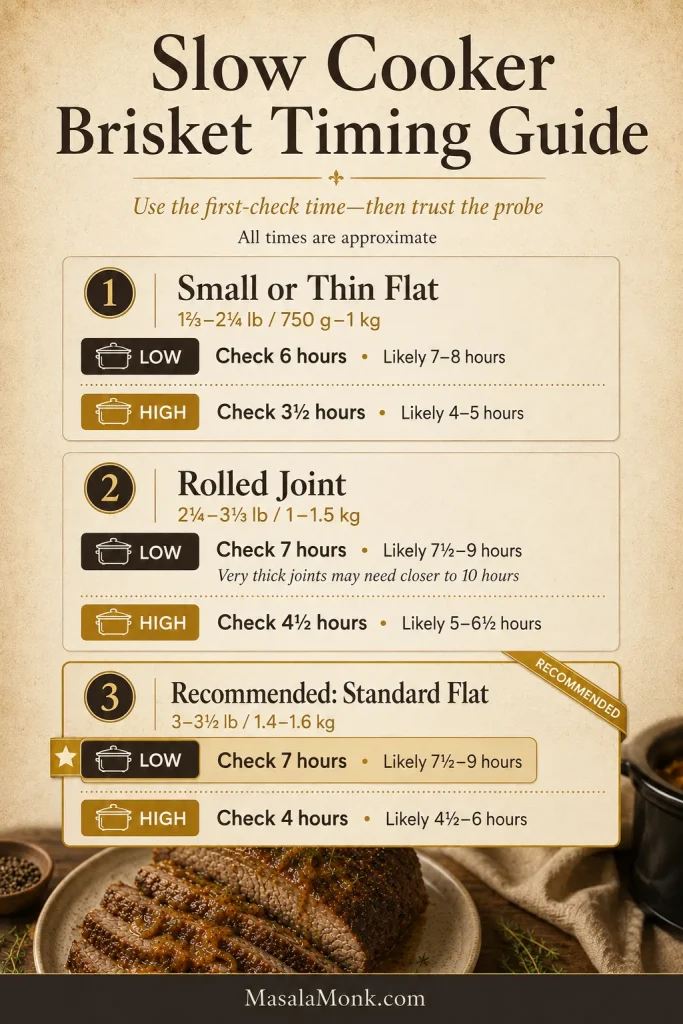
Timing guide comparing first-check and expected cooking windows for a small brisket flat, rolled joint and standard flat on LOW and HIGH.
Save this chart as a quick starting point. Begin checking at the earlier time shown, but let thickness and probe resistance decide when the brisket is ready.

Open the full-size brisket timing chart, then save it to your phone or computer for future cooks.

Once the probe gives you the answer, remove the brisket and finish the cooking juices as rich onion gravy.

How to Turn the Cooking Juices Into Rich Gravy

The liquid will probably look thinner than finished gravy when the lid first comes off. That is expected. It may already smell deeply savory, but its flavor and body develop in the saucepan.

Reduce for flavor. Thicken for texture. Reduction concentrates the beef and onions. Cornstarch changes only how the sauce flows.

Why Slow Cooker Brisket Juices Look Thin
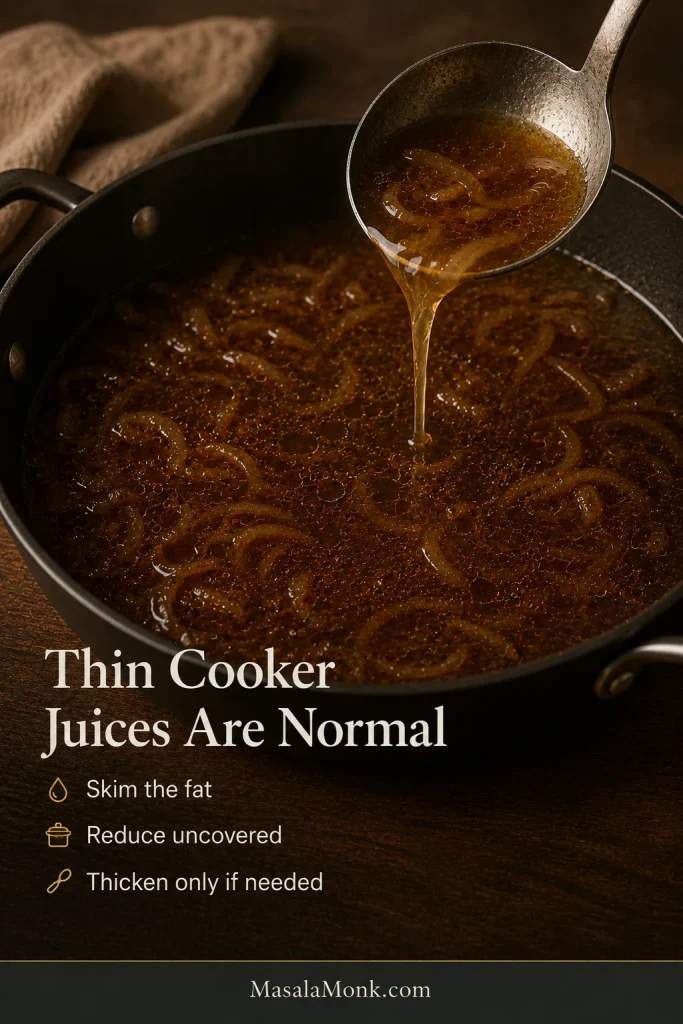
Thin brown slow-cooker juices containing softened onions and visible fat droplets being poured from a ladle into a wide saucepan.
A wide saucepan concentrates thin cooker juices faster than a narrow pot because more liquid is exposed to evaporation.

Remove the Fat and Choose the Texture

Let the liquid settle briefly, then spoon away the glossy fat or use a separator. A point cut or heavily capped brisket may need more attention than a lean flat. When the brisket is cooked a day ahead, the chilled fat lifts away especially cleanly.

Keep the softened onions for rustic gravy, blend them into the liquid with an immersion blender for a smooth sauce, or strain them out for a clearer finish.

Reduce Before You Thicken

Pour the liquid into a wide saucepan and simmer uncovered. At first it may taste savory but diluted. Start tasting after about 10 minutes. As the beef and onion flavors concentrate, the bubbles turn slower and glossier. The spoon also begins leaving a brief trail across the pan.

Stop when the gravy tastes deeply beefy and onion-rich, even if it looks slightly thinner than you want. Mix 1 tablespoon cornstarch with 1 tablespoon cold water, whisk it in gradually, and simmer for 1–2 minutes. If it remains too thin, mix another tablespoon of cornstarch with another tablespoon of cold water and add only as much as needed. The finished gravy should coat the back of a spoon and fall in a broad ribbon.
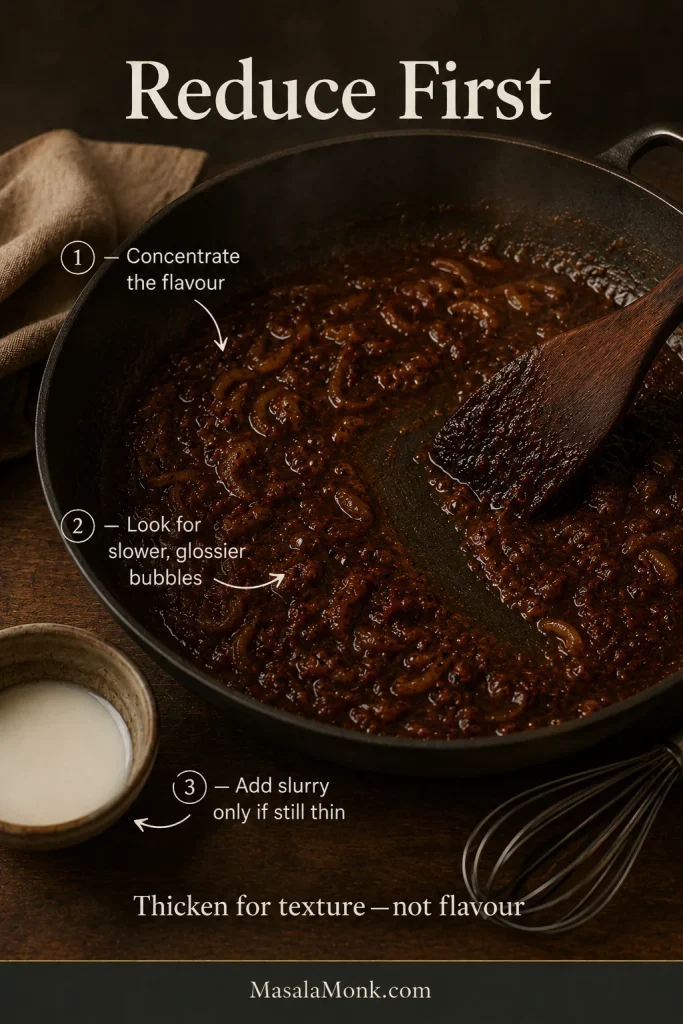
Onion gravy reducing in a wide pan with glossy bubbles, a temporary spoon trail and a small bowl of cornstarch slurry nearby.
Let a spoonful cool for a moment before the final tasting. Very hot gravy can hide salt and acidity and tempt you to over-adjust it.

What Finished Onion Gravy Should Look Like
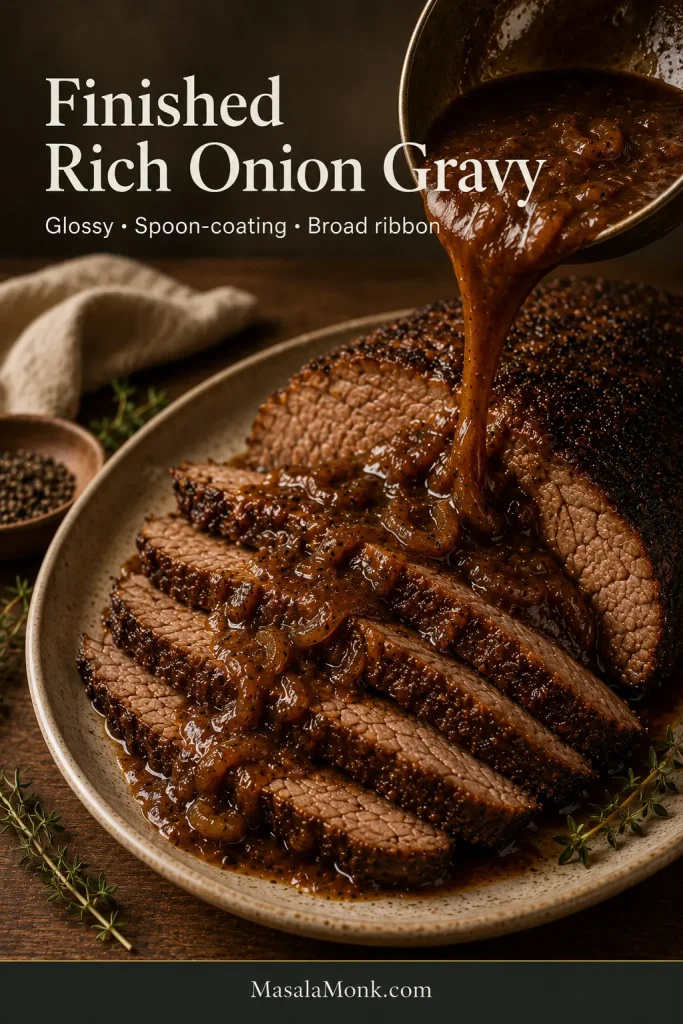
Deep brown onion gravy pouring in a broad glossy ribbon onto one slice of brisket while the other slices remain mostly uncovered.
Gravy thickens as it cools, so stop while it looks a little looser than you want at the table.

Balance the Finished Gravy

If the gravy tastes…Try this
Flat or heavyAdd 1 teaspoon red wine vinegar, taste, then add more only if needed. It should lift the richness without tasting vinegary.
Not savory enoughAdd a small splash of Worcestershire or a pinch of salt.
Overly saltyStop reducing and dilute with unsalted stock or water.
Too sweetAdd acidity and a little additional stock.
Harsh or sharpAdd more stock or a very small pinch of brown sugar.
GreasySeparate more fat before making any other adjustment.
Rich but too thinAdd more slurry gradually.
Overly thickWhisk in warm stock a little at a time.
Not enough gravyAdd warm unsalted stock, simmer briefly to integrate it, and taste again before serving.

Slow Cooker Brisket Troubleshooting

Most brisket problems fall into two groups: the meat needs more time, or the cooking liquid needs finishing. Even an over-soft brisket can become an excellent pull-apart dinner.

Brisket Rescue at a Glance
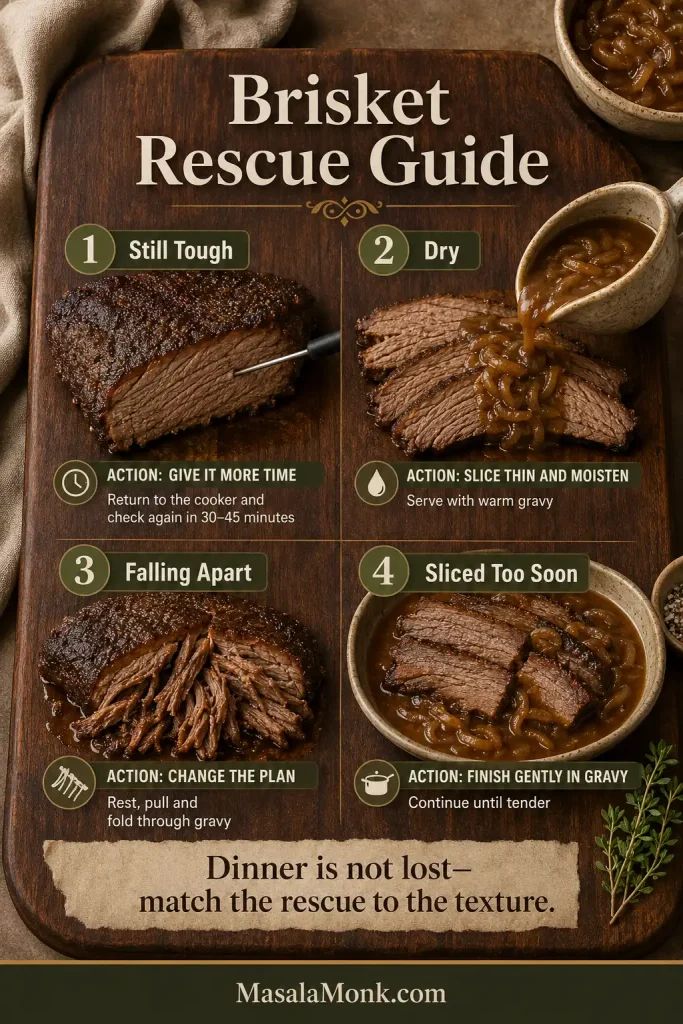
Four-part brisket rescue guide pairing still-tough meat, dry slices, falling-apart brisket and prematurely sliced meat with different corrective actions.
Check tenderness and moisture separately. Moist but resistant brisket needs more heat; soft, cottony meat needs gravy, not more cooking.

My Brisket Is Still Tough

If your brisket still feels moist but the probe pushes back, nothing has gone wrong. Keep it whole, replace the lid, and cook for another 30–45 minutes. Test the thickest center, not a soft edge or a seam of fat.

If the brisket has just been sliced and is still hot, arrange the slices snugly in a covered baking dish with hot gravy or cooking liquid. Continue cooking gently at 300°F (150°C) and check every 20–30 minutes. For refrigerated brisket, use the reheating guidance below instead.

My Brisket Is Dry

Dryness can come from a very lean flat, cooking past the ideal window, or reheating uncovered. Beef can overcook even while surrounded by liquid because the muscle fibers still tighten and release their own moisture.

Spoon generous gravy over the slices or chop the meat and fold it into the sauce. The beef cannot absorb all the lost moisture again, but thicker pieces and plenty of gravy can make a satisfying dinner.

It Fell Apart Before I Could Slice It

If the brisket breaks as you lift it, dinner isn’t lost—it has simply moved from sliceable to pull-apart. Remove any large deposits of fat, shred the beef, and add enough finished gravy to coat the fibers.

When presentation matters, let the meat cool before handling. Chilled brisket firms up, making it easier to portion cleanly than delicate hot meat.

Gravy Troubleshooting at a Glance
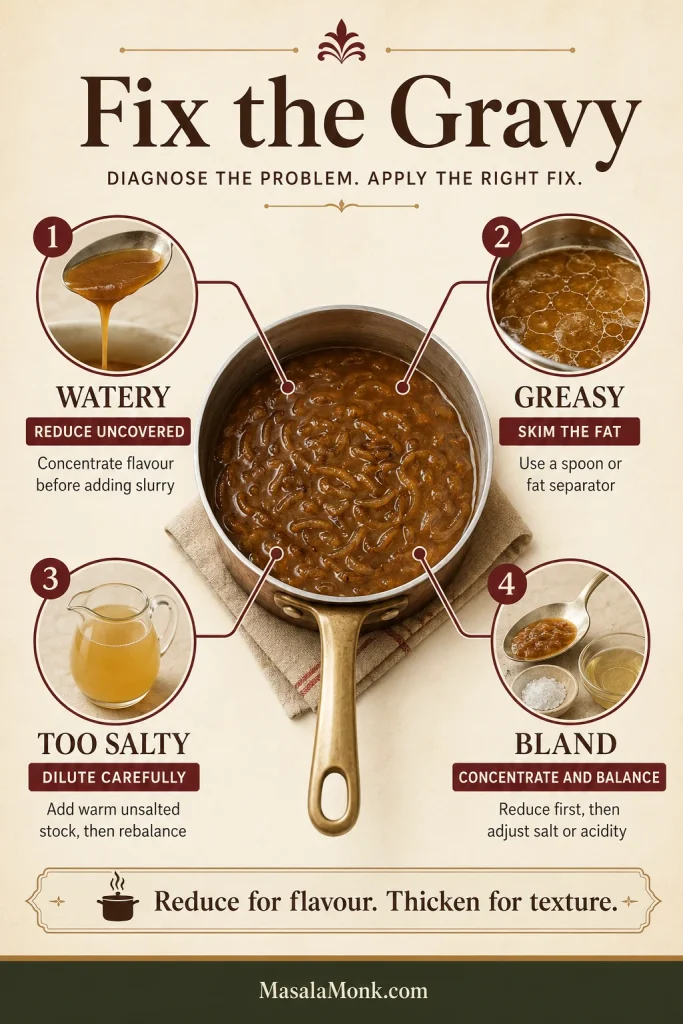
Four-part gravy troubleshooting guide pairing watery, greasy, salty and bland onion gravy with reduction, skimming, dilution and flavor balancing.
Concentrate the gravy before seasoning it. Once it is too salty, dilute it—more reduction will only intensify the salt.

The Gravy Is Watery

The liquid may look disappointingly thin when you first open the cooker. That is often normal; it has not been reduced yet. Move it to a wide pan and simmer uncovered until the flavor concentrates, then use a slurry only if it still needs more body.

The Gravy Is Greasy

A point cut, thick fat cap, or heavy internal seams can release more fat than the sauce can comfortably hold. Let the liquid settle and skim it, use a separator, or chill it and remove the hardened layer.

The Gravy Is Too Salty

Reduction intensifies salt from stock, Worcestershire, seasoning mixes, and the beef itself. Stop reducing and add unsalted stock or water. If that makes the gravy too thin, restore its body with a little slurry rather than concentrating the salt again.

The Brisket Tastes Bland

Skipping the sear, using weak stock, beginning with too much liquid, or forgetting to taste before serving can all leave the sauce muted. Reduce it first, then taste for salt, savory depth, and acidity. A little Worcestershire or red wine vinegar can wake it up quickly.

Dinner Timing: Running Late or Finished Early

If dinner is running late and the brisket is fully hot but still tough, switch from LOW to HIGH and check again in 30 minutes.

If it finishes early, remove it from the cooker rather than letting it continue for hours. For a short delay, keep it whole and safely hot at 140°F (60°C) or above, with a little hot cooking liquid.

A long stay on WARM can soften and dry a lean flat. If safe hot holding is not practical, refrigerate the brisket within two hours and reheat the slices in gravy.

Slow Cooker Brisket Variations

Whichever version you make, stop cooking when the brisket reaches the texture you want.

Choose Wine, Ale, or Stock—and Add Balsamic if You Like

Red wine: Use ½ cup (120 ml) dry red wine for deglazing. Cabernet Sauvignon, Merlot, or another dry medium-to-full-bodied red suits the dark onion gravy. Keep the amount restrained so the reduced sauce doesn’t become sharp.

Ale or stout: Replace the wine with ½ cup (120 ml) dark ale or stout. Choose a round, malt-forward beer rather than a heavily bitter one, because bitterness becomes more noticeable as the gravy reduces.

Balsamic: Add 1 tablespoon (15 ml) balsamic vinegar to the braising liquid. Omit the final red wine vinegar unless the reduced gravy still needs brightness.
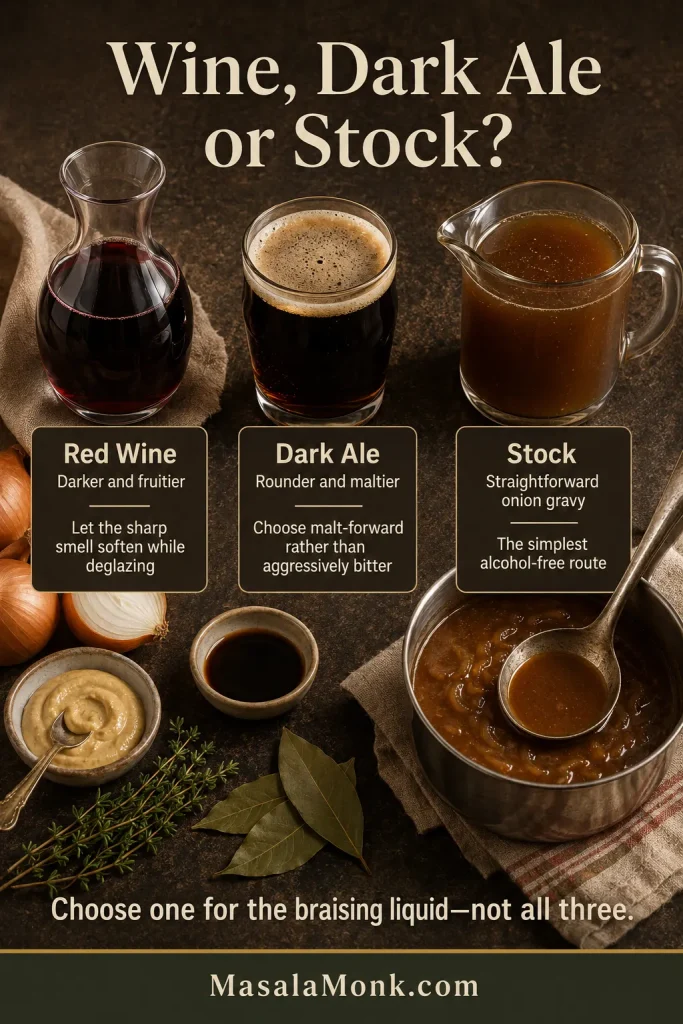
Red wine, dark ale and beef stock arranged beside onions, mustard, Worcestershire sauce, herbs and a saucepan as alternative brisket braising liquids.
Choose a braising liquid that already tastes balanced. Reduction magnifies bitterness, sweetness and salt along with the flavors you want.

Do You Have to Sear Brisket Before Slow Cooking?

No. Skipping the skillet saves about 25 minutes, although the meat and gravy will have less browned depth. Follow the no-sear method in the recipe notes.

Brisket With Potatoes and Carrots

The most dependable approach is to keep the cooker focused on beef and onions, then prepare the vegetables separately. A tray of roasted carrots can cook while the brisket finishes.

If the cooker has room, add up to 12 oz (340 g) waxy potatoes and 8 oz (225 g) carrots. Cut them into 1½–2 inch (4–5 cm) pieces and add them for the final 2½–3 hours on LOW.

The vegetables will be softer, take up valuable cooker space, and release extra water, so expect a longer gravy reduction.
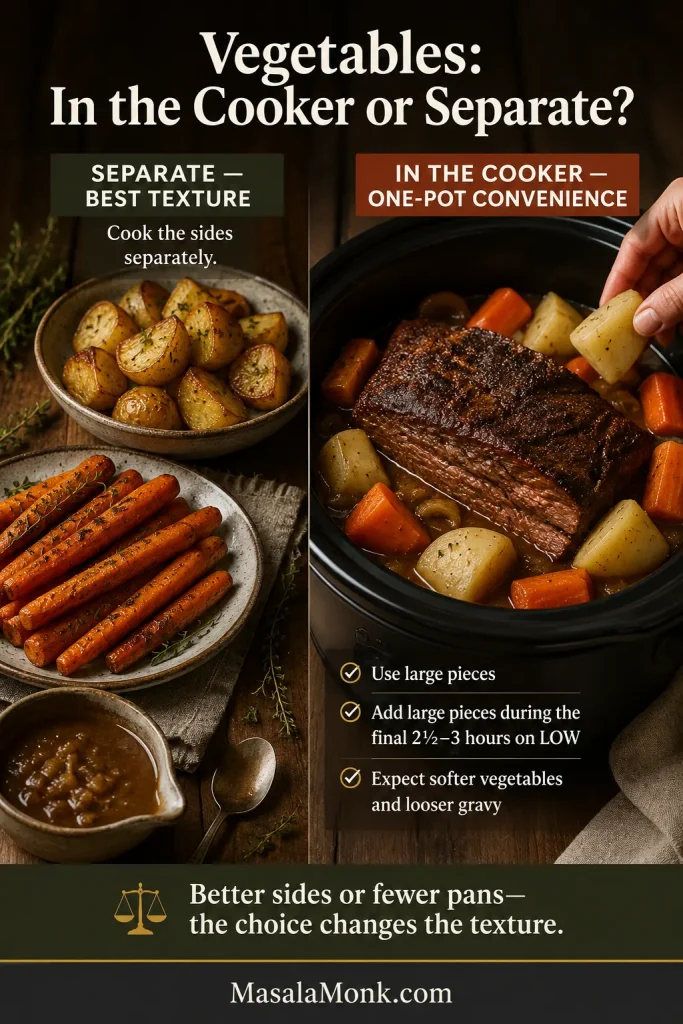
Split comparison of separately roasted potatoes and carrots with large vegetable pieces being added late around brisket in a slow cooker.
Use waxy potatoes and large pieces in the cooker. Floury potatoes or smaller cuts can soften into the gravy.

How to Make It Pull-Apart

Continue cooking until the fibers separate readily when pressed. Rest the brisket for about 10 minutes, remove any large pockets of fat, then pull it into broad strands. Fold through enough finished gravy to coat the meat without drowning it.

What to Serve With Slow Cooker Brisket

Brisket with gravy wants something soft enough to catch the sauce or crisp enough to balance the richness. Spoon the gravy over the cut face of the beef so it settles between the slices and reaches the potatoes beneath.

Classic Brisket and Gravy Dinner

  • Creamy or fluffy mashed potatoes for catching the onion gravy
  • Roasted or buttered carrots
  • Green beans or peas
  • Buttered cabbage
  • Yorkshire puddings
  • Soft dinner rolls for the remaining gravy

A spoonful of onion gravy, mashed potatoes, and one green vegetable are enough. The brisket brings all the richness the plate needs.
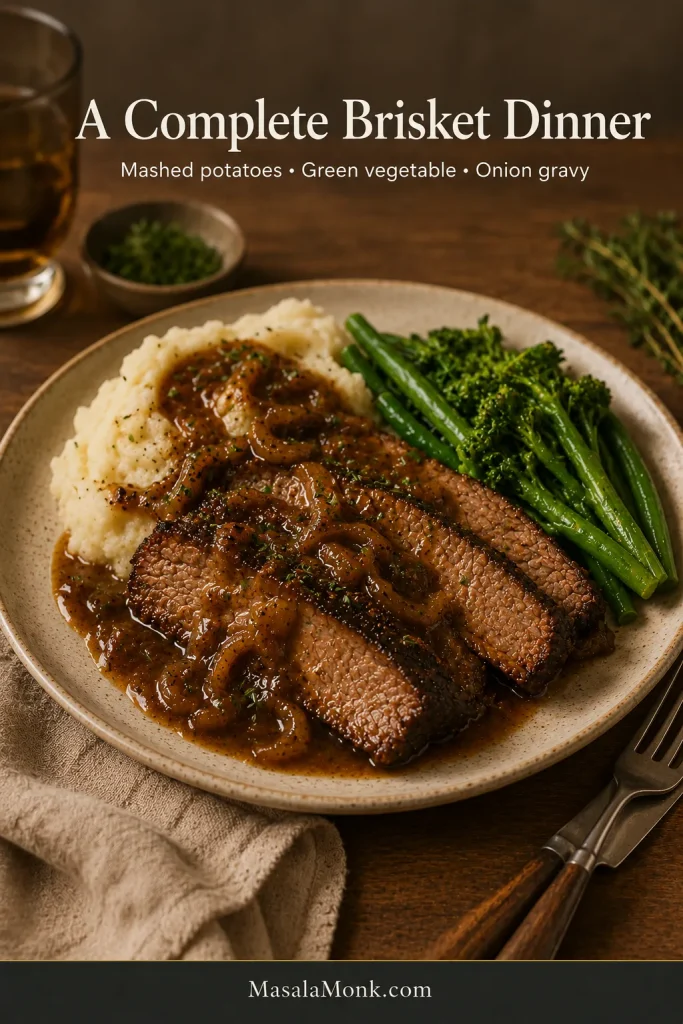
Plate of sliced brisket with onion gravy, mashed potatoes and green vegetables arranged as a complete roast-style dinner.
A mild starch catches the gravy, while a crisp green vegetable keeps the rich brisket from making the whole plate feel heavy.

For an egg-free and dairy-free roast-dinner option, use these eggless Yorkshire puddings without milk.

A Lighter Plate

A classic wedge salad brings cold crunch and sharpness beside the warm beef and gravy, keeping the plate from feeling too soft or heavy.

  • Cauliflower mash
  • Steamed or sautéed greens
  • Crisp cabbage salad
  • Roasted broccoli or Brussels sprouts
  • Green beans finished with lemon

Ways to Use Leftover Brisket

The second meal is one of the rewards of cooking a full brisket.

  • Open-faced brisket sandwiches with hot gravy
  • Brisket and gravy over polenta
  • Baked potatoes filled with chopped brisket
  • Rice bowls with onions and greens
  • Brisket hash with potatoes and eggs

Leftover brisket also works beautifully in rice bowls; use the guide to cooking fluffy rice so the grains stay separate enough to catch the gravy without turning wet or gummy.
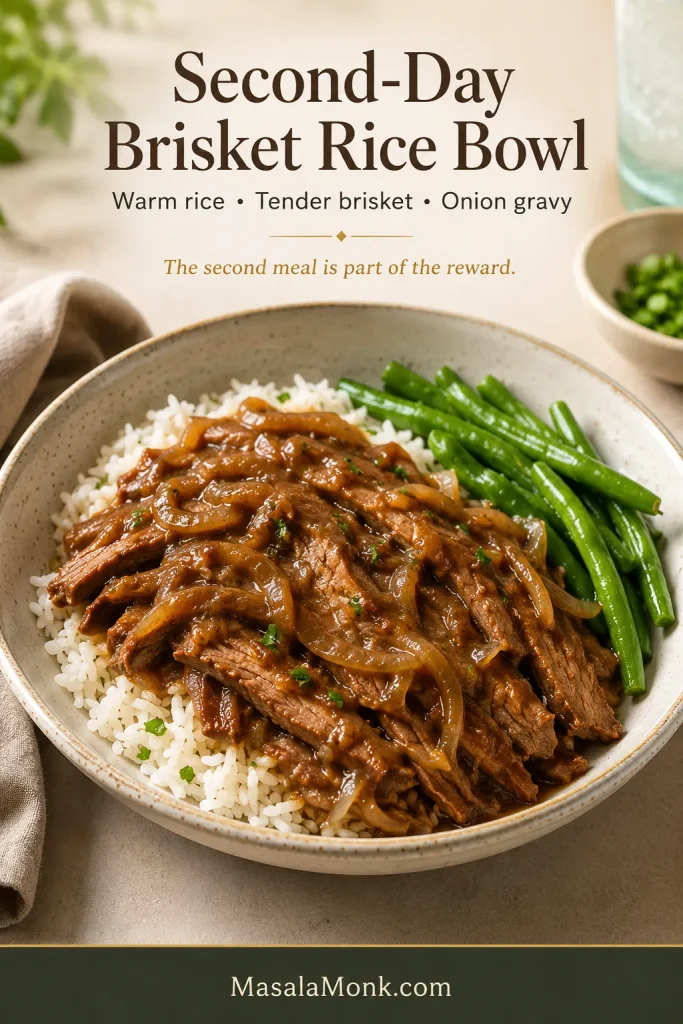
Shallow bowl of fluffy white rice topped with tender leftover brisket, brown onion gravy, softened onions and bright green beans.
Rice drinks up sauce quickly. Loosen chilled gravy with a splash of unsalted stock before warming the brisket.

When serving the brisket later—or tomorrow—keep the meat with enough gravy to protect the cut surfaces. The full make-ahead, storage, and reheating guidance follows below.

Make-Ahead, Storage, Freezing, and Reheating

Brisket can be served the day it cooks, but making it a day ahead is often the calmer choice for guests. The fat lifts away cleanly, the chilled meat slices neatly, and reheating it in gravy removes the pressure of timing dinner to the minute.

The Best Make-Ahead Brisket Method

  1. Cook the brisket until tender but still intact.
  2. Transfer it promptly from the hot cooker with enough cooking liquid to keep the surface moist.
  3. If the brisket is especially thick, divide it into two or three large portions, then refrigerate the meat and liquid in shallow covered containers within two hours.
  4. Lift away the solidified fat the following day.
  5. Slice the cold brisket across the grain.
  6. Finish or loosen the gravy as needed.
  7. Reheat the slices gently in the gravy until the center reaches 165°F / 74°C, following one of the methods below.
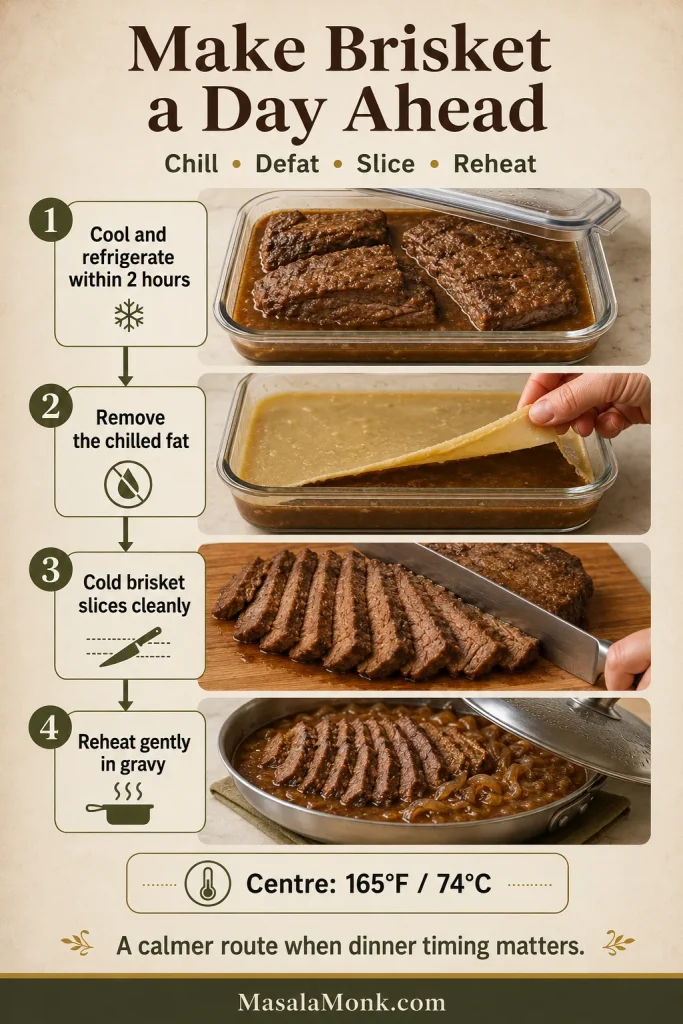
Four-stage make-ahead brisket sequence showing cooling in a shallow container, lifting chilled fat, slicing cold meat and reheating the slices in gravy.
Cold brisket is easier to portion neatly. Arrange the slices before reheating so the fragile warm meat only needs to be moved once.

If the side dish also needs to be prepared ahead, these garlic mashed potatoes include make-ahead and gentle reheating guidance that fits the same dinner plan.

Refrigerating Leftovers

Refrigerate cooked brisket within two hours and use it within 3–4 days. Keep sliced meat covered with gravy or cooking liquid so the exposed surfaces don’t dry out.

Freezing Brisket

Freeze meal-size portions of sliced or chopped brisket with enough gravy to coat and protect the meat. For the best texture and flavor, use it within about three months.

Thaw frozen brisket in the refrigerator before reheating.

How to Reheat Brisket Without Drying It Out

Whichever method you use, reheat the center to 165°F (74°C). Do not use a slow cooker to warm refrigerated brisket gradually from cold.

Covered oven: Arrange the slices in a baking dish with gravy, cover tightly, and reheat at 325°F (165°C).

Stovetop: Warm the brisket gently in gravy over low heat. Avoid a hard boil, which can break soft slices apart.

Microwave: Place an individual portion in a covered microwave-safe dish with gravy. Heat in short intervals and rearrange the slices as needed.

Frequently Asked Questions

Does Brisket Need to Be Covered With Liquid?

No. The top can remain exposed because the beef and onions release moisture beneath the closed lid. The measured stock carries the browned flavor and becomes the gravy.

How Long Does a 1 kg / 2.2 lb Brisket Take?

A thin flat often takes about 7–8 hours on LOW; check around 6 hours. A 2 lb (900 g) flat may finish sooner when unusually thin, while a rolled joint can take longer.

Can I Cook Brisket on HIGH Instead of LOW?

Yes. For the 3–3½ lb brisket, start testing around 4 hours and expect roughly 4½–6 hours. LOW gives a lean flat a wider tenderness window.

Can Frozen Brisket Go Straight Into a Slow Cooker?

No. Fully thaw it in the refrigerator first; a large frozen center can warm too slowly in a slow cooker.

Do I Leave the String on a Rolled Brisket?

Leave heat-safe butcher’s string on until after resting. Remove plastic, absorbent pads, clips, and non-heat-safe elastic netting before cooking.

Can I Make Slow Cooker Brisket a Day Ahead?

Yes. Chill it with some cooking liquid, remove the hardened fat, slice the meat cold, and reheat it in the finished gravy.

The Brisket Is Ready When It Stops Resisting

Once the probe slides in easily and the brisket holds together, the uncertain part is over. Move it to the board, let it rest, and finish the gravy while the meat settles.

Slice across the grain, spoon the onion gravy over the warm cut face, and bring the rest to the table. The first slice should bend without crumbling.

Was yours a flat, point, or rolled joint—and did it stay sliceable or move toward pulled beef? Share the cut, weight, setting, and approximate cooking time, especially if the result surprised you. Your experience may help the next cook recognize a brisket that looks like theirs.
Posted on Leave a comment

Crock Pot Salisbury Steak Recipe

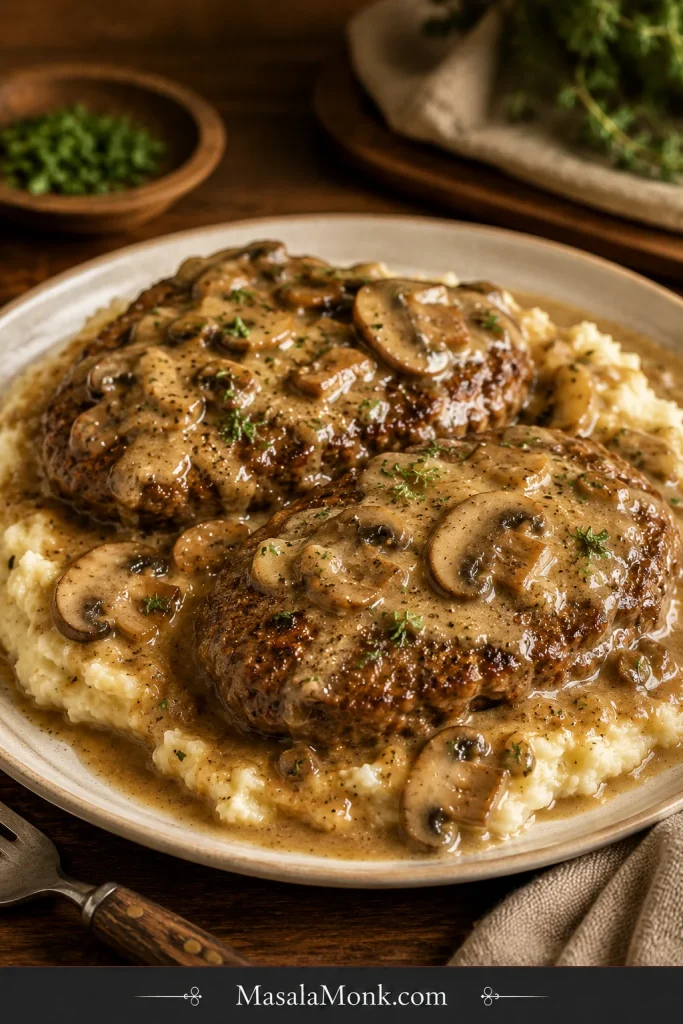
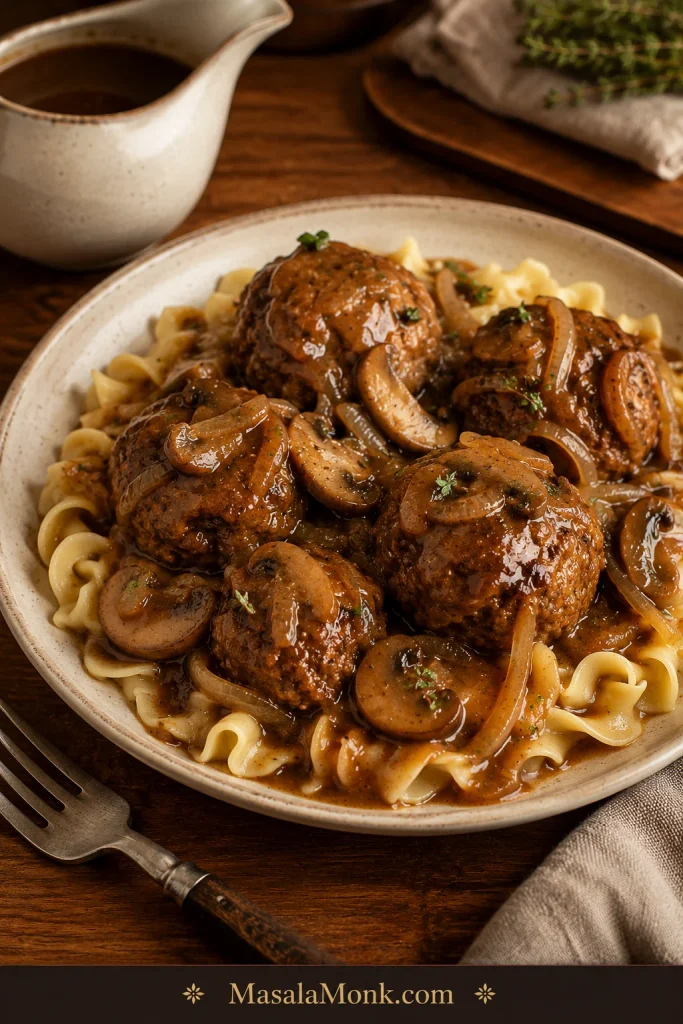
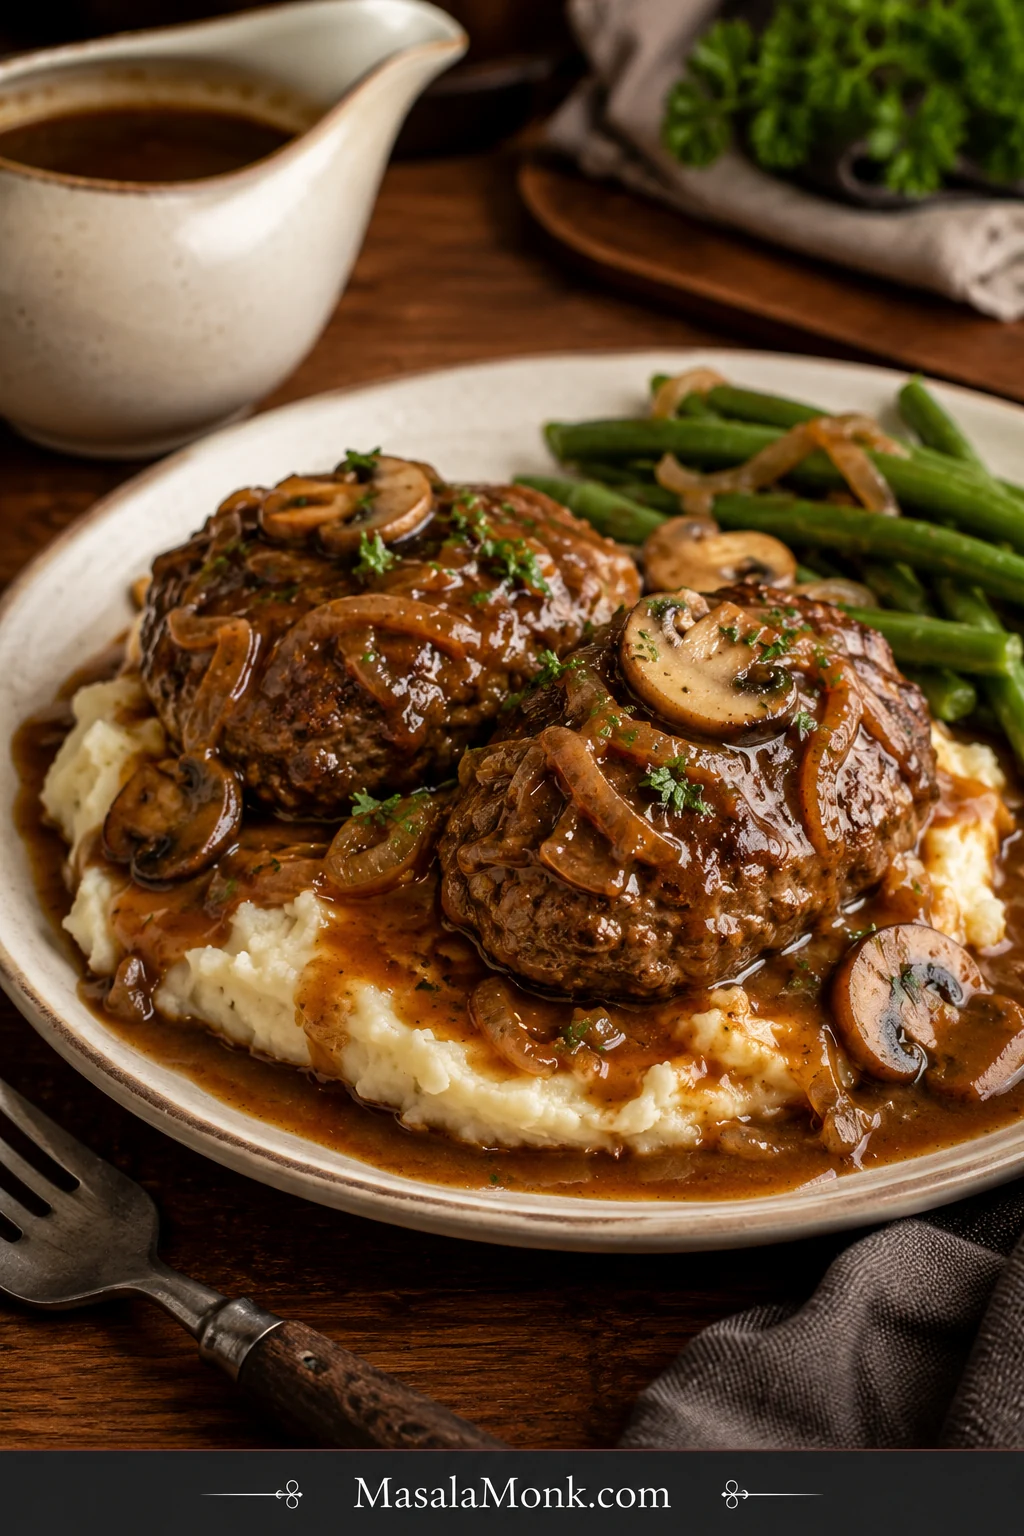
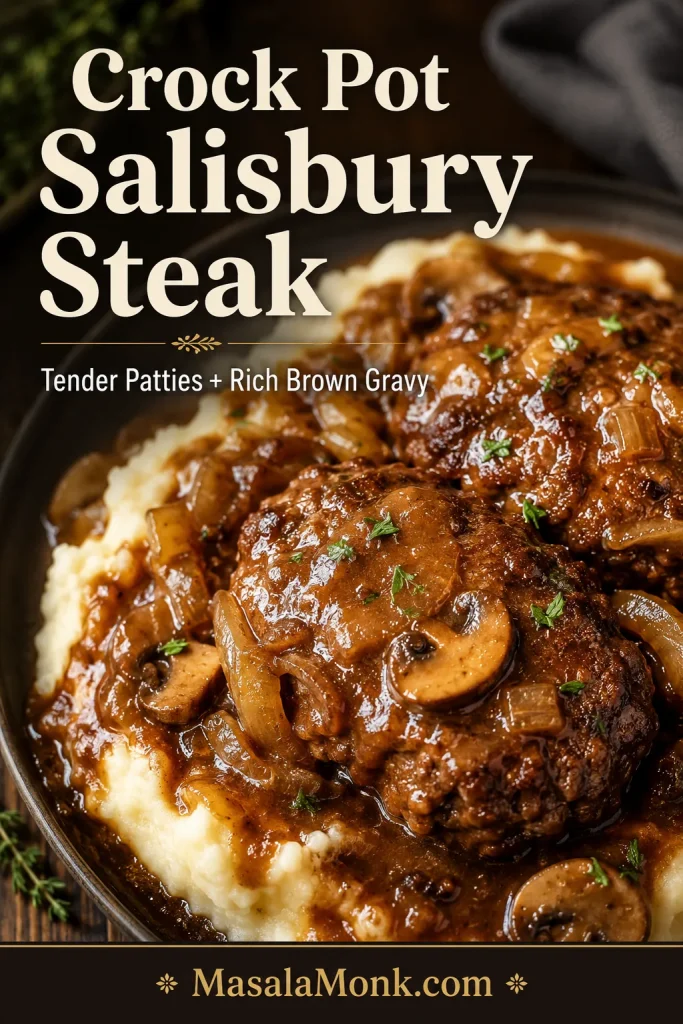
Two Salisbury steak patties covered with mushroom onion brown gravy over mashed potatoes, served with green beans on a cream plate.

This crock pot Salisbury steak is the slow cooker dinner you make when mashed potatoes are already on your mind. Tender ground beef patties cook in rich brown gravy with soft onions, mushrooms if you like them, and enough sauce to spoon over everything on the plate.

A good crock pot Salisbury steak is really a gravy dinner with beef patties in the middle, so the sauce has to be treated like the main event. It should taste beefy, oniony, and rich — not thin, salty, or steamed.

You also get clear shortcut options for thawed hamburger patties, cream of mushroom soup, brown gravy mix, onion soup mix, French onion soup, and meatballs, because some nights dinner starts with the pantry or freezer. The goal is not to pretend packets and cans do not exist. Instead, use them in a way that still tastes balanced, cozy, and cared for.

If you want the classic side ready too, this mashed potatoes recipe is built for creamy, fluffy potatoes that can hold a lot of gravy.

Quick Answer: Can You Make Salisbury Steak in a Crock Pot?

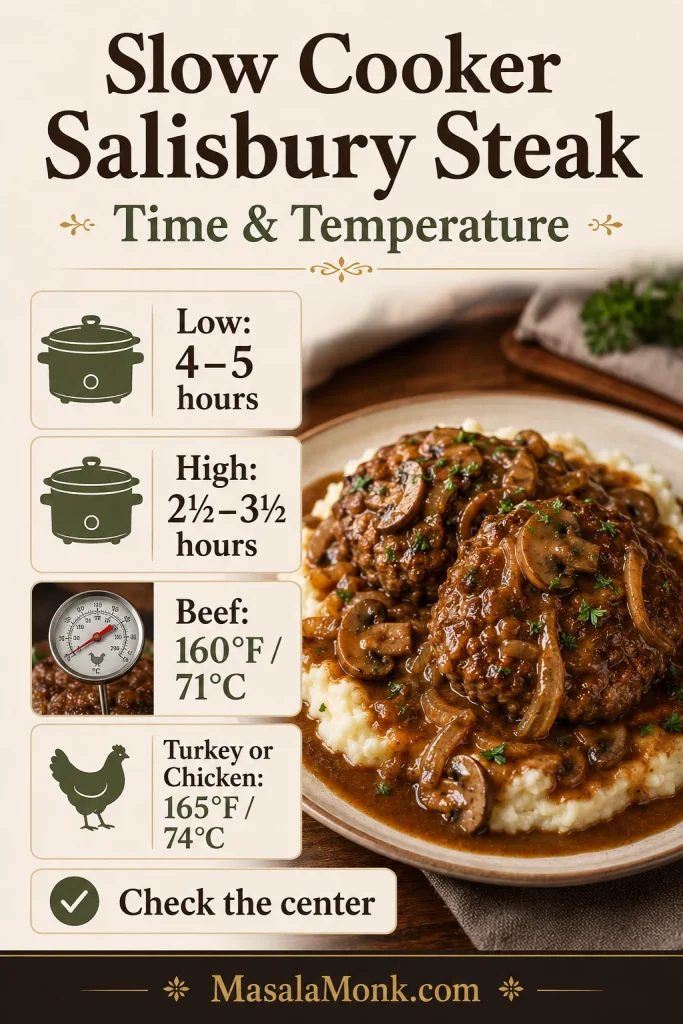
Yes. Salisbury steak works well in a crock pot when the patties are shaped firmly, browned first if possible, and cooked in a flavorful sauce. For homemade browned patties, cook on low for 4 to 5 hours, or on high for 2½ to 3½ hours, until the centers reach 160°F / 71°C.

The sauce will usually look thinner while it cooks because slow cookers trap moisture. Give it its final 15 to 20 minutes after the cornstarch slurry; that is when it turns from slow cooker liquid into spoonable gravy.

This is not a fussy dinner. It is the kind of meal that feels best when the gravy is generous, the potatoes are soft, and nobody is asking what else is for dinner.

Remember this: mix the beef gently, brown first if you can, cook on low when possible, and save the real thickening for the end.

Make This When

Make this when you want the slow cooker to help, but you still want the plate to feel like real comfort food.

  • You want an easy slow cooker dinner that still feels old-fashioned and cozy.
  • A sauce-heavy meal for mashed potatoes, noodles, or rice sounds right.
  • Pantry shortcuts need to taste balanced, not flat or too salty.
  • Frozen hamburger patties need to become a proper dinner.
  • Broken patties, watery gravy, tough beef, or bland sauce need clear fixes.

This is the kind of dinner that smells like it has been waiting for mashed potatoes all afternoon. Keep the sides simple and do not ration the gravy.

Crock Pot Salisbury Steak Recipe

Tender ground beef patties slow cooked in rich brown mushroom onion gravy until the sauce is glossy, spoonable, and ready for mashed potatoes, egg noodles, rice, or cauliflower mash.

Prep Time
15 minutes
Browning Time
6 to 8 minutes
Cook Time
4 to 5 hours on low
Thickening Time
15 to 20 minutes
Total Time
About 5 to 6 hours
Servings
6 patties
Best Crock Pot
6-quart oval
Patty Size
About 4 oz / 113 g each
Safe Beef Temp
160°F / 71°C

Ingredients

For the Salisbury Steak Patties

  • 1½ lb / 680 g lean ground beef
  • ½ cup / about 45 to 55 g plain breadcrumbs, or ⅓ cup / about 20 to 25 g panko
  • 1 large egg
  • 3 tbsp / 45 ml milk
  • 1 tbsp / 15 ml Worcestershire sauce
  • ½ tsp salt, or less if using onion soup mix
  • ½ tsp black pepper
  • ½ tsp garlic powder
  • ½ tsp onion powder
  • 1 tbsp oil, for browning

For the Brown Gravy

  • ½ medium onion, thinly sliced, about 60 to 75 g
  • 4 to 8 oz / 113 to 227 g mushrooms, sliced, optional
  • 2 cups / 480 ml low-sodium beef broth
  • 1 packet brown gravy mix, about 0.87 to 1 oz / 25 to 28 g
  • 1 tbsp / 15 ml Worcestershire sauce
  • 1 tbsp / 15 ml ketchup
  • 1 tsp / 5 ml Dijon mustard
  • 1 small garlic clove, minced, or ½ tsp garlic powder
  • 1 to 2 tbsp / 8 to 16 g cornstarch
  • 1 to 2 tbsp / 15 to 30 ml cold water

Optional Shortcut Add-Ins

  • ½ packet onion soup mix, for stronger onion flavor
  • 1 can cream of mushroom soup, usually 10.5 oz / 298 g, for a creamier gravy
  • 1 can golden mushroom soup, usually 10.5 oz / 298 g, for deeper mushroom flavor
  • 1 can French onion soup, usually 10.5 oz / 298 g, to replace part of the beef broth
  • 1 can cream of chicken soup, usually 10.5 oz / 298 g, for a milder creamy shortcut
  • 1 packet au jus mix, to use instead of brown gravy mix

Instructions

  1. Mix the patties gently. In a large bowl, combine ground beef, breadcrumbs, egg, milk, Worcestershire sauce, salt, pepper, garlic powder, and onion powder. Mix only until combined. Avoid squeezing or overworking the meat.
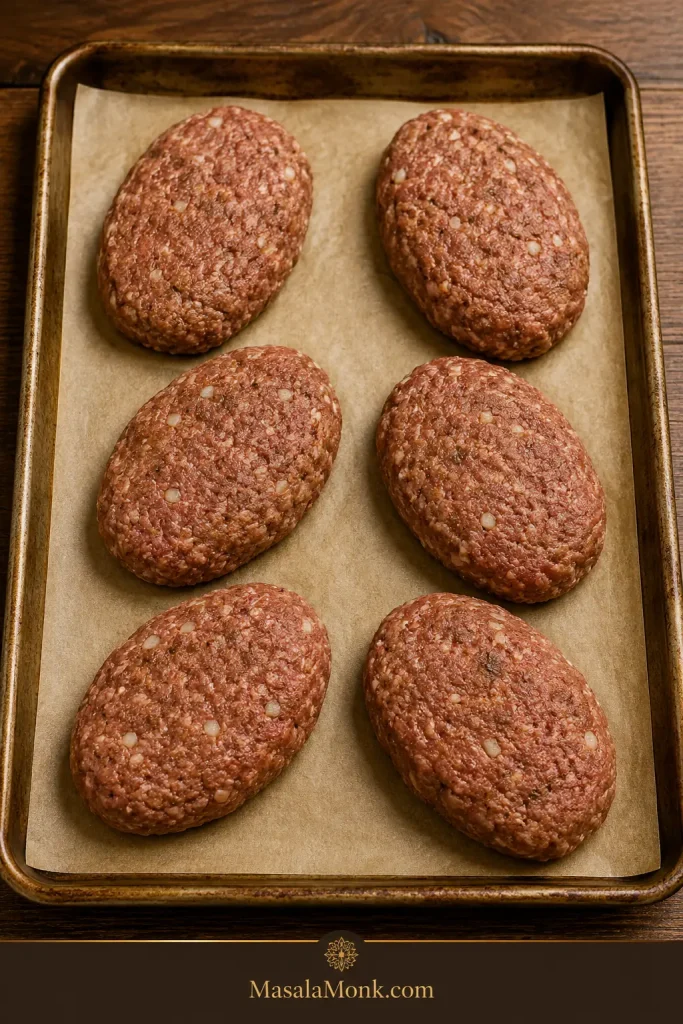
  2. Shape the patties. Divide into 6 oval patties, about 4 oz / 113 g each. Keep them even in thickness so they cook at the same pace.
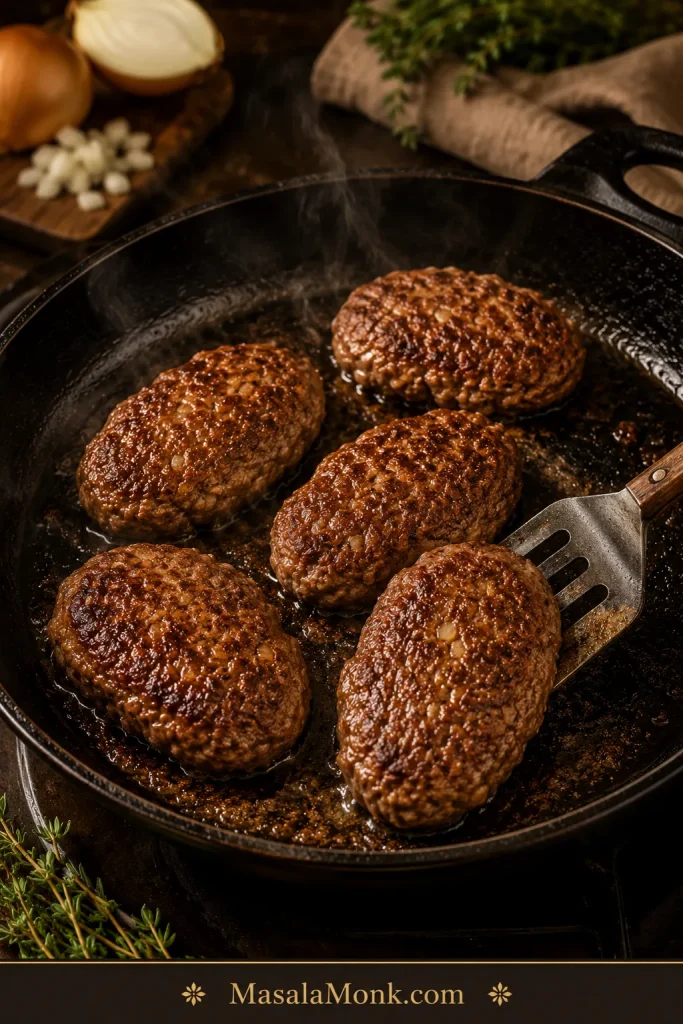
  3. Brown the patties. Heat oil in a skillet over medium-high heat. Brown patties for 2 to 3 minutes per side. They do not need to cook through.
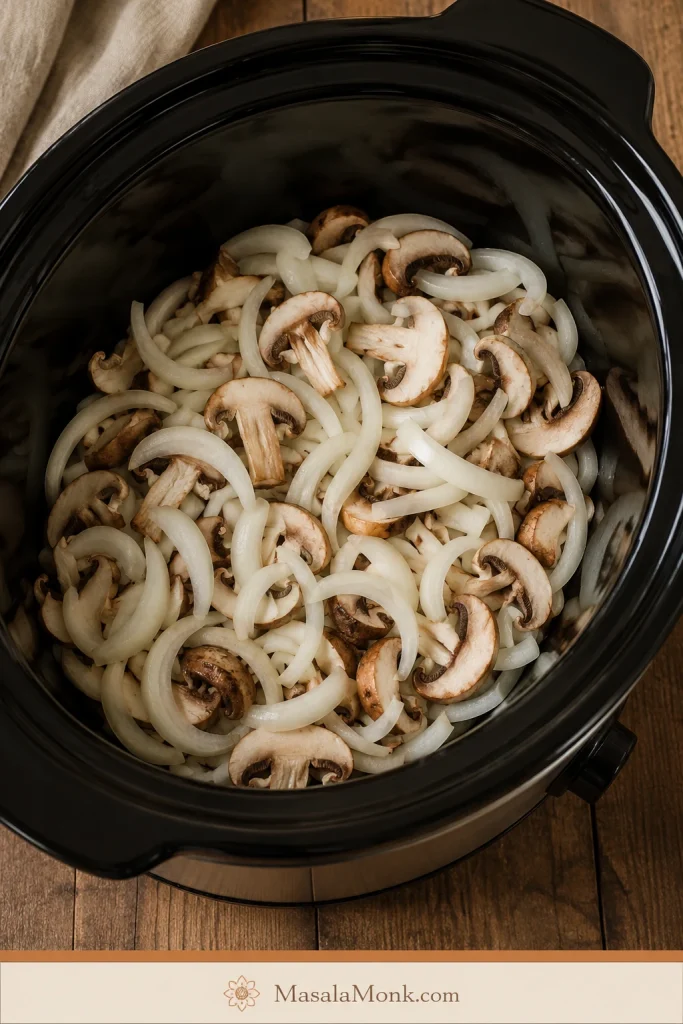
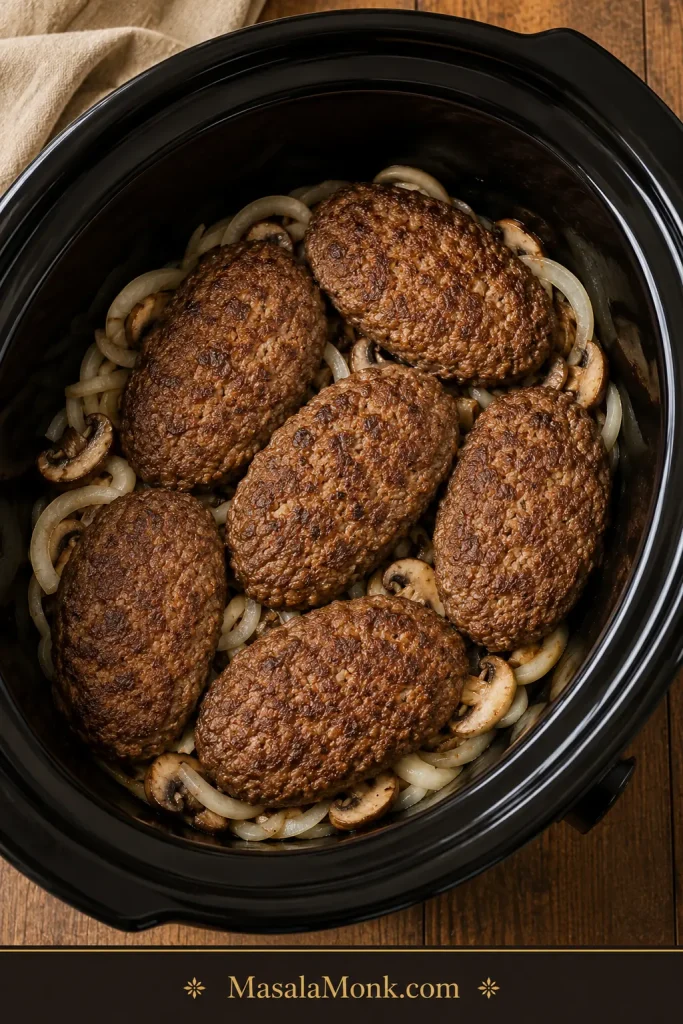
  4. Layer the crock pot. Add onions and mushrooms to the bottom of a 6-quart oval slow cooker. Place browned patties on top, overlapping only if needed.
  5. Whisk the gravy. In a bowl, whisk beef broth, brown gravy mix, Worcestershire sauce, ketchup, Dijon, and garlic until smooth.
  6. Slow cook. Pour gravy over the patties. Cover and cook on low for 4 to 5 hours, or on high for 2½ to 3½ hours, until the patties reach 160°F / 71°C.
  7. Thicken the gravy. Mix 1 tablespoon cornstarch with 1 tablespoon cold water. Stir into the hot gravy, cover, and cook for 15 to 20 minutes. Repeat with another tablespoon of cornstarch and water if you want it thicker.
  8. Serve. Let the patties rest in the gravy for a few minutes, then serve over mashed potatoes, egg noodles, rice, or cauliflower mash.

Recipe Notes

  • Low heat gives the best texture. High heat works, but the patties can become firmer.
  • If your slow cooker runs hot, start checking near the early end of the time range.
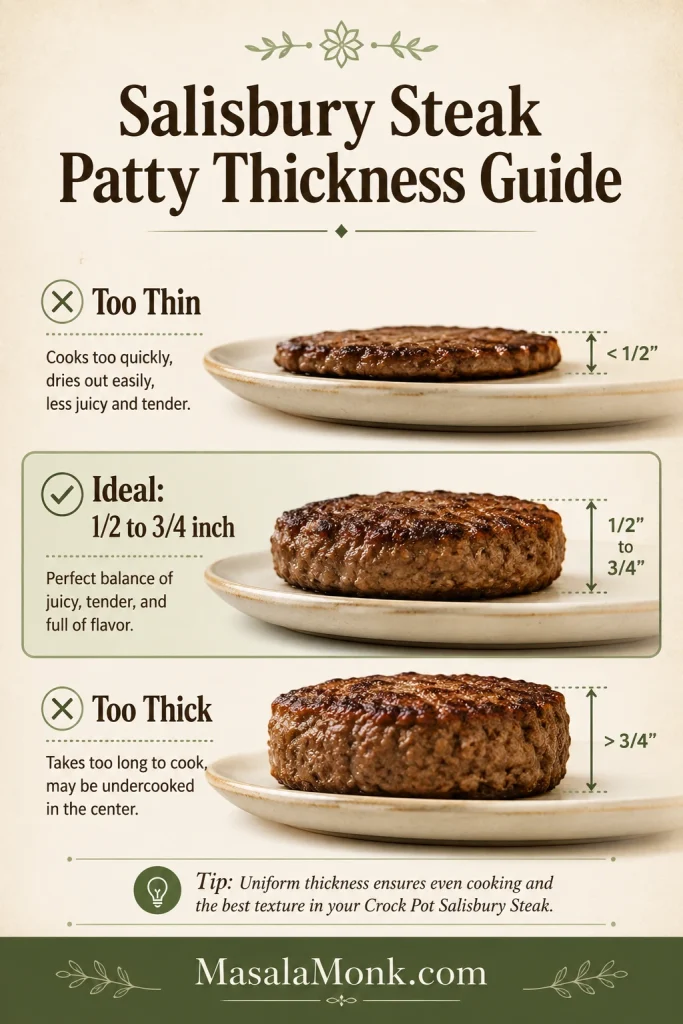
  • Keep the patties about ½ to ¾ inch thick so they hold together and cook evenly.
  • Do not overfill the slow cooker. The patties need enough space for heat and gravy to move around them.
  • Use low-sodium beef broth if adding gravy mix, onion soup mix, au jus, or canned soup.
  • For extra gravy, increase broth to 2½ cups / 600 ml and use extra slurry before serving.
  • You can shape or brown the patties up to 1 day ahead and refrigerate them covered until ready to assemble.

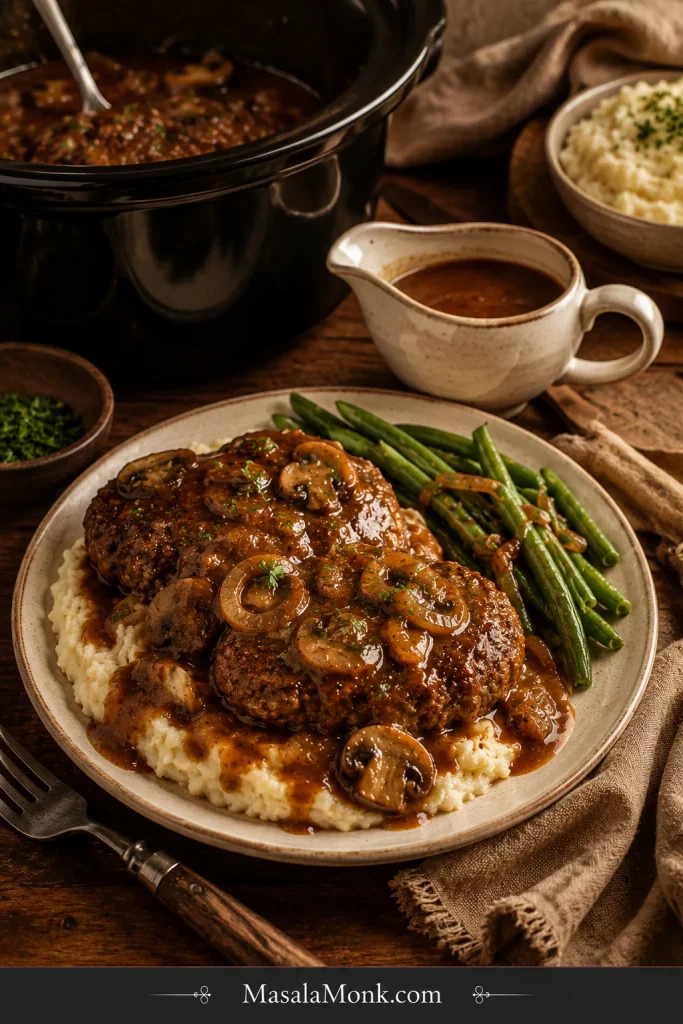
This finished-dish view gives readers a quick visual reference after the recipe card: tender patties, generous brown gravy, and a plate that works with potatoes, noodles, or rice.

Vertical recipe image showing crock pot Salisbury steak with tender patties, rich brown gravy, and mashed potatoes.
Tender patties, rich brown gravy, and a soft side underneath make this slow cooker Salisbury steak feel like a complete comfort-food dinner.

Need a specific fix? Jump to gravy thickening, frozen patties, shortcut gravy options, or troubleshooting.

Before You Start: Crock Pot Salisbury Steak Basics

Best beef amount1½ lb / 680 g for 6 patties
Best patty sizeAbout 4 oz / 113 g each
Best thicknessAbout ½ to ¾ inch thick
Best slow cooker6-quart oval slow cooker
Best settingLow for 4 to 5 hours
Fast settingHigh for 2½ to 3½ hours
Safe beef temperature160°F / 71°C in the center
Best gravy finishUse a cornstarch slurry near the end
Best serving baseMashed potatoes, egg noodles, or rice

Slow cookers vary, so use the time range as a guide. Thick patties, tightly stacked patties, thawed frozen patties, and smaller cookers may need more time.

The win is simple: beef that stays together, sauce that tastes deeper than a packet, and enough gravy for the potatoes to disappear under it.

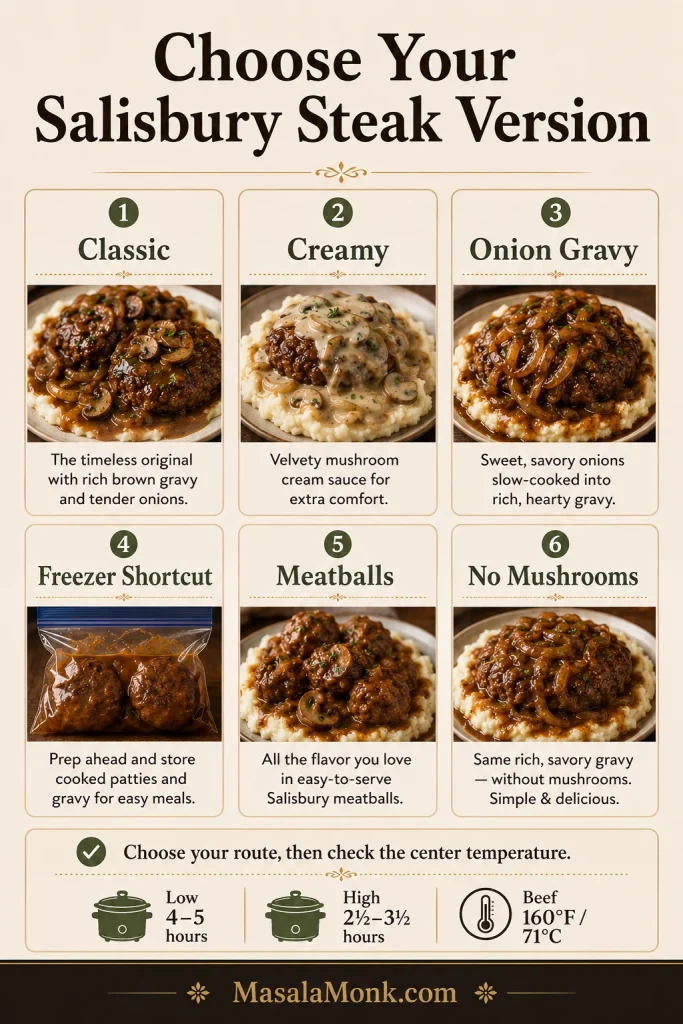
Choose Your Salisbury Steak Version

Below, the main recipe branches into homemade patties, easy brown gravy, and the shortcut ingredients already in your pantry or freezer.

Salisbury steak version guide showing six options: classic, creamy, onion gravy, freezer shortcut, meatballs, and no mushrooms, with cook time and temperature reminders.
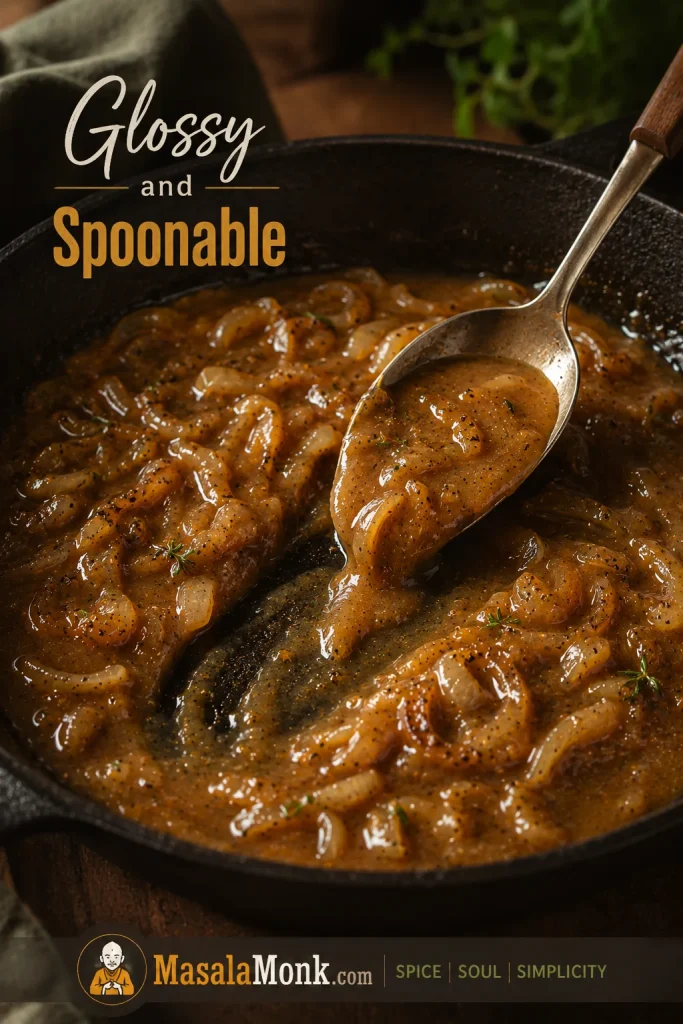
This version guide helps you choose the best route for your pantry: classic brown gravy, creamy mushroom, onion gravy, freezer shortcut, meatballs, or no mushrooms. After that, use temperature as the final doneness check.
GoalUse This RouteWatch This
Classic crock pot Salisbury steakHomemade browned patties, beef broth, brown gravy mixThicken near the end if the sauce looks loose
More homemade flavorAdd Worcestershire, Dijon, ketchup, onions, mushrooms, garlicMix the beef gently
Frozen hamburger patty shortcutThaw raw frozen patties safely first, then brown and slow cookExpect extra liquid if patties were frozen
Fully cooked frozen pattiesHeat thoroughly in gravy according to package guidancePull them before they turn firm
Creamier gravyAdd cream of mushroom or golden mushroom soupReduce salt
Milder creamy shortcutAdd cream of chicken soupLess beefy; add Worcestershire or au jus
Onion gravy flavorAdd onion soup mix or French onion soupUse low-sodium broth
No mushroomsSkip mushrooms and add extra onionsAdd flavor with Worcestershire and Dijon
Meatball versionUse frozen or homemade meatballsCook until hot and thicken the sauce

Best Route for the First Time

For your first batch, start with the classic browned-patty version. If you came here because of freezer patties or canned soup, use the shortcut sections below and keep the salt low.

Once you know your route, the job is simple: keep the beef sturdy, keep the sauce spoonable, and keep the salt from taking over.

Choosing a shortcut? Go straight to cream of mushroom, French onion, frozen hamburger patties, or meatballs and variations.

Why This Crock Pot Salisbury Steak Works

Slow cookers are great at tenderness, but they are not great at reducing sauce. That is why this recipe gives the beef a quick browned edge first, then waits until the end to thicken the gravy.

The beef stays tender because it is mixed gently with breadcrumbs, egg, and milk instead of being packed tight. Browning adds flavor and helps each oval hold its shape once it settles into the sauce.

The sauce starts simple — beef broth and brown gravy mix — then gets enough Worcestershire, Dijon, ketchup, onion, mushroom, and garlic to taste more like dinner than a packet.

Save the real thickening for the end. By then, the beef is cooked, the onions have softened, and you can turn the cooking liquid into glossy spoon-over-potatoes gravy without guessing.

Think of it this way: give the beef structure, give the sauce body, and keep the salt under control.

That same slow-cooker liquid-control problem shows up in slow cooker cottage pie too; the lid keeps everything tender, but it does not let sauce reduce like an open pan.

The comfort-food rule: Salisbury steak should taste browned, beefy, and gravy-rich — not steamed, watery, or packet-salty.

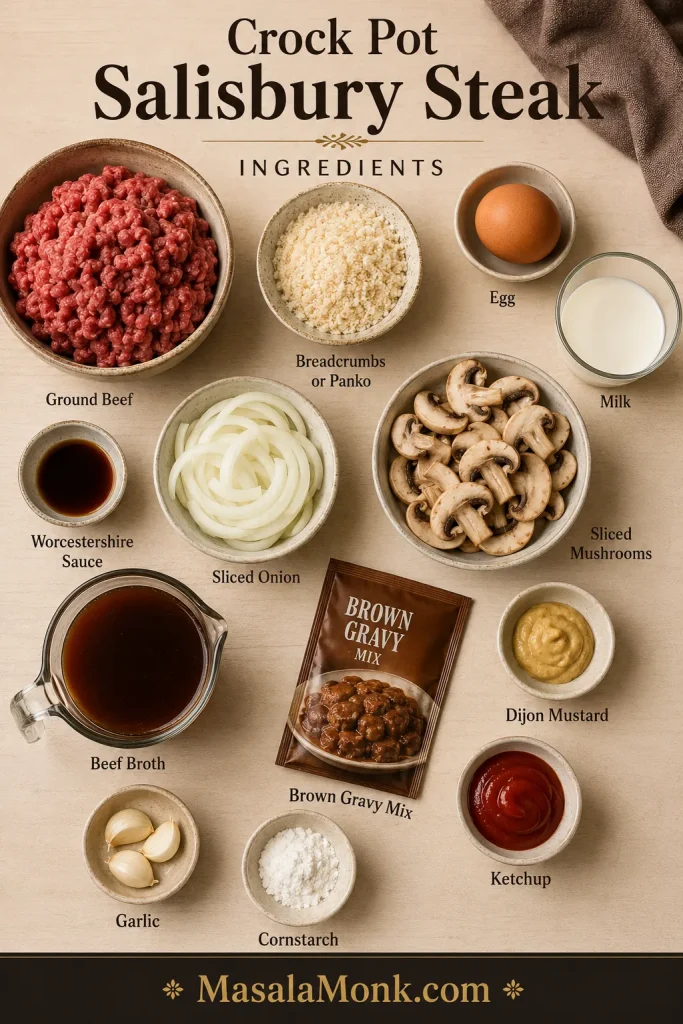
Ingredients You’ll Need

Nothing here is fancy. The balance is what matters: enough binder to keep the beef together, enough seasoning to make the sauce savory, and enough restraint that the shortcut ingredients do not take over.

Overhead ingredient board with ground beef, breadcrumbs, egg, milk, sliced onion, mushrooms, beef broth, brown gravy mix, Worcestershire sauce, Dijon, ketchup, garlic, and cornstarch.
These ingredients build flavor in stages: beef and breadcrumbs help the patties hold together, broth and gravy mix create body, and Worcestershire, Dijon, onions, and mushrooms add the deeper Salisbury steak flavor.

Ground Beef

Use lean ground beef, preferably 85/15 or 90/10. It has enough fat for flavor without making the sauce greasy. If your beef is fattier, brown the patties first and skim excess fat before tightening the sauce.

Breadcrumbs, Egg, and Milk

Breadcrumbs help the patties hold together, egg binds the mixture, and milk keeps the crumbs from making the beef dense. The mixture should feel moist and shapeable, not wet or crumbly.

Worcestershire, Dijon, and Ketchup

These small ingredients make the brown sauce taste more complete. Worcestershire adds savory depth, Dijon gives balance, and ketchup adds a little sweetness and body. In the final dish, they should blend into the gravy instead of standing out separately.

Onions and Mushrooms

Onions soften into the gravy and make it taste fuller. Mushrooms add that classic Salisbury steak flavor, but this dinner does not fall apart without them; extra onions can carry the sauce just fine.

Love a mushroom-heavy gravy? This creamy mushroom sauce goes deeper into building that rich mushroom flavor.

Beef Broth and Brown Gravy Mix

Beef broth gives the sauce a stronger base than water, especially after a few hours in the slow cooker. Brown gravy mix keeps the recipe easy and familiar, while the extra seasonings make it taste less like a packet and more like dinner.

How to Make Crock Pot Salisbury Steak

The slow cooker does the long work, but the first few minutes decide the final texture. Shape the patties gently, brown them quickly, and let the sauce carry the rest.

1. Mix the Patty Ingredients

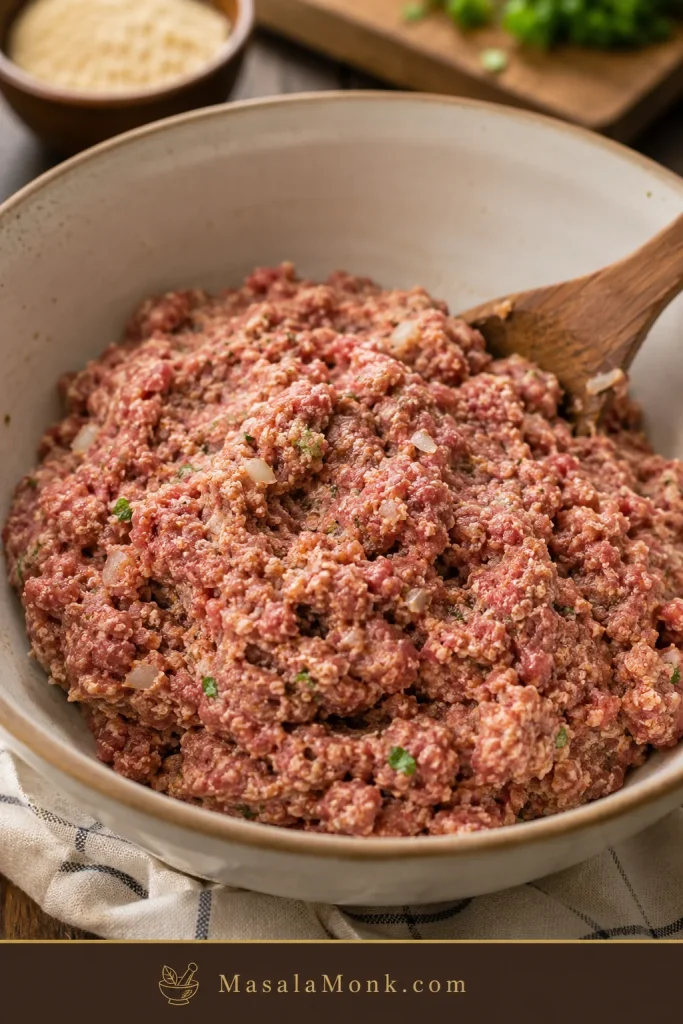
In a large bowl, combine the ground beef, breadcrumbs, egg, milk, Worcestershire sauce, salt, pepper, garlic powder, and onion powder. Stir only until the ingredients come together. Overmixing makes the patties heavy and tough.

Bowl of gently mixed Salisbury steak patty mixture with ground beef, breadcrumbs, egg, milk, and seasonings.
Mix just until the beef mixture comes together. A gentle hand keeps the Salisbury steak patties tender instead of dense.

2. Shape Even Oval Patties

Divide the mixture into 6 oval patties. Aim for about 4 oz / 113 g each. The oval shape is classic, but even thickness matters more than perfect shape.

Six raw oval Salisbury steak patties arranged on parchment paper before browning.
Shape even oval patties so they fit neatly in the crock pot and cook at the same pace.

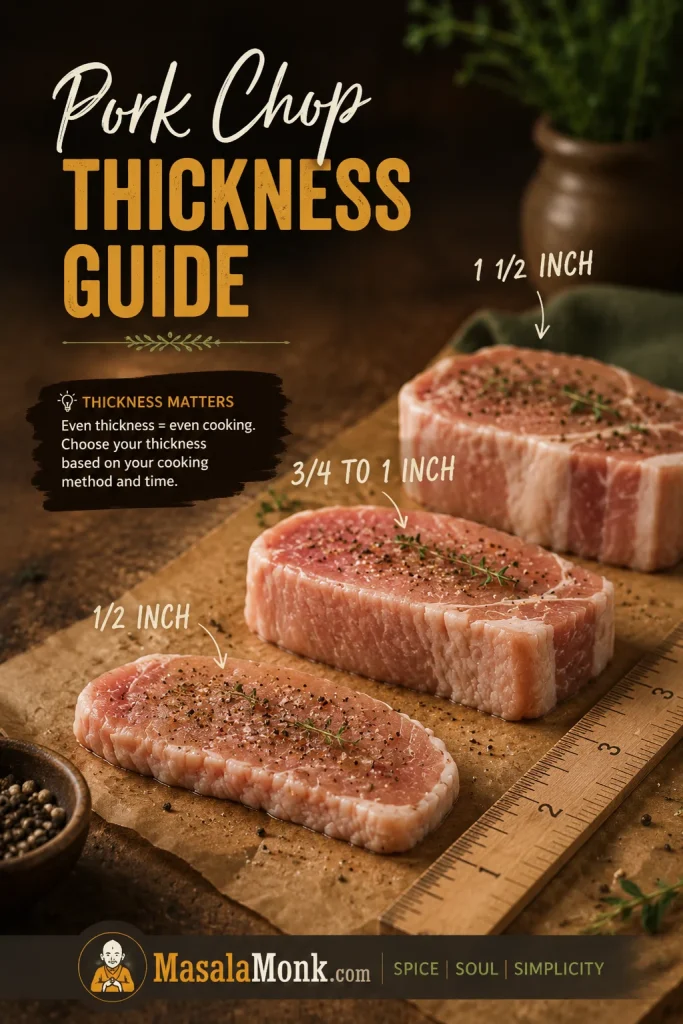
Aim for about ½ to ¾ inch thick. Very thin patties can break more easily, while very thick ones may need extra time in the center.

Salisbury steak patty thickness guide showing too-thin, ideal, and too-thick patties, with the ideal thickness labeled 1/2 to 3/4 inch.
Thickness helps decide whether the patties stay tender or fall apart. Aim for 1/2 to 3/4 inch: thin enough to cook through, but sturdy enough to survive slow cooking in gravy.

If the mixture feels very soft, chill it for 10 to 15 minutes before browning. Cold patties are easier to lift and less likely to crack.

3. Brown the Patties

In a skillet, heat oil over medium-high heat. Brown the patties for 2 to 3 minutes per side. They should get color on the outside but do not need to cook through. Use a wide spatula and turn them gently.

Oval Salisbury steak patties browning in a skillet with a visible seared crust.
Browning adds deeper flavor and helps the patties hold their shape once they simmer in the gravy.

For a slightly thicker, more old-fashioned gravy, lightly dust the patties with flour before browning. Skip this if you want the simpler version or need the recipe to stay gluten-free.

4. Build the Slow Cooker

Add onions and mushrooms to the bottom of the crock pot. Place the browned patties over them, overlapping only if needed. A little overlap is fine; a tight stack can make the middle patties cook more slowly and break more easily.

Sliced onions and mushrooms spread across the bottom of a dark slow cooker insert.
Layer onions and mushrooms under the patties so they soften into the gravy as everything cooks.

Whisk the sauce ingredients separately, then pour the mixture over the beef. You should still be able to see the patties underneath; they do not need to be completely buried.

Browned oval Salisbury steak patties arranged over sliced onions and mushrooms in a slow cooker.
Place browned patties gently over the vegetables, leaving a little space so heat and gravy can move around them.

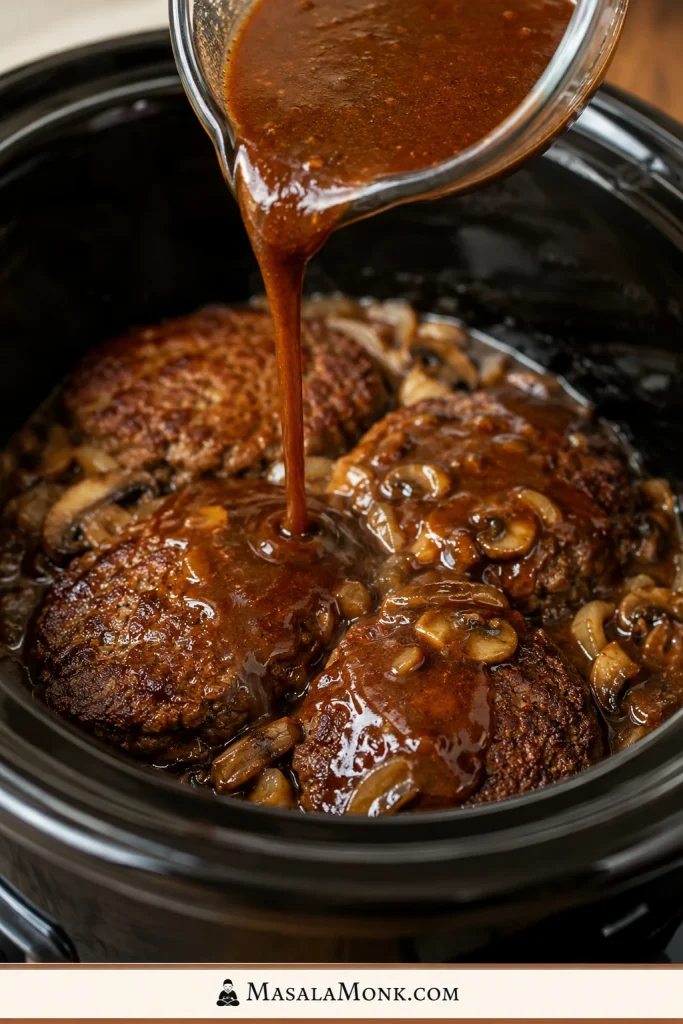
The liquid should look generous at this stage. It may seem a little loose, but that is better than starting too thick and having the sauce catch around the edges before the beef is done.

Brown gravy being poured from a glass measuring cup over Salisbury steak patties in a slow cooker.
The gravy starts thin on purpose. It carries flavor first, then thickens with slurry near the end.

5. Cook Low and Slow

Cook on low for 4 to 5 hours, or high for 2½ to 3½ hours. Low gives the most tender texture. High works when dinner needs to move faster, but the patties can become firmer if they cook too long.

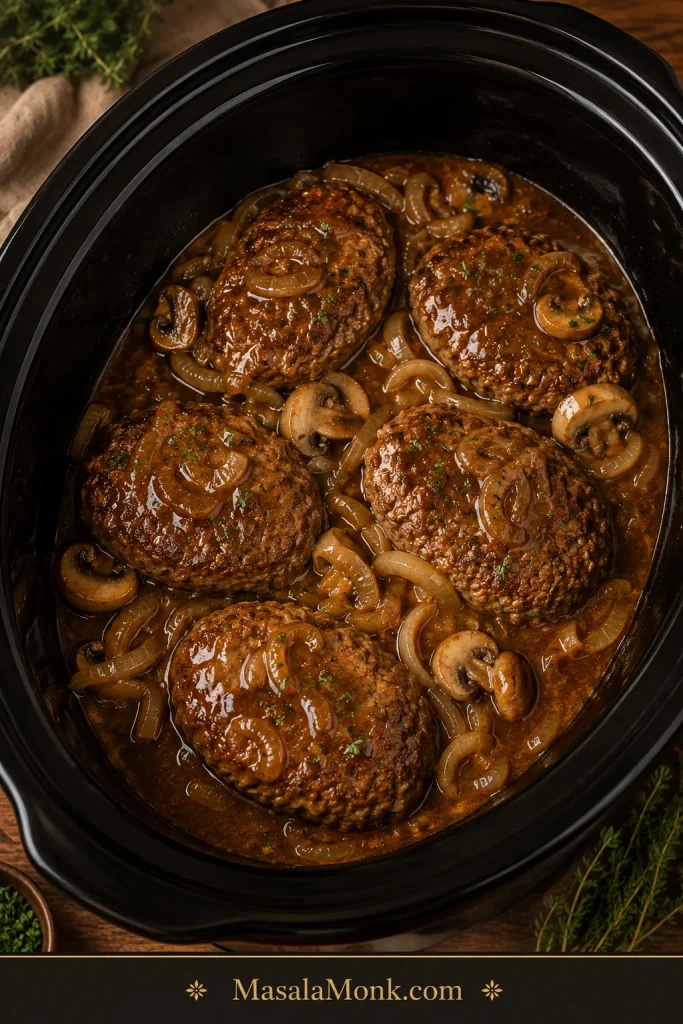
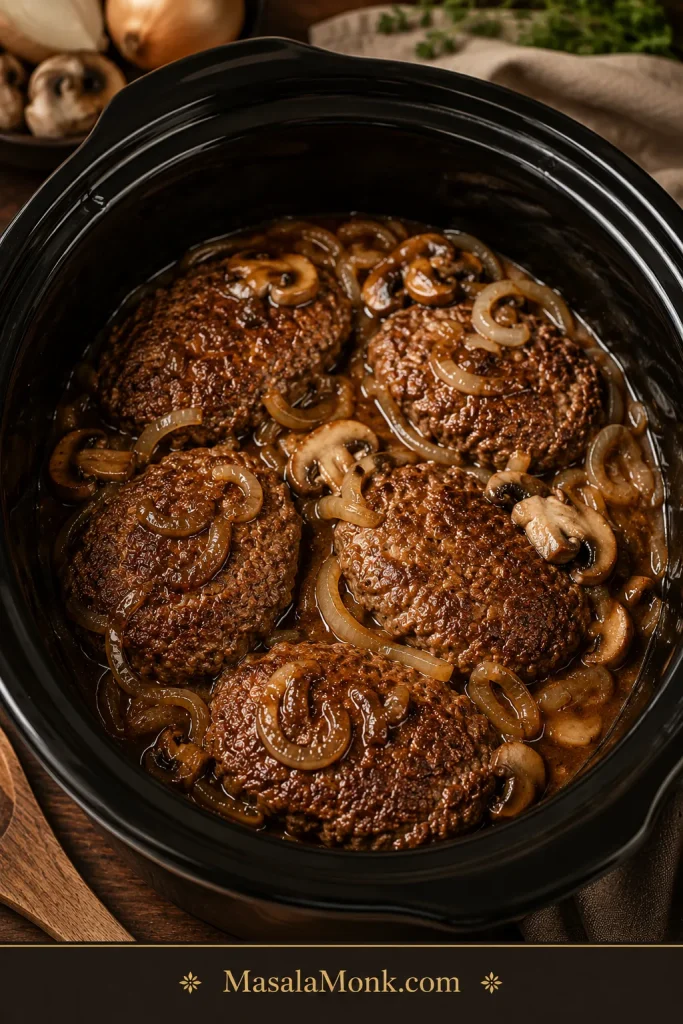
Slow cooked Salisbury steak patties in brown gravy with softened onions and mushrooms inside a dark slow cooker.
After cooking, the patties should be tender and the onions and mushrooms soft before the final thickening step.

6. Bring the Gravy Together

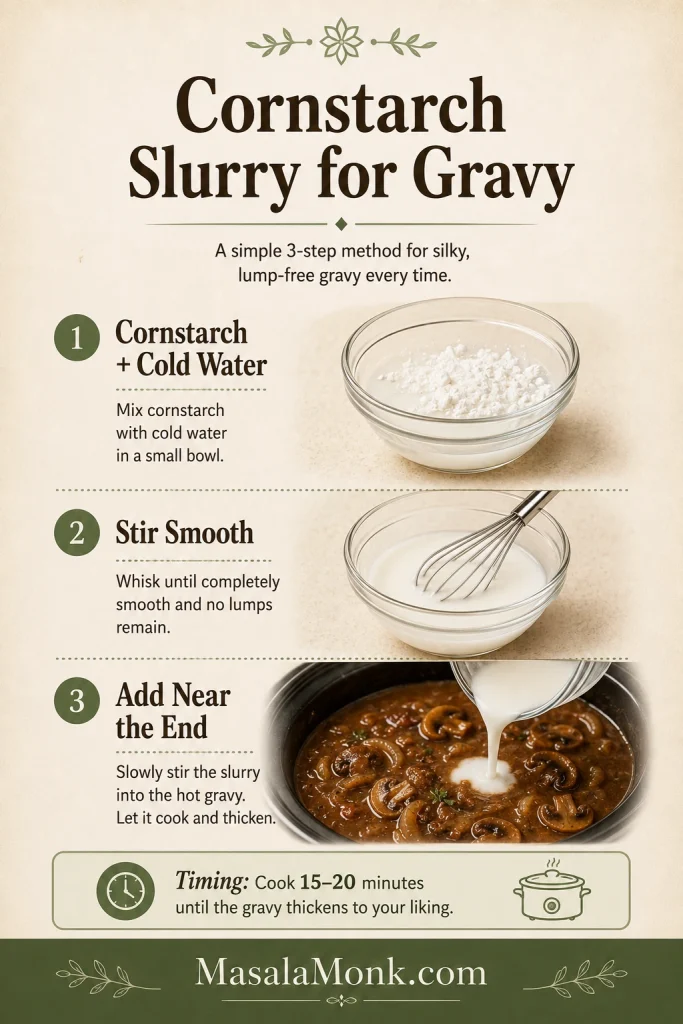
When the patties are done, stir cornstarch and cold water together until smooth. Stir the slurry into the hot sauce, cover, and cook another 15 to 20 minutes. This is when thin slow cooker liquid turns into proper spoon-over-potatoes gravy.

Three-step cornstarch slurry guide showing cornstarch with cold water, a smooth slurry, and slurry added near the end to hot gravy, with a 15 to 20 minute cook time.
Mix cornstarch with cold water first, then stir the slurry into hot gravy near the end until the sauce turns glossy.

At first the slurry may leave pale streaks. Stir gently and give it time; the sauce will turn darker, smoother, and glossier as it cooks.

Back to top

Once the patties are cooking, the rest of the recipe is mostly about small adjustments: keeping the sauce spoonable, choosing the shortcut that fits your pantry, and knowing what to do if the slow cooker gives you more liquid than expected.

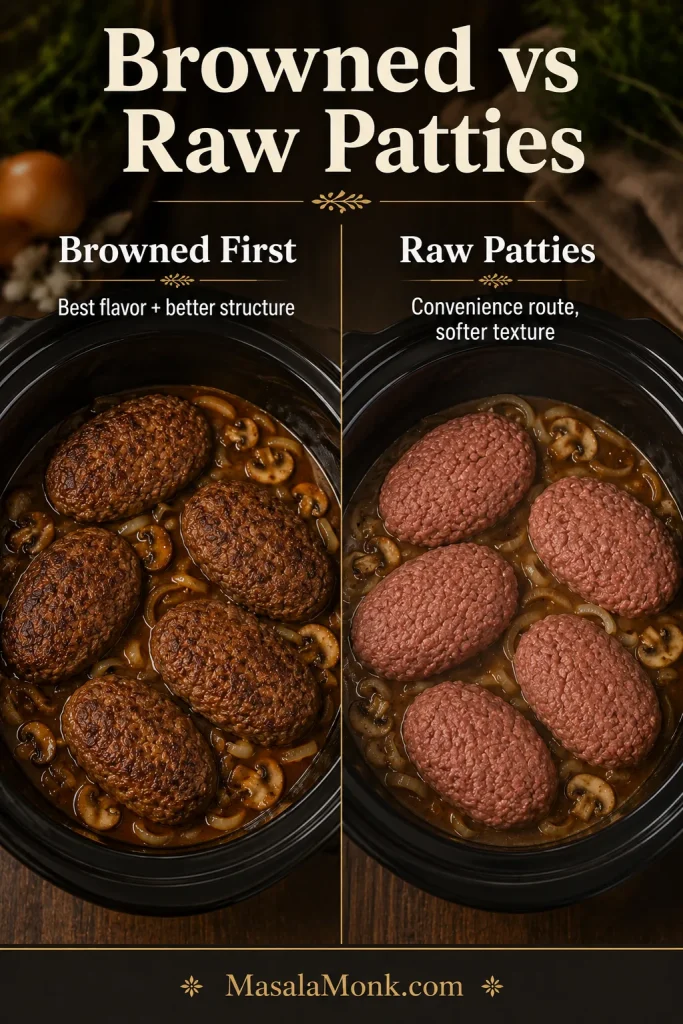
Browning vs Raw Patties: What Works Best?

Browned patties give the best flavor and the cleanest texture. Browning keeps the dish from tasting like boiled ground beef and gives the outside a sturdier edge before it sits in the sauce.

Split comparison of browned Salisbury steak patties and raw oval patties with labels about flavor, structure, and softer texture.
Browned patties are best for flavor and structure, while raw patties save time when convenience matters. Whichever route you choose, handle the beef gently and cook it to a safe center temperature.

Raw patties can still go into the crock pot when convenience matters. Keep them slightly thicker, avoid tight stacking, and use lean beef if possible because raw patties release more liquid and fat as they cook.

If it is one of those nights where browning feels like one pan too many, skip it without guilt. Just expect a softer patty, a little more fat to skim, and slightly less browned flavor. Check the center temperature before serving.

Slow Cooker Size, Cook Time, and Doneness

A 6-quart oval slow cooker is best because the patties have more room and do not need to be pressed into a tight pile. For 4 patties, a 4-quart cooker can work, but a narrow round crock may need more overlap and gentler handling.

As another slow-cooked beef dinner, this beef shoulder roast crock pot recipe uses the same gentle-heat logic with a tougher cut that needs time to turn tender.

Cook Time Guide

Once the patties are in the crock, time matters, but it is not the only thing that matters. Patty thickness, cooker shape, stacking, and whether the patties were previously frozen can all shift the finish.

Time and temperature guide for slow cooker Salisbury steak showing low for 4 to 5 hours, high for 2 and a half to 3 and a half hours, beef at 160°F, and poultry at 165°F.
Slow cooker timing helps you plan dinner, but temperature tells you when the meat is safe. Ground beef Salisbury steak should reach 160°F / 71°C; poultry versions should reach 165°F / 74°C.
MethodTimeBest For
Homemade browned patties on low4 to 5 hoursBest texture and gravy flavor
Homemade browned patties on high2½ to 3½ hoursFaster dinner
Raw homemade pattiesUsually 4 to 5 hours on lowNo-brown shortcut, softer texture
Raw frozen hamburger pattiesThaw safely first, then follow thawed-patty timingFood-safety-conscious freezer shortcut
Fully cooked frozen pattiesHeat thoroughly in gravyFastest patty shortcut
Frozen meatballs4 to 6 hours on low, depending size and package directionsNo-shaping variation

Safe Internal Temperature

Use the timer as a guide, then check the center temperature. Ground beef Salisbury steak is done at 160°F / 71°C. For turkey or chicken versions, the center should reach 165°F / 74°C.

Brown gravy can make a patty look done before the center is fully cooked, so temperature is safer than color. For reference, the USDA safe minimum internal temperature chart lists ground meats such as ground beef at 160°F / 71°C, while ground poultry should reach 165°F / 74°C.

Helpful Tools

  • Large skillet: for browning the patties.
  • Mixing bowl: for the beef mixture.
  • Whisk: for the gravy mixture.
  • Wide spatula: for moving patties without breaking them.
  • Instant-read thermometer: for checking doneness.

How to Make the Gravy Thick, Rich, and Not Watery

The gravy is the reason this recipe exists. It should coat the spoon, cling to the beef, and move slowly through mashed potatoes instead of running around the plate.

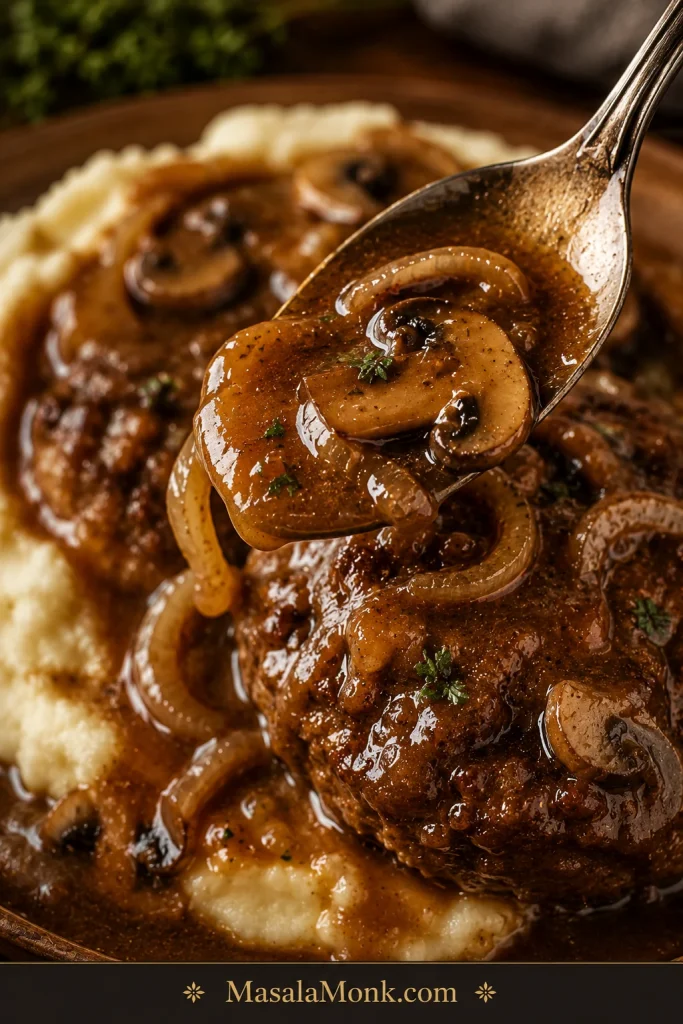
Close-up of thick glossy brown Salisbury steak gravy with mushrooms and onions clinging to a spoon.
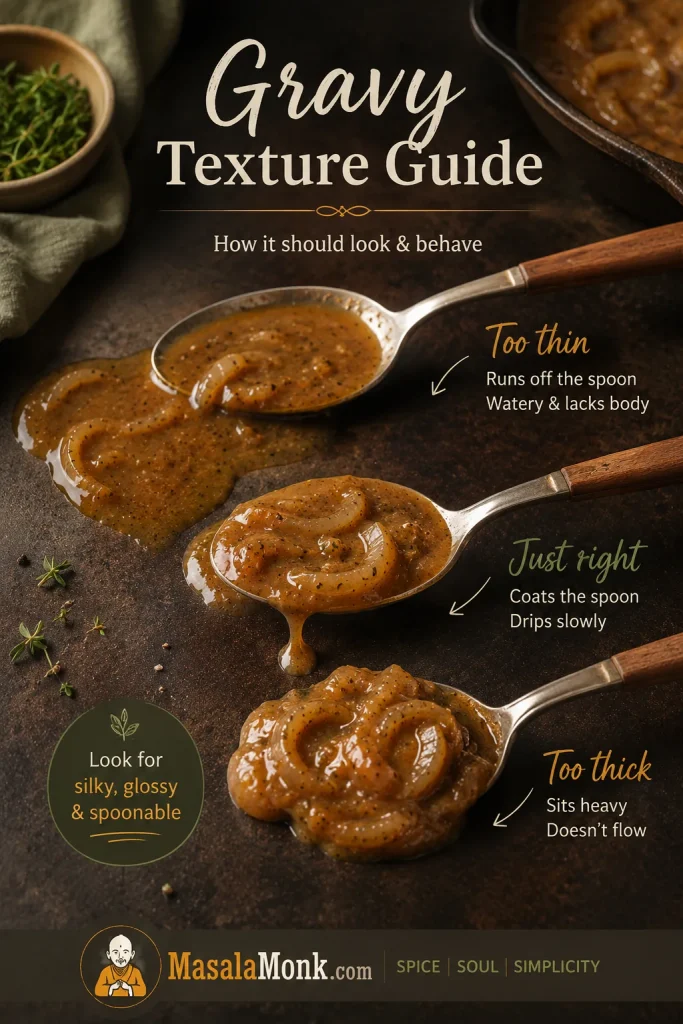
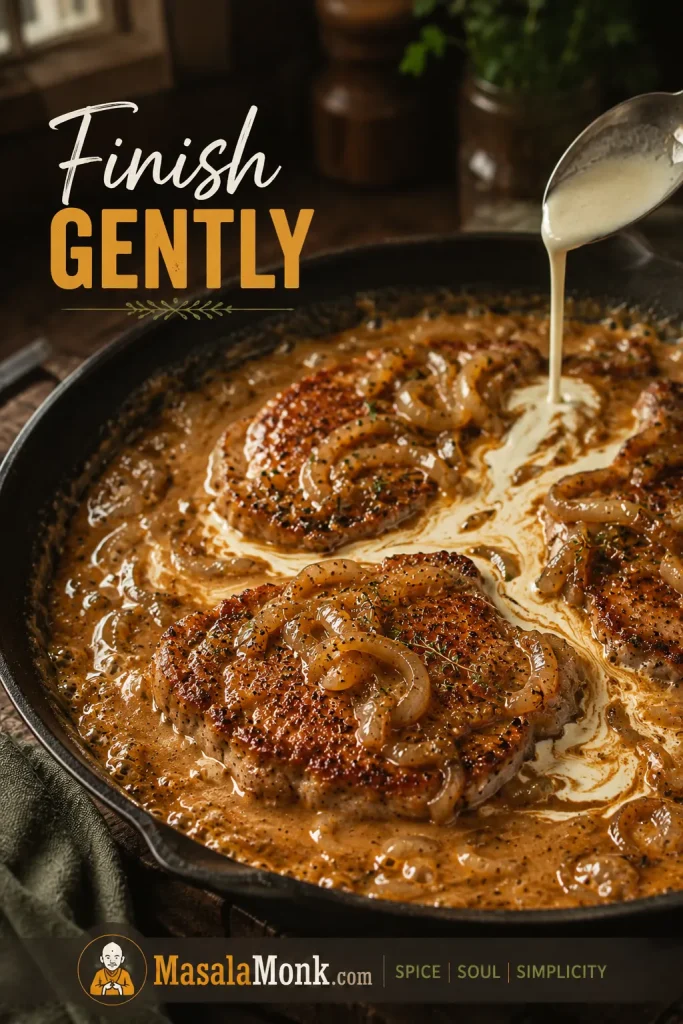
The best brown gravy should cling to the spoon instead of running off like broth. When it looks glossy and holds mushrooms and onions in place, it is ready for potatoes, noodles, or rice.

Slow cooker gravy often looks thin because moisture stays trapped under the lid. That does not mean the recipe failed. Let the beef cook first, then thicken the sauce near the end.

Comparison guide showing watery gravy that needs slurry and thick spoonable gravy that is ready to serve.
Thin gravy is usually easy to fix. Add a smooth slurry near the end, give it time to thicken, and stop when the sauce coats the spoon without turning gluey.

The same problem shows up in slow cooker beef recipes like slow cooker beef stew: tender beef is wonderful, but the sauce still needs enough body to feel like gravy instead of broth.

For Thicker Gravy

  • Mix 1 tablespoon cornstarch with 1 tablespoon cold water.
  • Stir it into the hot gravy once the patties are cooked.
  • Cover and cook for 15 to 20 minutes.
  • Repeat with another small slurry if the gravy still looks thin.

For Richer Gravy

  • Use beef broth instead of water.
  • Worcestershire sauce adds savory depth.
  • Dijon mustard brings balance.
  • Ketchup gives gentle sweetness and body.
  • Cook onions and mushrooms in the gravy from the start.
  • Browned patties add more flavor than raw patties when time allows.

When it is right, the gravy should drag slowly through the potatoes, cling to the beef, and leave the plate looking like someone already went back for seconds.

For Less Salty Gravy

Use low-sodium broth and reduce the salt in the patties when using brown gravy mix, onion soup mix, au jus, cream soup, or canned French onion soup. If the sauce tastes salty after cooking, stretch it with unsalted broth, a splash of cream, extra mushrooms or onions, or plain potatoes on the plate.

Mix cornstarch with cold water before adding it. A smooth slurry disappears into hot gravy; dry cornstarch can clump.

Gravy not behaving? See watery vs thick gravy, shortcut gravy options, or common fixes.

Shortcut Gravy Options

There is no shame in using the packet, the can, or the soup mix. The mistake is letting several salty shortcuts pile up without adjusting anything else.

Use the table below to see what each shortcut adds and what you need to watch.

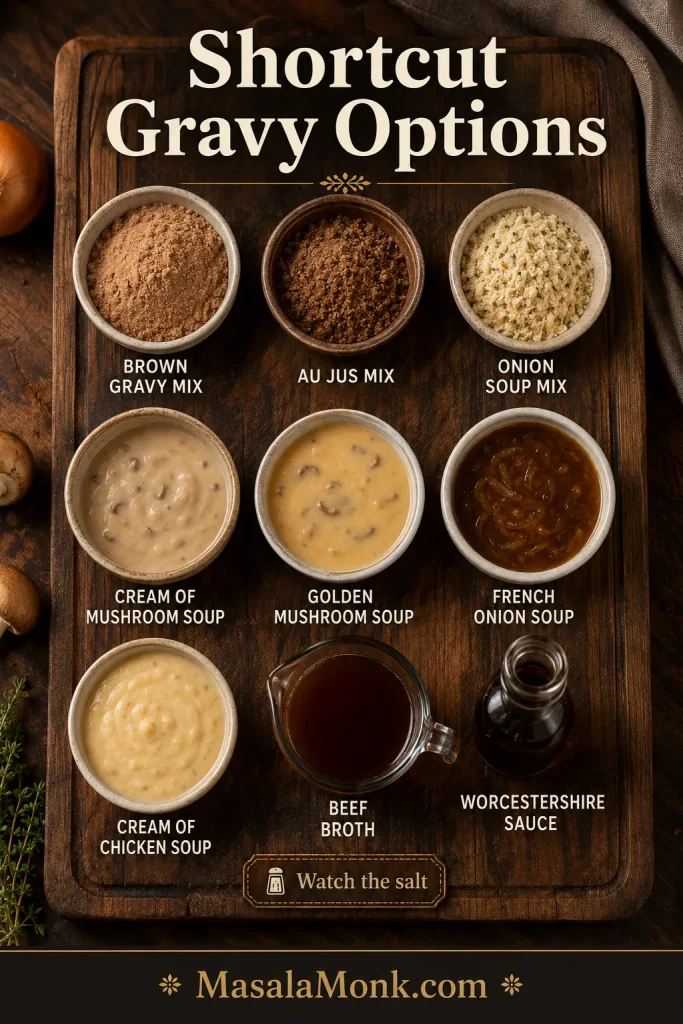
Shortcut gravy options board showing brown gravy mix, au jus mix, onion soup mix, cream of mushroom soup, golden mushroom soup, French onion soup, cream of chicken soup, beef broth, and Worcestershire sauce.
Shortcut gravy ingredients can save time, but they also affect salt, thickness, and flavor. Therefore, choose one main shortcut, taste before adding extra seasoning, and adjust with broth as needed.
ShortcutWorks?Best UseWatch Out For
Brown gravy mixYesClassic easy brown gravyCan be salty
Au jus mixYesBeefier flavorUsually thinner
Onion soup mixYesStrong onion flavorReduce added salt
Cream of mushroom soupYesCreamier gravyLess classic brown gravy flavor
Golden mushroom soupYesDeeper mushroom flavorStill salty
Cream of chicken soupYesMilder creamy shortcutLess beefy; add Worcestershire or au jus
French onion soupYesRich onion gravyNeeds thickening

Cream of Mushroom Version

For a creamier crock pot Salisbury steak, add 1 can of cream of mushroom soup, usually 10.5 oz / 298 g, to the gravy mixture. Use 1 can for a lighter creamy gravy or 2 cans for a thicker cream-soup style version.

Cream of mushroom Salisbury steak with oval patties, creamy mushroom-brown gravy, and mashed potatoes on a cream plate.
Cream of mushroom Salisbury steak should taste creamy and savory, not flat. Balance the soup with broth, Worcestershire, Dijon, and mushrooms so the sauce stays rich without becoming heavy.

If you use cream of mushroom soup with brown gravy mix or onion soup mix, reduce the added salt and use low-sodium broth. Add Worcestershire and Dijon so the sauce still tastes savory instead of flat.

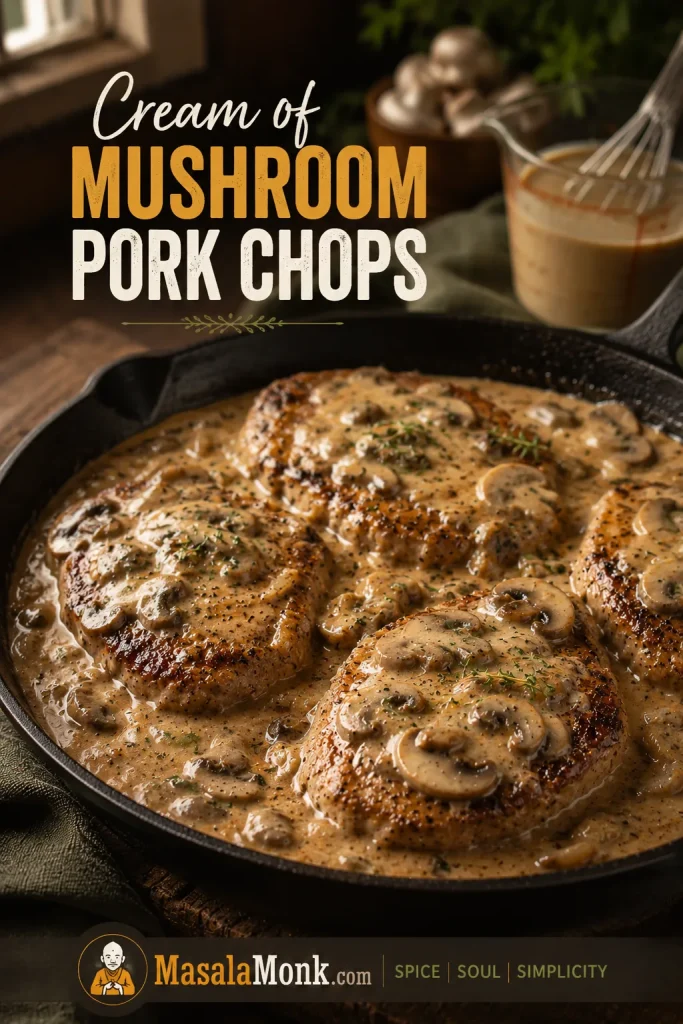
If cream-of-mushroom dinners are your kind of shortcut, these cream of mushroom pork chops use the same creamy mushroom-gravy idea with browned meat, rice and potato notes, baked options, and crock pot tips.

French Onion Soup Version

For a French onion soup version, replace 1 cup / 240 ml of the beef broth with canned French onion soup, usually 10.5 oz / 298 g per can. You can replace all the broth for a stronger onion flavor, but skip or reduce onion soup mix so the gravy does not become too salty.

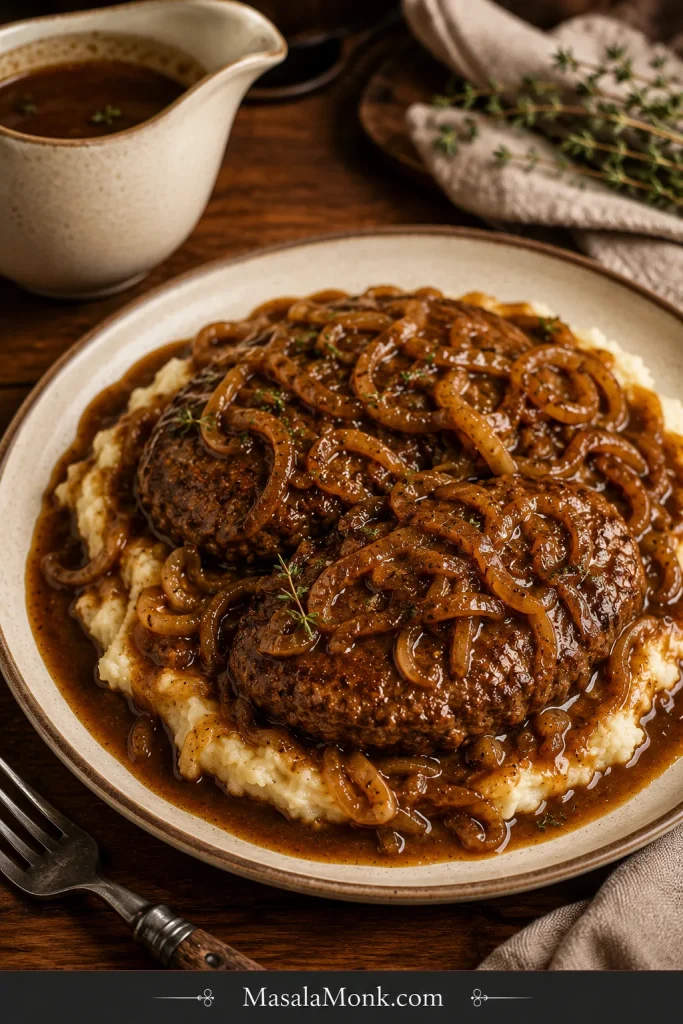
French onion Salisbury steak with oval patties, mashed potatoes, glossy brown onion gravy, and caramelized onion ribbons.
French onion Salisbury steak works when the onions carry the flavor. Let the soft onion ribbons melt into the deep brown gravy, then spoon it generously over the mashed potatoes.

This version usually needs a cornstarch slurry near the finish because canned soup gives flavor but does not always thicken enough on its own.

For a deeper look at the onion side of the flavor, this French onion soup recipe shows how slow-cooked onions become sweet, savory, and rich.

Onion Soup Mix Version

Use ½ packet onion soup mix in the gravy or patties for a balanced onion flavor. For a stronger shortcut taste, use a full packet. Reduce added salt and choose low-sodium broth.

Brown Gravy Mix or Au Jus Version

Brown gravy mix gives the most familiar Salisbury steak gravy. Au jus mix gives a beefier flavor, but it usually makes a thinner sauce, so plan to give it body with slurry once the patties are cooked.

Can You Use Frozen Hamburger Patties?

Yes, freezer patties can still save dinner. The key is knowing whether they are raw or fully cooked, because those two need different handling.

Raw Frozen vs Fully Cooked Patties

For raw frozen hamburger patties, thaw them safely in the refrigerator before adding them to the crock pot. The USDA slow cooker safety guidance recommends thawing meat or poultry before it goes into a slow cooker. Once thawed, brown the patties if possible, then let them cook gently in the gravy until the centers reach 160°F / 71°C.

Fully cooked frozen patties are different. Follow the package directions, heat them thoroughly in the gravy, and avoid cooking them so long that they turn firm or dry. They are already cooked, so the goal is heating, flavoring, and giving the sauce body.

If the package gives a reheating temperature or stovetop/microwave timing, use that as your safety guide, then let the gravy do the flavor work.

Frozen Patty Method Table

Use this table to match the method to the patties you actually have, not the patties you wish you had thawed yesterday.

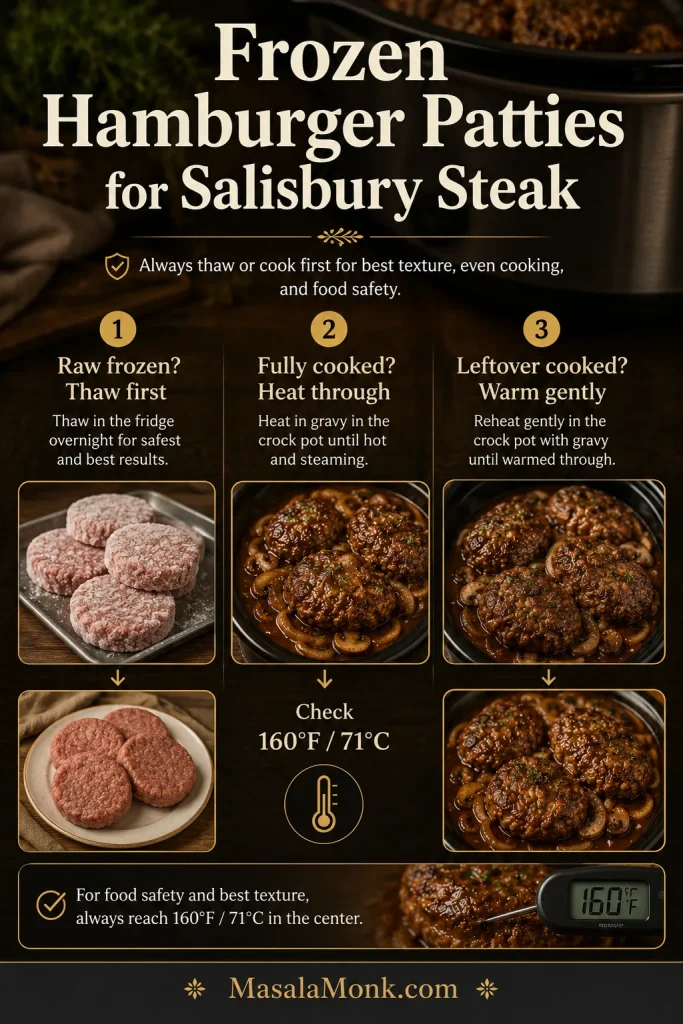
Frozen hamburger patty guide for Salisbury steak showing raw frozen patties should be thawed first, fully cooked patties heated through, and leftover cooked patties warmed gently.
Frozen hamburger patties need the right slow cooker path. Raw frozen patties should be thawed first, while fully cooked patties can be heated through gently in the gravy.
Patty TypeBest MethodWhat to Watch
Raw frozen hamburger pattiesThaw in the refrigerator first, then brown and slow cookAvoid adding raw frozen meat straight to the slow cooker
Homemade frozen raw pattiesThaw overnight in the fridge, then brown gentlyThey may be fragile after thawing
Thawed raw pattiesBrown first, then cook in gravyCheck 160°F / 71°C in the center
Fully cooked frozen pattiesHeat thoroughly in gravy according to package directionsStop before they turn firm
Leftover cooked burger pattiesWarm gently in gravyBest added later so they do not dry out

Previously frozen patties may release more liquid than freshly shaped patties, so plan on thickening the sauce before serving. Use a wide spatula when lifting them out because thawed or reheated patties can be softer than freshly browned Salisbury steaks.

Best Method for Thawed Hamburger Patties

Thawed and browned hamburger-style patties arranged in a slow cooker with brown gravy, onions, and mushrooms for Salisbury steak.
Thawed hamburger patties become more dinner-worthy when they are browned, layered with onions and mushrooms, and finished in gravy. Finally, thicken the sauce so the shortcut still tastes intentional.
  1. Thaw raw frozen patties safely in the refrigerator.
  2. Brown the thawed patties for 2 to 3 minutes per side, if possible.
  3. Add onions, mushrooms, patties, and whisked gravy to the slow cooker.
  4. Cook on low until the patties reach 160°F / 71°C.
  5. Skim extra grease if needed.
  6. Stir in slurry near the finish to give the sauce body.

Easy Variations

Once the basic method is clear, the recipe is flexible. Keep the same idea — sturdy beef, enough sauce, and salt control — then adjust the flavor around it.

Salisbury Steak Meatballs

Use frozen fully cooked meatballs or homemade meatballs with the same gravy. Meatballs are easier than patties because you do not need to shape ovals and there is less risk of breaking. Cook until hot all the way through, then thicken the sauce near the end.

Salisbury steak meatballs in glossy mushroom onion brown gravy served over egg noodles in a cream bowl.
Salisbury steak meatballs give you the same brown gravy comfort in an easier-to-portion form. They work especially well over egg noodles because the sauce settles into every fold.

No Mushroom Salisbury Steak

Skip the mushrooms and add extra onions. The gravy will be less earthy, but still savory and comforting. Worcestershire, Dijon, black pepper, and garlic help carry the flavor.

Extra Onion Gravy

Use a full sliced onion instead of half, and add ½ packet onion soup mix or replace part of the broth with French onion soup. This is the best route if you want onion gravy without mushrooms.

Gluten-Free Version

Use gluten-free breadcrumbs and check the labels on gravy mix, onion soup mix, canned soup, and Worcestershire sauce. Cornstarch is usually the easiest gluten-free thickener, but packet mixes vary by brand. Skip the optional flour dusting before browning.

Low-Carb or Keto Version

Use almond flour, crushed pork rinds, or another low-carb binder instead of breadcrumbs. Serve with mashed cauliflower, cauliflower rice, green beans, or sautéed cabbage. Use a low-carb thickener if cornstarch does not fit your plan.

Ground Turkey Version

For a lighter version, ground turkey works, but handle the patties gently because they are leaner and more delicate. Cook ground turkey patties to 165°F / 74°C and season the sauce well because turkey is milder than beef.

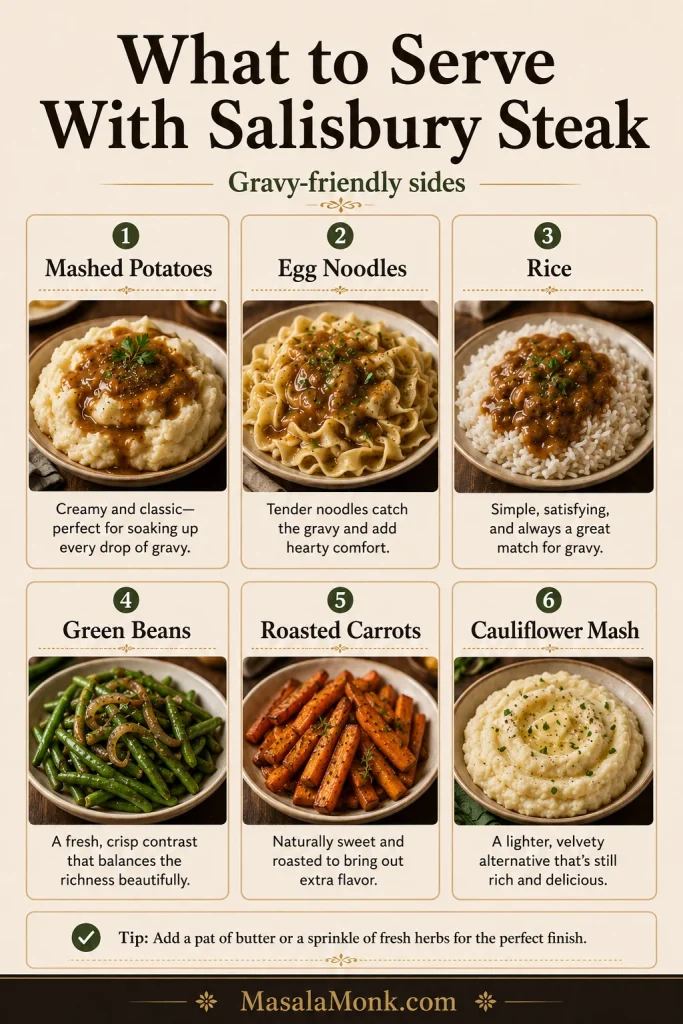
What to Serve With Crock Pot Salisbury Steak

Mashed potatoes are the classic because they catch the gravy. If you want to stretch the meal, egg noodles or rice also work beautifully.

Serving guide for Salisbury steak showing mashed potatoes, egg noodles, rice, green beans, roasted carrots, and cauliflower mash as side dish options.
Choose sides that make the gravy useful: mashed potatoes, egg noodles, rice, green beans, roasted carrots, or cauliflower mash. Meanwhile, a bright vegetable keeps the meal from feeling too rich.
  • Mashed potatoes: the best classic comfort-food pairing.
  • Egg noodles: good when you want a beef-and-noodles feel.
  • Rice: budget-friendly and excellent with extra gravy.
  • Green beans: simple and fresh next to rich gravy.
  • Roasted carrots: sweet, cozy, and easy.
  • Peas or corn: family-style sides that keep dinner simple.
  • Biscuits or dinner rolls: useful when there is extra gravy.
  • Cauliflower mash: a good lower-carb base.

For a garlic-forward potato side, these garlic mashed potatoes are especially good when the gravy is rich and beefy.

If the plate needs something crisp and cold beside all that gravy, a wedge salad gives you that steakhouse-style contrast.

The best plate has something plain underneath. Give the gravy somewhere to go: into potatoes, over noodles, across rice, or around cauliflower mash.

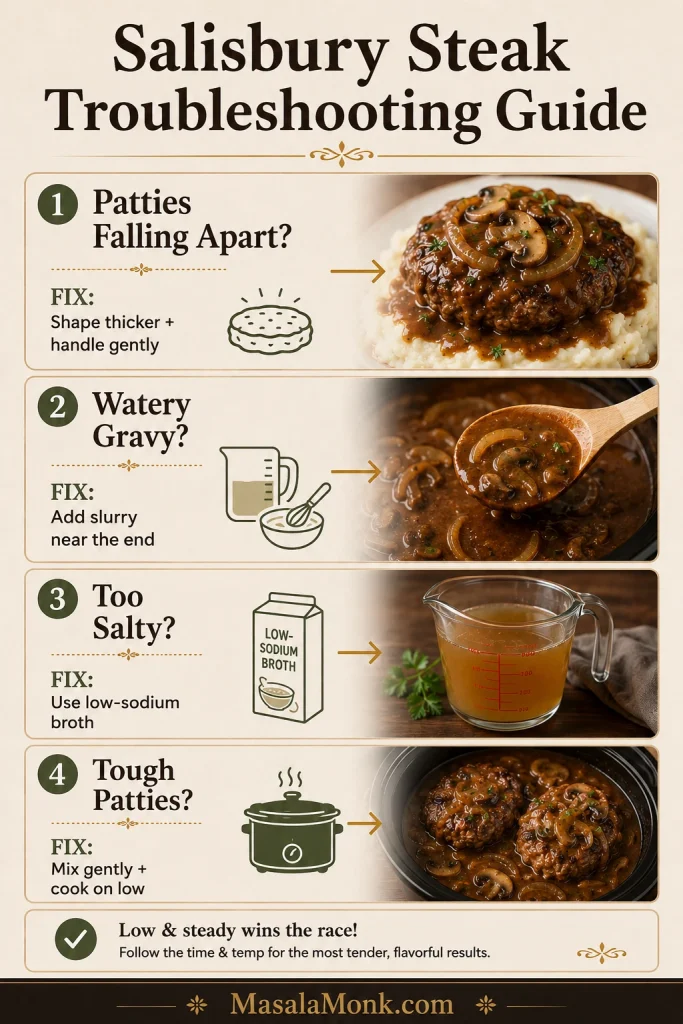
Troubleshooting Crock Pot Salisbury Steak

If your last slow cooker Salisbury steak came out thin, salty, or broken, you are not alone. None of those problems means dinner is ruined; most of them just need a small adjustment.

Most problems come from fragile patties, trapped slow-cooker moisture, or salty shortcut ingredients. Here is how to fix them.

Troubleshooting guide for Salisbury steak with fixes for patties falling apart, watery gravy, salty gravy, and tough patties.
Most Salisbury steak problems have simple fixes. Shape thicker patties if they break, use slurry for watery gravy, choose low-sodium broth for salty sauce, and cook gently for better texture.

Why Did My Patties Fall Apart?

The patties may have been too thin, too loosely shaped, moved too often, or stacked too tightly. Browning helps, but even unbrowned patties hold better when they are thick enough and moved with a wide spatula.

Why Is My Gravy Watery?

Slow cookers trap moisture, and beef releases juices as it cooks. Add a cornstarch slurry once the patties are done, cover, and let the sauce tighten. Use a second small slurry if needed.

Why Is My Gravy Too Salty?

Packets, soup mixes, canned soup, and broth can all add salt. Use low-sodium broth and reduce added salt. To fix a salty batch, add unsalted broth, a splash of cream, extra mushrooms or onions, or serve over plain potatoes or rice.

Why Are My Patties Tough?

The meat was likely overmixed, packed too tightly, or cooked too long on high. Mix gently, shape without compressing too much, and use low heat when possible.

Why Is There Grease on Top?

Ground beef releases fat as it cooks. Browning first removes some of it before the patties go into the crock pot. If grease collects on top, skim it off before thickening the sauce.

Why Does the Gravy Taste Flat?

Add Worcestershire, Dijon, black pepper, garlic, or a little more onion flavor. A small spoonful of ketchup can round out the gravy without making it taste sweet.

Why Did the Mushrooms Get Too Soft?

Mushrooms soften a lot in the slow cooker. For firmer mushrooms, use thicker slices or add half at the beginning and half during the last hour.

Can I Make the Patties Ahead?

Yes. Shape the patties up to a day ahead and refrigerate them covered. You can also brown the patties ahead, cool them, and refrigerate until you are ready to assemble the crock pot.

Storage, Freezing, and Reheating

  • Refrigerator: Store leftovers in an airtight container for 3 to 4 days.
  • Freezer: Freeze cooked patties with gravy for 2 to 3 months.
  • Reheating: Warm gently with a splash of broth or water to loosen the gravy.
  • After freezing: The gravy may thin after thawing. Simmer gently and thicken again with a small slurry if needed.

For the best freezer texture, freeze the patties with gravy instead of freezing the patties dry. The sauce protects the beef and makes leftovers feel more like dinner than a rescue mission.

FAQ

Should Salisbury steak patties be browned before slow cooking?

Browning is not required, but it gives better flavor and helps the patties hold together. If you skip it, make them slightly thicker and handle them gently.

Can frozen hamburger patties go straight into the crock pot?

For raw frozen hamburger patties, thaw them in the refrigerator first, then brown and slow cook them in the gravy. Fully cooked frozen patties are different; follow the package directions and heat them thoroughly in the sauce.

Is cream of mushroom soup a good shortcut?

Yes. Use 1 can, usually 10.5 oz / 298 g, for a lighter creamy gravy or 2 cans for a thicker cream-soup version. Reduce salt if you also use gravy mix or onion soup mix.

Can I use cream of chicken soup instead?

Yes. It makes a milder, creamier sauce. Add Worcestershire, au jus, or extra black pepper so it still tastes savory and not flat.

What does onion soup mix add?

Onion soup mix adds savory onion flavor and salt. Use ½ packet for balance or a full packet for a stronger shortcut version, then reduce added salt and use low-sodium broth.

How do you thicken slow cooker Salisbury steak gravy?

Mix cornstarch with cold water, stir it into the hot gravy once the patties are cooked, and cook for 15 to 20 minutes. Add another small slurry if you want it thicker.

What can replace mushrooms?

Use extra onions, onion gravy, French onion soup, or cream of onion soup. Brown gravy versions also work well without mushrooms.

What internal temperature should Salisbury steak reach?

Ground beef patties should reach 160°F / 71°C in the center. For ground turkey or ground chicken patties, use 165°F / 74°C.

Is Salisbury steak the same as hamburger steak?

They are closely related. Salisbury steak usually includes seasoned ground beef with a binder such as breadcrumbs or egg, then gravy. Hamburger steak is often simpler: seasoned beef patties with onion gravy or brown gravy.

Final Thoughts

Crock pot Salisbury steak does not need to be fancy to be memorable. It just needs tender beef, brown gravy, soft onions, and the kind of sauce that makes mashed potatoes disappear from the plate.

Whether you start with homemade patties or a freezer shortcut, the win is the same: tender beef, a spoonable brown sauce, and a plate of potatoes, noodles, or rice that catches every bit of it.

Complete crock pot Salisbury steak dinner with mashed potatoes, mushroom onion gravy, green beans, a gravy boat, and a slow cooker in the background.
This final dinner scene shows the payoff: tender Salisbury steak, mashed potatoes, green beans, and glossy mushroom onion gravy. The slow cooker handles the work, while the plate still feels like a full comfort-food meal.

Back to top

Posted on Leave a comment

Smothered Pork Chops Recipe

Golden-brown smothered pork chops covered with onion gravy, served with mashed potatoes in a warm skillet-style setting.

The gravy is not the hard part of smothered pork chops. The hard part is keeping the pork tender by the time the gravy is rich.

That is where many smothered pork chop recipes go wrong. The pork browns nicely, the onions soften, the gravy starts to thicken — and then the chops sit in the pan a few minutes too long. If you have ever made a beautiful pan of gravy and still ended up with tough pork, this method is built around that exact problem.

This smothered pork chops recipe is built to avoid that. The chops are browned for flavor, removed before they overcook, then finished gently in onion gravy until they reach the right internal temperature. The sauce tastes like it belongs to the pork because everything happens in the same skillet, but the meat does not have to suffer while the pan catches up.

This is the version to use when you want rich onion gravy, tender pork chops, and clear timing instead of guesswork. Whether you make the classic onion-gravy version or take the cream-of-mushroom shortcut, the goal is the same: juicy pork, a smooth sauce, and a plate where every spoonful has somewhere good to land — over buttery potatoes, fluffy rice, egg noodles, or a biscuit dragged through the gravy.

Sliced smothered pork chop with a moist interior, glossy onion gravy, and soft cooked onions on the plate.
A sliced smothered pork chop tells the truth quickly: the meat should look moist before the sauce does any work.

If mashed potatoes are the plan, these garlic mashed potatoes are the kind of soft, buttery base that makes onion gravy feel like the whole point of dinner.

Quick Answer

To make smothered pork chops, season and lightly dredge ¾- to 1-inch pork chops, brown them briefly in a skillet, then remove them before they cook through. Soften onions in the same pan, cook 2 tablespoons of clean reserved flour into the onions, whisk in stock, and return the chops to finish gently in the gravy until they reach 145°F / 63°C. Rest for 3 minutes before serving.

Before dredging, reserve 2 tablespoons of clean flour for the sauce, and remember that the timing is built around the pork, not the gravy — sauce can keep cooking, but pork cannot uncook.

Four-step visual guide showing dredged pork chops, skillet browning, onion gravy, and a 145 degree thermometer check.
Brown the chops first, build the onion gravy next, and then finish gently to 145°F so the pork stays tender.

If your pork chops are thinner or thicker than ¾ to 1 inch, check the pork chop thickness chart before you start.

Smothered Pork Chops at a Glance

Use this as the quick map before you start: choose the right chop thickness, brown for flavor, finish gently, and check temperature before the sauce makes you lose track of the pork.

Need to KnowBest Answer
Good pork chops to buyBone-in or boneless chops, ¾ to 1 inch thick
Main methodBrown first, make the sauce, then finish gently
Internal temperature145°F / 63°C, then rest 3 minutes
Gravy styleOnion gravy for the main recipe; mushroom gravy or cream of mushroom for alternate paths
Texture targetGlossy and spoonable: thick enough to coat a spoon, loose enough to pool on potatoes or rice
Common mistakeBoiling the chops hard in the pan or treating thin chops like thick ones
Sides that workMashed potatoes, rice, egg noodles, biscuits, cornbread, green beans, collards

For the safest timing cue, use the doneness guide instead of judging only by gravy thickness.

Ingredients for smothered pork chops arranged on a prep surface, including pork chops, onions, garlic, flour, stock, cream, butter, and seasonings.
The ingredients are simple, but each one has a job: browning the chops, building the gravy, balancing salt, or finishing the sauce.

Smothered Pork Chops with Rich Onion Gravy

These smothered pork chops are browned in a skillet, finished gently in rich onion gravy, and served with enough sauce to soak into potatoes, rice, noodles, or biscuits without drowning the pork. Use bone-in or boneless chops, add mushrooms for a deeper gravy, or use the cream-of-mushroom shortcut when you want a thicker pantry-style dinner.

Prep Time
15 minutes
Cook Time
30 to 35 minutes
Total Time
45 to 50 minutes
Servings
4

Equipment: large 12-inch skillet, shallow dish, small bowl, tongs, whisk, instant-read thermometer

Ingredients

For the pork chops

  • 4 pork chops, bone-in or boneless, ¾ to 1 inch thick, about 1½ to 2 lb / 680 to 900 g total
  • 1 teaspoon kosher salt for the pork chops, or ¾ teaspoon fine salt, plus more only if needed for the gravy
  • ½ to 1 teaspoon black pepper, to taste
  • 1 teaspoon garlic powder
  • ½ teaspoon onion powder
  • ½ teaspoon smoked paprika, sweet paprika, or ground sage
  • ½ cup / 60 g all-purpose flour, reserving 2 tablespoons in a clean bowl before dredging
  • 2 tablespoons / 30 ml neutral oil
  • 2 tablespoons / 28 g butter

For the onion gravy

  • 1 large yellow onion, thinly sliced, about 180 to 220 g
  • 3 to 4 garlic cloves, minced
  • 2 cups / 480 ml low-sodium chicken stock or broth
  • ½ cup / 120 ml heavy cream or half-and-half
  • 1 teaspoon Worcestershire sauce, optional
  • 1 teaspoon fresh thyme leaves or ½ teaspoon dried thyme
  • Extra salt and black pepper, to taste
  • Chopped parsley, for serving

Salt note: Use the listed salt for the pork chops if you are making the homemade onion gravy with low-sodium stock. Use less salt if your stock is salted, or if you are making the cream-of-mushroom method. If you use condensed soup, onion soup mix, or a gravy packet, do not add extra salt until the very end.

Instructions

Brown the Pork Chops and Build the Gravy

  1. Dry and season the pork chops. Pat the pork chops dry with paper towels. Mix the salt, black pepper, garlic powder, onion powder, and paprika or sage. Season both sides. If time allows, rest the seasoned chops for 15 to 20 minutes before searing.
  2. Reserve clean flour for the sauce. Add the flour to a shallow dish, then remove 2 tablespoons to a small clean bowl before dredging. You will use that clean flour to thicken the sauce.
  3. Dredge lightly. Dredge each pork chop lightly in the flour left in the shallow dish, shaking off the excess. The coating should be thin, not heavy.
  4. Brown the chops. Heat the oil in a large skillet over medium-high heat. Add the pork chops in a single layer and brown for 3 to 4 minutes per side, just until golden. Do not cook them through. Transfer to a plate.
  5. Cook the onions. Reduce the heat to medium. Add the butter and sliced onion to the same skillet. Cook for 6 to 8 minutes, stirring often, until the onion softens, turns glossy, and begins to pick up golden edges. Add the garlic and cook for 30 seconds.
  6. Build the gravy. Sprinkle the reserved clean flour over the onions. Stir for 1 to 2 minutes so the flour loses its raw taste. Slowly whisk in the chicken stock, scraping up the browned bits from the bottom of the skillet. Add the Worcestershire sauce and thyme.

Finish the Pork Chops Gently

  1. Return the pork to the gravy. Add the pork chops and any plate juices back to the skillet. Reduce the heat to medium-low, cover partially, and cook until the thickest part reaches 140 to 143°F / 60 to 62°C, usually 4 to 7 minutes for ¾- to 1-inch chops.
  2. Add cream and bring the sauce together. Stir in the cream or half-and-half. Let the sauce barely bubble until glossy and the pork reaches 145°F / 63°C. If the pork gets there first, move it to a plate and finish the sauce separately.
  3. Rest and serve. Turn off the heat and let the pork chops rest for at least 3 minutes. Spoon the onion gravy over the chops and finish with parsley.

What Success Looks Like

The pork slices cleanly and stays juicy, the onions soften enough to melt into the gravy, and the sauce coats a spoon without sitting like paste. This timing is written for ¾- to 1-inch chops in a large 12-inch skillet; thinner chops need less time, and thicker chops need a thermometer more than they need guesswork.

When it works, the gravy feels generous instead of necessary — the pork is still juicy enough to stand on its own, and the sauce makes the whole plate better.

Success guide showing sliced juicy pork, soft onions, and spoonable gravy for smothered pork chops.
The finished skillet should show three signs at once: juicy pork, softened onions, and gravy that is spoonable but not pasty.

If the pork is already done but the sauce is not right, go straight to the troubleshooting table.

Why This Smothered Pork Chops Recipe Works

The trick is letting the pork and gravy keep different schedules. The chops brown first for flavor, then leave the pan before they overcook. That gives the onion gravy time to develop without making the pork wait too long.

The sauce is built in the same skillet, so the onions, garlic, flour, stock, and cream pick up the browned bits from the pork. That makes the pan sauce taste connected to the chops instead of like something poured over them afterward.

The flour and cream are timed carefully. A little clean reserved flour gives the gravy body, while cream goes in near the end so the sauce turns glossy without boiling hard or turning heavy.

Ingredients for Smothered Pork Chops

The ingredient list is simple, which is exactly why the small choices matter: the right chop, patient onions, and stock that does not turn the gravy too salty.

Pork Chops to Use

For the most forgiving skillet version, choose pork chops that are ¾ to 1 inch thick. Bone-in chops are usually more forgiving because the bone slows the cooking slightly. Boneless chops also work well, especially for weeknights, but they cook faster and need closer attention.

Thin pork chops need a quick sear and a short finish. Thick chops can be excellent, but they need a thermometer because the outside can look ready before the center is done.

Different pork chop cuts on butcher paper, including bone-in chops, boneless chops, thin chops, and thick chops.
Start with the right pork chop cut and thickness, because thin chops and thick chops need different timing in the same gravy.
Pork Chop TypeUse It ForWhat to Watch
Bone-in pork chopsForgiving, flavorful skillet resultsCheck temperature near the center, away from the bone
Boneless pork chopsEasy weeknight cookingCook quickly, so check early
Thin pork chopsQuick skillet dinnersUse a short sear and very short sauce finish
Thick pork chopsJuicier dinner-plate chopsCheck the center, not the clock
Shoulder or blade chopsSlower cooking methodsMay need more time to become tender

If you are using shoulder chops, blade chops, or thicker marbled chops, the slow-cooker method may be the better fit.

Have pork tenderloin instead? Pork tenderloin is a different cut and cooks differently from pork chops. Use this pork tenderloin in oven guide if your package says tenderloin.

Onion Gravy Ingredients

The onion gravy starts with butter, sliced onion, garlic, flour, stock, thyme, and a small amount of cream. Cook the onion until it is soft and lightly golden, not just warmed through. That is what gives the sauce a sweeter, deeper base.

Use low-sodium chicken stock if you can. The pork is seasoned, the sauce reduces slightly, and Worcestershire sauce adds more savory saltiness. Starting with low-sodium stock lets you control the final flavor.

Heavy cream gives the richest finish. Half-and-half makes the gravy a little lighter. For a brown onion gravy, leave the dairy out and add a splash more stock.

Why Flour Matters

Flour helps the pork brown and gives the gravy body. The trick is to use it lightly: a thin dusting on the chops, plus 2 tablespoons of clean reserved flour cooked into the onions before the stock goes in.

That short cooking step keeps the sauce smooth instead of raw or pasty.

How to Make Smothered Pork Chops

Everything good starts in the skillet: browned pork, softened onions, and the little browned bits that dissolve into the gravy. As you cook, watch for these cues.

1. Season and Dredge the Pork Chops

Pat the pork chops dry before seasoning. Dry meat browns better. Wet meat steams, and steamed pork chops do not build the same flavor in the pan.

Reserve Clean Flour Before Dredging

Before any raw pork touches the flour, reserve 2 tablespoons in a clean bowl for the gravy. That small step keeps the thickener separate and helps the sauce stay smooth.

Spoonful of flour being reserved in a clean bowl before raw pork chops are dredged in the remaining flour.
Reserve clean flour before dredging so the gravy thickener stays separate from flour that has touched raw pork.

Then season both sides and dredge lightly in the remaining flour. Shake off the excess so the coating looks like a thin dusting, not a breaded crust.

Pork chop lifted from a flour dish with a thin, even dusting of flour on the surface.
A thin flour coating helps the pork brown and gives onion gravy body, while too much flour can make the surface heavy.

2. Brown the Pork Chops Without Cooking Them Through

Use a heavy skillet if you have one. Heat the oil until it shimmers, then brown the chops in a single layer. If the pan is crowded, cook in batches; crowding traps steam and softens the crust.

The goal is golden color, not doneness. Once the chops are browned on both sides, move them to a plate. They will finish later in the gravy.

Pork chop browning in a skillet with tongs lifting one edge to show a golden sear.
Browning creates the flavor base; after that, the chops should leave the skillet before they cook through.

3. Cook the Onions in the Same Skillet

Reduce the heat to medium, add butter and sliced onion, and cook until the onions look soft and glossy with a few golden edges. If the pan looks dry, add a small splash of stock to loosen the browned bits. Add the garlic near the end.

At this point, the skillet should smell sweet, savory, and browned rather than sharp with raw onion.

Sliced onions cooking in a skillet until soft, glossy, and lightly golden with browned bits in the pan.
Let the onions turn soft, glossy, and lightly golden before adding liquid; otherwise, the gravy misses its sweet-savory base.

4. Make the Onion Gravy

Sprinkle the reserved clean flour over the onions and stir for 1 to 2 minutes. Slowly whisk in the chicken stock, scraping the bottom of the skillet so the browned bits dissolve into the pan sauce.

The gravy should move lazily, not boil hard — more like a slow, steady bubble than a pan trying to rush dinner.

Spoon dragging through glossy golden-brown onion gravy with visible soft onions in a skillet.
Look for onion gravy that coats the spoon yet still moves, so it can settle around the pork instead of sitting stiffly on top.

5. Finish the Pork Chops in Gravy

Return the pork chops and any plate juices to the skillet. Keep the heat gentle. When the pork is nearly done, add the cream and let the sauce come together until glossy.

If the pork reaches 145°F / 63°C before the gravy looks ready, move the chops to a plate and finish the sauce separately. The pork wins.

Seared pork chops gently simmering in onion gravy with small bubbles around the edge of the skillet.
Keep the sauce at a gentle bubble while the pork finishes, because hard boiling is where juicy pork chops start to tighten.

6. Rest and Serve

Let the pork chops rest for at least 3 minutes, then spoon the onion gravy over the top. On the plate, the pork slices cleanly and the gravy settles around it instead of sitting in a stiff mound.

Pork Chop Thickness and Cook Time Chart

Thickness matters more than most recipes admit. That is why the same skillet can give one cook juicy chops and another cook dry ones.

Pork chop thickness comparison with measurement cues for thin, standard, and thick pork chops.
Before you trust the clock, check the thickness; it is one of the biggest reasons smothered pork chops turn tender or dry.
Pork Chop TypeBrown FirstFinish in GravyKey Note
Thin boneless, about ½ inch1 to 2 minutes per side2 to 4 minutesCheck early; dries fast
Standard ¾ to 1 inch3 to 4 minutes per side5 to 8 minutesMost forgiving for juicy weeknight chops
Thick 1 to 1½ inch4 to 5 minutes per side10 to 15 minutesUse a thermometer
Slow-cooker chopsOptional 2 to 3 minutes per side3 to 6 hours on LOW, depending on cutThicker, more marbled chops stay softer

How to Know When Smothered Pork Chops Are Done

The safest and most reliable way to know when smothered pork chops are done is to use an instant-read thermometer. Check the thickest part of the chop. If the chop is bone-in, avoid touching the bone with the thermometer probe.

Pork chops should reach 145°F / 63°C, followed by a 3-minute rest. At that temperature, the center may still have a slight blush. That is normal when the pork has reached the right temperature and rested properly. For official guidance, see the FoodSafety.gov safe minimum internal temperature chart.

Instant-read thermometer in a smothered pork chop showing 145°F.
A thermometer keeps the gravy from distracting you; pull the pork at 145°F and let the chops rest before serving.

Gravy thickness and cooking time can guide you, but they should not be the final judge. Temperature is the tie-breaker.

Once the pork is rested, the dish should feel like one skillet, not pork plus sauce: soft onions, gravy that tastes like the browned pan, and chops juicy enough that the sauce feels generous instead of necessary.

Which Smothered Pork Chops Version Should You Make?

The onion gravy is the main path; the other versions are there for the nights when your pork chop cut, pantry, or schedule makes the choice for you.

Pork Chop CutBest MethodWhy
¾–1 inch bone-in chopsStovetop onion gravyForgiving, flavorful, and ideal for the main recipe
¾–1 inch boneless chopsStovetop or cream-of-mushroom skilletFast and practical, but check early
Thin boneless chopsStovetop onlyA short finish keeps them from drying out
Thick bone-in chopsStovetop or bakedNeeds gentle cooking and a thermometer
Shoulder or blade chopsSlow cookerBetter suited to longer cooking

Add mushrooms when you want deeper flavor. For the fastest pantry dinner, use condensed cream of mushroom soup. A more Southern-style plate works best when the onion gravy stays central and the cream stays lighter. Choose the slow cooker only when the chops are thick or marbled enough to handle it.

If your goal is shredded pork rather than whole chops in gravy, pork shoulder or pork butt is the better cut. For that style of dinner, use this slow cooker pulled pork method instead.

Smothered Pork Chops with Mushroom Gravy

For mushroom gravy, add 8 to 10 oz / 225 to 280 g sliced mushrooms after the onions have softened. Use 8 oz for a balanced mushroom gravy, or closer to 10 oz if you want it mushroom-forward.

Smothered pork chops covered with darker mushroom gravy and browned sliced mushrooms.
Browned mushrooms add depth to smothered pork chops, while watery mushrooms can leave the gravy flat and thin.

Cook the Mushrooms Until the Pan Looks Dry

Cook the mushrooms until the pan no longer looks wet. They should look browned in spots, not steamed. If you add flour and stock while the mushrooms are still wet, the sauce can taste thin and muted.

Comparison of wet mushrooms and browned mushrooms cooked until the pan looks mostly dry.
Cook mushrooms until the pan no longer looks wet; then the mushroom gravy can turn rich instead of diluted.

The mushroom version feels deeper and a little more steakhouse-style, with browned mushrooms giving the gravy extra savory weight — especially when the sauce lands on mashed potatoes or egg noodles.

Cream of Mushroom Smothered Pork Chops

Cream of mushroom smothered pork chops are the busy-night shortcut: creamy, pantry-friendly, nostalgic, and ready to spoon over rice or mashed potatoes. The method is forgiving as long as you control the salt and stop cooking the pork on time.

Pork chops in a creamy mushroom gravy with visible mushrooms and a thick beige sauce.
Cream of mushroom pork chops are the shortcut version, although they still need gentle heat so the pork stays tender.

To make this method, season and brown the pork chops as written. Cook the onions and garlic in the skillet, then whisk together:

  • 1 can condensed cream of mushroom soup, 10.5 oz / about 298 g
  • ½ cup / 120 ml chicken stock, milk, or half-and-half
  • ½ teaspoon black pepper or dried thyme
  • Optional: ½ cup sliced mushrooms, cooked first

Use Condensed Soup, Not Ready-to-Serve Soup

Use condensed cream of mushroom soup, not ready-to-serve soup. Add the soup mixture to the skillet, return the pork chops, and cook over low, steady heat until the pork reaches temperature. Taste before adding salt because condensed soup, stock, seasoning packets, and the pork coating can all add up quickly.

Comparison of thick condensed cream of mushroom soup and thinner ready-to-serve mushroom soup in separate bowls.
Use condensed soup for cream of mushroom pork chops; ready-to-serve soup is already diluted and can make the sauce too loose.

If the sauce is too thick, whisk in stock or milk a splash at a time. For a thin sauce, remove the pork chops once they are done and simmer the sauce uncovered for a few minutes.

If you are using the same canned-soup shortcut with chicken instead of pork, this cream of mushroom chicken recipe follows the same creamy comfort-dinner idea.

Southern-Style Smothered Pork Chops

For a Southern-style plate, lean into a flour-dredged chop, plenty of onion, a brown or lightly creamy gravy, and simple sides like rice, mashed potatoes, collard greens, green beans, biscuits, or cornbread.

Southern-style smothered pork chop with onion gravy, white rice, collard greens, and a piece of cornbread.
On a Southern-style plate, onion gravy belongs to everything: pork, rice, greens, and cornbread.

This is not a dainty sauce-on-the-side dinner. The gravy is part of the meal — it should run into the rice, soften the potatoes, or give a biscuit something to drag through.

To push this recipe in that direction, keep the onion gravy central and go lighter on the cream. Add a pinch of cayenne, a little Creole or Cajun seasoning, or a few dashes of hot sauce if you like heat. You can also add thinly sliced bell pepper with the onions for a sweeter, more old-school skillet flavor.

If you like this kind of rice-and-gravy comfort food, MasalaMonk’s red beans and rice recipe is another slow-simmered Southern-style dinner built around a saucy bowl.

If using a seasoned blend such as Creole seasoning, Cajun seasoning, seasoned salt, or an all-purpose spice mix, reduce the salt in the pork chop seasoning. Many blends are salty, and the gravy will concentrate that salt as it cooks.

Baked Smothered Pork Chops

Baked smothered pork chops are useful when your skillet is crowded or you want a gentler finish. The strongest baked version still starts on the stovetop: brown the chops first and make the gravy before baking, so the pork has flavor and moisture around it from the start.

Transfer the chops and gravy to a baking dish, cover tightly with foil or a lid, and bake at 350°F / 175°C until the pork reaches 145°F / 63°C.

Baked smothered pork chops in a ceramic dish with onion gravy, browned tops, and foil pulled back.
Baked smothered pork chops work best when the chops and gravy are browned first, then finished covered in the oven.
Chop ThicknessApproximate Covered Bake Time After SearingKey Check
Thin boneless chops, about ½ inch8 to 12 minutesCheck early
¾ to 1 inch chops15 to 20 minutesUse thermometer
1 to 1½ inch chops20 to 28 minutesCheck the center, not the clock

Keep the dish covered while the pork cooks. Uncover only at the end if the gravy is too loose, or remove the chops and reduce the gravy separately in a skillet.

Slow Cooker Smothered Pork Chops

The slow-cooker method is convenient and cozy, but it gives a softer, less browned result than the stovetop skillet version. Choose it when hands-off cooking matters more than crust, and use thicker, more forgiving chops so the pork stays tender.

Slow cooker filled with thick pork chops in creamy mushroom-onion gravy with a spoon lifting sauce.
Slow cooker smothered pork chops are most forgiving with thicker, more marbled chops that can handle longer cooking.

Best slow-cooker cuts: shoulder chops, blade chops, thick bone-in chops, or thicker marbled chops. Thin boneless loin chops are better on the stovetop.

Slow Cooker Sauce and Timing

For better flavor, brown the chops first. Then add sliced onions to a 5 to 6 quart slow cooker, place the chops on top, and pour the gravy mixture over them. Use a broth-and-cream-of-mushroom mixture for the easiest method, or use the homemade gravy base if you want more onion flavor.

For 4 thick chops, a simple slow-cooker sauce is 1 can condensed cream of mushroom soup, ½ cup / 120 ml low-sodium broth, ½ cup sliced onion, and 1 cup sliced mushrooms. For 6 to 8 chops, use 2 cans condensed soup and 1 to 1½ cups broth; start with the lower amount if your slow cooker tends to make watery sauces.

If the slow-cooker gravy is watery, remove the pork chops once they are done. Whisk 1 tablespoon cornstarch with 1 tablespoon cold water, stir the slurry into the slow cooker, and cook on HIGH for 10 to 20 minutes, or until the sauce thickens.

Have a larger pork roast instead of chops? Use a dedicated slow cooker pork loin method. A pork loin roast and individual pork chops do not cook on the same schedule.

How to Fix Smothered Pork Chop Problems

Most smothered pork chop problems come from one of three places: the pork is overcooked, the gravy was rushed, or the salt level was not controlled. The good news is that most sauce problems can be fixed after the pork is safely moved to a plate.

Quick Fixes for Pork and Gravy

Troubleshooting guide for dry pork chops, thin gravy, thick gravy, lumpy gravy, salty sauce, and watery slow-cooker gravy.
Most pork chop and gravy problems are easier to fix after the cooked pork comes out of the pan.
ProblemDo This NowDo This Next Time
Dry pork chopsSlice the chops, cover with hot gravy, and rest off heat for a few minutesUse thicker chops, finish gently, and stop at 145°F / 63°C
Tough pork chopsIf lean, serve with gravy; if shoulder-style, cook gently a little longerTreat lean chops and shoulder-style chops differently
Pork chops did not brownKeep going; the sauce will still carry flavorPat chops dry, use enough heat, and avoid crowding the pan
Thin gravyRemove chops, simmer uncovered, or add a small slurryCook the flour briefly, then add liquid slowly
Too-thick gravyWhisk in warm stock, milk, or half-and-half a splash at a timeKeep the sauce slightly loose before the pork goes back in
Lumpy gravyWhisk hard over low heat or strain the gravyAdd stock slowly while stirring
Floury gravyCook gently for a few more minutesCook the flour with the onions before adding stock
Mushroom gravy is wateryRemove chops and simmer uncovered until thickerCook mushrooms until the pan looks nearly dry before adding flour
Gravy looks curdledLower heat and whisk in a splash of warm stock or creamAdd dairy near the end and avoid boiling hard
Salty gravyAdd cream, milk, or unsalted stock; serve over plain starchUse low-sodium stock and reduce salt with canned soup
Watery slow-cooker gravyRemove chops, add slurry, and cook sauce on HIGHStart with less liquid and thicken at the end

Gravy Texture Guide

For a visual sauce check, compare the gravy before you adjust it with stock, milk, cream, or slurry.

Three spoons comparing onion gravy textures: too thin, just right, and too thick.
Aim for gravy that coats the spoon and drips slowly; that texture will pool softly instead of running away or clumping.

If the pork is already done, move it out first. Dry meat can be sliced and covered with hot gravy; thin, lumpy, salty, or separated sauce can be fixed separately over gentle heat without making the chops tougher.

What to Serve with Smothered Pork Chops

Smothered pork chops need a side that can catch the gravy, because the sauce is part of the meal.

The best plate is the one where the gravy has somewhere to go. It should sink into potatoes, run through rice, cling to noodles, or leave a biscuit with something to chase. That is when smothered pork chops stop feeling like pork with sauce and start feeling like a full comfort dinner.

Smothered Pork Chops with Mashed Potatoes

For the classic comfort plate, spoon the onion gravy over mashed potatoes while the sauce is still loose enough to settle into the edges.

Smothered pork chop with onion gravy served beside mashed potatoes and green beans.
Mashed potatoes are the classic base for pork chops with gravy because they catch the sauce without competing with it.

Smothered Pork Chops with Rice

If you are serving the chops over rice, this how to cook rice guide helps keep the grains fluffy instead of gummy under the gravy.

Southern-style smothered pork chop with onion gravy served over white rice with collard greens and cornbread.
Rice works beautifully with Southern-style smothered pork chops when the onion gravy is loose enough to season the grains.
Side DishWhy It Works
Mashed potatoesThe classic base for onion gravy
White rice or brown riceSimple, filling, and good for extra sauce
Egg noodlesTurns the meal into a cozy skillet dinner
BiscuitsGood for scooping up thick gravy
Green beansFresh contrast to the rich sauce
Roasted carrotsSweetness balances the savory gravy
Collard greens or sautéed greensEarthy, slightly bitter balance
CornbreadComfort-food pairing with a little sweetness
Applesauce or sautéed applesSweet contrast for a rich pork dinner
Side dishes for smothered pork chops, including mashed potatoes, rice, noodles, biscuits, green beans, cornbread, and apples.
Choose sides that give the gravy somewhere useful to go: potatoes, rice, noodles, biscuits, greens, cornbread, or apples.

Easy Plate Combinations

  • Classic comfort plate: smothered pork chops, mashed potatoes, green beans.
  • Southern-style plate: smothered pork chops, rice, collard greens, cornbread.
  • Weeknight skillet plate: pork chops and gravy, egg noodles, peas.
  • Cream-of-mushroom plate: creamy pork chops, rice or buttered noodles, roasted carrots.
  • Slow-cooker plate: pork chops with gravy, mashed potatoes, simple steamed vegetables.

Planning for leftovers? See storage and reheating before you pack the pork away.

Storage, Reheating, and Leftovers

Store leftover pork chops with the gravy, not separately. The sauce protects the meat in the refrigerator and gives you a better chance of reheating it without drying it out. Use an airtight container and refrigerate for up to 3 to 4 days.

For the best texture, reheat gently on the stovetop over low heat. Add a splash of stock, milk, or water to loosen the gravy. Leftovers are best sliced into the gravy so each piece warms gently instead of sitting as one thick chop.

Smothered pork chops stored in gravy in a glass container and sliced leftovers reheating in a skillet with added liquid.
Store leftovers with the gravy, then reheat gently with a splash of stock or milk to help the pork stay moist.

You can freeze smothered pork chops, although cream-based gravy may look slightly separated after thawing. Reheat slowly and whisk the sauce as it warms; a splash of stock or milk usually brings it back together.

Made this recipe? Leave a comment with the pork chop thickness you used — thin, standard, or thick — and whether you made onion gravy, mushroom gravy, or the cream-of-mushroom version. That detail helps the next cook judge timing before their chops overcook.

FAQs

Bone-in or boneless pork chops: which is better?

Bone-in pork chops are usually more forgiving and flavorful, but boneless pork chops work well if they are not too thin. Boneless chops cook faster, so check them earlier.

What temperature should smothered pork chops reach?

Smothered pork chops should reach 145°F / 63°C in the thickest part, followed by at least a 3-minute rest. Use a thermometer instead of judging only by color.

Should the skillet be covered while the pork cooks?

Cover the skillet partially while the chops finish in the gravy. This helps them cook gently without reducing the sauce too fast. If the sauce is too thin near the end, uncover the pan and simmer briefly after the chops are done.

How do I use cream of mushroom soup?

Use one 10.5 oz / 298 g can of condensed cream of mushroom soup and thin it with ½ cup / 120 ml stock, milk, or half-and-half. Go lighter on added seasoning because canned soup already brings salt and body.

Can smothered pork chops be dairy-free or gluten-free?

For a dairy-free version, skip the cream and use extra stock. The gravy will be lighter, but still savory and spoonable. For gluten-free gravy, use a gluten-free all-purpose flour blend for a light dredge, or skip the dredge and thicken the sauce with a cornstarch slurry after the chops are cooked.

Why are my smothered pork chops dry?

Dry chops usually mean the pork cooked too long, the heat was too high, or the chops were very thin. Brown them briefly, keep the sauce at a gentle bubble, and stop cooking when the thickest part reaches 145°F / 63°C.

How do I make smothered pork chop gravy thicker?

Remove the pork chops once they are done, then simmer the gravy uncovered. If it is still thin, stir in a small slurry made from 1 teaspoon cornstarch and 1 tablespoon cold water, then cook for 1 to 2 minutes.

What changes if my pork chops are thin?

Thin pork chops need a quick sear and a short finish. Make the gravy without them in the pan, then return them only for the final few minutes so they warm through without drying out.

Are pork loin chops the same as regular pork chops?

Pork loin chops are a type of pork chop and work well as long as they are not sliced too thin. Because they are lean, give them a quick sear, finish them gently, and use a thermometer so they do not overshoot.

What is the best make-ahead method?

Store the chops in the gravy and reheat gently over low heat. Add a splash of stock or milk if the gravy thickens in the refrigerator. Pork chops are still best freshly cooked, but storing them with sauce helps protect the meat.

Can I make brown onion gravy instead of creamy gravy?

For brown onion gravy, leave out the cream and use a little extra chicken stock. The sauce will taste more like a classic onion pan gravy: lighter, savory, and less creamy.

However you make them — skillet, baked, creamy, mushroom-rich, or slow-cooked — the win is the same: tender pork, a gravy that tastes like the pan, and a plate that feels finished before it ever reaches the table.

Back to top ↑