Posted on Leave a comment

Minestrone Soup Recipe

Bowl of minestrone soup with tomato broth, white beans, kidney beans, small pasta, carrots, zucchini, greens, herbs, and bread on the side.

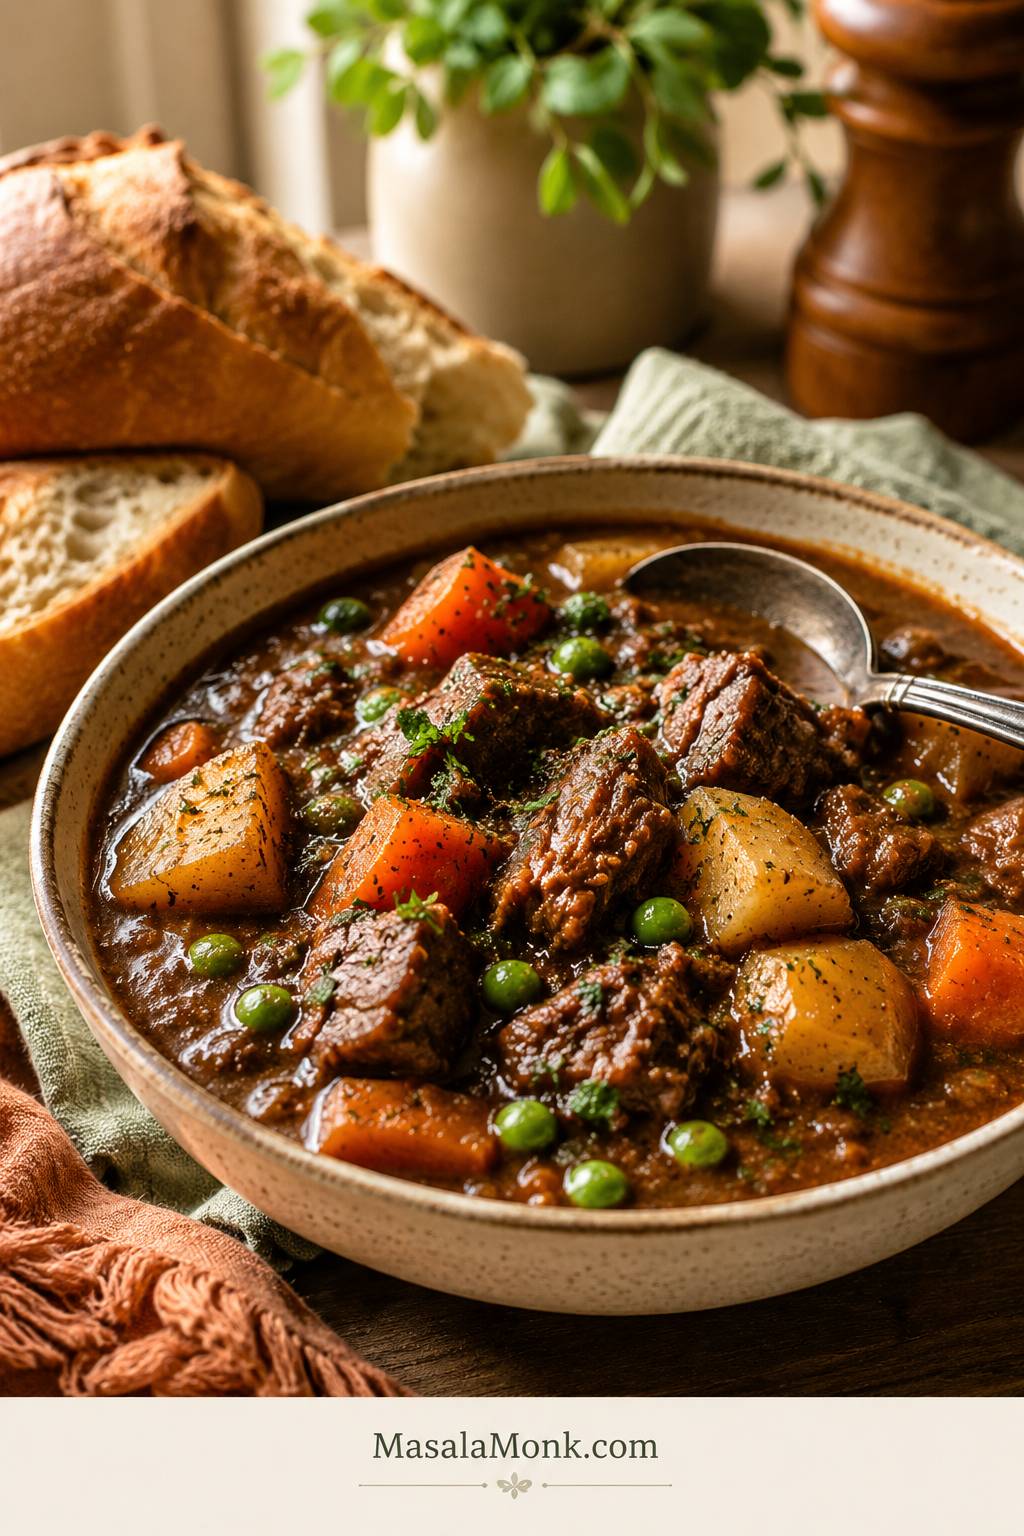
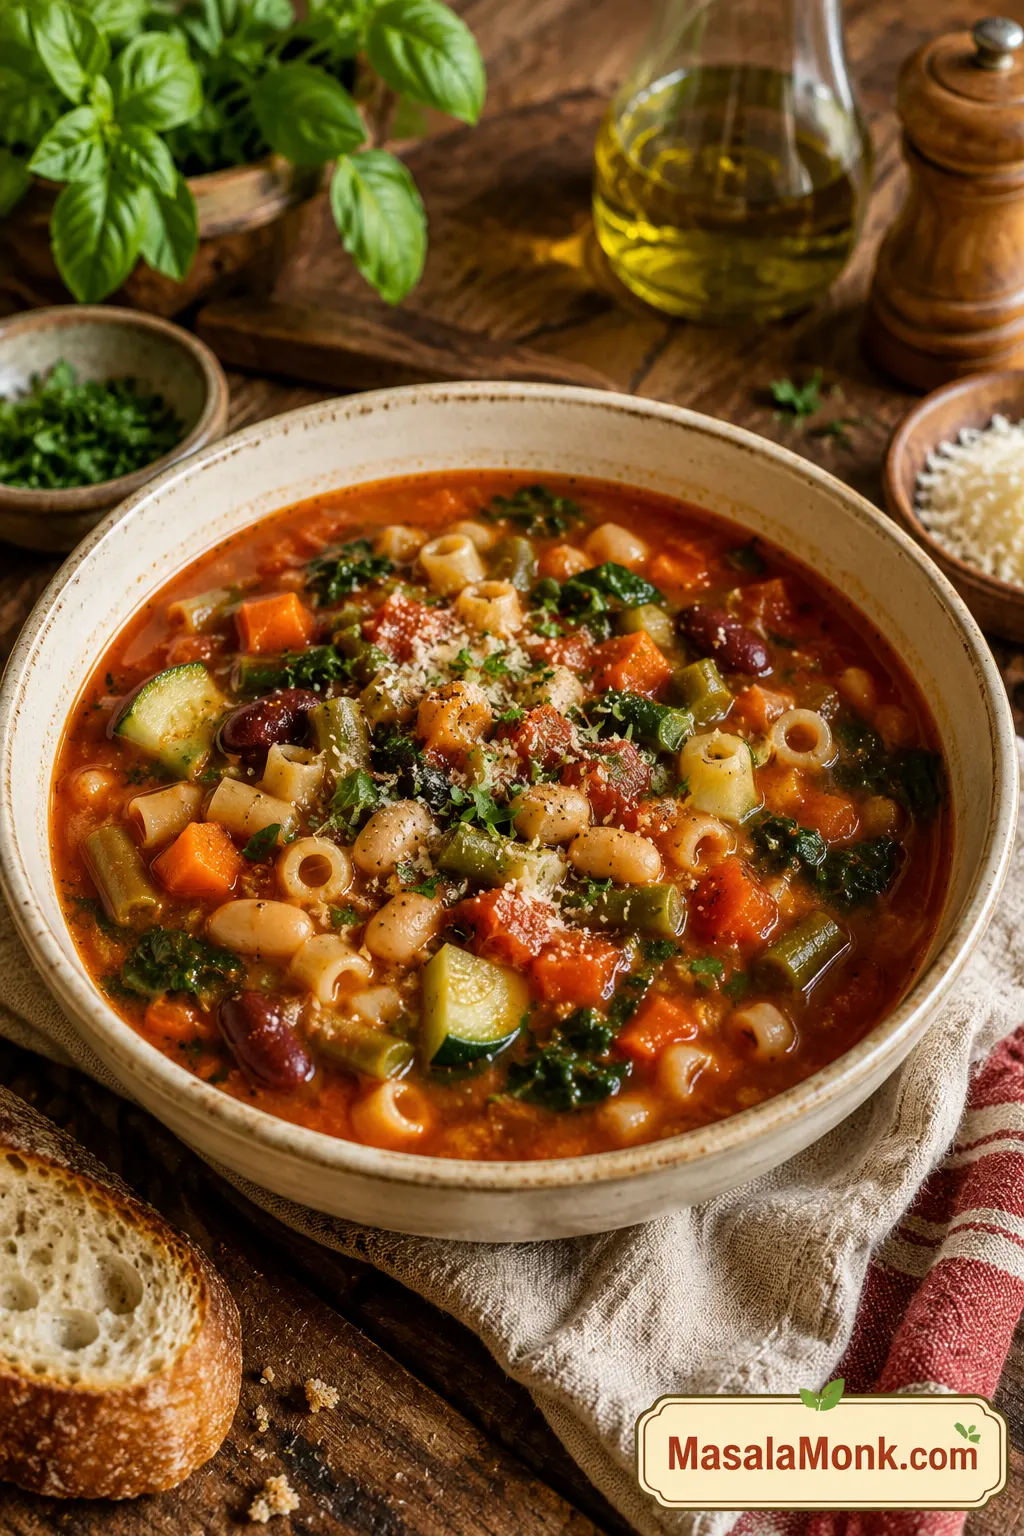
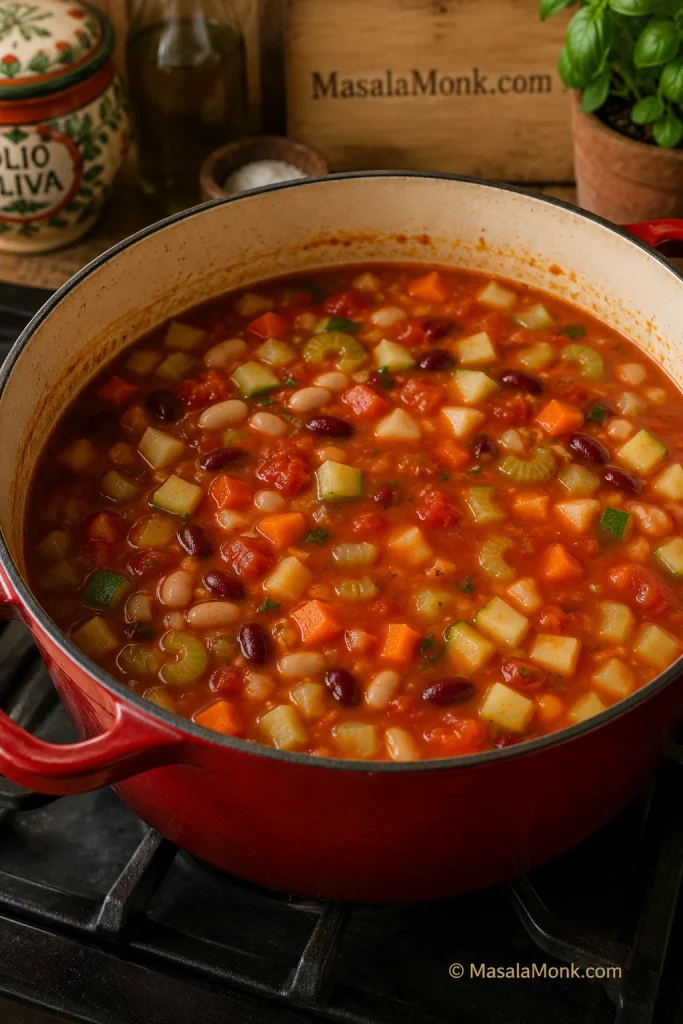
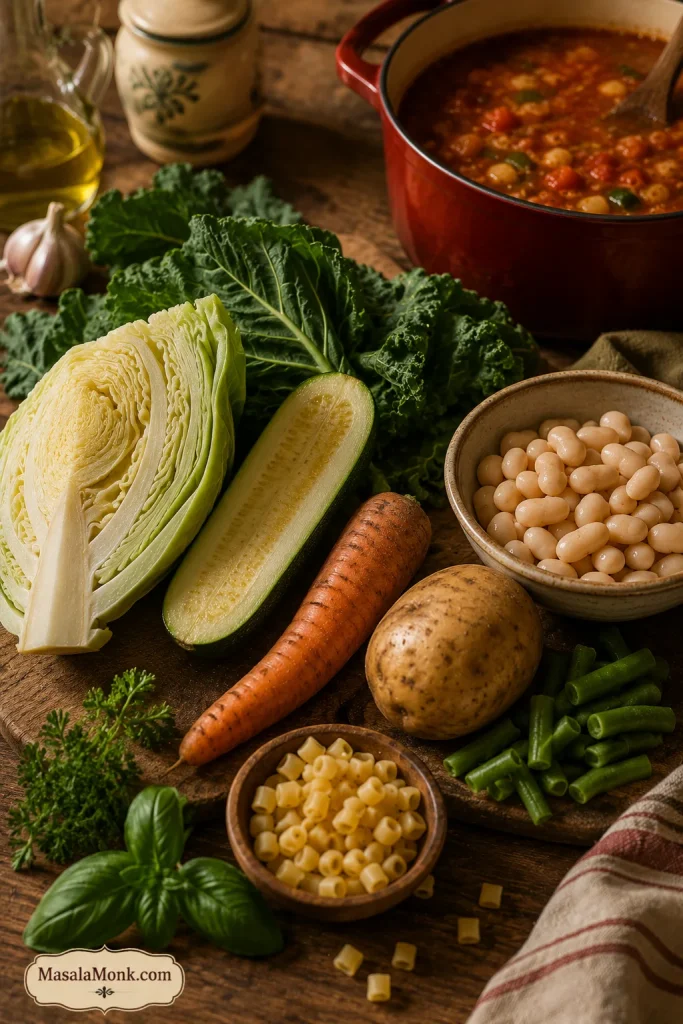
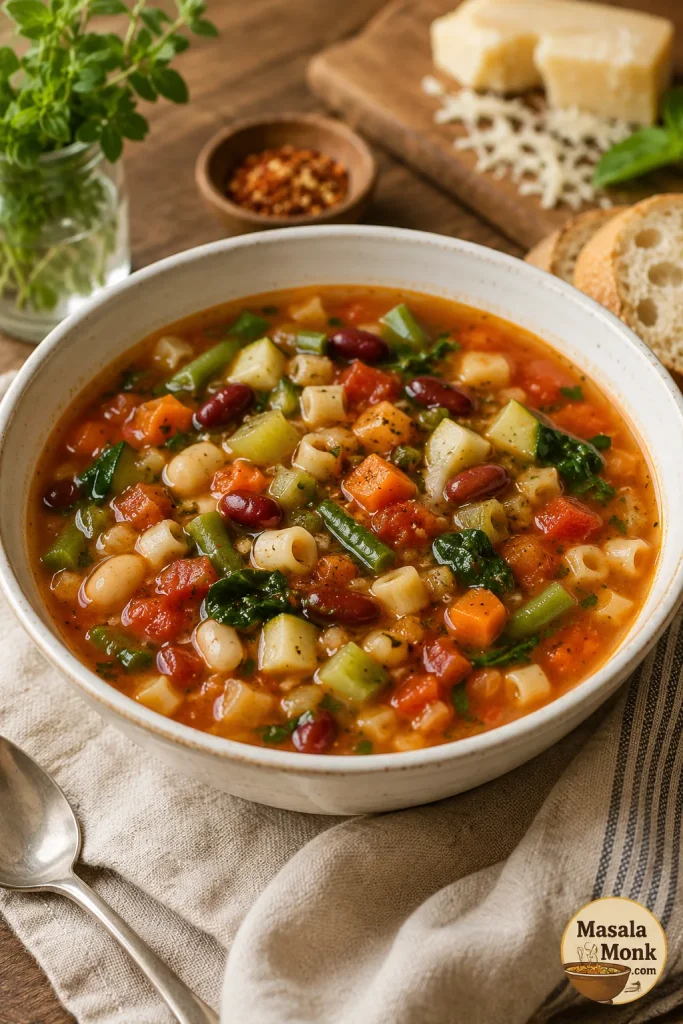
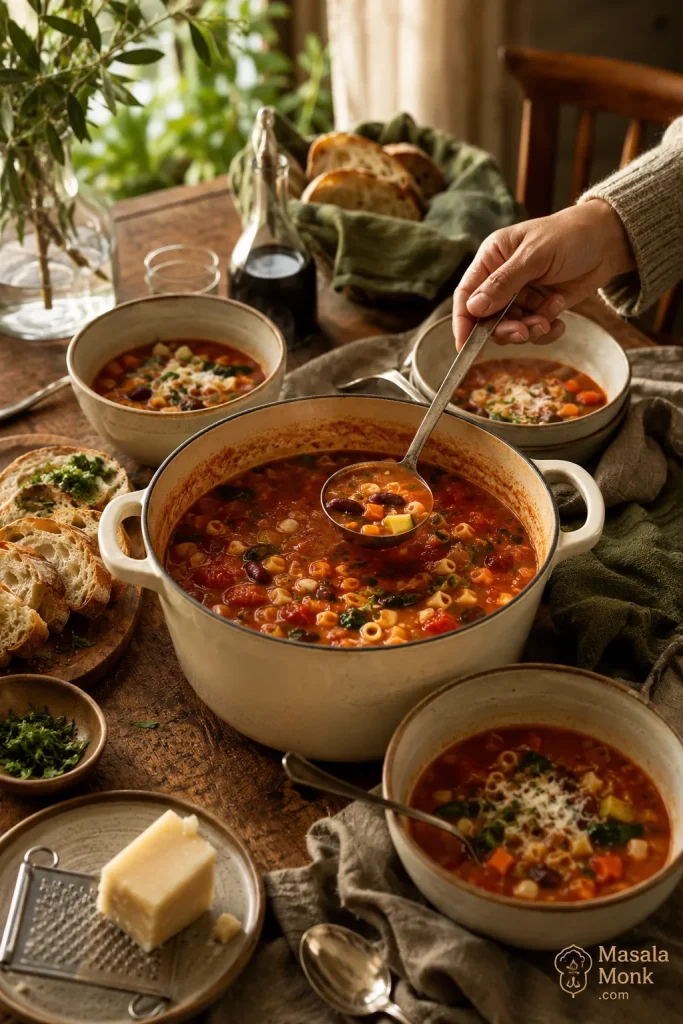
A good minestrone soup should look generous before you even take the first spoonful: tender vegetables, creamy beans, small pasta, herbs, and a tomato broth that tastes rich instead of watery. The first spoonful should catch a little of everything — a soft bean, a piece of pasta, sweet carrot, zucchini, greens, and enough tomato broth to pull it all together.

This pot works because it protects the three things that matter most in minestrone: rich tomato broth, vegetables with texture, and pasta that does not turn the leftovers into mush. Even a half-used zucchini, a tired carrot, two cans of beans, and the last handful of pasta can become a proper dinner.

Homemade minestrone also gives you something canned soup rarely does: better texture. The vegetables do not have to be overcooked, the pasta can stay tender, and you control the salt, broth, and finish.

Cooking now? Jump to the recipe card. The notes below help keep the broth rich, the vegetables tender, and the leftovers useful.

What a Good Minestrone Spoonful Should Show

Before you start, notice the target balance: beans, vegetables, pasta, greens, and tomato broth should all show up in the same spoonful.

Spoon lifting minestrone soup with small pasta, white bean, kidney bean, carrot, zucchini, greens, and tomato broth dripping back into the bowl.
This spoonful shows the balance you want: beans for body, vegetables for freshness, small pasta for comfort, and tomato broth tying everything together.

Recipe at a Glance

Prep time20 minutes
Cook time45 minutes
Total time1 hour 5 minutes
Faster versionAbout 40 to 45 minutes with smaller diced vegetables, the full 6 cups broth, and a shorter 15 to 20 minute base simmer
Servings6 generous bowls
YieldAbout 11 to 13 cups soup
MethodStovetop
Best pot5 to 6 quart / 5 to 6 liter Dutch oven or heavy soup pot
Best forWeeknight dinner, meal prep, and freezer-friendly soup base
DietMeatless when made with vegetable broth; vegan option

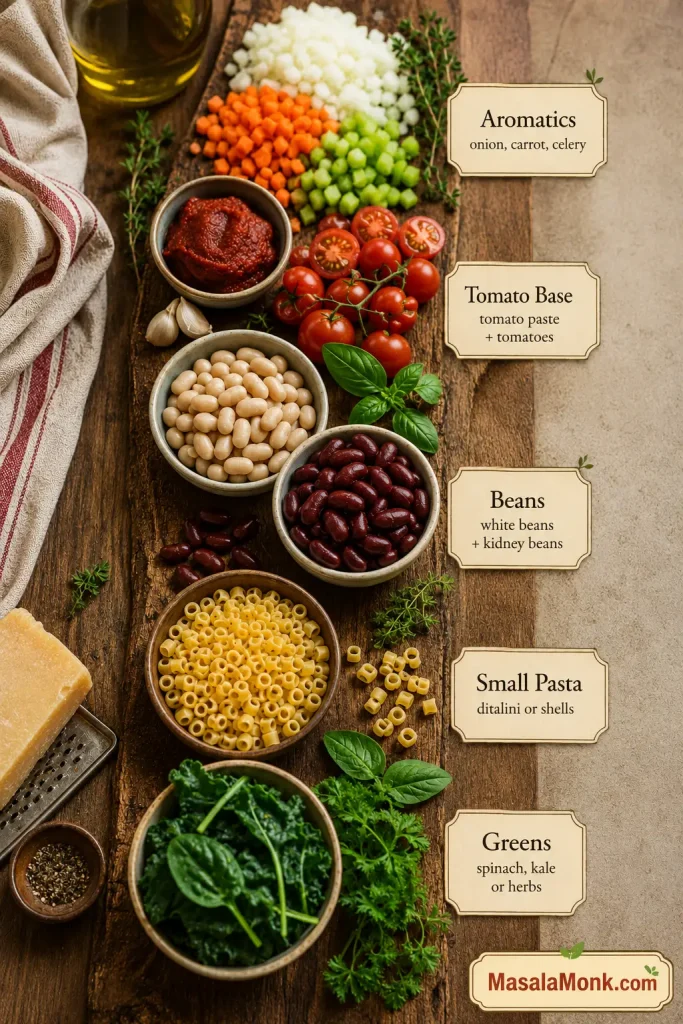
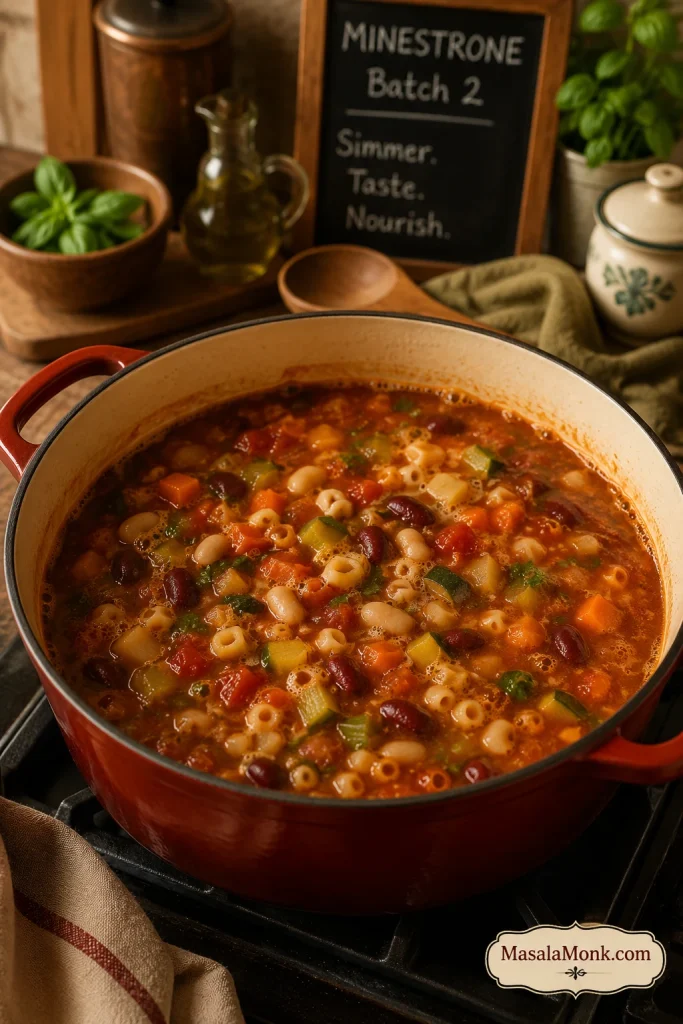
The Minestrone Rule of 5: soften the aromatics, build the tomato base, add beans for body, keep the pasta small, and save tender greens for the end. Vegetables can change; the rhythm is what keeps the pot balanced.

Why this works: tomato paste gives the soup depth, beans make it feel full, late-added vegetables keep their shape, and pasta goes in only when the broth already tastes good. That is what keeps the soup hearty without letting it turn heavy or dull.

The Minestrone Rule of 5

This visual is the memory hook for the whole recipe: keep the rhythm steady, even when the vegetables change.

Rustic board showing minestrone ingredients arranged as aromatics, tomato base, beans, small pasta, and leafy greens.
Use the Minestrone Rule of 5 when you want the recipe to feel flexible: aromatics, tomato base, beans, small pasta, and greens are the core building blocks.

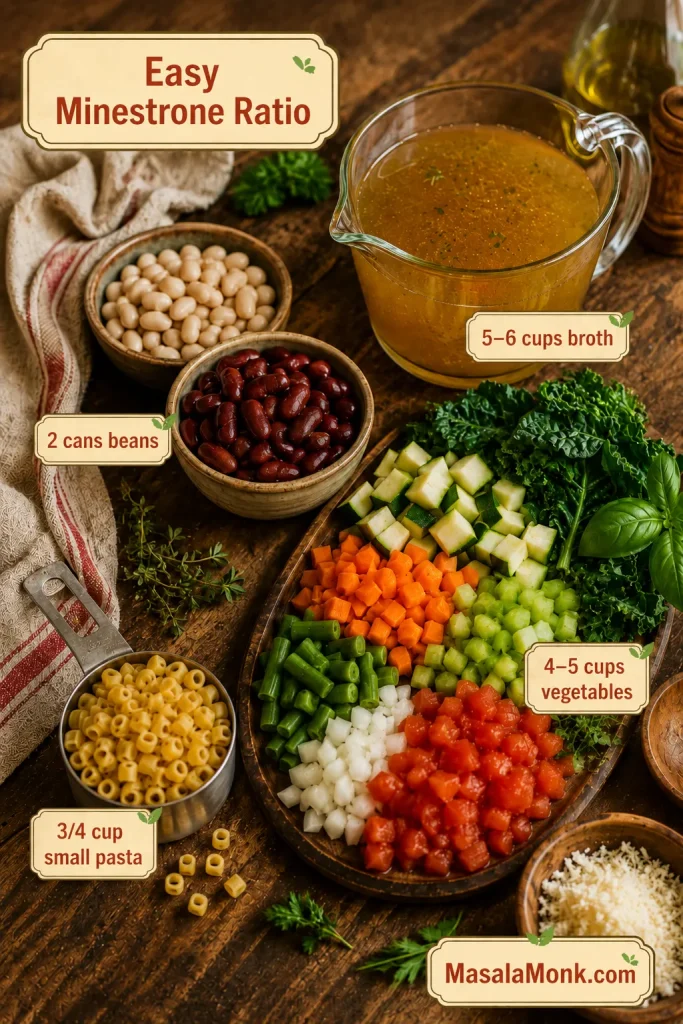
Easy minestrone ratio: for 6 bowls, use about 5 to 6 cups broth, 2 cans beans, 4 to 5 cups chopped vegetables, and 3/4 cup small pasta.

Short on time? Dice the vegetables smaller, use the full 6 cups broth, and simmer the soup base for 15 to 20 minutes before adding pasta and greens. The full cook gives deeper flavor, but the faster version still makes a good weeknight bowl.


Minestrone Soup Recipe Card

Description: A hearty minestrone soup with vegetables, beans, small pasta, and a rich tomato broth. It is meatless when made with vegetable broth, cozy without cream, and easy to adjust for leftovers or a thicker dinner-style bowl.

Prep: 20 minutes | Cook: 45 minutes | Total: 1 hour 5 minutes | Serves: 6 generous bowls | Yield: about 11 to 13 cups

Equipment: 5 to 6 quart / 5 to 6 liter Dutch oven or heavy soup pot, knife, cutting board, can opener, colander, wooden spoon, and ladle.

Ingredients

Base

  • 2 tablespoons olive oil, plus more for finishing, about 30 ml
  • 1 medium yellow onion, diced, about 150 to 180 g
  • 2 medium carrots, diced, about 130 to 160 g
  • 2 celery ribs, diced, about 90 to 120 g
  • 4 garlic cloves, minced
  • 3 tablespoons tomato paste, about 45 g

Broth and Seasoning

  • 1 can crushed or diced tomatoes, 28 oz / 794 g
  • 5 to 6 cups vegetable broth, 1.2 to 1.4 liters
  • 1 bay leaf
  • 1 1/2 teaspoons Italian seasoning
  • 1/2 teaspoon dried oregano, optional
  • 1/4 teaspoon red pepper flakes, optional
  • 1 teaspoon kosher salt or 3/4 teaspoon fine salt, plus more to taste; start with less if your broth is salted
  • 1/2 teaspoon black pepper, plus more to taste
  • 1 parmesan rind, optional; skip for vegan minestrone

Beans, Vegetables, and Pasta

  • 1 can cannellini beans or white beans, 15 oz / 425 g, drained and rinsed
  • 1 can kidney beans, 15 oz / 425 g, drained and rinsed
  • 1 cup chopped green beans, about 100 to 125 g
  • 1 medium zucchini, diced, about 180 to 220 g
  • 3/4 cup small pasta such as ditalini, small shells, elbows, or macaroni, about 75 to 90 g
  • 2 cups packed spinach or chopped kale, about 60 to 80 g
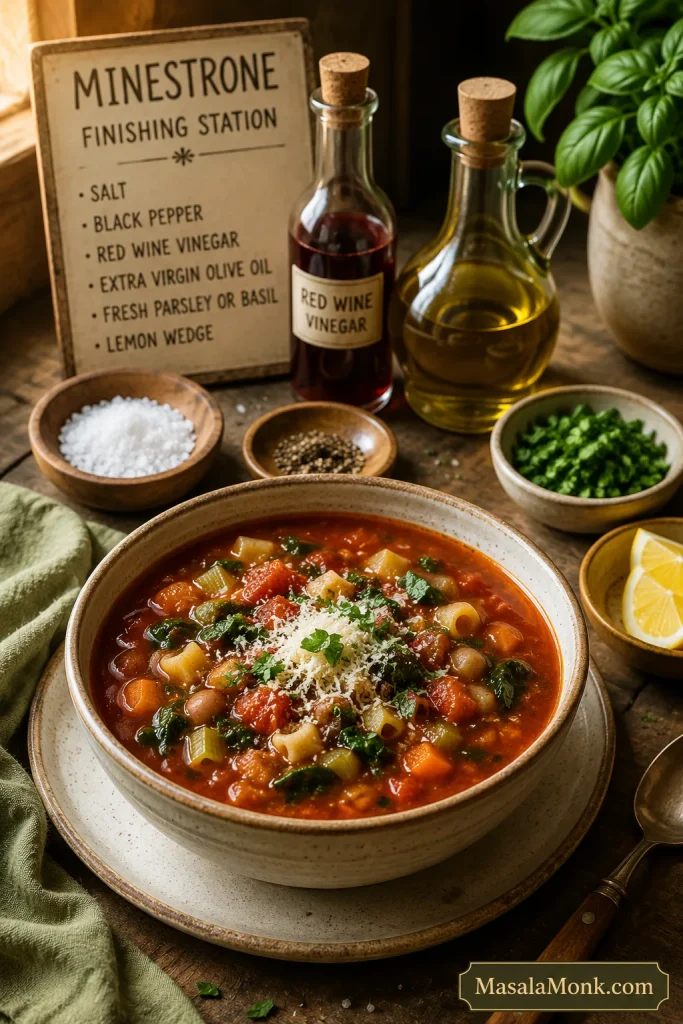
Finish

  • 1 to 2 teaspoons lemon juice or red wine vinegar, 5 to 10 ml
  • 1/4 cup chopped parsley or basil, about 10 to 15 g
  • Extra olive oil, for finishing
  • Grated parmesan, optional, for serving

Instructions

  1. Heat olive oil in a 5 to 6 quart / 5 to 6 liter Dutch oven or heavy soup pot over medium heat.
  2. Add onion, carrot, celery, and salt. Cook for 7 to 10 minutes, stirring often, until softened and fragrant.
  3. Add garlic and tomato paste. Cook for 1 to 2 minutes, stirring often, until the tomato paste darkens slightly.
  4. Add crushed or diced tomatoes, vegetable broth, bay leaf, Italian seasoning, oregano if using, red pepper flakes if using, black pepper, and parmesan rind if using. Stir well and scrape the bottom of the pot.
  5. Add the cannellini beans and kidney beans. Bring to a boil, then reduce to a gentle simmer.
  6. Simmer partly covered for 20 to 25 minutes, until the broth tastes developed. Add firm vegetables such as cabbage, potato, or squash during this simmer if using them.
  7. Add green beans, zucchini, and pasta. Cook for 8 to 10 minutes, or until the pasta is just tender.
  8. Stir in spinach or kale and cook for 1 to 3 minutes, just until wilted.
  9. Remove the bay leaf and parmesan rind. Stir in lemon juice or red wine vinegar, parsley or basil, and a drizzle of olive oil.
  10. Taste and adjust salt, pepper, and acidity. Let the soup rest for 5 minutes before serving.
  11. Serve hot with parmesan, extra herbs, crusty bread, garlic bread, or a simple salad.

Recipe Notes

  • Brothier soup: use 3/4 cup pasta and the full 6 cups broth.
  • Thicker soup: use 1 cup pasta or mash 1/2 cup beans into the broth.
  • Firmer zucchini: add zucchini during the final 5 minutes instead of with the pasta.
  • Better leftovers: cook pasta separately and add it to bowls.
  • Vegan version: use vegetable broth and skip parmesan rind and parmesan cheese.
  • Meal prep: toss separately cooked pasta with a tiny drizzle of olive oil after draining so it does not clump.
  • Gluten-free version: use gluten-free pasta or rice, preferably cooked separately.
  • Rice version: cooked rice is easiest. Add it near the end or directly to bowls because rice absorbs broth quickly.
  • Extra richness: simmer with a parmesan rind or finish with olive oil and herbs.

The recipe works on its own, but the notes below help you adjust the beans, pasta, vegetables, storage, and appliance methods without losing the minestrone feel. If leftovers matter, the storage and freezing notes are especially useful.

Before the deeper notes, this quick visual ratio gives you a flexible way to adjust the pot without losing the minestrone balance.

Easy Minestrone Ratio

Use this ratio when you want to adjust the recipe without losing the soup’s balance.

Broth, beans, chopped vegetables, and small pasta arranged on a rustic counter as an easy minestrone ratio guide.
Instead of measuring every vegetable perfectly, follow the ratio: broth keeps it loose, beans make it filling, vegetables add bulk, and pasta should stay modest.

What Is Minestrone Soup?

Minestrone is an Italian vegetable soup made with vegetables, beans, tomatoes, broth, herbs, olive oil, and usually pasta or rice. Classic minestrone is not about one fixed vegetable list; it is about building a generous, seasonal soup with enough beans and starch to feel like a meal.

That is why one pot might have zucchini and green beans while another has cabbage, kale, potato, or squash. A good bowl should be crowded, not dry: enough vegetables and beans to make it feel like dinner, but enough tomato broth to keep it unmistakably soup.

Why You’ll Like This Recipe

  • The broth tastes built, not diluted. Tomato paste, sautéed aromatics, herbs, beans, and olive oil give it a rounded tomato flavor.
  • The vegetables keep their texture. Firm vegetables simmer first, while zucchini and greens go in later.
  • The pasta will not hijack the leftovers. Cook it in the soup when serving right away, or separately when you want better storage.
  • It starts meatless. Use vegetable broth, and the whole pot stays hearty without meat.
  • It gives you room to use what you have. Small shells, elbows, ditalini, zucchini, green beans, cabbage, kale, spinach, white beans, kidney beans, or chickpeas can all work.
  • It can be lighter or heartier. Use more greens and less pasta for a lighter bowl, or extra beans and a little more pasta for a thicker dinner-style soup.

Minestrone feels hearty without cream because beans, vegetables, pasta, and olive oil do the work. If you like cozy tomato-and-pasta dinners, this sits near the same comfort zone as baked ziti, but it is lighter, brothier, and packed with vegetables.

Minestrone Soup Ingredients

These ingredients follow the same Rule of 5: aromatics, tomato broth, beans, small pasta or rice, and tender greens at the end. Do not worry if you are missing one vegetable. Minestrone is forgiving as long as the base stays balanced.

If you are missing one vegetable or bean, check the easy minestrone swaps before changing the broth or pasta ratio.

Ingredients for minestrone soup on a counter, including tomatoes, broth, beans, pasta, carrots, celery, onion, garlic, zucchini, green beans, greens, herbs, olive oil, and parmesan rind.
Each minestrone ingredient has a role: aromatics create sweetness, tomatoes shape the broth, beans add substance, pasta brings comfort, and greens freshen the finish.

If you remember one thing: taste the broth before adding pasta. When it tastes thin or flat at that point, fix the broth first; pasta will not rescue a weak soup.

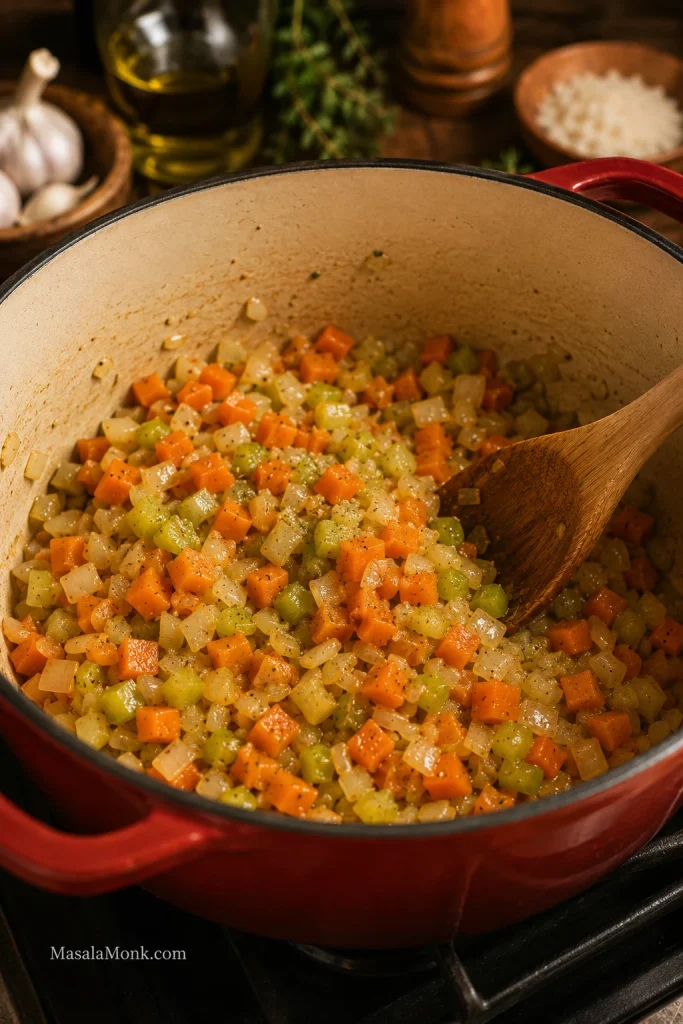
Build the Aromatic Base

Onion, carrot, celery, garlic, and olive oil create the base. Cook the onion, carrot, and celery until the sharp onion smell softens and the pot starts smelling sweet. The onion should look translucent and the carrot edges should soften. This is the first moment the soup starts smelling like dinner instead of chopped vegetables.

Onion, carrot, and celery sautéing in olive oil inside a Dutch oven with a wooden spoon.
First, cook the onion, carrot, and celery until they soften and smell sweet. This step gives homemade minestrone a deeper base before the tomatoes arrive.

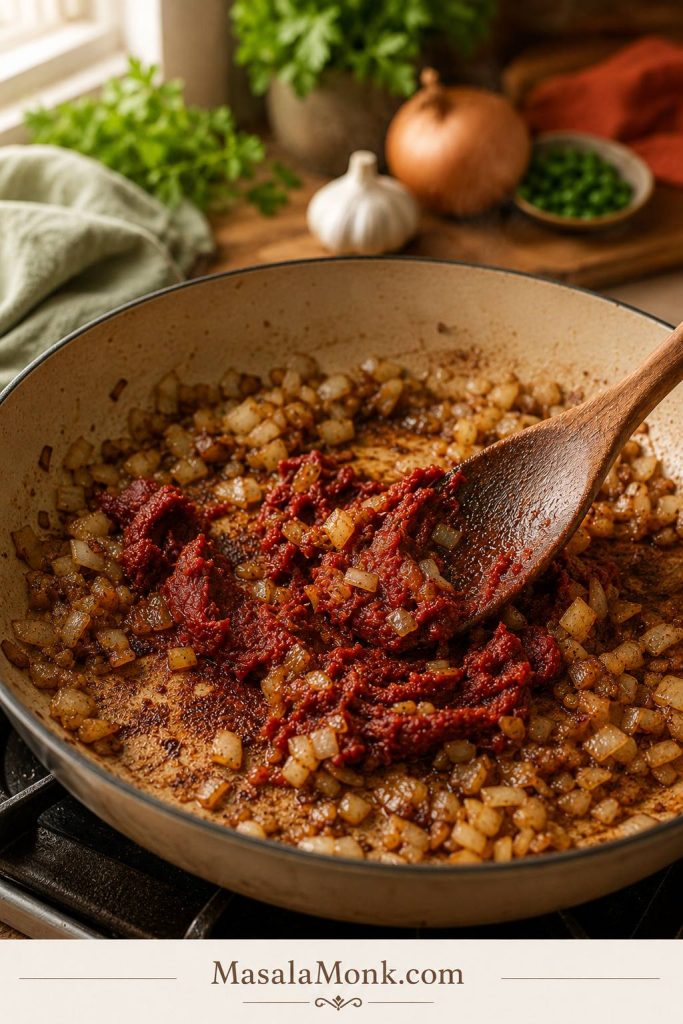
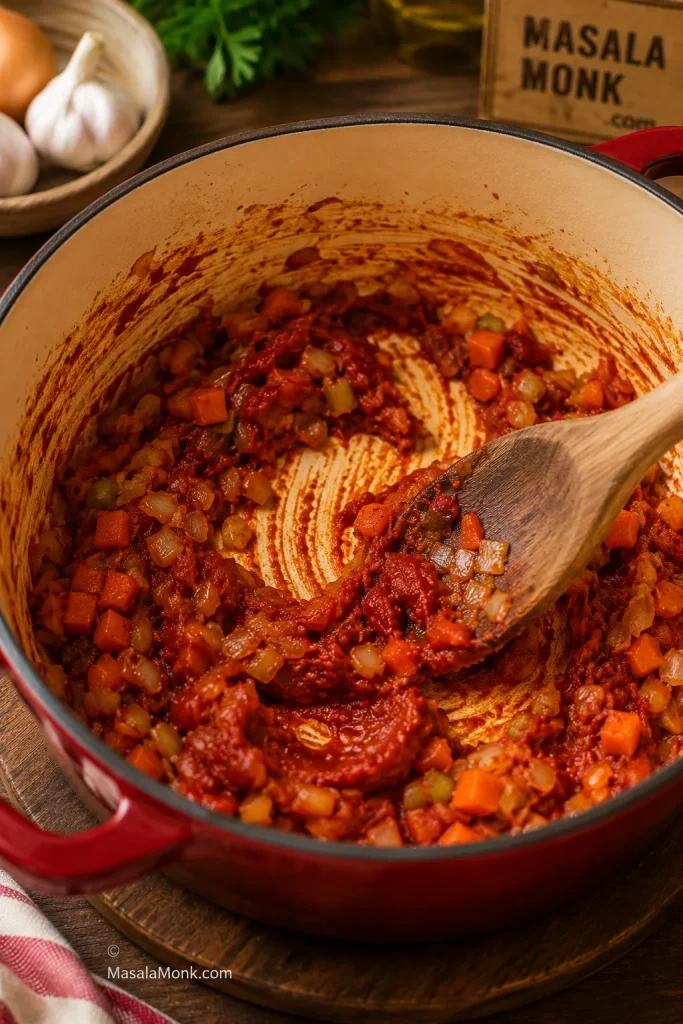
Cook the Tomato Paste Before Broth


Tomato paste and a large can of crushed or diced tomatoes give the broth its color and flavor. Cook the tomato paste until it darkens slightly; it should leave orange-red streaks on the bottom of the pot, not black bits. Crushed tomatoes make a fuller, smoother broth, while diced tomatoes give a chunkier texture.

Tomato paste cooked with onion, carrot, and celery in a pot, with a wooden spoon dragging through the red paste.

Next, let the tomato paste cook briefly with the aromatics. It deepens the soup base and helps the broth taste rich instead of thin.

Broth


Vegetable broth keeps the soup meatless and easy to make vegan. Chicken broth also works if you are not keeping the soup vegetarian. Low-sodium broth gives you more control because canned beans, tomatoes, pasta, and cheese can all add salt.

Beans


White beans and kidney beans are a strong everyday combination. The white beans soften into the tomato broth and make the soup feel fuller, almost as if it simmered longer than it did. Kidney beans add color, bite, and the familiar minestrone look. Rinse canned beans before adding them so the broth stays clean and balanced.

Pasta or Rice


Small pasta is what keeps minestrone easy to eat by the spoonful. Ditalini is classic, but small shells, elbows, macaroni, or orzo all work. Use 3/4 cup for a brothier soup and up to 1 cup for a thicker bowl. Cooked rice also works when you want a pasta-free version. If you are cooking for leftovers, see how to keep minestrone pasta from getting mushy before adding pasta directly to the pot.

Vegetables


Zucchini, green beans, spinach, kale, cabbage, potato, peas, squash, carrots, and celery can all work. Dense vegetables such as potato, squash, cabbage, and carrots need more time. Zucchini, peas, spinach, and tender greens should go in later so they keep some color and shape.

Minestrone is not a test of whether you bought the exact vegetables; it is a way to turn the vegetables you have into a balanced soup.

Herbs and Finishers


Italian seasoning, oregano, basil, thyme, bay leaf, black pepper, parsley, and fresh basil all fit well. A parmesan rind is optional for extra depth, but use vegetarian-style parmesan if that matters to you, or skip cheese completely for a vegan version.

A small splash of lemon juice or red wine vinegar wakes up the whole pot at the end, especially after the beans and pasta have softened the broth. A spoonful of pesto can make the finish taste brighter; these basil pesto variations are useful if you like that herby direction.

How to Make Minestrone Soup

The steps follow the same rhythm as the Rule of 5: sauté, deepen, simmer, add quick-cooking ingredients late, finish fresh.

1. Sauté the Onion, Carrot, and Celery


Heat olive oil in a large Dutch oven or heavy soup pot over medium heat. Add onion, carrot, celery, and salt. Cook for 7 to 10 minutes, stirring often, until the vegetables soften and the onion turns translucent. The pot should smell sweet and savory before you move on.

2. Add Garlic and Tomato Paste


Stir in the garlic and tomato paste. Cook for 1 to 2 minutes, stirring often. The tomato paste should darken slightly and smell richer, but it should not scorch. A watery minestrone usually means the base was rushed, so give this step its minute.
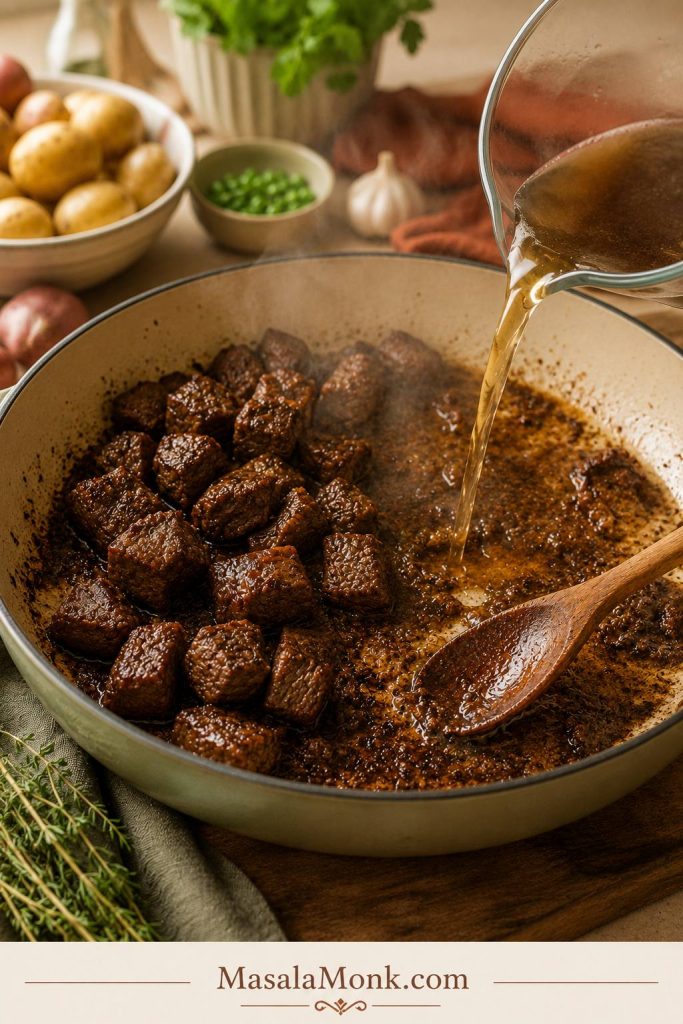
3. Build the Broth


Add crushed or diced tomatoes, broth, Italian seasoning, bay leaf, black pepper, and parmesan rind if using. Scrape the bottom of the pot so all the tomato paste and aromatics dissolve into the broth.

Minestrone soup base in a Dutch oven with tomato broth, beans, carrots, celery, and firm vegetables before pasta and greens are added.

Let the tomato broth, beans, and firm vegetables simmer before adding pasta. As a result, the base tastes rounded instead of rushed.

4. Add Beans and Simmer Gently


Add the rinsed beans and any firm vegetables such as cabbage, potato, or squash. Bring the soup to a boil, then reduce it to a gentle simmer. You want small bubbles, not a rolling boil. Cook partly covered for 20 to 25 minutes, until the broth tastes fuller and the vegetables are tender.

Taste the broth before adding pasta. If it tastes thin or flat now, give it more simmering time, adjust the salt, or brighten it with a little lemon juice or vinegar. The broth should already taste good before the pasta goes in; if it still tastes weak, use the troubleshooting section before adding pasta.

Minestrone soup gently simmering in a Dutch oven with tomato broth, beans, carrots, celery, pasta, and vegetables.

Keep minestrone at a gentle simmer, not a hard boil. Small bubbles build flavor while helping the vegetables stay tender and intact.

5. Add Quick-Cooking Vegetables and Pasta


Add green beans, zucchini, and small pasta near the end. Cook for 8 to 10 minutes, or until the pasta is just tender. Stop while it still has a little structure, because it will keep softening in the hot broth.

Small pasta being poured into a pot of minestrone soup with spinach added near the end of cooking.

Add pasta and greens near the end. This keeps the soup brighter, protects the greens, and helps prevent pasta from swelling in the pot.

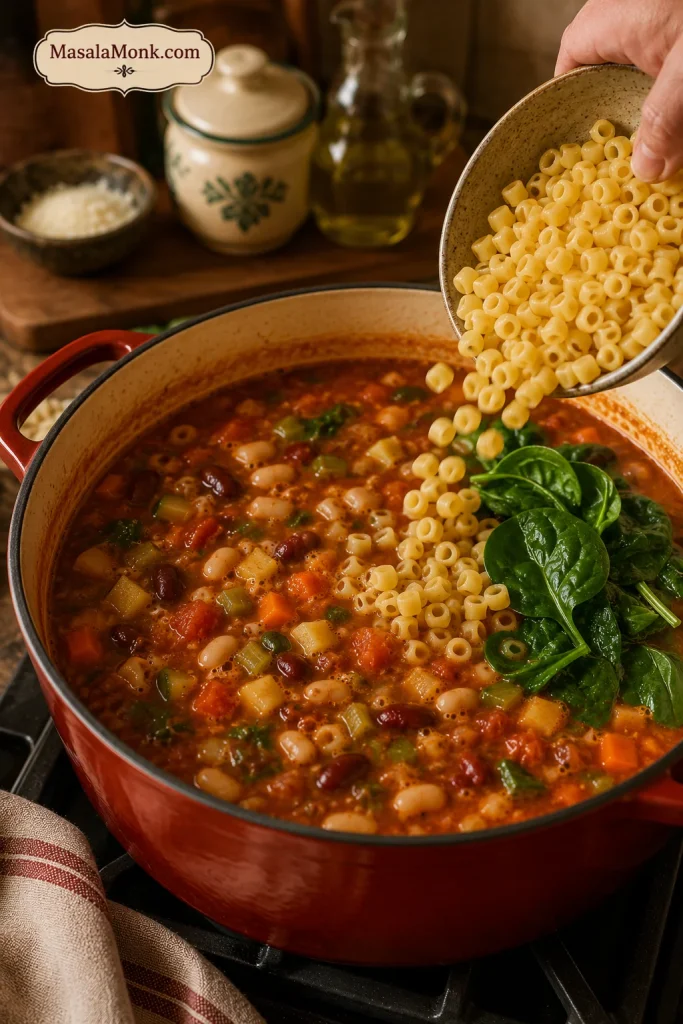
6. Finish with Greens, Herbs, and Brightness


Stir in spinach or kale for the final 1 to 3 minutes. The greens only need to wilt; they do not need to cook down into the broth. Remove the bay leaf and parmesan rind. Finish with parsley or basil, a drizzle of olive oil, and lemon juice or red wine vinegar. Rest the soup for 5 minutes before serving so the broth settles and the flavors come together.

Finished pot of homemade minestrone soup with tomato broth, beans, pasta, carrots, zucchini, green beans, greens, herbs, and olive oil.

When the pot is ready, it should look colorful and ladle easily. If it feels crowded, loosen it with a splash of broth before serving.

Easy Minestrone Swaps

Once the base makes sense, the soup becomes forgiving. You do not need the exact same vegetables every time; you just need the right balance of broth, beans, pasta or rice, and timing.

Use What You Have

Use this section when the pot needs to adapt to the vegetables, beans, and pasta you already have.

Rustic board with minestrone swaps including zucchini, carrot, cabbage, kale, potato, white beans, green beans, herbs, and small pasta.

Minestrone is made for flexible cooking. Therefore, zucchini, cabbage, kale, potato, beans, herbs, and small pasta can all work when you add them at the right time.

If you do not have Use this instead
Cannellini beans Navy beans, great northern beans, white beans, or chickpeas
Kidney beans More white beans, borlotti beans, chickpeas, or lentils
Zucchini Cabbage, green beans, peas, spinach, kale, or squash
Ditalini Small shells, elbows, macaroni, or orzo
Vegetable broth Water with extra tomato paste, herbs, olive oil, and careful seasoning
Fresh greens Frozen spinach, frozen kale, or chopped cabbage added earlier
Parmesan rind Skip it, or finish with olive oil, herbs, and a little lemon juice or vinegar

This is also where minestrone becomes personal. One cook adds cabbage, another adds potato, another uses chickpeas, and another keeps it brothy. The base stays the same, but the pot can still feel like yours. For more timing help, see the firm-early, tender-late vegetable guide.

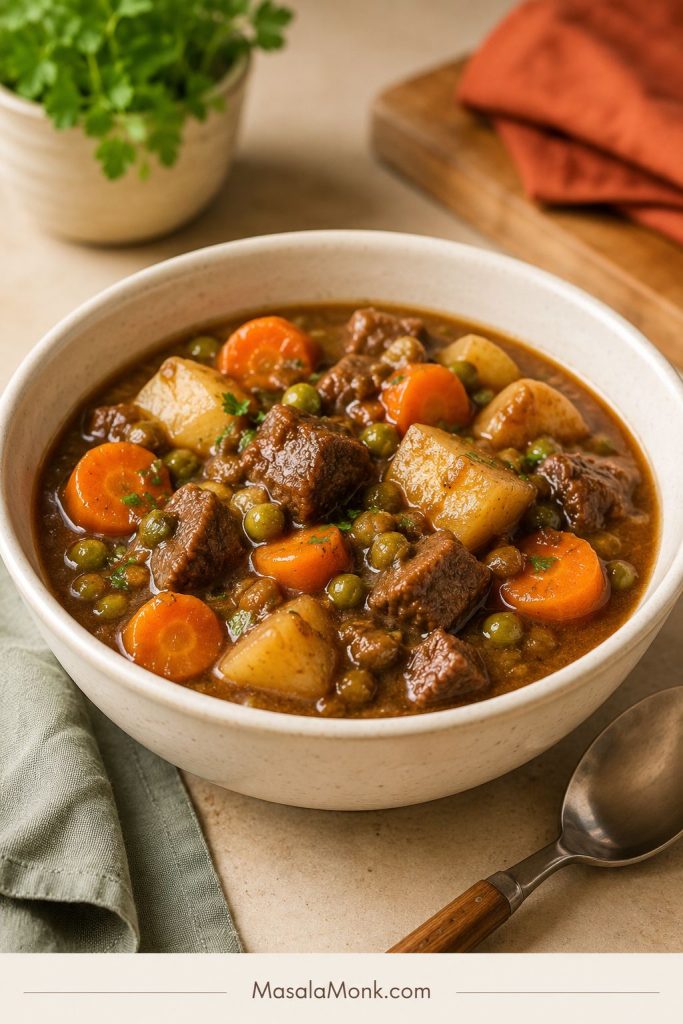
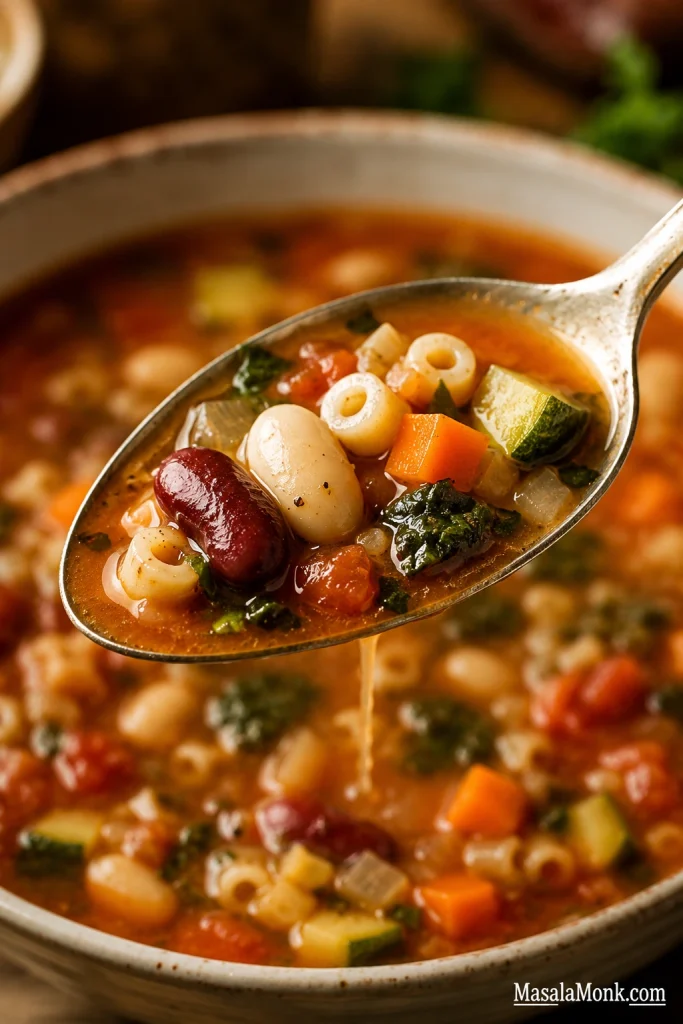
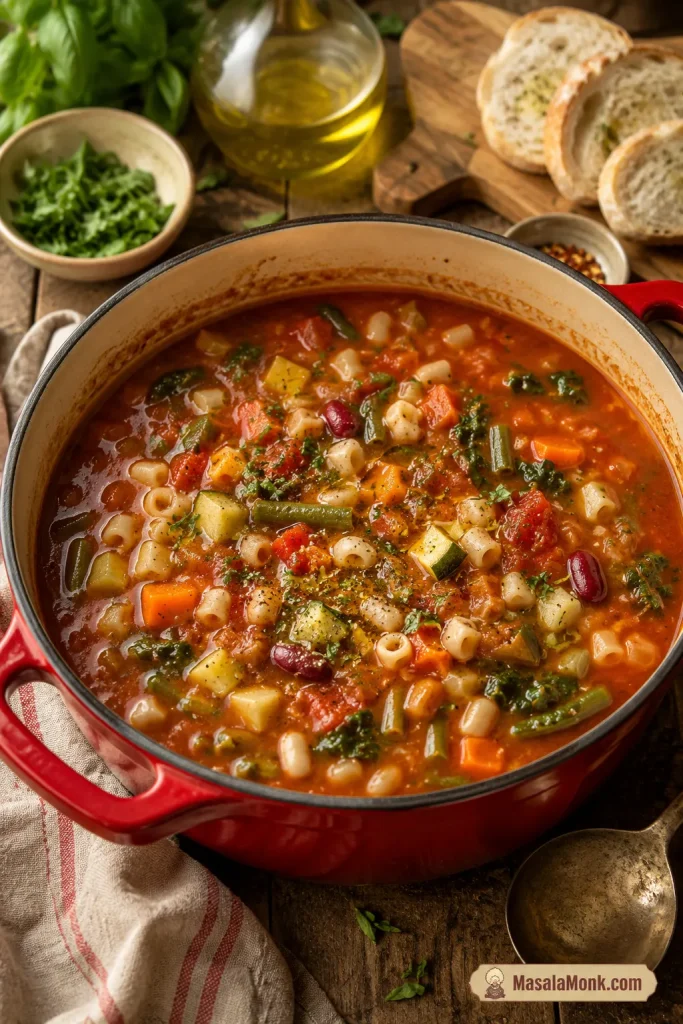
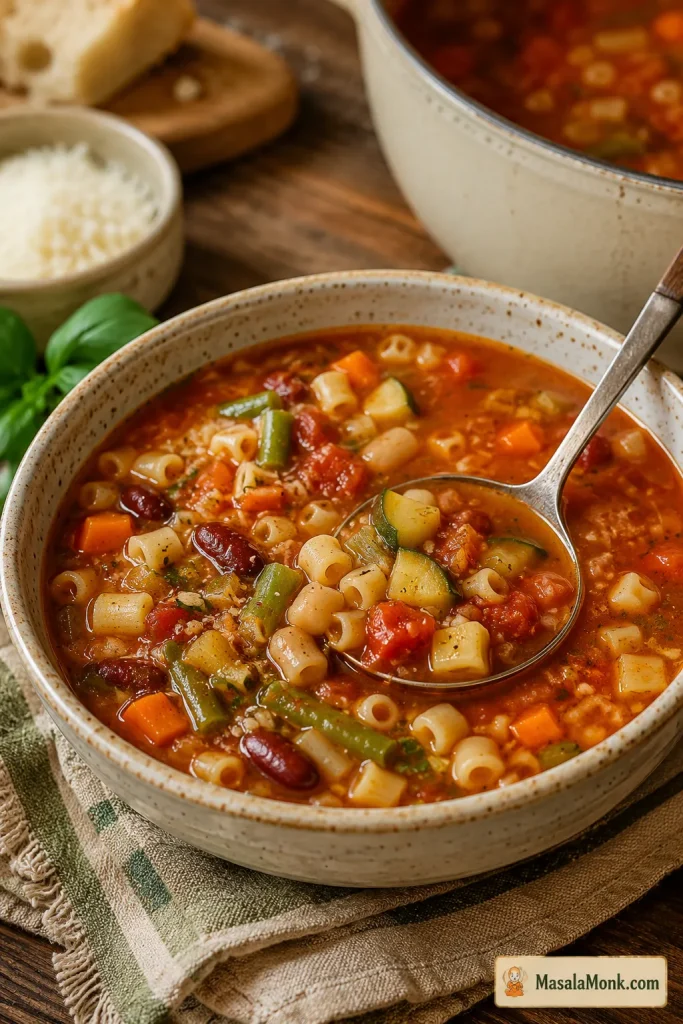
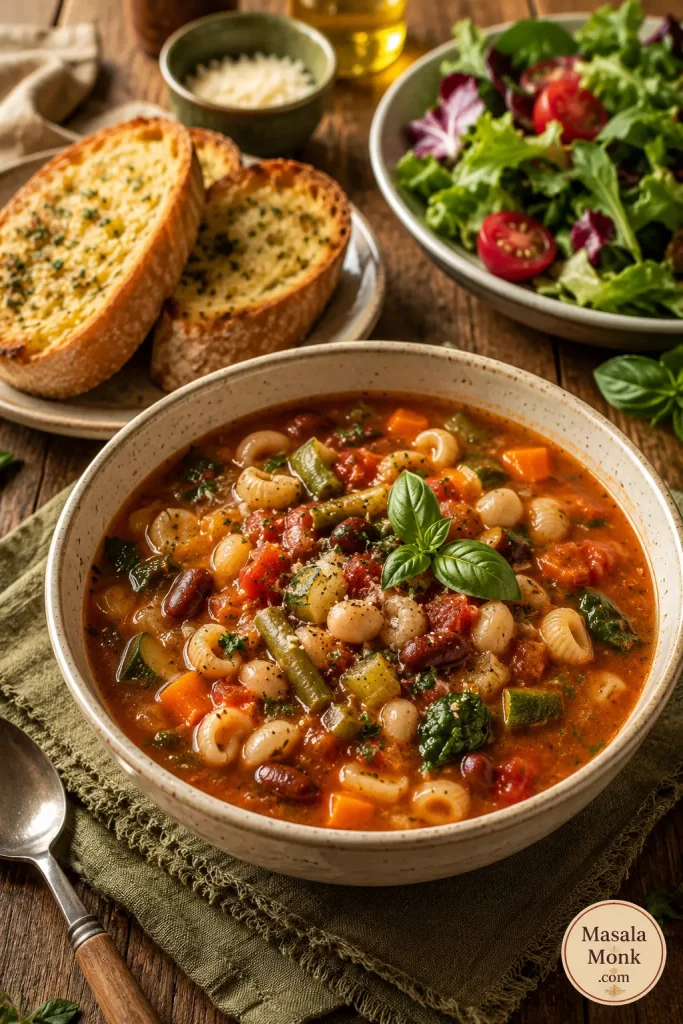
What the Soup Should Look and Taste Like

You are looking for a soup that is chunky but still brothy. The tomato broth should taste rounded rather than sharp or thin. Vegetables should be tender without collapsing, beans should stay creamy but mostly intact, and the pasta should be just tender, not swollen.

Finished Bowl Texture Check

Use the finished bowl as a quick check before serving: the soup should look full, but it should still move like soup.

Close-up bowl of finished minestrone soup with tomato broth, white beans, kidney beans, pasta, carrots, zucchini, greens, and herbs.

Use the finished bowl as a texture check. The vegetables and beans should stand out clearly, while the tomato broth still fills the gaps around them.

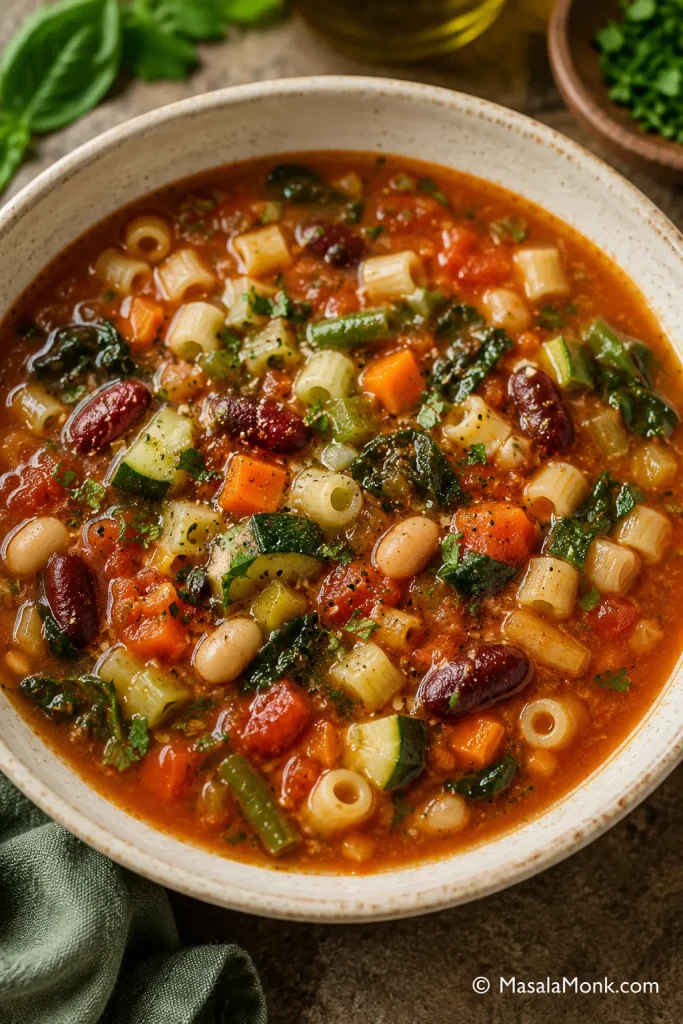
Chunky but Still Soup

If the pot looks crowded but still has enough broth to move around the vegetables, you are in the right place. You should be able to drag the spoon through the bowl and see vegetables and beans settle back into the tomato broth, not sit in a dry pile. The final olive oil, herbs, and lemon juice or vinegar should make the bowl taste brighter, not sour.

Close bowl of chunky but brothy minestrone soup with visible tomato broth, beans, pasta, carrots, zucchini, greens, and herbs.

Aim for chunky but not dry. The spoon should catch vegetables and beans, while the broth still makes the bowl feel like soup.

Best Beans, Pasta, and Vegetables for Minestrone

Beans, pasta, and vegetables are where minestrone becomes dinner. The choices do not need to be fancy; they just need to make sense together in the spoon.

Best Beans and Pasta for Minestrone

Start with spoon-friendly beans and small pasta shapes, then choose vegetables that match the season and cooking time.
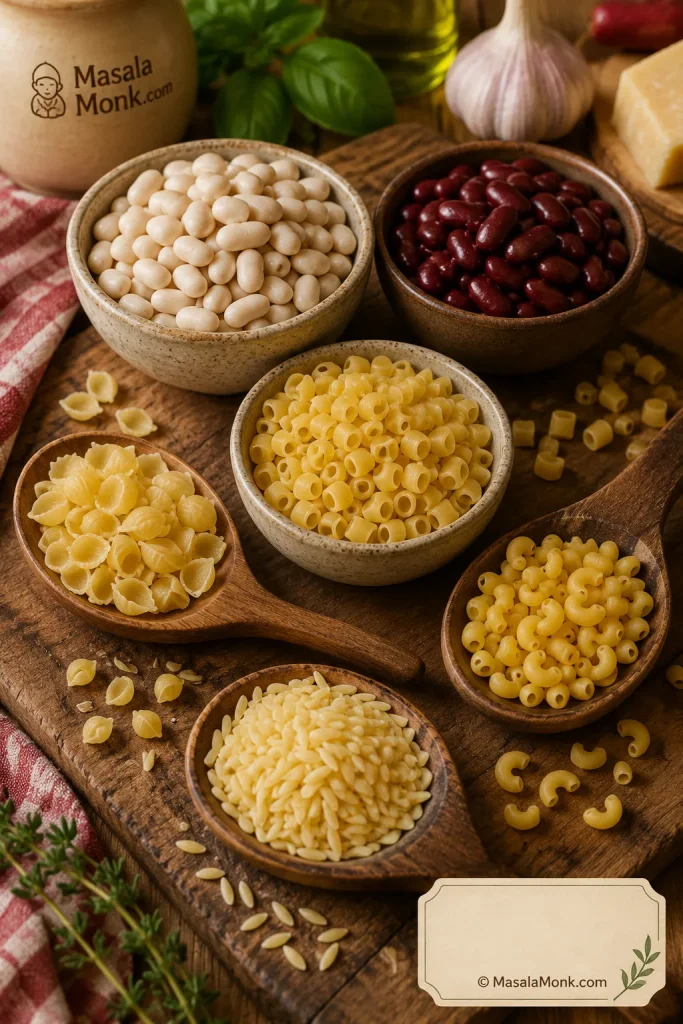
Bowls and spoons of cannellini beans, kidney beans, ditalini pasta, small shells, elbows, and orzo for minestrone soup.

Choose beans and pasta that fit easily on a spoon. Cannellini beans, kidney beans, ditalini, elbows, or small shells keep minestrone hearty without making it clumsy.

Best Beans


  • Cannellini or white beans: creamy, mild, and classic.

  • Kidney beans: firmer, colorful, and familiar in restaurant-style minestrone.

  • Borlotti beans: rustic and soft with a fuller bean flavor.

  • Chickpeas: nutty and firmer, good when you want more bite.

  • Lentils: useful for a thicker, higher-protein variation.

Best Pasta


  • Ditalini: classic and spoon-friendly.

  • Small shells: good for catching tomato broth.

  • Elbows or macaroni: easy pantry choice.

  • Orzo: soft and pleasant, but it thickens leftovers quickly.

  • Rice: useful if you do not want pasta. Cooked rice is easiest.

Once the beans and pasta are chosen, the vegetables are mostly about timing: firm ones early, tender ones late. That is what keeps the bowl generous without making it taste tired.

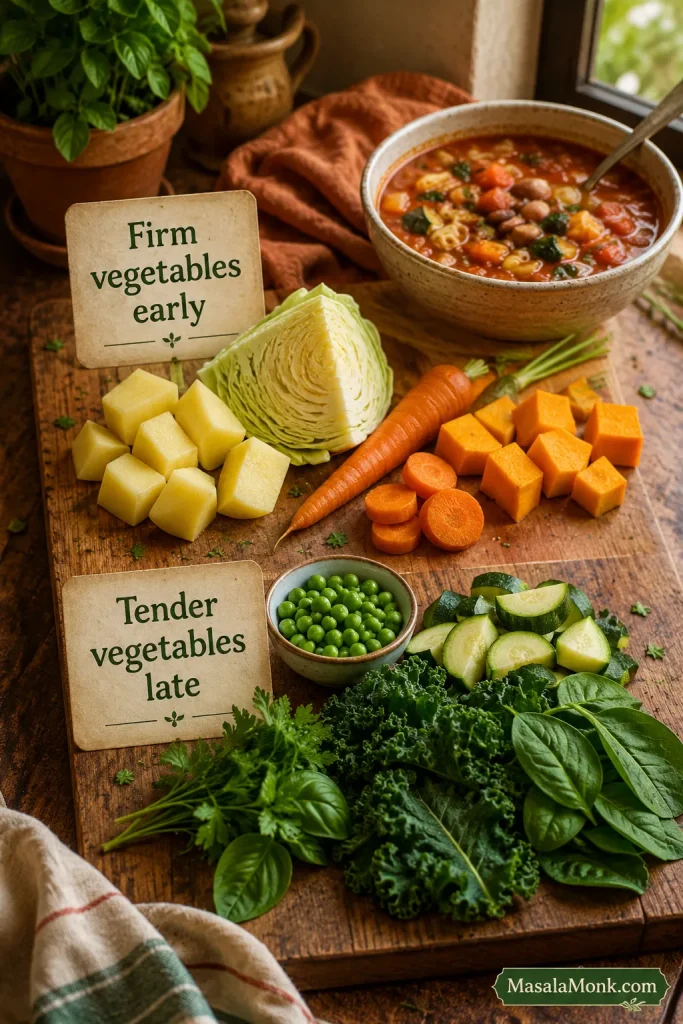
Firm Vegetables Early, Tender Vegetables Late


A good minestrone should never feel trapped by one vegetable list. Keep the tomato broth, aromatics, beans, herbs, and small pasta structure, then choose vegetables that fit the pot.

  • Summer: zucchini, green beans, fresh tomatoes, basil, spinach.

  • Winter: cabbage, kale, potato, squash, carrots, celery.

  • Spring: peas, asparagus, spinach, leeks, fresh herbs.

  • Pantry version: canned tomatoes, canned beans, frozen vegetables, cabbage, carrots, small pasta.

Add dense vegetables like potato, squash, cabbage, and carrots earlier. Add zucchini, peas, spinach, and tender greens near the end. Try not to overload the pot; minestrone should be hearty, but it should still have enough broth to feel like soup.

Rustic vegetable timing board showing firm vegetables like potato, cabbage, carrot, and squash beside tender vegetables like zucchini, peas, spinach, kale, and herbs.

Vegetable timing matters more than a perfect shopping list. Add firm vegetables early, then save tender greens, zucchini, peas, and herbs for the final minutes.

How to Fix Minestrone Soup Problems

If your minestrone tastes bland, watery, too thick, too acidic, or overcooked, it can usually be fixed. Most problems come down to seasoning, simmering, pasta timing, vegetable timing, or broth balance.

Fix Bland Minestrone Soup

Before rebuilding the whole pot, taste for salt, acid, herbs, pepper, and olive oil; those small finishes often fix a flat bowl.

Bowl of minestrone soup beside salt, lemon wedge, red wine vinegar, olive oil, parsley or basil, and black pepper.

Bland minestrone often needs a finish, not a rebuild. Salt, lemon or vinegar, herbs, black pepper, and olive oil can wake up the whole pot.

Problem Fix
Soup tastes flat Add salt first, then a small splash of lemon juice or red wine vinegar.
Broth is too thin Simmer uncovered for a few minutes or mash 1/2 cup of beans into the broth.
Soup is too thick Add broth or water until it becomes spoonable again.
Pasta is too soft Add more broth, fresh herbs, and a little acidity. Next time, cook pasta separately.
Vegetables are overcooked Freshen the bowl with herbs, olive oil, and extra broth. Next time, add zucchini and greens later.
Soup tastes too acidic Add a drizzle of olive oil or a tiny pinch of sugar to round the tomato flavor.
Soup is too salty Add unsalted broth, water, extra beans, or more vegetables.

Most of the time, the fix is smaller than you think. A little salt, a little acid, a splash of broth, or a few mashed beans can bring the pot back.

Fix Watery Minestrone Soup

When the broth looks thin, mashed white beans are the quickest natural thickener because they add body without changing the soup into cream sauce.

Two bowls of minestrone comparing thin watery broth with richer tomato broth, with mashed white beans shown as the thickening fix.

If the broth tastes watery, mash a few white beans into the soup and simmer briefly. This thickens minestrone naturally without cream or flour.

How to Make Minestrone Richer

  • Cook the onion, carrot, and celery until they soften and smell sweet.

  • Cook the tomato paste before adding broth.

  • Use crushed tomatoes for a fuller broth.

  • Add a parmesan rind if you are using cheese.

  • Mash some of the beans into the soup for natural body.

  • Simmer partly uncovered when the soup looks too thin.

  • Finish with olive oil, herbs, and a small splash of lemon juice or vinegar.

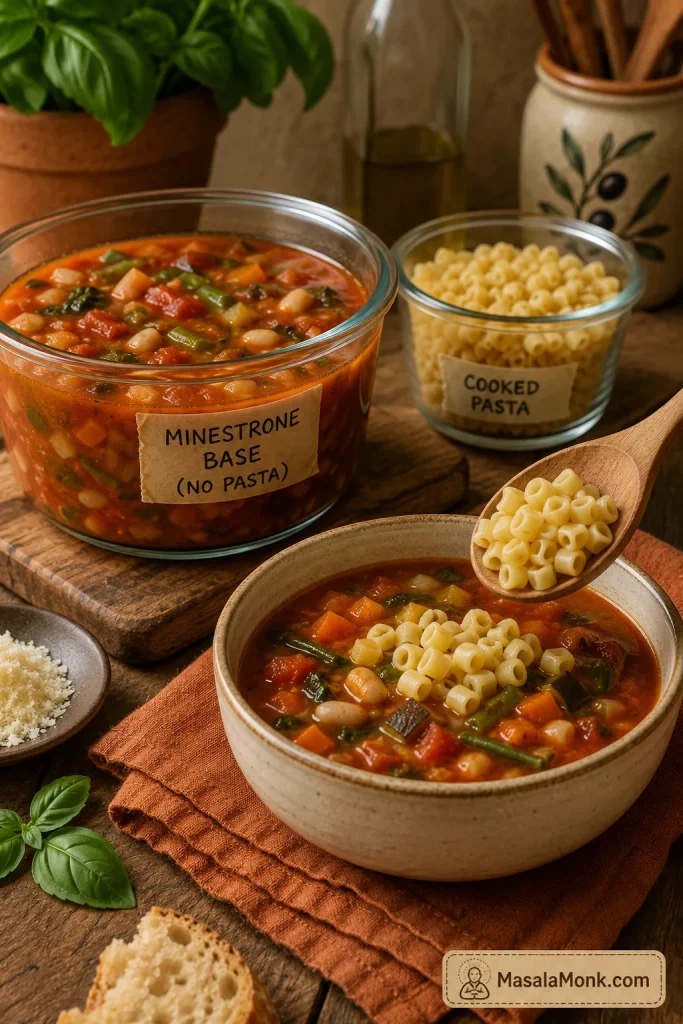
How to Keep Pasta from Getting Mushy


Minestrone pasta gets mushy when it sits in hot broth for too long or stays in the soup through storage. The safest method depends on how you plan to serve it.

  • Serving immediately: add dry pasta during the final 8 to 10 minutes.

  • Meal prep: cook pasta separately and add it to each bowl.

  • Freezing: freeze the soup without pasta and add fresh pasta later.

  • Thick leftovers: reheat with extra broth or water.

Glass containers showing minestrone soup base stored separately from cooked small pasta, with pasta being added to a serving bowl.

For better leftovers, store the soup base and pasta separately. Then add pasta to each serving so the next bowl stays fresh instead of soggy.

Slow Cooker and Instant Pot Minestrone

Slow Cooker vs Instant Pot Minestrone

For both appliance methods, the texture rule is the same: cook the base first and keep pasta and greens late. The pasta texture notes are especially useful for meal prep.

Slow cooker and Instant Pot filled with minestrone soup, with small bowls of pasta and greens nearby for adding near the end.

Whether you use a slow cooker or Instant Pot, cook the soup base first. Meanwhile, keep pasta and greens for the end so the texture stays better.

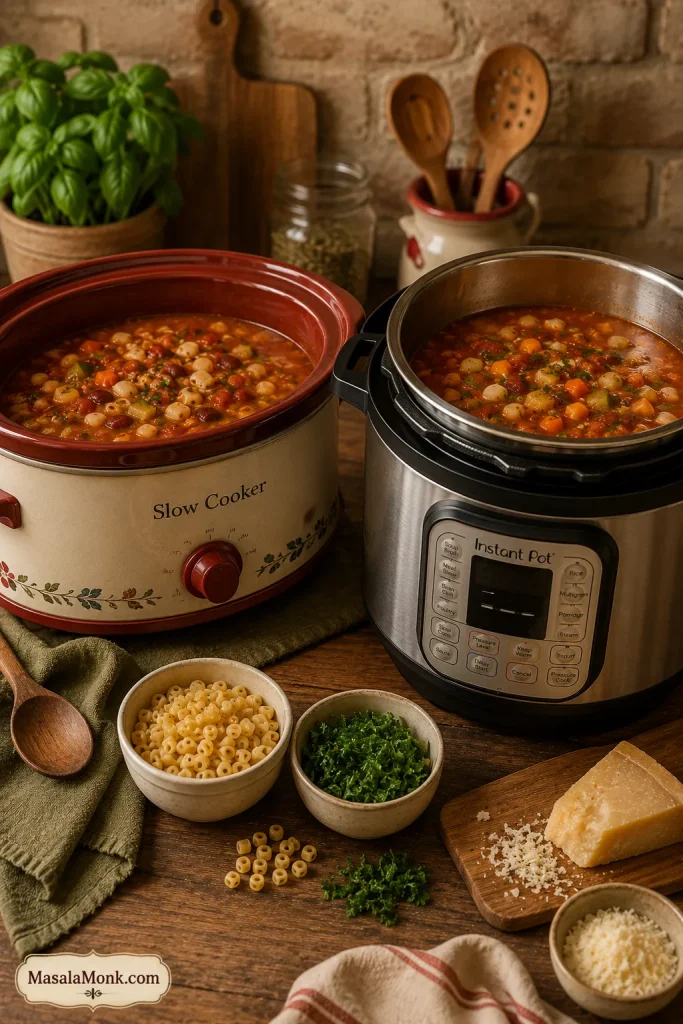
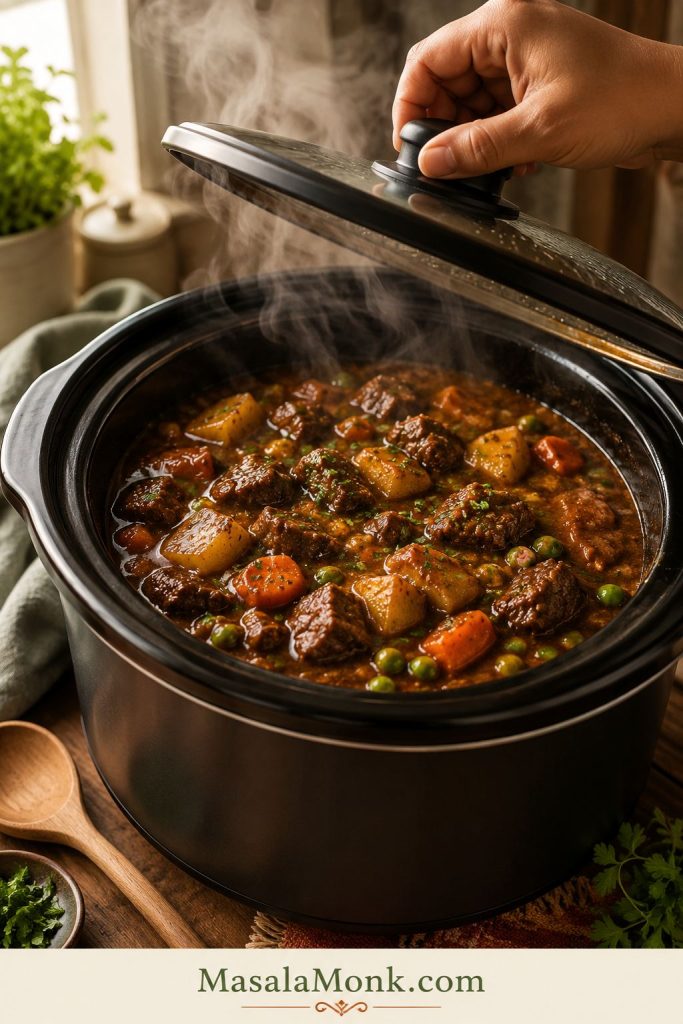
Slow Cooker Minestrone

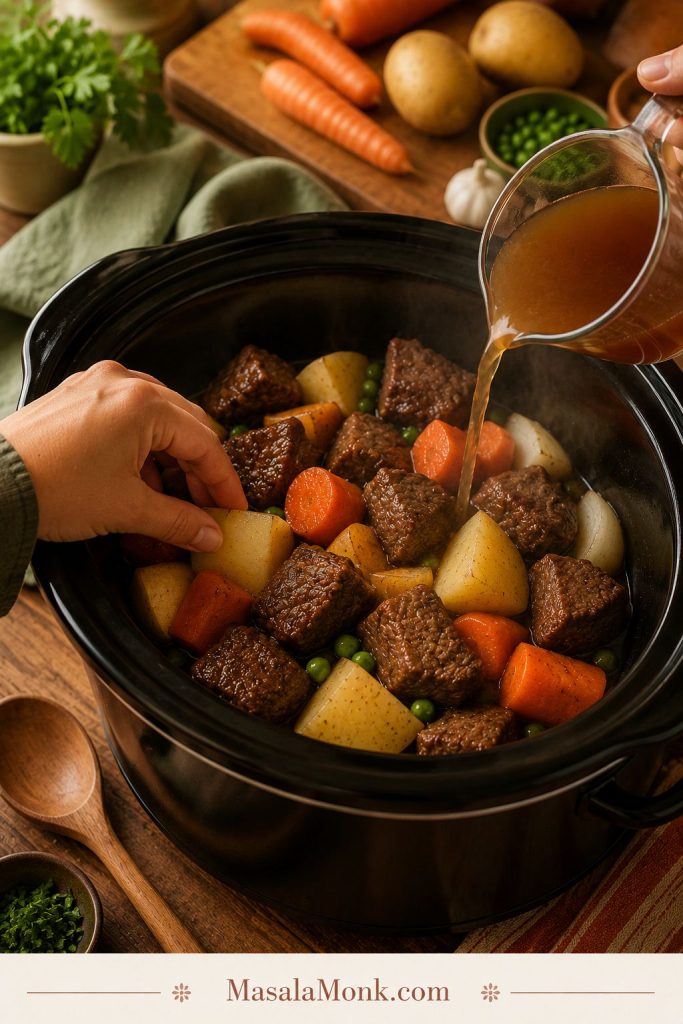
Slow cooker minestrone is best for a hands-off soup base. Cook the broth, beans, aromatics, and firm vegetables first, then add zucchini, pasta, and greens near the end so they do not overcook.

  1. Add onion, carrot, celery, garlic, tomato paste, tomatoes, broth, herbs, bay leaf, beans, and firm vegetables to the slow cooker.

  2. Cook on low for 6 to 8 hours or high for 3 to 4 hours.

  3. Add zucchini and green beans during the final 30 minutes.

  4. Add pasta only during the final 20 to 30 minutes, or cook pasta separately.

  5. Stir in spinach or kale at the end, then finish with herbs, olive oil, and lemon juice or vinegar.

Instant Pot Minestrone


Instant Pot minestrone is best for a fast soup base. Pressure cook the broth, beans, and firm vegetables, then add cooked pasta and greens at the end so the pasta does not turn soft under pressure.

  1. Use sauté mode to cook onion, carrot, celery, and olive oil for 4 to 5 minutes.

  2. Add garlic and tomato paste. Cook for 1 minute.

  3. Add tomatoes, broth, herbs, bay leaf, beans, and firm vegetables.

  4. Pressure cook on high for 4 to 5 minutes.

  5. Let pressure release naturally for 5 to 10 minutes, then quick release carefully.

  6. Stir in greens and cooked pasta, then finish with herbs, olive oil, and lemon juice or vinegar.

Olive Garden-Style Minestrone Soup

If you like Olive Garden’s lighter tomato-broth style, use these adjustments while keeping the main recipe homemade. Olive Garden describes its minestrone as vegetables, beans, and pasta in a light tomato broth, so this is a home version in that familiar direction, not the official recipe. You can see Olive Garden’s menu description for the style reference.

Light tomato-broth minestrone soup in a cream bowl with kidney beans, white beans, pasta, carrots, zucchini, green beans, celery, spinach, and herbs.

For Olive Garden-style minestrone at home, keep the broth lighter, the beans whole, the vegetables small, and the pasta modest.

  • Use diced tomatoes instead of crushed for a lighter restaurant-style texture.

  • Do not mash the beans into the broth.

  • Keep the pasta modest so the soup stays brothy.

  • Use kidney beans, white beans, zucchini, green beans, carrots, celery, and spinach.

  • Finish with herbs and acidity so the bowl tastes bright, not heavy.

Minestrone Soup Variations

After the base tastes good, you can take the soup in a few different directions without losing the minestrone feel. Keep the tomato base, beans, vegetable timing, and small pasta structure in place, then adjust the bowl you want. For gluten-free, rice-based, or pasta-free versions, the storage section is useful if you plan to cook the starch separately.

Three bowls of minestrone variations showing a vegan version, a gluten-free or rice version, and a thicker bean-rich version on a rustic table.

Once the tomato-bean base tastes good, you can take minestrone in several directions: vegan, gluten-free, rice-based, or thicker and extra hearty.

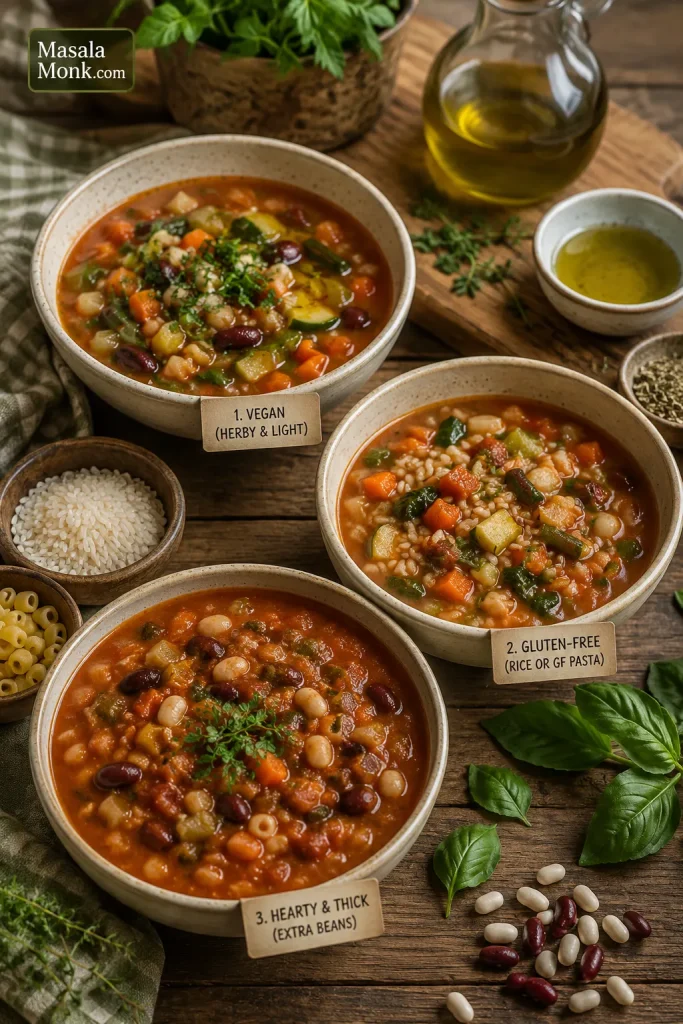
  • Vegan minestrone: use vegetable broth and skip parmesan rind, parmesan cheese, meat, and egg pasta. Finish with olive oil, herbs, nutritional yeast, or vegan pesto.

  • Gluten-free minestrone: use gluten-free pasta or rice. Cook gluten-free pasta separately for the best texture. Do not use barley or farro.

  • Minestrone without pasta: skip the pasta and add extra beans, cabbage, zucchini, potato, kale, spinach, or cooked rice.

  • Thick and hearty minestrone: use crushed tomatoes, 1 cup pasta, extra white beans, and a small potato. Mash some beans into the broth.

  • Brothy minestrone: use 3/4 cup pasta, unmashed beans, and an extra cup of broth for a lighter, restaurant-style bowl.

  • Low-sodium minestrone: start with low-sodium broth, rinse canned beans well, and choose no-salt-added tomatoes if available. Use garlic, herbs, lemon juice, vinegar, and olive oil to build flavor.

  • Add meat: brown Italian sausage or ground beef before adding the aromatics, or stir in shredded cooked chicken near the end.

Think of these as directions, not separate recipes. The same pot can become lighter, heartier, vegan, gluten-free, or meatier without losing its minestrone backbone.

What to Serve with Minestrone Soup

Minestrone can stand alone as dinner, especially with beans and pasta, but a simple side makes the meal feel complete.

  • A lighter meal: serve minestrone with a crisp salad, roasted vegetables, or something bright like beet salad.

  • For a heartier dinner: add garlic bread, focaccia, grilled cheese, parmesan toast, or pesto toast.

Bowl of minestrone soup served with garlic bread, a green salad with tomatoes, herbs, and a spoon on a wooden table.

Minestrone can stand alone, but the sides change the meal. Garlic bread makes it heartier, while a fresh salad keeps dinner lighter.

The best side is something that balances the tomato broth without making the meal feel heavy.

Make-Ahead, Storage, Freezing, and Reheating

Make-Ahead Plan


Yes, you can make minestrone ahead of time. For the best texture, make the soup base without pasta, refrigerate it, and add freshly cooked pasta when serving.

  • Chop the onion, carrot, celery, zucchini, and green beans up to 1 day ahead.

  • Drain and rinse the beans ahead of time.

  • Make the soup base without pasta up to 3 days ahead.

  • Add greens when reheating so they stay brighter.

  • Cook pasta fresh, or store cooked pasta separately with a tiny drizzle of olive oil.

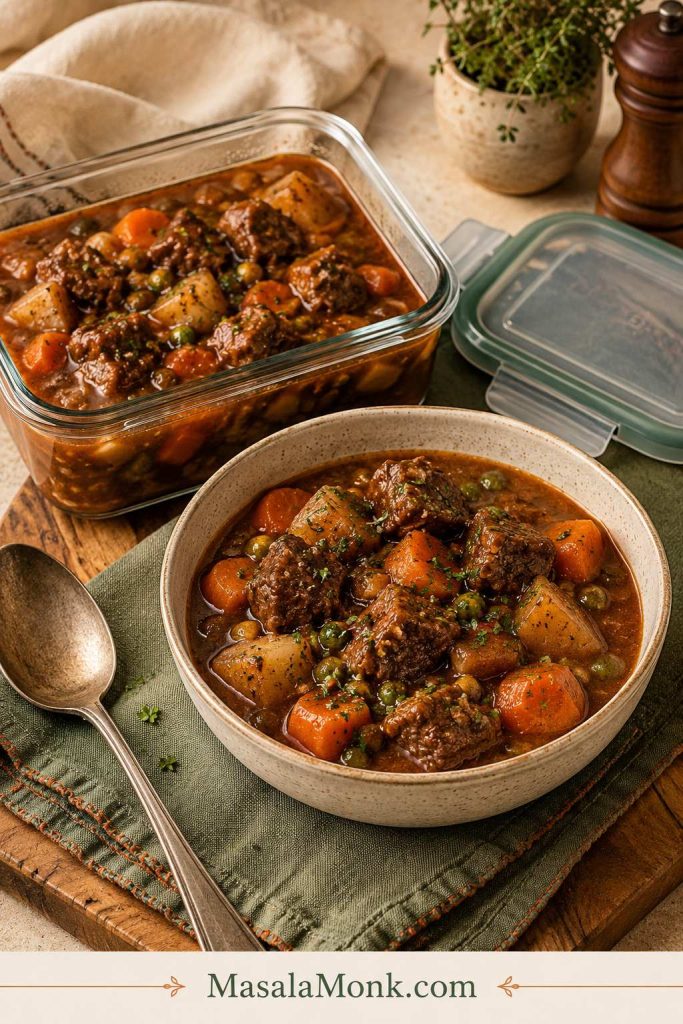
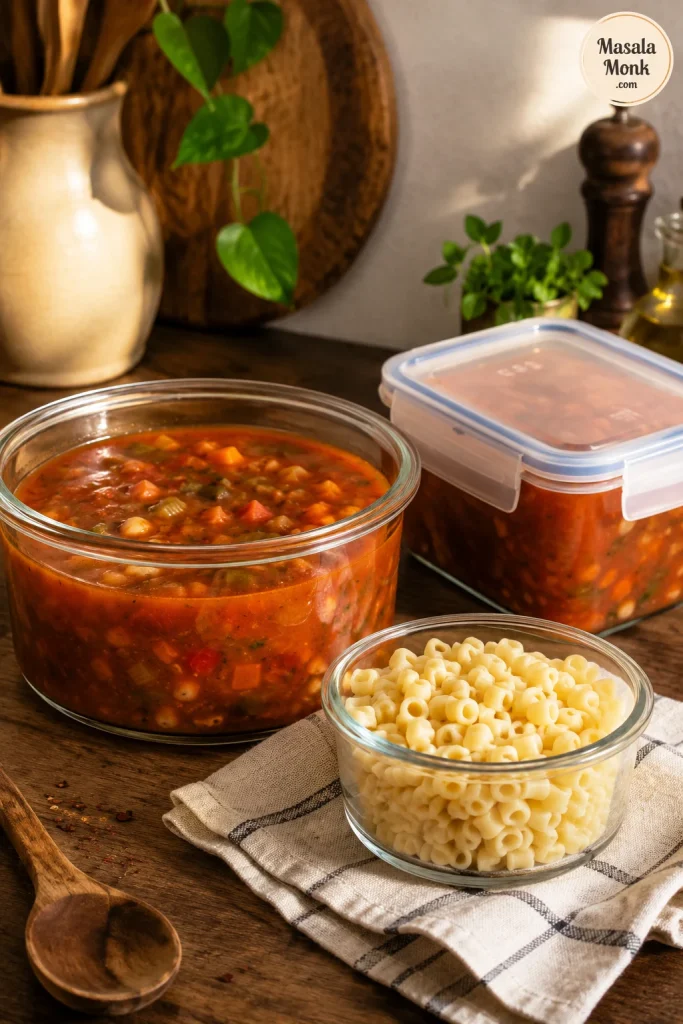
Store and Freeze Minestrone with Pasta Separately

This storage setup keeps the soup base useful and protects the pasta from swelling before the next serving.

Glass containers of minestrone soup base and a separate bowl of cooked small pasta for storing and freezing.

For freezing, leave pasta out of the soup base. This way, the broth, beans, and vegetables reheat well, and fresh pasta can be added later.

Fridge

Store minestrone soup in an airtight container in the fridge for 3 to 4 days, which matches the USDA’s general guidance for refrigerated leftovers. The next-day soup is often thicker and more flavorful. Loosen it with broth before reheating.

Freezer


Minestrone freezes best without pasta. Freeze the soup base for up to 3 months, then add freshly cooked pasta when reheating. If you freeze it with pasta, the flavor will still be good, but the pasta will become softer.

Reheating


Reheat gently on the stovetop over low to medium-low heat. Add broth or water to loosen the soup. After reheating, freshen the bowl with olive oil, herbs, lemon juice, vinegar, or parmesan. For the fastest fix when leftovers get thick, see the troubleshooting table.

Serve Minestrone Family-Style

Family-style Dutch oven of minestrone soup on a wooden table with a ladle, bowls of soup, bread, herbs, cheese, and a hand serving soup.

Serve minestrone family-style when you want the meal to feel relaxed and generous, with herbs, cheese, bread, or extra broth added at the table.

Once you have the rhythm down, minestrone becomes one of those soups you can make again and again without overthinking it. Keep the tomato broth, beans, small pasta, and vegetable timing in place, then let the pot change with the season.

The best minestrone is not the one with the longest ingredient list; it is the one where the broth, beans, vegetables, and pasta all still feel like they belong in the same spoonful.

Minestrone changes from kitchen to kitchen. If your pot had cabbage, potato, chickpeas, kale, extra zucchini, or a pasta shape that worked beautifully, tell us. Those small choices are often what help the next person make a better pot from what they already have.


Frequently Asked Questions

What is minestrone soup made of?


Minestrone soup is an Italian vegetable soup made with vegetables, beans, tomatoes, broth, herbs, olive oil, and usually pasta or rice. Common vegetables include onion, carrot, celery, zucchini, green beans, cabbage, spinach, kale, potato, and peas.

Is minestrone soup vegetarian?


Minestrone soup is vegetarian when it is made with vegetable broth and no meat. If you add parmesan, choose vegetarian-style parmesan if that matters to you.

Is minestrone soup vegan?


Minestrone soup is vegan when it is made with vegetable broth and no parmesan, parmesan rind, meat, or egg pasta. For a vegan finish, use olive oil, herbs, nutritional yeast, or vegan pesto.

What is the best pasta for minestrone?


Ditalini is one of the best pasta shapes for minestrone because it is small and spoon-friendly. Small shells, elbows, macaroni, and orzo also work.

What beans are best for minestrone?


Cannellini beans, white beans, and kidney beans are the best everyday beans for minestrone. Borlotti beans, navy beans, chickpeas, and lentils also work.

Why does my minestrone taste bland?


Bland minestrone usually needs salt, acidity, or more simmering time. Cook the aromatics well, cook the tomato paste until it darkens slightly, taste the broth before adding pasta, then finish with lemon juice or vinegar if the tomato flavor tastes flat.

How do you make minestrone less watery?


To make minestrone less watery, simmer it uncovered, mash some beans into the broth, use crushed tomatoes, or add a parmesan rind if you are using cheese. A watery soup often means the aromatics or tomato paste needed more time at the beginning.

How do you keep pasta from getting mushy in minestrone?


To keep pasta from getting mushy in minestrone, add it only near the end and stop when it is just tender. For leftovers, meal prep, or freezing, cook pasta separately and add it to each bowl.

Can you make minestrone soup ahead of time?


Yes, minestrone is a good make-ahead soup, especially if you make the soup base without pasta. Refrigerate the base for 3 to 4 days, then add freshly cooked pasta when serving.

Can you freeze minestrone soup?


Yes, minestrone soup freezes well, but it freezes best without pasta. Freeze the soup base for up to 3 months, then add freshly cooked pasta when serving.

What is the difference between minestrone and vegetable soup?


Minestrone is usually heartier than plain vegetable soup because it often includes beans, pasta or rice, tomatoes, Italian herbs, and olive oil. Vegetable soup can be any broth-based soup made with vegetables.

What is the difference between minestrone and pasta e fagioli?


Minestrone is a vegetable-heavy soup that often includes beans plus pasta or rice. Pasta e fagioli means pasta and beans, so it is more focused on those two ingredients and is often thicker and more bean-forward.

Can I make minestrone without pasta?


Yes, you can make minestrone without pasta. Add extra beans, cabbage, zucchini, potato, kale, spinach, or cooked rice instead.

Can I use frozen vegetables in minestrone?


Yes, frozen peas, green beans, spinach, kale, and mixed vegetables can work well in minestrone. Add quick-cooking frozen vegetables near the end unless they are dense vegetables. If frozen spinach releases too much water, squeeze it before adding.

Can I make minestrone with canned vegetables?


Yes, canned vegetables can work in minestrone when you need a pantry version. Drain them well and add them near the end because they are already cooked and can become too soft if simmered for a long time.

Posted on Leave a comment

Air Fryer Pork Chops Recipe: Juicy Boneless, Bone-In, Thin & Thick Chops

No-breading air fryer pork chops on a cream plate, with one pork chop sliced open to show the cooked center.

Dry pork chops are usually not a pork chop problem — they are a timing problem. Air fryers cook lean pork quickly, which is great for dinner, but it also means a thin or boneless chop can turn tough if it stays in the basket just a little too long.

If you have ever pulled pork chops out of the air fryer looking perfect on the outside but tight and dry inside, the fix is usually not a complicated marinade. It is better timing, enough space, and knowing when to stop.

This recipe is built around a no-dry timing guide, so you can match the method to the pork chop you actually bought — boneless, bone-in, thin, thick, breaded, frozen, or air fryer oven-style.

When it works, the edges are browned, the paprika-garlic rub smells warm and smoky, and the inside stays tender enough to slice cleanly without losing all its juices. The timer gives you a starting point; the thermometer gives you the answer.

Quick Time and Temperature Answer

For most 1-inch boneless pork chops, air fry at 380°F / 193°C for 10 to 12 minutes, flipping halfway, until the center reaches 145°F / 63°C. Rest for 3 to 5 minutes before slicing. Use 390°F to 400°F / 199°C to 204°C for breaded chops or crispier edges, and start checking earlier for thin chops.

Many recipes use 400°F, and that can work. This recipe uses 380°F as the default because it gives lean pork a little more time to cook through before the outside tightens up.

Jump to What You Need

Quick No-Breading Recipe for 1-Inch Boneless Chops

Need dinner moving now? This is the fast path for the most common version: 1-inch boneless pork chops with no breading.

Seasoned boneless pork chops on a wooden board beside an air fryer basket, spice bowl, and oil brush.
For 1-inch boneless air fryer pork chops, this is the simplest starting point: season, arrange, cook, and check the center. Then adjust the timing if your chops are thin, thick, bone-in, breaded, or frozen.
  1. Preheat the air fryer to 380°F / 193°C for 3 to 5 minutes.
  2. Pat dry 4 pork chops, about 6 oz / 170 g each.
  3. Rub with oil: use 1½ tbsp / 22 ml olive oil or avocado oil.
  4. Season with 2 tsp smoked paprika, 1 tsp garlic powder, ½ tsp onion powder, 1 tsp fine salt, ½ tsp black pepper, ½ tsp thyme, Italian seasoning, or ground mustard, and 1 tbsp brown sugar if you want a lightly caramelized edge.
  5. Air fry in a single layer for 10 to 12 minutes, flipping halfway.
  6. Remove when the center reaches 145°F / 63°C.
  7. Rest loosely for 3 to 5 minutes, then serve.

The goal is not a perfect-looking chop that eats dry. What you want is pork that still feels tender when you cut into it.

Once you have made this basic version once, the rest is just adjusting for the chop in front of you: thinner, thicker, bone-in, breaded, or frozen.

If your chops are thinner, thicker, bone-in, breaded, or still frozen, do not force the 10 to 12 minute timing. Use the air fryer pork chops time and temperature chart and start checking early.

Air Fryer Pork Chops Time and Temperature Chart

Use this chart when your pork chops are not the exact 1-inch boneless chops in the quick recipe. Pick the row closest to your chop thickness. The “first check” column tells you when to start checking so you can stop before lean pork overcooks.

Timing by Pork Chop Type

Pork Chop TypeAir Fryer TempCook TimeFirst CheckBest Note
Very thin boneless, under ½ inch / 1.25 cm375°F / 190°C4–6 minutes3–4 minutesFast cook; stay close.
Thin boneless, about ½ inch / 1.25 cm375°F / 190°C6–8 minutes4–5 minutesDo not use thick-chop timing.
Boneless, about ¾ inch / 2 cm380°F / 193°C8–10 minutes6–7 minutesGood everyday size.
Boneless, about 1 inch / 2.5 cm380°F / 193°C10–12 minutes8–9 minutesBest default for this recipe.
Thick boneless, about 1½ inches / 4 cm375–380°F / 190–193°C12–16 minutes10–12 minutesUse patience, not high heat.
Bone-in, about 1 inch / 2.5 cm390–400°F / 199–204°C11–15 minutes9–10 minutesCheck the meat near the bone.
Bone-in, about 1½ inches / 4 cm380–400°F / 193–204°C14–18 minutes12–14 minutesRest well before slicing.
Breaded pork chops390–400°F / 199–204°C8–12 minutes7–8 minutesSpray dry spots with oil.
Shake and Bake pork chops390–400°F / 199–204°C8–12 minutes7–8 minutesSingle layer matters.
Frozen boneless pork chops375–380°F / 190–193°C12–20+ minutesAfter softening, then oftenSeason after the surface softens.
Reheating cooked pork chops350°F / 175°C3–5 minutes3 minutesWarm gently.
Air fryer pork chops time and temperature chart with cook times and first-check times for different pork chop cuts.
Use this air fryer pork chops time and temperature chart as a starting range, not a strict countdown. The first-check column matters because lean pork can move from tender to overdone quickly.

Why Thin and Thick Pork Chops Need Different Timing

Three raw pork chops of different thicknesses on a cutting board, labeled as thin, one-inch, and thick chops.
Before choosing a cook time, look at thickness first. Thin pork chops can finish quickly even without deep browning, while thick chops need enough time for the center to cook through gently.

In plain terms: thin chops need speed, thick chops need patience, breaded chops need oil-kissed crumbs, and frozen chops need the thermometer more than the timer.

These are ranges, not promises. Air fryer model, chop thickness, bone, breading, and basket crowding all change the final time. For safe, juicy pork chops, the important number is 145°F / 63°C with at least a 3-minute rest. If you are deciding between 375°F, 380°F, and 400°F, use the temperature comparison next.

Air Fryer Pork Chops at 375°F, 380°F, or 400°F

The temperature question matters because lean pork can move from juicy to tough quickly. Use lower heat when you need control, and higher heat when you want crisping.

Choosing 375°F, 380°F, or 400°F

Temperature guide comparing 375°F, 380°F, and 390 to 400°F for cooking different air fryer pork chops.
Temperature should match the job. Use 375°F for control, 380°F for everyday boneless pork chops, and 390–400°F when breading, Shake and Bake, or stronger browning needs extra heat.
TemperatureBest ForWatch Out For
375°F / 190°CThin chops, frozen-start chops, thick chops that are browning too fastSlower browning
380°F / 193°CDefault juicy boneless chops, especially around 1 inch thickLess aggressive crisping than 400°F
390–400°F / 199–204°CBreaded chops, Shake and Bake, bone-in chops, crispier edgesLean boneless chops can overcook faster

For most people making plain boneless chops tonight, 380°F is the easiest place to start. Move hotter when you want crisp coating, stronger browning, or a bone-in chop that needs more edge color; for coating-specific guidance, jump to the breaded pork chops section.

If the pork reaches 145°F earlier than the chart says, take it out. The timer is not the goal; juicy pork is.

Best Pork Chops to Use

The right chop gives you more forgiveness before you even start cooking. If you are standing at the store, choose chops that are evenly thick, not paper-thin on one end and thick on the other.

Raw bone-in, boneless, thin, and uneven pork chops shown as a visual guide for air fryer cooking.
The best pork chops for the air fryer are evenly thick because they cook more predictably from edge to center. If the chop is very thin or uneven, start checking earlier than the timer suggests.
ChoiceBest ForWhy It Works
Best beginner choice1-inch bone-in center-cut chopsJuicier and more forgiving.
Best weeknight choice1-inch boneless center-cut chopsFast, easy, and reliable with the chart.
Best crispy option1-inch boneless or bone-in chops with breadingEnough thickness to cook through while the coating browns.
Risky but workable½-inch thin chops or cutletsFast dinner, but they need early checking.
Best to avoidUneven ultra-thin chopsOne part dries out before the thicker part finishes.

Bone-in cuts are a little more forgiving if you are worried about dryness. Boneless cuts are faster and convenient, but they need closer attention. Around 1 inch thick is the easiest size to cook well. Already bought a different cut? Use the boneless, bone-in, thin, and thick chop guide before choosing a final cook time.

Ingredients and Equipment

The rub is not trying to hide the pork. It helps the edges brown and gives every bite a little garlic-smoky warmth. If you are cooking from the pantry, the essentials are simple: pork chops, oil, salt, garlic powder, paprika, and pepper. For the full measured version, jump to the recipe card.

Raw pork chops with olive oil, smoked paprika, garlic powder, onion powder, salt, pepper, brown sugar, and herbs.
This pork chop seasoning builds flavor without a long ingredient list. Paprika helps the surface look warm and browned, garlic and onion add savory depth, and optional brown sugar encourages caramelized edges.

Pork Chop Seasoning Ingredients

IngredientUS AmountMetric Amount
Pork chops4 x 6 oz chops4 x 170 g chops
Olive oil or avocado oil1½ tbsp22 ml
Brown sugar, optional1 tbsp12 g
Smoked paprika2 tsp4–5 g
Garlic powder1 tsp3 g
Onion powder½ tsp1–2 g
Fine salt1 tsp5–6 g
Black pepper½ tsp1 g
Dried thyme, Italian seasoning, or ground mustard½ tspabout 1 g
  • Salt note: If your pork chops are labeled enhanced, pre-brined, or already seasoned, reduce the salt slightly.
  • Brown sugar note: It helps the edges caramelize, but you can skip it for a sugar-free version.
  • Oil note: Use just enough to lightly coat the surface. Greasy pork will not brown better.

Equipment

  • Air fryer: Basket-style or oven-style both work.
  • Instant-read meat thermometer: The most important tool for avoiding dry pork chops.
  • Paper towels: For drying the surface before seasoning.
  • Small bowl: For mixing the rub.
  • Tongs: For flipping without scraping off the seasoning.
  • Perforated parchment, optional: Use only if sticking is a problem; do not preheat loose parchment without food weighing it down.

Why These Air Fryer Pork Chops Stay Juicy

These are the small details that make the difference between pork chops that only look done and pork chops that actually eat juicy. Need a visual doneness check later? Use the done pork chops guide.

  • Match the chop, not the clock. Thin, thick, bone-in, breaded, and frozen chops all need different timing.
  • Dry, oil, season. A dry surface and a light oil coating help the rub brown instead of steam. This is the same reason air fryer chicken wings crisp better when the skin is dry.
  • Give the air space. Cook in a single layer so the hot air can reach the edges.
  • Check before the timer ends. Especially with thin chops, small chops, or compact basket-style air fryers.
  • Rest loosely. A tight foil wrap can soften the crust, while a short loose rest lets the juices settle.

Quick Visual Steps Before Air Frying

Pat the Pork Chops Dry

Before seasoning, blot the surface well so the rub has something dry to cling to. This visible step supports the pat-dry instruction in the quick recipe.

A hand pats raw pork chops dry with a paper towel on a wooden cutting board.
Blotting the pork chops dry before seasoning helps the rub cling instead of sliding around. As a result, the surface browns better and the air fryer does less steaming.

Season Both Sides Evenly

Next, coat both sides with oil and seasoning, then press the rub in lightly. This is where the no-breading version gets most of its color and aroma.

A hand sprinkles paprika-garlic seasoning over raw pork chops on a wooden cutting board.
Season both sides and press the rub in lightly so it stays attached during cooking. Since these are no-breading pork chops, that spice layer becomes the main source of color, aroma, and flavor.

Leave Space in the Basket

Arrange the pork chops in a single layer instead of stacking or overlapping them. Space around the edges helps the air fryer brown the surface more evenly.

Seasoned pork chops arranged in a single layer with space between them inside a black air fryer basket.
A single layer lets hot air reach the top, sides, and edges of each pork chop. If the basket is crowded, the chops can steam where they touch and brown unevenly.

Flip Halfway Through Cooking

Halfway through the cook time, turn the chops gently with tongs. This gives both sides direct heat and helps prevent one pale side.

Tongs lift a browned pork chop from an air fryer basket while other pork chops cook nearby.
Flip pork chops halfway through air frying so both sides get direct heat. For breaded chops, lift gently with tongs instead of dragging, which helps keep the coating intact.

Once the main method is clear, the rest is just small adjustments: the chop you bought, the air fryer you own, and how crisp you want the edges.

What Done Pork Chops Look and Feel Like

The best batch should look roasted at the edges, smell garlicky and smoky, and slice without turning chalky. The seasoning should look darker and fragrant, and the surface should look browned rather than wet. Breaded chops should be golden, not pale or dusty.

Doneness guide for air fryer pork chops showing browned edges, 145°F internal temperature, and a sliced cooked center.
Browned edges are helpful, but color alone is not enough for pork chops. For better doneness confidence, combine a 145°F / 63°C center with a short rest and a tender-looking slice.

If you grew up thinking pork had to be cooked until completely white, this may feel different. A slight blush can be normal when pork reaches 145°F / 63°C and rests. The thermometer matters more than fear.

Use 145°F as the Stop Point

A meat thermometer inserted into a cooked pork chop shows an internal temperature of 145°F.
The timer tells you when to check, but the thermometer tells you when the pork is actually done. Aim for 145°F / 63°C in the thickest part, then rest the chops before cutting.

When the outside is browning too fast but the center is not done, lower the temperature to 350°F / 175°C and cook for a few more minutes. That is better than burning the crust while waiting for the inside.

Check the Slice After Resting

Sliced air fryer pork chop with a browned crust and moist cooked center on a wooden board.
After resting, a good air fryer pork chop should slice cleanly and still look tender inside. If the meat looks tight or chalky, check the next batch sooner and rely on temperature instead of time alone.

If your pork chops still turn out dry or tough after checking temperature, use the troubleshooting guide before the next batch.

If you want the complete measured version in one place, use the recipe card below.

Air Fryer Pork Chops Recipe Card

This is the full recipe card version for 1-inch boneless chops. Use the chart above for thin, thick, bone-in, breaded, or frozen chops.

Recipe Details

Prep Time10 minutes
Cook Time10–12 minutes
Resting Time3–5 minutes
Total TimeAbout 25 minutes
Servings4
Cooking MethodAir fryer
Best For1-inch boneless chops; see chart for other cuts

Ingredients

  • 4 pork chops, about 6 oz / 170 g each, preferably 1 inch thick
  • 1½ tbsp / 22 ml olive oil or avocado oil
  • 1 tbsp / 12 g brown sugar, optional
  • 2 tsp / 4–5 g smoked paprika
  • 1 tsp / 3 g garlic powder
  • ½ tsp / 1–2 g onion powder
  • 1 tsp / 5–6 g fine salt
  • ½ tsp / 1 g black pepper
  • ½ tsp dried thyme, Italian seasoning, or ground mustard

Instructions

  1. Preheat. Set the air fryer to 380°F / 193°C and preheat for 3 to 5 minutes.
  2. Dry. Pat both sides of the pork chops dry with paper towels.
  3. Oil and season. Rub both sides lightly with oil, then coat with the spice mixture.
  4. Arrange. Place pork chops in a single layer. Cook in batches if needed.
  5. Air fry. Cook for 10 to 12 minutes for 1-inch boneless chops, flipping halfway through.
  6. Check doneness. Remove when the center reaches 145°F / 63°C.
  7. Rest. Rest loosely for 3 to 5 minutes before slicing.

Recipe Notes

  • Bone-in chops may need 2 to 3 extra minutes; check near, but not touching, the bone.
  • Thin chops can be ready quickly, so start checking around 4 to 5 minutes.
  • Thick chops do better at 375°F to 380°F with internal temperature as the final guide.
  • Crispier edges usually need heat closer to 400°F / 204°C, but lean boneless chops need close attention.
  • If using enhanced, pre-brined, or already seasoned pork chops, reduce the salt slightly.

Nutrition will vary most by chop size, breading, oil, sugar, and sauces. If you are tracking closely, use the cooked chop weight and adjust for toppings. For a deeper look, see this guide to calories in a pork chop.

Back to top ↑

Boneless, Bone-In, Thin, and Thick Chops

If you already bought a different chop, you do not need a different recipe. You just need to adjust the timing.

Cooked boneless, bone-in, thin, and thick air fryer pork chops shown in a labeled comparison guide.
The seasoning can stay the same, but the cooking approach should change by cut. Boneless chops cook fast, bone-in chops are more forgiving, thin chops need attention, and thick chops need patience.
  • Boneless pork chops: Fast and convenient, but less forgiving. Best around 1 inch thick.
  • Bone-in pork chops: Usually juicier and more forgiving. Check the meaty area near the bone without touching the bone.
  • Thin pork chops: Not difficult, but they do not forgive distraction. Start checking early and do not walk away.
  • Thick pork chops: Better texture potential, but they need patience. Lower the heat if the outside browns too fast.

The seasoning can stay the same; the timing cannot.

Breaded or Fried-Style Pork Chops

The base version skips breading: oil, seasoning, air fryer, done. Breading changes the job. Now you are cooking the pork and managing the crust at the same time. Air fryers crisp oil-kissed crumbs; they do not magically brown dry flour.

Golden breaded air fryer pork chops with crisp breadcrumb coating on a plate.
Breaded air fryer pork chops crisp best with a thin coating and a light oil mist. That way, the crumbs turn golden before the pork underneath has a chance to overcook.

How to Bread Pork Chops for the Air Fryer

Pork chops being coated in flour, egg, and breadcrumbs at a breading station.
For crispy breaded pork chops, keep the flour, egg, and breadcrumb layers even rather than thick. Too much coating can stay pale while the meat continues cooking underneath.

For breaded chops, use 2 tbsp / 15 g flour, 1 egg, ½ cup / 30 g panko or breadcrumbs, optional ¼ cup / 20–25 g parmesan, and oil spray. Air fry at 390°F to 400°F / 199°C to 204°C, flip halfway, and spray pale or dusty spots lightly with oil.

Why Breaded Pork Chops Look Pale in the Air Fryer

If breaded pork chops look pale, the coating usually needs a light mist of oil, not several extra minutes. Dry crumbs do not brown well in the air fryer, and overcooking the pork just to darken the crust can make the center tough.

Comparison guide showing pale dry breading and lightly oiled golden breading on air fryer pork chops.
If breaded pork chops look pale, the coating may need a light mist of oil, not more time. Adding several extra minutes can brown the crumbs but push the pork past its best texture.

If the coating browns before the pork is done, lower the heat and finish gently. Do not bread frozen chops directly; thaw first or use the frozen pork chops method before seasoning. If the crust stays pale or the center finishes unevenly, check the troubleshooting guide.

Frozen Pork Chops in the Air Fryer

Frozen pork chops are not the most even-cooking option, but they can still work when dinner needs to happen now. It will not be quite as even as thawed pork, but it can still save dinner if you check the center instead of trusting the timer. For the target temperature and visual cues, use the done pork chops guide.

Two-step guide showing frozen pork chops in an air fryer basket before seasoning and then brushed with oil after softening.
Frozen pork chops are easier to season after the surface softens. Start them plain in the air fryer, then add oil and seasoning once the rub can stick evenly.
  1. Preheat the air fryer to 375°F / 190°C.
  2. Place frozen chops in a single layer.
  3. Air fry for 5 to 8 minutes, just until the surface starts to soften.
  4. Brush lightly with oil or melted butter.
  5. Add seasoning to both sides.
  6. Continue air frying, flipping occasionally, until the center reaches 145°F / 63°C.
  7. Rest for 3 to 5 minutes before serving.

Frozen timing varies heavily. Thin frozen chops may cook fairly quickly, while thick frozen chops may take 20 minutes or more. For another frozen air fryer example, see these frozen chicken wings in the air fryer.

Basket vs Oven-Style Air Fryers

Different air fryers do not behave exactly the same, so treat your first batch as a calibration batch. Compact basket-style air fryers may brown faster, while oven-style models may need rack rotation.

Comparison of basket-style and oven-style air fryers cooking pork chops in separate labeled sections.
Basket-style and oven-style air fryers can brown pork chops at different speeds because the airflow is different. Keep the same internal temperature goal, but adjust the timing for your machine.
  • Basket-style air fryers: Start checking early if your machine browns food quickly.
  • Oven-style air fryers: Rotate racks if one level cooks faster than another.
  • Ninja Foodi, Cosori, Instant Vortex, PowerXL, Philips, and similar models: Use the chart as a starting point, then adjust by a minute or two after your first batch.
  • Small baskets: Cook in batches instead of stacking.

Back to top ↑

Flavor Variations

Keep the base timing steady, then change the finish based on the kind of dinner you want: creamy, smoky, spicy, sweet, or crisp. After choosing a flavor, use the serving ideas to build the plate.

Flavor variation guide for air fryer pork chops with ranch, parmesan, BBQ, Cajun, garlic butter, honey mustard, lemon pepper, and Shake and Bake ideas.
Once the basic air fryer pork chop timing works, change the finish to fit the meal. Ranch feels creamy and herby, BBQ adds smoky sweetness, Cajun brings heat, and lemon pepper keeps the plate brighter.
VariationAdd ThisWhen to AddBest With
RanchRanch seasoningBefore cookingPotatoes, green beans, salad
Parmesan crustedFinely grated parmesanBefore cooking or in crumbsCaesar-style salad or roasted vegetables
BBQBBQ sauceLast 1–2 minutesBaked beans, coleslaw, applesauce
CajunCajun seasoningBefore cookingRice, corn, creamy slaw
Garlic butterMelted garlic butterAfter cookingMashed potatoes or roasted vegetables
Honey mustardHoney mustard glazeNear the endCarrots, potatoes, green salad
Lemon pepperLemon pepper and lemon juiceBefore cooking, then finish afterAsparagus, rice, crisp salad
Shake and BakePackaged seasoned coatingBefore cooking, with oil sprayMac and cheese, green beans, slaw

What to Serve with Them

The easiest plate is creamy potatoes, something green, and a little sweetness on the side. That gives you comfort, freshness, and balance without making dinner complicated.

Three air fryer pork chop dinner plates with mashed potatoes, mushroom sauce, baked beans, coleslaw, salad, and roasted carrots.
Build the plate around contrast so the pork chop dinner feels complete. Pair the savory chop with something creamy, something green, and something a little sweet for better balance.

Storage and Reheating

Let leftovers cool, then store them in an airtight container in the refrigerator. Keep sauce separate when possible so the surface does not turn soggy.

Reheat cooked chops at 350°F / 175°C for 3 to 5 minutes, just until warmed through. When the chops are very lean, brush with a little butter, broth, or sauce before reheating. Breaded chops usually reheat better in the air fryer than in the microwave because the coating can crisp again.

Back to top ↑

Troubleshooting Dry or Tough Pork Chops

When pork chops turn out dry, the fix is usually small. Change the check time, the temperature, or the thickness next time.

Troubleshooting guide for air fryer pork chops with fixes for dry centers, pale outsides, uneven cooking, and frozen centers.
When air fryer pork chops go wrong, match the fix to the symptom. Dry centers, pale crusts, uneven cooking, and frozen middles usually point to timing, heat, spacing, or thickness.
What HappenedLikely CauseFix Next Time
Brown outside, dry insideHeat too high, chop too thin, or cooked too longCheck earlier or use 375°F to 380°F.
Pale outside, cooked insideSurface too wet or basket crowdedPat dry, oil lightly, and leave space.
Crispy coating but undercooked centerBreading browned too fastLower heat and finish gently.
One side dry, one side juicyUneven chop thicknessChoose more even chops or check the thinner side early.
Tough even though timing seemed rightVery lean boneless chop or no restUse 1-inch chops, rest before slicing, and add sauce if needed.
Frozen chop browned outside but cold insideFrozen center needed more timeUse the staged frozen method and check the center.

For a slower comfort-food pork chop dinner next time, try cream of mushroom pork chops, smothered pork chops, or crock pot pork chops and sauerkraut.

The first time you make these, check early and note your air fryer’s timing. After that, this becomes the kind of weeknight recipe you can repeat without hovering: same seasoning, same method, and one small adjustment based on the chop in front of you.

Back to top ↑

FAQs

How long do pork chops take in the air fryer?

Most 1-inch boneless pork chops take 10 to 12 minutes at 380°F / 193°C. Thin chops cook faster; thick or bone-in chops need more time.

What temperature is best for air fryer pork chops?

380°F / 193°C is the best default for juicy pork chops. Use 390°F to 400°F / 199°C to 204°C for breaded or crispier chops.

How do you keep pork chops from drying out in the air fryer?

Use chops around 1 inch thick, cook in a single layer, and stop when the center reaches 145°F / 63°C. The biggest fix is not overcooking them.

Do boneless pork chops work well in the air fryer?

Boneless pork chops work well in the air fryer when they are close to 1 inch thick. They cook quickly, so start checking before they turn tight or dry.

Are bone-in pork chops better in the air fryer?

Bone-in pork chops are often more forgiving because the bone slows the cook slightly. Check the thickest meaty part without touching the bone.

How long do thin pork chops take in the air fryer?

Thin chops around ½ inch thick may take 6 to 8 minutes. Very thin cuts can be done in 4 to 6 minutes, so check early.

How long do thick pork chops take in the air fryer?

Thick chops around 1½ inches may take 12 to 16 minutes for boneless cuts and longer for bone-in cuts.

Do you flip pork chops in the air fryer?

Yes. Flip halfway through for more even browning and better texture on both sides.

Is slightly pink pork safe?

A slight blush can be safe when pork reaches 145°F / 63°C and rests for at least 3 minutes. Temperature matters more than color alone.

No-breading pork chops: what changes?

No-breading pork chops rely on a dry surface, light oil, and a flavorful rub instead of crumbs. They are faster and less fussy than breaded chops.

Breaded air fryer pork chops: what changes?

Breaded pork chops need a thin coating, a light oil spray, and enough basket space for the crumbs to crisp. The internal temperature still needs to reach 145°F / 63°C.

Frozen pork chops: what is the safest method?

The safest frozen method is staged: soften the chops first, then oil, season, and finish cooking until the center reaches 145°F / 63°C.

Does Shake and Bake work in the air fryer?

Shake and Bake works in the air fryer when the coated chops are sprayed lightly with oil, cooked in a single layer, flipped halfway, and checked with a thermometer.

Should you preheat the air fryer?

Preheating helps pork chops cook evenly and brown better. If there is no preheat setting, run the air fryer empty at the cooking temperature for about 3 minutes.

Why are my pork chops tough?

They were probably overcooked, too thin for the timing, or sliced before resting. Next time, start checking earlier, especially if your chops are thin or boneless.

Posted on Leave a comment

Slow Cooker Beef Stew Recipe

A bowl of beef stew with beef chunks, potatoes, carrots, peas, thick brown gravy, bread, and a spoon.

Tender beef, soft potatoes, sweet carrots, and a Crock Pot gravy that stays rich instead of turning thin.

If you have ever waited all day for beef stew and opened the slow cooker to thin broth instead of rich gravy, this version is built to avoid that disappointment.

The goal is the moment you lift the lid and see glossy, deep brown gravy settled around tender beef instead of a pot that needs rescuing.

Lid-lift cue: The finished pot should look glossy and settled, with steam rising from gravy rather than beef and vegetables floating in broth.

A hand lifting the lid of a slow cooker to reveal steaming beef stew with beef, potatoes, carrots, peas, and glossy gravy.
When you lift the lid, look for gravy settled around the beef and vegetables. If the pot looks glossy instead of flooded, the liquid stayed under control.

This is the kind of slow cooker beef stew you want waiting at the end of the day: beef soft enough to break with a spoon, carrots that turn sweet in the gravy, potatoes that still hold their shape, and deep brown gravy thick enough to drag bread through.

Finished cue: This is the texture we are aiming for: chunky beef, visible vegetables, and gravy thick enough to feel like stew instead of soup.

A bowl of beef stew with beef chunks, potatoes, carrots, peas, thick brown gravy, bread, and a spoon.
Start with the finished goal in mind: chunky beef stew with glossy brown gravy, visible vegetables, and enough body to scoop with bread instead of chasing thin broth.

Why This Slow Cooker Beef Stew Stays Thick

This method works with the slow cooker instead of fighting it. It uses controlled liquid, the right cut of beef, vegetables cut large enough for a long cook, and a simple thickening step once the meat is tender. You still get classic beef stew with potatoes and carrots, but the pot is set up to finish glossy enough to coat a spoon instead of thin and brothy.

You can make it with chuck roast or packaged beef stew meat. Brown the beef for the deepest flavor, or use the dump-and-go version when dinner just needs to get started. Either way, the fork test matters more than the timer, and the slow cooker gives you the kind of dinner that feels finished before you even sit down.

Quick Answer: How to Make Slow Cooker Beef Stew That Is Not Watery

For thick, tender slow cooker beef stew, use beef chuck or stew meat cut into 1¼- to 1½-inch chunks. Coat the beef lightly with flour, brown it if you have time, then slow cook it with potatoes, carrots, onion, tomato paste, Worcestershire sauce, herbs, and controlled beef broth.

Cook on low until the beef gives easily with a fork, then stir in a cornstarch slurry during the final 20 to 30 minutes if the gravy needs more body. Start with enough broth to moisten the pot, not enough to fully cover every piece of beef and potato.

  1. Use chuck roast or stew meat cut into even chunks.
  2. Add only enough broth to moisten the pot.
  3. Cook on low until the beef is truly tender.
  4. Finish with slurry during the final 20 to 30 minutes.
  5. Rest before serving so the gravy settles.

Ready to cook? Start with the recipe card. If thin gravy is your main worry, jump to how much liquid to use before loading the pot; if you already bought packaged cubes, read the beef stew meat notes first.

Recipe Card

Slow Cooker Beef Stew Recipe

Description: A classic slow cooker beef stew made with chuck roast or beef stew meat, potatoes, carrots, onion, herbs, and a rich gravy-style broth. Includes browned-beef and no-browning methods.

Prep Time25–30 minutes with browning
12–15 minutes dump-and-go
Slow Cook Time8 hours on low
4–5 hours on high
Thickening + Rest30–45 minutes
Total TimeAbout 8 hours 45 minutes to 9 hours
Servings6 generous servings
Equipment6-quart / 5.7 L slow cooker

Ingredients

For the beef stew

  • 2½ lb / 1.1 kg beef chuck roast or beef stew meat, cut into 1¼- to 1½-inch chunks
  • 1 teaspoon salt, plus up to ½ teaspoon more after thickening if needed
  • 1 teaspoon black pepper
  • 3 tablespoons / 24 g all-purpose flour or plain flour
  • 2 tablespoons / 30 ml neutral oil, for browning
  • 1 large onion, diced, about 150 g
  • 4 garlic cloves, minced
  • 3 tablespoons / 45 g tomato paste
  • 2½ cups / 600 ml beef broth or beef stock
  • ½ cup / 120 ml red wine, or use extra beef broth
  • 2 tablespoons / 30 ml Worcestershire sauce
  • 1 tablespoon / 15 ml balsamic vinegar, optional but helpful for depth
  • 1 beef bouillon cube or 1 teaspoon beef base, optional
  • 4 medium carrots, cut into thick pieces, about 300–350 g
  • 1½ lb / 680 g Yukon gold or red potatoes, cut into large chunks
  • 2 celery ribs, sliced, about 100–120 g
  • 2 bay leaves
  • 1 teaspoon dried thyme
  • 1 rosemary sprig, or ½ teaspoon dried rosemary
  • 1 cup / 130–140 g frozen peas

For thickening near the end

  • 2 tablespoons / 16 g cornstarch
  • ¼ cup / 60 ml cold water

Instructions

  1. Cut and season the beef. Pat the beef dry. Cut into 1¼- to 1½-inch chunks if needed. Season with 1 teaspoon salt and the black pepper.
  2. Coat lightly with flour. Sprinkle flour over the beef and toss until lightly coated. The flour should cling to the beef, not form a thick paste.
  3. Brown the beef for best flavor. Heat oil in a large skillet over medium-high heat. Brown beef in batches for 2 to 3 minutes per side, just until the outside is deeply browned. Transfer to the slow cooker.
  4. Build the flavor base. In the same skillet, cook onion for 2 to 3 minutes. Add garlic and tomato paste and cook for about 1 minute. Pour in wine or a splash of broth and scrape the pan. Transfer everything to the slow cooker.
  5. Load the slow cooker. Add potatoes and carrots toward the bottom and sides, then add the beef, onion mixture, broth, Worcestershire sauce, balsamic if using, bouillon if using, celery, bay leaves, thyme, and rosemary. Stir gently. The liquid does not need to cover everything.
  6. Cook low and slow. Cover and cook on low for 8 hours, or until the beef is fork-tender. High works in 4 to 5 hours, but low gives better tenderness. Keep the lid on as much as possible.
  7. Add peas and thicken. Mix cornstarch with cold water until smooth. Stir slurry into the stew, then add frozen peas. Cover and cook on high for 20 to 30 minutes.
  8. Rest and serve. Turn off the slow cooker and let the stew rest for 10 to 15 minutes. Remove bay leaves and rosemary stem. Taste and adjust salt and pepper.

Notes

  • For a no-browning version, toss beef with flour and seasoning, then add everything directly to the slow cooker except peas and slurry.
  • If skipping wine, use 3 cups / 720 ml total beef broth.
  • Add the extra ½ teaspoon salt only if using low-sodium broth and no salty shortcuts like bouillon, onion soup mix, gravy mix, or a seasoning packet.
  • Start with the listed broth amount and adjust the final consistency after the beef is tender.
  • If the beef is tough, cook it longer. Tough stew meat usually needs more time, not more heat.
  • Thaw beef before adding it to the slow cooker. Frozen peas are fine near the end.

Recipe cue: Use the recipe card for the exact amounts, then use the visual sections below to judge texture, liquid level, and doneness.

A bowl of Crock Pot beef stew with beef, potatoes, carrots, peas, and brown gravy on a neutral surface.
A good Crock Pot beef stew should serve as one complete spoonful: tender beef, chunky vegetables, and gravy that carries everything together.

The Start Low, Finish Thick Method

The secret to this stew is simple: start with less liquid than you would use for stovetop stew, let the beef and vegetables release their own moisture, then adjust the gravy only after the meat is tender.

The pot may look a little under-liquid at first. That is not a mistake; that is the plan. A stew that looks thin before the final step has not failed; it simply is not finished yet.

The anti-watery stew system: use less broth at the start, cut the vegetables large, cook on low until the beef gives, then thicken only after the slow cooker has created its own liquid.

Method cue: The anti-watery setup starts before cooking, with large chunks and restrained broth instead of a fully submerged pot.

Hands arranging beef and large vegetables in a slow cooker while a small amount of broth is poured around them.
This is the anti-watery setup: large chunks, restrained broth, and room for the slow cooker to create its own liquid as it cooks.

Before You Start: Three Things That Matter Most

  1. Do not fully cover the stew with liquid. The beef and vegetables should be moistened, not swimming.
  2. Let tenderness decide the timing. The beef should give when pressed with a fork, not just be “cooked through.”
  3. Wait to judge the gravy. The final texture should be judged after the beef is tender, the slurry has cooked, and the stew has rested.

Visual Cues for Success

  • Before cooking: the ingredients look moistened, not submerged.
  • Once cooked: the beef gives easily with a fork.
  • When thickened: the gravy looks glossy and lightly coats a spoon.
  • After resting: the potatoes hold their shape and the gravy settles around the beef.

This is not a fussy stew. It is a patient one. Set it up well, let it cook gently, and make the final call on texture only when the beef is ready.

Back to top ↑

You’ll Like This Version If You Want

  • A classic potatoes-and-carrots beef stew made in the slow cooker
  • Rich, spoon-coating gravy instead of a thin beef broth
  • A recipe that works with chuck roast or packaged beef stew meat
  • A choice between browning the beef and a no-browning shortcut
  • Potatoes that stay in soft, generous chunks
  • Clear fixes for thin gravy, tough beef, bland flavor, or mushy vegetables

Prefer a brothy bowl? Add extra warm broth at the end, after the beef is tender and the gravy has been adjusted. This recipe is written as a thick, gravy-style stew.

If you want the same thick, cozy feeling without beef, this bean stew recipe is a hearty meatless option with a similar spoonable texture.

Why This Recipe Works

The best slow cooker stews feel effortless at the table, but they are usually won before the lid goes on. This version uses a simple four-part system: less broth at the start, large vegetable pieces, low heat until the beef gives, and slurry only after the pot has shown you how much liquid it created.

Flour gives the beef a little body, tomato paste and Worcestershire build depth, and slow heat gives tougher cuts time to soften. The peas go in late so they stay sweet and green instead of dull.

Wait until the long cook is done before judging the gravy. By then, the beef and vegetables have released their liquid, and you can thicken what is actually in the pot instead of guessing at the start.

Kitchen confidence cue: do not judge the stew too early. A pot that looks a little loose at hour six can still finish beautifully after the slurry and a short rest.

What This Beef Stew Tastes Like

The gravy should taste rounded and savory, with the tomato paste melted into the background instead of tasting sharp or tomato-heavy. Worcestershire sauce and optional balsamic add just enough lift to keep the bowl rich without making it heavy.

The beef should be soft enough to press apart with a spoon, the potatoes should be creamy at the edges, and the carrots should taste sweet from the long cook. Browned beef gives the stew a deeper, roastier finish; the dump-and-go version is gentler, but still cozy and satisfying.

This is the kind of stew that wants bread, rice, mashed potatoes, or noodles nearby — something simple to catch the last spoonfuls of gravy at the bottom of the bowl.

That same cozy beef-and-potato comfort shows up in this slow cooker cottage pie, especially if you like rich gravy-style dinners.

Ingredients You’ll Need

Nothing here is fancy, but each ingredient has a job. The stew tastes best when the basics are doing their work: beef for depth, potatoes for body, carrots for sweetness, and a little acidity to wake up the gravy.

Ingredient cue: Each ingredient has a job, so keep the lineup simple and let beef, vegetables, broth, tomato paste, and herbs do the work.

Beef chuck, potatoes, carrots, onion, garlic, broth, herbs, flour, and tomato paste arranged on a kitchen counter.
Before cooking begins, build the stew in layers: beef for depth, potatoes for body, carrots for sweetness, and tomato paste for a darker gravy base.

Beef

Chuck roast is the first choice here because it gives the best mix of tenderness and flavor. Packaged beef stew meat is also fine and is often the most convenient option; see the stew meat section if that is what you have.

Cut the beef into even 1¼- to 1½-inch chunks. Pieces that are too small can dry out, while very large chunks may need extra time before they soften.

Flour

Flour helps the beef brown and gives the gravy body. Use a light coating. Too much flour can make the stew feel heavy or pasty.

For a gluten-free version, skip the flour or use a gluten-free all-purpose flour blend. Then finish the stew with cornstarch or arrowroot slurry.

Potatoes

Yukon gold potatoes or red potatoes are best because they hold their shape. The goal is soft edges, not potato collapse.

Russet potatoes can be used, but they soften more and may cloud the gravy. If you use russets, cut them into larger chunks and expect a softer texture.

Serving the stew over potatoes instead of cooking potatoes inside it? These garlic mashed potatoes are built to stay creamy instead of gluey under gravy.

Carrots, Celery, and Onion

Carrots bring sweetness, celery adds a classic stew flavor, and onion gives the gravy a savory base. Cut carrots into thick pieces so they hold up during the long cook.

Tomato Paste, Worcestershire, and Broth

Cooked briefly or whisked well into the broth, tomato paste gives the gravy depth without making the stew taste like tomatoes. Worcestershire sauce adds savory depth. Beef broth or beef stock is the main liquid, but the amount is controlled so the pot finishes hearty instead of soupy.

Low-sodium broth gives you more control when bouillon, beef base, onion soup mix, or a seasoning packet is involved. Taste after thickening, not before; salt feels different once the gravy tightens.

Red Wine or No-Wine Option

Red wine adds depth and a richer stew flavor. For a no-wine version, use 3 cups / 720 ml total beef broth and keep the Worcestershire sauce. The optional balsamic becomes more useful without wine because it gives the gravy a small lift.

Herbs and Peas

Bay leaves, thyme, and rosemary are classic with beef stew. Frozen peas go in late because they only need enough time to heat through. Adding peas at the beginning can make them dull and mushy.

Best Beef to Use

The best beef for stew is not the fanciest beef. It is the cut that has enough time to soften. The slow cooker is not the place for very lean quick-cooking steak cuts; stew is where tougher, flavorful cuts become tender.

Beef cue: Choose a cut that benefits from slow cooking; chuck roast is better here than lean quick-cooking steak.

A whole beef chuck roast with visible marbling on a wooden cutting board beside a chef’s knife.
Chuck roast works because slow cooking gives its connective tissue time to soften. That is why it becomes tender instead of dry in beef stew.
Beef Cut Use It? Notes
Chuck roast Best choice Cut it yourself into even chunks for the best texture and flavor.
Beef stew meat Yes Convenient and useful when you want less prep.
Stewing beef, braising steak, casserole beef Yes Good global equivalents for long-cooked beef dishes.
Very lean steak cuts Not ideal Can become dry or chewy during long cooking.

Using Beef Stew Meat in the Slow Cooker

This is the section for the pack of stew meat already sitting in your fridge. You do not need perfect butcher-counter cubes to make a good pot of stew.

Stew meat cue: Spread packaged stew meat out before cooking so you can trim hard fat and even out the largest pieces.

Raw beef stew meat pieces on a wooden cutting board being sorted and trimmed with a knife.
If using packaged beef stew meat, sort it first. Trim hard fat and cut oversized pieces so the beef cooks evenly in the slow cooker.

Spread the pieces out on a board before cooking. Cut very large pieces down, trim large hard fat, and aim for pieces around 1¼ to 1½ inches. Even pieces cook more evenly and give you a better chance of tender beef throughout the pot.

Size cue: Cut beef into even 1¼- to 1½-inch chunks so the stew meat stays juicy while it becomes fork-tender.

Raw beef pieces cut into even chunks on a wooden cutting board with a knife nearby for scale.
Next, keep the beef pieces large enough to stay juicy. Chunks around 1¼ to 1½ inches are ideal for fork-tender stew meat.

A light flour coating helps stew meat in two ways: it gives the gravy body and helps the beef brown if you are searing it first. Browning is useful, but not required. For the no-browning method, lean on the tomato paste, Worcestershire sauce, optional balsamic, and beef base for depth; the dump-and-go section shows the shortcut.

If stew meat is chewy after 8 hours, do not assume it is ruined. In most cases, it needs more time on low. Keep cooking until a piece gives easily when pressed with a fork.

Choose Your Method: Browned Beef or Dump-and-Go

There is no single right way to start this stew. Browning gives the deepest flavor, but the dump-and-go method is useful on busy days. The best choice is the one that gets dinner into the slow cooker without making the recipe feel like a project.

Method How to Do It Best For Tradeoff
Best flavor Flour and brown the beef, sauté onion/garlic/tomato paste, then deglaze the pan. Richest gravy, deeper color, weekend-style comfort Adds 10–15 minutes
Dump-and-go Add floured beef, vegetables, broth, tomato paste, Worcestershire, and herbs directly to the slow cooker. Busy mornings, low effort, basic weeknight stew Slightly lighter flavor and color
Middle path Skip browning but whisk tomato paste, Worcestershire, balsamic, and beef base into the broth first. Good flavor without the skillet step Not quite as roasted as browned beef

On busy days, the dump-and-go version still gets a real dinner going. Browning is better, but the stew can still be worth making without it.

How Much Liquid to Use So the Stew Is Not Watery

This is the moment where slow cooker stew asks you to trust the process a little. It is tempting to add more broth at the start, but restraint is what gives you rich gravy instead of soup.

On the stove, steam escapes and the sauce reduces. In a slow cooker, the lid traps that steam while the beef and vegetables release their own moisture. Too much broth at the beginning can leave you with a loose bowl by the end.

The Pot Should Look a Little Low on Liquid

When you first load the slow cooker, the ingredients should look moistened and surrounded by broth, not fully submerged like soup. Potatoes and carrots should still be visible. The beef should sit among the vegetables, not float in a deep pool of liquid. If the pot is already loose, use the thickening guide near the end instead of adding more starch too early.

Liquid cue: Before the lid goes on, the broth should sit around the beef and vegetables, not cover them like soup.

A slow cooker filled with raw beef, potatoes, carrots, onion, herbs, and broth that sits below the top of the ingredients.
Before cooking, the ingredients should be moistened, not submerged. This one visual cue does more to prevent watery slow cooker beef stew than almost anything else.

This can feel strange if you are used to stovetop stew, but it is intentional. The liquid level will rise as the beef and vegetables cook. Resist adding extra broth early unless the pot truly looks dry.

Warning cue: If the ingredients are floating before cooking, the slow cooker may finish with thin broth instead of rich gravy.

Beef, potatoes, and carrots floating in too much broth inside a slow cooker before cooking.
By contrast, if the beef and vegetables are floating at the start, the finished stew can turn thin. Add more broth only after cooking if needed.

Texture cue: the liquid should come partway around the beef and vegetables. It should not fully cover everything. A slightly low-looking pot at the start usually becomes a better stew at the end.

If you like oniony gravy-style slow-cooker dinners, this slow cooker French onion chicken uses the same idea of controlled liquid and a cozy sauce.

How Full Should the Slow Cooker Be?

For even cooking, aim for the slow cooker to be about half to three-quarters full. Packed to the very top, the stew may cook unevenly or bubble over. Too empty, and the edges may cook faster while the liquid behaves differently.

A 6-quart / 5.7 L slow cooker is the best size for this full recipe. Use the small-batch version below for a 3-quart cooker.

How to Make It Step by Step

Step 1: Cut the Beef and Vegetables Properly

Cut the beef into 1¼- to 1½-inch pieces. This size is large enough to stay juicy and small enough to tenderize well.

Cut potatoes into large chunks, about 1½ inches. Cut carrots into thick pieces. Small vegetable pieces can become mushy after 8 hours.

Vegetable cue: Cut potatoes and carrots larger than you would for soup because they need to survive the full slow-cooker time.

Large potato chunks and thick carrot pieces on a wooden cutting board with a knife and whole vegetables nearby.
Cut the vegetables for the long cook, not for a quick soup. Larger potato and carrot pieces hold their shape while the beef finishes tenderizing.

Step 2: Season and Flour the Beef

Season the beef with salt and pepper, then toss with flour. The coating should be light and even. Shake off any heavy clumps.

That light coating helps the beef brown in the skillet and gives the stew more body later.

Flour cue: The coating should look light and dusty, not thick or clumpy, so the gravy gains body without turning pasty.

Raw beef chunks lightly coated with flour in a shallow bowl on a kitchen counter.
A thin flour coating helps the beef brown and gives the gravy a head start. Keep it light so the final stew does not taste pasty.

Step 3: Brown the Beef, If You Have Time

Heat oil in a large skillet. Brown the beef in batches, leaving space between pieces. Crowding the pan makes the beef steam instead of brown.

You only need to brown the outside. The beef will finish cooking in the slow cooker.

Browning cue: Give the beef room in the skillet so the outside browns deeply before it goes into the slow cooker.

Beef cubes browning in a skillet with seared edges and space between the pieces.
Browning is optional, but it adds roasted depth. Leave space between the beef pieces so they sear instead of steaming in the pan.

Step 4: Build the Flavor Base

After browning the beef, use the same skillet for onion, garlic, and tomato paste. Then add wine or broth to loosen the browned bits from the pan. Those browned bits bring depth into the stew.

Flavor-base cue: Cook the tomato paste briefly with onion and garlic so the gravy tastes deeper, not raw or sharp.

Tomato paste, onions, and garlic cooking in a skillet with a wooden spoon.
Then cook the tomato paste with the onions and garlic. This deepens the flavor and keeps the gravy from tasting sharp or raw.

Deglazing cue: Scrape up the browned bits before they are lost; they are concentrated flavor for the slow-cooker gravy.

Liquid being poured into a skillet while a wooden spoon scrapes browned bits from the pan.
After browning, deglaze the skillet before adding everything to the slow cooker. Those browned bits turn into extra flavor in the gravy.

For the no-browning version, whisk the tomato paste, Worcestershire sauce, balsamic if using, and broth together before pouring them over the beef and vegetables. This helps the tomato paste blend in instead of sitting in clumps.

Step 5: Load the Slow Cooker

Add potatoes and carrots toward the bottom and sides because they can handle the long cook. Add the beef over and among the vegetables, then add the onion mixture, broth, Worcestershire sauce, balsamic if using, celery, herbs, and bouillon or beef base if using.

Stir gently so everything is distributed, but do not worry if the ingredients are not fully submerged. Save the peas and cornstarch slurry for the finish.

Step 6: Cook Until the Beef Gives Easily

Cook on low for about 8 hours. Low is the best setting for tender beef because it gives the meat time to soften gradually.

On high, start checking around 4 hours, then continue until the beef is tender. Chewy beef usually needs more time, not more heat.

Keep the lid on as much as possible. Opening it repeatedly releases heat and makes the timing less predictable.

Doneness cue: Trust the fork more than the timer; the beef should give easily before you call the stew done.

A fork pressing into a cooked brown beef chunk in stew with gravy, potatoes, carrots, and peas nearby.
The timer is not the final test. The beef is ready when it gives under a fork and starts to separate into soft fibers.

Potato cue: The potato pieces should be tender but still visible, which is why large chunks matter from the beginning.

A spoon lifting a cooked potato chunk from beef stew while the potato holds its shape and gravy clings to it.
Meanwhile, the potatoes should stay intact. Soft edges are good; falling-apart potatoes usually mean the pieces were cut too small.

Step 7: Add Peas and Finish the Gravy

Mix cornstarch with cold water in a small bowl. Stir until smooth, then pour it into the stew. Add frozen peas. Cover and cook on high for 20 to 30 minutes.

Before-thickening cue: Judge the gravy after the long cook, not before, because the beef and vegetables release liquid as they soften.

Cooked beef stew in a slow cooker with beef, potatoes, carrots, peas, steam, and loose gravy before thickening.
After the long cook, the stew may look slightly loose. Do not panic yet; this is the right time to judge the real liquid level.

Slurry cue: Mix starch with cold water first so it disappears smoothly into the hot stew instead of clumping.

A small bowl of smooth cornstarch slurry being stirred with a spoon on a kitchen counter.
Mix cornstarch with cold water before it touches the stew. A smooth slurry thickens the gravy evenly and prevents dry clumps.

Thickening cue: Add slurry near the end, once you can see exactly how much liquid is in the pot.

A hand pouring white cornstarch slurry into hot beef stew in a slow cooker with beef, potatoes, and carrots visible.
Now thicken only what the slow cooker actually made. Adding slurry near the end gives you control over the final gravy texture.

Pea cue: Frozen peas only need a short finish, so add them late instead of letting them cook all day.

Bright green peas being poured from a small bowl into hot beef stew in a slow cooker.
Add peas late so they stay bright and sweet. If they cook all day, they lose color before the beef has time to become tender.

The gravy should turn glossier and begin to coat a spoon. A good stew often looks slightly under-liquid before cooking and glossy after this final step.

Texture cue: The gravy is finished when it looks glossy and clings to a spoon instead of running off like broth.

A spoon lifted above a slow cooker with thick brown gravy and a beef chunk coating the spoon.
Finally, check the spoon. The gravy should cling lightly and look glossy; if it runs like broth, give it more thickening time.

Step 8: Rest Before Serving

Let the stew rest for 10 to 15 minutes before serving. This gives the gravy time to settle and makes the stew easier to serve without breaking up the potatoes.

Resting cue: A short rest helps the finished gravy settle around the beef and vegetables before you ladle the stew.

Finished beef stew in a dark slow cooker with a ladle, steam, beef chunks, potatoes, carrots, peas, and brown gravy.
Once the gravy has thickened, let the stew rest briefly. This helps the sauce settle around the beef and vegetables before serving.

How Long to Cook It

Beef stew is done when the beef is soft enough to spoon apart, not just when the timer ends.

Setting Time Best Use
Low 8 to 9 hours Best tenderness and flavor
High 4 to 5 hours Faster option, but slightly less forgiving
Finish on high 20 to 30 minutes Thickening after slurry

Low is the better default for beef stew. High is fine when dinner needs to move faster, but low gives chuck roast and stew meat more time to soften. A perfect gravy around chewy beef is still not done, so let the meat lead the timing.

Slow cookers vary. If yours runs hot, check the stew a little earlier and keep the potato chunks large. If yours runs cool, the beef may need extra time on low.

How to Thicken the Gravy

Do not worry about perfect thickness at the start. Once the beef is tender and the vegetables have released their moisture, the slow cooker will show you what the gravy actually needs.

Body builds in two stages: a light flour coating at the start and a slurry at the finish. Think of the slurry as the final polish, not a rescue for bad stew.

Thickening Method Best For When to Add How to Use It
Flour on beef Body from the start Before cooking Toss beef lightly with flour before browning or slow cooking.
Cornstarch slurry Quick glossy finish Last 20–30 minutes Mix cornstarch with cold water, then stir into hot stew.
Arrowroot slurry Gluten-free or paleo-style thickening Last 10–20 minutes Add near the end and stop once the gravy thickens.
Mashed potatoes Natural thickening After potatoes are soft Mash a few potato pieces into the gravy.
Saucepan reduction Very loose stew At the end Reduce some liquid on the stove, then stir it back in.

Flour at the Beginning

The flour coating on the beef gives the stew some body as it cooks. If you brown the beef, the flour also helps create a richer surface and better color.

Use only enough flour to coat the beef lightly. Too much flour can make the gravy heavy or pasty.

Why the Slurry Waits Until the End

A cornstarch slurry is the easiest way to control the final texture. Always mix cornstarch with cold water before adding it to the hot stew. Dry cornstarch can clump if it goes straight into the slow cooker.

Do not add the slurry at the beginning. It can thin out or lose thickening power during the long cook. Add it after the long simmer, when you can see how much liquid is actually in the pot.

Use 2 tablespoons cornstarch mixed with ¼ cup cold water for the standard finish. For an extra-thick gravy, increase the cornstarch to 3 tablespoons while keeping the water at ¼ cup.

Emergency Fix for Very Thin Gravy

For very thin gravy, ladle some of the liquid into a saucepan and simmer it on the stove until reduced. Stir the reduced liquid back into the slow cooker. This is the fastest way to rescue a stew that started with too much broth.

Do not dump dry flour or cornstarch directly into the slow cooker. Do not add a large amount of flour at the end, or the stew can taste raw and pasty. Wait to fix the thickness until the beef is tender.

Back to top ↑

Crock Pot Beef Stew: Is It the Same Recipe?

Yes. Crock Pot is a type of slow cooker, so the same method works either way.

For the full recipe, a 6-quart / 5.7 L slow cooker is ideal. A 5-quart cooker can work if it is not overfilled, while a 7-quart cooker may leave the stew sitting a little shallower depending on the model.

Using a 3-quart cooker? Follow the small-batch version below.

Easy Dump-and-Go Method

This is the basic version for days when you want the stew started fast. Using a packet too? Check the seasoning packet notes so the stew does not become too salty.

Toss the beef with flour, salt, and pepper. Add it to the slow cooker with the potatoes, carrots, celery, and onion. Whisk the broth, tomato paste, Worcestershire sauce, balsamic if using, and beef base if using, then pour it over the top. Add the herbs, cover, and cook on low until the beef is tender.

During the final 20 to 30 minutes, stir in the cornstarch slurry and frozen peas. Browning gives better flavor, but this version still gives you a warm, hearty stew with very little effort.

Dump-and-go cue: Whisk the broth mixture before pouring it in so the tomato paste and seasonings reach the whole pot.

Raw beef, potatoes, carrots, onion, celery, herbs, and broth mixture being added to a dark slow cooker.
For the dump-and-go method, mix the broth, tomato paste, and seasonings well first. That gives the no-browning version a stronger base.

Can I Use Onion Soup Mix or a Beef Stew Seasoning Packet?

Yes, you can use onion soup mix or a beef stew seasoning packet. Shortcuts are not the problem. Stacking salty shortcuts is the problem.

Packets, bouillon, beef base, gravy mix, and store-bought broth can all be salty. Low-sodium broth gives you more room to adjust later.

A packet can add seasoning, but it does not automatically fix a loose gravy. You still need to control the amount of liquid and finish the texture once the stew has cooked. Taste after thickening, because salt can seem stronger once the gravy tightens.

Shortcut How to Use It What to Reduce
Onion soup mix Add 1 packet with the broth for a savory onion-style stew. Reduce salt and skip bouillon or beef base at first.
Beef stew seasoning packet Use as the main seasoning base for an easy family-style version. Use low-sodium broth and taste before adding more salt.
Brown gravy mix Use only if you want a packet-style thick gravy. Reduce cornstarch slurry so the stew does not become gummy.
Bouillon or beef base Use a small amount for deeper beef flavor. Reduce added salt and avoid stacking too many salty shortcuts.

Shortcut rule: if using a seasoning packet, skip the bouillon or beef base in the main recipe first. You can always add more flavor later, but it is harder to fix an over-salty stew.

Variations

Once the liquid and timing are right, you can change the flavor without throwing off the stew. Keep the liquid ratio steady when adding mushrooms, beer, or extra vegetables, then adjust the texture at the end.

Red Wine Slow Cooker Beef Stew

Use ½ cup red wine along with the beef broth. If browning the beef, use the wine to deglaze the pan before adding everything to the slow cooker. The wine gives the stew a deeper, rounder flavor.

Slow Cooker Beef Stew Without Wine

Replace the wine with extra beef broth, using 3 cups / 720 ml total broth. Keep the Worcestershire sauce and optional balsamic for depth. You can also add a little extra tomato paste or beef base if you want a richer flavor.

Guinness or Beer Beef Stew

Replace the red wine with stout or another dark beer. This gives the stew a darker, slightly malty flavor without changing the basic slow-cooker method.

Mushroom Beef Stew

Add 8 oz / 225 g sliced mushrooms. For best texture, sauté them briefly after browning the beef, then add them to the slow cooker. Mushrooms release liquid, so do not increase the broth.

Gluten-Free Slow Cooker Beef Stew

Use gluten-free flour to coat the beef, or skip the flour and rely on cornstarch or arrowroot slurry at the end. Make sure your Worcestershire sauce, broth, bouillon, and seasoning packets are gluten-free if needed.

Low-Carb or Keto-Style Beef Stew

For a lower-carb version, replace potatoes with turnips, radishes, mushrooms, or extra celery and carrots. Because potatoes and flour do a lot of the thickening here, keep the low-carb version simple and adjust the gravy at the end with a small amount of slurry if needed.

Beef Stew Over Rice

Serve leftovers over rice to stretch the meal. This works especially well if the stew has plenty of gravy. Cooking for two instead of making the full pot? Use the small-batch amounts. For fluffy grains that soak up sauce without turning mushy, use this guide on how to cook perfect rice.

Rice cue: Serve leftovers over rice when you want the gravy to stretch further and make a smaller amount feed more bowls.

Beef stew with beef, potatoes, carrots, and glossy brown gravy served over white rice in a bowl.
For leftovers, rice stretches the stew and catches extra gravy. It is especially useful when you want one pot to feed more bowls.

Small-Batch Version for Two

For one or two people, a 3-quart slow cooker is the better fit. The method stays the same, but the liquid needs to stay restrained.

Ingredient or Detail Small-Batch Amount
Beef ¾ to 1 lb / 340–450 g
Potatoes ½ lb / 225 g
Carrots 2 medium
Onion ½ medium
Beef broth and wine combined 1 to 1½ cups / 240–360 ml
Flour 1 to 1½ tablespoons / 8–12 g
Cornstarch 1 tablespoon / 8 g
Cold water for slurry 2 tablespoons / 30 ml
Slow cooker size 3-quart
Cook time 7 to 8 hours on low

A small slow cooker does not need much broth. The ingredients should not be swimming at the start. If your 3-quart cooker runs hot, start with the lower end of the liquid range and adjust near the end only if needed.

Small-batch cue: Match the recipe to the cooker size so a smaller amount of stew does not spread too thin.

A compact slow cooker with a modest amount of beef stew and two small bowls nearby, one filled and one empty.
For a small-batch beef stew, scale the pot as well as the ingredients. A compact cooker helps the stew stay rich instead of spreading too shallow.

Troubleshooting: Thin Gravy, Tough Beef, Mushy Potatoes

Stew is more forgiving than it looks. A thin pot, chewy beef, or bland broth does not mean dinner is lost; most fixes happen in the final stretch, once the beef is tender and you can see what the gravy actually needs.

Quick Fixes by Problem

Problem Likely Reason Fix
Stew is watery Too much broth, trapped steam, or vegetables releasing moisture Add slurry, cook uncovered on high, or reduce some liquid in a saucepan.
Beef is tough It has not cooked long enough, or the pieces are uneven Keep cooking on low until the beef is fork-tender.
Potatoes are mushy Pieces were too small or potatoes were too soft Use Yukon gold or red potatoes and cut them into larger chunks next time.
Carrots or potatoes are still firm Pieces were very large or the slow cooker runs cool Keep cooking on high for 20 to 40 minutes. If the beef is already perfect, remove the firm vegetables, simmer or microwave them with a splash of broth until tender, then return them to the stew.
Gravy tastes bland Needs more salt, umami, browning, or acidity Add Worcestershire, beef base, tomato paste, salt, or a tiny splash of vinegar.
Stew is too salty Packet, broth, or bouillon added too much salt Add unsalted broth if there is room, or serve over rice, potatoes, or noodles.
Stew is too thick Slurry thickened more than expected or stew rested/chilled Stir in warm broth a splash at a time until the gravy loosens.
Gravy is lumpy Dry starch was added directly Always mix cornstarch with cold water before adding it.
Stew is greasy Fatty beef or surface fat was not skimmed Skim the top before thickening.
Peas are dull and mushy They were added too early Add frozen peas during the last 10 to 20 minutes.

Back to top ↑

Storage, Freezing, and Reheating

Leftovers are one of the quiet rewards of beef stew. The gravy settles, the flavors round out, and the next bowl often tastes even deeper. For pairing ideas, jump to what to serve with beef stew.

Let the stew cool, then store leftovers in airtight containers. The gravy thickens as it chills, so do not be surprised if it looks firmer the next day.

Storage cue: Expect the gravy to thicken in the fridge, then loosen leftovers gently only if they need it.

Beef stew in a glass storage container with a reheated bowl of stew nearby on a kitchen counter.
The next day, the gravy will usually be thicker. Reheat gently and loosen it with a small splash of broth only if needed.
Storage Method Time Reheating Note
Refrigerator Up to 4 days Add a splash of broth or water if the gravy is too thick.
Freezer Up to 3 months Potatoes may soften slightly after thawing, but the flavor stays good.
Reheating Until steaming hot throughout Reheat gently on the stove or in the microwave, stirring occasionally.

One safety note: do not put frozen beef directly into the slow cooker. Thaw it first so it heats evenly and safely. The USDA slow cooker safety guide recommends thawing meat or poultry before slow cooking.

Frozen peas or frozen mixed vegetables are fine near the end because they are small and heat quickly.

Can I Prep It the Night Before?

Yes. You can cut the vegetables, trim the beef, and measure the seasonings the night before. Store everything covered in the refrigerator. If you brown the beef ahead, cool it quickly and refrigerate it separately or with the vegetables.

Do not leave the filled slow cooker insert sitting at room temperature for hours before cooking. Add the chilled ingredients to the slow cooker when you are ready to start the recipe, then begin cooking right away.

What to Serve With Beef Stew

A bowl of this can stand on its own, but the gravy almost demands something to catch it.

Serving cue: A good ladleful should bring beef, vegetables, and gravy together, not leave the chunks behind.

A ladle pouring beef stew with beef, potatoes, carrots, peas, and gravy into a light stoneware bowl.
When ladling, each serving should carry both chunks and gravy. That balance is what makes the bowl feel hearty instead of brothy.

For Soaking Up the Gravy

Bread cue: If the gravy clings to bread, the liquid balance and thickening step did their job.

A hand dragging crusty bread through thick beef stew gravy at the edge of a bowl.
This is the payoff for controlling the liquid: gravy thick enough to cling to bread, not just soak it with thin broth.

For Stretching Leftovers

  • Mashed potatoes
  • Rice
  • Buttered noodles
  • Toast
  • Pot pie crust

Leftover cue: Thick stew over mashed potatoes turns the same pot into a second dinner without making the bowl watery.

Beef stew with beef, carrots, potatoes, and brown gravy served over creamy mashed potatoes.
For a second serving idea, spoon the stew over mashed potatoes. Thick gravy should pool into the potatoes without making them watery.

For Something Fresh on the Side

  • Green salad
  • Cabbage slaw
  • Roasted green beans
  • Steamed peas
  • Chickpea salad

Frequently Asked Questions

These are the questions that usually come up once the stew is actually in the pot.

Should beef stew be covered with liquid in the slow cooker?

Not fully. The beef and vegetables should be moistened and surrounded by broth, but they do not need to be completely covered like soup. The ingredients release liquid as they cook, and too much broth at the start can make the stew watery.

Why is my slow cooker beef stew watery?

The usual reason is too much added broth. Vegetables also release moisture, and the covered slow cooker traps steam. Use less liquid at the start and thicken near the end with a cornstarch slurry.

How do I thicken slow cooker beef stew?

Use a slurry made from cornstarch and cold water, then stir it in during the final 20 to 30 minutes. For extra body, mash a few soft potato pieces into the gravy or reduce some liquid in a saucepan and stir it back in.

Why is my beef stew meat chewy after 8 hours?

It usually needs more time. Large pieces, cooler slow cookers, and collagen-rich cuts can take longer to soften. Keep cooking on low until the beef gives easily with a fork.

Can I use beef stew meat?

Yes. Beef stew meat is convenient and fits this recipe well. Check the pieces before cooking, cut very large chunks down, and keep cooking until the beef is tender all the way through.

What is the best beef for slow cooker beef stew?

Chuck roast is the first choice because it becomes tender and flavorful during long cooking. Beef stew meat also works well. Avoid very lean steak cuts because they can become dry or chewy in the slow cooker.

Can I put raw beef in slow cooker beef stew?

Yes. Browning adds flavor, but raw beef can go into the slow cooker. Toss it with seasoning and flour first.

Do I have to brown beef before adding it to the slow cooker?

No. Browning gives deeper color and flavor, but the no-browning version still works if you build flavor with tomato paste, Worcestershire sauce, optional balsamic, and beef base.

Is it better to cook beef stew on low or high?

Low is better for tenderness. High is fine when dinner needs to move faster, but low gives chuck roast and stew meat more time to soften.

How long does beef stew take in a slow cooker?

Most slow cooker beef stew takes about 8 hours on low or 4 to 5 hours on high. The exact time depends on your slow cooker and the size of the beef pieces. The stew is ready when the beef gives easily with a fork.

Can I add potatoes at the beginning?

Yes. Add potatoes at the beginning if they are cut into large chunks and you are using Yukon gold or red potatoes. Small pieces or softer russet potatoes can break down more during the long cook.

What potatoes are best for beef stew?

Yukon gold and red potatoes are best because they hold their shape. Russet potatoes work, but they soften more and can make the gravy cloudier.

Can I make slow cooker beef stew without wine?

Yes. Replace the wine with extra beef broth, using 3 cups / 720 ml total broth. Add Worcestershire sauce, optional balsamic vinegar, tomato paste, or beef base for extra depth.

Can I use onion soup mix?

Yes. Use low-sodium broth and reduce added salt because onion soup mix is salty. Skip bouillon at first.

Can I use gravy mix instead of cornstarch?

Yes, but add it carefully. Gravy mix already contains salt and thickener, so use less slurry and taste before adding more seasoning.

When should I add peas?

Add frozen peas during the last 10 to 20 minutes of cooking. They only need to heat through. Adding them at the beginning can make them mushy and dull.

Can I freeze slow cooker beef stew?

Yes. Freeze cooled stew in airtight containers for up to 3 months. The potatoes may become softer after thawing, but the flavor is still good.

Can I make this in a 3-quart slow cooker?

Yes. Use the small-batch version: ¾ to 1 lb / 340–450 g beef and 1 to 1½ cups / 240–360 ml total liquid. Keep the pot from looking flooded at the start.

Can I start with frozen beef?

No. Thaw the beef first before adding it to the slow cooker. Frozen peas or frozen vegetables are fine near the end because they heat quickly.

Can I prep this the night before?

Yes. Cut the vegetables, trim the beef, and measure seasonings ahead. Keep everything covered in the refrigerator. Start the slow cooker when you are ready to cook, not hours later on a delayed timer.

The Bottom Line: Tender Beef, Rich Gravy, Dinner Done

The best slow cooker beef stew is not complicated, but it does need the right balance. Use beef that benefits from long cooking, keep the liquid controlled, finish the gravy after the meat is tender, and let the stew rest before serving.

Once you know the liquid level your slow cooker likes, this becomes one of those dependable cold-weather dinners you can start early and trust. Keep the beef tender, the vegetables chunky, and the gravy finished at the end, and the whole pot feels calmer.

A good stew should feel generous, not complicated. Brown the beef when you want the deepest flavor. Skip browning when life is busy. Either way, the slow cooker gives you tender beef, soft vegetables, and a rich gravy that makes the kitchen smell like dinner has been taking care of itself all day.

Back to top ↑

Posted on Leave a comment

Baked Beans Recipe With Canned Beans, Canned Baked Beans, or Dried Beans

Homemade baked beans in a white ceramic dish with browned edges.

Good baked beans should taste like they took their time, even when you start with cans. The sauce should cling to the spoon, the edges should bubble and darken, and the flavor should land somewhere between sweet, tangy, deeply savory, and just smoky enough to feel slow-cooked.

This baked beans recipe is made for the way people actually cook: with whatever beans are already in the pantry. Plain canned beans, canned baked beans, and dried navy beans can all lead to a thick, balanced, homemade-tasting pan — with bacon, without pork, vegetarian, vegan, lower-sugar, and lower-sodium adjustments built in.

That means fewer store trips, less guessing with sweet canned beans, and dried beans that turn tender before they ever meet the sauce. Brown sugar and molasses bring familiar sweetness, mustard and vinegar add lift, onion and garlic make the beans taste cooked, and the oven gives you those glossy edges people keep sneaking from the pan.

This is the kind of side dish that quietly disappears from the corner of the pan while everyone is still “just tasting.”

For beans as a full dinner instead of a side dish, this bean stew recipe turns canned or cooked beans into a thick, hearty one-pot meal.

Quick Answer: How to Make Baked Beans

For easy homemade baked beans, start with plain canned white beans, navy beans, Great Northern beans, or cannellini beans. Drain and rinse the beans, then simmer them briefly in a sauce made with sautéed onion, ketchup or tomato sauce, a little barbecue sauce, brown sugar or molasses, mustard, apple cider vinegar, smoked paprika, and optional bacon.

Bake uncovered at 350°F / 175°C for 55 to 70 minutes, until the edges bubble, the sauce darkens, and it coats the beans instead of pooling around them. Rest the beans for 10 to 15 minutes before serving so the sauce can settle into the pan.

Spoon lifting thick baked beans from a ceramic baking dish.
Use the spoon test before serving. When the beans hold together in a full scoop, the sauce has reduced enough to rest.
Shortcut note: Starting with canned baked beans? Treat sweetness as an adjustment, not the starting point. Most cans already bring sugar, salt, and sauce; your job is to add onion, tang, cooked flavor, and a better baked texture.

This is an American-style baked beans recipe: thicker, darker, sweeter, and more barbecue-friendly than British-style tomato baked beans. For full amounts, jump to the recipe card, or keep reading for bean choices, pan size, texture cues, and fixes for watery, bland, too-sweet, or too-thick baked beans.

Baked Beans at a Glance

Most reliable beans: Plain canned navy beans, Great Northern beans, cannellini beans, or small white beans

Classic from-scratch beans: Dried navy beans

Quickest shortcut: Canned baked beans, adjusted with onion, mustard, vinegar, cooked flavor, and less sugar

Oven temperature: 350°F / 175°C

Cook time: 55 to 70 minutes for the main canned-bean version

Rest time: 10 to 15 minutes

Dish: 9×13-inch / 23×33 cm baking dish or Dutch oven

Texture cue: Bubbling edges, glossy top, and sauce that slowly settles when spooned

Serving cue: Serve after a short rest, when the sauce has stopped running and starts clinging to the beans

Why This Recipe Works

This recipe works because it does not force you into one starting point. A pantry can of white beans, a can of baked beans, and a bag of dried navy beans can all become a good pan — they just need slightly different handling.

The sauce is layered instead of just sweet. Onion and garlic create a savory base. Ketchup or tomato sauce gives body. Brown sugar and molasses bring that familiar baked-bean flavor. Mustard and vinegar keep the sauce bright. Smoked paprika adds a warm barbecue-style note, especially when there is no bacon in the pan.

Uncovered baking does the slow work. It concentrates the sauce, deepens the flavor, and gives the edges that slightly caramelized finish that makes the beans taste like they have been sitting near the grill for hours.

The baked beans balance test: Before baking, the sauce should taste a little stronger than the finished beans: sweet, tangy, savory, and loose enough to reduce in the oven. If it tastes flat, add mustard, vinegar, or a savory note before adding more sugar.

Canned Beans, Canned Baked Beans, or Dried Beans?

The best starting point is not the same for everyone. A weeknight pan, a potluck shortcut, and a from-scratch weekend batch all need slightly different handling.

Choose your starting point

  • Choose plain canned beans when you want the easiest homemade-tasting version.
  • Reach for canned baked beans when you need a fast potluck or cookout shortcut.
  • Start with dried navy beans when you want the most old-fashioned texture and do not mind extra time.
White beans draining in a colander over a bowl.
Plain canned white beans give you control. After draining and rinsing, you can build a cleaner baked beans sauce from scratch.
Starting Point When to Use It What to Know
Plain canned white beans Easy homemade flavor Fast, flexible, and less sweet than canned baked beans. This is the most reliable starting point for this recipe.
Canned baked beans Fast shortcut Already sweet and seasoned. Do not rinse them; adjust the sauce instead.
Dried navy beans From-scratch version Cook until fully tender before adding tomato, vinegar, molasses, or sugar.
Pork and beans Classic cookout shortcut Good with bacon, barbecue sauce, mustard, brown sugar, and a longer uncovered bake.
Cannellini or Great Northern beans Easy substitute Larger and creamier than navy beans, but reliable in a homemade sauce.
Pinto beans BBQ-style variation Earthier and heartier. Good for barbecue-style beans, potlucks, and mixed-bean versions.
Plain canned beans means cooked beans packed in liquid, usually not sweet. Canned baked beans means beans already packed in a seasoned tomato-style sauce. Treat them differently.

For this recipe, plain canned white beans are the easiest starting point. The beans are already tender, but the flavor is still yours to build — sweetness, tang, salt, depth, and final texture all stay in your hands.

Canned baked beans poured from an unlabeled can into a bowl.
Canned baked beans are already sweet and sauced. Upgrade them with onion, acid, smoke, and oven time instead of more sugar.

Which Beans Work Best for Baked Beans?

The classic bean for baked beans is the navy bean, also called a haricot bean in some places. It is small, creamy, and holds its shape well in a thick sauce.

The good news is that baked beans are forgiving. The exact bean matters less than tenderness, sauce balance, and enough oven time.

  • Navy beans / haricot beans: the classic baked bean choice.
  • Great Northern beans: slightly larger, creamy, and easy to use.
  • Cannellini beans: larger and softer, but very convenient.
  • Pinto beans: good for barbecue-style baked beans.
  • Mixed beans: better for potluck or barbecue-style versions than classic baked beans.

For the cleanest homemade flavor, use plain canned navy beans or Great Northern beans. For the most traditional from-scratch version, use dried navy beans. All you have is cannellini or small white beans? Use them. As long as the beans are tender and the sauce is balanced, the pan will still work.

Three bowls showing different white beans for baked beans.
Navy beans are traditional, but Great Northern and cannellini beans also work. Choose white beans that soften well and hold sauce.

For a more complete rice-and-beans meal, this red beans and rice recipe is a better fit than a sweet-savory baked bean side.

Which Pan or Pot Works Best?

The dish changes how quickly the sauce settles around the beans. Wide baking dishes give more surface area, so the sauce tightens faster. Deeper casseroles keep the beans saucier, while a Dutch oven lets you sauté, simmer, and bake in the same pot.

  • 9×13-inch / 23×33 cm baking dish: the most reliable choice for a glossy, spoonable sauce because it gives the beans more surface area.
  • Dutch oven: best for one-pot cooking from stovetop to oven.
  • 2–3 quart casserole dish: works well, but keeps the beans saucier and may need more time.
  • Slow cooker: useful for keeping baked beans warm, but it will not give the same caramelized edges.
  • Thin metal pan: not ideal for long baking because sugary sauce can scorch at the edges or bottom.

Choose the 9×13 dish for a spoonable, glossy sauce. A Dutch oven is better for one-pot convenience. For parties, bake the beans first, then keep them warm in a slow cooker. Need a full slow-cooker beans-and-sausage dinner? Use this slow cooker sausage casserole recipe.

Wide baking dish and Dutch oven shown as baked beans pan options.
The pan changes the result. A wide dish reduces sauce faster, while a deeper Dutch oven keeps baked beans softer and saucier.

Ingredients You’ll Need

This recipe makes one 9×13-inch pan, about 8 to 10 servings.

Beans

Use 3 cans of plain white beans, 15 oz / 425 g each, drained and rinsed. Navy beans, Great Northern beans, cannellini beans, or small white beans all work.

If your cans are 400 g / 14 oz, use 3 cans for the same sauce ratio. Use 4 cans only for a larger batch, and increase the sauce by about one-quarter so the beans do not turn out under-sauced.

Onion and Garlic

Onion gives the sauce its savory base. Garlic adds depth. This is where the canned-bean flavor starts becoming cooked, not just mixed.

Ketchup, Tomato Sauce, or Tomato Paste

Ketchup gives sweetness, tang, and body. Tomato sauce gives a less sweet base. Tomato paste is optional, but useful when you want the sauce to cling better with less added sugar.

Barbecue Sauce

A little barbecue sauce adds cookout flavor and roundness. Use it as a background note, not the whole personality of the dish.

Brown Sugar and Molasses

Brown sugar gives quick sweetness. Molasses gives deeper, darker baked-bean flavor. Together, they create the old-fashioned sweetness people expect from baked beans. Use both for a classic sweet-savory sauce, or reduce the brown sugar for a less sweet pan.

Mustard and Vinegar

Mustard and vinegar keep the sauce balanced. They should not make the beans sour. They should make the sweetness taste brighter and less heavy. This is the difference between beans that taste flat and beans people keep spooning back onto the plate.

Smoked Paprika

Smoked paprika gives a warm, savory edge, especially useful when you are making baked beans without bacon or pork.

Worcestershire, Soy Sauce, or Tamari

A small amount adds rounded flavor. Standard Worcestershire sauce often contains anchovies, so use vegetarian Worcestershire, soy sauce, or tamari for vegetarian or vegan baked beans. A little goes a long way, especially once the sauce reduces.

Tomato, mustard, and molasses stirred into baked beans sauce.
Build the sauce in layers: tomato for body, mustard for brightness, molasses for depth, and spice for a slow-cooked finish.

Bacon, Optional

Bacon adds salt, fat, and a savory edge. It is good, but not required. For no-pork baked beans, use olive oil or butter and build flavor with smoked paprika, mustard, vinegar, and a little vegetarian Worcestershire, soy sauce, or tamari.

Important: Starting with canned baked beans instead of plain canned beans? Taste before adding brown sugar or molasses.

What the Sauce Should Look Like

Baked beans are simple, but the texture matters. Too loose, and they taste like beans floating in sauce. Too dry, and they feel heavy. Aim for a sauce that coats the beans, bubbles at the edges, and firms up slightly as it rests.

A loose-looking pan halfway through baking is normal. The beans need room to bake into the sauce, and the final stretch plus the rest time are where the sauce turns spoonable.

Texture cues by stage

Stage What You Should See What It Means
Before baking The beans look saucy and slightly loose. The oven will reduce the sauce, so do not start with a dry mixture.
Halfway through baking The edges bubble first and the top starts to darken slightly. Stir once if the edges are reducing much faster than the center.
At the end The surface looks glossy and the sauce no longer pools like liquid. The beans are nearly ready. The sauce will cling better after resting.
After resting A spoon leaves a slow trail through the beans. This is the best serving texture.

If the sauce looks too thick before baking, add a splash of water, stock, or bean cooking liquid. If it looks watery near the end, keep baking uncovered and let the pan sit before judging the final texture. A little looseness at the end is fine; beans that look perfect the second they leave the oven can become too thick after resting.

Close-up of baked beans bubbling along the edge of a dish.
Bubbling edges mean the sauce is concentrating. As the sides darken slightly, the baked beans move from saucy to properly baked.

How to Make Baked Beans With Canned Beans

Once the beans and pan are sorted, the method is simple: build flavor in a skillet, let the oven do the slow work, then give the pan a short rest before serving.

1. Heat the Oven

Preheat the oven to 350°F / 175°C. Use a 9×13-inch / 23×33 cm baking dish for more surface area, or a Dutch oven to sauté and bake in the same pot.

2. Cook the Bacon, If Using

If using bacon, cook 4 to 6 slices in a skillet until partly crisp. Remove the bacon, chop it, and keep about 1 to 2 tablespoons of the drippings in the pan. If skipping bacon, heat 2 tablespoons of olive oil, butter, or another cooking fat instead.

3. Sauté the Onion and Garlic

Add 1 finely chopped medium onion and cook for 5 to 7 minutes, until soft and lightly golden. Add 2 minced garlic cloves and cook for another 30 seconds.

This step is small, but it changes the whole dish. It makes the beans taste cooked instead of simply mixed.

Chopped onion sautéing in a skillet with a wooden spoon.
Start with onion when you want homemade flavor. This quick sauté gives canned or plain beans a savory base before the sauce goes in.

4. Build the Sauce

Stir in ketchup or tomato sauce, barbecue sauce, brown sugar, molasses, mustard, vinegar, smoked paprika, and black pepper. Tomato paste makes the sauce thicker and less sweet. Worcestershire, soy sauce, or tamari gives the pan more body when the flavor tastes flat.

Loosen the sauce with ¼ to ⅓ cup / 60 to 80 ml water, stock, or bean cooking liquid if it looks too tight before baking. Let it bubble for 2 to 3 minutes so everything comes together. Hold back extra salt until after the beans have baked and the sauce has concentrated.

Reddish-brown baked beans sauce coating a spoon in a skillet.
Before adding beans, check the sauce on the spoon. It should taste bold now because the beans will soften the flavor later.

5. Add the Beans

Stir in the drained and rinsed beans gently so they are coated in the sauce. Taste the sauce before baking. It should be sweet, tangy, savory, and slightly stronger than you want the finished dish to be, because the beans will mellow it.

White beans folded into reddish-brown sauce with a wooden spoon.
Fold gently at this stage. The beans should stay mostly whole while the sauce coats them and prepares to reduce in the oven.

6. Bake Uncovered

Transfer the beans to the baking dish. Scatter the chopped bacon over the top if using. Bake uncovered for 55 to 70 minutes, until the edges are bubbling and the sauce has tightened around the beans. Stir once around the halfway point if the edges are getting much darker than the center.

Saucy baked beans in a cream baking dish before baking.
Before baking, the mixture should look looser than the final dish. That extra sauce protects the beans while the oven reduces it.

The pan should still look saucy when it goes into the oven. Uncovered heat will reduce the liquid, darken the edges, and turn the mixture into proper baked beans.

Baking dish of baked beans being placed on an oven rack.
Uncovered oven time is where the recipe changes. The sauce thickens, the edges darken, and the flavors settle into the beans.

The edges usually tell you first. They bubble, darken, and start to look sticky before the center fully catches up.

Finished baked beans bubbling in a cream baking dish.
When the pan is bubbling and the edges look darker, stop before it dries out. Resting will finish thickening the sauce.

If the beans still look a little saucy at 45 minutes, that is normal. The final stretch of baking and the short rest after the oven usually bring the sauce together.

7. Rest and Adjust

Let the baked beans rest for 10 to 15 minutes before serving. This is when the sauce stops looking separate and starts tasting settled. Taste after resting, then adjust with a little more vinegar, mustard, black pepper, or salt if needed.

Spoon dragged through rested baked beans, leaving a visible trail.
After resting, drag a spoon through the pan. A slow trail means the baked beans are thick enough for serving.
Doneness cue: The beans are ready when the edges are bubbling, the top looks glossy, and the sauce slowly settles back when you drag a spoon through it.

Recipe Card: Easy Homemade Baked Beans

Tender white beans baked in a sweet-savory tomato-molasses sauce with onion, mustard, vinegar, smoked paprika, and optional bacon. Start with the main canned-bean version below, then use the notes for canned baked beans, dried navy beans, vegetarian, vegan, low-sugar, low-sodium, and no-pork adjustments.

Prep Time
15 minutes
Cook Time
55 to 70 minutes
Rest Time
10 to 15 minutes
Total Time
About 1 hour 30 minutes
Servings
8 to 10

Times are for the canned-bean version. The dried-bean version needs soaking and simmering time before baking.

Equipment

  • 9×13-inch / 23×33 cm baking dish or Dutch oven
  • Large skillet
  • Spoon or spatula
  • Foil, optional

Ingredients

Beans and Base

  • 3 cans plain white beans, 15 oz / 425 g each, drained and rinsed, or 3 cans white beans, 400 g / 14 oz each, drained and rinsed
  • 2 tablespoons olive oil, butter, or bacon drippings
  • 1 medium onion, finely chopped
  • 2 garlic cloves, minced, or ½ teaspoon garlic powder

Sauce

  • ½ cup / 120 ml ketchup or tomato sauce
  • ¼ cup / 60 ml barbecue sauce
  • ¼ cup / 50 g brown sugar
  • 2 tablespoons molasses or maple syrup
  • 2 tablespoons yellow mustard or Dijon mustard
  • 1 tablespoon apple cider vinegar, plus more to taste
  • 1 teaspoon smoked paprika
  • ½ teaspoon black pepper
  • ¼ to ⅓ cup / 60 to 80 ml water, stock, or bean cooking liquid, as needed

Optional Flavor Boosters

  • 1 tablespoon tomato paste, for a thicker sauce
  • 1 teaspoon Worcestershire sauce, soy sauce, or tamari
  • ⅛ teaspoon liquid smoke, optional; use up to ¼ teaspoon only for a stronger smoky flavor
  • Salt, added carefully at the end, to taste

Optional Bacon

  • 4 to 6 slices bacon

Instructions

  1. Preheat the oven to 350°F / 175°C.
  2. If using bacon, cook it in a skillet until partly crisp. Remove, chop, and set aside. Keep 1 to 2 tablespoons of the drippings in the pan. If skipping bacon, heat olive oil or butter instead.
  3. Add the onion and cook for 5 to 7 minutes, until soft and lightly golden. Add the garlic and cook for 30 seconds.
  4. Stir in the ketchup or tomato sauce, barbecue sauce, brown sugar, molasses, mustard, vinegar, smoked paprika, and black pepper. Add tomato paste, Worcestershire, soy sauce, tamari, or liquid smoke if using. Add a splash of water, stock, or bean cooking liquid if the sauce looks too tight. Do not add extra salt yet unless you are sure your beans and sauces are unsalted.
  5. Stir in the drained beans gently until coated.
  6. Transfer to a 9×13-inch / 23×33 cm baking dish or keep in a Dutch oven. Scatter bacon over the top if using.
  7. Bake uncovered for 55 to 70 minutes, until bubbling at the edges and glossy. Stir once if the edges are getting darker faster than the center.
  8. Rest for 10 to 15 minutes before serving. Taste and adjust with a little more vinegar, mustard, black pepper, or salt if needed.

Notes

Bean starting points

  • Balance test: Before baking, the sauce should taste sweet, tangy, savory, and slightly stronger than the finished beans.
  • Canned baked beans: Use 2 large cans, about 28 oz / 794 g each. Do not rinse them. Start with no extra sugar; add onion, mustard, vinegar, smoked paprika, and a little barbecue sauce.
  • Dried beans: For a batch close to the main recipe, use 12 oz / 340 g dried navy beans. Soak overnight, simmer until creamy, then sauce and bake. With 1 lb / 454 g dried beans, increase the sauce by about one-third.

Adjustments

  • Vegetarian baked beans: Skip bacon and use olive oil or butter. Add smoked paprika, mustard, vinegar, and vegetarian Worcestershire or soy sauce for rounded flavor.
  • Vegan baked beans: Use olive oil, maple syrup or molasses, smoked paprika, tomato sauce, mustard, vinegar, and tamari or soy sauce. Check that your barbecue sauce is vegan.
  • Low-sugar baked beans: Reduce brown sugar by half, use tomato sauce instead of ketchup, and balance the sauce with mustard, vinegar, tomato paste, and smoked paprika.
  • Low-sodium baked beans: Rinsed plain beans are easier to control than canned baked beans. Use low-sodium tomato sauce and salt only at the end.
  • Salt control: Bacon, canned baked beans, Worcestershire, soy sauce, tamari, and salted beans can all add salt, so taste before adding more.
  • Thicker baked beans: Bake uncovered longer, use a wider dish, or mash a few spoonfuls of beans and stir them back in.
  • Storage: Refrigerate for 3 to 4 days or freeze for up to 3 months.
Bowl of homemade baked beans served beside the baking dish.
A good serving bowl should show tender beans coated in sauce, without a watery pool at the bottom.

Back to top ↑

How to Make Baked Beans From Dried Navy Beans

For a from-scratch batch close to the main canned-bean recipe, use 12 oz / 340 g dried navy beans. A full 1 lb / 454 g bag makes a larger batch, so increase the sauce by about one-third.

Dried navy beans and soaked beans in bowls on a wooden table.
Dried navy beans need to turn tender first. Then the molasses, mustard, tomato, and vinegar can season them without keeping them firm.

Think of dried beans as a two-step job: first make them tender in water, then make them flavorful in sauce.

Rinse the beans, then soak them in plenty of water for 8 to 12 hours. Drain and rinse again. Put the beans in a pot with fresh water and simmer until tender, usually 45 to 90 minutes, depending on the age of the beans.

The beans should be creamy inside before they go into the sauce. Do not stop when they are merely “not crunchy.” Once tomato, vinegar, molasses, or sugar are added, firm beans can take much longer to soften.

Cooked navy beans before sauce with a spoon pressing into them.
Test dried beans before adding sweet or acidic sauce. Otherwise, the flavor may be right while the beans stay too firm.

Save some of the bean cooking liquid before draining. Once the beans are tender, continue with the sauce and baking method above. Bake at 325°F / 163°C for a deeper, slower version, or 350°F / 175°C for the standard version. Add reserved bean liquid if the beans get too thick before the sauce is done.

Important dried-bean rule: Tenderness comes before sauce. Cook dried beans until creamy and tender before adding tomato, vinegar, molasses, or sugar.

Can You Quick-Soak the Beans?

Yes. Cover rinsed beans with plenty of water, bring them to a boil, boil for 2 minutes, then turn off the heat. Cover and let them rest for 1 hour. Drain, rinse, and simmer in fresh water until tender before adding the sauce.

Can You Skip Soaking the Beans?

You can, but the simmering time will be longer and less predictable. Rinse the beans, cover them with plenty of water, and simmer until fully tender before adding them to the sauce.

If beans stay firm after a long simmer, they may be old. Keep simmering them in fresh water before adding sauce; do not try to force them tender in a sweet-acidic sauce.

How Much Cooked Bean Do You Get From Dried Beans?

One pound / 454 g dried navy beans usually gives roughly 6 to 7 cups cooked beans, depending on the beans and cooking time. That is more than the main canned-bean batch, so increase the sauce if using the full pound.

For a deeper dry-bean preparation guide, North Dakota State University Extension has a useful all-about-beans guide.

How to Make Canned Baked Beans Taste Homemade

Canned baked beans can taste like a real baked side dish, not just something warmed from a tin. The fastest route is simple: keep the can as the base, add onion and tang, hold back on sweetness, then bake uncovered until the sauce tastes cooked instead of canned.

Use 2 large cans of baked beans, about 28 oz / 794 g each. Do not rinse them; the sauce is part of the shortcut. Sauté a small chopped onion in oil, butter, or bacon drippings, then add mustard, apple cider vinegar, smoked paprika, a little barbecue sauce, and bacon if using. Add extra sugar only after tasting.

Canned baked beans stirred in a skillet with onion and seasoning.
To make canned baked beans taste homemade, warm them with onion, mustard, vinegar, and smoky seasoning before baking.

Bake uncovered at 350°F / 175°C for 45 to 60 minutes, until bubbling and glossy. If the beans still look loose, give them more uncovered time. A top that darkens too quickly just needs one stir and a loose cover.

Upgraded canned baked beans baked in a small casserole dish.
After baking, the shortcut should look darker, thicker, and more cooked-in. That is the difference between opened and upgraded.
Canned baked beans usually need onion, tang, and enough cooked flavor to stop tasting straight from the can — not more sweetness first.

Quick Fixes for Canned Baked Beans

Problem What to Add or Do
Too sweet Add mustard, vinegar, tomato paste, smoked paprika, or more unsweetened beans.
Watery sauce Bake uncovered, use a wider dish, simmer first, or mash a few beans.
Bland flavor Add sautéed onion, garlic, mustard, smoked paprika, Worcestershire, soy sauce, or tamari.
Too salty Add unsalted beans, tomato sauce, or a splash of water. Avoid adding more BBQ sauce or bacon.
Thin sauce Bake longer uncovered, use tomato paste, or mash a small portion of beans.
Canned taste Sauté onion first, add acid and rounded flavor, then bake uncovered until the sauce darkens and clings to the beans.

A slow cooker is useful for keeping canned baked beans warm, but it will leave them softer and saucier than the oven. Bake first for the best flavor, then hold warm for serving.

Baked Beans Time and Temperature Guide

The oven temperature changes the finish. A hotter oven reduces the sauce quickly. A lower oven gives a deeper, slower flavor. For most home cooks, 350°F / 175°C is the most reliable default because it tightens the sauce without drying the beans too fast.

Method Temperature Time Use It For What to Watch
Quick canned baked beans 400°F / 204°C 30–35 minutes Fast weeknight side Reduces quickly, so watch for dry edges.
Standard baked beans 350°F / 175°C 55–70 minutes Most reliable method Good balance of reduction and control.
Low-and-slow baked beans 325°F / 163°C 1½–2 hours Deeper cookout flavor Add liquid if the sauce gets too tight before flavor develops.
Dried bean baked beans 325–350°F / 163–175°C 1½–3 hours after beans are cooked From-scratch version Beans must be fully tender before saucing.
Slow cooker baked beans Low 3–5 hours for canned base Potlucks and keeping warm Convenient, but less caramelized and often saucier.

If you are building a holiday or potluck oven schedule, baked beans also sit well beside a 350°F side like green bean casserole. For a sweeter holiday table, they can share the make-ahead plan with sweet potato casserole.

Should Baked Beans Be Covered or Uncovered?

Bake baked beans uncovered when you want the sauce to reduce, tighten, and darken around the edges. This is the most reliable method for this version.

Cover the dish when the beans are drying out before they are hot and tender, or when the edges are darkening too quickly. For very saucy beans, bake covered for the first 30 minutes, then uncover and continue baking until the sauce has lost its watery edge.

Easy rule: Watery beans need uncovered baking. Dry edges need a stir and a loose cover.
Baked beans loosely covered with foil lifted at one corner.
Use foil only when the edges darken too fast. Keep it loose so steam can escape and the sauce can still finish.

Easy Baked Beans Variations

Once the basic pan is working, these small changes let you take it toward BBQ, Boston-style, vegetarian, vegan, low-sugar, or no-pork baked beans without starting over.

Southern BBQ Baked Beans

This is the cookout version: a little bolder, a little smokier, and ready for a plate with ribs, hot dogs, grilled chicken, cornbread, or air fryer burgers. Lean more into barbecue sauce, smoked paprika, bacon, and brown sugar, but stop before the beans taste like bottled sauce.

Southern-style baked beans with bacon served beside cornbread.
Southern BBQ baked beans should feel smoky and bold. Bacon, darker sauce, and cornbread push them toward cookout territory.

Boston-Style Baked Beans

Boston-style baked beans are darker, slower, and more molasses-forward. Lean on navy beans, molasses, mustard, onion, and bacon or salt pork, then bake lower and slower for a more traditional pan.

Boston-style baked beans in a dark Dutch oven with molasses sauce.
Boston-style baked beans lean deeper and more molasses-forward. Navy beans and a slower bake give this version its old-fashioned feel.

Vegetarian Baked Beans

Vegetarian baked beans still need the same rounded, cookout-style flavor. Skip the bacon, but replace what it usually brings: richness from olive oil or butter, smoke from paprika, brightness from mustard and vinegar, and a salt-and-umami note from vegetarian Worcestershire, soy sauce, or tamari.

Vegan Baked Beans

Vegan baked beans can still taste full and glossy. Use olive oil instead of butter or bacon fat, maple syrup or molasses for sweetness, tomato sauce or ketchup for body, and tamari or soy sauce for a deeper finish. Standard Worcestershire sauce often contains anchovies, so use vegetarian Worcestershire, soy sauce, or tamari instead. Check that your barbecue sauce is vegan too.

Vegan baked beans in a cream dish with toast nearby.
Vegan baked beans still need savory depth. Onion, smoked paprika, mustard, vinegar, and tamari can replace the bacon backbone.

For a lighter plant-based plate, pair these beans with a fresh chickpea salad or add homemade falafel for a more filling spread.

Low-Sugar Baked Beans

Low-sugar baked beans should still taste glossy, tangy, and cookout-worthy — just not candy-sweet. The easiest route is plain canned beans plus tomato sauce, mustard, vinegar, onion, smoked paprika, and just enough molasses for depth.

Start with tomato sauce instead of ketchup, cut the brown sugar in half, and taste before adding more sweetness. Some barbecue sauces are as sweet as ketchup, so choose a less sweet sauce or lean on tomato paste and warm spice instead.

Low-Sodium Baked Beans

Plain canned beans give you the most control because you can rinse them, choose your tomato base, and add salt only after the sauce has reduced. Choose low-sodium or no-salt-added canned beans when possible, rinse well, use low-sodium tomato sauce, and go easy on barbecue sauce, Worcestershire, soy sauce, bacon, and added salt.

For flavor without more salt, lean on onion, garlic, mustard, vinegar, smoked paprika, tomato paste, and a small amount of molasses.

No-Pork Baked Beans

No-pork baked beans need a little help replacing the smoky, salty backbone bacon usually gives. Caramelized onion, smoked paprika, mustard, vinegar, and a small splash of soy sauce, tamari, or vegetarian Worcestershire do the job well. Liquid smoke can help too, but start with only ⅛ teaspoon.

For a no-pork protein plate, serve the beans with baked chicken breast and a crisp salad instead of bacon-heavy sides.

Spicy Baked Beans

To make the pan spicy, build heat slowly so it supports the sweet-smoky sauce instead of taking over. Chipotle powder, cayenne, hot sauce, jalapeño, chilli flakes, or diced green chillies all work.

American vs British Baked Beans

American-style baked beans and British-style baked beans are related, but they do not taste the same. This recipe leans American-style: thicker, sweeter, darker, and more suited to BBQ plates and potlucks. British-style baked beans are usually softer, more tomato-forward, and often served on toast or baked potatoes.

  • American baked beans: thicker, sweeter, often smoky, with molasses, brown sugar, mustard, BBQ sauce, and optional bacon.
  • British-style baked beans: softer, more tomato-forward, less smoky, and usually served on toast, baked potatoes, or breakfast plates.

For a British-style version, skip the barbecue sauce, reduce the sugar, use tomato sauce or passata, and keep the sauce looser and more tomato-forward.

Common Baked Beans Mistakes to Avoid

  • Adding full sugar to canned baked beans: Taste first. They may already be sweet enough.
  • Skipping the onion step: Sautéed onion is one of the easiest ways to make canned beans taste homemade.
  • Covering the dish the whole time: Covered beans stay saucier. Uncovered baking reduces the sauce.
  • Adding acidic sauce before dried beans are tender: Tomato, vinegar, molasses, and sugar can slow softening.
  • Using a dish that is too deep: A deep dish reduces slowly. Use a wider dish if you want the sauce to tighten faster.
  • Skipping the rest time: Baked beans become more spoonable after 10 to 15 minutes out of the oven.
  • Salting too early: Bacon, canned beans, BBQ sauce, Worcestershire, soy sauce, and canned baked beans can all add salt.

How to Fix Baked Beans

Even if the pan does not look perfect when it comes out of the oven, baked beans are forgiving. Most problems are easy to fix with time, heat, or one balancing ingredient.

Watery baked beans in a deep cream casserole with loose sauce.
Thin sauce around the spoon means the baked beans need more uncovered time. Let the liquid reduce before serving.
Problem Fix
Watery baked beans Bake uncovered longer, use a wider dish, simmer the sauce first, or mash some beans.
Too sweet Add vinegar, mustard, tomato paste, smoked paprika, or more unsweetened beans.
Salty sauce Add unsalted beans, tomato sauce, or a splash of water; serve with rice or potatoes.
Overly thick beans Add water, stock, tomato sauce, or bean cooking liquid.
Bland flavor Add salt carefully, mustard, vinegar, smoked paprika, onion, garlic, Worcestershire, soy sauce, or tamari.
Hard dried beans Dried beans were not cooked enough before adding sauce. Simmer them until creamy before baking.
Dry baked beans Add liquid, cover loosely, and reduce the bake time next time.
Burned edges Lower the oven temperature, stir once, or use a heavier dish.

If your beans taste flat, they probably need tang, salt, or a deeper savory note — not more sugar. For thin beans, keep baking uncovered or mash a few beans before serving.

Thickened baked beans with reduced sauce and a spoon in the pan.
To thicken baked beans, remove moisture or add body. Bake uncovered longer, use a wider pan, or mash a few beans in.

What to Serve With Baked Beans

Baked beans can be a side dish, a potluck pan, or part of a simple comfort meal. They sit naturally beside smoky grilled foods like slow cooker pulled pork, but they can also turn toast, rice, potatoes, or eggs into something more filling.

Think of baked beans as the warm, saucy anchor on the plate. For the best plate, pair them with one smoky or grilled main, one crisp side, and one plain starch so the meal has contrast.

Baked beans served with slaw, cornbread, and grilled meat.
Build the plate with contrast: smoky grilled food, crisp slaw, and cornbread or bread to balance the sweet-savory beans.

For a BBQ or Cookout Plate

Build the plate around contrast: smoky meat, cool salad, crisp slaw, and these warm beans.

  • Burgers
  • Hot dogs
  • Ribs
  • Sausages
  • Grilled chicken
  • Corn on the cob
  • Potato salad
  • Coleslaw
  • Cornbread

A smoky sliced-meat plate works just as well as sandwiches, so these beans pair nicely with smoked pork loin. Creamy potato salad or crisp coleslaw adds the cold, fresh contrast needed against the sweet-savory sauce.

Easy Comfort Meal

Choose a plain starch when you want the beans to feel more like dinner. Toast, rice, potatoes, and eggs all catch the sauce well without competing with it.

  • Toast
  • Rice
  • Baked potatoes
  • Eggs
  • Roasted vegetables
  • Buttered bread

For a cozier plate, add toast, eggs, or a scoop of garlic mashed potatoes beside the beans.

Vegetarian Plate

Vegetarian plates work best when the beans are paired with something fresh, roasted, or crisp. That keeps the meal from feeling too soft.

  • Baked potatoes
  • Rice bowls
  • Grilled mushrooms
  • Roasted sweet potatoes
  • Simple green salad
  • Toast with herbs or chilli flakes

Leftover Ideas

Spoon leftover baked beans over toast, rice, baked potatoes, or roasted sweet potatoes. Serve them with eggs, fold them into wraps, use them as a quick side with sausages, or warm them until the sauce loosens again for a second-day lunch.

Make Ahead, Storage, Freezing, and Reheating

Baked beans are one of the rare sides that can become better after a night in the fridge. The sauce has time to settle into the beans, and reheating usually makes the pan taste even more rounded.

  • Make ahead: Cook 1 to 2 days ahead and refrigerate.
  • Fridge: Store leftovers in an airtight container for 3 to 4 days.
  • Freezer: Freeze for up to 3 months.
  • Reheating: Warm gently on the stovetop or cover and bake at 325°F / 163°C until hot.
  • If too thick after chilling: Add a splash of water, stock, or tomato sauce.
  • For parties: Bake first, then keep warm in a slow cooker on the warm setting while serving.
Baked beans in a glass container and saucepan for reheating.
Baked beans often improve overnight. When reheating, loosen the sauce with water, stock, or tomato sauce only as needed.
Baked beans thicken in the fridge and after freezing. Warm them first, then loosen with a little water, stock, or tomato sauce if needed. If serving for a party, refrigerate leftovers within 2 hours; this follows the standard FoodSafety.gov 2-hour rule.

Frequently Asked Questions

If you are adjusting the recipe for different beans, sweetness levels, or make-ahead timing, these quick answers should help.

What beans are used for baked beans?

Navy beans are the classic choice for baked beans, but Great Northern beans, cannellini beans, small white beans, and pinto beans also work. Plain canned white beans are the easiest option when you want homemade baked beans without a long cooking time.

Can I make baked beans with canned beans?

Yes. Plain canned beans are the easiest shortcut because the beans are already tender, but the sauce is still yours to control. Drain and rinse them, then bake them in the homemade sauce until it coats the beans instead of pooling around them.

Can I use canned baked beans for this recipe?

Yes. Treat canned baked beans as a shortcut base, not a blank canvas. They already bring sauce, sweetness, and salt, so add onion, mustard, vinegar, smoked paprika, and only a little extra sugar after tasting.

Do I drain canned beans for baked beans?

Drain and rinse plain canned beans. Do not rinse canned baked beans because their sauce is part of the shortcut. Extra liquid can be handled in the oven by baking uncovered.

How do you make canned baked beans taste homemade?

Sauté onion first, add mustard and vinegar for balance, use smoked paprika or a tiny amount of liquid smoke for depth, and bake uncovered until the sauce tastes cooked instead of canned.

Can I make baked beans from dried beans?

Yes. Use dried navy beans, soak them overnight or quick-soak them, then simmer until creamy and tender before adding the sauce. Think of dried beans in two steps: make them tender in water first, then make them flavorful in sauce.

Why are my baked beans watery?

They usually need more uncovered baking time. Baked beans often look loose before they come together; the last stretch in the oven and the 10-minute rest are where the sauce turns spoonable.

How do I thicken baked beans?

Bake them uncovered for longer, use a wider dish, simmer the sauce before baking, or mash a few spoonfuls of beans and stir them back in. Resting the beans also helps the sauce cling better.

Should baked beans be covered while baking?

For thicker baked beans, bake them uncovered. Cover them only when they are drying out too quickly or when the edges are darkening before the center is hot.

How do I make baked beans less sweet?

Use less brown sugar, reduce or skip extra molasses, and balance the sauce with mustard, vinegar, tomato paste, smoked paprika, and unsweetened beans. Beans that are already too sweet usually need acidity and rounded flavor, not more sugar.

Can I make baked beans without pork or bacon?

Yes. Bacon adds smoke, salt, fat, and umami, but you can replace those with smoked paprika, sautéed onion, mustard, vinegar, and a little vegetarian Worcestershire, soy sauce, or tamari.

Can baked beans be vegetarian or vegan?

Yes. Skip the bacon and use olive oil. For vegetarian or vegan depth, use smoked paprika, mustard, vinegar, caramelized onion, and soy sauce, tamari, or vegetarian Worcestershire sauce. Standard Worcestershire often contains anchovies, so check the label or use a vegetarian alternative.

Can I make baked beans in a slow cooker?

Yes. Cook canned-bean baked beans on low for about 3 to 5 hours. The slow cooker is useful for potlucks and keeping beans warm, but the sauce will not caramelize the same way it does in the oven. For the best texture, bake first and keep warm in the slow cooker.

Are baked beans better the next day?

Often, yes. The sauce settles and the flavor deepens after a night in the fridge. Reheat gently and add a splash of water, stock, or tomato sauce if the beans are too thick.

Can baked beans be made ahead?

Yes. Baked beans are one of those sides that often tastes better the next day. Make them 1 to 2 days ahead, refrigerate, then reheat gently before serving.

Can you freeze baked beans?

Yes. Cool them completely, freeze in airtight containers for up to 3 months, thaw overnight in the fridge, and reheat gently. Add a splash of water or tomato sauce if they are too thick after thawing.

What can I add to baked beans for more flavor?

Use the balance test first. If the beans taste flat, add tang, salt, or rounded flavor before adding more sugar. Sautéed onion, mustard, vinegar, smoked paprika, Worcestershire sauce, soy sauce, tomato paste, chipotle, or a tiny amount of liquid smoke can all help.

What is the difference between American and British baked beans?

American baked beans are usually thicker, sweeter, smokier, and often flavored with molasses, brown sugar, mustard, bacon, or barbecue sauce. British-style baked beans are usually more tomato-forward, softer, less smoky, and often served on toast or baked potatoes.

Final Thoughts

The best baked beans are not just sweet beans in sauce. They need enough sweetness to feel familiar, enough tang to stay balanced, enough depth to feel slow-cooked, and enough oven time for the sauce to settle into the beans.

Whether you started with pantry cans, a shortcut can of baked beans, or dried navy beans, the goal is the same: tender beans, a balanced sauce, and a pan with glossy edges that people keep returning to before the meal is even over.

Back to top ↑

Posted on Leave a comment

Chicken Liver Recipe with Onions: Tender, Rich, and Never Bitter

Finished chicken livers with golden onions, lemon wedges, herbs, and glossy pan juices in a warm serving dish.

Chicken liver has a reputation problem. Cooked badly, it can be bitter, dry, and hard to love. Cooked with a little care, it turns soft, savory, and deeply comforting — the kind of simple skillet dish where sweet onions, garlic, lemon, and a little butter do most of the work.

The method is simple: clean the livers, take away the bitter bits, dry them well, cook the onions until sweet, then sear the livers quickly and finish with garlic, lemon, and butter. Nothing fancy — just the few steps that make liver taste good.

This chicken liver recipe is for the nervous first-timer as much as the person who already loves liver. Most of the time is in the onions and prep; once the pan is hot, the livers themselves cook in about 5 to 7 minutes.

Good first plate: Use this section when you want chicken liver to feel milder, softer, and less intimidating.

Small serving of chicken liver with onions over rice, with lemon and herbs on a cream plate.
For a first plate, rice makes chicken liver feel softer and less intense, while lemon keeps each bite fresh.

Quick Answer: How to Cook Chicken Liver

Trim away white connective tissue, fatty bits, dark clots, and any green or yellow-stained areas. Soak the livers in milk or lemon water if you want a milder flavor, then drain and pat them very dry.

Cook sliced onions first until soft and lightly golden, move them to a plate, then sear the livers in one layer for about 2 to 3 minutes per side. Use the largest piece as your guide and cook to 165°F / 74°C. Return the onions to the pan, add butter, garlic, lemon juice, herbs, and final seasoning, then serve warm.

Done right, the onions are glossy, the lemon brightens the pan, and the livers stay soft enough to cut with a fork.

The short version: trim carefully, dry well, give the livers space in the pan, and use a thermometer on the largest piece.

Before you cook: if doneness makes you nervous, read the safe temperature rule. If you are ready to start, go straight to the step-by-step method.

Quick setup: Get the livers, onions, garlic, lemon, herbs, and seasoning ready before the skillet starts moving fast.

Chicken livers, sliced onions, garlic, lemon, herbs, butter, oil, salt, pepper, and paprika arranged on a wooden prep board.
Before the pan gets hot, set up the flavor base: onions for sweetness, garlic for depth, lemon for lift, and herbs for freshness.

Recipe Card

Tender Chicken Liver with Onions, Garlic, and Lemon

A simple skillet method for tender chicken livers with glossy onions, garlic, lemon, and buttery pan juices. Use the optional soak if you want a milder first bite.

Prep Time
15 minutes
Optional Soak
10 to 30 minutes
Cook Time
15 to 20 minutes, including onions
Total Time
30 to 35 minutes, excluding longer soak
Servings
4 with sides
Safe Temperature
165°F / 74°C

Ingredients

  • 1 lb / 450 to 500 g fresh chicken livers
  • 1 large onion, thinly sliced
  • 2 tbsp / 30 ml olive oil or neutral oil, divided
  • 1 tbsp / 14 g butter, optional
  • 3 garlic cloves, minced
  • ½ tsp fine salt, divided, plus more to taste
  • ¼ to ½ tsp black pepper
  • ½ tsp paprika, optional
  • 2 tsp / 10 ml lemon juice, plus more to taste
  • 2 tbsp chopped parsley or coriander

Optional Soak

  • ½ to 1 cup / 120 to 240 ml milk, just enough to mostly cover
  • Or ½ to 1 cup / 120 to 240 ml water mixed with 1 tbsp lemon juice

Optional Light Crust

  • 2 to 3 tbsp flour or cornstarch, for a very light dusting

Instructions

  1. Trim the livers. Remove white connective tissue, excess fat, stringy bits, dark clots, and any green or yellow-stained areas. Cut large pieces to about 1 to 1½ inches / 2.5 to 4 cm.
  2. Soak if desired. Use milk for 10 to 30 minutes, or lemon water for about 10 minutes. Drain well.
  3. Pat the livers very dry with paper towels.
  4. Heat 1 tbsp oil in a large skillet over medium heat. Add onion and a pinch of salt. Cook for 8 to 12 minutes, until soft, lightly golden, and sweet-smelling. Move to a plate.
  5. Season the livers with the remaining salt, pepper, and paprika if using. Dust very lightly with flour or cornstarch if using.
  6. Add the remaining 1 tbsp oil to the skillet. Increase heat to medium-high. Add livers in one layer; the pan should sizzle, not flood.
  7. Cook for 2 to 3 minutes on the first side. Flip gently and cook for another 2 to 3 minutes.
  8. Check the largest piece with an instant-read thermometer. Cook to 165°F / 74°C.
  9. Lower the heat. Return onions to the pan. Add butter if using and let it melt into the pan juices, then add garlic. Cook for 30 to 45 seconds. Add lemon juice and herbs. Taste and adjust seasoning.
  10. Serve warm with toast, rice, potatoes, roti, salad, or crusty bread.

Notes

  • Soaking is optional. It mellows flavor but does not replace proper trimming.
  • Always remove green or yellow-stained pieces.
  • Cook in batches if the pan is small.
  • Dry the livers thoroughly before cooking.
  • Use a thermometer instead of judging doneness by color alone.
  • If you used lemon water for soaking, start with less lemon juice at the end.
  • Reheat only until warm; extra heat makes the texture firm.

Finished-skillet reference: The livers should look glossy, the onions coated, and the pan juices loose enough to spoon over a side.

Skillet of cooked chicken livers with onions, garlic, melted butter, lemon, herbs, and pan juices.
Once the livers are done, the final minute matters most: butter softens the edges, and lemon wakes up the whole skillet.

What Chicken Liver Should Taste Like

The flavor is deep, savory, and slightly earthy. It is stronger than regular chicken meat, but usually milder than beef, lamb, mutton, or calf liver. Properly cooked, it is soft and full-flavored, almost like a warm, savory bite of pâté, but served whole instead of blended.

A good batch should be soft, savory, and clean-tasting. The main things that get in the way are poor trimming, too much moisture, a crowded pan, and extra minutes on the heat.

Texture check: This is a visual doneness cue, not a color test.

Fork cutting into a tender cooked chicken liver piece with onions and pan juices on a plate.
Look for a soft, fork-tender bite rather than a bouncy one; gentle timing is what keeps chicken liver from turning rubbery.

If you have only had dry, bitter liver before, this version may feel like a different dish. Keep the first batch simple, serve it with something familiar, and let the onions and lemon do some of the heavy lifting.

Onions make the flavor sweeter. Garlic makes it more savory. Lemon makes it brighter. Butter rounds the edges. Black pepper and paprika add warmth without making the dish complicated.

Bright finish: This cue belongs after cooking, when lemon and herbs can lift the dish without turning harsh.

Lemon and fresh herbs being added to cooked chicken livers and onions in a skillet.
Add lemon and herbs at the end, not the beginning, so the finished chicken liver tastes brighter without turning sharp.

Why This Method Works

The method works because it solves the three problems that make liver hard to love: bitter bits, surface moisture, and extra time on the heat.

  • Trim well so the flavor stays clean and the harsh pieces never reach the pan.
  • Dry and spread out so the pieces brown instead of steam.
  • Finish quickly with onions, garlic, lemon, butter, and a thermometer check.

Method memory: Think of this as the whole recipe in one view: prep cleanly, dry well, then finish fast.

Chicken livers being prepared with paper towels nearby and a finished skillet of cooked livers in the background.
The best chicken liver recipe depends on three quiet steps: clean trimming, thorough drying, and quick cooking.
First time cooking chicken liver? Use the onions, use the optional soak, finish with lemon, and serve it with something familiar like plain rice or jeera rice, toast, potatoes, roti, or a simple salad.

At a Glance: Choose Your Best Path

What you want Best choice
Nervous about the flavor Use the milk soak, cook the onions until sweet, and finish with lemon.
Fastest dinner Skip the soak, dry the livers well, and use the basic skillet method.
Indian-style kaleji Use the masala variation with onion, ginger-garlic, tomato, coriander, cumin, chilli, and garam masala.
Strong liver smell Use fresh livers, trim carefully, dry well, cook with onions, and finish with lemon.
Comfort food Use extra onions, butter, and serve with mashed potatoes, rice, toast, or roti.

Serving path: Choose the side by the mood you want from the meal.

Chicken liver served in different ways with rice, roti, and mashed potatoes on a warm table.
Use the side dish to shape the meal: rice makes it mild, roti makes it spiced, and mashed potatoes make it cozy.

Safe but Tender: The Doneness Rule

Because chicken liver cooks so quickly, safety and tenderness come down to the same habit: check the largest piece and stop at the right time. The goal is not to cook liver forever; it is to cook it accurately.

Chicken liver should be cooked to 165°F / 74°C in the center. Color can fool you here, so let the thermometer make the decision. CDC guidance says the same thing in practice: use a thermometer, because you cannot tell by looking.

A useful rule keeps the section simple: cook it to the safe temperature, then stop. Best texture comes from stopping as soon as the center is done, while the pieces are still soft and delicate. USDA FSIS chicken liver guidance also gives 165°F / 73.9°C as the safe-temperature target for chicken liver dishes.

Good texture comes from timing. Check the largest lobe, then pull the pan off the heat once the livers are done. The butter, garlic, lemon, and herbs go in at the end.

Doneness checkpoint: This is the safety step that protects tenderness too.

Instant-read thermometer inserted into a cooked chicken liver piece in a skillet with onions.
For safe but tender chicken liver, check the largest piece from the side and stop cooking once it reaches 165°F / 74°C.

Ingredients You Need

Before the pan gets hot, the most important work happens on the cutting board. Once the livers are trimmed and dry, the ingredient list is simple.

Main ingredients and why they matter

Ingredient Amount Why it matters
Chicken livers 1 lb / 450 to 500 g The right amount for 4 servings with sides.
Large onion, thinly sliced 1 large / 160 to 200 g Adds sweetness and moisture.
Olive oil or neutral oil 2 tbsp / 30 ml For cooking the onions and searing without burning.
Butter 1 tbsp / 14 g, optional Melts into the onions at the end and makes the pan juices taste rounder.
Garlic 3 cloves / 12 to 15 g, minced Adds savory depth; it burns if added too early.
Fine salt ½ tsp, divided, plus more to taste Use a pinch for the onions and the rest for the livers.
Black pepper ¼ to ½ tsp Balances the deeper flavor.
Paprika ½ tsp, optional Adds color and mild warmth, not much heat.
Lemon juice 2 tsp / 10 ml, plus more to taste Cuts the mineral edge and brightens the finish.
Parsley or coriander 2 tbsp chopped Adds freshness at the end.

Ingredient logic: A short list works when every ingredient has a clear job.

Ingredients for chicken liver with onions, including chicken livers, garlic, lemon, butter, herbs, paprika, salt, pepper, and oil.
This chicken liver recipe stays simple because each ingredient has a job: sweetness, acidity, richness, freshness, or gentle heat.

For an optional soak, use enough milk to mostly cover the trimmed livers, or use water with 1 tbsp lemon juice. The full soak guidance is below.

Ingredients ready? The next choice is whether to soak the chicken livers or move straight to cooking.

A Note on Fresh and Frozen Livers

Fresh chicken livers are easiest to cook well. Frozen livers can work too, but thaw them fully in the refrigerator, drain them well, and dry them thoroughly before cooking. Frozen livers often release more liquid, so give them extra attention before they hit the pan.

Fresh livers can smell lightly mineral or iron-rich, but they should not smell sour, rotten, ammonia-like, or rancid. They should look moist, not slimy, grey, or dried at the edges. If the smell is unpleasant in a spoiled way, discard them.

Frozen-liver checkpoint: Drain first, then trim, season, and sear.

Thawed chicken livers draining in a metal sieve over a bowl with paper towels, lemon, and herbs nearby.
If you start with frozen chicken livers, thaw them fully and drain them well before seasoning; extra moisture is the first cause of steaming.

Best Pan to Use

Cast iron, stainless steel, and nonstick can all work. Cast iron and stainless steel give better browning when the livers are dry and the pan is hot enough. Nonstick is easier for beginners and gentler when flipping delicate pieces.

Choose the pan that lets you stay calm at the stove. The real secret is not the pan brand — it is dry livers, enough space, and a steady sizzle without smoking.

Pan setup: Room and steady heat matter more than the pan brand.

Chicken livers cooking with space between the pieces in a skillet with light oil bubbling.
The right pan setup gives each piece room to brown; crowding turns a quick chicken liver sear into a wet steam.

How to Clean and Trim Chicken Livers

This is the one prep step worth slowing down for. A minute of careful trimming does more for flavor than any spice mix can.

What to remove first

Place the livers on a cutting board or large plate. Separate any large lobes so the pieces are easier to inspect. They often come in uneven pieces, so take a minute to look through them before seasoning.

Trim away white connective tissue, stringy bits, tough membranes, excess fat, dark clots if present, and any green or yellow-stained areas. The stained parts are the most important to remove because they can taste unpleasantly bitter.

Trimming checkpoint: This is where bitterness prevention starts.

Raw chicken livers on a wooden board with white connective tissue separated beside them and a knife tip pointing toward it.
When cleaning chicken livers, look for white connective tissue and tough stringy bits first; removing them gives a cleaner bite later.

Cut, rinse only if needed, and dry well

Cut very large pieces in half so they are roughly similar in size. Aim for pieces about 1 to 1½ inches / 2.5 to 4 cm. They do not need to be perfect, but they should be close enough that they cook at the same speed.

Cut-size checkpoint: Similar pieces make timing and doneness easier.

Chicken livers cut into even medium pieces on a wooden board with a knife and sliced onions nearby.
Next, cut large lobes into similar-sized pieces; even pieces cook more predictably and make doneness easier to judge.

Rinsing is optional. If the livers look especially wet or messy, you can rinse them briefly, but dry them very thoroughly afterward.

Drying matters more than it sounds. A dry surface helps the pieces sizzle instead of steam. Pat them well with paper towels before cooking.

Drying checkpoint: This is the bridge between prep and browning.

Chicken livers spread on paper towels while a hand presses another towel over them to dry the surface.
After trimming or soaking, dry the surface well; that dry surface is what helps pan-fried chicken livers brown instead of leak water.

Since these are raw poultry livers, treat the prep board like you would for raw chicken: wash your hands, clean the knife and board, and keep salads or cooked sides away from the raw-liver area.

Should You Soak Chicken Liver?

Fresh, well-trimmed livers can go straight to the pan; the soak is there when you want a gentler first bite. Chicken liver is usually milder than beef or mutton liver, so soaking is helpful but not required.

Use a short soak when you want the first bite to feel gentler, especially for someone still deciding whether they like liver. It can mellow the natural flavor and make the dish more approachable without changing the basic method.

Milk soak, lemon-water soak, or no soak

Soak choice Time Use it when
No soak None The livers are fresh and you like a deeper liver flavor.
Milk soak 10 to 30 minutes You want a milder, softer flavor. Use ½ to 1 cup / 120 to 240 ml, just enough to mostly cover.
Lemon-water soak About 10 minutes You want a brighter, cleaner finish. Use ½ to 1 cup / 120 to 240 ml water with 1 tbsp lemon juice.

Milk-soak cue: Use this optional soak when you want the chicken liver flavor to feel milder for hesitant eaters.

Milk being poured over chicken liver pieces in a shallow bowl with lemon and kitchen cloth nearby.
A milk soak is optional, but it can make chicken liver taste milder when you are cooking for hesitant eaters.

After soaking, dry before cooking

After soaking, drain the livers and pat them very dry. If you used lemon water, start with only 1 tsp lemon juice at the end of cooking, then add more only if the dish needs it.

Lemon-water option: Use this when you want a cleaner, brighter start.

Lemon being squeezed into a clear bowl of water with chicken livers partly submerged.
Alternatively, lemon water gives the livers a brighter start; just drain and dry them well before cooking so they still sear properly.
Soaking helps with normal liver flavor, but trimming is what removes truly bitter pieces. It cannot fix old liver, spoiled liver, poor trimming, or green/yellow-stained pieces.

Choose the version that fits your table

Choose your version:
  • Mildest: milk soak, onions, butter, lemon, and parsley.
  • Brightest: lemon-water soak, garlic, a little extra lemon, and coriander.
  • Boldest: no soak, black pepper, paprika, and the masala-style spice option.
  • Most comforting: extra onions, butter, and mashed potatoes or rice.

Choose-your-version guide: The base method can move mild, bright, bold, or comforting.

Cooked chicken liver with onions served with milk, lemon wedges, spices, butter, and mashed potatoes nearby.
Adjust the same base recipe to the table: milk for mildness, lemon for freshness, spices for heat, and potatoes or rice for comfort.

After soaking or skipping it, drain and dry the livers well, then move to how to cook them step by step.

Before you start: Have the garlic, lemon, herbs, and serving plate ready. Once the livers hit the pan, the recipe moves fast — and that quick finish is what keeps them tender.

How to Cook It Step by Step

The skillet moves quickly here. Once the livers go in, the small things — dry surface, space, gentle flipping, and a quick finish — show up fast.

1. Cook the onions first

Heat 1 tbsp oil in a large skillet over medium heat. Add the sliced onion and a pinch of the salt. Cook for 8 to 12 minutes, stirring occasionally, until the onion is soft, lightly golden, and sweet-smelling. Move the onions to a plate.

The onions should smell sweet before the liver goes in. If they still smell sharp, give them another minute or two so they can soften properly. If the onions and liver go in together, the onions may stay sharp or the liver may overcook while you wait.

Onion-first step: Build sweetness before the delicate livers enter the pan.

Sliced onions cooking in a skillet with a wooden spoon until soft, glossy, and lightly golden.
First, cook the onions until they soften and smell sweet; then the chicken livers can cook quickly without waiting on the pan.

2. Season the livers

Season the dried livers with the remaining salt, black pepper, and paprika if using. You do not need to bring them fully to room temperature, but avoid cooking them icy-cold or wet from the fridge. Let them sit for a few minutes while the onions cook.

If you want a little more browning, dust them very lightly with 2 to 3 tbsp flour or cornstarch and shake off the excess. Flour gives a softer browned coating; cornstarch gives a slightly lighter edge. Use either one lightly.

Seasoning step: Season after drying, then keep any coating light.

Chicken livers on a tray being seasoned with salt, pepper, paprika, and a light dusting before searing.
Once the livers are dry, season them lightly; salt, pepper, and paprika add warmth without hiding the natural flavor.

3. Sear in one layer

Add the remaining 1 tbsp oil to the skillet and increase the heat to medium-high. Save the butter for the finish so it tastes sweet and rounded instead of browned or burnt. The pan is ready when a piece of liver sizzles immediately, but the oil is not smoking.

Add the livers in one layer. The pan should sizzle, not flood. Cook for 2 to 3 minutes on the first side without moving them too much, then flip gently and cook for another 2 to 3 minutes.

Sizzle check: Look for active bubbling and space, not a pan full of liquid.

Chicken livers searing in one layer in a skillet with space between the pieces and oil bubbling lightly.
This is the pan cue to look for: a steady sizzle, visible space between pieces, and no liquid flooding the skillet.

Flip step: Turn the pieces carefully once the first side has browned.

Chicken liver pieces and onions in a skillet as a utensil lifts one browned piece during cooking.
Then, flip the livers gently instead of stirring hard; careful turning helps the delicate pieces stay whole.

When liquid appears, let it bubble off. A flooded pan usually means the livers were too wet or crowded; move some liquid out, give the next batch more space, and add a teaspoon more oil if the pan looks dry.

When the pan starts filling with liquid, jump to troubleshooting before the next batch.

4. Check the largest piece

Use an instant-read thermometer to check the largest piece. Insert the thermometer from the side into the center instead of straight down into the pan. Cook to 165°F / 74°C. Smaller pieces may be ready quickly, while larger lobes may need another minute or two.

Once the center reaches temperature, pull the pan off the heat or lower the heat right away. That is how you keep the texture tender.

5. Finish with butter, garlic, lemon, onions, and herbs

Lower the heat. Return the cooked onions to the pan. Add the butter if using and let it melt into the pan juices, then add the minced garlic and stir for 30 to 45 seconds, just until fragrant. Add lemon juice and toss gently so the pan smells brighter and the onions pick up the buttery juices.

Taste after the lemon and onions go back in. Liver often needs its final seasoning after the acidity is added, not before. Adjust salt and pepper, then finish with chopped parsley or coriander.

At the end, the onions should be soft and coated in pan juices, the livers should cut easily, and the finished dish should smell bright from lemon, not heavy or metallic. Serve warm, while the texture is still soft and delicate.

Final finish: Lower heat here so garlic perfumes the pan instead of burning.

Cooked chicken livers with onions, melted butter, lemon, garlic, herbs, and glossy pan juices in a skillet.
Finish gently here; garlic needs only a short moment, and butter should melt into the onions rather than brown hard.

When it works, the dish feels simple in the best way: soft livers, sweet onions, a little buttery pan juice, and enough lemon to make the whole plate feel lighter.

Now build the plate: see what to serve with chicken liver for rice, toast, roti, mashed potatoes, and salad ideas.

How Long to Cook Chicken Liver

The actual cooking is quick. The exact time depends on the size of the pieces, how wet they are, how crowded the pan is, and how hot your skillet runs.

Step or situation Approximate time What to watch for
Onions first 8 to 12 minutes Soft, lightly golden, sweet-smelling onions.
Medium liver pieces 5 to 7 minutes total Lightly browned outside and safe temperature in the largest piece.
Smaller pieces 4 to 5 minutes total They may finish first, so do not wait for every piece to look identical.
Larger lobes 7 to 9 minutes total Use the biggest piece as your guide.
Lightly flour-dusted pieces Usually about 1 extra minute Coating should brown lightly, not burn.
Oven version 30 to 35 minutes Softer texture; still check the largest pieces.

Time is a guide. The biggest piece gives you the real answer.

Variations

This is the base skillet method. Once you understand it, you can shift the flavor without changing the core rules: trim well, dry well, cook in one layer, and avoid overcooking.

Looking beyond the basic skillet? Try the kaleji direction below, or compare more ways to cook chicken liver.

Chicken Liver with Onions

The main recipe already uses onions, but you can make them more central. Cook the onions a little longer, until deeply golden and jammy. After the liver is done, return the onions to the pan with a small splash of water, stock, or lemon juice to loosen the browned bits. Finish with butter and black pepper, then spoon everything over toast, rice, or creamy garlic mashed potatoes.

Comfort serving: Use this direction when you want chicken liver and onions to feel softer and more filling.

Chicken liver and onions served over creamy mashed potatoes with lemon, herbs, and pan juices.
Chicken liver and onions with mashed potatoes works because the creamy base softens the rich, savory bite.

Garlic Butter Lemon Livers

For a brighter, more rounded version, finish the cooked livers with 1 tbsp butter, extra garlic, 1 tbsp lemon juice, black pepper, and chopped parsley or coriander. Add the garlic only at the end so it stays fragrant.

Quick Chicken Kaleji-Style Masala

For a masala-style variation, season the livers with ½ tsp turmeric, 1 tsp coriander powder, ½ tsp cumin powder, ½ tsp red chilli powder, ½ tsp black pepper, and a little garam masala. Cook the onions as usual, add ginger-garlic paste if you like, then cook the livers in the spiced oil. A small chopped tomato can be added after the onions; cook it down until jammy before adding the livers so the masala does not turn watery. Finish with lemon juice and fresh coriander.

This is a quick masala-style direction, not the only way chicken kaleji is made. Use it when you want the same basic skillet method with warmer spices.

Kaleji direction: This is the spiced path with roti, coriander, onions, and lemon.

Chicken kaleji-style masala with onions served in a small pan beside roti, lemon, coriander, and sliced onions.
For a spiced version, turn the same base method toward chicken kaleji with onions, coriander, lemon, and roti on the side.

Oven Version

For less splatter, spread trimmed and dried livers in a single layer with sliced onions, about 1 tbsp oil, salt, pepper, garlic powder, and paprika in a baking dish. Garlic powder works better than fresh garlic here because fresh garlic can catch and turn bitter. Cover with foil and bake at 350°F / 175°C for about 20 minutes. Uncover, stir gently, and bake for another 10 to 15 minutes, or until the largest pieces reach 165°F / 74°C.

Baking gives a softer texture than pan-searing, but it is useful when you want a more hands-off method.

When to Use a Different Method

Use this skillet method when you want a quick warm meal. Choose a different method if you want a crisp coating, a smooth pâté, a creamy peri-peri-style sauce, a quick pan gravy, or a saucy adobo-style dish. Those versions use different techniques, so this recipe keeps the focus on the simplest skillet method first.

What to Serve with Chicken Liver

Because the flavor is deep and savory, the plate needs something fresh, starchy, or acidic beside it. You want the sides to balance the liver, not fight it.

Style Serving ideas
Simple dinner Rice, toast, mashed potatoes, roasted potatoes, buttered noodles
Indian-style Jowar bajra roti, paratha, dal-rice, onion salad, lemon wedges
Fresh and light Cucumber salad, sautéed greens, pickled onions, lemony salad
Comfort-food style Mashed potatoes, pan juices, deeply cooked onions, crusty bread
Appetizer-style Toast, small bread slices, pickles, sharp salad, lemon wedges, or a chilled potato salad

Toast catches the buttery juices, rice softens the intensity, and a lemony salad keeps the plate from feeling heavy. If you are serving someone unsure about liver, keep the pieces smaller and serve them with something familiar: rice, toast, potatoes, roti, or a fresh salad with lemon.

Rice dinner: Use this serving when you want the pan juices to become part of the meal.

Chicken liver with onions served over rice with lemon, herbs, roti, and salad in the background.
For a fuller dinner, serve chicken liver over rice and spoon the oniony pan juices into the grains.

Toast serving: Use this for a smaller plate with crisp contrast.

Toasted bread topped with cooked chicken liver pieces, caramelized onions, herbs, and lemon on a wooden board.
For a smaller serving, toast gives contrast: crisp bread underneath, soft chicken liver on top, and onions to tie it together.

Storage and Reheating

This dish is at its best straight from the skillet. The longer it sits, the more that soft texture fades. For leftovers, let the livers stop steaming, then refrigerate them in an airtight container within 2 hours of cooking. Store them with the onions and pan juices if possible; they help the livers reheat more gently. Use within 2 days for the best texture.

To reheat, warm gently in a skillet over low heat with a splash of water, stock, or lemon juice. You can add a small knob of butter to loosen the pan juices. The microwave works in a hurry, but use short bursts and stop as soon as the livers are warm.

Avoid long reheating. Once overcooked, the texture turns rubbery and dry quickly.

Troubleshooting: What Went Wrong?

If your first batch was not perfect, that is normal. Chicken liver gives very clear feedback, and most problems are easy to trace. Start with trimming, moisture, crowding, heat, and timing.

Common problems and the next-batch fix

Problem Likely cause Fix
Bitter liver Green/yellow bits, poor trimming, burnt garlic, or overcooking Trim carefully, add garlic late, use onion and lemon, and avoid extra cooking time.
Metallic taste Strong natural liver flavor or not enough acidity Use an optional soak, garlic, onion, lemon juice, herbs, and black pepper.
Rubbery texture Overcooking Cook in one layer and stop once the largest piece reaches the safe temperature.
Dry or grainy texture Cooked too long after doneness Use medium-high heat for a shorter cook and check earlier.
Steamed instead of browned Wet livers or crowded pan Pat dry thoroughly and cook in batches.
Too much splatter Surface moisture hitting hot oil Dry well, lower heat slightly, and use a splatter screen.
Strong smell Old liver, poor trimming, steaming in a crowded pan, or normal liver aroma that feels too intense Use fresh liver, trim well, cook with onions, garlic, and lemon, and discard anything sour or rancid.
Lots of liquid in the pan Frozen livers, wet livers, or overcrowding Thaw fully, drain well, pat dry, and cook in one layer.
Livers fell apart Pieces were too small, too wet, or stirred too aggressively Keep medium pieces, dry well, and flip gently.
Unsure if done Relying on color or timing only Use a thermometer on the largest piece.

Watery-pan fix: This visual explains why wet or crowded livers steam instead of brown.

Crowded skillet of chicken livers and onions with visible liquid pooling beside a wooden spoon.
If chicken livers release a lot of liquid, the pan is usually too crowded or the pieces are too wet; cook in batches for better browning.

More Ways to Cook Chicken Liver

Once you know the base skillet method, you can take the same trimming, drying, and doneness skills in a few different directions.

Version Best for Key change
Skillet liver and onions A quick warm dinner Cook the onions first, then sear the livers quickly.
Crispy fried chicken livers Crunchy appetizer-style serving Bread or batter the pieces and fry separately.
Chicken liver pâté Toast, crackers, and make-ahead spreads Cook gently, then blend with butter and aromatics.
Chicken kaleji masala A spiced Indian-style meal Use onion, ginger-garlic, tomato, coriander, cumin, chilli, and garam masala.
Peri-peri chicken livers Saucy, spicy, restaurant-style flavor Add chilli, garlic, lemon or vinegar, and a sauce base.
Chicken liver adobo A tangy, savory Filipino-style dish Simmer briefly with soy, vinegar, garlic, and aromatics.

More methods: After the base skillet technique, these are the next flavor directions.

Warm table spread with several chicken liver dishes, including skillet livers, spiced kaleji, fried pieces, pâté on toast, and saucy versions.
Once you understand trimming, drying, and timing, the same chicken liver skills can lead to skillet livers, kaleji, pâté, fried livers, and more.

A Small Note on Nutrition

A small serving goes a long way: the flavor is bold, the texture is dense, and the nutrition is concentrated. Chicken liver is commonly eaten for iron, B vitamins, protein, and its deep savory taste. For a broader food-first look at iron, MasalaMonk’s guide to iron-rich foods explains how animal and plant sources differ.

For B12 context, MasalaMonk’s guide to Vitamin B12 rich foods also covers meat and organ-meat sources. Enjoy chicken liver as food first. For personal medical questions about organ meats, follow professional guidance.

And if you arrived through liver-health or cleanse searches, keep the line clear: this is dinner, not a detox.

FAQs

Do you need to soak chicken liver before cooking?

No. If the livers are fresh and well trimmed, you can go straight to the pan. Use the soak when you want a gentler first bite, especially for someone still deciding whether they like liver.

How do you make chicken liver taste less bitter?

Start with trimming. Remove green or yellow-stained areas, white connective tissue, and tough bits. Then use onions, garlic, lemon juice, butter, black pepper, paprika, or spices to balance the flavor.

How long should chicken liver be cooked?

It usually takes about 5 to 7 minutes in a hot skillet after the onions are cooked. Smaller pieces may cook faster, and larger pieces may need longer. The biggest piece gives you the real answer, so check it with a thermometer.

Can chicken liver be pink inside?

Color can fool you here. Chicken liver should be cooked to 165°F / 74°C in the center. A thermometer is the best way to know it is done safely without cooking it longer than needed.

How do I keep chicken liver from smelling too strong?

Use fresh livers, trim them well, dry them properly, and cook them with onions, garlic, and lemon. Give the pieces space in the pan too; steaming makes the smell stronger. If the raw livers smell sour, rotten, ammonia-like, or rancid, discard them.

Why is my chicken liver rubbery?

It is almost always overcooked. Chicken liver does not forgive extra minutes the way chicken thighs do, so stop as soon as the largest piece is done.

Why did my chicken liver release so much liquid?

The pieces were probably too wet, previously frozen, or crowded in the pan. Thaw fully, drain well, pat dry with paper towels, and cook in batches if needed. You want a steady sizzle, not a pan full of liquid.

Can I use frozen chicken livers?

Yes. Thaw them fully in the refrigerator, drain them well, trim them, and pat them very dry before cooking. Frozen livers often release more liquid, so dryness and pan space matter even more.

How do I know if chicken livers are fresh?

They can smell lightly mineral or iron-rich, but they should not smell sour, rotten, ammonia-like, or rancid. They should look moist, not slimy, grey, or dried at the edges.

Can I make chicken liver spicy?

Yes. Add red chilli powder, cayenne, black pepper, peri-peri seasoning, or the quick kaleji-style spice mix. Add heat gradually because liver has a strong flavor of its own and does not need heavy seasoning to taste good.

Is chicken liver the same as chicken kaleji?

Yes. Kaleji is the Hindi/Urdu word commonly used for liver. Chicken kaleji usually refers to chicken liver cooked with onions, spices, ginger-garlic, and sometimes tomato.

Is chicken liver healthy?

Chicken liver is nutrient-dense and rich in flavor. It is commonly eaten for iron, B vitamins, and protein. Because it is an organ meat and very rich, portion size and personal health context matter.

Can I bake chicken liver?

Yes. Bake trimmed chicken livers with onions and seasoning at 350°F / 175°C until the largest pieces reach 165°F / 74°C. Baking is softer and less browned than skillet cooking, but it reduces splatter.

Can I make crispy fried chicken livers with this recipe?

This recipe is for skillet chicken liver, not Southern-style crispy fried chicken livers. For a light crust, you can dust the livers with flour or cornstarch before searing. Fully crispy fried chicken livers need a separate breading and frying method.

Can I make chicken liver pâté with this recipe?

Chicken liver pâté uses a different method. The livers are cooked gently, then blended with butter and other flavorings until smooth. This skillet recipe is better for serving warm as a meal.

Final Notes

If you remember only four things, remember these: trim the stained bits, dry the livers well, cook them in one layer, and let the biggest piece guide the doneness.

Final plate: This is the warm, finished meal the post is building toward.

Partly eaten plate of chicken liver with onions, rice, lemon, herbs, pan juices, and roti in the background.
A good final plate should feel simple: tender livers, sweet onions, lemon, a soft side, and enough juices to pull it together.

Do that, and the plate feels warmer and simpler: tender pieces, sweet onions, bright lemon, and enough pan juice for rice or toast. One good batch can change how liver feels at the table. Start with the onion-garlic-lemon version; from there, the same base can go toward masala, extra onions, or a brighter garlic-butter finish.