Posted on Leave a comment

Mushroom Stroganoff Recipe: Easy, Creamy & Deeply Savory

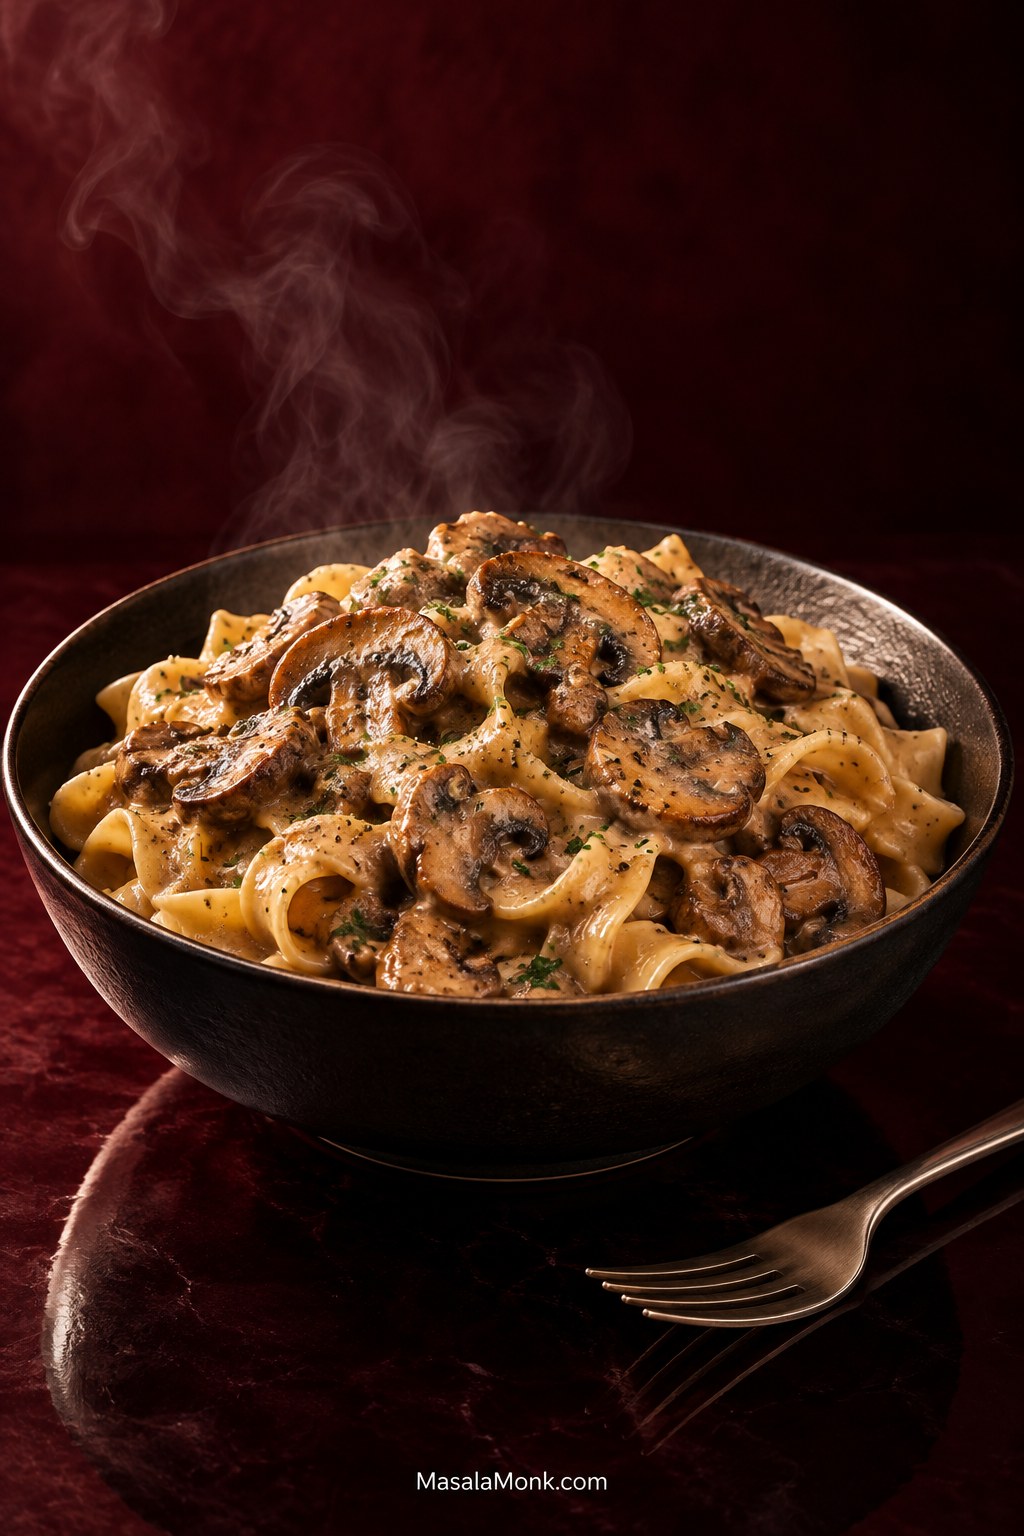
Bowl of mushroom stroganoff with wide egg noodles coated in brown creamy sauce, topped with browned sliced mushrooms, herbs and black pepper.

A good mushroom stroganoff recipe gets wetter before it gets better. Halfway through browning, the skillet can suddenly fill with mushroom water and look as though everything has gone wrong. It hasn’t. Keep cooking and the puddle disappears, the sharper frying sound comes back, and gray mushrooms begin picking up browned edges.

The goal is a mushroom-heavy stroganoff with browned pieces and silky sauce clinging to the noodles instead of pooling underneath them. It takes about 40–50 minutes for four servings, with most of the attention going to one worthwhile stage: letting the mushrooms cook through the water they release before the sauce begins.

This is the meatless counterpart to Beef Stroganoff, but the sauce still needs plenty of savory depth before the sour cream arrives. Wine, Dijon, tomato paste and a small umami boost do most of that work; the sour cream gives the finished sauce its familiar tang.

Quick answer: to know when mushroom stroganoff is going right, read the skillet as Wet → Brown → Glossy.

WET

The mushrooms have released water. Keep cooking; the sauce comes later.

BROWN

The water has mostly gone, frying resumes and real brown patches appear.

GLOSSY

The sauce coats a spoon but still flows. Return the mushrooms and finish with sour cream off heat.

Mushroom Stroganoff Recipe

This recipe uses 20 oz / 570 g mushrooms for four servings, enough sauce to coat the noodles, and a little broth held back so you can loosen the sauce only if it needs it.

Serves4
PrepAbout 10–15 minutes
CookAbout 30–35 minutes
TotalAbout 40–50 minutes
Mushrooms20 oz / 570 g
Main pan12-inch / 30-cm wide skillet or sauté pan

Ingredients

  • 20 oz / 570 g mushroomsUse cremini, brown or chestnut mushrooms, or replace up to about 6 oz / 170 g with shiitake or oyster mushrooms.
  • 1 tbsp / 15 ml olive or neutral oil, divided
  • 2 tbsp / 28 g / 1 oz butter, divided
  • 1 medium yellow onion or 2 large shallots, about 5 oz / 140 g, finely chopped
  • 3 garlic cloves, finely minced
  • 1 tbsp tomato paste
  • ½ cup / 4 fl oz / 120 ml dry white wineFor strict vegetarian or vegan cooking, use suitably labeled wine or replace it with broth.
  • 2 tbsp / about 16 g all-purpose flour
  • 1¼ cups / 10 fl oz / 300 ml low-sodium vegetable or mushroom brothFor the no-wine version, have 1¾ cups / 14 fl oz / 420 ml broth total available.
  • 2 tsp Dijon mustard
  • 2 tsp / 10 ml soy sauce, tamari or vegetarian Worcestershire sauceChoose one.
  • 1 tsp sweet paprika
  • ½ tsp dried thyme or 1–1½ tsp fresh thyme leaves
  • ½ tsp fine salt for the mushrooms, plus more for the pasta water and final seasoning
  • ½ tsp freshly ground black pepper, plus more to finish
  • ½ cup / about 120 g full-fat sour cream
  • 10 oz / about 280 g wide egg noodles
  • 2 tbsp chopped parsley or dill, to finish
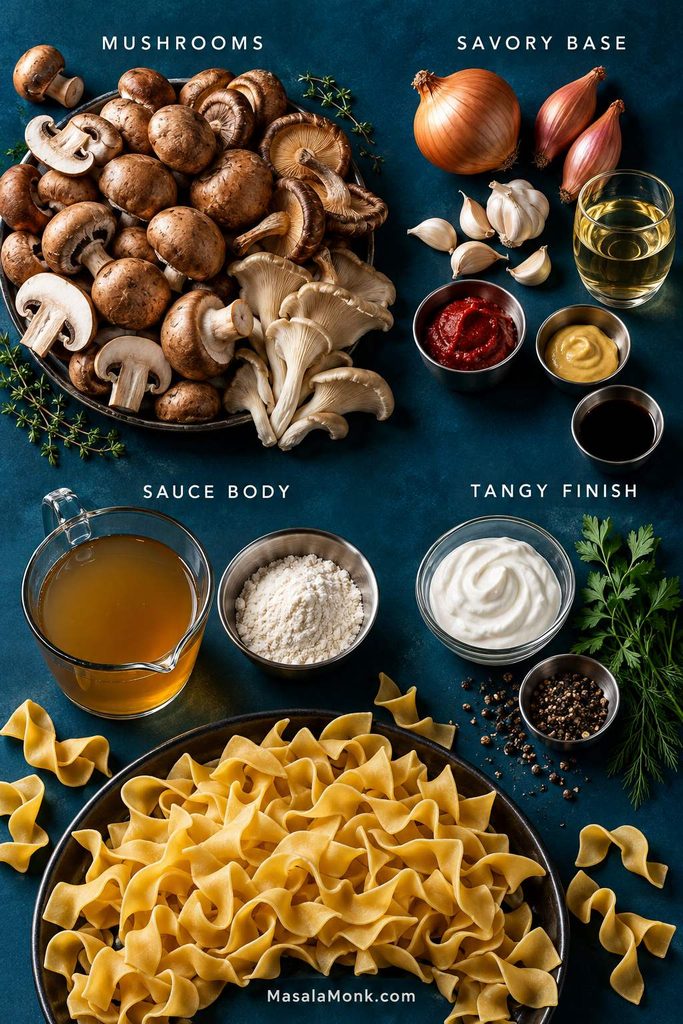
Mushroom stroganoff ingredients arranged in labeled groups for mushrooms, savory base, sauce body and tangy finish, with noodles, broth, sour cream, aromatics and seasonings.
Mushroom stroganoff ingredients make more sense when read by function: mushrooms create the core flavor, aromatics and seasonings deepen it, broth and flour control body, while sour cream contributes cultured tang at the finish.

Method

1. Prep the Mushrooms

Slice cremini, brown, chestnut or white button mushrooms around ¼ inch / 6 mm thick. Tear oyster mushrooms into bite-size pieces and remove tough shiitake stems before slicing the caps. Chop the onion and garlic so everything is ready once the pan gets hot.

2. Brown the Mushrooms in Two Batches

Heat a 12-inch / 30-cm wide skillet over medium-high heat. Add half the oil and about ½ tablespoon butter, then spread half the mushrooms across the skillet. Leave them alone for a couple of minutes before stirring.

The pan may suddenly look very wet. That’s normal. Keep it uncovered and let the moisture cook away. As the puddle disappears, listen for the pan to start sounding like it is frying again. Give the mushrooms another couple of minutes to develop real brown patches and a roasted smell.

You aren’t looking for perfect browning on every slice. Once the batch has good color across it, season with about ¼ teaspoon salt and transfer it to a plate. This often takes around 6–9 minutes, although a wetter batch can take longer.

Now put a large pot of water over high heat for the noodles. Add the remaining oil and another ½ tablespoon butter to the skillet, then repeat with the second half of the mushrooms. Season with the remaining ¼ teaspoon salt and move them to the plate.
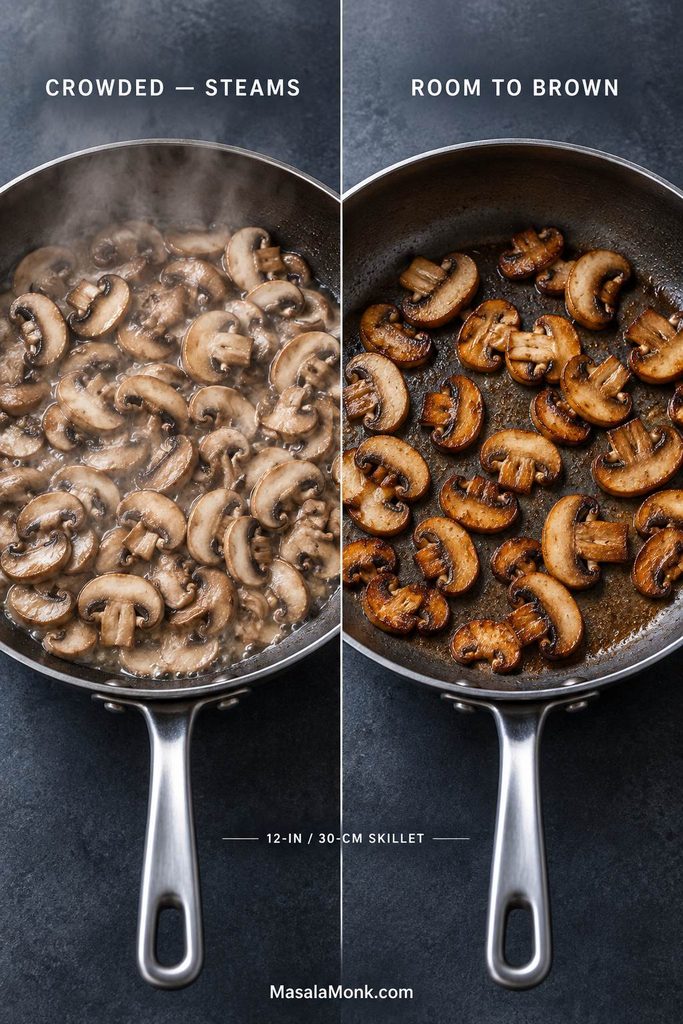
Split comparison of mushrooms cooking in the same skillet: the crowded side is pale and surrounded by liquid, while the less crowded side has browned mushrooms and exposed pan surface.
Crowding is mainly a moisture-management problem. Because more exposed pan surface lets water escape faster, two smaller batches reach the frying stage sooner and spend less time steaming.

3. Build the Aromatic Base

Reduce the skillet heat to medium and add the remaining 1 tablespoon butter. Cook the onion or shallots for about 3–4 minutes, until soft and beginning to color.

Add the garlic for about 30 seconds, then stir in the tomato paste. Give the paste another minute against the hot skillet. It should darken slightly and lose its raw, sharp smell.

4. Deglaze, Reduce and Cook the Noodles

Pour in the ½ cup / 120 ml dry white wine and scrape up the browned bits from the skillet. Simmer for about 2–4 minutes. The sharp wine smell should fade and the liquid should reduce to a shallow, concentrated layer.

No wine? Use ½ cup / 120 ml extra low-sodium broth and reduce it to the same point.

Once the pasta water is boiling, salt it and add the 10 oz / 280 g egg noodles. Cook according to the package directions while you finish the sauce.
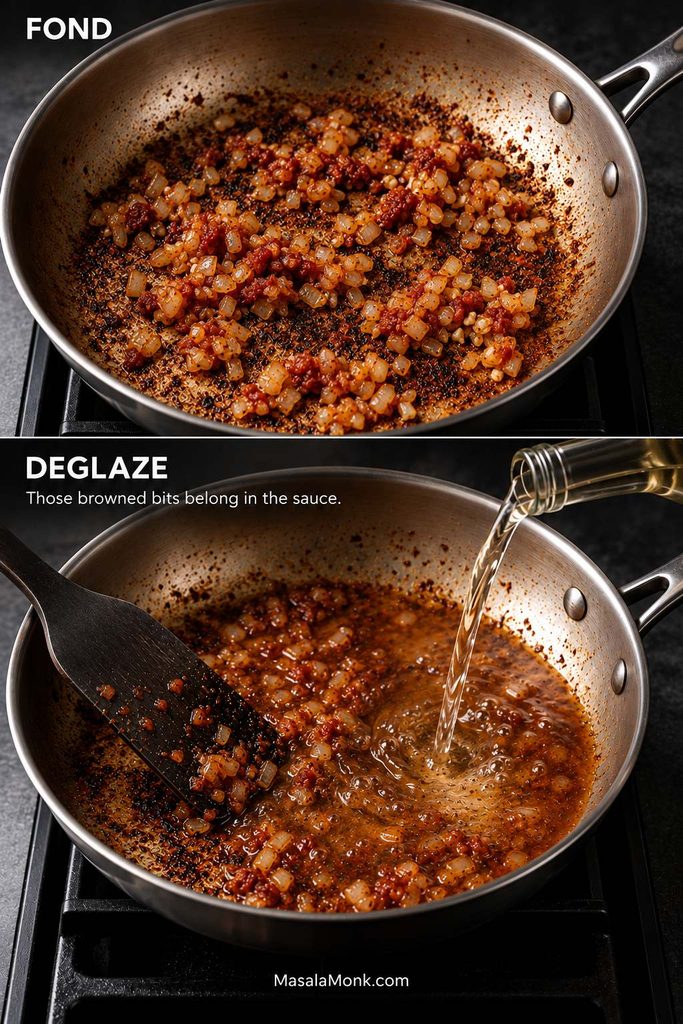
Two-step skillet comparison showing cooked onions and tomato paste over browned fond, followed by liquid being poured in while a spatula loosens the browned bits.
Fond is flavor already paid for: the browned layer left on the skillet after cooking. Once wine or broth loosens it, those concentrated mushroom and aromatic notes dissolve into the stroganoff sauce instead of staying stuck to the pan.

5. Thicken and Season the Sauce

Sprinkle the 2 tablespoons / 16 g flour over the onion mixture and stir for 30–60 seconds. Gradually pour in 1 cup / 240 ml broth, stirring or whisking until smooth. Hold back the final ¼ cup / 60 ml; you may not need it.

Add 2 teaspoons Dijon, then 2 teaspoons of one chosen savory seasoning: soy sauce, tamari or vegetarian Worcestershire. Stir in the paprika, thyme and black pepper.

Simmer gently for about 4–6 minutes. By now the sharp wine aroma should be gone and the pan should smell rounded, savory and distinctly mushroomy. A thin film of sauce should cling to the back of a spoon.

Gluten-free: skip the flour and use verified gluten-free broth plus tamari or another verified gluten-free savory seasoning. Once the broth is hot, whisk in a slurry of 1 tablespoon / about 8 g cornstarch mixed with 2 tablespoons / 30 ml cold reserved broth.

6. Taste Before the Sour Cream

Take a spoonful now. The sauce should already taste like dinner.

Start with salt when it tastes flat. A well-seasoned sauce that still seems washed out needs more concentration, not more seasoning, so reduce it another minute or two. Then check the Dijon. Extra soy, tamari or Worcestershire comes last.

7. Return the Mushrooms and Finish Off Heat

Return the mushrooms and any juices from the plate. Give them 1–2 minutes to warm through. You should still see plenty of actual mushroom pieces in the pan.

Switch off the burner and let vigorous bubbling settle. Refrigerator-cold sour cream can be loosened first with a spoonful of warm sauce. Fold in the ½ cup / 120 g full-fat sour cream.

Tilt the skillet. The sauce should cling to the mushrooms while still moving easily. Add reserved broth 1 tablespoon / 15 ml at a time if it has tightened too much; it will continue to thicken as it stands.
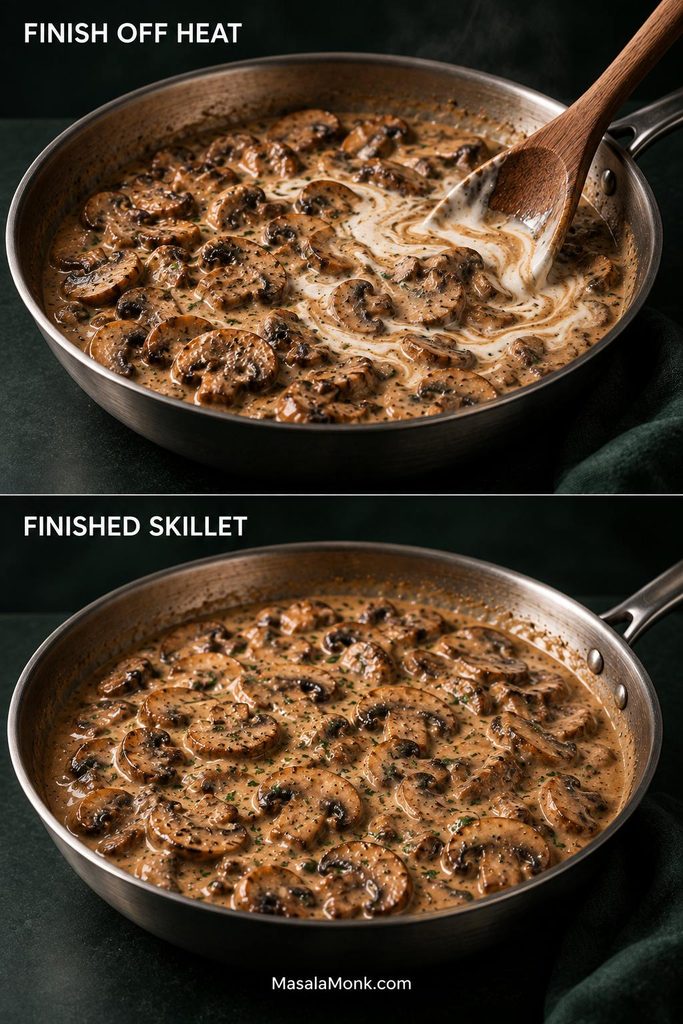
Two-panel skillet showing sour cream being folded into mushroom sauce off heat, followed by the finished smooth brown mushroom stroganoff sauce.
Get the reduction and seasoning right before the sour cream goes in. Off heat, the dairy should add tang and smoothness—not do the sauce-building for you.

Drain the noodles when tender. Spoon the stroganoff over them and finish with parsley or dill and freshly ground black pepper.

Pan-size rule: a 12-inch / 30-cm skillet handles this amount well in two batches. With a smaller skillet, use three. When doubling the recipe, more batches or a second skillet are worth the trouble.

Read the Skillet: Wet → Brown → Glossy
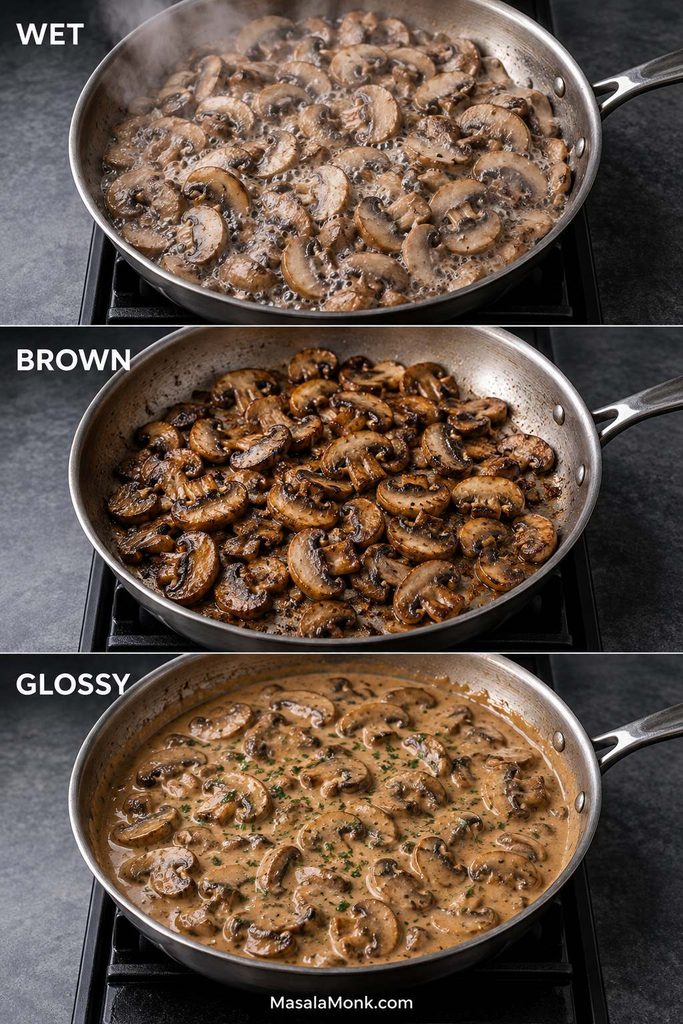
Three stages in the same skillet labeled Wet, Brown and Glossy: watery pale mushrooms, browned mushrooms after the liquid evaporates, and mushrooms in finished glossy stroganoff sauce.
Treat Wet → Brown → Glossy as checkpoints rather than timestamps. Stay in Wet until the water cooks away, move on once Brown develops, and stop reducing at Glossy before the mushroom stroganoff sauce loses its flow.

Mushrooms do not brown on a perfectly predictable clock. Freshness, storage, variety, slice thickness, pan material and burner strength all change how quickly their moisture cooks away. One batch may brown in six minutes. Another may need ten.

Wet: Let the Mushroom Water Cook Away

The skillet can look alarmingly wet for a while. If the mushrooms are still sitting in a puddle, don’t judge the browning yet. Leave the pan uncovered and give that water somewhere to go.

Still a puddle? Keep going.

Frozen mushrooms usually make an even wetter pan and need longer before browning begins. They work, but fresh mushrooms are the better choice here when texture matters.

Brown: Listen for the Frying Sound to Return

As the last puddles disappear, the soft wet hiss turns into a sharper sizzle. That’s the useful moment. The mushrooms are frying again, and the last couple of minutes are where much of their deeper flavor develops.

Don’t chase restaurant-perfect browning on every slice. Once you have real color across the batch and the mushrooms smell roasted instead of damp, you’re there.

Glossy: Stop While the Sauce Still Flows

Drag a spoon or spatula through the sauce. A brief trail should appear, then slowly fill back in. Sauce that races together immediately needs more reduction; a trail that stays sharply open means the pan is heading too thick.

There is some margin here. Slightly loose is easier to correct than a sauce that has already tightened too far.

Best Mushrooms for Stroganoff

For an everyday stroganoff, start with cremini, brown or chestnut mushrooms. They have more earthy flavor than white button mushrooms, hold their shape well and brown reliably.
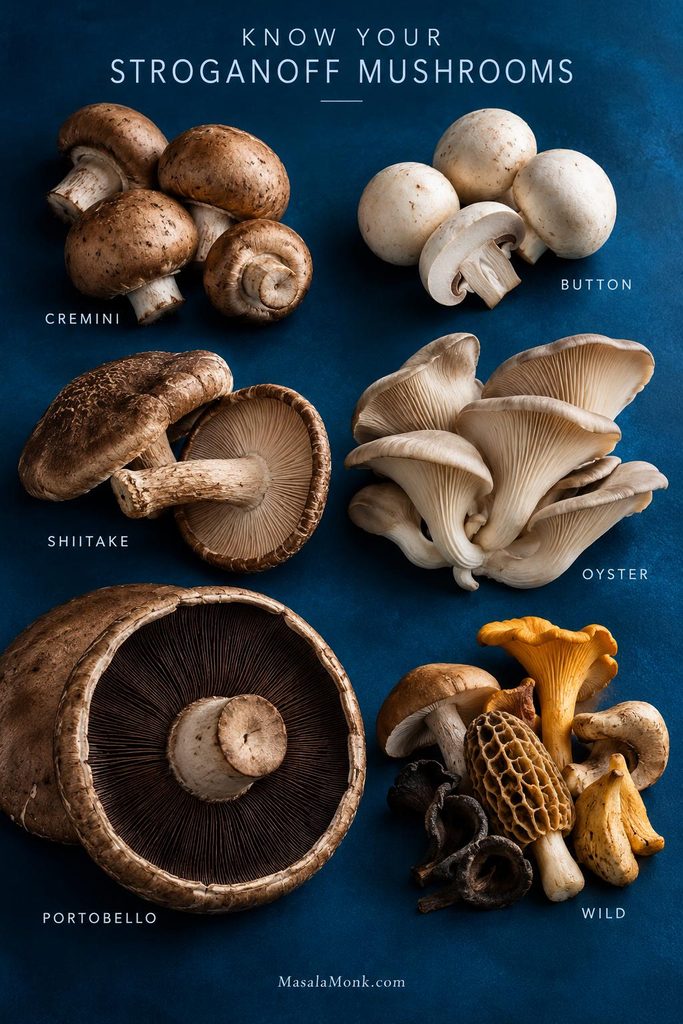
Six labeled mushroom types used for stroganoff: cremini, white button, shiitake, oyster, portobello and a mixed selection of wild mushrooms.
The best mushrooms for stroganoff are the ones you can brown well. All-cremini is not a compromise; use shiitake, oyster or wild mushrooms when you specifically want a deeper aroma or different texture.
If you want…Use…Why
Best everyday choiceCremini, brown or chestnutGood flavor, firm texture and dependable browning
A milder versionWhite buttonPerfectly workable once well browned
Deeper aromaMostly cremini + some shiitakeShiitake adds a stronger, woodier note
More textural contrastMostly cremini + some oysterOyster mushrooms give tender pieces and crisped edges
Meatier piecesPortobelloThicker slices keep more bite
A special batchFresh wild mushroomsMore aroma and variety, but not necessary

How Much to Use and How to Cut Them

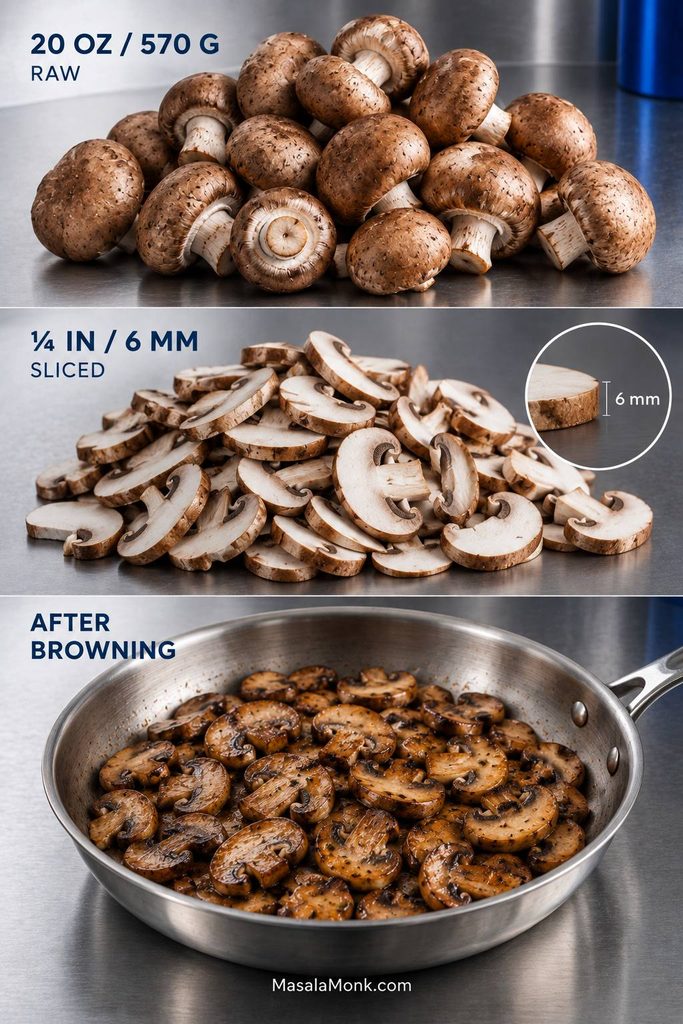
Three-stage guide showing 20 ounces or 570 grams of raw cremini mushrooms, slices about ¼ inch or 6 millimeters thick, and the smaller volume of mushrooms after browning.
Uniformity matters more than ruler-perfect slices. Keeping most mushrooms near ¼ inch / 6 mm helps the batch shed moisture at roughly the same pace, so thin pieces do not overcook while thicker ones are still steaming.

20 oz / 570 g may look like a lot of mushrooms at the cutting board. It won’t once their water cooks away. That amount keeps the final bowl mushroom-heavy enough that the noodles never take over.

All cremini is completely fine. For more aroma, replace about 6 oz / 170 g with shiitake or oyster mushrooms; there is no need to build an expensive five-mushroom mix.

Slice cremini, button and shiitake caps around ¼ inch / 6 mm thick. Tear oyster mushrooms. Portobellos can stay closer to ⅜–½ inch / 10–12 mm. Very thin slices cook quickly, but they also lose more of the bite that makes the finished dish satisfying.

Cleaning mushrooms: a brief rinse is fine when they need it. Dry them well before they hit the skillet.

Once those mushrooms taste properly roasted, the sauce has a simpler job: deepen that flavor and carry it across the plate.

Build a Stroganoff Sauce That Tastes Savory Before It Tastes Creamy

Build the Savory Base

Cook the tomato paste briefly after the onions and garlic. Once it darkens, deglaze with wine and scrape up the browned bits left from the mushrooms. Reduce until the sharp alcohol smell has gone and only a concentrated layer remains in the skillet.

Dijon gives the sauce brightness. Choose one savory seasoning—soy sauce, tamari or vegetarian Worcestershire—to deepen the mushrooms. Many traditional Worcestershire sauces contain anchovy, so use a vegetarian-labeled version when that matters.

Flat flavor is easier to fix when you diagnose it in order: salt → concentration → brightness → extra umami. Salt cannot fix a diluted sauce, and soy sauce cannot replace proper reduction. By this point, the pan should smell rounder and more savory than it did a few minutes earlier.

How to Thicken Mushroom Stroganoff Sauce

Flour gives the broth a light gravy-like body. Cornstarch provides the thickening for the gluten-free version. In either case, keep part of the broth out of the pan until the sauce tells you it needs more.

You’re looking for enough body to coat a spoon without turning stiff. A slightly loose sauce is easier to correct, especially because sour cream and a few minutes of standing will thicken it further.
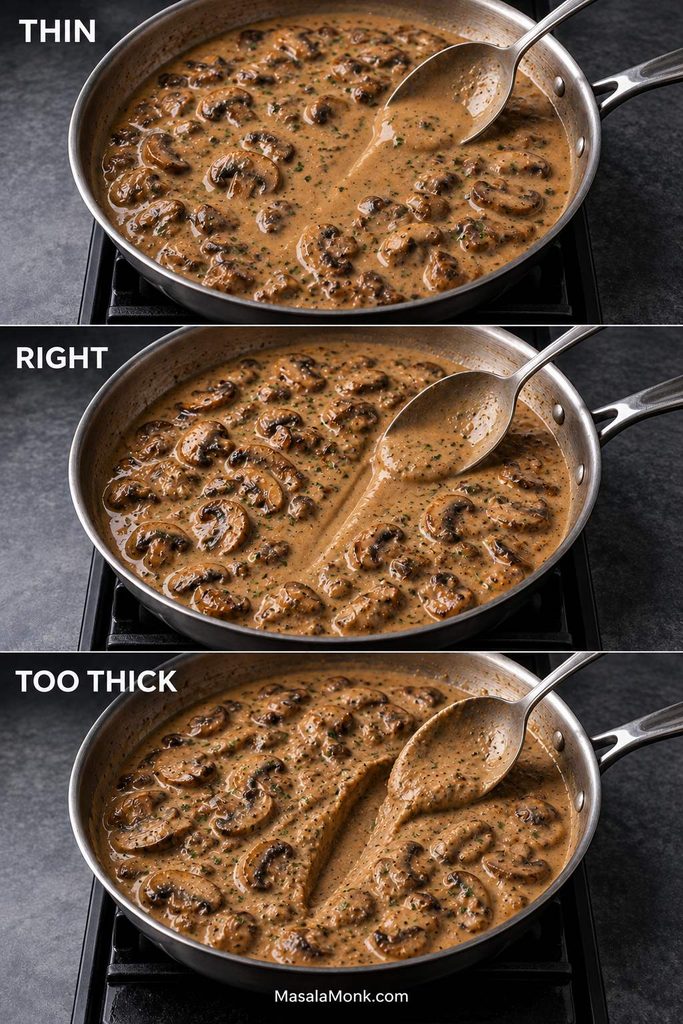
Three skillet comparisons labeled Thin, Right and Too Thick, showing increasingly thick mushroom sauce and how clearly a spoon trail remains in each one.
Judge stroganoff sauce while it is hot, not after it has sat on the plate. Because sour cream, cooling and an absorbent base all tighten the experience, the ideal skillet consistency should still have visible movement.

Finish With Sour Cream Without Splitting It

Once the mushrooms are back in the sauce, take the skillet off the heat and let hard bubbling stop. Then add the sour cream. Full-fat sour cream is the best overall choice here: enough tang to keep the sauce lively, but enough fat to stay smooth when handled gently.

FinishResultVerdict / adjustment
Full-fat sour creamClassic creamy-tangy balanceBest overall choice
Crème fraîcheRicher and milderExcellent substitute; may need more acidity
Full-fat Greek yogurtLighter and tangierBest lighter option; always add off heat
Low/nonfat Greek yogurtLeaner and less richWorks, but is more prone to looking grainy
Heavy or double creamSmooth and mildNeeds extra acidity to taste like stroganoff
Cream cheeseThick, rich and mildPossible, but not the closest substitute
Plant-based sour creamDairy-free finishUseful for vegan versions; adjust by taste

If what you want is a broader cream-and-mushroom sauce without stroganoff’s tang, the Creamy Mushroom Sauce Recipe is the better fit.

Useful Substitutions and Variations
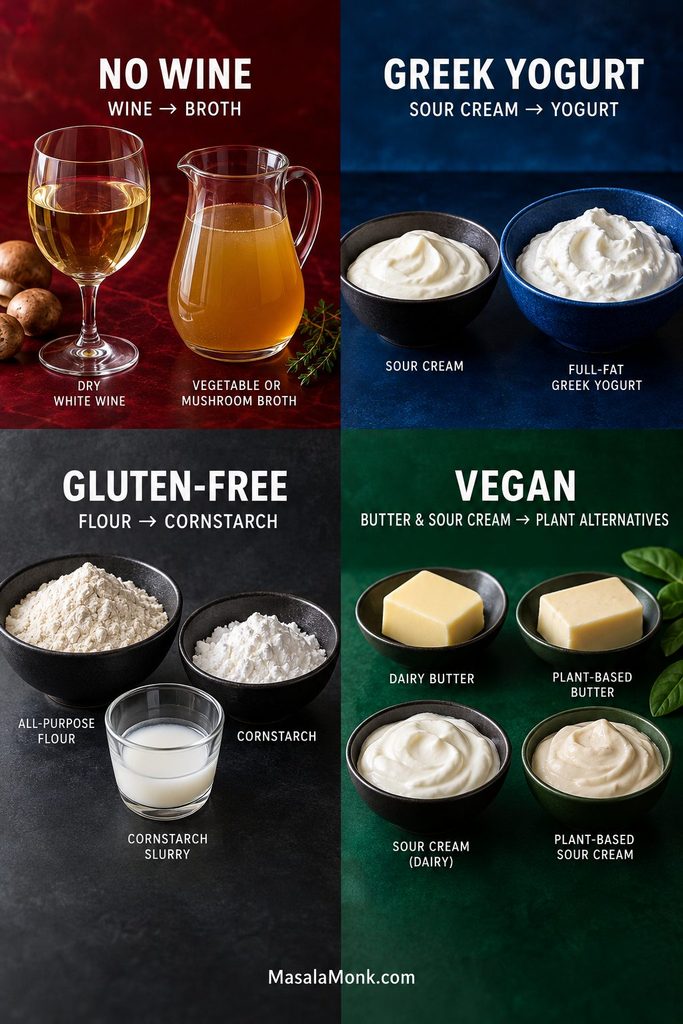
Four labeled mushroom stroganoff substitutions showing wine beside broth, sour cream beside Greek yogurt, flour beside cornstarch and slurry, and dairy butter and sour cream beside plant-based alternatives.
A mushroom stroganoff without wine, with Greek yogurt, gluten-free, or vegan can still behave like the original when each swap preserves function—liquid, tang, thickening or richness—rather than merely matching appearance.

Can I Make Mushroom Stroganoff Without Wine?

Yes. Use ½ cup / 120 ml extra low-sodium broth in place of the wine and reduce it well. Taste the finished sauce after the sour cream goes in before adding extra acid. When it still tastes heavy or dull, about 1 teaspoon / 5 ml lemon juice or white-wine vinegar is usually enough to wake it up.

Using Greek Yogurt Instead of Sour Cream

Use about ½ cup / 120 g full-fat Greek yogurt. Take the skillet off the heat first; refrigerator-cold yogurt benefits from a spoonful of warm sauce mixed into it before it reaches the pan. Because yogurt is already tangy, taste before adding more acid.

Gluten-Free or Vegan Stroganoff

For gluten-free stroganoff, use verified gluten-free broth, tamari or another verified gluten-free savory seasoning, gluten-free noodles and the cornstarch method given in the recipe.

To make the stroganoff vegan, use oil or plant butter, vegetable or mushroom broth, soy or tamari, suitably labeled wine or extra broth, plant-based sour cream and egg-free noodles. Plant-based sour creams vary more than dairy sour cream, so taste first and adjust the looseness or acidity only when needed.

Add Spinach Near the End

Add 4–5 oz / 115–140 g baby spinach once the sauce has thickened. Let it wilt, then take the skillet off the heat and add the sour cream. Earlier is not better here—the spinach only needs enough time to collapse into the sauce.

What to Serve With Mushroom Stroganoff

Best Bases: Noodles, Rice, Potatoes or Polenta

Wide egg noodles are the classic choice, but rice, mashed potatoes, polenta and toast all work. The base changes how quickly the sauce tightens on the plate, so something absorbent such as rice or mash benefits from a slightly looser stroganoff.
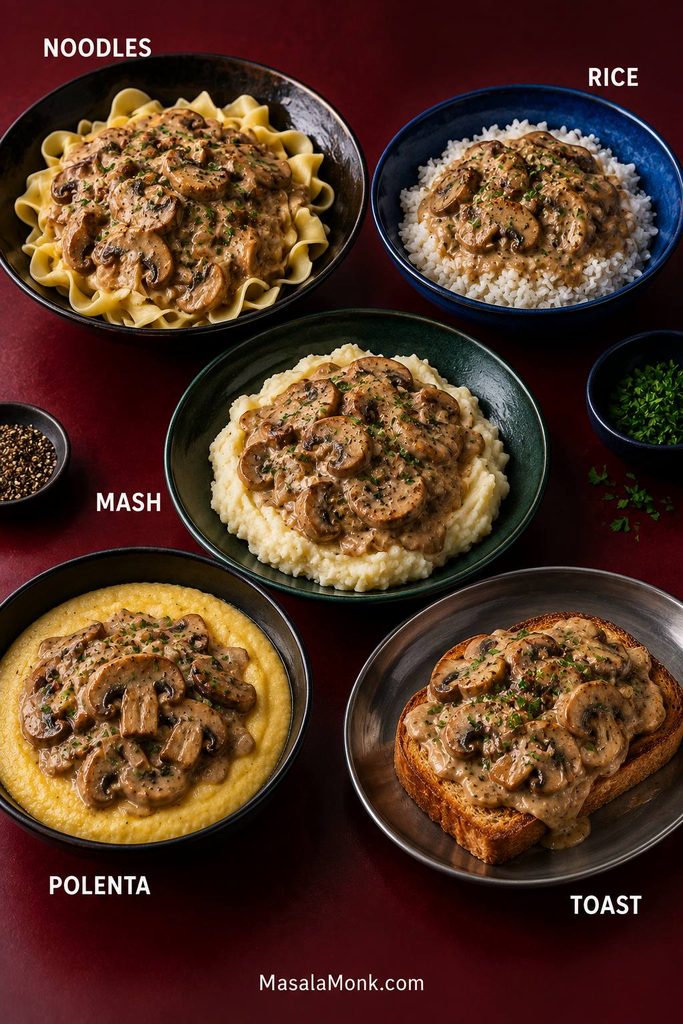
Five servings of mushroom stroganoff labeled Noodles, Rice, Mash, Polenta and Toast, each topped with the same browned mushroom sauce.
The more absorbent the base, the looser the sauce should be when it leaves the skillet.
Serve overKeep the sauce…Why
Wide egg noodlesGlossy and spoon-coatingNoodles catch sauce well but keep absorbing it
RiceSlightly looserRice absorbs sauce quickly
Mashed potatoesLoose and generousThick mash benefits from more flowing sauce
PolentaMedium-looseKeeps the bowl creamy without becoming stodgy
ToastSlightly thickerThe sauce stays on top instead of soaking straight through

For four servings, use about 10 oz / 280 g wide egg noodles or 1–1¼ cups / 190–240 g uncooked rice. Tagliatelle, pappardelle and fettuccine are good pasta alternatives. Our guide to cooking rice covers stovetop ratios if rice is your base.

Mashed potatoes and soft polenta need no special ratio here—just enough on each plate to catch a generous spoonful of sauce. The Mashed Potatoes Recipe is particularly good when you want a richer dinner.

Side Dishes That Cut the Richness

A crisp green salad with sharp vinaigrette, cucumber-dill salad, green beans, asparagus, broccoli or simple crusty bread all work well. The useful principle is contrast: stroganoff is soft and creamy, so freshness, crunch or acidity keeps the plate lively.

Cornichons, crispy shallots or plenty of black pepper can create the same contrast without adding another side dish.

Troubleshooting: Read What Went Wrong

What you see or tasteLikely causeWhat to do
Water around the mushroomsThey are still releasing moistureKeep cooking uncovered before starting the sauce
Gray, pale mushroomsThey steamed before they could brownCook off the water completely; use smaller batches if needed
Thin finished sauceWine or broth did not reduce enoughBefore dairy, simmer uncovered until the sauce clings lightly to a spoon
Thick or pasty sauceToo much reduction or thickenerAdd warm low-sodium broth 1 tbsp / 15 ml at a time
Bland sauceSalt, concentration, brightness or umami is missingCheck them in that order
Tastes mainly of sour creamThe base was under-seasoned or too much dairy was addedA little Dijon or black pepper may rebalance it; next time strengthen the base before adding dairy
Too tangyVery sour dairy or too much added acidSoften with a little cream or butter if needed
Soft or soggy mushroomsThin slices, crowding or too much time simmering in sauceThey cannot fully crisp again; next time slice thicker, brown in batches and return them near the end
Split or grainy sauceSour cream or yogurt got too hotRemove the skillet from heat and whisk gently
Too saltyBroth and savory seasonings compoundedLoosen carefully with unsalted liquid; use low-sodium broth and season later next time
Not mushroomy enoughWeak browning or very mild mushroomsBetter browning helps more than adding extra cream
Not enough sauceOver-reduction or pasta was mixed into the sauce too earlyAdd warm low-sodium broth 1 tbsp / 15 ml at a time

Why Is My Mushroom Stroganoff Watery?

There are two different problems. Water pooling around the mushrooms means they have not finished releasing moisture. A thin sauce after browning means the wine or broth needs more reduction. Fix the stage you’re actually looking at.

What If the Sour Cream Split?

Take the skillet off the heat and whisk gently. A sauce that has only started separating may smooth out somewhat with a spoonful of cool cream or sour cream. Once the sauce is fully curdled, it may not become perfectly silky again, but it will usually still taste good.
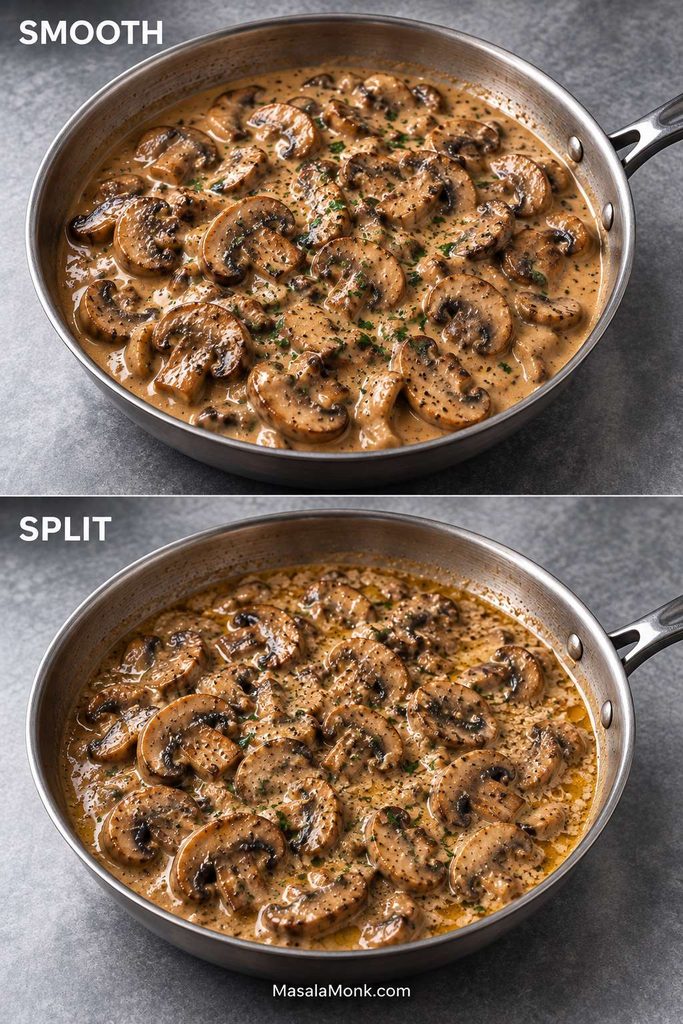
Two skillet close-ups labeled Smooth and Split: the smooth mushroom sauce is evenly emulsified, while the split sauce shows graininess and small pools of separated fat.
Graininess is the first warning; visible fat means the emulsion has broken further. Pull the pan from aggressive heat as soon as separation begins.

How to Store, Reheat and Freeze Mushroom Stroganoff

Refrigerate mushroom stroganoff for 3–4 days. Keep the noodles separate when practical because they continue soaking up sauce in the refrigerator.

Reheating

Warm the sauce gradually, stirring often. It commonly tightens overnight, so loosen it with a splash of broth or water when needed. Heat thoroughly, but once hot there is no advantage in keeping a sour-cream sauce at a hard boil.

Food-safety guidance recommends reheating leftovers to 165°F / 74°C. See the USDA leftovers and food-safety guidance.

Freezing

For the smoothest result, freeze the mushroom sauce before adding sour cream and leave the noodles out. Thaw and reheat the base, adjust the consistency, then add fresh sour cream off heat.

Already finished the whole dish? Freeze it if you need to. Expect the noodles to soften and the dairy to look a little less silky after thawing.
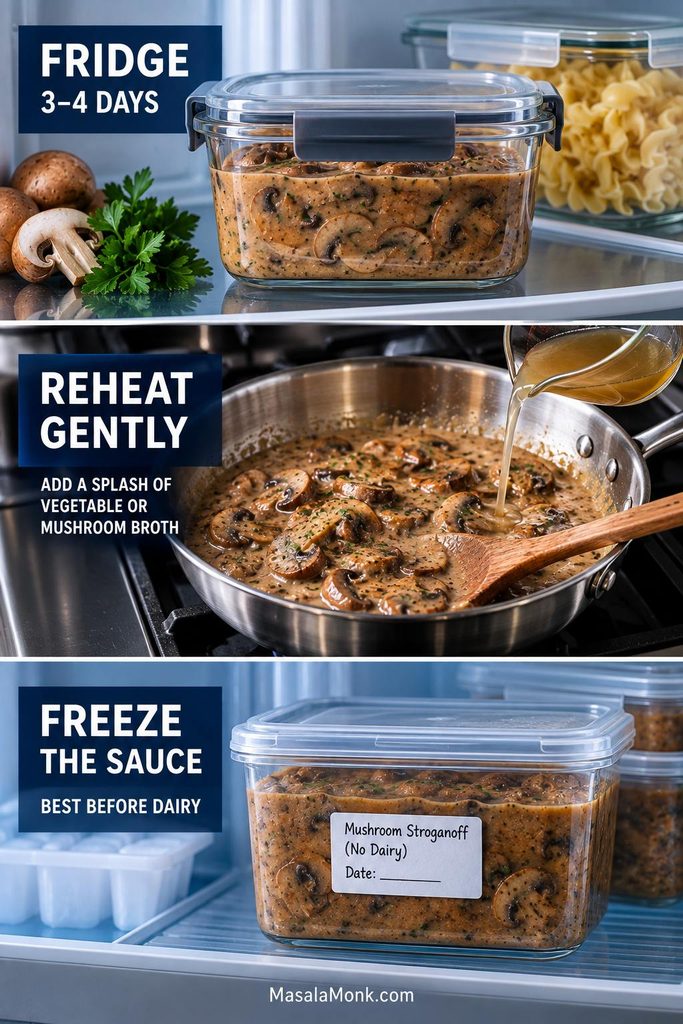
Three-panel storage guide showing mushroom stroganoff sauce refrigerated in a sealed container, gently reheated with vegetable or mushroom broth, and frozen in a sealed container before dairy is added.
For better leftovers, portion the sauce separately before chilling or freezing. That lets you loosen only what you reheat and keeps stored noodles from becoming increasingly soft.

Mushroom Stroganoff FAQ

1. Is Mushroom Stroganoff Vegetarian?

Yes. This mushroom stroganoff is vegetarian when made with vegetable or mushroom broth, vegetarian Worcestershire, soy sauce or tamari, and suitably labeled wine—or broth in place of the wine. Many traditional Worcestershire sauces contain anchovy.

2. Can I Make This Recipe in a Slow Cooker?

Not with these ratios. This recipe depends on uncovered skillet cooking to evaporate mushroom moisture and concentrate the sauce. A slow-cooker version needs different starting liquid and thickening; transferring these quantities directly is likely to produce a thinner stroganoff.

3. Can I Double This Mushroom Stroganoff Recipe?

Yes. Use 40 oz / about 1.1 kg mushrooms and double the main sauce ingredients, but brown the mushrooms in more batches or use a second skillet. Hold back the extra reserved broth until you know the larger batch needs it, and expect reduction to take a little longer.

4. Can I Make It Ahead?

Yes. Make the sauce ahead and keep it separate from the noodles. For the smoothest finish, stop before adding sour cream, reheat the sauce later, then stir in fresh sour cream off heat.

What the Finished Mushroom Stroganoff Should Look Like
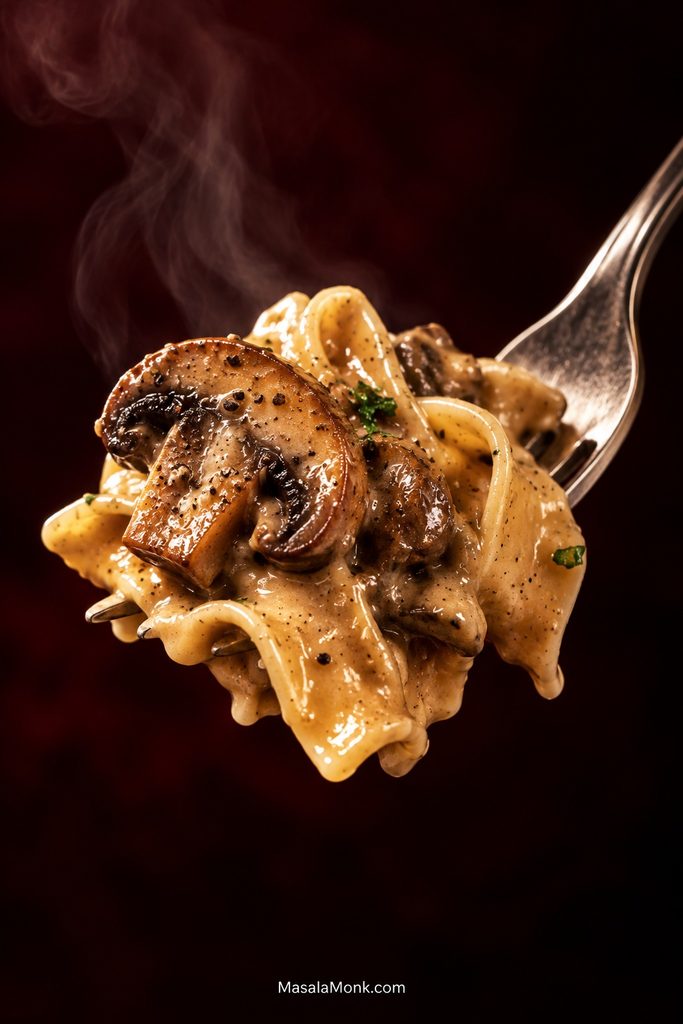
Close-up forkful of wide egg noodles coated in creamy brown mushroom stroganoff sauce with a browned mushroom slice, black pepper and small herb flecks.
The recipe’s 20 oz mushrooms to 10 oz noodles ratio is deliberate. Even after the mushrooms release water and shrink, the finished forkful should still contain browned mushroom—not just pasta coated in cream.

Don’t chase perfection in every slice or spoonful. When the mushrooms taste roasted, the sauce still flows and the sour cream stays smooth, you’re there. You want mushrooms with some bite, silky sauce around the noodles, and enough tang and black pepper to keep the next forkful interesting.

Made it? Tell us which mushrooms you used and whether you served it over noodles, rice or potatoes. If your pan behaved differently from the cues above, that is useful to hear too.
Back to: Recipe Top

Posted on Leave a comment

Vegetable Lasagna Recipe (Best Vegetarian Lasagna)

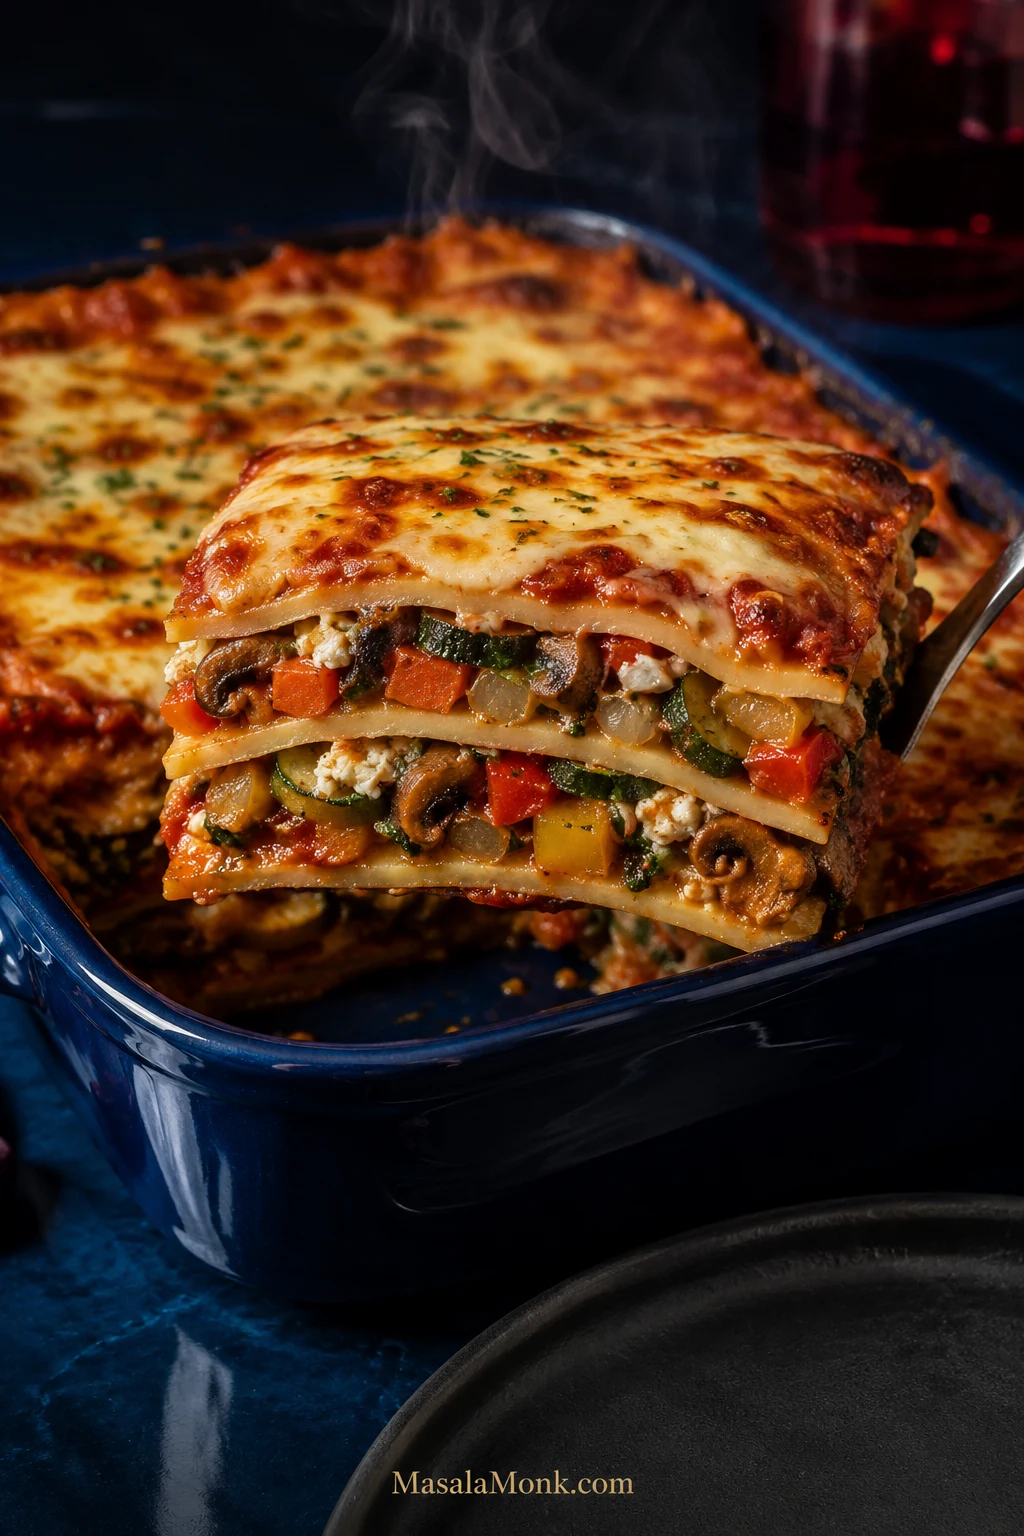
Finished vegetable lasagna in a deep blue baking dish with a lifted slice showing pasta, ricotta, spinach, zucchini, mushrooms, peppers and tomato sauce.

Before this becomes lasagna, the vegetables should already taste worth eating. The mushrooms need to be dark and savory, the zucchini smaller and browned at the edges, the onion sweet, and the peppers and carrots properly tender. If the filling tastes flat before it goes between the noodles, another layer of cheese will not magically make it exciting.

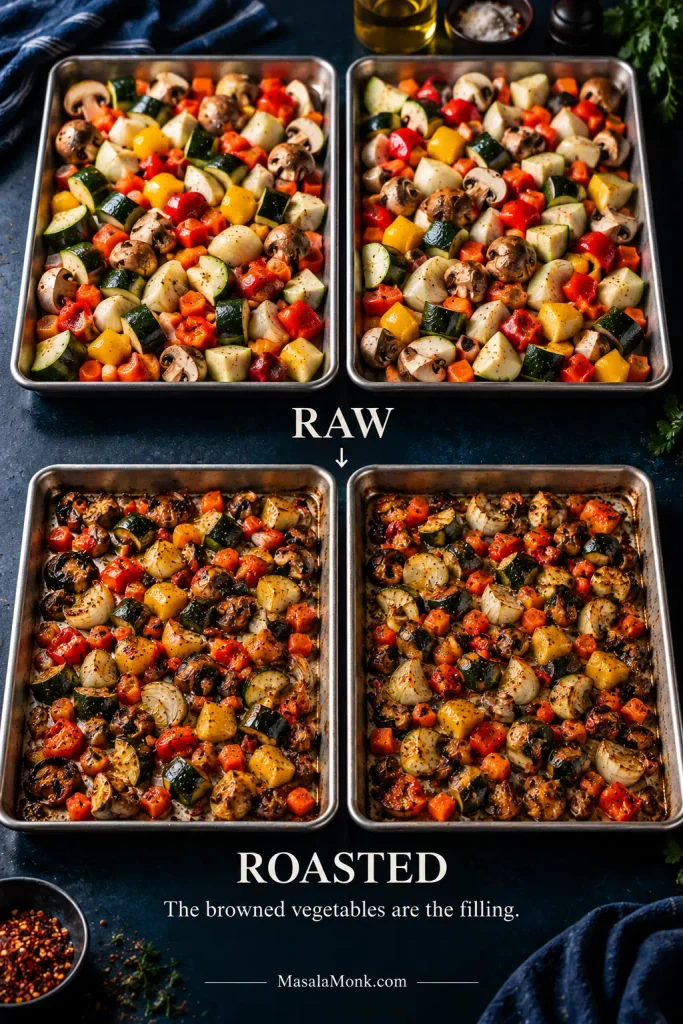
A deep 9 × 13-inch pan holds about 2 pounds / 910 g of roastable vegetables, plus spinach, layered with ricotta, mozzarella, tomato sauce and pasta. The finished lasagna is deeply cheesy, but the roasted vegetables are what give each layer its character. The browned vegetables are the filling.

Timings help, but watch the food too: mushrooms that release their water and begin browning again, marinara that clings to a spoon, and a knife that passes through the middle without catching on firm pasta.

Raw zucchini, mushrooms, bell pepper, yellow onion and carrot on sheet pans beside the same vegetables roasted until smaller and browned.
Raw vegetable volume can be misleading: moisture loss dramatically reduces zucchini, mushrooms, peppers and onions during roasting. That is why a generous raw quantity can become two balanced filling layers without making the finished lasagna overwhelmingly vegetable-heavy.

Jump to: Make the lasagna · Choose your vegetables · Why it gets watery · Troubleshoot the pan

Open the full table of contents

Vegetable Lasagna Recipe

This version uses roasted vegetables, ricotta, low-moisture mozzarella, tomato sauce and oven-ready lasagna sheets. There is no separate pot of noodles to boil.

Allow about 2 hours from the first chop to the first slice, with a little extra breathing room the first time you make it. You are not working for all of that: the ricotta, spinach and sauce can be handled while the vegetables roast, and the final 20 minutes belong to the lasagna, not you.

Pan9 × 13 inches / 23 × 33 cm, ideally at least 2½ inches / 6 cm deep
Yield8 main-dish servings or 10–12 smaller servings with sides
Hands-on prepAbout 45–50 minutes, with some work happening while the vegetables roast
Vegetable roast20–25 minutes using two pans; add about 20–25 minutes if you need to roast in two batches
Covered bake40 minutes, then check; some pans need another 5–10 minutes
Uncovered bake10–15 minutes
Rest20 minutes; 25–30 minutes for particularly neat slices

Cooking for more people? Make two regular 9 × 13-inch pans rather than one unusually deep double batch. They bake more evenly, are easier to move, and give you more browned edges.

Ingredients

Vegetables

  • 9 oz / 250 g zucchini, about 1 medium-large or 2 small, unpeeled and cut into roughly ½-inch / 1–1.5 cm pieces
  • 8 oz / 225 g mushrooms, about one 8-ounce package, quartered if small or thickly sliced if larger
  • 6 oz / 170 g red or yellow bell pepper, about 1 large, cut into roughly ½-inch / 1–1.5 cm pieces
  • 5 oz / 150 g yellow onion, about 1 medium, cut into roughly ½-inch / 1–1.5 cm pieces
  • 4 oz / 115 g carrot, about 1 large or 2 small, cut into smaller ¼-inch / 6 mm dice
  • 5 oz / 140 g frozen chopped spinach, thawed; or about 8 oz / 225 g fresh spinach
  • 3 tablespoons / 45 ml olive oil
  • 1 teaspoon fine salt
  • 1 teaspoon Italian seasoning
  • ½ teaspoon garlic powder
  • ½ teaspoon freshly ground black pepper

Ricotta Filling

  • 15 oz / 425 g whole-milk ricotta, drained if whey is visibly pooling around it
  • 1 large egg
  • 1½ oz / 42 g Parmesan or another hard Italian-style cheese, finely grated
  • 1 small garlic clove, finely grated
  • 1 teaspoon finely grated lemon zest
  • 2 tablespoons finely chopped fresh basil or flat-leaf parsley
  • ¼ teaspoon fine salt, or to taste depending on the cheese
  • ¼ teaspoon black pepper

For the Layers

  • 4 cups / 950 ml thick marinara sauce, homemade or jarred
  • 8–9 oz / 225–255 g oven-ready/no-boil lasagna sheets, or enough for 3 complete pasta layers; sheet count varies by brand
  • 12 oz / 340 g low-moisture mozzarella, shredded, about 3 cups
  • ½ oz / 14 g Parmesan or another hard Italian-style cheese, finely grated, for the top
  • Optional: red pepper flakes and fresh basil for serving

If you avoid animal rennet, check the cheese labels. Traditional Parmigiano Reggiano uses animal rennet, while vegetarian alternatives may use microbial or other non-animal coagulants. The Vegetarian Society’s guide to vegetarian cheese can help when the label is unclear.

Lightly oil the bottom and sides of a deep 9 × 13-inch / 23 × 33 cm baking dish. You will also need two large rimmed sheet pans; half-sheet pans, roughly 13 × 18 inches / 33 × 46 cm, are ideal. Have a mixing bowl, clean kitchen towel and foil ready too.
If the trays need separate oven racks, you will swap their positions halfway through roasting. Only one suitably large tray? Roast the vegetables in two batches rather than crowding them, and allow another 20–25 minutes.

Lasagna can bubble over as it bakes. If the assembled filling sits close to the rim, put the baking dish on a rimmed sheet pan before it goes into the oven.

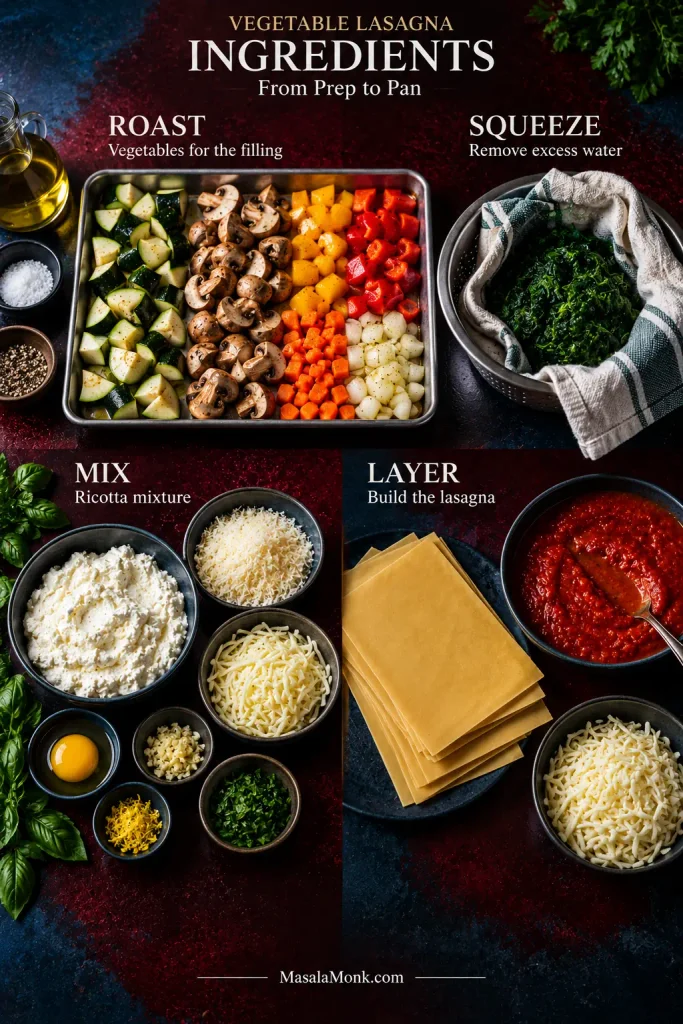
Vegetable lasagna ingredients grouped by preparation: vegetables for roasting, spinach for squeezing, ricotta ingredients for mixing, and sauce, pasta and mozzarella for layering.
Think of the recipe as four checkpoints rather than one long ingredient list: control vegetable moisture, control spinach moisture, season the cheese, then balance the pasta with sauce. Catching a problem at its own checkpoint is much easier than fixing it after assembly.

1. Roast the Vegetables Until They Taste Finished

Heat the oven to 425°F / 220°C.

Divide the zucchini, mushrooms, bell pepper, onion and carrot between the two sheet pans. Add the olive oil, salt, Italian seasoning, garlic powder and black pepper. Toss well and spread everything out.

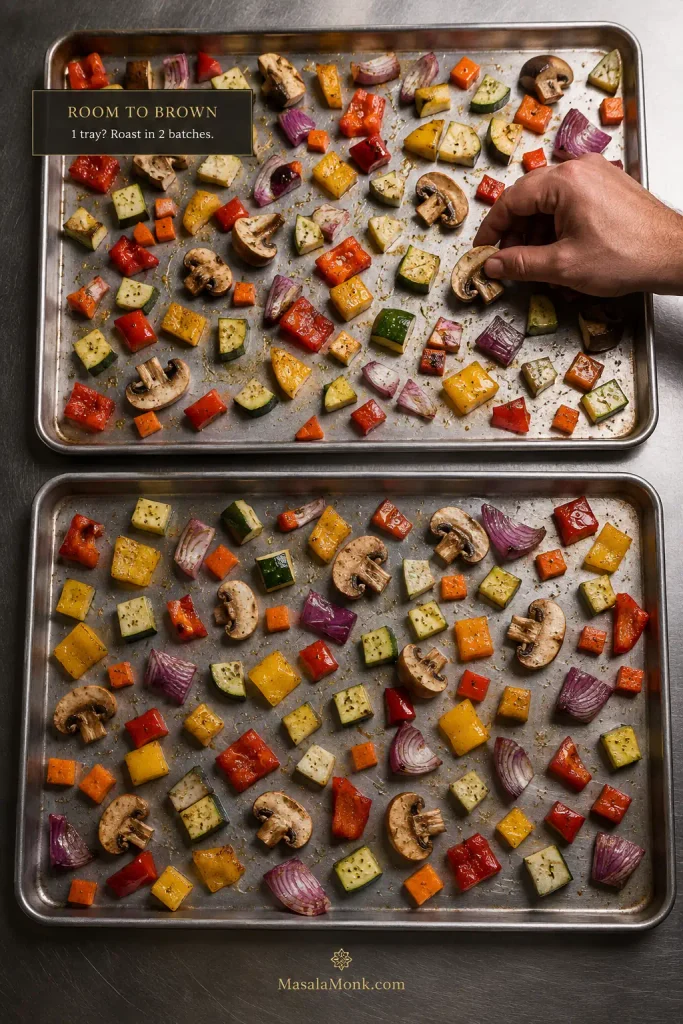
Crowded vegetables steam. Give these some room.

Chopped vegetables spread with space between them on two rimmed sheet pans for roasting and browning.
If the trays still look wet halfway through roasting, extending the timer is not always the best first move. Redistributing crowded pieces can expose more surface to hot air, helping evaporation and browning happen together instead of simply cooking the vegetables softer.

Roast for 20–25 minutes, stirring once. If the pans are on separate racks, swap the upper and lower pans and turn them front-to-back when you stir.

How to Know the Vegetables Are Ready

What looked like an unreasonable amount of vegetables at the beginning will look much more manageable now. The onion smells sweeter and the zucchini has shrunk. Peppers are tender, carrot pieces nearly cooked through, and dark edges have started appearing across both trays.

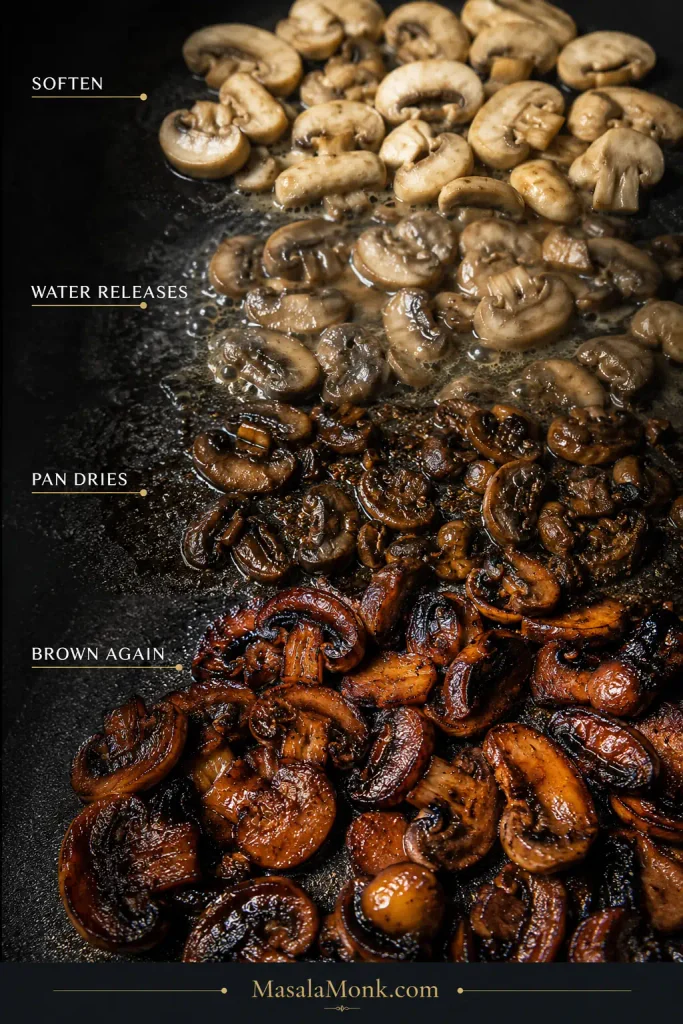
Mushrooms are especially easy to read. First they soften. Then they release enough liquid to make the pan look wetter than it did before. Keep going. The liquid disappears, the pan dries, and the mushrooms begin to brown again.

Mushrooms shown softening, releasing water, cooking until the pan dries, and finally becoming deeply browned.
When mushrooms release a panful of liquid, keep cooking rather than draining it away. Once the pan dries, the concentrated flavor has a chance to brown.

Taste one.

Then taste a piece of zucchini and some onion. If those bites are not good now, fix the seasoning before they disappear between pasta and cheese.

Reduce the oven to 375°F / 190°C.

2. Dry the Spinach

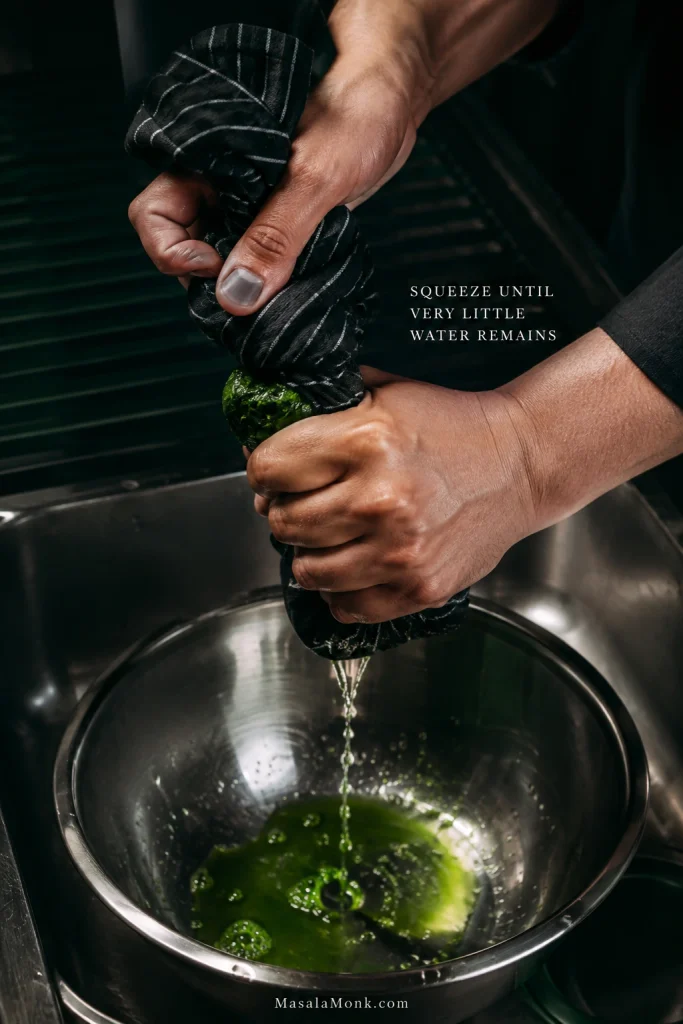
Put the thawed spinach in the center of a clean kitchen towel, gather the towel around it and twist firmly over the sink. Keep squeezing until very little more liquid comes out.

Using fresh spinach? Wilt the 8 oz / 225 g in a large pan, let it cool enough to handle, squeeze out the excess liquid and chop it.

Hands twisting cooked spinach in a dark towel over a stainless-steel bowl to squeeze out excess water.
After squeezing, loosen the compact spinach with your fingers or a fork before mixing it into the roasted vegetables. That small step distributes the greens through both filling layers instead of leaving dense wet pockets in only a few slices.

Break the spinach apart and mix it through the roasted vegetables.

3. Check the Sauce

A good jarred marinara keeps this dinner practical.

Drag a spoon through the sauce. The trail should remain for a moment before slowly closing, and the sauce needs to be loose enough to spread easily across the dry noodles. If it runs like tomato juice, simmer it uncovered for a few minutes.

Marinara showing the correct thick, spreadable consistency and separate examples of sauce that is too thin and too thick.
For no-boil lasagna noodles, sauce is part of the cooking system as well as the flavor. If a thin marinara needs reducing, judge and measure the sauce after reduction so you still have enough finished sauce to hydrate the pasta properly.

Stop before it becomes heavily reduced or pasty. Oven-ready sheets need enough sauce around them to become tender.

Taste the sauce too. Ricotta, mozzarella and pasta soften its seasoning once everything is layered.
Making the sauce from fresh tomatoes? They carry more water, so reduction matters. The fresh tomato sauce recipe shows the consistency to look for before measuring the 4 cups / 950 ml.

4. Mix the Ricotta

Stir together the ricotta, hard cheese, garlic, lemon zest, herbs, salt and pepper without the egg first.

Taste it. The ricotta needs enough seasoning to remain noticeable once it is surrounded by pasta, vegetables and tomato sauce. The lemon zest is there for brightness rather than obvious lemon flavor.

Once the seasoning is right, stir in the egg. It helps the cheese layer set; without it, the ricotta simply stays softer.

The messy part is mostly over now. The trays are roasted, the spinach is squeezed, the sauce is ready and the ricotta is mixed.

From here, you’re building.

5. Build the Layers

The vegetables, sauce and ricotta should each taste properly seasoned on their own before you layer them.

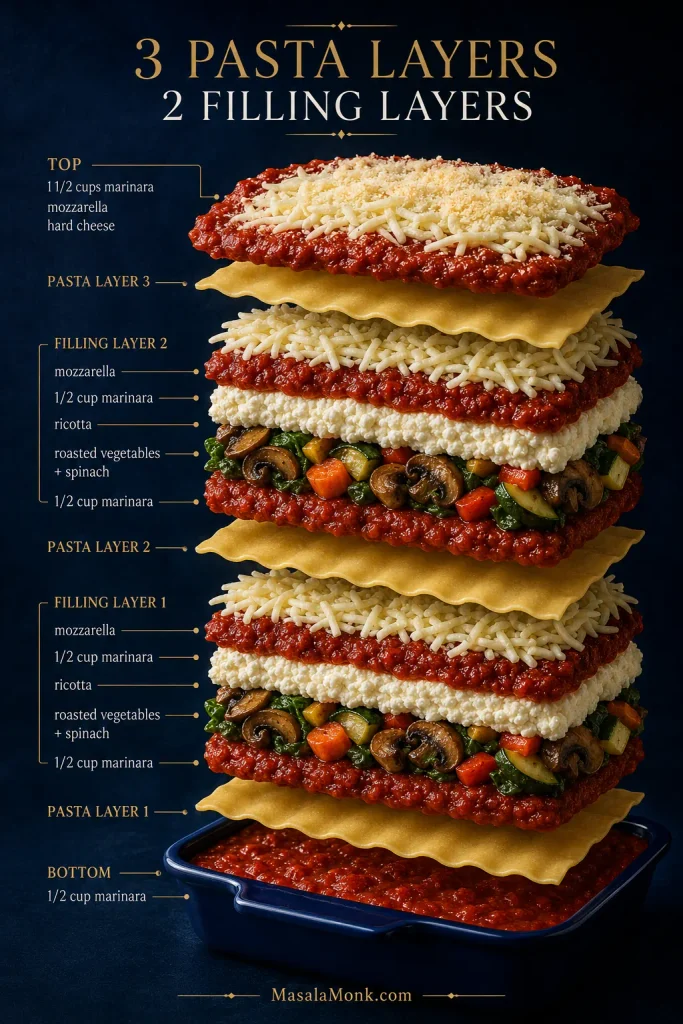
Divide the vegetables and ricotta mixture roughly in half. Keep the marinara, noodles and mozzarella beside the baking dish. You are making three pasta layers and two filling layers.

Exploded vegetable lasagna showing three pasta layers, two vegetable-and-ricotta filling layers, marinara between the noodles and cheese on top.
Layering evenly matters more than making every spoonful mathematically identical. Broad, fairly level filling layers heat more predictably than thick vegetable mounds, while three complete pasta layers give the finished lasagna structure without turning it into an unnecessarily tall stack.

Bottom

  • ½ cup marinara
  • Enough oven-ready pasta to cover the pan

First Filling Layer

  • ½ cup marinara, spread over the noodles
  • Half the ricotta filling
  • Half the vegetables
  • Another ½ cup marinara
  • About 1 cup mozzarella

Second Filling Layer

  • A second complete pasta layer
  • ½ cup marinara
  • Remaining ricotta filling
  • Remaining vegetables
  • Another ½ cup marinara
  • About 1 cup mozzarella

Top

  • Final complete pasta layer
  • Remaining 1½ cups marinara
  • Remaining mozzarella
  • ½ oz / 14 g grated hard cheese

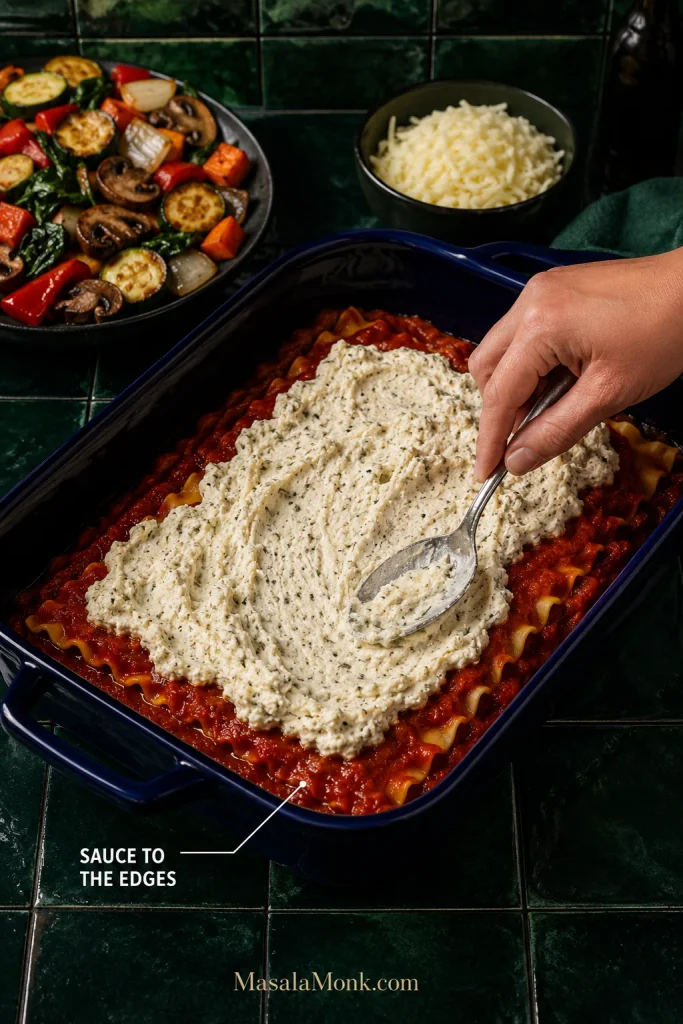
Dollop the ricotta onto the sauced noodles and spread it before adding the vegetables. It is much easier to move ricotta across a flat sheet of pasta than across a pile of zucchini and mushrooms.

Hands spreading ricotta over a sauced pasta layer in a blue lasagna dish, with marinara reaching the edges and corners.
Do not chase a perfectly smooth ricotta layer. A lightly spread, mottled layer lets the roasted vegetables settle into the cheese instead of sliding across a slick surface, while sauce at the perimeter protects the pasta where drying happens fastest.

Set the next pasta layer down and press gently over any obvious vegetable mounds. Don’t pack the filling.

Sheet sizes vary, sometimes a lot. Three complete pasta layers are the useful target. Break sheets to fill a real gap, but avoid thick patches of overlapping dry pasta.

Cover the final noodle layer completely with the last 1½ cups of marinara, right into the corners. Pasta left exposed here is likely to stay hard.

The two trays of vegetables, bowl of ricotta and stack of pasta have finally become one pan of lasagna.

6. Cover and Cook the Pasta

Cover the dish tightly with foil. Lightly oil the underside if it sits close to the cheese.

Bake at 375°F / 190°C for 40 minutes.

Forget about browning for now. The middle of the pan and the dry noodles need the covered heat first.

7. Check the Middle, Then Brown the Top

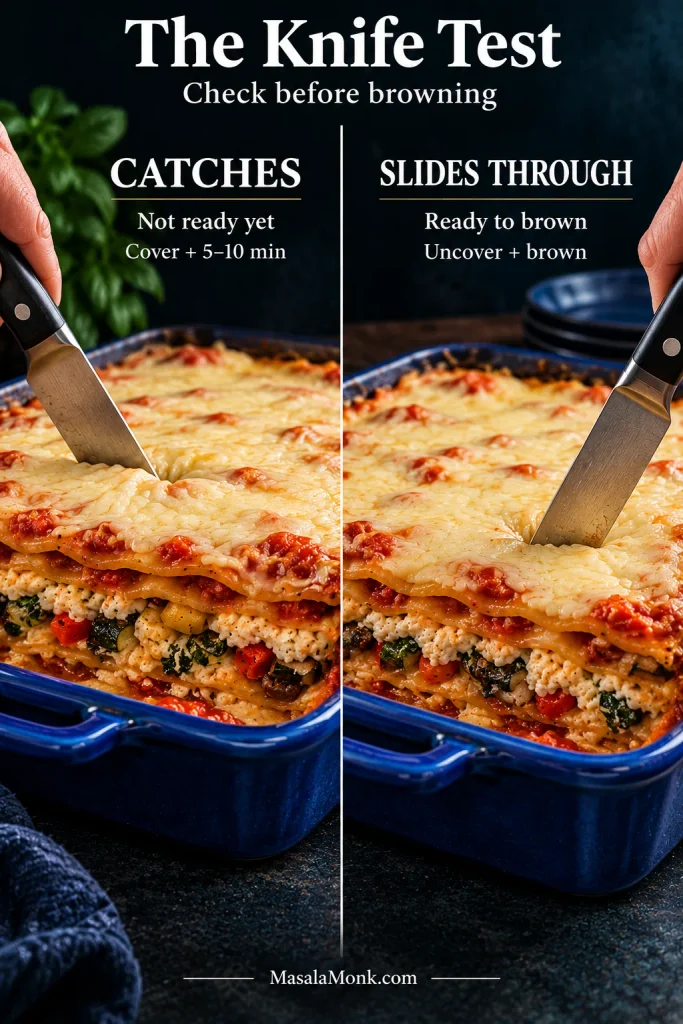
Push a thin knife through the middle after 40 minutes.

If it slides through without catching on firm pasta, you’re ready to uncover. If the knife catches, nothing has gone wrong. Cover the pan again and give it another 5–10 minutes.

Two lasagna pans compare a knife stopping in firm pasta with a knife sliding deeply through tender noodles before final browning.
When checking doneness, distinguish firm pasta resistance from simply bumping into a piece of carrot or another vegetable. A hydrated noodle gives way smoothly; an undercooked sheet feels broader, firmer and more leathery against the knife.

A refrigerator-cold pan or thicker oven-ready sheets may need closer to 50 minutes covered.

Once the pasta is tender, remove the foil and bake for another 10–15 minutes. Tomato sauce will bubble around the perimeter. The mozzarella picks up golden patches, darker freckles and, here and there, a crisp edge.

If your baking dish is broiler-safe, a pale but fully cooked top can have a brief broil. Stay close—the distance between bronzed mozzarella and burned cheese is surprisingly short.

8. Give It 20 Minutes Before You Ask It to Be a Slice

Take the pan out and leave it alone for 20 minutes.

The furious bubbling subsides, the ricotta firms a little and the sauce stops running quite so freely when you cut.

For particularly clean slices, wait 25–30 minutes. The middle will remain plenty hot.

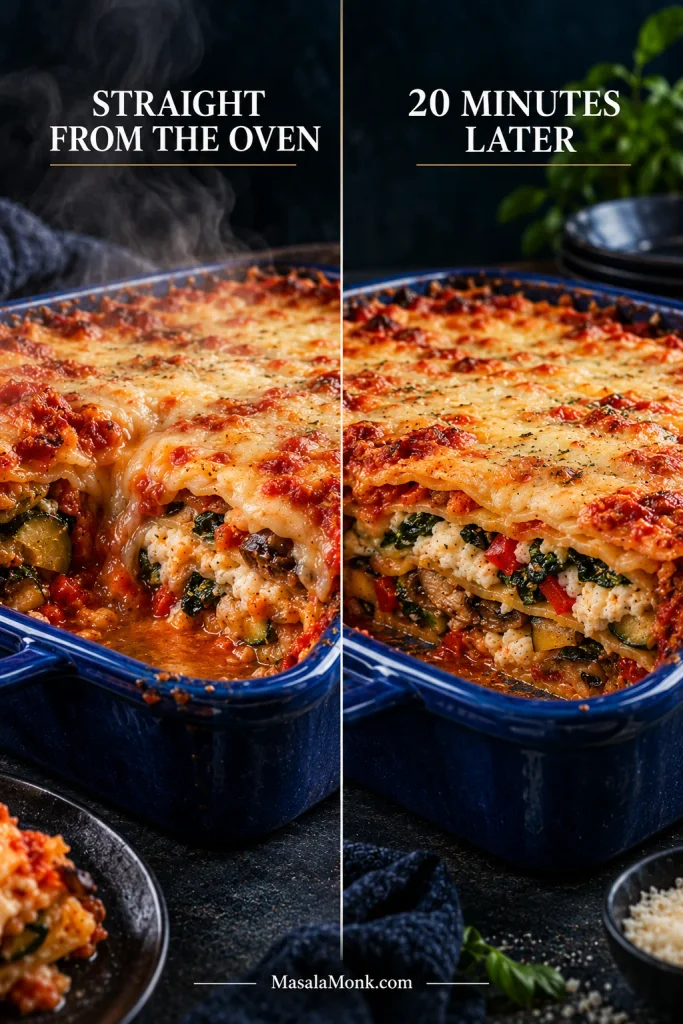
Vegetable lasagna shown steaming and loose straight from the oven beside the same lasagna after 20 minutes, when the layers hold together more cleanly.
Resting changes mobility more than moisture quantity. The liquid has not vanished after 20 minutes; rather, the sauce, cheese and filling have cooled just enough to move less freely, which is why the same lasagna becomes noticeably easier to portion.

Need help with the pan? Choose or swap vegetables · Make it ahead · Fix excess moisture · Troubleshoot what you see

Easy Shortcuts

This is not a 30-minute dinner. It does not need to become an all-afternoon project either.

  • Jarred marinara: use one that passes the consistency check above and move on.
  • Oven-ready noodles: no boiling, draining or handling floppy sheets.
  • Frozen spinach: excellent here once thoroughly squeezed.
  • Pre-shredded low-moisture mozzarella: a perfectly reasonable place to save a few minutes.
  • Vegetables roasted a day ahead: the most useful shortcut when tomorrow’s assembly needs to be quick.

Best Vegetables for Lasagna

For this style of lasagna, cook the vegetables before layering them. Raw zucchini and mushrooms can release too much liquid in the pan, while dense vegetables may still be firm by the time the pasta is done.

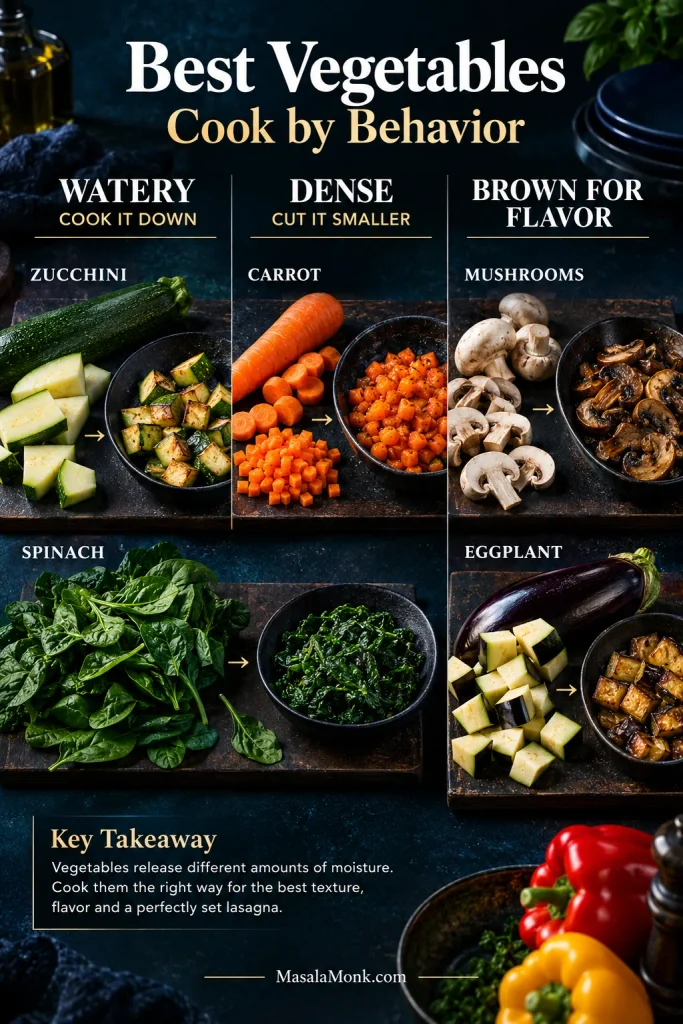
Zucchini can become eggplant without much trouble. Carrot is different. It carries far less water and takes longer to soften, so replacing vegetables cup-for-cup can change the filling more than expected.

The base recipe uses about 2 pounds / 910 g of trimmed roastable vegetables, plus spinach. Raw weight is a useful rough guide for substitutions; then account for how dense and watery the replacement is.

Zucchini, mushrooms, eggplant, carrot and spinach shown with guidance to cook watery vegetables down, cut dense vegetables smaller and brown for flavor.
The best vegetables for lasagna are often the ones that can be swapped for something with similar density and water content. Zucchini and eggplant behave more alike than zucchini and carrot, for example, so matching cooking behavior makes substitutions far more predictable.

How to Swap Vegetables Without Throwing Off the Filling

VegetableHow to Use It
ZucchiniTender and fairly watery. Roast until smaller and browned. Eggplant is an easy replacement.
MushroomsDeeply savory. Keep cooking until their released liquid is gone and browning starts again.
SpinachWilt fresh or thaw frozen, then squeeze firmly. Kale works too but needs more cooking.
Bell peppersSweet and forgiving. Roast until tender. Well-drained roasted red peppers also work.
CarrotsSweet and relatively dry. Cut them smaller so they become tender at roughly the same time as the other vegetables.
OnionGive it enough time to soften and brown. Large undercooked pieces are distracting in the finished slice.
EggplantSilky and savory after roasting. Excellent in place of some or all of the zucchini.
Butternut squashDense and sweet. Use small cubes and roast until nearly tender.
Broccoli or cauliflowerUse small pieces and roast first. Better as part of a mixed filling than the entire filling.
KaleMore robust than spinach. Remove tough stems and cook it until properly tender.

No mushrooms? Replace their 8 oz / 225 g with eggplant, extra pepper, zucchini or a mixture. You lose some savory depth, so give the tomato sauce a final taste before assembly.

For a smoother, more hidden-vegetable filling, grate zucchini into the marinara and simmer until tender and its extra moisture has cooked away. Browned mushrooms can be chopped very finely, and spinach can simply be minced before mixing it through.

Vegetable Lasagna With Frozen Vegetables

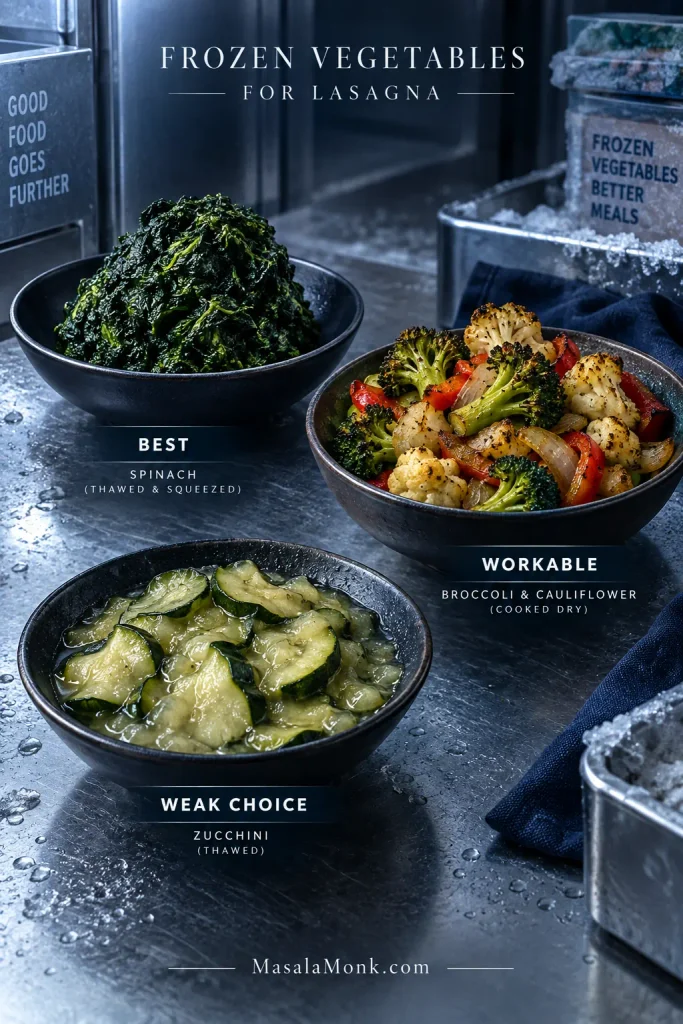
Frozen spinach is excellent here. Frozen zucchini is not. Most other frozen vegetables fall somewhere between those two.
Prepared frozen spinach labeled best, cooked broccoli and cauliflower labeled workable, and soft wet zucchini labeled a weak choice for lasagna.
With frozen vegetables for lasagna, fix excess moisture at the vegetable stage rather than compensating by cutting back too aggressively on marinara. That distinction matters with oven-ready pasta, which can still need plenty of sauce even when the filling itself started wet.
Frozen VegetableBest Approach
SpinachThaw completely and squeeze firmly until very little more water comes out.
Broccoli or cauliflowerThaw, drain and blot. Roast or sauté briefly if the pieces still look wet.
Peppers or pepper-and-onion mixesSauté until released water evaporates and some color starts developing.
Mixed vegetablesThaw, then sauté until the pan no longer looks wet. Choose the blend for flavor as well as convenience.
ZucchiniIt can be used, but the texture is considerably softer and wetter. Fresh zucchini is much better here.

If most of the filling comes from frozen vegetables, cook and drain them before assembly. Aim for about 5 cups total cooked, well-drained vegetables across the two filling layers, including spinach if you’re using it.

The volume does not need to be exact. Two full, fairly level layers are enough.

Still dealing with excess liquid? See why vegetable lasagna gets watery.

Ricotta and Cottage Cheese in Vegetable Lasagna

Ricotta leaves soft, creamy pockets between the roasted vegetables, sauce and pasta. A very loose tub needs draining first.

Using Cottage Cheese Instead

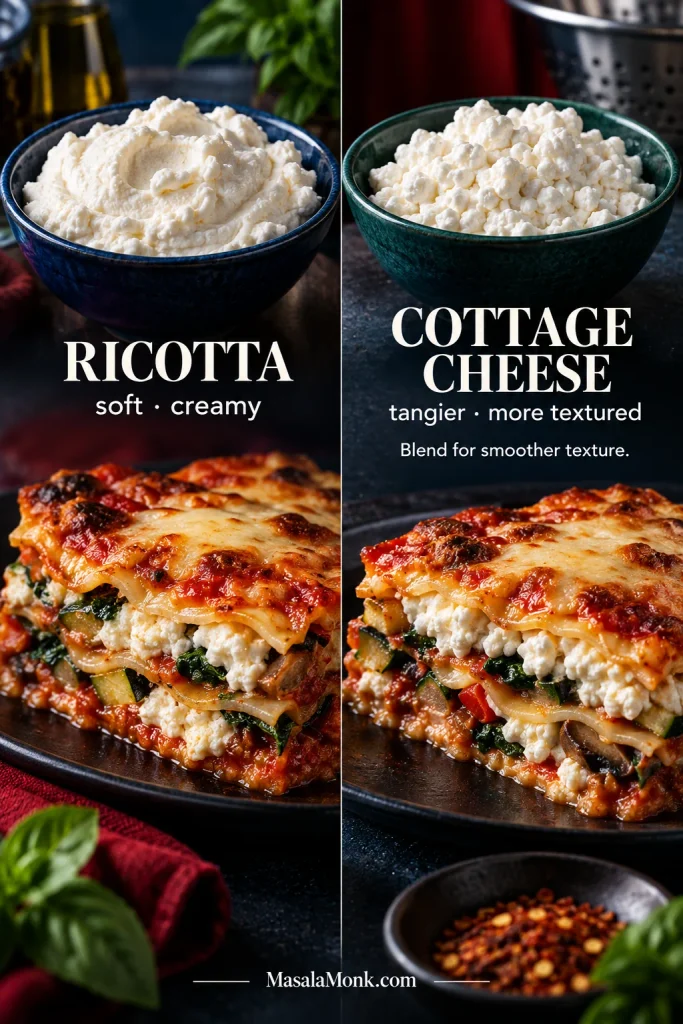
Cottage cheese is tangier, with visible curds unless you blend it. Swap it for the ricotta by weight—15 oz / 425 g—and make the rest of the filling exactly the same way. Blend the cottage cheese before adding the other ingredients when you want a smoother texture, and drain off obvious liquid first.

Ricotta and cottage cheese shown in bowls and lasagna slices, comparing smooth creamy ricotta with more visible cottage-cheese curds.
For ricotta vs cottage cheese in lasagna, neither option is automatically “drier” across every brand. Choose the cheese for the texture you want, then judge the tub in front of you: visible pooled whey matters more to the finished pan than the name on the label.

The cottage cheese lasagna is built around that cheese from the start rather than treating it as a substitution.

For a different style altogether, béchamel gives you a softer, silkier lasagna with creaminess spread more evenly through the layers. The béchamel sauce for lasagna is the better starting point for that version.

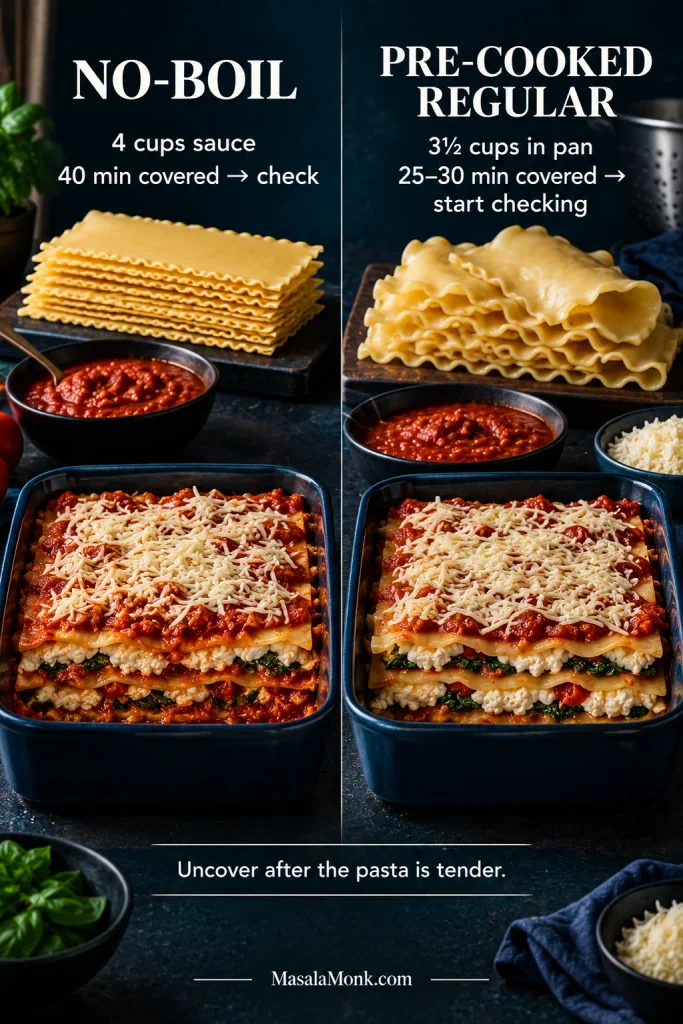
No-Boil and Regular Lasagna Noodles

This version is built for oven-ready/no-boil sheets. Keep every sheet well covered with sauce and give the pan the full covered bake before checking the pasta.

Using Pre-Cooked Regular Noodles

Cook enough regular noodles for the same three complete pasta layers; sheet dimensions and package sizes vary. Boil them only until flexible and a little firmer than you would serve as finished pasta.

For cooked noodles, reduce the sauce over each vegetable layer from ½ cup to ¼ cup. Keep every other sauce amount the same; this uses 3½ cups in the lasagna and leaves ½ cup to warm for serving if you want extra sauce at the table.

Dry no-boil lasagna sheets and a saucier pan compared with flexible pre-cooked regular noodles and a slightly less saucy assembly.
Changing noodle type changes more than bake time. No-boil lasagna noodles arrive dry and take part of their hydration from the sauce, whereas pre-cooked noodles bring water into the pan themselves; therefore, the sauce quantity should change with the pasta method.

Pre-cooked noodles do not need the full 40–50 minute hydration stage. Cover the freshly assembled lasagna and start checking it after 25–30 minutes at 375°F / 190°C. Once the middle is hot and bubbling, uncover and brown the cheese for another 10–15 minutes.

A refrigerator-cold pan will take longer. Judge it by a thoroughly hot, bubbling middle rather than the clock alone.

Gluten-free sheets vary too much by brand for one universal method. Follow the package directions, keep dry sheets well sauced and check the pasta before uncovering.

Pasta still firm? Return to the knife doneness test · ↑ Back to top

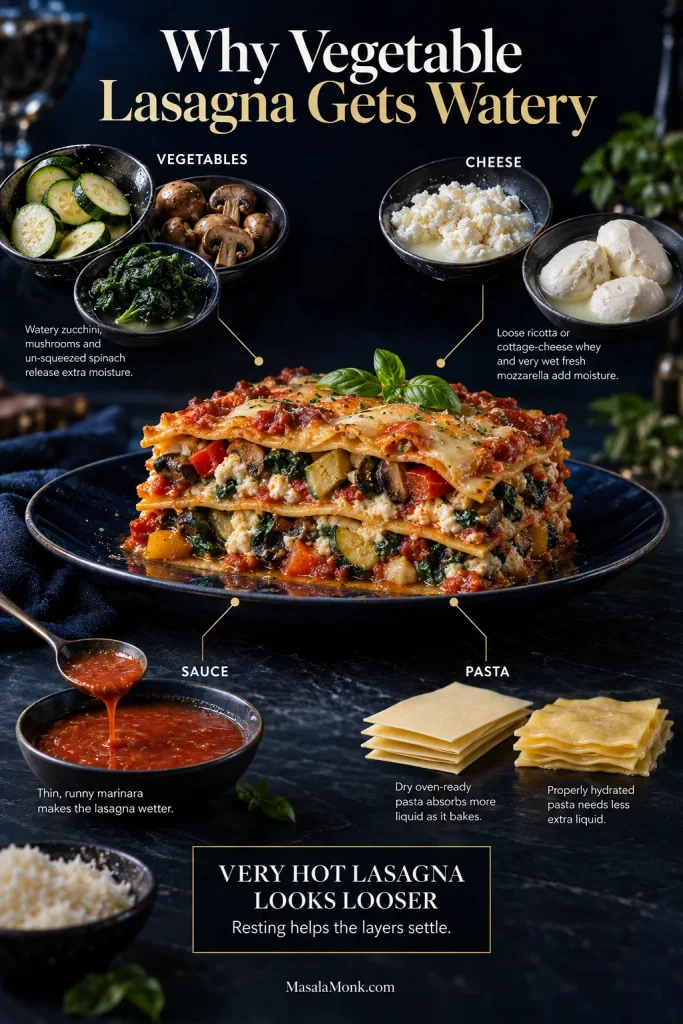
Why Vegetable Lasagna Gets Watery

Most watery lasagnas are not ruined by one dramatic mistake. They get there by accumulation: spinach that still held water, mushrooms that never reached the browning stage, unusually loose ricotta and thin tomato sauce all meeting in the same pan.

  • Vegetables: zucchini, mushrooms and spinach can release plenty of water. Roasting, sautéing and squeezing deal with much of it before layering.
  • Cheese: ricotta and cottage cheese vary by brand. If whey is pooling, drain it. Fresh mozzarella contains considerably more water than low-moisture mozzarella and is not a straightforward 1:1 substitute here unless it is drained and blotted extremely well.
  • Sauce: very thin marinara loosens the whole pan. Sauce reduced too far creates the opposite problem when dry noodles need liquid.
  • Pasta: oven-ready sheets absorb liquid while they cook. Boiled noodles arrive in the pan already hydrated.
Vegetable lasagna surrounded by four moisture sources: wet vegetables, watery cheese, thin marinara and pasta with different hydration needs.
The useful distinction in watery vegetable lasagna is not simply “more liquid versus less liquid.” It is controlled moisture versus uncontrolled moisture: pasta needs deliberate hydration, while vegetable water, cheese whey and excessively thin sauce can accumulate where the recipe does not need them.

A lasagna also looks looser when it is extremely hot. Straight from the oven, the sauce moves more freely; after 20 minutes, the layers hold themselves together much better.

A spoonful of juices around a very hot first slice is not a failed lasagna.

A lake underneath it is something worth fixing.

Already have a pan in front of you? Troubleshoot what you’re seeing.

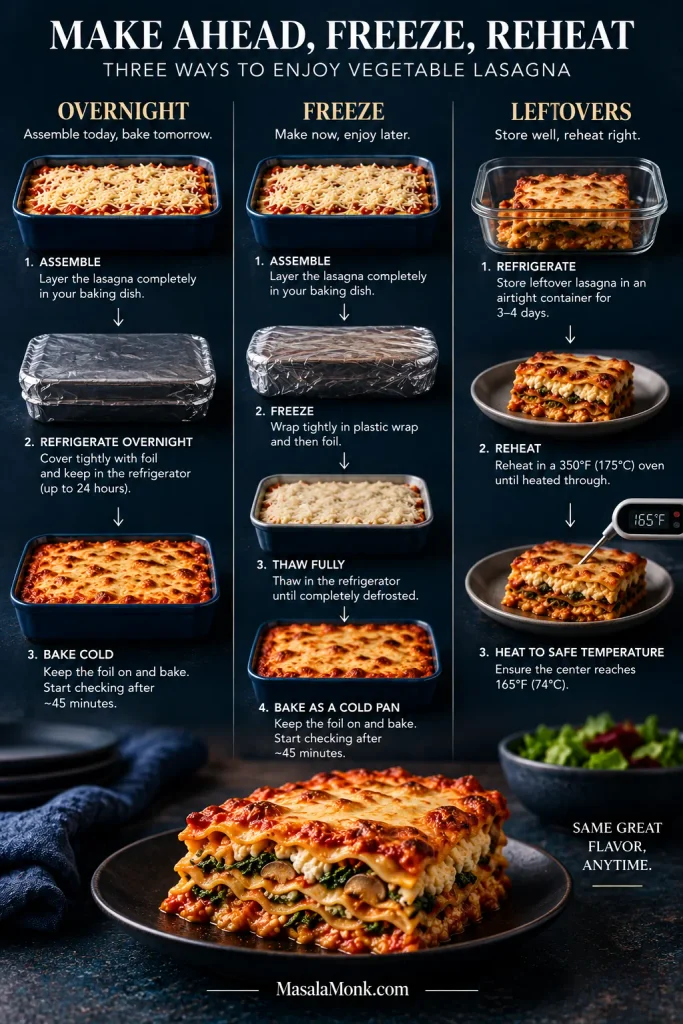
Make Ahead, Freeze and Reheat

Assemble It the Night Before

Cover the assembled pan tightly and refrigerate overnight. The next day, start checking the pasta after about 45 minutes covered. The whole dish begins cold, so it usually needs longer than a freshly assembled pan.

Three vegetable lasagna workflows show refrigerating an assembled pan overnight, freezing and thawing it in the refrigerator, and reheating leftovers to 165°F or 74°C.
With make-ahead vegetable lasagna, watch the center rather than trusting the browned edges. A refrigerator-cold or fully thawed pan can look active around the perimeter while the middle is still catching up, so doneness cues remain more reliable than adding one fixed number of minutes.

Opening the refrigerator and finding dinner already built is one of the better rewards for doing the chopping a day early.

Prep the Components Earlier

The roasted vegetables and tomato sauce can be made up to 2 days ahead and refrigerated separately. Mix the ricotta and assemble closer to baking.

Freeze the Whole Pan or Individual Slices

A tightly wrapped assembled lasagna can be frozen before baking. Thaw it fully in the refrigerator; a deep frozen 9 × 13-inch pan may take longer than one night to thaw through.

Once fully thawed, treat it like any other refrigerator-cold assembled lasagna: bake covered at 375°F / 190°C and start checking the pasta after about 45 minutes. Uncover once the noodles are tender and brown the top.

For leftover slices, cool the lasagna first, divide it into individual portions, wrap well and freeze. Thawing in the refrigerator gives the most even reheating.

Leftovers and Reheating

Refrigerate leftovers promptly in covered containers and use them within 3–4 days, or freeze them for longer storage. The USDA’s leftover-safety guidance has additional storage and reheating advice.

For several refrigerated slices or a larger portion, cover and reheat at about 350°F / 175°C until hot through the middle. Uncover for the last few minutes if you want to refresh the cheese on top.

For a measurable food-safety endpoint, USDA recommends reheating leftovers to 165°F / 74°C in the center.

A single slice usually does better with gentler staged microwave heating than one long blast at maximum power. Chilled lasagna has another advantage: the layers often cut even more cleanly the next day.

Cooking it now? Return to the main recipe · ↑ Back to top

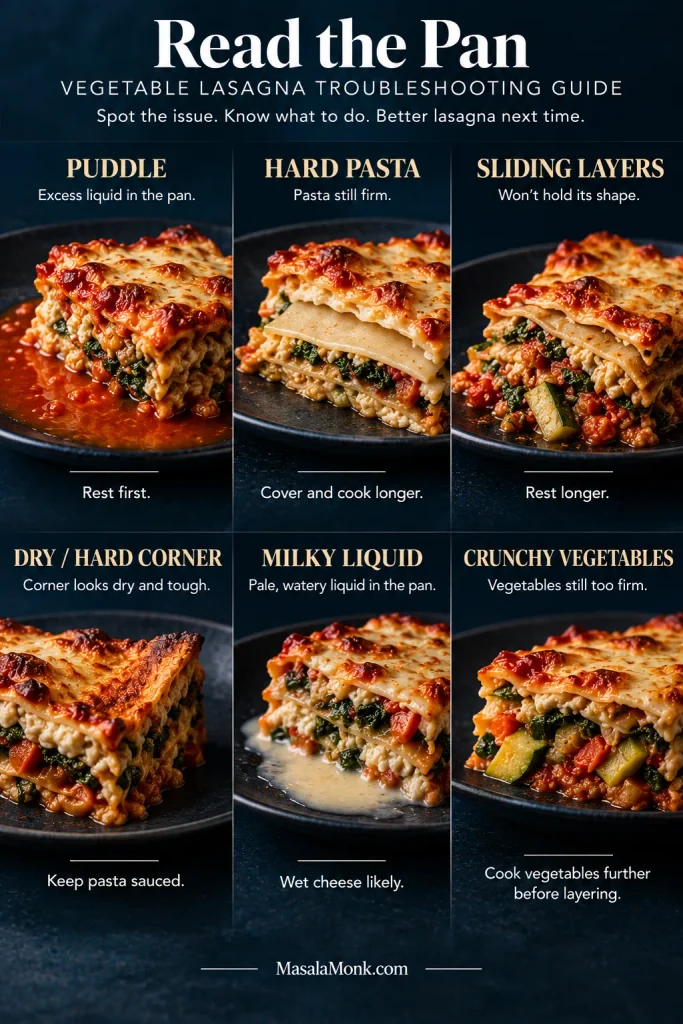
Read the Pan: What Went Wrong?

Do not chase architectural perfection.

A good lasagna can slump a little at the edge of the plate and still be exactly right. What deserves attention is a real pool of liquid, genuinely hard pasta, a dry top, a cold middle or vegetables that never became tender.

If the first slice collapses, give the pan another few minutes before deciding anything dramatic. The first piece out of a very hot lasagna is often the least tidy one.

What You SeeWhat to Do
Thin puddle around the edgesRest the pan first. If a genuine pool remains, carefully spoon off a little before serving. Next time, cook more moisture out of the vegetables or reduce an unusually thin sauce.
Noodles hard throughoutCover the pan again and give the pasta another 5–10 minutes, then check once more.
Mushy pastaThere is no real rescue once pasta is over-softened. Next time, boil regular noodles less or adjust the amount of liquid or baking time for very thin oven-ready sheets.
Lasagna slides apartGive it more time to rest before cutting another slice. Very wet cheese, loose sauce and excessively thick filling layers can make the problem worse.
Lasagna is dryServe it with warm marinara. Next time, keep the pasta fully covered and check the bake earlier.
Everything tastes flatAdd grated hard cheese, herbs, black pepper or chile at the table. Next time, brown and season the vegetables properly and taste the sauce and ricotta before layering.

A Few Other Clues

  • Hard top corners: pasta was probably left exposed above the sauce.
  • Milky liquid: unusually wet ricotta, cottage cheese or mozzarella is often involved.
  • Crunchy vegetables: dense vegetables were cut too large or did not cook far enough before assembly.
Six lasagna problems shown in close-up: pooled liquid, hard pasta, sliding layers, a dry corner, milky cheese liquid and oversized firm vegetables.
Good vegetable lasagna troubleshooting starts by identifying what kind of liquid or resistance you are seeing. Tomato-colored runoff suggests a different problem from pale milky whey, while hard pasta points toward hydration rather than excess moisture—even though all three can make a slice look wrong.

Should a Watery Lasagna Stay in the Oven Longer?

Only if the pasta still needs cooking.

A slightly loose lasagna often improves more from ten minutes on the counter than ten more minutes in the oven. A flooded one can remain wet underneath while the cheese and exposed pasta get drier and drier.

What to Serve With Vegetable Lasagna

Lasagna already brings soft pasta, roasted vegetables, tomato and plenty of creamy cheese. Something crisp, green or sharply dressed beside it gives the next bite a useful contrast.

  • Cucumber salad: cold cucumber, onion, dill and vinegar cut through the richness; this cucumber salad recipe is a natural fit.
  • Roasted broccoli or broccolini: charred edges and a greener, slightly bitter contrast to the sweeter tomato sauce.
  • Garlic bread: for a full comfort-food dinner; this homemade garlic bread loaf works well alongside it.
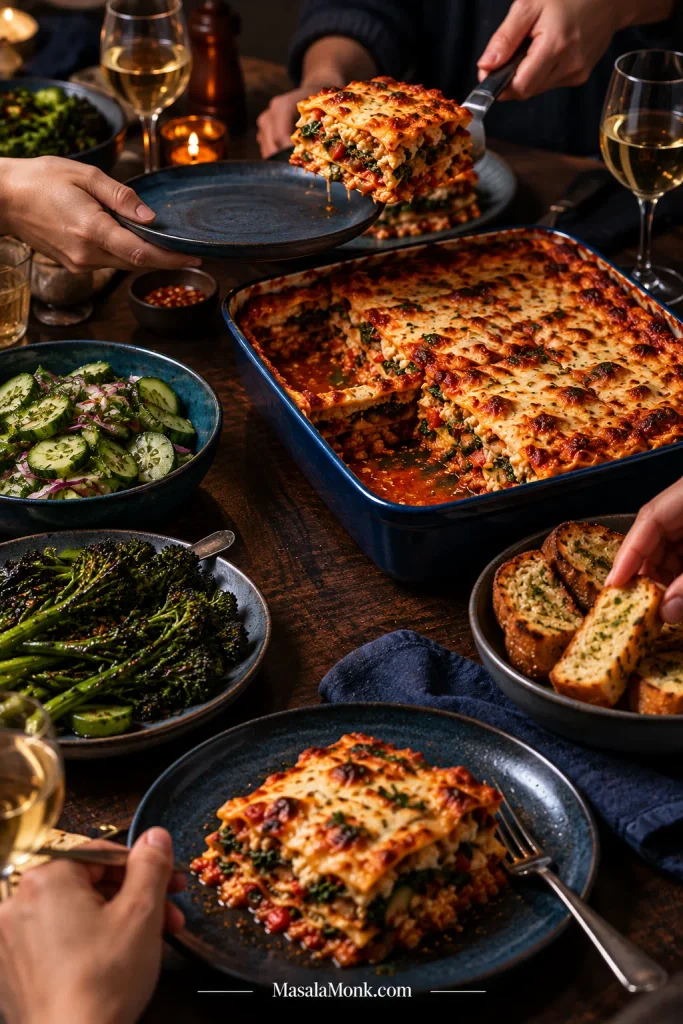
People serving vegetable lasagna at a dark wooden table with cucumber salad, charred broccolini and garlic bread.
For what to serve with vegetable lasagna, think in terms of contrast rather than quantity. Choose something crisp and acidic, something green and charred, or garlic bread for maximum comfort; you do not need three additional rich sides around an already generous main dish.

Cut through a browned corner and lift the first piece. The cheese at the edge may be a little crisp while the layers underneath stay soft, with creamy ricotta between zucchini, mushrooms and peppers and enough tomato sauce to keep the pasta tender without running across the plate.

The vegetable lasagna worth making again is the one where the vegetables taste good before they become filling, the pasta is tender, and the whole generous pan still knows how to become a slice.

Back to the recipe · ↑ Back to top

Posted on Leave a comment

Broccoli Pasta Recipe: Garlic Parmesan Broccoli Pasta That Stays Saucy Without Cream

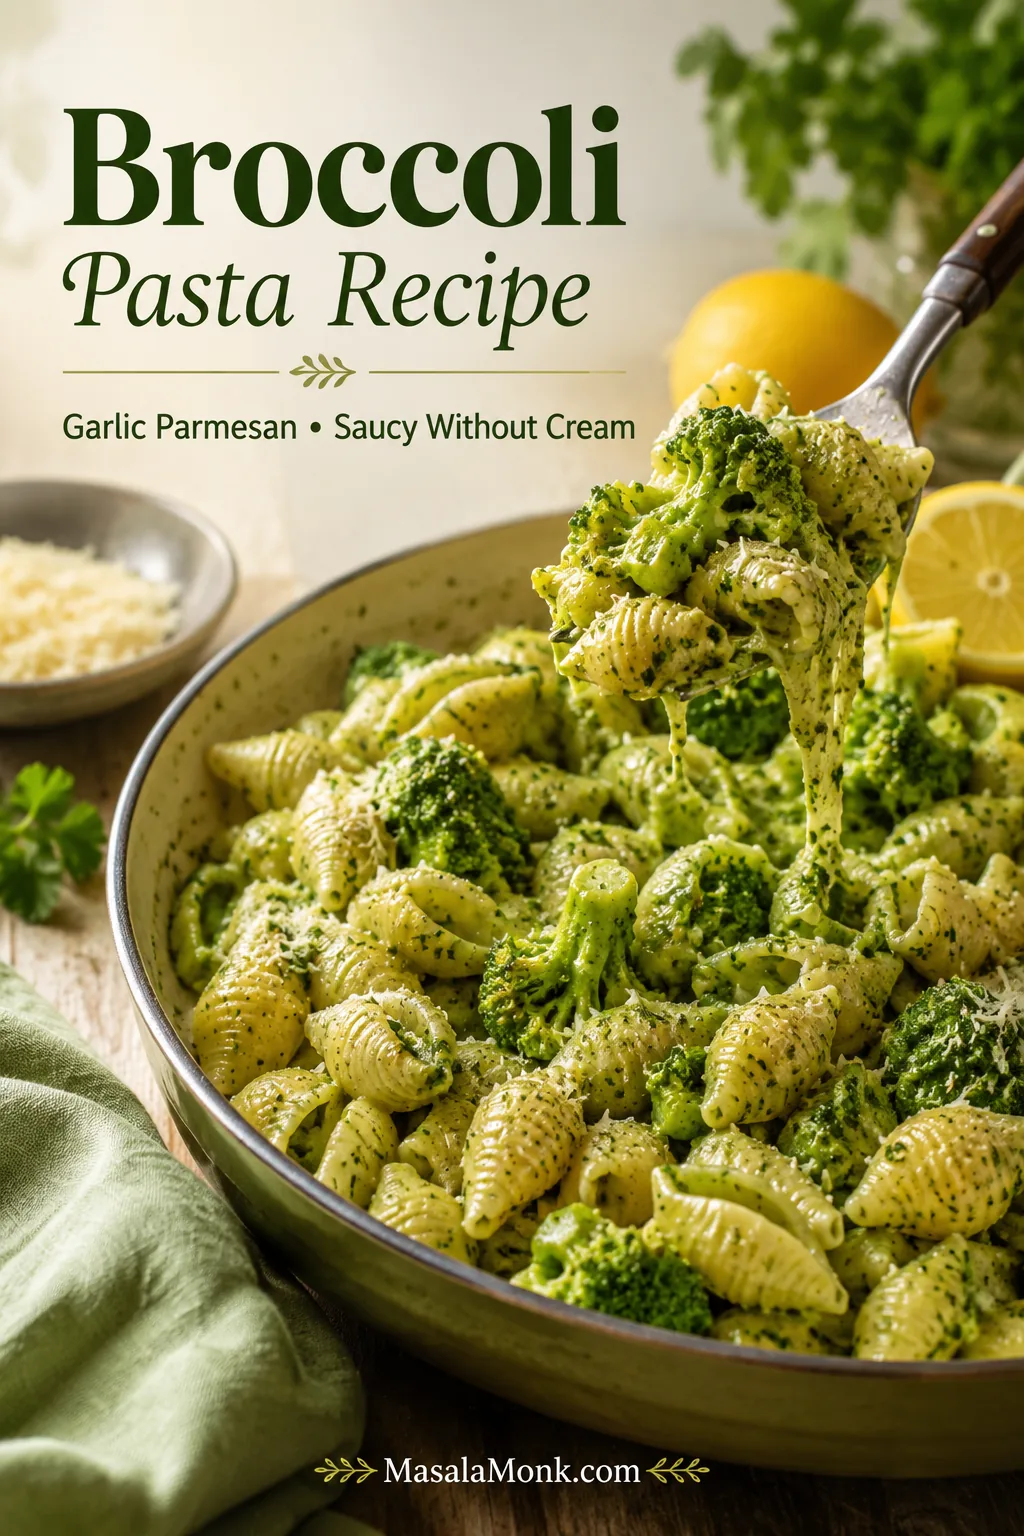
Shell pasta and broccoli in a shallow bowl with a fork lifting a glossy bite, lemon and Parmesan nearby, with text reading “Broccoli Pasta Recipe” and “Garlic Parmesan • Saucy Without Cream.”

Broccoli pasta should be easy: pasta, broccoli, garlic, Parmesan, done. But anyone who has made a disappointing bowl knows the usual problems. The pasta turns dry before it reaches the table. Broccoli tastes watery or bland. Cheese clumps instead of melting. Somehow, dinner ends up tasting like plain noodles with steamed vegetables.

This broccoli pasta recipe is built to avoid that. The trick is simple: use broccoli in two textures — small pieces for sauce, florets for freshness.

The good version should feel like vegetables and comfort food finally agreeing with each other. Some broccoli melts into the garlic-Parmesan coating; some stays green and visible. Lemon keeps the cheese from feeling heavy, and the whole bowl lands somewhere between fresh weeknight pasta and cozy comfort food.

Once the broccoli is cut, the pasta comes together in about 25 minutes. The first time may take closer to 30 minutes while you grate the cheese, learn the timing, and see how loose the sauce should look in the pan.

If your broccoli pasta usually turns dry, the two biggest fixes are simple: save pasta water, and add Parmesan off the heat.

Quick Answer: How Do You Make Broccoli Pasta?

To make broccoli pasta, cook the pasta with finely chopped broccoli until some of the broccoli is soft enough to mash. Toss it with garlic, butter or olive oil, Parmesan, and starchy pasta water until saucy. Add a few visible florets near the end so the bowl still looks green and fresh. That balance keeps the pasta saucy without turning the whole bowl soft.

What makes this version different is that broccoli is not just a topping. Some becomes sauce, some stays visible, and the best bites taste like broccoli all the way through.

What Good Broccoli Pasta Should Look Like

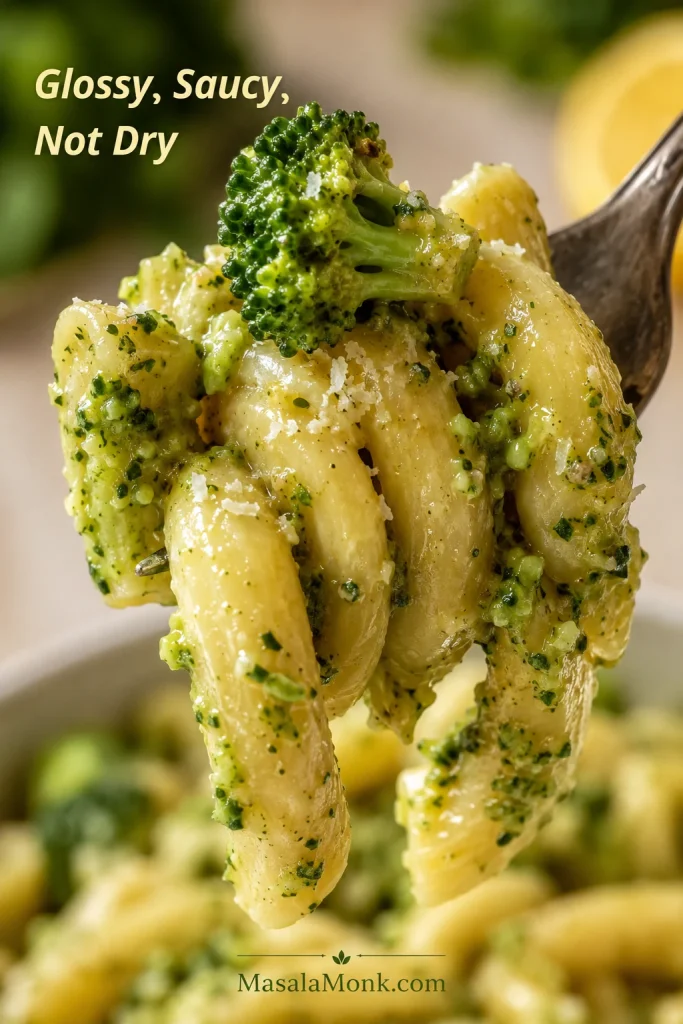
Use this as the visual target before you cook: the pasta should look coated and lively, not matte, stiff, or separated from the broccoli.

Close-up of glossy broccoli pasta lifted on a fork, with green broccoli sauce clinging to short pasta and text reading “Glossy, Saucy, Not Dry.”
Look for a glossy coating, not sauce pooling at the bottom.

At a Glance

  • Total time: about 25 minutes once you know the rhythm
  • Yield: 4 dinner servings or 6 smaller side servings
  • Main flavor: garlic, Parmesan, lemon, black pepper, broccoli
  • Texture: saucy, green-flecked, lightly creamy, not heavy
  • Best pasta: shells, fusilli, orecchiette, penne, rigatoni, or cavatappi
  • Fresh or frozen: both work

Garlic Parmesan Broccoli Pasta That Stays Saucy Without Cream

Recipe Card

This garlic Parmesan broccoli pasta turns finely chopped broccoli, garlic, Parmesan, and pasta water into a light, glossy sauce, with a few florets kept whole for freshness. It stays saucy without heavy cream.

Servings
4 dinner servings
Prep Time
10 minutes
Cook Time
15 minutes
Total Time
25 minutes

Equipment

  • Large pot
  • 12-inch skillet or wide sauté pan
  • Colander, slotted spoon, or spider
  • Measuring cup for pasta water
  • Fine grater or microplane
  • Fork, potato masher, wooden spoon, or spatula

Ingredients

  • 12 oz / 340g short pasta, such as shells, fusilli, orecchiette, penne, rigatoni, or cavatappi
  • 1¼ to 1½ lb / 565 to 675g broccoli, florets and tender stems
  • Kosher salt, for the pasta water
  • 3 tbsp / 45 ml olive oil
  • 1 to 2 tbsp / 14 to 28g butter
  • 4 garlic cloves, finely minced or grated
  • ½ tsp red pepper flakes, optional
  • ½ cup / 45 to 50g finely grated Parmesan, plus more for serving
  • 1 cup / 240 ml reserved pasta water, divided
  • 1 to 2 tsp lemon zest or 1 tbsp lemon juice, to taste
  • Black pepper, to taste

Optional Add-Ins

  • 2 tbsp cream cheese for a creamier sauce
  • ¼ cup / 60 ml milk for a lighter creamy version
  • ½ cup shredded cheddar or mozzarella for a cheesier pasta
  • 2 cups cooked chicken for a fuller dinner

Instructions: Cook the Pasta and Broccoli

  1. Cut the broccoli in two textures. Finely chop about two-thirds of the broccoli into ¼ to ½ inch pieces, including tender stems. Cut the remaining broccoli into small visible florets, about ¾ to 1 inch. Peel thick stems first if the outside feels tough.
  2. Boil the pasta water. Bring a large pot of water to a boil and salt it well. Add pasta and cook until just shy of al dente. Start checking 1 to 2 minutes before the package time.
  3. Add the finely chopped broccoli. When the pasta has about 5 minutes left, add the finely chopped broccoli pieces. Make sure the water returns to a steady boil.
  4. Add the visible florets. When the pasta has about 2 minutes left, add the remaining small florets.
  5. Reserve pasta water. Scoop out 1 cup / 240 ml pasta water before draining. Do not rinse the pasta.

Build the Sauce and Finish

  1. Make the garlic base. While the pasta cooks, warm olive oil and butter in a wide skillet over medium-low heat. Add garlic and red pepper flakes. Cook for 30 to 60 seconds, until fragrant but not browned.
  2. Mash some broccoli. If using a slotted spoon, move broccoli into the skillet first and mash the soft pieces into the garlic oil. Then add pasta. If everything was drained together, add pasta and broccoli to the skillet and mash some broccoli in place.
  3. Toss with pasta water. Add ½ cup / 120 ml reserved pasta water. Toss until the pasta looks coated and green bits cling to it. Add more pasta water a few tablespoons at a time if needed.
  4. Add Parmesan off the heat. Turn off the heat. Add Parmesan gradually, tossing until it melts into the pasta. Loosen with more hot pasta water if needed.
  5. Finish and serve. Add lemon zest or juice, black pepper, and more Parmesan. Taste and adjust salt, lemon, pepper, and cheese before serving.

Notes

  • If your pasta cooks in less than 9 minutes, boil the finely chopped broccoli pieces for 2 to 3 minutes before adding the pasta, or cook the broccoli separately until mashable.
  • Frozen broccoli: thaw large florets enough to chop and drain well.
  • Gluten-free, chickpea, or lentil pasta: check early and toss gently.
  • Add Parmesan off the heat so it melts smoothly.
  • Chicken: add extra pasta water because it absorbs sauce.
  • Stop while the skillet looks slightly loose; the pasta thickens as it sits.

Why the Two-Texture Broccoli Method Works

The method works because the broccoli has two jobs. Chopped broccoli softens enough to coat the pasta; florets keep the bowl green and fresh. If all the broccoli is large, the pasta tastes like noodles with vegetables on top. If all of it is finely chopped, the flavor is good but the bowl looks dull.

The best broccoli pieces are not the pretty ones. They are the little bits that disappear into the garlic oil and make every shell taste like sauce. Do not worry if the broccoli looks a little messy in the skillet. That mess is what makes the sauce.

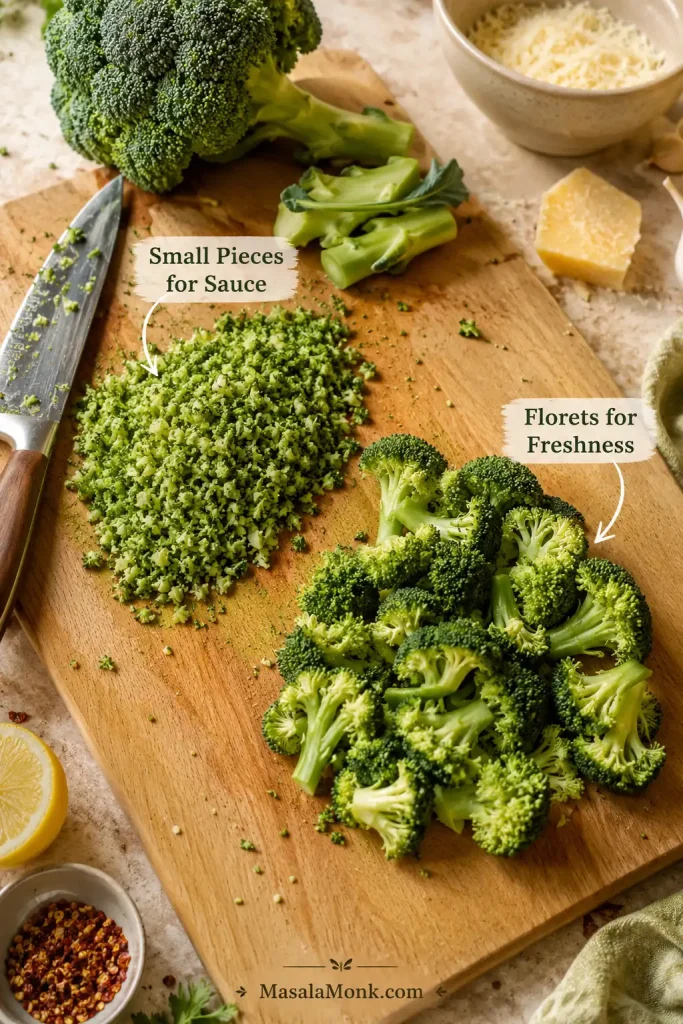
Small Pieces for Sauce, Florets for Freshness

This cut is the foundation of the recipe. The small pieces are for flavor and body; the larger florets are for color, bite, and the finished look.

Cutting board with finely chopped broccoli and stems on one side and larger broccoli florets on the other, labeled “Small Pieces for Sauce” and “Florets for Freshness.”
Chopped broccoli builds sauce; larger florets keep the pasta green and fresh.

Success cue: the pasta should look a little saucier in the pan than you want on the plate. Hot pasta keeps absorbing as it sits, so a slightly loose skillet becomes a well-coated bowl by the time you eat.

Do not chase dryness with more cheese. Wake the sauce up with pasta water first, then add cheese for flavor.

Ingredients You’ll Need

The ingredients are simple, but three details matter most: broccoli cut size, starchy pasta water, and finely grated Parmesan.

The Ingredients That Make the Sauce Work

Use short pasta, enough broccoli, fresh garlic, finely grated cheese, and lemon. Those few choices carry most of the flavor.

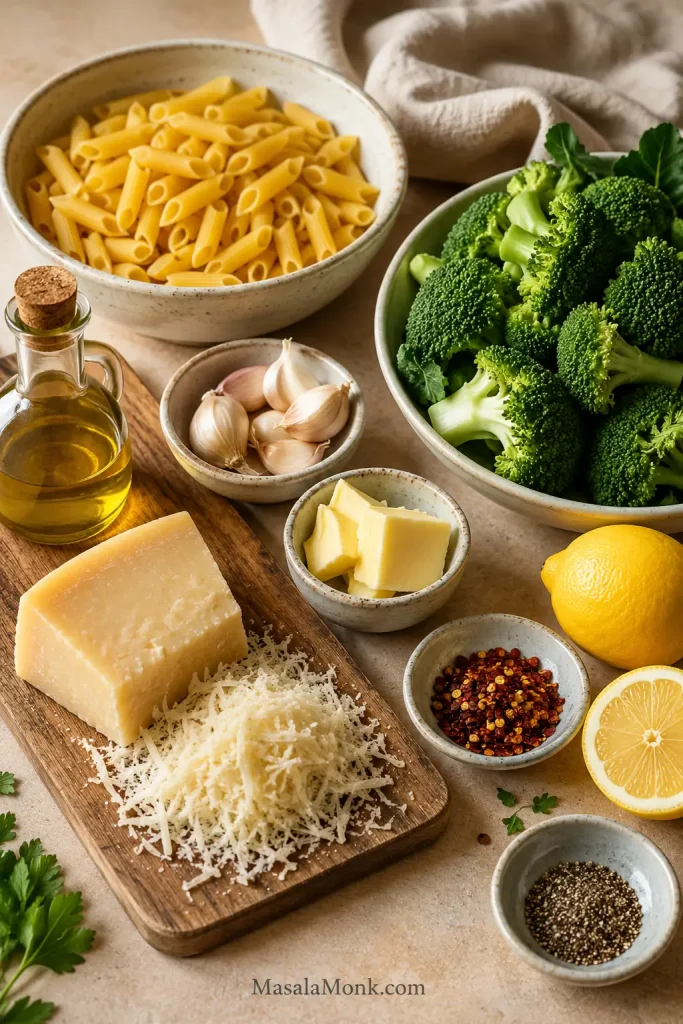
Ingredients for broccoli pasta arranged on a kitchen surface, including short pasta, broccoli, Parmesan, garlic, lemon, olive oil, butter, black pepper, and red pepper flakes.
Short pasta, broccoli, garlic, Parmesan, and lemon each carry part of the flavor.

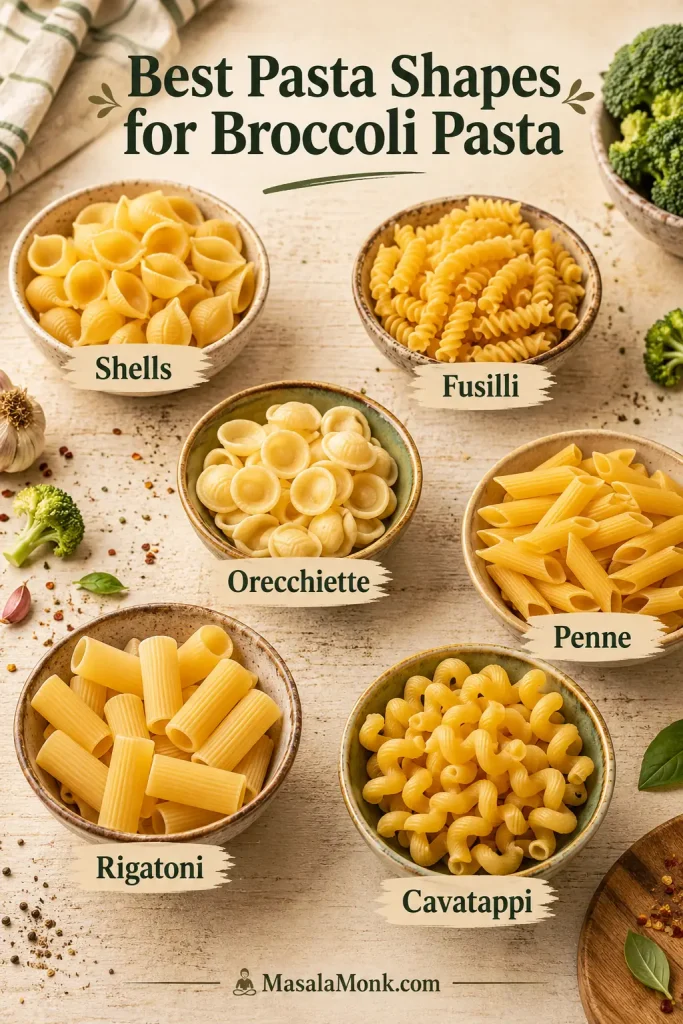
Best Pasta Shapes for Broccoli Pasta

Use 12 oz / 340g short pasta. Shells and fusilli are especially good because mashed broccoli catches in their curves. Orecchiette, penne, rigatoni, and cavatappi also work. Long pasta needs smaller broccoli and more tossing.

Six bowls of dry pasta labeled Shells, Fusilli, Orecchiette, Penne, Rigatoni, and Cavatappi under the heading “Best Pasta Shapes for Broccoli Pasta.”
Curves, ridges, and cups give broccoli sauce places to cling.

Chickpea, lentil, and gluten-free pasta can work too, but check early and toss gently because they can break more easily than regular wheat pasta.

Broccoli

Use 1¼ to 1½ lb / 565 to 675g broccoli. Chop most of it into ¼ to ½ inch pieces so it can soften into the sauce. Save a handful of ¾ to 1 inch florets so the finished pasta still looks green and fresh.

Do not waste the stems. Peel tough outsides, then chop the tender centers small so they can help thicken the sauce.

Using frozen broccoli instead? Jump to the fresh vs frozen broccoli notes before you start, because frozen broccoli needs a little more moisture control.

Garlic, Oil, and Butter

Use 4 garlic cloves, 3 tbsp / 45 ml olive oil, and 1 to 2 tbsp / 14 to 28g butter. They build the warm base later, so keep the heat gentle.

Parmesan

Use ½ cup / 45 to 50g finely grated Parmesan, plus more for serving. A block grated finely at home melts better than large shreds. Pecorino Romano is sharper; Grana Padano is milder. Taste before adding extra salt.

Lemon, Salt, Pepper, and Red Pepper Flakes

Use 1 to 2 tsp lemon zest or 1 tbsp lemon juice. Lemon does not need to taste loud; it just keeps the cheese and broccoli from feeling flat. Finish with black pepper and red pepper flakes if you want gentle heat.

Common Broccoli Pasta Mistakes to Avoid

Before you cook, watch these four things:

  • Do not cut all the broccoli large. You need chopped broccoli that can collapse into sauce.
  • Do not forget pasta water. It is the difference between glossy and dry.
  • Do not add Parmesan over high heat. That is how smooth cheese turns grainy.
  • Do not rinse the pasta. The surface starch helps the broccoli sauce cling.

How to Make Broccoli Pasta with the Two-Texture Method

Once you know the basic steps, the real difference is in the cues: how soft the broccoli gets, how loose the sauce looks, and when to stop adding heat.

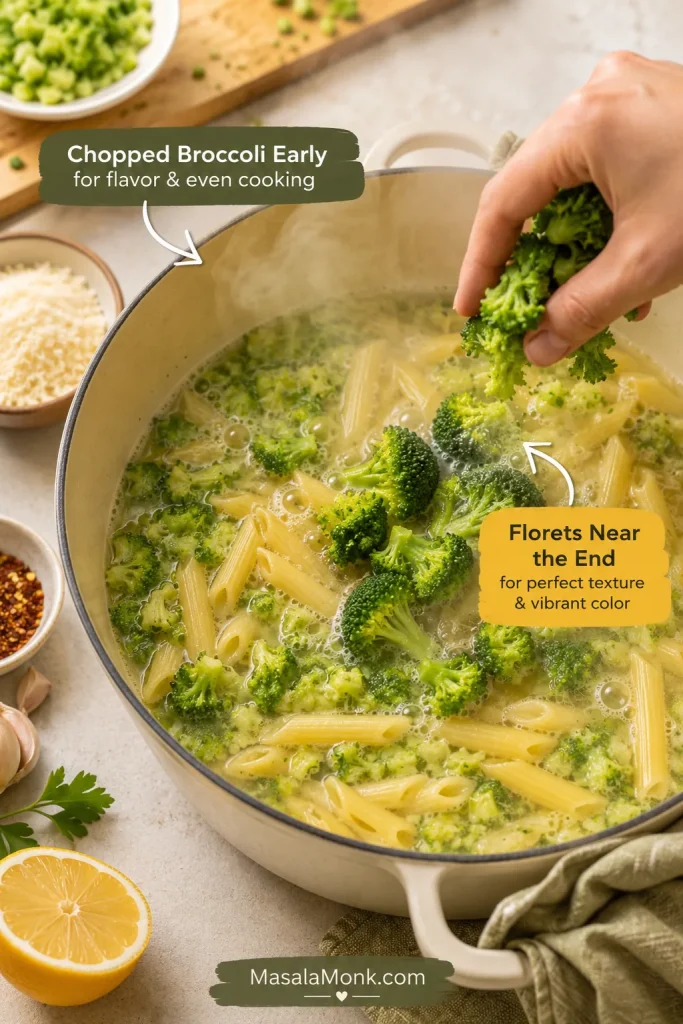
When to Add Broccoli to Pasta

Use the timing as a texture guide, not just a clock. Chopped broccoli needs time to soften enough for sauce; florets need less time so they stay green.

TimingAdd ThisGoal
5 minutes before pasta is doneFinely chopped broccoliSoft enough to mash
2 minutes before pasta is doneVisible floretsGreen and tender
Before drainingPasta waterSauce insurance
Off the heatParmesanSmooth, not grainy
A hand adding broccoli florets to a pot of pasta and chopped broccoli, with text explaining “Chopped Broccoli Early” and “Florets Near the End.”
Chopped broccoli goes in early; florets go in near the end.

1. Cut for Sauce, Not for Perfect Florets

Do not worry about perfect broccoli shapes here. The chopped broccoli is supposed to look a little messy because it is going to disappear into the sauce. Keep a handful of visible florets aside so the finished pasta still looks like broccoli pasta, not just green pasta.

2. Use the Pasta Pot for Timing

The only timing that matters is this: chopped broccoli needs enough time to soften; florets only need enough time to turn green and tender. If the water slows down after adding broccoli, give the pasta a little extra time and check before draining.

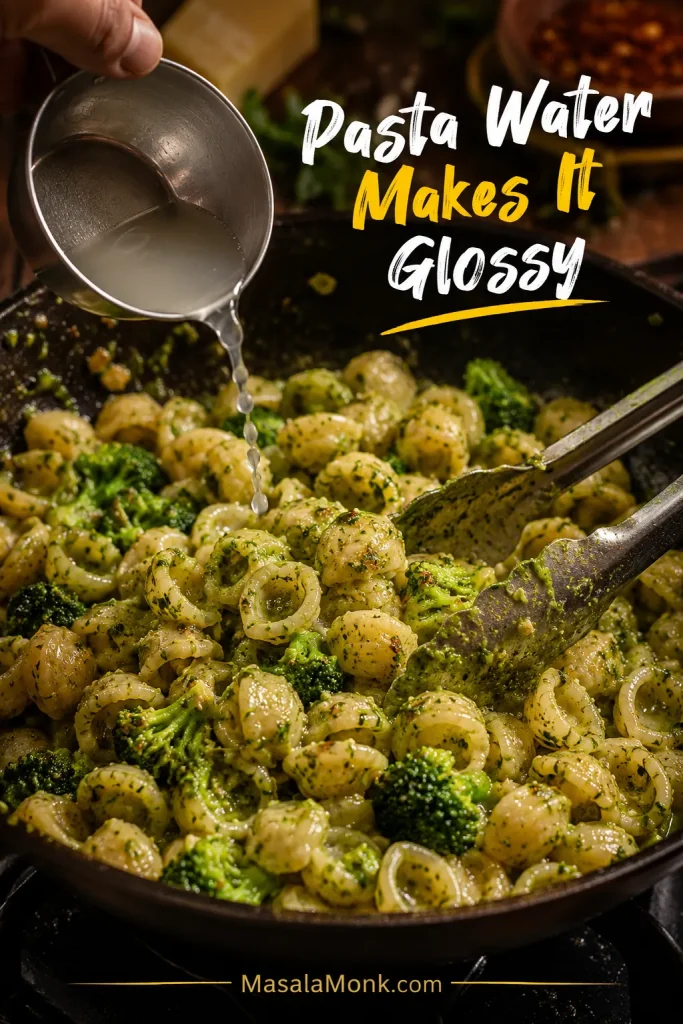
3. Why Pasta Water Makes Broccoli Pasta Glossy

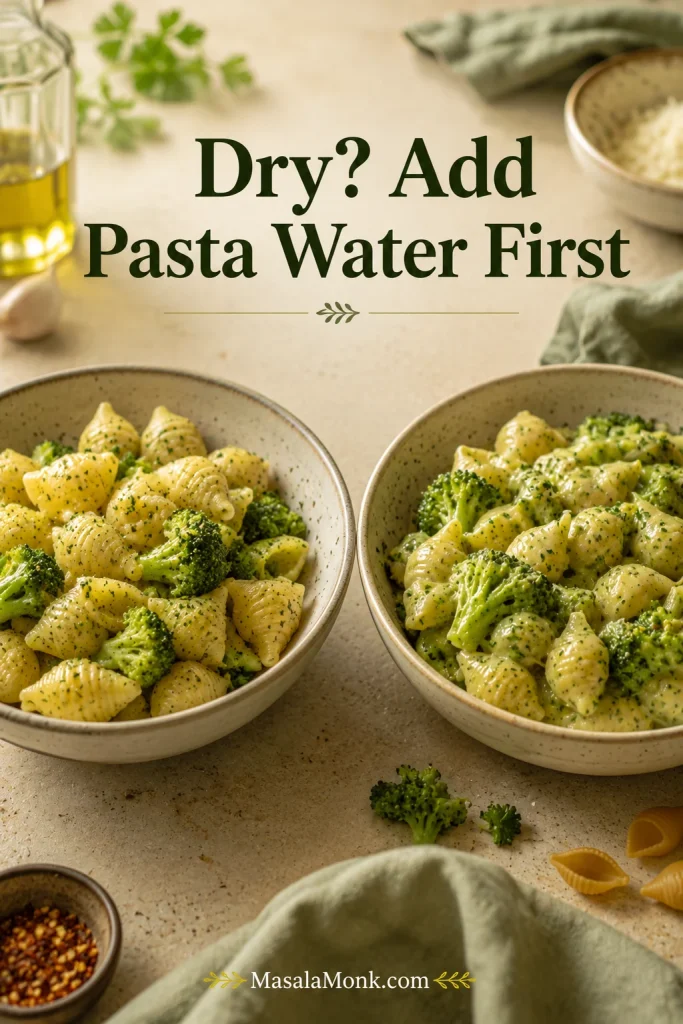
Pasta water is boring until the moment your skillet looks dry. Then it becomes the thing that saves dinner. Scoop it before draining so you are not trying to fix dry pasta with plain water later.

Starchy pasta water being poured into a skillet of short broccoli pasta while tongs toss the glossy sauce, with text reading “Pasta Water Makes It Glossy.”
Pasta water loosens the broccoli sauce and brings back gloss before more cheese.

If your pasta already looks matte or tight, see the dry vs glossy broccoli pasta fix before adding more cheese.

4. Keep the Garlic Gentle

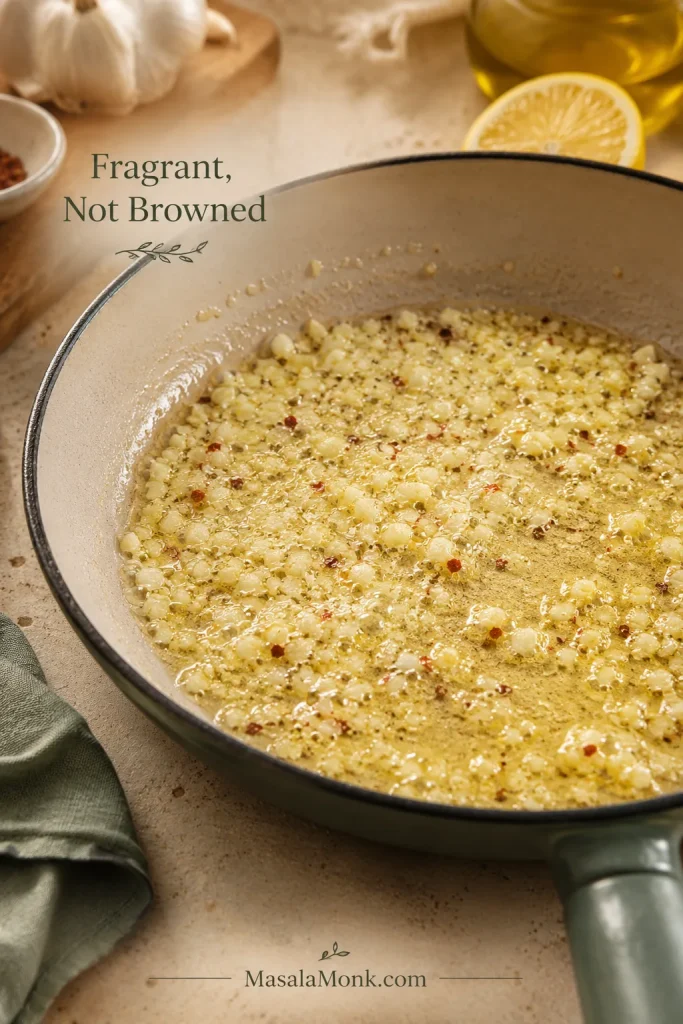
Warm the olive oil, butter, garlic, and red pepper flakes over medium-low heat. The goal is fragrance, not color; if the garlic browns hard here, the bitterness follows the broccoli sauce into the bowl.

Close-up of sliced garlic warming in olive oil and butter in a skillet, with text reading “Fragrant, Not Browned.”
Pale garlic tastes warm and sweet; browned garlic can turn bitter.

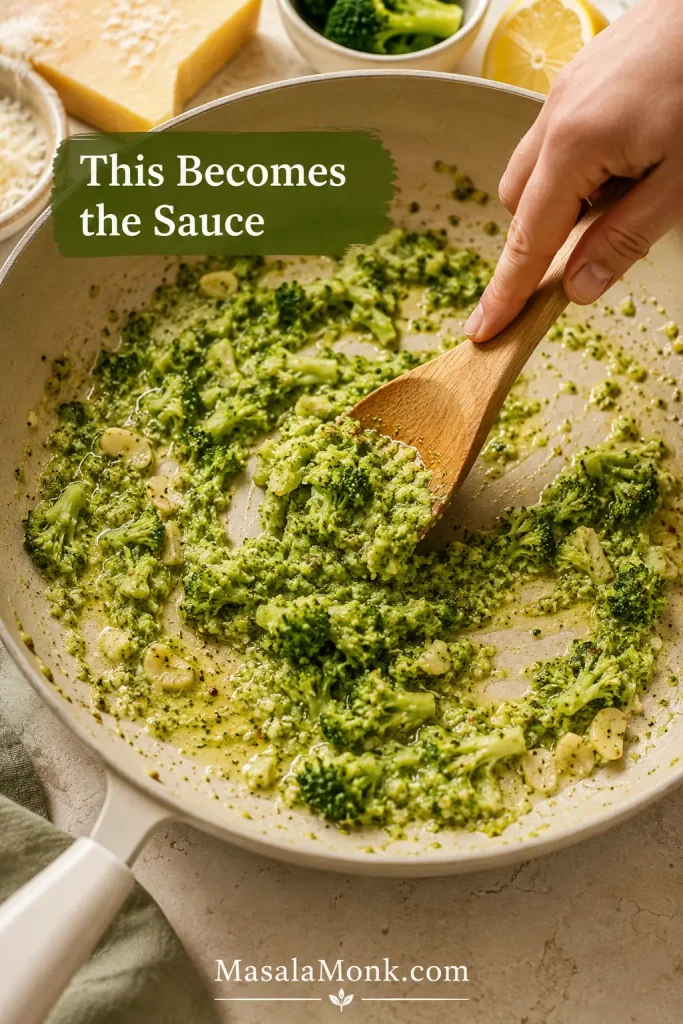
5. Mash Broccoli Into the Sauce

Mash the soft broccoli into the garlic oil, then add pasta water and toss until the sauce clings. The pan should look slightly too loose before serving; the bowl will catch up. By the end, the green bits should be tucked into the curves of the pasta, not sitting at the bottom of the pan.

Soft broccoli being mashed with a wooden spoon in a skillet with garlic oil and butter, with text reading “This Becomes the Sauce.”
Mashing tender broccoli turns it from topping into sauce.

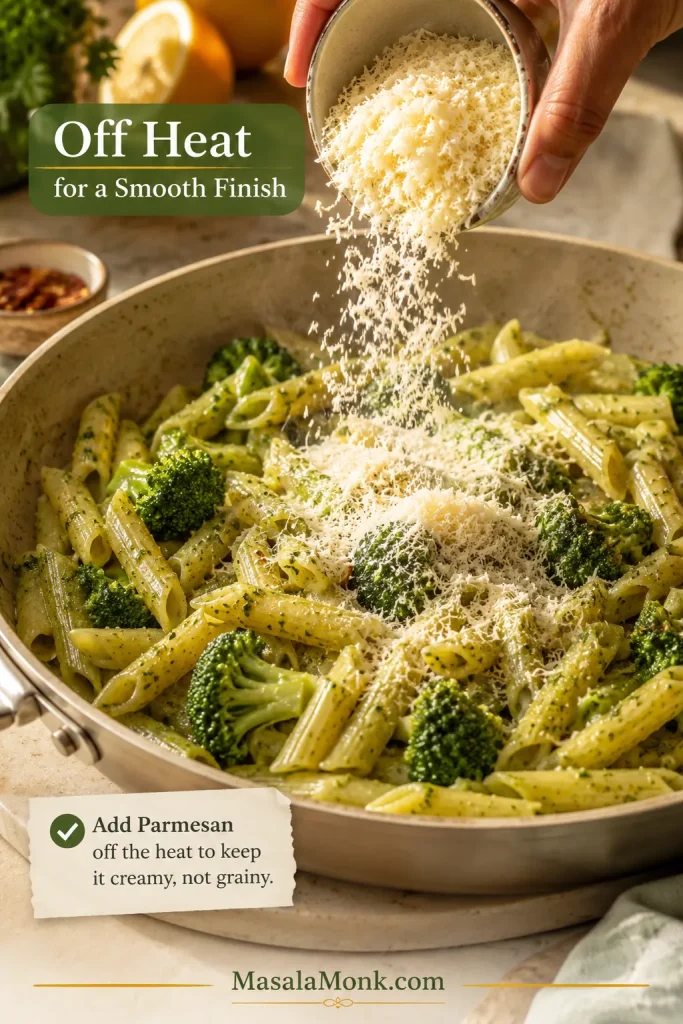
6. Add Parmesan Off the Heat and Finish

Turn off the heat before adding Parmesan. Finish with lemon when the pasta tastes good but not quite awake. The lemon should lift the cheese, not make the pasta sour.

Finely grated Parmesan being added to hot short pasta with broccoli in a skillet, with text reading “Off Heat for a Smooth Finish.”
Off-heat Parmesan melts smoother and coats instead of clumping.

If the cheese clumps or turns grainy, use the troubleshooting table instead of adding more Parmesan.

Fresh vs Frozen Broccoli for Pasta

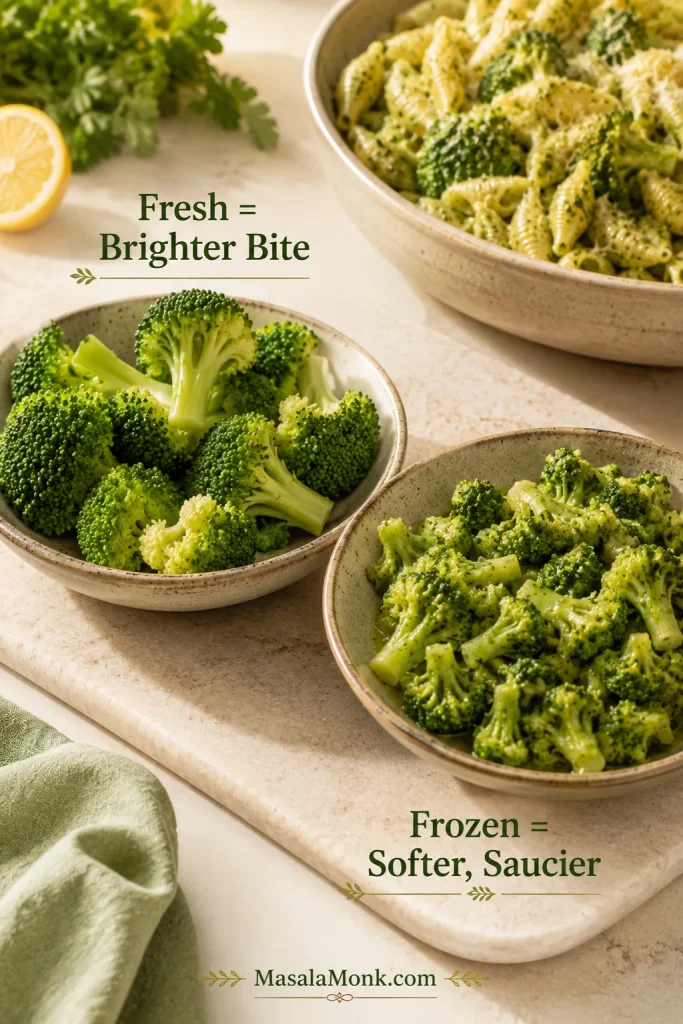
The choice is not about right or wrong broccoli. It is about what kind of bowl you want. Use fresh when you want the pasta to look bright and dinner-table pretty. Use frozen when you want a softer, saucier weeknight bowl.

Choose the Broccoli Texture You Want

Fresh and frozen broccoli both work here, but they do not behave the same way. Use the image and table below to choose the texture you want before you cook.

Fresh broccoli florets in one bowl, softer cooked broccoli in another bowl, and broccoli pasta in the background, with text reading “Fresh = Brighter Bite” and “Frozen = Softer, Saucier.”
Fresh broccoli stays brighter; frozen broccoli cooks softer and saucier.
Broccoli TypeBest ForHow to Use It
Fresh broccoliPrettiest bowl and cleaner biteCut small pieces for sauce and save a few small florets for the end.
Frozen broccoli, thawed and choppedBest control with frozen broccoliThaw just enough to chop large florets, drain extra water, then cook until mashable.
Frozen broccoli added directlyFastest pantry versionAdd near the end of pasta cooking, mash in the skillet, and add pasta water slowly.

Is This Creamy Broccoli Pasta?

Yes, but it is not cream-sauce pasta. The creaminess comes from soft broccoli, pasta water, butter or olive oil, and finely grated Parmesan, so the pasta feels glossy and coated while the broccoli stays central. These add-ins push it further toward comfort food.

Make It Creamier or Cheesier

Build the broccoli sauce first, then add dairy slowly. That keeps the flavor green instead of turning the bowl into plain cheese pasta.

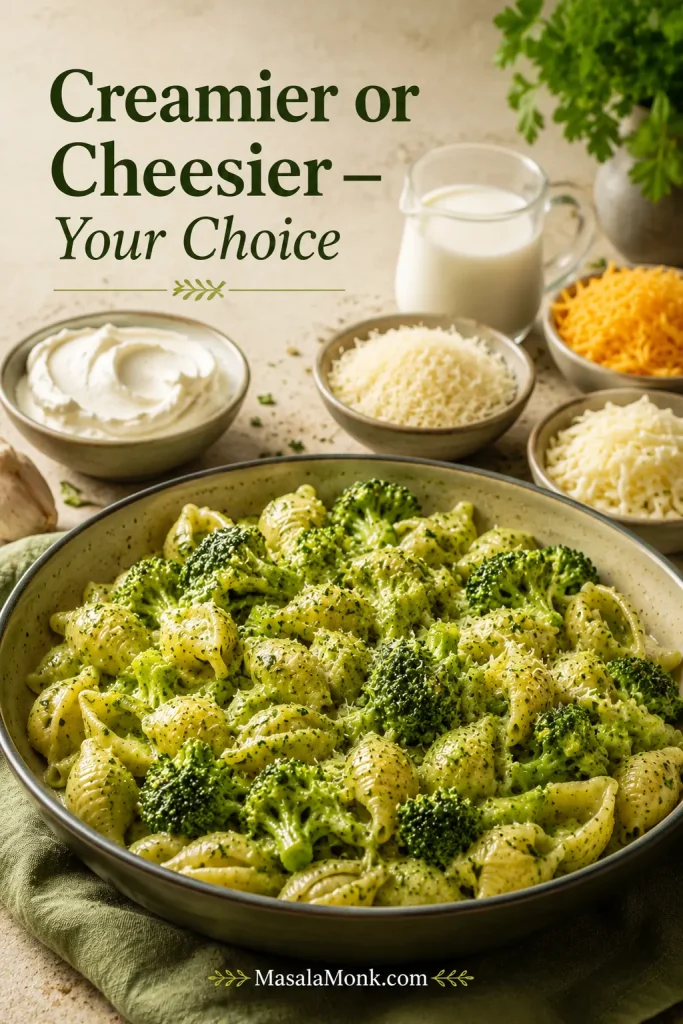
A bowl of glossy broccoli pasta with bowls of cream cheese, milk, grated Parmesan, cheddar, and mozzarella nearby, with text reading “Creamier or Cheesier — Your Choice.”
Add richness slowly so cheese supports the broccoli instead of hiding it.
GoalWhat to AddWhen to Add It
Creamier sauce2 tbsp cream cheeseAfter mashing broccoli and adding pasta water, before Parmesan
Lighter creamy sauce¼ cup / 60 ml milkAdd with pasta water and warm gently before cheese
More Parmesan flavorExtra ¼ cup ParmesanOff the heat, gradually, with splashes of pasta water
Broccoli-cheddar pasta½ cup shredded cheddarOff the heat or very low heat after Parmesan
Stretchy cheesy pasta½ cup shredded mozzarellaOff the heat, then serve immediately

If you want a true mac-and-cheese style dinner, MasalaMonk’s macaroni and cheese recipe is the better direction.

If the cheese turns grainy, the heat was probably too high when it went in. Move the pan off the heat, add a splash of hot pasta water, and stir gently.

Can You Make This One-Pot?

Yes, but the skillet version gives better garlic flavor and more room to toss. Use the one-pot shortcut when convenience matters more than maximum garlic flavor.

The One-Pot Shortcut

In the one-pot version, stop while the pasta still looks a little loose. It tightens faster than the skillet version, so serve as soon as the sauce coats.

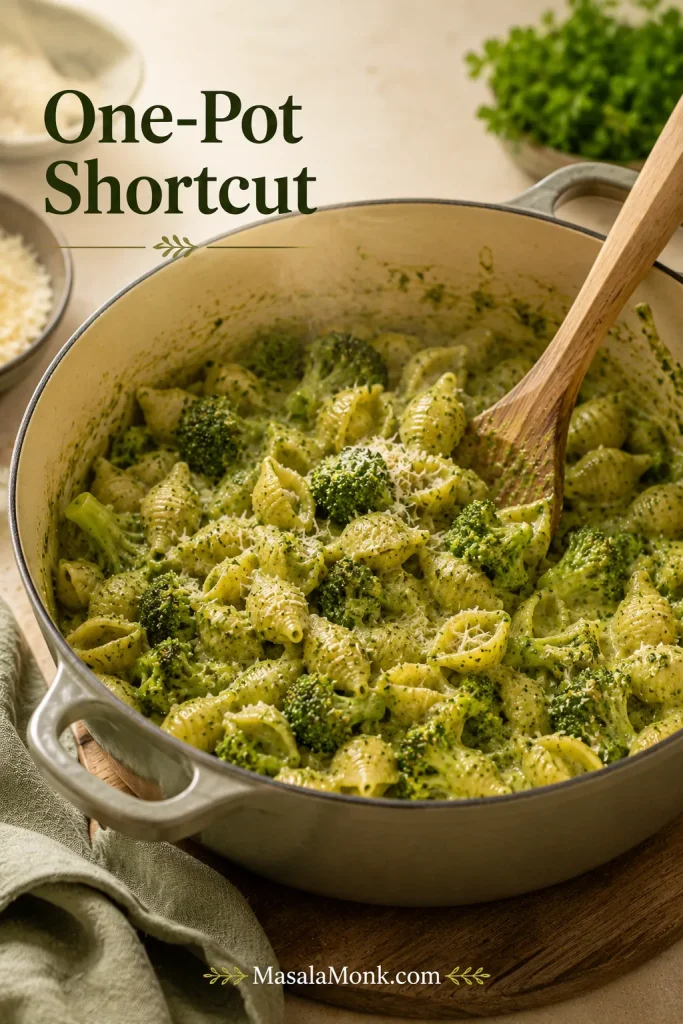
Broccoli pasta with short shells in a Dutch oven with a wooden spoon, grated Parmesan, and text reading “One-Pot Shortcut.”
Stop one-pot pasta a little loose; it tightens faster as it sits.

For the shortcut, cook the pasta and broccoli in one large pot, reserve pasta water, drain, then build the garlic oil in the same pot. Return the pasta and broccoli, mash some of the soft pieces, loosen with pasta water, and add Parmesan off the heat.

Finishing Options That Make It Better

Broccoli pasta is simple, so the best finishes solve small problems in the bowl.

  • If it tastes flat: add lemon juice.
  • When it smells good but needs lift: add lemon zest.
  • For mild flavor: add Parmesan and black pepper.
  • If it feels too soft: add toasted breadcrumbs.
  • When it needs warmth: add red pepper flakes or extra black pepper.

Broccoli Pasta Variations by Dinner Mood

Once the base works, the variations are easy. Keep the broccoli sauce loose, then add whatever makes dinner feel complete.

Make It a Full Dinner

Choose one of these when the pasta needs to become the whole meal.

  • Chicken broccoli pasta: fold in 2 cups cooked chicken once the pasta is coated. Add extra pasta water because chicken absorbs moisture quickly. For a more casserole-style chicken and broccoli dinner, MasalaMonk’s Cheesy Chicken Broccoli Rice is the better fit.
  • Salmon broccoli pasta: fold cooked salmon flakes in at the end, after the pasta is coated. Lemon matters even more here because it balances both the fish and broccoli.
  • Sausage broccoli pasta: brown sausage in the skillet first, scoop it out if needed, then use the same pan for the garlic base so the broccoli picks up the browned bits.
  • White beans or chickpeas: add them at the end with a splash of pasta water so they warm without breaking apart.

Make It More Comforting

  • Cheesy broccoli pasta: add cheddar off the heat with the Parmesan when you want the bowl to feel closer to mac and cheese but still taste like broccoli.
  • Baked broccoli pasta: best as a leftover move. Add a splash of milk or pasta water, spoon into a baking dish, top with cheese and breadcrumbs, and bake until bubbling.

Make It Fresher

  • Broccoli pesto pasta: blend some cooked broccoli with basil or parsley, Parmesan, lemon, olive oil, garlic, and pasta water. MasalaMonk’s pesto pasta recipe uses a similar pasta-water tossing technique.
  • Lemon breadcrumb broccoli pasta: finish with toasted breadcrumbs and extra lemon zest for crunch and brightness.
  • Broccoli rabe or rapini pasta: treat it as its own dish. Broccoli rabe is more bitter and leafy than regular broccoli, and it works especially well with garlic, chili, olive oil, and sausage.

What to Serve with Broccoli Pasta

A bowl of this with extra Parmesan is enough for a quick dinner, but it also plays well with protein, crunch, and something fresh on the side.

  • For a light dinner, serve it with a simple salad, lemony greens, grilled fish, or baked tofu.
  • Need more protein? Add chicken, shrimp, salmon, sausage, or a fried egg.
  • For a vegetarian full meal, add white beans, chickpeas, toasted nuts, or extra broccoli.
  • To make it a comfort meal, serve it with extra Parmesan, toasted breadcrumbs, or MasalaMonk’s homemade garlic bread loaf.

Storage, Reheating, and Make-Ahead Tips

Broccoli pasta is best right after tossing, while the pasta is warm and glossy. Leftovers can still be good, but they need a splash of moisture when reheating because pasta keeps absorbing sauce in the fridge.

  • Refrigerate: store in an airtight container for 3 to 4 days. For general cold-storage guidance, see the FoodSafety.gov cold food storage chart.
  • Reheat on the stovetop: add a splash of water, milk, or stock and warm gently over low heat, stirring often.
  • Reheat in the microwave: add a splash of water or milk, cover loosely, heat in short bursts, and stir halfway through.
  • Add lemon after reheating: a fresh squeeze at the end tastes brighter than lemon added before storage.
  • Freeze: possible, but not ideal. Pasta softens after freezing, and cheesier versions can reheat less smoothly.

If leftovers seem gluey after reheating, add moisture first, then cheese. The same rescue logic works after storage.

For make-ahead, prep the broccoli and grate the cheese ahead of time, but cook the pasta just before serving. When saving leftovers, keep the pan a little saucier than usual and save extra Parmesan for reheating.

Troubleshooting Broccoli Pasta

Most broccoli pasta problems look worse than they are. If you saved pasta water, you can usually bring the pan back. Match the problem to the fix below.

Dry or Glossy: What to Fix First

This is the fastest visual check. If the pasta looks dull or tight, loosen it before you add more cheese or toppings.

Two bowls of broccoli pasta side by side, one looking drier and one glossier, with text reading “Dry? Add Pasta Water First.”
Dry pasta usually needs hot pasta water before it needs more cheese.
ProblemFix NowFix Next Time
Pasta is dry or matteAdd hot pasta water 2 tbsp at a time and toss vigorously.Reserve a full cup of pasta water and keep the pan slightly saucier.
Liquid is poolingToss over medium-low heat for 1 to 2 minutes, then rest briefly.Drain broccoli better and add pasta water gradually.
Pasta tastes bland or broccoli tastes dullAdd salt, lemon, black pepper, and more Parmesan.Salt the pasta water properly and keep some florets greener.
Garlic tastes bitterAdd lemon and cheese to soften the bitterness, if mild.Cook garlic over medium-low heat and do not brown it hard.
Parmesan turned grainy or clumpyAdd a splash of hot pasta water and stir gently off heat.Add finely grated Parmesan gradually, off the heat or over very low heat.
Broccoli is too firmAdd a splash of water, cover, and cook 2 to 3 minutes.Cut the broccoli smaller and add it earlier.
Frozen broccoli made it wateryStop adding liquid and toss until the coating tightens.Thaw, chop, and drain frozen broccoli before adding.
Leftovers are glueyReheat with water, milk, or stock and stir gently.Store with a little extra moisture or loosen before refrigerating.

FAQs About Broccoli Pasta

How do you make broccoli pasta creamy without cream?

Mash tender broccoli into garlic oil and butter, loosen it with hot pasta water, then add finely grated Parmesan off the heat. The sauce should look glossy and loose, not thick like Alfredo. For a richer version, add cream cheese or milk before the Parmesan.

Fresh or frozen broccoli — which works better?

Fresh broccoli gives brighter florets and better bite. Frozen broccoli gives a softer, saucier pasta. Both work; just add pasta water slowly with frozen broccoli.

Can I use broccoli stems in broccoli pasta?

Yes. Peel thick stems if the outside feels tough, then chop the tender inside into small pieces. Stems soften well and are excellent for the sauce.

Why did my broccoli pasta turn dry?

It needed more pasta water or sat too long before serving. Add hot pasta water a few tablespoons at a time and toss until shiny again. Loosen first, then add more cheese only if the flavor still needs it.

What is the best pasta shape for broccoli pasta?

Short pasta shapes are best because they catch the small broccoli pieces. Shells, fusilli, orecchiette, penne, rigatoni, and cavatappi all work well. Long pasta can work too, but chop the broccoli smaller and toss more thoroughly.

How do you keep Parmesan from turning grainy?

Add finely grated Parmesan gradually, off the heat, not all at once. High heat can make it clump or turn grainy. If it tightens, loosen with a splash of hot pasta water.

Can I add chicken to broccoli pasta?

Yes. Add about 2 cups cooked chicken or rotisserie chicken once the pasta is coated. Add an extra splash of pasta water because chicken absorbs sauce quickly.

Is this the same as broccoli Alfredo?

No. Broccoli Alfredo usually uses a heavier cream-based sauce. This version is lighter; the sauce comes from mashed broccoli, pasta water, butter or olive oil, and Parmesan.

Can this be made as a one-pot broccoli pasta?

Yes. It is convenient, but a skillet gives better garlic flavor and more room to toss. For one-pot broccoli pasta, cook the pasta and broccoli together, reserve pasta water, drain, build the garlic oil in the same pot, then return everything and add Parmesan off the heat.

Does broccoli rabe work in this recipe?

Broccoli rabe, or rapini, is more bitter and leafy than regular broccoli, so it needs different handling. It is delicious with garlic, olive oil, chili, and sausage, but use regular broccoli for this version.

How can I make this more kid-friendly?

Chop the broccoli smaller, mash more into the sauce, skip the red pepper flakes, and use shells. A little extra Parmesan or cheddar can make the broccoli flavor feel familiar.

Can leftovers be reheated without drying out?

Yes. Add a splash of water, milk, or stock before reheating. Warm gently and finish with extra Parmesan, black pepper, or lemon.

Final Thoughts

Once you learn the rhythm — soften, mash, loosen, cheese off the heat — broccoli pasta stops feeling like a compromise dinner. It becomes something worth repeating.

Did you keep it simple, make it cheesy, add chicken, or use frozen broccoli? Tell me how you made it — those little changes are often what help the next cook.

Back to top

Posted on 5 Comments

Indian Inspired Alfredo Pasta: 5 Indian Twists on Creamy Alfredo

Magazine-style cover featuring a bowl of creamy Indian-inspired Alfredo pasta topped with charred paneer tikka. Text overlay reads “Indian-Inspired Alfredo Pasta” and “5 Indian Twists on Creamy Alfredo,” listing masala, paneer tikka, korma, spinach paneer, and coconut curry, plus “one-pot + baked options included,” with MasalaMonk.com in the footer.

Creamy Alfredo has a certain pull—soft, glossy, and comforting in a way that makes a normal weeknight feel oddly luxurious. At the same time, the classic bowl can start to feel predictable once you’ve made it a few times. That’s exactly why Indian inspired Alfredo pasta works so well: it keeps everything you love about Alfredo—the cling, the richness, the peppery warmth—while letting you steer the flavor somewhere exciting.

Sometimes that means a masala bloom in ghee that perfumes the whole pan. Other times, it’s smoky paneer tikka folded into cream so the char and the sauce play off each other. On quieter evenings, a korma-style nuttiness turns Alfredo mellow and restaurant-like. And when you want something that tastes rich yet feels balanced, spinach paneer Alfredo delivers a green, velvety comfort that’s hard to stop eating. Finally, coconut curry Alfredo brings coastal warmth that’s ridiculously good with shrimp.

Even better, these aren’t “one-off” novelty ideas. Each twist below reads as a complete, standalone recipe you can cook tonight—yet everything is built on a shared base so you’re not learning five totally different methods. Along the way, you’ll also get an easy jar-sauce upgrade, a one pot Alfredo approach, and a baked Alfredo pasta approach (ziti, penne, tortellini) so you can match the mood of the day.

If you want the deeper technique story behind classic Alfredo, you can also read Classic vs. Authentic Alfredo: 5 Essential Recipes—it’s a great companion when you’re in the “I want the why, not just the what” mood.


Indian Inspired Alfredo Pasta Base: A Creamy Alfredo Sauce That Stays Silky

Alfredo is at its best when it behaves like a sauce rather than a thick dairy blanket. The ideal version is glossy and cohesive—fat, cheese, and starch held together in a smooth emulsion so every strand of pasta looks lacquered. That’s why gentle heat and starchy pasta water matter so much. When you build the sauce in the pan and finish the pasta in it, the results feel restaurant-level without requiring restaurant tools. The mechanics are beautifully explained in Serious Eats’ fettuccine Alfredo method, and once you understand the approach, the Indian twists become easy choices instead of stressful experiments.

Dark luxe recipe card for Indian inspired Alfredo pasta base showing creamy Alfredo pasta, ingredients, step-by-step method, and “Silky Rules” tips to prevent splitting and keep the sauce glossy.
Indian inspired Alfredo pasta starts here: a silky, glossy Alfredo base that won’t split (plus the “Silky Rules” that make it foolproof). Save this recipe card, then scroll for 5 Indian twists—masala, paneer tikka, korma, spinach paneer, and coconut curry.

Alfredo base (serves 4)

  • 300–350 g pasta (fettuccine, penne, fusilli, ziti; or tortellini if you want a faster “wow” bowl)
  • 2 tbsp butter (or ghee if you like a warmer, rounder finish)
  • 3–5 garlic cloves, finely grated (optional, but very good)
  • 1 to 1¼ cups cream (or cooking cream)
  • ¾ cup finely grated parmesan (or a parmesan-style hard cheese)
  • ½ to 1 cup reserved pasta water (you’ll add it gradually)
  • ½ tsp freshly ground black pepper (plus more to finish)
  • Salt, to taste (go light until cheese is in)

The method (steady, reliable, forgiving)

  1. Bring a big pot of water to a boil. Salt it generously. Cook pasta until just al dente. Before draining, reserve at least ½ cup pasta water (a full cup is safer).
  2. Meanwhile, melt butter (or ghee) in a wide pan over medium-low heat. If using garlic, add it and warm gently until fragrant—soften it, don’t scorch it.
  3. Lower the heat. Add cream and warm until steaming. Avoid a rolling boil; high heat encourages separation.
  4. Add grated cheese in small handfuls, whisking constantly so it melts smoothly.
  5. Now, adjust with pasta water: add a splash, whisk, and watch the sauce loosen into a glossy, clingy texture. Repeat until it coats the back of a spoon.
  6. Add pasta to the pan and toss well so the sauce grips every strand.

That final step—tossing pasta in the sauce instead of pouring sauce over pasta—makes a real difference. If you enjoy the technique, Serious Eats’ guidance on saucing pasta the right way is worth reading.

Dark luxe infographic explaining why Alfredo sauce splits, turns grainy, or gets too thick, with quick fixes: lower heat, whisk in warm pasta water, and add finely grated cheese slowly.
Why does Alfredo split or turn grainy? This quick rescue guide fixes 3 common problems—split/oily, grainy, and too thick—using low heat, warm pasta water, and slow-added fine cheese for a glossy emulsion. Save this, then use it with any Indian inspired Alfredo pasta twist in the post.

Best cheese for fettuccine Alfredo (and practical substitutes)

A finely grated hard cheese melts more evenly and emulsifies more easily. The shape of the cheese matters too; fine, snowy shreds melt into the cream without clumping, especially when the heat is low, as described in Serious Eats’ Alfredo guide.

If parmesan is expensive or hard to find, use what’s available: a parmesan-style hard cheese for flavor plus a small amount of melt-friendly cheese if you need a smoother texture. Still, keep the melt cheese in check so it doesn’t overwhelm the sauce. Alfredo should taste creamy and peppery, not like generic cheese sauce.

Also Read: Chicken Pesto Pasta (Easy Base Recipe + Creamy, One-Pot, Baked & More)


Alfredo Pasta With an Indian Twist: Choosing the Right Pasta Shape

Different shapes change the entire experience.

  • Fettuccine Alfredo pasta feels classic and indulgent because broad noodles wear the sauce like satin.
  • Penne Alfredo and alfredo penne pasta feel “bitey” and complete because sauce hides inside the tubes.
  • Ziti with Alfredo sauce (alfredo ziti) is tailor-made for baking—saucy inside, bubbly on top.
  • Tortellini in Alfredo sauce feels restaurant-level fast because stuffed pasta adds richness without extra work.
  • Fusilli Alfredo catches sauce in the spirals, which is especially satisfying for thicker versions like spinach paneer Alfredo.
Dark luxe infographic showing the best pasta shapes for Alfredo sauce—fettuccine, penne, ziti, tortellini, and fusilli—with quick notes on which shapes coat best, hold sauce inside, work for baked Alfredo, or suit thicker sauces like spinach paneer Alfredo.
Choosing the right pasta shape makes Alfredo instantly better. Use this quick guide for Indian inspired Alfredo pasta: fettuccine for silky coating, penne for sauce-in-every-bite, ziti for baked Alfredo, tortellini for fast “restaurant wow,” and fusilli for thicker sauces like spinach paneer Alfredo. Save this, then pick your twist below.

If you’re using tortellini and want timing confidence, How to cook tortellini (fresh, frozen, dried) is a helpful companion.

Also Read: Pork Tenderloin in Oven (Juicy, Easy, 350°F or 400°F) Recipe


How to Make Easy Alfredo Pasta With Jar Sauce Taste Homemade (Without Overdoing It)

Some nights you want the comfort without the extra steps. Easy Alfredo pasta with jar sauce can absolutely work—as long as you treat jar Alfredo like a base rather than the final answer.

Dark luxe infographic showing how to upgrade jar Alfredo sauce to taste homemade in 5 minutes using reserved pasta water, black pepper, a small squeeze of lemon or lime, and optional butter, with a “twist it into” list for masala, spinach paneer, coconut curry, or tikka-style versions.
Easy Alfredo pasta with jar sauce can taste homemade—fast. This 5-minute jar Alfredo upgrade uses pasta water for silkiness, pepper for warmth, and a squeeze of lemon/lime for lift (plus optional butter for gloss). Save this shortcut, then turn it into Indian inspired Alfredo pasta: masala, spinach paneer, coconut curry, or tikka-style protein.

The fastest jar Alfredo upgrade (serves 4)

  • 1 jar Alfredo sauce (about 400–500 g)
  • ¼–½ cup reserved pasta water
  • 1 tbsp butter (optional, for gloss)
  • Black pepper
  • 1 small squeeze of lemon or lime

Warm the jar sauce on low heat. Whisk in pasta water until it loosens and turns silky. Add butter if you want extra shine. Finish with black pepper and a squeeze of citrus.

From here, you can steer it toward any twist in this post by adding the spice bloom, spinach puree, coconut milk, or tikka-style protein.

If you like shortcut-friendly creamy pasta nights, Chicken Alfredo Pasta, 5 Ways is a natural companion—plenty of weeknight structure and add-in ideas without losing the comfort.

Also Read: How to Make a Flax Egg (Recipe & Ratio for Vegan Baking)


Indian Inspired Alfredo Pasta: 5 Indian Twists You’ll Keep Coming Back To

Each recipe below is written as a complete “recipe card” section—ingredients, method, timing, and the small sensory details that make the bowl feel special. Even so, the flow stays simple: cook pasta, build sauce, add twist, toss, finish.


1) Masala Alfredo Pasta (Warm, Spicy, Comforting)

Masala Alfredo pasta tastes like a familiar cream sauce took a confident step toward Indian flavors. The aroma hits first: cumin and coriander blooming in ghee, then a warm red chili note that feels inviting rather than aggressive. Finally, a little kasuri methi and lemon add a restaurant-style lift that keeps the sauce from tasting heavy.

Pasta choice: fettuccine for classic comfort, penne for a heartier bite, or fusilli for maximum sauce-catching.

Dark luxe recipe card for Masala Alfredo Pasta (Indian inspired Alfredo) showing creamy pasta with lemon and kasuri methi, plus an ingredients list and step-by-step method including blooming cumin and coriander, adding cream and parmesan, and loosening with pasta water for a glossy sauce.
Masala Alfredo pasta = creamy comfort with warm Indian spice. This recipe card walks you through blooming cumin + coriander in ghee, building a silky parmesan sauce, then finishing with kasuri methi and lemon for that restaurant-style lift. Save this pin, then try the other Indian inspired Alfredo pasta twists in the post.

Ingredients (serves 4)

For the pasta

  • 300–350 g pasta
  • Salt for boiling water

For the masala Alfredo sauce

  • 2 tbsp butter or ghee (ghee is excellent here)
  • 4 garlic cloves, finely grated (optional but highly recommended)
  • 1 to 1¼ cups cream
  • ¾ cup finely grated parmesan (or hard cheese)
  • ½ to 1 cup reserved pasta water
  • 1 tsp cumin
  • 1 tsp coriander
  • ½ to 1 tsp Kashmiri chili powder (adjust to your heat preference)
  • ¼ to ½ tsp garam masala (optional)
  • ½ tsp black pepper (plus more to finish)
  • ½ tsp crushed kasuri methi (optional, but magic)
  • Lemon wedge to finish
  • Salt, to taste

Method

  1. Boil pasta in salted water until just al dente. Reserve 1 cup pasta water, then drain.
  2. In a wide pan, warm ghee (or butter) over medium-low heat. Add garlic and let it soften until fragrant.
  3. Add cumin and coriander. Let them bloom for about 10–15 seconds—just enough to smell nutty and warm.
  4. Add Kashmiri chili powder and stir quickly; don’t let it burn.
  5. Lower heat. Add cream and warm gently.
  6. Whisk in cheese in small handfuls until smooth.
  7. Add pasta water a splash at a time until the sauce turns glossy and coats a spoon.
  8. Toss pasta in the sauce until every piece looks lacquered.
  9. Finish with black pepper, crushed kasuri methi, and a squeeze of lemon.

Kasuri methi is one of those small additions that changes the impression of the entire dish. If you want to understand why it works so well, NDTV’s guide on using kasuri methi explains its flavor boost clearly.

Variations (choose one)

  • Chicken broccoli Alfredo: sauté 300 g chicken until golden; blanch 2 cups broccoli florets for 60–90 seconds; fold both in at the end. This gives you the comfort of chicken alfredo pasta with broccoli while keeping the spice profile interesting.
  • Alfredo mushroom pasta: brown 250 g mushrooms deeply first (don’t rush this). Fold into sauce for savory depth.
  • Sausage Alfredo pasta: brown sliced sausage or spiced mince; fold in for a hearty bowl that feels weeknight-friendly and indulgent.

If you enjoy Italian classics reimagined with Indian flavors, you’ll likely also love Ravioli reinvented with Indian-inspired twists—same spirit, different pasta format.

Also Read: Croquettes Recipe: One Master Method + 10 Popular Variations


2) Paneer Tikka Alfredo (Smoky, Charred, Crowd-Pleasing)

Paneer tikka Alfredo is what you make when you want creamy pasta that still has drama. The charred edges of paneer are essential here: smoky, slightly crisp, and bold enough to stand up to the richness of Alfredo. In every bite, you get creamy sauce followed by a pop of spice and a whisper of tandoor-like flavor.

Pasta choice: penne or fusilli—both catch sauce and hold paneer pieces beautifully.

Dark luxe recipe card for Paneer Tikka Alfredo pasta showing creamy penne Alfredo topped with smoky, charred paneer tikka cubes, plus a paneer tikka marinade list, Alfredo sauce ingredients, and step-by-step method including searing paneer in batches and loosening sauce with pasta water.
Paneer Tikka Alfredo is creamy pasta with real smoky drama—charred paneer cubes folded into a silky Alfredo sauce. This recipe card includes the quick tikka marinade, the “sear in batches (don’t steam)” tip, and the easy method for glossy sauce using pasta water. Save it, then try the other Indian inspired Alfredo pasta twists in the post.

Ingredients (serves 4)

For the pasta

  • 300–350 g penne or fusilli
  • Salt for boiling water

What you need for paneer tikka

  • 300 g paneer, cut into bite-size cubes
  • ⅓ cup thick yogurt (hung curd works brilliantly)
  • 1 tbsp ginger-garlic paste
  • 1 tsp Kashmiri chili powder (or mild red chili powder)
  • ½ tsp turmeric
  • 1 tsp garam masala (or tikka masala blend)
  • ½ tsp cumin
  • 1 tbsp lemon juice
  • 1 tbsp oil (for searing)
  • Salt, to taste

For Alfredo sauce

  • 2 tbsp butter
  • 1 to 1¼ cups cream
  • ¾ cup finely grated parmesan (or hard cheese)
  • ½ to 1 cup reserved pasta water
  • Black pepper

To finish

  • Chopped coriander
  • Lime wedge

If you want a reliable reference for the paneer tikka method and marinade structure, Hebbar’s paneer tikka recipe is a solid baseline.

Method

  1. Boil pasta until al dente. Reserve 1 cup pasta water, then drain.
  2. Marinate paneer in yogurt, spices, lemon, and salt for at least 15–20 minutes (longer is great, but not required).
  3. Heat a pan until hot. Add oil and sear paneer cubes in batches so they char instead of steaming. Turn gently until multiple sides develop dark, smoky spots.
  4. In a separate wide pan, melt butter over low heat. Add cream and warm.
  5. Whisk in cheese gradually until smooth.
  6. Add pasta water to loosen into a silky sauce.
  7. Toss pasta in the sauce, then fold in paneer tikka.
  8. Finish with black pepper, coriander, and a squeeze of lime.

Variations (choose your mood)

  • Easy spinach Alfredo pasta: wilt a couple of handfuls of spinach and fold in right before serving. The green bitterness balances cream.
  • Chicken tikka Alfredo: swap paneer for cooked chicken tikka pieces.
  • Baked paneer tikka Alfredo: pour into a baking dish, top with mozzarella, and bake until bubbly—crispy edges, creamy center.

When you want more baked pasta inspiration in the same comfort lane, Baked ziti variations is a natural next click.

Also Read: Fish and Chips Reimagined: 5 Indian Twists (Recipe + Method)


3) Chicken Korma Alfredo (Mellow, Nutty, Restaurant-Style)

Chicken korma Alfredo is creamy comfort turned elegant. Instead of heat-forward spice, you get warm aromatics, gentle sweetness from onion, and that unmistakable nutty richness that makes the sauce taste “finished.” It’s the kind of bowl that feels special without being loud.

Pasta choice: fettuccine for a classic luxurious feel, or penne for a family-friendly, scoopable version.

Dark luxe recipe card for Chicken Korma Alfredo pasta showing creamy pale-gold Alfredo with juicy chicken, plus ingredients for a korma-style base (onion, ginger-garlic, cashew paste, warm spices) and a step-by-step method to keep the sauce silky using low heat and pasta water, finished with lemon and optional saffron.
Chicken Korma Alfredo is creamy comfort with a mellow, nutty, restaurant-style finish. This recipe card shows the korma-style base (onion + cashew paste + warm spices), then the silky Alfredo method with pasta water for a glossy sauce—finished with lemon (and optional saffron). Save this, then try the other Indian inspired Alfredo pasta twists in the post.

Ingredients (serves 4)

For the pasta

  • 300–350 g pasta
  • Salt for boiling water

What you need for the chicken korma component

  • 350–400 g boneless chicken (thighs stay juicy; breast works too)
  • 1 medium onion, finely grated or minced
  • 1 tbsp ginger-garlic paste
  • 2 tbsp butter or ghee
  • 2 tbsp cashew paste (blend ¼ cup cashews with a few tbsp water)
  • ½ tsp ground cardamom (or 3 green cardamoms, crushed)
  • Pinch of cinnamon
  • ½ tsp cumin
  • ½ tsp coriander
  • ¼ tsp turmeric
  • Salt, to taste

For Alfredo sauce

  • 1 to 1¼ cups cream
  • ¾ cup finely grated parmesan (or hard cheese)
  • ½ to 1 cup reserved pasta water
  • Black pepper

To finish

  • Lemon wedge
  • Optional: a few saffron strands soaked in warm milk

For a reference point on korma-style flavor structure, Sanjeev Kapoor’s chicken korma recipe is a helpful baseline.

Method

  1. Boil pasta to al dente. Reserve 1 cup pasta water and drain.
  2. In a wide pan, warm butter or ghee. Add onion and cook on low heat until soft and lightly golden. This step creates the mellow sweetness that makes korma taste luxurious.
  3. Add ginger-garlic paste and cook until fragrant.
  4. Add chicken and cook until nearly done.
  5. Stir in spices and cashew paste. Add a small splash of water if it looks too thick, then simmer briefly so everything becomes cohesive.
  6. Lower heat. Add cream and warm gently.
  7. Whisk in cheese gradually until smooth.
  8. Add pasta water to loosen into a silky sauce.
  9. Toss pasta in the sauce, finish with black pepper and lemon.

Variations and add-ins

  • Chicken and broccoli penne Alfredo: add blanched broccoli at the end; it brightens the bowl and balances richness.
  • Chicken and mushroom Alfredo pasta: fold in browned mushrooms for deeper savoriness.
  • Crock pot direction: if you love creamy comfort meals in slower formats, it’s easy to stay in the same mood with Crock pot lasagna soup—different format, similar coziness.

Also Read: Dirty Martini Recipe (Classic, Extra Dirty, No Vermouth, Spicy, Blue Cheese, Tequila + Batched)


4) Spinach Paneer Alfredo (Green, Creamy, Balanced)

Spinach paneer Alfredo is for people who want creamy pasta that doesn’t feel heavy. The spinach brings freshness and a gentle earthiness; paneer adds soft richness without overwhelming the sauce. The result feels comforting yet surprisingly lively, especially with lemon and black pepper to finish.

Pasta choice: fusilli or penne for sauce-catching, or fettuccine for a smooth, green-sauce luxury.

Dark luxe recipe card for Spinach Paneer Alfredo pasta showing creamy green spinach Alfredo with paneer cubes and lemon, plus ingredients and step-by-step method for blending spinach puree, keeping heat low, adding parmesan slowly, and loosening with pasta water for a silky sauce.
Spinach Paneer Alfredo is the “creamy but balanced” bowl—vibrant green sauce, soft paneer, black pepper warmth, and a lemon finish that keeps it lively. This recipe card shows the spinach-puree trick and the low-heat method for a smooth, glossy Alfredo. Save it, then try the other Indian inspired Alfredo pasta twists in the post.

Ingredients (serves 4)

Needed for the pasta

  • 300–350 g pasta
  • Salt for boiling water

For spinach paneer

  • 200–250 g paneer, cubed (or lightly crumbled)
  • 200 g spinach (roughly 5–6 packed cups)
  • 2 tbsp butter
  • 1 tbsp garlic, grated or minced (optional)
  • 1 to 1¼ cups cream
  • ¾ cup finely grated parmesan (or hard cheese)
  • ½ to 1 cup reserved pasta water
  • ½ tsp black pepper
  • 1 small green chili (optional)
  • Salt, to taste
  • Lemon wedge to finish

Method

  1. Boil pasta until al dente. Reserve 1 cup pasta water and drain.
  2. Wilt spinach in a pan with a splash of water. Once it collapses, blend into a smooth puree. Add green chili if you want a gentle kick.
  3. In a wide pan, melt butter over low heat. Add garlic if using and warm gently.
  4. Add cream and warm. Whisk in cheese gradually until smooth.
  5. Whisk in spinach puree. Keep heat low so the sauce stays smooth and vibrant.
  6. Add pasta water to adjust consistency.
  7. Toss pasta in sauce and fold in paneer.
  8. Finish with black pepper and lemon.

Herb-forward “basil Alfredo” option

If you want alfredo with basil vibes without turning the dish into a different pasta category, fold in chopped basil off heat or swirl in a spoon of pesto at the end. For pesto ideas that work well in Indian kitchens, Pesto recipe variations is a reliable companion. If you want to stay within the “Indian twist pasta” universe, Pesto pasta with Indian twists fits naturally.

Also Read: Keto Hot Chocolate Recipe (Sugar-Free Hot Cocoa) + Best Homemade Mix


5) Coconut Curry Alfredo (Coastal, Fragrant, Perfect With Shrimp)

Coconut curry Alfredo is the twist that surprises people, then immediately converts them. Coconut milk brings silk; curry spices bring warmth; Alfredo keeps the creamy comfort intact. With shrimp, the bowl feels special. With spinach, it feels balanced. And with tortellini, it feels like restaurant food in sweatpants.

Pasta choice: fettuccine for a luxurious coating, or tortellini for a fast “wow.”

Dark luxe recipe card for Coconut Curry Alfredo pasta with shrimp, showing creamy coconut-cream Alfredo with curry spices, lime, and coriander, plus ingredients and step-by-step method for keeping the sauce silky using low heat and pasta water and adding shrimp at the end to prevent overcooking.
Coconut Curry Alfredo is coastal comfort in a creamy bowl—silky coconut-cream sauce, warm spices, and shrimp finished with lime and coriander. This recipe card keeps it foolproof (low heat + pasta water = glossy sauce, shrimp added at the end). Save it, then explore the other Indian inspired Alfredo pasta twists in the post.

Ingredients (serves 4)

What you need for the Pasta

  • 300–350 g pasta (or 500 g tortellini)
  • Salt for boiling water

For coconut curry Alfredo

  • 2 tbsp butter
  • 1 tbsp ginger-garlic paste (optional)
  • ¾ cup coconut milk (adjust for richness)
  • 1 cup cream (you can reduce a bit if using more coconut milk)
  • ¾ cup finely grated parmesan (or hard cheese; keep slightly lighter if you want coconut-forward flavor)
  • ½ to 1 cup reserved pasta water
  • ½ tsp turmeric
  • 1 tsp cumin
  • 1 tsp coriander
  • Curry leaves (optional, but exceptional)
  • Black pepper
  • Salt, to taste

Shrimp option

  • 250–300 g shrimp, peeled and deveined
  • 1 tbsp butter or oil
  • Salt and pepper
  • Optional: a pinch of chili

To finish

  • Lime juice
  • Chopped coriander

Method

  1. Boil pasta until al dente. Reserve 1 cup pasta water. Drain.
  2. If using shrimp, sauté quickly in butter or oil until just pink and curled. Remove and set aside.
  3. In a wide pan, melt butter. Add curry leaves (if using) and ginger-garlic paste. Warm until fragrant.
  4. Add turmeric, cumin, coriander, and stir briefly.
  5. Pour in coconut milk and cream. Warm gently.
  6. Whisk in cheese gradually until smooth.
  7. Add pasta water to reach a glossy, clingy consistency.
  8. Toss pasta in sauce and fold in shrimp.
  9. Finish with lime and coriander.

Variations

  • Shrimp fettuccine Alfredo with spinach: wilt spinach and fold in right at the end for a bright, balanced bowl.
  • Shrimp Alfredo tortellini: use tortellini as the base; it becomes rich and special very quickly.
  • Plant-based alternative: tofu works beautifully, and if you want a seafood-like swap, this guide to vegan shrimp substitutes keeps the idea accessible without pulling you out of the comfort-food mood.

Also Read: 10 Low Carb Chia Pudding Recipes for Weight Loss (Keto, High-Protein, Dairy-Free)


One Pot Indian Inspired Alfredo Pasta (Creamy, Fast, Minimal Dishes)

One pot Alfredo pasta is the weeknight hero when you want fewer dishes and still want sauce that coats properly. The key is concentrated starch: cook pasta in less water so the starchy liquid left in the pot becomes a tool for emulsifying the sauce. Serious Eats’ lighter Alfredo approach explains how that concentrated pasta water changes everything.

Dark luxe infographic showing a one pot Indian inspired Alfredo pasta method with three steps: cook pasta in minimal water, lower heat and add butter/cream/cheese without boiling, then finish with a twist like masala, tikka, korma, spinach, or coconut; includes a tip to keep starchy liquid for a glossy sauce and a warning to avoid boiling after cheese.
One pot Indian inspired Alfredo pasta = creamy comfort with minimal dishes. This no-split method keeps sauce silky by using concentrated starchy pasta water, then adding butter, cream, and cheese on low heat (no boiling). Save this cheat sheet, then choose your twist—masala, tikka, korma, spinach paneer, or coconut curry.

One pot method (serves 4)

  • 300–350 g pasta
  • Water or broth, just enough to barely cover pasta
  • 2 tbsp butter
  • 1 to 1¼ cups cream (or jar Alfredo + cream)
  • ¾ cup grated cheese
  • Black pepper
  • Your chosen twist add-ins (masala bloom, spinach puree, paneer tikka, korma chicken, coconut curry)

Cook pasta with minimal water, stirring often. When pasta is nearly done and there’s starchy liquid left, lower heat and add butter, cream, and cheese. Stir until glossy. Then add your twist components and finish with citrus or herbs.

If you like creamy one-pot dinners beyond Alfredo, One pot chicken bacon ranch pasta sits close to this vibe—comforty, saucy, weeknight-friendly.

Also Read: Garlic & Paprika Cabbage Rolls (Keto-Friendly Recipes) – 5 Bold Savory Twists


Baked Alfredo Pasta (Ziti, Penne, Tortellini) That Doesn’t Turn Dry

Baked Alfredo pasta is its own category of comfort: bubbling cheese, crisp edges, creamy center. However, it can also turn dry if you bake it too long or start with a sauce that’s too thick. The solution is simple: keep the sauce a touch looser than stovetop Alfredo and bake just until hot and bubbly.

Dark luxe infographic showing how to make baked Alfredo pasta that stays creamy (not dry) for ziti, penne, or tortellini: keep sauce looser with extra pasta water, undercook pasta by 2 minutes, and bake only until bubbly; includes notes to cover most of the bake and uncover briefly to brown.
Baked Alfredo pasta doesn’t have to turn dry. This bake-plan card shows the 3 rules that keep it creamy: loosen the sauce with extra pasta water, undercook pasta by 2 minutes, and bake only until bubbly (cover most of the bake, uncover briefly to brown). Save this for ziti, penne, or tortellini nights—then use any Indian inspired Alfredo twist from the post.

Baked ziti Alfredo sauce pasta plan (serves 6)

  • 450–500 g ziti or penne
  • Your chosen Alfredo twist sauce (make it slightly looser with extra pasta water)
  • 1½ cups mozzarella (or a melt-friendly cheese)
  • Add-ins: chicken, broccoli, mushrooms, paneer tikka, spinach paneer, or shrimp (shrimp is best added near the end)

Cook pasta slightly under al dente. Mix with sauce. Pour into a baking dish. Top with cheese. Bake until bubbly and lightly golden.

For more baked pasta inspiration in the same comfort lane, Baked ziti variations is an easy next step.

Baked tortellini with Alfredo sauce (fastest bake)

Tortellini cooks quickly, so it’s ideal for a weeknight baked dish. Warm sauce, fold in tortellini, top with cheese, bake until bubbling—then stop. If you’re unsure about timing differences between fresh and frozen tortellini, How to cook tortellini keeps it simple.

Also Read: Eggless Yorkshire Pudding (No Milk) Recipe


Flavor Directions That Work With Any Twist: Lemon, Basil, Cajun-Style Heat, and Truffle-Style Umami

Even within these five recipes, small changes keep dinner from feeling repetitive.

Want Indian inspired Alfredo pasta to taste “restaurant-level” fast? Use one finishing move: black pepper bloom, lemon at the end for brightness, basil/pesto off heat, paprika + chili for a smoky Cajun-ish lane, or browned mushrooms for truffle-style umami. Save this guide and use it with any twist in the post—masala, paneer tikka, korma, spinach paneer, or coconut curry.

Lemon Alfredo

Lemon Alfredo is the quickest way to brighten a rich sauce. Add zest and juice at the end with black pepper. It’s especially good with chicken, shrimp, broccoli, and mushrooms because it keeps everything tasting alive.

Alfredo with basil

Fold in chopped basil off heat, or swirl pesto into the bowl right before serving. For pesto ideas that fit Indian kitchens, Pesto recipe variations helps you keep it fresh.

Cajun chicken Alfredo (Indian-friendly)

You don’t need a strict Cajun mix. Black pepper, paprika, garlic, and chili create a similar direction, while a tandoori-style rub can hit the same smoky lane. If you’re using jar Alfredo, this becomes a particularly easy weeknight version.

Truffle Alfredo (truffle-style mood without chasing ingredients)

Deeply browned mushrooms, extra black pepper, and gentle garlic create that “truffle-style” feeling—earthy, aromatic, luxurious—without relying on specialty products.

Also Read: Crock Pot Chicken Breast Recipes: 10 Easy Slow Cooker Dinners (Juicy Every Time)


Dairy-Free, Lactose-Free, Low Carb, and Keto Directions (Without Losing the Comfort)

Creamy pasta can still work for different needs; the foundation simply shifts.

Dark infographic titled “Creamy Alfredo for Every Diet” showing four Alfredo options: lactose-free Alfredo (lactose-free cream, low heat, pasta water), dairy-free Alfredo (cashew or oat cooking cream with nutritional yeast), low carb Alfredo (zucchini noodles or cabbage ribbons with salt-and-drain tip), and keto Alfredo (shirataki noodles rinsed and dry-panned or roasted spaghetti squash), with a golden rule about low heat and gradual liquid for a glossy sauce.
Creamy Alfredo can still work for different needs—lactose-free, dairy-free, low carb, or keto—without losing that glossy comfort. This chart shows the best base swaps (zoodles, cabbage ribbons, shirataki, spaghetti squash) plus the key sauce rule: keep heat low and add liquid gradually for a silky emulsion. Save this, then use it with any Indian inspired Alfredo pasta twist in the full post.

Lactose-free Alfredo

Use lactose-free cream and keep heat low. Add pasta water gradually to maintain a smooth emulsion.

Dairy-free Alfredo / non dairy fettuccine Alfredo

Cashew cream or oat cooking cream can create a satisfying sauce. Nutritional yeast adds savory depth. The result won’t be identical to parmesan Alfredo, yet it can still be glossy, rich, and comforting.

Dark luxe infographic titled “Dairy-Free Alfredo (Still Glossy)” showing a creamy dairy-free Alfredo pasta bowl and a side-by-side comparison of cashew cream versus oat cooking cream, plus an umami boost strip with nutritional yeast, garlic and black pepper, lemon added at the end, and pasta water for emulsifying; includes a low-heat rule and MasalaMonk.com footer.
Making dairy-free Alfredo that still feels rich is all about the base + umami. Choose cashew cream for the closest “classic” vibe or oat cooking cream for an easy weeknight version, then level it up with nutritional yeast, garlic + black pepper, lemon at the end, and pasta water for a glossy sauce. Save this guide and use it with any Indian inspired Alfredo twist in the full post.

Low carb Alfredo Pasta and keto-friendly options

The sauce can stay creamy while the base changes:

  • zucchini noodles
  • spaghetti squash
  • sautéed cabbage ribbons
  • shirataki noodles (well rinsed and dried)
Dark luxe infographic titled “Low-Carb Alfredo Bases (No Watery Sauce)” with a 2×2 grid showing zucchini noodles (salt 10 min then squeeze dry), spaghetti squash (roast cut-side down then fluff), cabbage ribbons (quick sauté 2–3 min to wilt), and shirataki noodles (rinse then dry-pan 5–7 min), plus a note to finish with Alfredo on low heat and a MasalaMonk.com footer.
Doing low carb or keto Alfredo? The base matters as much as the sauce. This cheat sheet shows the prep step that prevents watery pasta: salt + squeeze zoodles, roast spaghetti squash, quick-sauté cabbage ribbons, and dry-pan shirataki after rinsing. Save this for weeknights, then use your favorite Indian inspired Alfredo twist from the full post.

If you like the smart-carb pasta angle, Lentil pasta for weight loss (nutrition + recipes) is a helpful post that would allow you to move through a cohesive pasta ecosystem.

Also Read: Mozzarella Sticks Recipe (Air Fryer, Oven, or Fried): String Cheese, Shredded Cheese, and Every Crunchy Variation


A White Sauce Detour That Makes Sense in Indian Kitchens

Many Indian home cooks already know white sauce from baked pasta nights. Alfredo and béchamel aren’t identical, yet they share a creamy logic that makes the comparison useful. If you want an Indian-friendly explanation of white sauce for baking, Tarla Dalal’s white sauce guide is a helpful reference. For a strong internal companion, Béchamel sauce for lasagna fits naturally if you’re building a small collection of creamy, bake-ready sauces.


What to Serve With Indian Inspired Alfredo Pasta

Because Alfredo is rich, the best sides bring contrast—crunch, brightness, or both.

  • A lemony salad
  • Roasted vegetables
  • Sautéed greens
  • Garlic bread that makes everyone suspiciously cheerful

For a side that pairs with any Alfredo variation, Homemade garlic bread loaf is a perfect companion.

If you want another creamy pasta “cousin” that keeps you in the comfort lane without repeating Alfredo, try Vodka pasta recipe—it’s the same glossy, restaurant-style comfort, but with a totally different flavor direction.

Also Read: Sourdough Starter Recipe: Make, Feed, Store & Fix Your Starter (Beginner Guide)


Bringing It All Together: A Simple Way to Choose Your Next Bowl

If you want bold and warming, go Masala Alfredo pasta. If you want smoky and festive, paneer tikka Alfredo is the answer. Then if you want mellow and luxurious, chicken korma Alfredo hits perfectly. For those who want green and balanced, spinach paneer Alfredo stays creamy while feeling fresh. And if you want coastal comfort, coconut curry Alfredo belongs on your table—especially with shrimp.

Dark luxe decision-map infographic titled “Choose Your Alfredo Twist” with a central Alfredo Base badge and five connected cards: Masala Alfredo (bold), Paneer Tikka Alfredo (smoky), Chicken Korma Alfredo (mellow), Spinach Paneer Alfredo (green), and Coconut Curry Alfredo with shrimp (coastal), each listing the best pasta shapes; includes a bottom line suggesting formats like one pot, baked, tortellini, or classic fettuccine.
Not sure which Indian inspired Alfredo pasta to make tonight? Use this quick “pick by mood” map: Masala for bold comfort, Paneer Tikka for smoky drama, Korma for mellow nuttiness, Spinach Paneer for a green balanced bowl, or Coconut Curry (shrimp) for coastal warmth. Save this pin, then jump into the full post for the exact recipe cards + one-pot and baked options.

From there, pick the format: classic fettuccine Alfredo pasta when you want silky comfort, one pot Alfredo when you want fewer dishes, baked Alfredo pasta when you want bubbling edges, tortellini Alfredo when you want fast restaurant energy, or ziti with Alfredo sauce when you want a casserole you can share.

Once you’ve made one or two of these, you’ll start noticing something satisfying: you’re not repeating the same dinner—you’re rotating a creamy pasta universe. The base stays familiar, while the flavor moves. And that’s exactly what makes Indian inspired Alfredo pasta such a keeper.

Also Read: Peanut Butter Fudge: Recipes & Guide (8 Methods + Easy Variations)

FAQs: Indian Inspired Alfredo Pasta

1) What is Indian inspired Alfredo pasta?

Indian inspired Alfredo pasta is a creamy Alfredo-style pasta that’s finished with Indian flavors such as cumin, coriander, garam masala, kasuri methi, paneer tikka-style spice, spinach-paneer notes, or coconut curry warmth. In other words, the sauce stays rich and silky, yet the flavor shifts into an Indian-leaning comfort zone.

2) Can I make Alfredo pasta with an Indian twist using jar Alfredo sauce?

Yes. Start by warming the Alfredo pasta sauce jar on low heat, then loosen it with a splash of reserved pasta water (or warm milk) until it turns smooth and glossy. After that, fold in your Indian twist—masala bloom, tikka seasoning, spinach puree, or coconut curry base—so it tastes layered rather than flat.

3) What’s the best cheese for fettuccine Alfredo pasta?

Traditionally, a finely grated hard cheese gives the cleanest melt and the smoothest texture. Because Alfredo is simple, the cheese choice matters: it should taste nutty and savory without turning the sauce heavy or grainy. If you’re experimenting, combine a hard cheese for flavor with a small amount of melt-friendly cheese for extra creaminess.

4) Why does my Alfredo sauce turn grainy or split?

Most often, Alfredo splits because the heat is too high or the cheese is added too quickly. Similarly, graininess can happen when the sauce boils or when pre-shredded cheese doesn’t melt smoothly. To fix it, reduce the heat, whisk steadily, and add small splashes of pasta water until the sauce comes back together.

5) How do I fix Alfredo sauce that’s too thick?

Add warm pasta water a tablespoon at a time while stirring until the sauce loosens and coats the pasta evenly. If you don’t have pasta water, warm milk or cream can help; however, pasta water usually creates the most “clingy” texture.

6) How do I make one pot Alfredo pasta without it turning gummy?

Use just enough water to barely cover the pasta and stir frequently so it doesn’t stick. When the pasta is nearly done, you should still have a little starchy liquid left—this helps the sauce bind. Then lower the heat before adding dairy and cheese so the sauce stays smooth rather than gluey.

7) Is one pot Alfredo pasta with jar sauce a good idea?

It can be, especially on busy nights. The key is gentle heat and enough liquid to keep the sauce silky. If the jar sauce seems overly thick, thin it gradually with pasta water. Afterward, add your chosen twist—masala, basil-aligned herbs, lemon, spinach, or coconut curry—so it tastes intentional.

8) Which pasta shape is best for Alfredo: fettuccine, penne, or ziti?

Fettuccine Alfredo pasta feels classic because wide noodles carry sauce beautifully. Meanwhile, penne Alfredo holds sauce inside the tubes, so each bite tastes richer. Ziti with Alfredo sauce is ideal when you’re planning a bake because it stays sturdy and doesn’t collapse.

9) Can I make Alfredo ziti or baked Alfredo pasta ahead of time?

Yes. For baked Alfredo pasta, slightly undercook the pasta, keep the sauce a little looser than usual, and assemble everything in a dish. Then bake just until hot and bubbly. If it sits too long in the oven, it can dry out, so aim for “bubbly and done,” not “baked forever.”

10) How do I make baked fettuccine Alfredo with jar sauce without drying it out?

First, loosen the jar sauce with pasta water or milk so it’s silky before mixing it with pasta. Next, cover the dish for most of the bake, then uncover briefly at the end for a golden top. Finally, avoid overbaking—Alfredo stays best when it’s heated through rather than aggressively reduced.

11) How do I make chicken broccoli and ziti Alfredo taste better?

Season each part. Brown the chicken well for flavor, blanch the broccoli briefly so it stays bright, and keep the sauce smooth with pasta water. Then combine everything and bake only until bubbly. As a result, you get a creamy chicken broccoli ziti Alfredo that tastes layered instead of bland.

12) What’s the easiest way to make chicken Alfredo penne with jar sauce?

Cook penne until al dente. Warm jar Alfredo on low heat, thin it with pasta water, and add black pepper. Then stir in cooked chicken and toss everything together. If you want an Alfredo pasta with an Indian twist, finish with a quick masala bloom or tikka-style seasoning.

13) How do I keep shrimp from turning rubbery in shrimp Alfredo pasta?

Cook shrimp separately and briefly—just until pink and curled. Then add it to the sauce at the end so it warms through without overcooking. This approach works especially well for shrimp fettuccine Alfredo with spinach or shrimp Alfredo tortellini.

14) Can I make shrimp and tortellini Alfredo?

Absolutely. Tortellini cooks quickly and feels extra hearty in Alfredo. Keep the sauce smooth, add shrimp at the end, and finish with lemon or black pepper. If you like, add spinach for a shrimp spinach Alfredo variation that tastes brighter.

15) How do I make Alfredo mushroom pasta taste richer?

Brown mushrooms deeply first so they develop a roasted, savory flavor. Then fold them into the sauce. In particular, mushroom Alfredo becomes even more satisfying with extra black pepper and a small squeeze of lemon to lift the richness.

16) How do I make basil Alfredo or Alfredo with basil without it tasting flat?

Add basil at the end, off the heat, so it stays fragrant. Also, balance it with black pepper and a little citrus. If you want more depth, a small spoon of herb paste or pesto-style basil mixture can intensify the flavor without overpowering the sauce.

17) What is lemon Alfredo, and when should I add the lemon?

Lemon Alfredo is Alfredo finished with lemon zest and juice for brightness. Add lemon at the very end so it stays fresh and doesn’t curdle the dairy. It’s especially good with chicken, shrimp, broccoli, and spinach.

18) Can I make Cajun chicken Alfredo using this Indian-inspired approach?

Yes. You can build a Cajun-style direction with black pepper, paprika, garlic, and a bit of chili. Then, if you want it to feel more Indian-leaning, add a pinch of cumin or garam masala and finish with lime. That way, the flavor stays bold while still fitting the Indian inspired Alfredo pasta theme.

19) How do I make Alfredo pasta with Italian sausage (or sausage Alfredo pasta) without making it too heavy?

Use browned sausage for flavor, then keep the sauce slightly looser with pasta water. Additionally, finish with black pepper and lemon so the bowl tastes lively instead of heavy. You can also add broccoli or spinach for balance.

20) Can I make Alfredo pasta with tuna or ham?

Yes—both tuna Alfredo pasta and ham Alfredo pasta are common quick options. Add the tuna or ham toward the end so it warms through gently. Then finish with lemon and pepper to brighten the sauce.

21) Is there a lactose-free fettuccine Alfredo option?

Yes. Use lactose-free cream (or lactose-free milk with a thickener), then choose a hard cheese that melts smoothly. Keep the heat low and rely on pasta water to help the sauce bind so it stays silky.

22) How do I make dairy free fettuccine Alfredo or non dairy Alfredo sauce?

Use cashew cream, oat cooking cream, or another creamy plant base. Then add savory depth with nutritional yeast, garlic, and black pepper. After that, use pasta water to create a cohesive, glossy texture so it still feels like Alfredo.

23) What’s a good low carb fettuccine sauce or keto Alfredo sauce option?

For keto fettuccine Alfredo sauce, keep the sauce creamy and swap the base: zucchini noodles, spaghetti squash, sautéed cabbage ribbons, or well-prepped shirataki. That way, you keep the comfort while cutting the carbs.

24) How long does Alfredo pasta last in the fridge, and what’s the best way to reheat it?

Typically, Alfredo pasta keeps well for a few days when stored properly in the fridge. When reheating, do it gently on low heat with a splash of milk, cream, or water to loosen the sauce. If you microwave it, stir halfway through so it warms evenly and doesn’t separate.

25) Why does my Alfredo sauce taste bland, and how do I fix it quickly?

Usually it needs salt, black pepper, and a bright finish. Add pepper, a tiny pinch of salt, and a squeeze of lemon. For an Alfredo pasta with Indian twist, add crushed kasuri methi or a quick masala bloom—those small touches often transform the flavor immediately.

Alfredo Pasta Reinvented: 5 Indian-Inspired Twists