Posted on — Leave a comment

Vegetable Lasagna Recipe (Best Vegetarian Lasagna)

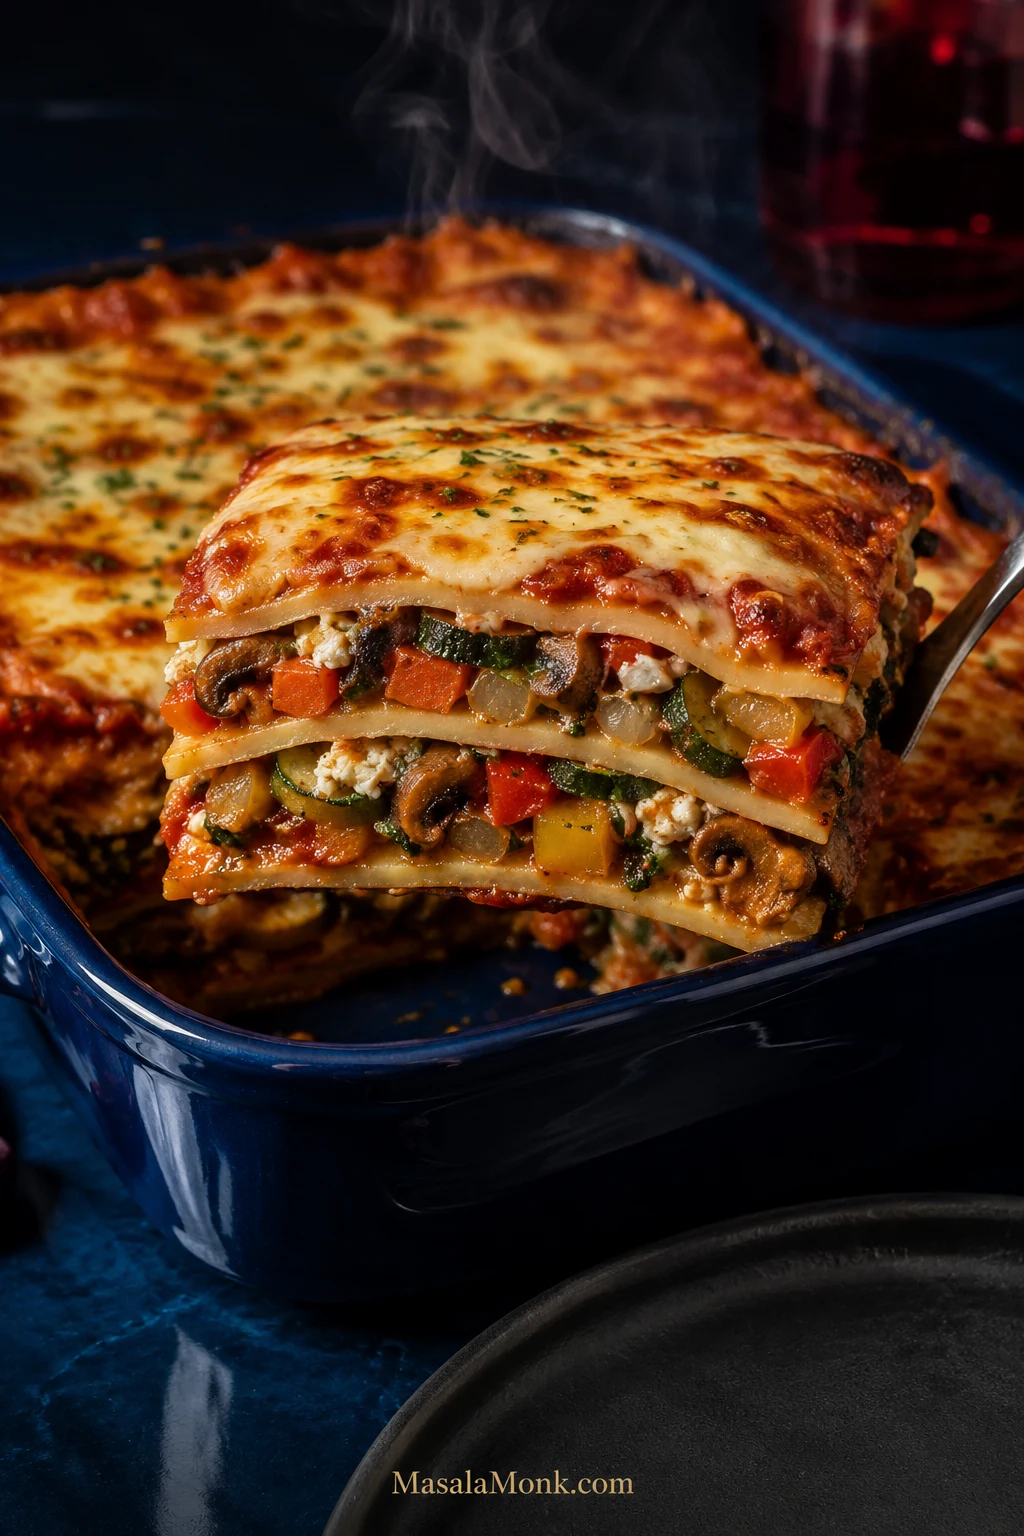
Finished vegetable lasagna in a deep blue baking dish with a lifted slice showing pasta, ricotta, spinach, zucchini, mushrooms, peppers and tomato sauce.

Before this becomes lasagna, the vegetables should already taste worth eating. The mushrooms need to be dark and savory, the zucchini smaller and browned at the edges, the onion sweet, and the peppers and carrots properly tender. If the filling tastes flat before it goes between the noodles, another layer of cheese will not magically make it exciting.

A deep 9 × 13-inch pan holds about 2 pounds / 910 g of roastable vegetables, plus spinach, layered with ricotta, mozzarella, tomato sauce and pasta. The finished lasagna is deeply cheesy, but the roasted vegetables are what give each layer its character. The browned vegetables are the filling.

Timings help, but watch the food too: mushrooms that release their water and begin browning again, marinara that clings to a spoon, and a knife that passes through the middle without catching on firm pasta.
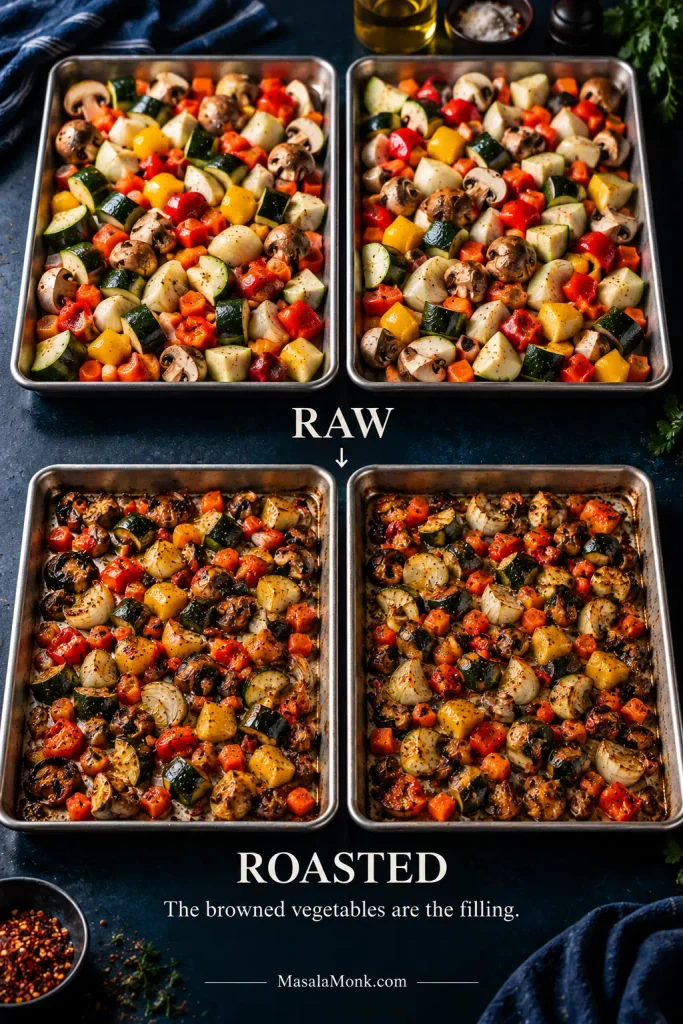
Raw zucchini, mushrooms, bell pepper, yellow onion and carrot on sheet pans beside the same vegetables roasted until smaller and browned.
Raw vegetable volume can be misleading: moisture loss dramatically reduces zucchini, mushrooms, peppers and onions during roasting. That is why a generous raw quantity can become two balanced filling layers without making the finished lasagna overwhelmingly vegetable-heavy.

Jump to: Make the lasagna · Choose your vegetables · Why it gets watery · Troubleshoot the pan

Open the full table of contents

Vegetable Lasagna Recipe

This version uses roasted vegetables, ricotta, low-moisture mozzarella, tomato sauce and oven-ready lasagna sheets. There is no separate pot of noodles to boil.

Allow about 2 hours from the first chop to the first slice, with a little extra breathing room the first time you make it. You are not working for all of that: the ricotta, spinach and sauce can be handled while the vegetables roast, and the final 20 minutes belong to the lasagna, not you.

Pan9 × 13 inches / 23 × 33 cm, ideally at least 2½ inches / 6 cm deep
Yield8 main-dish servings or 10–12 smaller servings with sides
Hands-on prepAbout 45–50 minutes, with some work happening while the vegetables roast
Vegetable roast20–25 minutes using two pans; add about 20–25 minutes if you need to roast in two batches
Covered bake40 minutes, then check; some pans need another 5–10 minutes
Uncovered bake10–15 minutes
Rest20 minutes; 25–30 minutes for particularly neat slices

Cooking for more people? Make two regular 9 × 13-inch pans rather than one unusually deep double batch. They bake more evenly, are easier to move, and give you more browned edges.

Ingredients

Vegetables

  • 9 oz / 250 g zucchini, about 1 medium-large or 2 small, unpeeled and cut into roughly ½-inch / 1–1.5 cm pieces
  • 8 oz / 225 g mushrooms, about one 8-ounce package, quartered if small or thickly sliced if larger
  • 6 oz / 170 g red or yellow bell pepper, about 1 large, cut into roughly ½-inch / 1–1.5 cm pieces
  • 5 oz / 150 g yellow onion, about 1 medium, cut into roughly ½-inch / 1–1.5 cm pieces
  • 4 oz / 115 g carrot, about 1 large or 2 small, cut into smaller ¼-inch / 6 mm dice
  • 5 oz / 140 g frozen chopped spinach, thawed; or about 8 oz / 225 g fresh spinach
  • 3 tablespoons / 45 ml olive oil
  • 1 teaspoon fine salt
  • 1 teaspoon Italian seasoning
  • ½ teaspoon garlic powder
  • ½ teaspoon freshly ground black pepper

Ricotta Filling

  • 15 oz / 425 g whole-milk ricotta, drained if whey is visibly pooling around it
  • 1 large egg
  • 1½ oz / 42 g Parmesan or another hard Italian-style cheese, finely grated
  • 1 small garlic clove, finely grated
  • 1 teaspoon finely grated lemon zest
  • 2 tablespoons finely chopped fresh basil or flat-leaf parsley
  • ¼ teaspoon fine salt, or to taste depending on the cheese
  • ¼ teaspoon black pepper

For the Layers

  • 4 cups / 950 ml thick marinara sauce, homemade or jarred
  • 8–9 oz / 225–255 g oven-ready/no-boil lasagna sheets, or enough for 3 complete pasta layers; sheet count varies by brand
  • 12 oz / 340 g low-moisture mozzarella, shredded, about 3 cups
  • ½ oz / 14 g Parmesan or another hard Italian-style cheese, finely grated, for the top
  • Optional: red pepper flakes and fresh basil for serving

If you avoid animal rennet, check the cheese labels. Traditional Parmigiano Reggiano uses animal rennet, while vegetarian alternatives may use microbial or other non-animal coagulants. The Vegetarian Society’s guide to vegetarian cheese can help when the label is unclear.

Lightly oil the bottom and sides of a deep 9 × 13-inch / 23 × 33 cm baking dish. You will also need two large rimmed sheet pans; half-sheet pans, roughly 13 × 18 inches / 33 × 46 cm, are ideal. Have a mixing bowl, clean kitchen towel and foil ready too.

If the trays need separate oven racks, you will swap their positions halfway through roasting. Only one suitably large tray? Roast the vegetables in two batches rather than crowding them, and allow another 20–25 minutes.

Lasagna can bubble over as it bakes. If the assembled filling sits close to the rim, put the baking dish on a rimmed sheet pan before it goes into the oven.
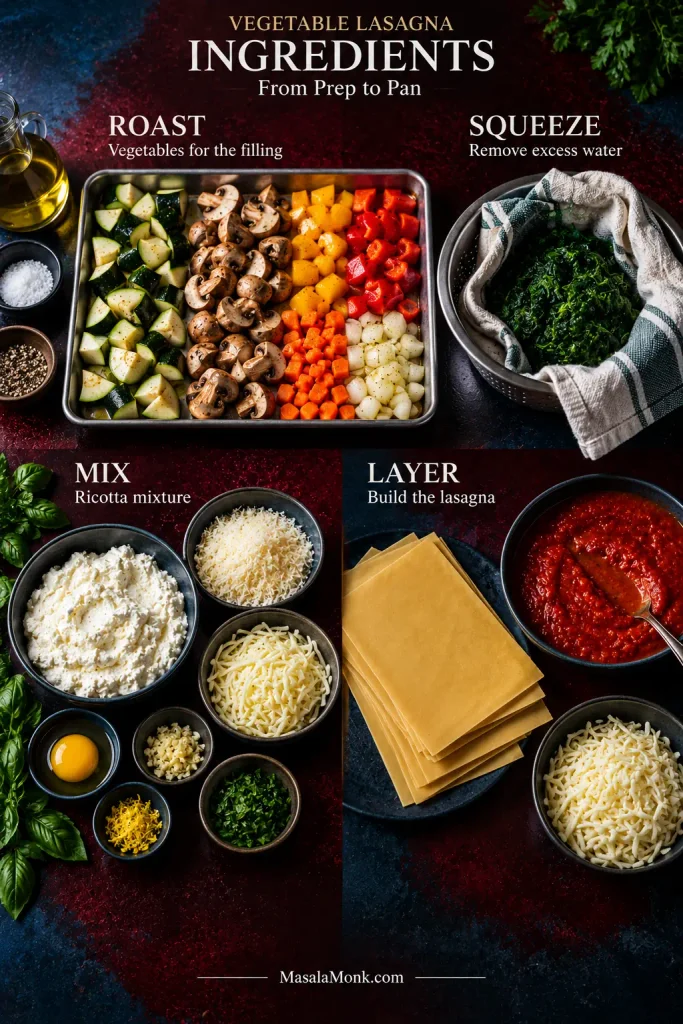
Vegetable lasagna ingredients grouped by preparation: vegetables for roasting, spinach for squeezing, ricotta ingredients for mixing, and sauce, pasta and mozzarella for layering.
Think of the recipe as four checkpoints rather than one long ingredient list: control vegetable moisture, control spinach moisture, season the cheese, then balance the pasta with sauce. Catching a problem at its own checkpoint is much easier than fixing it after assembly.

1. Roast the Vegetables Until They Taste Finished

Heat the oven to 425°F / 220°C.

Divide the zucchini, mushrooms, bell pepper, onion and carrot between the two sheet pans. Add the olive oil, salt, Italian seasoning, garlic powder and black pepper. Toss well and spread everything out.

Crowded vegetables steam. Give these some room.
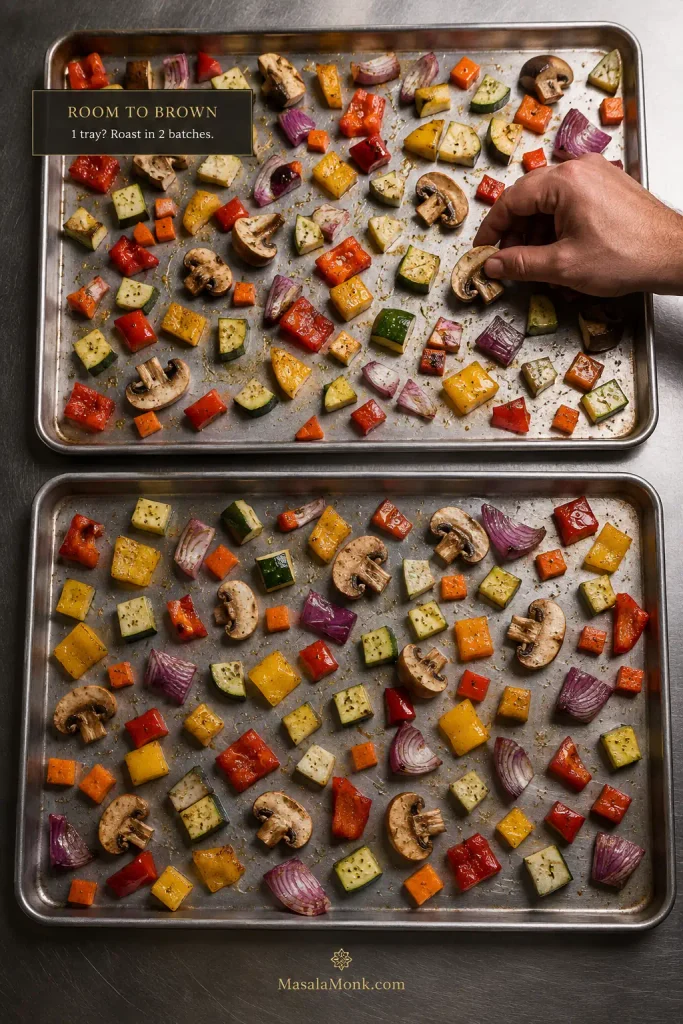
Chopped vegetables spread with space between them on two rimmed sheet pans for roasting and browning.
If the trays still look wet halfway through roasting, extending the timer is not always the best first move. Redistributing crowded pieces can expose more surface to hot air, helping evaporation and browning happen together instead of simply cooking the vegetables softer.

Roast for 20–25 minutes, stirring once. If the pans are on separate racks, swap the upper and lower pans and turn them front-to-back when you stir.

How to Know the Vegetables Are Ready

What looked like an unreasonable amount of vegetables at the beginning will look much more manageable now. The onion smells sweeter and the zucchini has shrunk. Peppers are tender, carrot pieces nearly cooked through, and dark edges have started appearing across both trays.

Mushrooms are especially easy to read. First they soften. Then they release enough liquid to make the pan look wetter than it did before. Keep going. The liquid disappears, the pan dries, and the mushrooms begin to brown again.
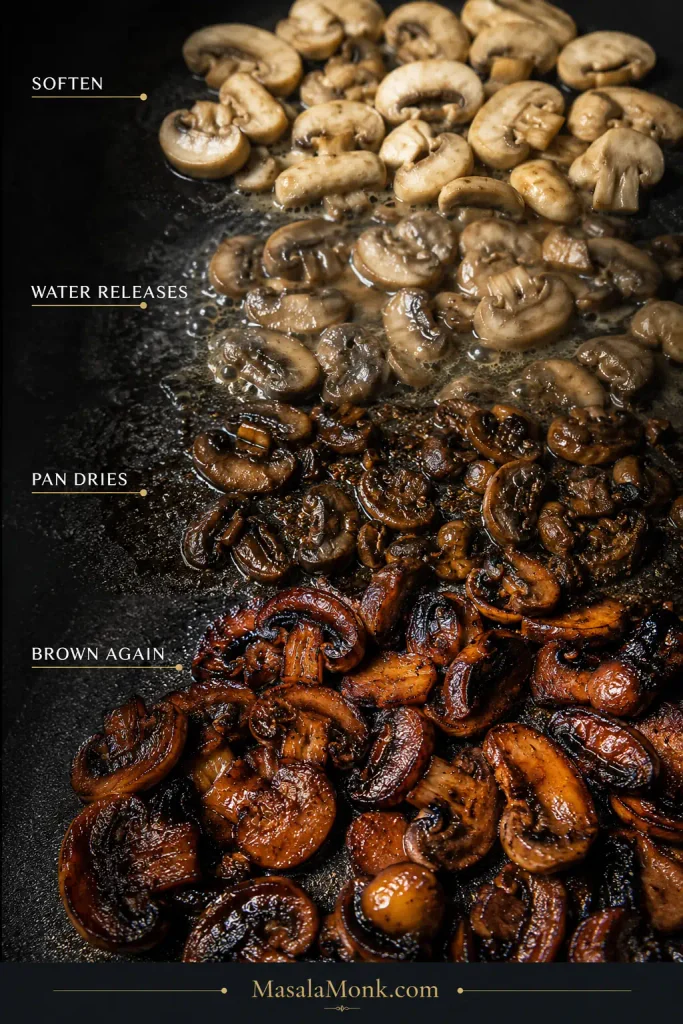
Mushrooms shown softening, releasing water, cooking until the pan dries, and finally becoming deeply browned.
When mushrooms release a panful of liquid, keep cooking rather than draining it away. Once the pan dries, the concentrated flavor has a chance to brown.

Taste one.

Then taste a piece of zucchini and some onion. If those bites are not good now, fix the seasoning before they disappear between pasta and cheese.

Reduce the oven to 375°F / 190°C.

2. Dry the Spinach

Put the thawed spinach in the center of a clean kitchen towel, gather the towel around it and twist firmly over the sink. Keep squeezing until very little more liquid comes out.

Using fresh spinach? Wilt the 8 oz / 225 g in a large pan, let it cool enough to handle, squeeze out the excess liquid and chop it.
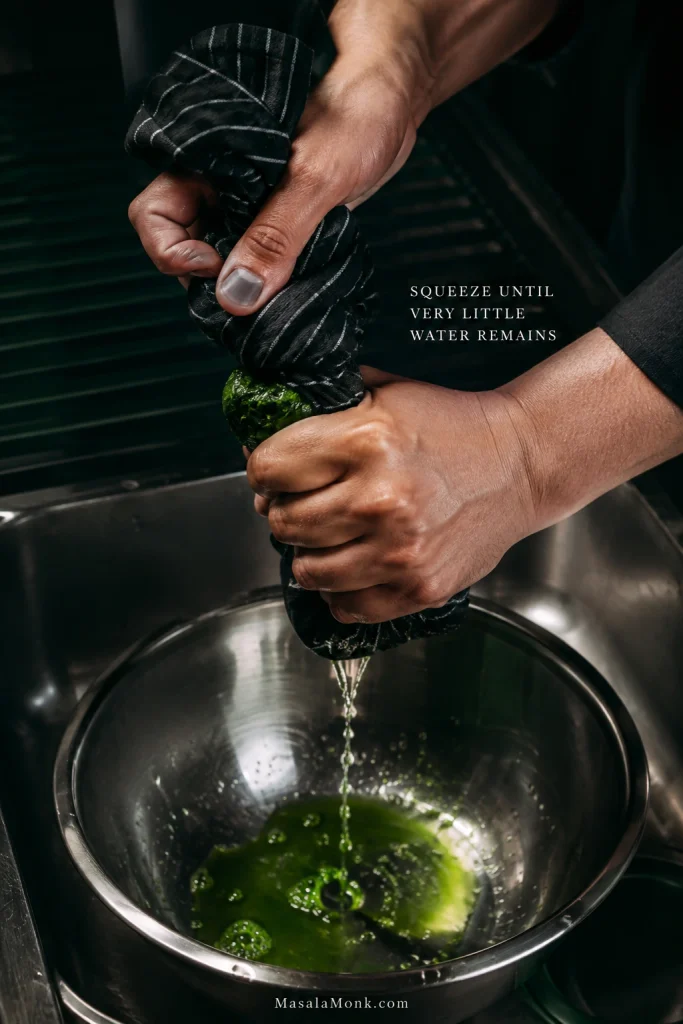
Hands twisting cooked spinach in a dark towel over a stainless-steel bowl to squeeze out excess water.
After squeezing, loosen the compact spinach with your fingers or a fork before mixing it into the roasted vegetables. That small step distributes the greens through both filling layers instead of leaving dense wet pockets in only a few slices.

Break the spinach apart and mix it through the roasted vegetables.

3. Check the Sauce

A good jarred marinara keeps this dinner practical.

Drag a spoon through the sauce. The trail should remain for a moment before slowly closing, and the sauce needs to be loose enough to spread easily across the dry noodles. If it runs like tomato juice, simmer it uncovered for a few minutes.

Marinara showing the correct thick, spreadable consistency and separate examples of sauce that is too thin and too thick.
For no-boil lasagna noodles, sauce is part of the cooking system as well as the flavor. If a thin marinara needs reducing, judge and measure the sauce after reduction so you still have enough finished sauce to hydrate the pasta properly.

Stop before it becomes heavily reduced or pasty. Oven-ready sheets need enough sauce around them to become tender.

Taste the sauce too. Ricotta, mozzarella and pasta soften its seasoning once everything is layered.

Making the sauce from fresh tomatoes? They carry more water, so reduction matters. The fresh tomato sauce recipe shows the consistency to look for before measuring the 4 cups / 950 ml.

4. Mix the Ricotta

Stir together the ricotta, hard cheese, garlic, lemon zest, herbs, salt and pepper without the egg first.

Taste it. The ricotta needs enough seasoning to remain noticeable once it is surrounded by pasta, vegetables and tomato sauce. The lemon zest is there for brightness rather than obvious lemon flavor.

Once the seasoning is right, stir in the egg. It helps the cheese layer set; without it, the ricotta simply stays softer.

The messy part is mostly over now. The trays are roasted, the spinach is squeezed, the sauce is ready and the ricotta is mixed.

From here, you’re building.

5. Build the Layers

The vegetables, sauce and ricotta should each taste properly seasoned on their own before you layer them.

Divide the vegetables and ricotta mixture roughly in half. Keep the marinara, noodles and mozzarella beside the baking dish. You are making three pasta layers and two filling layers.
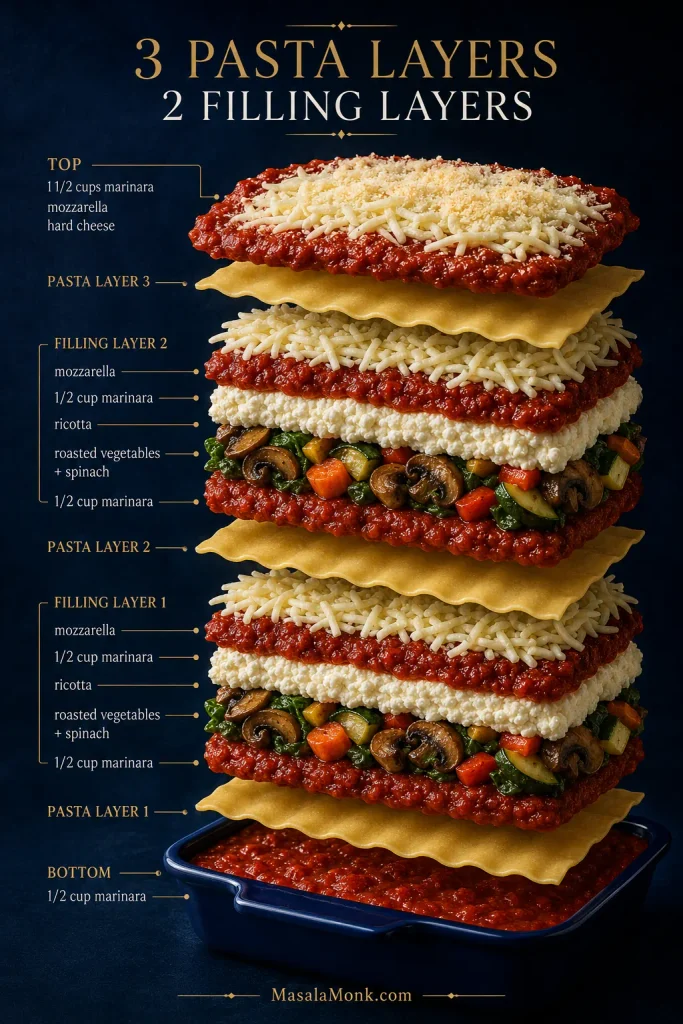
Exploded vegetable lasagna showing three pasta layers, two vegetable-and-ricotta filling layers, marinara between the noodles and cheese on top.
Layering evenly matters more than making every spoonful mathematically identical. Broad, fairly level filling layers heat more predictably than thick vegetable mounds, while three complete pasta layers give the finished lasagna structure without turning it into an unnecessarily tall stack.

Bottom

  • ½ cup marinara
  • Enough oven-ready pasta to cover the pan

First Filling Layer

  • ½ cup marinara, spread over the noodles
  • Half the ricotta filling
  • Half the vegetables
  • Another ½ cup marinara
  • About 1 cup mozzarella

Second Filling Layer

  • A second complete pasta layer
  • ½ cup marinara
  • Remaining ricotta filling
  • Remaining vegetables
  • Another ½ cup marinara
  • About 1 cup mozzarella

Top

  • Final complete pasta layer
  • Remaining 1½ cups marinara
  • Remaining mozzarella
  • ½ oz / 14 g grated hard cheese

Dollop the ricotta onto the sauced noodles and spread it before adding the vegetables. It is much easier to move ricotta across a flat sheet of pasta than across a pile of zucchini and mushrooms.
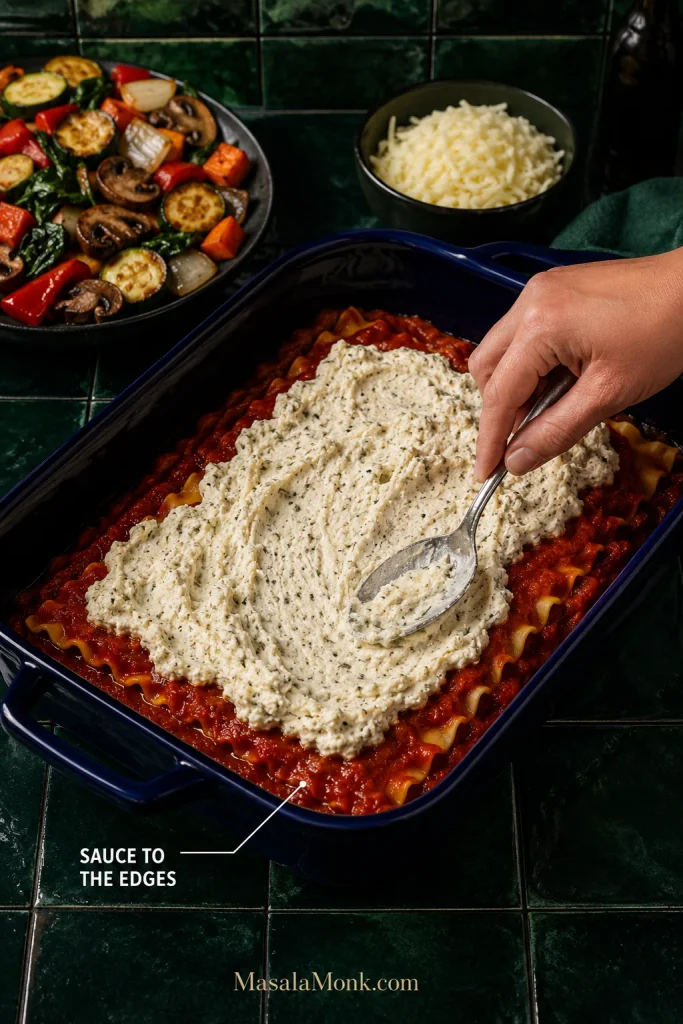
Hands spreading ricotta over a sauced pasta layer in a blue lasagna dish, with marinara reaching the edges and corners.
Do not chase a perfectly smooth ricotta layer. A lightly spread, mottled layer lets the roasted vegetables settle into the cheese instead of sliding across a slick surface, while sauce at the perimeter protects the pasta where drying happens fastest.

Set the next pasta layer down and press gently over any obvious vegetable mounds. Don’t pack the filling.

Sheet sizes vary, sometimes a lot. Three complete pasta layers are the useful target. Break sheets to fill a real gap, but avoid thick patches of overlapping dry pasta.

Cover the final noodle layer completely with the last 1½ cups of marinara, right into the corners. Pasta left exposed here is likely to stay hard.

The two trays of vegetables, bowl of ricotta and stack of pasta have finally become one pan of lasagna.

6. Cover and Cook the Pasta

Cover the dish tightly with foil. Lightly oil the underside if it sits close to the cheese.

Bake at 375°F / 190°C for 40 minutes.

Forget about browning for now. The middle of the pan and the dry noodles need the covered heat first.

7. Check the Middle, Then Brown the Top

Push a thin knife through the middle after 40 minutes.

If it slides through without catching on firm pasta, you’re ready to uncover. If the knife catches, nothing has gone wrong. Cover the pan again and give it another 5–10 minutes.
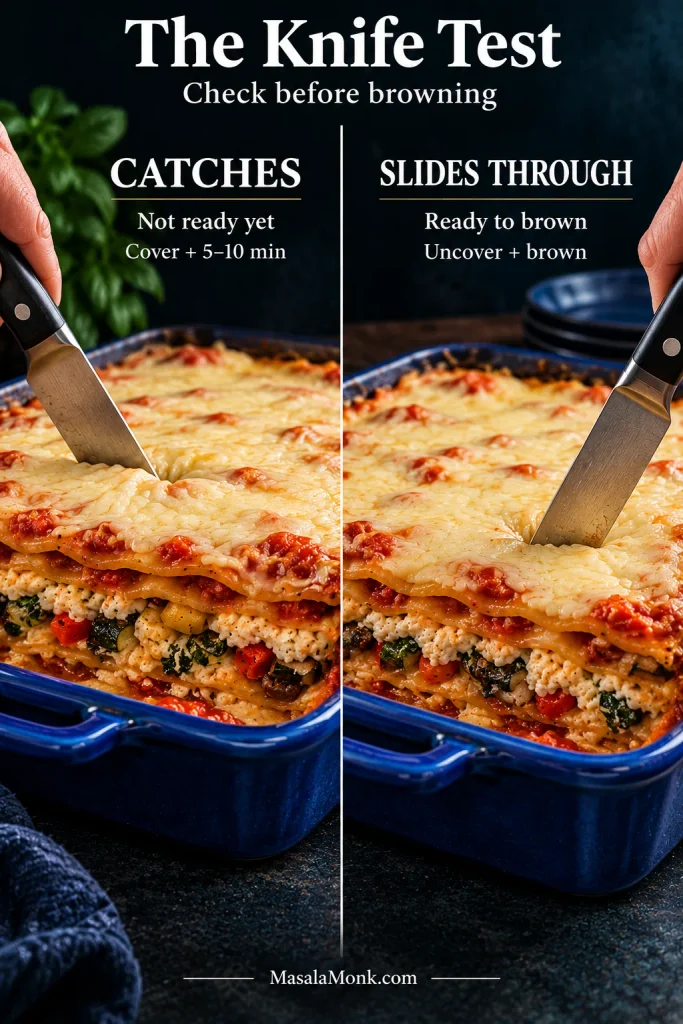
Two lasagna pans compare a knife stopping in firm pasta with a knife sliding deeply through tender noodles before final browning.
When checking doneness, distinguish firm pasta resistance from simply bumping into a piece of carrot or another vegetable. A hydrated noodle gives way smoothly; an undercooked sheet feels broader, firmer and more leathery against the knife.

A refrigerator-cold pan or thicker oven-ready sheets may need closer to 50 minutes covered.

Once the pasta is tender, remove the foil and bake for another 10–15 minutes. Tomato sauce will bubble around the perimeter. The mozzarella picks up golden patches, darker freckles and, here and there, a crisp edge.

If your baking dish is broiler-safe, a pale but fully cooked top can have a brief broil. Stay close—the distance between bronzed mozzarella and burned cheese is surprisingly short.

8. Give It 20 Minutes Before You Ask It to Be a Slice

Take the pan out and leave it alone for 20 minutes.

The furious bubbling subsides, the ricotta firms a little and the sauce stops running quite so freely when you cut.

For particularly clean slices, wait 25–30 minutes. The middle will remain plenty hot.
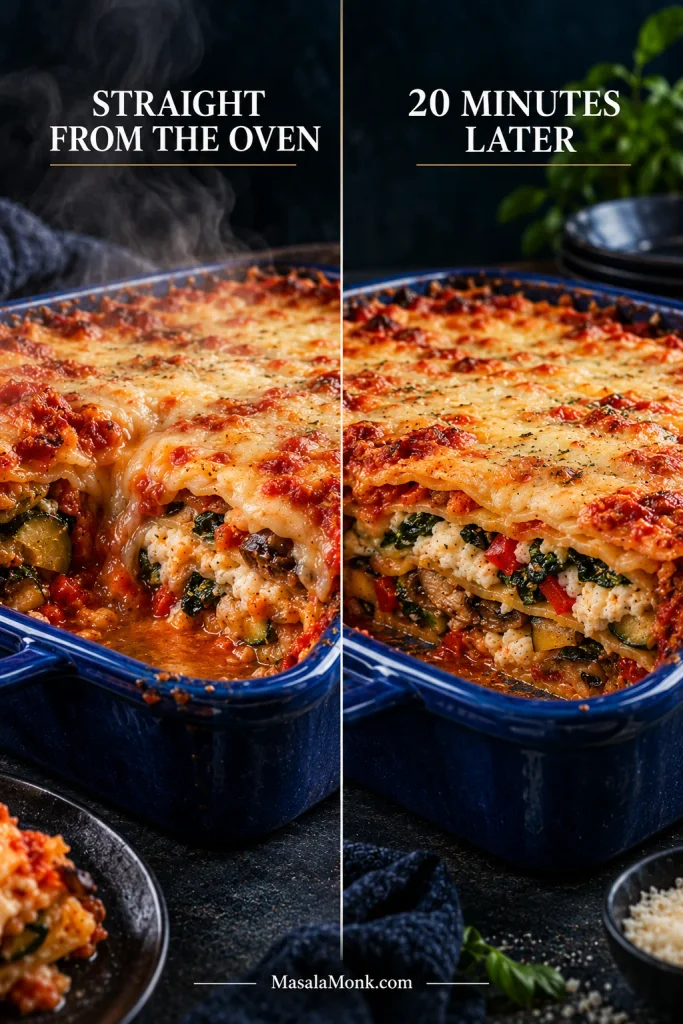
Vegetable lasagna shown steaming and loose straight from the oven beside the same lasagna after 20 minutes, when the layers hold together more cleanly.
Resting changes mobility more than moisture quantity. The liquid has not vanished after 20 minutes; rather, the sauce, cheese and filling have cooled just enough to move less freely, which is why the same lasagna becomes noticeably easier to portion.

Need help with the pan? Choose or swap vegetables · Make it ahead · Fix excess moisture · Troubleshoot what you see

Easy Shortcuts

This is not a 30-minute dinner. It does not need to become an all-afternoon project either.

  • Jarred marinara: use one that passes the consistency check above and move on.
  • Oven-ready noodles: no boiling, draining or handling floppy sheets.
  • Frozen spinach: excellent here once thoroughly squeezed.
  • Pre-shredded low-moisture mozzarella: a perfectly reasonable place to save a few minutes.
  • Vegetables roasted a day ahead: the most useful shortcut when tomorrow’s assembly needs to be quick.

Best Vegetables for Lasagna

For this style of lasagna, cook the vegetables before layering them. Raw zucchini and mushrooms can release too much liquid in the pan, while dense vegetables may still be firm by the time the pasta is done.

Zucchini can become eggplant without much trouble. Carrot is different. It carries far less water and takes longer to soften, so replacing vegetables cup-for-cup can change the filling more than expected.

The base recipe uses about 2 pounds / 910 g of trimmed roastable vegetables, plus spinach. Raw weight is a useful rough guide for substitutions; then account for how dense and watery the replacement is.
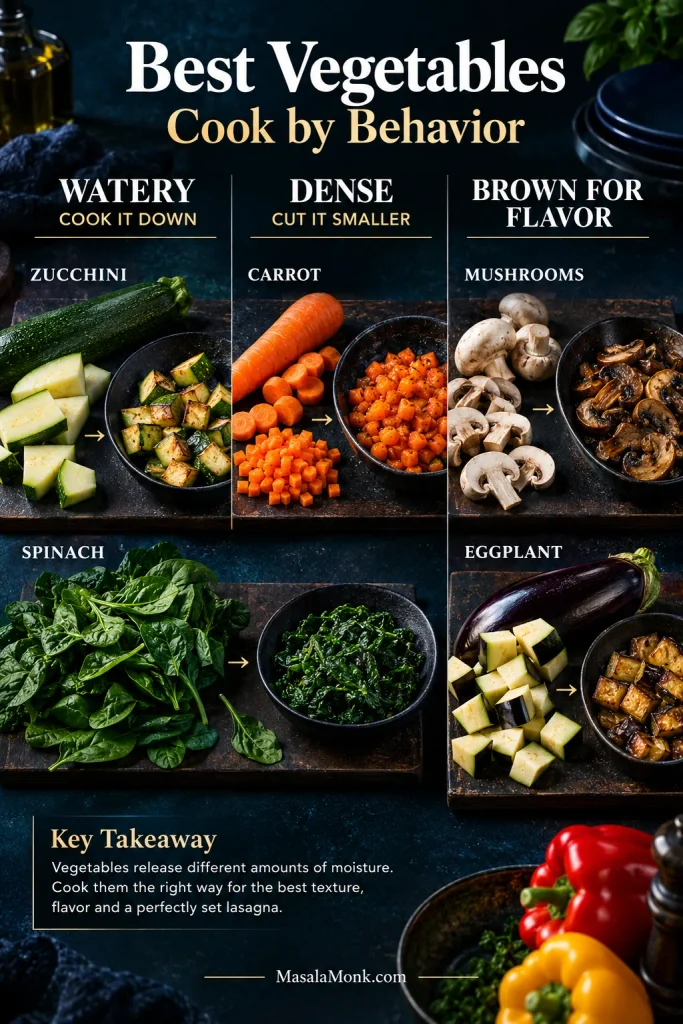
Zucchini, mushrooms, eggplant, carrot and spinach shown with guidance to cook watery vegetables down, cut dense vegetables smaller and brown for flavor.
The best vegetables for lasagna are often the ones that can be swapped for something with similar density and water content. Zucchini and eggplant behave more alike than zucchini and carrot, for example, so matching cooking behavior makes substitutions far more predictable.

How to Swap Vegetables Without Throwing Off the Filling

VegetableHow to Use It
ZucchiniTender and fairly watery. Roast until smaller and browned. Eggplant is an easy replacement.
MushroomsDeeply savory. Keep cooking until their released liquid is gone and browning starts again.
SpinachWilt fresh or thaw frozen, then squeeze firmly. Kale works too but needs more cooking.
Bell peppersSweet and forgiving. Roast until tender. Well-drained roasted red peppers also work.
CarrotsSweet and relatively dry. Cut them smaller so they become tender at roughly the same time as the other vegetables.
OnionGive it enough time to soften and brown. Large undercooked pieces are distracting in the finished slice.
EggplantSilky and savory after roasting. Excellent in place of some or all of the zucchini.
Butternut squashDense and sweet. Use small cubes and roast until nearly tender.
Broccoli or cauliflowerUse small pieces and roast first. Better as part of a mixed filling than the entire filling.
KaleMore robust than spinach. Remove tough stems and cook it until properly tender.

No mushrooms? Replace their 8 oz / 225 g with eggplant, extra pepper, zucchini or a mixture. You lose some savory depth, so give the tomato sauce a final taste before assembly.

For a smoother, more hidden-vegetable filling, grate zucchini into the marinara and simmer until tender and its extra moisture has cooked away. Browned mushrooms can be chopped very finely, and spinach can simply be minced before mixing it through.

Vegetable Lasagna With Frozen Vegetables

Frozen spinach is excellent here. Frozen zucchini is not. Most other frozen vegetables fall somewhere between those two.
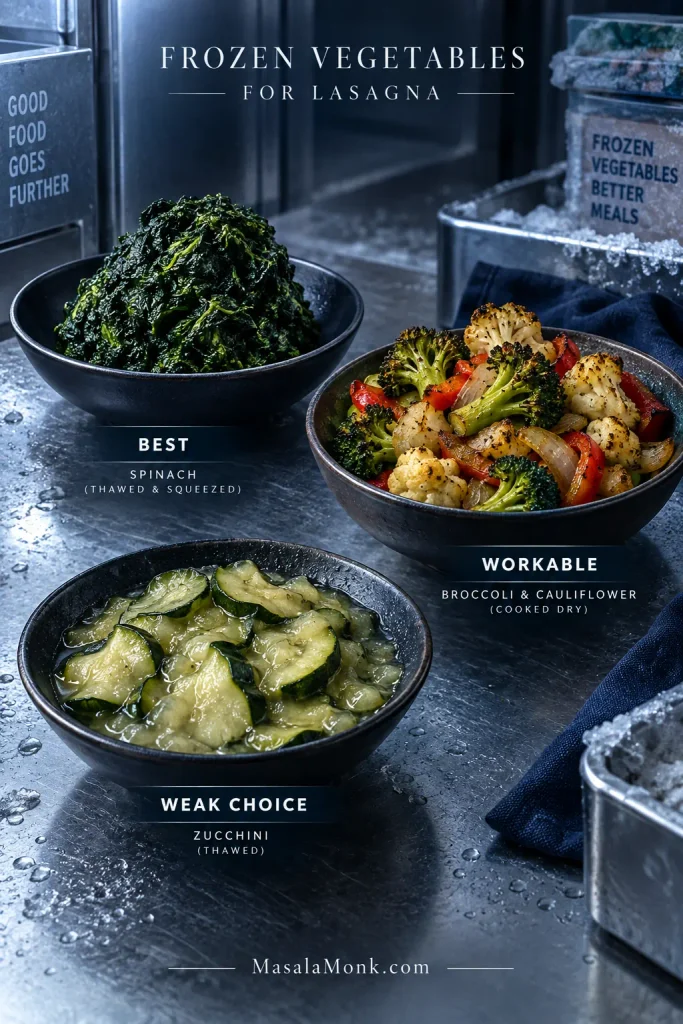
Prepared frozen spinach labeled best, cooked broccoli and cauliflower labeled workable, and soft wet zucchini labeled a weak choice for lasagna.
With frozen vegetables for lasagna, fix excess moisture at the vegetable stage rather than compensating by cutting back too aggressively on marinara. That distinction matters with oven-ready pasta, which can still need plenty of sauce even when the filling itself started wet.
Frozen VegetableBest Approach
SpinachThaw completely and squeeze firmly until very little more water comes out.
Broccoli or cauliflowerThaw, drain and blot. Roast or sauté briefly if the pieces still look wet.
Peppers or pepper-and-onion mixesSauté until released water evaporates and some color starts developing.
Mixed vegetablesThaw, then sauté until the pan no longer looks wet. Choose the blend for flavor as well as convenience.
ZucchiniIt can be used, but the texture is considerably softer and wetter. Fresh zucchini is much better here.

If most of the filling comes from frozen vegetables, cook and drain them before assembly. Aim for about 5 cups total cooked, well-drained vegetables across the two filling layers, including spinach if you’re using it.

The volume does not need to be exact. Two full, fairly level layers are enough.

Still dealing with excess liquid? See why vegetable lasagna gets watery.

Ricotta and Cottage Cheese in Vegetable Lasagna

Ricotta leaves soft, creamy pockets between the roasted vegetables, sauce and pasta. A very loose tub needs draining first.

Using Cottage Cheese Instead

Cottage cheese is tangier, with visible curds unless you blend it. Swap it for the ricotta by weight—15 oz / 425 g—and make the rest of the filling exactly the same way. Blend the cottage cheese before adding the other ingredients when you want a smoother texture, and drain off obvious liquid first.
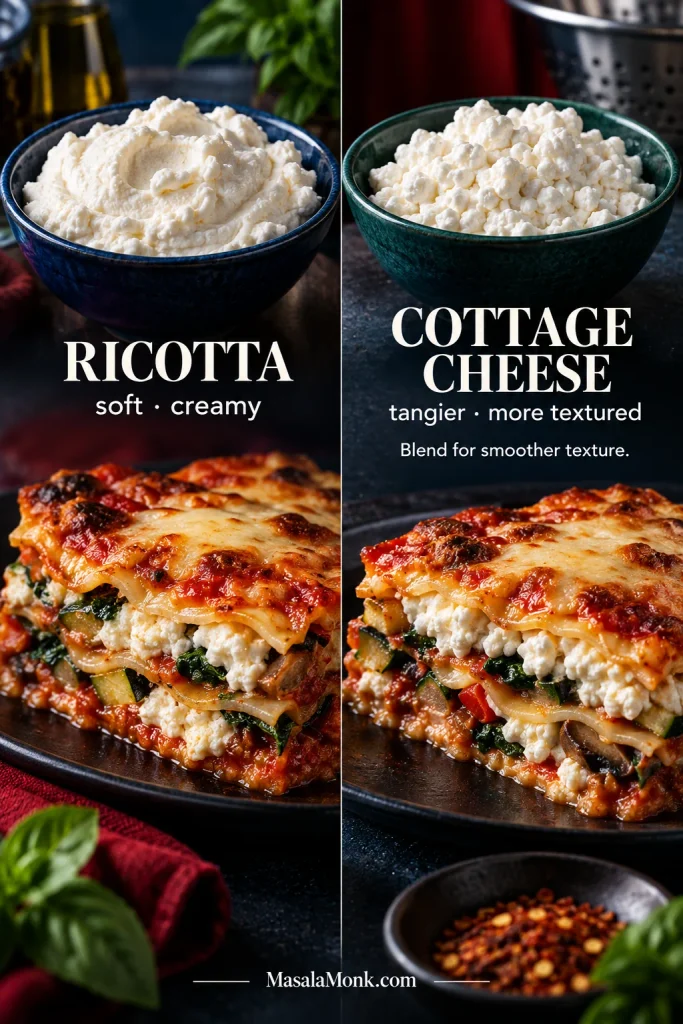
Ricotta and cottage cheese shown in bowls and lasagna slices, comparing smooth creamy ricotta with more visible cottage-cheese curds.
For ricotta vs cottage cheese in lasagna, neither option is automatically “drier” across every brand. Choose the cheese for the texture you want, then judge the tub in front of you: visible pooled whey matters more to the finished pan than the name on the label.

The cottage cheese lasagna is built around that cheese from the start rather than treating it as a substitution.

For a different style altogether, béchamel gives you a softer, silkier lasagna with creaminess spread more evenly through the layers. The béchamel sauce for lasagna is the better starting point for that version.

No-Boil and Regular Lasagna Noodles

This version is built for oven-ready/no-boil sheets. Keep every sheet well covered with sauce and give the pan the full covered bake before checking the pasta.

Using Pre-Cooked Regular Noodles

Cook enough regular noodles for the same three complete pasta layers; sheet dimensions and package sizes vary. Boil them only until flexible and a little firmer than you would serve as finished pasta.

For cooked noodles, reduce the sauce over each vegetable layer from ½ cup to ¼ cup. Keep every other sauce amount the same; this uses 3½ cups in the lasagna and leaves ½ cup to warm for serving if you want extra sauce at the table.
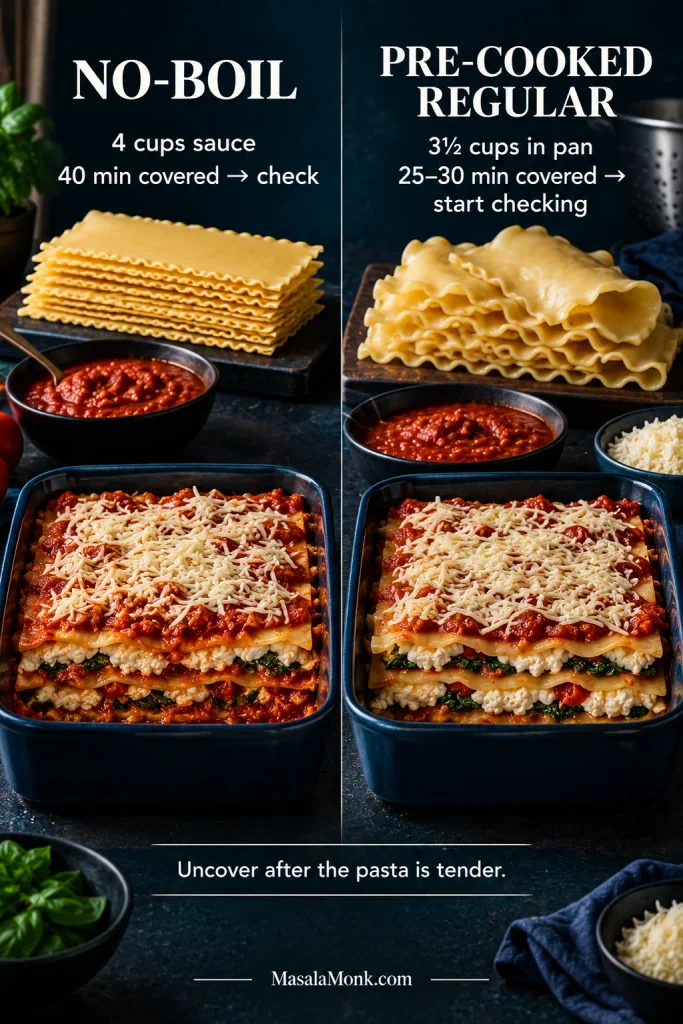
Dry no-boil lasagna sheets and a saucier pan compared with flexible pre-cooked regular noodles and a slightly less saucy assembly.
Changing noodle type changes more than bake time. No-boil lasagna noodles arrive dry and take part of their hydration from the sauce, whereas pre-cooked noodles bring water into the pan themselves; therefore, the sauce quantity should change with the pasta method.

Pre-cooked noodles do not need the full 40–50 minute hydration stage. Cover the freshly assembled lasagna and start checking it after 25–30 minutes at 375°F / 190°C. Once the middle is hot and bubbling, uncover and brown the cheese for another 10–15 minutes.

A refrigerator-cold pan will take longer. Judge it by a thoroughly hot, bubbling middle rather than the clock alone.

Gluten-free sheets vary too much by brand for one universal method. Follow the package directions, keep dry sheets well sauced and check the pasta before uncovering.

Pasta still firm? Return to the knife doneness test · ↑ Back to top

Why Vegetable Lasagna Gets Watery

Most watery lasagnas are not ruined by one dramatic mistake. They get there by accumulation: spinach that still held water, mushrooms that never reached the browning stage, unusually loose ricotta and thin tomato sauce all meeting in the same pan.

  • Vegetables: zucchini, mushrooms and spinach can release plenty of water. Roasting, sautéing and squeezing deal with much of it before layering.
  • Cheese: ricotta and cottage cheese vary by brand. If whey is pooling, drain it. Fresh mozzarella contains considerably more water than low-moisture mozzarella and is not a straightforward 1:1 substitute here unless it is drained and blotted extremely well.
  • Sauce: very thin marinara loosens the whole pan. Sauce reduced too far creates the opposite problem when dry noodles need liquid.
  • Pasta: oven-ready sheets absorb liquid while they cook. Boiled noodles arrive in the pan already hydrated.
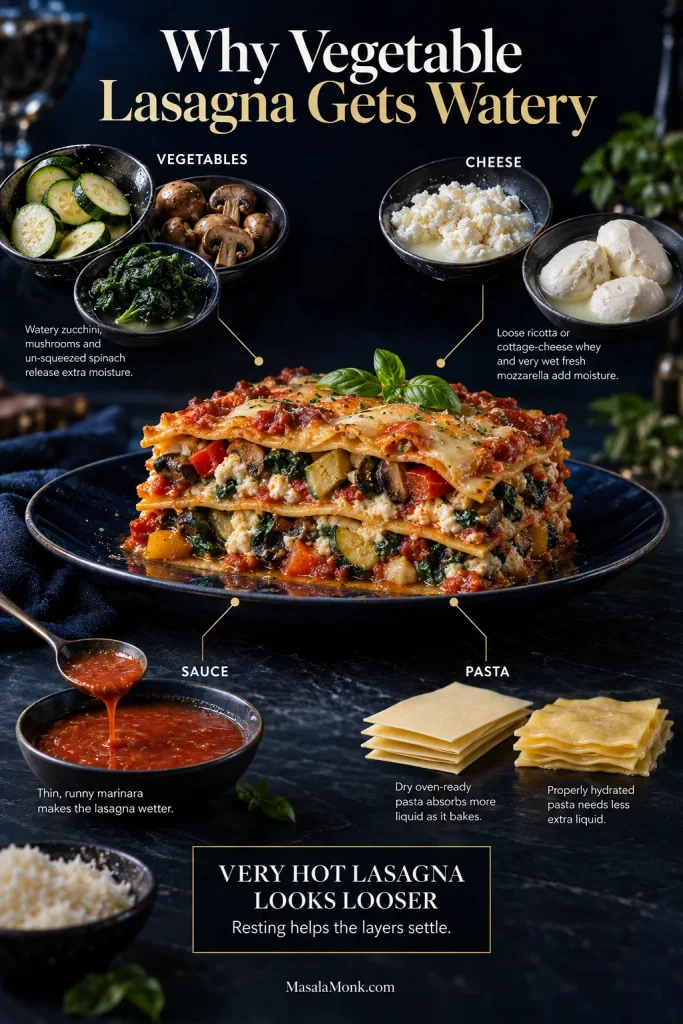
Vegetable lasagna surrounded by four moisture sources: wet vegetables, watery cheese, thin marinara and pasta with different hydration needs.
The useful distinction in watery vegetable lasagna is not simply “more liquid versus less liquid.” It is controlled moisture versus uncontrolled moisture: pasta needs deliberate hydration, while vegetable water, cheese whey and excessively thin sauce can accumulate where the recipe does not need them.

A lasagna also looks looser when it is extremely hot. Straight from the oven, the sauce moves more freely; after 20 minutes, the layers hold themselves together much better.

A spoonful of juices around a very hot first slice is not a failed lasagna.

A lake underneath it is something worth fixing.

Already have a pan in front of you? Troubleshoot what you’re seeing.

Make Ahead, Freeze and Reheat

Assemble It the Night Before

Cover the assembled pan tightly and refrigerate overnight. The next day, start checking the pasta after about 45 minutes covered. The whole dish begins cold, so it usually needs longer than a freshly assembled pan.
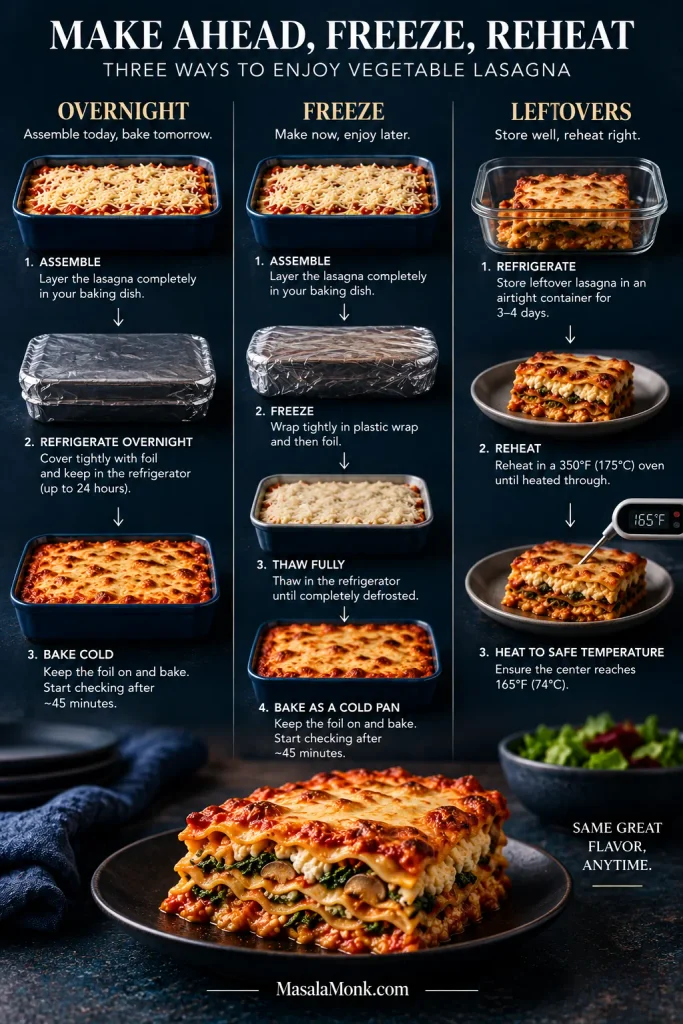
Three vegetable lasagna workflows show refrigerating an assembled pan overnight, freezing and thawing it in the refrigerator, and reheating leftovers to 165°F or 74°C.
With make-ahead vegetable lasagna, watch the center rather than trusting the browned edges. A refrigerator-cold or fully thawed pan can look active around the perimeter while the middle is still catching up, so doneness cues remain more reliable than adding one fixed number of minutes.

Opening the refrigerator and finding dinner already built is one of the better rewards for doing the chopping a day early.

Prep the Components Earlier

The roasted vegetables and tomato sauce can be made up to 2 days ahead and refrigerated separately. Mix the ricotta and assemble closer to baking.

Freeze the Whole Pan or Individual Slices

A tightly wrapped assembled lasagna can be frozen before baking. Thaw it fully in the refrigerator; a deep frozen 9 × 13-inch pan may take longer than one night to thaw through.

Once fully thawed, treat it like any other refrigerator-cold assembled lasagna: bake covered at 375°F / 190°C and start checking the pasta after about 45 minutes. Uncover once the noodles are tender and brown the top.

For leftover slices, cool the lasagna first, divide it into individual portions, wrap well and freeze. Thawing in the refrigerator gives the most even reheating.

Leftovers and Reheating

Refrigerate leftovers promptly in covered containers and use them within 3–4 days, or freeze them for longer storage. The USDA’s leftover-safety guidance has additional storage and reheating advice.

For several refrigerated slices or a larger portion, cover and reheat at about 350°F / 175°C until hot through the middle. Uncover for the last few minutes if you want to refresh the cheese on top.

For a measurable food-safety endpoint, USDA recommends reheating leftovers to 165°F / 74°C in the center.

A single slice usually does better with gentler staged microwave heating than one long blast at maximum power. Chilled lasagna has another advantage: the layers often cut even more cleanly the next day.

Cooking it now? Return to the main recipe · ↑ Back to top

Read the Pan: What Went Wrong?

Do not chase architectural perfection.

A good lasagna can slump a little at the edge of the plate and still be exactly right. What deserves attention is a real pool of liquid, genuinely hard pasta, a dry top, a cold middle or vegetables that never became tender.

If the first slice collapses, give the pan another few minutes before deciding anything dramatic. The first piece out of a very hot lasagna is often the least tidy one.

What You SeeWhat to Do
Thin puddle around the edgesRest the pan first. If a genuine pool remains, carefully spoon off a little before serving. Next time, cook more moisture out of the vegetables or reduce an unusually thin sauce.
Noodles hard throughoutCover the pan again and give the pasta another 5–10 minutes, then check once more.
Mushy pastaThere is no real rescue once pasta is over-softened. Next time, boil regular noodles less or adjust the amount of liquid or baking time for very thin oven-ready sheets.
Lasagna slides apartGive it more time to rest before cutting another slice. Very wet cheese, loose sauce and excessively thick filling layers can make the problem worse.
Lasagna is dryServe it with warm marinara. Next time, keep the pasta fully covered and check the bake earlier.
Everything tastes flatAdd grated hard cheese, herbs, black pepper or chile at the table. Next time, brown and season the vegetables properly and taste the sauce and ricotta before layering.

A Few Other Clues

  • Hard top corners: pasta was probably left exposed above the sauce.
  • Milky liquid: unusually wet ricotta, cottage cheese or mozzarella is often involved.
  • Crunchy vegetables: dense vegetables were cut too large or did not cook far enough before assembly.
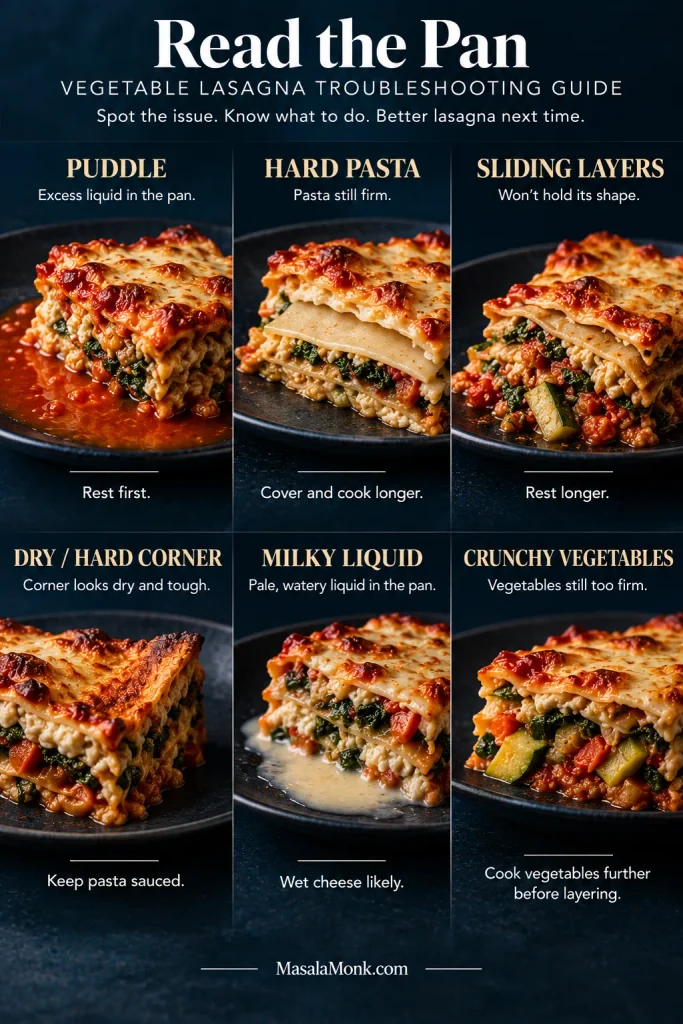
Six lasagna problems shown in close-up: pooled liquid, hard pasta, sliding layers, a dry corner, milky cheese liquid and oversized firm vegetables.
Good vegetable lasagna troubleshooting starts by identifying what kind of liquid or resistance you are seeing. Tomato-colored runoff suggests a different problem from pale milky whey, while hard pasta points toward hydration rather than excess moisture—even though all three can make a slice look wrong.

Should a Watery Lasagna Stay in the Oven Longer?

Only if the pasta still needs cooking.

A slightly loose lasagna often improves more from ten minutes on the counter than ten more minutes in the oven. A flooded one can remain wet underneath while the cheese and exposed pasta get drier and drier.

What to Serve With Vegetable Lasagna

Lasagna already brings soft pasta, roasted vegetables, tomato and plenty of creamy cheese. Something crisp, green or sharply dressed beside it gives the next bite a useful contrast.

  • Cucumber salad: cold cucumber, onion, dill and vinegar cut through the richness; this cucumber salad recipe is a natural fit.
  • Roasted broccoli or broccolini: charred edges and a greener, slightly bitter contrast to the sweeter tomato sauce.
  • Garlic bread: for a full comfort-food dinner; this homemade garlic bread loaf works well alongside it.
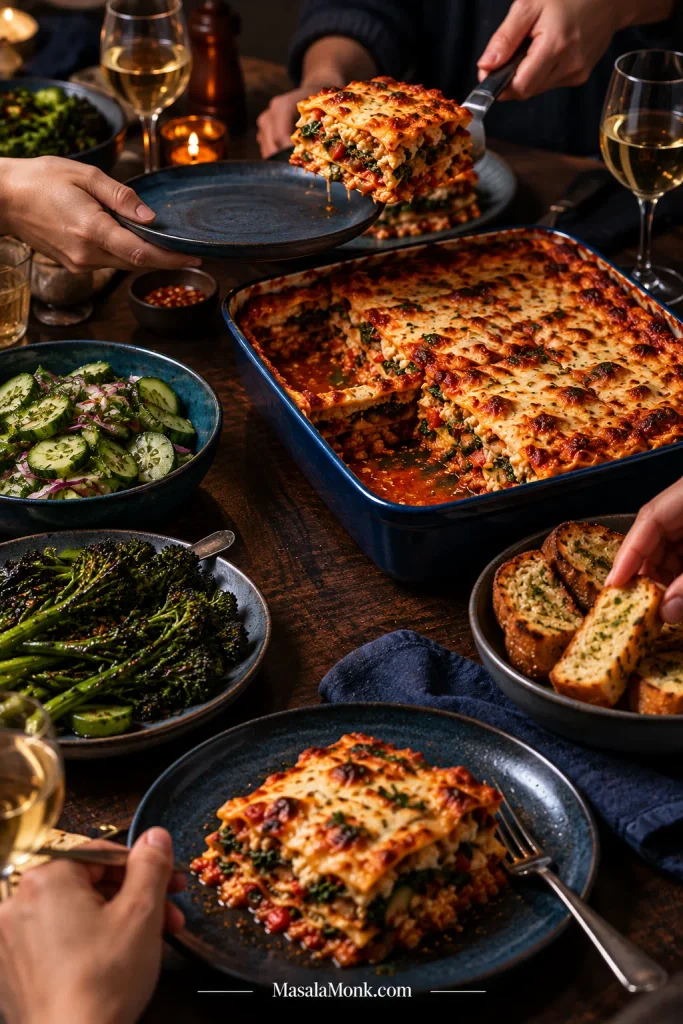
People serving vegetable lasagna at a dark wooden table with cucumber salad, charred broccolini and garlic bread.
For what to serve with vegetable lasagna, think in terms of contrast rather than quantity. Choose something crisp and acidic, something green and charred, or garlic bread for maximum comfort; you do not need three additional rich sides around an already generous main dish.

Cut through a browned corner and lift the first piece. The cheese at the edge may be a little crisp while the layers underneath stay soft, with creamy ricotta between zucchini, mushrooms and peppers and enough tomato sauce to keep the pasta tender without running across the plate.

The vegetable lasagna worth making again is the one where the vegetables taste good before they become filling, the pasta is tender, and the whole generous pan still knows how to become a slice.
Back to the recipe · ↑ Back to top

Posted on — Leave a comment

Lasagna Recipe — Classic Homemade Lasagna

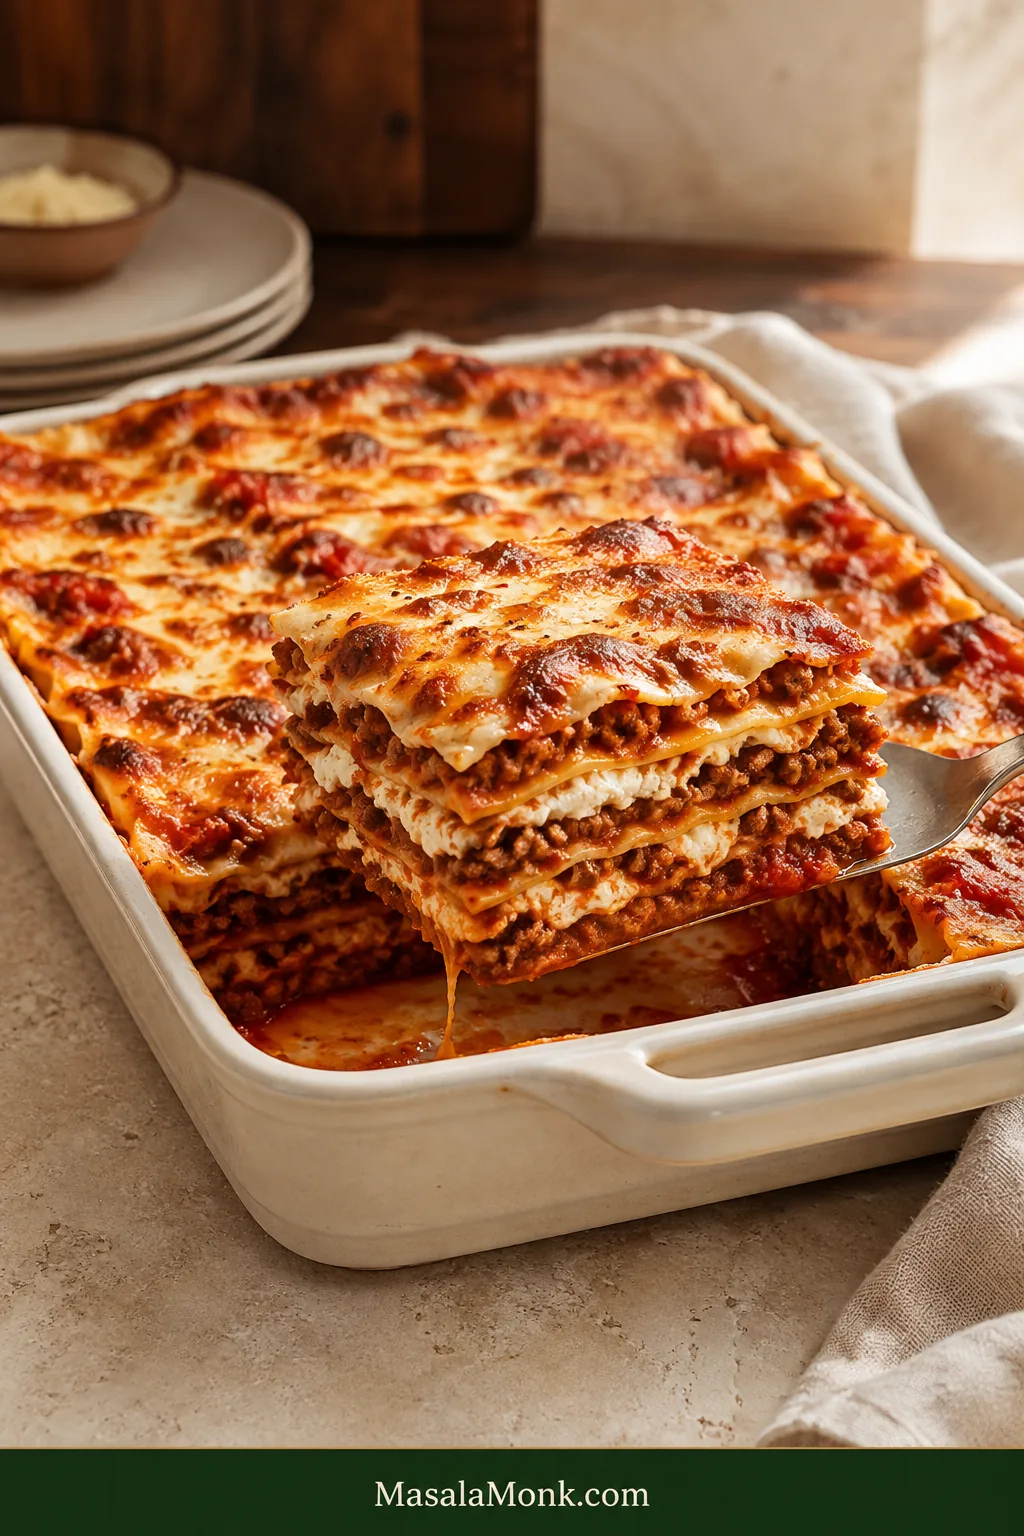
A first slice of beef and sausage lasagna lifted from an ivory baking dish, showing layered pasta, ricotta, red meat sauce and browned melted cheese.

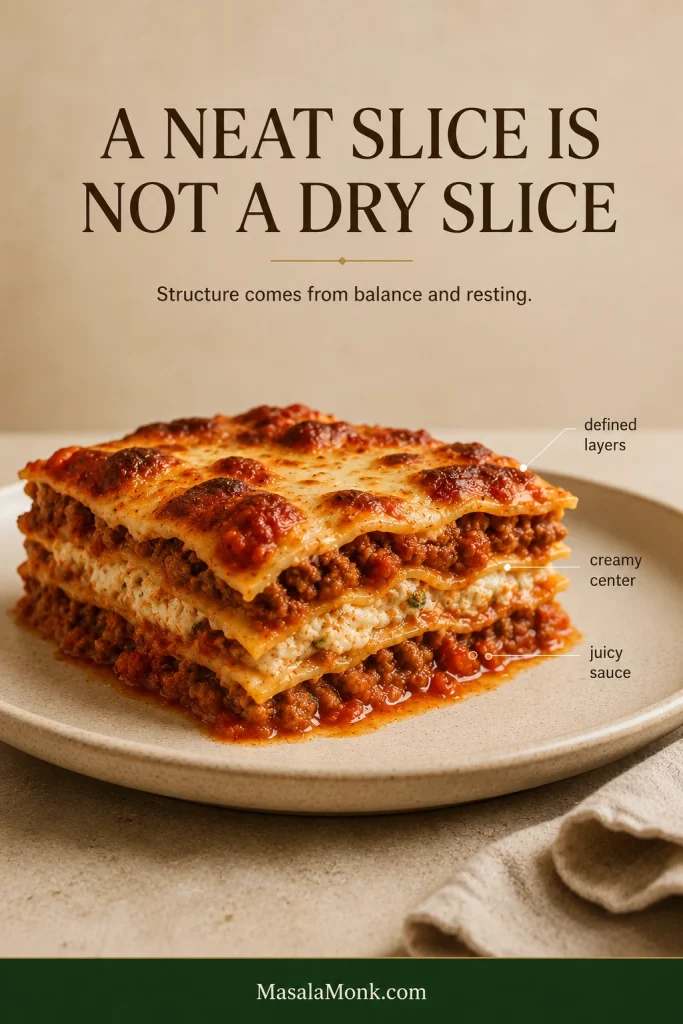
A good homemade lasagna should be generous without turning into a landslide. You want deeply flavored meat sauce between tender pasta, creamy ricotta, melted mozzarella and Parmesan, bubbling edges, and a browned top. Cut into it and the layers should still look like layers—even while the sauce stays soft and juicy.

Lasagna isn’t especially difficult; it is sequential. You prepare several things separately before they finally meet in one pan. That is where small decisions start to matter. Reduce the sauce too far and the noodles can stay hard. Start with watery cheese and the first slice may flood the plate. Leave a corner of pasta exposed and it can turn crisp before the center is ready. Cut into the pan five minutes after it leaves the oven and a perfectly good lasagna can look like it failed.

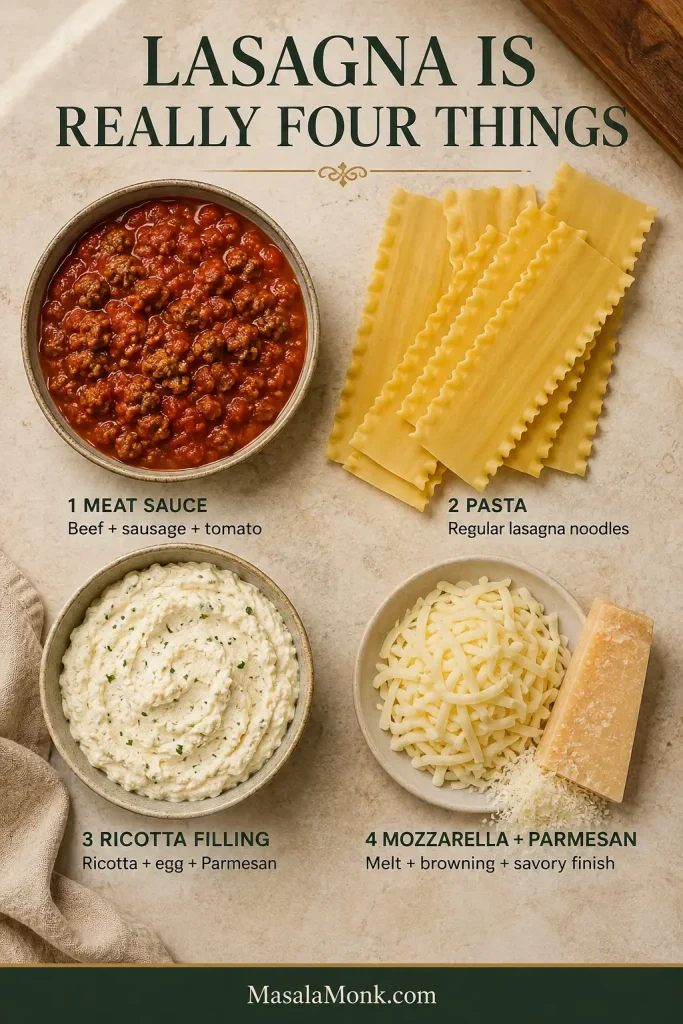
Despite the ingredient list, you are really making only four things: meat sauce, pasta, ricotta filling, and mozzarella with Parmesan. Keep the sauce spoonable, cover every noodle, and give the baked lasagna time to rest. Those three habits take most of the uncertainty out of the dish.

This is the familiar Italian-American pan: beef and Italian sausage in tomato sauce, creamy ricotta, mozzarella and Parmesan.

An overhead arrangement of lasagna noodles, beef and sausage meat sauce, ricotta filling, shredded mozzarella and Parmesan.
Once these four components are ready, most of the remaining work is simply building the layers.

Classic Lasagna at a Glance

Brown beef and Italian sausage, then simmer them with tomatoes until the meat sauce is concentrated but still loose enough for layering. Cook regular lasagna noodles only until very al dente and mix whole-milk ricotta with egg and Parmesan.

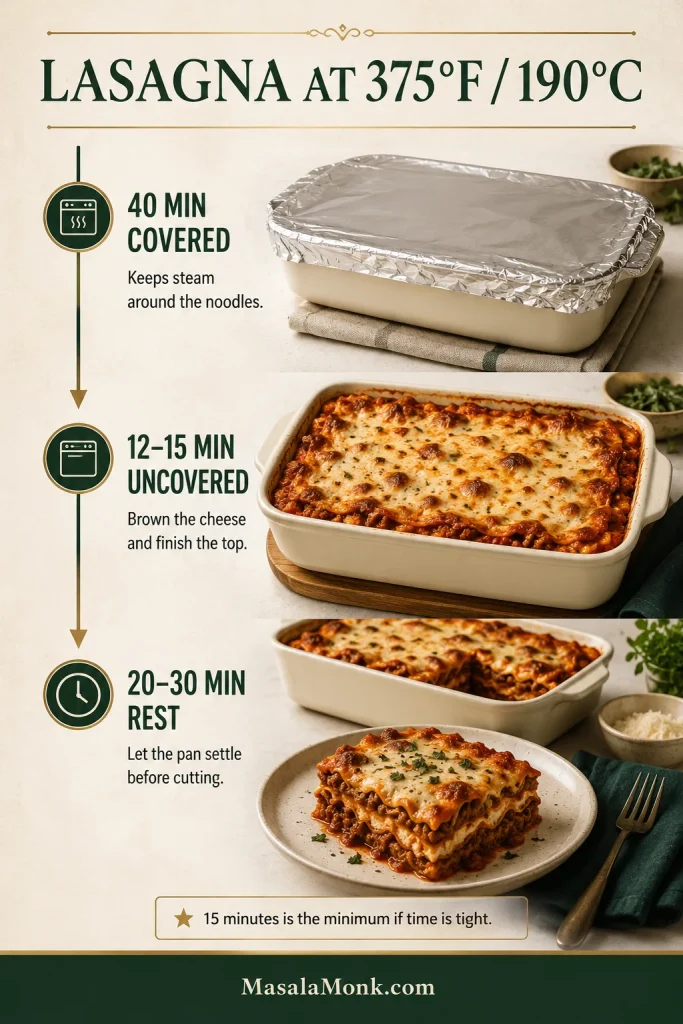
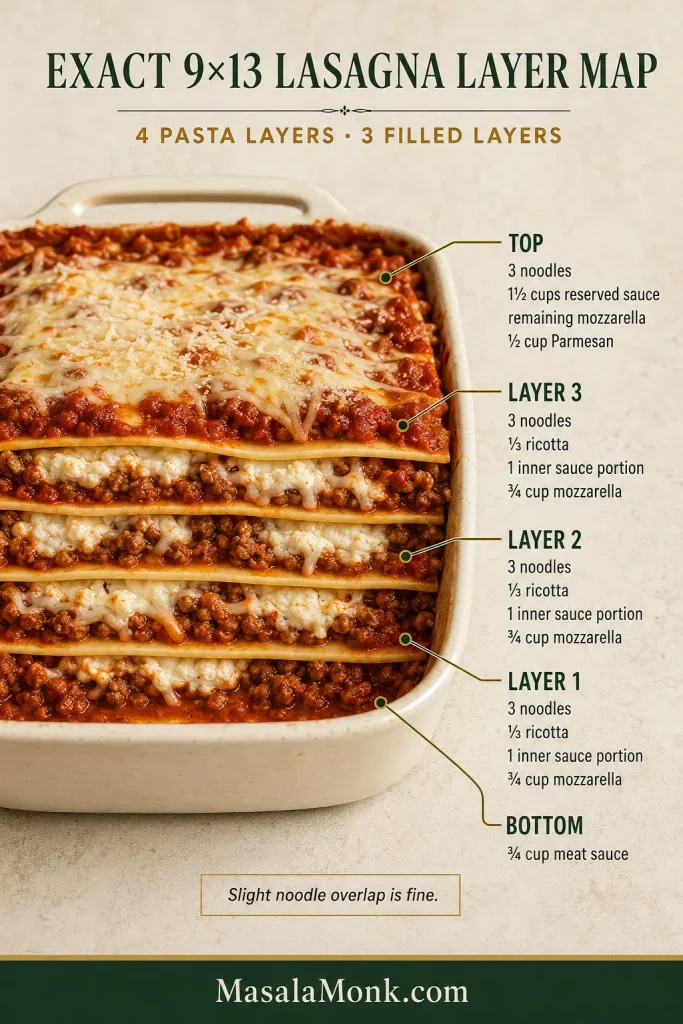
Build the lasagna in a deep 9 × 13-inch / 23 × 33-cm dish with four pasta layers and three filled layers. Keep sauce underneath the first noodles and reserve 1½ cups for complete coverage on top. Bake at 375°F / 190°C for 40 minutes covered and 12–15 minutes uncovered, then rest for 20–30 minutes before cutting.

A lasagna timeline showing a covered bake, an uncovered browning stage and a resting period at 375°F or 190°C.
Covered heat tenderizes the pasta, uncovered heat browns the cheese, and resting lets the hot filling settle before slicing.

Classic Homemade Lasagna Recipe

Serves10 generous or 12 moderate portions
Pan9 × 13 in / 23 × 33 cm, preferably 2½–3 in / 6.5–7.5 cm deep
Hands-on timeAbout 45 minutes
BakeAbout 55 minutes
Rest20–30 minutes
Total timeAbout 2 hours; allow closer to 2¼ hours the first time
Oven375°F / 190°C

Equipment

  • Deep 9 × 13-inch / 23 × 33-cm baking dish
  • Large skillet, sauté pan or Dutch oven
  • Large pot for the noodles
  • Medium mixing bowl
  • Aluminum foil
  • Instant-read food thermometer, helpful for checking the center

Ingredients

Meat sauce

  • 1 pound / 454 g 85–90% lean ground beef
  • 8 ounces / 227 g mild Italian sausage, casings removed if necessary
  • 1 medium yellow onion, finely chopped, about 150 g
  • 4 garlic cloves, minced, about 12 g
  • 2 tablespoons / 32 g tomato paste
  • 1 can, 28 ounces / 794 g crushed tomatoes
  • 1 can, 15 ounces / 425 g tomato sauce
  • ½ cup / 120 ml beef broth or water, plus more if needed
  • 1½ teaspoons Italian seasoning
  • ½ teaspoon fine salt to start, plus more to taste
  • ½ teaspoon freshly ground black pepper
  • ¼ teaspoon red-pepper flakes, optional
  • A small pinch of sugar only if the finished sauce tastes sharply acidic

Ricotta filling

  • 15 ounces / 425 g whole-milk ricotta
  • 1 large egg
  • ½ cup / about 45 g finely grated Parmesan
  • 2 tablespoons finely chopped fresh parsley
  • ¼ teaspoon fine salt
  • Freshly ground black pepper

For assembly

  • 12 standard dried lasagna noodles, plus 1–2 extras in case one tears
  • Salt, for the pasta water
  • 16 ounces / 454 g low-moisture whole-milk mozzarella, freshly grated, about 4 cups
  • ½ cup / about 45 g finely grated Parmesan

Method

Make the Meat Sauce

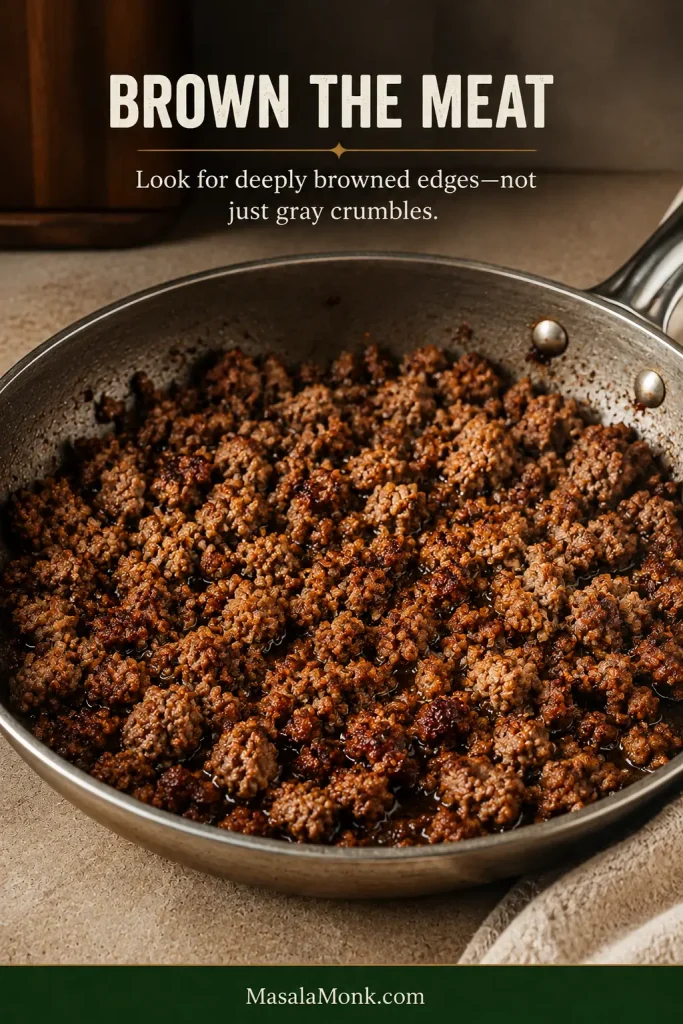
  1. Brown the meat. Heat a large skillet or Dutch oven over medium-high heat. Add the beef and Italian sausage and give the meat time against the hot pan before breaking it into small crumbles. Cook until you have plenty of deeply browned edges. Those browned bits are what make the finished sauce taste cooked rather than merely assembled. Spoon off a substantial pool of rendered fat if one forms; a thin sheen can stay behind.
Ground beef and Italian sausage browning in a skillet with irregular crumbles, caramelized dark edges and browned bits on the pan.
Look for irregular dark-brown edges between the crumbles, not meat that is simply gray throughout.
  1. Build the sauce. Add the onion and cook for 4–5 minutes, until softened. Stir in the garlic for about 30 seconds, then add the tomato paste and cook for another minute. Pour in the crushed tomatoes, tomato sauce and broth. Add the Italian seasoning, ½ teaspoon salt, black pepper and optional red-pepper flakes.
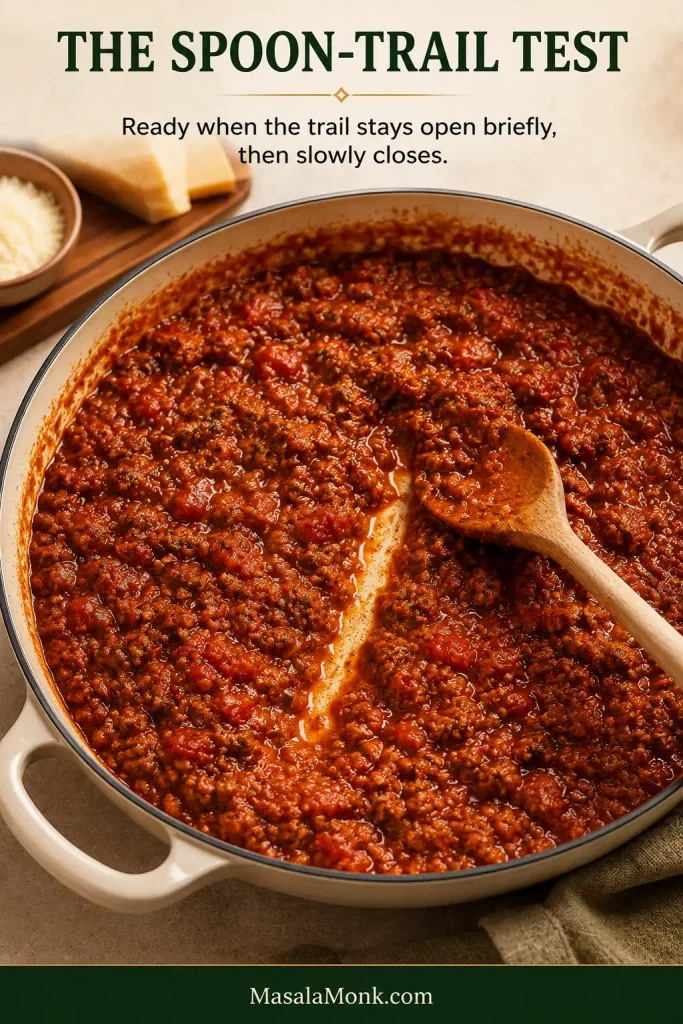
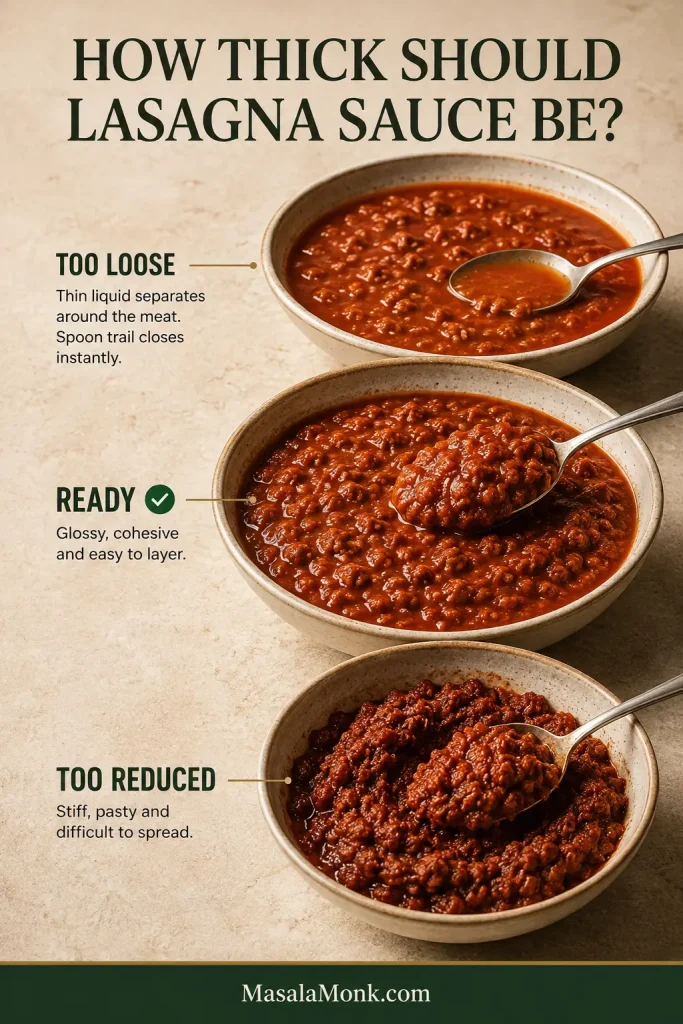
  2. Finish and season the sauce. Simmer uncovered for about 20–25 minutes in a wide pan; a deeper pot may take longer. While it cooks, preheat the oven to 375°F / 190°C. Drag a spoon through the sauce. The trail remains for a moment, then slowly closes. The meat looks coated and glossy, with no moat of thin tomato liquid around it. You’ll usually end up with 6½–7 cups / 1.5–1.65 liters. Don’t chase the number if the sauce has already reached the right consistency. Taste it now. It should be fully seasoned but not salty; add more salt if needed and a tiny pinch of sugar only if the tomatoes still taste sharply acidic.
A spoon dragged through thick beef and sausage tomato sauce, leaving a visible trail that is slowly beginning to close.
The sauce is ready when a spoon trail holds briefly, then slowly closes without a watery moat.

Prepare the Noodles and Ricotta

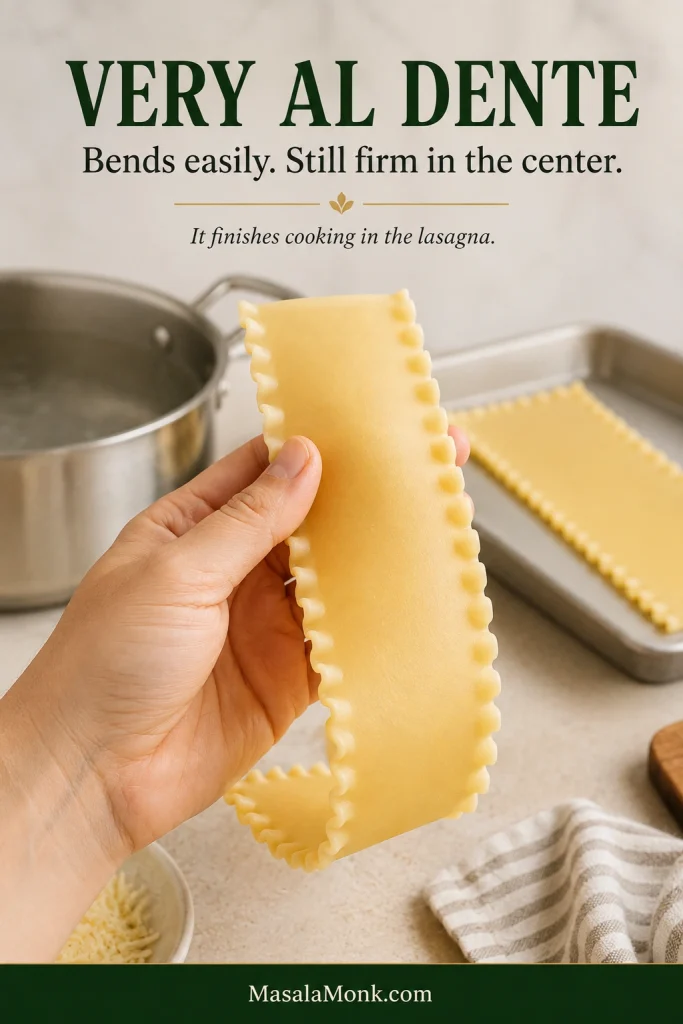
  1. Cook the noodles until very al dente. Bring a large pot of well-salted water to a boil. Add the noodles gradually instead of dropping in the whole stack. Gently separate them with tongs during the first minute and once or twice as they cook. Begin checking about 2 minutes before the package’s suggested cooking time. Drain when the sheets bend easily but retain a firm center. They’ll feel firmer than pasta you would serve immediately. That’s intentional—they finish cooking in the lasagna. Lay them separately on clean kitchen towels or a large tray.
A cooked ruffled lasagna noodle held with tongs, flexible enough to bend but still firm enough to maintain its shape.
The noodle should bend easily but still feel firmer than pasta you would serve immediately.
  1. Mix the ricotta filling. Stir together the ricotta, egg, ½ cup Parmesan, parsley, salt and black pepper. The mixture should be thick, creamy and scoopable, mounding softly on the spoon instead of spreading into a puddle. Drain visible whey around the ricotta first; a thick tub needs no special treatment.

Assemble the Lasagna

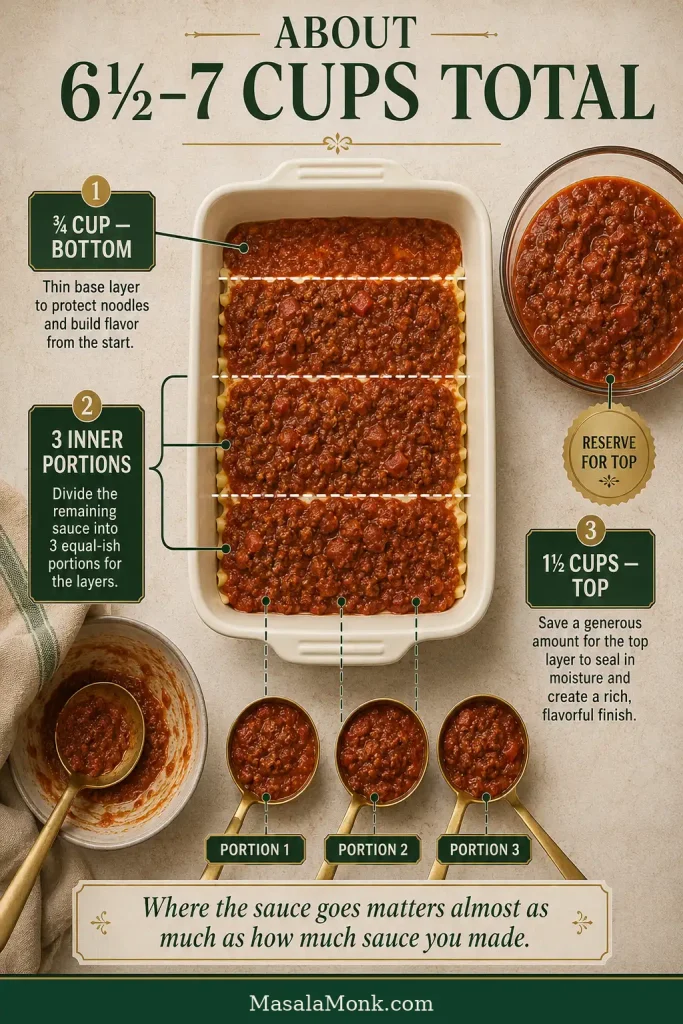
  1. Divide the sauce and mozzarella. Reserve 1½ cups meat sauce for the top and spread ¾ cup across the bottom of the baking dish. The bottom only needs a thin layer; its job is to keep the first noodles from sitting against the bare dish. Divide the remaining sauce into three roughly equal portions—you can eyeball this. Set aside about 1¾ cups mozzarella for the top; use ¾ cup in each filled layer.
An overhead lasagna pan showing noodles topped in sequence with ricotta, beef and sausage meat sauce, and shredded mozzarella.
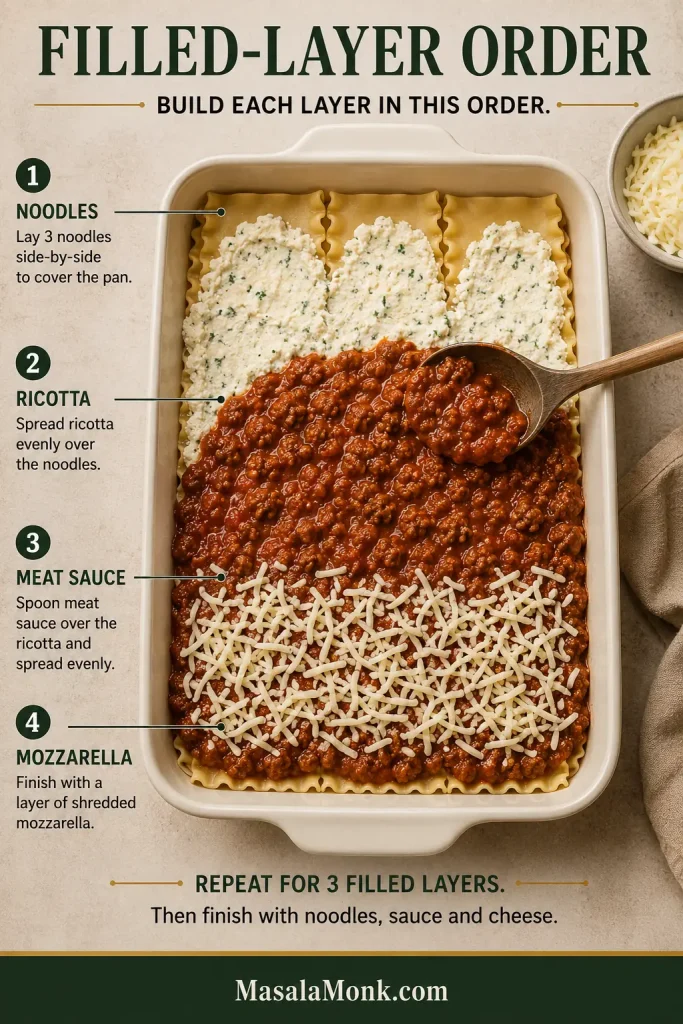
Use the same order every time: noodles, ricotta, meat sauce, then mozzarella.
  1. Build the first filled layer. Add 3 noodles, or enough pasta to cover the pan. Slight overlap is fine, and a noodle can be trimmed or broken to fill a small gap. Dollop one-third of the ricotta mixture across the pasta and gently spread the spoonfuls together. Add one portion of meat sauce, followed by ¾ cup mozzarella.
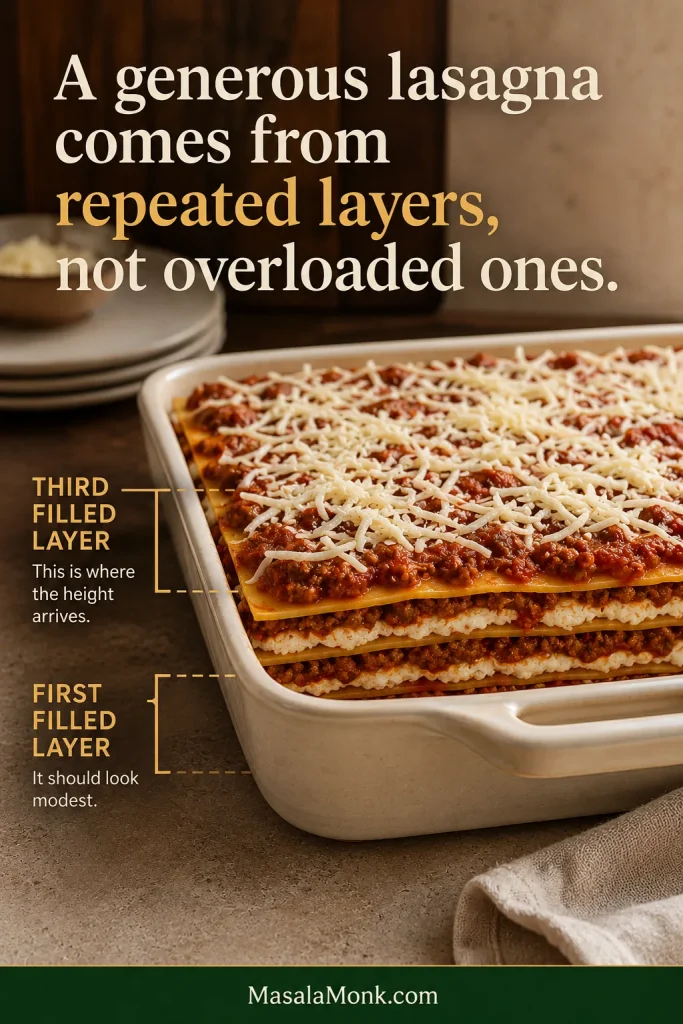
  1. Repeat twice. Make two more layers in the same order, using another third of the ricotta, one sauce portion and ¾ cup mozzarella each time. Keep the fillings thin and fairly even. A generous lasagna comes from repeated layers, not overloaded ones. The first round can look surprisingly modest. By the third, the pan finally starts looking as generous as the finished slice will be.
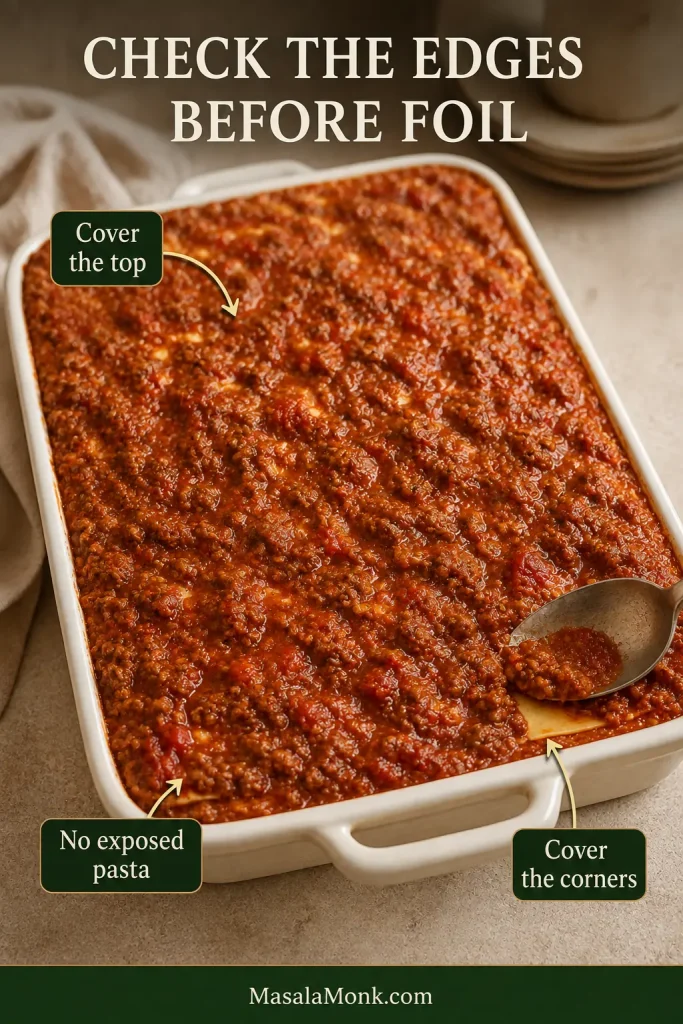
  2. Finish the top. Add the fourth pasta layer and spread the reserved 1½ cups sauce from edge to edge. Cover every visible piece of pasta, especially the corners. Finish with the reserved mozzarella and ½ cup Parmesan. A dish filled close to the rim belongs on a rimmed sheet pan before baking.
A spoon covering a small exposed pasta corner with meat sauce before an assembled lasagna is covered for baking.
Cover exposed pasta now, especially at the corners; those small dry patches are the first places to turn chewy.

Bake, Brown and Rest

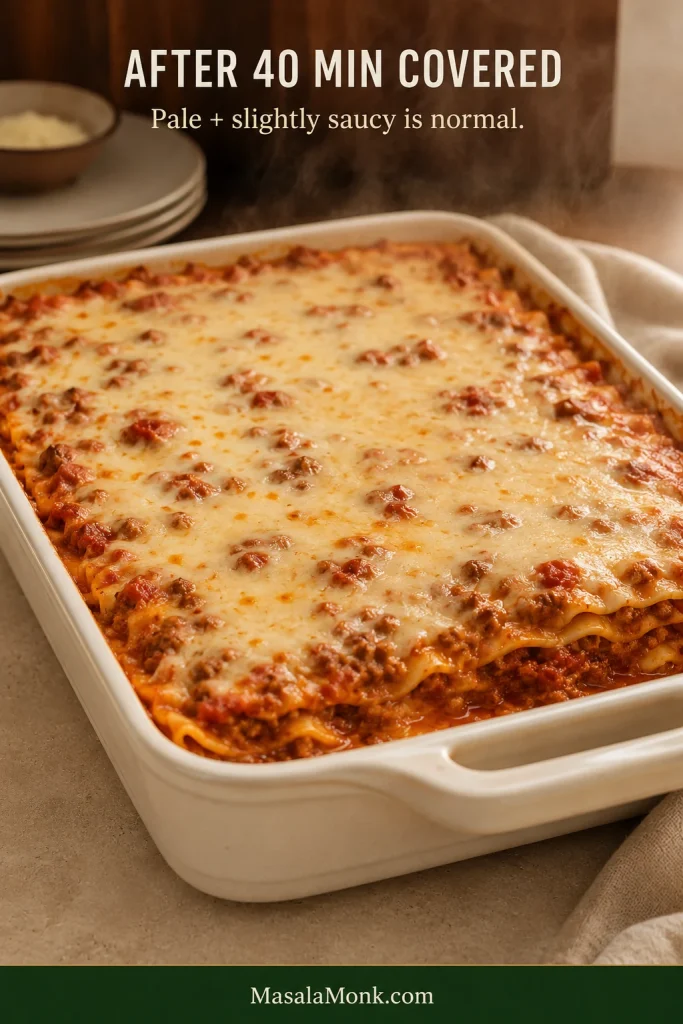
  1. Bake covered. Lightly grease the underside of a sheet of foil, cover the dish and bake for 40 minutes. When the foil comes off, the lasagna may still look pale and slightly saucy. That’s fine. The uncovered stretch is when the top changes fastest: the cheese melts together, the edges bubble harder and the first browned spots begin to appear.
A lasagna immediately after its covered bake, with pale melted cheese, glossy sauce and bubbling edges before the final uncovered browning stage.
Pale cheese after the covered bake is normal. The uncovered stage is where the surface catches up.
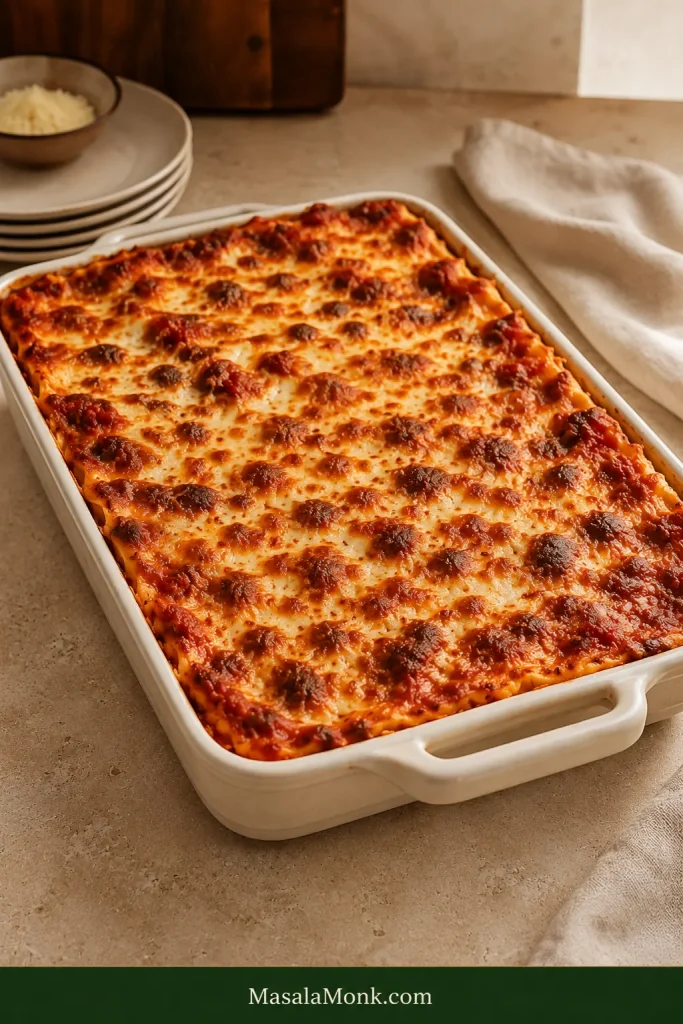
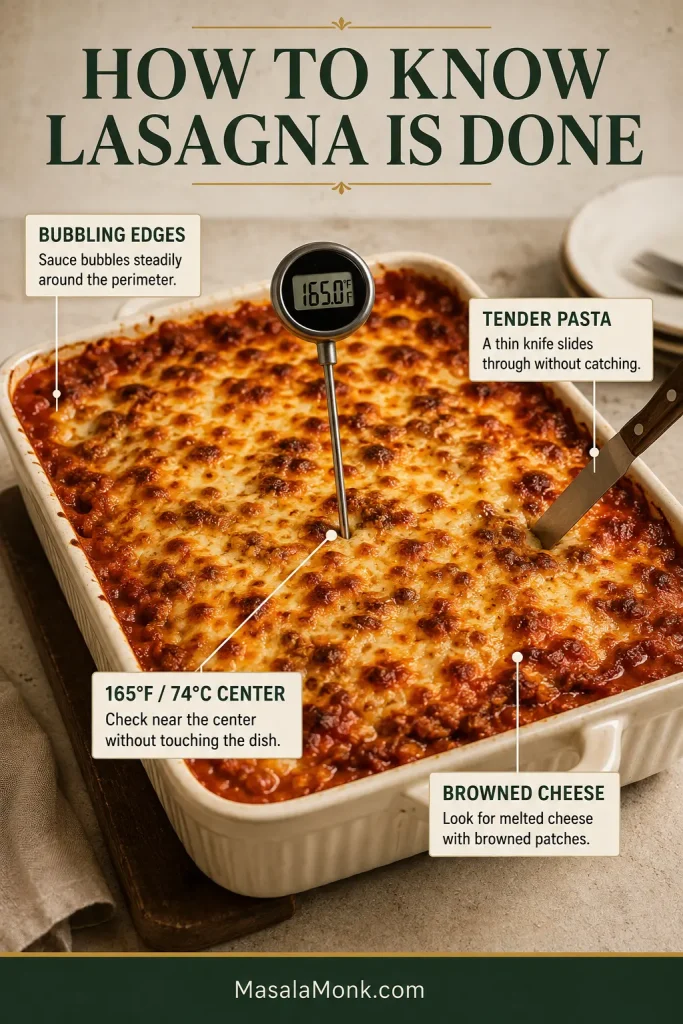
  1. Brown and finish cooking. Bake uncovered for another 12–15 minutes. Look for steady bubbling around the edges and browned patches across the cheese. A thin knife should pass through the pasta without catching. Check the temperature near the center of the pan without touching the baking dish; it should reach 165°F / 74°C. If the top browns before the pasta is tender, cover the pan again. The cheese has browned enough; the noodles need more time under foil.
A fully baked lasagna in a deep ivory baking dish with bubbling meat sauce at the edges and irregular golden-brown patches across the melted cheese.
Irregular golden and mahogany patches are enough; the whole surface does not need to brown evenly.
  1. Rest and serve. Leave the lasagna for 20–30 minutes before cutting; 15 minutes is the minimum. Use a sharp knife and a wide spatula. The first corner is usually the least cooperative because there is nowhere for it to move. Give it some room and the next slices generally come out more easily.

What the Finished Lasagna Should Look Like

Those details all solve the same problem: moisture balance. A neat slice is not a dry slice. The noodles need enough sauce to become tender, the cheese needs enough body to stay between the pasta layers, and the finished pan needs time to settle.

A good hot slice still relaxes on the plate. The layers remain recognizable; they do not need to stand rigidly to count as a success.

A plated lasagna slice with distinct tender layers, creamy ricotta and glossy meat sauce gently relaxing around its base.
A successful slice keeps recognizable layers while the sauce and ricotta stay soft, glossy and moist.

Meat Sauce for Lasagna: How Thick Should It Be?

The meat sauce should be thick enough to cling to the beef and sausage but still spoonable enough to settle easily over the noodles. The pasta will absorb some moisture in the oven, so taking the sauce all the way to a stiff, pasty consistency works against you.

Three meat sauces compared side by side: thin and watery, glossy and spoonable, and very thick and over-reduced.
Aim for glossy and spoonable: loose enough to hydrate pasta, thick enough to stay between the layers.

Why Beef and Italian Sausage Work Together

Ground beef gives the sauce body; Italian sausage adds fennel, seasoning and extra richness without taking over. The 2:1 ratio keeps beef as the main flavor.

Prefer all beef? Use about 1½ pounds / 680 g ground beef. Add another ½ teaspoon Italian seasoning and, if you enjoy it, a small pinch of lightly crushed fennel seed.

Remove only the excess fat. Fat release varies with the meat. Spoon away a clear pool after browning, but leave the thin sheen behind.

The Meat Sauce Is Ready When…

  • Too loose: the spoon trail disappears immediately and thin tomato liquid separates around the meat.
  • Ready: glossy, cohesive and loose enough to settle into an even layer.
  • Too far reduced: the sauce piles up and drags instead of settling easily across the pasta.

For this 9 × 13-inch lasagna with four pasta layers, you want about 6½–7 cups of meat sauce. Texture still gets the final say. By this stage the sharp tomato aroma has mellowed into something deeper and more savory.

An overhead sauce-allocation guide for a deep 9-by-13-inch lasagna showing sauce divided between the bottom, inner layers and top.
Protect the bottom and top pasta first; poor sauce distribution can leave dry noodles even when the total quantity is right.

Taste it now; once the sauce is between pasta and mild cheeses, flat seasoning is much harder to correct.

Starting with ripe garden tomatoes? Use a properly reduced fresh tomato sauce as the base instead of replacing the canned tomatoes cup for cup. Fresh tomatoes can bring considerably more water with them.

Shortcut: Use Jarred Marinara

Brown the meat and cook the onion, garlic and tomato paste as written. Skip the crushed tomatoes, tomato sauce and initial ½ cup broth, then add about 36 ounces / 1.02 kg prepared marinara. Add broth only if a particularly thick brand needs loosening, and keep a little extra marinara nearby if the meat mixture needs more sauce. You’re looking for enough sauce to coat the meat generously and settle easily into the layers.

If you would rather make the tomato base yourself, our homemade marinara sauce gives you a straightforward starting point.

Cheese for Lasagna: Ricotta, Mozzarella and Parmesan

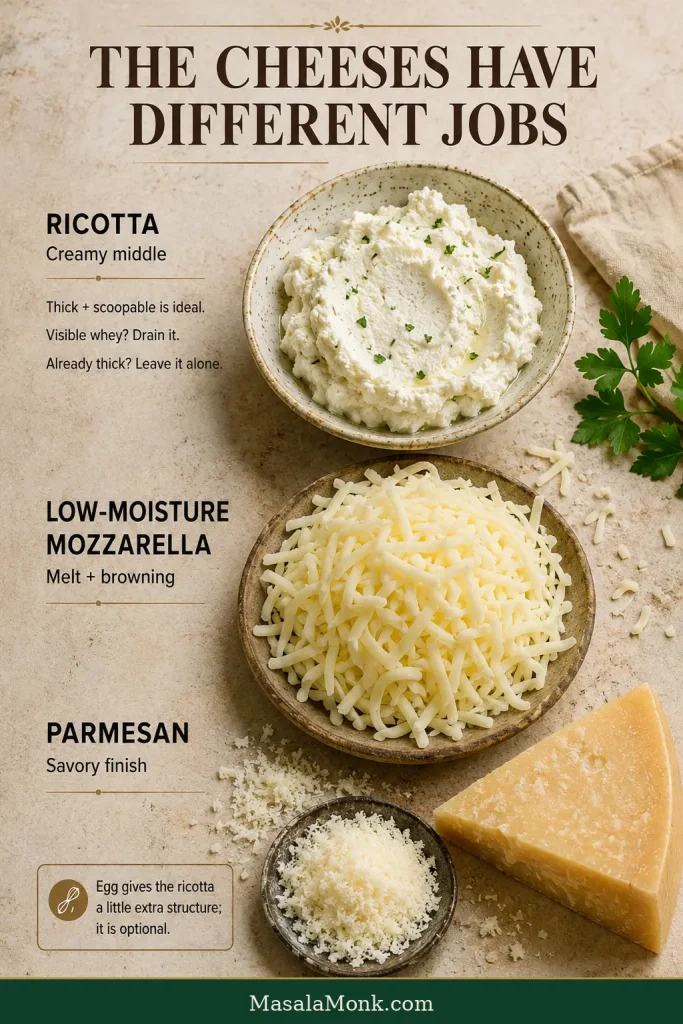
The cheeses have different jobs here: ricotta keeps the middle creamy, mozzarella gives you melt and browning, and Parmesan brings a sharper savory finish.

Ricotta filling, shredded low-moisture mozzarella and grated Parmesan displayed separately as the three cheeses used in the lasagna.
Ricotta brings creaminess, mozzarella brings melt, and Parmesan brings sharper savory depth; excess dairy moisture is the main thing to control.

Ricotta. Whole-milk ricotta makes the creamy middle layer. Thick and scoopable is what you want. Drain visible whey around the cheese; otherwise, leave it alone.

Do you need the egg? The egg does not turn the filling firm. It simply gives the ricotta enough structure to stay between the noodles when a slice is lifted. Leave it out if necessary and the lasagna will still work; the cheese layer will be softer.

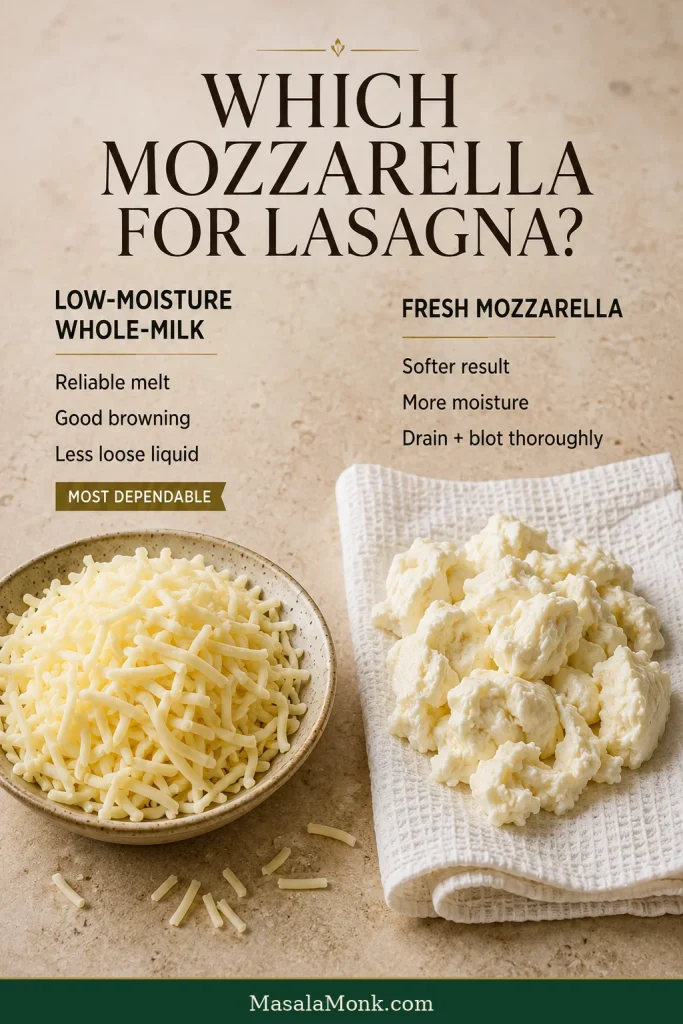
Mozzarella. Low-moisture whole-milk mozzarella melts smoothly and browns well without adding much loose liquid to the pan. Fresh mozzarella can work too; drain and blot it thoroughly first and expect a softer slice.

Shredded low-moisture mozzarella beside fresh mozzarella being drained on a towel to compare their moisture levels.
Fresh mozzarella can work, but blotting away surface moisture makes the finished pan more predictable.

Parmesan. A smaller amount goes a long way here, adding salty, savory depth to the ricotta and a flavorful crust across the top. Our guide to Parmesan and Parmigiano Reggiano explains the differences if you are choosing between wedges.

Can I Use Cottage Cheese Instead of Ricotta?

Yes. Substitute it by weight and drain visible liquid around the curds first. Cottage cheese gives the filling a looser, more visibly curded texture; ricotta makes it smoother and richer.

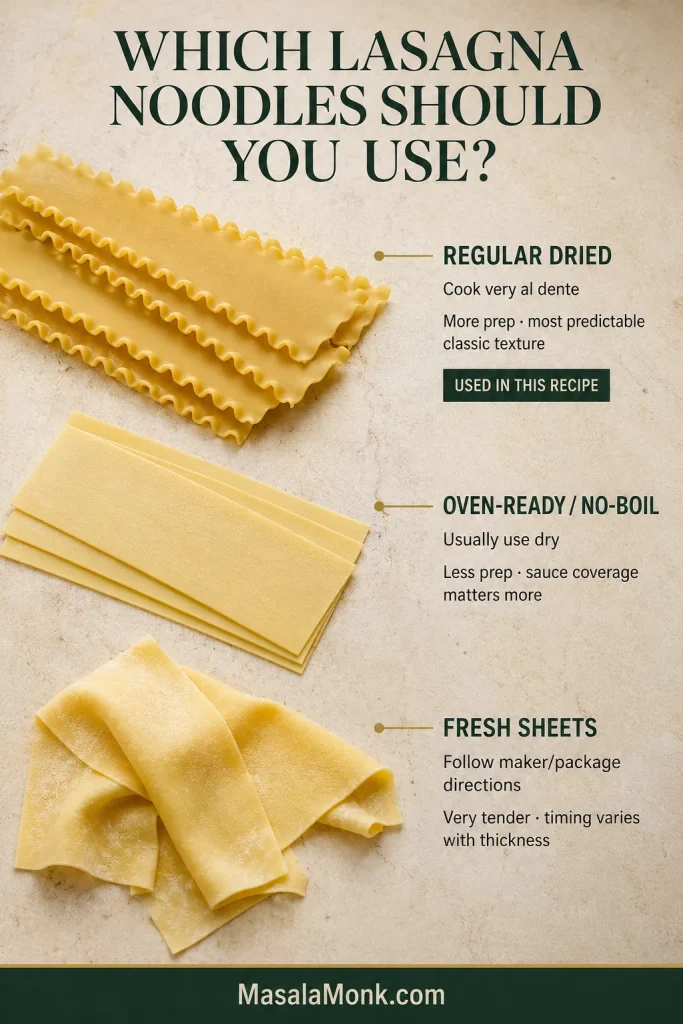
Which Lasagna Noodles Should You Use?

Regular ruffled dried lasagna noodles, flat oven-ready sheets and folded fresh pasta displayed side by side.
Regular, oven-ready and fresh sheets can all work. The main difference is how each gets its moisture and how gently it needs to be handled.

This recipe uses regular dried noodles cooked very al dente, but oven-ready and fresh sheets can work too.

PastaWhat to DoMain Trade-Off
Regular dried noodlesCook until very al denteMore prep, but the most predictable classic texture
Oven-ready / no-boilUsually use dry; follow package guidanceLess prep, but sauce coverage matters more
Fresh lasagna sheetsOften need no pre-cooking; follow package or pasta-maker directionsVery tender, but timing varies more with thickness

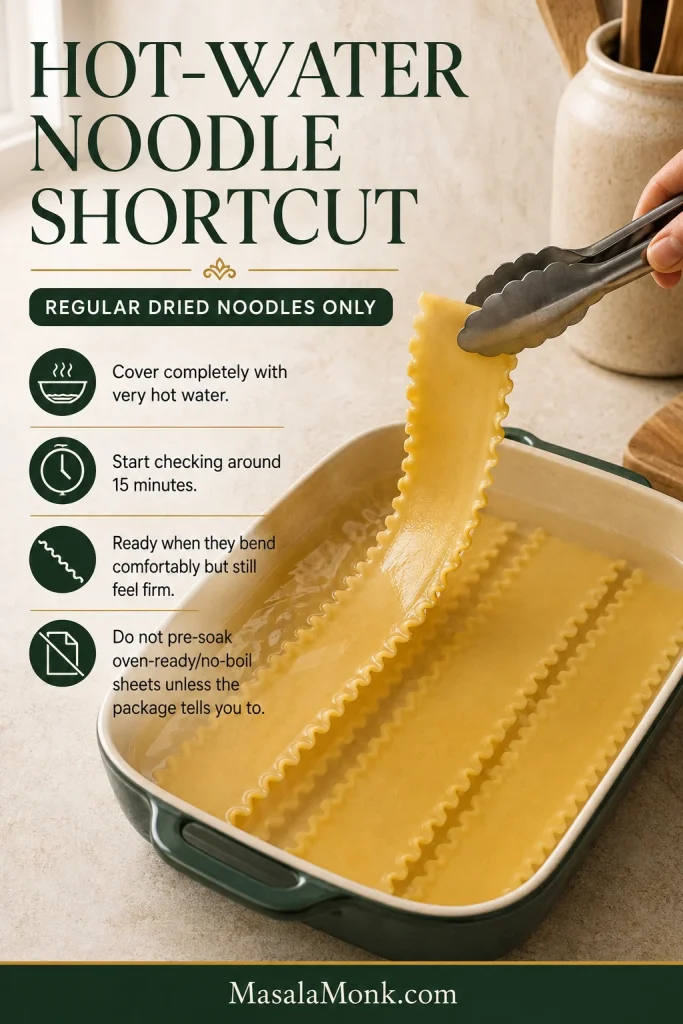
Hot-Water Shortcut for Regular Dried Noodles

This shortcut is for regular dried lasagna noodles, not oven-ready/no-boil sheets. Place the noodles in a large heatproof dish and cover them completely with very hot water. Begin checking around 15 minutes. Drain when they bend comfortably but still feel distinctly firm; thickness varies by brand.

Regular dried lasagna noodles soaking in hot water while one softened but still firm ruffled sheet is lifted with tongs.
Separate the sheets early and drain them well; flexible is the goal, not fully cooked.

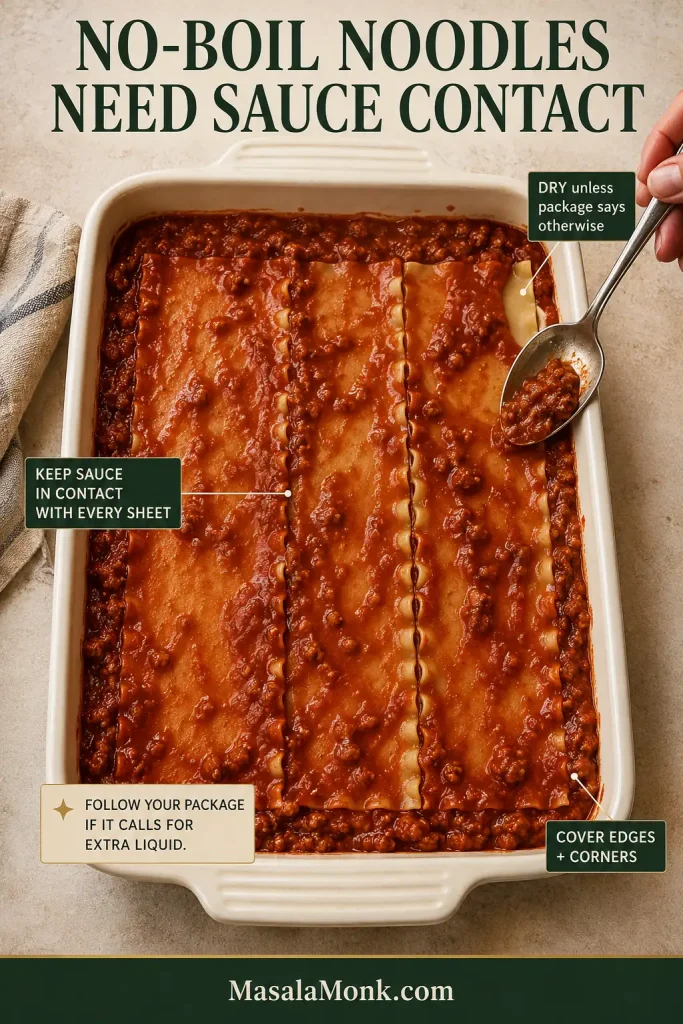
Using Oven-Ready or No-Boil Noodles

Oven-ready noodles soften entirely inside the casserole, so complete contact with sauce becomes especially important.

Oven-ready lasagna sheets in a baking dish with meat sauce spread beneath, across and around the pasta edges.
No-boil sheets need complete contact with sauce that still spreads easily into corners and seams.
  • Use them dry unless the package says otherwise.
  • Do not over-reduce the meat sauce.

  • Cover the edges and corners completely.
  • Follow any additional-liquid directions on your specific package.

Brands vary in thickness and formulation. Barilla’s oven-ready lasagna guidance, for example, likewise emphasizes keeping the sheets in contact with enough sauce while they bake.

How to Layer Lasagna Without Guessing

Four pasta layers. Three filled layers. Sauce underneath and sauce on top. That is the whole structure.

A cutaway lasagna diagram showing four pasta layers separated by three ricotta and meat sauce layers, with sauce beneath and sauce and cheese on top.
Four pasta layers and three restrained filled layers distribute sauce, ricotta and cheese more evenly from top to bottom.

For each filled layer: noodles → ricotta → meat sauce → mozzarella. Repeat that three times, then finish with noodles, sauce and cheese.

A generous lasagna comes from repeated layers, not overloaded ones. Keeping each filling layer fairly thin makes the pan easier to build, easier to cut and less likely to slide when you serve it.

A deep lasagna pan during assembly showing a relatively modest first filled layer and the taller structure reached after three filled layers.
The first filled layer can look modest; repeating thin layers is what creates height without forcing filling out the sides.

Layer Quantities for a 9 × 13-Inch Pan

LevelWhat Goes Into the Pan
Bottom¾ cup meat sauce
Layer 13 noodles* + ⅓ ricotta + 1 of 3 inner sauce portions + ¾ cup mozzarella
Layer 23 noodles* + ⅓ ricotta + 1 of 3 inner sauce portions + ¾ cup mozzarella
Layer 33 noodles* + ⅓ ricotta + 1 of 3 inner sauce portions + ¾ cup mozzarella
Top3 noodles* + reserved 1½ cups sauce + reserved mozzarella + ½ cup Parmesan
*Use three standard noodles or enough pasta to cover the pan. Slight overlap is fine.

Before the foil goes on, check the edges. Take ten seconds and look around the perimeter. Tuck sauce over any exposed pasta, especially at the top and corners. Small gaps can be filled by trimming, breaking or slightly overlapping a noodle.

How Long to Bake Lasagna at 375°F / 190°C

Bake a freshly assembled lasagna for 40 minutes covered, then 12–15 minutes uncovered.

The covered stage keeps steam around the noodles while they finish becoming tender. Uncovering near the end lets the mozzarella melt and develop browned patches across the surface.

How to Know Lasagna Is Done

A browned lasagna with an instant-read thermometer inserted near the center and a knife checking the pasta, with bubbling edges visible around the pan.
Use both checks: 165°F / 74°C for the center, and a thin knife for actual noodle tenderness.
  • Sauce bubbles steadily around the edges.
  • A thin knife slides through the pasta without meeting a tough layer.
  • The center reaches 165°F / 74°C.
  • The top is melted and browned in patches.

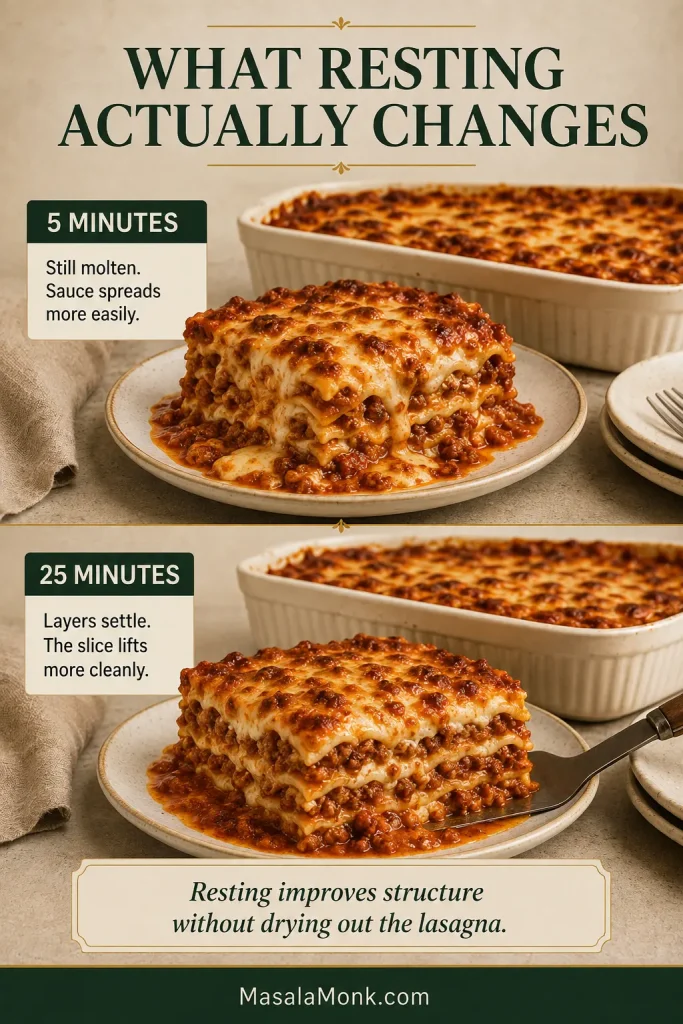
How Long Should Lasagna Rest Before Cutting?

Rest lasagna for 20–30 minutes before cutting; give it at least 15 minutes if time is tight.

Straight from the oven, the sauce is bubbling and the cheese is molten. As it rests, the sauce and cheese settle around the pasta and the slices become much easier to lift.

Two lasagna slices comparing five minutes and 25 minutes of resting, with the early slice looser and the later slice more settled but still juicy.
At five minutes the filling moves readily; by 25 minutes it settles enough for cleaner, still-juicy slices.

Lasagna Troubleshooting

Looking for a specific fix? Watery lasagna · Hard noodles · Lasagna that falls apart

Start With What You See

What You SeeLikely Cause + What Helps
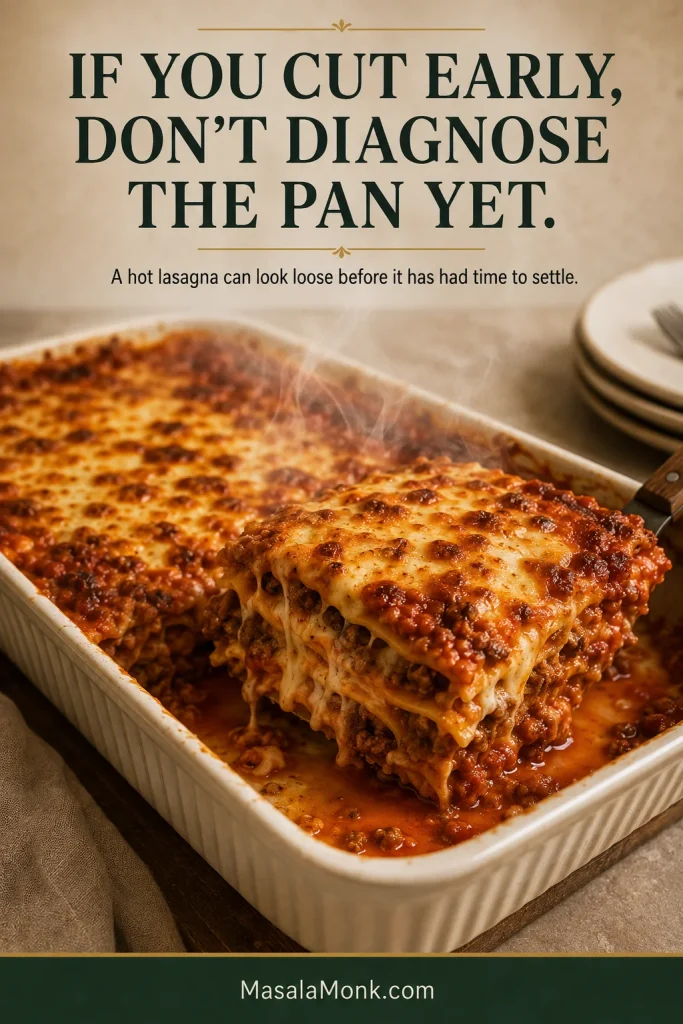
Watery as soon as it is cut It may simply be too hot. Give it time to settle before deciding anything went wrong.
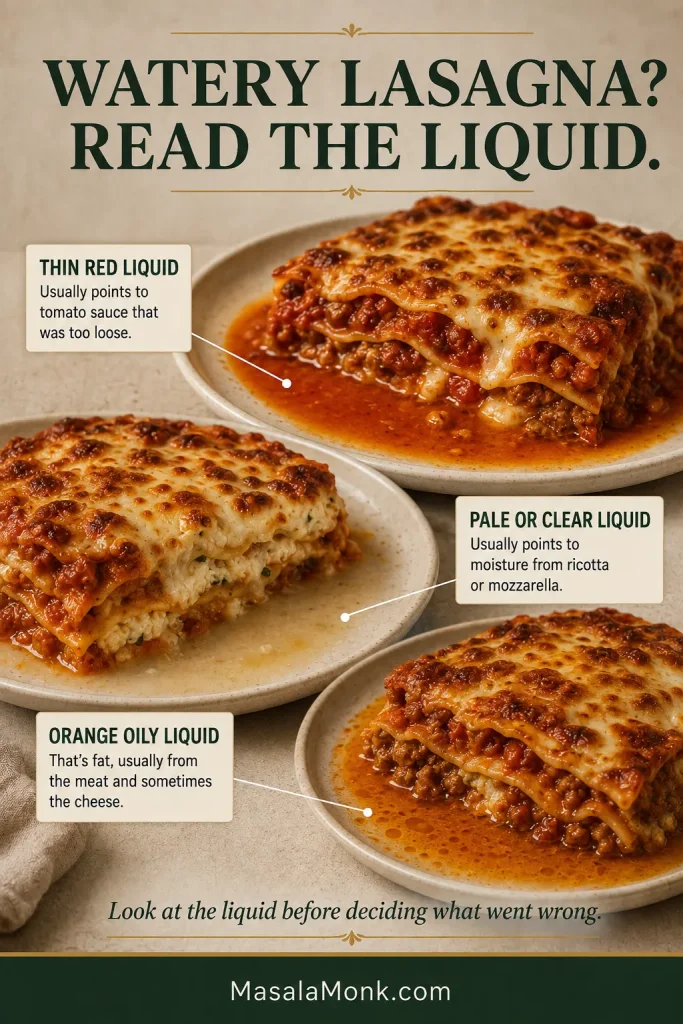
Still watery after resting The sauce or cheese carried too much loose liquid. Thin red liquid points toward sauce; pale or clear liquid points toward cheese.
Slice collapses It may still be too hot, too wet or overfilled. Rest longer now; next time keep the filling layers thin and even.
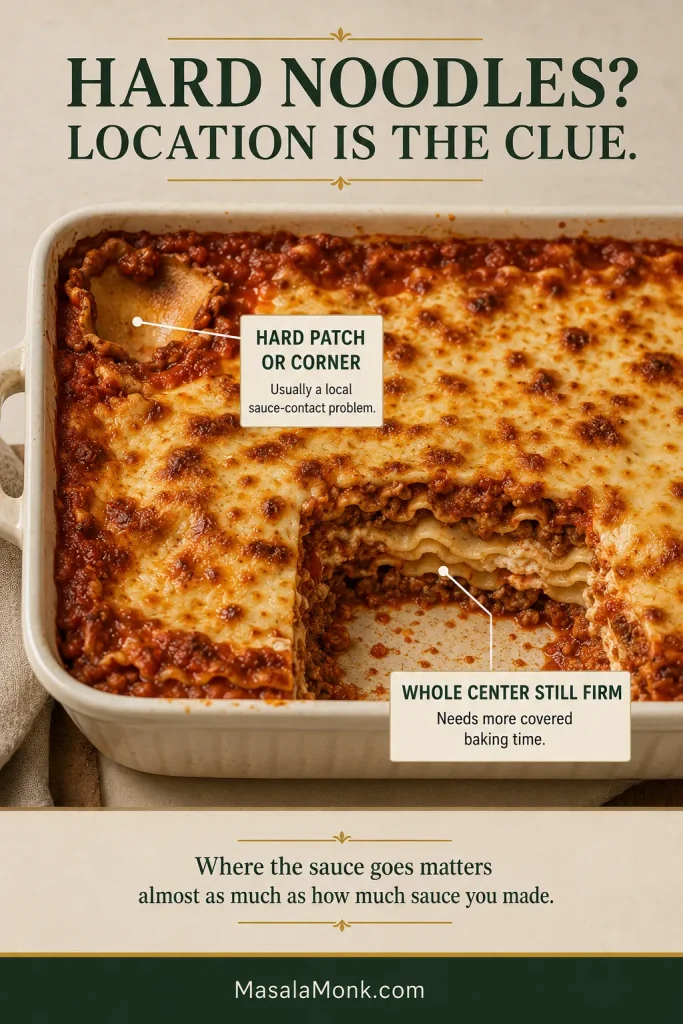
Hard patches or corners Those areas did not have enough sauce contact. If the pan is still hot, cover it and continue baking; next time check the edges carefully before baking.
Hard bottom The bottom noodles likely did not have enough sauce underneath. Start with a full thin layer of sauce next time.
Hard or crispy top Part of the final pasta layer was exposed. Cover the top completely with sauce before baking.
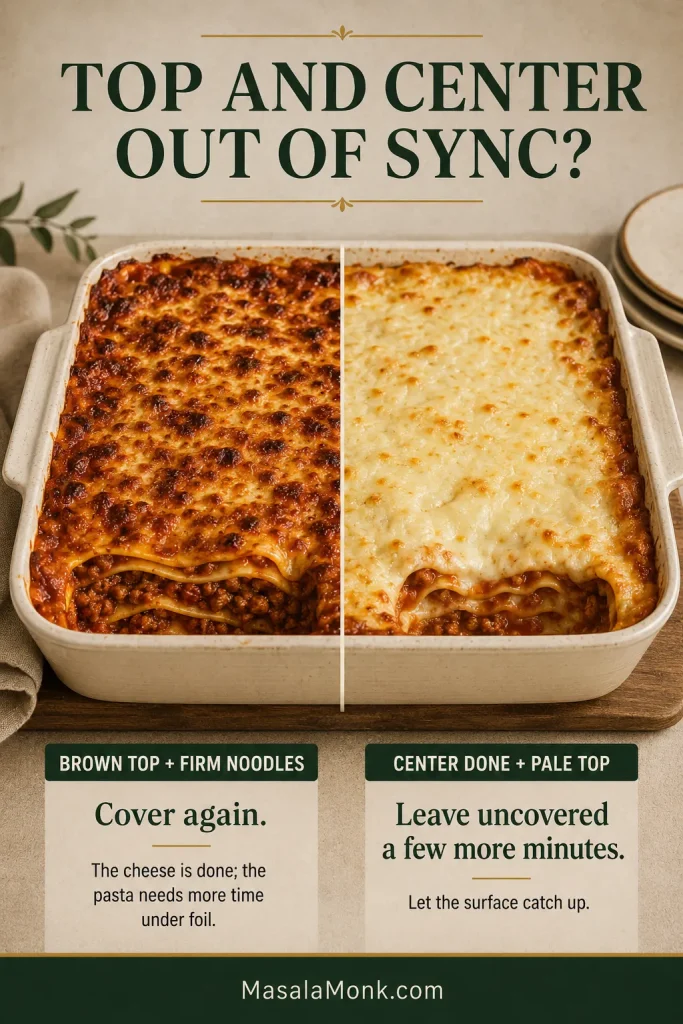
Brown top, firm center The surface finished before the middle. Cover the dish again and give the noodles more time under foil.
Lasagna tastes dry The sauce was over-reduced or the uncovered bake ran too long. Stop reducing once the sauce is cohesive and keep the final uncovered bake brief.
Loose cheese layer The cheese carried too much moisture. Drain visibly wet ricotta or cottage cheese and blot fresh mozzarella thoroughly.
Greasy orange pools Fat can come from both the meat and cheese. Spoon away a large pool of rendered meat fat after browning instead of sending all of it into the sauce.
Lasagna tastes bland The sauce or pasta likely went in underseasoned. Season the sauce before layering and salt the pasta water. Already baked? Serve with warm, well-seasoned marinara and extra Parmesan.

Brown Top or Pale Top?

Brown top but firm noodles? Cover the pan again. The cheese has browned enough; the noodles need more time under foil.

Center done but top still pale? Leave the lasagna uncovered for a few more minutes and let the surface catch up.

Two lasagna conditions compared: one with a deeply browned top but firm interior pasta and another with a pale top over a tender cooked center.
If surface and center finish at different speeds, protect what is done and keep cooking only what still needs time.

Why Is My Lasagna Watery?

If you cut early, don’t diagnose the pan yet.

A steaming first slice lifted from hot lasagna, with molten cheese and red sauce relaxing outward around the freshly cut corner.
The first slice can look loose simply because the filling is still molten. Rest before diagnosing the pan.

If it still looks watery after resting, look at the liquid itself. Thin red liquid points toward under-reduced tomato sauce. Pale or clear liquid around the cheese suggests wet ricotta or mozzarella. Orange oily pools are fat.

Three lasagna portions with different pooled liquids: thin red tomato liquid, pale dairy moisture and orange oily rendered fat.
Read the puddle: red suggests sauce, pale or clear suggests dairy, and orange sheen points toward rendered fat.

Vegetables change the balance too. Spinach, mushrooms, zucchini and eggplant all release moisture as they cook. For an eggplant-based casserole where that moisture is handled before assembly, see our baked eggplant Parmesan.

Why Are Parts of My Lasagna Noodles Still Hard?

A pan can have liquid pooled in one place while a corner of pasta stays stubbornly firm. Check the bottom, top and edges first. Where the sauce goes matters almost as much as how much sauce you made.

A lasagna showing one dry curled corner and a separate opened center where the interior pasta layers can be checked for firmness.
One hard corner is a local moisture problem, not automatically a reason to keep baking the entire pan.

Why Does My Lasagna Fall Apart?

If you’ve already given it enough time to rest, look next at excess moisture, overly thick filling layers, noodles that were too soft before assembly, or unusually wet cheese. A clean slice comes from the balance of the whole pan rather than one magic binder.

Make Ahead, Freeze, Store and Reheat Lasagna

Jump to: Bake refrigerated · Freeze · Fridge storage · Reheat

Split the Work Over Two Days

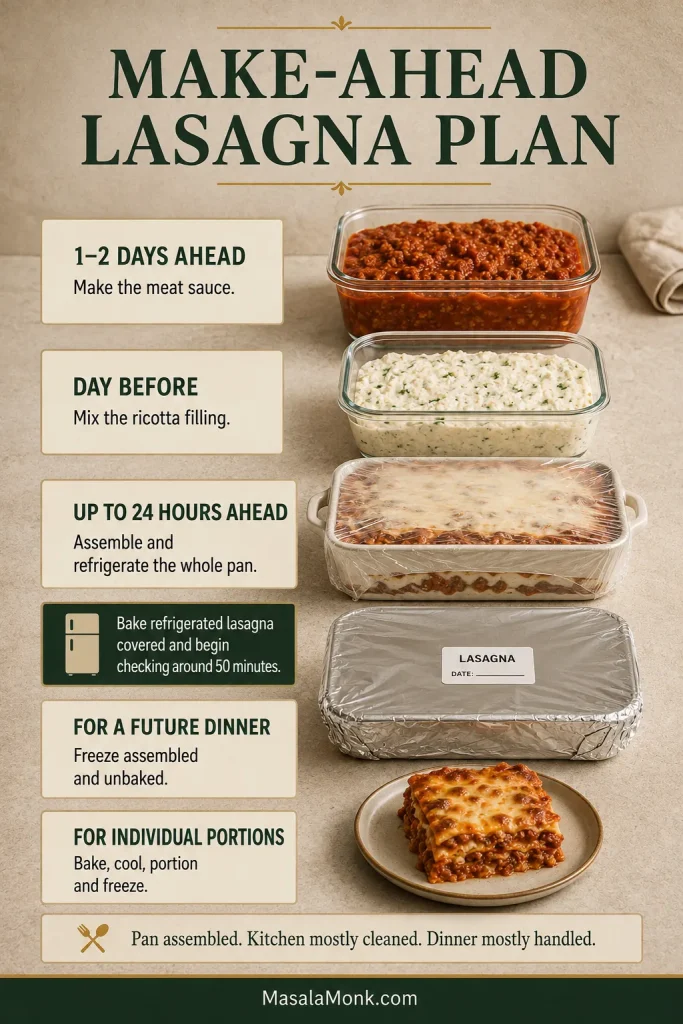
You do not have to make every component in one session. The meat sauce can be cooked 1–2 days ahead, cooled and refrigerated. The ricotta filling can be mixed the day before and kept covered in the refrigerator.

On dinner day, cook the noodles and assemble the pan—or assemble the entire lasagna up to 24 hours ahead and refrigerate it until baking. For an assembled make-ahead lasagna, keep the regular noodles very al dente because they will continue absorbing moisture in the refrigerator.

For company, this is the kind of make-ahead that actually helps: the sauce is finished, the pan can be assembled, the kitchen is mostly cleaned, and the main job left before dinner is getting the lasagna into the oven.

A make-ahead lasagna planning scene with prepared meat sauce, ricotta filling, a covered assembled pan, a wrapped freezer pan and an individual baked portion.
Freeze a whole assembled pan for a future dinner, or baked portions when you want easy individual servings.

Bake a Refrigerated Lasagna

Bake a refrigerator-cold lasagna covered at 375°F / 190°C and begin checking around 50 minutes; a very cold or especially deep pan may take longer. Once the center is hot and the noodles are nearly tender, uncover and bake for another 12–15 minutes, until the top is browned and the center reaches 165°F / 74°C.

For a glass baking dish, follow the manufacturer’s guidance about moving a refrigerator-cold dish into a hot oven because thermal-shock limits vary.

Freeze Before or After Baking?

Freeze an assembled pan when you want a complete future dinner. Freeze baked individual portions when you would rather reheat one or two servings at a time.

For an unbaked lasagna, cool the cooked components before assembly, use a freezer-safe pan, wrap well and freeze. Thaw the pan completely in the refrigerator. A full 9 × 13-inch lasagna may need about 24 hours or longer depending on its depth and freezer temperature. Once thawed, use the refrigerated-lasagna directions above.

Baked portions can be wrapped individually after cooling. For the best texture and flavor, use frozen lasagna within about 2–3 months.

How Long Does Lasagna Last in the Fridge?

Refrigerate leftovers within 2 hours—or within 1 hour when the surrounding temperature is above 90°F / 32°C. Keep covered leftovers in the refrigerator for 3–4 days. These limits follow USDA leftover food-safety guidance.

How to Reheat Lasagna Without Drying It Out

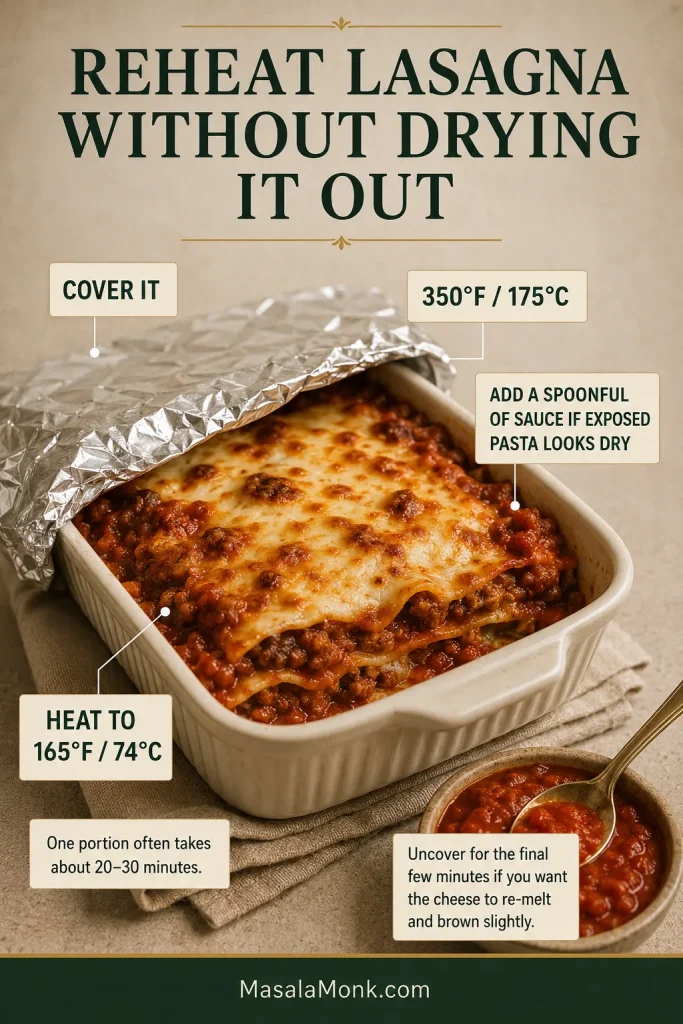
Place a portion in an oven-safe dish. Dry-looking exposed pasta benefits from a spoonful of extra sauce or a very small splash of water. Cover and reheat at 350°F / 175°C until the center reaches 165°F / 74°C.

A single portion often needs 20–30 minutes; larger amounts take longer. Uncover for the final few minutes if you want the cheese on top to re-melt and brown slightly.

A single lasagna portion reheating in a small ivory oven-safe dish with foil partially covering it and extra tomato sauce nearby.
Cover during most of reheating to protect the cut edges, then uncover briefly to re-melt the cheese on top.

For the microwave, cover the portion loosely and heat in shorter intervals until the center is steaming hot throughout.

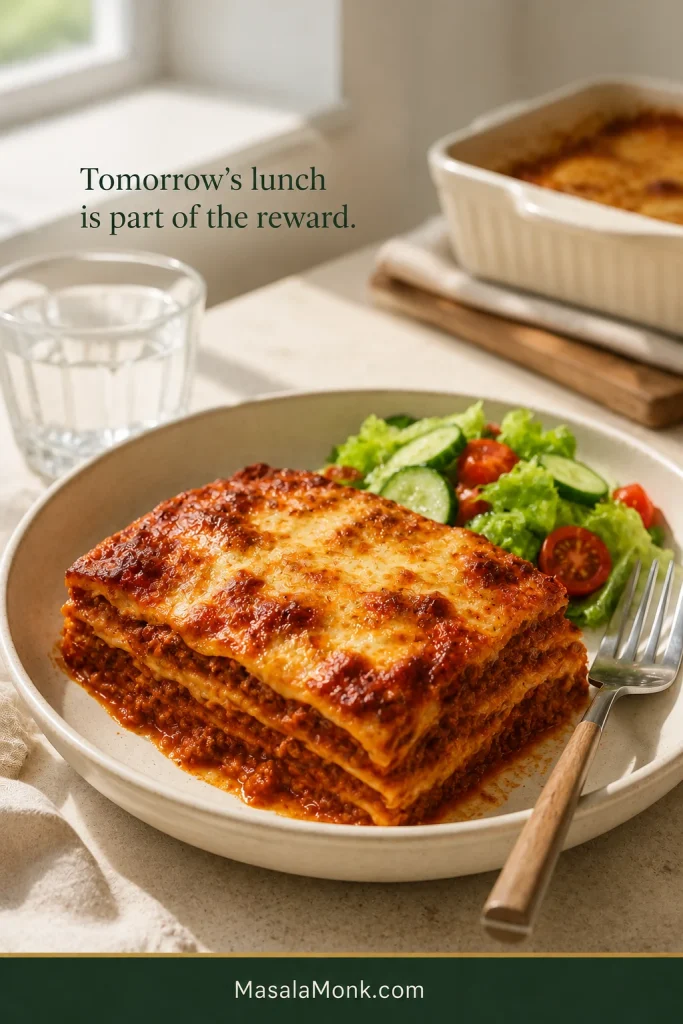
After putting this much work into one pan, having tomorrow’s lunch already handled is part of the reward. Leftover lasagna often slices even more neatly than it did on the first night because the layers have completely settled. Reheating it covered keeps those tidy layers tender.

A neat reheated slice of leftover lasagna on an ivory plate with a fresh green and cucumber salad in soft daytime light.
Chilling firms the layers; gentle covered reheating softens the sauce and cheese again without drying the edges.

What to Serve With Lasagna

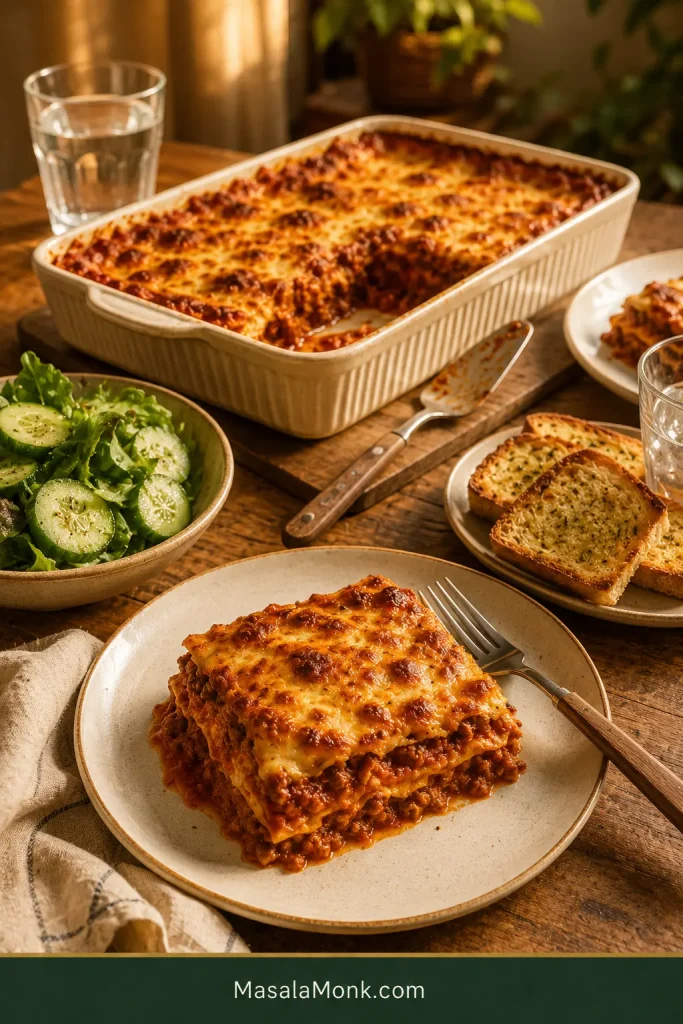
Lasagna already brings plenty of meat, cheese and tomato, so crisp, green or acidic sides work especially well. A cold cucumber salad with vinegar, dill and onion is one easy way to put something fresh beside the hot casserole.

  • A sharp green salad with vinaigrette
  • Roasted broccoli or green beans
  • Marinated peppers or another tangy vegetable side

And when a little meat sauce is left on the plate, homemade garlic bread earns its place beside the pan.

A warm dinner table with a served lasagna slice, the remaining ivory baking dish, cucumber salad, garlic bread, utensils and glasses of water.
Crisp or acidic sides refresh the rich lasagna; garlic bread handles the sauce left on the plate.

The difficult part arrives when the lasagna comes out of the oven. The sauce is bubbling, the mozzarella has browned and everything smells ready.

Give it those last twenty minutes anyway.

Then cut in. The knife slides through without catching. The first piece may let a little sauce relax around its edges, but the layers stay recognizable, the ricotta stays creamy and the meat sauce stays rich and juicy.

That’s the slice all the waiting was for.