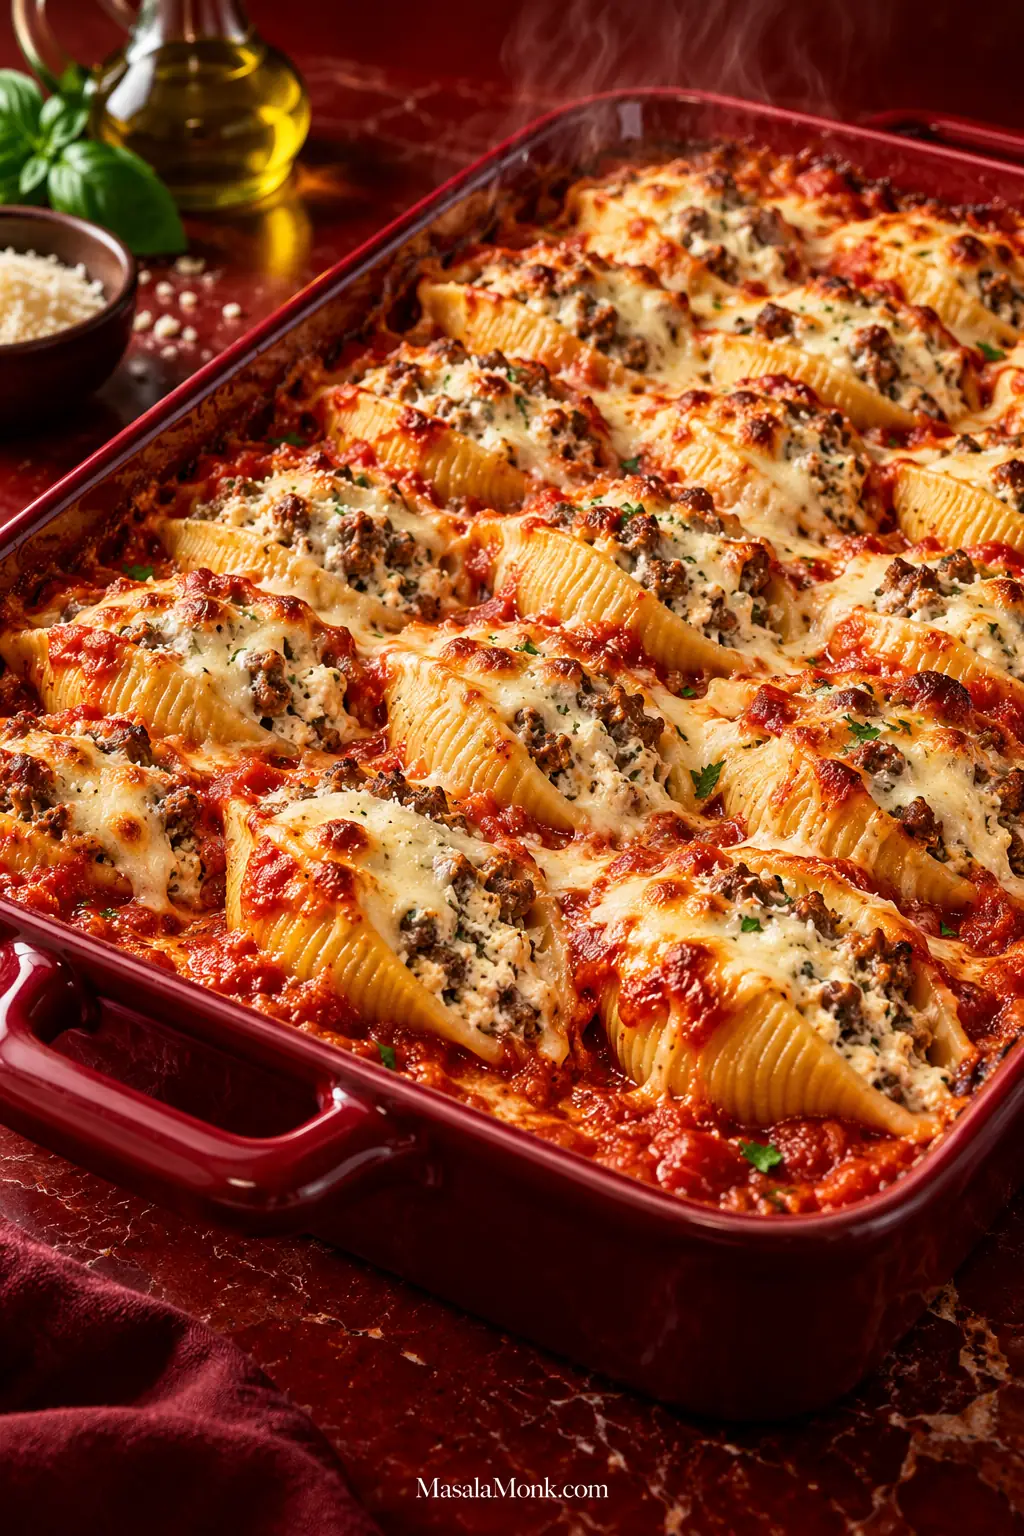
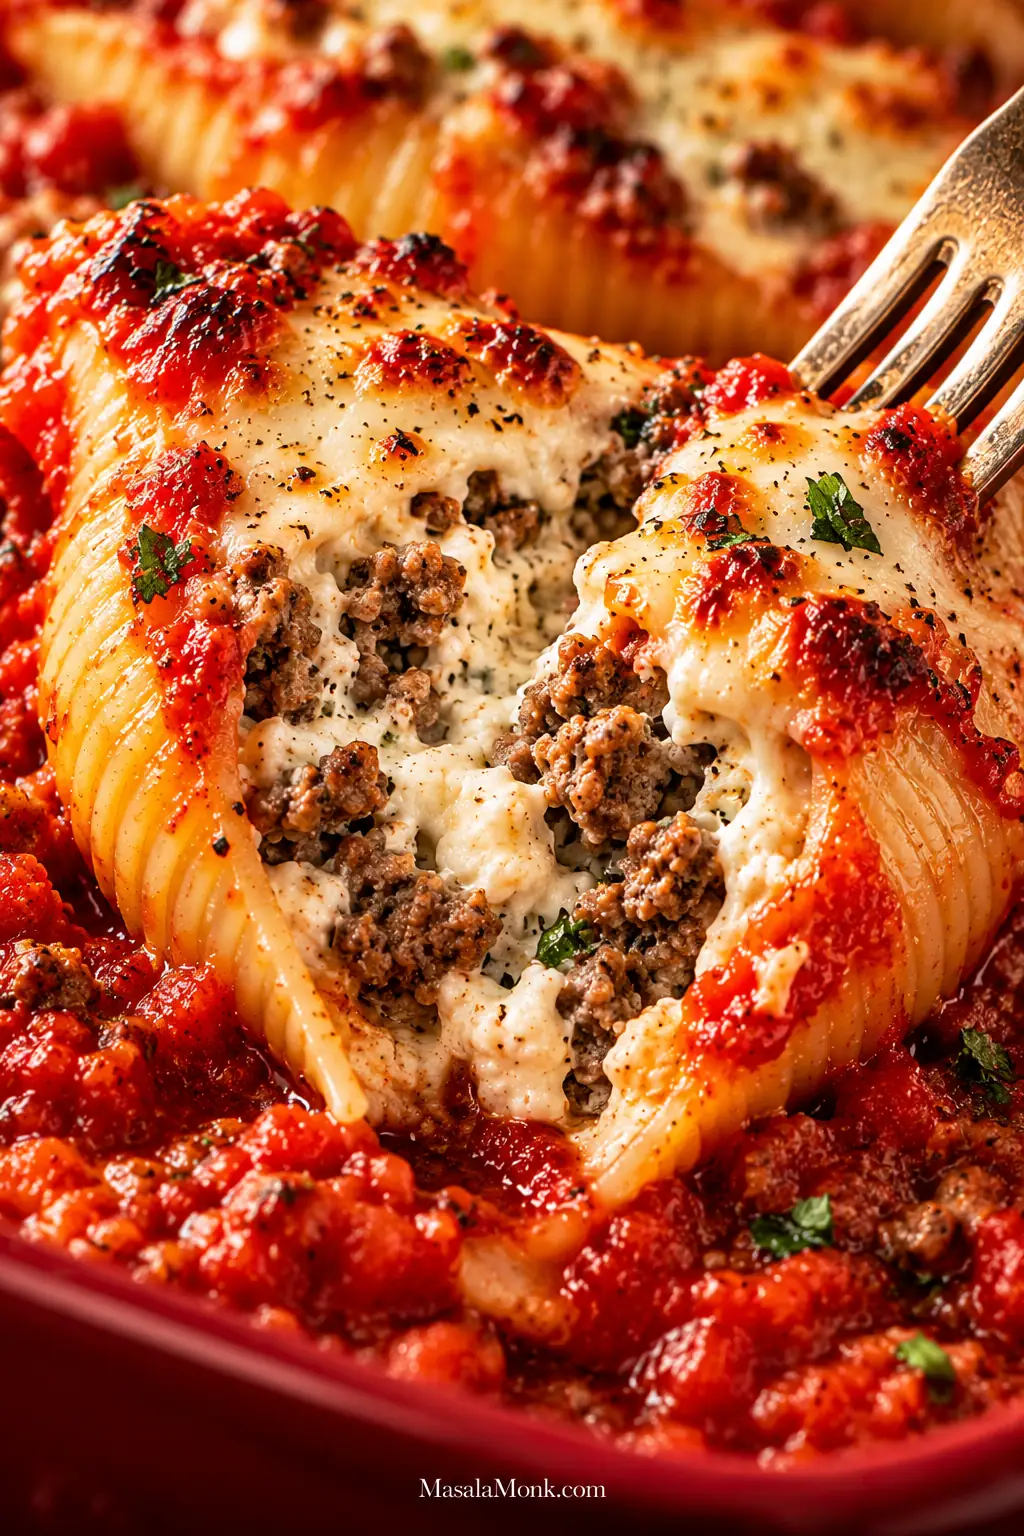
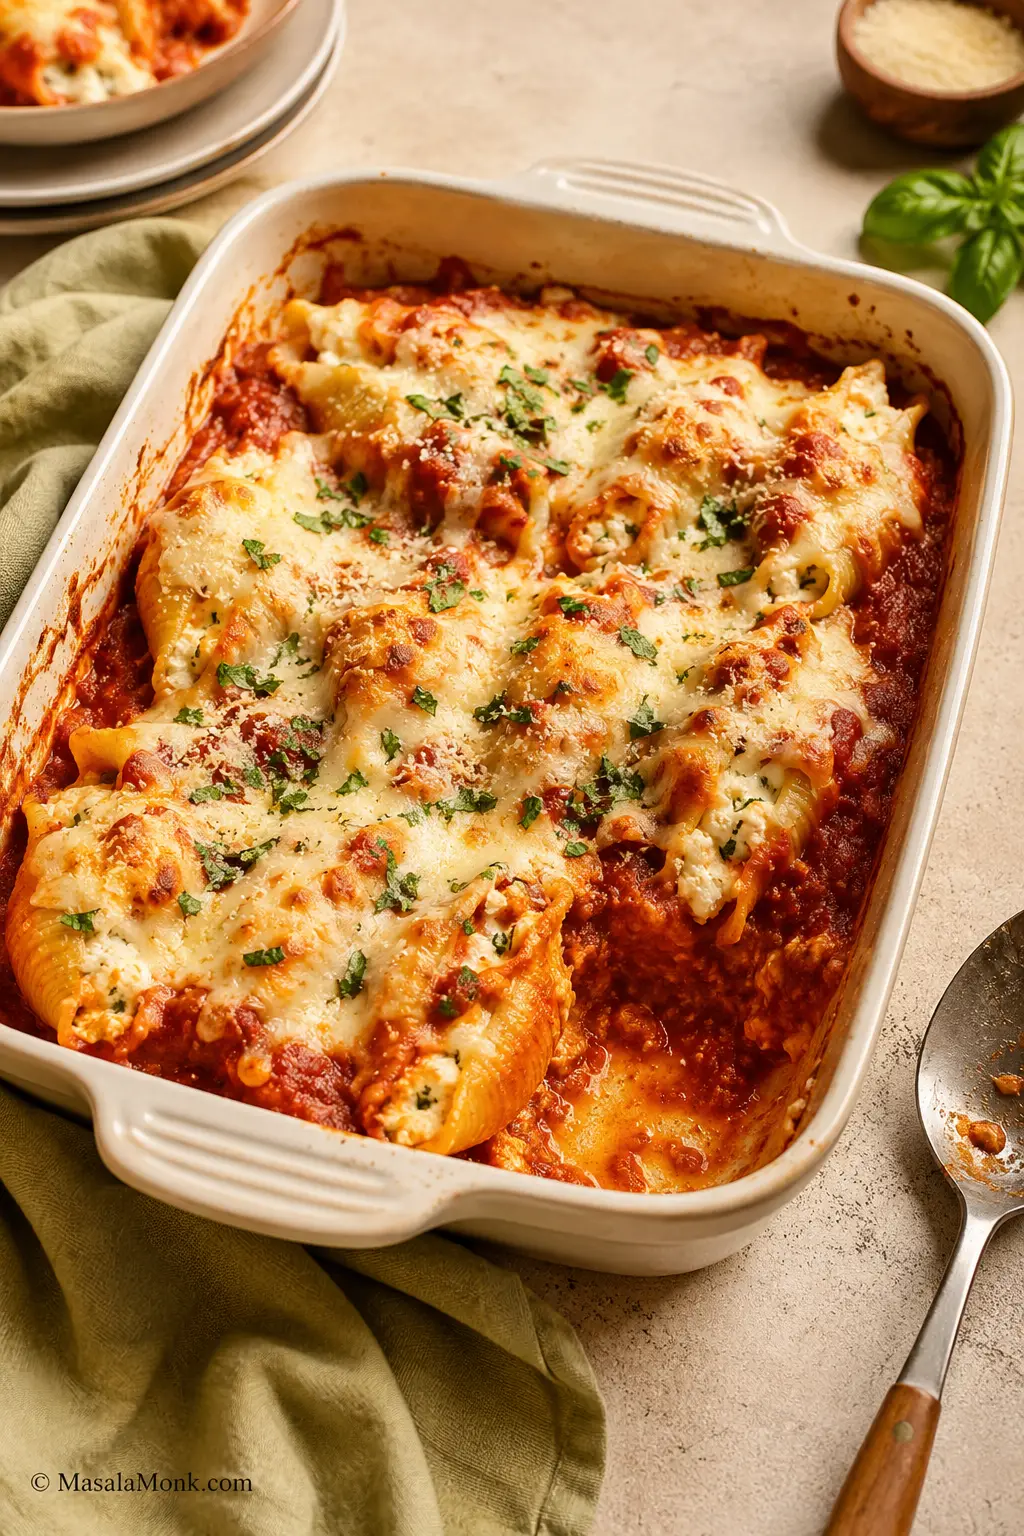
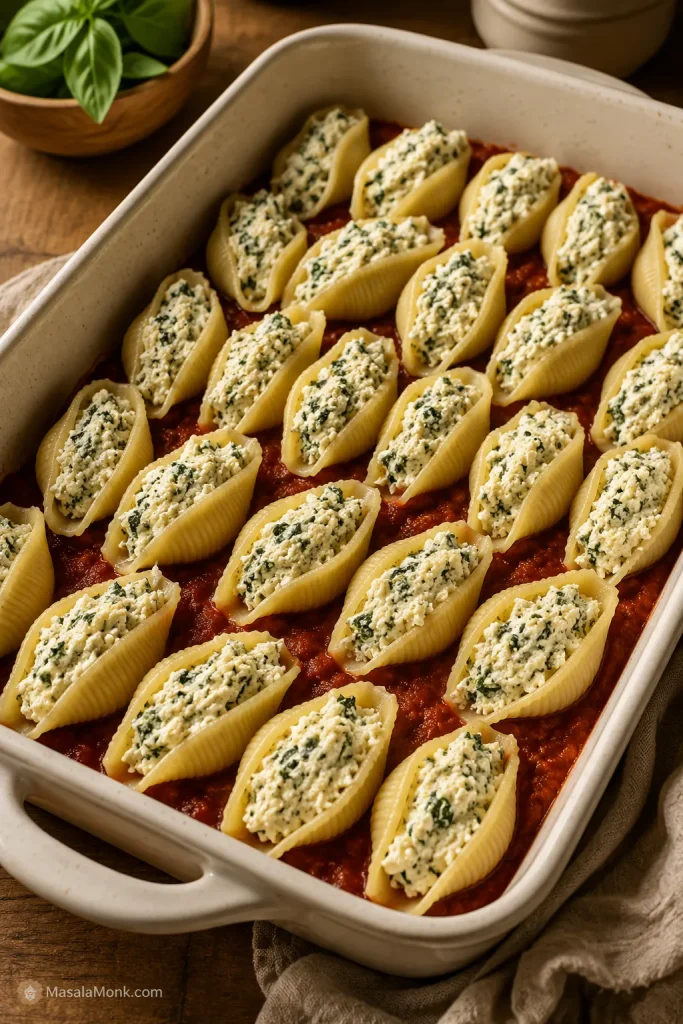
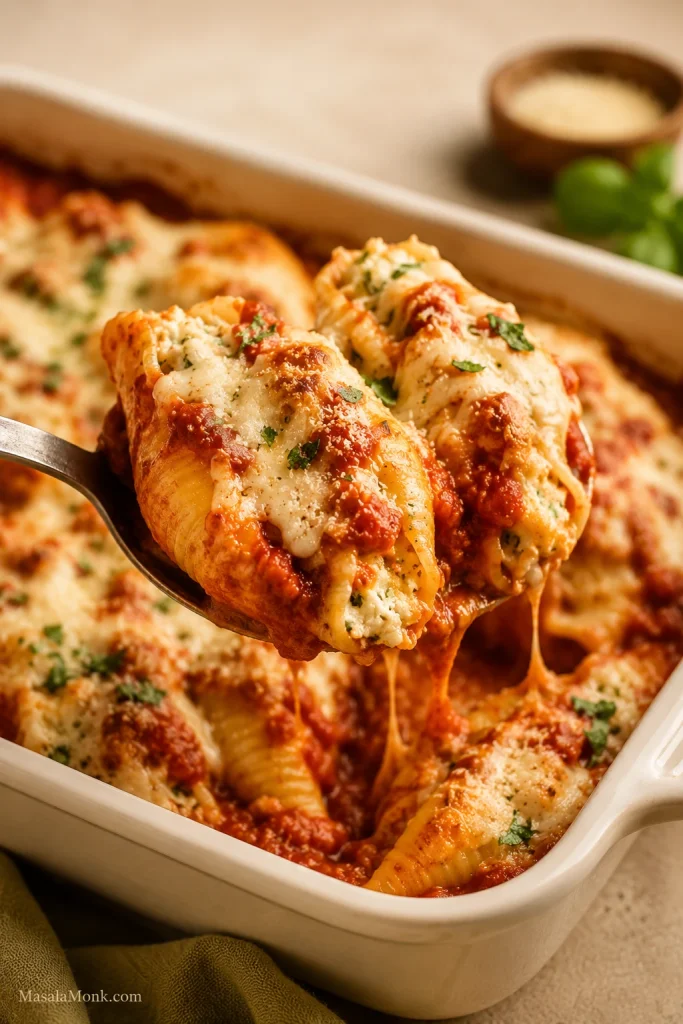
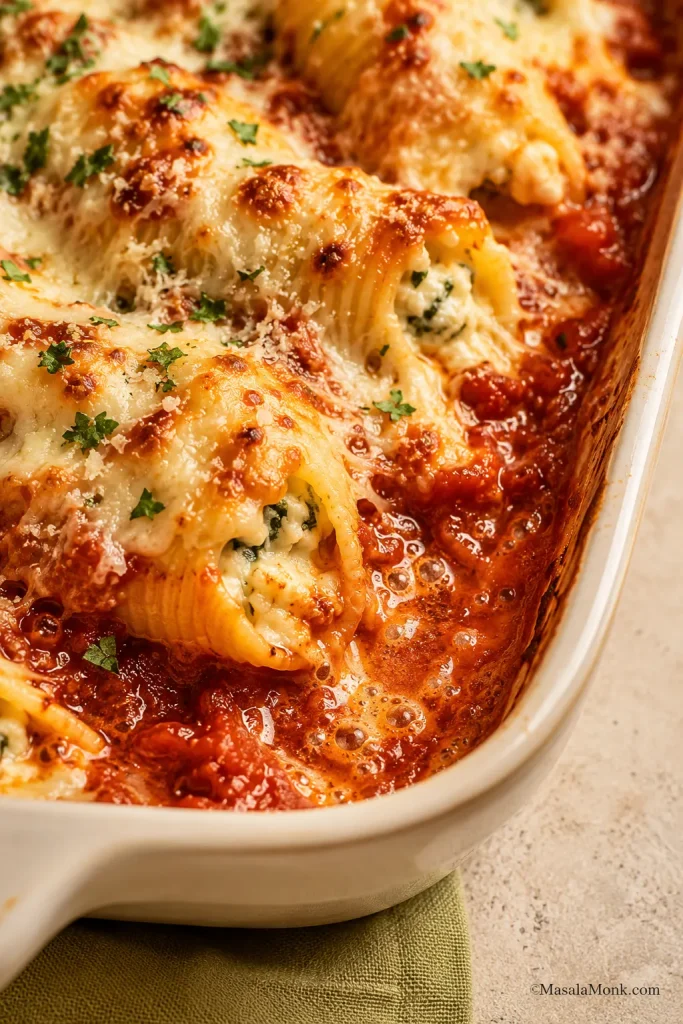
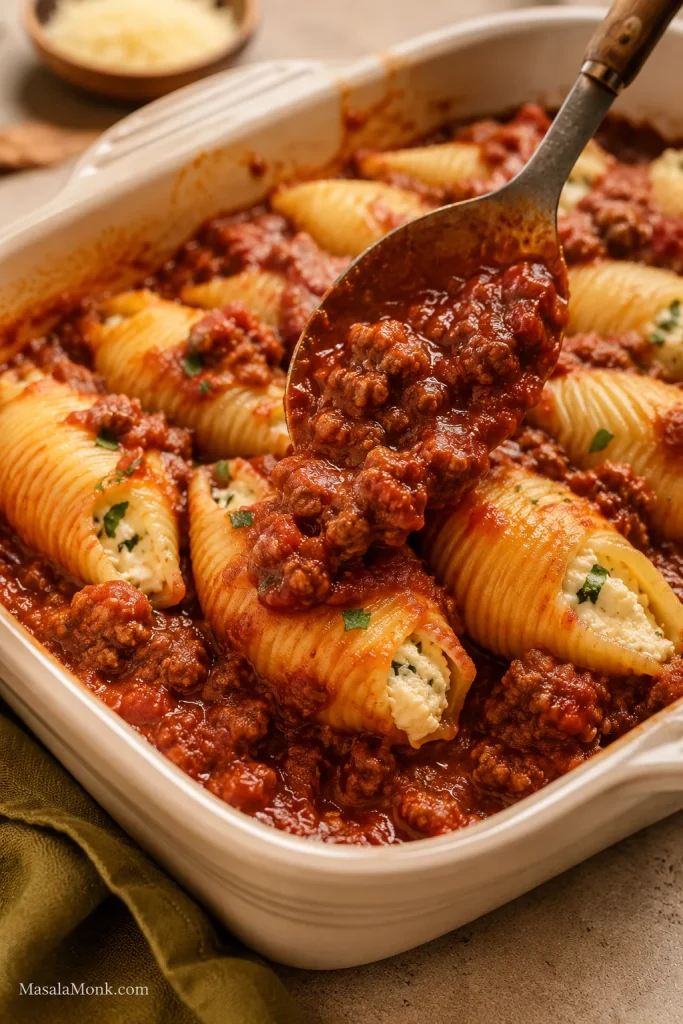
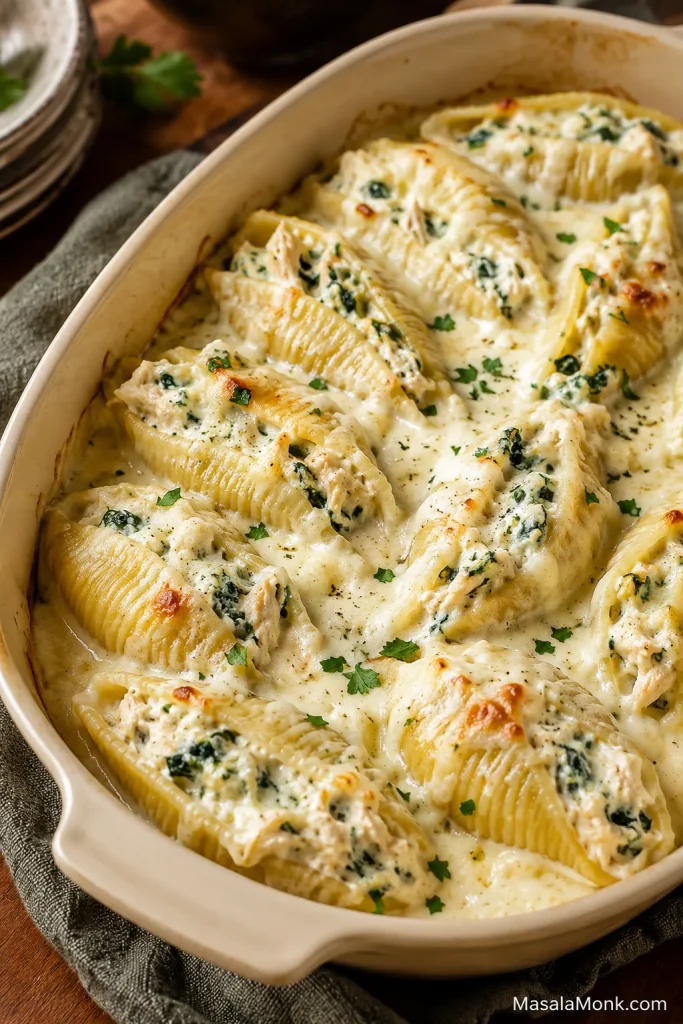
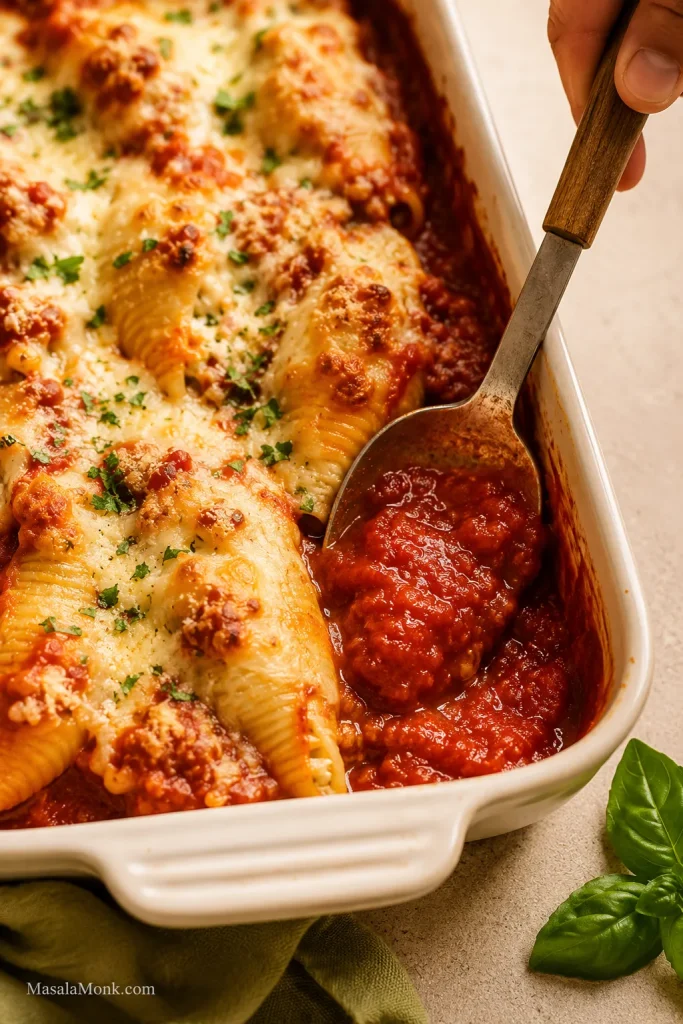
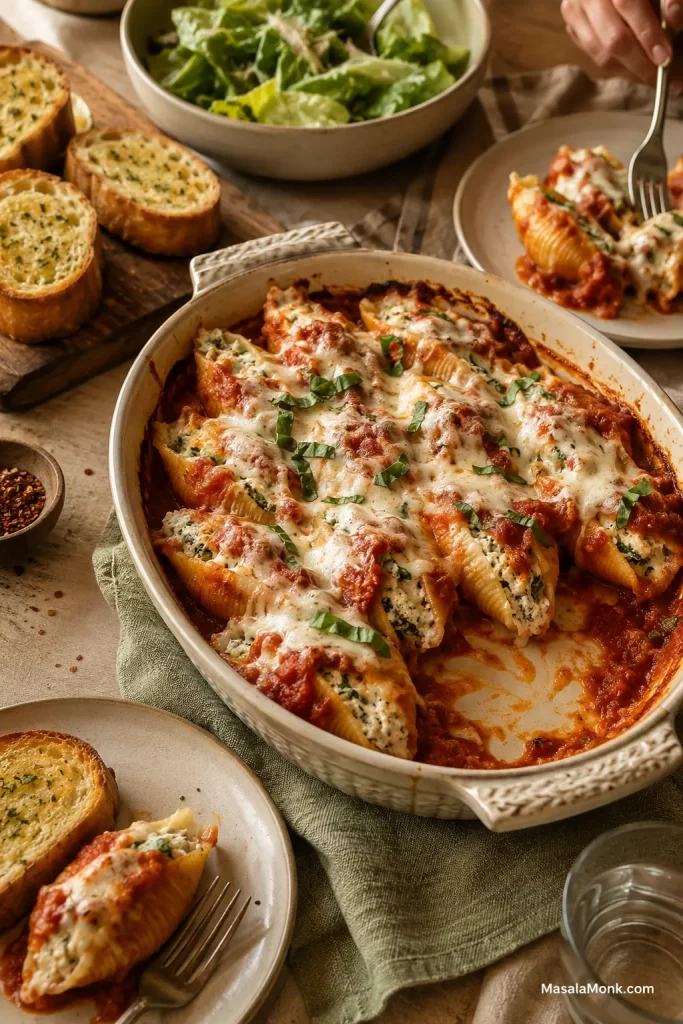
These stuffed shells with meat are filled with seasoned ground beef, creamy ricotta, mozzarella and Parmesan. They bake in marinara until the sauce bubbles around the edges and the cheese melts over the top. The beef goes right into the filling, so every shell gets a generous, savory center rather than cheese in one bite and meat in another.
Let the beef get properly browned before it goes into the ricotta, and pull the shells from the water while they’re still a little firm. They’ll be easier to fill, and they’ll finish cooking in the sauce without turning mushy.
The recipe makes about 24 stuffed shells—enough for six hearty servings or eight with sides. You can also assemble the casserole a day ahead, which is handy when you’d rather have most of dinner dealt with before the evening gets busy.
Servings6 at 4 shells each, or 8 at 3 each with sides
Oven375°F / 190°C
Baking dish9×13 in / 23×33 cm
Prep timeAbout 35 minutes
Bake time30–35 minutes
Rest time10 minutes
Total timeAbout 1 hour 20 minutes
Ingredients
Pasta and sauce
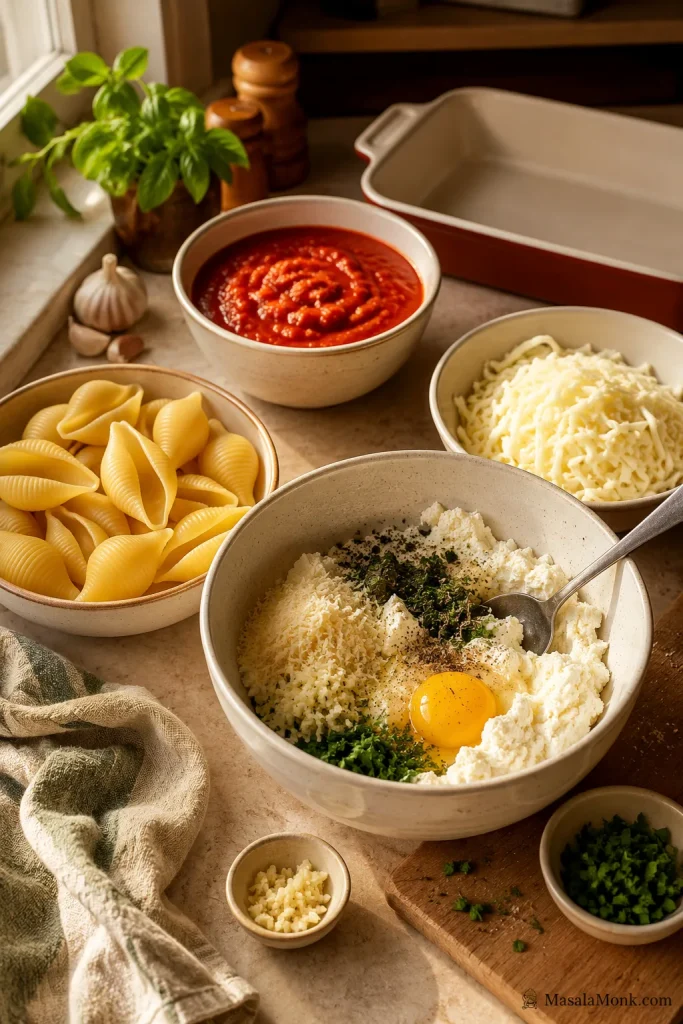
28 jumbo pasta shells, allowing a few extras in case some break
24 oz / 680 g marinara sauce
2–4 tablespoons / 30–60 ml water, only if needed to loosen a very thick sauce
Beef and ricotta filling
2 teaspoons / 10 ml olive oil
½ medium yellow onion, finely chopped (about ½ cup / 75 g)
1 lb / 454 g ground beef, preferably 90% lean
3 garlic cloves, minced
15 oz / 425 g whole-milk ricotta, drained briefly if visibly watery
8 oz / 225 g low-moisture mozzarella, shredded and divided
½ cup / about 45 g finely grated Parmesan
1 large egg
1½ teaspoons Italian seasoning
¾ teaspoon fine sea salt, divided, plus more for the pasta water
½ teaspoon freshly ground black pepper
2 tablespoons chopped fresh parsley, optional
¼ teaspoon crushed red pepper flakes, optional
Can’t find jumbo shells? Manicotti is a good alternative, and cooked lasagna sheets can be rolled around the filling. Small pasta shells are too small to stuff individually; if that’s what you have, a baked pasta such as baked ziti is a better fit.
For the beef, 90% lean gives you plenty of flavor without producing as much rendered fat as a fattier blend. An 85% lean package works too. Use low-moisture mozzarella for the filling and topping. Freshly shredded melts especially well, but a bag of pre-shredded mozzarella is completely fine here.
Because the sauce flavors every shell, use a marinara you already enjoy. Jarred sauce keeps dinner simple; our homemade marinara sauce is another option when you want to make the sauce too.
If the marinara is very thick, loosen it with a splash of water. If it’s unusually thin, simmer it briefly until it clings lightly to a spoon.
Equipment
9×13-inch / 23×33 cm baking dish
Large pot and colander
Tray or large plate for the cooked shells
Large skillet
Aluminum foil
Large mixing bowl
Large spoon or 2-tablespoon scoop, optional
Instant-read thermometer, optional
How to Make Stuffed Shells with Meat
1. Prepare the baking dish
Heat the oven to 375°F / 190°C. Spread about 1 cup of marinara over the bottom of a 9×13-inch / 23×33 cm baking dish. Keep the remaining sauce for the assembled shells.
2. Cook the shells until bendable, not tender
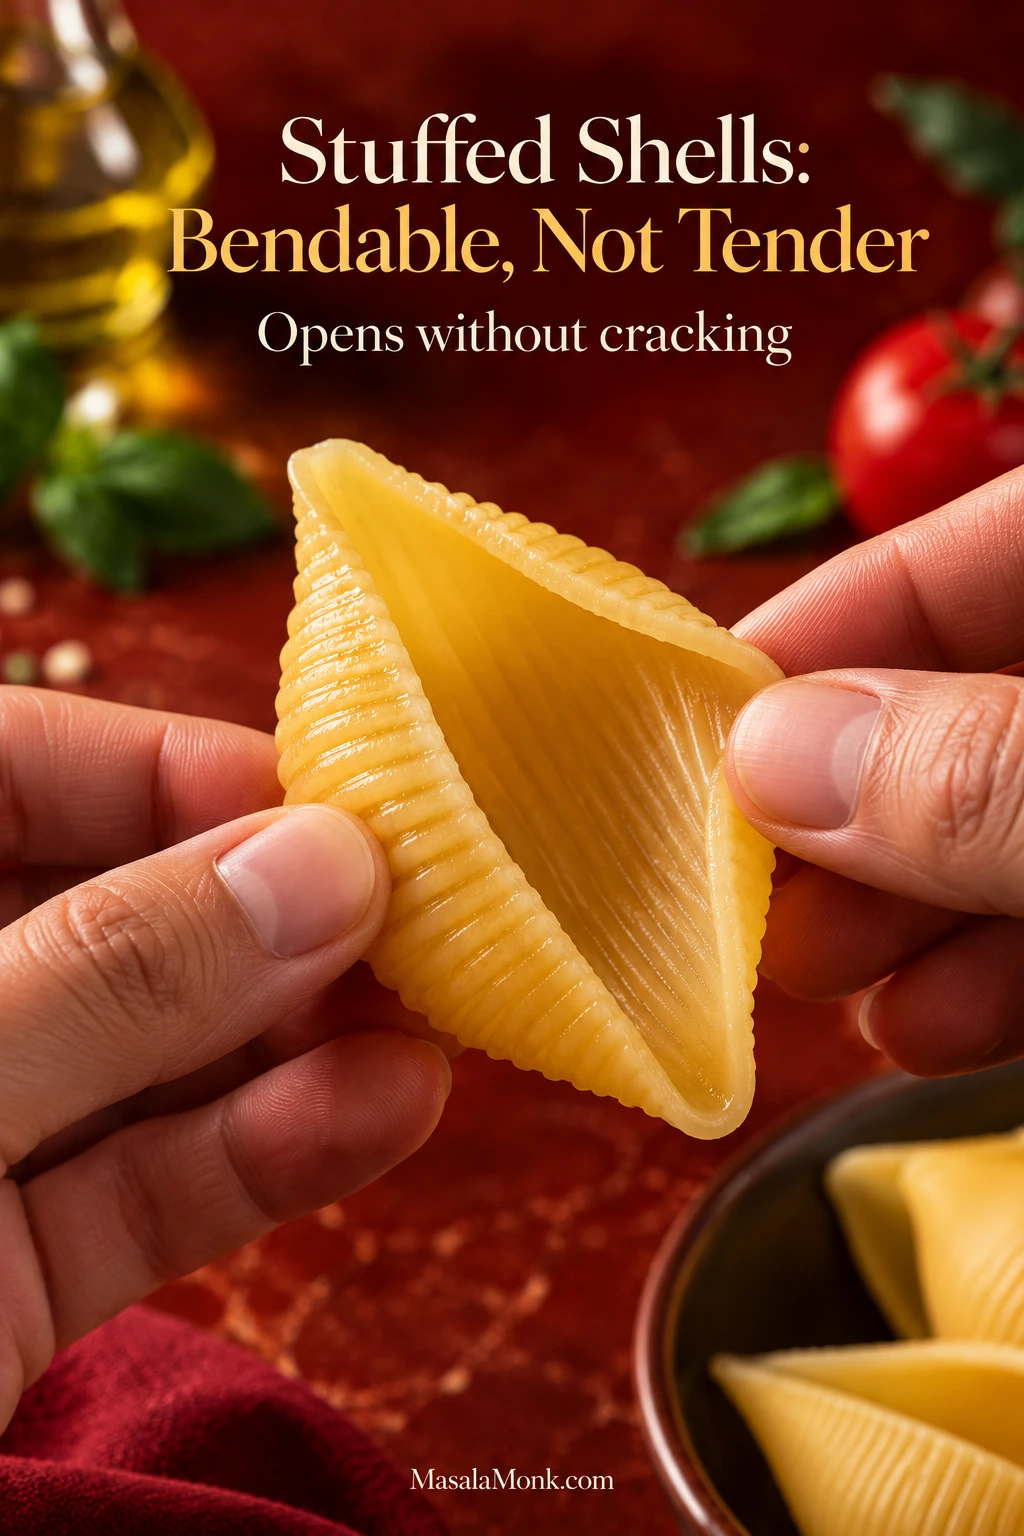
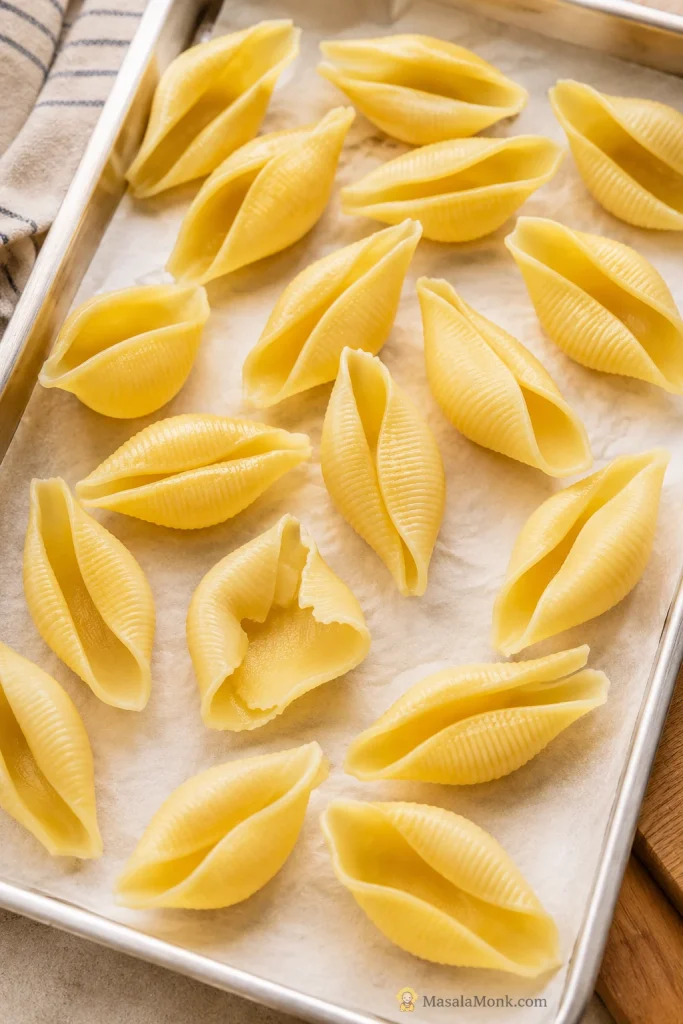
Bring a large pot of well-salted water to a boil. Add the 28 jumbo shells and start checking them about 2 minutes before the shortest cooking time listed on the package. Use their texture as the final guide: a shell should open without cracking but still feel distinctly firm.
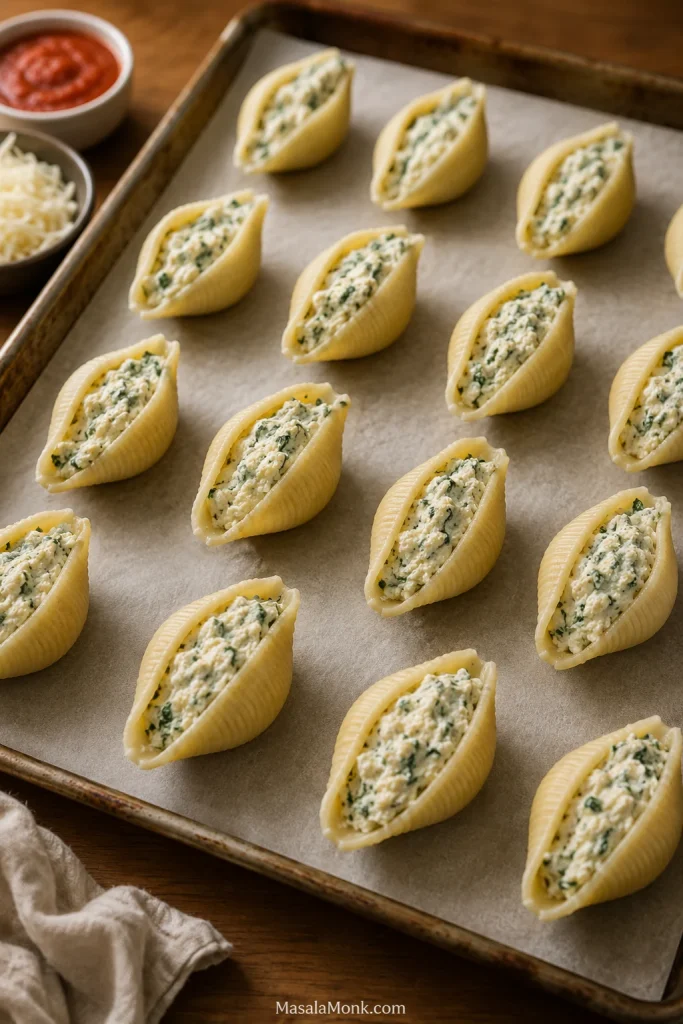
Drain immediately and spread the shells in a single layer on a tray or large plate. Separate any that begin sticking together. They’ll finish cooking once the casserole goes into the oven.
A jumbo pasta shell that is ready to fill should flex with a little resistance. If it turns floppy in the pot, it will be harder to drain, open and stuff without tearing.
3. Brown and season the beef
Heat the 2 teaspoons / 10 ml olive oil in a large skillet over medium heat. Add the onion and cook for 3–4 minutes, until softened.
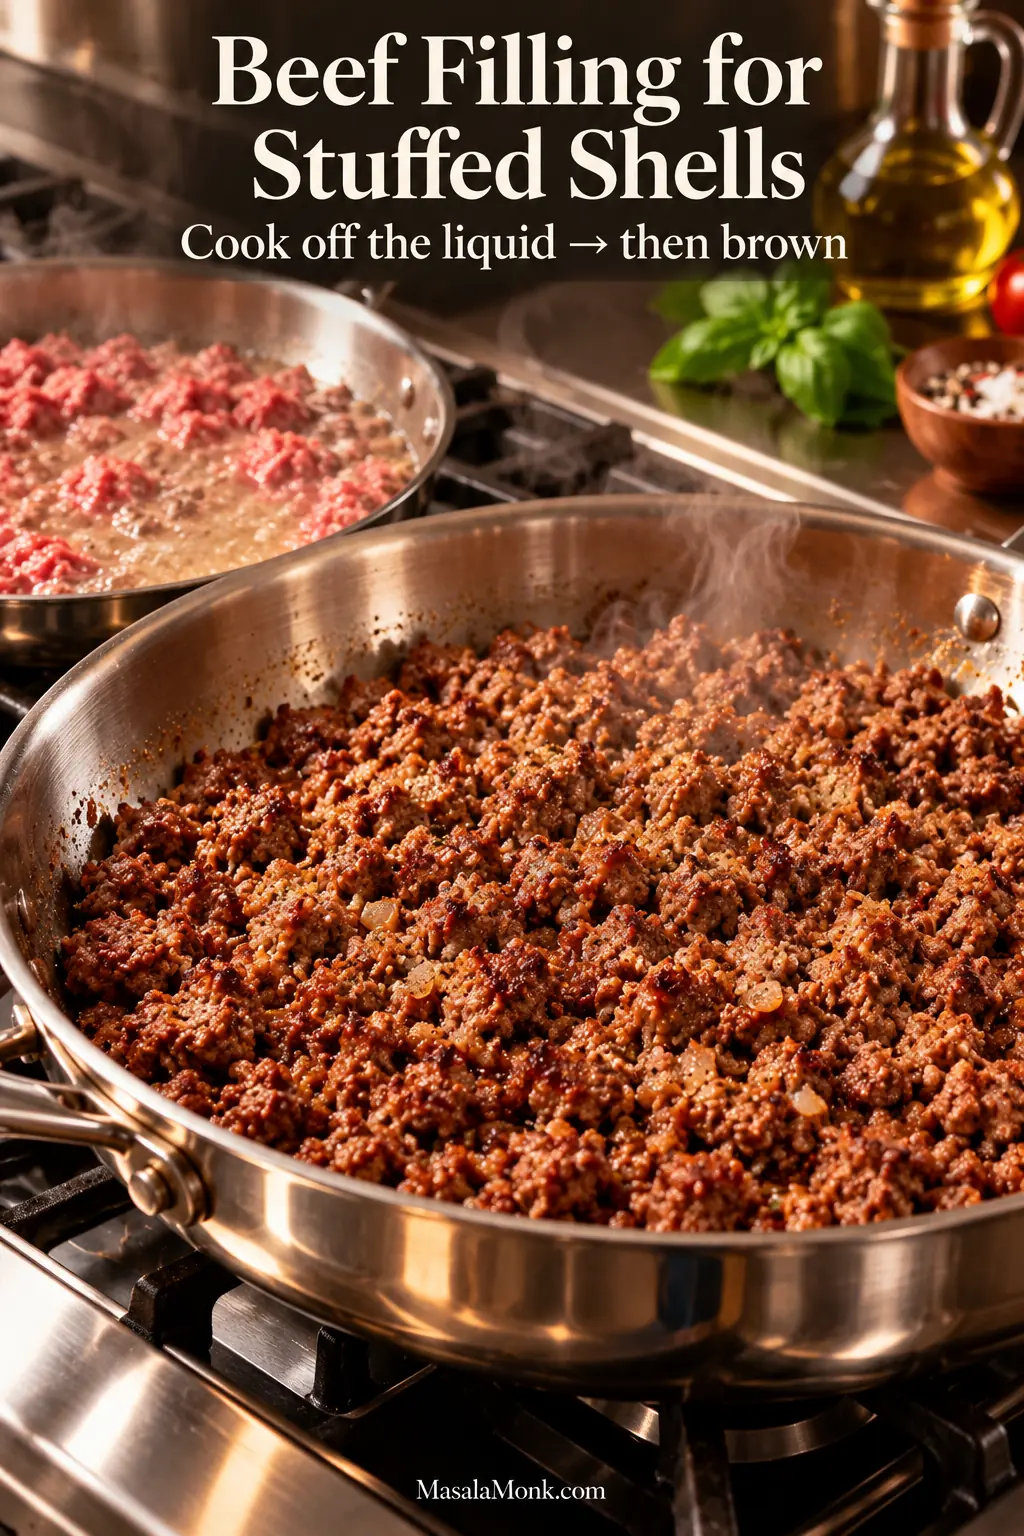
Add the ground beef and break it into small crumbles. Let the released liquid cook away, raising the heat to medium-high if needed. If a large pool of rendered fat remains, spoon or drain off the excess. Then let some of the crumbles sit against the skillet long enough to develop browned edges.
Listen as well as look when browning ground beef: the pan shifts from bubbling to a sharper sizzle once excess moisture has cooked away. That is the point when real browning can begin.
Reduce the heat to medium. Add the garlic, Italian seasoning, ½ teaspoon salt, black pepper and optional red pepper flakes. Cook for another 30–60 seconds, just until you can smell the garlic. The beef should reach 160°F / 71°C before it comes off the heat.
Taste a small piece of the cooked beef and adjust the seasoning now, before it goes into the ricotta mixture. Once the filling contains raw egg, don’t taste it. Transfer the beef to a bowl or plate and let it cool until warm, not steaming hot.
4. Mix the beef and ricotta filling
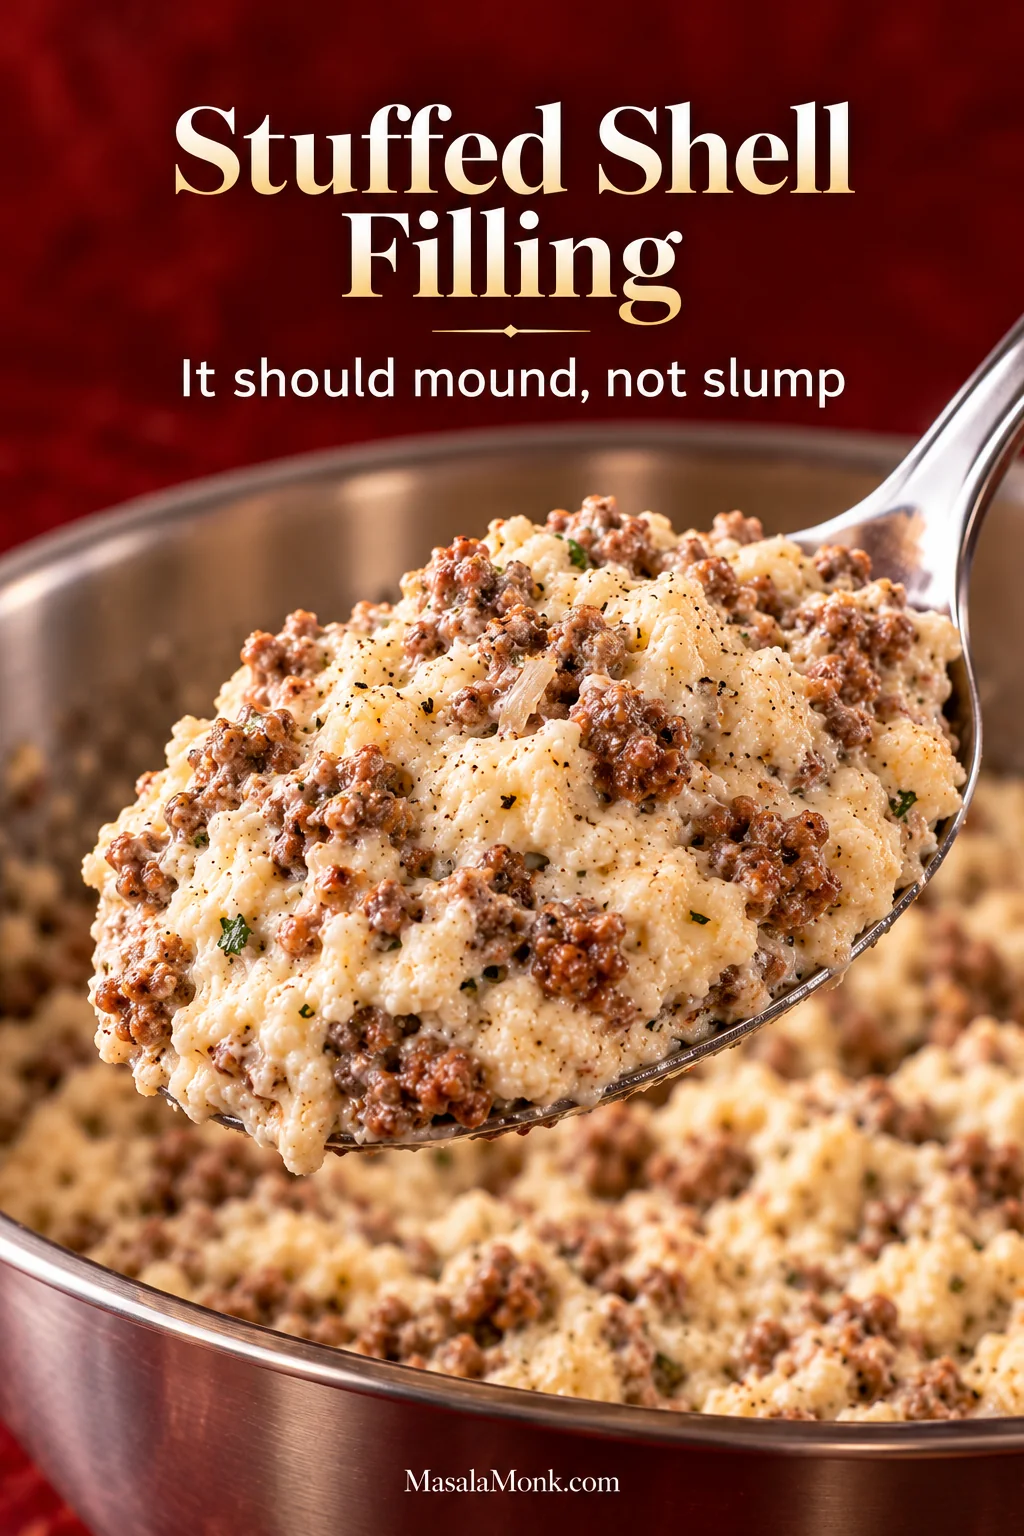
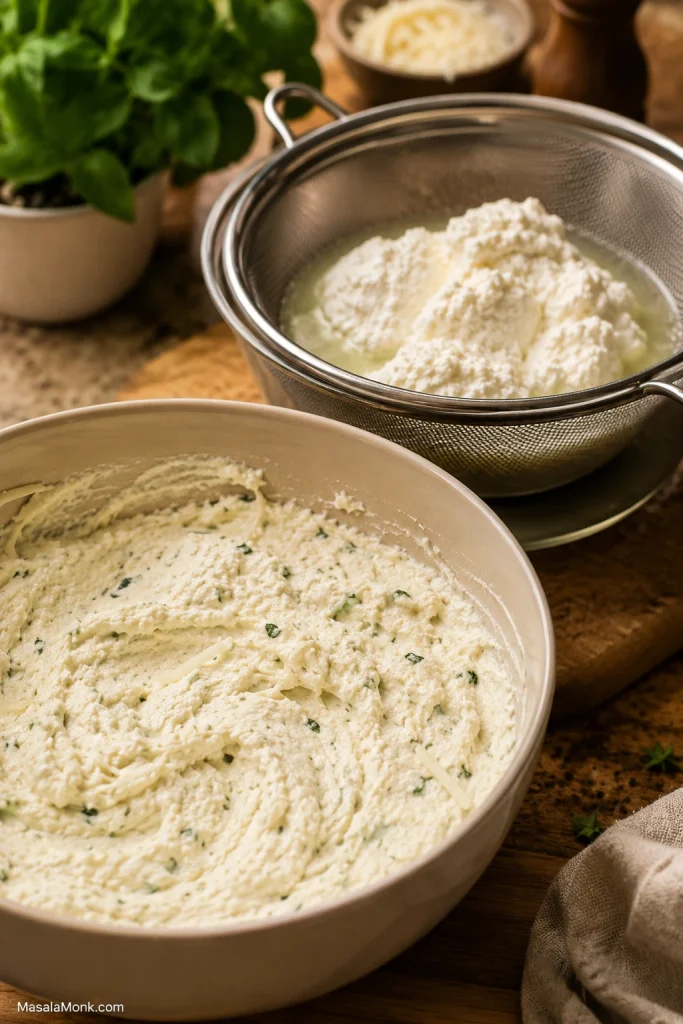
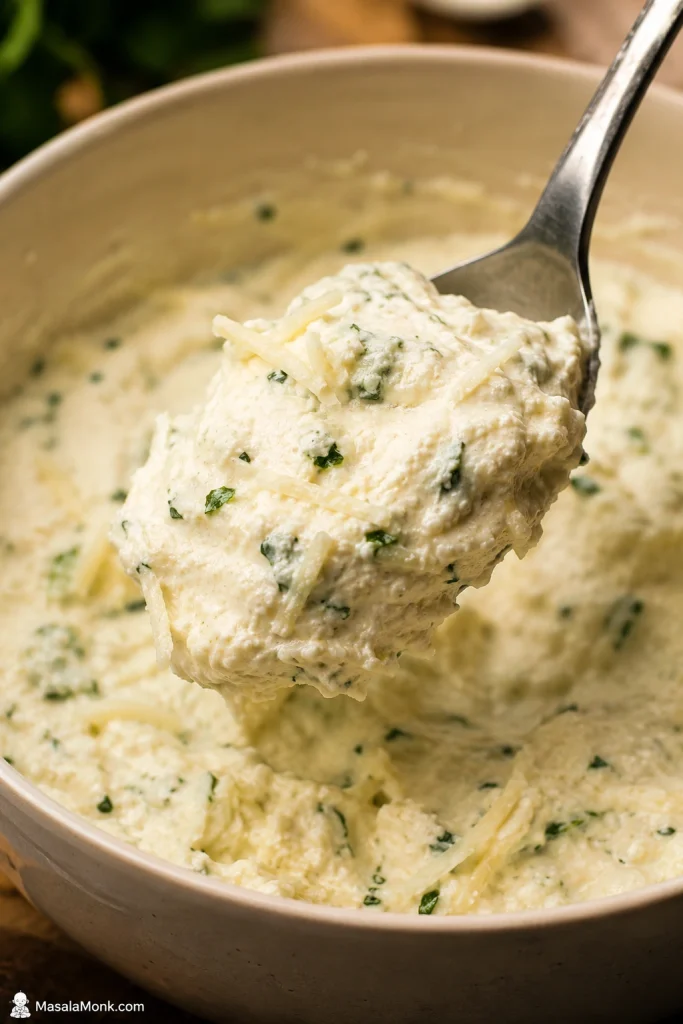
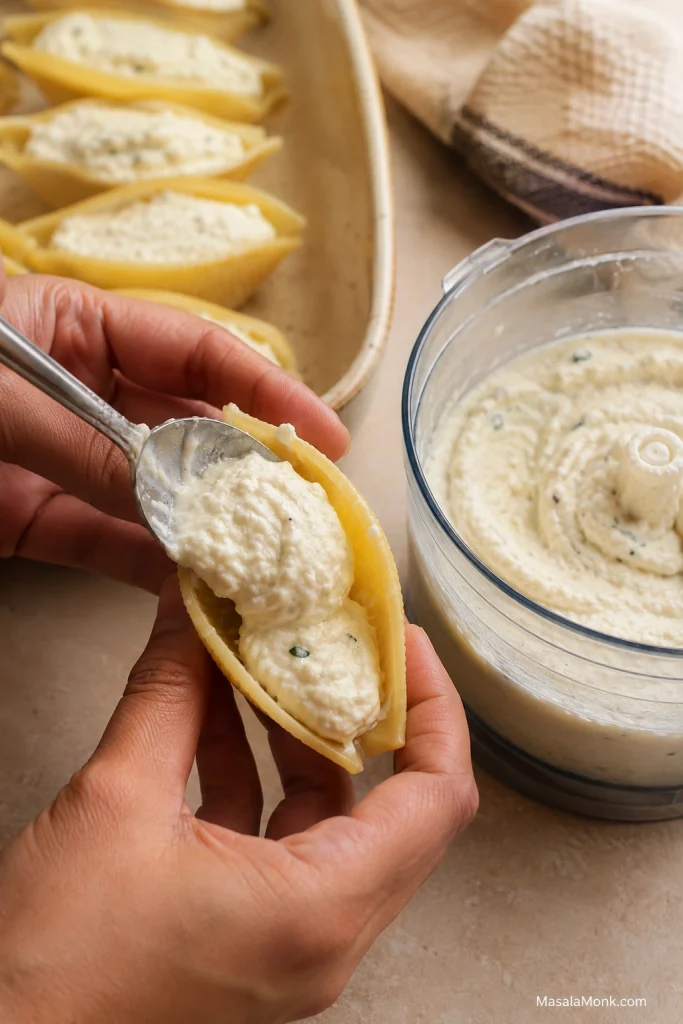
In a large bowl, combine the ricotta, 4 oz / 113 g mozzarella, Parmesan, egg and remaining ¼ teaspoon salt. Add the parsley if using, then fold in the cooled beef. The mixture should be creamy but thick enough to mound on a spoon.
If the beef-and-ricotta filling spreads flat instead of holding a soft mound, check its moisture before stuffing the shells. Watery ricotta or residual skillet liquid is much easier to correct in the bowl than after baking.
5. Fill the shells evenly
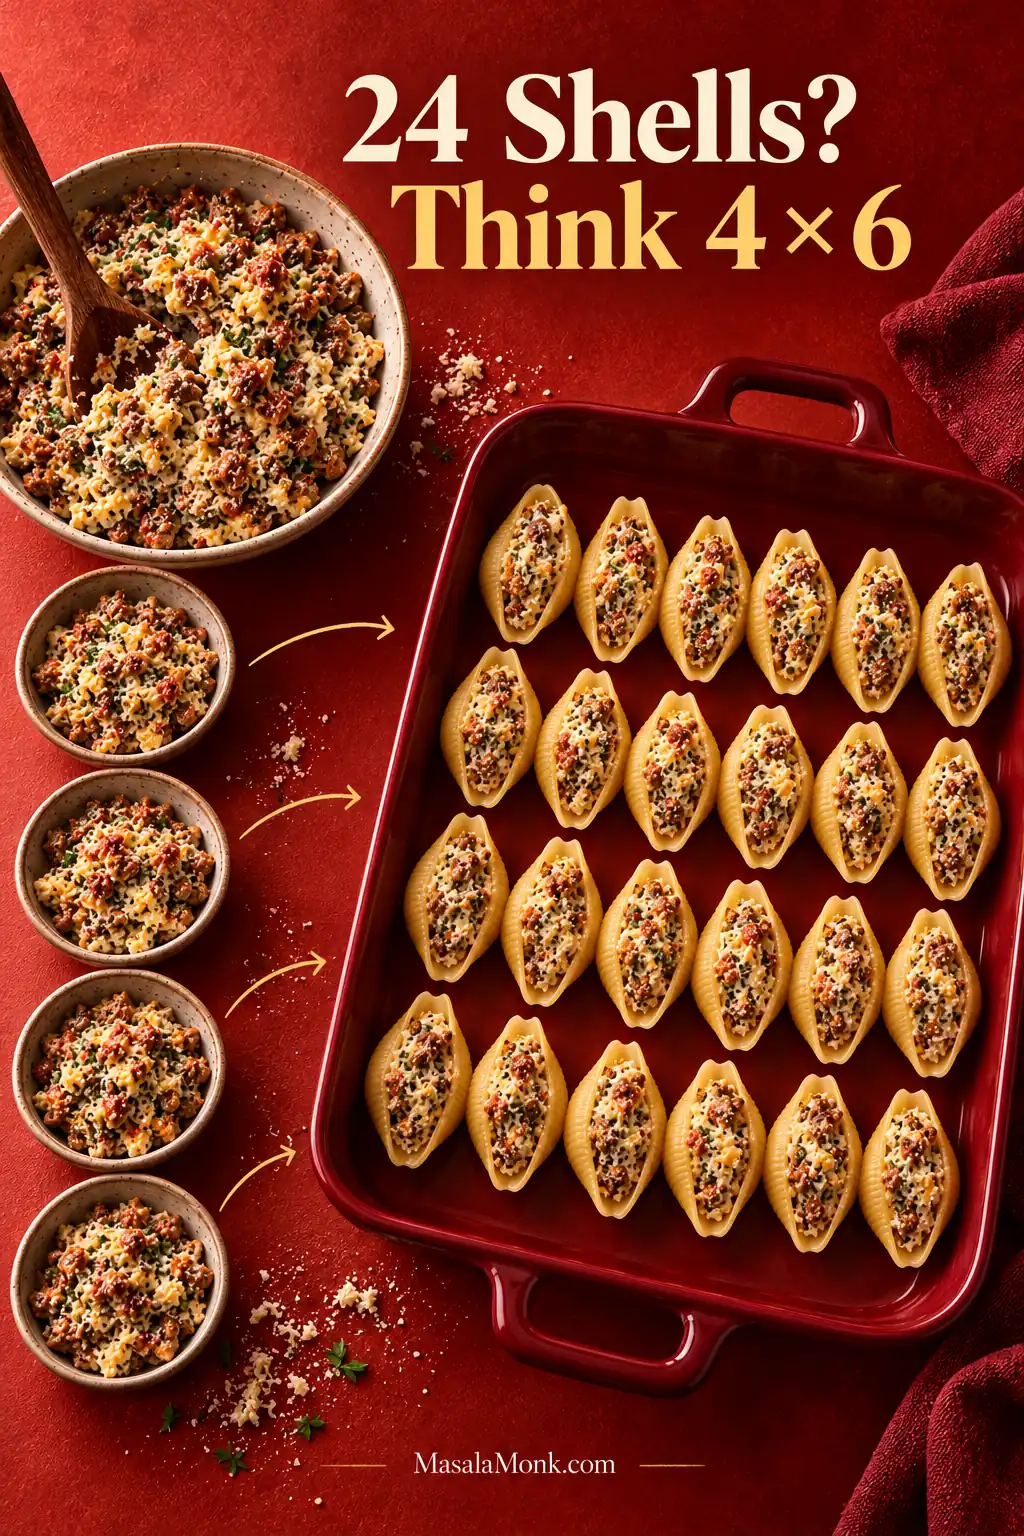
Fill about 24 intact shells with roughly 2 heaping tablespoons of filling each, adding more to any especially large shells. A 2-tablespoon scoop makes this quicker if you have one.
There’s an easy way to avoid beautifully overstuffing the first six and running short at the end. Mentally divide the filling into four portions, then use about one portion for every six shells. They don’t need to look identical. Fill them generously without forcing the pasta open.
Treat each group of six stuffed shells as a checkpoint. If one quarter of the filling is nearly gone after only four or five shells, redistribute before continuing. That is easier than discovering the shortage at the final row.
6. Add the sauce and mozzarella
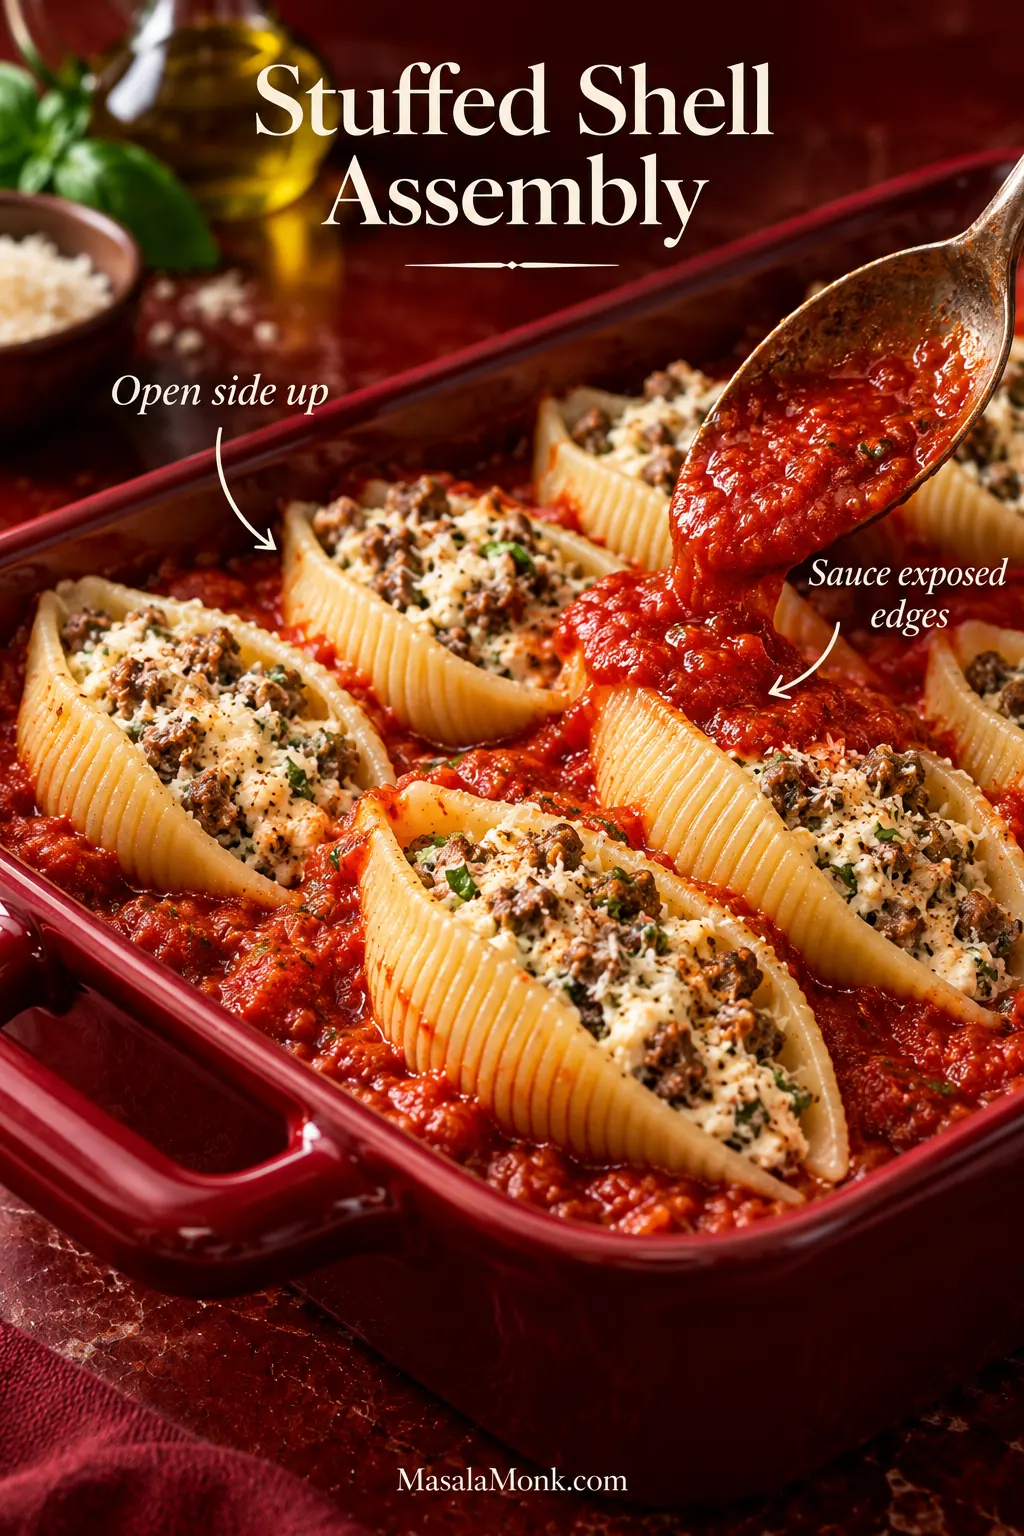
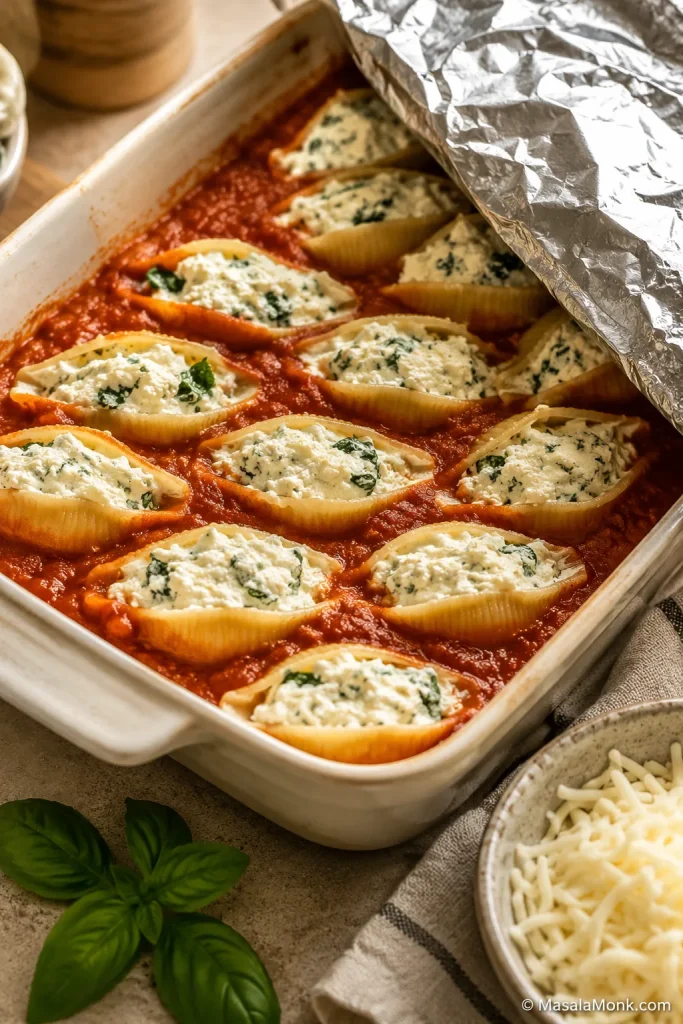
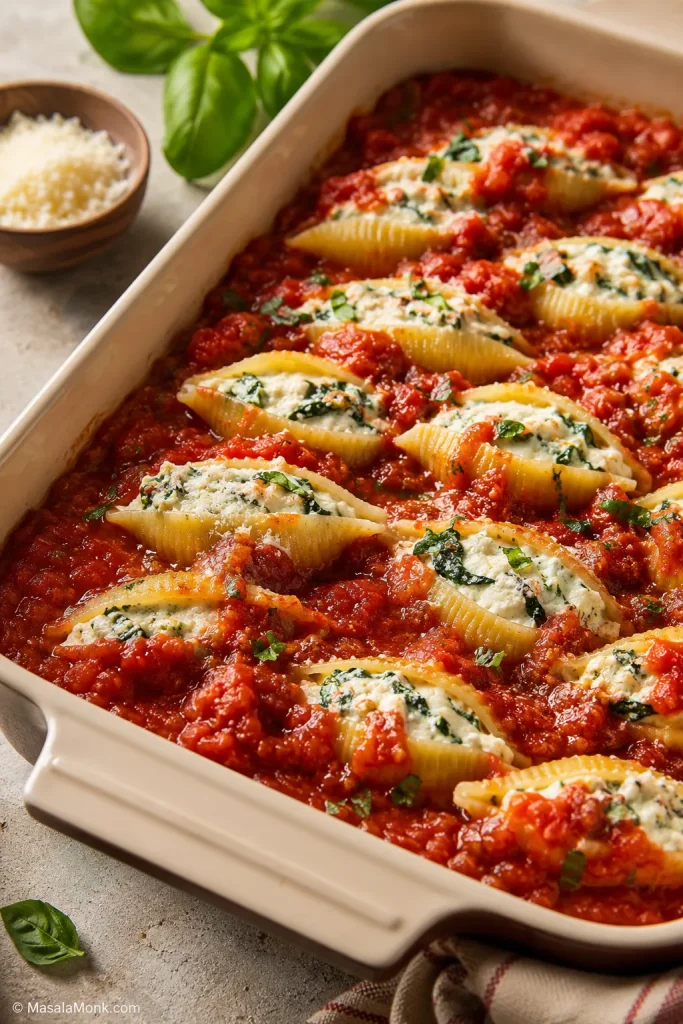
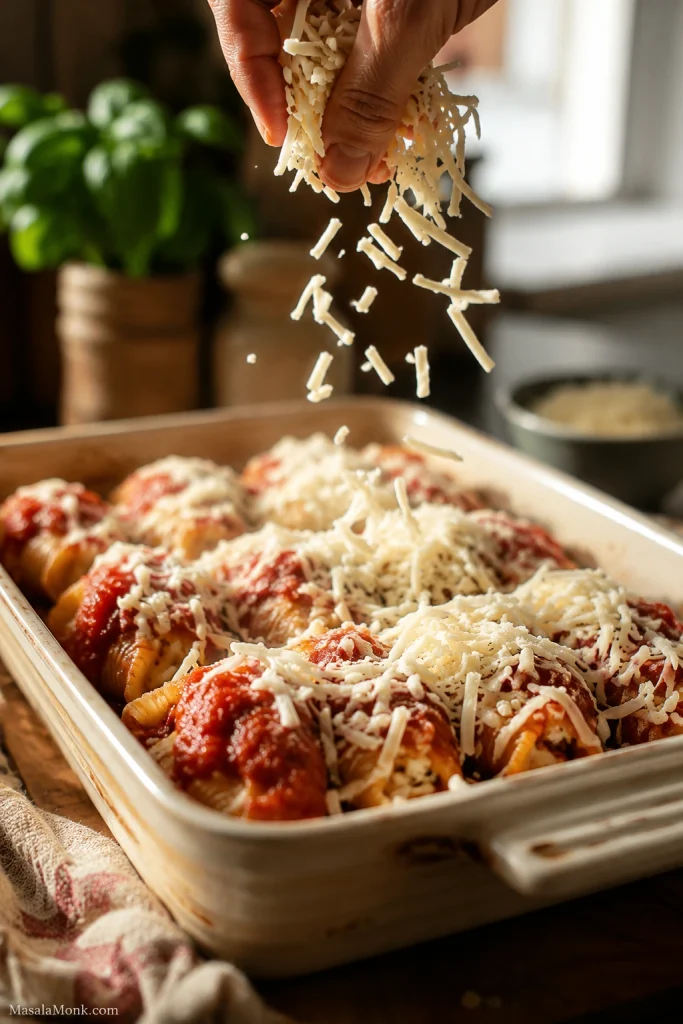
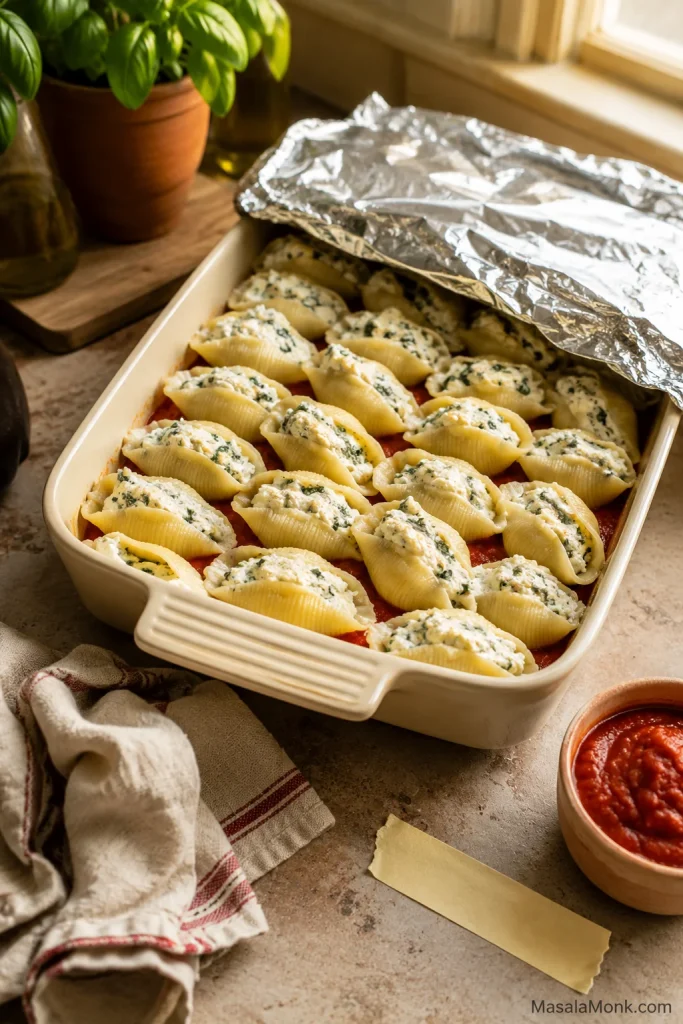
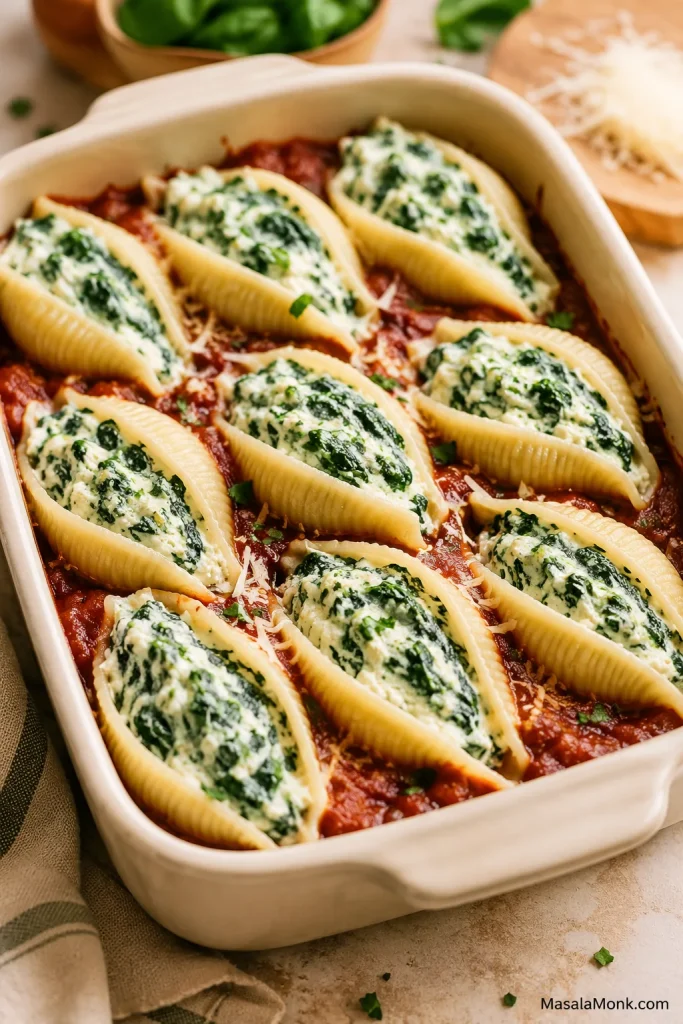
Arrange the filled shells open side up over the marinara. Spoon the remaining sauce around them and over any exposed pasta edges, then scatter the remaining 4 oz / 113 g mozzarella across the top.
It’s fine to leave the ridges visible. Just make sure the exposed pasta isn’t sitting completely dry, since those edges are the first to harden in the oven.
Focus extra marinara on the thin lips and exposed tips of the stuffed shells. Those small areas lose moisture faster than the pasta already resting against sauce, even when the main ridges remain uncovered.
7. Bake covered, then uncover
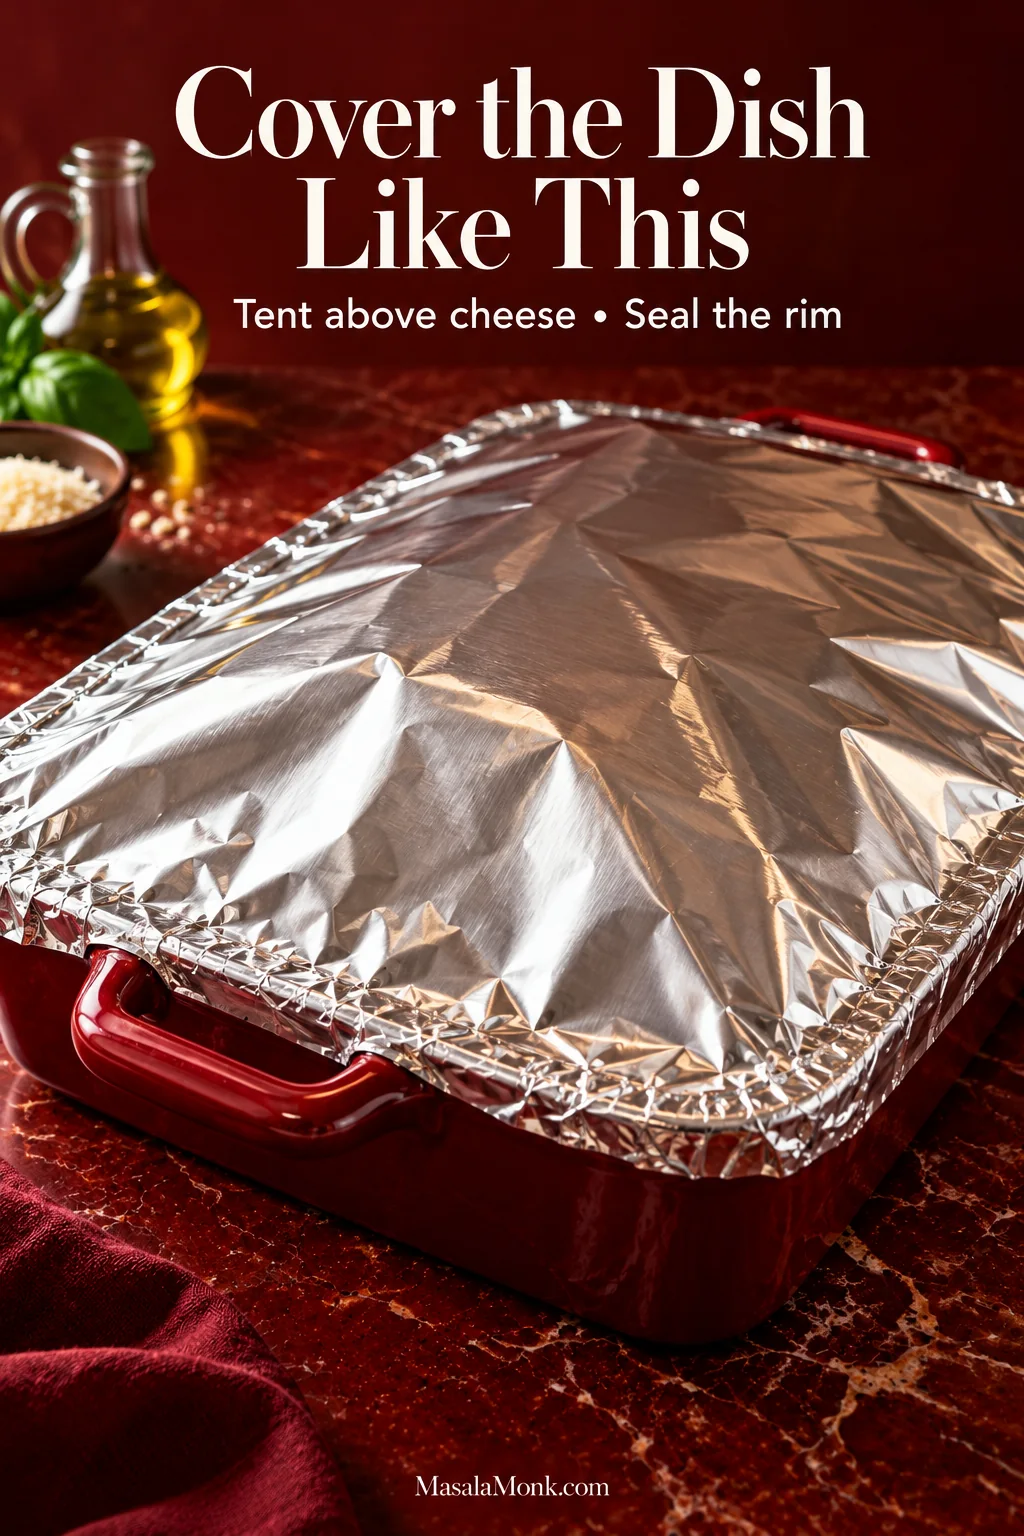
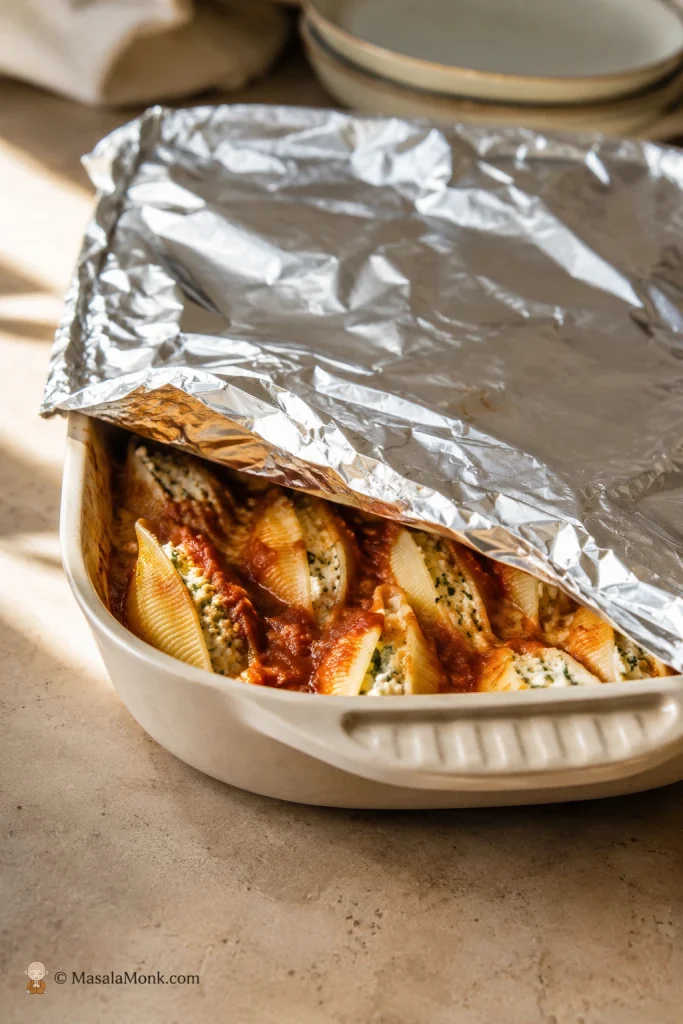
Cover the dish with foil, tenting it above the mozzarella but sealing it around the rim. Bake for 25 minutes, then remove the foil and bake for another 5–10 minutes. The sauce should be bubbling around the shells, with the mozzarella melted across the tops and catching some color in spots.
The foil only needs a shallow dome above the mozzarella. Meanwhile, a snug seal around the rim keeps humid heat inside the casserole, helping the pasta finish tenderizing without the cheese sticking to the foil.
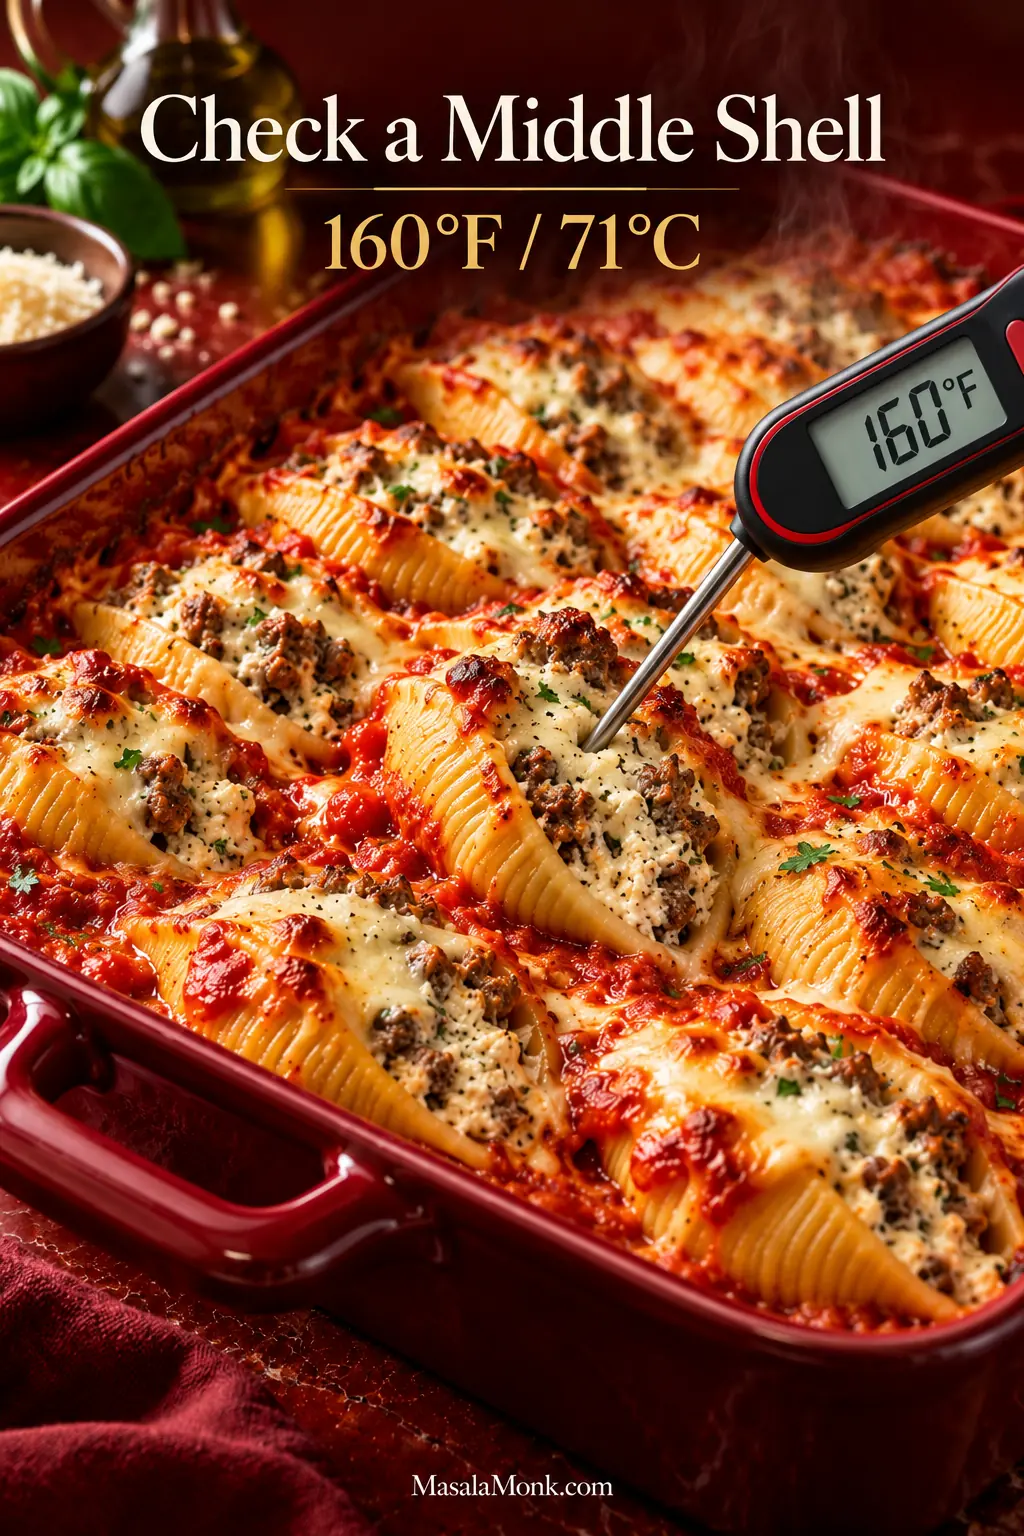
Check one of the shells near the middle of the casserole instead of judging doneness only by the bubbling edges. The pasta should be tender and the filling steaming hot all the way through. If you’re checking with a thermometer, the filling in a shell near the middle should reach 160°F / 71°C.
For the most useful temperature check, place the thermometer tip in the filling of a middle shell—not merely in hot marinara, against the pasta wall or near the hotter edge of the baking dish.
8. Rest before serving
Let the casserole stand for 10 minutes. It’ll still be plenty hot, but the shells will lift from the dish more cleanly and the filling will have a chance to settle.
Cut into one and you should find browned beef throughout the ricotta filling, with marinara tucked into the shell’s ridges and mozzarella melted over the top.
A properly rested ground-beef-and-ricotta stuffed shell should hold together when lifted while the center stays soft and creamy. The goal is structure around the filling, not a dry or firmly set interior.
Getting the Meat and Ricotta Filling Right
How much beef and ricotta do you need?
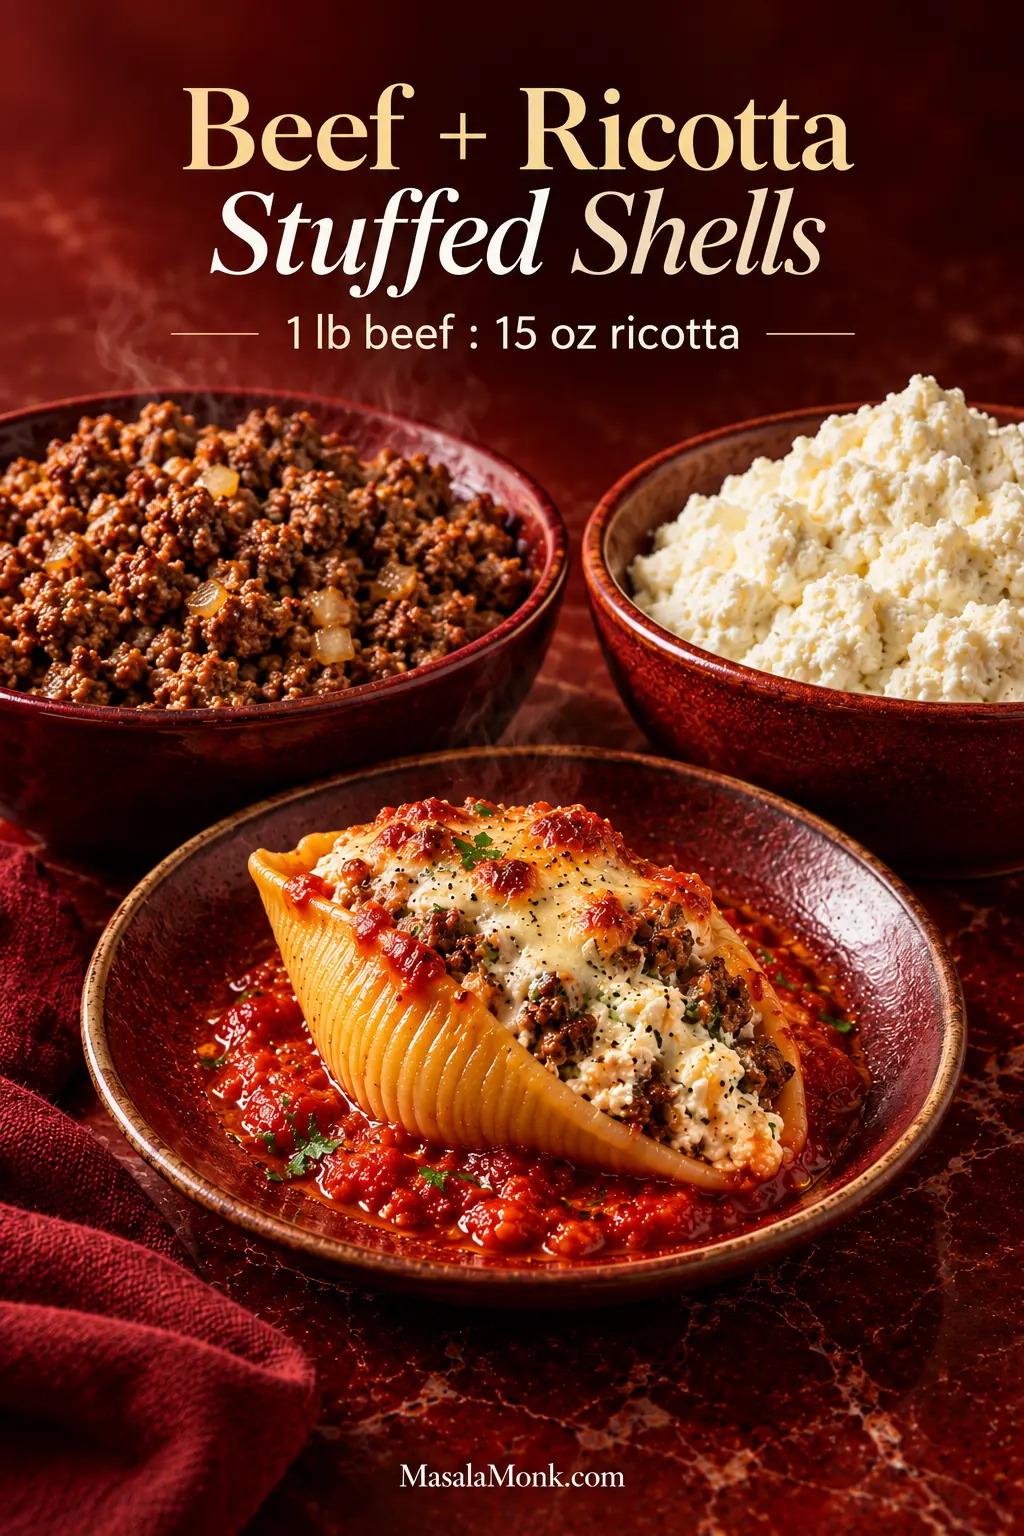
For about 24 stuffed shells, use 1 lb / 454 g ground beef with 15 oz / 425 g ricotta. That gives you beef in every shell without making the filling dense or pushing out the ricotta. The egg helps the beef-and-ricotta mixture hold together once baked.
You can change the ratio, but adding more meat isn’t necessarily the best route to stronger beef flavor. Good browning and seasoning do more without crowding the ricotta out of the shell.
Keep the browned beef in fairly small crumbles so it distributes through the ricotta instead of collecting in a few heavy pockets. That gives each stuffed shell beef throughout while the center stays creamy.
If you want the same meat, cheese and marinara combination without filling two dozen shells, our classic lasagna turns it into a different baked pasta dinner.
Should the meat go in the filling or the sauce?
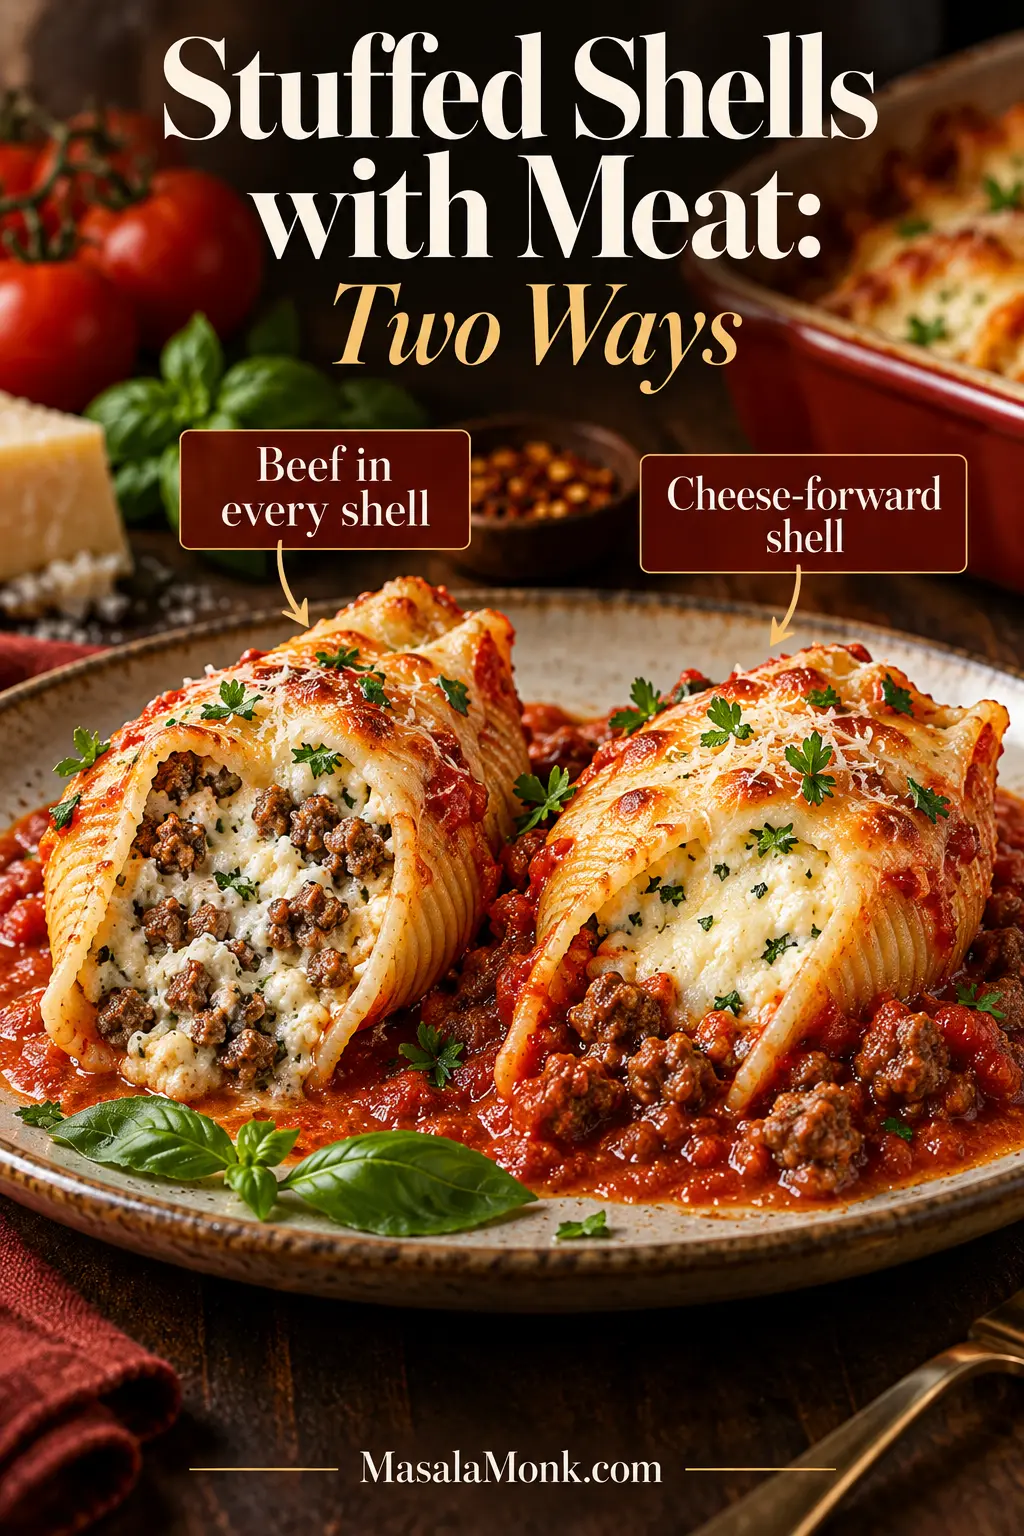
Both work; the difference is where you want the beef. Mixing it with the ricotta gives every shell a substantial meat-and-cheese filling. Stirring it into the marinara keeps the inside more cheese-forward and spreads the beef around the pasta instead.
Where the beef goes changes each forkful. Meat mixed into the ricotta makes every stuffed shell self-contained. By contrast, beef in the marinara makes the amount of meat depend more on how much sauce is served with it.
For the meat-sauce version, cook the beef as directed but stir it into the marinara instead. Fill the shells with the ricotta, mozzarella, Parmesan and egg mixture, then assemble and bake as above.
For a version without meat, our classic stuffed shells recipe keeps the filling focused on ricotta, mozzarella and Parmesan.
Troubleshooting Stuffed Shells with Meat
Why are my stuffed shells watery?
Watery stuffed shells usually come from loose ricotta, liquid left with the ground beef, wet vegetables, very thin marinara or pasta that was cooked too far before baking.
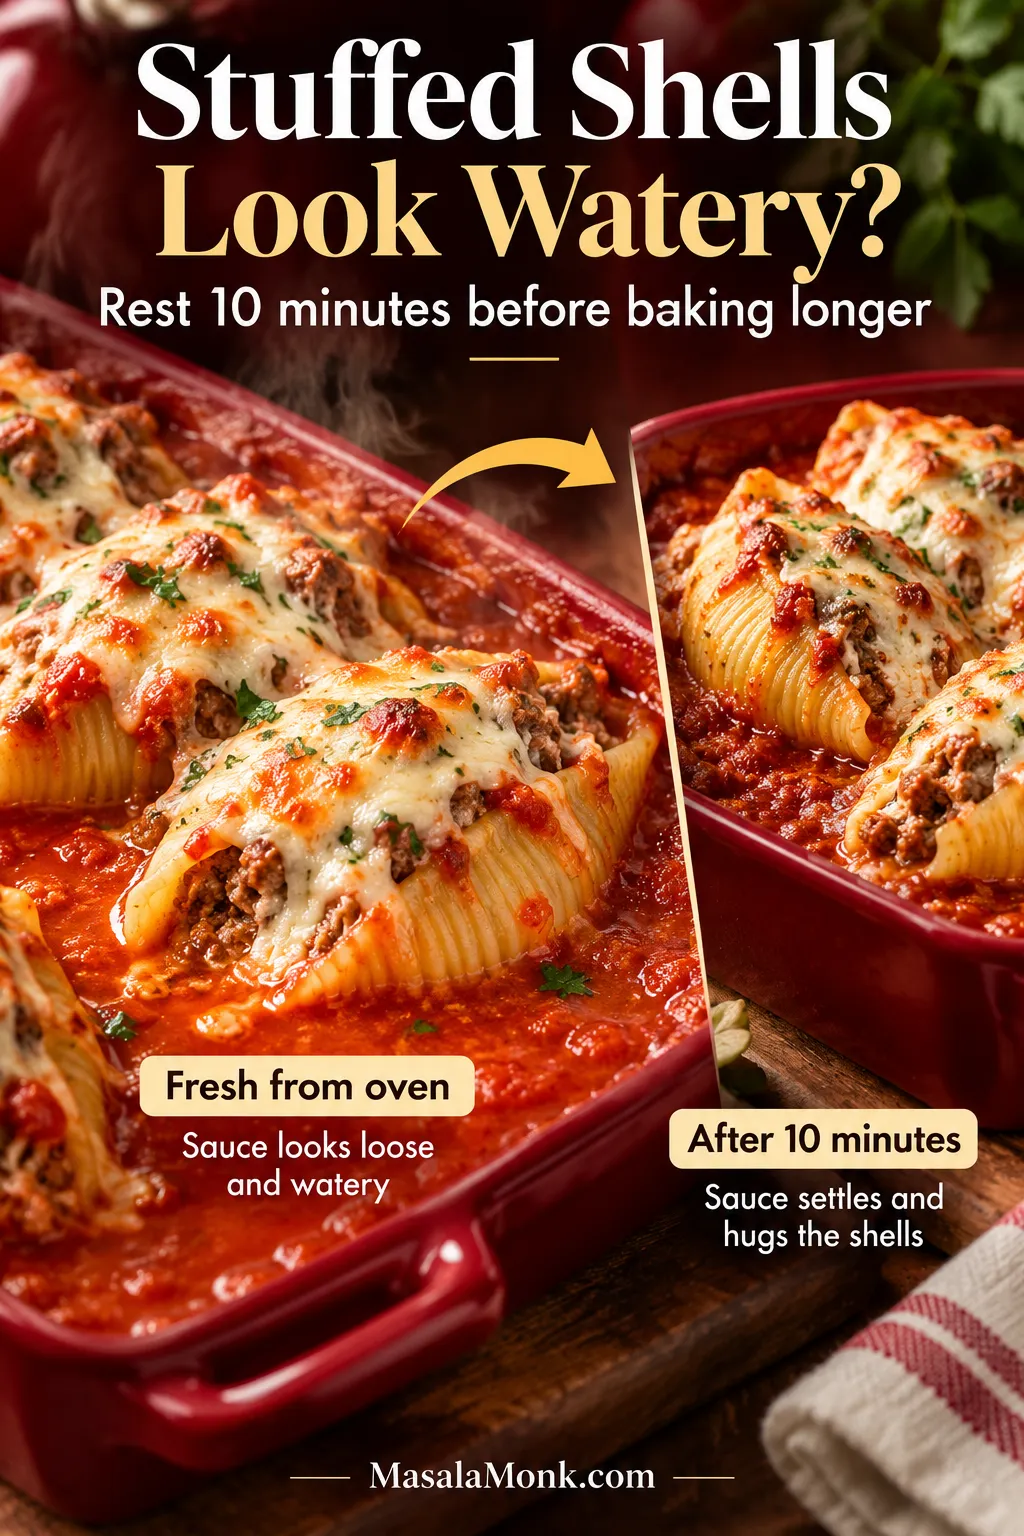
A casserole that simply looks wet when it first leaves the oven is different. Give it the full 10-minute rest before deciding it needs more heat. Some loose sauce around the shells is normal and will settle. Prolonged baking, however, can dry the pasta and make the ricotta grainy without solving the original problem.
After the 10-minute rest, judge what remains. If marinara still pools heavily around the stuffed shells, investigate ricotta, beef liquid, vegetables or sauce consistency. Do that before automatically extending the bake and drying the pasta.
Too much time in the oven is a common culprit. Whole-milk ricotta helps keep the filling tender, but prolonged heat can still dry it out. Start checking the shells near the end of the recommended baking window instead of extending the bake just because the surface still looks saucy.
Running short on filling
The first shells probably got more than their share. If you are still filling them, use the four-groups-of-six checkpoint for the remaining shells; otherwise, move some filling from the fullest shells into the emptier ones.
Why do stuffed shells tear?
They may have cooked too long or stuck together while cooling. Pull them from the water while they’re still firm, spread them out after draining and open each shell gently. The few extras in the pot are there for the occasional casualty.
Hard pasta edges
Exposed pasta probably didn’t have enough sauce or spent too long in dry oven heat. Spoon marinara over bare edges and keep the casserole covered for most of the bake. The short uncovered finish is enough to melt the cheese and give it some color.
For an all-sausage version, replace the beef with 1 lb / 454 g mild or hot Italian sausage. Or use ½ lb / 227 g each of ground beef and Italian sausage. This keeps the familiar beef flavor while adding some of the sausage’s extra seasoning and richness. Drain excess fat after browning, and go lightly with added salt until you’ve accounted for the seasoning already in the sausage.
Ground turkey
Replace the beef with 1 lb / 454 g ground turkey. Turkey is milder and often leaner, so season it well and cook away any liquid in the skillet before adding it to the cheese mixture. Ground poultry should reach 165°F / 74°C.
Beef, ricotta and spinach
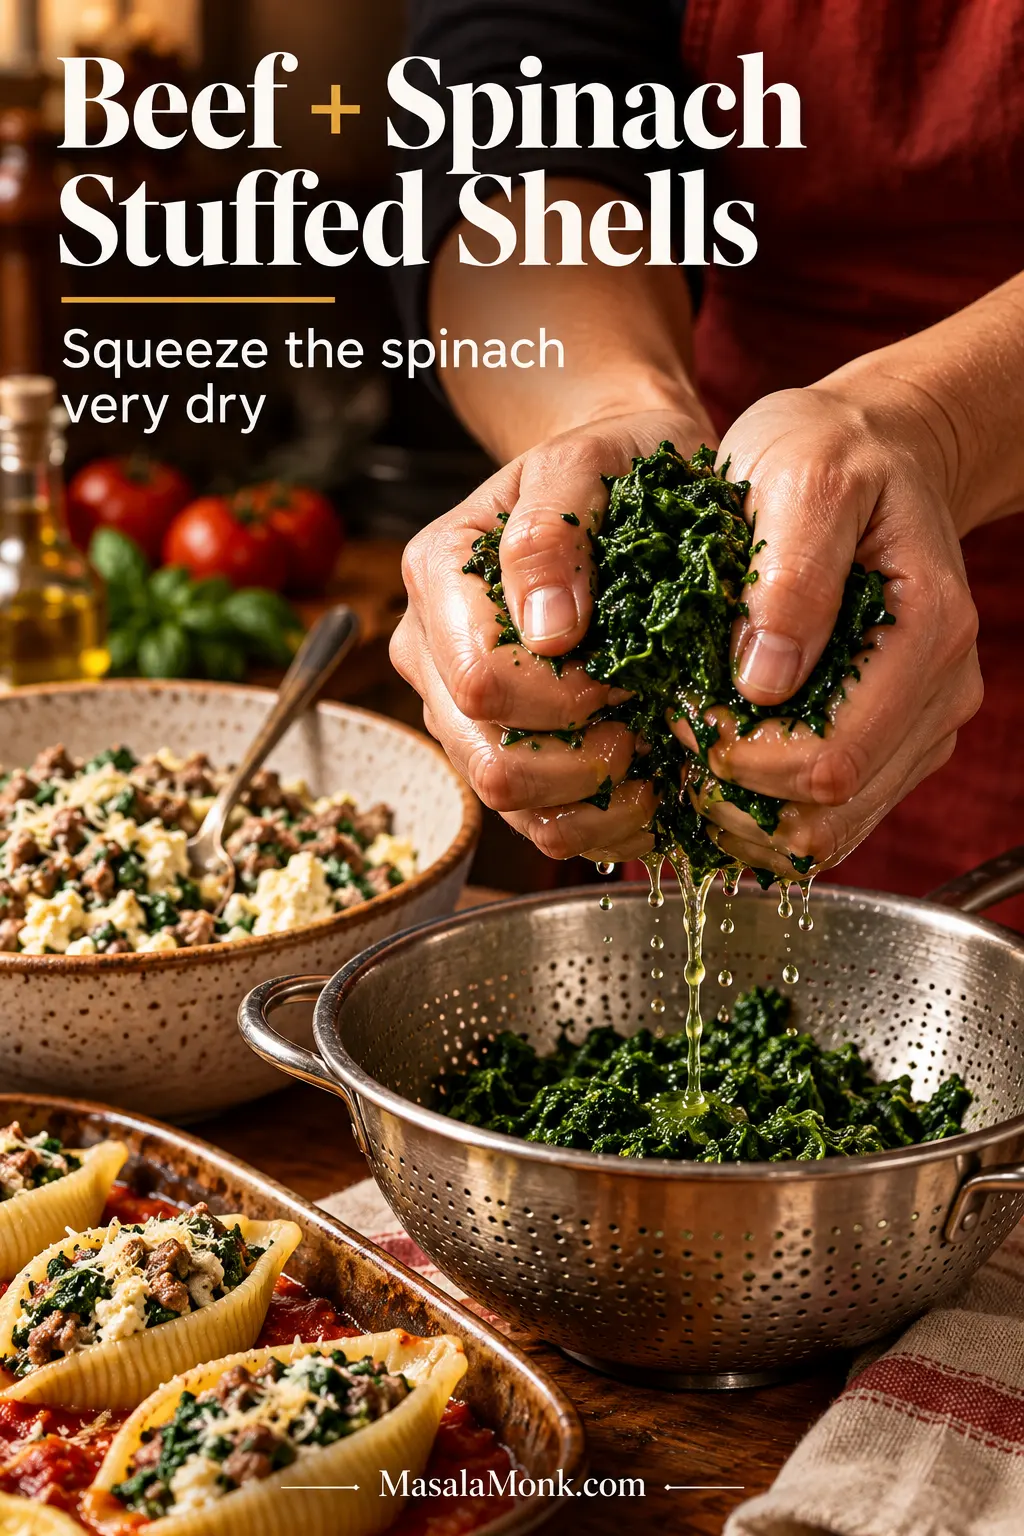
Add about 5 oz / 140 g frozen chopped spinach, thawed and squeezed very dry. Water left in the spinach goes straight into the filling. If you want vegetables to be more than an add-in, our vegetable lasagna builds the dish around them from the start.
For beef and spinach stuffed shells, properly drained spinach should form a compact clump and stop releasing water under firm pressure. That physical cue is more reliable than squeezing it for an arbitrary number of seconds.
Make Ahead, Freeze and Reheat
Can I assemble stuffed shells the day before?
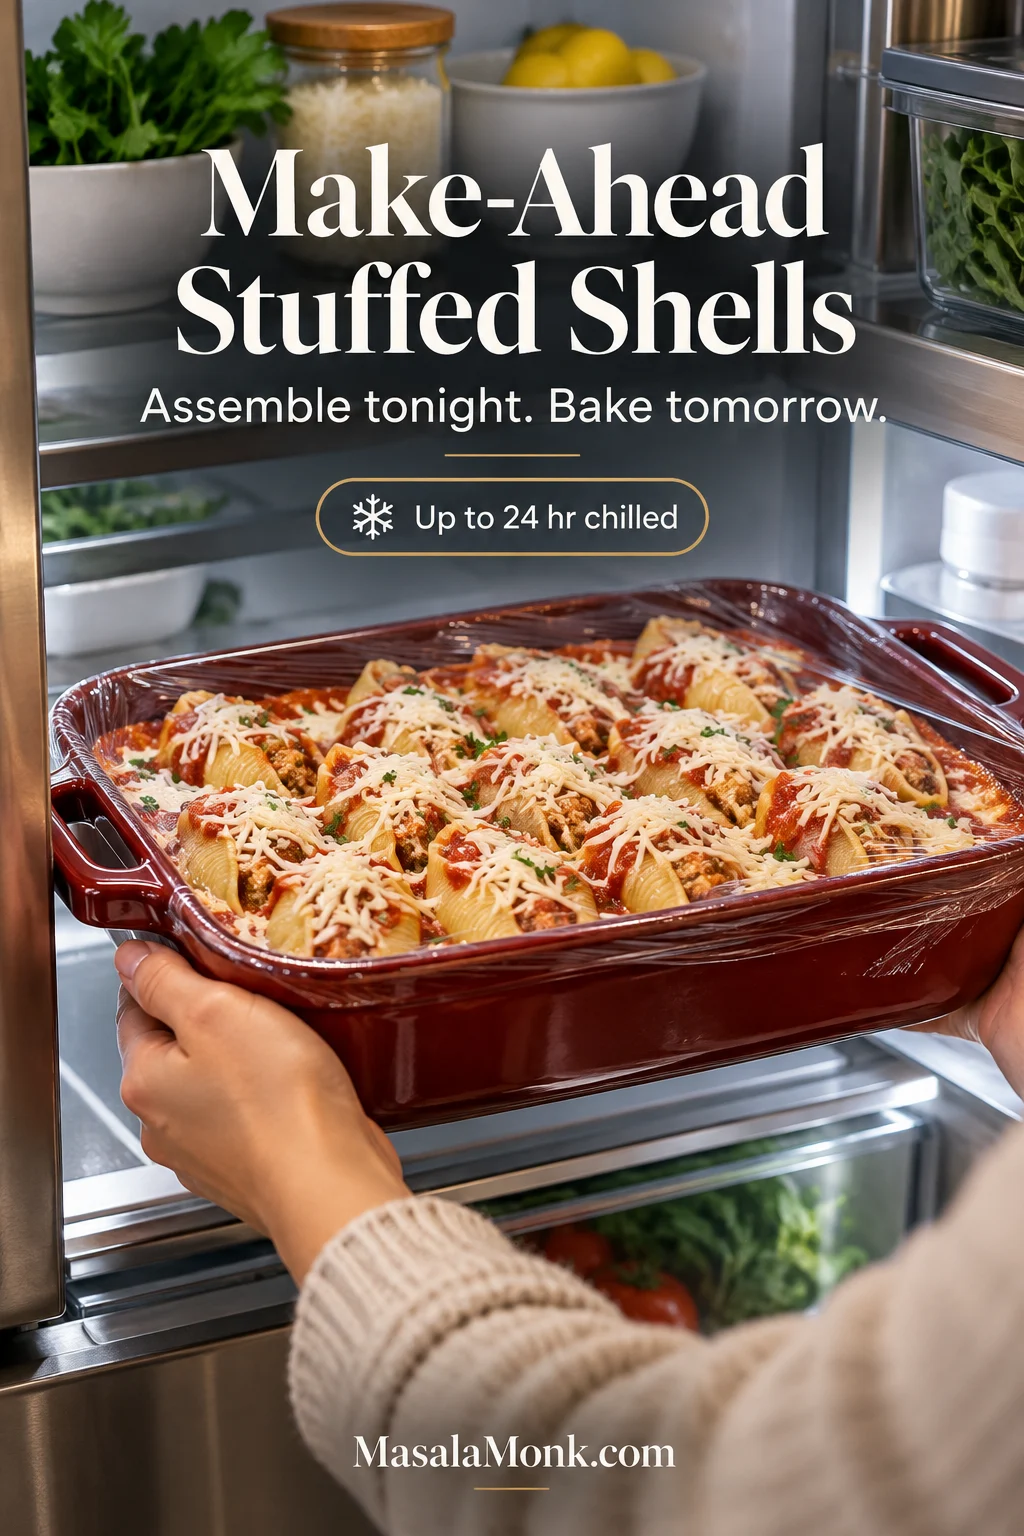
Yes. Assemble the casserole through the mozzarella topping, cover it and refrigerate promptly for up to 24 hours. That gets most of the work out of the way before dinner.
Keep make-ahead stuffed shells tightly covered while they chill. Otherwise, exposed pasta ridges can begin drying in the refrigerator before the casserole ever reaches the oven, especially around the upper edges.
When baking straight from the refrigerator, allow roughly 10–15 extra minutes of covered baking time as a starting point. A very cold dish may need longer, so check a shell near the middle before uncovering for the final 5–10 minutes.
You can also make the beef-and-ricotta filling up to 24 hours ahead, refrigerate it promptly, then cook and fill the shells closer to baking time.
Can you freeze stuffed shells?
Yes. Bake the stuffed shells first, refrigerate them promptly until chilled, then cover tightly and freeze for up to 2–3 months for best quality.
Thaw the baked shells overnight in the refrigerator for the most even reheating. Individual baked portions can also be frozen separately when you don’t want to reheat the entire casserole.
How to store and reheat leftovers
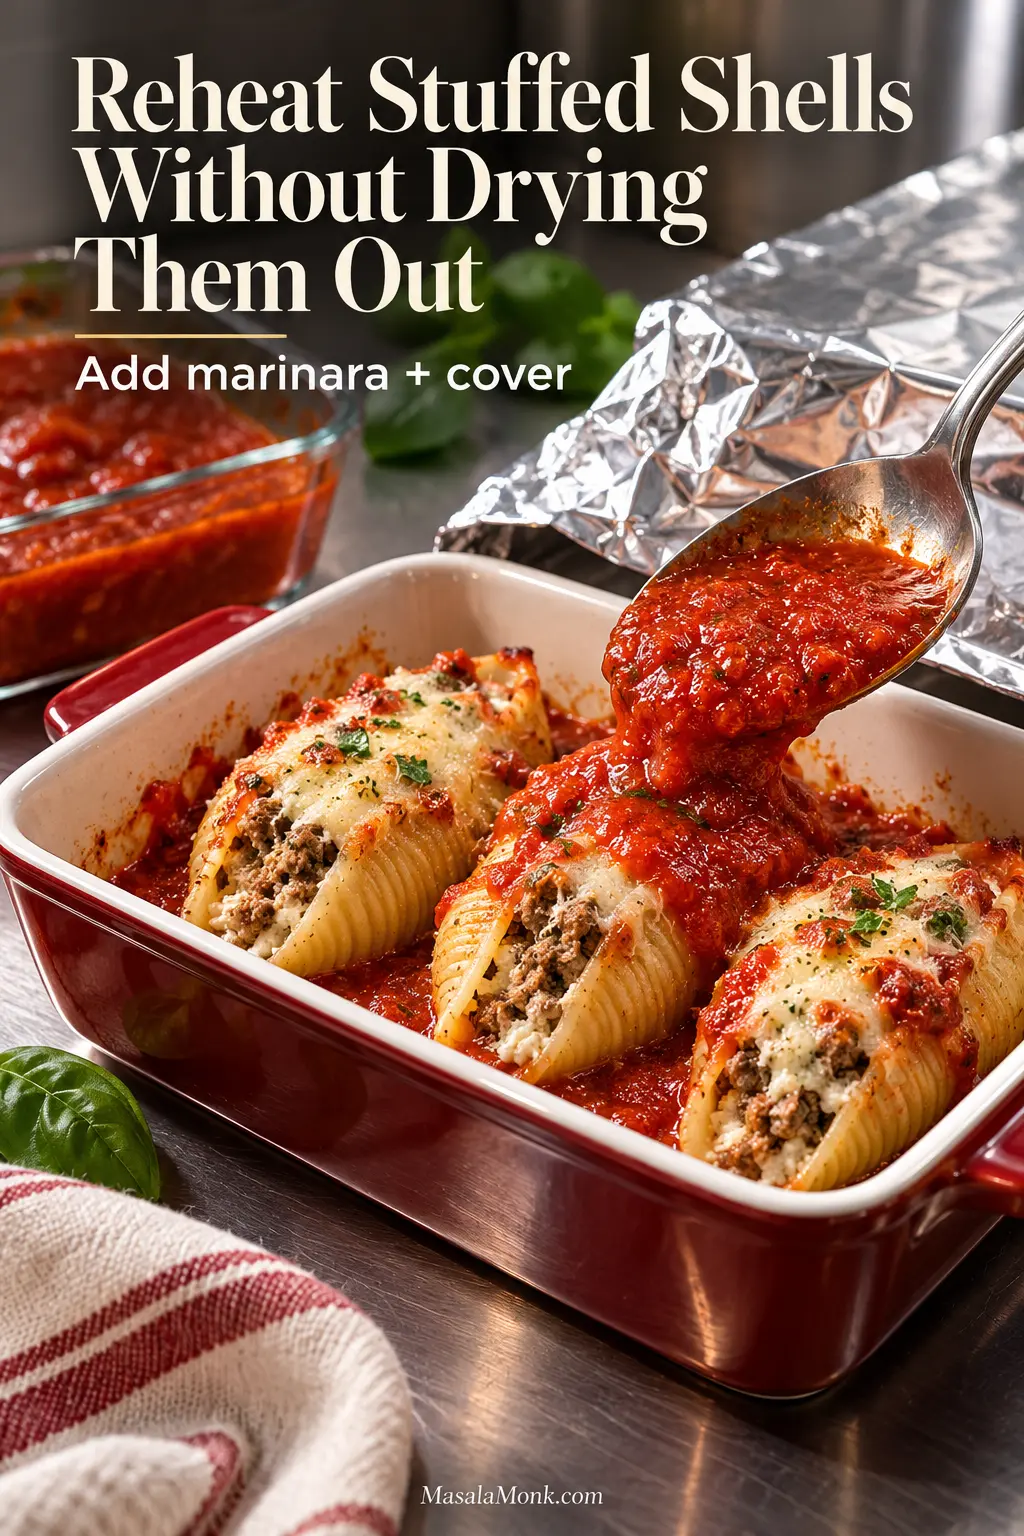
Refrigerate leftovers promptly in a covered container and use them within 3–4 days. A spoonful of marinara helps if the pasta has dried slightly in the refrigerator.
When reheating leftover stuffed shells, aim the extra marinara at pasta that looks matte or dry—particularly exposed lips and ridges. This restores moisture where it is needed without turning the whole portion unnecessarily soupy.
For a larger refrigerated or thawed portion, cover and reheat at 350°F / 175°C for about 20–25 minutes as a starting point. Continue until the center reaches 165°F / 74°C. Individual portions can be loosely covered and reheated in the microwave until hot throughout.
How Many Stuffed Shells Per Person?
These stuffed shells are substantial enough to serve as the main dish. From one batch, plan on:
4 stuffed shells per person for 6 hearty servings.
3 stuffed shells per person for about 8 servings with sides.
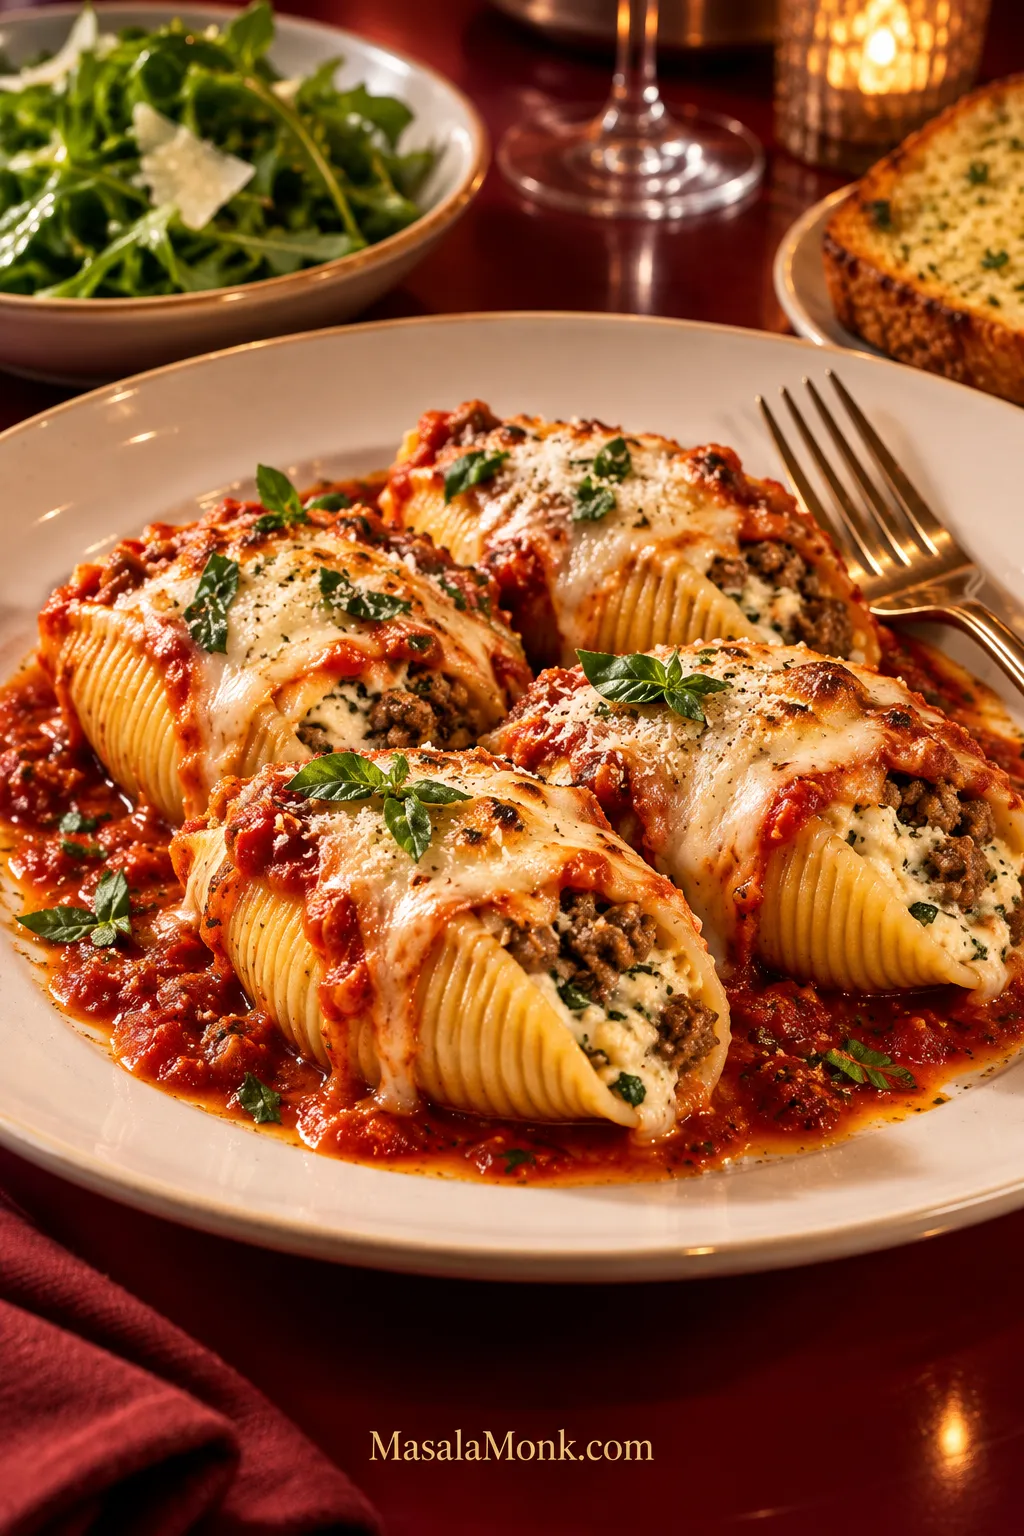
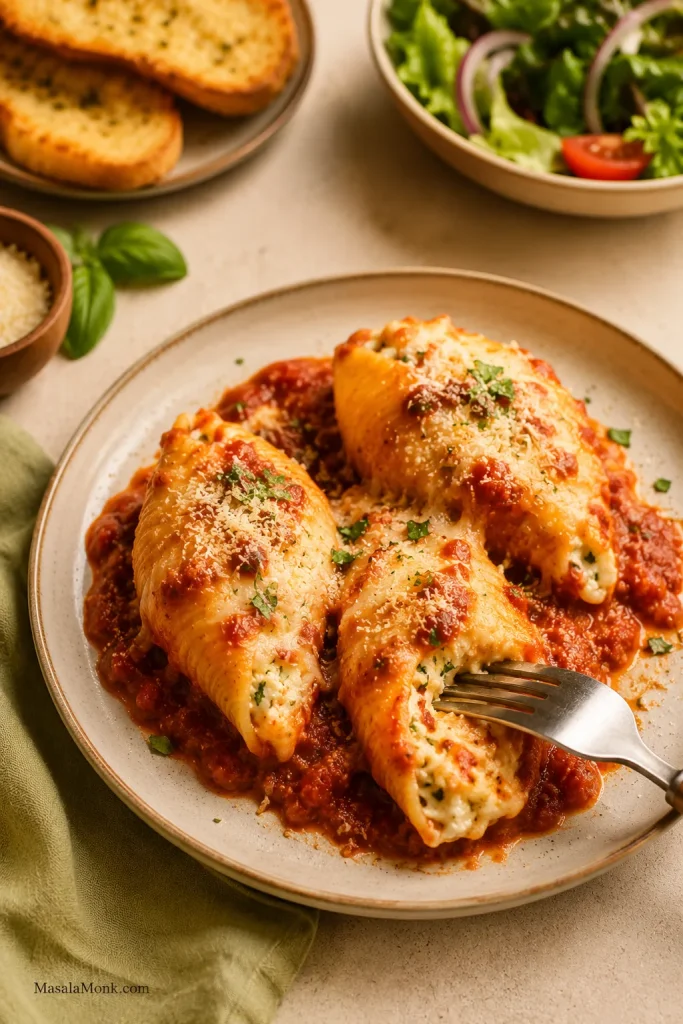
For a hearty serving of stuffed shells with meat, four shells fill the plate without needing to be buried in sauce. Spoon marinara around and lightly over them so the beef-and-ricotta centers remain visible and easy to portion.
What to Serve with Stuffed Shells
A cold, crunchy side works especially well against the hot casserole. Our broccoli salad brings crisp vegetables and a tangy dressing, while a simple green salad is an easy lighter option.
For something warm, green beans almondine adds lemon and toasted almonds without competing with the marinara. Roasted broccoli works too, and garlic bread is an easy choice when you want something for the sauce left on the plate.
Bring the casserole to the table while the mozzarella is still soft and stretchy, and spoon some of the marinara from the dish over each serving. Add something crisp or green alongside if you like. That’s really all these shells need.
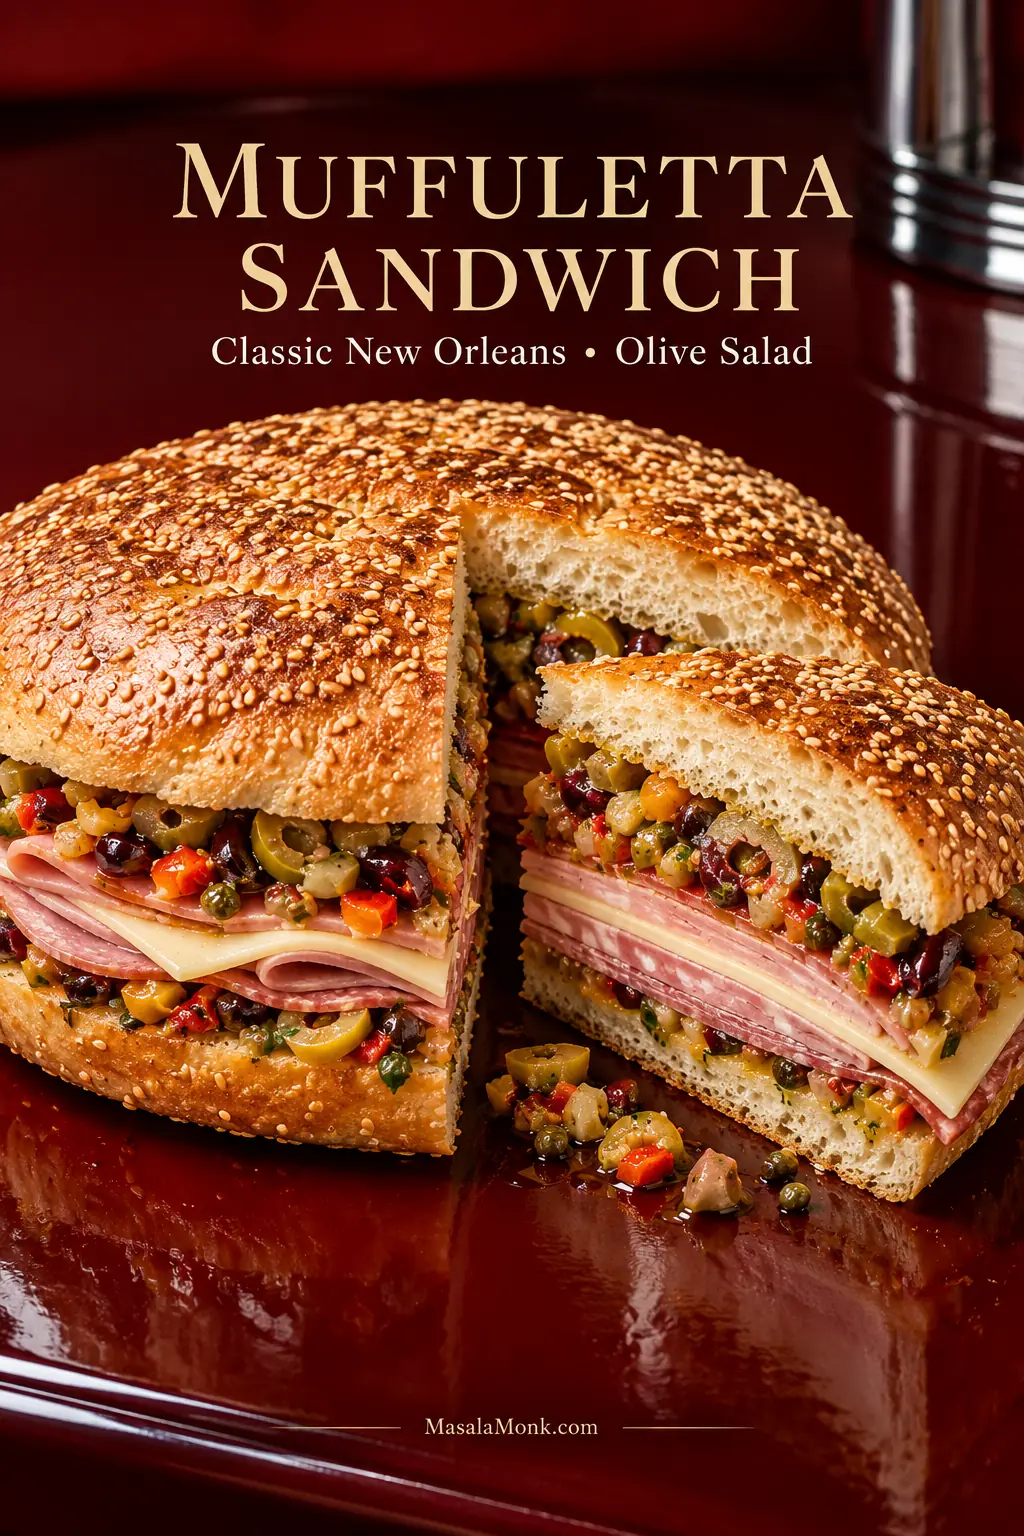
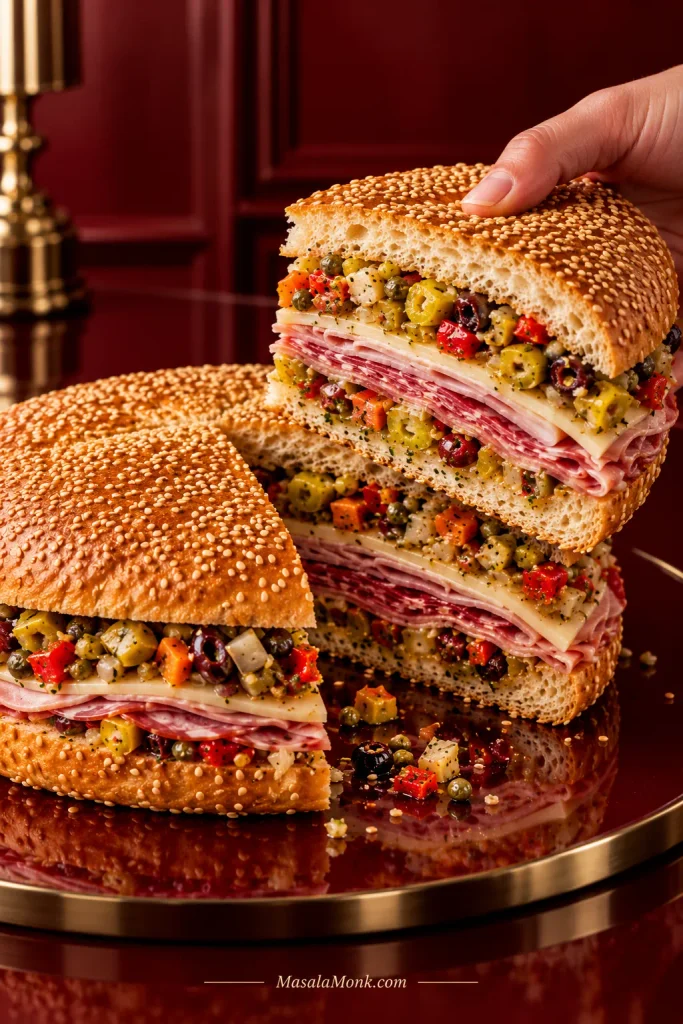
A muffuletta is one of the rare sandwiches where waiting is part of the recipe. Build the loaf, wrap it, put some weight on top and give the olive dressing time to work into the bread. When you finally cut through the round, what began as separate layers of meat, cheese, olives and bread should hold together as one sandwich.
A good wedge yields when you bite it. The sesame loaf bends around the filling, the crumb glistens with seasoned olive oil without feeling soaked, and a rough green-and-red line of olive salad runs through each slice. Thin folds of cured meat and cheese stay where they belong instead of pulling the sandwich apart.
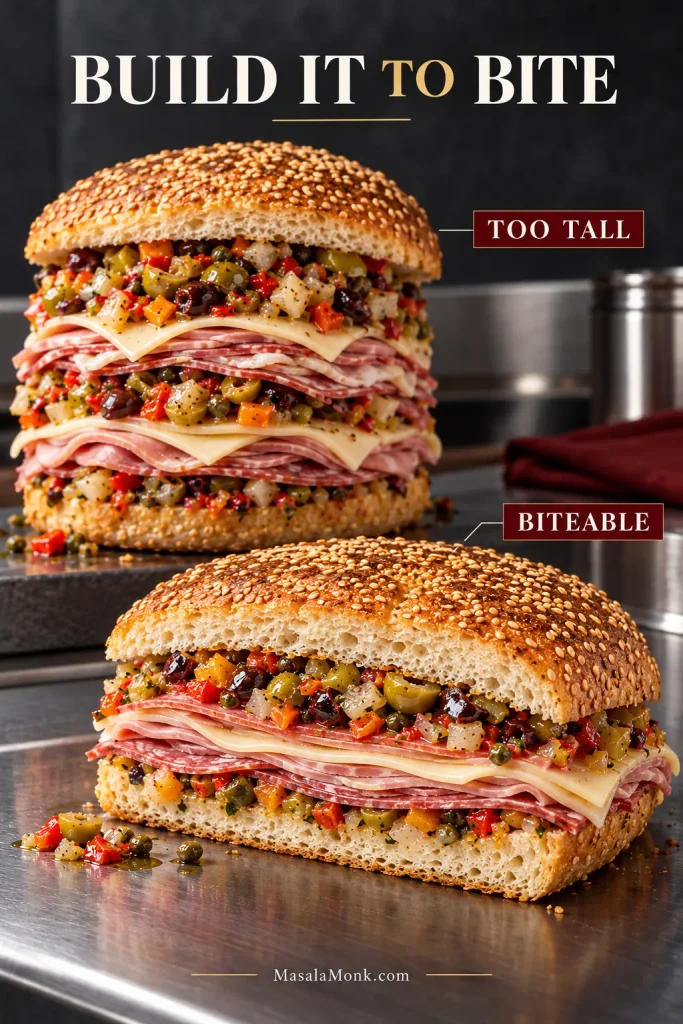
Homemade versions usually go wrong at one of those points. A handsome loaf can be too hard or too tall. Extra meat can make the sandwich harder to eat. Olives, giardiniera, capers, salami and cheese can pile salt on top of salt, while too much loose dressing softens the bread before anyone is ready for a wedge. The method below keeps those parts in balance and gives the sandwich enough time to come together.
Build for the press. Use a broad, tender sesame loaf, control the olive-salad oil, keep the filling low and even, then refrigerate the wrapped sandwich under weight for 1–2 hours.
Classic Muffuletta Sandwich Recipe
A classic New Orleans muffuletta with a round sesame loaf, Genoa salami, mortadella, ham, provolone, Swiss, and coarse homemade olive salad. The loaf is dressed, filled, wrapped and pressed until it cuts into clean, satisfying wedges.
Yield
6 large wedges or 8 smaller portions
Active prep
About 25–30 minutes
Olive salad rest
At least 1 hour; preferably overnight
Sandwich press
1–2 hours refrigerated
Same-day total
About 2½–3½ hours
Loaf
9–10 in / 23–25 cm across
Optional warming
350°F / 175°C
Equipment
Serrated bread knife
Large cutting board
Medium mixing bowl
Chef’s knife or food processor
Measuring cups and spoons
Kitchen scale, useful for the deli filling
Plastic wrap; reusable food wrap or foil also works
Second cutting board or tray for pressing
Cast-iron skillet for weight; a Dutch oven or another broad, steady weight works too
Ingredients
For the Olive Salad
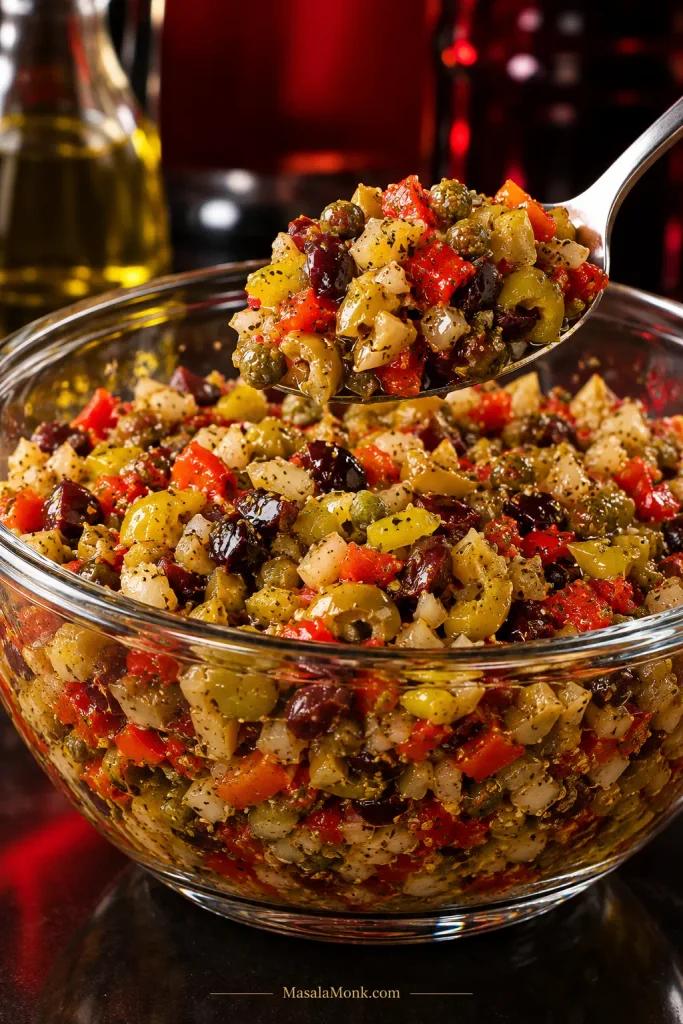
1 cup drained green olives / about 140 g, preferably pimiento-stuffed or another firm, flavorful green olive
½ cup drained Kalamata or other dark olives / about 70–75 g
½ cup well-drained mild giardiniera / about 90 g (Italian mixed pickled vegetables), unless you specifically want a hotter sandwich
¼ cup drained pepperoncini / about 35 g
¼ cup drained roasted red pepper / about 40 g
2 tbsp drained capers / about 18 g
2 medium garlic cloves, roughly chopped
1 tsp dried oregano
¼ tsp freshly ground black pepper
2 tbsp / 30 ml red wine vinegar
⅓ cup / 80 ml extra-virgin olive oil
Fine salt only if needed after tasting
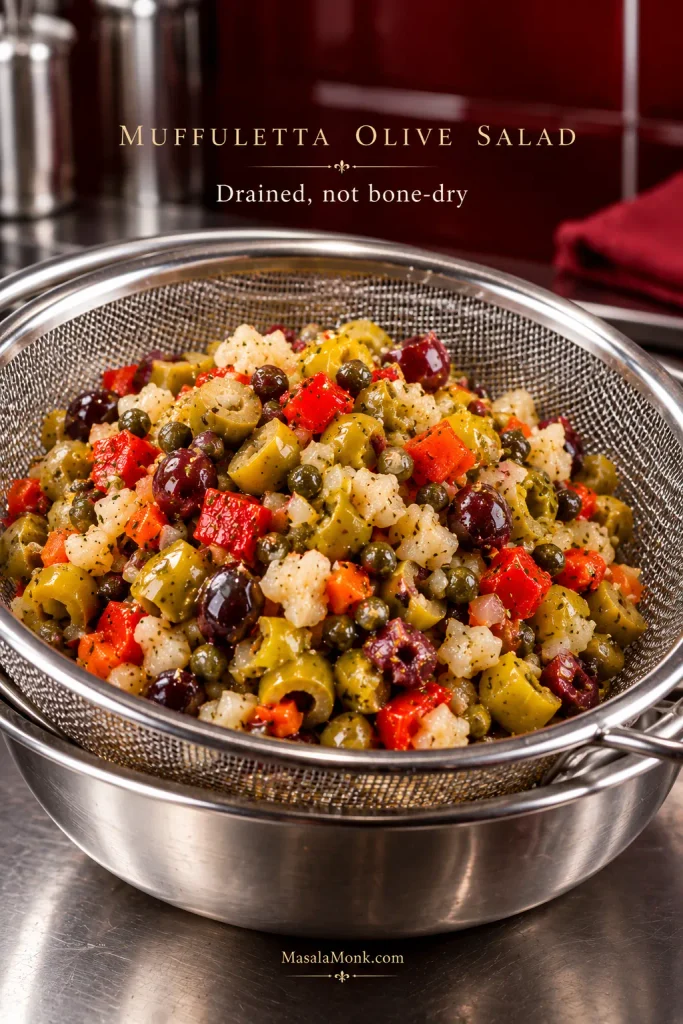
Drain the jarred vegetables until they no longer shed obvious brine when pressed lightly with a spoon; they do not need to be dried bone-dry.
A practical drainage test: press a spoonful gently against the strainer. If liquid immediately pools underneath, give the olives and pickled vegetables more time before mixing the muffuletta olive salad.
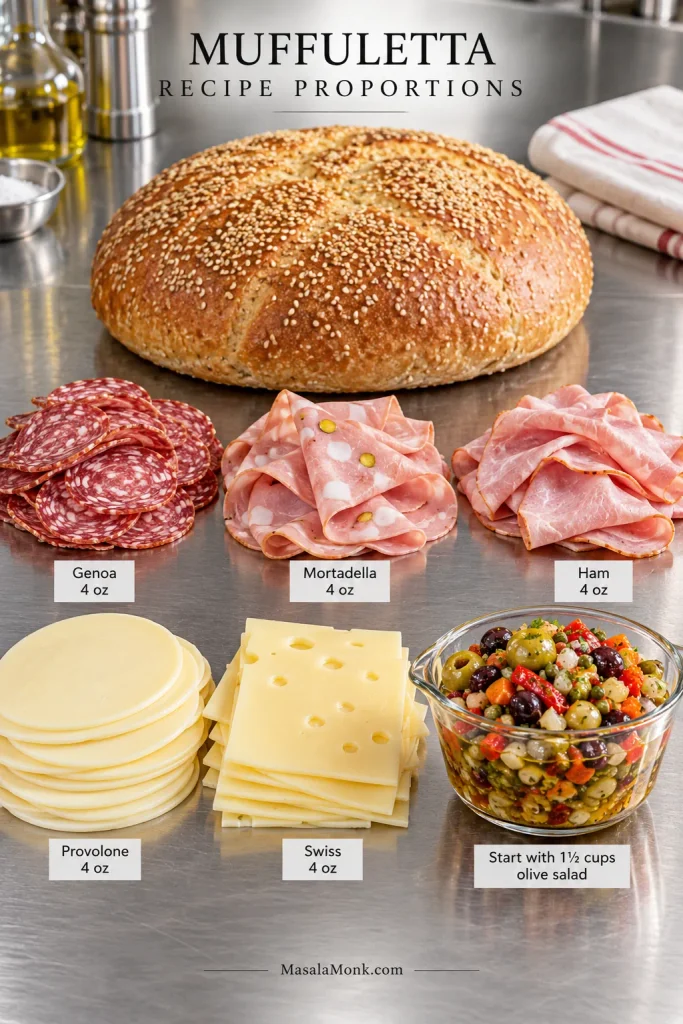
The finished mixture makes roughly 2½–3 cups, usually around 500 g, depending on the ingredients and how thoroughly they are drained. Plan on about 1½ cups / 300 g to start for the sandwich; a broad 9–10 inch loaf may comfortably take up to 2 cups / 400 g. You’ll probably have some olive salad left over. That’s intentional.
If your giardiniera is packed in oil, drain it especially well and begin with ¼ cup / 60 ml olive oil instead of the full ⅓ cup. Add more after the salad rests if it needs it. Oil trapped between chopped vegetables is easy to miss and difficult to take back out later.
For the Sandwich
1 round sesame loaf, 9–10 in / 23–25 cm across
4 oz / 113 g thinly sliced Genoa salami
4 oz / 113 g thinly sliced mortadella
4 oz / 113 g thinly sliced ham
4 oz / 113 g sliced provolone
4 oz / 113 g sliced Swiss
Ask the deli counter for slices that fold easily without being shaved into wisps. Mortadella especially likes to bunch into thick pillows; pull those folds apart as you build so one bite does not end up twice as tall as the next.
The recipe uses 12 oz / 340 g meat and 8 oz / 225 g cheese, but those numbers only help when both are distributed across the full round instead of concentrated in one area.
Method
1. Chop the Olive Salad
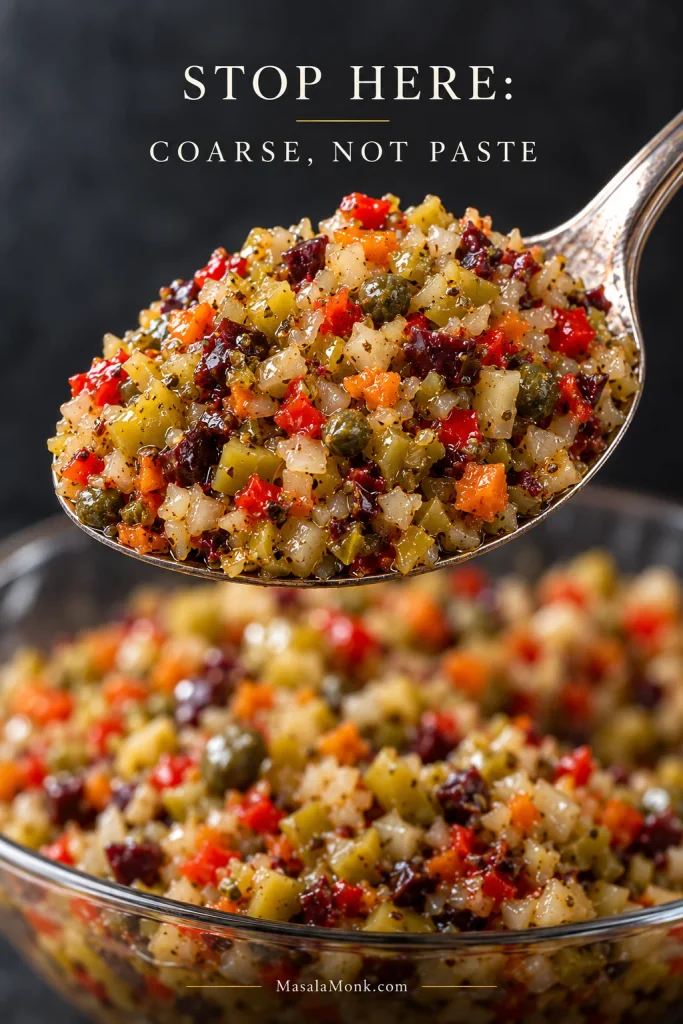
Combine the green olives, dark olives, giardiniera, pepperoncini, roasted red pepper, capers and garlic. Chop by hand or pulse briefly in a food processor until most pieces are roughly lentil-to-pea size.
Stop while you can still tell an olive from a pepper. A few uneven pieces are fine. Smooth olive paste loses the little flashes of crunch and pickle that make the sandwich interesting.
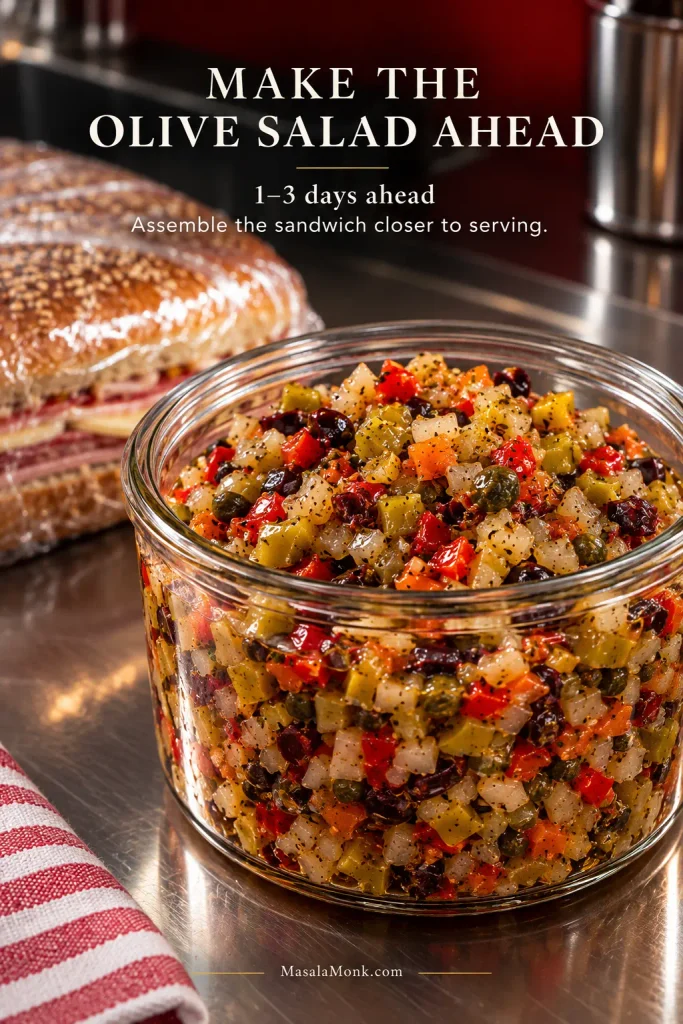
The spoon should hold a loose mound rather than a smear. That coarse muffuletta olive salad texture keeps olives, peppers and giardiniera distinct even after the sandwich is pressed.
2. Dress and Rest the Olive Salad
Stir in the oregano, black pepper, red wine vinegar and olive oil. Cover and refrigerate for at least 1 hour, preferably overnight.
Stir from the bottom before using it and taste before reaching for salt. The vegetables should no longer taste like several separate jars emptied into one bowl. You’re looking for a glossy, spoonable mixture with a little seasoned oil around the solids.
After the muffuletta olive salad rests, stir from the bottom before tasting it again. The final salt decision belongs here, once the vegetables, vinegar, garlic and seasoned oil have had time together.
3. Slice and Assess the Loaf
Cut the loaf horizontally with a serrated knife. A broad, relatively low loaf can keep its crumb intact. With a tall supermarket boule, pull out only enough soft interior to improve the bread-to-filling ratio, leaving roughly ¾–1 in / 2–2.5 cm of crumb beneath the crust.
Press the cut surface gently with a fingertip. The crumb should spring back a little. A loaf that already feels like a hard bread bowl will still be hard after pressing.
4. Dress the Bread
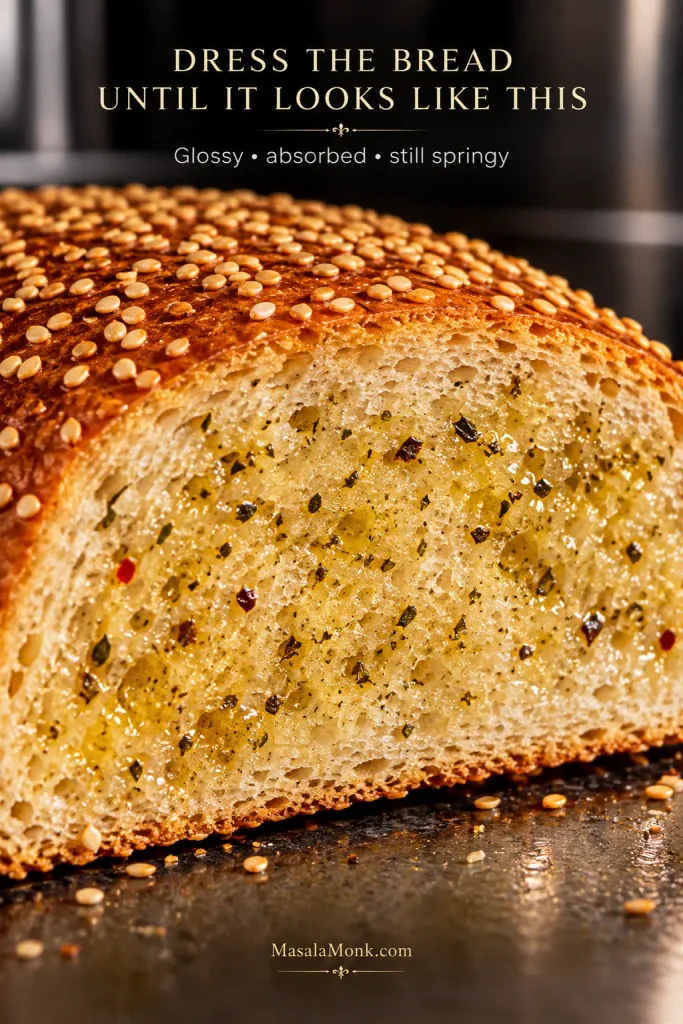
Spoon some seasoned oil from the olive salad over both cut faces. Give it a moment to disappear into the crumb.
Still pale and dry? Add another spoonful. Already glossy with some spring underneath? Stop there. The last spoonful is often the one you do not need.
Pause after each spoonful of seasoned oil and let the crumb respond. Fast absorption means there is still capacity; a lingering surface sheen is the cue to stop.
5. Build the Sandwich
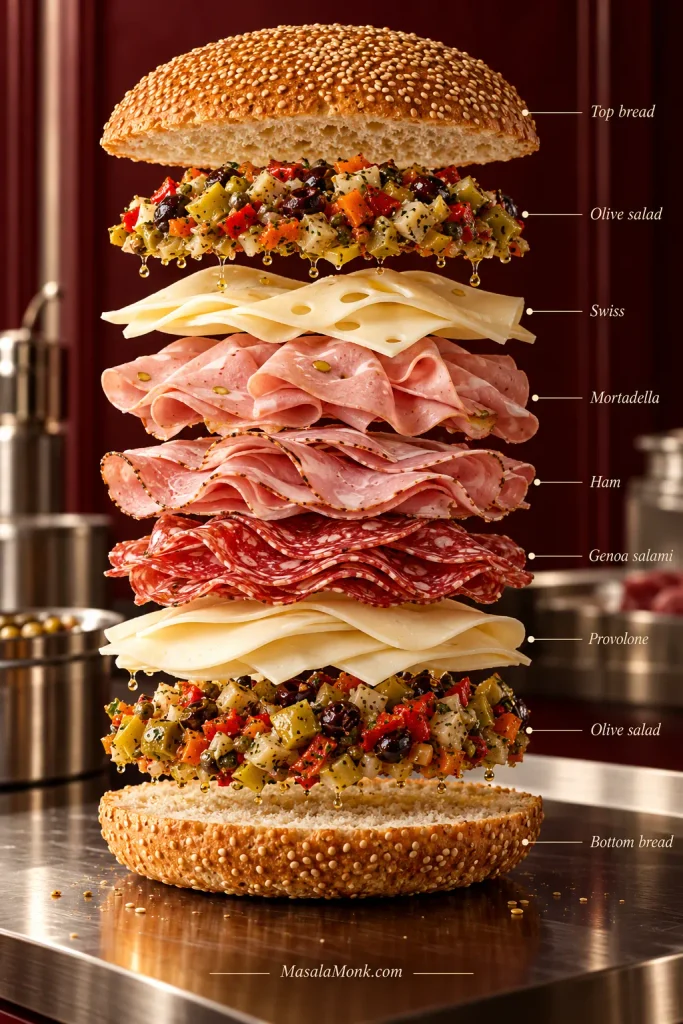
Spread about ¾ cup olive salad over the bottom bread, staying about ½–¾ in / 1–2 cm inside the edge.
Lay the provolone across the olive salad. Add Genoa salami, ham and mortadella in loose overlapping folds, spreading each meat across the full round. Finish with Swiss.
Spoon another ¾ cup olive salad over the upper cheese. That gives you the 1½-cup baseline; add more a spoonful at a time if the loaf still closes easily, up to about 2 cups total. Keeping the chunky salad on the filling also saves you from flipping an olive-covered top half onto the sandwich.
Splitting the olive salad between the two sides of the filling prevents one thick wet band from dominating the sandwich, while broad layers of cheese and meat keep the build even.
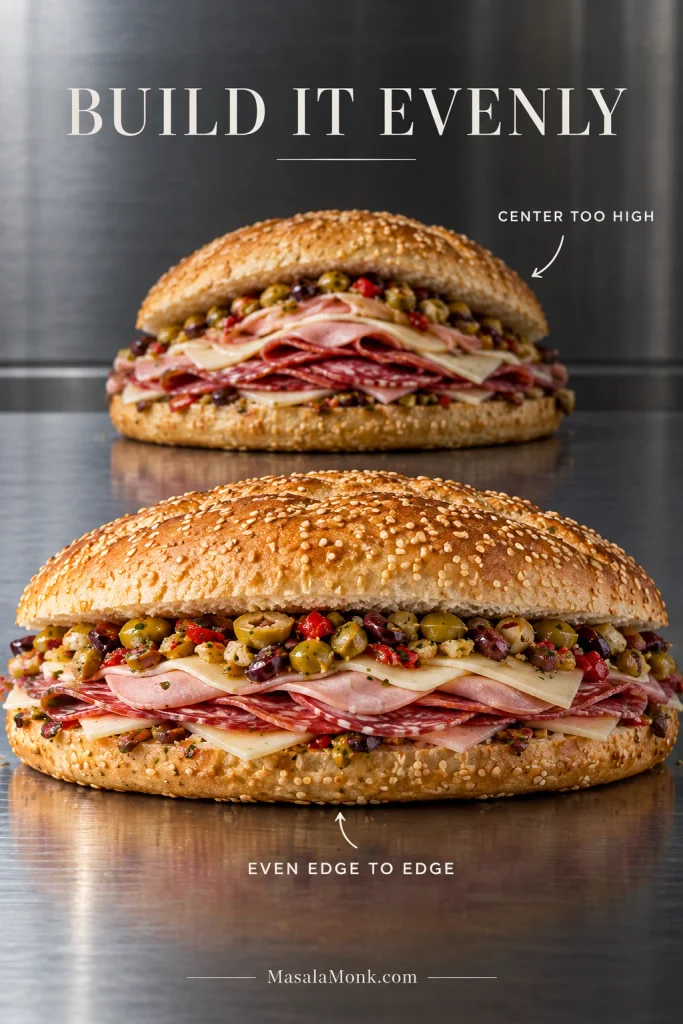
Look at the loaf from the side. It can be abundant without becoming awkward to bite. Move thick meat folds around now; an even sandwich presses more cleanly.
6. Close and Wrap
Lower the oil-dressed top bread straight onto the filling. Wrap it snugly in plastic wrap. Reusable food wrap or foil also works.
7. Press for 1–2 Hours
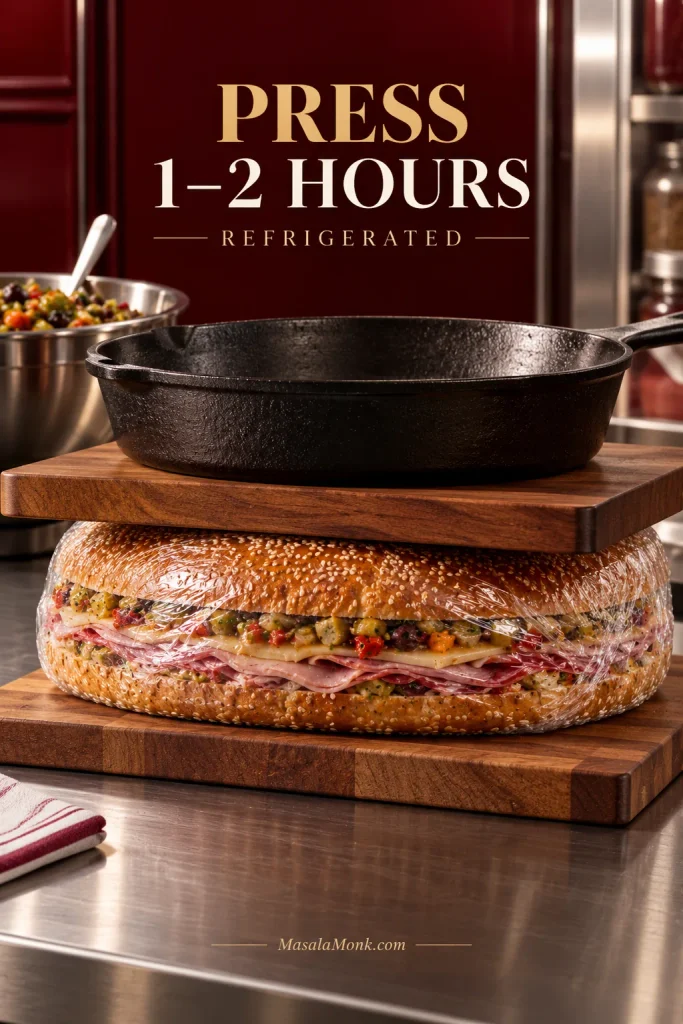
Put the wrapped sandwich on a cutting board or tray and place another flat board on top. Set a cast-iron skillet over it and refrigerate. A Dutch oven or another broad weight works too; roughly 5–8 lb / about 2–4 kg is a useful starting point.
A flat board turns the weight into even pressure across the muffuletta. Without it, one area can compress hard while the outer edges remain comparatively loose.
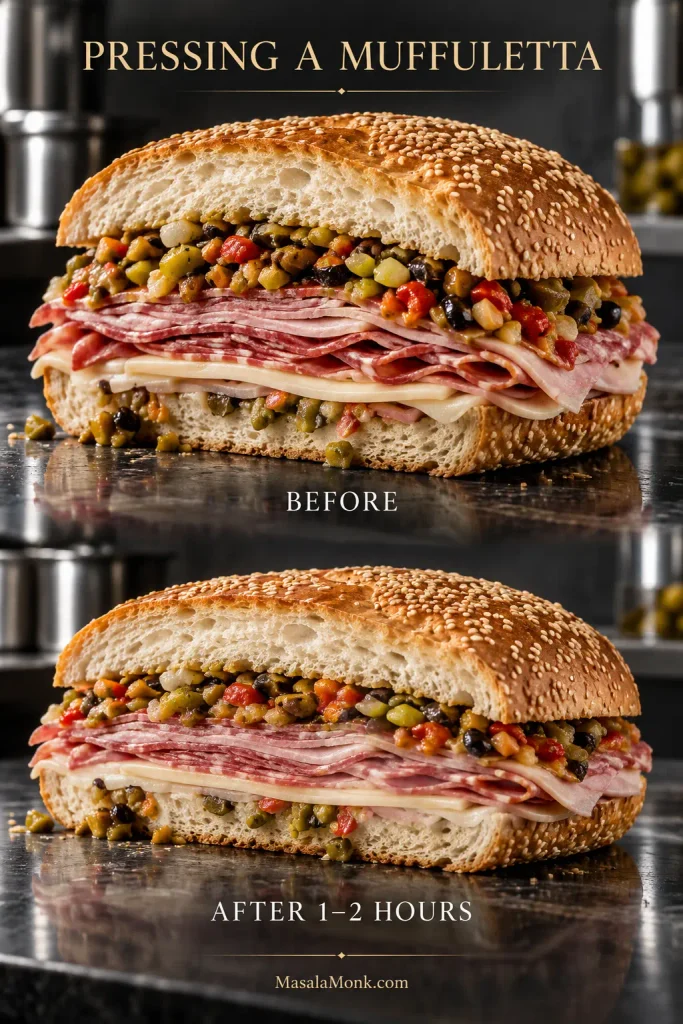
At first the loaf can look almost comically full. An hour or two later it should be lower and firmer, with the layers holding together when you lift it.
Some spring should remain in the bread. If dressing is squeezing steadily from the edges, ease up on the weight or check whether there’s too much loose oil.
8. Cut and Serve
Unwrap and saw gently with a serrated knife into 6 large wedges or 8 smaller portions. Once pressed, a wedge should lift cleanly without needing both hands to clamp it together.
After a good press, a wedge should hold its layers when lifted while the crumb still looks tender rather than compressed. That is the balance to look for before serving.
Serve it cool, or give a refrigerated sandwich a brief temper before eating if you prefer softer bread and cheese.
9. Warm It, If You Like
Wrap loosely in foil and warm at 350°F / 175°C. Start checking individual wedges after about 8 minutes; a refrigerator-cold whole loaf will need longer and may take 15 minutes or more.
The real finish line is softened cheese and fragrant cured meat. Pull the sandwich before the crust turns hard and dry.
A Few Useful Notes
A same-day version still works: give the olive salad 30–60 minutes if that is all you have, then assemble and press the sandwich.
Jarred olive salad can replace homemade. Taste both the solids and the oil first; stale or harsh oil is worth draining and refreshing with good extra-virgin olive oil and a little vinegar.
Taste before salting. Between the olives, capers, pickled vegetables, cured meat and cheese, you may already have all the seasoning you need.
Keep total unrefrigerated time within 2 hours, or 1 hour above 90°F / 32°C.
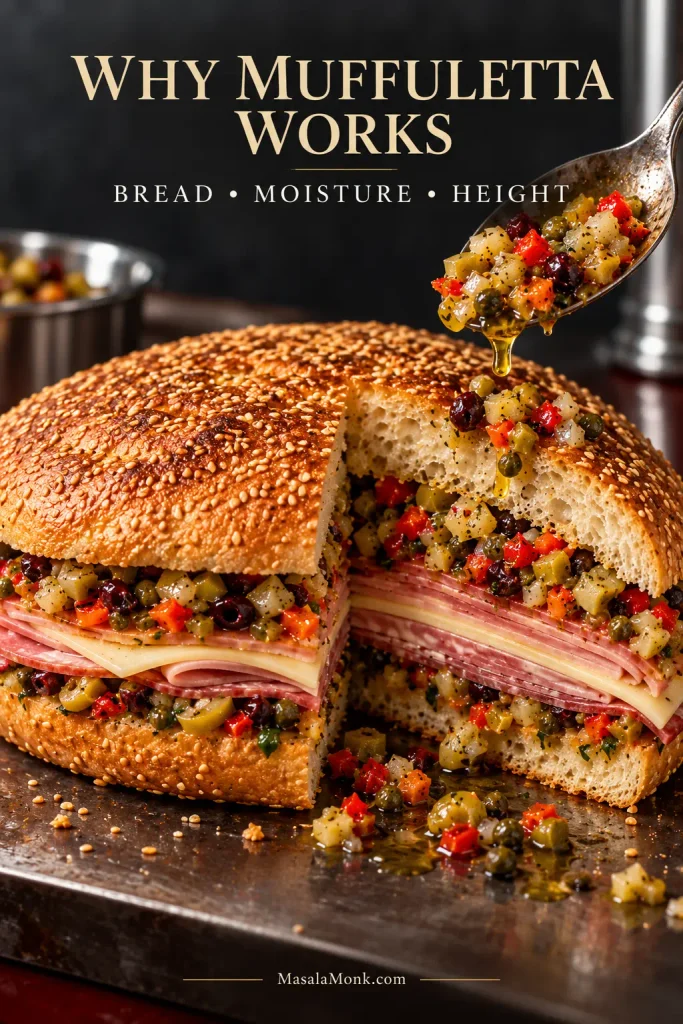
Most muffuletta problems come down to three things: the loaf, the moisture in the olive salad and the height of the filling.
Bread, moisture and height interact throughout a muffuletta: a resistant loaf is hard to bite, excess loose dressing softens the crumb, and an overbuilt sandwich becomes harder to press evenly.
Strip away the variations and a muffuletta still comes down to a few unmistakable things: a broad sesame loaf, olive salad, cured meats and cheese. During the rest, seasoned olive oil works into the crumb, making the bread part of the flavor rather than simply its container.
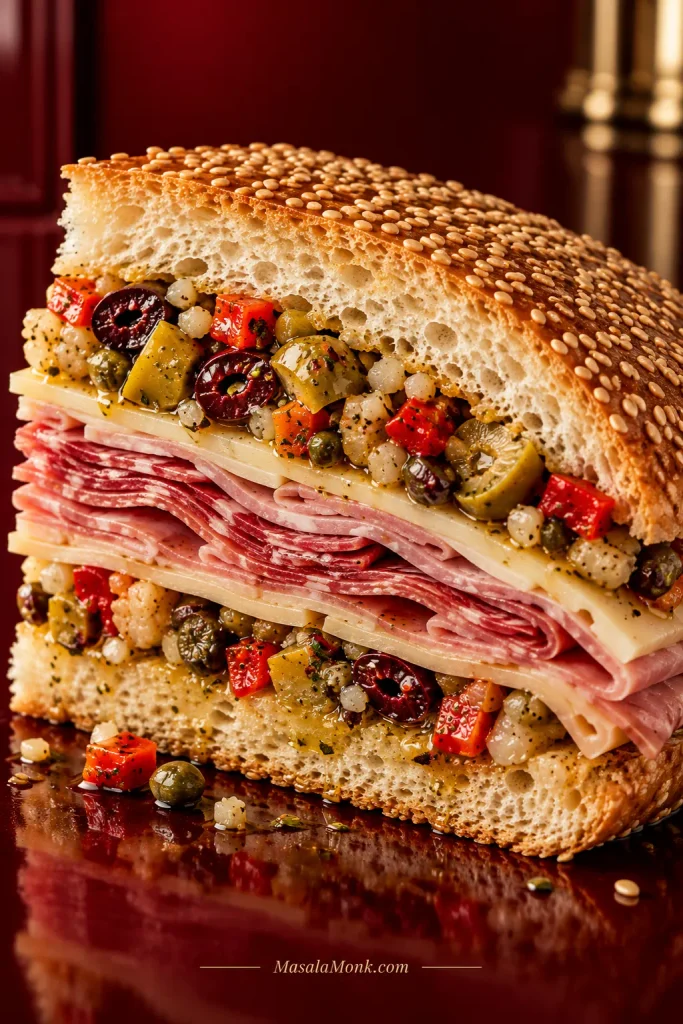
Use the muffuletta cross-section as a balance check: if one band of filling dominates the others, that wedge is more likely to pull apart even when the total ingredient amounts are right.
If you obsess over only two things, make them the bread and the olive salad. The exact deli meats and second cheese can vary. A hard loaf or weak olive salad changes the sandwich much more.
Central Grocery and the Muffuletta’s New Orleans Story
Central Grocery says its French Quarter store was founded in 1906 by Sicilian immigrant Salvatore Lupo, whom it credits with creating the muffuletta. Its sandwich brings together a round Sicilian sesame loaf, cured meats, cheese and briny Italian olive salad.
It gathers the pleasures of an Italian deli counter—bread, cured meat, cheese, olives and pickled vegetables—into one portable round loaf.
This recipe keeps that recognizable New Orleans structure. Low-moisture mozzarella can also replace Swiss as a common variation. You will also see the sandwich spelled muffaletta. The spelling changes; the sandwich does not.
The Best Bread for a Muffuletta
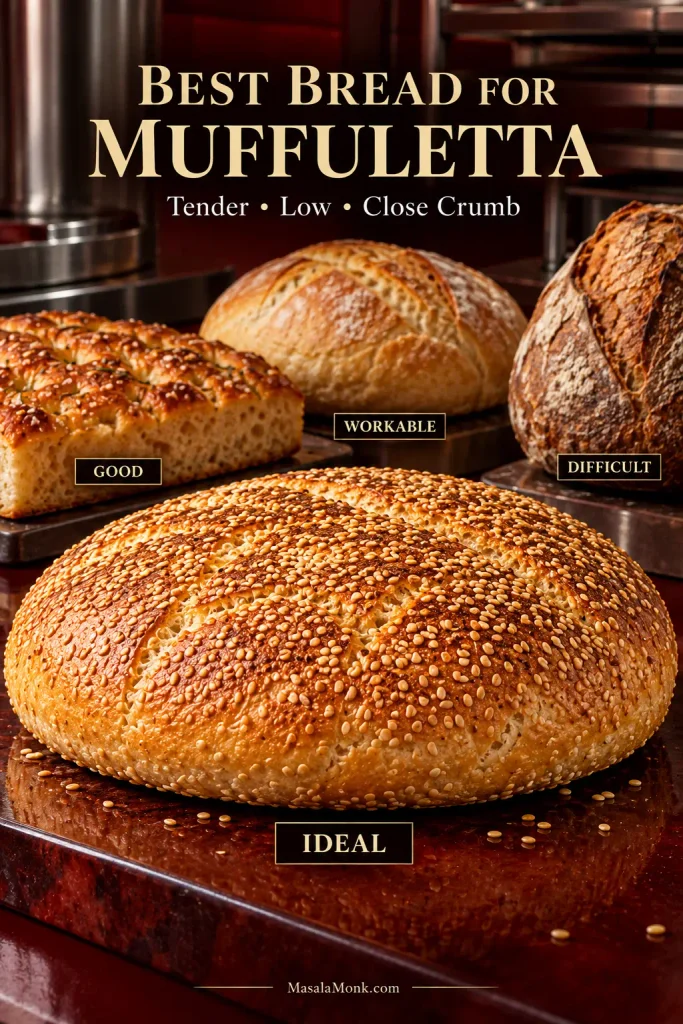
Bread is the one part worth being picky about. Get the loaf right and you have plenty of room to improvise at the deli counter. Start with a hard, towering boule and the rest of the sandwich spends its life trying to compensate.
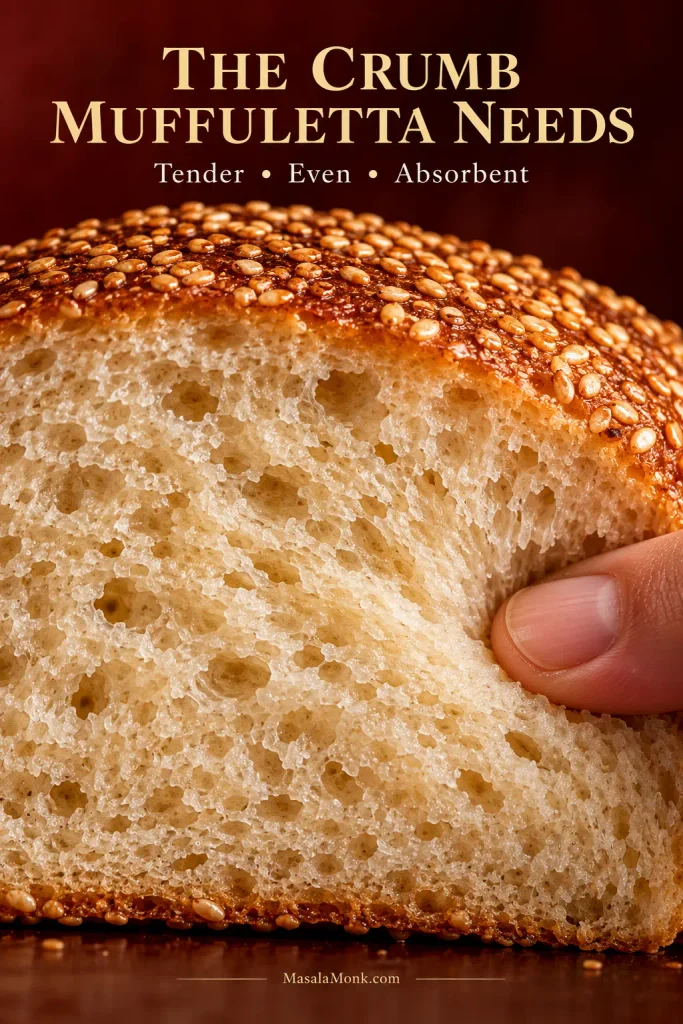
Look for a round loaf around 9–10 inches / 23–25 cm across and roughly 2–3 inches / 5–7.5 cm high. The crust can have some character, but it should yield easily when bitten. Inside, a moderately close, spongy crumb gives the olive dressing somewhere to go.
When choosing the best bread for muffuletta, press the crumb gently with a fingertip. A useful loaf should give a little and spring back rather than feeling rigid like a bread bowl.
What you want is a tender bite with enough crumb strength to absorb seasoned oil without collapsing. Giant air pockets let dressing slip straight through; a heavy dense crumb makes every bite more work than it should be.
In close-up, useful muffuletta crumb has many modest pores rather than a few cavernous holes. That gives seasoned oil more bread surface to meet as the sandwich rests.
When You Can’t Find the Traditional Loaf
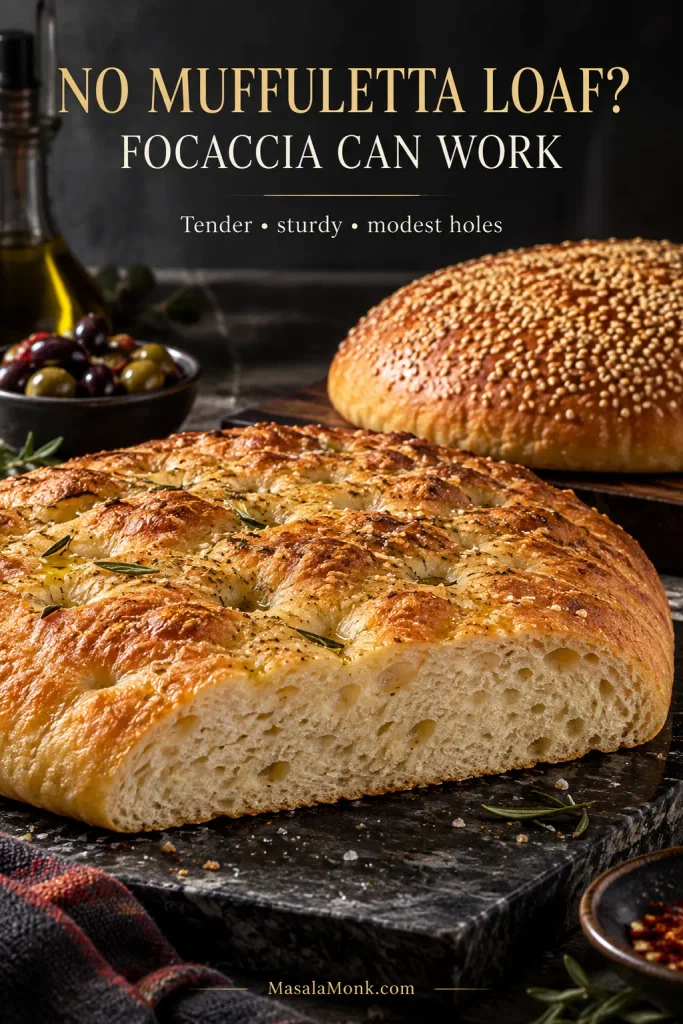
A low round sesame Italian loaf is the first substitute to look for. Sturdy focaccia comes next, especially when it has enough crumb to take the dressing. If you want to bake one, this no-knead focaccia recipe gives you the base method; choose a flatter, tighter section instead of the most dramatically bubbly part of the slab.
For focaccia, the cut face matters more than dramatic surface bubbles. Choose a flatter piece with modest interior holes so the olive dressing has plenty of crumb to meet.
A wide soft boule also works when you correct its height. Softer ciabatta can work too, provided the crust is easy to bite and the holes are modest. Very crusty artisan bread and dense sourdough are much harder to press into the yielding sandwich we want.
Baking your own? Shape the loaf broad and low, add sesame to the top and aim for a tender crust with fairly even crumb. Spectacular air pockets are unnecessary here. For muffuletta, boring-looking crumb can be an advantage.
Should You Hollow Out the Bread?
Hollowing is a geometry correction, not an authenticity ritual. A low muffuletta-style loaf can stay intact. With a tall boule, remove only enough soft crumb to bring the bread back into proportion with the filling. Leave plenty behind to absorb dressing and cushion the crust.
With a tall boule, think shallow correction rather than bread bowl. Preserve a generous cushion of crumb around the cavity so the filling still has soft bread to press into.
Olive Salad: Chunky, Generous, but Not Swimming
If bread is the frame, olive salad is the part that makes the sandwich unmistakable. After a night in the refrigerator, the garlic loses some of its raw edge, the vinegar works through the vegetables, and the oil starts tasting like the salad rather than something poured over it.
Is Muffuletta Spread the Same as Tapenade?
Not quite. Despite the name muffuletta spread, the sandwich wants a chopped olive-and-pickled-vegetable salad rather than a smooth tapenade. The coarser texture gives you distinct bites of olive, pepper and giardiniera.
Jarred ingredients vary wildly in salt. Taste them before dressing the salad. An aggressively briny olive or giardiniera can be rinsed briefly and drained again; make the final salt decision only after everything has rested together.
Dress the Bread in Two Steps
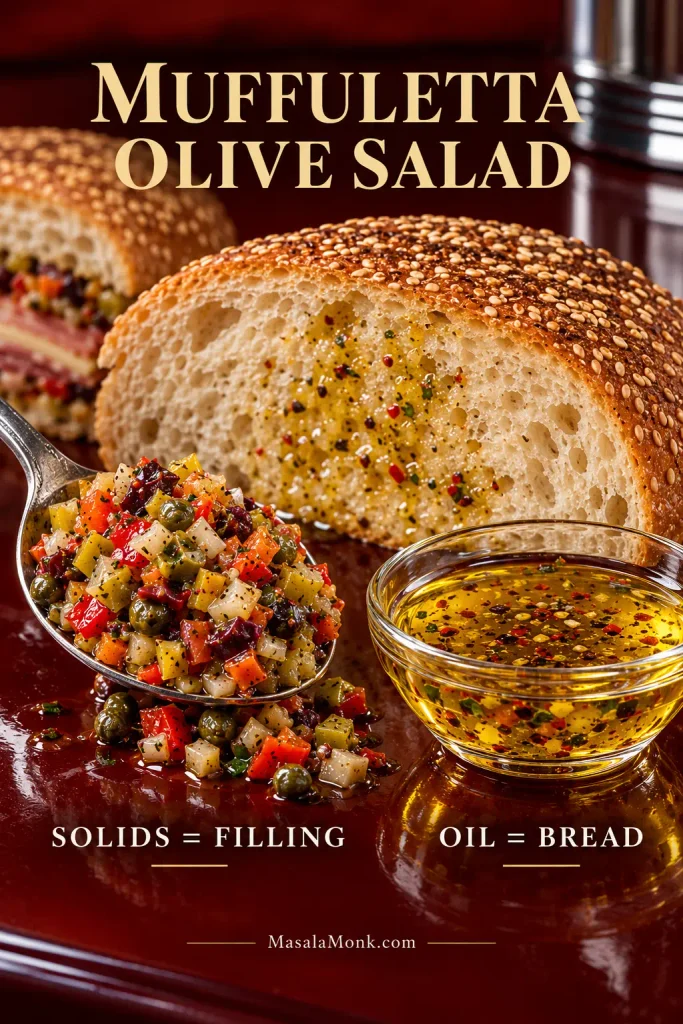
The chopped salad and its loose seasoned oil do different jobs. Keep enough solids in the filling for olive, pepper and pickle in every bite. Use the free oil on the bread, a little at a time.
Different loaves absorb it differently. Airy bread may take another spoonful; softer bread may already look glossy. A glossy surface does not mean the crumb is saturated.
If you need more olive flavor without more wetness, add solids; if the bread tastes dry, add seasoned oil. Keeping them separate lets you correct one variable at a time.
How Much Olive Salad to Use
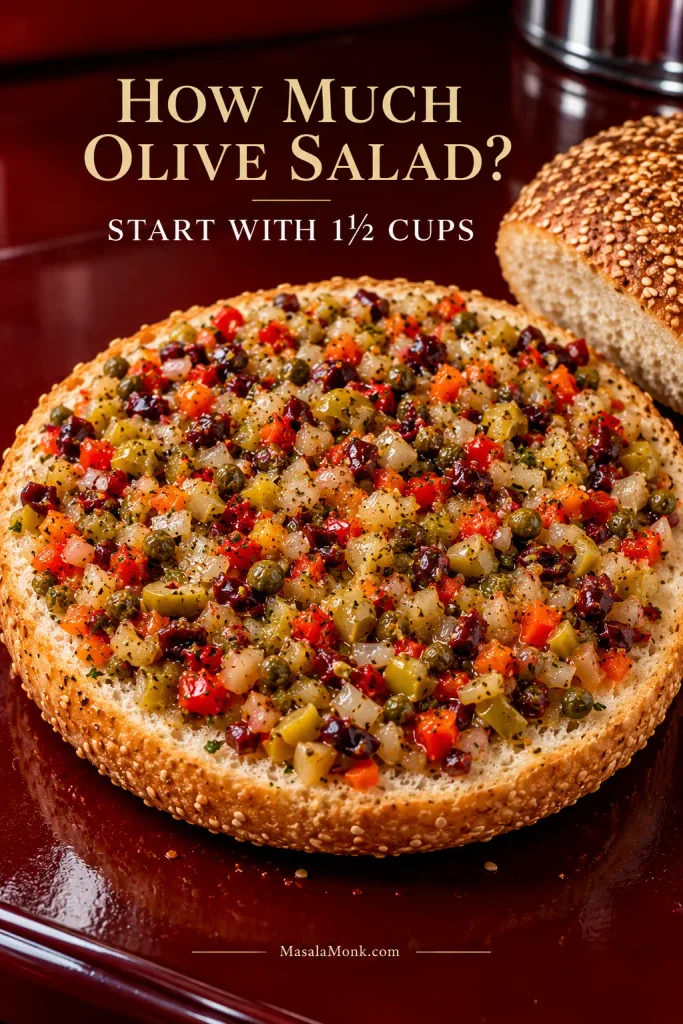
About 1½ cups / 300 g is a good baseline for a 9–10 inch sandwich. A broad, sturdy loaf may take up to 2 cups / 400 g. If the loaf closes comfortably at 1½ cups, stop there instead of forcing in the last spoonful.
Spread the olive salad as two thinner layers rather than one deep pile—roughly half below the provolone and half above the upper cheese—so it reaches more of the loaf without creating a wet center.
Use leftover olive salad in this lemony chickpea salad; add it a spoonful at a time because it already brings salt, oil and acidity.
For a 9–10 inch / 23–25 cm loaf, 12 oz / 340 g meat and 8 oz / 225 g cheese already make a substantial sandwich. Restaurant versions can go heavier. At home, extra height quickly gets in the way of a clean bite.
Thin slices help. Spread the meat across the whole round in loose folds instead of building a thick center, and pull apart clumps of mortadella or ham as you go. What matters here is even height from edge to edge.
Before wrapping, look across the muffuletta from the side. A center hump is easier to redistribute now than after pressing, when an uneven stack can leave the middle much higher than the edges.
Before wrapping, look at the sandwich from the side. If it already needs both hands just to stay closed, correct the height now. Redistribute thick folds, remove a little filling or hollow a tall loaf further if needed.
Pressing can make a well-built muffuletta lower and more cohesive, but it cannot fix an excessive filling load. If the loaf barely closes before wrapping, correct the proportions first.
Once cut, the finished wedge should be easy to read: sesame crust around oil-darkened crumb, a rough green-and-red streak of olive salad, then ribbons of salami, ham and mortadella between pale layers of cheese. Garlic and olive oil hit first; the cured meat follows. Vinegar and pickled vegetables keep the richness in check.
Pressing turns the awkward stack you just built into something you can cut, carry and eat. The loaf lowers, the layers grip one another and some of the seasoned oil moves farther into the crumb.
This is different from the hot press used for a Cuban sandwich. A Cubano browns and crisps as it is compressed. A muffuletta can do all of its pressing cold.
Very integrated filling; bread and dressing matter more
For a 9–10 inch loaf, roughly 5–8 lb / about 2–4 kg is a useful starting point. A board between the sandwich and the weight spreads pressure across the full round.
Watch the bread more than the scale. It should become clearly shorter while keeping a little spring. If the skillet rocks because the middle sits much higher than the edges, redistribute the filling or use a broader tray before adding more weight.
After 1–2 hours of pressing, judge the muffuletta by the bread rather than a target thickness. It should be clearly lower and firmer while still retaining a little spring.
Food safety:USDA guidance says perishable food should not remain unrefrigerated for more than 2 hours, or more than 1 hour above 90°F / 32°C. Assembly, room-temperature pressing, tempering and serving all count toward that same cumulative window.
Cool or Warm?
There isn’t one required serving temperature. Napoleon House is famous for its warm muffuletta, while Central Grocery’s version is traditionally sold ready to eat rather than hot-pressed.
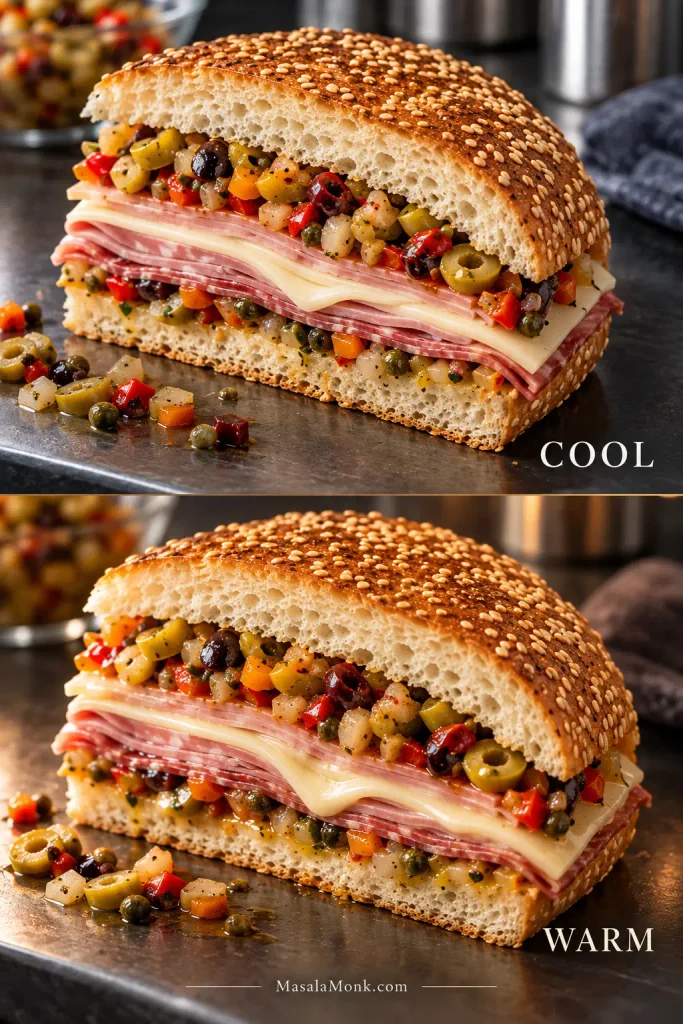
For a cool muffuletta, cut after the refrigerated press; if the bread and cheese feel too firm straight from the fridge, give it a short temper within the safe serving window.
For a warm muffuletta, 350°F / 175°C is gentle enough. Warm it until the cheese softens and the cured meat becomes fragrant, then pull it before the crust hardens.
Warm the muffuletta only after pressing is complete. Heat is a serving choice here, not the compression method; the goal is softer cheese and cured-meat fat, not a browned crust.
A rich, briny sandwich benefits from something cold and sharp beside it. This cucumber salad with vinegar, dill and onion adds crunch and acidity without making the plate heavier.
Once you’ve decided how you want to serve it, the filling itself is fairly flexible.
Ingredient Substitutions
Do not let the deli counter become a purity test. If the loaf is right, the olive salad tastes sharp and briny, and the sandwich still closes without a fight, you have plenty of room to change the meats and second cheese.
Can’t find
Use
Difference
Muffuletta loaf
Low sesame Italian loaf or sturdy tender focaccia
Choose bread that compresses easily and catches the dressing
Mortadella
Mild good-quality bologna or extra ham
Less silky richness
Genoa salami
Mild or medium Italian salami
Very dry salami chews harder; spicy salami can dominate the olives
Ham
Capicola / coppa
Stronger cured flavor and usually more salt
Swiss
Low-moisture mozzarella
Milder, softer and milkier
Dark olives
Another ripe black or purple olive you enjoy from the jar
Very bitter olives become more obvious after pressing
Giardiniera
Well-drained mixed pickled vegetables
Choose something crisp and vinegary
Pepperoncini
Another mild pickled pepper
Adjust for heat and acidity
Capicola, soppressata and prosciutto can all fit comfortably here. Just watch the total salt: a stronger cured meat may call for fewer capers, a milder cheese or a quick rinse of especially briny olives.
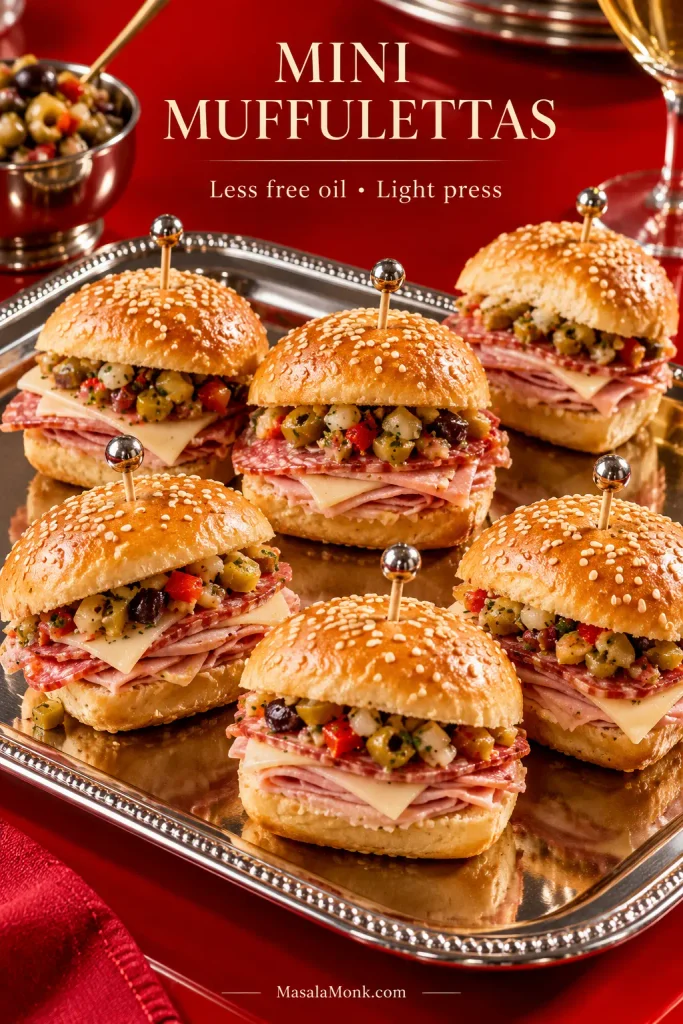
Mini Muffulettas for a Party
Small sesame rolls or pieces of tender focaccia make good mini muffulettas. Use the same basic layers, but go lighter on free olive oil because a small roll has much less crumb to absorb it. Spread the chopped olive salad first, add only enough dressing to make the bread glossy, then give the sandwiches a light press.
On a mini roll, a spoonful that looks small beside a full loaf can be too much. Scale the free oil down quickly, then press only enough to keep the layers together.
For a picnic or game-day table, put extra crunch beside them with a bowl of crisp homemade coleslaw instead of trying to squeeze slaw into every roll.
This is naturally good party and picnic food because most of the waiting can happen before anyone is hungry. Make the olive salad 1–3 days ahead if convenient. For a same-day sandwich, even 30–60 minutes helps.
Once assembled, time changes the bread too. For the texture described in this recipe, use the 1–2 hour refrigerated press. For an overnight sandwich, choose sturdy bread, keep the loose dressing under control and expect a softer loaf by morning.
A make-ahead muffuletta has two different clocks: the olive salad can improve for 1–3 days, while the assembled bread keeps softening. Those two clocks do not need to start together.
Storing Leftovers
Wrap leftover wedges tightly and refrigerate promptly. For texture, the sandwich is best within the first 1–2 days; the bread keeps absorbing dressing as it sits.
USDA’s general guidance allows most properly refrigerated leftovers for 3–4 days, but that safety window is longer than this sandwich’s best-quality window. By day three, a safe muffuletta can still be much softer than you want.
A cold leftover wedge can feel tougher because the cheese and cured-meat fat have firmed up. Let it lose some chill within the safe serving window, or warm it gently.
Troubleshooting: Fix the Sandwich Before Serving
Bread, Height and Pressing Problems
The bread is hard to bite. A thick artisan crust or dense crumb is usually responsible. A brief warm-up can help a cold sandwich, but next time use the bread guide to start with a more tender loaf.
There is too much bread. A tall boule needs some interior crumb removed before filling. Leave enough behind to absorb dressing and support the crust.
The sandwich is too tall. If it looks like you need to unhinge your jaw before it has even been pressed, fix the proportions now. Remove excess crumb, reduce the filling or spread thick meat folds more evenly.
The loaf barely compresses. Make sure the weight reaches the whole sandwich. If the bread is rigid and dense, adding more weight usually squeezes the filling before it softens the loaf much at all.
The meat pulls out in whole slices. The deli meat is too thick. Thin, flexible slices bite through more cleanly.
The filling slides around. Large olive pieces, uneven meat layers and too little resting can all contribute. Chop the salad more evenly, spread the filling across the loaf and give it time under pressure.
Olive Salad, Salt and Moisture Problems
The olive salad is too salty. Dilution is the real fix. Rinse and thoroughly dry an extra portion of olives or giardiniera before folding it in, or add more roasted red pepper and a little fresh olive oil.
The olive salad tastes flat. Add a small splash of red wine vinegar first, taste, then refresh with good extra-virgin olive oil. Flat does not always mean under-salted.
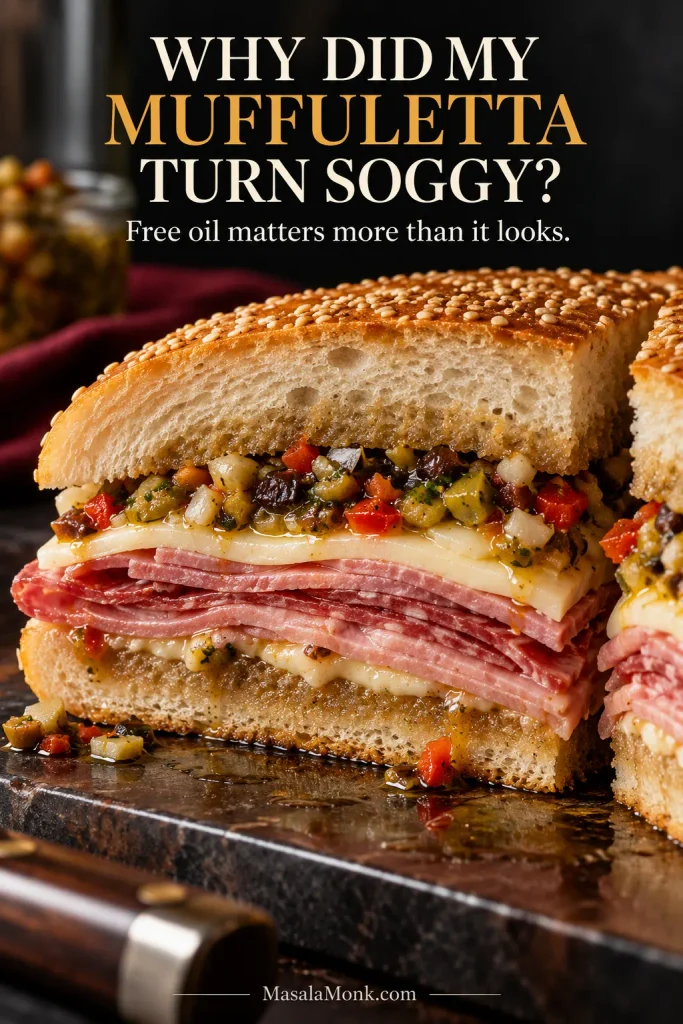
Why a Muffuletta Turns Soggy or Oily
Use both the crumb and the board as clues instead of treating every soft loaf as the same problem. Excess free dressing, fragile bread and an overlong assembled rest can all push the sandwich toward sogginess.
A dark, saturated crumb band tells you the bread has taken on too much moisture; free oil on the board, weak bread or extra resting time helps explain why.
The bread is soggy. Too much free dressing, fragile bread or a very long assembled rest are the usual causes. Revisit how the salad solids and seasoned oil are separated, then shorten the assembled rest next time.
The sandwich tastes dry. Add more olive salad and a little of its seasoned oil. A dry muffuletta usually needs better bread dressing before it needs more meat.
Oil runs onto the board. There’s too much free dressing. Next time, add the oil in stages and stop when the crumb begins absorbing it more slowly.
The olive salad turned to paste. Fold in more hand-chopped olives or giardiniera to bring some texture back.
Olive pieces keep falling out. Chop the largest pieces smaller, drain excess liquid and give the sandwich enough time under pressure.
An overnight sandwich is too soft. Use a sturdier loaf, reduce loose dressing or return to the make-ahead timing and assemble closer to serving next time.
Bring It to the Table
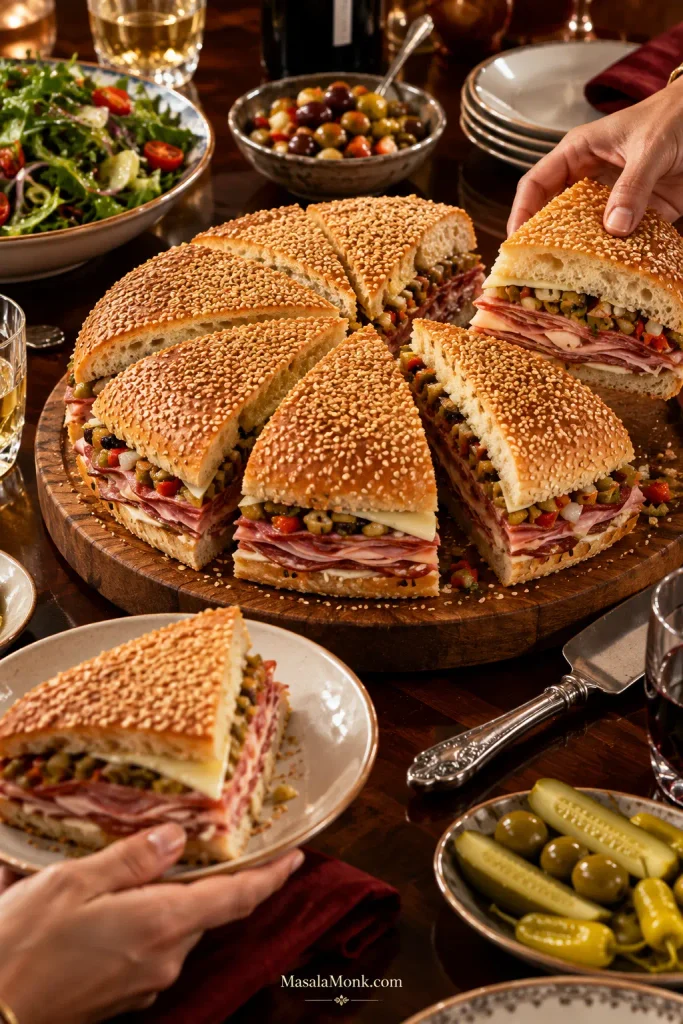
Then cut the loaf into wedges and put it in the middle of the table. The bread has taken on the olive dressing, and each slice carries a little bit of everything. A muffuletta is abundant food, but the best ones never feel chaotic. All that bread, meat, cheese, pickle and olive finally finds the right shape.
Once rested and cut, muffuletta is made for the middle of the table. Serve the wedges with something crisp or acidic so the rich meat, cheese and olive salad still feel balanced.
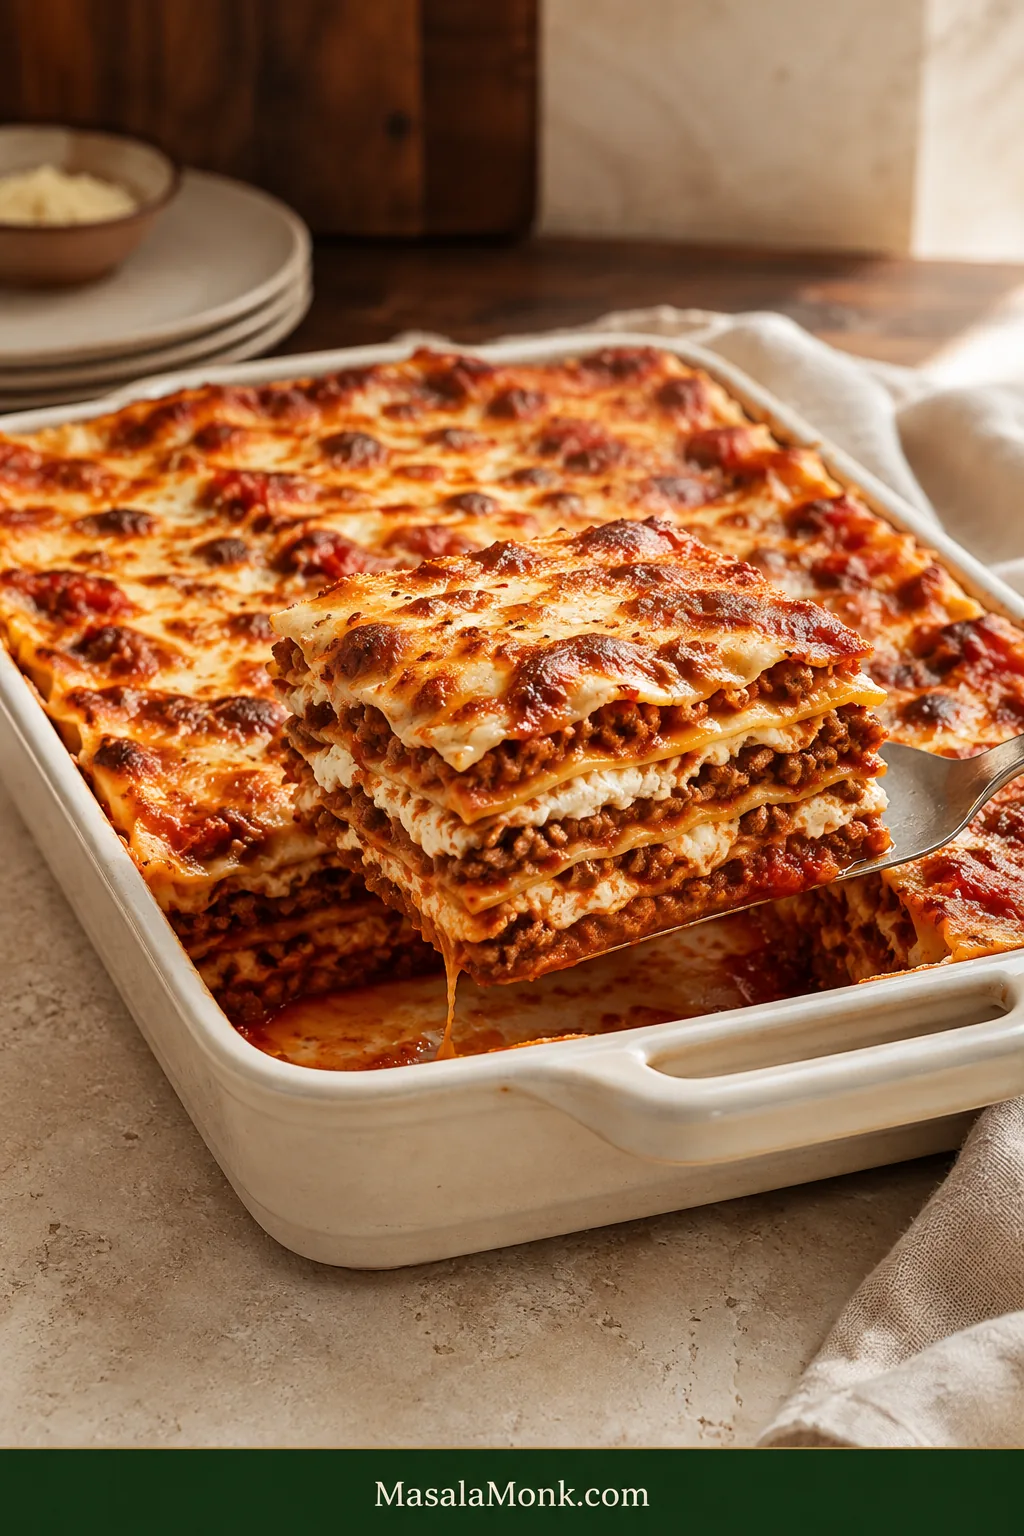
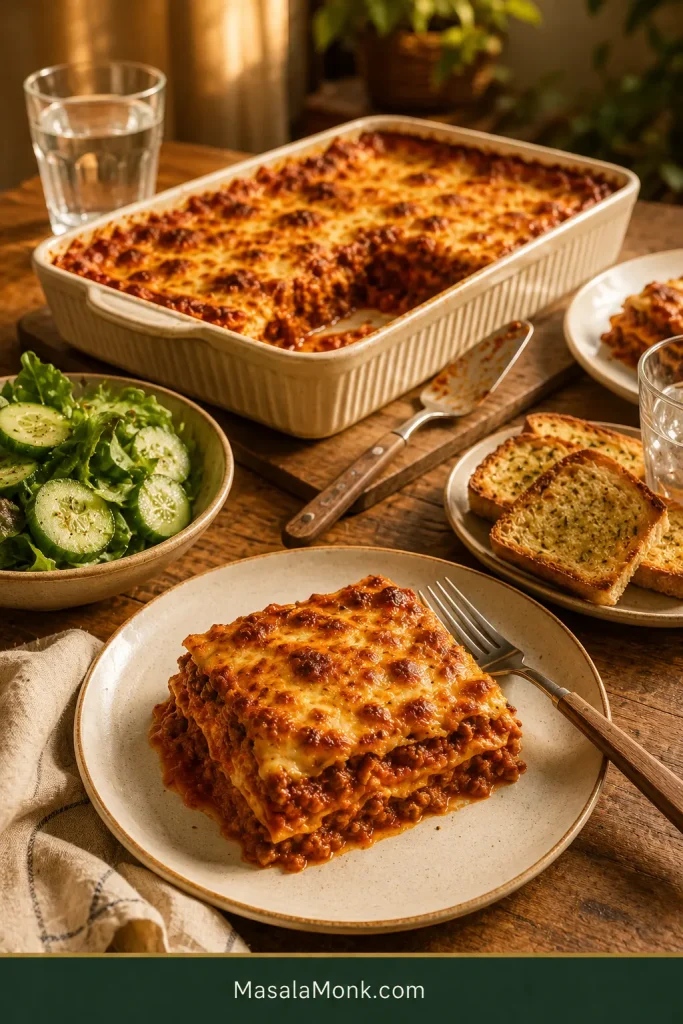
A good homemade lasagna should be generous without turning into a landslide. You want deeply flavored meat sauce between tender pasta, creamy ricotta, melted mozzarella and Parmesan, bubbling edges, and a browned top. Cut into it and the layers should still look like layers—even while the sauce stays soft and juicy.
Lasagna isn’t especially difficult; it is sequential. You prepare several things separately before they finally meet in one pan. That is where small decisions start to matter. Reduce the sauce too far and the noodles can stay hard. Start with watery cheese and the first slice may flood the plate. Leave a corner of pasta exposed and it can turn crisp before the center is ready. Cut into the pan five minutes after it leaves the oven and a perfectly good lasagna can look like it failed.
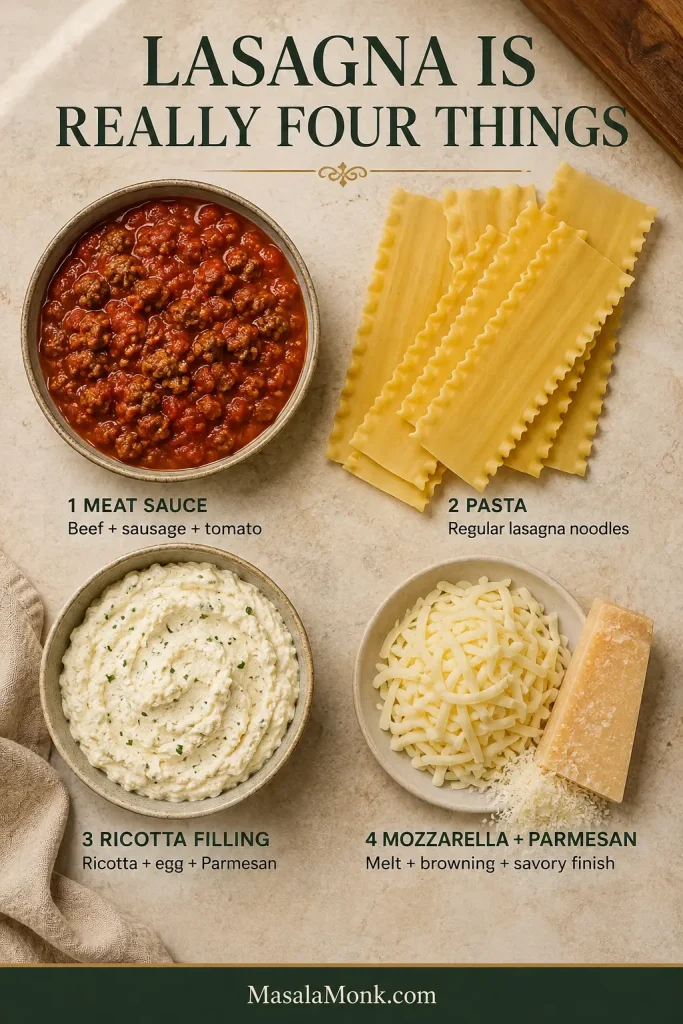
Despite the ingredient list, you are really making only four things: meat sauce, pasta, ricotta filling, and mozzarella with Parmesan. Keep the sauce spoonable, cover every noodle, and give the baked lasagna time to rest. Those three habits take most of the uncertainty out of the dish.
This is the familiar Italian-American pan: beef and Italian sausage in tomato sauce, creamy ricotta, mozzarella and Parmesan.
Once these four components are ready, most of the remaining work is simply building the layers.
Brown beef and Italian sausage, then simmer them with tomatoes until the meat sauce is concentrated but still loose enough for layering. Cook regular lasagna noodles only until very al dente and mix whole-milk ricotta with egg and Parmesan.
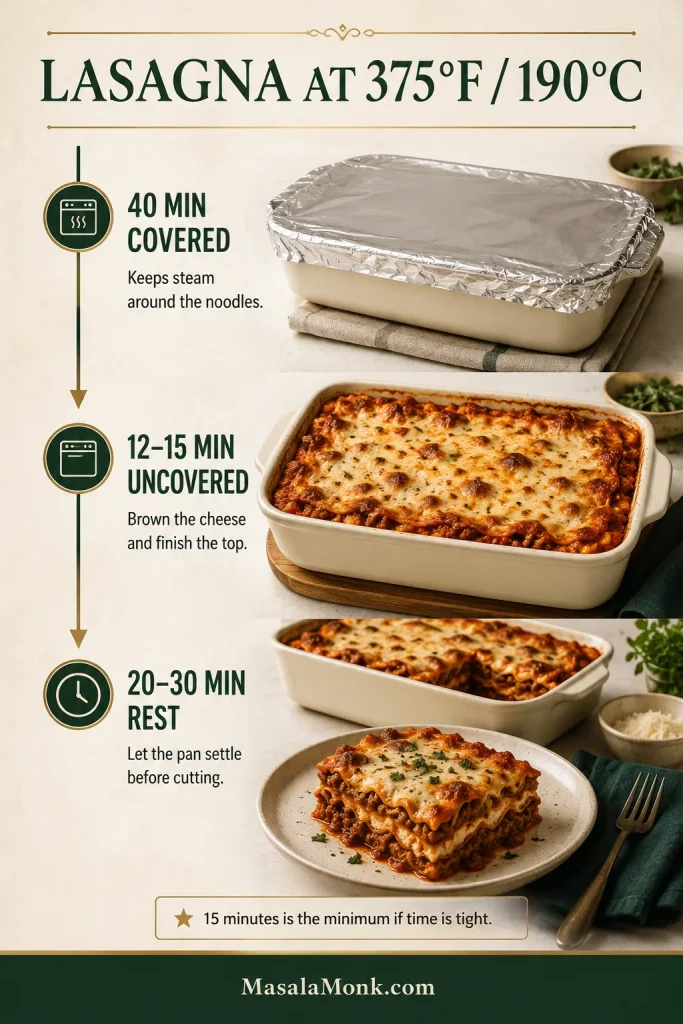
Build the lasagna in a deep 9 × 13-inch / 23 × 33-cm dish with four pasta layers and three filled layers. Keep sauce underneath the first noodles and reserve 1½ cups for complete coverage on top. Bake at 375°F / 190°C for 40 minutes covered and 12–15 minutes uncovered, then rest for 20–30 minutes before cutting.
Covered heat tenderizes the pasta, uncovered heat browns the cheese, and resting lets the hot filling settle before slicing.
Classic Homemade Lasagna Recipe
Serves
10 generous or 12 moderate portions
Pan
9 × 13 in / 23 × 33 cm, preferably 2½–3 in / 6.5–7.5 cm deep
Hands-on time
About 45 minutes
Bake
About 55 minutes
Rest
20–30 minutes
Total time
About 2 hours; allow closer to 2¼ hours the first time
Oven
375°F / 190°C
Equipment
Deep 9 × 13-inch / 23 × 33-cm baking dish
Large skillet, sauté pan or Dutch oven
Large pot for the noodles
Medium mixing bowl
Aluminum foil
Instant-read food thermometer, helpful for checking the center
Ingredients
Meat sauce
1 pound / 454 g 85–90% lean ground beef
8 ounces / 227 g mild Italian sausage, casings removed if necessary
1 medium yellow onion, finely chopped, about 150 g
4 garlic cloves, minced, about 12 g
2 tablespoons / 32 g tomato paste
1 can, 28 ounces / 794 g crushed tomatoes
1 can, 15 ounces / 425 g tomato sauce
½ cup / 120 ml beef broth or water, plus more if needed
1½ teaspoons Italian seasoning
½ teaspoon fine salt to start, plus more to taste
½ teaspoon freshly ground black pepper
¼ teaspoon red-pepper flakes, optional
A small pinch of sugar only if the finished sauce tastes sharply acidic
Ricotta filling
15 ounces / 425 g whole-milk ricotta
1 large egg
½ cup / about 45 g finely grated Parmesan
2 tablespoons finely chopped fresh parsley
¼ teaspoon fine salt
Freshly ground black pepper
For assembly
12 standard dried lasagna noodles, plus 1–2 extras in case one tears
Salt, for the pasta water
16 ounces / 454 g low-moisture whole-milk mozzarella, freshly grated, about 4 cups
½ cup / about 45 g finely grated Parmesan
Method
Make the Meat Sauce
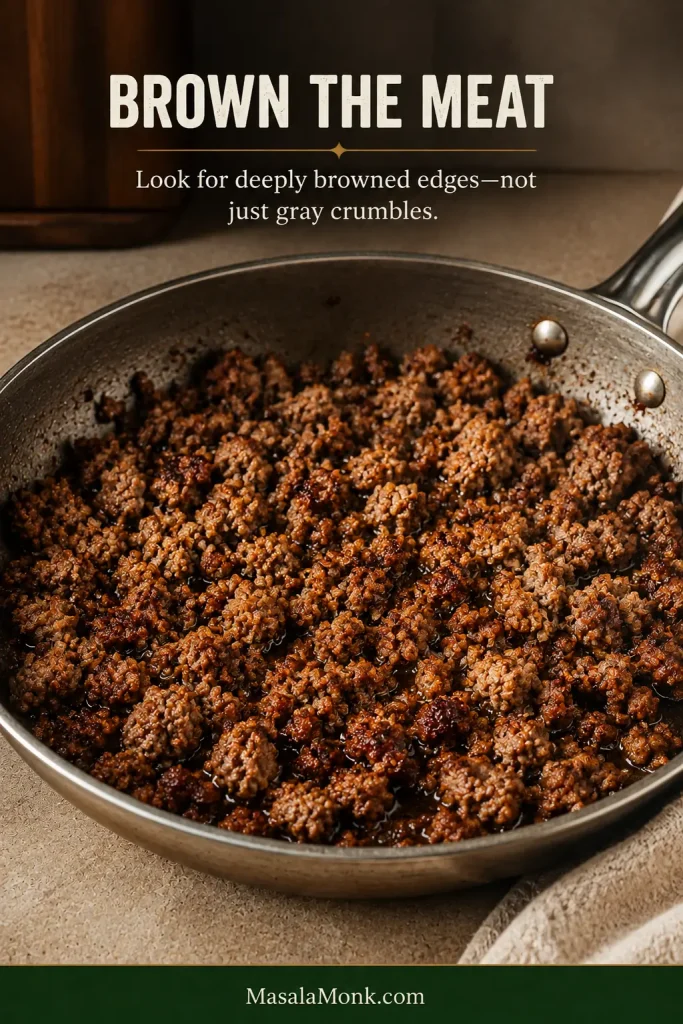
Brown the meat. Heat a large skillet or Dutch oven over medium-high heat. Add the beef and Italian sausage and give the meat time against the hot pan before breaking it into small crumbles. Cook until you have plenty of deeply browned edges. Those browned bits are what make the finished sauce taste cooked rather than merely assembled. Spoon off a substantial pool of rendered fat if one forms; a thin sheen can stay behind.
Look for irregular dark-brown edges between the crumbles, not meat that is simply gray throughout.
Build the sauce. Add the onion and cook for 4–5 minutes, until softened. Stir in the garlic for about 30 seconds, then add the tomato paste and cook for another minute. Pour in the crushed tomatoes, tomato sauce and broth. Add the Italian seasoning, ½ teaspoon salt, black pepper and optional red-pepper flakes.
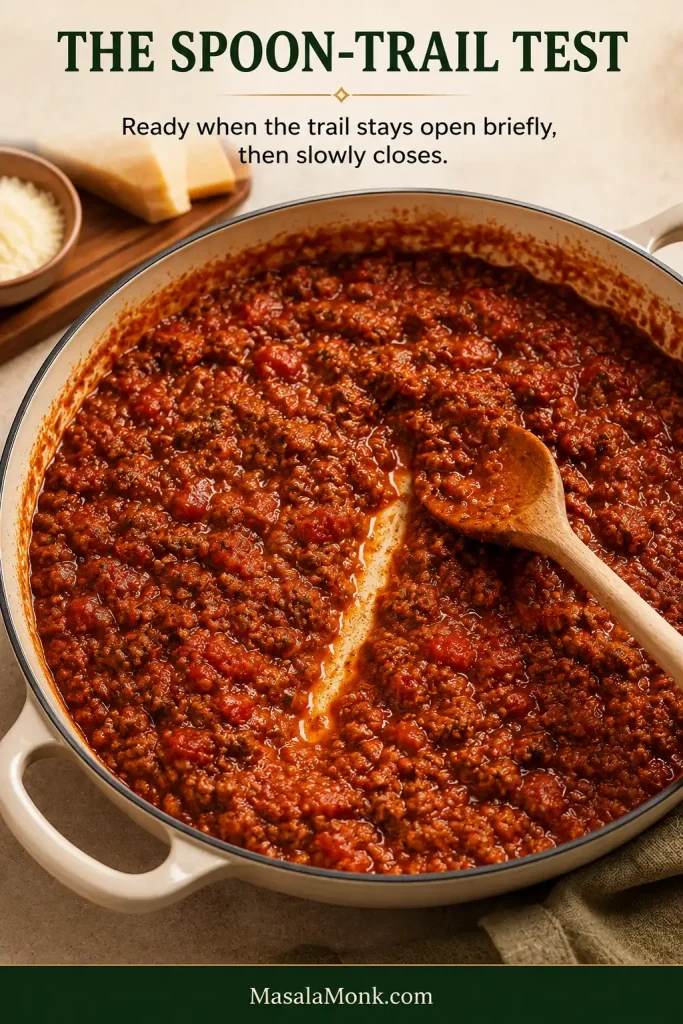
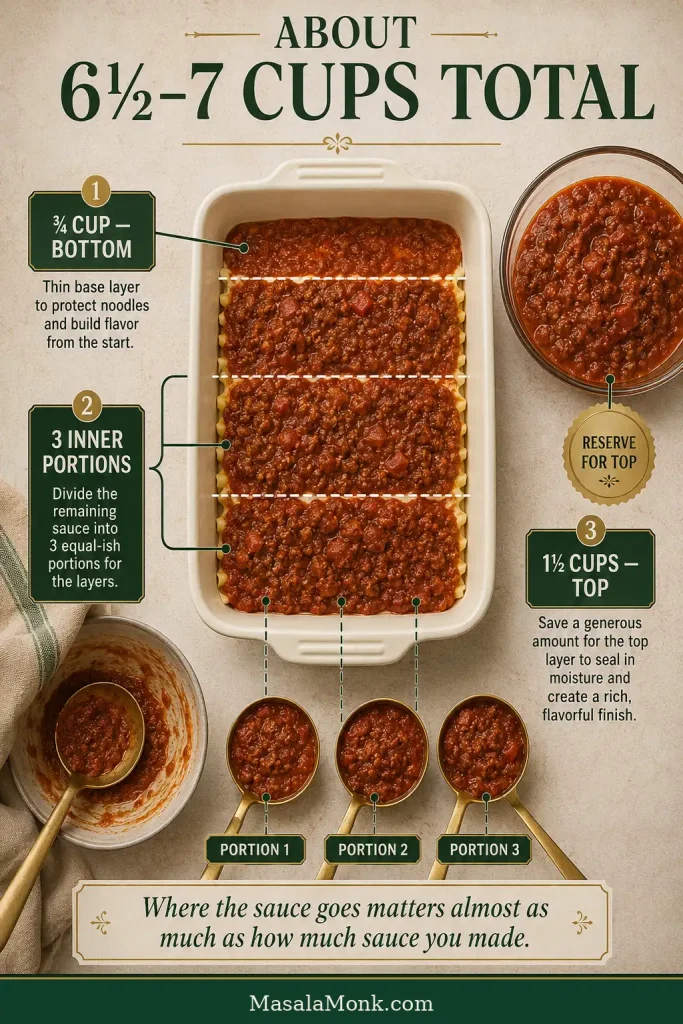
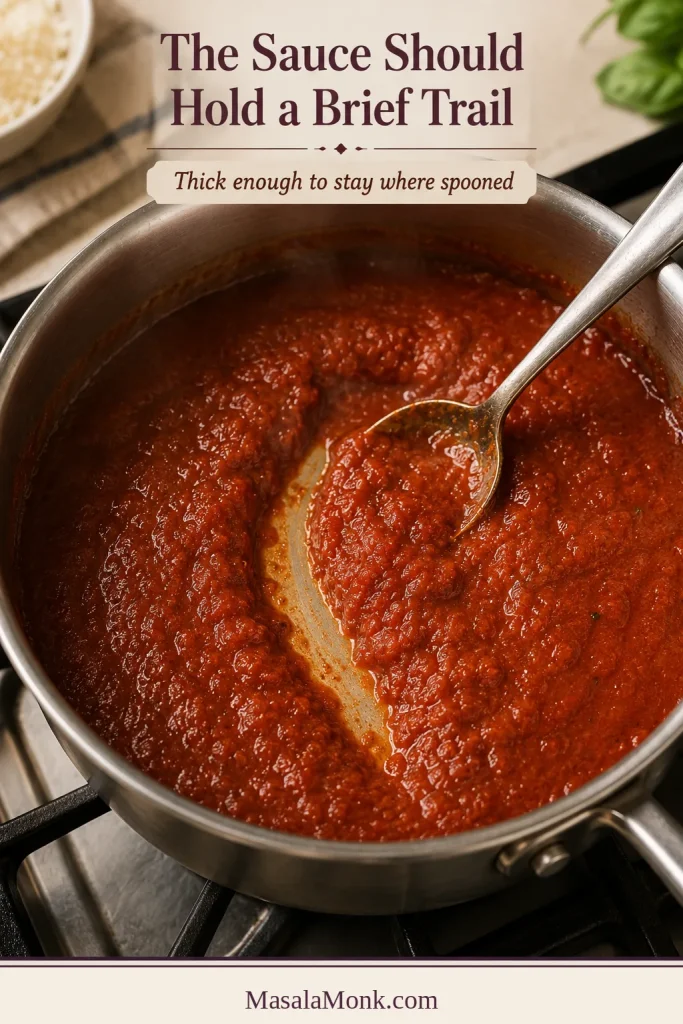
Finish and season the sauce. Simmer uncovered for about 20–25 minutes in a wide pan; a deeper pot may take longer. While it cooks, preheat the oven to 375°F / 190°C. Drag a spoon through the sauce. The trail remains for a moment, then slowly closes. The meat looks coated and glossy, with no moat of thin tomato liquid around it. You’ll usually end up with 6½–7 cups / 1.5–1.65 liters. Don’t chase the number if the sauce has already reached the right consistency. Taste it now. It should be fully seasoned but not salty; add more salt if needed and a tiny pinch of sugar only if the tomatoes still taste sharply acidic.
The sauce is ready when a spoon trail holds briefly, then slowly closes without a watery moat.
Prepare the Noodles and Ricotta
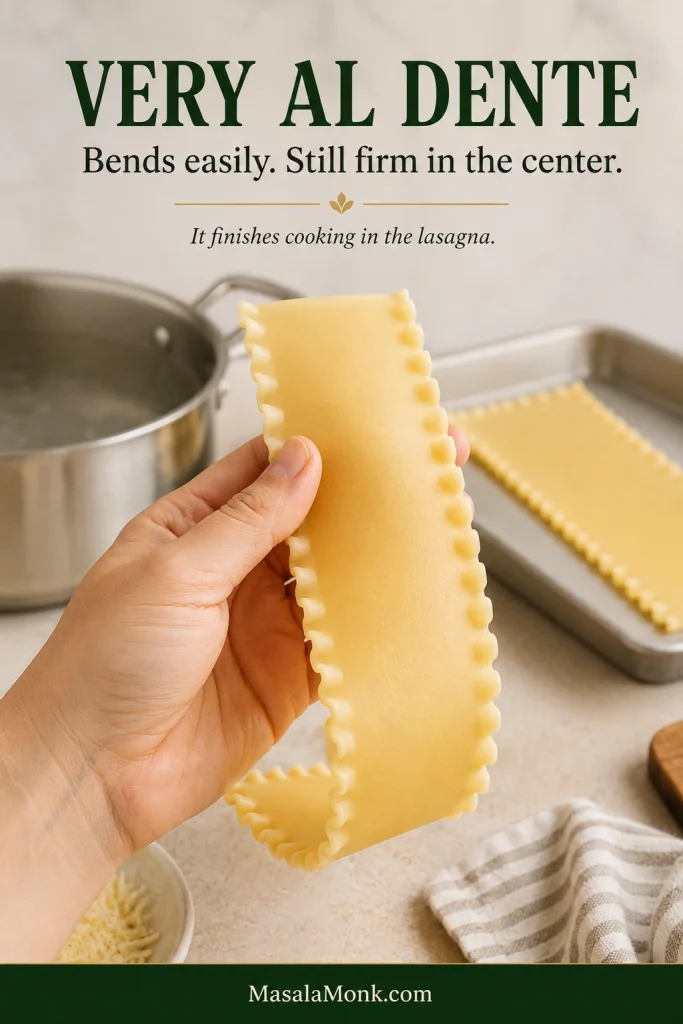
Cook the noodles until very al dente. Bring a large pot of well-salted water to a boil. Add the noodles gradually instead of dropping in the whole stack. Gently separate them with tongs during the first minute and once or twice as they cook. Begin checking about 2 minutes before the package’s suggested cooking time. Drain when the sheets bend easily but retain a firm center. They’ll feel firmer than pasta you would serve immediately. That’s intentional—they finish cooking in the lasagna. Lay them separately on clean kitchen towels or a large tray.
The noodle should bend easily but still feel firmer than pasta you would serve immediately.
Mix the ricotta filling. Stir together the ricotta, egg, ½ cup Parmesan, parsley, salt and black pepper. The mixture should be thick, creamy and scoopable, mounding softly on the spoon instead of spreading into a puddle. Drain visible whey around the ricotta first; a thick tub needs no special treatment.
Assemble the Lasagna
Divide the sauce and mozzarella. Reserve 1½ cups meat sauce for the top and spread ¾ cup across the bottom of the baking dish. The bottom only needs a thin layer; its job is to keep the first noodles from sitting against the bare dish. Divide the remaining sauce into three roughly equal portions—you can eyeball this. Set aside about 1¾ cups mozzarella for the top; use ¾ cup in each filled layer.
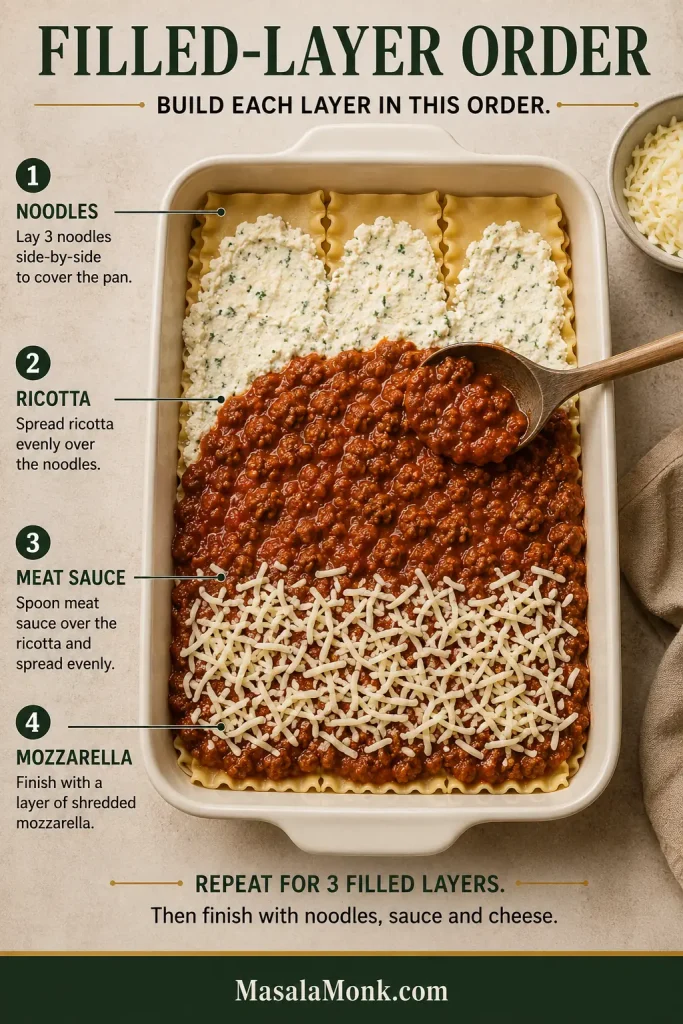
Use the same order every time: noodles, ricotta, meat sauce, then mozzarella.
Build the first filled layer. Add 3 noodles, or enough pasta to cover the pan. Slight overlap is fine, and a noodle can be trimmed or broken to fill a small gap. Dollop one-third of the ricotta mixture across the pasta and gently spread the spoonfuls together. Add one portion of meat sauce, followed by ¾ cup mozzarella.
Repeat twice. Make two more layers in the same order, using another third of the ricotta, one sauce portion and ¾ cup mozzarella each time. Keep the fillings thin and fairly even. A generous lasagna comes from repeated layers, not overloaded ones. The first round can look surprisingly modest. By the third, the pan finally starts looking as generous as the finished slice will be.
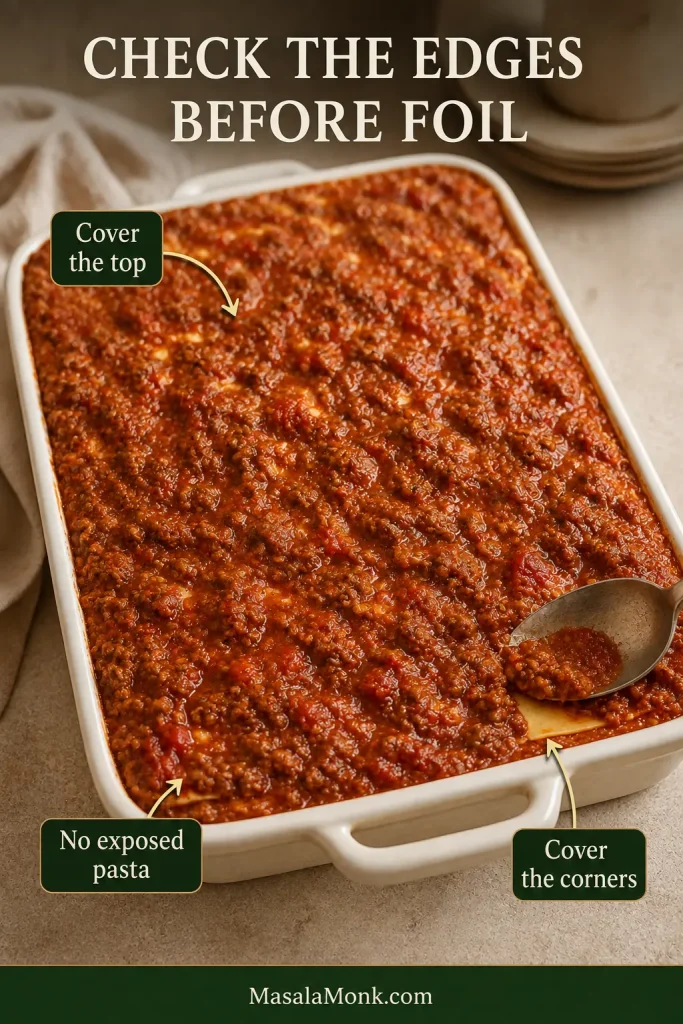
Finish the top. Add the fourth pasta layer and spread the reserved 1½ cups sauce from edge to edge. Cover every visible piece of pasta, especially the corners. Finish with the reserved mozzarella and ½ cup Parmesan. A dish filled close to the rim belongs on a rimmed sheet pan before baking.
Cover exposed pasta now, especially at the corners; those small dry patches are the first places to turn chewy.
Bake, Brown and Rest
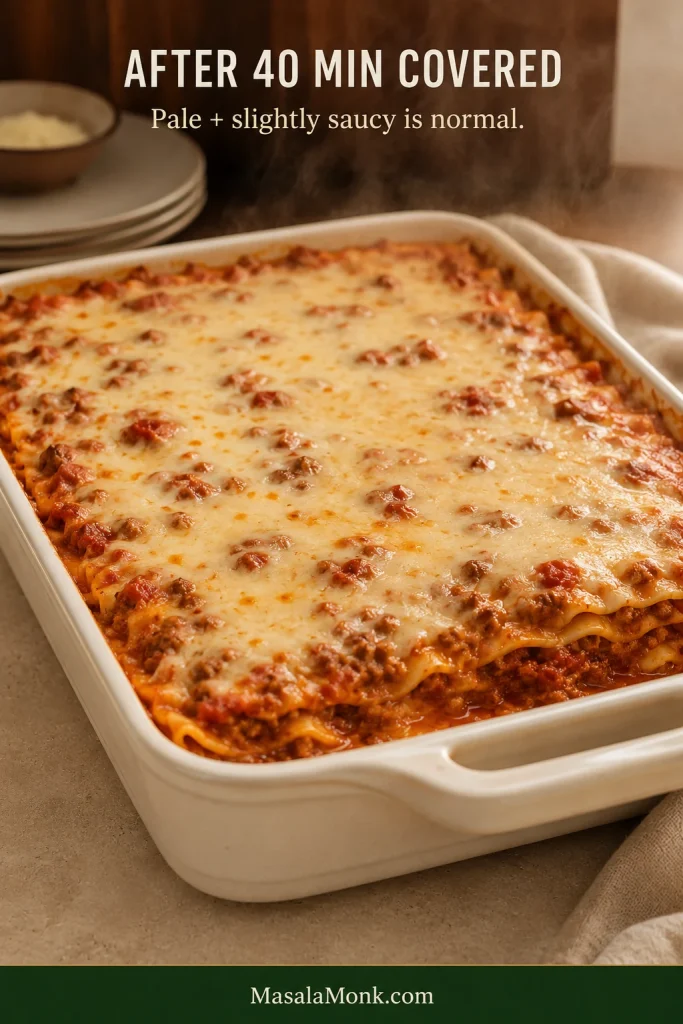
Bake covered. Lightly grease the underside of a sheet of foil, cover the dish and bake for 40 minutes. When the foil comes off, the lasagna may still look pale and slightly saucy. That’s fine. The uncovered stretch is when the top changes fastest: the cheese melts together, the edges bubble harder and the first browned spots begin to appear.
Pale cheese after the covered bake is normal. The uncovered stage is where the surface catches up.
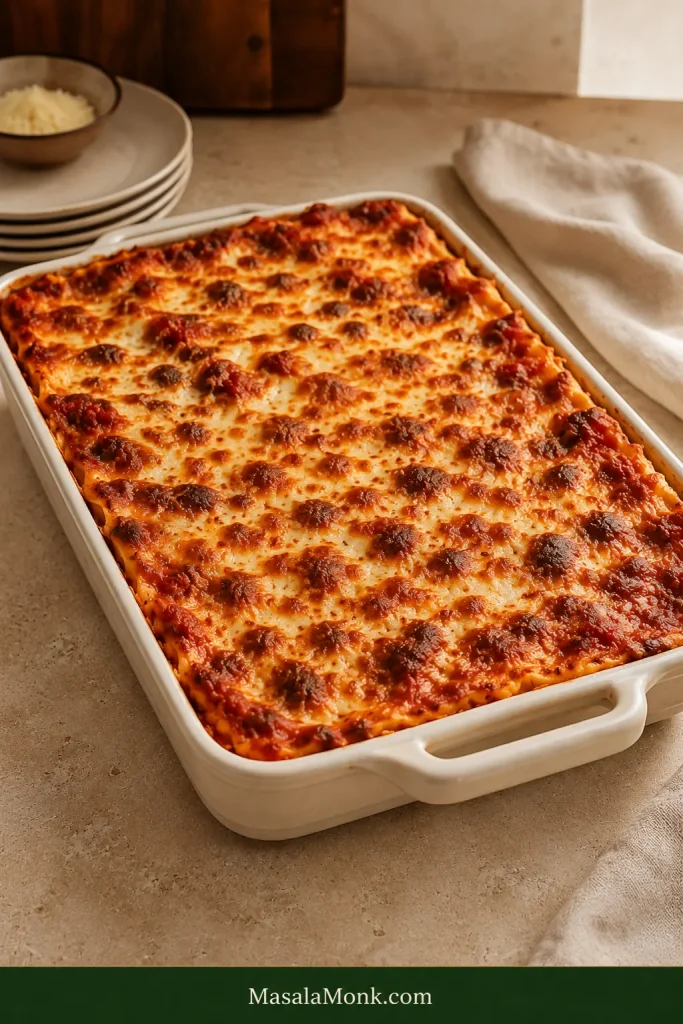
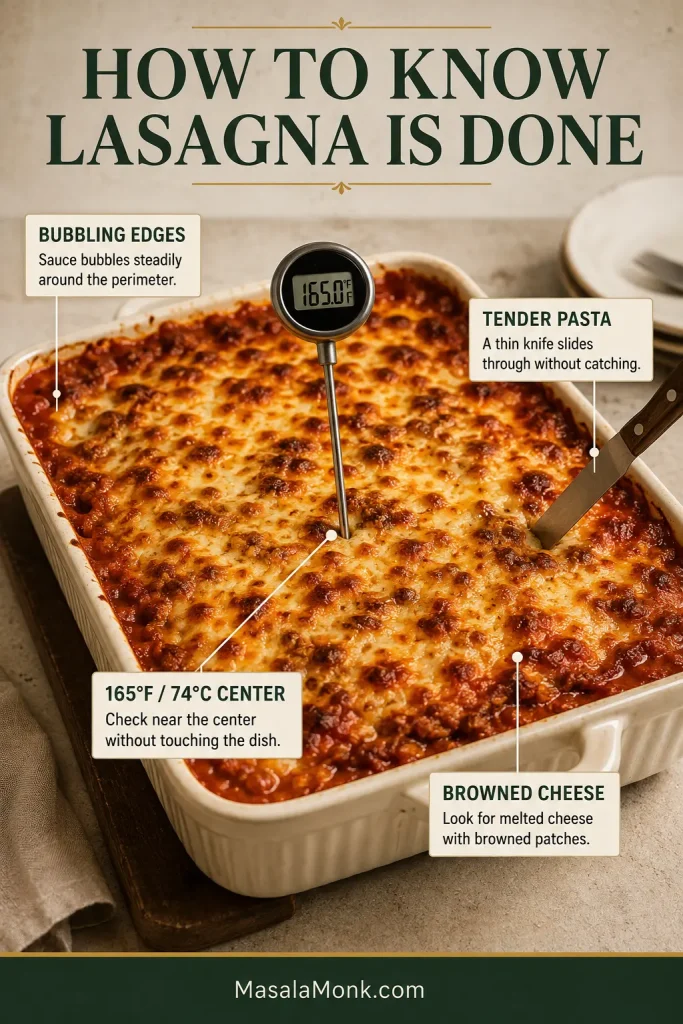
Brown and finish cooking. Bake uncovered for another 12–15 minutes. Look for steady bubbling around the edges and browned patches across the cheese. A thin knife should pass through the pasta without catching. Check the temperature near the center of the pan without touching the baking dish; it should reach 165°F / 74°C. If the top browns before the pasta is tender, cover the pan again. The cheese has browned enough; the noodles need more time under foil.
Irregular golden and mahogany patches are enough; the whole surface does not need to brown evenly.
Rest and serve. Leave the lasagna for 20–30 minutes before cutting; 15 minutes is the minimum. Use a sharp knife and a wide spatula. The first corner is usually the least cooperative because there is nowhere for it to move. Give it some room and the next slices generally come out more easily.
What the Finished Lasagna Should Look Like
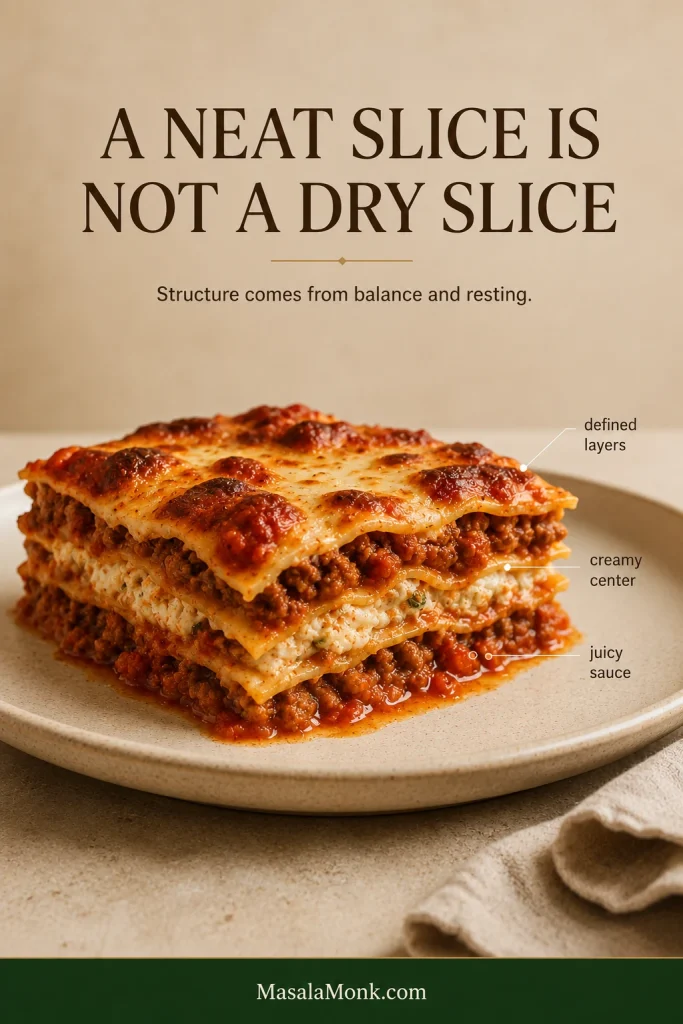
Those details all solve the same problem: moisture balance. A neat slice is not a dry slice. The noodles need enough sauce to become tender, the cheese needs enough body to stay between the pasta layers, and the finished pan needs time to settle.
A good hot slice still relaxes on the plate. The layers remain recognizable; they do not need to stand rigidly to count as a success.
A successful slice keeps recognizable layers while the sauce and ricotta stay soft, glossy and moist.
The meat sauce should be thick enough to cling to the beef and sausage but still spoonable enough to settle easily over the noodles. The pasta will absorb some moisture in the oven, so taking the sauce all the way to a stiff, pasty consistency works against you.
Aim for glossy and spoonable: loose enough to hydrate pasta, thick enough to stay between the layers.
Why Beef and Italian Sausage Work Together
Ground beef gives the sauce body; Italian sausage adds fennel, seasoning and extra richness without taking over. The 2:1 ratio keeps beef as the main flavor.
Prefer all beef? Use about 1½ pounds / 680 g ground beef. Add another ½ teaspoon Italian seasoning and, if you enjoy it, a small pinch of lightly crushed fennel seed.
Remove only the excess fat. Fat release varies with the meat. Spoon away a clear pool after browning, but leave the thin sheen behind.
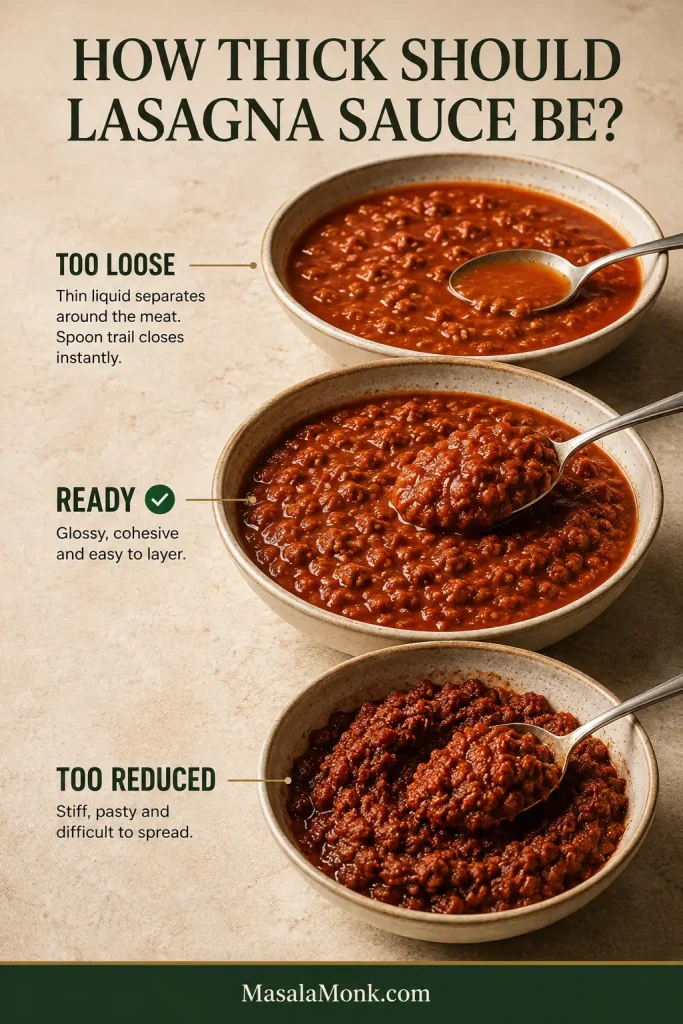
The Meat Sauce Is Ready When…
Too loose: the spoon trail disappears immediately and thin tomato liquid separates around the meat.
Ready: glossy, cohesive and loose enough to settle into an even layer.
Too far reduced: the sauce piles up and drags instead of settling easily across the pasta.
For this 9 × 13-inch lasagna with four pasta layers, you want about 6½–7 cups of meat sauce. Texture still gets the final say. By this stage the sharp tomato aroma has mellowed into something deeper and more savory.
Protect the bottom and top pasta first; poor sauce distribution can leave dry noodles even when the total quantity is right.
Taste it now; once the sauce is between pasta and mild cheeses, flat seasoning is much harder to correct.
Starting with ripe garden tomatoes? Use a properly reduced fresh tomato sauce as the base instead of replacing the canned tomatoes cup for cup. Fresh tomatoes can bring considerably more water with them.
Shortcut: Use Jarred Marinara
Brown the meat and cook the onion, garlic and tomato paste as written. Skip the crushed tomatoes, tomato sauce and initial ½ cup broth, then add about 36 ounces / 1.02 kg prepared marinara. Add broth only if a particularly thick brand needs loosening, and keep a little extra marinara nearby if the meat mixture needs more sauce. You’re looking for enough sauce to coat the meat generously and settle easily into the layers.
If you would rather make the tomato base yourself, our homemade marinara sauce gives you a straightforward starting point.
Cheese for Lasagna: Ricotta, Mozzarella and Parmesan
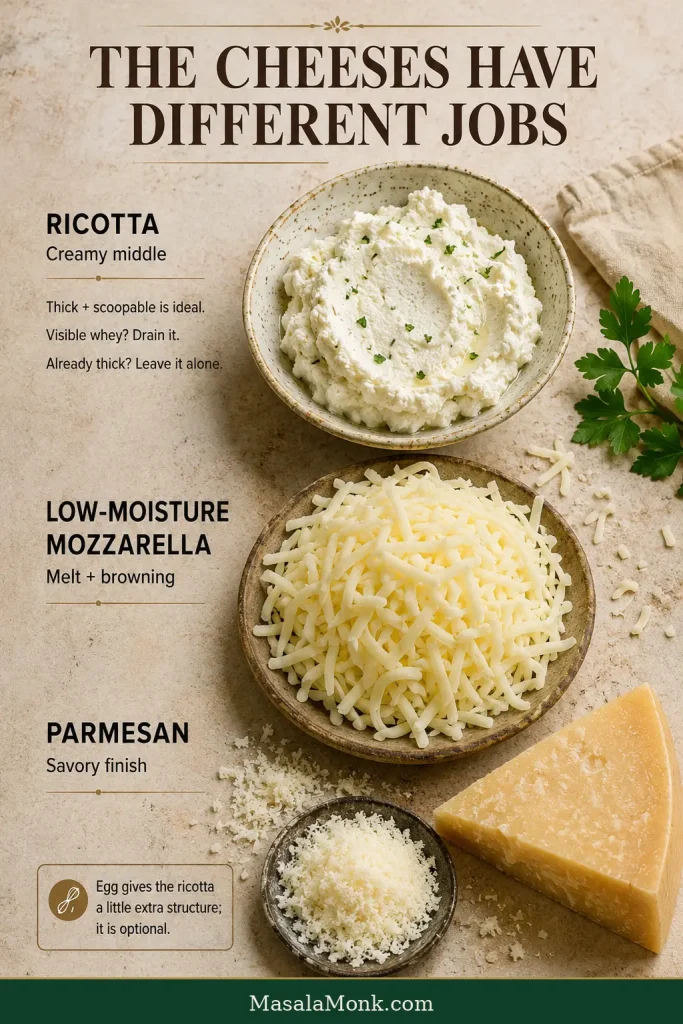
The cheeses have different jobs here: ricotta keeps the middle creamy, mozzarella gives you melt and browning, and Parmesan brings a sharper savory finish.
Ricotta brings creaminess, mozzarella brings melt, and Parmesan brings sharper savory depth; excess dairy moisture is the main thing to control.
Ricotta. Whole-milk ricotta makes the creamy middle layer. Thick and scoopable is what you want. Drain visible whey around the cheese; otherwise, leave it alone.
Do you need the egg? The egg does not turn the filling firm. It simply gives the ricotta enough structure to stay between the noodles when a slice is lifted. Leave it out if necessary and the lasagna will still work; the cheese layer will be softer.
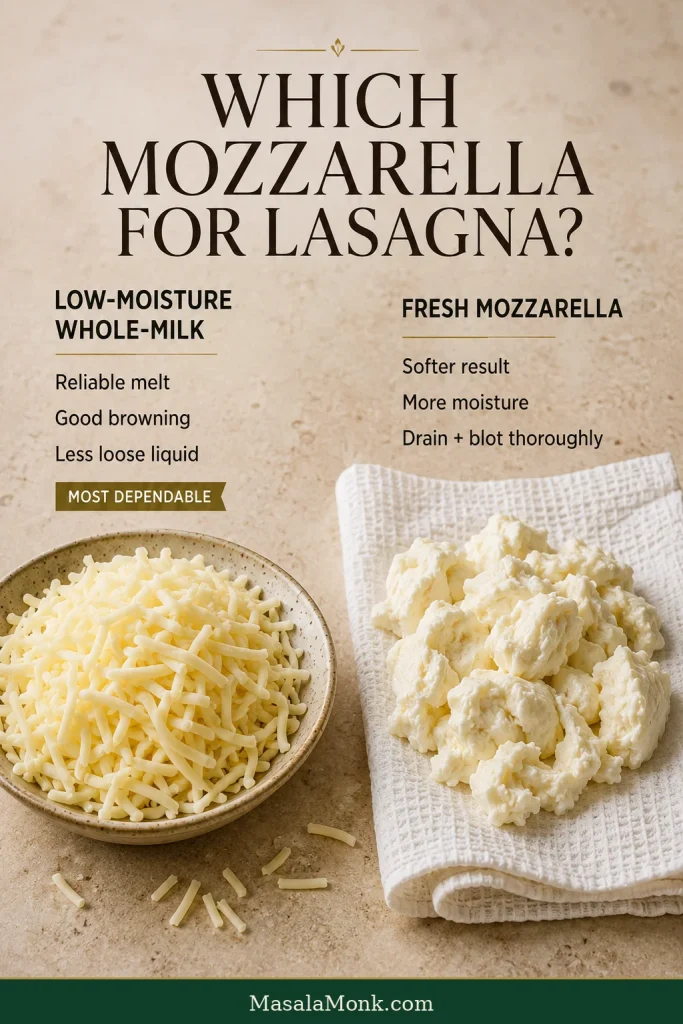
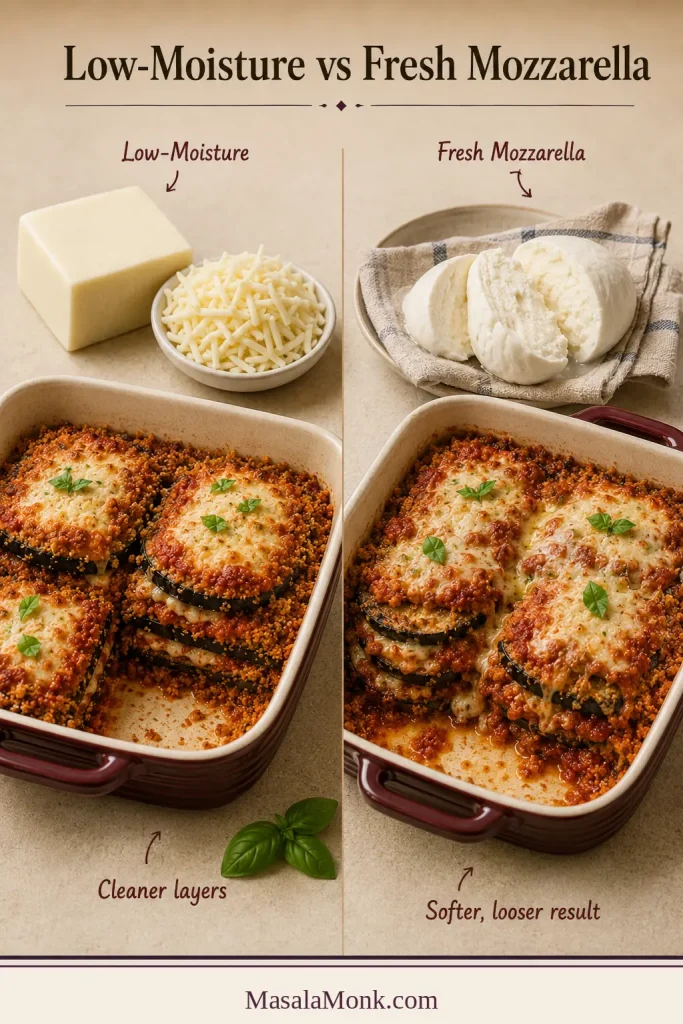
Mozzarella. Low-moisture whole-milk mozzarella melts smoothly and browns well without adding much loose liquid to the pan. Fresh mozzarella can work too; drain and blot it thoroughly first and expect a softer slice.
Fresh mozzarella can work, but blotting away surface moisture makes the finished pan more predictable.
Parmesan. A smaller amount goes a long way here, adding salty, savory depth to the ricotta and a flavorful crust across the top. Our guide to Parmesan and Parmigiano Reggiano explains the differences if you are choosing between wedges.
Can I Use Cottage Cheese Instead of Ricotta?
Yes. Substitute it by weight and drain visible liquid around the curds first. Cottage cheese gives the filling a looser, more visibly curded texture; ricotta makes it smoother and richer.
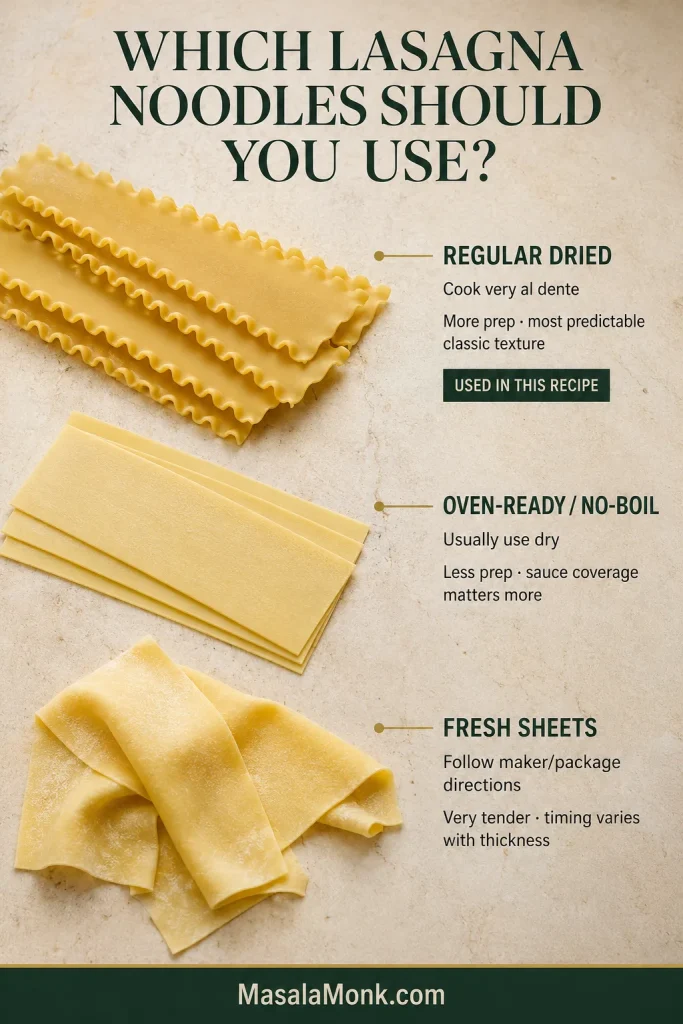
Which Lasagna Noodles Should You Use?
Regular, oven-ready and fresh sheets can all work. The main difference is how each gets its moisture and how gently it needs to be handled.
This recipe uses regular dried noodles cooked very al dente, but oven-ready and fresh sheets can work too.
Pasta
What to Do
Main Trade-Off
Regular dried noodles
Cook until very al dente
More prep, but the most predictable classic texture
Oven-ready / no-boil
Usually use dry; follow package guidance
Less prep, but sauce coverage matters more
Fresh lasagna sheets
Often need no pre-cooking; follow package or pasta-maker directions
Very tender, but timing varies more with thickness
Hot-Water Shortcut for Regular Dried Noodles
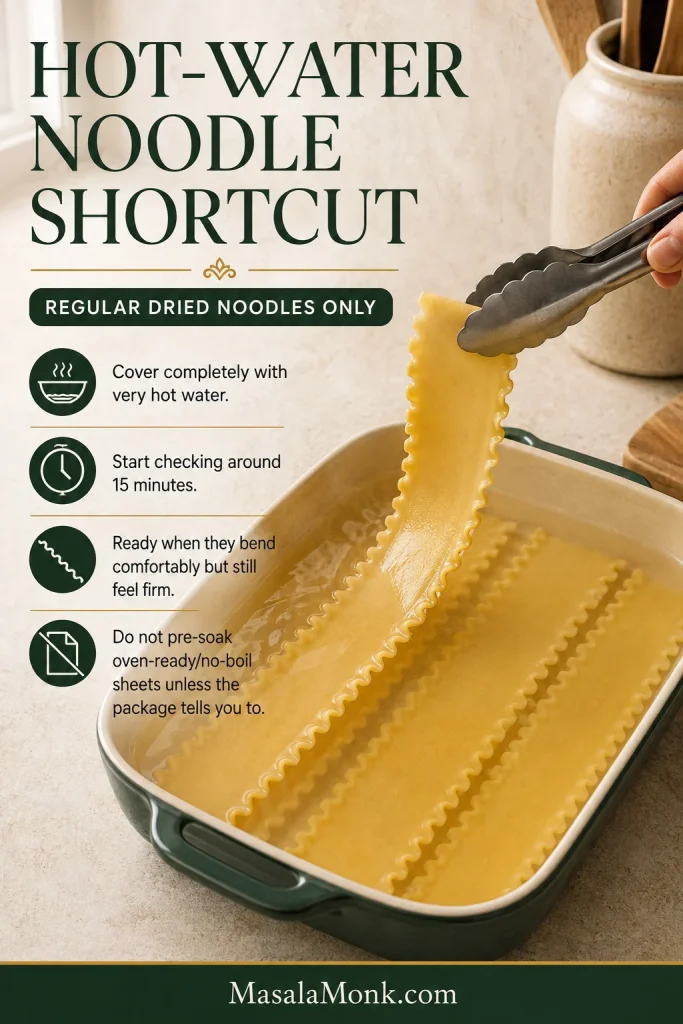
This shortcut is for regular dried lasagna noodles, not oven-ready/no-boil sheets. Place the noodles in a large heatproof dish and cover them completely with very hot water. Begin checking around 15 minutes. Drain when they bend comfortably but still feel distinctly firm; thickness varies by brand.
Separate the sheets early and drain them well; flexible is the goal, not fully cooked.
Using Oven-Ready or No-Boil Noodles
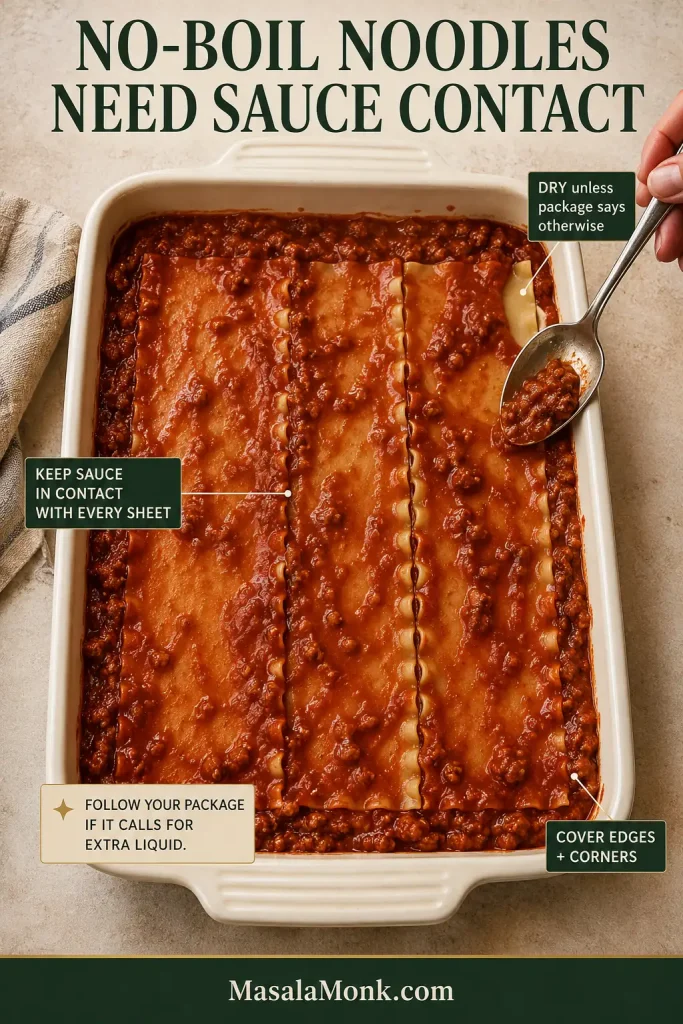
Oven-ready noodles soften entirely inside the casserole, so complete contact with sauce becomes especially important.
No-boil sheets need complete contact with sauce that still spreads easily into corners and seams.
Use them dry unless the package says otherwise.
Do not over-reduce the meat sauce.
Cover the edges and corners completely.
Follow any additional-liquid directions on your specific package.
Brands vary in thickness and formulation. Barilla’s oven-ready lasagna guidance, for example, likewise emphasizes keeping the sheets in contact with enough sauce while they bake.
How to Layer Lasagna Without Guessing
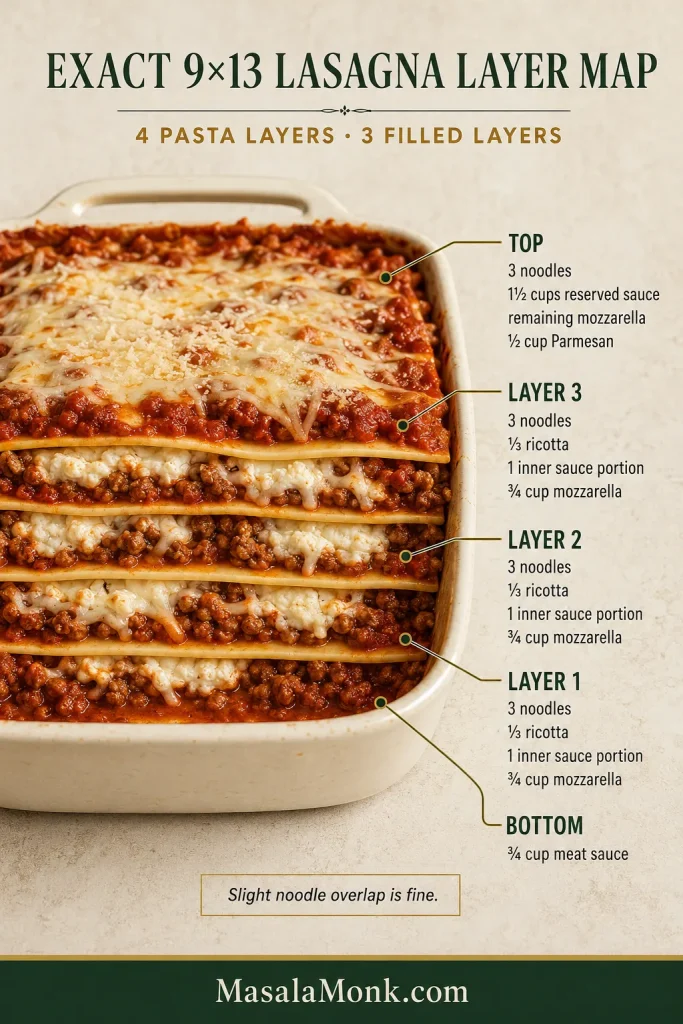
Four pasta layers. Three filled layers. Sauce underneath and sauce on top. That is the whole structure.
Four pasta layers and three restrained filled layers distribute sauce, ricotta and cheese more evenly from top to bottom.
For each filled layer: noodles → ricotta → meat sauce → mozzarella. Repeat that three times, then finish with noodles, sauce and cheese.
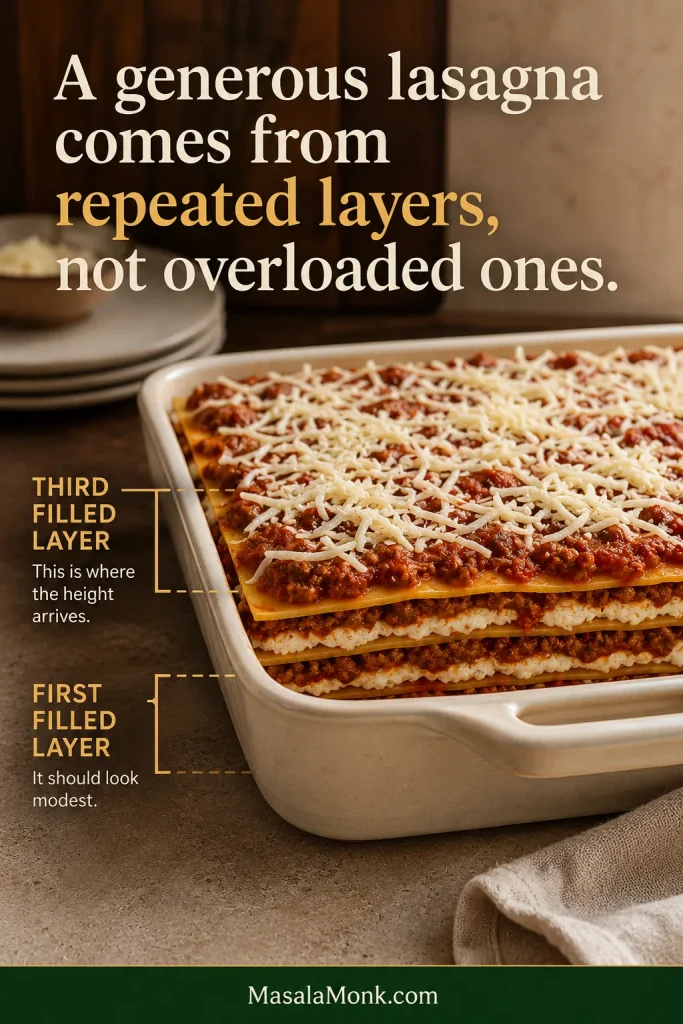
A generous lasagna comes from repeated layers, not overloaded ones. Keeping each filling layer fairly thin makes the pan easier to build, easier to cut and less likely to slide when you serve it.
The first filled layer can look modest; repeating thin layers is what creates height without forcing filling out the sides.
Layer Quantities for a 9 × 13-Inch Pan
Level
What Goes Into the Pan
Bottom
¾ cup meat sauce
Layer 1
3 noodles* + ⅓ ricotta + 1 of 3 inner sauce portions + ¾ cup mozzarella
Layer 2
3 noodles* + ⅓ ricotta + 1 of 3 inner sauce portions + ¾ cup mozzarella
Layer 3
3 noodles* + ⅓ ricotta + 1 of 3 inner sauce portions + ¾ cup mozzarella
Top
3 noodles* + reserved 1½ cups sauce + reserved mozzarella + ½ cup Parmesan
*Use three standard noodles or enough pasta to cover the pan. Slight overlap is fine.
Before the foil goes on, check the edges. Take ten seconds and look around the perimeter. Tuck sauce over any exposed pasta, especially at the top and corners. Small gaps can be filled by trimming, breaking or slightly overlapping a noodle.
How Long to Bake Lasagna at 375°F / 190°C
Bake a freshly assembled lasagna for 40 minutes covered, then 12–15 minutes uncovered.
The covered stage keeps steam around the noodles while they finish becoming tender. Uncovering near the end lets the mozzarella melt and develop browned patches across the surface.
How to Know Lasagna Is Done
Use both checks: 165°F / 74°C for the center, and a thin knife for actual noodle tenderness.
Sauce bubbles steadily around the edges.
A thin knife slides through the pasta without meeting a tough layer.
The center reaches 165°F / 74°C.
The top is melted and browned in patches.
How Long Should Lasagna Rest Before Cutting?
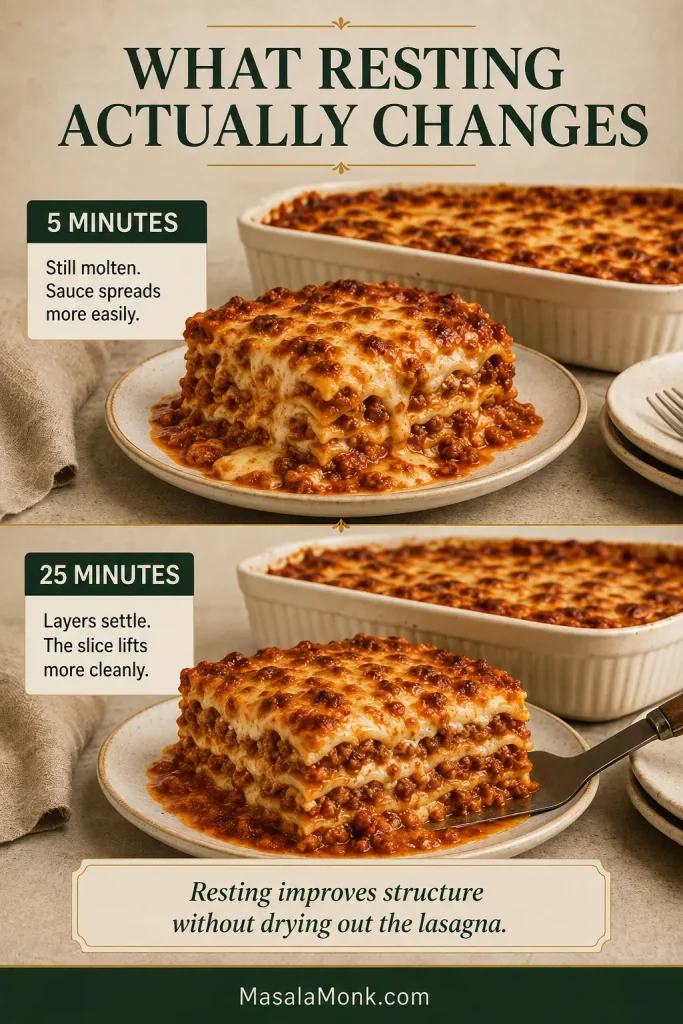
Rest lasagna for 20–30 minutes before cutting; give it at least 15 minutes if time is tight.
Straight from the oven, the sauce is bubbling and the cheese is molten. As it rests, the sauce and cheese settle around the pasta and the slices become much easier to lift.
At five minutes the filling moves readily; by 25 minutes it settles enough for cleaner, still-juicy slices.
It may simply be too hot. Give it time to settle before deciding anything went wrong.
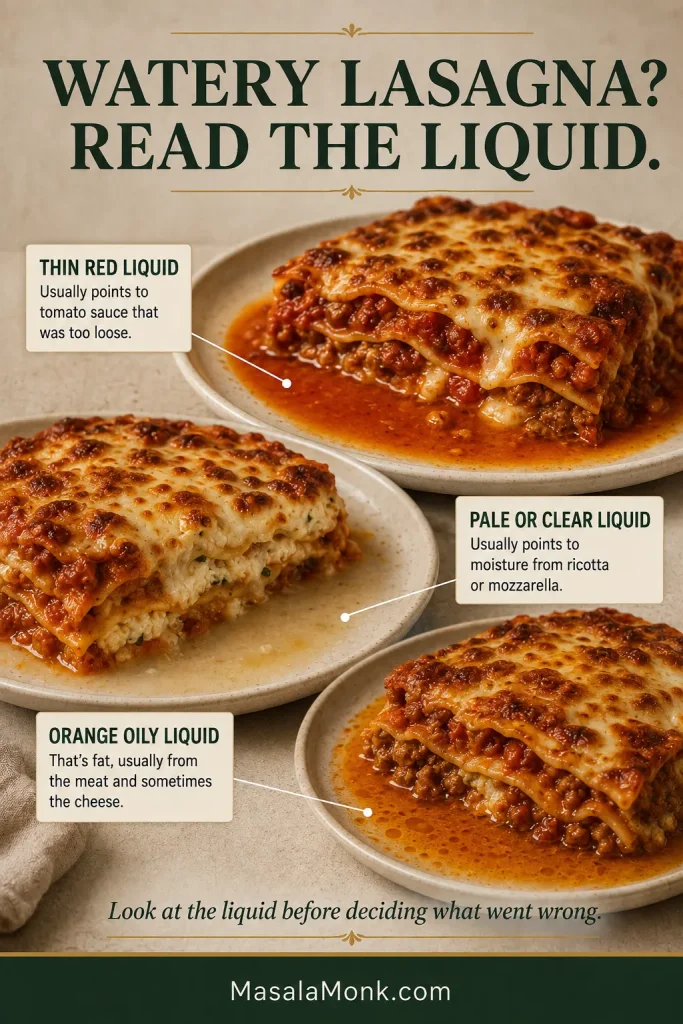
Still watery after resting
The sauce or cheese carried too much loose liquid. Thin red liquid points toward sauce; pale or clear liquid points toward cheese.
Slice collapses
It may still be too hot, too wet or overfilled. Rest longer now; next time keep the filling layers thin and even.
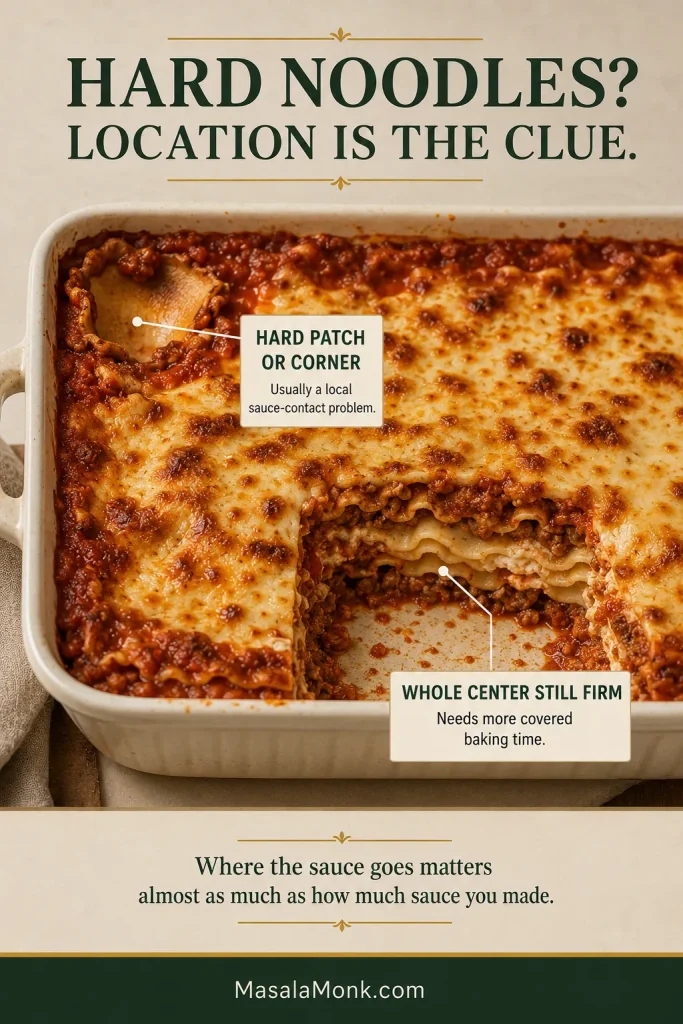
Hard patches or corners
Those areas did not have enough sauce contact. If the pan is still hot, cover it and continue baking; next time check the edges carefully before baking.
Hard bottom
The bottom noodles likely did not have enough sauce underneath. Start with a full thin layer of sauce next time.
Hard or crispy top
Part of the final pasta layer was exposed. Cover the top completely with sauce before baking.
Brown top, firm center
The surface finished before the middle. Cover the dish again and give the noodles more time under foil.
Lasagna tastes dry
The sauce was over-reduced or the uncovered bake ran too long. Stop reducing once the sauce is cohesive and keep the final uncovered bake brief.
Loose cheese layer
The cheese carried too much moisture. Drain visibly wet ricotta or cottage cheese and blot fresh mozzarella thoroughly.
Greasy orange pools
Fat can come from both the meat and cheese. Spoon away a large pool of rendered meat fat after browning instead of sending all of it into the sauce.
Lasagna tastes bland
The sauce or pasta likely went in underseasoned. Season the sauce before layering and salt the pasta water. Already baked? Serve with warm, well-seasoned marinara and extra Parmesan.
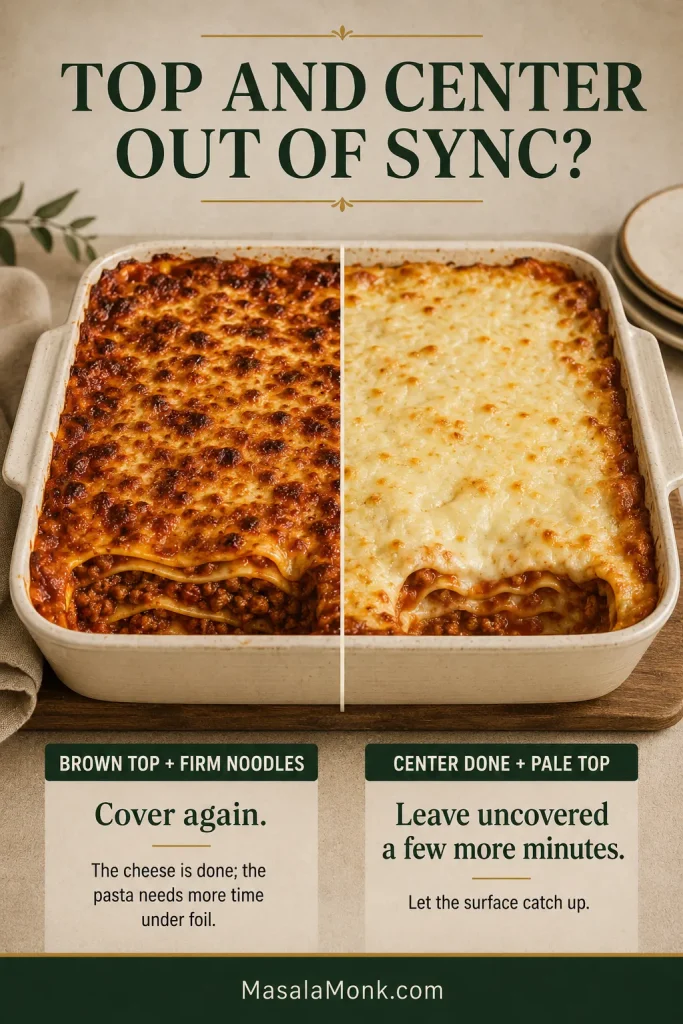
Brown Top or Pale Top?
Brown top but firm noodles? Cover the pan again. The cheese has browned enough; the noodles need more time under foil.
Center done but top still pale? Leave the lasagna uncovered for a few more minutes and let the surface catch up.
If surface and center finish at different speeds, protect what is done and keep cooking only what still needs time.
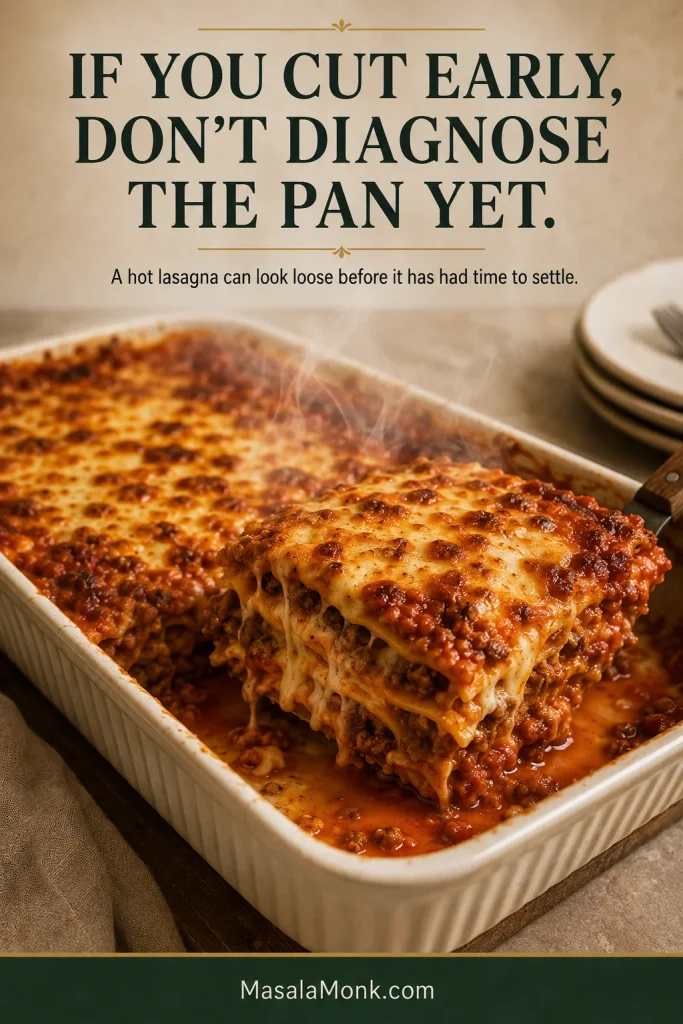
Why Is My Lasagna Watery?
If you cut early, don’t diagnose the pan yet.
The first slice can look loose simply because the filling is still molten. Rest before diagnosing the pan.
If it still looks watery after resting, look at the liquid itself. Thin red liquid points toward under-reduced tomato sauce. Pale or clear liquid around the cheese suggests wet ricotta or mozzarella. Orange oily pools are fat.
Read the puddle: red suggests sauce, pale or clear suggests dairy, and orange sheen points toward rendered fat.
Vegetables change the balance too. Spinach, mushrooms, zucchini and eggplant all release moisture as they cook. For an eggplant-based casserole where that moisture is handled before assembly, see our baked eggplant Parmesan.
Why Are Parts of My Lasagna Noodles Still Hard?
A pan can have liquid pooled in one place while a corner of pasta stays stubbornly firm. Check the bottom, top and edges first. Where the sauce goes matters almost as much as how much sauce you made.
One hard corner is a local moisture problem, not automatically a reason to keep baking the entire pan.
Why Does My Lasagna Fall Apart?
If you’ve already given it enough time to rest, look next at excess moisture, overly thick filling layers, noodles that were too soft before assembly, or unusually wet cheese. A clean slice comes from the balance of the whole pan rather than one magic binder.
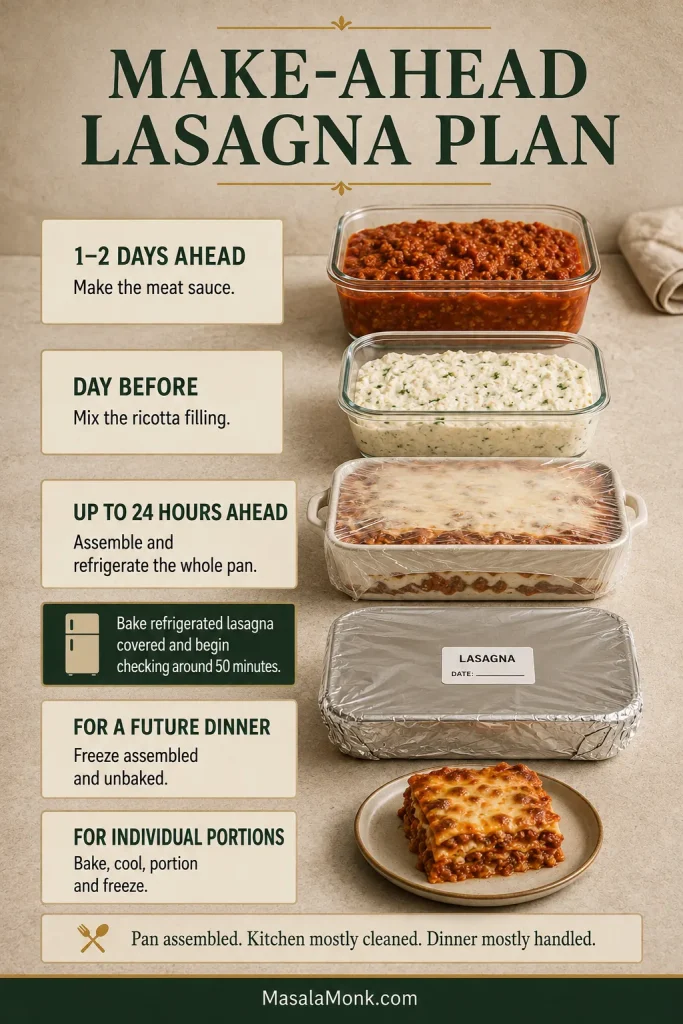
You do not have to make every component in one session. The meat sauce can be cooked 1–2 days ahead, cooled and refrigerated. The ricotta filling can be mixed the day before and kept covered in the refrigerator.
On dinner day, cook the noodles and assemble the pan—or assemble the entire lasagna up to 24 hours ahead and refrigerate it until baking. For an assembled make-ahead lasagna, keep the regular noodles very al dente because they will continue absorbing moisture in the refrigerator.
For company, this is the kind of make-ahead that actually helps: the sauce is finished, the pan can be assembled, the kitchen is mostly cleaned, and the main job left before dinner is getting the lasagna into the oven.
Freeze a whole assembled pan for a future dinner, or baked portions when you want easy individual servings.
Bake a Refrigerated Lasagna
Bake a refrigerator-cold lasagna covered at 375°F / 190°C and begin checking around 50 minutes; a very cold or especially deep pan may take longer. Once the center is hot and the noodles are nearly tender, uncover and bake for another 12–15 minutes, until the top is browned and the center reaches 165°F / 74°C.
For a glass baking dish, follow the manufacturer’s guidance about moving a refrigerator-cold dish into a hot oven because thermal-shock limits vary.
Freeze Before or After Baking?
Freeze an assembled pan when you want a complete future dinner. Freeze baked individual portions when you would rather reheat one or two servings at a time.
For an unbaked lasagna, cool the cooked components before assembly, use a freezer-safe pan, wrap well and freeze. Thaw the pan completely in the refrigerator. A full 9 × 13-inch lasagna may need about 24 hours or longer depending on its depth and freezer temperature. Once thawed, use the refrigerated-lasagna directions above.
Baked portions can be wrapped individually after cooling. For the best texture and flavor, use frozen lasagna within about 2–3 months.
How Long Does Lasagna Last in the Fridge?
Refrigerate leftovers within 2 hours—or within 1 hour when the surrounding temperature is above 90°F / 32°C. Keep covered leftovers in the refrigerator for 3–4 days. These limits follow USDA leftover food-safety guidance.
How to Reheat Lasagna Without Drying It Out
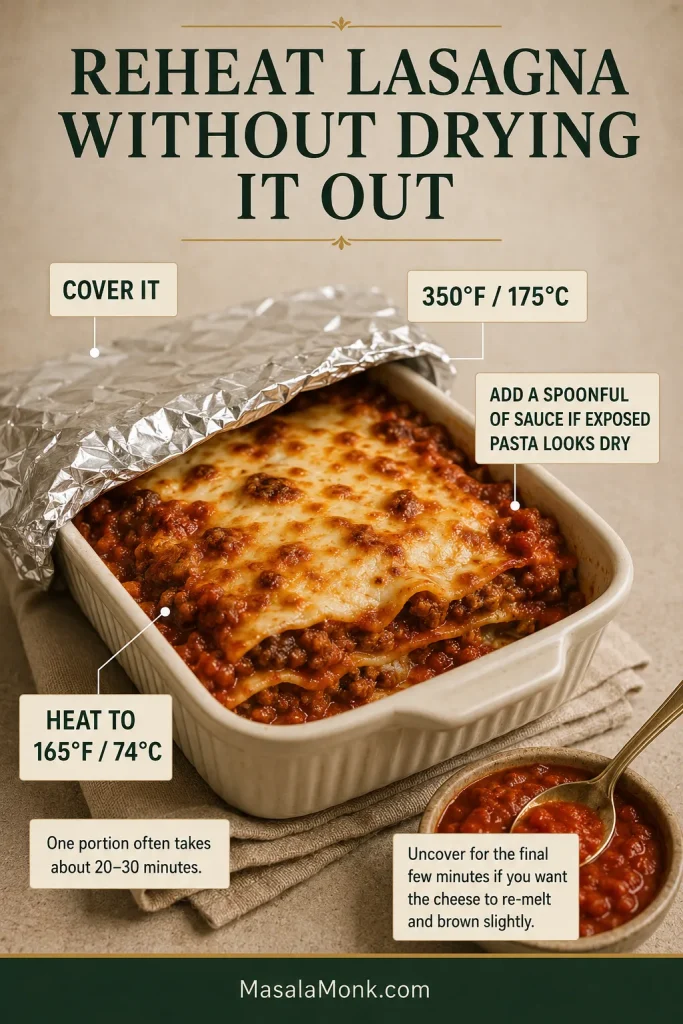
Place a portion in an oven-safe dish. Dry-looking exposed pasta benefits from a spoonful of extra sauce or a very small splash of water. Cover and reheat at 350°F / 175°C until the center reaches 165°F / 74°C.
A single portion often needs 20–30 minutes; larger amounts take longer. Uncover for the final few minutes if you want the cheese on top to re-melt and brown slightly.
Cover during most of reheating to protect the cut edges, then uncover briefly to re-melt the cheese on top.
For the microwave, cover the portion loosely and heat in shorter intervals until the center is steaming hot throughout.
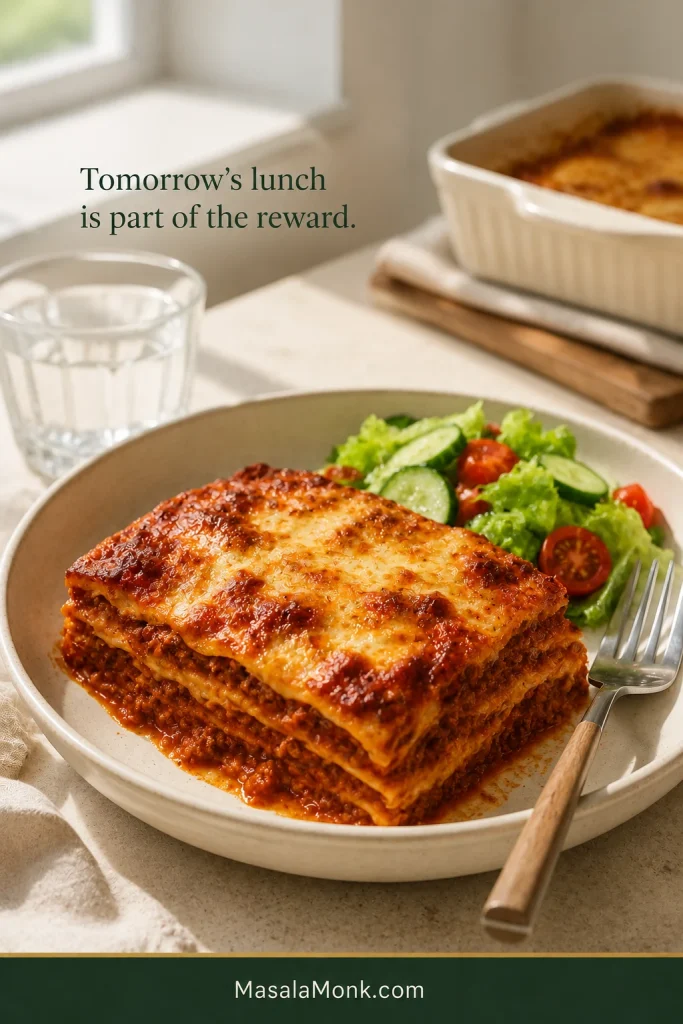
After putting this much work into one pan, having tomorrow’s lunch already handled is part of the reward. Leftover lasagna often slices even more neatly than it did on the first night because the layers have completely settled. Reheating it covered keeps those tidy layers tender.
Chilling firms the layers; gentle covered reheating softens the sauce and cheese again without drying the edges.
What to Serve With Lasagna
Lasagna already brings plenty of meat, cheese and tomato, so crisp, green or acidic sides work especially well. A cold cucumber salad with vinegar, dill and onion is one easy way to put something fresh beside the hot casserole.
A sharp green salad with vinaigrette
Roasted broccoli or green beans
Marinated peppers or another tangy vegetable side
And when a little meat sauce is left on the plate, homemade garlic bread earns its place beside the pan.
Crisp or acidic sides refresh the rich lasagna; garlic bread handles the sauce left on the plate.
The difficult part arrives when the lasagna comes out of the oven. The sauce is bubbling, the mozzarella has browned and everything smells ready.
Give it those last twenty minutes anyway.
Then cut in. The knife slides through without catching. The first piece may let a little sauce relax around its edges, but the layers stay recognizable, the ricotta stays creamy and the meat sauce stays rich and juicy.
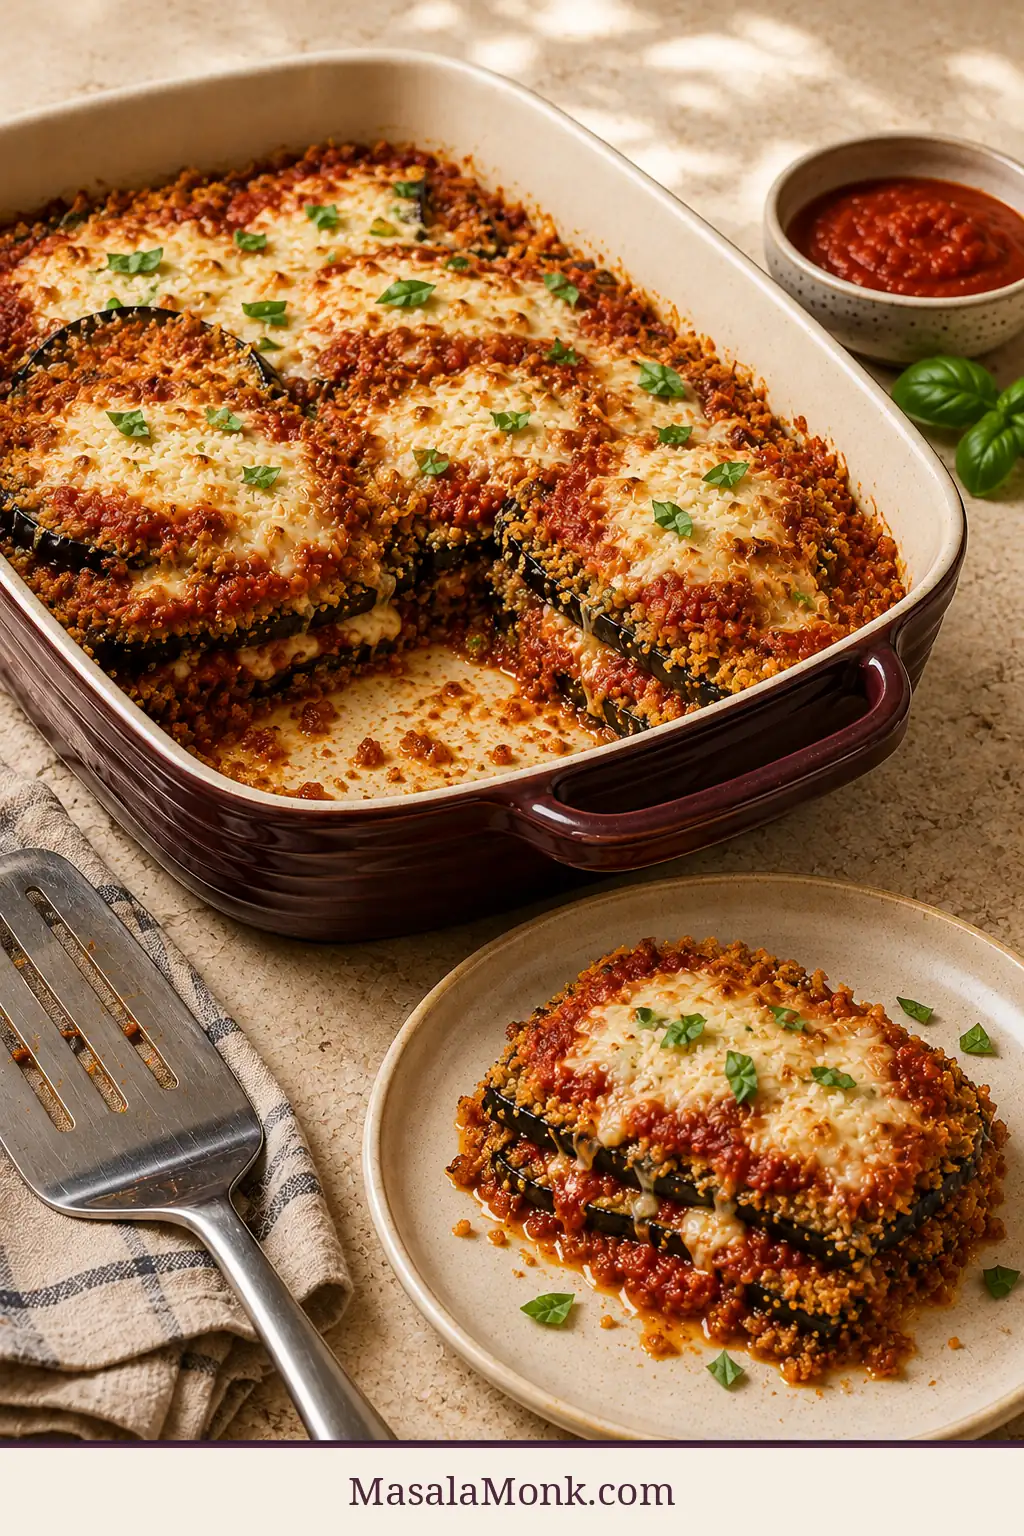
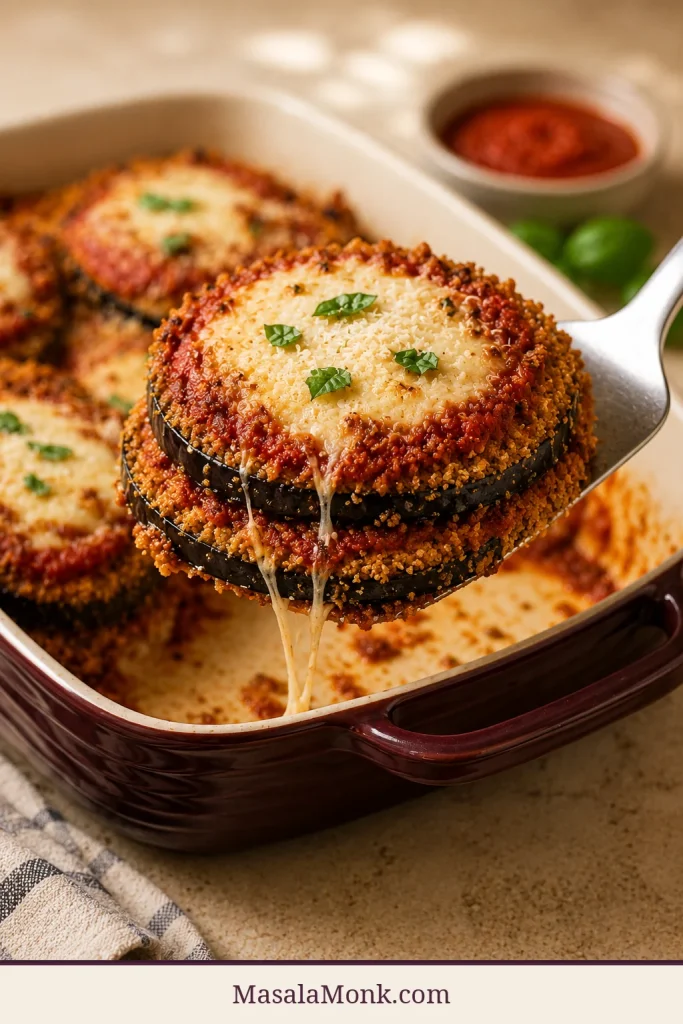
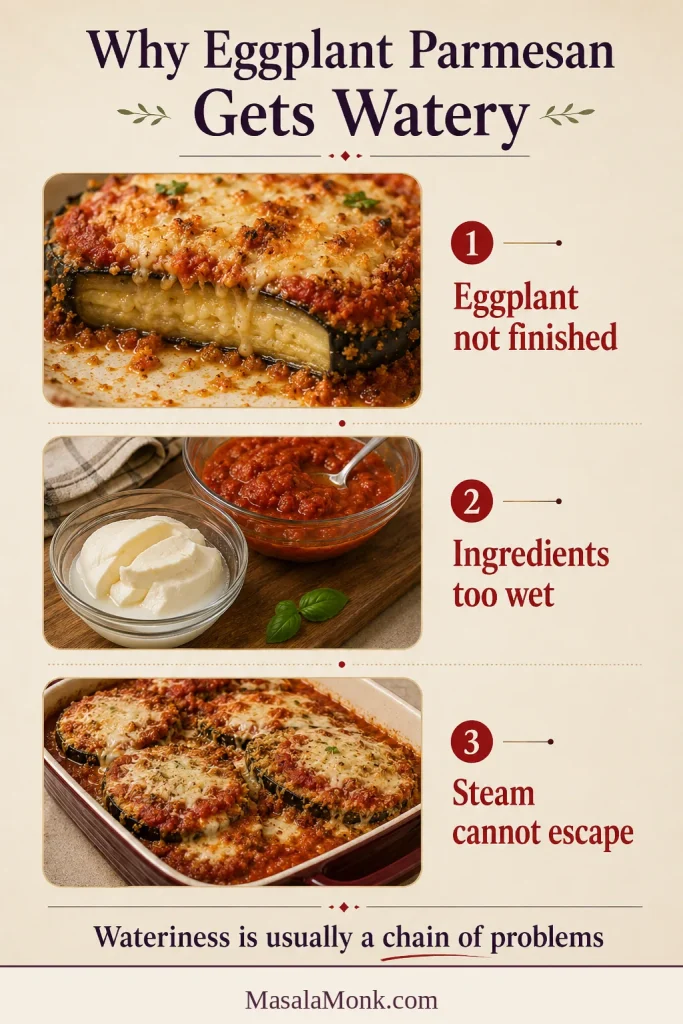
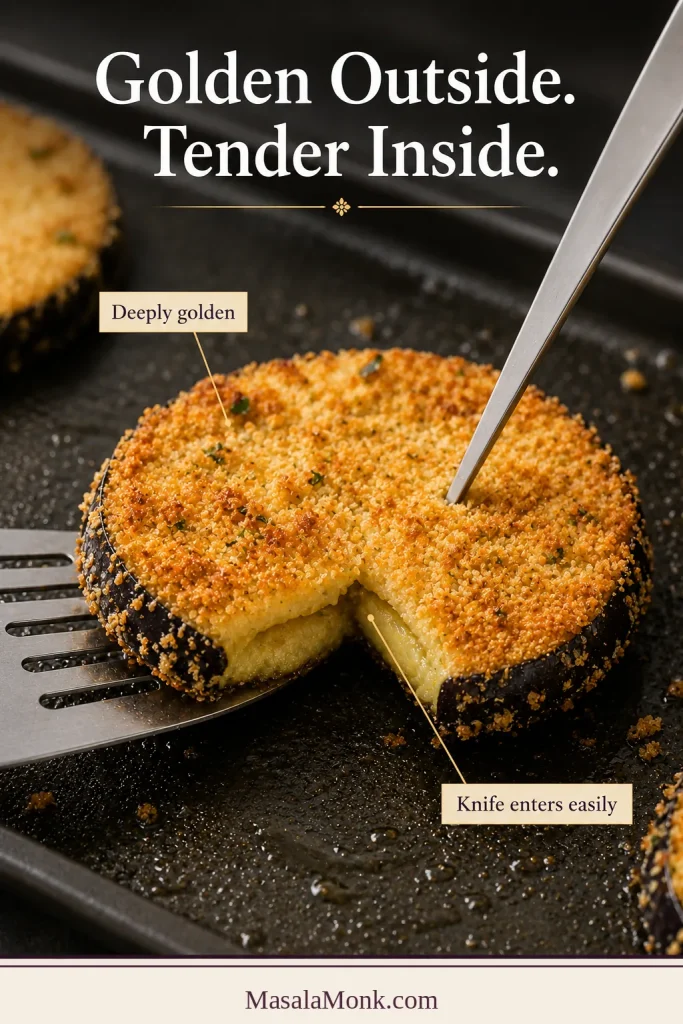
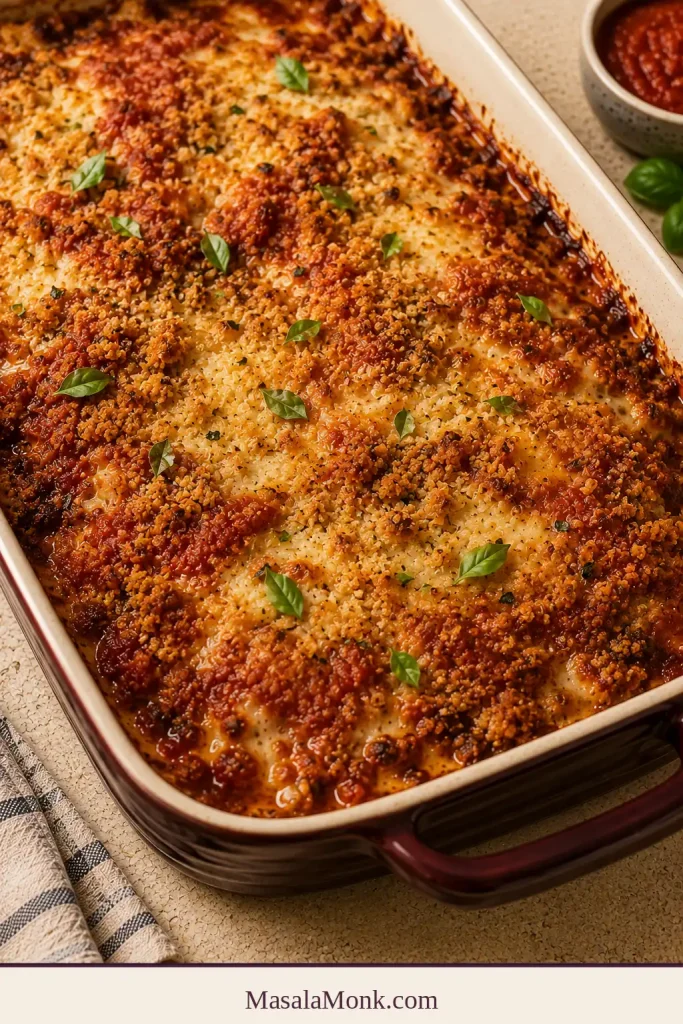
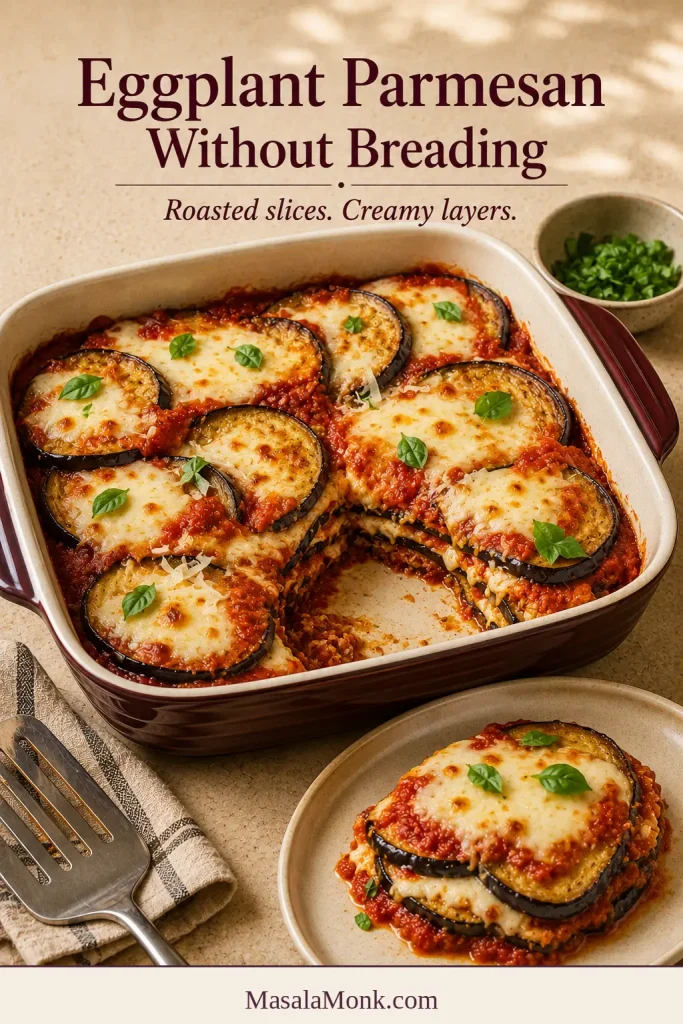
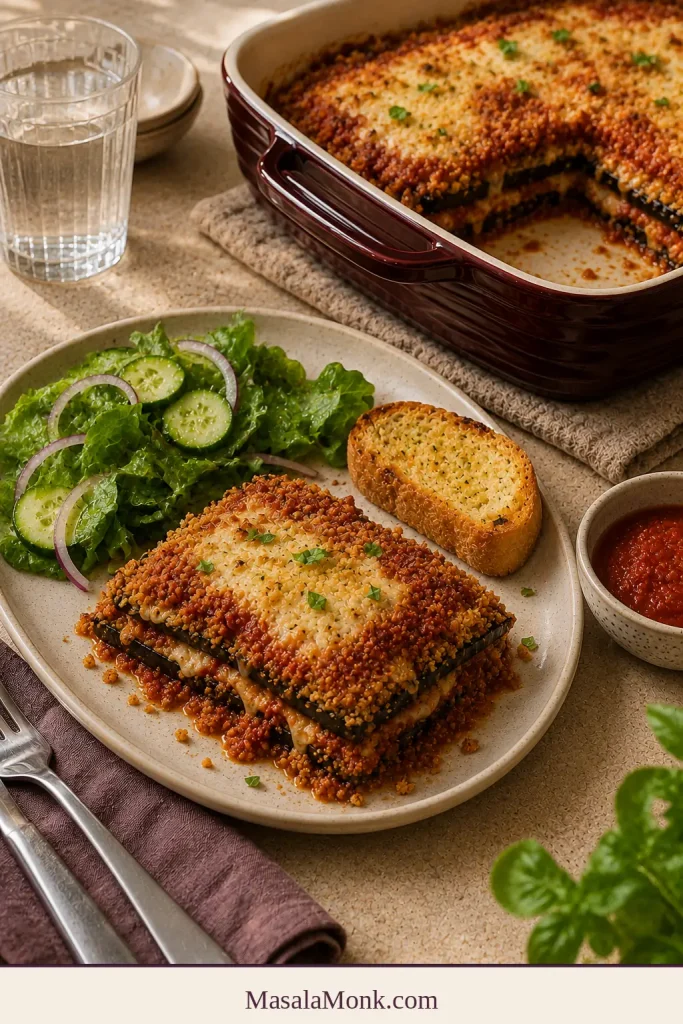
The first slice tells the truth. In a good baked Eggplant Parmesan, the spatula lifts a settled portion, mozzarella pulls between tender layers and a few Parmesan-panko edges still offer a light crunch. The disappointing version can look just as golden—until loose sauce gathers underneath and the breaded shell disappears into it.
This version keeps the familiar comfort of tomato, basil and melted cheese while baking the eggplant instead of frying it in batches. Even rounds are lightly salted, breaded and cooked until the centres turn silky and both sides are deeply golden. Only then are they layered with thick marinara and low-moisture mozzarella.
This is a weekend-worthy dinner for when you want each slice wrapped in its own browned Parmesan-panko crust without standing over a frying pan. That individual crust is what the extra handling buys you—not merely breadcrumbs scattered between the layers. It is not a 30-minute shortcut, but the work comes in manageable bursts and most of the elapsed time belongs to salting, baking and resting.
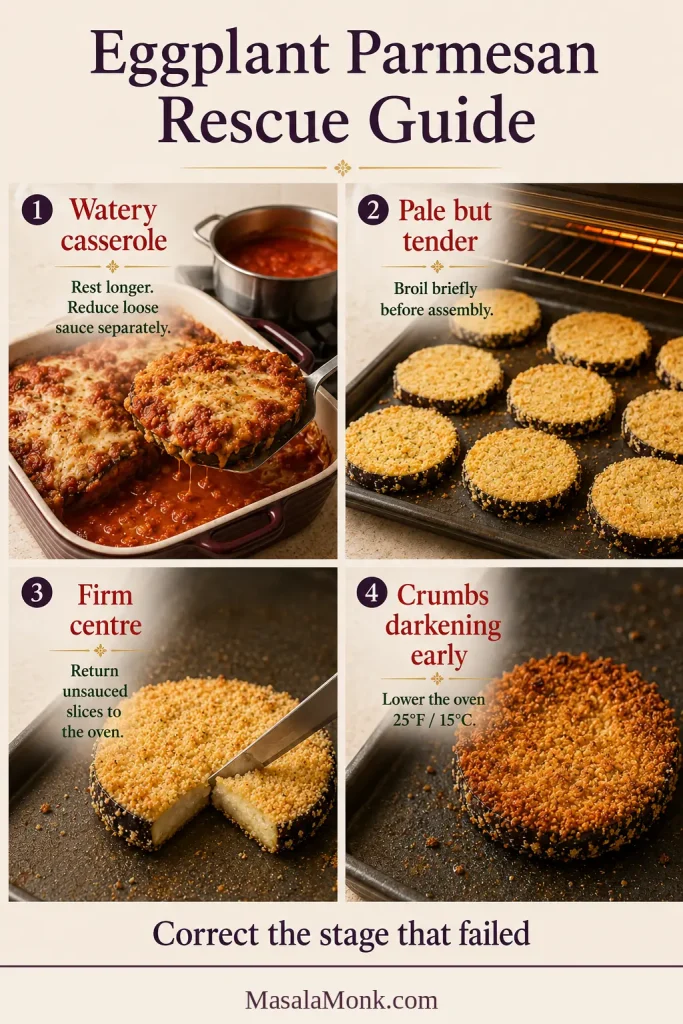
The MasalaMonk rule is simple: let the first bake finish the eggplant; let the final bake bring the casserole together.
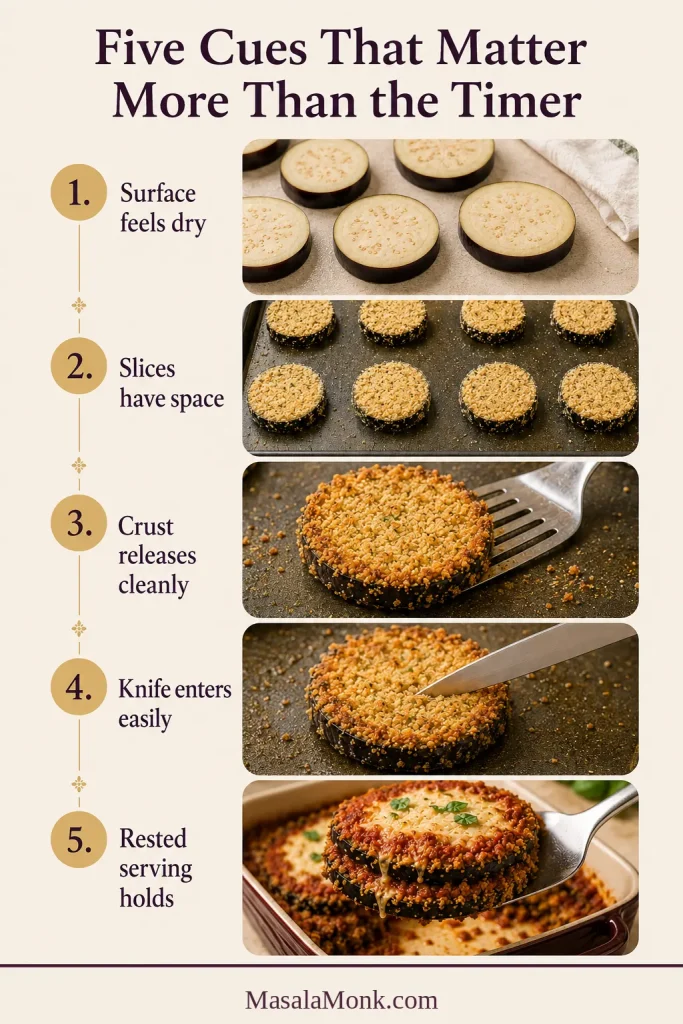
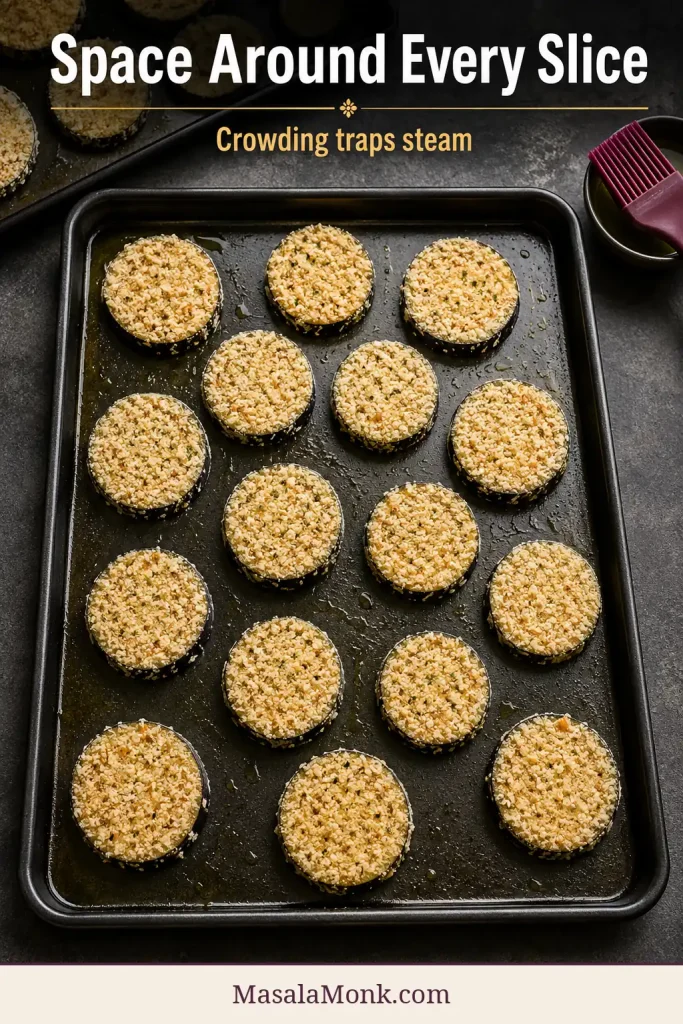
Cut the eggplant evenly, dry the surfaces well and bake the breaded slices with room around them until the crust is golden and the centres are fully tender. That first bake does the real cooking.
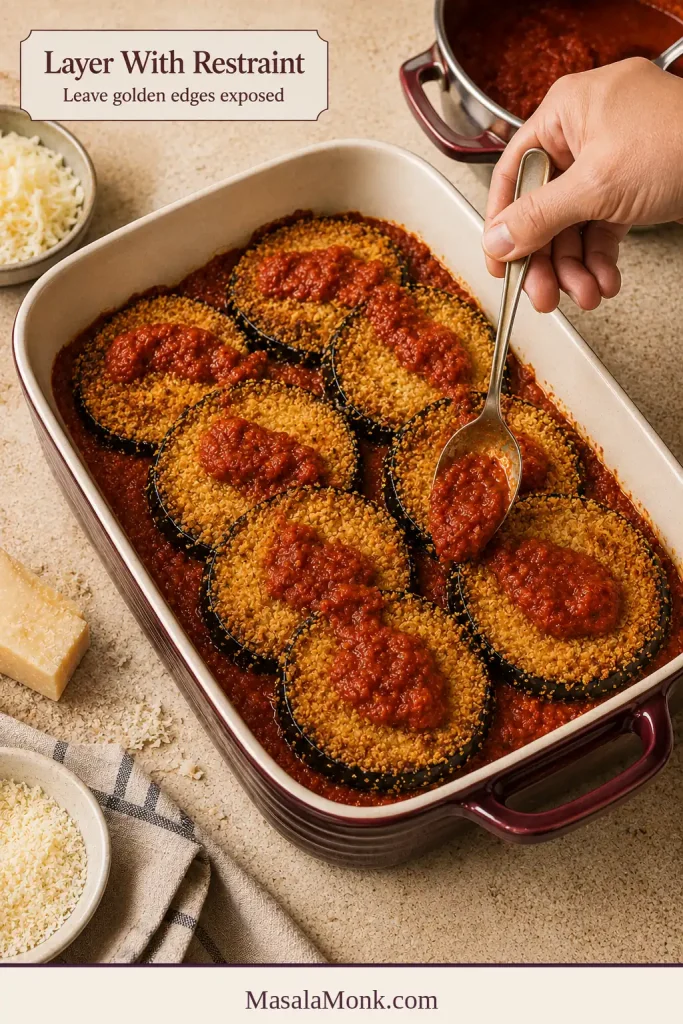
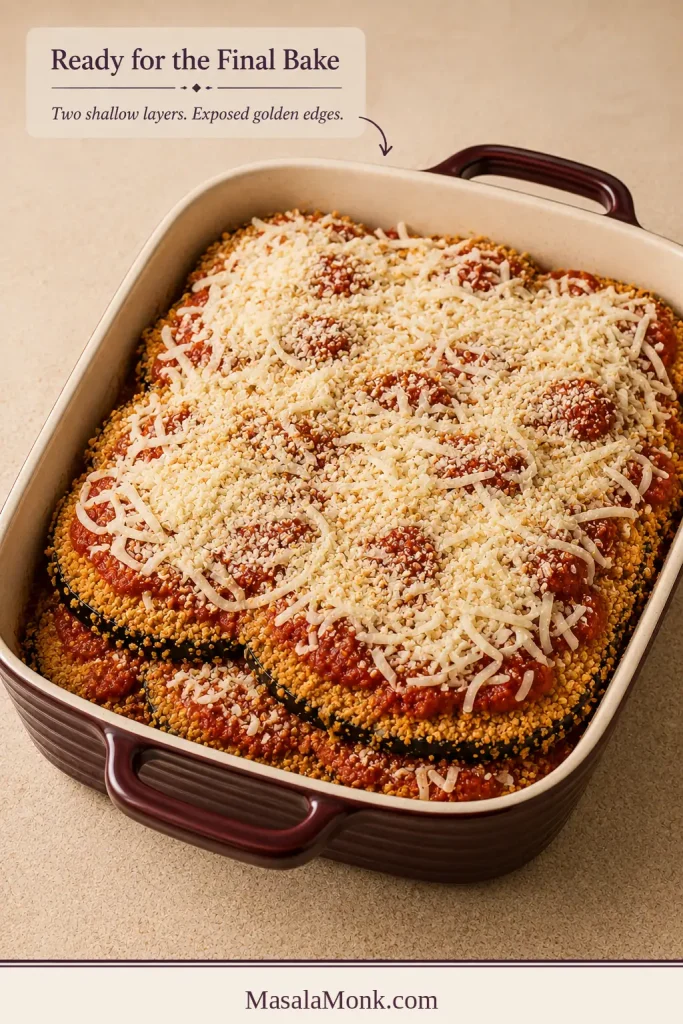
For assembly, use marinara thick enough to cling, low-moisture whole-milk mozzarella and only two shallow layers. Sauced breading naturally softens; the goal is a crust that stays distinct beneath the marinara, with crisp edges left exposed. Bake uncovered until the sauce bubbles around the edges, then give the pan 15 minutes to settle before lifting a serving.
A clean first slice depends less on adding more cheese than on fully cooking the eggplant before assembly and allowing the finished casserole time to settle.
How this method was built
This research-led recipe compares common baked, fried and sheet-pan approaches. It then works backward from the failures home cooks report most often: firm centres, slipping breading, pale crumbs, loose sauce and wet cheese. The method separates surface dryness from interior doneness, calibrates the sauce and cheese quantities to protect the layered texture, and pairs timing windows with visible, tactile and aroma cues because eggplants, pans and ovens vary.
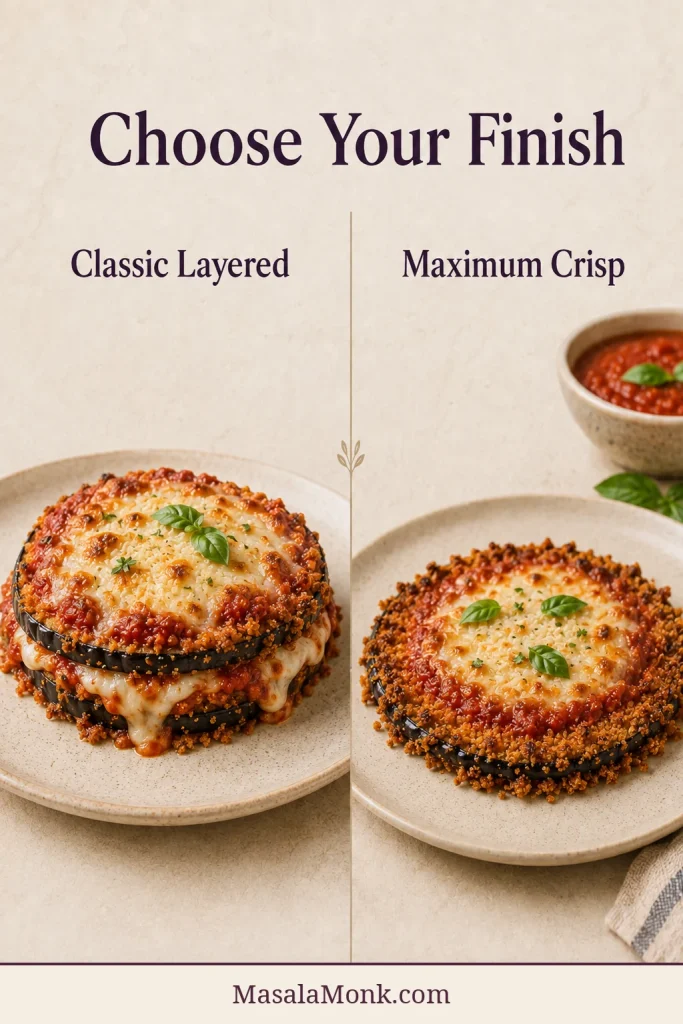
Choose the Texture You Want
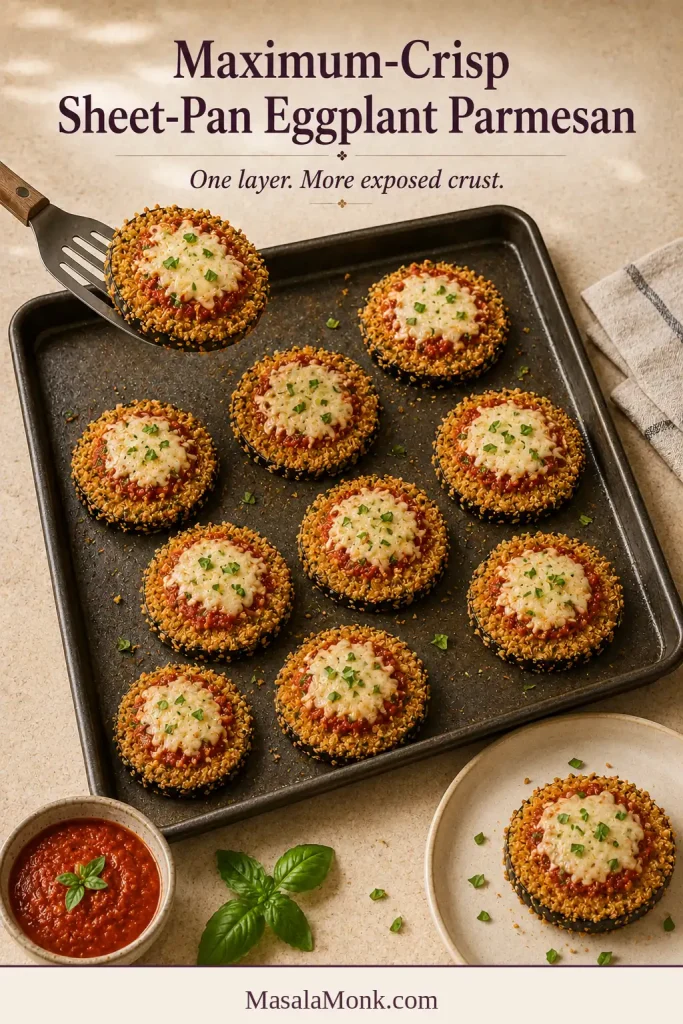
Those same breaded slices can become a saucy layered casserole or stay in one crisp sheet-pan layer. The recipe below follows the classic layered route.
On a phone, each finish appears as a stacked card.
Finish
How to build it
What reaches the table
Classic layered
Two shallow layers with measured sauce and cheese; leave a few breaded edges exposed
A cohesive, saucy casserole with tender centres and crisp-edged contrast
Maximum crisp
Keep the rounds in one layer, top each lightly and serve extra warm marinara alongside
More browned crust, lighter topping and easy individual portions
The classic layered version trades some exposed crust for saucy cohesion, whereas the sheet-pan finish keeps the rounds separate and preserves substantially more crisp breading.
Prefer the sheet-pan finish? The exact sauce and cheese amounts are in Variations.
Make it now
Crispy-Edged Baked Eggplant Parmesan Recipe
Slice the eggplant evenly, salt it lightly and coat it in flour, egg and Parmesan-seasoned panko. Bake until the centres are tender and the crumbs are deeply golden, then layer with thick marinara, whole-milk mozzarella, Parmesan and basil for a tomato-rich casserole that slices cleanly after resting.
Yield 6 generous or 8 smaller servings
Hands-on time About 50–60 minutes
Passive salting 30 minutes
Eggplant bake About 26–34 minutes
Assembly + final bake About 28–32 minutes
Resting time At least 15 minutes
Total elapsed time About 2 hours 10 minutes to 2 hours 25 minutes
The timing windows overlap: prep and cleanup happen during salting and baking, so they are not meant to be added together. Timing assumes 28–36 slices fit across two half-sheet pans. Smaller pans or unusually numerous slices may require a second batch; add 26–34 minutes.
Equipment
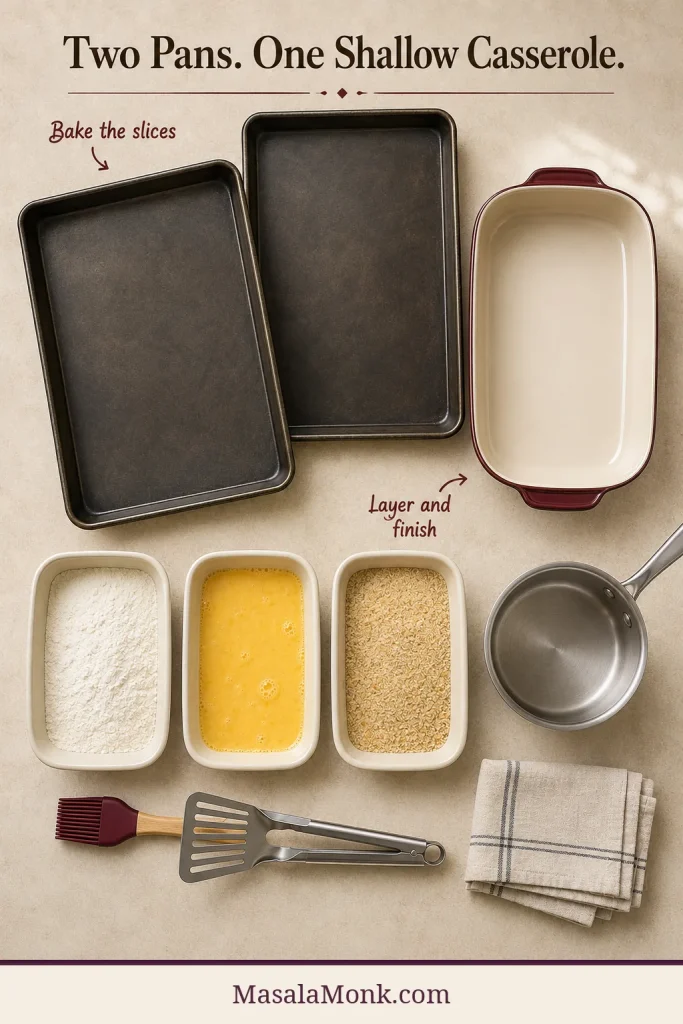
Two rimmed half-sheet pans, approximately 18 × 13 inches / 46 × 33 cm
One shallow 9 × 13-inch / 23 × 33 cm baking dish; choose metal or broiler-safe ceramic if you plan to brown the top beneath the broiler
Three wide, shallow bowls or dishes for breading
Sharp chef’s knife or guarded mandoline
Large thin spatula or turner
Wire cooling racks, useful but optional
Pastry brush or oil mister
The sheet pans do the real cooking; the shallow casserole only brings the finished components together. That separation keeps the final bake brief and protects the breading.
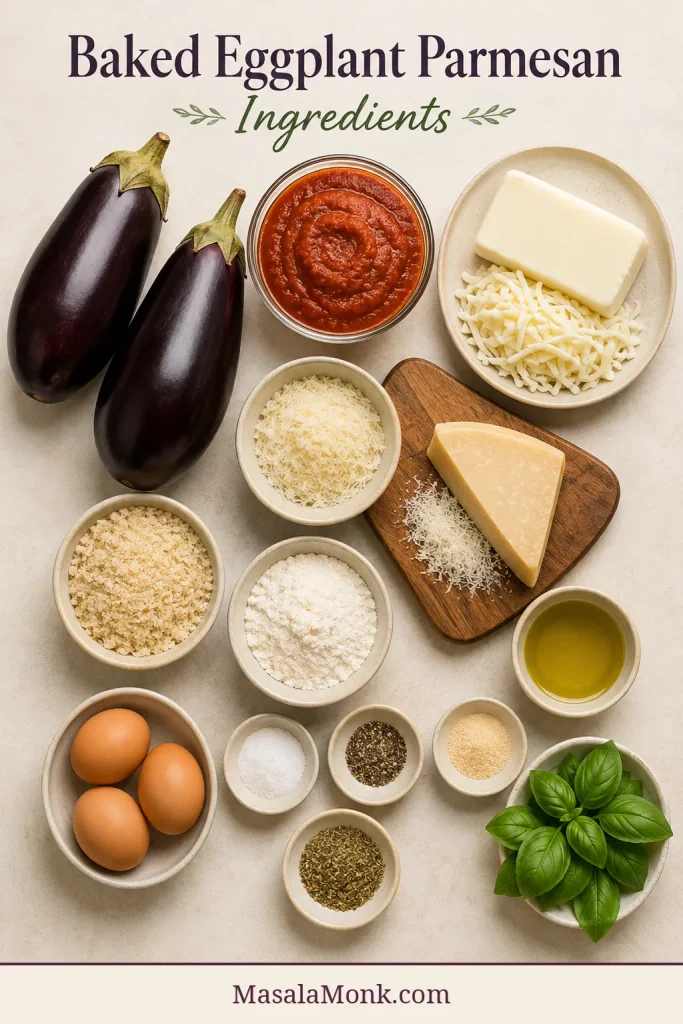
Ingredients
For the breaded eggplant
2 medium globe or Italian eggplants, about 2–2¼ pounds / 900 g–1 kg before trimming
6 g fine sea salt, about 1 teaspoon; measure kosher salt by weight because crystal size differs by brand
¾ cup all-purpose flour, about 90 g
3 large eggs, plus 1 additional egg only if needed for unusually broad rounds
1 tablespoon water, 15 ml, plus 1 teaspoon / 5 ml for the optional extra egg
2 cups panko breadcrumbs, about 120 g
1 cup finely grated Parmesan, about 90 g
1 teaspoon garlic powder
1 teaspoon dried Italian seasoning
½ teaspoon ground black pepper
6 tablespoons olive oil, 90 ml, divided, plus a little more only if a second batch is needed
For assembling
1 jar thick marinara sauce, 24 ounces / 680 g, about 2¾ cups / 660 ml, divided
10 ounces low-moisture whole-milk mozzarella, about 285 g, freshly shredded
½ cup finely grated Parmesan, about 45 g
½ cup loosely packed basil leaves, about 15 g, torn or thinly sliced
Ground black pepper, to finish
Use the waiting time
While the eggplant salts, shred the mozzarella and measure the breading. While the first side bakes, clear the breading station, tear the basil, set out the casserole dish and check whether the marinara needs reducing. Much of the elapsed time is waiting for salt or oven heat to do its work, not two hours of nonstop prep.
Instructions
Slice, salt and prepare the pans
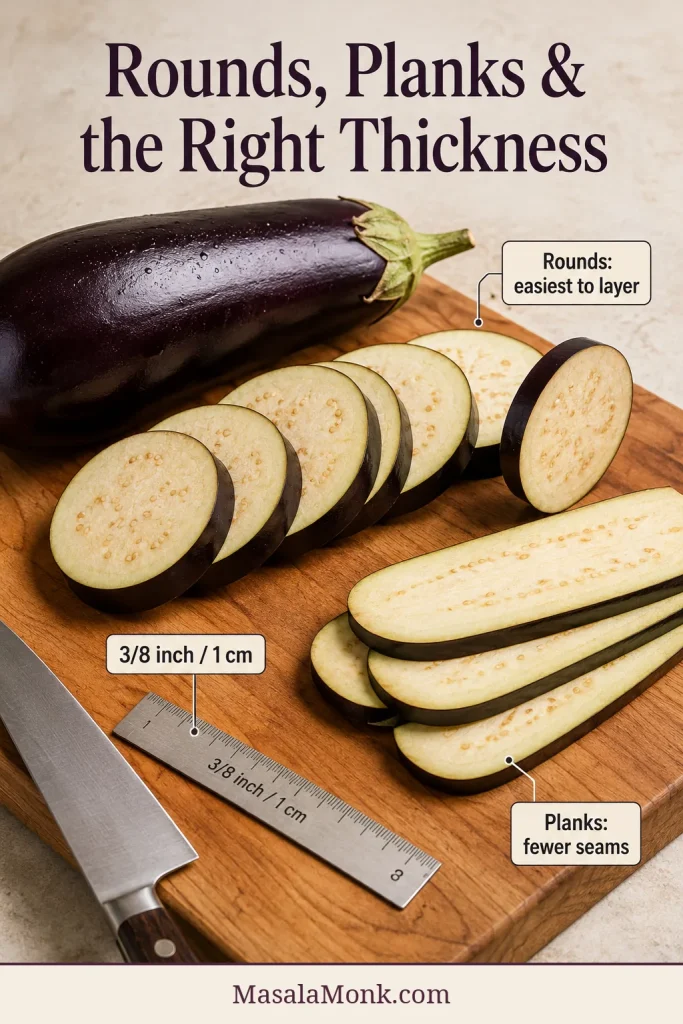
Slice evenly. Trim the ends, then cut the eggplants into ⅜-inch / 1 cm rounds. Expect 28–36 usable slices, depending on their shape. Keep the thickness as consistent as possible.
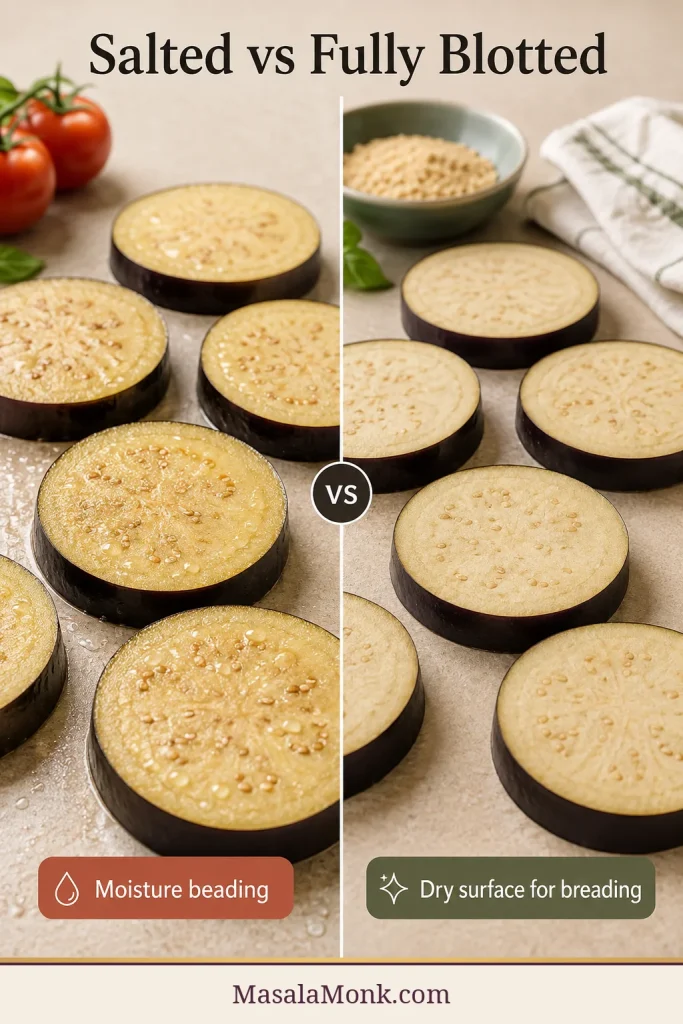
Salt and dry. Arrange the rounds in a single layer. Sprinkle the measured salt lightly and evenly over both sides; do not build a visible salt crust. Leave for 30 minutes, then blot firmly with clean kitchen towels or paper towels until the surfaces feel dry. Do not rinse; remove visible moisture and any undissolved salt.
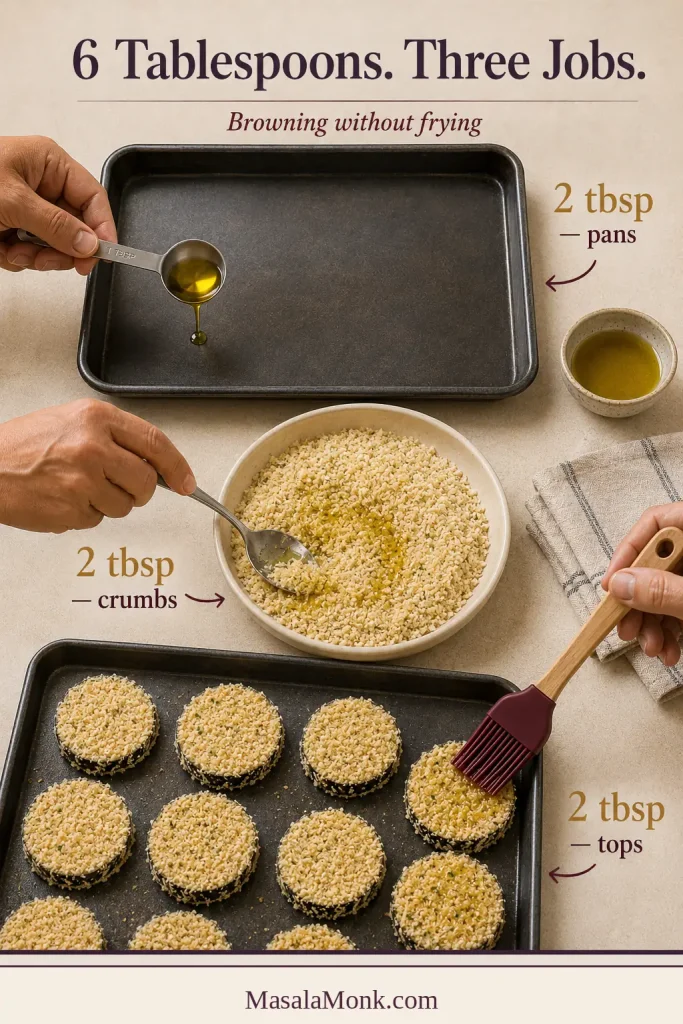
Heat the oven. Position racks in the upper and lower thirds. Preheat to 425°F / 220°C conventional or 400°F / 200°C fan. Brush the two metal pans with 2 tablespoons / 30 ml olive oil in total. Plan on 14–18 rounds per pan.When smaller pans or unusually numerous slices leave overflow, keep those rounds unbreaded until the first batch is nearly done. Reuse the pans and add only a thin extra film of oil if they look dry.
Bread and oil the slices
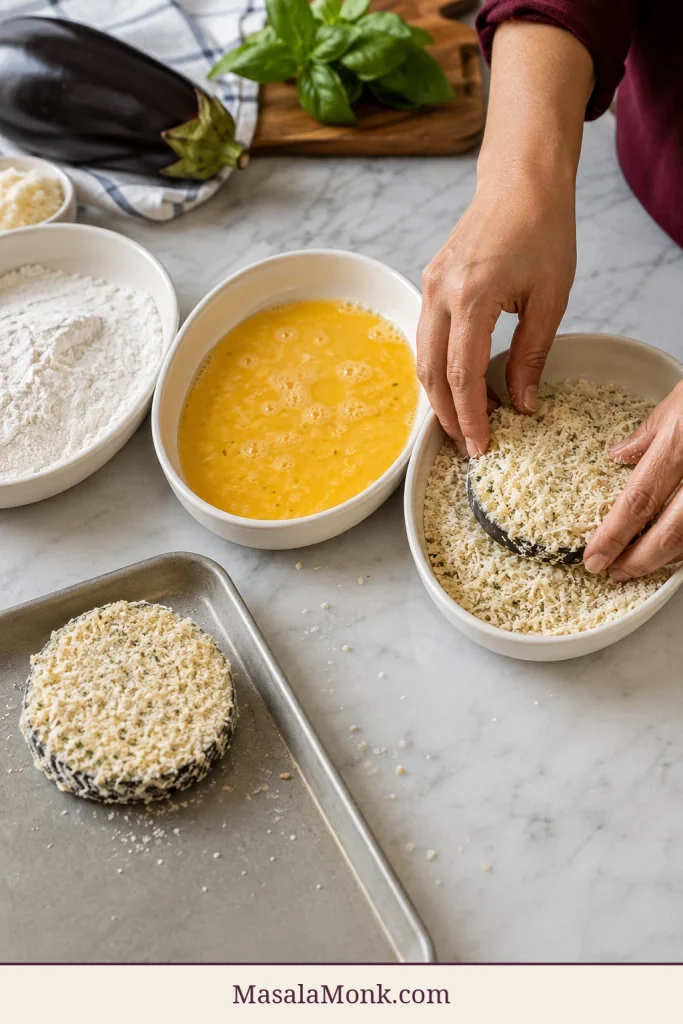
Prepare three breading dishes. Put the flour in the first. Beat the eggs with 1 tablespoon / 15 ml water in the second. Combine panko, 1 cup / 90 g Parmesan, garlic powder, Italian seasoning and black pepper, then rub 2 tablespoons / 30 ml olive oil evenly through it.Keep half the crumb mixture aside and replenish the working dish as needed. This keeps the later slices away from damp, heavy clumps.
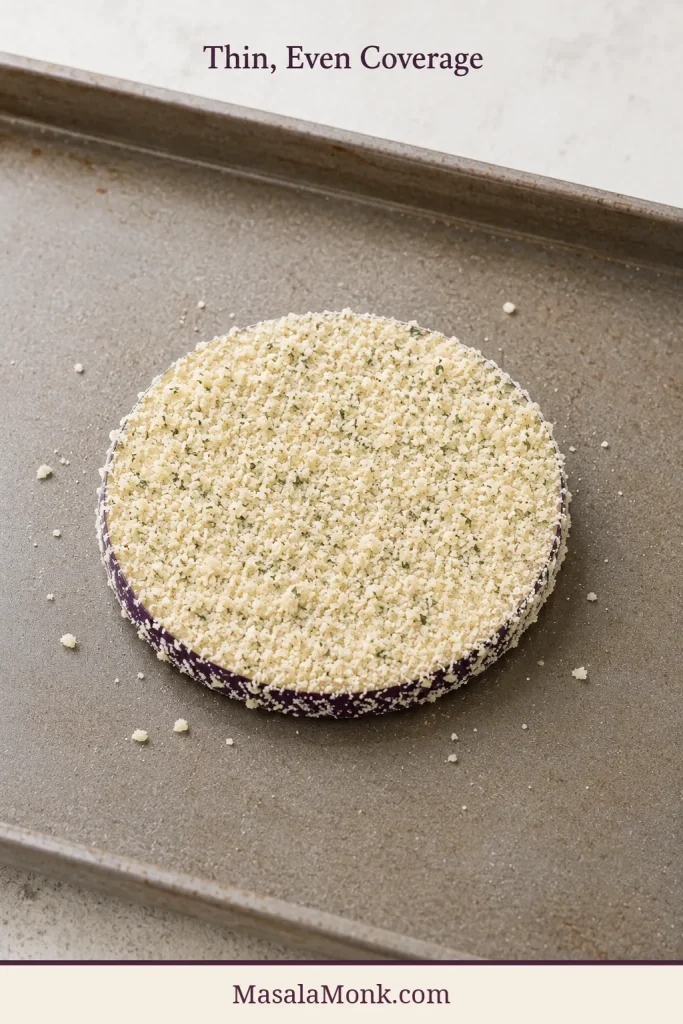
Bread each slice. Coat lightly in flour and shake off the excess. Dip in egg and let the extra drip away. Press into the panko mixture on both sides.Transfer to the prepared pans with a little space around each round.If especially broad rounds use the egg wash early, beat the optional egg with 1 teaspoon / 5 ml water instead of stretching a thin, patchy coating over the final slices.
Oil the tops. Brush or mist the remaining 2 tablespoons / 30 ml olive oil evenly over the breaded surfaces. Cover dry-looking crumb patches without creating pools.
Bake the breaded eggplant
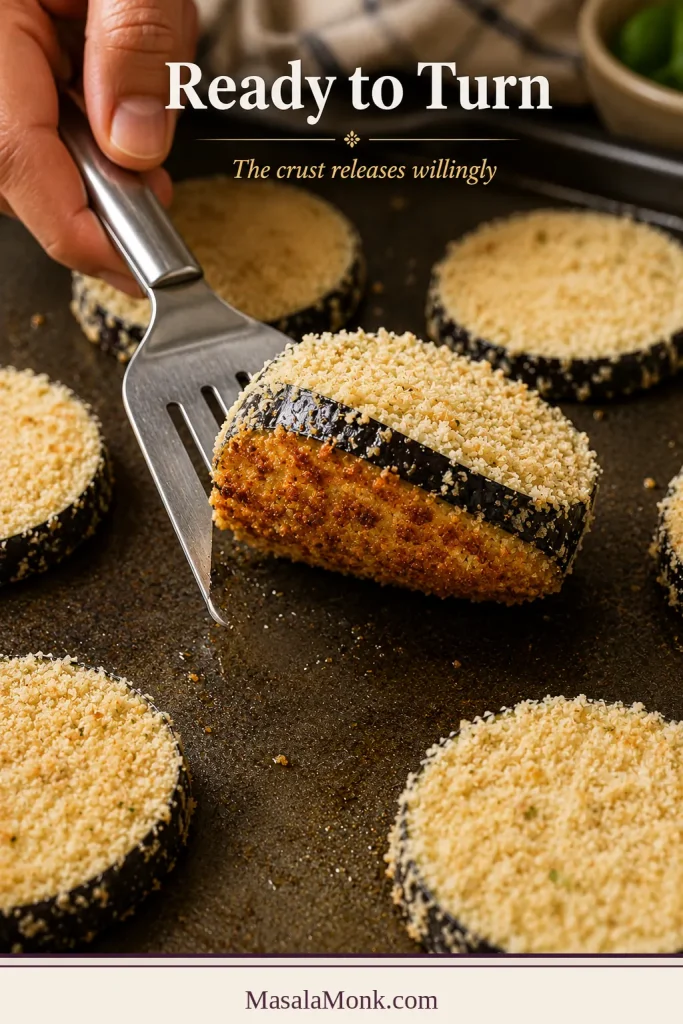
Bake the first side. Bake for 14–16 minutes. Wait until the crust has set before lifting a slice; forcing an under-browned coating from the metal can pull it away. Flip the slices, rotate both pans front to back and exchange their rack positions.
Warm, taste and check the marinara. While the second side bakes, warm the sauce. If it looks loose, simmer uncovered until a spoon drawn across the pan leaves a trail for a moment before the sauce flows back. Taste it warm: it should be tomato-forward and balanced rather than markedly sweet or salty, since Parmesan and mozzarella will add more salt in the casserole.
Finish the eggplant. Bake the second side for 12–18 minutes. Check from 26 minutes total. Both sides should be deeply golden, a thin knife should enter the centre with little resistance and a lifted round should bend slightly without falling apart. Give any firm or pale slices longer before assembly.
Assemble, melt and rest
Lower the oven and prepare the dish. Reduce to 400°F / 200°C conventional or 375°F / 190°C fan, then spread ½ cup / 120 ml sauce across the base of the baking dish.
Build the first layer. Add half the eggplant in one slightly overlapping layer. Spoon over ¾ cup / 180 ml sauce in patches, leaving a few golden edges visible. Add half the mozzarella, ¼ cup / about 22 g Parmesan and half the basil. The leaves will soften and perfume the warm sauce. Reserve the remaining basil for serving.
Complete the casserole. Add the remaining eggplant. Spoon over ¾ cup / 180 ml sauce without completely flooding every slice. Add the remaining mozzarella and Parmesan. Reserve the remaining ¾ cup / about 180 ml sauce for the table; jar yields vary slightly.
Bake uncovered. Bake for 18–22 minutes. Begin checking at 18 minutes. The sauce should bubble at the edges and the mozzarella should be fully melted.
Brown the top if needed. Broil for 1–3 minutes only when the cheese needs more colour, watching continuously. Use cookware rated for direct broiler heat; ordinary glass dishes should not go beneath the broiler.
Rest and serve. Rest for at least 15 minutes—the melted cheese makes the wait difficult, but a clean serving is worth it. Finish with the reserved basil and black pepper, and serve the reserved sauce warm at the table.
Prefer more crunch? Keep the slices on their sheet pans and use the maximum-crisp finish instead of stacking them.
A watery Eggplant Parmesan is usually a chain of problems, not one bad step. The eggplant may still be undercooked, the sauce or cheese may carry too much liquid, or steam may be trapped by crowding, deep layers, covering or cutting too soon. Salting helps dry the surface, but it cannot replace a complete first bake or careful assembly.
Wateriness is cumulative. A slightly firm centre, marginally loose sauce and a little trapped steam can combine into a much wetter result than any one problem would cause alone.
On a phone, swipe sideways to see the cause and fix together.
What goes wrong
Why it matters
What helps
Uneven slices
Thin rounds overcook while thick rounds stay firm and wet
Cut every slice to about ⅜ inch / 1 cm
Wet surface after salting
Flour turns pasty and the crust slips
Blot both sides firmly before breading
Crowded pans
Released moisture becomes trapped steam
Use two large metal sheet pans
Incomplete first bake
The sauced casserole has to finish cooking the vegetable
Bake until the centre is tender before assembly
Pale, dry crumbs
The coating absorbs sauce before it forms a browned shell
Distribute a measured amount of oil evenly
Thin marinara
Loose water runs between the layers
Reduce sauce until it briefly holds a spoon trail
Fresh mozzarella liquid
Whey loosens the sauce and softens the coating
Use low-moisture whole-milk mozzarella
Excess sauce
Every crumb becomes saturated
Measure each layer and reserve sauce for serving
Deep or covered casserole
Steam cannot escape
Build two shallow layers and bake uncovered
Cutting immediately
Hot sauce and cheese run before the layers settle
Rest for at least 15 minutes
Prepare the Eggplant
Peel only when the skin asks for it
Most medium eggplants can keep their skin; it helps the rounds survive breading, turning and layering. Peel fully or in alternating strips when the eggplant is oversized, the skin feels thick or you prefer especially soft layers.
Rounds are easiest; planks make tidier layers
Rounds are easier to bread, flip and portion, and their uneven edges leave more crust visible. Lengthwise planks create neater, lasagna-like layers. Either shape works as long as every piece lies flat on the sheet pan.
Uniformity matters more than choosing rounds or planks. When every slice stays close to ⅜ inch / 1 cm, the whole batch reaches tenderness within a tighter checking window.
Keep the slices close to ⅜ inch / 1 cm
Consistency matters more than perfect geometry. Thin ¼-inch / 6 mm rounds cook quickly but can disappear into the casserole; thick ½-inch / 13 mm rounds need longer to soften. At ⅜ inch / 1 cm, the eggplant stays substantial and still becomes silky. Use a sharp knife or a guarded mandoline that can safely hold that setting.
Salt and blot for a drier breading surface
Modern eggplants are often mild, so the useful benefit here is practical rather than bitterness control. A measured 30-minute rest draws beads of liquid to the surface, lightly seasons the flesh and gives you a chance to remove that liquid before flour is applied.
Blot firmly and brush away visible salt; rinsing only creates another drying job. Very fresh eggplants may not need salting for bitterness, but this breaded casserole is calibrated around the full salt-and-blot step because it seasons the flesh and creates the driest, most dependable surface for flour. Keep it especially when the eggplants are older, softer, unusually large or quick to bead with liquid.
Salt reveals the moisture, but careful blotting determines whether the breading will hold. The surface is ready when it looks matte rather than wet or glossy.
Ingredients and What They Do
These ingredients form two systems: thick marinara and low-moisture mozzarella control liquid, while Parmesan, panko and olive oil build savoury browning without frying.
Eggplant
Choose medium globe or Italian eggplants with smooth, glossy skin, green caps and firm flesh that gives only slightly when pressed. Medium eggplants are generally easier to slice and cook evenly; very large ones are more likely to have developed seeds, thicker skin and a spongier centre.
Weight is more dependable than “two large eggplants.” About 2–2¼ pounds / 900 g–1 kg usually produces 28–36 rounds for two layers in a 9 × 13-inch dish. Eggplant shape varies, so keep any overflow for a second sheet-pan batch instead of packing the pans or casserole into a deep, steamy stack.
Flour, egg and panko
A thin dusting of flour absorbs the last surface moisture and gives the egg something dry to hold. A visible flour shell can turn into a pasty band beneath the crust.
Let extra egg drip away before moving the slice into the panko, then press the crumbs on gently. Panko gives the coating irregular, crisp edges; ordinary fine breadcrumbs also work, though the crust will be smoother, denser and less craggy. That dry-to-wet-to-crumb sequence keeps the coating attached in MasalaMonk’s homemade mozzarella sticks.
Keep one hand mainly for the egg and the other for flour and crumbs. This small habit slows clumping and keeps the final rounds as evenly coated as the first.
Parmesan and olive oil
Finely grated Parmesan distributes more evenly than large shreds, brings nutty savouriness and helps the panko brown.
Parmesan, marinara and mozzarella already bring salt, so the coating needs restraint. MasalaMonk’s Parmesan versus Parmigiano Reggiano guide can help when choosing between milder domestic Parmesan, sharper aged cheese and other hard grating options.
Baked crumbs need some fat. Oil is divided between the pan, panko and tops so the underside and exposed surface can colour. A loose drizzle leaves some crumbs dry and others greasy, so measured oil gives a more even crust.
Dividing the olive oil creates three different forms of browning. Pouring it all onto the pans would leave the crumb mixture and upper surfaces comparatively dry and pale.
Choose marinara for flavour and body
Choose a marinara you enjoy by the spoonful, with enough acidity to balance the cheese and enough body to stay where it is spooned. A brief uncovered simmer not only removes excess water; it makes the tomato, garlic and herb flavours fuller so a measured amount still tastes generous. Drag a spoon across the saucepan: the track should remain visible briefly before the sauce flows back.
If liquid fills the trail immediately, keep simmering. MasalaMonk’s homemade marinara sauce makes 3–4 cups, leaving enough to thicken for the casserole and warm for the table.
This spoon trail marks the assembly threshold: the marinara is concentrated enough to cling, yet still loose enough to spread without dragging or disturbing the crust.
Why low-moisture mozzarella fits this version
Low-moisture whole-milk mozzarella gives a soft, full melt with less free liquid than fresh mozzarella. Part-skim cheese works but can set more firmly. Fresh mozzarella tastes delicate and milky, though its whey produces a softer casserole.
To replace the low-moisture mozzarella, use one 7–8-ounce / 200–225 g ball of fresh mozzarella. Slice or tear it, then drain it over towels for at least 30 minutes. Put about one-third between the layers and scatter the rest over the top. Keep the same final-bake checking window, but expect softer layers and a little more surface liquid. Pre-shredded low-moisture mozzarella also works, although anti-caking powders can make the melt slightly less fluid than cheese shredded from a block.
Fresh mozzarella works best when most of it stays on top, where released moisture has less opportunity to loosen the middle layers. Low-moisture cheese remains the firmer option.
Vegetarian note: traditional Parmesan may be made with animal rennet. Strict vegetarians should choose a Parmesan-style hard cheese and mozzarella labelled as using microbial or vegetarian rennet.
Fresh basil brings a clean, peppery lift to the tomato and melted cheese. Tear some into the layers and save the brightest leaves for the rested casserole.
Five Cues That Matter More Than the Timer
Timers tell you when to look. These five cues show what readiness looks, feels and smells like when your oven or the eggplants behave differently.
The order matters: dry the surface, leave space, wait for release, confirm tenderness and then rest the finished casserole. Skipping an early cue usually weakens a later one.
1. Turn a damp cut surface into one that can hold a crust
After salting, press the rounds with clean towels until they no longer feel wet. This is not a ceremonial pat: flour clings to a dry surface instead of turning into glue.
Dust lightly with flour, let excess egg drip away and press on a modest layer of panko. By the final broad rounds, the egg wash may be running low and the working crumbs much clumpier than at the start. Replenishing both is easier than forcing a thin, patchy coating onto the last slices.
Thicker breading is not automatically crispier. A heavy coating can darken before the eggplant softens, whereas a thin shell browns with the slice rather than around it.
2. Give the crumbs room, oil and contact with metal
Room around each slice lets steam escape and gives the underside contact with hot metal. There is no prize for squeezing the last rounds onto a crowded pan. Dark pans colour faster; parchment may need extra time, and silicone mats can slow underside browning.
Steam is the invisible problem here. If neighbouring rounds touch or nearly touch, divide them between two pans rather than sacrificing browning for convenience.
3. Watch pale, rigid slices become golden and tender
A crust that is ready to turn usually releases with little persuasion. If it clings, give it another minute rather than tearing it away.
Clean release is a doneness signal. Once the underside has formed a stable golden shell, the slice can be turned without leaving its coating attached to the pan.
Colour alone is not enough. A thin knife should pass through a thicker centre with little resistance, and the slice should bend slightly while staying intact. If the crumbs brown first, lower the oven by about 25°F / 15°C and keep going until the eggplant is tender.
Use two signals together: browning confirms the coating is ready, while the knife test confirms the eggplant—not merely the crust—is fully cooked.
When the crust releases cleanly and the Parmesan smells toasted, the slices stop feeling like prepared ingredients and start feeling ready to eat.
4. Layer without hiding all the browning
Warm loose marinara until a spoon drawn across the saucepan leaves a brief trail. The measured sauce may look restrained as you assemble the dish. That restraint is deliberate: warm sauce at the table keeps the portions generous without soaking every breaded surface in the pan.
Uneven coverage is intentional. The sauced areas keep the casserole generous, while the dry-looking perimeter is where crisp contrast survives the second bake.
A little breading left uncovered is intentional. Once the mozzarella melts and the sauce bubbles, those exposed crumbs provide the contrast.
5. Let the hot casserole settle before cutting
This is the moment to wait. As the casserole rests, the sauce gains body and the cheese stays with the layers, allowing a wide spatula to lift a complete serving.
Eggplant Parmesan Bake Time and Oven Temperature
Breaded eggplant needs 26–34 minutes at 425°F / 220°C conventional or 400°F / 200°C fan. The assembled casserole then needs 18–22 minutes at 400°F / 200°C conventional or 375°F / 190°C fan. The hotter first stage browns the coating and cooks the centres; the shorter second stage bubbles the sauce and melts the cheese.
On a phone, swipe sideways for both oven settings and doneness cues.
Stage
Conventional oven
Fan oven
Begin checking
Ready when
Breaded eggplant
425°F / 220°C
400°F / 200°C
26 minutes total
Both sides are golden and the centre is fully tender
Assembled casserole
400°F / 200°C
375°F / 190°C
18 minutes
Sauce bubbles at the edges and mozzarella is melted
Optional broil
High
High
After 1 minute
Cheese is browned without burnt panko
Rest
Room temperature
Room temperature
15 minutes
A lifted portion holds together
At this stage, the eggplant should already be tender enough to eat. The final bake now has one job: melt the cheese and unite the two shallow layers.
Pan colour, oven calibration and the eggplants themselves can shift the last few minutes. Use the times as checking windows, then let deep browning, easy knife entry and bubbling sauce decide.
Look for gentle activity around the edges rather than a rolling boil across the centre. Quiet perimeter bubbling signals that the casserole is hot without excessive loose moisture.
Troubleshooting
Problem
Likely cause
Most useful fix
The dish is watery
Thin sauce, wet cheese, undercooked eggplant or cutting too soon
Reduce the sauce, use low-moisture mozzarella, bake the slices until tender and rest the casserole 15 minutes
The coating became completely soft
Too much sauce, deep layers or a covered final bake
Use measured sauce, build two layers and bake uncovered
The breading falls off
Wet eggplant, skipped flour or excess egg
Dry thoroughly, flour lightly and let egg drip before panko
The coating is pale
Too little oil, crowding or weak contact with hot metal
Distribute oil evenly, use two pans and continue until browned
Crumbs burn before the centre softens
Slices are thick or the oven runs hot
Lower the temperature about 25°F / 15°C and continue until tender
The eggplant feels firm or spongy
It entered the casserole before the first bake was complete
Return unsauced slices to the oven; do not rely on the final bake
The finished dish is salty
Surface salt, salty marinara and Parmesan accumulated
Use salt by weight, blot thoroughly and avoid extra seasoning before tasting
The cheese releases liquid
Fresh mozzarella was not drained
Use low-moisture cheese or drain fresh mozzarella for at least 30 minutes
The layers slide apart
Excess sauce or insufficient resting
Reserve more sauce for serving and rest longer before cutting
The skin is tough
The eggplant was oversized or mature
Choose medium eggplant or peel it in alternating strips
Match the remedy to the failed stage. Once a casserole is assembled, removing or reducing loose liquid is often more effective than simply leaving everything in the oven longer.
Can a watery finished casserole be rescued?
Let it rest longer first; some apparent liquid thickens as the dish cools. When a large amount remains, lift portions with a slotted spatula and simmer any loose sauce separately before spooning it back over the plate.
Do not keep baking the whole casserole indefinitely. The sauce may reduce, but the eggplant and cheese can become dry before the centre stops looking loose.
What if the eggplant is tender but the coating is pale?
Shift the pan to a higher rack or broil briefly before assembly, watching continuously. Once sauce has been added, pale crumbs are much harder to correct.
Variations
Start with the breaded recipe above, then use the option that matches the texture or dietary change you need. Each variation lists only what changes.
Maximum-crisp sheet-pan Eggplant Parmesan
Keep the browned rounds in one layer. For the full batch, use up to 1½ cups / 360 ml marinara and 8 ounces / 225 g mozzarella—about 2–2½ teaspoons sauce and roughly 1 tablespoon shredded cheese per round. Return to a 400°F / 200°C oven for 5–7 minutes, then broil briefly only if needed.
Serve the remaining sauce warm alongside. Because the rounds are never stacked, more of the Parmesan-panko crust reaches the plate browned and distinct.
Treat these as individually topped rounds, not miniature stacks. Keeping the sauce above the crust—and extra marinara at the table—protects the sheet-pan version’s main advantage.
Eggplant Parmesan without breading
Skip the flour, eggs and slice coating. Brush the rounds with 4 tablespoons / 60 ml olive oil in total. Roast at 425°F / 220°C conventional or 400°F / 200°C fan, turning once, until browned and fully tender. Assemble with 2 cups / 480 ml thick marinara, 8 ounces / 225 g mozzarella and ⅓ cup / 30 g Parmesan.
For crunch on top, combine ½ cup / 30 g panko with ¼ cup / 22 g Parmesan and 1 tablespoon / 15 ml olive oil. Scatter it over the final cheese layer. The result has creamy roasted eggplant and a crisp top rather than a crust around every slice. For a completely breadcrumb-free casserole, simply omit this topping.
Without a crumb shell, thorough roasting becomes even more important. Browning the eggplant surfaces first prevents the smooth slices from turning slippery inside the sauced casserole.
Gluten-free Eggplant Parmesan
Gluten-free panko is the direct substitution and gives the closest result to the main recipe. Replace the flour with a gluten-free all-purpose blend and keep the same flour–egg–crumb order.
For allergy-led cooking, check the panko, flour blend, seasoning, marinara and cheeses for relevant allergen and cross-contact statements.
Egg-free Eggplant Parmesan
For an egg-free coating, skip the separate flour and egg dishes. Whisk ¾ cup / 180 ml dairy or unsweetened soy milk with ½ cup / 60 g all-purpose flour and 1 tablespoon / 8 g cornstarch. The mixture should be smooth and thin enough to drip slowly from a spoon. Add milk 1 tablespoon at a time if it becomes too thick.
Dip each dry eggplant round in the batter, let the excess drip, then press on the panko mixture. The coating is more fragile than an egg-bound crust, so turn it with a thin spatula only after the first side has set and browned.
Eggplant Parmesan with ricotta
Ricotta makes a creamier, more lasagna-like casserole. If that is the texture you enjoy, MasalaMonk’s baked ziti guide explores the same ricotta-and-mozzarella comfort-food lane in pasta form.
Mix 15 ounces / 425 g well-drained whole-milk ricotta with 1 large egg, ¼ cup / 22 g from the Parmesan reserved for assembly and black pepper. Spread it in a thin, even layer over the first layer of sauced eggplant.
Reduce the mozzarella to 6 ounces / 170 g and use the remaining ¼ cup / 22 g Parmesan on top. Keep only 2 cups / 480 ml sauce inside the casserole and rest it for about 20 minutes so the creamy layers cut more cleanly.
Small-batch Eggplant Parmesan
For two to four servings, use one medium eggplant weighing 1–1¼ pounds / 450–570 g and halve the remaining ingredients. For the breading station, beat 2 large eggs with 2 teaspoons / 10 ml water; expect a little to remain. An 8 × 8-inch / 20 × 20 cm dish usually holds two shallow layers.
The slice-baking temperatures stay the same. Begin checking the smaller assembled dish at about 15 minutes; its shallower centre usually heats sooner than a full 9 × 13-inch pan.
What to Serve With It
Eggplant Parmesan is rich enough to arrive at the centre of the table as the main event. Set down the rested pan and pass the warm reserved marinara. The centre pieces stay silky and saucy; the corners bring browned cheese and exposed crumbs. Something green, sharp or bread-like keeps bright tomato, milky mozzarella and nutty Parmesan from feeling heavy.
Dress the salad sharply with lemon or vinegar and keep the bread portion modest. The plate needs freshness and crunch more than another rich or heavily sauced component.
Classic dinner: spaghetti, linguine or another simply dressed pasta for catching the extra sauce
Comfort-food table: a homemade garlic bread loaf, crisp-edged focaccia or another crusty loaf for the last spoonful of marinara
Lighter plate: sautéed greens, salad or roasted vegetables instead of pasta
Tomorrow’s lunch: a reheated slice tucked into a toasted roll with a little extra sauce and basil
Reheat the Eggplant Parmesan before it enters the roll rather than using the bread as the reheating vessel. Then add only enough warm marinara to moisten the filling.
When the casserole is already generously sauced, keep pasta simple. The plate needs contrast more than another heavy tomato-and-cheese component.
Make Ahead: Choose by Texture
Convenience and crispness move in opposite directions. Decide which matters more for this meal, then stop at the point that fits your plans.
The real make-ahead decision is which surface you are willing to soften. Sauce can wait without penalty, while assembled breaded layers gradually exchange crispness for convenience.
On a phone, each make-ahead option appears as a stacked card.
Prepare it this far
Best for
What to expect
Make the marinara ahead
Spreading the work across two days
The finished texture stays the same
Bake slices and refrigerate separately for up to 1 day
Guests or a planned dinner when crust still matters
The crispest make-ahead route
Assemble overnight
Dinner that only needs baking
A softer, more integrated casserole
Freeze baked slices separately for up to 2 months
Crisper portions after reheating
More assembly later, but stronger browned edges
Freeze the assembled casserole
The easiest freezer meal
Softer layers after baking
Store the components separately for the crispest result
Bake the breaded slices and cool them completely on wire racks, or on clean sheet pans with the slices turned once so condensation does not collect beneath them. Refrigerate for up to 1 day in shallow containers with parchment between layers. Store the sauce and shredded cheese separately.
Before assembly, return refrigerated slices to a 425°F / 220°C conventional or 400°F / 200°C fan oven for 6–10 minutes, beginning to check at 6 minutes. Refresh only until the coating feels dry and hot; then layer and complete the short final bake.
Can the casserole be assembled a day ahead?
Yes, but the breading will absorb moisture while it rests. Cover and refrigerate for up to 24 hours. The next day, bake uncovered at 375°F / 190°C conventional or 350°F / 175°C fan for 25–35 minutes, checking from 25 minutes. The centre should reach 165°F / 74°C. Follow the cookware manufacturer’s guidance before moving a chilled glass or ceramic dish into a hot oven.
This is the easiest day-ahead option, though the breading will be softer. Keep the components separate when browned crust matters most.
Storage, Freezing and Reheating
The portion methods below assume one piece equal to roughly one-sixth to one-eighth of the pan. Thick pieces, cold cookware and a colder starting temperature may add time, so check from the early end and heat the centre to 165°F / 74°C.
Dry, circulating heat restores the exposed edges most effectively. A skillet concentrates crispness underneath, whereas the microwave warms fastest but leaves the breading softer.
Refrigerating leftovers
Divide leftovers into shallow containers and refrigerate within 2 hours of cooking—within 1 hour when the room or outdoor temperature is above 90°F / 32°C. Use refrigerated leftovers within three to four days, in line with USDA leftover-safety guidance.
The coating softens in storage, but dry heat can recover some texture around the exposed edges.
Freezing breaded eggplant slices separately
Cool the baked slices completely, freeze them in one layer until firm, then transfer to a freezer-safe container with parchment between layers. Freeze for up to two months for best quality. Reheat from frozen at 425°F / 220°C conventional or 400°F / 200°C fan for 12–18 minutes. Turn once and check from 12 minutes, then assemble when the slices are hot and the coating feels dry.
Freezing the assembled casserole
To freeze a complete dinner rather than separate components, wrap the unbaked casserole securely and freeze for up to two months for best quality. Thaw completely in the refrigerator, usually 24–48 hours, then bake uncovered at 375°F / 190°C conventional or 350°F / 175°C fan for about 35–45 minutes. Begin checking at 35 minutes and heat the centre to 165°F / 74°C.
Use a freezer-safe metal or suitable ceramic dish. Do not transfer an ice-cold glass dish directly to a hot oven because sudden temperature change can break it.
Reheating a fully cooked casserole
For a fully cooked casserole that has thawed in the refrigerator, cover loosely and reheat at 350°F / 175°C conventional or 325°F / 165°C fan for 25–35 minutes. Uncover for the final 10 minutes and heat the centre to 165°F / 74°C. Follow the cookware manufacturer’s temperature-change guidance, especially for glass or ceramic dishes.
How to reheat Eggplant Parmesan while bringing back some browned edges
Oven or toaster oven: Reheat a refrigerated portion uncovered at 375°F / 190°C for about 15–20 minutes, beginning to check at 15 minutes. Tent loosely only near the end if the cheese darkens too quickly.
Air fryer: Reheat one portion at 350°F / 175°C for about 5–8 minutes, checking at 5 minutes so the exposed coating refreshes before the cheese burns.
Skillet: Warm over medium-low heat for about 8–12 minutes with the lid slightly ajar. The base can crisp, but trapped steam softens the top.
Microwave: Heat in 60-second intervals, covered and vented, until hot. It is the fastest route but produces the softest breading.
Whichever method you use, reheat leftovers to 165°F / 74°C in the centre. Warm additional sauce separately and add it afterward; sauce poured over the portion first slows any return of crispness.
Baked Eggplant Parmesan vs. Italian Parmigiana
This is a breadcrumb-coated, oven-baked Italian-American Eggplant Parmesan. Each round is browned before it meets tomato sauce, mozzarella, Parmesan and basil, creating a crisp-edged coating without frying every batch in oil.
Traditional Italian parmigiana di melanzane, or melanzane alla parmigiana, is generally unbreaded and often fried before layering. Its softer, integrated texture is different from the deliberate panko crust here. Family and regional versions vary; La Cucina Italiana’s overview gives useful context. In the UK, both styles may be called aubergine Parmesan or aubergine parmigiana.
Frequently Asked Questions
Do you have to salt eggplant?
Salting is recommended for this breaded version because it seasons the flesh and gives the flour a drier, more dependable surface. Very fresh eggplants may not need it for bitterness, but the recipe is calibrated around the full 30-minute salt-and-blot step. Blot the rested slices rather than rinsing them.
Should you peel eggplant for Parmesan?
Usually not. Keep the skin on medium, tender eggplants; peel fully or in alternating strips when the skin feels thick or you want especially soft layers.
Why does Eggplant Parmesan turn watery?
Common causes include eggplant that was still firm inside, loose marinara, too much sauce, undrained fresh mozzarella, deep layers or cutting while the sauce and cheese are still loose. Salting helps the surface but cannot correct all of those factors.
Can you use fresh mozzarella?
Yes. Use one 7–8-ounce / 200–225 g ball, slice or tear it, then drain it over towels for at least 30 minutes. Put about one-third between the layers and the rest on top; expect a softer casserole than the low-moisture version.
Can Eggplant Parmesan be assembled the day before?
Yes. Cover and refrigerate it for up to 24 hours, then bake uncovered from cold at 375°F / 190°C conventional or 350°F / 175°C fan for 25–35 minutes, until the centre reaches 165°F / 74°C. The breading will be softer than when the components are stored separately.
The First Slice Is Worth the Wait
After all the salting, breading and turning, the reward arrives in the first lifted portion. The sauce stays with the layers, the eggplant cuts easily with the side of a fork, mozzarella stretches through the centre and browned crust still shows around the edges.
Cook first. Layer second. Once the eggplant reaches the sauce already golden and tender, the final bake becomes the easy part. The layered casserole gives saucy, family-style comfort; the sheet-pan finish protects every crunchy edge.
What usually gives you trouble with Eggplant Parmesan—wateriness, breading or timing?
Stuffed shells are the kind of baked pasta that makes the table feel full before anyone even sits down: tender jumbo shells, creamy ricotta filling, tomato sauce bubbling around the edges, and mozzarella melted over the top. They give you lasagna-level comfort without all the layering, and the recipe is much more forgiving than it looks.
This version is built to avoid the usual stuffed shell problems: loose ricotta filling, dry pasta edges, shells that turn mushy after baking, and a tray that looks good on top but tastes flat in the middle. Think of it as the no-dry-shell method: thick filling, enough sauce, a covered bake first, and tender shells all the way through.
It fits one classic 9×13-inch baking dish: about 20–24 filled jumbo shells, a seasoned ricotta-mozzarella filling, marinara under and over the pasta, and mozzarella melted on top. A few shells may tear while boiling. The first few you fill may look messy. That is normal. Once everything is tucked into sauce and baked until bubbling, nobody at the table can tell which ones were imperfect.
Stuffed Shells at a Glance
No long planning needed. Here is the quick version before you start.
Start with a 12 oz / 340g box of jumbo pasta shells, or enough to cook 28–30 shells.
Aim to fill about 24 shells. If your shells are very large, you may fit closer to 20–22 in the baking dish.
Mix 15–16 oz / 425–454g ricotta with mozzarella, parmesan, egg, garlic, herbs, salt, and pepper.
Use about 3 cups / 720ml marinara sauce, with sauce under and over the shells.
Bake at 375°F / 190°C for 25 minutes covered, then 8–10 minutes uncovered.
Rest for 5–10 minutes before serving so the filling settles and the shells lift more cleanly.
Boil, fill, sauce, cover, bake, rest — that is the whole recipe. This is also a good one to save because the base method stays the same even when the filling changes.
Quick answers: Yes, you boil the shells first for this version. Use about 3 cups sauce for one 9×13-inch baking dish. Egg helps the filling set, but you can skip it if you prefer a softer filling. Stuffed shells freeze best before baking.
Start with the essentials: jumbo shells, thick ricotta filling, marinara, mozzarella, parmesan, egg, garlic, and herbs.
Why This Stuffed Shells Recipe Works
This method is built around four small choices that make the biggest difference: undercook the shells slightly, keep the ricotta filling thick, use sauce under and over the pasta, and bake covered before browning the cheese.
Shells stay tender. Boiling them just shy of al dente keeps them flexible enough to fill, but firm enough to finish in the oven.
Filling stays creamy, not runny. Ricotta gives body, mozzarella gives melt, parmesan adds savory depth, and egg helps everything set.
Sauce protects the pasta. Marinara on the bottom keeps the shells from sticking, while sauce over and around the shells prevents dry edges.
A covered bake does the work. Foil traps heat and steam so the pasta finishes cooking gently before the cheese browns.
Flexibility is built in. Keep it classic, add spinach, stir meat into the sauce, swap in cottage cheese, or freeze a batch for later.
Best of all, the edge of the baking dish tells you dinner is almost ready: sauce bubbling up around the shells, little golden patches of mozzarella, and the smell of garlic, tomato, and browned cheese.
The no-dry-shell method is simple: sauce underneath, sauce around the edges, and foil on top for the first bake.
Ingredients You Need
Stuffed shells do not need complicated ingredients, but they do need the right balance: sturdy shells, thick ricotta filling, enough sauce, and mozzarella that melts without making the pasta watery.
Jumbo Pasta Shells
Choose a 12 oz / 340g box of jumbo pasta shells. These are the large shells made for stuffing, not small shell pasta or macaroni-style shells. Cook 28–30 jumbo shells for one baking dish, or cook the whole box if you like having extra backups.
Some shells will split or fold while boiling, so cook a few extras and move on. The sauce and cheese hide almost everything.
Ricotta Cheese
Use 15–16 oz / 425–454g ricotta cheese. Whole milk ricotta gives the creamiest filling. Loose or watery ricotta should be drained for 10–15 minutes in a fine-mesh strainer or on a few layers of paper towel before mixing. For the right texture, the ricotta filling section shows what the mixture should look like before stuffing.
Loose ricotta should be drained first; thick filling is what prevents watery stuffed shells after baking.
Mozzarella
You need 3 cups shredded low-moisture mozzarella, about 12 oz / 340g, divided between the filling and topping. Low-moisture mozzarella melts into the filling and gives the top a bubbly finish without watering down the pasta. Fresh mozzarella can be used on top in small amounts, but it is softer and wetter.
Parmesan or Pecorino
Use ½ cup / 45–55g grated parmesan or pecorino. Ricotta gives you the creamy center, but parmesan or pecorino is what makes the filling taste seasoned and savory instead of just milky.
Egg
One large egg helps bind the ricotta filling so it holds together after baking. You can skip it, but the filling will be softer. If you leave out the egg, add a little extra parmesan or mozzarella to help the filling hold.
Marinara Sauce
About 3 cups / 720ml marinara sauce gives one baking dish enough sauce for the bottom, top, and edges. A 24 oz / 680g jar is the practical shortcut and usually gives enough sauce for one batch. A good jarred marinara is not a shortcut to apologize for here; stuffed shells are mostly about enough sauce and a well-seasoned filling. If you want to make your own, this homemade marinara sauce gives you a classic base plus spicy, dipping, low-sodium, and sugar-free variations.
Very thick marinara benefits from 2–4 tablespoons of water before baking. If your jar is slightly short or extra thick, loosen it with a splash of water and save a little warm sauce for serving.
Garlic, Herbs, Salt, and Pepper
Ricotta needs seasoning. Garlic, Italian seasoning or fresh herbs, salt, pepper, and optional red pepper flakes make the filling taste like dinner instead of plain cheese. Use ½ teaspoon salt if your parmesan and sauce are already salty. Use closer to ¾ teaspoon if your ricotta is mild and your sauce is lower in salt.
Dried Italian seasoning is the easiest pantry option. Fresh parsley adds brightness, basil gives a sweeter flavor, and oregano gives the filling a stronger Italian-American note. Save fresh basil partly for the top after baking.
Optional Spinach
Either fresh or frozen spinach works; the real rule is to squeeze out as much moisture as possible. Wet spinach can turn a creamy filling loose and watery. For the full version, jump to spinach ricotta stuffed shells.
Optional Meat
The main recipe below is a classic cheese stuffed shells recipe, but cooked ground beef or Italian sausage can make the meal heartier. Brown the meat fully before adding it to the sauce or filling, then drain off excess fat so the pasta does not turn greasy. For the heartier version, see meat stuffed shells.
Tools That Help
You do not need special tools. A large pot, colander, mixing bowl, 9×13-inch / 23×33 cm baking dish, foil, and a spoon or zip-top bag are enough. A zip-top bag with one corner snipped off can make filling the shells faster and neater, but a spoon works perfectly well.
The first few shells are usually the messiest; by the fifth or sixth one, you will know exactly how much filling your shells can hold.
What Pasta Shells Should You Use?
Jumbo pasta shells are the shape you want here. They are large enough to hold ricotta filling and sturdy enough to bake in sauce. Small shells, medium shells, macaroni shells, and regular conchiglie are better for tossing with sauce, not stuffing.
Boil the shells 2–3 minutes shy of al dente. They should be flexible enough to open and fill, but not fully soft. Spread them on a tray to cool; rinse only if they are sticking badly or too hot to handle.
Depending on shell size and your baking dish, you may fit 20–24 filled shells. Aim for 24, but do not force them in. A slightly looser baking dish bakes better than crushed shells.
Cook jumbo shells just shy of al dente and boil a few extras, because a torn shell or two is normal when stuffing pasta.
The Best Ricotta Filling for Stuffed Shells
The filling should look thick and scoopable, more like a cheese spread than a sauce. It should mound on a spoon without running off. If it spreads like sauce, it is too wet; if it feels dry or crumbly, a spoonful of ricotta or sauce will loosen it.
A good stuffed shells filling uses ricotta for creaminess, mozzarella for melt, parmesan or pecorino for savory depth, egg for structure, and garlic, herbs, salt, and pepper for flavor. To check the seasoning safely, mix the cheeses, garlic, herbs, salt, and pepper first, taste, then add the egg last.
A good ricotta filling should mound on a spoon, not drip, so it stays creamy inside each pasta shell.
Save This Stuffed Shells Filling Ratio
For one 9×13-inch baking dish, use:
15–16 oz / 425–454g ricotta
2 cups / about 225g mozzarella inside the filling
½ cup / 45–55g parmesan or pecorino
1 large egg
1–2 garlic cloves
Herbs, salt, and pepper
1 cup / about 115g mozzarella for the top
Once the filling looks thick and scoopable, you are in good shape.
How Much Sauce Do Stuffed Shells Need?
Use about 3 cups / 720ml marinara for one 9×13-inch baking dish. The shells should sit in sauce and have sauce spooned over and around them, but they do not need to be buried.
1 cup / 240ml goes on the bottom of the baking dish
1½–2 cups / 360–480ml goes over and around the filled shells
Extra warm sauce can be served on the side if you like a saucier plate
Before baking, you should still see the shape of each shell, but the edges should be surrounded by sauce.
The shells should stay visible, but the edges need enough marinara to finish tender instead of drying out.
How to Make Stuffed Shells
With the shells, filling, and sauce sorted, assembly is simple: sauce, filled shells, more sauce, cheese, foil, and oven. While the shells boil, mix the filling and spread sauce in the baking dish. By the time the shells are cool enough to handle, the filling and baking dish are ready.
1. Boil the shells
Bring a large pot of salted water to a boil. Add the jumbo shells and cook them 2–3 minutes less than the package says for al dente. Drain and let them cool until they are easy to handle.
2. Make the ricotta filling
In a large bowl, mix ricotta, 2 cups mozzarella, parmesan, egg, garlic, herbs, salt, pepper, and optional red pepper flakes. The filling should be creamy but thick enough to hold its shape on a spoon.
3. Add sauce to the baking dish
Spread about 1 cup of marinara sauce across the bottom of a 9×13-inch / 23×33 cm baking dish. This layer keeps the shells from sticking and protects the bottom of the pasta.
4. Fill the shells
Fill each shell with about 1½–2 tablespoons / about 30g of ricotta filling, depending on shell size. Use a spoon, piping bag, or zip-top bag. Fill generously, but not so much that the shells split. Do not worry if a little filling shows or the shells sit at slightly different angles.
Fill each shell generously, then stop before the pasta stretches or splits around the ricotta filling.
5. Arrange and sauce
Place the filled shells in the baking dish, filling-side up. Spoon the remaining sauce over and around the shells. You want the pasta to look full and well-coated, not dry or sparse.
Once the filled shells sit in sauce, cover the dish so the pasta can finish baking gently and evenly.
6. Bake covered, then uncovered
Cover the baking dish with foil without pressing it into the shells. If the foil may touch the sauce or cheese, place a sheet of parchment under the foil or tent the foil slightly. Bake at 375°F / 190°C for 25 minutes.
Foil traps steam during the first bake, which helps stuffed pasta shells stay soft and tender.
Remove the foil, sprinkle the remaining mozzarella over the top, and bake for another 8–10 minutes, until the cheese is melted and the sauce is bubbling. The uncovered bake is where the top gets those golden spots.
Add mozzarella after the covered bake, then uncover the dish so the cheese melts and lightly browns.
7. Rest before serving
Let the stuffed shells rest for 5–10 minutes before serving. This is the hardest part because it smells ready, but the short rest makes serving much cleaner. After resting, the shells should lift from the baking dish without spilling all their filling.
Rest baked stuffed shells before serving so the filling settles and each shell lifts cleanly from the sauce.
How to Know When Stuffed Shells Are Done
The stuffed shells are done when the sauce is bubbling around the edges, the cheese is melted and lightly browned in spots, and the filling is hot in the center. The best bite is fork-tender pasta, thick ricotta filling, tangy tomato sauce, and a little golden mozzarella from the top.
Check the edge of the baking dish: bubbling sauce and melted cheese mean the shells are hot through the center.
If the top cheese browns before the center is hot, cover the pasta loosely with foil again and keep baking until the filling is hot through the middle.
Stuffed Shells Recipe
This is the full classic version: jumbo shells filled with seasoned ricotta, tucked into marinara, covered until tender, then finished uncovered so the mozzarella melts into golden spots.
Yield: 6 servings
Prep time: 30 minutes
Cook time: 35 minutes
Total time: 1 hour 5 minutes
Oven temperature: 375°F / 190°C
Baking dish: 9×13-inch / 23×33 cm
Ingredients
12 oz / 340g jumbo pasta shells, or enough to cook 28–30 shells
3 cups / about 720ml marinara sauce, or one 24 oz / 680g jar, divided
15–16 oz / 425–454g ricotta cheese
3 cups shredded low-moisture mozzarella, about 12 oz / 340g, divided
½ cup / 45–55g grated parmesan or pecorino
1 large egg
1–2 garlic cloves, minced or grated
1 tsp dried Italian seasoning, or 2–3 tbsp chopped fresh parsley or basil
½–¾ tsp salt, plus more for pasta water
¼–½ tsp black pepper
Pinch of red pepper flakes, optional
A few drops of olive oil, only if needed to keep cooked shells from sticking
Instructions
Heat the oven. Preheat the oven to 375°F / 190°C.
Cook the shells. Bring a large pot of salted water to a boil. Add 28–30 jumbo shells and cook 2–3 minutes less than the package directions for al dente. Drain and let cool until easy to handle. If the shells start sticking, spread them on a tray or toss with only a few drops of olive oil.
Make the filling. In a large bowl, combine ricotta, 2 cups mozzarella, parmesan, garlic, Italian seasoning or herbs, salt, pepper, and red pepper flakes if using. Taste the cheese mixture before adding the egg, then mix in the egg last.
Prepare the baking dish. Spread about 1 cup of marinara sauce over the bottom of a 9×13-inch / 23×33 cm baking dish.
Fill the shells. Spoon about 1½–2 tablespoons / about 30g filling into each shell. Arrange the filled shells in the dish, filling-side up. Aim for 24 filled shells; if your shells are very large, 20–22 may fit better.
Add sauce. Spoon the remaining marinara sauce over and around the shells. Cover the baking dish tightly with foil, tenting it slightly so it does not press into the cheese or filling.
Bake covered. Bake for 25 minutes, until the shells are hot and the sauce is bubbling around the edges.
Finish uncovered. Remove the foil, sprinkle the remaining 1 cup mozzarella over the top, and bake uncovered for 8–10 minutes, until the cheese is melted and lightly browned in spots.
Rest and serve. Let the stuffed shells rest for 5–10 minutes before serving. Serve with extra warm marinara if you like a saucier plate.
Recipe Notes
Softer top cheese: Add all the mozzarella before covering and baking if you want a fully melted top.
Stretchier browned top: Save the final cup of mozzarella and add it after the covered bake.
Spinach shells: Add 5 oz / 140g cooked fresh spinach or 8 oz / 225–250g thawed frozen spinach, squeezed very dry.
Meat sauce version: Add ½–1 lb / 225–450g cooked ground beef or Italian sausage to the sauce, and increase sauce by ½–1 cup if the pasta looks dry.
Cottage cheese swap: Blend cottage cheese briefly for a smoother filling and drain it first if it looks watery.
Small Details That Make Better Stuffed Shells
Cook 28–30 shells. You need backups for the ones that tear.
Drain watery ricotta. Loose ricotta makes the filling run instead of mound.
Taste before adding egg. It is easier to fix bland filling before the egg goes in.
Loosen very thick marinara. A few tablespoons of water help the sauce move around the shells.
Cover first. The pasta finishes cooking in the sauce before the cheese browns.
Rest before serving. The filling firms slightly as it sits.
Make-Ahead, Freezer, and Reheating Instructions
Stuffed shells are one of the best baked pasta dinners to prepare ahead. The shells, filling, sauce, and cheese all hold up well, and a freezer batch feels like a future dinner already handled. This is also a good place to make two baking dishes: bake one tonight and freeze the second before baking.
Best Make-Ahead Option
Assemble the stuffed shells up to 24 hours ahead. Fill the shells, arrange them in sauce, cover tightly, and refrigerate. Let them sit at room temperature only while the oven preheats, about 20–30 minutes. If baking straight from the fridge, add 5–10 minutes to the covered baking time.
Stuffed shells are ideal for make-ahead dinners because you can refrigerate or freeze them before baking.
Best Freezer Option
Freeze stuffed shells before baking. Assemble the shells in a freezer-safe baking dish, cover tightly with plastic wrap and foil or a freezer-safe lid, and freeze for up to 2–3 months for best quality.
If you froze the shells in a glass or ceramic baking dish, thaw them overnight unless the dish is labeled freezer-to-oven safe. That helps prevent sudden temperature shock. You can also freeze the filled shells separately and transfer them to an oven-safe dish with sauce before baking.
Best Small-Batch Freezer Option
Freeze filled shells on a tray until firm, then transfer them to a freezer-safe bag or container. Later, place only the number of shells you need into a baking dish with sauce and cheese. This is useful when you want 2–4 servings instead of a full batch.
Freeze stuffed shells in a single layer first so they do not stick together; once firm, you can transfer them for easy small-batch freezer meals later.
Best Texture After Freezing
For the best texture, thaw frozen stuffed shells overnight in the refrigerator before baking. Before baking, remove any plastic wrap and cover the baking dish again with foil. Bake as directed, adding 5–10 extra minutes if the pasta is still cold.
How to Bake Frozen Stuffed Shells
To bake from frozen, cover the baking dish with foil and bake at 350°F / 175°C for about 60–75 minutes, or until the center is steaming hot. Uncover, add cheese if needed, and bake 10–15 minutes more until bubbling and melted.
How to Store Leftovers
Store leftover stuffed shells in an airtight container in the refrigerator for 3–4 days. A 3–4 day refrigerator window is also the general USDA guidance for cooked leftovers, so it is a good limit to use here.
How to Reheat Stuffed Shells
Reheat covered in the oven at 350°F / 175°C until hot, or microwave individual portions. Add a spoonful of extra sauce or a small splash of water before reheating so the pasta does not dry out.
Leftover Ideas
Leftover stuffed shells are best reheated with extra sauce, but you can also chop them into smaller pieces and reheat them like baked pasta. Add fresh herbs, parmesan, or a little extra marinara to wake the flavor back up. This is the sort of dinner that makes leftovers feel like a reward.
Stuffed Shells Variations
Think of the recipe card as the house version. The variations are how you adjust the pasta for the people eating it — greener for spinach lovers, meatier for Sunday dinner, lighter with cottage cheese, or richer with Alfredo.
Which Stuffed Shells Variation Should You Make?
Classic: Make the ricotta version as written first if you want the most traditional baked pasta.
Beef or sausage: Use the meat sauce version for a heartier Sunday-style dinner.
Cottage cheese: Try stuffed shells without ricotta if you want a lighter, higher-protein filling or do not have ricotta.
Alfredo: Make Alfredo stuffed shells for a richer white-sauce version with chicken or spinach.
Spinach Ricotta Stuffed Shells
Add spinach to the ricotta filling for a classic spinach stuffed shells variation. Fresh spinach and frozen spinach both work, but the spinach needs to be cooked, chopped, and squeezed very dry before it goes into the filling. Use about 5 oz / 140g fresh spinach or 8 oz / 225–250g frozen spinach.
For spinach ricotta stuffed shells, squeeze the spinach dry so the filling stays creamy instead of watery.
Beef Stuffed Shells
For the cleanest shells, keep the ricotta filling mostly cheese-based and put the browned meat in the sauce. That gives every bite a hearty meat sauce without making the shells heavy or hard to close. Brown ½–1 lb / 225–450g ground beef with a little salt, pepper, garlic, and Italian seasoning, then drain excess fat before adding it to the marinara.
Sausage Stuffed Shells
Italian sausage brings more seasoning than ground beef, so it is the easiest way to make the sauce taste deeper. Remove it from the casing if needed, brown it well, and drain any excess fat. Sausage brings more salt and spice than plain ground beef, so taste before adding extra seasoning.
For meat stuffed shells, keep the cheese inside the pasta and stir browned beef or sausage into the marinara.
Cottage Cheese Stuffed Shells
Cottage cheese is the easiest ricotta swap and a good option if you want a lighter, higher-protein filling. Replace ricotta 1:1 by weight, drain it if watery, and blend it briefly for a smoother texture. The flavor is a little tangier and less classic than ricotta, but it bakes up creamy when mixed with mozzarella, parmesan, egg, garlic, and herbs.
Stuffed Shells Without Ricotta
If you do not have ricotta, use cottage cheese, a mix of cream cheese and mozzarella, a meat filling, roasted vegetables, or tofu ricotta for a dairy-free version. This helps if you dislike ricotta or simply do not have it. The recipe can still work well as long as the filling is thick and not watery.
For stuffed shells without ricotta, blend cottage cheese until smooth so the filling holds its shape inside the pasta.
Alfredo Stuffed Shells
For a creamy white-sauce version, use Alfredo sauce instead of marinara. Because Alfredo is rich, spinach or chicken works especially well here. For more creamy pasta dinner ideas, see this chicken Alfredo pasta guide.
Alfredo stuffed shells are the creamy white-sauce variation to choose when you want spinach, chicken, or a richer pasta bake.
No-Boil Stuffed Shells
No-boil stuffed shells can work, but they need a different sauce ratio and a longer covered bake. This recipe is written for boiled shells because it gives the most predictable texture: shells that are flexible enough to fill, tender after baking, and less likely to stay firm in the center. If you want a true no-boil version, increase the sauce or liquid and keep the dish tightly covered until the pasta is fully tender.
Serving and Scaling
How Many Stuffed Shells Per Person?
Plan on 3–4 stuffed shells per adult if serving with salad, bread, or vegetables. Plan on 4–5 shells per person for a heartier main dish with fewer sides. A 9×13-inch baking dish with about 20–24 stuffed shells serves 6 people generously.
For dinner portions, plan on three to four ricotta stuffed shells per adult with salad, garlic bread, or vegetables.
Can You Double This Recipe?
Yes. To double the recipe, use two 9×13-inch baking dishes instead of crowding everything into one deep dish. If baking both at the same time, rotate them halfway through if your oven has hot spots. If the pans are cold from the fridge, they may need a few extra minutes of covered baking time. You can also bake one now and freeze one for later.
What to Serve with Stuffed Shells
Stuffed shells are rich, cheesy, and well-sauced, so they pair best with something crisp, green, garlicky, or simple. On a weeknight, salad is enough. When serving company, add garlic bread and something fresh on the side.
Bake just until melted and use low-moisture mozzarella
Pasta looks watery
Wet filling or vegetables
Drain ingredients and rest before serving
If the shells or edges look dry after baking, spoon warm marinara around the pasta before serving. Sauce brings moisture back better than adding more cheese.
When the edges look dry, spoon warm marinara around the shells before serving to soften them again.
Frequently Asked Questions
A few common questions come up once you start adjusting the recipe. These quick answers should help you choose the right shells, filling, sauce, and make-ahead method.
What pasta shells do I use for stuffed shells?
Use jumbo pasta shells. Small shells, medium shells, and macaroni-style shells are not large enough for stuffing.
Do you have to boil shells before stuffing them?
For this version, yes. Boiling first gives you shells that are soft enough to fill but firm enough to finish in the oven. No-boil shells need more liquid and a longer covered bake.
What is the best cheese filling for stuffed shells?
The best classic filling uses ricotta, mozzarella, parmesan or pecorino, egg, garlic, herbs, salt, and pepper. Ricotta makes it creamy, mozzarella adds melt, parmesan adds depth, and egg helps it hold together.
Do I need egg in stuffed shells?
Egg helps the filling set so the shells lift more cleanly. You can skip it, but the filling will be softer. If skipping egg, add a little extra parmesan or mozzarella.
Can I use cottage cheese instead of ricotta?
You can replace ricotta 1:1 by weight, drain cottage cheese if watery, and blend it first if you want a smoother filling. The no-ricotta section gives more options.
Can I make stuffed shells without ricotta?
Yes — use cottage cheese, cream cheese mixed with mozzarella, a meat filling, roasted vegetables, or tofu ricotta. Keep the filling thick so it does not run out of the shells.
How much sauce do stuffed shells need?
For one 9×13-inch baking dish, use about 3 cups / 720ml sauce. Spread about 1 cup on the bottom and spoon the rest over and around the filled shells.
Do you bake stuffed shells covered or uncovered?
Bake them covered for most of the time so the pasta stays moist and the filling heats through. Uncover at the end to melt and lightly brown the cheese.
How do you keep stuffed shells from drying out?
Use sauce under and over the shells, cover the baking dish for the first bake, and reheat leftovers with extra sauce or a small splash of water. That is the same no-dry-shell method used in the main recipe.
Can I make stuffed shells ahead of time?
Yes. Assemble stuffed shells up to 24 hours ahead, cover, and refrigerate. The make-ahead section explains the timing and freezer options.
Can stuffed shells be frozen?
Freeze them before baking for the best texture, either as a full baking dish or as individual filled shells. Use within 2–3 months for best quality.
Can I bake stuffed shells from frozen?
You can bake them covered at 350°F / 175°C for 60–75 minutes, or until the center is hot. Then uncover and bake until the sauce bubbles and the cheese melts.
Can I add meat to stuffed shells?
Meat works best in the sauce, where it makes the dish heartier without weighing down the ricotta filling. Brown and drain the meat before adding it.
How many stuffed shells per person?
Plan on 3–4 stuffed shells per adult with sides, or 4–5 shells per person for a heartier main dish.
How long do leftover stuffed shells last?
Leftovers keep for 3–4 days and reheat best with extra sauce. Store them in an airtight container in the refrigerator and reheat until hot.
Make It Your Own
A good batch of stuffed shells should feel generous: pasta tucked into sauce, cheese bubbling around the edges, and enough filling in every shell that nobody feels shortchanged. The whole recipe comes back to the same simple method: thick filling, enough sauce, covered bake, tender shells.
This is the kind of tray that looks a little messy in the best way: sauce at the edges, cheese pulling from the spoon, and enough shells for someone to quietly go back for one more.
Serve stuffed shells family-style with garlic bread and salad; this is the pasta bake people come back to for one more shell.
You can keep the recipe classic, add spinach, make it meaty with beef or sausage, swap in cottage cheese, use Alfredo sauce, or freeze a batch for another night. For another cozy pasta dinner after this one, save this broccoli pasta too.
If you make these stuffed shells, tell us which version landed on your table: classic ricotta, spinach, meat sauce, cottage cheese, Alfredo, or extra saucy. I especially want to know if you froze a batch for later — that is where this recipe really earns its keep.