Posted on Leave a comment

Ground Pork Meatballs Recipe: Juicy Baked, Pan-Fried or Air-Fried Meatballs

Baked ground pork meatballs on a cream platter, with one meatball split open to show the cooked center and a small bowl of marinara behind it.

The first meatball is usually eaten beside the tray: browned at the edges, tender enough to split with a fork and still moist in the middle.

Ground pork is naturally suited to that balance. These meatballs have rich pork flavor, gentle garlic and onion, fresh parsley and a golden-brown exterior around a tender center.

They are especially useful on nights when the ground pork is ready but dinner is not. Make one simple mixture, then turn it into a marinara dinner, a gravy plate, a rice bowl or an appetizer with dipping sauce.

One pork mixture, three ways to cook it—and a tender center whichever you choose. Soften the breadcrumbs first, handle the pork gently, keep the portions even and stop cooking as soon as the centers are ready.

Start With the Baked Version

Baking is the easiest place to begin. It cooks all 16 meatballs at once, asks for the least attention and is the most forgiving method.

The process is only four moves: soften the panko, mix gently, shape 16 even meatballs and bake. From there, the oven does the hands-off cooking, and the baked version takes about 40 minutes from bowl to table.

Four-step visual guide showing panko being hydrated, ground pork being mixed gently, meatballs being shaped, and baked meatballs checked with a thermometer.
Hydrate the crumbs, mix gently, shape evenly and check the center—the four controls behind tender baked pork meatballs.

For the simplest dinner, bake them, warm four per person in marinara and serve with spaghetti or toasted bread. Choose the skillet when you want the deepest crust, or air-fry six to ten meatballs when speed matters. Whichever method you choose, a moist mixture needs gentle handling—not extra kneading.

The recipe

Ground Pork Meatballs: Baked, Pan-Fried or Air-Fried

A little milk-softened panko keeps these all-pork meatballs tender without making them too soft to shape or brown.

Recipe at a glance

  • Yield: About 16 medium meatballs; serves 4
  • Portion: 35–36 g / 1¼ oz each, about 1½ inches / 4 cm
  • Preparation: About 20 minutes
  • Total time, baked: About 40 minutes, including a 3-minute rest
  • Oven: 15–18 minutes
  • Skillet: 10–12 minutes per batch; up to 14 with the covered finish
  • Air fryer: 10–13 minutes per batch
  • Ground pork doneness: 160°F / 71°C

Ingredients

  • 1 lb (454 g) plain ground pork or pork mince, preferably regular rather than extra-lean
  • 25 g panko breadcrumbs (begin with about ⅓ cup when measuring without a scale)
  • 2 tablespoons (30 ml) milk
  • 1 large egg (about 50 g) without the shell
  • 2 tablespoons (about 8 g) finely chopped fresh parsley
  • 1 teaspoon (about 3 g) onion powder
  • 1 teaspoon (about 3 g) garlic powder
  • 5 g fine sea salt (about ¾ teaspoon)
  • ½ teaspoon (about 1 g) freshly ground black pepper
  • 1 tablespoon (15 ml) neutral oil, for pan-frying
  • Oil for greasing the tray, rack or air-fryer basket, as needed

Equipment: a large mixing bowl, fork or flexible spatula, instant-read thermometer and the pan or air fryer needed for your chosen method. A scale or 2-tablespoon scoop helps keep the portions even.

Mix and shape

  1. Make the panade. Stir the panko and milk together in the mixing bowl. Leave for 5 minutes, until the crumbs are evenly damp and no loose milk remains.
  2. Season the binder. Add the egg, parsley, onion powder, garlic powder, salt and black pepper. Mix until even.
  3. Add cold pork. Keep the pork refrigerated until the panade is ready, then fold it in with a fork, flexible spatula or your fingertips just until no large unmixed patches remain. Do not knead the mixture smooth.
  4. Check the seasoning, if needed. Cook a 20 g tester patty completely, cool briefly and taste. Scatter any adjustment evenly over the bowl and fold once or twice. Never taste raw pork.
  5. Portion first. Divide into 16 portions weighing about 35–36 g / 1¼ oz each. A rounded 2-tablespoon scoop is a useful starting point. After removing a 20 g tester, divide the remaining mixture into 16 portions of about 35 g each.
  6. Shape gently. Roll each portion only until it holds a ball about 1½ inches / 4 cm across. The surface should feel slightly sticky but still hold a rounded shape; it should not slump flat or feel liquid.
  7. Chill only if needed. If the mixture is warm or the balls begin to flatten, refrigerate them for 15–20 minutes before cooking.

After shaping, follow one cooking method below.

Choose one: Bake

  1. Heat the oven. Set the oven to 400°F / 200°C conventional / 180°C fan. Line a rimmed sheet pan with parchment or place a lightly greased wire rack over the pan.
  2. Space the meatballs. Arrange in one layer with about 1 inch / 2.5 cm between them.
  3. Bake and begin checking early. Start checking at 14 minutes. Most 35–36 g meatballs will need about 15–18 minutes.
  4. Check the center. Take them out when two of the largest meatballs reach 160°F / 71°C. Use color as a clue, but let the thermometer decide.
  5. Rest briefly. Leave for 3 minutes before serving or transferring to sauce so the juices settle and the surface firms slightly.

Choose one: Pan-Fry

  1. Heat the skillet. Warm 1 tablespoon (15 ml) neutral oil in a 12-inch / 30 cm heavy skillet over medium heat.
  2. Work in two batches. Add 8 meatballs, leaving room to turn them. Let the first side cook for about 2 minutes before moving.
  3. Brown several surfaces. Turn gradually. Once browned, reduce the heat to medium-low.
  4. Finish the centers. Continue cooking and turning until the meatballs reach 160°F / 71°C, about 10–12 minutes in total, or up to 14 minutes when the covered finish is needed.
  5. Rescue early darkening. Move the pan off the heat, add 2 tablespoons / 30 ml water down the side, cover and return to low heat for 1–2 minutes. Uncover for the final 30–60 seconds.
  6. Reset for the remaining eight. Wipe out burnt bits, leave a thin film of rendered fat and add 1 teaspoon oil only if the skillet looks dry. The second panful may finish slightly sooner because the skillet is already hot.
Choose one: Air-Fry

  1. Preheat when recommended. Set a basket-style air fryer to 375°F / 190°C and follow the manufacturer’s preheating guidance.
  2. Leave room for airflow. Lightly oil the basket and arrange the meatballs in one layer without touching. Cook in batches, and never preheat with loose parchment inside.
  3. Begin checking at 9 minutes. Turn after about 6 minutes if the appliance browns more strongly on one side.
  4. Cook to temperature. Most 35–36 g meatballs will need about 10–13 minutes. Remove at 160°F / 71°C.
  5. Pause between batches. Rest the cooked meatballs for 3 minutes while the next round cooks.

Recipe notes

  • Panko volume varies by brand. Without a scale, begin with about ⅓ cup, hydrate it fully and add more only if the chilled mixture still slumps. For fine dry breadcrumbs, begin with 20 g, wait 5 minutes and add up to 5 g more only if needed.
  • Use the 5 g salt weight for consistent seasoning; fine and coarse crystals fill a spoon differently.
  • Unsweetened, unflavored non-dairy milk or water may replace the 2 tablespoons / 30 ml milk.
  • Ground chicken or turkey substitutions must reach 165°F / 74°C.
  • To double: double every ingredient by weight, mix in two bowls if needed and use spaced trays or separate cooking batches.

The recipe above is all you need to start cooking. Keep reading for why the mixture works, how the methods differ and what to do if something goes wrong.

Why Ground Pork Works So Well for Meatballs

Plain ground pork—or pork mince in the UK, Australia and several other markets—has enough fat and natural richness to make tender meatballs without beef, veal or sausage.

A light panko-and-milk panade protects the center without making it bready, while keeping the portions even makes every cooking time more useful. The raw mixture will feel softer than a lean beef mixture; if a scoop stays rounded on the tray, trust it before reaching for more crumbs.

Seasoning stays simple but not bland: garlic and onion sit quietly behind the pork, parsley adds freshness and enough salt makes the meatballs satisfying before any sauce is added. Simmer a few in marinara tonight, glaze a few for tomorrow’s rice bowl and freeze the rest for another dinner.

Think of this as an everyday savory base. Swedish gravy meatballs, sweet-and-sour versions and Vietnamese xíu mại each need their own balance of binder, seasoning and sauce. For other ways to use the package, browse MasalaMonk’s ground pork recipes.

Ingredients for Ground Pork Meatballs

Overhead ingredient board with ground pork, panko, milk, egg, parsley, onion powder, garlic powder, sea salt, and black pepper.
The base seasoning stays neutral, so one batch can move toward marinara, gravy, rice bowls or appetizers.

Ground Pork or Pork Mince

Use plain ground pork, not breakfast or Italian sausage, which already contains salt, spices and often extra fat. Regular pork is more forgiving than the leanest package; when the label gives a percentage, roughly 15–20% fat suits an everyday meatball.

Comparison of regular ground pork and extra-lean ground pork with cooked meatballs showing how fat level changes texture.
A regular-fat package gives a wider margin before dryness; extra-lean pork needs earlier checking.

The Panade: Panko, Milk and Egg

Soaking the panko in milk creates a light panade that holds moisture more effectively than dry crumbs mixed straight into the pork. Just 2 tablespoons / 30 ml milk tenderizes the center without making the mixture slump or flatten.

Fine dry breadcrumbs absorb faster than panko, so add them gradually. Unsweetened non-dairy milk or water can replace the milk in the same 2-tablespoon / 30 ml quantity.

Panko panade guide showing 25 grams of panko, an approximate one-third cup measure, milk being added, and hydrated crumbs after resting.
Hydrate the panko first so it softens and distributes moisture evenly through the pork.

The egg helps the pork and breadcrumbs hold together. It is not the ingredient that makes the meatball juicy, and adding more does not automatically make the center softer. Too much egg relative to the crumbs and meat can create a loose raw mixture and a springy cooked texture.

Aromatics and Seasoning

Powdered aromatics distribute evenly without adding the variable moisture of raw onion, which helps one mixture work across all three methods. Prefer fresh onion? A measured version appears below; large pieces can stay firm and create weak points.

Parsley adds freshness without tying the meatballs to one sauce or cuisine, while black pepper gives the pork gentle background warmth. Salt must reach the center, and crystal sizes vary, so use the 5 g weight when possible.

If you add salty Parmesan, soy sauce or another assertive ingredient, cook a small tester before shaping. It is the safest way to correct the bowl without gambling on the whole tray.

The main recipe uses a light panade. Because the alternatives below change the finished texture, treat them as separate versions rather than direct swaps. Pork meatballs can be made with or without breadcrumbs, but the results will not be identical.

Three cooked pork meatballs compared by binder: no binder, dry crumbs and egg, and light panade, with different interior textures.
Binder choice changes the bite: no binder is firmest, dry crumbs are tighter, and a light panade gives the most tender center.

No binder

Texture: Firm and pork-forward

Forgiveness: Lowest

Best for: Regular-fat pork and cooks who prefer a firmer bite

Dry breadcrumbs and egg

Texture: Cohesive and slightly firmer

Forgiveness: Moderate

Best for: Quick everyday meatballs

Light panade

Texture: Tender without becoming very soft

Forgiveness: Highest

Best for: Baking, pan-frying, air frying, spaghetti and freezing

The light panade keeps the center tender across the oven, skillet and air fryer without making the meatballs difficult to shape, brown or reheat.

Binder-Free Pork Meatballs: No Breadcrumbs or Egg

For a firmer binder-free meatball, use regular ground pork—preferably near 20% fat when labeled—and omit the panko, milk and egg together. Mix only until the pork feels slightly tacky and cohesive, then portion the same 35–36 g size, shape without compressing and chill for about 20 minutes.

Baking gives this variation the widest cooking window. Use the same 160°F / 71°C endpoint; if pan-frying, let the first surface set fully before turning. Expect a firmer, more pork-forward center and a narrower margin between ready and dry.

Gluten-Free Pork Meatballs

Use gluten-free panko in the same gram weight. That preserves a texture much closer to the original than replacing the breadcrumbs with a large amount of almond flour.
Before adding more crumbs: give the panko its full hydration time. If the quantities are correct and the mixture is merely warm, chill it for 15–20 minutes first. When the chilled mixture still slumps rather than merely feeling sticky, fold in 1 teaspoon panko, wait 3 minutes and reassess. Repeat only as needed, up to 1 tablespoon.
How to Mix and Shape Pork Meatballs

1. Make and Season the Panade

Stir the panko and milk together and wait about 5 minutes. The crumbs should swell and look evenly damp, not float in a pool of milk.

Mix in the egg, parsley, onion powder, garlic powder, salt and pepper before the pork enters the bowl. The seasoning spreads more evenly, so the meat needs less handling later.

2. Fold in the Cold Pork

Keep the pork refrigerated while the panade hydrates, then fold it in only until no large plain patches remain. Stop while the mixture still looks loose and softly textured—not glossy, smeared or paste-like.

Hands folding cold ground pork into a hydrated panko panade in a mixing bowl on a wooden work surface.
Fold only until the pork is evenly combined; a pasty mixture cooks firmer and springier.

The mixture may feel softer than you expected. That is normal. Scoop one portion onto the tray: if it stays rounded rather than spreading, keep going instead of reaching for more crumbs.

Three raw pork meatball mixtures showing a loose mixture that spreads, a ready mixture that holds a rounded scoop, and an overmixed glossy mixture.
A sticky mixture is workable when it still holds a rounded scoop after resting.

3. Cook a Seasoning Tester

A small cooked tester is the safest way to correct the seasoning before shaping all 16 meatballs. If it needs adjustment, scatter the extra seasoning evenly over the bowl and fold only once or twice; never taste raw pork mixture.

Small pork seasoning tester cooked in a skillet, cooled on a plate, and prepared for tasting with a fork.
Cook one small tester before shaping so seasoning corrections happen safely.

4. Portion, Shape and Chill Only if Needed

Scoop or weigh all 16 portions before rolling. Without a tester, use 35–36 g / about 1¼ oz per meatball; after a 20 g tester, portion the remainder at about 35 g each. A rounded 2-tablespoon scoop and a diameter near 1½ inches / 4 cm are useful visual checks.

Sixteen raw ground pork meatball portions on a parchment-lined sheet pan, with one portion on a scale reading 35 grams.
Even 35 g portions help the full tray finish at the same time.

Roll each portion only until the surface closes and the ball holds together. Dampen your palms if the mixture clings. If the portions flatten on the tray or the kitchen is warm, chill them for 15–20 minutes; when they already hold their shape, cook them without adding an automatic delay.

Damp hands gently shaping a raw ground pork meatball while other portions rest on a parchment-lined tray.
Close the surface with light pressure without compressing the center into a dense ball.

Choose Your Cooking Method

Choose the oven for calm, the skillet for crust or the air fryer for speed. The mixture stays the same; only the capacity, browning and attention change.

  • Bake for ease. The full recipe cooks at once with moderate browning and very little hands-on work.
  • Pan-fry for the deepest crust. Work in two batches when you want strong browning and flavorful skillet fond for gravy or sauce.
  • Air-fry six to ten for speed. This works best when the basket has enough open space for hot air to move around every meatball.
Comparison board showing oven-baked, skillet-cooked, and air-fried ground pork meatballs with different browning levels.
Baking is hands-off, skillet cooking builds crust, and air frying favors small, well-spaced batches.

Baked Ground Pork Meatballs

Baking is the calmest way to cook the whole tray. Bake 35–36 g meatballs at 400°F / 200°C conventional / 180°C fan. Begin checking at 14 minutes; most take 15–18 minutes. Take them out at 160°F / 71°C. Use parchment for easy cleanup and deeper browning underneath, or a greased rack when you want air to circulate around more of each meatball.

Before-and-after sheet pans showing sixteen raw pork meatballs before baking and sixteen baked meatballs with browned bottoms and lightly colored tops.
Baked pork meatballs often brown more underneath than on top, so let temperature make the final call.

Parchment vs Wire Rack

  • Parchment: easiest cleanup and minimal sticking, though the bottoms may sit in a little rendered fat.
  • Wire rack: more even browning, but longer cleanup and a very soft mixture may settle into the wires.
Side-by-side comparison of baked pork meatballs on parchment and on a wire rack set over a sheet pan.
Use parchment for cleanup or a rack for airflow; both can work well with the same mixture.

Flipping is optional when the meatballs have room around them. Turn them once near the end only if the undersides color much faster than the tops. When they are close, the tops should look dry and lightly golden, with deeper browning underneath; rest the meatballs for 3 minutes before serving or adding them to sauce.

Pan-Fried Ground Pork Meatballs

Pan-frying gives the meatballs their deepest crust and leaves browned flavor in the skillet for gravy or sauce. For 35–36 g meatballs, begin checking at 9 minutes; most need 10–12 minutes per batch, or up to 14 minutes with the covered finish. Take them out at 160°F / 71°C. This method needs more attention than baking because the surface can color before the middle is ready.

Brown Them in Two Batches

A 12-inch / 30 cm heavy skillet holds about eight standard meatballs with room to turn. Heat a thin film of neutral oil over medium, add the first eight and leave the first side alone for about 2 minutes. If a meatball resists the turn, give it another 20–30 seconds; a firm golden-brown patch usually releases more cleanly than a pale surface.

Tongs testing a browned pork meatball in a cast-iron skillet, with other meatballs cooking around it.
A stuck skillet meatball usually needs more time, not more force.

Turn gradually so several sides develop color, then lower the heat to medium-low. Before the second eight, remove any burnt bits, leave a thin film of rendered fat and add only about 1 teaspoon oil if the skillet looks dry. They may finish slightly sooner because the pan is already hot.

When the Outside Browns Too Fast

A dark crust with an underdone middle does not mean the meatballs are lost. Reduce the heat, move the skillet briefly away from the burner and add about 2 tablespoons (30 ml) water carefully down the side. Cover immediately and return to low heat for 1–2 minutes.

Uncover for the final 30–60 seconds so the crust does not stay wet. The sizzling should settle as the water evaporates and the browned surface firms again.

Two-step skillet guide showing browned pork meatballs moved off direct heat, water added at the side, and the pan covered on low heat.
Covered low heat finishes the center when the crust browns too quickly.

Browned is not the same as done. A meatball can have a deep crust and still be undercooked in the middle. Browning tells you about flavor; the thermometer tells you when the ground pork is safely cooked.

Air Fryer Ground Pork Meatballs

A basket-style air fryer is useful for six to ten meatballs or a quick dinner for two. Cook 35–36 g meatballs at 375°F / 190°C. Begin checking at 9 minutes; most need 10–13 minutes per load. Take them out at 160°F / 71°C. Its concentrated heat creates good color quickly, but it also makes the center easier to overshoot.

Give the hot air room to move. Follow the manufacturer’s preheating guidance, never preheat with loose parchment inside and arrange six to ten oiled meatballs in one layer with visible space between them.

Air fryer basket showing raw pork meatballs spaced apart before cooking and browned meatballs after cooking.
Visible air gaps help air-fryer pork meatballs brown instead of steam.

Turn after about 6 minutes only when the appliance browns more strongly from one direction. Look for a dry, browned exterior and rounded sides rather than waiting for every surface to become deeply dark; oven-style air fryers may need several additional minutes.

Ground Pork Meatball Cooking Times and Doneness

The following ranges apply to raw meatballs weighing about 35–36 g / 1¼ oz and measuring roughly 1½ inches / 4 cm across. Use 400°F / 200°C conventional / 180°C fan for the oven and 375°F / 190°C for the air fryer; every method finishes at 160°F / 71°C.

Here are all three methods side by side.

MethodSetting / loadCheck fromTime
Oven400°F; full recipe14 min15–18 min
SkilletMedium, then medium-low; about 89 min10–12 min per batch, plus a brief pan reset
Air fryer375°F; 6–109 min10–13 min per load

These are times to start checking, not promises that every appliance will finish at the same minute. Chilled meatballs, crowded pans and larger portions need longer; powerful air fryers and smaller portions may finish sooner.

Mini Pork Meatballs

Mini meatballs weighing around 18–20 g cook much faster. Begin checking baked meatballs around 9 minutes, skillet meatballs around 6 minutes and air-fried meatballs around 6–7 minutes.

They work well in soup, on appetizer platters and in meals where every spoonful should contain a meatball. Use the thermometer for the final decision.

For larger 50–60 g meatballs, keep the same cooking temperature and begin checking several minutes after the standard size. Their timing varies more by method, so use 160°F / 71°C as the endpoint.

Size guide showing mini, standard, and large raw pork meatball portions with gram ranges and a ruler.
Size changes timing; the safe center temperature does not.

How to Check Pork Meatball Doneness

Ground pork meatballs are ready when their centers reach 160°F / 71°C. The familiar 145°F / 63°C guidance applies to intact pork chops, steaks and roasts—not ground pork. See the USDA safe minimum temperature chart.

  1. Choose two of the largest meatballs, preferably from different parts of the tray, skillet or basket.
  2. Insert an instant-read thermometer through the side rather than straight down from the top.
  3. Aim for the center without pushing the probe through into the hot cooking surface.
  4. Take them out when both meatballs have reached the safe temperature in the middle.
Instant-read thermometer inserted through the side of a cooked pork meatball, reading 160°F and 71°C, with a split meatball nearby.
Probe from the side to reach the center; ground pork meatballs are done at 160°F / 71°C.

Color alone is not a reliable safety test. A faint pink tone does not mean you need to cook away all the moisture: pork can remain slightly pink after reaching a safe temperature, while a dry meatball can still look moist when sliced. Use a thermometer for a more useful answer than cutting several meatballs apart. The center should split easily with a fork and look moist rather than wet or springy.

Finishing Pork Meatballs in Marinara

These meatballs are mild enough for tomato sauce but savory enough to serve without it. Keep them near the standard size so they heat evenly and sit comfortably beside each forkful of pasta. Use MasalaMonk’s homemade marinara sauce or a well-seasoned jarred sauce.

For fully cooked meatballs: simmer gently in marinara for 5–10 minutes, stirring around them rather than repeatedly pushing them against the pan. Extra cooked meatballs can also become meatball baked ziti.

When meatballs are browned but undercooked: transfer them directly from the skillet into gently simmering marinara and continue cooking without interruption. Do not cool or refrigerate partially cooked ground pork to finish later.

Can raw meatballs cook directly in sauce? They can, but this soft panade mixture is easier to handle and develops better browned flavor when baked or seared first. The timings here are therefore written for fully cooked meatballs or for meatballs browned and moved straight into sauce while cooking continues.

Three-route marinara guide showing fully cooked meatballs warmed in sauce, browned unfinished meatballs transferred to sauce, and raw meatballs placed in sauce.
Warm cooked meatballs gently; keep browned or raw meatballs cooking until their centers reach 160°F / 71°C.

Check one of the largest meatballs from the side and keep simmering until the center reaches 160°F / 71°C. Meatball size and sauce temperature vary, so the thermometer matters more than a fixed number of minutes.

Ground Pork Meatball Troubleshooting

If something went wrong, start with what you saw. Dry, loose, pale and dark-on-the-outside meatballs have different causes; several can still be rescued tonight, and the rest are straightforward to prevent next time.

Texture and Structure

Troubleshooting board showing dry, tough, bready, falling-apart, too-soft, and cracked pork meatball examples with short rescue cues.
Match the symptom first; texture fixes depend on moisture, binder, mixing and turning.

Match the Texture Symptom

Dry

Likely cause: Very lean pork or cooking past the safe center temperature

Rescue now: Warm briefly in marinara, gravy or a little broth.

Next time: Use regular ground pork and start checking earlier.

Tough or rubbery

Likely cause: Overmixing, tight shaping or cooking too long

Rescue now: Slice or crumble into sauce, soup or a baked pasta.

Next time: Fold only until combined, shape without compressing and stop cooking at temperature.

Bready or spongy

Likely cause: Too many breadcrumbs, too much egg or an overextended binder

Rescue now: Serve with a strongly seasoned sauce or break into a tomato-based dish.

Next time: Weigh the panko and keep the egg-and-milk quantities unchanged.

Falling apart

Likely cause: Excess liquid, unevenly mixed binder or a first surface that has not set

Rescue now: Stop turning and finish gently under a lid or directly in simmering sauce.

Next time: Measure the liquid, distribute the binder evenly and wait before the first turn.

Too soft or slumping

Likely cause: A warm mixture, excess liquid or panko that has not fully hydrated

Rescue now: Chill for 15–20 minutes. If it still slumps, add panko 1 teaspoon at a time as described above.

Next time: Keep the pork cold, hydrate the panko fully and measure every liquid.

When Meatballs Crack

Small surface lines usually mean the portions were shaped a little dry or loose. Dampen your hands and close the surface gently. Deep cracks with crumbling point to a mixture that is too dry or not evenly combined.

Browning and Pan Problems

Troubleshooting board showing sticking, pale or steamed meatballs, greasy meatballs, and dark outside meatballs with an undercooked center.
Heat, space, surface moisture and fat usually explain browning problems before the recipe needs changing.

Fix the Browning Problem

Sticking to the pan

Likely cause: Too little oil, an unsuitable surface or turning before the crust releases

Rescue now: Leave the meatball another 20–30 seconds, then loosen it gently with a thin spatula.

Next time: Use a thin film of oil and let the first side brown before moving it.

Pale or steamed

Likely cause: Crowding, wet surfaces or insufficient heat and airflow

Rescue now: Create more space and, while the centers are still below temperature, give the meatballs brief higher heat.

Next time: Dry the cooking surface and leave visible room around every meatball.

Greasy

Likely cause: Particularly fatty pork or meatballs sitting in rendered fat

Rescue now: Drain or blot the excess fat, then move the meatballs to a clean pan or rack if they still need cooking.

Next time: Drain the skillet between batches or bake on a rack when the pork releases a lot of fat.

Dark outside, undercooked inside

Likely cause: Heat too high or meatballs larger than the recipe size

Rescue now: Lower the heat and finish under a lid or directly in simmering sauce.

Next time: Keep the portions even and reduce the heat once the crust forms.

Flavor and Fat Checks

If they taste bland: finish them with a well-seasoned sauce, glaze or a small pinch of finishing salt. Next time, weigh the salt and cook the optional tester before shaping.

A little rendered fat is normal. If a large amount collects, use a rack in the oven or drain the skillet between batches so the meatballs brown instead of sitting in it.

Ground Pork Meatball Variations

The gentle garlic, onion and parsley base leaves room for several different meals. Keep it as written when you want options later, or choose one flavor direction instead of combining every appealing seasoning in the same bowl.

Four flavor directions for pork meatballs: Italian, ginger-soy, smoky-spicy, and fresh onion with garlic.
Flavor directions let the same pork base become marinara-friendly, bowl-ready, glazed or aromatic.

Italian-Style Pork Meatballs

  • Stir in 1 teaspoon dried oregano or Italian seasoning.
  • Fold in ¼ cup (about 22 g) finely grated Parmesan.
  • Keep the parsley and add an extra ¼ teaspoon black pepper.
  • Reduce the fine salt to ½ teaspoon (about 3 g), then confirm with a cooked tester.

Oregano, Parmesan and extra pepper make these fuller and saltier, especially good with marinara or toasted subs.

Ginger-Soy Pork Meatballs

  • Mix in 2 teaspoons (about 4 g) finely grated fresh ginger.
  • Replace the parsley with 2 tablespoons (about 10 g) sliced scallions.
  • Use 1 tablespoon (15 ml) soy sauce.
  • Finish with ½ teaspoon toasted sesame oil.
  • Reduce the fine salt to ¼ teaspoon (about 1.5 g), then confirm with a cooked tester.

Ginger and scallions make the pork brighter and more aromatic, especially with rice, peanut noodles or crisp vegetables. Sweet-and-sour and Vietnamese-style meatballs need their own binder, aromatics and sauce rather than one extra seasoning stirred into this base.

Smoky and Spicy Pork Meatballs

  • Stir in 1 teaspoon smoked paprika.
  • Use ¼–½ teaspoon chili flakes, depending on how much heat you want.
  • For rice, flatbreads or yogurt sauce, include ⅛ teaspoon ground cumin.

Smoked paprika warms the browned edges before the chili arrives. For a sweet-hot finish, spoon or brush on mango habanero sauce after cooking so the glaze does not scorch.

Fresh Onion and Garlic

Replace the onion powder with 2 tablespoons (about 20 g) very finely grated onion and the garlic powder with 1 small finely grated garlic clove (about 3 g). Reduce the milk to 1 tablespoon (15 ml) to account for the onion’s moisture, then chill the mixture if it still feels soft.

Fresh onion gives the meatballs a softer, slightly sweeter aromatic flavor, although the extra moisture makes the mixture a little looser.

For a brighter herb-led plate, serve this version with fresh chimichurri. Its parsley, garlic and vinegar echo the meatball seasoning while cutting through the pork’s richness.

All-Pork Meatballs vs Beef-and-Pork Meatballs

Comparison of all-pork, pork-and-beef, and pork-and-poultry meatballs with cooked interiors and safe temperature labels.
All-pork and pork-beef finish at 160°F; pork mixed with poultry needs 165°F.

Pork only

Texture and flavor: Rich, tender and juicy

Best for: The main recipe, rice bowls, gravy and flexible meal prep

Pork and beef

Texture and flavor: Firmer with deeper beef flavor

Best for: Tomato sauces and meatball sandwiches

Pork and turkey or chicken

Texture and flavor: Lighter but less forgiving

Best for: Leaner meal prep; cook to 165°F / 74°C

For a straightforward beef-and-pork version, use 8 oz / 227 g ground pork plus 8 oz / 227 g ground beef and keep the base binder unchanged; expect a firmer bite and deeper beef flavor. Lean poultry may need more moisture, while seasoned sausage usually needs much less added salt. Pork and veal can produce a delicate mixed-meat result, but it belongs to recipes designed for that softer texture. Any mixture containing ground poultry requires the higher 165°F / 74°C endpoint.

The softer all-pork version is particularly good under a spoonful of creamy mushroom sauce, while the firmer beef-and-pork version stands up well to a thicker tomato sauce.

What to Serve With Ground Pork Meatballs

One recipe can become more than one dinner. Simmer four meatballs in marinara tonight, glaze four for tomorrow’s rice bowl and freeze the rest for another evening.

Four pork meatballs served over spaghetti with marinara, parsley, and a small amount of Parmesan in a cream bowl.
Four medium meatballs make a generous serving with spaghetti, marinara and a crisp salad.

Pasta and Sandwiches

  • Serve with marinara, spaghetti, Parmesan and a crisp salad.
  • Tuck them into a toasted roll with marinara and melted mozzarella.
  • Turn leftovers into a comforting meatball baked ziti.

Comfort-Food Plates

  • Spoon the skillet meatballs and gravy over garlic mashed potatoes with green beans.
  • Pair baked meatballs with ranch roasted potatoes and a simple green salad.
  • Serve with creamy mashed potatoes and onion or mushroom gravy.
Pork meatballs with brown gravy, mashed potatoes, and green beans on a dark plate.
Gravy rewards a deeper skillet crust because the browned flavor carries into the sauce.

Rice Bowls and Lighter Meals

  • Add ginger-soy meatballs to rice with roasted or steamed vegetables.
  • Build a lower-carb plate with roasted vegetables, cauliflower mash or a cool tzatziki sauce.
  • Balance the richness with cucumber salad or crisp homemade coleslaw.

Appetizers and Meal Prep

  • Serve mini meatballs with mustard, tomato or yogurt sauce; for a sweet-savory party version, make grape jelly meatballs.
  • Pack medium meatballs with a grain, roasted vegetables and the sauce in a separate container.
Two serving ideas showing pork meatballs in a rice bowl with vegetables and mini meatballs on an appetizer platter with dipping sauce.
The same mixture can become a rice bowl dinner or mini appetizer meatballs for dipping.

As a main dish, plan on about 4 medium meatballs per person; with spaghetti or a substantial grain bowl, 3 may be enough. For appetizers, allow 3–4 mini meatballs per person among several snacks, or 5–6 when the meatballs are the main party bite.

Make Ahead, Store, Freeze and Reheat

Make Ahead and Refrigerate

Shape the meatballs up to 24 hours ahead. Keep the total refrigerated time for the raw ground pork within 1–2 days of purchase or refrigerator thawing, and do not exceed the package date.

Cover and refrigerate at 40°F / 4°C or colder in one layer, or separate stacked layers with parchment. Begin checking the cold meatballs at the normal time.

Refrigerate cooked meatballs within 2 hours in a shallow, covered container and use them within 3–4 days. A small amount of sauce helps protect the surfaces from drying.

Freeze Raw or Cooked Meatballs

To freeze raw meatballs:

  1. Arrange the shaped raw meatballs on a parchment-lined tray without letting them touch.
  2. Leave them until firm.
  3. Transfer to a freezer-safe container or bag.
  4. Label clearly as raw and add the date.
  5. For the best texture, use within 3–4 months. Thaw overnight in the refrigerator before cooking because the oven, skillet and air fryer timings in this recipe are written for thawed meatballs.

If the pork thawed safely in the refrigerator, it may be refrozen raw, although the texture can lose quality. Pork thawed in cold water or the microwave should be cooked before refreezing. See the USDA freezing guidance.

To freeze cooked meatballs:

Cool promptly, tray-freeze in one layer and transfer to a sealed freezer container once firm. Use within about 3 months for the best texture. Stash a few now and one future bowl of pasta, rice or soup is already halfway solved.

Freezer guide showing raw pork meatballs frozen on a tray and bagged, and cooked meatballs cooled on a rack and stored in a labeled container.
Freeze raw meatballs separately before bagging, and cool cooked meatballs completely before storage.

Reheat Without Drying Them Out

  • Sauce: warm gently in a covered pan.
  • Oven: cover and reheat at 325°F / 160°C with a spoonful of water or sauce.
  • Air fryer: reheat near 350°F / 175°C and start checking after 3 minutes.
  • Microwave: cover loosely and use short intervals, turning between intervals.
Reheating guide showing pork meatballs warmed in sauce, covered in the oven, reheated in an air fryer, and reheated in a covered microwave-safe dish, with a leftovers temperature of 165°F.
Reheat gently with moisture when possible, and bring leftovers to 165°F / 74°C.

Reheated leftovers should reach 165°F / 74°C. Warm only what you need instead of repeatedly reheating all of them.

The Rule to Remember

Ground pork does not need another meat to make a good meatball. Let the panko absorb the milk, spread the seasoning through the binder and stop mixing as soon as the pork is evenly combined.

From there, keep the portions consistent and pull them from the heat as soon as the centers are safely cooked. The best method is the one that gets a tender meatball onto your plate without making dinner harder than it needs to be.

Which method did you choose—and did the meatballs go into spaghetti, gravy, a rice bowl or straight from the tray?

Posted on Leave a comment

Air Fryer Chicken Drumsticks Recipe: Crispy, Juicy Chicken Legs in About 30 Minutes

Six cooked paprika-garlic chicken drumsticks on a cream platter with browned blistered skin, a lemon wedge, parsley and a blurred air fryer in the background.

A good air fryer chicken drumstick delivers the contrast bone-in chicken should have: browned skin that crackles under the tongs and dark meat that stays succulent right beside the bone.

The awkward part is timing. A small drumstick can be ready while a thicker one still needs several minutes, and a beautifully browned exterior cannot tell you what is happening at the deepest point. One fixed number will suit some packages and disappoint with others.

This recipe keeps the weeknight method simple without pretending every drumstick is identical. Start with thawed chicken; dry it well, leave room around each drumstick, turn once and check the largest one first.

For pieces weighing about 4–4½ oz / 113–128 g each, dinner is ready in about 30 minutes, including a short rest. Larger and frozen drumsticks need longer, while flour-coated or glazed versions need a small method adjustment.

The piece count matters less than the weight of the largest drumstick. Once that idea is clear, an uneven supermarket package becomes much easier to manage.

Quick answer

The Base Method: 400°F / 200°C for 18–20 Minutes

Drumsticks weighing about 4–4½ oz / 113–128 g each: cook at 400°F / 200°C and begin checking at 17 minutes. Most finish around 18–20 minutes.

Drumsticks above about 5½ oz / 156 g: use 380°F / 190°C and the weight chart below.

Chicken is safe at 165°F / 74°C; many people prefer the softer texture of dark meat closer to 175–180°F / 79–82°C. The timer starts the check; the thermometer ends it.

Recipe summary card for air fryer chicken drumsticks showing base weight, 400 degrees Fahrenheit, checking at 17 minutes and safe internal temperatures.
Use this as a first-check roadmap for drumsticks weighing about 4–4½ oz / 113–128 g each; the thermometer still decides the finish.

Make it now

Air Fryer Chicken Drumsticks Recipe

Start with this unbreaded version: crisp natural skin, a smoky paprika-garlic flavor and a cooking time based on actual drumstick weight—not a generic piece count. Here, “chicken legs” means drumsticks, not attached thigh-and-drumstick leg quarters.

Recipe at a glance

  • Yield: 6 drumsticks; serves 3 generously or 4 with substantial sides
  • Preparation: About 5–10 minutes
  • Air frying: 18–20 minutes
  • Resting: About 5 minutes
  • Total time: About 28–35 minutes
  • Temperature: 400°F / 200°C
  • Safe minimum: 165°F / 74°C

Ingredients

  • 6 skin-on chicken drumsticks, thawed and refrigerator-cold
    Target weight: 4–4½ oz / 113–128 g each; 24–27 oz / 680–770 g total
  • Neutral cooking oil: 1 tablespoon / 15 ml
  • Paprika or smoked paprika: 1½ teaspoons / about 3 g
  • Garlic powder: 1 teaspoon / about 3 g
  • Onion powder: 1 teaspoon / about 2.5 g
  • Fine sea salt: 1 teaspoon / about 5–6 g, or about 2 teaspoons Diamond Crystal kosher salt
  • Black pepper: ½ teaspoon / about 1 g
  • Dried oregano or thyme: ½ teaspoon
  • Cayenne: ¼ teaspoon, optional
  • Baking powder: 1 teaspoon / about 4 g, optional for more blistered skin
Overhead ingredient board with six raw chicken drumsticks, oil, paprika, garlic powder, onion powder, salt, pepper, dried herbs, cayenne and baking powder in small bowls.
Oil helps seasoning cling, while paprika and dry aromatics build color without adding moisture to the chicken skin.

Equipment: air fryer, instant-read thermometer, bowl, paper towels and smooth-edged tongs.

Instructions

Prepare and season

  1. Preheat the air fryer. Set it to 400°F / 200°C. Let it heat for 3–5 minutes when your model recommends preheating; the chicken can be prepared during that time.
  2. Dry the drumsticks. There is no need to bring raw chicken to room temperature. The USDA advises against washing raw poultry. Pat every side thoroughly dry, including beneath loose skin and around the broad end.
Comparison image showing a wet raw chicken drumstick with shiny moisture beside a patted-dry raw drumstick with matte skin.
Dry skin browns faster. Pat away package moisture before oiling so steam does not soften the surface.
  1. Add a thin coat of oil. Turn the drumsticks in the oil until the skin has a light sheen rather than wet patches.
  2. Season evenly. Mix the paprika, garlic, onion, salt, pepper, oregano, optional cayenne and optional baking powder. Coat the drumsticks all over, including the narrow ends.
Two-stage preparation image showing a raw chicken drumstick lightly coated with oil and then evenly covered with paprika-garlic seasoning.
Aim for a light oil sheen and even seasoning, especially around the ends and folds before air frying.

Air fry, check and rest

  1. Give them room. Arrange the drumsticks in one layer without stacking or wedging them together. Use two batches when necessary.
Basket comparison showing crowded chicken drumsticks touching on one side and spaced drumsticks with visible basket openings on the other side.
Visible gaps matter: crowded drumsticks steam, while spaced pieces brown more evenly in the air fryer basket.
  1. Cook the first side. Air fry at 400°F / 200°C for 9 minutes.
  2. Turn once. The exposed skin should look drier, deeper in color and lightly blistered, and the seasoning should smell toasted rather than scorched. If the skin still clings, wait another minute before turning.
Two-stage guide showing partly cooked drumsticks at about nine minutes and one drumstick being turned with tongs in an air fryer basket.
At the turn, look for drying skin and early browning—not a finished surface—before flipping gently.
  1. Cook the second side. Continue for 8 minutes, bringing the total to 17 minutes.
  2. Check the thickest drumstick. Insert the thermometer from the fleshy side into the deepest meat without touching bone, then test another drumstick from a different part of the basket.
  3. Let each one finish in its own time. Return undercooked drumsticks for 1–2 minutes at a time. If the skin is already dark, lower the air fryer to 380°F / 190°C while the inside catches up. Take the smaller drumsticks out as soon as they are ready.
Cooked paprika-garlic chicken drumsticks arranged in a black air fryer basket with visible openings and varied browning.
Remove ready drumsticks as they finish instead of waiting for the largest piece, so smaller pieces stay juicy.
  1. Rest for about 5 minutes. The skin should feel firm beneath the tongs while the meat remains plump around the bone. Keep the drumsticks loosely arranged so steam can escape.

Recipe notes

  • Scale the dry seasoning roughly with the package’s total weight; cooking time still follows the weight of each drumstick.
  • For a softer dark-meat texture, continue beyond the 165°F / 74°C safety floor toward roughly 175–180°F / 79–82°C, provided the skin is not becoming too dark.
  • Add BBQ sauce, honey glaze and other sugary finishes only during the final few minutes.
  • The dry seasoning can be mixed ahead. Keep the raw chicken refrigerated, then dry, oil and season it shortly before air frying.

How Long Drumsticks Take by Weight

A mixed package does not mean anything has gone wrong. Remove the smaller drumsticks as they become ready and give the largest one a few more minutes.

Why air-fryer drumstick recipes give different times

If a previous batch took longer than a recipe promised, that does not necessarily mean you did anything wrong. Six drumsticks can vary dramatically in weight, and two air fryers set to the same temperature may cook at different speeds.

That is why published cooking times disagree. Weight tells you when to begin checking, while the thermometer tells you when each drumstick is ready.

Estimate Drumstick Weight Without a Scale

No kitchen scale?

Divide the package weight by the number of drumsticks to estimate the average. A 2 lb / 907 g package containing six drumsticks averages about 5⅓ oz / 151 g each. Use that as the starting row, then move a visibly oversized drumstick into the next heavier range.

Infographic showing a two-pound chicken package divided by six drumsticks to estimate about five and one-third ounces each, with one larger drumstick highlighted.
Use package weight as a starting estimate, then adjust for the heaviest-looking drumstick before choosing the chart row.

Size names vary between shops and recipes, so use the weight—not labels such as small or large—to choose when to begin checking.

Use the Time Chart Correctly

These are practical first-check starting points, not rigid cutoffs. Drumstick shape, air-fryer design and a cold start can all shift the timing.

The chart is for thawed, skin-on drumsticks in a preheated, wide basket-style air fryer.

Portrait infographic listing chicken drumstick weight ranges with air fryer temperatures and begin-checking times from 15 to 24 minutes.
These are first-check times for air fryer drumsticks by weight, not guaranteed finish times; after that, test the thickest meat.
Weight per drumstickTemperatureBegin checking
Under 4 oz / 113 g400°F / 200°C15 minutes
4–4½ oz / 113–128 g400°F / 200°C17 minutes
4½–5½ oz / 128–156 g400°F / 200°C19 minutes
5½–7 oz / 156–198 g380°F / 190°C21 minutes
Over 7 oz / 198 g380°F / 190°C24 minutes
First-check starting points for thawed, skin-on drumsticks.

When a drumstick sits on the boundary between two rows, begin with the earlier check; then remove smaller pieces as they finish instead of waiting for the largest one.

Three-stage guide showing six mixed-size drumsticks raw, cooking together, and five finished pieces resting while one larger drumstick remains in the air fryer.
Mixed-size packs cook better when smaller drumsticks leave early and the largest piece gets extra time instead of overcooking everything.

How to Know When Chicken Drumsticks Are Done

A deeply browned drumstick can still be behind at its thickest point. The thermometer makes bone-in chicken less stressful, not more technical. It lets you stop with confidence instead of cutting every drumstick open or adding precautionary minutes to the whole batch.

Where to place the thermometer

  1. Start with the largest drumstick.
  2. Insert the probe from the fleshy side into the deepest meat, keeping the tip away from the bone.
  3. Check one more drumstick from a different part of the basket.
Thermometer placement guide showing a correct probe angle into the thickest meat of a cooked drumstick and three mistake callouts.
Probe the thickest meat from the side and keep the tip away from bone for a reliable temperature reading.

165°F / 74°C is the safety floor

The USDA lists 165°F / 74°C as the safe minimum for chicken pieces. Many people prefer dark-meat drumsticks closer to 175–180°F / 79–82°C. At that temperature, the meat often feels softer and releases from the bone more readily.

That higher range is a texture preference, not a different safety rule. Every drumstick should reach at least 165°F / 74°C before it leaves the air fryer.

Educational temperature board showing 165 degrees Fahrenheit as the safe minimum and 175 to 180 degrees Fahrenheit as a softer dark-meat texture range.
165°F / 74°C is the safety floor; higher dark-meat temperatures are a texture choice, not a separate safety rule.

Pink or dark meat near the bone

The USDA explains that safely cooked poultry can remain pink, and darkening beside porous young bones can be more noticeable after freezing.

If that pink patch makes you hesitate, trust the thermometer rather than the color. You are not looking for perfectly white meat; you are looking for a safe temperature in the thickest flesh.

Cooked chicken drumstick opened near the bone with a small pink area, plus a thermometer reading showing a safe internal temperature.
Pink near the bone can happen in cooked chicken; the thermometer is the deciding tool, not the color alone.

When one drumstick needs more time

Return only that drumstick for 1–2 minutes at a time. Keep the finished ones loosely arranged rather than sealing them under foil, which traps steam and softens the skin.

Once the base method feels clear, the more enjoyable decision is how you want the drumsticks to taste.

Choose the Version That Fits Your Dinner

The easiest way to keep the method dependable is to change one thing at a time—the crust, the seasoning or the final sauce.

Flavor board showing seven different finished chicken drumsticks labeled natural crisp, extra-blistered, thin flour coating, BBQ glaze, Buffalo, lemon pepper and Indian-spiced.
Choose the finish first—crisp, coated, sauced, bright, spicy or Indian-spiced—then follow the matching dinner adjustment.
VersionWhat to expect
Natural crisp skinCrisp, savory and uncomplicated.
Extra-blistered skinCrisper, evenly browned skin with tiny blisters.
Thin flour coatingA light, craggy shell rather than thick breading.
BBQ, honey or teriyakiA sticky, glossy, sweet-savory finish.
BuffaloButtery heat with a tangy finish.
Lemon pepperBright, peppery and fresh.
Indian-spicedAromatic, earthy and gently hot.
Choose the texture or flavor, then apply the matching adjustment.

For more blistered skin

Mix the optional 1 teaspoon / about 4 g baking powder thoroughly into the base seasoning. It raises the skin’s surface pH, helping it brown and form tiny blisters. A light, even amount avoids a chalky or alkaline taste; baking soda is much stronger and should not be used measure for measure.

Close-up comparison of natural air-fried chicken skin and extra-blistered chicken skin with a callout about using baking powder, not baking soda.
Baking powder should add subtle blistering, not a thick crust; never swap in baking soda.

For a thin flour coating

Omit the optional baking powder from the base rub. Combine the base seasonings with ¼ cup / 30 g all-purpose flour and 1 teaspoon / about 4 g baking powder. Coat dried, lightly oiled drumsticks thinly, shake off the excess and mist only visible white patches.

For drumsticks weighing about 4–4½ oz / 113–128 g each, cook at 400°F / 200°C. Turn gently once the coating has begun to set and begin checking at about 20 minutes.

The coating is ready when no dry flour remains, the shell feels set beneath the tongs and the thickest meat has reached its target temperature.

Before-and-after guide showing a raw drumstick with a thin flour coating and a cooked drumstick with a light craggy shell.
Think thin dusting, not breading, so the air-fried shell turns craggy instead of heavy.

For BBQ, honey, teriyaki or Buffalo

For BBQ, honey or teriyaki: cook the drumsticks mostly dry. A batch of six drumsticks usually needs about ⅓ cup / 80 ml BBQ sauce. Brush BBQ sauce on during the final 3–5 minutes; add honey or a thin coat of homemade teriyaki sauce during the final 2–4 minutes.

For Buffalo: air fry the chicken completely, then toss it with about ¼ cup / 60 ml Buffalo sauce.

Keep serving sauce separate. Use a clean brush and a fresh portion for the final glaze rather than returning sauce or utensils that touched undercooked chicken to the table.

Vertical sauce timing guide for air fryer chicken drumsticks showing dry cooking, late BBQ glaze, late honey or teriyaki, and Buffalo sauce added after cooking.
Sweet glazes go on late; Buffalo sauce works best after the chicken finishes cooking.

For lemon pepper or Indian spices

For lemon pepper, use a dry seasoning before cooking and squeeze fresh lemon over the drumsticks afterward. This lemon pepper chicken recipe gives the full seasoning balance.

For the Indian-spiced version, replace the oregano and cayenne with 1 teaspoon garam masala, ½ teaspoon ground cumin, ½ teaspoon ginger powder and ¼–½ teaspoon Kashmiri chili powder. Serve with rice, raita and lemon, then finish with chopped cilantro.

Skinless drumsticks work with the same seasoning, but this timing chart is calibrated for skin-on chicken. Oil them lightly, expect browned spices and juicy meat rather than crackly skin, and begin checking earlier than a skin-on drumstick of the same size.

Whatever seasoning or sauce you choose, the crispest natural skin still comes down to dryness, airflow and heat.

Side-by-side image of a crisp dry-seasoned chicken drumstick and a glossy sauced chicken drumstick labeled as two successful finishes.
Crisp dry skin and glossy sauced skin are different successful finishes, depending on whether sauce is involved.

How to Get Crispy Skin

The air fryer has two jobs: brown the skin and carry heat into the meat around the bone. Crisp natural skin does not require flour, but the chicken must begin dry enough to brown before the inside overcooks.

Crisp-Skin Basics

  • Dry the skin: pat beneath folds and around the broad end until it feels tacky rather than wet.
  • Leave open space: pressed-together patches steam and stay pale.
  • Use a thin sheen of oil: enough for the seasoning to cling, not enough to pool under the chicken.
  • Match the heat to the weight: drumsticks around 4–4½ oz / 113–128 g suit 400°F / 200°C, while pieces above about 5½ oz / 156 g often brown more evenly at 380°F / 190°C.
Extreme close-up of crisp cooked chicken drumstick skin with tiny blisters, toasted paprika, pepper flecks and browned edges.
Tiny blisters, rendered skin and toasted seasoning are the natural crisp-skin target for unsauced air fryer drumsticks.

Fix Pale or Soft Skin

If the underside stays pale. The underside receives less direct heat and may sit against the crisper plate. Turning once, keeping the basket holes open and resting on a rack all help. A solid liner makes cleanup easier but usually sacrifices some lower-skin browning.

If you used a wet marinade. Yogurt, coconut milk, soy-heavy mixtures and generous lemon juice add flavor and charred edges, but they also add moisture. Scrape away heavy excess before cooking. Expect tender chicken with a seasoned, lightly charred coating rather than dry, crackly skin.

If the cooked skin is still soft. Give unsauced chicken another 1–3 minutes at 400°F / 200°C, watching closely. Once the drumsticks are coated with BBQ, honey or another sugary glaze, aim for a glossy, tender finish rather than forcing the skin to become crackly. Rest the chicken on a rack so steam does not soften it further.

Before-and-after guide showing a cooked drumstick with soft skin and another drumstick with firmer browned skin after one to three more minutes.
Use this quick blast only for cooked, unsauced drumsticks with soft skin, not sugary glazed pieces.

Why the Base Seasoning Works

Oil: one tablespoon is enough to help the dry seasoning cling and give the skin more even color. The drumsticks can cook without it, but the base version browns more dependably with a light coating.

Paprika and aromatics: smoked paprika adds mild barbecue character, while sweet paprika is gentler. Garlic and onion powders build savory flavor without adding the surface moisture of fresh chopped aromatics.

Salt and baking powder: use about 5–6 g salt for the base batch—roughly 1 teaspoon fine sea salt or 2 teaspoons Diamond Crystal kosher salt. Baking powder is optional; used lightly, it encourages browning and small blisters.

Frozen Chicken Drumsticks in the Air Fryer

Frozen drumsticks need a short softening stage before the seasoning can cling and the skin can brown. Confirm that your air-fryer manual permits cooking raw poultry from frozen, and make sure the drumsticks become fully separable so hot air can reach every side.

Frozen dinner rescue

If the drumsticks are frozen into one solid block, thaw them in the refrigerator until they can be separated. Individually frozen pieces can go straight into the staged method below.

  1. Loosen the drumsticks. Air fry at 360°F / 180°C for 5–10 minutes.
  2. Separate and dry them. Once the drumsticks loosen, pull them apart with tongs and pat away the melted ice you can reach.
  3. Oil and season. Add the oil and dry rub once the skin is dry enough for the seasoning to cling.
  4. Continue at 380°F / 190°C. For individually frozen drumsticks around 4–4½ oz / 113–128 g each, begin checking the largest one when the total cooking time reaches about 25 minutes. Continue for 2–3 minutes at a time and test more than one drumstick.
  5. Crisp only when needed. If the chicken is safely cooked but still pale, use 400°F / 200°C for the final 2–3 minutes.
Five-stage frozen drumstick guide showing a frozen block, individual frozen pieces, loosening, drying and seasoning, and continued air frying.
Frozen drumsticks need staging: separate first, then dry, season and continue cooking so seasoning can actually stick.

Allow approximately 25–40 minutes from frozen, depending on weight and ice. The approximately 30-minute timing applies to fully thawed drumsticks in the base weight range.

How Different Air Fryers Change the Timing

Most timing differences come down to how close the chicken sits to the heating element, how much open cooking space the machine provides and whether different zones or levels heat evenly.

Match the Method to Your Air Fryer

  • Compact or narrow basket: cook fewer drumsticks or use batches so hot air can move freely around each one.
  • Hot-running machine: begin checking early. If the skin darkens before the inside is ready, continue at 380°F / 190°C.
  • Dual basket: divide the drumsticks evenly and check both zones; one side may finish first.
  • Oven-style or multi-level machine: follow the recommended rack position, rotate levels when needed and watch the drumsticks closest to the heating element.
Appliance guide showing four generic air fryer types with tips for compact baskets, hot-running machines, dual baskets and oven-style models.
Match the method to the machine: basket size, heat pattern and rack position all matter for air fryer chicken legs.

Preheating gives the first batch a more consistent start. From a cold machine, keep the same thermometer target and expect the first check to move by roughly 1–3 minutes.

Liners, Tools and Two Batches

Liners and tools: smooth or silicone-tipped tongs are less likely to tear the skin. A solid liner can simplify cleanup but may block lower airflow. Do not use or preheat parchment unless your appliance manual permits it, and never leave loose paper unweighted near the heating element.

Cooking two batches? Rest the first batch on a wire rack, where steam can escape. While the second batch cooks, keep the first on the rack in a 200°F / 95°C oven and avoid holding it longer than necessary. A final minute in the air fryer can refresh the skin before serving.

Three-stage board showing cooked drumsticks on a wire rack, a short low-oven hold and a brief air fryer refresh.
A rack and short low-oven hold protect the first batch while the second cooks, without steaming the skin.

Troubleshooting Soft Skin, Uneven Cooking and Smoke

Most disappointing batches are fixable. One undercooked drumstick can go back into the air fryer without delaying the rest of dinner.

Dark Outside, Low Inside

If the exterior is already dark but the center is still below target, lower the heat and finish the drumstick in short checks instead of pushing the whole batch harder.

Troubleshooting image showing a dark browned drumstick with a thermometer below the target temperature and instructions to lower the air fryer to 380 degrees Fahrenheit.
When the outside races ahead, lower the heat and finish in short thermometer-led intervals rather than forcing a hotter cook.

Quick Fixes by Problem

ProblemWhat to do
Skin stayed soft or rubberyFix now: give unsauced chicken another 1–3 minutes at 400°F / 200°C, watching closely. Next time: dry the skin more thoroughly and leave more space between the drumsticks.
Skin burnt before the inside cookedLower the temperature to 380°F / 190°C and continue in short intervals. Large drumsticks often need gentler heat.
One drumstick is undercookedReturn only that drumstick. The others can rest while it cooks for another 1–2 minutes at a time.
Chicken turned dryRemove smaller drumsticks earlier. They do not need to wait for the largest one.
Seasoning or flour looks patchyPat the skin dry, add a thin sheen of oil and mist only visible dry flour patches.
Coating fell offShake off excess flour and wait until the crust begins to set before turning with smooth tongs.
BBQ or honey glaze burntSweet sauce went on too early. Cook mostly dry and glaze only during the final few minutes.
Chicken looks pink near the boneCheck the thickest flesh with a thermometer. Color alone cannot confirm whether poultry is safe.
Underside stayed paleTurn once and keep the crisper-plate holes open. Solid liners reduce the hot air reaching the underside.
The air fryer is smokingStop and inspect the appliance safely. Clean old residue and rendered fat, reduce excess oil and keep sugary sauce away from the hottest part of the cook.
Fast fixes for skin, doneness, coating, smoke and sauce problems.

Smoke and Safe Inspection

Persistent or unusual smoke deserves a pause. Once the appliance is safe to inspect, clean the basket, crisper plate and collection area, then follow the manual if the problem continues.

Infographic showing common air fryer smoke causes including old residue, rendered fat, excess oil and burning sugary glaze, with a clean basket shown as prevention.
Most smoke comes from residue, fat, excess oil or sugar added too early, so check those causes first.

What to Serve With Air Fryer Chicken Drumsticks

Once the drumsticks are crisp and rested, dinner only needs one comforting side and something fresh. Cool or acidic sides are especially good beside Buffalo, BBQ and honey-glazed versions because they cut through the richer coating.

Fast weeknight plate: smoky paprika-garlic drumsticks, roasted potatoes and green beans.

Cookout plate: BBQ drumsticks, corn and cold potato salad.

Fresh and tangy plate: Buffalo or glazed drumsticks with yogurt dip and a cold vinegar and dill cucumber salad.

Indian-spiced plate: jeera rice, kachumber, mint yogurt, flatbread and lemon wedges.

Serving board with four different chicken drumstick meals labeled weeknight, BBQ, Buffalo and Indian-spiced, each with different sides.
The same air fryer chicken drumsticks can shift from weeknight plate to BBQ, Buffalo or Indian-spiced dinner.

Once the plates are planned, the final cue is the bite itself: browned skin, juicy dark meat and a drumstick that still feels like easy dinner.

A hand holding a cooked chicken drumstick with one bite taken, showing browned skin and juicy cooked dark meat against a blurred dinner table.
The payoff is crisp-edged skin with juicy dark meat—not just a correct temperature—when the method is right.

Storage, Freezing and Reheating

Refrigerate cooked drumsticks in shallow covered containers within 2 hours—or within 1 hour when the surrounding temperature is above 90°F / 32°C. Use them within 3–4 days and store extra sauce separately when possible.

For reheating, arrange the drumsticks in one layer and air fry at 350–375°F / 180–190°C for 5–8 minutes, turning once, until the center reaches 165°F / 74°C. Use the lower end of the range for BBQ, honey or other sugary finishes.

Freeze cooled drumsticks in a freezer-safe container and thaw them in the refrigerator before reheating. For the best flavor and texture, use frozen cooked drumsticks within about 4 months. The skin may not return to its original crispness, but the air fryer usually restores it more successfully than a microwave.

For meal prep, keep sauce separate and reheat only the number you plan to eat. Cold meat can also be pulled from the bone for wraps or these chicken sandwich ideas. That often protects the texture better than reheating the same drumstick twice.

Storage and reheating guide showing cooked drumsticks in a container, freezer storage, an air fryer reheating step and a thermometer cue.
Chill promptly, reheat to 165°F / 74°C, and use the air fryer when leftover texture matters.

Frequently Asked Questions

Is 380°F or 400°F better for chicken drumsticks?

Use 400°F / 200°C for drumsticks under about 5½ oz / 156 g. Heavier pieces often cook more evenly at 380°F / 190°C.

Can I use parchment paper or foil?

Only use parchment or foil when your specific air-fryer manual permits it. Solid liners restrict airflow and lower-surface browning, while loose paper can be pulled toward the heating element. When a liner is permitted, keep it weighted beneath the food and avoid covering the basket’s airflow openings.

Why are my drumsticks pink beside the bone?

Bone pigments can color safely cooked meat, especially after freezing. Pinkness alone cannot confirm doneness, so check the thickest flesh with a thermometer.

Can I cook drumsticks from frozen?

Yes, when your appliance manual permits it. Loosen and separate the drumsticks first, then dry, oil and season them. Continue at 380°F / 190°C and begin checking drumsticks around 4–4½ oz / 113–128 g each at about 25 minutes total.

Use this card when weight, frozen chicken or sauce changes the base method.

Air fryer drumstick decision card with cooking temperatures, weight ranges, frozen and sauce guidance, and a cooked drumstick in an open basket.
Weight sets the first check, frozen chicken needs staging, and sugary sauces belong near the end.

The four drumstick decisions to remember

Dry first. Give them room. Sauce late. Check the largest piece. Those four decisions do more for crisp skin and juicy meat than chasing one supposedly perfect cooking time.

That is the small satisfaction of this dinner: an inexpensive package of chicken comes out smoky, properly browned and generous. The thermometer quietly removes the worry that usually comes with meat beside the bone.

Which version made it to your table—the smoky base, a sticky glaze, Buffalo or the Indian-spiced batch? If your drumsticks needed noticeably longer than the guide suggested, add the average weight and air-fryer model too. Those details can help the next cook understand why.

Recipe card Guide contents Back to top ↑

Posted on Leave a comment

Slow Cooker Brisket Recipe: Tender Slices With Rich Onion Gravy

Overlapping slices of tender slow cooker brisket on a stoneware platter, partly covered with glossy brown onion gravy and softened onions.

Brisket asks for most of a day, so uncertainty near the end can feel bigger than it does with an ordinary roast. One piece is broad and relatively thin. Another is tied into a thick, compact joint. Both may weigh the same, yet one can become tender noticeably earlier than the other.

This slow cooker brisket is built for the result that suits gravy best: beef that feels deeply tender when sliced but holds together when lifted. The browned bits from the skillet deepen the cooking liquid, which is reduced into rich onion gravy rather than served as thin broth.

By the time the lid comes off, the onions should have softened into the dark cooking juices and the brisket should hold its shape. Dinner should smell as though the beef was fussed over all day, even though the slow cooker handled the long middle stretch.

The key moment comes near the end. A probe that felt springy half an hour earlier begins to slide into the thickest part with very little resistance, yet the brisket still lifts in one piece. The clock gives you a window; the probe gives you the answer. Aim for beef that is tender enough to yield, yet structured enough to slice.

Quick Answer: How to Make Tender Slow Cooker Brisket

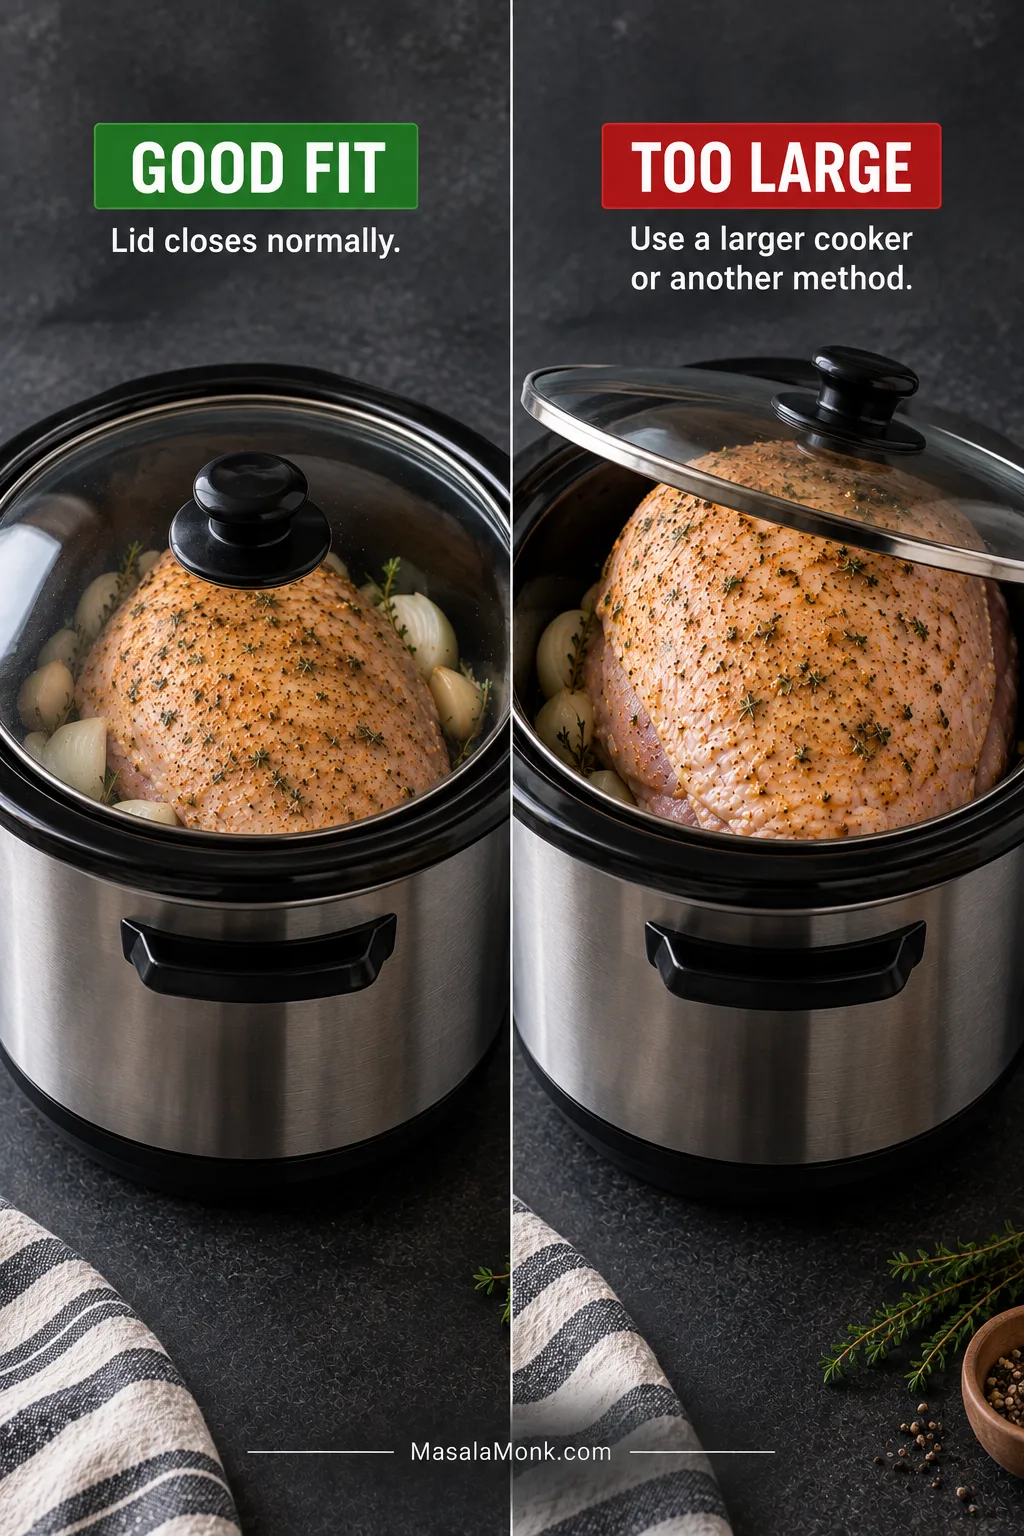
Use a 3–3½ lb (1.4–1.6 kg) fresh, uncured brisket flat that fits comfortably in a 5–6 quart (about 5–6 L) slow cooker. Brown the beef and soften the onions in the same skillet, then add 1 cup (240 ml) low-sodium beef stock plus ½ cup (120 ml) red wine, dark ale, or more stock.

Cook on LOW for about 7½–9 hours, making the first tenderness check at 7 hours. Remove the brisket when a probe enters the thickest section easily and the meat holds together when lifted.

Rolled-joint guidance, LOW versus HIGH timing, and pull-apart and no-sear variations appear below.

The three decisions that matter most: judge the brisket by thickness as well as weight, keep the starting liquid controlled, and reduce the cooking juices for flavor before using starch for texture.

Choose Your Version

Decide whether you want neat slices, pull-apart meat, or less hands-on preparation. You can always cook sliceable brisket longer for pulling, but once it begins falling apart, it will not return to neat slices.

Your goalHow to make it
Recommended for neat slicesUse a flat-cut brisket, brown it first, cook on LOW, and remove it while it remains intact enough to slice.
Rolled brisket jointLeave the string on, allow for the thick center, and check it later than you would a thin flat.
Pull-apart brisketContinue cooking until the fibers separate readily, then shred and moisten with finished gravy.
No-sear shortcutSkip the skillet work, combine everything in the slow cooker, and give the finished liquid a longer stovetop reduction.

The recipe below follows the neat-slice version.

Slow Cooker Brisket With Rich Onion Gravy

A savory brisket cooked over browned onions, garlic, stock, and herbs until tender but still sliceable. The cooking liquid is skimmed and reduced before thickening, giving you deeply flavored onion gravy instead of diluted slow cooker broth.

Prep Time25 minutes
Skillet Time25 minutes
Slow Cooker Time7½–9 hours on LOW
Resting Time15–20 minutes
Gravy Time10–20 minutes
Hands-On Time1–1¼ hours
Total Time9–10½ hours
Servings6 generous or 8 moderate servings
Cooker Size5- to 6-quart (about 5–6 L) oval slow cooker or Crock-Pot
Texture and FinishTender and sliceable, with rich onion gravy

Equipment

Use an oval slow cooker or Crock-Pot, a large heavy skillet, tongs, two broad spatulas, and an instant-read thermometer. You will also need a cutting board, a sharp slicing knife, a wide saucepan, and a whisk.

A thin metal skewer helps assess resistance, but only a thermometer verifies temperature. A reliable sear or sauté function can replace the separate skillet. For the gravy, a spoon is enough to skim the fat; a separator, sieve, or immersion blender is optional.

Ingredients

Raw brisket arranged with sliced onions, garlic, beef stock, red wine, dark ale, tomato paste, Dijon mustard, Worcestershire sauce and herbs.
The ingredients work in layers: browning builds depth, the braising liquid carries it, and final tasting decides how much acidity or starch the gravy needs.

For the Brisket

  • 3–3½ lb / 1.4–1.6 kg fresh, uncured beef brisket, preferably a flat or first cut for neat slices; a rolled joint also works, while a fattier point is better suited to pull-apart meat
  • 2 teaspoons fine salt, about 10–12 g, divided
  • 1 teaspoon coarsely ground black pepper
  • 2 tablespoons / 30 ml neutral cooking oil, divided

For the Onion Braising Base

  • 3 medium-large yellow or brown onions, about 16–19 oz / 450–550 g, sliced from root to tip
  • 5 large garlic cloves, finely chopped or crushed
  • 2 tablespoons / 34 g tomato paste
  • ½ cup / 120 ml dry red wine, dark ale, or additional low-sodium beef stock
  • 1 cup / 240 ml low-sodium beef stock
  • 1½ tablespoons / 22 ml Worcestershire sauce
  • 2 teaspoons / 10 g Dijon mustard
  • 1 teaspoon dried thyme or 6–8 fresh thyme sprigs
  • 2 bay leaves

And for Finishing the Gravy

  • Red wine vinegar: 1–2 teaspoons / 5–10 ml, as needed
  • Dark brown sugar: ¼–1 teaspoon, only if the reduced gravy tastes too sharp
  • Cornstarch: 1–2 tablespoons / 8–16 g, divided
  • Cold water: 1–2 tablespoons / 15–30 ml, divided
  • Additional salt and black pepper, as needed

Instructions

Prepare and Build the Braising Base

  1. Mark, trim, and season. Note the direction of the grain with a photo or shallow corner notch. Remove hard exterior fat and reduce any very thick fat cap to about ¼ inch / 6 mm. Pat the brisket dry, then season all sides with 1½ teaspoons of the salt and all the black pepper.
  2. Sear the brisket. Heat 1 tablespoon oil in a large skillet over medium-high heat. Brown the broad sides for 4–5 minutes each and the thick edges briefly, then transfer the brisket to a tray.
  3. Brown the onion base. Reduce the heat to medium. Add the remaining oil if needed, followed by the onions and up to the remaining ½ teaspoon salt; hold some back if the stock or Worcestershire tastes salty. Cook for 8–10 minutes until softened with golden edges. Add the garlic for 30 seconds, then cook the tomato paste for 1–2 minutes until it deepens to a rusty red.
  4. Deglaze and season the liquid. Add the wine, ale, or extra stock and scrape up the browned residue. If using wine or ale, let it bubble for 1–2 minutes. Stir in the 1 cup / 240 ml stock, Worcestershire sauce, Dijon, thyme, and bay leaves.

Slow Cook and Test for Tenderness

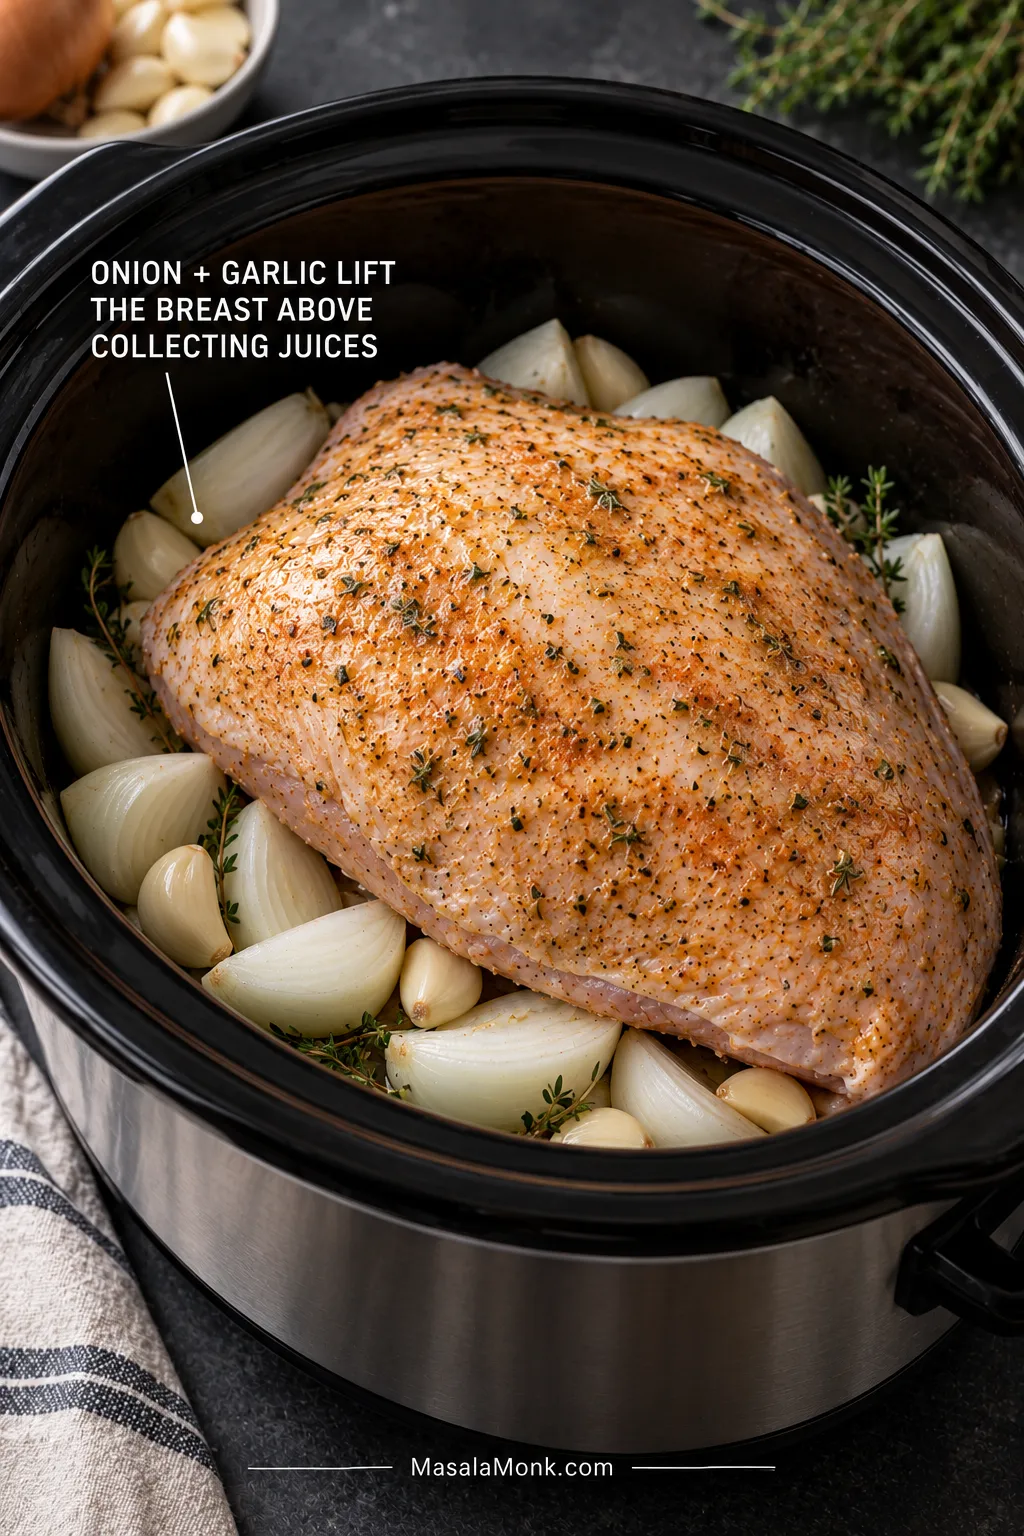
  1. Load the slow cooker. Transfer the onions and liquid to the cooker. For a flat: nestle it into the mixture with the lean underside down and fat side up. For a rolled joint: set it on its broadest stable side and leave heat-safe butcher’s string in place. Remove plastic wrapping, absorbent pads, clips, and non-heat-safe elastic netting. The top can remain exposed; don’t add extra stock simply to submerge the meat.
  2. Cook on LOW. Cover and cook a standard 3–3½ lb / 1.4–1.6 kg flat for about 7½–9 hours. Make the first tenderness check at 7 hours. For a tightly rolled joint, start checking around 7 hours; many finish between 7½ and 9 hours, although an especially thick joint or cooler-running cooker may need closer to 10 hours.
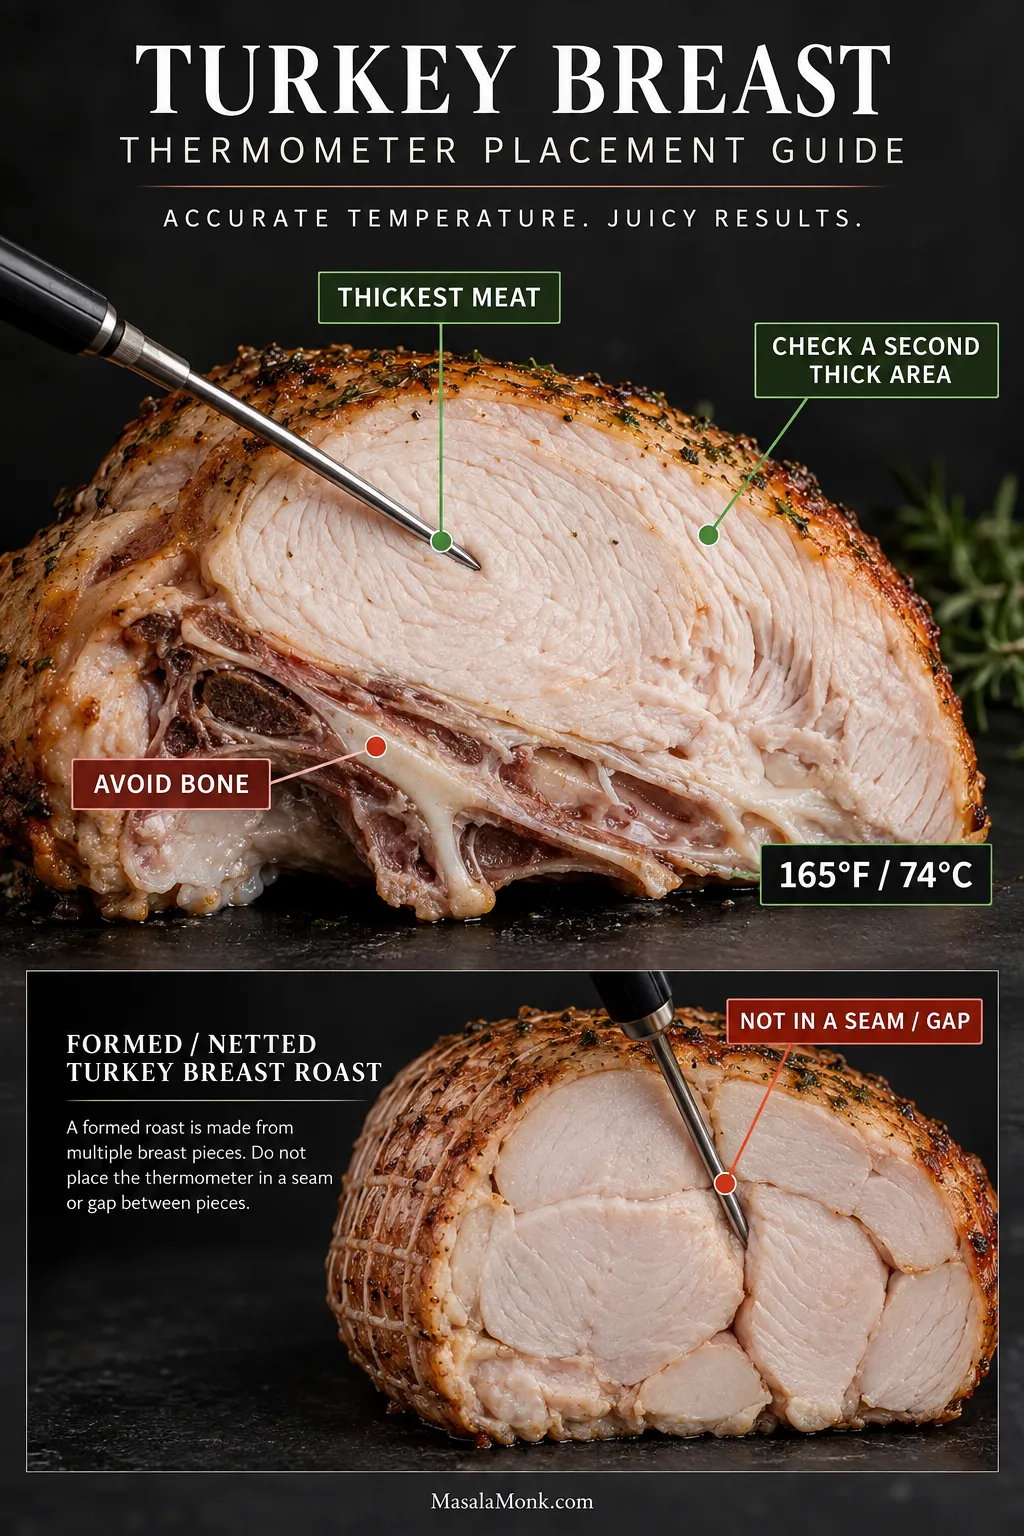
  3. Check the texture. Insert the thermometer probe—or a thin metal skewer if you are checking texture only—into the thickest section. Only the thermometer verifies temperature. If the meat feels firm and springy, close the lid and cook for another 30–45 minutes. The brisket is ready for slicing when the probe or skewer enters easily and the roast keeps its shape as you lift it.

Rest, Finish the Gravy, and Serve

  1. Rest the brisket. Move it to a cutting board with two broad spatulas, tent loosely with foil, and rest for 15–20 minutes.
  2. Finish the gravy. Remove the bay leaves and thyme stems, skim excess fat, and transfer the onions and liquid to a wide saucepan. Blend with an immersion blender or strain if desired, then simmer for about 10–20 minutes, until the liquid tastes richer, looks glossier, and briefly parts behind the spoon. Once the liquid tastes concentrated, taste the gravy. Add 1 teaspoon red wine vinegar if it tastes flat or heavy, then add more only if needed. Add a small pinch of brown sugar only if it tastes harsh or sharp, and adjust the salt and pepper. If the flavor is right but the gravy remains too thin, mix 1 tablespoon cornstarch with 1 tablespoon cold water. Whisk it in gradually and simmer for 1–2 minutes. If the gravy remains too thin, mix another tablespoon of cornstarch with another tablespoon of cold water and add only as much as needed.
  3. Slice and serve. Remove the string from a rolled joint. Cut the brisket about ¼ inch / 6 mm thick across the grain. Spoon over enough gravy to keep the slices glossy and serve the rest at the table.

Recipe Notes

  • For a 1⅔–2¼ lb / 750 g–1 kg flat: make the first check at about 6 hours on LOW. Many pieces finish around 7–8 hours, although a very thin flat may be ready sooner.
  • For HIGH: start testing the 3–3½ lb brisket around 4 hours and expect about 4½–6 hours.
  • For a no-sear version: omit the oil. Place the onions and seasoned beef directly in the cooker, whisk together the remaining braising ingredients, and pour them over the beef. Skipping the skillet saves about 25 minutes of active work, but the gravy will taste lighter and need a longer stovetop reduction.

Food-safety note: Fully thaw the brisket before slow cooking. See the USDA slow-cooker guidance for safe handling.

Why This Slow Cooker Brisket Method Works

A slow cooker surrounds brisket with gentle heat and moisture, but it can’t create a dark sear or concentrate gravy. Browning the beef, softening the onions, and cooking the tomato paste in a skillet build the roasted flavor the covered cooker cannot.

The starting liquid stays restrained because the beef and onions release more moisture as they cook. Meanwhile, gentle heat gives the brisket’s dense collagen time to soften into gelatin. Once that work is complete, continued cooking can dry the lean muscle fibers even while the meat becomes softer.

Remove the brisket as soon as it is tender enough to slice, then finish the cooking liquid separately. That lets you remove excess fat, evaporate water, and deepen the gravy without pushing the meat beyond its best slicing point.

How quickly it reaches that point depends heavily on the shape and thickness of the cut; use the cooking-time guide to decide when checking should begin.

Which Brisket Cut Should You Buy?

If the labels at the butcher counter are confusing, look at the shape before worrying about the name. Use fresh, uncured beef brisket—not corned beef brisket, which has already been cured in salty brine. A broad, even flat gives you the cleanest slices; a compact rolled joint simply needs more patience at the center.

Three raw brisket cuts displayed side by side: a broad lean flat, a thicker marbled point and a compact tied rolled joint.
Compare shape and thickness at the butcher counter, not weight alone. Two equal-weight briskets can finish at very different times.

Flat Cut Versus Point Cut

Choose a flat or first cut for neat gravy-covered slices. It is broad and comparatively lean, so remove it once the probe glides in easily and the roast holds together.

Choose a point cut for richer, fattier meat or a pull-apart finish. Trim heavy exterior fat and skim the cooking liquid carefully.

Brisket Joint or Rolled Brisket

A tightly rolled joint may take longer than a heavier flat because heat must reach its thick center. Leave heat-safe butcher’s string in place while it cooks.

If the joint will not fit beneath the lid, unroll it or divide it into two large pieces and begin checking sooner.

Whole packer brisket: It contains both the flat and point and is usually too large for a household slow cooker. Use a smoker or oven method instead.

If the label says shoulder roast, chuck shoulder, arm roast, or shoulder clod, use the beef shoulder roast crock pot guide. Those cuts behave more like pot roast than brisket.

Brisket or Pot Roast?

Choose brisket for distinct slices and a narrower finish between firm and falling apart. Chuck breaks into soft chunks more readily; brisket keeps a visible grain and rewards slicing across it. For forgiving chuck roast with potatoes and carrots in the cooker, use MasalaMonk’s slow cooker pot roast recipe.

How Much Brisket per Person?

Allow about ½ lb (225 g) raw boneless brisket per adult with substantial sides. This recipe serves six generously or eight moderately; buy extra when leftovers are part of the plan.

Prepare the Brisket Before It Goes Into the Cooker

Remove only the hard excess fat, mark the grain while it is visible, and make sure the brisket fits beneath the lid.

Trim the Fat and Mark the Grain

Remove hard, waxy lumps and heavy edge deposits. Leave a reasonably even layer—about ¼ inch (6 mm) where practical—especially on a lean flat.

Photograph the direction of the raw muscle fibers or make a shallow notch across one corner. After cooking, slice perpendicular to those fibers so each bite is easier to chew.

A hand trimming firm white exterior fat from raw brisket while arrows mark the muscle-grain direction for slicing after cooking.
Trim hard surface fat now, and mark the grain while it is easy to see. Both become harder to judge once the brisket is browned and sauced.

Does Brisket Need a Rub or Marinade?

No marinade is needed for tenderness; the long cook softens the connective tissue. The browned onions, garlic, Worcestershire, Dijon, and herbs provide enough seasoning for this gravy-based version. You may season several hours or a day ahead, but a sweet barbecue rub moves the dish toward a different style.

Raw brisket flat on a wooden board, patted dry and evenly seasoned with salt and coarse black pepper before searing.
Seasoning ahead is fine. Blot away any moisture before searing so the skillet browns the brisket instead of steaming it.

Make It Fit and Position It Correctly

The lid should close fully without resting on the meat, and the brisket should not be folded tightly against the sides. If necessary, cut it across its width into two large pieces, arrange them with little overlap, and begin checking at the standard-flat time; thinner pieces may finish first.

Set a flat fat-side up with the lean side nearer the onions and liquid. Place a rolled joint on its broadest stable side; secure placement and a closed lid matter more than exact fat-cap orientation.

Tied rolled brisket positioned inside an oval slow cooker beneath a raised lid, with plastic wrapping, clips and elastic netting marked for removal.
A small rolled joint can cook more slowly than a heavier flat because heat must travel farther to reach its center.

Ingredients That Build the Brisket and Gravy

Three onions look generous in the skillet, but they collapse into the cooking liquid and give the finished gravy much of its body. Tomato paste adds depth, low-sodium stock leaves room for reduction, and Worcestershire, Dijon, and herbs round out the sauce without needing a packet mix.

Onions, Stock, and Tomato Paste

Slice the onions from root to tip so some texture remains through the long cook.

Low-sodium stock gives you room to reduce the gravy without making it harsh. Resist adding more simply because the top of the brisket remains exposed; the beef and onions will release additional moisture beneath the closed lid.

Seared brisket resting over softened onions in an oval slow cooker, with brown braising liquid below and around the meat but not covering its top.
The exposed top still cooks in the trapped steam, while the beef and onions release enough moisture to raise the liquid level naturally.

Tomato paste adds color, savory depth, and a little body without making the gravy taste tomato-heavy. Cook it until it darkens slightly so it loses its raw edge.

The Braising Liquid

Red wine gives the gravy darker fruit and acidity. Ale adds a rounder maltiness, while extra beef stock creates the most straightforward onion gravy. Keep the amount restrained: the wine or ale should deepen the sauce without becoming its main flavor.

Worcestershire brings savory depth and gentle acidity, while Dijon rounds the liquid without making the gravy taste strongly mustardy. Both become more concentrated during reduction, so taste again before serving.

Cornstarch adds body only after reduction has concentrated the flavor. Add it gradually so the gravy stays glossy rather than becoming pasty.

What Slow Cooker Brisket Should Look and Feel Like

The cues below show what each stage should look and feel like, especially when the clock cannot tell you enough.

The Crust and Onion Base

Pat the surface dry, then leave each broad side in the hot skillet until a deep crust forms and the meat releases more easily. Cook the onions until their raw smell softens and their edges turn golden.

Brisket browning in a cast-iron skillet with a dark mahogany crust and browned fond, while metal tongs lift one edge.
Pale patches usually mean lingering moisture or weak contact with the skillet. Move the brisket only when needed so a deep crust can form.

Stir in the tomato paste until it changes from bright red to rusty red and begins sticking lightly to the pan. Pour in the wine, ale, or stock and scrape up the browned layer—those sticky bits belong in the gravy. If using wine or ale, let it bubble until its sharp alcoholic smell softens, then nestle the brisket into the onions.

Golden sliced onions and darkened tomato paste in a skillet as liquid is poured in to loosen the browned residue from the pan.
Brown fond belongs in the gravy; black, bitter residue does not. Smell the pan before deglazing and leave genuinely burned patches behind.

The Tenderness Change to Watch For

The first tenderness check is often the least encouraging one. At the sliceable stage, the roast flexes when lifted, its edges remain attached, and any surface cracks stay narrow. As it moves toward pull-apart tenderness, those cracks widen and the fibers begin separating under light pressure.

Side-by-side comparison of intact sliced brisket with attached edges and softer brisket separating into broad, moist pulled fibers.
Narrow cracks and attached edges point to clean slices. Widening seams show the brisket moving toward a moist pull-apart finish.

How Soft Brisket Should Slice

Support the softened brisket with two broad spatulas and rest it for 15–20 minutes. Slice across the grain; the first piece should bend without crumbling. Cut exceptionally soft meat a little thicker.

Rested brisket supported on a cutting board and carved across the grain into even slices with a long slicing knife.
Use long, gentle knife strokes. A blunt blade or heavy sawing motion can squash a very tender brisket before it reaches the plate.

The slow cooker brisket timing chart tells you when to begin looking for those changes.

How Long to Cook Brisket in a Slow Cooker

For a 3–3½ lb (1.4–1.6 kg) brisket flat, cook on LOW for about 7½–9 hours or HIGH for about 4½–6 hours. Begin checking at 7 hours on LOW or 4 hours on HIGH.

Cooking time changes with thickness, shape, fat content, starting temperature, cooker size, and how hot your slow cooker runs. A small rolled joint may take longer than a heavier broad flat because heat has farther to travel through its tightly rolled center.

There is no dependable minutes-per-pound or hours-per-kilogram formula for slow cooker brisket. Use the chart to decide when to make the first check, then let the resistance of the meat decide when to stop.

Open the lid briefly, test one or two places in the thickest section, and close it again quickly if the meat resists. Check again after another 30–45 minutes.

All times are approximate. Use the “Begin checking” column for your first tenderness test.

On a phone, swipe sideways to see all columns in the timing table.

BrisketSettingBegin checkingLikely window
Thin or small flat, 1⅔–2¼ lb / 750 g–1 kgLOW6 hours7–8 hours
Thin or small flat, 1⅔–2¼ lb / 750 g–1 kgHIGH3½ hours4–5 hours
Compact or rolled joint, 2¼–3⅓ lb / 1–1.5 kgLOW7 hours7½–9 hours; a very thick joint may need closer to 10 hours
Compact or rolled joint, 2¼–3⅓ lb / 1–1.5 kgHIGH4½ hours5–6½ hours
Standard flat, 3–3½ lb / 1.4–1.6 kgHIGH4 hours4½–6 hours

For a 4–5 lb (1.8–2.3 kg) brisket: use a 7–8 quart cooker and begin checking at about eight hours on LOW. Many thick whole briskets need roughly 9–11 hours. If you divide the brisket into thinner pieces, begin near the standard-flat window and remove each piece separately when tender.

What the Probe Is Telling You

A thermometer probe entering the thickest center of browned brisket during an early tenderness check inside an onion-filled slow cooker.
Do not judge the brisket by one check. What matters is the change from firm and springy toward easier entry each time you test.
What you feelWhat it meansWhat to do
Firm resistance as the probe entersNeeds longerClose the lid and check again in 30–45 minutes
The probe glides into the thickest sectionTender and sliceableRemove the brisket and let it rest
The meat separates around the probePull-apart stageLift carefully, rest briefly, and shred

Where to Place the Probe

Probe inserted into the thickest meaty center of cooked brisket, with a fat seam and thin edge marked as misleading testing locations.
When readings disagree, trust the firmest result from the thick central meat. A soft fat seam or thin edge can be misleading.

Is LOW Better Than HIGH?

LOW is the more forgiving setting because it gives a lean flat a wider window between firm and overly soft. HIGH can produce good brisket when dinner needs to happen sooner, but it isn’t an exact half-time conversion.

Comparison guide for cooking brisket on LOW and HIGH, with a slow-cooker dial and separate first-check and likely finishing windows.
HIGH narrows the final checking window because tenderness can change quickly near the end. Start early and stay close once the meat begins yielding.

What Internal Temperature Is Slow Cooker Brisket Done?

Begin checking brisket for tenderness around 185–190°F (85–88°C). Many pieces become probe-tender in the 190s to low 200s, but resistance—not temperature alone—decides when to remove them.

Whole beef roasts reach the USDA minimum safety benchmark at 145°F (63°C) followed by a three-minute rest. Brisket is normally still firm at that point because its connective tissue hasn’t softened enough.

Vertical brisket temperature scale relating 145°F to beef safety, 185–190°F to tenderness checks and the 190s to low 200s to common finishing temperatures.
Temperature tells you when to start paying close attention. Probe feel still makes the final decision.

Can You Overcook Brisket in a Slow Cooker?

Yes. A brisket can become softer while its lean fibers become drier. Watch for these signs:

  • The brisket splits before it can be lifted from the cooker.
  • The fibers separate as soon as the surface is pressed.
  • Slices crumble into short strands instead of bending.
  • A lean flat feels soft but dry or cottony in the mouth.
  • The edges break down before you can carve the center.

An over-soft brisket works well shredded, moistened with finished gravy, and served in rolls, baked potatoes, or rice bowls.

Save the Slow Cooker Brisket Timing Guide

Prefer one visual reference for later? This chart brings together the first-check and likely cooking windows for flats and rolled joints on LOW or HIGH. Save it as a starting point, then let probe resistance decide the actual finish.

Timing guide comparing first-check and expected cooking windows for a small brisket flat, rolled joint and standard flat on LOW and HIGH.
Save this chart as a quick starting point. Begin checking at the earlier time shown, but let thickness and probe resistance decide when the brisket is ready.

Open the full-size brisket timing chart, then save it to your phone or computer for future cooks.

Once the probe gives you the answer, remove the brisket and finish the cooking juices as rich onion gravy.

How to Turn the Cooking Juices Into Rich Gravy

The liquid will probably look thinner than finished gravy when the lid first comes off. That is expected. It may already smell deeply savory, but its flavor and body develop in the saucepan.

Reduce for flavor. Thicken for texture. Reduction concentrates the beef and onions. Cornstarch changes only how the sauce flows.

Why Slow Cooker Brisket Juices Look Thin

Thin brown slow-cooker juices containing softened onions and visible fat droplets being poured from a ladle into a wide saucepan.
A wide saucepan concentrates thin cooker juices faster than a narrow pot because more liquid is exposed to evaporation.

Remove the Fat and Choose the Texture

Let the liquid settle briefly, then spoon away the glossy fat or use a separator. A point cut or heavily capped brisket may need more attention than a lean flat. When the brisket is cooked a day ahead, the chilled fat lifts away especially cleanly.

Keep the softened onions for rustic gravy, blend them into the liquid with an immersion blender for a smooth sauce, or strain them out for a clearer finish.

Reduce Before You Thicken

Pour the liquid into a wide saucepan and simmer uncovered. At first it may taste savory but diluted. Start tasting after about 10 minutes. As the beef and onion flavors concentrate, the bubbles turn slower and glossier. The spoon also begins leaving a brief trail across the pan.

Stop when the gravy tastes deeply beefy and onion-rich, even if it looks slightly thinner than you want. Mix 1 tablespoon cornstarch with 1 tablespoon cold water, whisk it in gradually, and simmer for 1–2 minutes. If it remains too thin, mix another tablespoon of cornstarch with another tablespoon of cold water and add only as much as needed. The finished gravy should coat the back of a spoon and fall in a broad ribbon.

Onion gravy reducing in a wide pan with glossy bubbles, a temporary spoon trail and a small bowl of cornstarch slurry nearby.
Let a spoonful cool for a moment before the final tasting. Very hot gravy can hide salt and acidity and tempt you to over-adjust it.

What Finished Onion Gravy Should Look Like

Deep brown onion gravy pouring in a broad glossy ribbon onto one slice of brisket while the other slices remain mostly uncovered.
Gravy thickens as it cools, so stop while it looks a little looser than you want at the table.

Balance the Finished Gravy

If the gravy tastes…Try this
Flat or heavyAdd 1 teaspoon red wine vinegar, taste, then add more only if needed. It should lift the richness without tasting vinegary.
Not savory enoughAdd a small splash of Worcestershire or a pinch of salt.
Overly saltyStop reducing and dilute with unsalted stock or water.
Too sweetAdd acidity and a little additional stock.
Harsh or sharpAdd more stock or a very small pinch of brown sugar.
GreasySeparate more fat before making any other adjustment.
Rich but too thinAdd more slurry gradually.
Overly thickWhisk in warm stock a little at a time.
Not enough gravyAdd warm unsalted stock, simmer briefly to integrate it, and taste again before serving.

Slow Cooker Brisket Troubleshooting

Most brisket problems fall into two groups: the meat needs more time, or the cooking liquid needs finishing. Even an over-soft brisket can become an excellent pull-apart dinner.

Brisket Rescue at a Glance

Four-part brisket rescue guide pairing still-tough meat, dry slices, falling-apart brisket and prematurely sliced meat with different corrective actions.
Check tenderness and moisture separately. Moist but resistant brisket needs more heat; soft, cottony meat needs gravy, not more cooking.

My Brisket Is Still Tough

If your brisket still feels moist but the probe pushes back, nothing has gone wrong. Keep it whole, replace the lid, and cook for another 30–45 minutes. Test the thickest center, not a soft edge or a seam of fat.

If the brisket has just been sliced and is still hot, arrange the slices snugly in a covered baking dish with hot gravy or cooking liquid. Continue cooking gently at 300°F (150°C) and check every 20–30 minutes. For refrigerated brisket, use the reheating guidance below instead.

My Brisket Is Dry

Dryness can come from a very lean flat, cooking past the ideal window, or reheating uncovered. Beef can overcook even while surrounded by liquid because the muscle fibers still tighten and release their own moisture.

Spoon generous gravy over the slices or chop the meat and fold it into the sauce. The beef cannot absorb all the lost moisture again, but thicker pieces and plenty of gravy can make a satisfying dinner.

It Fell Apart Before I Could Slice It

If the brisket breaks as you lift it, dinner isn’t lost—it has simply moved from sliceable to pull-apart. Remove any large deposits of fat, shred the beef, and add enough finished gravy to coat the fibers.

When presentation matters, let the meat cool before handling. Chilled brisket firms up, making it easier to portion cleanly than delicate hot meat.

Gravy Troubleshooting at a Glance

Four-part gravy troubleshooting guide pairing watery, greasy, salty and bland onion gravy with reduction, skimming, dilution and flavor balancing.
Concentrate the gravy before seasoning it. Once it is too salty, dilute it—more reduction will only intensify the salt.

The Gravy Is Watery

The liquid may look disappointingly thin when you first open the cooker. That is often normal; it has not been reduced yet. Move it to a wide pan and simmer uncovered until the flavor concentrates, then use a slurry only if it still needs more body.

The Gravy Is Greasy

A point cut, thick fat cap, or heavy internal seams can release more fat than the sauce can comfortably hold. Let the liquid settle and skim it, use a separator, or chill it and remove the hardened layer.

The Gravy Is Too Salty

Reduction intensifies salt from stock, Worcestershire, seasoning mixes, and the beef itself. Stop reducing and add unsalted stock or water. If that makes the gravy too thin, restore its body with a little slurry rather than concentrating the salt again.

The Brisket Tastes Bland

Skipping the sear, using weak stock, beginning with too much liquid, or forgetting to taste before serving can all leave the sauce muted. Reduce it first, then taste for salt, savory depth, and acidity. A little Worcestershire or red wine vinegar can wake it up quickly.

Dinner Timing: Running Late or Finished Early

If dinner is running late and the brisket is fully hot but still tough, switch from LOW to HIGH and check again in 30 minutes.

If it finishes early, remove it from the cooker rather than letting it continue for hours. For a short delay, keep it whole and safely hot at 140°F (60°C) or above, with a little hot cooking liquid.

A long stay on WARM can soften and dry a lean flat. If safe hot holding is not practical, refrigerate the brisket within two hours and reheat the slices in gravy.

Slow Cooker Brisket Variations

Whichever version you make, stop cooking when the brisket reaches the texture you want.

Choose Wine, Ale, or Stock—and Add Balsamic if You Like

Red wine: Use ½ cup (120 ml) dry red wine for deglazing. Cabernet Sauvignon, Merlot, or another dry medium-to-full-bodied red suits the dark onion gravy. Keep the amount restrained so the reduced sauce doesn’t become sharp.

Ale or stout: Replace the wine with ½ cup (120 ml) dark ale or stout. Choose a round, malt-forward beer rather than a heavily bitter one, because bitterness becomes more noticeable as the gravy reduces.

Balsamic: Add 1 tablespoon (15 ml) balsamic vinegar to the braising liquid. Omit the final red wine vinegar unless the reduced gravy still needs brightness.

Red wine, dark ale and beef stock arranged beside onions, mustard, Worcestershire sauce, herbs and a saucepan as alternative brisket braising liquids.
Choose a braising liquid that already tastes balanced. Reduction magnifies bitterness, sweetness and salt along with the flavors you want.

Do You Have to Sear Brisket Before Slow Cooking?

No. Skipping the skillet saves about 25 minutes, although the meat and gravy will have less browned depth. Follow the no-sear method in the recipe notes.

Brisket With Potatoes and Carrots

The most dependable approach is to keep the cooker focused on beef and onions, then prepare the vegetables separately. A tray of roasted carrots can cook while the brisket finishes.

If the cooker has room, add up to 12 oz (340 g) waxy potatoes and 8 oz (225 g) carrots. Cut them into 1½–2 inch (4–5 cm) pieces and add them for the final 2½–3 hours on LOW.

The vegetables will be softer, take up valuable cooker space, and release extra water, so expect a longer gravy reduction.

Split comparison of separately roasted potatoes and carrots with large vegetable pieces being added late around brisket in a slow cooker.
Use waxy potatoes and large pieces in the cooker. Floury potatoes or smaller cuts can soften into the gravy.

How to Make It Pull-Apart

Continue cooking until the fibers separate readily when pressed. Rest the brisket for about 10 minutes, remove any large pockets of fat, then pull it into broad strands. Fold through enough finished gravy to coat the meat without drowning it.

What to Serve With Slow Cooker Brisket

Brisket with gravy wants something soft enough to catch the sauce or crisp enough to balance the richness. Spoon the gravy over the cut face of the beef so it settles between the slices and reaches the potatoes beneath.

Classic Brisket and Gravy Dinner

  • Creamy or fluffy mashed potatoes for catching the onion gravy
  • Roasted or buttered carrots
  • Green beans or peas
  • Buttered cabbage
  • Yorkshire puddings
  • Soft dinner rolls for the remaining gravy

A spoonful of onion gravy, mashed potatoes, and one green vegetable are enough. The brisket brings all the richness the plate needs.

Plate of sliced brisket with onion gravy, mashed potatoes and green vegetables arranged as a complete roast-style dinner.
A mild starch catches the gravy, while a crisp green vegetable keeps the rich brisket from making the whole plate feel heavy.

For an egg-free and dairy-free roast-dinner option, use these eggless Yorkshire puddings without milk.

A Lighter Plate

A classic wedge salad brings cold crunch and sharpness beside the warm beef and gravy, keeping the plate from feeling too soft or heavy.

  • Cauliflower mash
  • Steamed or sautéed greens
  • Crisp cabbage salad
  • Roasted broccoli or Brussels sprouts
  • Green beans finished with lemon

Ways to Use Leftover Brisket

The second meal is one of the rewards of cooking a full brisket.

  • Open-faced brisket sandwiches with hot gravy
  • Brisket and gravy over polenta
  • Baked potatoes filled with chopped brisket
  • Rice bowls with onions and greens
  • Brisket hash with potatoes and eggs

Leftover brisket also works beautifully in rice bowls; use the guide to cooking fluffy rice so the grains stay separate enough to catch the gravy without turning wet or gummy.

Shallow bowl of fluffy white rice topped with tender leftover brisket, brown onion gravy, softened onions and bright green beans.
Rice drinks up sauce quickly. Loosen chilled gravy with a splash of unsalted stock before warming the brisket.

When serving the brisket later—or tomorrow—keep the meat with enough gravy to protect the cut surfaces. The full make-ahead, storage, and reheating guidance follows below.

Make-Ahead, Storage, Freezing, and Reheating

Brisket can be served the day it cooks, but making it a day ahead is often the calmer choice for guests. The fat lifts away cleanly, the chilled meat slices neatly, and reheating it in gravy removes the pressure of timing dinner to the minute.

The Best Make-Ahead Brisket Method

  1. Cook the brisket until tender but still intact.
  2. Transfer it promptly from the hot cooker with enough cooking liquid to keep the surface moist.
  3. If the brisket is especially thick, divide it into two or three large portions, then refrigerate the meat and liquid in shallow covered containers within two hours.
  4. Lift away the solidified fat the following day.
  5. Slice the cold brisket across the grain.
  6. Finish or loosen the gravy as needed.
  7. Reheat the slices gently in the gravy until the center reaches 165°F / 74°C, following one of the methods below.
Four-stage make-ahead brisket sequence showing cooling in a shallow container, lifting chilled fat, slicing cold meat and reheating the slices in gravy.
Cold brisket is easier to portion neatly. Arrange the slices before reheating so the fragile warm meat only needs to be moved once.

If the side dish also needs to be prepared ahead, these garlic mashed potatoes include make-ahead and gentle reheating guidance that fits the same dinner plan.

Refrigerating Leftovers

Refrigerate cooked brisket within two hours and use it within 3–4 days. Keep sliced meat covered with gravy or cooking liquid so the exposed surfaces don’t dry out.

Freezing Brisket

Freeze meal-size portions of sliced or chopped brisket with enough gravy to coat and protect the meat. For the best texture and flavor, use it within about three months.

Thaw frozen brisket in the refrigerator before reheating.

How to Reheat Brisket Without Drying It Out

Whichever method you use, reheat the center to 165°F (74°C). Do not use a slow cooker to warm refrigerated brisket gradually from cold.

Covered oven: Arrange the slices in a baking dish with gravy, cover tightly, and reheat at 325°F (165°C).

Stovetop: Warm the brisket gently in gravy over low heat. Avoid a hard boil, which can break soft slices apart.

Microwave: Place an individual portion in a covered microwave-safe dish with gravy. Heat in short intervals and rearrange the slices as needed.

Frequently Asked Questions

Does Brisket Need to Be Covered With Liquid?

No. The top can remain exposed because the beef and onions release moisture beneath the closed lid. The measured stock carries the browned flavor and becomes the gravy.

How Long Does a 1 kg / 2.2 lb Brisket Take?

A thin flat often takes about 7–8 hours on LOW; check around 6 hours. A 2 lb (900 g) flat may finish sooner when unusually thin, while a rolled joint can take longer.

Can I Cook Brisket on HIGH Instead of LOW?

Yes. For the 3–3½ lb brisket, start testing around 4 hours and expect roughly 4½–6 hours. LOW gives a lean flat a wider tenderness window.

Can Frozen Brisket Go Straight Into a Slow Cooker?

No. Fully thaw it in the refrigerator first; a large frozen center can warm too slowly in a slow cooker.

Do I Leave the String on a Rolled Brisket?

Leave heat-safe butcher’s string on until after resting. Remove plastic, absorbent pads, clips, and non-heat-safe elastic netting before cooking.

Can I Make Slow Cooker Brisket a Day Ahead?

Yes. Chill it with some cooking liquid, remove the hardened fat, slice the meat cold, and reheat it in the finished gravy.

The Brisket Is Ready When It Stops Resisting

Once the probe slides in easily and the brisket holds together, the uncertain part is over. Move it to the board, let it rest, and finish the gravy while the meat settles.

Slice across the grain, spoon the onion gravy over the warm cut face, and bring the rest to the table. The first slice should bend without crumbling.

Was yours a flat, point, or rolled joint—and did it stay sliceable or move toward pulled beef? Share the cut, weight, setting, and approximate cooking time, especially if the result surprised you. Your experience may help the next cook recognize a brisket that looks like theirs.

Posted on Leave a comment

Greek Yogurt Pizza Dough: 2 Easy No-Yeast Versions

Round homemade pizza with tomato sauce, melted cheese, basil leaves and one slice pulled away.

Pizza cravings rarely arrive with two hours of notice.

This Greek yogurt pizza dough is for the night when the sauce, cheese and appetite are ready, but no dough is rising on the counter. Thick Greek yogurt and flour come together in minutes, there is no yeast to activate, and dinner does not need to become an afternoon project.

The crust bakes up soft through the center, lightly chewy at the rim and crisp around the edges. It is not as stretchy or deeply flavored as an overnight yeast dough, but it gives you something that matters more tonight: genuinely good homemade pizza without the wait.

The dough is ready in about 15 minutes, including its short rest. With a heated metal baking sheet, the whole pizza usually reaches the table in about 35–45 minutes. A stone or steel needs a longer head start.

Quick Answer

Mix all-purpose flour with baking powder and salt, then add thick plain Greek yogurt until a soft dough forms. Rest it for five minutes, roll it into an 11–12-inch crust and par-bake at 450°F (230°C) for 5–6 minutes. Add the toppings and bake for another 6–8 minutes, until the cheese bubbles and the base develops golden-brown patches. For the true two-ingredient version, use self-rising flour and begin with slightly less yogurt.

Soft dough. Set crust. Hot bottom. Keep the dough slightly tacky, give the bare crust a short first bake before wet toppings and use a fully heated baking surface.

Greek Yogurt Pizza Dough Recipe

Easy No-Yeast Greek Yogurt Pizza Dough

A soft, lightly chewy pizza crust with crisp edges and enough structure to carry sauce and bubbling cheese—all without yeast or rising time.

Active prep10 minutesDough rest5 minutes
Bake11–14 minutesTable-ready with metal sheetAbout 35–45 minutes
YieldOne 11–12-inch pizzaServes2 as a meal
Oven450°F (230°C)MethodPar-baked crust

Baseline method in this guide: Thick 2% Greek yogurt, the all-purpose flour formula, an 11–12-inch crust and a fully heated heavy metal sheet give the clearest route to a tender middle, crisp edge and browned base.

Choose Your Flour

VersionBest forMain advantage
All-purpose flourThe easiest first batchFull control over the salt and baking powder
Self-rising flourThe shortest ingredient listA true two-ingredient dough

Useful Equipment

Medium mixing bowl, spoon or spatula, rolling pin, heat-rated parchment, heavy metal baking sheet, wide spatula and wire rack.

All-Purpose-Flour Dough

  • 1½ cups all-purpose flour (180 g / 6.3 oz), plus up to 2 tablespoons (20 g / 0.7 oz) if needed
  • 1½ teaspoons baking powder (about 6 g)
  • ½ teaspoon fine salt (about 3 g)
  • ¾ cup plus 1 tablespoon thick plain Greek yogurt (200 g / 7.1 oz), preferably 2%
  • 1 teaspoon olive oil (5 ml), optional

Two-Ingredient Self-Rising Variation

Use this variation instead of the all-purpose ingredient list:

  • 1½ cups self-rising flour (180 g / 6.3 oz)
  • Start with about ⅔ cup plus 1 tablespoon thick plain Greek yogurt (170–180 g / 6–6.3 oz)
  • Add more yogurt a spoonful at a time, up to about ¾ cup plus 1 tablespoon (200 g / 7.1 oz), only until the final dry patches disappear

Do not add separate baking powder or salt. Place the self-rising flour in the bowl and, at Step 3, begin with the lower yogurt amount.

Toppings for One 11–12-Inch Pizza

  • ¼ cup thick pizza sauce or marinara (60 ml)
  • ¾ cup shredded low-moisture mozzarella (80–90 g / 2.8–3.2 oz)
  • Up to ½ cup cooked or well-drained toppings
  • Olive oil, oregano, chili flakes or grated Parmesan for the rim, optional

Make and Rest the Dough

  1. Heat the oven and metal sheet. Place a rack in the lower-middle of the oven. Turn a heavy metal baking sheet upside down and heat it at 450°F (230°C). Use it once the oven is fully heated, or give it another 5–10 minutes for stronger browning.
  2. Mix the dry ingredients. Whisk the all-purpose flour, baking powder and salt in a medium bowl.
  3. Add the yogurt. Stir in about 180 g yogurt and the optional olive oil. Add the remaining yogurt a spoonful at a time, stopping when the last dry patches disappear. For the self-rising variation, begin with 170–180 g and add more only as needed.
  4. Bring the dough together. Mix until a rough dough forms. Turn it onto a lightly floured surface and knead for 45–90 seconds, just until it holds together and looks mostly smooth.
  5. Rest, then assess. Cover the dough for 5 minutes. If it leaves wet paste on your fingers, add flour 1 tablespoon (8–10 g) at a time. If it cracks or refuses to hold together, add yogurt 1 teaspoon (about 5 g) at a time.

Shape and Par-Bake the Crust

  1. Shape the crust. Place the dough on parchment rated for at least 450°F (230°C), or use a lightly floured peel or inverted tray. Roll or press it into an 11–12-inch circle, with a center about ⅛–3/16 inch (3–5 mm) thick and a slightly thicker rim.
  2. Give the bare crust a head start. Pierce the center lightly with a fork, avoiding the rim. Transfer it to the hot surface and bake for 5–6 minutes. It will still look pale; the surface only needs to look dry and firm enough to hold the toppings.

Top, Finish and Cool

  1. Add the toppings. Spread the sauce thinly, leave a visible rim and avoid crowding the center. Add the cheese and any cooked or well-drained toppings.
  2. Finish baking. Bake for another 6–8 minutes, until the cheese bubbles, the rim turns golden and the base develops browned patches. Near the end, the cheese will bubble more actively and the exposed rim will begin to smell toasted.
  3. Cool briefly. Transfer the pizza to a wire rack for 2 minutes before slicing. This lets steam escape so the bottom stays crisp.

What success looks like: Lift an edge with a wide spatula. The base should show golden-brown patches, and the center should lift with the slice instead of folding like wet dough. After cutting, the middle should look set rather than wet or shiny, while remaining tender.

If the cheese is ready before the bottom, move the pizza lower in the oven. Trim exposed parchment and keep it away from the broiler.

Finished Greek yogurt pizza with callouts for golden rim, set center, browned bottom and bubbling cheese.
Time is only a guide; doneness is visual. Look for a golden rim, set center, browned bottom and bubbling cheese before pulling the pizza from the oven.

Using a stone or steel? Heat a pizza steel for 30–45 minutes or a stone for 45–60 minutes. Start it first; either surface needs longer to heat than the dough needs to come together.

Once the basic method makes sense, the sections below will help you adjust for your yogurt, flour, baking surface and toppings without making the dough feel complicated.

Need help before shaping? See how the dough should feel, or skip to baking without a gummy center.

The recipe works best when you keep one simple system in mind: soft dough, a crust that sets before heavy toppings sink in and enough bottom heat for browning.

Instructional guide showing soft dough, set crust and hot bottom cues for Greek yogurt pizza dough.
Think of this crust in three parts: soft dough before baking, a set center after baking and a browned bottom underneath. Dough texture and baking surface both matter.

What Does Greek Yogurt Pizza Dough Taste Like?

The crust has a mild tang, a tender center and a light chew. Rolled to 11–12 inches and baked on a properly heated surface, it develops crisp edges and enough structure to lift as a slice without becoming dry.

The middle bends gently instead of snapping like a cracker. Once the sauce and cheese go on, the yogurt stays quietly in the background and does not make the finished pizza taste sour.

This dough is less stretchy than yeast dough, so rolling or pressing works better than tossing it. For a stretchier crust with deeper fermented flavor, use MasalaMonk’s sourdough pizza dough recipe. The sliced crust below shows the close, tender texture to expect from a quick yogurt dough.

Close-up of a sliced Greek yogurt pizza crust showing a golden edge and tender close-textured crumb.
A compact, tender crumb is normal for a no-yeast yogurt crust; large open bubbles belong to longer-fermented dough.

Choosing the Yogurt and Flour

Thick Greek yogurt supplies the moisture while adding mild tang, richness and protein. Plain 2% yogurt is a practical starting point because it is thick enough to control the dough and rich enough to keep the crust tender.

Whole-milk yogurt often gives the edge a softer, more tender texture. Nonfat yogurt can bake a little firmer, and the optional teaspoon of olive oil helps soften the result.

The yogurt can go straight from the refrigerator into the bowl. A small amount of whey can be stirred back in. If there is a large pool of whey or the yogurt becomes pourable, drain it briefly or measure from the thicker portion. Vanilla, fruit-flavored and sweetened yogurts belong at breakfast, not in this dough.

Check yogurt texture before measuring; a little whey is fine, but pourable yogurt can push the dough too wet.

Comparison of thick Greek yogurt and loose yogurt in bowls for pizza dough texture.
Yogurt thickness changes the dough before kneading begins. Thick Greek yogurt gives structure; loose yogurt needs slower flour adjustments.

All-Purpose or Self-Rising Flour?

All-purpose flour is widely available and lets you control the baking powder and salt. Weighing it gives the most consistent result. When using cups, spoon the flour lightly into the cup and level the top without packing it down.

Self-rising flour gives you the classic two-ingredient version because the leavener and salt are already included. It may need less yogurt. In the UK and Australia, look for self-raising flour; “Greek yoghurt” is simply the regional spelling.

These two routes use the same bowl method, but the all-purpose version controls leavening separately while self-rising flour already includes it.

Ingredient guide showing two Greek yogurt pizza dough routes with flour, yogurt, baking powder, salt and olive oil.
Both routes start with thick Greek yogurt and flour, but they are not measured the same way. Choose the flour first, then build the dough around it.

Bread flour adds chew but may spring back while rolling. Replacing up to half the all-purpose flour with whole wheat produces a heartier crust. Gluten-free blends absorb moisture differently and need a separate, blend-specific ratio.

Why Greek yogurt dough ratios vary: Yogurt brands contain different amounts of whey, cup-measured flour can vary considerably, kitchen humidity can shift hydration slightly, and a thicker 9–10-inch crust needs a different balance from a thin 12-inch crust. Begin with the lower yogurt amount and adjust by feel rather than forcing every brand into one exact cup ratio.

Infographic explaining how yogurt thickness, flour and humidity affect Greek yogurt pizza dough ratios.
Greek yogurt pizza dough is a feel-based dough because yogurt thickness, flour absorbency and humidity all shift the ratio. Use the numbers, then trust the texture.

A practical protein estimate: Depending on the flour and yogurt labels, the untopped all-purpose crust contains approximately 35–45 grams of protein in total. Cut into eight slices, that is roughly 4–6 grams per slice before toppings. The exact number changes with the brands used, so treat it as an estimate.

How the Dough Should Feel and How to Shape It

Once the ingredients are combined, texture matters more than whether the dough looks perfectly smooth.

Mix, Rest and Correct

At first, the bowl may look more like yogurt-coated flour than pizza dough. It will look untidy before it looks promising, and that is normal. Keep folding gently. This rough stage is where it is easiest to add too much flour too early.

Bowl of shaggy Greek yogurt pizza dough with rough clumps, dry flour patches and a spatula.
Shaggy dough is not a mistake. Once it rests, dry patches hydrate and the rough mixture becomes easier to bring together.

Once the rough dough holds together, cover it for five minutes. Rest first, correct second; many sticky-looking batches settle as the flour absorbs moisture.

Before-and-after guide showing rough Greek yogurt pizza dough before resting and smoother dough after five minutes.
The five-minute rest does quiet work: flour absorbs moisture, stickiness drops and the dough becomes easier to shape without extra flour.

Correct the Dough Texture

Dough conditionWhat it meansWhat to do
Soft and slightly tackyIt holds a ball and releases without leaving wet paste.Start shaping.
Wet and smearingIt spreads on the counter or heavily coats your fingers.Add flour 1 tablespoon (8–10 g) at a time.
Dry and crackingThe edges split and the dough breaks instead of bending.Add yogurt 1 teaspoon (about 5 g) at a time.
Three-panel dough texture guide showing soft tacky dough, wet smearing dough and dry cracked dough.
Target texture: soft, cohesive and lightly tacky. Add flour or yogurt only in small amounts when the dough clearly needs it.

Stop while the dough is still a little tacky. Knead only until it holds together; extra flour and extra kneading can make the crust tough.

Hands kneading Greek yogurt pizza dough briefly, followed by a soft dough ball on a floured counter.
Stop when the surface looks mostly smooth but still soft, not tight, dry or floury.

Roll and Shape Without Chasing Perfection

Thickness matters more than achieving a perfect circle. An uneven homemade edge will taste better than a neat round made tough with too much flour.

  • Full batch, 11–12 inches: The most balanced crust, with a tender center and crisp edge.
  • Full batch, 9–10 inches: A softer, breadier crust that may need another minute during the first bake.
  • Half batch, 6½–7 inches: A personal pizza sized for most air-fryer baskets.
Thickness guide showing 9–10 inch, 11–12 inch and 12–13 inch Greek yogurt pizza bases.
Thickness changes the eating experience. A smaller crust stays softer, while an 11–12 inch base gives the best balance of tender middle and crisp edge.

Shape the dough on the parchment, peel or inverted tray you will use to transfer it. If the rolling pin sticks, dust it lightly or roll between two sheets of parchment. A slightly uneven circle is better than a tough, over-floured one.

Greek yogurt pizza dough being rolled on parchment into a slightly uneven circle with a wooden rolling pin.
Parchment makes soft dough easier to move from counter to pan. A slightly uneven circle is better than a perfectly round crust that has been overworked.

Dough feels right? Move on to baking it without a gummy center.

How to Bake It Without a Gummy Center

Give the Bare Crust a Head Start

Give the bare crust five or six minutes first. That small head start keeps the sauce and cheese from sinking into a soft center. The first bake is only to set the crust, so it should still look pale.

Three-stage guide showing raw Greek yogurt pizza dough, pale par-baked crust and finished baked pizza.
Par-baking is supposed to look pale, not finished. Once the crust is set, the second bake can melt the cheese without leaving the center soft.

Do you have to par-bake it? Not always. A thin crust on a fully heated stone or steel with light toppings can bake in one stage. For an 11–12-inch crust on a standard metal sheet—or whenever the toppings carry more moisture—the short first bake is the more reliable route.

Decision guide showing when to par-bake pizza crust and when one-stage baking can work.
Par-bake for reliability when using a metal sheet, a thicker base or wetter toppings. Thin crust with light toppings can bake directly on a very hot stone or steel.

For a one-stage bake, roll the crust to 12–13 inches and bake it for about 10–14 minutes at 450°F (230°C). Use a fully heated surface, add a light layer of toppings and begin checking the base at 10 minutes.

Control Moisture on Top

Sauce should leave a thin, even coating across the dough. A crowded center traps moisture, so cook mushrooms and spinach before using them and drain fresh mozzarella on paper towels for 10–15 minutes.

Pizza prep guide showing thin tomato sauce on crust with cooked mushrooms, drained greens and blotted mozzarella.
A restrained topping layer protects the crust. Spread sauce thinly, cook mushrooms, drain greens and blot fresh mozzarella before baking.

A thick homemade marinara sauce works better here than watery tomato purée.

Give the Bottom Real Heat

A cool tray absorbs heat from the dough and leaves the base pale. A hotter tray will do more for the crust than another handful of flour will ever do for the dough.

Turn a sturdy metal baking sheet upside down and heat it with the oven. A stone or steel needs longer to heat through fully; King Arthur Baking provides additional guidance on preparing pizza baking surfaces.

Three-panel guide comparing an inverted metal baking sheet, pizza stone and pizza steel for baking pizza crust.
The baking surface sets the bottom before moisture can make it gummy. A metal sheet is the easiest route; stone and steel need longer preheating but brown faster.

Parchment makes a soft round easier to move, but heat limits vary. Check the package, trim exposed paper and keep it away from the broiler. Once the crust has set, carefully pull away the parchment and finish directly on the hot surface.

Lift an edge before taking the pizza out. Once the base has distinct golden-brown patches and the slice holds itself, the nervous part is over.

Pizza slice lifted with a spatula to show the browned bottom of a Greek yogurt pizza crust.
The underside tells you what the top cannot. If the slice holds and the base is browned, the crust has set; if it bends or looks pale, the pan needed more heat.

Toppings That Work Best on This Quick Crust

This dough can carry plenty of flavor, but the best combinations add interest without burying the center under a heavy layer. MasalaMonk’s pizza sauce guide covers red, white, pesto, buffalo and barbecue directions.

Four topping variations for Greek yogurt pizza labeled Margherita-style, Garlic Herb, White Pizza and Veggie.
Variations work best when the topping load stays light. Margherita-style, garlic herb, white pizza and veggie versions all need the same rule: flavor first, moisture under control.
  • Margherita-style: Thick marinara, low-moisture mozzarella, oregano and basil after baking.
  • Garlic herb: A thin layer of olive oil or white sauce, mozzarella, garlic, oregano and a little Parmesan.
  • White pizza: Use a restrained layer of ricotta or white sauce with low-moisture mozzarella and keep the center light.
  • Vegetable: Cooked mushrooms, peppers, onion and well-drained spinach.
  • Extra protein: Cooked chicken, turkey pepperoni, tofu or firm paneer with peppers and onion. MasalaMonk’s homemade paneer method produces cubes that stay tender under the cheese.
  • Pesto or buffalo: Use a thin layer and avoid heavy wet toppings in the center.

Air Fryer Greek Yogurt Pizza

The oven gives the most even result, but half the dough makes a good personal pizza in an air fryer. Keep it small enough to check underneath before adding toppings.

  • Half the dough batch
  • 2–3 tablespoons thick pizza sauce
  • 40–50 g (1.4–1.8 oz) low-moisture mozzarella
  • A small handful of cooked or well-drained toppings
  1. Preheat the air fryer to 375°F (190°C) when your model recommends preheating.
  2. Roll the dough into a 6½–7-inch circle, or slightly smaller than the basket, and dock the center lightly with a fork.
  3. Transfer it to the basket, using suitable perforated parchment when needed.
  4. Air fry the bare crust for 6–8 minutes, until the surface looks dry and set.
  5. Check underneath. If the base is still pale, flip the crust and cook for another 1–2 minutes.
  6. Turn it upright, add the toppings and cook for another 5–7 minutes.
Small Greek yogurt personal pizza in an air fryer basket with parchment underneath and light toppings.
Air fryer pizza works best in personal size. Because the basket is small and heat moves fast, keep the base thin, toppings light and check early.

The first air fryer pizza is partly a conversation with your machine. Some baskets brown underneath quickly, while others need the flip. The center should feel set and the base should show visible color before it comes out.

Never preheat loose parchment by itself. It can lift toward the heating element unless the dough is holding it down.

Greek Yogurt Pizza Dough Troubleshooting

Most batches need no rescue. When something does go wrong, the problem usually traces back to hydration, thickness, bottom heat or topping moisture. The visual below groups those causes before the table gets specific.

Four-panel troubleshooting guide showing gummy center, pale bottom, tough crust and wet toppings on pizza.
Most crust problems trace back to four causes: hydration, thickness, bottom heat or topping moisture. Fix the cause and the next pizza improves fast.
ProblemLikely cause and fix
The dough is extremely stickyThe yogurt may be loose or too much was added. Rest the dough, then work in extra flour a spoonful at a time.
The dough is dry and crackingThere is too much flour or the yogurt is exceptionally thick. Work in yogurt 1 teaspoon at a time.
The dough tears while rollingIt may be too dry or too tight. Cover it and leave it for 5–10 minutes before rolling again.
The dough springs backThis happens more often with bread flour. Let the dough relax before widening it again.
The crust is toughToo much flour or kneading is the usual cause. Stop while the dough remains slightly tacky.
The center is gummyThe crust is too thick or carrying too much moisture. Roll it wider, drain wet toppings and give the bare crust a head start.
The bottom is paleThe baking surface needs more heat. Preheat it longer and remove the parchment near the end when possible.
The edge browns before the center cooksRoll the center thinner or extend the first bake. Cover a dark rim loosely with foil while the middle finishes.
The dough barely risesThe baking powder may be old. Replace it and bake the dough soon after mixing.
The air fryer bottom stays rawYour machine heats more strongly from above. Flip the crust during the first cooking stage.

Ready to bake again? Return to the recipe card, or see storage and reheating.

Storage, Freezing and Reheating

Best Make-Ahead Route

This dough is best shaped and baked soon after mixing. If you need a short pause while the oven heats or toppings are prepared, keep the dough covered so it does not dry out. For true make-ahead prep, par-bake the crust, cool it completely and then refrigerate or freeze that base.

Covered Greek yogurt pizza dough and storage notes beside a refrigerator, showing short holding before the more reliable par-baked crust method.
Cover raw dough only for a short pause. For true make-ahead pizza, par-bake the base, cool it completely and store that instead.

Refrigerate leftover pizza within two hours and keep it in an airtight container for 3–4 days. Separate stacked slices with parchment so the cheese does not stick. These timings follow the FoodSafety.gov cold-food storage chart.

How to Reheat It

Leftover Greek yogurt pizza slice lifted from a skillet with a spatula to show a crisp reheated base.
Dry heat brings back the crisp base. Use a skillet or hot oven for the best texture; the microwave is fastest but softer.
  • Air fryer: 350°F (175°C) for 3–5 minutes
  • Oven: 375°F (190°C) for 6–10 minutes
  • Skillet: Warm over medium-low heat, then cover briefly to melt the cheese
  • Microwave: Fast, but the crust will be softer

Store or Freeze the Par-Baked Crust

Par-baked Greek yogurt pizza bases cooling on a rack and stacked with parchment in a freezer bag.
Par-baked bases freeze better than raw flattened dough. Cool them completely, separate with parchment and wrap flat so they are ready to top later.

For shorter storage, cool the par-baked crust completely, wrap it well and refrigerate it for up to two days.

For longer storage, freeze the cooled crust flat. Once firm, wrap it well and keep it frozen for up to two months for the best texture. Add toppings while the crust is frozen or partly thawed, then finish at 450°F (230°C), checking from about 10 minutes.

For freezer mini pizzas, divide the dough into four rounds, par-bake and cool them, then add sauce and cheese before freezing flat. Raw dough is less dependable because the baking powder begins reacting as soon as the yogurt is mixed in.

Frequently Asked Questions

Does the finished crust taste like yogurt?

Only faintly. The plain crust has a mild tang, but sauce, cheese and toppings quickly move that flavor into the background.

Do I have to par-bake Greek yogurt pizza dough?

Not always. A thin crust on a fully heated stone or steel with light toppings can bake in one stage. On a standard metal sheet—or with a thicker crust or wetter toppings—the short first bake gives the center a more reliable structure.

What can I use instead of self-rising flour?

Use the all-purpose version with baking powder and salt. There is no need to prepare a separate homemade self-rising-flour mixture.

Does regular yogurt work?

Regular yogurt is usually looser than Greek yogurt. Drain it until thick, add it gradually and expect to use less.

Will nonfat Greek yogurt make the crust dry?

It can make the edge firmer, but it still works. The optional teaspoon of olive oil helps keep the crust tender.

How far ahead can I prepare the crust?

Cool the par-baked crust completely, then refrigerate it for up to two days or freeze it for up to two months.


The bowl may look messy, the first bake may look pale and the final circle may never resemble a pizzeria’s. None of that matters once the bottom is crisp, the cheese is bubbling and a homemade pizza is on the table while the craving still matters.

When the first slice lifts cleanly and the browned edge gives under the cutter, the rough bowl of yogurt and flour finally feels like pizza.

Which version did you make, and what topping did you reach for when the craving hit?

Posted on Leave a comment

Juicy Air Fryer Chicken Breast Recipe: Time & Temperature Guide

Sliced paprika-garlic air fryer chicken breast served with rice, green vegetables, lemon and herbs on a warm plate.

Air fryer chicken breast should be one of the easiest dinners in your week: quick enough for tonight, versatile enough for tomorrow’s lunch, and simple enough that you don’t need to hover over it.

When it goes well, the paprika-garlic coating is warm, savoury and lightly bronzed. The rested centre stays tender enough to slice cleanly and juicy enough to eat without hiding it beneath a heavy sauce.

When it doesn’t, the narrow end turns dry while the thick centre is still catching up—or the seasoning darkens before the meat is ready. That inconsistency is real. Chicken breasts don’t arrive in one standard size, and air fryers don’t all move heat in exactly the same way.

Start with the chicken, not the timer. Weight gives you the broad cooking window; thickness tells you when to check.

Two breasts can weigh almost the same and still cook differently when one is much thicker through the centre.

Comparison of two raw chicken breasts with similar weights but different centre thicknesses, showing why thickness affects cooking time.
Similar weights can hide very different centre thicknesses — and different first-check times.

Quick Answer: How Long to Air Fry Chicken Breast

Air-fry fresh, boneless, skinless, unbreaded chicken breasts at 375°F / 190°C. For breasts weighing about 7–8 oz / 200–225 g each and evened to roughly ¾ inch / 2 cm thick, begin checking at 9 minutes. Many will finish between 10 and 14 minutes.

Flip once during cooking. Insert an instant-read thermometer sideways into the thickest part and remove each breast when the centre reaches 165°F / 74°C. Rest the chicken for five minutes on a clean plate or board rather than inside the hot basket.

The time range gets you close; the temperature in the centre gives you the final answer.

Which Chicken Are You Cooking?

Match your chicken to the row below before using the timing.

What you haveBest approach
Fresh, whole, boneless and unbreaded breastUse the recipe and timing chart below
Thin-sliced breast or chicken cutletUse the thin-cutlet row and check the centre much earlier
Raw frozen chicken breastChoose a method written specifically for frozen chicken
Chicken tenderloinsUse these shorter air-fryer tenderloin directions
Breaded breast or cutletsChoose a method designed for breading and oil spray
Stuffed or bone-in breastChoose instructions designed for that form

Using fresh, whole, boneless chicken breast? Go straight to the recipe card. Cooking a thinner or thicker piece? Check the timing chart first.

Air Fryer Chicken Breast Recipe

Make this version first. The paprika-garlic coating develops golden patches and a savoury edge, while the seasoning is simple enough to work in salads, wraps, pasta, sandwiches and meal-prep bowls.

Prep time10 minutes
Cook timeAbout 10–14 minutes
Rest time5 minutes
Total timeAbout 25–29 minutes
Servings2 main-dish servings or 4 smaller meal-prep portions
SettingAir Fry or equivalent Air Crisp setting
Temperature375°F / 190°C
Safe internal temperature165°F / 74°C
EquipmentAir fryer, instant-read thermometer, tongs, and a meat mallet, rolling pin or small heavy pan

Ingredients

  • 2 boneless, skinless chicken breasts, about 14–16 oz / 400–450 g total
  • 2 teaspoons / 10 ml olive oil or avocado oil
  • Fine salt, ¾ teaspoon, roughly 4–4.5 g depending on crystal size
  • Paprika, 1 teaspoon
  • Garlic powder, ¾ teaspoon
  • Onion powder, ½ teaspoon
  • Dried oregano or Italian seasoning, ½ teaspoon
  • Ground black pepper, ¼ teaspoon
  • Pinch of cayenne pepper, optional
Overhead ingredient board with raw chicken breasts, oil, salt, paprika, garlic powder, onion powder, oregano, black pepper and cayenne.
This simple paprika-garlic base adds colour and savoury flavour without turning the dish into a sauced recipe.
Vertical air fryer chicken breast method guide showing 375°F, flip at 6 minutes, first reading at 9 minutes, 165°F endpoint and 5-minute rest.
Use this map as a checkpoint: 375°F / 190°C, flip at 6 minutes, first reading at 9 minutes, finish at 165°F / 74°C and rest off heat.

Instructions

Prepare the chicken

  1. Check the size. The timing below works best for breasts weighing about 7–8 oz / 200–225 g each. Take a noticeably smaller piece out first if it reaches temperature sooner.
  2. Even the thickest section. Place the chicken between two sheets of baking parchment or inside a sturdy food-safe bag. Gently level only the thick central area until each breast is close to ¾ inch / 2 cm thick.
Before-and-after guide showing a raw chicken breast with the thick centre gently flattened while the thin tapered end remains natural.
Level the thick centre only; keep the thin end from getting hammered flat and drying out.
  1. Preheat the air fryer. Select Air Fry, or the equivalent Air Crisp setting, and heat to 375°F / 190°C for about three minutes. Follow the manufacturer’s guidance when it recommends a different preheating routine.
  2. Dry and season. Pat the breasts dry with paper towels and coat them with the oil. Mix the salt, paprika, garlic powder, onion powder, oregano, black pepper and optional cayenne, then season both sides and the thicker edges.
Split comparison of a wet raw chicken breast surface and a dried, seasoned chicken breast surface with better seasoning adhesion.
Dry the surface so the spices cling and the exterior browns more evenly.
Close-up of raw chicken breast with paprika-garlic seasoning on the surface and thick side edge, with labels for light oil and seasoning.
A thin oil film is enough; season the thick edges too, so every slice carries flavour.

Cook, check and rest

  1. Arrange the basket. Place the chicken in one layer with a visible gap between the pieces. Extra basket spray is usually unnecessary when the chicken is lightly oiled and the basket coating is in good condition.
Split air fryer basket comparison showing properly spaced chicken breasts with airflow arrows and crowded chicken breasts touching.
Visible space is part of the method. Crowded chicken steams before it browns.
  1. Cook and flip. Air-fry for six minutes, then turn the chicken gently with tongs. Look for scattered golden patches and the aroma of toasted spices. Do not wait for a dark crust.
  2. Take the first temperature reading. Cook for another three minutes, then insert an instant-read thermometer sideways into the thickest central part.
  3. Finish the chicken. A reading below 165°F / 74°C is useful: you have caught the chicken while there is still room to finish it gently. Continue in one-minute increments and lift out each piece as soon as it reaches temperature.
Tongs turning paprika-seasoned chicken breasts in a black air fryer basket at the flip stage with golden browned patches.
Use colour as a clue, not the final answer. Temperature decides when the chicken is done.
  1. Rest away from the heat. Transfer the chicken to a clean plate or cutting board and rest for five minutes.
  2. Slice across the grain. Cut the rested chicken this way for shorter, more tender pieces.
Cooked air fryer chicken breast resting on a clean board beside an empty basket, with one breast sliced across the grain.
Rest outside the hot basket, then slice across the grain for shorter, more tender pieces.
Macro close-up of sliced air fryer chicken breast with a moist opaque centre, paprika-garlic crust, lemon and herbs.
The target slice is opaque, moist and gently glossy, not pink, chalky or oily.

Food-safety reminder

Raw-chicken safety: Don’t rinse raw poultry. Wash your hands after handling it, clean any surface it touched, and use clean utensils and a fresh plate for the cooked chicken.

Four-panel raw chicken safety guide showing do not rinse, wash hands, clean surfaces and use a fresh plate for cooked chicken.
Skip rinsing, wash hands, clean surfaces and switch to a fresh plate before cooked chicken comes out.

Recipe Notes

  • Fridge-cold chicken: The breasts can go directly from the refrigerator to preparation. They do not need to reach room temperature.
  • Enhanced chicken: When the package says the meat contains an added solution, reduce the salt and expect it to release more liquid.
  • Optional 30-minute dry brine: Salt the chicken in advance and keep it refrigerated for deeper seasoning. Reduce or omit the salt in the later spice mixture.
Two-branch prep guide showing salted raw chicken for a dry brine and packaged chicken labeled as containing added solution.
Salted chicken can taste more seasoned; enhanced chicken may need less salt and can release more liquid.

Use this visual checklist when your package does not match the fresh, whole, boneless chicken breast method above.

Six-panel guide showing whole fresh breast, thin cutlet, frozen breast, chicken tenderloins, breaded cutlet and stuffed chicken breast.
Match the form before you use the timing; whole breasts, cutlets, tenderloins and frozen pieces need different handling.

Four things make the difference: even the thick end, dry the surface, leave visible gaps and take the first temperature reading early. Together, they help the centre cook through without drying the tapered end.

Air Fryer Chicken Breast Time and Thickness Chart

Start with the row that most closely matches the piece in front of you. Similar-sized breasts are easier to manage together, while extremely large or strongly tapered pieces are better sliced horizontally before cooking.

How to use this timing chart: These ranges are starting points for fresh, boneless, skinless chicken breasts prepared to the thickness shown. The first-reading time is intentionally early because breast shape, basket position and machine style can change the finish time. Use the chart to know when to start checking; use 165°F / 74°C in the thickest centre to know when to stop.

Chicken formIndividual weightPrepared thicknessTiming at 375°F / 190°C
Thin cutlet3–5 oz / 85–140 g⅜–½ inch / 1–1.25 cmFirst reading: 5 minutes; often 6–10 minutes total
Small breast5–6½ oz / 140–185 gAbout ⅝ inch / 1.5–1.6 cmFirst reading: 7 minutes; often 8–11 minutes total
Medium breast6½–8 oz / 185–225 gAbout ¾ inch / 2 cmFirst reading: 9 minutes; often 10–14 minutes total
Large breast8–10 oz / 225–285 g¾–1 inch / 2–2.5 cmFirst reading: 10–11 minutes; often 12–16 minutes total
Very large breastMore than 10 oz / 285 gMore than 1 inch / 2.5 cmButterfly or slice horizontally, then use the row matching the new thickness
Timing chart for air fryer chicken breast at 375°F showing thin cutlet, small, medium and large breast first-reading times and total ranges.
The chart tells you when to take the first reading; the thermometer tells you when to stop.

If your chicken needs another two or three minutes, nothing has gone wrong. The chart tells you when to start looking; it does not force every breast to finish on schedule.

Once you have the timing range, check how to confirm doneness or return to the recipe card.

How to Tell When the Chicken Is Done

Use a thermometer first

Chicken breast is safely cooked when the centre of its thickest part reaches 165°F / 74°C. Insert the thermometer from the side so the sensing tip reaches the middle instead of passing through the meat and touching the basket. Take the first reading before you expect the chicken to be done; a lower number means there is still room to finish it gently.

Instant-read thermometer inserted sideways into the thickest centre of a paprika-garlic chicken breast in an air fryer basket.
Insert from the side so the probe reaches the thickest centre without touching the basket.

The official safe minimum internal temperature guidance lists 165°F / 74°C for poultry, including chicken breast.

If you do not have a thermometer

No thermometer? Cut into the centre of the thickest breast. The meat should be opaque with no glossy, translucent or raw-looking section. Return it to the air fryer in one-minute increments when needed. Visual checks are less dependable, so an instant-read thermometer remains the easiest way to remove the guesswork.

Three-panel chicken breast doneness guide showing translucent centre, moist opaque centre and dry fibrous overcooked centre.
Colour and texture cues help you spot trouble, but 165°F / 74°C in the thickest centre is the decision point.

The first slice should look moist through the centre, with a slight sheen of juice rather than a wet raw appearance or dry, fibrous meat. Once you have seen that fully cooked centre, the next batch becomes much easier to judge.

Chicken breast is leaner and less forgiving than chicken thighs. For a richer cut with a wider timing margin, use this air fryer chicken thighs recipe.

Chicken is cooked and resting? Jump to serving ideas. Still troubleshooting texture? Go to the problem-solving section.

Seasoning Ideas and Marinades

Six air fryer chicken breast seasoning options labeled herby paprika-garlic, lemon pepper, chilli lime, Cajun, smoky barbecue dry rub and garlic Parmesan.
Change the flavour, not the method: thickness, early checks and final temperature still matter.

Bright and fresh

For lemon pepper chicken, replace the paprika and oregano with a lemon-pepper blend, checking first to see how much salt it contains. Finish with fresh lemon after cooking.

For chilli lime, add chilli powder and cumin to the base seasoning, then squeeze lime over the warm slices. A spoonful of salsa also works well when the chicken is headed for tacos or rice bowls.

Prefer browned chicken with a proper lemon-butter pan sauce? Use this lemon pepper chicken recipe.

Smoky and savoury

Cajun seasoning can replace the individual spices, although many blends already contain salt. For smoky barbecue chicken, use smoked paprika and add barbecue sauce only during the final one to two minutes so the sugars do not scorch.

With garlic Parmesan, lean into the garlic powder and add finely grated Parmesan near the end. Cheese left in the basket for the full cooking time can darken before a thick breast is ready.

Marinated chicken

A thin oil-based or yogurt marinade works well. Let the excess drip away so the chicken browns instead of steaming beneath a heavy coating.

Tandoori-inspired chicken can be coated with yogurt, ginger, garlic, chilli, garam masala and salt. Serve it with a bright coriander-mint green chutney.

Tandoori-inspired air fryer chicken breast sliced on a plate with green chutney, red onion, lime wedges and coriander.
Yogurt, spices, chutney, onion and lime give this variation MasalaMonk flavour without fake tandoor char.

Keep acid-heavy marinades relatively short because a long soak in lemon or vinegar can soften the outer texture. Add sticky, sweet marinades closer to the end.

Keep any sauce intended for serving separate from marinade that touched raw poultry. If the same mixture is reused, it must be safely cooked first.

Turn It Into Dinner

Spoon something cool, sharp or creamy over the warm slices—a squeeze of lemon, green chutney, honey mustard or herby chimichurri—and simple chicken immediately feels like a finished dinner.

Eat it tonight

Serve it with fluffy rice, couscous or a tray of crispy ranch roasted potatoes. Add a green vegetable or a crisp salad.

For a quick sauce, finish the plate with lemon, pesto, salsa or a spoonful of homemade honey mustard dressing.

Sliced paprika-garlic air fryer chicken breast served with rice, roasted potatoes, salad, sauces, lemon and herbs.
Rice, potatoes, greens and a small sauce turn the chicken into a complete dinner.

Make tomorrow easier

  • Slice it cold for salads, wraps and sandwiches
  • Cube it for rice or grain bowls
  • Fold it into pesto pasta for an easy second-night dinner
  • Chop it into cheesy chicken broccoli rice, adding the cooked chicken near the end so it warms without drying again
  • Shred it into soup or pack it with vegetables and a separate sauce for lunch
Four-panel lunch board showing air fryer chicken in a salad, grain bowl, wrap and chicken-broccoli rice bowl.
Cook once, then use the leftovers in a salad, grain bowl, wrap or chicken-broccoli rice.

Most cooks can stop after the serving ideas. If your basket, liner or machine behaves differently, use the setup notes below. Storing leftovers? Jump to storage and reheating.

Temperature and Air-Fryer Setup

The main recipe uses 375°F / 190°C because it gives everyday chicken breasts a useful balance of colour, speed and control. Other settings still have their place.

TemperatureBest useTrade-off
350°F / 177°CThicker but reasonably even pieces when gentler browning is preferredSlower cooking with less surface colour
375°F / 190°CEveryday whole or evenly prepared breastsThe best general balance of speed, colour and control
400°F / 204°CThin fillets and faster browningA narrower margin before the edges dry or spices darken
Three-panel comparison of air fryer chicken breast cooked at 350°F, 375°F and 400°F with paler, balanced and darker results.
350°F is gentler, 375°F is the baseline and 400°F / 204°C browns faster; check earlier when cooking hotter.

Save temperatures above 400°F / 204°C for thin pieces or specialised coatings.

Cooking a larger batch in the oven? This baked chicken breast recipe uses the same weight-and-thickness approach.

Preheating, settings and basket capacity

Select Air Fry, or the equivalent Air Crisp setting, and preheat for the published timing. If an oven-style machine has no Air Fry setting, use convection Bake or Roast at 375°F / 190°C as a starting point.

Cook as many breasts as fit in one uncrowded layer. A full basket may need a little longer because several cold pieces pull down the heat at once. Check differently sized breasts separately and remove each one when it is ready.

Parchment, silicone and machine styles

  • Never preheat loose parchment without food holding it down; moving air can lift it toward the heating element.
  • Solid liners reduce airflow beneath the chicken and can leave the underside paler or wetter.
  • Perforated liners preserve more airflow than solid sheets.
  • Compact baskets often colour food quickly, while oven-style models may brown more strongly near the back or upper rack.
Four-panel air fryer airflow guide showing open basket, perforated liner, solid liner and oven-style air fryer with airflow arrows.
Open baskets circulate best; perforated liners breathe, solid liners slow browning, and oven-style models may need rotation.

For help with liners, blocked airflow, smoking and cleanup, see these common air-fryer mistakes and their fixes.

Storage and Reheating

Saving the second breast for tomorrow? Keep it whole when practical; whole chicken generally holds its moisture better than pre-sliced meat. Refrigerate it within two hours—or within one hour when the surrounding temperature is above 90°F / 32°C.

Divide a larger batch between shallow containers so it cools more quickly.

NeedBest approach
RefrigerateStore in an airtight container for 3–4 days
FreezePack airtight, remove excess air and use within about 4 months for the best quality
Reheat one breastAir-fry at 325–350°F / 160–177°C with a light brush of broth or oil
Reheat slicesWarm over low skillet heat with a splash of broth or sauce
Serve without reheatingUse properly refrigerated chicken in salads, wraps and sandwiches
Storage and reheating guide for air fryer chicken breast showing refrigerating, freezing, reheating whole, warming slices with sauce and serving cold.
Store whole when practical, then reheat gently or add moisture to slices to protect texture.

Reheat cooked chicken to 165°F / 74°C. Thin slices heat—and overheat—much faster than a whole breast.

Freezer note: Four months is a quality recommendation. Chicken held continuously at 0°F / −18°C remains safe longer, although its texture will gradually decline.

When you need a larger, hands-off batch rather than the air fryer’s quick small-basket method, these crock pot chicken breast recipes offer several dinner and meal-prep directions.

For detailed cooling, storage and reheating guidance, see the USDA leftovers and food-safety guide.

Back to top ↑

Troubleshooting Dry or Uneven Chicken

The way the chicken failed usually tells you what to change.

Cooking problems

ProblemLikely reasonWhat to change
The chicken is dryIt cooked too long or stayed inside the hot basket after it was readyTake the temperature earlier and transfer it out promptly
The centre is raw but the edges are dryThe breast was too thick or unevenButterfly it or gently even the thick section
The outside is paleThe surface was wet, the basket was crowded or there was very little oilPat the chicken dry and use a thin, even oil coating
The spices burntThe heat was high or the seasoning contained sugar or a large amount of paprikaUse gentler heat or add sweet sauces near the end
The seasoning fell offThe surface was wet or the chicken was turned roughlyDry the surface and flip gently with tongs
The chicken browned unevenlyThe basket was crowded, the chicken was not flipped or the machine has a hot areaLeave more space and turn or rotate once

Timing, reheating and basket problems

ProblemLikely reasonWhat to change
The chicken took much longerIt was thicker, colder, crowded or cooked from a cold startContinue in short increments and note the thickness for next time
One breast finished firstThe pieces differed in weight, thickness or basket positionLift out each piece when it is ready
Liquid collected beneath itThe meat contained added solution, the basket was crowded or the marinade was heavyReduce excess coating and leave more open space
The reheated chicken is rubberyIt was reheated too hot or for too longUse gentler heat, add moisture and stop once it reaches temperature
The air fryer smokedOld grease, excessive oil, loose spice or sugary marinade reached a hot surfaceStop cooking, clean the drawer and apply sweet sauce late
Troubleshooting board for air fryer chicken breast showing dry chicken, raw centre, pale exterior, burnt spices, uneven browning and liquid underneath.
Dry, pale, uneven or watery chicken usually points back to timing, thickness, surface moisture, spacing or added solution.

Cooked correctly but still tough or fibrous? Occasionally, the problem comes from the meat rather than from overcooking. A poultry-quality condition commonly called woody breast can leave some pieces unusually firm even when they reach the correct temperature. Slice the chicken thinly and serve it with a moist sauce or dressing.

How to Rescue Chicken That Is Already Dry

You can’t uncook dry chicken, but you can make it much more enjoyable. Slice it thinly across the grain and add moisture instead of reheating it again as a plain whole breast.

Four-panel rescue board showing dry chicken turned into chicken salad, sauced pasta, a vegetable wrap and a rice bowl with sauce.
Dry chicken is not wasted; chop, sauce, wrap or bowl it instead of reheating it plain.
  • Chop it finely and turn it into a creamy chicken salad sandwich
  • Fold it into pasta with a creamy or tomato sauce
  • Tuck thin slices into a wrap with dressing and crunchy vegetables
  • Warm it briefly in broth, gravy or pan juices
  • Cube it for a rice bowl and add salsa, yogurt sauce or a generous spoonful of homemade chimichurri

Starting over with fresh chicken? Return to the recipe card. Need the timing again? Open the time chart.

Frequently Asked Questions

Do I need to brine chicken breast before air frying?

No. Evening the thick section and taking an early temperature reading matter more for this baseline method. For deeper seasoning, salt the chicken about 30 minutes ahead and keep it refrigerated. A wet brine can also work, but it adds time, and chicken labelled as containing an added solution may already be seasoned.

Do I need to preheat the air fryer?

Preheating gives the published timing a more consistent starting point. You can cook from a cold start, but the chicken may need a little longer. Take the first reading at the usual time rather than automatically adding several minutes.

Do I have to flip air fryer chicken breast?

Flipping is recommended because most basket air fryers colour more strongly from above. The chicken can still cook through without flipping, but the underside may remain paler and the result may be less even.

Can I use this timing for frozen chicken breast?

No. Frozen chicken needs a method designed around a longer cooking window and the way the centre thaws as it cooks. Do not simply add a few minutes to this fresh-chicken recipe.

Can I make air fryer chicken breast without oil?

Yes. Oil is not required for the chicken to cook safely, but the seasoning may cling less evenly and the exterior may remain paler. Pat the surface very dry and press the seasoning on firmly before cooking.


The Takeaway

Start with the chicken, not the timer. Even the thick section and leave space around each breast. Weight gets you into the right range; thickness tells you when to take the first reading. Move each piece out of the hot basket as soon as it is ready.

Then let it rest while you finish the rice, dress the salad or warm the tortillas. Slice it while it is still moist, add the sauce that suits the evening, and keep the second breast for the lunch that will be easier tomorrow.

If you make it, tell us which air fryer you used, how large the breasts were, how long they took and what you served with them. Did the weight-and-thickness chart match your batch? Your experience may help the next person standing over the basket.

Back to top ↑