Posted on — Leave a comment

Chicken Lo Mein Recipe: Easy, Saucy Takeout-Style Noodles

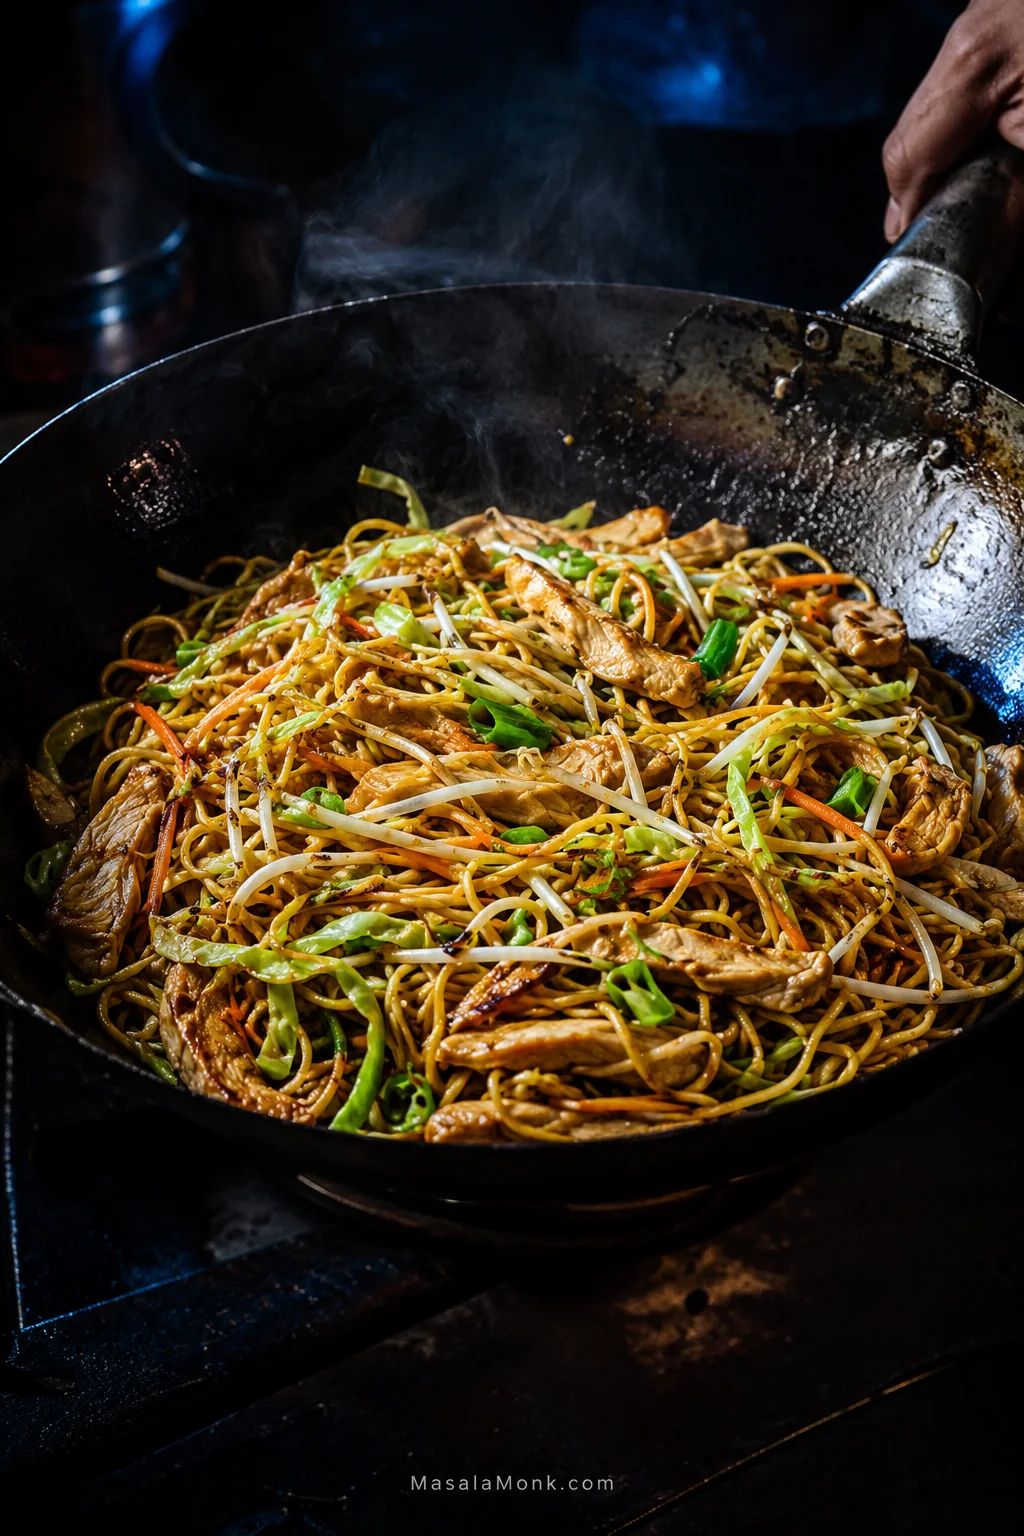
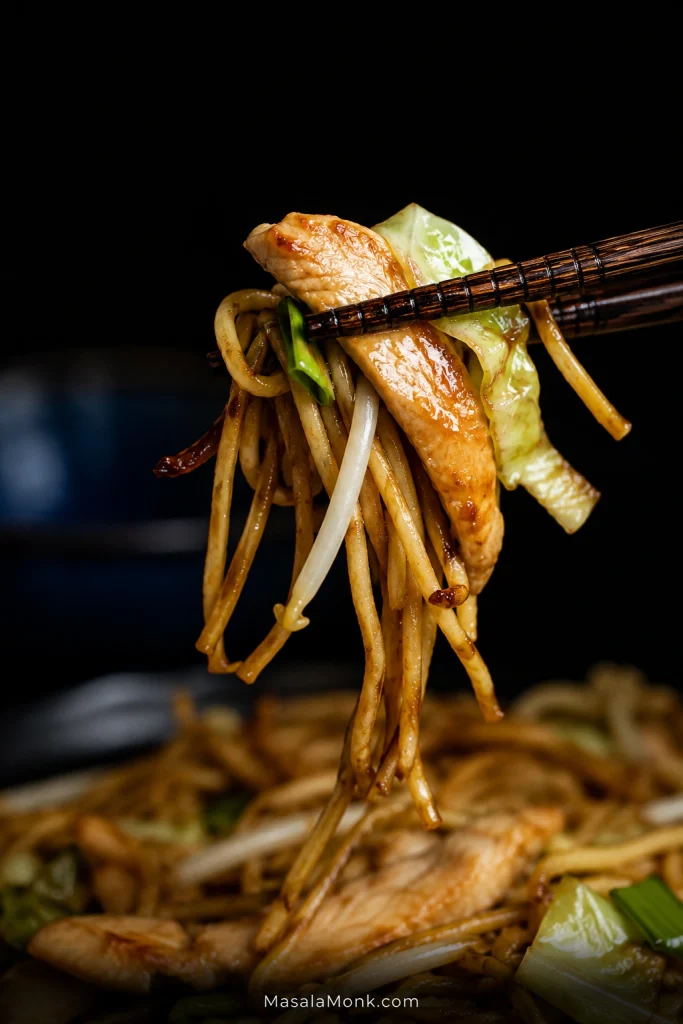
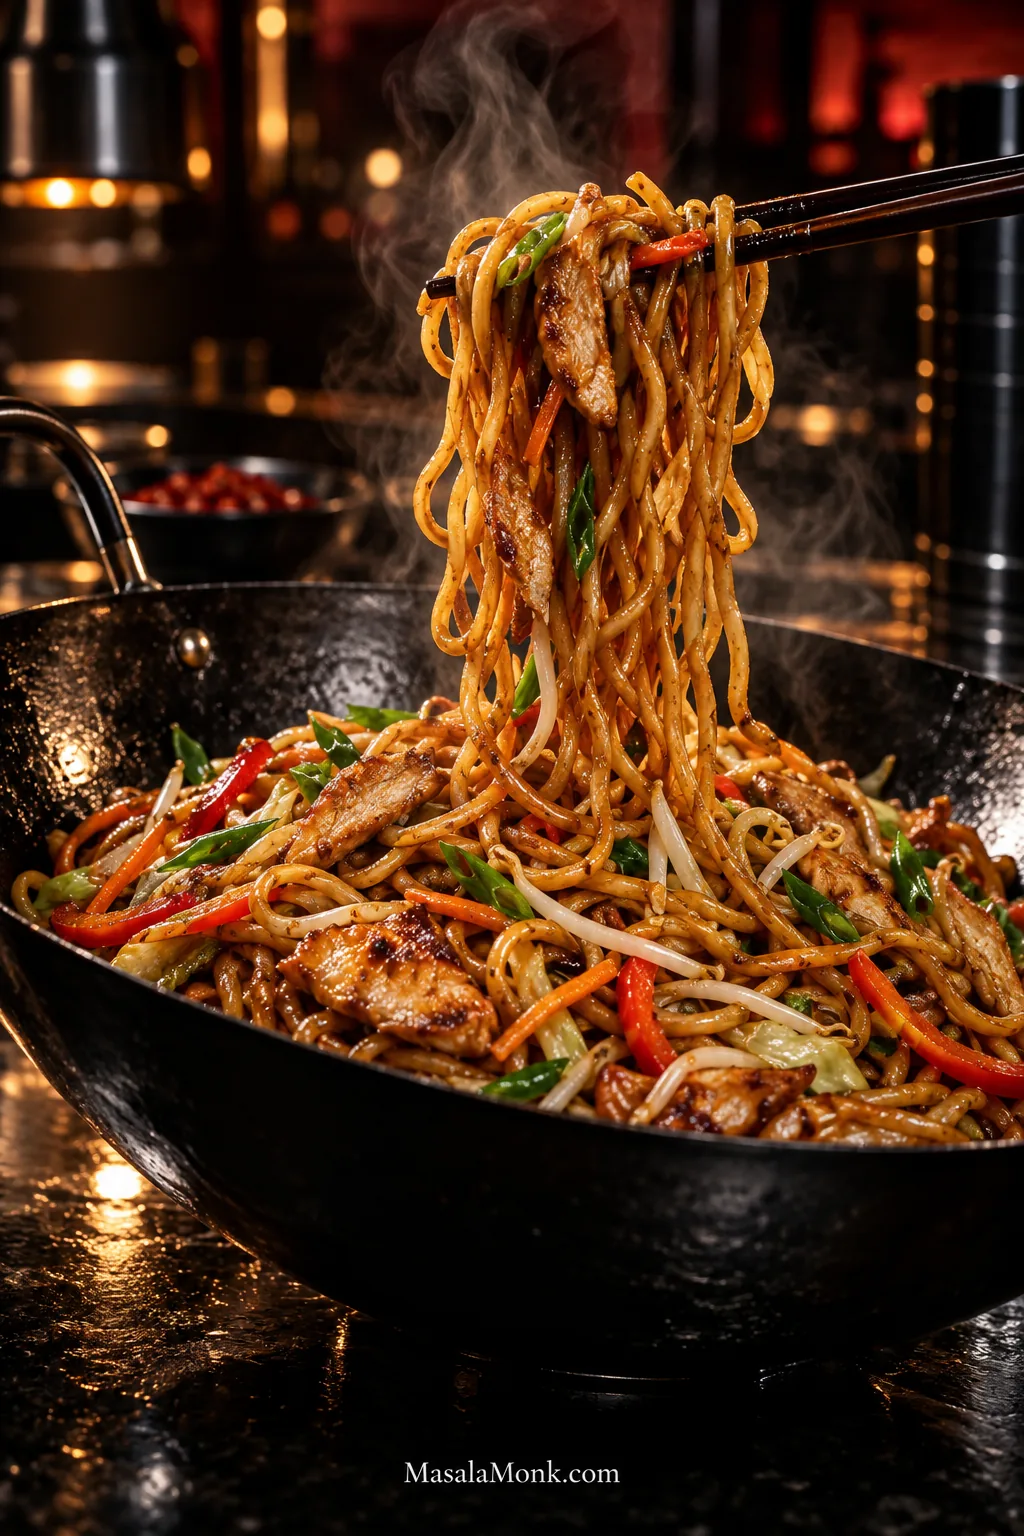
Dark chopsticks lift steaming chicken lo mein noodles from a black wok with thin sliced chicken, red bell pepper, carrots, bean sprouts and scallions.

Lift a tangle of chicken lo mein from the bowl and the strands should separate as they rise, carrying their brown sauce with them instead of dragging up one sticky mass. The noodles bend easily but still push back when you bite, the chicken stays tender, and the vegetables keep enough snap to break up all that soft, slippery noodle texture.

Homemade lo mein can miss that mark in several directions at once. Noodles cooked until completely tender can soften too far during the final toss. Adding regular soy sauce just to make the pan darker can leave dinner overwhelmingly salty. Wet noodles and an overcrowded skillet cool everything down just when the sauce should be tightening around the strands.

This version takes about 30–35 minutes and gives you the saucier Chinese-American takeout-style lo mein many people are trying to recreate at home. A wide skillet works; you do not need a restaurant wok burner. What matters most is the state of the noodles you bought, how much water reaches the pan, and how much sauce you want those strands to carry.

Before You Start

Stop the noodles while they still have some chew, drain them exceptionally well, and do not create a saucier bowl by pouring in extra soy. Those three decisions matter more than owning a wok.

The chicken’s 10–15 minute marinade happens while you cut the vegetables and get the noodle water ready, so it does not add another quarter-hour to dinner. Fresh and dried noodles are not a gram-for-gram swap; the recipe gives separate quantities for each.

Chicken Lo Mein Recipe

The ingredient list looks longer than the actual cooking. Most of it gets mixed or chopped before the skillet is hot; once cooking starts, you are mostly adding prepared things in order.

The base recipe lands in the takeout-saucy middle of the range. Cook it this way the first time. The variations farther down are for anyone who already knows they prefer the noodles more lightly coated or noticeably wetter.

Easy Chicken Lo Mein

Yield4 main-dish servings
PrepAbout 20 minutes
CookAbout 10–12 minutes
TotalAbout 30–35 minutes
Pan13–14 inches / 33–36 cm preferred; a 12-inch / 30-cm skillet is workable but gives you less tossing room

Equipment

  • Wide skillet or wok
  • Pot and colander for the noodles
  • Tongs, chopsticks or two spatulas

For the Chicken

  • 12 oz / 340 g boneless skinless chicken breast or thighs
  • 2 teaspoons / 10 ml low-sodium soy sauce
  • 1 tablespoon / 15 ml Shaoxing wine or dry sherry
  • 2 teaspoons / about 5 g cornstarch
  • 1 tablespoon / 15 ml water
  • 1 teaspoon / 5 ml neutral cooking oil
  • ¼ teaspoon ground white pepper

For the Lo Mein Sauce

  • 2 tablespoons / 30 ml low-sodium soy sauce
  • 2 teaspoons / 10 ml dark soy sauce
  • 2 tablespoons / 30 ml oyster sauce
  • 2 tablespoons / 30 ml Shaoxing wine or dry sherry
  • ¼ cup / 60 ml unsalted or low-sodium chicken stock or water
  • 2 teaspoons / about 8 g sugar
  • 1½ teaspoons / about 4 g cornstarch
  • 1 teaspoon / 5 ml toasted sesame oil
  • ¼ teaspoon ground white pepper
  • ¼ teaspoon MSG, optional

For the Noodles and Vegetables

  • 12 oz / 340 g fresh Chinese lo mein or egg noodles or 7 oz / 200 g dried Chinese wheat or egg noodles
  • 2 tablespoons / 30 ml neutral high-heat cooking oil, divided, plus another teaspoon only if needed
  • 2 cups / about 140 g thinly shredded green or napa cabbage
  • 1 medium carrot, about 3½ oz / 100 g, cut into fine matchsticks
  • 1 medium bell pepper, about 5 oz / 140–150 g, thinly sliced
  • 1 cup / about 3½ oz / 100 g bean sprouts
  • 3 scallions, sliced, white and green parts separated
  • 3 garlic cloves, about 9 g, finely chopped
  • 2 teaspoons / about 4 g finely grated or minced fresh ginger

Set yourself up before the skillet gets hot. Mix the sauce, start the chicken marinating and cut the vegetables first. Prepare and drain the noodles as your final prep job so they spend as little time as possible sitting around warm.
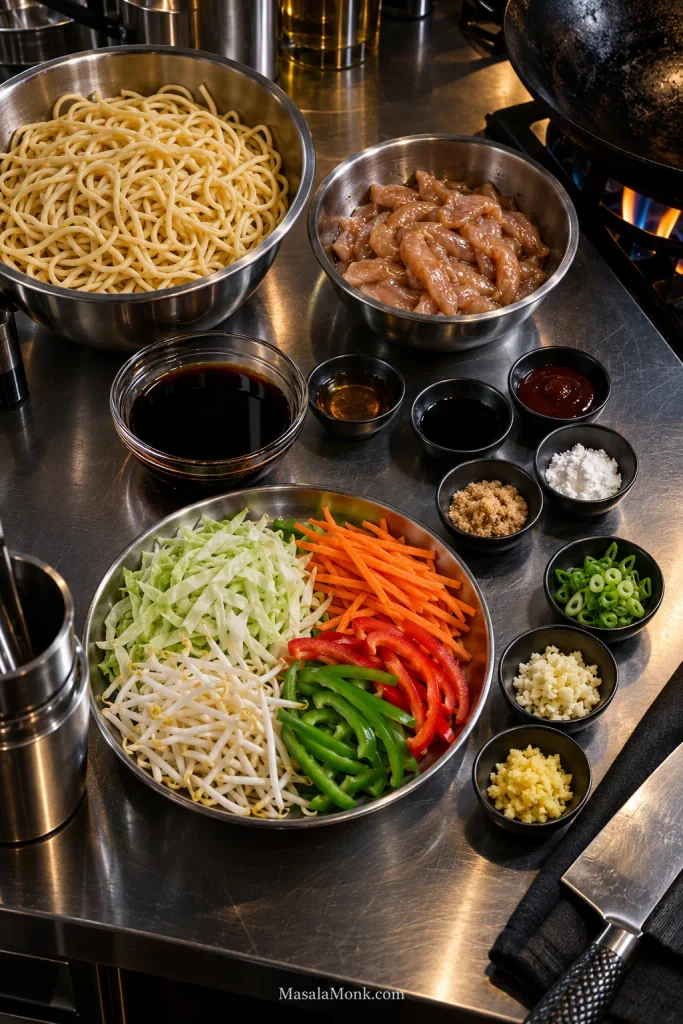
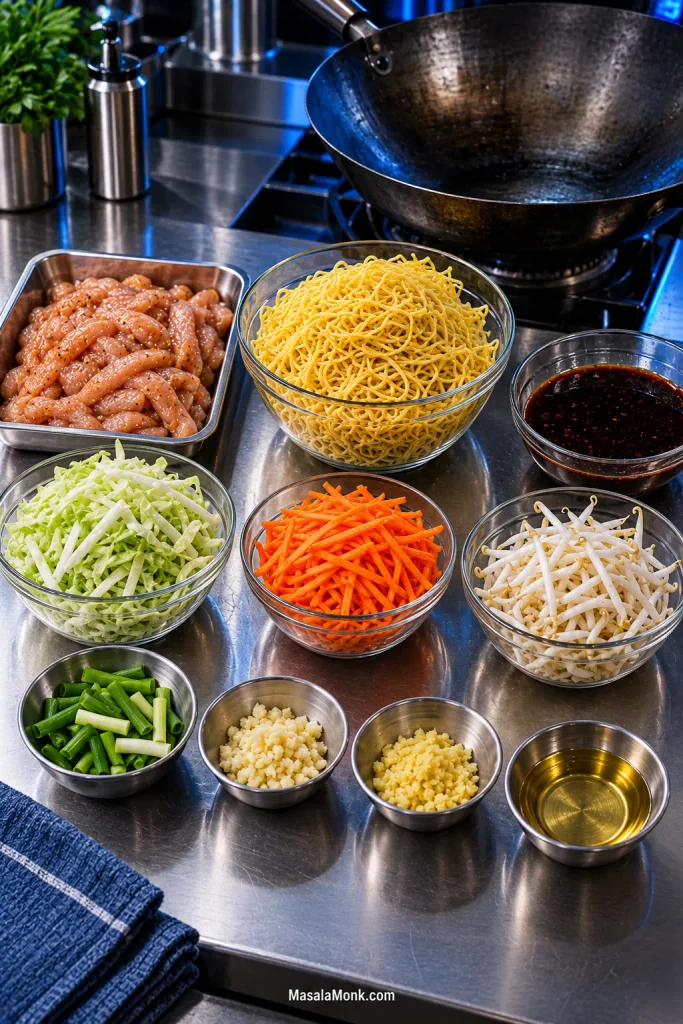
Professional stainless-steel prep station with separate bowls of lo mein noodles, sliced marinated chicken, sauce ingredients, cabbage, carrots, bell pepper, bean sprouts, scallions, garlic and ginger.
For chicken lo mein, group ingredients by when they enter the pan—not just by type. Once cooking starts, that simple setup keeps you moving without stopping to measure, chop or untangle noodles.

How to Make Chicken Lo Mein

1. Mix the Sauce

Whisk together all of the sauce ingredients. Stir again just before using because the cornstarch settles as it sits.

2. Marinate the Chicken

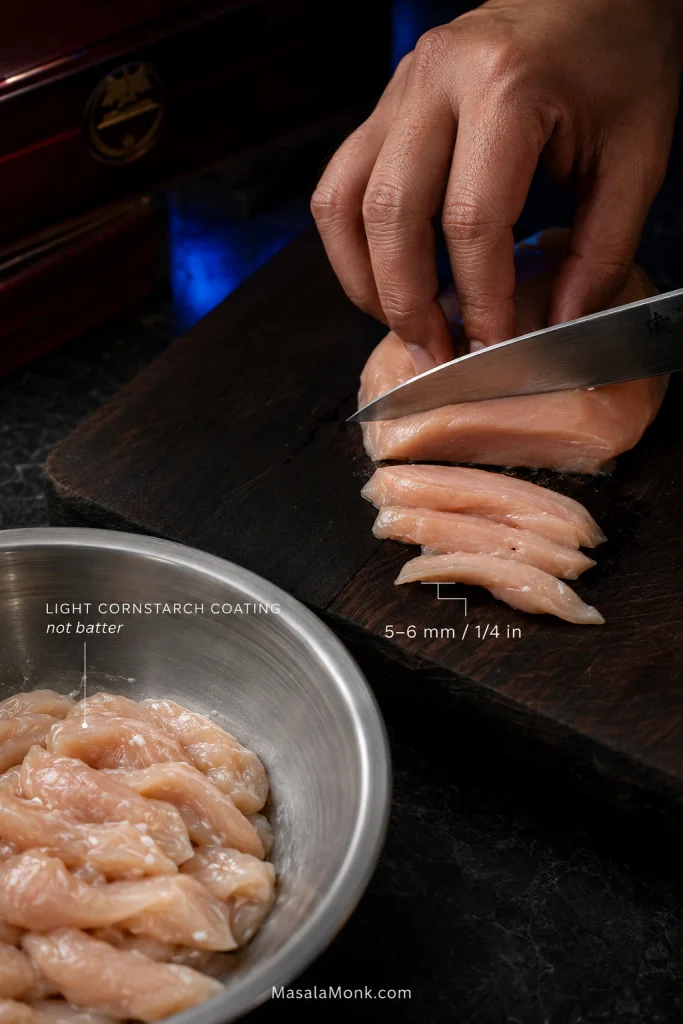
Slice the chicken across the grain about ¼ inch / 6 mm thick. Mix with the soy sauce, Shaoxing wine, cornstarch, water, oil and white pepper. Stir until the pieces look lightly slick and there is no puddle of thin marinade. Rest 10–15 minutes while you prepare the vegetables.

3. Prepare the Vegetables

Shred the cabbage, cut the carrot into fine matchsticks and slice the bell pepper. Keep the bean sprouts and scallion greens aside for the end.

4. Prepare the Noodles Last

Cook dried noodles until just shy of tender. Raw fresh noodles usually need much less time; already cooked or oily noodles may need only loosening or a brief hot-water treatment.

Floury fresh noodles often arrive pressed into a stubborn block. Loosen the bundle gently before boiling, then tease the strands apart as soon as they hit the water.

Drain extremely well and keep the strands loose in the colander. They should be a little firmer than you ultimately want. Move on to the skillet without leaving them packed together while warm.
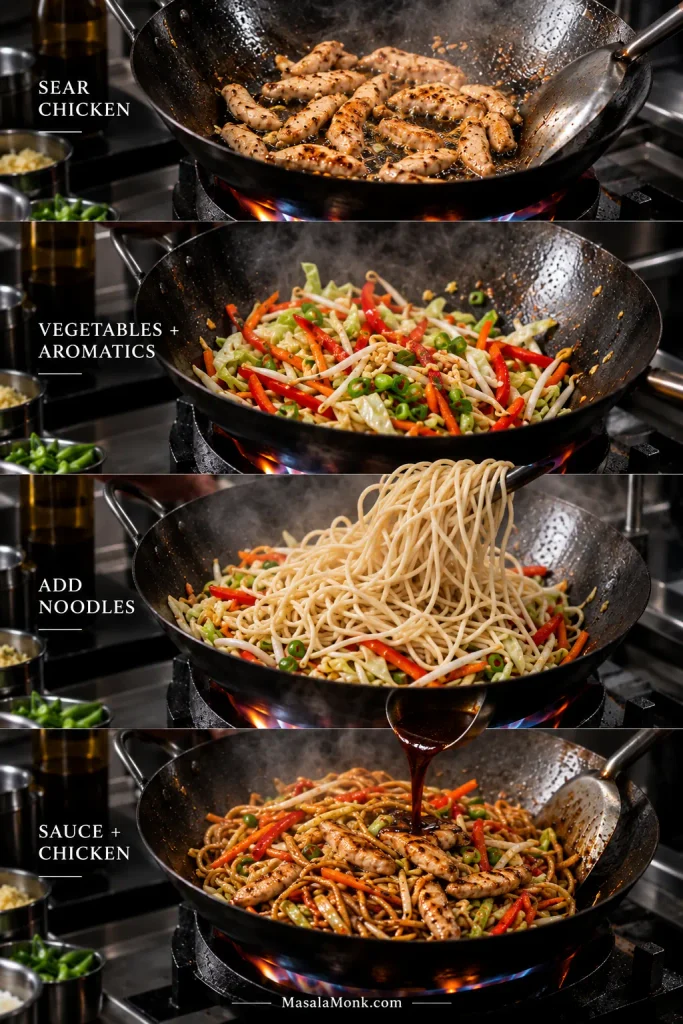
Four-stage wok sequence showing sliced chicken searing, vegetables and aromatics cooking, pale drained noodles being added, then sauce and chicken tossed through the noodles.
Notice that the sauce waits until the drained noodles are already in the pan. Adding it later lets the hot skillet turn thin liquid into a coating instead of making the vegetables and noodles simmer in it.

5. Sear the Chicken

Heat the skillet or wok over medium-high to high heat. Add 1 tablespoon / 15 ml oil. When it shimmers, add the chicken in a loose layer. Let it sit about 30 seconds, then stir-fry another 1½–2 minutes, until mostly opaque with some browning at the edges.

Transfer to a clean plate. Heavy overlap means two quick batches.

6. Cook the Vegetables and Aromatics

Add the remaining tablespoon / 15 ml oil, carrot, bell pepper and cabbage. Stir-fry about 2 minutes. The cabbage should begin to soften while the pepper stays bright and the carrot keeps some bite.

Add the scallion whites, garlic and ginger. Twenty or thirty seconds is enough. The aroma should sharpen almost immediately.

Visible water in the pan needs another moment to cook away.

7. Add the Noodles

Add the drained noodles and toss for about 30 seconds. Lift and turn them so the strands start slipping past one another instead of sitting in one dense mound.

8. Add the Sauce and Return the Chicken

Stir the sauce again, pour it into the pan, and return the chicken. Toss for 1–2 minutes. The noodles should deepen in color and the thin liquid should turn into a coating that moves with the strands.

9. Finish With Bean Sprouts and Scallion Greens

Add the bean sprouts and scallion greens and toss for 30–60 seconds, until heated through while the sprouts retain some crunch. Chicken should reach at least 165°F / 74°C; see the USDA safe minimum temperature chart for food-safety guidance.

Bean sprout safety: for anyone at higher risk of serious foodborne illness, cook the sprouts thoroughly until steaming hot or leave them out instead of serving them lightly cooked.

10. Taste, Then Stop When the Sauce Coats

Taste a noodle before changing anything. Flat flavor needs a little more seasoning; start with low-sodium soy a teaspoon at a time. A sauce that tastes good but feels too concentrated needs liquid instead—add 1 tablespoon / 15 ml stock or water.

Lift a few strands. They should separate easily and still push back a little when you bite. Drag a spatula through the bottom of the pan: a little sauce may slowly creep back into the gap, but watery liquid should not flood it.
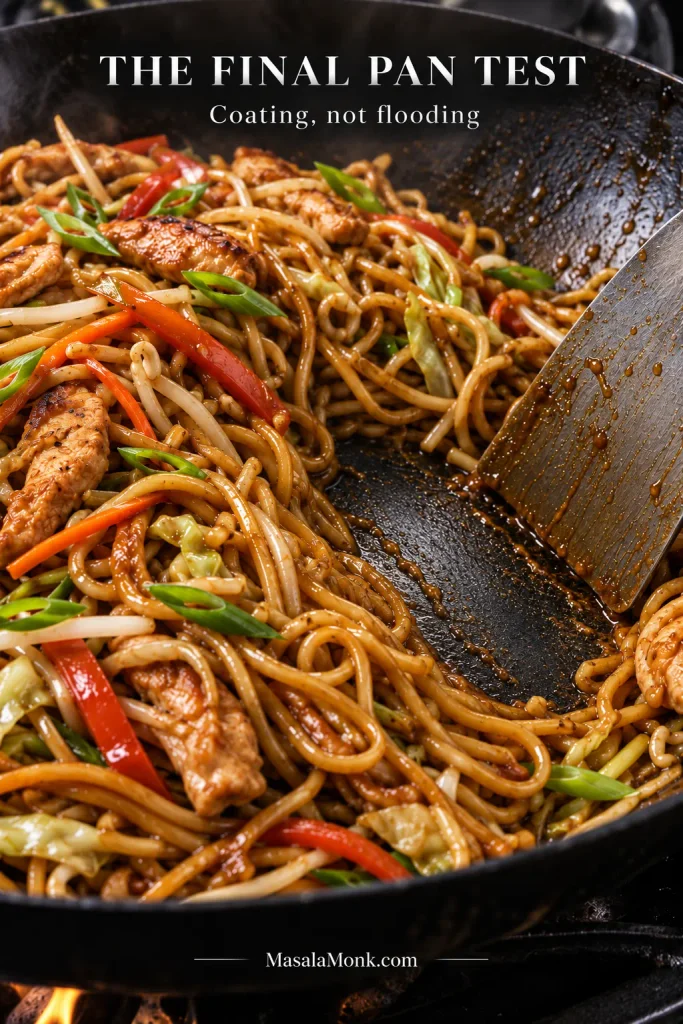
Close-up of chicken lo mein in a dark wok with a metal spatula clearing a channel through the noodles and exposing a thin layer of glossy sauce on the pan.
Judge the speed of the sauce, not its color. A channel that closes slowly suggests coating; one that floods immediately tells you free liquid is still sitting in the pan.

That’s the finish you’re looking for.

Serve immediately.

Doubling the recipe? Cook two batches unless you have an unusually large pan and powerful burner. A skillet can physically hold all the food and still be too crowded to cook it well.

Chicken Lo Mein or Chicken Chow Mein?

Chicken lo mein is tossed with sauce; chicken chow mein gets more direct frying.

In the Chinese-American takeout context we’re using here, lo mein starts with cooked or softened wheat or egg noodles that are tossed with chicken, vegetables and sauce. The strands stay springy, slippery and sauce-forward.

Chow mein generally gives the noodles more contact with the hot pan, producing a drier, toastier texture that can turn crisp around the edges. The terminology varies across regions and traditions, but that practical difference is useful when deciding which bowl you actually want.
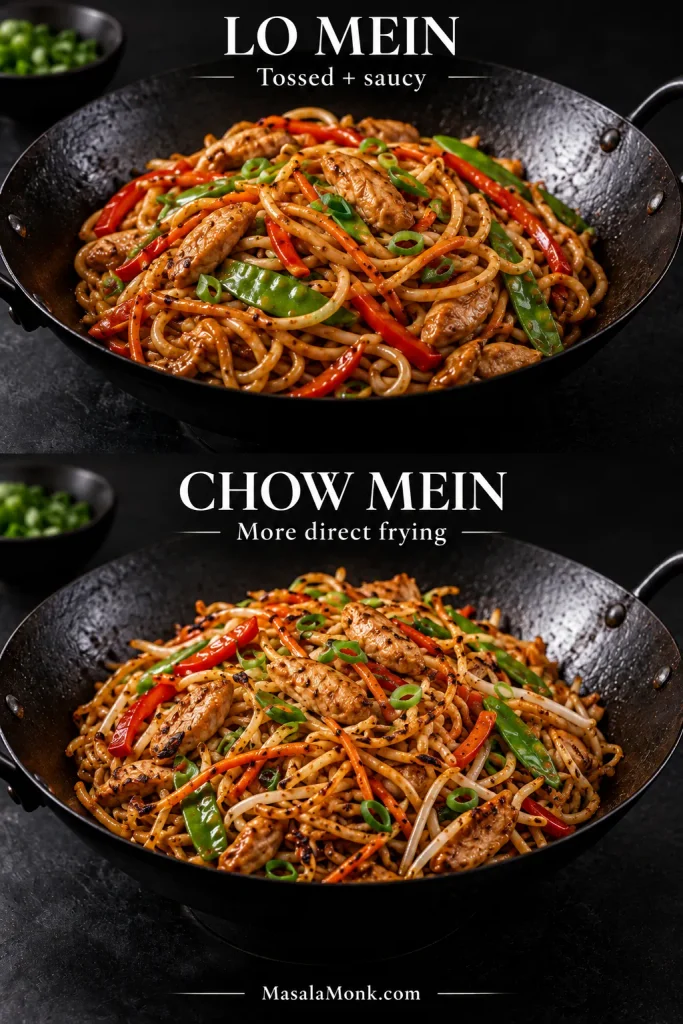
Two matched wok photos compare glossy chicken lo mein with drier chicken chow mein showing more browned and toasted areas on the noodles.
The noodle surface gives another clue in the lo mein vs. chow mein comparison: lo mein looks more uniformly coated, while chow mein tends to show more irregular toasted spots where strands have contacted the hot pan.

For the fried, toastier version, use the Chicken Chow Mein Recipe.

Which Noodles Should You Use for Chicken Lo Mein?

Fresh Chinese wheat or egg noodles are the best fit for takeout-style chicken lo mein. Look for them in the refrigerated or freezer section of an Asian grocery. Dried Chinese wheat or egg noodles are the easiest shelf-stable substitute and work very well.

Noodle packages are frustratingly inconsistent. Some tell you exactly what you’ve bought; others barely tell you whether the noodles are raw.
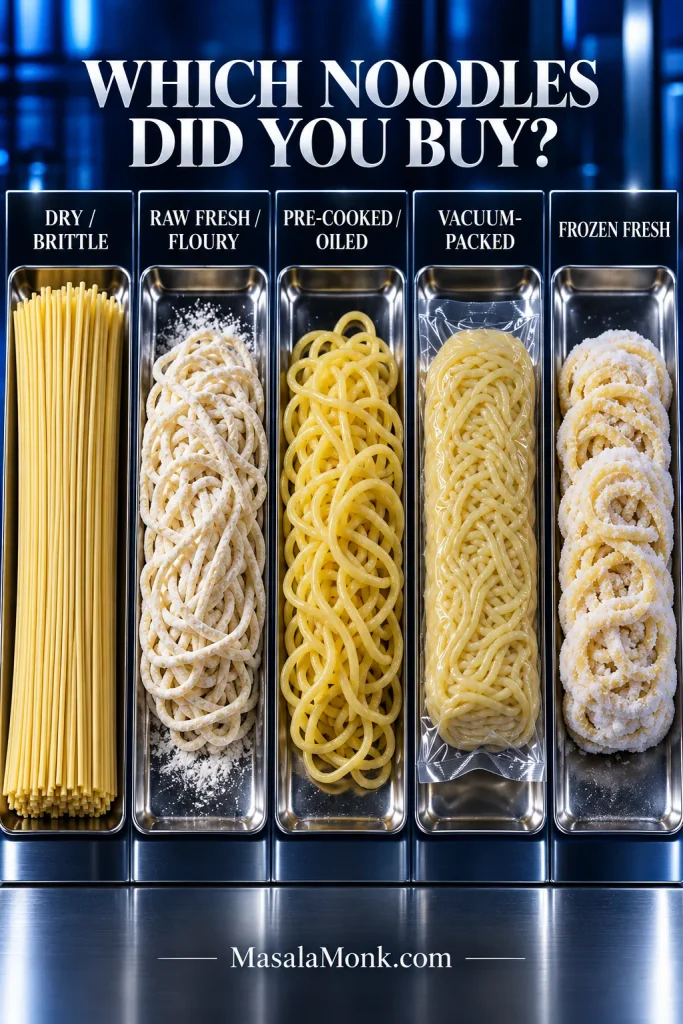
Five noodle types displayed in metal trays and labeled dry and brittle, raw fresh and floury, pre-cooked and oiled, vacuum-packed, and frozen fresh.
When a noodle package tells you very little, check three things first: dry or hydrated, raw or pre-cooked, loose or compressed. Those clues usually tell you more about handling than the product name does.
What you seeWhat you probably haveBest way to handle it
Dry, brittle strandsDried Chinese wheat or egg noodlesBoil until just shy of fully tender
Soft but dusty or flouryRaw fresh noodlesLoosen first; cook briefly and check early
Soft, shiny or lightly oilyPre-cooked or oil noodlesUsually need loosening or a short hot-water treatment
Compressed vacuum-packed noodlesPartially cooked shelf-stable noodlesFollow the package and separate gently
Frozen noodle bundleFrozen fresh noodlesUse the package directions instead of dried-noodle timing

Raw fresh noodles deserve the most attention. A floury, compressed bundle can move from pleasantly chewy to doughy very quickly, so loosen it first and start checking early.

Fresh and Dried Noodles Are Not a Gram-for-Gram Swap

Fresh noodles already contain much more water. For this recipe, use about 12 oz / 340 g fresh noodles or 7 oz / 200 g dried noodles. Using the same dry weight as fresh would produce far more cooked noodle than this sauce and pan are designed to handle.
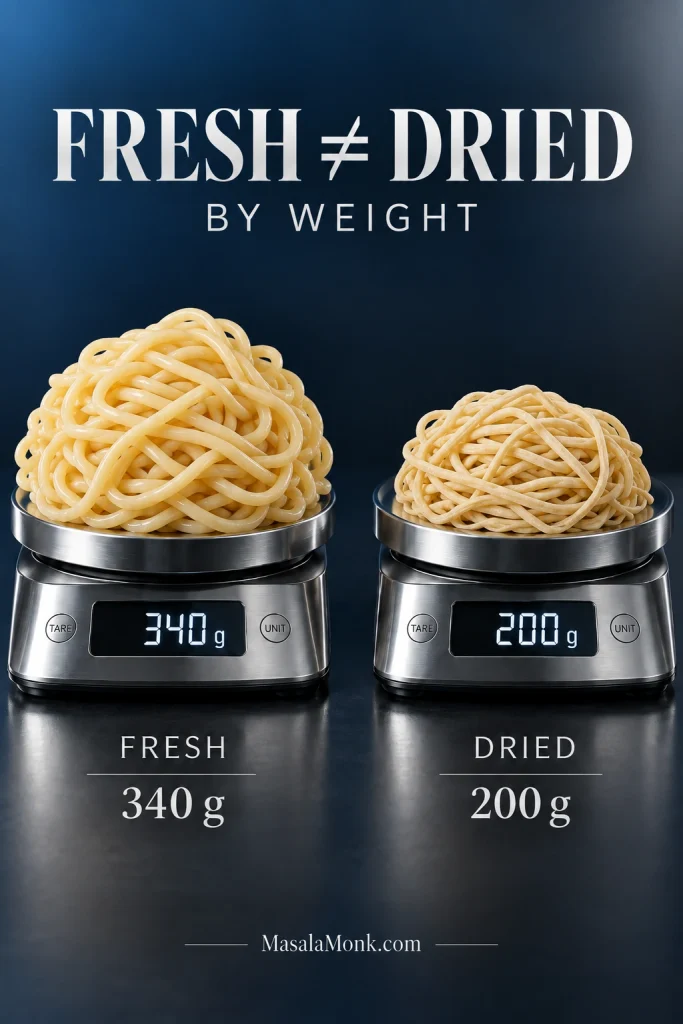
Fresh lo mein noodles weighing 340 grams and dried noodles weighing 200 grams on matching stainless-steel digital scales.
Treat 340 g fresh and 200 g dried as two separate starting points, not a conversion formula. Once either noodle is cooking, texture—not the number on the packet—still decides when it leaves the water.

Thin or Thick Lo Mein Noodles?

There is no single correct width. Medium Chinese wheat or egg noodles are an easy takeout-style choice. Thin strands soften quickly; thicker noodles need longer and can carry a little more sauce.

Cook the noodle in front of you.

No Lo Mein Noodles? Use What You Can Find

NoodleHow well it worksWhat to expect
Fresh Chinese wheat or egg noodlesBest fitSpringy, chewy and closest to familiar takeout texture
Dried Chinese wheat or egg noodlesExcellentFirm, dependable and easy to store
Yakisoba or Hokkien-style noodlesVery goodConvenient; check whether they are already cooked
RamenGoodUsually thinner and springier; discard the seasoning packet
Spaghetti or linguineUseful supermarket fallbackDifferent chew but still makes a satisfying lo mein-style dinner
Rice noodlesPossibleThe sauce works, but the finished texture is distinctly different

Spaghetti is a perfectly sensible supermarket fallback when that’s what you can actually buy. The chew is different, but cooking it firm and finishing it in the skillet gets you much closer than abandoning dinner because the specialty noodles aren’t there.

For another noodle dinner built around flexibility, Peanut Noodles can work with spaghetti, ramen, udon and several other noodles.

What the Noodles Should Feel Like Before the Skillet

Forget another universal minute count. Bite one strand.

Too firm: the middle still feels chalky or distinctly raw.

Ready: the noodle bends easily and is already edible, but the center has some chew left. Drain it here.

Too soft: there is almost no resistance left before the noodle even reaches the skillet.
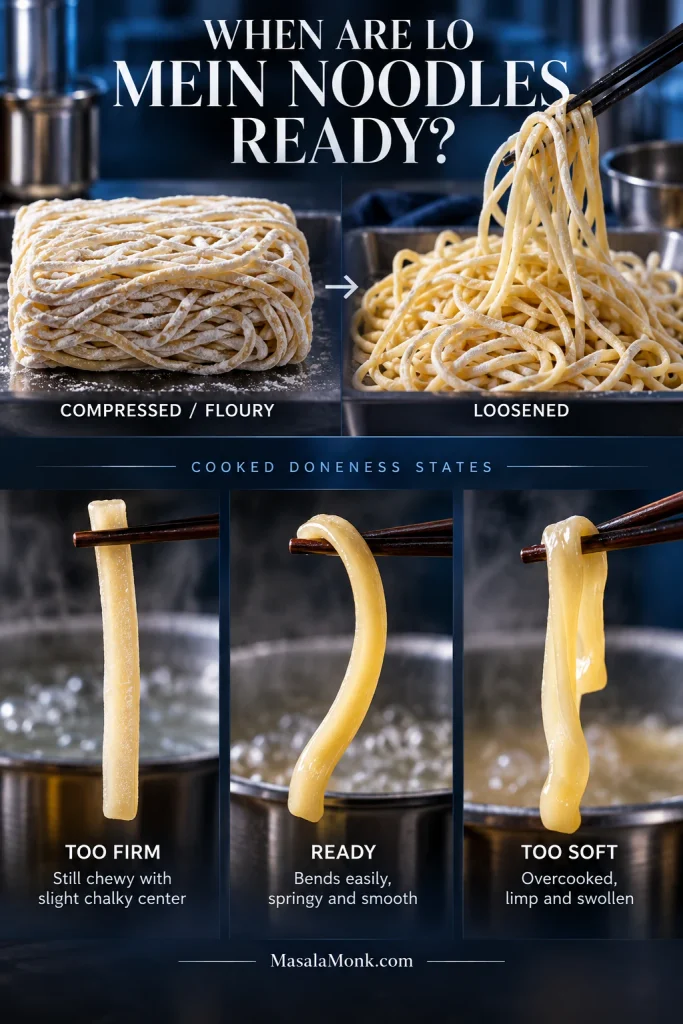
Fresh noodle guide showing a compressed floury noodle block, loosened strands, and cooked noodles labeled too firm, ready and too soft.
Drain at the ready stage because the skillet is part of the cooking process too. A noodle that feels perfectly soft in the pot has little room left for the final toss with hot sauce.

Shake the colander firmly. Water dripping freely from the noodles is water that would otherwise land in the skillet and thin the sauce.
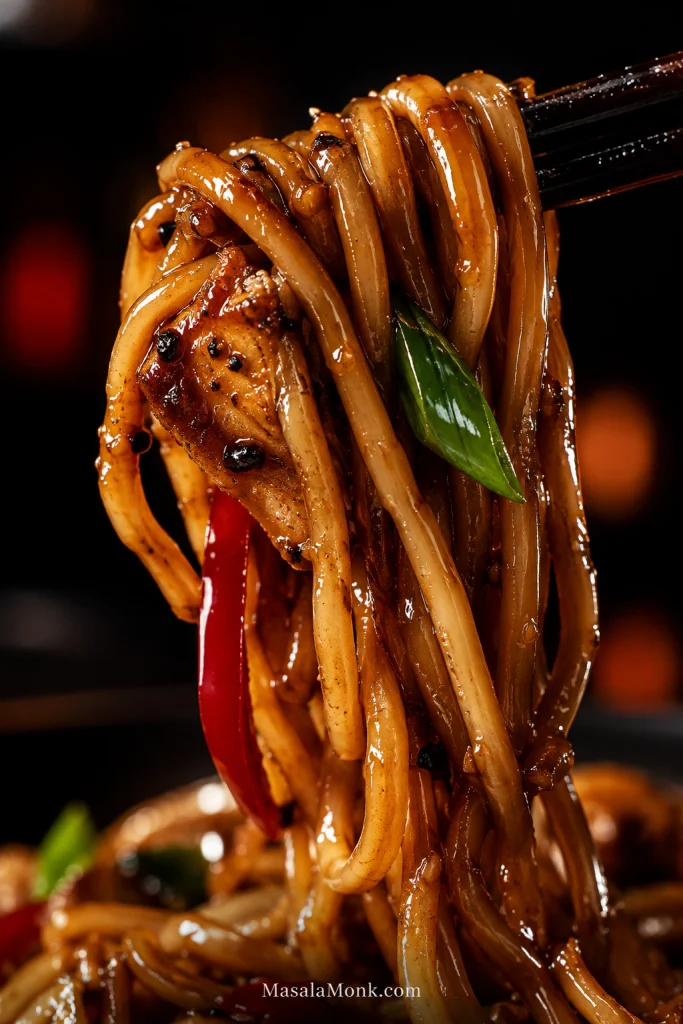
Extreme close-up of glossy brown-sauced lo mein noodles lifted with dark chopsticks beside a browned chicken slice, red pepper and scallion.

Chicken Lo Mein Sauce: How Saucy Do You Want It?

Chicken lo mein sauce is a savory brown sauce built from soy sauce, oyster sauce, Shaoxing wine, stock and sesame oil; dark soy deepens the color while cornstarch helps the sauce stay on the noodles.

Some people want the noodles lightly coated with almost nothing underneath. Others want the last forkful dragging a little sauce up from the bottom of the bowl.
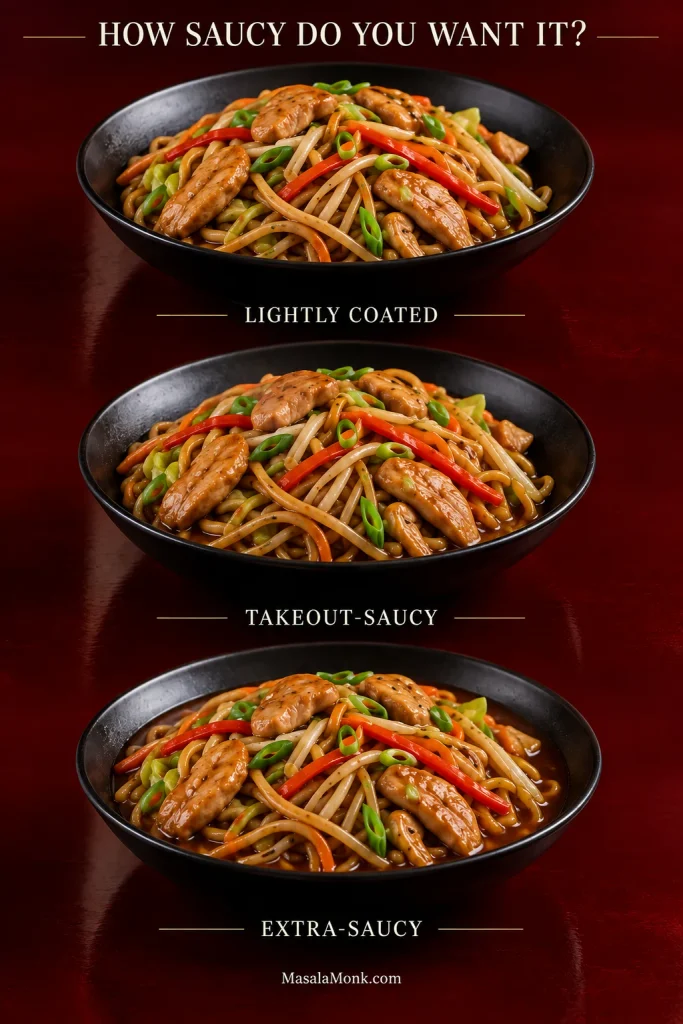
Three matching black bowls compare lightly coated, takeout-saucy and extra-saucy chicken lo mein against a dark red background.
A saucier chicken lo mein needs more volume, not simply more seasoning. Stock, oyster sauce and a little extra body can increase the coating while keeping soy from doing all the work.
StyleWhat it looks likeAdjustment
Lightly CoatedEvery strand coated; almost no loose sauceUse 2 tbsp / 30 ml stock instead of ¼ cup / 60 ml and reduce sauce cornstarch to 1 tsp
Takeout-SaucyGenerous coating with a little sauce moving between the noodlesUse the recipe exactly as written
Extra-SaucyNoticeably wetter but still clearly a noodle dishAdd the extra-sauce mixture below

For Extra-Saucy Lo Mein

  • ¼ cup / 60 ml additional unsalted or low-sodium chicken stock or water
  • 1 tablespoon / 15 ml additional oyster sauce
  • 1 teaspoon / 5 ml additional low-sodium soy sauce
  • ½ teaspoon / about 1.5 g additional cornstarch

This gives you more sauce without simply doubling the concentrated seasonings. A loose-looking pan often needs another 20–30 seconds of heat before it needs more starch.

What Actually Changes the Sauce

Stock is the easiest lever for sauce volume: more makes the noodles wetter, less gives you a tighter coating. Cornstarch controls how readily that liquid clings once it gets hot. Toasted sesame oil is there for fragrance, so adding more will not make the sauce richer in the same way that oyster sauce or stock will.

Hoisin isn’t required in this version. Some takeout-style recipes use it for extra sweetness and body. Oyster sauce plus a little sugar keeps this one more savory.

For other combinations of meat, tofu and vegetables, the Stir Fry Sauce Recipe goes further into adjusting sauce around whatever is actually in the pan.

Keep the Salt and Color in Balance

Don’t sacrifice a properly seasoned bowl just to make it browner. A small amount of dark soy gives the noodles much deeper color, so regular soy does not need to carry that job.

Light soy does not mean low-sodium soy. In Chinese cooking, “light soy sauce” generally distinguishes the thinner everyday seasoning soy from dark soy; it does not mean reduced sodium. A full-sodium Chinese light soy may need a smaller starting quantity than the low-sodium soy used here. This guide to Chinese soy sauces is useful when the labels in the store are confusing.

Shaoxing cooking wine deserves a label check too because some bottles contain added salt. Leave the noodle water unsalted or only very lightly salted; plenty of seasoning arrives later.

About MSG: the ¼ teaspoon in the recipe is optional. A small amount can deepen the savory flavor without requiring another splash of soy sauce.

Keep the Chicken Tender While the Noodles Finish

Thin slicing, a short cornstarch marinade and removing the chicken before the final toss keep lo mein chicken tender. Slice it about ¼ inch / 6 mm thick, marinate for 10–15 minutes, then sear it quickly and take it out before it finishes cooking.
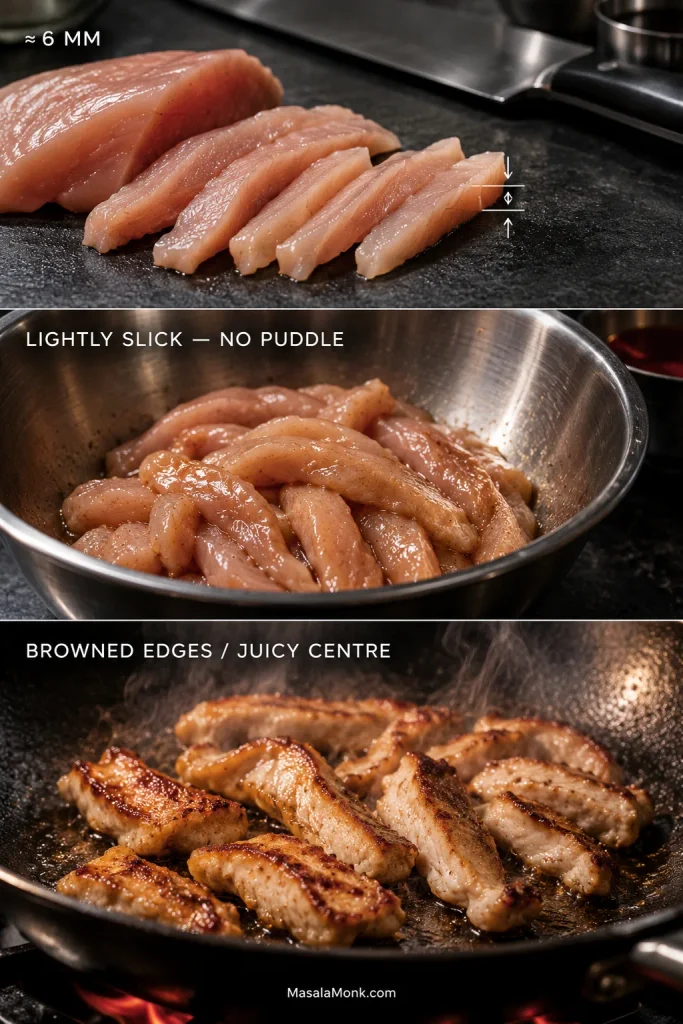
Three-stage chicken preparation showing thin raw slices measured at about six millimeters, lightly marinated glossy chicken and browned strips searing in a dark skillet.
Uniform thickness is the hidden advantage here. When the chicken strips are close to the same size, the thin pieces do not dry out while thicker ones are still waiting to brown.

Thighs stay juicy a little longer when the timing runs over. Breast works beautifully too; it simply has less patience for an extra few minutes in the skillet.

Look for browned edges while the center is still juicy. The chicken comes back with the sauce, so the first sear is not the moment to chase complete doneness.

The same broad technique works in Chicken Fried Rice, where the chicken also leaves the pan while the rest of dinner catches up.

Baking soda isn’t necessary here. Carefully measured baking soda can tenderize meat, but excess leaves an alkaline or soapy taste. Thin slicing and the short cornstarch marinade are more forgiving.

Best Vegetables for Chicken Lo Mein: Add Them by Cooking Speed

Cabbage, carrot, bell pepper and bean sprouts make a balanced default. Half a bell pepper left in the fridge, a handful of broccoli, mushrooms or snow peas can all join in. The order matters more than matching one prescribed vegetable list.

When it goes inGood choicesTypical time
Needs a head startThicker carrot slices, broccoli stems, firm green beansAbout 3–4 minutes depending on size
MiddleFine carrot matchsticks, broccoli florets, mushrooms, bell peppers, onionAbout 2–3 minutes
Almost doneCabbage, snow peas, bok choy stemsAbout 1–2 minutes
Last minuteBean sprouts, spinach, bok choy leaves, scallion greensAbout 30–60 seconds

A good bowl has contrast: cabbage softened around the edges, peppers still lively, sprouts with enough snap to be noticed against the noodles.
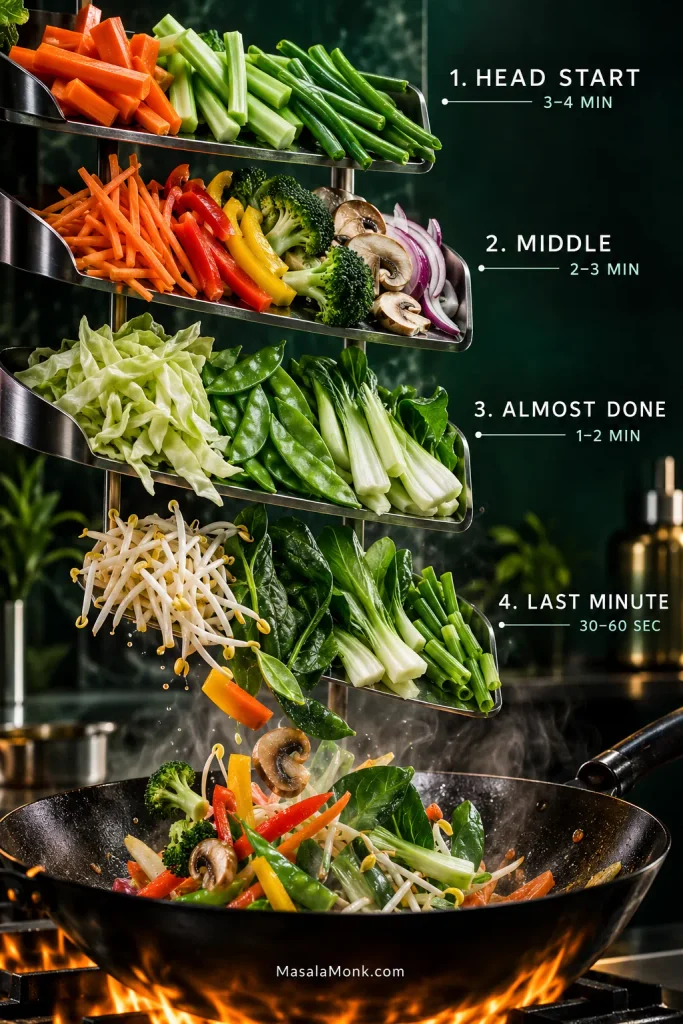
Four descending metal trays group stir-fry vegetables by cooking time, from thick carrots and firm green vegetables to cabbage, bean sprouts, leafy greens and scallions above a hot wok.
Cut size changes timing too: fine carrot matchsticks can cook with peppers, while thicker pieces need the earlier head start.

Broccoli works especially well. Keep the florets fairly small and give them a head start so the stems become crisp-tender before the noodles are finished.

For a dinner where broccoli really is the point, Beef and Broccoli goes deeper into keeping stalks and florets crisp-tender while the brown sauce stays concentrated.

Adding another couple of cups of vegetables? Mix up to 25% extra sauce and keep it beside the stove. Add only as much as the finished noodles need; mushrooms, spinach, cabbage and broccoli all change the pan differently.

Frozen Vegetables and Mushrooms

Frozen stir-fry vegetables are completely workable, but they release more water. Give that water time to disappear before adding the noodles and sauce.

Mushrooms are worth watching. They can dump enough liquid into the skillet to undo otherwise good work. Let them cook until the pan looks lively again and their flavor has deepened.

Why Doesn’t Homemade Chicken Lo Mein Taste Like Takeout?

Homemade lo mein often tastes flatter than takeout because the home skillet gets wetter and cooler: wet noodles, crowded ingredients and weak heat recovery dilute the sauce before it can properly coat the strands.

Water Dilutes More Than the Sauce

Water clinging to noodles or released by vegetables cools the skillet before it ever weakens the seasoning. A pan can contain all the right ingredients and still taste flat because the heat is busy boiling off water.

Give the Pan Room to Recover

A 12-inch skillet can make good lo mein; it just gives you less room than a 13- or 14-inch pan.

Listen to the pan. The active sizzle should return as you cook. A skillet buried under too much cold food stays quiet and steamy.
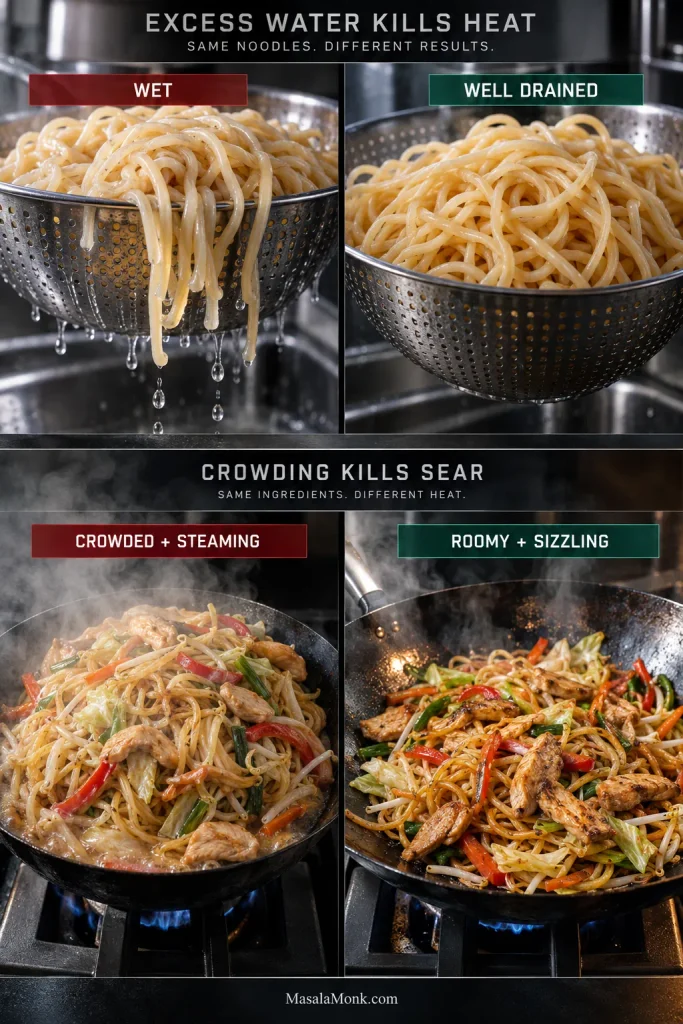
Four-panel comparison showing wet dripping noodles beside well-drained noodles, then a crowded steaming pan beside a wider, roomier sizzling pan of chicken lo mein.
A burst of steam is normal; steam replacing the sizzle is the warning sign. When excess water and crowding keep the pan quiet, browning and sauce concentration both slow down.

A Pale Batch Isn’t Necessarily Underseasoned

A pale pan that already tastes properly seasoned does not need another pour of regular soy. Use a small amount of dark soy next time if you want deeper color—or let the noodles stay a little paler.

High Heat Helps; Smoke Is Not the Goal

A very hot wok can add toasted aroma, but convincing lo mein does not require a smoke-filled kitchen. Properly drained noodles, enough cooking surface and fast tossing matter far more on an ordinary home stove.

When the sauce hits a properly hot pan, the smell should become richer almost at once—soy, ginger, scallion and toasted sesame carried by the steam coming off the noodles.

Fix Your Lo Mein

Find the problem that looks like yours and make the smallest correction first.

Mushy, Sticky or Gummy Noodles

Mushy: get them off the heat and serve. Next time, stop cooking the noodles earlier.

Sticking together: loosen them gently with tongs or chopsticks. A very starchy noodle may benefit from a brief rinse next time, followed by thorough draining.

Gummy after the sauce went in: toss with a tablespoon or two of hot stock or water. Noodles that were tacky before the skillet were already too soft or starchy.

Dry Noodles

Add 1–2 tablespoons / 15–30 ml unsalted stock or water and toss over heat. Strands that immediately loosen and shine again simply needed more free liquid.

Prefer that wetter finish? Start with the extra-saucy formula next time.
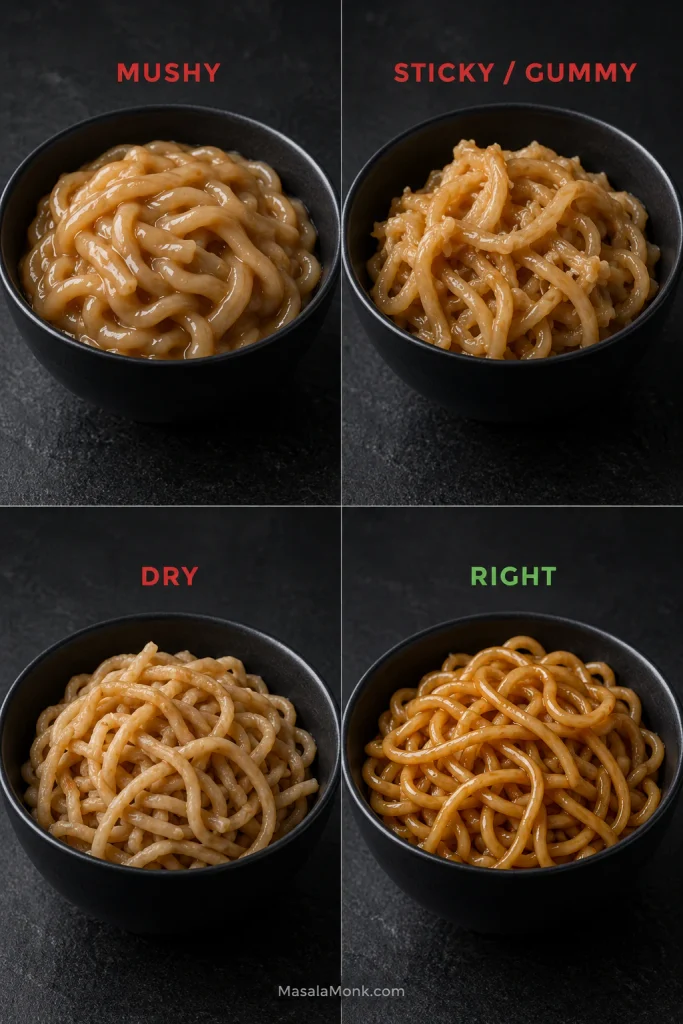
Four matching black bowls compare mushy noodles, sticky or gummy noodles, dry noodles and properly cooked loose glossy lo mein noodles.
Do not treat every clump as overcooked noodles. Mushy strands lose structure, gummy strands can still hold their shape but stick through tackiness, while dry noodles look tight and dull rather than sticky.

Too Salty—or Pale but Already Salty

Too salty: add a little unsalted stock or water and extra plain noodles or vegetables when available.

Pale but already salty: stop adding seasoning soy. Color and seasoning are separate problems.

Sauce Too Thin, Too Thick or Pooling

Too thin: keep the pan hot and uncovered for another 20–30 seconds. A tiny cornstarch slurry can help after obvious excess water is gone.

Too thick: add stock or water 1 tablespoon / 15 ml at a time while tossing.

Pooling underneath: toss briefly over heat. A puddle that quickly becomes a coating needed another moment; persistent watery liquid points to excess moisture in the pan.

The Noodles Taste Plain or the Whole Pan Is Watery

Thick sauce sitting unevenly on the noodles: add 1 tablespoon / 15 ml stock or water and toss again.

Sauce moves freely but tastes flat: add a teaspoon of low-sodium soy or a small spoonful of reserved sauce.

Watery and bland: evaporate first. Keep the skillet uncovered and hot for 30–60 seconds, then taste again.
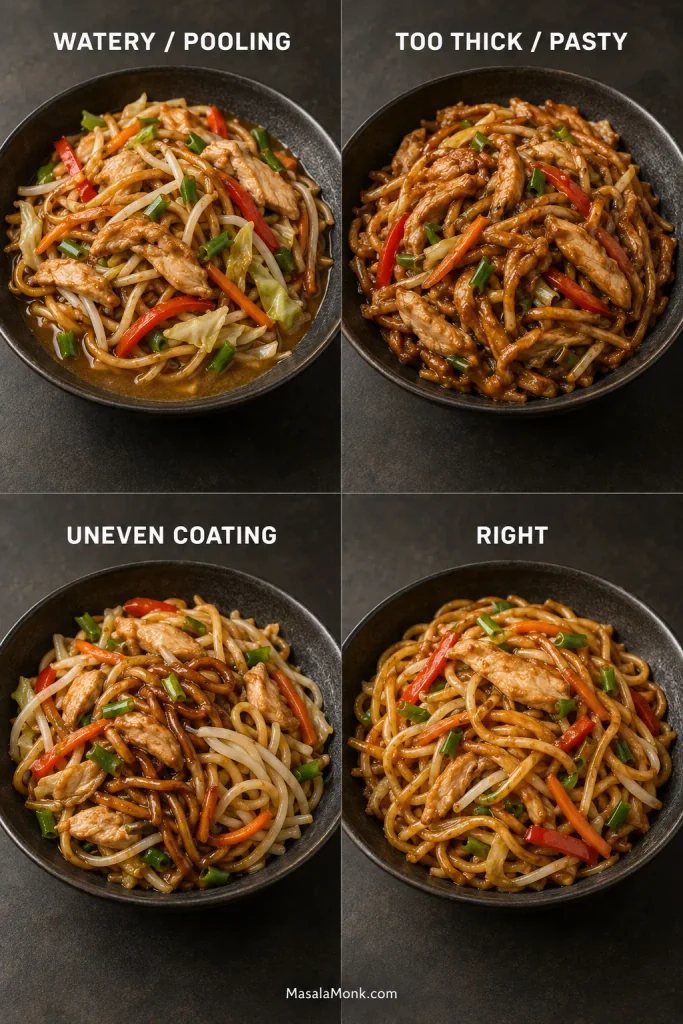
Four matching bowls compare chicken lo mein with watery pooled sauce, overly thick pasty sauce, uneven patchy coating and an evenly coated glossy finish.
Look at where the sauce is, not only how dark the noodles are. Pooling points to free liquid, a pasty film points to excessive thickness, and pale patches reveal coating that never distributed evenly.

Dry Chicken or Limp Vegetables

Dry chicken: use the tender-chicken technique: slice it about ¼ inch / 6 mm thick, shorten the first sear, and get it out of the skillet earlier.

Limp vegetables: return to the vegetable cooking-order guide: give firm vegetables their head start and keep sprouts, leafy greens and scallion tops for the end.

Baking Soda Taste or an Oily Finish

Alkaline or soapy chicken: skip the baking soda next time and rely on thin slicing plus the cornstarch marinade.

Greasy noodles: use less neutral cooking oil. Toasted sesame oil is there for aroma, not as the main frying fat.

Practical Ingredient Swaps

If you don’t have…Use…What changes
Shaoxing wineDry sherry or plain sake; unsalted stock/water for alcohol-freeSherry is the closest easy substitute; stock loses some aromatic depth
Oyster sauceMushroom-based vegetarian oyster-style sauceClosest swap for savory body; hoisin is sweeter and changes the profile more
Dark soy sauceLeave it out instead of replacing all of it with regular soyThe noodles will be paler but easier to keep properly seasoned
Toasted sesame oilOmit itThe recipe still works, with less nutty aroma at the finish
Bean sproutsExtra cabbage, snow peas or bok choyYou lose some juicy crunch but not the structure of the dish

Missing bean sprouts or one specialty bottle shouldn’t stop dinner. These swaps change the edges of the dish, not its basic shape.

Making It Gluten-Free

Use gluten-free noodles, tamari or another certified gluten-free soy sauce, plus verified gluten-free dark soy and oyster-style sauces. Many Shaoxing wines contain wheat, so replace the bottle with a verified gluten-free dry sherry or another gluten-free cooking wine.

Gluten-free noodles vary enormously in how quickly they soften. Their texture gets the final vote on timing.

For a sweeter, stickier direction: changing the sauce makes more sense than adding extra sugar to this one. Homemade Teriyaki Sauce deliberately moves toward a sweeter, shinier glaze.

Adding shrimp: cook it separately until just shy of done, remove it, then return it near the end. Shrimp spends far less time in the pan than chicken.

Make Ahead, Store and Reheat

The easiest make-ahead wins are the sauce and vegetables. Mix the sauce and refrigerate it covered, then stir or shake it before cooking because the cornstarch settles. Slice the vegetables ahead and keep them chilled. The chicken can be cut in advance too; its marinade only needs 10–15 minutes.

Cooking the noodles ahead: possible, but not ideal. Stop them while they are still firm, cool them promptly and keep the strands loose instead of pressing them into one warm mound. If you are unsure where to stop, use the noodle doneness guide. A very small amount of neutral oil can help a particularly sticky batch.

Store and Reheat

Refrigerate leftovers promptly—within 2 hours—in an airtight container and use them within 3–4 days.

The next-day skillet version can be excellent. Add 1–2 tablespoons / 15–30 ml water or unsalted stock, cover briefly to loosen the cold noodles, then uncover and toss until everything is steaming hot. Reheated leftovers should reach 165°F / 74°C.
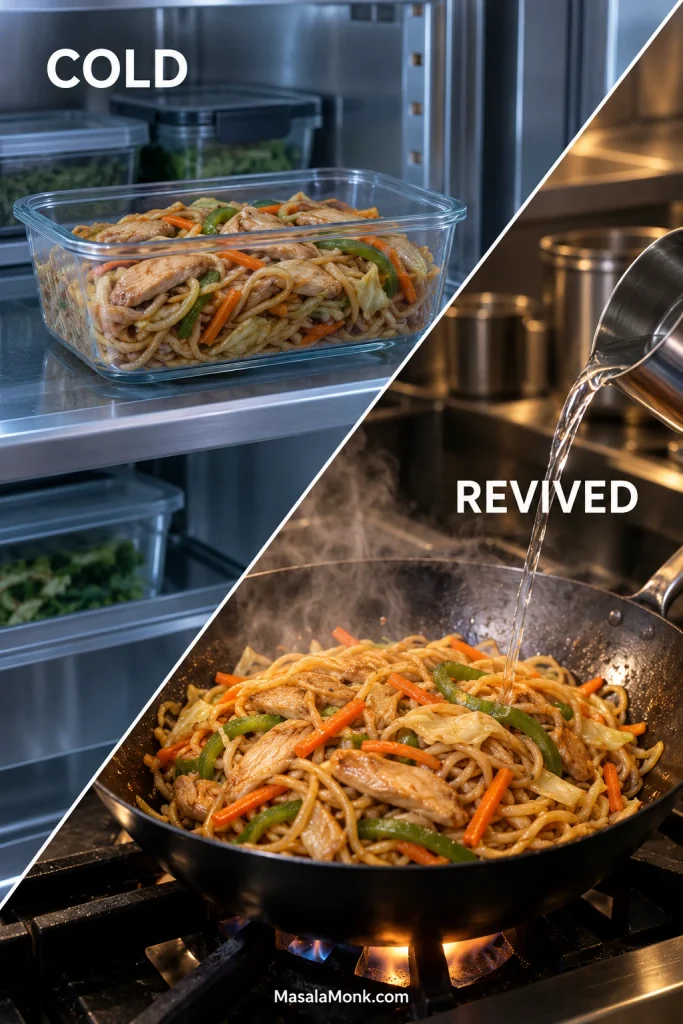
Split image showing cold chicken lo mein in a glass refrigerator container and the same noodles steaming in a wok while a small amount of water is added.
When reheating chicken lo mein, the goal is separation rather than more sauce. A little steam loosens chilled starch so the original coating can move with the noodles again.

For the microwave, add a small splash of water, cover loosely and heat in short intervals, stirring between them, until the food reaches 165°F / 74°C throughout.

Freezing: possible, though not preferred. Noodles soften further after thawing and crisp vegetables lose much of their bite. Refrigeration gives you a much better second bowl.

What to Serve With It

Chicken lo mein already brings noodles, meat and plenty of vegetables to the bowl. It doesn’t need a parade of sides.

For something cold and crisp, Cucumber Salad makes a refreshing contrast. Its rice-vinegar, sesame, ginger and scallion variation sits especially well beside the warm savory noodles.

A small bowl of Egg Drop Soup takes the meal in the other direction: warm broth, soft egg ribbons and no extra heavy starch.
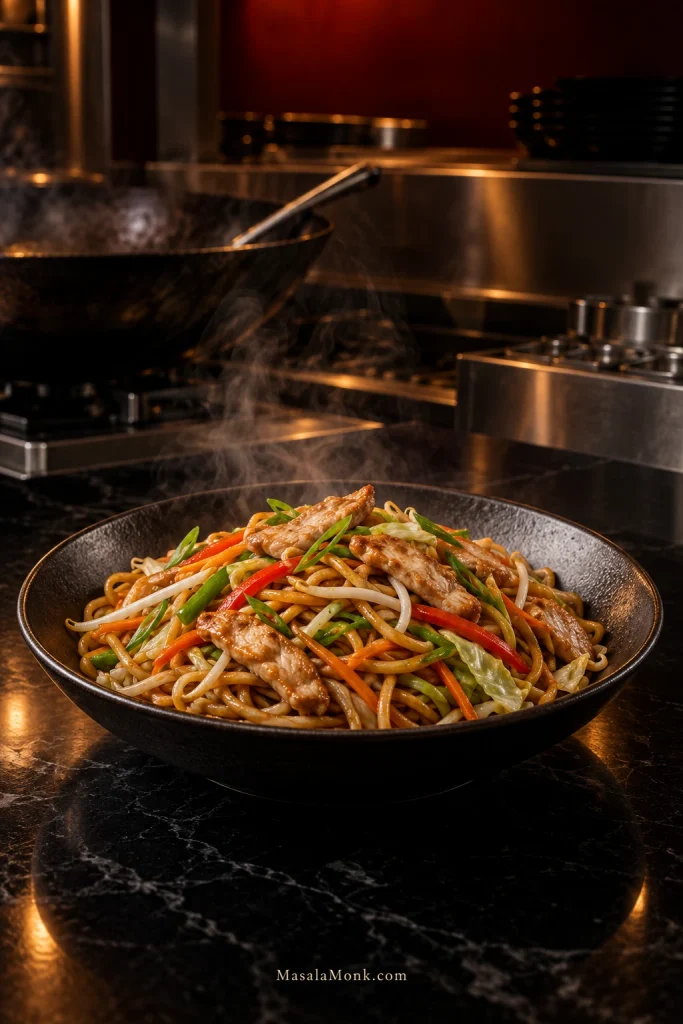

Finished chicken lo mein in a dark bowl on polished black stone, gently steaming in front of a wok and stainless-steel equipment in a dim professional kitchen.

Serve the lo mein straight from the pan while the strands are loose and shining, the vegetables still have bite and the bean sprouts still crunch. Once you recognize that finish—the sauce riding with the noodles, the center still springy—you do not need a restaurant burner or one perfect brand of noodle to find your way back to it.
Posted on — Leave a comment

Sesame Chicken Recipe: Crispy Chicken With Sticky Sesame Sauce

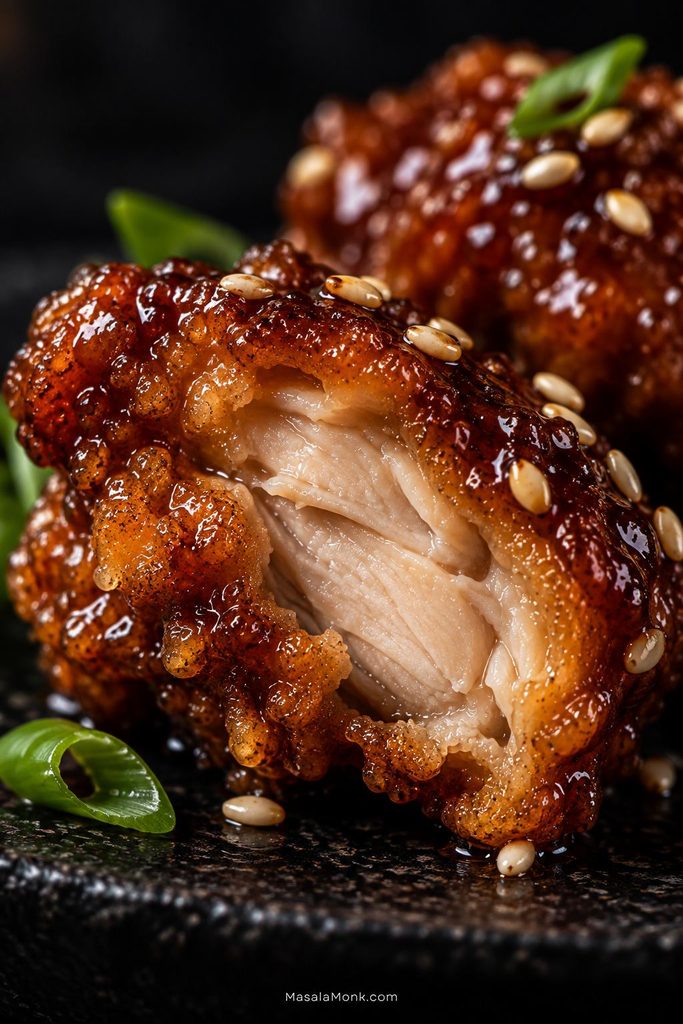
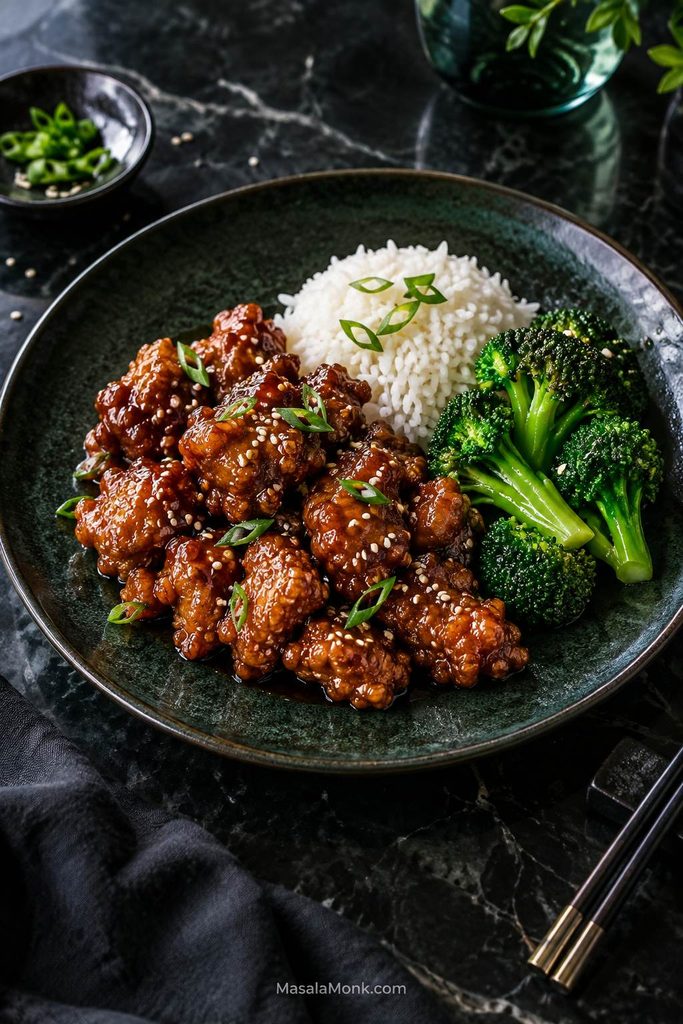
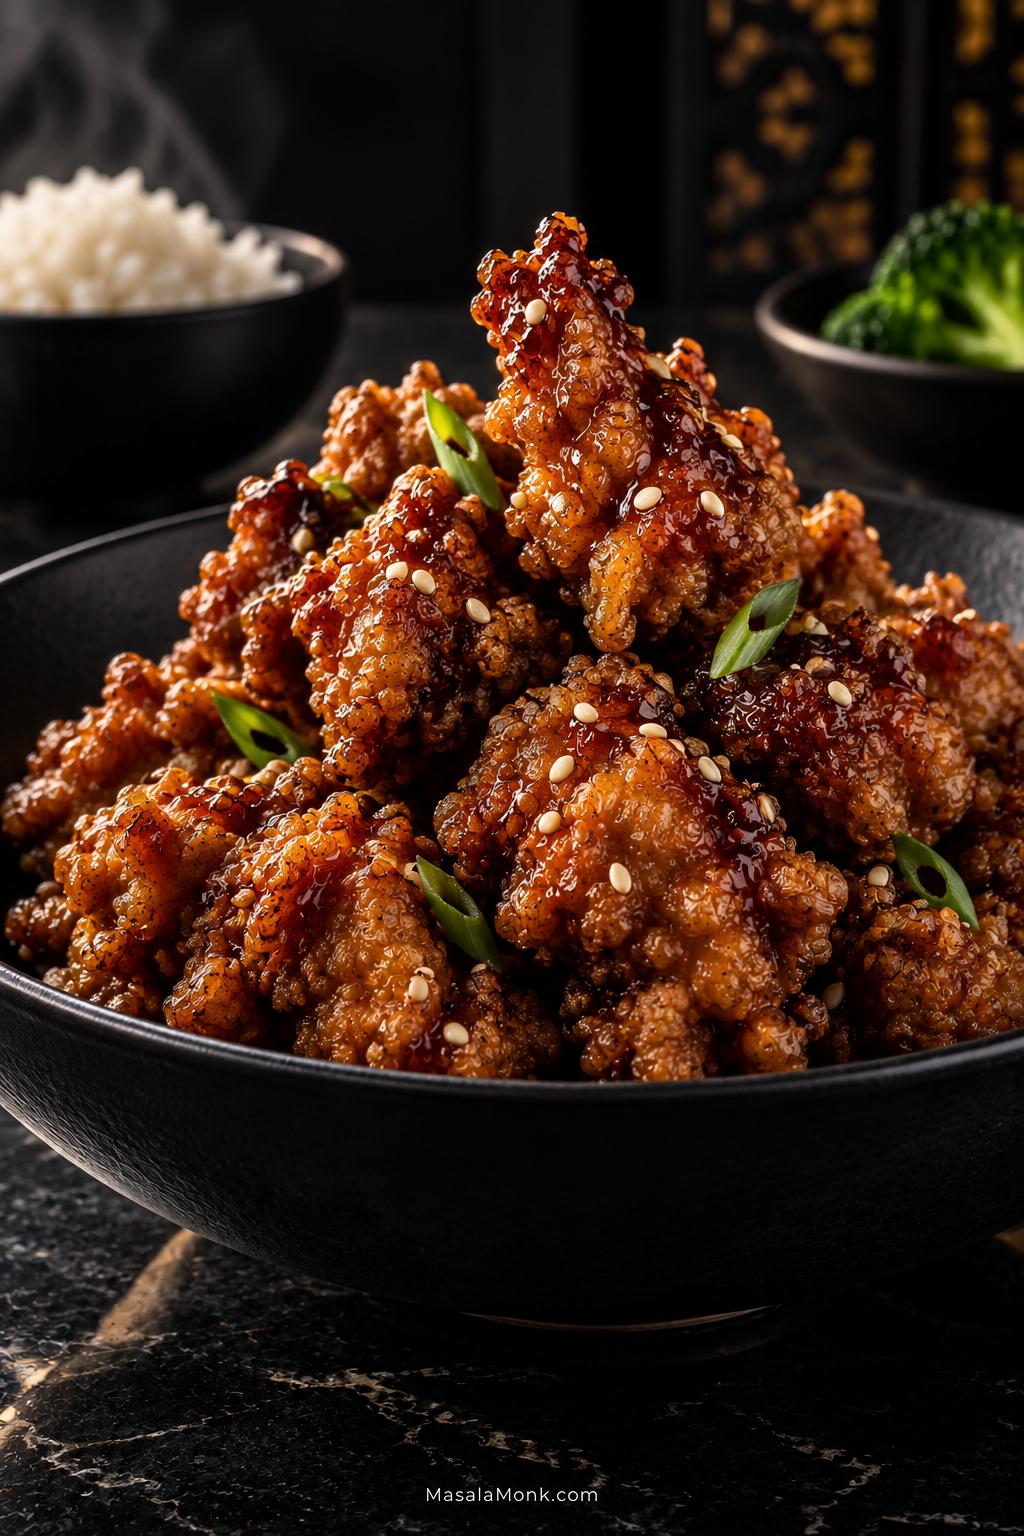
Bowl of crispy sesame chicken coated in thin amber-brown glaze, lightly topped with sesame seeds and scallions, with rice and broccoli behind.

A good sesame chicken recipe has one awkward problem to solve: the chicken should still have crisp edges after it meets the sticky sauce. Get the timing right and the glaze catches on the fried surface instead of pooling underneath it. The chicken stays juicy inside, toasted sesame smells nutty and warm, and every bite keeps some contrast between crisp crust and glossy sauce.

This is the takeout-style version—the kind with real texture under the sauce, not simply diced chicken simmered in a sweet skillet glaze. Thighs give you the widest margin for juicy meat, although breast works too. You do not need restaurant equipment or a roaring wok burner. Steady oil temperature and a finished glaze waiting for the chicken matter much more.

The second fry earns its place because home cooking gives you one advantage takeout cannot: the chicken can go from hot oil to glaze to plate almost immediately.

This sesame chicken recipe makes Chinese-American fried chicken coated in a sweet-savory sesame glaze. For the crispest version, fry once at 350°F / 175°C, rest on a wire rack while the sauce thickens, then fry again at 375°F / 190°C. Toss only after the glaze is ready and serve straight away. The largest pieces should reach at least 165°F / 74°C.

Sesame Chicken Recipe

Allow about 50–60 minutes, depending on your pot, burner and batch size. Much of the work overlaps. Think of it as three phases: fry the chicken, finish the sauce during the rest, then crisp and glaze just before serving.

Chicken
24 oz / 680 g

Cut
1–1¼ in / 2.5–3.2 cm

First Fry
350°F / 175°C

Second Fry
375°F / 190°C

Serves
4 generously; up to 6 with sides

Prep
About 25 minutes

Cook
About 25–35 minutes

Total
About 50–60 minutes

For the Chicken

  • 24 oz / 680 g boneless skinless chicken thighs, cut into roughly 1–1¼ in / 2.5–3.2 cm pieces
  • 1 tablespoon / 15 ml reduced-sodium soy sauce
  • 1 tablespoon / 15 ml Shaoxing wine or dry sherry
  • 1 large egg white, about 1 oz / 30 g
  • 1 teaspoon / about 2 g finely grated fresh ginger
  • 1 teaspoon / 5 ml toasted sesame oil
  • ¼ teaspoon white pepper

Chicken breast: Use the same weight and cut it to the same size. It has less margin for overcooking, so watch the center temperature closely.

No Shaoxing wine? Dry sherry is the closest easy substitute. For an alcohol-free version, use 1 tablespoon / 15 ml unsalted or low-sodium chicken stock or water. Rice vinegar supplies acidity, so it is not a Shaoxing substitute.

For the Crisp Coating

  • ¾ cup / about 90 g cornstarch
  • ½ cup / about 60 g all-purpose flour
  • 1½ teaspoons / about 6 g baking powder
  • ½ teaspoon fine salt
  • ¼ teaspoon white pepper

For Frying

  • Neutral high-heat oil such as canola or vegetable oil, enough to reach about 2 in / 5 cm deep in your pot; peanut oil is another option

For the Sticky Sesame Sauce

  • 3 tablespoons / 45 ml reduced-sodium soy sauce
  • 3 tablespoons / about 63 g honey
  • 1 tablespoon / about 13 g packed brown sugar
  • 2 tablespoons / 30 ml unseasoned rice vinegar
  • 2 tablespoons / about 30 g ketchup
  • 1 tablespoon / 15 ml oyster sauce, or vegetarian mushroom stir-fry sauce
  • 2 tablespoons / 30 ml water
  • 2 teaspoons / about 4 g finely grated fresh ginger
  • 2 teaspoons / about 6 g finely minced garlic
  • 1 teaspoon / 5 ml neutral oil
  • 1 teaspoon / 5 ml toasted sesame oil
  • ¼ teaspoon MSG, optional
  • ¼ teaspoon crushed red pepper flakes, optional

Soy sauce varies: Chinese light soy works, but some brands are saltier than reduced-sodium all-purpose soy. Start with 2 tablespoons / 30 ml in the sauce if yours is especially assertive and add more after tasting. Dark soy should not replace the full amount one-for-one.

No oyster sauce? Use 1 tablespoon / 15 ml vegetarian mushroom stir-fry sauce. Brands differ in saltiness, so taste before adding extra soy.

For the Cornstarch Slurry

  • 2 teaspoons / about 5 g cornstarch
  • 1 tablespoon / 15 ml cool water

To Finish

  • 2 tablespoons / about 18 g toasted sesame seeds
  • 2 scallions, thinly sliced, optional

Raw sesame seeds need only a few minutes in a dry skillet over medium-low heat. Stir often and remove them when they smell nutty and turn lightly golden.

Allergen note: With conventional oyster sauce, the recipe contains sesame, soy, wheat, egg and shellfish. Peanut oil adds a peanut-allergy consideration if you use it. A vegetarian mushroom stir-fry sauce removes the oyster, but check individual labels whenever you are cooking for a food allergy.

Equipment

  • Frying: deep heavy-bottomed pot or wok, deep-fry thermometer, spider or skimmer, and a wire rack set over a sheet pan
  • Doneness: instant-read food thermometer
  • Sauce: wide skillet or wok

Before the oil gets hot: mix the soy sauce, honey, brown sugar, rice vinegar, ketchup, oyster or mushroom sauce, water and optional MSG. Keep the cornstarch slurry separate. Put the rack, skimmer and thermometers within reach, and have the sesame seeds, scallions and serving dishes ready. If you’re serving rice, start it before heating the frying oil.

Instructions

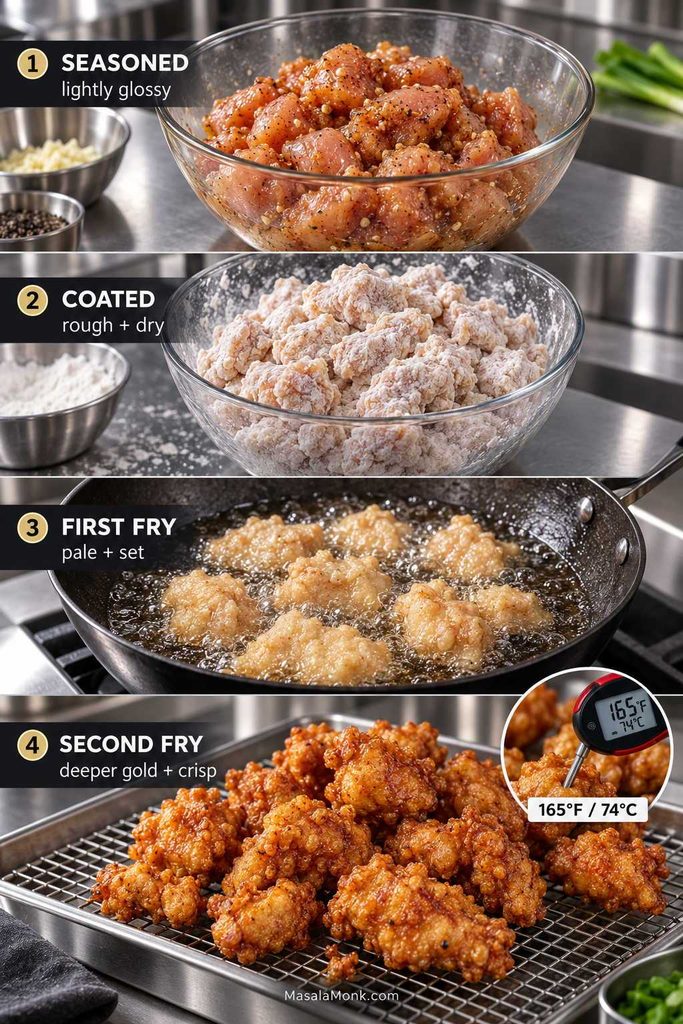
Four-step sesame chicken guide showing lightly glossy seasoned chicken, rough dry coating, pale first fry, crisp second fry, and a 165°F / 74°C temperature check.
Use these as batch markers, not a color target. The first fry can stay pale; later batches darkening faster are a sign your oil is running hotter.

Season, Coat and First Fry

  1. Season the chicken. Mix the chicken with soy sauce, Shaoxing wine, egg white, toasted sesame oil, ginger and white pepper. The pieces should look lightly glossy, with very little loose liquid underneath. Rest for 10–15 minutes while you mix the coating and finish the remaining prep.
  2. Coat the chicken. Whisk the cornstarch, flour, baking powder, salt and white pepper in a wide bowl. Let obvious excess seasoning drip from each handful of chicken, then toss through the dredge. Press and turn until the wet surface disappears under a rough, irregular coating. A few uneven edges are exactly what you want. Rest for about 5–8 minutes while the oil heats. Discard any dredge left in the bowl after it has contacted raw chicken.
  3. Heat the oil. Add enough neutral oil to reach about 2 in / 5 cm deep in a deep pot with plenty of empty space above it. Heat to 350°F / 175°C. Keep water away from hot oil, never overfill the pot and never leave it unattended.
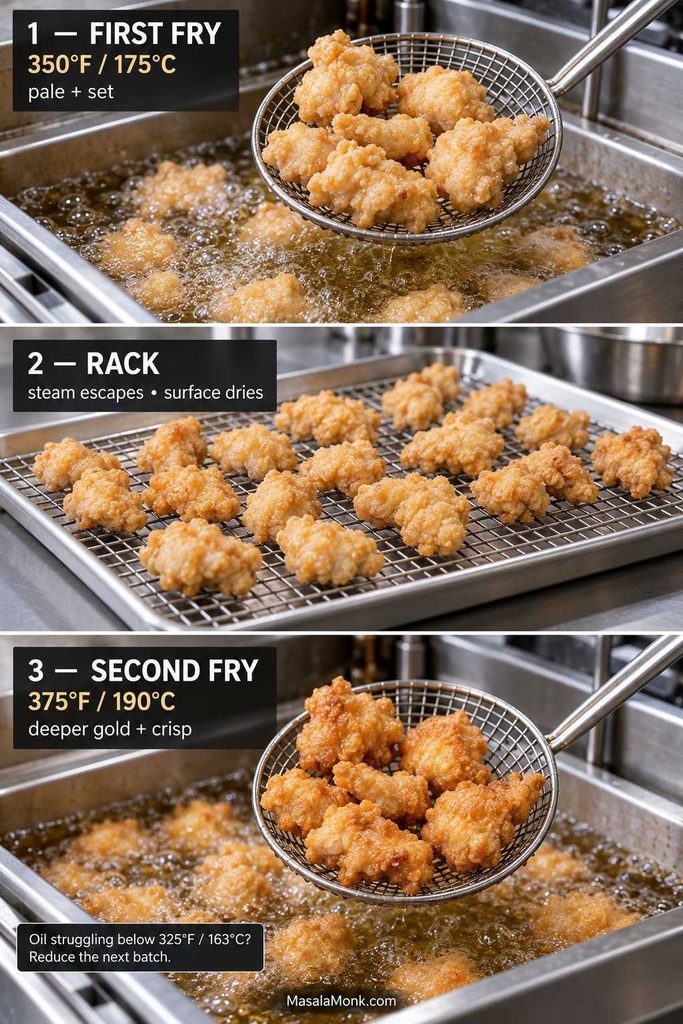
  4. Fry the first round. Lower in enough chicken to form a loose layer. Give the coating a moment to set before moving the pieces much. Fry for about 2½–3½ minutes. The surface should change from soft and chalky-looking to firm and pale golden. Pale is fine; deeper color comes later. If the oil stays much below 325°F / 163°C, make the next batch smaller. Transfer to the rack and let the oil recover.

Make the Glaze

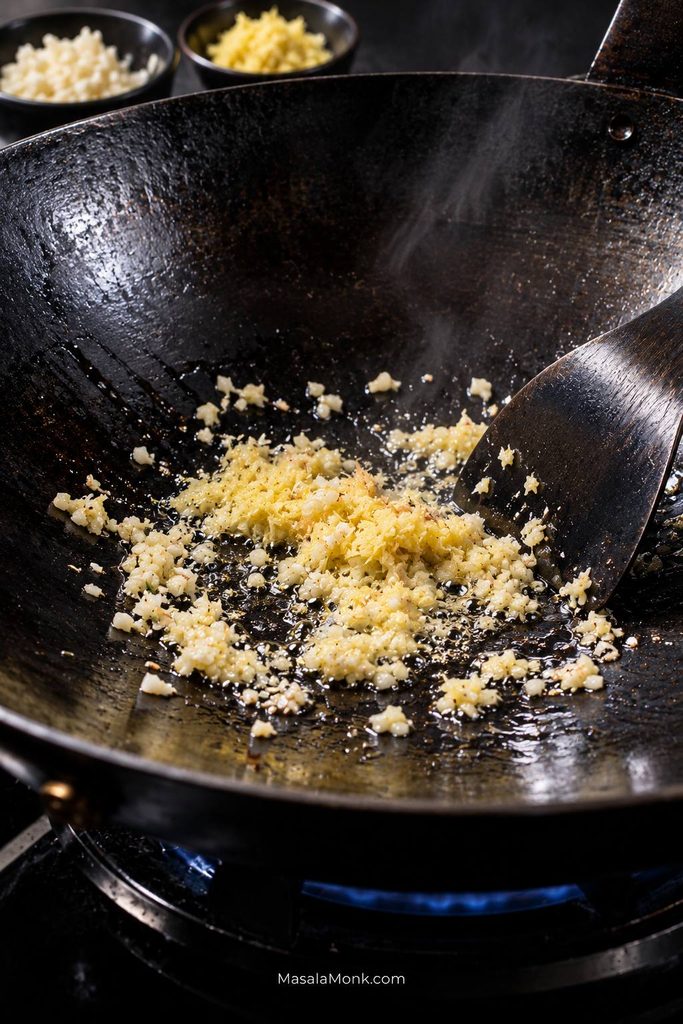
  1. Cook the sauce while the chicken rests. Heat 1 teaspoon neutral oil in a wide skillet or wok over medium heat. Add the garlic, ginger and optional chile flakes. After 15–30 seconds they should smell fragrant but not browned. Pour in the prepared sauce mixture and bring it to a lively simmer. This is still the sauce mixture; once it thickens enough to ribbon from a spoon and cling to the chicken, think of it as the glaze.
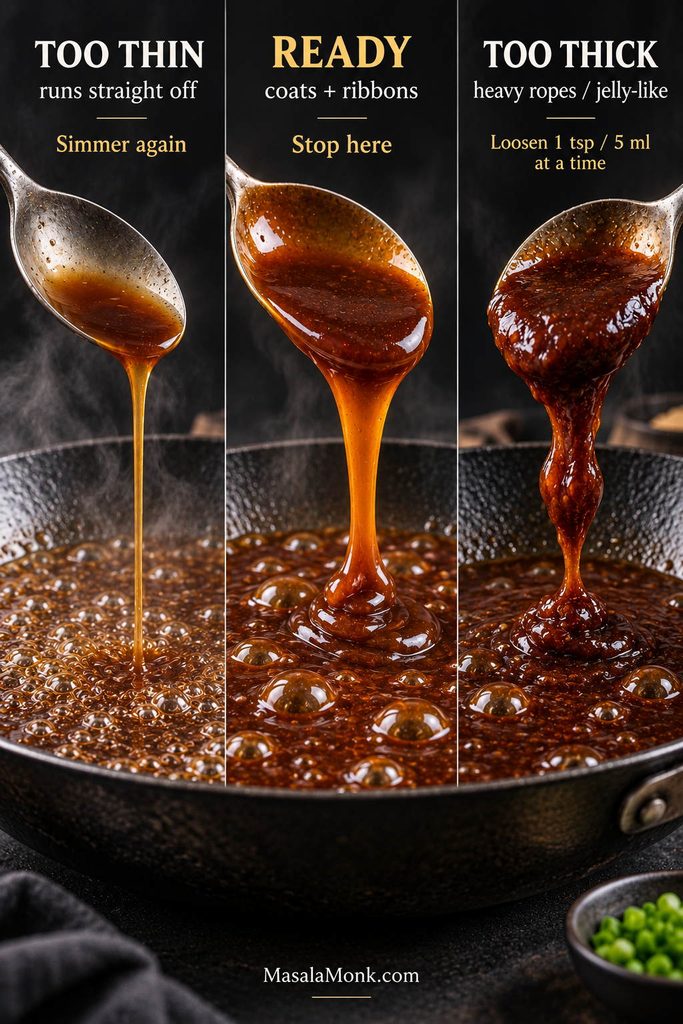
  2. Thicken the glaze. Stir the slurry again and add about two-thirds. Let it bubble briefly. The bubbles become slower and shinier as it thickens. When the glaze coats the back of a spoon and falls into the pan in a ribbon, turn off the heat and stir in the toasted sesame oil. If it looks right before all the slurry is used, stop there.

Second Fry, Glaze and Serve

  1. Fry a second time. Raise the oil to 375°F / 190°C. Starting with the chicken that came out first, fry in batches for another 45–75 seconds. The crust should tighten, deepen slightly and look drier. Check one of the largest pieces by inserting an instant-read thermometer through the side so the tip reaches the center.
    If it is under 165°F / 74°C: return those pieces briefly and check again.
    If the crust is already deeply browned: let the oil settle closer to 350°F / 175°C before finishing them.
  2. Glaze. Warm the glaze briefly over low heat if it has tightened, then switch off the heat. Add the chicken and turn the pieces only long enough for the fried surface to shine with a thin coating.
  3. Serve. Add the toasted sesame seeds and scallions and move the chicken straight to the table.

Chicken temperature: Time is only a guide. Poultry should reach 165°F / 74°C. See the safe minimum internal temperature chart for official guidance.

How to Keep Sesame Chicken Crispy

Crispness is a chain. The coating has to grip the chicken, the first fry has to set it, the rack has to let steam escape, and the finished glaze has to cling without soaking the crust.

Extreme close-up of a cut sesame chicken piece showing moist cooked chicken, craggy fried crust, thin amber glaze, sesame seeds and scallion.
Use the cross-section to judge coating thickness. The crisp shell should be much thinner than the chicken inside; if crust and meat look nearly equal, too much wet mixture or dredge probably built up before frying.

Chicken Choice and Cut Size

If you have no strong preference, use thighs. They stay juicy across a wider cooking window and make batch frying more forgiving. Breast gives a leaner, firmer bite and works well too.

Aim for pieces around 1–1¼ inches / 2.5–3.2 cm. They do not need to be identical; they just need to be close enough in size that the smallest pieces are not drying out while the largest are still cooking.

Build a Coating That Holds

The seasoned chicken should feel tacky and lightly slick, with very little liquid pooled underneath. The egg white gives the dry coating something to grip. Carry a puddle of marinade into the dredge and the flour and starch can turn into heavy patches of paste.

Cornstarch brings brittle crunch, flour gives the crust structure, and baking powder makes the surface lighter and more irregular. Smooth is not the goal. You should still feel like you are eating chicken first, not a thick shell of breading.

Potato starch works too. Swap 90 g for the 90 g cornstarch, then add a little more only where wet patches remain.

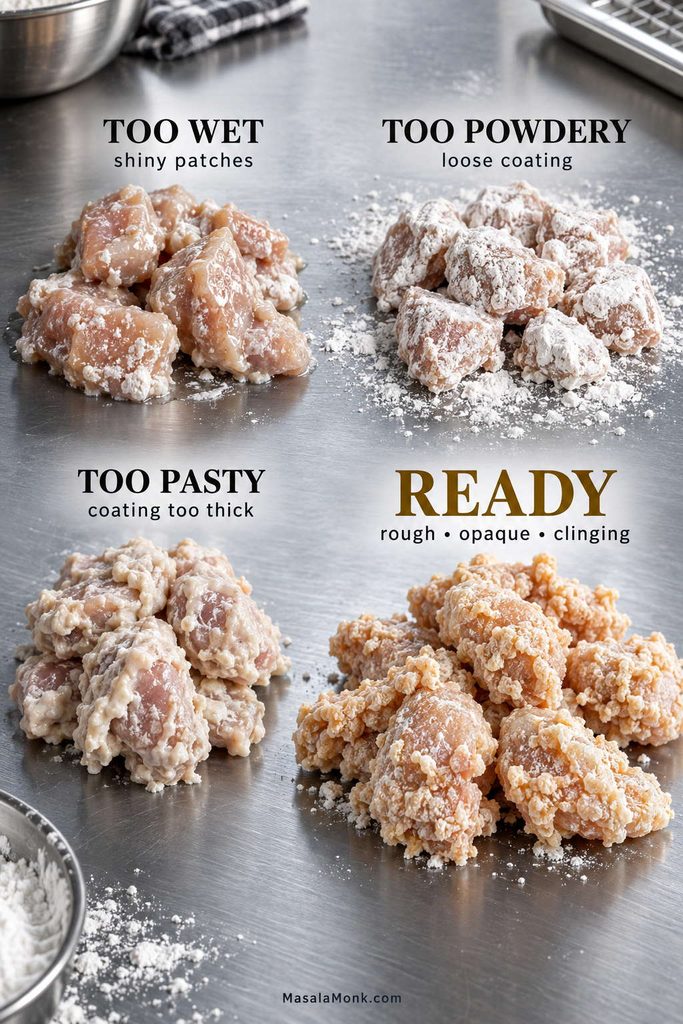
Before frying, look for an opaque, rough surface with small irregular bits of coating clinging to the chicken. Wet shiny patches need another turn through the dredge. Loose white powder needs pressing in. Thick paste is too much.

Four coating examples for sesame chicken: too wet, too powdery, too pasty, and ready with rough opaque coating clinging to the chicken.
Craggy is useful only when those crags are firmly attached. Loose flour breaks away in hot oil, while attached rough edges create more crisp surface for the glaze to catch later.

For this flour-and-starch coating, a short 5–8 minute rest lets the damp spots settle. Pure starch coatings behave differently.

First Fry, Rest, Then Fry Again

The first batch tells you what your pot, burner and quantity of oil can actually handle. Watch how quickly the temperature recovers after the chicken goes in; that is more useful than an arbitrary piece count.

Oil Depth and Batch Size

About 2 inches / 5 cm of oil gives the chicken heat around several sides at once and keeps damp coating from sitting against the metal for too long.

If the thermometer recovers quickly and the pieces separate easily, the batch size is working. If loose coating crumbs begin to darken, skim them out before the next batch.

Let the Crust Set

Fresh dredge is fragile when it first hits the oil. Leave the chicken mostly alone until the exterior firms up. Then a skimmer can move the pieces without scraping away the crust.

Two pieces touching is not a disaster. Ease them apart once the coating has set.

Rest, Then Finish With a Second Fry

Spread the first-fried pieces across a rack in one layer so steam can escape underneath. By the end of the rest, the surface should feel dry, not steamy.

The second fry is the finish, not a rescue. The hotter oil tightens and dries a crust that has already set. This is when the chicken starts looking like the dish you came for: deeper gold, drier edges and a coating that feels crisp against the skimmer.

If the first fry left a batch pale and oily, correct the oil temperature and batch size before continuing. A longer second fry will not rebuild a crust that never formed properly.

Three-stage sesame chicken frying guide showing a pale first fry at 350°F / 175°C, rack rest to dry the crust, and crisp second fry at 375°F / 190°C.
A wire rack works better than paper towels between fries because air can move underneath the chicken. Trapped steam has an easier escape route, so the second fry starts with a drier crust.

Sesame Chicken Sauce: From Sauce to Glaze

Sesame chicken sauce is a sweet-savory glaze made with soy sauce, honey, brown sugar, rice vinegar, ketchup, oyster or mushroom stir-fry sauce, garlic, ginger and toasted sesame oil. Before thickening, it is the sauce mixture. Once it ribbons from the spoon and clings instead of running off, it has become the glaze you need for fried chicken.

Honey gives the glaze rounded sweetness and shine, while brown sugar adds a slightly darker caramel note. Rice vinegar keeps the sweetness in check. Ketchup adds body, tang and the reddish-brown color familiar in Chinese-American sesame chicken sauces.

When the garlic and ginger hit the warm oil, the pan finally starts smelling like sesame chicken instead of a bowl of measured ingredients. Toasted sesame oil goes in after thickening so its aroma stays brighter.

Finely minced garlic and grated ginger sizzling briefly in a thin film of oil in a dark wok over a blue gas flame.
Have the mixed sesame chicken sauce beside the stove before the aromatics hit the wok. This fragrant stage lasts only seconds.

Know When the Glaze Is Thick Enough

What It DoesWhat It MeansNext Move
Runs straight off the spoonToo thinSimmer another 20–30 seconds and check again. Add more slurry only if needed.
Coats the spoon and falls in a ribbonReadyStop thickening.
Falls in heavy ropes or looks jelly-likeToo thickLoosen with water 1 teaspoon / 5 ml at a time.

Stir the slurry just before pouring because cornstarch settles quickly. Start with about two-thirds. The bubbles become slower and shinier as the glaze thickens.

It will tighten further as it cools. Stop while it still moves easily from the spoon. If you go a little too far, a teaspoon or two of water usually brings it back.

Three spoon tests for sesame chicken glaze showing sauce that is too thin and runny, ready and ribboning, and too thick and rope-like.
Let each slurry addition heat through before adding more. Cornstarch thickens with heat, so rushing the next spoonful can take a loose sesame chicken glaze past ribboning and into a gummy texture.

Fix the Glaze Before Adding the Chicken

  • Slightly too sweet: add unseasoned rice vinegar 1 teaspoon / 5 ml at a time.
  • Clearly too sweet: start with 1 tablespoon / 15 ml water, 1 teaspoon / 5 ml soy sauce and 1 teaspoon / 5 ml rice vinegar. Simmer briefly and taste again.
  • Too salty: add water 1 teaspoon / 5 ml at a time. If the glaze becomes too thin, add 1 teaspoon of the prepared slurry, simmer briefly and reassess before adding more.
  • Too sour: add honey 1 teaspoon / about 7 g at a time.
  • Needs thinning: add water 1 teaspoon / 5 ml at a time.
  • Still too thin: simmer another 20–30 seconds first. If it still runs straight off the spoon, add prepared slurry 1 teaspoon at a time.
  • Sesame flavor feels quiet: add more toasted seeds first, then a small splash of toasted sesame oil if needed.

Want It Sweeter or Need Extra Glaze?

For sweeter honey sesame chicken, add another tablespoon / about 21 g honey. For a deliberately less-sweet batch, omit the brown sugar first. If you want to pull it back further, reduce the honey by 1 teaspoon / about 7 g at a time.

If you want more sauce, make more—but reserve it separately. Scale the sauce and slurry to 1½ times the listed amounts, thicken it, then move roughly one-third to a bowl. Extra glaze belongs with the rice or broccoli, not poured over the finished crust.

For a looser sauce that works across chicken, tofu, vegetables and noodles, see our stir fry sauce recipe. The glaze here is intentionally more concentrated because it has a different job: coating fried chicken quickly.

How to Sauce Sesame Chicken: The Toss Is the Timer

Have the glaze completely finished before the chicken goes in. Warm it only if it has become stiff, switch off the heat, then turn the chicken through the pan just long enough to coat it.

You should still be able to see the crust underneath the shine. A few streaks of glaze at the bottom of the pan are normal. A puddle means the chicken has more sauce than it needs.

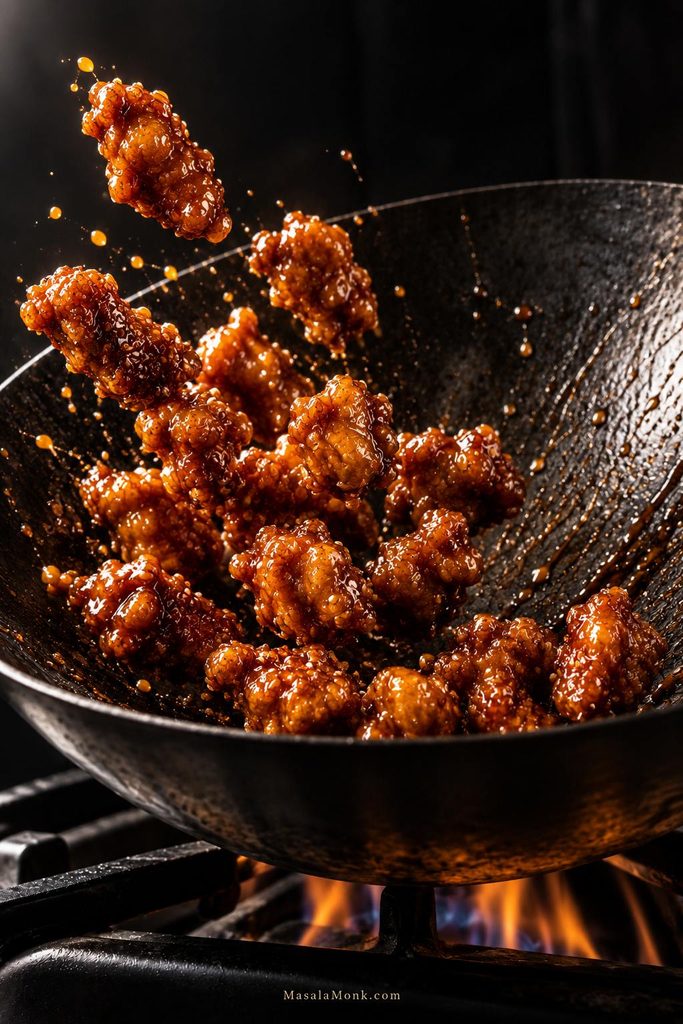
Sesame chicken pieces being tossed in a dark wok with thin amber glaze clinging to the craggy fried crust and no pool of sauce underneath.
Turn off the heat and coat quickly. A thin film needs fewer turns, which gives the fried edges less time to absorb moisture.

This is where the extra effort pays off. The chicken can go from its second fry to glaze to plate in under a minute, before a takeout box has the chance to steam the crust.

Sauced fried chicken will eventually soften. What you want is crunch when it reaches the table and through those first bites—not a promise that glazed chicken somehow stays crackly forever.

What to Serve With Sesame Chicken

Pile the chicken beside hot steamed rice and something green while the glaze is still shining and the crust still has some snap. Broccoli is an easy choice: the rice catches extra sauce, while the broccoli keeps the plate from becoming too sweet.

Plate of glazed sesame chicken served with steamed white rice and bright green broccoli on a dark green ceramic plate.
Keep the green vegetable simply seasoned. Hot rice catches extra glaze, while a clean green side keeps the next sesame chicken bite from feeling too sweet.

If you’re making plain rice, our guide to cooking rice covers jasmine, long-grain, basmati and other methods.

For a fuller takeout-style dinner, Chicken Fried Rice gives you a seasoned rice option. If you would rather serve noodles, Chicken Chow Mein fits the same kind of meal. Bok choy, green beans or a cold cucumber salad work well too.

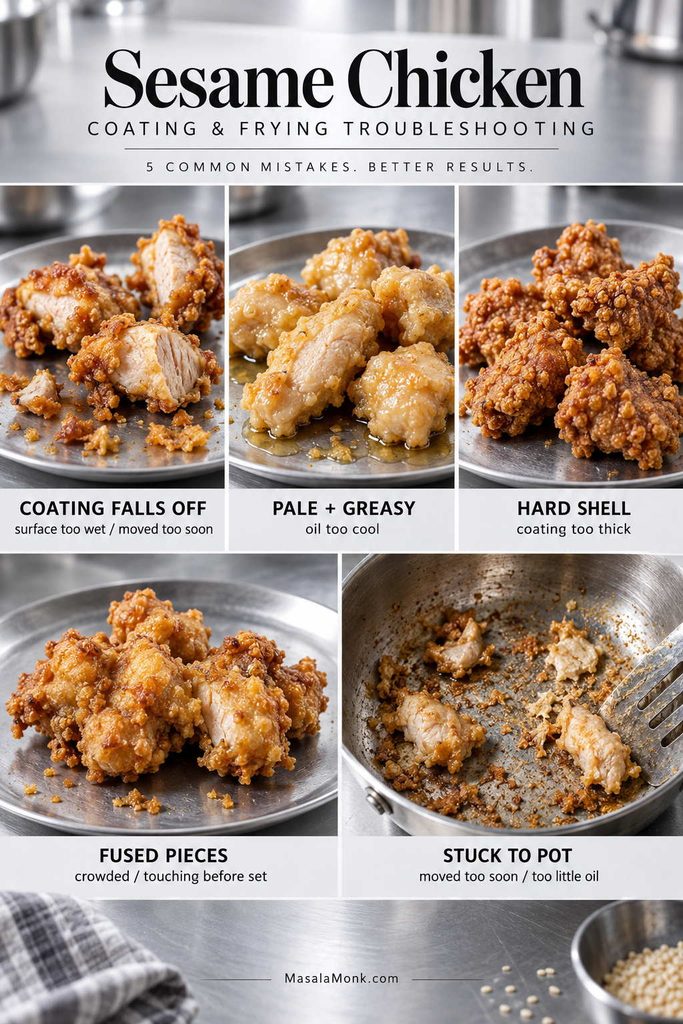
Sesame Chicken Troubleshooting

Find the moment when it changed. Chicken that was already soft before the glaze arrived points toward the coating or fryer. Chicken that stayed crisp until glazing points toward glaze thickness, amount or timing.

Coating and Frying Problems

ProblemLikely CauseWhat to Change
Coating falls off in the oilToo much surface liquid, weak contact with the dredge or rough handling at the startDrain obvious excess seasoning, press on the coating and give the crust time to set.
Crust slides off when bittenThe coating is too thick or poorly bondedUse a thinner layer and carry less loose marinade into the dredge.
Pieces fuse togetherThe fryer is crowded, or pieces were lowered against one another before the crust setLeave more room between pieces. If two touch, wait until the coating firms before easing them apart.
Crust is hardToo much dry coatingKeep the layer irregular but relatively thin and knock away heavy excess.
Chicken is pale and greasyThe oil stayed too coolLet it recover fully and reduce the next batch size.
Chicken darkens too quicklyThe oil is too hot or the pieces are unusually smallCheck the thermometer and lower the heat before continuing.
Coating sticks to the potToo little oil or the crust stayed against the metal before settingUse roughly 2 in / 5 cm of oil and wait until the coating firms before moving the pieces.
Second fry does not make it crispThe first fry left the crust greasy, wet or damagedCorrect the first-fry conditions; do not simply extend the hotter fry.
Five sesame chicken frying problems shown together: coating falling off, pale greasy crust, hard coating, fused pieces, and chicken stuck to the pot.
For a failed batch, keep one piece unsauced. Comparing it with a glazed piece quickly tells you whether the texture problem began in the fryer or appeared during finishing.

Glaze and Finishing Problems

ProblemLikely CauseWhat to Change
Chicken was crisp until glazedThe glaze was too thin, too abundant or left around the chicken too longFinish the glaze first and use only enough to coat the surface.
Chicken softens after several minutesMoisture from the glaze is working into the crust, especially if the chicken is heavily sauced or coveredServe promptly and keep extra glaze separate.
Glaze flavor or texture is offThe balance or thickness needs adjustmentFix it before adding chicken using the recovery guide above.
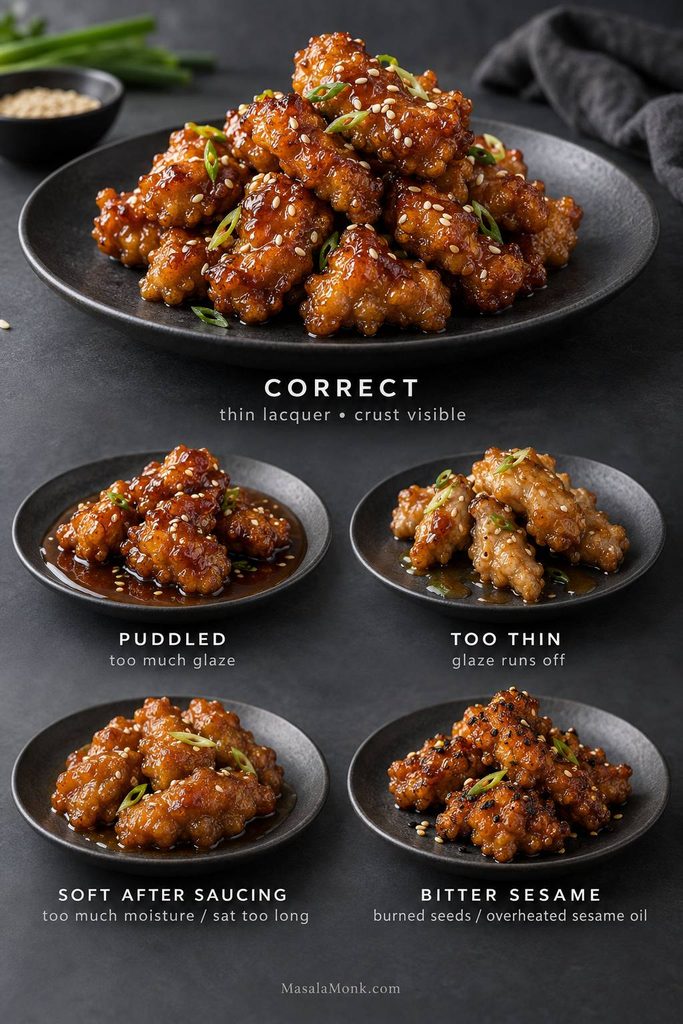
Sesame flavor tastes bitterBurned seeds or overheated toasted sesame oilToast seeds gently and add sesame oil after thickening.
Glaze troubleshooting board showing correct thin lacquer, puddled glaze, glaze that is too thin, softened chicken after saucing, and bitter scorched sesame.
When the glaze looks uncertain, test one piece before adding the whole batch. Visible crust means continue; pooling, running or heavy ropes mean fix the glaze first.

Sesame Chicken vs General Tso’s Chicken vs Orange Chicken

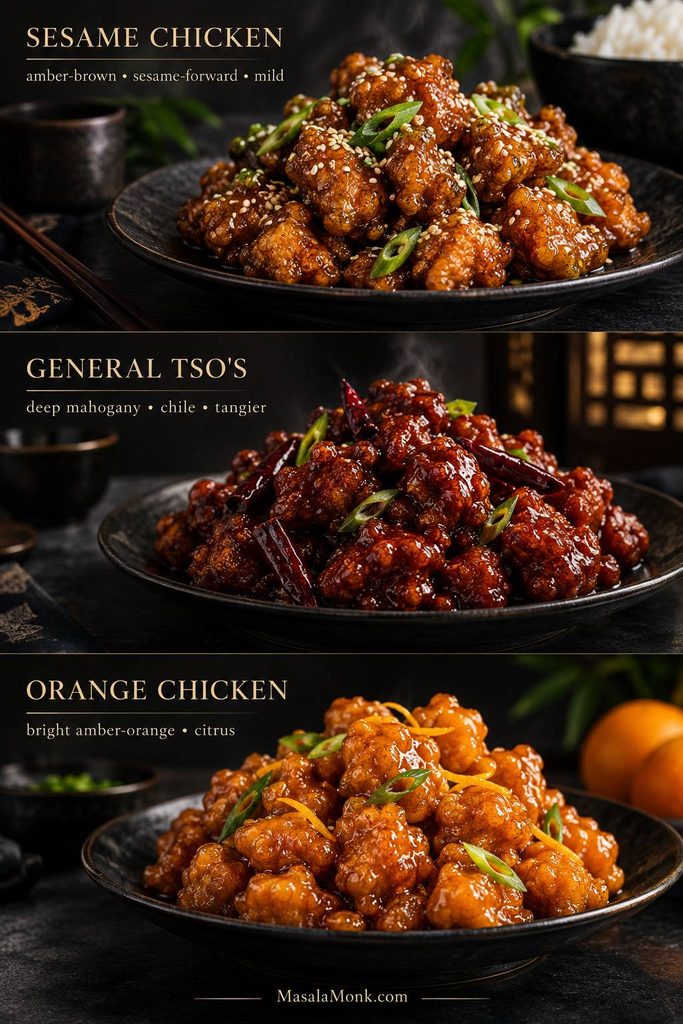
The main difference is the glaze. Sesame chicken is usually mild and sesame-forward. General Tso’s chicken is generally darker, tangier and more chile-forward, while orange chicken is defined by citrus.

Restaurant versions vary, but sesame chicken should taste meaningfully of toasted sesame—not like a generic sweet sauce with seeds scattered over it. For a chicken stir-fry built around dried chiles, peanuts and a tangier sauce, see our Kung Pao Chicken.

Three plated chicken dishes compared vertically: amber sesame chicken with sesame, dark General Tso's chicken with dried chiles, and brighter orange chicken with citrus.
Look past color: toasted sesame, chile and citrus are the flavors that distinguish sesame chicken, General Tso’s chicken and orange chicken.

Make Ahead, Store and Reheat

If you know you will save some chicken, keep that portion unsauced. Fried coating has a much better chance of crisping again when it has not spent the night absorbing glaze.

What You Can Prepare Ahead

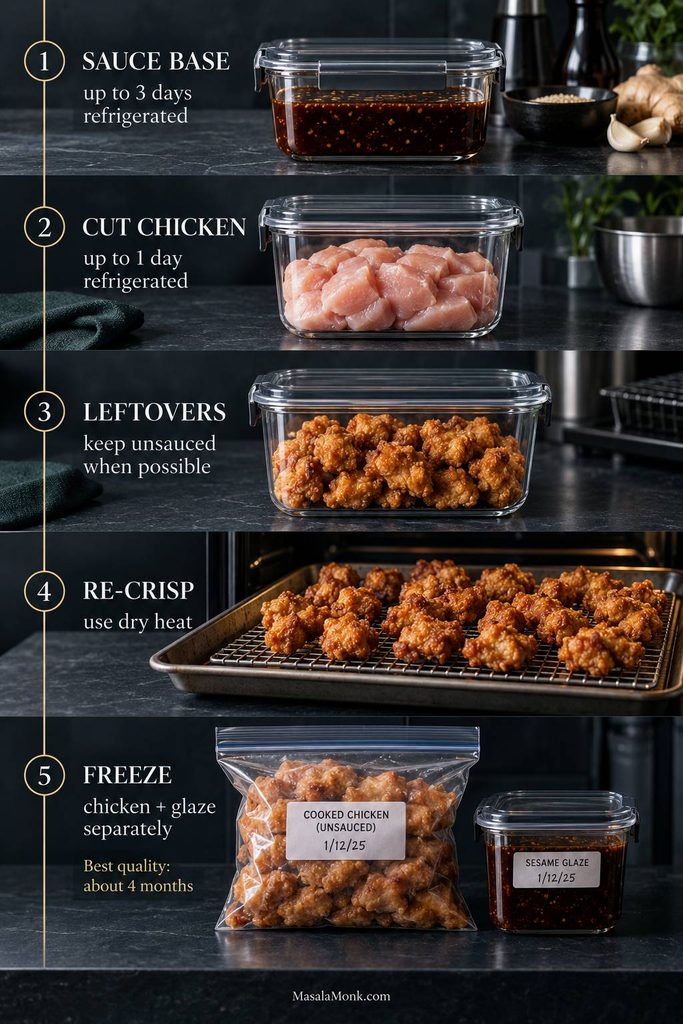
  • Sauce base: mix the soy sauce, honey, brown sugar, rice vinegar, ketchup, oyster or mushroom sauce, water and optional MSG up to 3 days ahead. Refrigerate in a covered container.
  • Chicken: cut it up to 1 day ahead, keep it covered and refrigerated at 40°F / 4°C or below, and do not add the egg-white seasoning until you are closer to cooking.
  • Dry dredge: combine the cornstarch, flour, baking powder, salt and white pepper several days ahead and keep it airtight and dry.
  • Slurry: mix it close to cooking. Cornstarch settles quickly, so stir again immediately before using.

Cooked Chicken for Another Day

Do not deliberately partly cook chicken, chill it and finish it later. Cook it fully to 165°F / 74°C, cool promptly and store safely.

Re-crisp fully cooked unsauced pieces in a hot oven, air fryer or briefly in hot oil before adding warm glaze. The result will not be identical to a fresh batch, but keeping chicken and glaze separate gives you the best chance.

Leftovers and Freezing

Refrigerate leftovers within about 2 hours and use refrigerated cooked chicken within about 3–4 days. Reheat thoroughly to 165°F / 74°C.

Unsauced chicken responds best to dry heat from an oven or air fryer. Already-glazed chicken is easier to warm in a skillet or wok; add a teaspoon or two of water if the glaze has tightened too much. The microwave is fastest and gives you the softest crust.

To freeze: cool fully cooked unsauced chicken, freeze the pieces in a single layer until firm, then transfer them to an airtight freezer container or bag. Freeze the glaze separately. USDA lists about 4 months as the best-quality freezer window for cooked or fried chicken, although the crust will still be at its best when freshly cooked. See the USDA chicken storage guidance.

Let frying oil cool completely before straining it for reuse or transferring it for disposal. Never pour cooking oil down the sink.

Five-step sesame chicken storage guide showing sauce base, cut raw chicken, unsauced leftovers, dry-heat re-crisping, and cooked chicken frozen separately from glaze.
For better leftovers, separate is better: dry chicken re-crisps more easily, while the glaze can be warmed and added just before eating.

Sesame Chicken Questions

1. What is sesame chicken made of?

A Chinese-American sesame chicken recipe usually combines bite-size chicken, a crisp fried coating and a sweet-savory sesame glaze made with soy sauce, honey or sugar, vinegar, garlic, ginger and sesame.

2. Is sesame chicken spicy?

Usually it is mild. The optional ¼ teaspoon crushed red pepper gives this sauce a little background warmth. Leave it out for a mild batch or increase it gradually for more heat.

3. Can I use chicken breast instead of thighs?

Yes. Keep the pieces the same size and use 165°F / 74°C at the center as your doneness check. Breast has less margin for overcooking than thigh.

4. Is sesame chicken gluten-free?

Not as written. The flour, conventional soy sauce, many oyster or mushroom sauces, some Shaoxing wines and some packaged baking powders can contain gluten or require label checking. Use certified gluten-free tamari, certified gluten-free sauces and baking powder, plus dry sherry or stock unless your Shaoxing wine is confirmed gluten-free.

For the coating, a pure cornstarch or potato-starch version can provide a gluten-free route, but it behaves differently from the flour-and-starch dredge above. Coat the chicken close to frying and expect a more brittle crust.

5. Can I make sesame chicken without honey?

You can replace the 3 tablespoons / about 63 g honey with 4 tablespoons / about 50 g packed brown sugar plus 1 tablespoon / 15 ml water as a starting point. Honey adds body as well as sweetness, so judge the finished glaze by taste and the spoon-coating cue.

6. Can I use potato starch instead of cornstarch?

Potato starch works well in the same amount: start with 90 g in place of the 90 g cornstarch. Add a little more only if wet patches remain on the chicken.

7. Can I make sesame chicken in an air fryer or oven?

An air fryer or oven can work, but not by moving this exact deep-fry dredge unchanged into dry circulating heat and expecting the same crust. Those methods work better with coatings designed for them. If you mainly want sesame chicken flavor without breading or a pot of oil, our Sesame Ground Chicken is the easier skillet route.


When the chicken is freshly glazed and the crust still has some snap, get it to the table.

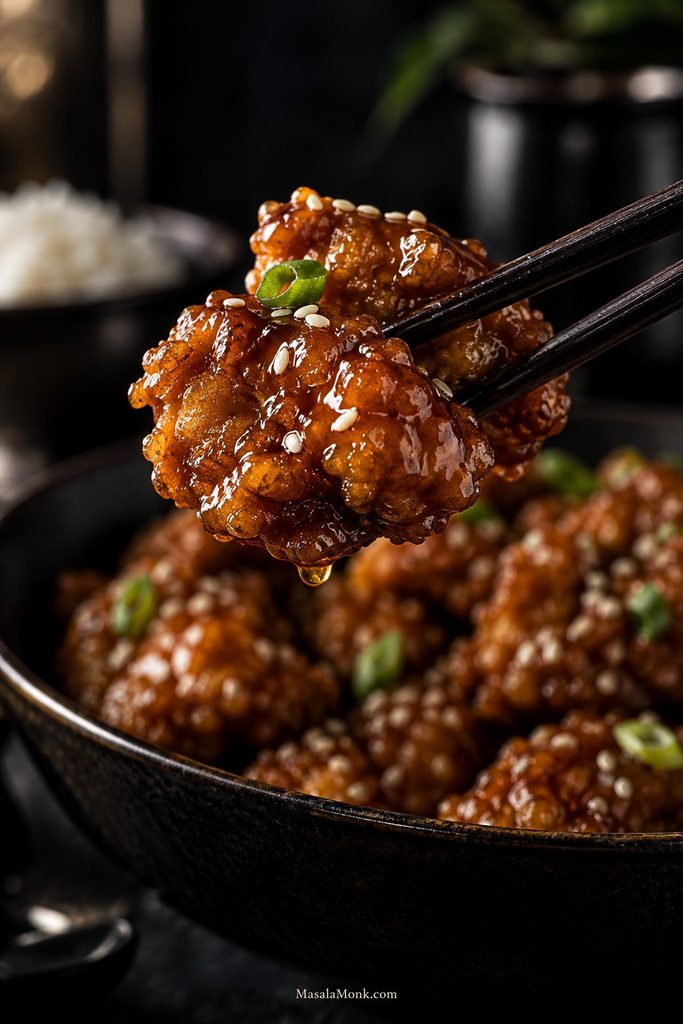
Dark chopsticks lifting two glossy sesame chicken pieces above a bowl, with visible crisp ridges, sesame seeds, scallion and a small glaze droplet.
Thin glossy glaze, craggy fried edges, and enough crunch left for the first bites.

Extra sauce can wait for the rice. The chicken shouldn’t.

Posted on — Leave a comment

Chicken Chow Mein Recipe: Easy Takeout-Style Noodles With Homemade Chow Mein Sauce

Chicken chow mein in a dark carbon-steel wok with thin chicken strips, medium-thin noodles, green cabbage, bean sprouts, carrots and scallions, with glossy strands and scattered browned edges.

Chow mein does not give you much time to think once the pan is hot. Chicken comes out, vegetables go in, noodles hit the hot surface, and the sauce has only a minute or two to turn everything glossy before dinner is ready.

That speed is part of the appeal—and the reason homemade chicken chow mein can unravel so quickly. Noodles go in wet. Cabbage cools the pan. Chicken keeps cooking while everything else catches up. A little more sauce seems like the answer, and suddenly the noodles are soft instead of fried.

When it goes right, you can smell the difference before the pan reaches the table: toasted noodles, hot garlic and ginger, the savory edge of soy and oyster sauce. The chicken stays juicy, the vegetables snap, and a few noodle strands catch darker around the edges while the rest remain springy.

This recipe gets there by keeping the jobs separate. Thin strips of chicken get a short cornstarch marinade, the vegetables cook and come out, and the noodles get a mostly empty pan. Everything meets again only when each part is ready.

A wok is excellent, but you do not need restaurant equipment. A wide skillet works too.

Quick Answer

Good chow mein depends on timing and space as much as ingredients. The useful cue is simple: noodles should bend, separate and arrive at the wok without dripping. Anything already cooked can then make room for the next stage.


How to Make Chicken Chow Mein

Recipe card: servings, timings, ingredients, equipment and the complete method are below.

The chicken and vegetables come out before the noodles go in. It can look fussy on paper, but it makes the cooking easier: nothing sits around overcooking while you fight for space. It is one pan, just not one pile.

Once everything is sliced and the sauce is mixed, the actual stir-frying is only a handful of short stages.

Serves4 as a generous main course
DifficultyEasy, but fast-moving once the pan is hot
PrepAbout 20–25 minutes
CookingAbout 12–15 minutes
TotalAbout 35–40 minutes
Best pan14-inch / 35 cm wok; a roomy 12-inch / 30 cm skillet also works with batching

Chicken and Quick Marinade

  • 450 g / 1 lb boneless skinless chicken thighs or chicken breast
  • 1 tablespoon / 15 ml Chinese light soy sauce or regular/all-purpose soy sauce
  • 1 tablespoon / 15 ml Shaoxing wine
  • 1 tablespoon / about 8 g cornstarch (cornflour in the UK)
  • 1 tablespoon / 15 ml water
  • 1 teaspoon / 5 ml neutral cooking oil
  • ¼ teaspoon white pepper

Cut the chicken about 5–6 mm / ¼ inch thick and roughly 5 cm / 2 inches long where practical. Slice chicken breast across the grain.

Thin strips of raw chicken being sliced for chow mein beside a small bowl of marinade on a dark kitchen work surface.
For cleaner, thinner chicken strips, start with meat that is very cold and slightly firm. Consistent pieces cook at a similar pace, which matters once a fast stir-fry leaves little time to chase individual pieces for doneness.

Sauce Ingredients

  • 2 tablespoons / 30 ml Chinese light soy sauce or regular/all-purpose soy sauce
  • 2 teaspoons / 10 ml dark soy sauce
  • 2 tablespoons / 30 ml oyster sauce
  • 1 tablespoon / 15 ml Shaoxing wine
  • 2 teaspoons / about 8 g sugar
  • ¼ teaspoon white pepper
  • 1 teaspoon / 5 ml toasted sesame oil
  • 1 teaspoon / about 3 g cornstarch (cornflour in the UK)
  • ¼ cup / 60 ml water or unsalted chicken stock
  • ¼ teaspoon MSG or ½ teaspoon chicken powder, optional

Keep another 2 tablespoons / 30 ml water beside the stove in case the noodles need loosening at the end.

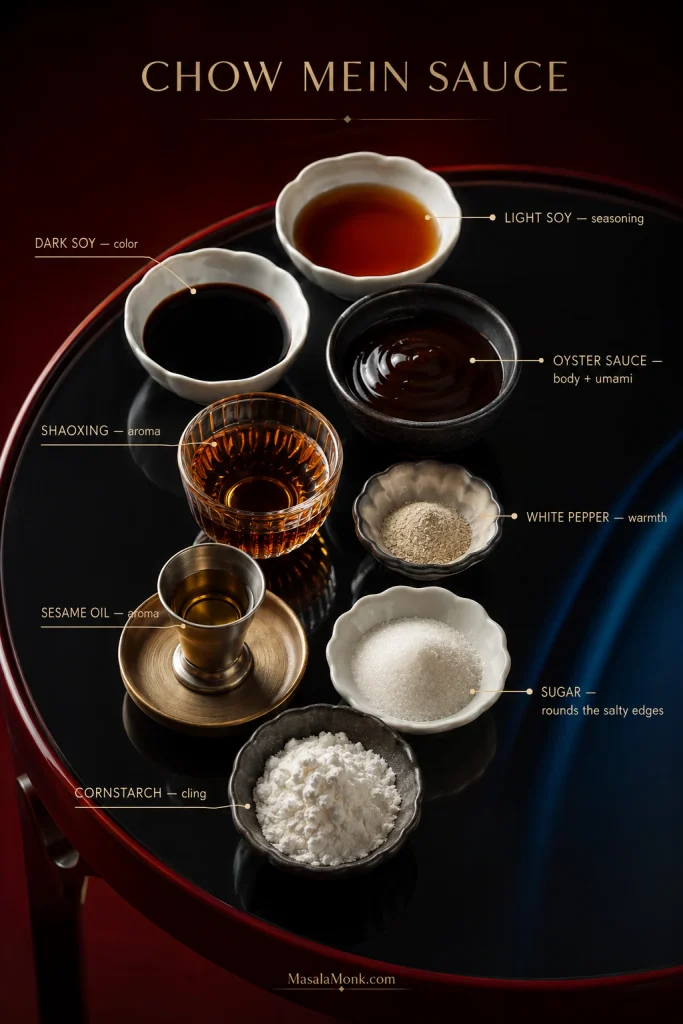
Measured ingredients for homemade chow mein sauce arranged in small bowls and vessels, including soy-based sauces, seasonings and liquid ingredients.
Give the sauce one final stir before it hits the wok. That keeps the seasoning and cornstarch evenly dispersed, so the sauce behaves consistently from the first splash to the last.

Noodles, Vegetables and Aromatics

  • 250 g / 9 oz dried Chinese egg or dried chow mein noodles
  • Using fresh noodles? Use the package amount intended for about 4 servings. Fresh noodle products vary too much in hydration and cooking state for one reliable gram-for-gram conversion from dried noodles.
  • 3 tablespoons / 45 ml neutral high-heat oil such as peanut, canola, grapeseed or rice-bran oil, divided
  • 1 teaspoon neutral oil for drained noodles only if they are prone to sticking
  • 250 g / 9 oz green cabbage, thinly shredded
  • 1 medium carrot, about 100 g / 3½ oz, cut into fine matchsticks
  • 150 g / 5 oz bean sprouts
  • 4 scallions (spring onions), cut into 2.5–5 cm / 1–2 inch lengths
  • 3 garlic cloves, finely chopped
  • 15 g / ½ oz fresh ginger, finely grated or minced

Instructions

Have Everything Ready Before the Wok Gets Hot

Prepared chicken chow mein ingredients beside an empty wok, including marinated chicken, noodles, sauce, cabbage, carrots, bean sprouts, scallions, garlic, ginger and cooking oil.
Arrange the station in cooking order: keep the quick finishing ingredients separate so they can hit the wok only when the final texture needs them.

Prep Before the Wok

  1. Mix the sauce. Whisk the light soy, dark soy, oyster sauce, Shaoxing wine, sugar, white pepper, sesame oil, cornstarch, water or stock, and optional MSG or chicken powder until smooth. Set it aside and stir again just before it goes into the pan; the cornstarch will settle.
  2. Cut the vegetables, then marinate the chicken. Prepare the cabbage, carrot, scallions, garlic and ginger first. On a separate or thoroughly cleaned board, slice the chicken and mix it with the marinade ingredients. Wash your hands and clean the knife, board and anything else that touched the raw chicken immediately. Leave the chicken for 10–15 minutes while you prepare the noodles.
  3. Prepare the noodles last. Start checking dried noodles about a minute before the package’s full cooking time. Stop when the strands bend and separate easily but feel firmer than you want to eat. Drain and briefly rinse under cool water, then shake the colander firmly. Spread the noodles loosely for a couple of minutes. Lift a small handful; dripping noodles need more draining or a gentle blot with a clean kitchen towel. Toss with 1 teaspoon oil only when the strands are prone to sticking.

Cook in Stages

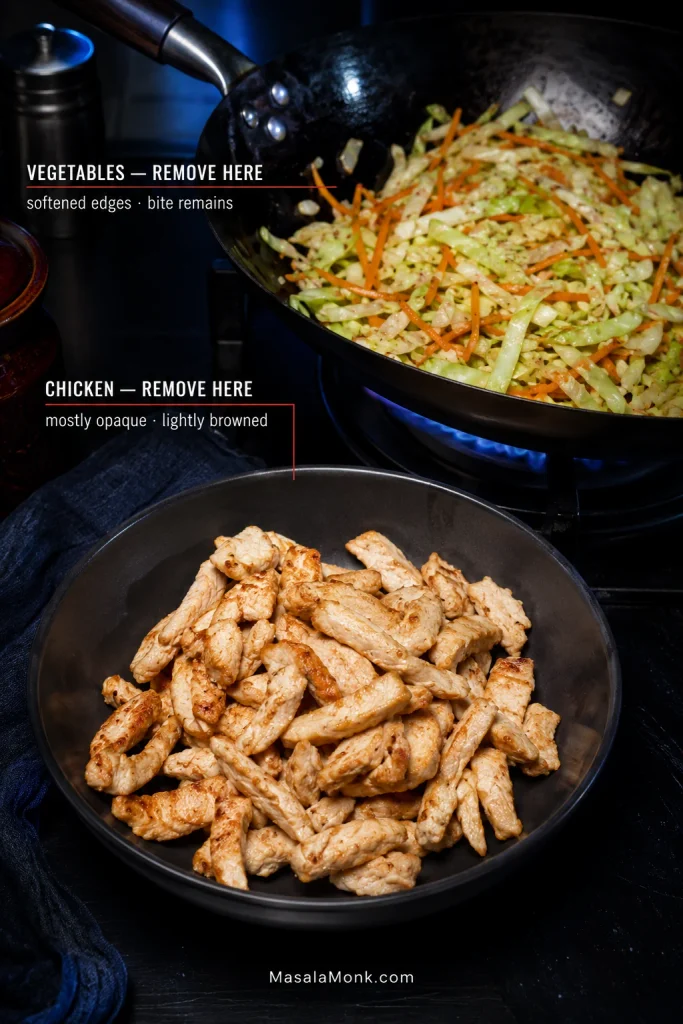
  1. Partially cook the chicken. Heat the wok or skillet over medium-high heat until hot. Add 1 tablespoon oil and spread the chicken into a loose layer. An immediate sizzle is what you want. Cook in two batches when the pieces would otherwise heavily overlap. Stir-fry for about 2 minutes, until most surfaces are opaque with a little browning. Transfer to a clean plate or bowl; the thickest pieces may remain slightly underdone inside.
  2. Cook the cabbage and carrot. Add another tablespoon oil and stir-fry for about 1½–2 minutes. The cabbage should soften at the edges while keeping some bite; the carrot should bend but not flop. Add the garlic and ginger for the final 20–30 seconds, just until their raw sharpness disappears and the aroma turns strong and savory. Let obvious liquid evaporate, then transfer everything to a bowl.
Lightly browned chicken strips and briefly stir-fried cabbage, carrots and other vegetables in a hot wok, with the vegetables still bright and structured.
Let excess cooking juices stay behind. The chicken and vegetables have already done their job; bringing that liquid back can make the final noodle toss wetter than intended.
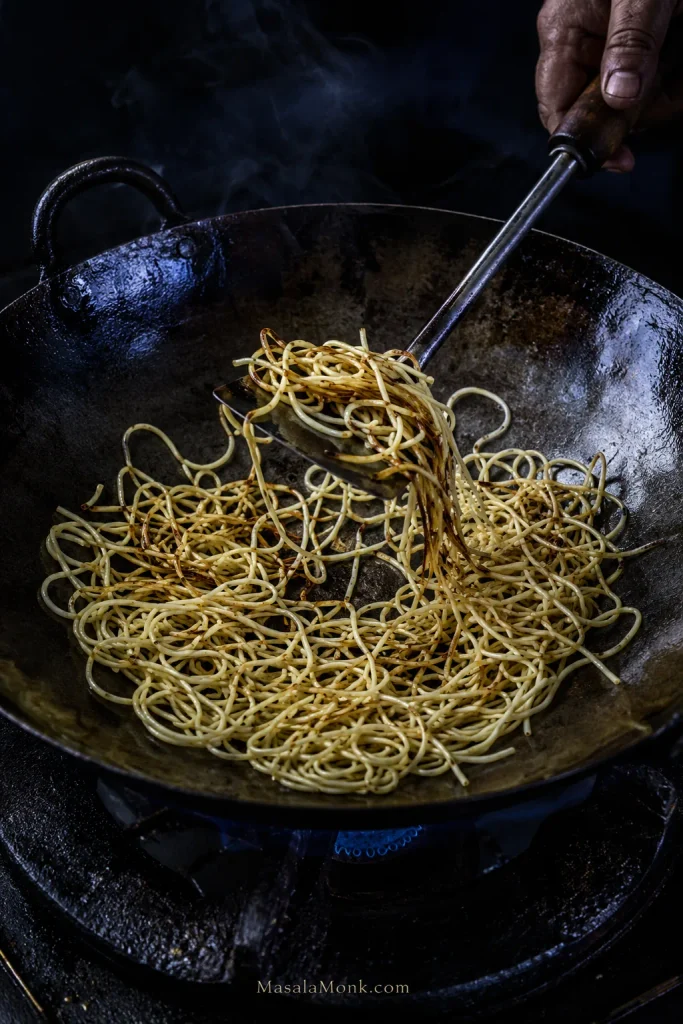
  1. Give the noodles the pan. Add the final tablespoon of oil and spread the noodles across as much hot surface as possible. Leave them alone for 30–45 seconds, then lift and turn. Continue for about 2 minutes. The pan should sound like frying, not simmering. Some strands will curl, wrinkle or darken while others stay pale. Uneven browning is fine. Those toasted patches give the noodles a deeper, nuttier edge that comes through after the sauce goes in.
Medium-thin yellow chow mein noodles spread across a dark wok with exposed metal and scattered golden-brown toasted patches, without chicken, vegetables or sauce.
Lift and turn the noodles in broad sections instead of stirring constantly. More strands get direct pan contact, so you build toasted edges without sacrificing the softer noodles underneath.

Finish and Serve

  1. Finish the stir-fry. Stir the sauce again and pour it over the noodles. Immediately return the chicken and vegetables. Leave behind any noticeable puddle of thin watery liquid on the chicken plate. Toss for 1–2 minutes, adding the reserved water 1 tablespoon at a time only when the noodles need loosening. A crowded 12-inch skillet is easier to handle as two half-batches.
  2. Add the bean sprouts and scallions. Give them 30–60 seconds. The sprouts should be hot, juicy and crisp. The thickest piece of chicken should reach 165°F / 74°C.
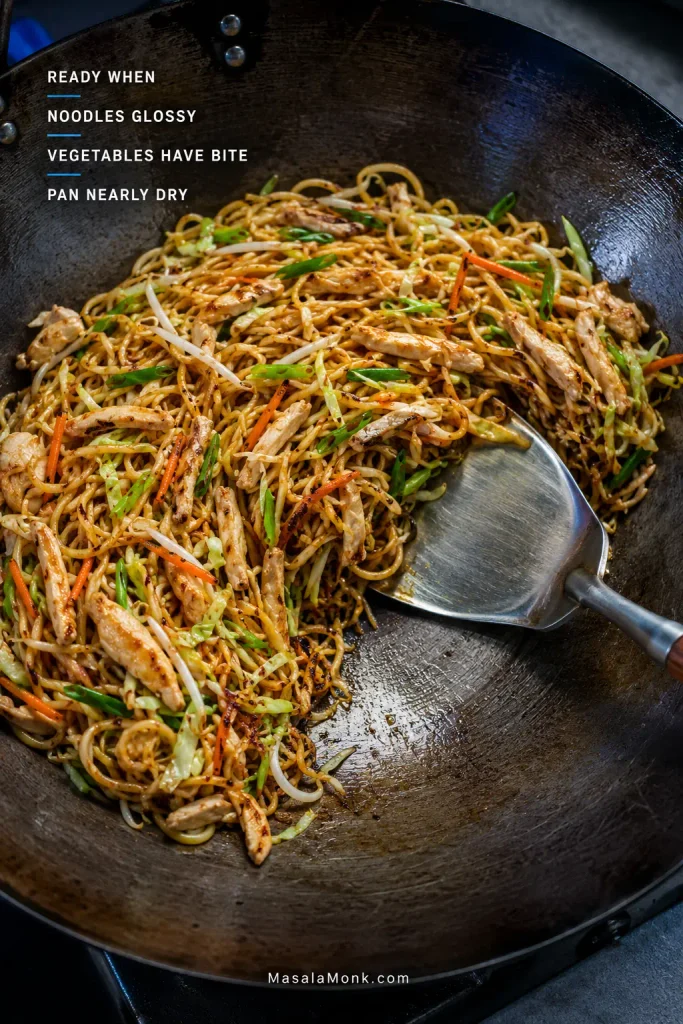
  3. Taste one forkful. It should be savory first, with mild sweetness and white-pepper warmth behind it. No single flavor component should dominate. The best forkful has chicken, cabbage or a crisp bean sprout tangled through noodles that are soft in places and toasted in others. Very little sauce should remain at the bottom. Turn off the heat and serve immediately.

Prefer softer noodles? Shorten the dedicated noodle-frying stage a little. For more browned edges, give them another 30–60 seconds of pan contact before the sauce goes in.

A Little Uneven Is Fine

The noodles should pull apart easily, the chicken should stay juicy, and some crunch should remain in the vegetables. Broken strands, darker patches and slightly softer cabbage are normal.

Finished chicken chow mein in a wok with separate glossy noodles, thin chicken strips, cabbage, bean sprouts, carrots and scallions, with little visible liquid underneath.
Use appearance and movement as the final check: glossy strands, little loose liquid, visible vegetables and chicken spread through the noodles. When those cues line up, turn off the heat and serve.

If this does not look like the chow mein you grew up ordering, you’re probably not misremembering it.

Why Chicken Chow Mein Looks Different Depending Where You Live

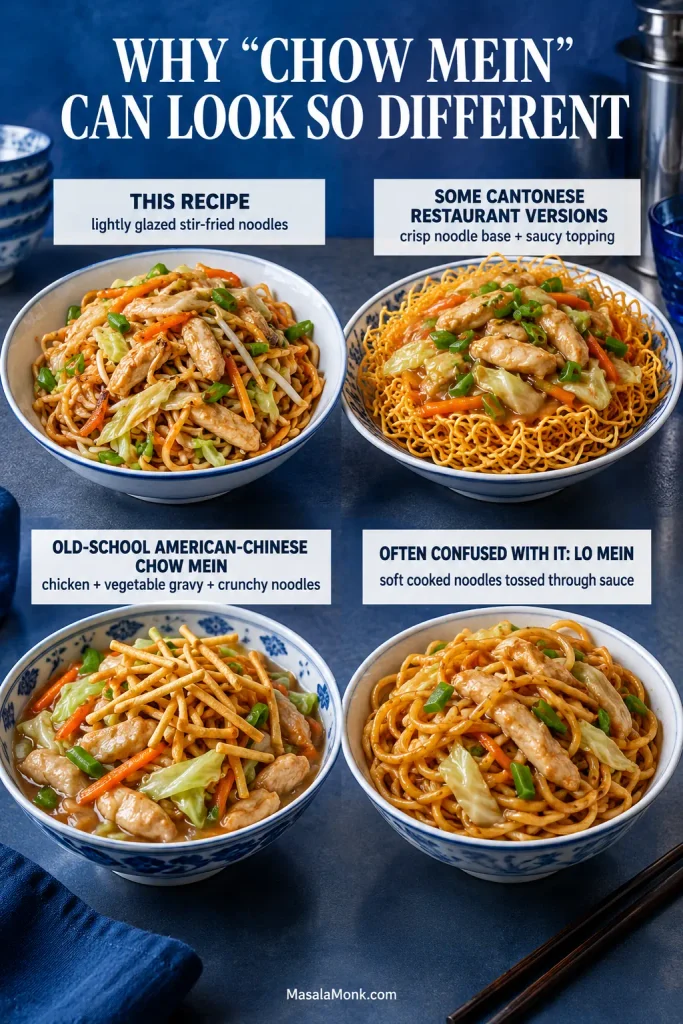
At its broadest, chow mein refers to noodles that are fried or stir-fried, but the dish can look very different depending on region and restaurant tradition. This recipe is the lightly glazed stir-fried-noodle style, with chicken and vegetables folded back through noodles that have had direct contact with the pan.

Some Cantonese restaurant versions use a crisp noodle base topped with saucy meat and vegetables. Some old-fashioned American-Chinese or Subgum-style chow mein is a chicken-and-vegetable gravy dish served with crunchy fried noodles.

Lo mein usually starts with cooked noodles that are tossed through sauce rather than deliberately fried for browned edges. It tends to be softer and more sauce-forward; this chow mein puts more emphasis on direct pan contact and noodle texture.

Here, the target is springy noodles, scattered browned edges, crisp vegetables and tender chicken.

Four noodle dishes compare lightly glazed stir-fried chicken chow mein, crisp noodles with a saucy topping, American-Chinese chow mein with gravy and crunchy noodles, and soft sauce-tossed lo mein.
Menu wording can hint at the expected texture: “crispy,” “pan-fried” or “lo mein” often point toward different noodle treatments. Regional usage varies, though, so the dish description matters more than the name alone.

The Chow Mein Noodle Guide

If you’ve ever followed the noodle packet perfectly and ended up with a sticky heap in the wok, you may not have cooked the noodles “wrong.” They may simply have been too soft—or too wet—for another round of heat.

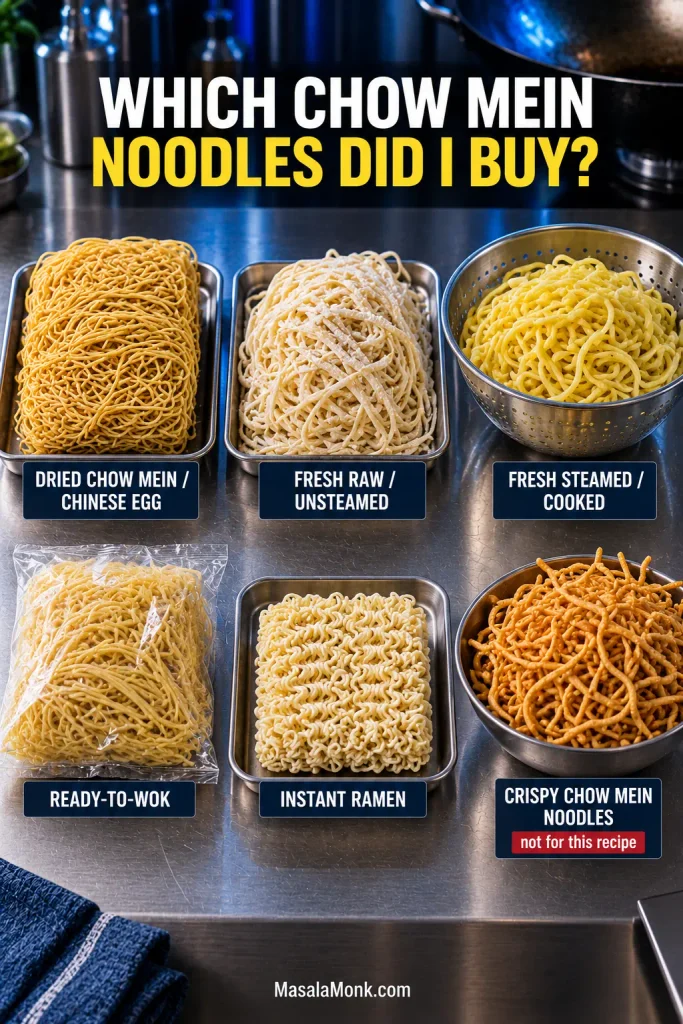
Open the packet before the water boils and see what you actually bought. Raw noodles, steamed noodles and ready-to-wok noodles can look remarkably similar while starting at very different stages of cooking.

Which Chow Mein Noodles Did I Buy?

Guide comparing several noodle products used or sold for chow mein, including fresh or steamed noodles, dried noodles and crisp fried noodles, with the crispy product identified separately.
Package names are clues, not guarantees. Two products labeled “chow mein noodles” may have undergone very different amounts of cooking, so the preparation directions on an unfamiliar packet are often more useful than the product name itself.
If the package says…What you probably haveWhat to do
Dried chow mein / Chinese egg noodlesDry and uncookedBoil until flexible but firmer than serving doneness, then cool and drain thoroughly.
Fresh raw / unsteamed egg noodlesFresh but uncookedCook according to the package, often with a brief boil or blanch. Stop while they retain some firmness.
Fresh steamed / cooked noodlesAlready substantially cookedUsually loosen or briefly blanch rather than giving them a full boil.
Ready-to-wok / straight-to-wok noodlesHydrated and prepared for quick pan cookingLoosen as directed and avoid unnecessary boiling. Watch for extra surface moisture.
Instant ramenDry and very quick-cookingDiscard the seasoning packet and cook only until barely flexible.
Crispy chow mein noodlesAlready fried and crunchyNot the noodle for this recipe.

A note on “Hong Kong-style” noodles: the name describes a noodle style, not one universal preparation state. They may be sold raw, steamed or dried, so the package directions matter more than the words “Hong Kong-style” on the front.

Fresh noodle labels can be maddeningly vague. One yellow packet wants several minutes in boiling water; the packet beside it wants to go almost straight into the wok. The Woks of Life’s Chinese noodle guide (opens in a new tab) is useful when the refrigerated case looks like a wall of nearly identical noodles.

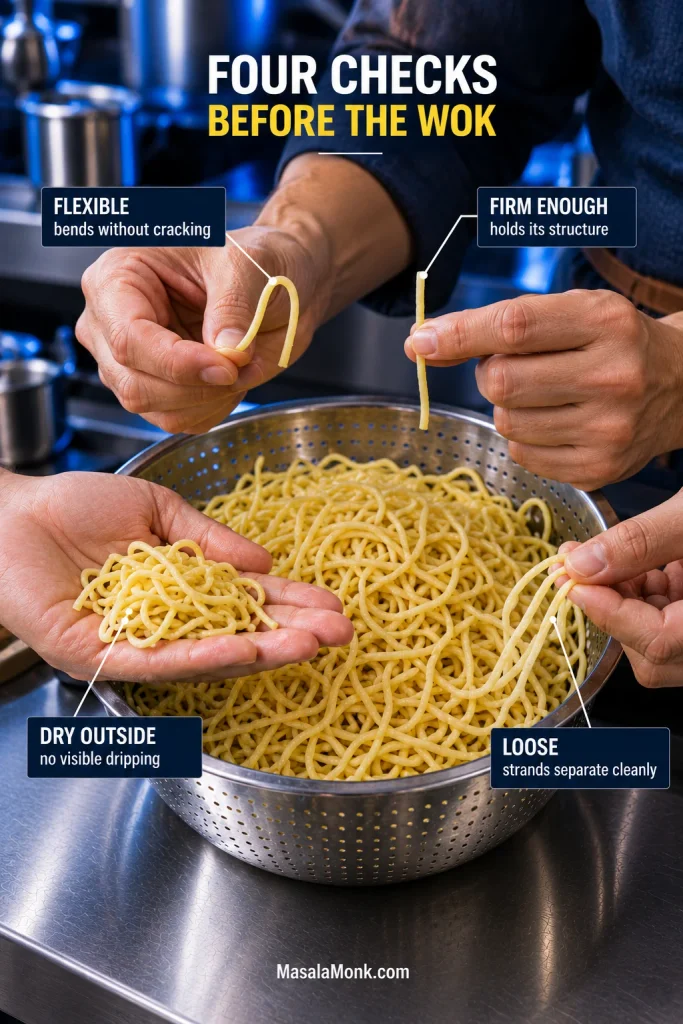
Four Things to Check Before the Wok

  1. Flexible: the noodle bends and separates without cracking.
  2. Firm enough: noodles you boil yourself should remain slightly underdone; pre-cooked noodles need enough firmness to handle another brief cook.
  3. Dry outside: the strands are not carrying obvious water into the pan.
  4. Loose: the noodles are separate instead of compressed into one warm, starchy block.
Four noodle readiness checks labeled Flexible, Firm Enough, Dry Outside and Loose, showing a bent strand, an intact strand, surface-dry noodles and separated strands.
Each noodle check guards against a different failure: flexibility limits breakage, firmness survives the second cook, a dry exterior protects pan heat, and loose strands expose more noodle surface to the wok. Together, they predict behavior rather than merely doneness.

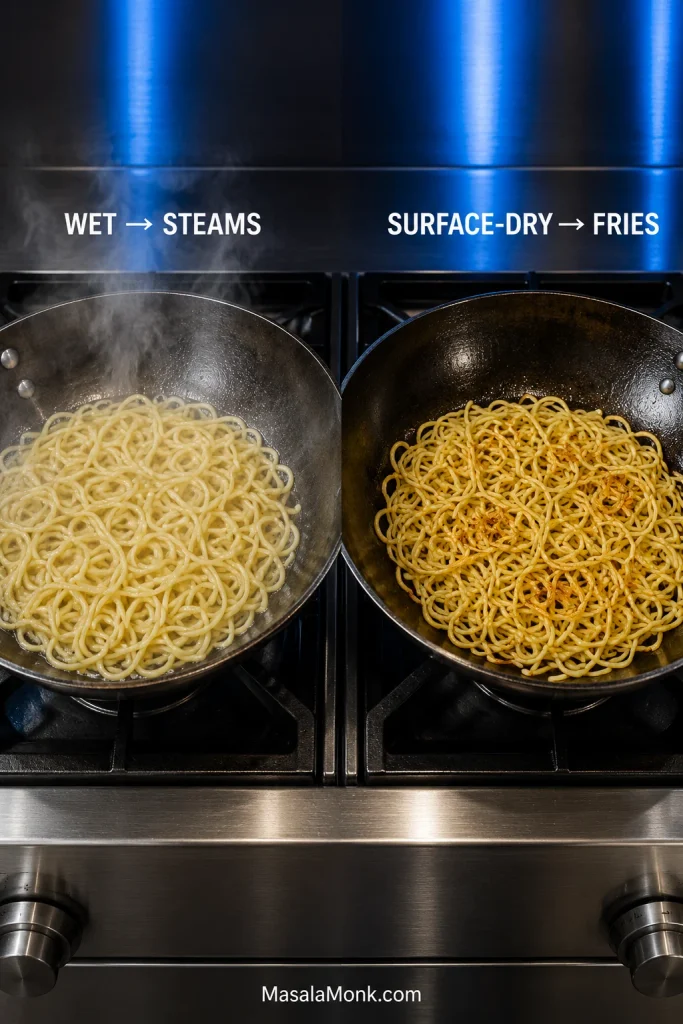
Doneness and dryness are separate problems. A noodle can be cooked correctly and still be wet enough to cool the pan. It can also be dry and separate but already too soft to handle another few minutes of heat.

If water drips when you lift a handful, give the noodles more time in the colander or blot them gently. Wet noodles steal heat.

Two woks compare wet noodles producing heavy steam with surface-dry noodles making direct pan contact and developing browned patches; labels read “Wet → Steams” and “Surface-Dry → Fries.”
“Surface-dry” does not mean dehydrated, cold or stiff. Chow mein noodles can still be warm and flexible; the useful difference is that free water is no longer coating them and consuming the wok’s heat before frying can begin.

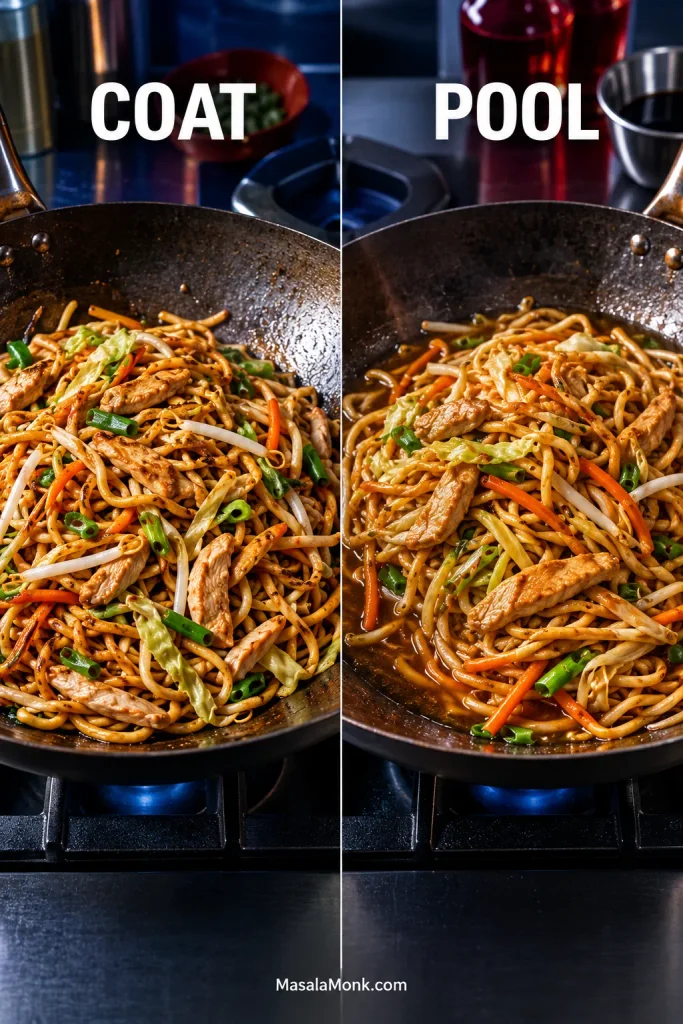
Homemade Chow Mein Sauce: Coat, Don’t Pool

For this version, a good chow mein sauce is almost invisible once dinner is finished. You should taste it everywhere without seeing much of it underneath.

Matched pans labeled Coat and Pool compare glossy separated chicken chow mein with little liquid underneath against wetter noodles sitting in visible dark sauce.
Judge chow mein sauce after it has been tossed over heat for a moment, not at the instant it enters the wok. Cornstarch thickens as it heats, while chicken and vegetables can release moisture of their own, changing the final consistency.

If the noodles taste salty but flat, more soy only pushes the salt higher. Deeper flavor also comes from oyster sauce, Shaoxing wine, white pepper, aromatics and the browning the noodles picked up in the pan.

Light or all-purpose soy does most of the seasoning. Dark soy is there mainly for color and deeper soy flavor. Oyster sauce gives the noodles body and a little sweetness; Shaoxing brings an aromatic note that suits this version. White pepper adds warm, earthy background heat.

One label is worth checking closely here: Shaoxing products sold specifically as cooking wine sometimes contain added salt. That can push an otherwise balanced sauce much farther than expected.

Toasted sesame oil goes into the sauce for aroma, not into the wok as the main frying oil. Sugar softens the salty edges, while the small amount of cornstarch helps the sauce cling. MSG or chicken powder is optional for extra savory depth. You do not need a separate seasoning packet; this sauce already does that job.

The homemade stir-fry sauce guide (opens in a new tab) uses many of the same building blocks for other stir-fries.

When the balance is right, the noodles remain the main event—only darker, fuller and more savory, with an occasional toasted edge coming through.

Tender Chicken, Vegetables With Some Bite

Chicken thigh gives you a little more margin before it dries out. Breast works well too, especially when thinly sliced across the grain. The cornstarch leaves a light coating around either cut during both trips through the heat; baking soda is not necessary for this method.

Keep the vegetables long and fairly thin. Cabbage works well in narrow ribbons, carrots in matchsticks and scallions in 1–2 inch lengths. Once everything comes back together, the chicken and vegetables should weave through the noodles rather than sitting in separate piles on top.

Wok or Skillet?

On a normal home stove, listen to the pan. A sharp sizzle means the food is frying; a wet, quiet simmer means moisture is taking over.

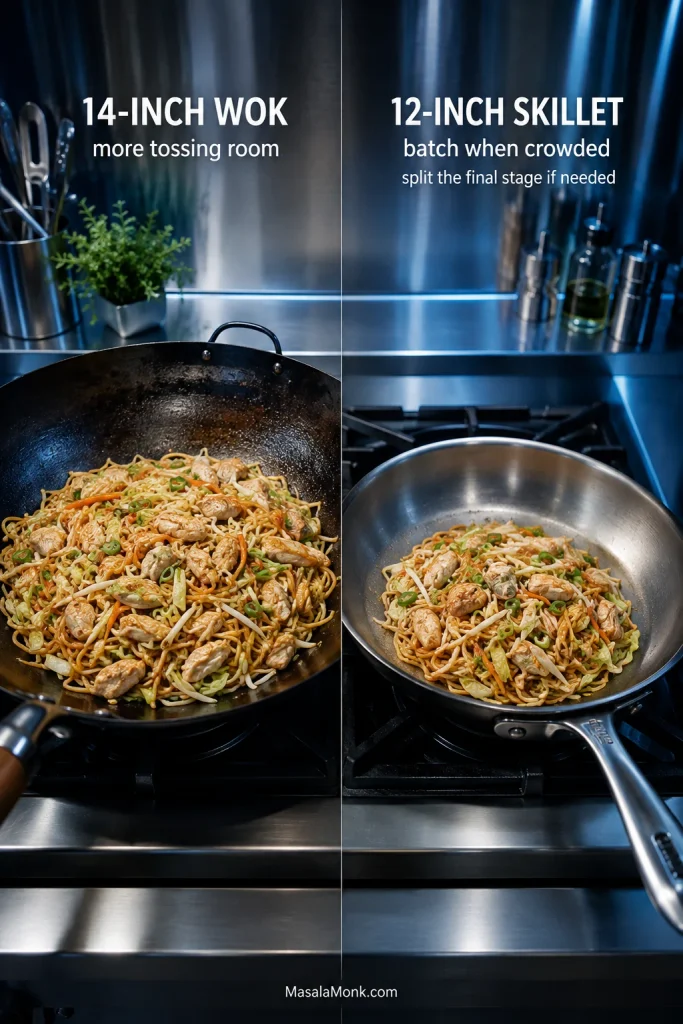
  • 14-inch / 35 cm flat-bottom carbon-steel wok: the best size for the full recipe. Wok shape and burner strength vary, so split the final stage if it feels cramped.
  • 12-inch / 30 cm large skillet: completely workable. Batch the chicken when needed and expect two half-batches when everything goes back in if the skillet is shallow.
  • Coated nonstick pan: usable, but follow the manufacturer’s heat guidance rather than automatically heating it until it smokes.
Large carbon-steel wok holding chicken chow mein beside a 12-inch stainless skillet with a smaller batch, illustrating the difference in usable cooking and tossing space.
A wok gives you more vertical room to move food; a skillet depends more on its flat cooking surface. That makes spreading and batching especially useful as the pan fills.

A home burner will not give you exactly the same smoky char and aroma as very high-heat restaurant wok cooking. That’s fine. Good direct pan contact gives the noodles plenty of toasted character.

Cooking for more people? Make two complete batches. Double the ingredients, not the pan load.

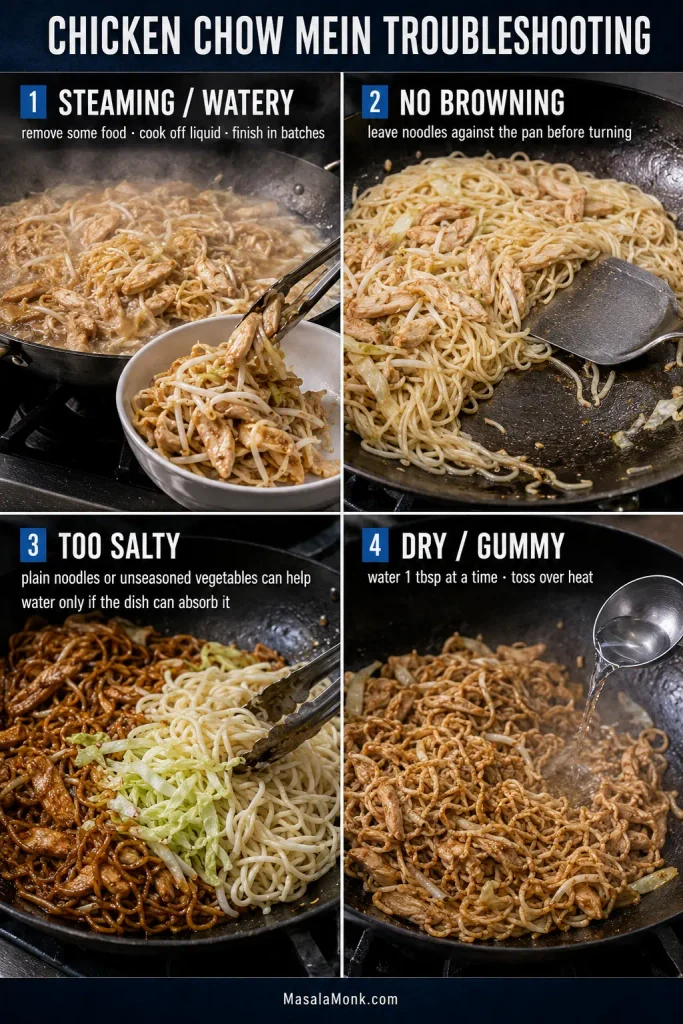
Chicken Chow Mein Troubleshooting

If dinner is already in the pan, don’t start over. Find the problem that looks familiar and fix that first. You can analyze dinner later.

Four troubleshooting scenes show watery steaming chow mein with food being removed, pale noodles resting against the pan, plain noodles and cabbage added to an overly seasoned batch, and water added to dry clumped noodles.
Before changing the seasoning, identify the actual failure: too much moisture, poor pan contact, too much salt or dry/tight noodles. Fix the physical problem first; otherwise one rescue can create another.

Before the wok

ProblemFix
Noodles already too softCool and drain immediately. Keep their later frying and saucing brief.
Noodles stuck in one blockLoosen gently. A quick cool rinse can help boiled dried noodles; drain and dry them again afterward.
Vegetables dripping wetPat them dry before they enter the pan.
Sauce tastes far too saltyDilute it slightly with water before cooking. Check the stock, chicken powder and cooking wine too.
Cornstarch lumpyWhisk the lumps smooth with a small amount of liquid before mixing them back into the sauce.

While frying

ProblemFix
Pan filling with water / everything steamingStop adding food. Remove some if needed and let the liquid cook off before continuing; finish in batches.
Noodles stickingCheck crowding and moisture before adding more liquid. Lift gently instead of scraping hard.
No noodle browningGive the strands 30–45 seconds of contact before turning instead of stirring continuously.
Chicken cooking too fastTake it out and return it near the end.
Noodles and vegetables will not mixLift and toss. Loosen clumps gently instead of chopping through the strands.

After the sauce goes in

ProblemFix
Too saltyAdd plain noodles or extra unseasoned vegetables if you have them, or a small splash of water if the dish can absorb it. Sugar will not remove salt.
Too sweetAdd a small splash of water and toss. Extra plain noodles or vegetables help even more.
BlandCheck salt first. Then try a little oyster sauce, white pepper or optional MSG/chicken powder. Add soy only a teaspoon at a time.
Too dry or sauce gummyAdd water 1 tablespoon at a time and toss over heat until the noodles loosen and regain their gloss.
Too wetKeep the pan uncovered and reduce the liquid. Remove some food first if necessary.
Chicken toughNext time, slice it thinner and remove it sooner during the first fry.

Substitutions and Variations

Chow mein substitution guide showing Chinese noodles with instant ramen and thin pasta, dark soy sauce, oyster-style sauces and small vessels representing Shaoxing wine alternatives.
When using instant ramen, the noodle block is the useful substitute—not the seasoning packet. The packet can push the dish far saltier than the homemade sauce is designed to be.
Instead of…Try…Expect…
Chow mein / Chinese egg noodlesInstant ramen — the closer quick substituteThinner, softer noodles. Discard the seasoning packet and cook only until barely flexible.
Chow mein / Chinese egg noodlesThin spaghetti or angel hair — a pantry fallbackA firmer, more pasta-like chew.
Dark soy sauceOmit it rather than replacing it volume-for-volume with regular soyThe noodles will be paler, but the sauce balance stays closer to the original.
Oyster sauceVegetarian mushroom oyster-style sauceThe closest straightforward replacement.
Oyster sauceHoisin sauceNot a neutral swap; the result will be sweeter. Reduce or omit the sugar.
Shaoxing wineDry sherryA similar aromatic role.
Shaoxing wineStock or waterLess aromatic depth, but the method works.
Bean sproutsExtra cabbage, bok choy or another crisp vegetableA different crunch without changing the basic method.

For chicken and mushroom chow mein: add about 150 g / 5 oz sliced mushrooms and reduce the cabbage to about 150 g / 5 oz. Cook the mushrooms until most of the water they release has evaporated. Keeping the full cabbage quantity as well works better when the mushrooms get their own turn in the pan.

Make it spicy

Add chili crisp, chili oil, sliced fresh chili or a little chili-garlic sauce at the end. Sweet chili sauces change the balance, so use less sugar in the chow mein sauce when needed.

Dietary adjustments

Lower sodium: use lower-sodium soy sauce and unsalted stock, skip the chicken powder, and compare the sodium on the noodles, oyster sauce and cooking wine. Some Shaoxing cooking wines contain added salt.

Gluten-free: use noodles labeled for a gluten-free diet, certified gluten-free tamari or soy sauce, and a gluten-free oyster-style sauce. Check the Shaoxing wine and optional chicken powder too; many Shaoxing products are not gluten-free. Use a verified gluten-free dry sherry or sake, or replace the wine with stock or water when needed.

Halal: use halal-certified chicken and check the noodles, sauces and stock according to the requirements you follow. Replace Shaoxing wine with stock, water or an appropriate certified alcohol-free cooking seasoning.

Using leftover cooked chicken: skip the raw-chicken marinade and add sliced cooked chicken near the end, giving it enough time to reheat fully to 165°F / 74°C. Adding it much earlier usually dries it out.

Make-Ahead, Storage and Reheating

The sauce, cabbage and carrot can be prepared up to a day ahead and refrigerated separately. Raw chicken can be sliced ahead too, but keep it covered and completely separate from the vegetables. Leave the bean sprouts and scallions until close to cooking time.

If you need to boil the noodles ahead, cool them promptly, drain and surface-dry them well, toss with a very small amount of neutral oil and refrigerate them separately.

Cool leftover chicken chow mein promptly and refrigerate it in a covered container for up to 3–4 days. The USDA’s food-safety guidance (opens in a new tab) recommends reheating leftovers to 165°F / 74°C.

A skillet or wok gives chilled noodles the best chance of loosening without turning mushy. Add about 1 tablespoon water per serving and toss over medium-high heat until steaming hot and the added water has mostly evaporated.

Leftover chicken chow mein reheating in a dark skillet while a hand adds a tablespoon of water near the pan edge, with steam rising from noodles, chicken and vegetables.
Let steam loosen cold noodle clumps first rather than forcing them apart with a spatula. Once the strands relax, gentle tossing reheats them with less tearing.

For the microwave, cover loosely and heat in short intervals, stirring between them.

Freezing is possible but not ideal. The noodles soften and bean sprouts lose much of their crunch after thawing.

What to Serve With Chicken Chow Mein

Chicken chow mein is already a full meal, so sides work best when they bring a different texture or temperature rather than more heaviness. A small bowl of egg drop soup (opens in a new tab) keeps things light and broth-based, while a cool cucumber salad (opens in a new tab) gives the hot, savory noodles a crisp, sharp contrast.


Once the noodles are glossy, the vegetables still have some bite and the pan is nearly dry, dinner is done.

Get the chow mein onto plates while it still looks a little unruly. Browned strands, crisp bean sprouts and chicken tucked through the noodles are exactly where they should be.

Close-up chopsticks lifting glossy chow mein noodles with a thin browned chicken strip, cabbage, bean sprout and scallion against a dark background.
The best bite is intentionally varied: toasted noodle edges beside softer strands, tender chicken and a crisp sprout. Serve immediately, while those contrasts are still distinct.
Posted on — Leave a comment

Beef and Broccoli Recipe: Tender Beef, Crisp Broccoli & Chinese-Style Stir-Fry Sauce

Finished beef and broccoli stir-fry with browned beef strips and bright green broccoli coated in glossy brown sauce, served with white rice.

When beef and broccoli is right, the beef bends easily under your fork, the broccoli stays bright with some bite in the stalks, and the brown sauce catches along the edges before slipping into the hot rice underneath.

It can also look perfectly respectable and disappoint at the first bite. Pink beef can be chewy. Wet broccoli can loosen a sauce that seemed fine moments earlier. And a skillet set to “high” can cool so quickly under a pile of cold meat that searing quietly turns into steaming.

Only a few things really need your attention: thin slices across the grain, enough heat under the pan, dry broccoli and sauce that thickens before the final toss. This version of the Chinese-American takeout staple keeps the brown sauce savory rather than sweet, with oyster sauce, soy sauce and Shaoxing wine plus a brief tenderizing marinade for flank steak.

It is built for an ordinary home stove, whether you’re using a wok or a wide skillet. Keeping the pan hot matters more than trying to imitate a restaurant wok. The beef rests while you prepare everything else, so dinner can be on the table in about 30 minutes once the steak is ready to slice.

How to Make Beef and Broccoli Stir Fry

Serves4 with rice
DifficultyEasy, but fast-moving
PrepAbout 20 minutes
CookingAbout 10 minutes
Elapsed timeAbout 30 minutes once the steak is ready to slice
Best pan12-inch (30-cm) heavy skillet or well-heated wok

Beef and Marinade

  • 1 lb (450 g) flank steak
  • 1 tablespoon (15 ml) water
  • 1 teaspoon light or regular soy sauce
  • ¼ teaspoon (about 1 g) baking soda
  • 1 tablespoon (about 8 g) cornstarch
  • 1 teaspoon neutral cooking oil

Using sirloin or flat iron? Both are naturally tender, so you can reduce or omit the baking soda. Firmer cuts need more care; chuck steak can work, while round and stew meat are less forgiving.

Stir-Fry Sauce

  • ½ cup (120 ml) unsalted or low-sodium chicken stock, beef stock or water
  • 2 tablespoons (30 ml) oyster sauce
  • 1 tablespoon (15 ml) light or regular soy sauce
  • 1 tablespoon (15 ml) Shaoxing wine
  • 1 teaspoon dark soy sauce
  • 1½ teaspoons (about 6 g) sugar
  • ½ teaspoon toasted sesame oil
  • ⅛ teaspoon white pepper, or a small pinch

Cornstarch slurry: mix 2 teaspoons (about 6 g) cornstarch with 1 tablespoon (15 ml) cold water.

Broccoli, Aromatics and Oil

  • 1 lb (450 g) broccoli florets, weighed after trimming and cut into fairly even pieces
  • 2–3 tablespoons (30–45 ml) neutral high-heat cooking oil, divided as needed
  • 3 garlic cloves, finely chopped or minced
  • 2 teaspoons finely grated fresh ginger
  • Steamed rice, for serving

Before the pan gets hot: have the beef, broccoli, sauce, slurry, garlic and ginger beside you. Once stir-frying starts, there is very little waiting around.

1. Slice and Marinate the Beef

If the steak is already cold and easy to slice, go straight to the knife. Very soft steak is easier to cut after 15–30 minutes in the freezer, just until it firms up. That optional firming time is extra and is not included in the roughly 30-minute recipe time.

Find the long muscle fibers and cut across them into strips about ⅛–¼ inch (3–6 mm) thick. Keep the slices reasonably even so they cook at about the same rate.

Put the beef in a bowl. Add the water, soy sauce and baking soda and mix until the liquid coats the meat. Mix in the cornstarch, then work in the teaspoon of oil. Leave the beef for about 20 minutes while you prepare the sauce and broccoli.

Two-panel guide showing flank steak sliced perpendicular to its visible grain into thin strips, beside raw beef strips with a light glossy marinade coating in a stainless-steel bowl.
Across the grain shortens the long muscle fibers; after marinating, the strips should still separate easily with only a light sheen.

2. Mix the Sauce

Check your Shaoxing bottle first. Some bottles sold as cooking wine contain added salt; if yours does, use unsalted stock and be cautious with any extra soy later.

Combine the stock, oyster sauce, light soy sauce, Shaoxing wine, dark soy, sugar, sesame oil and white pepper.

Taste only to catch an obviously over-salty combination—the uncooked sauce should taste stronger than the finished dish. Don’t worry about the sharp edge of the Shaoxing; that softens as it cooks.

Give the slurry a quick stir and leave it beside the stove. The cornstarch will settle again before you use it. That’s normal.

3. Give the Broccoli a Head Start

Bring a large saucepan or pot of unsalted water to a strong boil. Add the broccoli and cook for about 30–60 seconds for small-to-medium florets. Larger pieces can need closer to 90 seconds.

Trust the stalk more than the clock. Take the broccoli out when it has turned vivid green and looks almost ready to eat, but the stalks still have some firmness.

Drain thoroughly and let the steam escape. If the florets still look wet, spread them over a clean kitchen towel or paper towels for a minute.

Two-panel comparison showing bright green broccoli just after blanching in a stainless strainer and drained broccoli resting on a rack with dry-looking surfaces.
Pull the broccoli while the stalks still resist slightly, then spread it out so steam and surface moisture can escape.

Water on the broccoli becomes water in the sauce.

4. Sear the Beef

Heat a 12-inch (30-cm) heavy skillet over medium-high to high heat until hot. A carbon-steel wok can go hotter; with nonstick cookware, stay within the manufacturer’s recommended heat range.

Add about 1 tablespoon oil and spread the beef into a mostly single layer. Your first batch will tell you a lot about the pan. If the beef keeps sizzling, carry on. When the sound dies and liquid gathers around the slices, cook less meat at once.

Side-by-side skillets showing crowded beef strips steaming in released liquid and spaced beef strips browning against a drier hot pan.
Use exposed pan as a batch-size check: if the beef would cover almost the whole skillet, split the batch. Open hot metal gives moisture somewhere to escape, helping the beef sear instead of steam.

Give the first side a moment of uninterrupted contact, then toss. Cook until the surfaces are browned and the meat is nearly done, usually about 2 minutes for thin slices.

Transfer the first batch to a plate. Wipe away blackened marinade residue, add fresh oil if the pan looks dry, then cook the remaining beef in another batch if needed.

5. Finish the Sauce

Turn the heat down slightly if the empty pan is fiercely hot. Add a splash of oil when needed, followed by the garlic and ginger. Stir for about 15 seconds. The kitchen should smell of garlic and ginger almost immediately. That’s enough.

Pour in the sauce and bring it to a lively simmer. As it bubbles, the color deepens and the sharp edge of the Shaoxing softens.

Stir the slurry again—cornstarch settles quickly—then pour in about three-quarters while stirring the bubbling sauce. Give it 20–30 seconds before deciding whether it needs the rest.

Glossy brown stir-fry sauce simmering in a black wok while a metal spoon moves through the thickening sauce.
A spoon trail should close again quickly. If the channel stays sharply open behind the spoon, stop adding slurry—the sauce is already heading toward too thick.

The sauce is ready when it leaves a light coating on a spatula and moves easily around the skillet. Don’t chase thickness after that point.

6. Bring Everything Together

Return the broccoli and beef, along with any small amount of juices on the plate, while the sauce is bubbling. If there is an unusually large watery puddle from the beef, leave most of it behind. Toss until the beef has just cooked through and everything is evenly coated, usually 30–60 seconds.

Thin beef strips and bright green broccoli being tossed above a hot wok with glossy brown sauce droplets and visible steam.

The sauce should catch along the edges of the broccoli and beef without burying them. Take the pan off the heat while it is slightly looser than you want on the plate; cornstarch sauces tighten as they cool.

Taste before adding more seasoning. A few drops of soy can fix a sauce that needs salt; a tablespoon of hot water or unsalted stock can loosen one that has become too intense or thick.

Serve Over Hot Rice

Spoon it over hot rice. The best bites have a strip of beef, a floret and enough sauce underneath to soak into the grains.

A spoonful of beef and broccoli held above white rice as glossy brown sauce flows from the spoon into the rice.
The finished sauce should slip between the rice grains rather than sit on top in a sticky mound.

How to Keep the Beef Tender

Velveting helps, but beef that stays chewy even with a pink center usually points to the cut, slicing direction or thickness. A thick strip cut with the grain won’t become tender just because it spent a few fewer seconds in the skillet.

What Is the Best Steak for Beef and Broccoli?

CutWhat to expectHow to use it
Flank steakLean, beefy, clearly grainedThe default here. Slice thinly across the grain and use the light marinade.
SirloinTender and forgivingAn easy substitute; little or no baking soda is needed.
Flat ironVery tenderExcellent for quick cooking; little or no baking soda is needed.
Skirt steakDeep flavor, strong visible grainSlice thinly and clearly across the grain.
Chuck steakBeefy and firmer than flank or sirloinSlice very thinly across the grain. It can work here, but expect a little more chew with this light marinade.
RoundLean and fairly firmSlice very thinly. Flank or sirloin is easier for this quick method.
Pre-cut stir-fry stripsConvenient, variable qualityChoose thin, even strips intended for fast cooking.
Chuck roast or stew beefUsually better suited to slower cookingSkip it for this quick stir-fry.
Beef grain guide showing flank and skirt with strong visible grain, sirloin and flat iron with finer grain, firmer chuck steak and round, and chuck roast or stew beef for slower cooking.
Use the label to identify the cut, then use the visible fibers to decide slicing direction. Grain direction matters more than the steak’s trimmed shape.

What the Beef Marinade Actually Does

This is a light velveting treatment, not an aggressive tenderizing soak. Soy seasons the surface, water gives the beef some moisture to absorb, and the modest amount of baking soda helps flank steak stay tender during fast cooking. Cornstarch forms a thin coating before the oil goes in.

Baking soda tenderizes. Cornstarch coats. That’s the useful distinction.

For flank steak, ¼ teaspoon baking soda for 1 lb (450 g) is deliberately modest. Sirloin or flat iron may not need it. Too much baking soda—or leaving the beef in it much longer than intended—can create an alkaline taste and an unnaturally soft texture.

Beef and Broccoli Sauce: Savory and Not Too Sweet

Oyster sauce does most of the heavy lifting here, giving the brown sauce its depth and body. Soy brings the salt, while the teaspoon of dark soy is mainly there for deeper color. Shaoxing adds its characteristic wine aroma, and the small amount of sugar rounds everything without turning the sauce sweet.

If you want a sweeter, more glaze-like sauce, that’s closer to homemade teriyaki sauce. Here, the sauce stays looser and less sweet so it can coat the beef, broccoli and rice without turning sticky.

How Thick Should the Sauce Be?

Think coating, not pudding. The sauce should cling lightly to the beef and broccoli, then flow back into the pan when you move a spatula through it. If it barely moves, loosen it before the final toss.

Three-panel comparison showing thin brown sauce running quickly from a spoon, correctly thickened sauce lightly coating and flowing, and overly thick sauce clinging in a slow heavy ribbon.
Thin sauce usually needs more simmering before more starch; overly thick sauce needs hot water or unsalted stock. The middle is the stopping point.

Want Extra Sauce for Rice?

Increase the stock to ¾ cup (180 ml) and the oyster sauce to 2½ tablespoons. Keep the light soy, Shaoxing wine, dark soy, sugar, sesame oil and white pepper at their original amounts.

This version is deliberately a little lighter rather than simply scaling every salty ingredient upward. You get more for the rice without making the whole bowl overly salty.

For the larger slurry, mix 1 tablespoon (about 8 g) cornstarch with 2 tablespoons (30 ml) cold water. Add it gradually; you may not need all of it. The consistency should still be glossy and coating, but you’ll have more left in the pan to spoon over the rice.

Fresh or Frozen Broccoli?

Frozen broccoli is useful here too. Skip the blanch. Heat it separately only until thawed and barely hot, then drain and blot away obvious moisture before it meets the sauce.

It won’t have the firmness of fresh broccoli, and that’s fine. The important part is keeping its extra water out of the skillet.

Side-by-side comparison of fresh broccoli after a brief blanch and thawed frozen broccoli with visible released water on a stainless-steel tray.
With frozen broccoli, moisture control matters more than extra cooking: thaw, drain and blot before the florets meet the sauce.

Wok or Skillet?

A carbon-steel wok shines over a strong gas flame. On many electric and induction stoves, a broad 12-inch (30-cm) skillet gives the beef a larger hot surface underneath it. If your burner is weaker, smaller batches matter more than pan shape.

Doubling the recipe means doubling the batches too. The skillet doesn’t get larger because the ingredient list did.

Side-by-side comparison of beef and broccoli cooking in a carbon-steel wok over a strong blue gas flame and in a broad skillet on a flat electric or induction cooktop.
Strong gas suits a wok; flat electric or induction heat often gives a broad skillet the more useful contact area.

Ingredient Substitutions

Some swaps barely change the dish; others can throw off the beef texture or the balance of the sauce.

Instead of…Try…What changes
Flank steakSirloin or flat ironUsually needs little or no baking soda.
Oyster sauceMushroom-style vegetarian oyster sauceThe closest easy substitute; use it in roughly the same way. Check labels if allergies matter.
Oyster sauceHoisinNot a direct substitute. If it is all you have, expect a sweeter, different sauce and reduce or omit the added sugar.
Soy sauceCoconut aminosSweeter and usually less salty. Reduce the sugar. Check the other condiments too if the entire dish needs to be soy-free.
Shaoxing wineDry sherryThe easiest close substitute.
Shaoxing wineMirinSweeter and less savory. Start with slightly less than the Shaoxing amount and omit the recipe sugar; adjust after tasting.
No cooking wine availableUnsalted stockThe sauce will be simpler and less aromatic.
Dark soyOmit itThe sauce will be lighter. Don’t replace it measure-for-measure with regular soy.

Don’t confuse rice wine with rice vinegar. Rice vinegar is much more acidic and is not a substitute for Shaoxing wine here.

For a gluten-free version: use gluten-free tamari, a gluten-free oyster-style sauce and gluten-free stock. Shaoxing wine is traditionally made with a wheat-based starter, so dry sherry is the simpler choice unless you know your bottle is gluten-free. Check the other packaged sauces too, since brands vary.

Variations

Mushrooms. After the beef comes out of the pan, brown sliced mushrooms until their released water has cooked away. Then continue with the garlic, ginger and sauce.

Carrots. Slice them thin and add them to the blanching water shortly before the broccoli so they get extra time to soften.

Bell peppers. After the beef comes out, stir-fry thinly sliced bell pepper briefly, then continue with the garlic and ginger; leave the pepper slightly crisp.

Spicy. Add crushed red pepper with the garlic and ginger, or finish individual bowls with chili oil or chili crisp.

What to Serve With Beef and Broccoli

Steamed jasmine rice or long-grain white rice is the easiest pairing. Brown rice works too. If you’d rather not guess at the rice, the guide to cooking rice has ratios and timings for the common varieties.

A cold cucumber salad gives the meal something completely different: crisp, cool and acidic against the warm brown sauce.

Complete beef and broccoli dinner with glossy beef strips and green broccoli on a dark serving plate, with white rice and a separate cucumber salad.

Storage, Reheating and Prep Ahead

This stir-fry is best straight from the pan. The next day it can taste very good, but the broccoli softens and the sauce loses some of its freshly cooked texture.

Refrigerate leftovers within 2 hours of cooking, or within 1 hour when the surrounding temperature is above 90°F / 32°C. Use refrigerated leftovers within 3–4 days.

The USDA leftovers guidance recommends reheating leftovers to 165°F / 74°C.

Warm only what you plan to eat. A skillet over moderate heat gives you good control, and a spoonful of water or unsalted stock can loosen sauce that tightened in the refrigerator.

You can cut the broccoli, slice the steak and mix the sauce earlier in the day and refrigerate them separately. Add the baking soda and the rest of the short beef marinade closer to cooking.

Freezing works, but it isn’t the best storage choice for this dish. The broccoli softens noticeably after thawing, which takes away much of the texture that makes the stir-fry good.

Troubleshooting Beef and Broccoli

Start with what changed. Did the sauce thin only after the broccoli went in? Did the beef turn gray as soon as it hit the pan? Is it chewy even though the center isn’t overcooked? Those clues tell you more than simply adding heat, starch or cooking time.

Beef Problems

What happenedWhat to do
The beef is chewy, even though it may still be pink inside.
A firmer cut, slices running with the grain or pieces that are too thick can all stay chewy before the beef looks obviously overcooked. Dry, gray beef may simply have cooked too long.
Now: If the beef is still underdone, finish cooking it only as much as needed; extra cooking won’t fix chewiness caused by the cut, grain or thickness. Keep it well coated with sauce and cut unusually large strips smaller before serving.
Next time: Choose a suitable cut, slice about 3–6 mm across the grain and remove the beef while it is still just shy of done.
Some pieces are tender and others are tough.
Uneven slicing is the usual reason.
This can’t really be evened out after cooking. Next time, keep the slices as consistent in thickness as practical.
The beef tastes alkaline or feels strangely soft.
Too much baking soda was used, or the beef sat in it for too long.
The texture can’t really be reversed. Extra unsalted sauce, vegetables and rice may soften an alkaline taste. Next time, measure the baking soda carefully and keep to the short marinade rest.
The beef is gray and sitting in liquid.
The pan lost too much heat.
Now: Stop adding beef, let the moisture cook away and finish the remaining meat separately.
Next time: Use smaller batches and let the pan recover between them.

Sauce Problems

Thickness and Texture Problems

What happenedWhat to do
The sauce won’t thicken.
The slurry may have settled, the sauce may not be simmering, or there may be too little starch for the liquid in the pan.
Now: Remove already-cooked beef and broccoli if necessary. Mix 1 teaspoon cornstarch with 2 teaspoons cold water and add it gradually to the bubbling sauce.
Next time: Re-stir the slurry immediately before pouring and give it a moment to cook.
The sauce was thick until the broccoli went in.
The vegetables probably carried water into the skillet.
Now: Remove finished beef and broccoli and reduce the sauce briefly before reaching for more starch.
Next time: Drain and dry the broccoli thoroughly.
The sauce is gummy.
Too much starch went in, or the sauce reduced too far.
Now: Add unsalted stock or water 1 tablespoon (15 ml) at a time until it flows again.
Next time: Add the slurry gradually.

Flavor Problems

What happenedWhat to do
The sauce is too salty.
Soy, oyster sauce, stock and sometimes salted Shaoxing cooking wine can add up.
Now: Slightly salty? Loosen it with unsalted stock or water. Badly oversalted? Spoon out some sauce first, then replace that volume with unsalted liquid. Plain rice or extra unseasoned broccoli can soften the overall saltiness.
Next time: Check condiment labels and taste the uncooked sauce only for an obviously over-salty combination.
The sauce is too sweet.
Too much sugar went in, or a sweeter substitute such as hoisin or mirin wasn’t accounted for.
Now: Add a splash of unsalted stock or water first. If the sauce then tastes flat, add oyster sauce or soy a few drops at a time.
Next time: Reduce the added sugar when using sweeter substitutes.
The sauce tastes bitter.
The garlic, ginger or dark residue in the pan probably scorched.
Now: Remove the burned pieces and taste. A few scorched flecks may not ruin the sauce. If the bitterness has spread through it, wipe the pan clean and remake the sauce mixture.
Next time: Lower the heat before adding the aromatics and move on as soon as they smell fragrant.

Broccoli and Pan Problems

What happenedWhat to do
The broccoli is hard.
The florets were large or needed more of a head start.
Now: Take the beef out, add a splash of water, cover the pan briefly and let the broccoli steam until the stalks begin to yield. Uncover, let excess water cook away, then return the beef.
Next time: Cut the florets more evenly and use stalk tenderness as the cue, not only the clock.
The broccoli is mushy.
It cooked too far before or during the final toss.
The texture can’t be restored once it becomes soft. Next time, take it out of the blanching water earlier and remember that it cooks again during the final toss.
The second beef batch tastes burned.
Marinade residue from the first batch scorched in the pan.
Now: Remove burned solids before continuing.
Next time: Wipe away blackened residue between batches and add fresh oil when needed.
A doubled recipe turns watery.
Twice the cold food went into the same-size skillet.
Now: Remove some of the food and finish it in batches.
Next time: Double the ingredients, not the amount your pan is expected to sear at once.

Once it looks right, stop fussing with it. Spoon everything over hot rice and eat it while the pan is still steaming.

Posted on — Leave a comment

Sesame Ground Chicken Recipe: Easy 15-Minute High-Protein Dinner

Bowl of jasmine rice topped with glossy sesame ground chicken, sliced scallions and toasted sesame seeds.

A pound of ground chicken is useful. Exciting is another matter. Give it a hot skillet and a gingery sesame sauce, though, and suddenly there are browned edges, juicy crumbles, toasted sesame, and a shiny sweet-savory glaze over hot rice.

This is the kind of dinner that makes an ordinary package of ground chicken feel like a plan instead of a problem. This version is built for 1 lb / 454 g ground chicken, and the chicken itself takes about 15 minutes. No breading, deep frying, or long stir-fry prep.

It takes the familiar savory-sweet direction of sesame chicken and turns it into a quick ground-chicken skillet dinner, sometimes called ground sesame chicken. Brown first. Crumble second. Then give the excess moisture time to leave before the sauce goes in. That short sequence gives the chicken a chance to pick up color without cooking it into tiny dry pieces.

Quick Answer: Sesame Ground Chicken in About 15 Minutes

For 1 lb / 454 g ground chicken: brown it untouched for 1½–2 minutes, then break it into irregular crumbles and keep cooking until the pan no longer looks watery.

Lower the heat to medium, stir in the ginger and garlic for about 30 seconds, then add the sesame sauce and cook for another 1–2 minutes. A 12-inch / 30-cm skillet gives the chicken enough room for moisture to escape. Ground poultry should reach 165°F / 74°C.

Serving it with rice? Start that first or use already-cooked or microwave rice. This guide to how to cook rice covers water ratios and timings for jasmine, basmati, brown, white, and other varieties. Very wet chicken or a crowded smaller skillet may need another minute or two.

Sesame Ground Chicken Recipe

Ground chicken with fresh ginger, garlic, and a sweet-savory toasted-sesame sauce, cooked until juicy, lightly browned, and coated in a thin glaze.

PrepAbout 5 minutes
CookAbout 10 minutes
TotalAbout 15 minutes
Yield3 hearty bowls or 4 standard servings
Ground chicken1 lb / 454 g
HeatMild as written; easy to increase
Safe temperature165°F / 74°C

Protein from the chicken alone: about 29 g per hearty bowl when divided 3 ways, or 22 g per standard serving when divided 4 ways. That estimate assumes your ground chicken provides about 22 g protein per 4 oz / 113 g; check the package because products vary.

Equipment: 12-inch / 30-cm skillet, sturdy spatula or wooden spoon, small bowl or measuring jug, and an instant-read thermometer.

For the Chicken

  • 1 lb / 454 g ground chicken; regular ground chicken is easier to keep juicy than extra-lean breast-only mince
  • 1 teaspoon / 5 ml neutral cooking oil, such as avocado, canola, or vegetable oil, if needed
  • 2 teaspoons finely grated fresh ginger, about 4–5 g
  • 3 garlic cloves, finely minced, about 9 g

For the Sesame Sauce

  • 2 tablespoons / 30 ml low-sodium soy sauce
  • 1½ tablespoons honey, about 30–32 g
  • 1 tablespoon / 15 ml rice vinegar
  • ¼ cup / 60 ml water or unsalted chicken broth
  • 1½ teaspoons toasted sesame oil
  • 1½ teaspoons cornstarch
  • ½ teaspoon chili garlic sauce or sriracha, optional; omit for a very mild version

To Finish

  • ½ teaspoon toasted sesame oil
  • 2 scallions, thinly sliced
  • 1 tablespoon toasted sesame seeds, optional
  • Chili crisp, sriracha, or extra chili garlic sauce, optional

Instructions

  1. Mix the sauce. Whisk the low-sodium soy sauce, honey, rice vinegar, water or broth, 1½ teaspoons toasted sesame oil, cornstarch, and optional chili sauce until smooth.
  2. Heat the skillet. Put a 12-inch / 30-cm skillet over medium-high heat and let it get hot. Add the neutral oil if the pan needs it.
  3. Brown first. Add the ground chicken and press it into a fairly even layer. Leave it undisturbed for 1½–2 minutes so the underside can pick up color.
  4. Crumble second. Turn and divide the chicken with a firm spatula or wooden spoon. Break it into small, uneven pieces you can still see on the fork. Cook for another 2–4 minutes.
  5. Let the excess water cook away. Clear liquid gathering around the chicken is normal. Keep cooking until most of it evaporates. With fattier chicken, spoon off some of any obvious oily pool that remains after the watery liquid is gone.
  6. Lower the heat and add the aromatics. Reduce the heat to medium. Stir in the ginger and garlic; they should smell fragrant almost immediately. About 30 seconds is plenty.
  7. Add the sauce. Whisk it again, pour it into the skillet, and stir for 1–2 minutes. Stay close because the honey can catch as the liquid reduces. Stop when the sauce leaves a light coating on the chicken and slowly settles between the crumbles.
  8. Finish and serve. Check that the chicken has reached 165°F / 74°C, then take the skillet off the heat. Stir in the reserved ½ teaspoon toasted sesame oil and taste before adding salt. Scatter over the scallions and toasted sesame seeds, then spoon the chicken over hot rice while the glaze is still loose and shiny.
Overhead skillet of browned sesame ground chicken coated in a thin amber glaze with scallions and sesame seeds.
Ready means glossy chicken with almost no loose sauce left in the skillet.

At a glance: the visual below maps the chicken from first sear to final glaze; use the deeper sections that follow when a pan cue needs more explanation.

Fifteen-minute sesame ground chicken timeline: brown for 1½–2 minutes, crumble and cook for 2–4 minutes, add ginger and garlic for about 30 seconds, add sauce for 1–2 minutes, then finish with sesame oil and scallions. Rice timing is separate.
Rice runs on a separate clock; the chicken itself stays on this 15-minute sequence.

What the Finished Chicken Should Look Like

The crumbles should stay irregular, with golden spots here and there and enough moisture inside to remain juicy. The sauce should form a thin coating around the meat, with no loose brown puddle at the bottom of the skillet.

Wet → Sizzling → Browned → Glossy

Pan StateWhat You See or HearWhat to Do
WetClear liquid collects around the chicken and the pan sounds like a simmer.Keep cooking. No sauce yet.
SizzlingMost water is gone and the sound becomes sharper.Let the meat pick up some color.
BrownedSome surfaces are golden instead of uniformly pale.Lower the heat and add the aromatics.
GlossyThe sauce lightly coats the crumbles without pooling.Finish and take the skillet off the heat.
Four ground chicken pan states: Wet with visible liquid and instruction to keep cooking; Sizzling after most moisture evaporates and instruction to let it brown; Browned with golden edges and instruction to lower the heat; and Glossy with a thin sauce coating and instruction to finish.
Listen as well as look. A wet simmer means moisture is still escaping; once the sound sharpens into a true sizzle, the skillet finally has the conditions needed for browning.

The whole batch doesn’t need to become crisp. A few browned edges and juicy crumbles are a better stopping point than continuing to fry lean chicken that is already cooked.

Water and rendered fat need different treatment too. Let clear cooking liquid evaporate. If an oily layer remains afterward because your chicken is fattier, spoon off only the excess.

Close comparison of ground chicken in thin released cooking water on one side and a clearer golden pool of rendered fat on the other.
Thin released water usually bubbles actively as it cooks away. Rendered fat behaves differently: after most watery moisture disappears, it tends to remain as a quieter, shiny oily layer around the chicken.

Browning tells you about surface moisture and flavor, not doneness. Ground chicken can be safely cooked even when it isn’t deeply browned, so use temperature—not color alone—to confirm 165°F / 74°C.

Chicken still turning pale or watery? Jump to the browning technique.

Ingredients That Matter

There isn’t a long ingredient list here, so a few choices do most of the work.

Raw ground chicken surrounded by measured low-sodium soy sauce, honey, rice vinegar, water or broth, toasted sesame oil, cornstarch, ginger, garlic, scallions, sesame seeds and optional chili sauce.
Measure the sauce ingredients before the skillet gets hot. Once ginger and garlic hit the pan, the remaining steps move quickly enough that stopping to measure can cost you both browning and sauce control.

Choose Ground Chicken You Can Keep Juicy

Regular ground chicken is usually more forgiving than extra-lean breast-only mince. When the package lists a lean percentage, something around 90–93% lean is a good fit, but chicken labeled simply “ground chicken” is perfectly fine.

Soy Sauce and Toasted Sesame Oil

Low-sodium soy sauce is easier to work with here. The sauce concentrates in the skillet, so starting slightly lower on salt leaves room to adjust once the chicken is finished.

Use dark, fragrant toasted sesame oil for the sesame flavor, not for frying the chicken. Most goes into the sauce; the final ½ teaspoon goes in off the heat, where its nutty aroma stays much fresher.

Ginger, Garlic, Honey, Vinegar and Cornstarch

Fresh ginger and garlic bring a sharp, fragrant edge. Honey adds gentle sweetness, rice vinegar keeps the sauce bright against the soy, and a small amount of cornstarch gives the chicken its thin, shiny coating.

How to Keep Ground Chicken Juicy and Browned

A broad layer of chicken gets uninterrupted contact with the hot skillet. Break it apart right away and lots of wet surfaces are exposed at once, making the pan more likely to steam before much color develops.

That initial untouched period isn’t about cooking the chicken through. It is there to build a browned underside before the meat is broken apart.

Ground chicken shown browning as a broad layer, a ragged section lifted to reveal a golden underside, and the seared meat being divided into irregular crumbles.
A firm spatula makes the sequence easier: lift a ragged section to check the underside, then divide the seared layer into pieces. Repeated scraping and mashing, by contrast, turns the chicken fine before it has a chance to brown.

Crumb Size Matters Too

Small, uneven crumbles give the sauce plenty of edges to cling to while staying juicier than finely mashed meat. Don’t turn it into chicken gravel. Tiny pieces have very little room between cooked and dry.

Comparison of moist, irregular ground chicken crumbles labeled “Right” beside much finer, drier chicken labeled “Too Fine” and “Dry chicken gravel.”
A useful crumble-size test is whether you can still see distinct pieces on a fork or spoon. Once the chicken looks uniformly grainy, it has far less room between properly cooked and dry.

Once the chicken is broken up, use the Wet → Sizzling → Browned → Glossy cues to read the pan. Those cues matter more than forcing every stage into an exact number of seconds.

How to Get the Sesame Sauce Just Right

Aim for savory first, then a gentle sweetness, with ginger, garlic, toasted sesame, and enough acidity to keep things lively. From there, adjust the sauce to the bowl you’re actually making.

Thin amber-brown sesame sauce being whisked in a clear glass bowl beside ginger, garlic and small dishes of sauce ingredients.
The uncooked sesame sauce should still pour easily. Cornstarch does most of its thickening after the mixture reaches the hot skillet, so a sticky glaze texture in the mixing bowl would already be too thick.

The 1-Pound Sesame Sauce Formula

For 1 lb / 454 g ground chicken, use 2 tablespoons low-sodium soy sauce + 1½ tablespoons honey + 1 tablespoon rice vinegar + ¼ cup water or broth + 1½ teaspoons toasted sesame oil + 1½ teaspoons cornstarch, then reserve another ½ teaspoon toasted sesame oil for finishing.

One-pound sesame sauce formula with 2 tablespoons low-sodium soy sauce, 1½ tablespoons honey, 1 tablespoon rice vinegar, ¼ cup water or broth, 1½ teaspoons toasted sesame oil and 1½ teaspoons cornstarch, plus ½ teaspoon sesame oil added off heat.
Reserve the final ½ teaspoon of toasted sesame oil for off-heat finishing, where its aroma stays fresher.

For a more general-purpose version you can adapt to chicken pieces, beef, tofu, vegetables, or noodles, this stir fry sauce recipe goes deeper into balancing soy, sweetness, acidity, and thickness for different stir-fries.

Want More Sauce for the Rice? Don’t Double Everything

A saucier rice bowl needs more liquid along with slightly more seasoning. Doubling the soy alone makes the mixture saltier much faster than it makes it better.

  • Water or unsalted broth: add ¼ cup / 60 ml
  • Low-sodium soy sauce: add 1 teaspoon / 5 ml
  • Honey: add 1 teaspoon
  • Rice vinegar: add ½ teaspoon
  • Cornstarch: add ½ teaspoon

Whisk those additions into the original sauce before it reaches the skillet. Honey can catch quickly once the mixture reduces. If it starts sticking hard, move the pan off the heat and loosen it with a tablespoon or two of water.

Two sesame ground chicken rice bowls compared side by side: standard glaze with little pooling and a saucier version with more loose glaze reaching the rice.
More sauce for rice should still look like glaze—not soup.

Taste and Finish the Sesame Glaze

Taste it the way you’re going to eat it. With a rice bowl, taste the chicken and rice together before making the final adjustment. Plain rice softens salt, sweetness, and heat, so the sauce can taste stronger on its own than it does in the finished bowl.

If It Tastes…Try This
Too saltyAdd water or unsalted broth first, then taste again.
Too sweetAdd a small splash of rice vinegar; if needed, follow with a little soy and water.
Flat or heavyTry a little rice vinegar before reaching for more salt.
Not savory enoughAdd low-sodium soy sauce ½ teaspoon at a time.
Needs more sesameAdd toasted sesame oil a few drops at a time after cooking.
Needs more heatAdd chili garlic sauce, sriracha, or chili crisp at the table.

When the glaze is right, it clings to the rough edges of the chicken while the ginger and toasted sesame still come through underneath the soy and honey.

Sauce not behaving? Jump to the sauce troubleshooting guide.

Close-up of irregular sesame ground chicken crumbles lightly coated in glossy amber sauce as a wooden spoon moves through the skillet.
Lift a spoonful before switching off the heat. The glaze should stay attached to the rough crumbles but should not stretch into strings or form a paste between them—thicker is not automatically better.

Make It a Complete Dinner

Pick one base, one vegetable, and something fresh or crunchy. A fast dinner doesn’t need to become a twelve-ingredient project.

Sesame Ground Chicken with Green Beans

Green beans are an especially good fit. Their crisp-tender bite breaks up the softness of chicken and rice, and they hold up well when leftovers are part of the plan.

Use about 8 oz / 225 g green beans, trimmed and cut into roughly 1-inch / 2.5-cm pieces.

  1. Add the beans to the hot skillet with 2 tablespoons / 30 ml water.
  2. Cover and steam for about 2 minutes.
  3. Uncover and let the remaining water evaporate.
  4. Cook another minute if needed, until bright and crisp-tender.
  5. Transfer them to a plate, then cook the chicken in the same skillet.
  6. Return the beans when the sesame sauce goes in.
Three-stage green bean method: cut green beans steam with 2 tablespoons water for about 2 minutes, are uncovered so the water evaporates, then become bright and crisp-tender before being removed from the skillet.
Don’t rely only on the two-minute steam. Before removing the green beans, check that the skillet looks mostly dry; lingering water can follow the beans back into the pan later and loosen the sesame glaze.

The same-pan version adds a few minutes because the beans cook before the chicken. To stay closer to the original timing, microwave or steam them at the same time as the chicken, then fold them in with the sauce.

Sesame ground chicken mixed with bright crisp-tender green beans and served beside fluffy white rice.
Cutting green beans into roughly 1-inch pieces helps them cook evenly and makes the finished bowl easier to eat—chicken, rice and crisp vegetable can all land naturally in the same forkful.

Sesame Ground Chicken Stir-Fry with Broccoli or Mixed Vegetables

Using broccoli instead? Start with about 8 oz / 225 g cut into small florets. Steam or microwave until crisp-tender, drain well, and add it when the sauce goes in.

Frozen broccoli, green beans, or a stir-fry mix work too. Cook away the water they release before adding the sauce so the glaze doesn’t become diluted.

Skillet of glossy sesame ground chicken mixed with bright green broccoli florets, with a wooden serving spoon lifting a portion.
The broccoli should stay bright and crisp-tender while the sesame ground chicken remains visibly glazed.

Build the Rest of the Bowl

Base

  • Jasmine rice
  • Brown rice
  • Noodles
  • Cauliflower rice
  • Sautéed cabbage
  • Lettuce cups

Vegetables

  • Green beans
  • Broccoli
  • Snap peas
  • Shredded carrots
  • Bok choy

Fresh & Crunchy

  • Scallions
  • Toasted sesame seeds
  • Cucumber
  • Cashews or peanuts
  • Chili crisp
Build-your-bowl guide offering jasmine rice, noodles or lettuce as bases; green beans, broccoli or bok choy as vegetables; cucumber, scallions or chili crisp as finishes; plus an example sesame ground chicken bowl with rice, broccoli and cucumber.
Think in textures as well as ingredients: a soft base, one cooked vegetable and one fresh or crunchy finish give the bowl contrast without turning a fast dinner into a long toppings project.

Cauliflower rice, sautéed cabbage, and lettuce cups are the lower-carb choices here. The sauce still contains honey, so keep that in mind if you’re counting carbs.

Four butter lettuce cups filled with sesame ground chicken, diced cucumber, sliced scallions and toasted sesame seeds.
Cool lettuce and cucumber do more than replace rice: their crispness cuts through the warm savory-sweet glaze, so sesame ground chicken lettuce cups still feel satisfying rather than sparse.

Noodles work beautifully as a base here too. If you’d rather make noodles the whole meal another night, these Peanut Noodles use many of the same ginger-soy-chili flavors with a creamy peanut sauce.

Easy Variations & Ingredient Swaps

Want more heat? Increase the chili sauce in the skillet or let everyone add sriracha or chili crisp at the table. Keeping the main batch mild makes it easy to adjust each bowl separately.

If crisp coated chicken with a sticky takeout-style glaze is the goal, try this General Tso Chicken recipe instead.

Ingredient Swaps That Work

If You Don’t Have…Use…How to Adjust
Ground chickenGround turkeyUse the same weight. Very lean turkey may need closer watching near the end.
Low-sodium soy sauceRegular soy sauce + waterUse 1–1½ tbsp soy, then add water to reach the original 2 tbsp volume.
Low-sodium soy sauceCertified gluten-free low-sodium tamariUse 1:1; sodium still varies by brand.
Fresh ginger or garlicRefrigerated ginger or garlic pasteUse the package’s stated fresh-equivalent amount.
Chili garlic sauceSrirachaUse the same starting amount, then adjust the heat at the table.

Making the whole dish gluten-free? Check the chili sauce and any other packaged condiments too, since certification can vary by brand.

Once you’ve settled on the version you want, scaling is mostly arithmetic—until the skillet gets crowded.

How to Scale Sesame Ground Chicken from ½ lb to 2 lb

Making 2 lb / 907 g? Scale the ingredients below, but brown the chicken in two batches unless your cooking surface is substantially larger. A double batch will take longer than 15 minutes because the chicken needs two rounds in the skillet.

Scaled Ingredients

Ingredient ½ lb / 227 g 1 lb / 454 g 1½ lb / 680 g 2 lb / 907 g
Low-sodium soy sauce1 tbsp / 15 ml2 tbsp / 30 ml3 tbsp / 45 ml¼ cup / 60 ml
Honey2¼ tsp / ~16 g1½ tbsp / ~32 g2¼ tbsp / ~48 g3 tbsp / ~64 g
Rice vinegarabout 8 ml / 1½ tsp15 ml / 1 tbspabout 22 ml / 1½ tbsp30 ml / 2 tbsp
Water or broth2 tbsp / 30 ml¼ cup / 60 ml6 tbsp / 90 ml½ cup / 120 ml
Toasted sesame oil, total1 tsp / 5 ml2 tsp / 10 ml1 tbsp / 15 ml4 tsp / 20 ml
Cornstarch¾ tsp1½ tsp2¼ tsp1 tbsp
Fresh ginger1 tsp2 tsp1 tbsp4 tsp
Garlic1–2 cloves3 cloves4–5 cloves6 cloves

Reserve about one-quarter of the toasted sesame oil for finishing and use the rest in the sauce. Neutral oil, scallions, and sesame seeds don’t need exact scaling. Scale the optional chili conservatively and adjust it at the end; taste before adding any final salt.

The sauce doubles. Your skillet capacity does not. Crowding two pounds of cold chicken into the same 12-inch pan traps much more moisture, so larger batches need room and an extra round of browning.

Same-size skillets comparing 1 pound of ground chicken spread out with bare pan visible against 2 pounds crowded together in released moisture; text advises browning 2 pounds in two rounds.
A simple crowding test is whether you can still see meaningful bare skillet between pieces. Once most of the hot surface disappears beneath chicken, released moisture has fewer places to escape and steaming takes over.

Troubleshooting: What Went Wrong?

A watery skillet, pale chicken, or sauce that looks wrong doesn’t automatically mean dinner is ruined. First work out whether the problem is coming from the meat, the pan, the vegetables, or the sauce.

For a quick visual reset, revisit the Wet → Sizzling → Browned → Glossy guide or the sesame sauce guide.

Start with the Symptom

ProblemMost Likely CauseWhat to Do
Chicken is grey and wateryPan too cool or crowded; released water hasn’t evaporated.Keep cooking until the excess liquid disappears and the chicken can begin taking on color.
Pan looks greasyFattier chicken released more rendered fat than needed.Once the watery liquid is gone, spoon off part of any obvious oily pool.
Chicken stays in one big lumpSticky raw chicken was worked too aggressively before it could sear.Let it brown briefly, divide it into several large sections, then break those into smaller crumbles.
Chicken is dry or toughVery lean meat, tiny crumbles, or continued cooking after doneness.Keep the pieces a little larger and stop once the chicken is safely cooked and sauced.
Chicken feels springy or sausage-likeRaw meat was overworked or homemade mince was processed into a sticky paste.Handle it lightly and pulse homemade mince only until coarse.
Sauce is wateryWater from chicken or vegetables, or too little finishing time.Cook away ingredient moisture first, then simmer the sauce briefly.
Sauce is gummyToo much starch or too much reduction.Add water or unsalted broth 1 tablespoon at a time.
Sauce is sticking or burningPan too hot or the honey-based sauce reduced too far.Move the skillet off the heat, add 1–2 tbsp water, and loosen it immediately.
Vegetables thin the sauceWet or frozen vegetables released water late in cooking.Cook off their moisture before adding the sauce.
Four ground chicken problem states: grey and watery chicken in released liquid, chicken stuck in one large lump, tiny dry and tough crumbles, and larger dense springy sausage-like pieces.
Don’t treat dry/tough and springy/sausage-like chicken as the same problem. Dry chicken looks small and crumbly; overworked chicken becomes denser and smoother, so identifying the texture points you toward the right fix.

Why Is the Chicken Grey Instead of Brown?

Browning struggles while the meat is surrounded by water. A small skillet, a cool pan, or constant stirring can keep the chicken steaming. Give it some uninterrupted contact with the hot surface and time for that excess liquid to leave.

Why Is the Chicken Springy or Sausage-Like?

Grinding chicken too finely or working it aggressively can turn the raw meat into a sticky paste that cooks with a noticeably springier texture. With homemade mince, pulse chilled chicken only until coarsely chopped. Ordinary dry or tough chicken is more often an overcooking problem.

Is Watery Sauce Always a Cornstarch Problem?

No. Clear water around the chicken or vegetables needs to evaporate before more starch enters the picture. Once the pan itself is no longer watery, give a thin sauce another 30–60 seconds before deciding it needs more thickener.

Four sesame ground chicken sauce states: watery with sauce pooling underneath, right with a thin coating and little pooling, gummy with an overly thick coating, and burning with dark over-reduced residue around the skillet.
Watery sauce does not automatically mean “add more cornstarch.” First look for loose moisture beneath the chicken; only after that water is under control can you judge whether the sauce itself is truly too thin.

Meal Prep, Storage & Reheating

Sesame ground chicken is easy to portion, and a thin coating of sauce helps the meat reheat without feeling dry. Divide the batch into three hearty bowls when you want chicken to carry more of the meal, or four standard servings when rice and vegetables make up a larger share.

Portion guide comparing three hearty sesame ground chicken bowls with larger chicken portions against four standard servings with proportionally more rice and vegetables.
Using chicken with about 22 g protein per 4 oz / 113 g, dividing the batch 3 ways gives roughly 29 g from chicken per bowl; 4 ways gives about 22 g.

Refrigerator & Freezer

Refrigerate cooked chicken promptly—generally within 2 hours, or within 1 hour when the surrounding temperature is above 90°F / 32°C—and use refrigerated leftovers within 3–4 days. USDA leftovers guidance covers safe cooling, storage, and reheating in more detail.

Prepping farther ahead? Put the later portions in the freezer instead of keeping the entire week’s batch refrigerated. For best quality, use frozen cooked leftovers within about 3–4 months.

Reheat the Chicken, Then Add the Fresh Parts

The sauce thickens in the refrigerator, so add a small splash of water before reheating and stir once hot. Sprinkle refrigerated rice with water and cover it while microwaving so the steam softens the grains again. Reheat leftovers thoroughly to 165°F / 74°C.

Add scallions, cucumber, sesame seeds, cashews, peanuts, lettuce, and chili crisp afterward. That cold crunch can make yesterday’s bowl feel like dinner again instead of another container from the fridge. A crisp Cucumber Salad works especially well when you want a full cold side.

Turn Leftovers Into Something Different

  • Lettuce cups: warm the chicken, then spoon it into cold crisp lettuce with cucumber and scallions.
  • Noodle bowl: loosen the chicken with a splash of water and toss it through hot noodles.
  • Cabbage bowl: sauté shredded cabbage until just tender, then spoon the warm sesame chicken over the top.
Three leftover sesame ground chicken meals: lettuce cups with cucumber and scallions, a noodle bowl with warmed chicken, and sautéed cabbage topped with sesame ground chicken.
For sesame ground chicken meal prep, keep fresh components separate when practical. Adding crisp lettuce, cucumber or other cool finishes after reheating changes the texture far more effectively than packing four identical bowls.

Back to top · Back to recipe card

Meal prep is much easier to look forward to when one batch doesn’t have to become four identical boxes.

Partially eaten bowl of sesame ground chicken and white rice with a spoon resting inside, scattered scallions and sesame, a glass of water and a second bowl softly blurred behind it.

Green beans tomorrow. Noodles next time. Same pound of ground chicken, much better dinner.