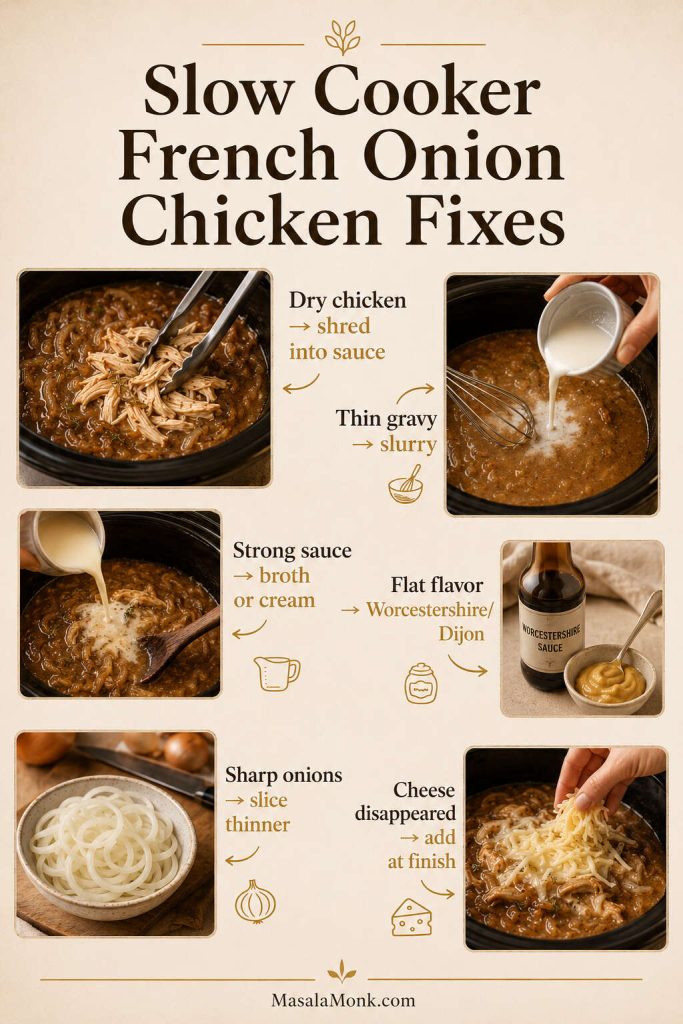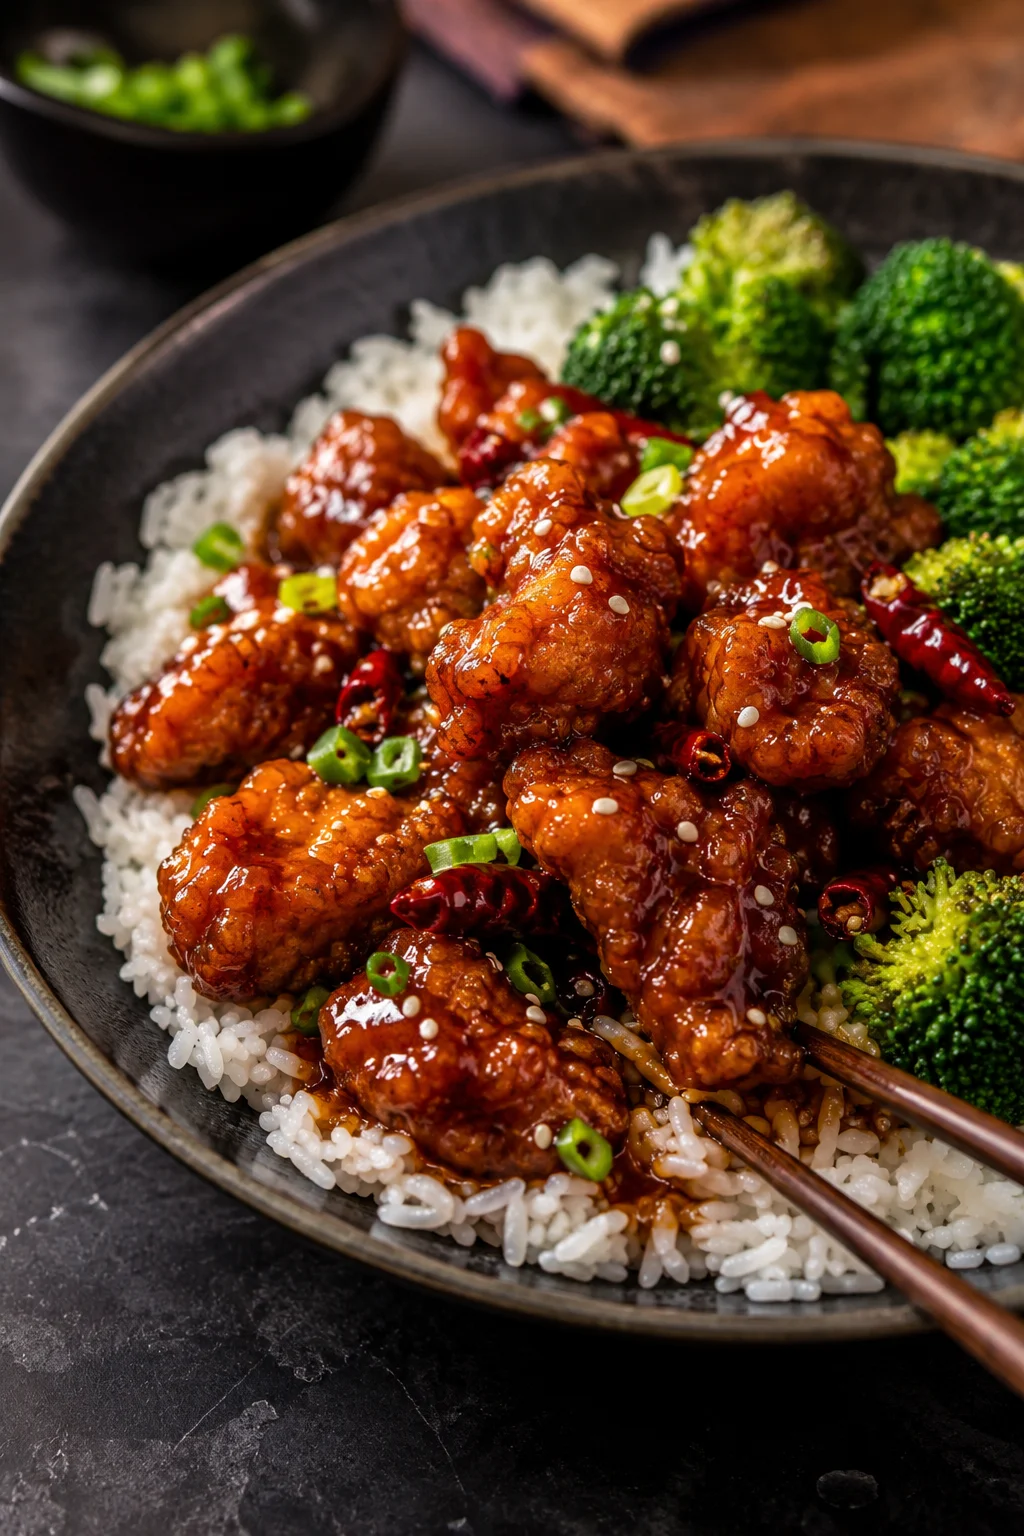
This General Tso chicken recipe is for the takeout craving: crisp pieces of chicken, a glossy sweet-spicy sauce, garlic and ginger in the pan, and rice waiting underneath to catch every sticky spoonful.
The secret is timing, not a complicated sauce. Takeout chicken often softens because it sits in glaze on the way home. Here, the sauce meets the chicken at the last second, so the first few bites still have crunch.
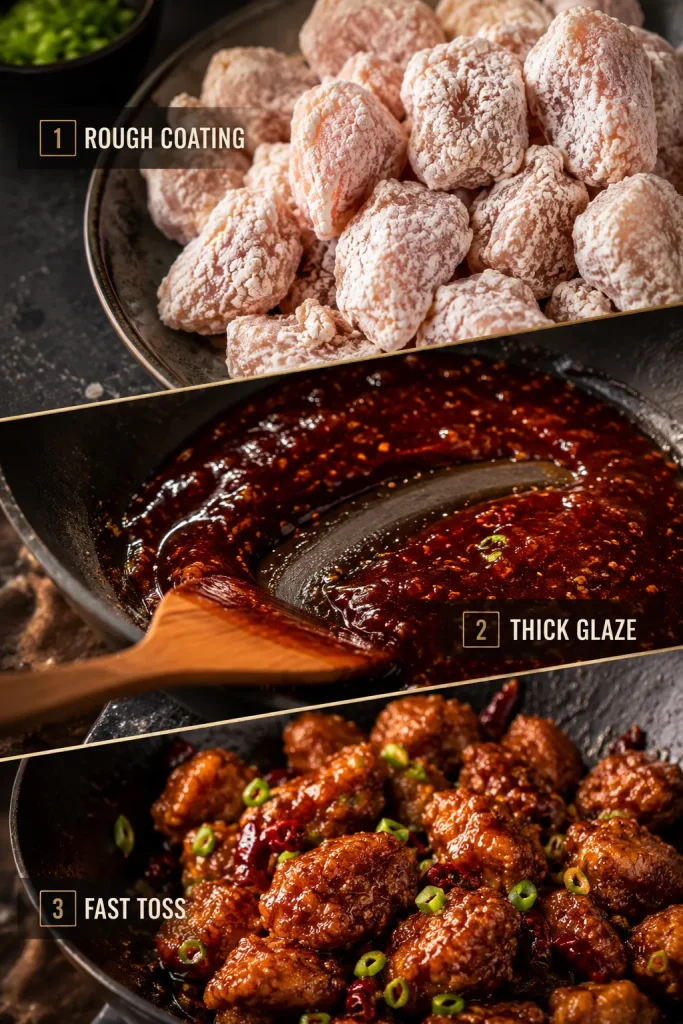
The whole recipe comes down to three cues: rough coating, thick glaze, fast toss. Remember that rhythm and you get crunchy edges, juicy centers, and sauce that clings instead of turning the pan soggy.
This version takes about 40 minutes from start to finish and uses a shallow-fry method, so you do not need a deep fryer. Better than takeout here does not mean fancier; it means the chicken is sauced at the last second, the glaze is balanced to your taste, and the first bite still feels fresh from the pan.
Jump to Recipe Card · 3-Cue Method · Visual Cues · Sauce · Keep It Crispy · Coating Choice · Air Fryer & Other Methods · Storage · FAQ
Quick Answer
The best homemade General Tso chicken is made by cutting boneless chicken into small pieces, coating it with cornstarch, shallow frying it until crisp, then tossing it briefly in a thick sweet-spicy sauce made with soy sauce, rice vinegar, hoisin, sugar, garlic, ginger, chili, sesame oil, stock or water, and cornstarch.
For the juiciest General Tso’s chicken, use boneless skinless chicken thighs. For the crispiest result without a deep fryer, fry the chicken in batches in about 2 cm / 3/4 inch of hot oil, thicken the sauce separately, and toss the fried pieces only at the end.
This recipe also helps with the two things that usually go wrong at home: soggy chicken and sauce that tastes too sweet, too salty, too thin, or too flat.
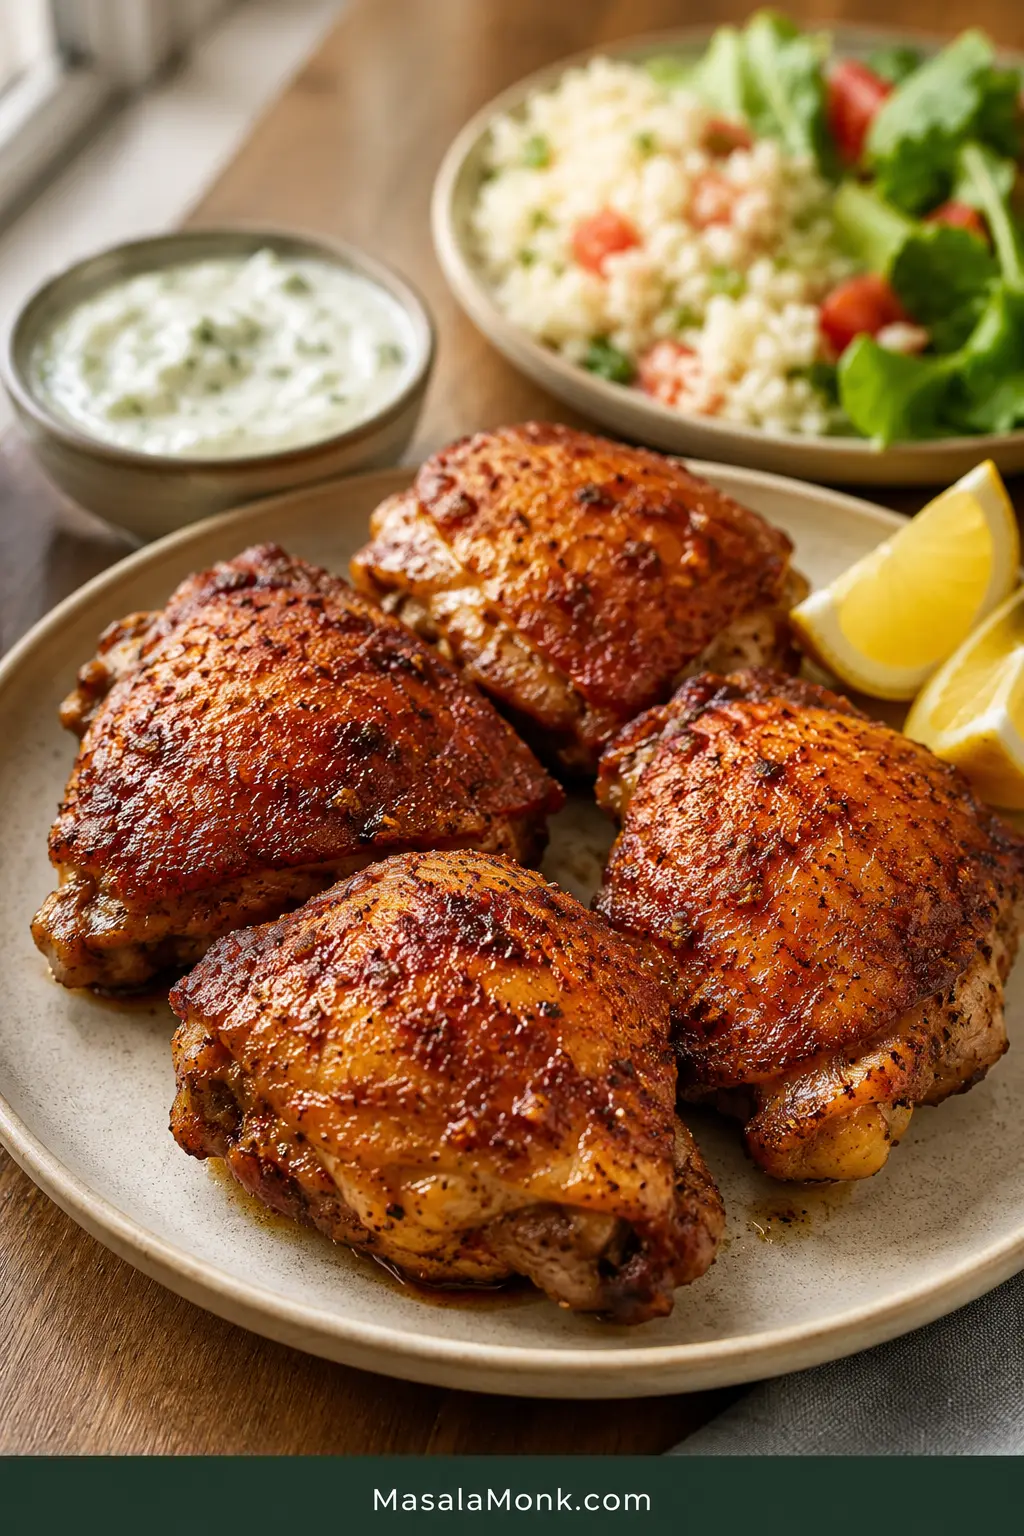
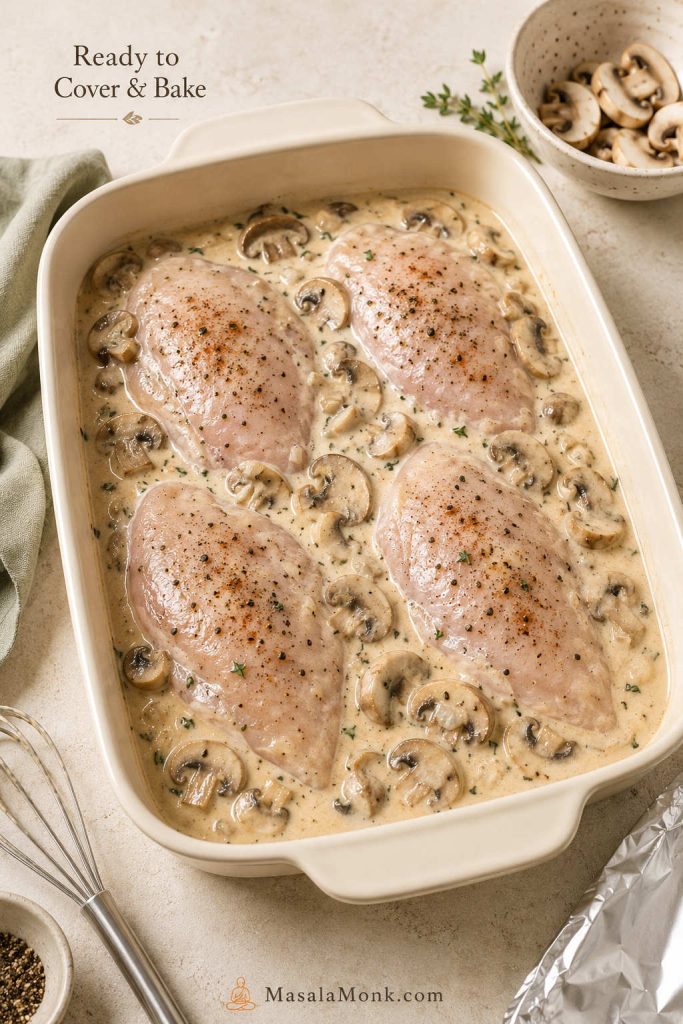
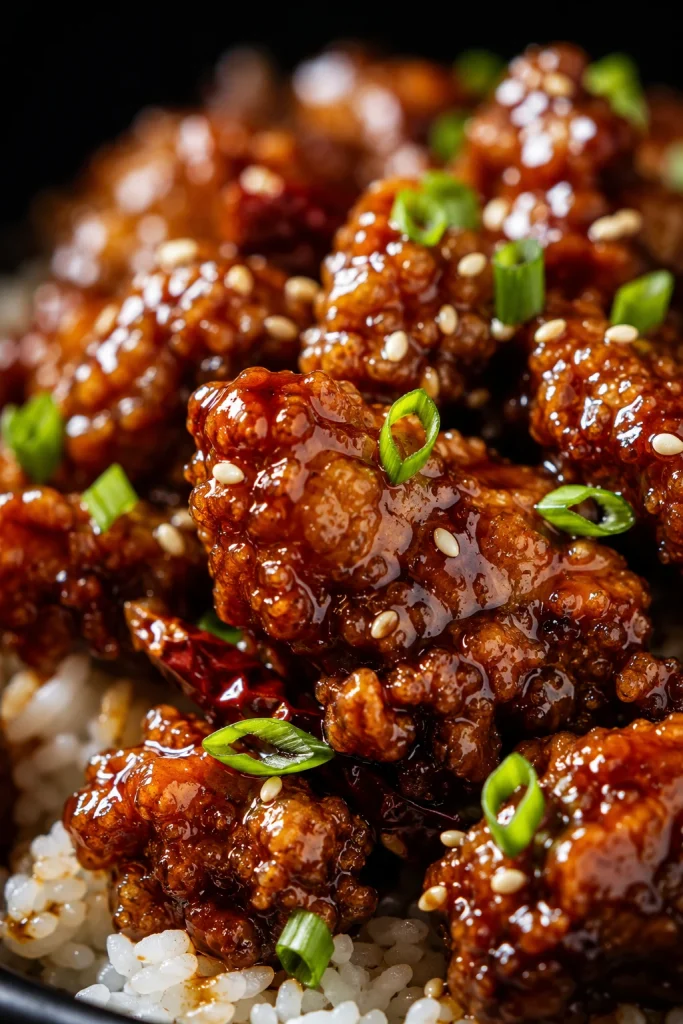
A close look at the finished chicken helps you know what the sauce should do: cling lightly to the ridges without hiding the crisp coating.
The 3-Cue Method
If you remember only one thing before cooking, remember this: rough coating, thick glaze, fast toss. These three checks protect the texture more than any complicated sauce trick.
| Cue | What to Look For | Why It Matters |
|---|---|---|
| Rough coating | Patchy, dry-looking chicken pieces, not smooth paste | Rough edges crisp better in hot oil |
| Thick glaze | Sauce that coats a spoon and leaves a short trail | Thin sauce soaks into the crust |
| Fast toss | About 30 seconds in the pan | The chicken gets coated without turning soft |
Once the sauce is mixed, the chicken is coated, and the rice is already steaming, the cooking feels much calmer. From there, it is hot oil, a quick glaze, scallions on top, and the sticky takeout-style bowl you were hoping for.
The Three Cues in One Look
Use this visual as a quick check before cooking: the coating should look rough, the sauce should look thick, and the toss should happen fast.
General Tso Chicken at a Glance
| Flavor | Sweet first, then savory, tangy, and gently spicy |
| Texture | Crisp chicken edges with a sticky glaze |
| Best chicken | Boneless skinless thighs for juicy takeout-style pieces |
| Leaner option | Chicken breast, cut evenly and cooked carefully |
| Main method | Shallow fry, thicken sauce, toss briefly |
| Oil depth | About 2 cm / 3/4 inch |
| Oil amount | About 1 1/2 cups in a 10-inch skillet; closer to 2 cups in a wider pan |
| Oil temperature | 375–390°F / 190–200°C |
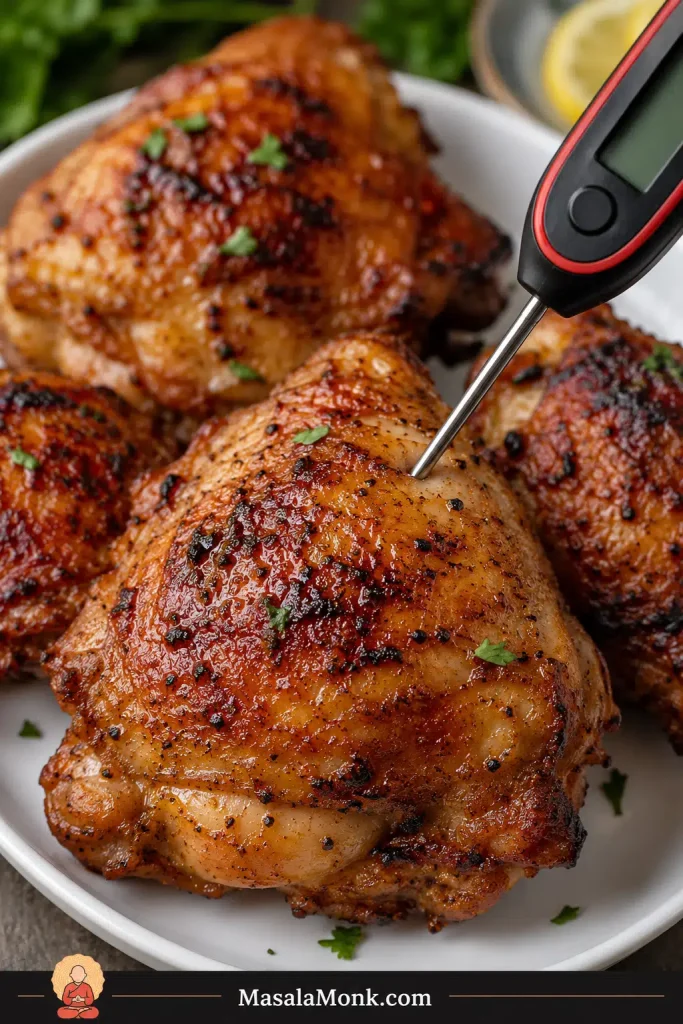
| Chicken safe temperature | 165°F / 74°C inside |
| Best served with | Rice and broccoli |
What Is General Tso Chicken?
General Tso chicken, often written as General Tso’s chicken, is a Chinese-American takeout dish made with crispy pieces of chicken tossed in a sweet, tangy, savory, lightly spicy sauce. It usually tastes sweet first, then savory and tangy, with a gentle chili warmth at the end. The goal is contrast: crisp edges, juicy chicken, and a shiny sauce that clings to each piece instead of pooling at the bottom of the pan.
Before You Start
This recipe moves quickly once the oil is hot, so a little prep makes everything easier. Start the rice first; this guide to cooking rice is useful when you want fluffy grains ready before the chicken hits the sauce.
Frying feels less stressful when you treat the first piece as a test. Use a heavy pan, keep the oil shallow, and fry one small coated piece before the first full batch. When it sizzles steadily and turns golden without burning, the oil is ready.
Crispy General Tso Chicken Without Deep Frying
Summary: Crispy shallow-fried chicken tossed in a glossy sweet, tangy, lightly spicy General Tso sauce. This homemade version gives you takeout-style flavor without a deep fryer.
| Prep Time | 20 minutes |
| Cook Time | 20 minutes |
| Total Time | 40 minutes |
| Servings | 4 servings |
| Method | Shallow fry, thicken sauce, toss briefly |
| Skill Level | Moderate, but very manageable with prep |
Equipment
- Large heavy skillet, wok, or Dutch oven
- Mixing bowls
- Whisk
- Tongs or a spider strainer
- Wire rack or paper towel-lined plate
- Instant-read thermometer or oil thermometer, helpful but optional
- Knife and cutting board
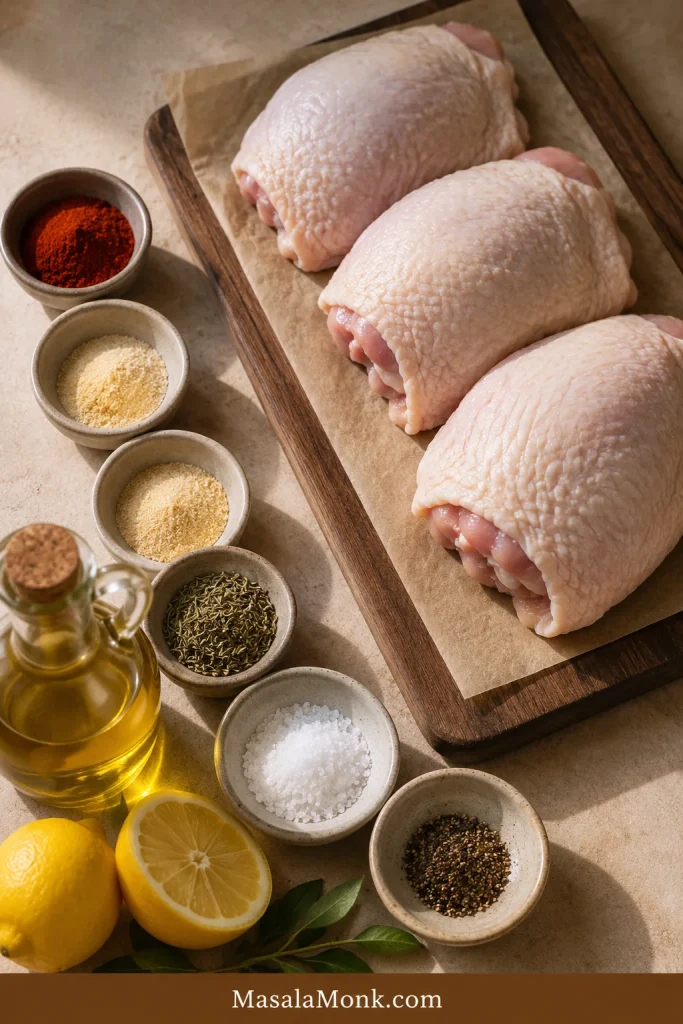
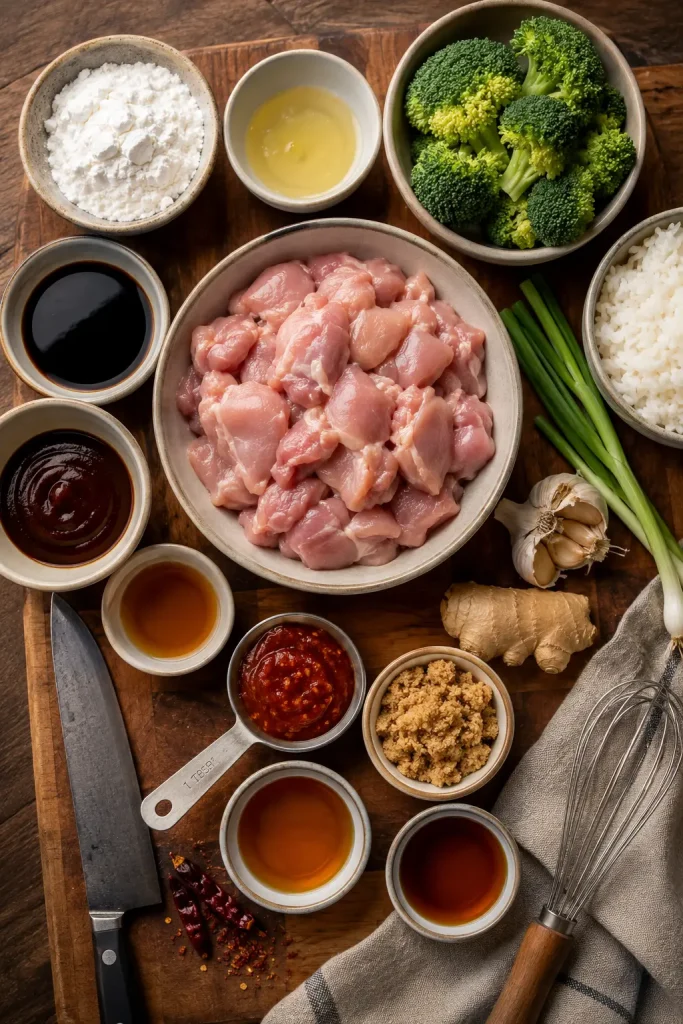
Ingredients
For the Chicken
- 600g / 1.3 lb boneless skinless chicken thighs, cut into 1-inch / 2.5 cm pieces
- 1 large egg white, or 2 tablespoons beaten egg, for better coating grip
- 1 tablespoon soy sauce
- 1 tablespoon Shaoxing wine, dry sherry, chicken stock, or water
- 1/4 teaspoon salt, plus more only if needed
- 1/4 teaspoon white pepper or black pepper
- 1/2 cup / about 65g cornstarch, plus 1–2 tablespoons more if needed
- Neutral oil for shallow frying, usually 1 1/2 to 2 cups depending on pan width
For the General Tso Sauce
- 1/2 cup / 120ml chicken stock or water
- 3 tablespoons low-sodium soy sauce
- 2 tablespoons hoisin sauce
- 2 tablespoons unseasoned rice vinegar
- 2–3 tablespoons brown sugar or honey, depending on how sweet you like it
- 1 tablespoon chili garlic sauce or sambal, or 1/2–1 teaspoon red pepper flakes
- 2 teaspoons sesame oil
- 1 tablespoon cornstarch
For the Aromatics and Serving
- 2–3 garlic cloves, minced
- 1 teaspoon fresh ginger, grated
- 3–5 dried red chilies, optional
- Cooked jasmine rice, white rice, brown rice, or fried rice
- Steamed or stir-fried broccoli
- Sliced scallions
- Sesame seeds
Instructions
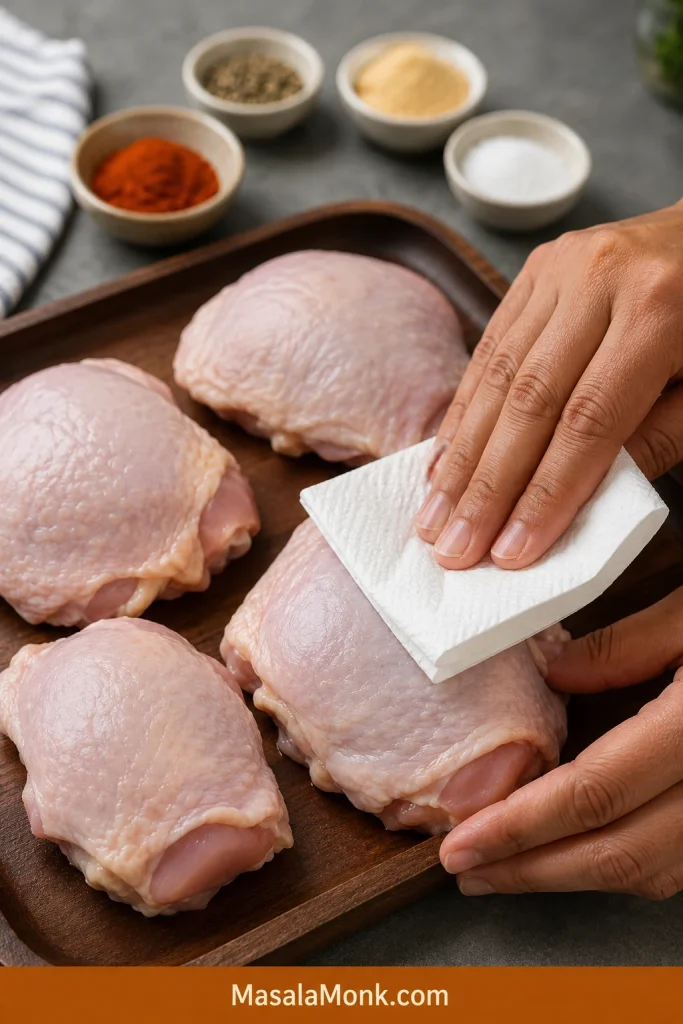
Prep the Chicken
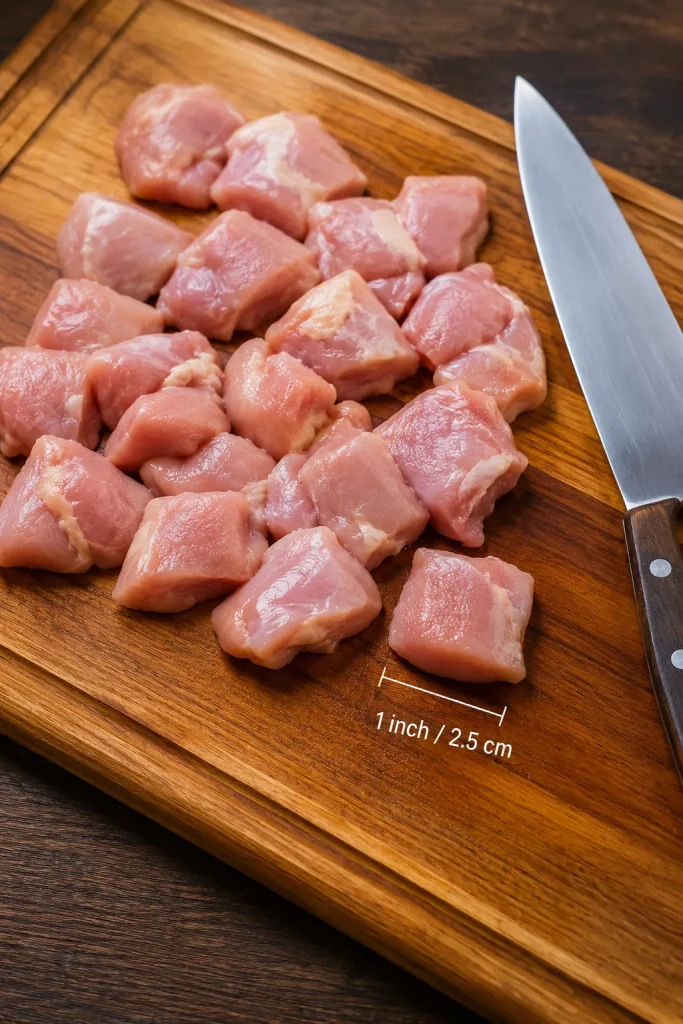
1. Cut the chicken. Cut the chicken into even 1-inch / 2.5 cm pieces. Similar size matters more than perfect cubes.
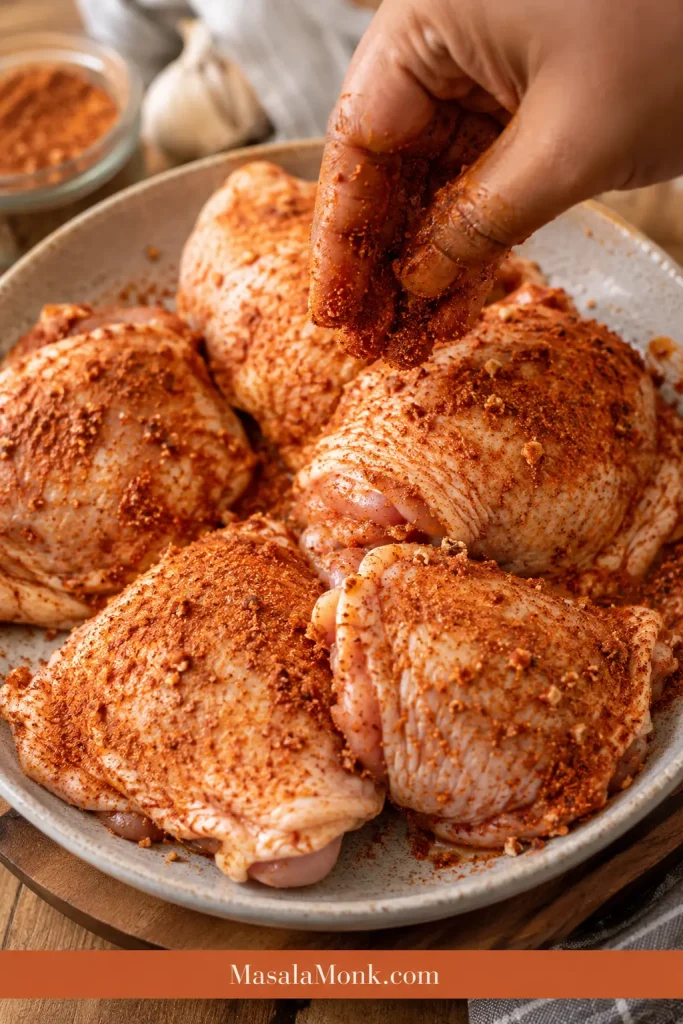
2. Season the chicken. In a bowl, combine the chicken with egg white or beaten egg, soy sauce, Shaoxing wine or another listed liquid, salt, and pepper. Stir until the pieces are lightly coated.
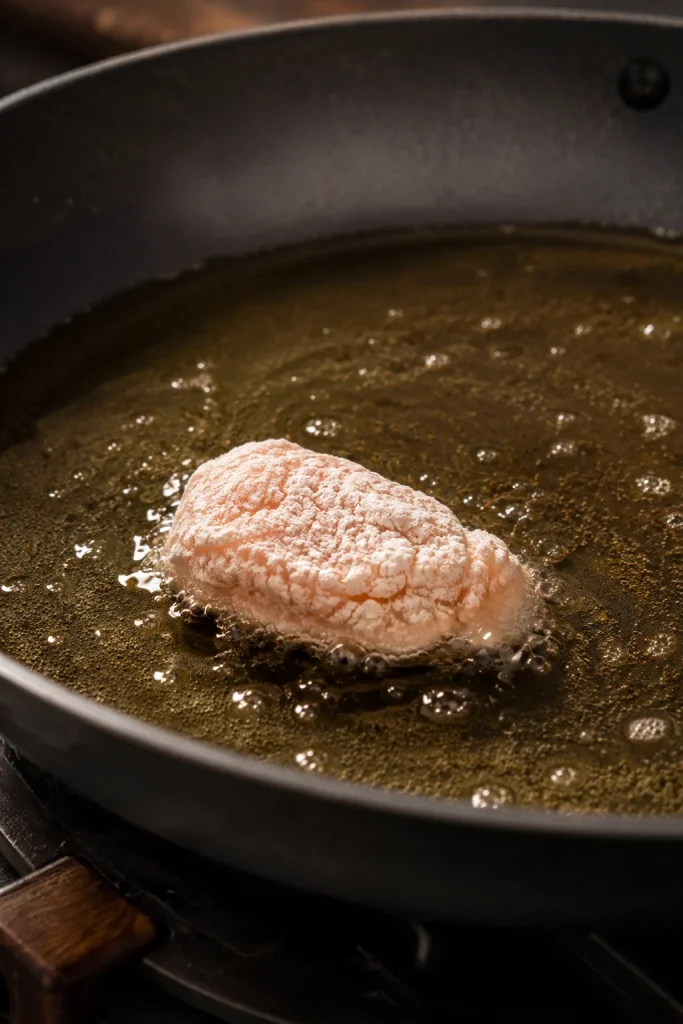
3. Add the cornstarch. Sprinkle in the cornstarch and toss until the chicken pieces have a thin, rough, mostly dry-looking coating. Uneven is good here because those rough patches turn into crisp edges in the oil. If the chicken looks wet or sticky, add another tablespoon or two of cornstarch. Shake off heavy loose clumps before frying.
4. Mix the sauce. In a separate bowl, whisk together the stock or water, soy sauce, hoisin sauce, rice vinegar, brown sugar or honey, chili garlic sauce, sesame oil, and cornstarch.
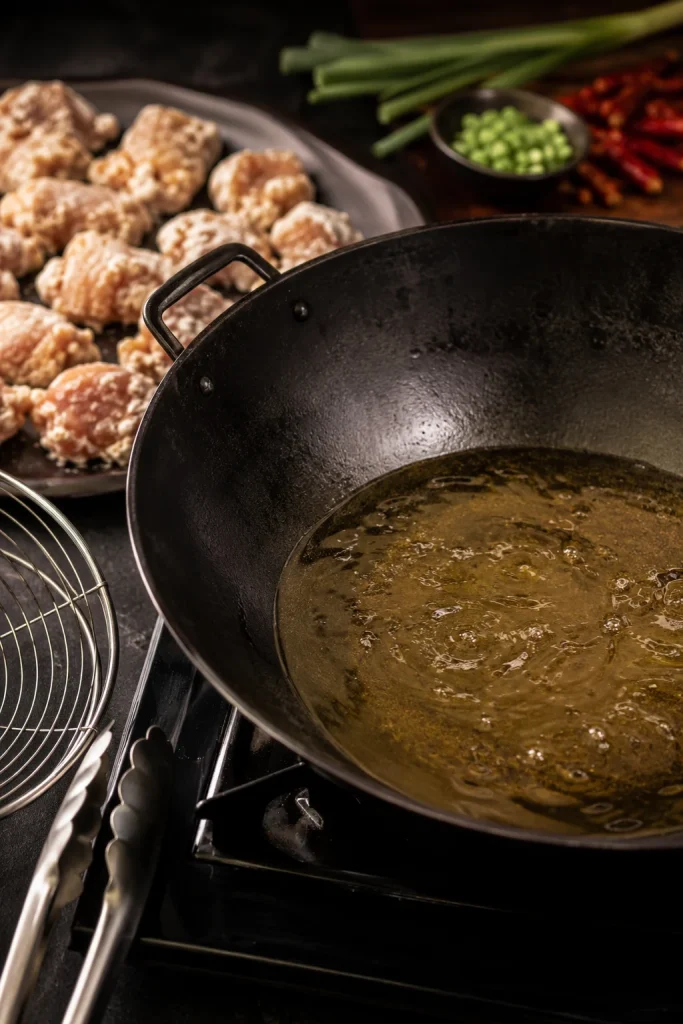
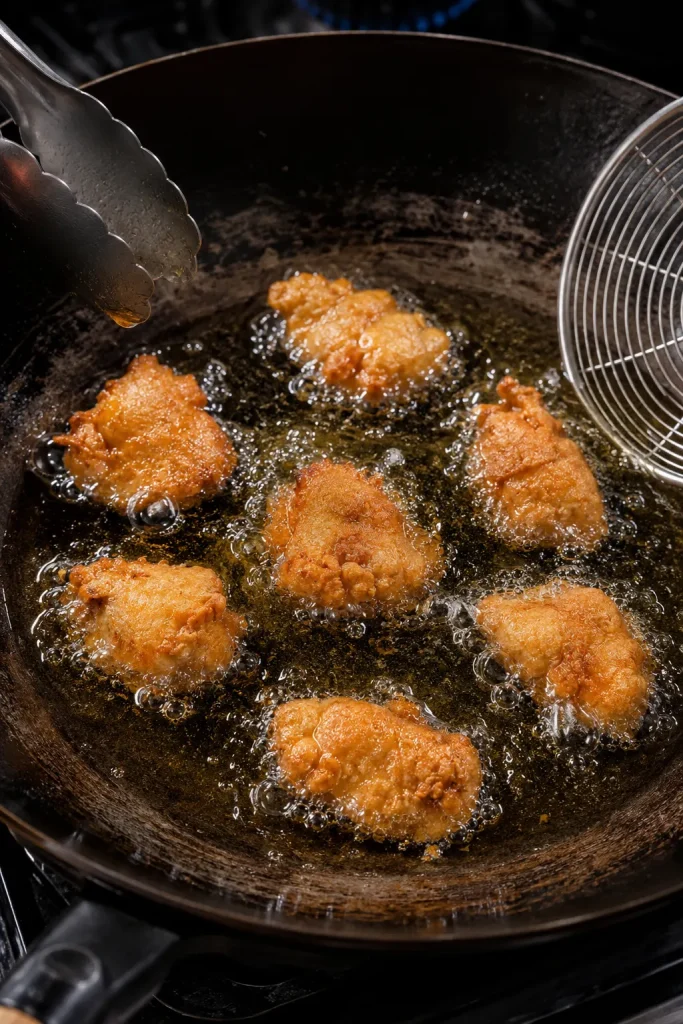
Fry and Drain
5. Heat the oil. Add about 2 cm / 3/4 inch neutral oil to a heavy skillet, wok, or Dutch oven. In a 10-inch skillet, start with about 1 1/2 cups oil. In a wider pan, you may need closer to 2 cups to reach the same shallow depth. Heat to 375–390°F / 190–200°C. Without a thermometer, look for shimmering oil and listen for an immediate steady sizzle when a small test piece goes in.
6. Fry in batches. Add the chicken in a single layer with space between pieces. Fry for 3–5 minutes total, turning as needed, until golden, crisp, and cooked through. The chicken should reach 165°F / 74°C inside.
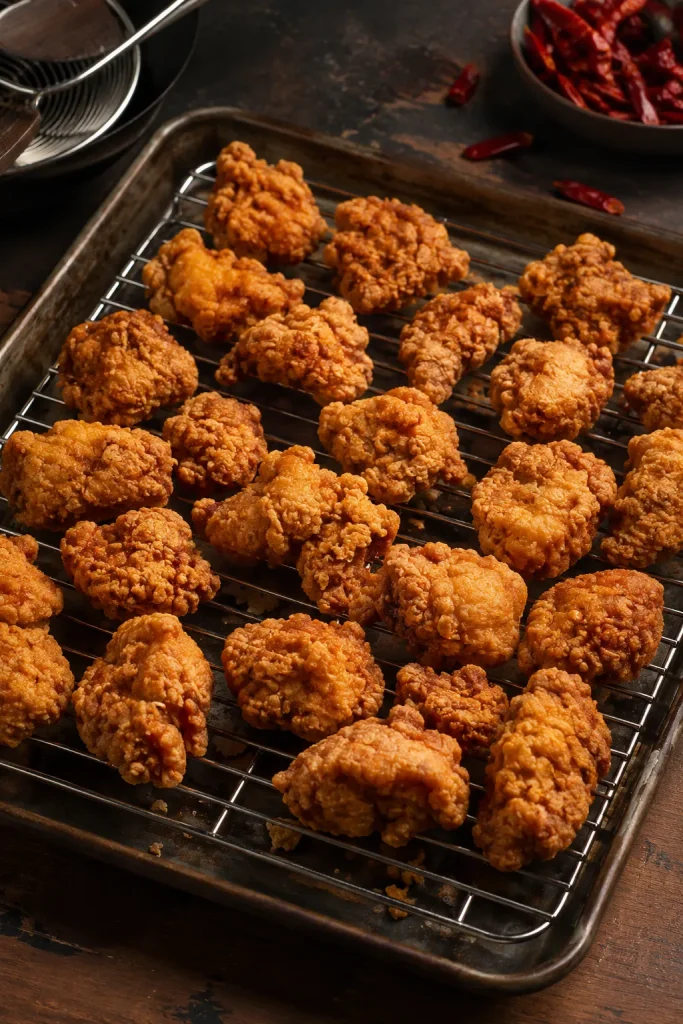
7. Drain the chicken. Transfer the fried chicken to a wire rack or a paper towel-lined plate. A wire rack is best because it lets steam escape instead of collecting under the coating. Repeat with the remaining chicken.
Make the Sauce and Toss
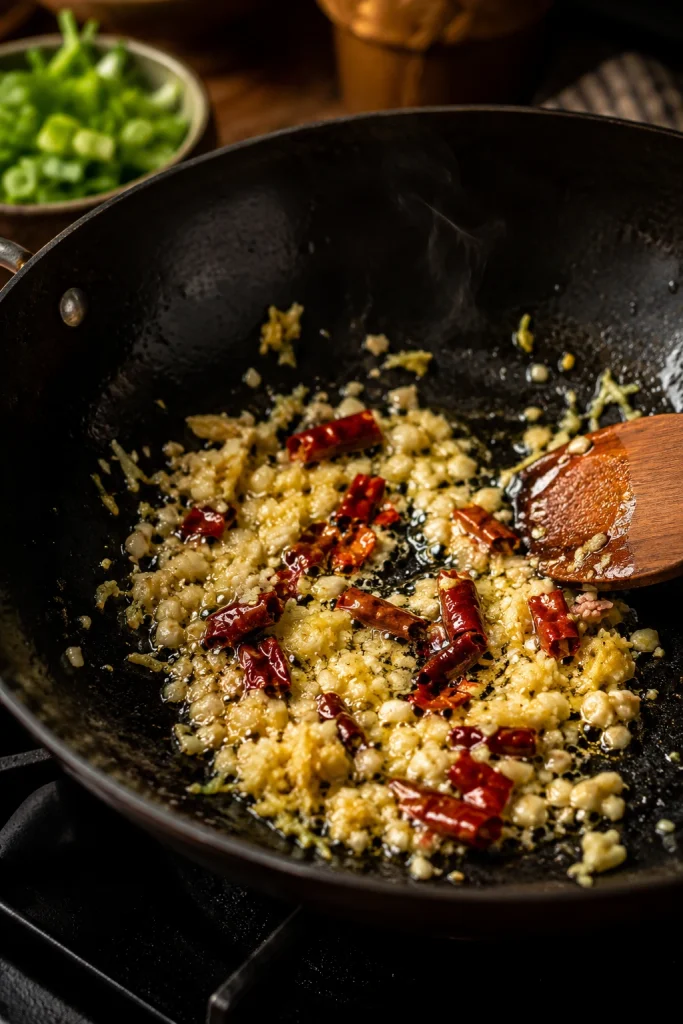
8. Cook the aromatics. Carefully pour off most of the oil, leaving about 1 tablespoon in the pan. Add the garlic, ginger, and dried chilies. Stir for 20–30 seconds, just until the garlic and ginger smell sharp, warm, and a little toasty. Stop before the garlic browns; burnt garlic can make the whole sauce taste harsh.
9. Thicken the sauce. Whisk the sauce once more, then pour it into the pan. Simmer for 1–2 minutes, stirring often, until the sauce turns shiny, darkens slightly, and moves like a glaze instead of a thin liquid. When you drag a spatula through the sauce, it should briefly leave a trail before flowing back together.
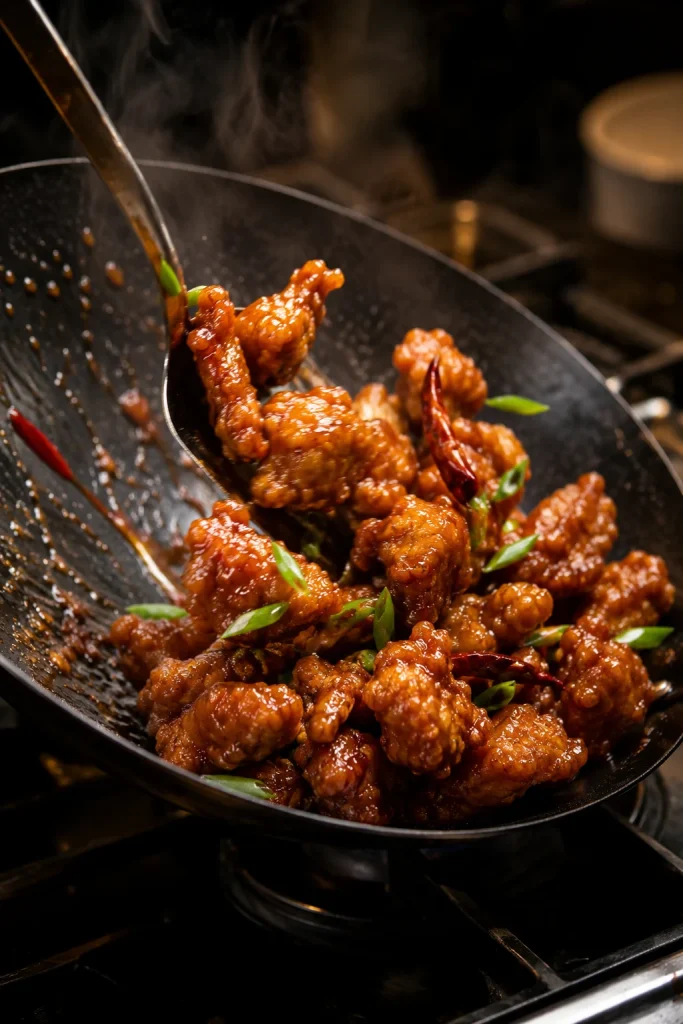
10. Toss quickly. Add the fried chicken back to the pan and toss for about 30 seconds, just until the glaze catches on the rough edges in a thin, shiny layer, with a few crisp ridges still showing. Get it out of the pan before the coating sits too long in the sauce.
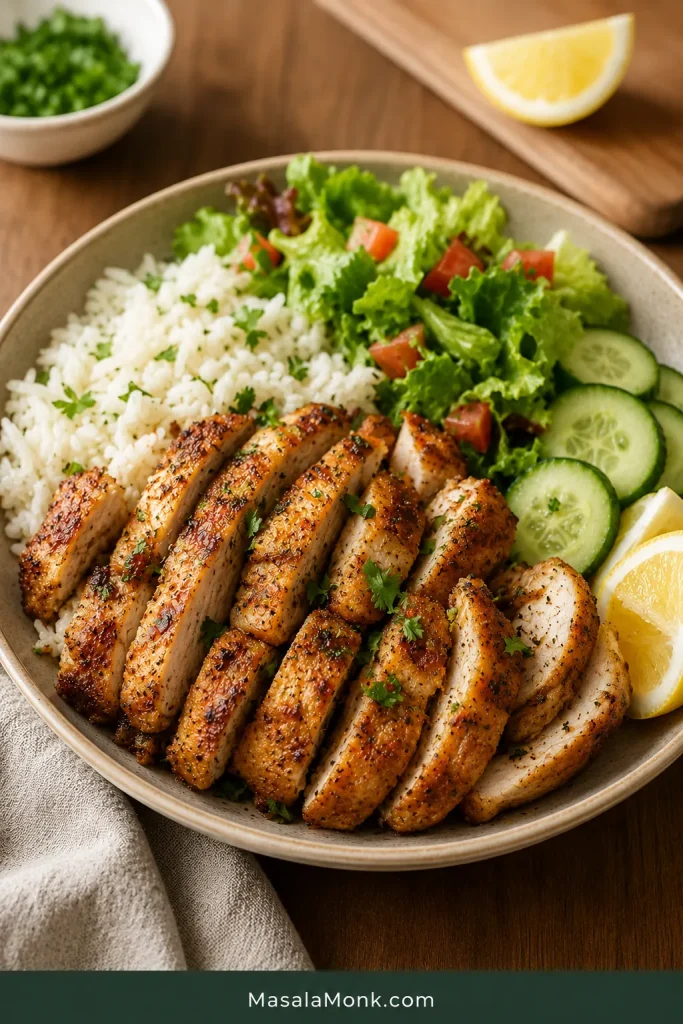
11. Serve immediately. Finish with scallions and sesame seeds. Serve hot with rice and broccoli while the sauce is shiny and the edges still have some crunch.
Recipe Notes
- Chicken thighs are the most forgiving choice because they stay juicy. Chicken breast works too, but avoid overcooking it.
- Egg white gives the cleanest coating. If using whole beaten egg, use only 2 tablespoons at first and add extra cornstarch as needed.
- Before frying, aim for rough, mostly dry chicken pieces. Before tossing, look for a glossy sauce that coats the spoon. If either one looks wet or thin, fix it before moving on.
- The sauce must thicken before the chicken returns. This one step protects the coating more than anything else.
- If the first batch browns before the chicken cooks through, the oil is too hot for the size of the pieces. Lower the heat slightly and give the next batch a little more time.
- For a milder sauce, reduce the chili garlic sauce or skip the dried chilies.
- For a sweeter restaurant-style sauce, use the full 3 tablespoons brown sugar or honey.
- If using regular soy sauce instead of low-sodium soy sauce, reduce the added salt and taste the sauce before coating the chicken.
This is the kind of recipe where the first batch teaches you the pan. By the second batch, the sizzle, color, and sauce thickness start to make sense.
The coating will not look perfectly smooth, and that is a good thing. Rough, patchy bits are what crisp in the oil, and the sauce needs to be thick before the chicken returns so those edges stay noticeable in the first few bites.
Why This Recipe Works
This dish looks simple, but the texture depends on timing. Cool oil makes the coating greasy. Thin sauce softens the crust. Too much time in the pan after saucing turns crunchy edges into soft ones.
- Small chicken pieces cook quickly. One-inch pieces brown fast and stay juicy inside.
- Egg white and cornstarch build the right coating. Egg white helps the coating grip, while cornstarch fries up lighter and crisper than heavy breading.
- Shallow frying gives better texture than a dry skillet. You get crunchy edges without needing a full deep fryer.
- A thick glaze protects the crust. Sauce thickness matters more than sauce complexity because thin liquid soaks into fried coating.
- A fast toss keeps the texture alive. The chicken needs enough time to catch the glaze, not enough time to stew in it.
- The flavor is adjustable. You can make the sauce sweeter, spicier, tangier, or less salty before it ever touches the chicken.
Ingredients You’ll Need
You do not need a long list of specialty ingredients here. What matters is balance: enough sweetness to feel like takeout, enough vinegar to keep it bright, enough chili to warm the bowl, and enough garlic and ginger to make the sauce smell alive as soon as it hits the pan.
The sauce can taste a little bold before it hits the chicken because the rice, broccoli, and crisp coating will soften the edges.
Set Up Before the Pan Gets Hot
General Tso chicken moves quickly once the pan is hot, so this setup keeps the frying, sauce, and serving steps from colliding.
Chicken and Coating
Chicken thighs are the easiest choice for juicy pieces because they handle hot oil well. Chicken breast works for a leaner version, but cut it evenly and pull it from the pan as soon as it is cooked through.
Egg white helps the cornstarch cling without making the coating heavy. Cornstarch is the ingredient to watch: too little and the pieces will not crisp well; too much loose powder can fall off in the oil. Aim for rough, dry-looking patches that cling to the chicken.
Sauce Ingredients
Low-sodium soy sauce gives you better control because the sauce reduces quickly. Hoisin adds body and that darker, rounder takeout sweetness. Rice vinegar keeps the sauce bright, while brown sugar or honey gives the sticky finish.
Chili garlic sauce gives spice plus flavor, sambal tastes sharper and more chili-forward, and red pepper flakes are the easiest pantry fix. Sesame oil goes in the sauce for aroma, and cornstarch turns everything glossy and spoon-coating.
When the balance is right, the sauce tastes bold on its own but even better once it catches the crisp chicken and drips into the rice.
Aromatics and Garnish
Fresh garlic and ginger wake up the sauce fast. Because the glaze only cooks for a minute or two, those fresh aromatics matter more here than they would in a long-simmered dish. Scallions, sesame seeds, and broccoli make the final bowl feel fresh instead of heavy.
Easy Ingredient Substitutions
| Ingredient | Best Substitute | What Changes |
|---|---|---|
| Shaoxing wine | Dry sherry, chicken stock, or water | Less restaurant-style aroma, but still works |
| Rice vinegar | Apple cider vinegar, using slightly less | Sharper flavor |
| Hoisin sauce | Extra soy sauce, sugar or honey, and a splash of stock | Less body, still sweet-savory |
| Chili garlic sauce | Sambal or red pepper flakes | Heat changes slightly |
| Low-sodium soy sauce | Regular soy sauce, with less added salt | Sauce can get salty faster |
| Chicken thighs | Chicken breast | Leaner, less forgiving |
Chicken Thighs vs Chicken Breast
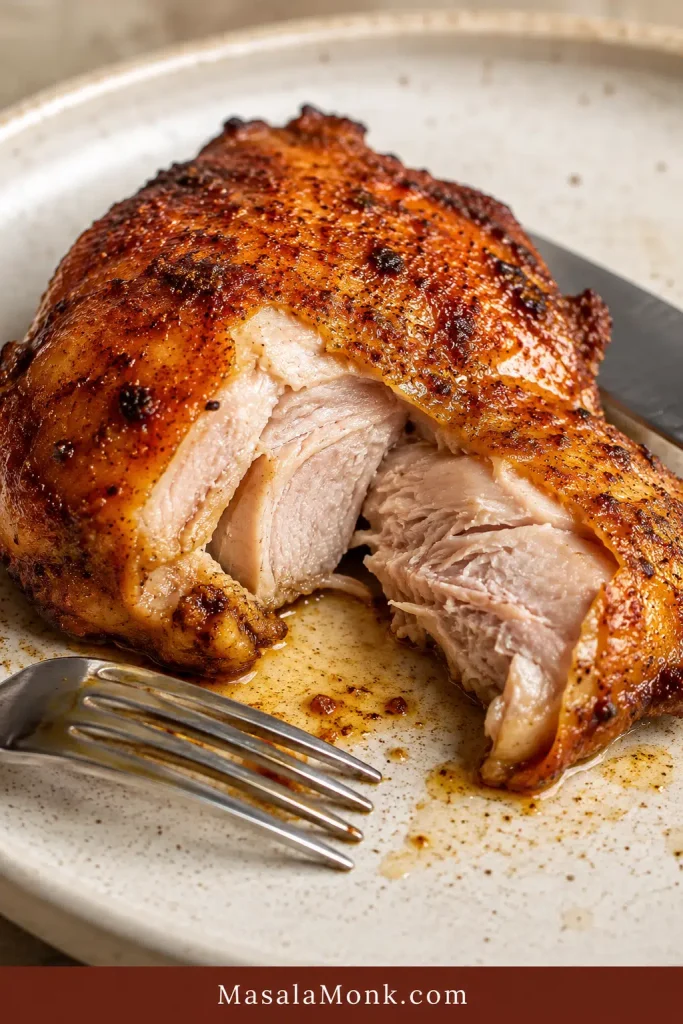
Chicken thighs are juicier, more forgiving, and closer to the takeout texture most people expect. Chicken breast is leaner, but it dries out faster, so cut it evenly and pull it from the pan as soon as it reaches 165°F / 74°C.
FoodSafety.gov’s safe minimum internal temperature chart is a helpful reference if you use a thermometer often.
Cornstarch vs Batter: Which Coating Is Best?
There is more than one way to coat the chicken. The best choice depends on whether the night calls for fast, extra crunchy, or somewhere in the middle.
| Coating Method | Best For | Result |
|---|---|---|
| Cornstarch only | Fastest weeknight version | Light crisp edges, easiest method |
| Egg white + cornstarch | Best balance for shallow frying | Better coating grip and stronger crispness |
| Flour + cornstarch + baking powder | Restaurant-style crunch | Thicker, crispier coating; best with double frying |
How Each Coating Looks After Frying
Use the coating comparison as a texture decision guide before you choose the fastest, balanced, or crunchiest version.
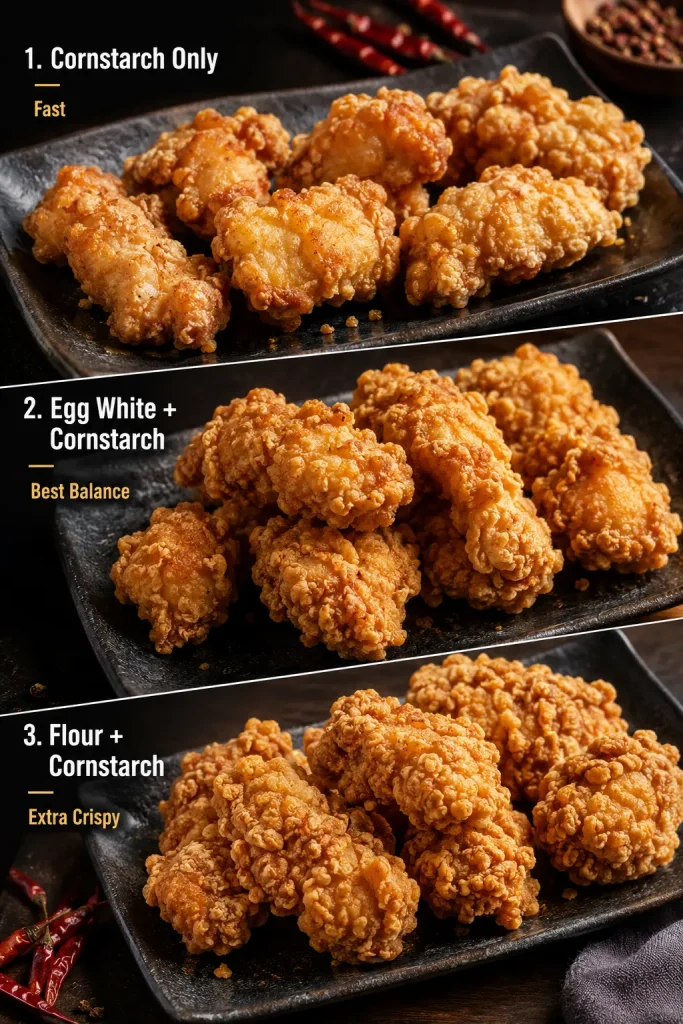
For this recipe, the egg-white-and-cornstarch method gives the best balance. It is still simple, but the coating grips better than cornstarch alone. For a very fast version, skip the egg white and use only cornstarch. For a restaurant-style version, add a little flour and baking powder and fry the chicken twice.
Extra crispy option: For a thicker, crunchier coating, replace part of the cornstarch with flour and add a pinch of baking powder. Fry once until cooked and lightly golden, rest the chicken on a rack, then fry again briefly until crisp. This gives a stronger restaurant-style crust, but it adds more oil, time, and cleanup.
General Tso Sauce: Sweet, Sticky, Spicy, and Tangy
This is where the dish becomes yours. The sauce should be sweet enough to feel like takeout, tangy enough to stay balanced, salty enough to season the chicken, and spicy enough to give warmth without overwhelming the bowl.
General Tso sauce formula: salty soy sauce, sweet brown sugar or honey, rounded hoisin, bright rice vinegar, chili warmth, fresh garlic and ginger, and enough cornstarch to turn it glossy and thick.
Garlic, Ginger, and Chilies
The sauce starts with a quick aromatic sizzle. Keep it brief so the garlic and ginger taste warm and sharp, not browned or bitter.
How Thick Should the Sauce Be?
Look for a sauce that coats a spoon and leaves a short trail when you drag a spatula through the pan. It thickens quickly once it starts bubbling, so stay close. If it is watery when the chicken goes in, the coating will soften quickly.
When the Sauce Is Thick Enough
This is the visual cue to look for before the fried chicken goes back into the pan.
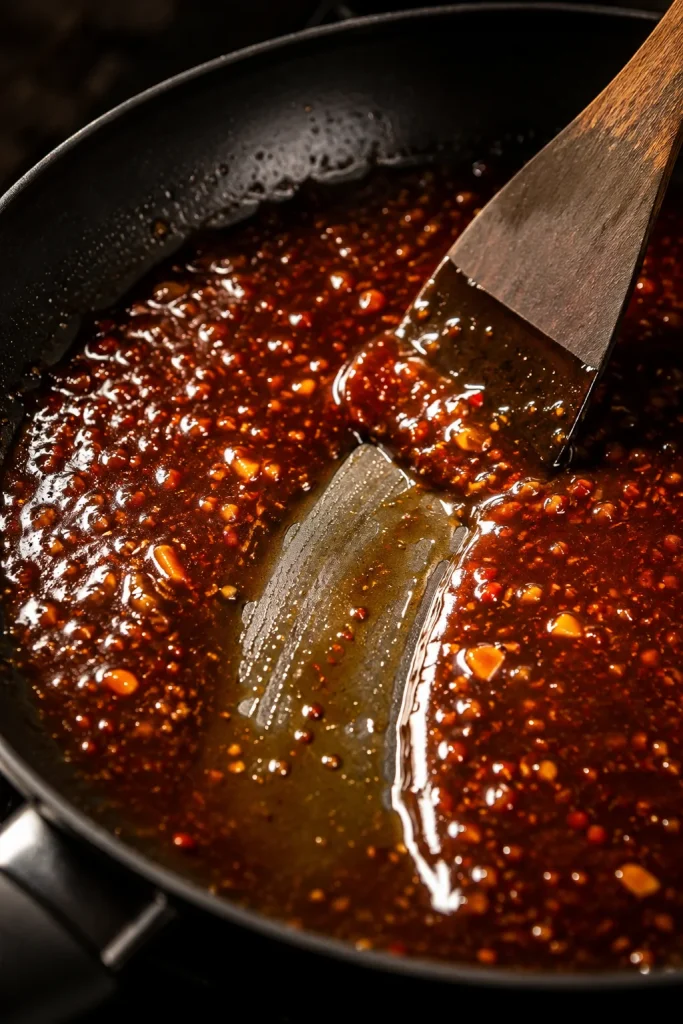
If the sauce tightens before the chicken is ready, loosen it with a splash of water or stock, warm it until glossy again, then toss. When the sauce is right, it looks like something you want to drag a spoon through before the chicken even goes in.
Can You Make General Tso Sauce Ahead?
Yes. You can mix and cook the sauce 3–4 days ahead, then refrigerate it in an airtight container. Reheat it gently in a pan with a splash of water or stock until it turns glossy again. For the best texture, fry the chicken fresh and toss it with the warmed sauce right before serving.
Other Ways to Use General Tso Sauce
Use it with crispy tofu, shrimp, cauliflower, stir-fried vegetables, frozen chicken bites, or rice bowls. The rule stays the same: cook the sauce until shiny, then toss it with the main ingredient at the end.
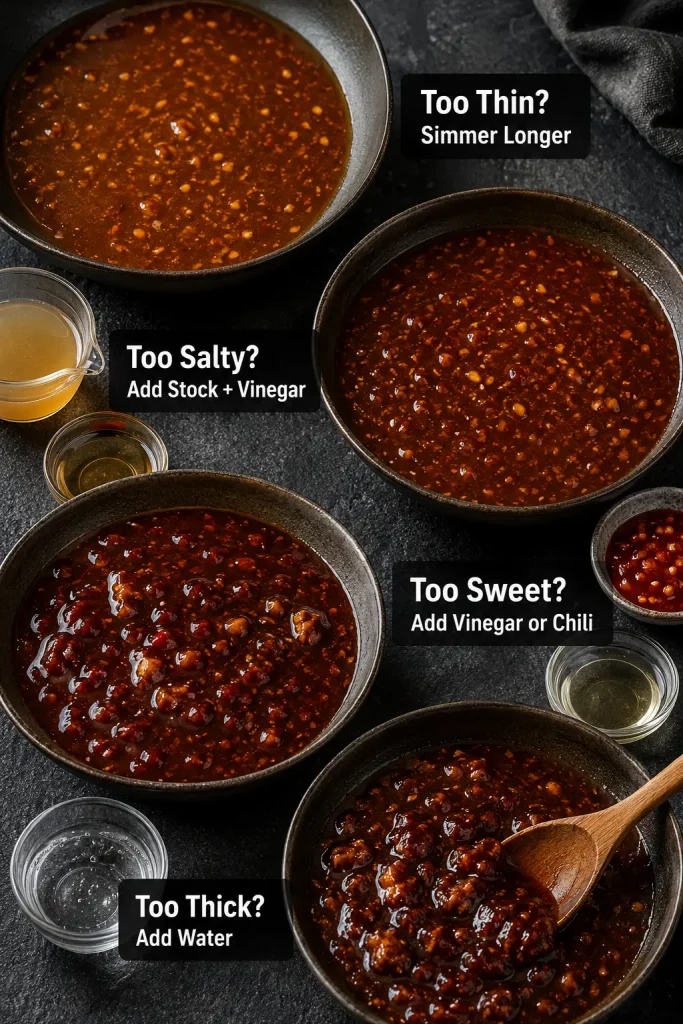
General Tso Sauce Troubleshooting
| Sauce Problem | How to Fix It |
|---|---|
| Too thick | Add water or stock 1 tablespoon at a time until it loosens. |
| Too thin | Simmer a little longer, or add a small cornstarch slurry. |
| Too salty | Add water or stock, then balance with a little sugar and vinegar. |
| Too sweet | Add rice vinegar or chili garlic sauce. |
| Too spicy | Add a little hoisin, sugar, or water. |
| Tastes flat | Add a little more ginger, garlic, vinegar, or sesame oil. |
How to Fix the Sauce Before Tossing
Fix the sauce while it is still by itself. Once the chicken returns, every extra minute in the pan softens the crust.
The sauce does not need to be perfect in the bowl before it hits the pan. It just needs to be balanced enough that, once it turns glossy, you want it on rice.
When in doubt, come back to the rhythm: rough coating, thick glaze, fast toss.
How It Should Look at Each Step
Once the exact steps are in front of you, these visual cues keep you from second-guessing the pan when the oil is hot and the recipe starts moving quickly.
Chicken Cut Size
The pieces do not need to be perfect cubes, but they should be close in size so they brown outside and cook through inside.
What the Marinade Should Look Like
Before the cornstarch goes in, the chicken should be lightly coated, not sitting in a puddle of marinade.

Rough Cornstarch Coating
Smooth paste is not the goal here. A patchy, dry-looking coating gives the sauce more crisp edges to grab later.

Set Up the Shallow Fry
Use enough oil to crisp the coating, but not so much that the recipe turns into a full deep-fry project.
How to Know the Oil Is Ready
Test one piece before committing to a full batch. Steady bubbles mean the oil is ready; silence or smoke means you need to adjust.
Frying in Batches
Space is part of the method. If the pieces touch everywhere, they steam before they crisp.
Why a Wire Rack Helps
A rack keeps the crust away from trapped steam while the rest of the recipe comes together.
When to Stop Tossing
Look for coated chicken, not submerged chicken. As soon as the glaze catches on the rough edges, get it out of the pan.
If the chicken is softening too quickly, jump to how to keep General Tso chicken crispy.
How to Keep General Tso Chicken Crispy
If homemade saucy chicken usually turns soft on you, this is the part to remember. You are not chasing dry, shattering crunch here. You want that first little crackle before the sauce turns soft and sticky.
Why General Tso Chicken Gets Soggy
Most texture problems come from one of four places: crowded oil, thin sauce, trapped steam, or too much time in the glaze.
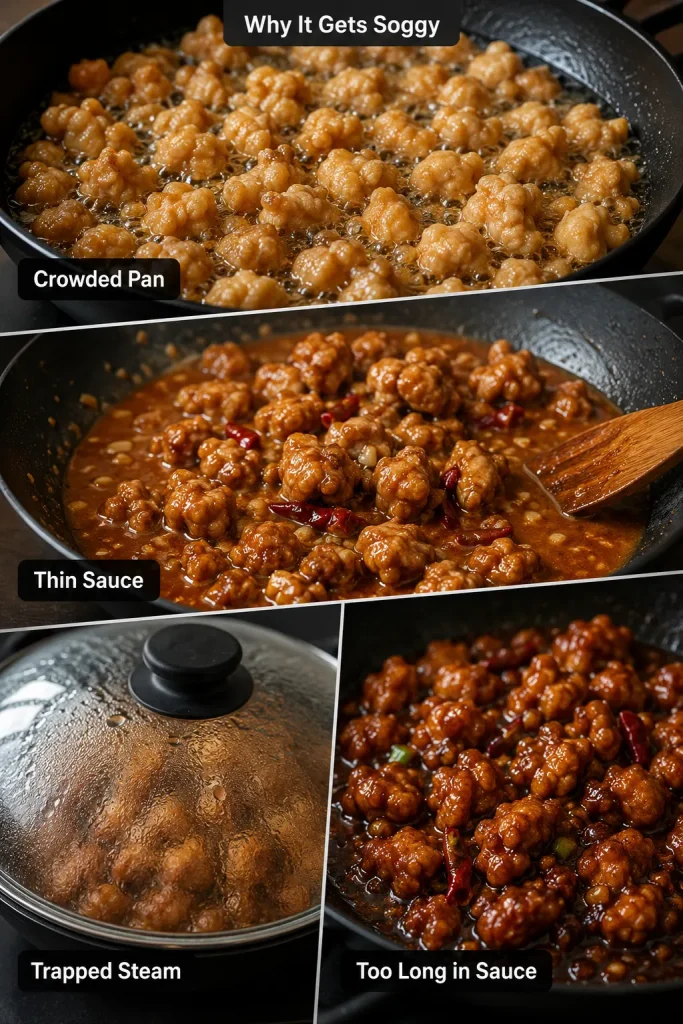
The Big 3 Crispy Rules
| Rule | Why It Matters |
|---|---|
| Fry in batches | Crowding makes the coating steam instead of crisp. |
| Thicken the sauce first | Thin sauce soaks into the crust. |
| Toss for about 30 seconds | Long simmering softens the fried coating. |
The supporting details matter too: pat the chicken dry if it looks wet, use enough cornstarch for a dry-looking coating, shake off heavy loose powder, drain the fried pieces on a rack, and serve as soon as the sauce goes on. Also avoid covering freshly fried or freshly sauced chicken; trapped steam is one of the fastest ways to soften the coating.
Quick Crispness Troubleshooting
| Problem | Likely Cause | Fix Next Time |
|---|---|---|
| Chicken feels greasy | Oil was too cool | Heat oil until chicken sizzles immediately |
| Coating fell off | Chicken was too wet or stirred too much | Use more cornstarch and turn gently |
| Chicken softened fast | Sauce was thin or chicken sat too long | Thicken sauce first and toss right before serving |
| Chicken browned but inside was undercooked | Pieces were too large or oil too hot | Cut smaller pieces and control heat |
| Chicken is dry | Overcooked or breast pieces were too small | Use thighs or cook breast just to 165°F / 74°C |
If the chicken softened almost immediately, the sauce was probably too thin or the pieces sat in it too long. If they never got crisp in the first place, the oil was probably too cool or the pan was crowded.
Even when leftovers soften, the first serving should give you that little edge of crunch that makes the whole bowl feel worth the extra pan.
Make It Sweeter, Spicier, Tangier, or Less Salty
Taste before you toss. Once the chicken is in, you have less room to adjust the sauce without softening the coating.
Cooking for kids or spice-sensitive eaters? Start with less chili in the sauce and add chili oil, flakes, or sambal at the table.
| Craving… | Adjustment |
|---|---|
| Sweeter sauce | Add 1–2 teaspoons brown sugar or honey. |
| Extra heat | Add chili garlic sauce, sambal, red pepper flakes, or dried chilies. |
| Tangier sauce | Add another splash of rice vinegar. |
| Lower salt | Use low-sodium soy sauce and add a little water or stock. |
| Bigger garlic flavor | Add one extra clove of garlic. |
| Restaurant-style depth | Add a little extra hoisin and sesame oil. |
| Less sweetness | Use 2 tablespoons sugar instead of 3 and add a little more vinegar. |
| Savory balance | Add a splash more soy sauce or a spoon of stock, then rebalance with vinegar. |
Make small changes and taste again. A good sauce does not taste like only sugar, only soy sauce, or only chili. It lands somewhere in the middle: sticky, bright, savory, and warm.
Lighter Version
To make the bowl a little lighter, use chicken breast, reduce the sugar to 2 tablespoons, choose low-sodium soy sauce, and use the air fryer or baked method. You will lose some takeout crunch, but you still get the sweet-spicy sauce, rice-bowl comfort, and a dinner that feels fun.
Choose Your Version
There are a few honest ways to make this dish, and they do not all promise the same texture. Pick the one that matches your night.
| Craving This? | Use This Method | What to Expect |
|---|---|---|
| Best balance of crisp and easy | Egg white + cornstarch shallow fry | Juicy chicken, crisp edges, no deep fryer |
| Fastest weeknight version | Cornstarch-only skillet method | Lighter coating, fewer steps |
| Restaurant-style crunch | Flour + cornstarch + baking powder, then double fry | Crispier crust, more oil and cleanup |
| Lower oil | Air fryer | Useful, but not as glossy-crisp as fried |
| Hands-off dinner | Slow cooker | Saucy and tender, not crispy |
| No-fry family meal | Baked or sheet-pan style | Easier cleanup, softer coating |
If crispness matters most, use the main shallow-fry recipe. If convenience matters more, jump to the other cooking methods.
The recipe card above is the version to make first. Once you understand the texture you want, you can adjust the method without guessing.
Air Fryer, Baked, Slow Cooker, and Deep-Fry Notes
The shallow-fry version is the main recipe because it gives the best mix of crispness, control, and realistic home cleanup. Choose the method that matches your night, not the one that sounds most impressive.
In short: shallow fry for the best overall texture, air fry for lower oil, bake for easier cleanup, slow cook for saucy comfort, and deep fry for the crunchiest restaurant-style result. If your main goal is less oil or less hands-on cooking, a softer coating is not a failure; it is just a different dinner — saucier, easier, and still good over rice.
Which Cooking Method Fits Your Night?
This comparison keeps the method choice honest: crispness, oil level, cleanup, and sauciness all change depending on how you cook the chicken.
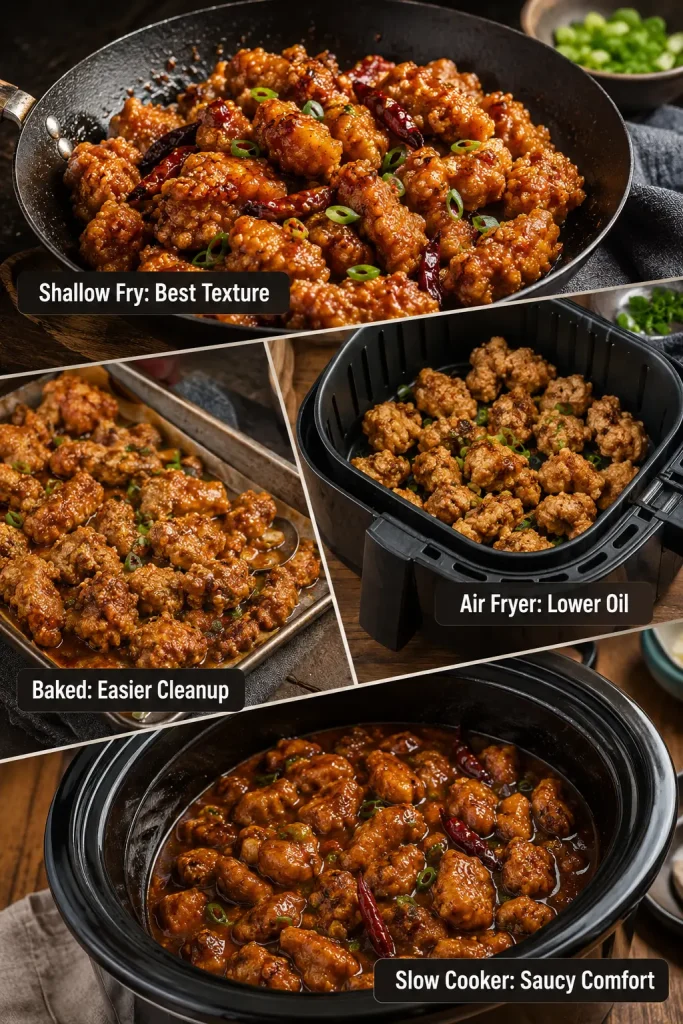
Air Fryer General Tso Chicken
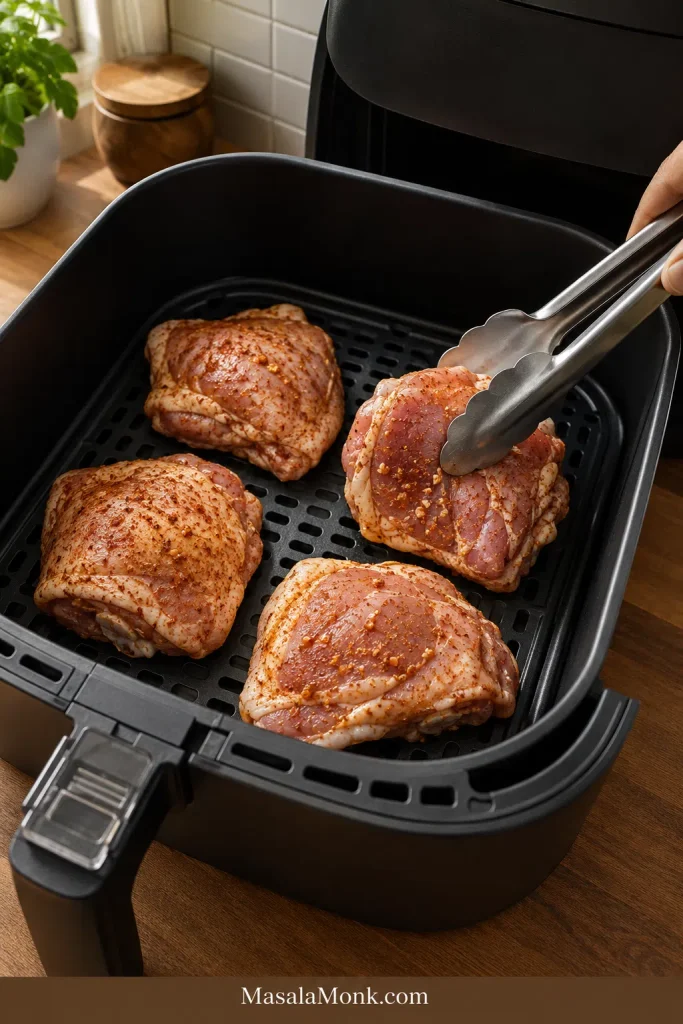
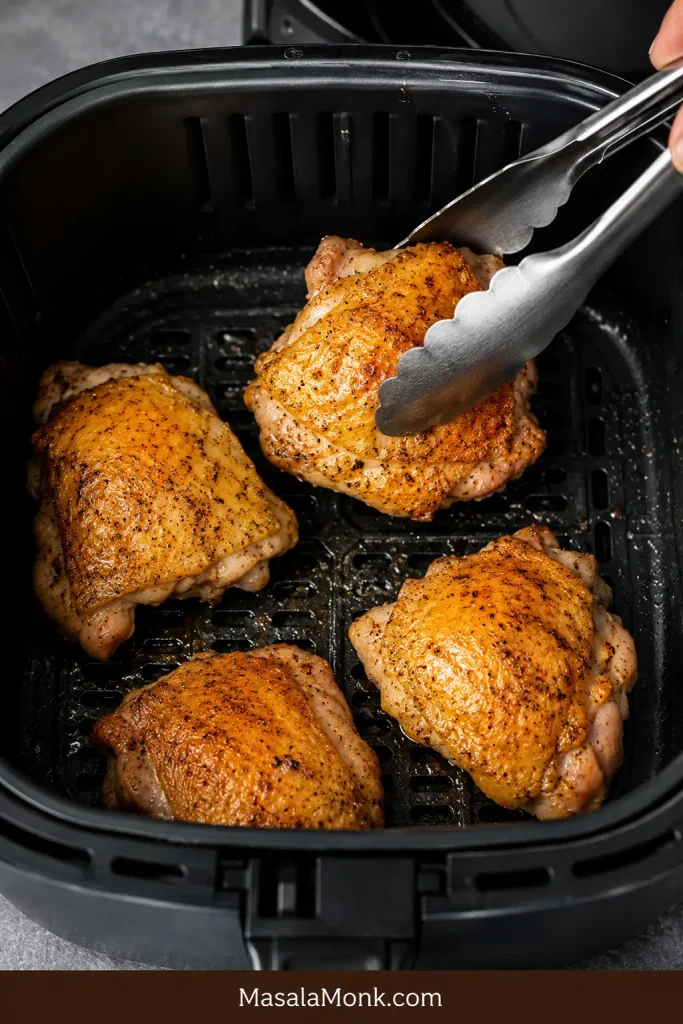
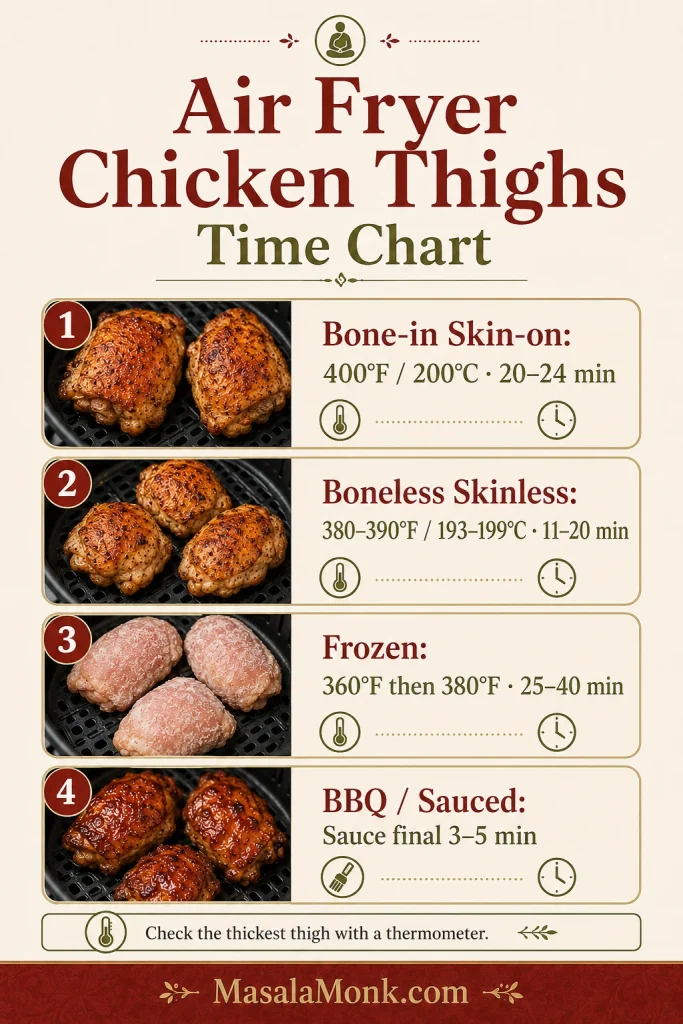
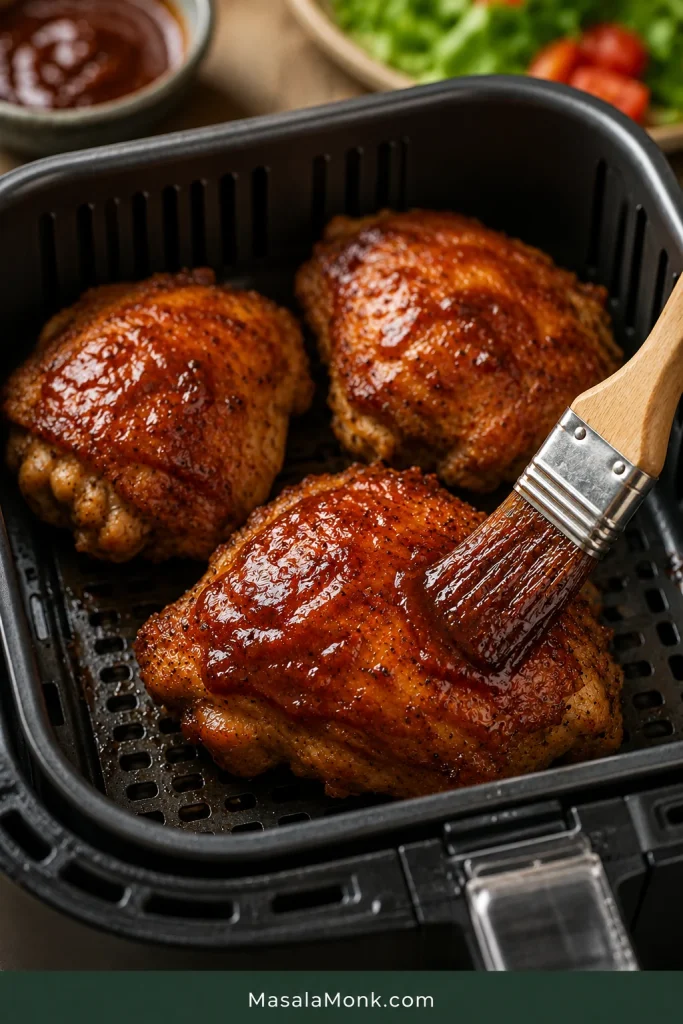
Air fryer General Tso chicken works best when the chicken is cooked separately and the sauce is made on the stove. Air fry coated chicken pieces at about 400°F / 200°C for 10–15 minutes, turning or shaking halfway through, then toss with hot sauce right before serving. Leave space between the pieces so the coating can dry and crisp instead of steaming.
If your air fryer chicken often turns out pale, uneven, or soft, this guide to common air fryer mistakes explains why spacing, flipping, and dry surfaces matter.
Baked General Tso Chicken
Baked General Tso chicken is easier and less messy, but it will be softer than fried. For better texture, bake the coated chicken on a rack or a well-oiled sheet pan, then sauce it after baking.
Slow Cooker General Tso Chicken
Slow cooker General Tso chicken is cozy and saucy. It is the version for spooning over rice, not the one for crisp edges. Brown the chicken first for better flavor, then cook it with the sauce and serve it hot.
Deep-Fried Restaurant-Style General Tso Chicken
The crispiest route is a deeper pot of oil and a double fry. Fry once until cooked and lightly golden, rest the chicken on a rack, then fry again briefly at a slightly hotter temperature before tossing with sauce.
Shortcut General Tso Chicken
For a shortcut dinner, use frozen crispy chicken bites or popcorn chicken and make only the sauce from scratch. Heat the chicken until crisp, simmer the sauce separately, then toss right before serving.
What to Serve With General Tso Chicken
General Tso chicken is rich and saucy, so it works best with simple sides that catch the sauce or balance the sweetness. Plain rice is the easiest base, but for a fuller takeout-style plate, shrimp fried rice works beautifully beside the sticky chicken.
- Steamed jasmine rice or white rice
- Brown rice
- Fried rice
- Steamed broccoli
- Stir-fried green beans
- Bok choy
- Noodles
- Cucumber salad
- Cabbage slaw
- Cauliflower rice for a lighter bowl
If serving broccoli, steam or blanch it for 3–4 minutes while the chicken drains, then serve it on the side or toss it into the pan only at the very end. Broccoli cuts through the sticky sauce and makes the plate feel complete without adding much extra work.
For the best bowl, add rice first, then broccoli, then the hot chicken. Spoon any extra sauce from the pan over the rice, not over the chicken, so the top pieces keep more texture. The best bowl is not neat; it is rice catching sauce, broccoli cutting the sweetness, and a few crisp edges still fighting through the glaze.
How to Build the Bowl
The rice can take the extra sauce. The top pieces should stay more exposed so the coating keeps a little texture.
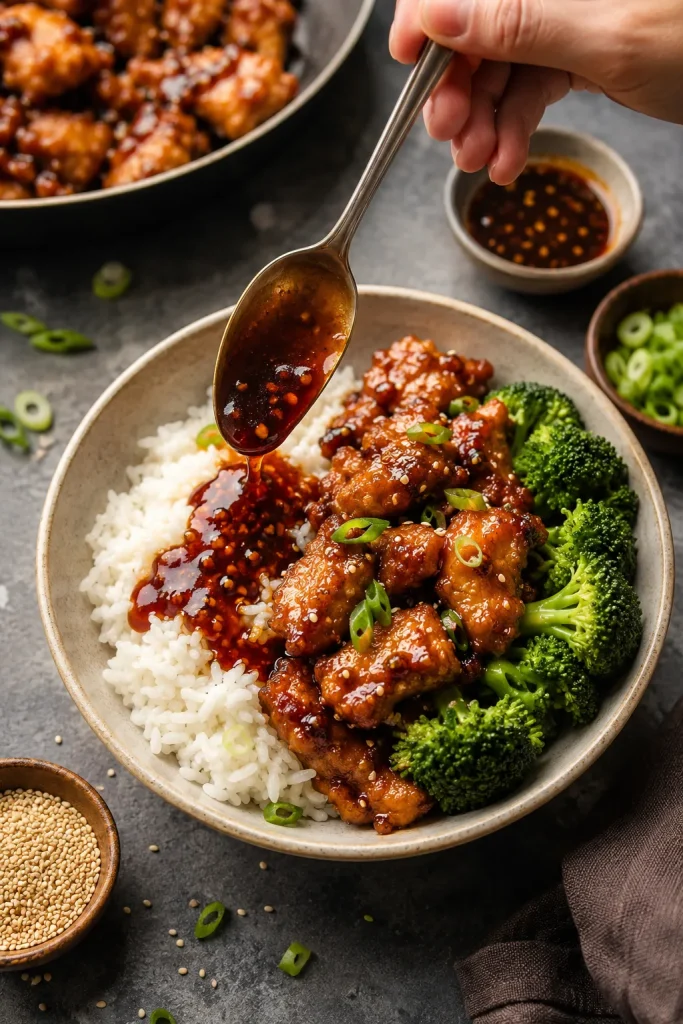
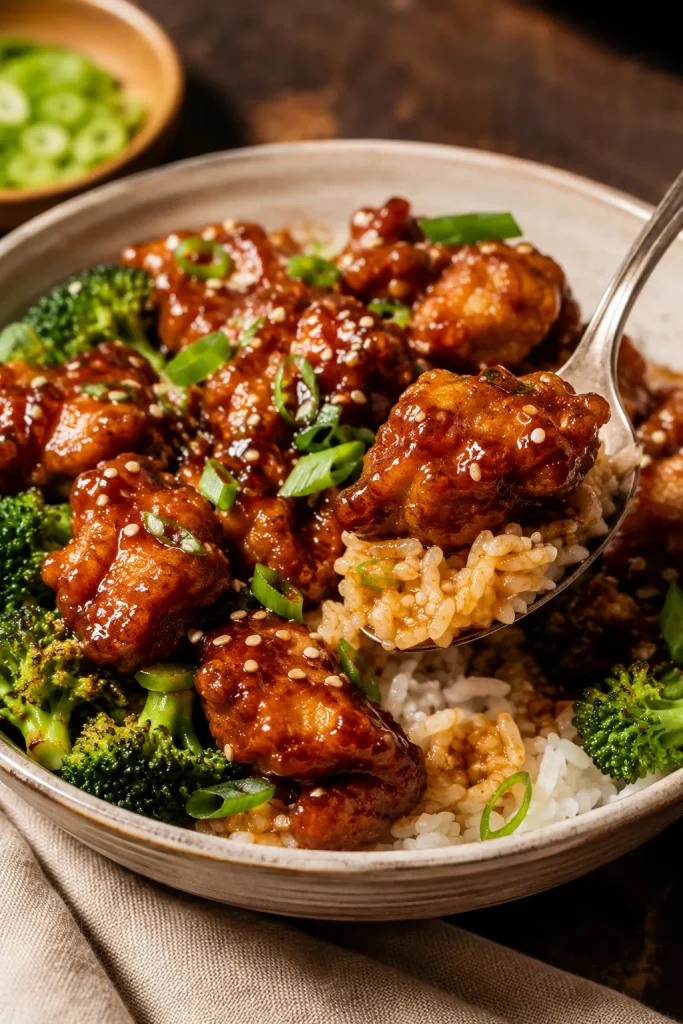
The Final Bowl
The finished bowl should look saucy and generous, but the chicken should still show some crisp edges after tossing.
For a starter, add something crisp and snacky like these crispy veg spring rolls. A small bowl of peanut sauce gives the table a creamy, salty-sweet contrast.
Storage and Reheating
General Tso chicken is best fresh. The coating starts to soften once it is tossed in sauce, so the first serving will always have the best texture. Leftovers are still good over rice, just more saucy and soft than crackly.
- Refrigerator: Store leftovers in an airtight container for 3–4 days.
- Rice: Store rice separately if possible so it does not absorb all the sauce.
- Microwave: Fastest option, but it softens the coating.
- Air fryer: Reheat at about 350°F / 175°C for 6–8 minutes.
- Skillet: Reheat over medium heat until hot, adding a splash of water if the sauce is too thick.
- Freezer: You can freeze it, but the coating will not stay crisp after thawing.
Can You Make It Ahead?
The parts can be prepped ahead, but save the frying and tossing for the last minute. Mix the sauce, cut the chicken, and chop the aromatics earlier in the day, then cook when you are ready to eat.
General Tso Chicken vs Sesame Chicken, Orange Chicken, and Kung Pao
These takeout dishes can look similar, but the flavor profiles are different.
| Dish | Main Flavor | Texture | Heat Level |
|---|---|---|---|
| General Tso chicken | Sweet, tangy, savory | Crispy chicken in sticky glaze | Mild to medium |
| Sesame chicken | Sweeter, sesame-forward | Crispy or saucy | Mild |
| Orange chicken | Sweet citrus | Crispy chicken in orange glaze | Usually mild |
| Kung pao chicken | Savory, spicy, nutty | Stir-fried, not usually battered | Medium |
Choose General Tso for sticky, sweet heat. Choose sesame chicken for a sweeter and milder sauce, orange chicken for citrus, and kung pao chicken for a less-sweet stir-fry with peanuts and chiles.
Is General Tso Chicken Authentic?
General Tso chicken is best known today as a Chinese-American restaurant dish. It has roots connected to Hunan-style cooking and the dish associated with Chef Peng Chang-kuei, but the version most people know from American takeout menus became sweeter, saucier, and more heavily coated over time. For a short background read, Smithsonian has a helpful piece on the history of General Tso’s chicken.
This is a takeout-style version, written for the flavor most people expect from the dish: crisp chicken, a sweet-spicy glaze, a little tang, and rice underneath. It is not trying to replace a traditional Chinese home recipe.
Once you understand the coating, sauce thickness, and toss timing, most General Tso problems become easy to fix.
FAQ
Is General Tso chicken spicy?
General Tso chicken is usually mildly spicy, not extremely hot. The heat comes from chili garlic sauce, dried red chilies, sambal, or red pepper flakes. For a family-friendly version, use less chili sauce and skip the dried chilies. For more heat, add extra chili near the end and taste as you go.
What is General Tso sauce made of?
General Tso sauce is made with soy sauce, rice vinegar, sugar or honey, hoisin, chili, garlic, ginger, sesame oil, stock or water, and cornstarch. It should taste sweet, savory, tangy, lightly spicy, and thick enough to coat the chicken.
Can I make General Tso chicken without hoisin sauce?
Yes. The sauce will be a little less rounded and glossy, but it will still work. Use an extra teaspoon of soy sauce, a little more sugar or honey, and a small splash of water or stock. If you have oyster sauce, add 1 teaspoon for body. Taste before tossing the chicken.
Why is my General Tso sauce not sticky?
General Tso sauce is usually not sticky because it is too thin, has not simmered long enough, or does not have enough cornstarch. Simmer it until glossy and spoon-coating. If it still looks watery, add a small cornstarch slurry and cook for another minute.
What oil is best for frying General Tso chicken?
Use a neutral high-heat oil such as canola, vegetable, peanut, sunflower, or rice bran oil. Avoid olive oil for this shallow-fry method because the oil needs to get hot enough for the coating to crisp quickly.
Can I use frozen chicken?
Yes, but thaw it completely first and pat it very dry before coating. Do not coat or fry frozen chicken pieces; the extra moisture can make the coating fall off, splatter in the oil, and turn the chicken soggy. For safest cooking, check the thickest piece and cook the chicken to 165°F / 74°C.
Why did my chicken get soggy?
Chicken gets soggy when the sauce is too thin, the pan is crowded, or the fried pieces sit in sauce too long. Fry in batches, drain well, thicken the sauce first, and toss right before serving.
Can I use chicken breast instead of thighs?
Yes, chicken breast works, but it is leaner and dries out faster than thighs. Cut it into even 1-inch pieces and avoid overcooking it. Chicken thighs are more forgiving and usually give a juicier, more takeout-style result.
Is General Tso the same as General Tao, General Cho, or General Gau chicken?
General Tao chicken, General Cho chicken, General Gau chicken, General Tsao chicken, and chicken tso are often used for very similar sweet-spicy crispy chicken dishes. The spelling changes by restaurant and region, but most people are looking for the same takeout-style idea.
Can I make it without deep frying?
Yes, shallow frying gives the closest texture without using a deep fryer. Air fryer and oven versions also work, but the coating will be lighter and less like classic takeout. For the crispiest result, shallow frying or deep frying works best.
How do I make it gluten-free?
Use gluten-free tamari instead of soy sauce and choose a gluten-free hoisin sauce. Cornstarch is usually gluten-free, but always check the label if needed. Serve with rice and vegetables instead of noodles unless the noodles are certified gluten-free.
Can General Tso chicken be made ahead of time?
The parts can be prepped ahead, but save the frying and tossing for the last minute. Mix the sauce, cut the chicken, and chop the aromatics earlier in the day, then cook when you are ready to eat.
What is the difference between General Tso chicken and sesame chicken?
General Tso chicken is usually tangier and spicier, while sesame chicken is sweeter, milder, and more sesame-forward. Both are often made with crispy chicken and sticky sauce, but General Tso has more heat and a sharper sweet-tangy balance.
Can I use bottled General Tso sauce?
Yes, bottled General Tso sauce works when dinner needs to be fast. Heat it separately and toss the chicken only at the end so the coating does not sit in sauce too long. Homemade still gives you better control over sweetness, salt, heat, and thickness.
Make it once as written, then adjust the sauce the way your table likes it. A little more vinegar, a little more chili, a little less sugar — that is when this stops feeling like a copied takeout order and starts feeling like yours. Next time, you will know exactly what to change.