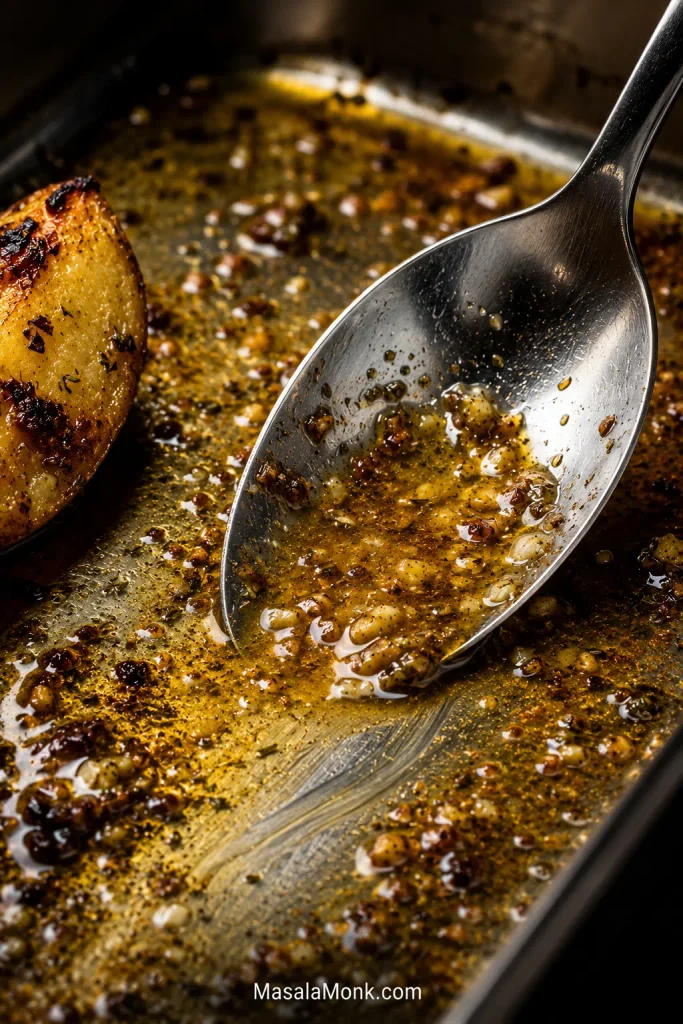
Posted on — Leave a comment

Greek Moussaka Recipe with Eggplant, Lamb & Béchamel

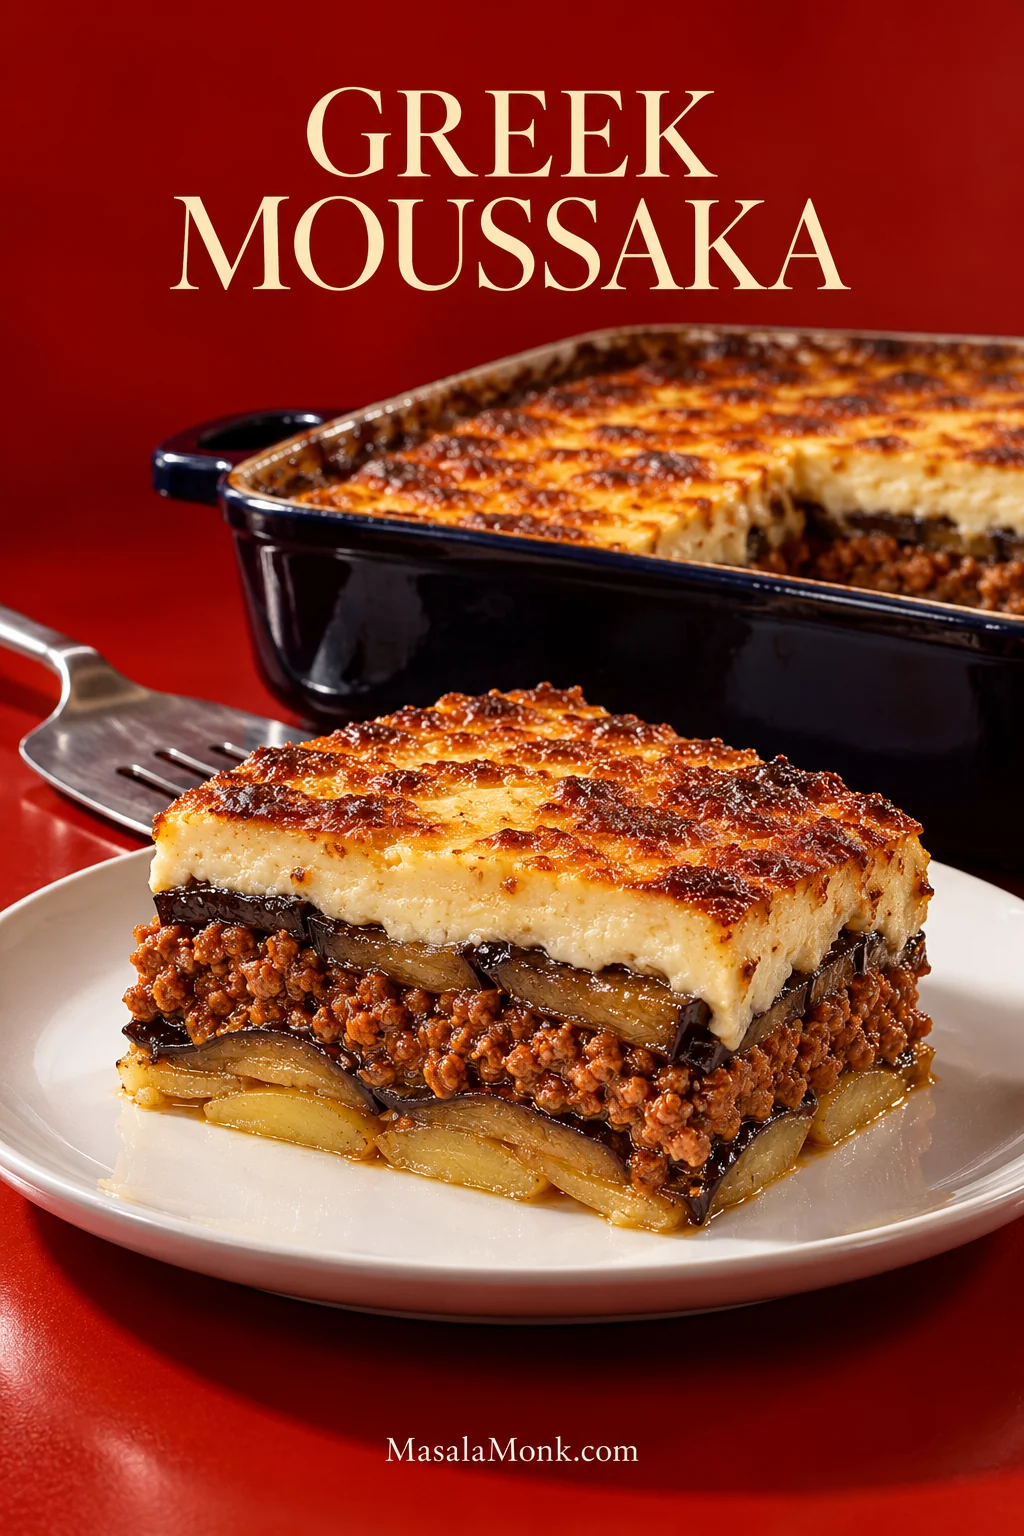
Slice of Greek moussaka on a white plate with a thin potato base, roasted eggplant, ground lamb and browned béchamel, with the casserole behind it.

A good moussaka comes to the table with a deeply browned top, tender eggplant underneath and lamb that has cooked down until it almost clings to the layers around it. Cut through the béchamel and those layers should still be visible: soft eggplant, savoury lamb and a thin potato base, all yielding without collapsing into one another.

Getting there takes a few separate jobs. Eggplant needs to soften without becoming oily, the lamb has to reduce into a concentrated sauce, the potatoes need a head start, and the béchamel must be thick before it ever reaches the oven. Done one after another, those jobs can make moussaka feel like an all-day undertaking.

The easiest way to make Greek moussaka feel manageable is to overlap the work: start the lamb while the eggplant salts, roast the vegetables while the sauce reduces, then make the béchamel last.

This is good food for a weekend dinner, a long lunch or a table where several people are properly hungry. Much of the work can happen before anyone arrives, which is one of the reasons moussaka rewards planning more than rushing.

Quick Answer

Greek moussaka is a baked casserole of eggplant (aubergine), seasoned minced meat and thick béchamel; many Greek versions also include a thin potato base. This Greek moussaka recipe uses ground lamb, roasted eggplant and potato, finished with an egg-and-cheese-enriched béchamel.

Four things matter before assembly: tender eggplant, partly cooked potatoes, lamb with no loose tomato liquid and béchamel thick enough to spread rather than pour. Get those right and the oven has a much easier job.
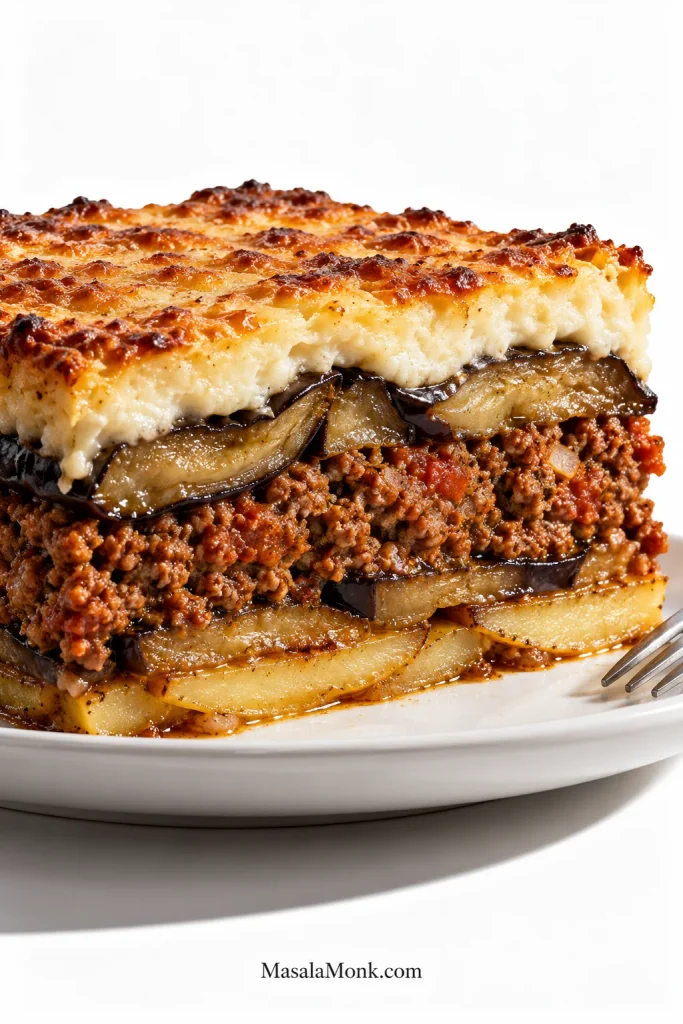
Close side view of a rested moussaka slice showing potato, two roasted eggplant layers, ground lamb filling and thick browned béchamel.
Real moussaka layers should look naturally irregular: overlapping eggplant, crumbly lamb and softly compressed potato, not ruler-straight bands.

Why This Moussaka Uses Lamb, Potato & Roasted Eggplant

Traditional Greek moussaka varies from kitchen to kitchen. Meat choices, potatoes, seasoning, cheese and vegetable preparation are not identical in every version. The Visit Greece moussaka recipe, for example, layers potatoes, eggplant, minced meat and béchamel.

Lamb tastes deeper and a little sweeter than beef here, which suits the tomato, oregano and eggplant particularly well. It also renders plenty of flavourful fat; we keep a little in the pan and remove any obvious pool before building the sauce. Ground beef can replace it at the same weight if you prefer a milder meat layer.

Potato catches some of the juices moving down from the meat and eggplant and gives the first slice a little support. About 1¼ lb / 550 g, cut 5–6 mm / roughly ¼ inch thick, is enough for one lightly overlapping layer in a 9 × 13-inch pan.

Roasting the eggplant makes the richness easier to control. Fried eggplant can be wonderfully silky, but it absorbs oil eagerly; roasting still gives us tender slices and useful browning without making the finished casserole unnecessarily oily.


Greek Moussaka Recipe with Eggplant, Lamb & Béchamel

Serves
8 generously
up to 10 with sides

Pan
9 × 13 in
23 × 33 cm, deep

Active prep
About
40 minutes

Cooking & baking
About
1 hr 20 min–1 hr 50 min

Final bake
40–45 minutes
included above

Resting
About
45 minutes

Total elapsed time: about 3 hours, typically 2 hours 45 minutes to 3 hours 15 minutes. The biggest variable is whether your oven can roast all the eggplant efficiently at once or needs another batch.

Oven temperatures: roast the vegetables at 425°F / 220°C conventional / 200°C fan, then bake the assembled moussaka at 375°F / 190°C conventional / 170°C fan.

Equipment

  • Deep 9 × 13-inch / approximately 23 × 33 cm casserole dish, ideally about 3 inches / 7–8 cm deep
  • 2–3 large rimmed sheet pans, or 2 pans plus time for another eggplant batch
  • Wide heavy skillet, sauté pan or Dutch oven
  • Heavy-bottomed saucepan
  • Balloon whisk
  • Kitchen scale

Also handy: a large colander, heatproof spatula, wide serving spatula and a mandoline for evenly slicing the potatoes.

Greek Moussaka Ingredients
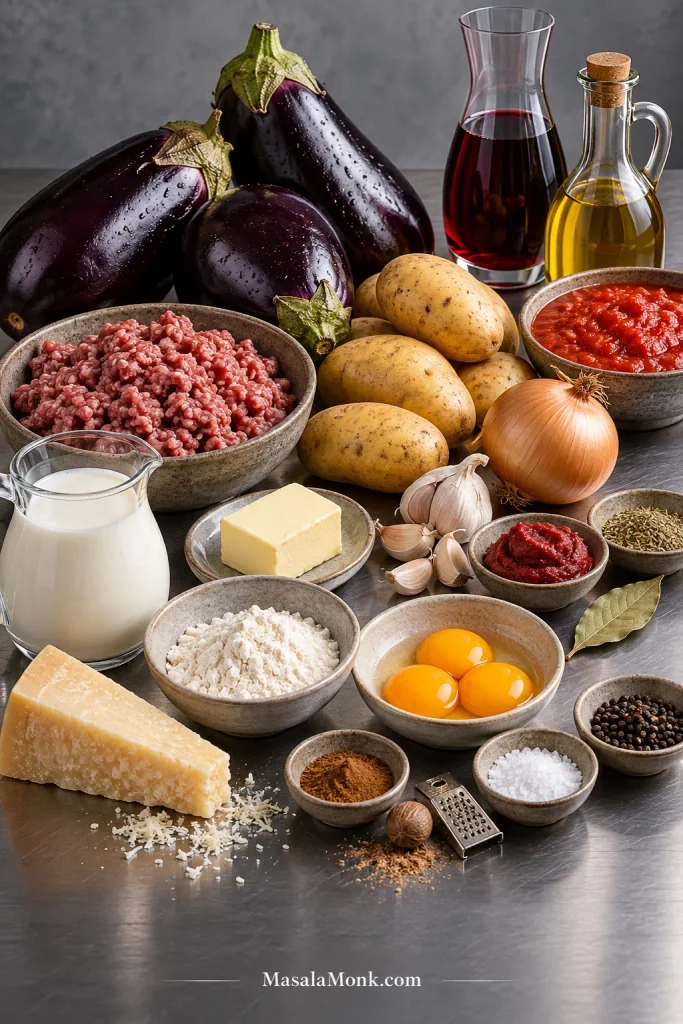
Moussaka ingredients arranged on a metal worktop, including eggplants, potatoes, ground lamb, tomato, onion, garlic, wine, milk, butter, flour, egg yolks, hard cheese and seasonings.
Eggplant, lamb, potato and béchamel build the structure; tomato, wine, cinnamon and nutmeg deepen the filling without taking over.

Eggplant & Potatoes

  • 2¾ lb / 1.25 kg globe eggplant (aubergine), about 3 large; buy by weight if possible
  • 1¼ lb / 550 g Yukon Gold, Russet, Maris Piper or another all-purpose/starchy potato
  • 1½ teaspoons / about 9 g fine sea salt, divided
  • ¼ cup / 60 ml olive oil, plus up to 1 tablespoon / 15 ml more if needed for a light coating

Lamb Sauce

  • 1¾ lb / 800 g ground lamb
  • 1 large yellow onion, about 7 oz / 200 g, finely diced
  • 4 garlic cloves, finely minced
  • 1 tablespoon / 15 ml olive oil, only if the lamb is very lean and the pan remains dry
  • 3 tablespoons / 45 g tomato paste — use the thick concentrated tomato product, not pourable tomato purée or passata; in the UK, the equivalent may be labelled concentrated tomato purée
  • ½ cup / 120 ml dry red wine
  • 1 can crushed tomatoes, 14 oz / 400 g; finely chopped canned tomatoes can be pulsed briefly if crushed tomatoes are unavailable
  • 1 teaspoon dried oregano
  • 1 bay leaf
  • ¼ teaspoon ground cinnamon
  • 1¼ teaspoons / about 7 g fine sea salt, then adjust to taste
  • ½ teaspoon freshly ground black pepper

Béchamel

  • ½ cup / 113 g unsalted butter
  • 1 cup / 120 g all-purpose flour
  • 4 cups / 950 ml whole milk, warmed but not boiling
  • 3 large egg yolks
  • 3½ oz / 100 g finely grated Kefalotyri, Pecorino Romano or Parmesan
  • ¼ teaspoon freshly grated nutmeg
  • ½ teaspoon / about 3 g fine sea salt, then adjust to taste
  • ¼ teaspoon black or white pepper

For the Top

  • 1½ oz / 40 g finely grated Kefalotyri, Pecorino Romano or Parmesan

How to Make Greek Moussaka

1. Salt the Eggplant

Trim the eggplants and cut them lengthways into slices about 8–10 mm / roughly ⅓ inch thick. Very skin-heavy end pieces can be discarded. For unusually mature eggplants with tough skin, peel a few narrow strips instead of removing all of it.

Arrange the slices in a colander or over trays and sprinkle both sides lightly with about 1 teaspoon of the measured salt. Leave them for 30 minutes.

Start the lamb while the eggplant sits.

The measured amount of salt here does not need rinsing; blotting is enough. A much heavier salting can be rinsed off briefly, followed by very thorough drying.
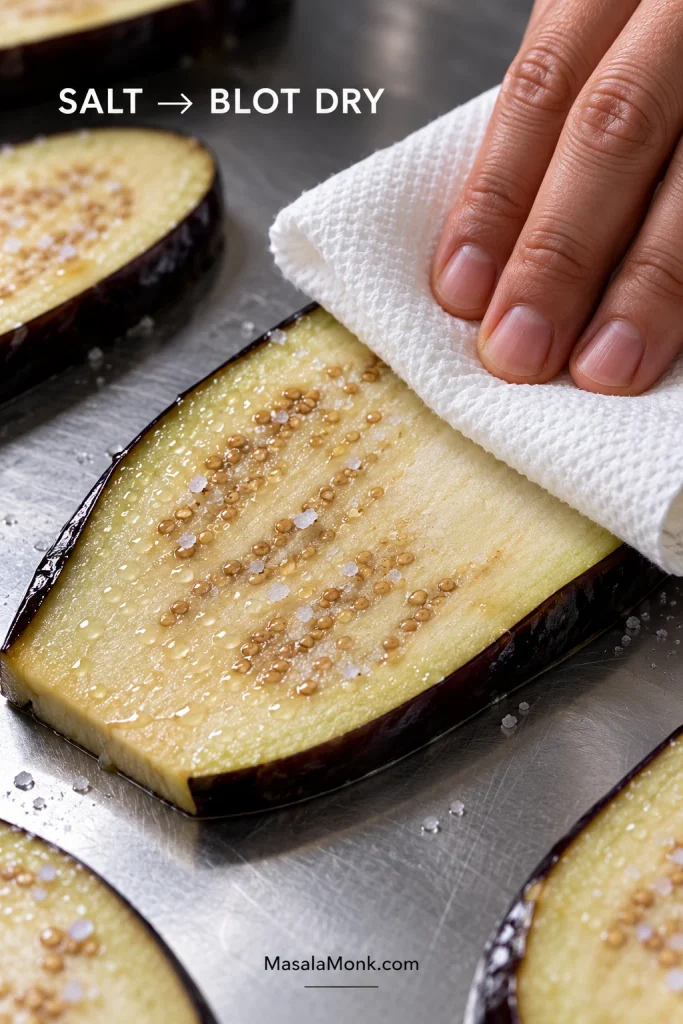
Hand blotting moisture from a salted lengthwise eggplant slice with a white towel before roasting.
A dry eggplant surface takes oil more evenly. If the towel still lifts obvious moisture, keep blotting before roasting.

2. Brown the Lamb and Start the Sauce

Heat a wide heavy skillet, sauté pan or Dutch oven over medium-high heat. Add the lamb and spread it into an even layer. Leave it undisturbed for 2–3 minutes so part of the meat can brown against the pan, then break it into smaller crumbles.

Continue cooking until no raw pink remains and browned patches appear among the crumbles, usually another 5–7 minutes. Very lean lamb may need the optional tablespoon / 15 ml olive oil; otherwise let its own fat do the work.

Look at the bottom of the pan. A sheen of lamb fat is useful; a visible pool is not. Spoon off the obvious excess.
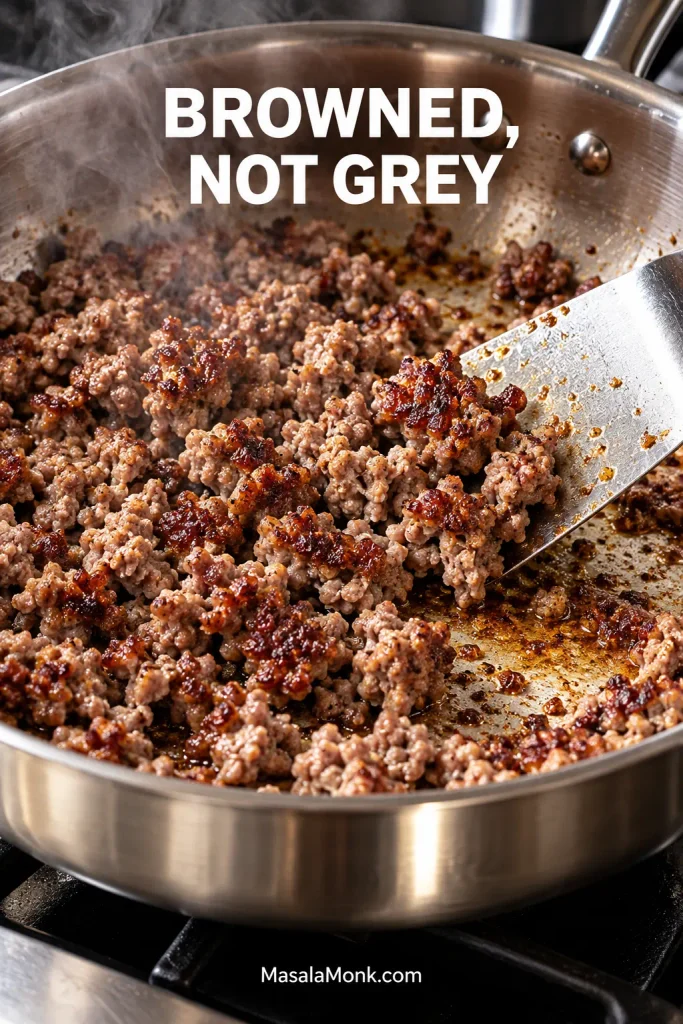
Ground lamb with caramelised brown patches cooking in a stainless-steel pan while a metal spatula turns the crumbles.
You do not need every crumble deeply browned. Scattered caramelised patches build flavour; chasing a uniform dark crust can dry the lamb before the sauce finishes.

Add the onion and cook for 5–7 minutes until soft and beginning to colour. Stir in the garlic for about 30 seconds. Add the tomato paste and cook for another 1–2 minutes, scraping it over the hot surface until it darkens slightly.

Pour in the wine and scrape up the browned bits. Let it bubble until reduced by roughly half. Add the crushed tomatoes, oregano, bay leaf, cinnamon, salt and pepper.

Bring to a simmer, then lower the heat enough to maintain steady uncovered bubbling. Leave the sauce reducing while you return to the vegetables.

3. Dry and Roast the Vegetables

Heat the oven to 425°F / 220°C conventional / 200°C fan. Arrange the racks so two sheet pans can roast with reasonable airflow.

Blot the salted eggplant thoroughly with clean kitchen towels or paper towels. The surfaces should feel dry.

Peel the potatoes, then slice them 5–6 mm / about ¼ inch thick. Toss with 1 tablespoon / 15 ml olive oil and the remaining ½ teaspoon salt, then arrange them on one sheet pan.

Give the Vegetables Room to Roast

Arrange the eggplant in a single layer on the remaining pans. Do not stack it. An oven that struggles with three trays will give better results if the extra eggplant is roasted as a second batch.
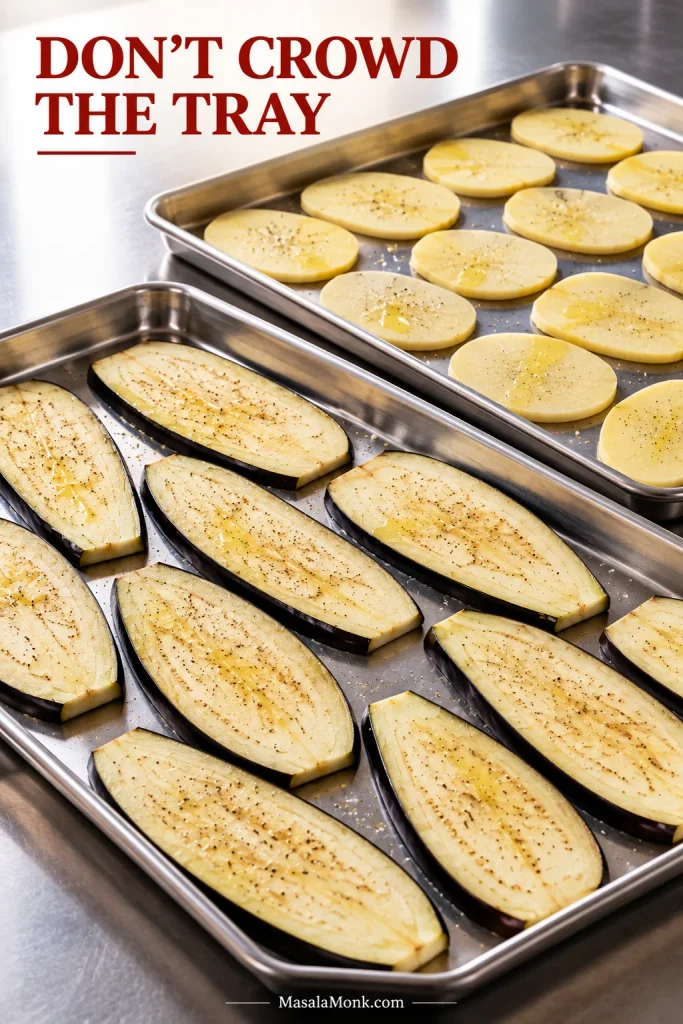
Separate metal trays of lengthwise eggplant slices and thin peeled potato slices arranged in uncrowded single layers.
Crowded trays trap steam. Use another tray or roast in batches so the eggplant can brown instead of merely soften.

Divide the remaining oil between the eggplant batches so the first tray does not use all of it. Brush or rub a thin sheen over both sides. The full 1.25 kg can take up to the extra tablespoon / 15 ml if needed.

Roast, swapping pan positions after about 10 minutes if your oven browns unevenly.

If the lamb sauce reaches the consistency described in Step 4 while the vegetables roast, take it off the heat rather than letting it reduce unnecessarily.

Check the Vegetables, Not Just the Clock

The potatoes usually need around 15–20 minutes. A ready slice bends without snapping and is partly tender while still lifting cleanly from the tray.

The eggplant usually needs about 20–25 minutes per batch. Pick up a slice with tongs. A properly roasted piece sags under its own weight, feels tender through the middle and has picked up a little browning around the edges.
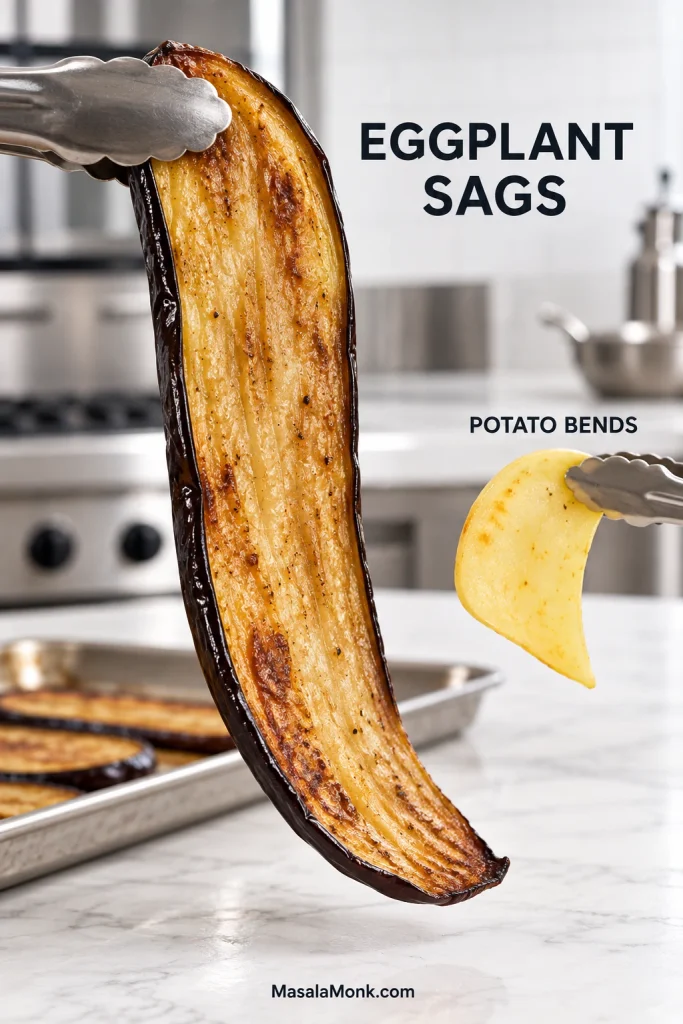
Roasted eggplant slice drooping from metal tongs beside a thin cooked potato slice bending while remaining intact.
Potato should be only partly tender; eggplant should be fully tender through the centre before assembly.

Still firm in the middle? Give it another few minutes. There is no prize for hitting exactly 20 or 25 minutes. The eggplant needs to be fully tender before it goes into the casserole.

Reduce the oven to 375°F / 190°C conventional / 170°C fan once the vegetables are finished.

4. Finish the Lamb Sauce

Return to the lamb. If it already reached the right consistency while the vegetables were roasting, leave it off the heat. Otherwise, simmer uncovered until the sauce becomes dense and spoonable.

Drag a spatula across the bottom once to check. The gap should remain visible briefly instead of immediately filling with thin tomato liquid, and a spoonful pushed to one side should mound instead of spreading.
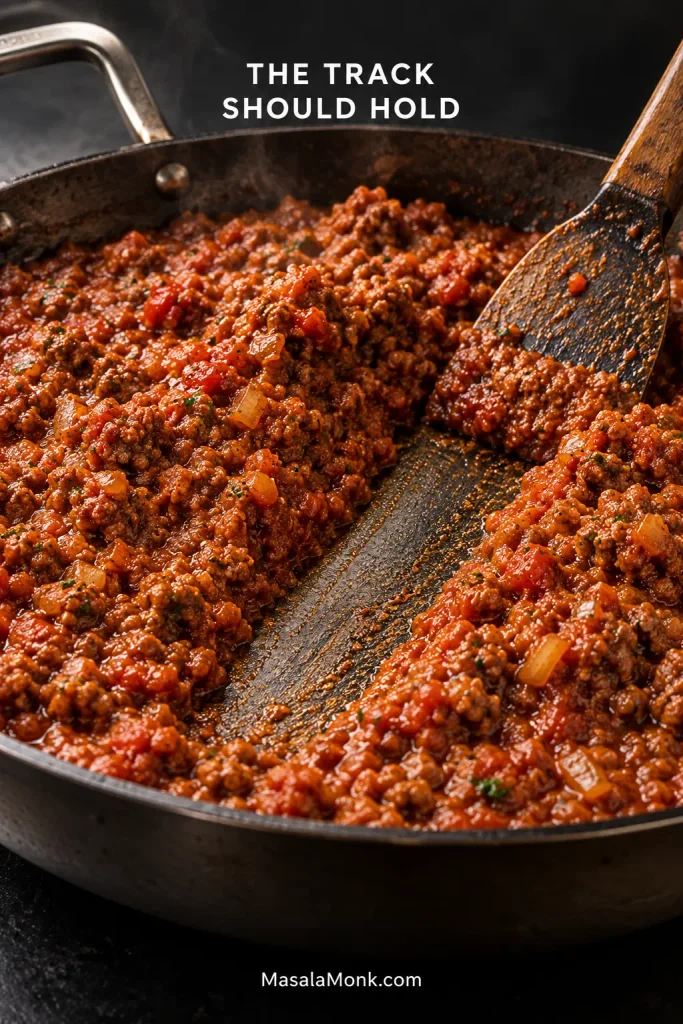
Thick ground-lamb tomato sauce pushed aside with a spatula, leaving an exposed strip of pan between two mounds of sauce.
The spatula track tests free liquid, not just thickness. If watery tomato juices rush back across the pan, the moussaka meat sauce needs more reduction.

A loose sauce may need another 5–15 minutes, depending on pan width, burner strength and the tomatoes you used. Trust what is happening in the pan more than the clock.

Remove the bay leaf, taste and adjust the seasoning. The sauce should smell primarily of browned lamb and concentrated tomato, with onion and warm spice underneath. Leave it uncovered while you make the béchamel.

5. Make the Béchamel Last

Warm the milk until steaming but not boiling.

Melt the butter in a heavy saucepan over medium heat. Add the flour and whisk for about 2 minutes. The roux should foam gently and lose its raw flour smell without browning.

Add roughly one-quarter of the warm milk and whisk until smooth. Add another quarter, whisk smooth again, then add the remaining milk in two additions.

Cook over medium to medium-low heat, whisking frequently and scraping the bottom corners of the saucepan. Once all the milk is incorporated, expect another 6–10 minutes before it becomes properly thick.

Lift the whisk. The sauce is ready when it falls back in thick, slow ribbons and leaves a spoon heavily coated. It should look smooth and rich rather than pourable.

It may look almost too thick compared with an everyday white sauce. That is what you want here.
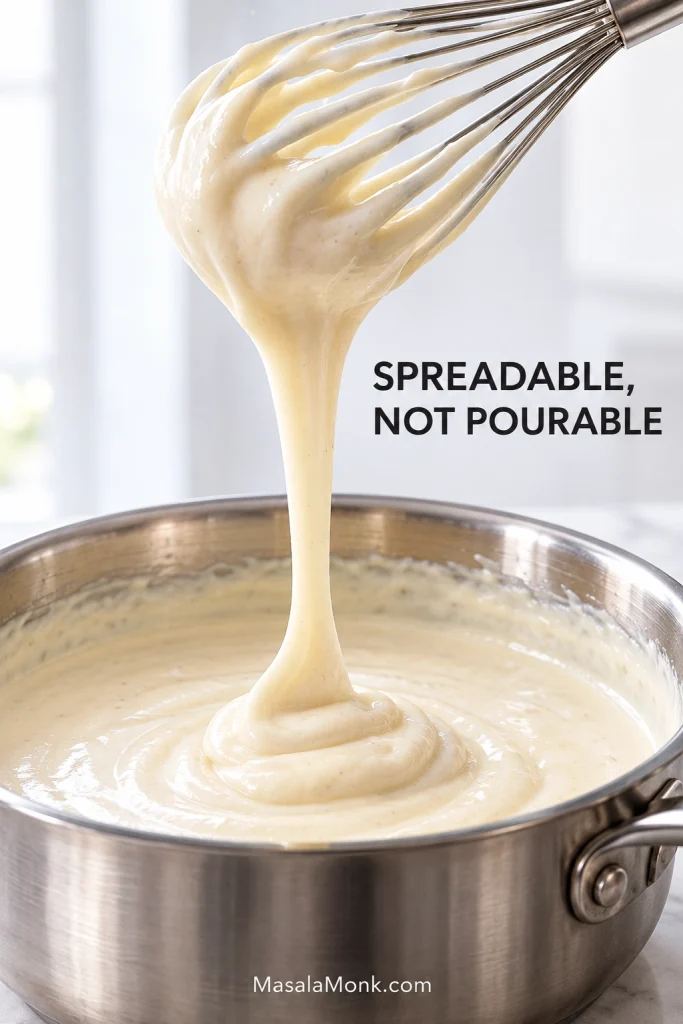
Thick pale béchamel falling from a whisk in a broad ribbon and folding onto the surface of the sauce in a stainless-steel pan.
After the ribbon lands, watch the surface. Properly thick moussaka béchamel should hold the fold briefly before slowly smoothing out.
Check All Four Components Before Assembly

Once the béchamel reaches this consistency, take it off the heat.

ComponentReady When…If It Needs More Work
PotatoFlexible and partly tender while still holding its shape.Give it a few more minutes in the oven.
EggplantBends easily, feels tender through the centre and looks surface-dry.Keep roasting until the centre softens.
LambDense and spoonable with no loose tomato liquid in the pan.Reduce uncovered for longer.
BéchamelHeavy enough to coat a spoon and fall from the whisk in slow ribbons.Return it to moderate heat and cook a little longer before adding the yolks.

If another component needs a few extra minutes, leave the béchamel off the heat and give it a brief whisk before finishing it. Assembly can wait.

When everything is ready, stir 3½ oz / 100 g grated cheese, nutmeg, salt and pepper into the béchamel. Let it stand for about 5 minutes before tempering the yolks.

Whisk the egg yolks in a small bowl. Gradually whisk about ½ cup of hot béchamel into them, then pour the tempered yolks back into the saucepan and whisk until smooth and glossy. Once the yolks are in, do not bring the sauce back to a hard boil.

6. Layer the Moussaka

Lightly oil a deep 9 × 13-inch / approximately 23 × 33 cm baking dish.

After all the separate pans and pots, this is the satisfying part: everything finally becomes one moussaka.

  1. Potato: cover the base in one lightly overlapping layer.
  2. Eggplant: arrange roughly half the slices over the potatoes.
  3. Lamb: spread the reduced meat sauce evenly over the eggplant.
  4. Eggplant: cover the lamb with the remaining slices.
  5. Béchamel: spread it right to the sides and corners in a generous layer about ½ inch / 1.5 cm deep.
  6. Cheese: scatter the remaining 1½ oz / 40 g hard cheese across the top.
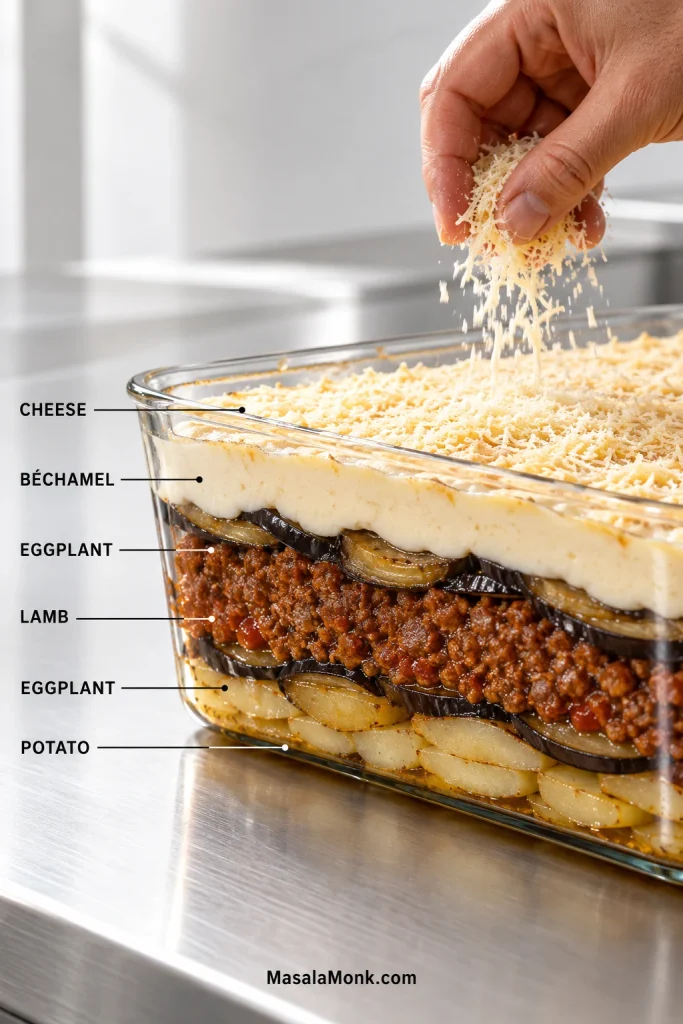
Clear casserole showing layers of potato, eggplant, ground lamb, eggplant and béchamel with finely grated hard cheese over the top.
The upper eggplant layer separates the concentrated lamb from the béchamel, while potato gives the base support.

Leave about ½ inch / 1.5 cm of headspace below the rim. Anything that will not fit comfortably is better baked in a small second dish than piled right to the top.

7. Bake Until the Centre Is Set

Once the pan is assembled, the busy part is over. The oven does the next job, which also gives you a welcome chance to clear the counters.

Bake uncovered until the béchamel is deeply golden, the edges are gently bubbling and the centre no longer sloshes. At 375°F / 190°C conventional / 170°C fan, this usually takes about 40–45 minutes.

As it bakes, the pale béchamel turns golden and the cheese begins to smell toasted, with warm nutmeg and lamb coming up underneath. A top that browns early can be loosely covered with foil while the centre finishes.

For anyone checking with a thermometer, the centre should reach 165°F / 74°C.
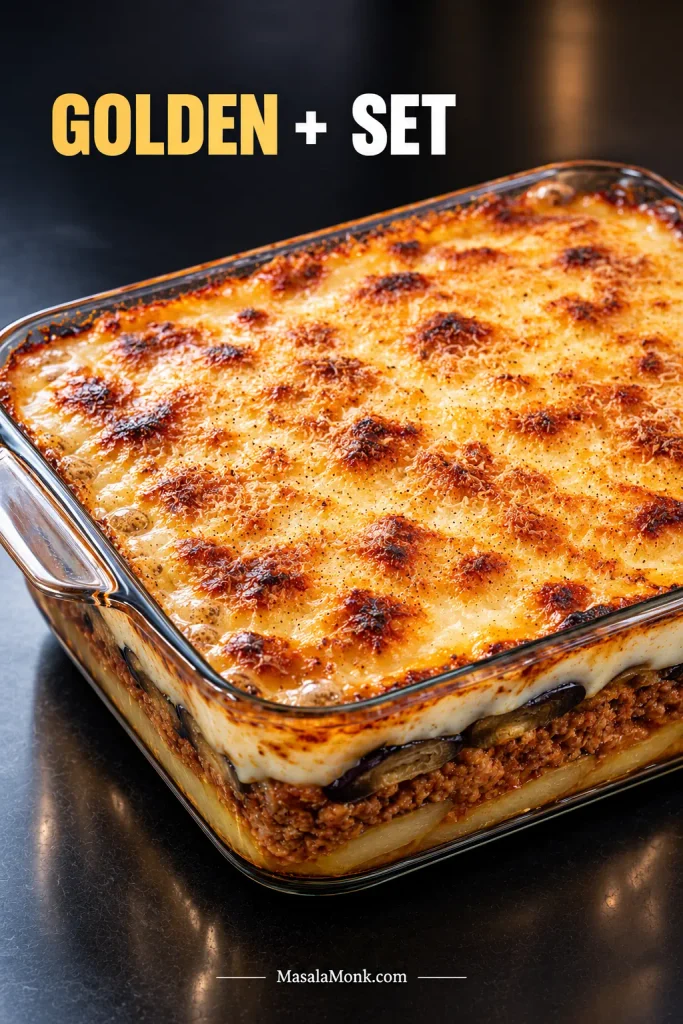
Whole baked moussaka in a rectangular glass casserole with a deeply golden béchamel surface and irregular darker toasted patches.
Do not judge doneness by the darkest corner; casserole edges brown first. The centre matters more than the perimeter.

8. Let the Pan Settle Before Cutting

Rest the moussaka for about 45 minutes before slicing. Cut sooner and the first piece will simply be hotter and softer.

Move the pan to a heat-safe rack or trivet as soon as it comes out. After the rest, cut straight down with a sharp knife and lift each portion with a wide spatula.
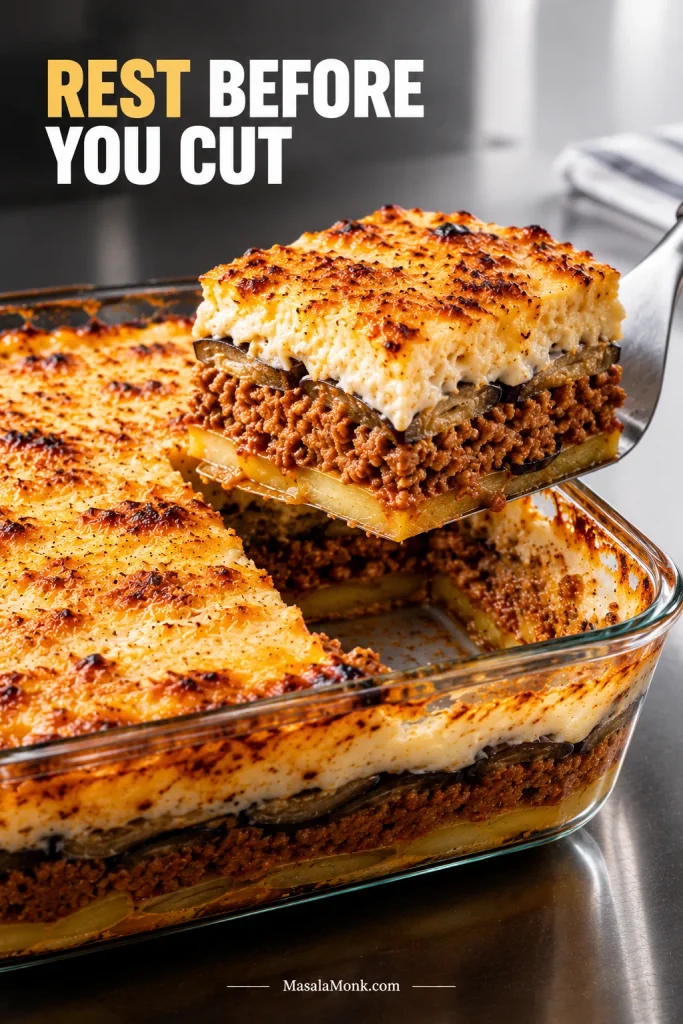
Rectangular moussaka slice being lifted from the casserole on a wide metal spatula, leaving an empty space behind it in the pan.
The first slice is hardest to lift cleanly because there is no empty space beside it yet.

Why the Layers Hold Together

Do You Need to Salt Eggplant for Moussaka?

Most supermarket eggplants today are not especially bitter, so salting here is mainly about drawing out moisture that can be blotted away before roasting.

Slice thickness matters just as much. Paper-thin pieces can disappear after two rounds of cooking, while very thick slices may stay fibrous even when their surfaces look done. Around 8–10 mm gives the aubergine enough substance to stay recognisable in the finished slice.

Why the Lamb Sauce Needs to Be Well Reduced

A moussaka meat sauce has a different job from a pasta sauce. It has to sit between soft vegetables without sending tomato liquid into the bottom of the casserole. That is why we reduce it until concentrated and spoonable rather than stopping as soon as the meat is cooked.

Pan width and burner strength can move the reduction time considerably, so use the physical endpoint rather than expecting every batch to finish in exactly the same number of minutes.

Cinnamon should be background, not headline. Browning the lamb and concentrating the tomato give the sauce most of its depth. The cinnamon should arrive quietly behind them.

How Thick Should Moussaka Béchamel Be?

Moussaka béchamel is much thicker than an everyday white sauce. It needs enough body to sit above the eggplant instead of disappearing into the layers below, while the egg yolks help it set further during baking.

If you want the fundamentals of making a smooth roux-based sauce, the béchamel sauce guide goes deeper into adding milk and fixing consistency. For this dish, stop only when the sauce is unmistakably spreadable rather than pourable.

How Long Should Moussaka Rest Before Cutting?

About 45 minutes is a good target. Straight from the oven, fat is fluid, steam is still moving through the vegetables and the béchamel is at its softest. As the pan cools, everything becomes less mobile and the slice gains structure without needing to be served cold.

The same thing happens with a hot classic lasagna: waiting is part of getting clean layers, not dead time after the cooking is finished.
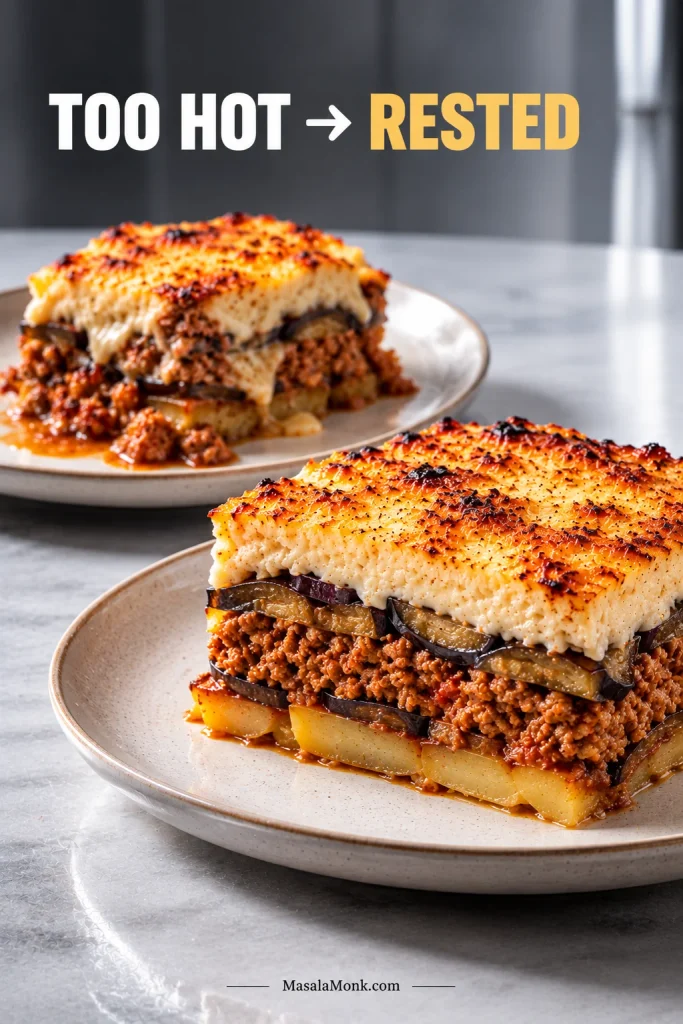
Firm rested moussaka slice in front with a softer, slumped slice of the same casserole behind it.
If later slices become noticeably cleaner as the pan cools, serving temperature—not automatically wet eggplant or loose sauce—was probably the issue.

Moussaka Troubleshooting: Fix the Problem You Can See

Most problems come back to moisture, excess fat, béchamel consistency or cutting the casserole too soon. The symptom matters because watery liquid, oily liquid and a hot collapsing slice do not have the same cause.

What You SeeWhat Probably HappenedWhat to Change
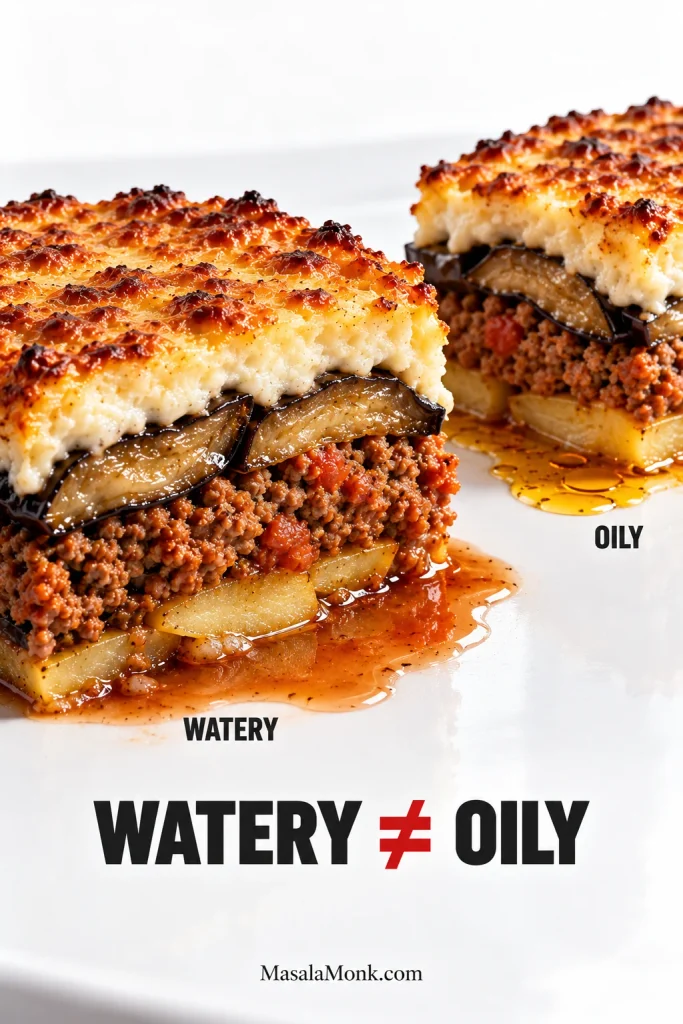
Red or watery liquid beneath the sliceEggplant went in wet, the meat sauce was loose, or the casserole was cut extremely hot.Dry and fully cook the eggplant, reduce the sauce well and give the pan time to settle.
Clear or orange oily liquidToo much rendered lamb fat or excess oil in the eggplant.Spoon off visible lamb fat and measure the roasting oil.
A good-tasting slice collapsesThe moussaka is still too hot.Let it rest longer before judging the structure.
Béchamel sinks into the fillingThe sauce was too thin, or the lower layers carried too much moisture.Thicken the béchamel properly and reduce the meat sauce fully.
Eggplant is difficult to cutSlices were too thick, under-roasted or very tough-skinned.Cut 8–10 mm and roast until tender throughout.
Eggplant almost disappearsSlices were too thin or overcooked.Keep them around 8–10 mm and remove them once tender.
Potatoes are firmThey were too thick or not pre-cooked enough.Keep them around 5–6 mm and roast until partly tender.
Two moussaka portions showing thin reddish watery liquid beneath one slice and clear golden-orange oily liquid beneath the other.
Judge leaked liquid after the pan settles. Hot lamb fat is very fluid, so a small clear sheen can look more alarming than it does once cooled.

Watery Right Now: Bake Longer or Let It Rest?

A centre that is still visibly loose or sloshing needs more oven time. A centre that is set but releases liquid when sliced straight from the oven usually needs more rest instead.

If the casserole has cooled properly and still leaves obvious watery liquid beneath the slices, look back to the earlier stages: the eggplant probably carried too much moisture, the meat sauce needed more reduction, or both.

Béchamel Thin, Lumpy or Curdled?

A thin béchamel needs more cooking over moderate heat before the yolks are added. Lumps can usually be dealt with at that same stage by vigorous whisking, passing the sauce through a fine sieve or giving it a brief pass with an immersion blender.

Curdling is a different problem: the yolks have met too much heat. Let the sauce cool briefly before tempering them, then avoid a hard boil once they are incorporated.

Can You Make Moussaka Ahead?

Yes. You can prepare the components a day ahead, assemble the full moussaka up to about 24 hours before baking, or bake it the day before and reheat it.

Moussaka is a much nicer dinner when you are not roasting eggplant, reducing lamb and whisking béchamel while people are already arriving.

Prepare the components the day before: roast the eggplant and potatoes, cook the lamb sauce, cool everything promptly and refrigerate the components separately. The next day, make the béchamel while they lose some of their refrigerator chill, then assemble and bake. Cold components may add a little oven time, so use the doneness cues in Step 7 rather than the clock alone.

Assemble it ahead: build the full casserole, cover it and refrigerate it promptly for up to about 24 hours. Bake from chilled, allowing extra time; if using glass or ceramic bakeware, follow the manufacturer’s fridge-to-oven guidance.
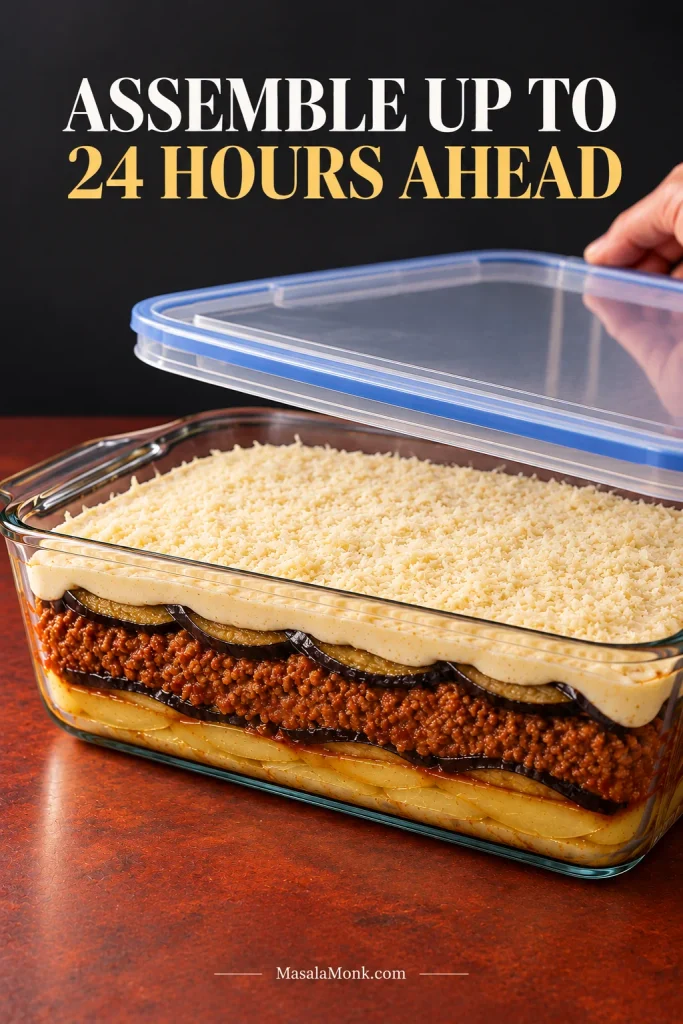
Unbaked layered moussaka in a clear rectangular casserole as a hand lowers a transparent lid over the dish.
Chilling changes the starting temperature, not the recipe. Keep the same layers and consistency, then allow extra baking time for the centre.

Bake it the day before: this is especially useful for a party. Once chilled, moussaka cuts very cleanly. Portion it cold, then reheat the pieces before serving.

What to Serve with Moussaka

If you make only one side, choose a sharp cucumber-tomato salad with plenty of acidity. Its crispness gives the lamb and béchamel exactly the contrast they need; lemon-dressed greens or tomatoes with red onion and olives follow the same idea.

For something cool and creamy, add a small spoonful of Greek tzatziki. A larger shared spread can also include warm homemade pita for tearing alongside salads, olives and dips.
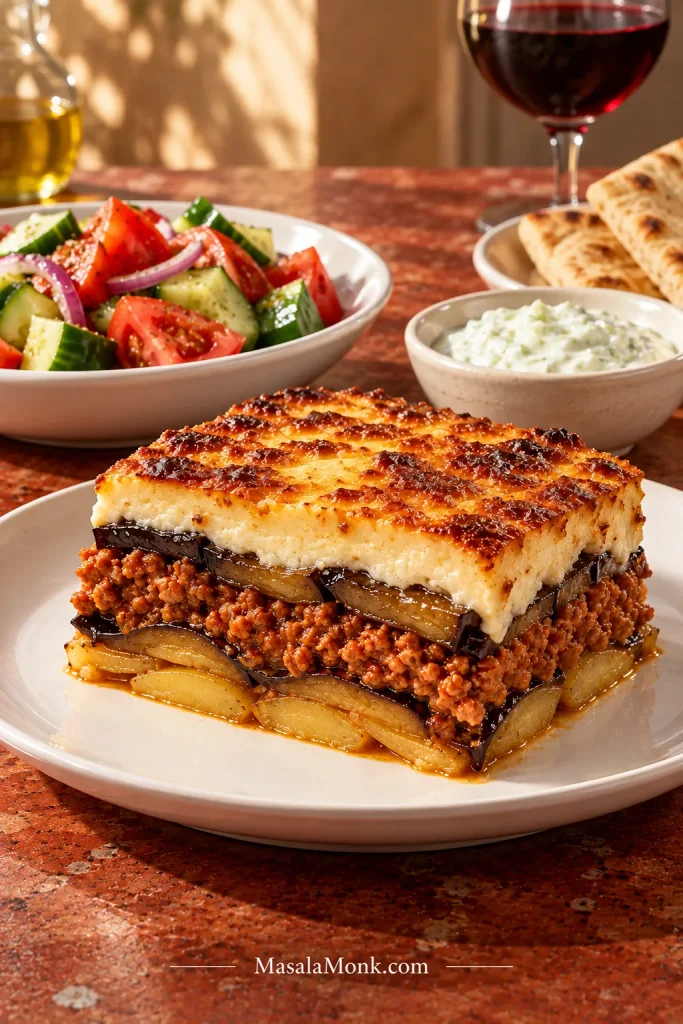
Plated moussaka slice served with cucumber-tomato salad, tzatziki and warm pita on a rust-coloured table.
A sharp salad and cool tzatziki balance the rich lamb and béchamel; keep pita a modest extra.

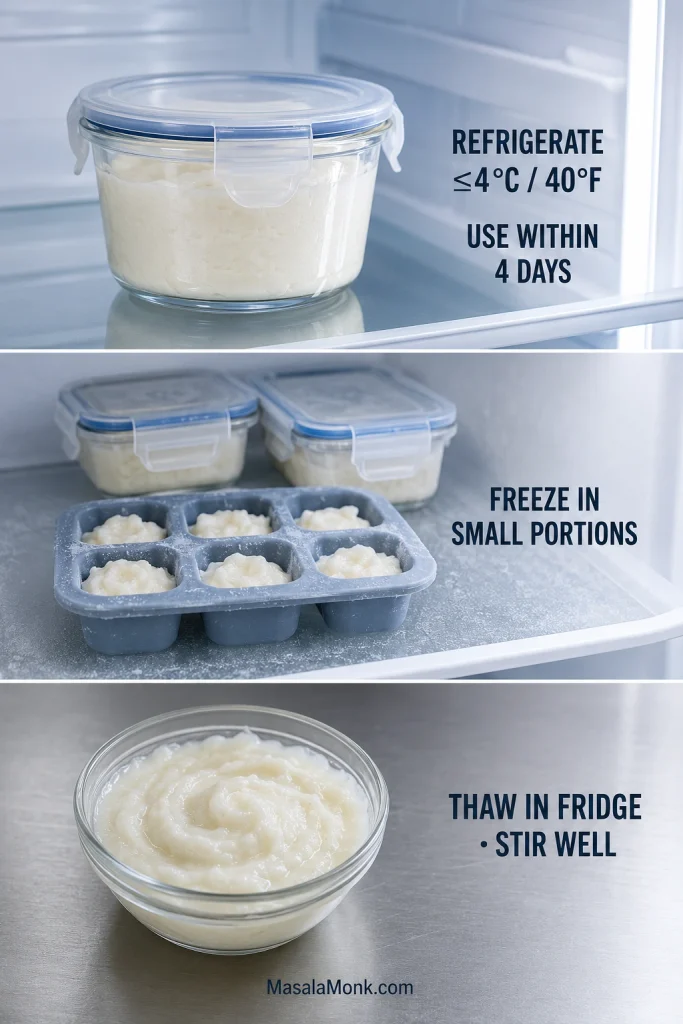
Storage, Freezing & Reheating

The USDA leftovers guidance recommends refrigerating perishable leftovers within 2 hours. For this moussaka, start that clock when the casserole comes out of the oven, not when the meal ends.

How long does moussaka last in the fridge? Cover the dish well or transfer portions to shallow airtight containers and refrigerate for up to 3–4 days.

Can you freeze moussaka? Yes. Wrap cooled portions well and aim to use them within roughly 2–3 months for the best texture. The eggplant will soften somewhat after freezing and thawing.

For a whole make-ahead moussaka, cool the cooked potato, eggplant and lamb promptly. Once cool, assemble those layers without the béchamel, wrap tightly and freeze. Thaw overnight in the refrigerator, make the béchamel fresh, then top and bake. Because the base is chilled, allow extra baking time as needed and use the doneness cues in Step 7.

For reheating: 350°F / 175°C conventional / 160°C fan works well. Individual chilled portions generally need around 20–30 minutes; a larger chilled casserole may need 30–45 minutes or longer. Keep it loosely covered for most of the reheating time, then uncover near the end if the surface needs refreshing. Reheated leftovers should reach 165°F / 74°C in the centre.
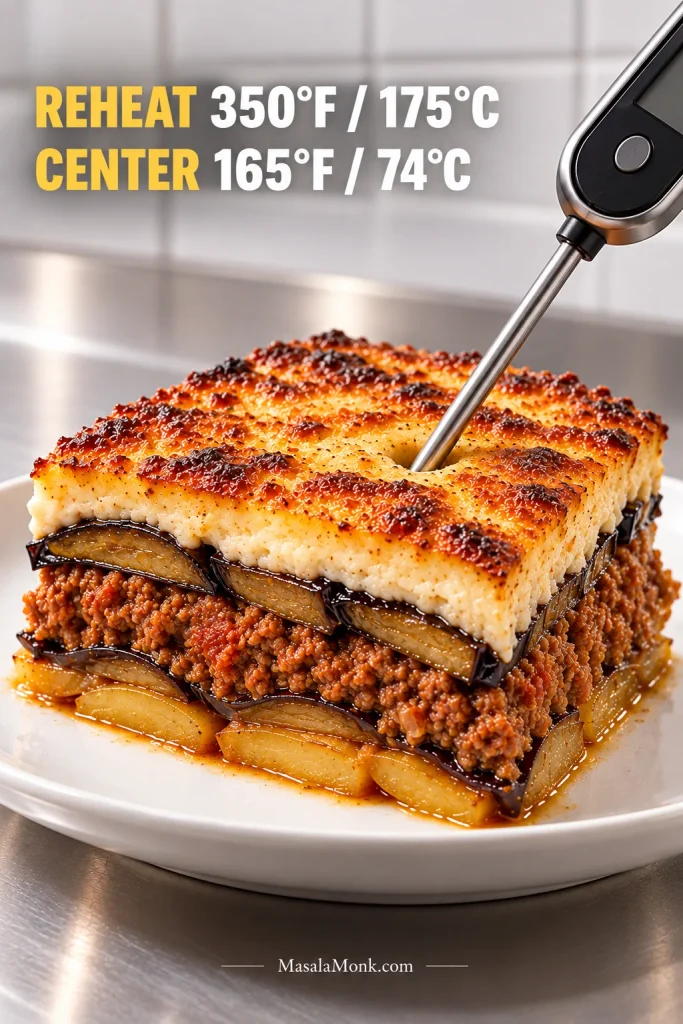
Reheated moussaka slice with a food thermometer probe inserted deeply into the thick central part of the portion.
Probe the thickest central part when reheating; the browned béchamel warms faster than the middle.

For the most even reheating, thaw frozen portions overnight in the refrigerator. You can also reheat them from frozen; keep them covered for most of the heating time so the centre warms through before the béchamel dries out.

Useful Moussaka Substitutions

  • Beef instead of lamb: replace the lamb with the same 1¾ lb / 800 g ground beef for a milder flavour, or use 14 oz / 400 g each lamb and beef for a middle ground.
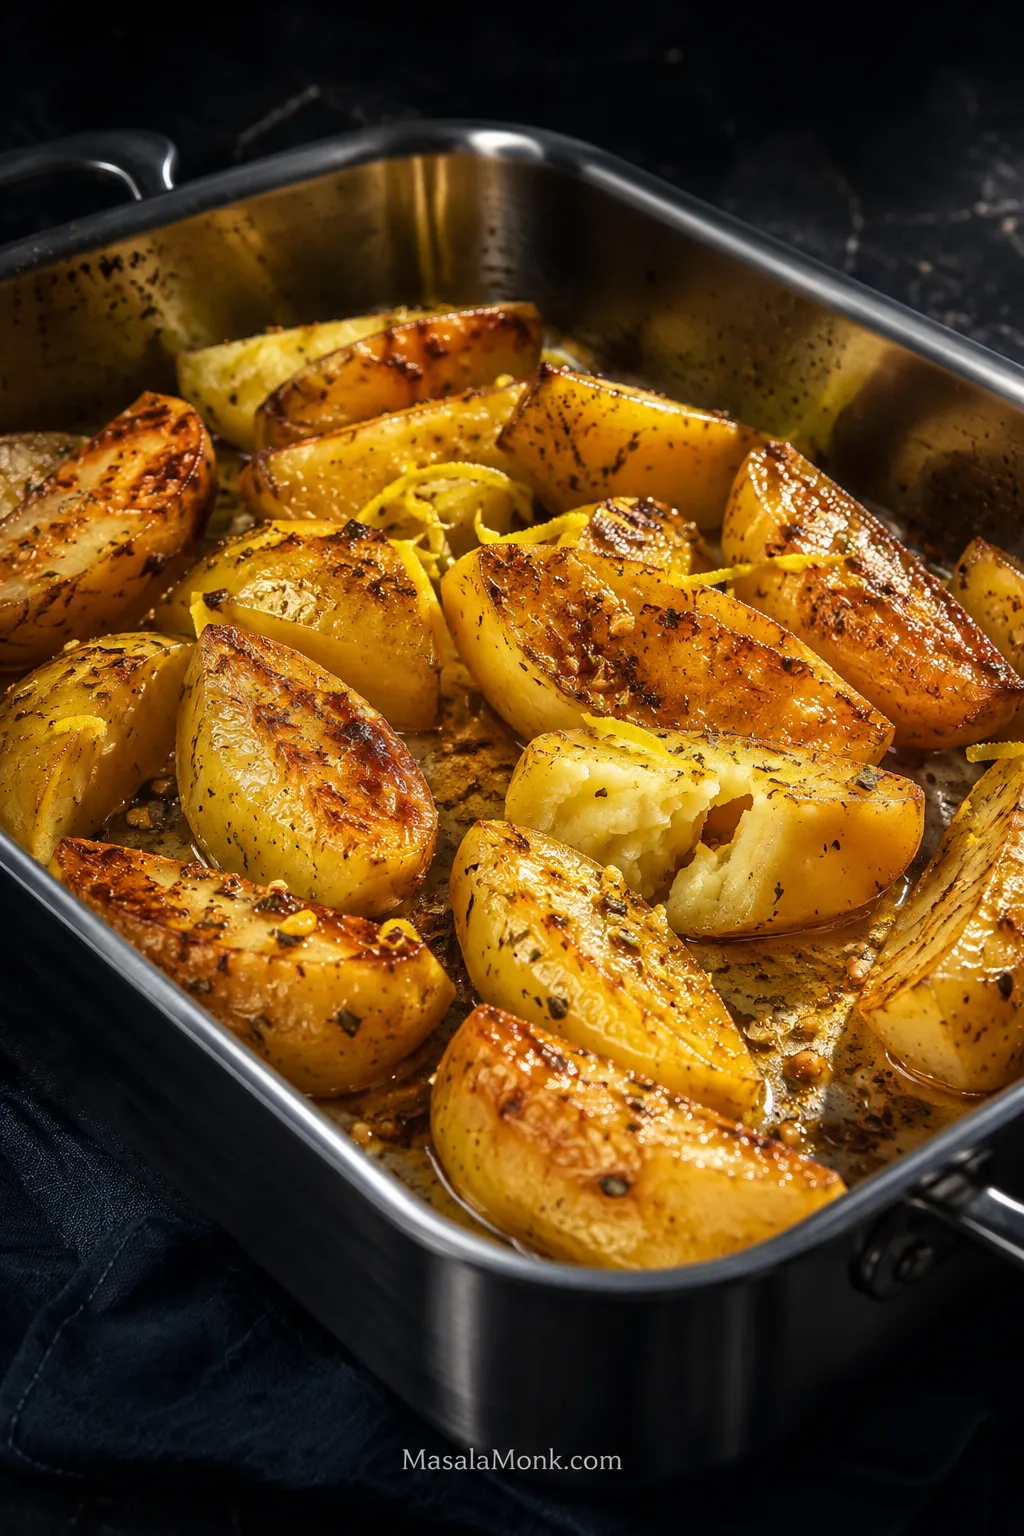
  • No potatoes: begin directly with eggplant. The base will be softer, so proper sauce reduction and cooling matter even more. If you would rather serve potatoes separately, Greek lemon potatoes are a natural option.
  • No red wine: use the same ½ cup / 120 ml of unsalted or low-sodium beef stock. Once the lamb has reduced, a small splash of red wine vinegar can replace some of the lost brightness.
  • No Kefalotyri: Pecorino Romano is an excellent substitute, and Parmesan also works well. Avoid soft, high-moisture or particularly stretchy cheeses in the béchamel.
  • Prefer fried eggplant: salt and dry the slices first, then shallow-fry in additional olive oil until tender and golden. Drain very well before assembly because the finished casserole is already rich.

Bring the moussaka to the table warm instead of scorching hot and cut straight through the browned top. Do not worry if the first piece is not restaurant-perfect. What matters is underneath: tender eggplant, savoury lamb, soft potato and a thick béchamel that stays creamy as you eat it.
Posted on — Leave a comment

Chicken Gyros Recipe: Juicy Greek Chicken with Tzatziki

Hand-held chicken gyro filled with thin browned chicken thigh pieces, tzatziki, tomato and red onion in soft pita.

The giveaway is in the pile of chicken. If it comes out as six neat grilled thighs or tidy cubes from a skewer, it may taste excellent. But it still does not eat quite like the thin, irregular pieces shaved from a gyro stack.

Good chicken gyro meat gives you several textures at once. Some folds stay juicy and tender. Others pick up dark golden edges, while a few narrow ends turn almost crisp. Tuck those pieces into warm pita with cold, thick tzatziki, ripe tomato and sharp onion, and every bite catches a little of each.

The difficult part when you make chicken gyro meat at home is creating those layers without a commercial spit. Seasoning gets you only part of the way. The bigger job is building a compact roast that stays juicy, can be shaved thin, and still has enough moisture to survive one last blast of heat.

This Greek chicken gyro recipe uses an ordinary loaf pan to recreate that layered structure in a home oven. Boneless thighs are pressed together, roasted until just cooked through, rested, shaved thin and given one fast final hit of heat.

Chicken Gyros at a Glance

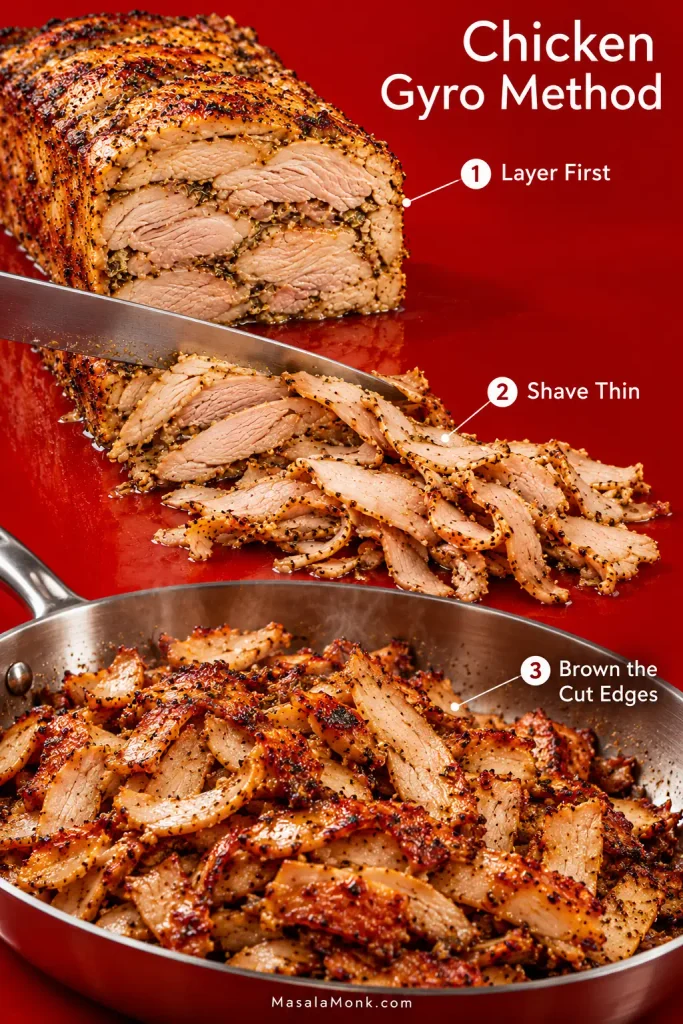
Layer first. Shave thin. Brown the cut edges. Those three jobs matter more here than adding another spoonful of spice.

Quick answer: Marinate whole chicken thighs, press them into a loaf pan and roast until the centre reaches 165°F / 74°C. Rest, shave the chicken into thin ribbons, then crisp small batches over high heat before wrapping them in warm pita with tzatziki.

Need dinner sooner? The fast version uses chicken strips, a 30–60 minute marinade and a hot sheet pan. You lose the layered shave, but you still get juicy browned chicken for pita tonight.

Three-stage chicken gyro method showing a layered cooked chicken roast, thin shaved pieces and the shaved chicken browned in a skillet.
Browning after shaving exposes far more hot surface area, adding crust without overcooking the protected inner chicken.

Chicken Gyros Recipe

Keeping the thighs whole is deliberate. Once roasted together and sliced across the stack, they retain natural folds, grain and irregular edges instead of becoming six separate pieces of chicken.

Yield
6 generous gyros

Prep
About 30 minutes

Marinate
2–12 hours
4–8 hours preferred

Roast
About 60–90 minutes

Rest
10 minutes

Slice + crisp
About 10–15 minutes

Warm + assemble
About 5–10 minutes

Total excluding marinating: roughly 1 hour 55 minutes to 2 hours 35 minutes.

For the chicken gyro meat

  • 1 kg / 2 lb 3 oz boneless, skinless chicken thighs
  • 80 g / about ⅓ cup thick plain Greek yogurt
  • 30 ml / 2 tbsp extra-virgin olive oil
  • 30 ml / 2 tbsp fresh lemon juice
  • Finely grated zest of 1 lemon
  • 4 large garlic cloves / about 16 g, finely grated or minced
  • 1 tbsp dried oregano
  • 2 tsp sweet paprika
  • 1 tsp Dijon mustard
  • 12 g / about 2 tsp fine sea salt; use weight when possible because salt density varies by brand and grind
  • 1 tsp freshly ground black pepper
  • 15–25 ml / 1–1½ tbsp extra olive oil for crisping, only if you do not get enough usable rendered chicken fat

For the thick tzatziki

  • 250 g / about 1 cup thick Greek yogurt
  • 170 g / about 6 oz English or Persian cucumber
  • ¼ tsp fine salt for draining the cucumber
  • 1 large garlic clove, finely grated; use 2 for a stronger sauce
  • 15 ml / 1 tbsp extra-virgin olive oil
  • 10 ml / 2 tsp fresh lemon juice
  • 1 tbsp finely chopped fresh dill, optional
  • ¼ tsp fine salt, then adjust after resting
  • Freshly ground black pepper to taste

To build 6 chicken gyro wraps

  • 6 soft Greek-style pitas, about 7–8 inches / 18–20 cm across
  • 2 medium ripe tomatoes / about 280–300 g, sliced or chopped
  • ½ small red onion / about 50–60 g, sliced very thin
  • Lemon wedges, for serving only if needed
  • Cooked fries, optional

Equipment that matters

  • 9 × 5-inch / 23 × 13 cm metal loaf pan
  • Parchment paper
  • Large mixing bowl or food-safe container
  • Instant-read thermometer
  • Sharp chef’s knife
  • 12-inch / 30 cm cast-iron or stainless-steel skillet, or a broiler-safe metal sheet pan
  • Box grater and clean kitchen towel for the cucumber

1. Even out the chicken

Trim away large loose pockets of fat and any hanging flaps that stop the thighs lying flat. Leave the smaller seams of fat; they help the meat stay supple through the roast and final crisp.

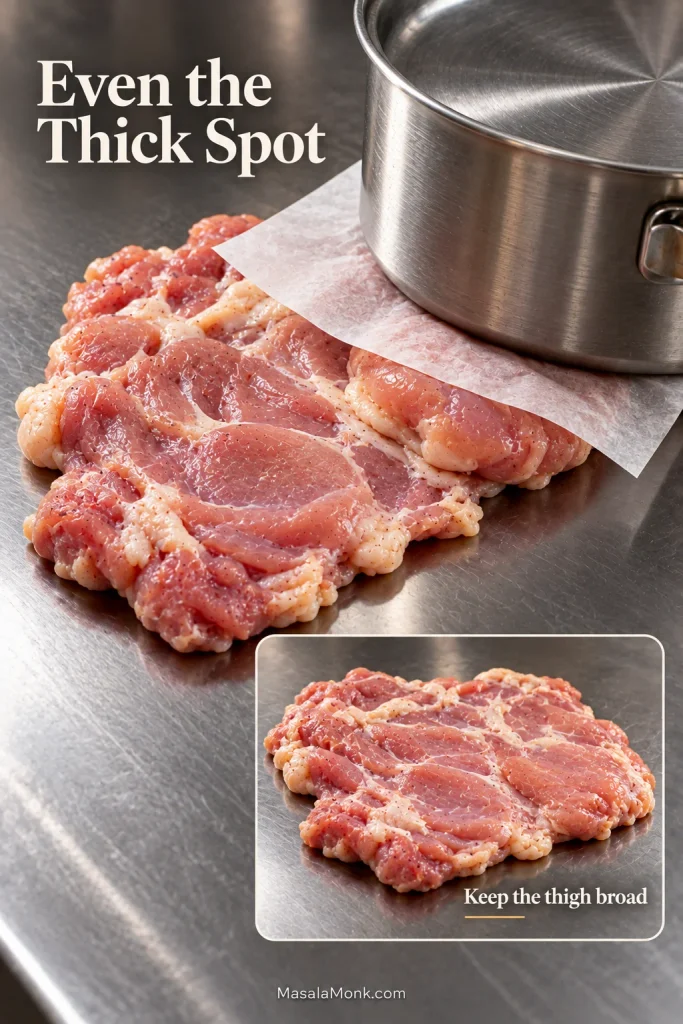
Open each thigh fully. If one section forms a dense knot while the rest is much thinner, cover the thigh with parchment. Give only that thick area a few firm taps with a meat mallet, rolling pin or heavy pan. Aim for broad, fairly even pieces that are still much thicker than cutlets. They do not need to look identical.

Raw boneless chicken thigh under parchment with a heavy pan pressing only its thicker section; inset shows the thigh still broad.
Even only the abrupt thick spot; the thigh itself can stay broad and irregular.

2. Make the chicken gyro marinade

Whisk the yogurt, olive oil, lemon juice, lemon zest, garlic, oregano, paprika, Dijon, salt and pepper until evenly combined.

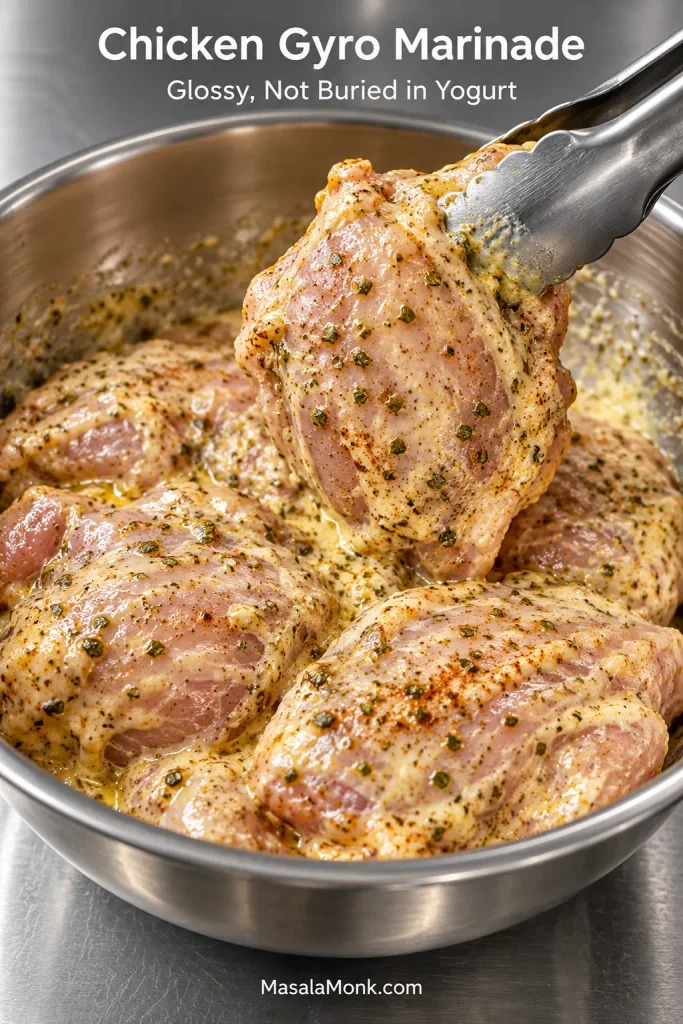
Add the thighs and turn them through the mixture. The right coating leaves the chicken glossy, speckled with oregano and paprika, with no heavy blanket of yogurt hiding the meat. Here, the seasoning stays oregano-led. Garlic and lemon are easy to taste, paprika brings warmth and colour, and the little bit of Dijon rounds things out without making the meat taste mustardy.

Whole raw chicken thighs lightly coated with a glossy yogurt, oregano and paprika marinade in a stainless bowl.
If the meat is still clearly visible beneath the marinade, the coating is light enough for stacking.

3. Marinate

Cover and refrigerate for at least 2 hours. For this marinade, 4–8 hours is a useful target and around 12 hours is plenty. That timing is about texture and flavour, not a food-safety cutoff.

4. Make the tzatziki while you wait

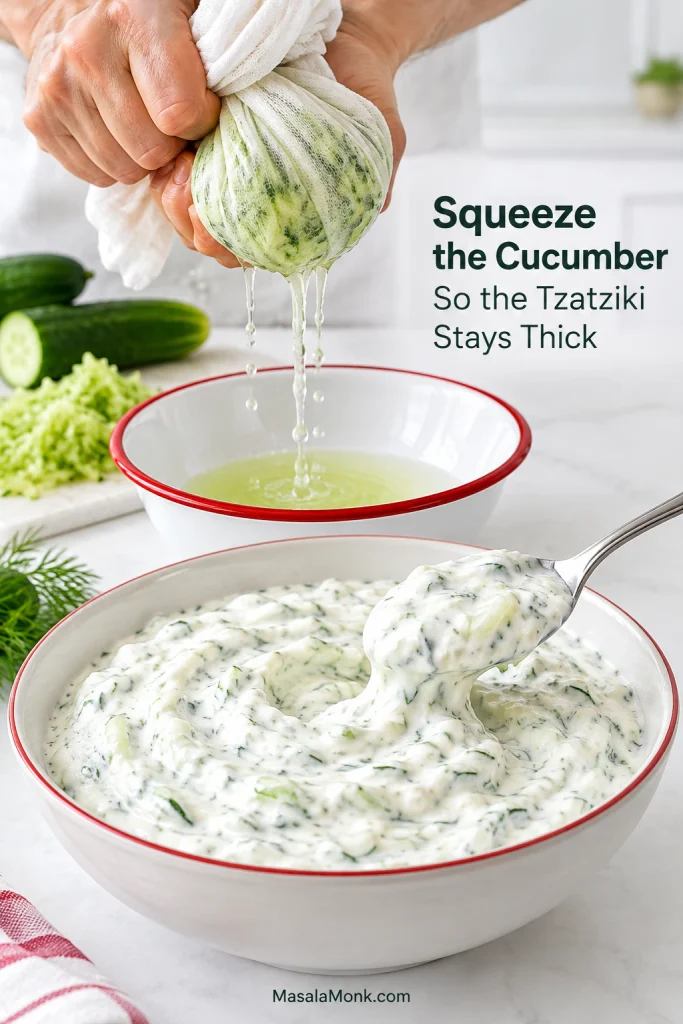
Grate the cucumber, toss it with ¼ teaspoon salt and leave it for about 10 minutes. Wrap it in a clean kitchen towel and squeeze firmly. Open the towel, gather it again and give it another hard twist. By then you should get only a few droplets, not another stream of cucumber water.

Mix the cucumber with the Greek yogurt, garlic, olive oil, lemon juice, dill if using, salt and pepper. Cover and refrigerate. The rest does the sauce good: the garlic settles down and the whole thing tastes more joined-up by the time the chicken is ready. You want it cool and thick enough to sit against hot meat without immediately running into the pita.

Grated cucumber being squeezed in cloth beside a bowl of thick tzatziki holding its shape on a spoon.
Salting starts the cucumber draining; squeezing finishes the job. The useful endpoint is grated cucumber that feels damp rather than wet, so the tzatziki stays creamy instead of loosening as it rests.

This batch makes a little more tzatziki than six wraps usually need. Put the rest on the table; somebody will use it.

5. Pack the loaf pan

Heat the oven to 375°F / 190°C conventional or about 350°F / 175°C fan. Line a 9 × 5-inch / 23 × 13 cm metal loaf pan with parchment, leaving enough overhang along the long sides to lift the chicken later.

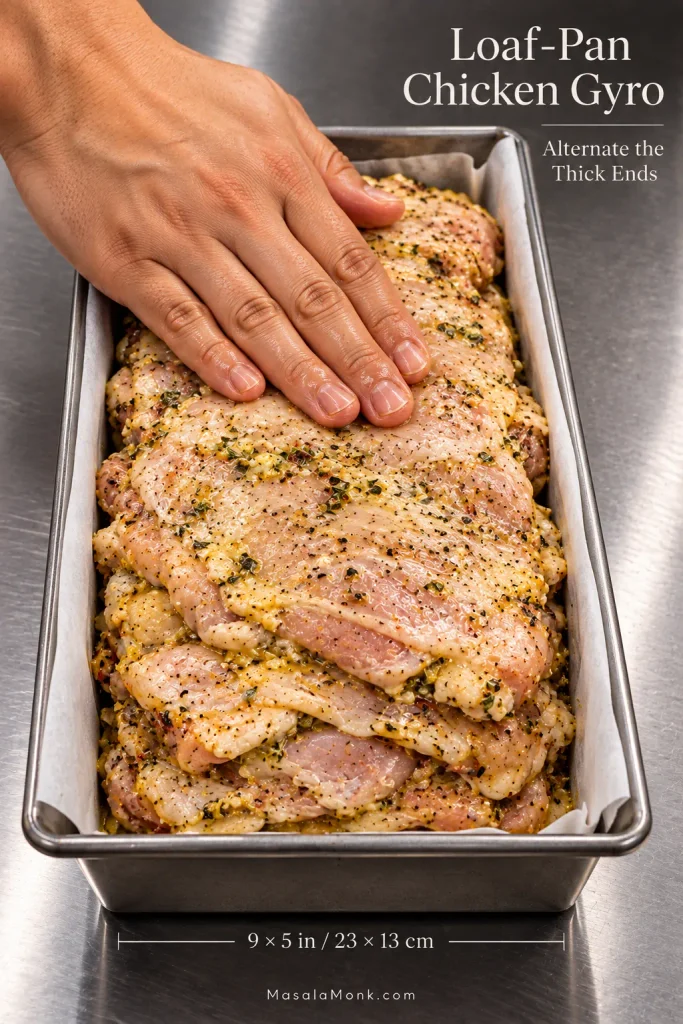
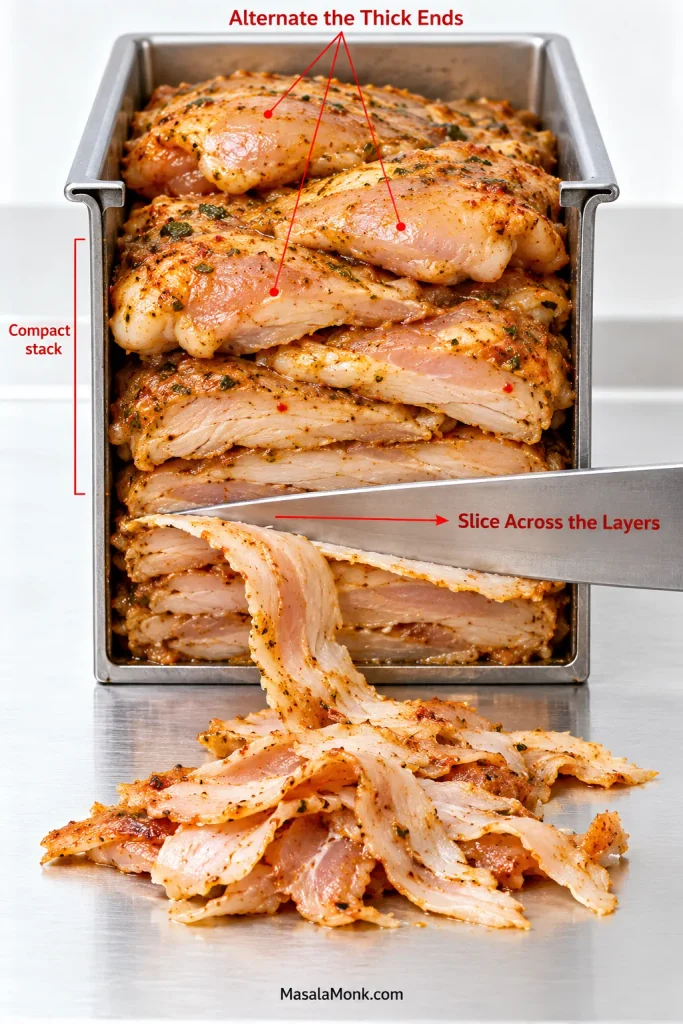
Lift one thigh from the bowl and let the heavy excess marinade fall back. Lay it across the bottom, then continue with the remaining thighs, alternating where the thicker end sits so those dense sections do not all collect on one side. Press firmly every few pieces.

The top may look a little uneven; that is fine. Nobody is going to see a perfect loaf once you start shaving it. What matters underneath is a tightly packed set of thighs without large loose gaps.

Parchment-lined loaf pan packed tightly with broad marinated chicken thighs layered over one another.
Stack over a shared footprint and alternate the dense ends so one side of the loaf does not grow much thicker.

Discard the remaining marinade that has been in contact with the raw chicken.

6. Roast to temperature

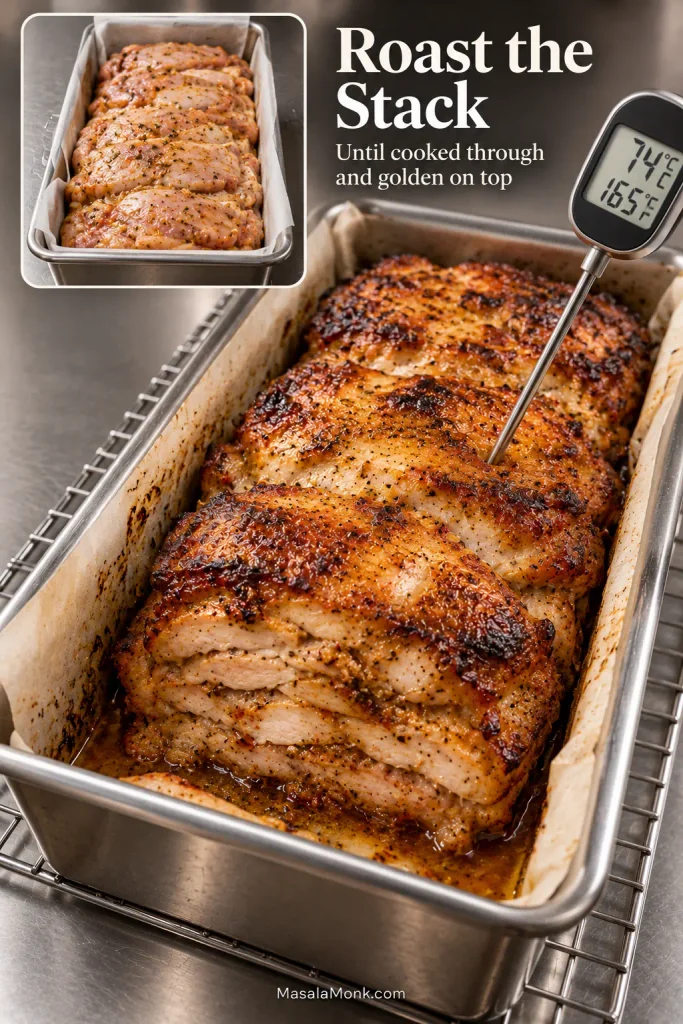
Roast uncovered on the middle rack. Begin checking around 55 minutes; most 1 kg stacks in this pan will finish somewhere around 60–90 minutes.

Insert an instant-read thermometer into the deepest central area without touching the pan. If the reading is close, check another nearby spot. The coldest reading should reach 165°F / 74°C, the USDA minimum internal temperature for poultry.

Meanwhile, the top should smell roasted and oregano-heavy and take on a deep golden colour. If it starts smelling sharply scorched or gets very dark while the middle is still below temperature, lay a loose piece of foil over the top and keep going.

Roasted layered chicken in a loaf pan with an instant-read thermometer inserted into the central meat and showing 165°F or 74°C.
Keep the thermometer tip suspended inside the deepest meat. Contact with the hot loaf pan—or slipping into a gap between thighs—can give a reading that does not represent the coldest part of the chicken.

7. Rest, then separate the fat and juices

Rest the chicken in the pan for 10 minutes. Meanwhile, slice the tomato and onion, set out the pita and get the crisping skillet ready.

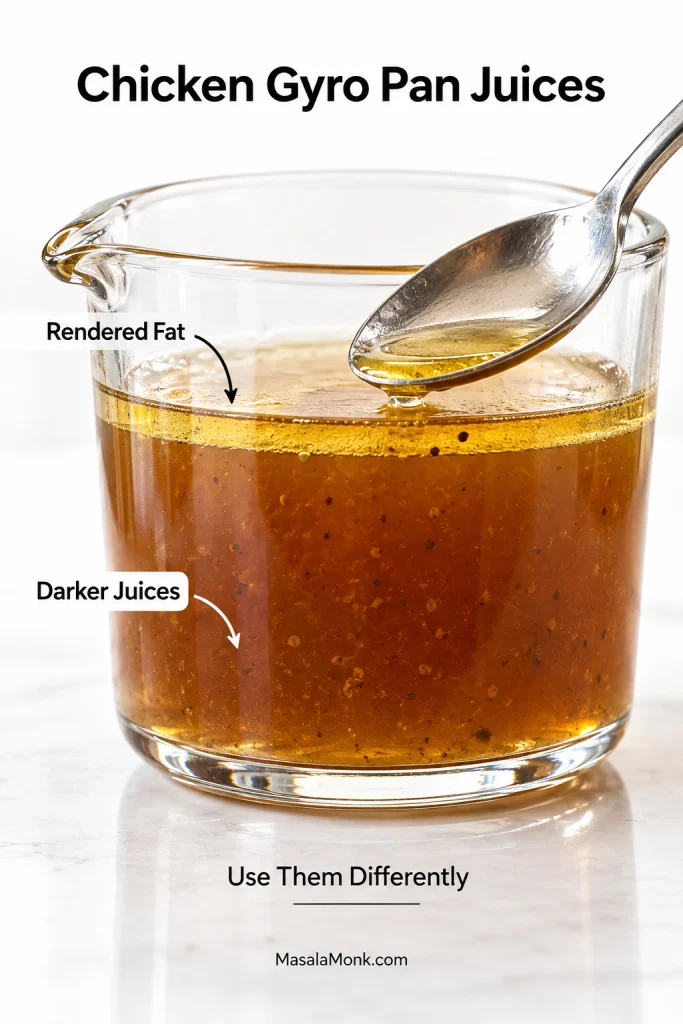
Pour the pan juices into a small heat-safe bowl and let them sit for a few minutes. Clear fat may gather on top, with the darker watery juices underneath.

When enough fat collects, spoon a little from the top for crisping and save the darker juices for leftovers. Barely any separation? Don’t fight it—use olive oil in the skillet and keep the pan juices for later. Lift the rested chicken onto a cutting board using the parchment sling.

Heatproof glass container holding darker roasted chicken juices with a thin clear golden layer of rendered fat above them.
Save the watery chicken juices for moisture, not for frying. Added to the crisping skillet, they lower the pan temperature and can turn the second browning stage back into steaming.

8. Shave across the layers

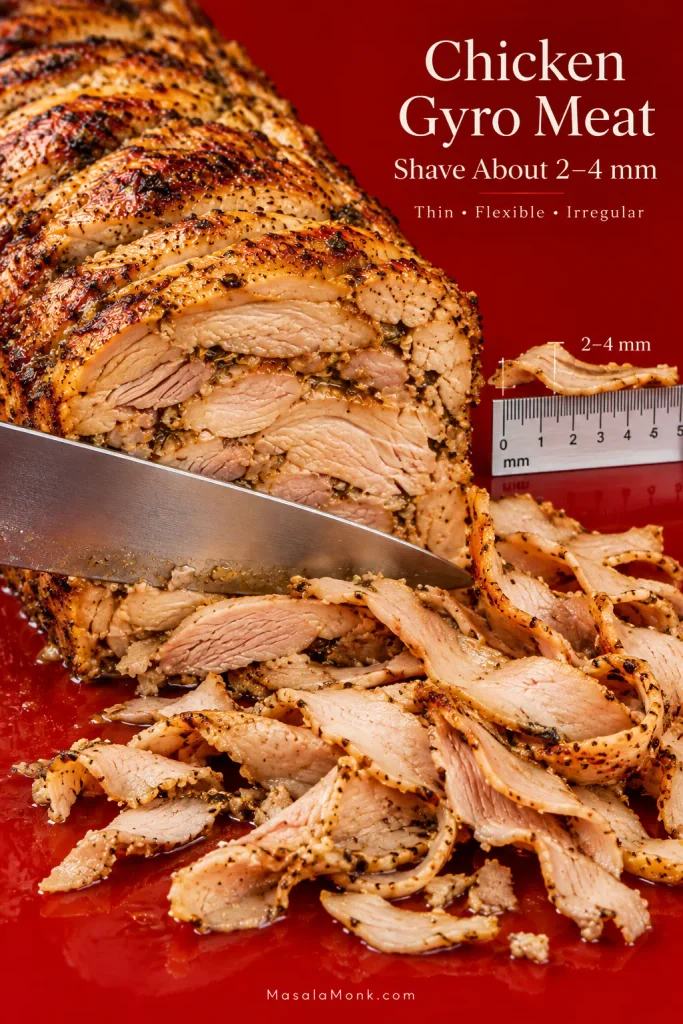
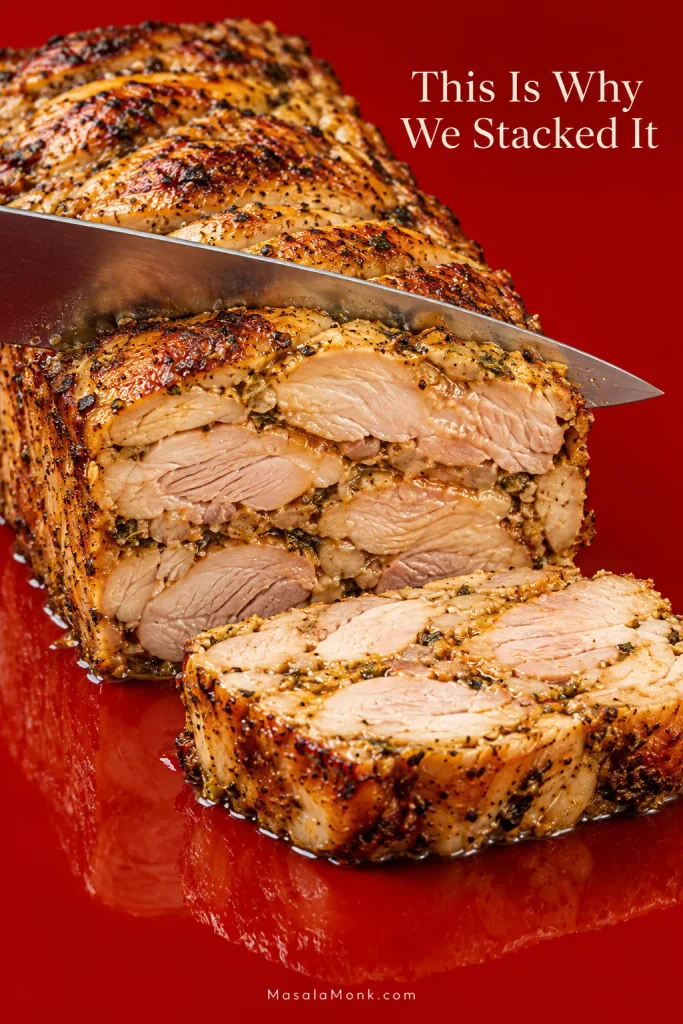
Now comes the part that explains why we bothered packing the thighs together. Cut across the roast and several pieces of chicken appear in each thin, irregular ribbon instead of six separate thigh-shaped slices.

Aim for roughly 2–4 mm. Some slices will stay broad and layered; others will split into little shards and ends. Keep all of them. Gyro meat looks better—and eats better—when the pile is a little unruly. If the board is filling with thick roast-chicken slices, take another pass with the knife.

Layered cooked chicken being sliced crosswise into thin irregular pieces beside a 2 to 4 millimeter measurement guide.
Cut across the width of the loaf rather than following its layers. That knife direction crosses several thighs in one stroke, so the slices break naturally into mixed-size gyro ribbons instead of individual thigh portions.

9. Brown the cut faces

Heat a 12-inch / 30 cm cast-iron or stainless-steel skillet over medium-high to high heat. Add about 1 teaspoon of rendered chicken fat or olive oil, followed by about 150–200 g shaved chicken. In a smaller skillet, use less; you want a loose layer with bits of hot pan still visible between the meat.

The first batch is where the loaf finally starts looking like gyro.

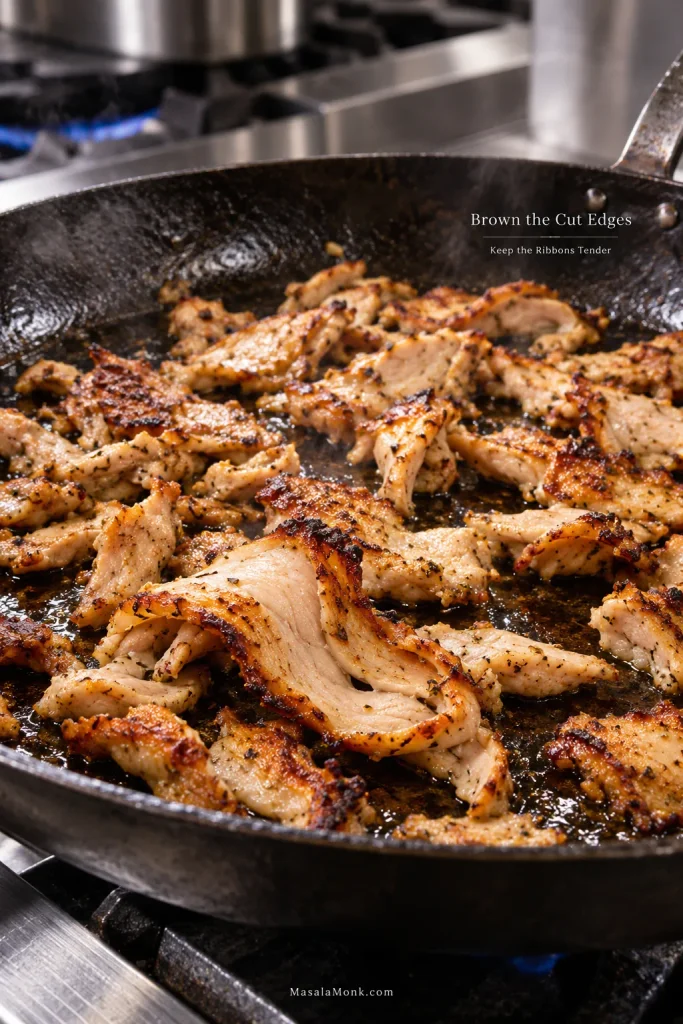
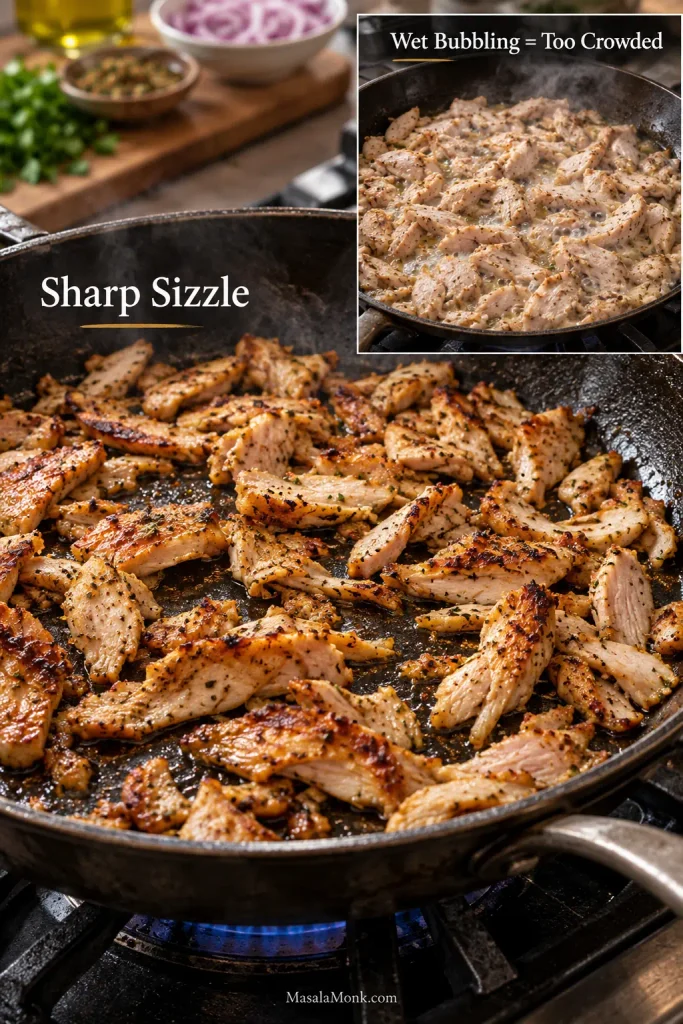
As it lands, the chicken should hit the pan with a sharp sizzle. Leave the first side alone for roughly 60–90 seconds, until the narrow edges begin curling and scattered rims turn dark golden. Toss and give the second side another 30–60 seconds.

Pull the chicken while the broader ribbons still bend easily. A few crisp tips are welcome; an entire batch of stiff chicken is not. Transfer each finished batch to a warm platter and leave it uncovered or only very loosely tented while you crisp the rest.

Thin shaved chicken gyro meat browning in a dark skillet with golden edges, crisp tips and moist lighter interiors.
Do not chase the same colour on every piece. Fresh cut faces brown quickly, while the broader chicken gyro ribbons should still look moist and bend easily when the batch leaves the skillet.

Wet bubbling means the skillet is getting crowded. Take some chicken out and let the pan recover its sharp sizzle before continuing.

10. Warm the pita and build the gyros

Warm each pita in a dry skillet for about 20–30 seconds per side, just until soft and flexible. Keep the warm rounds under a clean towel.

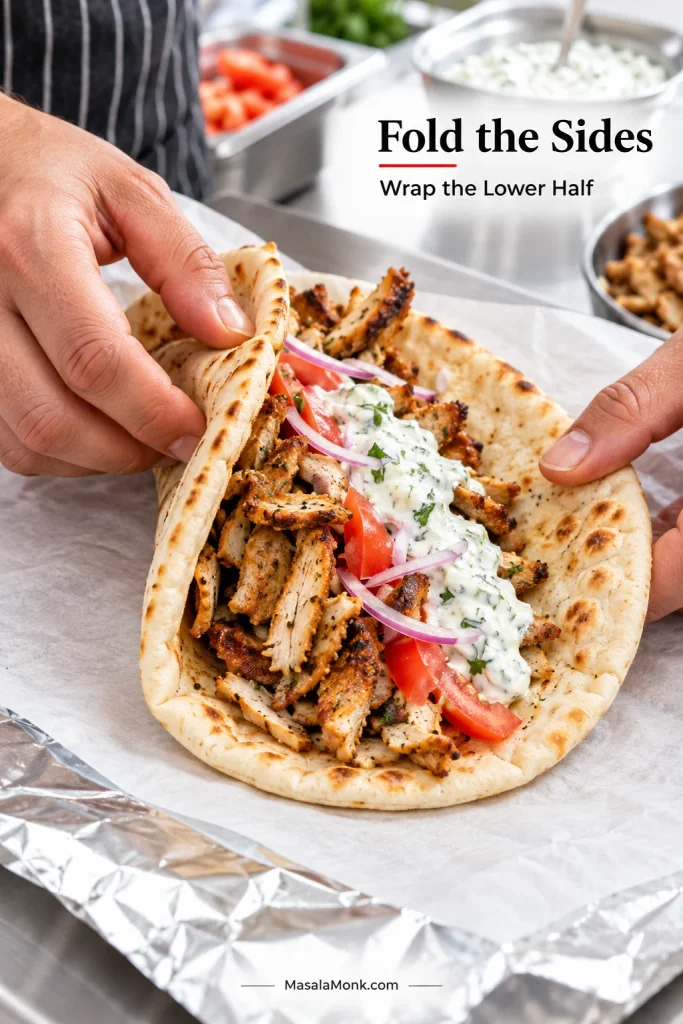
The simplest build is tzatziki → hot chicken → tomato → onion → optional fries. Keep most of the filling through the centre so the pita still folds easily. Use about 35–45 g / 2–3 tablespoons tzatziki and 120–130 g hot shaved chicken per pita.

Fold the sides around the filling and, for easier eating, wrap the lower half in parchment or foil.

Hands folding soft pita around browned chicken gyro meat, tzatziki, tomato and red onion over parchment and foil.
If the pita starts resisting the fold, rewarm it instead of squeezing harder. A soft round wraps a generous chicken gyro more cleanly and is much less likely to split along the edge.

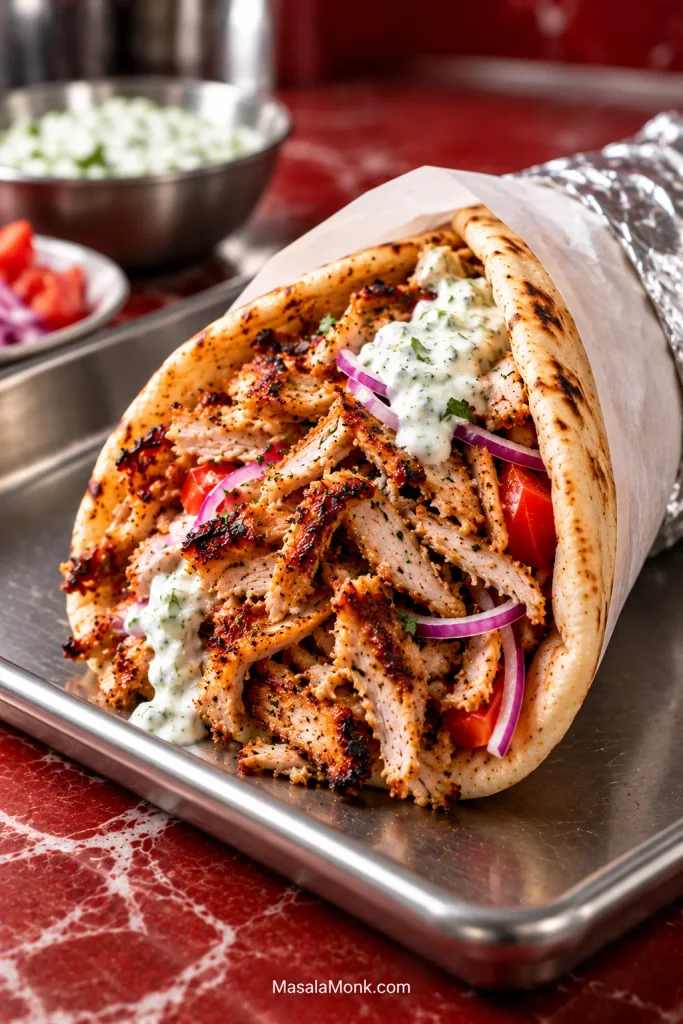
The best bite has hot browned chicken against cold garlicky tzatziki and soft warm pita. Add fries inside if you like, then taste before reaching for the lemon wedge. There is already acidity in the chicken, yogurt and tomato.

Finished chicken gyro on a stainless tray with browned shaved chicken, tzatziki, tomato and red onion in folded pita.
Keep the finished gyro chicken-first, with enough sauce and vegetables for contrast but plenty of browned meat still exposed.

Chicken Gyro Guide

If the recipe is all you needed, you can stop there. For the reasoning behind the stack, the gyro-versus-souvlaki distinction and the fixes for steaming instead of browning, keep reading.

When Something Goes Wrong

Why the Stack Matters More Than Another Spoonful of Spice

The loaf-pan method makes more sense once you look at what a commercial gyro stack is doing as it cooks. As the outside browns, that layer is shaved away, and meat that was protected a moment ago becomes the new exterior. That repeated cycle creates the mixture of tender shaved meat and darker little edges that makes the pile so distinctive.

Cook those same flavours on separate thighs and the chicken can still be delicious, but the texture lands somewhere else. A tall homemade spit can imitate the restaurant setup more closely. The loaf pan gives up the theatre and keeps the useful part: meat cooked together in layers.

Cross-section of cooked chicken gyro meat showing several irregular whole-thigh layers and visible natural muscle grain.
A little layer separation is normal; natural grain and irregular seams are what you want.

In other words, the pan builds the layers; the knife and skillet finish the job.

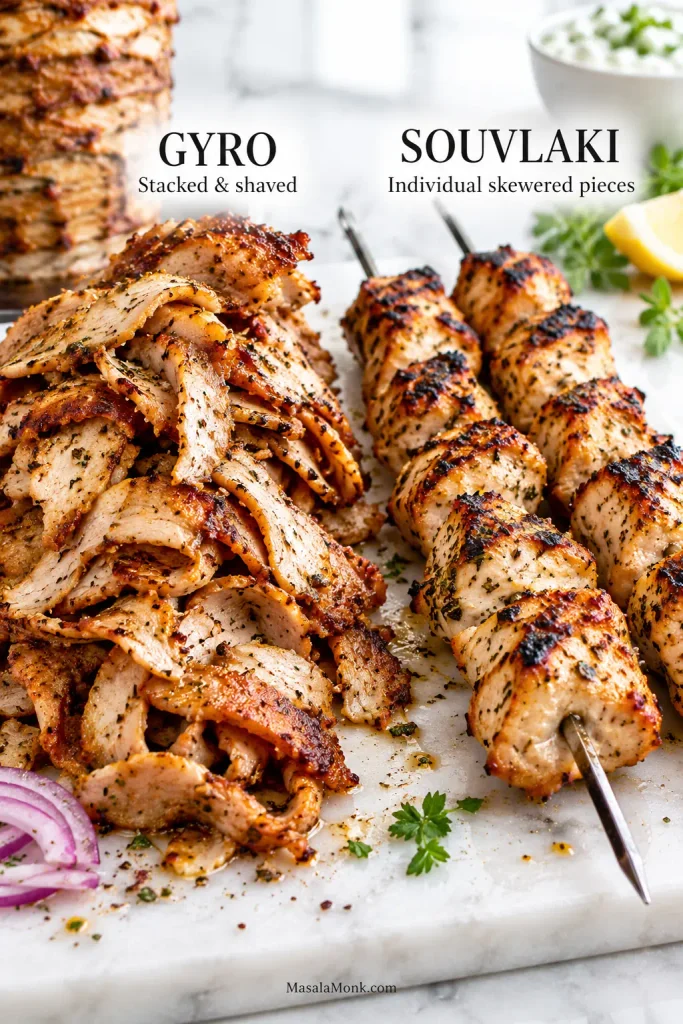
Chicken gyro vs souvlaki: what’s the difference?

Traditionally, gyro refers to meat cooked on a rotating stack and shaved from the browned exterior. In everyday use, especially outside Greece, “gyro” is also commonly used for the finished pita wrap.

With the traditional stack-and-shave style, chicken gyro meat is cooked as part of a larger stack. Chicken souvlaki is usually cut into individual pieces, threaded onto skewers and cooked directly over high heat. The fillings around them may look similar, but gyro gives you shaved layered ribbons while souvlaki gives you separate charred pieces.

Thin shaved chicken gyro meat beside larger grilled chicken pieces threaded onto metal souvlaki skewers.
Gyro shows up as thin irregular ribbons; souvlaki as separate, similarly sized charred pieces.

If charred pieces straight from a skewer are what you have in mind, the chicken souvlaki recipe is built around that result. Shawarma sits closer to gyro structurally because it also relies on stacked meat and browned exposed edges, although its seasoning moves in a warmer, more heavily spiced direction. The chicken shawarma recipe heads there deliberately; this gyro stays brighter and more oregano-led.

Chicken Thighs, Seasoning and Marinade

Thighs earn their place here twice. They stay forgiving during the roast, then handle the short blast of skillet heat without drying out as quickly as breast. For breast, use the quicker method farther down; flatter, faster cooking gives you much better control over doneness.

Chicken gyro seasoning varies widely across home and restaurant versions. Here, the profile stays bright and oregano-led, with sweet paprika for warmth and a little Dijon for savoury tang.

Yogurt helps the seasoning stay put, but the chicken does not need to swim in it. The modest amount here leaves the thighs glossy and seasoned, with no thick yogurt layer to cook away first.

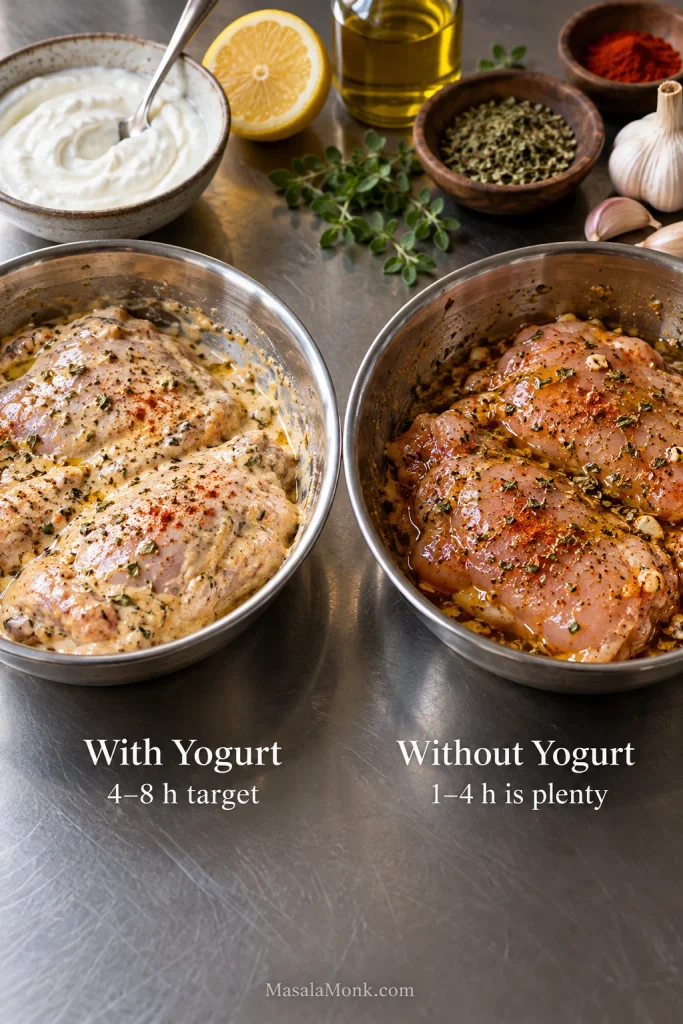
For a yogurt-free version, leave out the yogurt and increase the olive oil to about 3 tablespoons. A shorter 1–4 hour marinade is plenty; there is little benefit to leaving this more citrus-forward version on the chicken all day.

Two bowls of raw chicken thighs, one with a lightly creamy yogurt marinade and one with a clear oil, lemon and herb marinade.
The yogurt-free marinade should still look glossy; it simply lacks the lightly creamy film.

If yogurt-coated chicken stays pale or develops a grainy white surface, look at the coating before blaming the heat. A heavy wet layer has to lose a lot of water before the meat can brown.

Pack the Pan So the Chicken Can Be Shaved Later

The loaf pan presses broad thighs into one stable roast that can be cut across several layers at once. A 9 × 5-inch pan gives about 1 kg of chicken a manageable shape without the balancing act of a homemade vertical spit.

Once the stack is packed, the oven does most of the work; apart from checking the temperature near the end, there is nothing to turn or balance.

Alternate the thicker ends as you build and press every few pieces so large gaps do not run through the middle. For a double batch, use two pans. One extra-tall loaf changes the distance heat has to travel before the centre is cooked.

Technical view of whole chicken thighs layered in a loaf pan with alternating thick ends and a knife cutting across several layers.
Alternate the thick ends to control stack depth so one crosswise cut can pass through several overlapping thighs.

Some liquid around the chicken is normal. The protected inner layers cannot shed moisture directly into the oven, so water and rendered fat collect in the pan. Rest the roast, pour the liquid off and keep going. The browned edges come later.

Shave First, Then Chase the Crust

Those first few slices are the payoff. Each knife stroke cuts through several packed thighs at once and gives you ribbons with natural folds running through them. Broader pieces stay soft. Narrower shards and little ends colour faster.

Then listen.

A properly heated skillet gives a sharp frying sound as soon as the meat lands. Wet bubbling tells you the pan has become too crowded. The best batch still has plenty of tender chicken in it—you want browned edges scattered through the pile, not every slice cooked until crunchy.

Spaced browned chicken pieces in a hot skillet compared with crowded pale chicken bubbling in released liquid.
More oil does not fix an overcrowded skillet; more exposed hot pan does. Once the sound changes from frying to wet bubbling, remove some chicken and let the heat recover.

For a larger amount, a hot broiler is easier than working through endless skillet batches. Spread the shaved chicken over a preheated metal tray with a light sheen of fat or oil and stay close; the narrow tips can darken quickly.

Now Turn the Chicken into a Gyro

Once the chicken is hot and browned, the wrap does not need much decoration. Warm pita, shaved chicken, thick tzatziki, ripe tomato and very thin onion are enough.

Keep the tzatziki thick enough to stay put against the hot chicken. For different cucumber, garlic and herb ratios, the Greek tzatziki sauce guide goes much deeper.

A soft, pocketless Greek-style pita is ideal because it folds around the filling. If you cannot find one, a soft pocket pita works too; the homemade pita bread recipe shows how to keep those rounds tender and flexible.

Fries can go straight inside. Feta, lettuce, cucumber and olives can all taste good too. Still, if you have spent this much time getting the chicken right, let the chicken be the thing you taste first.

Tzatziki is not the only sauce you’ll find with Greek chicken pita. The Greek Foodie notes that in Athens, chicken souvlaki is often served with a creamy mustard-yogurt sauce. If that is the flavour you remember, changing the sauce may get you closer than adding more spice to the chicken.

For a Build-Your-Own Chicken Gyro Meal

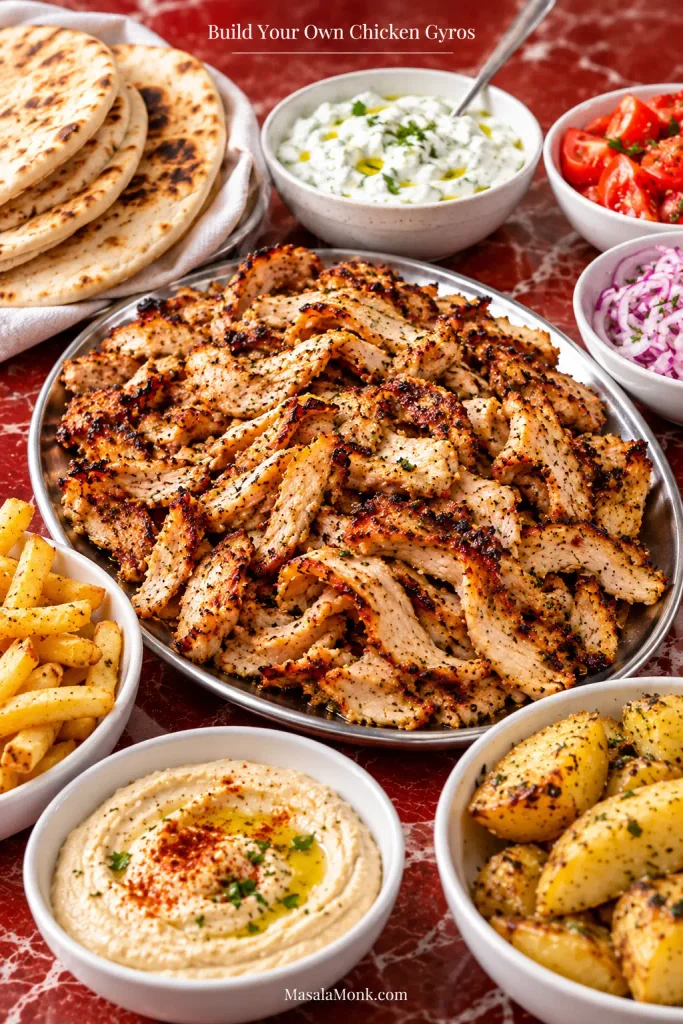
For a larger meal, put the chicken and warm pita on the table with extra-creamy hummus or a tray of Greek lemon potatoes and let everyone build their own plate.

Build-your-own chicken gyro spread with shaved chicken, pita, tzatziki, tomato, red onion, fries, hummus and lemon potatoes.
At the table, manage temperature as well as toppings: keep the chicken warm, the tzatziki cold and the pita covered until everyone is ready to assemble.

When You Want Chicken Gyros Tonight

Sometimes dinner just needs to happen. For an easy chicken gyro recipe on a weeknight, change the shape of the meat instead of trying to rush the layered roast. With only a 30-minute marinade and a short roast, this version fits much more comfortably into an ordinary evening.

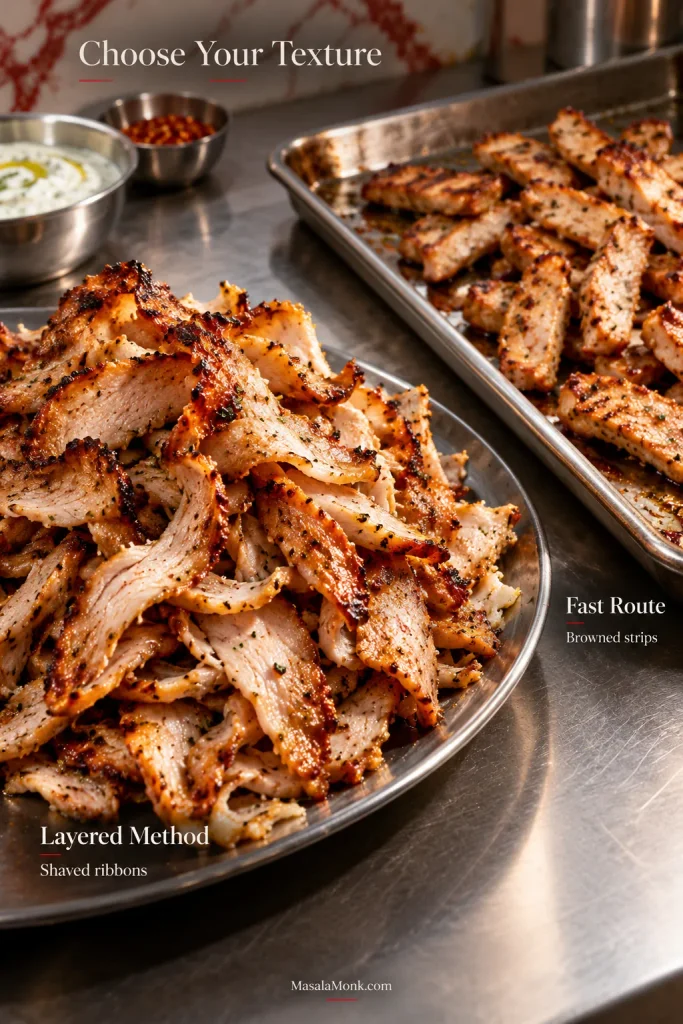
The trade-off is texture. You still get plenty of browned chicken, but the result is closer to Greek-marinated strips than meat shaved from a compact gyro stack.

Thin shaved chicken from the layered gyro method beside thicker browned chicken strips cooked on a sheet pan.
Sheet-pan strips brown during the main cook; the layered method exposes fresh cut faces only after shaving, so it benefits from a second crisp.

Fast Sheet-Pan Chicken Gyros

Use the marinade formula from the main recipe above. Open the thighs flat before cutting, then divide any thick folded sections so the pieces are reasonably even. Cut into strips about 1–1.5 cm / ⅜–½ inch wide, coat them and refrigerate for 30–60 minutes. Discard any marinade left in the bowl after the raw chicken is removed.

  1. Heat a conventional oven to 425°F / 220°C or a fan oven to about 400°F / 200°C.
  2. Let heavy excess marinade drip away, then spread the strips in one layer on a large rimmed sheet pan. An 18 × 13-inch / 46 × 33 cm pan works well. Crowded chicken needs a second tray.
  3. Begin checking around 14–15 minutes. Expect roughly 16–22 minutes depending on strip thickness, tray load and oven, turning once during cooking.
  4. Remove the chicken once the thickest pieces reach 165°F / 74°C. If they need more colour, use a fully heated broiler for another 1–2 minutes.

Chicken Breast and Air-Fryer Options

Chicken breast belongs with this quicker route too. Cut it into similarly sized strips, marinate for roughly 30–60 minutes and begin checking 2–3 minutes earlier than the thigh strips. Pull it as soon as the thickest piece reaches 165°F / 74°C. Yogurt can flavour breast beautifully; it cannot save meat that has simply stayed on the heat too long.

For the air fryer, leave the thighs whole and opened flat, use the gyro marinade here and follow the boneless-thigh method in the air fryer chicken thighs recipe. Slice the cooked thighs afterwards and build the gyros as usual.

Chicken Gyro Troubleshooting

A watery marinade, a dark top, loose slices and chicken that steams in the skillet all start at different stages. Find the symptom below and fix the part of the process that caused it.

Marinade and Roasting Problems

Problem Why it happens + what to do
Before cooking: marinade looks thin and watery Loose yogurt, wet chicken or excess liquid can thin the coating. Use thick Greek yogurt, measure the liquids and pat visibly wet chicken before marinating.
Before cooking: chicken has become unusually soft or mushy A very long acidic marinade can soften the surface. Four to eight hours is plenty for this yogurt version; shorten the marinating time next round.
Roasting: top is dark but centre is below temperature The exposed top is cooking faster than the packed centre. Cover loosely with foil and keep roasting until the middle reaches temperature.
Roasting: there is lots of liquid in the pan Some liquid is normal. An unusually large amount can come from loose marinade or water-heavy chicken. Rest the roast and separate usable fat from the pan juices if you can.

Slicing, Crisping and Assembly Problems

Problem Why it happens + what to do
Slicing: the roast separates into pieces Natural thigh layers will not behave like a processed meat loaf. Give the chicken its full rest, use a sharp knife and slice across several layers at once.
Crisping: chicken steams instead of sizzling The skillet is crowded. Remove some chicken, expose more hot pan and wait for the sharp frying sound to return.
Crisping: chicken becomes dry The second cook has run too long. Stop once scattered edges are dark golden while the broader ribbons still bend easily.
Assembly: tzatziki becomes watery The cucumber was not drained enough or the yogurt was loose. Use strained Greek yogurt and wring the salted cucumber more firmly.
Assembly: pita cracks It is probably cold or has been heated until dry. Warm briefly, remove while soft and keep covered until filling.
At the table: the whole gyro tastes too sour Acid has accumulated through chicken, yogurt, tomato and finishing lemon. Taste the assembled gyro before adding the lemon wedge.

How to Store and Reheat Chicken Gyro Meat

Keep the parts separate if you are cooking ahead. The storage and reheating limits below follow USDA leftovers guidance. Tomato and tzatziki start softening pita almost as soon as the wrap is assembled.

Storage How long Best approach
Refrigerator 3–4 days Cool promptly and store the chicken separately from pita, sauce and vegetables.
Freezer About 3–4 months for best quality Freeze cooked chicken in meal-sized portions. Raw marinated chicken can also be frozen promptly after coating; thaw completely in the refrigerator before cooking.
Reheating To 165°F / 74°C internally Use a hot skillet when you also want to restore the browned edges.

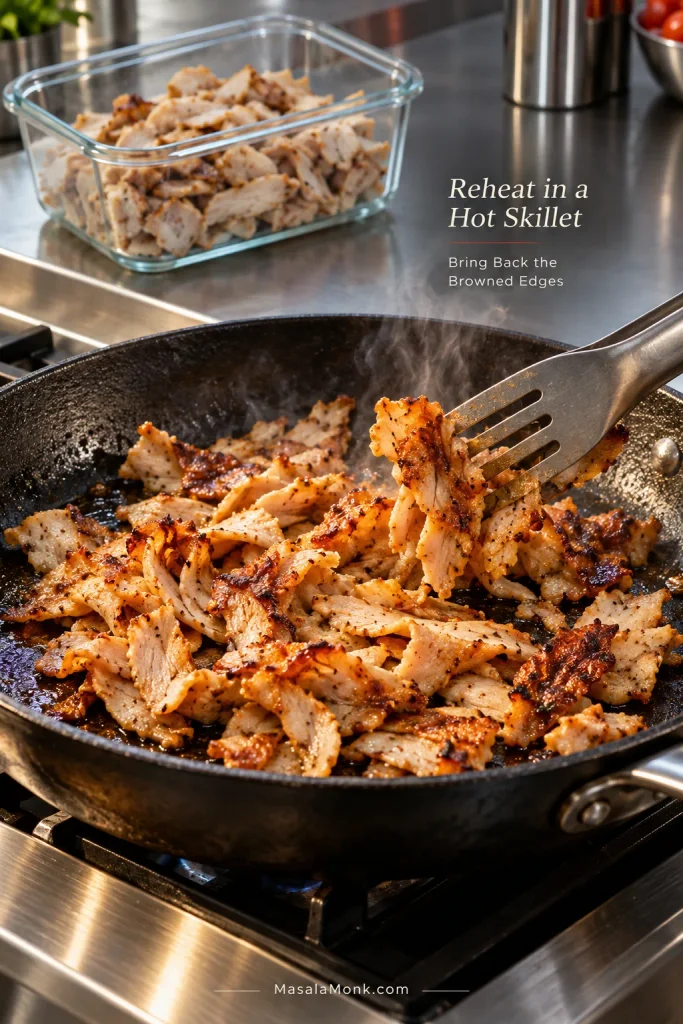
For the best day-two texture, give the chicken a short turn in a hot skillet. Use a little rendered fat when it needs browning or a spoonful of reserved pan juice when it needs moisture. A broiler or air fryer works too; the microwave is fine when speed matters more than crisp edges.

Leftover shaved chicken in a glass container behind a skillet where thin chicken pieces are reheating and browning at the edges.
Thin leftover gyro ribbons reheat fast, so work in a small batch and stop as soon as the edges wake up. Repeated or prolonged reheating turns the smallest pieces dry before the larger folds need it.

Leftover shaved chicken is also excellent over a cold Mediterranean chickpea salad. Reheat only the meat and keep the salad cold, and the next meal feels deliberately different from yesterday’s gyro.

The Best Bite Usually Is Not the Neatest One

You want a soft ribbon of thigh, one browned edge, cold tzatziki, a little tomato and onion, all caught in warm pita.

If the chicken pile has juicy folds, darker shaved edges and a few crisp little ends, leave it alone. That is the gyro.

Posted on — Leave a comment

Fattoush Salad Recipe: Authentic Lebanese Bread Salad with Sumac Dressing

Finished fattoush salad in a dark ceramic bowl with romaine, cucumber, tomatoes, radishes, parsley, mint, sumac and crisp toasted pita pieces.

The best fattoush has a brief window when everything is exactly right: the pita still crackles, cucumber and radish are cold and crisp, tomato is juicy without flooding the bowl, and the lemon-sumac dressing clings to everything without making the salad heavy.

Fattoush is a Levantine bread salad of fresh vegetables, herbs, and toasted or fried pita, usually sharpened with sumac and lemon. This fattoush salad recipe adds pomegranate molasses for sweet-tart depth while keeping the vegetables cool and the pita deeply crisp.

The Fattoush Rule: Dry First. Dress Second. Pita Last.

Most disappointing fattoush has simply lost the contrast that makes the salad fun to eat. Water clinging to the vegetables weakens the dressing, too much dressing weighs down the bowl, and pita added too early quickly turns soft.

  • Dry first. Get the lettuce and herbs properly towel-dried or spun, and deal with unusually watery cucumber or tomato before they reach the bowl.
  • Dress second. Toss until the vegetables are glossy and bright, then stop when they taste right.
  • Pita last. Fold the toasted bread in immediately before serving, or keep it alongside the salad when dinner will stretch out.
Three-stage fattoush assembly showing dry chopped vegetables first, a small amount of dressing added second, and crisp pita pieces added only at the end.
Season the vegetables before the pita goes in. That leaves room to adjust lemon, salt or sumac without sacrificing crunch.

Fattoush Salad Recipe

This version makes 6 generous side servings or about 4 light main-dish servings. The oven preheats while you prep the vegetables, and the pita bakes while the dressing comes together, so the whole salad can be on the table in about half an hour.

Recipe at a Glance

Yield: 6 generous side servings or about 4 light main-dish servings
Prep: about 15–20 minutes
Pita, oven method: about 8–12 minutes
Total: about 25–30 minutes
Best eaten: immediately after final assembly

Useful equipment: a large salad bowl, sheet pan, sharp knife, cutting board, small jar or whisking bowl, and ideally a salad spinner. No spinner? Clean kitchen towels work perfectly well.

Ingredients

Fattoush ingredients arranged on a teal set, including romaine, Persian cucumbers, tomatoes, radishes, scallions, parsley, mint, pita, lemon, sumac, pomegranate molasses, garlic and olive oil.
Good tomatoes, fresh herbs, real sumac and pita that crisps well matter more than minor vegetable swaps.

Vegetables and Herbs

  • 1 large romaine heart, about 200 g / 7 oz
  • 3–4 Persian cucumbers, about 300 g / 10½ oz
  • 3 medium ripe tomatoes, or cherry/grape tomatoes, about 350 g / 12 oz total
  • 5–6 radishes, about 90 g / 3 oz
  • 5–6 green onions or scallions, about 60 g / 2 oz
  • About 1 loosely packed cup flat-leaf parsley leaves and tender stems, 30 g / 1 oz
  • About ½ cup fresh mint leaves, 15 g / ½ oz

For the Crispy Pita

  • 2 medium pita breads, about 130 g / 4½ oz total
  • Extra-virgin olive oil, 30 ml / 2 tablespoons, for the baked, skillet or air-fryer methods
  • Neutral frying oil, as needed, optional for the deep-fried method
  • Fine salt, ¼ teaspoon, plus more for fried pita if needed
  • Sumac, ½ teaspoon, optional

For the Lemon-Sumac Dressing

  • Sumac, 2 teaspoons, plus more for finishing
  • Warm water, 15 ml / 1 tablespoon
  • Fresh lemon juice, 45 ml / 3 tablespoons
  • Pomegranate molasses, 15 ml / 1 tablespoon, plus more after tasting if desired
  • 1 small garlic clove, finely grated or crushed
  • Dried mint, ½ teaspoon, optional
  • Fine salt, ¾ teaspoon, plus more to taste
  • Freshly ground black pepper, to taste
  • Extra-virgin olive oil, 60 ml / ¼ cup

A note on the dressing: pomegranate molasses varies enormously from bottle to bottle, from sharply tart to distinctly sweet, so taste yours before adding more than the first tablespoon. The batch makes roughly 135 ml / a little over ½ cup, and you may not need all of it; very juicy produce often needs less.

How to Make Fattoush

Prepared fattoush vegetables on a blue surface with bite-size romaine, chunky cucumber and tomato, thin radish slices, scallion rounds, and loosely chopped parsley and mint.
Keep tomato and cucumber chunky, radish thin and herbs loose so the different textures stay distinct.

Prep the Vegetables and Crisp the Pita

  1. Heat the oven and wash the produce. Set the oven to 400°F / 205°C. Wash everything, then spin or towel-dry the romaine, parsley and mint until no water is clinging to the leaves. If your cucumber has an unusually loose, wet center, scrape it out; if the tomatoes leave a large puddle after cutting, let some of that liquid drain away.
  2. Cut for contrast, not precision. Tear or chop the romaine into bite-sized pieces. Keep the cucumber and larger tomatoes chunky; halve or quarter cherry and grape tomatoes. Slice the radishes thinly, cut the scallions into rounds, and roughly chop the herbs. The goal is leafy lettuce, substantial tomato and cucumber, thin radish and herbs scattered through everything.
  3. Prepare the pita. Tear it into irregular pieces roughly 1–2 inches / 2½–5 cm across. If you’re using thick pocket pita, split it along the seam first. Toss with 30 ml / 2 tablespoons olive oil and ¼ teaspoon salt.
  4. Bake until the pita snaps. Spread the pieces in one uncrowded layer and bake for 8–12 minutes, tossing once halfway through. Remove them when the surfaces are well browned and there is no soft center left. Cool uncovered; add ½ teaspoon sumac while warm if you want the bread seasoned too.

Make the Dressing and Assemble

  1. Bloom the sumac, then make the dressing. Stir 2 teaspoons sumac into 15 ml / 1 tablespoon warm water and let it sit for 5–10 minutes while the pita finishes. Add the lemon juice, pomegranate molasses, garlic, dried mint if using, salt and pepper. Whisk in 60 ml / ¼ cup olive oil, or shake everything together in a sealed jar. Taste it: the dressing should seem a little brighter and sharper than you ultimately want because the vegetables will quiet it down.
  2. Build the salad. Put the romaine, cucumber, tomato, radish, scallions, parsley and mint in a large bowl and toss gently. It should look generous and a little unruly: red tomatoes, green herbs, pale cucumber and pink-edged radish instead of a bowl of perfectly matched cubes.
  3. Start with 75–90 ml / 5–6 tablespoons of dressing. Toss and taste. Add more a tablespoon at a time only if the vegetables need it. Stop when they have a light sheen and the bottom of the bowl is still mostly clear.
  4. Add the pita immediately before serving. Fold in most of it with one or two gentle tosses. Scatter the rest over the top or keep some beside the bowl for anyone who wants extra crunch.
  5. Take one last taste. Add salt if the salad feels dull, lemon for brightness, sumac for more tart aroma, or a small drizzle of pomegranate molasses if it needs roundness. Serve straight away.

How Much Dressing Is Enough?

Two clear bowls comparing lightly dressed fattoush with a clean bowl bottom against overdressed fattoush with vinaigrette visibly pooling underneath.
Check the bowl bottom too. If dressing pools there, stop before the vegetables and pita lose definition.

A good forkful should give you several things at once: juicy tomato or cucumber, something green and fresh, a peppery edge from radish, and at least one piece of pita that still pushes back a little when you bite it. There should be no puddle collecting underneath.

Close-up forkful of fattoush containing tomato, cucumber, radish, parsley and mint, sumac, crisp pita and a small bead of dressing.
If one forkful gives you only lettuce or pita, toss again; extra dressing will not fix uneven distribution.

Once you know what that forkful should feel like, the rest of fattoush is mostly judgment: understanding what can change, what needs protecting, and what to do when your ingredients behave differently.

What Makes Fattoush Fattoush?

Fattoush is eaten across the Levant, including Lebanon, Syria, Palestine and Jordan. Vegetable combinations shift with the season and the household; there is no single produce checklist that every bowl must follow.

The name is often linked to Arabic words associated with crumbling or bread broken into pieces. The dish also belongs to a practical tradition of putting leftover pita back to work: bread that has lost its softness becomes useful again once toasted or fried.

What does fattoush taste like? Bright, herbal and distinctly tart, with cool cucumber and tomato against peppery radish and toasted bread. Sumac gives the dressing a dry, fruity tartness while pomegranate molasses adds restrained sweet-sour depth. The pleasure is in the movement from one bite to the next: brittle pita at first, then tender edges as lemon, herbs and tomato juice work their way into the bread. Some softening during the meal is part of eating fattoush, not automatically a failure. Fattoush is at its best when tomatoes are worth eating and yesterday’s pita is waiting on the counter.

Three pita pieces showing texture changing from dry and crisp to lightly dressing-stained and finally tender around the edges while still holding their shape.
Tender edges are welcome; the pita should still keep a drier center and a little resistance.

Fattoush vs Tabbouleh: What Is the Difference?

Tabbouleh is led by herbs. Fattoush is led by vegetables and bread. They often appear on the same table, but the proportions and texture are quite different.

Side-by-side bowls of fattoush and tabbouleh; fattoush has large vegetables and pita pieces, while tabbouleh is dominated by finely chopped parsley with tomato and bulgur.
The quickest visual clue is the bread: obvious pita points to fattoush, while dense chopped parsley points to tabbouleh.
FeatureFattoushTabbouleh
What leadsFresh vegetablesParsley and other herbs
Bread or grainToasted or fried pitaFine bulgur in the classic version
CutRustic, bite-sized piecesMuch more finely chopped
Signature textureJuicy vegetables with toasted breadFresh chopped herbs with tender bulgur
Typical acidityLemon and sumac; often pomegranate molassesPrimarily fresh lemon

Our Lebanese-style tabbouleh recipe keeps parsley firmly in the lead with only enough fine bulgur to support it. Fattoush heads in another direction, with larger vegetables and obvious pieces of pita in every serving.

Fattoush Ingredients: What Matters and What Can Change

The vegetable list has room to move. Freshness, moisture and texture matter more than forcing every bowl to contain exactly the same things.

Vegetables and Herbs

Small cucumbers are easiest because they carry less watery seed pulp. A large English or regular cucumber can work just as well; if the center looks loose and wet, scrape it out before chopping.

Use tomatoes that actually taste good. In peak season, almost any ripe tomato can work. Out of season, good cherry or grape tomatoes are a better choice than large tomatoes that taste of very little. If chopping them leaves a lake on the board, let some of that liquid drain away. The salad wants tomato juice, just not all of it.

Three tomato choices on a red background: a ripe full-size tomato, chopped tomato releasing excess liquid, and firm cherry tomatoes presented as the better fallback.
Drain only obvious excess tomato water; the flavorful juice left behind should still season the vegetables and pita.

Keep the radishes. Their peppery snap cuts through softer tomato and cucumber and gives the bowl another texture. Green onions are gentler than chunks of raw onion, while romaine contributes leafy volume without taking over.

Use enough parsley and mint that you notice them, but leave room for the vegetables to lead. Fresh mint belongs among the vegetables; dried mint is much more concentrated and works better sparingly in the dressing. Purslane is worth grabbing when you see it. Its fleshy, slightly tart leaves fit naturally here, but if you cannot find it, carry on without it.
Pita

Fresh pita works, but yesterday’s pita is often easier to crisp because some of its moisture has already left. Day-old bread is not a compromise here. Once it is torn, toasted and hit with sumac, its dryness becomes useful.
Tear the pita into uneven pieces instead of tidy cubes. Those odd folds and thin edges create brittle corners, slightly thicker centers and bites that catch different amounts of dressing. If you want to start with the bread itself, the homemade pita bread recipe covers both oven and stovetop methods.

Garlic, Sumac and Pomegranate Molasses

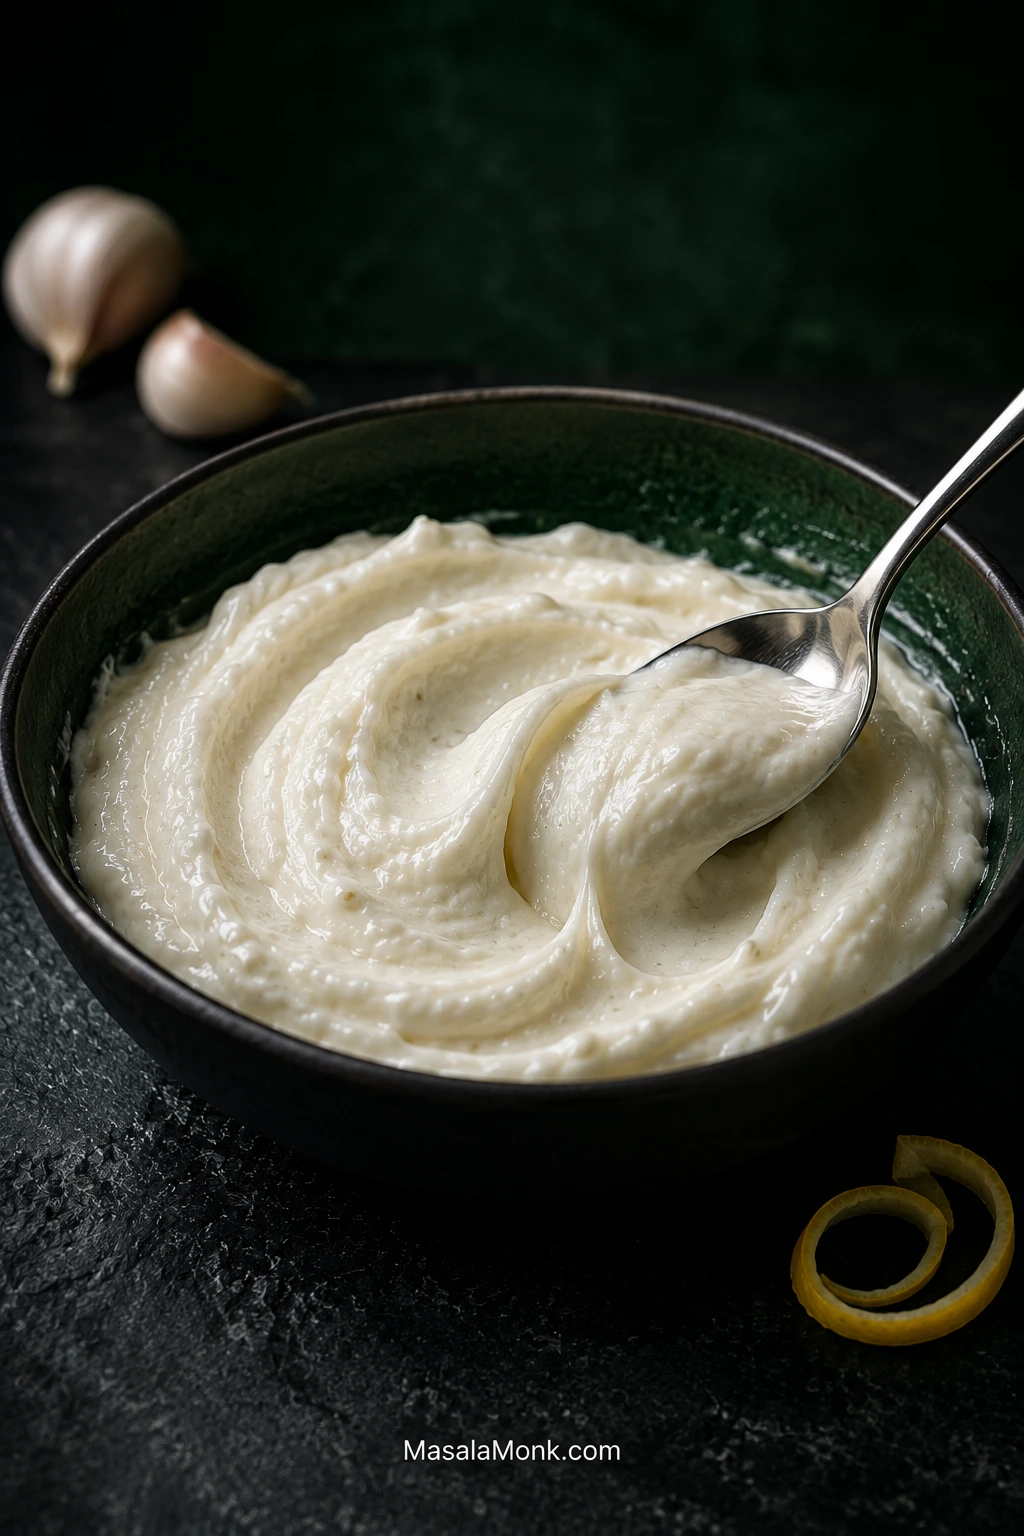
One small garlic clove is enough for this dressing. More can quickly crowd out the lemon and sumac. If you want a serious garlic presence at the table, serve Lebanese toum alongside the salad instead.

Use ground sumac itself, not za’atar. Za’atar usually includes herbs and sesame as well as sumac, so it changes both flavor and texture. Pomegranate molasses varies more from one fattoush tradition or recipe to another; we use it here for a deeper sweet-tart undertone without letting it dominate.

Sumac and pomegranate molasses are commonly sold at Middle Eastern grocers, spice shops and larger supermarkets with an international-food section. With pomegranate molasses especially, the flavor of the bottle matters more than the brand name.

Fattoush Dressing: Getting the Balance Right

Fattoush dressing is a lemon-and-olive-oil vinaigrette sharpened with sumac. This version also includes garlic, dried mint and pomegranate molasses. It should seem sharper on the spoon than it does in the finished salad because cucumber, tomato and romaine immediately soften its edges; a vinaigrette that tastes perfectly gentle by itself can disappear once everything is tossed.

Why Bloom the Sumac?

Some ground sumac is almost powdery; some is coarse enough to feel gritty between your teeth. Warm water softens the particles and lets the tart flavor disperse through the vinaigrette. Annisa Helou’s fattoush also soaks the sumac before mixing the dressing. Five to ten minutes fits neatly into this recipe because it can sit while the pita finishes.

Ground sumac shown dry, then receiving one tablespoon of warm water, followed by the darker moist sumac mixture after blooming for 5 to 10 minutes.
Bloomed sumac should look damp, not soupy; excess water only weakens the dressing.

Once the dressing reaches the vegetables, check it again. You should still notice lemon and sumac, enough salt to make them vivid, pomegranate fruitiness underneath, and olive oil taking off the hard edge.

How to Fix the Dressing

If it tastes…Try this
Too sour or harshWhisk in a little more olive oil. Add pomegranate molasses only if it also needs more roundness.
Too sweetAdd lemon juice a teaspoon at a time.
Too oilyAdd a little lemon, then check the salt again.
FlatCheck salt first. If that is right, add a little sumac or lemon.
Too garlickyDilute with more oil, lemon and the other dressing ingredients.

Change one thing, taste, then decide again. Salt, lemon, sumac and molasses solve different problems.

How to Crisp the Pita

The center of the bread matters more than the color of the edges. If a piece still bends after cooling briefly, it is not ready for the salad. Thick pocket pita should be split along its seam before toasting so the hidden interior has a chance to crisp too.

Three pita doneness stages showing pale flexible underdone pita, golden pita snapping open with a dry porous center, and dark over-toasted brittle pita.
Check the center after a brief cool; dark edges can hide a middle that is still leathery.

Oven-Baked Pita

Bake the oiled pita at 400°F / 205°C for about 8–12 minutes, tossing once halfway through. Thin pieces may finish sooner; thick bread can take longer.

The clock tells you when to look. The bread decides when it is done. Cool one piece for a moment and snap it. If the middle bends or feels leathery, give the tray a little longer.

Skillet-Crisped Pita

Heat 15–30 ml / 1–2 tablespoons olive oil in a large skillet over medium heat. Add the pita and cook for roughly 5–7 minutes, tossing frequently, until the pieces are browned and firm through the center. Drain on paper towels if they have picked up excess oil, then season while warm.

Deep-Fried Pita

Use the optional neutral oil instead of coating the pita with the 2 tablespoons of olive oil. Choose a deep, heavy skillet or saucepan with plenty of room above the oil, then pour in enough to reach roughly 1–2 inches / 2½–5 cm. Heat to 350°F / 175°C. Fry the pita in small batches, stirring or turning as needed, until puffed, golden and crisp—typically about 45 seconds to 2 minutes depending on thickness. Drain well and season while warm, letting the oil return to temperature before the next batch.

Air-Fryer Pita

Air-fry the oiled pita at 350°F / 175°C for about 6–8 minutes, shaking or tossing halfway through. Start checking a little early if your bread is very thin. After a brief cool, the pieces should break cleanly; hotter-running machines may finish sooner.

Store-bought pita chips are fine too. Choose plain or lightly salted chips, break large pieces into irregular shards, and add them at the end. A shortcut is still a shortcut worth taking on a busy night.

Whatever method you use, the test is the same: the bread should break, not bend.

Four ways to crisp pita: oven at 400°F for 8–12 minutes, skillet over medium heat for 5–7 minutes, deep fry at 350°F for 45 seconds–2 minutes, and air fryer at 350°F for 6–8 minutes.
Times vary by method; doneness does not. Let a piece cool briefly, then make sure it snaps.

How to Keep Fattoush From Getting Soggy

Four things usually soften fattoush too quickly: water clinging to the greens, unusually watery produce, too much dressing, or pita added too soon. Spin or towel-dry the lettuce and herbs, drain very juicy tomatoes, dress gradually, and keep the bread out of the bowl until the vegetables already taste right.

When to Seed or Salt the Cucumber

Most Persian cucumbers need neither seeding nor salting. Look at the cucumber before creating extra work for yourself.

  • Small Persian cucumber: chop it as it is.
  • Large cucumber with a loose, wet center: halve it lengthwise and scrape out the seed pulp.
  • Exceptionally watery cucumber: lightly salt the pieces, leave them in a strainer for about 15 minutes, then pat dry.
Three cucumber preparations showing Persian cucumber chopped as is, a larger cucumber with its watery seed core scraped out, and very watery cucumber pieces salted in a strainer to release moisture.
Judge the seed core, not the cucumber’s size. A firm, dense center needs no special treatment.

For a buffet or a table where people will eat at different times, keep the pita in its own bowl and let everyone add it themselves. That protects the texture without asking anyone to race through dinner.

Substitutions and What Changes

You can improvise, but some substitutions preserve the character of fattoush better than others. The useful question is not simply “Can I swap this?” but “What will the swap change?”

If you do not have…Best moveWhat changes
Pomegranate molassesOmit it and rebalance with lemon, or use reduced unsweetened pomegranate juice. For the simplest pantry fallback, use a little extra lemon plus a very small drizzle of honey, or maple syrup if keeping the salad vegan.You regain sweet-sour balance but not the same deep pomegranate flavor.
SumacUse extra lemon and perhaps a little zest.The salad keeps its acidity but loses sumac’s distinctive aroma.
PurslaneCarry on with romaine and the other herbs.You lose some succulent, naturally tart greenery.
Persian cucumberUse English or regular cucumber and remove wet seed pulp if needed.You may have more moisture to manage.
Fresh mintUse a small amount of dried mint in the dressing.You lose the fresh leaves but keep some mint character.
Wheat pitaUse gluten-free pita.The bread-salad structure can stay intact.

Can you make it without pita? You can still make an excellent chopped salad, but bread is central to the structure of fattoush. Leave it out and you lose the part of the dish that absorbs, crunches and gradually changes as you eat.

Make Ahead, Storage & Crowds

Fattoush is easier to prepare ahead than it is to assemble ahead. Keep the components apart until you’re close to eating.

A day ahead: make the dressing, toast the pita, and wash and thoroughly dry the romaine, radishes and scallions. Keep the cucumber whole if possible. Just before serving: cut the cucumber and tomatoes, chop the herbs, dress the vegetables, taste, and add the pita.

Make-ahead fattoush setup with dressing, dry romaine, radishes, scallions, whole cucumber and crisp pita stored separately, followed by fresh tomato, cucumber and herbs being assembled just before serving.
For make-ahead fattoush, keep cooled pita airtight at room temperature and store the vegetables and dressing separately.
  • Dressing: refrigerate promptly in a clean sealed container and use within 4 days. For a fresher garlic flavor, leave the garlic out and grate it in on serving day. If the dressing turns cloudy or partly firm in the refrigerator, the olive oil is usually just cold; let it loosen briefly, then shake or whisk again.
  • Romaine, radishes and scallions: wash and dry up to a day ahead and refrigerate well covered. Keep them whole or in larger pieces where practical.
  • Toasted pita: cool completely and keep airtight at room temperature. It is best within about 2 days.
  • Tomatoes, cucumber and fresh herbs: cut closer to serving for the best texture and aroma.

For best texture, eat dressed fattoush within about 24 hours. Refrigerate leftovers promptly, but expect a different salad the next day: the vegetables continue releasing liquid and the pita continues absorbing it. This is a next-day leftover, not a salad to assemble for several days of meal prep.

For a party or buffet, keep the pita separate and dress smaller bowls as the meal goes on. One enormous bowl assembled far in advance will gradually lose the contrast you worked for.

Fix Your Fattoush

If the dressing tastes wrong before it reaches the salad, use the dressing fixes above. Once everything is assembled, the problems are usually about water, bread, seasoning or timing.

Four fattoush problems and fixes showing watery salad with excess liquid, soft dressing-soaked pita, greasy pita pieces, and overdressed salad with pooled vinaigrette.
Identify the failure before fixing it: water, oil, softened bread and excess dressing each need a different correction.
ProblemWhat probably happenedWhat to do
Pita went soft immediatelyIt was under-toasted or added too early.Add a fresh handful of toasted pita now. Next time use the snap test before it goes into the salad.
The bowl is waterySurface water or unusually juicy produce diluted the salad.Drain excess liquid if needed, then taste before adding anything else. Next time manage that moisture before dressing.
Pita tastes greasyIt picked up too much oil.Blot or drain the current batch. Next time use a lighter coating and give the pieces room to toast.
The salad is overdressedMore vinaigrette went in than the vegetables could carry.Add more undressed vegetables if available, or transfer the salad with a slotted spoon and leave excess liquid behind.
The vegetables taste flatThe seasoning became diluted once everything was combined.Check salt first, then add lemon or sumac only if the bowl still needs brightness.
Dressed too earlyThe pita has had too much time to absorb liquid.Add fresh toasted pita just before serving. The softened pieces will stay soft, but the new batch restores contrast.

What to Serve With Fattoush

Fattoush belongs happily in the middle of a busy table. Its cold vegetables and sharp dressing are especially good beside food that is warm, creamy, charred or deeply savory. It is just as comfortable beside grilled tawook, kafta or kebabs, or as part of a larger mezze spread.

Fattoush served in the foreground with charred grilled chicken, smooth hummus, falafel and pita arranged separately on a dark table.
Keep hot chicken or falafel beside the salad, not over it, so steam and juices do not soften the pita.

Scoop up some extra-creamy hummus, then go back for cucumber, herbs and toasted pita. The creamy chickpeas make the lemon and sumac seem even brighter.

Warm chicken shawarma makes an easy full meal; serve it beside the salad rather than letting hot juices sit over the bread. For a meat-free table, homemade falafel brings another toasted, savory edge, while chickpeas or lentils are the simpler route.

Feta, halloumi, olives and pomegranate arils can all work. Add them because you want them, not because the salad needs rescuing.

FAQs

1. Is “fatoosh” the same as fattoush?

Yes. Fatoosh is another English spelling or transliteration of the same salad. Fattoush is the more common English spelling.

2. How do you pronounce fattoush?

In English, it is commonly approximated as fa-TOOSH, with the stress on the second syllable.

3. Does authentic fattoush need pomegranate molasses?

No. Pomegranate molasses appears in many Lebanese and Syrian-style versions, but it is not universal; traditional versions without it exist too.

4. Is fattoush healthy?

Fattoush is mostly vegetables and herbs, with olive oil in the dressing and pita supplying much of the carbohydrate. It is fairly light in protein on its own; chicken, fish, chickpeas, lentils or falafel can make it more substantial.

5. Is fattoush vegan and gluten-free?

This recipe is vegan as written. Check packaged pita or pita chips if needed. Traditional wheat pita means classic fattoush is not gluten-free; use a gluten-free pita that can be toasted until firm and snappy if required.

Tomatoes, lemons, cucumbers and pomegranate molasses change from batch to batch, so give the salad one final taste before it reaches the table. You want distinct vegetables, mint you can still smell as you lift a forkful, enough salt, a clear lemon-sumac tang, and pita that still has some resistance.

Dry first. Dress second. Pita last.

Back to the top ↑

Posted on — Leave a comment

Toum Recipe (Lebanese Garlic Sauce): Fluffy, Creamy & Garlicky

Bowl of pale, fluffy Lebanese toum with soft ridges and a spoon sweep, photographed on a dark stone surface against a deep green background.

Toum, the fluffy Lebanese garlic sauce served with shawarma and grilled chicken, should look almost like whipped cream and smell unmistakably of garlic. Spoon it beside hot chicken shawarma and it holds its shape until a piece of warm pita drags through it. The first taste is raw garlic, softened by the richness of the oil and sharpened again by fresh lemon.

At its best, toum is remarkably light for a sauce made mostly from oil. It piles rather than pours, clings to bread and has enough punch to stand up to charred chicken, salty fries and sharp pickles.

It can also be surprisingly temperamental. Sometimes the garlic never gets beyond finely chopped. Sometimes the first oil sits around it in a glossy puddle. And three cups of oil is a lot to watch separate in front of you.

The beginning is where patience matters most. Once the garlic turns pale and creamy, the process becomes much more forgiving. If that change is not happening yet, pause while there is still very little oil to lose.

Make the Toum · Choose Your Equipment · Fix My Toum

Quick Answer: How to Make Toum

For classic food-processor toum, use 130 g / 4½ oz peeled fresh garlic, 600 g neutral oil (or 3 cups if measuring by volume), 60 g (60 ml / ¼ cup) freshly squeezed lemon juice, 60 g (60 ml / ¼ cup) ice water and 6 g salt.

Purée the garlic and salt until smooth, using the first half of the lemon juice to help it become a sticky paste. Begin the oil in drops and then the finest stream you can comfortably manage. The loose oily shine should start disappearing as the garlic turns pale and creamy.

Once that pale cream appears, you can relax a little. Keep the stream thin, alternate the early oil with the remaining lemon and the later portions with measured ice water, and let the sauce gradually build volume. Allow roughly 10–15 minutes for the oil addition.

Finished toum should be pale, fluffy and spoonable. Classic toum is naturally vegan and egg-free; the garlic itself helps hold the emulsion together.

If the first oil is still pooling around the garlic, pause there. This is the cheapest moment to fix the batch.

Choose Your Equipment

For this full recipe, use a standard food processor. What matters most is blade coverage: the garlic needs to sit where the blade can reduce it to a smooth, sticky paste. A smaller batch usually needs a smaller bowl.

EquipmentVerdict
Standard food processorRecommended. Best fit for the full recipe and a very light, fluffy result
Mini processor or small work bowlBest for scaling down. Keeps a smaller quantity of garlic within reach of the blade
Powerful immersion blender + narrow jarUseful small-batch alternative. Vessel and machine matter, and the result may be denser and less airy
Mortar and pestleTime-honored and effective, but considerably more laborious
Countertop blenderLast choice here. Often less forgiving and more likely to give a thinner, denser sauce
Food processor bowl showing how enough garlic must sit within reach of the blade for smooth toum.
The full batch gives a standard processor enough garlic to work with. For a half batch, a smaller bowl keeps the cloves where the blade can turn them into a smooth paste.

Make It Now: Toum

If dinner is already underway, this section is enough to make the sauce.

Recipe at a Glance

TimeAbout 20 minutes; add 15 minutes if using the optional garlic rest
YieldAbout 950 ml / 4 cups
Serving guideAbout 32 × 2-tablespoon portions
MethodFood processor
TexturePale, fluffy and spoonable

This makes roughly four cups. If you don’t need that much, freeze several small portions on day one or use the half batch below.

Ingredients

  • 130 g / 4½ oz peeled fresh garlic (about 1 cup)
  • 6 g salt (about 1 teaspoon fine/table salt or 2 teaspoons Diamond Crystal kosher salt)
  • 60 g freshly squeezed lemon juice (60 ml / ¼ cup), divided
  • 60 g ice water (60 ml / ¼ cup), divided
  • 600 g neutral oil (or 3 cups if measuring by volume), such as sunflower, grapeseed, canola or safflower

Garlic: choose firm, plump cloves. If an older clove has a clearly developed green germ, split the clove and remove it before weighing and processing. Dry, rubbery or heavily sprouted garlic is more likely to taste harsh or tired.

Split garlic cloves comparing a fresh clove with an older clove that has a developed green germ.
If an older clove has a pronounced green germ, remove it before weighing. The clove itself can still be used if it is firm rather than dry or rubbery.

Salt: another kosher salt may measure differently by volume. If you’re not using Diamond Crystal, trust the 6 g weight.

Oil: use something pale, mild and fresh. With this much oil in the bowl, any stale or assertive flavor will show.

Ice water: keeps the thickening sauce workable and helps give finished toum its lighter texture.

Can I Halve This Toum Recipe?

Yes. Use a mini processor or small work bowl for the quantities below; a full-sized bowl is usually too large to keep 65 g of garlic in the blade’s working zone.

For a half batch, use:

  • 65 g / 2¼ oz peeled fresh garlic
  • 3 g salt
  • 30 g lemon juice (30 ml / 2 tablespoons)
  • 30 g ice water (30 ml / 2 tablespoons)
  • 300 g neutral oil (or 1½ cups if measuring by volume)

Divide the oil into six 50 g portions if weighing or six ¼-cup portions if using volume. In the method below, every 100 g / ½-cup oil portion becomes 50 g / ¼ cup, and every 15 g / 1-tablespoon lemon or water addition becomes 7.5 g / 1½ teaspoons. Yield: about 2 cups.

Before You Start

Measure the lemon and ice water before switching on the processor. For the full batch, choose one system for the oil and stay with it: 600 g by weight or 3 cups by volume. If you are making the half batch, use the scaled quantities above.

For the full batch, divide the oil into six 100 g portions if weighing or six ½-cup portions if using volume. For the half batch, those become six 50 g portions or six ¼-cup portions. Set them beside the processor before you begin.

Toum ingredients arranged beside a food processor with neutral oil divided into six measured portions.
Six measured oil portions turn one long drizzle into manageable checkpoints. Set out the lemon and ice water too, so you can watch the emulsion instead of stopping to measure.

Using especially fierce garlic? After Step 1, let the finished garlic-lemon paste stand for about 15 minutes before beginning the oil. Use only the lemon already measured for the recipe; don’t add extra.

Keep the water cold, and give the processor a break later if the bowl starts becoming noticeably hot.

1. Turn the Garlic Into a Paste

Add the garlic and salt to the processor. Pulse until finely minced, scraping the sides and bottom several times.

Add 1 tablespoon / 15 g lemon juice and process again. Add another tablespoon, scraping as needed, until the garlic becomes smooth and sticky.

Watch how it moves. Properly puréed garlic smears rather than scatters when the blade passes through it. Keep going while obvious pieces remain.

Toum garlic preparation comparing coarse chopped garlic that scatters with smooth sticky garlic paste that smears.
Coarse garlic still jumps and scatters around the bowl; ready garlic leaves a sticky smear behind the blade. Don’t start the oil until the paste looks like the smoother example.

If you’re using the optional 15-minute lemon rest for especially pungent garlic, pause here before beginning the oil.

2. Catch the First Emulsion

With the processor running, begin adding the first 100 g / ½ cup oil portion.

Start with drops, then move to the finest thread you can comfortably maintain. These opening additions deserve more patience than the oil that comes later.

Watch the surface. The glossy wet look should begin disappearing as the garlic turns paler and creamy.

Early toum emulsion comparison showing separate pooling oil beside garlic paste and the first pale creamy emulsion.
This is the change to wait for: separate oil gives way to a pale, creamy base. If you still see a glossy puddle, pause before adding more oil.

Then the bowl changes quickly. Soft ridges begin following the blade, and the oil seems to disappear into the pale sauce. The transformation looks almost improbable: raw garlic and a stream of oil suddenly behaving like something whipped.

Once you see that change, the most fragile part is behind you. Oil still pooling is your cue to pause. Make sure the garlic is genuinely smooth before adding more.

Finish that first oil portion, then blend in 1 tablespoon / 15 g lemon juice.

3. Build the Toum

Add the second 100 g / ½ cup oil portion in a thin stream. The toum should stay creamy as the bowl fills. Blend in the final 1 tablespoon / 15 g lemon juice.

Add the third 100 g / ½ cup oil portion, then 1 tablespoon / 15 g ice water.

Repeat with each of the remaining three oil portions, adding 1 tablespoon / 15 g ice water after each one. By the end, all six oil portions and all the measured ice water should be in the bowl.

The sauce grows paler and fuller with each round. The processor often sounds different too, its blade now pushing through a thick, airy sauce instead of a wet garlic purée.

Pale toum building in a food processor with soft ridges forming as the emulsion gains volume.
As the emulsion builds, the sauce rises higher on the bowl and soft ridges follow the blade. That fuller, airier movement is a better checkpoint than the clock.

If your processor pusher has a small hole for dripping liquid, use it to meter the oil into a fine stream.

4. Watch the Heat

Touch the bowl occasionally. Slight warmth is fine. If the machine becomes noticeably hot, give it a short rest before continuing.

The active method commonly takes around 20 minutes; the optional garlic rest adds 15 minutes. Treat those times as orientation rather than a deadline—the sauce in front of you tells you more than the clock.

5. Finish by Texture

Finished toum should be pale ivory to white and airy enough to mound on a spoon. There should be no greasy ring around the bowl, and it should feel rich without eating like straight oil.

The Spoon-Groove Check

Drag a spoon through it. The groove should stay visible briefly. Lift the spoon or spatula and the toum should cling instead of sliding straight off.

Finished toum lifting in a soft mound on a spoon while a defined groove remains visible in the bowl.
Finished toum should mound softly, cling to the spoon and hold a shallow groove. A greasy ring or free oil around the edges points to a different problem.

Fresh toum can taste especially fierce straight from the processor. When the texture is right, chill it before making large flavor adjustments.

Recipe Notes

  • Weigh the garlic. Bulbs and cups vary more than they appear to.
  • Measure the lemon. “One lemon” can produce a very different amount of juice from one fruit to another.
  • Watch the opening emulsion. Pale cream forming around the early oil additions matters more than an exact number of seconds.

Cooking right now? You have what you need. If the texture went wrong, jump straight to troubleshooting. Using a stick blender instead? Go to the immersion-blender guidance. If the batch worked but tastes fiercer, heavier or less like your favorite shawarma-shop sauce than expected, keep reading—the garlic, oil and even the sauce you’re comparing it with may explain why.


What Is Toum?

Toum (pronounced TOOM) simply means garlic in Arabic. The sauce is closely associated with Lebanese and wider Levantine cooking, especially alongside grilled chicken, shawarma, kebabs, potatoes and bread.

Although it looks a little like mayonnaise, classic toum gets its thick, whipped texture without mayo, cream or yogurt. Pulverized garlic helps hold the oil together with lemon and water. On a mezze-style spread, it can sit beside extra-creamy hummus, pickles and salads while bringing a much sharper garlic bite.

Toum and aioli aren’t the same sauce. If what you want is the quick mayo-based garlic aioli common in many modern kitchens and restaurants, our Garlic Aioli Recipe is the easier route. Classic toum is egg-free, lighter on the spoon and far more assertively garlicky.

The Garlic Changes the Batch

Two similar-looking bulbs can produce surprisingly different toum. Raw garlic varies considerably in heat, and using 130 g removes at least the quantity guesswork. Measuring by volume is less predictable because a tightly packed cup can contain much more garlic than a loosely filled one.

Toum also pulverizes raw garlic far more thoroughly than most dishes do, bringing out a great deal of its pungency. Heat takes garlic in another direction: in something like garlic mashed potatoes, cooked garlic becomes sweeter and softer instead of sharp.

Freshness matters too. An older clove with a well-developed green germ can taste harsher, which is why the recipe removes an obvious germ before the garlic is weighed and processed. Plump pre-peeled garlic can also work as a practical shortcut, though fresh whole heads remain the first choice.

Especially fierce garlic can be mellowed before the oil goes in. The optional 15-minute rest with the lemon juice already incorporated in Step 1 gives the raw garlic time to soften somewhat without cooking it.

Blanching can reduce raw garlic heat too, but it can also weaken the properties toum relies on to emulsify. That’s why it isn’t built into this formula.

What Is the Best Oil for Toum?

Use sunflower, grapeseed, canola or safflower oil. All four are mild enough to fade into the background while garlic and lemon stay in charge.

OilOur take
SunflowerBest all-round choice: mild, pale and clean
GrapeseedVery neutral; lets garlic and lemon dominate
CanolaMild, economical and easy to find
SafflowerClean and unobtrusive
Avocado oilWorks, but offers little advantage here and may tint the sauce
Extra-virgin olive oilSkip for classic pale toum: stronger flavor, darker color and possible bitterness after vigorous blending

A perfect emulsion can still taste wrong. Heavy, oily or bitter toum puts the oil itself under suspicion.

Can You Make Toum With an Immersion Blender?

Yes, but it isn’t the preferred tool for the fluffy food-processor formula above. A powerful immersion blender can work well for smaller batches in a narrow vessel, but machine power, vessel shape and the formula all matter. The finished toum may be denser and less airy than a food-processor batch.

Keep the blender head low while the first white emulsion forms, then raise it gradually so the oil above is pulled into the sauce. A jar that fits fairly closely around the blender head gives a small batch a much better chance than a wide container.

Immersion blender held low in a narrow jar as a small batch of toum begins emulsifying around the blade.
A narrow jar keeps a small batch around the blender head. Hold the blade low until a white emulsion forms, then begin raising it gradually through the mixture.

Think of it as a useful small-batch alternative, not an interchangeable substitute for the method above.

What Went Wrong With My Toum?

“Runny” can describe several different problems. Start with the moment the texture changed.

Three toum troubleshooting states showing an emulsion that never caught, one that split later, and a loose but intact sauce.
These three “runny” sauces are not the same failure: oil that never incorporated, a later split, and a pale but intact loose emulsion need different fixes.
What you seeLikely problemNext move
Garlic bouncing around the bowlBatch too small for the bowlMove to a smaller processor
Oil pooling from the beginningFirst emulsion never caughtPause before adding more oil
Creamy at first, then glossy and liquidEmulsion splitStop pouring and re-emulsify
Pale and smooth but softLoose rather than brokenLook for actual oil separation
Very thick, but no oil separationSauce is holding wellFinish the measured water; thin later if needed
GrainyGarlic paste too coarseImprove the paste stage next time
Texture looks right, but flavor is harshIngredient or flavor issueSee the flavor notes below
Perfect at first, oily laterSeparated during storageRe-emulsify if needed
Processor becoming hotHeat building in the machinePause and cool

Go straight to the symptom: Never emulsified · Split later · Rescue broken toum · Too thick or grainy · Flavor problem

When the Emulsion Never Starts

Garlic ricocheting around the processor usually means the machine isn’t catching enough of it. Move to a smaller bowl if repeated scraping doesn’t solve the problem.

A smooth paste with oil still pooling around it points to the pour. Those opening additions need to enter in drops or a very fine thread. Wait for pale cream before committing the remaining oil.

When It Starts Well and Then Splits

A sauce that was creamy and then suddenly becomes glossy or watery did form an emulsion; it later lost stability. Oil arriving too quickly is a common culprit. Excess heat or a sudden large splash of liquid can contribute too.

Once you see clear separation, stop the pour. Harder blending and more oil rarely make a broken toum happier.

How to Rescue Broken Toum

When the broken mixture already tastes good and you want to keep it egg-free, start a small fresh garlic base and gradually emulsify the failed toum into it.

  1. Purée 2–3 fresh garlic cloves with a small pinch of salt in a mini processor or very small blender cup. Two or three cloves are usually too little for a standard food-processor bowl.
  2. Add only a spoonful of the broken toum at first, extremely slowly.
  3. Wait for a fresh creamy emulsion to form.
  4. Once that base looks stable, feed in the remaining broken mixture in a fine stream.
Broken toum rescue sequence showing a fresh garlic base, gradual addition of broken sauce, and a stable pale emulsion.
The rescue happens in stages: make a tiny fresh garlic base, add one spoonful of the broken sauce, wait for creaminess, then feed in the rest slowly.

Treat the broken toum like the oil in a brand-new emulsion: add it slowly to the fresh base, never the other way around.

A batch that is already painfully garlicky may not benefit from another few raw cloves. One vegan rescue is to start with about ⅓ cup aquafaba and slowly feed the broken toum into it. When eggs are acceptable, egg white is another effective fresh base.

Rescue is optional. Broken toum still makes a terrific garlic-lemon marinade, vinaigrette base or coating for roasted potatoes and vegetables. It can go into pasta too. The texture failed; the ingredients did not become useless.

Too Thick or Grainy

Very thick toum can mean the sauce is holding beautifully. Finish the recipe’s measured ice water first. A stable sauce can then be loosened with additional cold water, 1 teaspoon at a time, if you want it softer.

Graininess points back to the beginning: the garlic probably never became smooth enough. Improve the paste before changing anything about the oil.

The Texture Is Right, but the Flavor Isn’t

Too strong or burning. Correct texture means the emulsion itself probably isn’t the problem. Garlic varies enormously in pungency; see The Garlic Changes the Batch before changing the formula.

Bitter. Older sprouting garlic can taste harsher, while strongly flavored extra-virgin olive oil may add its own bitter edge after heavy blending.

Too lemony. This is why measuring 60 g / ¼ cup is safer than using “one lemon.” Let the toum chill before adjusting. A stable emulsion can take a little more neutral oil slowly if you genuinely want to soften the acidity.

It Looked Perfect and Separated Later

Sometimes toum looks beautiful when it goes into the refrigerator and shows a ring of oil later. The emulsion formed, but it proved unstable during storage.

Visible separation can be repaired using the same rescue principles above. Spoon out only what you need and return the rest to the refrigerator.

Why Restaurant Garlic Sauce May Taste Different

You may not have made your toum incorrectly. The shawarma shop may be serving a different garlic sauce.

Toum is a garlic sauce, but not every white “garlic sauce” served with shawarma is classic toum. Restaurant and family versions may use egg white, starch, mayonnaise, yogurt or labneh, citric acid or other stabilizers. Those changes can create something softer, milder, denser or more mayo-like.

If your toum is fluffy and properly emulsified yet still doesn’t match the sauce you remember, the recipe may be doing exactly what it is supposed to do.

What to Eat With Toum

Toum comes alive beside food that is hot, browned and savory.

With shawarma or shish tawook, add pickles and soft homemade pita bread. Pink pickled turnips are particularly good here: sharp, crunchy and bright against the white sauce and browned chicken. Hot chicken, cold toum, chewy bread and something pickled make a much more interesting bite than any one part does alone.

Lebanese toum served with charred chicken shawarma, warm pita and bright pink pickled turnips.
Keep toum cold and serve it beside hot grilled food. The temperature contrast keeps the garlic bright and the sauce thick enough to cling to each bite.

Kebabs and other grilled meats work just as well. A charred edge dragged through cold garlic sauce rarely needs much embellishment.

Then there are potatoes. Hot crispy homemade French fries dipped straight into a mound of toum may be the fastest route through an open container, with roast potatoes close behind.

For a meat-free plate, add homemade falafel, vegetables, pickles and warm bread. A parsley-heavy tabbouleh brings enough lemon and fresh herb to cut through the richness.

Toum also works beyond the dipping bowl. Whisk a spoonful into lemon juice for dressing, spread a thin layer inside sandwiches and wraps, or work it into a marinade for chicken or roasted vegetables.

Made a big batch? Storage & freezing · Back to the toum recipe

Make Ahead, Storage & Freezing

Refrigerate freshly made toum promptly in a clean airtight container at 4°C / 40°F or colder. Published toum recipes vary widely on refrigerator life, but there is no validated food-safety guidance for this exact homemade emulsion that can confidently be applied to every batch.

Public-health guidance for homemade garlic-in-oil preparations uses a four-day refrigerated limit, so this recipe uses the same deliberately conservative 4-day limit. Toum is not identical to plain garlic-in-oil; the CDC and the National Center for Home Food Preservation are included as the conservative food-safety reference point, not as toum-specific shelf-life studies.

Freezing is practical, but expect some loss of texture. Toum may thaw only a little looser, or the emulsion may separate more noticeably. Freeze it in small portions and thaw in the refrigerator. Stir well first; if necessary, use the same re-emulsification principles described above.

Toum storage guide showing refrigerated sauce, small freezer portions and a thawed portion ready to stir.
Freeze extra toum in small portions rather than one large container. They thaw faster and are easier to stir or re-emulsify individually if the texture changes.

If a thawed portion won’t return to its original fluffiness, it still has plenty of value. Use it in marinades, dressings, roasted vegetables or other dishes where perfect whipped texture no longer matters.


When the Bowl Turns White

There is a satisfying point halfway through making toum when the bowl stops looking like garlic and oil and becomes pale, thick and almost cloud-like.

That is the part worth remembering next time. The exact number of seconds matters less than recognizing what the sauce looked like when the first emulsion caught.

Then give it somewhere worthwhile to go: hot chicken, warm bread, fries, grilled vegetables, sharp pickles.

If you make it, tell us what machine you used and what the toum looked like during the first oil additions. If something went wrong, tell us when the texture changed. Those details make a failed batch much easier to understand—and may help the next cook staring into the same bowl.

↑ Back to top · Make the Toum · Troubleshooting

Posted on — Leave a comment

Greek Lemon Potatoes Recipe (Patates Lemonates): Crispy, Golden & Garlicky

Finished Greek lemon potato wedges in a stainless roasting tray with deeply browned cut faces, softer glossy sides, oregano and concentrated pan juices; one split wedge shows the creamy interior.

Greek lemon potatoes don’t just taste lemony on the surface. Break open a wedge and the middle is seasoned too—creamy potato carrying lemon, garlic, oregano and olive oil all the way through. A few cut faces and corners go deeply golden where the juices reduce against them.

Maybe the potatoes you remember from a Greek restaurant, taverna or a meal on a trip were crisp around the edges. Maybe they were almost spoon-soft and sitting in lemony juices. Both versions exist. What matters is getting that flavor into the potato rather than leaving it on top.

Quick Answer

Greek lemon potatoes use a wet-to-dry roast. Thick wedges soften first with olive oil and stock; fresh lemon goes in partway through; then the tray dries enough for the exposed surfaces to brown. For 2 lb 10 oz / 1.2 kg potatoes, use ⅓ cup + 2 tablespoons / 110 ml olive oil and ¾ cup / 180 ml hot stock or water. Roast uncovered at 400°F / 205°C, add ¼ cup / 60 ml lemon juice after about 30 minutes, and finish with another 1 tablespoon / 15 ml once the centers are creamy and the remaining liquid has cooked down to lemon-garlic juices.

Close-up of a broken roasted potato wedge showing a creamy pale-yellow center, browned outer edge, oregano flecks and a light sheen of lemon-garlic pan juices.
Check one of the thickest wedges: the center should be moist and creamy, not chalky.

Greek Lemon Potatoes Recipe

These patates lemonates roast with olive oil, garlic, oregano, stock and fresh lemon, then get one last squeeze of lemon while the tray is still hot.

Serves6 as a side dish
PrepAbout 15 minutes
CookAbout 60–75 minutes, depending on the potatoes and final browning
Oven400°F / 205°C conventional
365°F / 185°C fan/convection
PanLarge rimmed metal roasting pan; around 12×16 in / 30×40 cm is a useful guide
Cut1–1¼ in / 2.5–3 cm thick wedges

Texture: creamy, well-seasoned centers with crisp, deeply browned patches around the edges. Because part of the roast happens in liquid, these stay softer than a completely dry-roasted potato.

Ingredients

  • 2 lb 10 oz / 1.2 kg Yukon Gold or similar all-purpose potatoes
  • ⅓ cup + 2 tablespoons / 110 ml extra-virgin olive oil
  • 5 garlic cloves, very finely grated or Microplaned
  • 1 tablespoon dried oregano, preferably Greek oregano
  • About 9 g fine sea salt / 1½ teaspoons, plus more if needed
  • ½ teaspoon freshly ground black pepper
  • ¾ cup / 180 ml hot low-sodium chicken or vegetable stock, or water
  • ¼ cup / 60 ml freshly squeezed lemon juice, for roasting
  • 1 tablespoon / 15 ml freshly squeezed lemon juice, for finishing, plus up to another tablespoon to taste
  • Finely grated zest of ½ lemon, optional
  • Fresh oregano or parsley, optional, for serving

Chicken stock gives the deepest savory flavor. Use vegetable stock for a vegan version, or water when you want the lemon and olive oil to come through most clearly.

You’ll usually need 2–3 medium lemons. Use fresh juice here; lemon is one of the main flavors, and bottled juice tends to taste flatter after a long roast. The 9 g of salt assumes low-sodium stock or water, so start with less if your broth, bouillon or stock concentrate is already salty.

Method

  1. Heat the oven. Set a rack in the middle and preheat to 400°F / 205°C conventional or 365°F / 185°C fan/convection.
  2. Prepare the potatoes. Peel them for a softer surface, or leave thin Yukon Gold skins on. Cut into wedges about 1–1¼ inches / 2.5–3 cm thick at the widest point. No soaking or parboiling is needed when you’re cooking them straight away.
  3. Season. Put the potatoes in the roasting pan with the olive oil, finely grated garlic, oregano, salt and pepper. Toss well, spread them into one layer and leave visible gaps between the wedges. Set one broad cut face down against the metal.
  4. Add the stock. Pour the hot liquid into the gaps rather than washing it over the seasoned tops. It should spread across the base and come only partway up the wedges. Most of each potato stays above the liquid.

What the Pan Should Look Like After Adding Stock

Use this stage as a calibration point rather than an exact liquid line. A wider pan can make the same amount of stock look shallower; what matters is that the wedge bases meet the liquid without the potatoes being submerged.

Raw peeled potato wedges arranged in one layer in a stainless roasting pan with visible gaps; seasoned stock covers the base and reaches only partway up the wedges.
Visible metal between the wedges is evaporation space. If the stock climbs too high or the wedges overlap, steam escapes more slowly and the wet phase lasts longer.
  1. Roast uncovered for about 30 minutes. The tray may still look pale and wet. Some loose stock will usually remain, and one of the larger wedges should be softening around the outside while still offering some resistance in the center. If the tray is nearly dry and the largest pieces are still hard, add about ¼ cup / 60 ml hot stock or water.
  2. Add the lemon and turn once. Pour ¼ cup / 60 ml lemon juice around the potatoes and carefully turn the wedges. That head start in the stock lets the centers begin softening before the main lemon goes in. Then leave them alone. Repeated stirring knocks soft edges off just as those surfaces are ready to start browning.

When the Lemon Goes In

Use the potato and pan state, not the 30-minute mark alone. The wedges should be softening, still fairly pale, with cooking liquid left in the pan.

Fresh lemon juice being poured into the spaces around partially roasted potato wedges in a stainless pan, with cooking liquid still visible around the softened potatoes.
Pour lemon into the open spaces so it disperses through the hot pan liquid.
  1. Roast uncovered for another 30–40 minutes. Start checking at 30 minutes. Push a thin knife into one of the thickest wedges, not the little corner piece. It should slide through easily. Break one open if you’re unsure: the middle should look moist and creamy, not chalky or dry.
  2. Look at the tray. Tip it gently. Thin stock should no longer rush into the corner. Drag a spoon through the bottom; it should pick up oily, garlicky juices instead of a pool of thin cooking liquid. The smell should be more roasted garlic and oregano than steam.
  3. Brown if needed. Already well colored? Stop there. Pale but tender wedges can stay in the dry oven for a few more minutes or go under the broiler/grill for 2–4 minutes. Don’t chase perfectly even browning. Darker corners and softer sides are part of a good tray.
  4. Finish and taste. Squeeze over 1 tablespoon / 15 ml fresh lemon juice while the potatoes and oil are still hot. The tray should smell noticeably brighter almost immediately. Taste one for lemon and salt before adding more juice, zest or fresh herbs.

Check the Potato and the Pan

PotatoPanWhat to do next
HardWetKeep roasting. The middle needs more time.
HardNearly dryAdd about ¼ cup / 60 ml hot stock or water.
TenderStill wetLet the excess liquid cook away, or move the wedges to a wider hot tray.
Pale but tenderMostly dryGive them dry heat or a quick broil.
Golden and tenderReducedFinish with lemon and serve.
Five-stage cooking guide comparing potato tenderness with pan moisture to show when Greek lemon potatoes need more roasting, more stock, reduction, dry heat, or a final lemon finish.
Tenderness tells you whether the potato needs more cooking; the liquid tells you whether to add moisture or let the pan dry. Check both before simply adding more time.

Done looks like this: a knife slips easily through a thick wedge, the thin broth has cooked away, and a few cut faces and corners are deeply golden. One wedge may split when you turn it. Keep it. Those craggy broken edges often become some of the best bits in the pan.


More help: What makes them different · Best potatoes · Crisp edges · Troubleshooting · Storage & reheating · Serving ideas

What Makes Greek Lemon Potatoes Different?

Ordinary roast potatoes rely mainly on dry heat. Greek lemon potatoes spend part of the cook in seasoned liquid, giving the flavor time to reach farther into each wedge before the exposed surfaces brown. That’s how you can end up with a creamy, lemony middle and roasted edges on the same potato.

Four-stage guide showing potato wedges progressing from pale and wet, to softening, to reducing with early browning, and finally to golden potatoes with concentrated pan juices.
The turning point comes when the loose liquid has mostly cooked away and hot metal and olive oil can take over the browning.

Patates means potatoes, while lemonates roughly means lemony or lemon-flavored. Olive oil, lemon and oregano sit at the heart of the dish, usually with garlic and water, stock or roasting juices. You may also see related names such as patates fournou for oven potatoes or patates riganates when oregano is emphasized. Greek kitchens don’t all arrive at exactly the same tray.

Best Potatoes for Greek Lemon Potatoes

Yukon Gold is the easiest all-round choice. It holds together well, but the middle turns creamy and takes on plenty of the lemony cooking juices.

For an especially fluffy middle, try Maris Piper or Russet. Keep the wedges thick and handle them gently once tender; both become more fragile than Yukon Gold. Very waxy potatoes stay neat but hold onto a firmer, smoother interior.

Comparison of raw and cooked potato types: Yukon Gold with a creamy cohesive center, a starchier Russet or Maris Piper type with a fluffy crumbly interior, and a waxy potato with a smooth firm center.
Yukon Gold is the most forgiving when you turn and serve the wedges. Russet or Maris Piper turns fluffier and more fragile; waxy potatoes stay firmer.

In the US, Yukon Gold is the easy default. UK cooks can reach for Maris Piper. In Australia, Désirée or Sebago work well. Elsewhere, choose a potato sold for roasting, baking or general-purpose cooking rather than a very waxy salad potato.

Peeling is optional. Peeled wedges expose more potato to the seasoned liquid and develop a softer surface. Thin skins give the pieces a little more structure.

The Cut, the Pan and the Liquid

Cut the potatoes thick: about 1–1¼ inches / 2.5–3 cm at the widest point. Small pieces can start breaking before the juices have finished reducing. Huge wedges risk a firm or lightly seasoned middle.

Give them room. Steam has to get out. A broad metal roasting pan exposes more potato to hot metal and gives moisture somewhere to escape. A deep glass or ceramic casserole can keep the dish wetter for longer, so browning may arrive later.

Side-by-side roasting comparison showing more browned potato wedges in a roomy shallow metal pan and wetter, softer-looking potatoes in a deeper crowded casserole.
Crowded or deep pans slow evaporation. If tender potatoes are still pale and wet, give the tray more reduction time.

Pan shape matters more than chasing an exact dimension. What matters is enough surface area for the wedges to sit in one layer with visible gaps between them.

Tray not matching the timing? Jump to troubleshooting and diagnose the wedge and pan together.

Lemon, Garlic and Oregano

Use fresh lemon. The juice added during roasting mellows into the garlic, stock and olive oil. The final squeeze restores the fresh citrus aroma that long oven heat softens. If you’ve kept adding juice and still can’t find the lemon aroma you remember, fresh zest often helps more than another splash of acid.

Leave thick lemon slices and squeezed halves out of the pan during the long roast; the pith and rind can become bitter. Grate the garlic very finely so it disappears into the cooking juices instead of leaving large pieces exposed once the liquid recedes.

Dried oregano handles the long roast beautifully. Greek oregano is excellent if you have it. Save fresh oregano or parsley for the finished tray.

The generous olive oil is intentional. As the stock cooks away, the oil takes over as the roasting fat and stays behind as part of the lemon-garlic sauce you spoon over the potatoes at the end.

These potatoes are particularly good beside chicken souvlaki, where the same lemon, garlic and oregano meet juicy chicken and charred edges.

Getting More Golden, Crisp Edges

Once the thickest wedges are tender, stop protecting the moisture and start chasing color. The broad cut faces and rough corners brown first, giving you some of the darkest, best-tasting patches.

Two styles of Greek lemon potatoes shown side by side: softer, juicier wedges with more pan juices and a more reduced version with deeper golden-brown roasted surfaces.
Choose the finish after the centers are tender: stop with spoonable juices for softer taverna-style potatoes, or reduce further for deeper golden edges.

Keep Them in the Same Pan

Tender potatoes in an almost-dry pan can stay exactly where they are. Give them a few more minutes of roasting or a 2–4 minute broil.

Move Them When the Pan Is Holding Them Back

A wet pan can keep already-tender potatoes from browning. Move the wedges to a clean, hot metal sheet when they’re still sitting in plenty of liquid, or when the garlic-rich juices are getting too dark. Brown the potatoes on the clean tray, reduce the juices separately, then spoon them back over.

If all-over crunch is what you’re after, use a dry-roasted method instead; these ranch roasted potatoes are built for that texture.

Trying to Recreate Softer Restaurant Potatoes?

If the potatoes you remember were almost spoon-soft, with more lemony juice than crisp crust, you may be trying to recreate a softer style.

Use stock rather than water and increase the starting liquid toward 1 cup / 240 ml. Let the wetter phase run longer. Stop while there is still a spoonable amount of concentrated juice in the pan and skip the aggressive broiler finish.

That softer style is especially good beside a roast leg of lamb, where the lemony potato juices can mingle with the richer meat juices on the plate.

When the Potatoes Go Wrong

If the tray doesn’t match the clock, forget the clock for a moment. Check one of the larger wedges and look at what’s left in the pan.

Troubleshooting guide showing six Greek lemon potato problems: tender but pale, hard and nearly dry, tender and still wet, brown but firm, too sour, and a bland center.
A hard potato and a wet pan are different problems. Add moisture only when the center still needs it; otherwise, let evaporation do the work.
What you seeWhat to do now
Tender but paleGive them a few more minutes of dry oven heat or a quick broil.
Garlic or juices getting too darkStop the aggressive heat or move the potatoes to a clean tray.
Wedges falling apartStop turning them and finish the remaining pieces undisturbed.
Too sourSkip the extra finishing lemon and spoon over the savory juices instead.
Tart enough but not lemony enoughAdd fresh zest rather than more juice.

The Pan Is Dry but the Center Is Still Hard

That’s fixable. Add about ¼ cup / 60 ml hot stock or water around the wedges and keep roasting. Your pan or oven has lost moisture faster than the potatoes could soften. A broad pan or hot-running oven may need a little more liquid next time.

The Potatoes Are Tender but Still Swimming

The difficult part is already done. A little thin liquid can simply cook away uncovered. If the potatoes are genuinely sitting in a deep pool, move them to a broad hot tray and brown them there while the original juices reduce separately. Spoon those juices back over before serving.

They Are Brown Outside but Firm Inside

Add a little hot liquid and back away from aggressive top heat. Keep cooking until a knife slips easily through one of the thickest wedges. You can always add more color later.

The Middle Tastes Bland

A squeeze of lemon over the top can brighten a bland potato, but it can’t completely replace seasoning that never reached the middle. Very waxy potatoes, oversized wedges, under-seasoned liquid or a tray that dried too quickly can all contribute. Spoon the reduced juices over this batch; next time, focus on the potato choice, wedge size and first part of the roast.

Doubling the Recipe for a Crowd

A bigger batch needs more pan space, not twice as much time.

  • Use two pans and keep each tray in one layer.
  • If your oven browns unevenly, swap the pans between racks during cooking. Judge each tray separately by tenderness and how much liquid remains.
  • Broil one pan at a time unless your broiler heats the full oven evenly.

Make Ahead, Store and Reheat

To cut the potatoes ahead: prepare them several hours in advance and keep them fully submerged in cold water in the refrigerator. Drain and dry them well before seasoning.

To cook them ahead: you can roast Greek lemon potatoes in advance and reheat them. Expect softer edges. As the potatoes sit, they continue absorbing the pan juices, so cook them reasonably close to serving when crispness matters most.

Cool leftovers promptly and refrigerate them, together with any remaining juices, in a covered container for 3–4 days. USDA leftovers guidance gives the same refrigerator window.

Reheat in a 425°F / 220°C oven for about 10–15 minutes, until hot throughout. An air fryer is also useful for restoring browned edges; reheat the potatoes in a single layer until hot and crisp around the edges. The microwave works, but the browned surfaces will soften.

Freezing is possible, though the texture usually suffers. Potatoes can become grainier or more watery after thawing.

What to Serve With Greek Lemon Potatoes

Cold Greek tzatziki is a particularly good contrast: cool cucumber and yogurt against roasted garlic, lemon and browned potato edges.

For a lighter main, try lemon-garlic baked tilapia. The potatoes also sit naturally beside roast chicken, lamb chops, souvlaki or kebabs, grilled vegetables, and a crisp tomato-cucumber salad.

Golden Greek lemon potato wedges served with charred chicken souvlaki, a small bowl of tzatziki, tomato-cucumber salad and fresh lemon on a dark restaurant-style table.
Charred souvlaki, cool tzatziki and crisp tomato-cucumber salad turn the lemony potatoes into a complete Greek-inspired dinner.

One last spoonful: the pan juices.

Close-up of a stainless spoon scraping through reduced golden lemon-garlic pan juices with oregano and browned potato bits, leaving a clean streak across the metal roasting pan.
Drag a spoon through the pan: it should briefly reveal clean metal before the glossy juices settle back. If thin liquid floods the track, keep reducing.

Once the potatoes are creamy inside and the liquid in the tray has cooked down to salty lemon-garlic juices, you’re there. Add the last squeeze of lemon, spoon everything from the bottom of the pan over the potatoes, and get them to the table hot. Those browned edges are good; the last garlicky spoonful in the pan may be even better.