

Pull properly cooked barbacoa apart and the beef should give way before you really have to tug. The strands stay juicy, smoky chile runs through the meat without covering up its beefiness, and the cooking juices cling instead of collecting as thin broth underneath. Put that into a hot corn tortilla with white onion, cilantro, lime and salsa, and very little else is required.
This Mexican beef barbacoa recipe uses well-marbled chuck, chipotle in adobo, warm spices, vinegar and lime in a standard 6–7 quart slow cooker.
Barbacoa refers to a broad family of slow-cooked meat preparations, with very different regional forms across Mexico and beyond. This is a practical slow-cooker adaptation rather than an attempt to represent every regional form.
There are two finish lines. First, the chuck has to become genuinely pull-apart tender. Then the cooking liquid needs its own attention. Remove excess fat, reduce it if it tastes thin, brighten it with fresh lime, and return only enough finished juice to leave the shredded beef glossy and succulent.
The finished beef should taste beefy first, smoky next, with a clean tang from vinegar and lime and quiet warmth from cumin and clove underneath.
If you are cooking now: for 4 lb / 1.8 kg chuck, cook on LOW for 8–10 hours and start checking at 8. Keep the beef in large 3–4 inch / 7.5–10 cm pieces, and use probe tenderness rather than the clock as the final test. Once the chuck gives way easily, shred it separately, finish the cooking liquid, then add the finished juices back a little at a time.
Slow Cooker Beef Barbacoa Recipe
Chuck keeps the main method straightforward: browned beef, a smoky chipotle sauce, relatively little added stock and a long covered cook. The slow cooker traps steam, so the beef and onion will create considerably more liquid as they cook.
Recipe at a Glance
| Beef | 4 lb / 1.8 kg boneless chuck roast |
|---|---|
| Slow cooker | 6–7 qt / 5.7–6.6 L |
| Prep | 25–30 minutes |
| LOW | Start checking at 8 hours; expect 8–10 hours |
| HIGH | Start checking at 5 hours; expect 5–7 hours |
| Finish | 15–25 minutes, depending on whether the cooking liquid needs reducing |
| Total on LOW | 9–11 hours, depending on the beef and cooker |
| Yield | 20–24 small tacos; 7–9 hearty servings, or 10–12 with substantial sides |
| Look for | Beef pulls easily; finished juices cling to the strands without pooling underneath |
Equipment
- 6–7 qt / 5.7–6.6 L slow cooker or Crock-Pot
- 12-inch / 30-cm heavy skillet, if searing
- Blender or food processor
- Small saucepan for reducing the cooking liquid, if needed
- Instant-read thermometer or thin probe, optional
Ingredients
- 4 lb / 1.8 kg well-marbled boneless chuck roast
- 12 g fine sea salt, about 2 tsp, plus more at the end only if needed
- 1 tsp / about 2 g freshly ground black pepper
- 1½–2 tbsp / 22–30 ml neutral high-heat oil, for searing
- 1 medium white or yellow onion, roughly chopped, about 5–6 oz / 150–180 g
- 5–6 large garlic cloves, about 20–25 g
- 3 individual canned chipotle peppers in adobo
- 1 tbsp / 15 ml adobo sauce from the can
- ¾ cup / 180 ml low-sodium beef stock
- 3 tbsp / 45 ml apple cider vinegar
- 3 tbsp / 45 ml fresh lime juice, divided, plus lime wedges for serving
- 1 tbsp / about 6 g ground cumin
- 2 tsp / about 2 g Mexican oregano
- ¼ tsp / about 0.5 g ground clove
- 3 bay leaves
For Serving
- Warm homemade corn tortillas
- Finely diced white onion
- Chopped fresh cilantro
- Fresh lime wedges
- Your favorite salsa
Before You Start: Chipotles, Clove and Lime
Chipotles: three individual peppers means three peppers, not the whole can. Measure the tablespoon of adobo sauce separately.

Clove: ¼ teaspoon should stay in the background. The beef ought to taste like beef and chile first.
Lime: 2 tbsp / 30 ml cooks with the beef. Keep the remaining 1 tbsp / 15 ml fresh for the finished juices.
Method
1. Keep the Chuck in Large Pieces
Pat the chuck dry. Trim away thick, hard slabs of exterior fat, but leave the marbling running through the meat. Cut the roast into 3–4 inch / 7.5–10 cm pieces.
Small stew-size cubes expose far more surface during a long cook and give you finer shreds at the end. Large pieces are more forgiving and produce broader, juicier strands.

Season all over with the salt and black pepper.
2. Brown Without Crowding the Pan
Heat a 12-inch / 30-cm heavy skillet over medium-high heat and add enough oil to leave a thin film across the base.
Add only as many beef pieces as will sit comfortably without touching. The pan should sound lively as the beef goes down. Leave each broad surface against the heat until deep brown patches develop and the smell turns noticeably more roasted, then turn.
Watery liquid gathering around pale-gray meat means the pan is crowded. Pull a piece or two out and let the heat recover, then move the browned beef into the slow cooker.

Skipping the sear? Put the seasoned beef straight into the slow cooker. Skip the deglazing step too and add the full ¾ cup / 180 ml stock directly to the blender. You lose some browned flavor, but the beef can still become beautifully tender.
3. Deglaze the Pan
Once the last batch is out, lower the heat slightly and pour roughly half of the stock into the skillet. Scrape until the browned fond loosens into the liquid.
Pour the deglazing liquid into the blender and add the remaining stock. Let it cool for a few minutes first if your blender is not rated for hot liquids.
4. Blend the Chipotle Sauce
Add the onion, garlic, chipotle peppers, measured adobo sauce, apple cider vinegar, 2 tbsp / 30 ml lime juice, cumin, Mexican oregano and clove.
Blend until the onion and chiles are broken down and the chipotle sauce looks reasonably smooth. A perfectly strained puree is unnecessary; the goal is simply to distribute the chile, aromatics and spices evenly around the beef.
5. Load the Slow Cooker
Pour the chipotle sauce over and around the beef, add the bay leaves, and turn the pieces once so the sauce reaches their surfaces.
The meat may look surprisingly exposed at first. Leave it alone. The chuck and onion will release plenty of moisture as they cook, and the liquid level will rise without needing to submerge the beef at the start.

6. Cook Until the Beef Stops Fighting the Probe
Cook on LOW and begin checking at 8 hours. Some roasts will be ready then; others will still feel firm at nine. Expect 8–10 hours, with variation from one roast and slow cooker to another.
On HIGH, begin checking at 5 hours and expect 5–7 hours. HIGH can work well, although differences in cooker temperature and piece size matter more when the cook moves faster.
Push a fork, skewer or thin probe into one of the thickest pieces. Ready beef gives very little resistance and begins to separate under gentle pressure.

Eight hours can feel like a very long time to lift the lid and find beef that still refuses to shred. Moist, firm chuck usually needs more tenderizing time, not harder pulling. Cover it again, give it another 30–45 minutes, and check once more.
When the beef is getting close, the sharp smell of the raw chile mixture should have mellowed into something deeper and more beef-forward. The probe still decides the finish, but that change in aroma is a good sign that the long cook is doing its work.
Still unsure about doneness? See how to read the beef from tight to pull-apart →
7. Pull the Beef Gently
Transfer the tender chuck to a wide tray or bowl and discard the bay leaves.
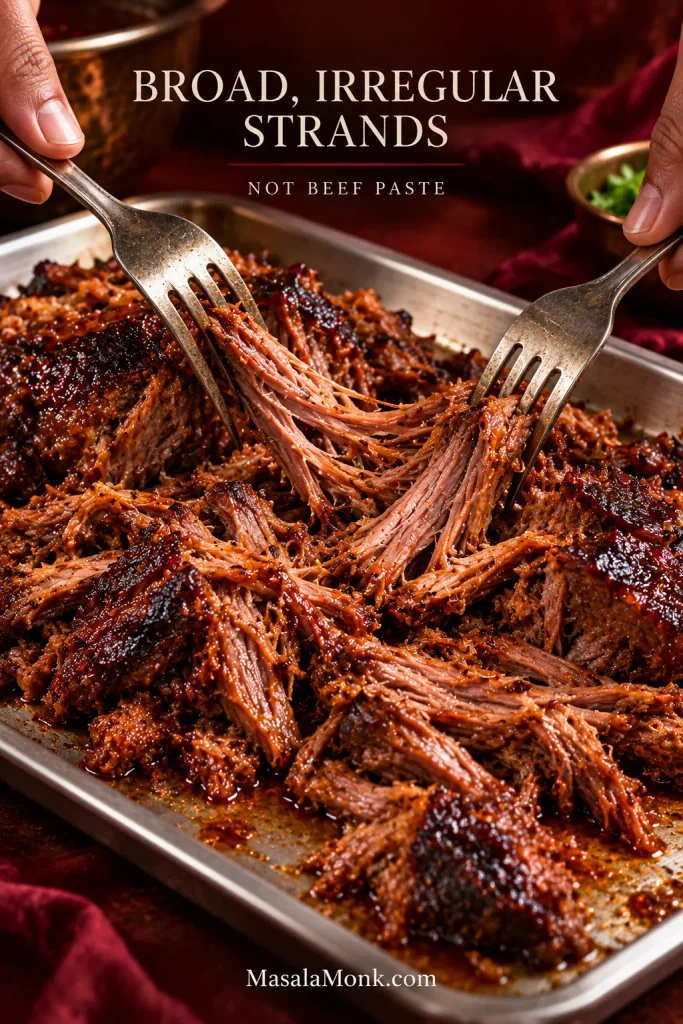
Once the meat is cool enough to handle safely, pull it into irregular strands with two forks or clean hands. Leave a few succulent small chunks among the shreds and discard any large pieces of hard fat or connective tissue that stayed firm.
A hand mixer can take very soft meat from chunky to paste surprisingly quickly. Forks or fingers give you far more control.
8. Finish the Cooking Liquid
Remove excess fat first, then taste the cooking liquid. If it tastes thin or watery, reduce it; if it is already concentrated, leave the volume alone. Add the reserved lime, check the seasoning, then return only enough finished juice to coat the shredded beef.
When the meat comes out, the cooking liquid may look thinner and much fattier than the chipotle sauce you started with. That does not mean anything has gone wrong. The roast has released water and fat during the long cook. Now you decide what is worth putting back.
Let a noticeable layer of rendered beef fat separate, then skim it with a spoon or use a fat separator. Do this before reducing the liquid; otherwise, you concentrate the grease along with the good flavors.

Reduce, Brighten and Return the Juices
Taste what remains. When it already tastes concentrated, leave the volume alone. If it tastes like good but thin broth, transfer it to a saucepan and boil until the flavor deepens and the liquid lightly coats a spoon. You are not trying to make gravy.
Stir in the reserved 1 tbsp / 15 ml fresh lime juice, taste again, and adjust the salt only after the reduction is finished. Salt becomes more concentrated as water evaporates.
Ladle the finished juices over the shredded beef a little at a time, tossing gently between additions. Stop when the strands are glossy and juicy with no puddle underneath.

If the strands stay broad, glossy and moist at this point, you are done fussing with them.
Taste a piece before any tortilla, salsa or garnish gets involved. The beef should feel succulent rather than greasy, with smoke up front, warm spice underneath and enough lime to keep the next bite appealing instead of heavy.
Serve once the balance tastes right. If the tortillas or toppings still need a few minutes, leave the beef sitting in those finished juices until you’re ready to eat.
Need a fix? Jump to tough, dry, watery or greasy barbacoa → Ready to eat? Build the first taco →
Scaling the Batch
Scale the seasonings and aromatics roughly with the amount of beef. Be more cautious with the stock. Slow-cooker liquid does not scale neatly in a straight line because cooker shape, headspace and moisture released by the meat all change the result.
The chipotle sauce should reach around the beef without needing to submerge it. A larger batch also needs room below the lid; if doubling crowds the cooker, split the recipe between two rather than simply doubling everything in the same pot.

Feeding more people? See how much cooked barbacoa to plan for →
Need More Help With the Barbacoa?
At this point, the beef is glossy, balanced and ready for tortillas. The sections below cover the questions that tend to come next. Choose another cut, fix a problem, adapt the method, or plan how to serve, store and reheat the beef.
What Meat Is Best for Barbacoa?
For this slow-cooker version, chuck roast is the best all-around choice. Choose beef cheek when you specifically want a softer, stickier and more gelatinous texture.
Well-marbled chuck carries plenty of beef flavor, enough collagen for a long cook and enough internal fat to stay succulent. It is also easy to buy in a predictable quantity.
Beef cheek, or cachete, is different. Tender cheeks can feel stickier, softer and more gelatinous than chuck because they contain so much connective tissue. For someone expecting broad shredded-beef fibers, that texture can be surprising. To someone who knows barbacoa as cachete, it may be exactly the point.

Untrimmed cheeks can also lose a surprising amount of package weight to hard fat, glands and tough exterior material. Trim what clearly will not become pleasant to eat, but leave the softer connective seams that can melt during the cook.
Brisket and Other Alternatives
Buying brisket specifically for this? Choose a well-marbled brisket point rather than a lean flat. Boneless short ribs also cook beautifully, although they are an expensive way to fill a taco.
| Cut | Texture | How it fits here |
|---|---|---|
| Chuck roast | Beefy, juicy, pull-apart | Best everyday choice |
| Beef cheek / cachete | Collagen-rich, sticky, gelatinous | Excellent if you want that cachete texture |
| Brisket point | Well-marbled and shreddable | Good alternative |
| Brisket flat | Leaner | Higher drying risk |
| Boneless short rib | Well-marbled and tender | Excellent but expensive |
| Round / very lean rump | Lean, less forgiving | Not the first choice for this long cook |
| Tongue / head meat | Distinct texture and preparation | Important to some traditions, but not a direct chuck substitution |
In the cooker, the package label matters less than what the meat feels like when you test it.
Read the Beef: From Tight to Pull-Apart
The clock gets you into the right part of the cook. Resistance tells you whether dinner is actually ready.
Tight: the probe meets obvious resistance and the beef still wants to slice cleanly. It may look completely cooked through, yet still be far too firm to shred.
Almost there: the outer layers begin to flake while the center still feels firm. This is the point where a long-cooked roast can look frustratingly close. Moist chuck in this state usually needs more time.
Ready: a thin probe glides through with very little pressure and gentle fork movement opens the meat into broad, moist fibers. Pull it from the cooker once it reaches this stage.
Do not chase the thermometer. As a secondary reference, collagen-rich chuck often becomes shreddable somewhere around 195–205°F / 91–96°C. That is a tenderness range, not a minimum safe temperature for beef. The number tells you the meat is in the right neighborhood; the probe tells you whether the connective tissue has softened enough.
Slow Cooker Barbacoa: LOW or HIGH?
LOW: 8–10 hours, checking from 8. HIGH: 5–7 hours, checking from 5. LOW gives large pieces of chuck a more forgiving window; HIGH still works, but differences in cooker temperature and piece size matter more.
The WARM setting is for holding cooked food, not for cooking raw beef.
Control the Chipotle Heat
Three chipotles let the smoke lead without turning the whole pot into a heat challenge. For a gentler batch, use 1–2 peppers. Four or more push the chile itself further forward, although cans can vary more than you might expect.
Once you know how hot your preferred brand runs, the next batch becomes easy to tune. Texture problems take a little more diagnosis.
Fix Tough, Dry, Watery or Greasy Barbacoa
The first question is whether the beef is still moist or has already become dry. Those two textures need very different fixes.

| What you see | What may be happening | What to do |
|---|---|---|
| Chuck is still moist but tough | It usually needs more tenderizing time | Cover and continue 30–45 minutes, then test again |
| Beef is dry and stringy | Lean cut, small pieces, hot cooker or too much time after tenderness | Moisten with finished juices; use fattier chuck and larger pieces next time |
| Cooking liquid is watery | The covered cooker retained released moisture | Remove the meat and reduce the defatted liquid |
| Cooking liquid is greasy | Too much rendered fat remains | Skim or separate the fat before any reduction |
| Finished beef tastes flat | Juices may be dilute, under-salted or short on fresh acidity | Reduce first, then adjust salt and lime |
| Barbacoa is too spicy | Too many chipotles or a particularly hot can | Serve with tortillas and fresh toppings; reduce the pepper count next time |
| Tacos become soggy | Too much loose liquid is coming with the meat | Use coated beef rather than spoonfuls of broth |
Using beef cheek? A sticky, gelatinous texture can be completely normal because its abundant connective tissue converts to gelatin during the long cook. Mushy cheek is different: very soft meat can lose its texture when it cooks too far or is worked too aggressively while shredding.
My Chuck Has Cooked for Hours and Is Still Tough
Still moist and tough after 8–9 hours? Give it another 30–45 minutes and test again. Once the connective tissue has had enough time to soften, the change can happen quickly.
Dry, fine, stringy beef is different. More cooking will not restore moisture already lost. Use some of the finished juices to help the current batch, then choose a fattier cut or larger pieces next time.
Trouble with the cooking liquid instead? Back to finishing the juices ↑
Dutch Oven and Instant Pot Barbacoa
The slow cooker is the main method here. A Dutch oven loses more moisture as it cooks, while a pressure cooker needs substantially more thin liquid to build pressure safely. Those differences matter more than simply converting the clock.

Dutch Oven
Cook the barbacoa covered at 325°F / 165°C for 3½–4 hours, beginning the tenderness checks at 3½ hours.
Brown the beef and prepare the chipotle sauce as written, then combine everything in a heavy Dutch oven with a tight-fitting lid. A genuinely dry pot late in the cook only needs a small splash of stock. Use the same probe-tender endpoint as the slow-cooker recipe.
Instant Pot / Electric Pressure Cooker
For a 6-quart Instant Pot, use at least 375 ml of thin cooking liquid—just over 1½ US cups. Cook the large chuck pieces for 60 minutes on HIGH PRESSURE, followed by a 10–15 minute natural release. Follow your own model’s minimum-liquid requirement if it differs.
When browning with the sauté function, scrape the base completely clean during deglazing. Add the thin liquid first, followed by the beef and blended chipotle sauce, so a thick mixture is not sitting directly against browned residue on the bottom.
After the natural release, check one of the thickest pieces. If it still feels firm, give the beef another short pressure cycle. Because this method begins with more liquid than the slow-cooker version, expect to reduce more of the cooking liquid before turning it into finished juices.
Prefer the slow cooker? Back to the main recipe ↑
Build Better Barbacoa Tacos
Warm a corn tortilla until it is soft and pliable, smells toasted and develops a few light brown spots from the hot pan. Add a controlled mound of steaming barbacoa, then finish with finely diced white onion, cilantro, fresh lime and salsa.
A bright roasted salsa verde works especially well because tomatillo acidity and green chile cut through the richness of the beef. Fresh onion, herbs and lime do the same job, especially with gelatin-rich cachete.
The beef should be coated, not dripping. If juice reaches your wrist before the first bite reaches your mouth, use a little less on the next tortilla.

A Few Browned Edges
For extra contrast, spread a portion of lightly sauced beef over a sheet pan and place it briefly under a hot broiler. Stop once a few exposed edges brown while most of the meat remains juicy. If the surface needs it, return a little finished juice afterward.
Match the Juices to What You Are Making
A rice bowl can carry more of the finished juices, especially with something fresh alongside it; mango salsa gives the smoky beef a sweet, bright counterpoint. Burritos need less loose moisture so the tortilla stays easy to roll. Quesadillas need the driest filling of the three so the tortilla can crisp rather than steam.
Serving a group? Check the taco and per-person portions →
How Much Beef to Plan For
Plan on about 2 oz / 55 g cooked barbacoa per small taco. With substantial sides, allow about 4 oz / 115 g per person. For a beef-forward bowl or main course, plan on 5–6 oz / 140–170 g.

A 4 lb / 1.8 kg chuck roast commonly finishes with 2½–3 lb / 1.1–1.35 kg shredded beef. The exact yield depends on the roast and how much exterior fat is trimmed away. At 2 oz / 55 g each, that gives you 20–24 small tacos.
In practice, this batch makes 7–9 hearty servings, or 10–12 when the table also has rice, tortillas, creamy refried beans and other substantial sides.
Cooking for later? See how to make ahead, store and reheat the barbacoa →
Ingredient Swaps That Actually Work
No chipotles in adobo? Start with 1½ tsp chipotle powder + 1 tsp smoked paprika for this batch. This is a workable smoky-heat substitute, not a direct replacement for the flavor or body of canned chipotles in adobo. Ground chipotle varies in strength, so taste cautiously.

No Mexican oregano? Use the same amount of ordinary dried oregano. For the vinegar, white wine vinegar or distilled white vinegar can stand in for apple cider vinegar. An especially sharp substitute may need a little less, so adjust after the cooking liquid has been reduced.
Beer works in the slow cooker or Dutch oven. Replace the ¾ cup / 180 ml stock with the same amount of a modestly malty lager or darker beer rather than something aggressively bitter. For the pressure-cooker version, keep the total thin cooking liquid at or above the minimum required by your machine.
Make Ahead, Store and Reheat Barbacoa
Barbacoa is a particularly good make-ahead dish. For a taco bar or dinner the next day, cook it ahead, chill it with some of the finished juices, then reheat gently before serving.

Cool cooked barbacoa promptly in shallow containers and refrigerate it within 2 hours. When the surrounding temperature is above 90°F / 32°C, shorten that window to 1 hour.
Keep refrigerated leftovers for 3–4 days and reheat them with some reserved juices until they reach 165°F / 74°C.
For the best texture, use frozen cooked barbacoa within 2–3 months. Freeze meal-size portions with some of the finished juices, thaw them in the refrigerator, and restore moisture gradually during reheating.
Reheated and ready to serve? Back to building the tacos ↑
A Few Barbacoa Questions
1. Can I Put Frozen Beef Directly in the Slow Cooker?
Thaw it first. A slow cooker heats gradually, so raw beef should be thawed before it goes into the cooker. The USDA’s slow-cooker food-safety guidance recommends starting with thawed meat rather than frozen.
2. What Is the Difference Between Barbacoa and Birria?
Barbacoa and birria are related but distinct Mexican cooking traditions. The broader barbacoa family includes regional slow-cooked-meat preparations, while birria is especially associated with Jalisco and commonly uses a chile-rich adobo or braising mixture. Modern beef birria tacos and beef barbacoa tacos can look similar online, but the names are not interchangeable.
3. What Is the Difference Between Barbacoa and Carnitas?
Carnitas is generally a pork preparation cooked until tender in its own fat or added fat, often with crisp browned edges at the finish. Barbacoa can involve several meats and regional cooking traditions; the slow-cooker beef here cooks in a chile-seasoned moist environment. Briefly broiling a portion for browned edges does not make it carnitas.
4. What Should I Do With Leftover Chipotles in Adobo?
Freeze the remaining peppers and sauce in small portions. Tablespoon-size portions are convenient because the next recipe may need only one pepper or a spoonful of adobo.
Barbacoa Changes From Place to Place
The chuck-and-chipotle method above sits inside a much larger family of barbacoa traditions.
In central Mexico, one famous traditional barbacoa de borrego method slowly cooks lamb in an earth pit wrapped with maguey leaves.
Elsewhere, barbacoa may center on other meats and cuts, including beef head and cheek. Dried chiles may matter much more than they do here, while some preparations keep the seasoning comparatively simple and serve flavorful broth alongside the meat.
Someone who grew up with sticky, gelatin-rich beef-cheek barbacoa may barely recognize the loose strands of a chuck version. A diner whose reference point is smoky restaurant-style shredded beef may have the opposite reaction. Both expectations come from somewhere.
Those differences are part of the food’s history, not defects to be corrected into one universal recipe.
Once the chuck pulls apart easily and the finished juices cling to the strands, the hard part is over. Warm the tortillas until they smell toasted, pile on the beef, then add onion, cilantro, lime and salsa. The first taco should be messy enough to need both hands, but not wet enough to fall apart before you get there.









