Posted on — Leave a comment

Roasted Potatoes Recipe: Crispy, Golden & Easy in the Oven

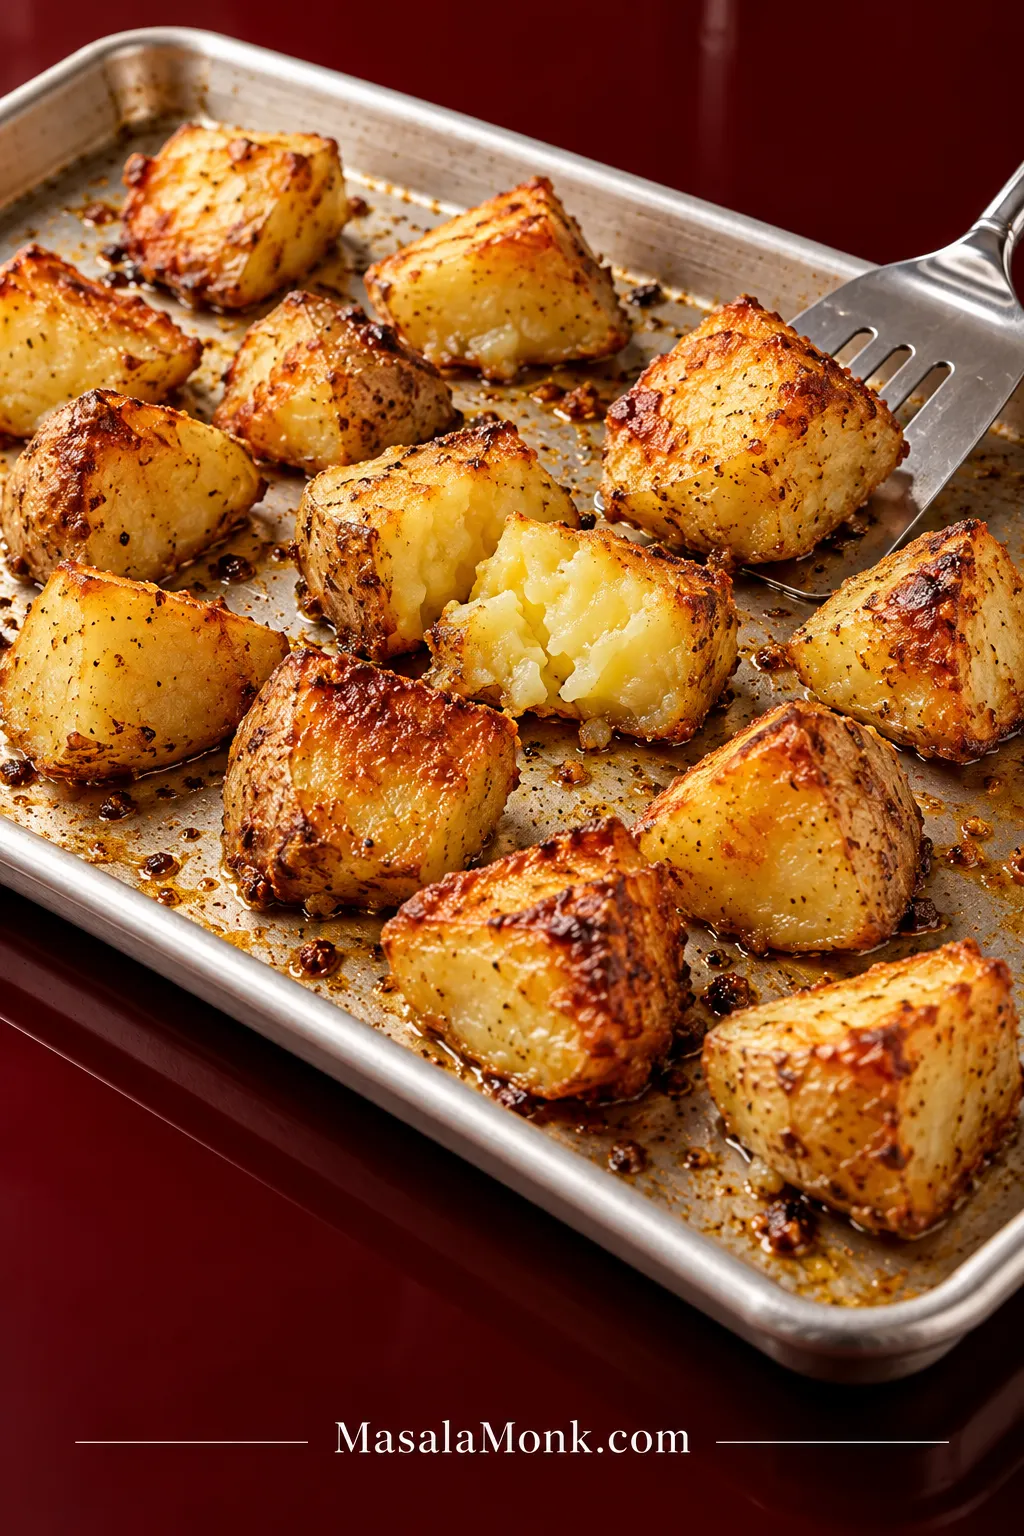
Golden roasted Yukon Gold potato chunks on a metal sheet pan with browned flat sides, crisp edges, and one opened to show its creamy yellow center.

Roasted potatoes should have deeply browned pan-side faces, crisp ragged edges and completely tender centers. Yet a tray can spend 40 minutes in a hot oven and still turn out pale and soft—or develop a promising crust that tears away the moment you try to turn it.

The fix starts before roasting. A short parboil gives the potatoes a head start, then they are drained, dried and gently roughed up before they meet a hot metal pan. That leaves a drier, more irregular surface for the oven to brown without relying on soaking, starch coatings or baking soda.

Roasted Potatoes at a Glance
Potato
2 lb / 900 g Yukon Gold

Cut
About 1½ inches / 4 cm

Drying cue
Surface looks matte, not wet

First turn
When the underside is deeply golden and releasing

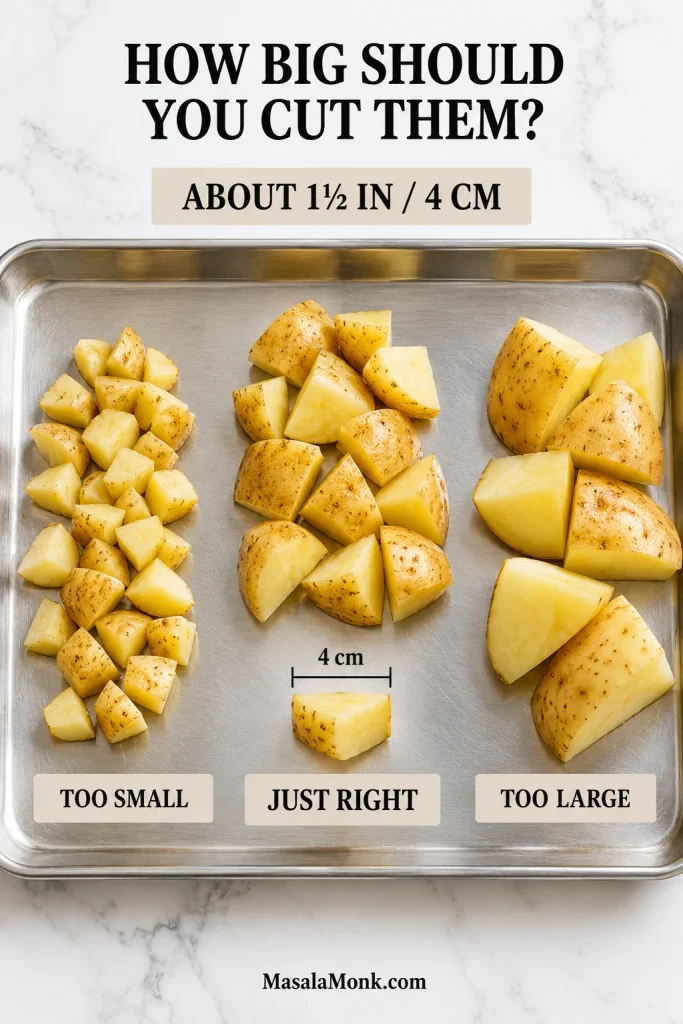
Raw Yukon Gold potato chunks arranged as too small, about 4 cm, and too large, with a 4-centimeter measurement guide.
The 1½-inch / 4 cm target is really about keeping the whole batch on one clock. Smaller potato chunks lose their creamy center sooner, while oversized pieces can lag behind even when the outside looks browned.

Crispy Oven Roasted Potatoes

Once the potatoes are on the hot tray, most of the oven time is hands-off.

Prep
15 minutes

Parboil
7–9 min after boil returns

Roast
40–50 minutes

Total
70–80 minutes

Serves
6 as a side

Oven
425°F / 220°C

Ingredients

  • 2 lb / 900 g Yukon Gold potatoes, scrubbed and cut into roughly 1½-inch / 4 cm pieces
  • 2½ qt / 2.4 L water, or enough to cover the potatoes by about 1 inch / 2.5 cm
  • 15 g fine sea salt, roughly 2½ teaspoons, for the parboiling water. If substituting kosher salt, use the gram weight because crystal size varies.
  • 3 tablespoons / 45 ml olive oil or a neutral high-heat oil
  • 4 g fine sea salt, roughly ⅔ teaspoon, for seasoning
  • 1 teaspoon / about 3 g garlic powder
  • ½ teaspoon / about 1 g freshly ground black pepper
  • 2 tablespoons chopped parsley, optional, for finishing

Method

Prep and Parboil

  1. Heat the oven and pan. Set a conventional oven to 425°F / 220°C. Put a sturdy, preferably light-colored rimmed metal half-sheet pan on the center rack while the oven heats. A standard half sheet is about 13 × 18 inches / 33 × 46 cm. Use metal for this preheated-pan method, not glass or ceramic. For a fan or convection oven, start around 400°F / 205°C.
  2. Start the water. Bring the water and 15 g salt to a steady boil in a large pot while you cut the potatoes.
  3. Cut the potatoes evenly. Aim for pieces around 1½ inches / 4 cm across. Don’t worry about perfect cubes. Similar-sized pieces matter more, and a few broad flat faces actually help the potatoes brown against the pan.
  4. Parboil just far enough. Add the potatoes to the boiling water. Once the water returns to a steady boil, start checking at 6–7 minutes. Most batches will need 7–9 minutes. The outside should be soft enough to scuff up, while each chunk still lifts from the water intact.
  5. Drain and steam-dry. Drain thoroughly in a colander and leave the potatoes uncovered for 3–5 minutes. Give the colander a gentle shake once or twice. The wet shine should disappear as the steam escapes.

Roughen and Roast

  1. Roughen, then season. Return the potatoes to the warm dry pot and toss gently several times. Stop when the edges look fuzzy and uneven but the chunks are still holding together. A few ragged corners are fine; you just don’t want whole pieces collapsing. Add the 3 tablespoons / 45 ml oil, 4 g fine sea salt, garlic powder and black pepper, then toss just enough to coat them.
  2. Transfer to the hot pan. Carefully remove the preheated sheet pan and set it on a heat-safe surface. Tip the potatoes onto the dry hot metal. A light sizzle is a good sign. Spread them out with visible space between most pieces, putting a broad flat face against the pan wherever you can.
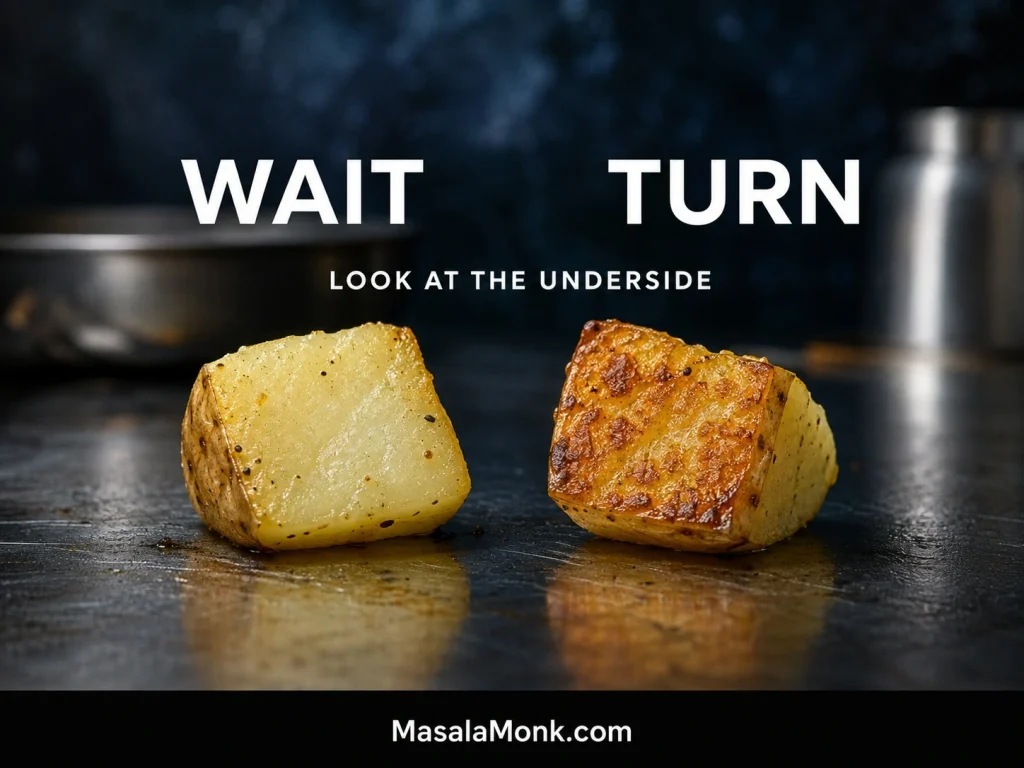
  3. Let the first side brown. Roast for 20–25 minutes before the first proper turn. Test one potato before moving the whole tray. A deeply golden underside that releases without much resistance is ready to turn. If the test potato is still firmly stuck, give it another few minutes. Don’t force it.
  4. Finish roasting. Roast for another 15–25 minutes, with most batches landing around 40–50 minutes total. Turn especially pale pieces toward the pan. Don’t stop at pale yellow-gold. Several faces should be deep golden to brown, the ragged corners should feel crisp, and a potato split open should be steaming and completely tender in the middle.
  5. Serve while the edges are crisp. Taste for salt, add the parsley if using and get the potatoes to the table soon after roasting. Avoid tightly covering the tray because trapped steam softens the exterior.

What Crispy Roasted Potatoes Should Look Like

A finished potato should split without resistance and stay creamy inside, with the strongest browning on the faces that touched the hot pan. Lighter upper surfaces are normal; the goal is contrast, not a uniformly hard shell.
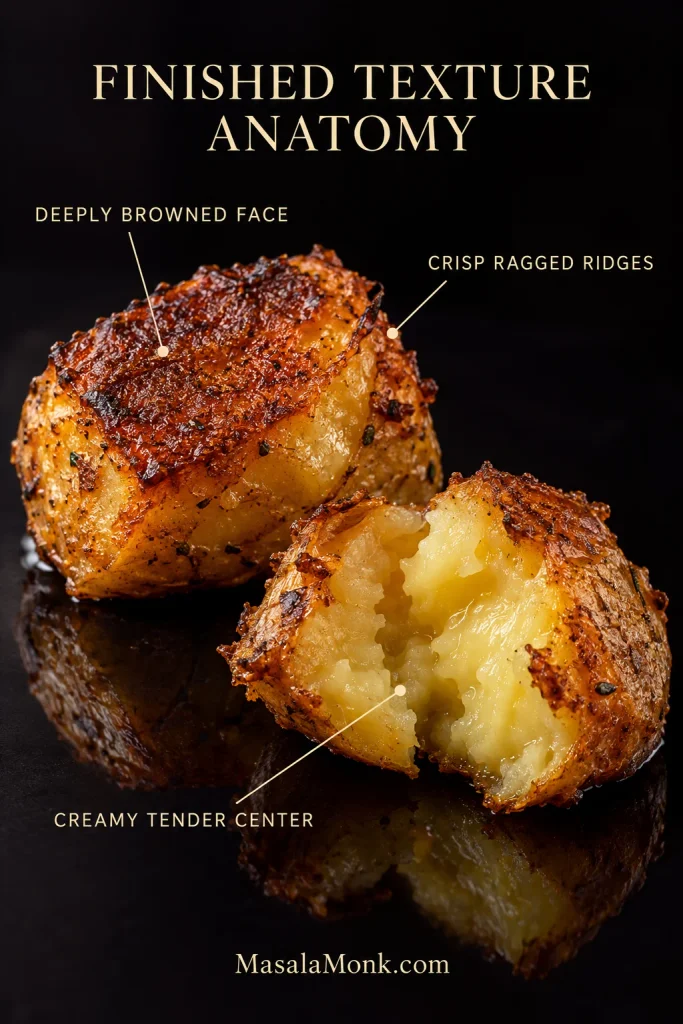
Close-up of roasted Yukon Gold potato chunks showing a deeply browned face, crisp ragged ridges, and a creamy yellow center.
The split center is a useful doneness check: crisp edges are not enough if the middle still resists a knife. Properly roasted Yukon Golds stay creamy inside beneath a thin browned crust.

The Crust Starts Before the Oven

Parboil Until the Chunks Still Hold Together

The short parboil softens the potato’s outer layer before the center is fully cooked. That softened surface scuffs into little ridges in the pot, and those ridges later crisp in the oven. Chunks already crumbling in the colander have gone farther than they need to.
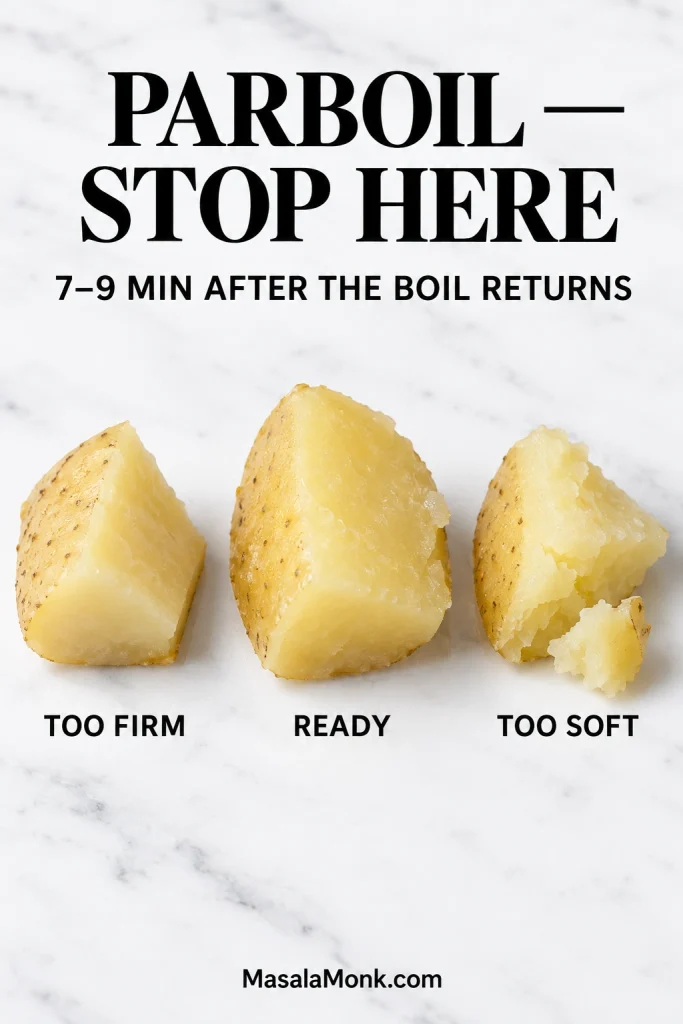
Three parboiled Yukon Gold potato chunks showing a firm smooth stage, the ready softened stage, and an over-softened chunk beginning to crumble.
Stop while the pieces still have enough structure for roughening and transfer. Too firm resists scuffing; too soft tends to crumble before it ever reaches the tray.

Let the Surface Turn Matte

Drying clears away surface water that would otherwise have to evaporate in the oven before browning can get properly underway.
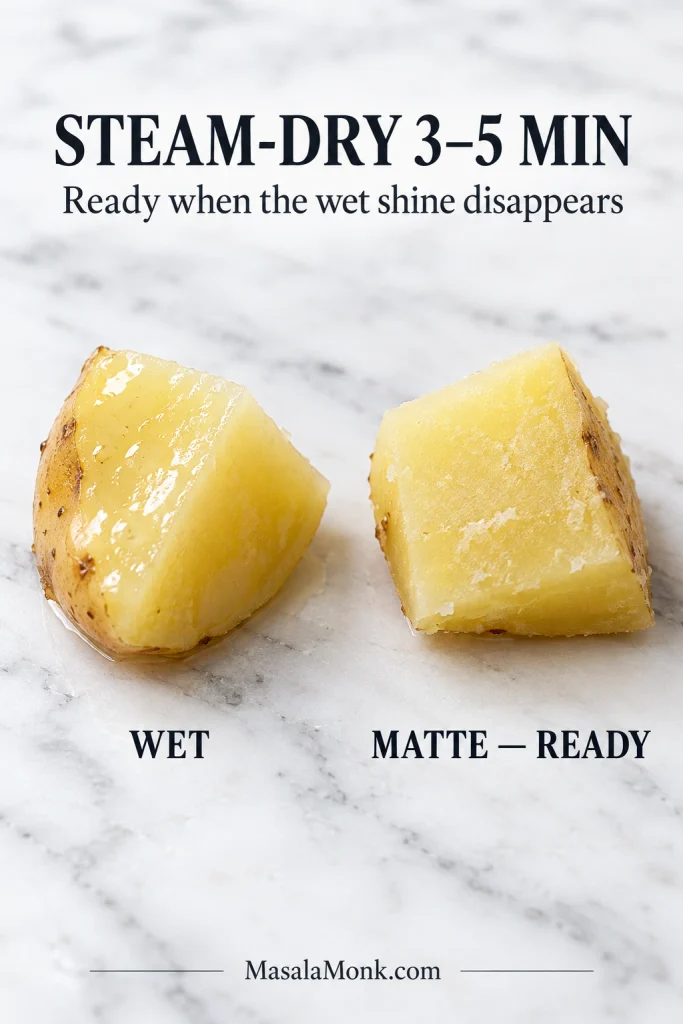
Two parboiled potato chunks side by side, one glossy with surface water and one dry with a matte surface.
Matte does not mean bone-dry. You only need the free surface water gone; once the shine disappears, the potatoes are dry enough to roughen and coat with oil.

Roughen Without Breaking the Potatoes

Once the wet shine disappears, a few gentle tosses create more irregular surface for the oil and heat to work on.
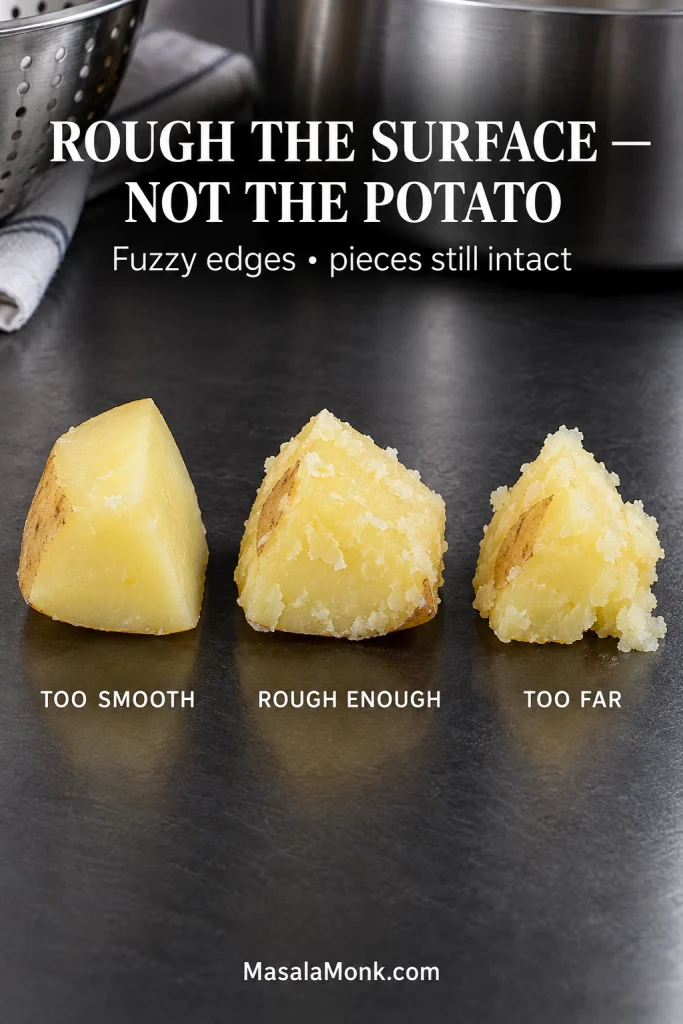
Three pale parboiled potato chunks showing a smooth surface, properly scuffed starchy ridges, and an over-roughened chunk beginning to break apart.
Look for roughness on the exposed potato flesh, not a powdery coating. The scuffed starch should form shallow ridges while the chunk itself still feels sturdy enough to handle.

On the tray, broad flat faces touching hot metal brown fastest, while gaps between the pieces give released moisture somewhere to escape. That is why good contact, visible space and leaving the first side alone matter as much as the oven temperature.

Back to the recipe

Choose the Potato for the Texture You Want

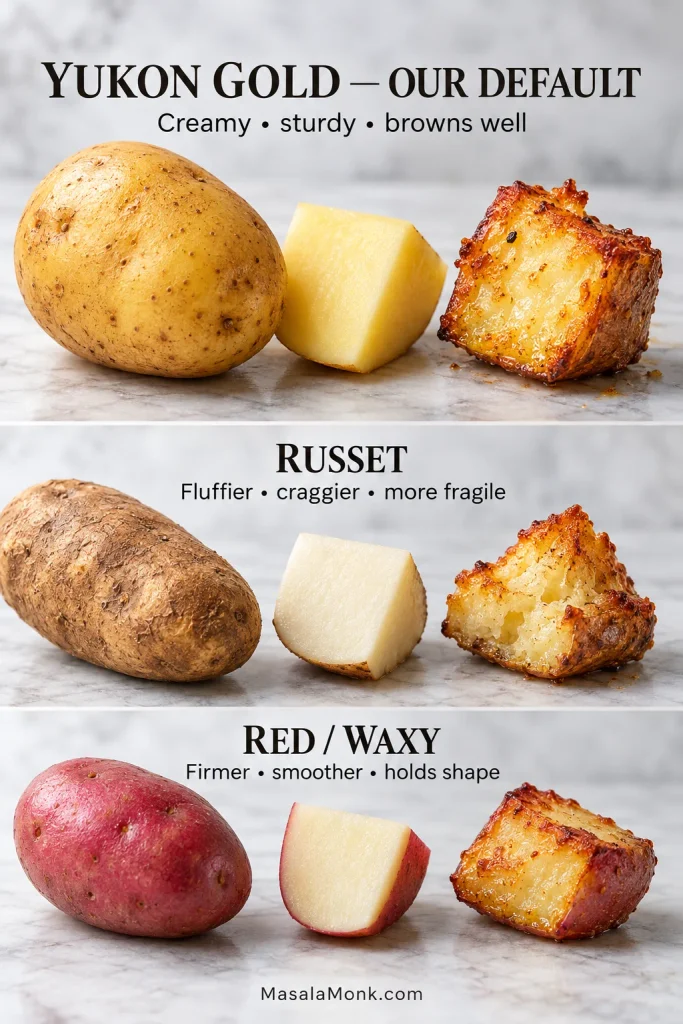
For this recipe, Yukon Gold is the best all-around choice. The edges soften enough to become nicely textured in the pot, but the pieces usually stay sturdy enough to survive draining and tossing. Inside, they stay creamy and tender, while the scuffed edges brown into thin crisp ridges.

Potato Result
Yukon Gold Creamy, tender center with good browning and enough structure for parboiling and roughening.
Russet Fluffier middle and a rougher, more craggy exterior. Handle gently after boiling because the pieces break more easily.
Red and other waxy potatoes, including many baby potatoes Firm, creamy centers and excellent shape retention. They usually stay smoother outside and less fluffy within.
Whole, cut, and roasted Yukon Gold, Russet, and red waxy potatoes compared for skin, flesh color, and roasted texture.
Yukon Gold is the most forgiving fit for this method because it roughens without becoming fragile as quickly as a Russet. Red and other waxy potatoes hold together easily, but their surfaces usually stay smoother.

No, you don’t need to peel Yukon Golds. Their thin skins can stay on after a good scrub. Russets can stay skin-on too, although peeling exposes more of their starchy flesh to the roughening and roasting.

If you are after one whole Russet with crisp skin and a loose, fluffy middle instead of roasted chunks, the Baked Potato Recipe is the better fit.

Roasting Potatoes at 400°F, 425°F or 450°F

For the 1½-inch / 4 cm parboiled Yukon Gold pieces in this recipe, 425°F / 220°C is the default and usually takes 40–50 minutes. It gives the textured outside strong browning without making the smallest corners race too far ahead of the center.

Oven setting What to expect
400°F / 205°C conventional Browning develops more slowly. Expect to give the potatoes longer than the 425°F version and judge the finish by deep color, crisp edges and a tender center.
425°F / 220°C conventional Usually 40–50 minutes for the parboiled 1½-inch pieces used here.
450°F / 230°C conventional The outside colors more quickly, so begin checking the pan-side faces and smaller corners earlier. Pull the potatoes when they are deeply browned and tender rather than forcing them to match the 425°F clock.
400°F / 205°C convection/fan Moving hot air speeds surface browning. Begin checking earlier than you would at the same temperature in a conventional oven.

Potato size, variety, pan material and the way an oven cycles all change the pace of browning. The visual and texture cues matter more than trying to convert every oven setting minute for minute.

If the timing looks right but the tray is still pale or soft, jump to troubleshooting.

What You Can Change — and What You Can Skip

Bare Metal or Parchment?

For the strongest browning, use bare preheated metal. Parchment makes release and cleanup easier, though the pan-side faces may brown a little less aggressively.

With parchment, preheat the metal pan bare and add the paper only when the potatoes are ready to go on. Check the package first; parchment rated for 425°F / 220°C may not be rated for 450°F / 230°C.
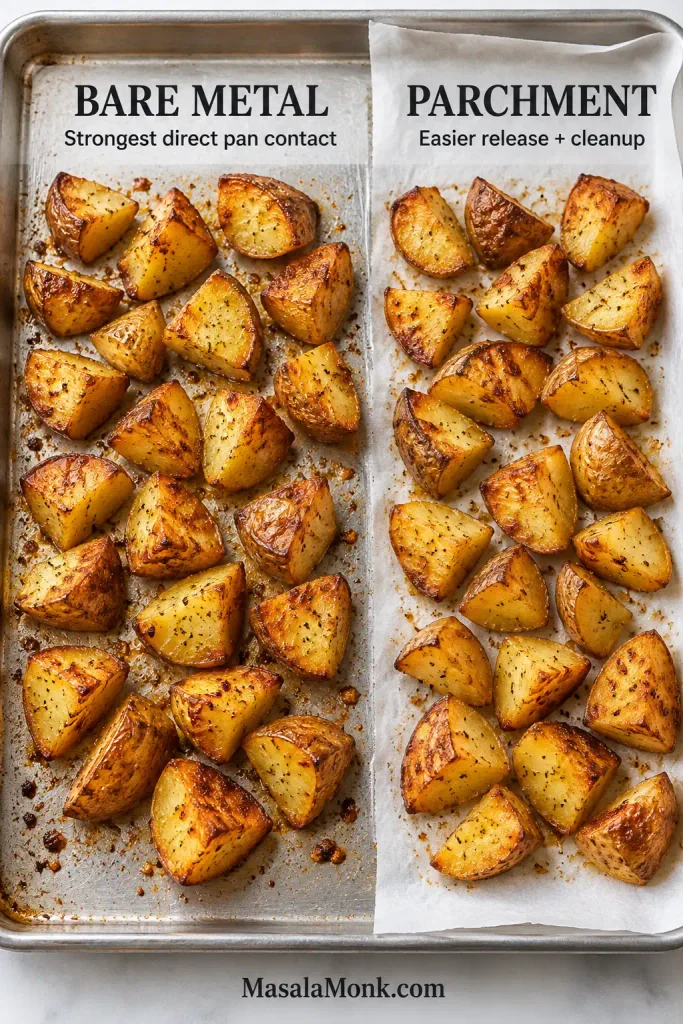
Roasted potato chunks shown directly on a bare metal sheet pan beside similar potatoes resting on parchment paper.
Whether you use bare metal or parchment, orientation still matters: put a broad cut face down. More flat contact gives the potato a better opportunity to brown than balancing a rounded side against the pan.

Do You Need to Soak the Potatoes or Add Baking Soda?

No, you don’t need a separate soak here. The parboil already softens the surface we want to rough up, so cold-water soaking adds time we don’t need for this method.

Baking soda can make the edges rougher and crispier, but it isn’t necessary here. A small measured amount in the boiling water makes the outside break down more aggressively, which can produce an especially craggy crust. It also makes the pieces easier to over-soften and can taste alkaline if overused. Serious Eats has a useful explanation of what alkaline water changes. For an everyday tray, salted water leaves more room for error.

Can You Skip the Parboil?

Yes—cut Yukon Golds to about 1 inch / 2.5 cm and roast them raw at 425°F / 220°C if you’d rather skip the extra pot. Dry them thoroughly, coat them with oil and seasonings, give them plenty of room on the pan and put broad cut faces against the metal.

Begin checking at 30 minutes. Most 1-inch pieces will need 35–45 minutes total, depending on the potato and pan. Turn them once the pan-side faces are properly browned. They can still become crisp and deeply colored; the exterior will simply be smoother than the parboiled version.
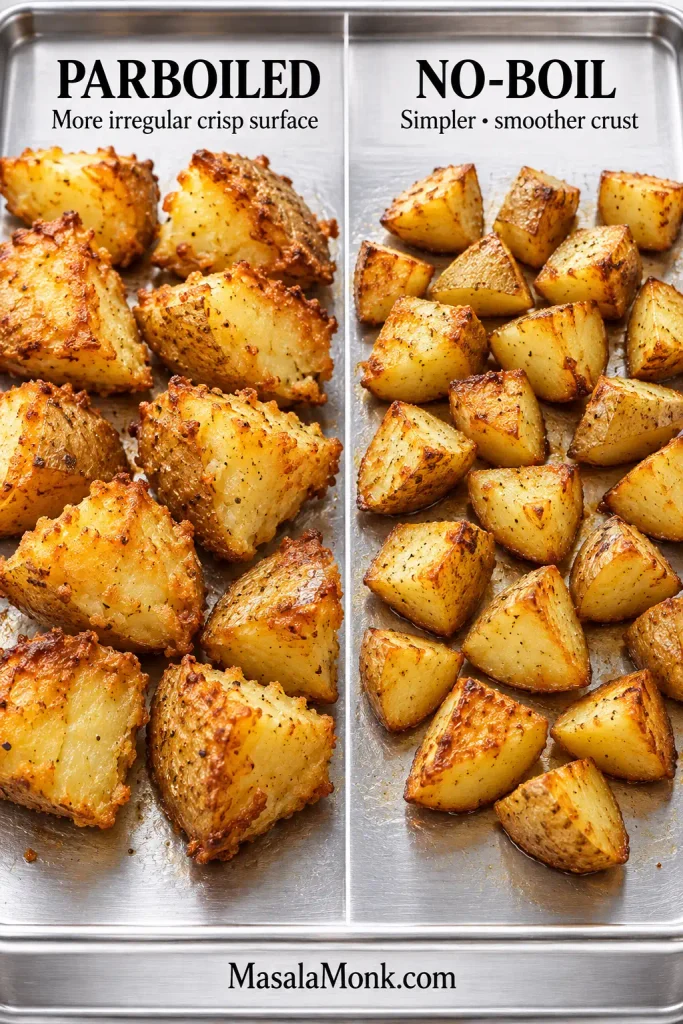
Side-by-side roasted Yukon Gold potatoes comparing larger rougher parboiled chunks with smaller smoother no-boil chunks.
Skipping the parboil changes the size you can get away with. Smaller no-boil potato chunks let heat reach the center sooner, while parboiled pieces can stay larger and still finish tender.

When Roasted Potatoes Refuse to Crisp

Potatoes breaking apart in the pot need a different fix from potatoes that looked crisp when they left the oven and softened five minutes later.
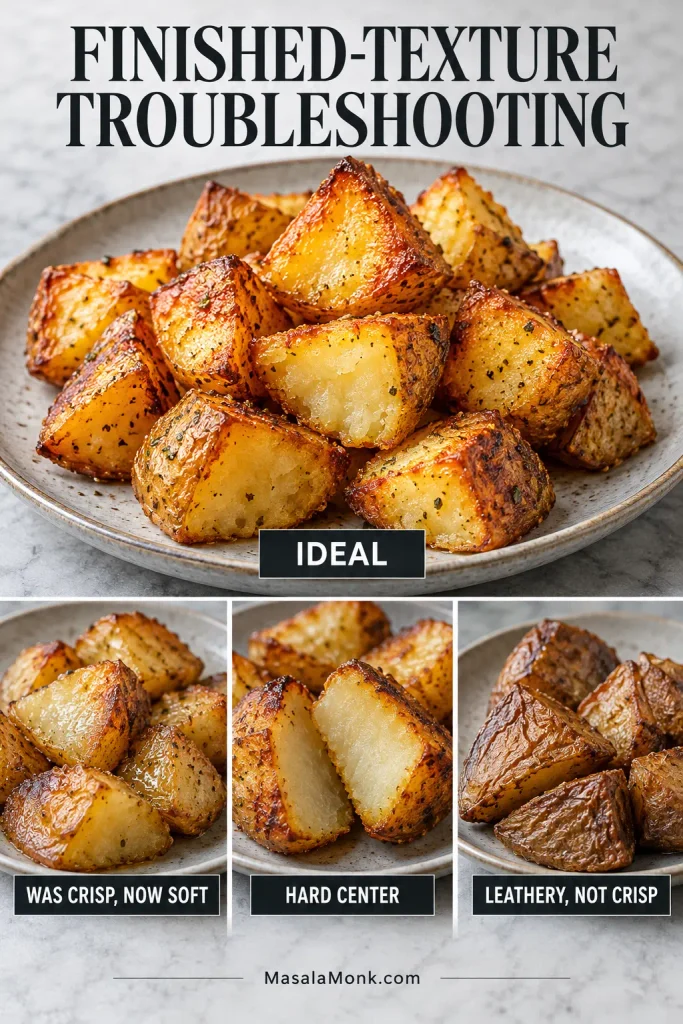
Four roasted potato examples comparing an ideal result with softened crust, a dense hard center, and a dry leathery exterior.
Do not troubleshoot every texture problem with more oven time. First decide whether the problem is trapped steam, an undercooked center, or a dry leathery surface; each points to a different fix.

Falling Apart Before Roasting

A few rough corners or little potato crumbs are nothing to worry about; those bits often become some of the crispiest parts. Whole chunks collapsing usually means they stayed in the water too long, were cut too small or were tossed too aggressively. Russets reach that fragile stage sooner than Yukon Golds.

Pale, Soft or Slow to Brown

Start with moisture and space. Damp potatoes take longer to color, and pieces packed closely together keep releasing steam into one another. An oven running cooler than its display can make both problems look worse. A crowded tray needs more room, not more oven time; split the potatoes between two pans.
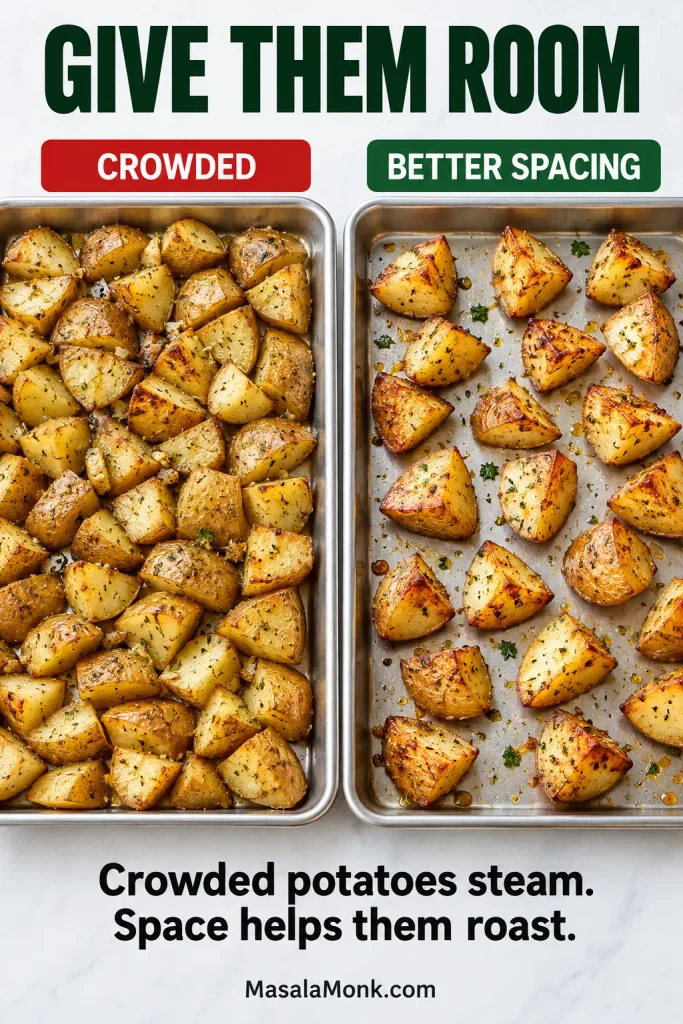
Overhead comparison of a crowded sheet pan of potato chunks and a properly spaced tray with visible gaps between most pieces.
Use visible metal as your capacity gauge. If most pieces touch a neighbor, the sheet pan is already too full for crisp roasted potatoes—even if another handful could physically fit.

Sticking or Losing the Golden Side

Sticking is usually a doneness signal rather than a pan emergency. The contact face releases more cleanly once its crust has properly formed; scraping too early can leave that browned layer behind on the metal. Use one test potato to judge whether the tray has reached that stage.
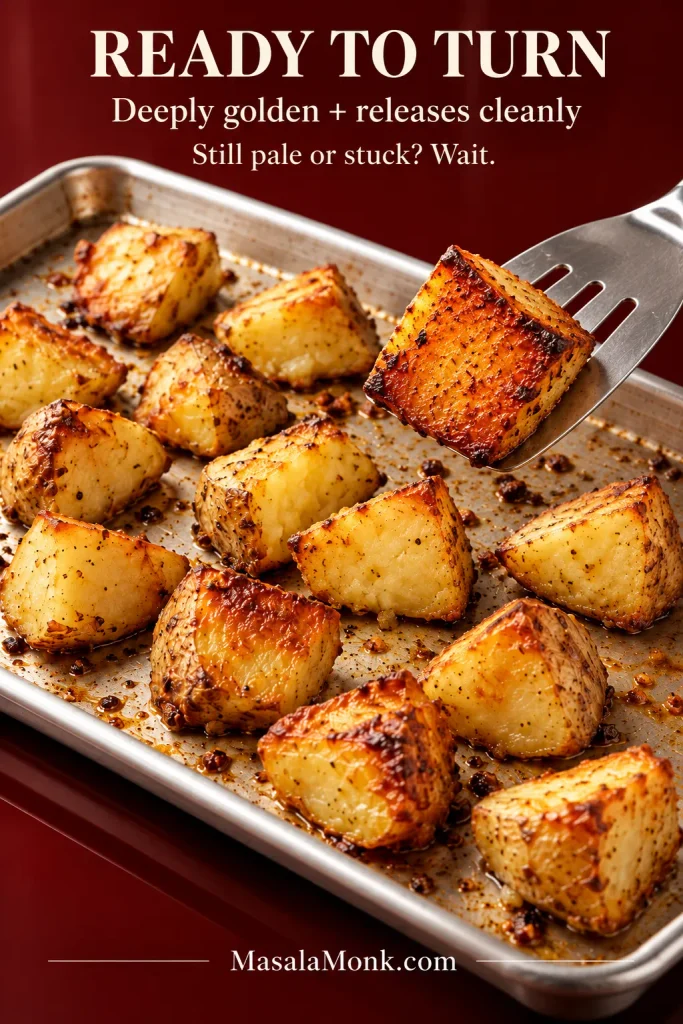
Metal turner lifting a roasted Yukon Gold potato chunk to reveal a deeply golden underside, with other potato chunks remaining on the sheet pan.
A ready-to-turn potato shows a broad, continuous golden contact patch rather than scattered brown spots. Once that crust is set, a thin turner should slide underneath with much less resistance.

Browning Too Fast

Very dark bottoms with pale upper sides usually point to the pan or rack position. Dark, lightweight pans can brown the bottoms surprisingly fast. A low rack puts the tray closer to the bottom heat, while smaller pieces brown much faster than the 1½-inch chunks used in the recipe.

A brown exterior with a hard middle is a related timing problem. Keep the current batch cooking until a knife moves through the center easily. Next time, cut the pieces closer to the recipe size or give the parboil a little more time before draining.

Leathery Instead of Crisp

A potato can be fully cooked without developing a properly crisp exterior. Very waxy potatoes naturally stay denser, while too little oil or poor contact with the hot pan can leave the outside dry rather than crisp. More oven time is not always the answer; eventually a pale exterior can simply get tougher.

Crisp at First, Soft at the Table

If dinner is delayed by a few minutes, leave the potatoes spread out and uncovered on the tray rather than piling them into a covered bowl. More exposed surface means less condensation settling back onto the crust.

A batch can behave differently even when you swear you did everything the same. Potato variety, age and storage affect moisture and starch, and home ovens drift. If the potatoes in front of you disagree with yesterday’s timer, trust what you can see and feel.

Back to the recipe · Back to top

Change the Flavor Without Changing the Method

Garlic and Rosemary Potatoes

For garlic and rosemary potatoes, add about 1 tablespoon finely chopped rosemary after the first turn so it has time to flavor the oil and potatoes. Add 1–2 small finely chopped garlic cloves only during the final 3–5 minutes, keeping most of the garlic on the potatoes rather than scattered across bare metal, where small pieces can darken quickly. The garlic powder in the base seasoning can stay.
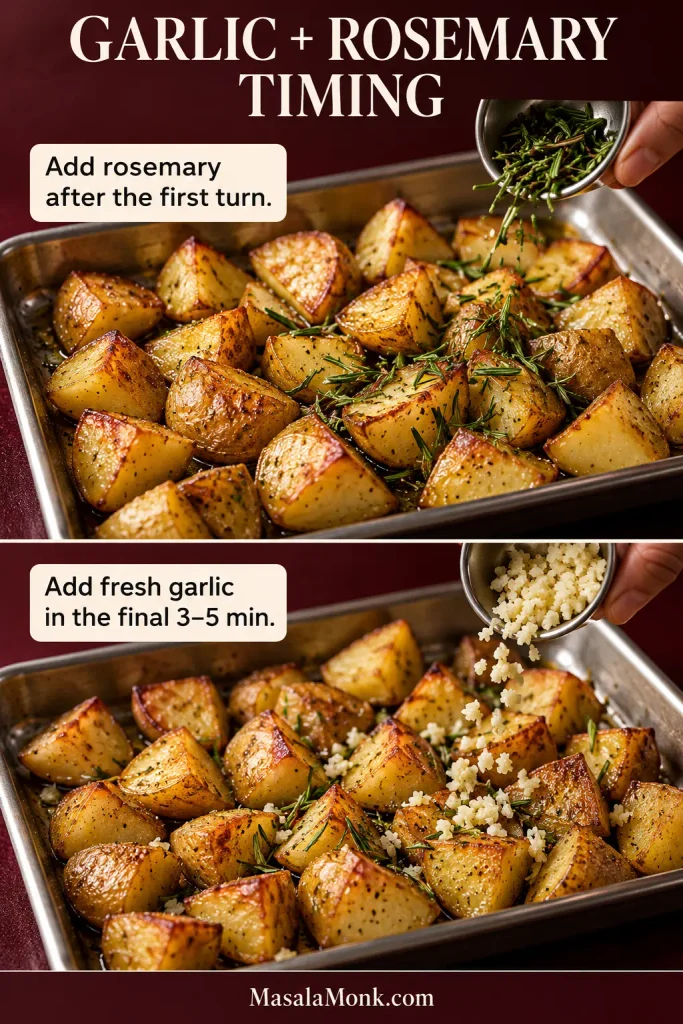
Roasted potatoes shown with rosemary added after turning and finely chopped fresh garlic added near the end of roasting.
Fresh garlic should finish fragrant and lightly golden, not dark brown. If tiny pieces are coloring too quickly, keep them tucked against the oiled potatoes instead of stranded on exposed hot metal.

Other Flavor Variations

For Parmesan roasted potatoes, scatter over about ¼ cup / 20–25 g finely grated Parmesan during the final 5 minutes, or just until the cheese has toasted onto the rough edges.

A half teaspoon of smoked paprika can go in with the garlic powder for a smoky note. Replacing the oil with the same amount of melted duck fat, goose fat or beef fat gives the potatoes a richer, more savory flavor.

If ranch is the flavor you actually want front and center, the Ranch Roasted Potatoes recipe is built around dry ranch seasoning from the start rather than treating it as a last-minute variation.

Serving Roasted Potatoes with Gravy

With a saucy main, keep the base potatoes simple. Beside Beef Tips and Gravy, for example, salt, pepper and garlic are plenty; the rough browned edges can catch the gravy without competing with it.
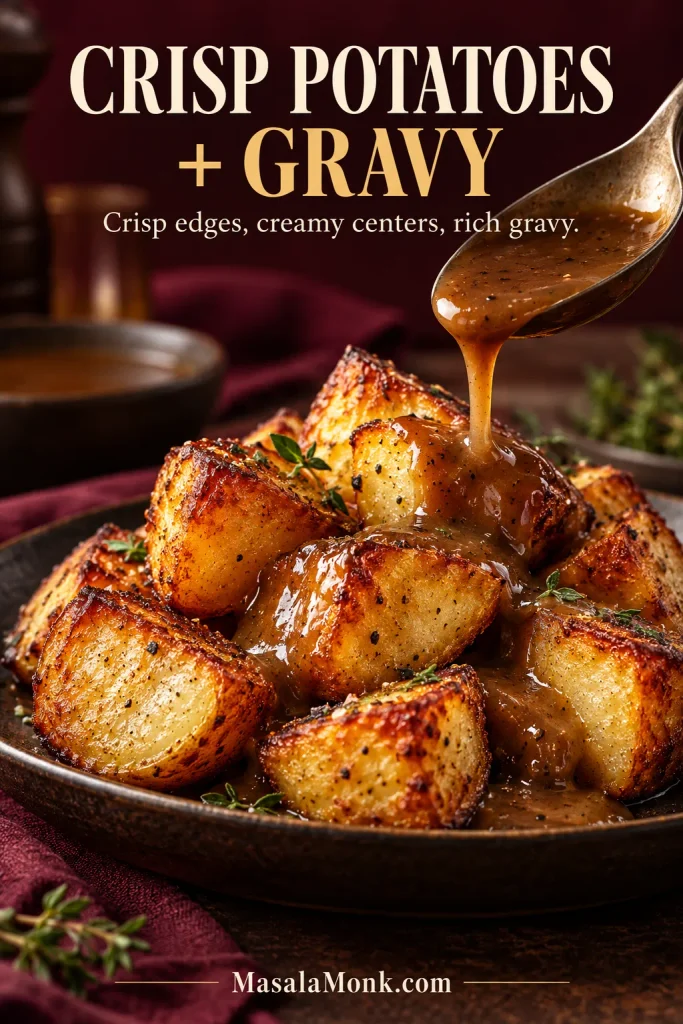
Golden roasted potato chunks as brown gravy is spooned over their rough crisp edges, with several browned surfaces still exposed.
Add gravy at serving rather than while the potatoes wait. The rough edges catch the sauce, while leaving some browned crust exposed preserves the contrast between crisp and creamy.

Back to the base recipe

Make Them Ahead Without Giving Up the Crust

Yes—you can parboil, dry and roughen the potatoes a day ahead; refrigerate them before adding the oil. That gets the pot and colander out of the way earlier while leaving the final browning for closer to dinner.
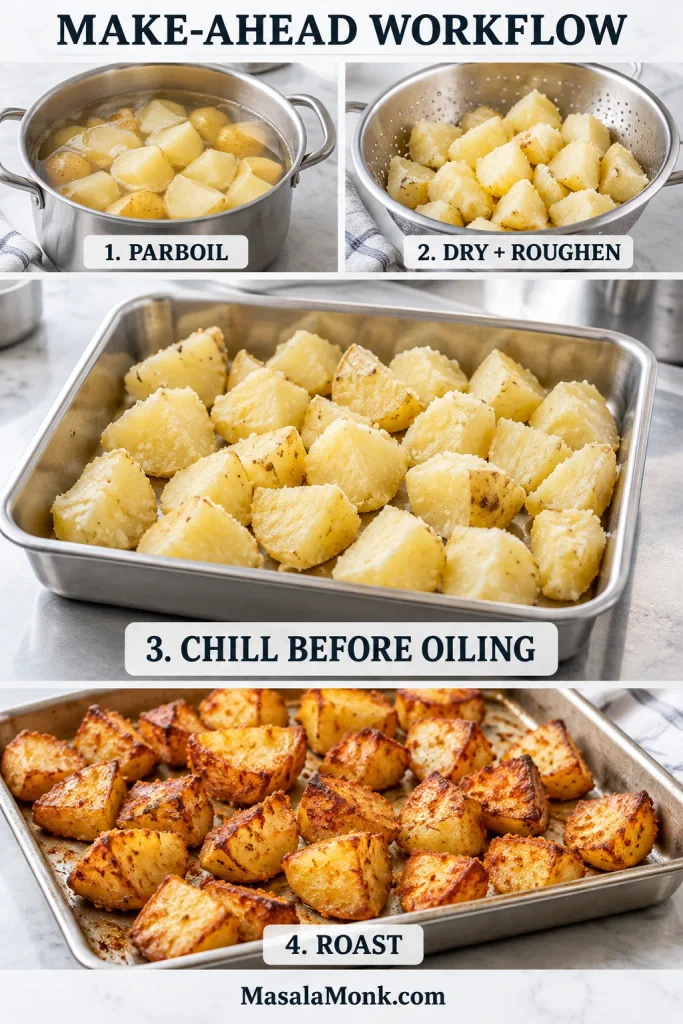
Four-stage make-ahead workflow showing potatoes parboiling, drying and roughening, chilling before oiling, and finally roasting golden.
Chilling the potatoes after parboiling and roughening separates prep from the final crisping stage. Refrigerator-cold pieces may need a little longer, so judge them by deep color and clean release.

Later the Same Day or Tomorrow

Spread the parboiled potatoes in a shallow layer and let the heavy steam subside briefly. Refrigerate promptly and within 2 hours; once cold, cover them. Add the oil and seasonings just before the potatoes go onto the hot pan.

Cooking for a Larger Dinner

When you double the potatoes, double the pan space too. A 4 lb / 1.8 kg batch needs two large sheet pans so the pieces still have room to release steam and brown. Two trays will also load the oven more heavily, so expect it to recover heat a little more slowly.

Once the potatoes have established their first browned side, rotate the pans and swap rack positions when one part of the oven is clearly running hotter.
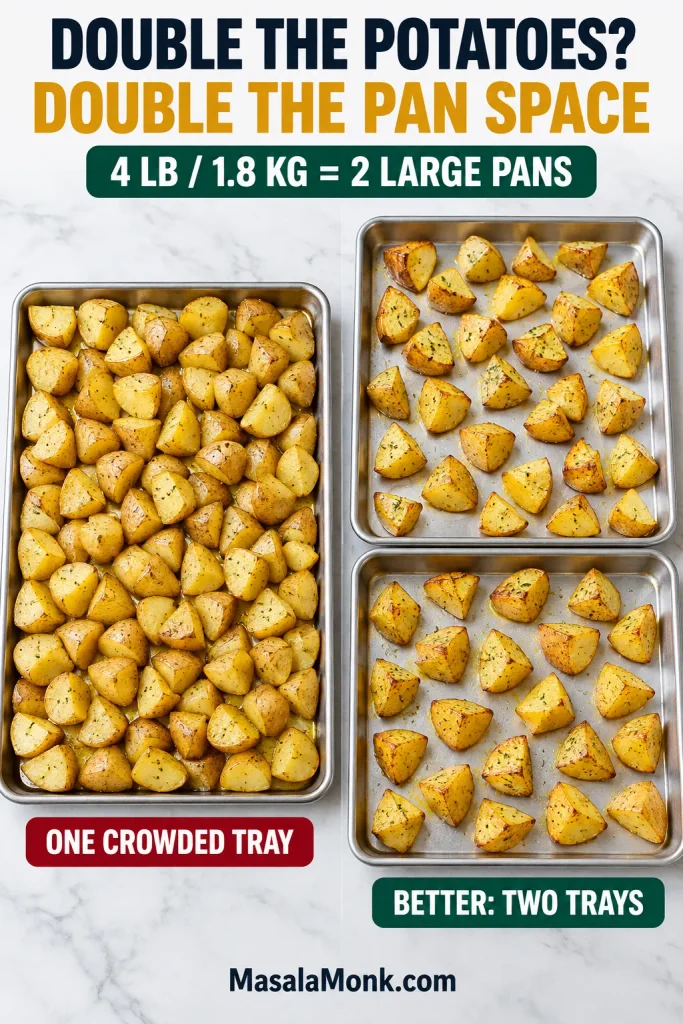
One crowded sheet pan of potatoes compared with two large trays holding a double batch with more space between the pieces.
Two trays only solve crowding if each one still shows open metal around most pieces. Splitting a large batch between two equally packed pans simply recreates the same steaming problem.

The Baked Chicken Breast Recipe also cooks at 425°F / 220°C, so the temperatures line up. Several crowded pans will still slow browning, though, so give the potato trays as much open rack space and airflow as you can.

Storing and Reheating Leftovers

Refrigerate cooked potatoes within 2 hours and use refrigerated leftovers within 3–4 days. FoodSafety.gov gives the same storage window and recommends reheating leftovers to 165°F / 74°C.

For texture, spread the potatoes in one layer and reheat them uncovered in a 400°F / 205°C oven for 10–15 minutes, checking once they are hot and the edges have begun to crisp again. In an air fryer, start around 375°F / 190°C and check at 5 minutes; small batches reheat quickly.

The microwave works when you simply need the potatoes hot. For anything close to the original crust, give them space and use dry heat.
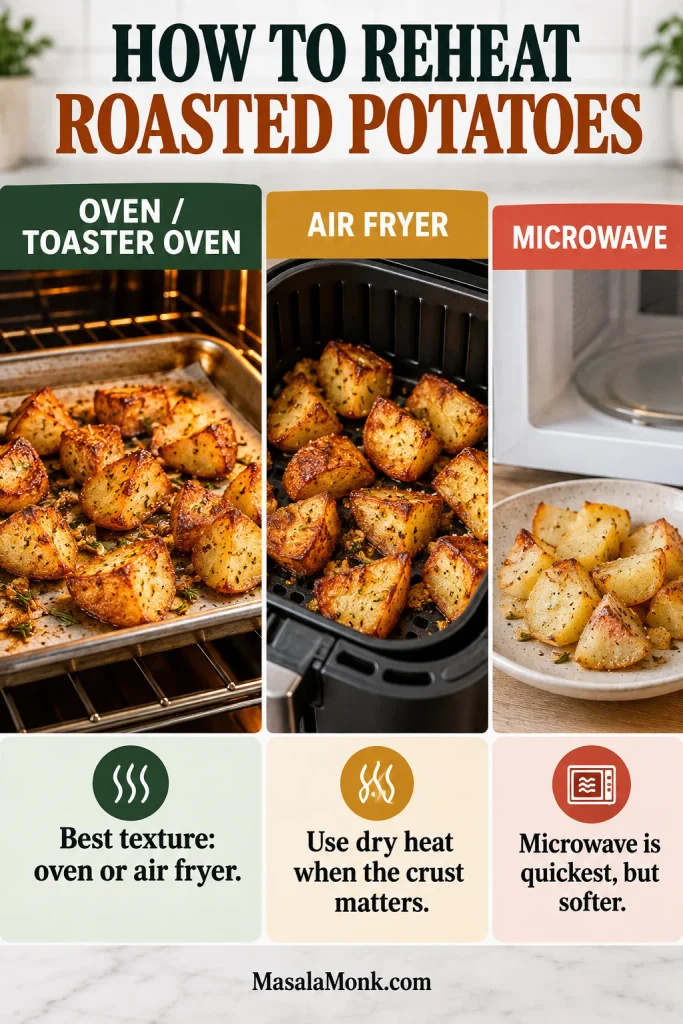
Roasted potatoes shown reheating in an oven, air fryer, and microwave, with the dry-heat methods retaining a crisper-looking exterior.
Reheat leftovers in a single uncrowded layer so exposed surfaces can dry and crisp again. The microwave is fastest, but it cannot reproduce the same dry-heat crust.

Back to the roasted potatoes recipe · Back to top

Posted on — Leave a comment

Roasted Cauliflower Recipe: Crispy, Golden & Easy to Make in the Oven

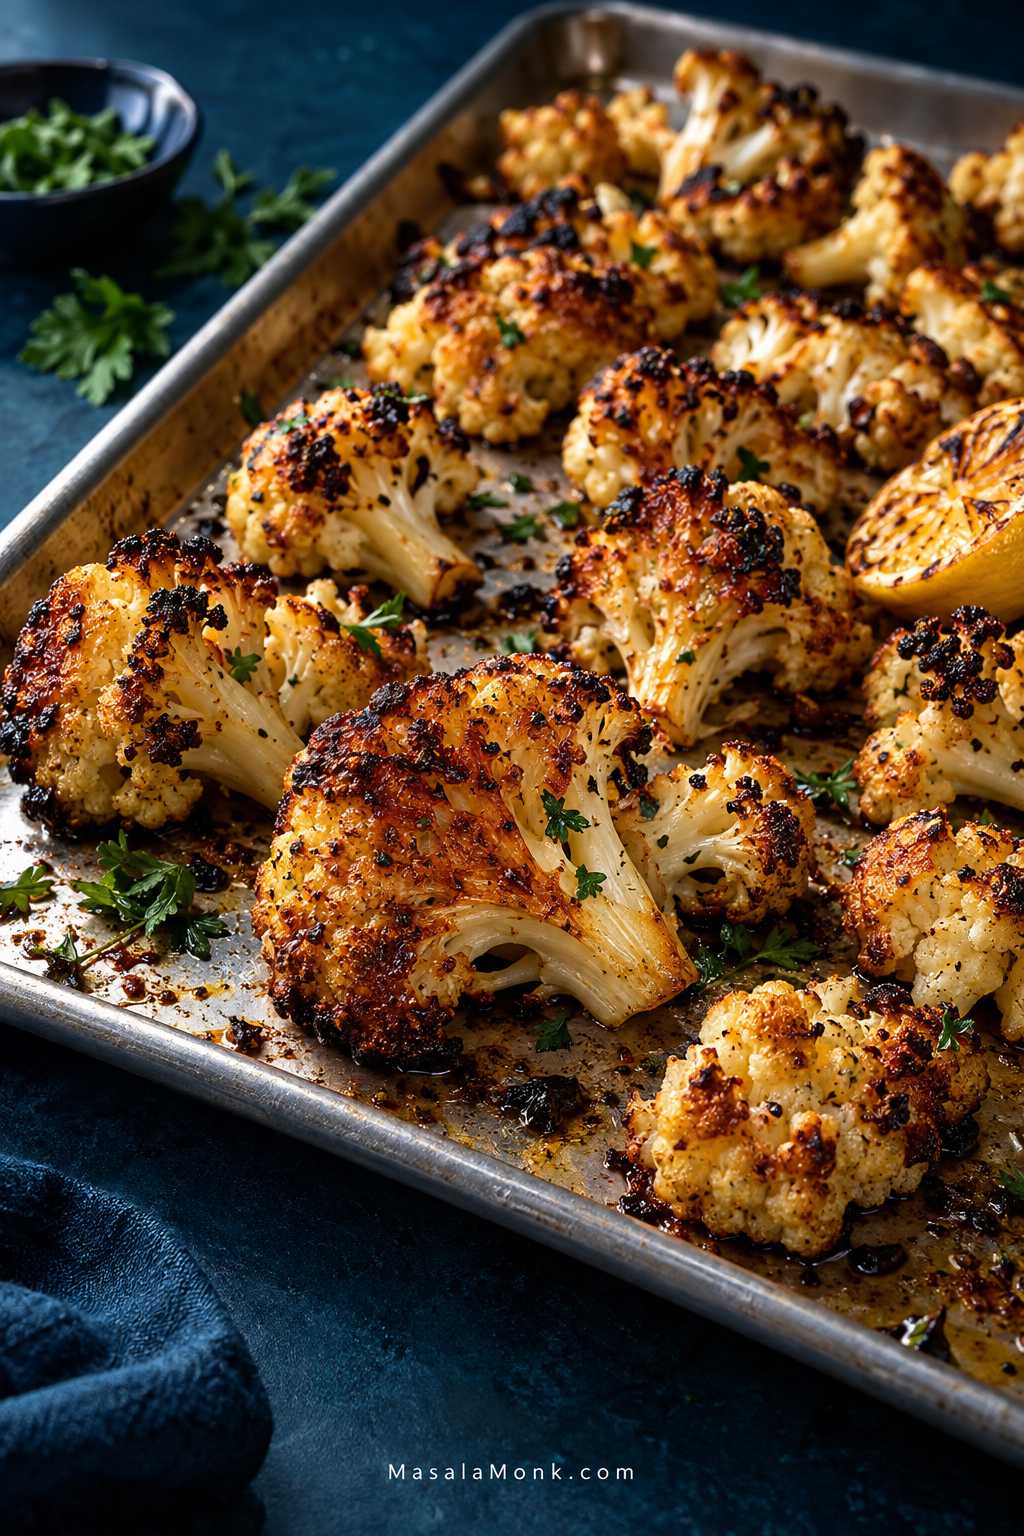
A brushed-metal sheet pan filled with irregular roasted cauliflower florets, showing deep golden-brown edges, darker roasted tips, tender stems, fresh green herbs, and a small lemon garnish against a deep teal background.

Good roasted cauliflower has crisp, deeply golden edges while the thicker stems stay tender. As it browns, the flavor changes too—sweeter, nuttier and much more savory than plain steamed cauliflower. The darkest little pieces tend to disappear first.

It can also be surprisingly frustrating for something so simple. Sometimes the cauliflower softens while it is still pale. At other times, the delicate tips burn while the thicker stems stay firm. And sometimes everything looks as though it needs another five minutes—until those five minutes turn it mushy.

None of this needs a complicated trick. Dry cauliflower, broad flat sides for browning, enough room on the pan, and enough time against hot metal do most of the work.

For this roasted cauliflower recipe, 425°F / 220°C is a good default. It is hot enough for deep browning, but gives the delicate tips more breathing room than 450°F / 230°C.

Quick Answer: How to Roast Cauliflower

Roast medium cauliflower florets at 425°F / 220°C for about 22–30 minutes, checking the underside after the first 15 minutes rather than relying on the timer alone.

Cut one medium-large cauliflower—about 2 lb / 32 oz / 900 g whole—into florets around 1–1½ inches / 2.5–4 cm. Halve the larger pieces through the stem so they have a flat side for browning.

Dry well, toss with 2 tbsp / 1 fl oz / 30 ml olive oil and the seasonings, then spread everything loosely across a large metal sheet pan with the cut sides against the metal.

After 15 minutes, lift a large piece. Deeply golden underneath? Turn the bigger florets. Still pale? Give that first side another 3–5 minutes. Continue until a fork slips easily into the stems and the edges are well browned.

For plain roasted cauliflower, “crispy” means browned cut surfaces and crisp edges around a tender center. It will not have the dry crunch of breaded or deep-fried cauliflower.

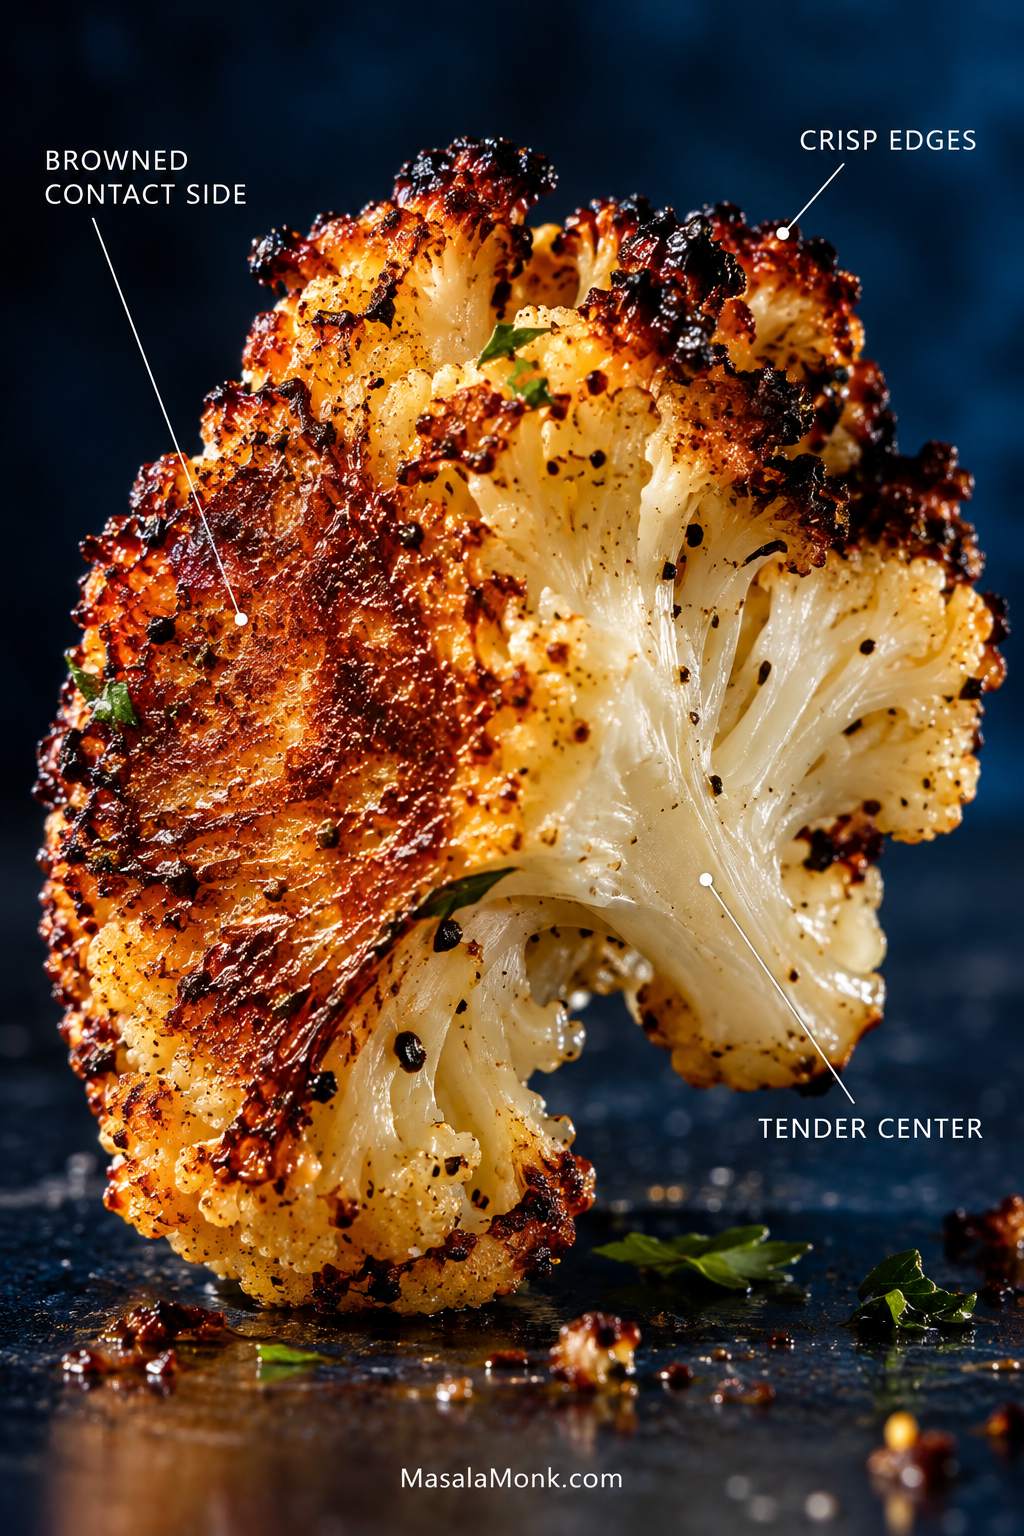
Close-up of a roasted cauliflower floret showing a deeply browned contact surface, dark crisp edges, and a pale tender center, with small labels identifying each texture.
The browned underside should be firm and toasted while the thicker stem still yields easily to a fork.

Make It Now: Crispy Oven-Roasted Cauliflower

Recipe at a Glance

Prep10–15 minutes
RoastUsually 22–30 minutes
TotalAbout 35–45 minutes
Oven425°F / 220°C conventional
RackMiddle
Yield4 generous or 6 smaller side servings

Ingredients

  • 1 medium-large cauliflower, about 2 lb / 32 oz / 900 g whole
  • 2 tbsp / 1 fl oz / 30 ml extra-virgin olive oil, plus another 1 tsp / 5 ml only if needed
  • 3.5–4 g salt; see the equivalents below
  • ½ tsp garlic powder
  • ¼ tsp freshly ground black pepper
  • ¼–½ tsp smoked paprika, optional
  • 1–2 tsp / 5–10 ml fresh lemon juice, optional, plus more to taste
  • Chopped parsley, cilantro or another fresh herb, optional

No scale? For roughly 3.5–4 g salt, use about 1¼ tsp Diamond Crystal kosher salt, about ¾ tsp Morton kosher salt, or roughly ½–⅔ tsp fine or table salt. Different crystal sizes mean these salts are not interchangeable by volume.

The Pan Matters

Use a large, sturdy, rimmed metal sheet pan, ideally light-colored uncoated aluminum, about 18 × 13 in / 46 × 33 cm. A dark nonstick sheet browns food faster, so check the cauliflower sooner if that is what you use.

Instructions

1. Heat the Oven

Put a rack in the middle position and heat a conventional oven to 425°F / 220°C. The regular Bake setting is all you need.

2. Rinse and Cut for Better Browning

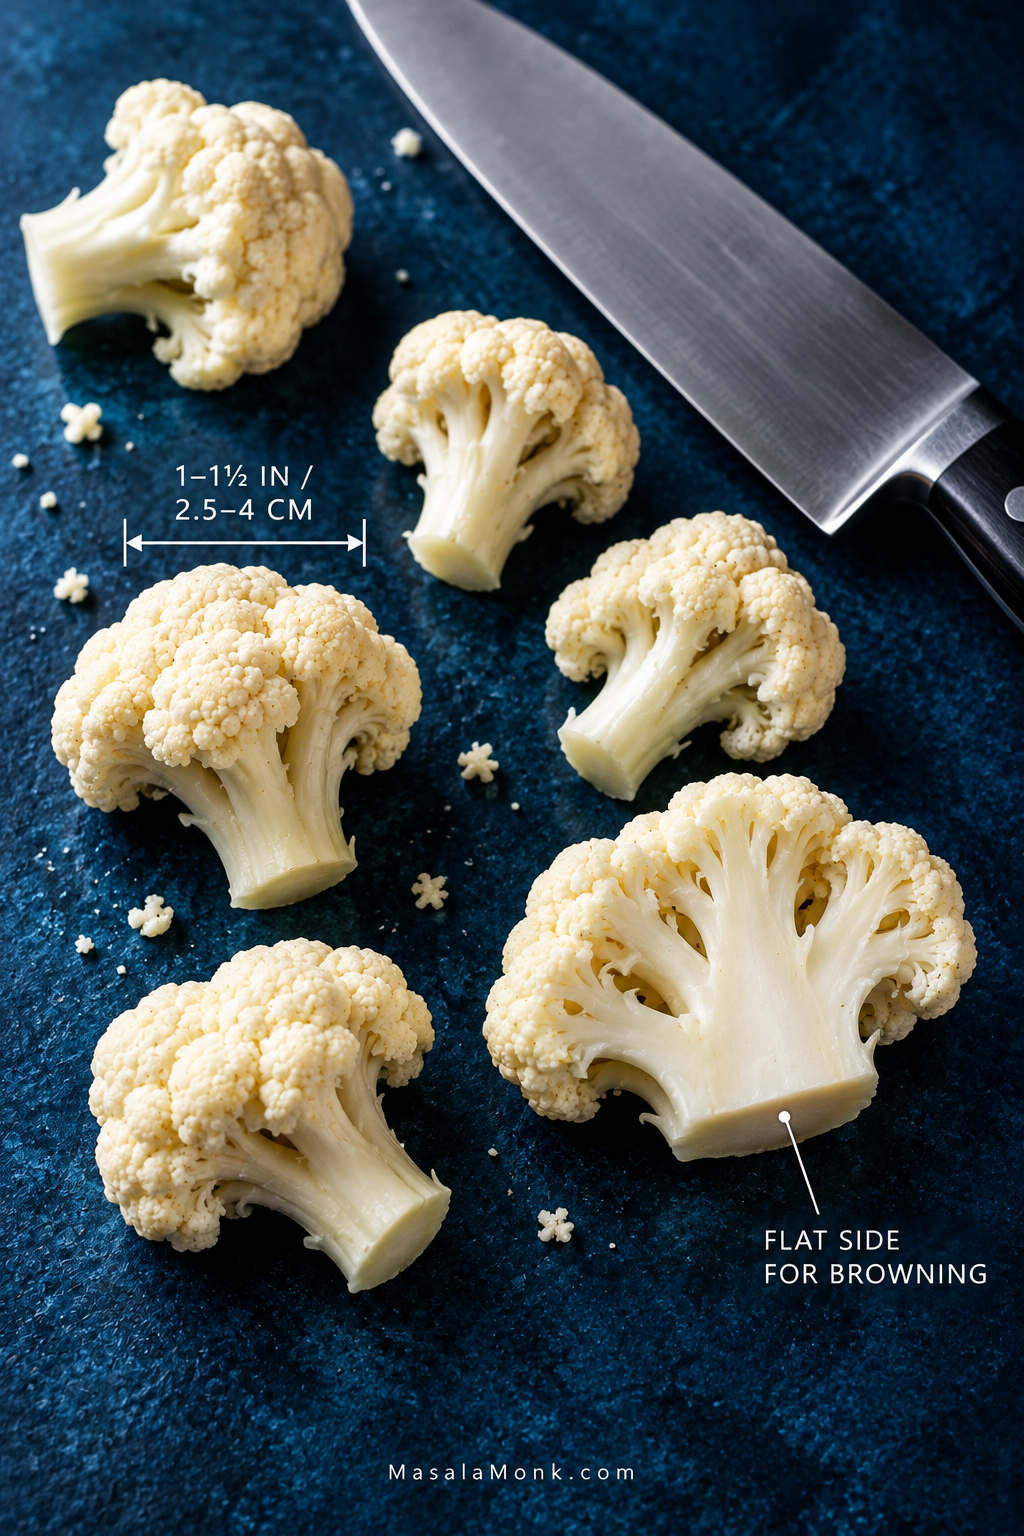
Rinse the cauliflower under cool running water, then shake off the excess. Remove the leaves and thick base of the core, and cut the cauliflower into roughly 1–1½ inch / 2.5–4 cm florets. Slice larger florets through the stem so each gets a broad flat side.

Using pre-cut florets? Halve the biggest pieces so the tray cooks more evenly, and pat away any condensation before seasoning. The tender inner stem is edible too; cut it into bite-size pieces and roast it with the florets.

Raw cauliflower florets on a dark blue preparation surface beside a chef’s knife, including a larger floret cut through the stem to reveal its broad flat side and pieces around 1 to 1½ inches in size.
A broader cut face gives the thicker part of each floret somewhere useful to brown, so the tips are not doing all the roasting while the body stays pale.

3. Dry, Oil and Season

Dry the cauliflower very thoroughly before adding oil. A kitchen towel works well; a salad spinner is handy for a larger batch.

Put the florets in a large bowl and add 2 tbsp / 30 ml olive oil, the salt, garlic powder, black pepper and optional paprika. Toss until the stems and branches have a light, even sheen.

Add another 1 tsp / 5 ml oil only if obvious dry patches remain. There should not be a puddle at the bottom of the bowl.

4. Give Every Floret Some Room

Spread the cauliflower in one loose layer, leaving visible gaps. Put the broad cut sides against the metal wherever possible.

Roasting two heads? Use two pans.

5. Leave the First Side Alone

Roast for 15 minutes without stirring or shaking the tray.

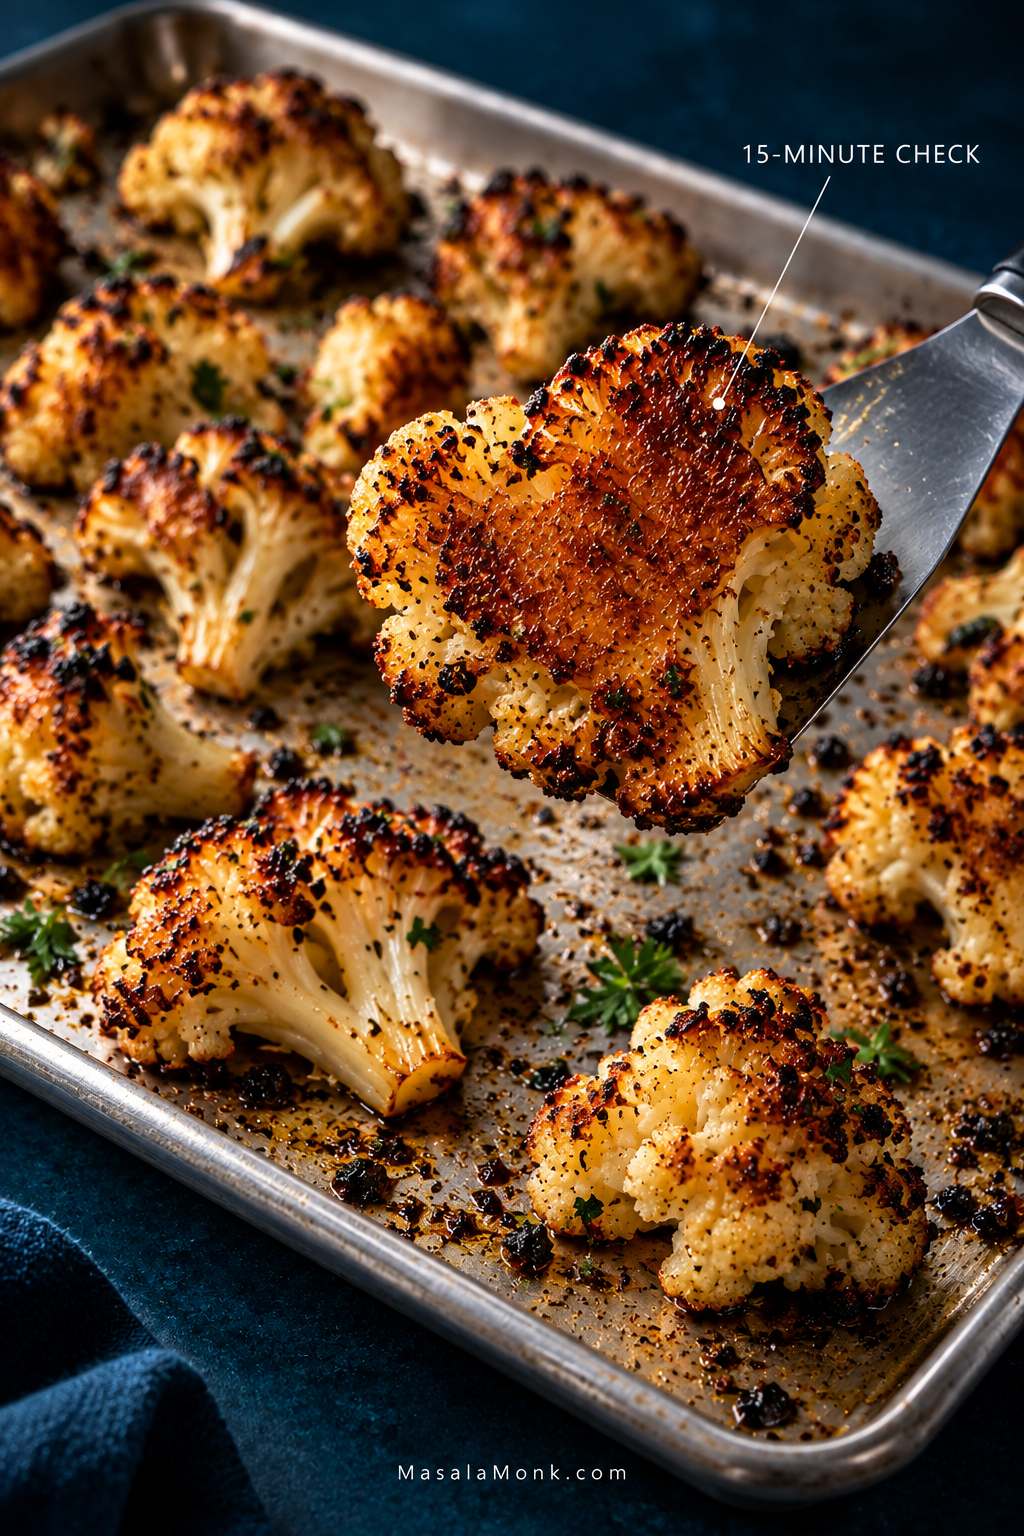
Lift one of the larger pieces. The underside should be broadly golden, with darker patches gathering around the edges—closer to deeply toasted bread than steamed cauliflower.

Already well browned? Turn the larger florets. Still pale or damp underneath? Give them another 3–5 minutes before turning.

A spatula lifts one roasted cauliflower floret above a metal sheet pan, revealing a broad golden-brown underside while other florets remain spaced across the tray.
A broad golden patch means the first side has done its job; pale and damp means leave it against the pan a little longer.

6. Turn Once and Finish

Turn the larger florets and rotate the pan. Roast for another 7–12 minutes. If the first side needed an extra 3–5 minutes to brown, start checking the stems toward the early end of that range.

A fork should slide readily into a thicker stem while the floret still holds together. Darker branch tips are part of the roast, not something to fear.

Most dry, well-spaced trays finish in about 22–30 minutes. A wetter head, larger pieces or a cooler-running oven can push the total a few minutes beyond that.

7. Finish While It Is Hot

Taste before adding more salt. Then squeeze over 5–10 ml lemon juice if you like. The acidity brightens the sweet, toasted flavor without turning the cauliflower into a wet, saucy side.

Add fresh herbs now too. For stronger garlic flavor, grate a small amount of fresh garlic over the hot cauliflower rather than exposing tiny pieces to the entire high-heat roast.

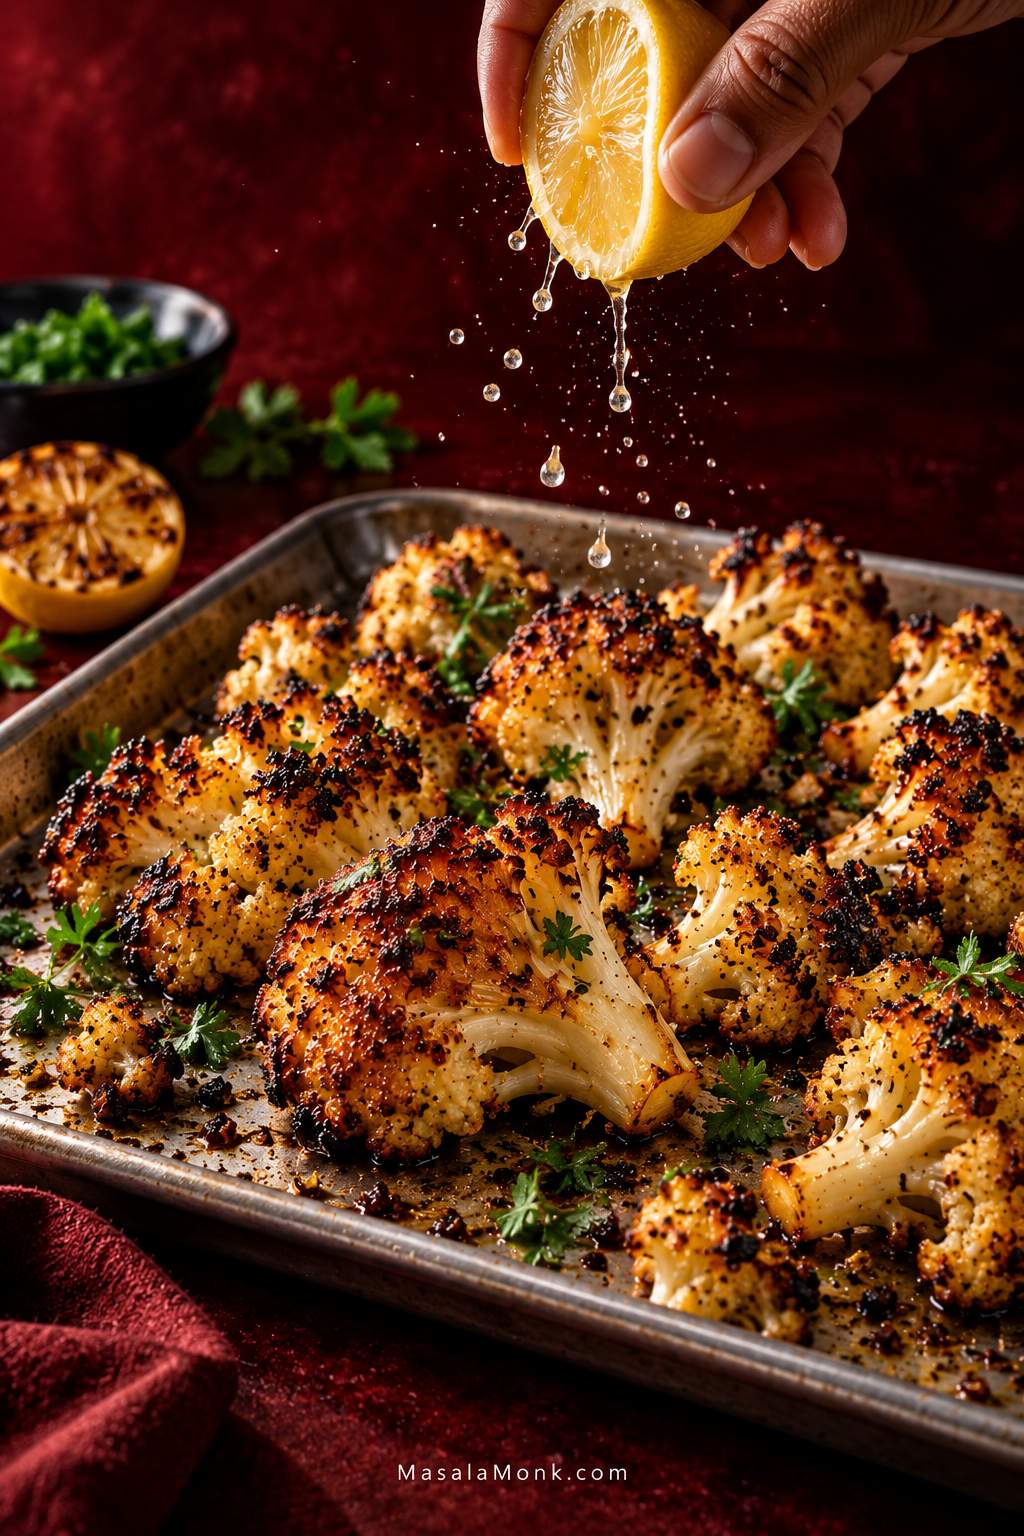
A hand squeezes a lemon half over deeply roasted cauliflower on a metal tray, with small lemon droplets falling onto browned florets against a dark burgundy background.
Lemon hits differently on a hot tray: the aroma lifts immediately while the deeply roasted flavor stays underneath.

Doneness beats the timer. The clock tells you when to look. Color and stem tenderness tell you when to stop.

Once those cues make sense, cauliflower becomes much less temperamental. From there, the useful questions are why one tray browns while another steams, how oven temperature changes the result, and what can still be rescued when dinner is not going to plan.

What Makes Roasted Cauliflower Crispy and Brown?

Browning starts once surface moisture has evaporated and a broad side stays against hot metal long enough to toast. That is why drying, spacing and cut shape matter more than simply turning the oven hotter.

Why Wet Cauliflower Stays Pale

Pack the pan tightly and even a 450°F / 230°C oven can leave cauliflower steaming in its own moisture. Water left from washing has to evaporate before the surface can really brown, and crowded florets release still more moisture into the same small space.

A second sheet pan often helps more than another 15 minutes in the oven.

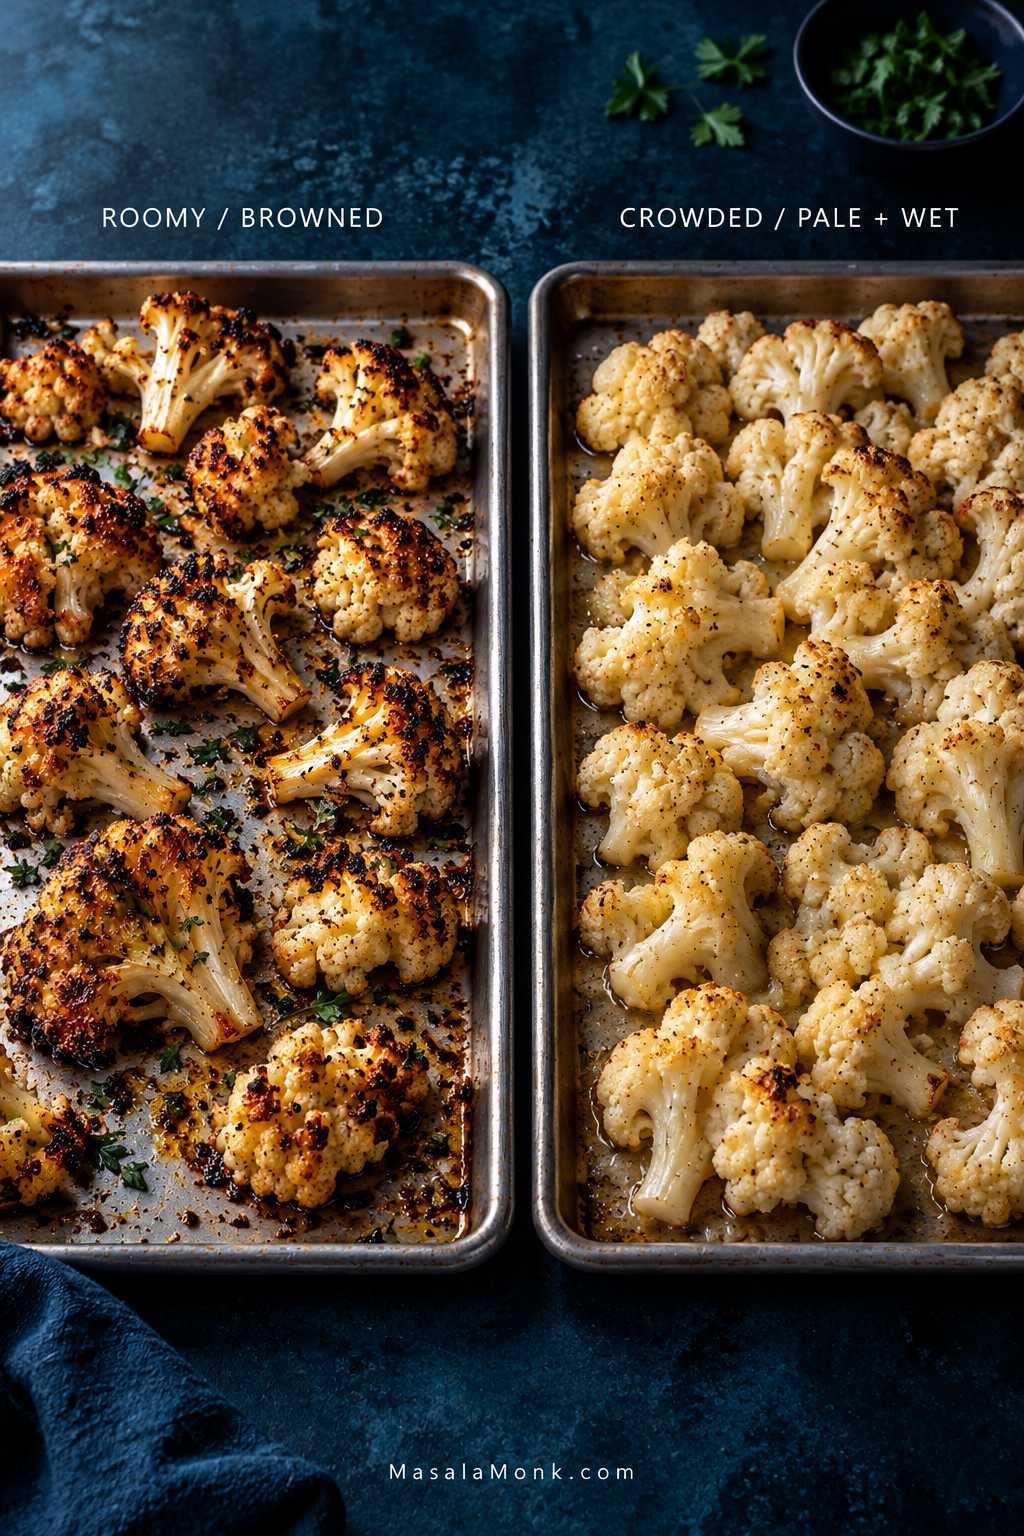
Two roasting trays compare cauliflower spacing: one has widely separated florets with deep browning, while the other has crowded florets that look paler and softer.
If one tray stays pale despite a hot oven, check the spacing before blaming the temperature. Crowded florets hold steam around one another, while open space gives browning a chance to begin.

Why the Tips Burn Before the Rest Browns

You may have seen it already: the tips are nearly black while most of the floret is still pale. Those delicate branches sit directly in hot oven air, while the side against the pan gets steady heat from the metal.

Slice a large floret through the stem and you give that pale body a broad surface that can actually toast against the pan.

Why the Flat Side Belongs Against the Pan

For the darkest crust underneath, bare metal works best. Foil is a useful cleanup compromise, while parchment gives a gentler underside. Serious Eats similarly recommends a sturdy uncoated pan, plenty of space and direct contact for stronger browning.

The oil should leave a light sheen, not a puddle. Too much pushes the cauliflower toward greasy and soft.

Then leave it alone. Turn once for more even color, or keep that first side against the pan longer when you want a darker crust.

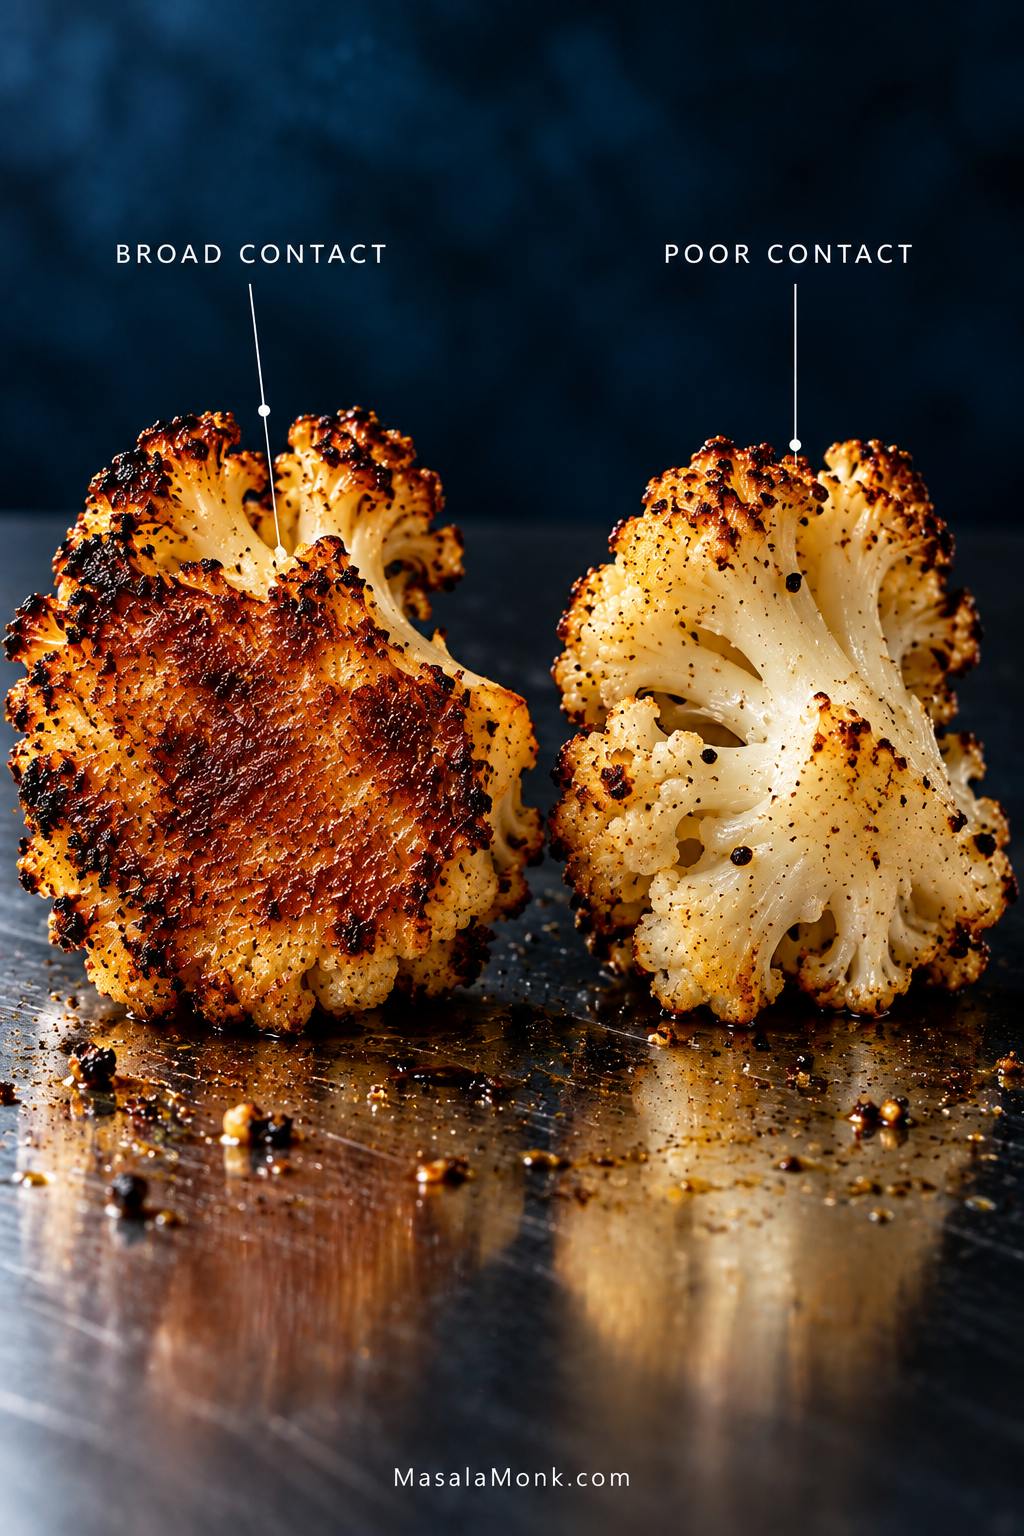
Two roasted cauliflower florets are shown from below; one has a wide caramelized brown contact patch from a flat pan-facing side, while the other has much less browning.
Metal contact browns differently from hot circulating air, which is why a broad pan-facing surface can develop a much deeper crust than the branching sides.

Roasted Cauliflower Time & Temperature

Roast medium cauliflower florets at 425°F / 220°C for about 22–30 minutes, checking the underside after the first 15 minutes. At 400°F they brown more gently; at 450°F they color faster.

SettingTypical RangeBest For
400°F / 200°CAbout 28–35 minGentler roasting or sharing the oven with another dish
425°F / 220°CUsually 22–30 minA good balance of browning and tenderness
450°F / 230°CAbout 20–30 minFaster, darker browning
Fan / convectionUse your oven’s usual convection conversion; start checking around 15–18 minFaster surface browning

Dinner Is Already at 400°F? Keep It There

Chicken, fish or a casserole already has the oven at 400°F / 200°C? Leave it there. Give the cauliflower a roomy pan and expect the color to build more slowly, usually over about 28–35 minutes.

If chicken is sharing the oven, 425°F is convenient: our baked chicken breast uses the same temperature, so each dish can cook on its own pan.

At 450°F / 230°C, watch the tray more closely. The edges darken faster, and fine spices or bits of fresh garlic have less time before they scorch.

Using convection? Start checking around 15–18 minutes. Use your oven’s usual convection conversion if it calls for one.

Look at the Cauliflower, Not Just the Clock

Pull the tray earlier if you like more bite. For the crisp-tender middle ground, wait until a fork goes in easily and the underside has strong brown patches. If you prefer very tender cauliflower, keep going—but stop before the florets begin collapsing.

The smell shifts too. As roasting continues, the sharper brassica aroma softens and the tray begins to smell sweeter, nuttier and properly toasted.

Seasoning Roasted Cauliflower

Once the cauliflower itself is well browned, it does not need much help. Keep the oil and salt from the basic recipe, then choose the direction that sounds right for dinner.

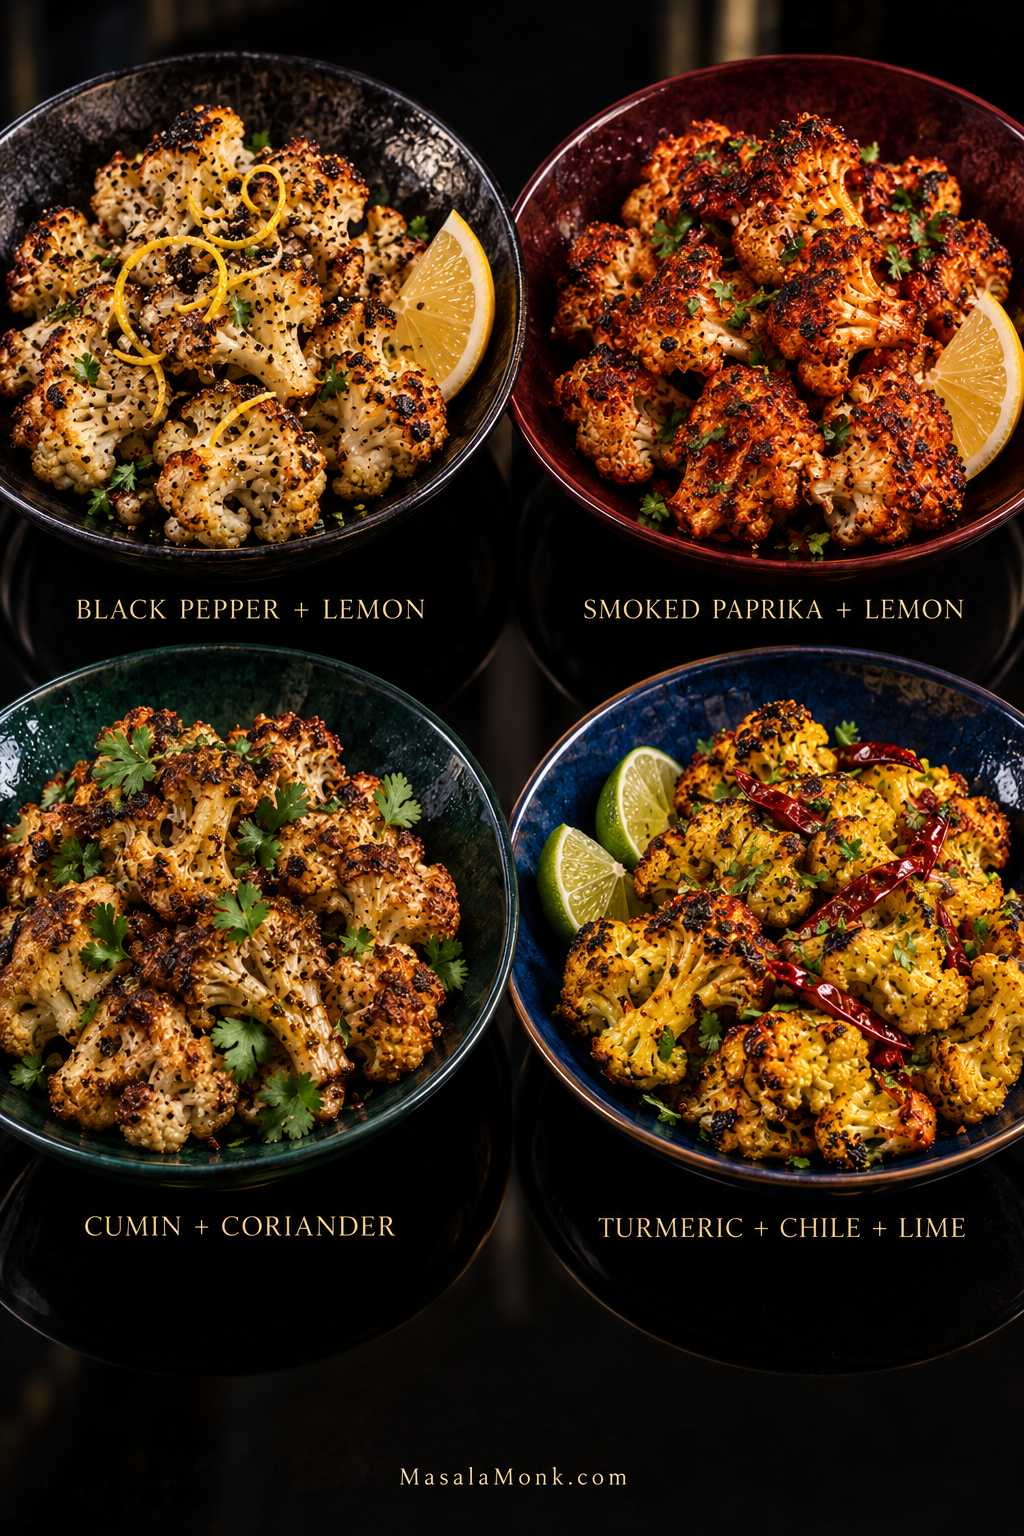
FlavorAdditional Flavor AdditionsFinish With
Black Pepper + Lemon¼ tsp black pepper1–2 tsp / 5–10 ml lemon juice or zest
Smoked Paprika + Lemon½ tsp smoked paprika + ¼ tsp black pepper1–2 tsp / 5–10 ml lemon juice
Cumin + Coriander½ tsp ground cumin + ½ tsp ground corianderCilantro + 1–2 tsp / 5–10 ml lemon juice
Turmeric + Chile + Lime½ tsp cumin + ¼ tsp turmeric + pinch of chileCilantro + 1–2 tsp / 5–10 ml lime juice
Four portions of roasted cauliflower in jewel-toned dishes labeled black pepper and lemon, smoked paprika and lemon, cumin and coriander, and turmeric with chile and lime.
Once the roast itself is right, seasoning becomes a choice of direction rather than a rescue—bright lemon and pepper, smoky paprika, warm cumin and coriander, or sharper chile and lime.

If you want cauliflower with a fuller Indian spice profile, aloo gobi pairs it with potatoes, cumin and turmeric in a more substantial dish.

When Garlic or Spices Turn Bitter

Bitter dark specks usually mean fresh garlic or fine spices scorched during the high-heat roast. More seasoning will not fix that.

Garlic powder is more forgiving for the full roast. Add fresh herbs, lemon juice, grated fresh garlic and most sauces after the cauliflower comes out or very near the end.

How to Roast Frozen Cauliflower Without Making It Mushy

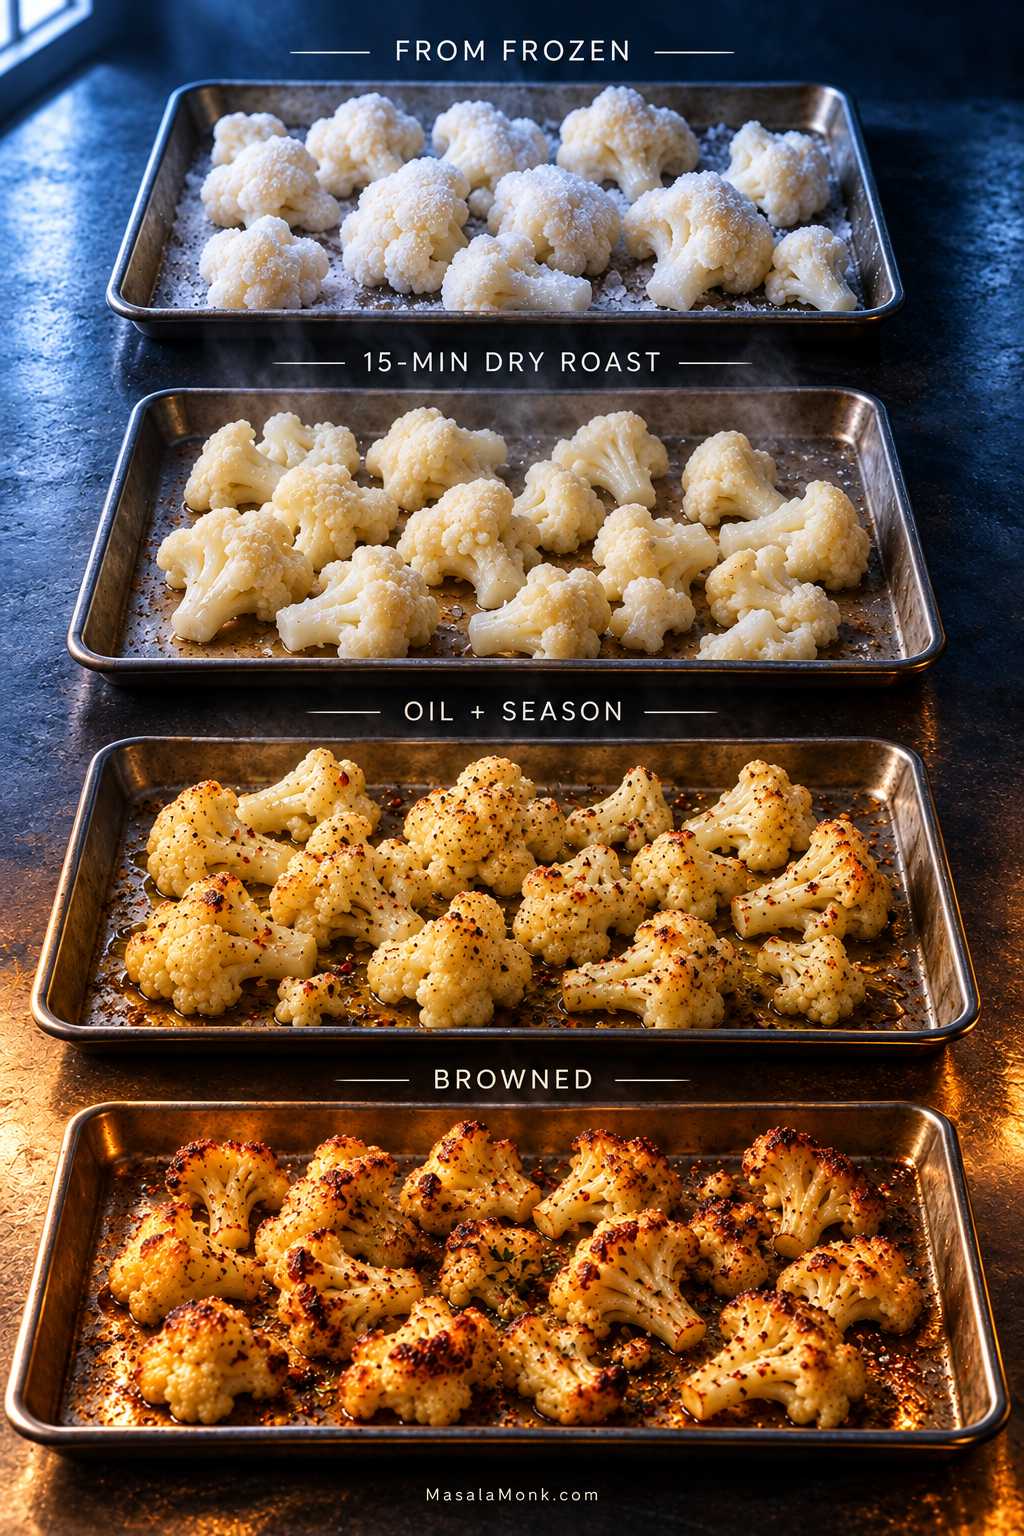
Yes. Roast frozen cauliflower straight from frozen—do not thaw it first. For a 1 lb / 16 oz / 450 g bag, use 425°F / 220°C: roast for 15 minutes first, then season and continue for another 15–20 minutes.

A vertical four-stage sequence showing frozen cauliflower, partially roasted florets after a 15-minute dry roast, seasoned florets with a light oil coating, and finished browned cauliflower.
Frozen cauliflower needs a different order of operations: first let excess surface moisture escape, then add oil and seasoning so the second stage can build better roasted color.
  1. Spread the frozen florets in one uncrowded layer. Lightly greased bare metal gives the strongest browning; foil is a useful compromise, while parchment gives easier release but gentler color.
  2. Roast for 15 minutes without oil or seasoning.
  3. Toss with 1 tbsp / 15 ml olive oil, about 2 g salt—roughly half the fresh-recipe salt amount, ¼ tsp garlic powder and ⅛ tsp black pepper, then spread the florets out again.
  4. Roast for another 15–20 minutes, until browned and tender.

Expect about 30–35 minutes total. Frozen cauliflower will usually be softer than fresh, but the edges should still pick up good roasted color.

When Roasted Cauliflower Goes Wrong

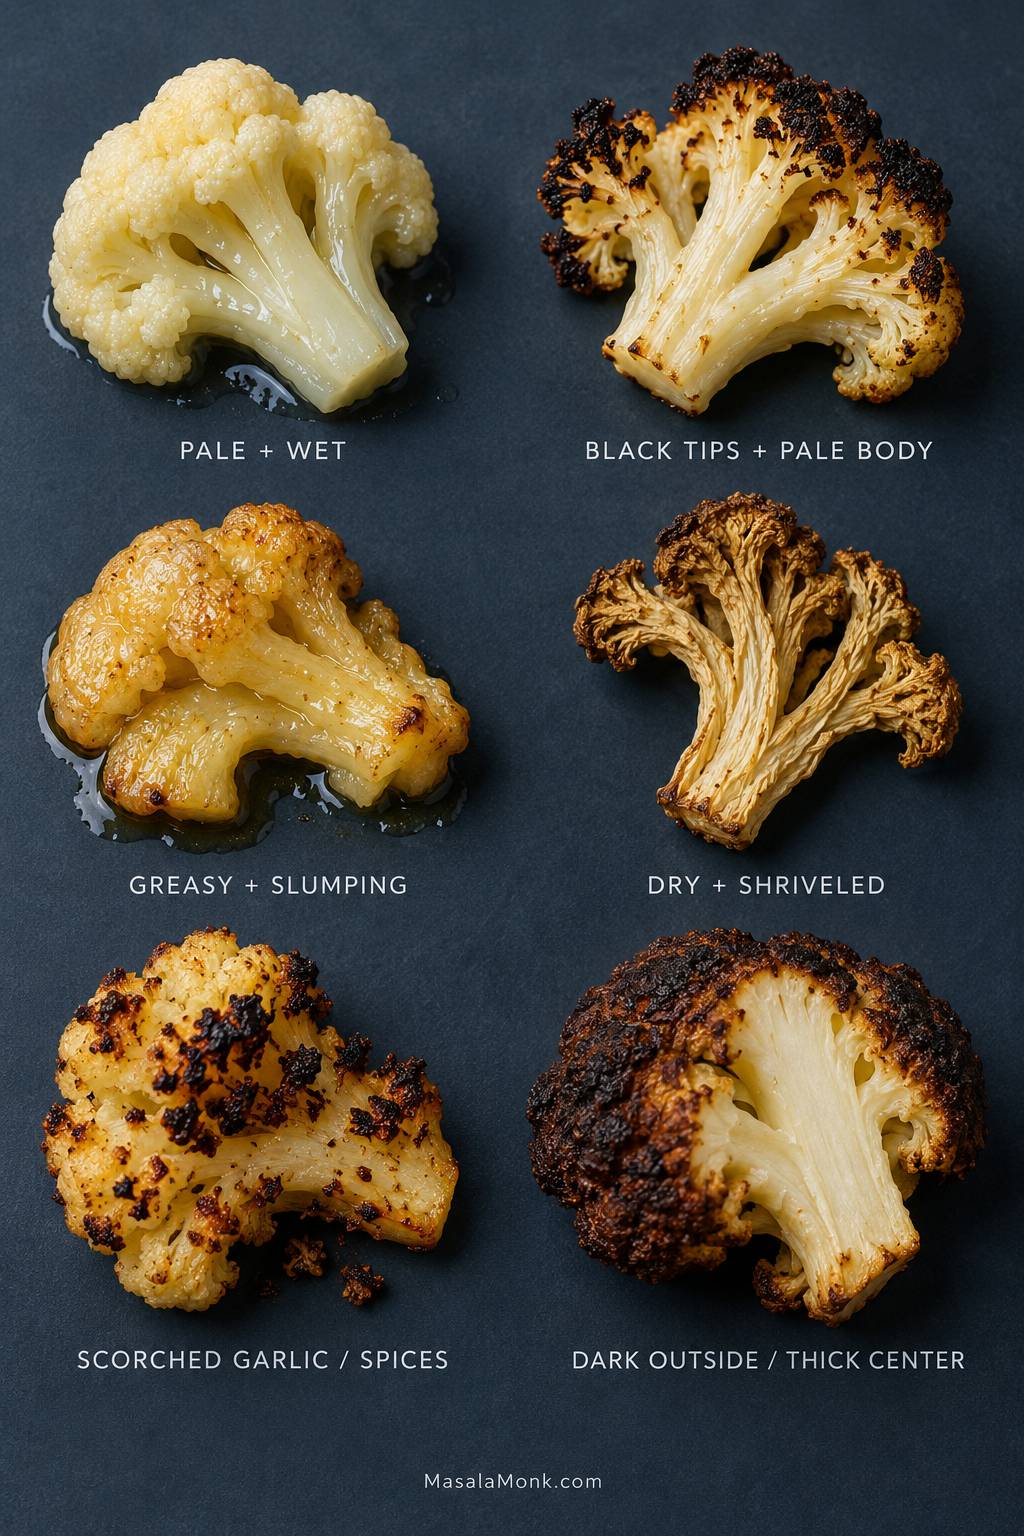
Pale and wet, tender but pale, black at the tips, greasy, shriveled—those trays may all look disappointing, but they are not the same problem.

A visual guide showing six roasted cauliflower problems: pale and wet florets, black tips with a pale body, greasy slumping florets, dry shriveled florets, scorched garlic or spices, and dark exteriors around a thick pale center.
Start with the visual symptom that looks closest to your tray, then work backward through the troubleshooting table to find the likely cause and the quickest useful response.
What You See or TasteWhat It Usually MeansWhat to Do
Pale + wetToo much moisture or crowdingSpread the pieces farther apart and continue roasting
Tender + paleThe inside cooked before enough color developedUse a brief broiler finish
Black tips + white bodyThe tips browned in hot air but the body had poor pan contactCreate broader flat sides and put them against the pan next time
Hard center + dark exteriorPieces are too large or uneven, or the oven runs hotCut more evenly and give thick stems enough time
Greasy + softToo much oilUse a lighter coating next time
Dry + shriveledSmall pieces, uneven oil coverage or too much timeCoat more evenly and pull the tray sooner
Bitter dark specksGarlic or spices scorchedAdd vulnerable aromatics later
Strong sulfur smell + collapsing floretsThe cauliflower has gone too farPull the next tray earlier
Timing is way offFloret size, pan color, convection, crowding or oven calibrationAdjust when you start checking; if it keeps happening, verify the oven temperature

Can You Rescue the Tray You Have?

Tender but pale: give it a short broiler finish and watch continuously. If the pan is lined with parchment, remove the parchment first, and follow the heat limits for any liner you use.

Wet but still fairly firm: spread the pieces farther apart—onto a second hot pan if necessary—and continue roasting.

Already mushy: stop trying to crisp it. Turn the batch into soup, mash or curry, or add a smooth homemade cheese sauce and let that softness work for the dish.

Pale cauliflower can often be browned. Overcooked cauliflower cannot be uncooked.

Once the tray is right, the contrast is obvious: toasted edges, tender stems and that sweeter roasted smell that was missing when the cauliflower was still steaming.

Turn Roasted Cauliflower Into Dinner

Roasted this deeply, cauliflower does not have to sit at the edge of dinner as the obligatory vegetable. Keep it simple with lemon and black pepper alongside chicken, fish, beans or lentils, or make it part of the meal itself with grains and something cool and crunchy.

When you want a heartier roasted side, roasted cauliflower and potatoes gives the cauliflower a more substantial partner without burying its browned edges.

A handful of roasted florets also fits naturally beside warm rice, cucumber and avocado in a salmon bowl. Those browned edges bring enough flavor to hold their own among the other components.

Add Sauce Without Softening Every Edge

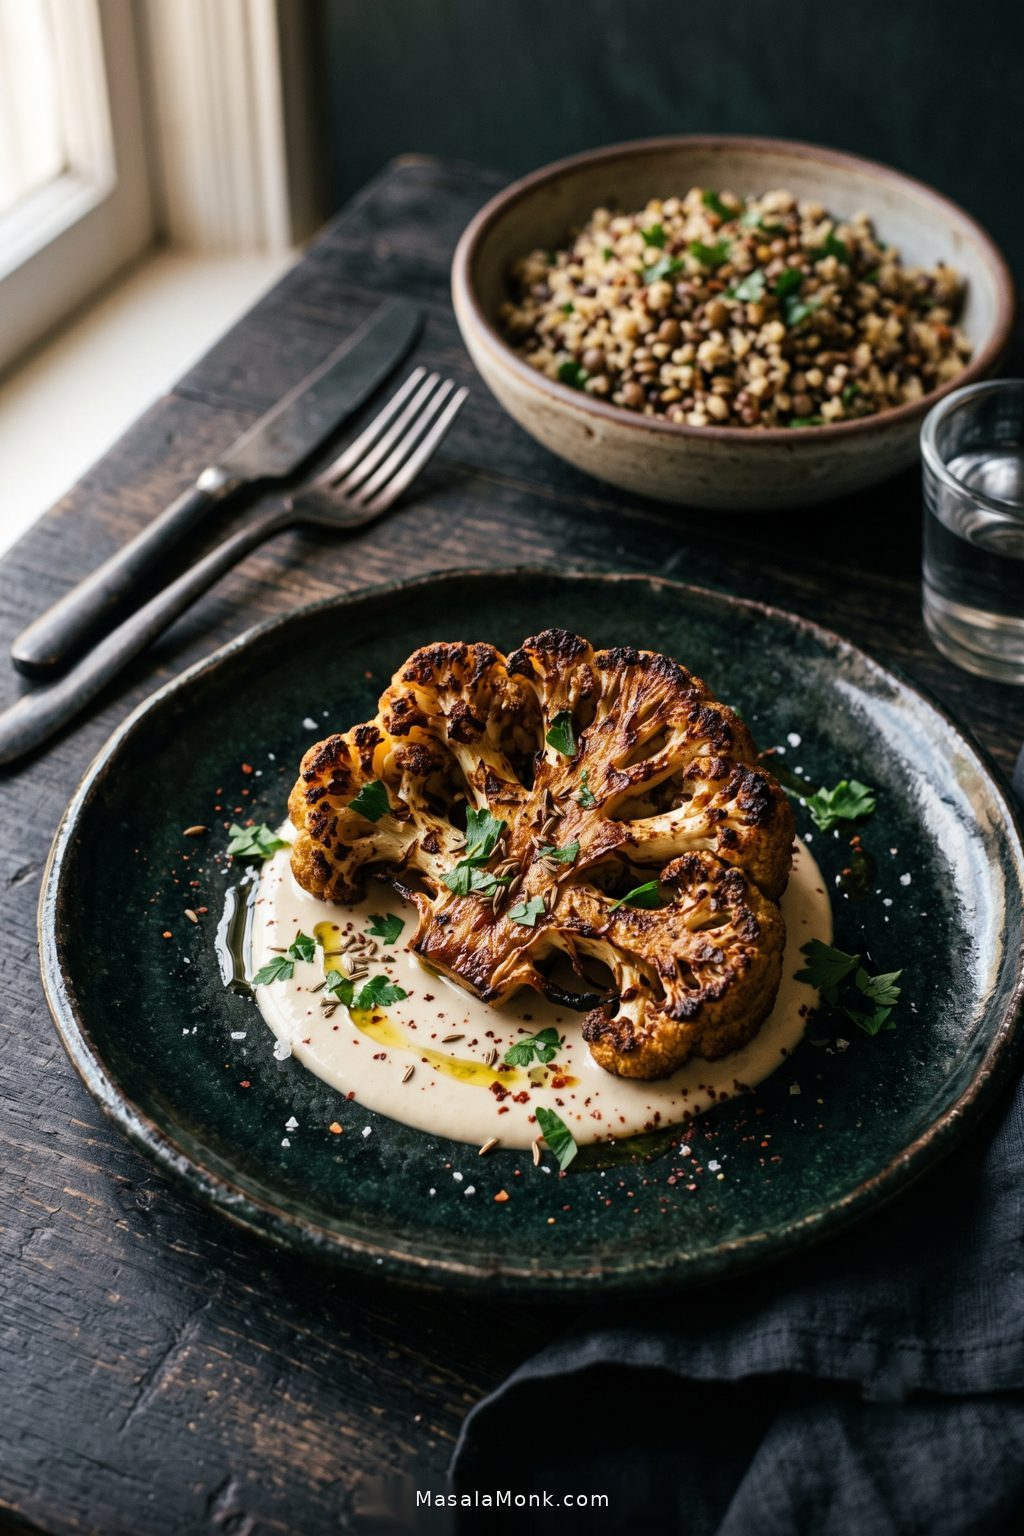
Tahini-lemon sauce, garlicky yogurt, romesco, pesto or chimichurri all work with the toasted sweetness of cauliflower.

A dark ceramic plate of deeply roasted cauliflower served with pale sauce underneath and beside the florets, with a fork and subtle dinner components softly visible behind the plate.
Treat sauce as contrast rather than camouflage: leave enough roasted surface exposed that the cauliflower’s browned edges still register in every bite.

Spoon the sauce underneath, drizzle lightly, or serve it alongside. Those crisp edges soften quickly once they sit in moisture.

How to Store and Reheat Roasted Cauliflower

Store roasted cauliflower in the refrigerator and use it within about 3–4 days. Transfer leftovers to a shallow container and refrigerate promptly; you do not need to wait for them to cool all the way to room temperature.

Let the first rush of steam escape briefly before sealing the container tightly. USDA guidance recommends refrigerating cooked leftovers within 2 hours.

The Best Ways to Reheat It

  • Air fryer: about 375°F / 190°C for 3–5 minutes for a small portion.
  • Oven: spread it out and heat at about 400°F / 200°C for 8–12 minutes.
  • Skillet: medium to medium-high heat for roughly 4–6 minutes.
  • Microwave: heat in short bursts until hot. It is quickest, but the edges will be softer.

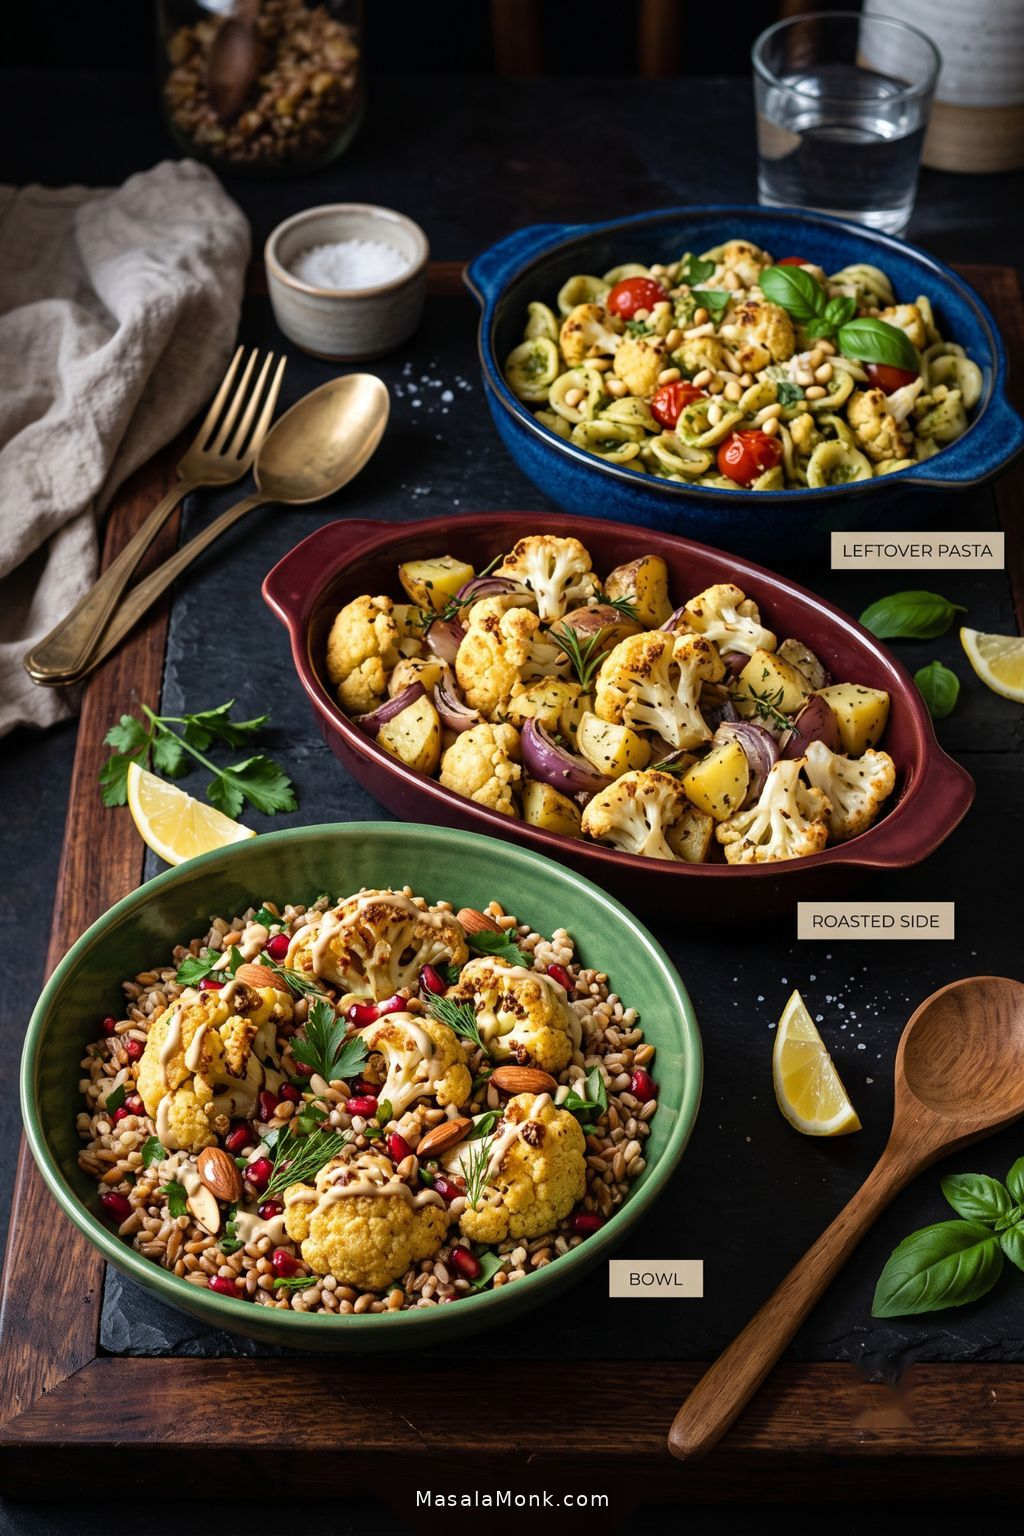
Once the crisp edges soften, leftovers are still useful in dishes where roasted flavor matters more than crunch. Roughly chop the florets and fold them into pesto pasta, grain bowls or salads instead of treating reheating as the only option.

Three serving ideas featuring roasted cauliflower: a grain bowl, a plate of roasted cauliflower with potatoes, and pesto pasta containing chopped roasted cauliflower.
The roast keeps paying off after the first meal because its concentrated flavor survives even when some crispness fades—use it in bowls, heartier vegetable plates, or leftover pasta.

A Few Common Roasted Cauliflower Questions

1. Do You Need to Boil Cauliflower Before Roasting?

No. Medium florets become tender during the 425°F / 220°C roast without boiling or blanching first.

Parcooking is useful only when you deliberately want an unusually soft center; otherwise it creates more moisture to deal with before browning begins.

2. Is Roasted Cauliflower the Same as Baked Cauliflower?

Baked cauliflower and roasted cauliflower often describe the same basic method when plain florets are cooked uncovered in a hot oven. In that sense, this works as a straightforward baked cauliflower recipe too.

A cauliflower bake can mean something quite different: a creamy or cheesy casserole made with sauce, breadcrumbs or other ingredients.

3. Can I Roast Two Heads of Cauliflower at Once?

Yes. Use two large sheet pans rather than squeezing both heads onto one.

If both pans are in the oven together, swap their positions and rotate them partway through if your oven browns unevenly.

4. Can I Make This Roasted Cauliflower Recipe Ahead?

Yes. Cut the florets ahead and refrigerate them in a covered container. Keep them dry and check for condensation before roasting.

Add the oil and seasonings shortly before the tray goes into the oven. Fully roasted cauliflower reheats well too, although its crispest edges will always be on the freshly roasted batch.

The finished tray should look a little more roasted than many people instinctively expect: proper brown patches underneath, darker tips and stems that yield to a fork without collapsing.

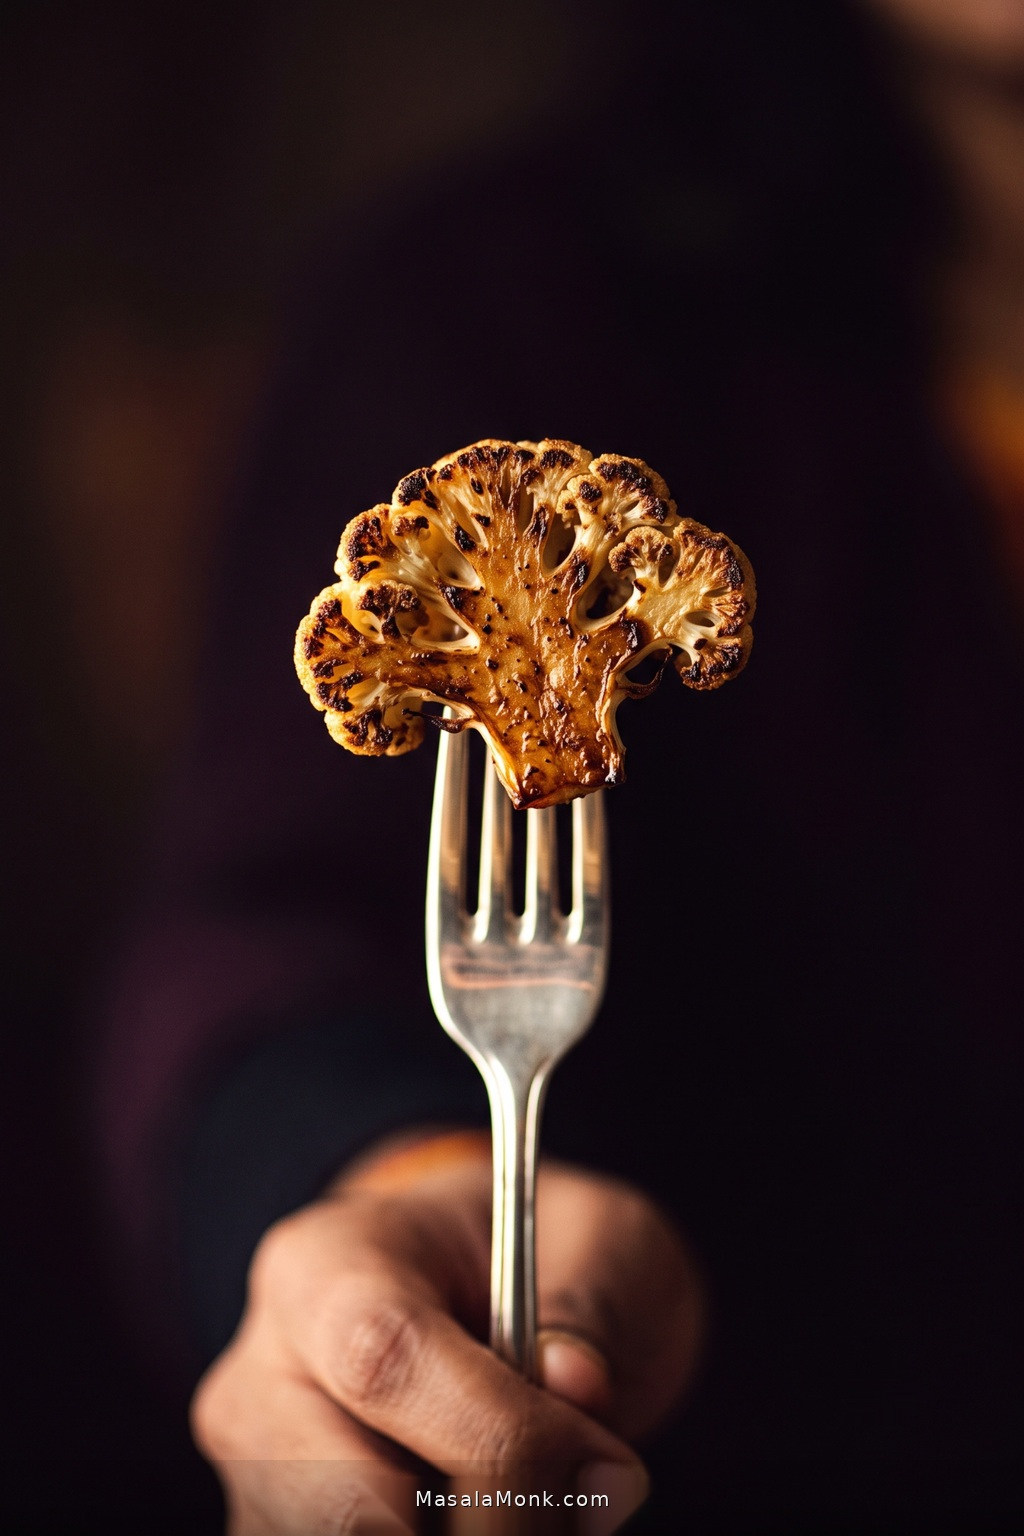
A silver fork lifts one deeply roasted cauliflower piece toward the viewer, showing dark browned edges and a pale tender interior against a deep plum background.
That first hot bite is the payoff, when the roasted edges are deepest, the centers are still tender, and the contrast between the two is at its sharpest.

Add the lemon while everything is still hot and get it onto the table. The darkest pieces rarely stay there for long.

Posted on — Leave a comment

Greek Lemon Potatoes Recipe (Patates Lemonates): Crispy, Golden & Garlicky

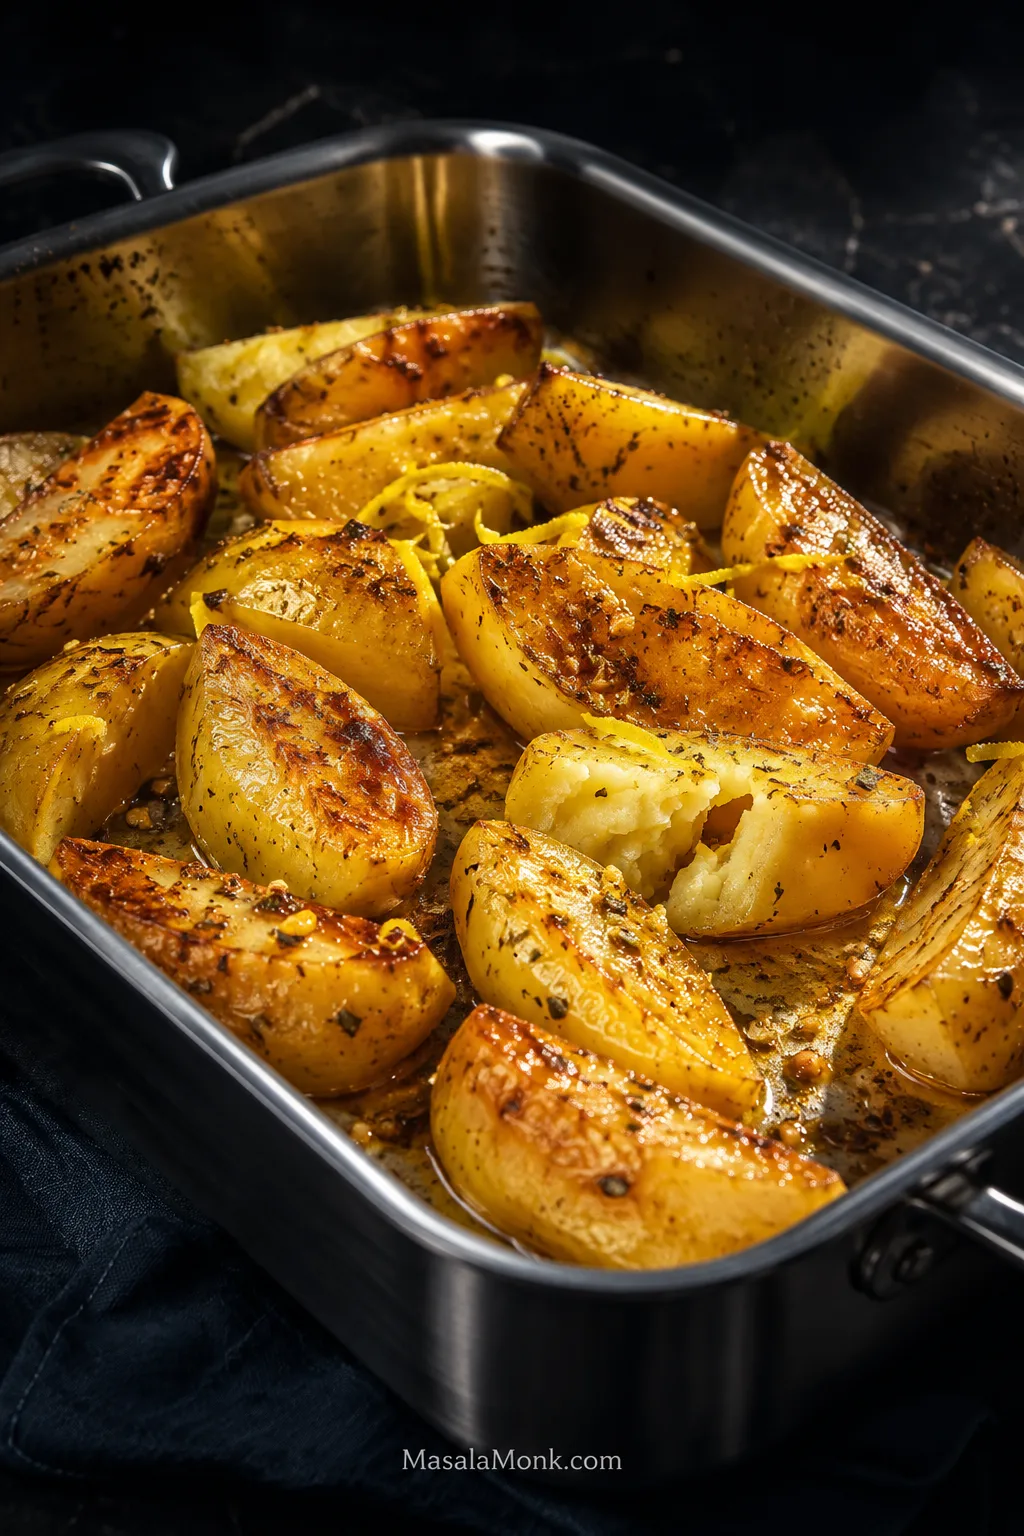
Finished Greek lemon potato wedges in a stainless roasting tray with deeply browned cut faces, softer glossy sides, oregano and concentrated pan juices; one split wedge shows the creamy interior.

Greek lemon potatoes don’t just taste lemony on the surface. Break open a wedge and the middle is seasoned too—creamy potato carrying lemon, garlic, oregano and olive oil all the way through. A few cut faces and corners go deeply golden where the juices reduce against them.

Maybe the potatoes you remember from a Greek restaurant, taverna or a meal on a trip were crisp around the edges. Maybe they were almost spoon-soft and sitting in lemony juices. Both versions exist. What matters is getting that flavor into the potato rather than leaving it on top.

Quick Answer

Greek lemon potatoes use a wet-to-dry roast. Thick wedges soften first with olive oil and stock; fresh lemon goes in partway through; then the tray dries enough for the exposed surfaces to brown. For 2 lb 10 oz / 1.2 kg potatoes, use ⅓ cup + 2 tablespoons / 110 ml olive oil and ¾ cup / 180 ml hot stock or water. Roast uncovered at 400°F / 205°C, add ¼ cup / 60 ml lemon juice after about 30 minutes, and finish with another 1 tablespoon / 15 ml once the centers are creamy and the remaining liquid has cooked down to lemon-garlic juices.

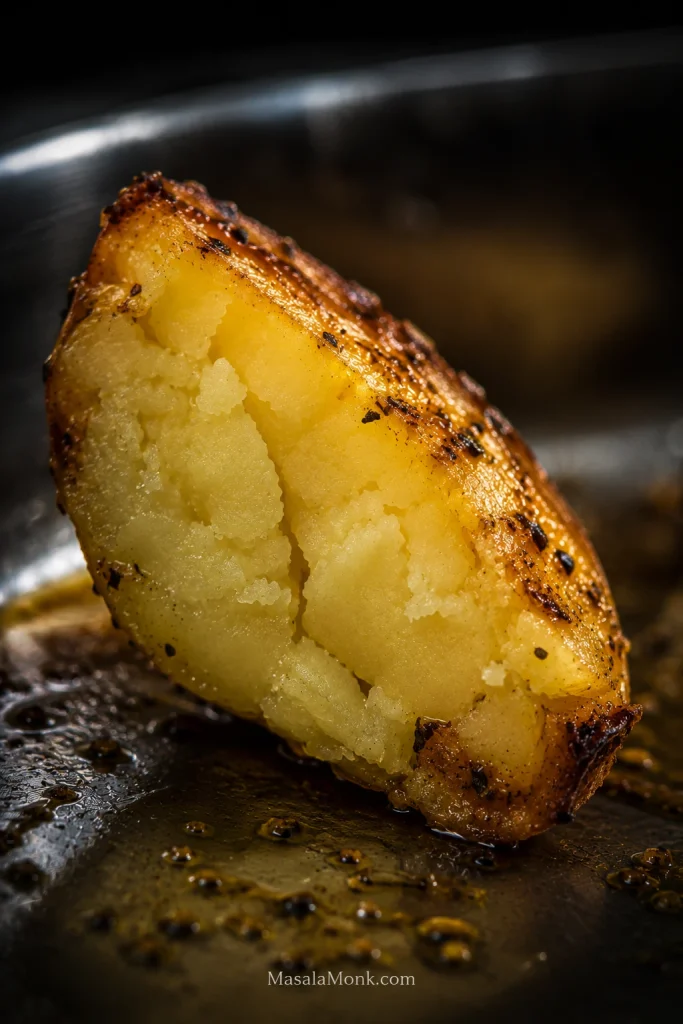
Close-up of a broken roasted potato wedge showing a creamy pale-yellow center, browned outer edge, oregano flecks and a light sheen of lemon-garlic pan juices.
Check one of the thickest wedges: the center should be moist and creamy, not chalky.

Greek Lemon Potatoes Recipe

These patates lemonates roast with olive oil, garlic, oregano, stock and fresh lemon, then get one last squeeze of lemon while the tray is still hot.

Serves6 as a side dish
PrepAbout 15 minutes
CookAbout 60–75 minutes, depending on the potatoes and final browning
Oven400°F / 205°C conventional
365°F / 185°C fan/convection
PanLarge rimmed metal roasting pan; around 12×16 in / 30×40 cm is a useful guide
Cut1–1¼ in / 2.5–3 cm thick wedges

Texture: creamy, well-seasoned centers with crisp, deeply browned patches around the edges. Because part of the roast happens in liquid, these stay softer than a completely dry-roasted potato.

Ingredients

  • 2 lb 10 oz / 1.2 kg Yukon Gold or similar all-purpose potatoes
  • ⅓ cup + 2 tablespoons / 110 ml extra-virgin olive oil
  • 5 garlic cloves, very finely grated or Microplaned
  • 1 tablespoon dried oregano, preferably Greek oregano
  • About 9 g fine sea salt / 1½ teaspoons, plus more if needed
  • ½ teaspoon freshly ground black pepper
  • ¾ cup / 180 ml hot low-sodium chicken or vegetable stock, or water
  • ¼ cup / 60 ml freshly squeezed lemon juice, for roasting
  • 1 tablespoon / 15 ml freshly squeezed lemon juice, for finishing, plus up to another tablespoon to taste
  • Finely grated zest of ½ lemon, optional
  • Fresh oregano or parsley, optional, for serving

Chicken stock gives the deepest savory flavor. Use vegetable stock for a vegan version, or water when you want the lemon and olive oil to come through most clearly.

You’ll usually need 2–3 medium lemons. Use fresh juice here; lemon is one of the main flavors, and bottled juice tends to taste flatter after a long roast. The 9 g of salt assumes low-sodium stock or water, so start with less if your broth, bouillon or stock concentrate is already salty.

Method

  1. Heat the oven. Set a rack in the middle and preheat to 400°F / 205°C conventional or 365°F / 185°C fan/convection.
  2. Prepare the potatoes. Peel them for a softer surface, or leave thin Yukon Gold skins on. Cut into wedges about 1–1¼ inches / 2.5–3 cm thick at the widest point. No soaking or parboiling is needed when you’re cooking them straight away.
  3. Season. Put the potatoes in the roasting pan with the olive oil, finely grated garlic, oregano, salt and pepper. Toss well, spread them into one layer and leave visible gaps between the wedges. Set one broad cut face down against the metal.
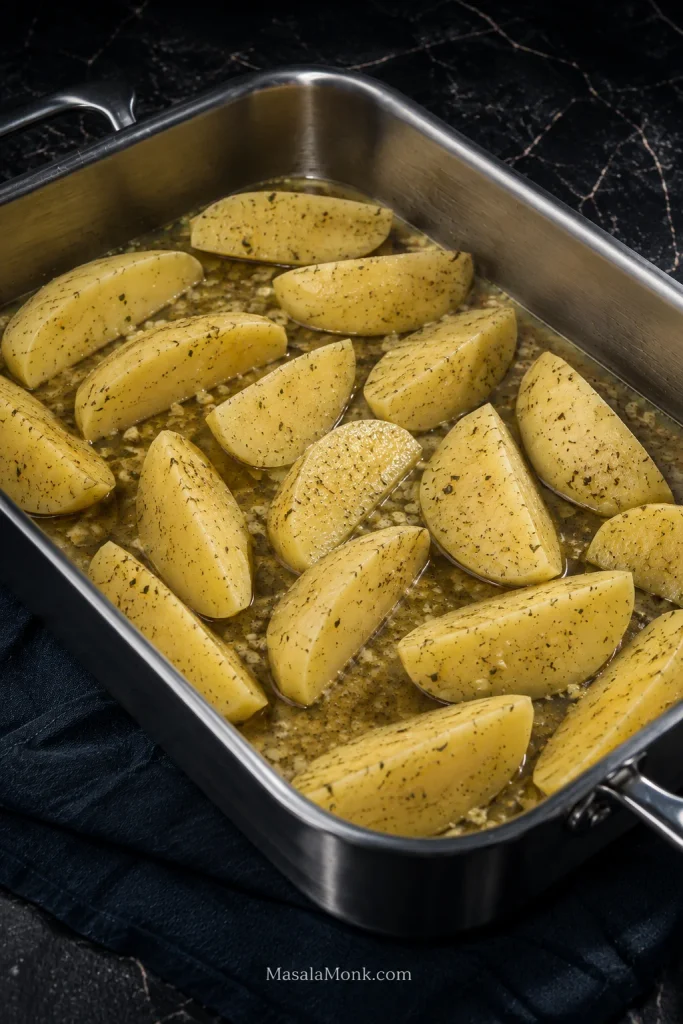
  4. Add the stock. Pour the hot liquid into the gaps rather than washing it over the seasoned tops. It should spread across the base and come only partway up the wedges. Most of each potato stays above the liquid.

What the Pan Should Look Like After Adding Stock

Use this stage as a calibration point rather than an exact liquid line. A wider pan can make the same amount of stock look shallower; what matters is that the wedge bases meet the liquid without the potatoes being submerged.

Raw peeled potato wedges arranged in one layer in a stainless roasting pan with visible gaps; seasoned stock covers the base and reaches only partway up the wedges.
Visible metal between the wedges is evaporation space. If the stock climbs too high or the wedges overlap, steam escapes more slowly and the wet phase lasts longer.
  1. Roast uncovered for about 30 minutes. The tray may still look pale and wet. Some loose stock will usually remain, and one of the larger wedges should be softening around the outside while still offering some resistance in the center. If the tray is nearly dry and the largest pieces are still hard, add about ¼ cup / 60 ml hot stock or water.
  2. Add the lemon and turn once. Pour ¼ cup / 60 ml lemon juice around the potatoes and carefully turn the wedges. That head start in the stock lets the centers begin softening before the main lemon goes in. Then leave them alone. Repeated stirring knocks soft edges off just as those surfaces are ready to start browning.

When the Lemon Goes In

Use the potato and pan state, not the 30-minute mark alone. The wedges should be softening, still fairly pale, with cooking liquid left in the pan.

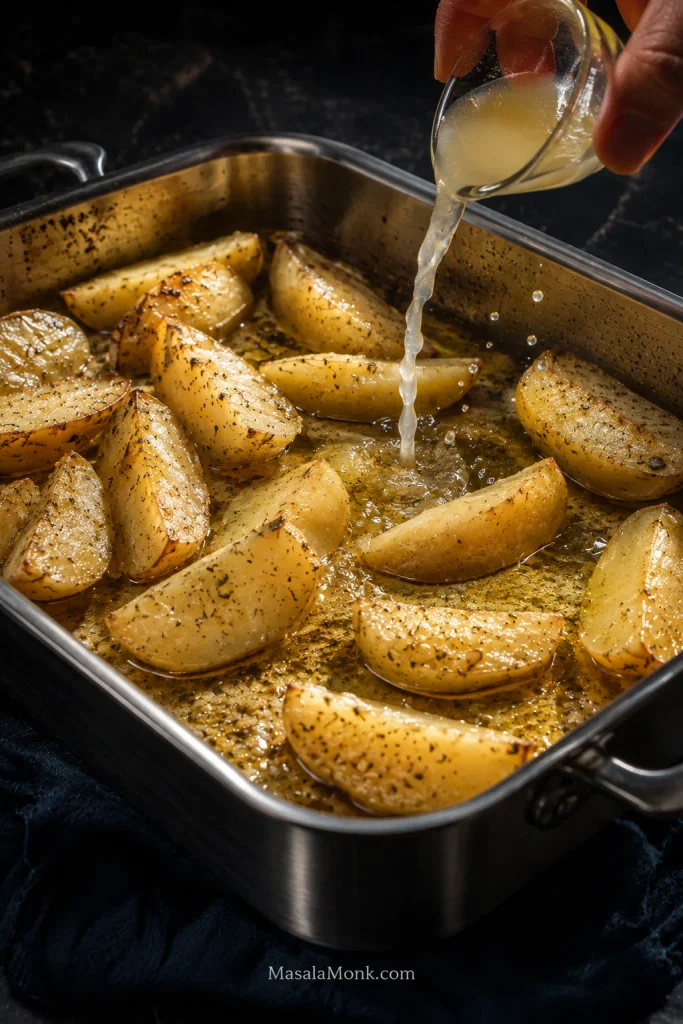
Fresh lemon juice being poured into the spaces around partially roasted potato wedges in a stainless pan, with cooking liquid still visible around the softened potatoes.
Pour lemon into the open spaces so it disperses through the hot pan liquid.
  1. Roast uncovered for another 30–40 minutes. Start checking at 30 minutes. Push a thin knife into one of the thickest wedges, not the little corner piece. It should slide through easily. Break one open if you’re unsure: the middle should look moist and creamy, not chalky or dry.
  2. Look at the tray. Tip it gently. Thin stock should no longer rush into the corner. Drag a spoon through the bottom; it should pick up oily, garlicky juices instead of a pool of thin cooking liquid. The smell should be more roasted garlic and oregano than steam.
  3. Brown if needed. Already well colored? Stop there. Pale but tender wedges can stay in the dry oven for a few more minutes or go under the broiler/grill for 2–4 minutes. Don’t chase perfectly even browning. Darker corners and softer sides are part of a good tray.
  4. Finish and taste. Squeeze over 1 tablespoon / 15 ml fresh lemon juice while the potatoes and oil are still hot. The tray should smell noticeably brighter almost immediately. Taste one for lemon and salt before adding more juice, zest or fresh herbs.

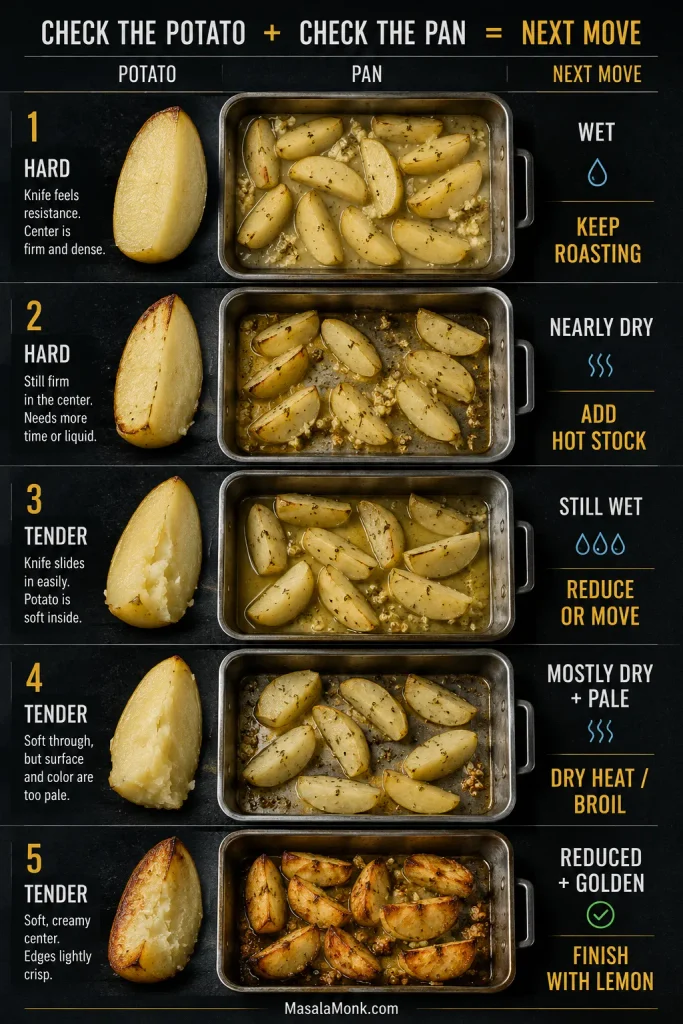
Check the Potato and the Pan

PotatoPanWhat to do next
HardWetKeep roasting. The middle needs more time.
HardNearly dryAdd about ¼ cup / 60 ml hot stock or water.
TenderStill wetLet the excess liquid cook away, or move the wedges to a wider hot tray.
Pale but tenderMostly dryGive them dry heat or a quick broil.
Golden and tenderReducedFinish with lemon and serve.
Five-stage cooking guide comparing potato tenderness with pan moisture to show when Greek lemon potatoes need more roasting, more stock, reduction, dry heat, or a final lemon finish.
Tenderness tells you whether the potato needs more cooking; the liquid tells you whether to add moisture or let the pan dry. Check both before simply adding more time.

Done looks like this: a knife slips easily through a thick wedge, the thin broth has cooked away, and a few cut faces and corners are deeply golden. One wedge may split when you turn it. Keep it. Those craggy broken edges often become some of the best bits in the pan.


More help: What makes them different · Best potatoes · Crisp edges · Troubleshooting · Storage & reheating · Serving ideas

What Makes Greek Lemon Potatoes Different?

Ordinary roast potatoes rely mainly on dry heat. Greek lemon potatoes spend part of the cook in seasoned liquid, giving the flavor time to reach farther into each wedge before the exposed surfaces brown. That’s how you can end up with a creamy, lemony middle and roasted edges on the same potato.
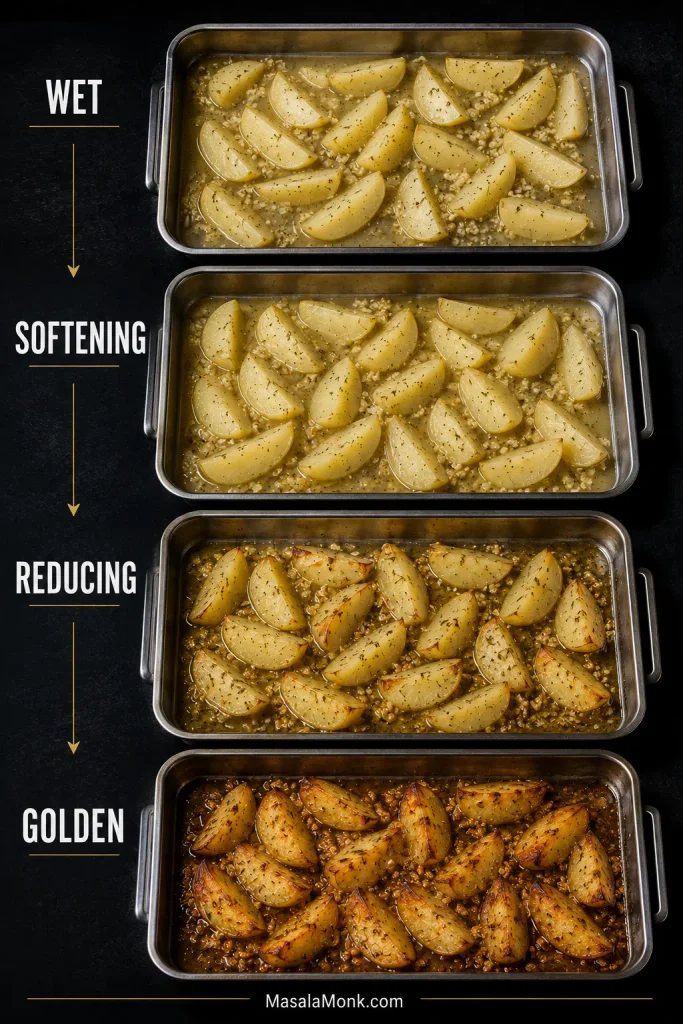
Four-stage guide showing potato wedges progressing from pale and wet, to softening, to reducing with early browning, and finally to golden potatoes with concentrated pan juices.
The turning point comes when the loose liquid has mostly cooked away and hot metal and olive oil can take over the browning.

Patates means potatoes, while lemonates roughly means lemony or lemon-flavored. Olive oil, lemon and oregano sit at the heart of the dish, usually with garlic and water, stock or roasting juices. You may also see related names such as patates fournou for oven potatoes or patates riganates when oregano is emphasized. Greek kitchens don’t all arrive at exactly the same tray.

Best Potatoes for Greek Lemon Potatoes

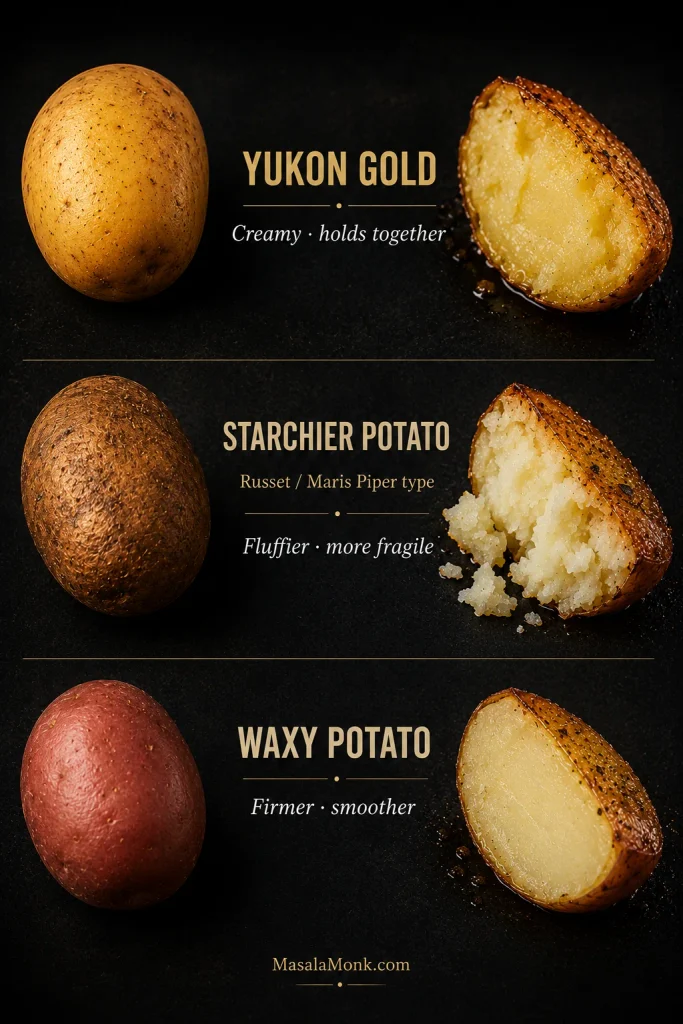
Yukon Gold is the easiest all-round choice. It holds together well, but the middle turns creamy and takes on plenty of the lemony cooking juices.

For an especially fluffy middle, try Maris Piper or Russet. Keep the wedges thick and handle them gently once tender; both become more fragile than Yukon Gold. Very waxy potatoes stay neat but hold onto a firmer, smoother interior.

Comparison of raw and cooked potato types: Yukon Gold with a creamy cohesive center, a starchier Russet or Maris Piper type with a fluffy crumbly interior, and a waxy potato with a smooth firm center.
Yukon Gold is the most forgiving when you turn and serve the wedges. Russet or Maris Piper turns fluffier and more fragile; waxy potatoes stay firmer.

In the US, Yukon Gold is the easy default. UK cooks can reach for Maris Piper. In Australia, Désirée or Sebago work well. Elsewhere, choose a potato sold for roasting, baking or general-purpose cooking rather than a very waxy salad potato.

Peeling is optional. Peeled wedges expose more potato to the seasoned liquid and develop a softer surface. Thin skins give the pieces a little more structure.

The Cut, the Pan and the Liquid

Cut the potatoes thick: about 1–1¼ inches / 2.5–3 cm at the widest point. Small pieces can start breaking before the juices have finished reducing. Huge wedges risk a firm or lightly seasoned middle.

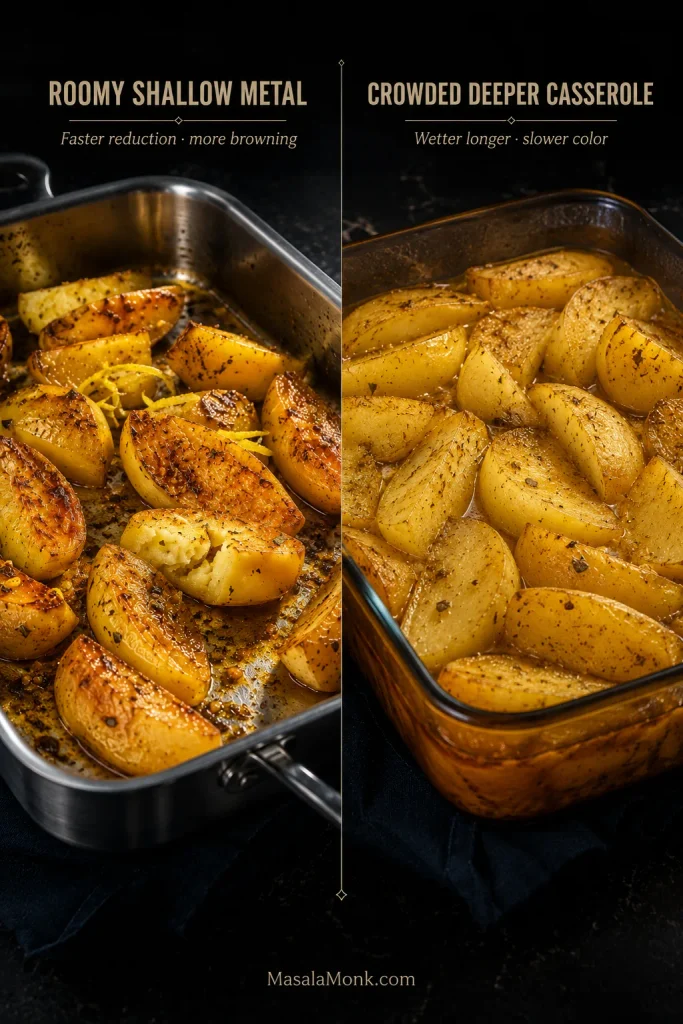
Give them room. Steam has to get out. A broad metal roasting pan exposes more potato to hot metal and gives moisture somewhere to escape. A deep glass or ceramic casserole can keep the dish wetter for longer, so browning may arrive later.

Side-by-side roasting comparison showing more browned potato wedges in a roomy shallow metal pan and wetter, softer-looking potatoes in a deeper crowded casserole.
Crowded or deep pans slow evaporation. If tender potatoes are still pale and wet, give the tray more reduction time.

Pan shape matters more than chasing an exact dimension. What matters is enough surface area for the wedges to sit in one layer with visible gaps between them.

Tray not matching the timing? Jump to troubleshooting and diagnose the wedge and pan together.

Lemon, Garlic and Oregano

Use fresh lemon. The juice added during roasting mellows into the garlic, stock and olive oil. The final squeeze restores the fresh citrus aroma that long oven heat softens. If you’ve kept adding juice and still can’t find the lemon aroma you remember, fresh zest often helps more than another splash of acid.

Leave thick lemon slices and squeezed halves out of the pan during the long roast; the pith and rind can become bitter. Grate the garlic very finely so it disappears into the cooking juices instead of leaving large pieces exposed once the liquid recedes.

Dried oregano handles the long roast beautifully. Greek oregano is excellent if you have it. Save fresh oregano or parsley for the finished tray.

The generous olive oil is intentional. As the stock cooks away, the oil takes over as the roasting fat and stays behind as part of the lemon-garlic sauce you spoon over the potatoes at the end.

These potatoes are particularly good beside chicken souvlaki, where the same lemon, garlic and oregano meet juicy chicken and charred edges.

Getting More Golden, Crisp Edges

Once the thickest wedges are tender, stop protecting the moisture and start chasing color. The broad cut faces and rough corners brown first, giving you some of the darkest, best-tasting patches.

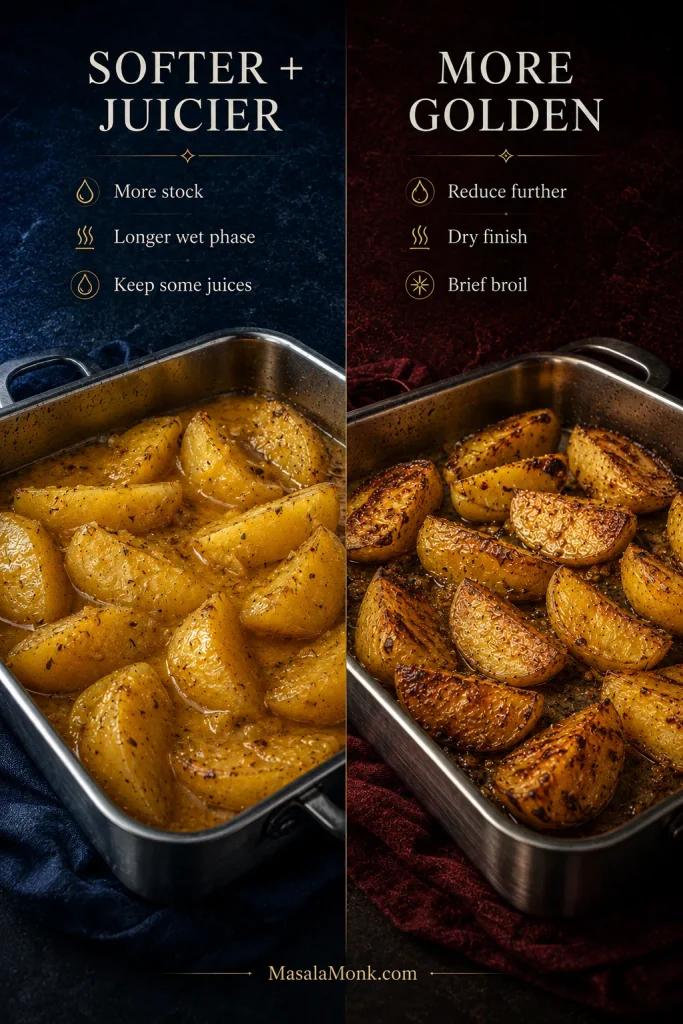
Two styles of Greek lemon potatoes shown side by side: softer, juicier wedges with more pan juices and a more reduced version with deeper golden-brown roasted surfaces.
Choose the finish after the centers are tender: stop with spoonable juices for softer taverna-style potatoes, or reduce further for deeper golden edges.

Keep Them in the Same Pan

Tender potatoes in an almost-dry pan can stay exactly where they are. Give them a few more minutes of roasting or a 2–4 minute broil.

Move Them When the Pan Is Holding Them Back

A wet pan can keep already-tender potatoes from browning. Move the wedges to a clean, hot metal sheet when they’re still sitting in plenty of liquid, or when the garlic-rich juices are getting too dark. Brown the potatoes on the clean tray, reduce the juices separately, then spoon them back over.

If all-over crunch is what you’re after, use a dry-roasted method instead; these ranch roasted potatoes are built for that texture.

Trying to Recreate Softer Restaurant Potatoes?

If the potatoes you remember were almost spoon-soft, with more lemony juice than crisp crust, you may be trying to recreate a softer style.

Use stock rather than water and increase the starting liquid toward 1 cup / 240 ml. Let the wetter phase run longer. Stop while there is still a spoonable amount of concentrated juice in the pan and skip the aggressive broiler finish.

That softer style is especially good beside a roast leg of lamb, where the lemony potato juices can mingle with the richer meat juices on the plate.

When the Potatoes Go Wrong

If the tray doesn’t match the clock, forget the clock for a moment. Check one of the larger wedges and look at what’s left in the pan.

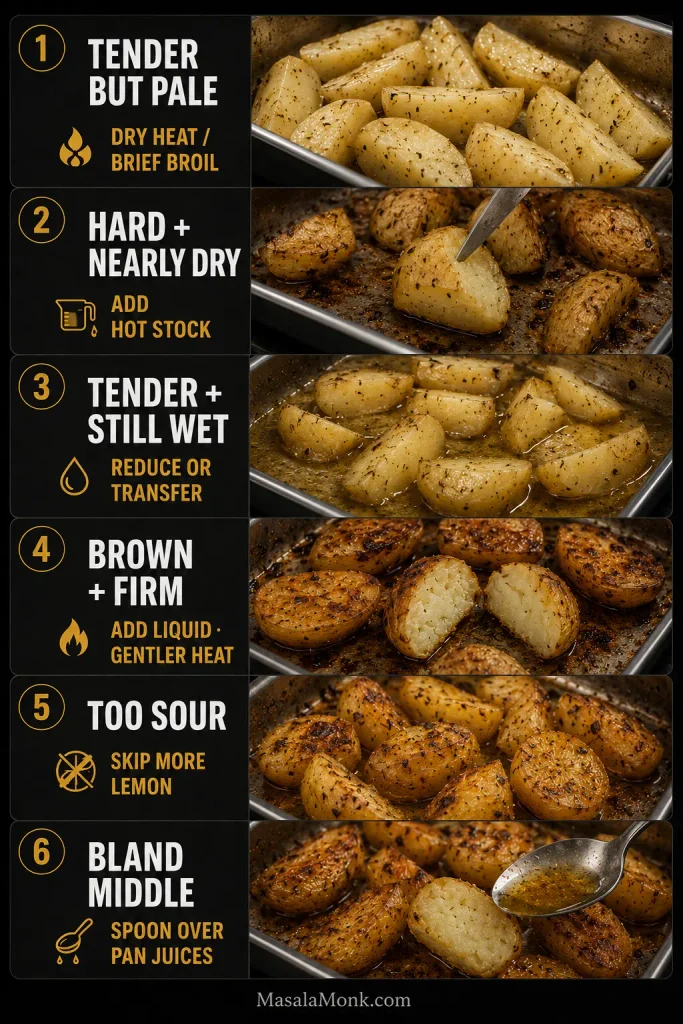
Troubleshooting guide showing six Greek lemon potato problems: tender but pale, hard and nearly dry, tender and still wet, brown but firm, too sour, and a bland center.
A hard potato and a wet pan are different problems. Add moisture only when the center still needs it; otherwise, let evaporation do the work.
What you seeWhat to do now
Tender but paleGive them a few more minutes of dry oven heat or a quick broil.
Garlic or juices getting too darkStop the aggressive heat or move the potatoes to a clean tray.
Wedges falling apartStop turning them and finish the remaining pieces undisturbed.
Too sourSkip the extra finishing lemon and spoon over the savory juices instead.
Tart enough but not lemony enoughAdd fresh zest rather than more juice.

The Pan Is Dry but the Center Is Still Hard

That’s fixable. Add about ¼ cup / 60 ml hot stock or water around the wedges and keep roasting. Your pan or oven has lost moisture faster than the potatoes could soften. A broad pan or hot-running oven may need a little more liquid next time.

The Potatoes Are Tender but Still Swimming

The difficult part is already done. A little thin liquid can simply cook away uncovered. If the potatoes are genuinely sitting in a deep pool, move them to a broad hot tray and brown them there while the original juices reduce separately. Spoon those juices back over before serving.

They Are Brown Outside but Firm Inside

Add a little hot liquid and back away from aggressive top heat. Keep cooking until a knife slips easily through one of the thickest wedges. You can always add more color later.
The Middle Tastes Bland

A squeeze of lemon over the top can brighten a bland potato, but it can’t completely replace seasoning that never reached the middle. Very waxy potatoes, oversized wedges, under-seasoned liquid or a tray that dried too quickly can all contribute. Spoon the reduced juices over this batch; next time, focus on the potato choice, wedge size and first part of the roast.

Doubling the Recipe for a Crowd

A bigger batch needs more pan space, not twice as much time.

  • Use two pans and keep each tray in one layer.
  • If your oven browns unevenly, swap the pans between racks during cooking. Judge each tray separately by tenderness and how much liquid remains.
  • Broil one pan at a time unless your broiler heats the full oven evenly.

Make Ahead, Store and Reheat

To cut the potatoes ahead: prepare them several hours in advance and keep them fully submerged in cold water in the refrigerator. Drain and dry them well before seasoning.

To cook them ahead: you can roast Greek lemon potatoes in advance and reheat them. Expect softer edges. As the potatoes sit, they continue absorbing the pan juices, so cook them reasonably close to serving when crispness matters most.

Cool leftovers promptly and refrigerate them, together with any remaining juices, in a covered container for 3–4 days. USDA leftovers guidance gives the same refrigerator window.

Reheat in a 425°F / 220°C oven for about 10–15 minutes, until hot throughout. An air fryer is also useful for restoring browned edges; reheat the potatoes in a single layer until hot and crisp around the edges. The microwave works, but the browned surfaces will soften.

Freezing is possible, though the texture usually suffers. Potatoes can become grainier or more watery after thawing.

What to Serve With Greek Lemon Potatoes

Cold Greek tzatziki is a particularly good contrast: cool cucumber and yogurt against roasted garlic, lemon and browned potato edges.

For a lighter main, try lemon-garlic baked tilapia. The potatoes also sit naturally beside roast chicken, lamb chops, souvlaki or kebabs, grilled vegetables, and a crisp tomato-cucumber salad.

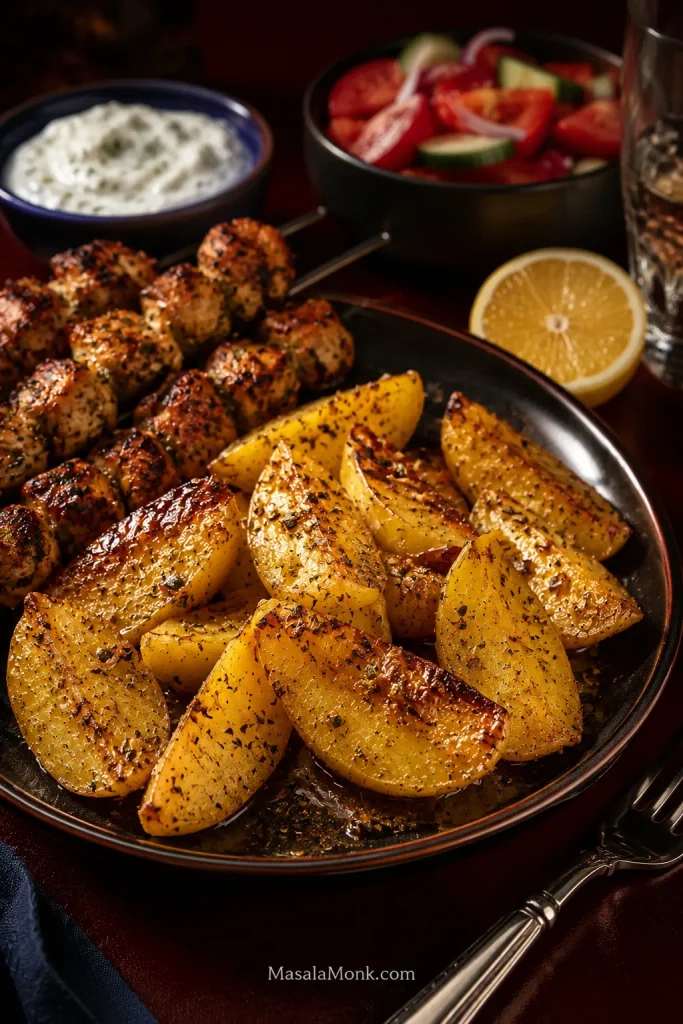
Golden Greek lemon potato wedges served with charred chicken souvlaki, a small bowl of tzatziki, tomato-cucumber salad and fresh lemon on a dark restaurant-style table.
Charred souvlaki, cool tzatziki and crisp tomato-cucumber salad turn the lemony potatoes into a complete Greek-inspired dinner.

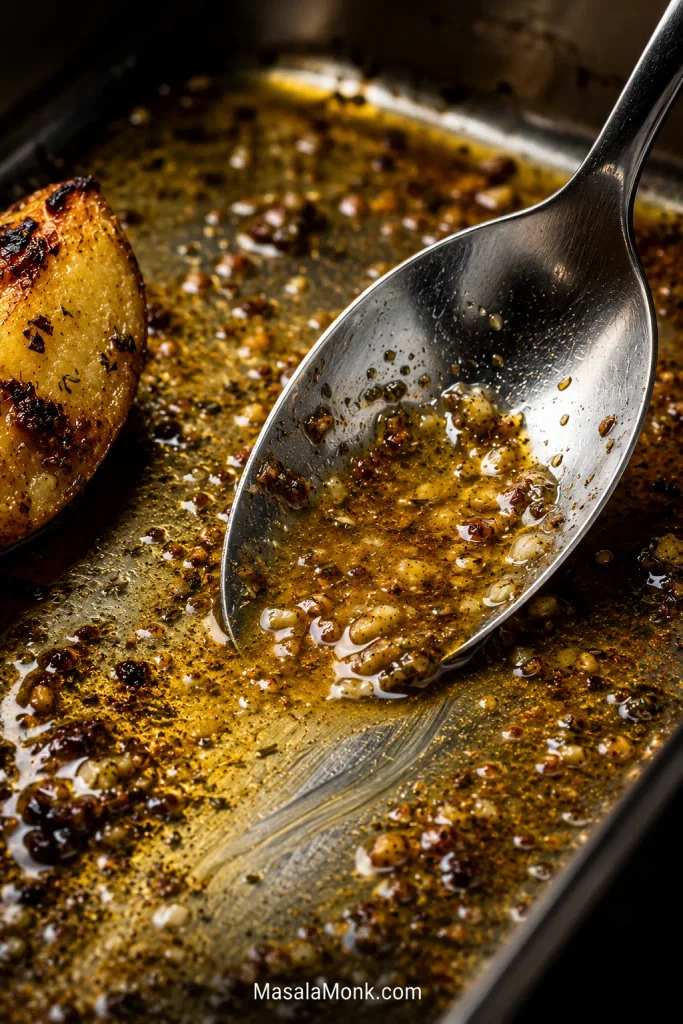
One last spoonful: the pan juices.

Close-up of a stainless spoon scraping through reduced golden lemon-garlic pan juices with oregano and browned potato bits, leaving a clean streak across the metal roasting pan.
Drag a spoon through the pan: it should briefly reveal clean metal before the glossy juices settle back. If thin liquid floods the track, keep reducing.

Once the potatoes are creamy inside and the liquid in the tray has cooked down to salty lemon-garlic juices, you’re there. Add the last squeeze of lemon, spoon everything from the bottom of the pan over the potatoes, and get them to the table hot. Those browned edges are good; the last garlicky spoonful in the pan may be even better.

Posted on — Leave a comment

Roasted Cauliflower and Potatoes Recipe (Crispy, Golden & Easy)

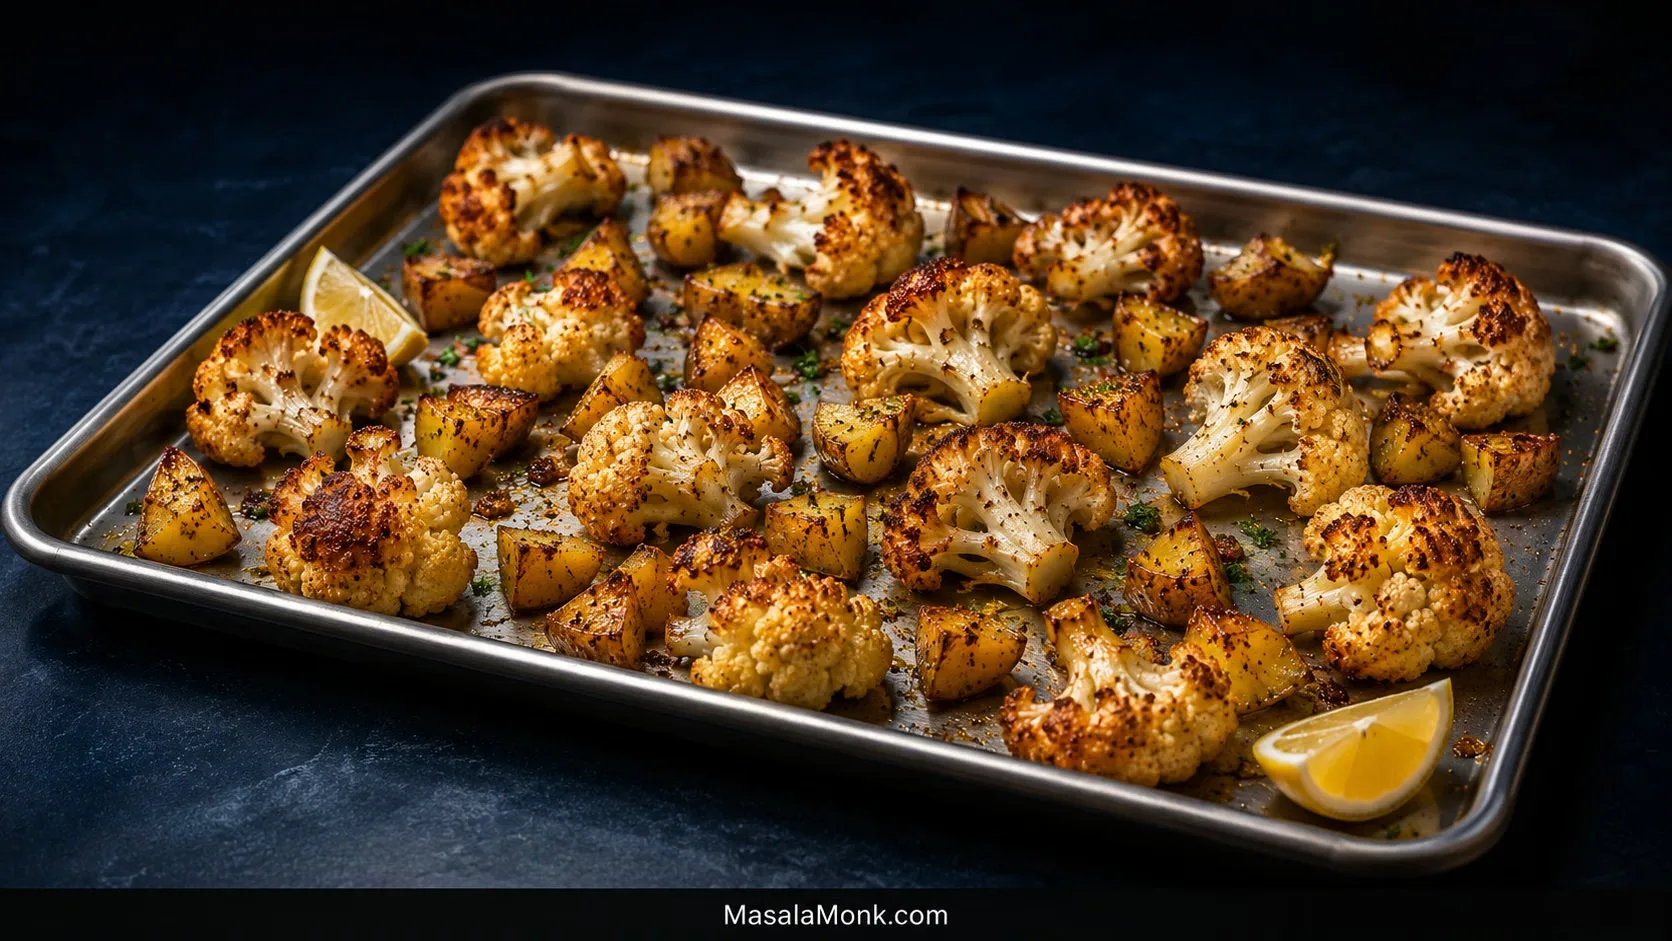
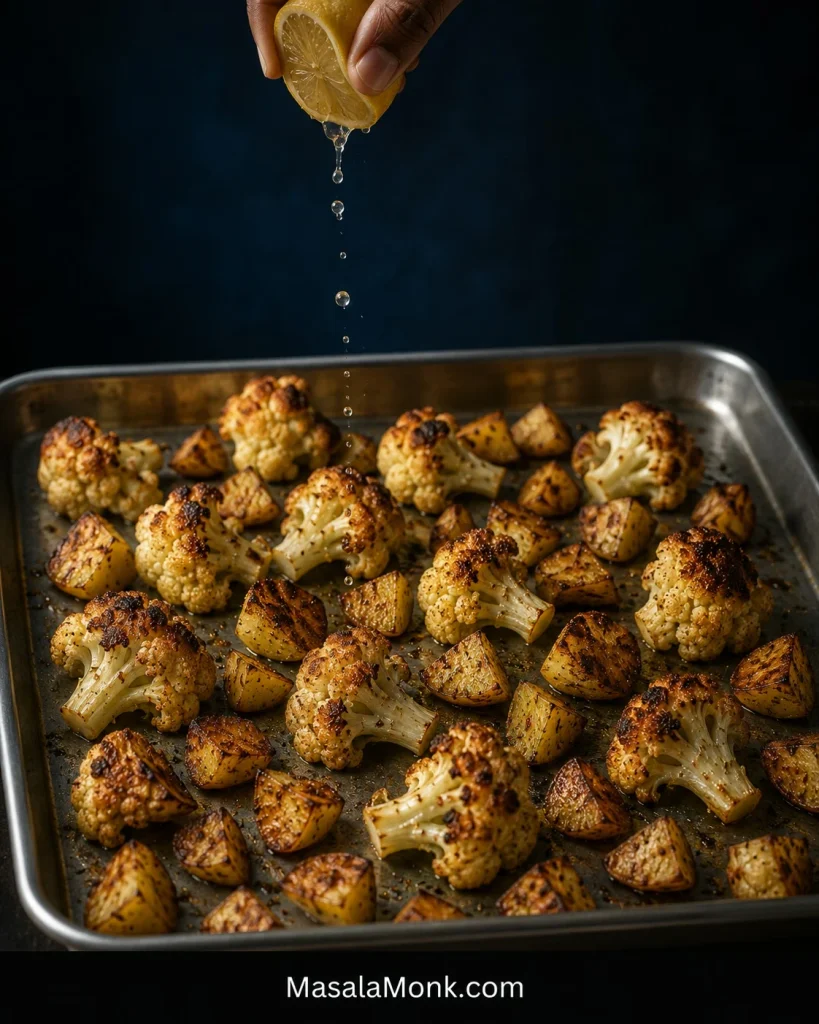
Roasted cauliflower florets and smaller Yukon Gold potato chunks spread across a stainless-steel sheet pan with deep golden browning and visible space between pieces.

The best pieces on this tray are usually the ones touching the metal: potatoes with properly browned bottoms and cauliflower with deeply golden edges. Inside, the potatoes should be creamy and the cauliflower tender while still holding its shape.

The frustrating version is familiar: the cauliflower looks ready, you test a potato, and the middle is still firm. Cauliflower softens faster than a dense chunk of potato, so the two vegetables do not need to be cut the same size.

Keep the potato pieces noticeably smaller than the cauliflower florets and they can roast together on the same sheet pan at 425°F (220°C). That one difference lets both vegetables start raw and reach the right texture at about the same time.

Quick Answer: How to Roast Cauliflower and Potatoes Together

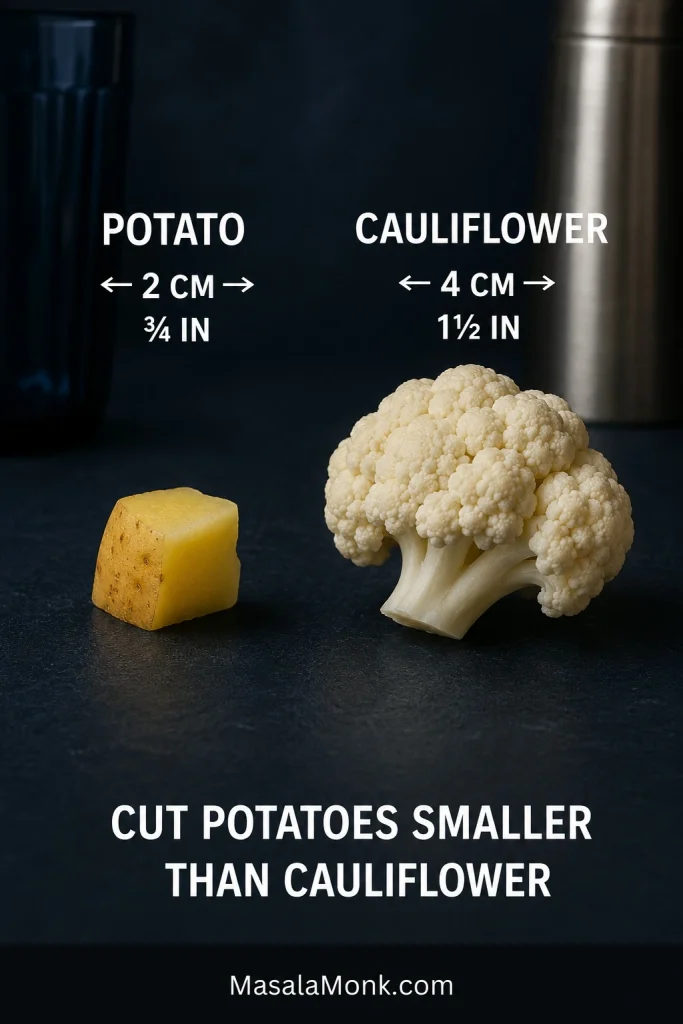
Heat the oven to 425°F (220°C). Cut the potatoes into ¾-inch (2 cm) pieces and keep the cauliflower florets larger, about 1½ inches (4 cm) across. At those sizes, both vegetables can start raw together—no boiling, soaking or parboiling is needed.

Toss with olive oil and seasonings, then spread the vegetables in a roomy single layer on a large rimmed sheet pan. Turn once after the undersides begin to brown.

Start checking at 25 minutes; typical total roasting time is 28–35 minutes. Test one of the largest potato pieces before you pull the pan. The center should be completely tender.

The Cut Sizes That Make This Work

That size difference is the timing trick: keep the dense potato chunks smaller than the cauliflower so both can go onto the pan raw and finish together.

Raw 2 cm Yukon Gold potato chunk beside a larger 4 cm cauliflower floret, showing the different cut sizes used so both vegetables can finish together.

Make It Now: Roasted Cauliflower and Potatoes

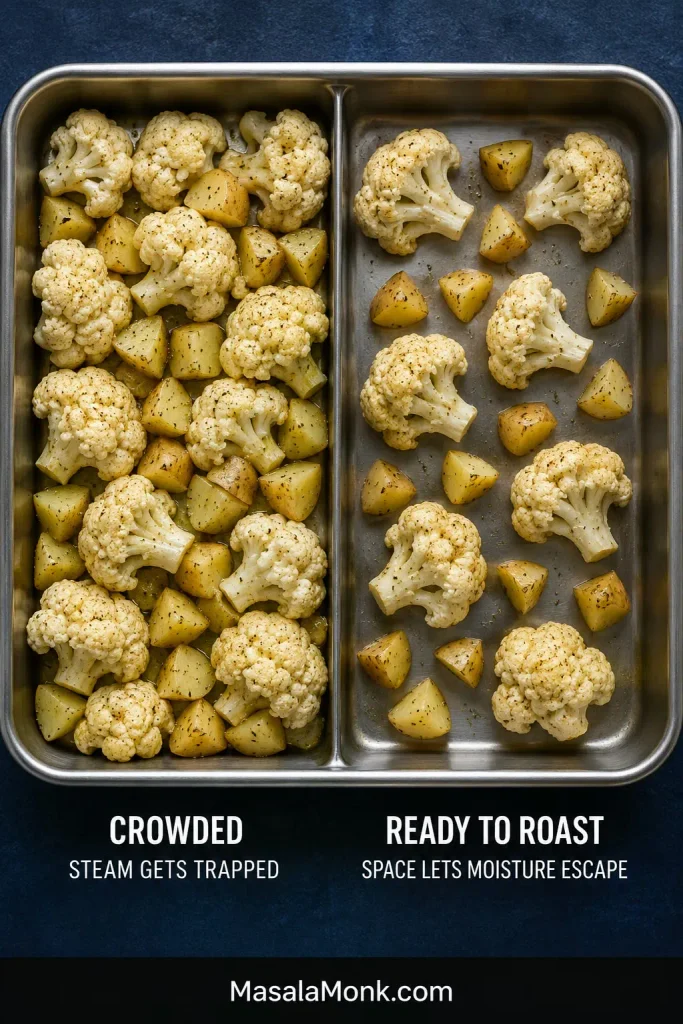
Allow 15–20 minutes for prep. Dry freshly washed cauliflower well. For roasting the whole batch on one pan, a sturdy rimmed metal half-sheet measuring about 13 × 18 inches (33 × 46 cm) is the minimum. Cauliflower varies a lot in bulk, so if the vegetables fill the pan edge to edge with almost no visible gaps, split them between two pans rather than crowding them.

The recipe makes 4 generous side servings and is vegan, dairy-free and naturally gluten-free as written.

Ingredients

  • 700 g (24–25 oz) cauliflower florets, weighed after trimming (about 1 large cauliflower)
  • 450 g (1 lb) Yukon Gold potatoes, scrubbed
  • 3 tablespoons (45 ml) olive oil
  • 7 g fine sea salt (about 1¼ teaspoons; volume varies somewhat by brand), plus more to taste
  • 1½ teaspoons garlic powder
  • 1½ teaspoons sweet paprika
  • ½ teaspoon freshly ground black pepper
  • 1 tablespoon (15 ml) fresh lemon juice, plus more to taste
  • 2 tablespoons chopped fresh parsley, optional

How to Roast Them

1. Heat the oven

Heat the oven to 425°F (220°C) with a rack near the middle. For a fan oven, use 200°C.

2. Cut the vegetables

Cut the potatoes into about ¾-inch (2 cm) pieces. Keep the cauliflower florets about 1½ inches (4 cm) across.

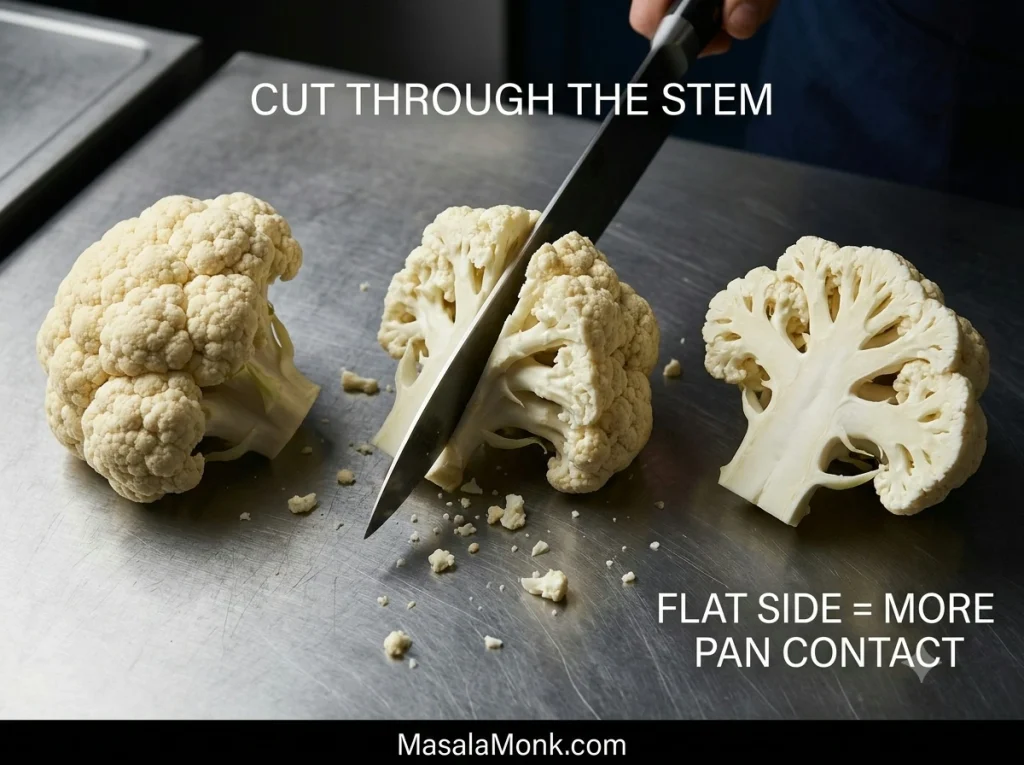
For better browning, make a flat side. Halve some of the larger florets through the stem. The broad cut surface sits flush against the pan and browns much better than a rounded floret.

Cauliflower floret cut lengthwise through the stem to create a flat side for direct contact with the roasting pan.
Keep the stem attached when halving a large floret; it helps the crown hold together while the flat face browns against the pan.

If your potato pieces are closer to 1 inch (2.5 cm), use the head-start method under Potato Size and Variety below.

3. Oil and season

Put the cauliflower and potatoes in a large bowl. Add the olive oil, salt, garlic powder, sweet paprika and black pepper. Toss until the potatoes are lightly glossy and the seasoning has worked its way into the cauliflower’s crags. There should not be a puddle of oil left at the bottom of the bowl.

Prefer fresh garlic? Finely chop 3 medium cloves and scatter them over the tray for the final 5–10 minutes. Skip the garlic powder for this version. Fresh garlic gives a sharper garlic flavor and can turn bitter if roasted for the full time.

4. Give everything room

Spread the vegetables into one open layer. Leave visible metal between many of the pieces and put some flat potato faces and cauliflower cut sides directly against the pan.

If the last handful only fits by closing those gaps and packing the pieces together, grab another tray or save it for later. A little empty metal does more for the roast than squeezing in one more floret.

Two trays of seasoned cauliflower and potatoes before roasting, one tightly crowded and one spaced apart with visible metal between the vegetables.

5. Let the first side brown

Roast undisturbed for 18–20 minutes. Use a spatula to lift one potato. You should see a proper golden-brown patch underneath. Completely pale bottoms need another couple of minutes before you turn the vegetables.

Two potato chunks shown cut-side up, one pale underneath and one deeply golden, demonstrating when the potatoes are ready to turn.
Use a potato cut face as the browning gauge; its flat underside gives a cleaner read on pan contact than cauliflower.

Turn once and continue roasting. Start checking at 25 minutes. Dark-colored pans and fan/convection ovens can brown the vegetables more quickly, so judge the food rather than waiting for minute 35.

Ready when: a thin knife slides through one of the largest potato pieces with very little resistance. The cauliflower stems should be tender and the florets should still hold together. Deeply browned tips are fine. A potato that looks done outside but remains firm in the middle needs more time.

If the vegetables are tender but still pale, see How to Get Crisp, Golden Edges. For a tray that has gone off track, jump to Fix My Tray.

6. Finish while the vegetables are hot

Add the lemon juice and parsley, if using, as soon as the pan comes out of the oven. You’ll smell the lemon immediately against the warm garlic and paprika. Taste a potato and a piece of cauliflower, then add more salt or another squeeze of lemon if needed.

Fresh lemon being squeezed over a hot sheet pan of deeply roasted cauliflower florets and golden potato chunks.

Serve straight away while the browned sides still have some crispness.


Potato Size and Variety

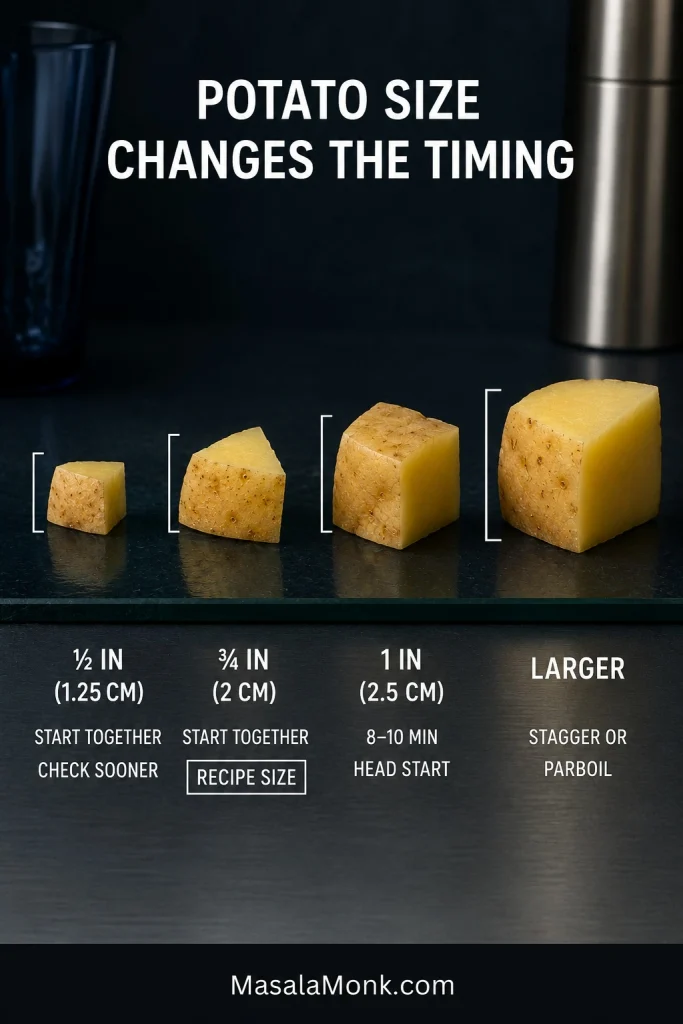
The ¾-inch (2 cm) potatoes in the main recipe are small enough to keep pace with the cauliflower. Bigger pieces need more time; smaller ones reach tenderness sooner.

Potato sizeBest approach
½ inch (1.25 cm)Start both vegetables together and begin checking sooner
¾ inch (2 cm)Both vegetables can start together
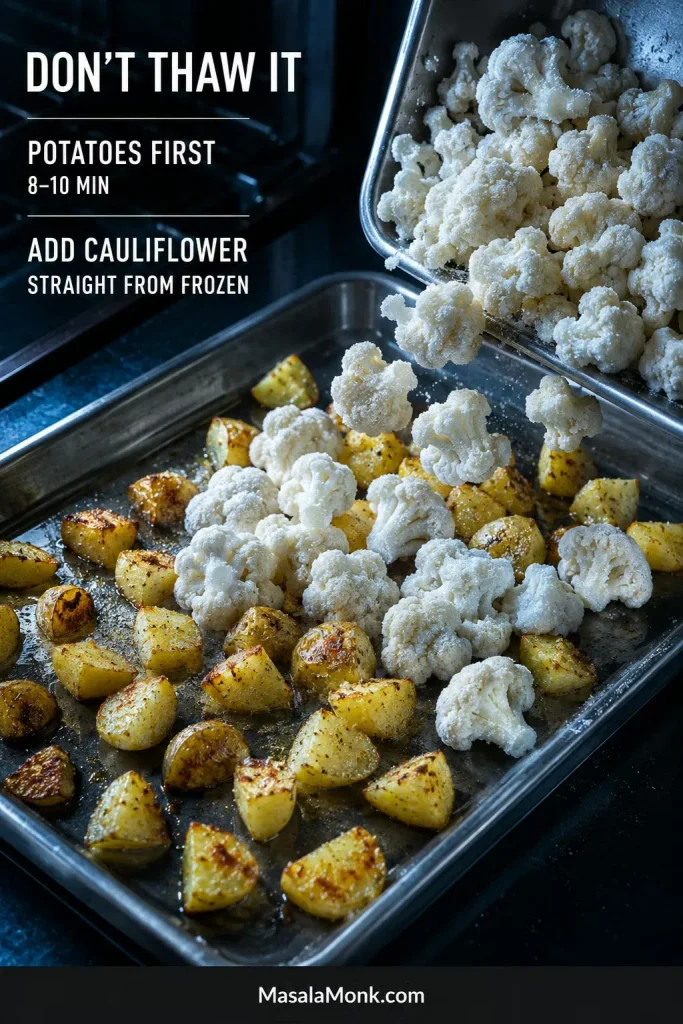
1 inch (2.5 cm)Give the potatoes an 8–10 minute head start
Larger than 1 inch (2.5 cm)Use a longer head start, parboil briefly or roast separately

For 1-inch (2.5 cm) potato pieces: toss the potatoes with half the oil and seasonings and roast for 8–10 minutes. Toss the cauliflower with the remaining oil and seasoning, add it to the hot pan, then continue with the main method.

Potato pieces shown at several sizes from about half an inch to larger than one inch, illustrating how larger cuts need more roasting time.
A small increase in width means much more potato to heat through, which is why 1-inch pieces need a head start.

Whatever size you use, check one of the biggest pieces before deciding the potatoes are done. The center should be creamy and tender, never chalky or crunchy.

Yukon Golds are the easiest all-round choice: creamy inside, sturdy enough to hold together and good at picking up color underneath. Red potatoes can be substituted 1:1 by weight at the same ¾-inch (2 cm) size. Russets work too, but their fluffier pieces become more delicate as they cook, so turn them gently. Yukon Gold and red potatoes can stay unpeeled after a good scrub.

Baby potatoes still need to be judged by their actual size; a larger one may need quartering. If potatoes are the main attraction, these ranch roasted potatoes take the browned-cut-side idea further.

How to Get Crisp, Golden Edges

What Good Browning Looks Like

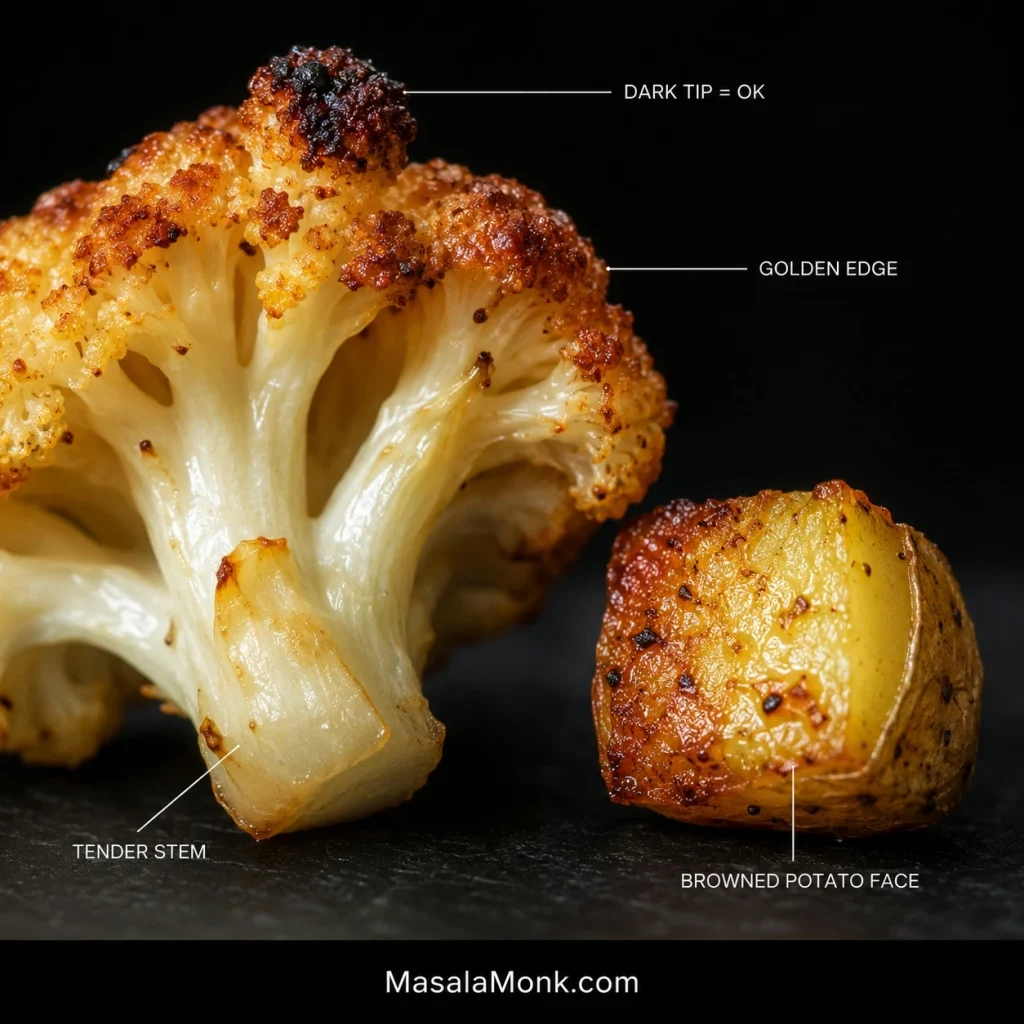
Here, “crispy” means crisp edges and well-browned flat sides around tender centers. Expect good color where the vegetables meet the pan, not a crust over every surface.

Close-up of roasted cauliflower with golden edges and a dark brown tip beside a potato chunk with a browned contact face.
Look for the cues together: browned potato contact faces, golden cauliflower edges and tender stems.

Dry cauliflower and open space do most of the early work. Surface water has to evaporate before the florets can brown, while a crowded sheet pan traps steam around them. A thin film of oil helps the cauliflower’s uneven edges and the cut potato faces brown more evenly.

Bare Metal, Foil or Parchment?

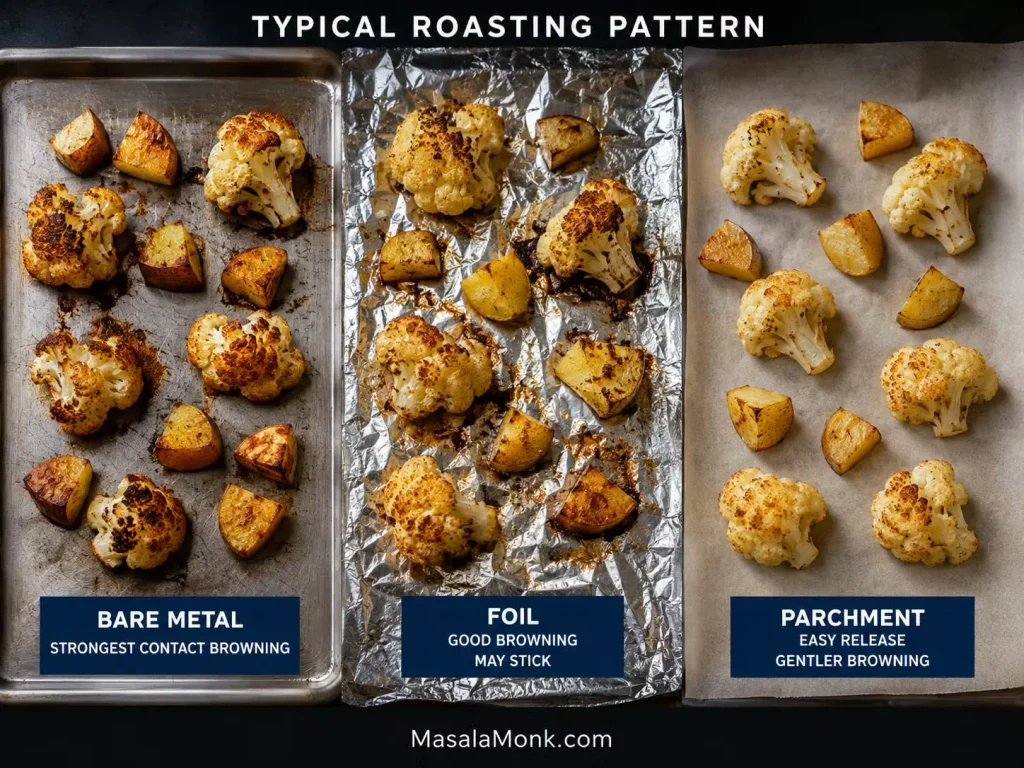
Flat sides against the pan supply the strongest color, so give them time before turning. Bare, lightly oiled metal browns best; foil works well too, though the vegetables may stick. Parchment releases more easily and usually gives gentler color underneath. A side-by-side roasting comparison from Serious Eats found the same general pattern.

Roasted cauliflower and potato pieces on bare metal, aluminum foil and parchment, showing progressively gentler contact browning.
Bare metal gives the strongest direct contact; parchment softens that contact and usually gives gentler browning underneath.

If you use parchment, choose one rated for at least 425°F. For deeper color, you can also preheat an empty bare sheet pan before adding the vegetables, but the regular method does not depend on that extra step.

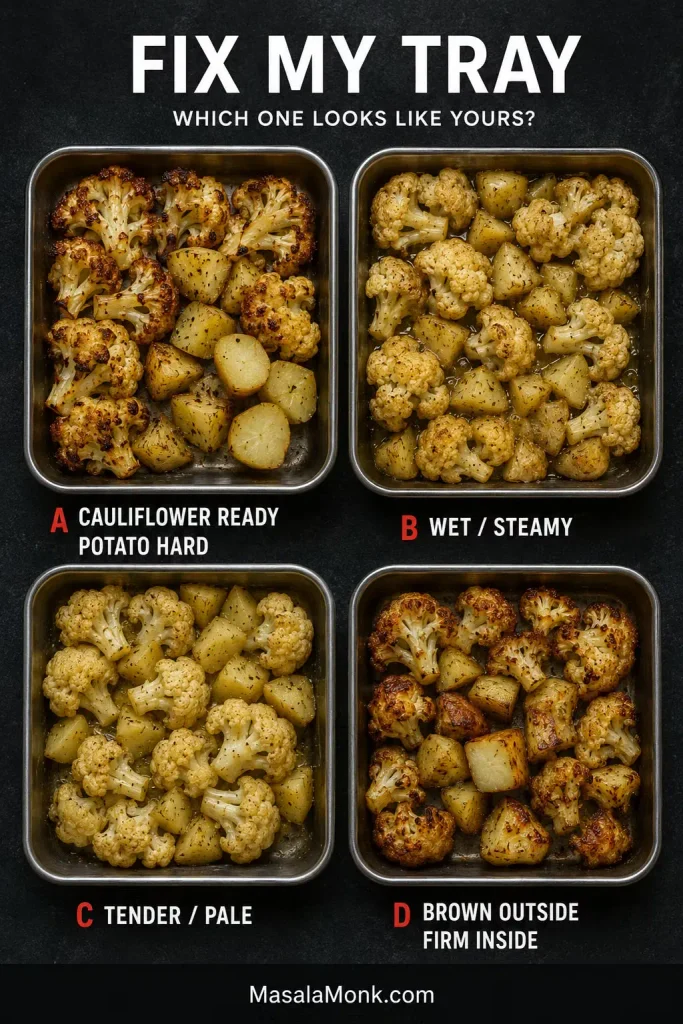
Fix My Tray

Once dinner is already in the oven, the clock is not always the best guide. Look at what the vegetables are doing and fix that problem.

Four trays showing common roasting problems: cauliflower done before potatoes, wet vegetables, tender but pale vegetables, and potatoes browned outside but firm inside.
Check tenderness first, moisture second and color third; those clues usually tell you whether to keep cooking, create space or push browning.

Common Roasting Problems and Quick Fixes

What you seeWhy it happenedWhat to do now
Cauliflower is ready but potatoes are hardThe two vegetables are no longer finishing togetherTake the cauliflower off the tray and roast the potatoes another 5–10 minutes. Dinner gets no bonus points because everything left the oven together.
Potatoes are deeply brown but still firm insideThe outside browned faster than the middle cookedTurn the darkest sides upward and keep roasting. If the edges are already close to scorching, lower the oven to about 400°F (200°C conventional; about 180°C fan) and continue until the centers are tender.
Everything is tender but paleThe vegetables cooked through before developing enough colorKeep roasting a little longer. If the vegetables are on a bare broiler-safe pan, 1–2 minutes under the broiler can help. Watch constantly. If you used parchment, stay with the regular oven instead.
Cauliflower is soft or falling apartThe florets were too small, crowded or overcookedRemove the cauliflower now. More heat will only soften it further.
The tray looks wet or steamyCrowding is trapping moisture around the vegetablesSplit the vegetables between two trays and keep roasting.
Potatoes are tender but the edges are softThey had poor pan contact or too much surrounding moisturePut the cut sides against the metal and give them a little longer.
Fresh garlic tastes bitterIt scorchedRemove badly blackened pieces; add fresh garlic later next time.
The vegetables are browned but taste flatThey need more salt or aciditySeason while hot and add another squeeze of lemon.

Deeply Browned or Actually Burned?

A few very dark cauliflower tips are normal. Acrid black garlic, dry scorched florets and smoke are much better signs that something has actually burned.

Ways to Change the Flavor

The garlic-paprika base can move in several directions without changing the roasting method.

Four versions of roasted cauliflower and potatoes finished as Garlic Parmesan, Indian-Spiced, Smoky and Spicy, and Lemon Herb.

Garlic Parmesan

Parmesan is especially good where it catches on the rough cauliflower edges and potato corners, melting into little browned patches. Use 5–6 g fine sea salt instead of the full 7 g, then scatter over 35 g (about ⅓ cup) finely grated Parmesan during the final 5–8 minutes. Taste before adding more salt.

Indian-Spiced

Skip the sweet paprika and use 1 teaspoon ground cumin, 1 teaspoon ground coriander and ½ teaspoon turmeric. For color and mild warmth, add ½ teaspoon Kashmiri chilli powder; for more heat, use up to ¼ teaspoon cayenne. Finish the hot vegetables with ½ teaspoon garam masala, cilantro and lemon or lime.

For cauliflower and potatoes cooked as the fuller Indian dish with onion, tomato and masala, use a classic aloo gobi recipe.

Smoky and Spicy

Replace the sweet paprika with 1½ teaspoons smoked paprika and add up to ¼ teaspoon cayenne or red pepper flakes. Finish generously with lemon so the smoky seasoning stays lively rather than heavy.

Lemon Herb

Add 1 teaspoon dried oregano or thyme with the garlic powder. Finish with 1 teaspoon finely grated lemon zest, lemon juice and parsley or dill for a brighter version.

Adding Other Vegetables

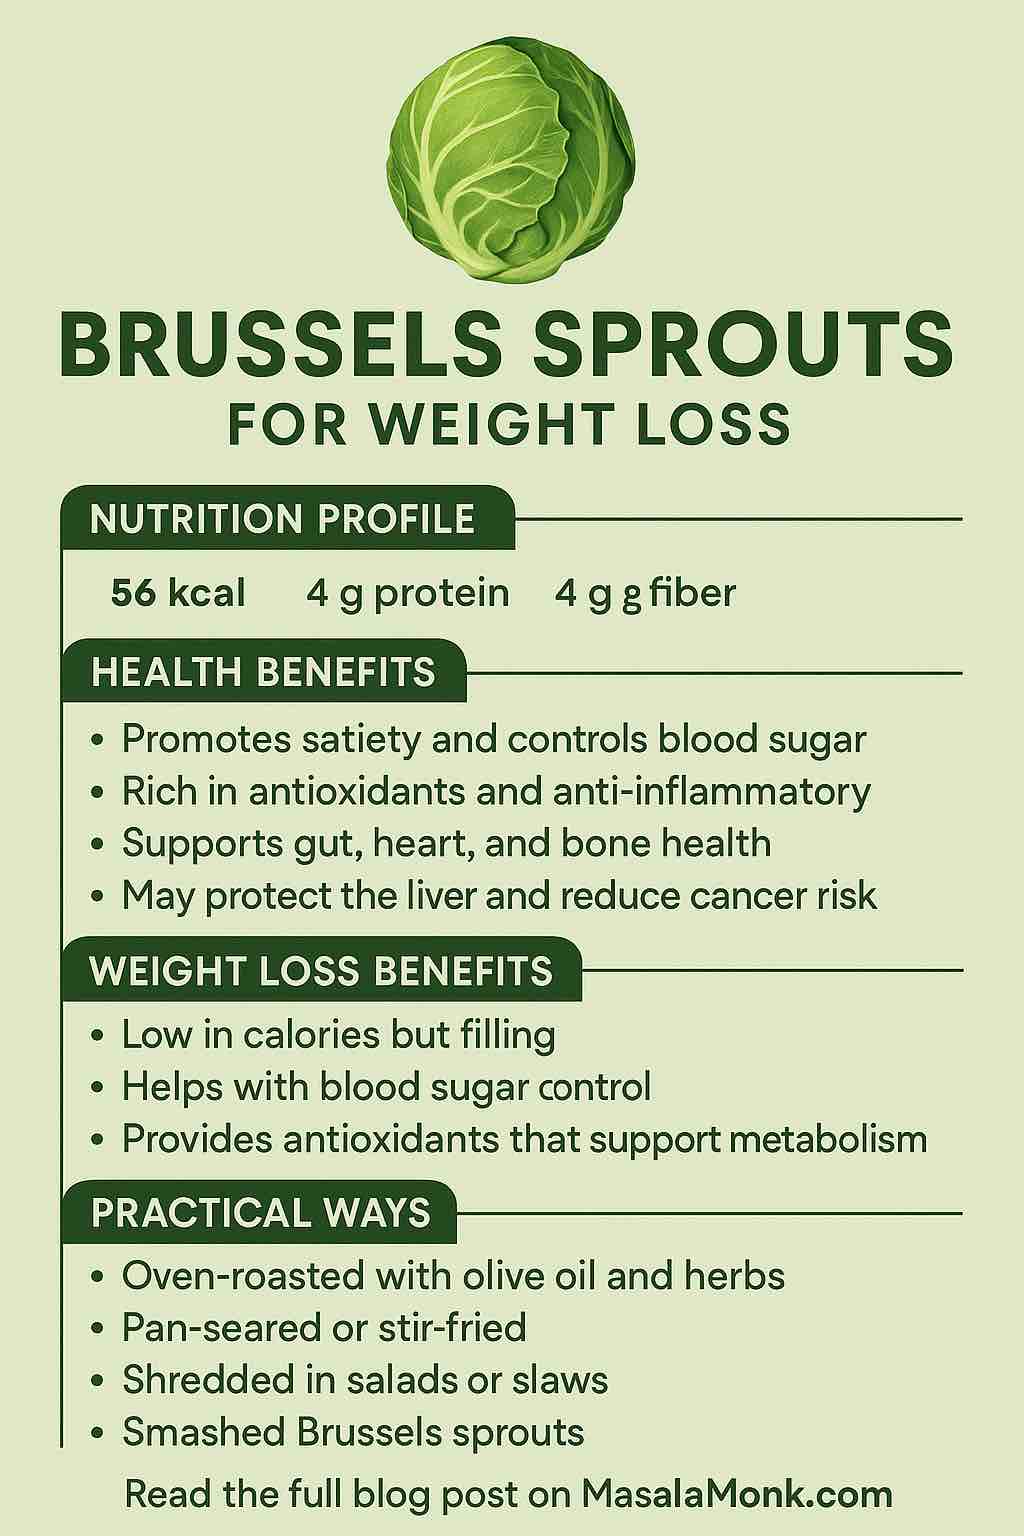
A small handful of onion or Brussels sprouts will not change the pan much. Once you’re adding cups of extra vegetables—or a full can of chickpeas—replace some of the cauliflower or potatoes or bring in a second pan. The base recipe already takes up most of one half-sheet while leaving enough room to brown.

Carrots, Brussels sprouts, onion and chickpeas grouped to roast from the start, with broccoli and bell peppers grouped to add later.
AdditionCut / prepWhen it goes in
CarrotsAbout ⅓ inch (8 mm) slicesFrom the beginning
Brussels sproutsHalve small sprouts; quarter large onesFrom the beginning
OnionThick wedges, with a little root end attached if possibleFrom the beginning
BroccoliMedium floretsFor the final 15–20 minutes
Chickpeas1 × 400 g (14–15 oz) can, about 240 g drained; rinse and dry thoroughlyFrom the beginning; reduce some of the base vegetables or use another pan
Bell peppersBroad 1-inch (2.5 cm) piecesFor the final 15–20 minutes

Making a Double Batch

To make eight side servings, use two half-sheet pans. Put them on separate racks; when you turn the vegetables, swap the upper and lower pans and rotate them front to back if your oven browns unevenly. Trying to fit a double batch onto one tray turns the central problem from roasting into steaming.

What to Serve With Them

For a vegetarian dinner, spoon the hot vegetables over extra-creamy hummus. The cool, smooth hummus works particularly well against the browned cauliflower and hot potatoes; chickpeas or lentils can make the plate more substantial.

Golden roasted potatoes and cauliflower florets served over creamy hummus in a deep red bowl with lemon and a small amount of herbs.
Spread the hummus underneath so the creamy contrast does not cover the crisp, browned surfaces.

As a side, baked chicken breast can share the same oven temperature. If the rest of dinner is rich, go the other way with something cold and acidic: a crisp cucumber salad cuts nicely through the potatoes and roasted edges.

Storage, Reheating and Leftovers

The vegetables keep well; the crisp edges do not. Refrigerate leftovers within 2 hours and use them within 3–4 days, in line with USDA leftovers guidance.

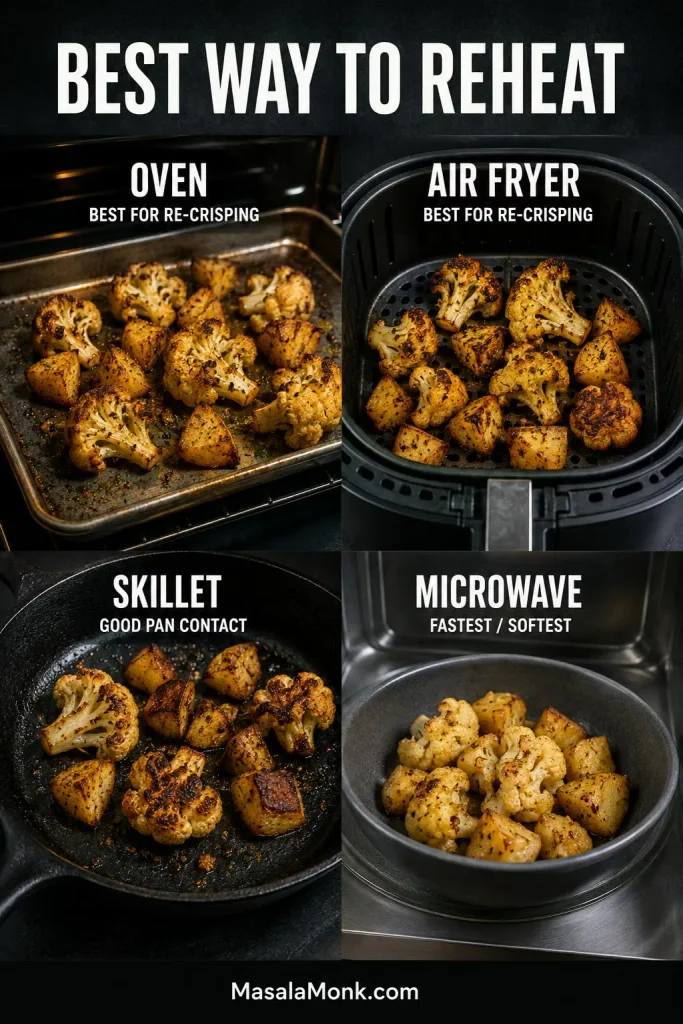
Best Way to Reheat Roasted Cauliflower and Potatoes

Four reheating options for roasted cauliflower and potatoes: oven, air fryer, skillet and microwave, with crisp and softer finished textures.
For crisp leftovers, keep dry-heat portions uncovered and spread out so they do not steam each other.
  • Oven or toaster oven: spread the vegetables in one layer and reheat at 375°F (190°C) until hot and the surfaces have dried again. Start checking after about 8 minutes.
  • Air fryer: reheat a loose single layer at 350°F (175°C). Start checking at about 3 minutes; a potato-heavy portion may need a few minutes more.
  • Skillet: warm over medium heat, turning occasionally and letting some potato cut sides sit against the pan again. A small portion usually heats through within a few minutes.
  • Microwave: heat one serving in short bursts until hot. It is the quickest option and gives the softest texture.

Freezing is possible, but it is hard on the texture of both vegetables. Refrigerating and reheating within a few days gives a better result.

Leftovers are good chopped into a breakfast hash, folded into a frittata, tucked into wraps or added to a grain bowl. A pot of fluffy rice turns the remaining vegetables into an easy lunch without asking them to become crisp all over again.

A Few Common Questions

Can I bake cauliflower and potatoes together?

Yes. Cut the potatoes smaller than the cauliflower so the two vegetables cook at similar rates. At the sizes used here, both can go onto the same sheet pan raw and roast together at 425°F (220°C).

Do I need to boil or soak the potatoes first?

No. Yukon Gold potatoes cut to ¾ inch (2 cm) can roast from raw alongside the larger cauliflower florets. Larger pieces are where a head start or brief parboil becomes worthwhile.

Is 400°F, 425°F or 450°F better?

All three can work. 425°F (220°C) works especially well here: it is hot enough for strong browning while still giving the potato centers time to soften. At 400°F (200°C), expect a longer roast and lighter color. Move up to 450°F (230°C), and you should begin checking sooner because cauliflower tips and dry spices can darken quickly.

Can I use frozen cauliflower?

Yes, although fresh cauliflower browns more easily. Do not thaw the frozen cauliflower first. Shake off any obvious loose ice before it goes onto the pan.

Toss the potatoes with half of the oil and seasonings and roast for 8–10 minutes. Meanwhile, toss the still-frozen cauliflower with the remaining oil and seasoning just before it goes onto the hot pan. Continue roasting until the potatoes are tender and the cauliflower has browned.

Frozen cauliflower florets being added to a tray of partially roasted potato chunks after the potatoes have begun cooking.
Scatter frozen cauliflower across the hot tray rather than mounding it, so moisture can escape faster.

Frozen cauliflower releases more water than fresh, so give it generous space. If liquid starts collecting around the vegetables, split them between two pans and keep roasting.


Serve while the potato bottoms still have their crust. One last squeeze of lemon is usually enough.

Back to the Quick Answer · Make It Now

Posted on — Leave a comment

Brussels Sprouts – Nutrition, Benefits, and 5 Practical Ways for Weight Loss

BRUSSELS SPROUTS FOR WEIGHT LOSS

Brussels sprouts have long been misunderstood—often cast aside as the soggy, bitter vegetable of childhood dinners. But in recent years, they’ve staged a full-on comeback—and for good reason. These tiny cabbages are nutrition-packed, versatile, and surprisingly effective when it comes to weight loss.

If you’re trying to eat healthier, shed a few pounds, or simply diversify your plate with superfoods, Brussels sprouts deserve a top spot on your grocery list.

Let’s explore the science-backed benefits, nutritional value, and five realistic, flavorful ways to add Brussels sprouts to your weight-loss routine.


🧬 The Nutritional Profile: Tiny Cabbages, Big Power

Brussels sprouts are a member of the cruciferous vegetable family—cousins to broccoli, kale, and cauliflower. Don’t let their size fool you; they are nutrient-dense with minimal calories.

✅ Per 1 cup cooked (~156 g):

  • Calories: 56 kcal
  • Protein: 4 g
  • Fiber: 4 g
  • Carbohydrates: 11 g (complex)
  • Fat: 0.8 g
  • Vitamin C: 97 mg (over 100% DV)
  • Vitamin K: 219 µg (over 180% DV)
  • Folate: 94 µg
  • Antioxidants: Sulforaphane, kaempferol
  • Minerals: Iron, potassium, manganese

TL;DR: Brussels sprouts offer the rare combination of low calories, high fiber, and dense micronutrients—ideal for any weight loss or wellness plan.


💪 Health Benefits (Backed by Science)

1. Promotes Satiety and Reduces Cravings

High fiber means slower digestion, which keeps you full longer. This satiety reduces snacking and overeating—two key drivers of unwanted weight gain.

A recent review (The Lancet, 2025) found diets rich in fiber helped individuals lose an average of 1.9 kg over 6 months—even without aggressive calorie restriction.

2. Stabilizes Blood Sugar

The fiber and antioxidant sulforaphane in Brussels sprouts help slow glucose absorption and improve insulin sensitivity, reducing cravings and promoting fat metabolism.

3. Supports Gut Health

The prebiotic fiber in Brussels sprouts feeds good gut bacteria, which are now linked to better metabolic health, inflammation control, and even mood regulation.

4. Detox & Inflammation Reduction

Compounds like glucosinolates and kaempferol help neutralize toxins and reduce inflammation—a hidden contributor to weight gain and chronic disease.

5. Liver & Bone Support

Vitamin K enhances calcium utilization, promoting bone strength. Sulforaphane may protect against non-alcoholic fatty liver disease, common in overweight individuals.


⚖️ Brussels Sprouts & Weight Loss: The Perfect Match

Weight loss is about creating a sustainable calorie deficit—without feeling deprived. Brussels sprouts hit the sweet spot:

  • High-volume, low-calorie: A large portion fills you up for <60 calories.
  • Gut & blood sugar friendly: Helps curb cravings.
  • Supports long-term health: Keeps you healthy while you lose fat—not just skinny.

🍽️ 5 Practical, Tasty Ways to Use Brussels Sprouts for Weight Loss

1. Crispy Roasted Brussels Sprouts (The Crowd-Pleaser)

Why it works: Roasting enhances flavor and creates a satisfying crunch—perfect for clean eating and low-calorie snacking.

How to make:

  • Halve sprouts and toss with olive oil, garlic, sea salt, and pepper.
  • Roast at 425°F (220°C) for 25 minutes until edges are crispy.
  • Optional: Add balsamic drizzle or a squeeze of lemon post-roast.

2. Brussels Sprouts Slaw (Crunch Without the Guilt)

Why it works: Eating them raw preserves nutrients and adds texture. This can be a base or side for almost any meal.

How to make:

  • Shred raw sprouts in a food processor or with a knife.
  • Mix with Greek yogurt, mustard, a dash of honey, and apple cider vinegar.
  • Add sunflower seeds or a few chopped almonds for healthy fat.
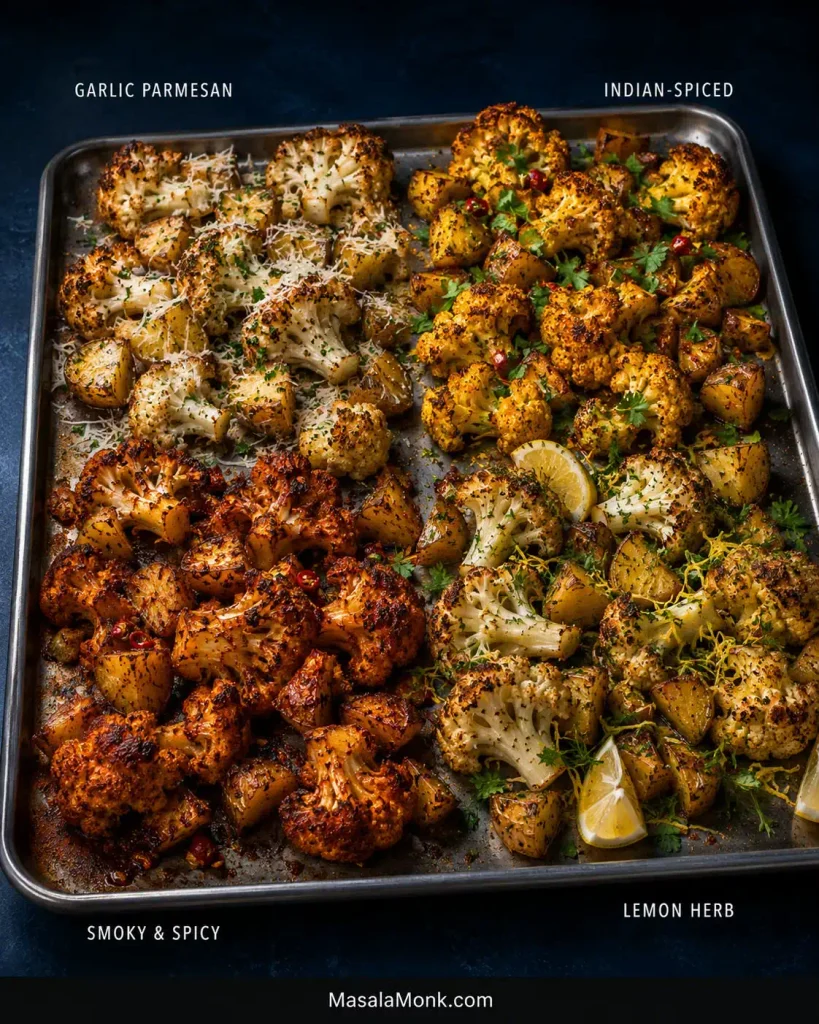
3. Sautéed Sprouts with Garlic and Chili (Quick & Spicy Side)

Why it works: Fast, flavorful, and oil-controlled—great for weeknight meals.

How to make:

  • Slice thinly or halve sprouts.
  • Sauté with olive oil, garlic, chili flakes, and a splash of lemon.
  • Serve alongside grilled chicken, salmon, or lentils.

4. Smashed Brussels Sprouts (Crispy and Fun!)

Why it works: Combines boiling and roasting for an ultra-crispy finish with minimal oil.

How to make:

  • Boil sprouts for 10 minutes. Drain and flatten with a spoon.
  • Brush with olive oil, sprinkle with smoked paprika or cumin.
  • Roast at 425°F for 20 minutes until golden.

5. Brussels Sprouts & Quinoa Bowl (Power Lunch)

Why it works: Combines plant protein, fiber, and good fats in a balanced meal.

How to make:

  • Roast Brussels sprouts. Combine with cooked quinoa, chickpeas, spinach.
  • Dress with tahini-lemon sauce or a vinaigrette.
  • Add pumpkin seeds or avocado for richness.

🔁 Keep It Sustainable

Here’s how to keep Brussels sprouts in your weekly rotation without getting bored:

  • Mix cooking styles: roasted, raw, stir-fried, or steamed.
  • Pair with different proteins (tofu, turkey, legumes).
  • Add seasonal ingredients (apple, pomegranate, citrus).
  • Use them in meal prep: they reheat well!

⚠️ A Few Cautions

  • Gas & bloating: Some may experience mild bloating due to raffinose. Introduce slowly.
  • Vitamin K interaction: Those on blood thinners should monitor intake (consult your doctor).
  • Overcooking ruins everything: Keep them vibrant, not mushy.

🧾 Final Thoughts

Brussels sprouts aren’t just another green vegetable—they’re a true nutritional powerhouse. Packed with fiber, antioxidants, and micronutrients, they’re a secret weapon in healthy weight management.
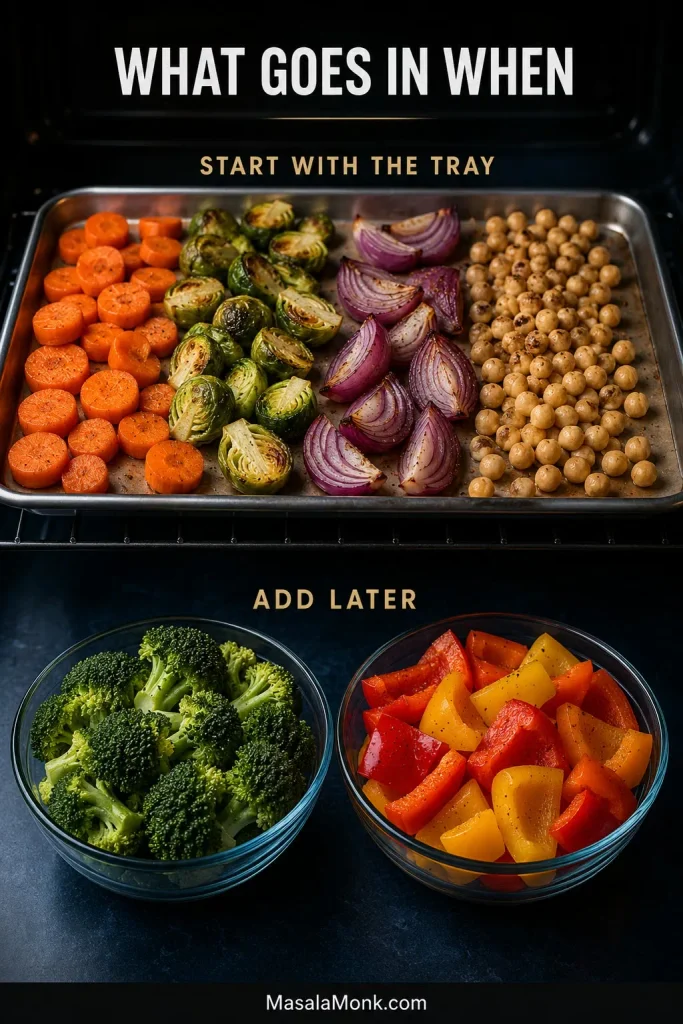
More importantly, they’re delicious when cooked right. Whether roasted to golden perfection, shaved raw into a zesty slaw, or tossed into a protein bowl, they can upgrade your meals while supporting your weight goals.
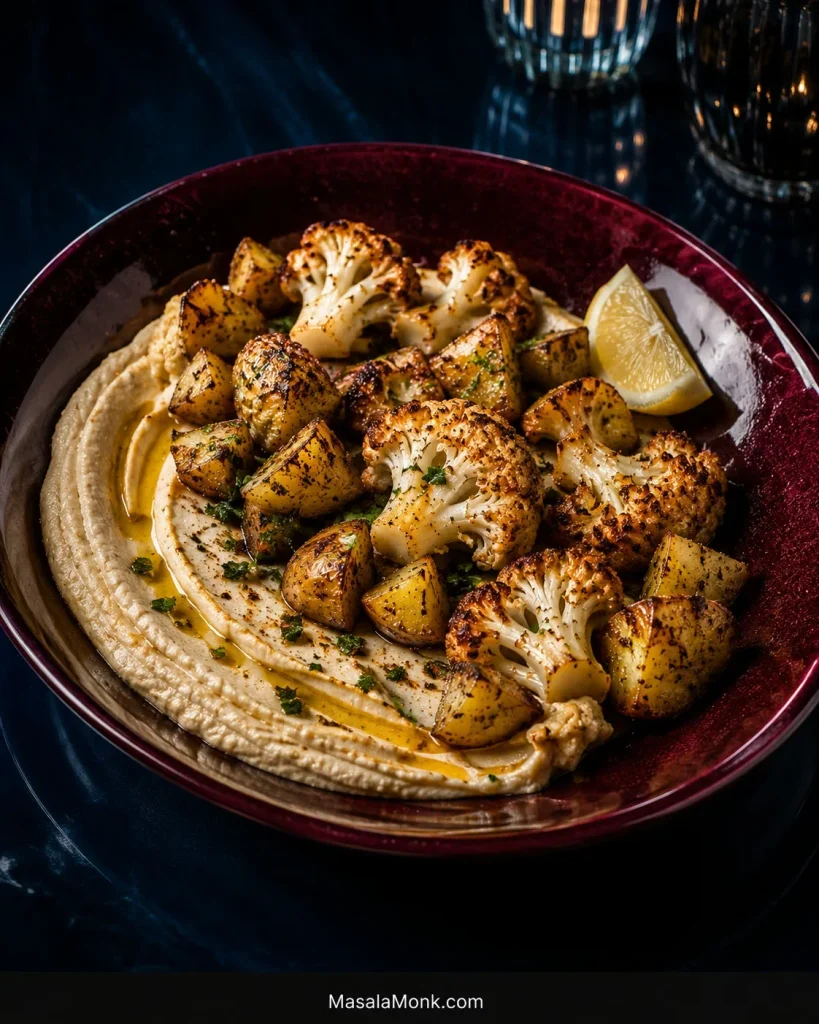
Start simple: Add Brussels sprouts 2–3 times a week, mix up cooking styles, and enjoy the satisfying fullness they bring.

FAQs

❓ 1. Are Brussels sprouts good for weight loss?

✅ Yes. They’re low in calories and high in fiber, which promotes fullness, stabilizes blood sugar, and supports fat metabolism—all essential for sustainable weight loss.


❓ 2. How often should I eat Brussels sprouts to see benefits?

👉 Aim for 2–4 times per week, with 1 cup cooked per serving. Consistent inclusion in a varied diet amplifies benefits like satiety, gut health, and inflammation reduction.


❓ 3. Can I eat Brussels sprouts raw?

Yes, you can! Shaved or shredded raw Brussels sprouts work great in slaws and salads. They’re crisp, fresh, and retain more vitamin C than cooked versions.


❓ 4. What is the best way to cook Brussels sprouts for weight loss?

Roasting or sautéing with minimal oil is ideal. These methods enhance flavor without adding excess calories. Steaming works too, but can be bland without seasoning.


❓ 5. Do Brussels sprouts cause gas or bloating?

They can, due to their fiber and raffinose content. Start with small portions and increase gradually. Cooking them thoroughly also helps reduce digestive discomfort.


❓ 6. Are frozen Brussels sprouts as healthy as fresh ones?

Generally, yes. Frozen sprouts are picked at peak ripeness and retain most nutrients. Just avoid pre-seasoned versions with added salt or fat.


❓ 7. How many calories are in 1 cup of cooked Brussels sprouts?

About 56 calories per cup. This makes them an ideal high-volume, low-calorie food for weight loss.


❓ 8. Can Brussels sprouts help reduce belly fat?

Not directly—but by reducing overall calorie intake, improving insulin sensitivity, and supporting metabolism, they can contribute to total fat loss, including belly fat.


❓ 9. Are Brussels sprouts keto-friendly?

Yes. They’re low in net carbs (~5 g per 100 g cooked), making them suitable for most low-carb and ketogenic diets.


❓ 10. What other vegetables pair well with Brussels sprouts?

Great pairings include sweet potatoes, carrots, kale, spinach, cauliflower, and onions. They complement both flavor and nutrient profiles in mixed dishes.