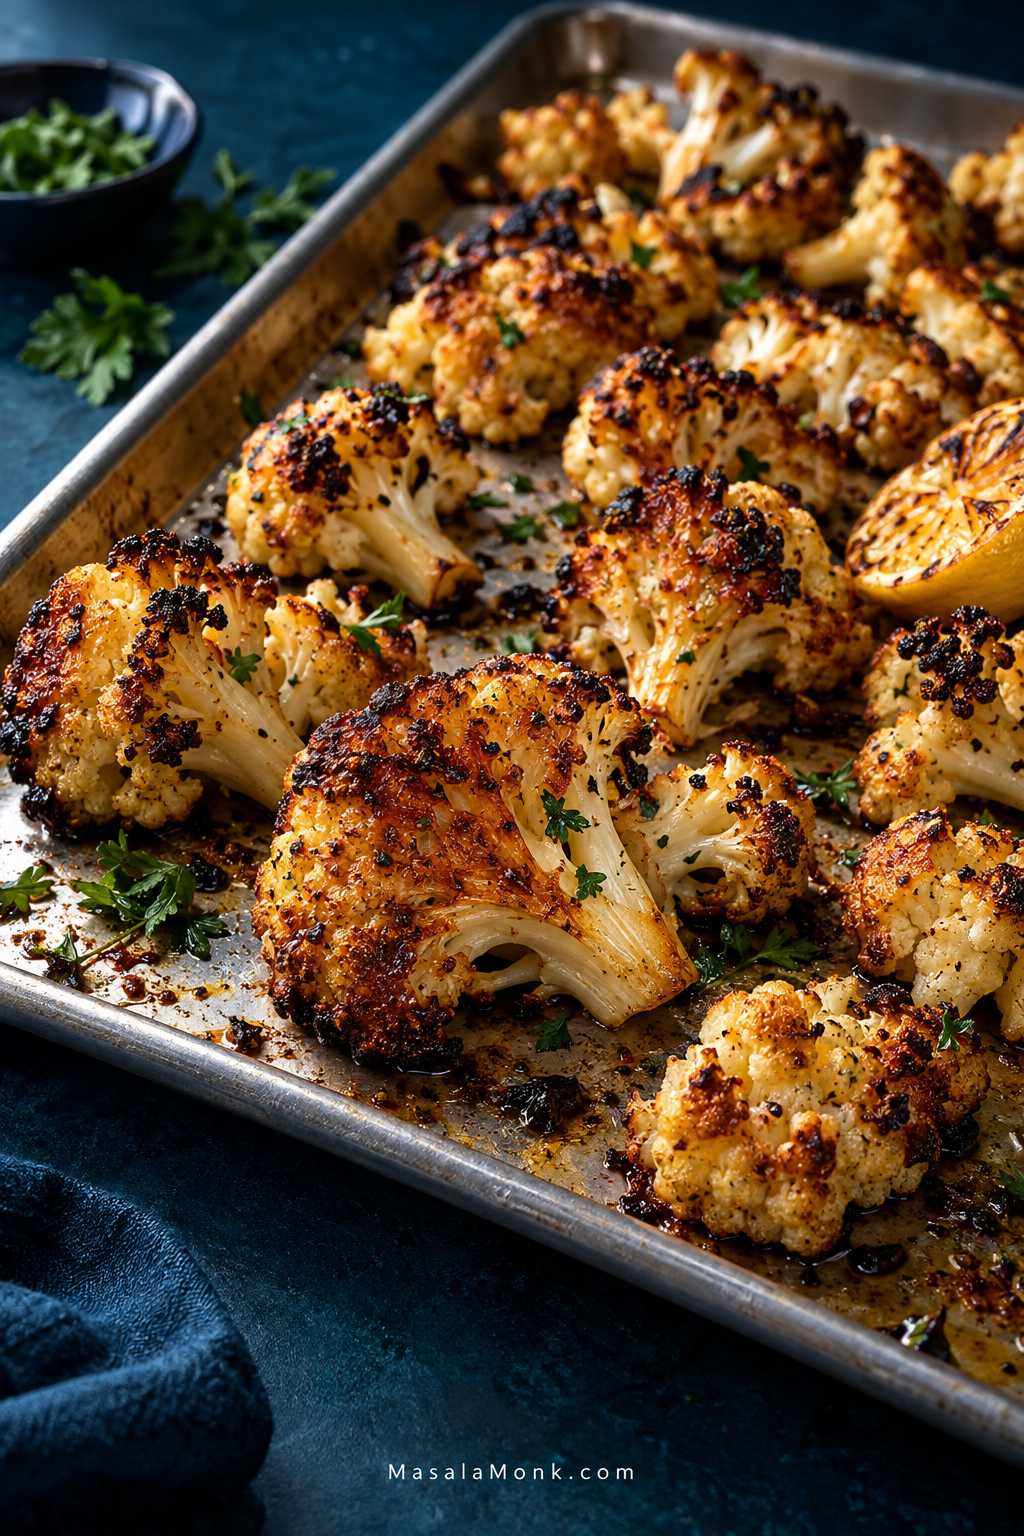
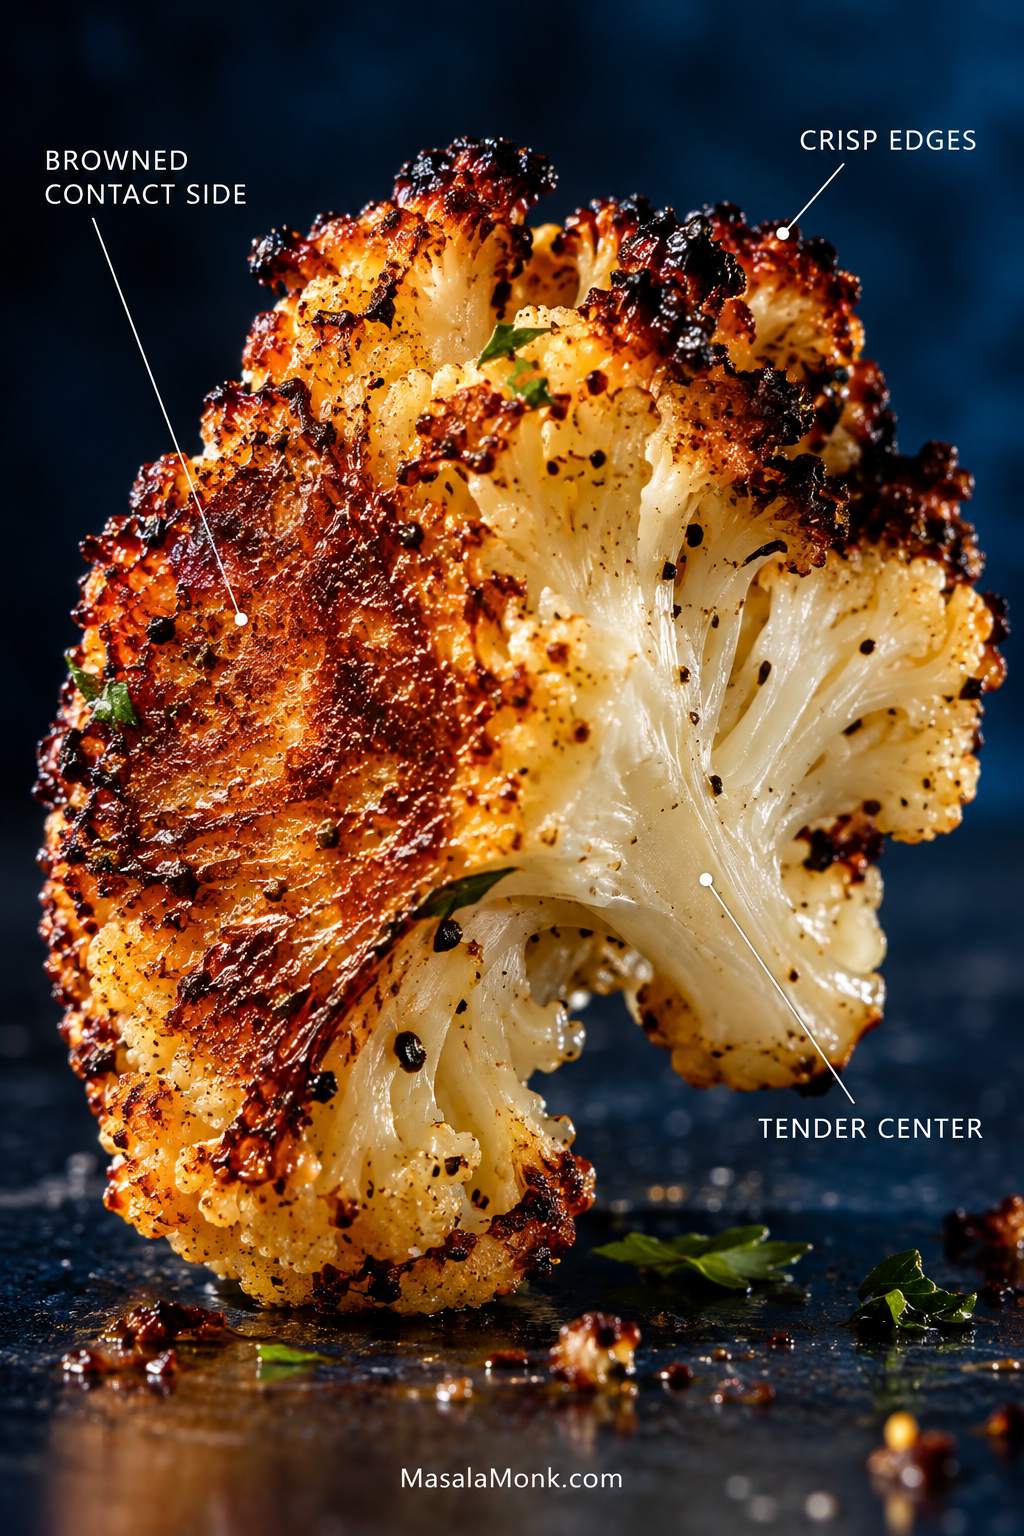
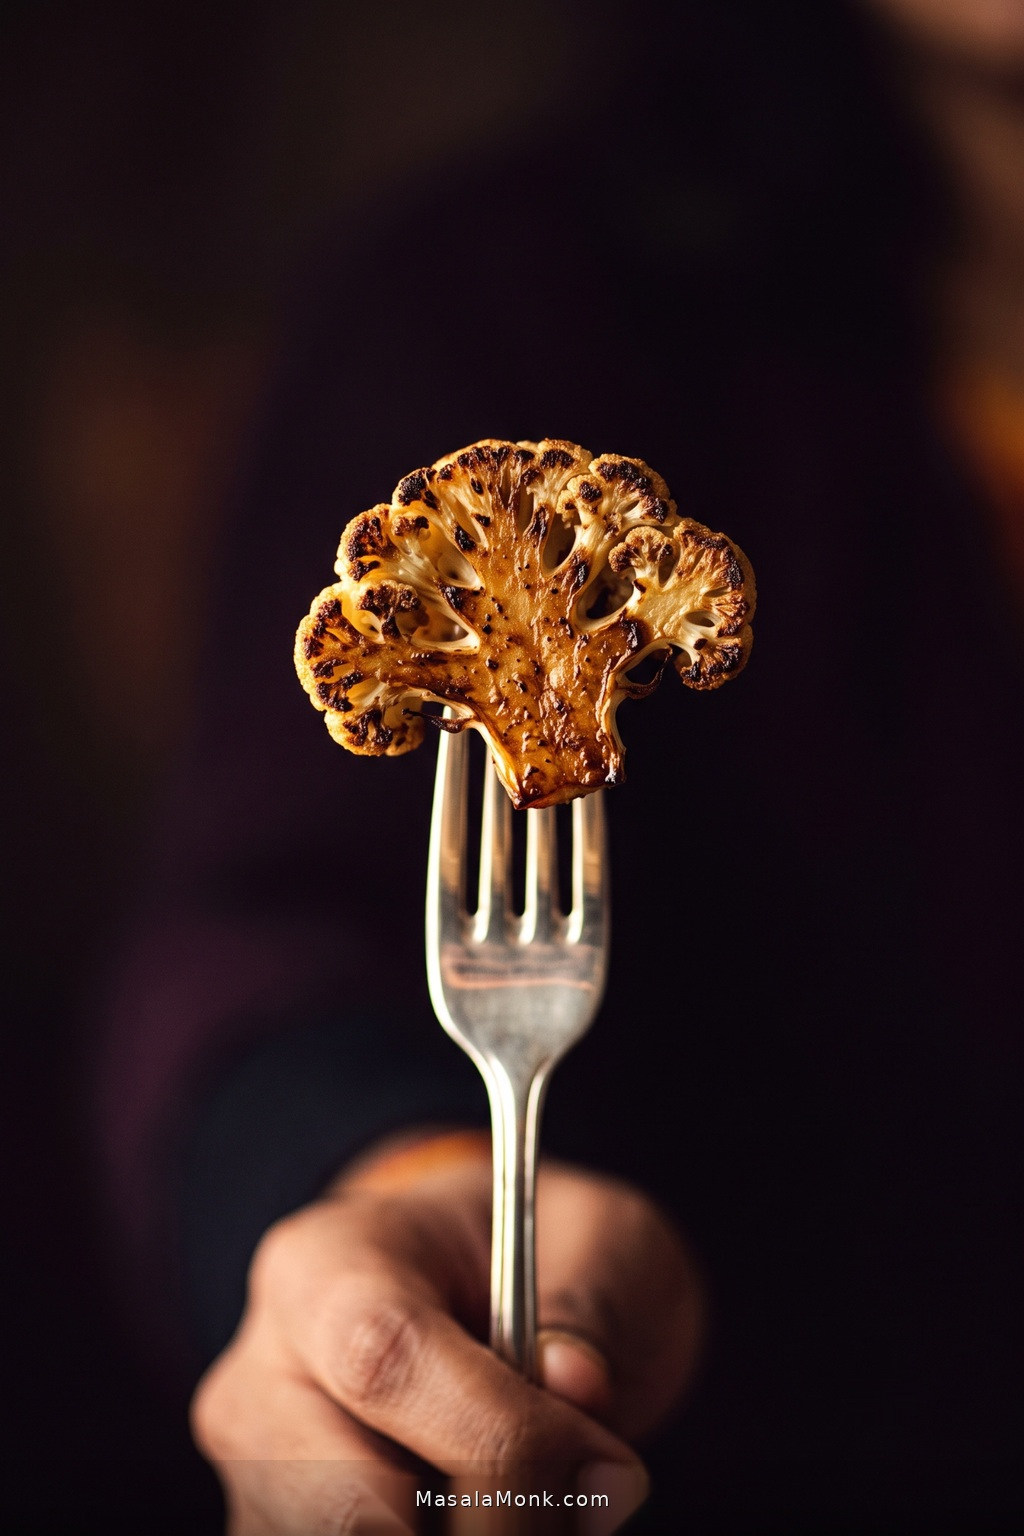
Good roasted cauliflower has crisp, deeply golden edges while the thicker stems stay tender. As it browns, the flavor changes too—sweeter, nuttier and much more savory than plain steamed cauliflower. The darkest little pieces tend to disappear first.
It can also be surprisingly frustrating for something so simple. Sometimes the cauliflower softens while it is still pale. At other times, the delicate tips burn while the thicker stems stay firm. And sometimes everything looks as though it needs another five minutes—until those five minutes turn it mushy.
None of this needs a complicated trick. Dry cauliflower, broad flat sides for browning, enough room on the pan, and enough time against hot metal do most of the work.
For this roasted cauliflower recipe, 425°F / 220°C is a good default. It is hot enough for deep browning, but gives the delicate tips more breathing room than 450°F / 230°C.
Quick Answer: How to Roast Cauliflower
Roast medium cauliflower florets at 425°F / 220°C for about 22–30 minutes, checking the underside after the first 15 minutes rather than relying on the timer alone.
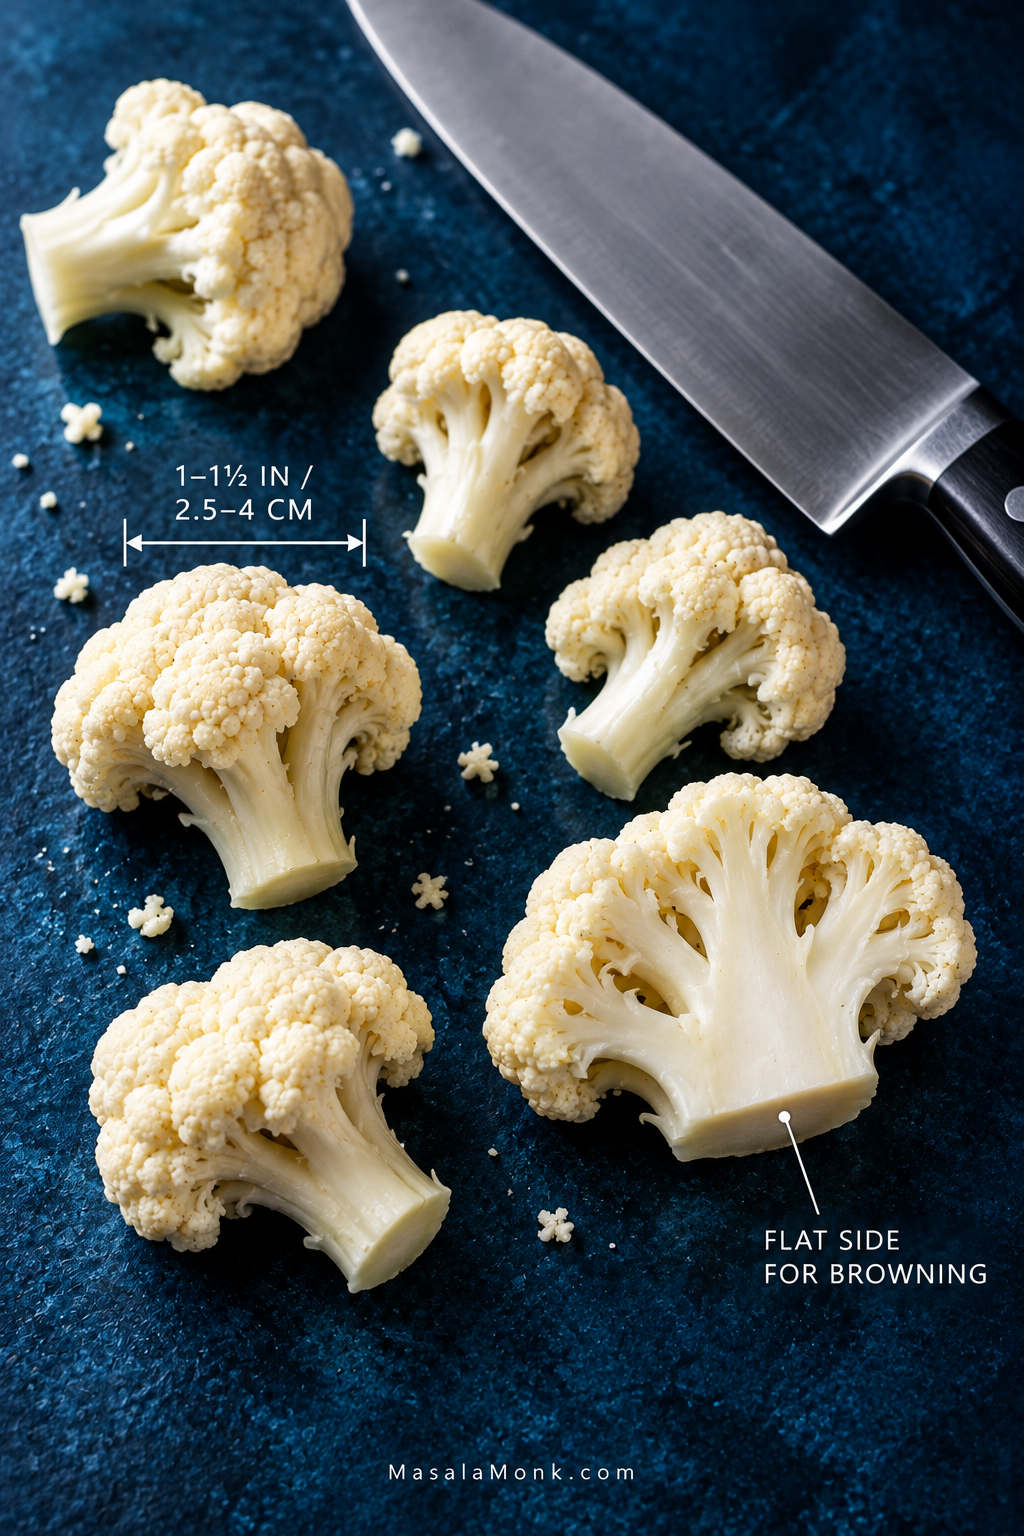
Cut one medium-large cauliflower—about 2 lb / 32 oz / 900 g whole—into florets around 1–1½ inches / 2.5–4 cm. Halve the larger pieces through the stem so they have a flat side for browning.
Dry well, toss with 2 tbsp / 1 fl oz / 30 ml olive oil and the seasonings, then spread everything loosely across a large metal sheet pan with the cut sides against the metal.
After 15 minutes, lift a large piece. Deeply golden underneath? Turn the bigger florets. Still pale? Give that first side another 3–5 minutes. Continue until a fork slips easily into the stems and the edges are well browned.
For plain roasted cauliflower, “crispy” means browned cut surfaces and crisp edges around a tender center. It will not have the dry crunch of breaded or deep-fried cauliflower.
Make It Now: Crispy Oven-Roasted Cauliflower
Recipe at a Glance
| Prep | 10–15 minutes |
| Roast | Usually 22–30 minutes |
| Total | About 35–45 minutes |
| Oven | 425°F / 220°C conventional |
| Rack | Middle |
| Yield | 4 generous or 6 smaller side servings |
Ingredients
- 1 medium-large cauliflower, about 2 lb / 32 oz / 900 g whole
- 2 tbsp / 1 fl oz / 30 ml extra-virgin olive oil, plus another 1 tsp / 5 ml only if needed
- 3.5–4 g salt; see the equivalents below
- ½ tsp garlic powder
- ¼ tsp freshly ground black pepper
- ¼–½ tsp smoked paprika, optional
- 1–2 tsp / 5–10 ml fresh lemon juice, optional, plus more to taste
- Chopped parsley, cilantro or another fresh herb, optional
No scale? For roughly 3.5–4 g salt, use about 1¼ tsp Diamond Crystal kosher salt, about ¾ tsp Morton kosher salt, or roughly ½–⅔ tsp fine or table salt. Different crystal sizes mean these salts are not interchangeable by volume.
The Pan Matters
Use a large, sturdy, rimmed metal sheet pan, ideally light-colored uncoated aluminum, about 18 × 13 in / 46 × 33 cm. A dark nonstick sheet browns food faster, so check the cauliflower sooner if that is what you use.
Instructions
1. Heat the Oven
Put a rack in the middle position and heat a conventional oven to 425°F / 220°C. The regular Bake setting is all you need.
2. Rinse and Cut for Better Browning
Rinse the cauliflower under cool running water, then shake off the excess. Remove the leaves and thick base of the core, and cut the cauliflower into roughly 1–1½ inch / 2.5–4 cm florets. Slice larger florets through the stem so each gets a broad flat side.
Using pre-cut florets? Halve the biggest pieces so the tray cooks more evenly, and pat away any condensation before seasoning. The tender inner stem is edible too; cut it into bite-size pieces and roast it with the florets.
3. Dry, Oil and Season
Dry the cauliflower very thoroughly before adding oil. A kitchen towel works well; a salad spinner is handy for a larger batch.
Put the florets in a large bowl and add 2 tbsp / 30 ml olive oil, the salt, garlic powder, black pepper and optional paprika. Toss until the stems and branches have a light, even sheen.
Add another 1 tsp / 5 ml oil only if obvious dry patches remain. There should not be a puddle at the bottom of the bowl.
4. Give Every Floret Some Room
Spread the cauliflower in one loose layer, leaving visible gaps. Put the broad cut sides against the metal wherever possible.
Roasting two heads? Use two pans.
5. Leave the First Side Alone
Roast for 15 minutes without stirring or shaking the tray.
Lift one of the larger pieces. The underside should be broadly golden, with darker patches gathering around the edges—closer to deeply toasted bread than steamed cauliflower.
Already well browned? Turn the larger florets. Still pale or damp underneath? Give them another 3–5 minutes before turning.
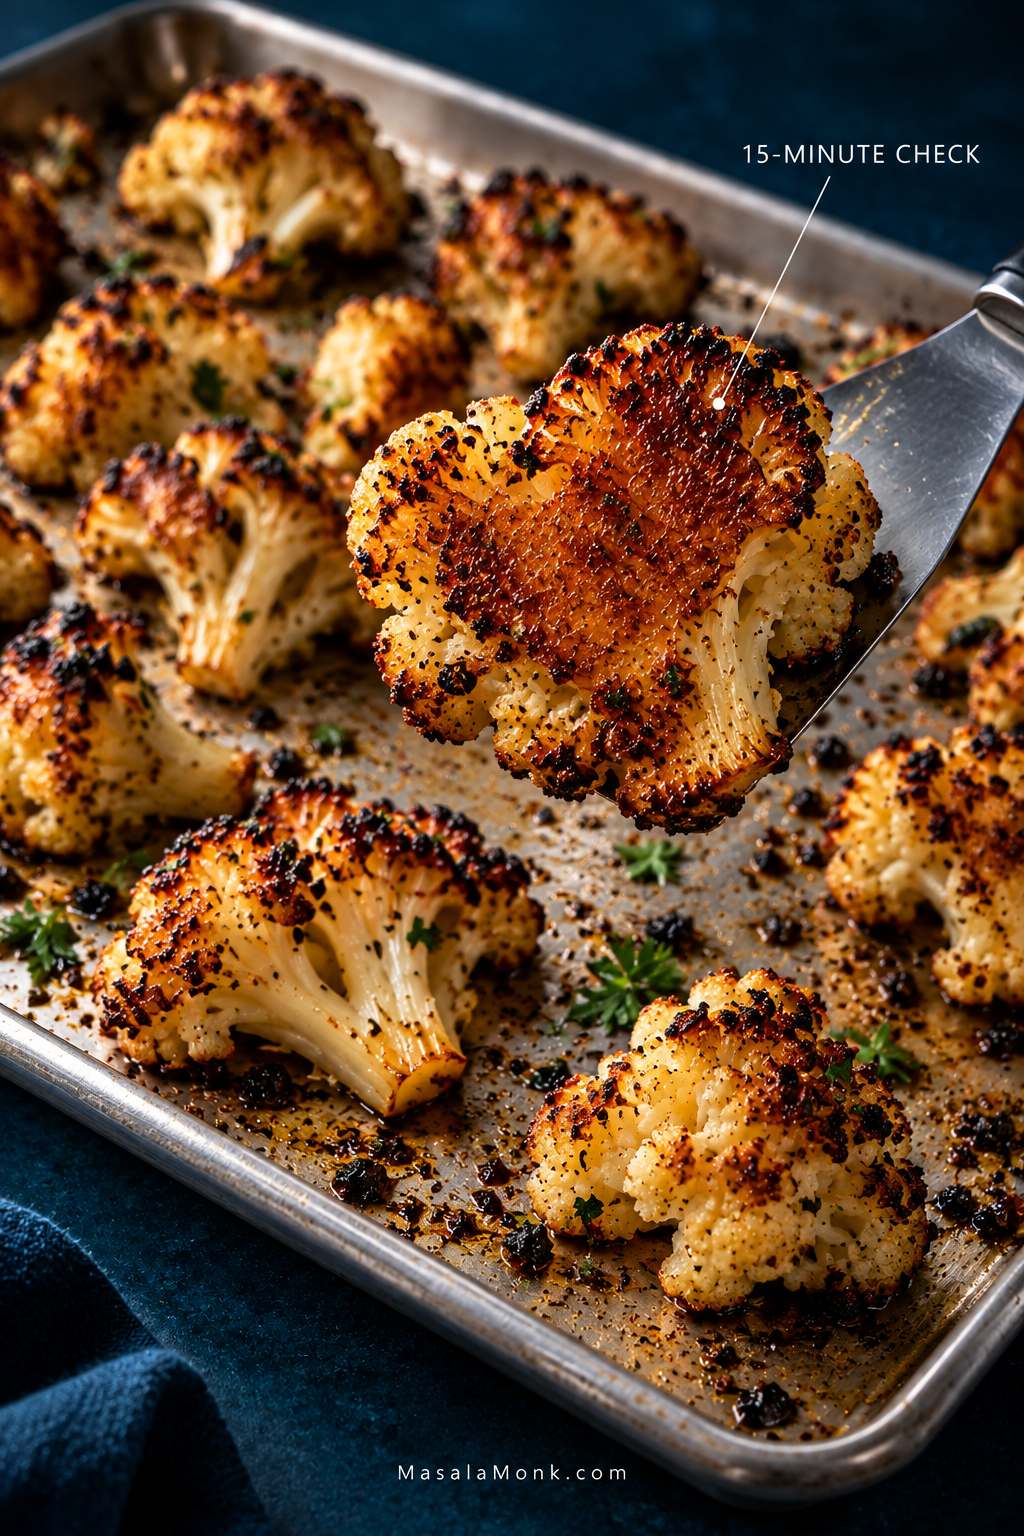
6. Turn Once and Finish
Turn the larger florets and rotate the pan. Roast for another 7–12 minutes. If the first side needed an extra 3–5 minutes to brown, start checking the stems toward the early end of that range.
A fork should slide readily into a thicker stem while the floret still holds together. Darker branch tips are part of the roast, not something to fear.
Most dry, well-spaced trays finish in about 22–30 minutes. A wetter head, larger pieces or a cooler-running oven can push the total a few minutes beyond that.
7. Finish While It Is Hot
Taste before adding more salt. Then squeeze over 5–10 ml lemon juice if you like. The acidity brightens the sweet, toasted flavor without turning the cauliflower into a wet, saucy side.
Add fresh herbs now too. For stronger garlic flavor, grate a small amount of fresh garlic over the hot cauliflower rather than exposing tiny pieces to the entire high-heat roast.
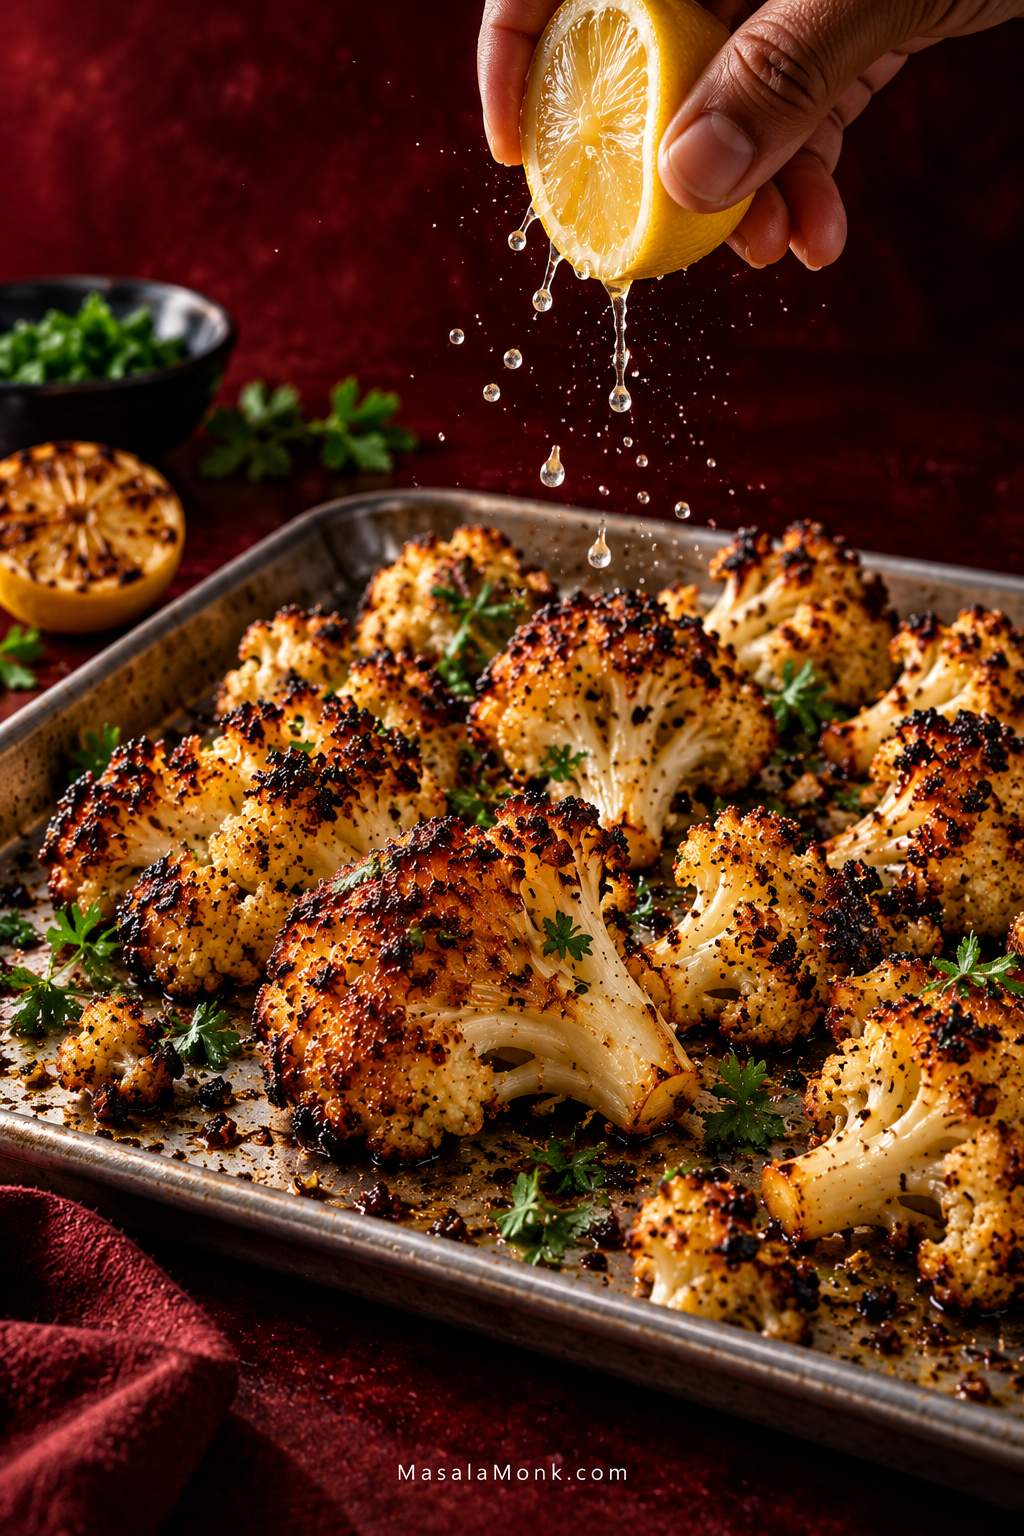
Doneness beats the timer. The clock tells you when to look. Color and stem tenderness tell you when to stop.
Once those cues make sense, cauliflower becomes much less temperamental. From there, the useful questions are why one tray browns while another steams, how oven temperature changes the result, and what can still be rescued when dinner is not going to plan.
In This Guide
Get the Roast Right
What Makes Roasted Cauliflower Crispy and Brown?
Browning starts once surface moisture has evaporated and a broad side stays against hot metal long enough to toast. That is why drying, spacing and cut shape matter more than simply turning the oven hotter.
Why Wet Cauliflower Stays Pale
Pack the pan tightly and even a 450°F / 230°C oven can leave cauliflower steaming in its own moisture. Water left from washing has to evaporate before the surface can really brown, and crowded florets release still more moisture into the same small space.
A second sheet pan often helps more than another 15 minutes in the oven.
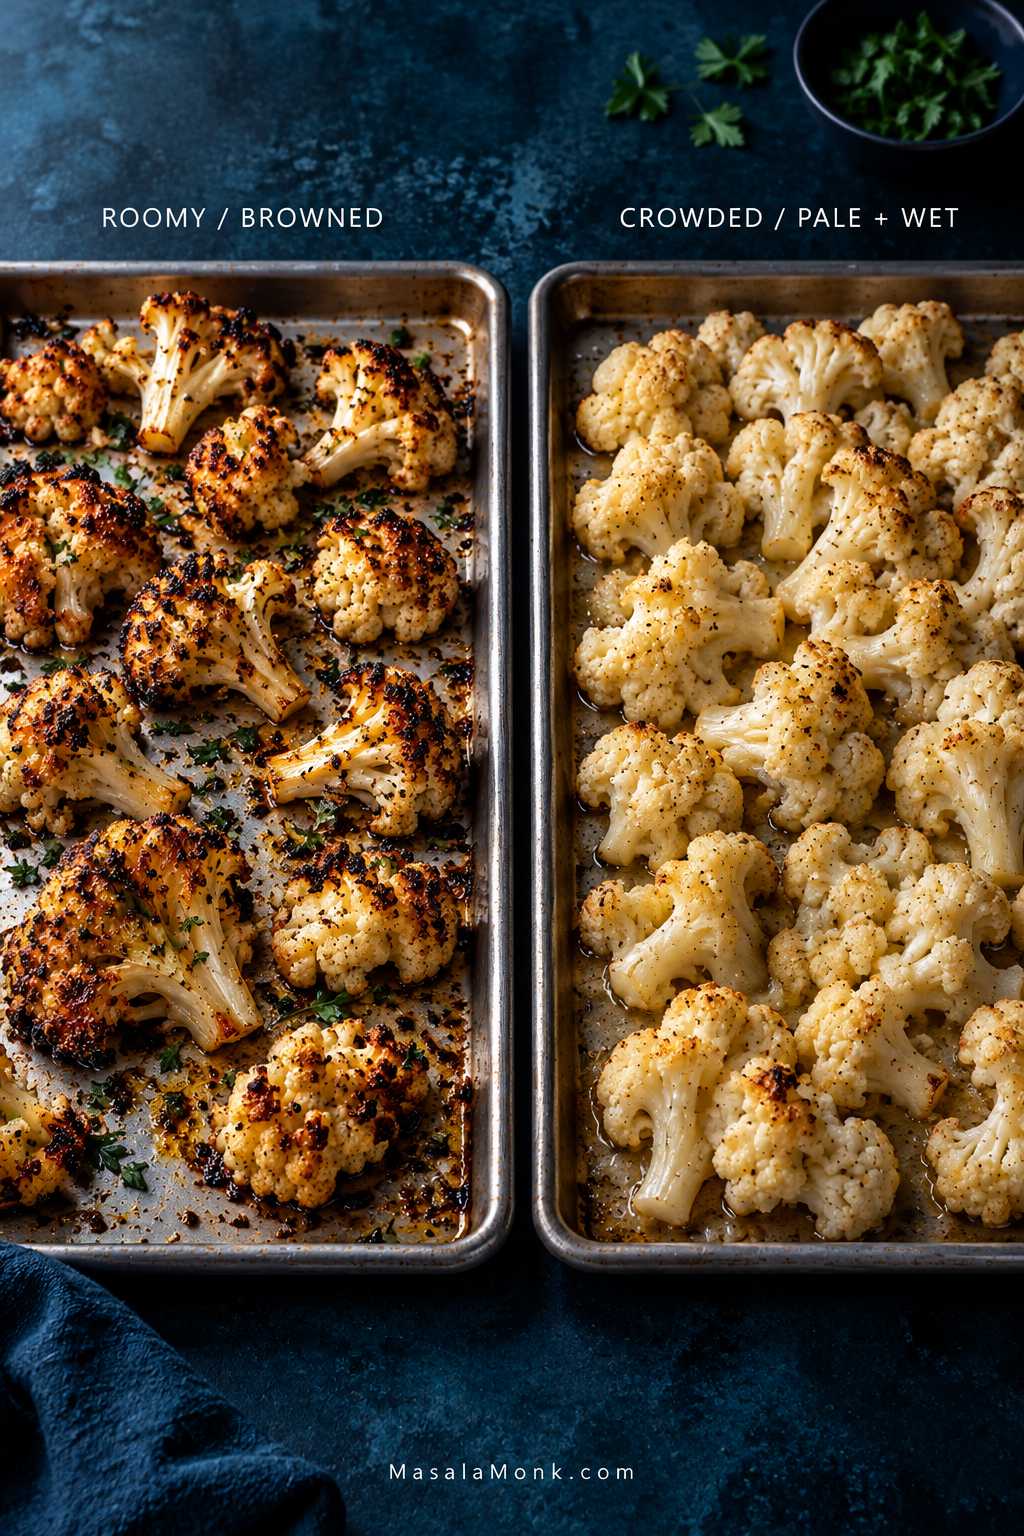
Why the Tips Burn Before the Rest Browns
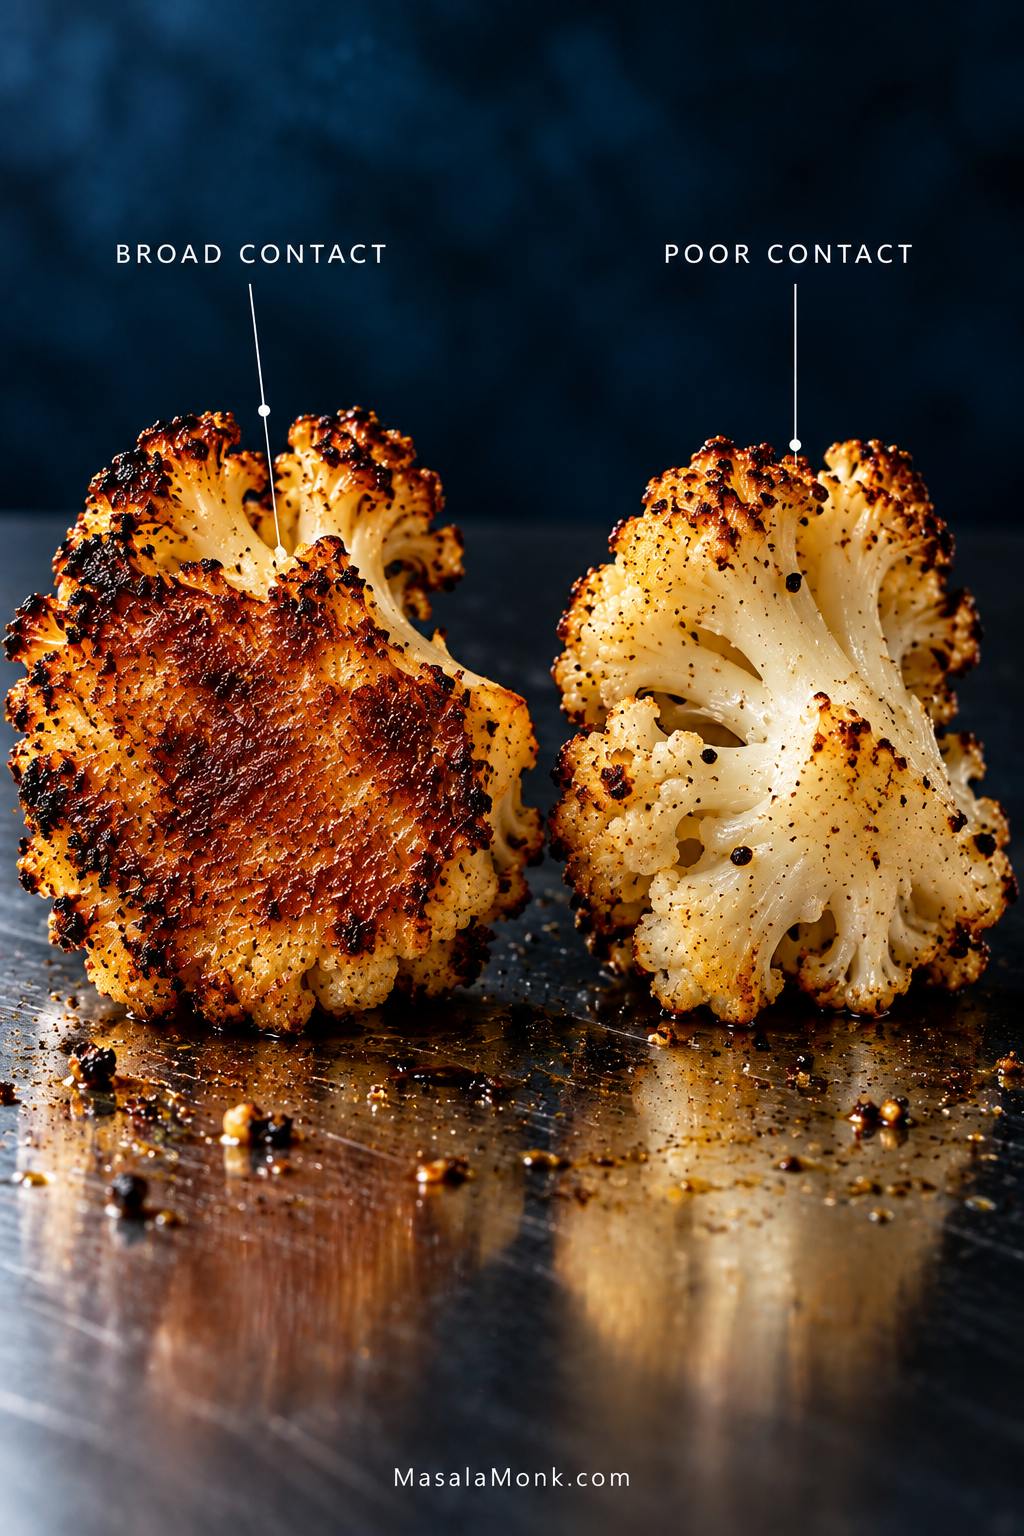
You may have seen it already: the tips are nearly black while most of the floret is still pale. Those delicate branches sit directly in hot oven air, while the side against the pan gets steady heat from the metal.
Slice a large floret through the stem and you give that pale body a broad surface that can actually toast against the pan.
Why the Flat Side Belongs Against the Pan
For the darkest crust underneath, bare metal works best. Foil is a useful cleanup compromise, while parchment gives a gentler underside. Serious Eats similarly recommends a sturdy uncoated pan, plenty of space and direct contact for stronger browning.
The oil should leave a light sheen, not a puddle. Too much pushes the cauliflower toward greasy and soft.
Then leave it alone. Turn once for more even color, or keep that first side against the pan longer when you want a darker crust.
Roasted Cauliflower Time & Temperature
Roast medium cauliflower florets at 425°F / 220°C for about 22–30 minutes, checking the underside after the first 15 minutes. At 400°F they brown more gently; at 450°F they color faster.
| Setting | Typical Range | Best For |
|---|---|---|
| 400°F / 200°C | About 28–35 min | Gentler roasting or sharing the oven with another dish |
| 425°F / 220°C | Usually 22–30 min | A good balance of browning and tenderness |
| 450°F / 230°C | About 20–30 min | Faster, darker browning |
| Fan / convection | Use your oven’s usual convection conversion; start checking around 15–18 min | Faster surface browning |
Dinner Is Already at 400°F? Keep It There
Chicken, fish or a casserole already has the oven at 400°F / 200°C? Leave it there. Give the cauliflower a roomy pan and expect the color to build more slowly, usually over about 28–35 minutes.
If chicken is sharing the oven, 425°F is convenient: our baked chicken breast uses the same temperature, so each dish can cook on its own pan.
At 450°F / 230°C, watch the tray more closely. The edges darken faster, and fine spices or bits of fresh garlic have less time before they scorch.
Using convection? Start checking around 15–18 minutes. Use your oven’s usual convection conversion if it calls for one.
Look at the Cauliflower, Not Just the Clock
Pull the tray earlier if you like more bite. For the crisp-tender middle ground, wait until a fork goes in easily and the underside has strong brown patches. If you prefer very tender cauliflower, keep going—but stop before the florets begin collapsing.
The smell shifts too. As roasting continues, the sharper brassica aroma softens and the tray begins to smell sweeter, nuttier and properly toasted.
Seasoning Roasted Cauliflower
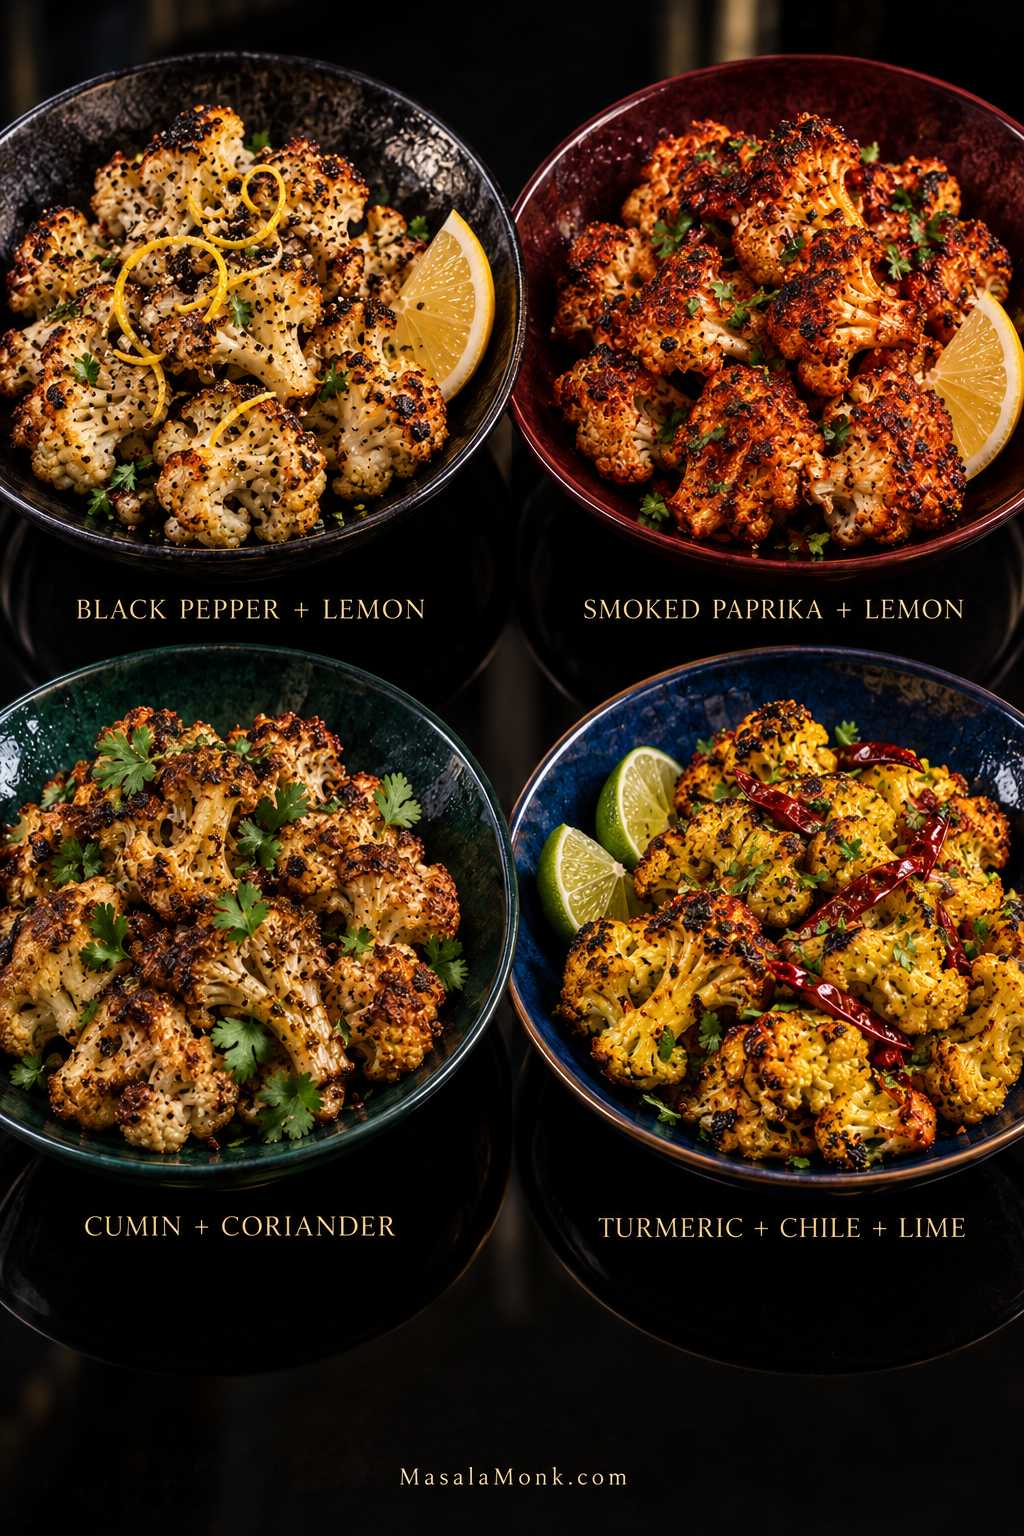
Once the cauliflower itself is well browned, it does not need much help. Keep the oil and salt from the basic recipe, then choose the direction that sounds right for dinner.
| Flavor | Additional Flavor Additions | Finish With |
|---|---|---|
| Black Pepper + Lemon | ¼ tsp black pepper | 1–2 tsp / 5–10 ml lemon juice or zest |
| Smoked Paprika + Lemon | ½ tsp smoked paprika + ¼ tsp black pepper | 1–2 tsp / 5–10 ml lemon juice |
| Cumin + Coriander | ½ tsp ground cumin + ½ tsp ground coriander | Cilantro + 1–2 tsp / 5–10 ml lemon juice |
| Turmeric + Chile + Lime | ½ tsp cumin + ¼ tsp turmeric + pinch of chile | Cilantro + 1–2 tsp / 5–10 ml lime juice |
If you want cauliflower with a fuller Indian spice profile, aloo gobi pairs it with potatoes, cumin and turmeric in a more substantial dish.
When Garlic or Spices Turn Bitter
Bitter dark specks usually mean fresh garlic or fine spices scorched during the high-heat roast. More seasoning will not fix that.
Garlic powder is more forgiving for the full roast. Add fresh herbs, lemon juice, grated fresh garlic and most sauces after the cauliflower comes out or very near the end.
How to Roast Frozen Cauliflower Without Making It Mushy
Yes. Roast frozen cauliflower straight from frozen—do not thaw it first. For a 1 lb / 16 oz / 450 g bag, use 425°F / 220°C: roast for 15 minutes first, then season and continue for another 15–20 minutes.
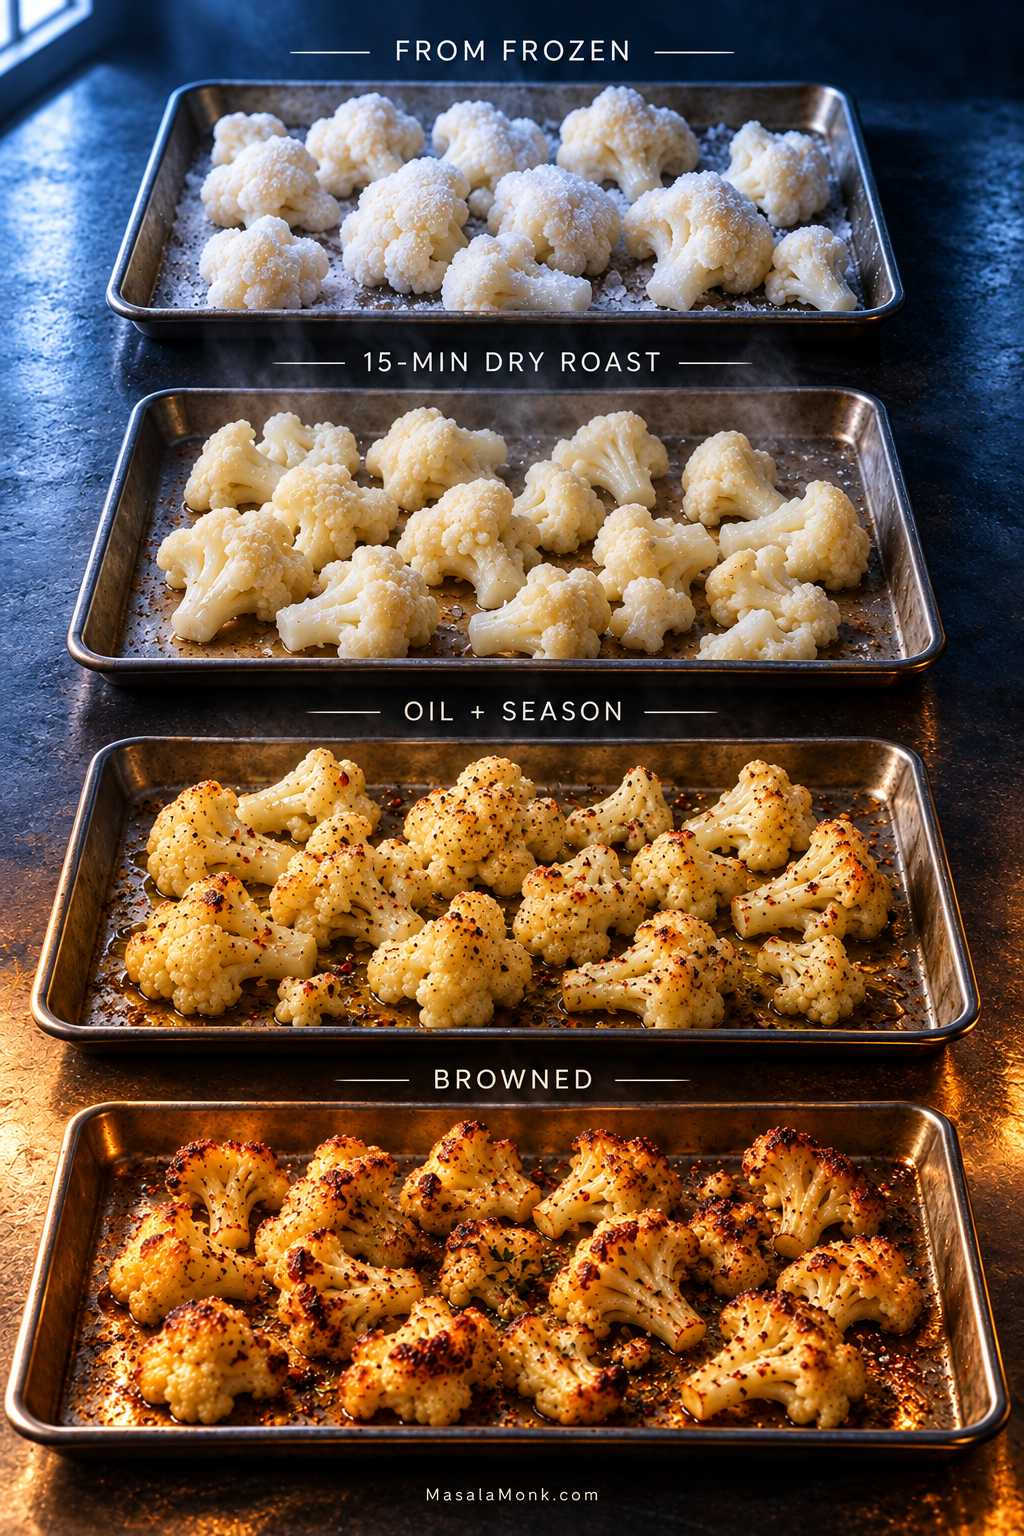
- Spread the frozen florets in one uncrowded layer. Lightly greased bare metal gives the strongest browning; foil is a useful compromise, while parchment gives easier release but gentler color.
- Roast for 15 minutes without oil or seasoning.
- Toss with 1 tbsp / 15 ml olive oil, about 2 g salt—roughly half the fresh-recipe salt amount, ¼ tsp garlic powder and ⅛ tsp black pepper, then spread the florets out again.
- Roast for another 15–20 minutes, until browned and tender.
Expect about 30–35 minutes total. Frozen cauliflower will usually be softer than fresh, but the edges should still pick up good roasted color.
When Roasted Cauliflower Goes Wrong
Pale and wet, tender but pale, black at the tips, greasy, shriveled—those trays may all look disappointing, but they are not the same problem.
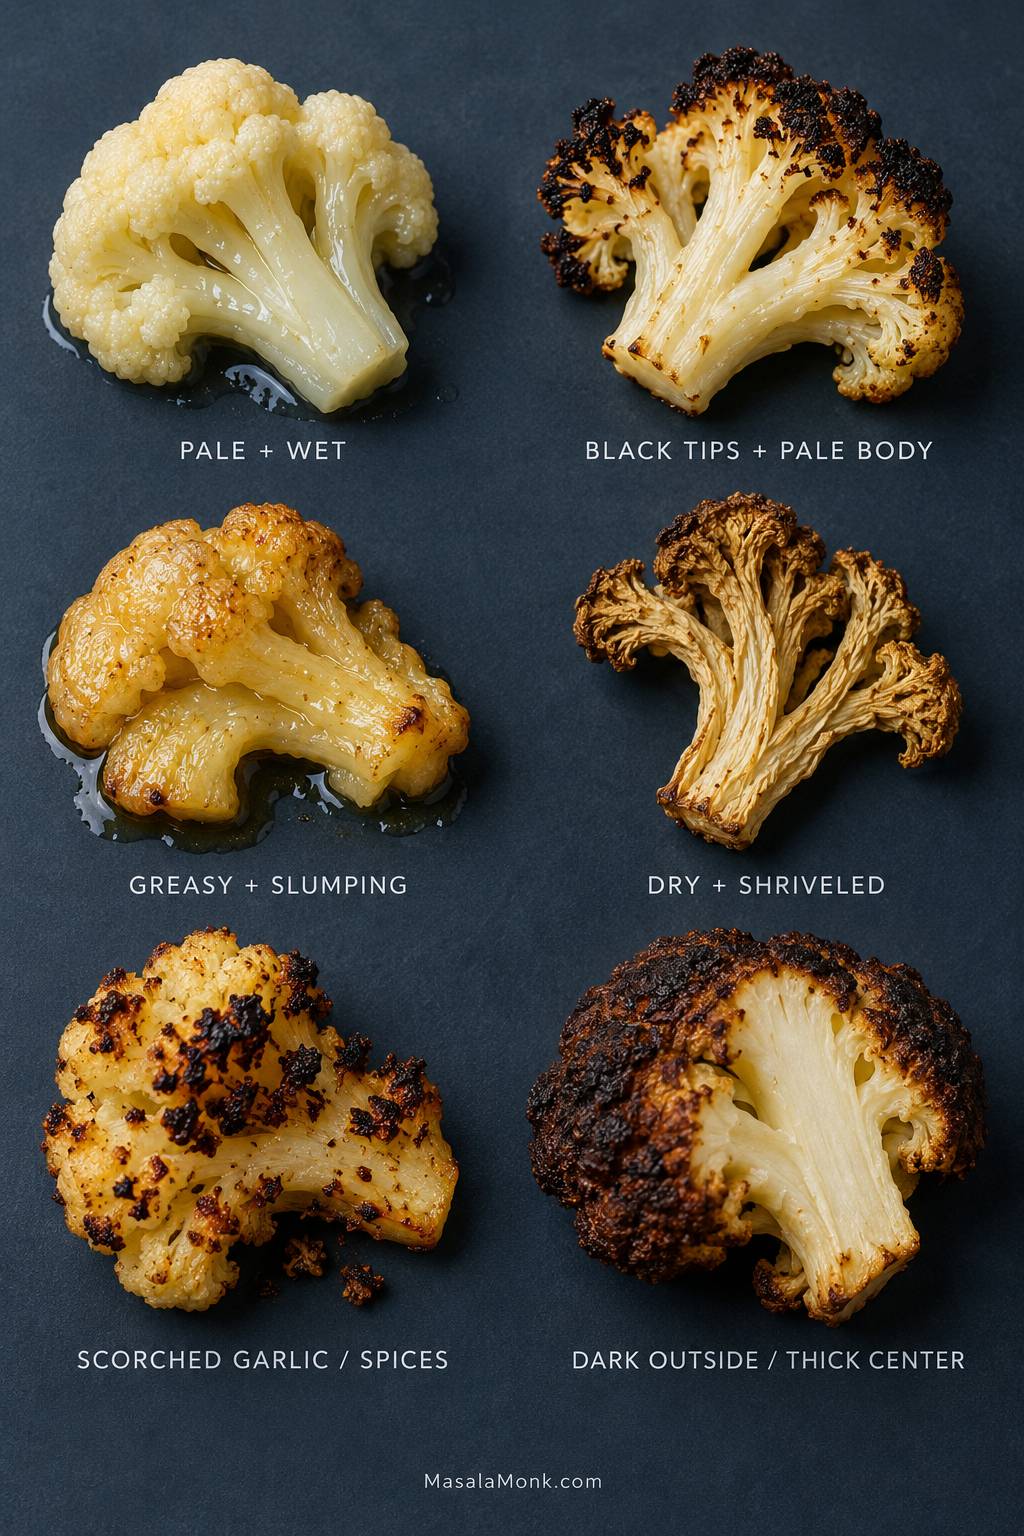
| What You See or Taste | What It Usually Means | What to Do |
|---|---|---|
| Pale + wet | Too much moisture or crowding | Spread the pieces farther apart and continue roasting |
| Tender + pale | The inside cooked before enough color developed | Use a brief broiler finish |
| Black tips + white body | The tips browned in hot air but the body had poor pan contact | Create broader flat sides and put them against the pan next time |
| Hard center + dark exterior | Pieces are too large or uneven, or the oven runs hot | Cut more evenly and give thick stems enough time |
| Greasy + soft | Too much oil | Use a lighter coating next time |
| Dry + shriveled | Small pieces, uneven oil coverage or too much time | Coat more evenly and pull the tray sooner |
| Bitter dark specks | Garlic or spices scorched | Add vulnerable aromatics later |
| Strong sulfur smell + collapsing florets | The cauliflower has gone too far | Pull the next tray earlier |
| Timing is way off | Floret size, pan color, convection, crowding or oven calibration | Adjust when you start checking; if it keeps happening, verify the oven temperature |
Can You Rescue the Tray You Have?
Tender but pale: give it a short broiler finish and watch continuously. If the pan is lined with parchment, remove the parchment first, and follow the heat limits for any liner you use.
Wet but still fairly firm: spread the pieces farther apart—onto a second hot pan if necessary—and continue roasting.
Already mushy: stop trying to crisp it. Turn the batch into soup, mash or curry, or add a smooth homemade cheese sauce and let that softness work for the dish.
Pale cauliflower can often be browned. Overcooked cauliflower cannot be uncooked.
Once the tray is right, the contrast is obvious: toasted edges, tender stems and that sweeter roasted smell that was missing when the cauliflower was still steaming.
Turn Roasted Cauliflower Into Dinner
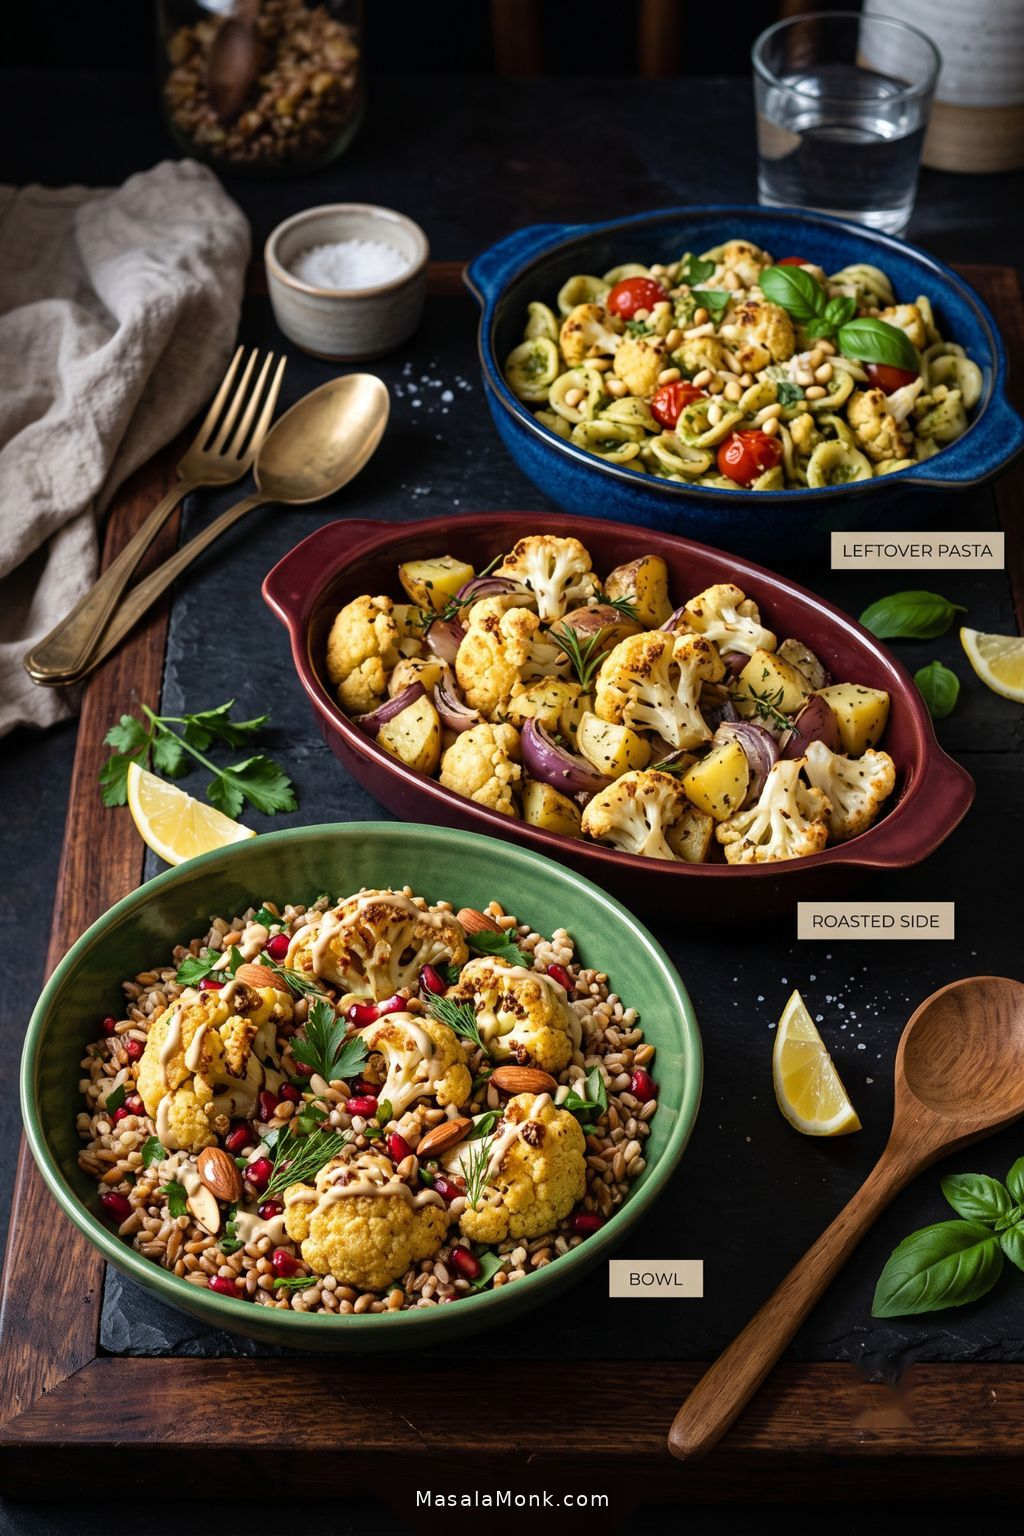
Roasted this deeply, cauliflower does not have to sit at the edge of dinner as the obligatory vegetable. Keep it simple with lemon and black pepper alongside chicken, fish, beans or lentils, or make it part of the meal itself with grains and something cool and crunchy.
When you want a heartier roasted side, roasted cauliflower and potatoes gives the cauliflower a more substantial partner without burying its browned edges.
A handful of roasted florets also fits naturally beside warm rice, cucumber and avocado in a salmon bowl. Those browned edges bring enough flavor to hold their own among the other components.
Add Sauce Without Softening Every Edge
Tahini-lemon sauce, garlicky yogurt, romesco, pesto or chimichurri all work with the toasted sweetness of cauliflower.
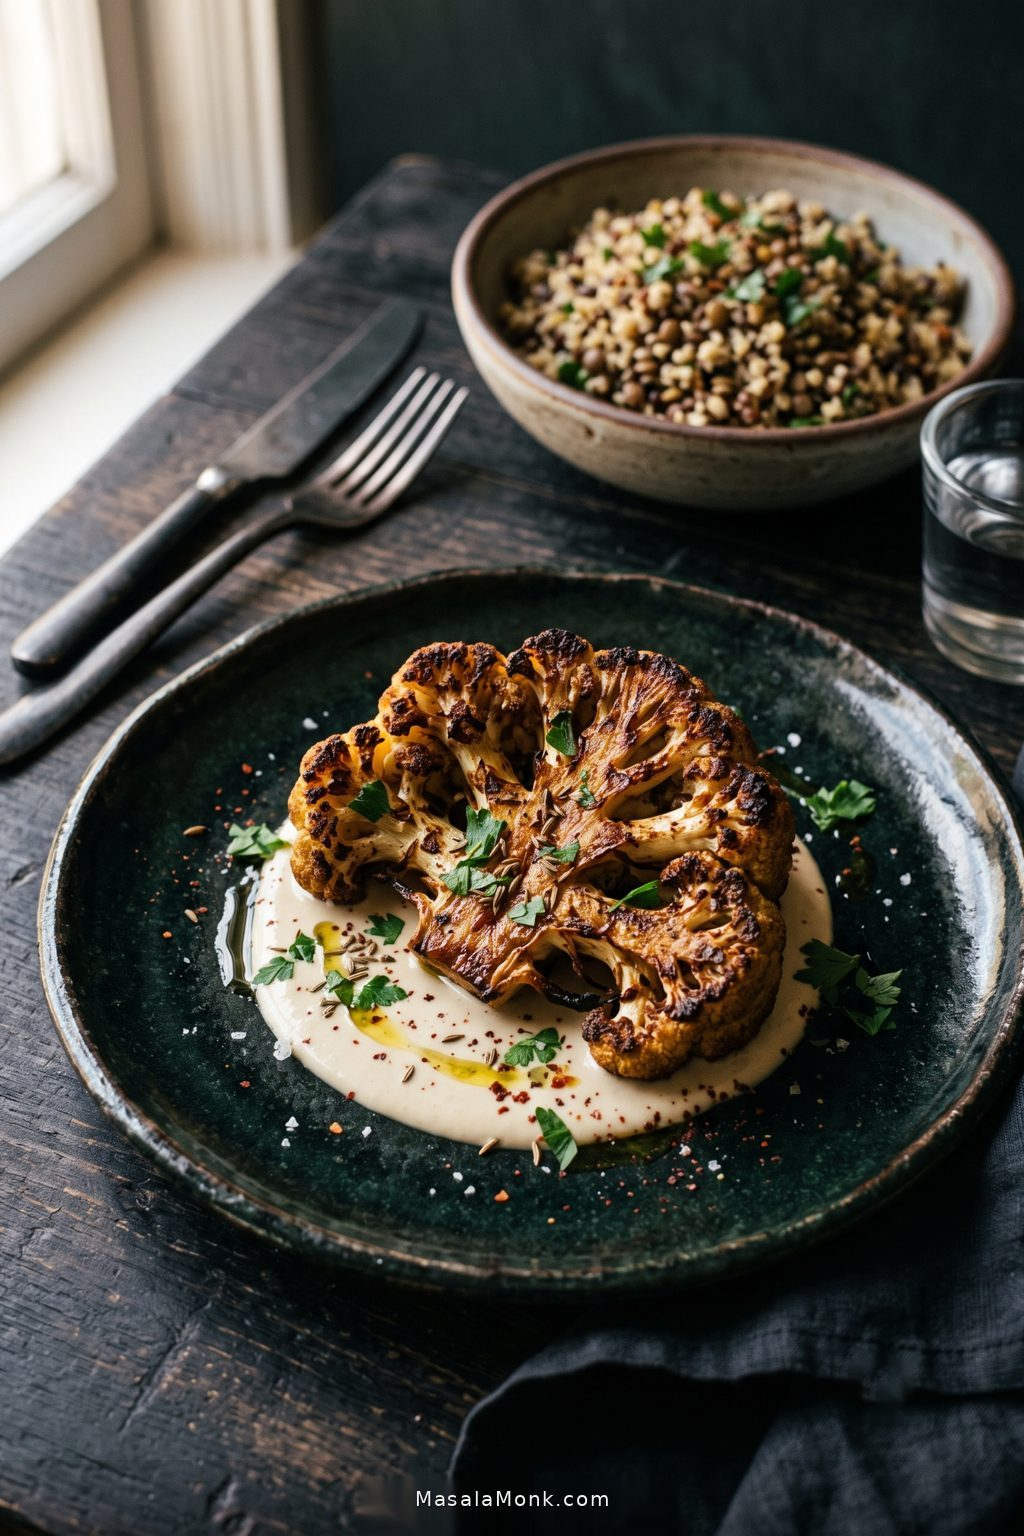
Spoon the sauce underneath, drizzle lightly, or serve it alongside. Those crisp edges soften quickly once they sit in moisture.
How to Store and Reheat Roasted Cauliflower
Store roasted cauliflower in the refrigerator and use it within about 3–4 days. Transfer leftovers to a shallow container and refrigerate promptly; you do not need to wait for them to cool all the way to room temperature.
Let the first rush of steam escape briefly before sealing the container tightly. USDA guidance recommends refrigerating cooked leftovers within 2 hours.
The Best Ways to Reheat It
- Air fryer: about 375°F / 190°C for 3–5 minutes for a small portion.
- Oven: spread it out and heat at about 400°F / 200°C for 8–12 minutes.
- Skillet: medium to medium-high heat for roughly 4–6 minutes.
- Microwave: heat in short bursts until hot. It is quickest, but the edges will be softer.
Once the crisp edges soften, leftovers are still useful in dishes where roasted flavor matters more than crunch. Roughly chop the florets and fold them into pesto pasta, grain bowls or salads instead of treating reheating as the only option.
Quick links: Back to the recipe · Seasoning ideas · Troubleshooting · Back to top
A Few Common Roasted Cauliflower Questions
1. Do You Need to Boil Cauliflower Before Roasting?
No. Medium florets become tender during the 425°F / 220°C roast without boiling or blanching first.
Parcooking is useful only when you deliberately want an unusually soft center; otherwise it creates more moisture to deal with before browning begins.
2. Is Roasted Cauliflower the Same as Baked Cauliflower?
Baked cauliflower and roasted cauliflower often describe the same basic method when plain florets are cooked uncovered in a hot oven. In that sense, this works as a straightforward baked cauliflower recipe too.
A cauliflower bake can mean something quite different: a creamy or cheesy casserole made with sauce, breadcrumbs or other ingredients.
3. Can I Roast Two Heads of Cauliflower at Once?
Yes. Use two large sheet pans rather than squeezing both heads onto one.
If both pans are in the oven together, swap their positions and rotate them partway through if your oven browns unevenly.
4. Can I Make This Roasted Cauliflower Recipe Ahead?
Yes. Cut the florets ahead and refrigerate them in a covered container. Keep them dry and check for condensation before roasting.
Add the oil and seasonings shortly before the tray goes into the oven. Fully roasted cauliflower reheats well too, although its crispest edges will always be on the freshly roasted batch.
The finished tray should look a little more roasted than many people instinctively expect: proper brown patches underneath, darker tips and stems that yield to a fork without collapsing.
Add the lemon while everything is still hot and get it onto the table. The darkest pieces rarely stay there for long.