
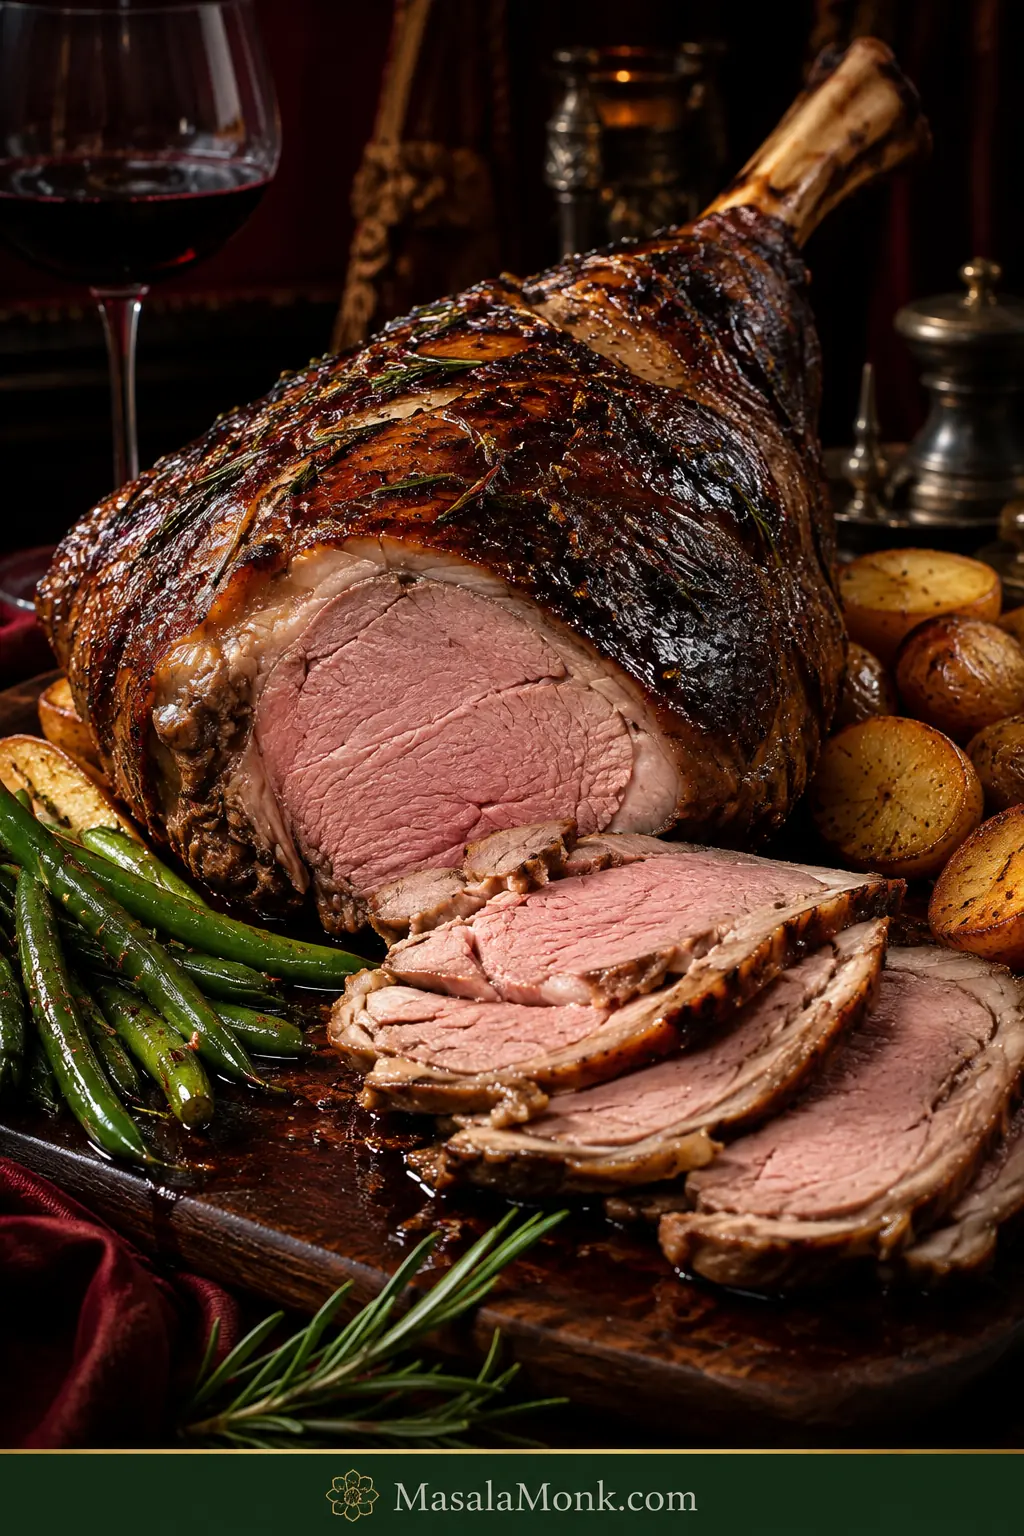
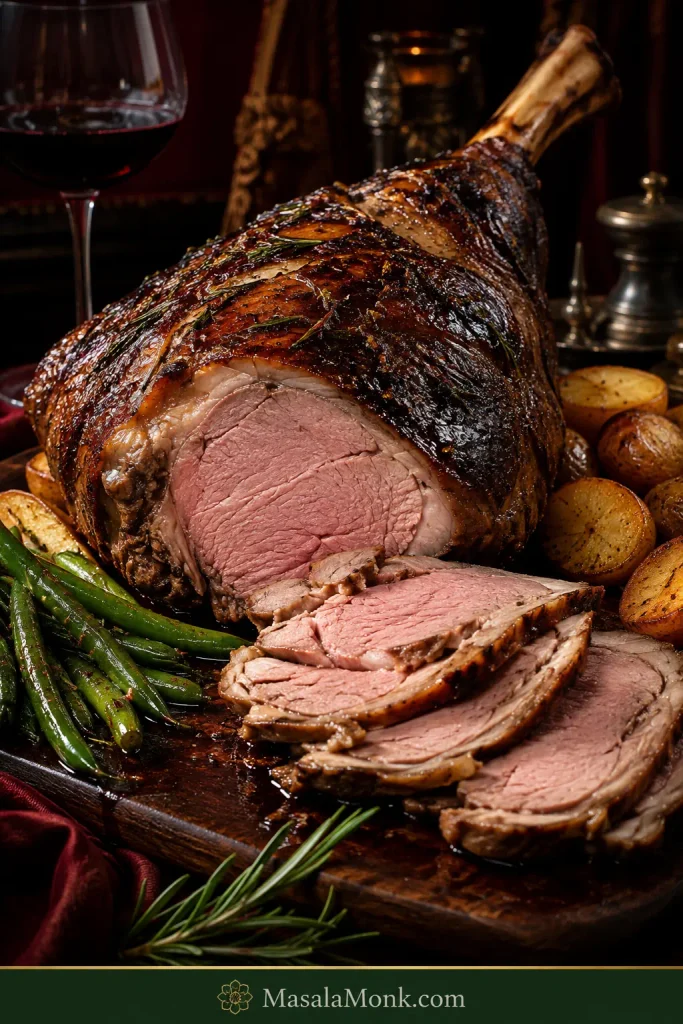
A good roast leg of lamb gives you that moment everyone is waiting for when the knife goes in: a deeply browned garlic-and-rosemary exterior, savoury juices glistening across the cut surface, and tender slices that stay juicy through the thickest part of the leg.
A leg of lamb is also substantial, usually bought for an occasion, and not something most people are eager to get wrong. There may be potatoes waiting, gravy to make and somebody already asking what time lunch will be.
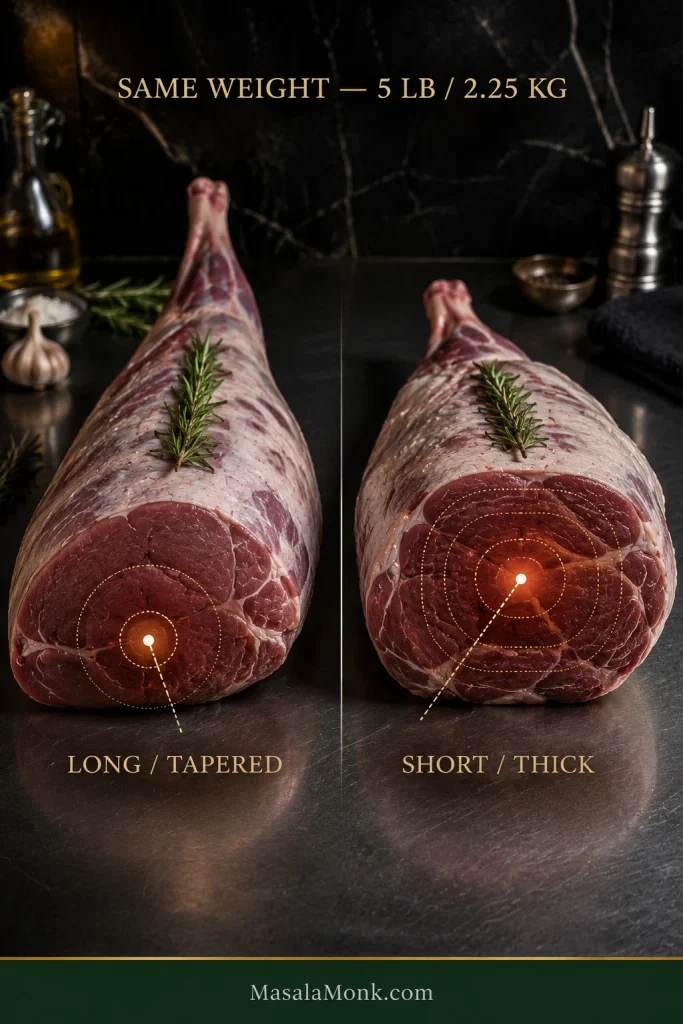
The reassuring part is that you do not need to predict the exact minute it will finish. One 5 lb leg may be long and tapered; another can be short and thick. Start hot so the outside browns, lower the oven for the longer part of the roast, then check before you expect it to be done. Weight tells you when to start checking; internal temperature tells you when to stop.
Here, “perfectly cooked” means a deeply browned conventional roast with juicy, carveable slices. This recipe uses a minimum removal temperature of 145°F / 63°C. After resting, expect pink-to-light-pink slices through the thicker sections, with the tapered areas naturally more done—not the ruby centre of restaurant-style medium-rare lamb.
Jump to Recipe · Cooking Time by Weight · Doneness & Temperature · Fix a Problem
Quick Answer: How to Roast a Leg of Lamb
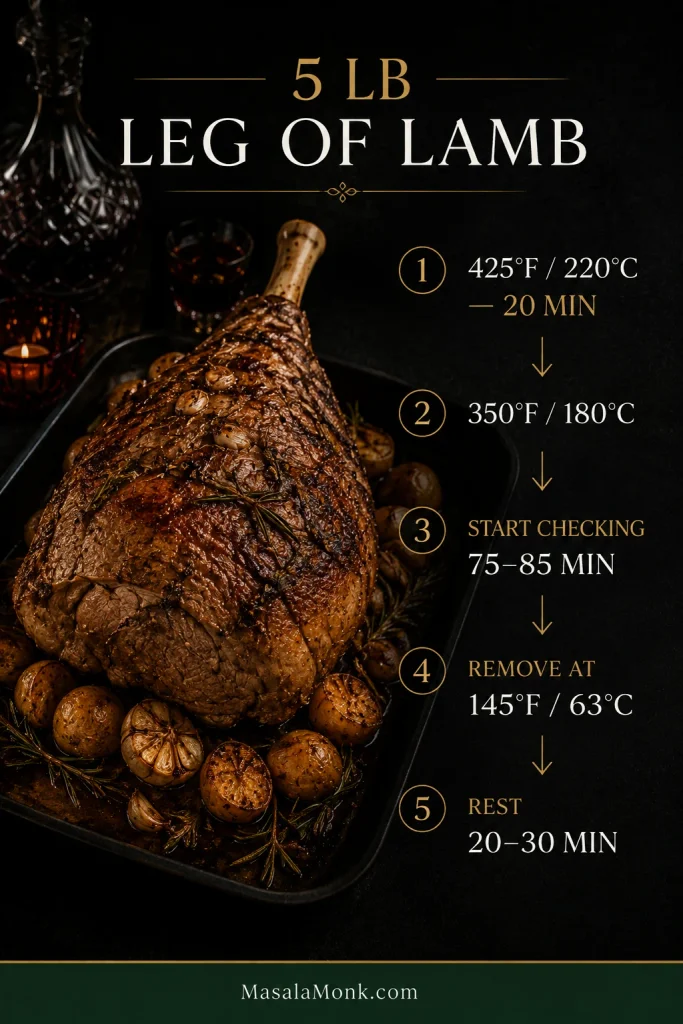
For a 5 lb / 2.25 kg whole bone-in leg, season with garlic, rosemary, lemon zest, olive oil, salt and pepper. Roast uncovered for 20 minutes at 425°F / 220°C conventional (400°F / 200°C fan/convection), then lower the oven to 350°F / 180°C conventional (325°F / 160°C fan/convection).
Start checking the thickest part at 75–85 minutes total oven time. Remove the roast when the thickest part reaches 145°F / 63°C, then rest for 20–30 minutes. Allow roughly 1½–2 hours in the oven for planning, but let the thermometer—not the clock—decide the finish.
Cooking your first leg of lamb? A thermometer removes most of the guesswork. You do not need to predict the finish from the clock alone.
Make It Now: Roast Leg of Lamb
Recipe at a Glance
| Roast | 5 lb / 2.25 kg whole bone-in leg |
|---|---|
| Serves | 6 generously or about 8 moderate portions |
| Prep | About 20 minutes |
| Hot start | 425°F / 220°C conventional (400°F / 200°C fan/convection) for 20 minutes |
| Then lower to | 350°F / 180°C conventional (325°F / 160°C fan/convection) |
| First check | 75–85 minutes total oven time |
| Minimum removal temperature | 145°F / 63°C |
| Rest | 20–30 minutes |
| Planning time | About 2½ hours from starting prep to carving; allow closer to 3 hours for a thick roast or a busy dinner |
Ingredients
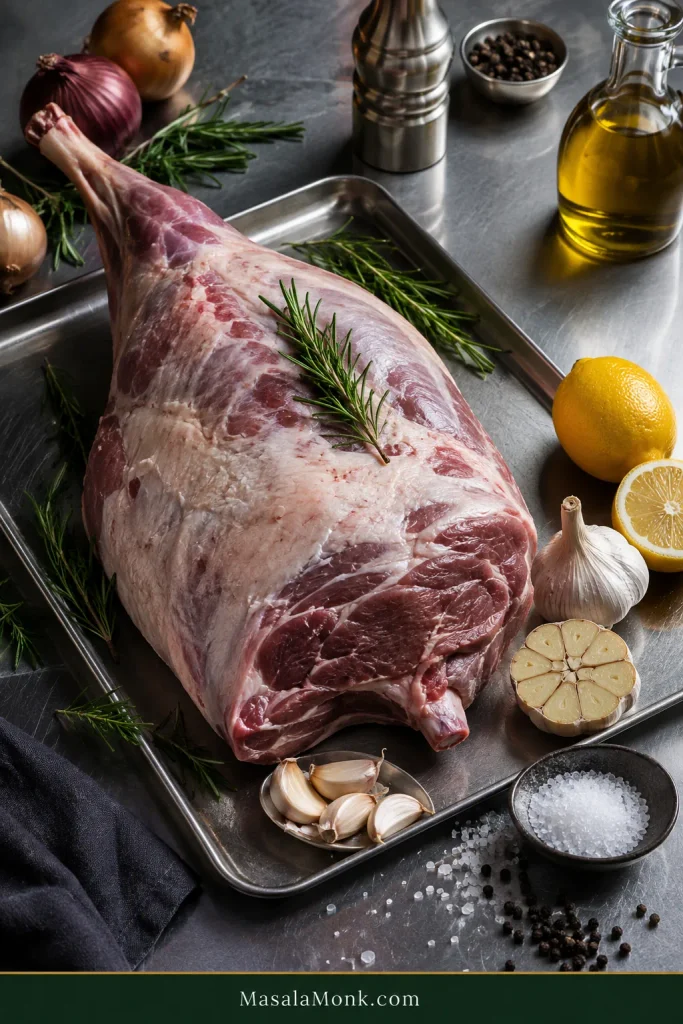
- 1 whole bone-in leg of lamb, about 5 lb / 2.25 kg
- 5 garlic cloves, cut into thin slivers
- 2 tbsp / 30 ml olive oil
- 1½ tbsp finely chopped fresh rosemary
- Finely grated zest of 1 lemon
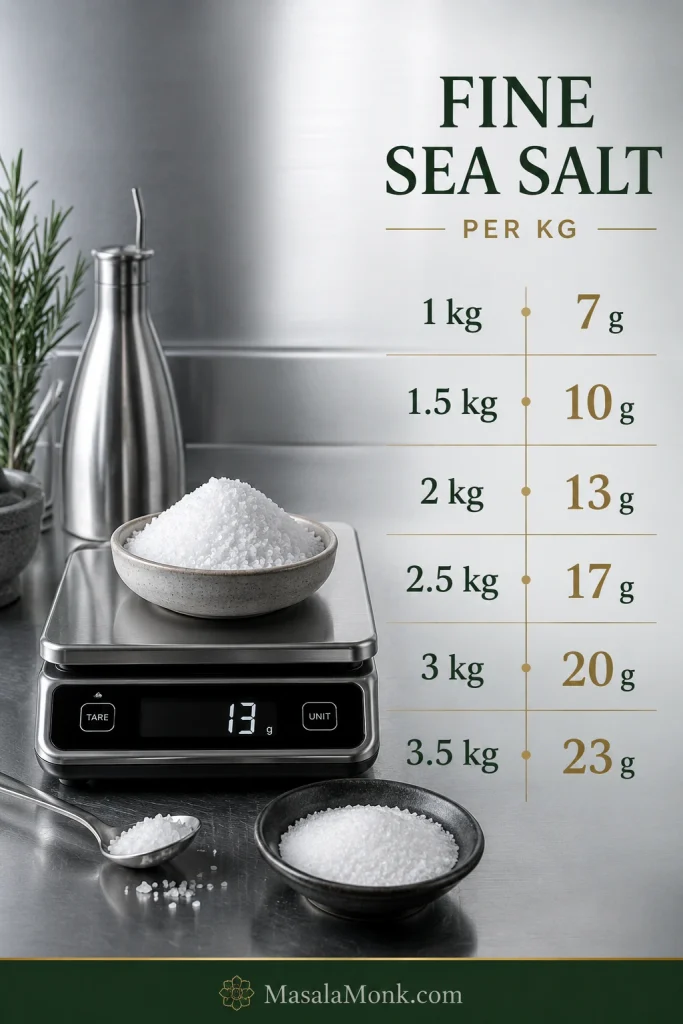
- 15 g fine sea salt, about 2½ tsp; if using kosher salt, weigh it because brands vary considerably by volume
- 1 tsp freshly ground black pepper
- 2 large onions, cut into thick wedges or slices
- 1 whole garlic bulb, halved crosswise, optional
Scaling the seasoning: the quantities above are for a 5 lb / 2.25 kg bone-in leg. A practical scaling rule from this recipe is about 6.5–7 g fine sea salt per kg of raw bone-in lamb: roughly 7 g for 1 kg, 10 g for 1.5 kg, 13 g for 2 kg, 17 g for 2.5 kg, 20 g for 3 kg and 23 g for 3.5 kg. Keep salt by weight; garlic, rosemary, lemon and oil can be adjusted more loosely to coat the roast evenly.
You will also need a roasting pan, a small sharp knife and, most importantly, an instant-read thermometer or oven-safe leave-in probe.
If you do not own a meat thermometer, this is the piece of equipment worth getting before you roast the lamb. Colour and cooking time are much less dependable guides to what is happening in the centre.
How to Make Roast Leg of Lamb
1. Start With Fully Thawed Lamb
The timing windows here assume a fully thawed, refrigerator-cold leg. Starting frozen? A whole leg may need two days or longer to thaw completely in the refrigerator, so plan that part ahead.
Take the lamb out when you begin prep; it does not need to sit on the counter for an hour or two first.
Position the oven rack so the lamb itself will sit roughly in the centre of the oven. Preheat to 425°F / 220°C conventional or 400°F / 200°C fan/convection.
2. Dry and Trim
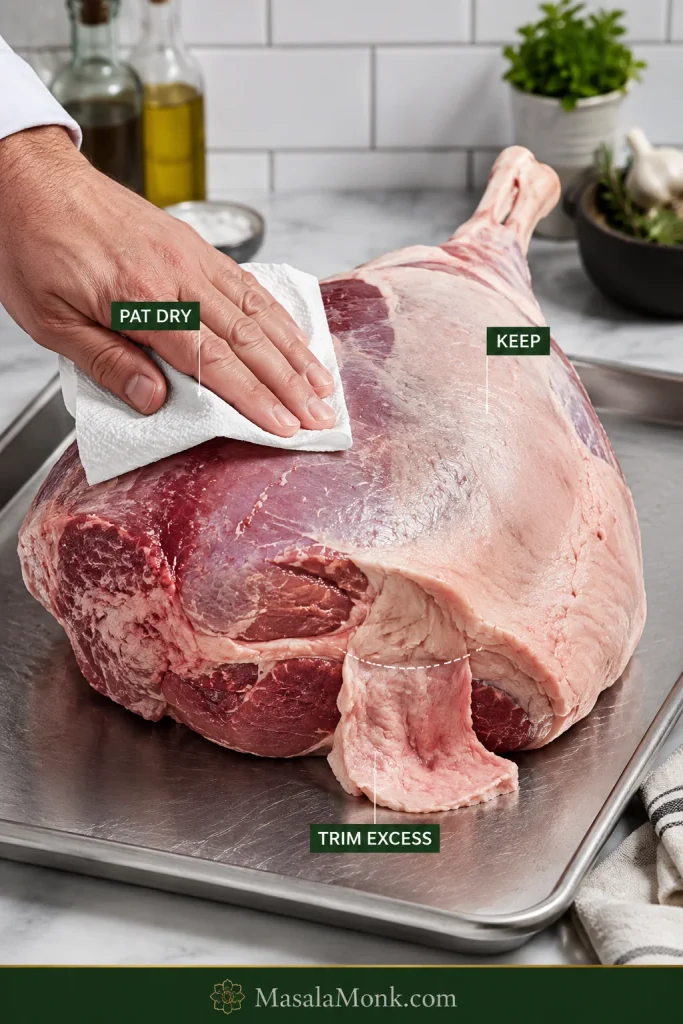
Do not rinse the lamb; pat it thoroughly dry instead. Get into the folds and creases too. A dry surface browns much more readily, and keeping raw-meat splashes away from the sink is a bonus.
Trim very thick, hard or dangling pieces of fat, but leave the normal exterior covering. That fat protects the meat and gives the roast much of its browned, savoury character.
3. Make Small Angled Garlic Pockets
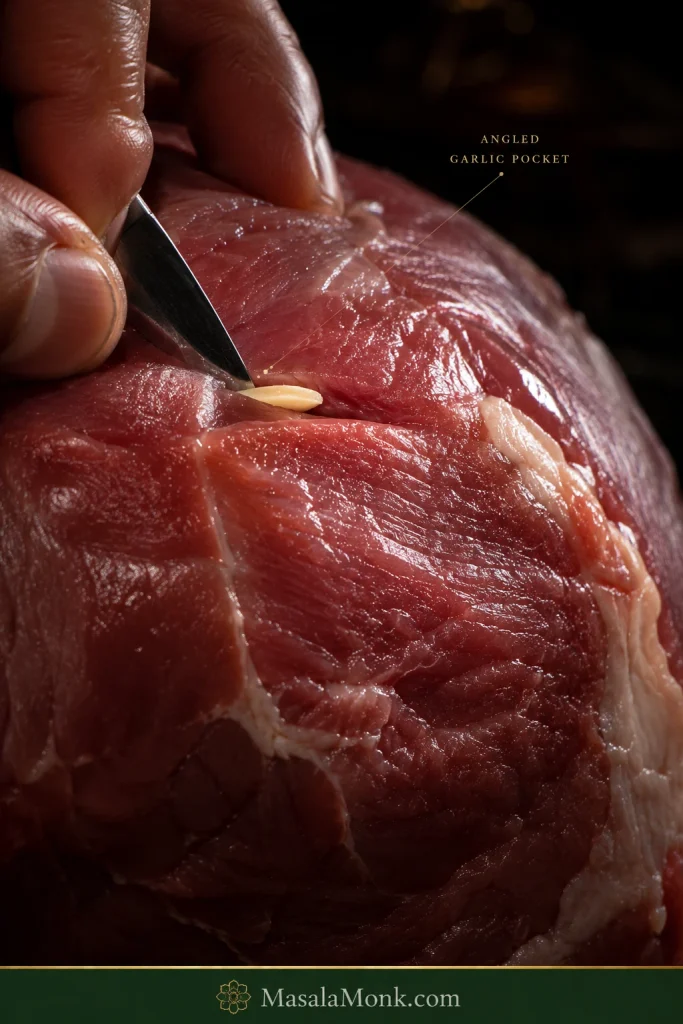
Use the point of a small knife to make small angled pockets in the thick meaty areas. Push one thin garlic sliver into each pocket.
These are pockets, not broad surface scores: the knife goes just deep enough to protect the thin garlic sliver beneath the surface. Thin slivers flavour the meat without leaving large pungent pieces inside the finished slices, while protected garlic is less likely to blacken.
4. Season and Set Up the Pan
Mix the olive oil, rosemary, lemon zest, salt and black pepper. Rub it all over the lamb, including the sides and ends.
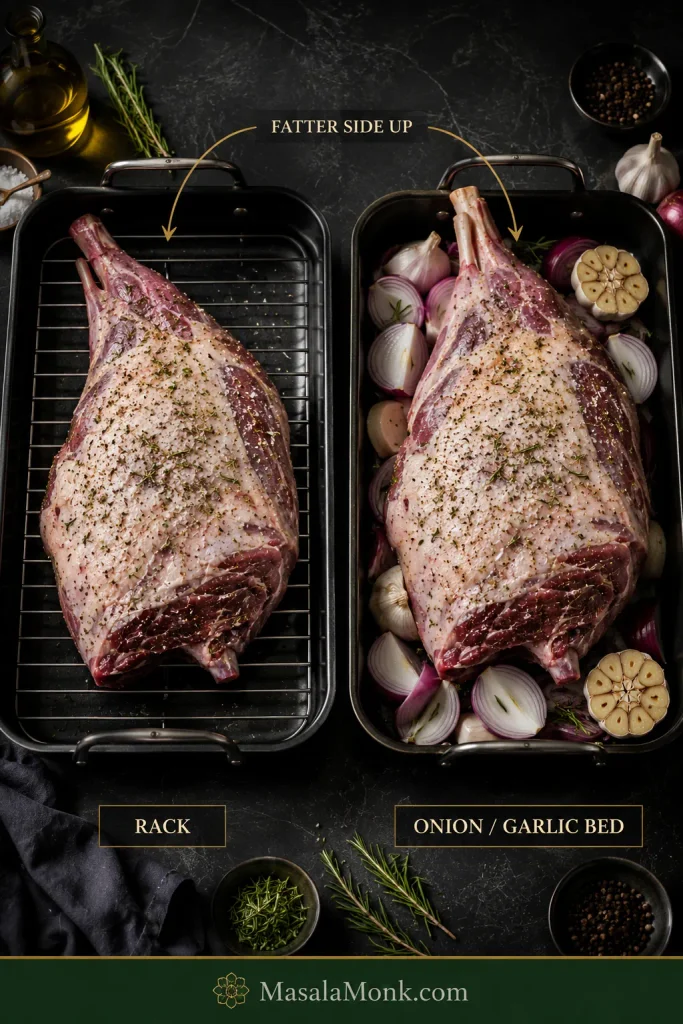
Scatter the onions and optional halved garlic bulb across the roasting pan. Set the lamb on top with the broader, more fat-covered side facing upward.
A metal rack gives the underside more airflow, but it is not essential. Thick onion wedges or halved garlic heads lift the roast slightly and make the drippings beneath it taste better.
5. Start Hot
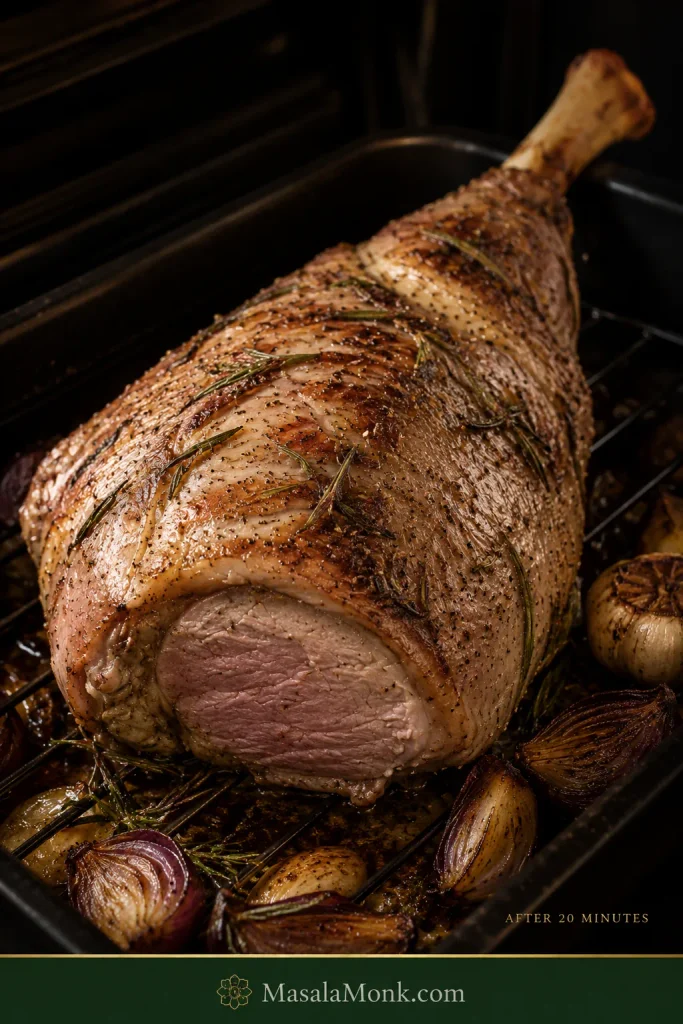
Roast the lamb uncovered for 20 minutes in the hot oven.
By the end of this stage, the high points of the fat should be turning golden and the rosemary-speckled surface should be beginning to look roasted instead of damp. Deeper colour will develop as the lamb cooks.
6. Lower the Oven
Reduce the heat to 350°F / 180°C conventional or 325°F / 160°C fan/convection.
Leave the lamb in place. Repeated flipping and basting add work without doing much for the juicy centre, while constantly opening the oven makes its temperature less stable.
As it cooks, the kitchen should begin smelling unmistakably like roast dinner: warm rosemary, browned lamb and sweet garlic. A sharp or burnt smell from exposed aromatics is your cue to look at the surface.
7. Start Checking Early
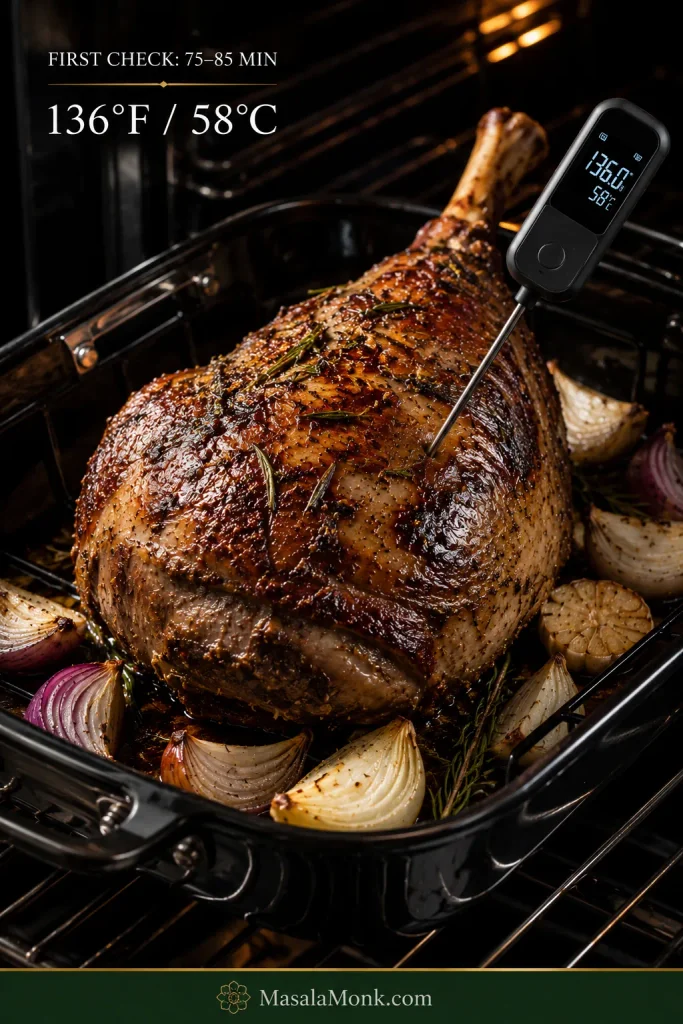
For the 5 lb / 2.25 kg roast, make the first deep temperature check after 75–85 minutes total oven time.
Insert an instant-read thermometer deep into the thickest part of the meat, away from bone and obvious pockets of fat. Check another thick area on an especially uneven leg.
Using a leave-in probe? Position it in the thickest part before roasting, following the manufacturer’s oven-safe instructions. An instant-read thermometer is useful for confirming the final reading elsewhere.
A roast that is still below temperature simply goes back into the oven. Shorten the interval between checks as the centre gets closer.
8. Take It Out When the Centre Is Ready
Remove the lamb when the thickest part reaches 145°F / 63°C.
By now the outside should be deeply browned at the high points, and the exposed fat should look golden and beginning to render instead of thick, white and waxy. The onions underneath should be soft with dark caramelized edges.
This is the moment when the roast should finally look like the centrepiece it was meant to become: browned, fragrant and ready to rest.
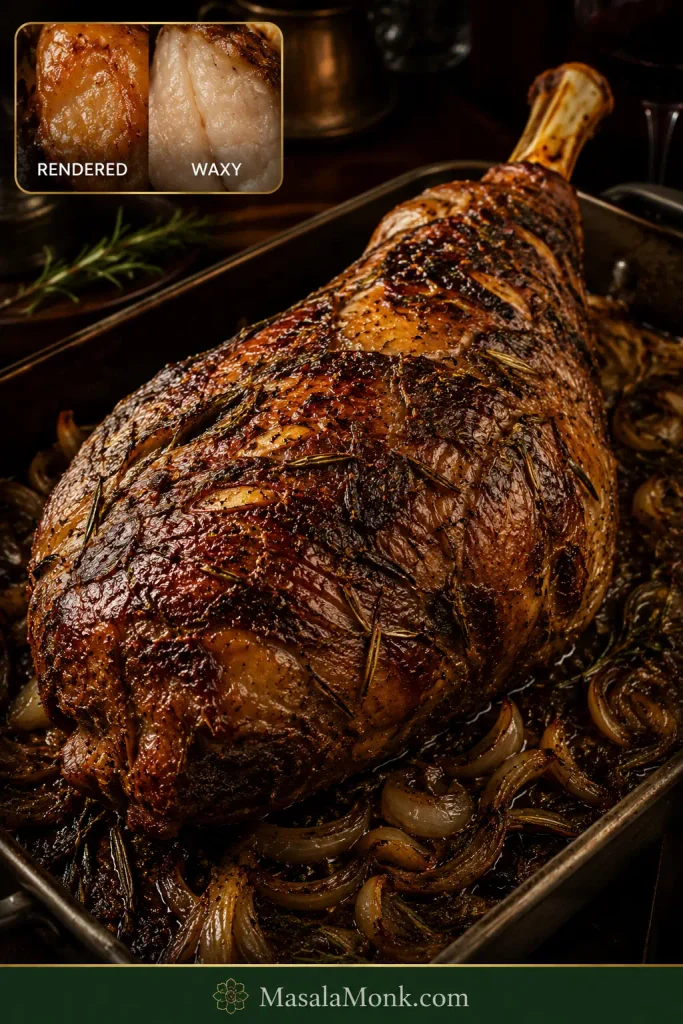
The thermometer gets the final vote. An early roast comes out early. The potatoes can catch up later.
9. Rest for 20–30 Minutes
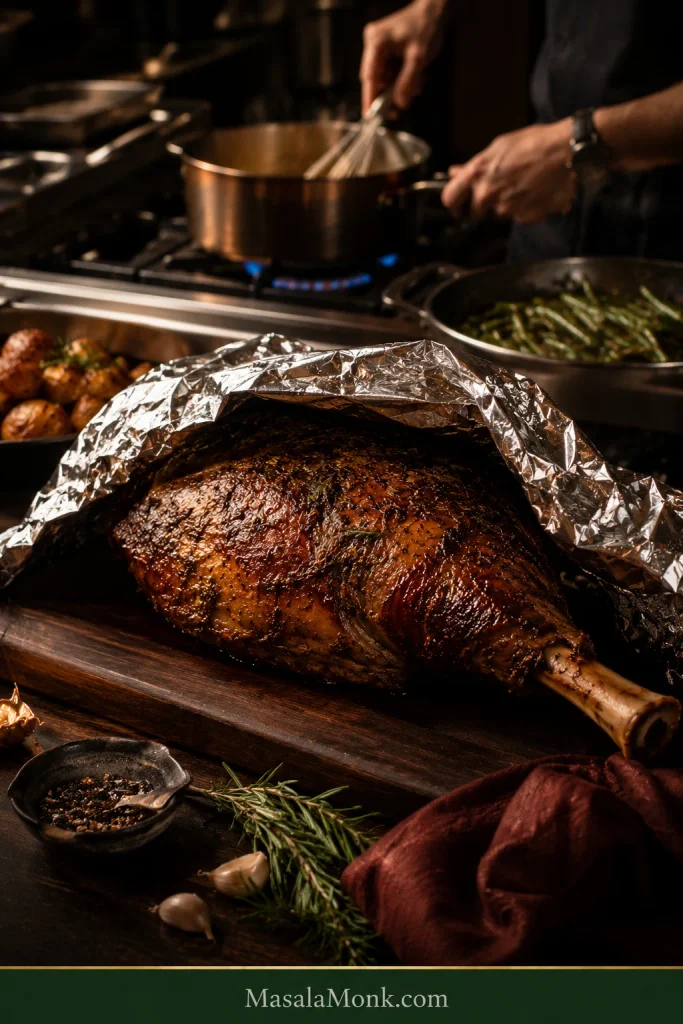
Transfer the lamb to a carving board and tent it loosely with foil.
A whole leg holds heat well, so the centre should still be plenty warm after a 20–30 minute loose-tented rest. It may look ready, everyone may be hungry, and the potatoes may be demanding attention—but this is cooking time, not dead time. Finish the sides and gravy while the lamb waits.
10. Carve Across the Grain
Cut the large meaty sections away from the bone, then slice those pieces across their grain.
A well-rested roast should carve cleanly without immediately flooding the board. Spoon over pan juices or gravy and bring it to the table while the rosemary crust is still fragrant.
Should You Cover Leg of Lamb With Foil?
For most of this roast, leave it uncovered. Dry oven heat develops the browned exterior.
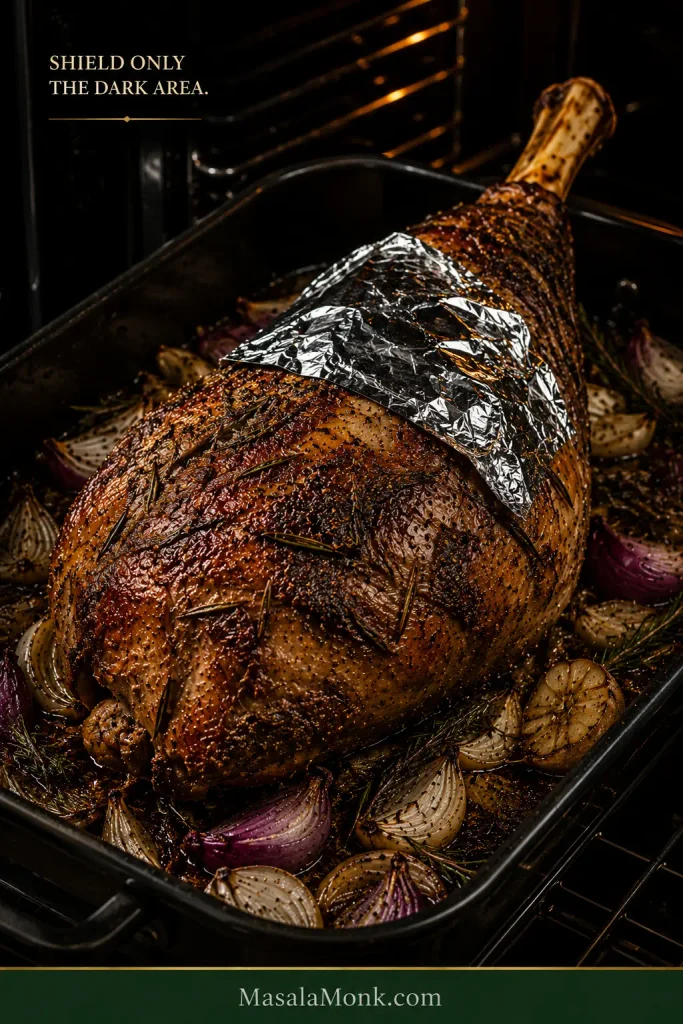
Fully covered roasting is another valid style, but it traps more moisture and produces a softer exterior. Here, foil works mainly as a shield: protect an area that is already dark enough while the centre catches up, then tent the whole roast loosely during the rest.
Recipe Notes
- The main recipe and timing table are for a fully thawed bone-in leg.
- The first-check window tells you when to bring out the thermometer, not when dinner must be ready.
- A compact rolled boneless roast can cook differently from a bone-in leg of the same weight.
The recipe above is enough to cook the lamb. The rest of the guide is for those moments when you look at your particular roast and wonder, Is this normal?
What Kind of Leg of Lamb Did You Buy?
Buying the lamb? For this recipe, look for a whole bone-in leg around 4½–6 lb / 2–2.75 kg, with unusually thick hard exterior fat already trimmed. A shank-on leg, sometimes sold as an American leg, keeps the lower shank attached and makes a dramatic centrepiece. Shank-off is less cumbersome in the pan and at the carving board.
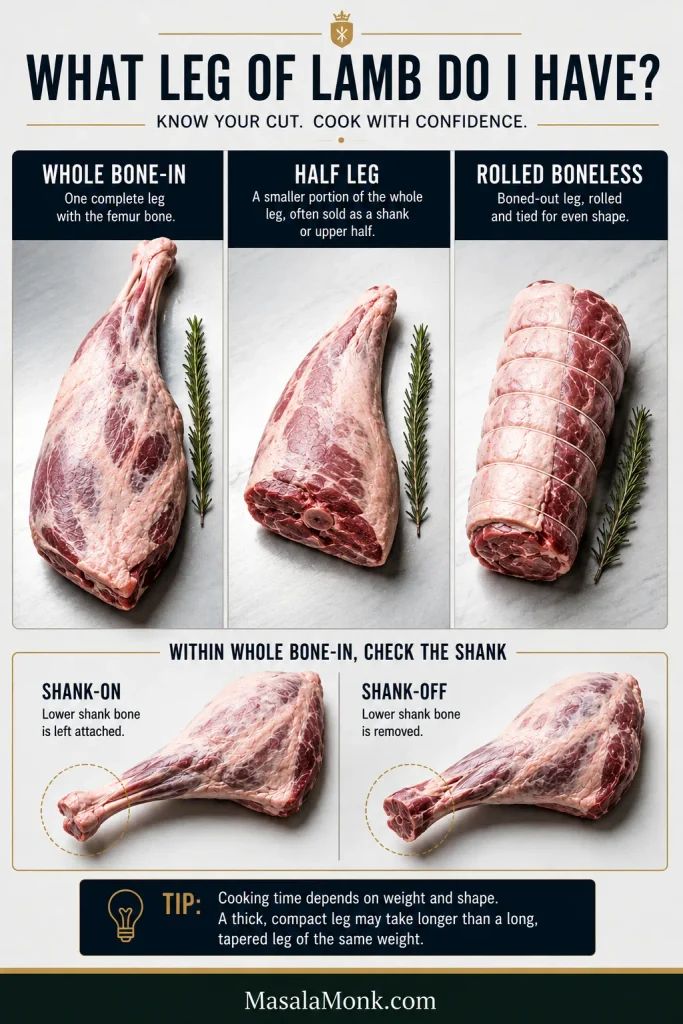
Whole bone-in leg: this is the roast the main method is designed for. Its tapered end will often cook ahead of the thickest part.
Half leg: a roast around 1 kg / 2.2 lb is often a half leg. Use the same broad approach but bring out the thermometer much earlier. Simply halving a whole-leg cooking time is less useful than checking the roast you actually have.
Boneless rolled leg: a compact, football-shaped roast can take longer than its weight suggests because heat has farther to travel to reach the centre.
Lamb varies noticeably in shape, size and fat cover. Yours may look quite different from somebody else’s recipe photograph. The roast in front of you is the one that matters.
Want Fork-Tender Lamb Instead?
For lamb soft enough to yield beneath a fork with plenty of gravy around it, use our Slow Cooker Leg of Lamb Recipe. That method aims for a completely different texture.
This oven-roasted version is finished while the meat is still juicy and structured enough to carve into clean slices.
How Much Leg of Lamb Per Person?
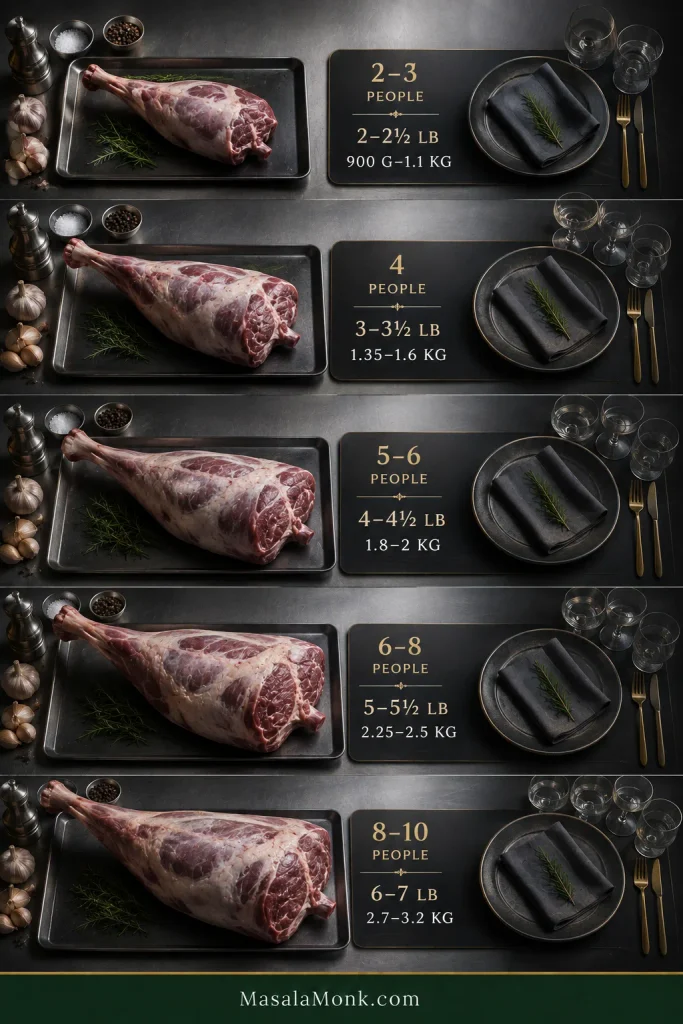
A bone-in leg includes bone and exterior fat, so its raw weight is higher than the amount of carved meat that reaches each plate. A little extra is rarely troublesome here; cold roast lamb is one of the better leftovers to find in the fridge the next day.
| People | Approx. Bone-In Leg | Best For |
|---|---|---|
| 2–3 | 2–2½ lb / 900 g–1.1 kg | Small dinner; often a half leg |
| 4 | 3–3½ lb / 1.35–1.6 kg | Normal portions |
| 5–6 | 4–4½ lb / 1.8–2 kg | Generous family meal |
| 6–8 | 5–5½ lb / 2.25–2.5 kg | Sunday or holiday roast |
| 8–10 | 6–7 lb / 2.7–3.2 kg | Larger gathering |
Buy toward the upper end when the lamb is the clear centrepiece or your crowd tends to eat generously.
How to Season a Leg of Lamb
Garlic, rosemary, lemon, salt and black pepper are enough for a beautiful roast. Garlic brings savouriness, rosemary gives the familiar piney aroma, and lemon zest brightens both without making the surface wet. The lamb itself should still be the main flavour.
Do You Need to Marinate Leg of Lamb?
No. You can season it and roast it the same day.
Salting the leg several hours or the night before gives the seasoning longer to work and lets the surface dry further in the refrigerator. It is a useful option, not a requirement. Today’s lamb does not have to become tomorrow’s project.
How Long to Roast a Leg of Lamb
This is usually the number everyone wants first: how long will my lamb take? By this point somebody may also be asking when dinner will be ready.
Think in terms of a checking window instead of one promised finishing minute. Cooking time plans dinner. Temperature finishes the lamb.
When to Start Checking a Bone-In Leg of Lamb by Weight
The table below applies to a fully thawed bone-in leg using the same two-stage method as the recipe above.
Every number is total elapsed oven time and already includes the initial 20-minute hot start. Start the clock when the lamb first goes into the oven. These are first-check windows, not finishing times.
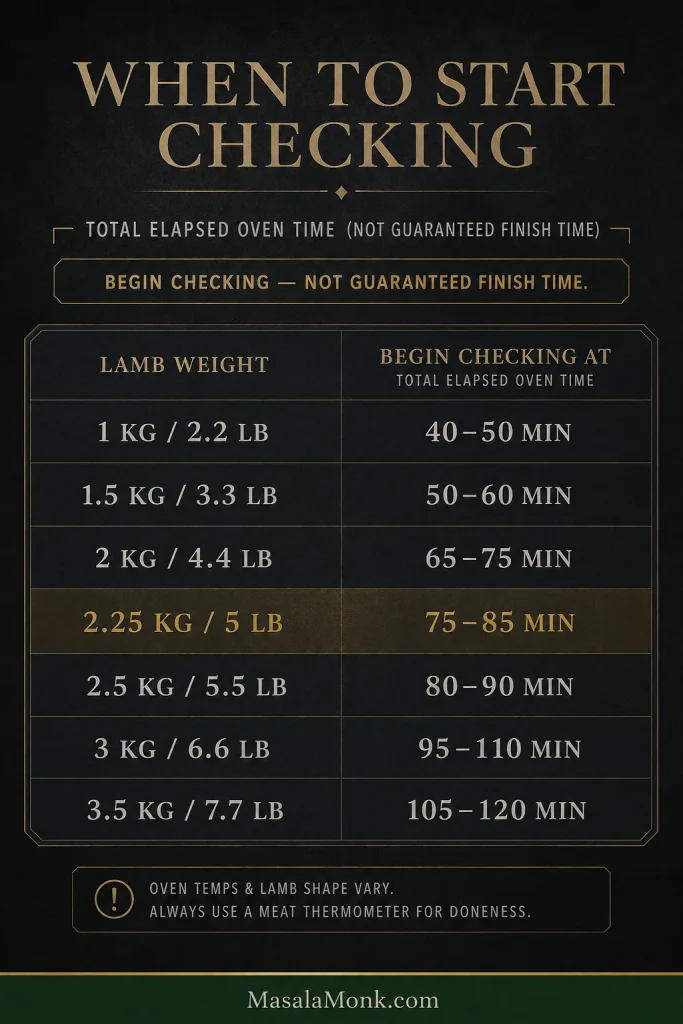
| Bone-In Leg Weight | Approx. Pounds | Begin Checking | Keep in Mind |
|---|---|---|---|
| 1 kg | 2.2 lb | 40–50 min | Usually a half leg; shape varies |
| 1.5 kg | 3.3 lb | 50–60 min | Small roast; check cautiously |
| 2 kg | 4.4 lb | 65–75 min | Probe deep in the thickest part |
| 2.25 kg | 5 lb | 75–85 min | Main recipe size |
| 2.5 kg | 5.5 lb | 80–90 min | Expect more roasting after the first check |
| 3 kg | 6.6 lb | 95–110 min | Check more than one thick area |
| 3.5 kg | 7.7 lb | 105–120 min | Large roast; allow a broad window |
For a 2.25–2.5 kg / 5–5½ lb whole leg, allowing roughly 1½–2 hours in the oven is sensible for dinner planning. The first thermometer check happens well before the end of that window.
Minutes Per Pound for Meal Planning
For meal planning only, allow about 15–20 minutes per 500 g / 1.1 lb after the initial 20-minute hot start.
For a 2.25 kg / 5 lb leg, that gives a rough overall window of about 1 hour 30 minutes to 1 hour 50 minutes. Start checking earlier and let internal temperature decide the finish. A thick, compact roast may run longer; a long, relatively narrow one can finish sooner.
Why Do Roast Lamb Recipes Give Different Times?
Different recipes use different oven temperatures, bone-in or boneless roasts, starting temperatures and ideas of doneness. Shape matters too. Two equal-weight legs can easily finish 15 minutes apart because the heat may have a very different distance to travel.
The USDA’s lamb cooking guidance likewise treats roasting times as planning information and recommends using a food thermometer to determine when the meat is ready.
Leg of Lamb Internal Temperature and Doneness
For this recipe, the thickest part should reach 145°F / 63°C before the lamb leaves the oven. After resting, the thicker sections can remain pink to light pink while the tapered areas may be more done. Colour can vary with the roast, so temperature remains the deciding measure.
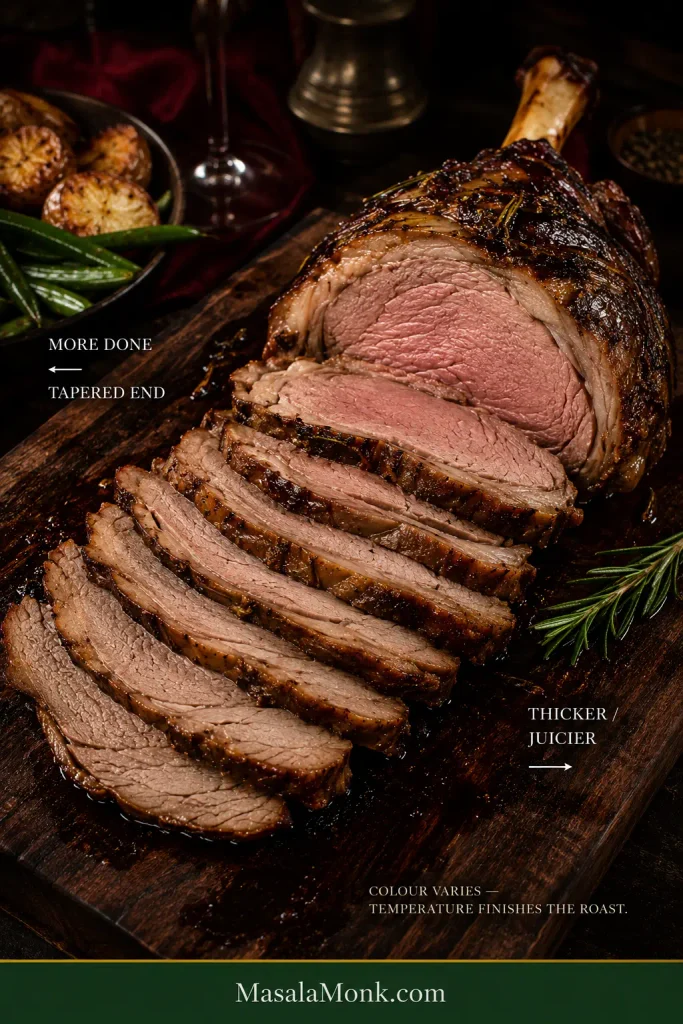
That may look more cooked than the ruby centre shown in some restaurant-style or chef-led lamb recipes. Those recipes are working with a different idea of doneness. Once the thermometer is in your hand, the guessing part of this roast is mostly over.
Removal Temperature vs Temperature After Resting
Removal temperature is what the thermometer reads in the thickest part when the roast comes out of the oven.
Temperature after resting may be somewhat higher because heat keeps moving inward during the early part of the rest. The rise depends on the roast’s size, shape and exterior temperature, so there is no universal “add 10 degrees” rule.
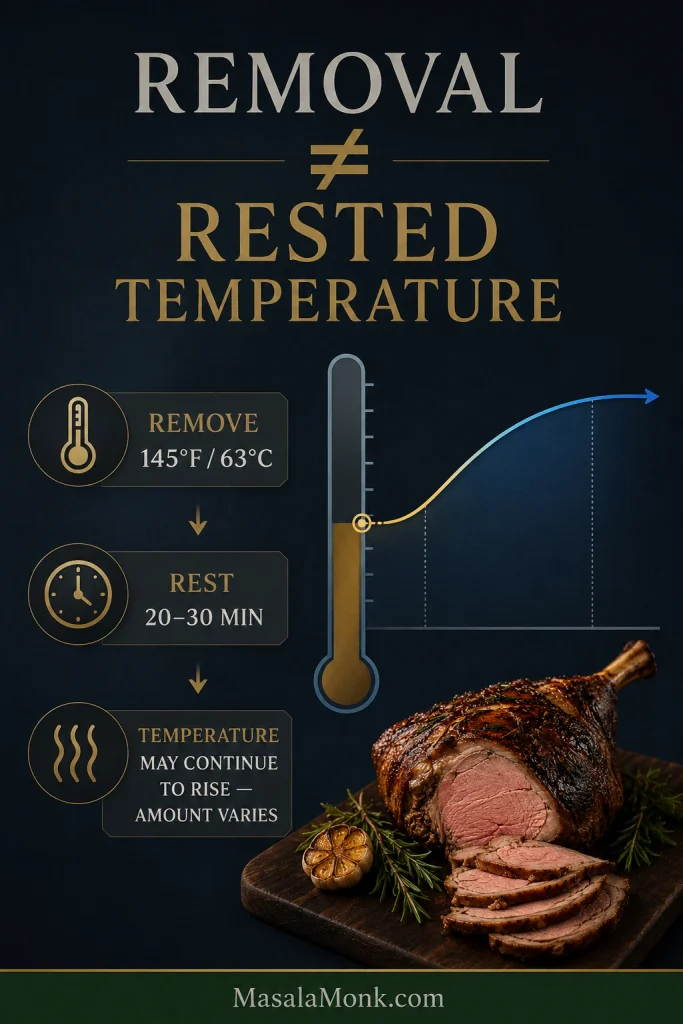
How Common Lamb Doneness Labels Compare
The ranges below are broad culinary reference labels that help explain why another lamb recipe may show a lower number. Doneness labels are not standardized across recipes, and they are not alternate removal temperatures or safety categories for this recipe.
| Doneness | Common Reference Range | Compared With This Recipe |
|---|---|---|
| Rare | 125–130°F / 52–54°C | Below the recipe minimum |
| Medium-rare | 130–135°F / 54–57°C | Below the recipe minimum |
| Medium | 140–145°F / 60–63°C | 145°F / 63°C reaches the minimum |
| Medium-well | 150–155°F / 66–68°C | Firmer with less pink |
| Well-done | 160°F / 71°C and above | Little to no pink |
For whole lamb roasts, the USDA recommends reaching at least 145°F before removal from the heat, followed by a minimum 3-minute rest. This recipe follows that minimum.
Where to Put the Thermometer in a Leg of Lamb
If there is one part of the roast worth slowing down for ten seconds, it is this one.
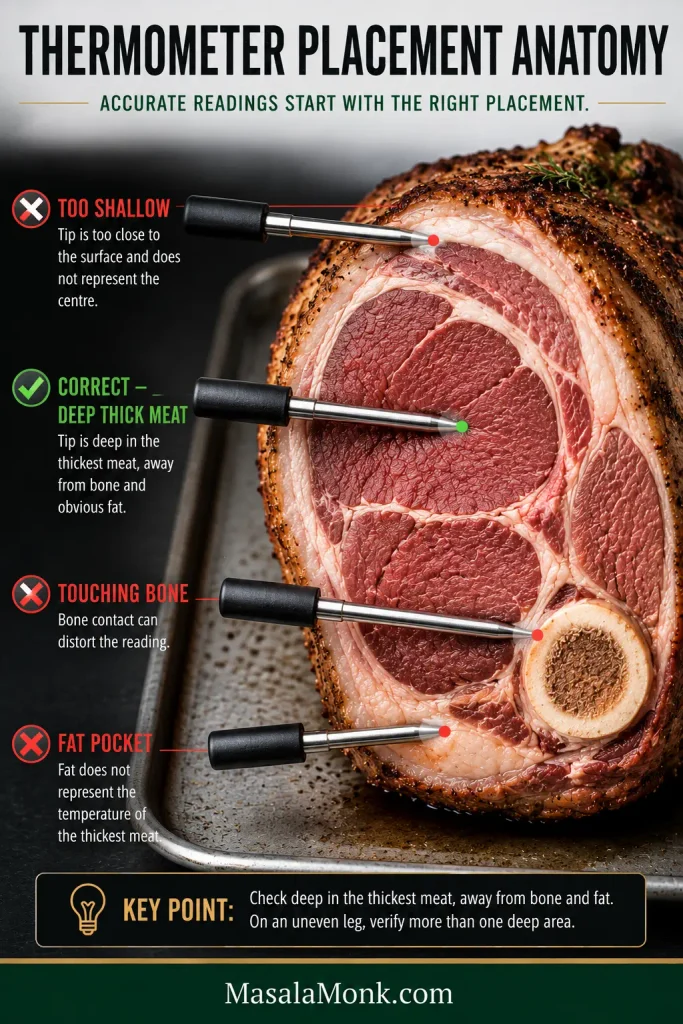
Put the probe deep into the thickest fleshy part, away from bone and obvious seams of fat.
- Measure the thickest meat, not the thin tapered end.
- Keep the thermometer tip away from bone.
- Avoid obvious fat pockets.
- A shallow reading just beneath the crust does not represent the centre.
- Check two or three thick areas on a very uneven leg.
What If Different Spots Give Different Temperatures?
Follow the coldest reliable deep reading. Do not average a cold centre with a hotter section.
For example, one properly placed reading may show 145°F while another deep reading shows 128°F. Averaging them into a theoretical 136°F does not tell you whether that colder part is ready. Recheck both positions and let the cooler centre catch up.
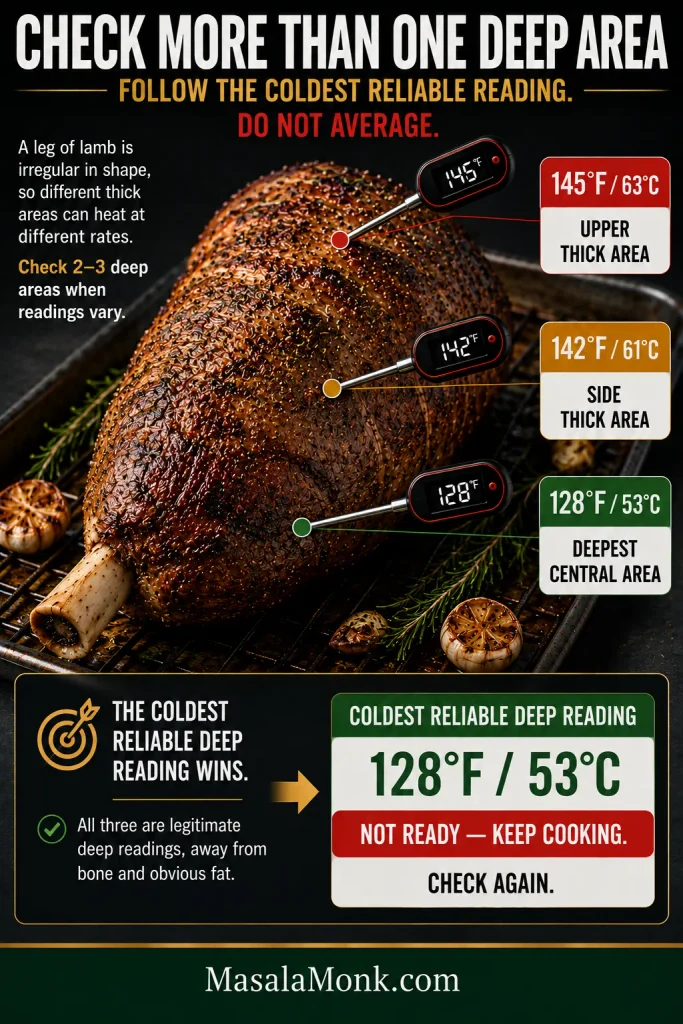
If two thermometers disagree sharply in the same spot, check the equipment as well as the placement. This is another reason equal weight cannot guarantee equal cooking time.
Resting and Carryover Cooking
Give a whole leg 20–30 minutes of rest, loosely tented with foil. A roast this size holds plenty of heat, so the centre should still be comfortably warm when you carve it.
The centre may continue warming during the early part of the rest while the exterior cools from oven-hot to something much nicer to carve and eat. For a full roast dinner, this is valuable working time: crisp the potatoes, finish the vegetables and make the gravy while the lamb waits.
What If the Lamb Finishes Early?
Take it out.
Finishing 20–30 minutes ahead is almost ideal: rest the lamb and finish the sides. A much longer delay needs a different plan. Putting the roast back into a normal hot oven just to wait will keep changing the doneness.
Cooked lamb being held for an extended period should stay at 140°F / 60°C or above, or be refrigerated within 2 hours.
An early roast is usually manageable. An overcooked roast cannot be uncooked.
How to Time the Whole Roast Dinner
This is where an otherwise calm Sunday lunch can suddenly feel busy. The lamb needs to come out when its centre is ready; the potatoes may still want hotter heat and another 20 minutes.
Use the normal resting period as part of the dinner plan. Creamy scalloped potatoes can also be baked ahead and reheated, removing one dish from the last-minute oven traffic.
Planning a 2:00 PM Dinner
This example for a 5 lb / 2.25 kg leg builds its breathing room into early thermometer checks and flexible side timing. The goal is not to make the lamb hit 2:00 exactly; it is to know where the roast stands early enough that the rest of dinner can move around it.
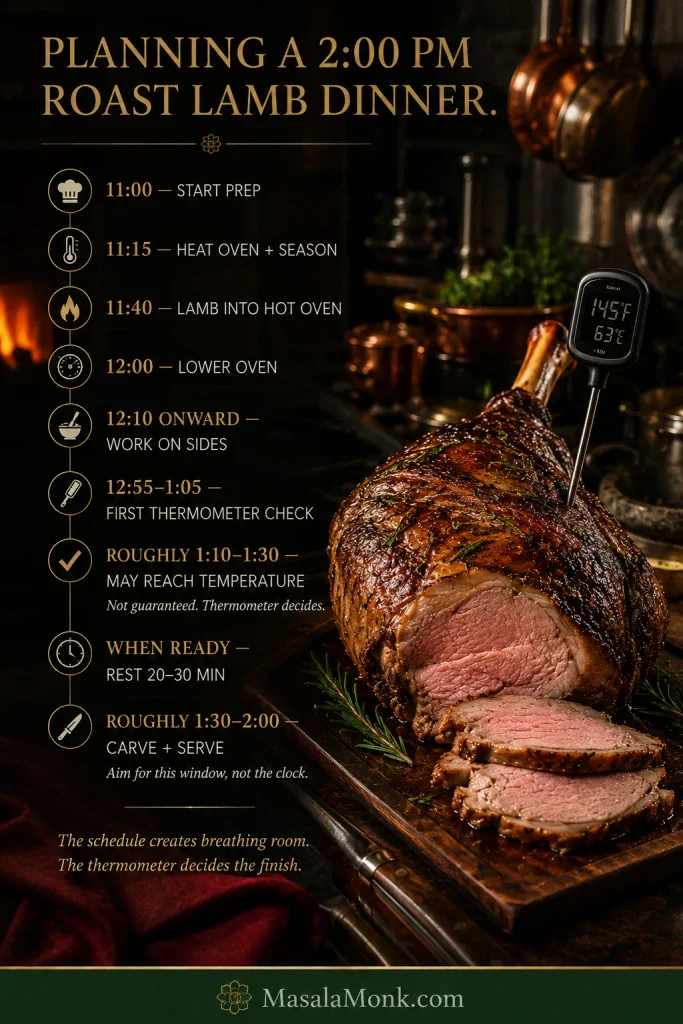
About 11:00 — Start prep.
Take the lamb from the refrigerator, gather the ingredients and position the oven rack.
About 11:15 — Heat the oven and season the lamb.
Dry, trim, add the garlic and rub over the rosemary seasoning.
About 11:40 — Lamb goes into the hot oven.
About 12:00 — Lower the oven.
From about 12:10 onward — Work on the sides.
Parboil potatoes, prep vegetables and get the gravy ingredients ready.
About 12:55–1:05 — Make the first thermometer check.
That is 75–85 minutes after the lamb first entered the oven.
Roughly 1:10–1:30 — The lamb may reach temperature.
The actual moment belongs to the thermometer.
As soon as it is ready — Rest for 20–30 minutes.
Finish the potatoes, vegetables and gravy.
Roughly 1:30–2:00 — Carve and serve.
A particularly thick roast may run later than this example. That is why the first check happens early: you find out while there is still time to adjust everything else.
Fitting Vegetables Around the Lamb
Parboil potatoes while the lamb roasts, then give them their hottest final crisping period once the meat comes out. Carrots fit the same rhythm: these oven-roasted carrots use 425°F / 220°C for browned edges, making them a natural resting-time side.
Pan Jus or Lamb Gravy
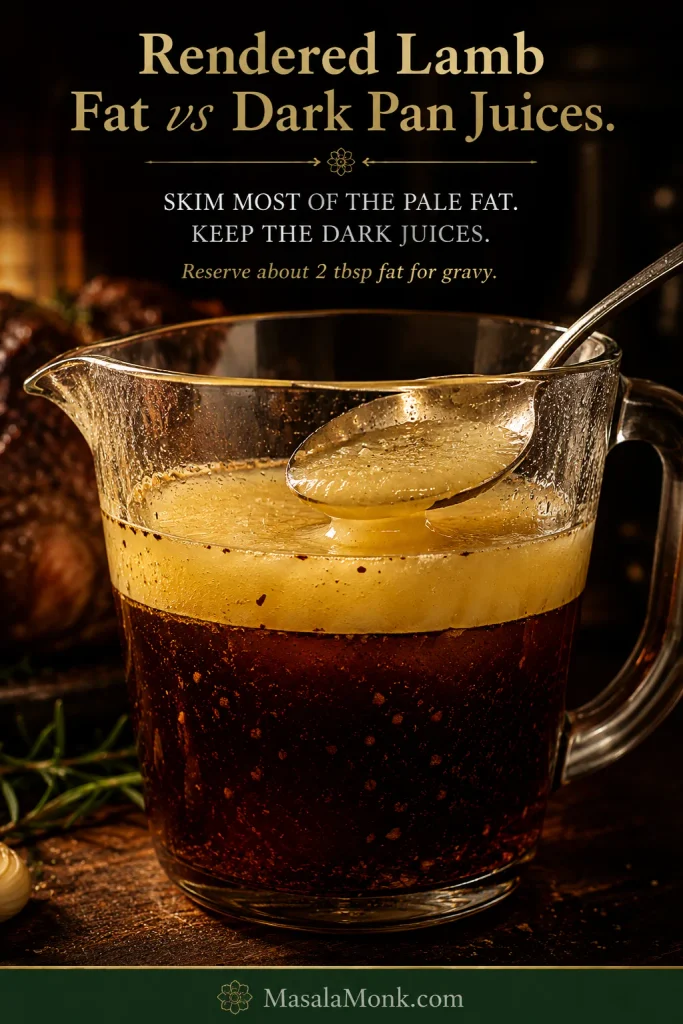
Once the lamb is resting, the pan may contain browned onion, soft garlic, dark savoury meat juices and a layer of rendered lamb fat. Keep the good juices; remove most of the excess fat.
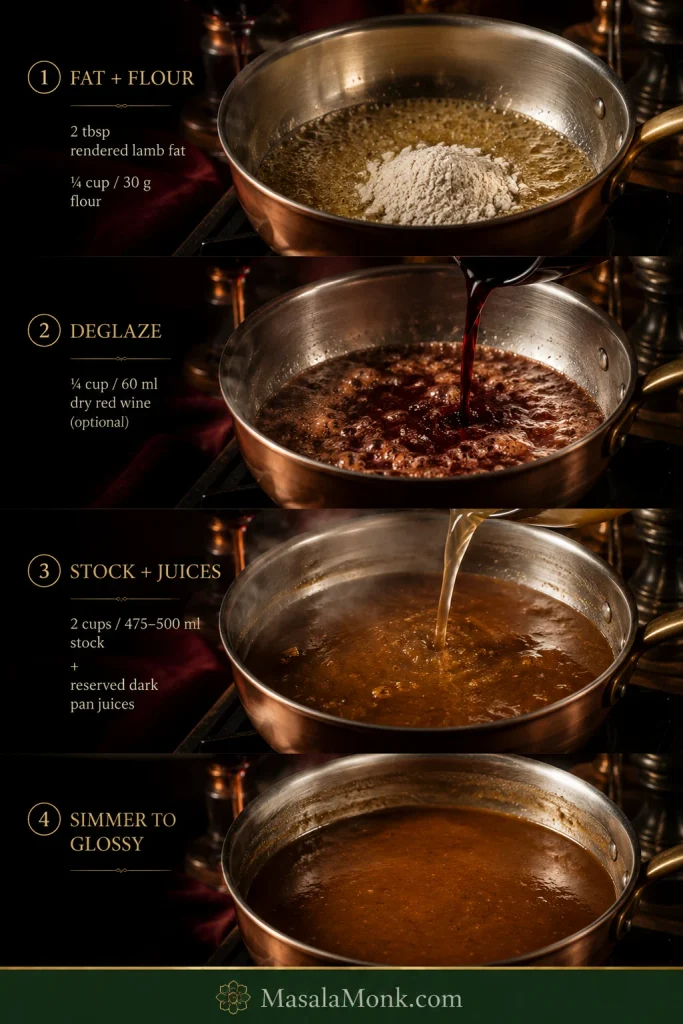
For Quick Lamb Gravy
- 2 tbsp rendered lamb fat from the pan
- ¼ cup / about 30 g all-purpose flour
- 2 cups / 475–500 ml beef or chicken stock
- ¼ cup / 60 ml dry red wine, optional
- Reserved darker pan juices
- Salt and black pepper, as needed
Pour the drippings into a heatproof jug and let the fat rise. Spoon off most of the pale fat, keeping about 2 tablespoons, and save the darker meat juices underneath.
Heat the reserved fat in the roasting pan or a saucepan. Whisk in the flour and cook for about 1 minute. Add the wine, if using, and scrape up the browned bits. Gradually whisk in the stock and reserved meat juices, then simmer until smooth, glossy and lightly thickened. A little soft roasted garlic or mashed onion from the pan can go in too.
Taste before adding salt; the concentrated roasting juices may have already supplied enough. Creamy garlic mashed potatoes give that gravy somewhere very good to go.
Prefer a Pan Jus?
Skip the flour. Deglaze the roasting pan with wine, stock or a splash of water and reduce until the juices taste concentrated enough to spoon over the carved lamb.
How to Carve a Bone-In Leg of Lamb
The simple idea is to free the large sections of meat from the bone, turn each piece so the grain is easy to see, then slice across it.
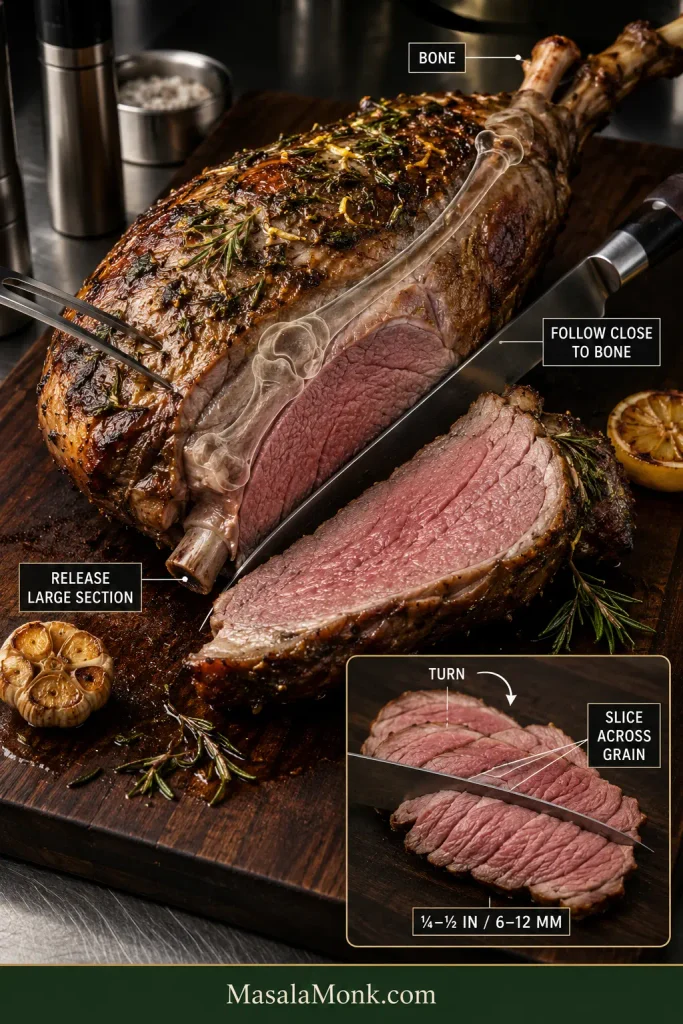
- Set the rested leg securely on a carving board.
- Identify the direction of the main bone.
- Slice down through one large meaty side until the knife reaches bone.
- Run the knife close to the bone to release that section.
- Repeat with the remaining large sections.
- Turn each piece and slice across the grain.
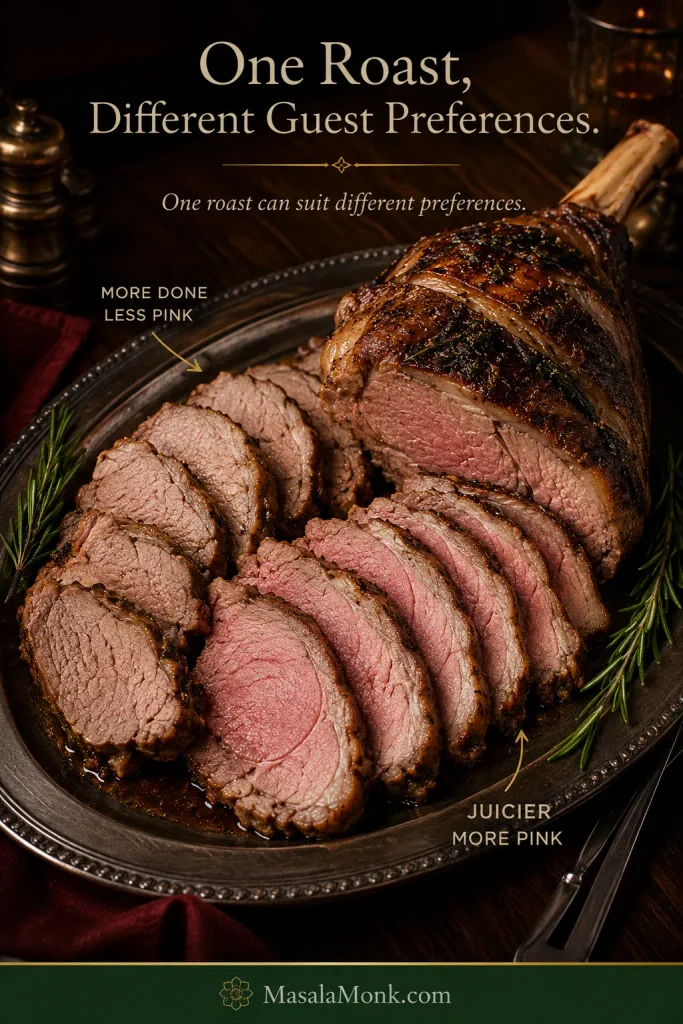
Slices around ¼–½ inch / 6–12 mm feel substantial without becoming awkward to eat. Unexpected chewiness is not always an overcooking problem: slicing with the grain can make properly cooked lamb feel considerably firmer.
Serving people with different doneness preferences? The more-done tapered slices are ideal for anyone who prefers less pink, while slices from the thicker sections will usually stay juicier.
Roast Leg of Lamb Troubleshooting
You probably will not need most of this table. But when a roast runs ahead, lags behind or surprises you after carving, this is the quickest route back to dinner.
| Problem | What Is Happening | What to Do |
|---|---|---|
| Outside done, centre undercooked | The thick centre is lagging behind | Confirm the deep reading, shield dark areas and continue roasting |
| Different areas show very different temperatures | Irregular shape, probe placement or thermometer error | Recheck and follow the colder reliable deep reading |
| Lamb is cooking much faster than expected | Thin shape, hotter oven or warmer starting point | Take it out when the thermometer says it is ready |
| Lamb is taking much longer | Thick shape, partially frozen centre, probe issue or cool-running oven | Check thawing, probe position and oven temperature |
| Top is getting too dark | The exterior is ahead of the centre | Loosely shield that area with foil |
| Lamb will not brown | Wet surface, covering, low heat or excess pan liquid | Keep it uncovered and confirm that the surface and oven are properly hot |
| Underside is pale or wet | It has been sitting close to pan juices | Still edible; use a rack or sturdier onion bed next time for more airflow |
| Garlic is harsh or burnt | Pieces were too large inside or too exposed outside | Use thin slivers in protected angled pockets |
| Lamb is cooked but not fork-tender | You are expecting slow-cooked texture | A conventional carving roast should still have structure |
| Centre is underdone after carving | The original probe missed the coldest area | Cook the underdone pieces separately until they reach 145°F / 63°C |
| Gravy is greasy | Too much rendered fat went into the sauce | Separate the pale fat from the darker meat juices |
| Lamb is ready but sides are late | Normal roast-dinner timing | Rest the lamb and let the sides catch up |
Outside Done, Centre Still Behind
Confirm the reading deep in the thickest part. A probe just beneath the browned exterior can read dramatically warmer than the middle. A genuinely cool centre needs more roasting, so loosely shield the already-dark exterior and check again in shorter intervals.
You Carved It and Found an Underdone Centre
Dinner is still salvageable. Separate the pieces that need more cooking and place them in a shallow dish with a spoonful of warm stock, jus or gravy. Return them to the oven until the thickest rescued piece reaches 145°F / 63°C.
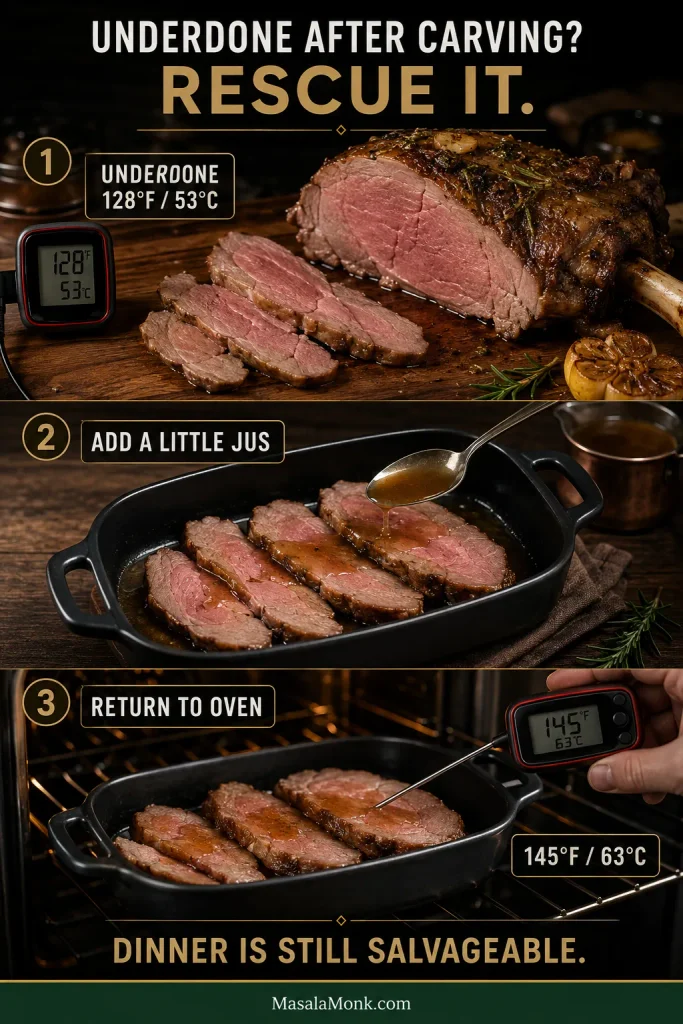
Check frequently. Sliced lamb heats much faster than the original whole roast.
The Lamb Is More Done Than You Wanted
Get it away from the heat and rest it normally. Slice it a little thinner and serve with pan jus, gravy, mint sauce or something bright and herby. More oven time will only take it further.
What to Serve With Roast Leg of Lamb
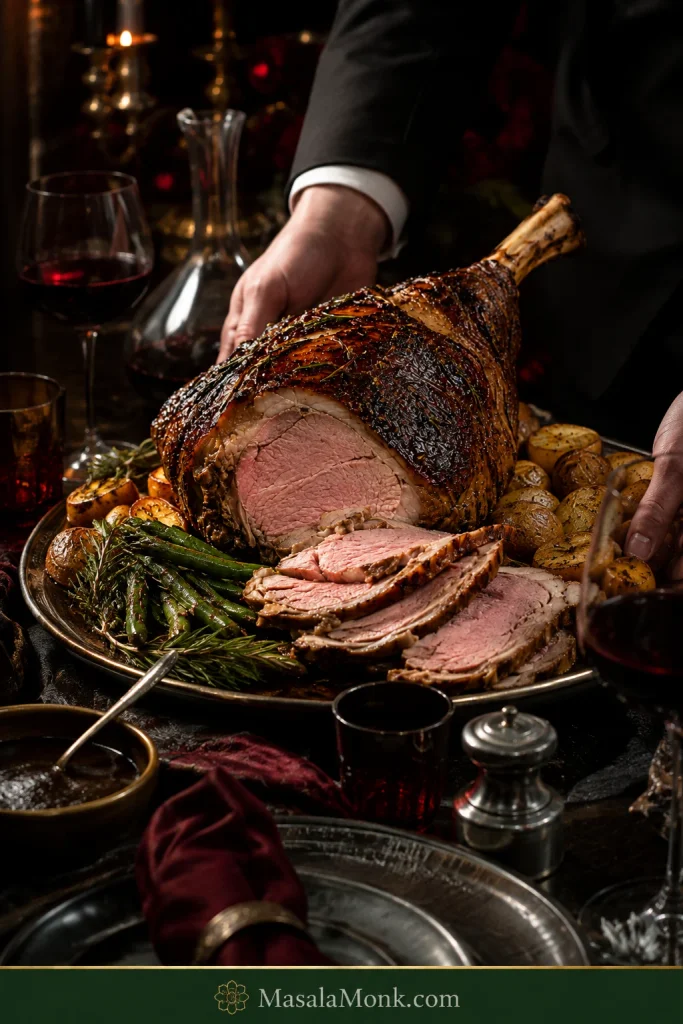
A classic roast pairs the lamb with crisp potatoes, sweet carrots or green vegetables, hot gravy and something minty.
For a spring or Easter table, peas, asparagus, herbs and crushed or roasted potatoes keep the plate brighter without making it feel less substantial.
For something lighter, add lemony greens and a cold, crisp side. A vinegar, dill and onion cucumber salad brings acidity and crunch against the richness of the lamb.
A spoonful of fresh chimichurri alongside the finished slices is another easy way to add acidity and herbs without covering the lamb’s flavour.
Storage, Freezing and Reheating
Refrigerating
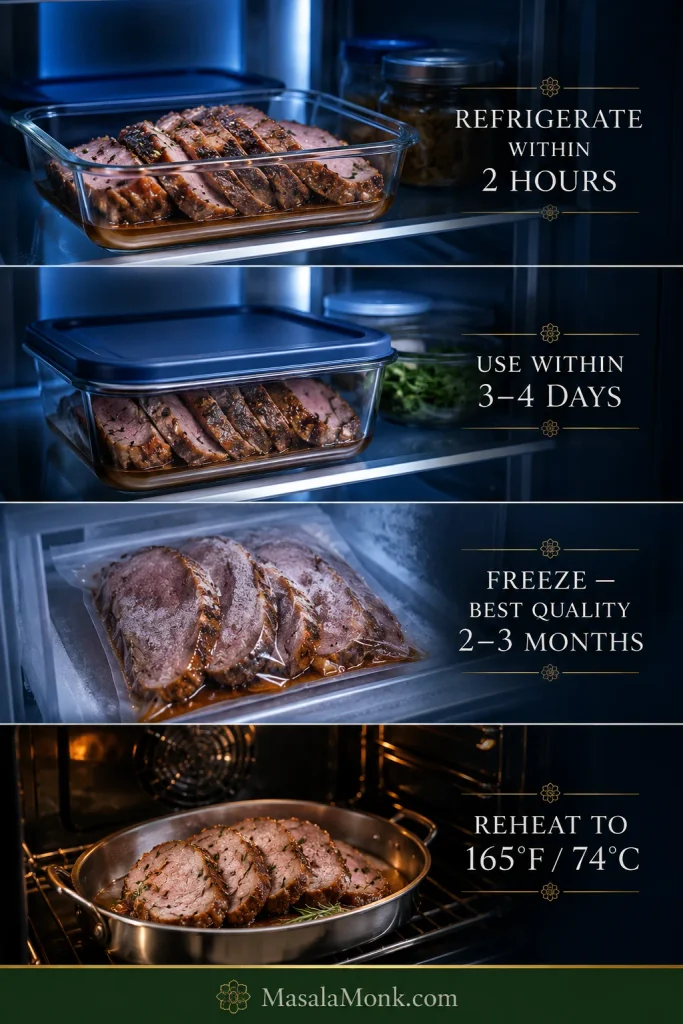
Refrigerate leftover cooked lamb within 2 hours and use it within 3–4 days. Store sliced lamb with a little jus or gravy where possible to protect the cut surfaces from drying.
Cold roast lamb does not have to become another roast dinner. Thin slices work beautifully with a lemony chickpea salad with cucumber, tomatoes and herbs; chopped leftover lamb can also become an easy shepherd’s-pie filling.
Freezing
Freeze the lamb sliced or portioned so you can thaw only what you need. A little gravy or jus in the container helps protect it from drying out. For the best eating quality, use frozen cooked lamb within about 2–3 months.
Reheating
Reheating is where beautifully cooked roast lamb can quickly become much more done than it was on the first day. Warm only the amount you need with a little stock, jus or gravy instead of repeatedly reheating the whole batch.
Reheated leftovers should reach 165°F / 74°C. Cold leftover lamb is also excellent in sandwiches and wraps when reheating would only take it farther than you want.
If you cook this roast, we’d love to know the weight, whether it was a whole leg, half leg or rolled roast, the oven type, and roughly when the thickest part reached temperature. Those details can help the next cook working with a similar piece of lamb.
When the First Slice Comes Away Cleanly
The best moment in this roast is not when the timer rings.
It is when the lamb has rested, the rosemary crust still smells warm and savoury, and the first proper slice comes away from the bone with juices glistening across the cut surface.
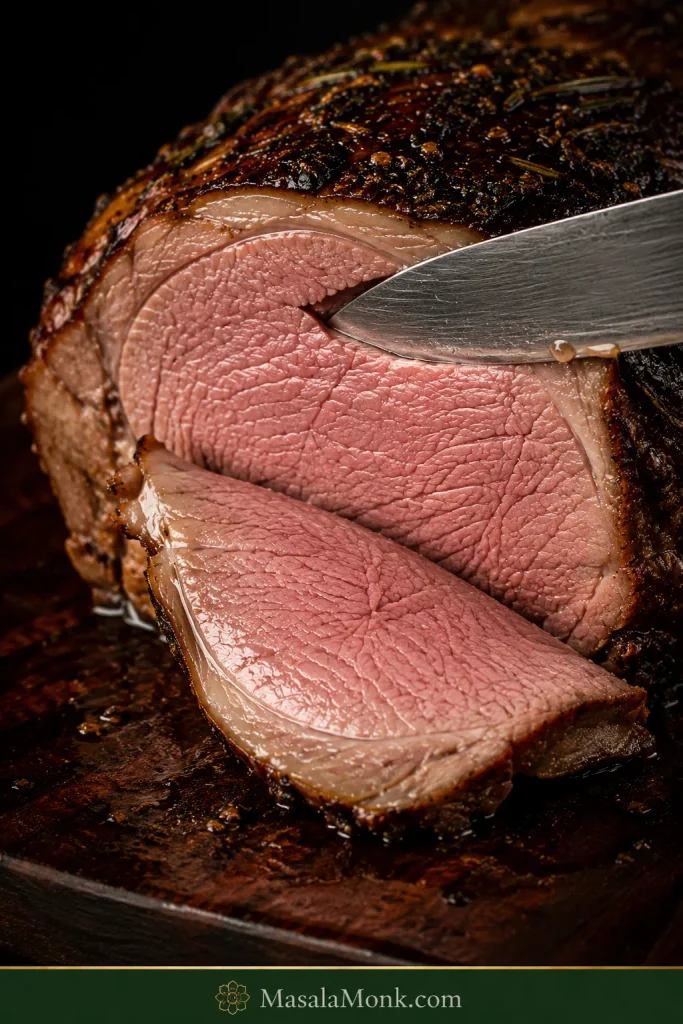
Once you stop asking the clock for one exact answer, roast lamb becomes much calmer to cook. Start checking early, trust the temperature in the real centre and give the meat time to rest.
Then carve it, bring the platter to the table and let the potatoes be five minutes late if they need to be. Nobody is going to remember the timer.








