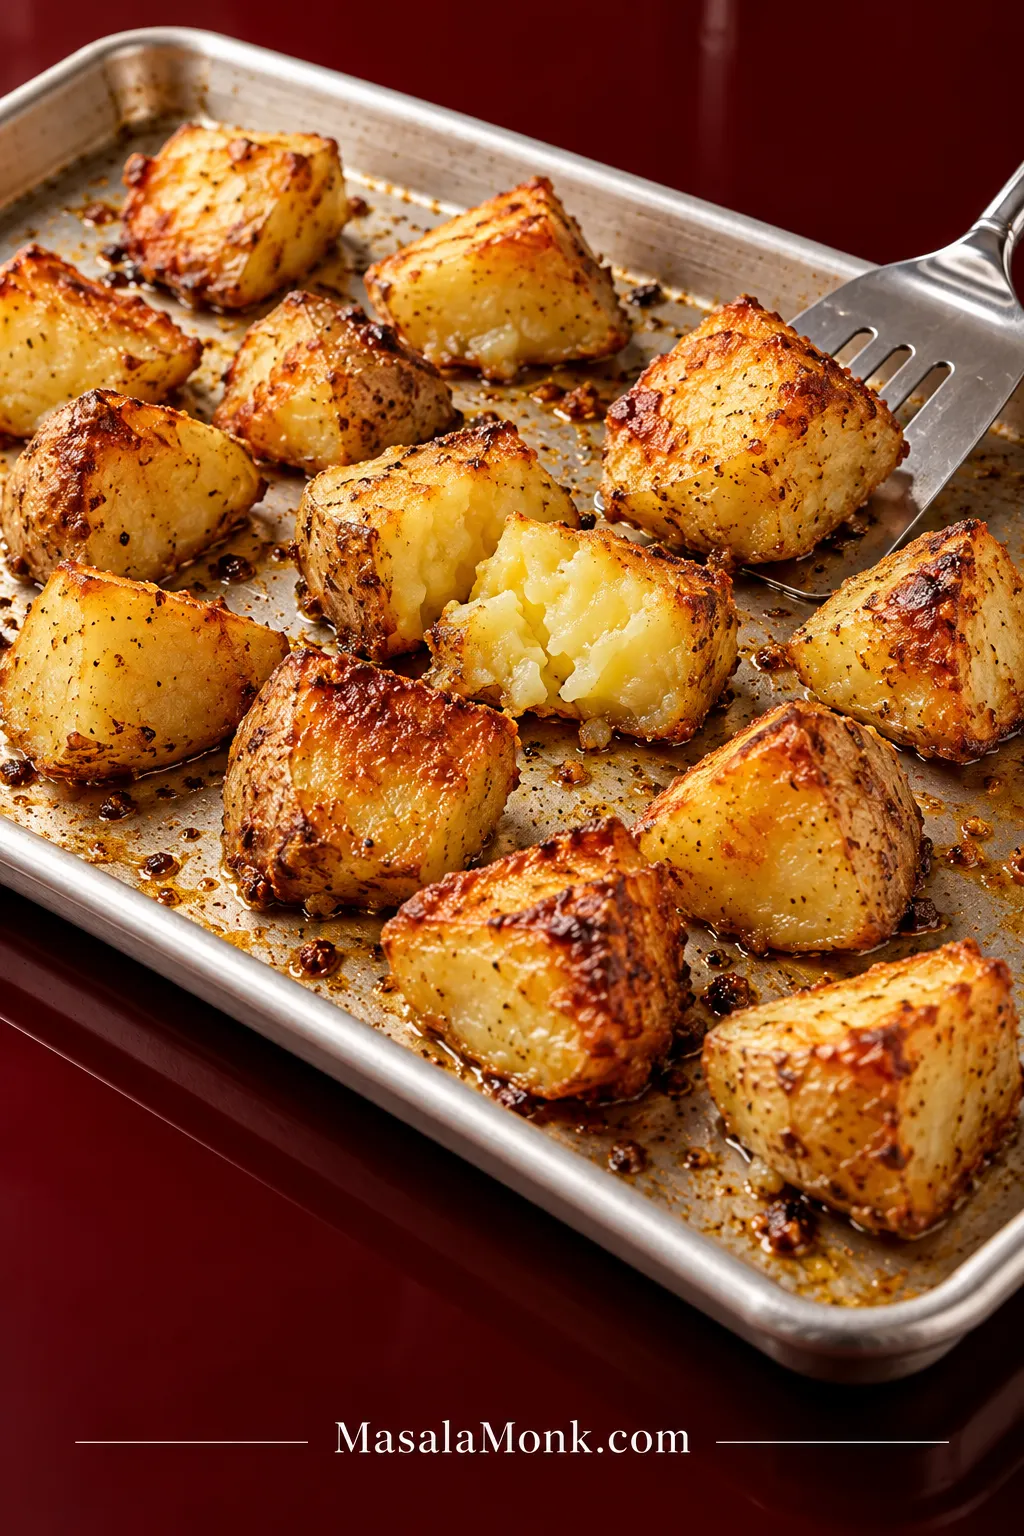
Roasted potatoes should have deeply browned pan-side faces, crisp ragged edges and completely tender centers. Yet a tray can spend 40 minutes in a hot oven and still turn out pale and soft—or develop a promising crust that tears away the moment you try to turn it.
The fix starts before roasting. A short parboil gives the potatoes a head start, then they are drained, dried and gently roughed up before they meet a hot metal pan. That leaves a drier, more irregular surface for the oven to brown without relying on soaking, starch coatings or baking soda.
Roasted Potatoes at a Glance
Crispy Oven Roasted Potatoes
Once the potatoes are on the hot tray, most of the oven time is hands-off.
Ingredients
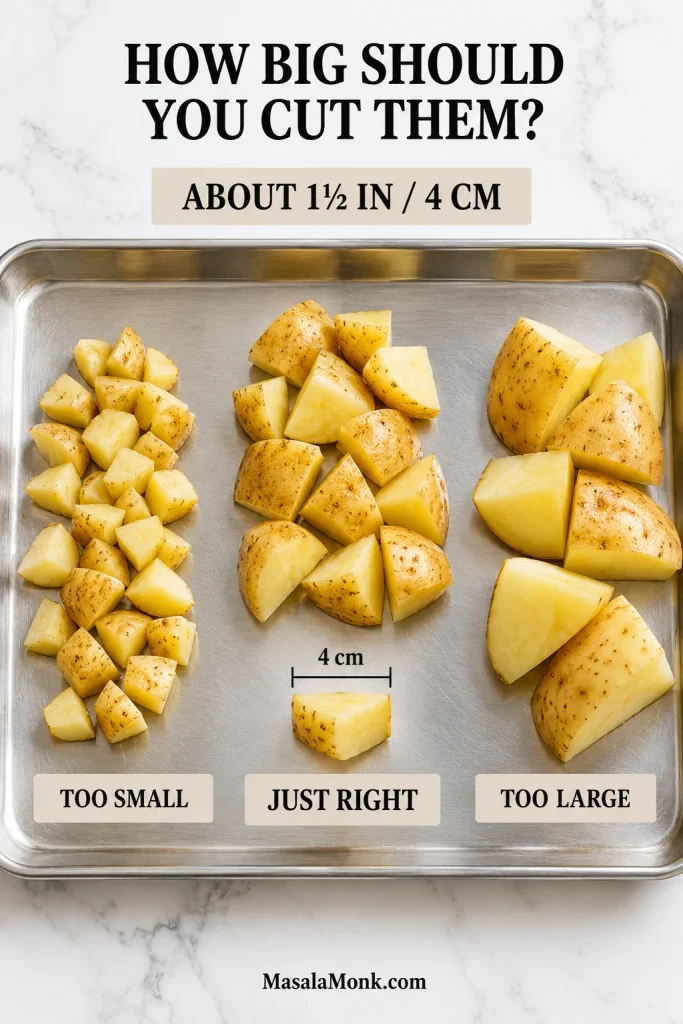
- 2 lb / 900 g Yukon Gold potatoes, scrubbed and cut into roughly 1½-inch / 4 cm pieces
- 2½ qt / 2.4 L water, or enough to cover the potatoes by about 1 inch / 2.5 cm
- 15 g fine sea salt, roughly 2½ teaspoons, for the parboiling water. If substituting kosher salt, use the gram weight because crystal size varies.
- 3 tablespoons / 45 ml olive oil or a neutral high-heat oil
- 4 g fine sea salt, roughly ⅔ teaspoon, for seasoning
- 1 teaspoon / about 3 g garlic powder
- ½ teaspoon / about 1 g freshly ground black pepper
- 2 tablespoons chopped parsley, optional, for finishing
Method
Prep and Parboil
- Heat the oven and pan. Set a conventional oven to 425°F / 220°C. Put a sturdy, preferably light-colored rimmed metal half-sheet pan on the center rack while the oven heats. A standard half sheet is about 13 × 18 inches / 33 × 46 cm. Use metal for this preheated-pan method, not glass or ceramic. For a fan or convection oven, start around 400°F / 205°C.
- Start the water. Bring the water and 15 g salt to a steady boil in a large pot while you cut the potatoes.
- Cut the potatoes evenly. Aim for pieces around 1½ inches / 4 cm across. Don’t worry about perfect cubes. Similar-sized pieces matter more, and a few broad flat faces actually help the potatoes brown against the pan.
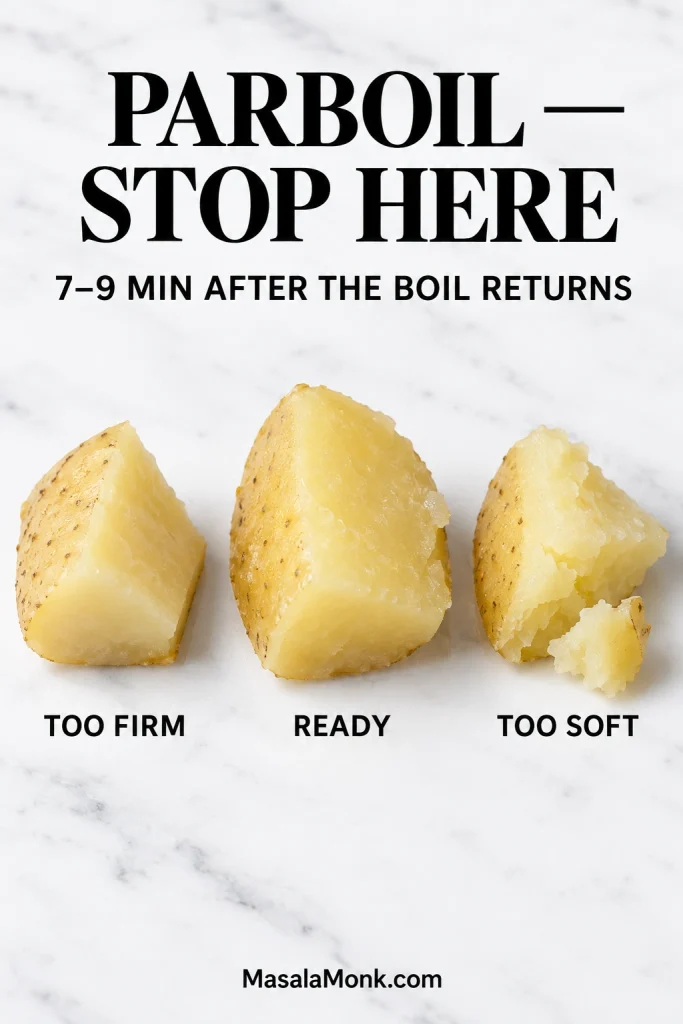
- Parboil just far enough. Add the potatoes to the boiling water. Once the water returns to a steady boil, start checking at 6–7 minutes. Most batches will need 7–9 minutes. The outside should be soft enough to scuff up, while each chunk still lifts from the water intact.
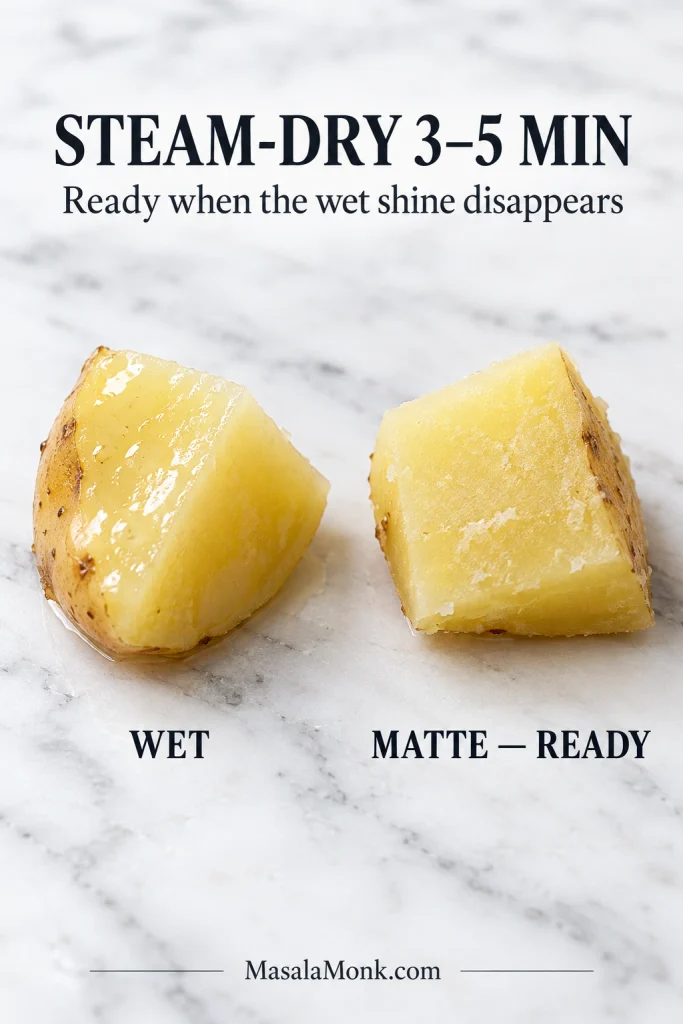
- Drain and steam-dry. Drain thoroughly in a colander and leave the potatoes uncovered for 3–5 minutes. Give the colander a gentle shake once or twice. The wet shine should disappear as the steam escapes.
Roughen and Roast
- Roughen, then season. Return the potatoes to the warm dry pot and toss gently several times. Stop when the edges look fuzzy and uneven but the chunks are still holding together. A few ragged corners are fine; you just don’t want whole pieces collapsing. Add the 3 tablespoons / 45 ml oil, 4 g fine sea salt, garlic powder and black pepper, then toss just enough to coat them.
- Transfer to the hot pan. Carefully remove the preheated sheet pan and set it on a heat-safe surface. Tip the potatoes onto the dry hot metal. A light sizzle is a good sign. Spread them out with visible space between most pieces, putting a broad flat face against the pan wherever you can.
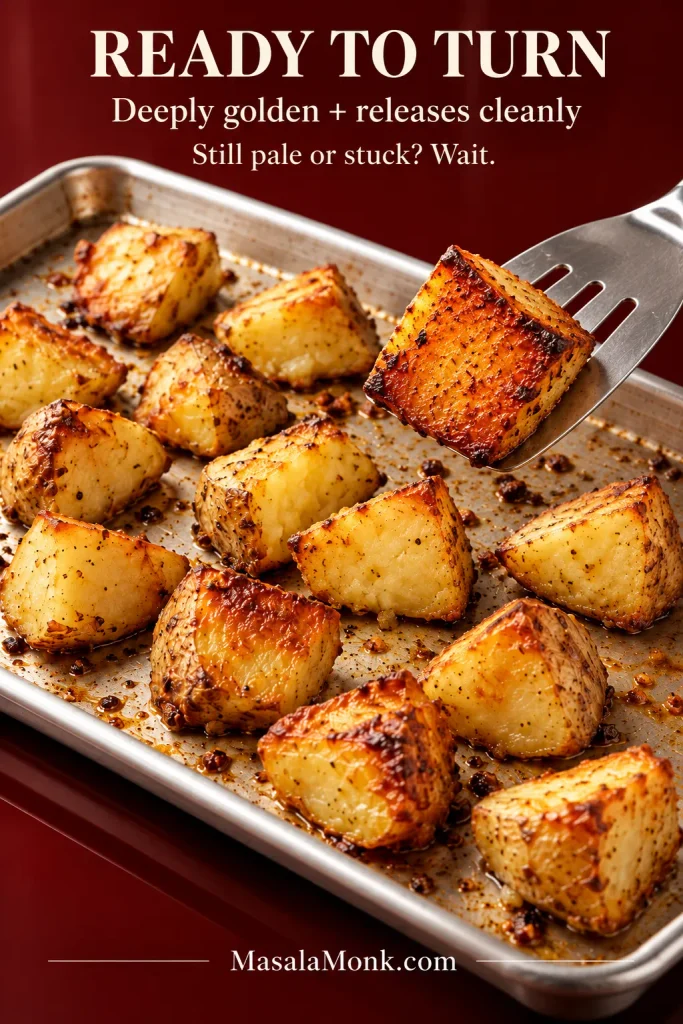
- Let the first side brown. Roast for 20–25 minutes before the first proper turn. Test one potato before moving the whole tray. A deeply golden underside that releases without much resistance is ready to turn. If the test potato is still firmly stuck, give it another few minutes. Don’t force it.
- Finish roasting. Roast for another 15–25 minutes, with most batches landing around 40–50 minutes total. Turn especially pale pieces toward the pan. Don’t stop at pale yellow-gold. Several faces should be deep golden to brown, the ragged corners should feel crisp, and a potato split open should be steaming and completely tender in the middle.
- Serve while the edges are crisp. Taste for salt, add the parsley if using and get the potatoes to the table soon after roasting. Avoid tightly covering the tray because trapped steam softens the exterior.
What Crispy Roasted Potatoes Should Look Like
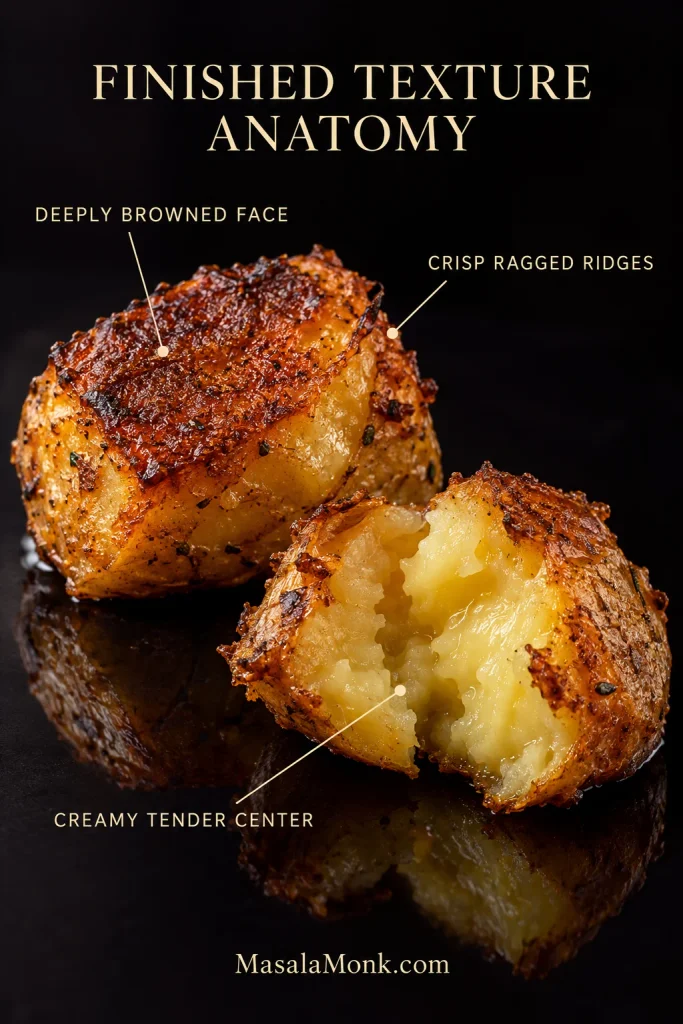
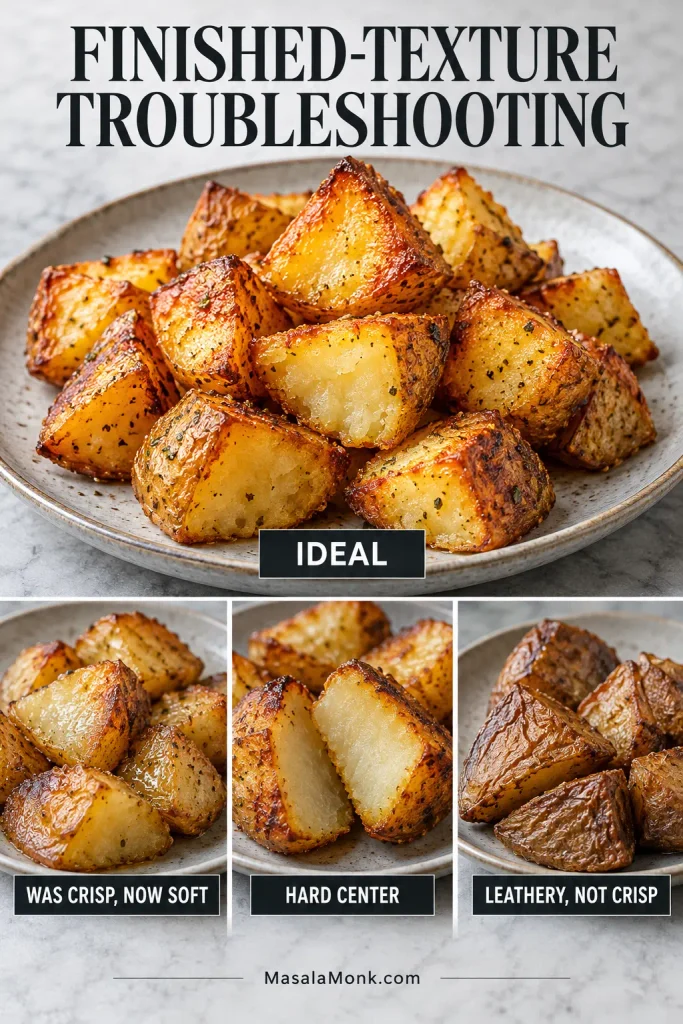
A finished potato should split without resistance and stay creamy inside, with the strongest browning on the faces that touched the hot pan. Lighter upper surfaces are normal; the goal is contrast, not a uniformly hard shell.
Why These Potatoes Crisp — and What to Change When They Don’t
Method and Fixes
Finish and Plan Ahead
The Crust Starts Before the Oven
Parboil Until the Chunks Still Hold Together
The short parboil softens the potato’s outer layer before the center is fully cooked. That softened surface scuffs into little ridges in the pot, and those ridges later crisp in the oven. Chunks already crumbling in the colander have gone farther than they need to.
Let the Surface Turn Matte
Drying clears away surface water that would otherwise have to evaporate in the oven before browning can get properly underway.
Roughen Without Breaking the Potatoes
Once the wet shine disappears, a few gentle tosses create more irregular surface for the oil and heat to work on.
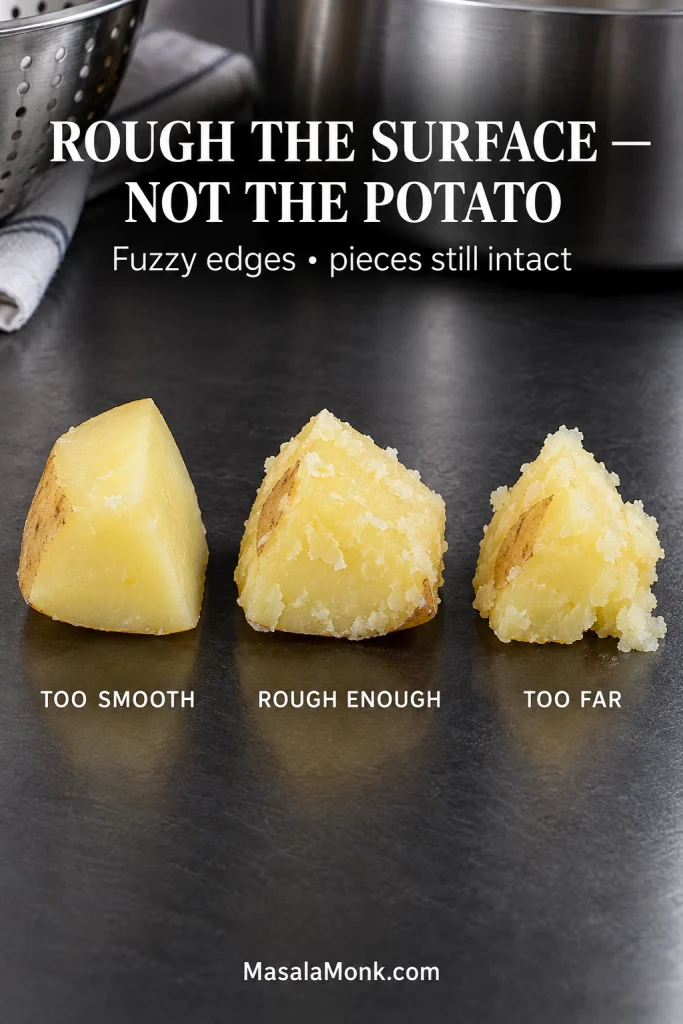
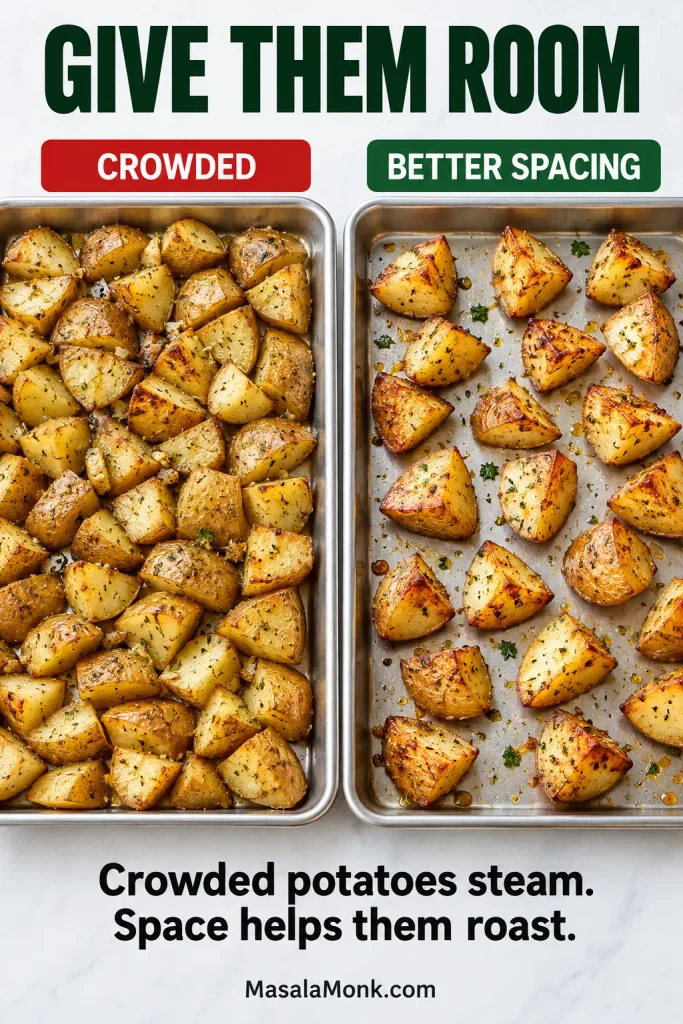
On the tray, broad flat faces touching hot metal brown fastest, while gaps between the pieces give released moisture somewhere to escape. That is why good contact, visible space and leaving the first side alone matter as much as the oven temperature.
Choose the Potato for the Texture You Want
For this recipe, Yukon Gold is the best all-around choice. The edges soften enough to become nicely textured in the pot, but the pieces usually stay sturdy enough to survive draining and tossing. Inside, they stay creamy and tender, while the scuffed edges brown into thin crisp ridges.
| Potato | Result |
|---|---|
| Yukon Gold | Creamy, tender center with good browning and enough structure for parboiling and roughening. |
| Russet | Fluffier middle and a rougher, more craggy exterior. Handle gently after boiling because the pieces break more easily. |
| Red and other waxy potatoes, including many baby potatoes | Firm, creamy centers and excellent shape retention. They usually stay smoother outside and less fluffy within. |
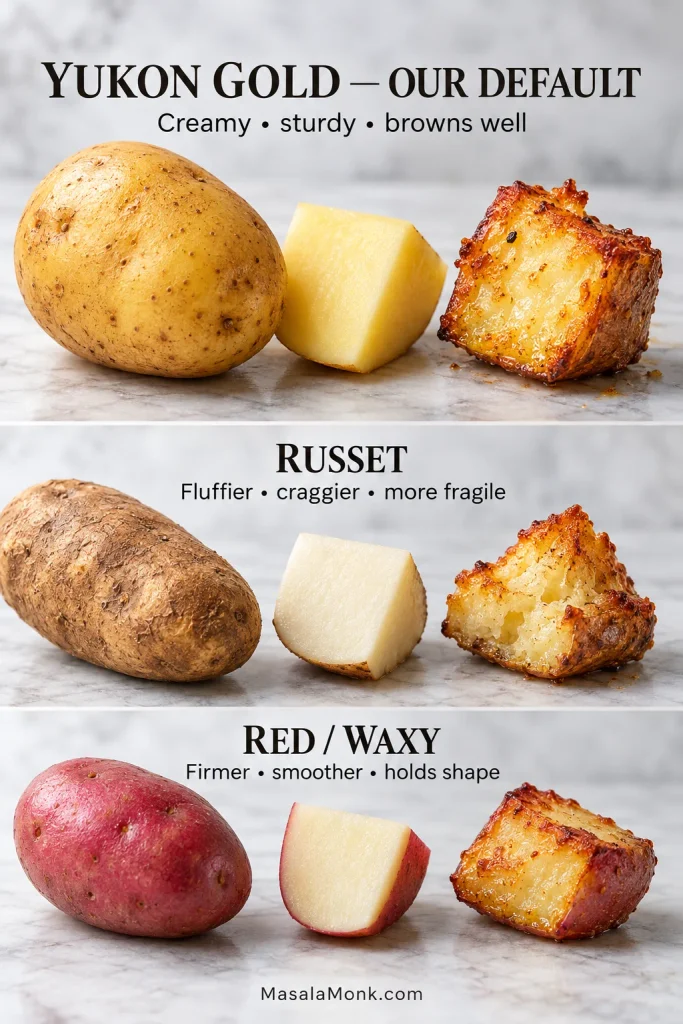
No, you don’t need to peel Yukon Golds. Their thin skins can stay on after a good scrub. Russets can stay skin-on too, although peeling exposes more of their starchy flesh to the roughening and roasting.
If you are after one whole Russet with crisp skin and a loose, fluffy middle instead of roasted chunks, the Baked Potato Recipe is the better fit.
Roasting Potatoes at 400°F, 425°F or 450°F
For the 1½-inch / 4 cm parboiled Yukon Gold pieces in this recipe, 425°F / 220°C is the default and usually takes 40–50 minutes. It gives the textured outside strong browning without making the smallest corners race too far ahead of the center.
| Oven setting | What to expect |
|---|---|
| 400°F / 205°C conventional | Browning develops more slowly. Expect to give the potatoes longer than the 425°F version and judge the finish by deep color, crisp edges and a tender center. |
| 425°F / 220°C conventional | Usually 40–50 minutes for the parboiled 1½-inch pieces used here. |
| 450°F / 230°C conventional | The outside colors more quickly, so begin checking the pan-side faces and smaller corners earlier. Pull the potatoes when they are deeply browned and tender rather than forcing them to match the 425°F clock. |
| 400°F / 205°C convection/fan | Moving hot air speeds surface browning. Begin checking earlier than you would at the same temperature in a conventional oven. |
Potato size, variety, pan material and the way an oven cycles all change the pace of browning. The visual and texture cues matter more than trying to convert every oven setting minute for minute.
If the timing looks right but the tray is still pale or soft, jump to troubleshooting.
What You Can Change — and What You Can Skip
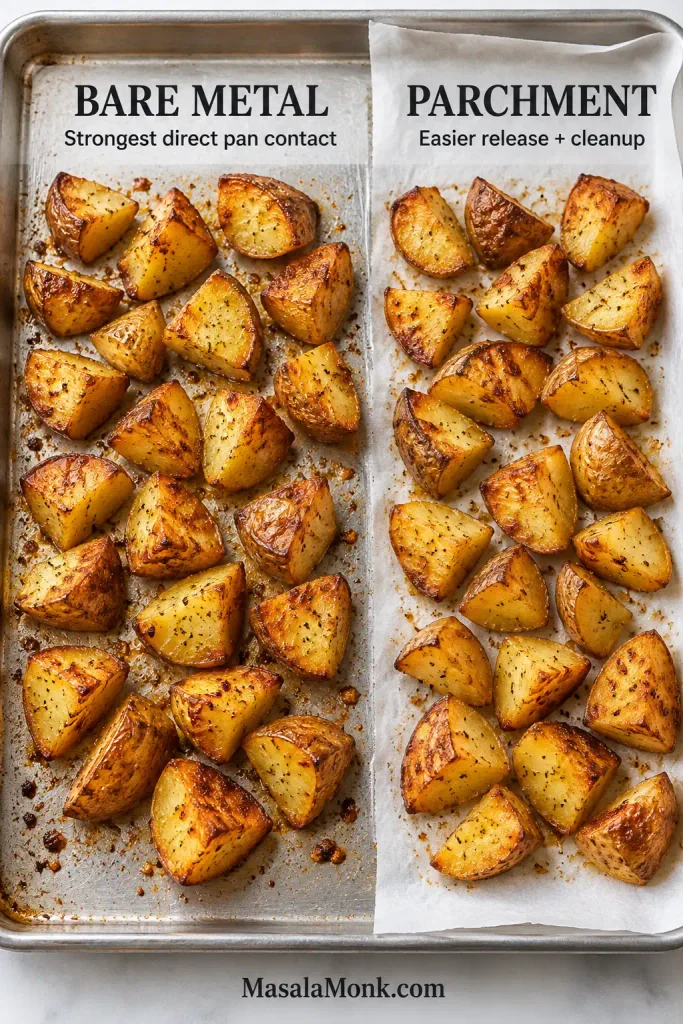
Bare Metal or Parchment?
For the strongest browning, use bare preheated metal. Parchment makes release and cleanup easier, though the pan-side faces may brown a little less aggressively.
With parchment, preheat the metal pan bare and add the paper only when the potatoes are ready to go on. Check the package first; parchment rated for 425°F / 220°C may not be rated for 450°F / 230°C.
Do You Need to Soak the Potatoes or Add Baking Soda?
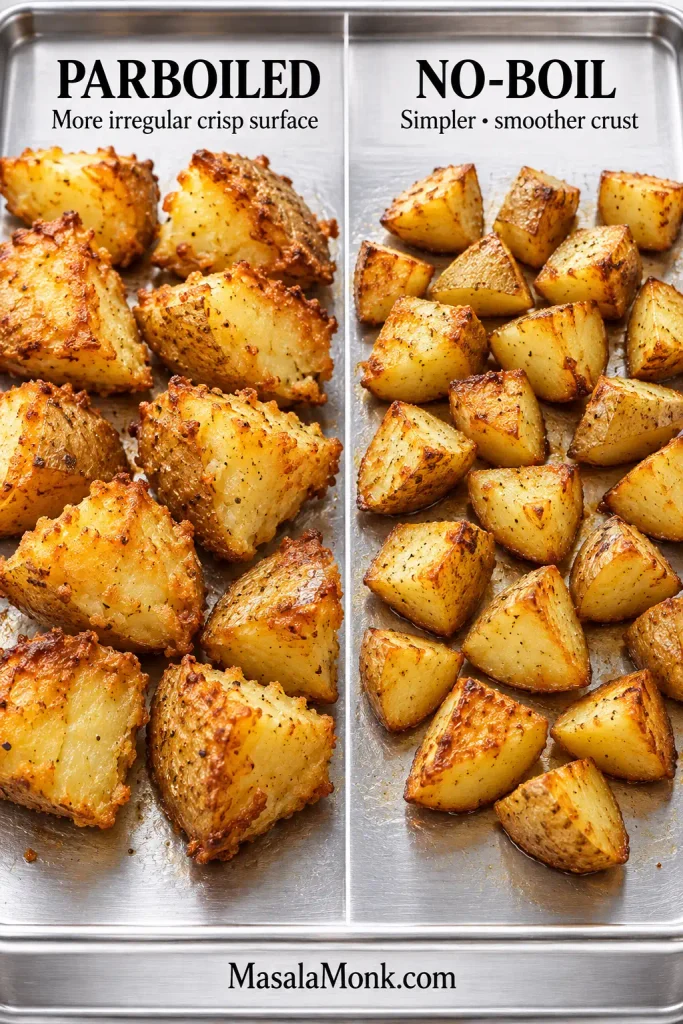
No, you don’t need a separate soak here. The parboil already softens the surface we want to rough up, so cold-water soaking adds time we don’t need for this method.
Baking soda can make the edges rougher and crispier, but it isn’t necessary here. A small measured amount in the boiling water makes the outside break down more aggressively, which can produce an especially craggy crust. It also makes the pieces easier to over-soften and can taste alkaline if overused. Serious Eats has a useful explanation of what alkaline water changes. For an everyday tray, salted water leaves more room for error.
Can You Skip the Parboil?
Yes—cut Yukon Golds to about 1 inch / 2.5 cm and roast them raw at 425°F / 220°C if you’d rather skip the extra pot. Dry them thoroughly, coat them with oil and seasonings, give them plenty of room on the pan and put broad cut faces against the metal.
Begin checking at 30 minutes. Most 1-inch pieces will need 35–45 minutes total, depending on the potato and pan. Turn them once the pan-side faces are properly browned. They can still become crisp and deeply colored; the exterior will simply be smoother than the parboiled version.
When Roasted Potatoes Refuse to Crisp
Potatoes breaking apart in the pot need a different fix from potatoes that looked crisp when they left the oven and softened five minutes later.
Falling Apart Before Roasting
A few rough corners or little potato crumbs are nothing to worry about; those bits often become some of the crispiest parts. Whole chunks collapsing usually means they stayed in the water too long, were cut too small or were tossed too aggressively. Russets reach that fragile stage sooner than Yukon Golds.
Pale, Soft or Slow to Brown
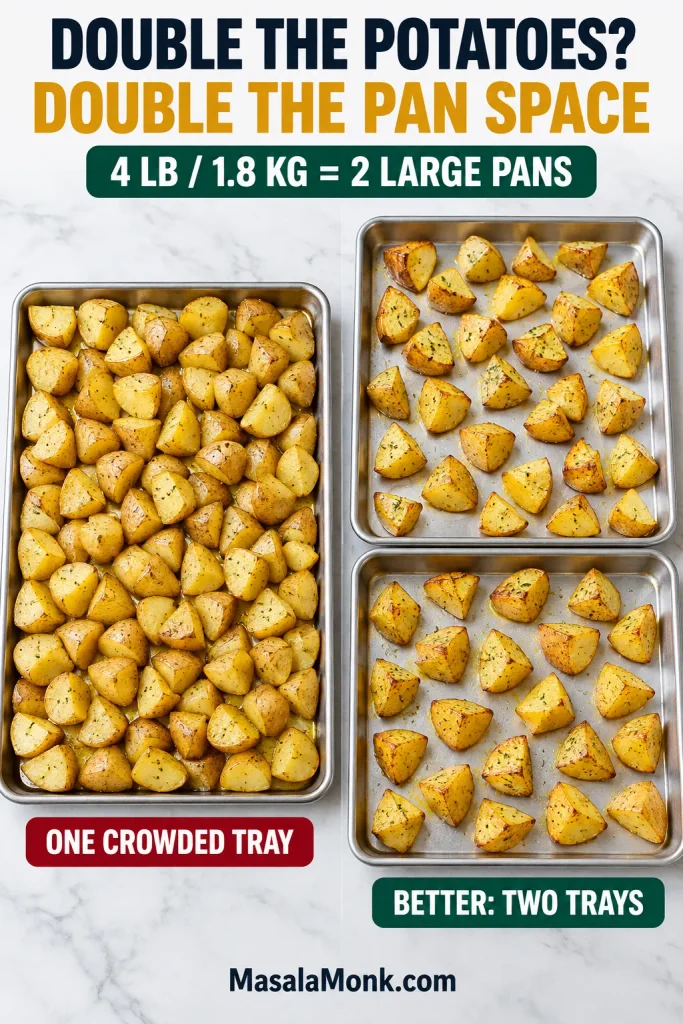
Start with moisture and space. Damp potatoes take longer to color, and pieces packed closely together keep releasing steam into one another. An oven running cooler than its display can make both problems look worse. A crowded tray needs more room, not more oven time; split the potatoes between two pans.
Sticking or Losing the Golden Side
Sticking is usually a doneness signal rather than a pan emergency. The contact face releases more cleanly once its crust has properly formed; scraping too early can leave that browned layer behind on the metal. Use one test potato to judge whether the tray has reached that stage.
Browning Too Fast
Very dark bottoms with pale upper sides usually point to the pan or rack position. Dark, lightweight pans can brown the bottoms surprisingly fast. A low rack puts the tray closer to the bottom heat, while smaller pieces brown much faster than the 1½-inch chunks used in the recipe.
A brown exterior with a hard middle is a related timing problem. Keep the current batch cooking until a knife moves through the center easily. Next time, cut the pieces closer to the recipe size or give the parboil a little more time before draining.
Leathery Instead of Crisp
A potato can be fully cooked without developing a properly crisp exterior. Very waxy potatoes naturally stay denser, while too little oil or poor contact with the hot pan can leave the outside dry rather than crisp. More oven time is not always the answer; eventually a pale exterior can simply get tougher.
Crisp at First, Soft at the Table
If dinner is delayed by a few minutes, leave the potatoes spread out and uncovered on the tray rather than piling them into a covered bowl. More exposed surface means less condensation settling back onto the crust.
A batch can behave differently even when you swear you did everything the same. Potato variety, age and storage affect moisture and starch, and home ovens drift. If the potatoes in front of you disagree with yesterday’s timer, trust what you can see and feel.
Back to the recipe · Back to top
Change the Flavor Without Changing the Method
Garlic and Rosemary Potatoes
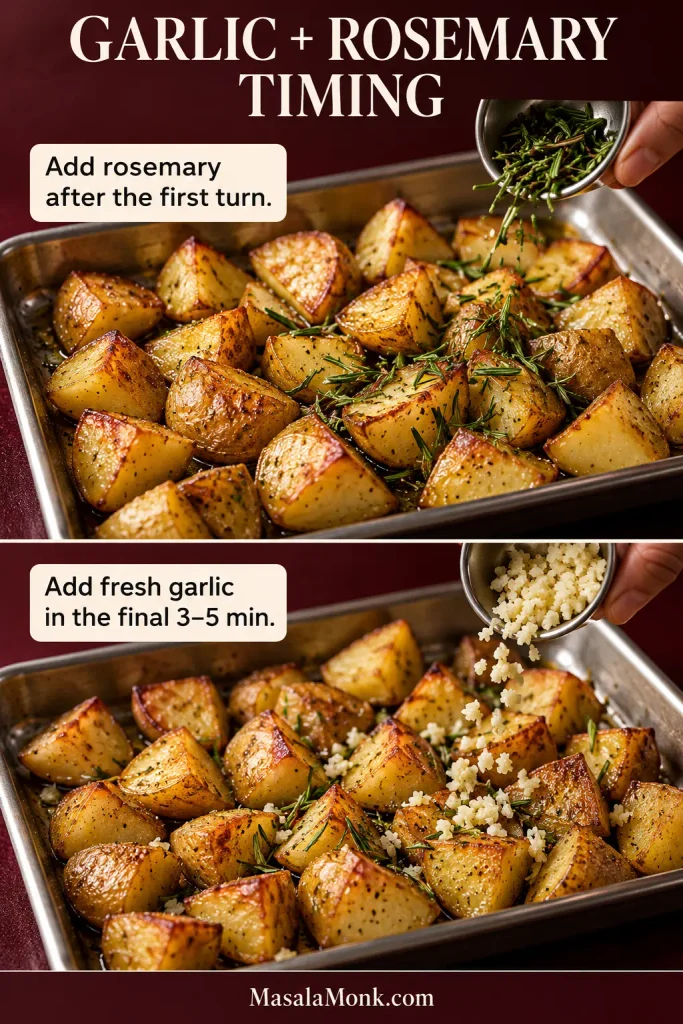
For garlic and rosemary potatoes, add about 1 tablespoon finely chopped rosemary after the first turn so it has time to flavor the oil and potatoes. Add 1–2 small finely chopped garlic cloves only during the final 3–5 minutes, keeping most of the garlic on the potatoes rather than scattered across bare metal, where small pieces can darken quickly. The garlic powder in the base seasoning can stay.
Other Flavor Variations
For Parmesan roasted potatoes, scatter over about ¼ cup / 20–25 g finely grated Parmesan during the final 5 minutes, or just until the cheese has toasted onto the rough edges.
A half teaspoon of smoked paprika can go in with the garlic powder for a smoky note. Replacing the oil with the same amount of melted duck fat, goose fat or beef fat gives the potatoes a richer, more savory flavor.
If ranch is the flavor you actually want front and center, the Ranch Roasted Potatoes recipe is built around dry ranch seasoning from the start rather than treating it as a last-minute variation.
Serving Roasted Potatoes with Gravy
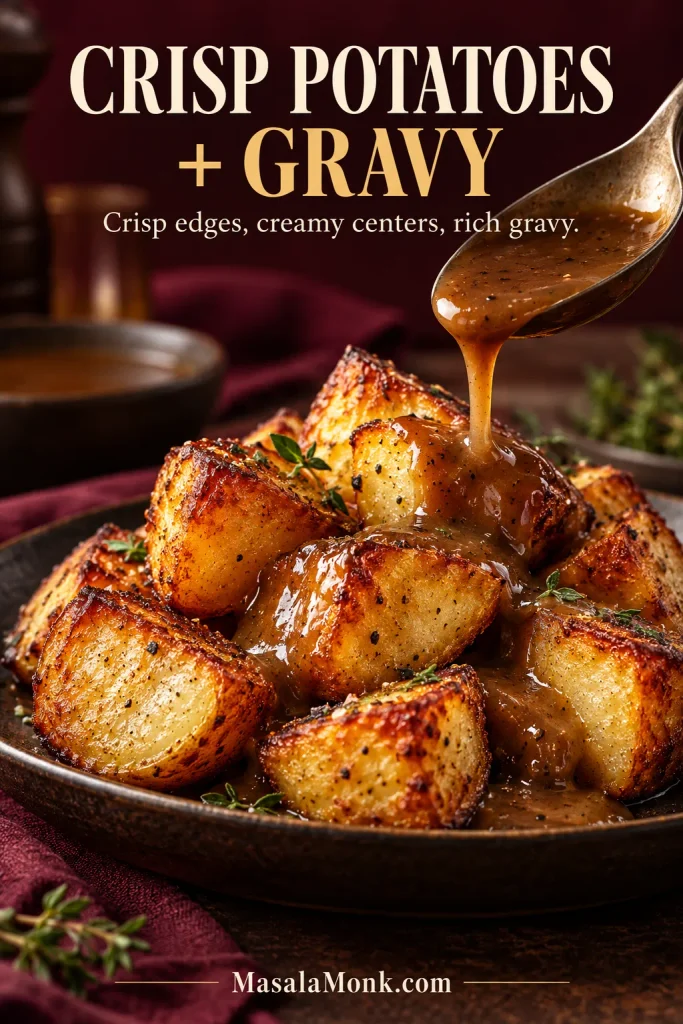
With a saucy main, keep the base potatoes simple. Beside Beef Tips and Gravy, for example, salt, pepper and garlic are plenty; the rough browned edges can catch the gravy without competing with it.
Make Them Ahead Without Giving Up the Crust
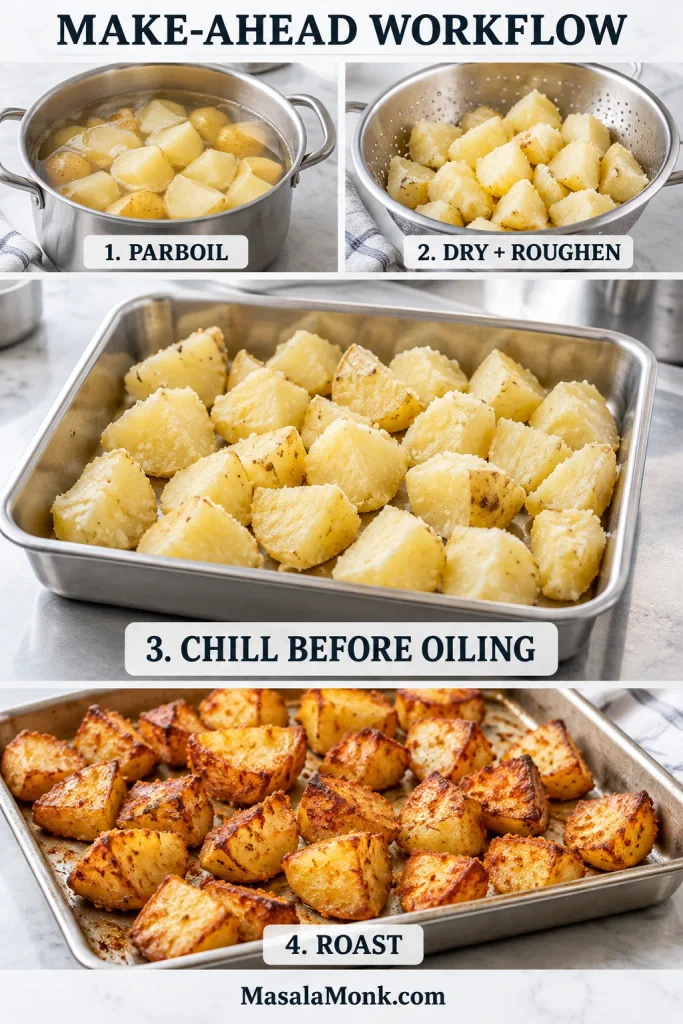
Yes—you can parboil, dry and roughen the potatoes a day ahead; refrigerate them before adding the oil. That gets the pot and colander out of the way earlier while leaving the final browning for closer to dinner.
Later the Same Day or Tomorrow
Spread the parboiled potatoes in a shallow layer and let the heavy steam subside briefly. Refrigerate promptly and within 2 hours; once cold, cover them. Add the oil and seasonings just before the potatoes go onto the hot pan.
Cooking for a Larger Dinner
When you double the potatoes, double the pan space too. A 4 lb / 1.8 kg batch needs two large sheet pans so the pieces still have room to release steam and brown. Two trays will also load the oven more heavily, so expect it to recover heat a little more slowly.
Once the potatoes have established their first browned side, rotate the pans and swap rack positions when one part of the oven is clearly running hotter.
The Baked Chicken Breast Recipe also cooks at 425°F / 220°C, so the temperatures line up. Several crowded pans will still slow browning, though, so give the potato trays as much open rack space and airflow as you can.
Storing and Reheating Leftovers
Refrigerate cooked potatoes within 2 hours and use refrigerated leftovers within 3–4 days. FoodSafety.gov gives the same storage window and recommends reheating leftovers to 165°F / 74°C.
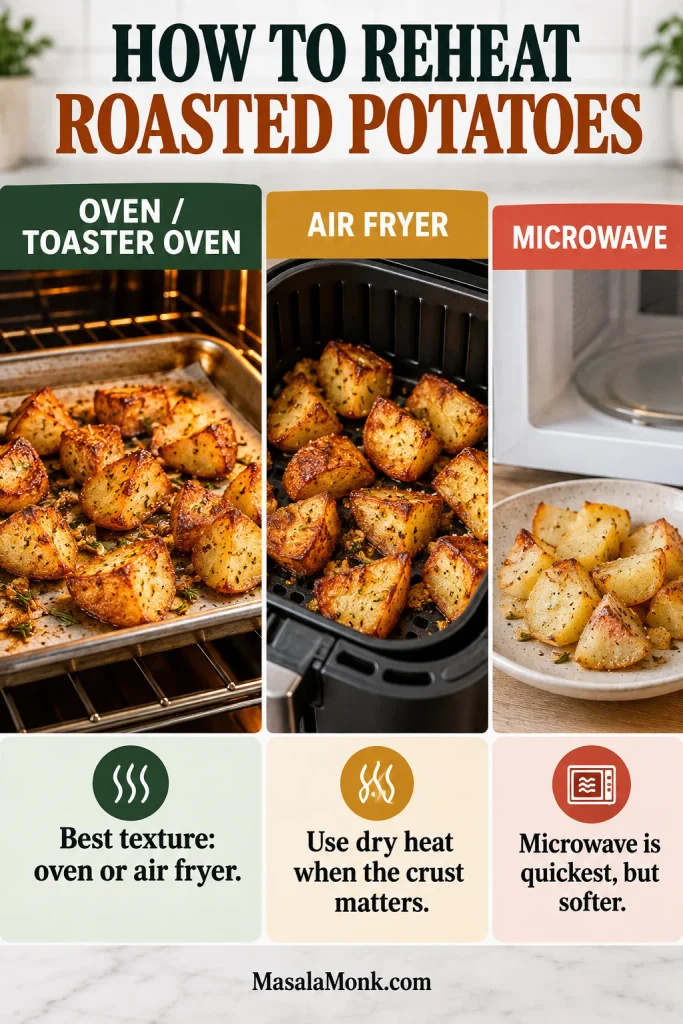
For texture, spread the potatoes in one layer and reheat them uncovered in a 400°F / 205°C oven for 10–15 minutes, checking once they are hot and the edges have begun to crisp again. In an air fryer, start around 375°F / 190°C and check at 5 minutes; small batches reheat quickly.
The microwave works when you simply need the potatoes hot. For anything close to the original crust, give them space and use dry heat.