Posted on — Leave a comment

Toum Recipe (Lebanese Garlic Sauce): Fluffy, Creamy & Garlicky

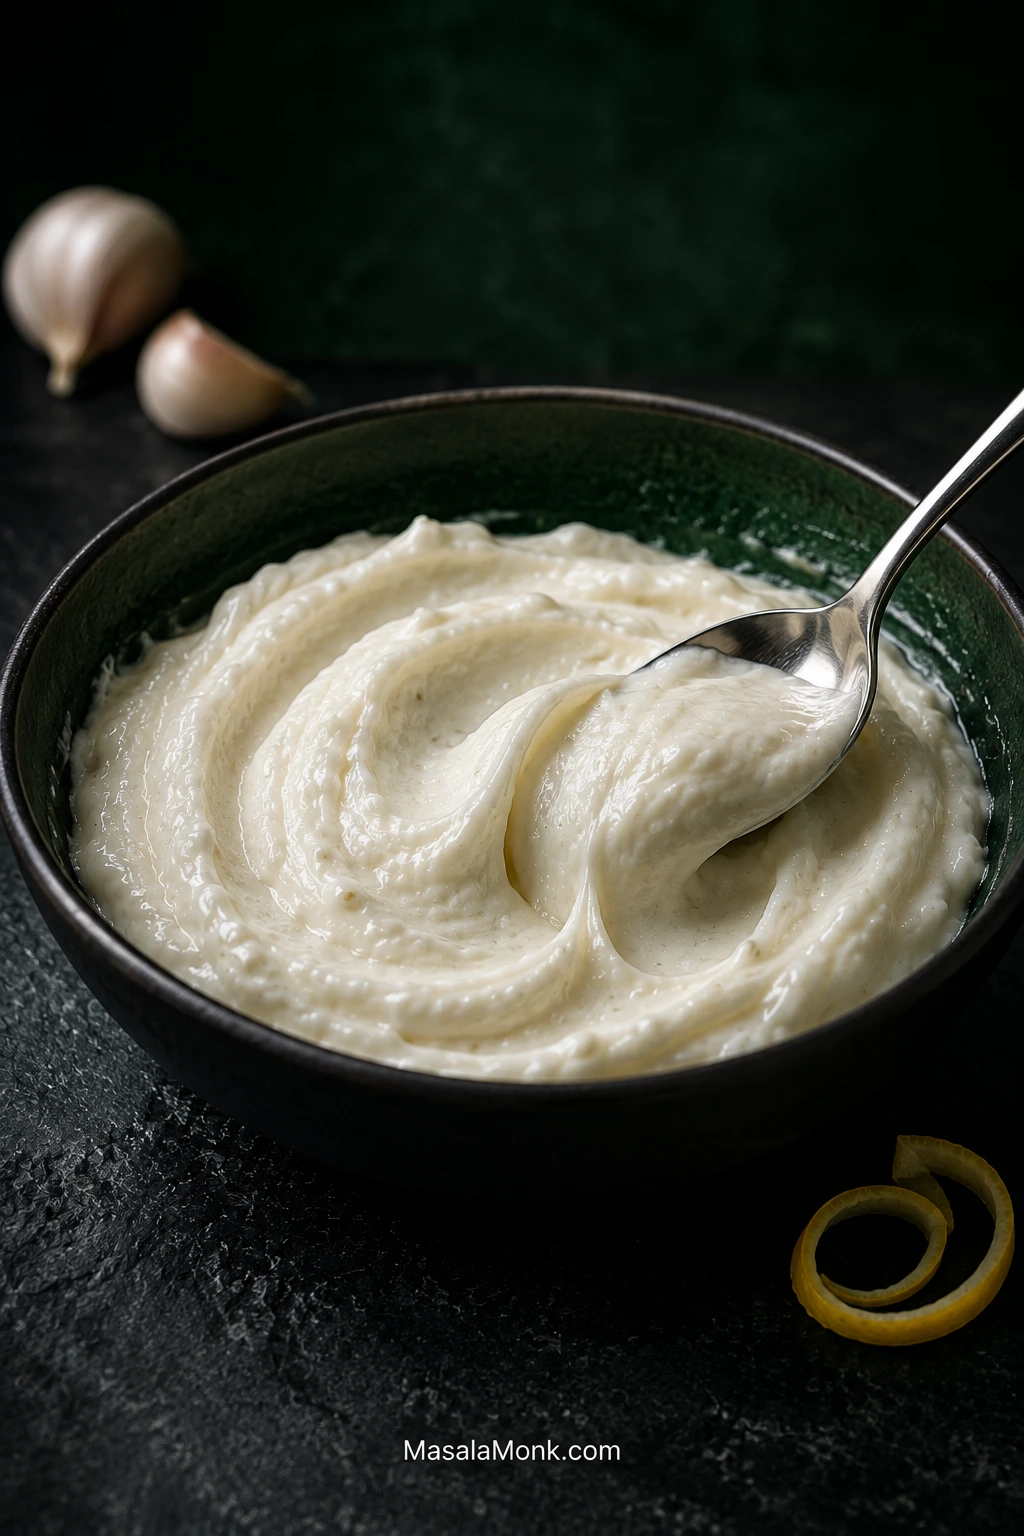
Bowl of pale, fluffy Lebanese toum with soft ridges and a spoon sweep, photographed on a dark stone surface against a deep green background.

Toum, the fluffy Lebanese garlic sauce served with shawarma and grilled chicken, should look almost like whipped cream and smell unmistakably of garlic. Spoon it beside hot chicken shawarma and it holds its shape until a piece of warm pita drags through it. The first taste is raw garlic, softened by the richness of the oil and sharpened again by fresh lemon.

At its best, toum is remarkably light for a sauce made mostly from oil. It piles rather than pours, clings to bread and has enough punch to stand up to charred chicken, salty fries and sharp pickles.

It can also be surprisingly temperamental. Sometimes the garlic never gets beyond finely chopped. Sometimes the first oil sits around it in a glossy puddle. And three cups of oil is a lot to watch separate in front of you.

The beginning is where patience matters most. Once the garlic turns pale and creamy, the process becomes much more forgiving. If that change is not happening yet, pause while there is still very little oil to lose.

Make the Toum · Choose Your Equipment · Fix My Toum

Quick Answer: How to Make Toum

For classic food-processor toum, use 130 g / 4½ oz peeled fresh garlic, 600 g neutral oil (or 3 cups if measuring by volume), 60 g (60 ml / ¼ cup) freshly squeezed lemon juice, 60 g (60 ml / ¼ cup) ice water and 6 g salt.

Purée the garlic and salt until smooth, using the first half of the lemon juice to help it become a sticky paste. Begin the oil in drops and then the finest stream you can comfortably manage. The loose oily shine should start disappearing as the garlic turns pale and creamy.

Once that pale cream appears, you can relax a little. Keep the stream thin, alternate the early oil with the remaining lemon and the later portions with measured ice water, and let the sauce gradually build volume. Allow roughly 10–15 minutes for the oil addition.

Finished toum should be pale, fluffy and spoonable. Classic toum is naturally vegan and egg-free; the garlic itself helps hold the emulsion together.

If the first oil is still pooling around the garlic, pause there. This is the cheapest moment to fix the batch.

Choose Your Equipment

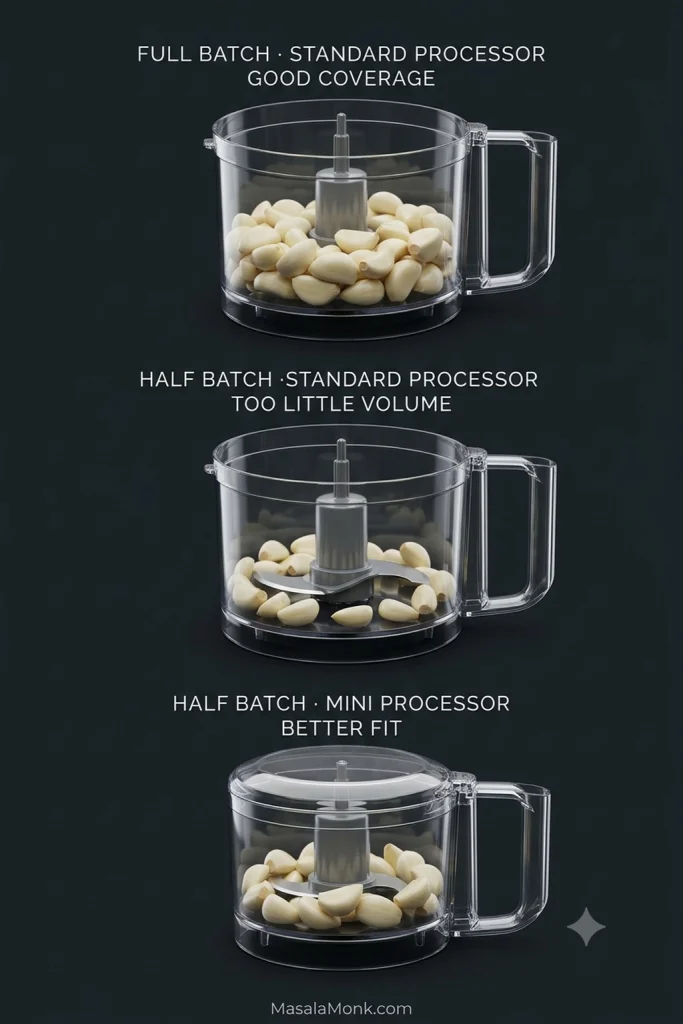
For this full recipe, use a standard food processor. What matters most is blade coverage: the garlic needs to sit where the blade can reduce it to a smooth, sticky paste. A smaller batch usually needs a smaller bowl.

EquipmentVerdict
Standard food processorRecommended. Best fit for the full recipe and a very light, fluffy result
Mini processor or small work bowlBest for scaling down. Keeps a smaller quantity of garlic within reach of the blade
Powerful immersion blender + narrow jarUseful small-batch alternative. Vessel and machine matter, and the result may be denser and less airy
Mortar and pestleTime-honored and effective, but considerably more laborious
Countertop blenderLast choice here. Often less forgiving and more likely to give a thinner, denser sauce
Food processor bowl showing how enough garlic must sit within reach of the blade for smooth toum.
The full batch gives a standard processor enough garlic to work with. For a half batch, a smaller bowl keeps the cloves where the blade can turn them into a smooth paste.

Make It Now: Toum

If dinner is already underway, this section is enough to make the sauce.

Recipe at a Glance

TimeAbout 20 minutes; add 15 minutes if using the optional garlic rest
YieldAbout 950 ml / 4 cups
Serving guideAbout 32 × 2-tablespoon portions
MethodFood processor
TexturePale, fluffy and spoonable

This makes roughly four cups. If you don’t need that much, freeze several small portions on day one or use the half batch below.

Ingredients

  • 130 g / 4½ oz peeled fresh garlic (about 1 cup)
  • 6 g salt (about 1 teaspoon fine/table salt or 2 teaspoons Diamond Crystal kosher salt)
  • 60 g freshly squeezed lemon juice (60 ml / ¼ cup), divided
  • 60 g ice water (60 ml / ¼ cup), divided
  • 600 g neutral oil (or 3 cups if measuring by volume), such as sunflower, grapeseed, canola or safflower

Garlic: choose firm, plump cloves. If an older clove has a clearly developed green germ, split the clove and remove it before weighing and processing. Dry, rubbery or heavily sprouted garlic is more likely to taste harsh or tired.
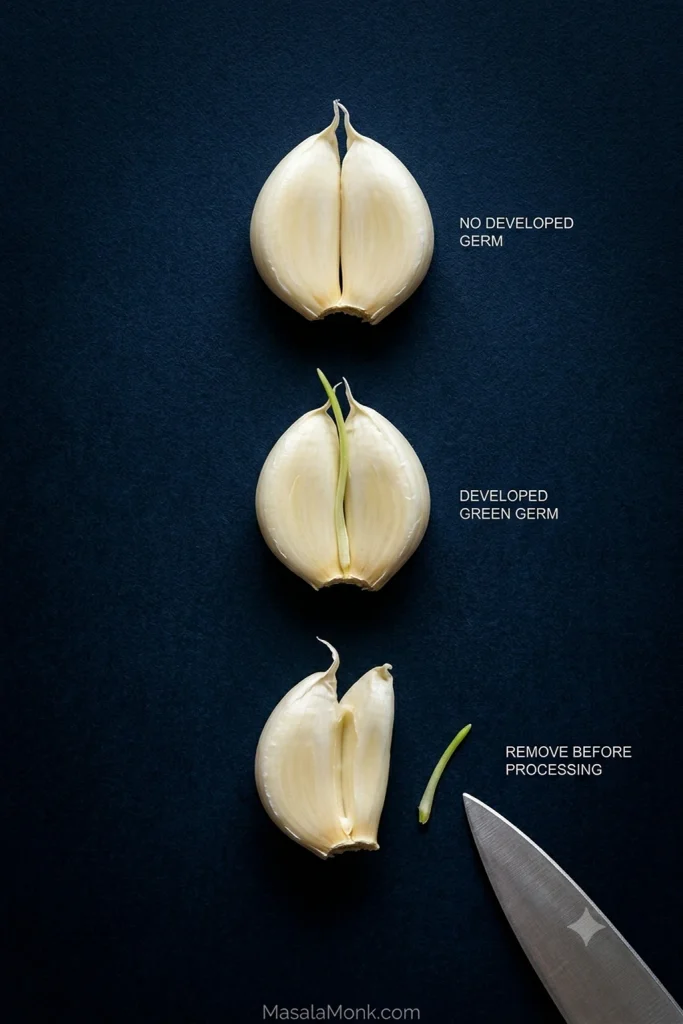
Split garlic cloves comparing a fresh clove with an older clove that has a developed green germ.
If an older clove has a pronounced green germ, remove it before weighing. The clove itself can still be used if it is firm rather than dry or rubbery.

Salt: another kosher salt may measure differently by volume. If you’re not using Diamond Crystal, trust the 6 g weight.

Oil: use something pale, mild and fresh. With this much oil in the bowl, any stale or assertive flavor will show.

Ice water: keeps the thickening sauce workable and helps give finished toum its lighter texture.

Can I Halve This Toum Recipe?

Yes. Use a mini processor or small work bowl for the quantities below; a full-sized bowl is usually too large to keep 65 g of garlic in the blade’s working zone.

For a half batch, use:

  • 65 g / 2¼ oz peeled fresh garlic
  • 3 g salt
  • 30 g lemon juice (30 ml / 2 tablespoons)
  • 30 g ice water (30 ml / 2 tablespoons)
  • 300 g neutral oil (or 1½ cups if measuring by volume)

Divide the oil into six 50 g portions if weighing or six ¼-cup portions if using volume. In the method below, every 100 g / ½-cup oil portion becomes 50 g / ¼ cup, and every 15 g / 1-tablespoon lemon or water addition becomes 7.5 g / 1½ teaspoons. Yield: about 2 cups.

Before You Start

Measure the lemon and ice water before switching on the processor. For the full batch, choose one system for the oil and stay with it: 600 g by weight or 3 cups by volume. If you are making the half batch, use the scaled quantities above.

For the full batch, divide the oil into six 100 g portions if weighing or six ½-cup portions if using volume. For the half batch, those become six 50 g portions or six ¼-cup portions. Set them beside the processor before you begin.
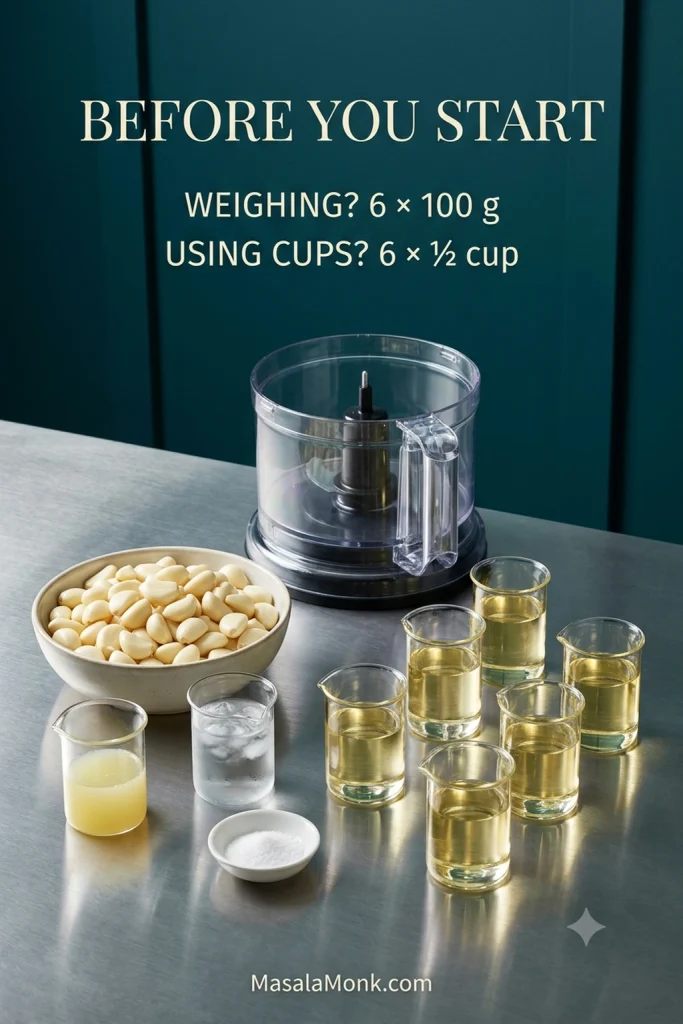
Toum ingredients arranged beside a food processor with neutral oil divided into six measured portions.
Six measured oil portions turn one long drizzle into manageable checkpoints. Set out the lemon and ice water too, so you can watch the emulsion instead of stopping to measure.

Using especially fierce garlic? After Step 1, let the finished garlic-lemon paste stand for about 15 minutes before beginning the oil. Use only the lemon already measured for the recipe; don’t add extra.

Keep the water cold, and give the processor a break later if the bowl starts becoming noticeably hot.

1. Turn the Garlic Into a Paste

Add the garlic and salt to the processor. Pulse until finely minced, scraping the sides and bottom several times.

Add 1 tablespoon / 15 g lemon juice and process again. Add another tablespoon, scraping as needed, until the garlic becomes smooth and sticky.

Watch how it moves. Properly puréed garlic smears rather than scatters when the blade passes through it. Keep going while obvious pieces remain.
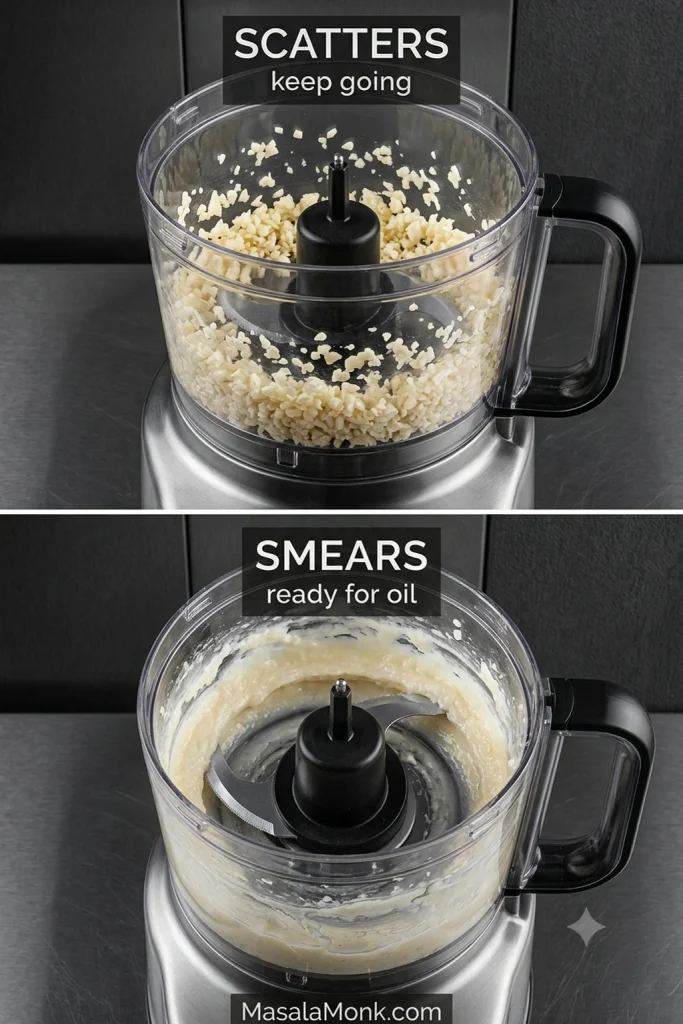
Toum garlic preparation comparing coarse chopped garlic that scatters with smooth sticky garlic paste that smears.
Coarse garlic still jumps and scatters around the bowl; ready garlic leaves a sticky smear behind the blade. Don’t start the oil until the paste looks like the smoother example.

If you’re using the optional 15-minute lemon rest for especially pungent garlic, pause here before beginning the oil.

2. Catch the First Emulsion

With the processor running, begin adding the first 100 g / ½ cup oil portion.

Start with drops, then move to the finest thread you can comfortably maintain. These opening additions deserve more patience than the oil that comes later.

Watch the surface. The glossy wet look should begin disappearing as the garlic turns paler and creamy.
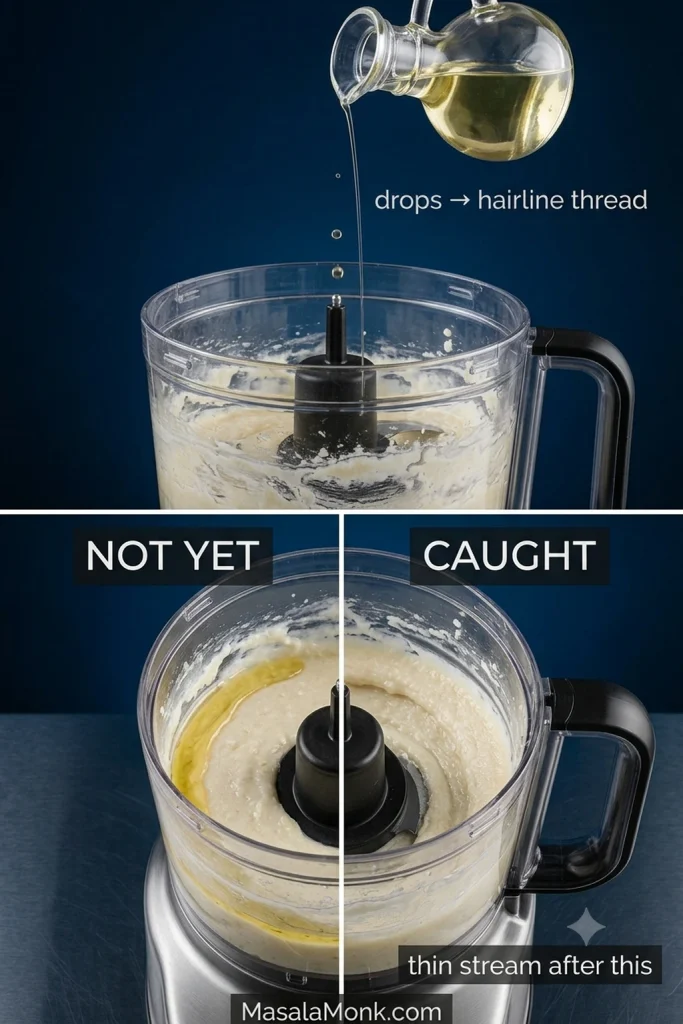
Early toum emulsion comparison showing separate pooling oil beside garlic paste and the first pale creamy emulsion.
This is the change to wait for: separate oil gives way to a pale, creamy base. If you still see a glossy puddle, pause before adding more oil.

Then the bowl changes quickly. Soft ridges begin following the blade, and the oil seems to disappear into the pale sauce. The transformation looks almost improbable: raw garlic and a stream of oil suddenly behaving like something whipped.

Once you see that change, the most fragile part is behind you. Oil still pooling is your cue to pause. Make sure the garlic is genuinely smooth before adding more.

Finish that first oil portion, then blend in 1 tablespoon / 15 g lemon juice.

3. Build the Toum

Add the second 100 g / ½ cup oil portion in a thin stream. The toum should stay creamy as the bowl fills. Blend in the final 1 tablespoon / 15 g lemon juice.

Add the third 100 g / ½ cup oil portion, then 1 tablespoon / 15 g ice water.

Repeat with each of the remaining three oil portions, adding 1 tablespoon / 15 g ice water after each one. By the end, all six oil portions and all the measured ice water should be in the bowl.

The sauce grows paler and fuller with each round. The processor often sounds different too, its blade now pushing through a thick, airy sauce instead of a wet garlic purée.
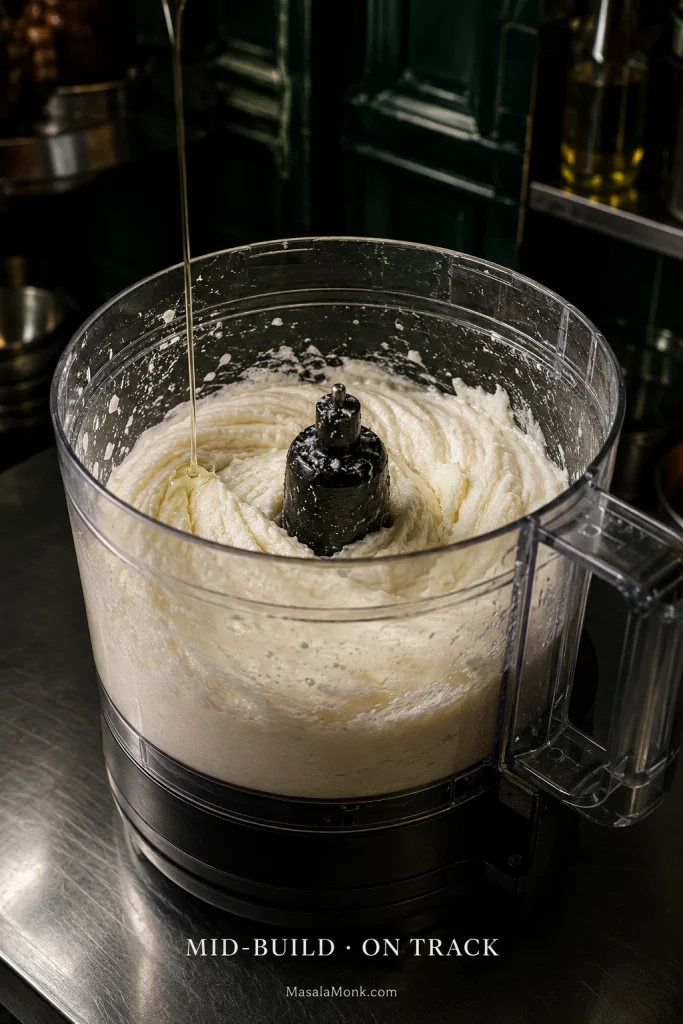
Pale toum building in a food processor with soft ridges forming as the emulsion gains volume.
As the emulsion builds, the sauce rises higher on the bowl and soft ridges follow the blade. That fuller, airier movement is a better checkpoint than the clock.

If your processor pusher has a small hole for dripping liquid, use it to meter the oil into a fine stream.

4. Watch the Heat

Touch the bowl occasionally. Slight warmth is fine. If the machine becomes noticeably hot, give it a short rest before continuing.

The active method commonly takes around 20 minutes; the optional garlic rest adds 15 minutes. Treat those times as orientation rather than a deadline—the sauce in front of you tells you more than the clock.

5. Finish by Texture

Finished toum should be pale ivory to white and airy enough to mound on a spoon. There should be no greasy ring around the bowl, and it should feel rich without eating like straight oil.

The Spoon-Groove Check

Drag a spoon through it. The groove should stay visible briefly. Lift the spoon or spatula and the toum should cling instead of sliding straight off.
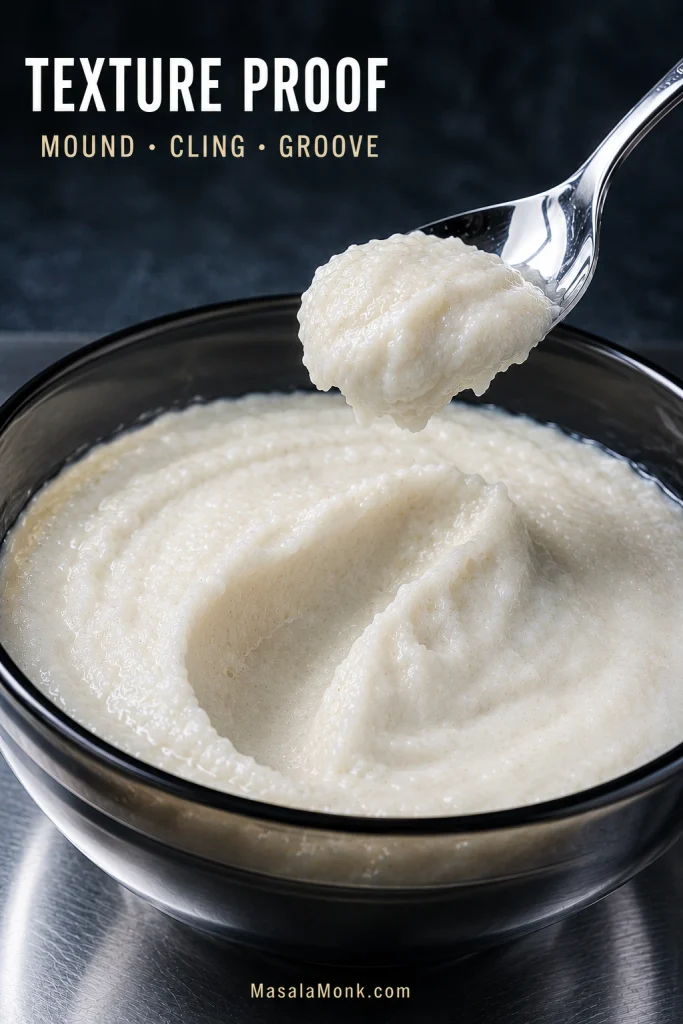
Finished toum lifting in a soft mound on a spoon while a defined groove remains visible in the bowl.
Finished toum should mound softly, cling to the spoon and hold a shallow groove. A greasy ring or free oil around the edges points to a different problem.

Fresh toum can taste especially fierce straight from the processor. When the texture is right, chill it before making large flavor adjustments.

Recipe Notes

  • Weigh the garlic. Bulbs and cups vary more than they appear to.
  • Measure the lemon. “One lemon” can produce a very different amount of juice from one fruit to another.
  • Watch the opening emulsion. Pale cream forming around the early oil additions matters more than an exact number of seconds.

Cooking right now? You have what you need. If the texture went wrong, jump straight to troubleshooting. Using a stick blender instead? Go to the immersion-blender guidance. If the batch worked but tastes fiercer, heavier or less like your favorite shawarma-shop sauce than expected, keep reading—the garlic, oil and even the sauce you’re comparing it with may explain why.


What Is Toum?

Toum (pronounced TOOM) simply means garlic in Arabic. The sauce is closely associated with Lebanese and wider Levantine cooking, especially alongside grilled chicken, shawarma, kebabs, potatoes and bread.

Although it looks a little like mayonnaise, classic toum gets its thick, whipped texture without mayo, cream or yogurt. Pulverized garlic helps hold the oil together with lemon and water. On a mezze-style spread, it can sit beside extra-creamy hummus, pickles and salads while bringing a much sharper garlic bite.

Toum and aioli aren’t the same sauce. If what you want is the quick mayo-based garlic aioli common in many modern kitchens and restaurants, our Garlic Aioli Recipe is the easier route. Classic toum is egg-free, lighter on the spoon and far more assertively garlicky.

The Garlic Changes the Batch

Two similar-looking bulbs can produce surprisingly different toum. Raw garlic varies considerably in heat, and using 130 g removes at least the quantity guesswork. Measuring by volume is less predictable because a tightly packed cup can contain much more garlic than a loosely filled one.

Toum also pulverizes raw garlic far more thoroughly than most dishes do, bringing out a great deal of its pungency. Heat takes garlic in another direction: in something like garlic mashed potatoes, cooked garlic becomes sweeter and softer instead of sharp.

Freshness matters too. An older clove with a well-developed green germ can taste harsher, which is why the recipe removes an obvious germ before the garlic is weighed and processed. Plump pre-peeled garlic can also work as a practical shortcut, though fresh whole heads remain the first choice.

Especially fierce garlic can be mellowed before the oil goes in. The optional 15-minute rest with the lemon juice already incorporated in Step 1 gives the raw garlic time to soften somewhat without cooking it.

Blanching can reduce raw garlic heat too, but it can also weaken the properties toum relies on to emulsify. That’s why it isn’t built into this formula.

What Is the Best Oil for Toum?

Use sunflower, grapeseed, canola or safflower oil. All four are mild enough to fade into the background while garlic and lemon stay in charge.

OilOur take
SunflowerBest all-round choice: mild, pale and clean
GrapeseedVery neutral; lets garlic and lemon dominate
CanolaMild, economical and easy to find
SafflowerClean and unobtrusive
Avocado oilWorks, but offers little advantage here and may tint the sauce
Extra-virgin olive oilSkip for classic pale toum: stronger flavor, darker color and possible bitterness after vigorous blending

A perfect emulsion can still taste wrong. Heavy, oily or bitter toum puts the oil itself under suspicion.

Can You Make Toum With an Immersion Blender?

Yes, but it isn’t the preferred tool for the fluffy food-processor formula above. A powerful immersion blender can work well for smaller batches in a narrow vessel, but machine power, vessel shape and the formula all matter. The finished toum may be denser and less airy than a food-processor batch.

Keep the blender head low while the first white emulsion forms, then raise it gradually so the oil above is pulled into the sauce. A jar that fits fairly closely around the blender head gives a small batch a much better chance than a wide container.
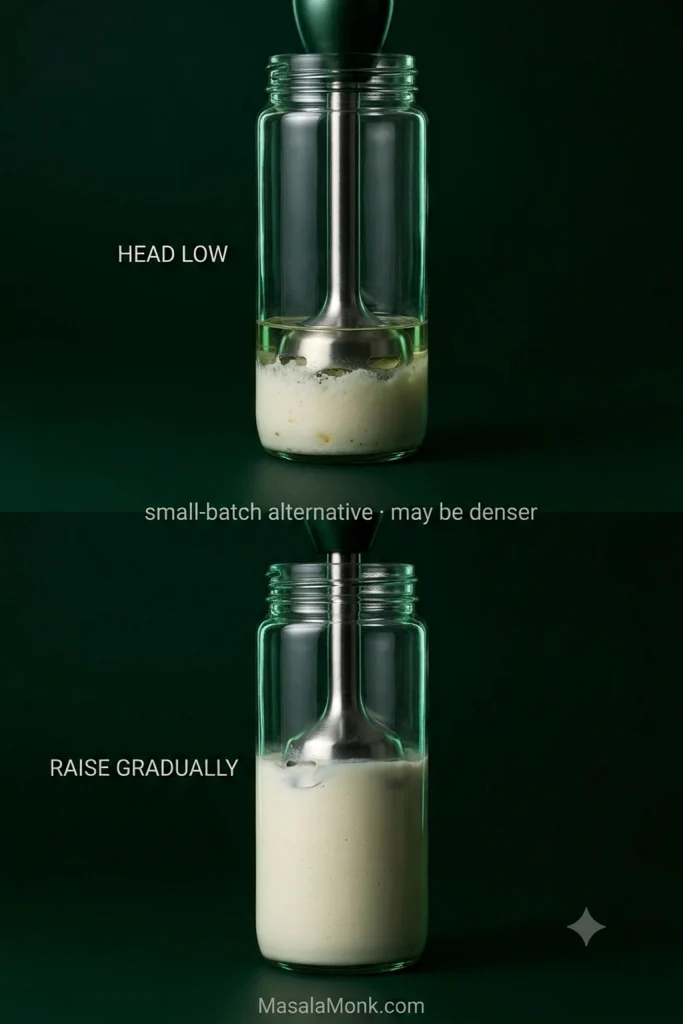
Immersion blender held low in a narrow jar as a small batch of toum begins emulsifying around the blade.
A narrow jar keeps a small batch around the blender head. Hold the blade low until a white emulsion forms, then begin raising it gradually through the mixture.

Think of it as a useful small-batch alternative, not an interchangeable substitute for the method above.

What Went Wrong With My Toum?

“Runny” can describe several different problems. Start with the moment the texture changed.
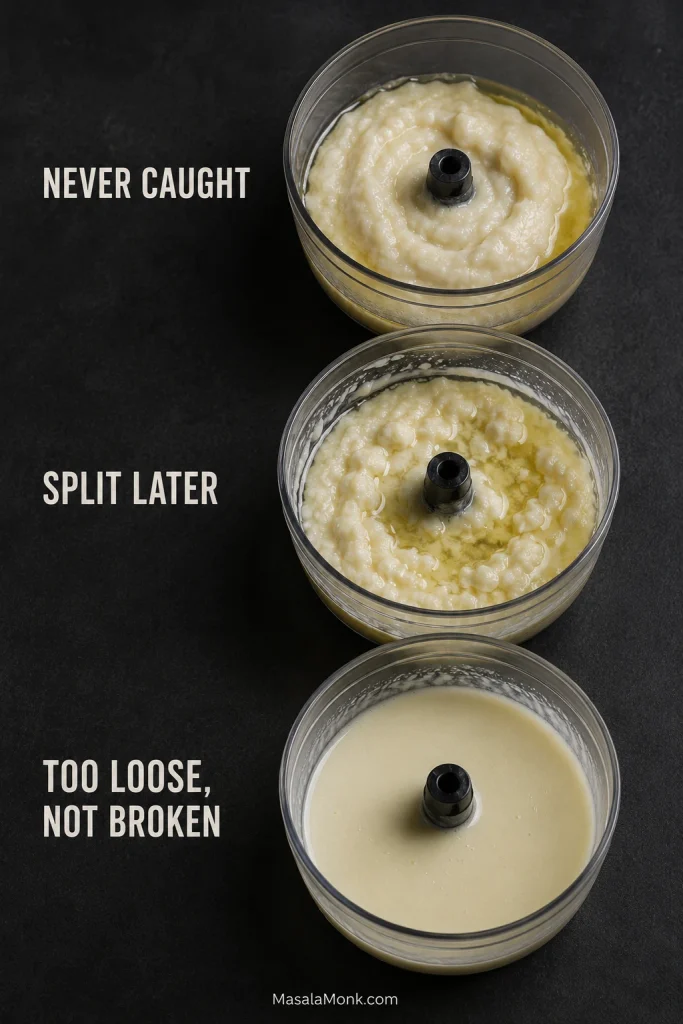
Three toum troubleshooting states showing an emulsion that never caught, one that split later, and a loose but intact sauce.
These three “runny” sauces are not the same failure: oil that never incorporated, a later split, and a pale but intact loose emulsion need different fixes.
What you seeLikely problemNext move
Garlic bouncing around the bowlBatch too small for the bowlMove to a smaller processor
Oil pooling from the beginningFirst emulsion never caughtPause before adding more oil
Creamy at first, then glossy and liquidEmulsion splitStop pouring and re-emulsify
Pale and smooth but softLoose rather than brokenLook for actual oil separation
Very thick, but no oil separationSauce is holding wellFinish the measured water; thin later if needed
GrainyGarlic paste too coarseImprove the paste stage next time
Texture looks right, but flavor is harshIngredient or flavor issueSee the flavor notes below
Perfect at first, oily laterSeparated during storageRe-emulsify if needed
Processor becoming hotHeat building in the machinePause and cool

Go straight to the symptom: Never emulsified · Split later · Rescue broken toum · Too thick or grainy · Flavor problem

When the Emulsion Never Starts

Garlic ricocheting around the processor usually means the machine isn’t catching enough of it. Move to a smaller bowl if repeated scraping doesn’t solve the problem.

A smooth paste with oil still pooling around it points to the pour. Those opening additions need to enter in drops or a very fine thread. Wait for pale cream before committing the remaining oil.

When It Starts Well and Then Splits

A sauce that was creamy and then suddenly becomes glossy or watery did form an emulsion; it later lost stability. Oil arriving too quickly is a common culprit. Excess heat or a sudden large splash of liquid can contribute too.

Once you see clear separation, stop the pour. Harder blending and more oil rarely make a broken toum happier.

How to Rescue Broken Toum

When the broken mixture already tastes good and you want to keep it egg-free, start a small fresh garlic base and gradually emulsify the failed toum into it.

  1. Purée 2–3 fresh garlic cloves with a small pinch of salt in a mini processor or very small blender cup. Two or three cloves are usually too little for a standard food-processor bowl.
  2. Add only a spoonful of the broken toum at first, extremely slowly.
  3. Wait for a fresh creamy emulsion to form.
  4. Once that base looks stable, feed in the remaining broken mixture in a fine stream.
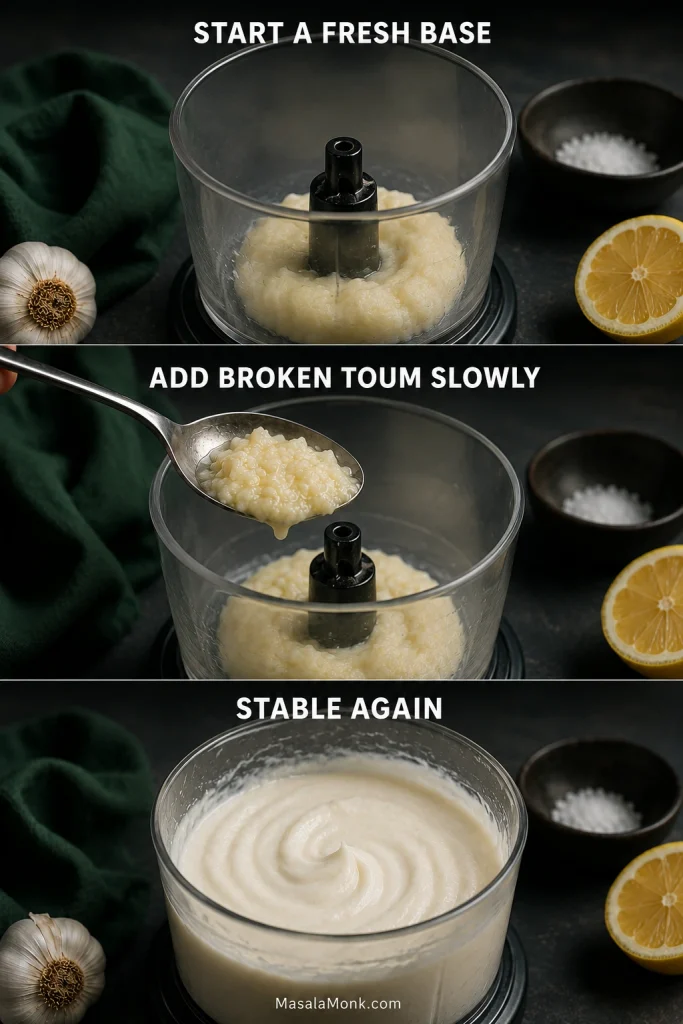
Broken toum rescue sequence showing a fresh garlic base, gradual addition of broken sauce, and a stable pale emulsion.
The rescue happens in stages: make a tiny fresh garlic base, add one spoonful of the broken sauce, wait for creaminess, then feed in the rest slowly.

Treat the broken toum like the oil in a brand-new emulsion: add it slowly to the fresh base, never the other way around.

A batch that is already painfully garlicky may not benefit from another few raw cloves. One vegan rescue is to start with about ⅓ cup aquafaba and slowly feed the broken toum into it. When eggs are acceptable, egg white is another effective fresh base.

Rescue is optional. Broken toum still makes a terrific garlic-lemon marinade, vinaigrette base or coating for roasted potatoes and vegetables. It can go into pasta too. The texture failed; the ingredients did not become useless.

Too Thick or Grainy

Very thick toum can mean the sauce is holding beautifully. Finish the recipe’s measured ice water first. A stable sauce can then be loosened with additional cold water, 1 teaspoon at a time, if you want it softer.

Graininess points back to the beginning: the garlic probably never became smooth enough. Improve the paste before changing anything about the oil.

The Texture Is Right, but the Flavor Isn’t

Too strong or burning. Correct texture means the emulsion itself probably isn’t the problem. Garlic varies enormously in pungency; see The Garlic Changes the Batch before changing the formula.

Bitter. Older sprouting garlic can taste harsher, while strongly flavored extra-virgin olive oil may add its own bitter edge after heavy blending.

Too lemony. This is why measuring 60 g / ¼ cup is safer than using “one lemon.” Let the toum chill before adjusting. A stable emulsion can take a little more neutral oil slowly if you genuinely want to soften the acidity.

It Looked Perfect and Separated Later

Sometimes toum looks beautiful when it goes into the refrigerator and shows a ring of oil later. The emulsion formed, but it proved unstable during storage.

Visible separation can be repaired using the same rescue principles above. Spoon out only what you need and return the rest to the refrigerator.

Why Restaurant Garlic Sauce May Taste Different

You may not have made your toum incorrectly. The shawarma shop may be serving a different garlic sauce.

Toum is a garlic sauce, but not every white “garlic sauce” served with shawarma is classic toum. Restaurant and family versions may use egg white, starch, mayonnaise, yogurt or labneh, citric acid or other stabilizers. Those changes can create something softer, milder, denser or more mayo-like.

If your toum is fluffy and properly emulsified yet still doesn’t match the sauce you remember, the recipe may be doing exactly what it is supposed to do.

What to Eat With Toum

Toum comes alive beside food that is hot, browned and savory.

With shawarma or shish tawook, add pickles and soft homemade pita bread. Pink pickled turnips are particularly good here: sharp, crunchy and bright against the white sauce and browned chicken. Hot chicken, cold toum, chewy bread and something pickled make a much more interesting bite than any one part does alone.
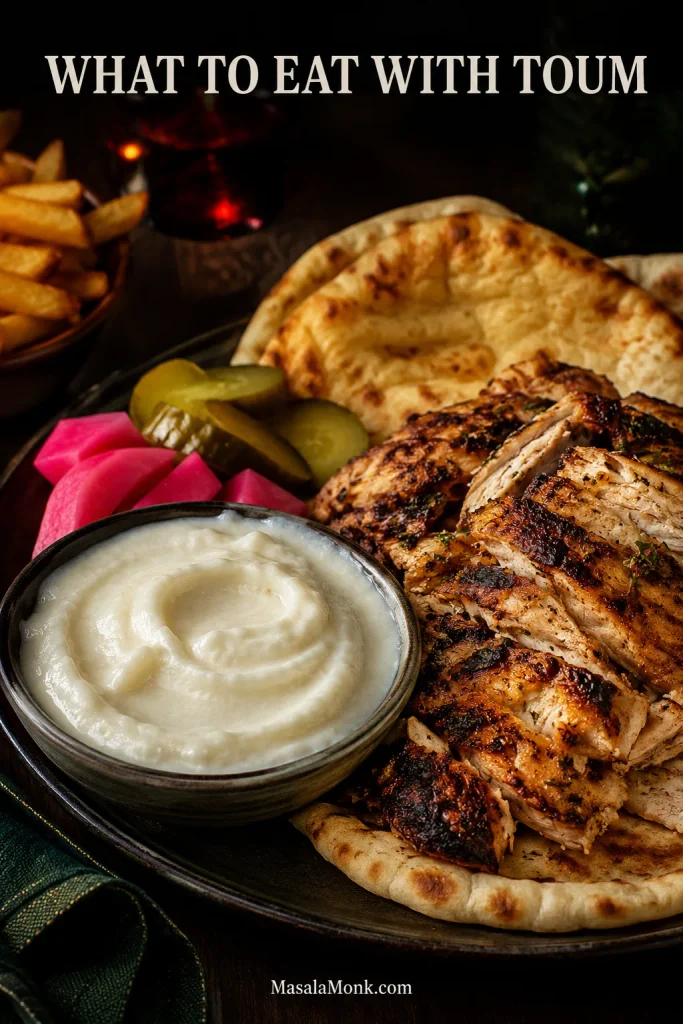
Lebanese toum served with charred chicken shawarma, warm pita and bright pink pickled turnips.
Keep toum cold and serve it beside hot grilled food. The temperature contrast keeps the garlic bright and the sauce thick enough to cling to each bite.

Kebabs and other grilled meats work just as well. A charred edge dragged through cold garlic sauce rarely needs much embellishment.

Then there are potatoes. Hot crispy homemade French fries dipped straight into a mound of toum may be the fastest route through an open container, with roast potatoes close behind.

For a meat-free plate, add homemade falafel, vegetables, pickles and warm bread. A parsley-heavy tabbouleh brings enough lemon and fresh herb to cut through the richness.

Toum also works beyond the dipping bowl. Whisk a spoonful into lemon juice for dressing, spread a thin layer inside sandwiches and wraps, or work it into a marinade for chicken or roasted vegetables.

Made a big batch? Storage & freezing · Back to the toum recipe

Make Ahead, Storage & Freezing

Refrigerate freshly made toum promptly in a clean airtight container at 4°C / 40°F or colder. Published toum recipes vary widely on refrigerator life, but there is no validated food-safety guidance for this exact homemade emulsion that can confidently be applied to every batch.

Public-health guidance for homemade garlic-in-oil preparations uses a four-day refrigerated limit, so this recipe uses the same deliberately conservative 4-day limit. Toum is not identical to plain garlic-in-oil; the CDC and the National Center for Home Food Preservation are included as the conservative food-safety reference point, not as toum-specific shelf-life studies.

Freezing is practical, but expect some loss of texture. Toum may thaw only a little looser, or the emulsion may separate more noticeably. Freeze it in small portions and thaw in the refrigerator. Stir well first; if necessary, use the same re-emulsification principles described above.
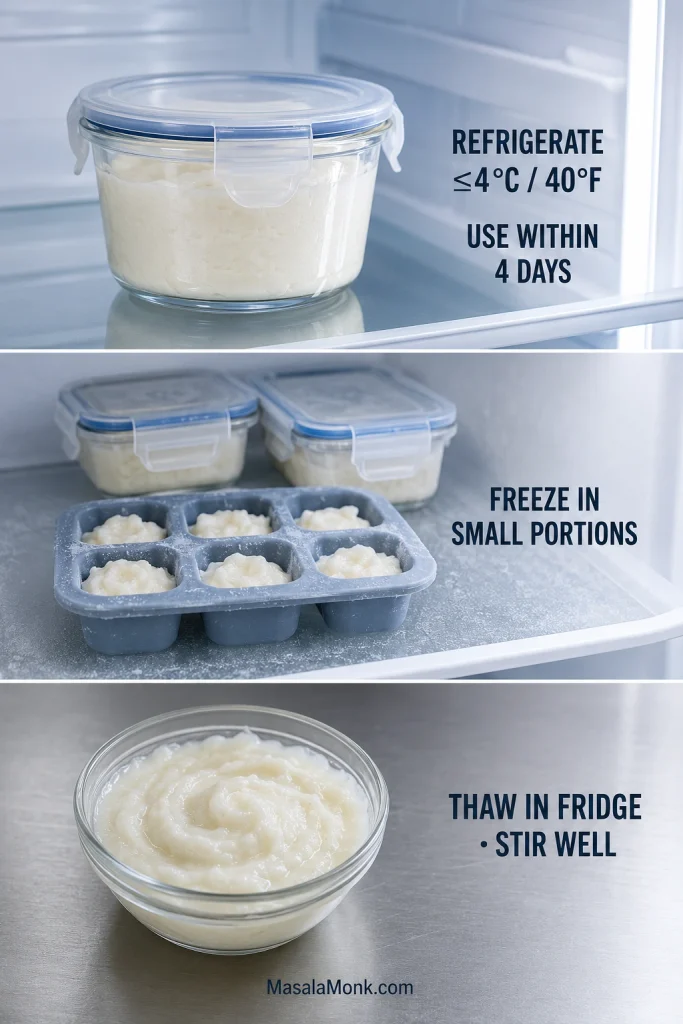
Toum storage guide showing refrigerated sauce, small freezer portions and a thawed portion ready to stir.
Freeze extra toum in small portions rather than one large container. They thaw faster and are easier to stir or re-emulsify individually if the texture changes.

If a thawed portion won’t return to its original fluffiness, it still has plenty of value. Use it in marinades, dressings, roasted vegetables or other dishes where perfect whipped texture no longer matters.


When the Bowl Turns White

There is a satisfying point halfway through making toum when the bowl stops looking like garlic and oil and becomes pale, thick and almost cloud-like.

That is the part worth remembering next time. The exact number of seconds matters less than recognizing what the sauce looked like when the first emulsion caught.

Then give it somewhere worthwhile to go: hot chicken, warm bread, fries, grilled vegetables, sharp pickles.

If you make it, tell us what machine you used and what the toum looked like during the first oil additions. If something went wrong, tell us when the texture changed. Those details make a failed batch much easier to understand—and may help the next cook staring into the same bowl.
↑ Back to top · Make the Toum · Troubleshooting

Posted on — Leave a comment

Tartar Sauce Recipe: Easy Homemade Sauce for Fish and Chips

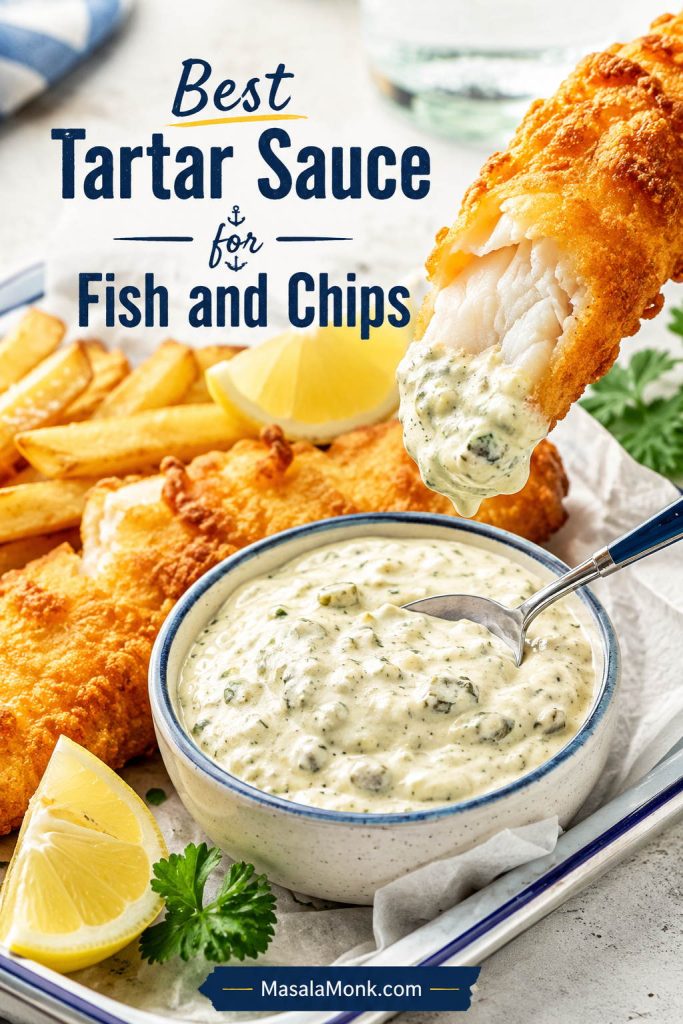
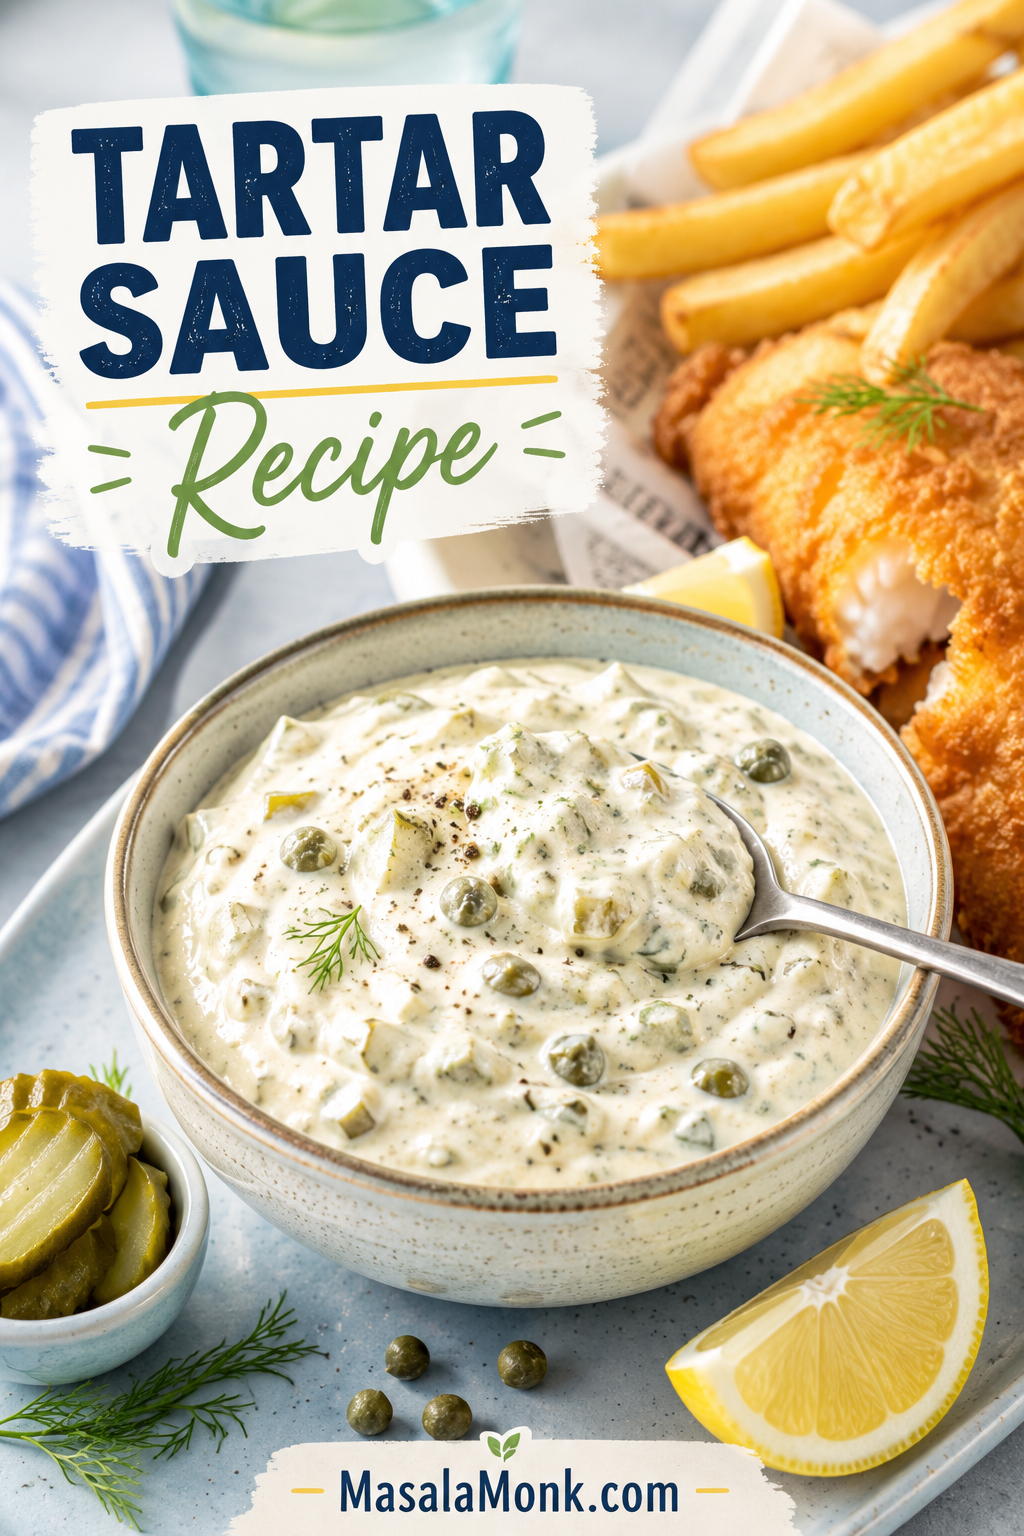
Bowl of thick homemade tartar sauce with pickle and herb flecks served beside crispy fish, chips, lemon, and fresh herbs

The best tartar sauce recipe makes hot fried fish taste better, not heavier. It should be creamy enough to cling, loose enough to spoon, and full of tiny pickle-and-caper bites so every forkful gets a little crunch, lemon, salt, and freshness.

This no-cook homemade tartar sauce is built for fish and chips, fish sticks, crab cakes, salmon cakes, shrimp, fries, and fried fish sandwiches. Start with the classic dill pickle version when you want the best match for fish and chips, use the quick relish version when dinner is moving fast, and use the substitution notes when the fridge is missing relish, pickles, capers, lemon, or mayo.

Quick Answer: How to Make Tartar Sauce

To make tartar sauce, stir mayonnaise with finely chopped dill pickles or relish, lemon juice, capers, Dijon mustard, herbs, and black pepper. Chill it for 15 to 30 minutes if you have time. For fish and chips, start with dill pickles, gherkins, or cornichons; for fish sticks or soft fish sandwiches, sweet relish gives a milder diner-style sauce.

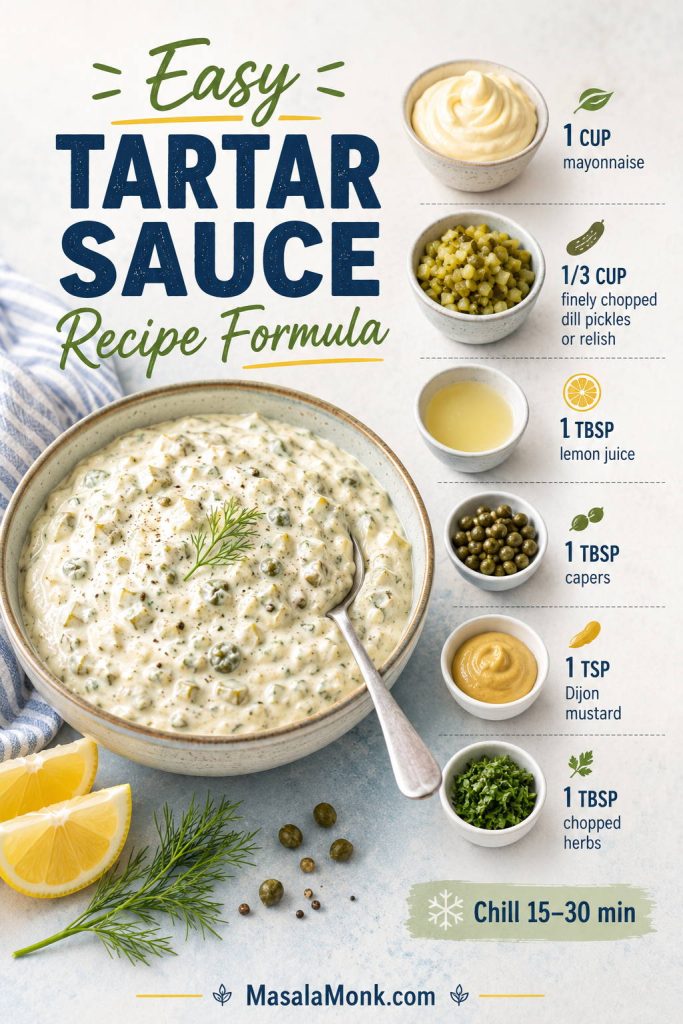
Best default ratio: For every 1 cup of mayo, use about ⅓ cup finely chopped dill pickles or relish, 1 tablespoon lemon juice, 1 tablespoon capers, 1 teaspoon Dijon, and 1 tablespoon chopped herbs. Make it before you start frying, and the sauce will be cold, rested, and ready when the fish hits the plate.

Formula board showing mayonnaise, chopped dill pickles or relish, lemon juice, capers, Dijon mustard, herbs, chill time, and finished tartar sauce
Use this formula as the starting point, then taste after chilling; the pickles, capers, lemon, and herbs settle as they rest.

Not sure which version fits your meal? Use the style guide below before you start mixing.

Homemade Tartar Sauce at a Glance

Prep time10 minutes
Cook time0 minutes
Rest time15–30 minutes recommended; 1 hour if using raw onion or shallot
YieldAbout 1¼ cups / 300 ml
Serving size2 tablespoons / 30 ml
Servings8–10
Best withFish and chips, fried fish, fish sticks, seafood cakes, shrimp, fries, and fish sandwiches
Main textureThick, spoonable, lightly chunky, and easy to dip
StorageMayo-based sauce: best quality within 4–7 days; Greek yogurt sauce: 2–3 days
FreezingNot recommended

Start with this bowl when dinner is moving fast; the notes below are there for texture choices, missing ingredients, lighter bases, and different seafood plates.

Homemade Tartar Sauce Recipe for Fish and Chips

This no-cook sauce is thick enough to sit on hot fish without sliding off, but still loose enough to spoon. The key is fine chopping: the pickles and capers should show up in every bite without turning the sauce into a bowl of relish.

Make the bowl before the fish goes in the oil, and the sauce will taste more settled by the time dinner is ready.

Prep10 minutes
Cook0 minutes
Rest15–30 minutes
Yield1¼ cups / 300 ml

Ingredients

  • 1 cup mayonnaise, about 225 g / 240 ml / 8 fl oz
  • ⅓ cup finely chopped dill pickles, gherkins, or cornichons, about 55–65 g
  • 1 tablespoon capers, drained and chopped, about 9–10 g
  • 1 tablespoon fresh lemon juice, 15 ml
  • 1–2 teaspoons pickle juice, optional, for extra tang or to loosen the sauce
  • 1 teaspoon Dijon mustard, 5 ml
  • 1 tablespoon chopped fresh dill or parsley, about 2–4 g
  • 1 tablespoon finely minced shallot or onion, optional
  • ½ teaspoon Worcestershire sauce, optional
  • ¼ teaspoon black pepper
  • Salt, only if needed

Method

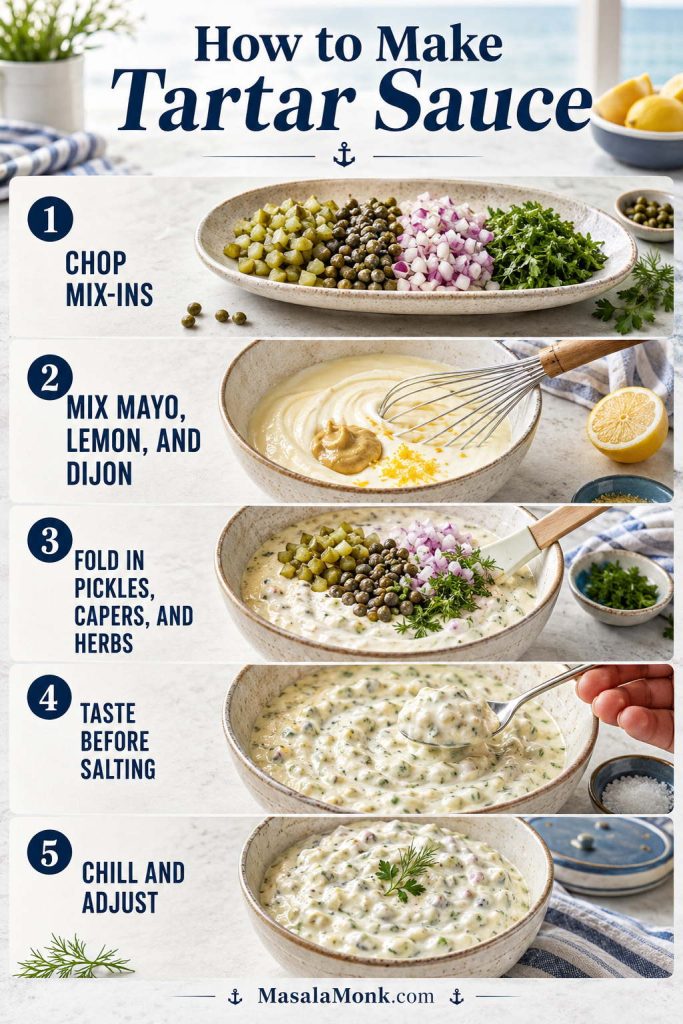
  1. Chop the mix-ins finely. Finely chop the pickles, capers, herbs, and optional shallot or onion. Smaller pieces give the sauce better texture and more even flavor. If one bite tastes like plain mayo and the next tastes like a pickle jar, the pieces are too big.
  2. Mix the base. Add the mayonnaise, lemon juice, Dijon mustard, and black pepper to a bowl. Stir until smooth.
  3. Fold in the flavor. Add the chopped pickles, capers, herbs, optional pickle juice, and optional onion or shallot. Stir until evenly combined.
  4. Taste before salting. Pickles and capers are salty, so add salt only after tasting.
  5. Rest if possible. Cover and refrigerate for 15–30 minutes. The sauce works immediately, but resting lets the chopped ingredients season the mayo.
  6. Adjust and serve cold. Stir once more before serving. Add lemon for lift, pickle juice for tang, mayo for softness, or capers for a saltier seafood edge.

Finished taste cue: The sauce should taste creamy first, then pickle-crunchy and lemony, with a light finish. If it feels heavy, add lemon or pickle juice. If it bites too hard, soften it with another spoonful of mayo.

Recipe Notes

  • Want it sweeter? Swap the chopped dill pickles for sweet pickle relish.
  • Serving fried fish? Use dill pickles, capers, lemon, and herbs.
  • Prefer a smoother sandwich sauce? Mince the pickles and capers very finely or pulse once or twice.
  • Making it vegan? Choose vegan mayo and skip Worcestershire sauce unless you are using a vegan one.
  • Want it lighter? Replace half or all of the mayo with plain Greek yogurt.
  • Keeping it keto? Choose full-fat mayo, dill pickles, capers, lemon, herbs, and no sweet relish or sugar.
  • Yield note: Yield varies slightly depending on how finely the pickles are chopped and whether you add pickle juice.

For more swaps and missing-ingredient fixes, see the substitution guide.

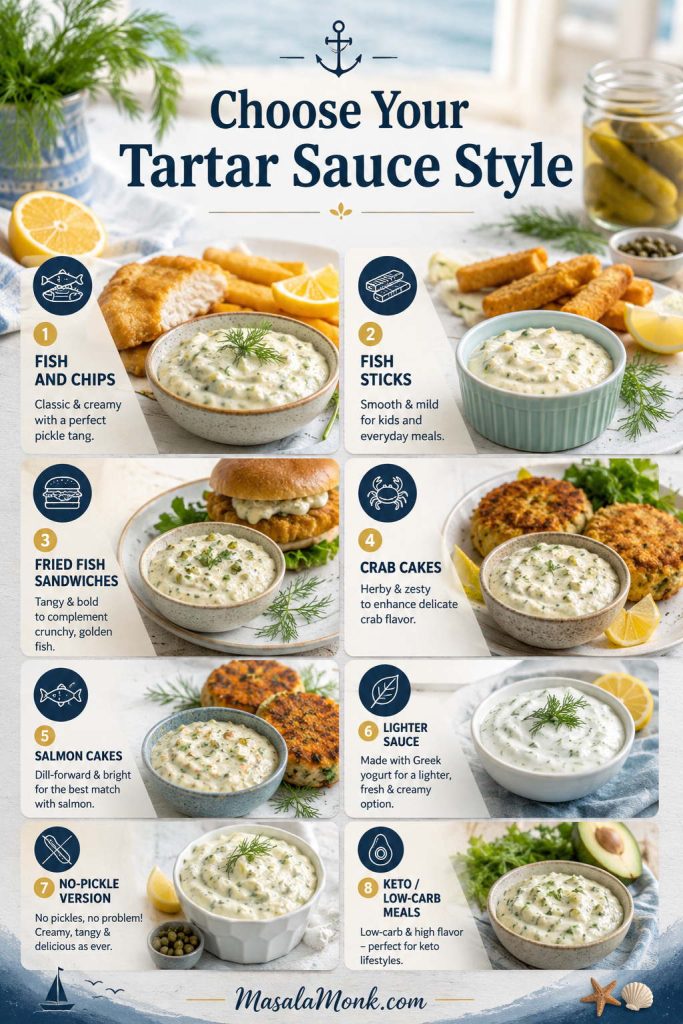
Choose Your Tartar Sauce Style

Use this table when you already know what is on the plate. It keeps the sauce matched to the meal without overthinking the bowl.

You are servingUse this style
Fish and chipsDill pickles or gherkins, capers, lemon, and herbs
Fish sticksSweet relish, mayo, and lemon juice
Fried fish sandwichFinely minced relish or pickles, a little onion, and a smoother texture
Crab cakesLemon, capers, dill, and a little extra pepper or cayenne
Salmon cakesExtra dill, lemon zest, and a thicker mayo base
No picklesCapers, shallot, lemon juice, and Dijon
Lighter sauceHalf mayo and half Greek yogurt
Keto or low-carb mealFull-fat mayo, dill pickles, capers, lemon, and no sweet relish
Guide showing tartar sauce styles for fish and chips, fish sticks, fried fish sandwiches, crab cakes, salmon cakes, lighter sauce, no-pickle sauce, and low-carb meals
The best bowl depends on the meal: sharper for crisp seafood, smoother for sandwiches, and lighter when the plate needs a fresher finish.

Why This Tartar Sauce Recipe Works

This sauce works because it balances fat, acid, salt, crunch, and rest time. Mayo gives the sauce body, while lemon and pickle juice cut through the mayo’s richness. Pickles bring texture, capers add small salty pops, and a short chill lets the chopped ingredients season the mayo instead of sitting in it separately.

That is why finely chopping matters. Large pickle pieces make some bites taste plain and others taste too sharp. Smaller pieces spread flavor through the bowl, so each spoonful lands the same way.

What Is Tartar Sauce Made Of?

Tartar sauce, also called tartare sauce in the UK and some other regions, is a creamy sauce usually made with mayonnaise, pickles or relish, lemon juice, herbs, and salty ingredients such as capers. It is most often served with fried fish, fish and chips, fish sticks, crab cakes, shrimp, and seafood sandwiches.

The creamy base can be as simple as store-bought mayo, but if you want to build the sauce from scratch, MasalaMonk’s mayo recipe walks through classic, eggless, vegan, garlic, spicy, and herb mayo options.

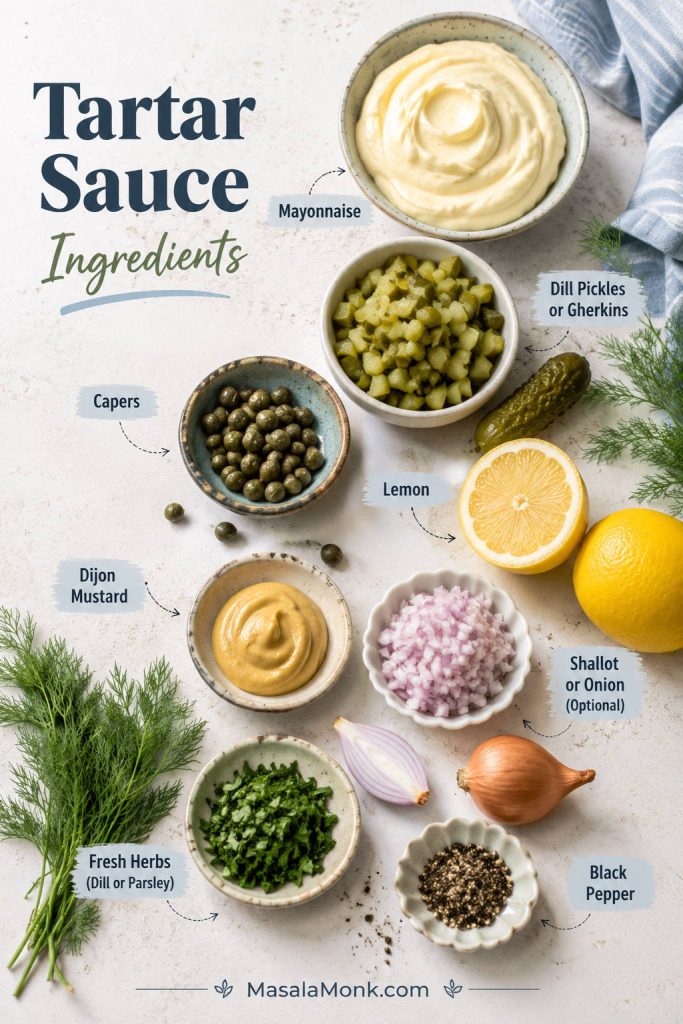
Tartar sauce ingredients on a light surface, including mayonnaise, dill pickles, capers, lemon, Dijon mustard, herbs, black pepper, and shallot
This small ingredient list works because every part has a job: mayo gives body, pickles add crunch, capers bring salt, and lemon keeps the sauce awake.
IngredientWhat it doesCan you skip or swap it?
MayonnaiseCreates the thick, creamy base.Swap in vegan mayo, Greek yogurt, sour cream, or a half-mayo, half-yogurt mix.
Dill pickles, gherkins, or cornichonsAdd crunch, acidity, and pickle flavor.Sweet relish works for a sweeter sauce; capers help if you have no pickles.
CapersAdd small salty pops that suit seafood.Optional, but worth using. Replace with extra pickles or pickle juice.
Lemon juiceLifts the mayo and cuts through fried food.Pickle juice, white vinegar, or apple cider vinegar can stand in.
Dijon mustardAdds gentle sharpness and depth.Yellow mustard, a little vinegar, or no mustard at all will still work.
Dill, parsley, chives, or tarragonAdd freshness and color.Dried dill works in a pinch; otherwise, leave herbs out.
Shallot or onionAdds savory bite.Optional. Onion powder gives a milder pantry-style flavor.
Worcestershire sauceAdds a deeper savory note.Optional. Skip for vegetarian or vegan tartar sauce unless using a vegetarian or vegan Worcestershire.

The Only Equipment Detail That Matters: Chop Size

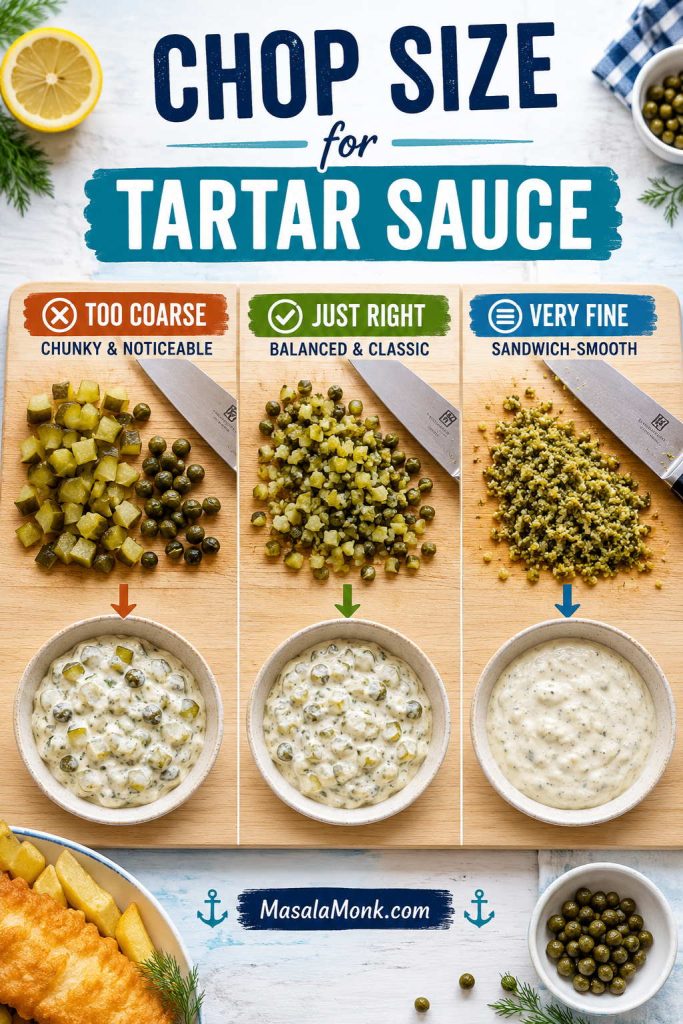
No blender is needed. A bowl, spoon, knife, cutting board, and storage jar are enough. The important part is chop size: pickles and capers should be small enough to spread through the mayo, but not so tiny that the sauce loses texture.

Comparison of coarse, fine, and very fine chopped pickles and capers with tartar sauce texture samples
Chop size is the quiet difference between homemade tartar sauce that tastes balanced and a bowl where one bite is plain while the next is all pickle.

Use a small food processor only when you want a smoother sandwich-style sauce. For dipping fish and chips, a knife gives better control.

After chopping, check the finished texture target so the sauce clings without turning stiff or runny.

How to Make Tartar Sauce Step by Step

1. Chop the Pickles and Capers Finely

The sauce should not feel like chopped pickles held together with mayo. Chop the pickles, capers, herbs, and optional onion finely so every spoonful tastes balanced. If the pieces are too large, some bites taste salty and others taste plain.

2. Mix the Mayo, Lemon, and Mustard First

Add the mayonnaise to a small bowl, then stir in the lemon juice, Dijon mustard, and black pepper. This loosens the mayo slightly and helps the sharper ingredients spread evenly before the chunky ingredients go in.

3. Fold in the Pickles, Capers, and Herbs

Add the chopped pickles, capers, herbs, and optional onion or shallot. Stir until everything is evenly coated. The sauce should look creamy and speckled, with small bits of pickle, caper, and herbs in every spoonful.

4. Taste Before Adding Salt

Pickles, relish, capers, mustard, and Worcestershire sauce can all bring salt. Taste before adding more. If the bowl feels dull, it may need lemon juice, pickle juice, capers, or mustard before it needs salt.

5. Chill, Then Adjust

You can serve it immediately, but 15–30 minutes in the fridge improves the flavor. Stir once more before serving. Add lemon for lift, pickle juice for tang, mayo for softness, or capers for a saltier seafood edge.

Here is the full stir-and-chill sequence at a glance.

Step-by-step tartar sauce process showing chopped mix-ins, mayonnaise base, pickles, capers, herbs, tasting, chilling, and finished sauce
Even though tartar sauce is no-cook, sequence still matters: chop small, season the base, fold gently, taste late, and chill before serving.

Texture Target: Chunky Dip or Smooth Sandwich Sauce

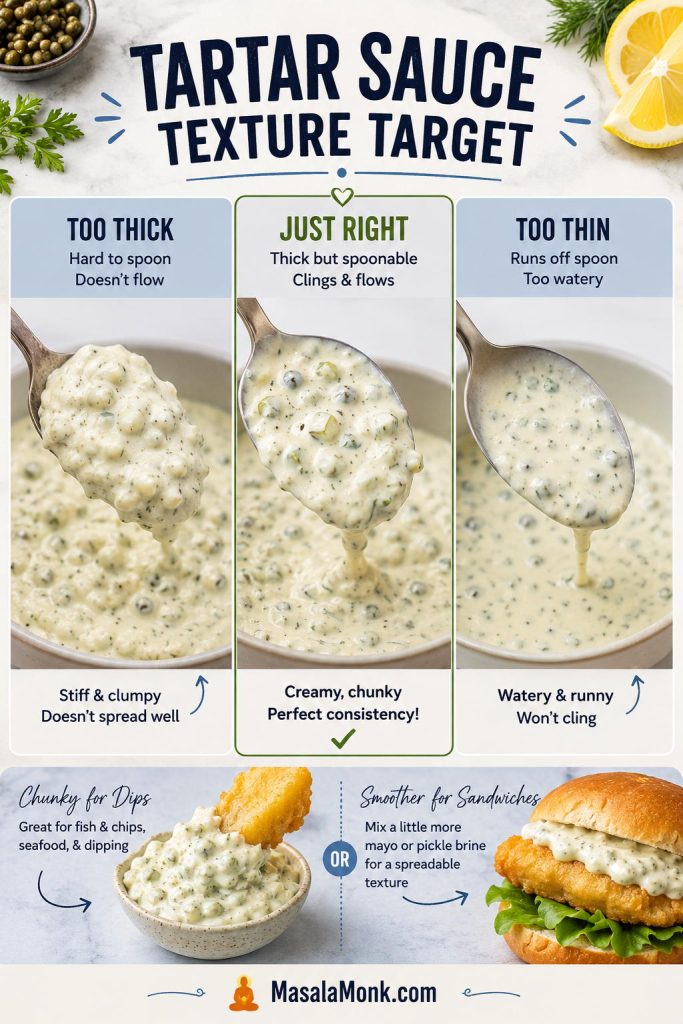
The sauce should be thick enough to sit on a piece of fish without sliding off, but loose enough to spoon easily. For dip texture, keep the pickles and capers finely chopped but visible. For sandwich texture, mince everything smaller or pulse once or twice.

Texture guide showing tartar sauce that is too thick, just right, too thin, chunky for dipping, and smoother for sandwiches
Aim for a sauce that holds on a spoon without feeling stiff. Keep dip versions chunkier and sandwich versions finer.

If the sauce looks stiff, loosen it with pickle juice, lemon juice, or a teaspoon of water. If it looks runny, add a spoonful of mayo and chill it for 15–30 minutes. A good bowl should cling, not puddle.

If the sauce has already gone too thick, thin, sweet, or salty, use the troubleshooting guide before making bigger changes.

3-Ingredient Tartar Sauce

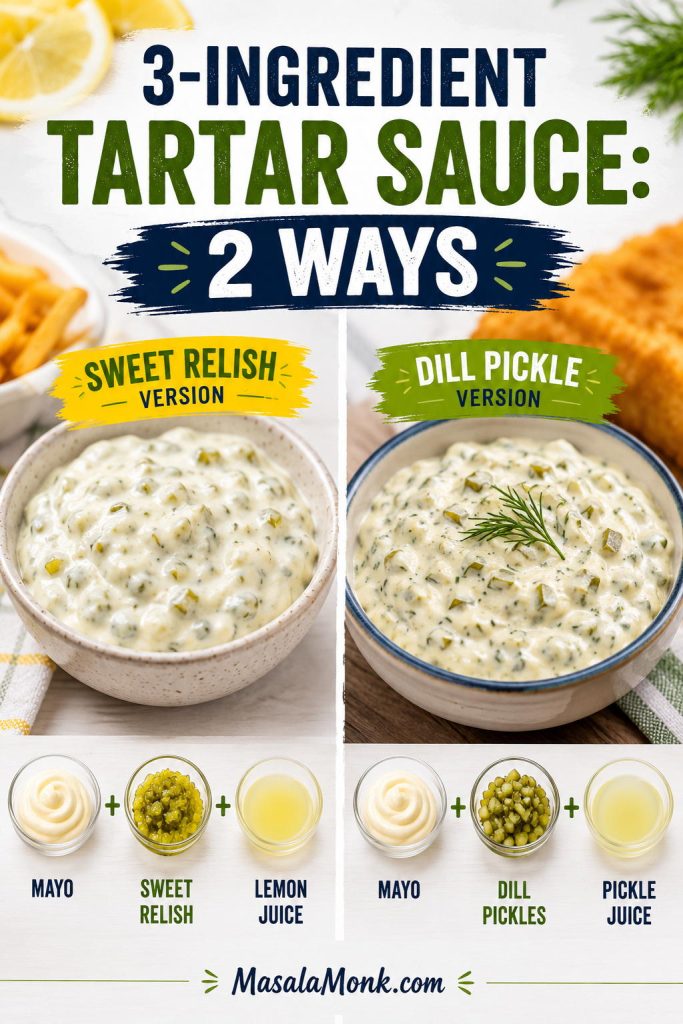
When you need the fastest bowl, you only need mayonnaise, pickles or relish, and lemon juice or pickle juice. This quick pantry sauce is not as layered as the full recipe, but it is exactly right for fish sticks, quick fried fish, frozen seafood, sandwiches, and busy weeknight dinners.

In a hurry, use relish and the sauce is closer to 5 minutes. For the best fish-and-chips texture, finely chopping pickles, capers, and herbs is worth the extra few minutes.

Sweet Relish 3-Ingredient Tartar Sauce

  • 1 cup mayonnaise
  • ⅓ to ½ cup sweet pickle relish
  • 1 teaspoon lemon juice

Dill Pickle 3-Ingredient Tartar Sauce

  • 1 cup mayonnaise
  • ⅓ cup finely chopped dill pickles
  • 1–2 tablespoons pickle juice or lemon juice

Stir, taste, and chill if possible. More pickle juice makes the bowl tangier; another spoonful of mayo softens it.

Two three-ingredient tartar sauces made with mayonnaise, sweet relish or dill pickles, and lemon juice or pickle juice
Three ingredients can still make a useful quick tartar sauce: relish gives a softer finish, while dill pickles give a sharper one.

If one of those ingredients is missing, the substitution section below will help you rebuild the bowl.

Sweet Relish vs Dill Pickles: Which Is Better?

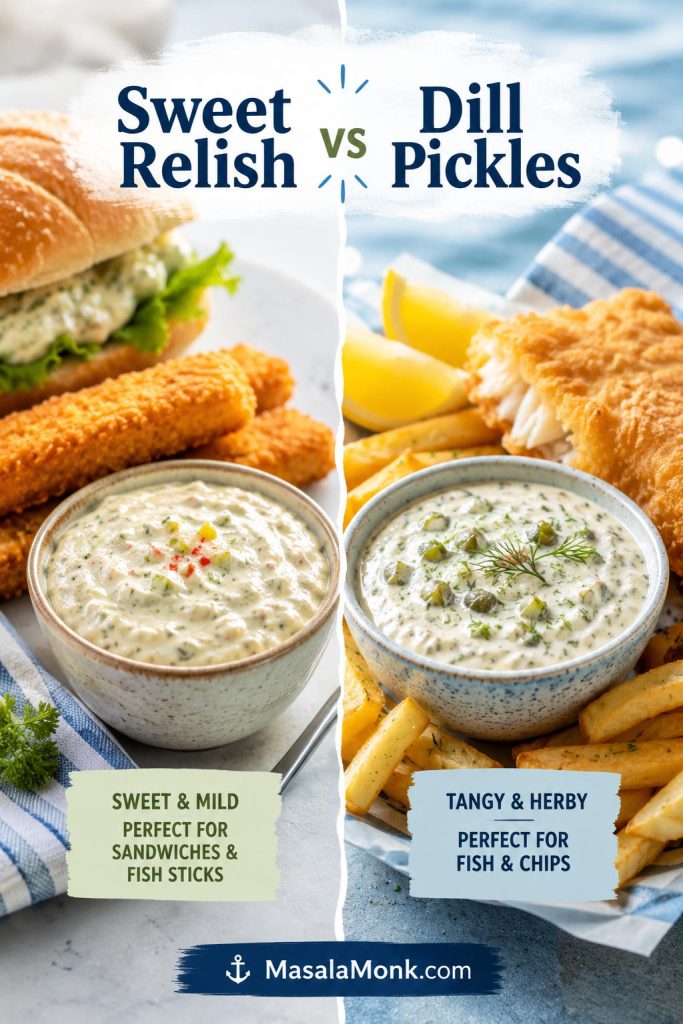
Team dill pickle for fish and chips, team sweet relish for fish sticks — both have a place, but they are not the same sauce. Dill pickles, gherkins, and cornichons give you a more direct pickle bite. Sweet relish gives you a softer, sweeter, more diner-style sauce.

Beside crisp battered fish, dill pickles or gherkins are the better default. If you want both directions in one bowl, use half dill pickle and half sweet relish.

Side-by-side comparison of sweet relish tartar sauce and dill pickle tartar sauce with serving cues for sandwiches and fish and chips
Sweet relish and dill pickles both belong in tartar sauce, but they solve different cravings: soft and familiar versus crisp and pickle-bright.

For the full fried-fish version, jump to the fish-and-chips sauce section.

Best Tartar Sauce for Fish and Chips

The best tartar sauce for fish and chips should be thick, cold, pickle-forward, and lemony enough to wake up the batter. Make it first, then let it chill while the fish cooks and the chips finish.

Crispy battered fish being dipped into thick homemade tartar sauce with chips and lemon nearby
Mix the tartar sauce before frying, because a short chill makes the sauce taste settled by the time the fish is hot and crisp.

If you are making the full meal, pair this sauce with MasalaMonk’s fish and chips recipe. While the sauce rests, you can prep the batter from MasalaMonk’s fish batter recipe so the cold sauce and hot coating are ready at the same time.

The goal is not fancy. It is that second bite where the fish still feels crisp and the sauce makes it easier to keep going.

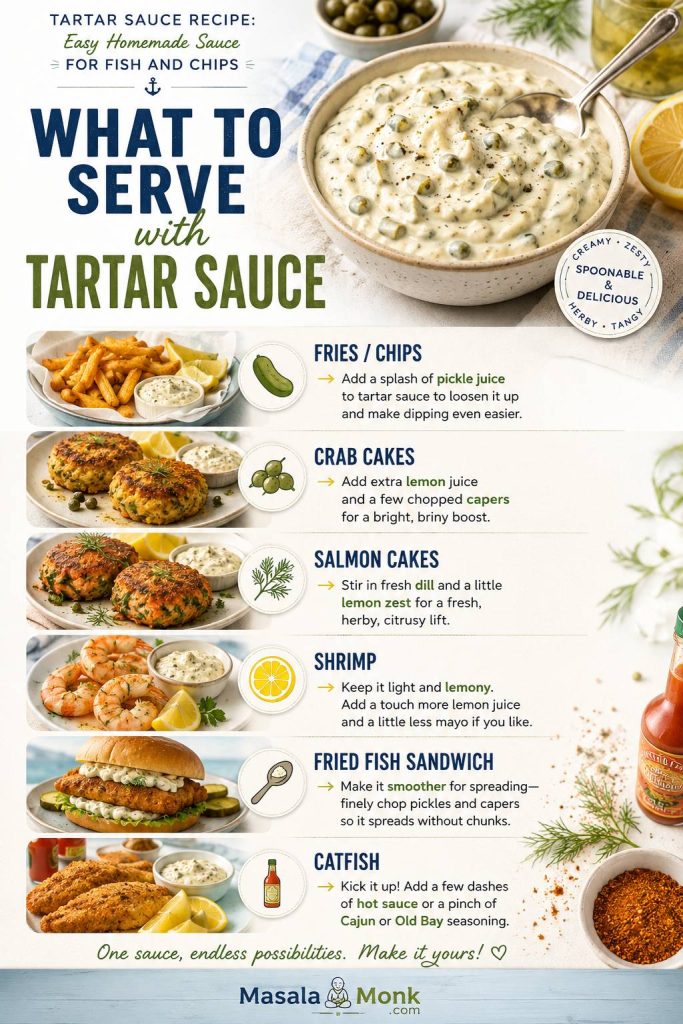
What to Serve with Tartar Sauce

Once the basic sauce is made, adjust the texture or seasoning for the food beside it instead of repeating the whole recipe.

Serve withSmall adjustment
Fries or chipsLoosen slightly with pickle juice so it dips easily.
Crab cakesAdd extra lemon, capers, and a pinch of cayenne.
Salmon cakesAdd more dill and a little lemon zest.
ShrimpKeep it lighter with parsley, lemon, and less onion.
Fried fish sandwichMince everything smaller so the sauce spreads cleanly.
CatfishAdd hot sauce, Cajun seasoning, or Old Bay-style seafood seasoning.
Serving guide showing tartar sauce with fries, crab cakes, salmon cakes, shrimp, a fried fish sandwich, and catfish
After the base is ready, adjust by the plate: loosen it for fries, add lemon for seafood cakes, or mince it finer for a sandwich spread.

That same cold, lemony contrast works beside MasalaMonk’s fish cakes, especially against crisp potato and flaky white fish. It is just as useful with salmon croquettes, where the capers and dill echo the flavors already working in the patties.

For a fry-night plate, MasalaMonk’s battered fries give the sauce exactly what it wants: something hot, crisp, and salty to cut through.

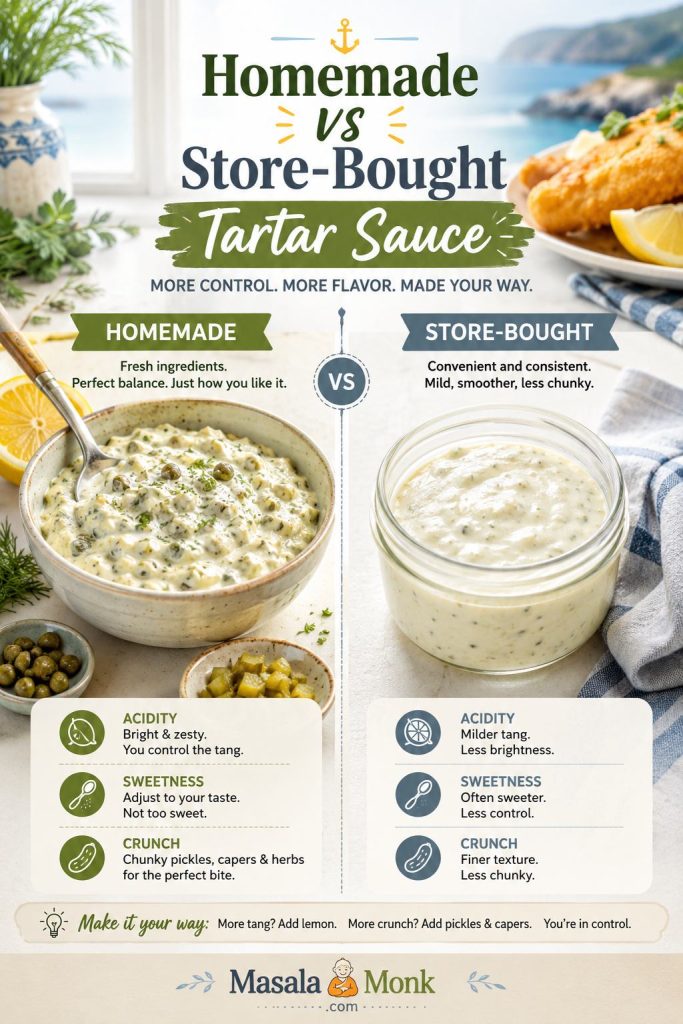
Homemade vs Store-Bought Tartar Sauce

Store-bought tartar sauce is convenient, but homemade gives you control over the three things bottled sauces often get wrong: sweetness, acidity, and crunch. Some jars taste sugary. Others taste flat, heavy, or short on pickle texture.

Homemade tartar sauce with visible chopped pickles and herbs compared with smoother store-bought tartar sauce in an unbranded jar
Bottled sauce is convenient, but homemade tartar sauce lets you decide how sweet, sharp, chunky, or herb-forward the final bowl should be.

Homemade wins when you want a livelier lemon-and-pickle finish and better chop texture. Bottled wins when convenience matters more. That is the whole comparison.

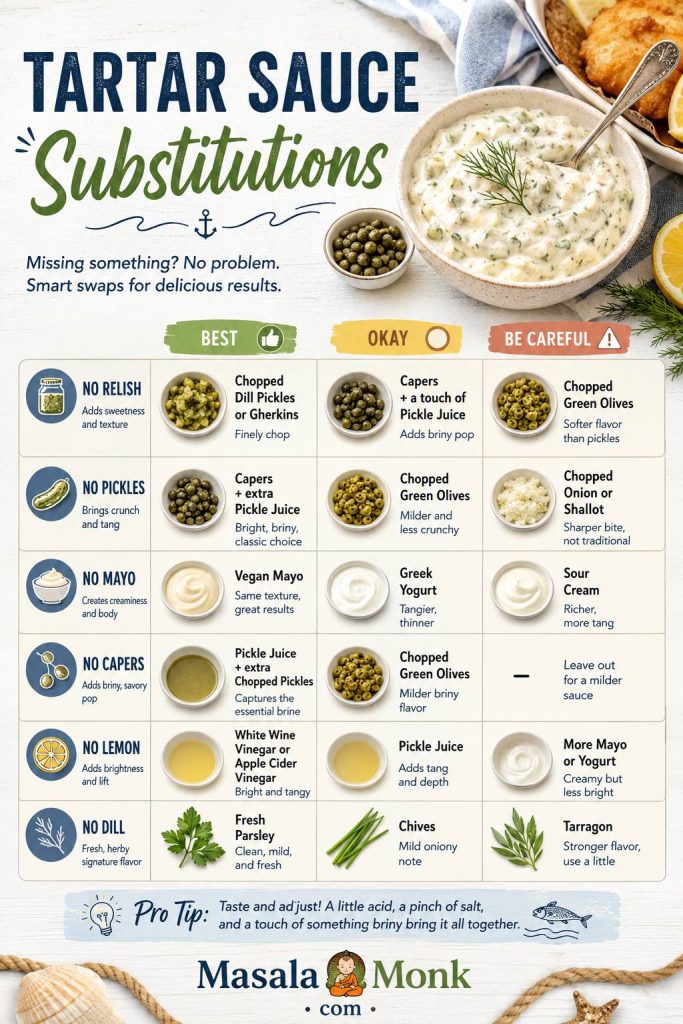
Tartar Sauce Substitutions: No Relish, No Pickles, No Mayo, No Capers, No Lemon

This is the kind of sauce that forgives a half-empty fridge. If you have mayo and something pickled, you are already close. Use the table below to choose the best swap without pushing the sauce too thin, too sweet, or too sour.

MissingBestOkayBe careful with
RelishFinely chopped dill pickles, gherkins, or cornichonsCapers plus a little pickle juiceAdding sugar too early
PicklesCapers, shallot, lemon juice, herbs, and DijonSweet relish if you want a softer saucePlain mayo with no briny ingredient
MayoVegan mayoGreek yogurt, sour cream, or half yogurt and half mayoThin milk-based bases
CapersExtra chopped pickles or cornichonsPickle juiceAdding salt before tasting
LemonPickle juiceWhite vinegar or apple cider vinegarToo much vinegar at once
DillParsley, chives, or tarragonA pinch of dried dillToo much dried herb
Substitution guide for tartar sauce showing swaps for missing relish, pickles, mayonnaise, capers, lemon, and dill
Missing relish, lemon, capers, or mayo does not have to stop dinner; instead, choose swaps that keep the sauce creamy, seasoned, and balanced.

Tartar Sauce Without Relish

You do not need relish. Finely chopped dill pickles, gherkins, or cornichons often give better texture for fish and chips. If you still want sweetness, add a tiny pinch of sugar at the end.

Tartar Sauce Without Pickles

No pickles or relish is not ideal, but the sauce is saveable. Capers bring salt, lemon brings lift, Dijon adds sharpness, and a little minced shallot gives the base something savory to hold onto.

Tartar Sauce Without Mayo

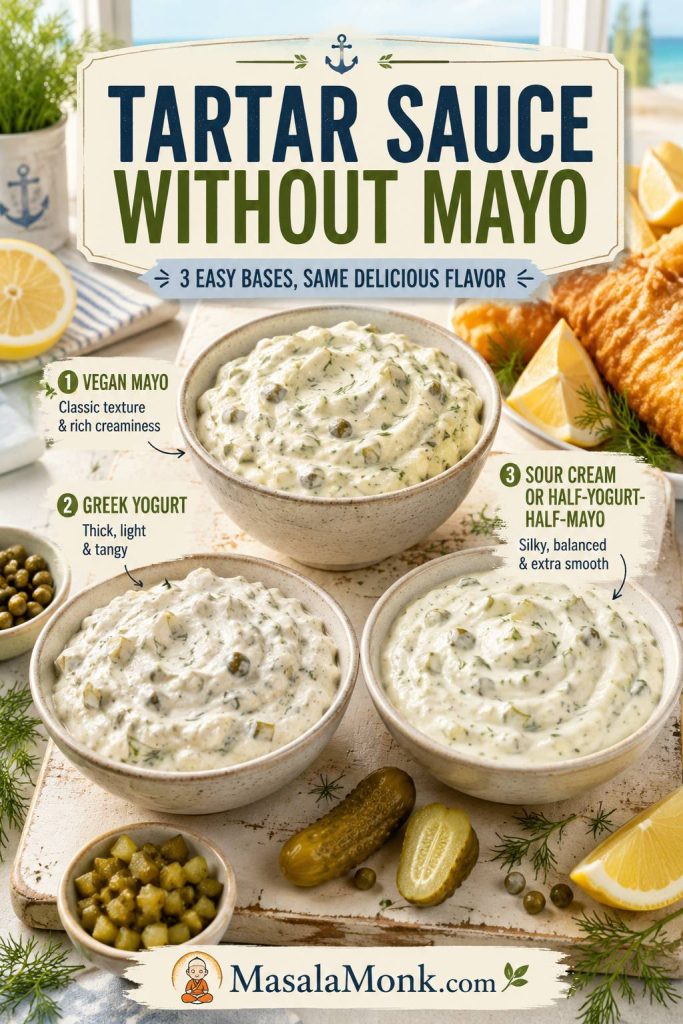
For a no-mayo bowl, choose vegan mayo, Greek yogurt, or sour cream. Vegan mayo gives the closest classic texture. Greek yogurt makes it lighter and tangier, while sour cream makes it softer and richer.

Tartar Sauce Without Capers

Add extra chopped pickles for crunch, a spoonful of relish for sweetness, or a splash of pickle juice if the bowl tastes flat. Taste before adding salt because pickles may already bring enough.

Tartar Sauce Without Lemon Juice

Pickle juice is the easiest lemon swap because it brings tang and seasoning at the same time. Vinegar also works, but add it slowly so the sauce does not turn harsh.

Vegan, Dairy-Free, Low-Calorie, Keto, and Low-Carb Tartar Sauce

Once you know the balance, you can change the base without losing the sauce. The base can be mayo, vegan mayo, Greek yogurt, or sour cream; the rest of the bowl still needs pickle, acid, salt, and texture.

If you are choosing the base carefully, MasalaMonk’s eggless mayonnaise recipe explains the difference between egg-free mayo and fully vegan mayo.

NeedBest adjustment
Vegan or egg-freeChoose vegan mayo, then keep the same pickle, lemon, caper, herb, and Dijon balance.
Dairy-freeMayo-based tartar sauce is usually dairy-free, but not egg-free. Check labels, especially for flavored mayo or Worcestershire sauce.
Low-calorie or no-mayoChoose Greek yogurt, or use half yogurt and half mayo for a lighter sauce that still tastes creamy.
Keto, low-carb, or sugar-freeChoose full-fat mayo and dill pickles. Avoid sweet relish, added sugar, and sweetened sauces.
Low-sodiumUse fewer capers and pickles, then lean on lemon juice, herbs, black pepper, and a small amount of mustard.
Three tartar sauce bowls made with vegan mayonnaise, Greek yogurt, and sour cream as mayonnaise alternatives
A no-mayo tartar sauce still needs body, so vegan mayo gives the closest classic texture while Greek yogurt brings a lighter tang.

Fish Sandwich / Filet-O-Fish-Style Tartar Sauce

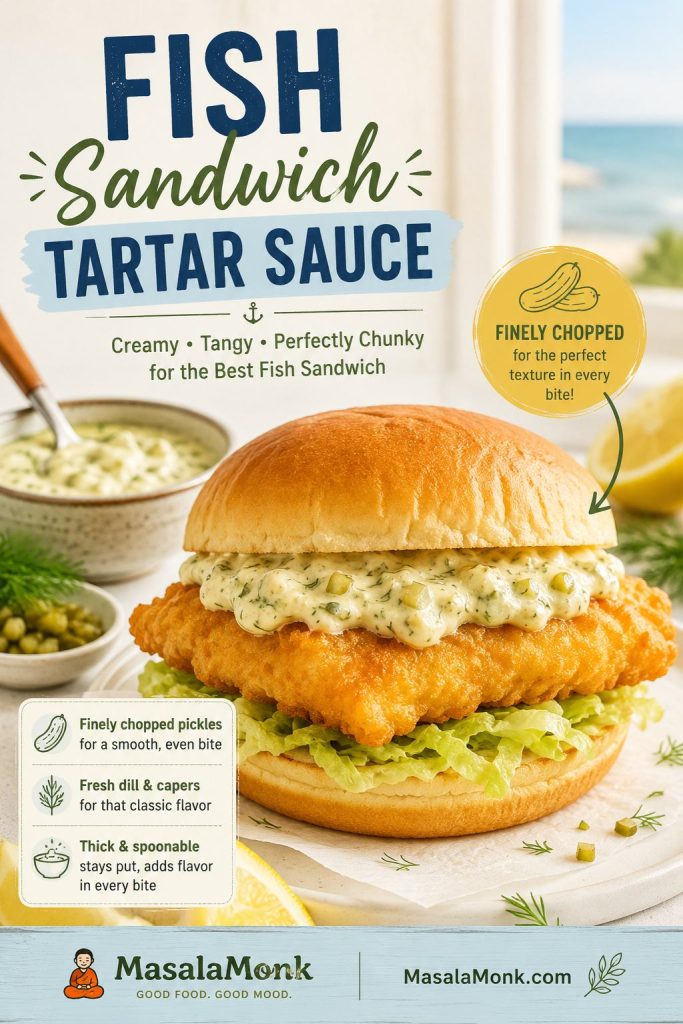
A fish sandwich-style sauce is smoother, sweeter, and more oniony. It makes more sense on a soft fish sandwich than beside a plate of crisp battered fish. Finely minced pickles or relish work better here than chunky pickle pieces, and a short chill helps the onion flavor settle into the mayo.

Fried fish sandwich with smooth tartar sauce spread, a crisp fish fillet, pickle flecks, herbs, and a soft bun
For a fried fish sandwich, finer chopping helps tartar sauce spread evenly instead of slipping out in large pickle-heavy bites.

This is a flavor direction, not an exact restaurant copy. Use dill relish or very finely minced pickles, add 1–2 teaspoons minced onion, add a tiny pinch of sugar if needed, and chill for at least 1 hour.

Flavor Variations

Think of the base sauce as the calm version. Lemon makes it livelier, Dijon makes it rounder, cayenne makes it warmer, and herbs make it fresher.

VariationHow to adjust 1 cup mayoBest with
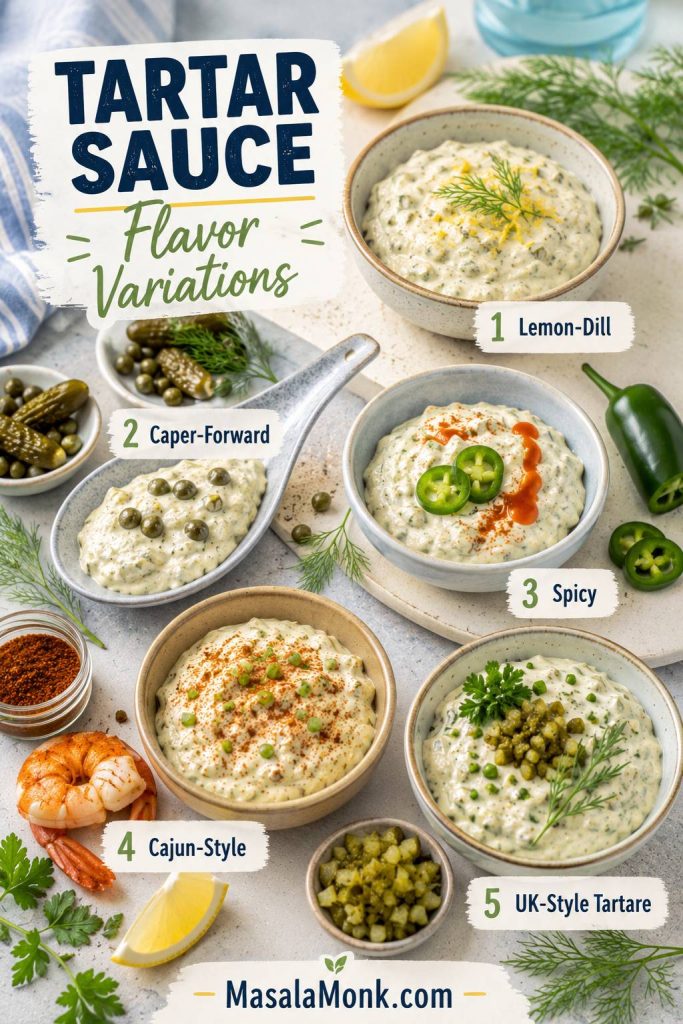
Lemon-dillAdd ½ teaspoon lemon zest, 1 extra teaspoon lemon juice, and another tablespoon chopped dill.Salmon cakes, shrimp, lighter fish
Caper-forwardIncrease capers to 2 tablespoons and use cornichons or gherkins.Crab cakes, fried seafood, richer fish
SpicyAdd ½ teaspoon hot sauce or 1 teaspoon minced jalapeño, then taste after resting.Catfish, fried fish sandwiches, shrimp
Old Bay or CajunAdd ¼ teaspoon seasoning, then taste before adding salt.Seafood platters, shrimp, catfish
UK-style tartareUse gherkins or cornichons, capers, parsley, chives, and optional tarragon.Fried cod, haddock, thick chips
Five tartar sauce flavor variations labeled lemon-dill, caper-forward, spicy, Cajun-style, and UK-style tartare
Once the base sauce tastes balanced, keep flavor changes small: extra dill, more capers, gentle heat, seafood seasoning, or fresh herbs.

For a homemade heat option, MasalaMonk’s pepper sauce guide can help you choose a vinegar-forward hot sauce style.

Troubleshooting Homemade Tartar Sauce

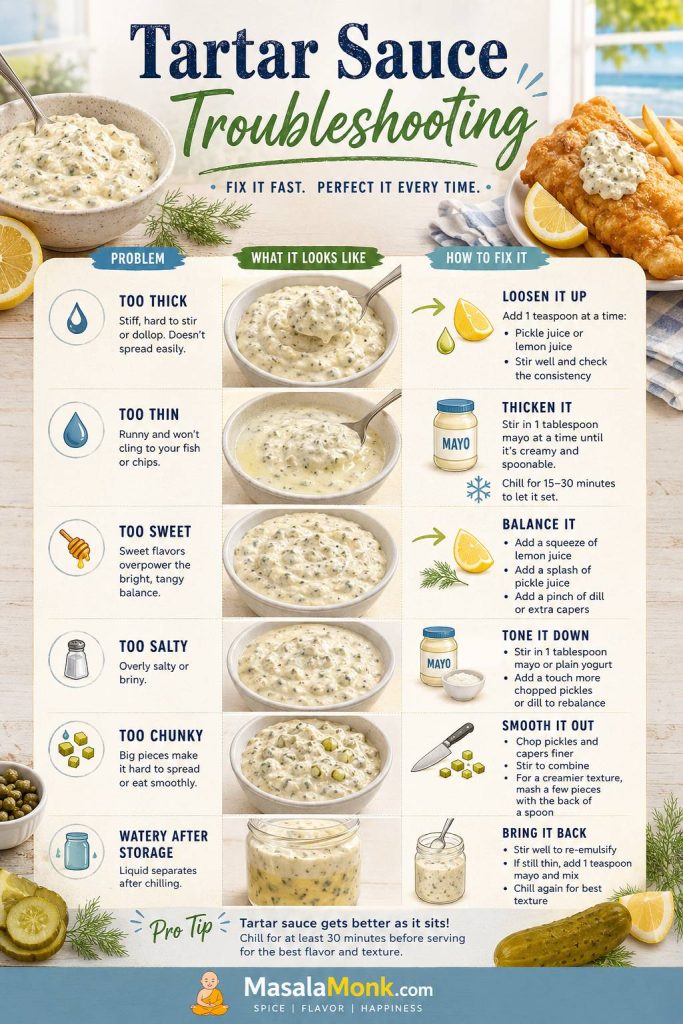
Fix the bowl slowly. A teaspoon of lemon juice, pickle juice, mayo, or capers can change everything, so stir, taste, and adjust again before adding more.

ProblemFix nowPrevent next time
Too thickStir in lemon juice, pickle juice, or 1 teaspoon water at a time.Do not drain the pickles completely dry if you want a looser dip.
Too thinAdd more mayo and chill for 30 minutes.Add pickle juice slowly and drain watery relish before mixing.
Too sweetAdd lemon juice, chopped dill pickles, capers, Dijon, or herbs.Start with ⅓ cup relish, or use half dill pickle and half relish.
Too sourSoften with more mayo or a tiny pinch of sugar.Add vinegar or lemon in teaspoons, not tablespoons.
Too saltyAdd more mayo, Greek yogurt, or sour cream.Taste before salting because capers and pickles already season the sauce.
Too blandAdd capers, pickle juice, Dijon, lemon juice, pepper, or Worcestershire sauce.Use at least one pickled or salty ingredient, not mayo alone.
Too chunkyPulse briefly or chop the mix-ins finer.Use smaller dice for sandwich sauce and slightly larger dice for dip.
Watery after storageStir well and add a spoonful of mayo if needed.Drain relish better and avoid over-loosening before chilling.
Troubleshooting guide for tartar sauce that is too thick, too thin, too sweet, too salty, too chunky, or watery after storage
Fix tartar sauce in teaspoons, not big swings; a little pickle juice, mayo, lemon, or finer chopping can bring the whole bowl back into balance.

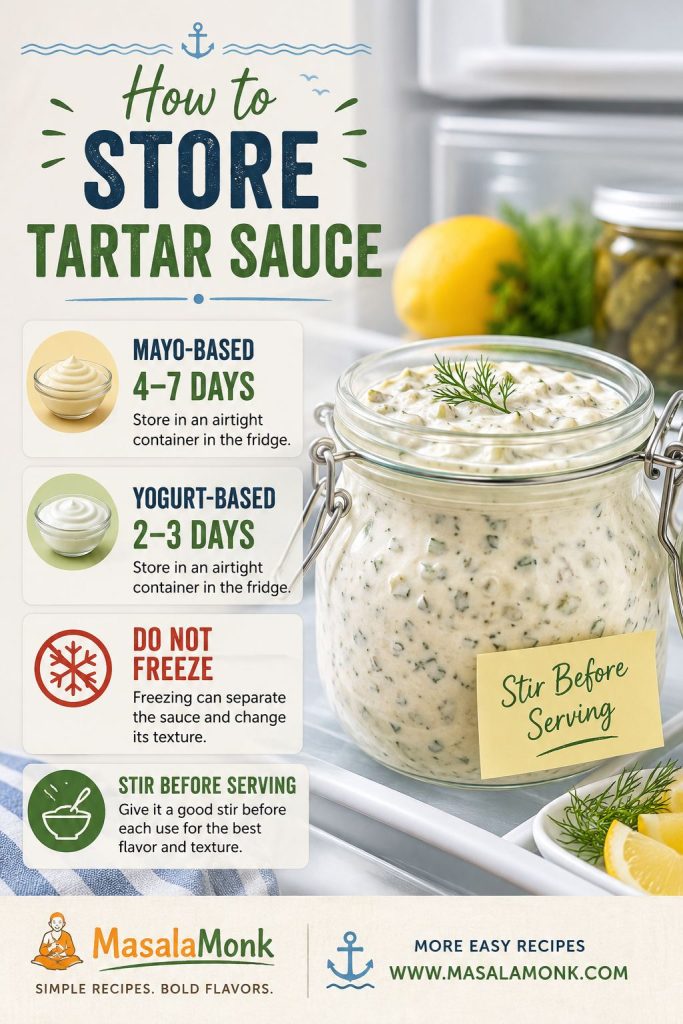
How to Store Tartar Sauce

Store the sauce in an airtight container in the refrigerator. A clean glass jar works well because it keeps the sauce covered and easy to stir before serving.

  • Mayo-based tartar sauce: best quality within 4–7 days when kept cold in a clean, airtight container.
  • Greek yogurt or no-mayo tartar sauce: best within 2–3 days because the texture loosens faster.
  • Homemade mayo, fresh onion, or yogurt sauces: use the shorter storage window.
  • Make-ahead: make it up to 1 day ahead for better flavor.
  • Long meals: return the sauce to the fridge when possible instead of leaving it out for hours.
  • Freezing: not recommended because mayo and yogurt-based sauces can split, turn watery, or lose their creamy texture.
Glass jar of homemade tartar sauce in the refrigerator with storage notes for mayo-based sauce, yogurt sauce, and freezing
Keep tartar sauce cold, stir it before serving, and avoid freezing so the creamy texture stays spoonable for the next fish-and-chips night.

If the sauce turns watery after chilling, use the troubleshooting guide before serving.

For mayo- or yogurt-based sauces, follow the general two-hour rule for perishable foods: do not leave them out through a long meal before returning them to the fridge.

If the sauce smells off, tastes sour in an unpleasant way, or has been left out too long, discard it.

Frequently Asked Questions

Is tartar sauce the same as tartare sauce?

Yes. In most recipe contexts, tartar sauce and tartare sauce mean the same creamy pickle-based sauce for fish and seafood. “Tartare sauce” is more common in the UK and some other regions.

What is the best pickle for tartar sauce?

Dill pickles, gherkins, and cornichons are best for a fish-and-chips sauce. Sweet pickle relish is better for a sweeter diner-style or fast-food-style sauce.

Does tartar sauce need capers?

No. It can be made without capers, but they add small salty pops that work especially well with seafood. If you skip them, add extra chopped pickle, relish, or pickle juice.

How long should tartar sauce chill before serving?

It can be served immediately, but 15–30 minutes in the fridge improves the flavor. If you added raw onion or shallot, 1 hour is better because the bite softens as it rests.

Can tartar sauce be made ahead?

Yes. Make it a few hours ahead or up to 1 day ahead, then stir and taste before serving. Add a little lemon juice or pickle juice if it needs freshening up.

Is tartar sauce dairy-free?

Many mayo-based tartar sauces are dairy-free, but check the mayonnaise and optional sauces you use. Greek yogurt, sour cream, buttermilk, and crème fraîche sauces are not dairy-free. For a dairy-free and egg-free bowl, use vegan mayo.

What makes homemade tartar sauce taste better than bottled?

Fresh lemon juice, chopped pickles, herbs, and adjustable sweetness make it taste fresher than most bottled sauces. You can push it sharper, sweeter, smoother, or lighter depending on the meal.

What is the best tartar sauce for fish and chips?

Use the dill-pickle version in the recipe card: mayo, dill pickles or gherkins, capers, lemon, herbs, Dijon, and black pepper. Keep it chilled until serving.

Can tartar sauce be frozen?

Freezing is not recommended. Mayo and yogurt-based sauces can split after thawing, leaving the sauce watery, grainy, or oily.

What is the difference between tartar sauce and remoulade?

Tartar sauce is usually a simpler mayo, pickle, lemon, caper, and herb sauce for fish and seafood. Remoulade is more seasoned and can include mustard, garlic, paprika, hot sauce, horseradish, spices, or seafood seasoning.

Final Sauce Notes

A good tartar sauce should not steal the plate. It should sit beside the fish, cling when you dip, and make the next hot bite easier to enjoy — which is exactly why a small bowl made before frying can change the whole meal.

Back to top