Posted on Leave a comment

Fattoush Salad Recipe: Authentic Lebanese Bread Salad with Sumac Dressing

Finished fattoush salad in a dark ceramic bowl with romaine, cucumber, tomatoes, radishes, parsley, mint, sumac and crisp toasted pita pieces.

The best fattoush has a brief window when everything is exactly right: the pita still crackles, cucumber and radish are cold and crisp, tomato is juicy without flooding the bowl, and the lemon-sumac dressing clings to everything without making the salad heavy.

Fattoush is a Levantine bread salad of fresh vegetables, herbs, and toasted or fried pita, usually sharpened with sumac and lemon. This fattoush salad recipe adds pomegranate molasses for sweet-tart depth while keeping the vegetables cool and the pita deeply crisp.

The Fattoush Rule: Dry First. Dress Second. Pita Last.

Most disappointing fattoush has simply lost the contrast that makes the salad fun to eat. Water clinging to the vegetables weakens the dressing, too much dressing weighs down the bowl, and pita added too early quickly turns soft.

  • Dry first. Get the lettuce and herbs properly towel-dried or spun, and deal with unusually watery cucumber or tomato before they reach the bowl.
  • Dress second. Toss until the vegetables are glossy and bright, then stop when they taste right.
  • Pita last. Fold the toasted bread in immediately before serving, or keep it alongside the salad when dinner will stretch out.
Three-stage fattoush assembly showing dry chopped vegetables first, a small amount of dressing added second, and crisp pita pieces added only at the end.
Season the vegetables before the pita goes in. That leaves room to adjust lemon, salt or sumac without sacrificing crunch.

Fattoush Salad Recipe

This version makes 6 generous side servings or about 4 light main-dish servings. The oven preheats while you prep the vegetables, and the pita bakes while the dressing comes together, so the whole salad can be on the table in about half an hour.

Recipe at a Glance

Yield: 6 generous side servings or about 4 light main-dish servings
Prep: about 15–20 minutes
Pita, oven method: about 8–12 minutes
Total: about 25–30 minutes
Best eaten: immediately after final assembly

Useful equipment: a large salad bowl, sheet pan, sharp knife, cutting board, small jar or whisking bowl, and ideally a salad spinner. No spinner? Clean kitchen towels work perfectly well.

Ingredients

Fattoush ingredients arranged on a teal set, including romaine, Persian cucumbers, tomatoes, radishes, scallions, parsley, mint, pita, lemon, sumac, pomegranate molasses, garlic and olive oil.
Good tomatoes, fresh herbs, real sumac and pita that crisps well matter more than minor vegetable swaps.

Vegetables and Herbs

  • 1 large romaine heart, about 200 g / 7 oz
  • 3–4 Persian cucumbers, about 300 g / 10½ oz
  • 3 medium ripe tomatoes, or cherry/grape tomatoes, about 350 g / 12 oz total
  • 5–6 radishes, about 90 g / 3 oz
  • 5–6 green onions or scallions, about 60 g / 2 oz
  • About 1 loosely packed cup flat-leaf parsley leaves and tender stems, 30 g / 1 oz
  • About ½ cup fresh mint leaves, 15 g / ½ oz

For the Crispy Pita

  • 2 medium pita breads, about 130 g / 4½ oz total
  • Extra-virgin olive oil, 30 ml / 2 tablespoons, for the baked, skillet or air-fryer methods
  • Neutral frying oil, as needed, optional for the deep-fried method
  • Fine salt, ¼ teaspoon, plus more for fried pita if needed
  • Sumac, ½ teaspoon, optional

For the Lemon-Sumac Dressing

  • Sumac, 2 teaspoons, plus more for finishing
  • Warm water, 15 ml / 1 tablespoon
  • Fresh lemon juice, 45 ml / 3 tablespoons
  • Pomegranate molasses, 15 ml / 1 tablespoon, plus more after tasting if desired
  • 1 small garlic clove, finely grated or crushed
  • Dried mint, ½ teaspoon, optional
  • Fine salt, ¾ teaspoon, plus more to taste
  • Freshly ground black pepper, to taste
  • Extra-virgin olive oil, 60 ml / ¼ cup

A note on the dressing: pomegranate molasses varies enormously from bottle to bottle, from sharply tart to distinctly sweet, so taste yours before adding more than the first tablespoon. The batch makes roughly 135 ml / a little over ½ cup, and you may not need all of it; very juicy produce often needs less.

How to Make Fattoush

Prepared fattoush vegetables on a blue surface with bite-size romaine, chunky cucumber and tomato, thin radish slices, scallion rounds, and loosely chopped parsley and mint.
Keep tomato and cucumber chunky, radish thin and herbs loose so the different textures stay distinct.

Prep the Vegetables and Crisp the Pita

  1. Heat the oven and wash the produce. Set the oven to 400°F / 205°C. Wash everything, then spin or towel-dry the romaine, parsley and mint until no water is clinging to the leaves. If your cucumber has an unusually loose, wet center, scrape it out; if the tomatoes leave a large puddle after cutting, let some of that liquid drain away.
  2. Cut for contrast, not precision. Tear or chop the romaine into bite-sized pieces. Keep the cucumber and larger tomatoes chunky; halve or quarter cherry and grape tomatoes. Slice the radishes thinly, cut the scallions into rounds, and roughly chop the herbs. The goal is leafy lettuce, substantial tomato and cucumber, thin radish and herbs scattered through everything.
  3. Prepare the pita. Tear it into irregular pieces roughly 1–2 inches / 2½–5 cm across. If you’re using thick pocket pita, split it along the seam first. Toss with 30 ml / 2 tablespoons olive oil and ¼ teaspoon salt.
  4. Bake until the pita snaps. Spread the pieces in one uncrowded layer and bake for 8–12 minutes, tossing once halfway through. Remove them when the surfaces are well browned and there is no soft center left. Cool uncovered; add ½ teaspoon sumac while warm if you want the bread seasoned too.

Make the Dressing and Assemble

  1. Bloom the sumac, then make the dressing. Stir 2 teaspoons sumac into 15 ml / 1 tablespoon warm water and let it sit for 5–10 minutes while the pita finishes. Add the lemon juice, pomegranate molasses, garlic, dried mint if using, salt and pepper. Whisk in 60 ml / ¼ cup olive oil, or shake everything together in a sealed jar. Taste it: the dressing should seem a little brighter and sharper than you ultimately want because the vegetables will quiet it down.
  2. Build the salad. Put the romaine, cucumber, tomato, radish, scallions, parsley and mint in a large bowl and toss gently. It should look generous and a little unruly: red tomatoes, green herbs, pale cucumber and pink-edged radish instead of a bowl of perfectly matched cubes.
  3. Start with 75–90 ml / 5–6 tablespoons of dressing. Toss and taste. Add more a tablespoon at a time only if the vegetables need it. Stop when they have a light sheen and the bottom of the bowl is still mostly clear.
  4. Add the pita immediately before serving. Fold in most of it with one or two gentle tosses. Scatter the rest over the top or keep some beside the bowl for anyone who wants extra crunch.
  5. Take one last taste. Add salt if the salad feels dull, lemon for brightness, sumac for more tart aroma, or a small drizzle of pomegranate molasses if it needs roundness. Serve straight away.

How Much Dressing Is Enough?

Two clear bowls comparing lightly dressed fattoush with a clean bowl bottom against overdressed fattoush with vinaigrette visibly pooling underneath.
Check the bowl bottom too. If dressing pools there, stop before the vegetables and pita lose definition.

A good forkful should give you several things at once: juicy tomato or cucumber, something green and fresh, a peppery edge from radish, and at least one piece of pita that still pushes back a little when you bite it. There should be no puddle collecting underneath.

Close-up forkful of fattoush containing tomato, cucumber, radish, parsley and mint, sumac, crisp pita and a small bead of dressing.
If one forkful gives you only lettuce or pita, toss again; extra dressing will not fix uneven distribution.

Once you know what that forkful should feel like, the rest of fattoush is mostly judgment: understanding what can change, what needs protecting, and what to do when your ingredients behave differently.

What Makes Fattoush Fattoush?

Fattoush is eaten across the Levant, including Lebanon, Syria, Palestine and Jordan. Vegetable combinations shift with the season and the household; there is no single produce checklist that every bowl must follow.

The name is often linked to Arabic words associated with crumbling or bread broken into pieces. The dish also belongs to a practical tradition of putting leftover pita back to work: bread that has lost its softness becomes useful again once toasted or fried.

What does fattoush taste like? Bright, herbal and distinctly tart, with cool cucumber and tomato against peppery radish and toasted bread. Sumac gives the dressing a dry, fruity tartness while pomegranate molasses adds restrained sweet-sour depth. The pleasure is in the movement from one bite to the next: brittle pita at first, then tender edges as lemon, herbs and tomato juice work their way into the bread. Some softening during the meal is part of eating fattoush, not automatically a failure. Fattoush is at its best when tomatoes are worth eating and yesterday’s pita is waiting on the counter.

Three pita pieces showing texture changing from dry and crisp to lightly dressing-stained and finally tender around the edges while still holding their shape.
Tender edges are welcome; the pita should still keep a drier center and a little resistance.

Fattoush vs Tabbouleh: What Is the Difference?

Tabbouleh is led by herbs. Fattoush is led by vegetables and bread. They often appear on the same table, but the proportions and texture are quite different.

Side-by-side bowls of fattoush and tabbouleh; fattoush has large vegetables and pita pieces, while tabbouleh is dominated by finely chopped parsley with tomato and bulgur.
The quickest visual clue is the bread: obvious pita points to fattoush, while dense chopped parsley points to tabbouleh.
FeatureFattoushTabbouleh
What leadsFresh vegetablesParsley and other herbs
Bread or grainToasted or fried pitaFine bulgur in the classic version
CutRustic, bite-sized piecesMuch more finely chopped
Signature textureJuicy vegetables with toasted breadFresh chopped herbs with tender bulgur
Typical acidityLemon and sumac; often pomegranate molassesPrimarily fresh lemon

Our Lebanese-style tabbouleh recipe keeps parsley firmly in the lead with only enough fine bulgur to support it. Fattoush heads in another direction, with larger vegetables and obvious pieces of pita in every serving.

Fattoush Ingredients: What Matters and What Can Change

The vegetable list has room to move. Freshness, moisture and texture matter more than forcing every bowl to contain exactly the same things.

Vegetables and Herbs

Small cucumbers are easiest because they carry less watery seed pulp. A large English or regular cucumber can work just as well; if the center looks loose and wet, scrape it out before chopping.

Use tomatoes that actually taste good. In peak season, almost any ripe tomato can work. Out of season, good cherry or grape tomatoes are a better choice than large tomatoes that taste of very little. If chopping them leaves a lake on the board, let some of that liquid drain away. The salad wants tomato juice, just not all of it.

Three tomato choices on a red background: a ripe full-size tomato, chopped tomato releasing excess liquid, and firm cherry tomatoes presented as the better fallback.
Drain only obvious excess tomato water; the flavorful juice left behind should still season the vegetables and pita.

Keep the radishes. Their peppery snap cuts through softer tomato and cucumber and gives the bowl another texture. Green onions are gentler than chunks of raw onion, while romaine contributes leafy volume without taking over.

Use enough parsley and mint that you notice them, but leave room for the vegetables to lead. Fresh mint belongs among the vegetables; dried mint is much more concentrated and works better sparingly in the dressing. Purslane is worth grabbing when you see it. Its fleshy, slightly tart leaves fit naturally here, but if you cannot find it, carry on without it.

Pita

Fresh pita works, but yesterday’s pita is often easier to crisp because some of its moisture has already left. Day-old bread is not a compromise here. Once it is torn, toasted and hit with sumac, its dryness becomes useful.

Tear the pita into uneven pieces instead of tidy cubes. Those odd folds and thin edges create brittle corners, slightly thicker centers and bites that catch different amounts of dressing. If you want to start with the bread itself, the homemade pita bread recipe covers both oven and stovetop methods.

Garlic, Sumac and Pomegranate Molasses

One small garlic clove is enough for this dressing. More can quickly crowd out the lemon and sumac. If you want a serious garlic presence at the table, serve Lebanese toum alongside the salad instead.

Use ground sumac itself, not za’atar. Za’atar usually includes herbs and sesame as well as sumac, so it changes both flavor and texture. Pomegranate molasses varies more from one fattoush tradition or recipe to another; we use it here for a deeper sweet-tart undertone without letting it dominate.

Sumac and pomegranate molasses are commonly sold at Middle Eastern grocers, spice shops and larger supermarkets with an international-food section. With pomegranate molasses especially, the flavor of the bottle matters more than the brand name.

Fattoush Dressing: Getting the Balance Right

Fattoush dressing is a lemon-and-olive-oil vinaigrette sharpened with sumac. This version also includes garlic, dried mint and pomegranate molasses. It should seem sharper on the spoon than it does in the finished salad because cucumber, tomato and romaine immediately soften its edges; a vinaigrette that tastes perfectly gentle by itself can disappear once everything is tossed.

Why Bloom the Sumac?

Some ground sumac is almost powdery; some is coarse enough to feel gritty between your teeth. Warm water softens the particles and lets the tart flavor disperse through the vinaigrette. Annisa Helou’s fattoush also soaks the sumac before mixing the dressing. Five to ten minutes fits neatly into this recipe because it can sit while the pita finishes.

Ground sumac shown dry, then receiving one tablespoon of warm water, followed by the darker moist sumac mixture after blooming for 5 to 10 minutes.
Bloomed sumac should look damp, not soupy; excess water only weakens the dressing.

Once the dressing reaches the vegetables, check it again. You should still notice lemon and sumac, enough salt to make them vivid, pomegranate fruitiness underneath, and olive oil taking off the hard edge.

How to Fix the Dressing

If it tastes…Try this
Too sour or harshWhisk in a little more olive oil. Add pomegranate molasses only if it also needs more roundness.
Too sweetAdd lemon juice a teaspoon at a time.
Too oilyAdd a little lemon, then check the salt again.
FlatCheck salt first. If that is right, add a little sumac or lemon.
Too garlickyDilute with more oil, lemon and the other dressing ingredients.

Change one thing, taste, then decide again. Salt, lemon, sumac and molasses solve different problems.

How to Crisp the Pita

The center of the bread matters more than the color of the edges. If a piece still bends after cooling briefly, it is not ready for the salad. Thick pocket pita should be split along its seam before toasting so the hidden interior has a chance to crisp too.

Three pita doneness stages showing pale flexible underdone pita, golden pita snapping open with a dry porous center, and dark over-toasted brittle pita.
Check the center after a brief cool; dark edges can hide a middle that is still leathery.

Oven-Baked Pita

Bake the oiled pita at 400°F / 205°C for about 8–12 minutes, tossing once halfway through. Thin pieces may finish sooner; thick bread can take longer.

The clock tells you when to look. The bread decides when it is done. Cool one piece for a moment and snap it. If the middle bends or feels leathery, give the tray a little longer.

Skillet-Crisped Pita

Heat 15–30 ml / 1–2 tablespoons olive oil in a large skillet over medium heat. Add the pita and cook for roughly 5–7 minutes, tossing frequently, until the pieces are browned and firm through the center. Drain on paper towels if they have picked up excess oil, then season while warm.

Deep-Fried Pita

Use the optional neutral oil instead of coating the pita with the 2 tablespoons of olive oil. Choose a deep, heavy skillet or saucepan with plenty of room above the oil, then pour in enough to reach roughly 1–2 inches / 2½–5 cm. Heat to 350°F / 175°C. Fry the pita in small batches, stirring or turning as needed, until puffed, golden and crisp—typically about 45 seconds to 2 minutes depending on thickness. Drain well and season while warm, letting the oil return to temperature before the next batch.

Air-Fryer Pita

Air-fry the oiled pita at 350°F / 175°C for about 6–8 minutes, shaking or tossing halfway through. Start checking a little early if your bread is very thin. After a brief cool, the pieces should break cleanly; hotter-running machines may finish sooner.

Store-bought pita chips are fine too. Choose plain or lightly salted chips, break large pieces into irregular shards, and add them at the end. A shortcut is still a shortcut worth taking on a busy night.

Whatever method you use, the test is the same: the bread should break, not bend.

Four ways to crisp pita: oven at 400°F for 8–12 minutes, skillet over medium heat for 5–7 minutes, deep fry at 350°F for 45 seconds–2 minutes, and air fryer at 350°F for 6–8 minutes.
Times vary by method; doneness does not. Let a piece cool briefly, then make sure it snaps.

How to Keep Fattoush From Getting Soggy

Four things usually soften fattoush too quickly: water clinging to the greens, unusually watery produce, too much dressing, or pita added too soon. Spin or towel-dry the lettuce and herbs, drain very juicy tomatoes, dress gradually, and keep the bread out of the bowl until the vegetables already taste right.

When to Seed or Salt the Cucumber

Most Persian cucumbers need neither seeding nor salting. Look at the cucumber before creating extra work for yourself.

  • Small Persian cucumber: chop it as it is.
  • Large cucumber with a loose, wet center: halve it lengthwise and scrape out the seed pulp.
  • Exceptionally watery cucumber: lightly salt the pieces, leave them in a strainer for about 15 minutes, then pat dry.
Three cucumber preparations showing Persian cucumber chopped as is, a larger cucumber with its watery seed core scraped out, and very watery cucumber pieces salted in a strainer to release moisture.
Judge the seed core, not the cucumber’s size. A firm, dense center needs no special treatment.

For a buffet or a table where people will eat at different times, keep the pita in its own bowl and let everyone add it themselves. That protects the texture without asking anyone to race through dinner.

Substitutions and What Changes

You can improvise, but some substitutions preserve the character of fattoush better than others. The useful question is not simply “Can I swap this?” but “What will the swap change?”

If you do not have…Best moveWhat changes
Pomegranate molassesOmit it and rebalance with lemon, or use reduced unsweetened pomegranate juice. For the simplest pantry fallback, use a little extra lemon plus a very small drizzle of honey, or maple syrup if keeping the salad vegan.You regain sweet-sour balance but not the same deep pomegranate flavor.
SumacUse extra lemon and perhaps a little zest.The salad keeps its acidity but loses sumac’s distinctive aroma.
PurslaneCarry on with romaine and the other herbs.You lose some succulent, naturally tart greenery.
Persian cucumberUse English or regular cucumber and remove wet seed pulp if needed.You may have more moisture to manage.
Fresh mintUse a small amount of dried mint in the dressing.You lose the fresh leaves but keep some mint character.
Wheat pitaUse gluten-free pita.The bread-salad structure can stay intact.

Can you make it without pita? You can still make an excellent chopped salad, but bread is central to the structure of fattoush. Leave it out and you lose the part of the dish that absorbs, crunches and gradually changes as you eat.

Make Ahead, Storage & Crowds

Fattoush is easier to prepare ahead than it is to assemble ahead. Keep the components apart until you’re close to eating.

A day ahead: make the dressing, toast the pita, and wash and thoroughly dry the romaine, radishes and scallions. Keep the cucumber whole if possible. Just before serving: cut the cucumber and tomatoes, chop the herbs, dress the vegetables, taste, and add the pita.

Make-ahead fattoush setup with dressing, dry romaine, radishes, scallions, whole cucumber and crisp pita stored separately, followed by fresh tomato, cucumber and herbs being assembled just before serving.
For make-ahead fattoush, keep cooled pita airtight at room temperature and store the vegetables and dressing separately.
  • Dressing: refrigerate promptly in a clean sealed container and use within 4 days. For a fresher garlic flavor, leave the garlic out and grate it in on serving day. If the dressing turns cloudy or partly firm in the refrigerator, the olive oil is usually just cold; let it loosen briefly, then shake or whisk again.
  • Romaine, radishes and scallions: wash and dry up to a day ahead and refrigerate well covered. Keep them whole or in larger pieces where practical.
  • Toasted pita: cool completely and keep airtight at room temperature. It is best within about 2 days.
  • Tomatoes, cucumber and fresh herbs: cut closer to serving for the best texture and aroma.

For best texture, eat dressed fattoush within about 24 hours. Refrigerate leftovers promptly, but expect a different salad the next day: the vegetables continue releasing liquid and the pita continues absorbing it. This is a next-day leftover, not a salad to assemble for several days of meal prep.

For a party or buffet, keep the pita separate and dress smaller bowls as the meal goes on. One enormous bowl assembled far in advance will gradually lose the contrast you worked for.

Fix Your Fattoush

If the dressing tastes wrong before it reaches the salad, use the dressing fixes above. Once everything is assembled, the problems are usually about water, bread, seasoning or timing.

Four fattoush problems and fixes showing watery salad with excess liquid, soft dressing-soaked pita, greasy pita pieces, and overdressed salad with pooled vinaigrette.
Identify the failure before fixing it: water, oil, softened bread and excess dressing each need a different correction.
ProblemWhat probably happenedWhat to do
Pita went soft immediatelyIt was under-toasted or added too early.Add a fresh handful of toasted pita now. Next time use the snap test before it goes into the salad.
The bowl is waterySurface water or unusually juicy produce diluted the salad.Drain excess liquid if needed, then taste before adding anything else. Next time manage that moisture before dressing.
Pita tastes greasyIt picked up too much oil.Blot or drain the current batch. Next time use a lighter coating and give the pieces room to toast.
The salad is overdressedMore vinaigrette went in than the vegetables could carry.Add more undressed vegetables if available, or transfer the salad with a slotted spoon and leave excess liquid behind.
The vegetables taste flatThe seasoning became diluted once everything was combined.Check salt first, then add lemon or sumac only if the bowl still needs brightness.
Dressed too earlyThe pita has had too much time to absorb liquid.Add fresh toasted pita just before serving. The softened pieces will stay soft, but the new batch restores contrast.

What to Serve With Fattoush

Fattoush belongs happily in the middle of a busy table. Its cold vegetables and sharp dressing are especially good beside food that is warm, creamy, charred or deeply savory. It is just as comfortable beside grilled tawook, kafta or kebabs, or as part of a larger mezze spread.

Fattoush served in the foreground with charred grilled chicken, smooth hummus, falafel and pita arranged separately on a dark table.
Keep hot chicken or falafel beside the salad, not over it, so steam and juices do not soften the pita.

Scoop up some extra-creamy hummus, then go back for cucumber, herbs and toasted pita. The creamy chickpeas make the lemon and sumac seem even brighter.

Warm chicken shawarma makes an easy full meal; serve it beside the salad rather than letting hot juices sit over the bread. For a meat-free table, homemade falafel brings another toasted, savory edge, while chickpeas or lentils are the simpler route.

Feta, halloumi, olives and pomegranate arils can all work. Add them because you want them, not because the salad needs rescuing.

FAQs

1. Is “fatoosh” the same as fattoush?

Yes. Fatoosh is another English spelling or transliteration of the same salad. Fattoush is the more common English spelling.

2. How do you pronounce fattoush?

In English, it is commonly approximated as fa-TOOSH, with the stress on the second syllable.

3. Does authentic fattoush need pomegranate molasses?

No. Pomegranate molasses appears in many Lebanese and Syrian-style versions, but it is not universal; traditional versions without it exist too.

4. Is fattoush healthy?

Fattoush is mostly vegetables and herbs, with olive oil in the dressing and pita supplying much of the carbohydrate. It is fairly light in protein on its own; chicken, fish, chickpeas, lentils or falafel can make it more substantial.

5. Is fattoush vegan and gluten-free?

This recipe is vegan as written. Check packaged pita or pita chips if needed. Traditional wheat pita means classic fattoush is not gluten-free; use a gluten-free pita that can be toasted until firm and snappy if required.

Tomatoes, lemons, cucumbers and pomegranate molasses change from batch to batch, so give the salad one final taste before it reaches the table. You want distinct vegetables, mint you can still smell as you lift a forkful, enough salt, a clear lemon-sumac tang, and pita that still has some resistance.

Dry first. Dress second. Pita last.
Back to the top ↑

Posted on Leave a comment

Muhammara Recipe: Syrian Roasted Red Pepper & Walnut Dip

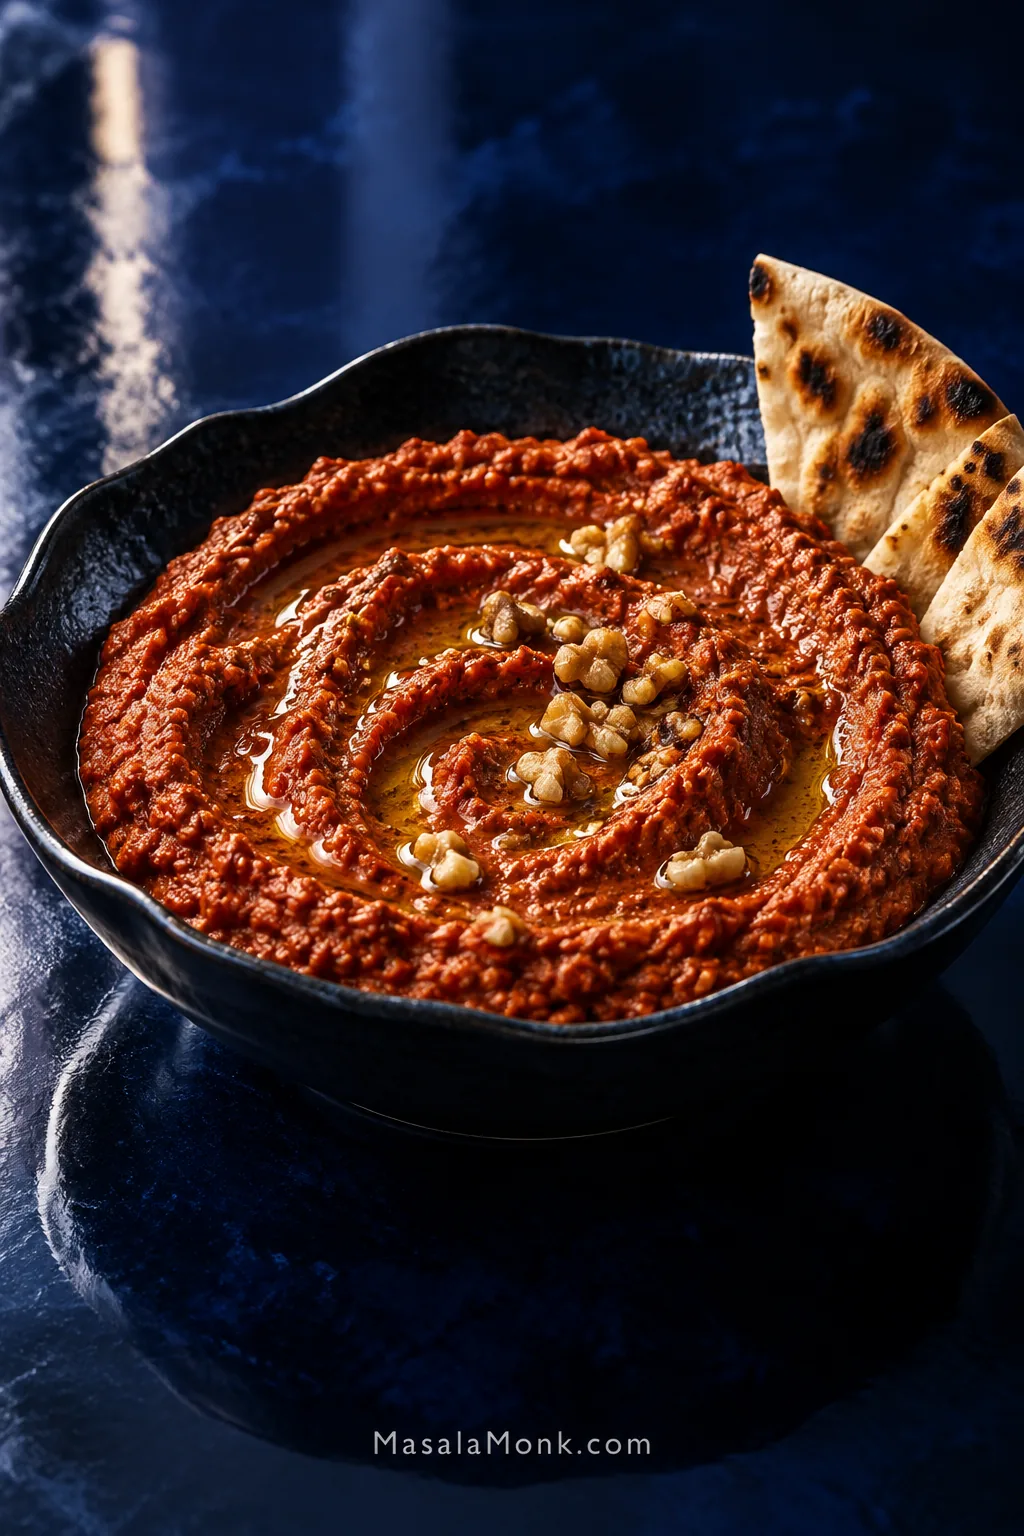
Brick-red muhammara in a dark scalloped bowl with olive oil in spoon ridges, walnut pieces and charred pita on a glossy cobalt-blue surface.

Muhammara is a thick Syrian roasted red pepper and walnut dip from Aleppo, traditionally made with pomegranate molasses, breadcrumbs, olive oil and gently warming Aleppo pepper. It is rich and savory but still bright enough to keep you reaching for the bread.

When it is right, a spoon leaves a groove through the dip and a piece of warm homemade pita picks it up cleanly. Roasted pepper comes through first, followed by walnut richness, fruity pomegranate tang and mild chile warmth.

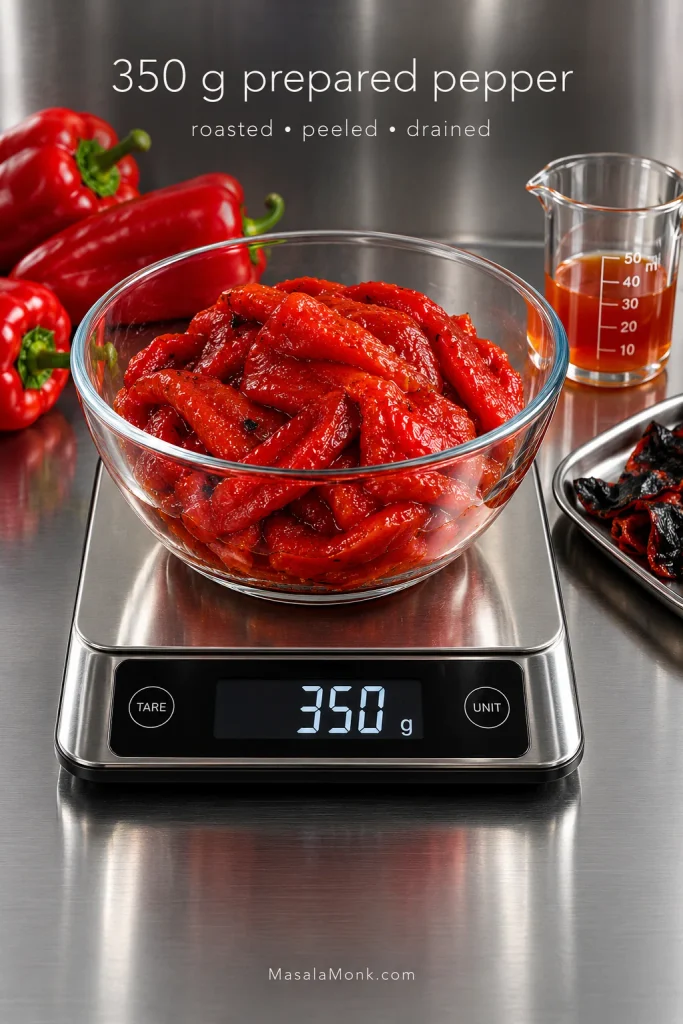
The number that matters in this muhammara recipe is not how many peppers you buy. It is 350 g / about 12 oz of roasted, peeled and well-drained pepper flesh. Starting there makes the rest of the recipe much easier to control.

Muhammara at a Glance

OriginAleppo, Syria
Hands-on timeAbout 20–25 minutes with fresh peppers
Fresh-pepper routeAbout 1 hour before resting
Jarred-pepper routeAbout 15 minutes of prep before resting
Recommended restAt least 30 minutes when possible
YieldAbout 2 cups; 6–8 mezze servings
Taste & textureRoasted, walnut-rich, sweet-tart and mildly spicy; thick and lightly coarse

Syrian-Style Muhammara Recipe

This version keeps roasted pepper firmly in front. The walnuts add depth and the breadcrumbs help the dip cling to bread, but neither should take over. Muhammara is forgiving; the two things most worth watching are excess pepper moisture and how far you process the walnuts.

Muhammara Ingredients

  • 900 g–1 kg / about 2–2¼ lb ripe red peppers; exact pepper count varies considerably by size. After roasting, peeling, seeding and draining, you need 350 g / about 12 oz prepared pepper flesh
  • 85 g / 3 oz walnuts, about ¾ cup loosely measured
  • 30 g / 1 oz plain dry breadcrumbs or panko, plus up to another 10 g if needed; fresh breadcrumbs also work but absorb differently
  • 1½ tbsp / about 22 ml pomegranate molasses, plus more to taste if needed
  • 2 tbsp / 30 ml extra-virgin olive oil, plus a little extra for adjusting and serving
  • 1½–2 tsp Aleppo pepper, the dried crushed chile seasoning, to taste
  • ¾ tsp ground cumin
  • 1 small garlic clove, finely grated or minced
  • 1 tbsp / 15 ml fresh lemon juice
  • ½ tsp fine salt, then more as needed

The raw pepper weight is a shopping estimate. Different peppers lose very different amounts of water as they roast, which is why the prepared weight matters more than pepper count.

Digital kitchen scale reading 350 g beneath a glass bowl of roasted, peeled and drained red pepper flesh, with whole peppers, charred skins and collected pepper juice nearby.
The 350 g is the weight after roasting, peeling, seeding and draining. Skins, seeds and pooled liquid do not count—the useful weight is the roasted red pepper flesh that actually goes into the muhammara.

No added sugar is needed here; ripe peppers and pomegranate molasses provide enough sweetness, though molasses brands vary.

Missing something? See the ingredient substitutions →

How to Make Muhammara

Moisture → structure → balance. Drain the peppers well, add just enough body, then adjust the seasoning. That is the method in miniature.

1. Roast the Peppers

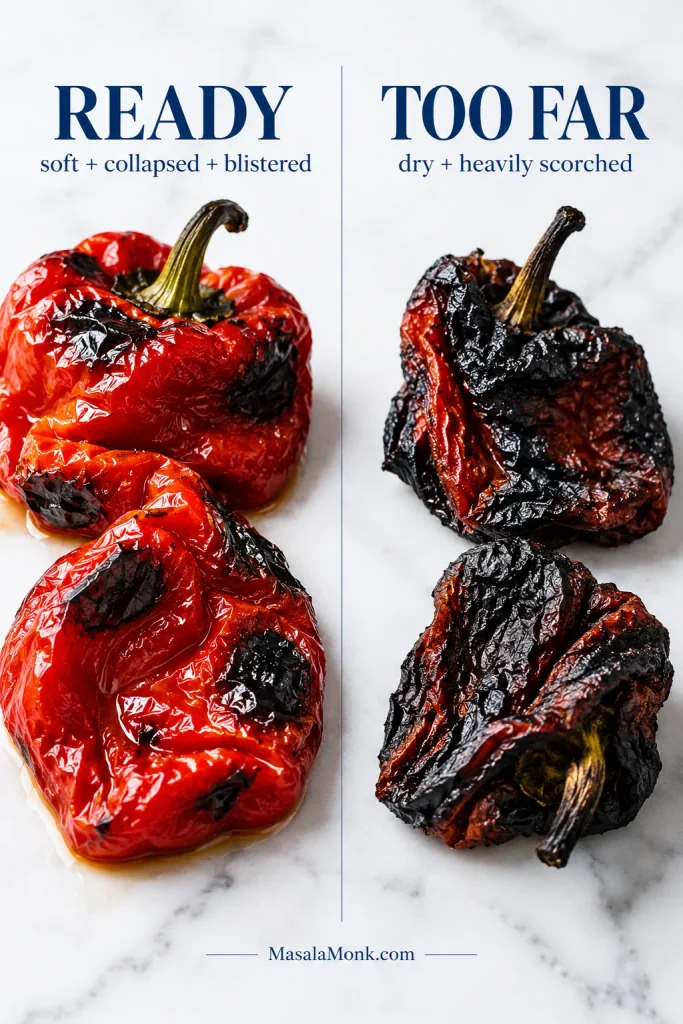
Heat the oven to 425°F / 220°C conventional / 200°C fan. Put the whole peppers on a rimmed baking sheet and roast for about 30–35 minutes, turning once or twice, until they are soft and slumped with blistered skins and plenty of dark patches.

Ready when: the peppers have collapsed and smell deeply roasted. They do not need to be black from end to end.

Split roasting guide labeled Ready and Too Far: the ready red pepper is soft, collapsed and blistered, while the over-roasted pepper is heavily scorched, dry and shriveled.
Watch the pepper flesh more than the skin. Dark blisters are useful because they peel away; underneath, the pepper should still be supple and juicy rather than dry at the edges.

For a faster route, char them beneath a very hot broiler/grill, turning as the skins blacken, usually for 12–15 minutes in total. Direct flame works too if that is already a method you use comfortably.

2. Steam, Peel, Drain and Weigh

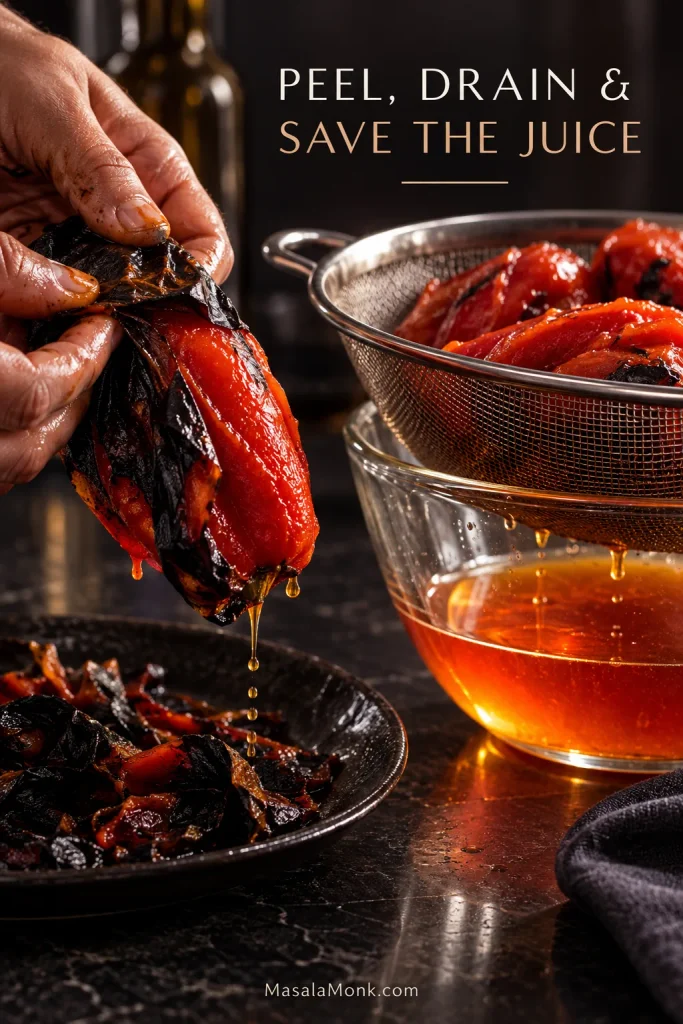
Move the hot peppers to a bowl and cover for 10–15 minutes. The trapped steam loosens the skins. Remove the stems and seeds, then peel away most of the blackened skin.

Peeling roasted peppers is messy, and they do not need to look immaculate. Don’t chase every last black fleck. A little char belongs here; large sheets of burnt skin do not.

Avoid rinsing the peppers under running water; it washes away some of the concentrated roasted flavor. Set the cleaned flesh in a sieve over a bowl for several minutes, then blot away obvious surface moisture.

Save the pepper juice underneath. It may be exactly what you need if the fresh batch becomes too stiff.

Hands peeling blackened skin from a roasted red pepper beside a metal sieve of peeled peppers, with red-orange pepper juice collecting in a glass bowl underneath.
Drain, don’t wring. Squeezing roasted peppers can remove flavorful juice along with excess water; instead, a short rest in a sieve followed by light blotting gives you much better moisture control.

Now weigh 350 g / about 12 oz roasted, peeled, seeded and well-drained pepper flesh. Anything around 325–375 g is close enough; the breadcrumb adjustment later absorbs that small difference.

The fiddly part is over. From here, the dip comes together quickly.

3. Toast the Walnuts and Prepare the Garlic

Taste one walnut before using the batch. If it tastes stale or rancid, replace the nuts. Check briefly for stray shell fragments too.

Toast the walnuts in a dry skillet over medium-low heat for 3–5 minutes, stirring often, just until fragrant and lightly darkened. Or toast them at 350°F / 175°C conventional / 160°C fan for 8–10 minutes. Let them cool.

Raw walnuts work too; light toasting gives this version a deeper walnut flavor. For particularly pungent garlic, stir it into the lemon juice for about 5 minutes to soften the raw edge.

4. Build the Muhammara

Add the peppers, garlic and lemon juice, 1½ tbsp pomegranate molasses, Aleppo pepper, cumin and salt to the food processor. Pulse until the peppers have broken down into a thick, fairly even mixture, scraping down the sides when needed.

For a more distinct walnut texture, finely chop the toasted walnuts by hand and keep them aside. Process the pepper base with the breadcrumbs and olive oil, then fold the chopped walnuts in at the end.

For the simpler food-processor route, add the cooled walnuts, 30 g breadcrumbs and 2 tbsp olive oil to the pepper base. Pulse in short bursts until everything comes together and small walnut flecks remain.

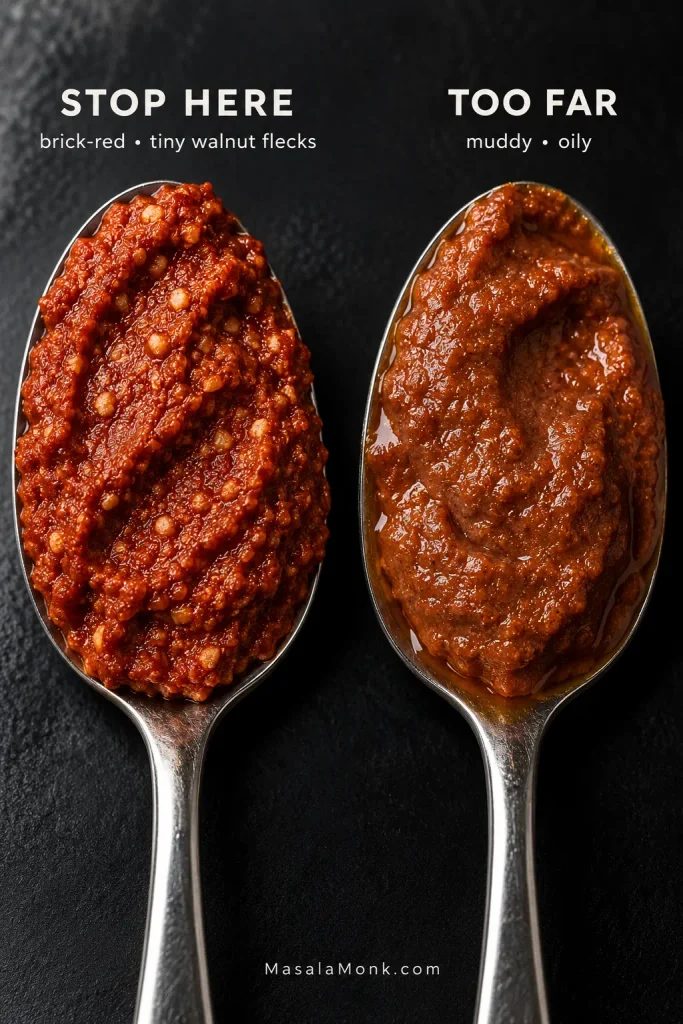
This is the point where it should begin to look unmistakably like muhammara: deep brick-red, cohesive and softly glossy, with tiny walnut flecks still visible. It should look like a spread, not a silky purée.

Stop there. Taking the walnuts much further can release more oil, making the dip heavier and its color muddier.

Two spoons compare properly processed brick-red muhammara with small walnut flecks against an overprocessed version that appears smoother, browner and oilier.
If coarse pieces are clinging to the processor wall, scrape them down instead of simply blending longer. Short pulses give you far more control over the walnut texture in muhammara than one continuous run.

5. Wait and Check the Texture

Leave the muhammara for 5–10 minutes before deciding whether it needs more bread. The breadcrumbs are still absorbing pepper juice, and a mixture that initially looks loose may settle perfectly on its own.

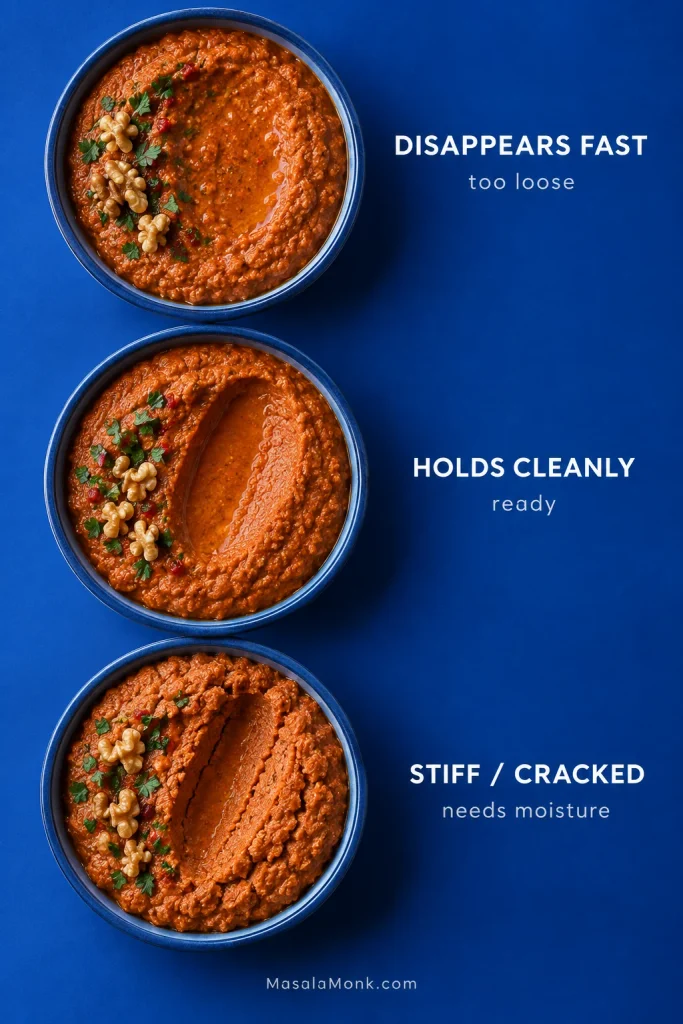
Drag the back of a spoon through it.

  • A groove that disappears quickly means the dip still needs more body. Add some of the reserved breadcrumbs, pulse briefly and wait again.
  • A stiff fresh batch needs moisture. Add reserved roasted-pepper juice 1 teaspoon at a time.
  • A groove that already holds means no more breadcrumbs are needed.

The last spoonful of breadcrumbs should earn its way in.

Three bowls demonstrate the muhammara spoon-groove test: a groove disappears in loose dip, holds cleanly in the correct texture, and cracks in dip that is too stiff.
The middle bowl is the target: the groove holds, but the edges stay soft rather than cracked.

6. Season and Rest

A sweet, flat dip usually needs salt before anything else. Add a pinch, taste, and then use a small squeeze of lemon if it still feels heavy. Add more Aleppo pepper if you want a warmer finish; it should still taste of roasted pepper first.

The muhammara should already be close. Cover it and let it rest for at least 30 minutes when possible; the flavors settle and the crumbs finish hydrating as it sits.

Before You Serve It

Drag a spoon through the muhammara once more. The groove should hold while the dip still scoops easily. Before you add the finishing olive oil, the dip itself should look cohesive, not oily or separated.

Muhammara is best after it has lost the refrigerator chill. The roasted pepper should still lead, with walnut underneath and enough pomegranate acidity to keep the sweetness lively. If you’re close, leave it alone.

If the texture or balance still feels wrong, jump to Fix My Muhammara →

Quick Muhammara With Jarred Roasted Peppers

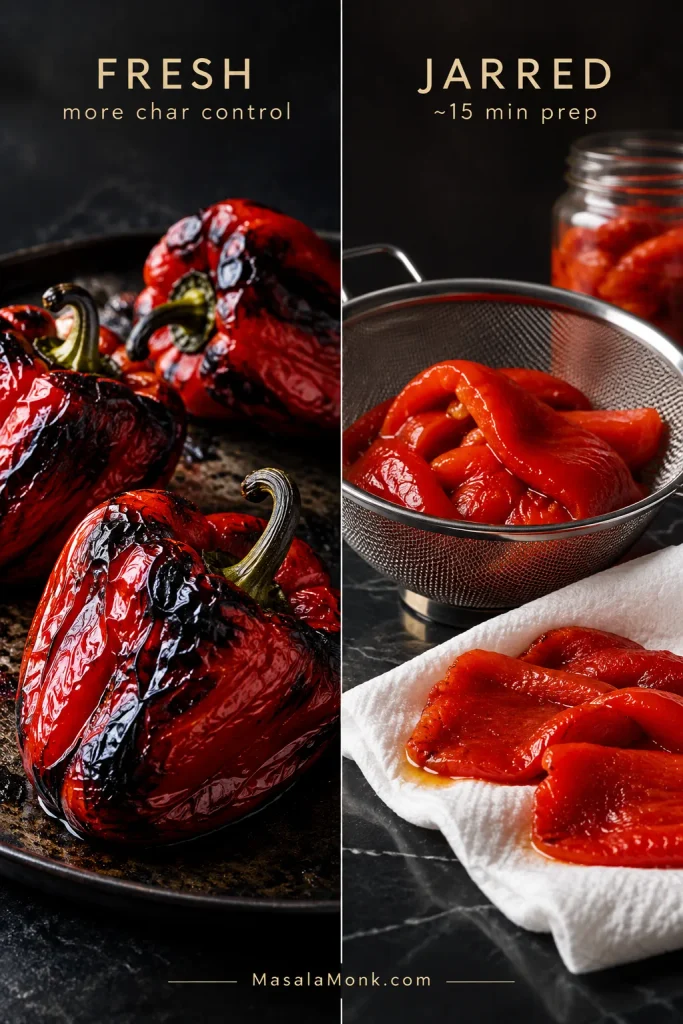
Jarred roasted peppers cut the preparation to about 15 minutes, plus resting time. Fresh peppers give you more control over the char, but the texture can be every bit as good with jarred peppers when they are drained thoroughly.

Split comparison showing blistered freshly roasted red peppers on one side and drained jarred roasted pepper pieces in a metal sieve on the other.

Taste a pepper first. If the packing liquid has left it unusually salty, acidic or strongly flavored, rinse the peppers briefly. Then drain thoroughly, blot dry and weigh 350 g / about 12 oz. Oil-packed peppers should be drained especially well so they do not bring extra oil into the dip.

For more char, blister the drained peppers briefly beneath a hot broiler/grill or in a dry grill pan, then continue with the walnut step.

Continue at Step 3: Toast the walnuts →

What to Eat With Muhammara

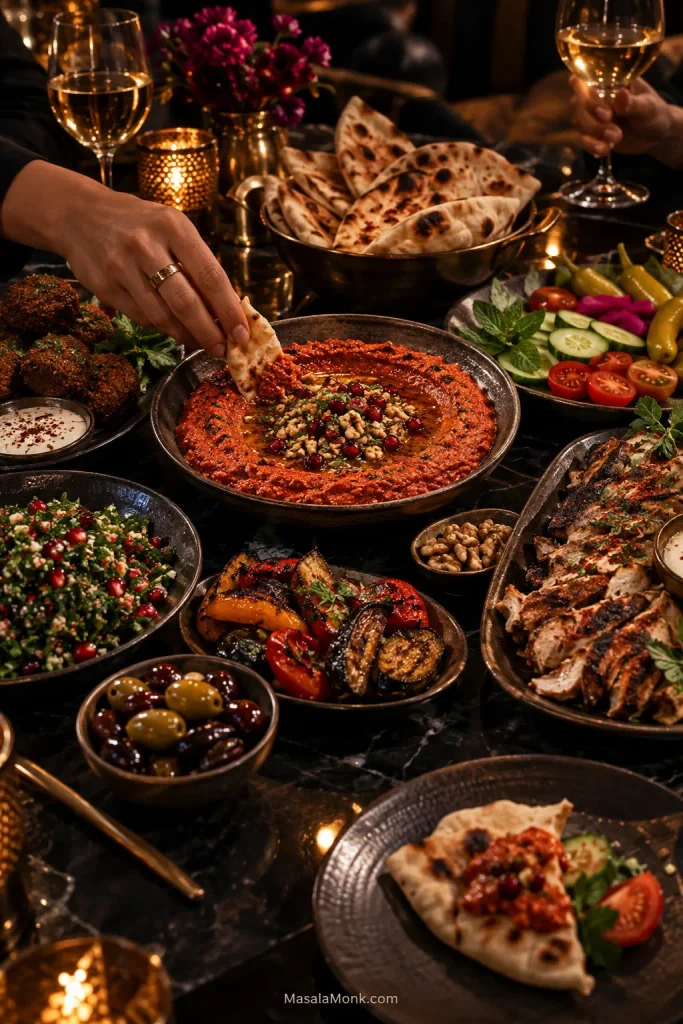
Muhammara makes the most sense as shared food: a shallow plate in the middle, warm bread within reach and a few other dishes around it.

Shared mezze table centered on muhammara with pita, falafel, tabbouleh, olives, pickled vegetables, grilled vegetables and sliced grilled chicken, with a hand dipping bread.
Build a mezze plate by contrast rather than quantity. Muhammara supplies richness and sweet-tart depth, so crisp vegetables, pickles and herb-heavy salads keep each scoop lively while warm pita does the carrying.

Pita is the classic choice. On a larger mezze table, muhammara’s richer sweet-tart flavor works especially well beside something fresh and herb-heavy such as tabbouleh, plus olives, pickles, cucumber, tomato and other crisp vegetables.

Spread it inside pita or flatbread with homemade falafel, herbs and pickles. One spoonful gives the sandwich pepper, walnut, tang and chile without needing several separate sauces.

It is equally good beside chicken shawarma, grilled chicken or lamb. The pomegranate cuts through richer bites while the walnuts give the dip enough weight to sit beside charred meat.

Roasted eggplant, cauliflower, carrots and squash work well too. Spread the muhammara beneath the vegetables and let the hot browned edges pick up the cooler dip as you eat.

Leftovers belong on toast and sandwiches, in grain or lentil bowls, swirled through labneh or thick yogurt, or thinned with a splash of pasta water into a quick sauce.

For serving, spread the muhammara over a shallow plate and make loose ridges with the back of a spoon. Add a small drizzle of olive oil. Chopped walnuts, Aleppo pepper or pomegranate seeds are optional.

Fix My Muhammara

Most batches are fixable. Change one thing at a time so you do not lose the roasted pepper while chasing the problem.

ProblemQuick diagnosis & fix
Too thinRest it first. Still loose after 5–10 minutes? Add breadcrumbs gradually.
Too thick immediatelyThe crumbs may be very absorbent or the peppers unusually dry. Loosen a fresh batch with reserved pepper juice, 1 teaspoon at a time.
Perfect yesterday, thick todayBreadcrumbs kept absorbing moisture. Let it warm slightly, stir, then loosen with water a teaspoon at a time.
Too sweetAdd a pinch of salt first, then a small squeeze of lemon if needed.
Too sourFold in more roasted pepper and walnut if available. Once the dip is sharply sour, there is no clean way to take that acidity back out.
Too hotAdd more roasted pepper, walnut and a little breadcrumb to dilute the heat. Without more of the base ingredients, a big correction is difficult.
BitterCheck for stale walnuts, burnt nuts or too much scorched pepper skin.
GreasyThe walnuts may have been processed too far or too much oil was added. More pepper mixture can help if available.
Brown or muddyVery finely ground walnuts can darken the dip. The flavor may still be fine.
Harsh garlicLet the dip rest. Use a smaller or fresher clove next time.

Why Is My Muhammara Too Runny?

First make sure it is actually too runny. Breadcrumbs need time to hydrate, so a loose-looking dip straight from the processor can become properly scoopable after a 5–10 minute rest.

Still flowing instead of holding a spoon mark? The pepper flesh probably carried in more water than usual. Add a small amount of the reserved breadcrumbs, wait again and stop as soon as the groove holds. A large handful added all at once can take the dip from loose to heavy very quickly.

Why Did It Get Thicker Overnight?

This is different from muhammara that starts out too thick. Dry breadcrumbs and panko can continue taking up moisture for hours, and refrigeration firms the dip further.

Let it lose some of its chill and stir before changing anything. If you refrigerated some of the reserved roasted-pepper juice, use that first; otherwise loosen the dip with water, 1 teaspoon at a time. Use olive oil when it needs more richness as well as a softer consistency.

Why Does My Muhammara Taste Bitter?

Bitterness has several possible sources, and they do not taste the same. Fresh walnuts naturally have a mild tannic edge; rancid walnuts can taste stale, soapy, chemical or paint-like. Darkly burnt nuts and large pieces of scorched pepper skin create a harsher bitterness.

A slight walnut bitterness can sit comfortably inside the finished dip. Rancid nuts or strongly burnt flavors are much harder to disguise, which is why tasting one walnut before you begin is worth the few seconds it takes.

Ingredient Substitutions

What Can I Use Instead of Pomegranate Molasses?

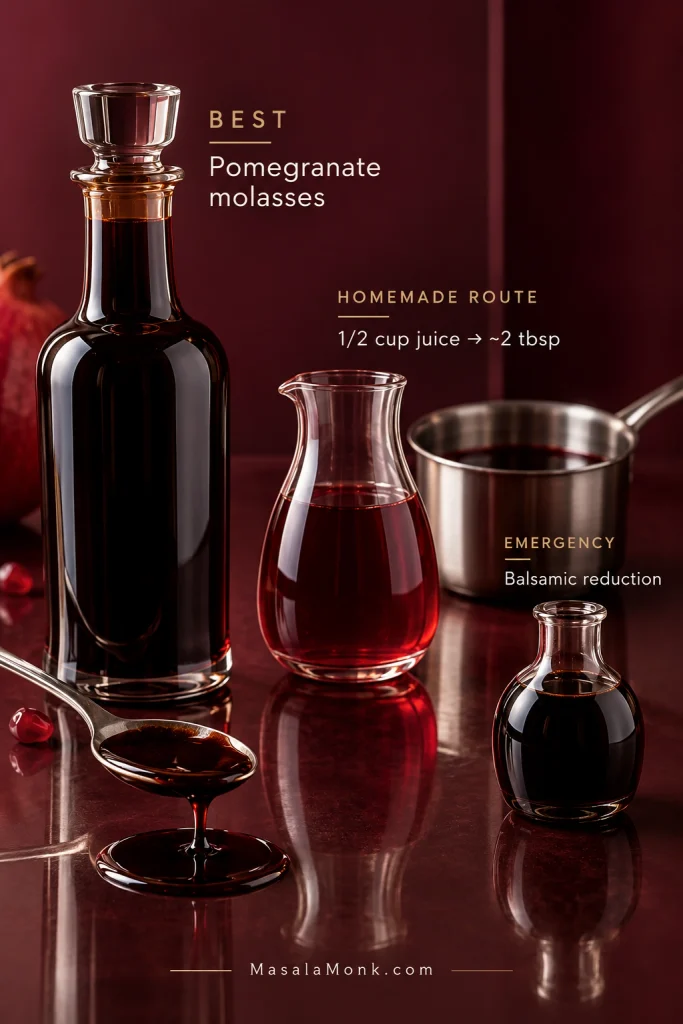
Nothing quite duplicates pomegranate molasses. If you need a homemade substitute, reduced unsweetened pomegranate juice is the closest route worth making. Simmer ½ cup / 120 ml until you have roughly 2 tablespoons / 30 ml and the juice is lightly syrupy. Cool it before using; it will thicken further as it cools.

Substitution guide showing pomegranate molasses as the best option, reduced unsweetened pomegranate juice as the homemade alternative, and balsamic reduction as an emergency substitute.
A useful pomegranate molasses substitute has to replace concentration and acidity, not sweetness alone. That is why reduced unsweetened pomegranate juice is a closer fit for muhammara than an ordinary sweet syrup.

A small amount of balsamic reduction is the emergency option. It provides sweet-sour intensity, although the flavor is different. Plain molasses, maple syrup and date syrup are not direct substitutes because they bring sweetness without the same acidity.

What Can I Substitute for Aleppo Pepper?

Use mostly sweet paprika with a very small pinch of cayenne or ordinary chile flakes. That comes closer to Aleppo pepper’s fruitiness, color and gentle heat than replacing it 1:1 with a much hotter chile.

Kashmiri chile powder or gochugaru can also work, but start cautiously because products vary.

Gluten-Free or Bread-Free Muhammara

For gluten-free muhammara, use gluten-free dry breadcrumbs or panko in the same gradual way as regular breadcrumbs.

For a bread-free version, replace the 30 g breadcrumbs with about 25–30 g ground almonds, or begin with roughly 15–20 g additional walnuts. Either route makes the dip more nut-forward, so keep the peppers in front and judge the final thickness after a short rest.

Why Muhammara Recipes Vary

This version starts from fresh-roasted peppers rather than concentrated pepper paste. Turkish preparations related to acuka often lean much more heavily on pepper paste, so two related recipes can look surprisingly different before they even reach the walnuts.

Muhammara itself has strong roots in Aleppo and Syrian cooking, but variation from kitchen to kitchen is normal. Some versions use fresh bread, others dry crumbs or panko. Walnuts may be raw or toasted, and the texture can range from coarse to nearly smooth. Tahini, onion, tomato paste, concentrated pepper paste or sumac appear in some recipes and not in others.

Sami Tamimi describes muhammara as Syrian in origin while also placing it within the wider cooking of Palestine and Lebanon. That overlap helps explain why one family’s muhammara can look quite different from another’s and still be recognizably the same dish.

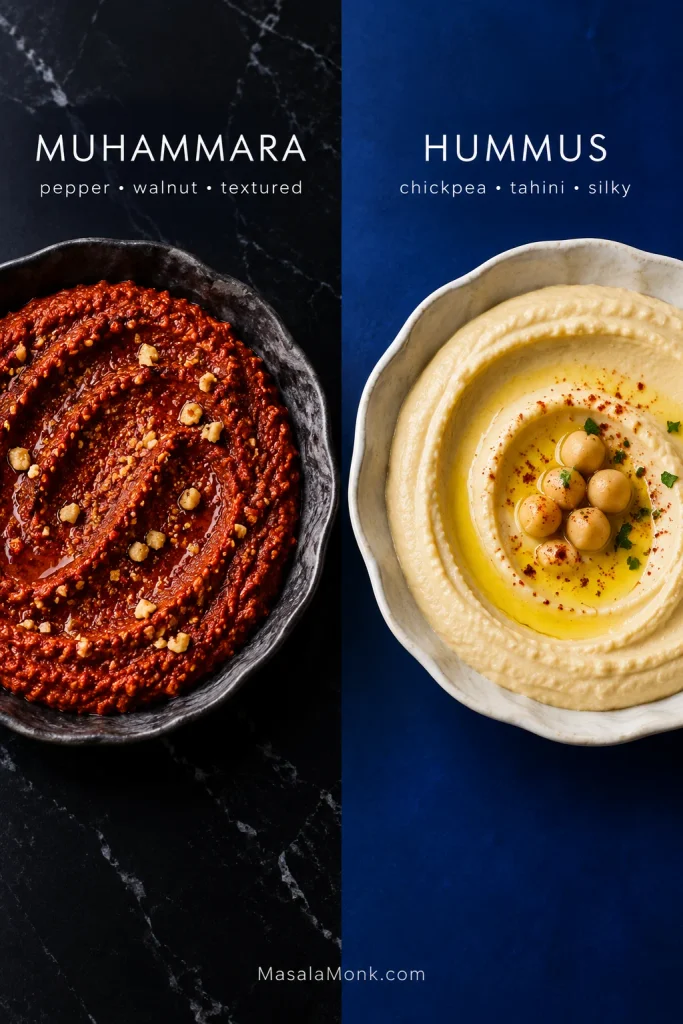
Muhammara vs Hummus: What’s the Difference?

Muhammara is built from roasted peppers and walnuts; hummus is built from chickpeas and tahini. That difference changes the flavor and texture completely.

Hummus is usually smooth, creamy and mellow. Muhammara is fruitier, tangier and more textured. That texture is part of the distinction: hummus is usually served silky-smooth, while this muhammara is better with a little walnut and pepper texture still intact.

Side-by-side bowls compare textured brick-red muhammara made from roasted peppers and walnuts with pale, smooth hummus made from chickpeas and tahini.
Same food processor, different endpoint: hummus benefits from sustained blending for silkiness, whereas muhammara keeps more character when you stop before its walnut texture disappears.

Put both on the table and they do very different jobs. Our extra-creamy hummus supplies the cool, smooth side of that contrast while muhammara brings roasted pepper, walnut and pomegranate tang.

Make Ahead, Storage & Freezing

Make Ahead

Muhammara benefits from resting. Thirty minutes helps; several hours give the flavors more time to settle. Making it the day before works well too, although the breadcrumbs may make it slightly firmer overnight.

Refrigerate

Store the dip in a clean airtight container in the refrigerator for about 3–4 days, in line with USDA guidance for refrigerated leftovers.

Let it warm slightly before serving. Stir first; a dip that is still too firm can be loosened with water 1 teaspoon at a time, or with a small amount of olive oil when it also needs more richness.

Freeze

Finished muhammara can be frozen, although it may be slightly softer after thawing. Defrost it in the refrigerator, stir well and check the consistency before serving.

Another option is to freeze roasted, peeled and drained pepper flesh in 350 g portions. Thaw one, drain any liquid released during freezing and make the muhammara fresh.

↑ Back to top

A Few Common Questions

1. How Do You Pronounce Muhammara?

English pronunciations vary slightly, but moo-HAM-ma-ra is a good approximation. The Arabic name is commonly glossed as “reddened” or “reddish.”

2. Is Muhammara Spicy?

Usually only mildly. Aleppo pepper brings gentle warmth and fruity chile flavor rather than aggressive heat.

3. Should Muhammara Be Served Warm or Cold?

Cool room temperature is ideal. Straight-from-the-fridge muhammara feels firmer and its flavors are more muted, so give it a little time before serving.

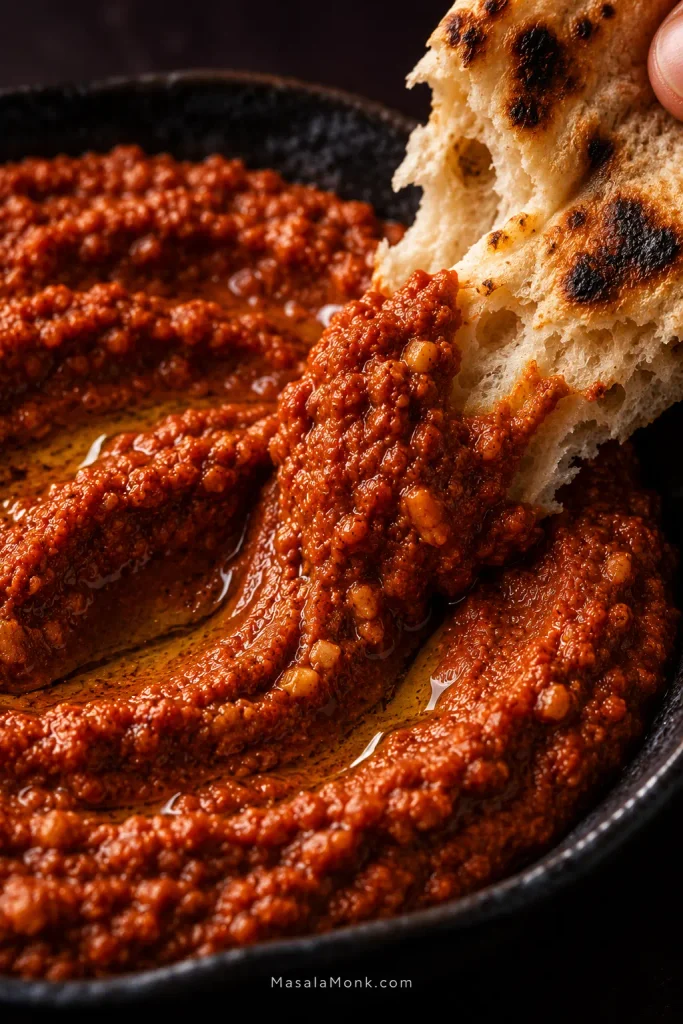
Close-up of torn, blistered pita dragging through thick brick-red muhammara, with the dip clinging to the bread and olive oil shining in its ridges.

Tear the bread, set the muhammara in the middle of the table and eat it while the flavors are awake.

Posted on Leave a comment

Moroccan Lamb Tagine Recipe With Apricots

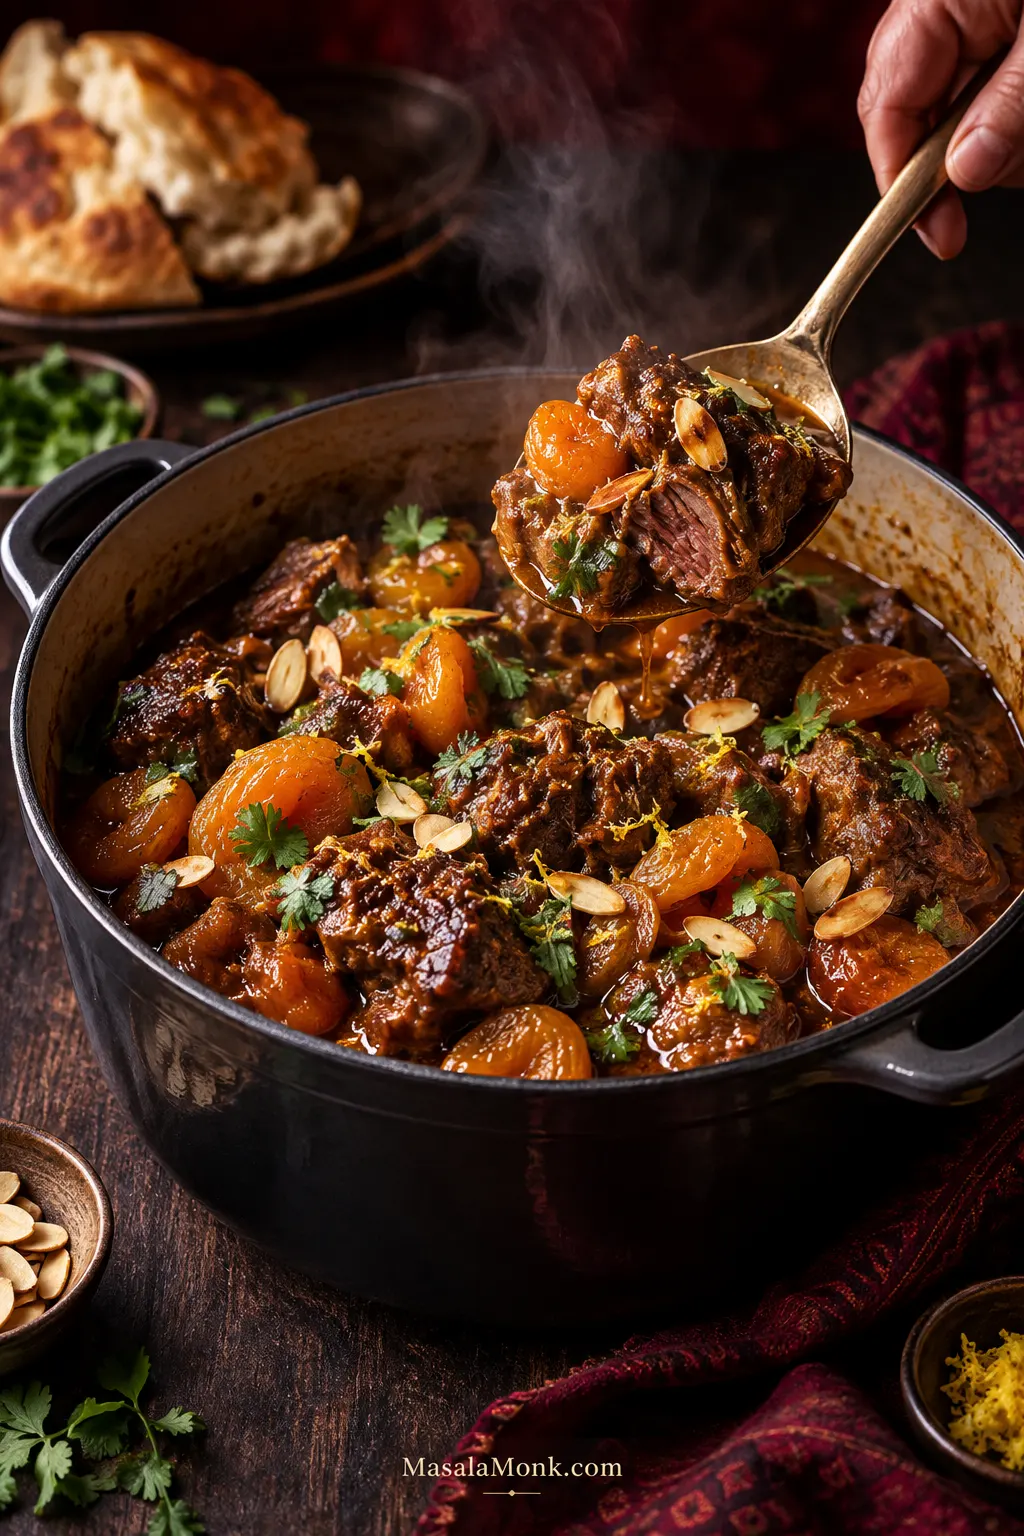
Finished Moroccan lamb tagine in a dark serving pot with braised lamb shoulder, plump dried apricots, toasted almonds, cilantro and glossy brown sauce.

A good lamb tagine announces itself before anyone takes a bite. Lift the lid and you get spice, lamb and fruit; press a fork into the meat and it gives without collapsing; spoon through the pot and the sauce clings instead of running like broth.

This Moroccan lamb tagine gets there with shoulder, onions, fragrant spices and a deliberately modest amount of braising liquid. The dried apricots wait until the lamb is almost tender, so they can soften in the sauce without spending hours dissolving into it.

Sweetness stays in the background. Most comes from the apricots, while lemon sharpens the sauce at the end. Honey is optional, and worth adding only after you taste the pot.

You don’t need a traditional tagine pot, either. A heavy Dutch oven or covered casserole handles the long braise beautifully, and the method leaves room for the reality that one shoulder, lid or oven rarely behaves exactly like another.

Quick Answer: How to Make Moroccan Lamb Tagine

Brown 1 kg / 2.2 lb lamb shoulder, soften the onions and briefly cook the spices. Add 350 ml / about 1½ cups stock or water and braise covered at 180°C / 160°C fan / 350°F until nearly tender. Add the dried apricots for about 25 minutes. Once the lamb is tender, reduce the sauce only if it needs it, then finish with lemon, toasted almonds and fresh cilantro.

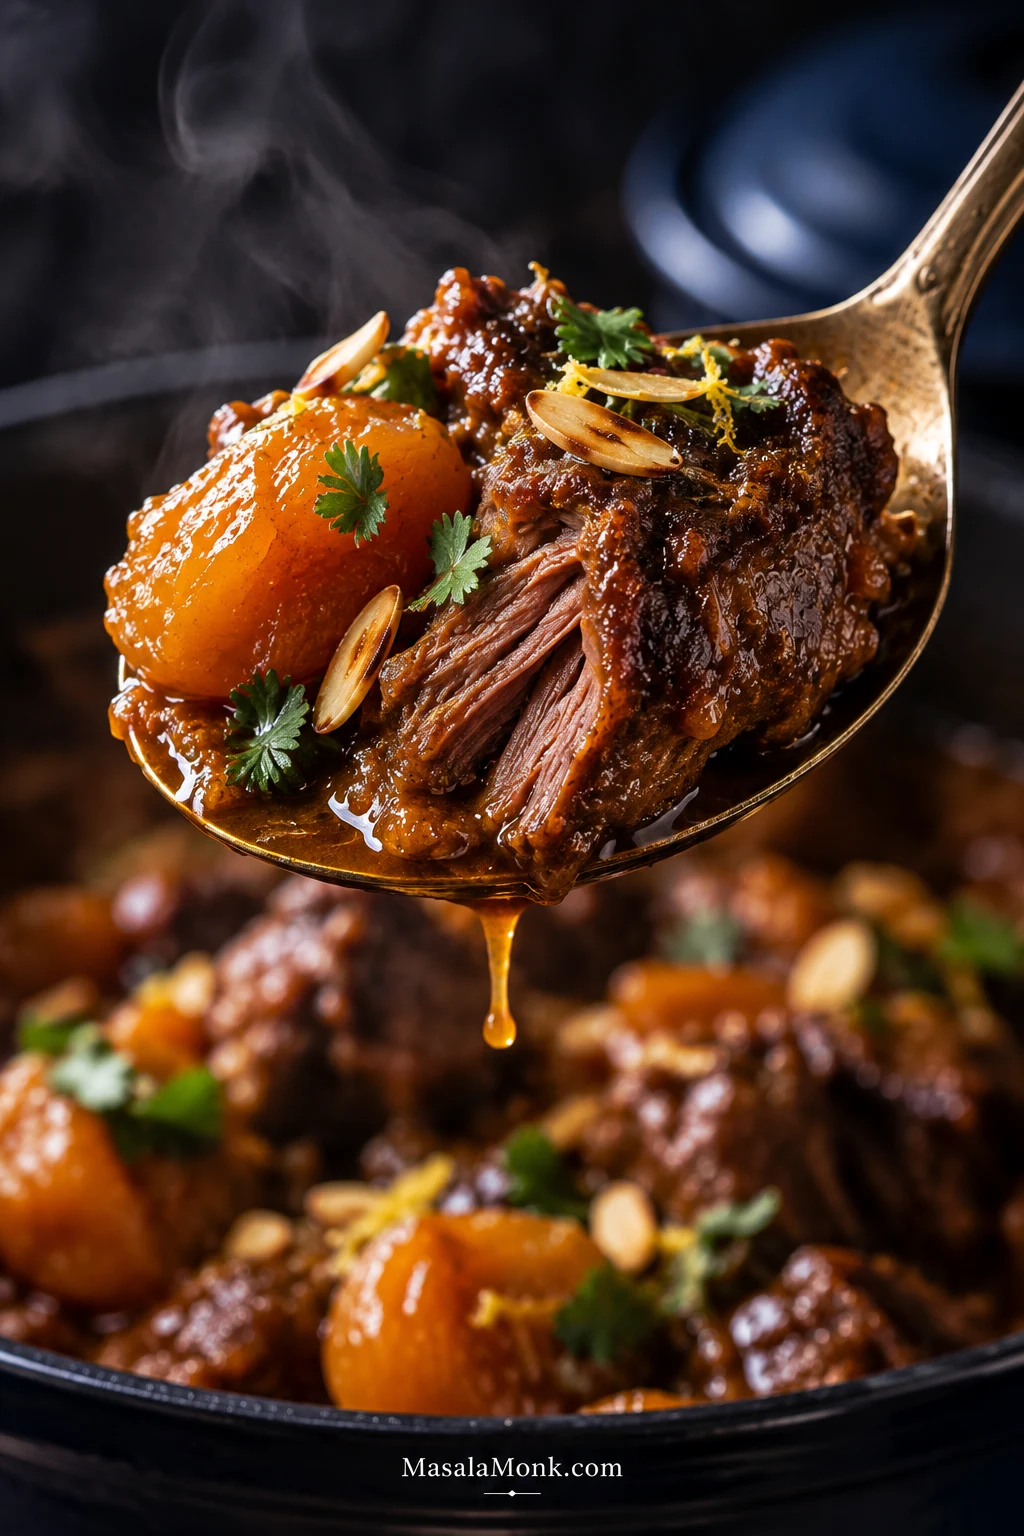
Close-up spoonful of tender braised lamb, softened apricot and glossy tagine sauce with almonds, herbs and a little lemon zest.
A finished bite should bring the lamb, apricot and sauce together at once: tender meat, soft fruit, a glossy coating and a little almond crunch. That is the texture and balance the recipe is working toward.

Moroccan Lamb Tagine Recipe With Apricots

Tender lamb shoulder braised with warm spices and dried apricots, brightened with lemon and finished with toasted almonds and fresh cilantro.

Jump to Ingredients · Jump to Instructions · Recipe at a Glance

Recipe at a Glance

Serves5 servings; up to 6 with generous bread, grain and sides
Prep time25 minutes
Cook timeUsually 2½–3¼ hours; particularly firm shoulder may take longer
Total timeAbout 3–3¾ hours, with extra time possible for firmer lamb
Oven180°C / 160°C fan / 350°F
Best potHeavy 24–26 cm / about 9½–10¼-inch Dutch oven or similar covered casserole
DonenessA fork enters the lamb easily and the meat yields while remaining in chunks

This is a patient recipe, not a complicated one. Most of the active work happens while you brown the lamb and build the onion-and-spice base; the oven handles the long middle. Keep a little extra hot water or stock nearby in case your pot loses moisture quickly.

No marinating is required. Seasoning before browning and the long braise give the lamb plenty of time with the spice base, so you can start this recipe the day you plan to eat it.

Ingredients

For the Lamb and Braise

  • 1 kg / 2.2 lb trimmed boneless lamb shoulder, cut into roughly 4 cm / 1½-inch pieces
  • 8 g fine salt (about 1¼ teaspoons; weighing is more reliable), plus more to taste
  • 2 tablespoons / 30 ml olive oil or neutral cooking oil
  • 350 g / 12 oz onions, thinly sliced
  • 5 garlic cloves, finely chopped
  • 25 g / about 1½ tablespoons tomato paste
  • 350 ml / about 1½ cups low-sodium chicken stock or water, plus more only if needed

Spices

  • 2 teaspoons ground cumin
  • 2 teaspoons ground coriander
  • 1 teaspoon ground ginger
  • 1 teaspoon ground turmeric
  • ½ teaspoon freshly ground black pepper
  • 1 teaspoon sweet paprika
  • ⅛–¼ teaspoon cayenne pepper, optional
  • 1 medium cinnamon stick
  • Small pinch saffron threads, optional; bloom for 10 minutes in 30 ml / 2 tablespoons taken from the measured stock or water

Apricots and Finishing Ingredients

  • 180 g / about 6¼ oz dried apricots; halve very large ones
  • 1 lemon, finely grated zest plus 1–2 tablespoons juice, to taste
  • 1–2 teaspoons honey, optional
  • 50 g / about 1¾ oz sliced or slivered almonds
  • Small handful fresh cilantro (coriander leaves), roughly chopped

Ingredient Notes

  • Water or stock: water works beautifully here. The lamb, onions and spices build plenty of flavor as they braise, so stock is optional rather than something you need to buy specially. With well-seasoned stock, reduce the initial salt to about 5–6 g and adjust near the end.
  • Ras el hanout: use about 1½–2 tablespoons in place of the cumin, coriander, ground ginger, turmeric, paprika, black pepper and cayenne. Begin at the lower end with a potent blend. Omit the cinnamon stick if the blend is already cinnamon-heavy, and account for any added salt.
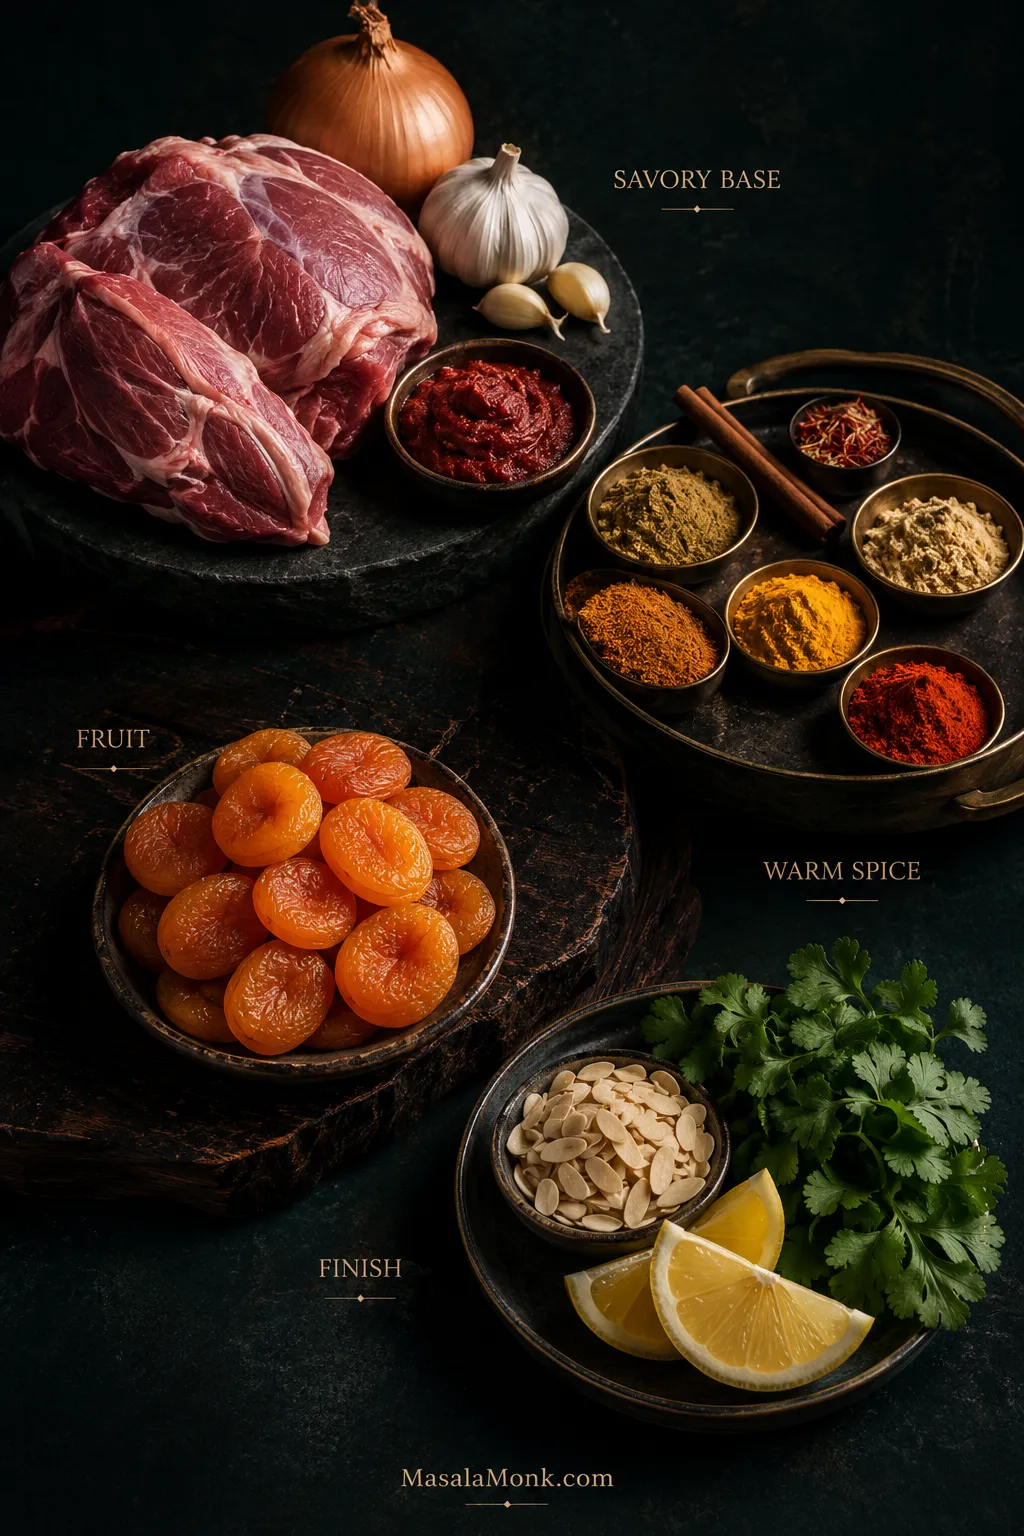
Dark editorial ingredient arrangement labeled savory base, warm spice, fruit and finish, showing the main flavor layers used in lamb tagine.
Instead of treating lamb tagine spices as one long list, think about what each layer contributes. The onion base creates savory depth, warm spices fill the aroma, dried fruit changes the middle of the bite, and the final lemon, herbs and almonds provide contrast. Complexity comes from those layers working in sequence, not from simply adding more spice.
Instructions

Prepare and Brown the Lamb

  1. Heat the oven. Heat to 180°C / 160°C fan / 350°F.
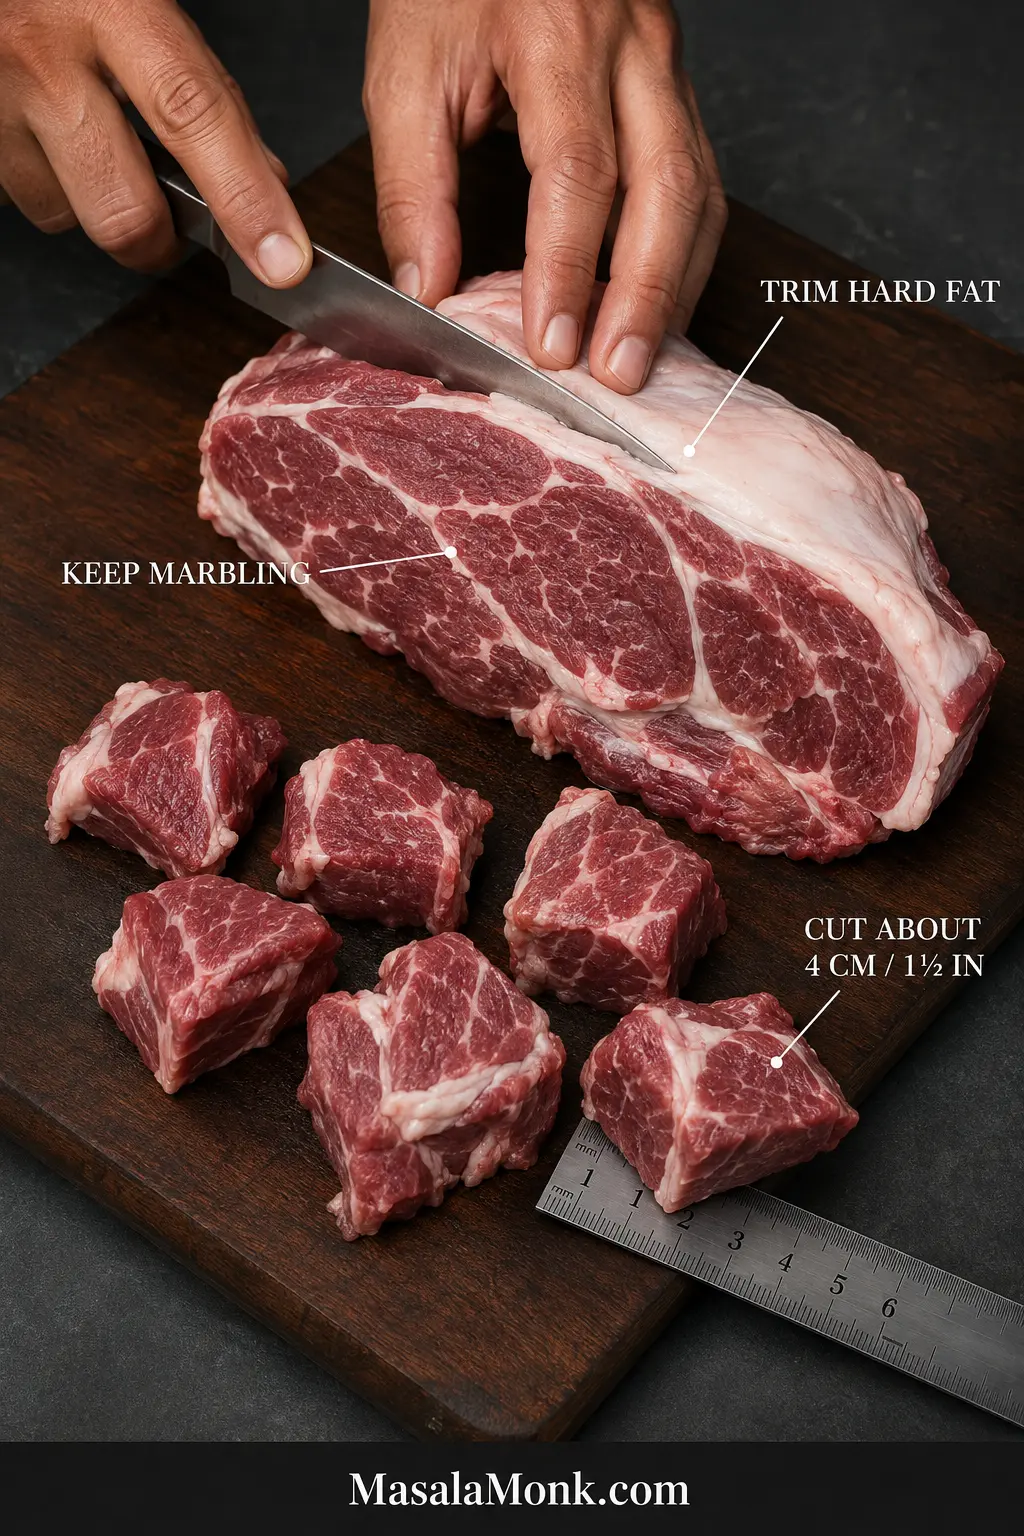
  2. Prepare the lamb. Trim away large hard deposits and seams of exterior fat, leaving the marbling within the shoulder. Cut into roughly 4 cm / 1½-inch pieces, pat dry and season with the measured salt.
Raw lamb shoulder being trimmed, with labels showing hard exterior fat to remove, marbling to keep and pieces cut to about 4 cm or 1½ inches.
With lamb shoulder for tagine, the biggest cubes effectively set the cooking clock. Keep the main pieces in roughly the same size family so one of the larger ones becomes a trustworthy tenderness benchmark later. Smaller scraps soften sooner and can make the pot appear ready before the substantial pieces have finished braising.
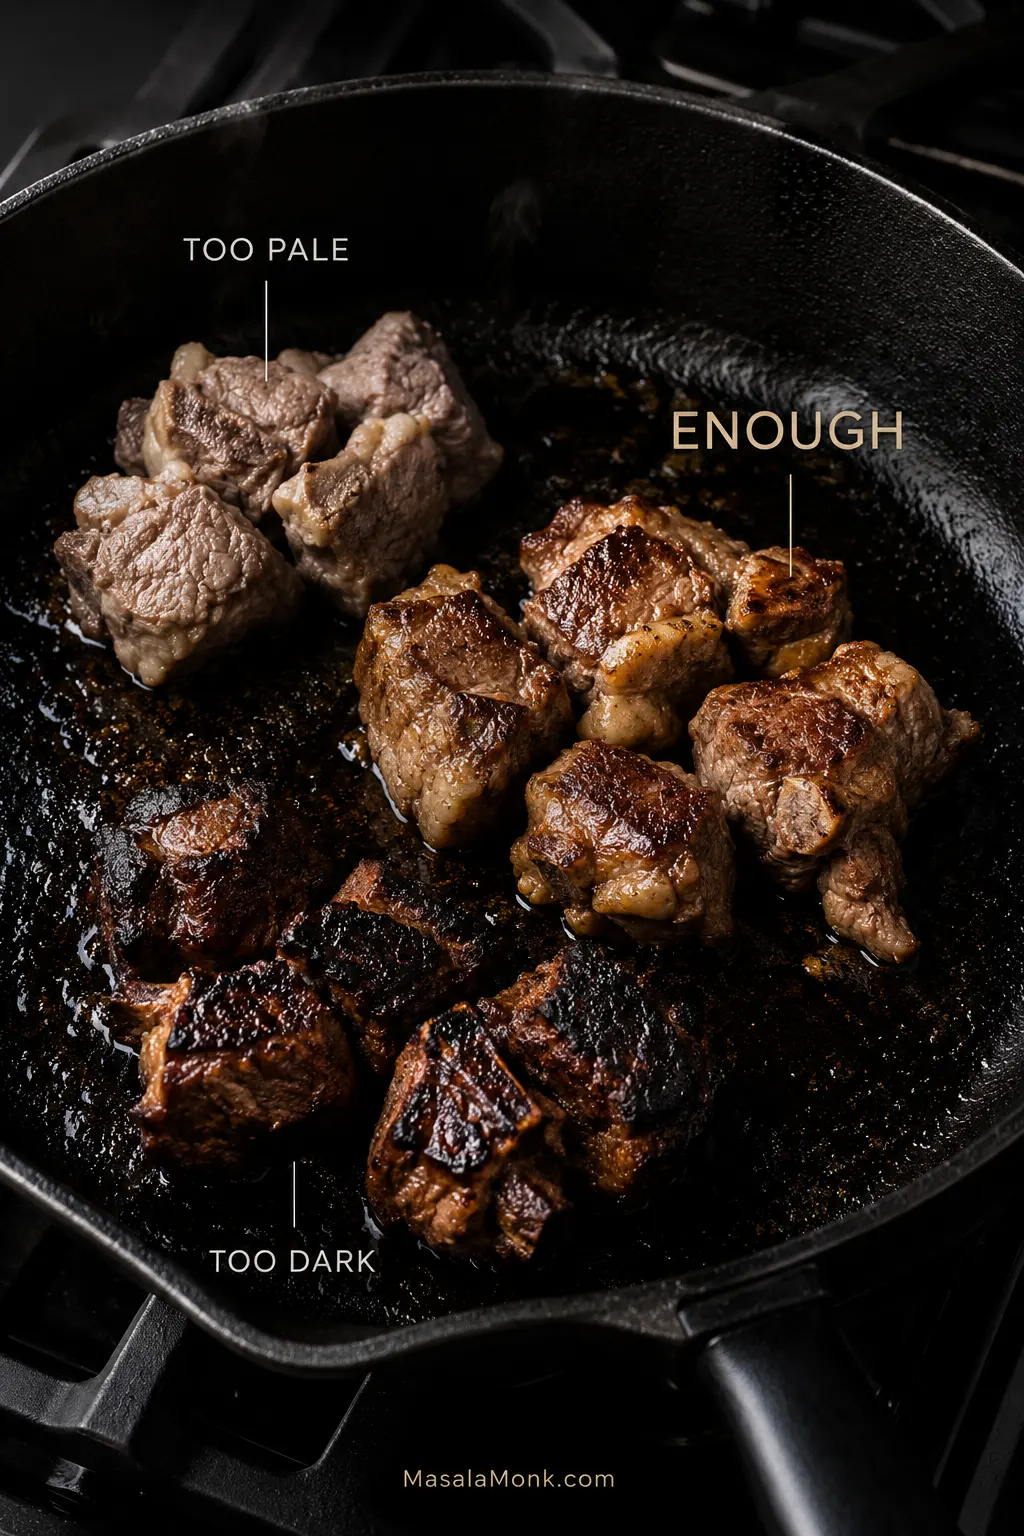
  1. Brown in batches. Heat the oil in the Dutch oven over medium-high heat. Brown the lamb in about three batches, roughly 3–4 minutes per batch. Give the pieces room to make good contact with the pot and turn them only once or twice. A few deep brown patches are enough; every surface does not need to be perfect. Transfer the lamb to a plate.
Three lamb pieces in a dark pan labeled too pale, enough and too dark, showing different levels of browning before braising.
When browning lamb for tagine, watch the bottom of the pot as well as the meat. Brown fond will loosen into the onions and eventually deepen the sauce; blackened residue brings bitterness instead. Between batches, meanwhile, give the pot a moment to recover its heat so the next pieces brown rather than release enough moisture to steam.

Build the Flavor Base

  1. Soften the onions. Reduce the heat to medium. Add the onions and cook for 7–8 minutes, scraping up the browned bits, until soft and beginning to turn golden. Deep caramelization isn’t necessary.
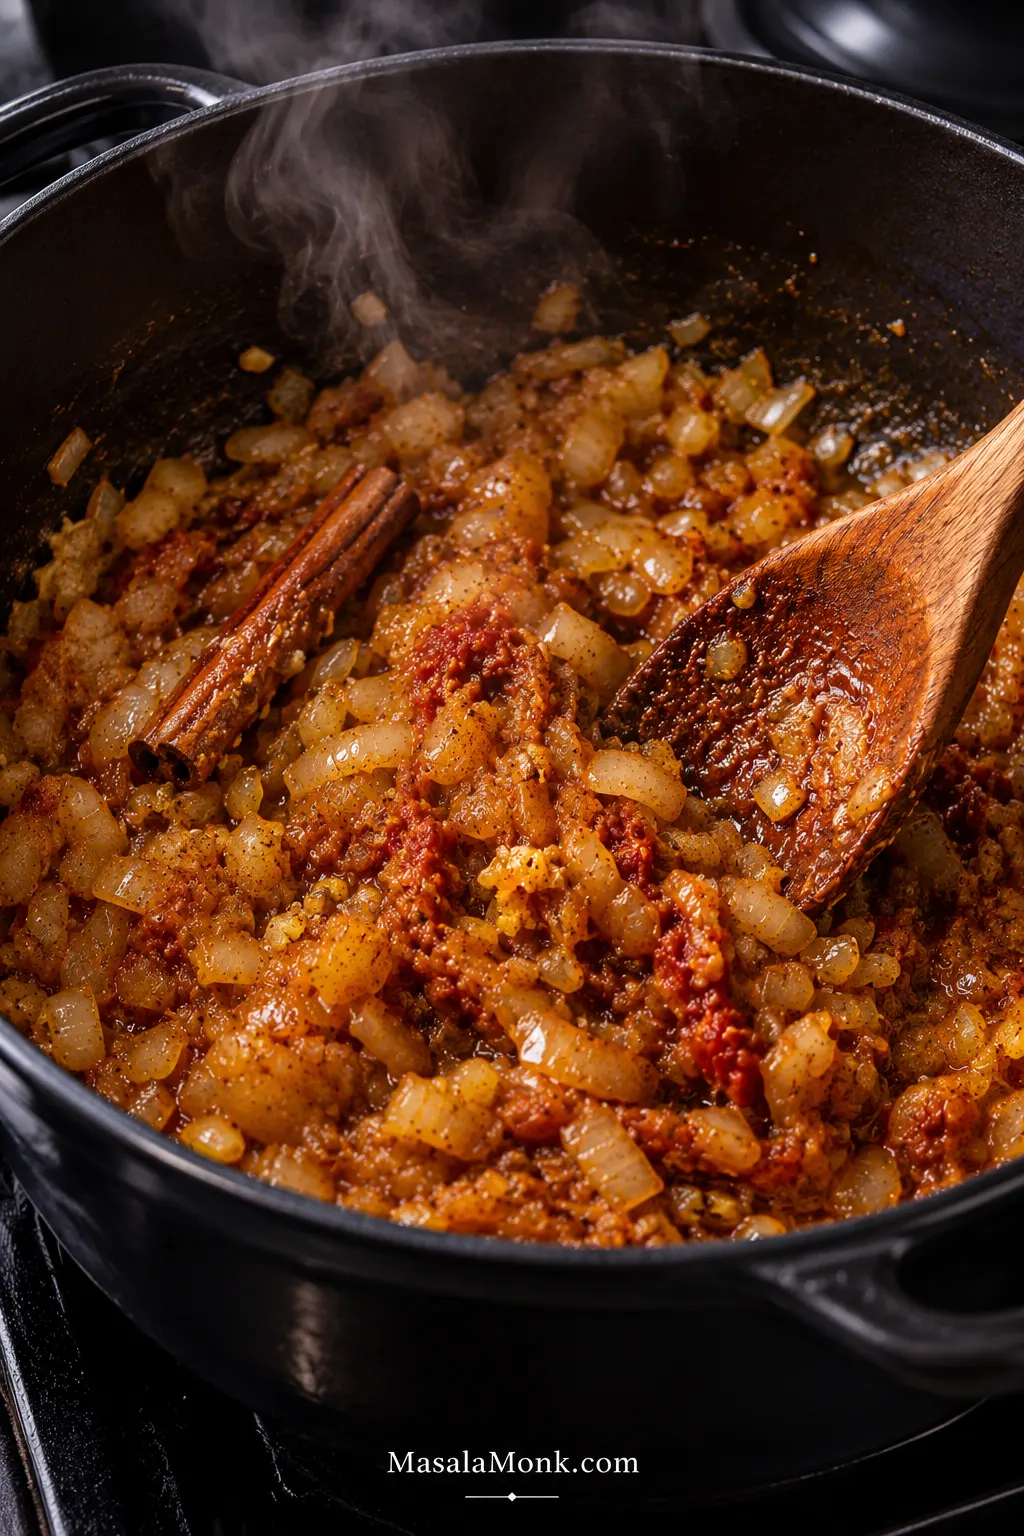
  2. Build the spice base. Add the garlic and cook for about 30 seconds. Stir in the cumin, coriander, ground ginger, turmeric, paprika, black pepper and cayenne, if using. Cook for 30–45 seconds, just until fragrant. Move on before the spices darken rapidly or smell acrid. Add the cinnamon stick and tomato paste and cook for another minute.
Soft onions, garlic, tomato paste, ground spices and a cinnamon stick cooking in a dark Dutch oven before the lamb and braising liquid are added.
A useful cue for the lamb tagine spice base is when it stops looking like separate ingredients. The ground spices lose their dusty appearance, the tomato paste blends into the onions, and the whole mixture becomes cohesive and glossy. Once that happens, add the liquid rather than extending the frying simply because the clock says you can.

Start the Braise

  1. Add the lamb and liquid. Return the lamb and any juices to the pot. Pour in the measured stock or water, including the saffron infusion if using, and bring to a gentle simmer. The liquid should sit around the meat and reach only partway up the pieces.
  2. Cover and braise for 60 minutes. Transfer the covered pot to the oven. The sauce will look loose at this stage. Leave it alone for now.
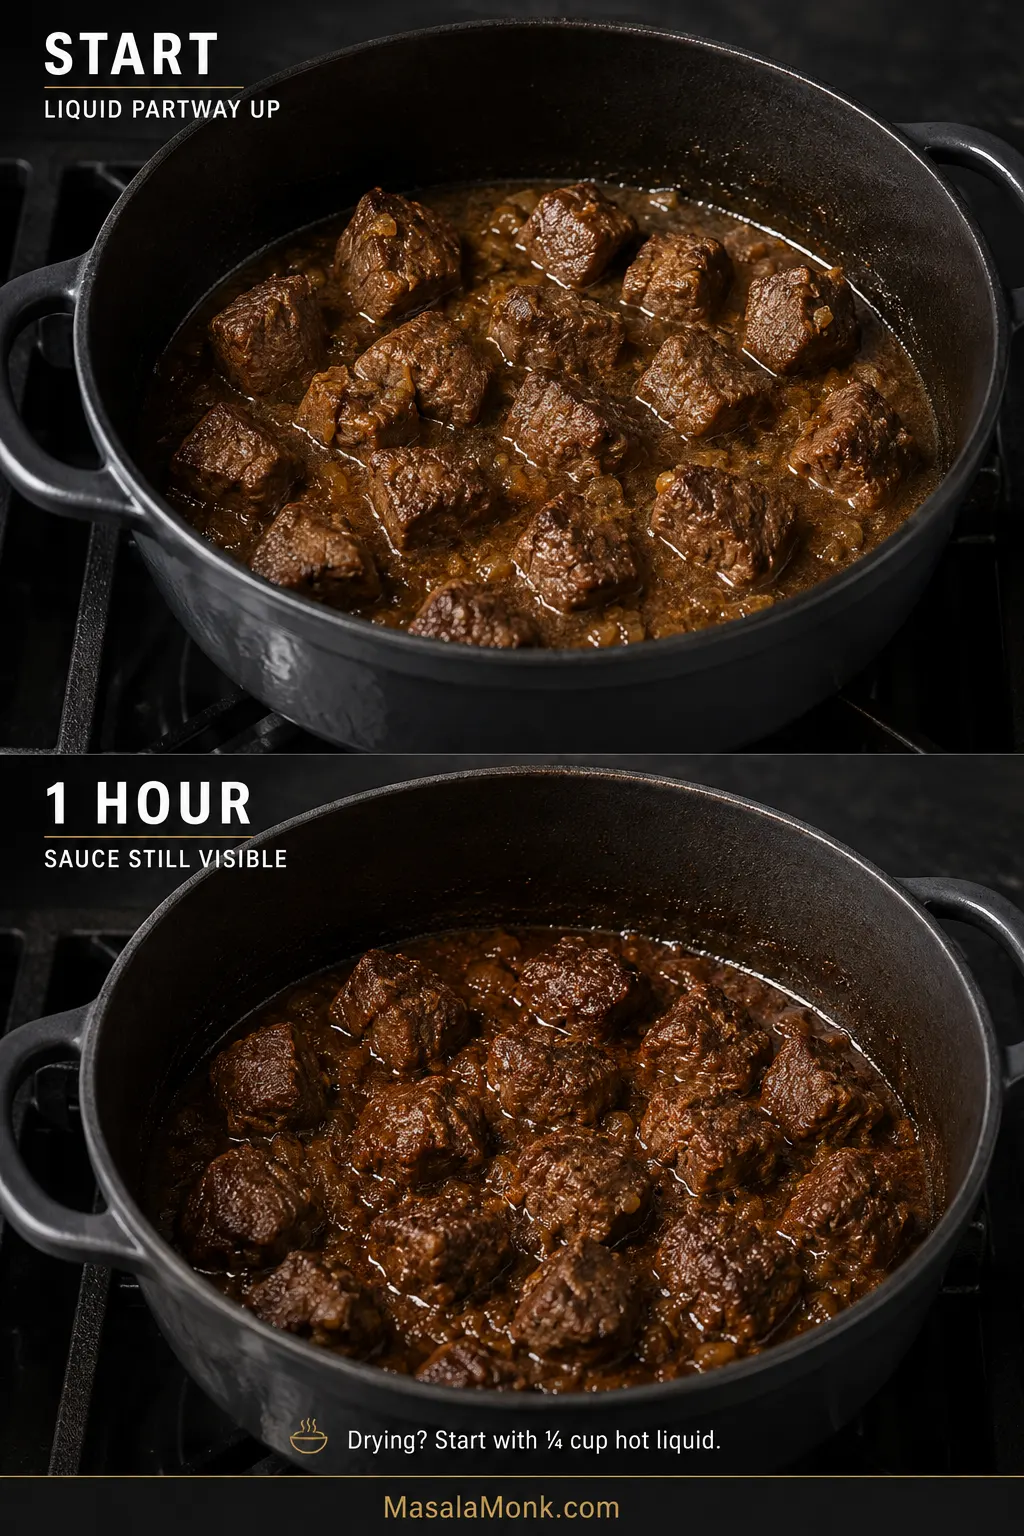
  3. Look at the moisture. Lift the lid after an hour. There should be sauce around the lamb and no dry, frying patches around the bottom edge. If the bottom is drying, add 60 ml / ¼ cup hot water or stock. Add up to another 60 ml / ¼ cup only if the pot still looks genuinely dry. Cover and cook for another 30 minutes.
Two braising stages showing lamb with liquid partway up the meat at the start and sauce still visible after cooking, with a note to add hot liquid only if drying.
For lamb tagine braising liquid, use the bottom edge of the pot as your warning zone. The upper surfaces of the meat can remain exposed; what matters is that the base stays moist rather than dry and frying. A broad casserole will reach that point faster than a snug Dutch oven, so pot geometry matters as much as the starting quantity.

Test Tenderness and Add the Apricots

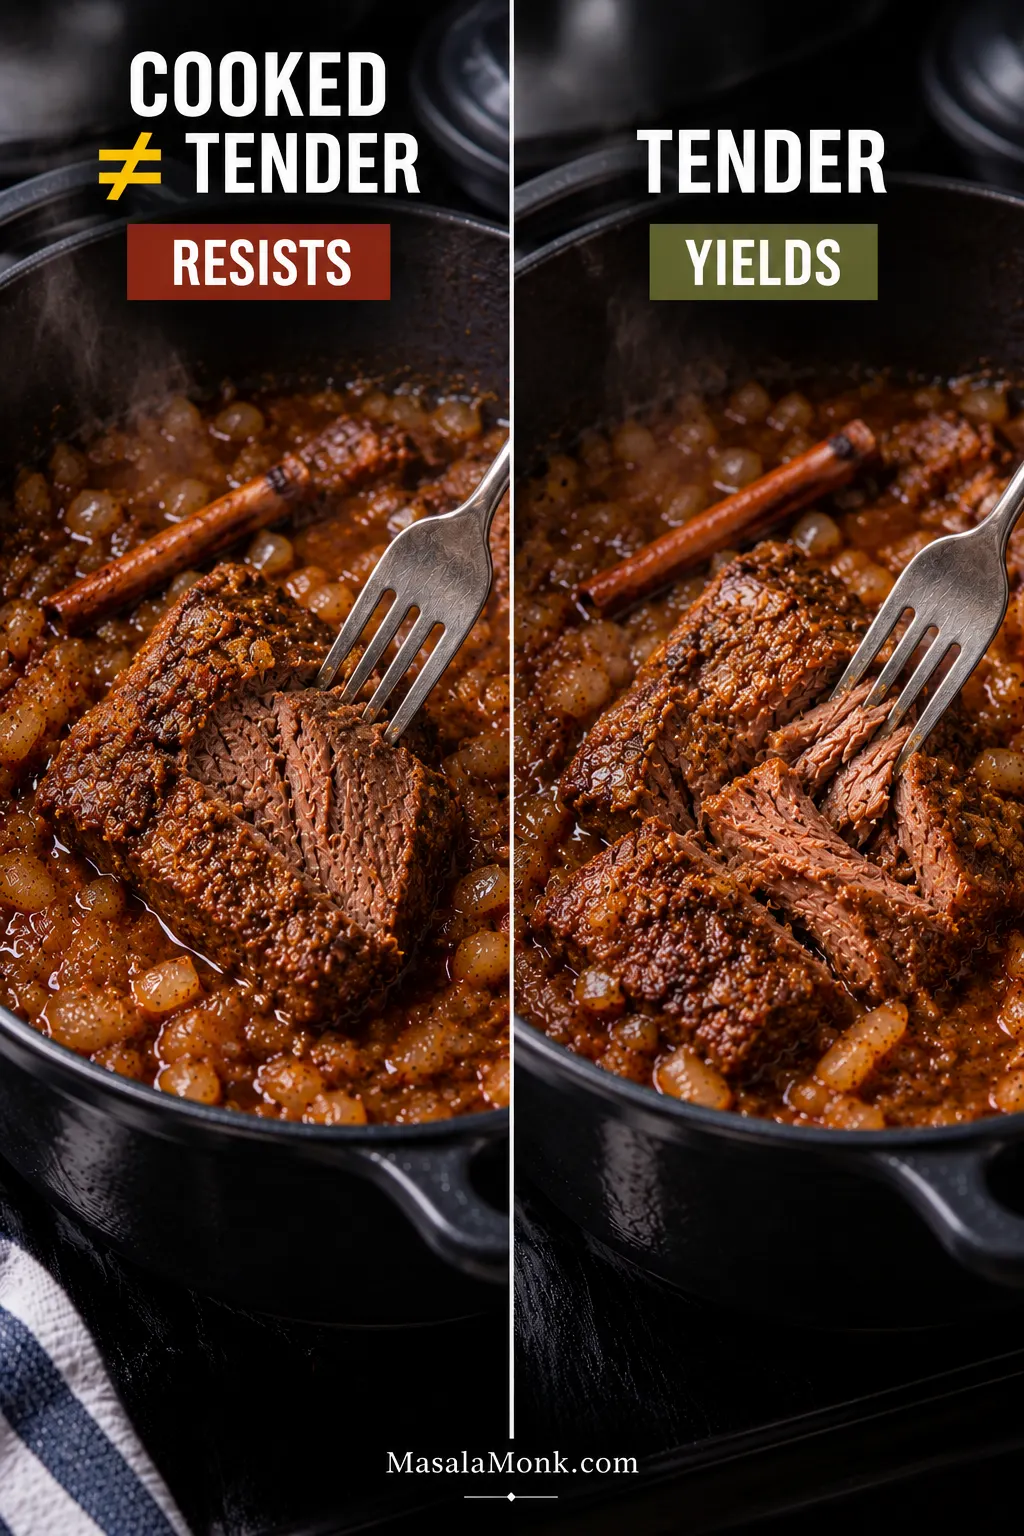
  1. Test the lamb. Push a fork into one of the largest pieces. Clear resistance means more covered cooking. Continue in 15-minute intervals until the fork enters fairly easily and the meat keeps its shape.
Side-by-side fork test of braised lamb labeled resists and yields, showing firm cooked meat compared with tender meat whose fibers open slightly while staying intact.
The target for braised lamb tenderness sits between two obvious extremes: no stubborn resistance, but no shredding on contact either. A fork should enter with little effort while the chunk keeps enough structure to reach the plate intact. Falling-apart meat can be delicious, but it is already beyond the texture this particular lamb tagine is aiming for.

Check the Finished Texture

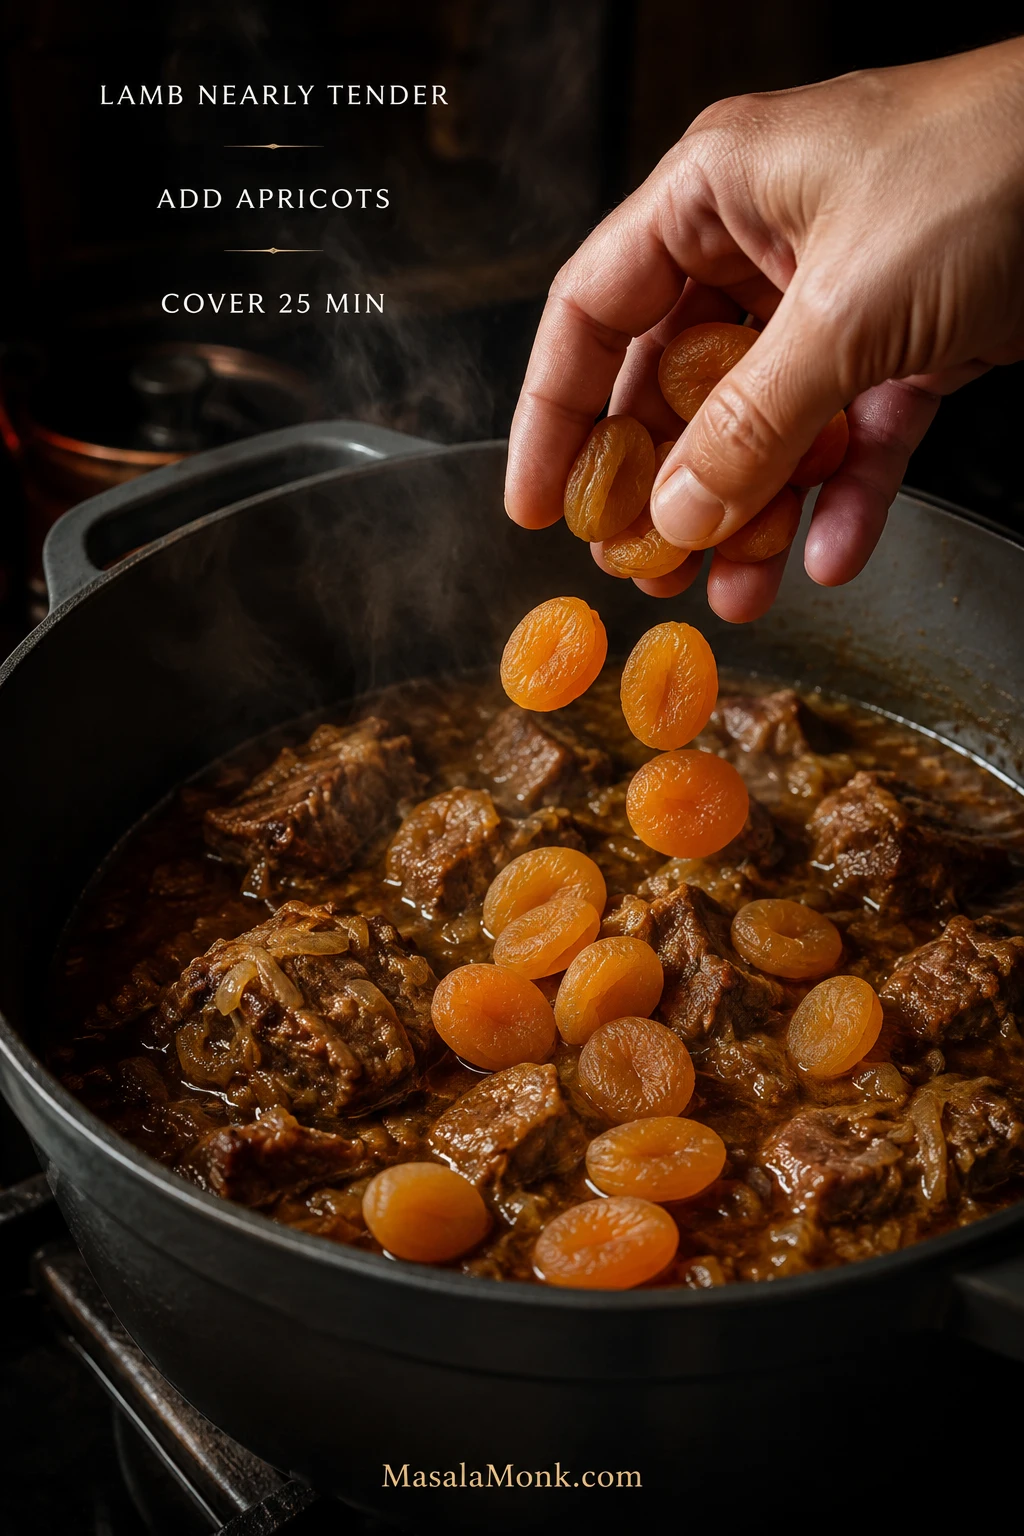
  1. Add the apricots. Stir in the dried apricots, cover and cook for 25 minutes. While they cook, toast the almonds in a dry frying pan over medium heat for 2–4 minutes, tossing often, until lightly golden and fragrant. Tip them onto a plate immediately.
A hand adding dried apricots to nearly tender braised lamb, with instructions to add the apricots near the end and cover the pot for 25 minutes.
Once dried apricots are softening in lamb tagine, handling becomes as important as timing. Stir only as much as necessary and move the fruit gently through the sauce; plumped apricots break much more easily than dry ones. Keeping them intact preserves little pockets of fruit rather than distributing all their sweetness through the entire pot.
  1. Know when to stop. Test one of the largest pieces of lamb and an apricot. The lamb should yield easily without collapsing; the apricots should be soft and full. If the lamb still resists, cover and continue in 10–15-minute intervals. If the apricots reach the texture you want before the lamb does, lift them onto a plate and return them later.
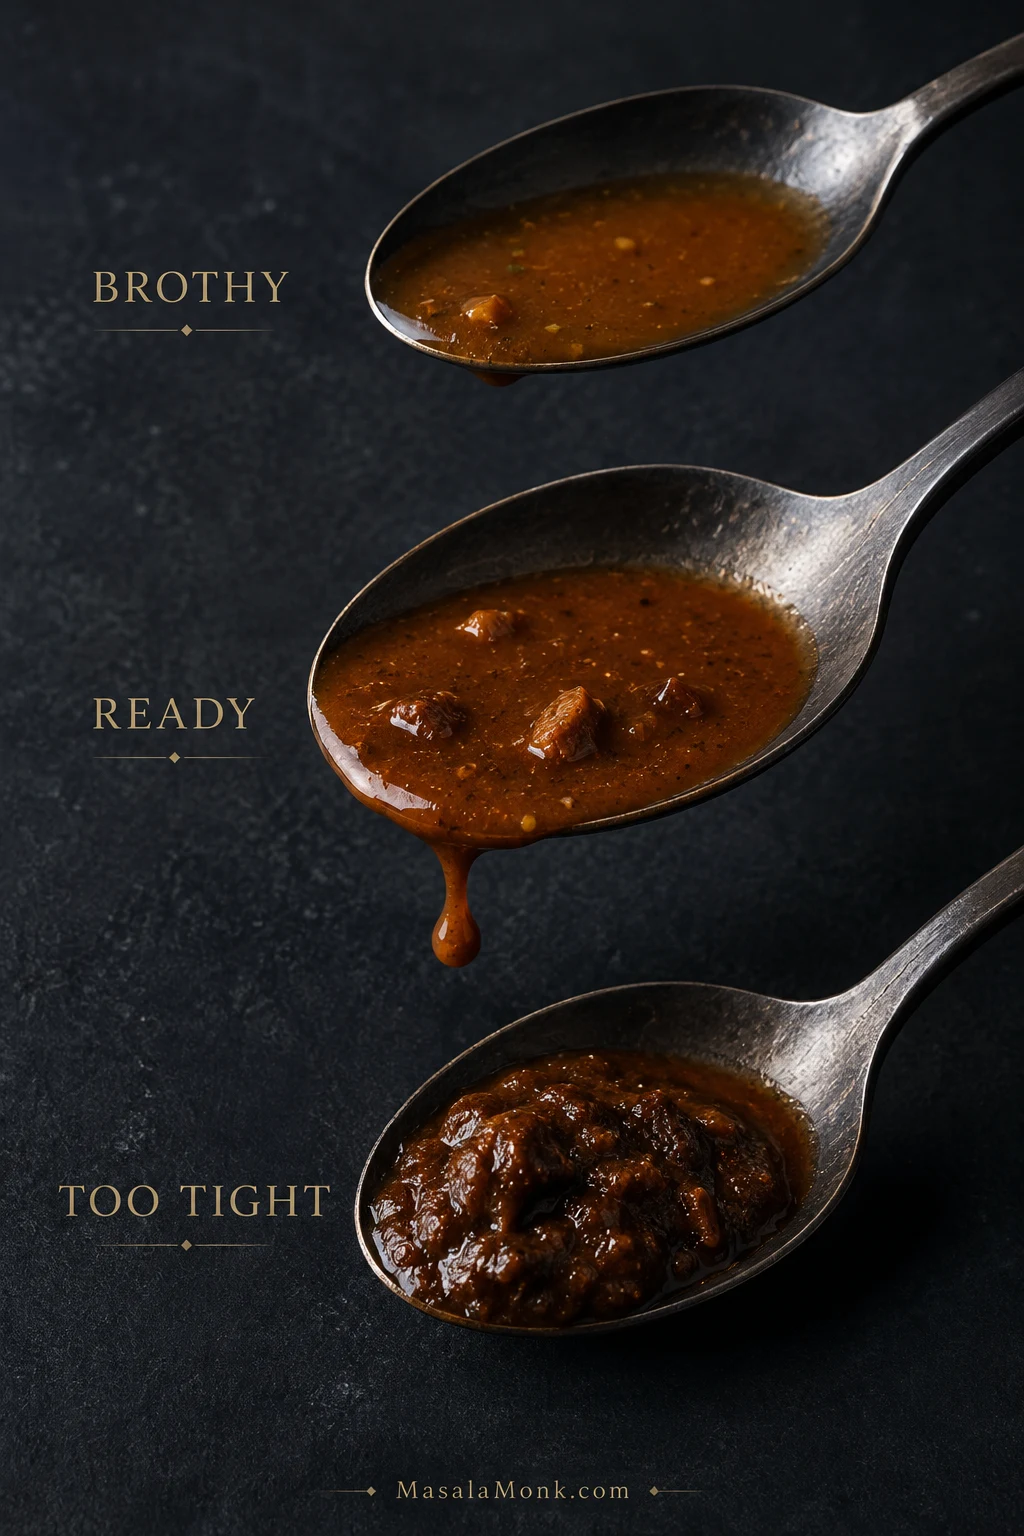
  2. Finish the sauce. If the lamb and apricots are ready and the sauce already lightly coats them, leave it alone. For a very brothy pot, lift the lamb and apricots onto a warm plate and reduce the sauce uncovered for 5–15 minutes, then return everything briefly to coat and heat through. Loosen an over-reduced sauce with hot water or stock, 30–60 ml / 2–4 tablespoons at a time. Mash two or three apricots into the sauce if you want it slightly thicker and fruitier.
Three spoonfuls of tagine sauce labeled brothy, ready and too tight, showing progressively thicker sauce textures.
The spoon gives a clearer lamb tagine sauce test than the busy surface of the pot. Brothy sauce runs off almost immediately; ready sauce leaves a thin glossy film before sliding away; over-reduced sauce sits heavily and starts to mound. That movement tells you more about concentration than color alone.

Season and Serve

  1. Season. Remove the cinnamon stick and skim excess surface fat. Check the salt first, then add lemon juice to taste. Taste before reaching for honey; the apricots may already have given you enough sweetness. Start with 1 teaspoon if you want more.
  2. Serve. Add the lemon zest, fresh cilantro and toasted almonds. Stir gently and serve hot.

Scaling up: use a larger pot as well as more ingredients. Let the liquid level around the lamb guide the extra stock or water; braising liquid rarely scales neatly with the meat.


How to Read the Pot as It Cooks

The recipe gives you the timetable. The pot tells you when that timetable needs changing.

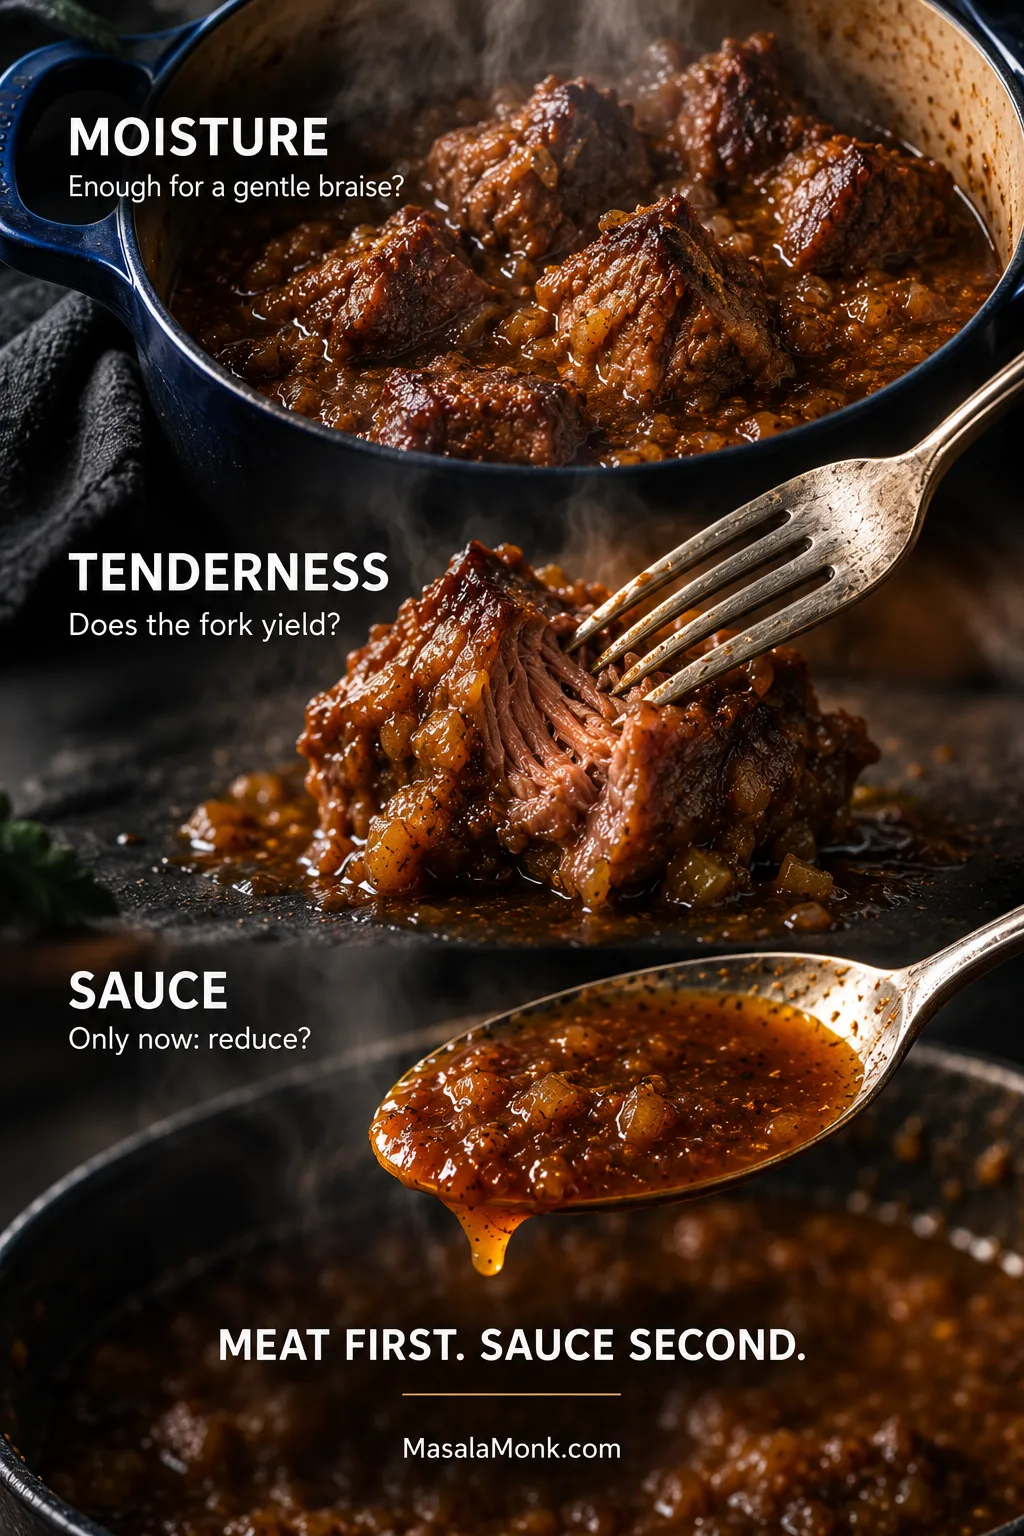
Cooking guide showing lamb braising moisture, a fork testing tenderness and sauce coating a spoon, labeled moisture, tenderness and sauce.
Think of moisture, tenderness and sauce as three separate dials on the same braise. A dry bottom is a moisture problem; a resistant fork is a tenderness problem; a spoon that will not hold a light coating is a sauce problem. Diagnose the right dial first, because fixing one automatically can make another worse.

The measured liquid is only a starting point. A broad casserole loses water faster than a snug Dutch oven with a heavy lid, while the lamb and onions contribute moisture of their own. Two cooks can start with the same amount and see very different pots an hour later.

The first hour is mostly about leaving the lamb alone. Keep enough moisture in the pot for a gentle braise while the shoulder is firm. A drying bottom is your cue for a splash of hot liquid. Starting with too much stock creates the opposite problem: plenty of water that eventually has to cook away.

Moisture buys the shoulder time. Eventually the useful question changes: has that time actually made the meat tender?

Lamb can be cooked through and still feel chewy because its connective tissue has not softened enough. Test one of the larger pieces. The fork should enter easily and gentle pressure should make the meat yield without collapsing.

If the fork still has to argue with the lamb, dinner needs more time.

Once the Lamb Is Tender, Judge the Sauce

Tender meat changes the job. A brothy pot can now spend some time uncovered; sauce that already coats the lamb lightly is close to where you want it.

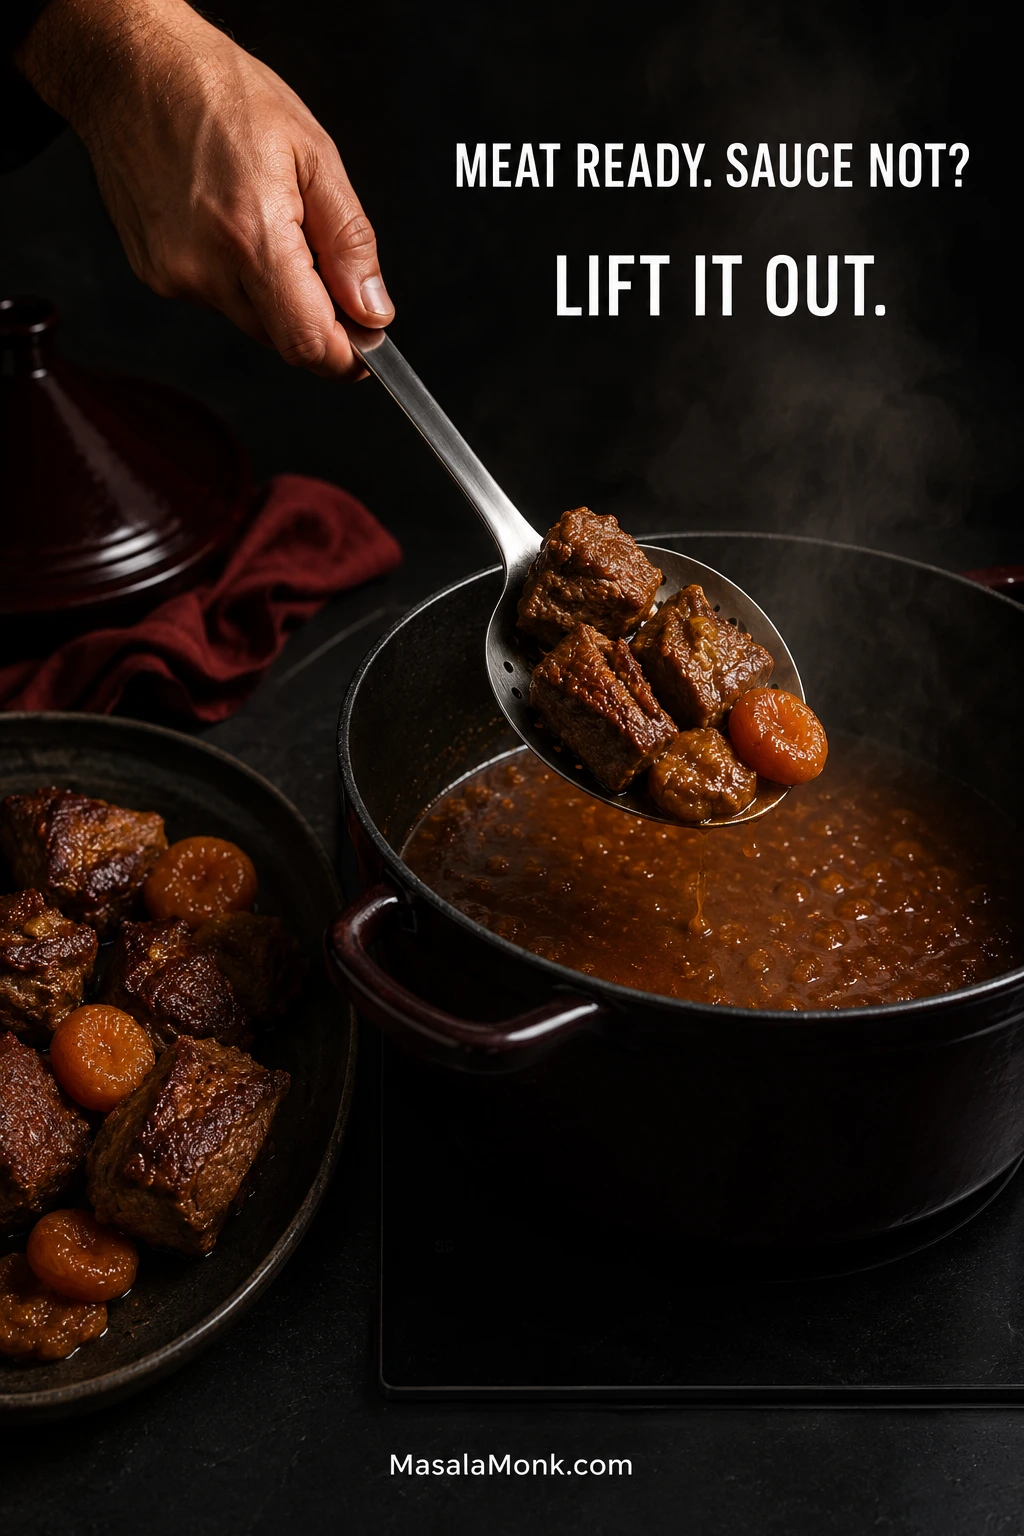
Perfect lamb and apricots in a pot with too much liquid is an easy fix. Lift the solids onto a warm plate, reduce the sauce on its own, then return everything briefly to coat and heat through.

Hand lifting tender lamb and softened apricots from a Dutch oven with a slotted spoon while loose brown sauce continues simmering in the pot.
Once the finished lamb and apricots are out of the pot, the sauce can reduce more actively without pushing either solid further. Return them only briefly when the liquid has reached the consistency you want, so the final coating stays concentrated without sacrificing tenderness.

At the table, aim for enough sauce to collect around the lamb and soak into bread or a spoonful of grain.

Fix My Lamb Tagine

Lamb Problems

ProblemWhat to do
Lamb is still toughCover and cook for another 15 minutes, then test one of the largest pieces again.
Lamb is dry and still chewyKeep it in the moist braise while a fork meets resistance. Very lean cuts and small pieces have less room for error.
Lamb is tender but dryStop cooking it and serve with plenty of sauce. Next time use shoulder or neck and keep the pieces larger.
Lamb is falling apartStir as little as possible and serve gently. Begin the tenderness checks earlier next time.

Sauce and Seasoning Problems

ProblemWhat to do
Sauce is wateryOnce the lamb is nearly tender, leave the lid off and let some water evaporate.
Lamb is ready but sauce is very wateryLift the lamb and apricots onto a warm plate, reduce the sauce separately, then return them briefly to coat and heat through.
Sauce is disappearingAdd hot water or stock 30–60 ml / 2–4 tablespoons at a time.
Tagine tastes too sweetCheck the salt first, then add lemon juice a little at a time. Leave out the honey.
Tagine tastes flatCorrect the salt, then add lemon before reaching for more ground spice.
Sauce tastes bitter or burntTransfer the unburnt upper portion to a clean pot without scraping the bottom, then reassess the seasoning.
Surface looks greasySkim the excess fat now, or chill the tagine and lift away the hardened fat before reheating.
Bottom is catchingLower the heat, add a small amount of hot liquid and leave the scorched material stuck to the pot.

Apricot Problems

ProblemWhat to do
Apricots have broken downThey’ve become part of the sauce. Add them later next time for more distinct pieces.
Apricots are still firmGive them another 10–15 minutes in the hot sauce.

The Best Lamb for Tagine

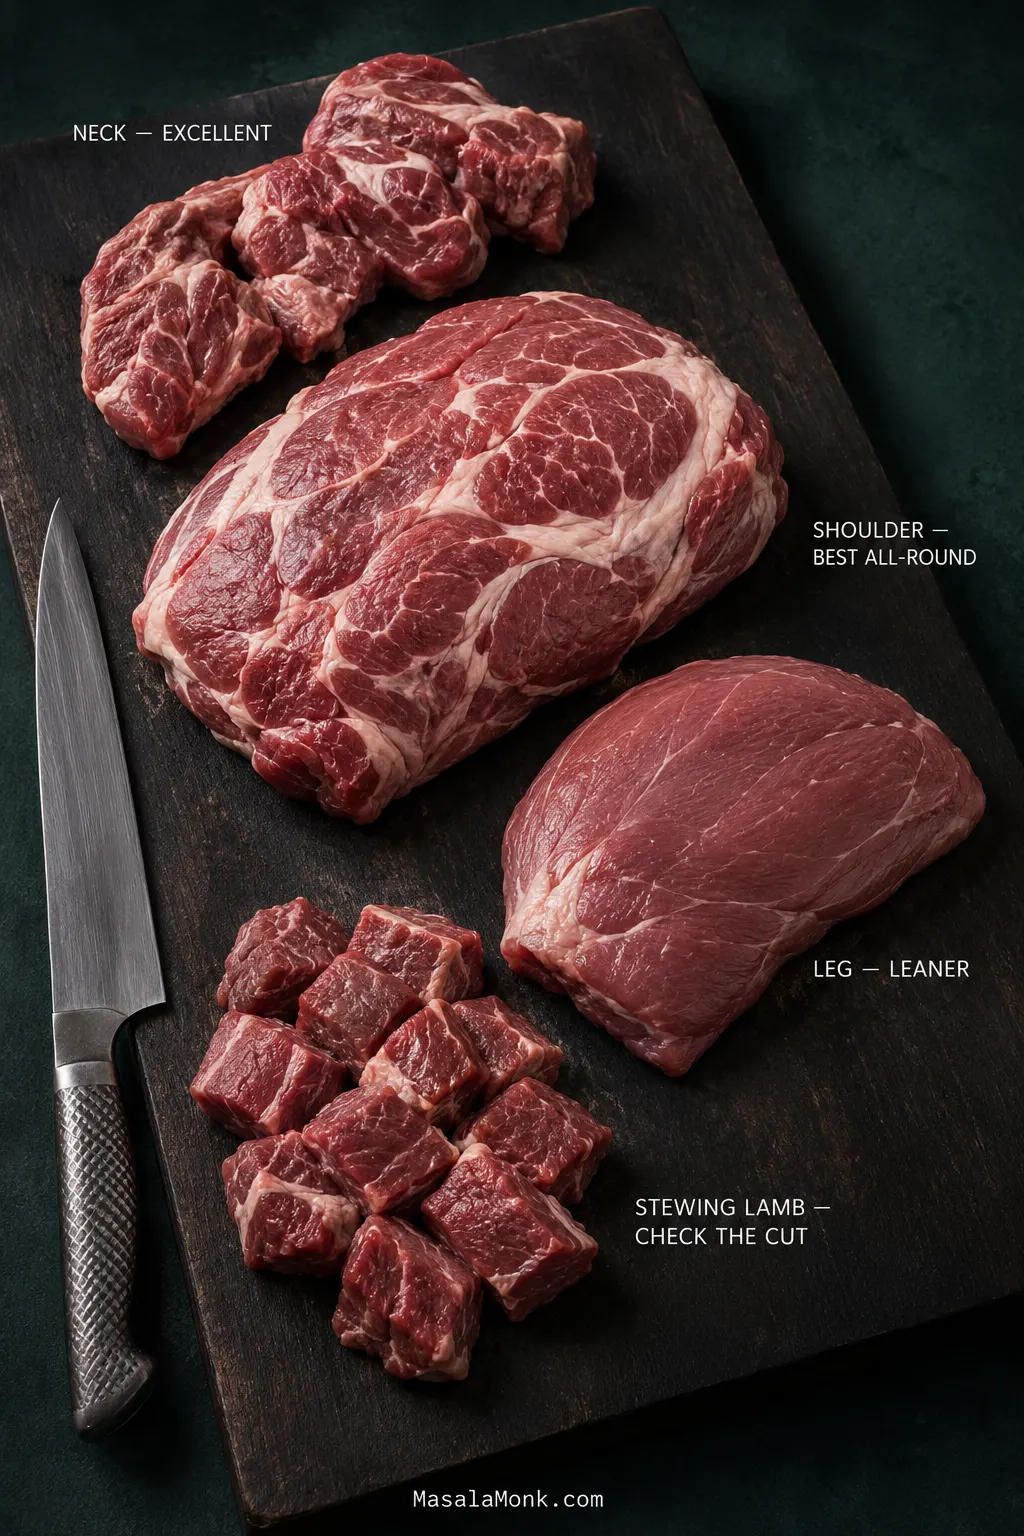
Lamb shoulder gives you the widest margin for error. It stays succulent through a long braise, while its collagen gives the sauce natural body as the shoulder softens. That also gives you some breathing room when the meat and sauce don’t reach their ideal point at exactly the same moment.

CutHow it behaves
ShoulderJuicy, well suited to a long braise and the best all-round choice.
NeckDeeply flavorful with plenty of connective tissue; allow extra time if necessary.
LegLeaner and more prone to drying during prolonged cooking.
Diced/stewing lambConvenient when the underlying cut is suitable for braising and the pieces are not too small.
Raw lamb shoulder, neck, leg and cubed stewing lamb arranged on a dark butcher board with labels describing each cut for braising.
At the butcher counter, the meat itself can tell you something the label cannot. Shoulder tends to look irregular and marbled; leg is cleaner and leaner; neck carries more compact connective tissue. Most importantly, “stewing lamb” describes how the meat has been cut, not which lamb cut it came from, so it is worth asking what is actually in the pack.

Already bought a whole leg and want to keep it intact? Our roast leg of lamb is built for browned edges, a juicy center and carving into slices.

Buying and Preparing Lamb Shoulder

The 1 kg / 2.2 lb in this recipe means shoulder after trimming. A heavy exterior fat cap means buying a little extra. Bone-in shoulder works too; allow extra purchase weight for the bone, then judge the cooking by tenderness rather than trying to match the boneless weight exactly.

Remove thick deposits and hard seams of exterior fat while keeping the marbling within the meat. Leave the chunks generous—around 4 cm / 1½ inches. Small pieces dry out more easily over a long braise.

Shanks need their own bone-in timing, while minced lamb belongs in a kefta-style tagine rather than this recipe.

Mutton and goat also suit these spices, although older meat may take longer to soften. For a completely different use of mutton—drier, darker and built around a reduced masala—see our Punjabi mutton bhuna.

Apricots, Spices and the Sweet-Savory Balance

Dried apricots soften in the sauce and pick up some of the lamb and spice around them. Their tart edge matters: the fruit tastes sweet, but the next forkful still tastes unmistakably like lamb.

For 1 kg / 2.2 lb lamb, 180 g / about 6¼ oz dried apricots gives the fruit a clear presence without dominating every bite. Adding them once the shoulder is nearly tender protects their texture if the meat takes longer than expected.

This recipe is formulated for dried apricots. Fresh apricots contain much more water and soften quickly, so add them only near the end and cook just until tender instead of making a direct gram-for-gram substitution. Drain canned apricots particularly well if they’re packed in syrup.

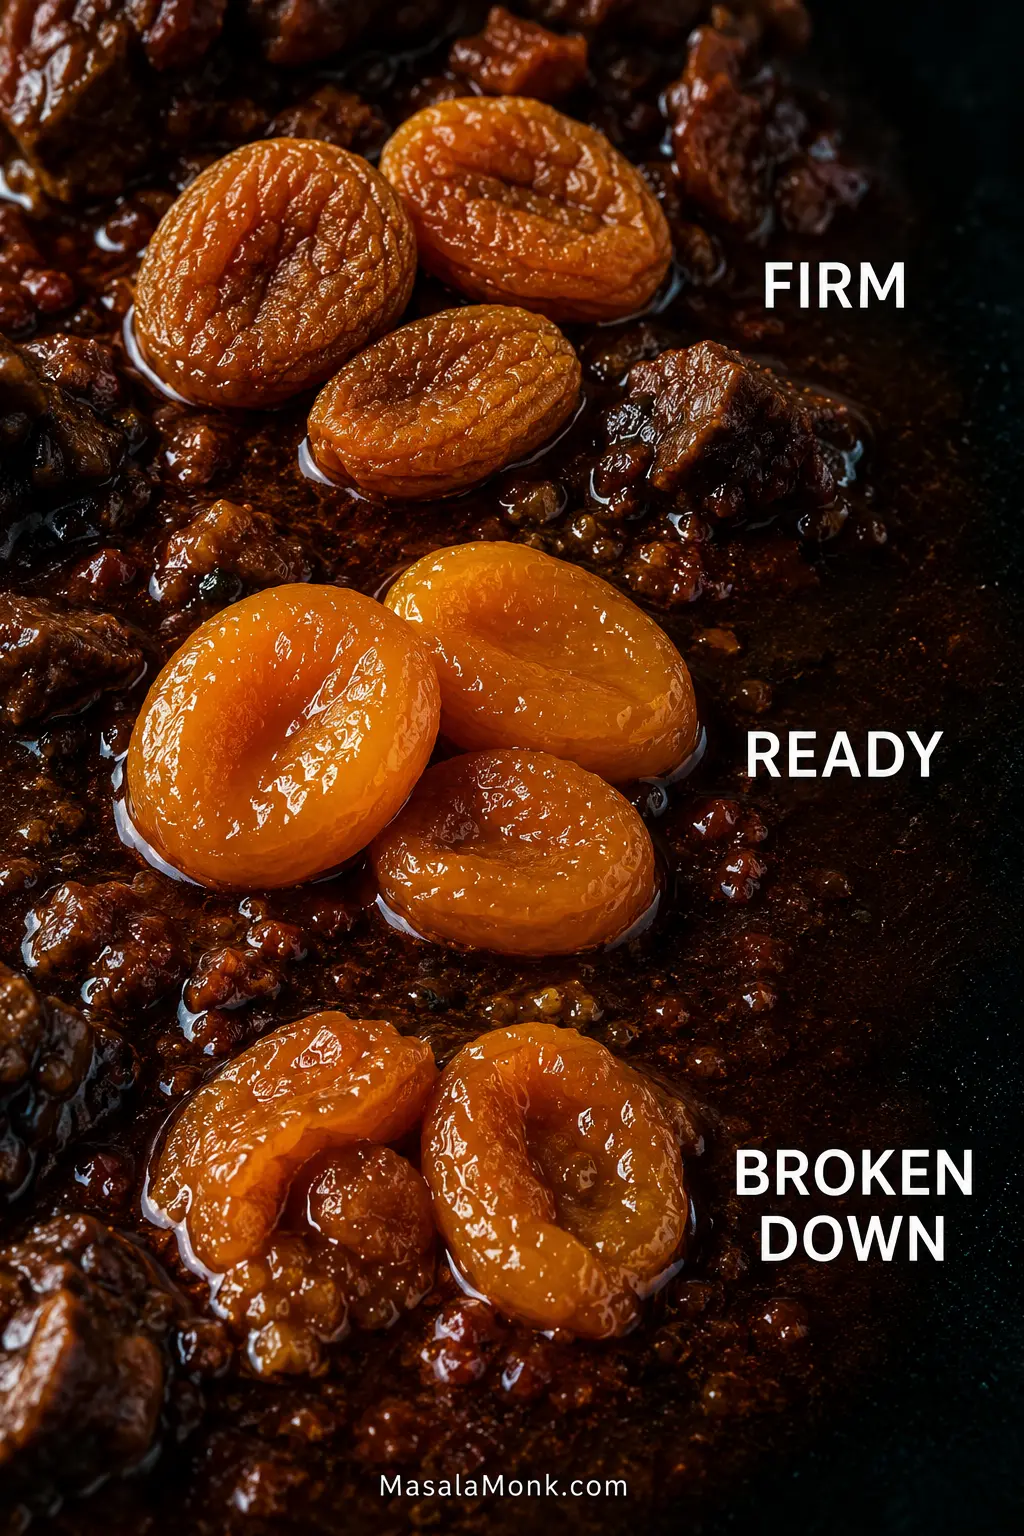
Dried apricots shown at three stages in dark sauce: firm and wrinkled, plump and ready, and partly broken down.
When judging dried apricot texture in tagine, look at shape as well as gloss. Firm fruit stays wrinkled and compact; ready fruit swells and rounds out while keeping clean edges; farther along, those edges begin feathering into the sauce. That last stage is not ruined fruit—it simply shifts more apricot flavor from distinct pieces into the braising liquid.

The Spice Blend

Cumin and coriander carry most of the earthy flavor, with ginger and black pepper adding warmth. Turmeric and paprika deepen the sauce. Cinnamon should remain a background note rather than make the lamb taste candied.

The blend is aromatic but mild rather than chile-hot. Cayenne controls the heat here, so you can leave it out for a gentler lamb tagine or increase it carefully if you prefer more warmth.

Ras el hanout can replace most of the individual ground spices, but blends vary enormously. Start around 1½ tablespoons and use up to 2 tablespoons with a milder blend, accounting for any salt, chili or cinnamon already present.

Saffron is optional. A small pinch adds a subtle floral note, but the tagine doesn’t depend on it. If that little jar rarely leaves the cupboard, our guide to saffron and how to use it explains where its flavor earns a place.

Salt and acidity become more pronounced as the sauce reduces, so make the important adjustments near the end. Check the salt first, then add lemon. Taste before reaching for honey; the apricots may already have given you enough sweetness.

What Is a Tagine—and Is There One Authentic Version?

The word tagine refers both to the distinctive lidded cooking vessel and to the family of dishes associated with it. In other words, “tagine” describes both the pot and a style of slow, gently cooked dishes. Moroccan tagine isn’t one fixed recipe: lamb may appear with prunes or apricots, while other versions feature preserved lemon and olives, vegetables, fish or kefta. For a wider look at the food tradition, the Moroccan National Tourist Office has a useful overview of tajine and other emblematic dishes.

This version is designed around a Dutch oven in a conventional home oven, with browned shoulder as its base. Those are deliberate choices for this recipe, not claims about how every Moroccan cook prepares tagine.

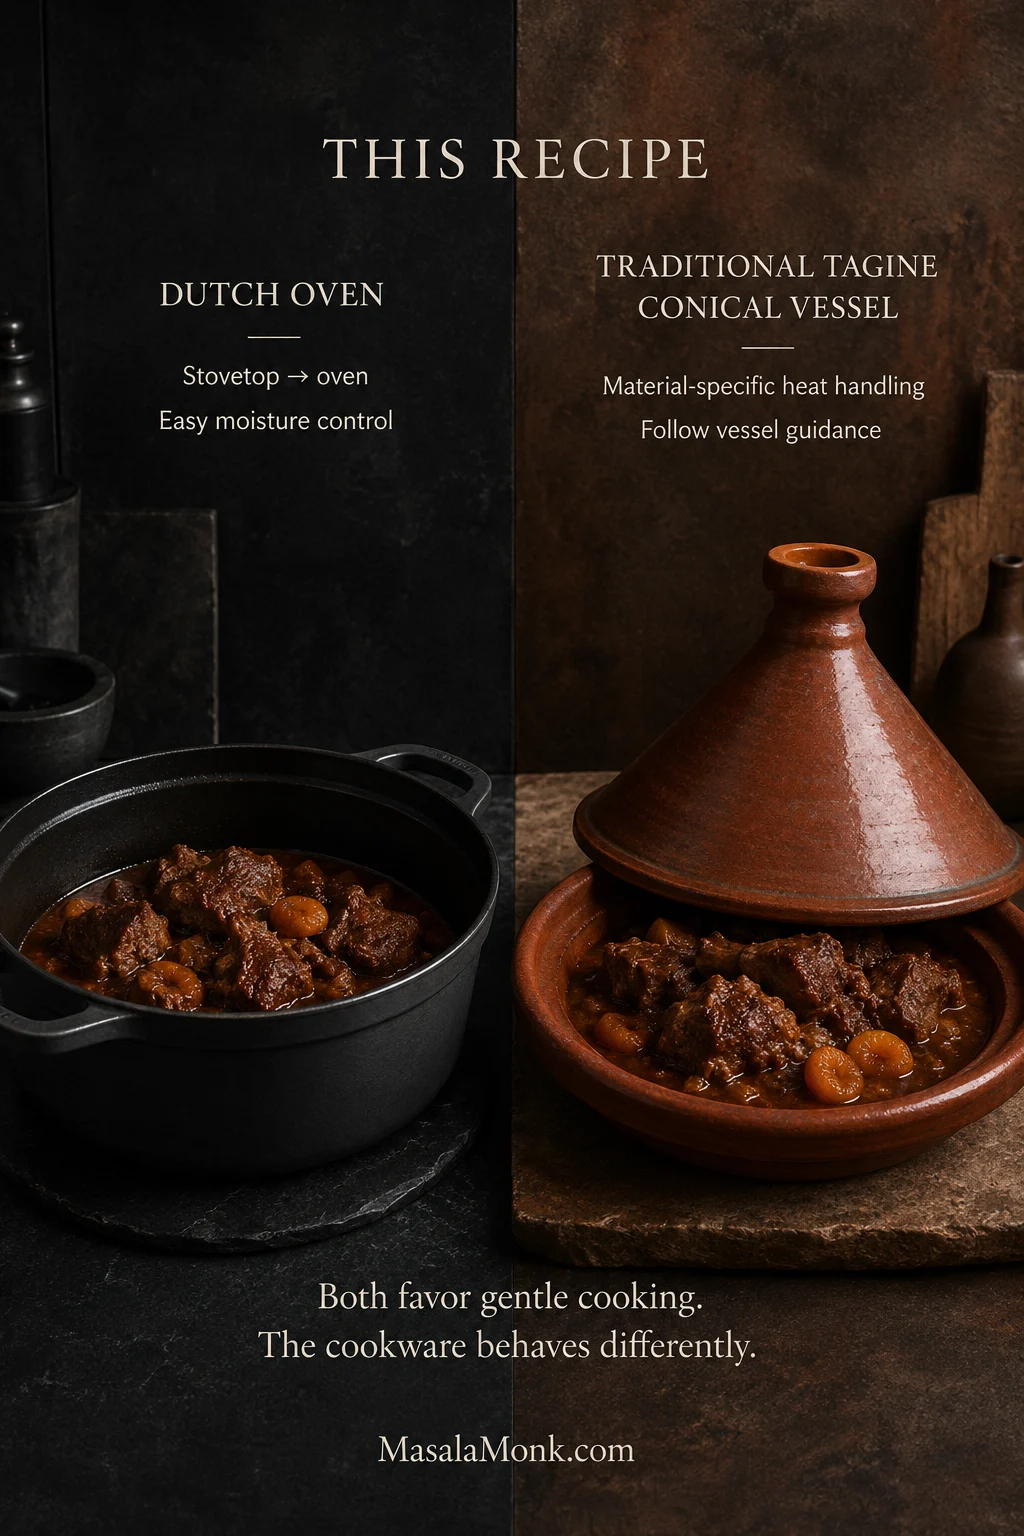
Do You Need a Tagine Pot?

No. A heavy Dutch oven you already own can make an excellent tagine. It holds the steady, covered heat the shoulder needs and moves easily from stovetop to oven.

Black enameled Dutch oven beside a traditional conical clay tagine, both containing lamb and apricot braise, with text explaining that the cookware handles heat differently.
For a tagine pot vs Dutch oven comparison, carry over the flavor idea rather than automatically carrying over the same liquid and timing. Heavy cast iron and clay manage stored heat, direct heat and evaporation differently. Therefore, the vessel is part of the cooking method—not merely a different-looking container for exactly the same instructions.

This recipe also browns the lamb first. Some tagine methods skip that step; here, the dark patches on the shoulder and the fond left in the pot create a deeper roasted base.
Cooking in an actual tagine? Make sure the vessel is intended for cooking. Glazed ceramic, unglazed clay, flameproof ceramic and cast-iron versions behave differently, so follow the manufacturer’s instructions for seasoning, direct heat and thermal shock. Some clay vessels benefit from a heat diffuser over a concentrated gas flame.

For stovetop cooking in a heavy covered pot, maintain the gentlest simmer you can. Look at the bottom and liquid a little more often than you would in the oven because concentrated sauce can catch over direct heat. Let tenderness, not the clock, decide when the lamb is ready.
Slow cooker or pressure cooker: both retain far more moisture than this Dutch-oven method, so do not carry the 350 ml / about 1½ cups liquid quantity across unchanged. For a reliable conversion, use an appliance-specific lamb-tagine formula and add the dried apricots late enough to keep their shape rather than treating this recipe as a line-by-line conversion.

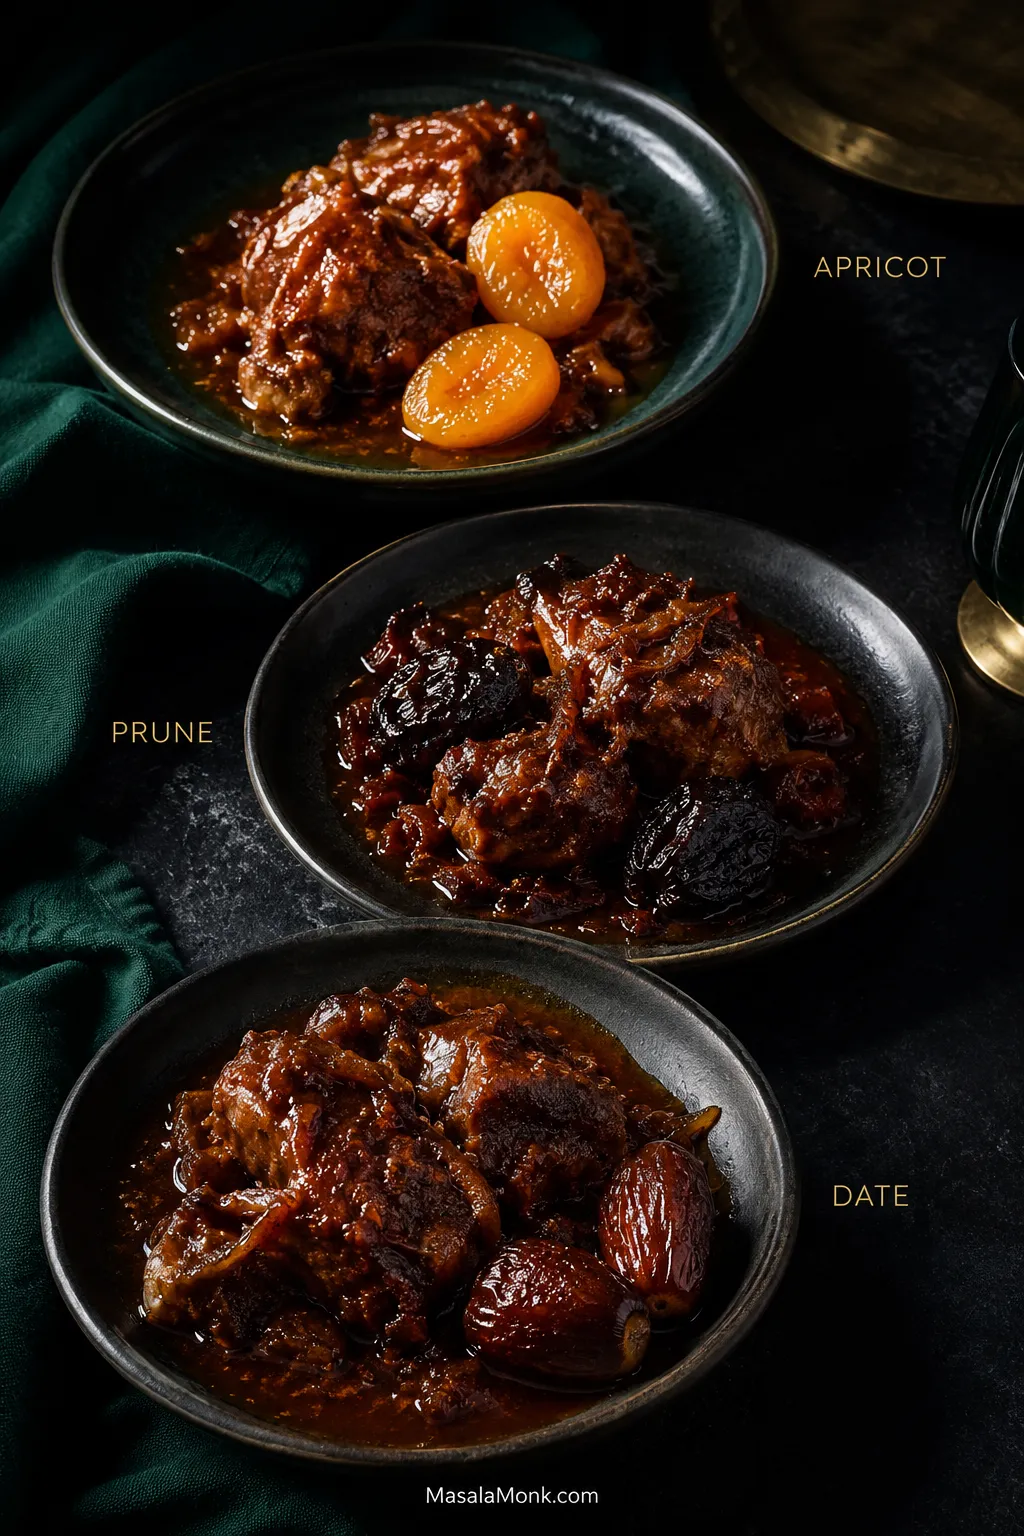
Prunes, Dates, Preserved Lemon and Other Variations

Prunes produce a darker, more jammy sauce and pair particularly well with almonds. They usually bring enough sweetness without much help from honey.

Dates are sweeter still, with more caramel depth. Use them more sparingly than apricots and keep enough lemon in the sauce to give the lamb some contrast.

Three finished lamb tagine portions made with apricots, prunes and dates, showing lighter amber, dark jammy and deep caramel fruit variations.
Switching dried fruit changes the finishing decisions as well as the flavor. Apricot keeps the sauce brighter, prune pushes it darker and jammier, and date brings deeper caramel sweetness. After changing the fruit, taste again before copying the apricot version’s honey or lemon adjustments, because the balance at the end may need to move with the substitution.

Preserved lemon and olives take the dish somewhere saltier and more intensely citrusy. Both bring seasoning of their own, so begin with less salt and use water or low-sodium stock.

Cooked chickpeas can stretch the pot; add them during the last 20–30 minutes. Carrots, squash and sweet potato in generous bite-size pieces need roughly 30–45 minutes and will absorb some of the braising liquid.

Mrouzia is a different preparation altogether, traditionally associated with lamb, honey, raisins and almonds. It deserves its own recipe.

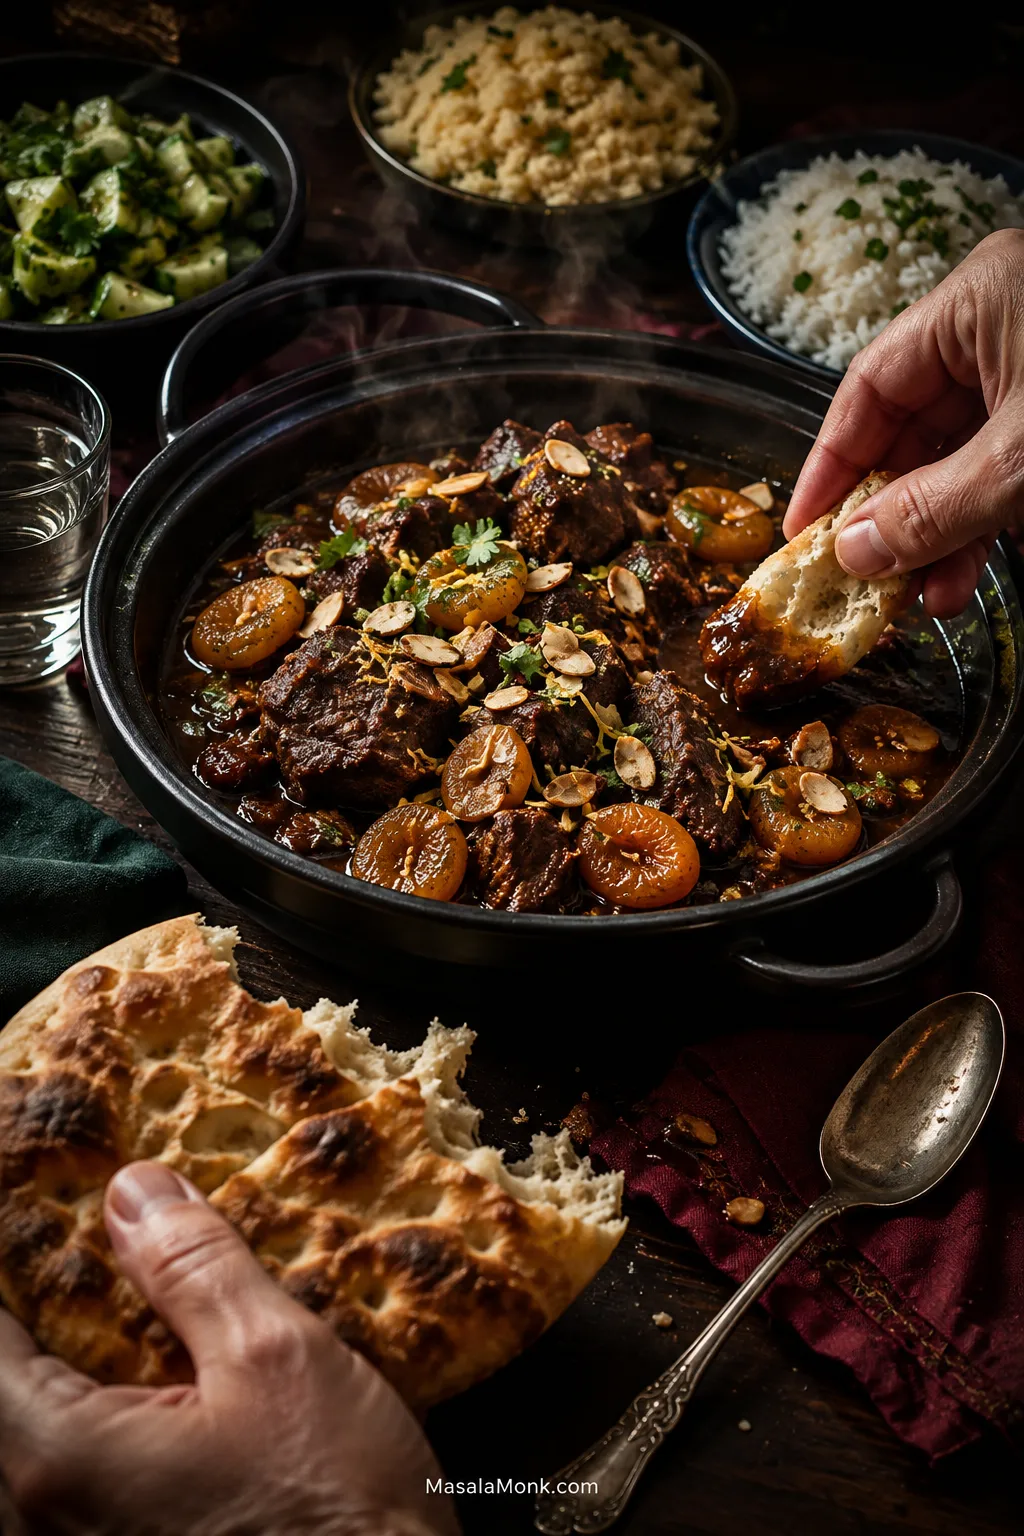
What to Serve With Lamb Tagine

The tagine is soft, fragrant and deeply flavored, so its best partners are simple: something to catch the sauce and something fresh enough to sharpen the plate.

Hands tearing bread beside a large lamb and apricot tagine, with separate bowls of couscous, rice and cucumber-herb salad on a dark dining table.
When deciding what to serve with lamb tagine, organize the table around contrast. Keep bread closest for sweeping through the sauce, serve couscous or rice separately when you want a more substantial plate, and put something cool and crisp alongside. That arrangement lets each bite move between rich, absorbent and fresh instead of becoming uniformly soft.

Moroccan bread is the classic table partner. Tear it and use it to scoop the lamb and sweep through the sauce. If khobz isn’t available, homemade pita is a practical stand-in.

For a plated meal, couscous is light and excellent at absorbing the braising juices. For a gluten-free plate, choose rice; standard couscous is wheat-based. Our rice cooking guide will help if you want loose, separate grains.

A lemony salad, fresh herbs or cucumber gives the plate a cooler, sharper side. Our crisp cucumber salad works especially well against the warm lamb and fruit.

Make Ahead, Store, Freeze and Reheat

If people are coming over, this is the kind of make-ahead recipe that genuinely changes the evening. The lamb can already be tender, excess fat can be removed cleanly once chilled, and all that’s left is warming the sauce and adding the fresh garnish.

Cook the tagine completely, cool it promptly and refrigerate it. The USDA’s leftovers guidance recommends refrigerating cooked food within 2 hours and generally using refrigerated leftovers within 3–4 days.

How to Reheat and Freeze Lamb Tagine

Remove any hardened excess fat while the tagine is cold, then reheat gently with the lid on. Wait until it is hot before deciding whether the sauce needs loosening; add small splashes of water or low-sodium stock only if necessary.

Reheat until thoroughly hot throughout; if checking with a thermometer, leftovers should reach 74°C / 165°F. Add fresh cilantro, lemon zest and toasted almonds after reheating.

For freezing, cool the tagine and pack it into airtight meal-sized portions. Freeze for up to 3 months for best quality, thaw overnight in the refrigerator when possible, and reheat thoroughly.

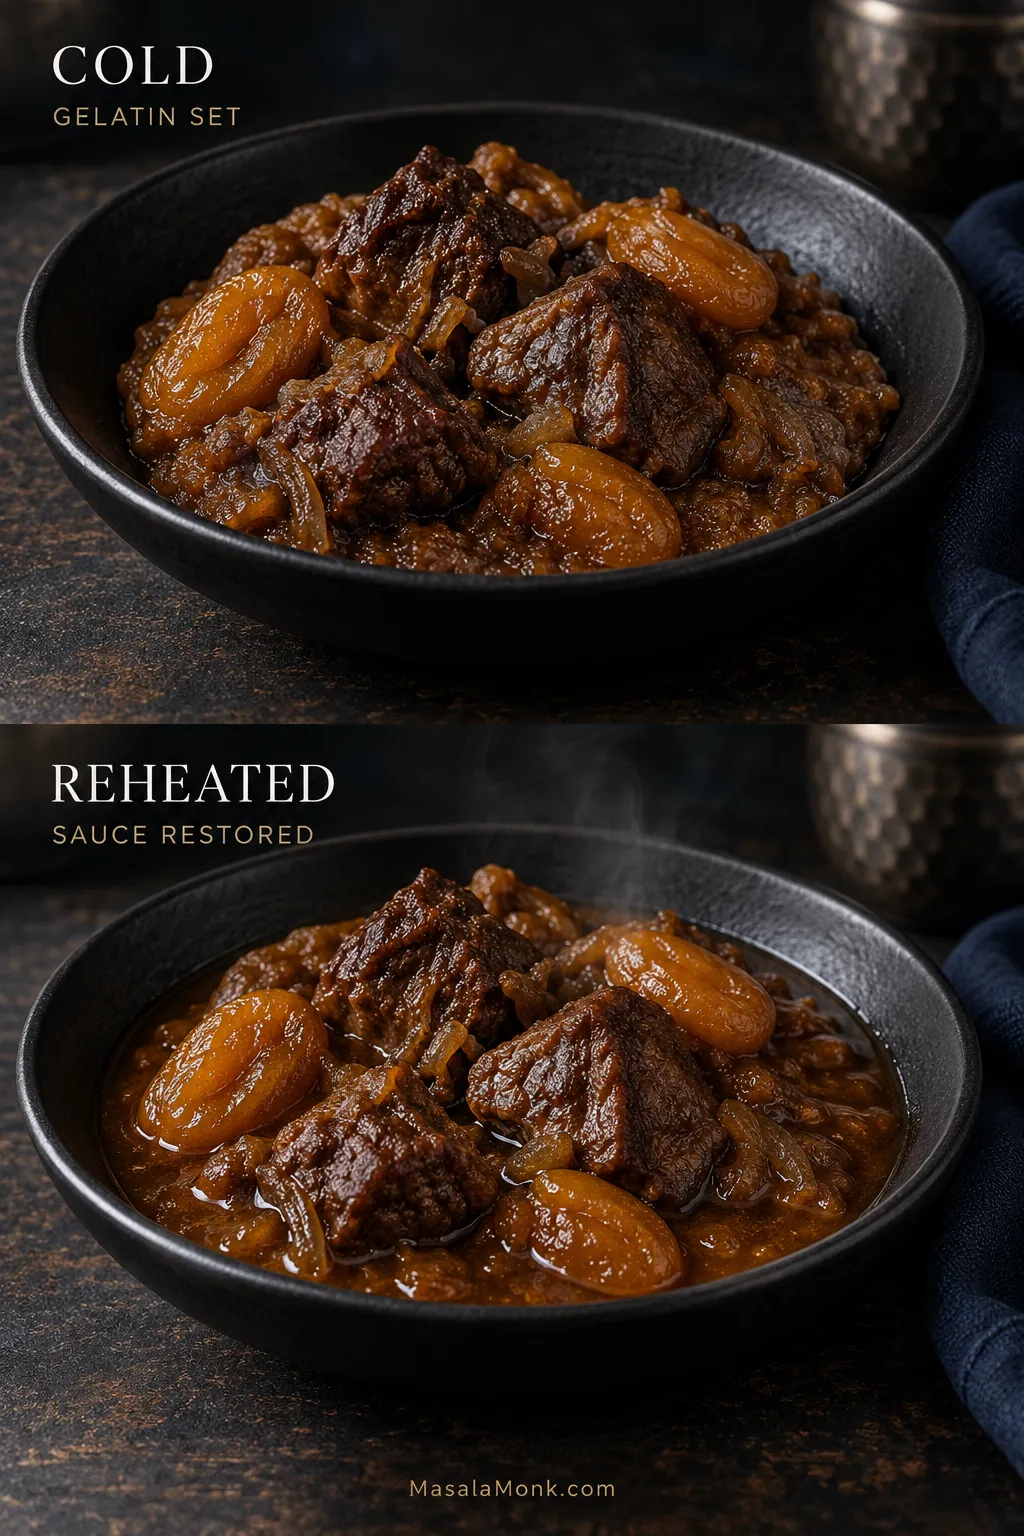
One last thing: a refrigerated tagine can look almost dry because lamb gelatin has set and the fruit is holding moisture. Give it heat before you give it stock. Much of the sauce returns as it warms.

Same bowl of lamb and apricot tagine shown cold with thick set sauce and reheated with looser glossy sauce and visible steam.
When reheating lamb tagine, judge the sauce by movement rather than shine. Cold gelatin can still catch the light and look moist even though it will not flow; once thoroughly hot, the sauce should move freely around the lamb again. Only after seeing that hot state can you tell whether refrigeration or reheating actually cost enough moisture to require extra liquid.

The useful moment to remember is not when the timer beeps. It is when you lift the lid, press a fork into one of the larger pieces and feel the lamb finally give. Lemon lifts the darker sauce, while the toasted almonds add a little crackle against all that softness.

Scatter over the cilantro, put bread within reach, and leave the serving spoon near the pot. The sauce at the bottom is worth going back for.

Posted on Leave a comment

Toum Recipe (Lebanese Garlic Sauce): Fluffy, Creamy & Garlicky

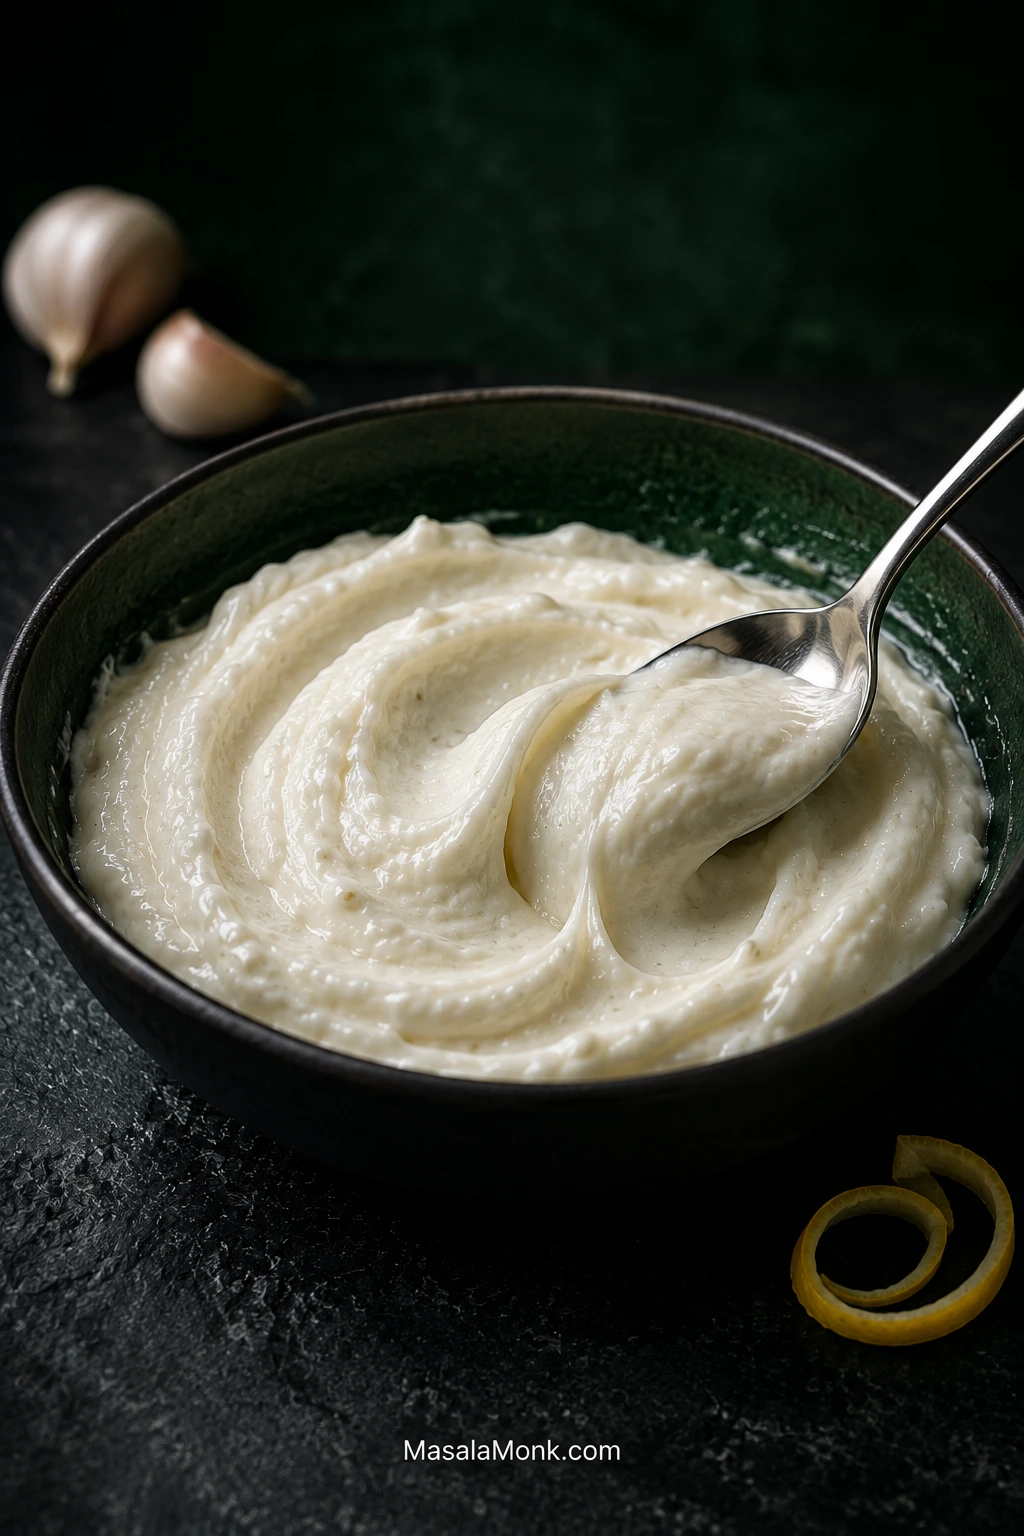
Bowl of pale, fluffy Lebanese toum with soft ridges and a spoon sweep, photographed on a dark stone surface against a deep green background.

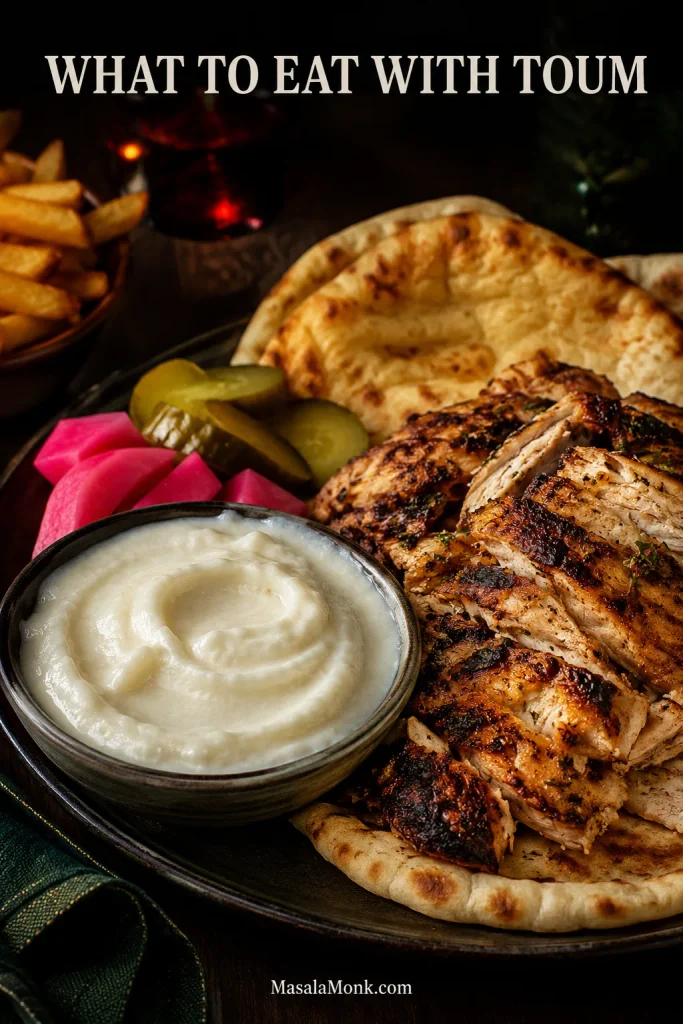
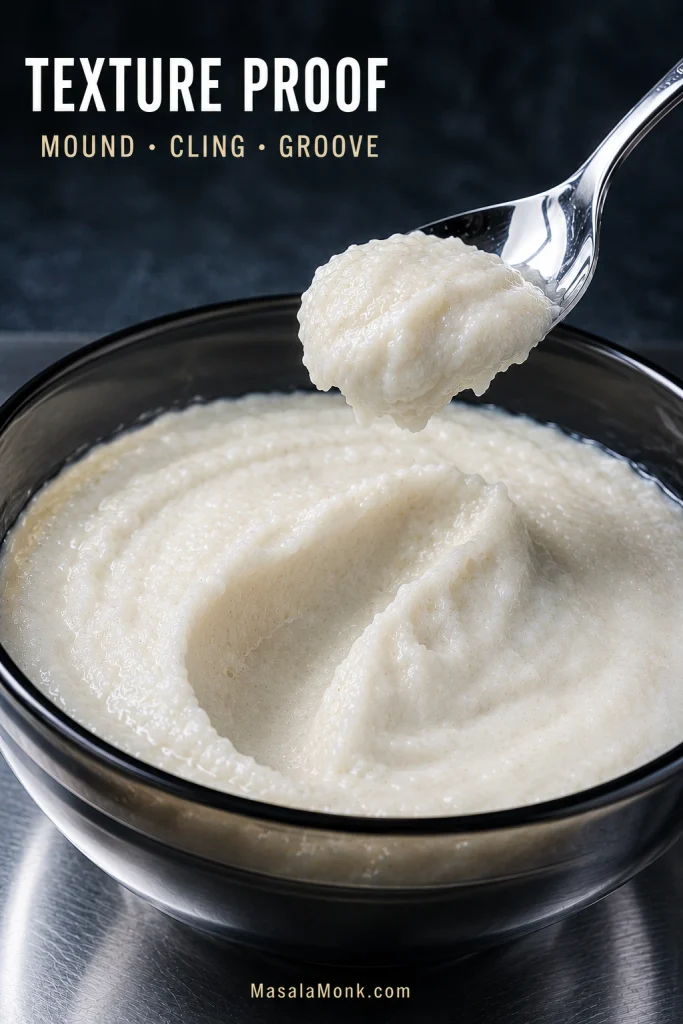
Toum, the fluffy Lebanese garlic sauce served with shawarma and grilled chicken, should look almost like whipped cream and smell unmistakably of garlic. Spoon it beside hot chicken shawarma and it holds its shape until a piece of warm pita drags through it. The first taste is raw garlic, softened by the richness of the oil and sharpened again by fresh lemon.

At its best, toum is remarkably light for a sauce made mostly from oil. It piles rather than pours, clings to bread and has enough punch to stand up to charred chicken, salty fries and sharp pickles.

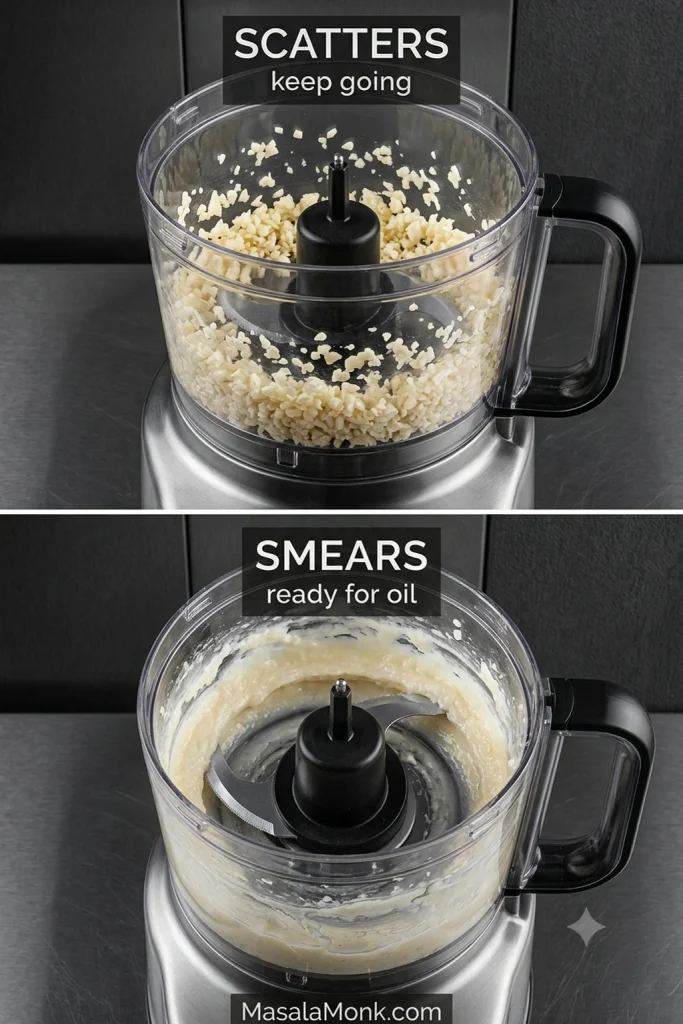
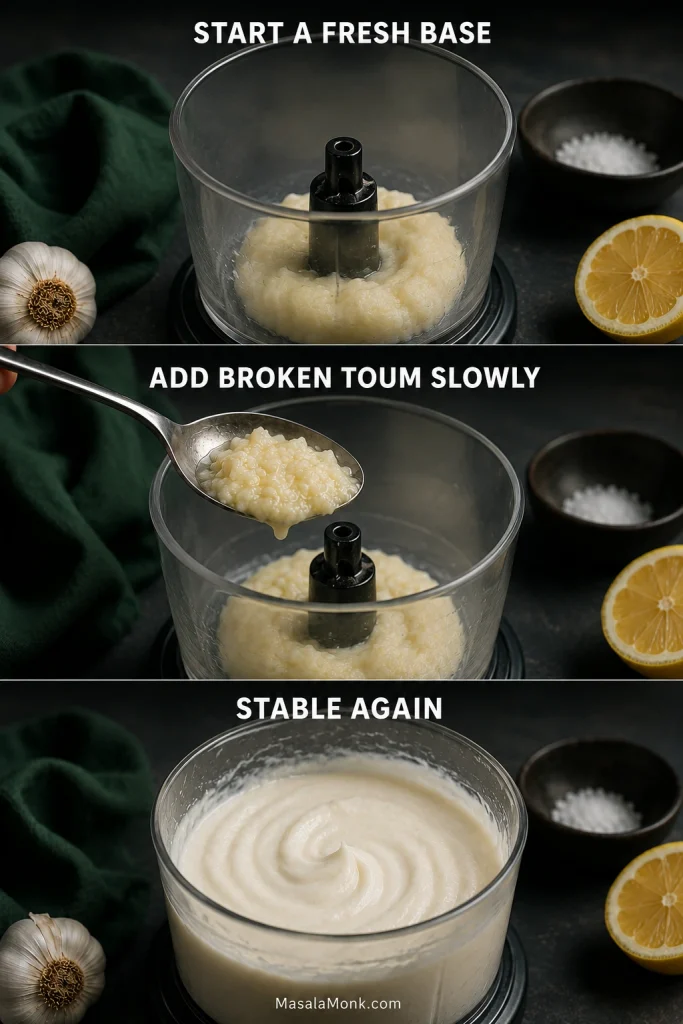
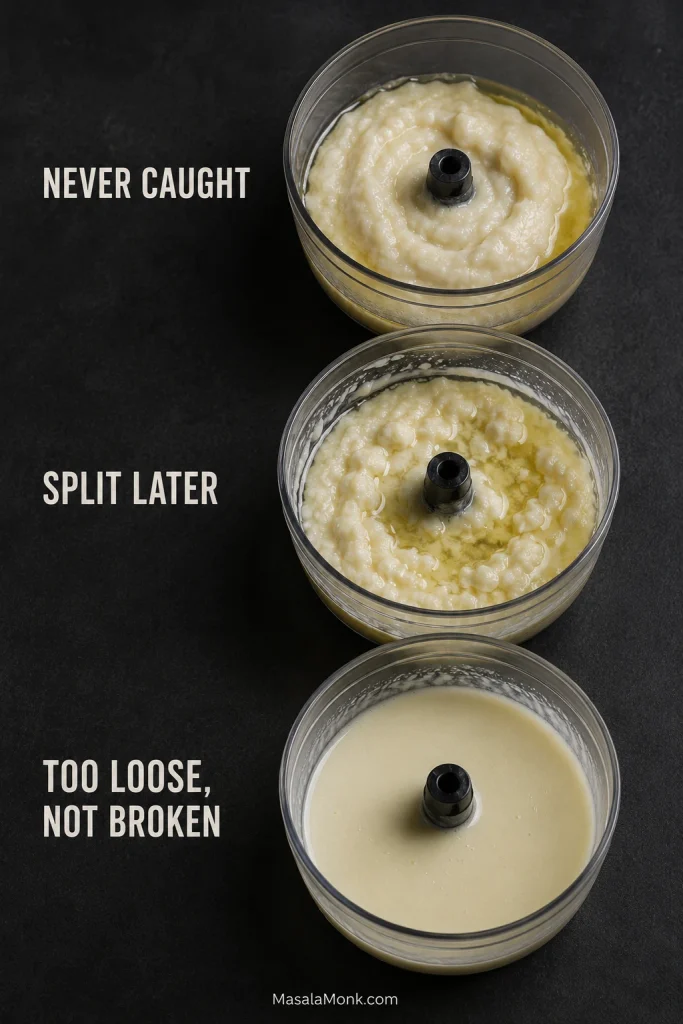
It can also be surprisingly temperamental. Sometimes the garlic never gets beyond finely chopped. Sometimes the first oil sits around it in a glossy puddle. And three cups of oil is a lot to watch separate in front of you.

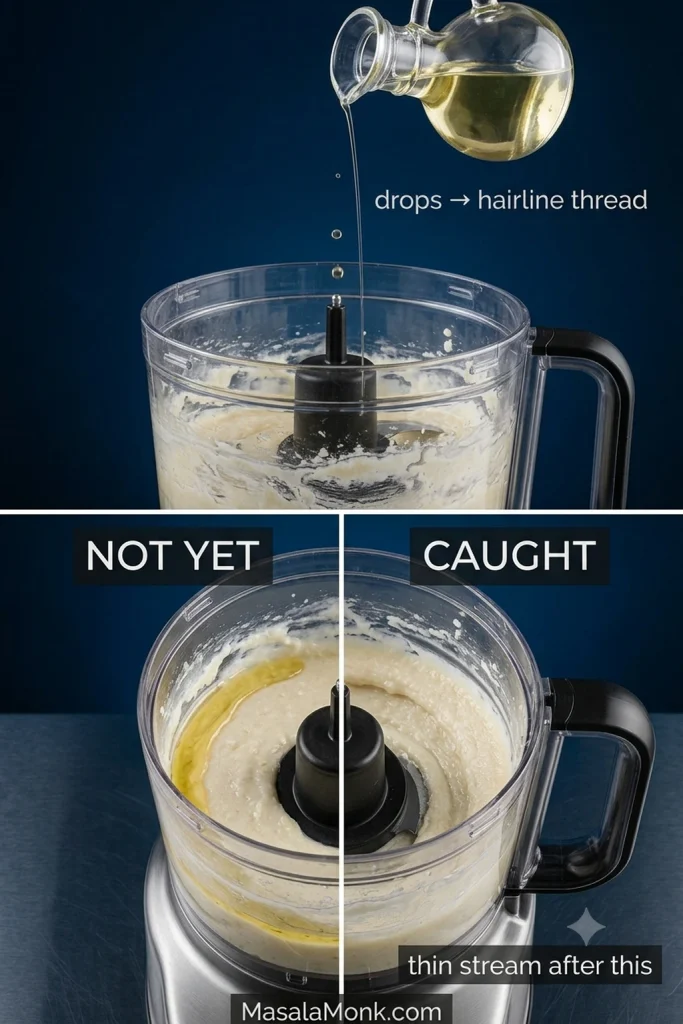
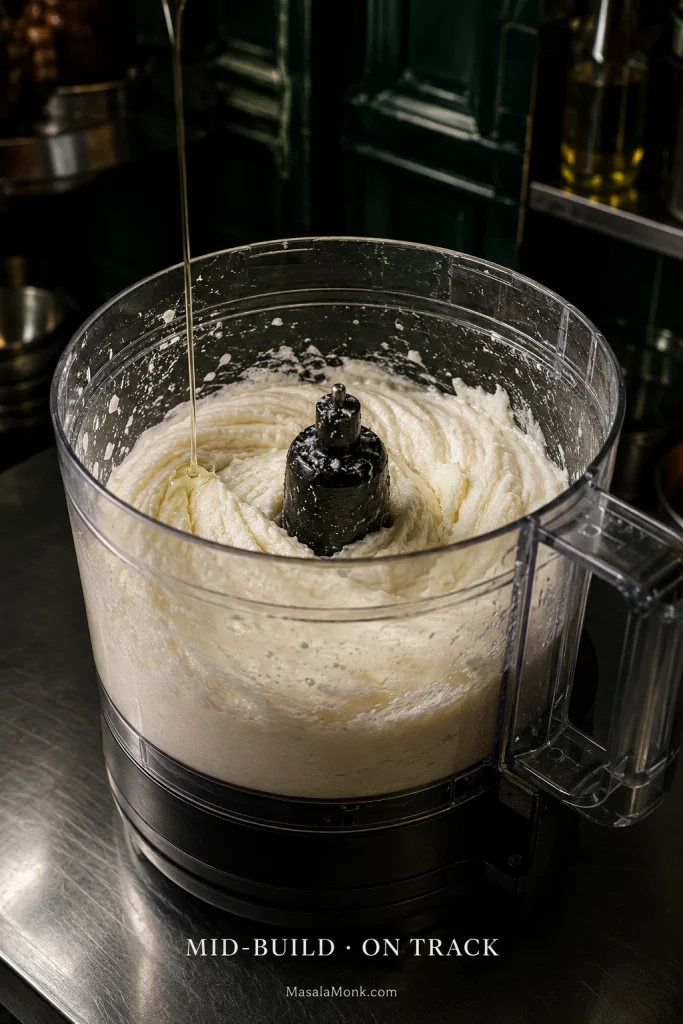
The beginning is where patience matters most. Once the garlic turns pale and creamy, the process becomes much more forgiving. If that change is not happening yet, pause while there is still very little oil to lose.

Make the Toum · Choose Your Equipment · Fix My Toum

Quick Answer: How to Make Toum

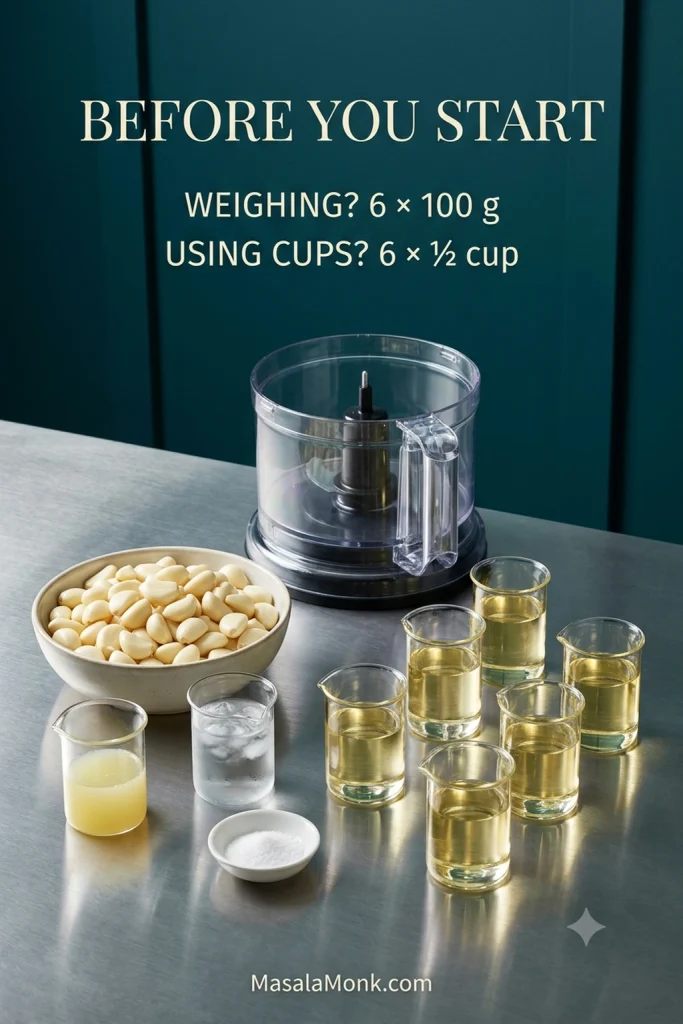
For classic food-processor toum, use 130 g / 4½ oz peeled fresh garlic, 600 g neutral oil (or 3 cups if measuring by volume), 60 g (60 ml / ¼ cup) freshly squeezed lemon juice, 60 g (60 ml / ¼ cup) ice water and 6 g salt.

Purée the garlic and salt until smooth, using the first half of the lemon juice to help it become a sticky paste. Begin the oil in drops and then the finest stream you can comfortably manage. The loose oily shine should start disappearing as the garlic turns pale and creamy.

Once that pale cream appears, you can relax a little. Keep the stream thin, alternate the early oil with the remaining lemon and the later portions with measured ice water, and let the sauce gradually build volume. Allow roughly 10–15 minutes for the oil addition.

Finished toum should be pale, fluffy and spoonable. Classic toum is naturally vegan and egg-free; the garlic itself helps hold the emulsion together.

If the first oil is still pooling around the garlic, pause there. This is the cheapest moment to fix the batch.

Choose Your Equipment

For this full recipe, use a standard food processor. What matters most is blade coverage: the garlic needs to sit where the blade can reduce it to a smooth, sticky paste. A smaller batch usually needs a smaller bowl.

EquipmentVerdict
Standard food processorRecommended. Best fit for the full recipe and a very light, fluffy result
Mini processor or small work bowlBest for scaling down. Keeps a smaller quantity of garlic within reach of the blade
Powerful immersion blender + narrow jarUseful small-batch alternative. Vessel and machine matter, and the result may be denser and less airy
Mortar and pestleTime-honored and effective, but considerably more laborious
Countertop blenderLast choice here. Often less forgiving and more likely to give a thinner, denser sauce
Food processor bowl showing how enough garlic must sit within reach of the blade for smooth toum.
The full batch gives a standard processor enough garlic to work with. For a half batch, a smaller bowl keeps the cloves where the blade can turn them into a smooth paste.

Make It Now: Toum

If dinner is already underway, this section is enough to make the sauce.

Recipe at a Glance

TimeAbout 20 minutes; add 15 minutes if using the optional garlic rest
YieldAbout 950 ml / 4 cups
Serving guideAbout 32 × 2-tablespoon portions
MethodFood processor
TexturePale, fluffy and spoonable

This makes roughly four cups. If you don’t need that much, freeze several small portions on day one or use the half batch below.

Ingredients

  • 130 g / 4½ oz peeled fresh garlic (about 1 cup)
  • 6 g salt (about 1 teaspoon fine/table salt or 2 teaspoons Diamond Crystal kosher salt)
  • 60 g freshly squeezed lemon juice (60 ml / ¼ cup), divided
  • 60 g ice water (60 ml / ¼ cup), divided
  • 600 g neutral oil (or 3 cups if measuring by volume), such as sunflower, grapeseed, canola or safflower

Garlic: choose firm, plump cloves. If an older clove has a clearly developed green germ, split the clove and remove it before weighing and processing. Dry, rubbery or heavily sprouted garlic is more likely to taste harsh or tired.

Split garlic cloves comparing a fresh clove with an older clove that has a developed green germ.
If an older clove has a pronounced green germ, remove it before weighing. The clove itself can still be used if it is firm rather than dry or rubbery.

Salt: another kosher salt may measure differently by volume. If you’re not using Diamond Crystal, trust the 6 g weight.

Oil: use something pale, mild and fresh. With this much oil in the bowl, any stale or assertive flavor will show.

Ice water: keeps the thickening sauce workable and helps give finished toum its lighter texture.

Can I Halve This Toum Recipe?

Yes. Use a mini processor or small work bowl for the quantities below; a full-sized bowl is usually too large to keep 65 g of garlic in the blade’s working zone.

For a half batch, use:

  • 65 g / 2¼ oz peeled fresh garlic
  • 3 g salt
  • 30 g lemon juice (30 ml / 2 tablespoons)
  • 30 g ice water (30 ml / 2 tablespoons)
  • 300 g neutral oil (or 1½ cups if measuring by volume)

Divide the oil into six 50 g portions if weighing or six ¼-cup portions if using volume. In the method below, every 100 g / ½-cup oil portion becomes 50 g / ¼ cup, and every 15 g / 1-tablespoon lemon or water addition becomes 7.5 g / 1½ teaspoons. Yield: about 2 cups.

Before You Start

Measure the lemon and ice water before switching on the processor. For the full batch, choose one system for the oil and stay with it: 600 g by weight or 3 cups by volume. If you are making the half batch, use the scaled quantities above.

For the full batch, divide the oil into six 100 g portions if weighing or six ½-cup portions if using volume. For the half batch, those become six 50 g portions or six ¼-cup portions. Set them beside the processor before you begin.

Toum ingredients arranged beside a food processor with neutral oil divided into six measured portions.
Six measured oil portions turn one long drizzle into manageable checkpoints. Set out the lemon and ice water too, so you can watch the emulsion instead of stopping to measure.

Using especially fierce garlic? After Step 1, let the finished garlic-lemon paste stand for about 15 minutes before beginning the oil. Use only the lemon already measured for the recipe; don’t add extra.

Keep the water cold, and give the processor a break later if the bowl starts becoming noticeably hot.

1. Turn the Garlic Into a Paste

Add the garlic and salt to the processor. Pulse until finely minced, scraping the sides and bottom several times.

Add 1 tablespoon / 15 g lemon juice and process again. Add another tablespoon, scraping as needed, until the garlic becomes smooth and sticky.

Watch how it moves. Properly puréed garlic smears rather than scatters when the blade passes through it. Keep going while obvious pieces remain.

Toum garlic preparation comparing coarse chopped garlic that scatters with smooth sticky garlic paste that smears.
Coarse garlic still jumps and scatters around the bowl; ready garlic leaves a sticky smear behind the blade. Don’t start the oil until the paste looks like the smoother example.

If you’re using the optional 15-minute lemon rest for especially pungent garlic, pause here before beginning the oil.

2. Catch the First Emulsion

With the processor running, begin adding the first 100 g / ½ cup oil portion.

Start with drops, then move to the finest thread you can comfortably maintain. These opening additions deserve more patience than the oil that comes later.

Watch the surface. The glossy wet look should begin disappearing as the garlic turns paler and creamy.

Early toum emulsion comparison showing separate pooling oil beside garlic paste and the first pale creamy emulsion.
This is the change to wait for: separate oil gives way to a pale, creamy base. If you still see a glossy puddle, pause before adding more oil.

Then the bowl changes quickly. Soft ridges begin following the blade, and the oil seems to disappear into the pale sauce. The transformation looks almost improbable: raw garlic and a stream of oil suddenly behaving like something whipped.

Once you see that change, the most fragile part is behind you. Oil still pooling is your cue to pause. Make sure the garlic is genuinely smooth before adding more.

Finish that first oil portion, then blend in 1 tablespoon / 15 g lemon juice.

3. Build the Toum

Add the second 100 g / ½ cup oil portion in a thin stream. The toum should stay creamy as the bowl fills. Blend in the final 1 tablespoon / 15 g lemon juice.

Add the third 100 g / ½ cup oil portion, then 1 tablespoon / 15 g ice water.

Repeat with each of the remaining three oil portions, adding 1 tablespoon / 15 g ice water after each one. By the end, all six oil portions and all the measured ice water should be in the bowl.

The sauce grows paler and fuller with each round. The processor often sounds different too, its blade now pushing through a thick, airy sauce instead of a wet garlic purée.

Pale toum building in a food processor with soft ridges forming as the emulsion gains volume.
As the emulsion builds, the sauce rises higher on the bowl and soft ridges follow the blade. That fuller, airier movement is a better checkpoint than the clock.

If your processor pusher has a small hole for dripping liquid, use it to meter the oil into a fine stream.

4. Watch the Heat

Touch the bowl occasionally. Slight warmth is fine. If the machine becomes noticeably hot, give it a short rest before continuing.

The active method commonly takes around 20 minutes; the optional garlic rest adds 15 minutes. Treat those times as orientation rather than a deadline—the sauce in front of you tells you more than the clock.

5. Finish by Texture

Finished toum should be pale ivory to white and airy enough to mound on a spoon. There should be no greasy ring around the bowl, and it should feel rich without eating like straight oil.

The Spoon-Groove Check

Drag a spoon through it. The groove should stay visible briefly. Lift the spoon or spatula and the toum should cling instead of sliding straight off.

Finished toum lifting in a soft mound on a spoon while a defined groove remains visible in the bowl.
Finished toum should mound softly, cling to the spoon and hold a shallow groove. A greasy ring or free oil around the edges points to a different problem.

Fresh toum can taste especially fierce straight from the processor. When the texture is right, chill it before making large flavor adjustments.

Recipe Notes

  • Weigh the garlic. Bulbs and cups vary more than they appear to.
  • Measure the lemon. “One lemon” can produce a very different amount of juice from one fruit to another.
  • Watch the opening emulsion. Pale cream forming around the early oil additions matters more than an exact number of seconds.

Cooking right now? You have what you need. If the texture went wrong, jump straight to troubleshooting. Using a stick blender instead? Go to the immersion-blender guidance. If the batch worked but tastes fiercer, heavier or less like your favorite shawarma-shop sauce than expected, keep reading—the garlic, oil and even the sauce you’re comparing it with may explain why.


What Is Toum?

Toum (pronounced TOOM) simply means garlic in Arabic. The sauce is closely associated with Lebanese and wider Levantine cooking, especially alongside grilled chicken, shawarma, kebabs, potatoes and bread.

Although it looks a little like mayonnaise, classic toum gets its thick, whipped texture without mayo, cream or yogurt. Pulverized garlic helps hold the oil together with lemon and water. On a mezze-style spread, it can sit beside extra-creamy hummus, pickles and salads while bringing a much sharper garlic bite.

Toum and aioli aren’t the same sauce. If what you want is the quick mayo-based garlic aioli common in many modern kitchens and restaurants, our Garlic Aioli Recipe is the easier route. Classic toum is egg-free, lighter on the spoon and far more assertively garlicky.

The Garlic Changes the Batch

Two similar-looking bulbs can produce surprisingly different toum. Raw garlic varies considerably in heat, and using 130 g removes at least the quantity guesswork. Measuring by volume is less predictable because a tightly packed cup can contain much more garlic than a loosely filled one.

Toum also pulverizes raw garlic far more thoroughly than most dishes do, bringing out a great deal of its pungency. Heat takes garlic in another direction: in something like garlic mashed potatoes, cooked garlic becomes sweeter and softer instead of sharp.

Freshness matters too. An older clove with a well-developed green germ can taste harsher, which is why the recipe removes an obvious germ before the garlic is weighed and processed. Plump pre-peeled garlic can also work as a practical shortcut, though fresh whole heads remain the first choice.

Especially fierce garlic can be mellowed before the oil goes in. The optional 15-minute rest with the lemon juice already incorporated in Step 1 gives the raw garlic time to soften somewhat without cooking it.

Blanching can reduce raw garlic heat too, but it can also weaken the properties toum relies on to emulsify. That’s why it isn’t built into this formula.

What Is the Best Oil for Toum?

Use sunflower, grapeseed, canola or safflower oil. All four are mild enough to fade into the background while garlic and lemon stay in charge.

OilOur take
SunflowerBest all-round choice: mild, pale and clean
GrapeseedVery neutral; lets garlic and lemon dominate
CanolaMild, economical and easy to find
SafflowerClean and unobtrusive
Avocado oilWorks, but offers little advantage here and may tint the sauce
Extra-virgin olive oilSkip for classic pale toum: stronger flavor, darker color and possible bitterness after vigorous blending

A perfect emulsion can still taste wrong. Heavy, oily or bitter toum puts the oil itself under suspicion.

Can You Make Toum With an Immersion Blender?

Yes, but it isn’t the preferred tool for the fluffy food-processor formula above. A powerful immersion blender can work well for smaller batches in a narrow vessel, but machine power, vessel shape and the formula all matter. The finished toum may be denser and less airy than a food-processor batch.

Keep the blender head low while the first white emulsion forms, then raise it gradually so the oil above is pulled into the sauce. A jar that fits fairly closely around the blender head gives a small batch a much better chance than a wide container.

Immersion blender held low in a narrow jar as a small batch of toum begins emulsifying around the blade.
A narrow jar keeps a small batch around the blender head. Hold the blade low until a white emulsion forms, then begin raising it gradually through the mixture.

Think of it as a useful small-batch alternative, not an interchangeable substitute for the method above.

What Went Wrong With My Toum?

“Runny” can describe several different problems. Start with the moment the texture changed.

Three toum troubleshooting states showing an emulsion that never caught, one that split later, and a loose but intact sauce.
These three “runny” sauces are not the same failure: oil that never incorporated, a later split, and a pale but intact loose emulsion need different fixes.
What you seeLikely problemNext move
Garlic bouncing around the bowlBatch too small for the bowlMove to a smaller processor
Oil pooling from the beginningFirst emulsion never caughtPause before adding more oil
Creamy at first, then glossy and liquidEmulsion splitStop pouring and re-emulsify
Pale and smooth but softLoose rather than brokenLook for actual oil separation
Very thick, but no oil separationSauce is holding wellFinish the measured water; thin later if needed
GrainyGarlic paste too coarseImprove the paste stage next time
Texture looks right, but flavor is harshIngredient or flavor issueSee the flavor notes below
Perfect at first, oily laterSeparated during storageRe-emulsify if needed
Processor becoming hotHeat building in the machinePause and cool

Go straight to the symptom: Never emulsified · Split later · Rescue broken toum · Too thick or grainy · Flavor problem

When the Emulsion Never Starts

Garlic ricocheting around the processor usually means the machine isn’t catching enough of it. Move to a smaller bowl if repeated scraping doesn’t solve the problem.

A smooth paste with oil still pooling around it points to the pour. Those opening additions need to enter in drops or a very fine thread. Wait for pale cream before committing the remaining oil.

When It Starts Well and Then Splits

A sauce that was creamy and then suddenly becomes glossy or watery did form an emulsion; it later lost stability. Oil arriving too quickly is a common culprit. Excess heat or a sudden large splash of liquid can contribute too.

Once you see clear separation, stop the pour. Harder blending and more oil rarely make a broken toum happier.

How to Rescue Broken Toum

When the broken mixture already tastes good and you want to keep it egg-free, start a small fresh garlic base and gradually emulsify the failed toum into it.

  1. Purée 2–3 fresh garlic cloves with a small pinch of salt in a mini processor or very small blender cup. Two or three cloves are usually too little for a standard food-processor bowl.
  2. Add only a spoonful of the broken toum at first, extremely slowly.
  3. Wait for a fresh creamy emulsion to form.
  4. Once that base looks stable, feed in the remaining broken mixture in a fine stream.
Broken toum rescue sequence showing a fresh garlic base, gradual addition of broken sauce, and a stable pale emulsion.
The rescue happens in stages: make a tiny fresh garlic base, add one spoonful of the broken sauce, wait for creaminess, then feed in the rest slowly.

Treat the broken toum like the oil in a brand-new emulsion: add it slowly to the fresh base, never the other way around.

A batch that is already painfully garlicky may not benefit from another few raw cloves. One vegan rescue is to start with about ⅓ cup aquafaba and slowly feed the broken toum into it. When eggs are acceptable, egg white is another effective fresh base.

Rescue is optional. Broken toum still makes a terrific garlic-lemon marinade, vinaigrette base or coating for roasted potatoes and vegetables. It can go into pasta too. The texture failed; the ingredients did not become useless.

Too Thick or Grainy

Very thick toum can mean the sauce is holding beautifully. Finish the recipe’s measured ice water first. A stable sauce can then be loosened with additional cold water, 1 teaspoon at a time, if you want it softer.

Graininess points back to the beginning: the garlic probably never became smooth enough. Improve the paste before changing anything about the oil.

The Texture Is Right, but the Flavor Isn’t

Too strong or burning. Correct texture means the emulsion itself probably isn’t the problem. Garlic varies enormously in pungency; see The Garlic Changes the Batch before changing the formula.

Bitter. Older sprouting garlic can taste harsher, while strongly flavored extra-virgin olive oil may add its own bitter edge after heavy blending.

Too lemony. This is why measuring 60 g / ¼ cup is safer than using “one lemon.” Let the toum chill before adjusting. A stable emulsion can take a little more neutral oil slowly if you genuinely want to soften the acidity.

It Looked Perfect and Separated Later

Sometimes toum looks beautiful when it goes into the refrigerator and shows a ring of oil later. The emulsion formed, but it proved unstable during storage.

Visible separation can be repaired using the same rescue principles above. Spoon out only what you need and return the rest to the refrigerator.

Why Restaurant Garlic Sauce May Taste Different

You may not have made your toum incorrectly. The shawarma shop may be serving a different garlic sauce.

Toum is a garlic sauce, but not every white “garlic sauce” served with shawarma is classic toum. Restaurant and family versions may use egg white, starch, mayonnaise, yogurt or labneh, citric acid or other stabilizers. Those changes can create something softer, milder, denser or more mayo-like.

If your toum is fluffy and properly emulsified yet still doesn’t match the sauce you remember, the recipe may be doing exactly what it is supposed to do.

What to Eat With Toum

Toum comes alive beside food that is hot, browned and savory.

With shawarma or shish tawook, add pickles and soft homemade pita bread. Pink pickled turnips are particularly good here: sharp, crunchy and bright against the white sauce and browned chicken. Hot chicken, cold toum, chewy bread and something pickled make a much more interesting bite than any one part does alone.

Lebanese toum served with charred chicken shawarma, warm pita and bright pink pickled turnips.
Keep toum cold and serve it beside hot grilled food. The temperature contrast keeps the garlic bright and the sauce thick enough to cling to each bite.

Kebabs and other grilled meats work just as well. A charred edge dragged through cold garlic sauce rarely needs much embellishment.

Then there are potatoes. Hot crispy homemade French fries dipped straight into a mound of toum may be the fastest route through an open container, with roast potatoes close behind.

For a meat-free plate, add homemade falafel, vegetables, pickles and warm bread. A parsley-heavy tabbouleh brings enough lemon and fresh herb to cut through the richness.

Toum also works beyond the dipping bowl. Whisk a spoonful into lemon juice for dressing, spread a thin layer inside sandwiches and wraps, or work it into a marinade for chicken or roasted vegetables.

Made a big batch? Storage & freezing · Back to the toum recipe

Make Ahead, Storage & Freezing

Refrigerate freshly made toum promptly in a clean airtight container at 4°C / 40°F or colder. Published toum recipes vary widely on refrigerator life, but there is no validated food-safety guidance for this exact homemade emulsion that can confidently be applied to every batch.

Public-health guidance for homemade garlic-in-oil preparations uses a four-day refrigerated limit, so this recipe uses the same deliberately conservative 4-day limit. Toum is not identical to plain garlic-in-oil; the CDC and the National Center for Home Food Preservation are included as the conservative food-safety reference point, not as toum-specific shelf-life studies.

Freezing is practical, but expect some loss of texture. Toum may thaw only a little looser, or the emulsion may separate more noticeably. Freeze it in small portions and thaw in the refrigerator. Stir well first; if necessary, use the same re-emulsification principles described above.

Toum storage guide showing refrigerated sauce, small freezer portions and a thawed portion ready to stir.
Freeze extra toum in small portions rather than one large container. They thaw faster and are easier to stir or re-emulsify individually if the texture changes.

If a thawed portion won’t return to its original fluffiness, it still has plenty of value. Use it in marinades, dressings, roasted vegetables or other dishes where perfect whipped texture no longer matters.


When the Bowl Turns White

There is a satisfying point halfway through making toum when the bowl stops looking like garlic and oil and becomes pale, thick and almost cloud-like.

That is the part worth remembering next time. The exact number of seconds matters less than recognizing what the sauce looked like when the first emulsion caught.

Then give it somewhere worthwhile to go: hot chicken, warm bread, fries, grilled vegetables, sharp pickles.

If you make it, tell us what machine you used and what the toum looked like during the first oil additions. If something went wrong, tell us when the texture changed. Those details make a failed batch much easier to understand—and may help the next cook staring into the same bowl.

↑ Back to top · Make the Toum · Troubleshooting

Posted on Leave a comment

Chicken Shawarma Recipe: Juicy, Spiced & Easy to Make at Home

Sliced chicken shawarma with browned, slightly charred edges and juicy interiors, served with garlic sauce, pink pickled turnips and blistered pita.

Great chicken shawarma gives you two things at once: juicy, deeply spiced chicken and dark edges that taste almost fried in their own rendered fat.

Those edges are usually the difficult part at home. The seasoning can be wonderful, yet the chicken comes out pale and soft—or it stays in the oven so long waiting for color that the meat dries out.

This chicken shawarma recipe handles the two jobs separately. Cook the thighs while they are still juicy. Rest them, slice them thinly, then give the newly exposed surfaces one short blast of hard heat.

Most of the work is hands-off. After the chicken is seasoned, the oven handles the first cook and the final browning takes only a few minutes. No homemade rotisserie required.

Cook for juiciness. Finish for the edges.

Quick Answer: How to Make Chicken Shawarma at Home

Coat 2 lb / 900 g boneless, skinless chicken thighs in a concentrated lemon-garlic shawarma marinade and roast at 425°F / 220°C. Start checking the thickest thigh at 18 minutes. Poultry is safe at 165°F / 74°C, while thighs often become more tender as they move toward roughly 170–175°F / 77–79°C. Rest for 5 minutes, slice thinly, then broil or sear briefly until the fresh edges darken.

Thirty to 60 minutes of marinating gives you good surface seasoning; a few hours is useful when you’re planning ahead. No time to wait? Coat the chicken thoroughly and cook it.

Cooked-but-pale chicken is easy to rescue. Dry chicken is not.

The finished chicken should smell garlicky and savory, with cumin up front and warmer cardamom and allspice behind it. Look for juicy pieces, irregular caramelized edges and a few darker tips.

Choose Your Cooking Method

MethodBest for
OvenThe easiest full batch
SkilletStrong stovetop browning
GrillSmoke, flame and direct char
Air fryerSmaller quantities

Make It Now: Chicken Shawarma

The method is simpler in the kitchen than it looks on paper: season the thighs, roast them, rest and slice, then give the edges one quick finish.

Recipe at a Glance

Chicken2 lb / 900 g boneless, skinless chicken thighs
Yield5–6 medium wraps, or about 6 servings with substantial sides
Active prepAbout 15 minutes
Start to servingAbout 45 minutes without a marinating rest; add your chosen marinating time
Marinate30–60 minutes when possible; several hours or overnight is fine
Oven425°F / 220°C
RoastBegin checking at 18 minutes; expect roughly 20–25 minutes
FinishRest 5 minutes, slice, then broil until the edges darken; 1–3 minutes is common

With the chicken in the oven, you have roughly half an hour of dinner-making left. Mix the sauce, warm the bread and get the fillings ready while it cooks.

Before You Start

Use a 13 × 18-inch / 33 × 46 cm broiler-safe rimmed metal sheet pan. Thighs that are dripping wet straight from the package benefit from a light blot before marinating; you’re only removing the obvious excess liquid.

The full 2 lb / 900 g batch should fit in one open layer. If it doesn’t, use a second pan. Tight packing makes it much harder for moisture to escape.

Equipment

  • Large mixing bowl or food-safe container
  • Broiler-safe rimmed metal sheet pan
  • Tongs
  • Sharp knife and cutting board
  • Instant-read thermometer
  • Heavy skillet, optional

Ingredients

For the Chicken

  • 2 lb / 900 g boneless, skinless chicken thighs
  • 3 tablespoons / 45 ml olive oil
  • 2 tablespoons / 30 ml fresh lemon juice
  • 4 large garlic cloves, finely grated or crushed
  • 2 teaspoons ground cumin
  • 2 teaspoons ground coriander
  • 2 teaspoons sweet paprika
  • 1 teaspoon ground turmeric
  • 1 teaspoon ground black pepper
  • 1 teaspoon ground allspice
  • ½ teaspoon ground cardamom
  • ¼ teaspoon ground cinnamon
  • ¼–½ teaspoon cayenne pepper, depending on the heat you want
  • 10 g fine salt, about 1⅔ teaspoons if using fine table salt

About the salt: coarse and kosher salts vary considerably by volume, so 10 g is the more dependable measurement.

Three portions of fine, medium and coarse salt, each weighing 10 grams but occupying different amounts of space.
Ten grams stays ten grams even when different crystal sizes fill the spoon differently. Weight is the reliable anchor.

Sweet or regular paprika works best here. Too much smoked paprika starts pulling the chicken toward barbecue territory.

Trim large loose pieces of thigh fat, but leave the smaller seams attached. They help the meat stay moist and become especially good around the browned edges.

Quick Garlic Yogurt Sauce

  • 1 cup / 240 g thick Greek yogurt
  • 1 small garlic clove, very finely grated
  • 1 tablespoon / 15 ml fresh lemon juice
  • 1 tablespoon / 15 ml olive oil
  • ½ teaspoon fine salt, or to taste
  • 1–2 tablespoons / 15–30 ml cold water, as needed

For the Wraps

  • 5–6 medium flatbreads or pitas; homemade pita bread is another option
  • About 1 cup garlic yogurt sauce or toum
  • ½–1 cup sliced sour cucumber pickles or pickled turnips
  • Fries, optional
  • Chili sauce or shatta, optional
  • Lettuce, tomato, cucumber and thinly sliced onion, optional for a fresher wrap

How to Make Chicken Shawarma

1. Mix, Coat and Marinate

Combine the olive oil, lemon juice and garlic in a large bowl. Stir in the cumin, coriander, paprika, turmeric, black pepper, allspice, cardamom, cinnamon, cayenne and salt.

Add the thighs and turn them until the spices coat every side. The surface should look glossy and well seasoned, with very little loose liquid underneath.

Three marinated chicken thigh examples labeled runny, too heavy and right, showing loose liquid, thick paste and a thin clingy spice coating.
The useful target is a glossy coating on the chicken, not marinade pooling underneath it.

Cover and refrigerate for 30–60 minutes, a few hours or overnight. There isn’t much to gain by pushing this lemon-based marinade past about 24 hours. If dinner needs to happen now, continue straight to cooking.

2. Heat the Oven and Arrange the Chicken

Heat the oven to 425°F / 220°C with a rack in the middle.

Lift the thighs from the bowl, let the obvious excess marinade drip back and arrange the pieces in a single open layer.

Two sheet pans of marinated chicken thighs showing a crowded arrangement and a properly spaced arrangement on a 13 by 18 inch pan.
If you cannot see metal between the thighs, use a second pan. Extra oven time cannot replace evaporation space.

A bare metal pan gives the most direct heat. Parchment is fine for easier cleanup during roasting, but remove it before broiling. Keep silicone and other non-broiler-safe liners away from intense overhead heat.

3. Roast the Chicken and Make the Sauce

Begin checking the thickest thighs at 18 minutes. Depending on their size and your oven, expect roughly 20–25 minutes.

Check the thickest part of the largest piece with an instant-read thermometer. Poultry is safe at 165°F / 74°C. Thighs often become more tender as they move into roughly the 170–175°F / 77–79°C range, so a few degrees beyond the safety minimum aren’t a problem.

Instant-read thermometer inserted into the thickest part of a lightly browned cooked chicken thigh on a sheet pan, reading 170 degrees Fahrenheit.
Color answers a surface question; the thermometer answers the center. Don’t keep cooking juicy chicken just to chase browning.

When the thighs are safely cooked and tender, get them out of the oven. A pale surface isn’t a reason to keep the center cooking—the color gets another chance in a few minutes.

Meanwhile, mix the yogurt, garlic, lemon juice, olive oil and salt. Add cold water a tablespoon at a time until the sauce is creamy and easy to spoon, then refrigerate until serving.

4. Rest, Check the Pan and Slice

Move the thighs to a cutting board and rest for 5 minutes. Switch the oven to the broiler, or overhead grill.

Take a look at the pan while the chicken rests. A thin glossy film of rendered fat and concentrated juices is useful. An obvious pool of watery liquid is different; carefully spoon or pour that off before the chicken goes back.

Two sheet pans comparing glossy amber rendered fat and concentrated juices with a paler watery pool around cooked chicken thighs.
Tilt the tray: concentrated fat and juices move with a glossy, heavier sheen; excess cooking water runs thin and fast.

Slice into strips about ¼ inch / 6 mm thick. They don’t need to match perfectly.

Cooked chicken thigh being sliced into roughly quarter-inch pieces, showing moist freshly cut surfaces and a 6 millimeter thickness marker.
About ¼ inch / 6 mm keeps a juicy bite while exposing plenty of surface for browning.

5. Brown the Fresh Edges and Taste

Spread the slices across the pan instead of leaving them in a mound. Place the pan about 6 inches / 15 cm below the broiler; move it down one rack if your top position sits much closer.

Sliced chicken spread in one layer on a sheet pan positioned about 6 inches below the glowing broiler element in an oven.
Six inches / 15 cm is a starting point, not a promise. Watch the edges, not just the clock.

Start checking after about 1 minute. A 1–3 minute finish is common, but let the chicken decide: stop when some edges curl and darken while the thicker pieces still look juicy.

Extreme close-up of chicken shawarma showing a dark curled browned edge, caramelized spice crust and moist cooked interior.

Listen as well as look. Once the sliced chicken starts sizzling sharply instead of sitting quietly in moisture, you’re finally working on the edges.

A hot heavy skillet can do the same job. Work in batches for about 60–90 seconds so the pan stays hot.

Taste a piece before building the wraps. It should be well seasoned enough to hold its own next to bread and sauce. Flat? Toss the hot chicken with a small pinch of fine salt and taste again.

6. Warm the Bread and Set Out the Fillings

Warm the pita or flatbread until soft and flexible. Set out the cold sauce, pickles and whatever fries, chili sauce or fresh vegetables you’re using.

7. Build the Wrap

Spread sauce over the bread, add a line of hot chicken and follow with pickles plus any fries or vegetables you want. Roll firmly.

Set the wrap seam-side down in a dry skillet for 30–60 seconds. Turn it briefly if you want a little crispness on the second side too.

Hot chicken, cool garlic sauce, soft bread and a sharp pickle all bring something different to the same bite.

Cut chicken shawarma wrap filled mainly with browned chicken thigh slices, garlic sauce, pink pickles and a small amount of fries in thin flatbread.
Chicken should dominate the wrap; sauce and pickles sharpen it rather than bury it.

Recipe Notes

  • Doubling the recipe? Use two half-sheet pans so the chicken still has room around it.
  • Freezer prep: fresh chicken can be frozen promptly in the marinade and thawed overnight in the refrigerator before cooking.
  • Raw-chicken marinade: don’t use marinade that has touched raw poultry as a ready-to-eat sauce.

Want the why behind the method? Continue to the Chicken Shawarma Guide → · ↑ Back to top


Chicken Shawarma Guide

If dinner is already underway, everything you need is above. The rest explains why the method works and what to do when the chicken in front of you isn’t behaving quite as expected.

What Is Chicken Shawarma?

Chicken shawarma is a Middle Eastern preparation in which seasoned meat traditionally cooks on a vertical rotating spit. The exposed surface darkens and sizzles first. That browned layer is shaved away for serving, revealing another juicy surface to the heat.

A tray of chicken gets one exterior; a shawarma stack keeps creating new ones. That repeated cycle helps explain how freshly shaved shawarma can have so many browned edges while the meat underneath remains juicy.

A sheet pan can’t duplicate a vertical rotisserie, but the same idea gives us a useful home method. Keep the thighs in larger pieces for the first cook, then slice them to expose fresh surfaces that can brown quickly.

Cooked boneless chicken thighs progressing from whole pieces to slicing, freshly exposed cut surfaces and browned shawarma slices.
Slicing after the first cook creates fresh surfaces that can brown quickly without overcooking the whole thigh.

Chicken Shawarma Marinade: Get the Coating Right

A good chicken shawarma marinade combines oil, lemon, garlic and warm spices in a concentrated coating that clings to the meat without leaving it swimming in liquid.

The spices get most of the attention, but the wet ingredients decide whether they cling to the chicken or collect in the pan.

Coat Rather Than Soak

Marinade running freely off the thighs? Leave the loose excess in the bowl. Thick ridges sitting on the meat need smoothing away. What you’re after is a glossy, clingy coating.

Do You Need Yogurt?

No. Plenty of excellent shawarma recipes use yogurt, but you don’t need it here. Yogurt changes the tang, tenderness, spice adhesion and surface moisture; the lighter oil-and-lemon coating keeps this home method straightforward and the later browning easier to manage.

How Long Should It Marinate?

TimeWhat to expect
No restLess developed seasoning, but completely workable
30–60 minutesGood surface seasoning
2–3 hoursA useful longer rest when you’re planning ahead
8–12 hoursA convenient make-ahead window
OvernightCompletely practical
Beyond about 24 hoursNot much to gain with this marinade

That roughly 24-hour recommendation is about how this marinade behaves. For the wider safety limit, the USDA says poultry can marinate in the refrigerator for up to two days.

Ready to cook? Go to Step 2: Heat the Oven and Arrange the Chicken →

Thighs or Breast?

Chicken thighs are the easier route to juicy shawarma because their extra fat gives you more room around high heat. Breast works too, but it needs a lighter touch.

Cooked sliced chicken thigh beside sliced chicken breast, with the thigh darker and more irregular and the breast paler and more uniform.
ThighsBreast
JuicinessStays moist more easilyLeaner
Best shapeLarger boneless piecesThin cutlets
DonenessWider doneness windowMore sensitive to extra cooking
High-heat finishHandles it wellKeep it short
ReheatingHolds up betterEasier to dry

For breast, slice thick pieces horizontally into cutlets about ½ inch / 1.25 cm thick. Once it’s done, get it out of the heat. Rest, slice and keep the final browning stage short.

If breast is what you cook most often, this baked chicken breast method has more detail on thickness and doneness.

What Gives Shawarma Its Flavor?

Cumin and coriander form the savory backbone; paprika and turmeric bring warm color and earthiness, while garlic and black pepper sharpen the base. Cardamom, allspice and a little cinnamon sit behind them with sweeter aromatic notes.

As the cumin and garlic hit the heat, the cardamom and allspice should rise behind them without taking over. Freshly ground cardamom can be far stronger than an older jar, so restraint helps.

Cayenne controls the heat. Keep it low or leave it out for a mild batch, then put chili sauce on the table for anyone who wants more.

Missing one accent spice? Make dinner anyway. Cardamom or allspice can sit this one out; the aroma will simply be a little less complex. Curry powder or five-spice changes the character much more dramatically.

Measured bowls of cumin, coriander, paprika, turmeric, black pepper, allspice, cardamom, cinnamon and cayenne grouped by their role in shawarma seasoning.
The small measures matter: cardamom and cinnamon can shift the aroma even beside much more cumin and coriander.

The spices create the aroma; heat changes what happens on the surface. This is where moisture starts to matter.

How to Get Dark Edges Without Dry Chicken

The surface has to lose enough moisture before meaningful browning can begin. Excess package liquid, loose marinade and too much chicken on too little hot metal all slow that process.

Sliced chicken shawarma sizzling on a dark hot pan with bubbling fat, steam, glossy surfaces and edges beginning to brown.
A sharper sizzle means enough surface water has left for browning to start in earnest.

The center keeps cooking in the meantime. Leave whole thighs in the oven indefinitely and you can eventually get the color you wanted on meat that’s no longer as juicy as it should be.

That’s why the sliced finish matters. After the chicken is cooked, all those thin fresh surfaces can brown quickly under the broiler or against a hot skillet.

Some of the best pieces will have one dark, curled edge and a softer juicy side. Uniform color isn’t the goal.

The Shawarma Edge Test

Four clusters of chicken on one dark pan showing pale and wet, cooked and pale, juicy with dark edges, and dark dry stages.
What you seeWhat it meansYour move
Pale + wetMoisture is winningCook the center safely, then fix the surface separately
Cooked + paleThe meat is ready before the colorRest, slice and finish at high heat
Juicy + irregular dark edgesYou are thereStop cooking
Dark all over + dryThe finishing stage went too longShorten it next time

Chicken already wet, pale or dry? Go straight to troubleshooting →

Skillet, Grill or Air Fryer?

For a full batch, the oven method above is the easiest choice. Smaller amounts open the door to other kinds of heat.

Chicken shawarma cooking in a sheet pan, skillet, grill and air-fryer basket in one professional kitchen setup.
Whatever the method, overcrowding turns browning heat into steam.

Skillet: heat a heavy pan over medium-high heat and work in batches if the thighs can’t sit comfortably. Leave the first side undisturbed for about 4–6 minutes, then turn and cook another 3–5 minutes or so while checking the thickest piece. Increase the heat a little if the chicken isn’t browning; back it off if the spice coating is darkening too quickly. Rest and slice before a short re-sear if you want more browned edges.

Grill: use medium-high direct heat and start around 4–6 minutes per side. Check the thickest piece as you go. After resting and slicing, a brief return to a hotter part of the grill can deepen the char.

Air fryer: cook at about 390°F / 200°C and begin checking around 12–14 minutes. Most basket machines need two batches for 900 g / 2 lb. Especially thick thighs may take longer; these air-fryer chicken thigh timings can help.

Know When the Chicken Is Done

The USDA lists 165°F / 74°C as the safe minimum for poultry. That’s especially useful to remember with breast, which is leaner and dries more readily once it’s done.

Thighs give you a wider doneness window. Their connective tissue continues softening as the temperature rises, so meat in roughly the 170–175°F / 77–79°C range can still be juicy and noticeably tender. When the thighs are where you want them, take them off the heat.

Boneless cooked chicken thigh with a thermometer in its thickest section beside text showing 165 degrees Fahrenheit as the safe minimum and 170 to 175 degrees as a common tender thigh range.
165°F / 74°C is the safety floor; the higher thigh range is about texture, not a second safety threshold.

Sauce, Wraps & What to Serve With Shawarma

When the chicken is right, the rest of dinner is mostly about contrast: something garlicky or nutty, bread, something sharp, and enough fresh or starchy sides to make the meal as simple or generous as you want it.

Which Sauce Belongs Here?

For a Lebanese-style chicken shawarma wrap, toum is the garlic sauce to know: garlic, neutral oil, acid and salt emulsified until pale and fluffy.

The garlic yogurt sauce in this recipe is the easier home option. It’s cool, tangy and takes about a minute to mix, but it has a different character from toum.

Tahini brings a nuttier sesame flavor and works particularly well when shawarma is served as a platter with salad, pita and pickles.

Three dark bowls containing fluffy white toum, thick smooth garlic yogurt and flowing beige tahini sauce.

What Goes in a Shawarma Wrap?

Fillings vary by region and from one shop to another. A common Lebanese-style direction is chicken, toum and sharp cucumber pickles or pickled turnips in thin bread, with fries tucked inside or served alongside.

For a fresher home version, use the garlic yogurt sauce with lettuce, tomato, cucumber and thinly sliced onion.

Whichever direction you take, keep the bread soft and flexible. If it starts cracking as you roll, heat it again before adding more filling.

Wrap, Platter or Rice Bowl?

Pita, hummus, rice, crisp cucumber or herb salads, sharp pickles and fries all work naturally with chicken shawarma. You don’t need all of them on the same table.

For a simple wrap night, chicken, bread, garlic sauce and pickles are enough.

For a platter, add creamy hummus, extra pita and something crisp or lemony. Pickles or salad keep the richer parts of the plate from becoming heavy.

For a rice bowl, spoon the shawarma over hot rice and add cucumber, tomato, pickles and garlic or tahini sauce. Making basmati too? This stovetop rice method covers the water ratios and doneness cues.

Three chicken shawarma meals on one table: a filled wrap, a platter with hummus and pita, and a rice bowl with vegetables and sauce.

Ready to assemble? Jump to Build the Wrap →

Chicken Shawarma Troubleshooting

Most shawarma problems are recoverable, especially while the chicken is still juicy. Start with what you can see or taste right now.

Wet, Watery or Pale

The chicken is gray and wet: excess surface moisture, crowding or insufficient heat may be pushing it toward steaming. Finish cooking the center, then rest and slice before using the broiler or a hot skillet for color.

The tray keeps filling with liquid even though it isn’t crowded: some chicken simply releases more retained moisture than other batches. When the meat is cooked, remove the watery excess and finish the slices separately. There’s no benefit in leaving the center in the oven until every drop has evaporated.

Cooked chicken thighs on a sheet pan with watery liquid being removed by a spoon and sliced pieces spread on a drier area of the same pan.
Once the center is cooked, remove watery excess instead of waiting for it to evaporate around already-done chicken.

It’s cooked but still pale: rest it, slice it and give the fresh edges a short high-heat finish. This is the easiest browning problem to solve.

Burning or Drying Out

The spices are scorching: the coating may be too thick or the pan may be sitting too close to the broiler. Move it down a rack or stop the finishing stage. The chicken is already cooked.

The meat is dry: skip further broiling. Slice it fairly thin and be generous with garlic sauce; hummus or tahini can help on a platter too. Next time, start checking the center sooner and save the serious browning for after slicing.

The texture is strangely soft or mealy: overcooking can contribute, as can a long soak in an aggressive acidic marinade. Stop adding heat and serve this batch with sauce, bread and something crisp or pickled.

The Flavor Is Off

It tastes flat: check the salt before adding more spice. Sprinkle a small pinch of fine salt over the hot sliced chicken, toss and taste again. If the meat itself tastes balanced, make sure the finished bite also includes browned edges, sauce and something sharp.

Cardamom is taking over: bread, sauce and vegetables can soften an over-strong cardamom note in this meal. Use less cardamom next time; piling on extra cumin or lemon usually creates a different imbalance.

Everything tastes too sour: taste the chicken by itself first. Lemon in the marinade, lemon in the sauce and sharp pickles can stack up quickly. For this meal, skip extra lemon and go easier on the pickles. If the chicken alone is aggressively sour, shorten the marinating time next time.

Wrap Problems

Two chicken shawarma wraps showing a damp sagging wrap labeled soggy and a second wrap with visible cracks in the flatbread.
Keep watery juices out of the bread and warm flatbread only when the fillings are ready.

The wrap is soggy: keep watery pan juices out of the bread, let the chicken rest before assembly and don’t flood the wrap with sauce. A soft but intact wrap can often be improved with a short turn in a dry skillet.

The bread cracks: warm it until flexible. If it has already split badly, rebuilding the wrap in fresh bread is usually easier than trying to patch it.

If the chicken is juicy, hot and well seasoned, dinner is still in very good shape. Garlic sauce, bread and pickles are forgiving company.

Need the method again? Return to the full recipe → · ↑ Back to top

Make Ahead, Freeze, Store & Reheat

Freeze & Store Chicken Shawarma

The easiest freezer prep is raw chicken already coated in its marinade. Pack it into a freezer-safe bag, flatten it into an even layer, remove excess air and freeze promptly. Thaw overnight in the refrigerator before cooking.

Raw marinated boneless chicken thighs spread in a single flat layer inside a sealed transparent freezer bag on a metal freezer shelf.
A flat freezer bag freezes, thaws and stacks more efficiently than a thick bundled package.

Cooked shawarma freezes too. The browned edges will soften after thawing, so warm the center gently and give the chicken a short turn in a hot skillet before serving. For best quality, use frozen cooked shawarma within about 4 months.

Refrigerate leftovers within 2 hours, or within 1 hour when the temperature is above 90°F / 32°C. Shallow covered containers help food cool quickly. Use refrigerated cooked chicken within 3–4 days.

Cold shawarma works in a pita or salad too. For meal-prep bowls, keep the hot and cold components separate: chicken and rice together; salad, pickles and sauce in their own containers. A cold tabbouleh works particularly well beside reheated chicken.

How to Reheat Chicken Shawarma

To reheat in a skillet, add 1–2 teaspoons of water and cover briefly so the center warms gently. Uncover and toss for another 30–60 seconds to remove the extra moisture and bring back a little edge texture. Reheat leftovers thoroughly to 165°F / 74°C.

Leftover sliced chicken shawarma steaming in a dark skillet as a metal lid is lifted, with a teaspoon measure beside the pan.
Cover briefly to warm the center; uncover to drive off moisture and restore some edge texture.

Something cold and crisp helps leftovers feel like a proper meal again. This cucumber salad with vinegar and dill gives the warm spices a sharp counterpoint.

Cooking fresh today? Jump to the full recipe →

Scaling Chicken Shawarma for a Crowd

The ingredients scale. The pan does not.

For 4 lb / 1.8 kg chicken, use two half-sheet pans or cook in batches. Give the thighs roughly the same breathing room they had in the original batch.

Two large rimmed sheet pans holding a doubled batch of raw marinated chicken thighs spaced apart in single layers.
Double the chicken and you must also double the hot, exposed pan area available for browning.

Allow about 5–6 oz / 140–170 g raw chicken per person when pita, hummus, rice and salad are substantial parts of the meal. For generously filled wraps or meat-heavy plates, 7–8 oz / 200–225 g is a more comfortable allowance.

For a group, put the bread, pickles, sauces and vegetables on the table and let people build their own while the chicken is hot. It’s easier than making a dozen wraps in advance.

If the meal is growing into a larger spread, homemade falafel fits naturally because the pita, hummus, sauces and pickles are already on the table.

Need the original quantities? Back to the ingredient list →


When Shawarma Night Comes Together

There is a point when the chicken is sliced, the pan is full of uneven dark edges, the garlic sauce is cold and somebody has already torn into the warm bread before you finish setting the table.

Dinner table with a pan of glossy browned chicken shawarma, torn pita, garlic sauce and pink pickles while several hands reach for bread and food.

That’s the dinner we’re after.

Season the chicken well. Give it enough room. Pull it while the center is juicy, then let the sliced edges take the heat.

Cook for juiciness. Finish for the edges.