Posted on — Leave a comment

Green Beans Almondine Recipe: Easy Green Beans With Almonds

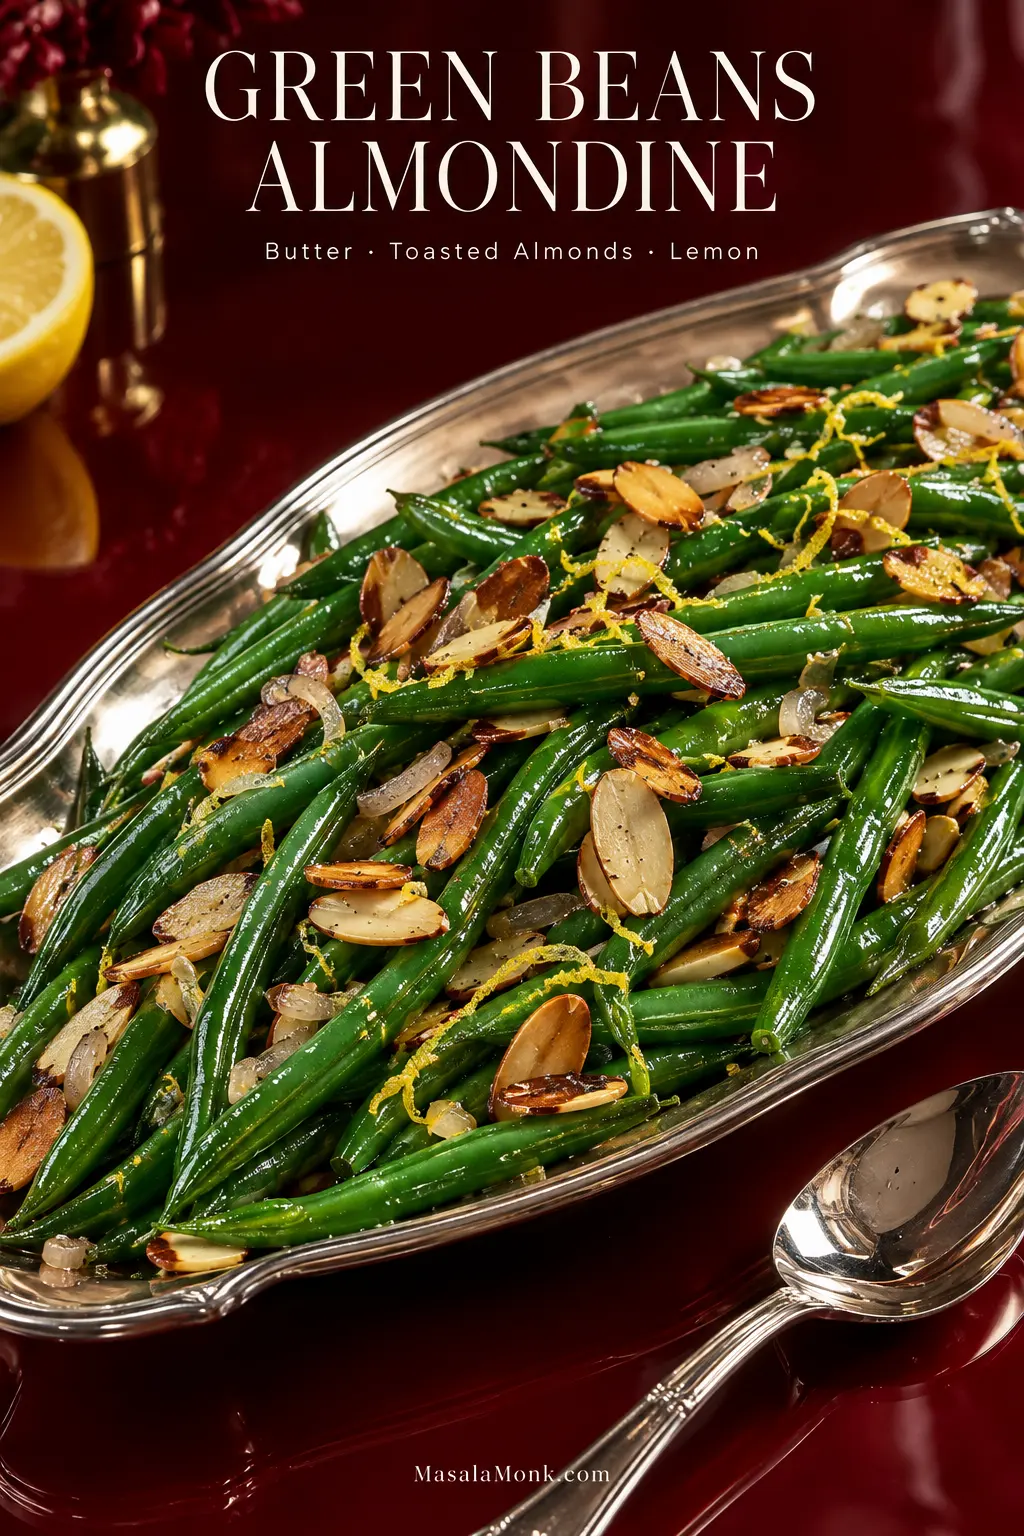
Silver platter of glossy green beans almondine topped with toasted sliced almonds, translucent shallot and fine lemon zest on a deep oxblood table.

At its best, green beans almondine gives you two textures in the same bite. The beans bend easily when you pick them up, while the toasted almonds still crack between your teeth. Butter coats everything lightly, and lemon comes through at the end to keep the beans tasting fresh.

It comes together in about 25–30 minutes. Beside roast meat, creamy potatoes, gravy, or a rich casserole, almondine gives the plate something green and fresh without asking you to make another heavy side.

Green beans almondine, or amandine, is the classic French combination of cooked green beans, butter, and toasted almonds. In this version, the beans and almonds stay at the center. Shallot adds gentle sweetness, garlic stays in the background, and lemon keeps the butter lively rather than heavy.

There isn’t much to manage, but the few moments that matter happen quickly. A brilliantly green bean can still be too firm in the middle. Almonds can move from light golden to bitter surprisingly fast, and beans that reach the skillet wet make it harder for the butter to cling properly.

Quick Answer: How to Make Green Beans Almondine

Blanch green beans in salted boiling water until tender to your liking, then drain them well. Toast sliced almonds in butter and set them aside. Soften shallot, briefly cook garlic, add the beans, then add lemon before returning the almonds. Start tasting thin beans early; thickness matters more than one fixed cooking time.

Make It Now: Green Beans Almondine

Recipe at a Glance

Serves4 generously or about 6 with several holiday sides
PrepAbout 10 minutes
CookAbout 15–20 minutes
TotalAbout 25–30 minutes
Make aheadBlanch beans 1–2 days ahead; bring the dish together close to serving

Ingredients

  • 1 lb / 450 g fresh green beans, trimmed
  • ⅓ cup / 30–35 g raw sliced almonds
  • 2 Tbsp / 28 g unsalted butter, divided
  • 1 medium shallot, finely diced
  • 2 medium garlic cloves, finely minced
  • 1 tsp finely grated lemon zest
  • 2 tsp / 10 ml fresh lemon juice, plus more to taste
  • 20 g kosher salt, for 4 qt / 3.8 L blanching water
  • ¼ tsp freshly ground black pepper, plus more to taste

If measuring the blanching salt by volume, 20 g is roughly 1⅓ Tbsp Morton Coarse Kosher Salt or 2⅓ Tbsp Diamond Crystal. Kosher salt crystals vary considerably by brand, so weight is more reliable here.

Sliced almonds spread through the beans more evenly and give a lighter crunch. Slivered almonds work too and are a little more forgiving while toasting.

Put the blanching water on first. While it heats, trim the beans, chop the shallot and garlic, zest the lemon, measure the almonds, and set a plate beside the skillet for the toasted nuts.
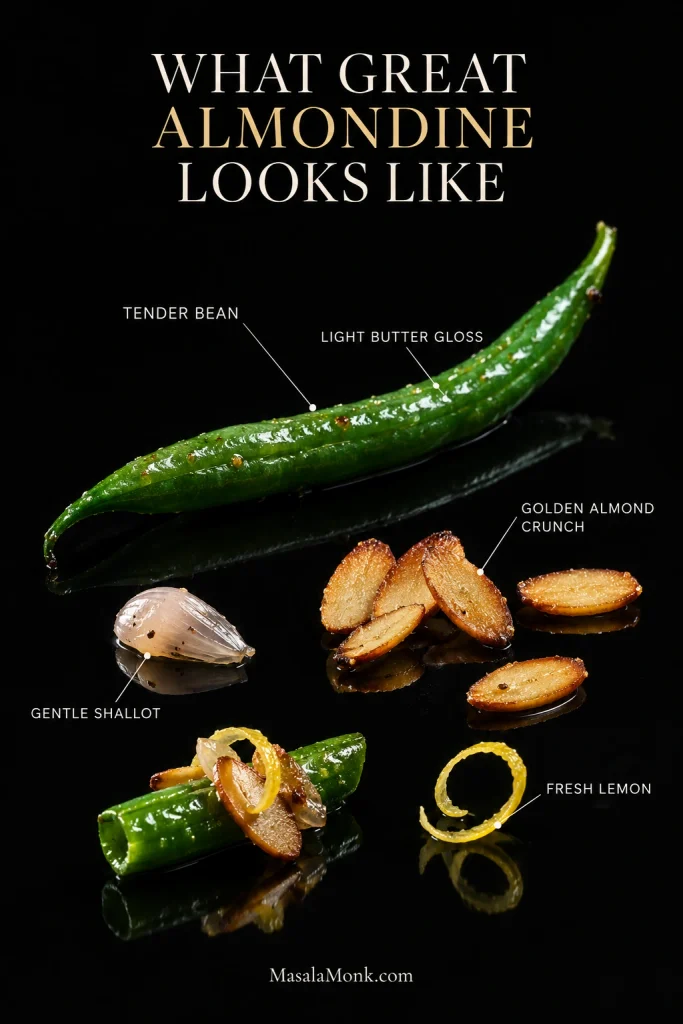
Ingredient study showing a glossy cooked green bean, toasted almond slices, softened shallot, lemon zest and a finished bite, with callouts identifying each element.
A good almondine still reads clearly as green beans, toasted almonds, softened shallot and fine lemon zest—nothing should disappear beneath a heavy coating.

1. Blanch the Beans

Bring 4 qt / 3.8 L water to a rolling boil in a 6-quart / about 6-liter pot or larger. Add the kosher salt, followed by the green beans.

  • Very thin haricots verts: start checking at 1½–2 minutes.
  • Slender regular green beans: start checking at 3 minutes; many are ready in 3–4 minutes.
  • Thicker beans: start checking at 4 minutes and expect that they may need 5 minutes or longer.

Bite one before draining. It should be tender through the center with gentle resistance. Prefer softer green beans? Give them another minute and taste again rather than draining only because the clock says so.

Before draining, scoop out 2 Tbsp / 30 ml hot cooking water and set it beside the stove.

The timer tells you when to check. The bean tells you when it is ready.

Drain the beans thoroughly and spread them briefly over a clean kitchen towel so surface moisture can escape. If you’re cooking them ahead, transfer them to ice water instead, drain as soon as they are cold, and dry them well before refrigerating.

2. Toast the Almonds

Heat a 12-inch / 30 cm skillet over medium-low heat. Add 1 Tbsp / 14 g butter and the almonds. Stir frequently until the almonds are light golden and fragrant, with a nutty aroma, 2–3 minutes. Scoop them onto a plate with a slotted spoon, leaving most of the butter in the skillet.

The butter picks up some of that toasted-almond flavor too, so the nuttiness carries into the beans later.
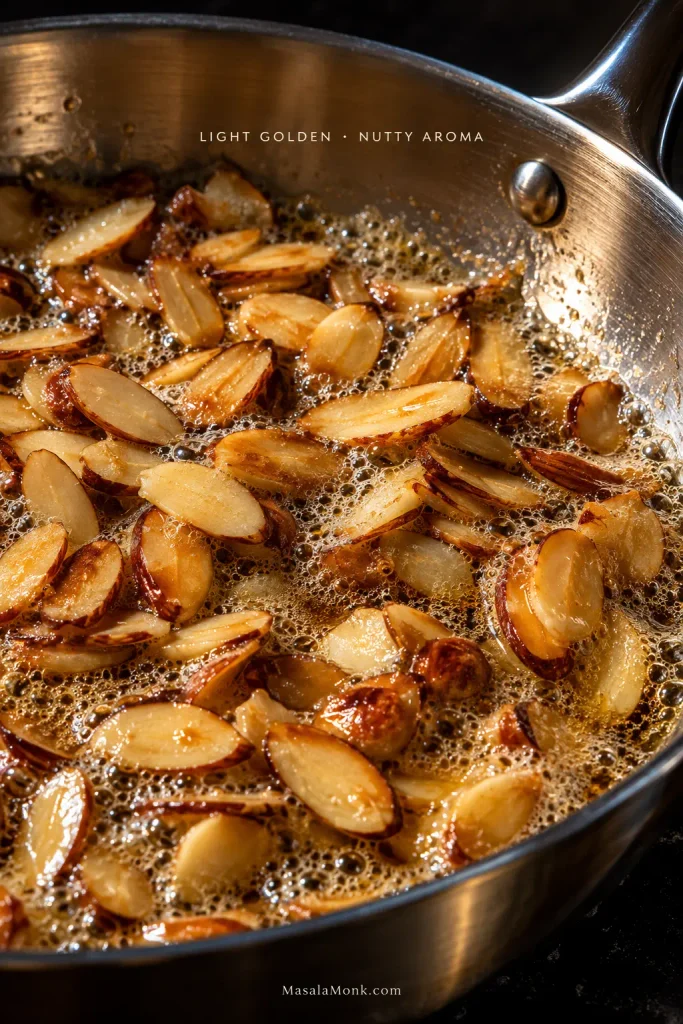
Close-up of sliced almonds turning golden in foaming butter in a stainless-steel skillet, showing the light-golden stage before deeper browning.
A few dark almond edges do not mean the whole batch is ready. Stir, look at the overall color, and remove the nuts once most slices are golden—the hottest parts of the skillet will always run slightly ahead.

3. Shallot, Garlic and Butter

Add the remaining 1 Tbsp / 14 g butter. Cook the shallot over medium heat until softened without taking on much color, 1–2 minutes. Add the garlic for 20–30 seconds.

Once the garlic smells good, the rest moves quickly. Add the drained beans and toss until hot, 1–2 minutes for freshly blanched beans and slightly longer if they are chilled.

If the butter sits separately instead of coating the beans, add 1 Tbsp / 15 ml cooking water and toss. Use another teaspoon or two only if needed. The beans should look lightly glossy, not wet.

Beans blanched a day or two earlier do not need yesterday’s cooking water. A spoonful of fresh hot water does the same job.

4. Add Lemon, Almonds and Serve

Reduce the heat or move the skillet off the burner. Add the lemon zest and 2 tsp / 10 ml lemon juice, then toss and taste. If you want the lemon to come through more clearly, add another squeeze.

Return the toasted almonds to the skillet, including any butter on the plate. Add black pepper, taste for salt, toss once more, and serve while the almonds are still crisp.
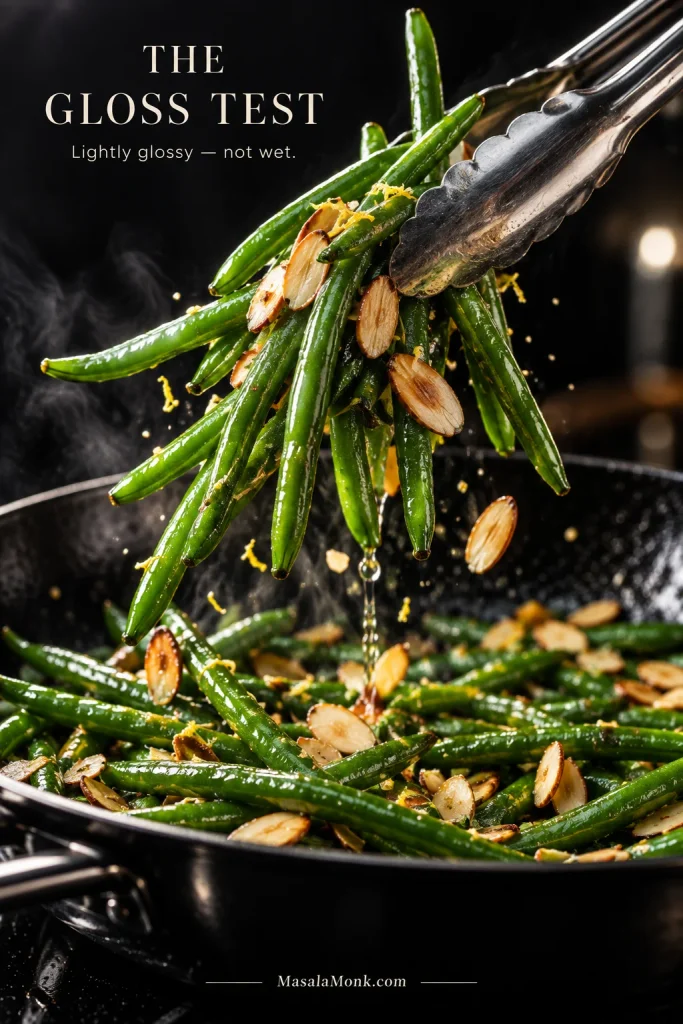
Metal tongs lifting glossy green beans and toasted almonds from a dark skillet with no visible pool of butter or sauce beneath them.
The finish should look lightly glossy, not saucy. If butter separates, a teaspoon of hot water and a quick toss can bring it together.

How Tender Should Green Beans Be?

Aim for green beans that are tender through the center with gentle resistance. If they still taste raw or squeak more than you enjoy, cook them longer.

“Crisp-tender” sounds precise until two people bite the same bean. Some people want a noticeable snap. Others dislike the waxy squeak of a firmer bean and would rather have it tender all the way through. Cook them to the texture you actually enjoy.

A bean that needs another minute is also different from one that is simply fibrous. Tender flesh inside a stubborn, stringy pod often points to an older bean. Large seed bulges, thick pods, and leathery skin are useful clues. University of Maine guidance on choosing green beans likewise recommends young, tender pods because over-mature beans can become tough and stringy.
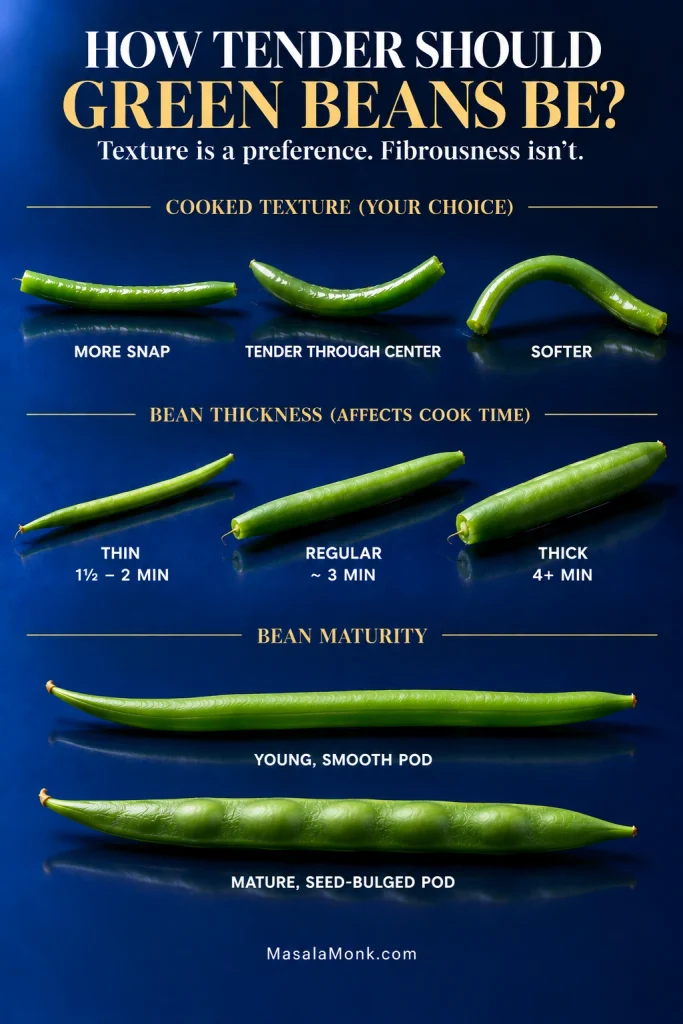
Green bean guide comparing more-snap, tender-through-center and softer textures; thin, regular and thick beans; and young smooth pods versus mature seed-bulged pods.
When green beans vary in size, bite one of the thickest pods before draining. The slender beans may already be tender while the larger ones still squeak, so testing the easiest bean can make the whole batch seem ready too soon.

Using Frozen or Canned Green Beans

Frozen beans work, though they’ll usually be softer and release more water than fresh beans. The important part is dealing with that extra moisture before the butter goes in: heat the beans first, cook the water away, and only then add the butter and aromatics.

Green Beans Almondine With Frozen Green Beans

For 1 lb / 450 g petite frozen green beans, use ⅓ cup / 30–35 g raw sliced almonds, 2 Tbsp / 28 g unsalted butter, 1 medium shallot, 2 garlic cloves, 1 tsp lemon zest, 2 tsp / 10 ml lemon juice, ¼ tsp black pepper, and salt to taste.

Dry-toast the almonds over medium-low heat until golden, then move them to a plate. Here, the butter waits until the excess moisture is gone.

Raise the skillet to medium-high. Add the frozen beans and 2 Tbsp / 30 ml water, cover, and cook for 3–4 minutes until the beans have thawed and heated through. Remove the lid and keep cooking, stirring occasionally, until the pan looks dry with no visible free water. Expect another 4–6 minutes, depending on the beans and pan.
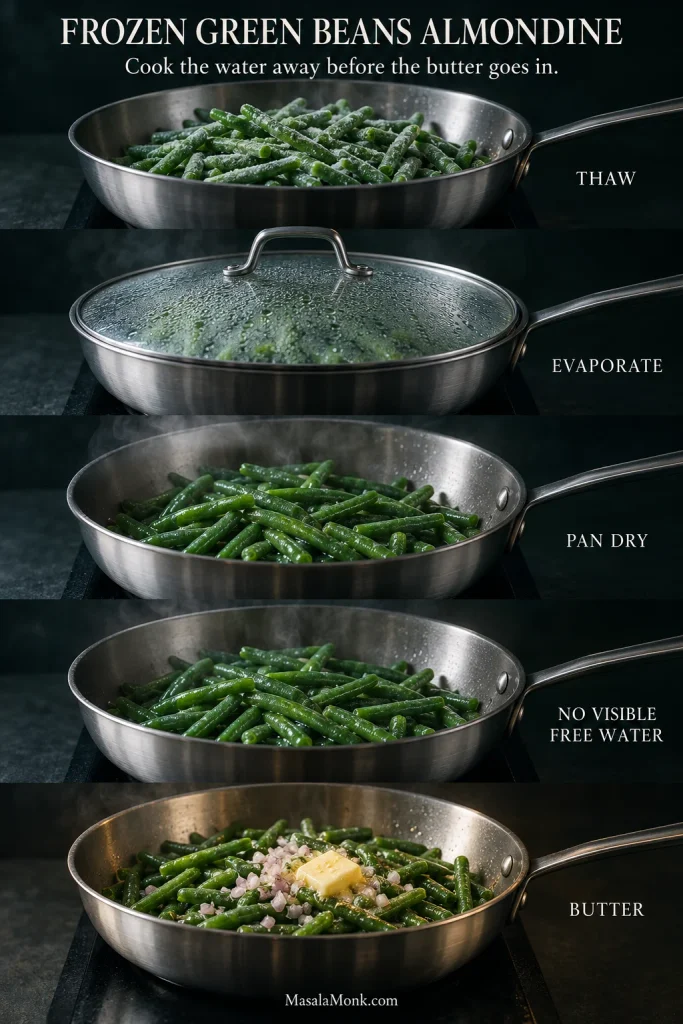
Step-by-step sequence showing frozen green beans thawing, releasing water, cooking until the pan has no visible free water, and then being finished with butter and aromatics.
Because frozen green beans carry different amounts of frost and surface ice, evaporation time naturally varies from bag to bag. Let a dry-looking skillet—not the clock—decide when the butter can go in.

Finish With Butter, Lemon and Almonds

Lower the heat to medium. Push the beans toward the sides and clear a space in the center. Add the butter and shallot there and cook until the shallot softens, 1–2 minutes. After that, cook the garlic for 20–30 seconds, toss everything together, then add the lemon zest, lemon juice, black pepper, and toasted almonds. Taste for salt before serving.

If the beans are already thawed, skip the covered stage. Pat away obvious surface moisture and begin by cooking off whatever water reaches the skillet.

Canned beans are softer still. Drain them thoroughly, skip blanching, and warm them only until hot. In that version, the toasted almonds provide most of the texture.

Using fresh beans instead? Go to the classic recipe →

How to Make Green Beans Almondine Ahead

Blanch the beans 1–2 days ahead, chill and dry them well, and keep the toasted almonds separate. Bring everything together in the skillet shortly before serving.

On a busy holiday, that is one of almondine’s nicest advantages. Most of the work can happen before the kitchen gets crowded, and you still get crisp almonds at the table instead of nuts that have been softening against damp beans overnight.

When prepping ahead, blanch the beans slightly firmer than you want them at dinner, chill them in ice water, then drain and dry them thoroughly before refrigerating. Toasted almonds can be prepared ahead too; let them cool completely and keep them airtight at room temperature.

If a sweet potato casserole is already assembled and waiting for the oven, those last few stovetop minutes can belong to the beans.

Just before dinner, warm the chilled beans with shallot, garlic, butter, and lemon, then add the almonds. Chilled beans may need an extra minute or two in the skillet.
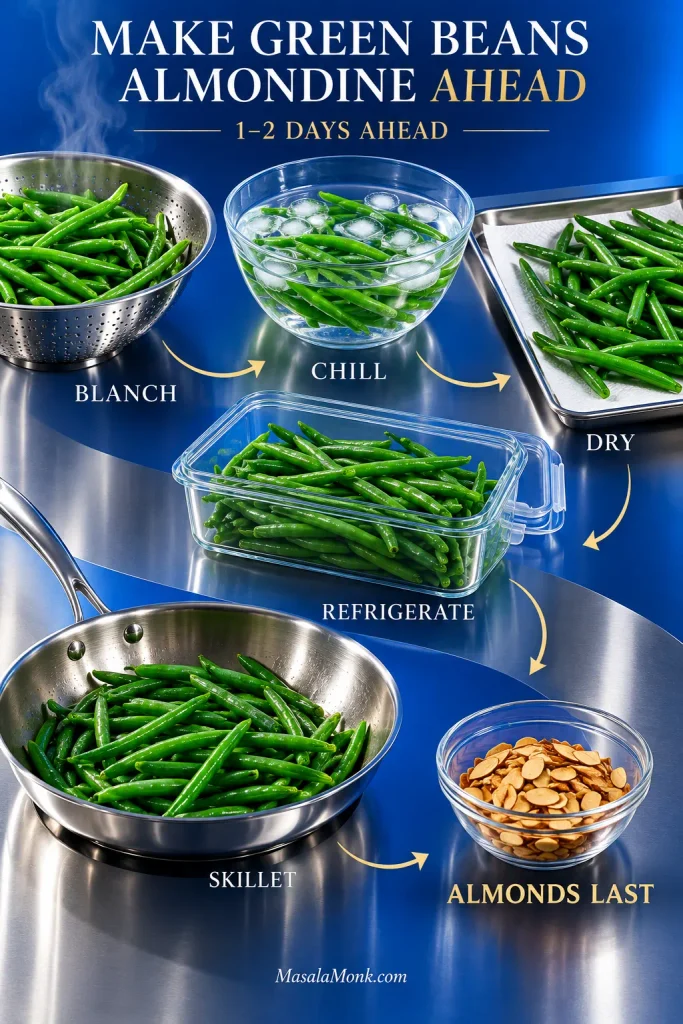
Make-ahead workflow showing green beans being blanched, chilled in ice water, dried, refrigerated, reheated in a skillet and finished with toasted almonds.
After chilling, dry the beans again if condensation collects; extra moisture has to evaporate before butter can coat them cleanly.

Green Beans Almondine for Thanksgiving, Christmas or a Crowd

With several other sides on the table, plan about 1 lb / 450 g green beans for every six guests. For a simpler dinner with only one or two sides, that pound serves about four generously.

GuestsGood starting amount with several sides
61 lb / 450 g
81½ lb / 680 g
122 lb / 900 g
203½ lb / 1.6 kg

Ingredient quantities scale. Skillet surface area does not.

A 12-inch / 30 cm skillet is comfortable with about a pound of beans. Finish larger quantities in batches instead of letting several pounds steam together. When prime rib, potatoes, and several other sides are already on the table, err toward the smaller serving amount rather than crowding the skillet.
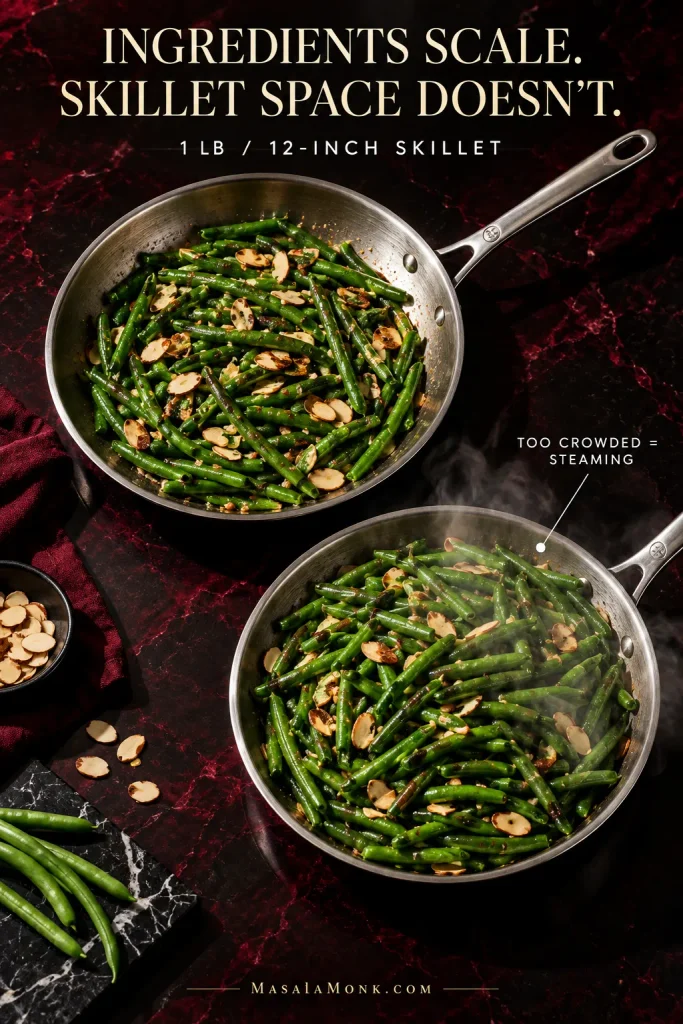
Two skillets comparing properly spaced green beans with an overcrowded, steaming pan, showing why larger batches need more cooking surface.

For transport, keep the almonds separate. A tightly covered hot container traps steam, so leave the beans slightly firmer if they have to travel. Reheat briefly at the destination when possible, then add lemon and almonds.

Lower-Fuss Ways to Make Green Beans Almondine

The blanch-and-sauté method gives you the most control over doneness and is the better choice for make-ahead beans. When fewer dishes or a crowded stovetop matter more, these alternatives make sense.

One-Pan Green Beans Almondine

The one-pan method saves a pot, although separate blanching gives you slightly finer control over the final texture. Use the same amounts of beans, almonds, butter, shallot, garlic, lemon, and pepper as in the main recipe. For this method, use only a pinch of salt in the steaming water, then season to taste at the end.

Toast the almonds in 1 Tbsp / 14 g butter over medium-low heat, then set them aside. Raise the heat to medium-high, add the beans, ⅓ cup / 80 ml water, and a pinch of salt, then cover. Cook for 7–10 minutes, depending on bean thickness. Add another splash of water only if the pan dries before the beans are nearly tender.

Remove the lid and let the remaining water evaporate. Once the pan is dry, lower the heat to medium, push the beans aside, and add the remaining butter and shallot to the cleared space. Cook until the shallot softens, then add the garlic for 20–30 seconds. Toss the beans with the lemon zest, lemon juice, black pepper, and toasted almonds. Taste for salt before serving.
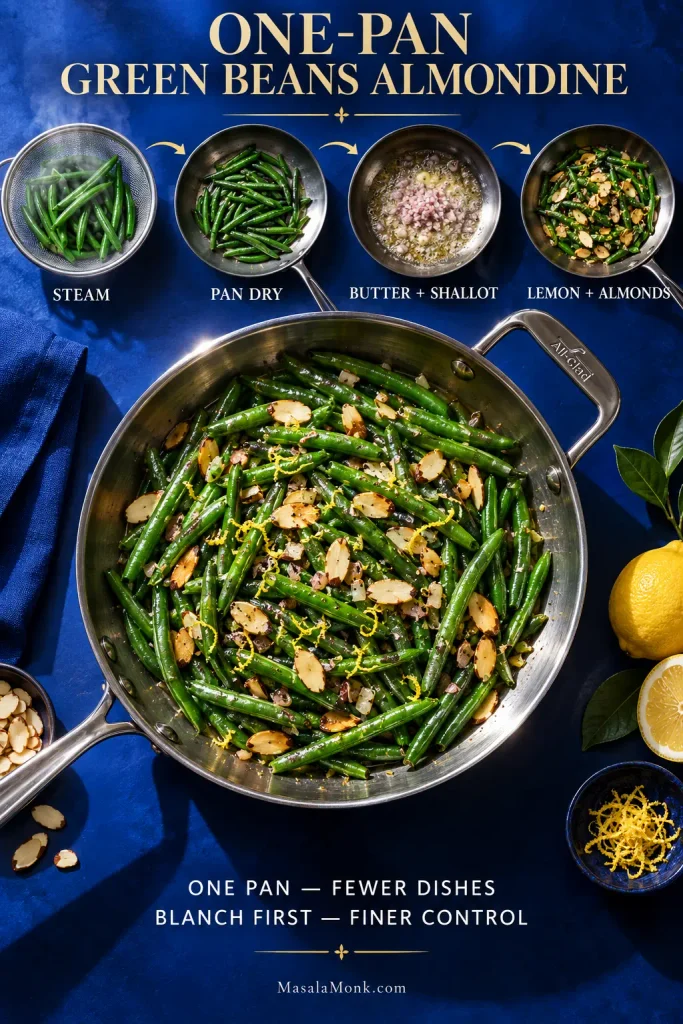
One-pan green beans almondine sequence showing beans steamed, the skillet dried, butter and shallot added, and the dish finished with lemon and almonds.
In one-pan green beans almondine, water and butter have different jobs: water gets the bean tender; butter finishes its surface. Let the first job end before the second begins, and the method becomes much easier to judge.

Want the most control over texture? Back to the classic recipe →

Microwave-First Green Beans Almondine

When the blanching pot would compete with garlic mashed potatoes or another stovetop side, the microwave can handle the first stage instead. Put trimmed beans in a covered microwave-safe bowl with 2 tsp / 10 ml water. Start checking thin beans at 4 minutes and continue in short bursts until tender, then drain well before moving to the butter-and-almond skillet step.

Roasted Green Beans Almondine

Roasting makes sense when the oven is already running. The trade-off is texture: the beans become browner and slightly drier around the edges than classic almondine. Toss dry beans with just enough olive oil to coat, season lightly with salt, and roast at 425°F / 220°C for 15–20 minutes, until tender with browned spots.

Toast the almonds separately, then toss the hot beans with melted butter, lemon, and almonds. A tray of ranch roasted potatoes can share the oven if both pans have enough room for hot air to circulate.

Green Beans Almondine Troubleshooting

Most almondine problems are easy to diagnose once you know whether the issue is doneness, moisture, browning, or seasoning. Some can be fixed in the skillet; a few are simply lessons for the next batch.

Texture and Moisture Problems

What happened?Likely reasonWhat to do
Beans are tough or squeakyThey are not tender enough for their thickness or your preferenceAdd a small splash of water, cover briefly, and cook another minute or two. Taste again.
Beans are mushyThey cooked too long before or during the skillet tossYou cannot make them crisp again. Fresh toasted almonds can still add contrast; pull the next batch from the water sooner.
Beans are tender inside but stringyThe pods may be older and over-matureMore cooking can soften them somewhat but cannot remove mature fiber. Look for younger, smoother pods next time.
Beans are watery or soggyFresh beans went into the skillet wet, frozen beans released water, or the pan is crowdedKeep the almonds out and cook the beans uncovered until the excess water has evaporated. Return the almonds only at the end.

Almond, Coating and Seasoning Problems

What happened?Likely reasonWhat to do
Almonds taste burnt or bitterThey toasted too farDiscard badly burnt almonds and toast a fresh handful. Pull them from the pan while golden next time.
Almonds have gone softThey sat against moist beans too longToast a fresh handful for the top. Store and transport the almonds separately next time.
The dish looks greasyThe butter is sitting separately instead of coating the beansAdd a teaspoon or two of hot water and toss until the beans look lightly glossy.
The flavor seems flatIt may need salt or more lemonTaste first. Adjust the salt, then add lemon gradually.
It tastes too tartToo much lemon juice went in at onceExtra butter and a small pinch of salt can soften the acidity. Use more zest and less juice next time.

↑ Back to the recipe

Green Beans Almondine Variations

For a cleaner, more classical almondine, skip the shallot and garlic and let butter, almonds, lemon, salt, and pepper carry the dish. If you want deeper nuttiness, let the butter take on some light brown color as the almonds toast. Watch the nuts closely and pull them from the skillet as soon as they are golden; the base version stays lighter and more lemon-forward.
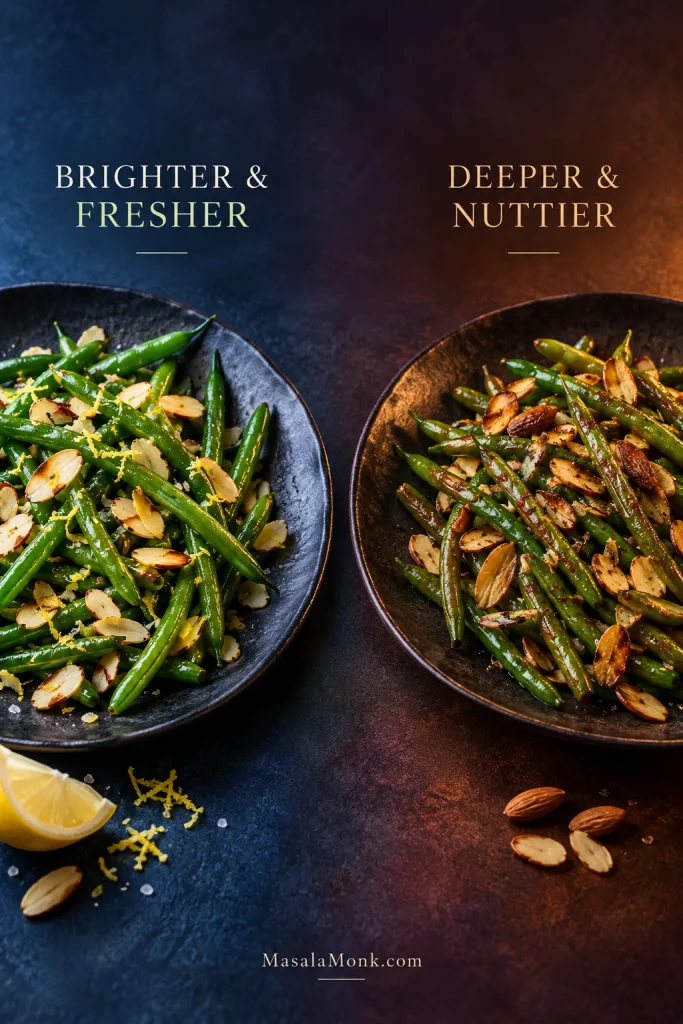
Side-by-side green bean dishes showing a bright lemon-forward almondine version and a deeper brown-butter version with more toasted flavor.
Brown butter and toasted almonds reinforce the same nutty flavors, so taste the lemon again once the dish is assembled. By contrast, pale butter leaves the citrus more exposed and usually needs less adjustment.

Extra-virgin olive oil or plant-based butter makes the same basic method dairy-free. Bacon works too: cook 3–4 strips until crisp and use some of the rendered fat in the skillet. It makes the side richer, though, and shifts it away from the fresh contrast that gives almondine much of its appeal.

If you’re cooking for someone with a serious nut allergy, prepare their portion separately with clean cookware and utensils appropriate to their allergy needs instead of simply removing a few beans before the almonds go in.

Almondine vs. Amandine: What’s the Difference?

Amandine is the French culinary term for food prepared or garnished with almonds; almondine is the familiar English spelling. Green beans amandine and green beans almondine therefore refer to essentially the same dish.

Haricots verts are the thinner French-style green beans often used for the dish, but they are not required. Ordinary green beans work just as well. Their thickness matters more to the cooking time than the name on the package.

What to Serve With Green Beans Almondine

However you spell it, almondine earns its place beside richer food. Lemon and green beans cut through roast meat, creamy potatoes, gratins, or a baked vegetarian main without introducing another heavy sauce. On a plate full of soft, rich food, the toasted almonds are a small thing that makes a noticeable difference.

It works particularly well with lemon-garlic sockeye salmon. On a holiday table, the choice between almondine and classic green bean casserole mostly comes down to what the rest of dinner needs: creamy and comforting, or fresher with more texture.
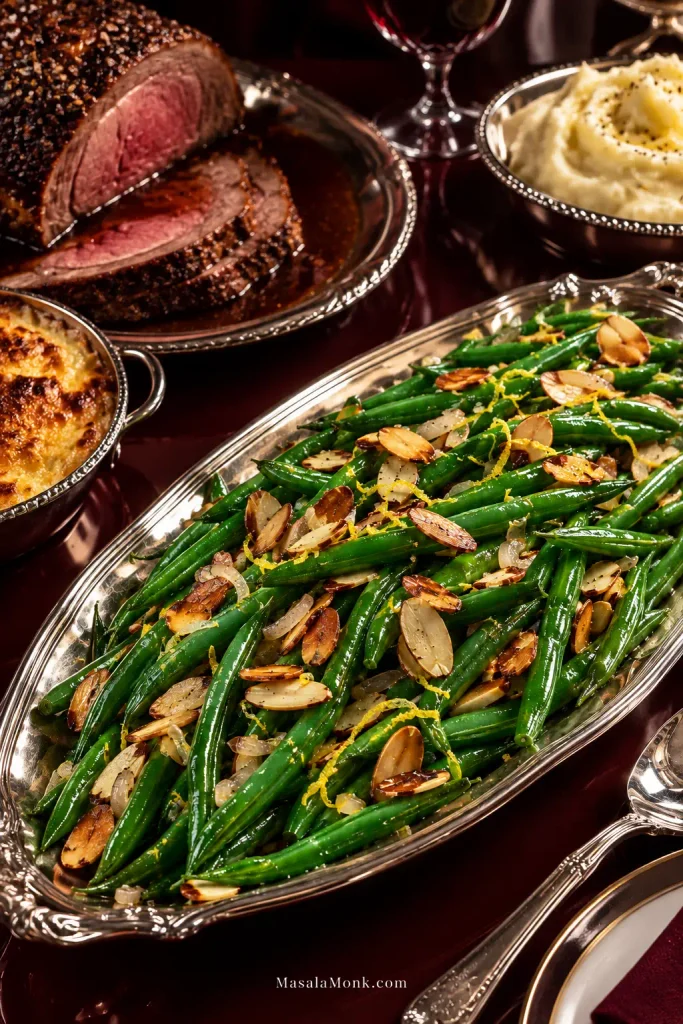
Formal dinner table with a large silver platter of green beans almondine in the foreground, alongside sliced roast beef, mashed potatoes and a baked side dish.

How to Store and Reheat Green Beans Almondine

Freshly cooked green beans almondine will keep 3–4 days in the refrigerator. If the beans were blanched earlier, count that 3–4 day window from the first cooking day, not from the final skillet toss. The USDA gives the same general 3–4 day refrigerated window for cooked leftovers.

A skillet gives the nicest reheated texture for a small portion. For a larger chilled batch, cover it and reheat at 350°F / 175°C, starting to check around 15 minutes; deeper or larger batches will take longer. Stored leftovers should reach 165°F / 74°C throughout, in line with USDA reheating guidance. Add the almonds and some fresh lemon after reheating.

A short delay before dinner is manageable; prolonged hot holding is where the texture begins to suffer. The beans continue to soften and the almonds lose their crunch, so bringing the dish together close to serving gives the best result.

Planning ahead instead of storing leftovers? See the make-ahead method →

Green beans almondine does not need many ingredients to be memorable. Pick up a bean with a few golden almond pieces clinging to it. It should bend easily, and the almond should still crack when you bite it. That’s the texture worth aiming for.
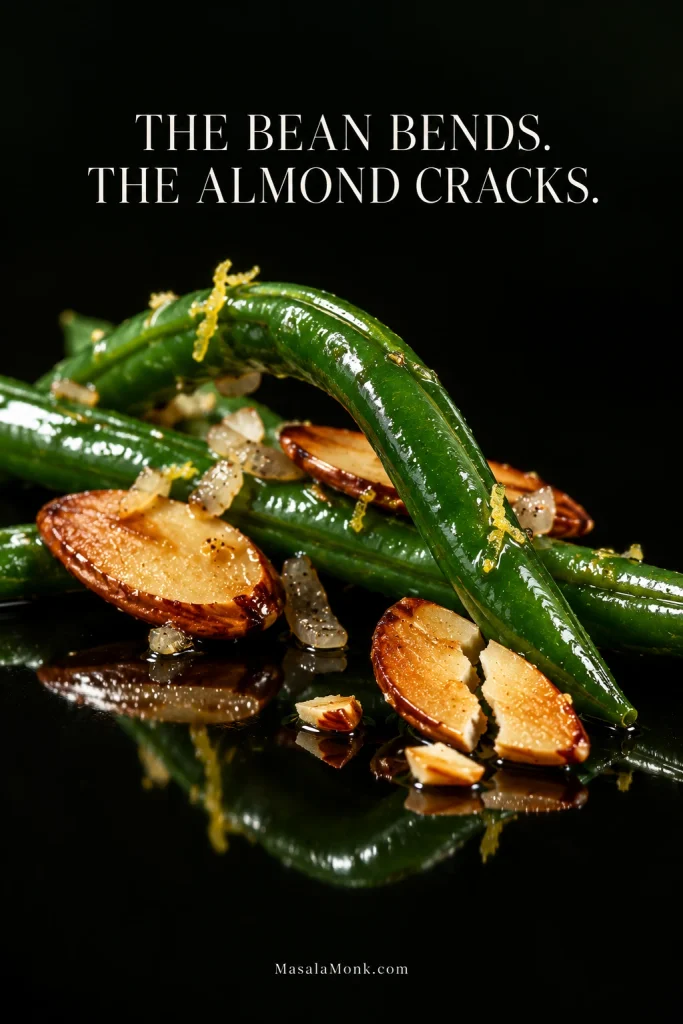
Macro view of curved glossy green beans with broken toasted almond pieces on a black reflective surface beneath the words “The bean bends. The almond cracks.”
Posted on — Leave a comment

Ratatouille Recipe: Easy, Classic French Vegetable Stew

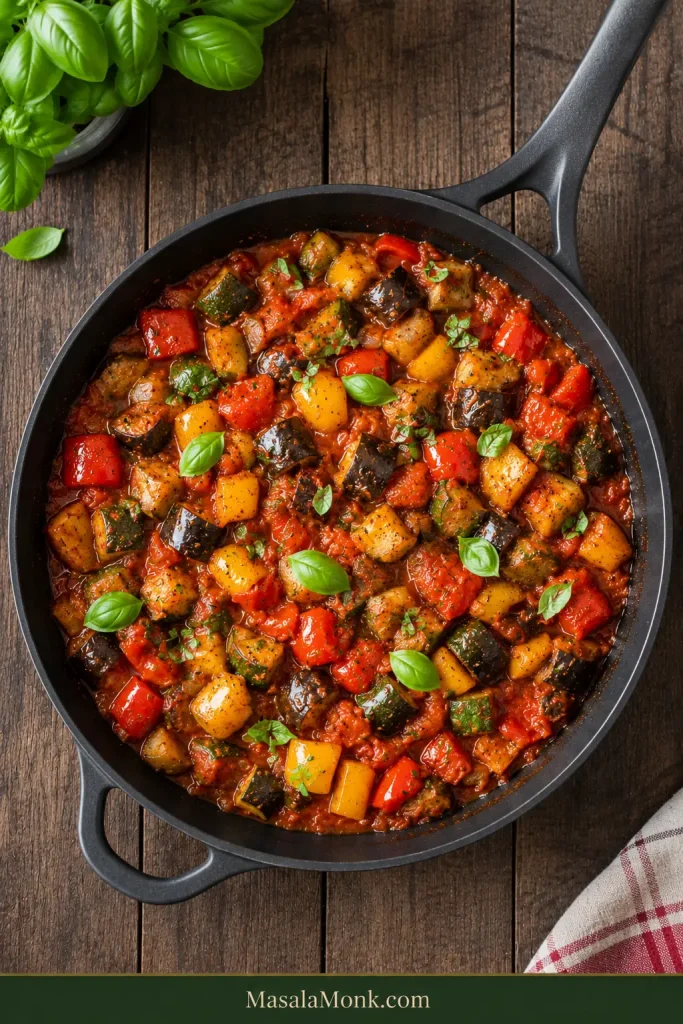
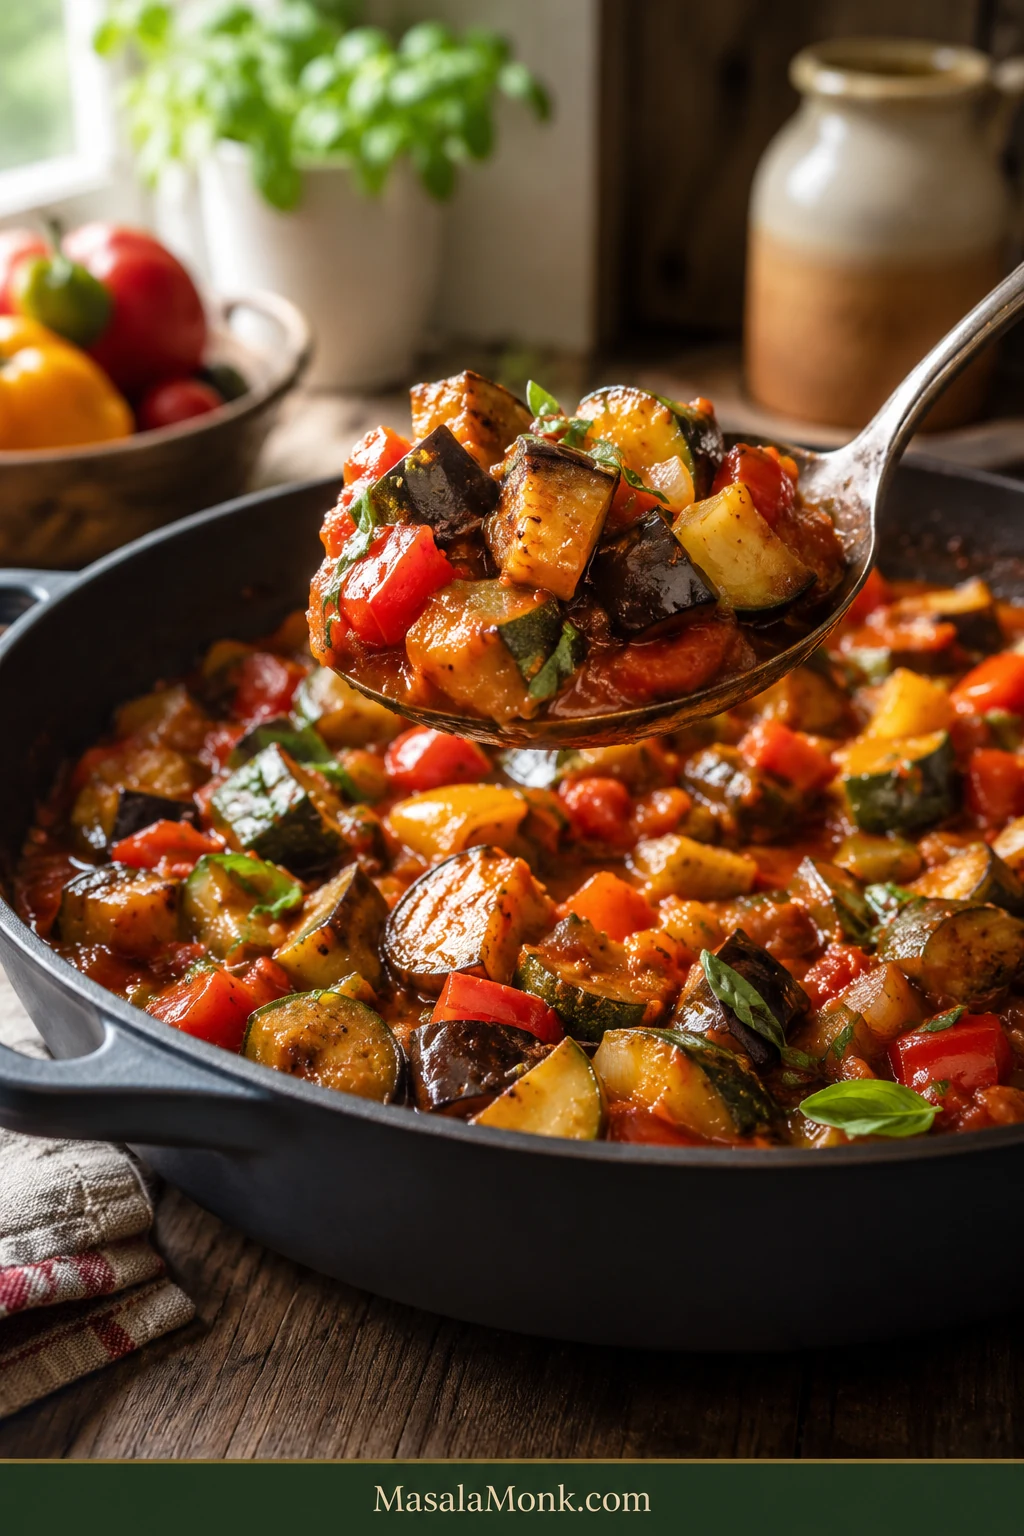
Finished classic ratatouille in a wide dark pan, with a serving spoon lifting chunks of eggplant, zucchini and bell pepper coated in thick tomato sauce.

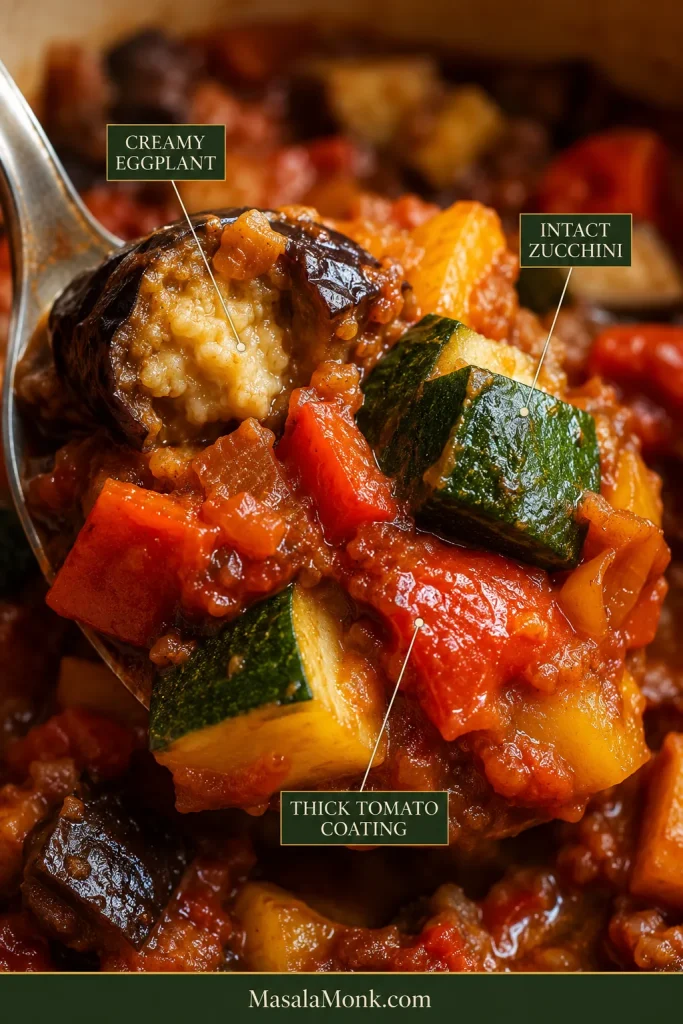
A good ratatouille gives you a little bit of everything in the same spoon: eggplant soft enough to almost melt, zucchini that is tender but still unmistakably zucchini, sweet pepper, and glossy tomato caught around the vegetables instead of pooling underneath them.

That sounds simple until five very different vegetables share the same pan. Eggplant needs enough heat and time to lose its spongy center. Zucchini can go from pleasantly tender to collapsed remarkably quickly. Tomatoes release plenty of water before they start behaving like sauce.

Ratatouille makes particular sense when the garden, market—or just your vegetable drawer—suddenly seems full of zucchini, tomatoes, peppers and eggplant. And after all that chopping, watching those vegetables disappear into a pale, watery pot feels particularly unfair.

This easy ratatouille recipe uses one wide pan and a staged method so the vegetables can finish tender without collapsing into one texture.

We stop when the stew is soft and generous but still varied from bite to bite. Serve it with bread, eggs or a simple grilled main, eat it warm or at room temperature, and save the leftovers for another meal—the flavors settle together beautifully overnight.

Quick Answer: How to Make Classic Ratatouille

Classic ratatouille is a Provençal vegetable stew made with eggplant, zucchini or courgette, bell peppers, tomatoes, onion, garlic, olive oil and herbs.

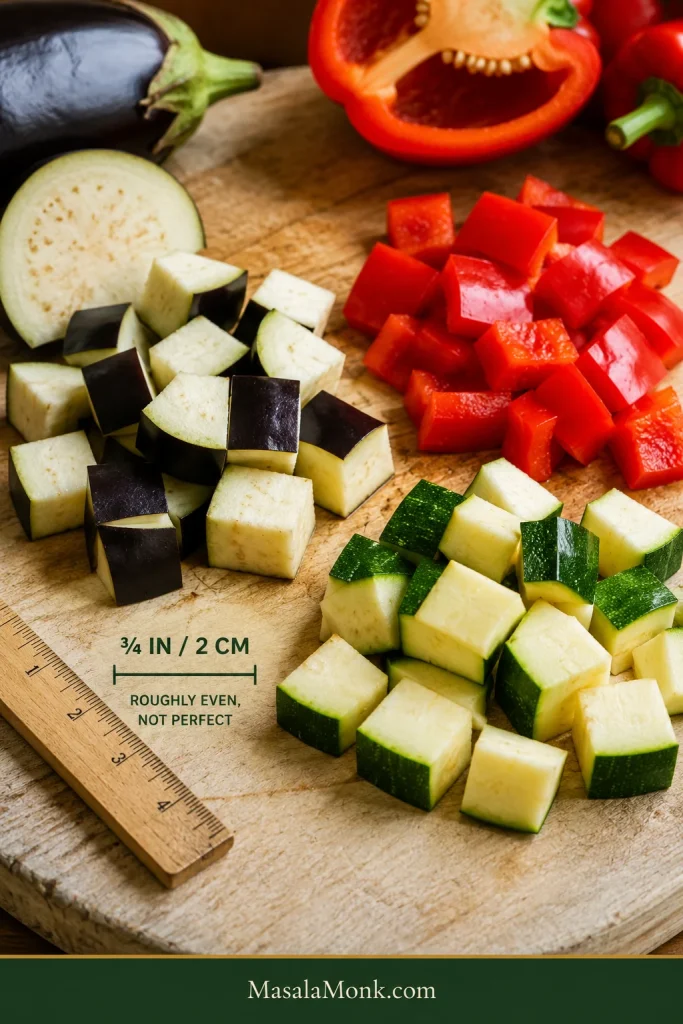
For about 6 side servings or 4 generous main-dish portions, use roughly 500 g / 18 oz eggplant, 400 g / 14 oz zucchini, 300 g / 10½ oz peppers and 750 g / 26 oz tomatoes. Cut the main vegetables into about ¾-inch / 2 cm pieces.

The easiest way to keep ratatouille from turning watery or mushy is to brown the eggplant and zucchini in separate turns, reduce the tomatoes before recombining, then return the zucchini only near the end. The eggplant gets enough time to become creamy while the zucchini keeps its shape.

What does ratatouille taste like? Sweet tomato and peppers, savory olive oil and garlic, creamy eggplant, tender zucchini, thyme and basil. It is rich enough to feel substantial while still tasting unmistakably of vegetables.

Close-up of finished ratatouille with callouts identifying creamy eggplant, intact zucchini and thick tomato coating.
Judge the spoonful, not just the pan: the best ratatouille gives you creamy eggplant, a little resilience from zucchini and concentrated tomato in the same bite.

Before you start: use fresh tomatoes when they are flavorful; otherwise use good canned whole peeled tomatoes. Fresh, firm eggplant can go straight into the pan—save pre-salting for unusually mature, heavily seeded or wet eggplant.

Classic Ratatouille Recipe

A staged one-pan French ratatouille with creamy eggplant, tender zucchini and sweet peppers in a concentrated tomato base.

Recipe at a Glance

  • Difficulty: easy
  • Prep: about 25–30 minutes
  • Cook: about 45–60 minutes
  • Rest: 15 minutes recommended
  • Total: about 1 hour 25 minutes to 1 hour 45 minutes
  • Serves: about 6 as a side or 4 as a generous main
  • Best pan: 12-inch / 30 cm wide high-sided sauté pan or wide shallow 5–6 qt / 5–6 L Dutch oven
  • Vegetable cut: about ¾ inch / 2 cm
  • Texture target: tender vegetables with a little thick tomato sauce around them and very little free liquid
  • Diet: naturally vegan, vegetarian, dairy-free and gluten-free

The technique is easy; the chopping takes time. The staged cooking adds minutes, not difficulty, and gives each vegetable enough room to keep its own texture.

Equipment

  • 12-inch / 30 cm wide high-sided sauté pan or wide shallow Dutch oven
  • Chef’s knife and cutting board
  • Wooden spoon or flexible spatula
  • Two bowls or plates for holding the eggplant and zucchini separately
  • Slotted spoon, useful but not essential

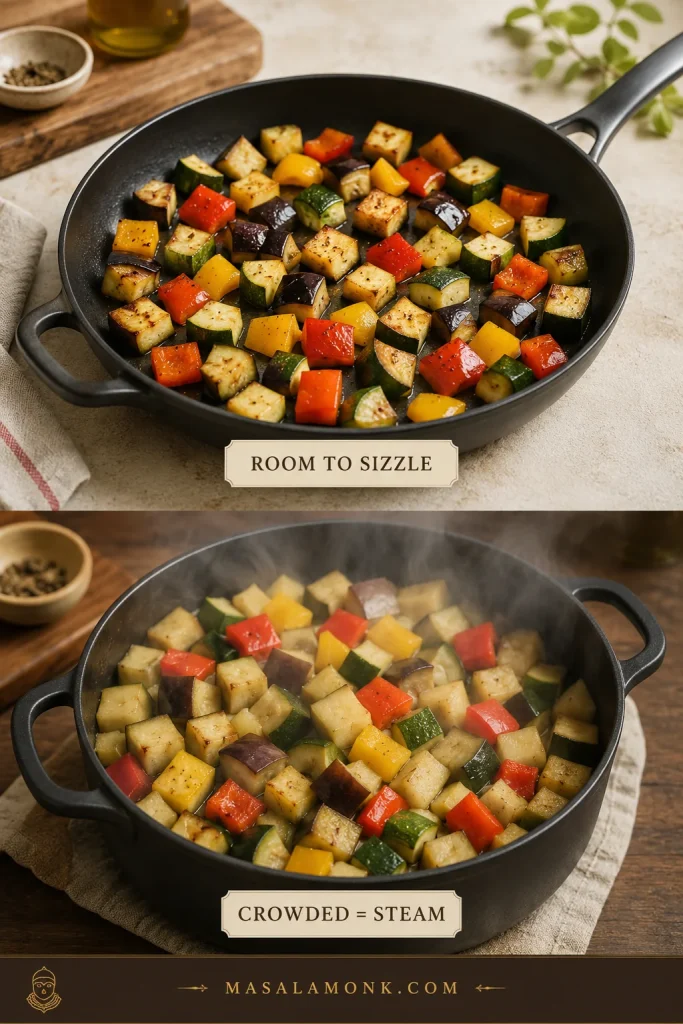
Pan shape matters. A broad cooking surface lets vegetable moisture escape. With a smaller pan, brown the eggplant and zucchini in batches instead of piling them high.

Side-by-side comparison of vegetables spread across a wide sauté pan and crowded into a deeper pot with more visible steam.
With a wider pan, steam has somewhere to go. Crowding a deep pot not only limits browning; it can also slow tomato reduction later and leave the whole dish wetter.

Ingredients

Weights are before trimming.

  • 500 g / 18 oz eggplant, about 1 medium-large or 2 small, cut into ¾-inch / 2 cm pieces
  • 400 g / 14 oz zucchini or courgette, about 2 medium, cut into ¾-inch / 2 cm pieces
  • 300 g / 10½ oz red, yellow or orange bell peppers, about 2 medium, cored and cut into ¾-inch / 2 cm pieces; green works too but gives a more vegetal, less sweet result
  • 200 g / 7 oz yellow onion, about 1 medium-large, chopped
  • 750 g / 26 oz ripe fresh tomatoes, about 5–6 medium, chopped with their juices or 1 x 28 oz / 794 g can whole peeled tomatoes, hand-crushed with the juices
  • 18 g garlic, about 4–5 large cloves, finely chopped
  • 75 ml / 5 tablespoons extra-virgin olive oil, divided, plus up to 15 ml / 1 tablespoon more if needed
  • 10 g fine sea salt, about 1¾ teaspoons depending on the salt, divided, plus more after tasting if needed
  • ½ teaspoon freshly ground black pepper
  • 2 teaspoons fresh thyme leaves, or 4–5 thyme sprigs
  • 15 g / ½ oz fresh basil leaves, roughly torn
  • 1–2 teaspoons red wine vinegar, optional, for finishing
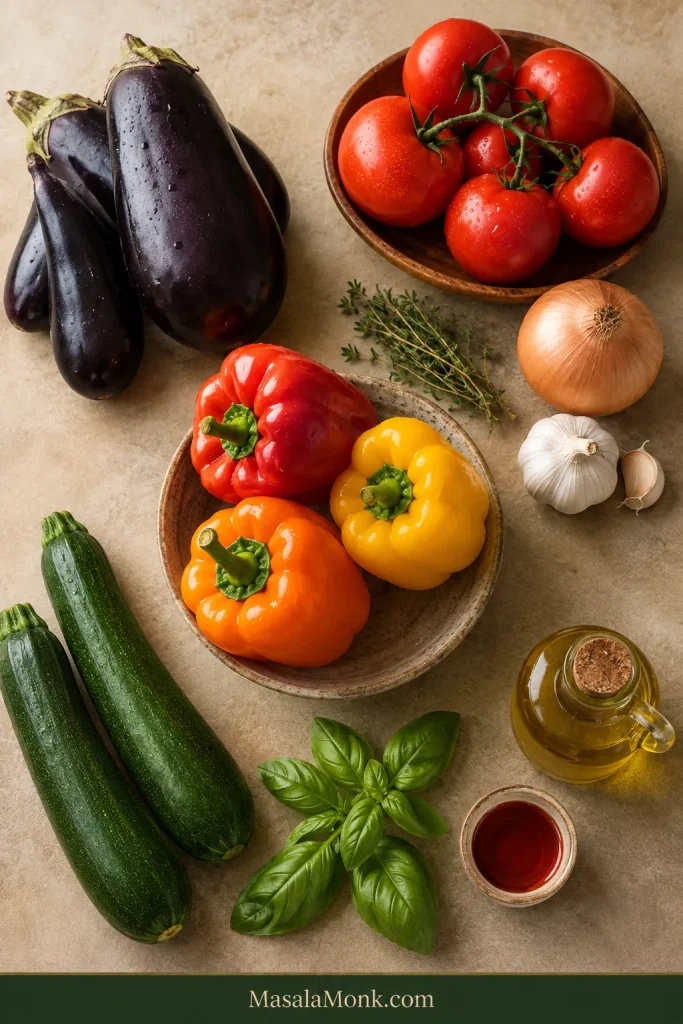
Eggplant, zucchini, bell peppers, tomatoes, onion, garlic, basil, thyme and olive oil arranged on a neutral work surface.
Because ratatouille has such a short ingredient list, condition matters: tired eggplant, watery zucchini or bland tomatoes affect the final pan more than an extra pinch of herbs.

Method

  1. Cut the vegetables. Cut the eggplant, zucchini and peppers into roughly ¾-inch / 2 cm pieces. Don’t worry about perfect cubes; aim for pieces that are reasonably even.
  2. Brown the eggplant. Heat 3 tablespoons / 45 ml olive oil over medium-high heat. Add the eggplant and ½ teaspoon of the measured salt. Spread the pieces as loosely as the pan allows and cook for 8–10 minutes, turning occasionally. Look for scattered brown patches and centers beginning to lose their raw, cottony resistance. Transfer the eggplant to a bowl.
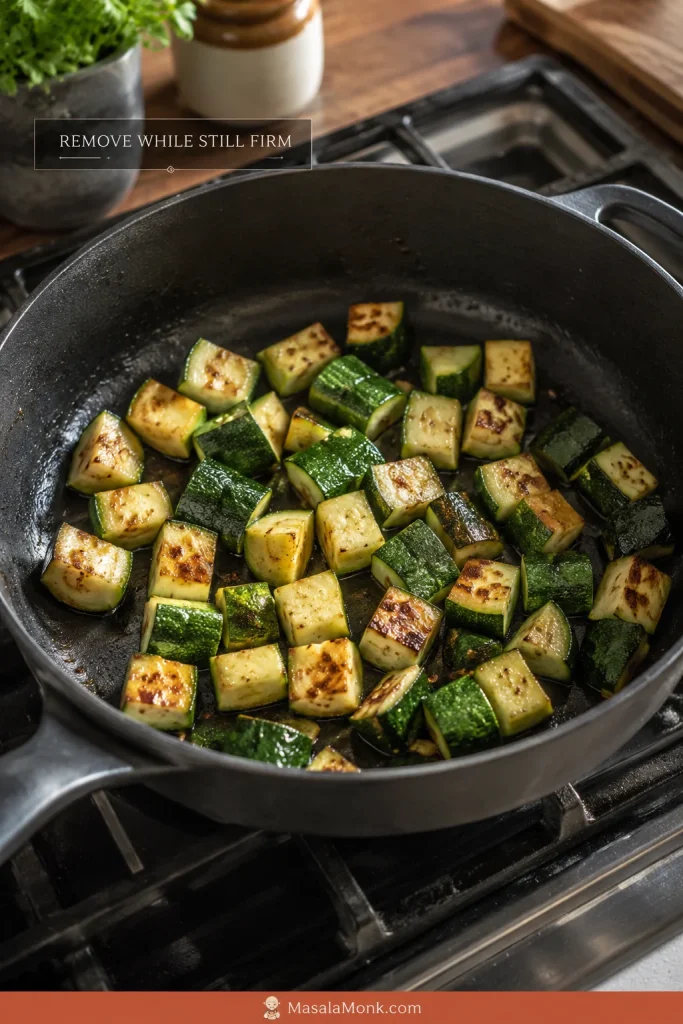
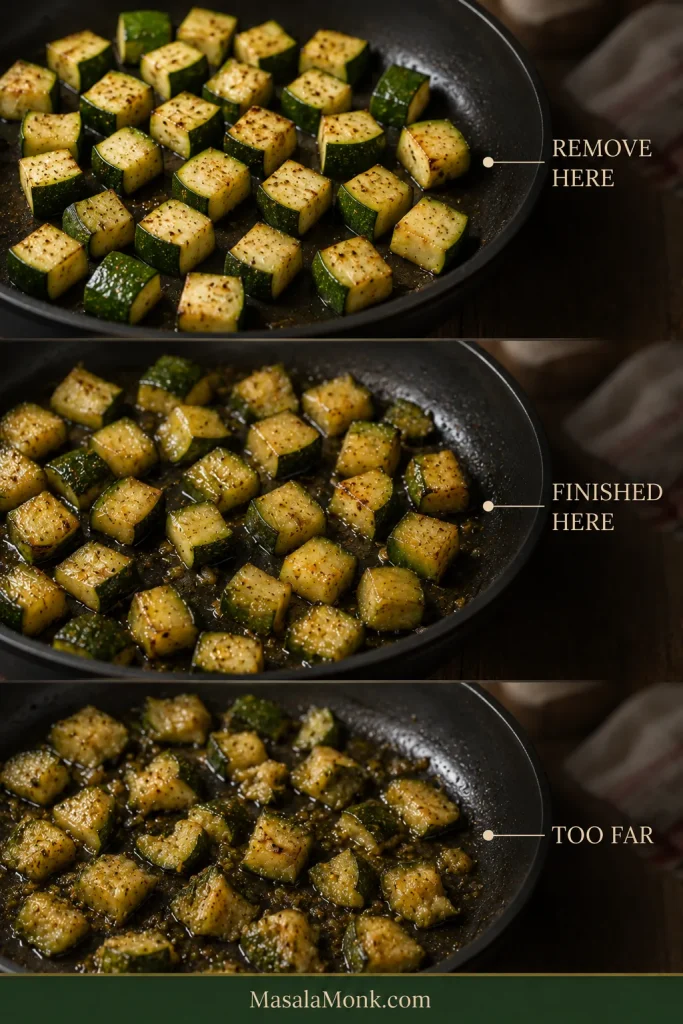
  3. Give the zucchini a shorter turn. Add 1 tablespoon / 15 ml olive oil, the zucchini and ¼ teaspoon salt. Cook for 4–5 minutes. Let it pick up some color, then remove it while the centers still feel firm. Transfer the zucchini to a separate plate or bowl; it returns to the pan later than the eggplant.
  4. Soften the onion and peppers. Reduce the heat to medium. Add the remaining 1 tablespoon / 15 ml olive oil, followed by the onion, peppers and ¼ teaspoon salt. Cook for 8–10 minutes. The onion should be soft, the peppers should bend easily under the spoon, and their raw grassy smell should have become noticeably sweeter.
  5. Add the garlic and thyme. Stir for 30–60 seconds. As soon as the garlic aroma rises clearly from the pan, add the tomatoes.

Reduce the Tomatoes, Then Recombine

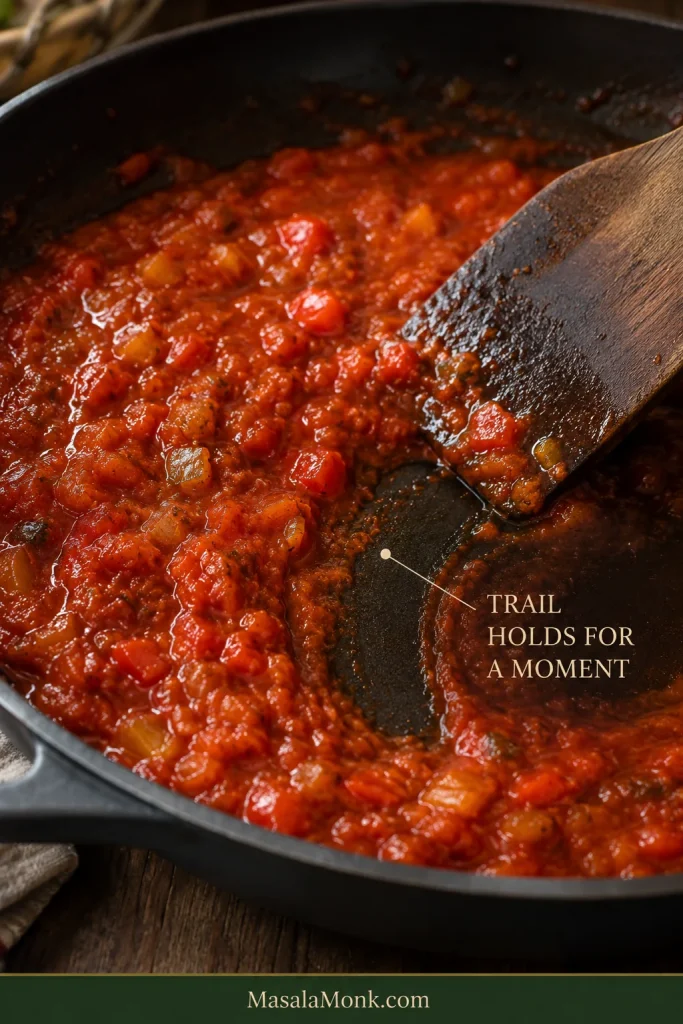
  1. Reduce the tomatoes. Add the tomatoes, black pepper and another ½ teaspoon salt, leaving the remaining salt for the final tasting. Bring to a lively simmer and cook uncovered for about 10–15 minutes, stirring occasionally. Very juicy tomatoes may need longer. Continue until the tomatoes have relaxed into a loose sauce and a spatula dragged across the bottom leaves a trail for a moment before the liquid closes behind it.
  2. Return the eggplant. Fold it into the tomato base. Lower the heat to a gentle simmer and cook uncovered for 8–10 minutes. Bite or press a piece when you are unsure: the center should be creamy, with no dry or cottony resistance.
  3. Return the zucchini. Fold it in gently and cook for another 3–5 minutes, just until tender. Stir only as much as necessary from here on so the softened vegetables hold together.
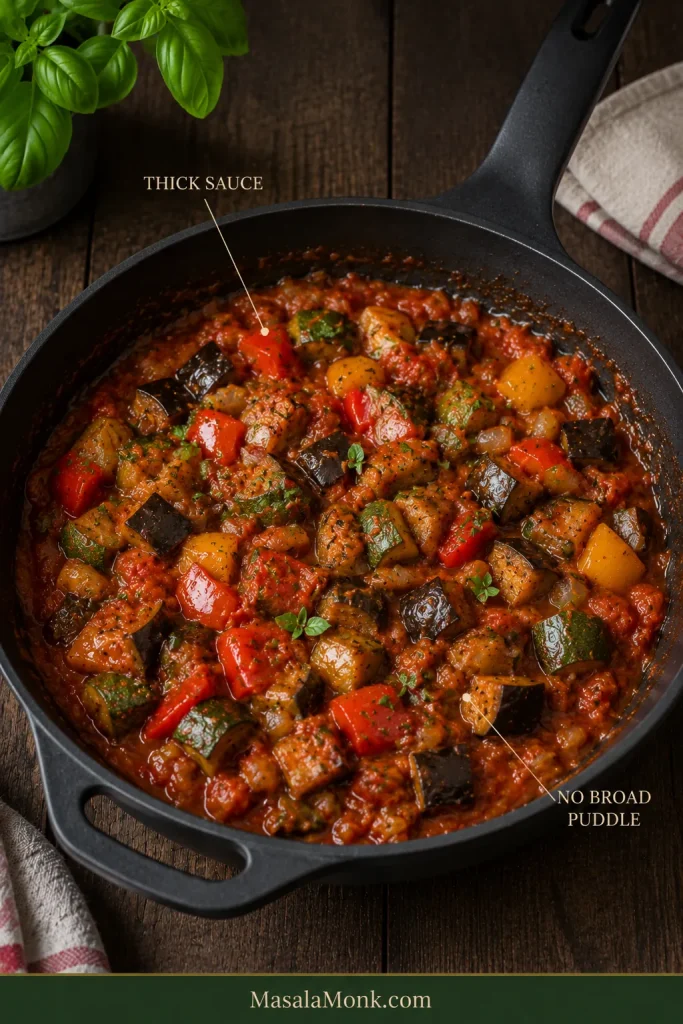
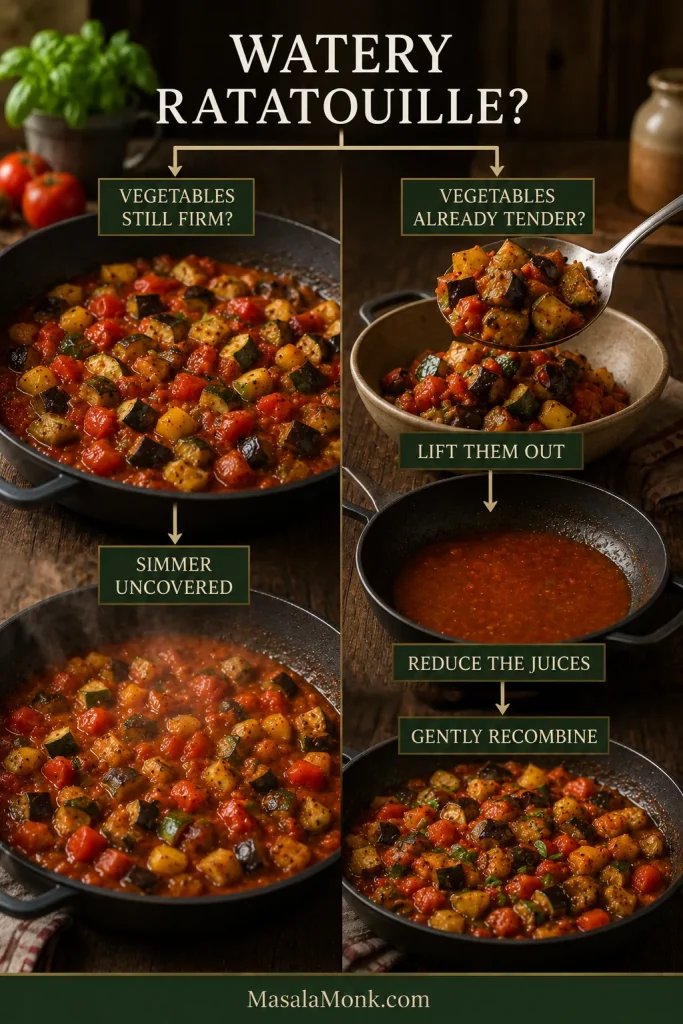
  4. Check the consistency. Tilt the pan. A small amount of thick sauce should move around the vegetables; you should not see a broad puddle of thin red juice. If the vegetables still need cooking, continue simmering uncovered. If they are already tender but the sauce is thin, lift them out with a slotted spoon, reduce the liquid on its own until glossy, then gently fold the vegetables back in.
  5. Finish and rest. Remove any thyme stems and taste for salt. If the ratatouille tastes rich but slightly dull, add 1 teaspoon red wine vinegar. Taste again and add the second teaspoon only if it still needs brightness. Fold in most of the basil, remove the pan from the heat and rest for 15 minutes. Finish with the remaining basil.

Recipe Notes

  • Fresh or canned tomatoes: ordinary ripe tomatoes need no routine peeling or seeding. Use canned whole peeled tomatoes with their juices when fresh ones are disappointing. Judge either version by the consistency of the sauce.
  • Optional eggplant salting: unusually mature, heavily seeded or wet eggplant can be salted with about ½ teaspoon of the measured salt for 20–30 minutes, then blotted very thoroughly. Skip the ½ teaspoon normally added with the eggplant in Step 2 and adjust the final seasoning by taste.
  • Water: the vegetables and tomatoes normally provide enough. If the tomato base begins catching before it has reduced, add only 1–2 tablespoons / 15–30 ml at a time.
  • Extra oil: the reserved tablespoon is there for an unusually absorbent batch of eggplant. Add it only if the pieces begin catching or scorching.

Check Doneness · Troubleshooting · Back to Top

Need Help With Your Ratatouille?

Classic Ratatouille Is the Rustic Stovetop Dish

Traditional ratatouille does not follow one fixed cooking sequence. Some versions cook the vegetables separately; others add them successively. Both approaches recognize the same thing: eggplant, zucchini, peppers and tomatoes do not soften or release water at the same rate. This recipe keeps one pan but gives the vegetables separate turns.

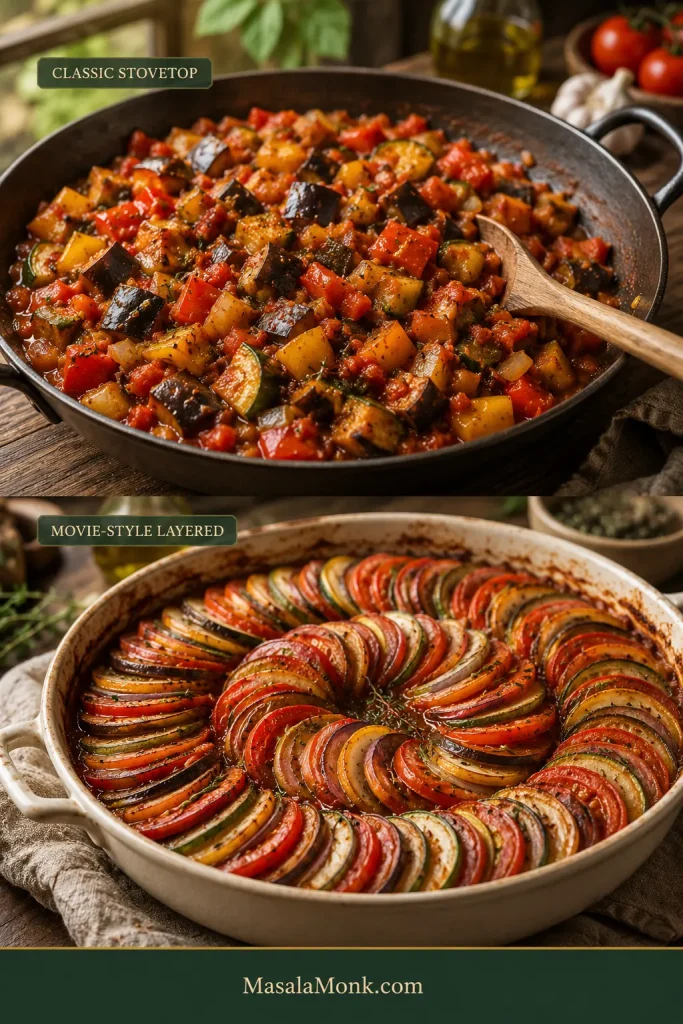
Classic ratatouille is a rustic Provençal vegetable stew; the neat spiral of thin vegetables popularized by the movie is a different refined preparation commonly associated with confit byaldi. If the immaculate vegetable spiral from the film is what you pictured, this pan will look much more relaxed and rustic. That’s the point: everyday stovetop ratatouille is about tender vegetables coming together in the pan, not maintaining a carefully arranged pattern.

Comparison of chunky classic stovetop ratatouille in a pan and a movie-style preparation made from thin overlapping vegetable slices.
The different cuts also change the eating experience. Chunky stovetop ratatouille gives varied textures in each spoonful, while thin layered vegetables create a more even, refined bite.

Ratatouille comes from Provence in southern France and is particularly associated with Nice. Classic versions usually bring together eggplant, zucchini or courgette, peppers, tomatoes, onion, garlic, olive oil and Mediterranean herbs. Some cooks keep the vegetables fairly distinct; others continue toward a soft, almost confited consistency. There is room for both.

Lidia Bastianich’s classic ratatouille on PBS, for example, sautés the vegetables separately before bringing them together for a much longer final cook. Here we keep that useful principle while doing the work in one pan.

Ingredients That Change the Result

The formula itself is simple. What matters most is the quality of the vegetables and how each one behaves in the pan.

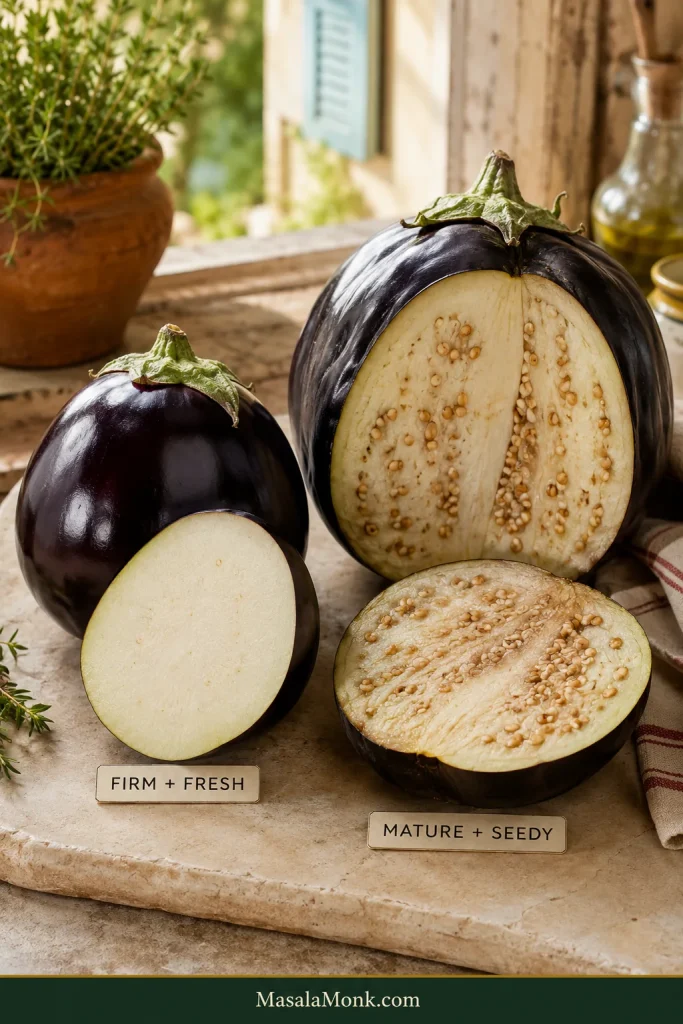
Eggplant: Choose Firm, Then Cook Until Creamy

Eggplant or aubergine gives ratatouille much of its soft body. Choose one that feels firm and heavy for its size, with smooth skin. Leave the skin on; it helps the pieces hold together.

Fresh firm dark-purple eggplant with compact pale flesh beside a more mature eggplant with numerous developed seeds and a wetter interior.
Seediness is a better warning sign than size alone. A large eggplant with compact pale flesh can cook beautifully; a loose, heavily seeded center is more likely to need extra attention.

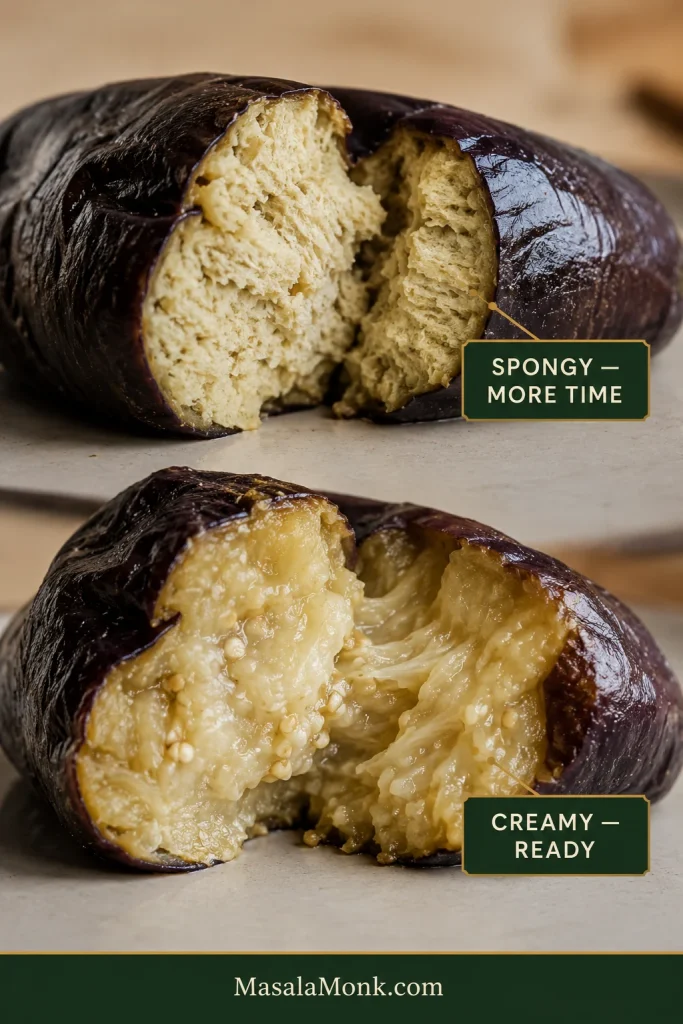
The important change happens inside. Raw eggplant has a dry, spongy bite. Properly cooked eggplant gives easily under the spoon and feels creamy through the center—the same tenderness cue that matters in baked Eggplant Parmesan.

Comparison of eggplant showing a pale dry fibrous center labeled “Spongy — more time” and a soft glossy center labeled “Creamy — ready.”
Surface color cannot tell you whether eggplant is done. A beautifully browned piece can still be spongy inside, so judge the softness of the center instead.

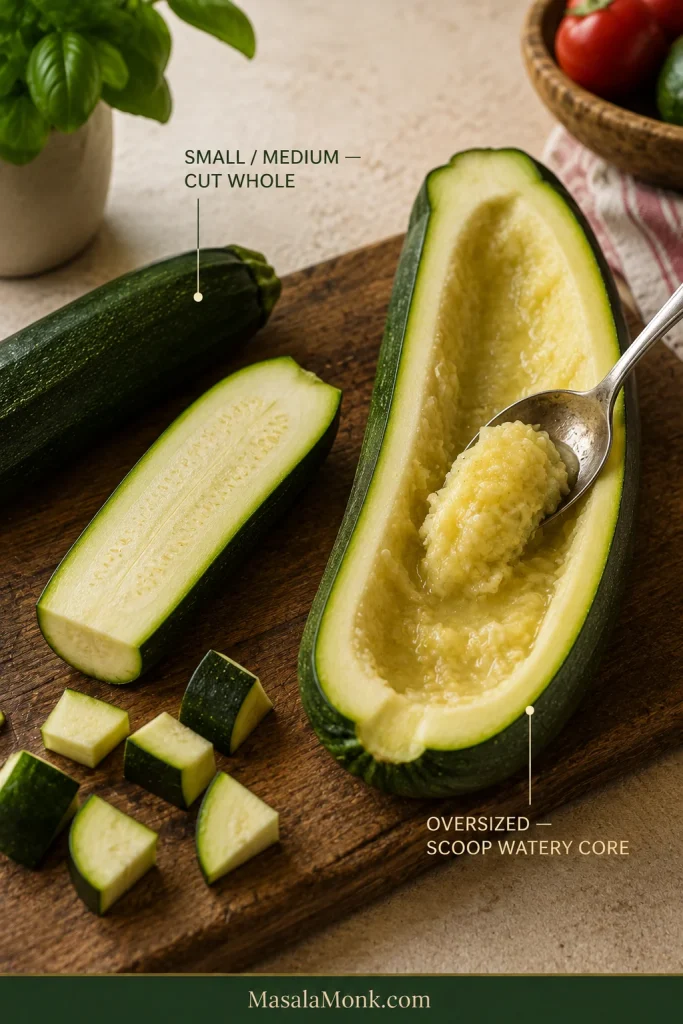
Zucchini: Choose Small or Medium When You Can

Small and medium zucchini have firmer flesh and smaller seed cavities, so you can simply cut them whole. An enormous garden zucchini with a pale, heavily seeded core benefits from having that loose watery center scooped out first.

Small zucchini with compact flesh beside an oversized zucchini split lengthwise while a spoon removes its loose watery seed core.
Use the center as your guide, not just the ruler. Scoop an oversized zucchini only when its seed core has become loose and watery enough to dilute the ratatouille.

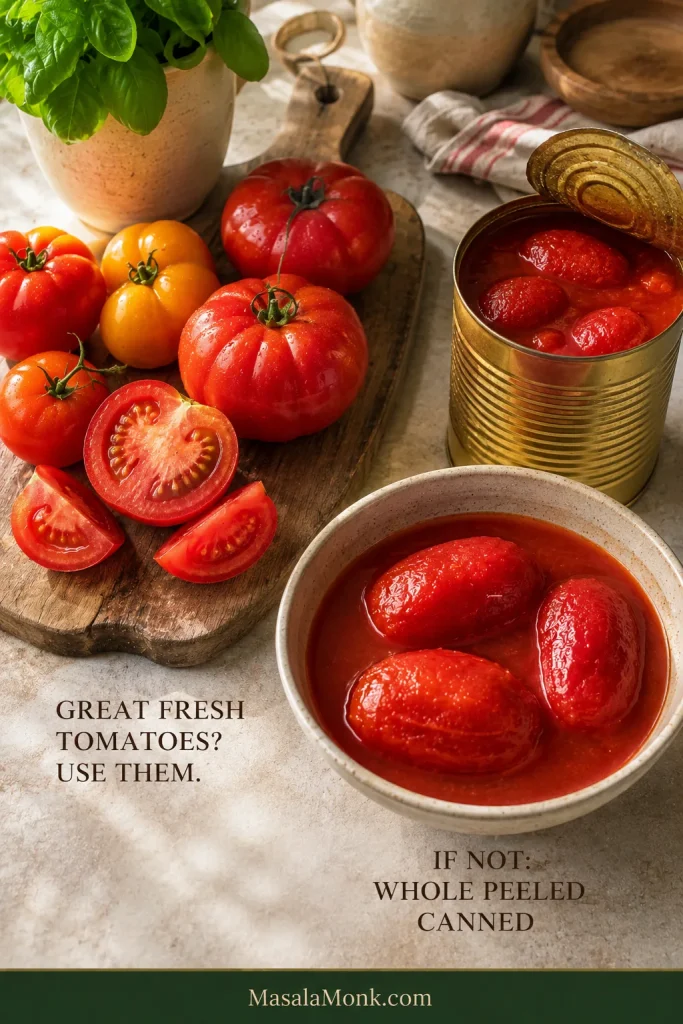
Tomatoes: Use the Ones That Taste Good

Fresh tomatoes earn their place when they are fragrant and flavorful before cooking. Ordinary ripe tomatoes can be chopped whole; blanching, peeling and routine seeding only add work.

Outside peak tomato season, good canned whole peeled tomatoes often give you a deeper, more reliable base—crush them by hand and pour in the juices too. If you have more ripe tomatoes to use, they can go into this fresh tomato sauce.

Ripe fresh tomatoes beside whole peeled canned tomatoes sitting in their juices.
Fresh versus canned tomatoes changes the journey more than the destination. Whichever you use, keep reducing until the sauce coats rather than judging doneness by a fixed cooking time.

Olive Oil, Peppers, Onion, Garlic and Herbs

Measure the olive oil before you start. Eggplant can make a pan look surprisingly dry for a few minutes, and having a measured amount makes it easier to resist pouring endlessly.

Red, yellow and orange peppers bring sweetness. Onion builds the base underneath them. Add the garlic once both have softened so it can perfume the pan without scorching. Thyme handles the simmer happily; basil tastes fresher near the end.

Ratatouille Substitutions That Still Make Sense

One missing vegetable does not have to derail dinner. The useful question is what the swap changes.

Change What to do What changes
No eggplant Increase zucchini and peppers for a lighter stew. Dense squash can add body but needs a longer head start. There is no exact substitute for eggplant’s rich, creamy texture. Winter squash also adds sweetness and takes the dish farther from classic ratatouille.
No zucchini Increase eggplant and peppers modestly. The finished dish will be richer and heavier.
No peppers Simply leave them out. You lose some sweetness and fruity pepper flavor.
Yellow summer squash Use it in place of zucchini. Very little changes; give it the same short cooking window.
No good fresh tomatoes Use canned whole peeled tomatoes with their juices. The reduction time may change, but the flavor can be better than with poor fresh tomatoes.
No fresh thyme Use about 1 teaspoon dried thyme or 1–1½ teaspoons herbes de Provence. Dried herbs are more concentrated, so use them with restraint.

Take away the tomatoes along with several of the defining vegetables and you’re moving toward another kind of vegetable stew. It may still be excellent; it does not need ratatouille’s name to be worth eating.

How to Make Ratatouille for Two

Halve the ingredients and keep the same sequence. Start with about 2½ tablespoons olive oil and keep another teaspoon or two nearby in case the eggplant starts catching.

Don’t shrink the cooking surface too aggressively. A tiny deep saucepan traps moisture more readily than a broad skillet even with half the vegetables.

The smaller batch may reduce faster once the tomatoes go in. Follow the appearance of the sauce instead of cutting every cooking time exactly in half.

Three Things Decide the Texture Before Cooking Starts

Cut the main vegetables around ¾ inch / 2 cm. Tiny dice soften quickly and disappear more readily into the sauce. Very large pieces keep more structure but need considerably longer. Two centimeters gives you a forgiving middle and keeps the chopping reasonable.

Eggplant, zucchini and bell pepper cut into roughly 2-centimeter chunks beside a ruler and 3/4-inch measurement guide.
Consistency matters more than perfect 2 cm cubes. A few uneven pieces are harmless; mixing tiny dice with large chunks creates vegetables that reach tenderness at completely different times.

Use a broad cooking surface. A broad surface gives steam somewhere to escape instead of trapping it around the vegetables.

Listen as well as look. Eggplant or zucchini hitting a properly heated pan should sizzle. A deep mound that quickly turns quiet and steamy needs more space.

Cooking Stages · Check Doneness

How Ratatouille Changes in the Pan

Times are useful checkpoints. The vegetables give better signals.

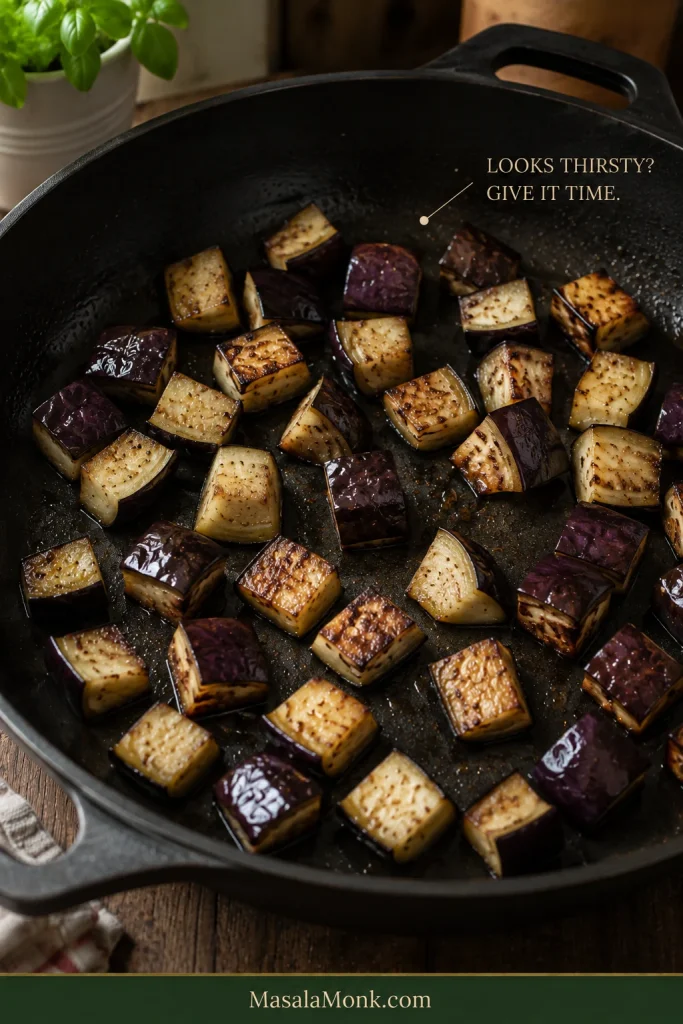
Watch the eggplant first. For a few minutes it can look alarmingly thirsty while the center is still spongy, which is exactly when another pour of oil feels tempting. Give it time. As the pieces brown and begin to soften, that urge to add more oil fades.

Eggplant chunks browning in a mostly dry-looking sauté pan with the words “Looks thirsty? Give it time.”
A dry-looking pan does not automatically mean the eggplant needs more oil. Give the flesh time to soften before deciding whether that reserved spoonful is actually necessary.

Zucchini needs almost the opposite treatment. Take it out while it still seems slightly underdone. That firmness gives it enough room to finish later without disappearing into the stew.

Chunky zucchini pieces lightly browned in a sauté pan with an instruction to remove them while still firm.
The brief sauté is for surface flavor, not full doneness. The center should still resist slightly when the zucchini leaves the pan.

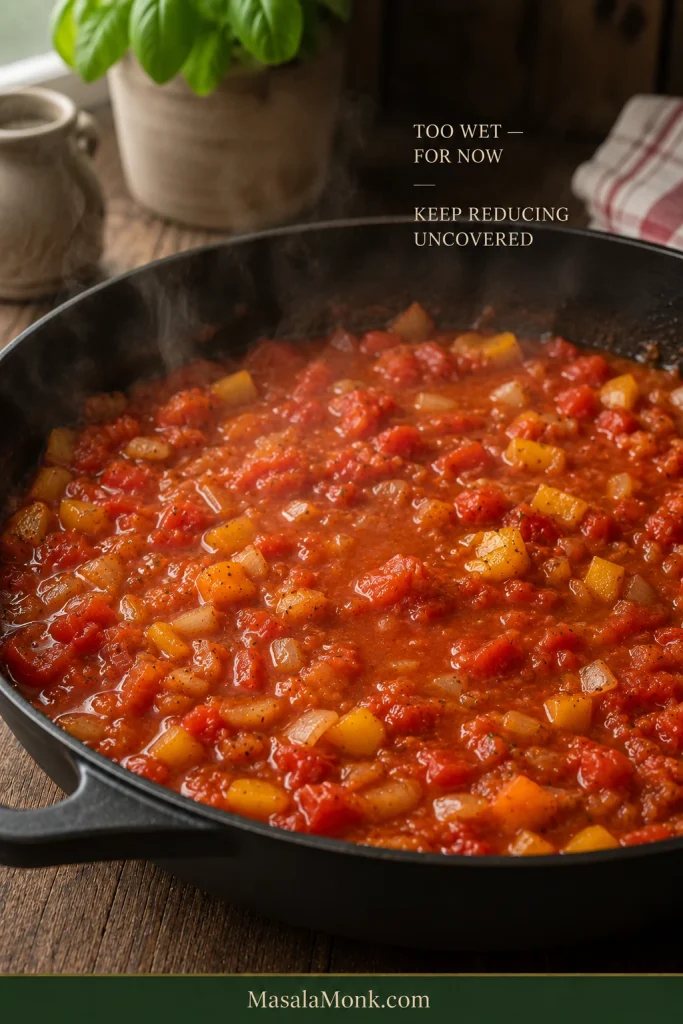
Then the tomatoes usually make the pan look worse before they make it look better. Juice spreads across the bottom, steam lifts from the surface, and for a while everything looks far too wet. Keep cooking. The tomato flesh slumps, the color darkens and turns glossier, and the sharp raw-tomato smell softens.

Tomatoes, softened onions and bell peppers simmering in abundant loose tomato liquid with steam rising from a wide pan.
Watch the direction of travel, not one wet-looking moment. If the tomato liquid is steadily reducing and becoming glossier, the ratatouille is moving toward the right consistency.

When the Tomatoes Start Behaving Like Sauce

Drag a spatula across the bottom. Early on, liquid rushes straight back into the trail. Later, the path stays visible for a moment before the sauce closes behind it. That same trail test works whenever you reduce a tomato sauce, including marinara: thin sauce usually needs evaporation before it needs another ingredient.

Reduced tomato base in a dark pan with a spatula dragged through the center, leaving a visible trail.
The spatula trail works across tomato types. Fresh and canned tomatoes can release very different amounts of water, but both are ready when the reduced sauce briefly holds a path.

When the eggplant returns, the pan may still look like several cooked vegetables sharing a sauce. A few minutes later the tomato begins settling around the pieces, the peppers soften into the background, and the zucchini finishes gently. Suddenly it looks like ratatouille.

From here, fold rather than churn. Soft vegetables can be broken with a spoon even when the cooking itself is exactly right.

Check Doneness · Back to Recipe

The Pan, Not the Timer, Tells You When Ratatouille Is Done

Start checking around the suggested times, then stop when the food reaches these cues. No single vegetable decides doneness; the useful window is when the slowest pieces are tender but the quickest-cooking ones have not started falling apart.

Final Consistency: Read the Whole Pan

Look at Ready when…
Eggplant The center is creamy and yielding with no dry, cottony resistance
Zucchini Tender enough to cut easily with a spoon while still holding its shape
Peppers Soft and sweet with no raw crunch
Tomato Thick enough to coat the vegetables without running freely around them
Pan bottom A small amount of sauce remains; there is no broad puddle of thin red liquid
Whole dish The flavors have come together, but the spoon still gives you different textures
Finished ratatouille in a tilted pan with thick sauce surrounding distinct vegetables and very little free liquid.
Stop just before the dish looks completely settled. Ratatouille tightens slightly during its rest, so a pan that is perfect over the heat can become too dry on the table.

Zucchini: Stop Before It Collapses

Like your ratatouille softer? Continue the gentle simmer. Some traditional versions go much farther toward a deep, almost jammy consistency. Our stopping point is a preference, not a universal rule.

Three stages of cooked zucchini labeled “Remove here,” “Finished here” and “Too far,” progressing from firm pieces to tender pieces and then collapsing pieces.
Zucchini texture changes before its color changes dramatically. That is why firmness is a much better doneness cue than waiting for the pieces to look visibly different.

Troubleshooting · Back to Recipe

Ratatouille Troubleshooting

Before adding ingredients or automatically cooking longer, look at what is actually wrong. Most ratatouille problems have a specific fix.

Decision guide showing watery ratatouille simmered uncovered when vegetables are firm, or tender vegetables removed while excess juices reduce before recombining.
A watery ratatouille is really two possible problems: excess liquid needs more heat, while vegetables that are already tender need protection from that extra cooking.

Texture and Moisture Problems

Problem Fix it now Why it happened / next time
Thin red liquid pooling Vegetables still firm? Simmer uncovered. Already tender? Lift them out, reduce the liquid alone until glossy, then fold them back in. Too much moisture was trapped. Give the vegetables more room and reduce the tomato base farther before recombining.
Eggplant is spongy Give it more time in the tomato sauce until the center becomes creamy. The eggplant is undercooked. Let it begin softening properly during the first browning.
Eggplant seems to absorb all the oil Turn the pieces and give them time. Use the reserved oil only if they begin to scorch. Some absorption is normal; weak heat can exaggerate it. Measure the oil and use active sautéing heat.
Finished ratatouille is greasy Spoon off obvious excess oil if necessary. Too much oil was added, often in repeated pours while the eggplant looked dry. Start with the measured amount.
Zucchini is collapsing Stop cooking. The flavor can still be excellent even if the zucchini has lost its shape. It cooked too long or returned too early. Brown briefly and add it back near the end.

Flavor and Seasoning Problems

Problem Fix it now Why it happened / next time
Vegetables are pale and bland Reduce loose liquid first, then correct the salt before adding more herbs. The vegetables steamed or excess water diluted the flavor. Use stronger heat, more pan surface or smaller batches.
Ratatouille tastes rich but flat Correct the salt first, then add 1 teaspoon red wine vinegar and taste again. The finished pan needs seasoning or a touch of acidity.
Tomato tastes harsh If the vegetables still need time, continue uncovered. If they are tender, remove them and reduce some sauce separately. Check salt before trying a tiny pinch of sugar. The tomato may be under-reduced or unusually acidic. Better tomatoes and sufficient reduction help next time.
Garlic tastes bitter Burned garlic is difficult to rescue; dilution may soften the bitterness. The garlic scorched. Add it only after the onion and peppers have softened.

Once the sauce is right, all of that diagnosis disappears from the plate. What remains is the good part: sweet pepper, soft eggplant, zucchini, basil and tomato in the same warm spoonful.

Overhead view of rested ratatouille in a dark pan with visible eggplant, zucchini, peppers, tomato sauce and fresh basil.
After resting, the dish should look unified without becoming uniform: tomato fills the gaps, while the shapes and colors of the vegetables still reveal what went into the pan.

Back to Recipe · Back to Top

What to Serve With Ratatouille

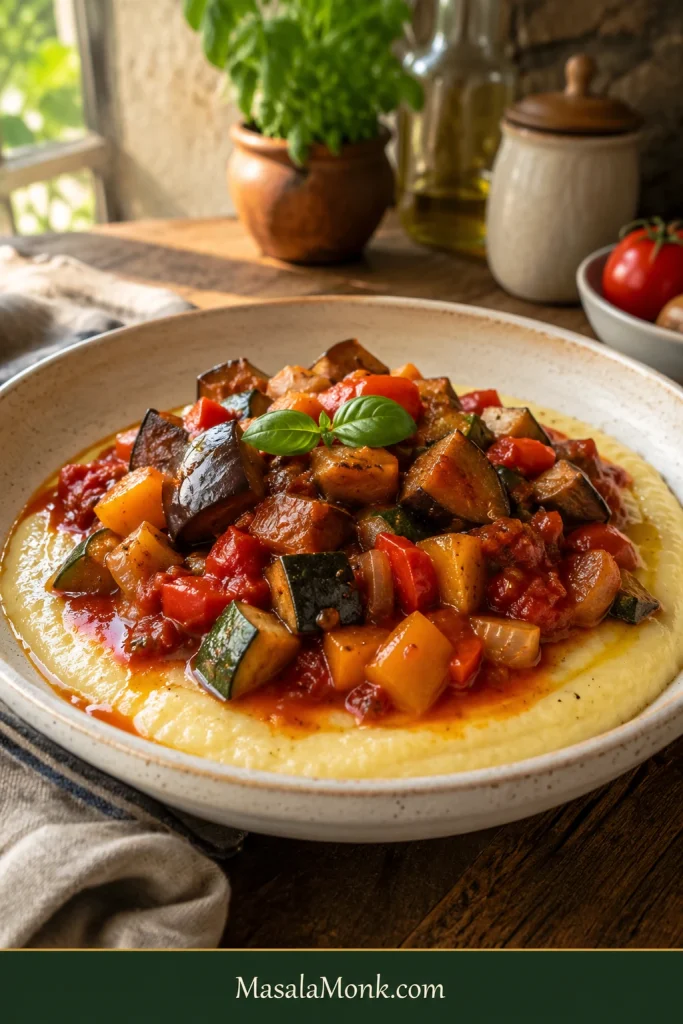
Serve ratatouille with crusty bread, polenta, rice or eggs for a vegetarian meal, or use it as a side for chicken, fish, lamb or sausages.

Once the pan is where you want it, ratatouille becomes wonderfully undemanding. Spoon it beside dinner, pile it onto bread, or let the vegetables become the meal.

Make it the main: add crusty bread or sourdough focaccia, creamy polenta, rice, couscous, white beans or chickpeas. A fried or poached egg makes it more substantial without taking attention away from the vegetables.

Chunky ratatouille spooned over pale creamy polenta in a shallow ceramic bowl and finished with basil.
Polenta works especially well with a strongly reduced batch of ratatouille. Its mild creaminess softens concentrated tomato and olive-oil flavors without competing with the vegetables.

Serve it as a side: simply cooked chicken, fish, lamb, sausages or roasted meat all leave plenty of room for the ratatouille.

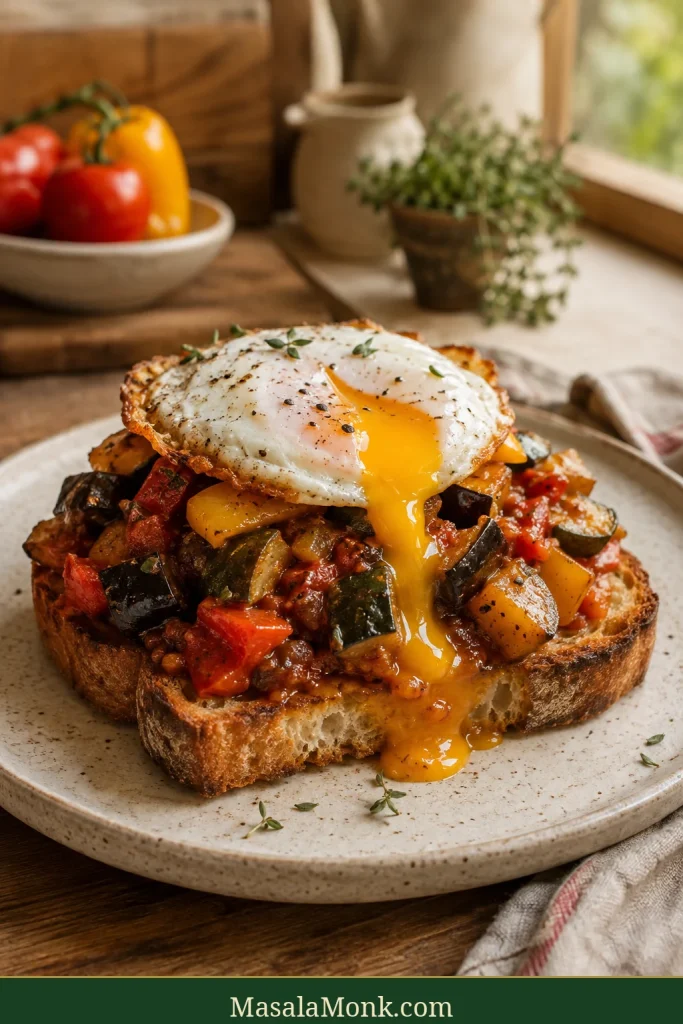
Or make lunch out of it: spoon warm ratatouille over crisp toast and add a fried egg. The tomato and olive oil soften the top of the bread while the edges stay crisp, and the yolk runs straight into the vegetables. Goat cheese or another tangy cheese is good here too, and a smaller amount of ratatouille can go into an easy frittata.

Thick crisp toast topped with chunky ratatouille and a fried egg, with runny golden yolk flowing over the vegetables.
Crisp toast is especially useful with next-day ratatouille: as the vegetables become softer and more integrated overnight, the bread puts a fresh layer of texture back into the meal.

Ratatouille does not need to be piping hot; it is good warm, at room temperature or chilled. During the 15-minute rest, the bubbling settles and the sauce thickens slightly around the vegetables, while the olive oil, herbs and tomato become easier to taste. If serving leftovers cold, let them lose the deepest refrigerator chill first.

Make Ahead, Store, Freeze and Reheat

Yes—ratatouille is excellent made a day ahead. The vegetables become softer, but the tomato, garlic, herbs and olive oil taste more integrated after a night in the refrigerator.

If you’re cooking specifically for the next day, hold back most of the basil and add it just before serving so its fresh flavor does not disappear into the overnight rest.

Day one gives you clearer textures. Day two gives you deeper integration. Neither is a consolation prize.

Fridge, Freezer and Reheating at a Glance

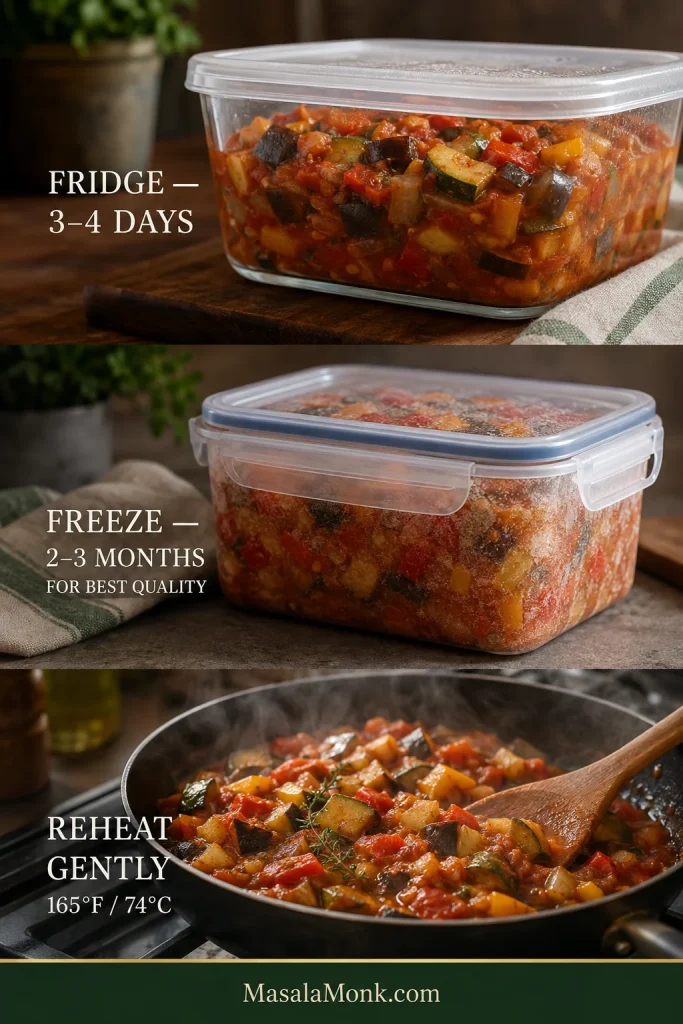
For the practical timeline, keep the three jobs separate: chill leftovers promptly, freeze airtight portions you will not use soon, and reheat only what you plan to eat.

Three-part guide showing ratatouille refrigerated in a covered container, frozen in an airtight container and gently reheated in a pan, with storage times and 165°F or 74°C reheating guidance.
Shallow containers help leftovers cool more quickly and make it easier to reheat only the amount you actually plan to serve.

Refrigerate and Reheat Gently

Refrigerate leftovers within 2 hours of cooking—or within 1 hour when the surrounding temperature is above 90°F / 32°C—in covered, preferably shallow containers. USDA leftover guidance recommends using refrigerated cooked leftovers within 3–4 days and reheating them to 165°F / 74°C.

Reheat only the portion you plan to eat. The microwave works well for a single serving because the heating is brief. On the stovetop, use low to medium-low heat and stir only as much as necessary. Once it is hot, stop. Yesterday’s zucchini does not need another fifteen-minute simmer.

An oilier appearance after reheating does not necessarily mean the original batch contained too much oil. Extra evaporation removes water while the olive oil remains, making it more visible.

Can You Freeze Ratatouille?

Yes. Freeze it in an airtight container and use it within about 2–3 months for best quality. Expect softer vegetables after thawing, especially the zucchini.

That softer texture works well in pasta, eggs, soup or on toast. A thawed batch that has become too soft to enjoy on its own can also become the start of a vegetable soup; minestrone takes the tomato-and-vegetable idea in a heartier beans-and-pasta direction.

Leftover Ideas · Back to Recipe

Five Good Ways to Use Leftover Ratatouille

Leftover ratatouille can become pasta sauce, a toast topping, frittata filling, a spoonful over polenta, or the beginning of a vegetable soup.

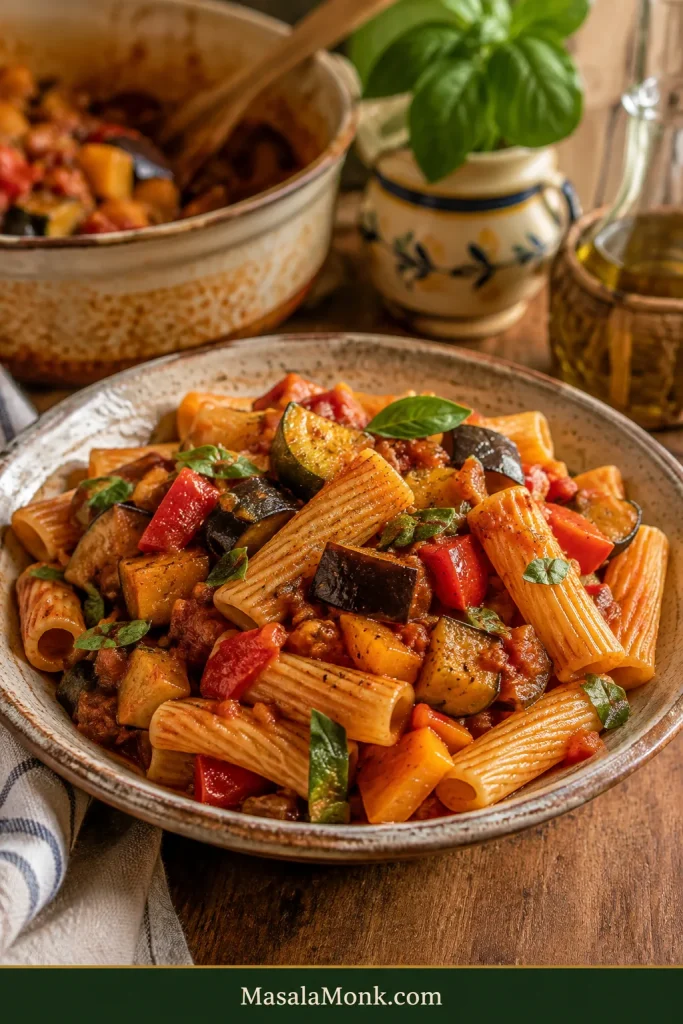
Rigatoni tossed with leftover ratatouille, with visible eggplant, zucchini and red and yellow peppers coated in tomato sauce and finished with basil.
Short pasta has a practical advantage here: chunky eggplant, zucchini and peppers settle between the tubes and ridges instead of slipping away from long strands to the bottom of the bowl.
  1. Toss it with pasta. Warm the ratatouille, loosen it with some pasta water and fold it through. Basil, Parmesan or goat cheese can finish it. For something cheesier and more substantial, the same vegetables also work beautifully in vegetable baked ziti.
  2. Pile it onto toast. Add an egg or tangy cheese and lunch is essentially done.
  3. Put it into eggs. Warm it under fried or poached eggs, or use a modest amount as a cooked vegetable filling for an omelet or frittata.
  4. Spoon it over polenta. Soft vegetables and concentrated tomato are particularly good against creamy polenta.
  5. Turn a very soft batch into sauce or soup. Crush it into a chunky pasta sauce or blend some of it into a smoother vegetable base. The texture changed; dinner did not fail.

When the Vegetables Come Together

When the pan is right, you don’t really need the clock anymore. The tomato has thickened around the vegetables, the eggplant gives under the spoon, the peppers are sweet, and the zucchini has made it to the end intact.

Give it fifteen minutes to settle. By then the sauce has gathered around the vegetables, the steaming heat has eased, and the ratatouille is ready to eat.

If you make it, tell me where you like your ratatouille to land: vegetables still clearly distinct, or soft and deeply confited?

Back to Recipe · Back to Top

Posted on — Leave a comment

Chicken and Chorizo Recipe

Dark skillet filled with boneless chicken pieces, sliced chorizo, peppers, herbs, and glossy red tomato sauce, with rice and bread behind it.

Chicken and chorizo is the meal you make when you want one pan to taste like it worked harder than it did. The chorizo releases smoky paprika oil, the chicken browns in it, and the tomato-pepper mixture turns rich enough to spoon over rice, toss with pasta, mop up with bread, or finish with cream.

Start with the stovetop smoky tomato version below. Once the chicken is simmering, you can keep it rustic, make it creamy, add orzo, serve it over rice, or use the guide to move the same flavors toward pasta, paella, a tray bake, or the slow cooker.

This is the kind of recipe that helps when dinner feels undecided. You do not have to commit to pasta, rice, or cream at the start. Build the smoky tomato mixture first, then choose the version that fits the night. It feels bigger than a quick dinner, but it still behaves like one.

Quick Answer

The best easy chicken and chorizo recipe is a one-pan tomato dinner: render Spanish-style chorizo, brown chicken thighs in the smoky oil, then simmer with peppers, garlic, tomatoes, paprika, and stock until the mixture coats the chicken.

Chicken thighs give the juiciest result, and firm Spanish-style chorizo is the easiest to cook with. Breast works too, but it needs gentler simmering. Mexican chorizo can be used, but cook it fully first because it behaves like raw seasoned sausage, not sliced cured chorizo.

Add cream at the end for a softer, richer finish. For orzo, add more stock and simmer it into a one-pot meal. Toss the tomato-chorizo mixture with pasta if you want pasta night. Use a paella method from the start if rice is the main event.

Chicken and Chorizo at a Glance

Start withOne-pan tomato chicken and chorizo
Total time35–40 minutes
Most forgiving chickenBoneless skinless chicken thighs
Easiest chorizoFirm Spanish-style cooking chorizo or cured chorizo
Main panLarge deep skillet or sauté pan with lid, ideally 28–30cm / 11–12 inch
Chicken doneness165°F / 74°C in the thickest pieces
Watch forExtra chorizo oil

Before You Start

Before you start, decide only one thing: are you making the smoky tomato version, the creamy version, or the orzo version? The first steps stay the same, but the liquid changes later.

  • Classic smoky tomato version: start with less stock and reduce until the mixture coats the chicken.
  • Creamy chicken and chorizo: spoon off extra chorizo oil before adding cream, or the finish can feel heavy.
  • Orzo version: use more stock and stir often because orzo thickens quickly.
  • Rice version: serve over cooked rice unless you are following a dedicated paella-style method.

Make this stovetop smoky tomato version first if you are unsure; it is the base for almost every direction below.

Decided your version? Go to the recipe card, or compare the chicken and chorizo variations first.

Recipe Card: One-Pan Chicken and Chorizo

One-Pan Tomato Chicken and Chorizo

A smoky, saucy meal made with chicken, chorizo, tomatoes, peppers, garlic, smoked paprika, and an optional creamy finish.

Prep Time10 minutes
Cook Time25–30 minutes
Total Time35–40 minutes
Servings4
EquipmentLarge deep skillet or sauté pan with lid, tongs, wooden spoon, sharp knife, chopping board, measuring jug

Ingredients

  • 600g / 1.3 lb boneless skinless chicken thighs, cut into large bite-size pieces
  • 120–150g / 4–5 oz firm Spanish-style chorizo, sliced or diced
  • 1 medium onion, finely chopped
  • 1 large bell pepper or 2 small bell peppers, sliced
  • 3–4 garlic cloves, minced
  • 1 tbsp tomato paste
  • 1–1½ tsp smoked paprika
  • 1 tsp dried oregano or mixed herbs
  • 400g / 14 oz canned chopped tomatoes or passata
  • 150–250ml / ⅔–1 cup chicken stock
  • 1 tbsp olive oil, only if the skillet needs it
  • Salt and black pepper, to taste
  • Small handful parsley or basil, chopped
  • Squeeze of lemon juice, to finish

Optional Creamy Finish

  • 100–180ml / ⅓–¾ cup cream
  • 20–30g parmesan, finely grated
  • 1–2 handfuls spinach

Instructions

  1. Render the chorizo. Heat a large deep skillet over medium heat. Add chorizo and cook for 2–3 minutes, until red oil appears and the edges start to crisp.
  2. Control the oil. Keep a glossy coating in the pan, but spoon off any shallow red pool before the dish turns heavy.
  3. Brown the chicken. Add the chicken pieces, season lightly, and brown for 4–5 minutes. They do not need to cook through yet.
  4. Soften the vegetables. Add onion and peppers. Cook for 4–5 minutes, then add garlic for 30 seconds.
  5. Build the smoky base. Stir in tomato paste, smoked paprika, and oregano. Cook for 1 minute so the paste darkens and the spices bloom.
  6. Simmer gently. Add tomatoes or passata and 150ml / ⅔ cup stock. Scrape the pan, cover loosely, and simmer for 10–12 minutes.
  7. Reduce until glossy. Uncover and simmer for 5–8 minutes, until the sauce coats the chicken and leaves a light spoon trail. Add stock if it gets too thick.
  8. Make it creamy, if you like. Lower the heat, then stir in cream, parmesan, and spinach. Simmer gently for 2–4 minutes without boiling hard.
  9. Finish fresh. Add parsley or basil and lemon juice. Taste before adding salt because chorizo and stock become stronger as they reduce.
  10. Check doneness. Chicken should reach 165°F / 74°C in the thickest pieces before serving.

Recipe Notes

  • Pan size: a wide 28–30cm / 11–12 inch skillet helps the chicken brown and the tomatoes reduce. If yours is smaller, brown the chicken in batches.
  • No lid? Use a sheet pan, large plate, or foil loosely over the skillet, or simmer uncovered with extra stock nearby. Watch the liquid and add a little more as needed.
  • Stock amount: start with 150ml for a thicker result. Use up to 250ml if your skillet is wide, your tomatoes are thick, or you prefer a looser finish.
  • Chorizo strength: if your chorizo is very salty, spicy, or oily, start closer to 120g.
  • Buying cue: look for firm Spanish-style chorizo that can be sliced or diced. If it is soft and loose like sausage meat, cook it fully first.
  • Tomato paste: 1 tbsp keeps the tomato flavor balanced. Use 2 tbsp if you want it deeper.
  • Chicken breast: use about 500g / 1.1 lb and simmer more gently. Breast cooks faster than thighs.
  • Mexican chorizo: cook it fully first, breaking it up like sausage meat, then continue with the recipe.
  • Lighter plate: use 100–120g chorizo and add extra peppers, spinach, peas, beans, or greens.
  • Thicker result: simmer uncovered for a few extra minutes.
  • Looser result: thin with stock a little at a time.

This is the point where the recipe starts paying you back: the chicken is tender, the smoky tomato mixture is rich, and the side dish almost chooses itself.

Sauce Texture Cue

Before choosing a variation, check the sauce texture. It should look glossy and thick enough to coat the chicken, not like separate pieces sitting in liquid.

Close-up of boneless chicken pieces and sliced chorizo coated in thick red tomato sauce with peppers and herbs.
At the finish, the sauce should cling to the chicken instead of dripping away; that is your cue that the tomatoes have reduced enough.

Need a different finish? Jump to creamy chicken and chorizo, rice, orzo, or pasta, or troubleshooting.

More Helpful Chicken and Chorizo Tips

Why This Chicken and Chorizo Recipe Works

The chorizo is not just an add-in. It is the flavor starter. As it fries, it releases paprika-rich oil that seasons the chicken, vegetables, and tomatoes. That is why the recipe begins with chorizo instead of plain oil.

The chicken is browned before it simmers, so the pieces taste savory instead of boiled. Tomato paste gets a short moment in the hot oil, which deepens the whole dish. Peppers add sweetness, stock gives the chicken enough moisture to finish cooking, and lemon or herbs at the end keep the richness in check.

By the time the tomatoes reduce, you are looking for a smoky, garlicky, slightly sweet mixture that clings to the chicken instead of sitting thin around it. That is when this stops feeling like chicken in tomato sauce and starts feeling like something you want to put in the middle of the table.

The smoky tomato mixture tastes good before you add cream, pasta, or rice, which is what makes it so flexible. Keep it rustic for a saucy skillet meal, add cream for comfort, stir in orzo for one-pot ease, or spoon it over rice when you want something simple.

What This Tastes Like

This is smoky, tomato-rich, and savory, with a little sweetness from the peppers and a salty paprika edge from the chorizo. The lemon and herbs at the end make the whole skillet taste brighter instead of heavy.

In its smoky tomato form, the skillet is bolder and brighter, especially with rice, potatoes, or a torn piece of bread. Cream makes it softer and richer, parmesan gives the finish more body, orzo turns it cozy and spoonable, pasta makes it glossy, and rice keeps it simple.

Ingredients You’ll Need

Chicken and Chorizo Ingredients at a Glance

The ingredient list is simple, but the order matters. Chorizo starts the flavor, chicken browns in that oil, and tomatoes, peppers, garlic, smoked paprika, and stock turn it into a flexible skillet sauce.

Raw boneless chicken thighs on a board with sliced chorizo, peppers, tomatoes, stock, spinach, cream, parmesan, garlic, paprika, lemon, and herbs.
The flavor starts before the sauce: chicken thighs, firm chorizo, smoked paprika, garlic, peppers, tomatoes, and stock all build the base.

Chicken Thighs or Chicken Breast

Chicken thighs are the most forgiving choice because they stay juicy while the tomatoes simmer down. They also hold their own against the smoky, salty richness of chorizo.

Breast works for a leaner or quicker meal. Cut it into larger pieces, brown it lightly, and simmer gently. Smaller pieces can dry out quickly once the tomatoes start reducing.

If keeping breast juicy is usually the problem, this Baked Chicken Breast Recipe will help with timing and texture.

Best Chorizo to Buy

For this recipe, the easiest choice is firm Spanish-style cooking chorizo or cured chorizo that can be sliced or diced. It should release smoky red oil as it fries and leave little browned edges in the skillet.

Mild chorizo gives you more control, especially if you are cooking for family. Spicy chorizo works well, but taste before adding extra paprika or pepper. Diced chorizo is convenient, while sliced chorizo gives better browned edges and a more visible finished dish.

Avoid a very oily chorizo for the creamy version unless you are ready to spoon off extra fat before the cream goes in. Soft, raw, loose chorizo should be cooked fully first and treated like Mexican chorizo.

Spanish Chorizo vs Mexican Chorizo

Spanish-style cooking chorizo or cured chorizo slices cleanly, releases smoky paprika oil, and gives the tomatoes their deep red flavor.

Mexican chorizo is usually raw, soft, and crumbly. It can still taste excellent with chicken, but it changes the texture. Cook it fully first, breaking it up like sausage meat, then build the tomatoes around it. The finished dish will be looser and meatier, not dotted with neat slices of chorizo.

Side-by-side comparison of sliced Spanish-style chorizo and soft crumbly Mexican-style chorizo with labels explaining how each is used.
Choose cured Spanish-style chorizo for clean slices and paprika oil. Cook soft Mexican-style chorizo through first, like fresh sausage.

For more on the ingredient difference, see Food & Wine’s guide to Spanish and Mexican chorizo.

A good amount for 4 servings is 120–150g / 4–5 oz chorizo. More than that can push the final dish toward oily or salty unless you balance it with potatoes, beans, rice, or extra vegetables.

Tomatoes, Peppers, Garlic, and Paprika

Canned chopped tomatoes make the finish rustic and spoonable. Passata gives a smoother result. Tomato paste adds depth, especially when it cooks for a minute in the chorizo oil before the liquid goes in.

Bell peppers are a natural match for chorizo. Red, yellow, and orange peppers add sweetness; green pepper gives a sharper edge. Garlic should go in after the onion and peppers have softened so it does not burn.

Smoked paprika reinforces the chorizo flavor. Use it carefully if your chorizo is already very smoky. The goal is rounded smokiness, not a harsh finish.

Stock, Salt, and Cream

Stock loosens the tomatoes and helps the chicken finish cooking. Start with 150ml / ⅔ cup for a thicker result. Use closer to 250ml / 1 cup if you prefer a looser finish or plan to add orzo.

Taste at the end, not the beginning. Chorizo, stock, parmesan, and olives can all become more intense as they reduce, so early seasoning can turn too salty later.

Cream is optional. Use 100ml / about ⅓ cup for a lightly creamy finish, or up to 180ml / ¾ cup for a richer one. Add it at the end, over lower heat, and simmer gently. A hard boil can make dairy split or turn greasy.

How to Make Chicken and Chorizo

1. Render the Chorizo First

Start the chorizo in a dry or barely oiled skillet over medium heat. Within a few minutes, the bottom should turn glossy and red-orange. This is the smell that tells you the recipe is going somewhere: smoky, salty, and already halfway to dinner.

Sliced chorizo frying in a dark skillet with red-orange oil forming around the crisping edges.
Give the chorizo its own minute first; as the edges crisp, the red oil becomes a smoky seasoning for the whole skillet.

Control the Chorizo Oil

Keep a glossy coating in the skillet, but spoon off any shallow red pool before moving on. That small bit of control keeps the finished dish rich instead of heavy.

Two-panel comparison showing a thin glossy coating of red chorizo oil beside a skillet with too much pooled red oil.
Keep the shine, lose the puddle: a thin chorizo oil coating adds flavor, while a deep pool can make the tomato sauce feel heavy.

2. Brown the Chicken in the Chorizo Oil

Add the chicken pieces and let them take on color. They do not need to cook through yet. Browning creates a better base and helps the chicken taste seasoned from the start.

Bite-size boneless chicken pieces browning in red chorizo oil in a dark skillet, with sliced chorizo pushed to one side.
Before simmering, sear the boneless chicken pieces in chorizo oil so they bring browned flavor into the sauce instead of tasting boiled.

In a crowded skillet, brown the chicken in two batches. Crowded chicken steams, and steamed chicken does not give the same depth.

3. Build the Tomato-Pepper Base

Add onion and peppers and cook until they begin to soften. Garlic goes in next, followed by tomato paste, smoked paprika, and oregano. The cue is a smoky, savory smell before the tomatoes go in.

Cooking the tomato paste for even one minute makes the final flavor richer. It is a small step that keeps the tomatoes from tasting thin or raw.

Tomato paste, smoked paprika, garlic, onions, and peppers cooking in red chorizo oil in a dark skillet before tomatoes are added.
After the chicken browns, briefly fry the tomato paste and smoked paprika; this turns a simple tomato sauce into a deeper, smokier one.

4. Simmer Until It Coats the Chicken

Add tomatoes and stock, then simmer gently. Keep it at a quiet bubble. You want the chicken to finish gently while the tomatoes thicken around it. As the mixture reduces and the chorizo oil folds in, it will turn darker, glossier, and more spoonable.

At this point, the skillet should look like dinner, not separate pieces sitting in liquid: red oil folded in, chicken coated, peppers soft, and everything smelling smoky enough to make rice or bread feel obvious.

You’ll know it is ready when it coats the chicken and leaves a light trail as you drag a spoon through the skillet. At this stage, you should want bread nearby even if you planned rice.

Spoon dragged through thick tomato-chorizo sauce in a skillet, leaving a visible trail with chicken and chorizo pieces around it.
A spoon trail is the easiest visual test: when the sauce parts for a moment, it is thick enough to coat the chicken.

If the chicken is cooked but the skillet still looks thin, simmer uncovered for a few more minutes. Oil pooling on top is your cue to spoon some off. If it gets too thick or tastes too rich, stock, lemon juice, and herbs will bring it back.

5. Finish Based on the Version You Want

For a brighter tomato finish, add herbs and lemon. To make it creamy, lower the heat before stirring in cream and parmesan. Orzo needs extra stock and direct simmering, while pasta works best when the mixture stays thicker and loosens later with pasta water.

Substitutions and Easy Swaps

Use what you have. This is not the kind of recipe that falls apart because you used one pepper instead of two or swapped thighs for breast. Keep the smoky tomato mixture, adjust the liquid, and you still have a good pan of food.

IngredientEasy swapWhat changes
Chicken thighsChicken breast or drumsticksBreast cooks faster; drumsticks need longer.
Spanish chorizoMexican chorizo cooked fully first, or smoked sausage plus smoked paprikaThe texture may become looser or less smoky.
Bell peppersCourgette, mushrooms, peas, spinach, green beans, kaleAdd delicate greens near the end.
Canned tomatoesPassata, crushed tomatoes, fresh chopped tomatoesFresh tomatoes may need longer to reduce.
Chicken stockWater plus bouillon, vegetable stockWatch salt if using cubes or powder.
CreamCrème fraîche, cream cheese, extra stock, pasta waterAdd dairy over low heat to avoid splitting.
ParmesanCheddar, manchego, pecorino, or skip itSaltiness changes, so taste before seasoning.
Parsley or basilCoriander, chives, lemon zestUse a fresh finish to cut the richness.

If you are using smoked sausage instead of chorizo, the skillet logic is similar to this Kielbasa and Potatoes Recipe: brown the sausage first, then let its flavor carry the rest of the meal.

Back to recipe card · Back to table of contents

Choose Your Chicken and Chorizo Variation

Start with the smoky tomato pan recipe first. From there, the table below helps you change the meal without turning the chicken dry, the finish greasy, or the rice mushy.

Already know what you want? Jump to creamy, rice, orzo, or pasta, or tray bake and slow cooker.

Chicken and Chorizo Variation Guide

Four-panel guide showing chicken and chorizo as a tomato skillet, creamy skillet, orzo dish, and rice bowl.
Once the base skillet is right, choose the finish by texture: bright tomato, silky cream, spoonable orzo, or fluffy rice.

Not sure which version to make? The smoky tomato version is the safest weeknight choice. Cream makes it softer and richer, orzo turns it into a full one-pot meal, and rice works best when it is cooked separately or handled with a paella-style method.

You want…Best way to make itWhat to watch
Classic pan mealMake the smoky tomato version as written.Keep it rich, not oily.
Creamy chicken and chorizoAdd cream and parmesan at the end.Lower the heat so the cream does not split.
Chicken and chorizo with riceServe over cooked rice or use a dedicated rice method.Rice needs planned liquid, not guesswork.
Chicken and chorizo orzoAdd orzo and extra stock to the skillet.Stir often because orzo sticks.
Chicken and chorizo pastaUse the tomato-chorizo mixture as a coating for short pasta.Loosen with pasta water, not too much stock.
Chicken and chorizo paellaUse the dedicated paella recipe.Paella needs rice and liquid control from the start.
Chicken and chorizo jambalayaUse Cajun seasoning and long-grain rice.It needs a separate rice-pot method.
Chicken and chorizo tray bakeUse thighs, potatoes, peppers, tomatoes, and chorizo.Do not crowd the tray.
Slow cooker chicken and chorizoUse thighs or drumsticks with less stock.Add cream, pasta, or orzo late.
Lighter chicken and chorizoUse less chorizo and add greens, beans, or extra peppers.Keep it tomato-based instead of creamy.

Creamy Chicken and Chorizo

Creamy chicken and chorizo is the softer, richer version — the one to make when you want the smoky tomato skillet to feel a little more comforting. Cream rounds off the paprika heat, parmesan gives the finish body, and spinach or peas keep the plate from feeling too heavy.

Creamy chicken and chorizo in a dark skillet with boneless chicken pieces, sliced chorizo, spinach, herbs, and pale orange tomato cream sauce.
Wait until the tomato-chorizo sauce has calmed down before adding cream; gentle heat keeps the finish smooth, glossy, and rich.

Make the smoky tomato version first, let it reduce until the chicken is cooked, then lower the heat before adding cream. Use 100ml / about ⅓ cup cream for a lightly creamy finish, or up to 180ml / ¾ cup for a richer one. Add 20–30g parmesan, stir gently, and simmer for 2–4 minutes, just until everything turns silky.

Spinach, peas, mushrooms, and basil all work well here. Lemon juice is small but useful because it cuts through the chorizo and cream. A thick creamy finish can be loosened with stock, milk, or pasta water.

The same gentle-heat rule matters in this Cream of Mushroom Chicken Recipe too.

Creamy rule: remove excess chorizo oil before adding cream. Too much oil plus dairy can make the finish feel heavy or split-looking.

Lighter Chicken and Chorizo

A lighter plate is easy if you let a smaller amount of chorizo do the seasoning. Use 100–120g chorizo, chicken breast or trimmed thighs, extra peppers, spinach, courgette, beans, or greens, and keep the tomatoes bright instead of creamy.

Serve it with salad, cauliflower rice, steamed greens, or a smaller portion of rice rather than pasta or potatoes. Start with little or no added oil because the chorizo will season the skillet on its own.

Chicken and Chorizo with Rice, Orzo, or Pasta

Choose your starch: rice, orzo, or pasta.

Three-panel comparison showing chicken and chorizo over white rice, mixed with orzo, and tossed with short pasta.
Rice, orzo, and pasta need different moves: serve rice underneath, simmer orzo directly in the sauce, and loosen pasta with a splash of pasta water.

Chicken and Chorizo with Rice

For the easiest chicken and chorizo with rice, serve the tomato-chorizo mixture over cooked rice. This keeps the chicken tender, the texture controlled, and the rice from turning mushy. White rice, brown rice, pilaf, and cauliflower rice all work.

Bowl of white rice topped with boneless chicken pieces, sliced chorizo, peppers, herbs, lemon, and red tomato sauce.
Cooked rice keeps this version simple: spoon the bold tomato-chorizo mixture over the grains so they stay fluffy.

If rice texture is where dinner usually goes wrong, this guide on How to Cook Rice will help with ratios, soaking, and cooking methods.

You can also stir cooked rice into the skillet at the end for a quick rice-bowl meal. Thin with stock if the rice absorbs too much of the pan juices.

If paella is what you want, take the rice-pan method from the beginning. Paella depends on rice depth, liquid timing, and resting, so it is better not to improvise it by stirring raw rice into this recipe. Use the Chicken and Chorizo Paella Recipe when you want the saffron rice-pan version.

Chicken and Chorizo Orzo

For chicken and chorizo orzo, add the orzo after the tomatoes and stock go in. Use 200g orzo and increase the total stock to about 500–600ml / 2–2½ cups.

Chicken and chorizo orzo in a dark skillet with boneless chicken pieces, sliced chorizo, tomato sauce, herbs, parmesan, and a serving spoon.
Because orzo drinks up liquid fast, stop while it still looks loose and glossy; it will thicken more as it rests.

Grams are more reliable than cups here. Orzo cup measures vary by brand and shape; 200g is usually around 1 to 1¼ cups.

Simmer for 9–12 minutes, stirring often. Orzo sticks as the mixture thickens, so keep extra stock nearby and stir in a little at a time if the skillet looks dry before the orzo is tender.

Finish orzo with spinach, peas, parmesan, parsley, or a little cream. Serve it while it is loose and saucy because orzo thickens as it sits.

Chicken and Chorizo Pasta

Pasta works best when the tomato-chorizo mixture starts slightly thicker, then loosens with pasta water. Cook 225–300g short pasta such as penne, rigatoni, fusilli, or orecchiette until just tender, then toss it through the skillet.

Creamy tomato pasta works best when the cream and parmesan go in before the pasta. For a pasta bake, mix the cooked pasta with the chicken and chorizo, top with cheese, and bake until bubbling.

The glossy finish uses the same pasta-water logic as this Broccoli Pasta Recipe.

Aim to finish pasta while the mixture still clings. Dry pasta needs pasta water, while soupy pasta needs another minute of simmering before serving.

Chicken and Chorizo Jambalaya

Jambalaya needs its own cooking plan before rice goes in. Instead of this tomato pan recipe, use long-grain rice, Cajun seasoning, peppers, tomatoes, stock, chicken, and chorizo, then simmer until the rice is tender.

Think of it as its own one-pot rice meal rather than a quick variation of this recipe. In this post, serve the skillet over cooked rice or use the paella link when you want saffron rice. Jambalaya needs its own seasoning, rice, and liquid plan from the start.

For another smoky rice-and-beans comfort meal, see this Red Beans and Rice Recipe.

Back to recipe card · Back to table of contents

Tray Bake and Slow Cooker Versions

Chicken and Chorizo Tray Bake

The tray bake version is for the night when you want the oven to take over and the potatoes to catch all that smoky chorizo oil. Use chicken thighs, chorizo, potatoes, peppers, onion, tomatoes, garlic, smoked paprika, and a little olive oil.

Spread everything in a large tray so the ingredients roast instead of steam. Bake at 200°C / 400°F for about 45–50 minutes, turning the potatoes once or twice, until the chicken is cooked through and the potatoes are tender. Bone-in thighs may need a little longer.

Metal roasting tray with browned chicken pieces, sliced chorizo, potatoes, peppers, onions, tomatoes, herbs, and roasted pan juices.
A crowded tray steams; a spread-out tray roasts, giving the chicken, chorizo, potatoes, peppers, and onions better browned edges.

Smaller pieces can brown faster at 220°C / 425°F if the tray is well spread out. For a general family tray bake, 200°C / 400°F is the safer starting point. Crowding is the fastest way to turn a tray bake watery, so use two trays if needed.

The same spread-it-out principle helps these Sheet Pan Chicken Fajitas brown instead of steam.

Slow Cooker Chicken and Chorizo

In the slow cooker, thighs or drumsticks are the safer choice because they stay juicier over longer cooking. Chicken breast can work, but check it earlier and avoid cooking it longer than needed.

If you are using breast in the slow cooker, these Crock Pot Chicken Breast Recipes are useful for keeping it tender.

The slow cooker traps liquid, so start with less stock than you think you need. For 4 servings, 400g / 14 oz tomatoes and about 100–150ml / ½ cup stock is usually enough. Cook for 3–4 hours on high or 6–8 hours on low, depending on your slow cooker and the size of the chicken pieces.

Brown the chorizo first when you have time. It is the difference between a slow cooker meal that tastes fine and one that still has that smoky skillet depth. Add cream, orzo, or pasta near the end so the texture stays right.

What to Serve with Chicken and Chorizo

Because the smoky tomato mixture is the best part, serve it with something that can catch it. A lighter plate works well with greens and bread, while a heartier family meal can take rice, potatoes, pasta, or orzo.

For a hearty plate

  • Steamed rice or pilaf
  • Crusty bread or garlic bread
  • Mashed potatoes
  • Roast potatoes
  • Short pasta
  • Orzo or couscous

For a lighter plate

  • Green salad with lemony dressing
  • Roasted broccoli
  • Green beans
  • Wilted spinach or kale
  • Cauliflower rice
  • Butter beans or chickpeas stirred into the skillet

Put the skillet in the middle of the table with rice or bread and it becomes the kind of meal people keep spooning from.

If bread is your plan for catching the smoky pan juices, this Homemade Garlic Bread Loaf is the kind of side that makes the plate feel complete.

Troubleshooting Chicken and Chorizo

Most problems come from the same few places: too much chorizo oil, overcooked chicken breast, over-reduced salty tomatoes, or the wrong liquid ratio for rice and orzo. The good news is that most of them are fixable while the skillet is still on the stove.

Common Chicken and Chorizo Fixes

Four-panel troubleshooting guide showing greasy red oil, watery tomato sauce, split cream sauce, and sticky orzo with short fix labels.
The fixes are simple: remove excess oil, reduce watery tomatoes, lower heat for cream, and add stock when orzo gets too tight.
ProblemWhy it happenedFix
The dish is greasyThe chorizo released more fat than needed.Spoon off extra oil after rendering the chorizo. Keep a glossy coating, not a shallow pool.
It tastes too saltyChorizo, stock, parmesan, or olives reduced together.Add tomatoes, unsalted stock, cream, beans, potatoes, or cooked rice. Salt later next time.
It is too spicyThe chorizo or paprika was hotter than expected.Add cream, tomatoes, beans, rice, or potatoes to soften the heat.
The chicken is dryBreast pieces cooked too long or too hard.Use thighs, cut breast larger, and simmer gently.
The skillet is wateryIt was covered too long or the vegetables released water.Simmer uncovered until the tomatoes reduce.
It tastes flatThe tomato paste and spices were not cooked in the oil.Cook tomato paste, paprika, and garlic briefly before adding liquid.
The cream splitThe mixture boiled hard after cream was added.Lower the heat and stir cream in at the end.
The orzo is stickingOrzo thickens quickly and catches on the base.Stir often and add stock a little at a time.
The rice is mushyRice was added without the right method or ratio.Use cooked rice on the side, or follow a dedicated rice or paella method.
The plate tastes too richToo much chorizo oil or cream built up.Add lemon juice, parsley, tomatoes, greens, or beans to balance it.

Back to recipe card · Back to table of contents

Storage, Freezing, Reheating, and Make-Ahead

Fridge

Store leftovers in an airtight container in the fridge for up to 3 days. Creamy versions are best within 2–3 days.

If you added rice, pasta, or orzo, the dish will thicken as it sits because the starch keeps absorbing the juices. Thin it with a little liquid when reheating.

Freezer

The smoky tomato version freezes better than creamy, pasta, or orzo versions. Cool completely, pack into freezer-safe containers, and freeze for up to 2 months.

Creamy finishes can separate slightly after freezing, but gentle reheating and stirring usually brings them back together.

Make-Ahead

The tomato chicken and chorizo mixture is the best part to make ahead. Cook it without cream, pasta, or orzo, then cool and store it. Add cream, fresh greens, cooked pasta, or orzo when reheating so the texture stays smoother and the starch does not turn soft.

Leftovers are not an afterthought here. The tomatoes often taste deeper after a night in the fridge, especially if you reheat gently and finish with fresh herbs or lemon.

Reheating

Reheat gently on the stovetop or in the microwave until hot all the way through. Use stock, water, milk, or cream to loosen the texture. Avoid boiling creamy leftovers aggressively.

Once you understand the chorizo oil and tomato mixture, this becomes less of a fixed recipe and more of a weeknight formula you can actually trust.

FAQs

What chorizo is best for chicken and chorizo?

Firm Spanish-style cooking chorizo or cured chorizo is best because it slices cleanly and releases smoky paprika oil. Mexican chorizo can work, but cook it fully first because it behaves like raw sausage meat.

Is chicken breast or chicken thigh better?

Chicken thighs are better for a juicy skillet meal because they stay tender during simmering. Breast works for a leaner version, but it needs gentler heat and a shorter simmer.

How much chorizo should I use?

For 4 servings, use 120–150g / 4–5 oz chorizo. That gives enough smoky flavor without making the dish too oily or salty.

Why is my chicken and chorizo oily?

Chorizo naturally releases fat as it cooks. Fry it first, then spoon off extra oil before adding tomatoes, stock, or cream. A glossy coating is enough for flavor.

How do I make it creamy?

Add 100–180ml / ⅓–¾ cup cream near the end and simmer gently. Parmesan, spinach, and lemon juice all work well in the creamy version.

Can I make chicken and chorizo without cream?

Yes. Keep it tomato-based and finish with lemon juice, herbs, and a little stock if needed. For body without cream, add beans, pasta water, or parmesan.

Can this be made with orzo?

Yes. Add 200g orzo and 500–600ml stock, then simmer for 9–12 minutes, stirring often. Keep extra stock nearby in case the orzo thickens before it turns tender.

Can I use cooked chicken?

Yes. Render the chorizo, build the tomato mixture, then stir in cooked shredded or chopped chicken near the end just long enough to heat through.

Will this work in the slow cooker?

Yes, but use less stock because slow cookers trap liquid. Thighs or drumsticks work better than breast. Add cream, orzo, or pasta near the end.

Can I make it ahead?

Yes. Make the tomato chicken and chorizo mixture ahead, then add cream, pasta, or orzo when reheating so the texture stays smoother.

What pan works best?

Use a large deep skillet or sauté pan with a lid, ideally 28–30cm / 11–12 inch. A wider cooking surface helps the chicken brown and the tomatoes reduce.

What temperature should chicken be cooked to?

Chicken should reach 165°F / 74°C in the thickest part before serving. A small meat thermometer is the easiest way to check. You can also refer to the FoodSafety.gov safe minimum internal temperature chart for poultry guidance.

Back to recipe card · Back to table of contents

Final Tip

The whole meal gets easier when you let the chorizo do its job first. Give it a few minutes to release that smoky red oil, keep only as much richness as the skillet needs, and the tomatoes will taste deeper before they have even simmered.

Keep it tomato-based for a saucy skillet meal, add cream for comfort, stir in orzo for one-pot ease, toss it with pasta, or serve it over rice. Use the paella method when you want the saffron rice-pan version.

Make the smoky tomato version once, and the next time you see chicken and chorizo in the fridge, you will know exactly what kind of meal it wants to become.