Posted on Leave a comment

Ratatouille Recipe: Easy, Classic French Vegetable Stew

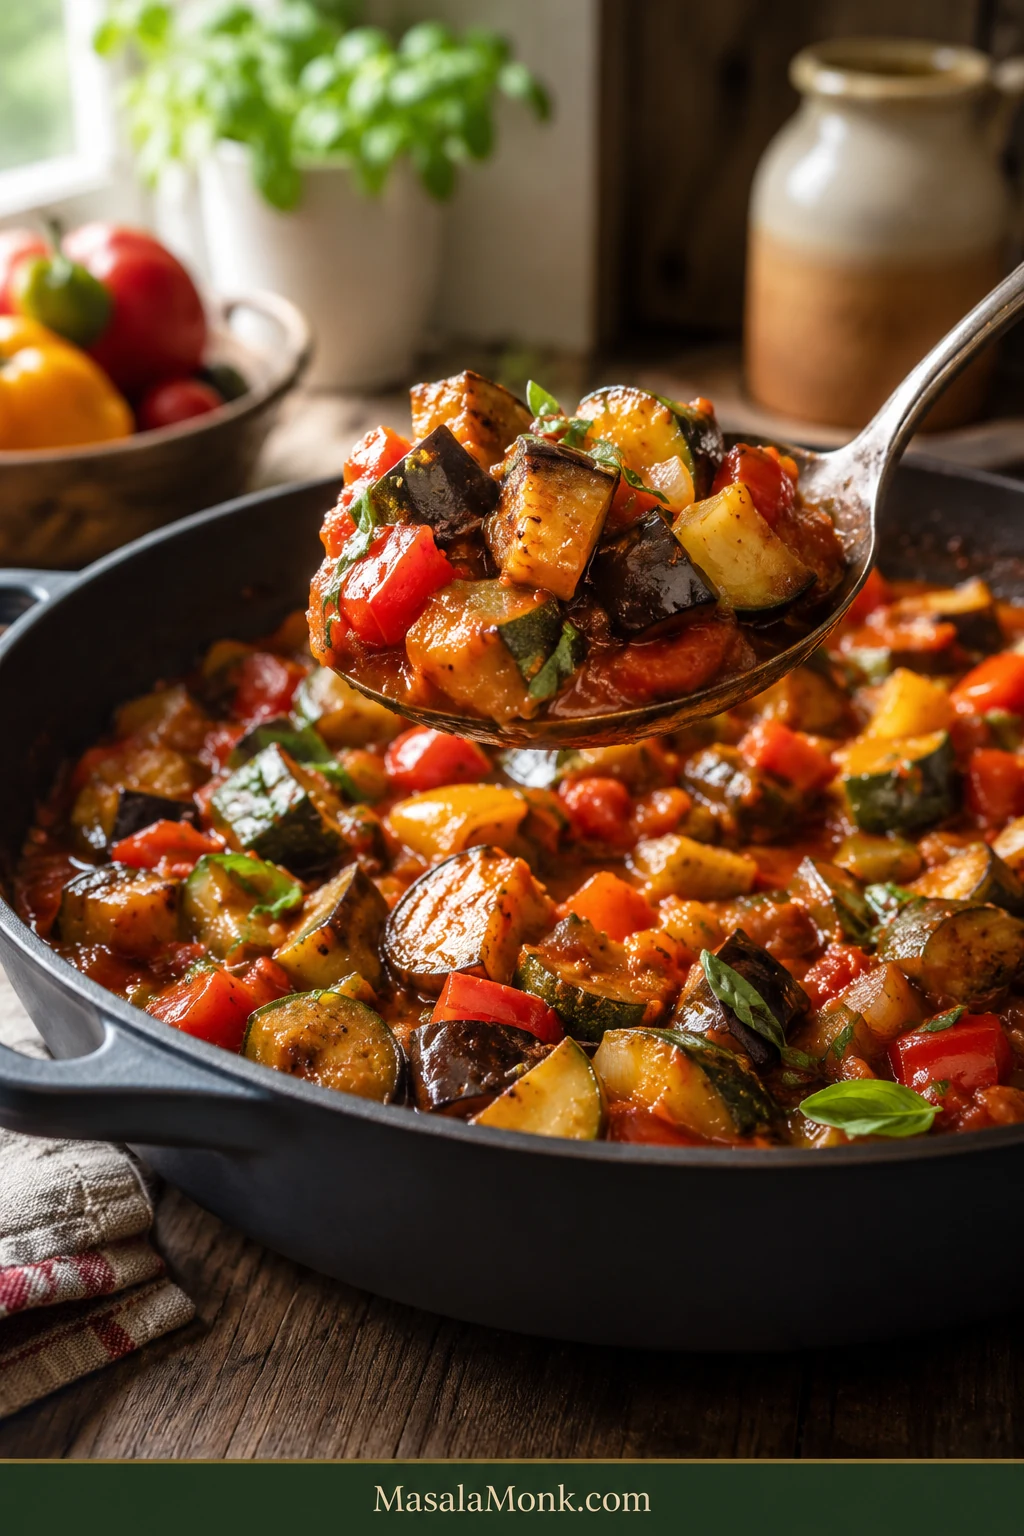
Finished classic ratatouille in a wide dark pan, with a serving spoon lifting chunks of eggplant, zucchini and bell pepper coated in thick tomato sauce.

A good ratatouille gives you a little bit of everything in the same spoon: eggplant soft enough to almost melt, zucchini that is tender but still unmistakably zucchini, sweet pepper, and glossy tomato caught around the vegetables instead of pooling underneath them.

That sounds simple until five very different vegetables share the same pan. Eggplant needs enough heat and time to lose its spongy center. Zucchini can go from pleasantly tender to collapsed remarkably quickly. Tomatoes release plenty of water before they start behaving like sauce.

Ratatouille makes particular sense when the garden, market—or just your vegetable drawer—suddenly seems full of zucchini, tomatoes, peppers and eggplant. And after all that chopping, watching those vegetables disappear into a pale, watery pot feels particularly unfair.

This easy ratatouille recipe uses one wide pan and a staged method so the vegetables can finish tender without collapsing into one texture.

We stop when the stew is soft and generous but still varied from bite to bite. Serve it with bread, eggs or a simple grilled main, eat it warm or at room temperature, and save the leftovers for another meal—the flavors settle together beautifully overnight.

Quick Answer: How to Make Classic Ratatouille

Classic ratatouille is a Provençal vegetable stew made with eggplant, zucchini or courgette, bell peppers, tomatoes, onion, garlic, olive oil and herbs.

For about 6 side servings or 4 generous main-dish portions, use roughly 500 g / 18 oz eggplant, 400 g / 14 oz zucchini, 300 g / 10½ oz peppers and 750 g / 26 oz tomatoes. Cut the main vegetables into about ¾-inch / 2 cm pieces.

The easiest way to keep ratatouille from turning watery or mushy is to brown the eggplant and zucchini in separate turns, reduce the tomatoes before recombining, then return the zucchini only near the end. The eggplant gets enough time to become creamy while the zucchini keeps its shape.

What does ratatouille taste like? Sweet tomato and peppers, savory olive oil and garlic, creamy eggplant, tender zucchini, thyme and basil. It is rich enough to feel substantial while still tasting unmistakably of vegetables.
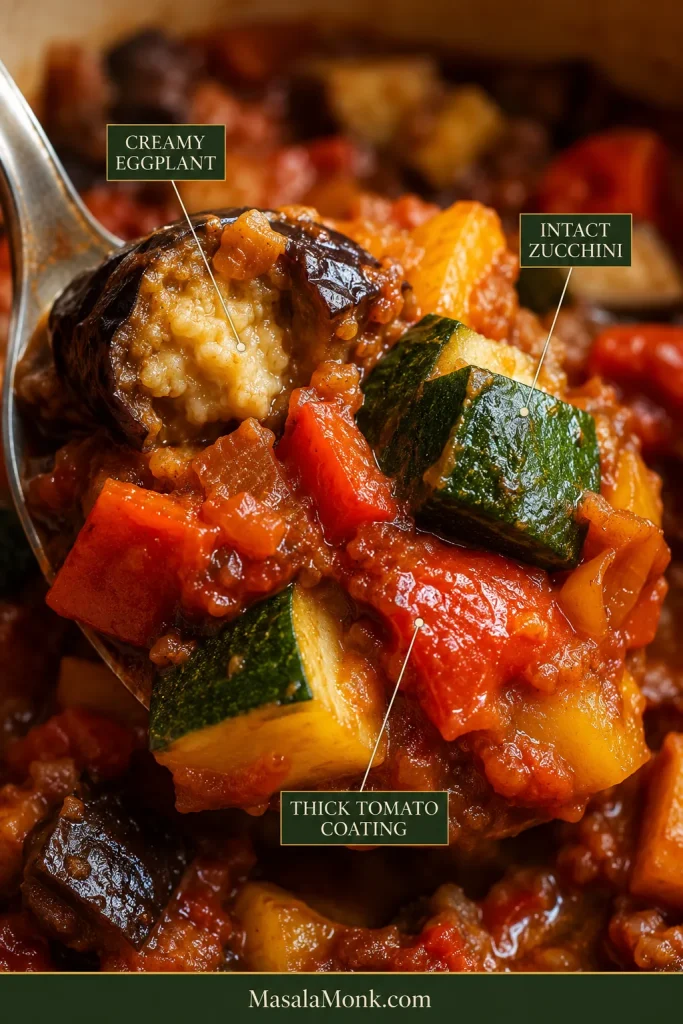
Close-up of finished ratatouille with callouts identifying creamy eggplant, intact zucchini and thick tomato coating.
Judge the spoonful, not just the pan: the best ratatouille gives you creamy eggplant, a little resilience from zucchini and concentrated tomato in the same bite.

Before you start: use fresh tomatoes when they are flavorful; otherwise use good canned whole peeled tomatoes. Fresh, firm eggplant can go straight into the pan—save pre-salting for unusually mature, heavily seeded or wet eggplant.

Classic Ratatouille Recipe

A staged one-pan French ratatouille with creamy eggplant, tender zucchini and sweet peppers in a concentrated tomato base.

Recipe at a Glance

  • Difficulty: easy
  • Prep: about 25–30 minutes
  • Cook: about 45–60 minutes
  • Rest: 15 minutes recommended
  • Total: about 1 hour 25 minutes to 1 hour 45 minutes
  • Serves: about 6 as a side or 4 as a generous main
  • Best pan: 12-inch / 30 cm wide high-sided sauté pan or wide shallow 5–6 qt / 5–6 L Dutch oven
  • Vegetable cut: about ¾ inch / 2 cm
  • Texture target: tender vegetables with a little thick tomato sauce around them and very little free liquid
  • Diet: naturally vegan, vegetarian, dairy-free and gluten-free

The technique is easy; the chopping takes time. The staged cooking adds minutes, not difficulty, and gives each vegetable enough room to keep its own texture.

Equipment

  • 12-inch / 30 cm wide high-sided sauté pan or wide shallow Dutch oven
  • Chef’s knife and cutting board
  • Wooden spoon or flexible spatula
  • Two bowls or plates for holding the eggplant and zucchini separately
  • Slotted spoon, useful but not essential

Pan shape matters. A broad cooking surface lets vegetable moisture escape. With a smaller pan, brown the eggplant and zucchini in batches instead of piling them high.
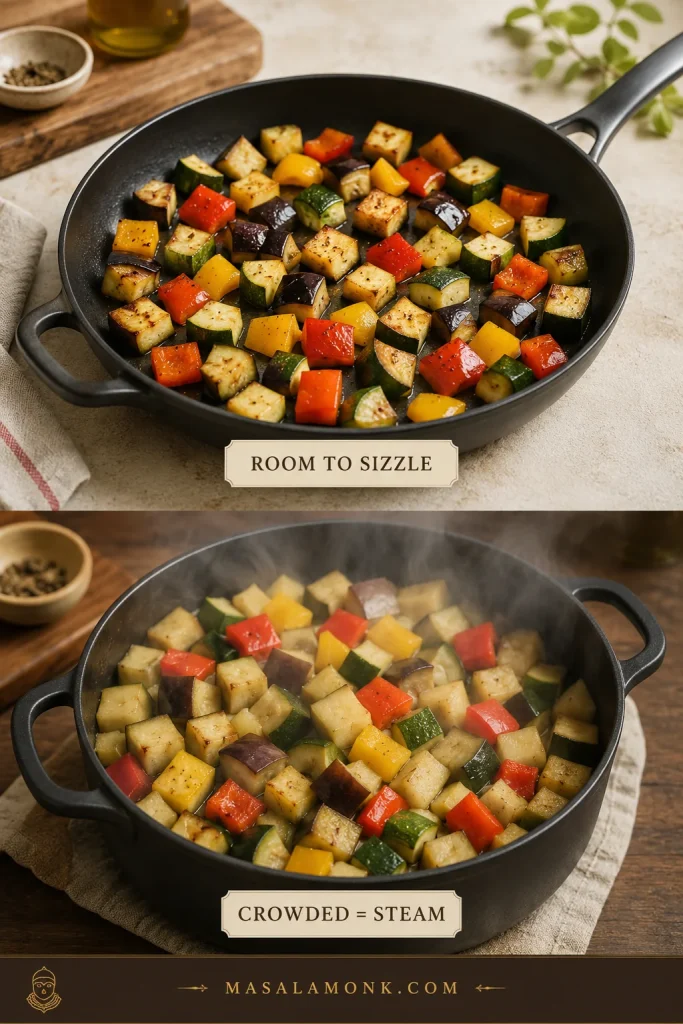
Side-by-side comparison of vegetables spread across a wide sauté pan and crowded into a deeper pot with more visible steam.
With a wider pan, steam has somewhere to go. Crowding a deep pot not only limits browning; it can also slow tomato reduction later and leave the whole dish wetter.

Ingredients

Weights are before trimming.

  • 500 g / 18 oz eggplant, about 1 medium-large or 2 small, cut into ¾-inch / 2 cm pieces
  • 400 g / 14 oz zucchini or courgette, about 2 medium, cut into ¾-inch / 2 cm pieces
  • 300 g / 10½ oz red, yellow or orange bell peppers, about 2 medium, cored and cut into ¾-inch / 2 cm pieces; green works too but gives a more vegetal, less sweet result
  • 200 g / 7 oz yellow onion, about 1 medium-large, chopped
  • 750 g / 26 oz ripe fresh tomatoes, about 5–6 medium, chopped with their juices or 1 x 28 oz / 794 g can whole peeled tomatoes, hand-crushed with the juices
  • 18 g garlic, about 4–5 large cloves, finely chopped
  • 75 ml / 5 tablespoons extra-virgin olive oil, divided, plus up to 15 ml / 1 tablespoon more if needed
  • 10 g fine sea salt, about 1¾ teaspoons depending on the salt, divided, plus more after tasting if needed
  • ½ teaspoon freshly ground black pepper
  • 2 teaspoons fresh thyme leaves, or 4–5 thyme sprigs
  • 15 g / ½ oz fresh basil leaves, roughly torn
  • 1–2 teaspoons red wine vinegar, optional, for finishing
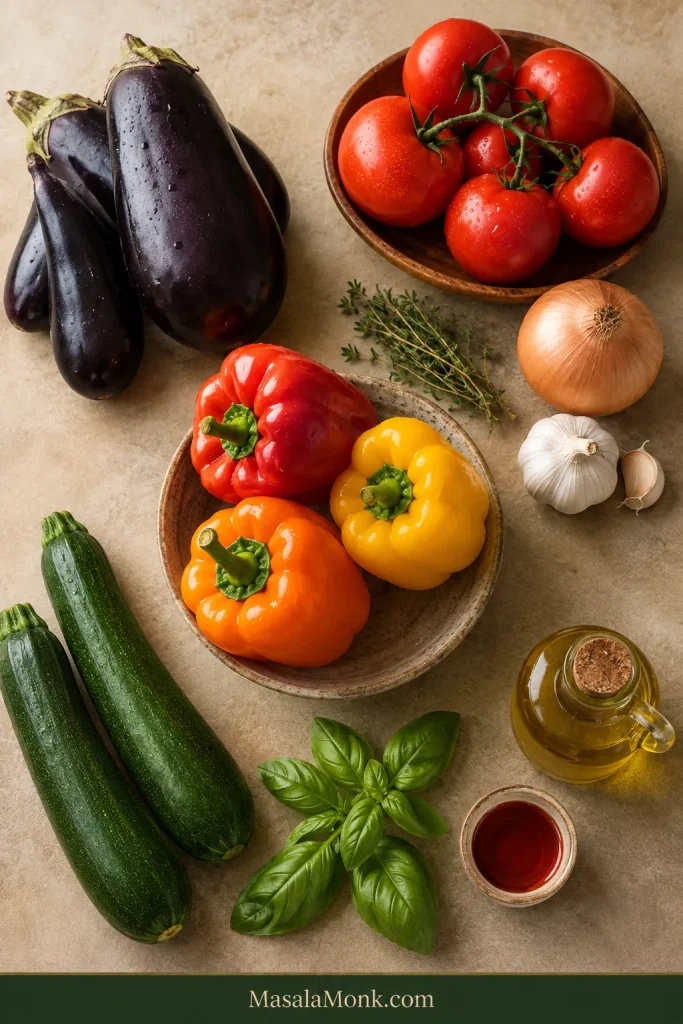
Eggplant, zucchini, bell peppers, tomatoes, onion, garlic, basil, thyme and olive oil arranged on a neutral work surface.
Because ratatouille has such a short ingredient list, condition matters: tired eggplant, watery zucchini or bland tomatoes affect the final pan more than an extra pinch of herbs.

Method

  1. Cut the vegetables. Cut the eggplant, zucchini and peppers into roughly ¾-inch / 2 cm pieces. Don’t worry about perfect cubes; aim for pieces that are reasonably even.
  2. Brown the eggplant. Heat 3 tablespoons / 45 ml olive oil over medium-high heat. Add the eggplant and ½ teaspoon of the measured salt. Spread the pieces as loosely as the pan allows and cook for 8–10 minutes, turning occasionally. Look for scattered brown patches and centers beginning to lose their raw, cottony resistance. Transfer the eggplant to a bowl.
  3. Give the zucchini a shorter turn. Add 1 tablespoon / 15 ml olive oil, the zucchini and ¼ teaspoon salt. Cook for 4–5 minutes. Let it pick up some color, then remove it while the centers still feel firm. Transfer the zucchini to a separate plate or bowl; it returns to the pan later than the eggplant.
  4. Soften the onion and peppers. Reduce the heat to medium. Add the remaining 1 tablespoon / 15 ml olive oil, followed by the onion, peppers and ¼ teaspoon salt. Cook for 8–10 minutes. The onion should be soft, the peppers should bend easily under the spoon, and their raw grassy smell should have become noticeably sweeter.
  5. Add the garlic and thyme. Stir for 30–60 seconds. As soon as the garlic aroma rises clearly from the pan, add the tomatoes.

Reduce the Tomatoes, Then Recombine

  1. Reduce the tomatoes. Add the tomatoes, black pepper and another ½ teaspoon salt, leaving the remaining salt for the final tasting. Bring to a lively simmer and cook uncovered for about 10–15 minutes, stirring occasionally. Very juicy tomatoes may need longer. Continue until the tomatoes have relaxed into a loose sauce and a spatula dragged across the bottom leaves a trail for a moment before the liquid closes behind it.
  2. Return the eggplant. Fold it into the tomato base. Lower the heat to a gentle simmer and cook uncovered for 8–10 minutes. Bite or press a piece when you are unsure: the center should be creamy, with no dry or cottony resistance.
  3. Return the zucchini. Fold it in gently and cook for another 3–5 minutes, just until tender. Stir only as much as necessary from here on so the softened vegetables hold together.
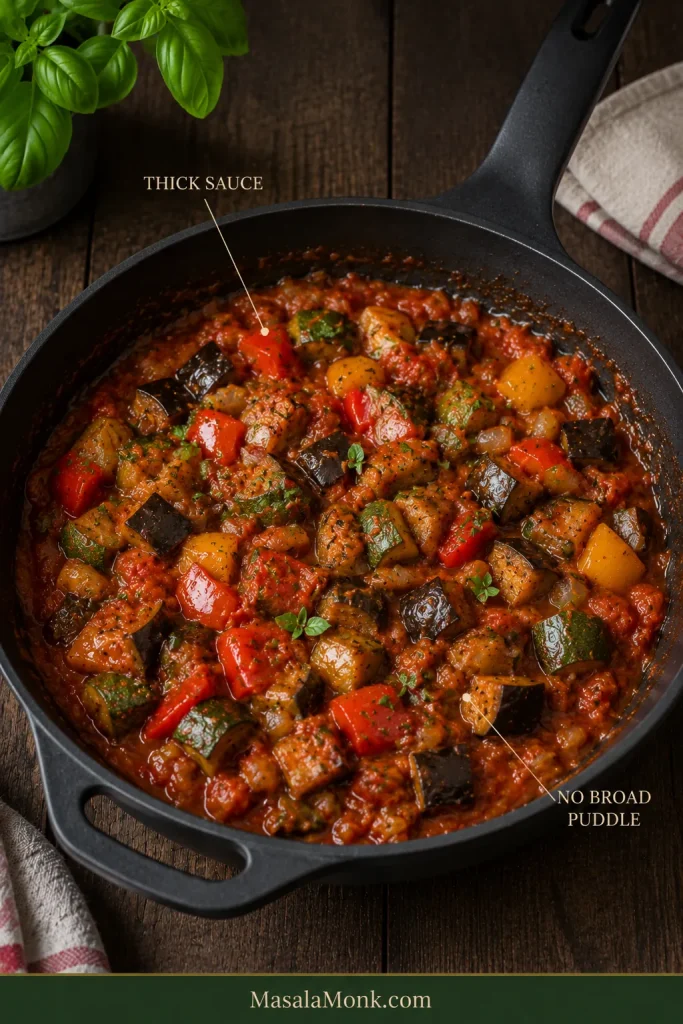
  4. Check the consistency. Tilt the pan. A small amount of thick sauce should move around the vegetables; you should not see a broad puddle of thin red juice. If the vegetables still need cooking, continue simmering uncovered. If they are already tender but the sauce is thin, lift them out with a slotted spoon, reduce the liquid on its own until glossy, then gently fold the vegetables back in.
  5. Finish and rest. Remove any thyme stems and taste for salt. If the ratatouille tastes rich but slightly dull, add 1 teaspoon red wine vinegar. Taste again and add the second teaspoon only if it still needs brightness. Fold in most of the basil, remove the pan from the heat and rest for 15 minutes. Finish with the remaining basil.

Recipe Notes

  • Fresh or canned tomatoes: ordinary ripe tomatoes need no routine peeling or seeding. Use canned whole peeled tomatoes with their juices when fresh ones are disappointing. Judge either version by the consistency of the sauce.
  • Optional eggplant salting: unusually mature, heavily seeded or wet eggplant can be salted with about ½ teaspoon of the measured salt for 20–30 minutes, then blotted very thoroughly. Skip the ½ teaspoon normally added with the eggplant in Step 2 and adjust the final seasoning by taste.
  • Water: the vegetables and tomatoes normally provide enough. If the tomato base begins catching before it has reduced, add only 1–2 tablespoons / 15–30 ml at a time.
  • Extra oil: the reserved tablespoon is there for an unusually absorbent batch of eggplant. Add it only if the pieces begin catching or scorching.

Check Doneness · Troubleshooting · Back to Top

Need Help With Your Ratatouille?

Classic Ratatouille Is the Rustic Stovetop Dish

Traditional ratatouille does not follow one fixed cooking sequence. Some versions cook the vegetables separately; others add them successively. Both approaches recognize the same thing: eggplant, zucchini, peppers and tomatoes do not soften or release water at the same rate. This recipe keeps one pan but gives the vegetables separate turns.

Classic ratatouille is a rustic Provençal vegetable stew; the neat spiral of thin vegetables popularized by the movie is a different refined preparation commonly associated with confit byaldi. If the immaculate vegetable spiral from the film is what you pictured, this pan will look much more relaxed and rustic. That’s the point: everyday stovetop ratatouille is about tender vegetables coming together in the pan, not maintaining a carefully arranged pattern.
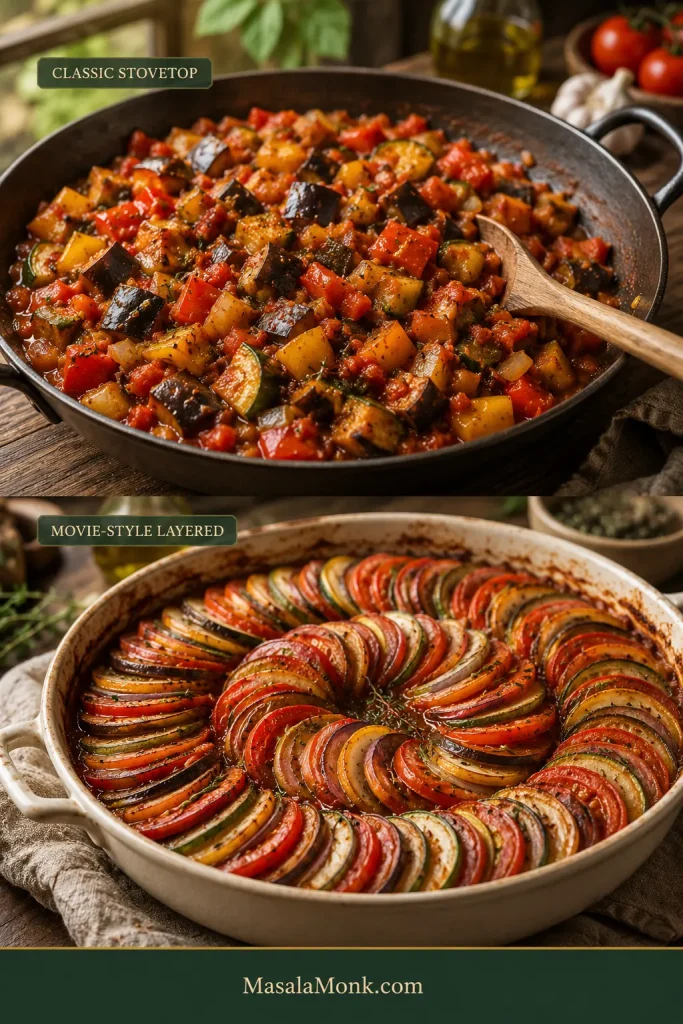
Comparison of chunky classic stovetop ratatouille in a pan and a movie-style preparation made from thin overlapping vegetable slices.
The different cuts also change the eating experience. Chunky stovetop ratatouille gives varied textures in each spoonful, while thin layered vegetables create a more even, refined bite.

Ratatouille comes from Provence in southern France and is particularly associated with Nice. Classic versions usually bring together eggplant, zucchini or courgette, peppers, tomatoes, onion, garlic, olive oil and Mediterranean herbs. Some cooks keep the vegetables fairly distinct; others continue toward a soft, almost confited consistency. There is room for both.

Lidia Bastianich’s classic ratatouille on PBS, for example, sautés the vegetables separately before bringing them together for a much longer final cook. Here we keep that useful principle while doing the work in one pan.

Ingredients That Change the Result

The formula itself is simple. What matters most is the quality of the vegetables and how each one behaves in the pan.

Eggplant: Choose Firm, Then Cook Until Creamy

Eggplant or aubergine gives ratatouille much of its soft body. Choose one that feels firm and heavy for its size, with smooth skin. Leave the skin on; it helps the pieces hold together.
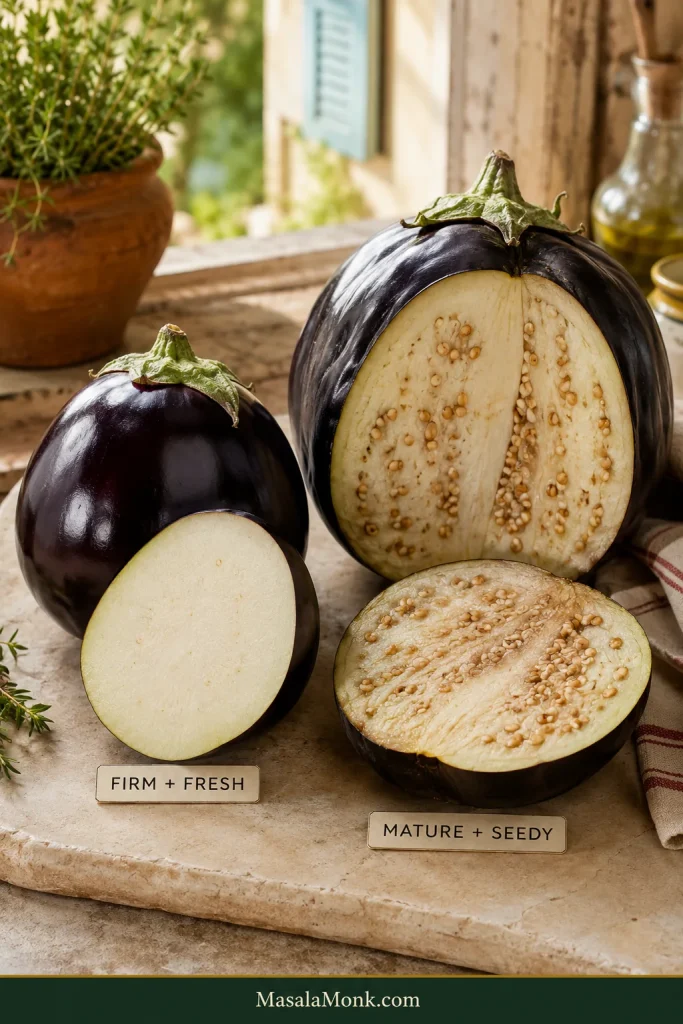
Fresh firm dark-purple eggplant with compact pale flesh beside a more mature eggplant with numerous developed seeds and a wetter interior.
Seediness is a better warning sign than size alone. A large eggplant with compact pale flesh can cook beautifully; a loose, heavily seeded center is more likely to need extra attention.

The important change happens inside. Raw eggplant has a dry, spongy bite. Properly cooked eggplant gives easily under the spoon and feels creamy through the center—the same tenderness cue that matters in baked Eggplant Parmesan.
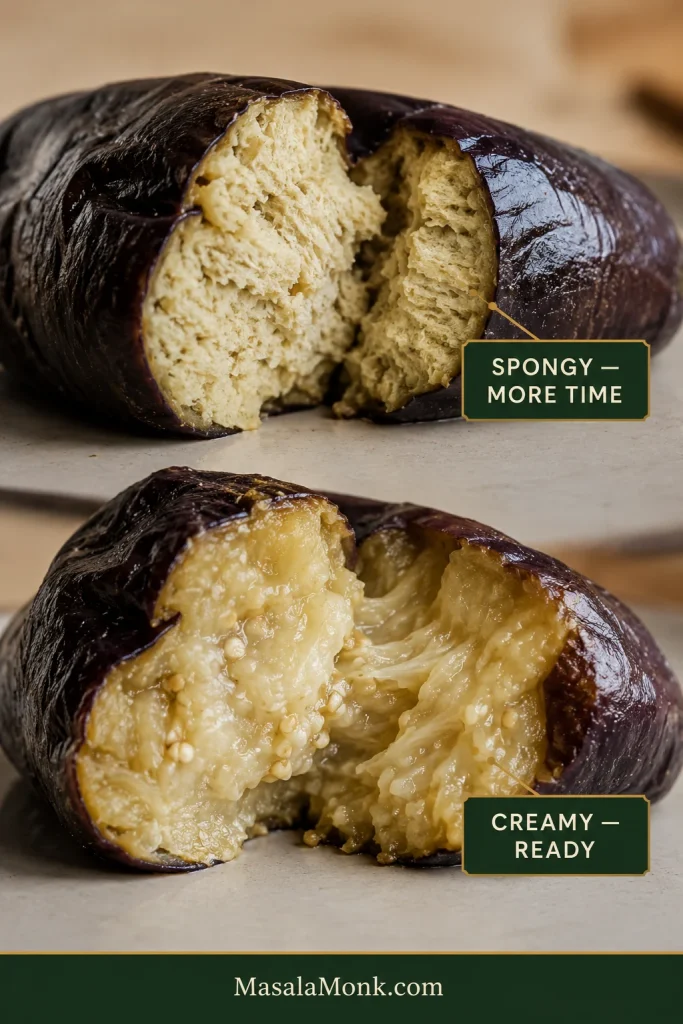
Comparison of eggplant showing a pale dry fibrous center labeled “Spongy — more time” and a soft glossy center labeled “Creamy — ready.”
Surface color cannot tell you whether eggplant is done. A beautifully browned piece can still be spongy inside, so judge the softness of the center instead.

Zucchini: Choose Small or Medium When You Can

Small and medium zucchini have firmer flesh and smaller seed cavities, so you can simply cut them whole. An enormous garden zucchini with a pale, heavily seeded core benefits from having that loose watery center scooped out first.
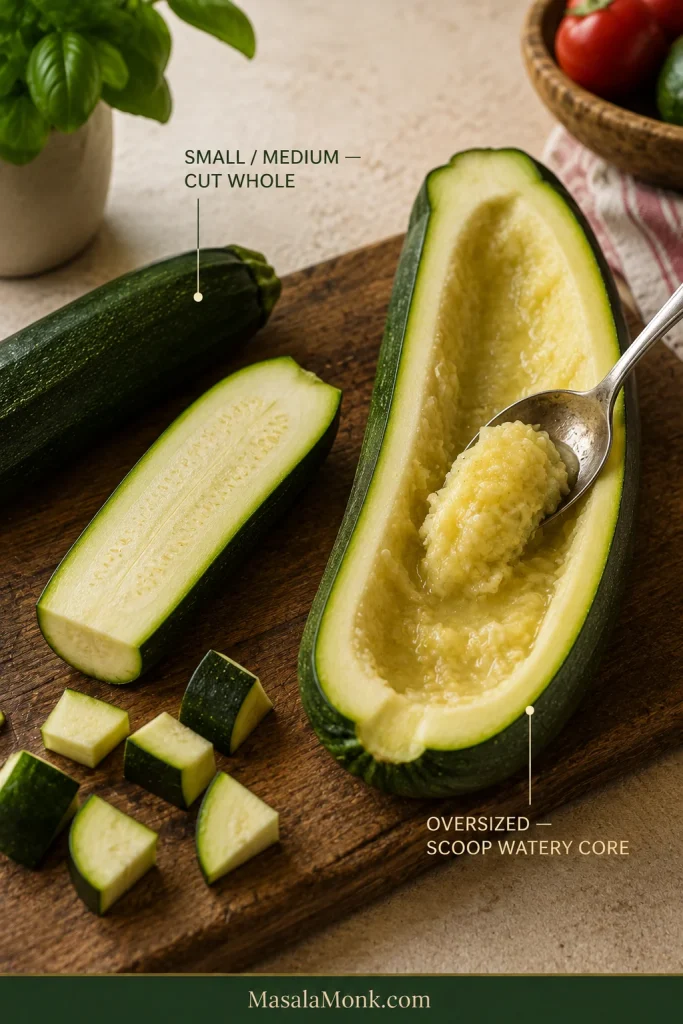
Small zucchini with compact flesh beside an oversized zucchini split lengthwise while a spoon removes its loose watery seed core.
Use the center as your guide, not just the ruler. Scoop an oversized zucchini only when its seed core has become loose and watery enough to dilute the ratatouille.

Tomatoes: Use the Ones That Taste Good

Fresh tomatoes earn their place when they are fragrant and flavorful before cooking. Ordinary ripe tomatoes can be chopped whole; blanching, peeling and routine seeding only add work.

Outside peak tomato season, good canned whole peeled tomatoes often give you a deeper, more reliable base—crush them by hand and pour in the juices too. If you have more ripe tomatoes to use, they can go into this fresh tomato sauce.
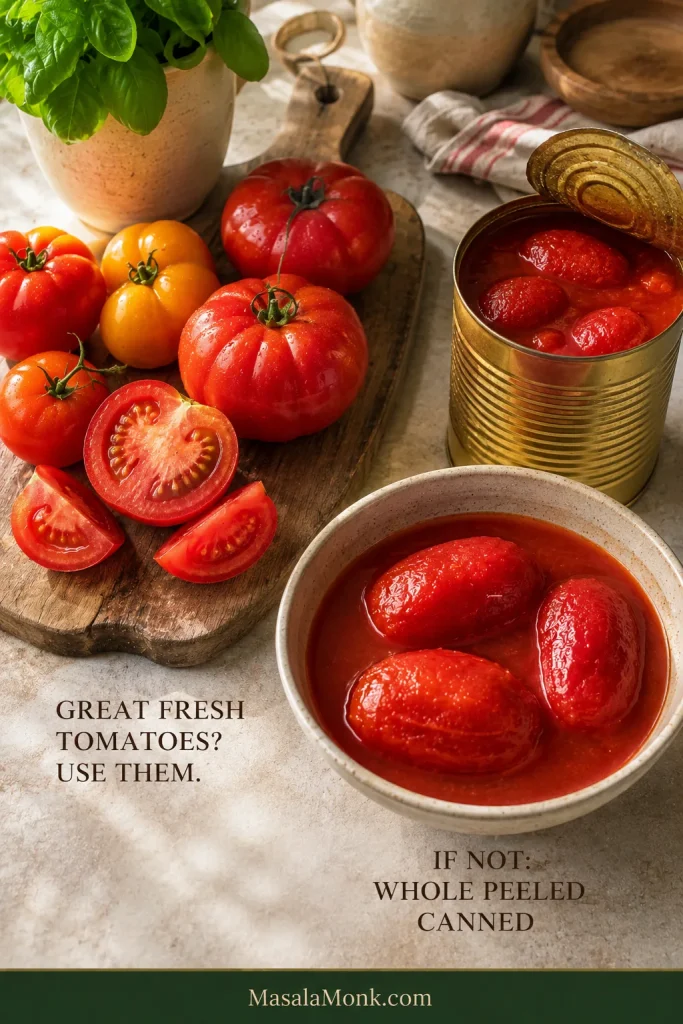
Ripe fresh tomatoes beside whole peeled canned tomatoes sitting in their juices.
Fresh versus canned tomatoes changes the journey more than the destination. Whichever you use, keep reducing until the sauce coats rather than judging doneness by a fixed cooking time.

Olive Oil, Peppers, Onion, Garlic and Herbs

Measure the olive oil before you start. Eggplant can make a pan look surprisingly dry for a few minutes, and having a measured amount makes it easier to resist pouring endlessly.

Red, yellow and orange peppers bring sweetness. Onion builds the base underneath them. Add the garlic once both have softened so it can perfume the pan without scorching. Thyme handles the simmer happily; basil tastes fresher near the end.

Ratatouille Substitutions That Still Make Sense

One missing vegetable does not have to derail dinner. The useful question is what the swap changes.

Change What to do What changes
No eggplant Increase zucchini and peppers for a lighter stew. Dense squash can add body but needs a longer head start. There is no exact substitute for eggplant’s rich, creamy texture. Winter squash also adds sweetness and takes the dish farther from classic ratatouille.
No zucchini Increase eggplant and peppers modestly. The finished dish will be richer and heavier.
No peppers Simply leave them out. You lose some sweetness and fruity pepper flavor.
Yellow summer squash Use it in place of zucchini. Very little changes; give it the same short cooking window.
No good fresh tomatoes Use canned whole peeled tomatoes with their juices. The reduction time may change, but the flavor can be better than with poor fresh tomatoes.
No fresh thyme Use about 1 teaspoon dried thyme or 1–1½ teaspoons herbes de Provence. Dried herbs are more concentrated, so use them with restraint.

Take away the tomatoes along with several of the defining vegetables and you’re moving toward another kind of vegetable stew. It may still be excellent; it does not need ratatouille’s name to be worth eating.

How to Make Ratatouille for Two

Halve the ingredients and keep the same sequence. Start with about 2½ tablespoons olive oil and keep another teaspoon or two nearby in case the eggplant starts catching.

Don’t shrink the cooking surface too aggressively. A tiny deep saucepan traps moisture more readily than a broad skillet even with half the vegetables.

The smaller batch may reduce faster once the tomatoes go in. Follow the appearance of the sauce instead of cutting every cooking time exactly in half.

Three Things Decide the Texture Before Cooking Starts

Cut the main vegetables around ¾ inch / 2 cm. Tiny dice soften quickly and disappear more readily into the sauce. Very large pieces keep more structure but need considerably longer. Two centimeters gives you a forgiving middle and keeps the chopping reasonable.
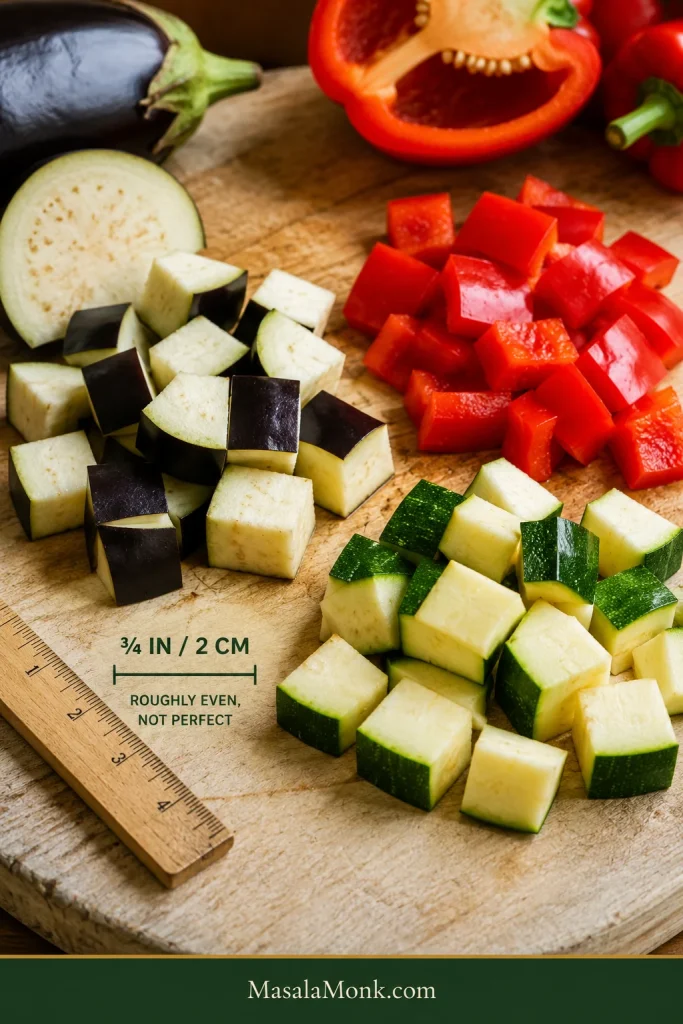
Eggplant, zucchini and bell pepper cut into roughly 2-centimeter chunks beside a ruler and 3/4-inch measurement guide.
Consistency matters more than perfect 2 cm cubes. A few uneven pieces are harmless; mixing tiny dice with large chunks creates vegetables that reach tenderness at completely different times.

Use a broad cooking surface. A broad surface gives steam somewhere to escape instead of trapping it around the vegetables.

Listen as well as look. Eggplant or zucchini hitting a properly heated pan should sizzle. A deep mound that quickly turns quiet and steamy needs more space.

Cooking Stages · Check Doneness

How Ratatouille Changes in the Pan

Times are useful checkpoints. The vegetables give better signals.

Watch the eggplant first. For a few minutes it can look alarmingly thirsty while the center is still spongy, which is exactly when another pour of oil feels tempting. Give it time. As the pieces brown and begin to soften, that urge to add more oil fades.
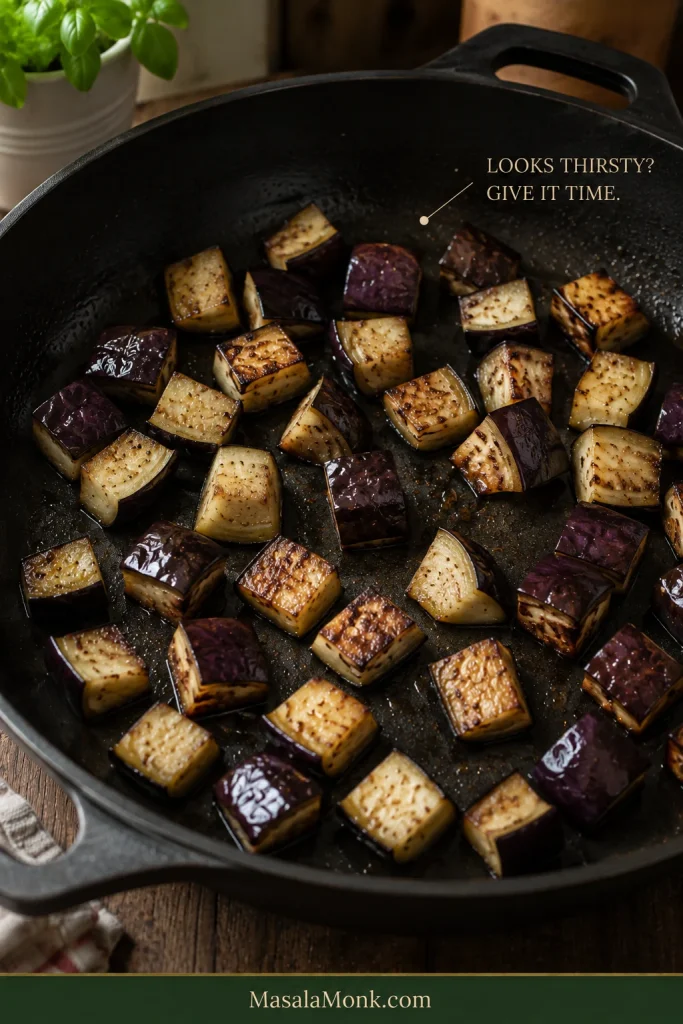
Eggplant chunks browning in a mostly dry-looking sauté pan with the words “Looks thirsty? Give it time.”
A dry-looking pan does not automatically mean the eggplant needs more oil. Give the flesh time to soften before deciding whether that reserved spoonful is actually necessary.

Zucchini needs almost the opposite treatment. Take it out while it still seems slightly underdone. That firmness gives it enough room to finish later without disappearing into the stew.
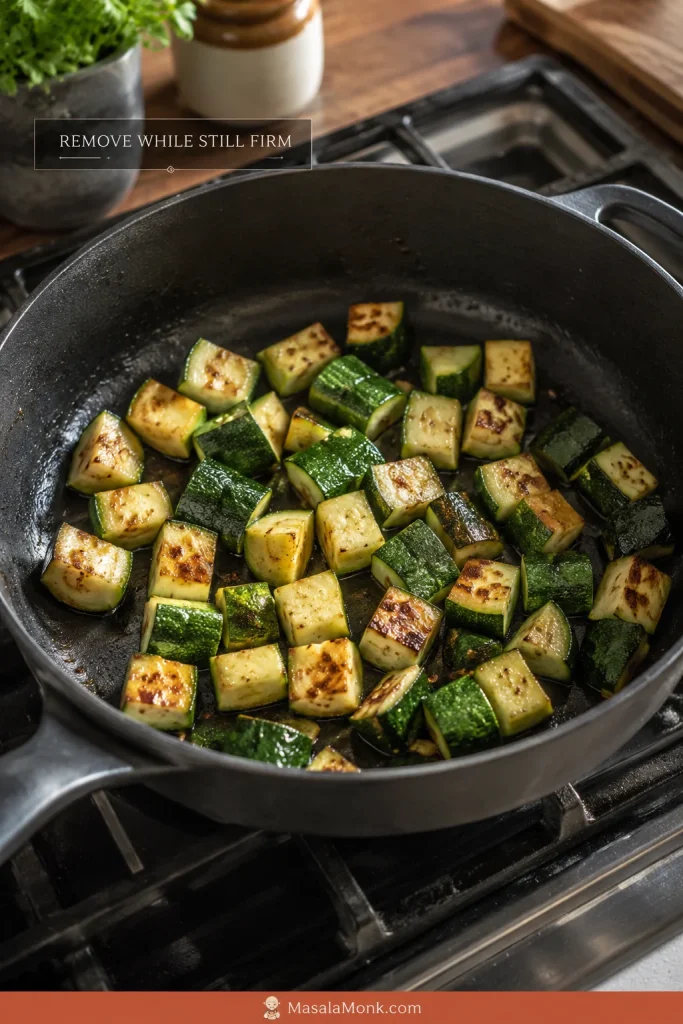
Chunky zucchini pieces lightly browned in a sauté pan with an instruction to remove them while still firm.
The brief sauté is for surface flavor, not full doneness. The center should still resist slightly when the zucchini leaves the pan.

Then the tomatoes usually make the pan look worse before they make it look better. Juice spreads across the bottom, steam lifts from the surface, and for a while everything looks far too wet. Keep cooking. The tomato flesh slumps, the color darkens and turns glossier, and the sharp raw-tomato smell softens.
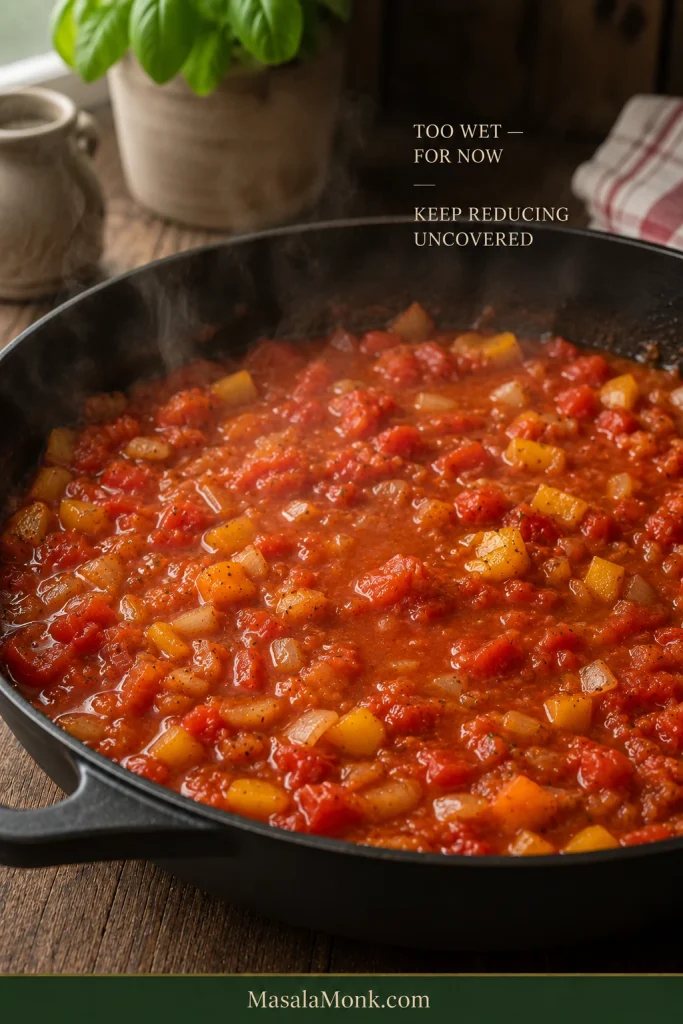
Tomatoes, softened onions and bell peppers simmering in abundant loose tomato liquid with steam rising from a wide pan.
Watch the direction of travel, not one wet-looking moment. If the tomato liquid is steadily reducing and becoming glossier, the ratatouille is moving toward the right consistency.

When the Tomatoes Start Behaving Like Sauce

Drag a spatula across the bottom. Early on, liquid rushes straight back into the trail. Later, the path stays visible for a moment before the sauce closes behind it. That same trail test works whenever you reduce a tomato sauce, including marinara: thin sauce usually needs evaporation before it needs another ingredient.
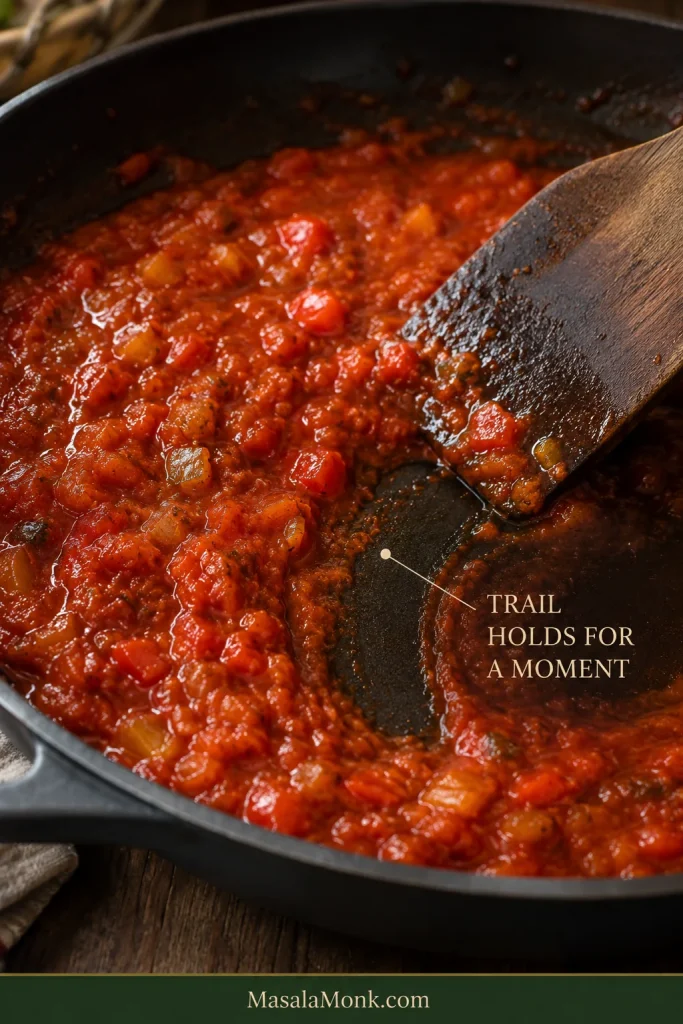
Reduced tomato base in a dark pan with a spatula dragged through the center, leaving a visible trail.
The spatula trail works across tomato types. Fresh and canned tomatoes can release very different amounts of water, but both are ready when the reduced sauce briefly holds a path.

When the eggplant returns, the pan may still look like several cooked vegetables sharing a sauce. A few minutes later the tomato begins settling around the pieces, the peppers soften into the background, and the zucchini finishes gently. Suddenly it looks like ratatouille.

From here, fold rather than churn. Soft vegetables can be broken with a spoon even when the cooking itself is exactly right.

Check Doneness · Back to Recipe

The Pan, Not the Timer, Tells You When Ratatouille Is Done

Start checking around the suggested times, then stop when the food reaches these cues. No single vegetable decides doneness; the useful window is when the slowest pieces are tender but the quickest-cooking ones have not started falling apart.

Final Consistency: Read the Whole Pan

Look at Ready when…
Eggplant The center is creamy and yielding with no dry, cottony resistance
Zucchini Tender enough to cut easily with a spoon while still holding its shape
Peppers Soft and sweet with no raw crunch
Tomato Thick enough to coat the vegetables without running freely around them
Pan bottom A small amount of sauce remains; there is no broad puddle of thin red liquid
Whole dish The flavors have come together, but the spoon still gives you different textures
Finished ratatouille in a tilted pan with thick sauce surrounding distinct vegetables and very little free liquid.
Stop just before the dish looks completely settled. Ratatouille tightens slightly during its rest, so a pan that is perfect over the heat can become too dry on the table.

Zucchini: Stop Before It Collapses

Like your ratatouille softer? Continue the gentle simmer. Some traditional versions go much farther toward a deep, almost jammy consistency. Our stopping point is a preference, not a universal rule.
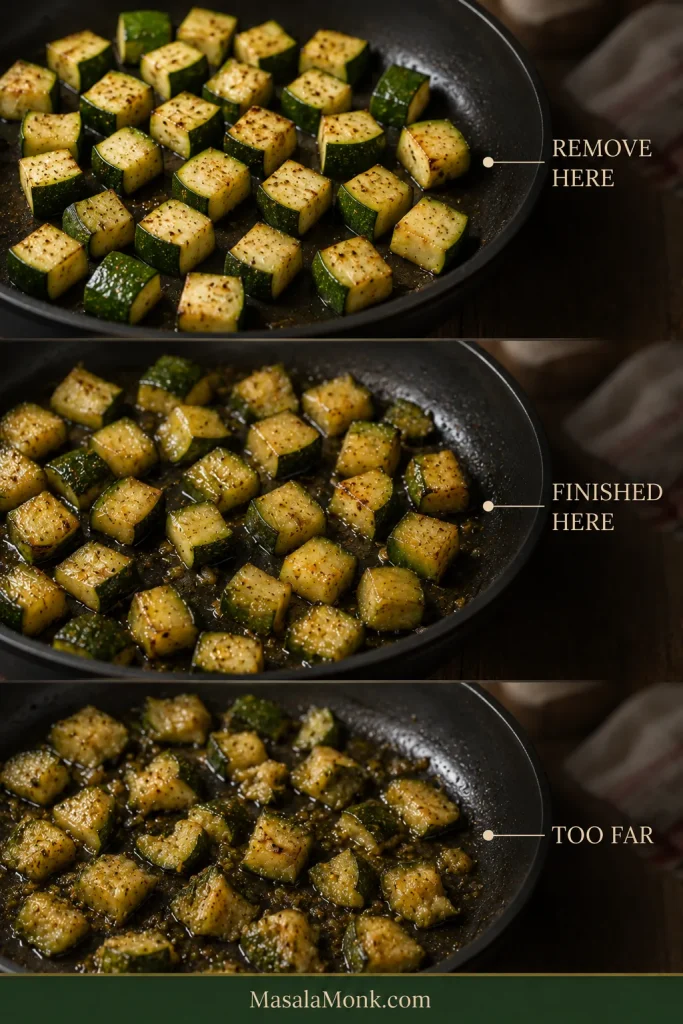
Three stages of cooked zucchini labeled “Remove here,” “Finished here” and “Too far,” progressing from firm pieces to tender pieces and then collapsing pieces.
Zucchini texture changes before its color changes dramatically. That is why firmness is a much better doneness cue than waiting for the pieces to look visibly different.

Troubleshooting · Back to Recipe

Ratatouille Troubleshooting

Before adding ingredients or automatically cooking longer, look at what is actually wrong. Most ratatouille problems have a specific fix.
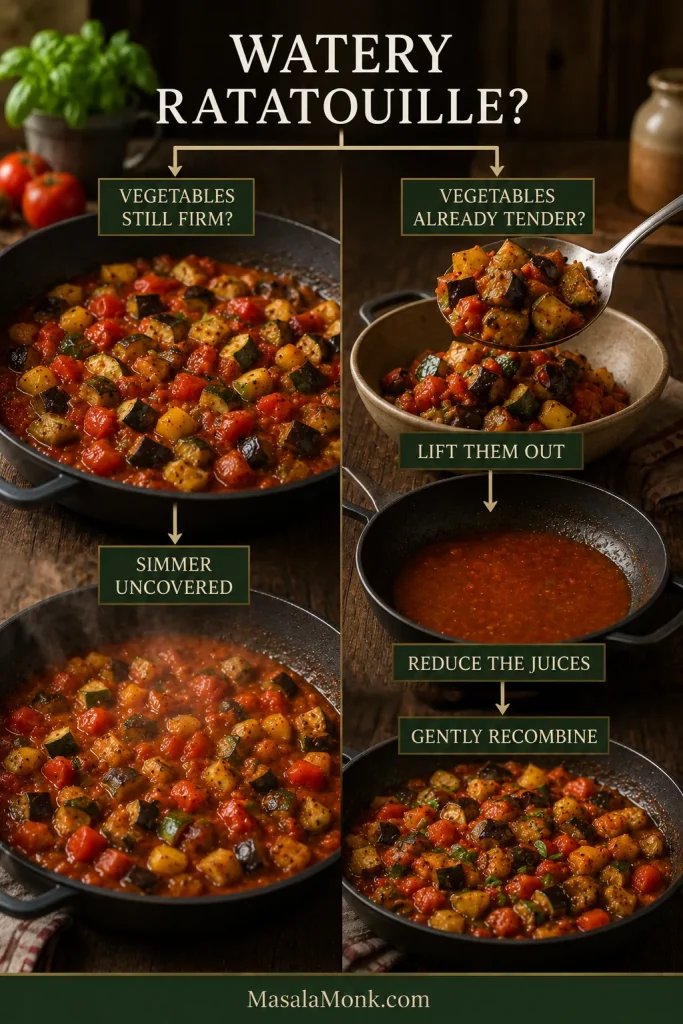
Decision guide showing watery ratatouille simmered uncovered when vegetables are firm, or tender vegetables removed while excess juices reduce before recombining.
A watery ratatouille is really two possible problems: excess liquid needs more heat, while vegetables that are already tender need protection from that extra cooking.

Texture and Moisture Problems

Problem Fix it now Why it happened / next time
Thin red liquid pooling Vegetables still firm? Simmer uncovered. Already tender? Lift them out, reduce the liquid alone until glossy, then fold them back in. Too much moisture was trapped. Give the vegetables more room and reduce the tomato base farther before recombining.
Eggplant is spongy Give it more time in the tomato sauce until the center becomes creamy. The eggplant is undercooked. Let it begin softening properly during the first browning.
Eggplant seems to absorb all the oil Turn the pieces and give them time. Use the reserved oil only if they begin to scorch. Some absorption is normal; weak heat can exaggerate it. Measure the oil and use active sautéing heat.
Finished ratatouille is greasy Spoon off obvious excess oil if necessary. Too much oil was added, often in repeated pours while the eggplant looked dry. Start with the measured amount.
Zucchini is collapsing Stop cooking. The flavor can still be excellent even if the zucchini has lost its shape. It cooked too long or returned too early. Brown briefly and add it back near the end.

Flavor and Seasoning Problems

Problem Fix it now Why it happened / next time
Vegetables are pale and bland Reduce loose liquid first, then correct the salt before adding more herbs. The vegetables steamed or excess water diluted the flavor. Use stronger heat, more pan surface or smaller batches.
Ratatouille tastes rich but flat Correct the salt first, then add 1 teaspoon red wine vinegar and taste again. The finished pan needs seasoning or a touch of acidity.
Tomato tastes harsh If the vegetables still need time, continue uncovered. If they are tender, remove them and reduce some sauce separately. Check salt before trying a tiny pinch of sugar. The tomato may be under-reduced or unusually acidic. Better tomatoes and sufficient reduction help next time.
Garlic tastes bitter Burned garlic is difficult to rescue; dilution may soften the bitterness. The garlic scorched. Add it only after the onion and peppers have softened.

Once the sauce is right, all of that diagnosis disappears from the plate. What remains is the good part: sweet pepper, soft eggplant, zucchini, basil and tomato in the same warm spoonful.
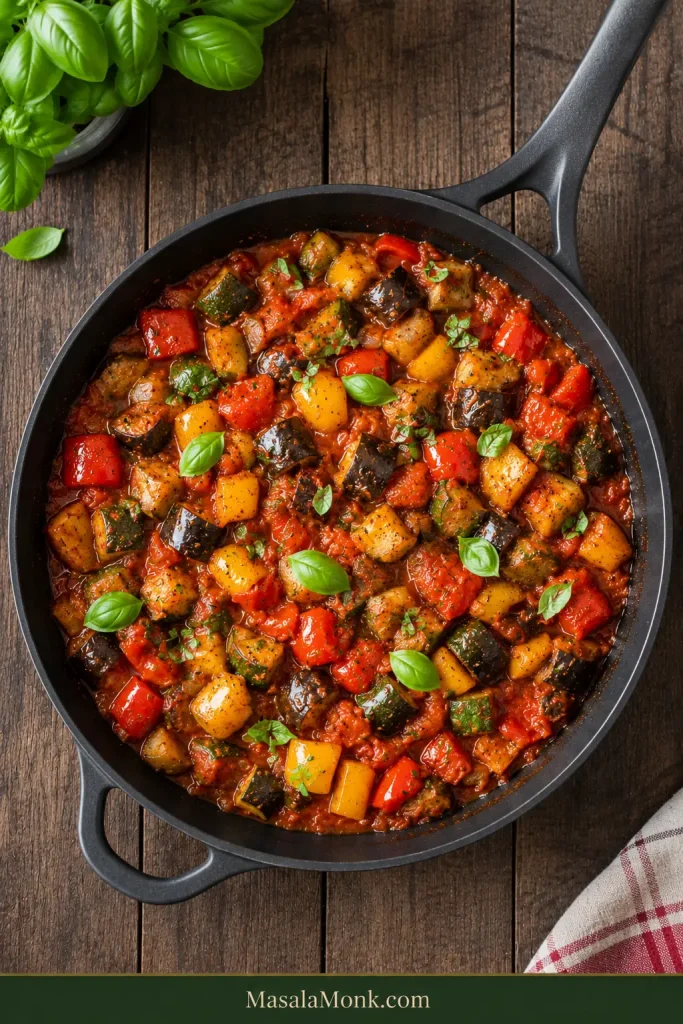
Overhead view of rested ratatouille in a dark pan with visible eggplant, zucchini, peppers, tomato sauce and fresh basil.
After resting, the dish should look unified without becoming uniform: tomato fills the gaps, while the shapes and colors of the vegetables still reveal what went into the pan.

Back to Recipe · Back to Top

What to Serve With Ratatouille

Serve ratatouille with crusty bread, polenta, rice or eggs for a vegetarian meal, or use it as a side for chicken, fish, lamb or sausages.

Once the pan is where you want it, ratatouille becomes wonderfully undemanding. Spoon it beside dinner, pile it onto bread, or let the vegetables become the meal.

Make it the main: add crusty bread or sourdough focaccia, creamy polenta, rice, couscous, white beans or chickpeas. A fried or poached egg makes it more substantial without taking attention away from the vegetables.
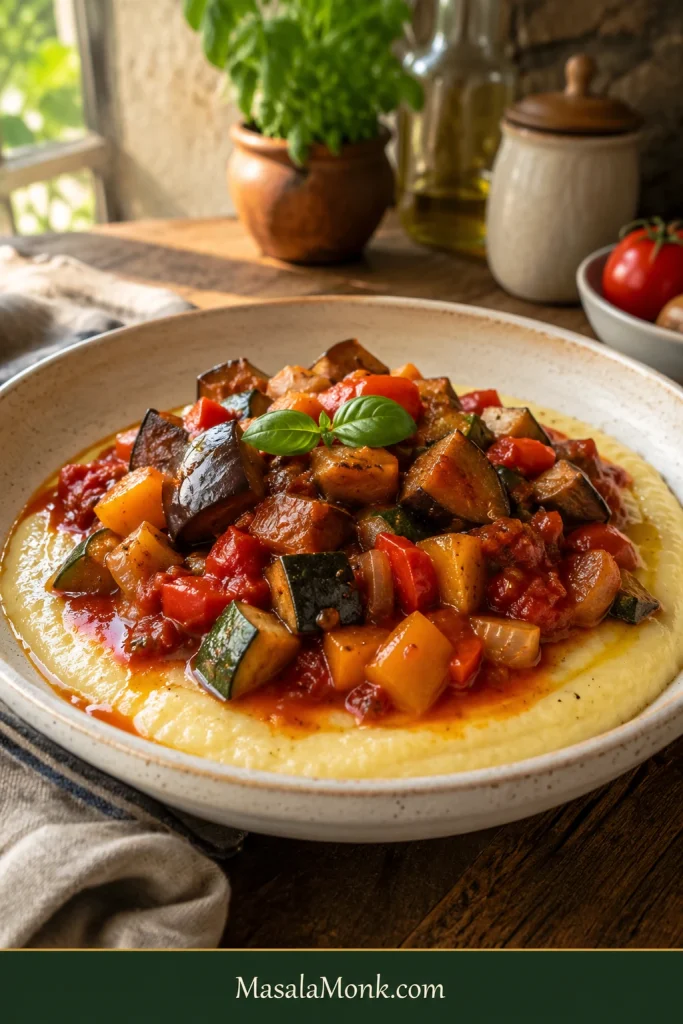
Chunky ratatouille spooned over pale creamy polenta in a shallow ceramic bowl and finished with basil.
Polenta works especially well with a strongly reduced batch of ratatouille. Its mild creaminess softens concentrated tomato and olive-oil flavors without competing with the vegetables.

Serve it as a side: simply cooked chicken, fish, lamb, sausages or roasted meat all leave plenty of room for the ratatouille.

Or make lunch out of it: spoon warm ratatouille over crisp toast and add a fried egg. The tomato and olive oil soften the top of the bread while the edges stay crisp, and the yolk runs straight into the vegetables. Goat cheese or another tangy cheese is good here too, and a smaller amount of ratatouille can go into an easy frittata.
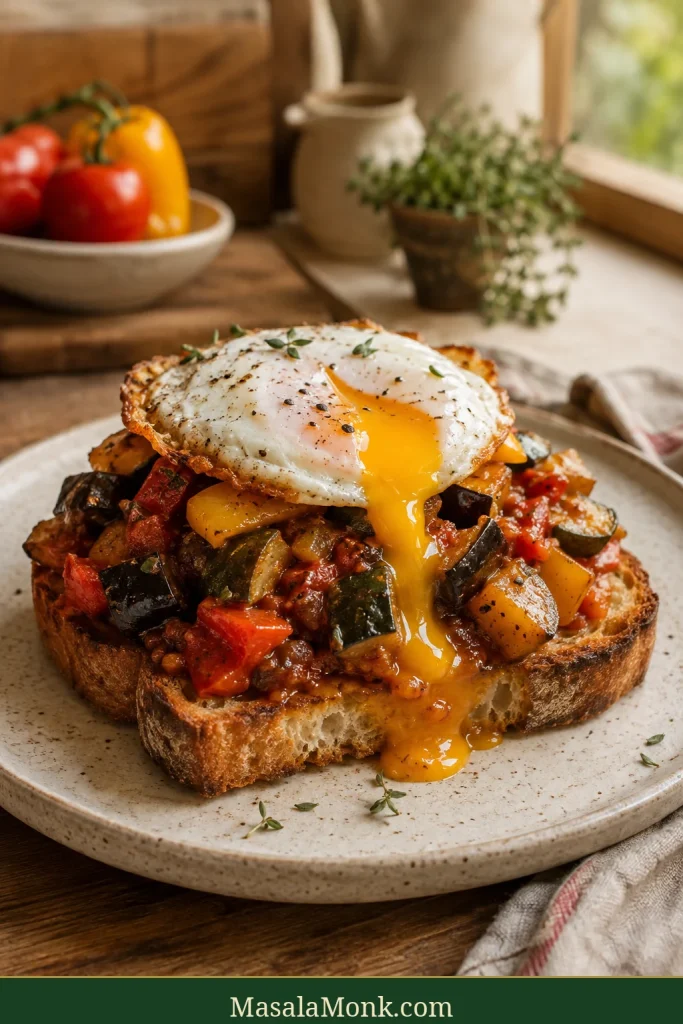
Thick crisp toast topped with chunky ratatouille and a fried egg, with runny golden yolk flowing over the vegetables.
Crisp toast is especially useful with next-day ratatouille: as the vegetables become softer and more integrated overnight, the bread puts a fresh layer of texture back into the meal.

Ratatouille does not need to be piping hot; it is good warm, at room temperature or chilled. During the 15-minute rest, the bubbling settles and the sauce thickens slightly around the vegetables, while the olive oil, herbs and tomato become easier to taste. If serving leftovers cold, let them lose the deepest refrigerator chill first.

Make Ahead, Store, Freeze and Reheat

Yes—ratatouille is excellent made a day ahead. The vegetables become softer, but the tomato, garlic, herbs and olive oil taste more integrated after a night in the refrigerator.

If you’re cooking specifically for the next day, hold back most of the basil and add it just before serving so its fresh flavor does not disappear into the overnight rest.

Day one gives you clearer textures. Day two gives you deeper integration. Neither is a consolation prize.

Fridge, Freezer and Reheating at a Glance

For the practical timeline, keep the three jobs separate: chill leftovers promptly, freeze airtight portions you will not use soon, and reheat only what you plan to eat.
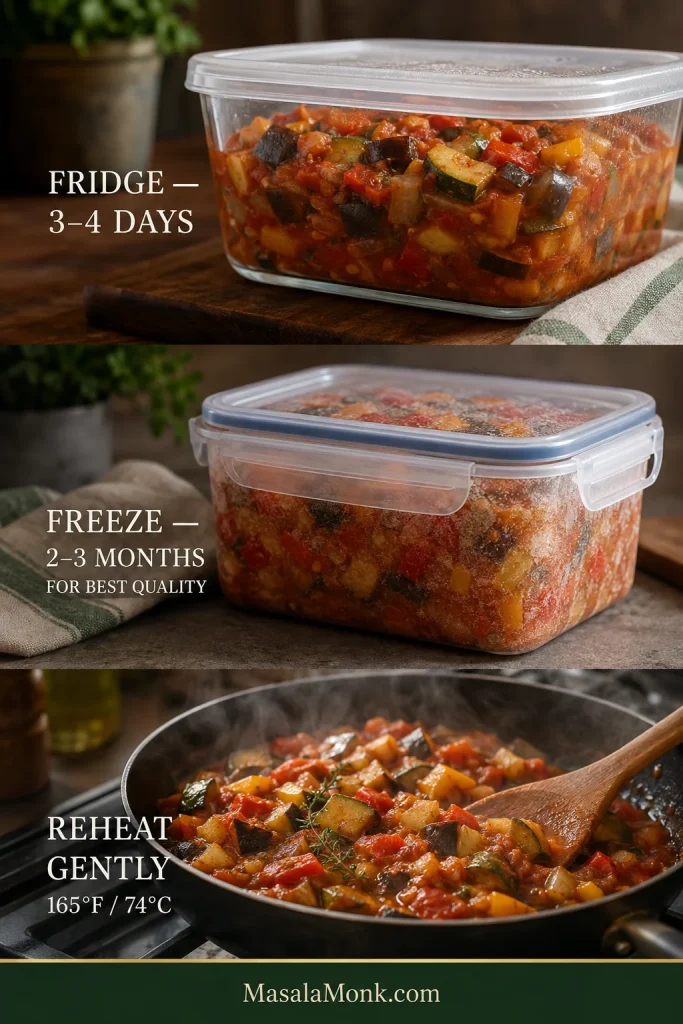
Three-part guide showing ratatouille refrigerated in a covered container, frozen in an airtight container and gently reheated in a pan, with storage times and 165°F or 74°C reheating guidance.
Shallow containers help leftovers cool more quickly and make it easier to reheat only the amount you actually plan to serve.

Refrigerate and Reheat Gently

Refrigerate leftovers within 2 hours of cooking—or within 1 hour when the surrounding temperature is above 90°F / 32°C—in covered, preferably shallow containers. USDA leftover guidance recommends using refrigerated cooked leftovers within 3–4 days and reheating them to 165°F / 74°C.

Reheat only the portion you plan to eat. The microwave works well for a single serving because the heating is brief. On the stovetop, use low to medium-low heat and stir only as much as necessary. Once it is hot, stop. Yesterday’s zucchini does not need another fifteen-minute simmer.

An oilier appearance after reheating does not necessarily mean the original batch contained too much oil. Extra evaporation removes water while the olive oil remains, making it more visible.

Can You Freeze Ratatouille?

Yes. Freeze it in an airtight container and use it within about 2–3 months for best quality. Expect softer vegetables after thawing, especially the zucchini.

That softer texture works well in pasta, eggs, soup or on toast. A thawed batch that has become too soft to enjoy on its own can also become the start of a vegetable soup; minestrone takes the tomato-and-vegetable idea in a heartier beans-and-pasta direction.

Leftover Ideas · Back to Recipe

Five Good Ways to Use Leftover Ratatouille

Leftover ratatouille can become pasta sauce, a toast topping, frittata filling, a spoonful over polenta, or the beginning of a vegetable soup.
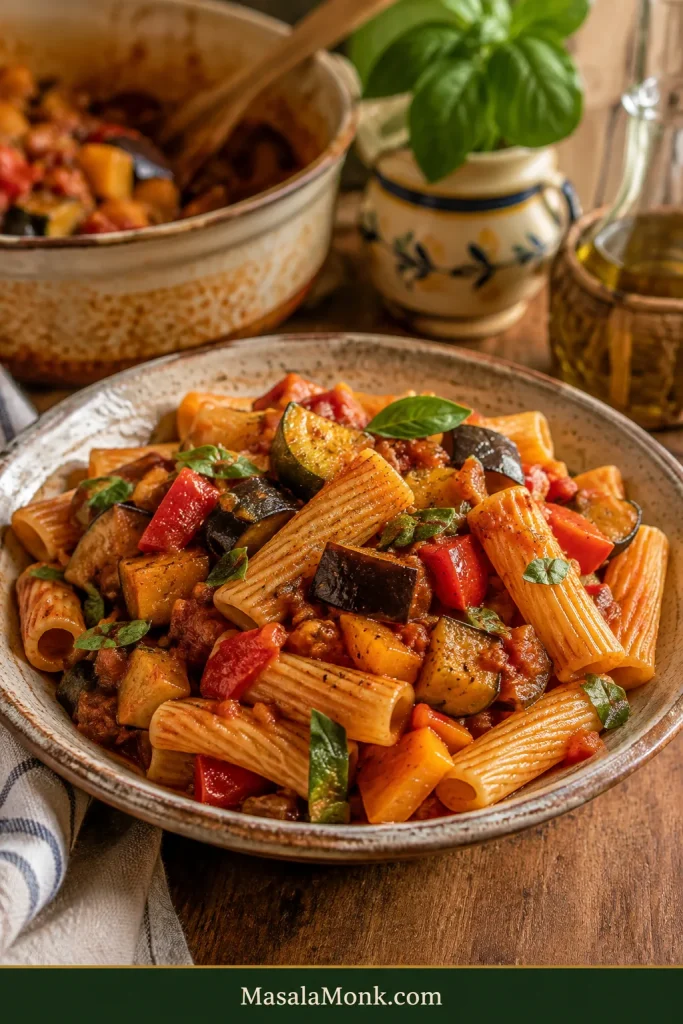
Rigatoni tossed with leftover ratatouille, with visible eggplant, zucchini and red and yellow peppers coated in tomato sauce and finished with basil.
Short pasta has a practical advantage here: chunky eggplant, zucchini and peppers settle between the tubes and ridges instead of slipping away from long strands to the bottom of the bowl.
  1. Toss it with pasta. Warm the ratatouille, loosen it with some pasta water and fold it through. Basil, Parmesan or goat cheese can finish it. For something cheesier and more substantial, the same vegetables also work beautifully in vegetable baked ziti.
  2. Pile it onto toast. Add an egg or tangy cheese and lunch is essentially done.
  3. Put it into eggs. Warm it under fried or poached eggs, or use a modest amount as a cooked vegetable filling for an omelet or frittata.
  4. Spoon it over polenta. Soft vegetables and concentrated tomato are particularly good against creamy polenta.
  5. Turn a very soft batch into sauce or soup. Crush it into a chunky pasta sauce or blend some of it into a smoother vegetable base. The texture changed; dinner did not fail.

When the Vegetables Come Together

When the pan is right, you don’t really need the clock anymore. The tomato has thickened around the vegetables, the eggplant gives under the spoon, the peppers are sweet, and the zucchini has made it to the end intact.

Give it fifteen minutes to settle. By then the sauce has gathered around the vegetables, the steaming heat has eased, and the ratatouille is ready to eat.

If you make it, tell me where you like your ratatouille to land: vegetables still clearly distinct, or soft and deeply confited?
Back to Recipe · Back to Top

Posted on Leave a comment

Pinakbet Tagalog Recipe

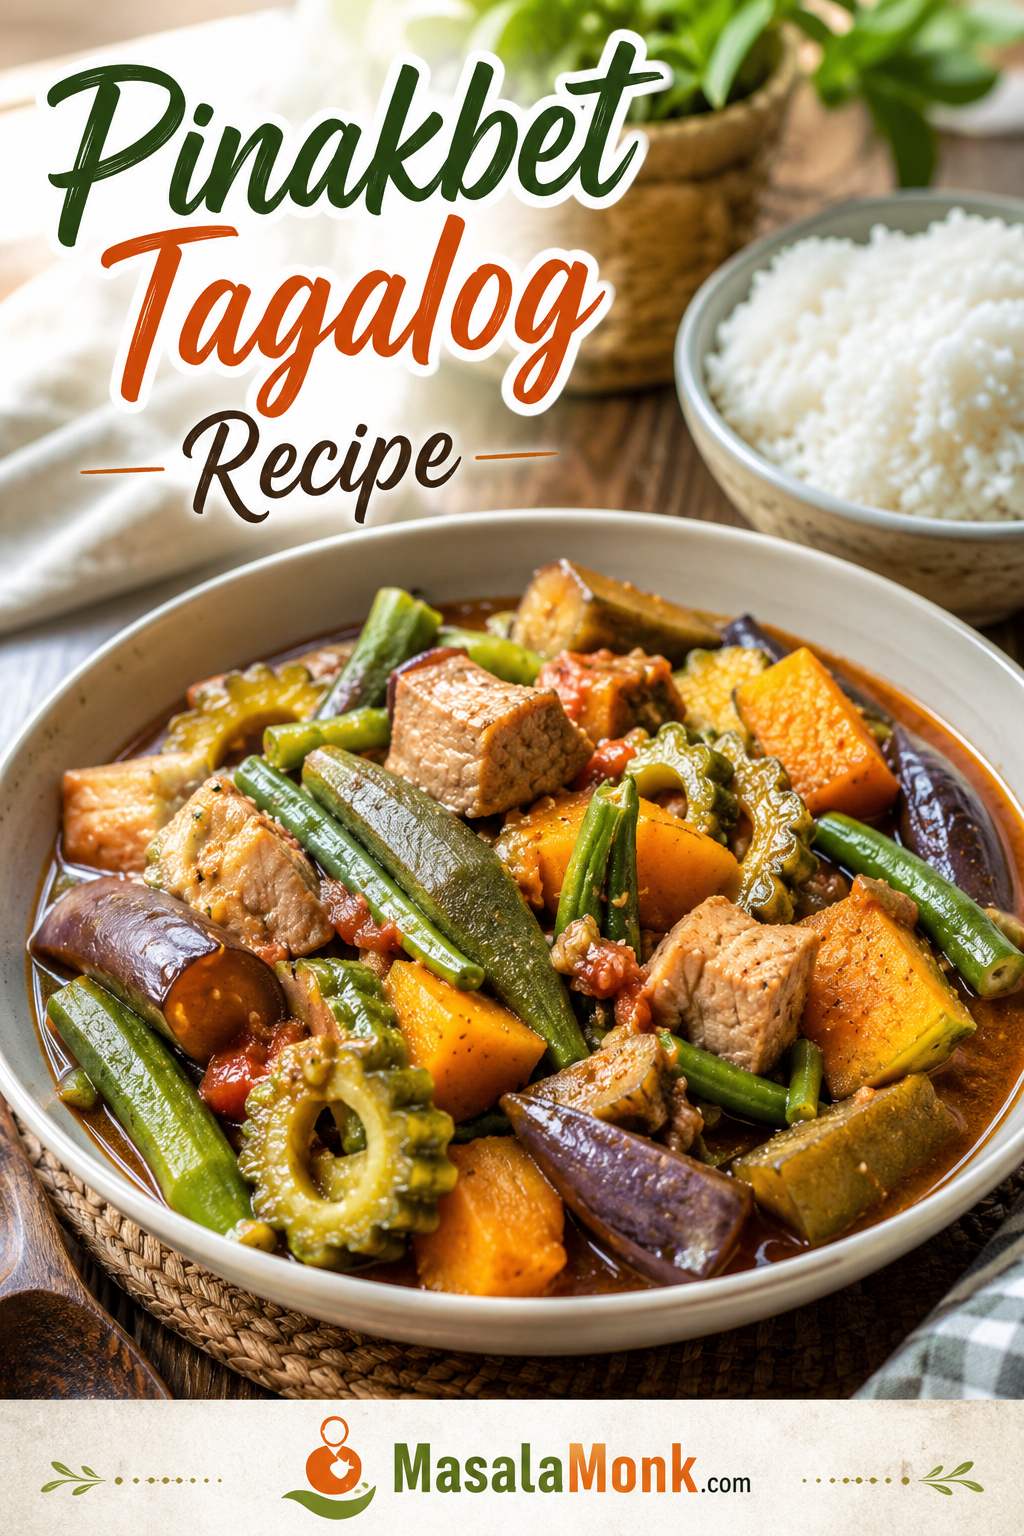
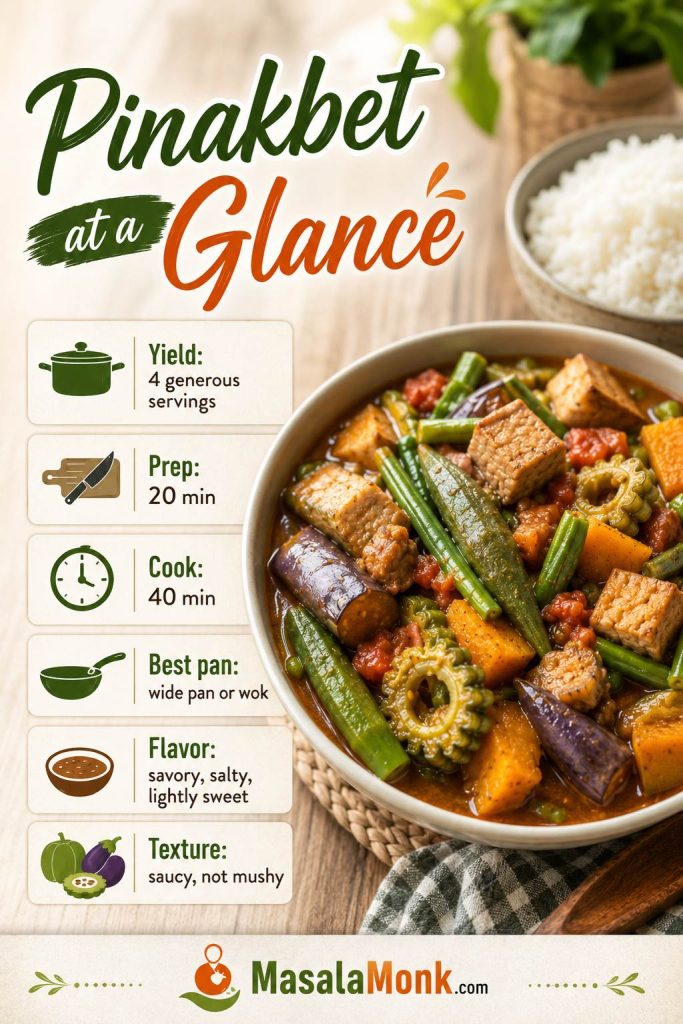
Bowl of Pinakbet Tagalog with pork, squash, okra, eggplant, ampalaya, long beans, and tomato-bagoong sauce, served with rice nearby.

Pinakbet Tagalog is the kind of vegetable dish that makes rice feel necessary. The best spoonful has salty bagoong-rich juices, sweet squash, silky eggplant, tender okra, a little bitter ampalaya, and enough porky depth to make the vegetables feel like the meal.

It is generous, home-style Filipino cooking: vegetables cooked until they soften into each other, but not so far that everything turns muddy. The squash should become creamy at the edges, the eggplant should turn soft and shiny, and the bitter melon should balance the sweetness instead of taking over.

If your pinakbet has ever turned watery, too salty, too bitter, or too soft, the problem usually is not the ingredient list. It is the order. Squash needs a head start, okra needs restraint, and bagoong needs to be cooked with the tomatoes instead of dumped in heavily at the end.

This is a Pinakbet Tagalog-style home recipe: squash-forward, shrimp-paste seasoned, saucy enough for rice, and built to keep the vegetables tender but distinct. It also includes notes for a sharper Ilocano direction, no-bagoong substitutions, and the small timing cues that keep pakbet from becoming mushy.

Quick Answer: What Is Pinakbet?

Pinakbet is a Filipino vegetable stew made with bagoong, tomatoes, and vegetables such as squash, okra, eggplant, bitter melon, and long beans. This version is Pinakbet Tagalog, made with bagoong alamang, pork, squash, and mixed vegetables in a salty, savory sauce that is meant for rice.

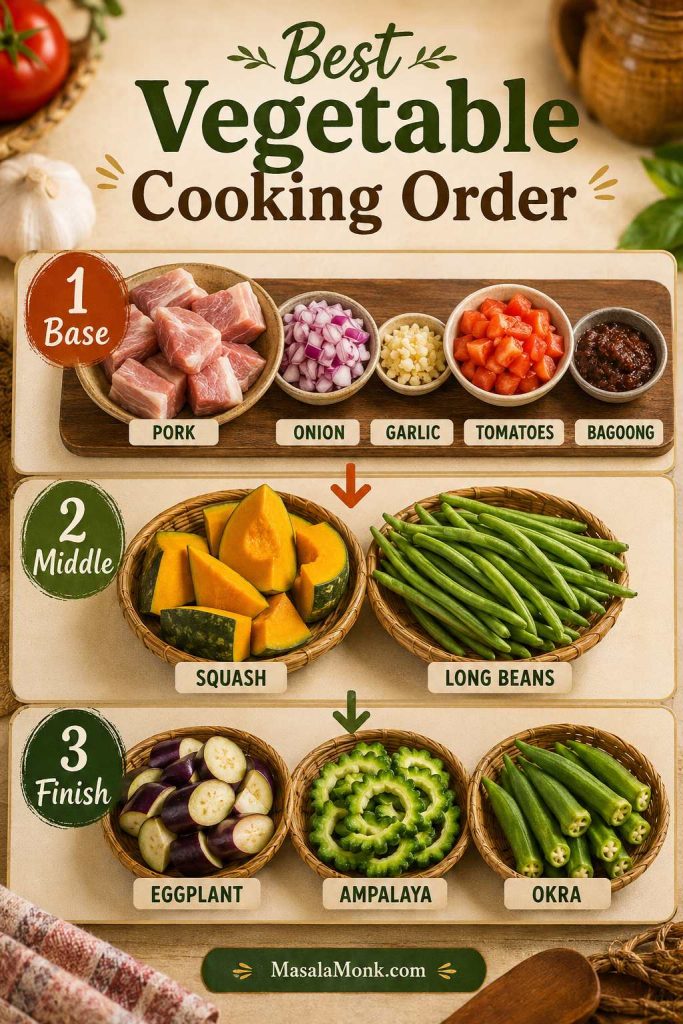
For the easiest balanced version, cook pork with onion, garlic, tomatoes, and shrimp paste. Add squash first, long beans next, and eggplant, ampalaya, and okra near the end. That order keeps the vegetables tender without turning everything into one soft mixed stew; the full vegetable cooking order is below.

  • Main seasoning: bagoong alamang, or shrimp paste
  • Protein: pork belly or pork shoulder, cut into 1-inch pieces
  • Vegetables: squash, long beans, okra, eggplant, and ampalaya
  • Liquid: 1 cup / 240 ml water or light stock, plus more only if needed
  • Texture goal: glossy and saucy, not soupy or mushy

Start here: Use 1 tablespoon bagoong first, then adjust with 1–3 teaspoons more near the end. Bagoong brands vary a lot, and starting low gives you room to correct the seasoning.

Pinakbet at a Glance

Yield4 generous servings with rice, or 5–6 smaller side servings
Prep time20 minutes
Cook timeAbout 40 minutes
Total timeAbout 1 hour
Best pan12-inch wide pan, wok, deep skillet, or wide Dutch oven
Main flavorSalty, savory, lightly sweet, earthy, and a little bitter
Main fixGive squash a head start and add delicate vegetables near the end
Pinakbet at a glance guide showing yield, prep time, cook time, best pan, flavor profile, and texture goal.
Use this Pinakbet Tagalog snapshot to set the cooking target early: tender vegetables, modest sauce, and a spoonable finish that stays clear of watery or mushy.

Why these amounts work: This recipe starts with 1 tablespoon bagoong and 1 cup / 240 ml water because both salt and liquid build as the vegetables cook. Bagoong tastes sharper before it softens into the tomatoes and squash, and the vegetables release liquid as they simmer. If you are unsure how saucy the finished dish should look, use the texture guide below before adding more water.

Pinakbet Tagalog vs Ilocano: What This Recipe Is

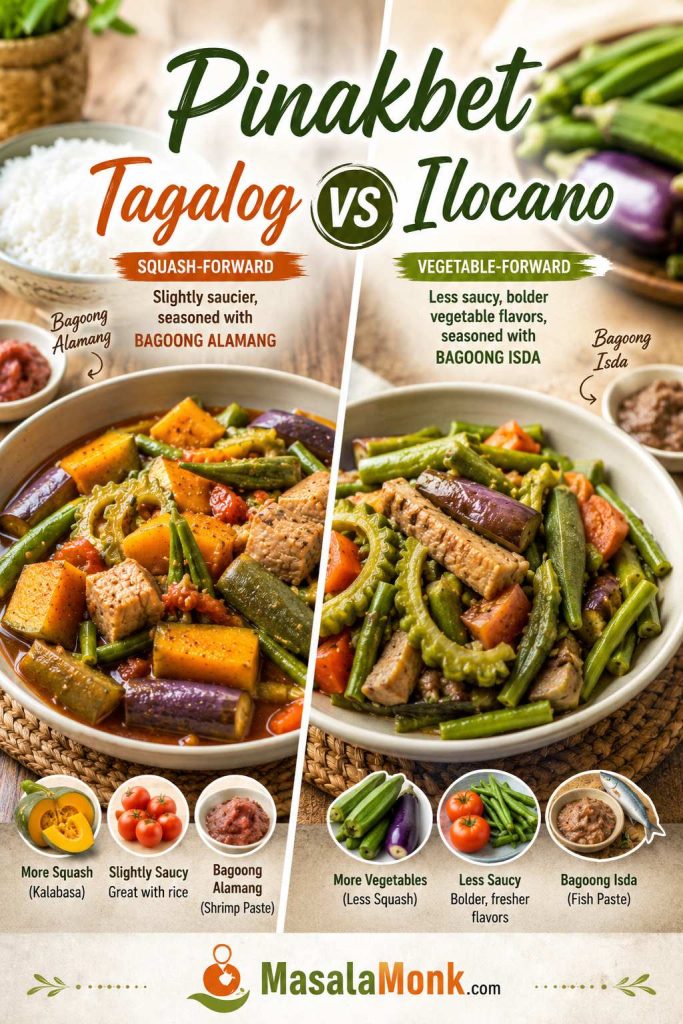
This is a Pinakbet Tagalog-style recipe: squash-forward, seasoned with bagoong alamang, and saucy enough to spoon over rice. It is the style many home cooks expect when they want pakbet with pork, shrimp paste, kalabasa, eggplant, okra, ampalaya, and long beans.

A stricter Ilocano-style pinakbet is often more closely tied to bagoong isda or fermented fish seasoning, and the finish can be drier and more vegetable-forward. To move this recipe in that direction, use bagoong isda, reduce the liquid slightly, stir less, and let the vegetables cook down more quietly.

Side-by-side comparison of Pinakbet Tagalog and Ilocano-style pinakbet with notes about bagoong and texture differences.
Pinakbet Tagalog usually leans rounder, saucier, and squash-forward. By contrast, Ilocano-style pinakbet often tastes sharper and drier, so the bagoong choice changes the whole direction of the dish.

Cook’s clarity: Follow the recipe as written for a rounder, shrimp-paste Tagalog-style pakbet. Use the Ilocano notes if you want a sharper, drier, more fermented-fish direction. The bagoong guide below explains when to use bagoong alamang, bagoong isda, or a lighter substitute.

Why This Pinakbet Recipe Works

Good pinakbet is not about throwing every vegetable into the pan and hoping for the best. Squash, okra, eggplant, long beans, and bitter melon do not cook at the same speed, and shrimp paste is strong enough that small choices matter.

The goal is a pan of vegetables that has softened into itself without losing every shape and texture. Squash should yield but still stay visible. Eggplant should look silky and soft. Okra should be tender, not slippery across the whole dish. Ampalaya should bring enough bitterness to balance the squash and tomato, not dominate every bite.

Brown the pork first

Pork belly or pork shoulder gives the tomato and seasoning mixture more depth. Let a little fat render before the aromatics go in.

Bloom the bagoong with tomatoes

Cooking the shrimp paste with softened tomatoes rounds out the sharp saltiness and helps the flavor spread through the pan.

Stage the vegetables

Squash needs a head start. Eggplant, okra, and ampalaya go in later so they soften without collapsing.

Tested texture target: In a wide pan, 1 cup / 240 ml water is usually enough to soften the pork and start the vegetables. Add up to 1/2 cup / 120 ml more only if the pork or squash needs extra time. The finished dish should have shallow glossy juices that cling lightly to the vegetables, not a soup-like broth.

Pinakbet Ingredients

The amounts below make 4 generous servings with rice, or 5–6 smaller servings as part of a larger meal. You get enough pork for richness, enough fermented seasoning for depth, enough tomato for body, and enough vegetable contrast to make the dish feel generous.

If you are cooking outside the Philippines, check Filipino or broader Asian groceries for long beans, bitter melon, Filipino eggplant, kalabasa, and bagoong alamang. Green beans, kabocha, butternut squash, and slender eggplant can still make a good home version if you keep the same balance of sweet, bitter, tender, and firm. If your market does not carry every Filipino vegetable, the substitution guide shows which swaps keep the dish closest to the original balance.

If you cannot find every traditional ingredient, do not let that stop you. The dish still works when the pan has the same basic shape: something sweet, something bitter if possible, something tender, something green, and enough savory depth to make it feel complete.

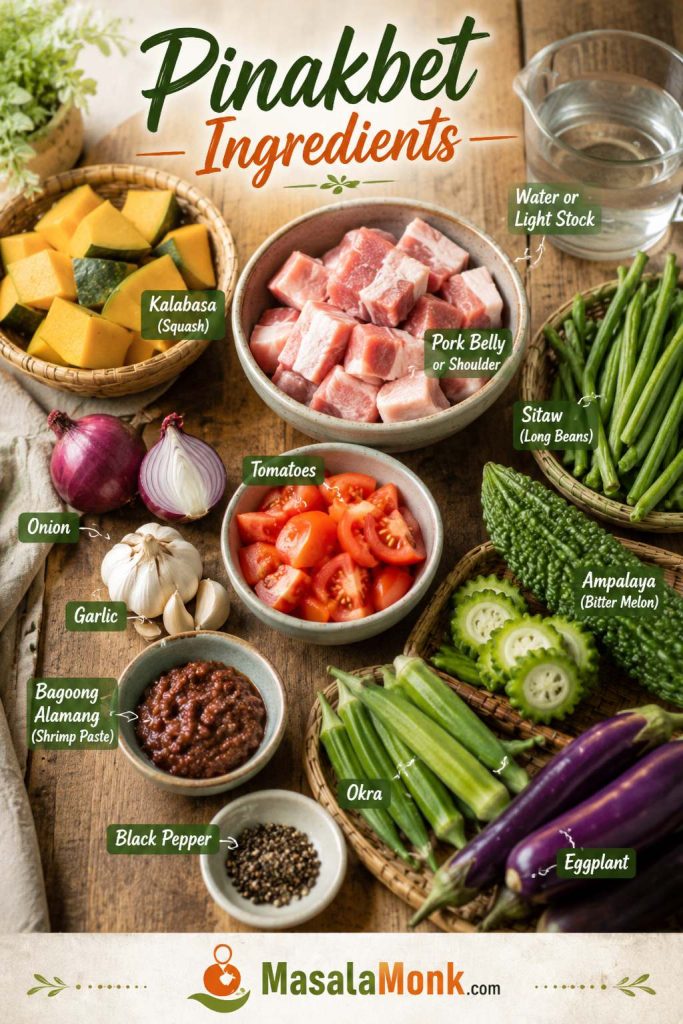
Ingredient board for Pinakbet Tagalog with pork, bagoong alamang, tomatoes, onion, garlic, squash, long beans, okra, eggplant, and ampalaya.
These ingredients show why Pinakbet Tagalog works before the pan even heats up: pork adds richness, bagoong brings depth, tomatoes give body, and the vegetables create the sweet, bitter, tender, and crisp-tender contrast that defines the dish.

Ingredient Amounts and Why They Matter

IngredientUS measureMetricWhy it matters
Pork belly or pork shoulder1/2 lb225 gPork belly gives richness; shoulder is leaner and may need a little more time.
Cooking oil1 tbsp15 mlUse less if the pork is very fatty.
Onion1 medium110–150 gBuilds sweetness in the savory foundation.
Garlic3–4 cloves12–16 gAdd after the onion so it does not burn.
Tomatoes2 mediumAbout 225 gCook down into the savory juices.
Bagoong alamang1 tbsp to start, plus 1–3 tsp more to taste15 g to start, plus more to tasteStarting low helps prevent the dish from becoming too salty.
Water or light stock1 cup, plus up to 1/2 cup more as needed240 ml, plus up to 120 ml more as neededLoosens the tomato-bagoong mixture without making the dish soupy.
Kalabasa / squash2 cups cubed250–300 gAdds sweetness and body.
Sitaw / long beans1–1 1/2 cups cut100–150 gAdds green bite and structure.
Okra6–8 pieces100–150 gAdd late so it keeps its shape.
Ampalaya / bitter melon1/2 medium, or up to 1 medium if you enjoy bitternessAbout 100–225 gGives the signature bitter edge.
Eggplant1 large or 2 small170–250 gAdd late so it softens without dissolving.
Black pepper1/4 tspAbout 0.5 gOptional, but rounds the flavor.

Best Vegetables for Pinakbet

The best bites have contrast: sweet squash, bitter ampalaya, silky eggplant, tender okra, and salty tomato-bagoong juices that pull everything together.

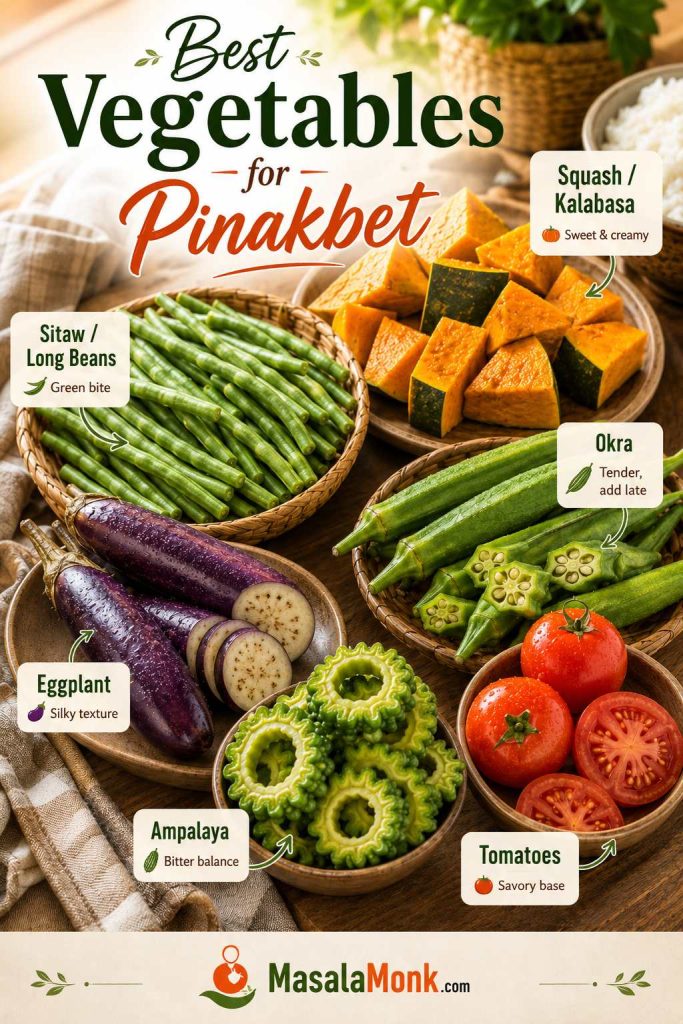
Guide showing squash, okra, eggplant, ampalaya, long beans, and tomatoes used in pinakbet, with short role labels.
Each vegetable does something different in pakbet, so the mix matters as much as the seasoning. Kalabasa brings sweetness, long beans keep the dish structured, eggplant turns silky, okra adds body, and ampalaya brings the bitter edge that keeps the dish from tasting flat.

Kalabasa / Squash

This sweet squash makes the salty seasoning feel round. Cut it into sturdy chunks so the edges turn creamy without the pieces disappearing.

Okra

Okra is there for softness and body, but it needs a light hand. Trim only the ends, add it late, and let it turn tender without stirring it into the whole pan.

Eggplant

Eggplant is at its best when it turns silky and soaks up the tomato-bagoong juices. Keep the pieces thick so they soften without vanishing.

Ampalaya

Ampalaya is the edge of the dish. Use less if you want a milder pan, but do not erase all the bitterness; that little bite is what keeps the squash and tomato from tasting too sweet.

Sitaw / Long Beans

Long beans keep the dish from feeling too soft, especially beside squash and eggplant. Cut them into 2- to 3-inch pieces so they cook evenly and keep a little bite.

Tomatoes

Once tomatoes soften into the pan, they make the fermented seasoning taste fuller and less sharp. Give them time to collapse before adding water.

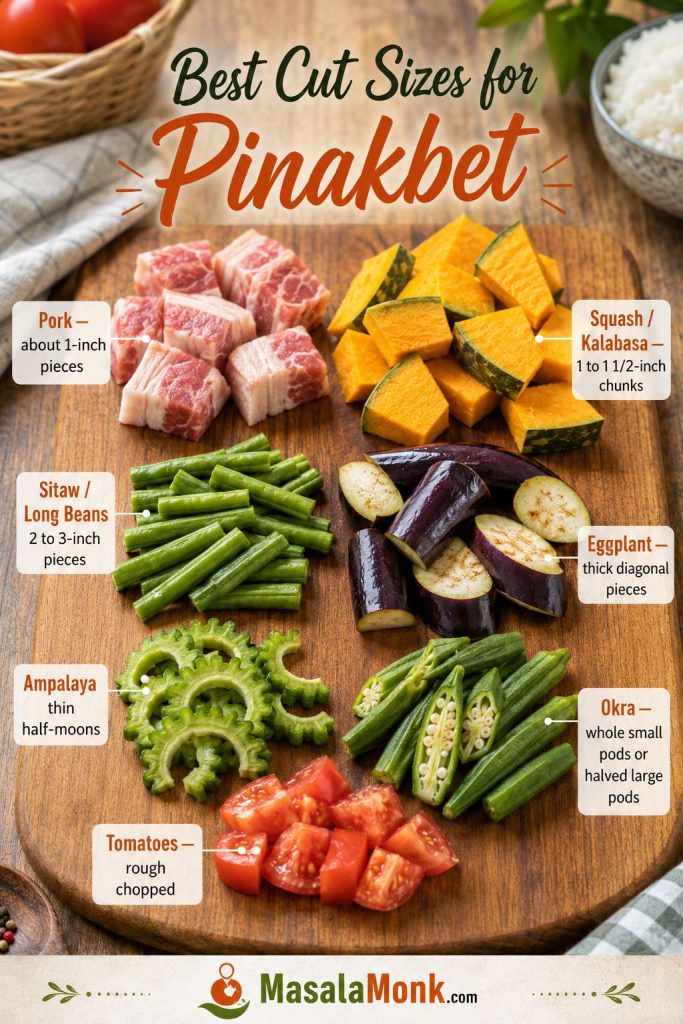
Best Cut Sizes for Pinakbet

Pinakbet is forgiving, but the knife work quietly decides a lot. Small squash collapses too early, thin eggplant disappears, and overcut okra can make the texture slippery.

Cut size guide showing pork pieces, squash chunks, long beans, eggplant pieces, ampalaya half-moons, okra pods, and chopped tomatoes for pinakbet.
Good knife work quietly improves Pinakbet Tagalog. Larger squash chunks hold shape better, thick eggplant pieces soften without disappearing, and lightly trimmed okra stays cleaner in texture, so the finished dish feels tender rather than collapsed.
IngredientBest cut sizeWhat to watch
Pork belly or shoulderAbout 1-inch piecesSmall enough to tenderize, large enough to stay juicy.
Squash / kalabasa1 to 1 1/2-inch chunksHolds shape while becoming tender.
Long beans / sitaw2 to 3-inch piecesCooks evenly and stays easy to serve.
EggplantThick diagonal pieces or large chunksSoftens without dissolving into the dish.
AmpalayaThin half-moonsDistributes bitterness without taking over every bite.
OkraWhole small pods or halved large podsLess cutting means a cleaner texture.
TomatoesRough choppedBreaks down into the tomato-bagoong mixture without needing perfect dice.

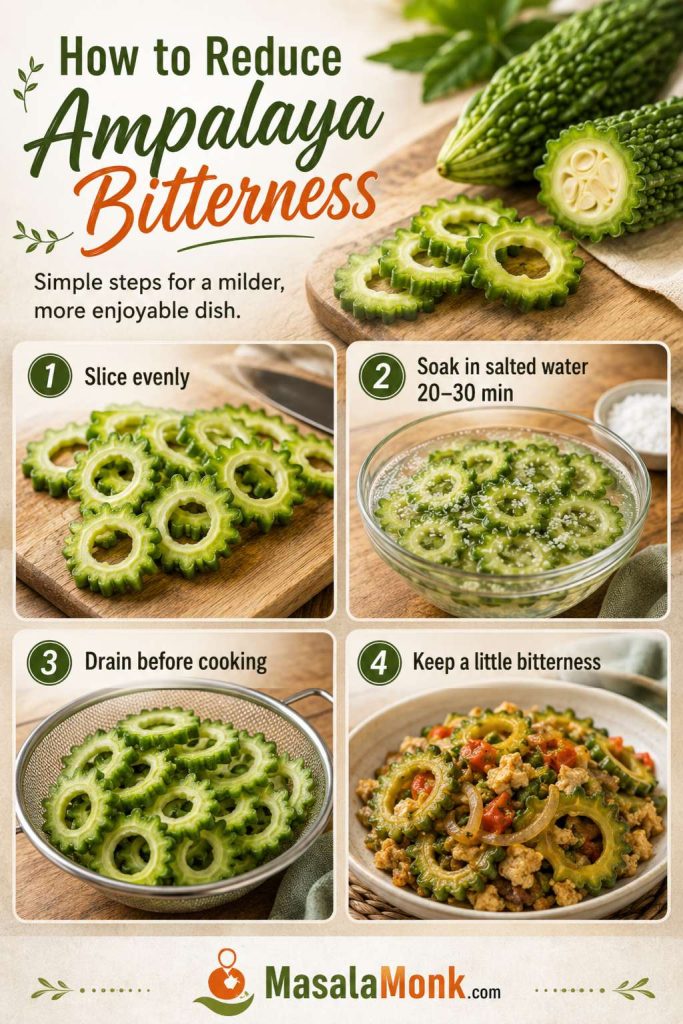
How to Reduce Ampalaya Bitterness

Optional ampalaya tip: For milder bitter melon, soak the sliced ampalaya in water with a big pinch of salt for 20–30 minutes, then drain before cooking. Skip this if you enjoy the stronger bitter edge.

Ampalaya bitterness guide showing sliced bitter melon, soaking in salted water for 20 to 30 minutes, draining, and keeping some bitterness.
Ampalaya should soften its bitterness, not lose it completely. A short salted-water soak helps mellow the sharpness; however, keeping a little bitterness in the final dish is exactly what makes Pinakbet Tagalog taste balanced instead of one-note.

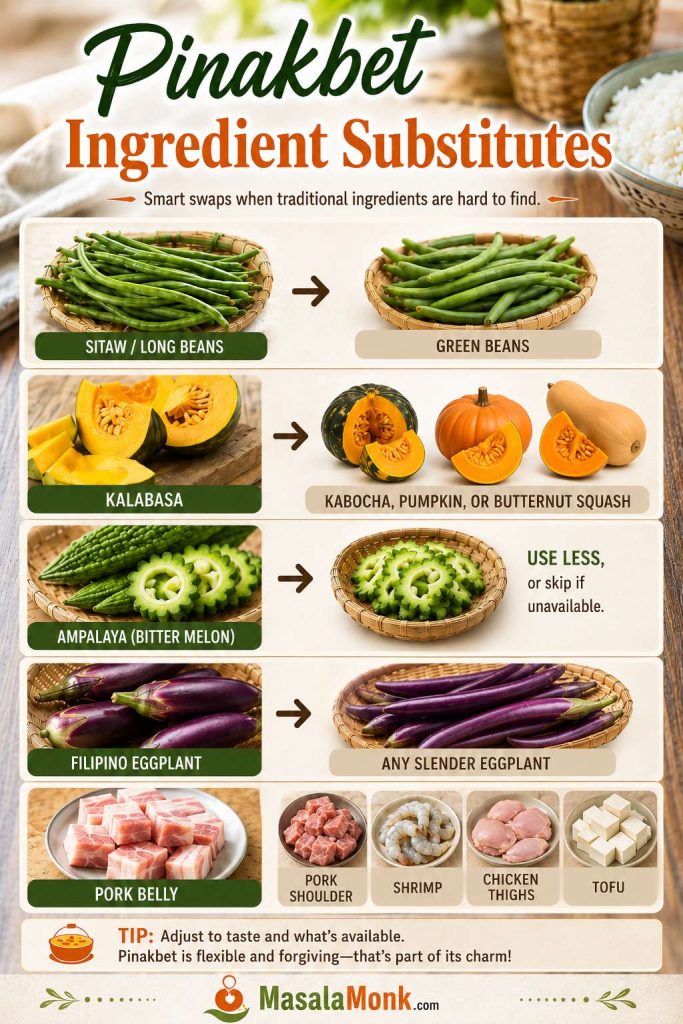
Ingredient Substitutes If You Cannot Find Everything

Pinakbet is best with traditional vegetables, but a home pot can still work when the market does not give you everything. Think about what each ingredient brings to the pan: sweetness from squash, bitterness from ampalaya, body from okra, and salty depth from the fermented seasoning.

Ingredient substitutes guide for pinakbet showing alternatives for long beans, squash, bitter melon, eggplant, and pork.
Traditional ingredients are ideal, yet pinakbet can still work when the pot keeps the same shape: something sweet, something green, something tender, a little bitterness if possible, and enough savory depth to make the vegetables feel complete.
Traditional ingredientGood substituteWhat to watch
Sitaw / long beansGreen beansGreen beans cook faster, so add them a little later.
KalabasaKabocha, pumpkin, or butternut squashSweetness and cooking time vary by squash type.
AmpalayaUse less, or skip if unavailableThe dish becomes less bitter and milder.
Filipino eggplantAny slender eggplantSimilar texture; avoid tiny pieces because they collapse.
Pork bellyPork shoulder, shrimp, chicken thighs, or tofuChanges richness and cooking time.

From here, the seasoning does the heavy lifting. This is where pinakbet can become deep and rounded, or too salty too quickly, so taste slowly and let the tomatoes do their work.

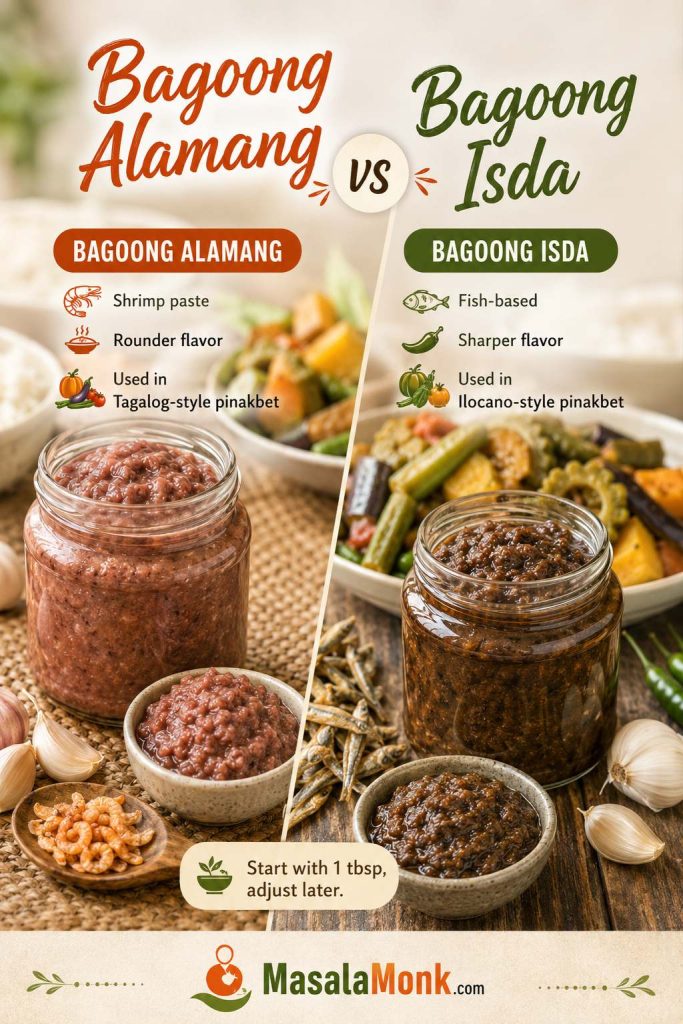
Bagoong Alamang vs Bagoong Isda

Bagoong is the ingredient that makes pinakbet taste like pinakbet. In this Tagalog-style version, bagoong alamang gives a round shrimp-paste flavor. To move the dish in a sharper Ilocano direction, use bagoong isda or bagoong monamon instead. For more background on Filipino pantry staples like bagoong and patis, this Filipino pantry guide is helpful.

Comparison guide showing bagoong alamang and bagoong isda for Pinakbet Tagalog and Ilocano-style pinakbet.
Bagoong does more than add salt; it gives pinakbet its fermented depth and unmistakable savory backbone. For a rounder Tagalog-style flavor, bagoong alamang fits naturally, while bagoong isda pushes the dish toward a sharper Ilocano direction.

Raw vs Ginisang Bagoong

Raw bagoong alamang tends to taste sharper and saltier, so it benefits from being cooked briefly with tomatoes before the water goes in. Ginisang bagoong is already sautéed and often tastes rounder, but many jars are also sweeter. Taste before adding more, especially if the jar is meant to be eaten as a condiment.

If your ginisang bagoong tastes sweet straight from the jar, be slower with extra squash and do not add more seasoning until the vegetables are cooked. Sweet jarred shrimp paste can taste pleasantly round at first, then too sweet once the squash softens.

Taste Before Adding More

Bagoong is powerful, so use it with patience. Let it bloom with the tomatoes, then taste again later when the vegetables have softened around it. A spoonful of cooking liquid may taste strong by itself; taste with squash or rice before deciding whether the dish needs more. If you cannot use shrimp paste at all, skip ahead to the without-bagoong options.

Bagoong typeStart withAdd more when
Very salty bagoong alamang1 tbspThe vegetables are cooked but the dish tastes flat.
Sweeter ginisang bagoong1 tbsp, then adjustThe dish needs more savory depth, not more sweetness.
Bagoong isda1 tbspYou want a sharper Ilocano-style flavor.
Fish sauce substitute1 tbspOnly after tasting near the end.

Bloom the bagoong: Cook it briefly with the tomatoes before adding water. Raw-stirred bagoong can taste sharp; cooked shrimp paste tastes rounder and spreads better through the dish.

Equipment You Need

A 12-inch wide pan, wok, deep skillet, or wide Dutch oven works best. Pinakbet has bulky vegetables, so a narrow pot forces you to stir more aggressively, which can break the squash and eggplant. Use a lid for gentle steaming and a wooden spoon or silicone spatula for turning.

How to Cook Pinakbet

Once everything is cut, the cooking is mostly patience. Brown the pork, soften the aromatics, let the tomatoes collapse, then cook the bagoong long enough for the smell to turn round and savory instead of sharply salty.

Do not rush the beginning. The tomato and shrimp paste mixture is what makes the vegetables taste complete, not like plain vegetables wearing salt. Once the squash and beans are in, give the pan enough time before you decide it needs more water. If your past batches turned watery, salty, bitter, or mushy, the troubleshooting table after the method will help you fix the problem.

A wide cooking surface helps everything cook in a shallow layer instead of being crushed. Do not stir just because the pan is quiet. You are looking for pieces that have softened into each other without losing themselves.

Best Vegetable Cooking Order

Slow-cooking vegetables and fast-cooking vegetables should not be treated the same way. This is the order that keeps pinakbet tender without making it mushy.

Three-stage guide showing the cooking order for pinakbet: base ingredients, squash and long beans, then eggplant, ampalaya, and okra.
The cooking order keeps Pinakbet Tagalog from turning into one soft pile. Build the savory base first, let the sturdier vegetables get started, then finish with the delicate ones so every bite still has contrast.
Add firstAdd in the middleAdd last
Pork, onion, garlic, tomatoes, bagoongSquash, kamote if using, long beansEggplant, ampalaya, okra
Builds the savory foundationNeeds time but should hold shapeOvercooks faster and can turn too soft

Step-by-Step Method

Build the Pork, Tomato, and Bagoong Base

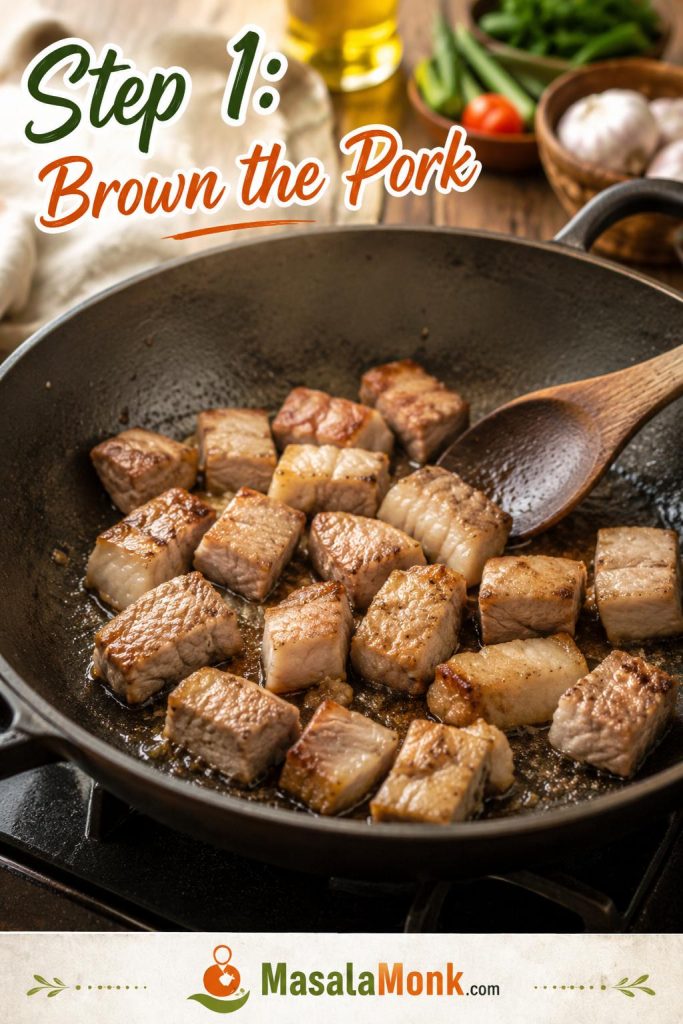
  1. Brown the pork. Heat oil in a wide pan over medium heat. Add pork in one layer and cook for 5–8 minutes, until lightly browned and some fat has rendered. Spread the pork out so it browns instead of steaming.

Visual Cue: Brown the Pork

Pork pieces browning in a wide pan at the beginning of making Pinakbet Tagalog.
Browning the pork first builds flavor before the vegetables ever hit the pan. As the fat renders and the edges deepen in color, the base becomes richer, which means the later tomato-bagoong mixture tastes fuller without needing extra seasoning.
  1. Cook the aromatics. Add onion and cook for about 2 minutes, until softened. Add garlic and cook for 30 seconds to 1 minute, just until fragrant.
  2. Soften the tomatoes. Add tomatoes and cook for 3–5 minutes, pressing them gently with the spoon. They should lose their raw shape and look juicy around the edges.
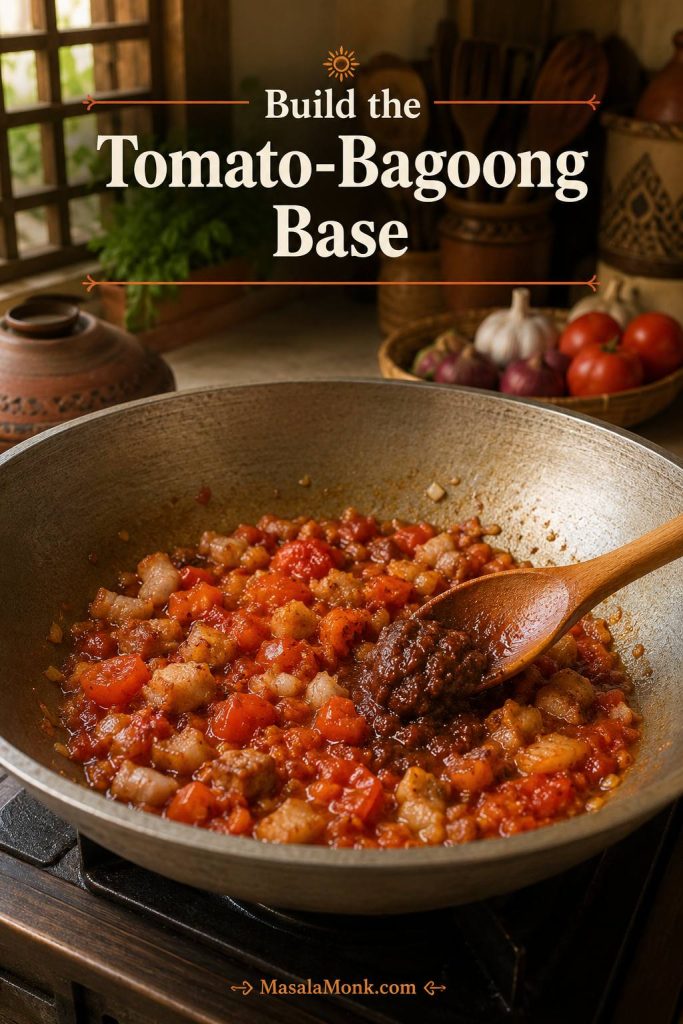
  3. Bloom the bagoong. Stir in 1 tablespoon bagoong and cook for 1–2 minutes. The smell should become rounder and more savory.

Visual Cue: Build the Tomato-Bagoong Base

Pork, onion, garlic, softened tomatoes, and bagoong being stirred together in a wide pan for Pinakbet Tagalog.
This step is where Pinakbet Tagalog starts tasting like itself. Once the tomatoes soften and the bagoong cooks into them, the flavor turns rounder and less harsh, so the vegetables later absorb something savory rather than just salty.
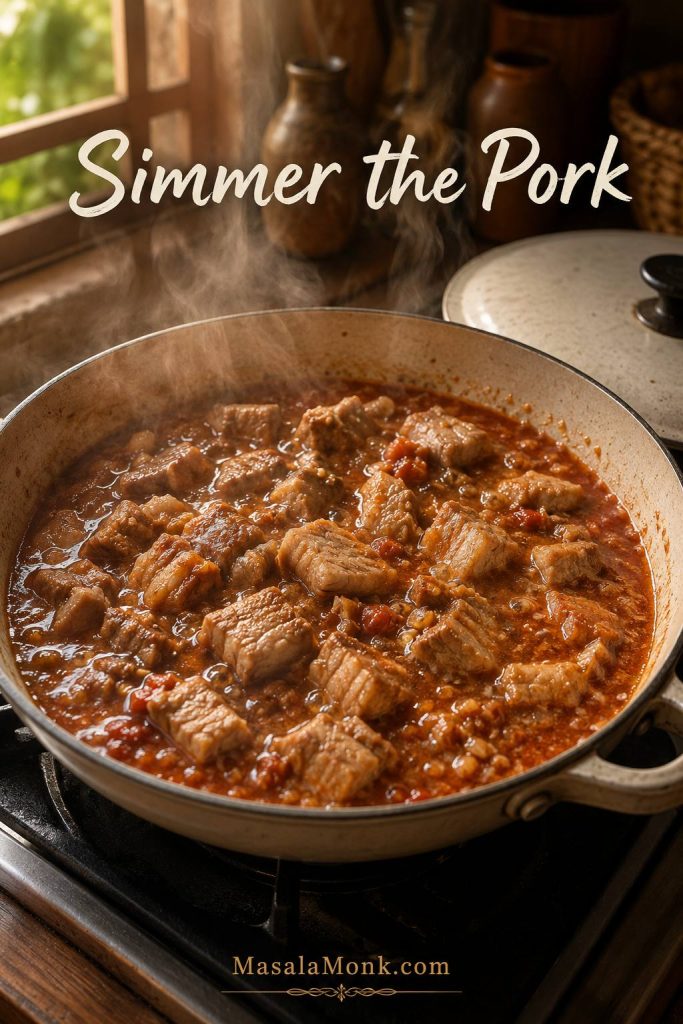
  1. Simmer the pork. Add 1 cup water or light stock. Cover and simmer for 15–20 minutes, or until the pork starts to become tender. If using pork shoulder and it still feels firm, simmer 5–10 minutes longer before adding squash. If the liquid already looks high before the squash goes in, do not add more yet; the vegetables will release more as they cook.

Visual Cue: Simmer the Pork

Pork simmering in shallow tomato-bagoong liquid in a wide pan with steam rising.
Simmer the pork before adding the vegetables, especially if you are using pork shoulder instead of belly. That little bit of patience lets the meat start tenderizing early, while the squash and softer vegetables can still cook on their own schedule later.

Add the Vegetables and Finish the Dish

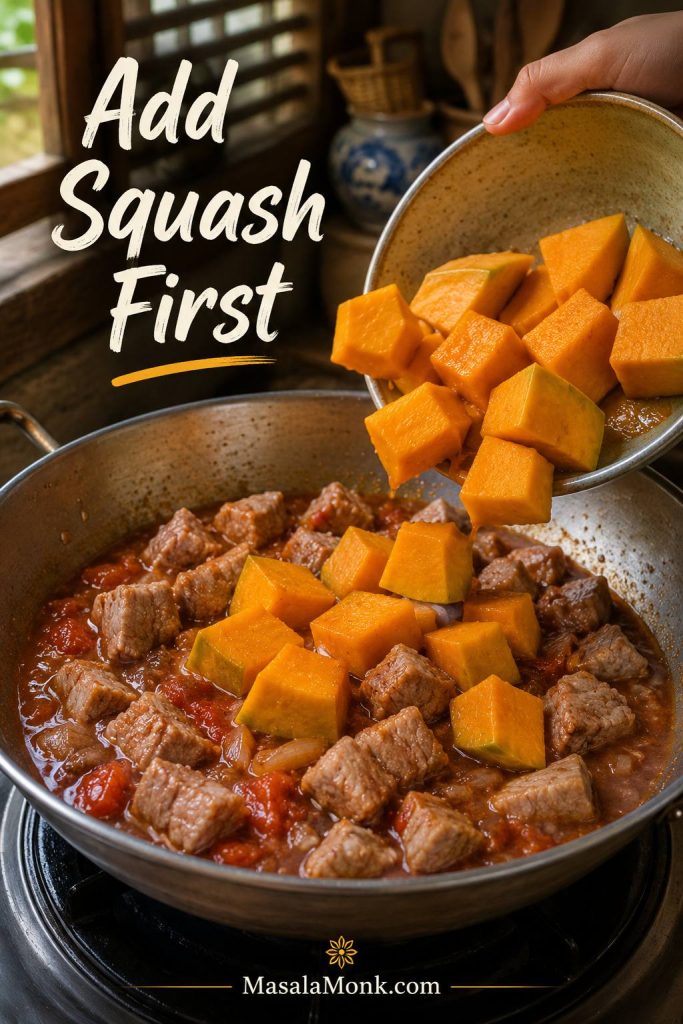
  1. Add the squash. Add kalabasa and cook for 5–7 minutes. It should begin to soften, but it should not be falling apart. Add up to 1/2 cup / 120 ml more water only if the pan looks dry or the squash needs more time.

Visual Cue: Add Squash First

Orange squash chunks being added to pork and tomato-bagoong sauce in a wide pan for pinakbet.
Squash goes in first because it is the vegetable that changes the dish’s body. As the edges soften, it thickens the pan slightly and rounds out the stronger bagoong flavor without making the pakbet taste sweet.
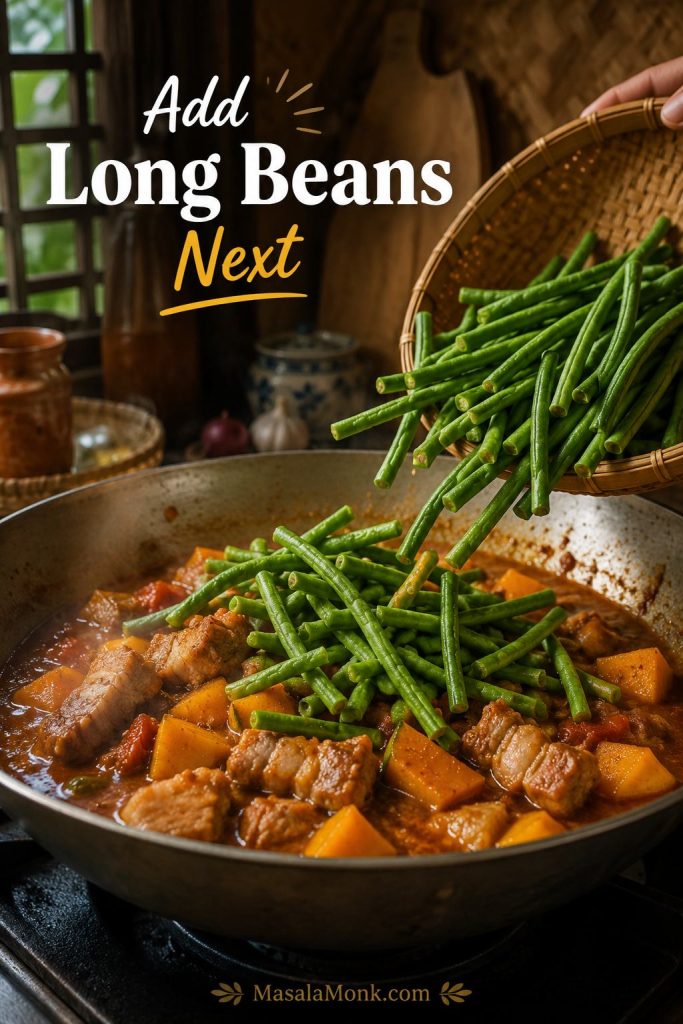
  1. Add the long beans. Add sitaw and cook for 2–3 minutes. The beans should brighten and begin to soften while still keeping some bite.

Visual Cue: Add Long Beans Next

Long beans being added to partially cooked squash and pork in a wide pan of Pinakbet Tagalog.
Long beans belong in the middle of the cooking process rather than at the beginning or the very end. This timing helps them stay green and tender, so the final pakbet still has a little structure instead of turning uniformly soft.
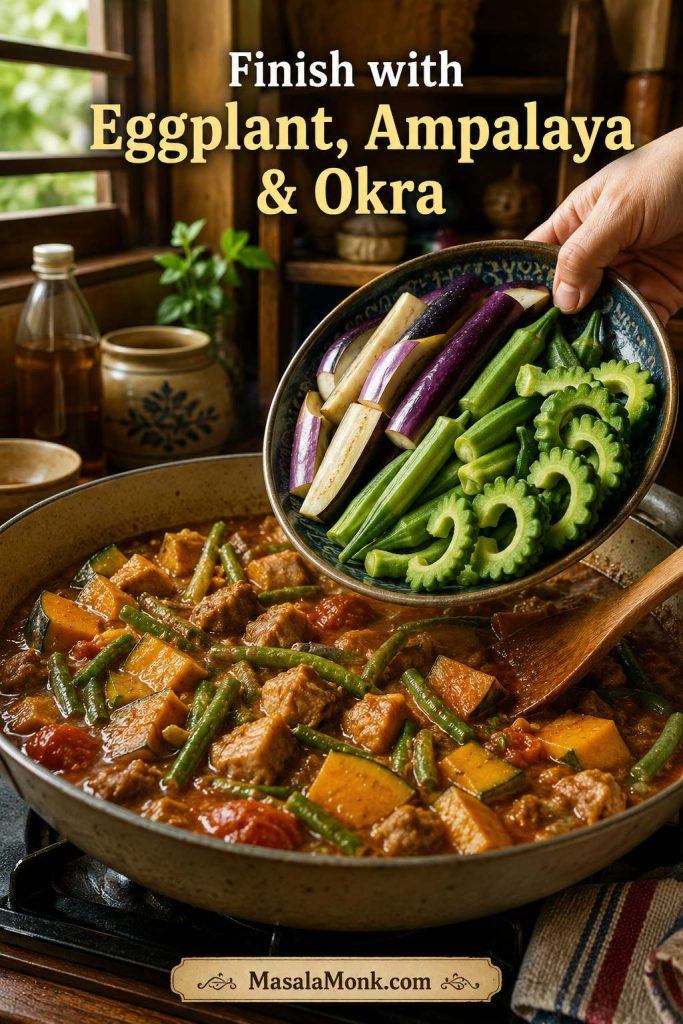
  1. Finish with eggplant, ampalaya, and okra. Cover and cook for 4–6 minutes, turning gently once or twice. The eggplant should look silky, the okra should still hold shape, and the ampalaya should soften without taking over the whole pan.

Visual Cue: Finish with Eggplant, Ampalaya, and Okra

Eggplant, ampalaya, and okra being added last to a pan of Pinakbet Tagalog with squash and long beans already cooking.
Eggplant, ampalaya, and okra cook quickly, so they should finish the dish instead of starting it. Added late, they keep their character: the eggplant turns silky, the okra stays tender, and the ampalaya gives bitterness without taking over the whole pot.
  1. Taste and adjust. Add 1–3 teaspoons more bagoong, pepper, or a small splash of water only if needed. The cooking liquid should cling lightly to the vegetables, with no large pool of broth at the bottom. Serve hot with rice.

Visual Cue: Taste, Adjust, and Finish

Finished Pinakbet Tagalog in a wide pan with a spoon lifting vegetables and glossy sauce.
The final texture should look moist and glossy, not brothy. Before adding more bagoong, taste with squash or rice, because the seasoning settles once the vegetables soften into the sauce.

How Long to Cook Pinakbet

Pinakbet is a stovetop dish, so the “temperature” is really about heat control. Medium heat is enough for most of the recipe. If the pan gets too hot, the juices can stick and the vegetables can break before they cook through.

StageHeatTimeVisual cue
Brown porkMedium to medium-high5–8 minutesEdges lightly browned, fat beginning to render
AromaticsMedium2–3 minutesOnion softened, garlic fragrant
Tomato and bagoongMedium3–5 minutesTomatoes juicy, bagoong darker and aromatic
Pork simmerMedium-low15–20 minutes, longer if needed for pork shoulderPork starting to tenderize
SquashMedium5–7 minutesFork enters but squash holds shape
Long beansMedium2–3 minutesBrighter, tender-crisp
Eggplant, ampalaya, okraMedium4–6 minutesTender, silky, and not collapsed

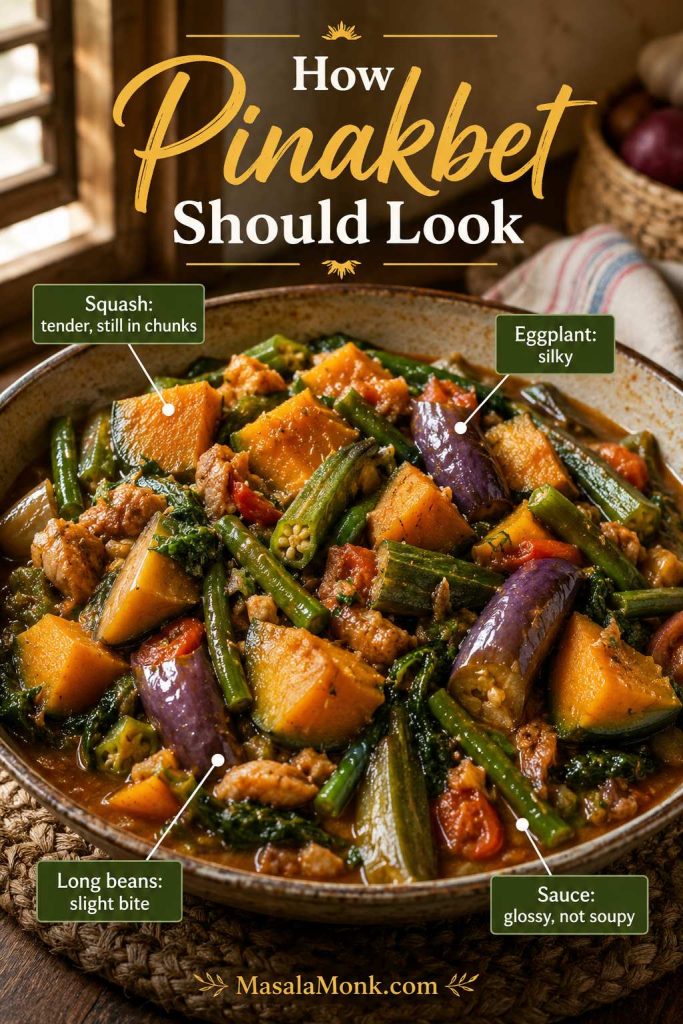
How Pinakbet Should Look When It Is Done

The best pinakbet does not look perfect. It looks generous, saucy, and ready for rice. The squash should be creamy at the edges but still in chunks. The long beans should keep a little bite. The eggplant should turn silky, not disappear. The okra should be tender without making the whole dish slippery.

If there is a lot of loose liquid, simmer uncovered for a few minutes. If the pan is dry before everything is tender, add a small splash of water, cover again, and continue gently. The final texture should feel saucy and spoonable, with shallow coated juices rather than loose broth. For a quick visual check, compare your pan with the watery vs right vs mushy guide.

You are done when the squash is fork-tender, the eggplant is silky, the long beans still have bite, and the cooking liquid lightly clings to the vegetables.

Finished Pinakbet Tagalog with notes showing tender squash, silky eggplant, long beans with slight bite, and glossy sauce that is not soupy.
Good pinakbet should look soft, but not sloppy. The vegetables ought to be tender and comfortable in the sauce, yet still easy to recognize, while the liquid should lightly coat them instead of drifting around like a separate broth.

Too Watery, Just Right, or Too Mushy

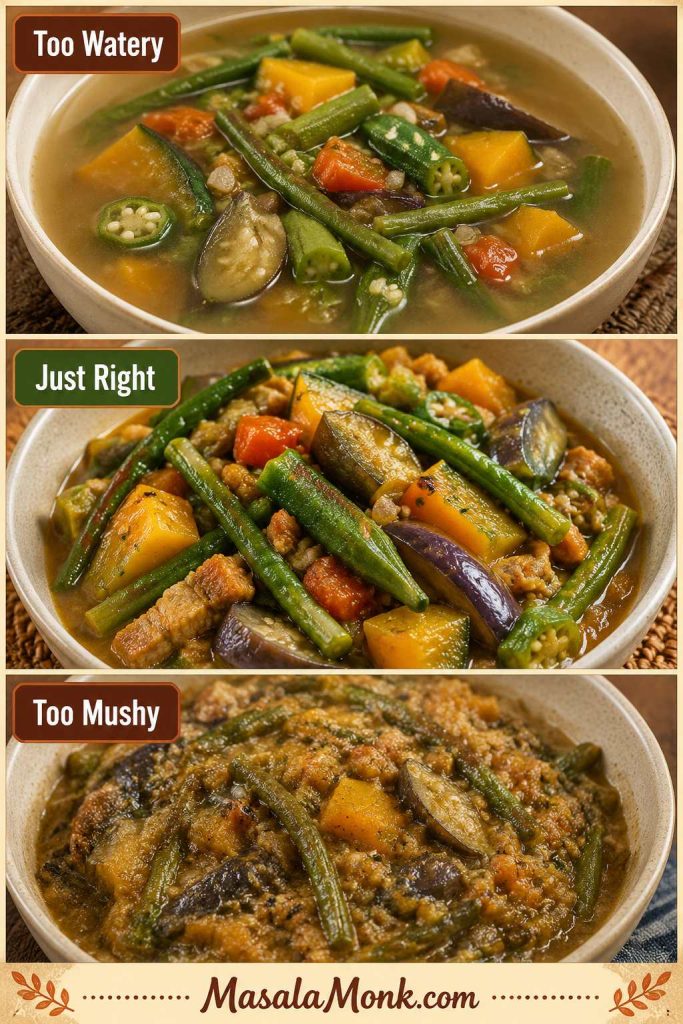
Three-panel comparison showing pinakbet that is too watery, just right, and too mushy.
This is one of the easiest ways to judge your Pinakbet Tagalog at a glance. If it looks watery, simmer uncovered; if it looks mushy, the vegetables likely stayed in too long, while the ideal version holds shape and still looks glossy.

Pinakbet Recipe Card

Pinakbet Tagalog Recipe

This Filipino Pinakbet Tagalog recipe builds a savory pork, tomato, and bagoong mixture first, then adds the vegetables in stages. The squash softens, the eggplant turns silky, and the okra and long beans keep their shape.

Yield
4 generous servings

Prep Time
20 minutes

Cook Time
40 minutes

Total Time
1 hour

Ingredients

  • 1/2 lb / 225 g pork belly or pork shoulder, cut into 1-inch pieces
  • 1 tbsp / 15 ml cooking oil
  • 1 medium onion, chopped
  • 3–4 garlic cloves, minced
  • 2 medium tomatoes, chopped
  • 1 tbsp / 15 g bagoong alamang, plus 1–3 tsp more to taste
  • 1 cup / 240 ml water or light stock, plus up to 1/2 cup / 120 ml more as needed
  • 2 cups / 250–300 g kalabasa or squash, cut into 1 to 1 1/2-inch chunks
  • 1 to 1 1/2 cups / 100–150 g sitaw or long beans, cut into 2- to 3-inch pieces
  • 6–8 okra, trimmed
  • 1/2 medium ampalaya, or up to 1 medium if you enjoy bitterness, seeded and sliced into thin half-moons
  • 1 large eggplant or 2 small eggplants, cut into thick pieces
  • 1/4 tsp black pepper, optional

Instructions

  1. Heat oil in a wide pan over medium heat. Add pork in one layer and cook for 5–8 minutes, until lightly browned and some fat has rendered.
  2. Add onion and cook for about 2 minutes, until softened. Add garlic and cook for 30 seconds to 1 minute, just until fragrant.
  3. Add tomatoes and cook for 3–5 minutes, pressing them gently, until softened and juicy around the edges.
  4. Stir in 1 tablespoon bagoong and cook for 1–2 minutes, until the smell becomes rounder and more savory.
  5. Add 1 cup water or light stock. Cover and simmer for 15–20 minutes, until the pork starts to become tender. If using pork shoulder and it still feels firm, simmer 5–10 minutes longer before adding the squash. Add up to 1/2 cup more water only if needed.
  6. Add squash and cook for 5–7 minutes, until a fork starts to enter but the pieces still hold shape.
  7. Add long beans and cook for 2–3 minutes, until brighter and beginning to soften.
  8. Finish with eggplant, ampalaya, and okra. Cover and cook for 4–6 minutes, turning gently once or twice, until the vegetables are tender but still distinct.
  9. Taste and adjust with 1–3 teaspoons more bagoong or pepper if needed. The finished dish should be moist and spoonable, with no large pool of broth at the bottom of the pan. Serve hot with rice.

Notes

  • Use a wide 12-inch pan so the vegetables cook evenly without being crushed.
  • Start with 1 tablespoon bagoong, especially if your brand is very salty.
  • For milder ampalaya, soak the slices in salted water for 20–30 minutes, then drain.
  • Add extra water only if the pork or squash needs more time.
  • Add crispy pork, bagnet, or lechon kawali just before serving so it does not become soggy.

A good batch should make rice feel like part of the recipe, not just a side. The juices should be salty enough to carry the vegetables, but not so strong that the squash, eggplant, okra, and ampalaya disappear.

Cook’s confidence: Flexible: exact vegetable mix, protein, and bitterness level. Not flexible: cooking the seasoning with the tomatoes, keeping the liquid modest, and giving slower vegetables more time than delicate ones.

What Pinakbet Should Feel Like

Pinakbet is not meant to eat like a smooth stew. It is a dish of contrast: squash softening at the edges, bitter melon cutting through sweetness, eggplant soaking up salty juices, and rice pulling everything together.

Some homes make it drier and sharper; others prefer it saucier and sweeter from squash. This version stays in the Pinakbet Tagalog lane while giving you room to adjust the bitterness, protein, and finish toward your own table.

Pakbet is simply the everyday shorter name many people use for pinakbet. The more useful difference is style: Pinakbet Tagalog is often shrimp-paste and squash-forward, while Ilocano pinakbet often leans more toward fermented fish seasoning and a drier finish.

Can You Make Pinakbet Without Bagoong?

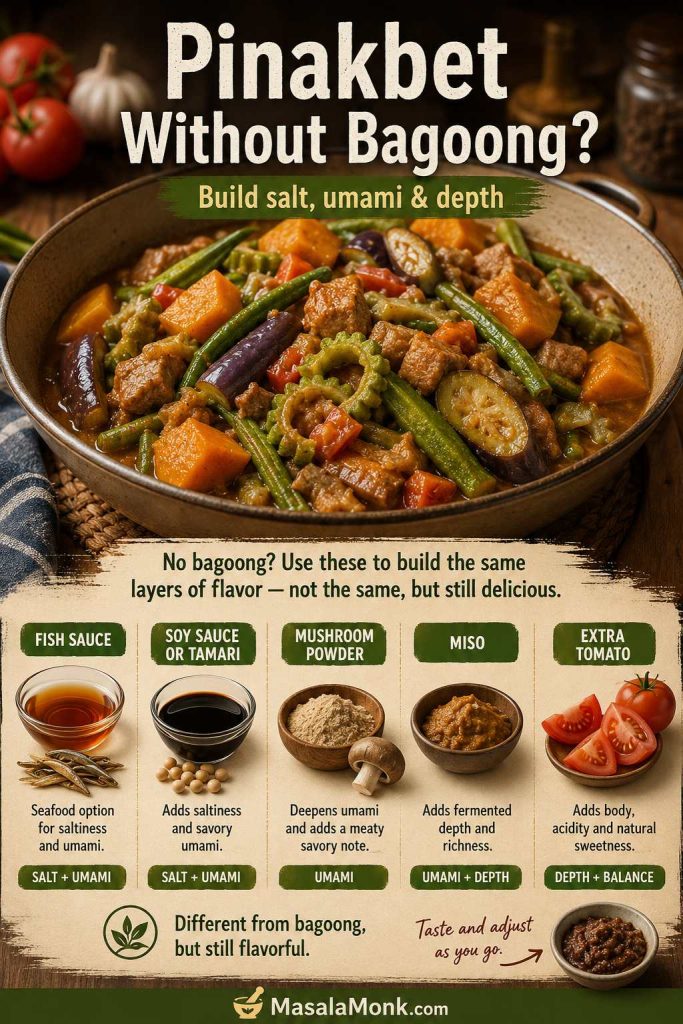
You can make pinakbet without bagoong, but it becomes a pinakbet-inspired vegetable stew. Bagoong does three jobs at once: it adds salt, fermentation, and deep umami. Replacing it means rebuilding all three, not just adding something salty.

If seafood is fine, fish sauce is the closest simple substitute. For seafood-free versions, use soy sauce or tamari for salt, mushroom powder for umami, and a little miso or extra cooked tomato for depth. Add these slowly and taste with a piece of squash or rice, because substitutes can become too salty fast.

  • No bagoong available: start with 1 tablespoon fish sauce, then adjust once the vegetables are tender.
  • Seafood-free version: use soy sauce or tamari plus mushroom powder and extra tomato.
  • Vegetarian or vegan direction: use miso, tamari, mushroom powder, and tomato to rebuild depth.
  • Lower-sodium attempt: use less bagoong rather than removing it completely, if possible.
Guide to making pinakbet without bagoong using fish sauce, soy sauce or tamari, mushroom powder, miso, and extra tomato.
Without bagoong, the dish changes, but it does not have to become bland. Instead of replacing only the salt, rebuild the missing layers with umami, depth, and a little extra tomato so the vegetables still taste grounded and complete.

Pinakbet Variations

You can change the protein, but do not rush the vegetables; they are still the heart of the dish.

Pinakbet with Pork Belly

This is the richest everyday version. Brown the pork first so the rendered fat flavors the tomatoes and shrimp paste.

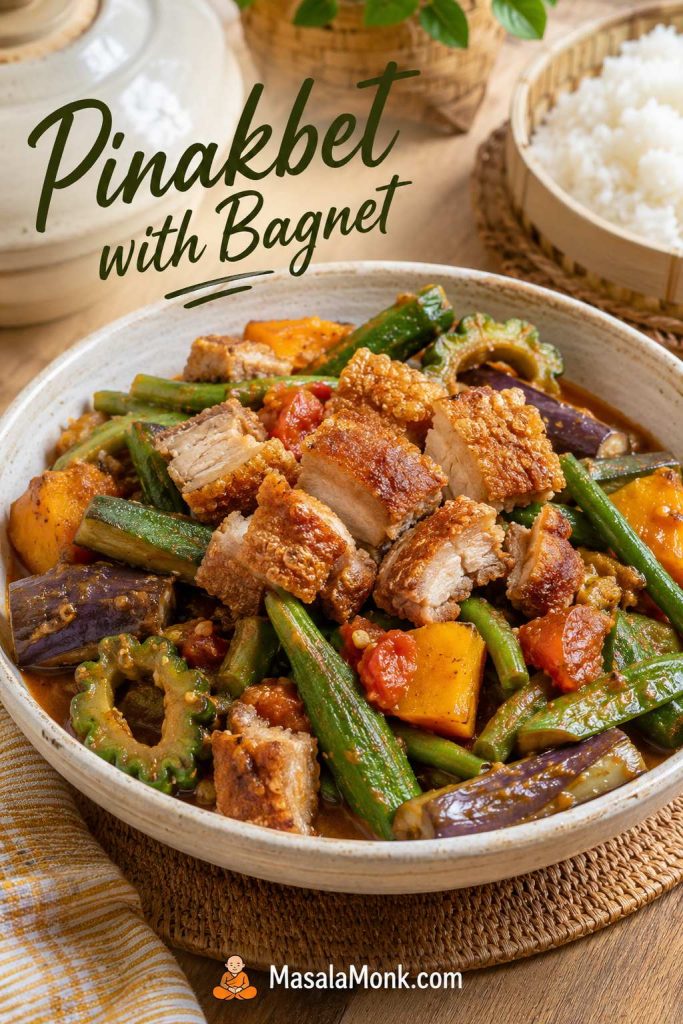
Pinakbet with Bagnet

Stir some bagnet or lechon kawali in near the end, then reserve a few crisp pieces for topping. If all of it simmers too long, it will soften.

Pinakbet with crispy bagnet pieces on top, mixed vegetables, glossy sauce, and rice nearby.
Bagnet gives pinakbet a completely different texture, especially when the crisp pieces are added close to serving time. That way, you get crunchy pork against soft vegetables and savory sauce instead of letting everything turn uniformly tender.

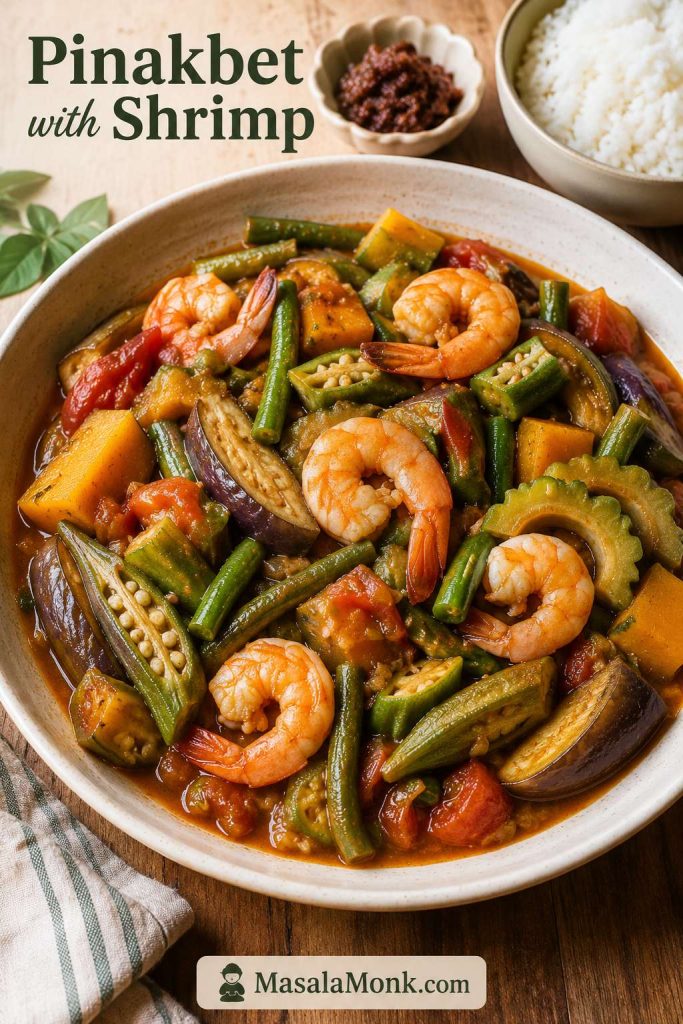
Pinakbet with Shrimp

Add shrimp in the final 2–3 minutes, after the vegetables are almost tender. Shrimp cooks quickly and turns rubbery if simmered too long.

Pinakbet with shrimp, squash, long beans, okra, eggplant, ampalaya, tomatoes, and glossy sauce served with rice.
Shrimp pinakbet needs a lighter hand than the pork version because shrimp cooks quickly and can toughen fast. Add it when the vegetables are almost done, and the dish stays sweet, seafood-forward, and still recognizably pakbet.

Chicken Pinakbet

Use boneless chicken thighs rather than chicken breast. Brown them first, then simmer until nearly tender before adding the squash.

Ginataang Pinakbet

Add coconut milk after the pork has softened and the squash has started cooking. Simmer gently; hard boiling can make coconut milk split.

Ginataang pinakbet with creamy coconut milk sauce, squash, long beans, eggplant, okra, and ampalaya in a shallow serving pan.
Ginataang pinakbet is richer, although it should still feel like a vegetable dish rather than a coconut stew. Simmer gently once the coconut milk goes in, because that softer cooking keeps the sauce smooth and the vegetables clear and distinct.

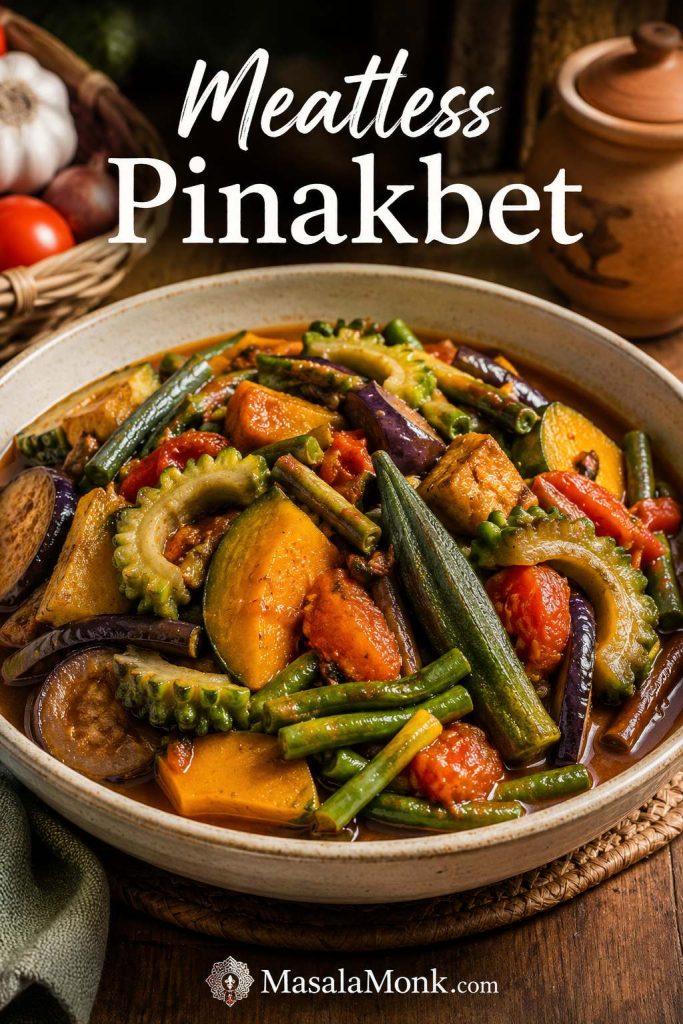
Meatless Pinakbet

Skip the pork but build depth with extra tomato, mushroom powder, and careful seasoning. If using tofu, add it near the end so it does not break apart.

Meatless pinakbet with squash, long beans, okra, eggplant, ampalaya, tomatoes, and glossy savory sauce in a bowl.
A meatless pinakbet can still taste full when the vegetables are cooked carefully and the seasoning is layered thoughtfully. Mushrooms, miso, soy, or extra tomato can help, yet the real success still comes from keeping the vegetables varied in texture and flavor.

Timing is what keeps each vegetable from disappearing into the next. Pork and chicken need time early, shrimp goes in late, crispy pork is best partly reserved for the top, and coconut milk needs gentle heat.

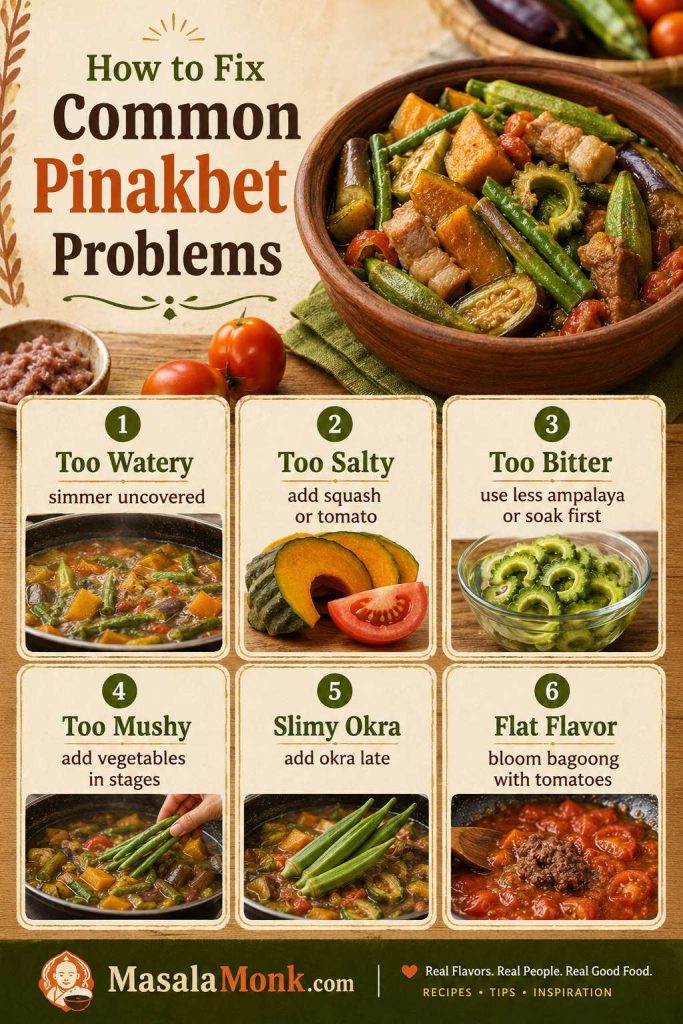
How to Fix Common Pinakbet Problems

Pinakbet is forgiving, but it tells on you quickly. Too much water pools under the vegetables, too much bagoong shows up in the first bite, and too much stirring shows up in the squash.

Start With the Problem You See

Troubleshooting guide for pinakbet showing fixes for watery texture, too much salt, too much bitterness, mushy vegetables, slimy okra, and flat flavor.
Most pinakbet problems come from the same few places: too much liquid, too much bagoong, bitter melon used too heavily, or vegetables added all at once. Fix what you can in the pan, then use the next batch to correct the timing.

Problem-by-Problem Fixes

ProblemFix nowNext time
Too waterySimmer uncovered for 3–5 minutes.Use less water and add extra only if pork or squash needs more time. Remember that the vegetables release liquid too.
Too saltyAdd more squash, eggplant, or tomato. Serve with plain rice.Start with less bagoong and adjust after vegetables cook.
Too bitterAdd a little more squash or tomato.Use less ampalaya, slice it thinner, or soak it briefly.
Vegetables are mushyYou cannot fully reverse this, but you can simmer uncovered if watery.Add vegetables in stages and turn gently.
Squash collapsedLet it thicken the dish and avoid more stirring.Use larger chunks and do not add squash too early.
Okra made it slimySimmer uncovered briefly and avoid stirring hard.Trim only the ends and add okra near the end.
Tastes flatAdd a little more bagoong, fish sauce, or tomato, then simmer briefly.Bloom the seasoning with the tomatoes before adding water.
Bagoong tastes too strongAdd tomato or squash, simmer gently, and serve with plain rice.Use less at the start and adjust later.
Dish tastes too sweetAdd a little fish sauce or bagoong.Watch sweet ginisang bagoong and very sweet squash.
Too oilySpoon off excess fat before serving.Render pork first and remove extra fat before adding vegetables.
Pork is toughSimmer the pork pieces longer before serving if vegetables can handle it.Give pork more time before adding squash and delicate vegetables.

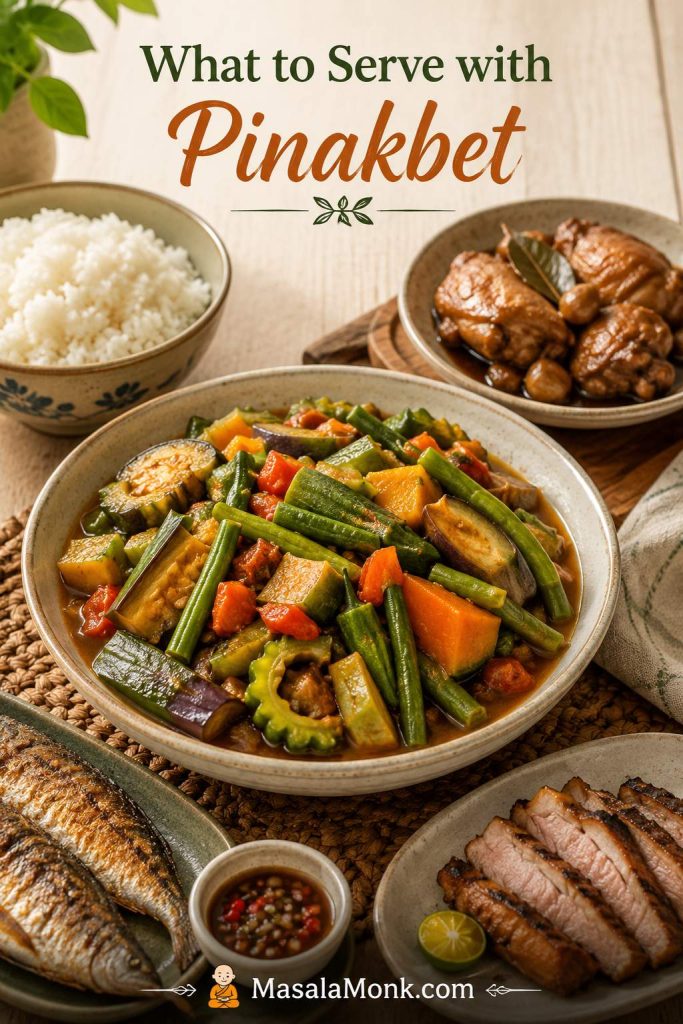
What to Serve With Pinakbet

Filipino meal spread with Pinakbet Tagalog, steamed rice, adobo, fried fish, grilled pork, dipping sauce, and calamansi.
Pinakbet shines beside plain steamed rice because the sauce is bold enough to carry the plate. For a fuller Filipino-style meal, add adobo, fried fish, or grilled pork while keeping pinakbet at the center.

Pinakbet is best with hot steamed rice. Because the tomato-bagoong mixture is bold, plain rice is not an afterthought here; it is part of how the dish works. If you want a dependable pot of rice, MasalaMonk’s guide on how to cook rice covers stovetop, cooker, and Instant Pot methods.

For a fuller Filipino-style meal, pinakbet sits naturally beside a savory protein dish like chicken adobo. Fried fish, grilled pork, simple chicken, or crispy pork also work well. If the pinakbet itself already has pork belly or bagnet, keep the rest of the meal simple.

Pinakbet is at its best when it tastes like more than the sum of its vegetables: salty enough for rice, sweet from squash, bitter enough to stay interesting, and saucy without becoming soup.

How to Store, Reheat, and Freeze Pinakbet

Cool leftovers quickly and store them in a shallow airtight container in the refrigerator. Pinakbet is best eaten within 3–4 days because it contains cooked vegetables and often pork or seafood-based seasoning. Store rice separately so the vegetables do not continue softening in the rice.

To reheat, warm it gently in a pan over low to medium-low heat. Add a splash of water only if the vegetables look dry. Avoid aggressive stirring because the squash and eggplant can break apart.

Microwaving is fine for a quick lunch, but the vegetables will soften more than they do in a pan. Freezing is possible, but not ideal; squash, eggplant, and okra soften further after thawing.

For general leftover safety, follow the USDA FSIS guidance on leftovers and food safety.

Some families prefer pinakbet drier and sharper; others like it saucier and sweeter from squash. Once you understand the timing, you can move the dish toward your table without losing its shape.

Back to top

FAQs About Pinakbet

What is pinakbet made of?

Most pinakbet starts with bagoong, tomatoes, and mixed vegetables such as squash, okra, eggplant, ampalaya, and long beans. Pork, shrimp, fish, bagnet, or crispy pork may be added depending on the household version.

Is pinakbet the same as pakbet?

Yes. Pakbet is the everyday shorter name many people use for pinakbet, though the exact style can change by region and household.

What does pinakbet taste like?

Pinakbet is savory, salty, earthy, lightly sweet, and a little bitter. The squash and tomatoes bring sweetness, while bagoong gives deep umami. A good version should taste balanced, not simply salty.

What is the difference between Pinakbet Tagalog and Ilocano pinakbet?

Pinakbet Tagalog usually uses bagoong alamang and squash, while Ilocano pinakbet is more closely tied to bagoong isda and a drier, more vegetable-forward finish. This recipe is Tagalog-style, with notes for adjusting it in a sharper Ilocano direction.

What is the best bagoong for pinakbet?

For Pinakbet Tagalog, bagoong alamang is the easiest fit because it gives a rounded shrimp-paste flavor. For a sharper Ilocano-style direction, use bagoong isda or bagoong monamon.

How do you keep pinakbet from getting mushy?

Add vegetables in stages and stir gently. Squash needs a head start, long beans need only a few minutes, and eggplant, ampalaya, and okra should go in near the end. A wide pan also helps because the vegetables steam and simmer instead of being crushed together.

Is pinakbet supposed to be soupy?

No. Pinakbet should be moist and saucy, not soupy. The vegetables should soften and shrink slightly, with cooking liquid clinging to them rather than floating in broth. If there is too much liquid, simmer uncovered for a few minutes.

Why is my pinakbet watery?

Pinakbet can turn watery if too much water was added or if the vegetables released more liquid than expected. Simmer uncovered until the liquid reduces and clings lightly to the vegetables. Next time, start with less water and add extra only if the pork or squash needs more time.

How do you reduce ampalaya bitterness in pinakbet?

Use less ampalaya, slice it evenly, and avoid overcooking it. For a milder flavor, soak the sliced bitter melon in lightly salted water for 20–30 minutes, then drain before cooking. A little bitterness should remain because it keeps the dish balanced.

What can I use instead of bagoong alamang?

Fish sauce is the easiest substitute if seafood is not a problem. For seafood-free versions, use soy sauce or tamari with mushroom powder and extra tomato. The flavor will not be the same, but it will have more depth than plain salt.

What is the difference between pinakbet and dinengdeng?

Both are Filipino vegetable dishes, but they eat differently. Pinakbet is usually a sautéed or simmered vegetable stew with bagoong, tomatoes, and often pork or seafood, while dinengdeng is generally lighter and more broth-like.

How long does pinakbet last in the fridge?

Pinakbet is best eaten within 3–4 days when stored in a shallow airtight container in the refrigerator. Reheat gently so the squash, eggplant, and okra do not break apart.

Posted on 2 Comments

Savor the Flavors: Kerala Style Coconut Vegetable Stew

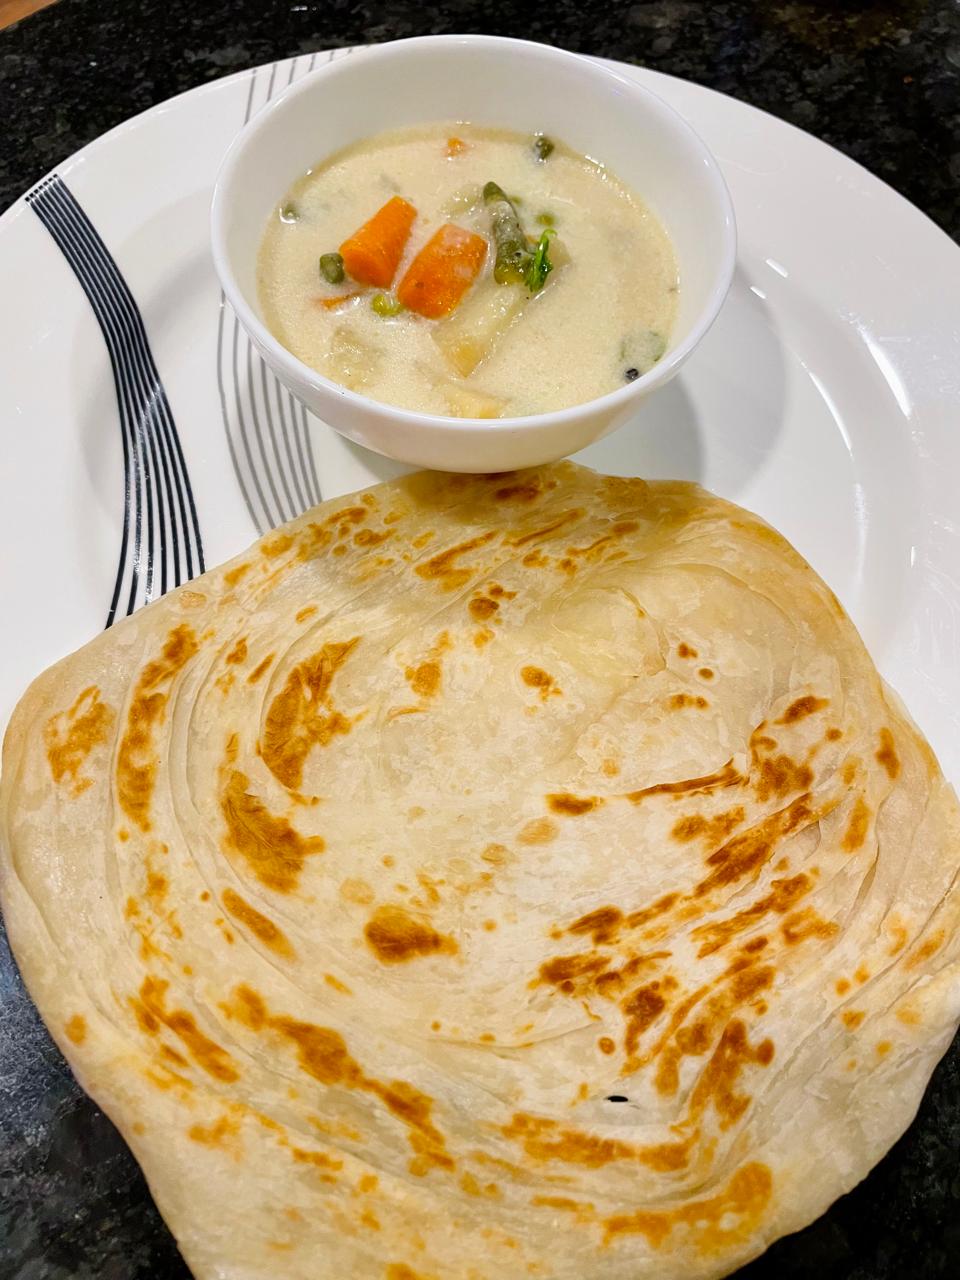
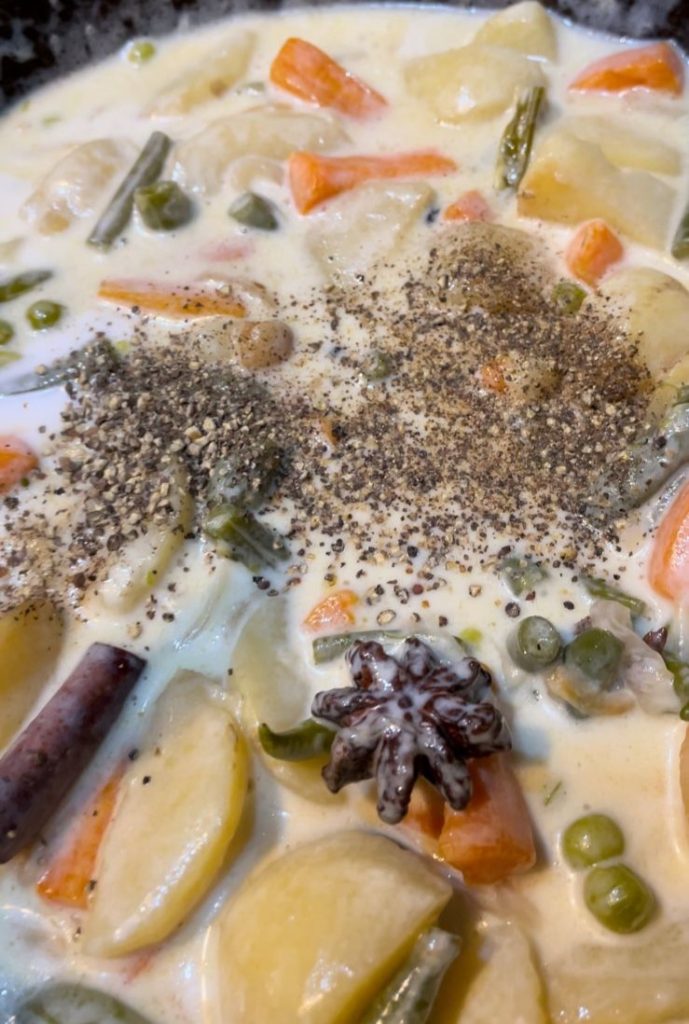
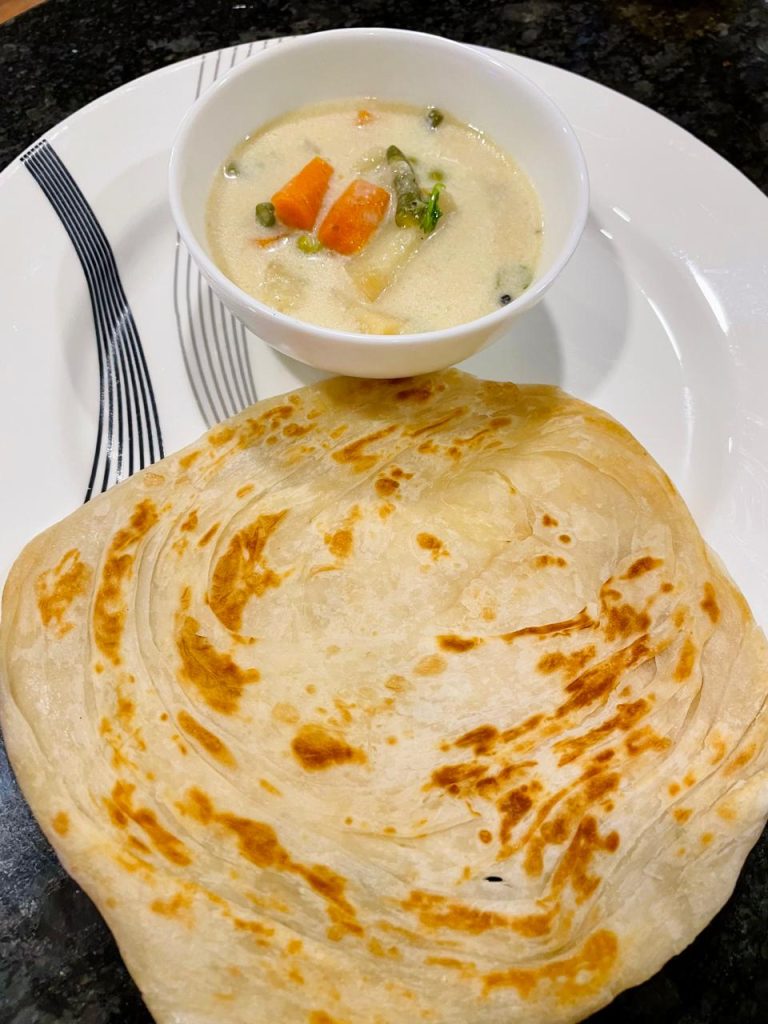
Few days back, when I visited my sister she made this delicious Kerala style vegetable stew with Malabar paratha. I couldn’t miss the opportunity to note down this recipe to share with you all.

This Extremely nourishing and comforting vegan curry stew with lots of vegetables subtly spiced and fragrant with coconut milk is something you should try.

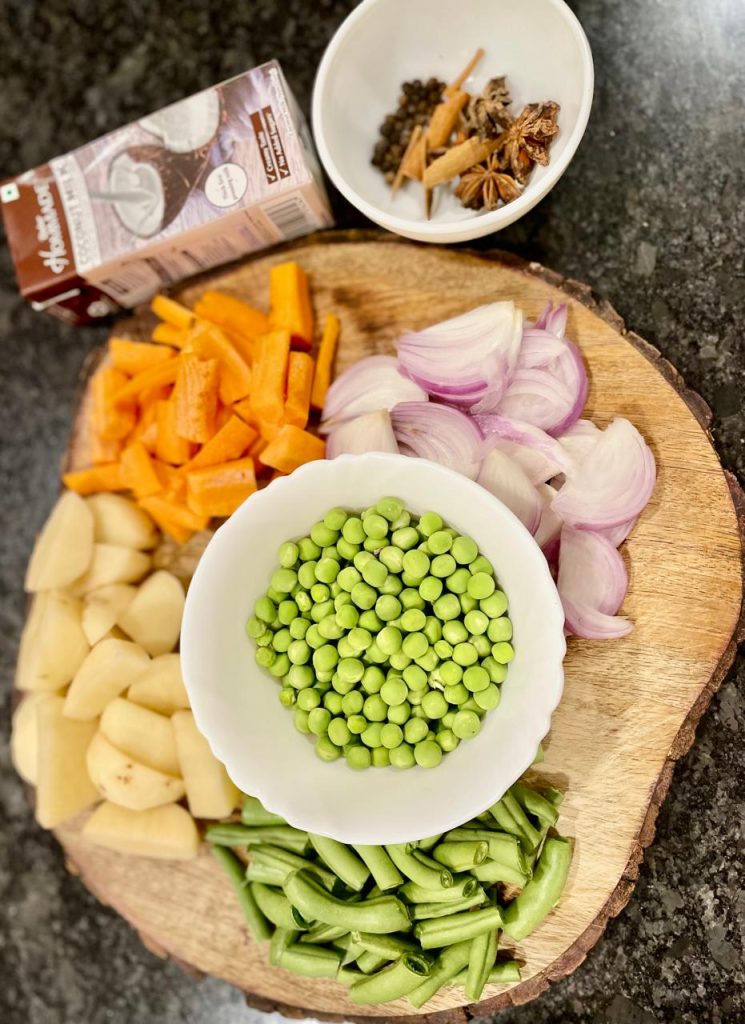
This simple vegetable stew is such an easy recipe that is wholesome and is loaded with vegetables. Potato, carrot, green beans and green peas are the most commonly added vegetables to this vegetable stew

Ingredients:

  • 250g Chopped Potatoes
  • 250g Chopped Beans
  • 250g Chopped Carrot
  • 250g Chopped Onion
  • 100g peas
  • 200ml Coconut Milk
  • 1 Star Anise
  • 1 Inch Cinnamon Stick
  • 6-7 Black Peppercorn
  • ½ tbsp pepper powder
  • 5-6 Curry Leaves
  • 2 tbsp Oil
  • Salt

Method:  

Wash, pat dry and cut all the vegetables into equal sized pieces .

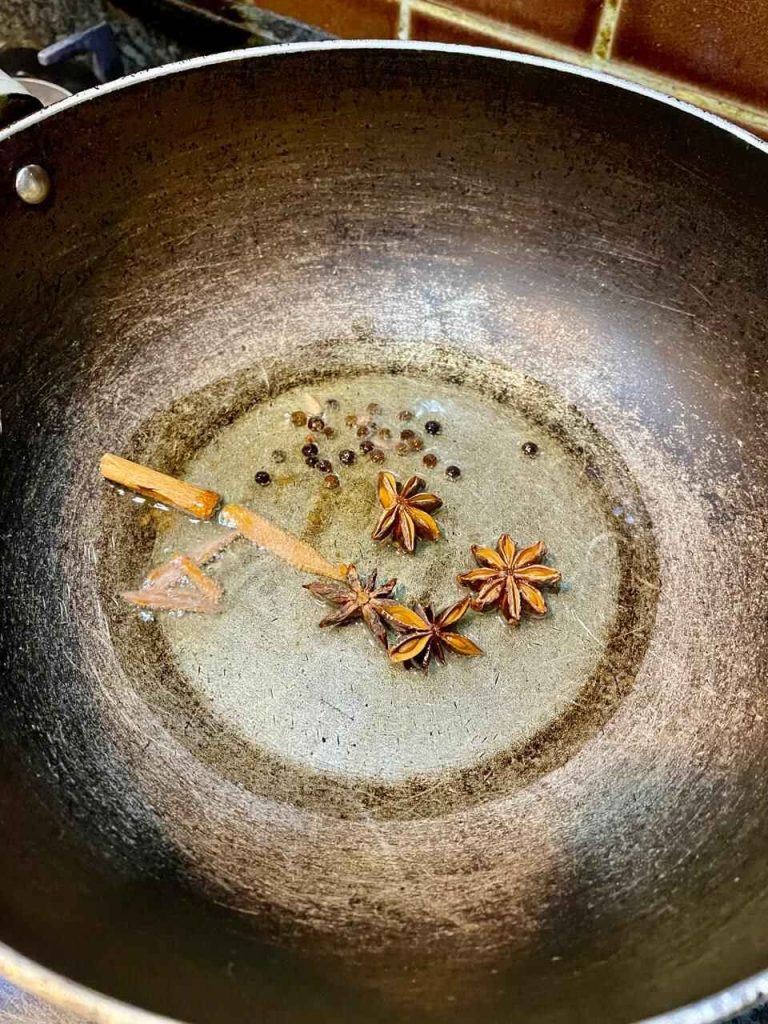
Heat a large pot or deep pan over medium heat. Add Oil if you want more coconut flavour add coconut oil and whole garam masala star anise, cinnamon stick and black peppercorns to the pot. Saute for a minute until fragrant.

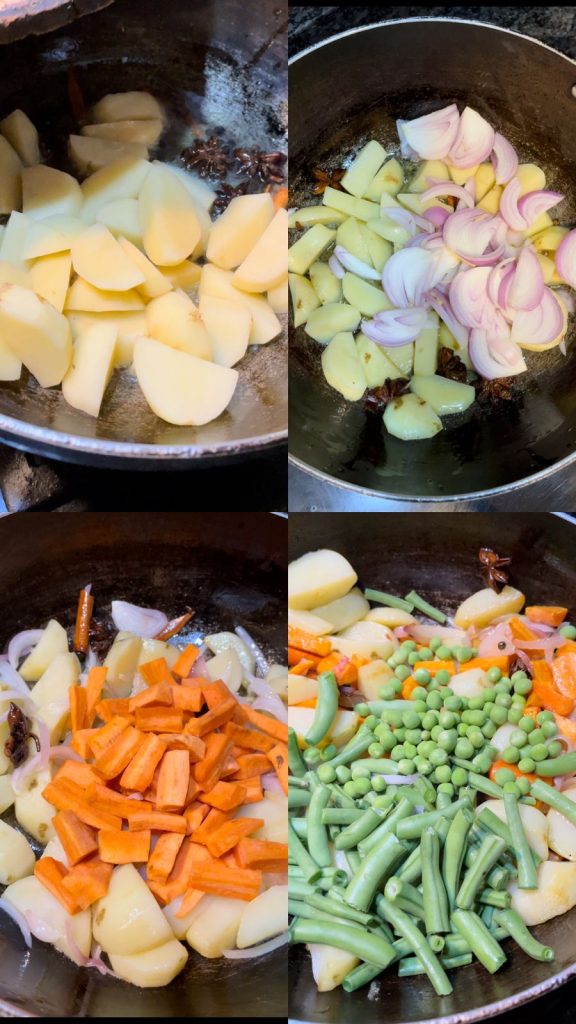
Add the chopped potatoes, beans, carrots, onions and green peas to the pot. Stir well to combine with the onions and spices.

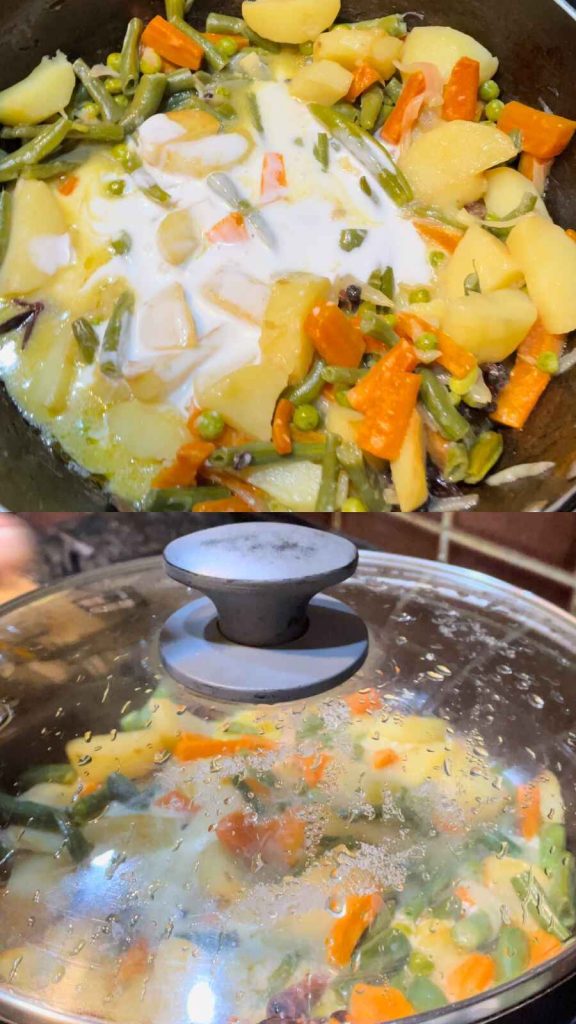
Now Pour in the coconut milk and mix thoroughly. Bring the mixture to a gentle simmer. Cover the pot with a lid and let the vegetables cook in the coconut milk for about 10-15 minutes or until they are tender and cooked through.

Season the stew with salt and pepper powder according to your taste preferences. Adjust the consistency of the stew by adding more coconut milk or water if needed.

Once the vegetables are cooked and the stew has thickened slightly, remove from heat. Serve the Kerala Style Coconut Vegetable Stew hot with Malabar Paratha or Appam. Also goes well with steaming hot rice and Idli.

Making Vegetable stew is great way to make your family eat their vegetables. you can add vegetables of your choice in this recipe and if you love non vegetarian foods you can add boiled eggs, chicken or meat of your choice in the same gravy. This vegan curry is so wholesome and comforting.

I would love to see your creations. If you tried this recipe , just click a pictures and tag us on @masala.monk or use the hashtag #MasalaMonkRecipe and share on Instagram and Facebook. Happy Cooking!