Posted on — Leave a comment

Ratatouille Recipe: Easy, Classic French Vegetable Stew

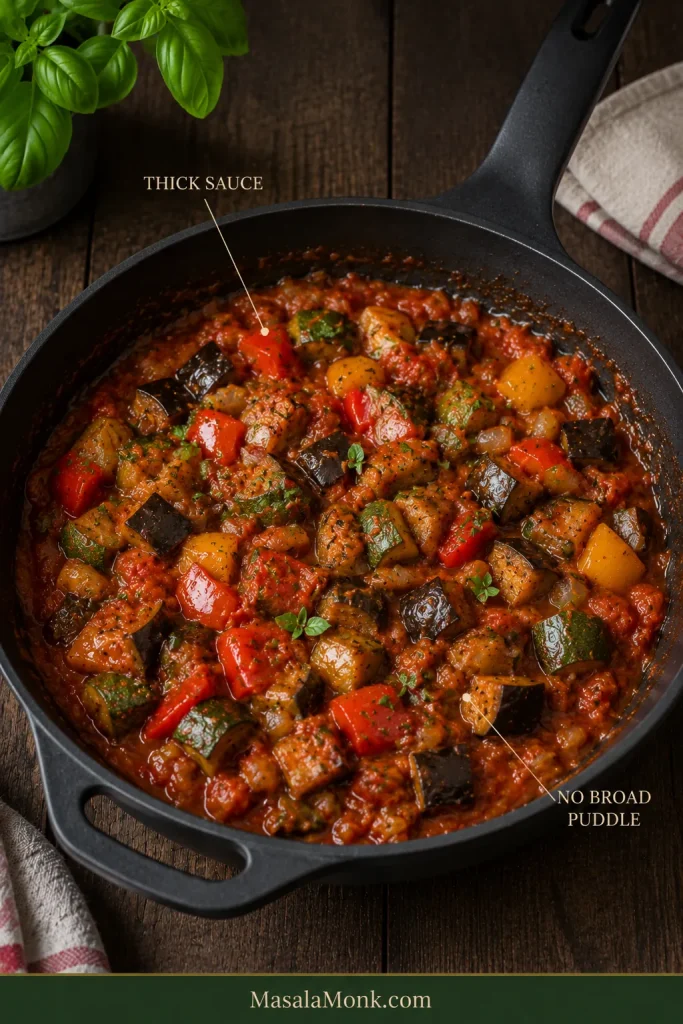
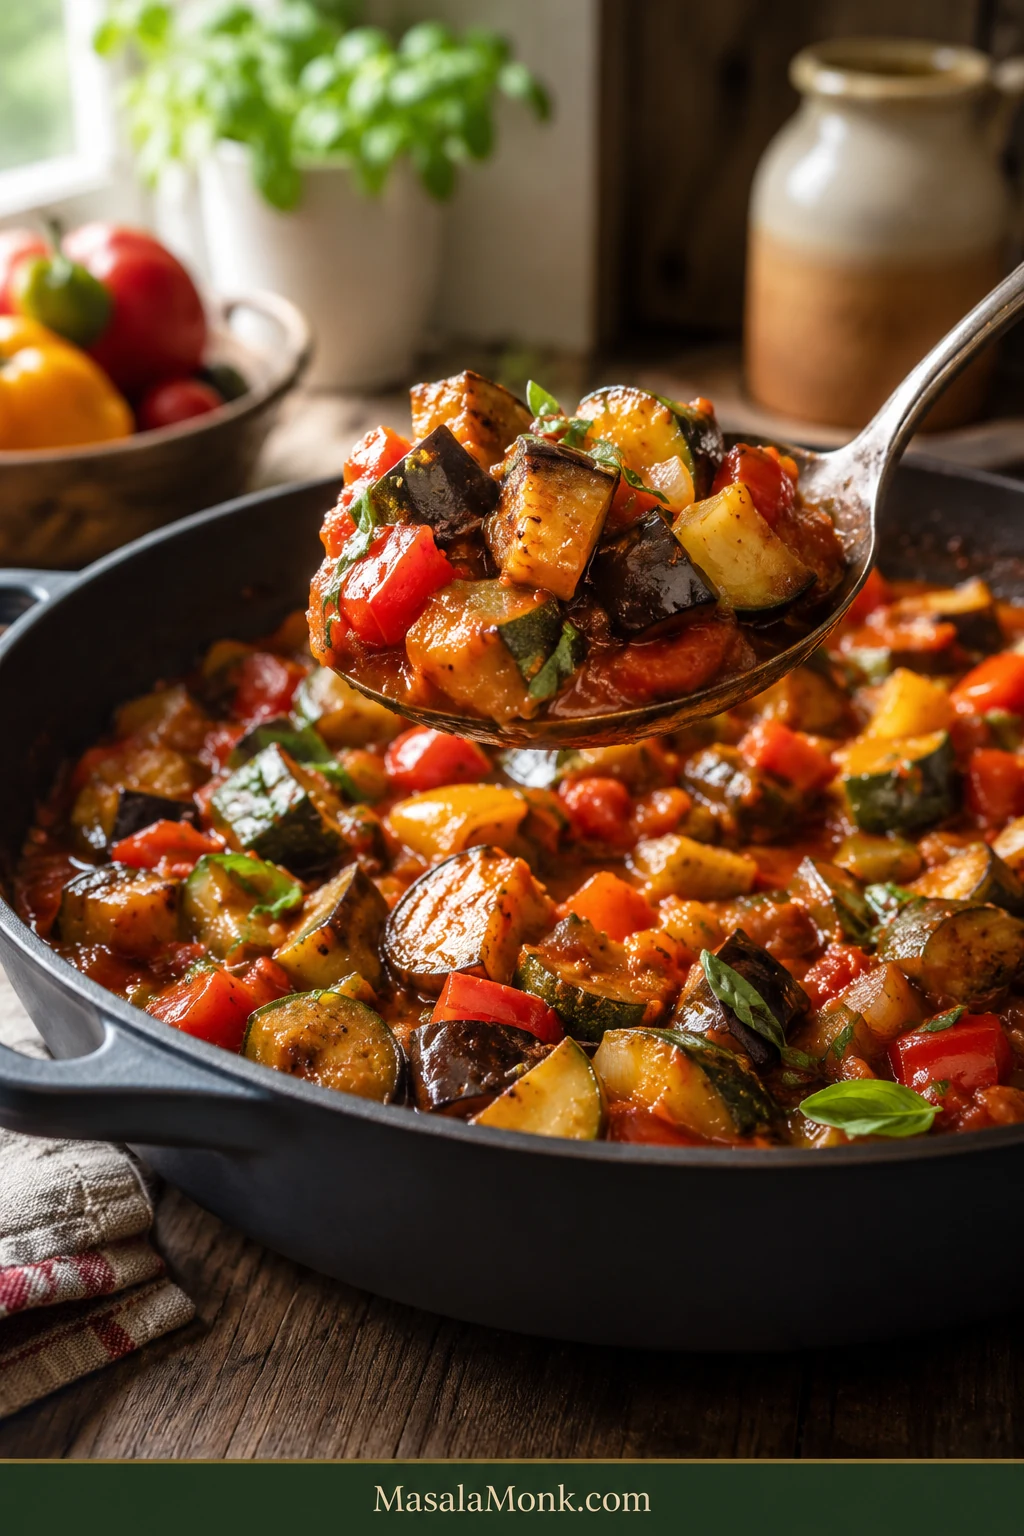
Finished classic ratatouille in a wide dark pan, with a serving spoon lifting chunks of eggplant, zucchini and bell pepper coated in thick tomato sauce.

A good ratatouille gives you a little bit of everything in the same spoon: eggplant soft enough to almost melt, zucchini that is tender but still unmistakably zucchini, sweet pepper, and glossy tomato caught around the vegetables instead of pooling underneath them.

That sounds simple until five very different vegetables share the same pan. Eggplant needs enough heat and time to lose its spongy center. Zucchini can go from pleasantly tender to collapsed remarkably quickly. Tomatoes release plenty of water before they start behaving like sauce.

Ratatouille makes particular sense when the garden, market—or just your vegetable drawer—suddenly seems full of zucchini, tomatoes, peppers and eggplant. And after all that chopping, watching those vegetables disappear into a pale, watery pot feels particularly unfair.

This easy ratatouille recipe uses one wide pan and a staged method so the vegetables can finish tender without collapsing into one texture.

We stop when the stew is soft and generous but still varied from bite to bite. Serve it with bread, eggs or a simple grilled main, eat it warm or at room temperature, and save the leftovers for another meal—the flavors settle together beautifully overnight.

Quick Answer: How to Make Classic Ratatouille

Classic ratatouille is a Provençal vegetable stew made with eggplant, zucchini or courgette, bell peppers, tomatoes, onion, garlic, olive oil and herbs.

For about 6 side servings or 4 generous main-dish portions, use roughly 500 g / 18 oz eggplant, 400 g / 14 oz zucchini, 300 g / 10½ oz peppers and 750 g / 26 oz tomatoes. Cut the main vegetables into about ¾-inch / 2 cm pieces.

The easiest way to keep ratatouille from turning watery or mushy is to brown the eggplant and zucchini in separate turns, reduce the tomatoes before recombining, then return the zucchini only near the end. The eggplant gets enough time to become creamy while the zucchini keeps its shape.

What does ratatouille taste like? Sweet tomato and peppers, savory olive oil and garlic, creamy eggplant, tender zucchini, thyme and basil. It is rich enough to feel substantial while still tasting unmistakably of vegetables.
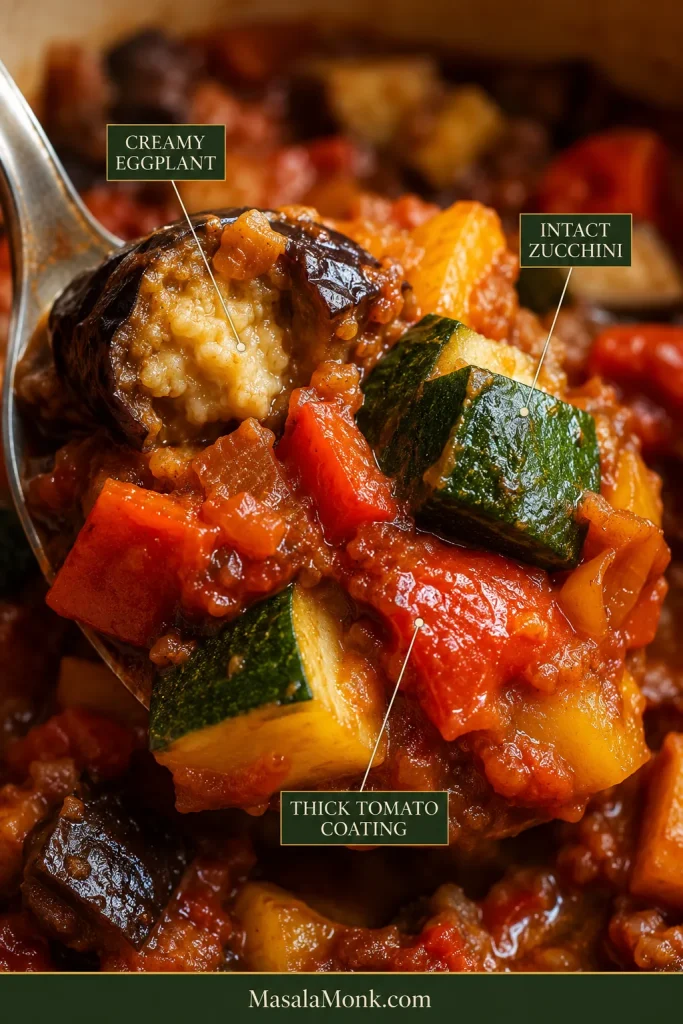
Close-up of finished ratatouille with callouts identifying creamy eggplant, intact zucchini and thick tomato coating.
Judge the spoonful, not just the pan: the best ratatouille gives you creamy eggplant, a little resilience from zucchini and concentrated tomato in the same bite.

Before you start: use fresh tomatoes when they are flavorful; otherwise use good canned whole peeled tomatoes. Fresh, firm eggplant can go straight into the pan—save pre-salting for unusually mature, heavily seeded or wet eggplant.

Classic Ratatouille Recipe

A staged one-pan French ratatouille with creamy eggplant, tender zucchini and sweet peppers in a concentrated tomato base.

Recipe at a Glance

  • Difficulty: easy
  • Prep: about 25–30 minutes
  • Cook: about 45–60 minutes
  • Rest: 15 minutes recommended
  • Total: about 1 hour 25 minutes to 1 hour 45 minutes
  • Serves: about 6 as a side or 4 as a generous main
  • Best pan: 12-inch / 30 cm wide high-sided sauté pan or wide shallow 5–6 qt / 5–6 L Dutch oven
  • Vegetable cut: about ¾ inch / 2 cm
  • Texture target: tender vegetables with a little thick tomato sauce around them and very little free liquid
  • Diet: naturally vegan, vegetarian, dairy-free and gluten-free

The technique is easy; the chopping takes time. The staged cooking adds minutes, not difficulty, and gives each vegetable enough room to keep its own texture.

Equipment

  • 12-inch / 30 cm wide high-sided sauté pan or wide shallow Dutch oven
  • Chef’s knife and cutting board
  • Wooden spoon or flexible spatula
  • Two bowls or plates for holding the eggplant and zucchini separately
  • Slotted spoon, useful but not essential

Pan shape matters. A broad cooking surface lets vegetable moisture escape. With a smaller pan, brown the eggplant and zucchini in batches instead of piling them high.
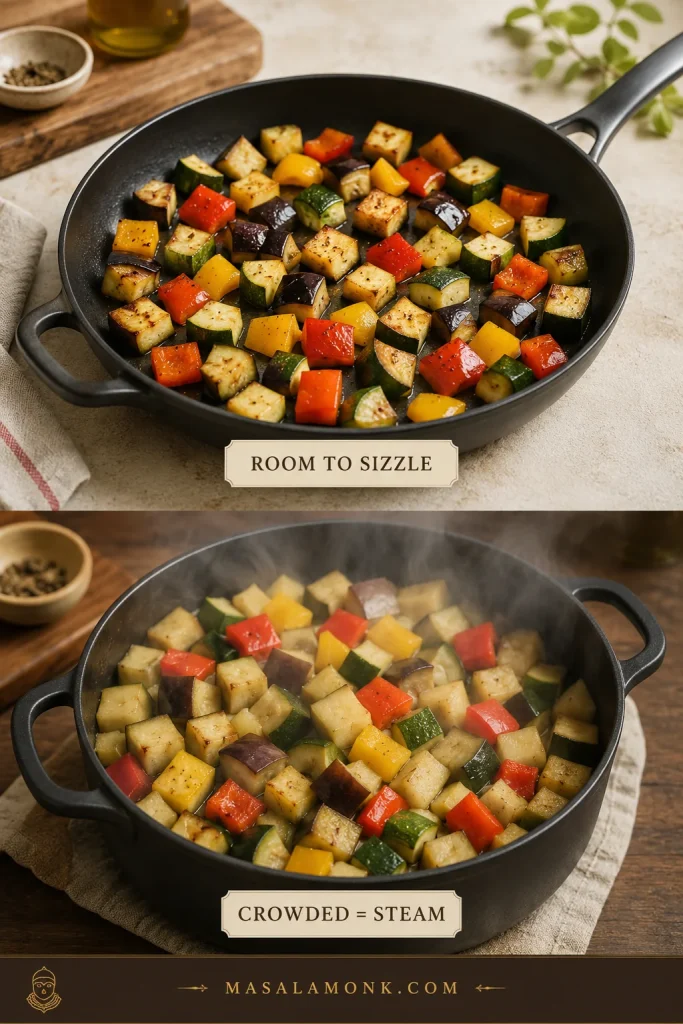
Side-by-side comparison of vegetables spread across a wide sauté pan and crowded into a deeper pot with more visible steam.
With a wider pan, steam has somewhere to go. Crowding a deep pot not only limits browning; it can also slow tomato reduction later and leave the whole dish wetter.

Ingredients

Weights are before trimming.

  • 500 g / 18 oz eggplant, about 1 medium-large or 2 small, cut into ¾-inch / 2 cm pieces
  • 400 g / 14 oz zucchini or courgette, about 2 medium, cut into ¾-inch / 2 cm pieces
  • 300 g / 10½ oz red, yellow or orange bell peppers, about 2 medium, cored and cut into ¾-inch / 2 cm pieces; green works too but gives a more vegetal, less sweet result
  • 200 g / 7 oz yellow onion, about 1 medium-large, chopped
  • 750 g / 26 oz ripe fresh tomatoes, about 5–6 medium, chopped with their juices or 1 x 28 oz / 794 g can whole peeled tomatoes, hand-crushed with the juices
  • 18 g garlic, about 4–5 large cloves, finely chopped
  • 75 ml / 5 tablespoons extra-virgin olive oil, divided, plus up to 15 ml / 1 tablespoon more if needed
  • 10 g fine sea salt, about 1¾ teaspoons depending on the salt, divided, plus more after tasting if needed
  • ½ teaspoon freshly ground black pepper
  • 2 teaspoons fresh thyme leaves, or 4–5 thyme sprigs
  • 15 g / ½ oz fresh basil leaves, roughly torn
  • 1–2 teaspoons red wine vinegar, optional, for finishing
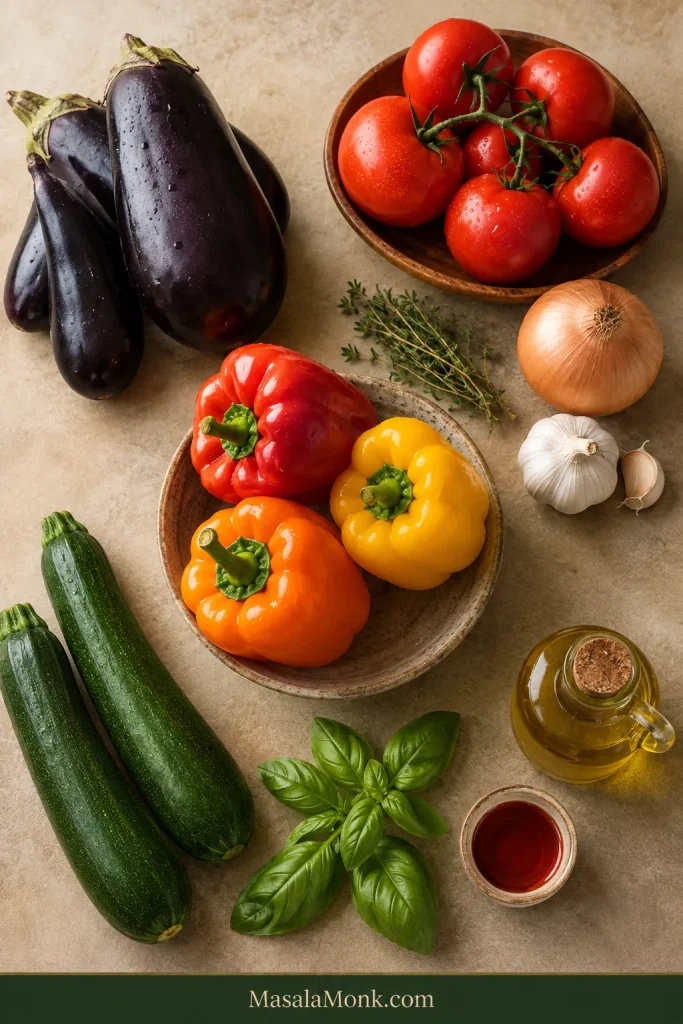
Eggplant, zucchini, bell peppers, tomatoes, onion, garlic, basil, thyme and olive oil arranged on a neutral work surface.
Because ratatouille has such a short ingredient list, condition matters: tired eggplant, watery zucchini or bland tomatoes affect the final pan more than an extra pinch of herbs.

Method

  1. Cut the vegetables. Cut the eggplant, zucchini and peppers into roughly ¾-inch / 2 cm pieces. Don’t worry about perfect cubes; aim for pieces that are reasonably even.
  2. Brown the eggplant. Heat 3 tablespoons / 45 ml olive oil over medium-high heat. Add the eggplant and ½ teaspoon of the measured salt. Spread the pieces as loosely as the pan allows and cook for 8–10 minutes, turning occasionally. Look for scattered brown patches and centers beginning to lose their raw, cottony resistance. Transfer the eggplant to a bowl.
  3. Give the zucchini a shorter turn. Add 1 tablespoon / 15 ml olive oil, the zucchini and ¼ teaspoon salt. Cook for 4–5 minutes. Let it pick up some color, then remove it while the centers still feel firm. Transfer the zucchini to a separate plate or bowl; it returns to the pan later than the eggplant.
  4. Soften the onion and peppers. Reduce the heat to medium. Add the remaining 1 tablespoon / 15 ml olive oil, followed by the onion, peppers and ¼ teaspoon salt. Cook for 8–10 minutes. The onion should be soft, the peppers should bend easily under the spoon, and their raw grassy smell should have become noticeably sweeter.
  5. Add the garlic and thyme. Stir for 30–60 seconds. As soon as the garlic aroma rises clearly from the pan, add the tomatoes.

Reduce the Tomatoes, Then Recombine

  1. Reduce the tomatoes. Add the tomatoes, black pepper and another ½ teaspoon salt, leaving the remaining salt for the final tasting. Bring to a lively simmer and cook uncovered for about 10–15 minutes, stirring occasionally. Very juicy tomatoes may need longer. Continue until the tomatoes have relaxed into a loose sauce and a spatula dragged across the bottom leaves a trail for a moment before the liquid closes behind it.
  2. Return the eggplant. Fold it into the tomato base. Lower the heat to a gentle simmer and cook uncovered for 8–10 minutes. Bite or press a piece when you are unsure: the center should be creamy, with no dry or cottony resistance.
  3. Return the zucchini. Fold it in gently and cook for another 3–5 minutes, just until tender. Stir only as much as necessary from here on so the softened vegetables hold together.
  4. Check the consistency. Tilt the pan. A small amount of thick sauce should move around the vegetables; you should not see a broad puddle of thin red juice. If the vegetables still need cooking, continue simmering uncovered. If they are already tender but the sauce is thin, lift them out with a slotted spoon, reduce the liquid on its own until glossy, then gently fold the vegetables back in.
  5. Finish and rest. Remove any thyme stems and taste for salt. If the ratatouille tastes rich but slightly dull, add 1 teaspoon red wine vinegar. Taste again and add the second teaspoon only if it still needs brightness. Fold in most of the basil, remove the pan from the heat and rest for 15 minutes. Finish with the remaining basil.

Recipe Notes

  • Fresh or canned tomatoes: ordinary ripe tomatoes need no routine peeling or seeding. Use canned whole peeled tomatoes with their juices when fresh ones are disappointing. Judge either version by the consistency of the sauce.
  • Optional eggplant salting: unusually mature, heavily seeded or wet eggplant can be salted with about ½ teaspoon of the measured salt for 20–30 minutes, then blotted very thoroughly. Skip the ½ teaspoon normally added with the eggplant in Step 2 and adjust the final seasoning by taste.
  • Water: the vegetables and tomatoes normally provide enough. If the tomato base begins catching before it has reduced, add only 1–2 tablespoons / 15–30 ml at a time.
  • Extra oil: the reserved tablespoon is there for an unusually absorbent batch of eggplant. Add it only if the pieces begin catching or scorching.

Check Doneness · Troubleshooting · Back to Top

Need Help With Your Ratatouille?

Classic Ratatouille Is the Rustic Stovetop Dish

Traditional ratatouille does not follow one fixed cooking sequence. Some versions cook the vegetables separately; others add them successively. Both approaches recognize the same thing: eggplant, zucchini, peppers and tomatoes do not soften or release water at the same rate. This recipe keeps one pan but gives the vegetables separate turns.

Classic ratatouille is a rustic Provençal vegetable stew; the neat spiral of thin vegetables popularized by the movie is a different refined preparation commonly associated with confit byaldi. If the immaculate vegetable spiral from the film is what you pictured, this pan will look much more relaxed and rustic. That’s the point: everyday stovetop ratatouille is about tender vegetables coming together in the pan, not maintaining a carefully arranged pattern.
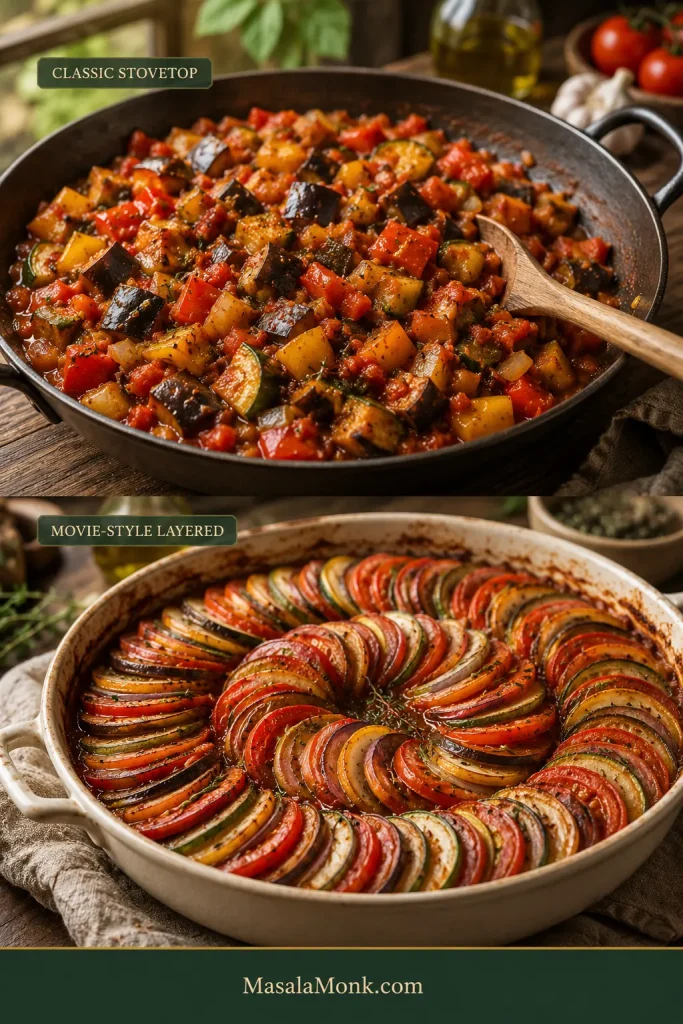
Comparison of chunky classic stovetop ratatouille in a pan and a movie-style preparation made from thin overlapping vegetable slices.
The different cuts also change the eating experience. Chunky stovetop ratatouille gives varied textures in each spoonful, while thin layered vegetables create a more even, refined bite.

Ratatouille comes from Provence in southern France and is particularly associated with Nice. Classic versions usually bring together eggplant, zucchini or courgette, peppers, tomatoes, onion, garlic, olive oil and Mediterranean herbs. Some cooks keep the vegetables fairly distinct; others continue toward a soft, almost confited consistency. There is room for both.

Lidia Bastianich’s classic ratatouille on PBS, for example, sautés the vegetables separately before bringing them together for a much longer final cook. Here we keep that useful principle while doing the work in one pan.

Ingredients That Change the Result

The formula itself is simple. What matters most is the quality of the vegetables and how each one behaves in the pan.

Eggplant: Choose Firm, Then Cook Until Creamy

Eggplant or aubergine gives ratatouille much of its soft body. Choose one that feels firm and heavy for its size, with smooth skin. Leave the skin on; it helps the pieces hold together.
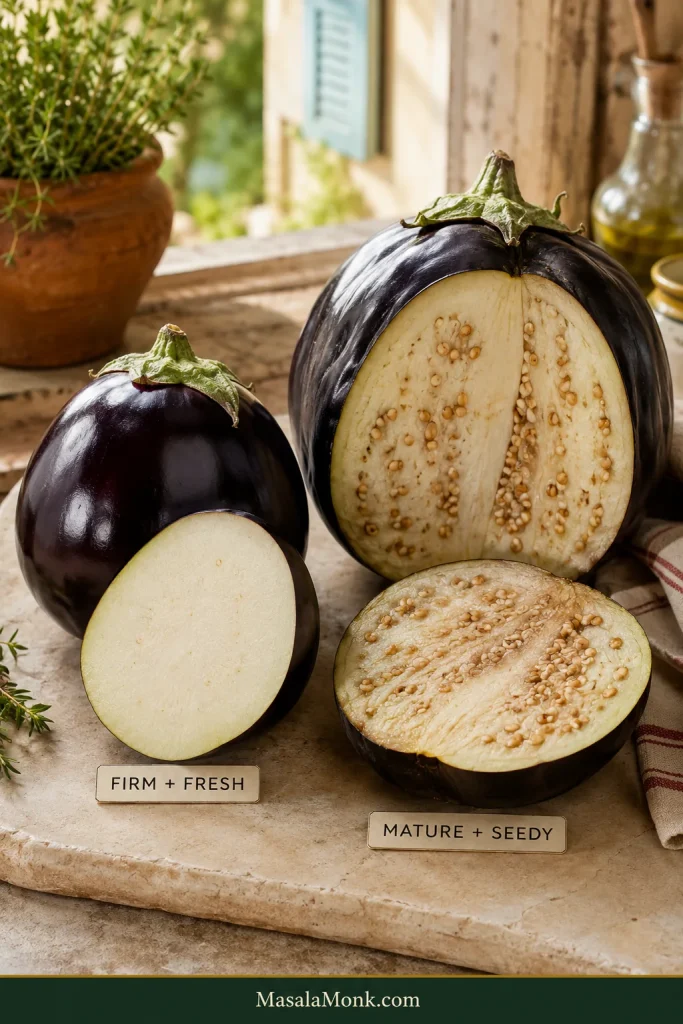
Fresh firm dark-purple eggplant with compact pale flesh beside a more mature eggplant with numerous developed seeds and a wetter interior.
Seediness is a better warning sign than size alone. A large eggplant with compact pale flesh can cook beautifully; a loose, heavily seeded center is more likely to need extra attention.

The important change happens inside. Raw eggplant has a dry, spongy bite. Properly cooked eggplant gives easily under the spoon and feels creamy through the center—the same tenderness cue that matters in baked Eggplant Parmesan.
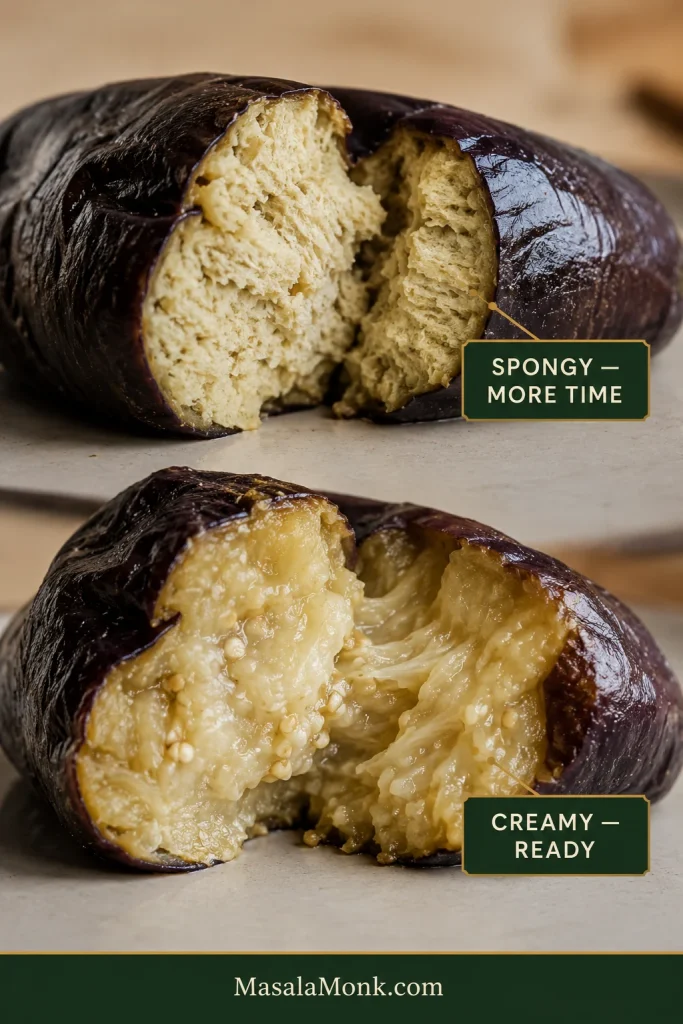
Comparison of eggplant showing a pale dry fibrous center labeled “Spongy — more time” and a soft glossy center labeled “Creamy — ready.”
Surface color cannot tell you whether eggplant is done. A beautifully browned piece can still be spongy inside, so judge the softness of the center instead.

Zucchini: Choose Small or Medium When You Can

Small and medium zucchini have firmer flesh and smaller seed cavities, so you can simply cut them whole. An enormous garden zucchini with a pale, heavily seeded core benefits from having that loose watery center scooped out first.
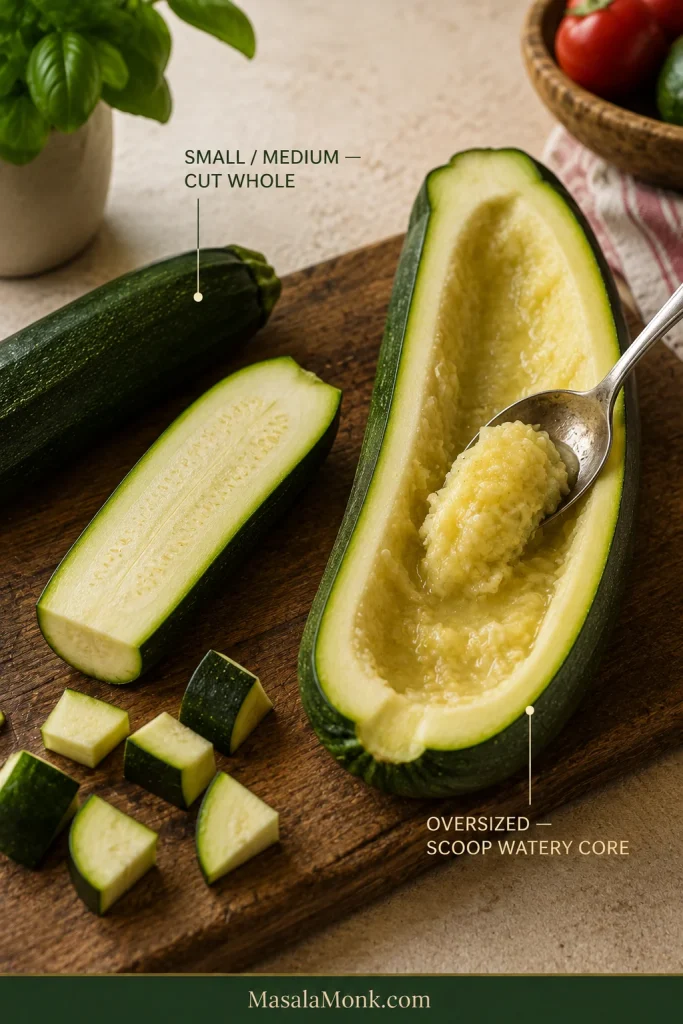
Small zucchini with compact flesh beside an oversized zucchini split lengthwise while a spoon removes its loose watery seed core.
Use the center as your guide, not just the ruler. Scoop an oversized zucchini only when its seed core has become loose and watery enough to dilute the ratatouille.

Tomatoes: Use the Ones That Taste Good

Fresh tomatoes earn their place when they are fragrant and flavorful before cooking. Ordinary ripe tomatoes can be chopped whole; blanching, peeling and routine seeding only add work.

Outside peak tomato season, good canned whole peeled tomatoes often give you a deeper, more reliable base—crush them by hand and pour in the juices too. If you have more ripe tomatoes to use, they can go into this fresh tomato sauce.
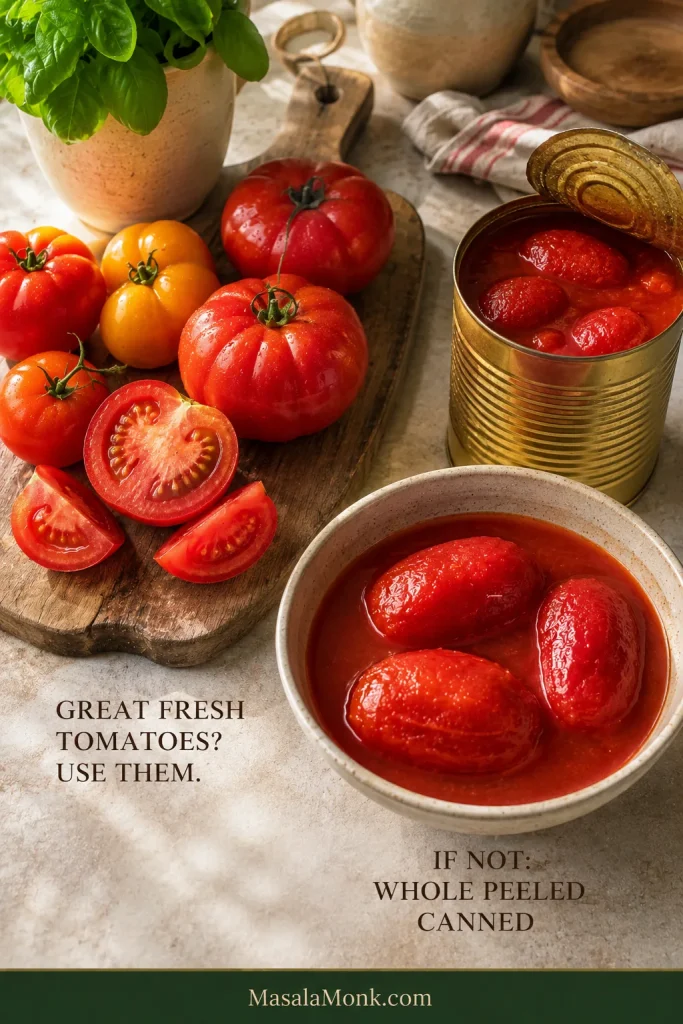
Ripe fresh tomatoes beside whole peeled canned tomatoes sitting in their juices.
Fresh versus canned tomatoes changes the journey more than the destination. Whichever you use, keep reducing until the sauce coats rather than judging doneness by a fixed cooking time.

Olive Oil, Peppers, Onion, Garlic and Herbs

Measure the olive oil before you start. Eggplant can make a pan look surprisingly dry for a few minutes, and having a measured amount makes it easier to resist pouring endlessly.

Red, yellow and orange peppers bring sweetness. Onion builds the base underneath them. Add the garlic once both have softened so it can perfume the pan without scorching. Thyme handles the simmer happily; basil tastes fresher near the end.

Ratatouille Substitutions That Still Make Sense

One missing vegetable does not have to derail dinner. The useful question is what the swap changes.

Change What to do What changes
No eggplant Increase zucchini and peppers for a lighter stew. Dense squash can add body but needs a longer head start. There is no exact substitute for eggplant’s rich, creamy texture. Winter squash also adds sweetness and takes the dish farther from classic ratatouille.
No zucchini Increase eggplant and peppers modestly. The finished dish will be richer and heavier.
No peppers Simply leave them out. You lose some sweetness and fruity pepper flavor.
Yellow summer squash Use it in place of zucchini. Very little changes; give it the same short cooking window.
No good fresh tomatoes Use canned whole peeled tomatoes with their juices. The reduction time may change, but the flavor can be better than with poor fresh tomatoes.
No fresh thyme Use about 1 teaspoon dried thyme or 1–1½ teaspoons herbes de Provence. Dried herbs are more concentrated, so use them with restraint.

Take away the tomatoes along with several of the defining vegetables and you’re moving toward another kind of vegetable stew. It may still be excellent; it does not need ratatouille’s name to be worth eating.

How to Make Ratatouille for Two

Halve the ingredients and keep the same sequence. Start with about 2½ tablespoons olive oil and keep another teaspoon or two nearby in case the eggplant starts catching.

Don’t shrink the cooking surface too aggressively. A tiny deep saucepan traps moisture more readily than a broad skillet even with half the vegetables.

The smaller batch may reduce faster once the tomatoes go in. Follow the appearance of the sauce instead of cutting every cooking time exactly in half.

Three Things Decide the Texture Before Cooking Starts

Cut the main vegetables around ¾ inch / 2 cm. Tiny dice soften quickly and disappear more readily into the sauce. Very large pieces keep more structure but need considerably longer. Two centimeters gives you a forgiving middle and keeps the chopping reasonable.
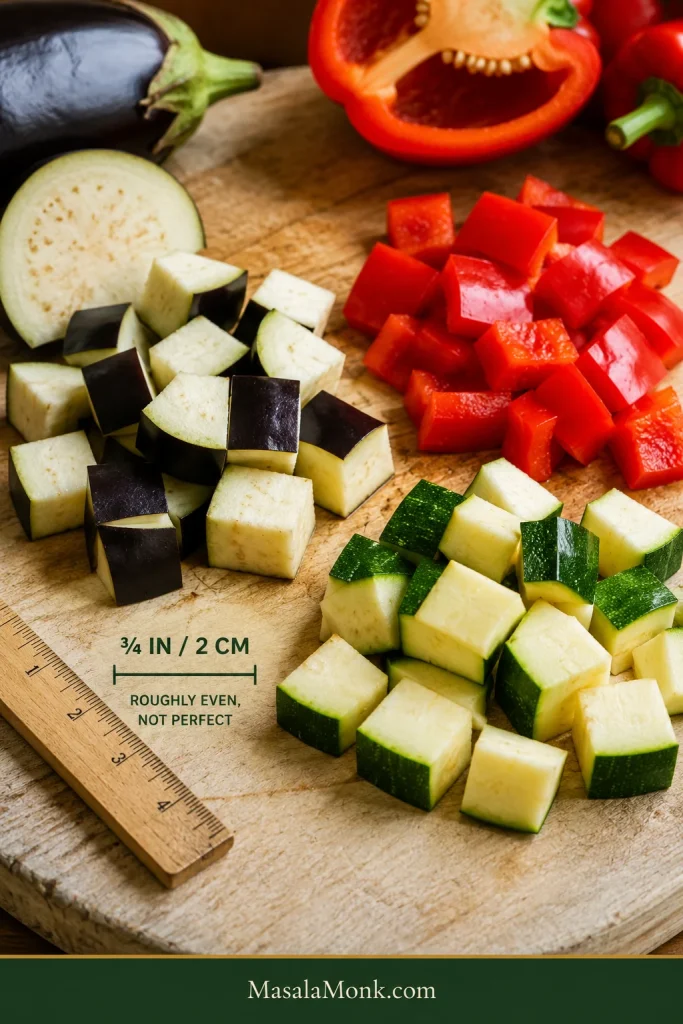
Eggplant, zucchini and bell pepper cut into roughly 2-centimeter chunks beside a ruler and 3/4-inch measurement guide.
Consistency matters more than perfect 2 cm cubes. A few uneven pieces are harmless; mixing tiny dice with large chunks creates vegetables that reach tenderness at completely different times.

Use a broad cooking surface. A broad surface gives steam somewhere to escape instead of trapping it around the vegetables.

Listen as well as look. Eggplant or zucchini hitting a properly heated pan should sizzle. A deep mound that quickly turns quiet and steamy needs more space.

Cooking Stages · Check Doneness

How Ratatouille Changes in the Pan

Times are useful checkpoints. The vegetables give better signals.

Watch the eggplant first. For a few minutes it can look alarmingly thirsty while the center is still spongy, which is exactly when another pour of oil feels tempting. Give it time. As the pieces brown and begin to soften, that urge to add more oil fades.
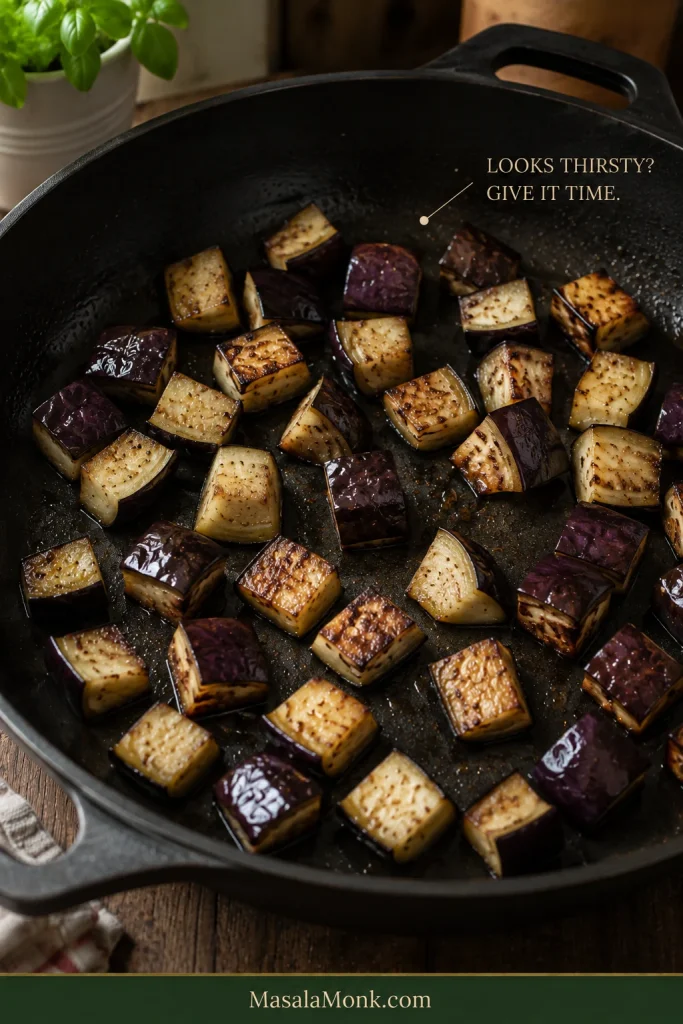
Eggplant chunks browning in a mostly dry-looking sauté pan with the words “Looks thirsty? Give it time.”
A dry-looking pan does not automatically mean the eggplant needs more oil. Give the flesh time to soften before deciding whether that reserved spoonful is actually necessary.

Zucchini needs almost the opposite treatment. Take it out while it still seems slightly underdone. That firmness gives it enough room to finish later without disappearing into the stew.
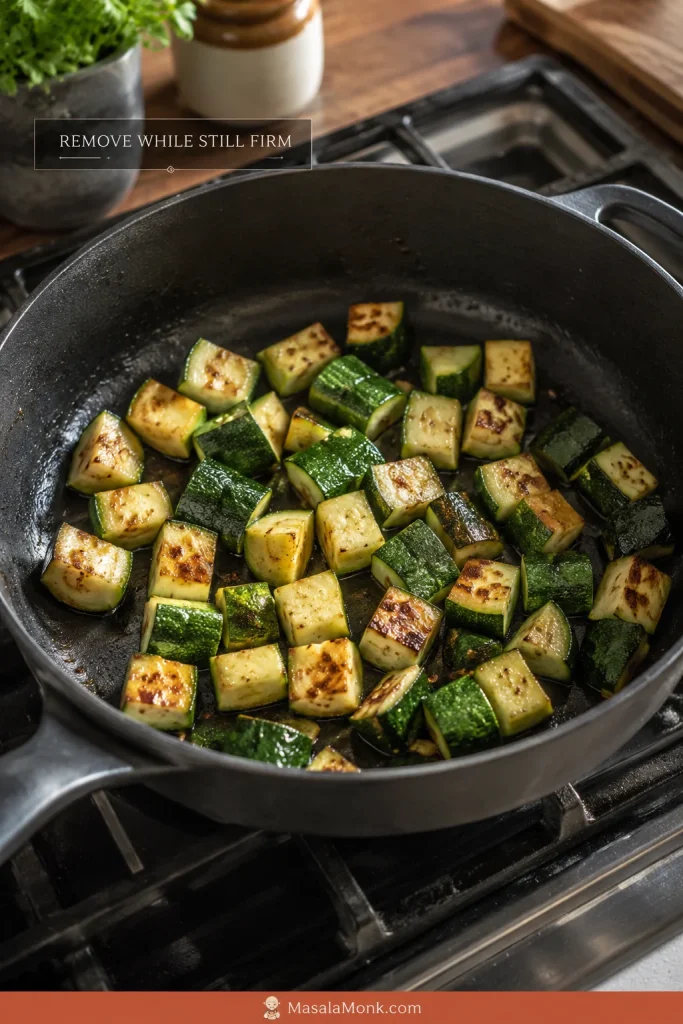
Chunky zucchini pieces lightly browned in a sauté pan with an instruction to remove them while still firm.
The brief sauté is for surface flavor, not full doneness. The center should still resist slightly when the zucchini leaves the pan.

Then the tomatoes usually make the pan look worse before they make it look better. Juice spreads across the bottom, steam lifts from the surface, and for a while everything looks far too wet. Keep cooking. The tomato flesh slumps, the color darkens and turns glossier, and the sharp raw-tomato smell softens.
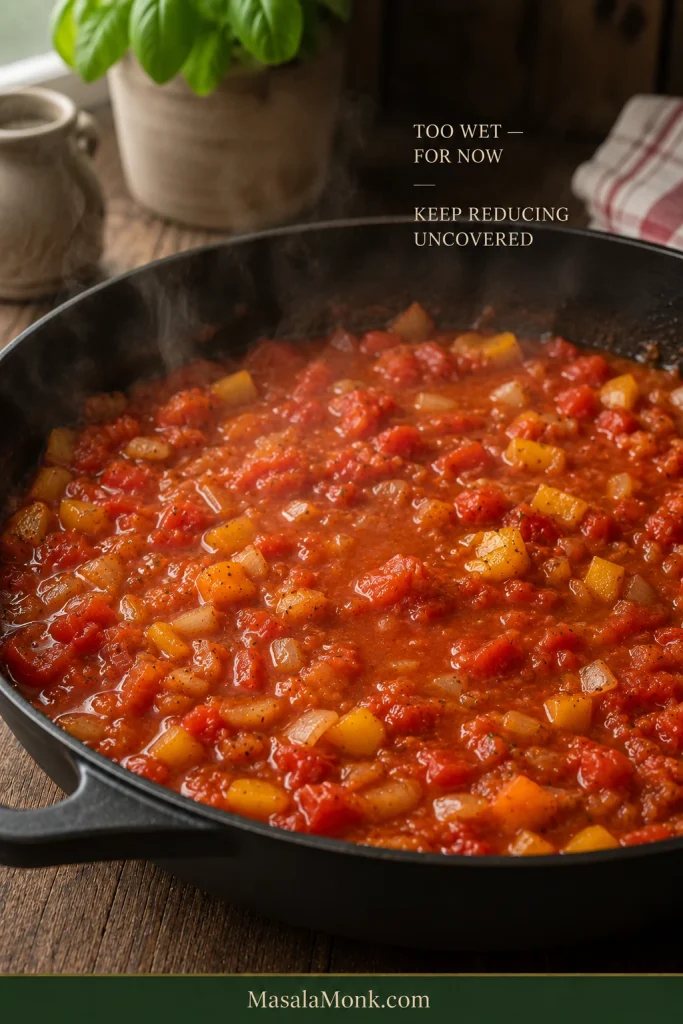
Tomatoes, softened onions and bell peppers simmering in abundant loose tomato liquid with steam rising from a wide pan.
Watch the direction of travel, not one wet-looking moment. If the tomato liquid is steadily reducing and becoming glossier, the ratatouille is moving toward the right consistency.

When the Tomatoes Start Behaving Like Sauce

Drag a spatula across the bottom. Early on, liquid rushes straight back into the trail. Later, the path stays visible for a moment before the sauce closes behind it. That same trail test works whenever you reduce a tomato sauce, including marinara: thin sauce usually needs evaporation before it needs another ingredient.
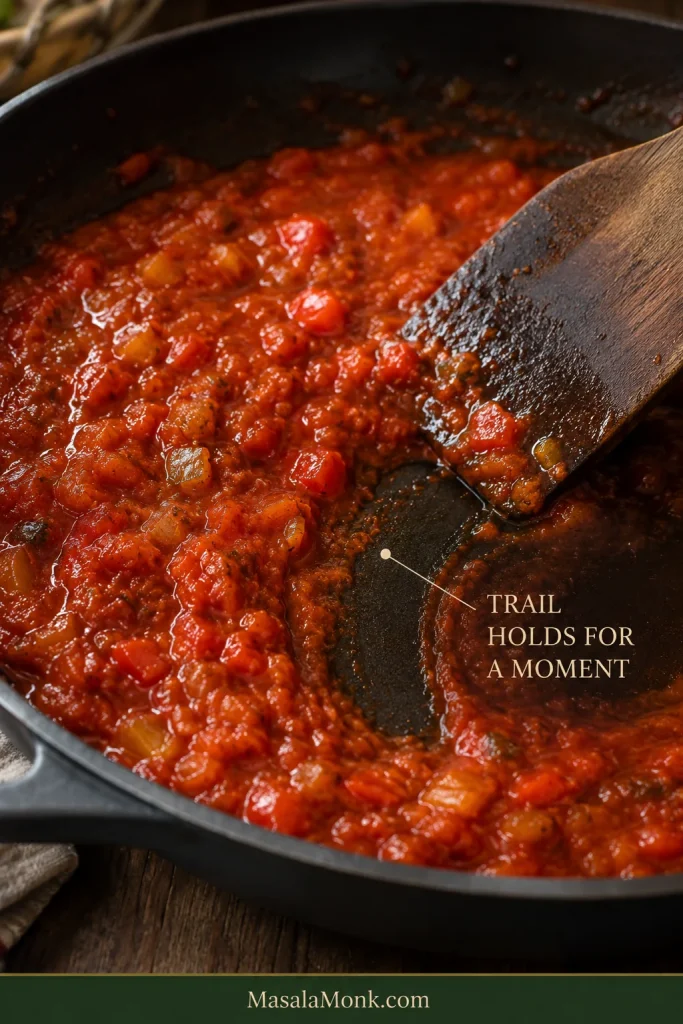
Reduced tomato base in a dark pan with a spatula dragged through the center, leaving a visible trail.
The spatula trail works across tomato types. Fresh and canned tomatoes can release very different amounts of water, but both are ready when the reduced sauce briefly holds a path.

When the eggplant returns, the pan may still look like several cooked vegetables sharing a sauce. A few minutes later the tomato begins settling around the pieces, the peppers soften into the background, and the zucchini finishes gently. Suddenly it looks like ratatouille.

From here, fold rather than churn. Soft vegetables can be broken with a spoon even when the cooking itself is exactly right.

Check Doneness · Back to Recipe

The Pan, Not the Timer, Tells You When Ratatouille Is Done

Start checking around the suggested times, then stop when the food reaches these cues. No single vegetable decides doneness; the useful window is when the slowest pieces are tender but the quickest-cooking ones have not started falling apart.

Final Consistency: Read the Whole Pan

Look at Ready when…
Eggplant The center is creamy and yielding with no dry, cottony resistance
Zucchini Tender enough to cut easily with a spoon while still holding its shape
Peppers Soft and sweet with no raw crunch
Tomato Thick enough to coat the vegetables without running freely around them
Pan bottom A small amount of sauce remains; there is no broad puddle of thin red liquid
Whole dish The flavors have come together, but the spoon still gives you different textures
Finished ratatouille in a tilted pan with thick sauce surrounding distinct vegetables and very little free liquid.
Stop just before the dish looks completely settled. Ratatouille tightens slightly during its rest, so a pan that is perfect over the heat can become too dry on the table.

Zucchini: Stop Before It Collapses

Like your ratatouille softer? Continue the gentle simmer. Some traditional versions go much farther toward a deep, almost jammy consistency. Our stopping point is a preference, not a universal rule.
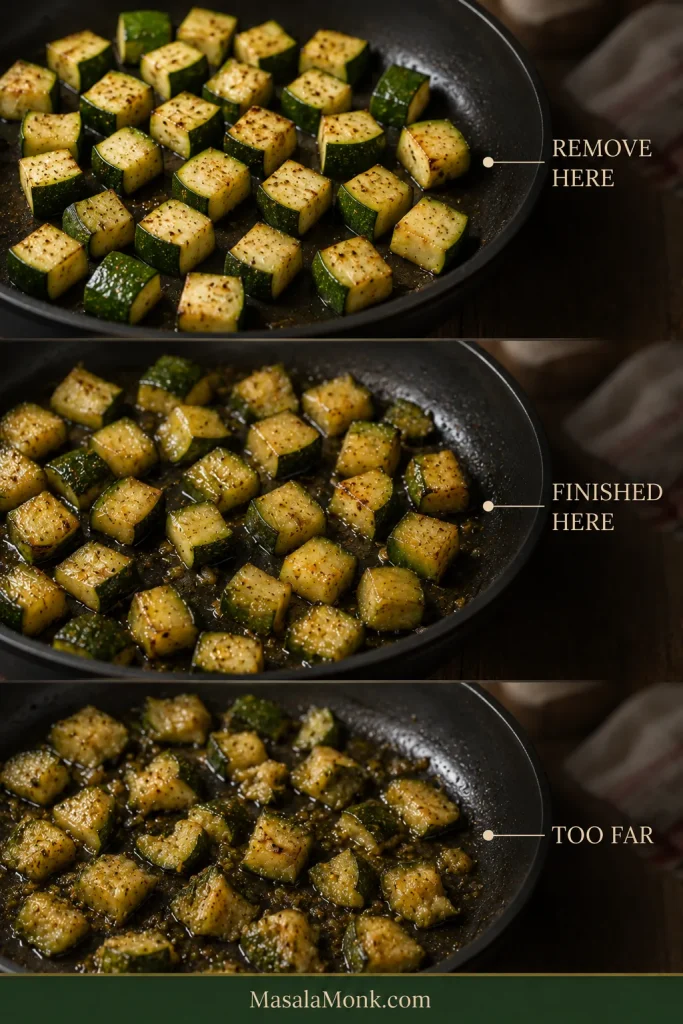
Three stages of cooked zucchini labeled “Remove here,” “Finished here” and “Too far,” progressing from firm pieces to tender pieces and then collapsing pieces.
Zucchini texture changes before its color changes dramatically. That is why firmness is a much better doneness cue than waiting for the pieces to look visibly different.

Troubleshooting · Back to Recipe

Ratatouille Troubleshooting

Before adding ingredients or automatically cooking longer, look at what is actually wrong. Most ratatouille problems have a specific fix.
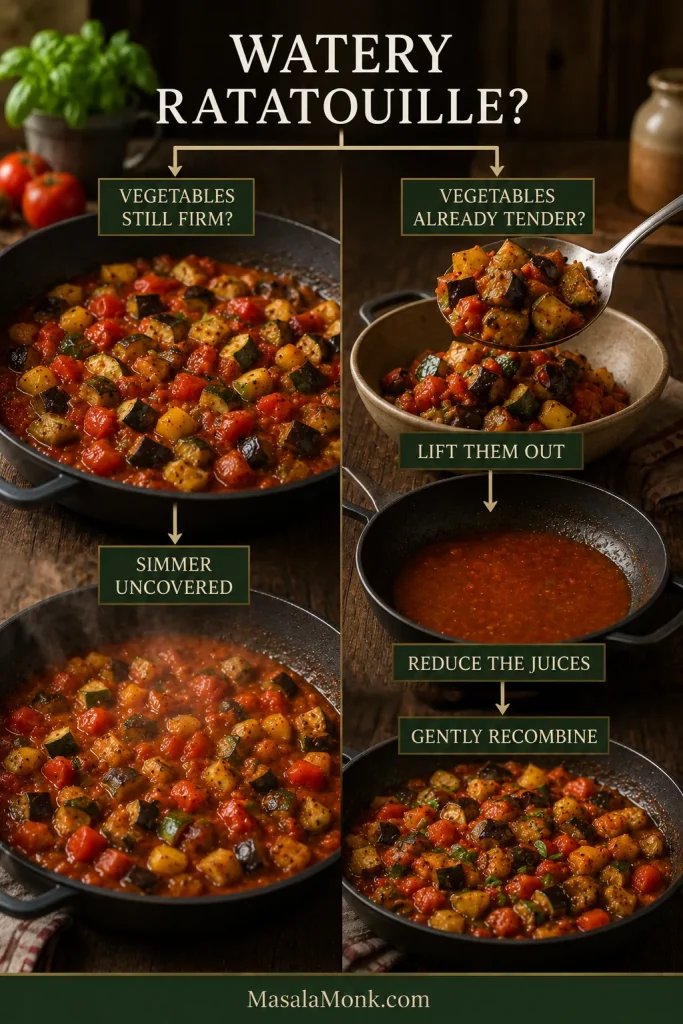
Decision guide showing watery ratatouille simmered uncovered when vegetables are firm, or tender vegetables removed while excess juices reduce before recombining.
A watery ratatouille is really two possible problems: excess liquid needs more heat, while vegetables that are already tender need protection from that extra cooking.

Texture and Moisture Problems

Problem Fix it now Why it happened / next time
Thin red liquid pooling Vegetables still firm? Simmer uncovered. Already tender? Lift them out, reduce the liquid alone until glossy, then fold them back in. Too much moisture was trapped. Give the vegetables more room and reduce the tomato base farther before recombining.
Eggplant is spongy Give it more time in the tomato sauce until the center becomes creamy. The eggplant is undercooked. Let it begin softening properly during the first browning.
Eggplant seems to absorb all the oil Turn the pieces and give them time. Use the reserved oil only if they begin to scorch. Some absorption is normal; weak heat can exaggerate it. Measure the oil and use active sautéing heat.
Finished ratatouille is greasy Spoon off obvious excess oil if necessary. Too much oil was added, often in repeated pours while the eggplant looked dry. Start with the measured amount.
Zucchini is collapsing Stop cooking. The flavor can still be excellent even if the zucchini has lost its shape. It cooked too long or returned too early. Brown briefly and add it back near the end.

Flavor and Seasoning Problems

Problem Fix it now Why it happened / next time
Vegetables are pale and bland Reduce loose liquid first, then correct the salt before adding more herbs. The vegetables steamed or excess water diluted the flavor. Use stronger heat, more pan surface or smaller batches.
Ratatouille tastes rich but flat Correct the salt first, then add 1 teaspoon red wine vinegar and taste again. The finished pan needs seasoning or a touch of acidity.
Tomato tastes harsh If the vegetables still need time, continue uncovered. If they are tender, remove them and reduce some sauce separately. Check salt before trying a tiny pinch of sugar. The tomato may be under-reduced or unusually acidic. Better tomatoes and sufficient reduction help next time.
Garlic tastes bitter Burned garlic is difficult to rescue; dilution may soften the bitterness. The garlic scorched. Add it only after the onion and peppers have softened.

Once the sauce is right, all of that diagnosis disappears from the plate. What remains is the good part: sweet pepper, soft eggplant, zucchini, basil and tomato in the same warm spoonful.
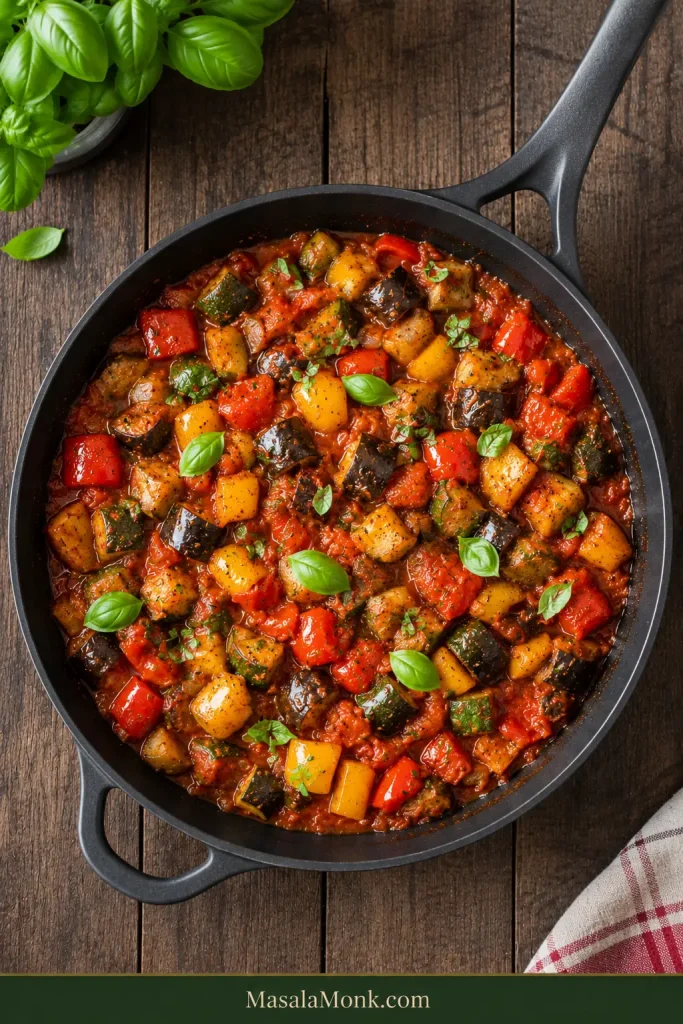
Overhead view of rested ratatouille in a dark pan with visible eggplant, zucchini, peppers, tomato sauce and fresh basil.
After resting, the dish should look unified without becoming uniform: tomato fills the gaps, while the shapes and colors of the vegetables still reveal what went into the pan.

Back to Recipe · Back to Top

What to Serve With Ratatouille

Serve ratatouille with crusty bread, polenta, rice or eggs for a vegetarian meal, or use it as a side for chicken, fish, lamb or sausages.

Once the pan is where you want it, ratatouille becomes wonderfully undemanding. Spoon it beside dinner, pile it onto bread, or let the vegetables become the meal.

Make it the main: add crusty bread or sourdough focaccia, creamy polenta, rice, couscous, white beans or chickpeas. A fried or poached egg makes it more substantial without taking attention away from the vegetables.
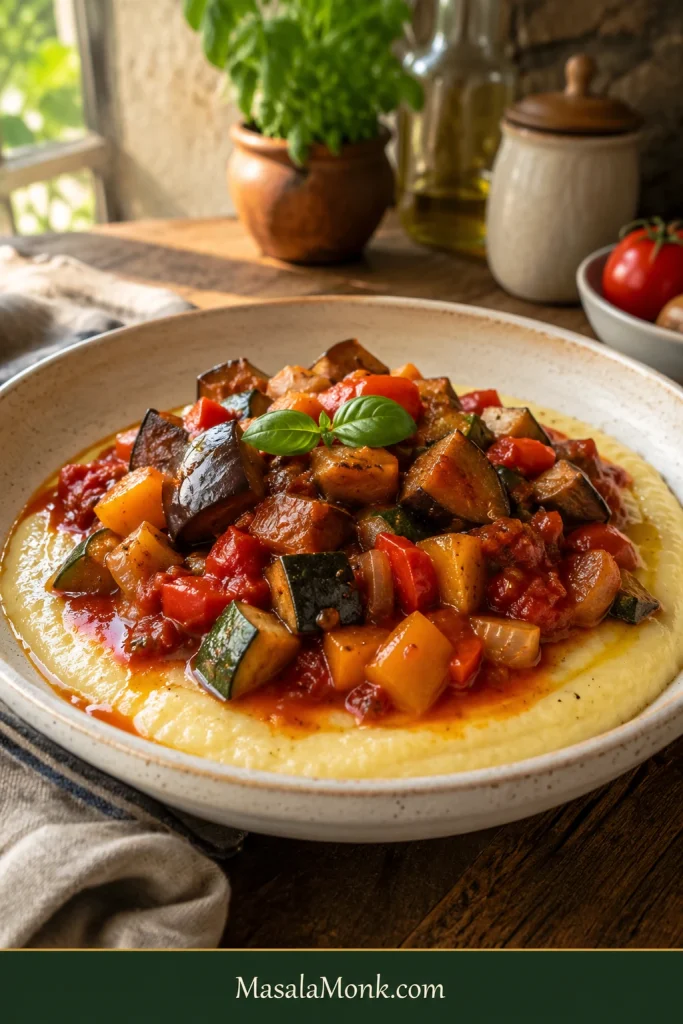
Chunky ratatouille spooned over pale creamy polenta in a shallow ceramic bowl and finished with basil.
Polenta works especially well with a strongly reduced batch of ratatouille. Its mild creaminess softens concentrated tomato and olive-oil flavors without competing with the vegetables.

Serve it as a side: simply cooked chicken, fish, lamb, sausages or roasted meat all leave plenty of room for the ratatouille.

Or make lunch out of it: spoon warm ratatouille over crisp toast and add a fried egg. The tomato and olive oil soften the top of the bread while the edges stay crisp, and the yolk runs straight into the vegetables. Goat cheese or another tangy cheese is good here too, and a smaller amount of ratatouille can go into an easy frittata.
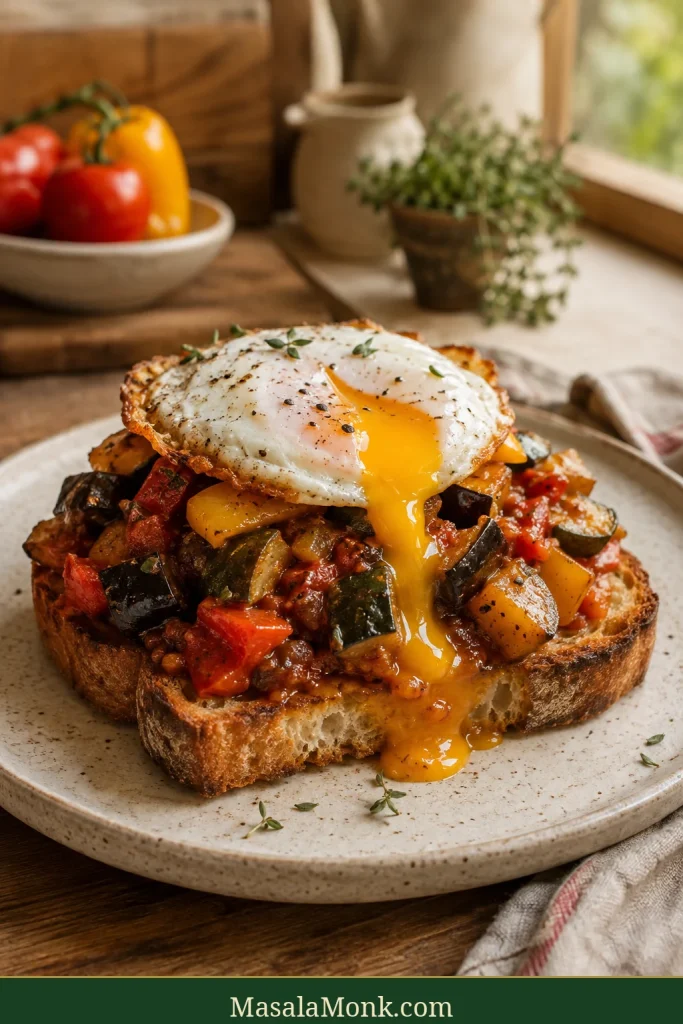
Thick crisp toast topped with chunky ratatouille and a fried egg, with runny golden yolk flowing over the vegetables.
Crisp toast is especially useful with next-day ratatouille: as the vegetables become softer and more integrated overnight, the bread puts a fresh layer of texture back into the meal.

Ratatouille does not need to be piping hot; it is good warm, at room temperature or chilled. During the 15-minute rest, the bubbling settles and the sauce thickens slightly around the vegetables, while the olive oil, herbs and tomato become easier to taste. If serving leftovers cold, let them lose the deepest refrigerator chill first.

Make Ahead, Store, Freeze and Reheat

Yes—ratatouille is excellent made a day ahead. The vegetables become softer, but the tomato, garlic, herbs and olive oil taste more integrated after a night in the refrigerator.

If you’re cooking specifically for the next day, hold back most of the basil and add it just before serving so its fresh flavor does not disappear into the overnight rest.

Day one gives you clearer textures. Day two gives you deeper integration. Neither is a consolation prize.

Fridge, Freezer and Reheating at a Glance

For the practical timeline, keep the three jobs separate: chill leftovers promptly, freeze airtight portions you will not use soon, and reheat only what you plan to eat.
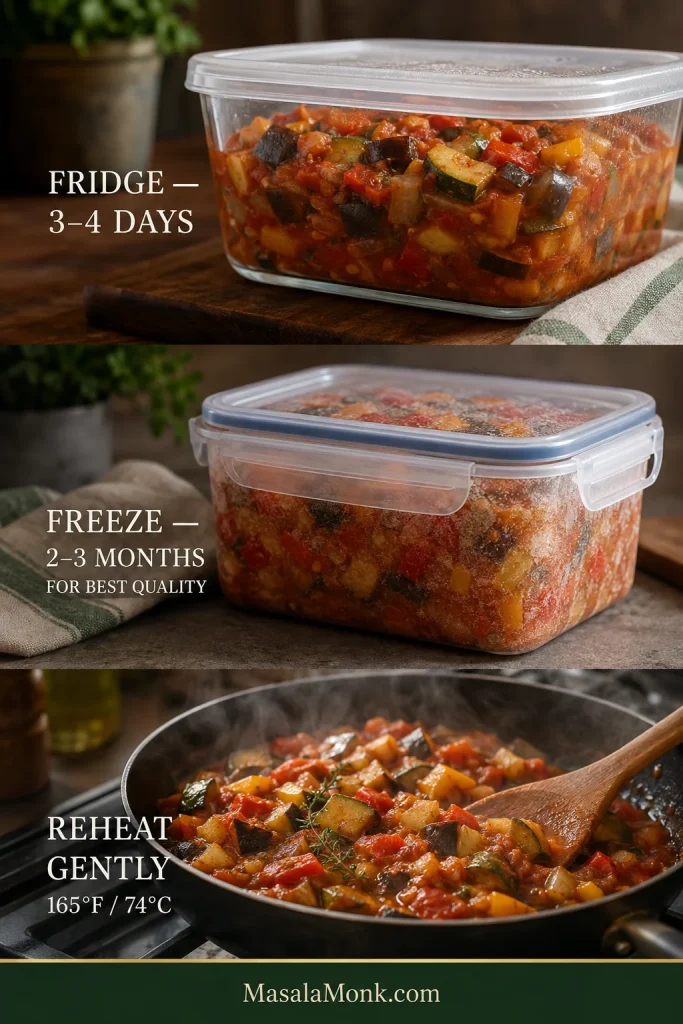
Three-part guide showing ratatouille refrigerated in a covered container, frozen in an airtight container and gently reheated in a pan, with storage times and 165°F or 74°C reheating guidance.
Shallow containers help leftovers cool more quickly and make it easier to reheat only the amount you actually plan to serve.

Refrigerate and Reheat Gently

Refrigerate leftovers within 2 hours of cooking—or within 1 hour when the surrounding temperature is above 90°F / 32°C—in covered, preferably shallow containers. USDA leftover guidance recommends using refrigerated cooked leftovers within 3–4 days and reheating them to 165°F / 74°C.

Reheat only the portion you plan to eat. The microwave works well for a single serving because the heating is brief. On the stovetop, use low to medium-low heat and stir only as much as necessary. Once it is hot, stop. Yesterday’s zucchini does not need another fifteen-minute simmer.

An oilier appearance after reheating does not necessarily mean the original batch contained too much oil. Extra evaporation removes water while the olive oil remains, making it more visible.

Can You Freeze Ratatouille?

Yes. Freeze it in an airtight container and use it within about 2–3 months for best quality. Expect softer vegetables after thawing, especially the zucchini.

That softer texture works well in pasta, eggs, soup or on toast. A thawed batch that has become too soft to enjoy on its own can also become the start of a vegetable soup; minestrone takes the tomato-and-vegetable idea in a heartier beans-and-pasta direction.

Leftover Ideas · Back to Recipe

Five Good Ways to Use Leftover Ratatouille

Leftover ratatouille can become pasta sauce, a toast topping, frittata filling, a spoonful over polenta, or the beginning of a vegetable soup.
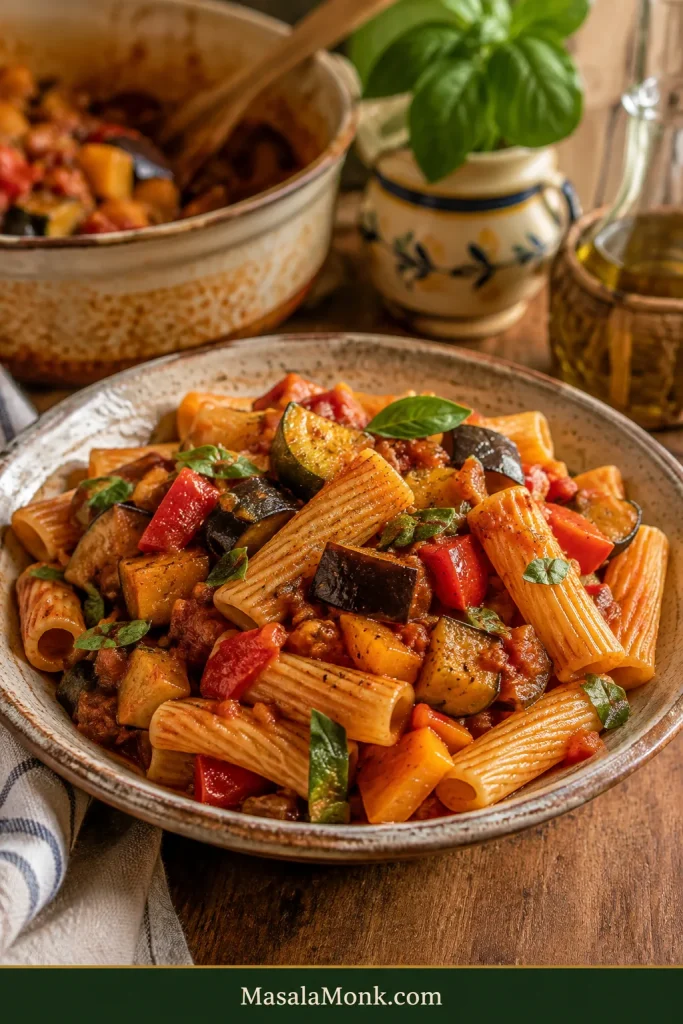
Rigatoni tossed with leftover ratatouille, with visible eggplant, zucchini and red and yellow peppers coated in tomato sauce and finished with basil.
Short pasta has a practical advantage here: chunky eggplant, zucchini and peppers settle between the tubes and ridges instead of slipping away from long strands to the bottom of the bowl.
  1. Toss it with pasta. Warm the ratatouille, loosen it with some pasta water and fold it through. Basil, Parmesan or goat cheese can finish it. For something cheesier and more substantial, the same vegetables also work beautifully in vegetable baked ziti.
  2. Pile it onto toast. Add an egg or tangy cheese and lunch is essentially done.
  3. Put it into eggs. Warm it under fried or poached eggs, or use a modest amount as a cooked vegetable filling for an omelet or frittata.
  4. Spoon it over polenta. Soft vegetables and concentrated tomato are particularly good against creamy polenta.
  5. Turn a very soft batch into sauce or soup. Crush it into a chunky pasta sauce or blend some of it into a smoother vegetable base. The texture changed; dinner did not fail.

When the Vegetables Come Together

When the pan is right, you don’t really need the clock anymore. The tomato has thickened around the vegetables, the eggplant gives under the spoon, the peppers are sweet, and the zucchini has made it to the end intact.

Give it fifteen minutes to settle. By then the sauce has gathered around the vegetables, the steaming heat has eased, and the ratatouille is ready to eat.

If you make it, tell me where you like your ratatouille to land: vegetables still clearly distinct, or soft and deeply confited?
Back to Recipe · Back to Top

Posted on — Leave a comment

Tomato Pie Recipe: Southern-Style, Cheesy and Never Soggy

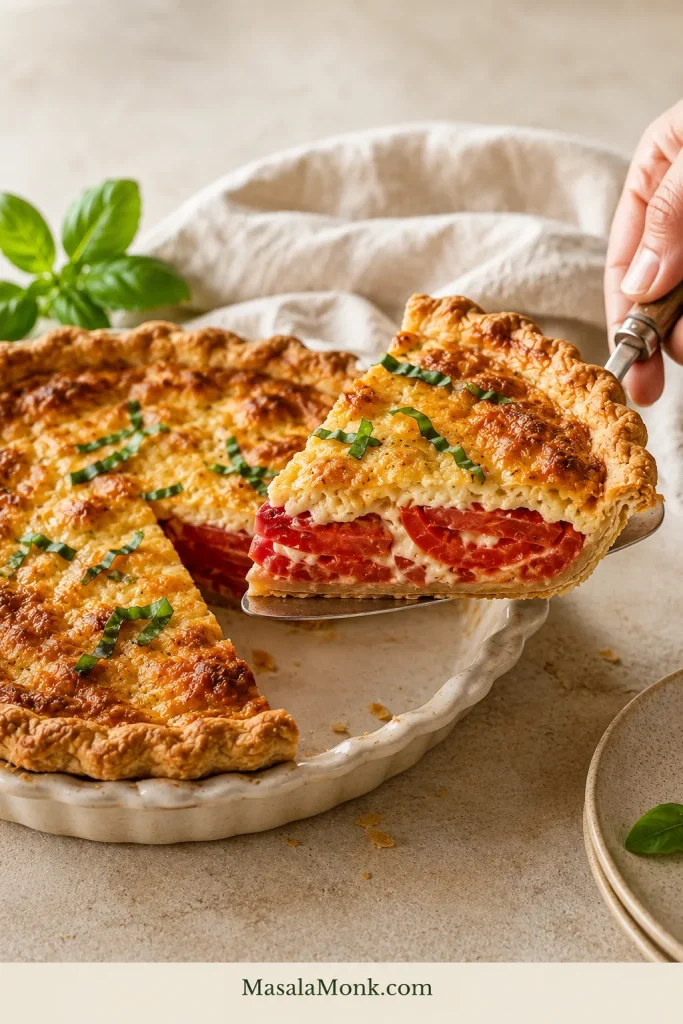
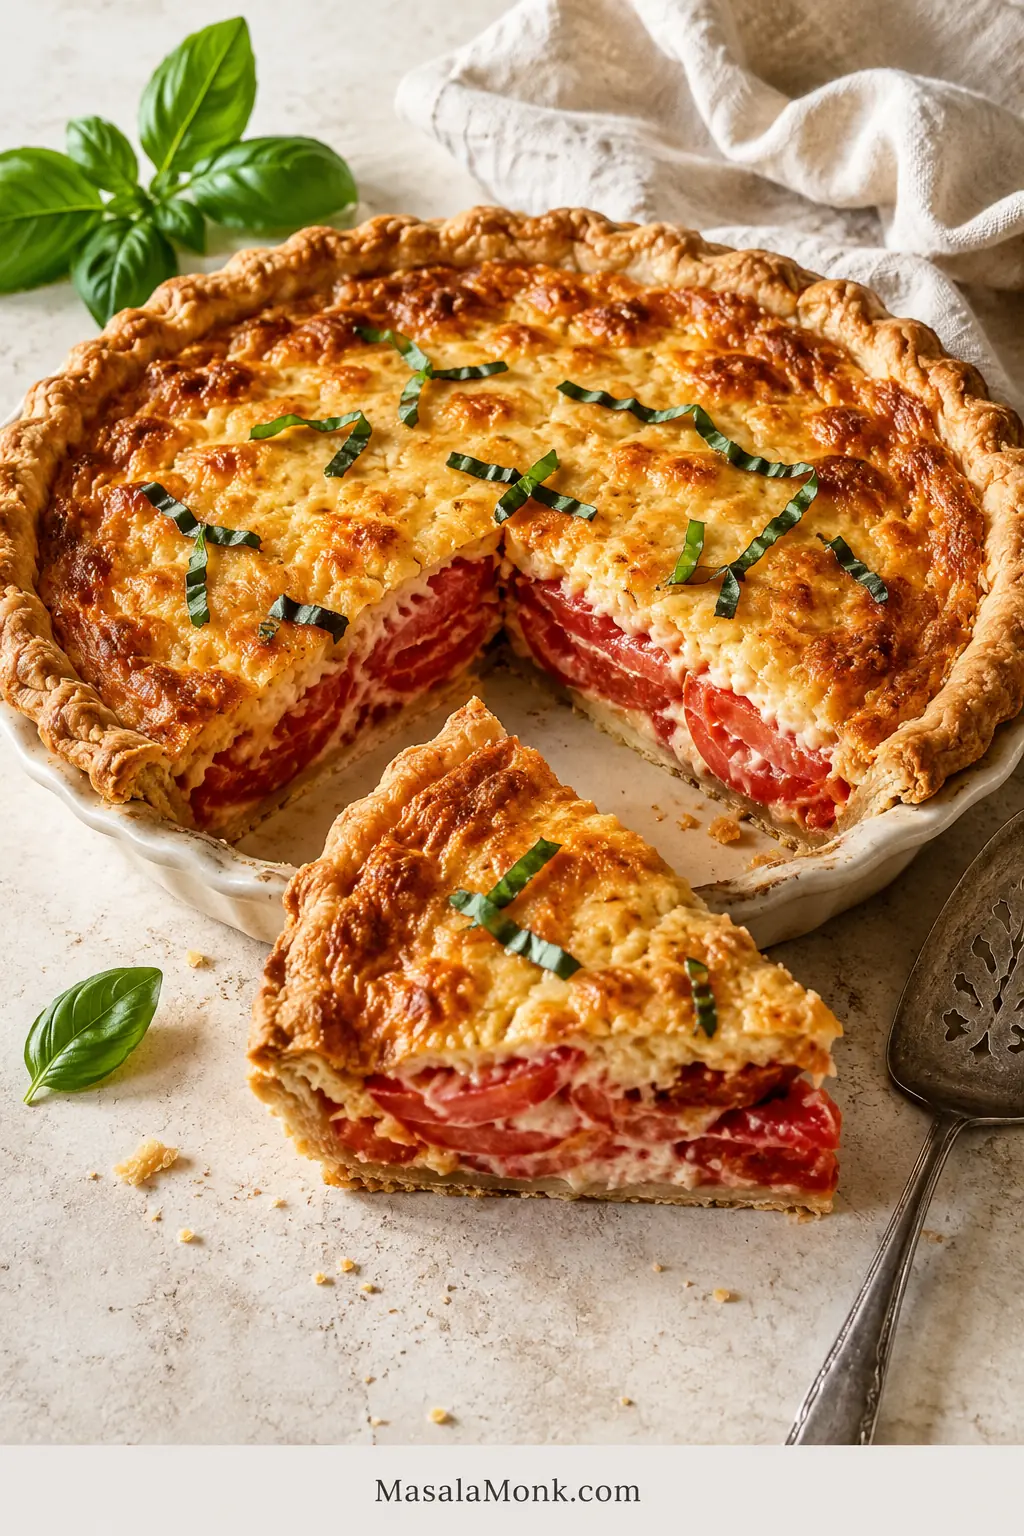
Whole Southern tomato pie with a golden crimped crust, browned cheese topping, fresh basil, and one wedge removed to reveal the red tomato filling.

The first slice tells you whether a tomato pie worked. The tomatoes should still taste unmistakably of summer, the cheese should be creamy and savory, and underneath it all there should be a crust flaky enough to matter—not pale pastry soaking in tomato juice.

This is the kind of pie to make when tomatoes are so ripe and fragrant that dinner can reasonably revolve around them. The aim is to concentrate that ripe tomato flavor while keeping enough water away from the pastry for the first wedge to come out looking—and eating—like a proper slice of pie.

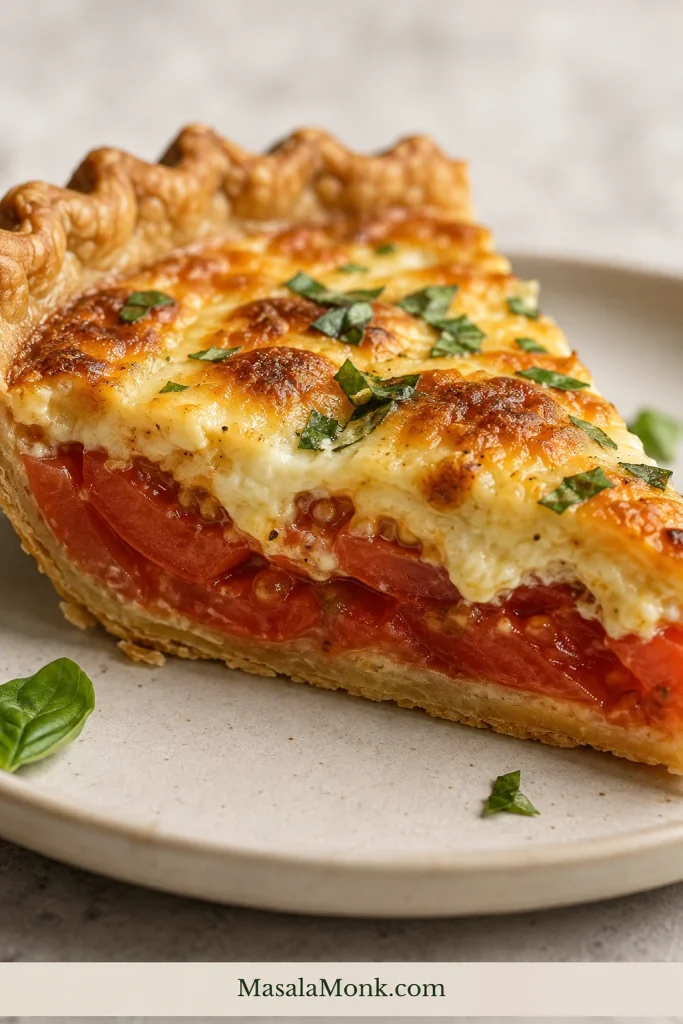
Close side view of a Southern tomato pie wedge showing an intact flaky bottom crust, red tomato layers, and browned creamy cheese topping.
A good slice keeps the flaky crust distinct beneath generous tomato and browned cheese.

So the tomatoes are lightly salted, blotted and roasted. The crust gets a head start in the oven and a thin layer of melted sharp cheddar before the tomatoes ever touch it. On top goes extra-sharp cheddar, Parmesan, fresh basil, Dijon and enough mayonnaise to make everything creamy while the tomatoes still taste like the reason you made the pie.

Jump to: Recipe · Keep It Crisp · Troubleshooting

Quick Answer: How to Make Tomato Pie Without a Soggy Crust

For a standard 9-inch / 23 cm pie, use about 2 lb / 900 g ripe tomatoes. Slice them ⅜–½ inch / 10–13 mm thick, lightly salt and blot them, then roast until slightly wrinkled and no longer wet-looking. Pre-bake the crust until the bottom is dry and lightly golden, then melt a thin layer of cheddar over it.

Arrange the tomatoes over the crust, add the cheese topping, and bake on the lower-third rack at 375°F / 190°C for about 30–35 minutes. Rest at least 30 minutes before slicing; closer to an hour gives cleaner wedges.

There are a few more steps here than in the quickest versions, but none is difficult. With one tomato tray, the tomatoes roast while the crust pre-bakes, so those two jobs finish at almost the same time.

Southern Tomato Pie Recipe With a Crisp Crust

This version keeps the tomatoes front and center: roasted just enough to deepen their flavor, layered over a pre-baked crust, then covered with a sharp, basil-flecked cheese topping that stays creamy without becoming heavy.

Yield: 1 standard 9-inch / 23 cm pie
Serves: 6 generous portions or 8 smaller portions
Hands-on time: about 30 minutes
Prep + bake: about 1¼–1½ hours
Rest: 30–60 minutes
Total time: about 2–2½ hours
Best served: warm or at room temperature
Timing note: Times assume you are starting with a prepared crust ready to blind-bake.

Equipment

  • Standard 9-inch / 23 cm pie plate, if using rolled dough
  • 1–2 large rimmed baking sheets
  • Parchment paper
  • Pie weights or dried beans, for rolled dough
  • Clean kitchen towels or paper towels
  • Wire cooling rack
  • Foil or a pie shield, optional

Ingredients

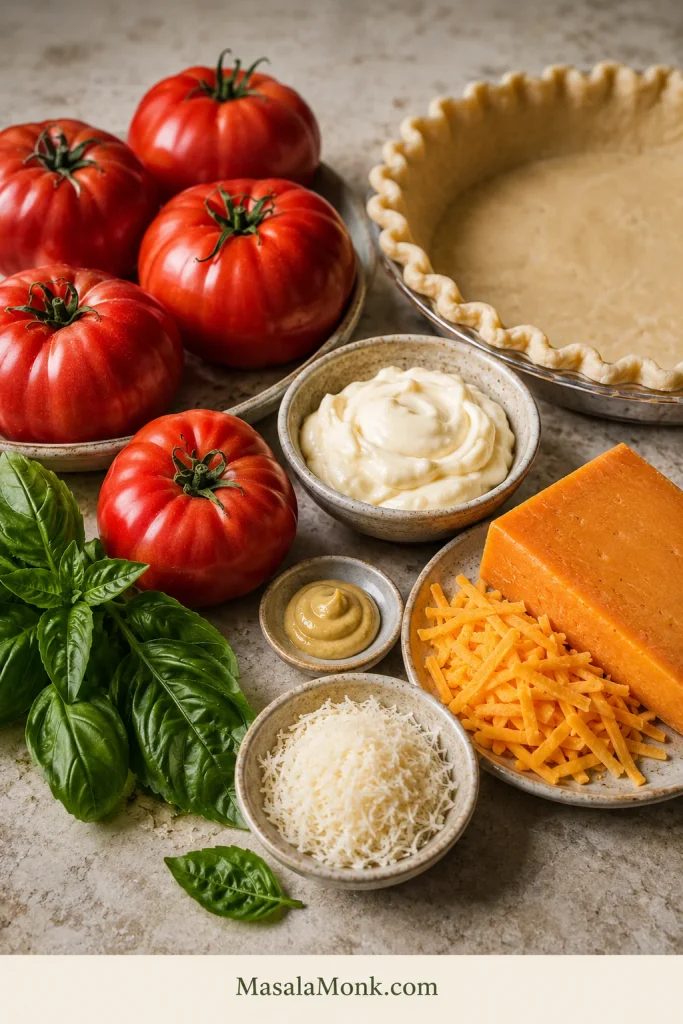
Ripe red tomatoes, pie crust, cheddar, Parmesan, mayonnaise, Dijon mustard, and fresh basil arranged together for Southern tomato pie.
Tomatoes bring the juiciness and acidity; cheddar, Parmesan and mayo add richness; Dijon and basil keep it bright.

For the Tomatoes

  • 2 lb / about 900 g ripe tomatoes, about 4–6 large tomatoes
  • ¾ teaspoon fine sea salt / about 4 g
  • ½ teaspoon freshly ground black pepper, divided

For the Crust and Bottom Cheese Layer

  • 1 prepared standard 9-inch / 23 cm pie crust, homemade or store-bought; not deep dish
  • 1½ oz / 40 g extra-sharp cheddar, finely grated

And for the Cheese Topping

  • 5½ oz / 160 g extra-sharp cheddar, freshly grated
  • 1 oz / 28 g Parmesan, finely grated; Pecorino Romano also works but is saltier
  • ½ cup / about 115 g mayonnaise
  • 1 teaspoon / 5 ml Dijon mustard
  • ¼ cup loosely packed fresh basil, torn or chopped, plus more for serving
  • Pinch of red-pepper flakes, optional

Shopping note: You need 7 oz / 200 g cheddar total. One standard 8 oz / 227 g block is enough for the whole pie with a little left over.

Instructions

Prep the Tomatoes and Crust

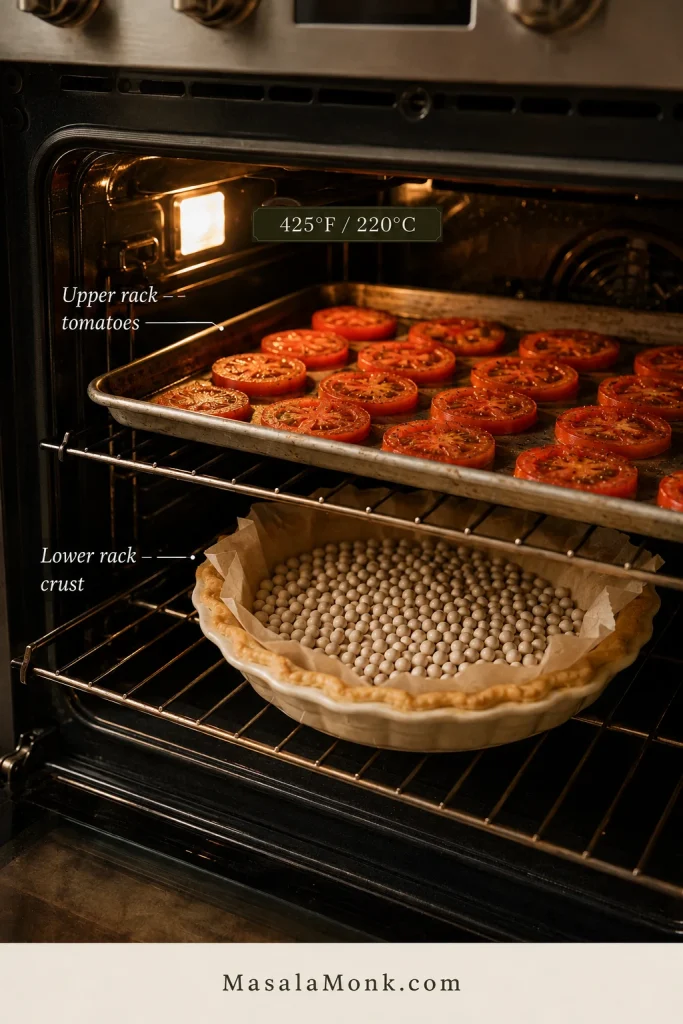
  1. Heat the oven. Position one rack in the upper half of the oven and another in the lower third. Heat to 425°F / 220°C conventional. Line a large rimmed baking sheet with parchment.
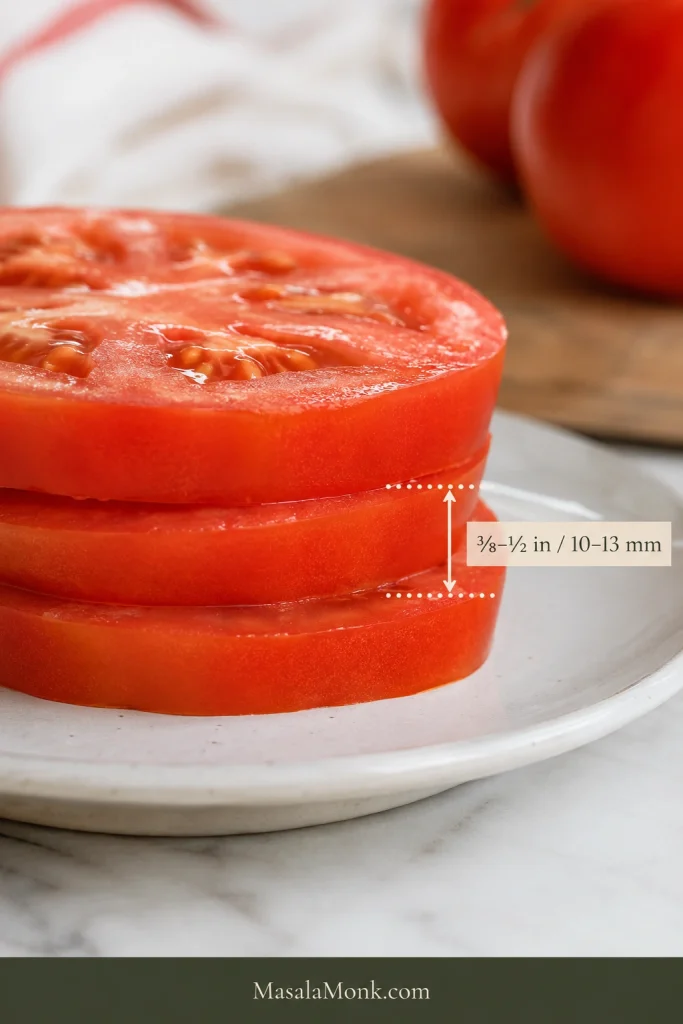
  2. Slice, salt and blot the tomatoes. Core them and cut into slices about ⅜–½ inch / 10–13 mm thick. Arrange them over clean kitchen towels or several layers of paper towel, sprinkle with the ¾ teaspoon / 4 g salt, and leave for 10–15 minutes. Blot firmly, then season with ¼ teaspoon black pepper. Very large rounds can be halved so the finished pie is easier to portion.
Side view of tomato slices with a measurement guide showing the target thickness of 3/8 to 1/2 inch, or 10 to 13 millimeters.
Aim for ⅜–½ inch / 10–13 mm: thick enough to stay substantial after roasting, but not so thick that moisture lingers.
  1. Prepare the crust and arrange the tomatoes.
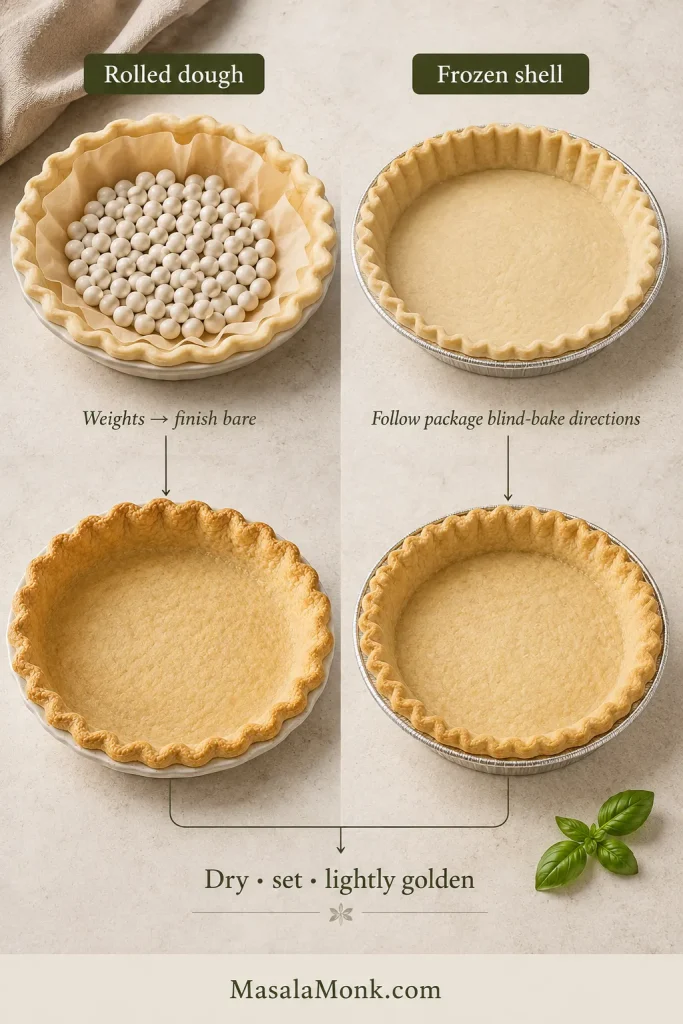
    Using rolled dough? Fit it into a standard pie plate, crimp the edge, line it with parchment and fill with pie weights or dried beans.
    Using a preformed frozen shell? Keep it in its supplied pan. Follow its package directions for blind-baking; use weights only if those directions call for them.
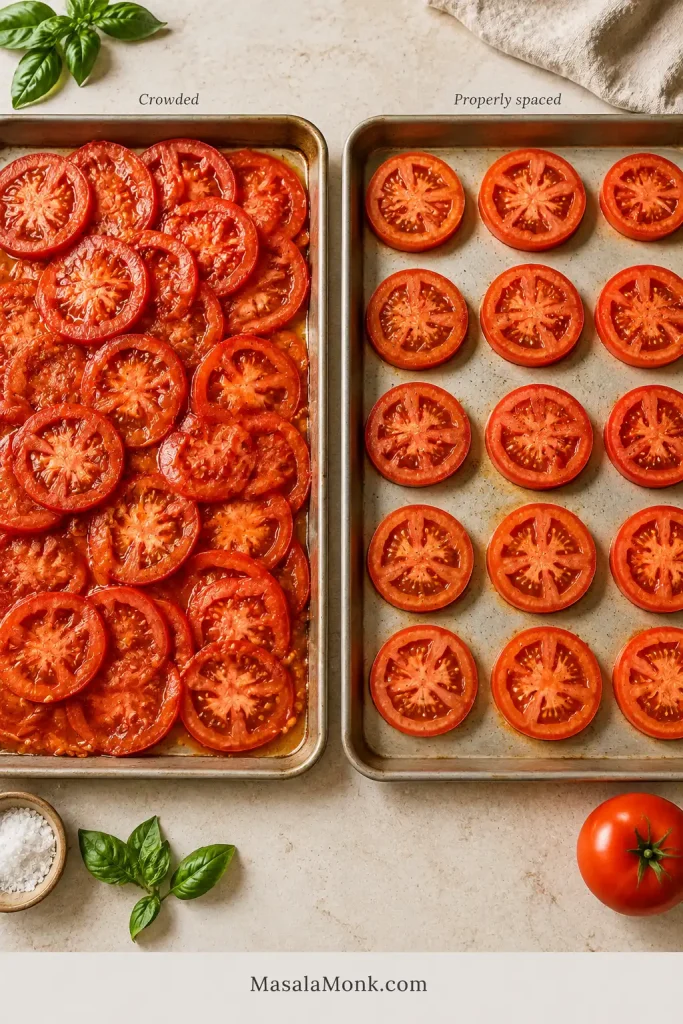
    Arrange the blotted tomato slices on the baking sheet in one layer with a little breathing room between them. Avoid heavy overlap.
Two sheet pans compare overlapping tomato slices with tomato slices arranged in a single layer with space between them.
Leave breathing room between slices so steam can escape instead of collecting where tomatoes overlap.
  1. Roast the tomatoes while the crust pre-bakes. With one tomato tray, roast the tomatoes on the upper rack while the crust bakes below.
    Rolled crust: Bake it with the weights for 15–18 minutes.
    Preformed frozen shell: Follow its blind-baking time. It may finish before or after the tomatoes; that is fine.
    Need two tomato trays? Roast them first, rotating the pans if needed, then pre-bake the crust afterward. Giving the tomatoes space matters more than forcing the two jobs to overlap.
Home oven showing a tray of tomatoes roasting on the upper rack while a weighted pie crust blind-bakes on the lower rack at 425 degrees Fahrenheit.
With one tomato tray, use the upper rack for tomatoes and the lower rack for the crust so both jobs can happen at once.

Finish the Crust and Make the Topping

  1. Finish the crust and check the tomatoes.
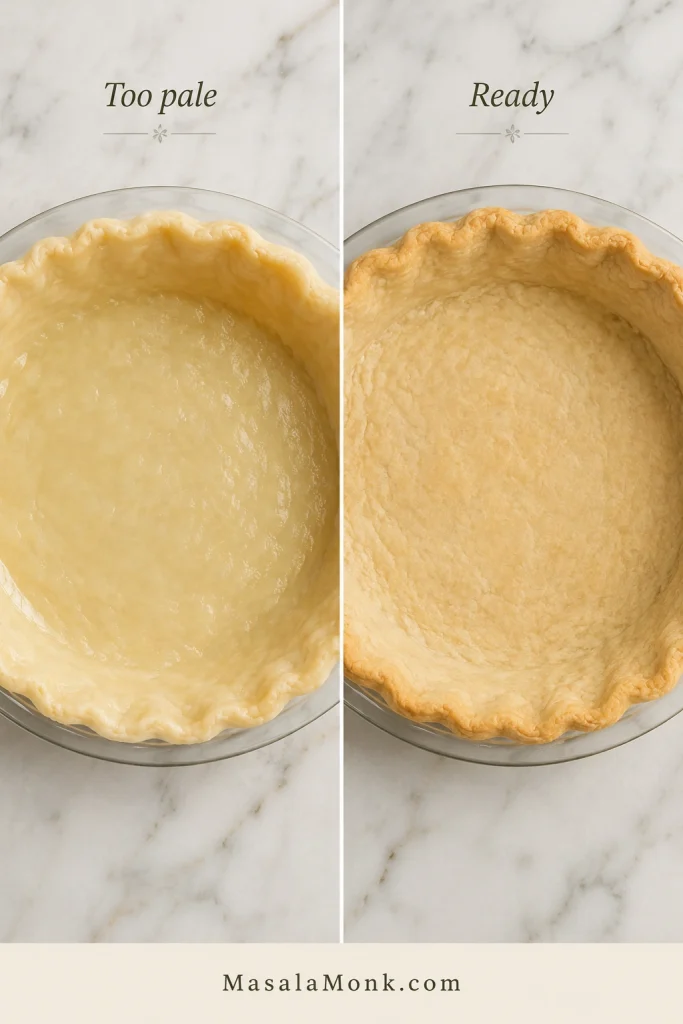
    Crust: For rolled dough, carefully remove the parchment and weights, then return the empty shell to the lower rack for another 5–7 minutes. For a preformed frozen shell, continue according to its package directions as needed. Whichever crust you use, the base should be dry, set and lightly golden before filling. Pale, shiny or slightly translucent pastry needs more time.
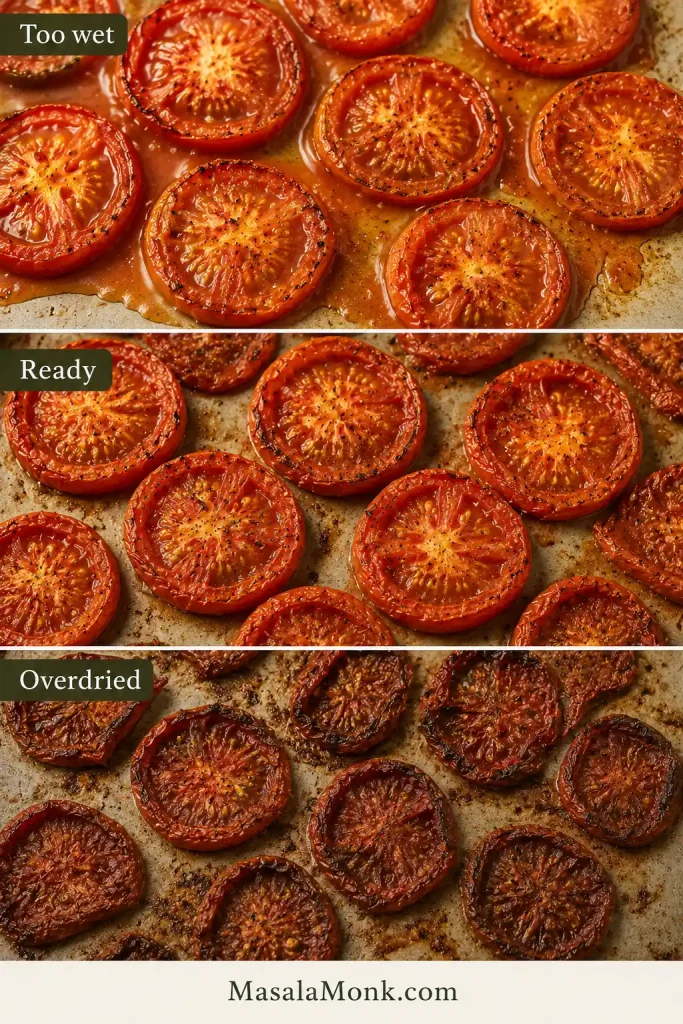
    Tomatoes: Their color should be a little deeper, the edges slightly wrinkled and the cut surfaces more matte than glossy. Very little thin juice should remain on the pan. They should still look juicy, not dried out.
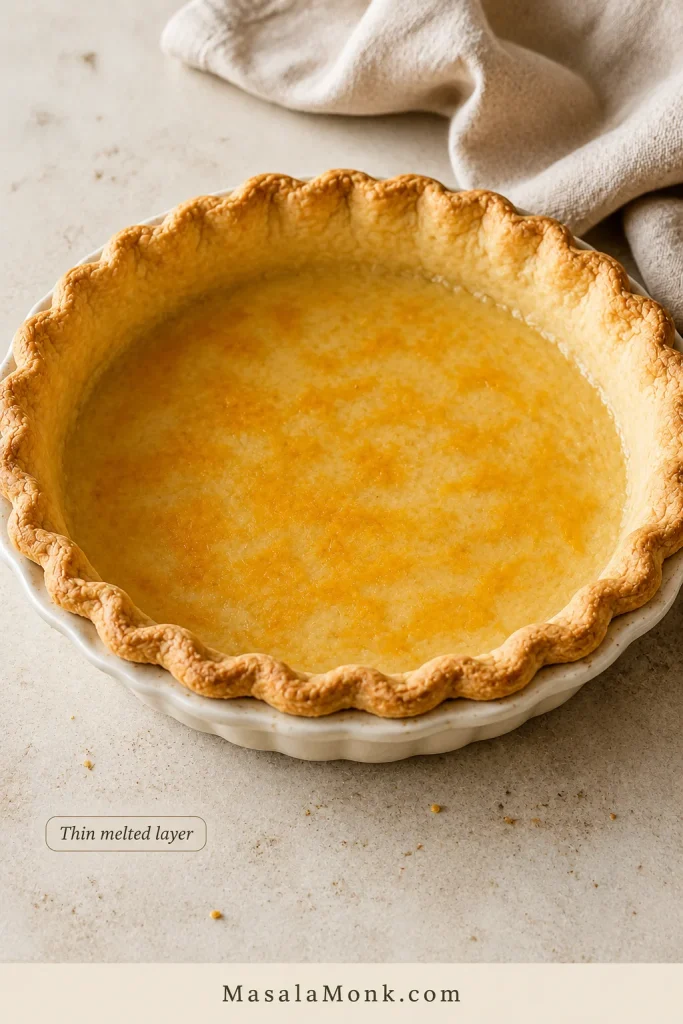
  2. Add the cheddar barrier and lower the oven. Scatter the 40 g cheddar over the hot crust and return it to the oven for about 3–5 minutes, until the cheese melts into a thin layer. Reduce the oven temperature to 375°F / 190°C conventional and keep one rack in the lower third.
Close view inside an empty blind-baked pie shell with a thin layer of melted cheddar coating the bottom crust.
A thin melted cheddar layer adds another buffer between the pastry and the juicy tomato filling.
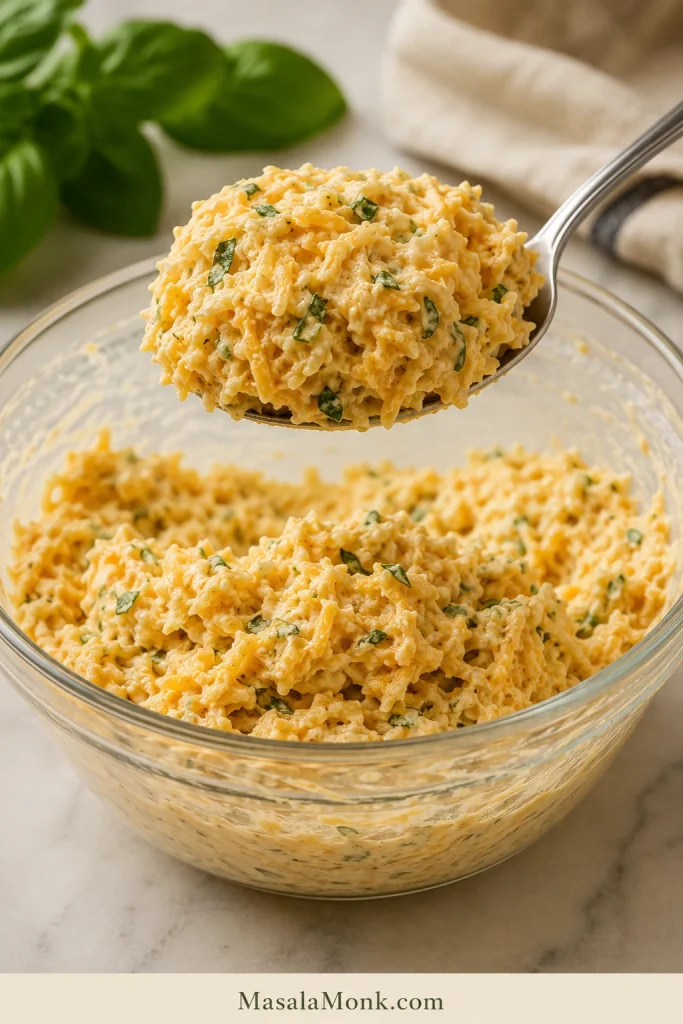
  1. Mix the topping. Combine the remaining 160 g cheddar, Parmesan, mayonnaise, Dijon, the remaining ¼ teaspoon black pepper and the basil. The mixture should be thick enough to hold its shape. Cheddar, Parmesan and mayonnaise already bring plenty of salt, so taste before adding any more.
Spoon holding a thick mound of cheddar, Parmesan, mayonnaise, Dijon, and basil mixture above a bowl, with no dripping or cheese strands.
The topping should mound on the spoon and stay there—thick, cohesive and easy to dollop.

Assemble, Bake and Rest

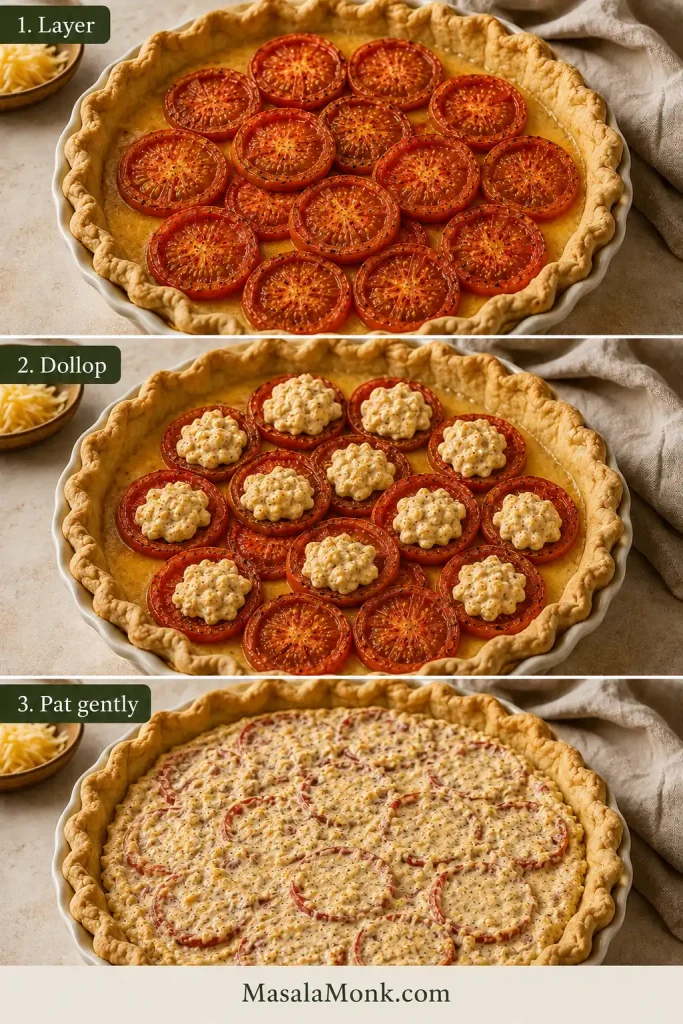
  1. Assemble the pie. Arrange the roasted tomatoes over the cheese-lined base with light overlap. Blot any slice that has released a fresh puddle while waiting. Dollop the topping in small spoonfuls over the tomatoes, then gently spread or pat it into an even layer with the back of a spoon.
Three stages of tomato pie assembly showing roasted tomatoes layered in the crust, small spoonfuls of cheese topping added, and the topping gently spread.
Dollop first, then spread gently so the roasted tomato slices stay where you placed them.
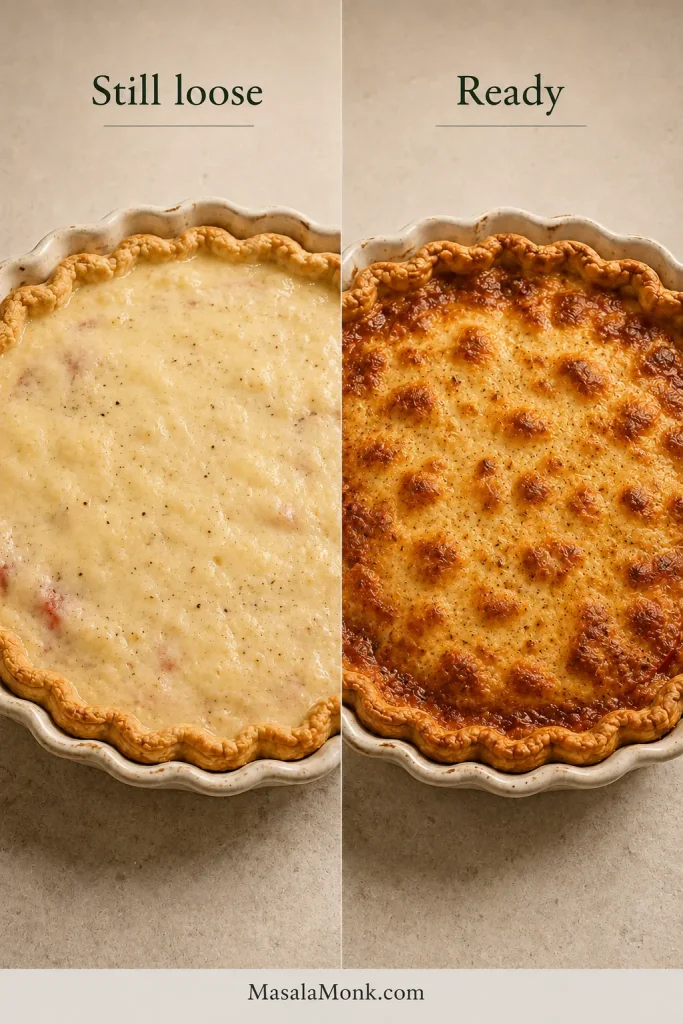
  1. Bake until browned and set. Bake on the lower-third rack for about 30–35 minutes, beginning to check around 25 minutes. The crust should be deeply golden, the topping browned in patches, and small bubbles should appear around parts of the filling. Give the dish a gentle nudge. A little movement is fine; the filling should move together instead of sloshing. Shield the rim with foil if it browns before the center is ready.
  2. Rest and serve. Set the pie on a wire rack for at least 30 minutes. For cleaner wedges, give it closer to 45–60 minutes. Finish with a little fresh basil before serving.

Recipe Notes

  • Two-tray timing: Allow roughly another 20–30 minutes because the crust can no longer pre-bake alongside the tomatoes.
  • Using coarse kosher salt? Weigh it if possible; crystal size varies enough between brands to make a direct teaspoon conversion unreliable.
  • Very juicy heirlooms may need longer. Trust the tray rather than forcing every batch to finish at exactly 25 minutes.
  • Fan/convection ovens brown faster. Use your oven’s usual temperature adjustment and begin checking both tomatoes and crust early.
  • For cleaner slices, cut through the tomato skins first. A sharp serrated knife or very sharp chef’s knife helps keep a large slice from pulling the filling out with it.

Need something specific? Best Tomatoes · The Best Crust · Cheese & Mayo · Times & Doneness · Troubleshooting · Variations · Serving · Make Ahead

Why Tomato Pie Gets Soggy—and Five Ways to Keep the Crust Crisp

A soft crust can begin in several places. Too much water may come in with the tomatoes. The pastry may need more time before filling, or the bottom may not be browning strongly enough. Sometimes a well-baked pie is simply sliced while everything inside is still loose and steaming.

The crispest pies do not rely on one heroic trick. A handful of smaller choices add up.

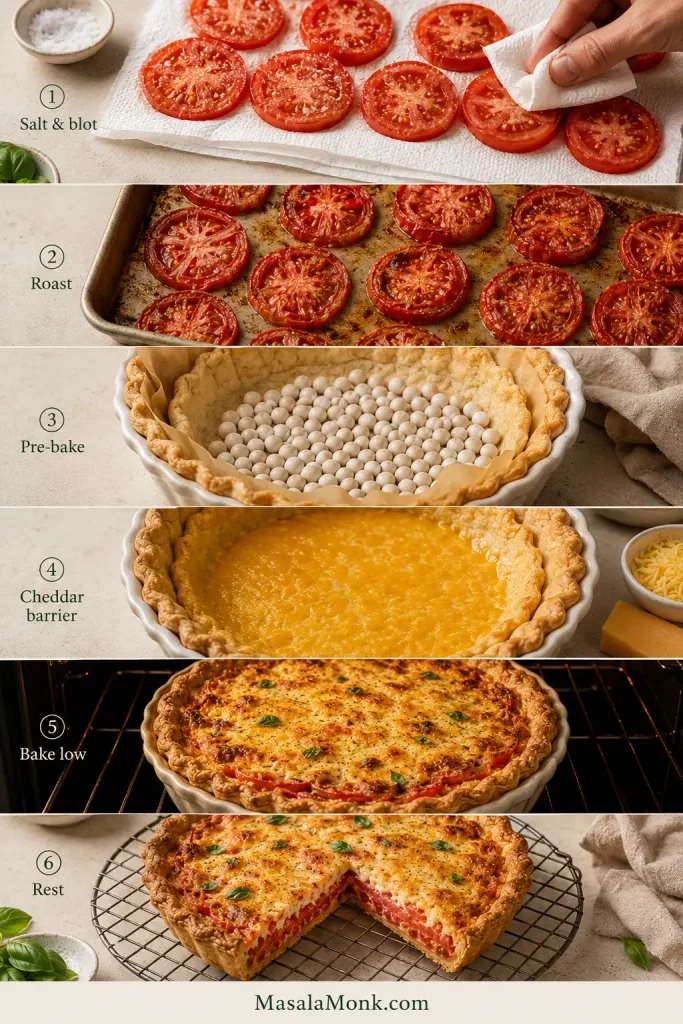
Tomato pie guide showing tomatoes salted and blotted, roasted, crust blind-baked, a thin cheddar barrier, a low-rack bake, and the finished pie resting.
Crispness comes from several small protections working together: blot, roast, pre-bake, add a thin cheese barrier, bake low and rest.
  1. Dry the tomatoes in two stages. A short salt-and-blot step removes easy surface water; roasting then drives off more moisture while concentrating the flavor.
  2. Give the crust a real head start. The base should already have color and structure before the tomatoes arrive.
  3. Add a thin cheese layer. Melted cheddar gives the crust another buffer against the tomato juices.
  4. Bake low in the oven. The lower rack encourages better browning underneath while the filling finishes.
  5. Let the pie rest. Cooling lets steam escape and gives the filling time to settle.

Together, those small choices make the difference between a pie that merely tastes good and one you can confidently lift from the dish and put on somebody’s plate.

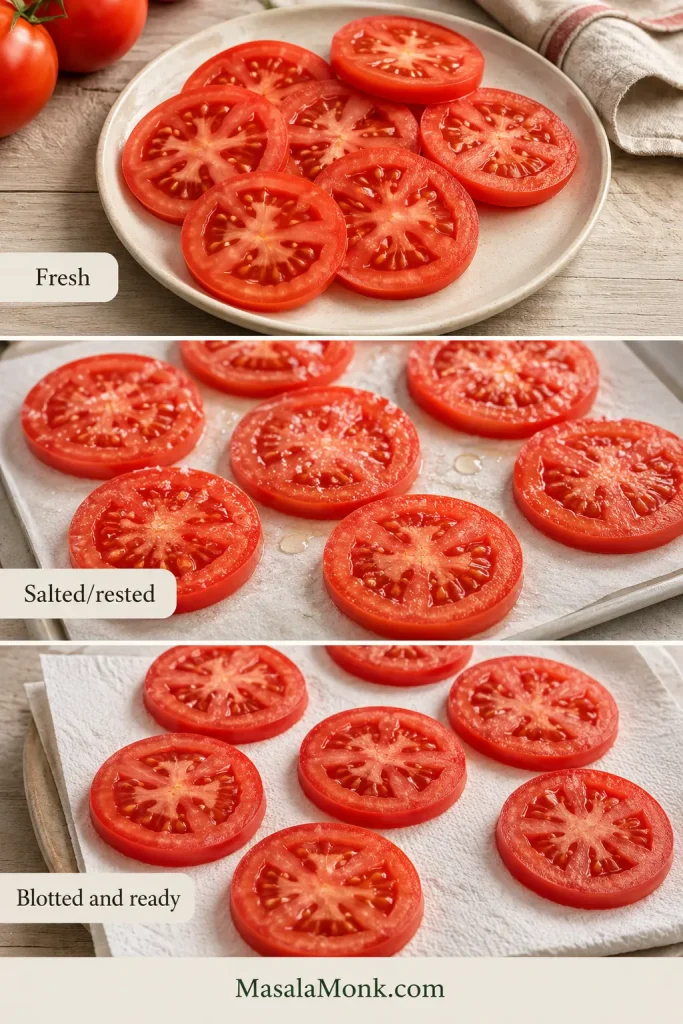
Surface water is the easiest moisture to remove: salting draws it out, and blotting takes it away before roasting begins.

Three tomato-preparation stages showing fresh glossy slices, salted slices with beads of moisture, and blotted slices with visibly drier surfaces.
The beads that appear after salting are moisture you can blot away before the tomatoes ever reach the crust.

Best Tomatoes for Tomato Pie

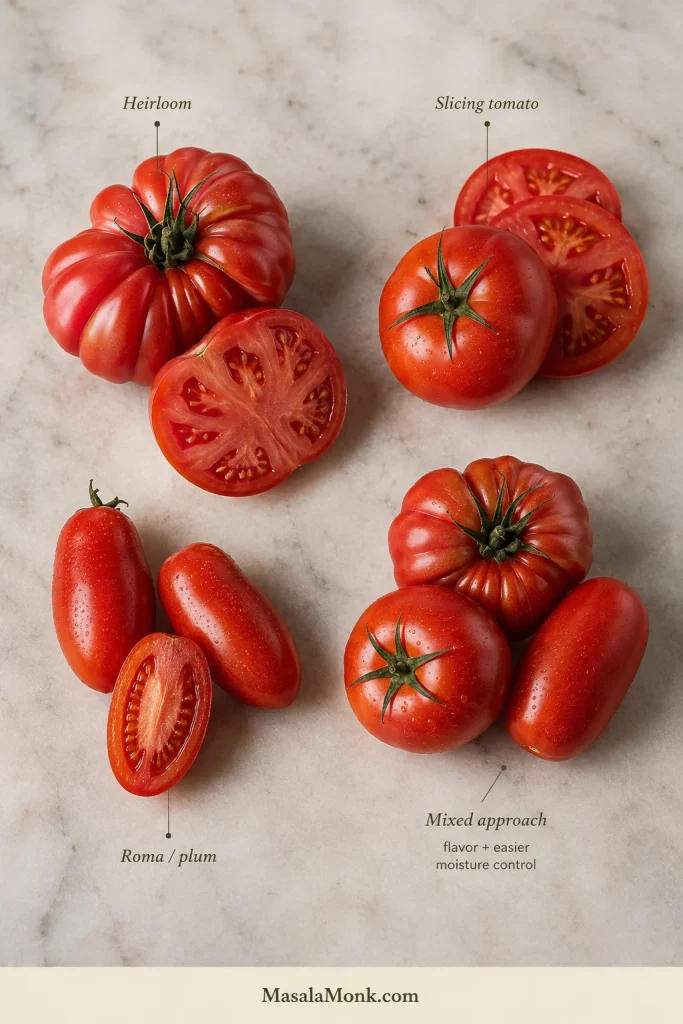
Four groups compare heirloom tomatoes, round slicing tomatoes, Roma or plum tomatoes, and a mixed combination of those tomato types.
Heirlooms bring big flavor but more juice; plum tomatoes are meatier; slicing tomatoes sit comfortably between the two.

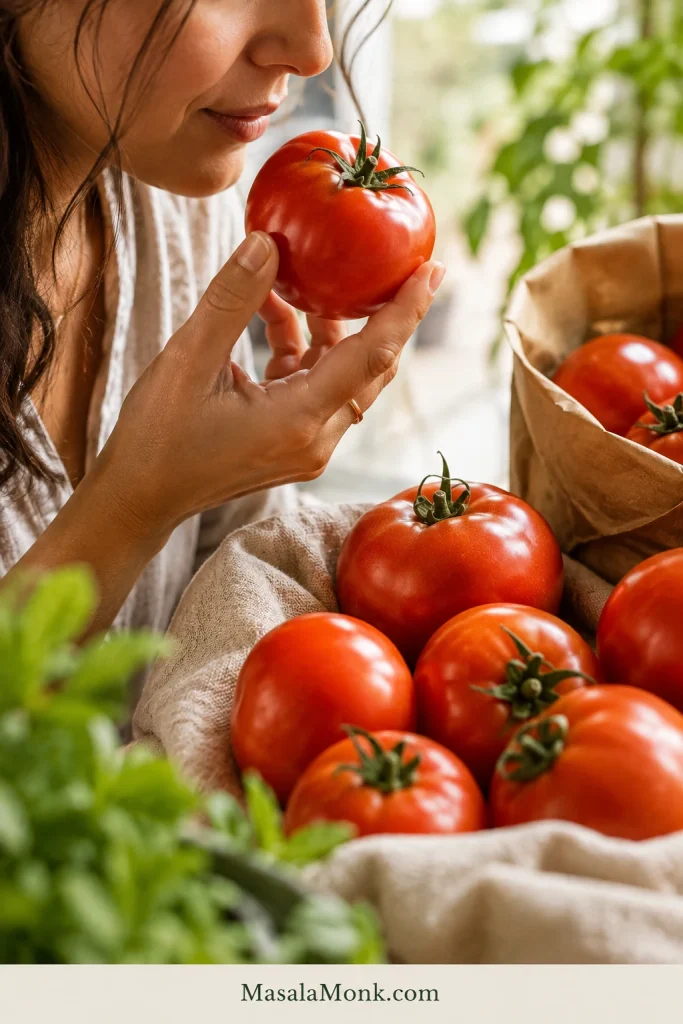
For pie, tomato flavor matters—but so does how much water that tomato is carrying. Smell them. If they barely smell like tomatoes before you cut them, roasting will not suddenly give them peak-summer flavor.

TomatoBest ForMoisture RiskWhat to Know
HeirloomBig flavor and beautiful colorHighWonderful in season, but very juicy varieties may need extra roasting time.
Ripe slicing tomatoBest all-round choiceMediumGood balance of flavor, structure and availability.
Roma or plumEasiest moisture controlLowerMeatier flesh makes them forgiving, although flavor varies.
Mixed tomatoesFlavor plus reliabilityMediumMix flavorful heirlooms with firmer slicing or plum tomatoes when you want both character and easier moisture control.

What I Would Buy

If I were shopping specifically for this pie, I would choose ripe but still firm slicing tomatoes unless especially flavorful heirlooms were available.

A hand holds a ripe red tomato near the nose while several firm red tomatoes rest nearby on linen and in a paper produce bag.
Choose tomatoes that smell ripe and give slightly under pressure without feeling soft or collapsed.

Peak-season heirlooms are worth using; just let their juiciness decide the roasting time. Mixing a few with meatier plum tomatoes also works well when you want plenty of flavor with a little less water to manage.

Roasting does more than solve a water problem. As excess juice cooks away, the tomatoes taste sweeter, deeper and more intensely like themselves. That concentrated flavor becomes the heart of the finished pie.

Three roasted tomato states labeled too wet, ready, and overdried, ranging from glossy and juicy to lightly wrinkled and then dark and shrunken.
Ready tomatoes stay red and plump with lightly wrinkled edges and a mostly matte surface—not glossy and watery, browned or shriveled.

If some of your tomatoes are already too soft or juicy to give you neat slices, they may be happier in fresh tomato soup, where their extra liquid can be cooked down instead of fought.

Cherry tomatoes can work, but they behave more like a variation than a direct substitute: once halved, they expose much more cut surface and do not create the same layered filling. Canned tomatoes are better saved for another recipe. This one really wants fresh tomatoes that can be sliced, roasted and layered.

The Best Crust

Use a standard 9-inch / 23 cm flaky pie crust, not deep dish. Homemade dough, refrigerated rolled pastry and a standard preformed frozen shell can all work. The base needs enough color and structure before the tomatoes arrive.

Two crust preparation routes compare rolled dough blind-baked with parchment and weights with a standard preformed frozen pie shell baked in its foil pan.
Rolled dough and a frozen shell can both work; what matters is a dry, well-set base before filling.

If store-bought crust gets tomato pie on the table, use it. The tomatoes matter much more here than whether you made the pastry yourself.

Do You Have to Blind-Bake the Crust?

For this recipe, yes. The shell gets a substantial head start so it is already baked across the bottom before it has to support a juicy filling.

Look underneath. Pale or slightly translucent pastry still needs more time. You want the bottom dry and lightly golden across the base, not just browned around the exposed rim.

Two empty pie shells compared side by side: one pale and slightly glossy, the other dry, opaque, set, and lightly golden.
Look across the center, not just the rim: the base should be dry, opaque, firm and lightly golden, without shiny or translucent patches.

A crust baked this far does not disappear underneath the filling. You can still feel its flaky edge when you cut into the finished pie.

If you want to make the pastry yourself, this flaky homemade pie crust recipe makes enough dough for two single 9-inch crusts, so you can use one here and freeze the second.

Metal, glass and ceramic pie plates can all work. Metal heats quickly. Glass lets you inspect the underside. Thick ceramic usually heats more slowly, so follow the color of the pastry rather than the clock alone.

Best Cheese—and Why Mayo Matters

Extra-sharp cheddar gives the topping plenty of flavor without requiring an especially thick cheese layer. A little melts directly over the crust, while the rest forms the backbone of the topping. Parmesan adds a concentrated savory edge without bringing much extra water.

Pecorino Romano can stand in for Parmesan, but it is saltier. Taste before adding anything else salty, especially if bacon is also going into the pie.

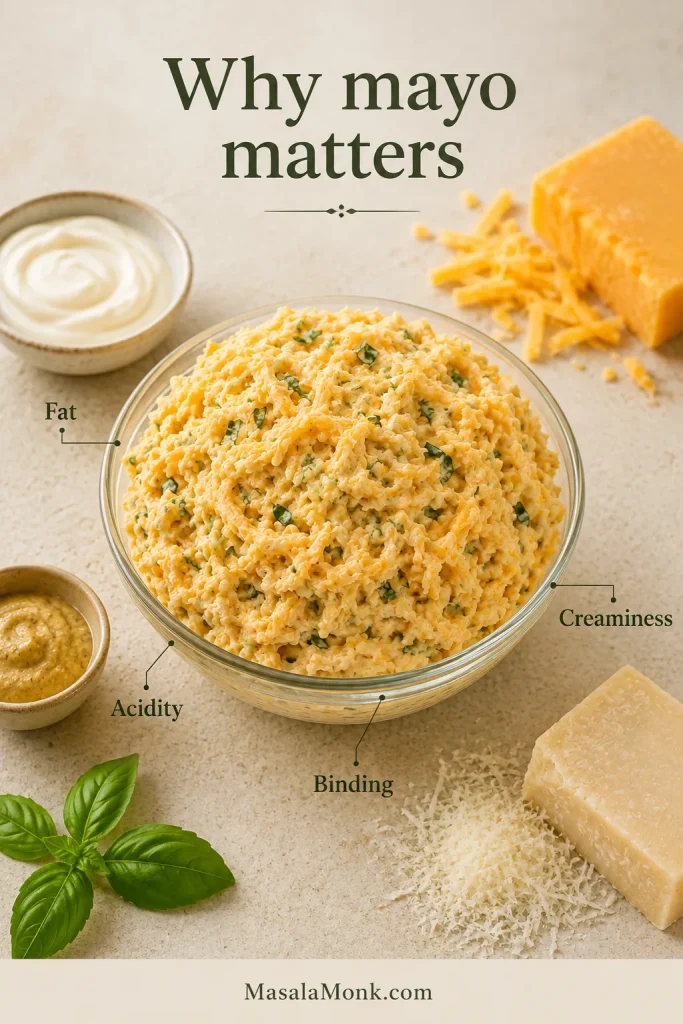
Why Does Southern Tomato Pie Use Mayonnaise?

Bowl of cheddar and mayonnaise topping surrounded by mayonnaise, cheddar, Parmesan, Dijon, and basil, with callouts for fat, acidity, creaminess, and binding.
Mayo is part of the topping’s structure here, not a separate sauce or finishing condiment.

Mayonnaise brings fat, acidity, creaminess and enough binding to help the cheese topping hold together as it bakes. If you prefer making condiments from scratch, this homemade mayonnaise recipe explains the basic emulsion and gives you a classic mayo you can use here.

The creamy layer needs enough tang to sharpen the tomatoes. The topping should frame the filling, not bury it.

For more stretch, choose low-moisture mozzarella rather than fresh mozzarella. Treat it as a texture variation, not an exact cheddar substitution. Fresh mozzarella carries much more water. Gruyère gives the pie a nuttier, more savory character, while fontina melts into a softer, silkier layer.

How Long to Bake Tomato Pie: Times and Readiness Cues

The timer tells you when to start looking. The food tells you when to move on. Tomato variety, crust thickness, pie-dish material and oven calibration all affect the exact timing, so use the clock together with the visual cues below.

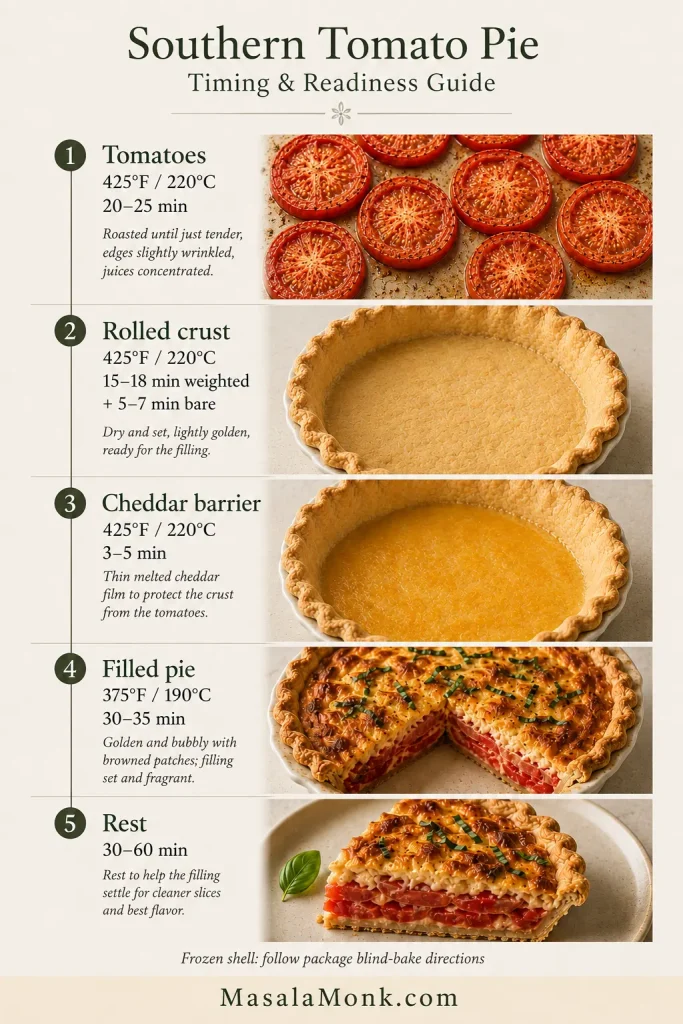
Vertical tomato pie timing guide showing roasted tomatoes, blind-baked crust, melted cheddar barrier, baked filled pie, and rested slice with temperatures and cooking times.
When your oven runs faster or slower than expected, these visual cues are the tie-breaker.
StageTemperatureStarting TimeReady When
Tomatoes425°F / 220°C20–25 minSlightly wrinkled, deeper in color, matte rather than wet-looking, very little thin juice
Weighted rolled crust425°F / 220°C15–18 minShell has set and the rim is beginning to color
Unweighted rolled crust425°F / 220°C5–7 minBase looks dry and lightly golden
Preformed frozen shellPer package directionsPer package directionsBase is dry, set and lightly golden
Cheddar barrier425°F / 220°C3–5 minCheese has melted into a thin layer
Filled pie375°F / 190°C30–35 minCrust deeply golden, topping browned in patches, gentle bubbling, center moves together
RestRoom temperature30–60 minFilling has settled enough for the kind of slice you want

By the end of the bake, the tomatoes should smell sweeter, the cheese will have browned in patches and the pastry should look unmistakably baked.

Two views of the same tomato pie during baking: one pale and glossy with a loose center, and one browned in patches with a cohesive, set filling.
A ready center may jiggle, but the filling should move together; loose liquid sloshing independently means it needs more time.

How Long Should It Cool?

The hardest part of this recipe may be leaving it alone once it comes out of the oven.

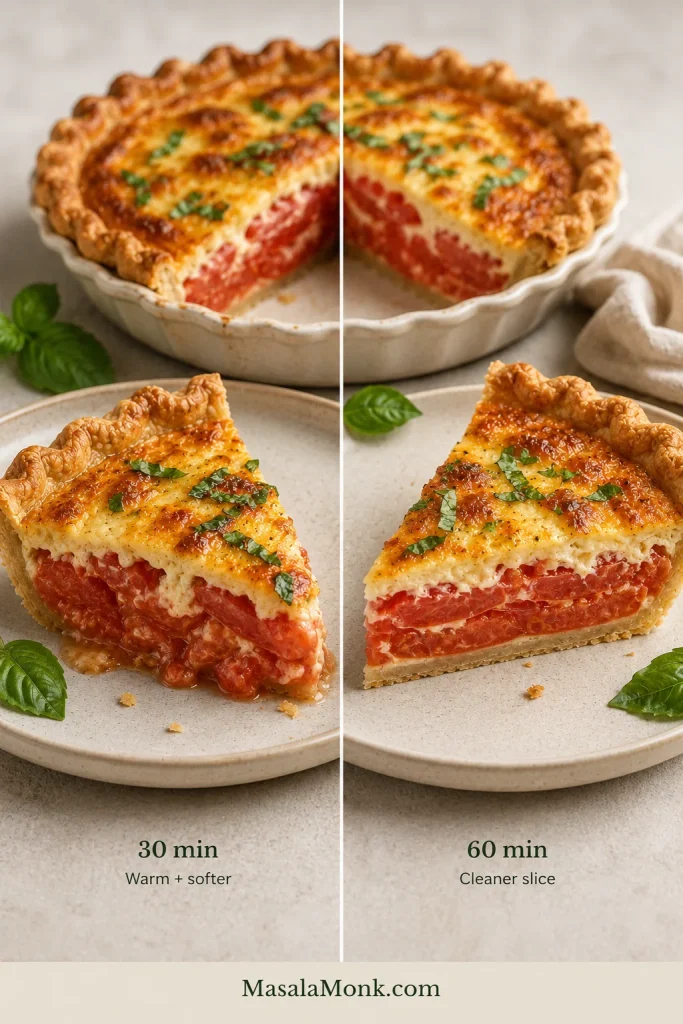
For a warm, softer wedge, about 30 minutes is enough. For clean slices at the table, give it closer to 45–60 minutes.

Two tomato pie wedges compare a warmer, softer slice after 30 minutes of resting with a cleaner, more firmly set slice after 60 minutes.
As the pie rests, the topping firms and the filling settles, so extra time buys a cleaner slice.

By then the kitchen will smell like toasted pastry, warm tomato, cheddar and basil, and the filling will have settled without going cold.

Tomato Pie Troubleshooting: What Went Wrong?

“Soggy” can mean several different things. Match the fix to what you actually see.

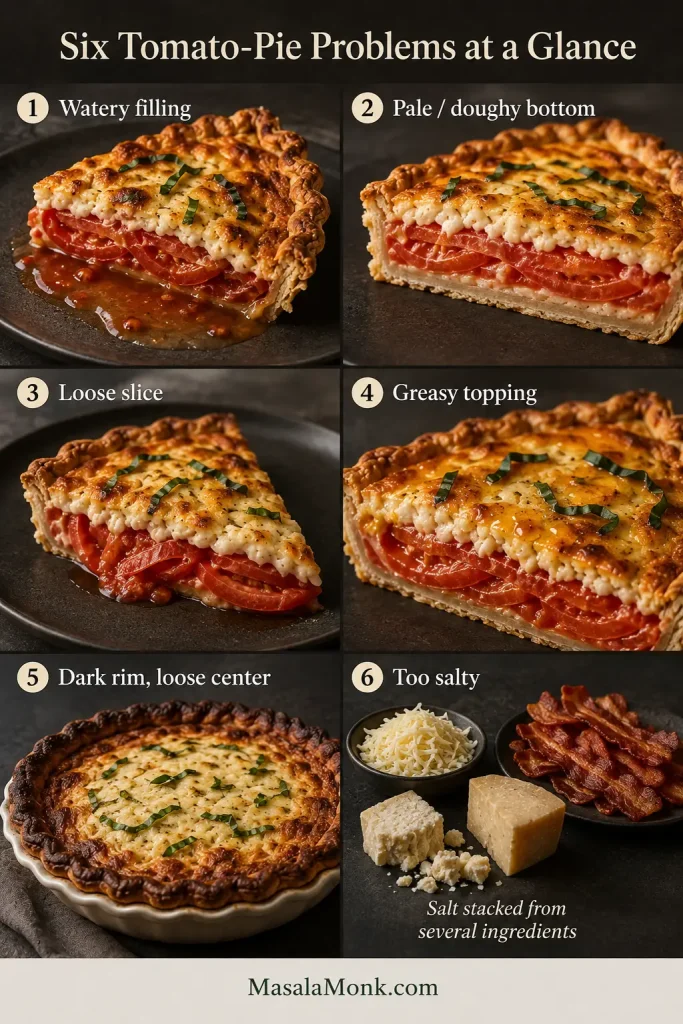
Six-panel tomato pie troubleshooting guide showing watery filling, pale bottom crust, loose filling, greasy topping, a dark rim with loose center, and several salty ingredients combined.
Start with where the problem appears—under the slice, in the filling, on top or around the rim—then match the fix.
What You SeeLikely CauseFix
Watery filling; tomato juice pools around the sliceTomatoes entered the pie too wetGive them more space or roasting time; blot slices that release juice while waiting
Pale, doughy bottom while the filling looks fineCrust needed more pre-baking or stronger bottom heatGive the base more color before filling and keep the filled pie low in the oven
Loose slice without much free liquidThe pie was cut too hotLet the filling settle longer before slicing
Clear or orange fat gathers on topToo many rich ingredients stacked togetherUse pesto modestly, drain bacon well and avoid another heavy cheese layer
Dark rim, loose centerCrust browned faster than the center cookedShield the rim with foil and keep baking
Harsh, overly salty toppingSalt from tomatoes, cheese and additions stacked upMeasure the tomato salt and taste before adding more when using Pecorino or bacon

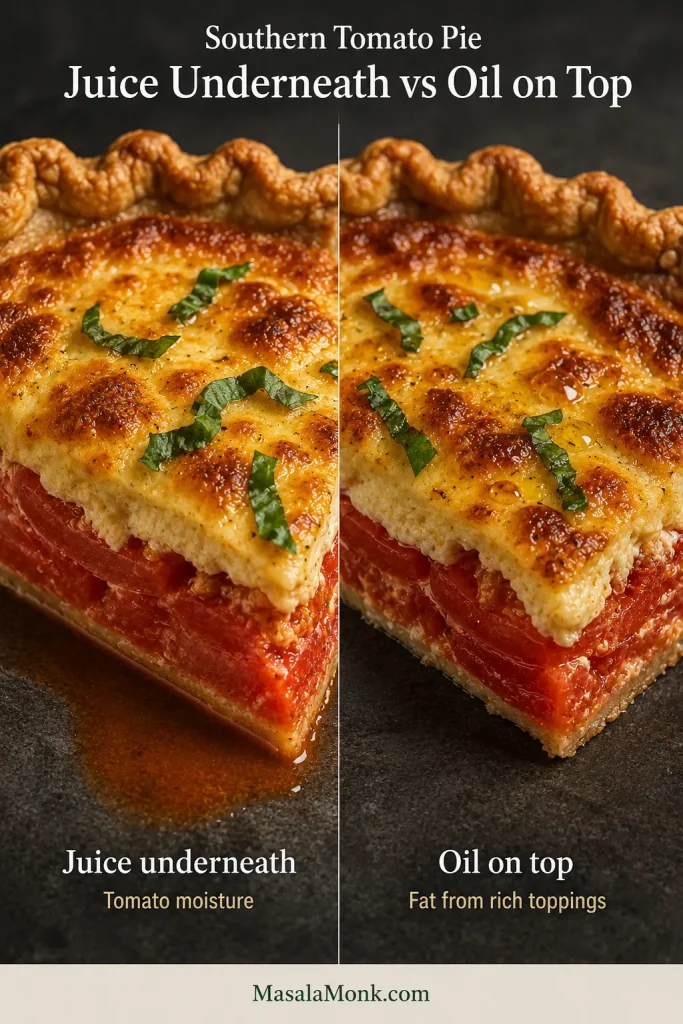
Juice underneath? Think tomatoes. Oil on top? Think cheese, mayo, bacon or pesto. They can look similar once the pie is cut, but they need completely different fixes.

Close comparison of tomato pie with thin reddish juice pooling beneath a slice and amber oil droplets sitting on top of the browned cheese.
Tomato juice is usually thin and reddish; rendered fat looks clearer and amber-orange, often beading on the cheese first.

Ready to try again? Back to Recipe · Times & Doneness

What Makes This a Southern Tomato Pie?

Ripe fresh tomatoes, pastry and a creamy cheddar-mayo topping put this firmly in the Southern tomato-pie family. Basil, onion, bacon and other cheeses vary from one kitchen to another, but tomatoes, pastry and a rich cheese layer sit at the center of the dish.

The name can be confusing. Trenton/New Jersey and Utica tomato pies belong to pizza traditions, while green tomato pie can mean something entirely different: a sweet, spiced pie made with unripe tomatoes. This recipe is the Southern savory version.

Easy Variations

Every addition brings something besides flavor—especially water, fat or salt. Keep those three in mind and the basic balance of the pie is much easier to preserve.

With Bacon

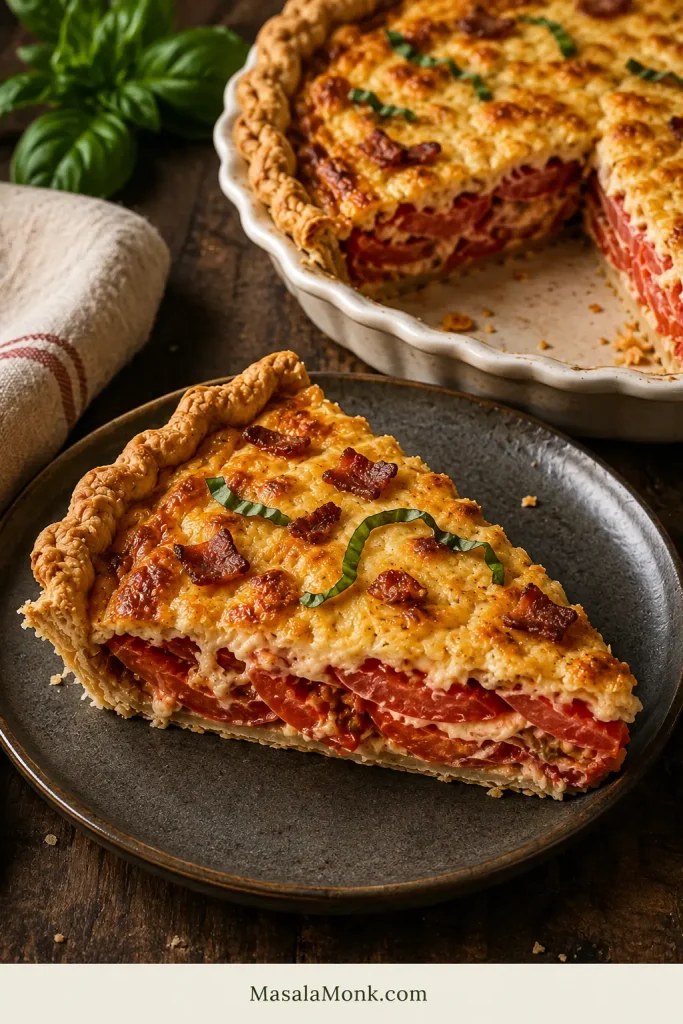
Add crisp, well-drained bacon between the tomatoes and topping. If you want an easy small-batch method, this crispy air fryer bacon recipe renders the fat well and lets the strips firm up after cooking. Cool and drain the bacon before crumbling it into the pie, and remember that it brings plenty of salt of its own.

Southern tomato pie wedge with red tomato layers, creamy browned topping, flaky crust, basil, and a restrained amount of small crisp bacon pieces.
Scatter bacon so a few bites get a smoky, crisp accent without turning the whole pie heavy.

With Pesto

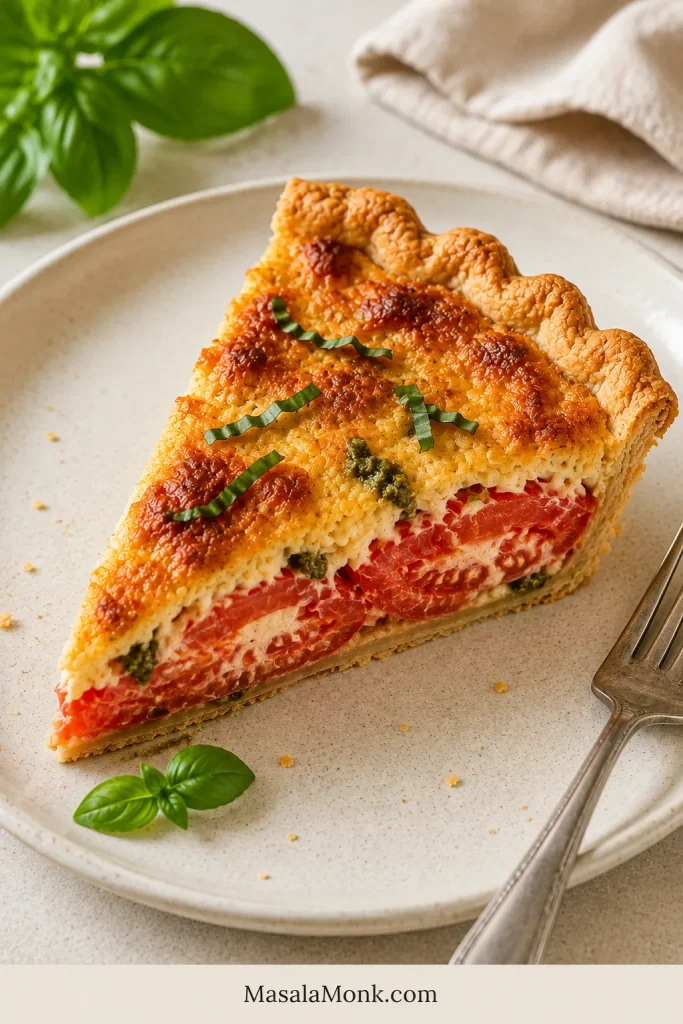
Use pesto sparingly. A classic basil pesto already contains olive oil, nuts and Parmesan, so a thick layer beneath the cheese topping can make the finished pie greasy. A thin smear is plenty. If what you mainly want is basil aroma, fresh leaves give you that lift with much less added fat.

Southern tomato pie wedge with red tomato layers, browned cheese topping, flaky crust, basil, and a few small green pesto accents in the filling.
A little pesto goes a long way; keep it as a bright basil-garlic accent, not another rich layer.

Two smaller additions: Sautéed onion or shallot adds sweetness while shedding some of its moisture before it reaches the filling. A modest handful of fresh corn adds little bursts of sweetness and texture.

Can You Make It Without Mayo?

Yes, but do not simply leave the mayonnaise out of this recipe. Mayo supplies fat, acidity, creaminess and binding, so a completely mayo-free pie needs a topping formulated around another binder.

If it is mainly the mayo flavor you want to soften, sour cream can be part of a lower-mayo topping. I would not swap it cup for cup here, though; changing the binder changes the way the topping sets. For a completely mayo-free version, use a recipe built specifically for that style.

What to Serve With Tomato Pie

The pie is rich enough that something cool, crisp or sharp alongside it works especially well.

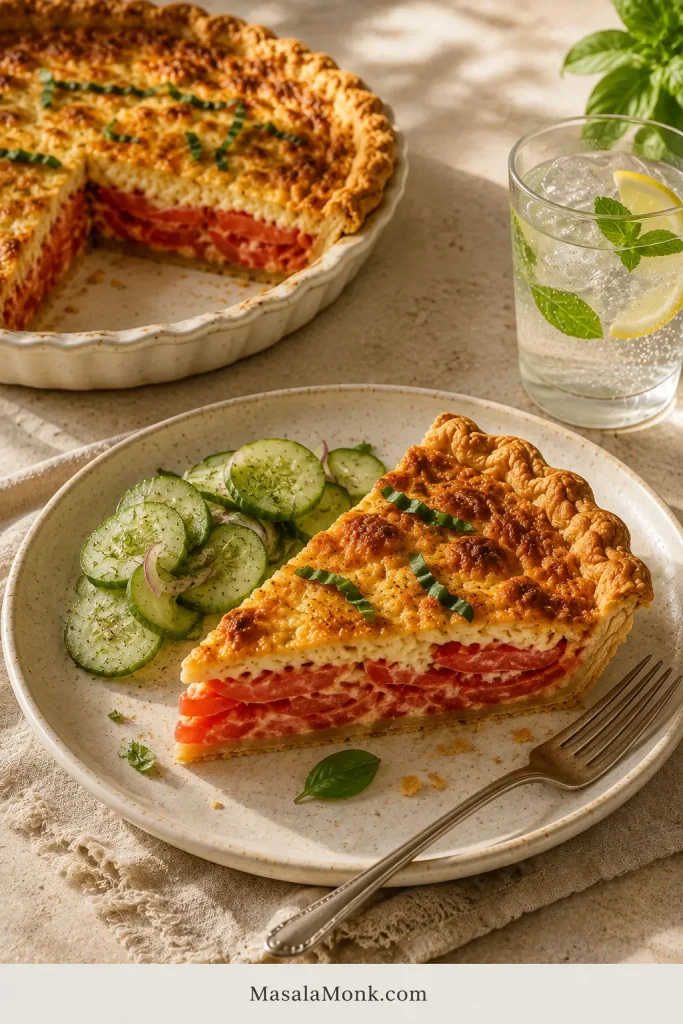
This cucumber salad with vinegar, dill and onion is a particularly good match because the crunch and acidity cut through the creamy cheese topping.

Southern tomato pie wedge served with cucumber salad and an iced lemon drink, with the remaining pie visible in the background under warm afternoon light.
Warm tomato pie, something crisp and cool, and a cold drink—that is summer lunch.
  • Green salad with a sharp vinaigrette
  • Green beans
  • Corn on the cob
  • Grilled chicken
  • Grilled shrimp
  • Fresh fruit or cold watermelon

For brunch, add eggs, fruit and a simple salad. For a summer lunch, a generous wedge and something cold and crunchy alongside it may be all you need.

Make Ahead, Store and Freeze

Make Ahead: What to Prep Early

If I were preparing this a day ahead, I would stop before assembly.

  • Roast the tomatoes and refrigerate them once cool.
  • Blind-bake the crust, let it cool completely and keep it covered.
  • Grate the cheddar and Parmesan and refrigerate them.
  • Stir the mayonnaise and Dijon together if you want one less job later, but leave the fresh basil whole until assembly.
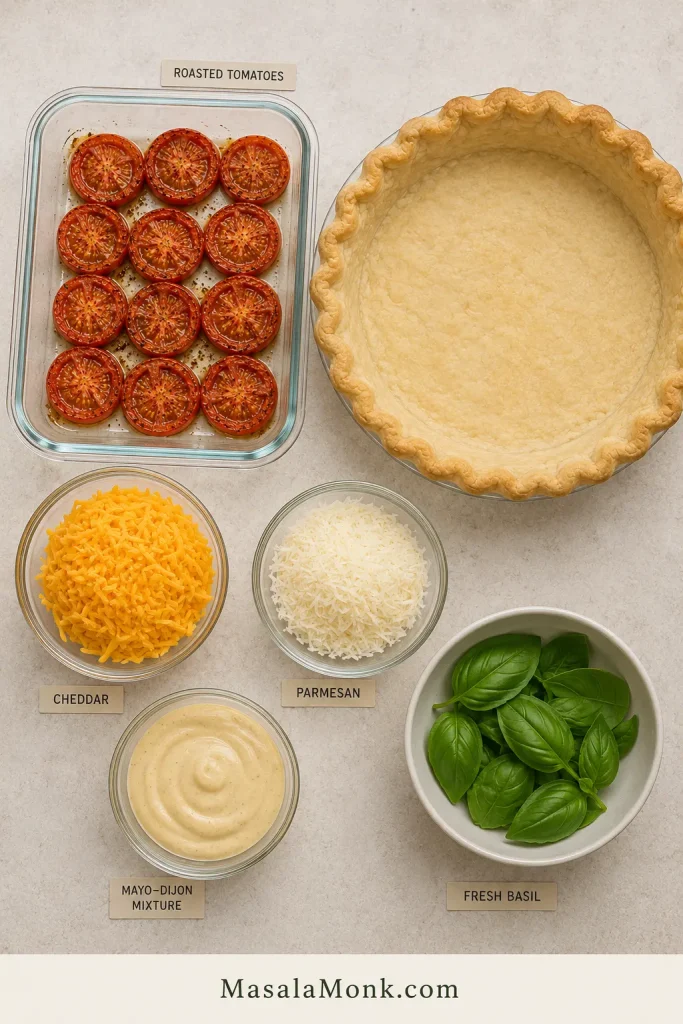
Overhead arrangement of lightly roasted tomato rounds, empty blind-baked crust, grated cheddar, Parmesan, mayo-Dijon mixture, and whole fresh basil kept separately.
Keep the components separate overnight so the crust stays dry and the basil stays fresh until assembly.

When you are ready to bake, take the roasted tomatoes from the refrigerator as you start preheating the oven so they can lose some of their chill. Melt the 40 g cheddar over the pre-baked crust, combine the remaining cheese and freshly cut basil with the mayo-Dijon mixture, then assemble the pie.

If the filling is still quite cold when it goes into the oven, the final bake may take a little longer. Follow the browned topping, gentle bubbling and center-movement cues rather than forcing it to finish at the usual minute mark.

Storing and Reheating Leftovers

After baking, keep the pie at room temperature for no more than 2 hours total, including cooling and serving time. If the surrounding temperature is above 90°F / 32°C, limit that to 1 hour. Refrigerate leftovers promptly, keep them covered and use them within 3–4 days. These timings follow USDA leftover-safety guidance.

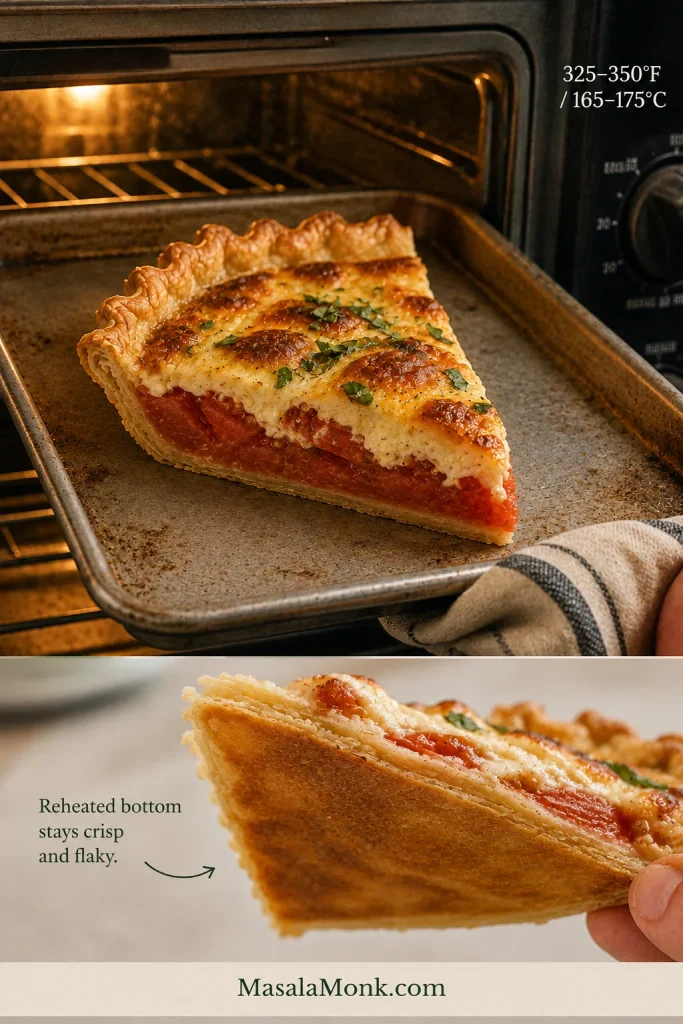
For the best crust, warm slices in an oven or toaster oven at about 325–350°F / 165–175°C. Reheated leftovers should reach 165°F / 74°C in the center. A preheated sheet pan underneath the slice can help crisp the base again.

Leftover tomato pie wedge reheating on a metal sheet pan in the oven, with a close view of the thin golden, crisp pastry on the underside.
Reheat on a hot metal sheet pan to give the pastry direct bottom heat and help it crisp again.

The microwave is fine when speed matters, but expect softer pastry.

Freezing

You can freeze the pie, but it would not be my first choice if crust texture matters.

Tomatoes soften after freezing and thawing; Penn State Extension likewise recommends thawed frozen tomatoes for cooked uses rather than expecting fresh tomato texture. The pastry also tends to come back softer than it was freshly baked.

If you know in advance that you will not need the whole pie, preparing the components ahead and baking closer to serving usually gives you the better result.

Useful shortcuts: Back to Recipe · FAQ · Back to Top

FAQ

Do I need to peel the tomatoes? No. Roasting and baking soften the skins, and leaving them on helps the slices retain their shape. Peel them only if your tomatoes have unusually tough skins or you strongly dislike the texture.

Should I remove the seeds? Not routinely. The seed cavities contain plenty of juice, so removing some can help with exceptionally watery tomatoes, but roasting gives you a more consistent way to manage moisture.

Can I make it gluten-free? Yes. Use a reliable gluten-free pie crust and follow the same tomato-drying and pre-baking method. Check the crust manufacturer’s directions because gluten-free pastry can brown and handle differently from wheat-based pastry.

The Slice You Are Looking For

By the time the pie has rested, the cheese should have settled into the tomatoes and the crust underneath should still feel like part of the dish. Run the knife cleanly through the tomato skins and pastry, then lift the first wedge.

The bottom should come with it.

Hand lifting a clean wedge of Southern tomato pie on a server, with the thin flaky bottom crust attached and the remaining pie behind it.
The payoff: a clean wedge that lifts with its flaky bottom crust still attached.

You get flaky pastry underneath, concentrated ripe tomato through the middle, sharp creamy cheese on top and fresh basil cutting through the richness.

Nothing running across the plate. Nothing drowning anything else.

Just a very good Southern tomato pie.

Back to Recipe · Back to Top