Posted on Leave a comment

Vegetable Pot Pie Recipe: Easy, Creamy & Flaky With Puff Pastry or Pie Crust

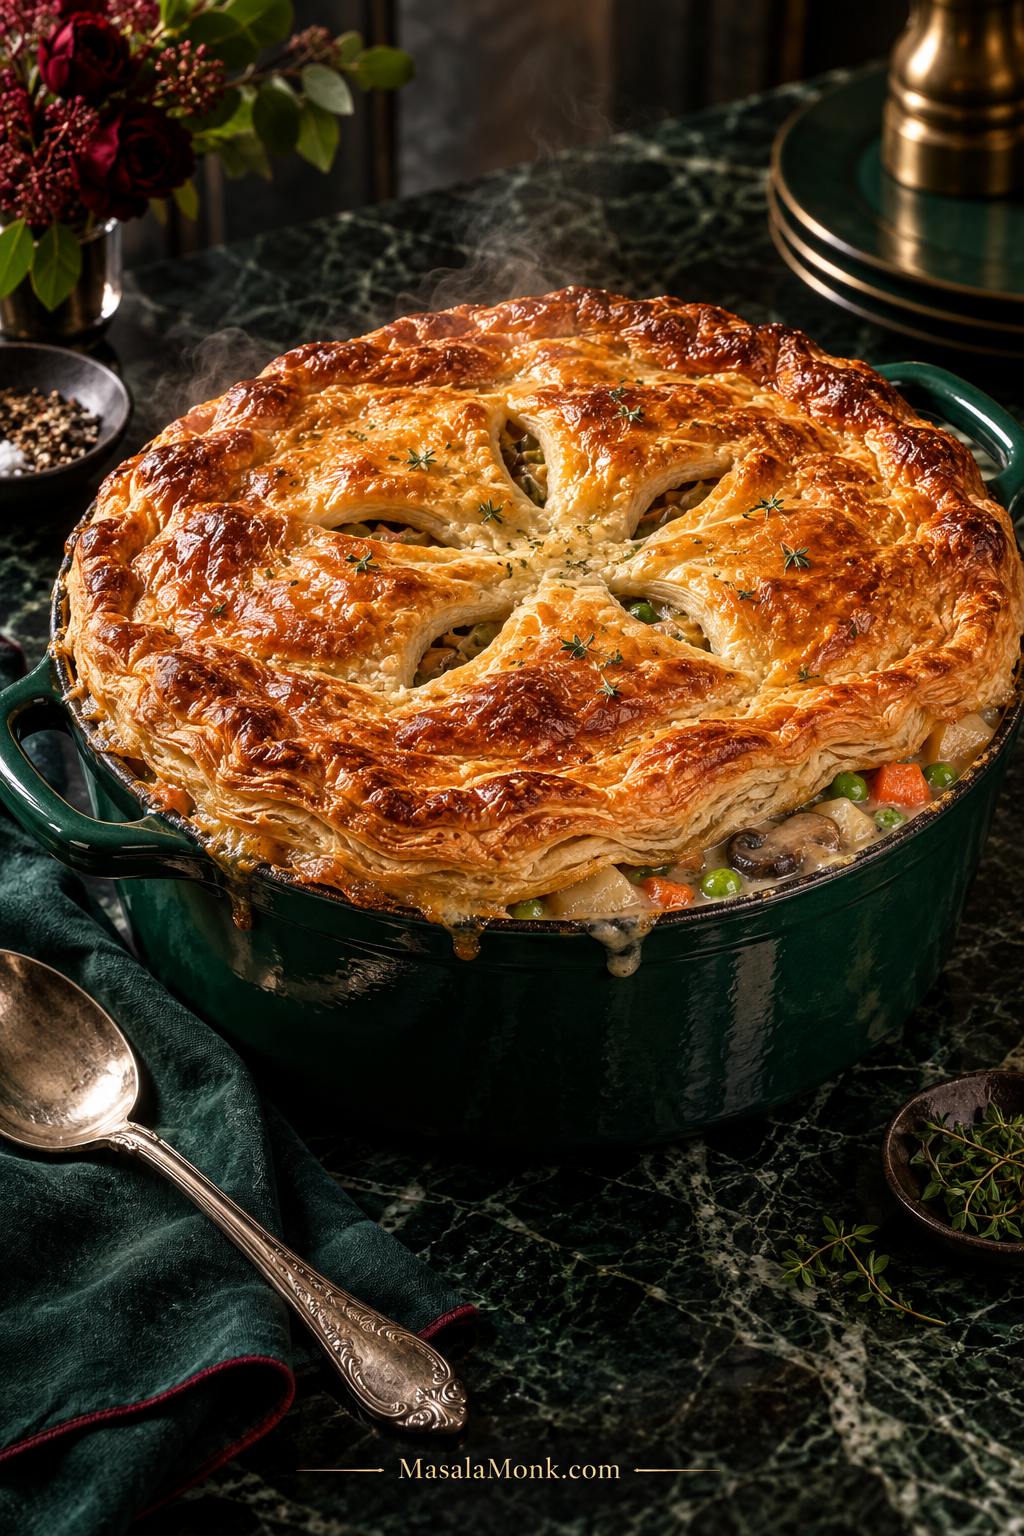
Vegetable pot pie in a deep green casserole with a deeply golden puff-pastry lid and creamy potato, carrot, pea, corn and mushroom filling visible around the rim.

Under a deeply golden pastry lid, the filling is creamy enough to cling to tender potatoes and carrots, with sweet peas, browned mushrooms and flaky crust in every spoonful.

That contrast is what makes vegetable pot pie worth baking: crisp pastry above, rich gravy underneath, and vegetables that stay distinct in the sauce. The key is getting those parts ready at the same time. Potatoes need a head start, mushroom water needs time to cook away, and puff pastry performs best when it reaches the oven still chilled.

This vegetable pot pie recipe handles most of that work before the dish reaches the oven. The cooking is straightforward: soften the vegetables, build the gravy, cover and bake. Once the filling is ready, the pastry turns a pan of creamy vegetables into a generous dinner with a crisp golden lid.

Vegetable Pot Pie Recipe

The recipe pairs a creamy thyme-and-sage vegetable filling with a deeply golden puff-pastry lid. Potatoes, mushrooms, carrots, peas and corn make this vegetarian pot pie substantial enough for dinner, while a single pie crust can replace the puff pastry for a sturdier finish.

Serves
About 6

Dish
2½–3 qt / 2.4–2.8 L

Oven
425°F / 220°C

Prep
20 minutes

Cook
60–70 minutes

Total
About 1 hr 30–1 hr 40 min

Three Checks Before the Crust Goes On

Cook firm vegetables until nearly tender, thicken the gravy until it clings, then add chilled pastry. Those three checks matter more than hitting every minute exactly.

Vegetables

Potatoes and other firm pieces are almost fork-tender. A knife meets only slight resistance.

Gravy

For the gravy, a spatula trail stays open for about 1–2 seconds before slowly closing.

Pastry

Puff pastry is cool and flexible, not sticky, greasy or floppy.
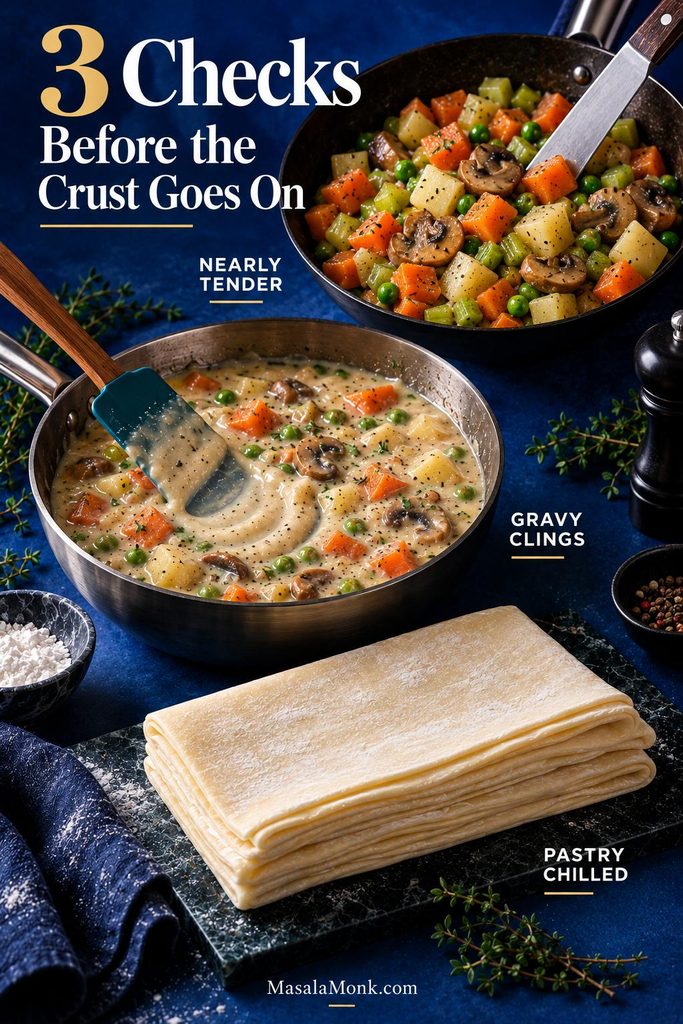
Three pre-baking checks for vegetable pot pie: nearly tender vegetables being tested, thick gravy that clings and leaves a brief trail, and chilled puff pastry ready for the dish.
These checks take pressure off the oven. Once the vegetables and gravy are ready, the bake is mainly about getting the chilled pastry properly puffed and browned.

Ingredients

Vegetables and Aromatics

  • 1 medium-large onion, diced — about 5 oz / 150 g
  • 2 medium carrots — about 5 oz / 150 gCut into ¼- to ⅜-inch / 6- to 10-mm pieces.
  • 2 celery stalks — about 3 oz / 80 gDice into small, even pieces.
  • 8 oz / 225 g mushroomsCremini or white mushrooms both work; slice or chop them.
  • 8 oz / 225 g Yukon Gold or other all-purpose potatoUsually 1 large or 2 small potatoes. Cut into ⅜- to ½-inch / 10- to 12-mm cubes.
  • 3 garlic cloves, minced
  • 1 tsp dried thyme
  • ½ tsp dried sage

For the Creamy Gravy

  • 4 tbsp / 2 oz / 56 g unsalted butter
  • ⅓ cup / about 1½ oz / 42 g all-purpose flour
  • 2 cups / 16 fl oz / 480 ml low-sodium vegetable broth, divided½ cup / 120 ml cooks the potato; the remaining 1½ cups / 360 ml builds the gravy.
  • ½ cup / 4 fl oz / 120 ml whole milkHeavy cream can replace the milk for a richer sauce.
  • 2 tsp / 10 ml soy sauce
  • 1½ cups / about 7½ oz / 210 g total frozen peas and corn
  • ¾ tsp fine salt, divided, plus more if needed
  • ½ tsp black pepper
  • 1 tsp / 5 ml apple cider vinegar or white wine vinegar

For the Puff-Pastry Top

  • Puff pastry — enough to cover the openingUsually one large sheet, often 8½–10½ oz / 240–300 g. Sheet dimensions matter more than package weight.
  • 1 large egg
  • 1 tbsp / 15 ml water or milk

Produce varies in size, so use the gram weights when your carrots, potatoes or onion look unusually large or small.
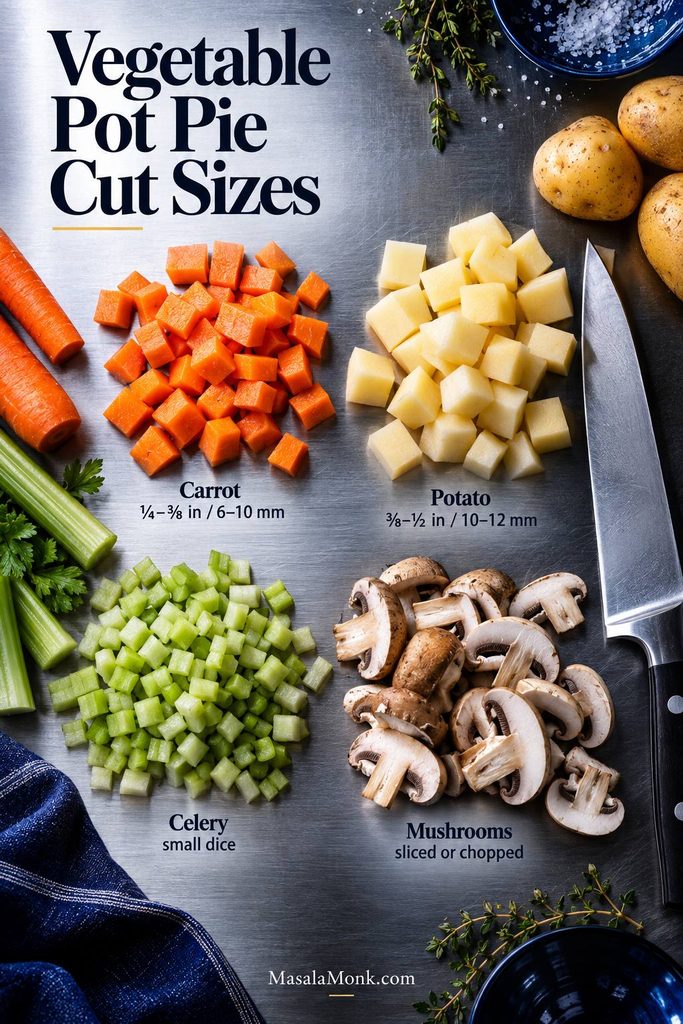
Overhead vegetable prep guide showing carrots cut about ¼ to ⅜ inch, potatoes about ⅜ to ½ inch, small-diced celery and sliced mushrooms.
Keep the firm vegetables small enough to finish before the pastry; a few oversized potato or carrot pieces can still be crunchy when the crust is already browned.

Equipment

  • Large deep skillet or Dutch oven
  • 2½–3 qt / 2.4–2.8 L oven-safe casserole or deep baking dish
  • Rimmed baking sheet
  • Whisk

A dish with an opening around 10–11 in / 25–28 cm works well with most large pastry sheets. Leave ½–¾ in / 1.25–2 cm between filling and rim so bubbling gravy has somewhere to go.

An oven-safe skillet can go straight from stovetop to oven when the filling fits with that headroom and the pastry covers the opening.

Instructions

  1. Heat the oven and chill the pastry. Preheat to 425°F / 220°C. Thaw puff pastry only until it unfolds without cracking, then return it to the refrigerator.
  2. Start the vegetables. Melt the butter over medium heat. Add onion, carrots, celery and ¼ tsp salt. Cook for 6–8 minutes, until the onion is translucent and the carrots have begun to soften.
  3. Brown the mushrooms. Add them and cook for 6–10 minutes. At first they will look wetter; keep going until that liquid evaporates and the pan returns to a clear sizzle. Add garlic, thyme, sage and pepper, then cook for 30–60 seconds, until the herbs smell distinctly savory.

Finish the Filling

  1. Get the potato nearly tender. Add potato and ½ cup / 120 ml broth. Cover for 6–8 minutes, then uncover and cook until the largest cubes offer only slight resistance and the broth has nearly disappeared. The oven is good at baking pastry; it is much less helpful with a raw potato buried under gravy.
  2. Build the gravy. Stir in the flour and cook for 1–2 minutes. Add ½ cup / 120 ml of the remaining broth and stir smooth. Gradually add the final 1 cup / 240 ml broth, then the milk, soy sauce and remaining salt. Simmer for 3–5 minutes.
  3. Add the peas and corn. Stir them in frozen and return the gravy to a gentle simmer for 2–3 minutes. Drag a spatula across the pan; the trail stays open briefly when the gravy is ready. A spoonful slumps back into the skillet, and the sauce clings to the vegetables instead of pooling underneath them.

Season and Add the Pastry

  1. Season the filling. Taste, adjust salt or pepper, then stir in the vinegar. The filling needs enough flavor to stand on its own before pastry covers it. If it is still bubbling vigorously, let it stand for about 5 minutes while the pastry stays refrigerated.
  2. Add the pastry. Transfer the filling if needed. Lay the pastry over the dish with a small overhang, press it lightly against the rim and trim only when necessary. Do not stretch the sheet to make it fit. Cut 3–5 vents, beat the egg with water or milk, and brush the top lightly.
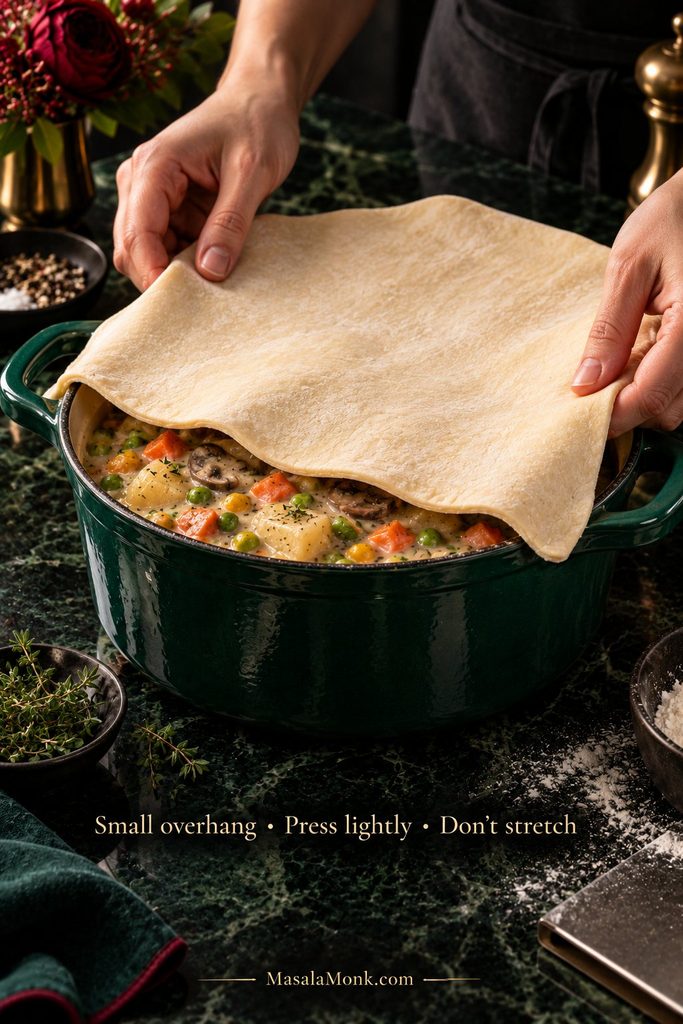
Hands laying one sheet of raw puff pastry over creamy vegetable pot pie filling with a small overhang around a deep green casserole.
If the sheet fits only when it is stretched, change the fit rather than the pastry. Taut layers have less room to separate and lift in the oven.

Bake and Rest

  1. Bake for 22–30 minutes. Look at the center as well as the edge: properly baked pastry is puffed, visibly layered and deeply golden. Gravy bubbling through the vents or around the rim is a good sign that the filling underneath is thoroughly hot. Shield dark edges loosely with foil when needed.
  2. Rest for 10 minutes. The gravy settles slightly while the lid stays crisp enough to break cleanly under a spoon.
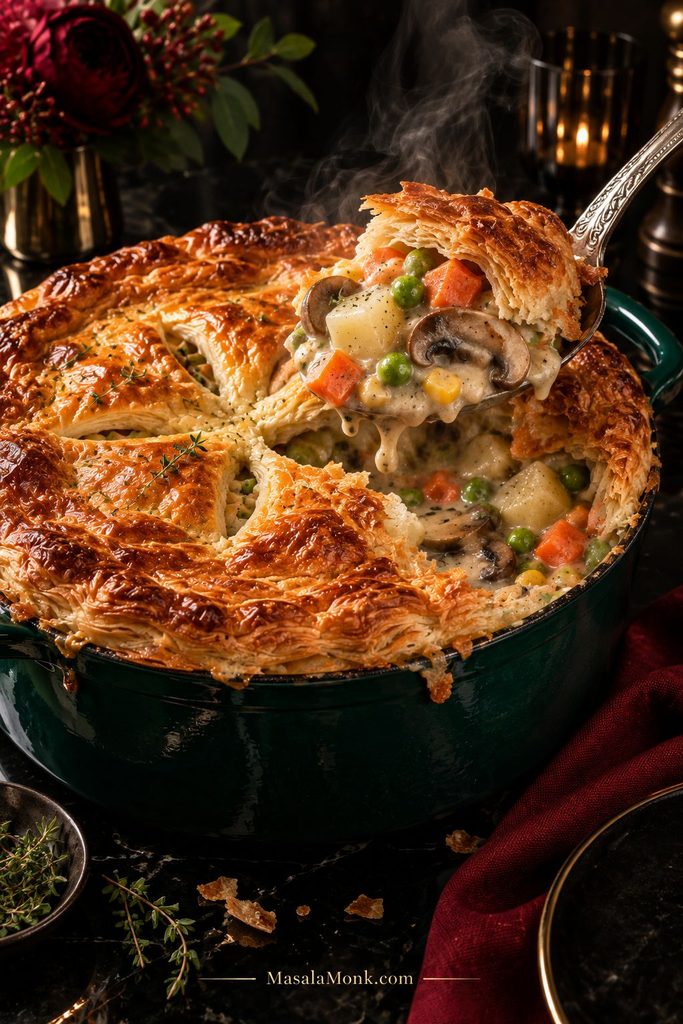
Serving spoon lifting creamy vegetable pot pie filling with potatoes, carrots, peas, corn and mushrooms beneath broken flakes of golden puff pastry.
Ten minutes after baking, look for a filling that holds briefly on the spoon before settling. That soft hold matters more than getting a perfectly tidy first serving.

Pie-crust version: cover the warm or slightly cooled filling with one prepared pie-crust round, cut several vents and brush with egg wash. Bake at 400°F / 205°C for 30–35 minutes, until deeply golden and bubbling. Check packaged crust when the dish needs to stay vegetarian, since some products use animal fat.

Best Vegetables for Pot Pie

Onion, carrots, celery, potatoes, mushrooms, peas and corn make a dependable pot-pie mix. Green beans, cauliflower, broccoli, spinach, sweet potato and squash work too. Two things matter when you swap: how long the vegetable needs to become tender and how much water it carries into the pan.

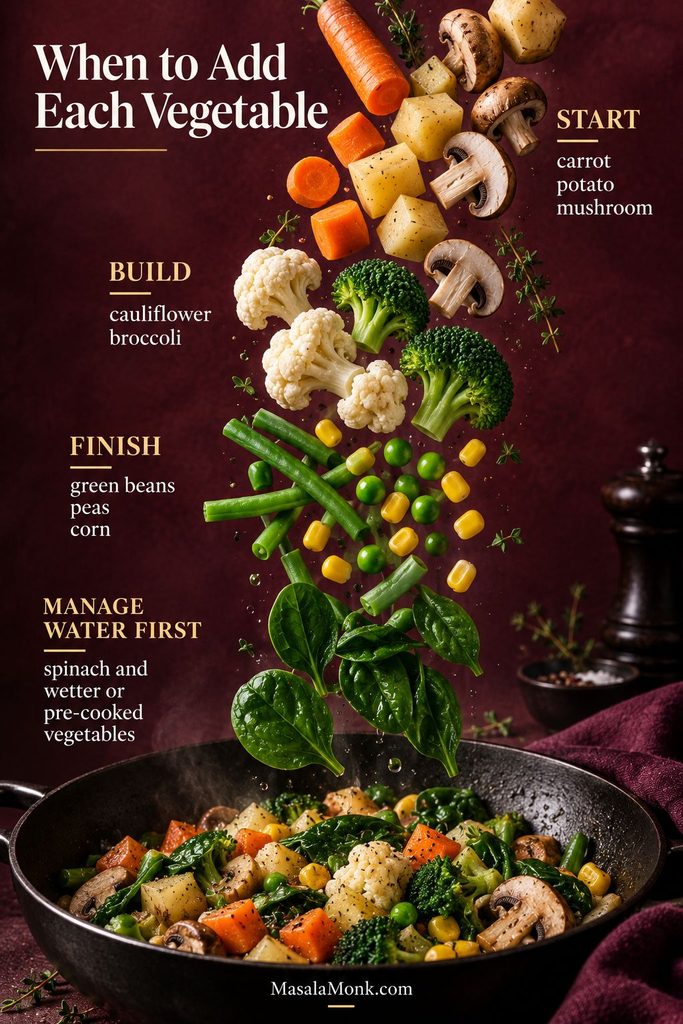
When to Add Each Vegetable

VegetableCut or PrepWhen to Add ItBefore Baking
Potato⅜–½ in / 10–12 mm diceAfter mushrooms, before flourAlmost tender
Carrot¼–⅜ in / 6–10 mm piecesWith onion and celeryMostly tender
CelerySmall diceWith onion and carrotSoftened
MushroomsSliced or choppedAfter aromatics softenWater gone; some browning
CauliflowerSmall floretsWith potato, before flourNearly tender
BroccoliSmall floretsAs the gravy thickensBright and slightly firm
Green beansShort piecesNear the end; slightly earlier if firmTender, not limp
PeasFresh or frozenAt the end, with cornHeated through
CornFresh or frozenNear the endHeated through
SpinachWilted or thawed and squeezedAt the endExcess water removed
Sweet potato½ in / 12 mm cubesWith potato; start checking earlyAlmost tender
Butternut squashSmall cubesWith potato, or roasted and added lateTender, not collapsing
Vegetable timing guide showing carrots, potatoes and mushrooms added early; cauliflower and broccoli next; green beans, peas and corn later; and spinach or wetter vegetables needing moisture control first.
Different vegetable swaps create different problems: sweet potato changes timing, spinach changes moisture, and roasted vegetables arrive with much of their cooking already finished.

Mushrooms and Potatoes Need the Head Start

Mushrooms usually get wetter before they get browner. Once their released water cooks away, the quiet bubbling changes to a sharper sizzle. That is when browning really begins, giving the finished gravy more depth. The same moisture-first sequence matters in our creamy mushroom sauce.
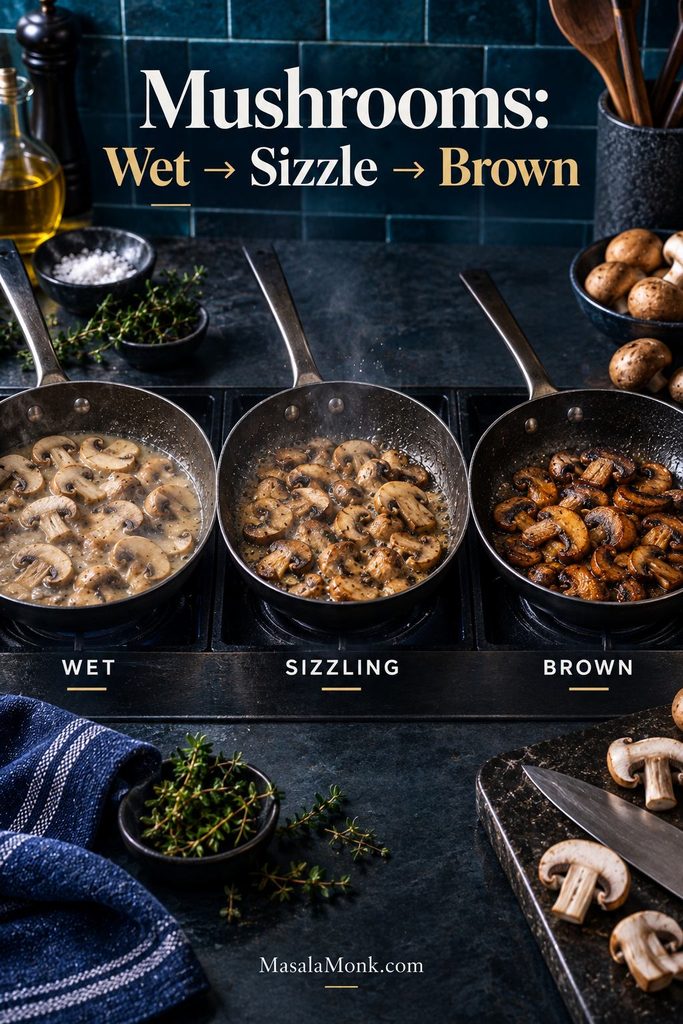
Three pans showing mushrooms releasing liquid, mushrooms sizzling as the liquid evaporates, and mushrooms deeply browned after the excess moisture is gone.
Cook the released mushroom water away before building the gravy. You get better browning now and less excess liquid to reduce later.

Potatoes have the opposite problem: they release little water but need time. Pieces around ⅜–½ inch / 10–12 mm soften efficiently without disappearing into the gravy. When potato shares the filling with cauliflower, smaller potato pieces help their cooking times meet in the middle; the same size logic appears in our roasted cauliflower and potatoes.

Swaps That Work Well

The table handles most substitutions, but a few deserve extra attention. Sweet potato softens faster than regular potato. Frozen spinach is unusually wet, so thawing and squeezing it first is worth the trouble. Already-roasted vegetables belong near the end. Roasting squash, cauliflower, Brussels sprouts or mushrooms also drives off water before it can loosen the gravy—the same moisture-control principle used in our vegetable lasagna.

Canned vegetables can work too, but their softer texture means they are best drained well and folded in late.

Build More Flavor Into the Filling

Browning does more for a meatless pot pie than simply adding extra herbs. Once the mushrooms have browned and the thyme and sage hit the pan, the filling starts smelling like pot pie before the gravy is even finished. Soy sauce gives it savory weight, while a small splash of vinegar keeps the finish lively. Mushrooms help, but cauliflower, green beans or extra potato can replace them.

Easy Vegetable Pot Pie With Frozen Vegetables

Yes. Most frozen mixed vegetables can go straight into the pot-pie filling without thawing. A few exceptions need a little prep first.

For less chopping, keep the onion, celery, mushrooms and potato, then use one 12 oz / 340 g bag of frozen peas, carrots, corn and green beans. Skip the fresh carrots and the separate peas-and-corn mixture from the main recipe.

Add the frozen mix after the gravy has thickened. The cold vegetables temporarily slow the simmer, so wait until the pan is bubbling gently again before judging thickness. Some bags barely change the sauce; heavily frosted ones can loosen it noticeably.

Straight From the Freezer

  • Peas
  • Corn
  • Small diced carrots
  • Green beans
  • Standard mixed-vegetable blends

Prep Before Adding

  • Spinach: thaw and squeeze dry.
  • Heavily frosted bags: knock away loose ice.
  • Large broccoli or cauliflower: give them more time to heat through before judging the gravy.
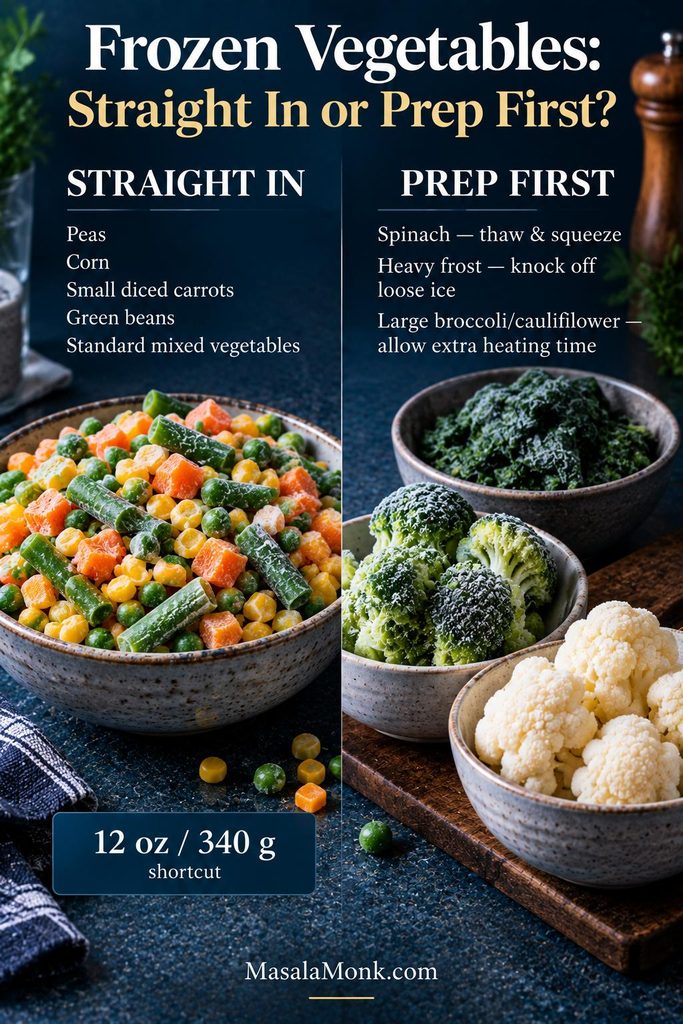
Frozen vegetable guide showing peas, corn, diced carrots and green beans used directly from frozen, while spinach, heavy frost and large broccoli or cauliflower pieces need extra preparation.
Loose freezer frost is extra water; knock it away before it reaches a gravy that is already close to finished thickness.

Jump to: Check filling thickness · Compare crusts · Back to recipe

Vegetable Pot Pie Filling: How Thick Should It Be?

The gravy should cling to the vegetables but still move slowly when you tilt the pan. Drag a spatula across the bottom; the trail should stay open for about 1–2 seconds before slowly closing.

Vegetable moisture can change a gravy that looked perfect a few minutes earlier, so judge its final thickness only after mushrooms, spinach or frozen vegetables are fully hot.
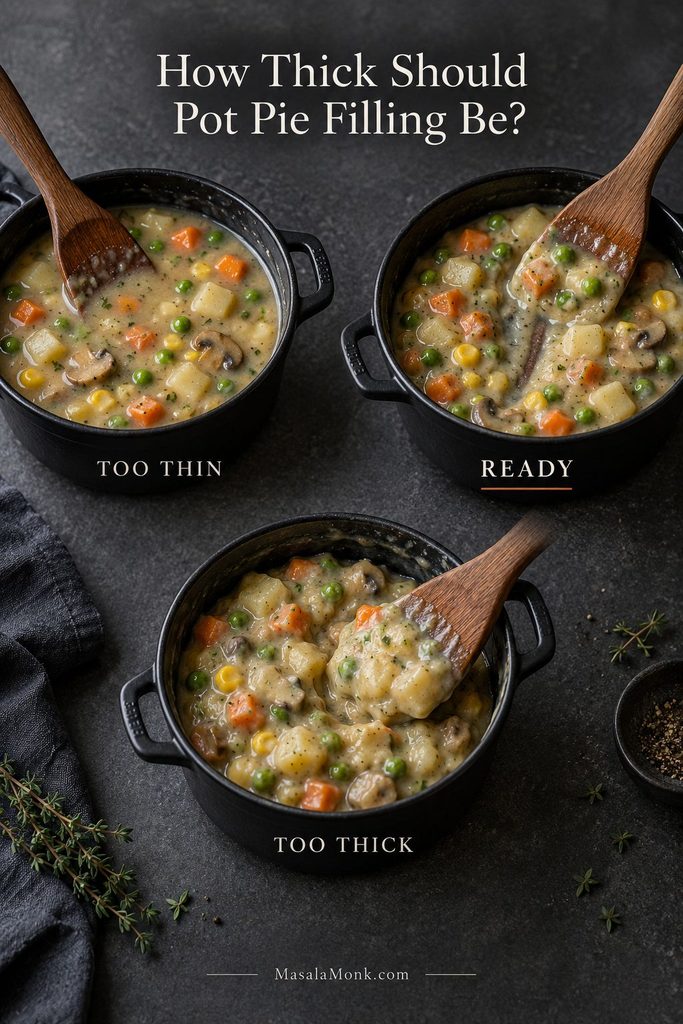
Three vegetable pot pie fillings showing a loose watery consistency, a creamy ready consistency that coats the vegetables, and an overly thick stiff consistency.
Wait for the simmer to return after adding frozen vegetables. Cold pieces can briefly make a correctly thickened pot pie filling look thinner than it really is.

When the Gravy Ends Up Too Thin

Reduce it uncovered before reaching for more starch. A few extra minutes over the heat often solve water introduced by vegetables. When reduction is not enough, mix 1 tsp / about 3 g cornstarch with 2 tsp / 10 ml cold water, stir in part of the slurry and simmer before deciding whether the rest is necessary.

When It Gets Too Thick

Add warm broth or milk 1–2 tbsp / 15–30 ml at a time. Stop once the gravy coats the vegetables easily again.

Puff Pastry, Pie Crust or Biscuits?

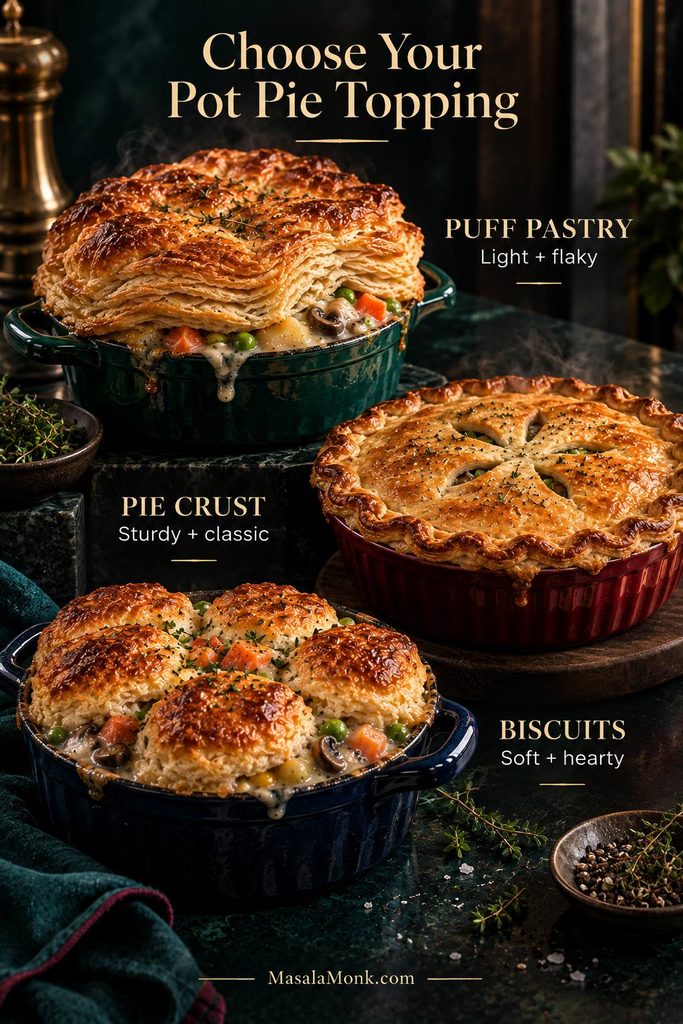
Puff pastry is the easiest default when you want a light, flaky lid without making dough. Choose pie crust for a sturdier top, or biscuits for a softer casserole-style finish. The filling itself can stay the same.

ToppingBest ForMain Adjustment
Puff pastryLight, flaky layersKeep chilled until assembly
Pie crustA sturdier classic lidBake around 400°F / 205°C
Double crustPastry underneath and on topCool filling and manage bottom moisture
BiscuitsA soft, hearty toppingCold dough over hot filling
Three vegetable pot pies comparing a tall flaky puff-pastry lid, a flatter crimped pie crust and separate golden biscuit topping.
Each topping changes the handling as well as the texture: keep puff pastry cold, use pie crust for structure, and give biscuits hot filling underneath.

Puff Pastry

For the puff pastry, the sheet is ready when it unfolds without cracking but still feels cool. Sticky, greasy or floppy pastry needs a few minutes back in the refrigerator.

Watch the middle of the lid in the oven. The edge can brown beautifully while the pastry over the wettest part of the filling remains pale and compressed. Properly baked layers look distinct and break under a spoon instead of bending together like damp dough.

Soft underneath is not the same as raw puff pastry. Steam naturally softens the side touching the gravy. Pale, sticky or floury pastry through the center is different and still needs more baking.
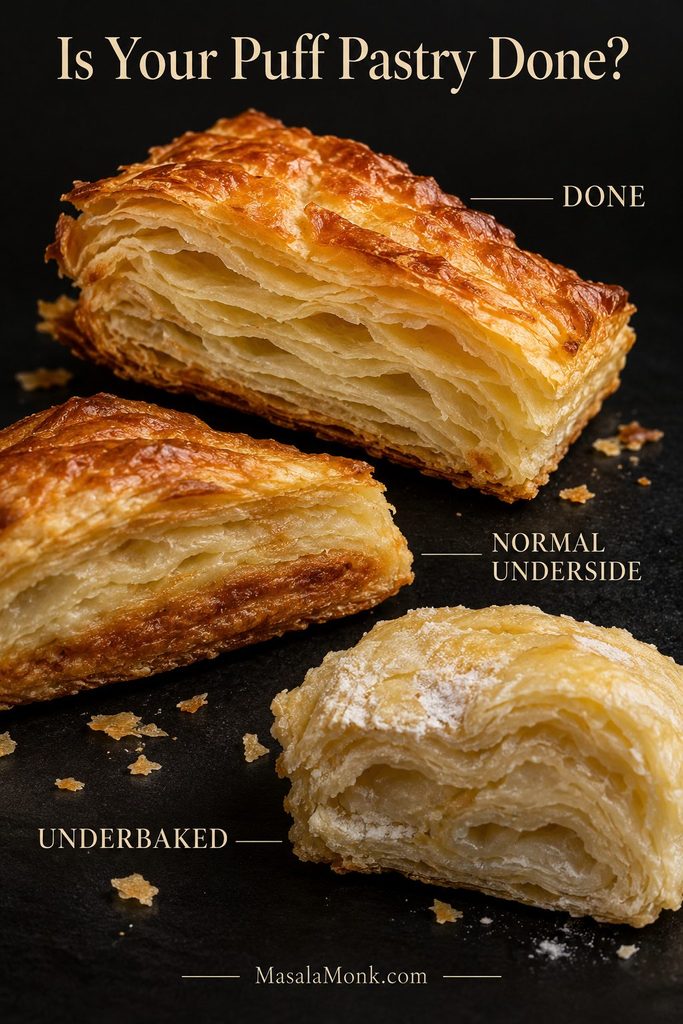
Three puff-pastry cross-sections showing fully baked separated golden layers, a cooked but softer underside, and pale compressed underbaked pastry.
If the center layers are pale, fused or tacky, keep baking—even when the edges are already deeply browned.

For crisp pastry on both sides, bake the sheet separately. Cut it into squares, brush with egg wash and bake on parchment at 400°F / 205°C, starting your check around 15 minutes. Spoon hot filling into bowls or ramekins and set the crisp pastry on top.

Puff pastry is much less forgiving on the bottom of a wet pot pie. Regular pie dough is the easier route when pastry underneath matters.

Pie Crust

For the easiest reliable pie-crust version, use a single top crust. It generally needs about 30–35 minutes at 400°F / 205°C. Cover the rim loosely with foil when it colors well ahead of the center.

Our homemade pie crust guide covers cold butter, hydration, rolling and chilling in more detail. For a double-crust pot pie, cool the filling before it meets the bottom dough and consider partial prebaking when a crisp base matters. Metal pans and stronger bottom heat also help; King Arthur Baking explains the role of pan material and bottom heat.

Using Biscuits as the Topping

Set cold biscuit dough over hot gravy with a little room between the pieces. For medium homemade biscuits, 400°F / 205°C for about 25–30 minutes is a useful starting point. Refrigerated dough should follow its package temperature and timing first.

Check a biscuit near the middle instead of judging only the browned tops. The underside is ready when it is set and no longer gummy.

Individual Pot Pies

Use six 16 oz / 475 ml ramekins, or six to eight smaller 12–14 oz / 355–415 ml dishes. Fill them no more than about three-quarters full. Puff-pastry tops often finish in roughly 18–22 minutes at 400–425°F / 205–220°C, although the center layers remain the better doneness cue.

Changing the dish changes the bake. A shallow ramekin, deep casserole, bottom crust and thick biscuit topping all move heat and steam differently. Borrow another version’s timer cautiously when the vessel or topping changes.
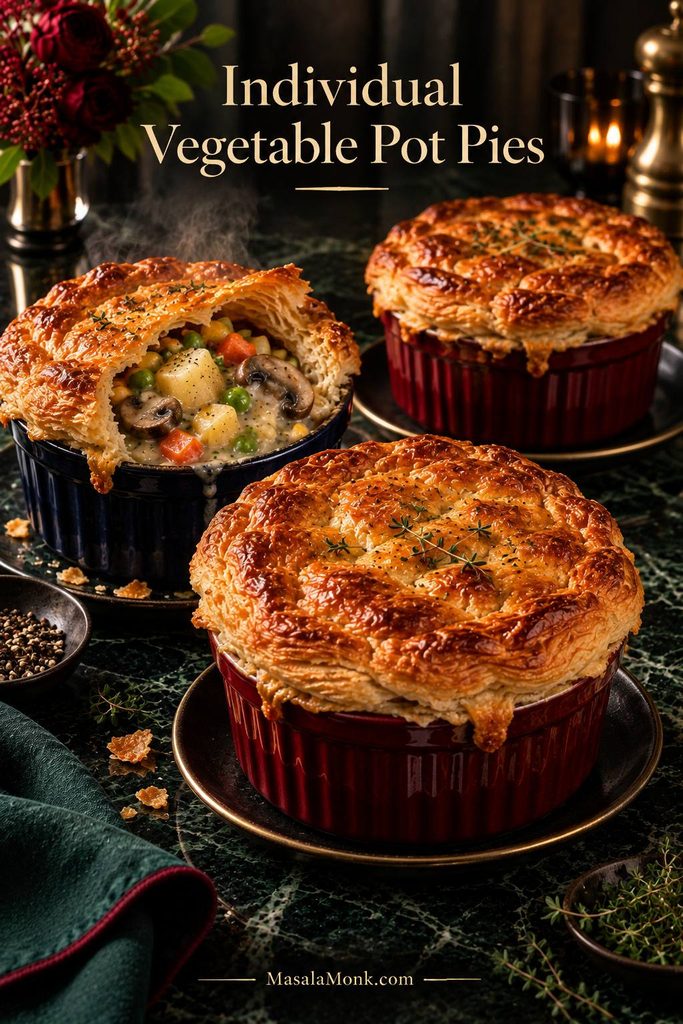
Three individual vegetable pot pies in ramekins with golden puff-pastry tops, including one opened to show creamy vegetable filling.
Three-quarter-full ramekins leave useful headroom for bubbling gravy, so the pastry edge stays cleaner and the filling stays in the dish.

Jump to: Vegetarian variations · Serving ideas · Make ahead · Back to recipe

Vegetarian Pot Pie Variations

Make It Heartier

Add 1–1½ cups / 170–255 g drained white beans or chickpeas and remove roughly the same volume of vegetables. White beans soften into the sauce; chickpeas keep more bite.

Vegan

Use vegan butter or another suitable cooking fat, vegetable broth and unsweetened oat or soy milk. Check the pastry label because prepared puff pastry and pie crusts vary in the fats they contain. Plant milk or aquafaba can replace the egg wash; nutritional yeast or a little extra soy sauce can deepen the gravy.

Gluten-Free

A gluten-free all-purpose blend designed to replace wheat flour can work in the roux. Cornstarch is another straightforward option.

For cornstarch, omit the 42 g flour. Once the vegetables are ready, add the broth and milk and bring them to a simmer. Mix 2½ tbsp / about 20 g cornstarch with 2½ tbsp cold water. Start with roughly half, simmer, then add only as much more as the gravy needs.

Use certified gluten-free tamari or soy sauce and a gluten-free topping.

Making a meat version? Cooked turkey or leftover gravy changes the liquid balance, so start with our Turkey Pot Pie Recipe instead.

What to Serve With Vegetable Pot Pie

Pot pie already brings pastry, gravy and plenty of vegetables, so the best sides add freshness. A cucumber salad with vinegar and dill gives a cold, sharp contrast, while green beans almondine add lemon and toasted-almond crunch. For the same reason, a peppery arugula salad with a bright vinaigrette works well, while simply roasted asparagus keeps the plate warm without making it heavier.
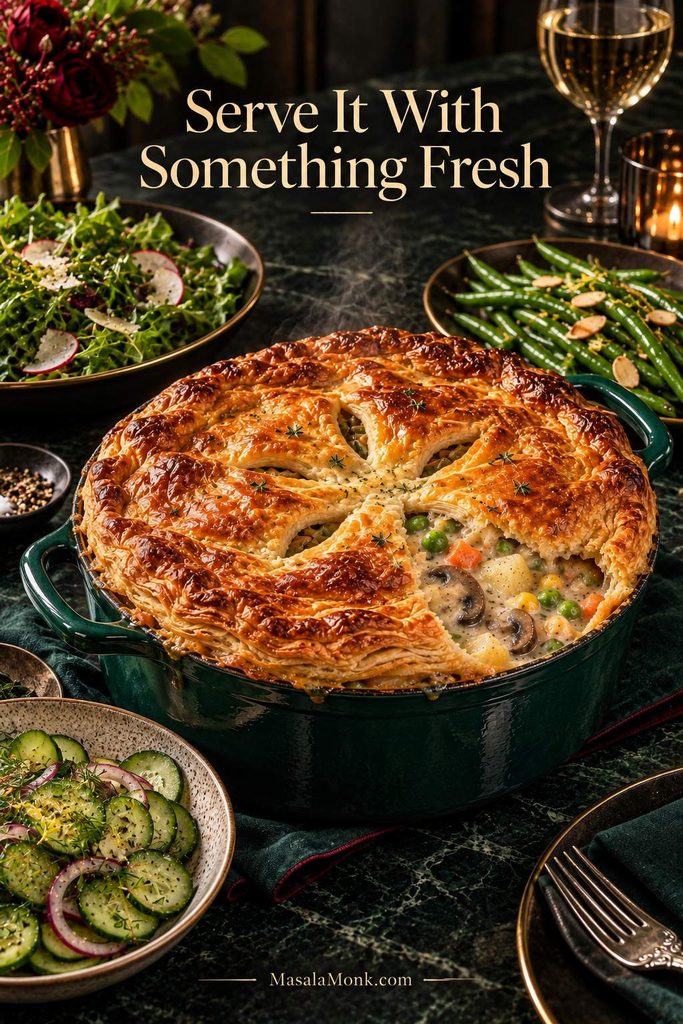
Vegetable pot pie served with fresh sides including cucumber salad, leafy greens and green beans on a dark dining table.
One crisp, fresh or acidic side is usually enough; another starch mostly competes with the pastry.

Make Ahead, Freeze and Reheat

Yes. Make the filling up to 2 days ahead, but keep the pastry separate until you’re ready to bake. Raw puff pastry gradually absorbs moisture when it sits directly against the gravy.

Reheat refrigerated filling until hot before assembly. Chilled flour-thickened gravy often firms up, so loosen it with a small splash of broth or milk when needed. If the filling is bubbling vigorously, let it stand for a few minutes before covering and baking.

Freezing

Freeze the cooked, cooled filling without the crust and aim to use it within 2–3 months for best quality. Thaw overnight in the refrigerator, reheat, adjust the consistency, then add fresh pastry. A fully baked pie can also be frozen, although the reheated crust will be softer.
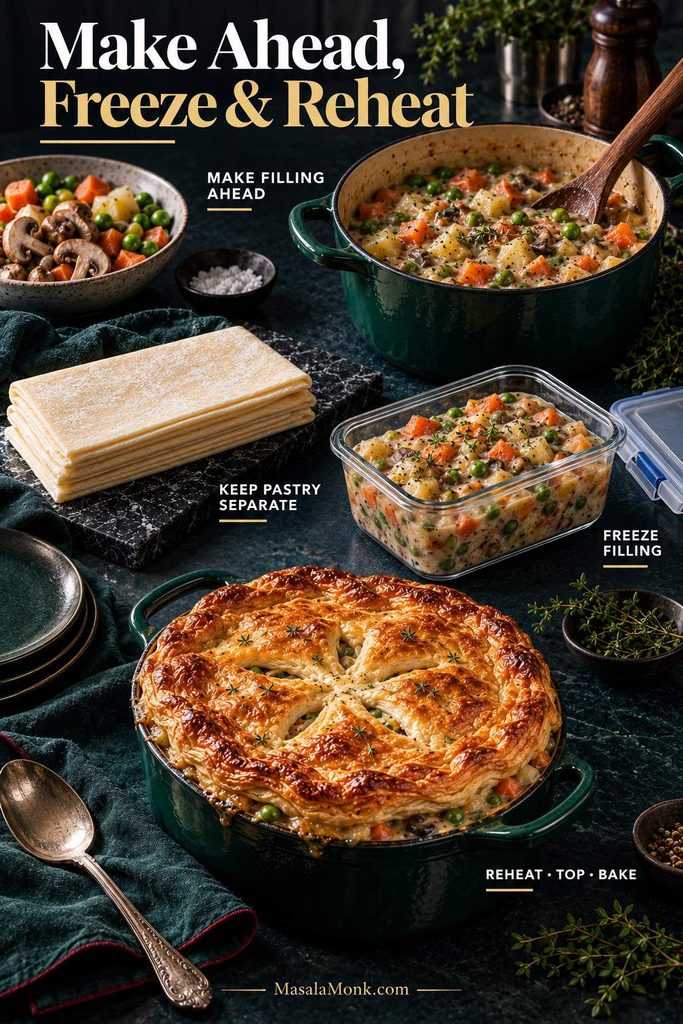
Make-ahead vegetable pot pie sequence showing cooked filling prepared and stored separately from raw puff pastry, followed by reheating, topping and baking.
For make-ahead pot pie, judge the gravy after reheating—not straight from the refrigerator, when the chilled sauce can look deceptively firm.

Leftovers

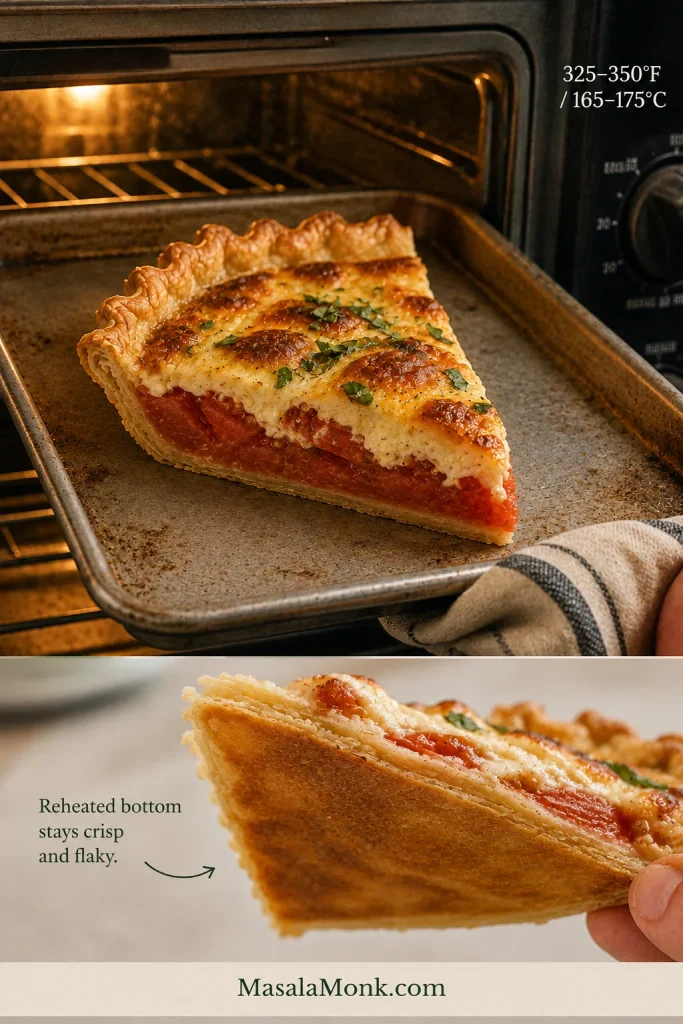
Refrigerated leftovers are best used within 3–4 days. Reheat in a 325–350°F / 165–175°C oven until the center reaches 165°F / 74°C. A microwave is quicker, but steam softens pastry. See the USDA FSIS leftovers guidance for cooling and reheating safety.

Vegetable Pot Pie Troubleshooting

A pot pie can go sideways for ordinary reasons: wetter vegetables, a deeper dish, cold filling or pastry that simply needs longer in the middle. Start with the stage where the problem appeared.

Before Baking
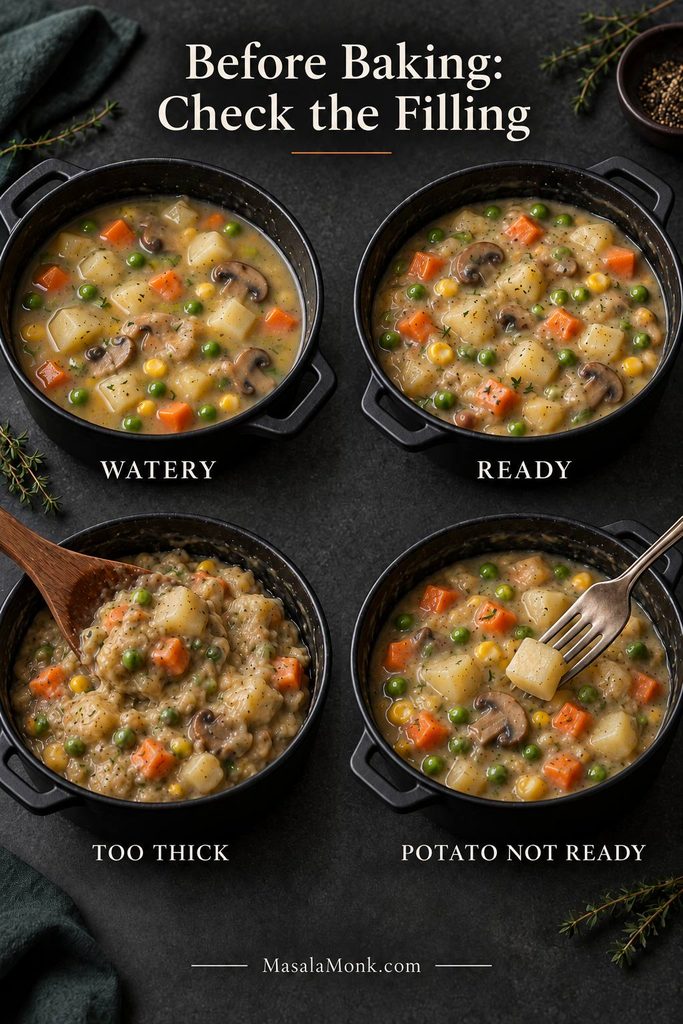
Before-baking troubleshooting guide showing watery filling, correctly thickened filling, overly thick filling and an undercooked potato being checked for tenderness.
Before the crust goes on, test the loosest-looking gravy and one of the largest potato cubes. Those are the two problems least likely to fix themselves in the oven.
What You SeeLikely CauseWhat to Do
Gravy is wateryVegetables released extra water or the sauce needs more reductionSimmer uncovered first; use a small cornstarch slurry only when reduction is not enough
Gravy is glueyToo much thickener or reductionAdd warm broth or milk 1–2 tbsp / 15–30 ml at a time
Flour formed lumpsLiquid reached the flour too quicklyWhisk if practical; next time smooth the first portion of broth in before adding the rest
Everything tastes blandNot enough salt, browning, herbs, umami or acidityCorrect the filling before pastry goes on
Potatoes still crunchPieces are too large or need longer on the stovetopCook longer and test one of the largest cubes

After Baking

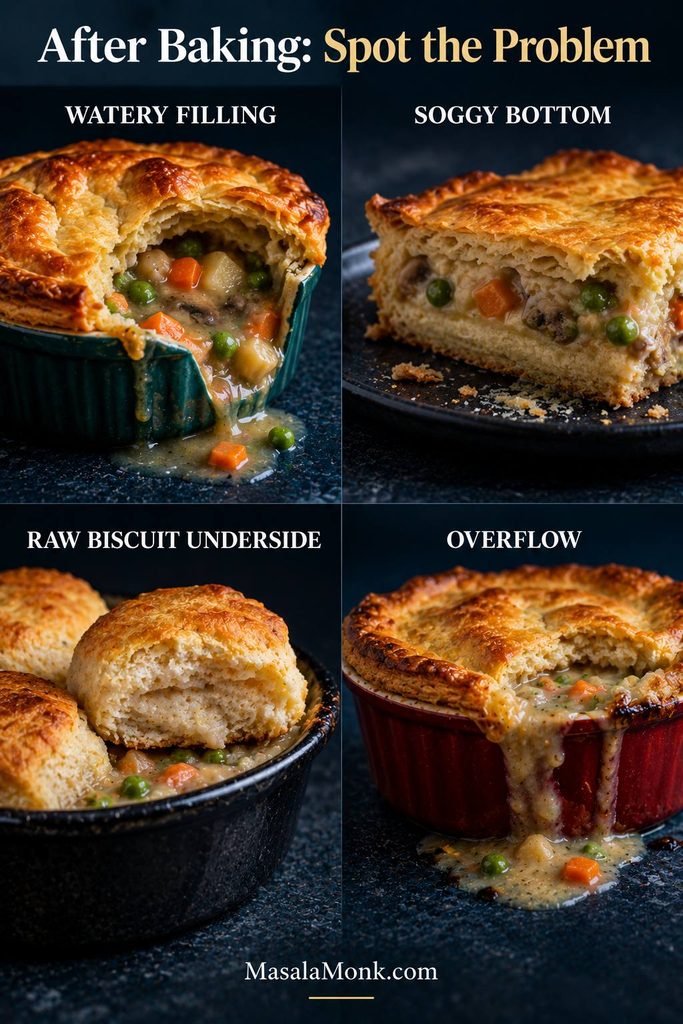
After-baking troubleshooting guide showing watery pot pie filling, a soggy bottom crust, a biscuit with a raw or gummy underside and filling overflowing from a baking dish.
Match the symptom to the fix: more oven time can help raw dough, but it cannot undo excess liquid or an overfilled dish.
What You SeeLikely CauseWhat to Do
Gravy became wateryWet vegetables released more liquid in the ovenNext time cook them drier and judge thickness only after frozen vegetables are hot
Puff center is pale or doughyThe middle needs more time, or pastry started too warmBake longer and shield dark edges with foil
Puff is soft underneathSteam softened the side touching the gravyThis can be normal; bake pastry separately next time when a crisp underside matters
Puff is gummy or rawGravy was too wet, pastry too warm or center underbakedContinue baking when possible; next time use thicker gravy and chilled pastry
Bottom pie crust is soggyWet filling reached raw dough before the base setCool the filling and consider partial prebaking plus stronger bottom heat
Biscuits are raw underneathFilling was too cool or biscuits too thick and crowdedContinue under loose foil; next time use hot filling and leave more space
Pie overflowedDish was too small or too fullLeave ½–¾ in / 1.25–2 cm headroom and bake on a rimmed sheet

Quick links: Recipe · Make ahead & leftovers · Back to top


The first scoop does not need to be neat. Break through the lid while it is still crisp and make sure every serving gets some flaky pastry with the creamy vegetables underneath.
Posted on Leave a comment

Pecan Pie Recipe: Easy, Classic & Perfectly Gooey

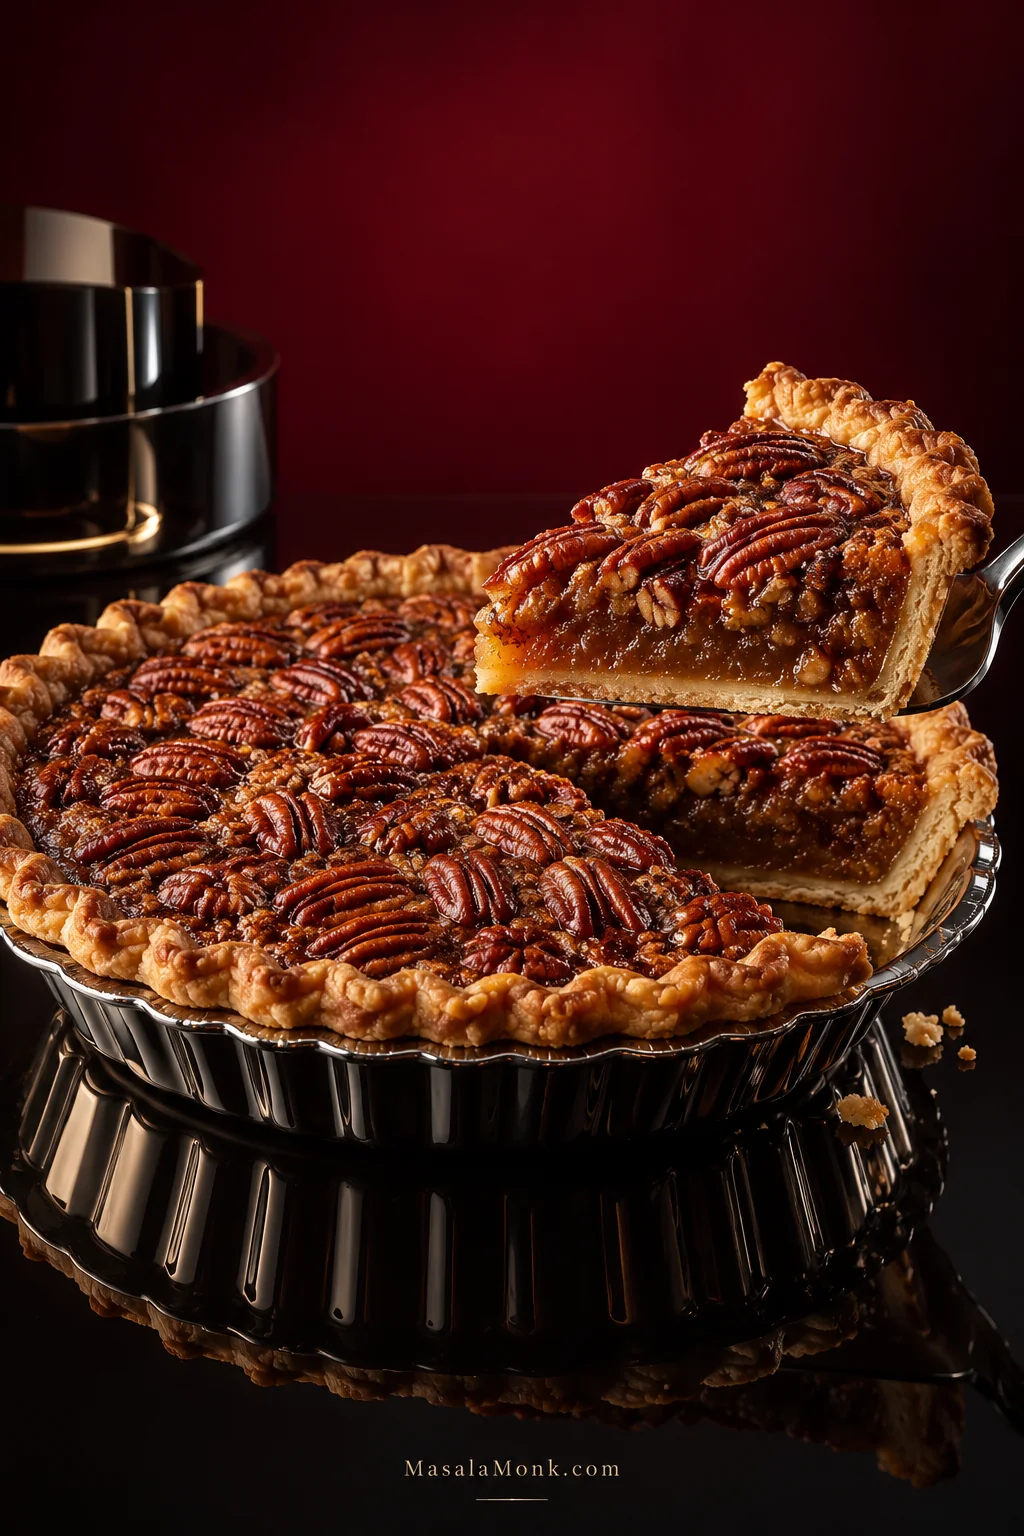
A slice of pecan pie lifted on a metal server above the remaining pie, showing flaky golden crust, toasted pecans and glossy caramel filling that holds its shape.

There is a moment with pecan pie when all the confidence disappears. The crust is browned, the pecans are glossy, the kitchen smells like butter and toasted nuts—and you still do not know what the middle will do when that first wedge comes out.

The goal with this pecan pie recipe is a soft, caramel-rich center that stays with the slice. It should not pour across the plate, but it should not be baked so firm that it eats like candy either. You want crisp pastry underneath, plenty of pecans in every forkful and a filling that gives easily when a fork goes in.

This is the familiar classic American holiday style: eggs, corn syrup, brown sugar, butter and plenty of pecans baked in a single pastry shell. The filling itself uses just seven ingredients. There is no stovetop caramel, no mandatory crust prebake and no need to arrange a perfect mosaic of pecan halves.

The important parts are simpler than that: the crust needs to bake through, the pecans need to taste toasted and the center needs to set soft.

Bake for the wobble. Cool for the slice.

Pecan Pie at a Glance

Quick answer: Pecan pie is done when the filling around the outside is set and the center moves together in one gentle wobble rather than sloshing. Bake this 9-inch / 23-cm pie at 350°F / 177°C on a rack in the lower third of the oven. Start checking around 45–50 minutes; most pies finish in about 50–60 minutes. Around 200°F / 93°C near the center is a useful extra check. Give the pie about 2 hours to cool and set before slicing.

Easy Classic Pecan Pie Recipe

A flaky 9-inch pie packed with buttery pecans and a glossy brown-sugar filling that stays gooey without flowing across the plate.

Yield: 1 9-inch pie

Serves: 8 generous or about 10 smaller slices

Prep: about 20 minutes with a prepared crust

Bake: about 50–60 minutes

Cool: about 2 hours

Total: about 3 hours 10–20 minutes with a prepared crust, including cooling

Oven: 350°F / 177°C

Before you start: Not every 9-inch pie plate holds the same amount. This filling fits most comfortably in a shell about 9 inches / 23 cm across and roughly 1½ inches / 3.8 cm deep. A shallow ready-made shell may need less filling.

Pecan Pie Ingredients

For the crust

  • 1 unbaked single 9-inch / 23-cm pie crust, homemade, refrigerated or frozen. Making the pastry yourself? Use one disc of our homemade flaky pie crust.

For the pecan pie filling

  • 8 oz / 225 g pecans, about 2 cups, divided between chopped nuts and larger pieces
  • 3 large eggs
  • 1 cup / 240 ml / 312 g corn syrup, light or dark
  • ½ cup packed light brown sugar / about 100 g
  • 4 tbsp / 2 oz / 56 g unsalted butter, melted and cooled until warm
  • 2 tsp / 10 ml vanilla extract
  • ½ tsp fine salt
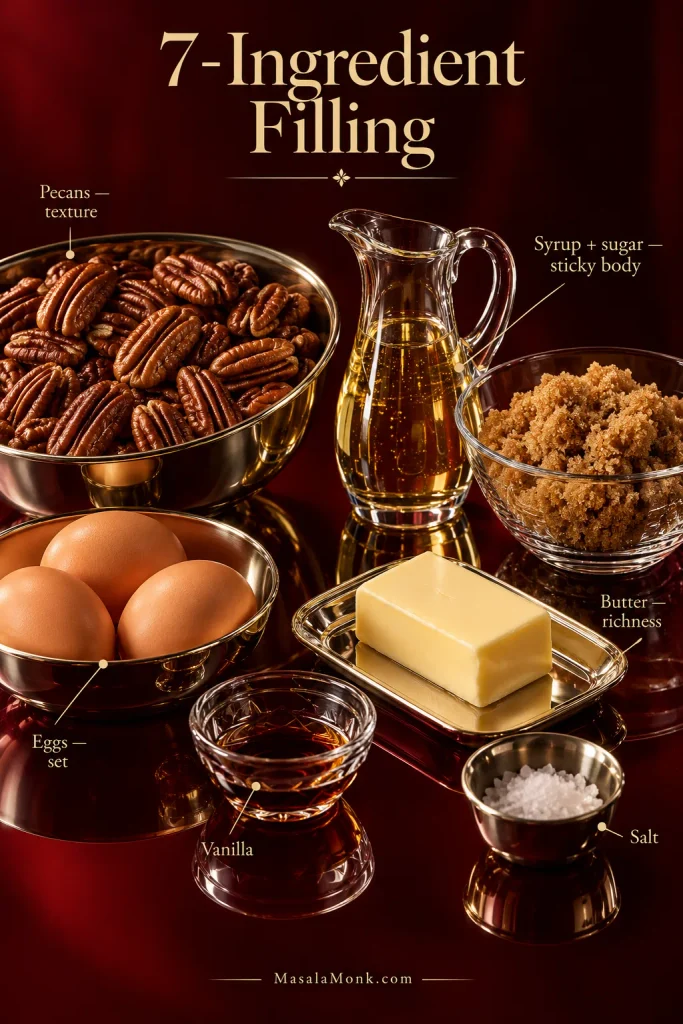
Pecans, eggs, corn syrup, brown sugar, butter, vanilla and salt arranged as the seven filling ingredients, with small labels showing the roles of eggs, syrup, sugar, butter and pecans.
A short pecan pie filling formula still depends on balance: eggs give it structure, syrup and sugar create body, and generous pecans keep the finished pie textured rather than simply sweet.

Equipment

  • 9-inch / 23-cm pie plate or deep-dish frozen pie shell
  • Rigid rimmed baking sheet if using a flexible disposable shell
  • Foil or pie-crust shield
  • Instant-read thermometer, optional

How to Make Pecan Pie

Prepare the Crust and Pecans

  1. Heat the oven. Set a rack in the lower third and heat to 350°F / 177°C. If you are using a flexible disposable pie shell, place it on a sturdy rimmed baking sheet before filling it.
  2. Fit and chill the crust. Press or roll homemade or refrigerated pastry into the plate and crimp the rim. Check the bottom and sides for cracks or paper-thin patches. For this method, do not prick or dock the raw shell; the liquid filling does not need extra openings where syrup could seep underneath. If the pastry has softened, refrigerate it for 15–20 minutes.
  3. Using a frozen shell? Follow its package directions for thawing. Some are filled from frozen; others are thawed first. Keep a flexible foil tin on its baking sheet while you fill and carry it.
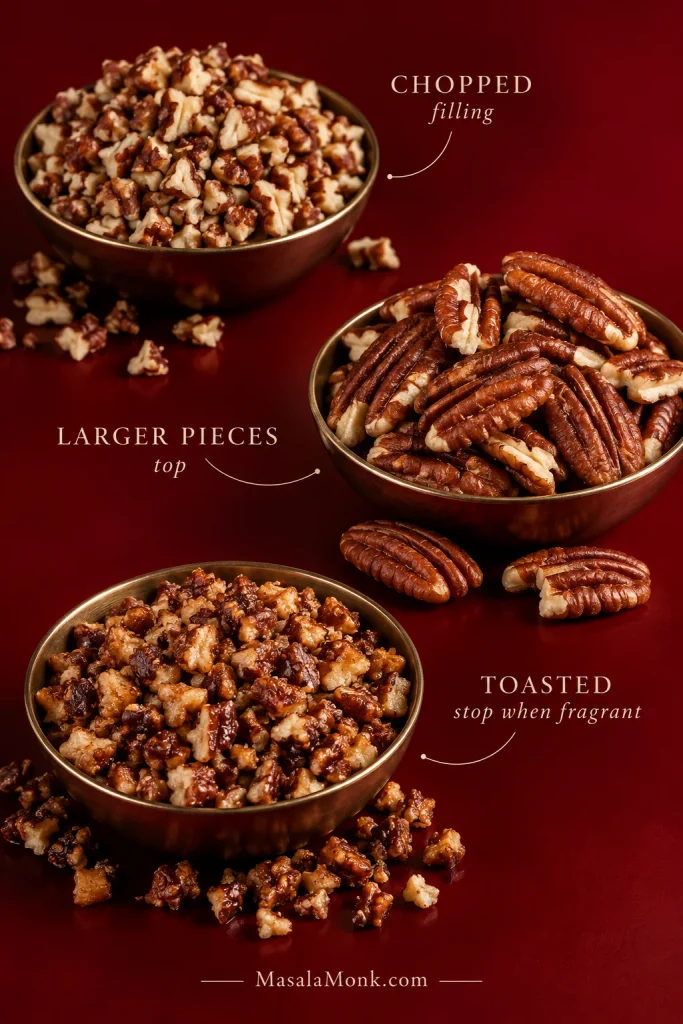
  4. Prepare the pecans. Coarsely chop about two-thirds and leave the rest in larger pieces or halves. For deeper roasted flavor, toast the chopped nuts for 6–8 minutes at 350°F / 177°C, just until the kitchen smells distinctly nutty. Let them cool briefly. This step is optional.
Three pecan preparations shown separately: coarsely chopped pecans for the filling, larger pecan pieces for the top and toasted chopped pecans.
Chopping most of the pecans does two useful things at once: it distributes nuts through more bites and makes clean slices easier; meanwhile, larger pieces give the top its crunch.

Mix, Fill and Bake

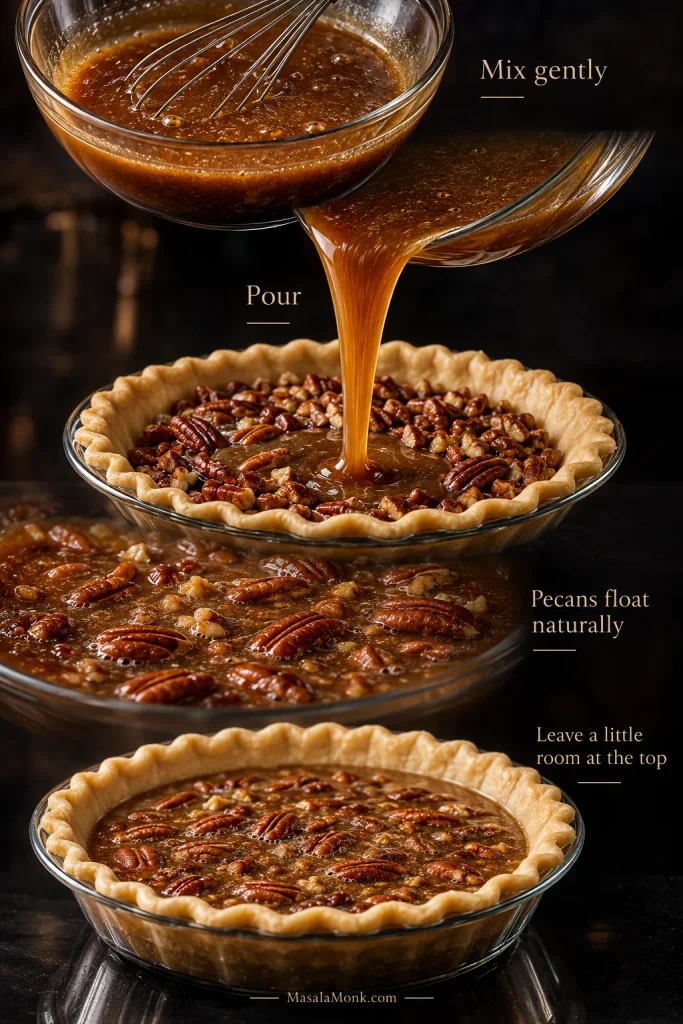
  1. Mix the filling gently. Whisk the eggs only until blended. Add the corn syrup, brown sugar, warm melted butter, vanilla and salt. Whisk until smooth and glossy. Too much beating can leave the filling pale and foamy.
  2. Fill the pie. Scatter the chopped pecans across the bottom, pour over the filling, then place the larger pieces loosely on top. Many pecans will rise or shift as the pie bakes. That is normal. There is no need to press them down.
  3. Leave a little room at the top. A shallow commercial shell may not take every last spoonful. Stop before the filling reaches the top of the pastry.
Vertical process showing pecan pie filling being mixed, poured over chopped pecans, pecans rising naturally toward the surface and the filled shell with space below the crust rim.
As pecans rise, they create the classic nut-heavy top without arranging a mosaic; meanwhile, chopped nuts left below keep pecans distributed through the filling.
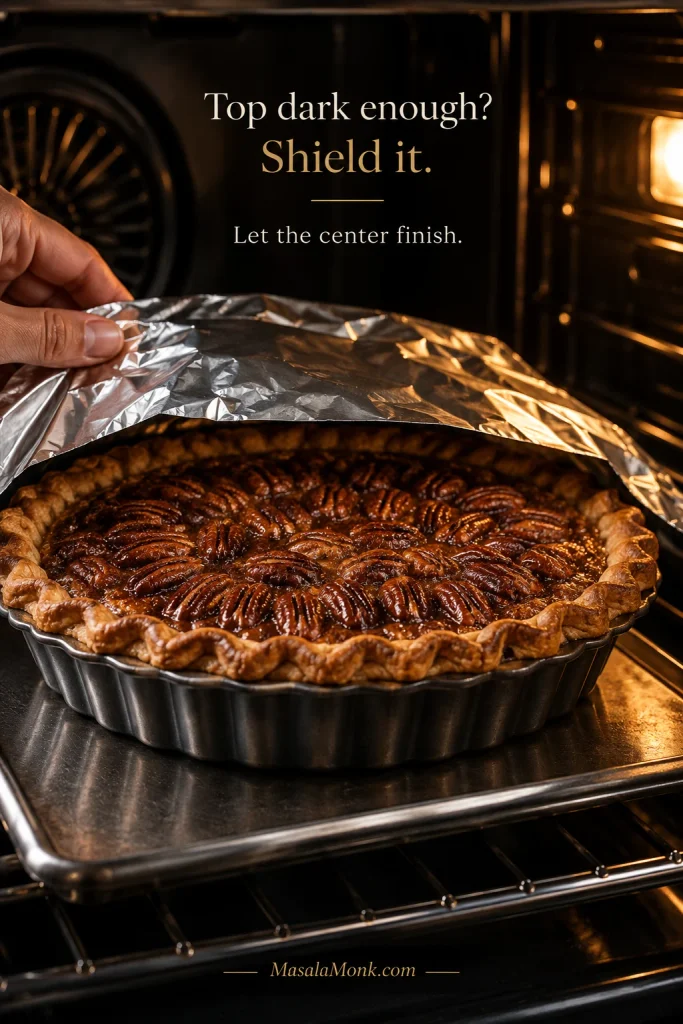
  1. Bake. Put a sturdy metal, glass or ceramic pie plate directly on the lower-third rack. Keep a flexible disposable shell on its baking sheet for support. Begin checking around 45–50 minutes; most pies of this depth finish in roughly 50–60 minutes. Shield the rim once it is brown enough. If the pecans are getting dark first, tent the top loosely with foil and let the middle keep baking.

Read the Center, Then Let It Set

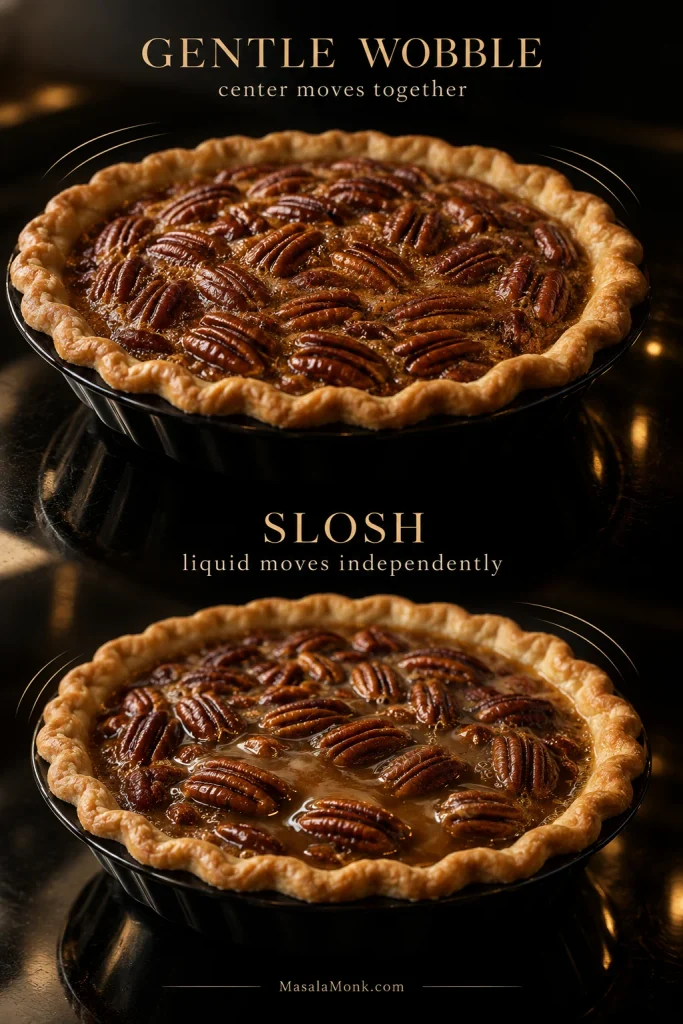
  1. Check the middle. The outer filling should look set and slightly puffed. Give the pan a gentle nudge. The center should move together in one gentle wobble. Loose syrup shifting independently under the pecans means it needs more oven time. For another check, look for roughly 200°F / 93°C near the center.
  2. Cool before cutting. Set the pie on a rack and let it cool for about 2 hours. That gives the filling time to finish setting. If you are not serving it after the cooling period, cover and refrigerate it promptly.

If the pie came out with that gentle wobble, the hard part is over.

Leave it alone.

A tiny “test slice” cut from a hot pie can make a perfectly good filling look underdone. The recipe above is all most bakers will need. The rest is here for the moments when the center, crust or timing has you wondering what to do next.

Need More Help With Your Pie?

How to Tell When Pecan Pie Is Done

Pecan pie is done when the filling around the edge is set and the center moves together in a gentle wobble, with no loose liquid sloshing underneath the pecans.

The timer tells you when to start paying attention. The center tells you when to stop.

Pecan Pie Bake Time: Start Looking Around 45–50 Minutes

At 350°F / 177°C, this 9-inch pie generally takes about 50–60 minutes. A shallow foil shell can finish sooner; a deeper pie or slower-heating dish may take longer.

A browned pecan pie in the oven with aluminum foil shielding the crust and top while the center continues baking.
Browning and doneness do not always arrive together. Once the surface has enough color, foil buys the center more baking time without asking the crust and pecans to take more heat.

Look for a wobble, not a slosh. Nudge the plate. A ready center moves together like thick custard and settles quickly. If syrup shifts independently under or between the pecans, keep baking. The top may already look finished, so shield it if necessary and give the middle the time it needs.

Two pecan pies compare doneness: one shows a gentle cohesive wobble in the center, while the other shows loose liquid moving independently between and beneath the pecans.
A gentle pan nudge reads the whole center without piercing or cutting a filling that is still setting; instead, the movement gives you a non-destructive doneness check.

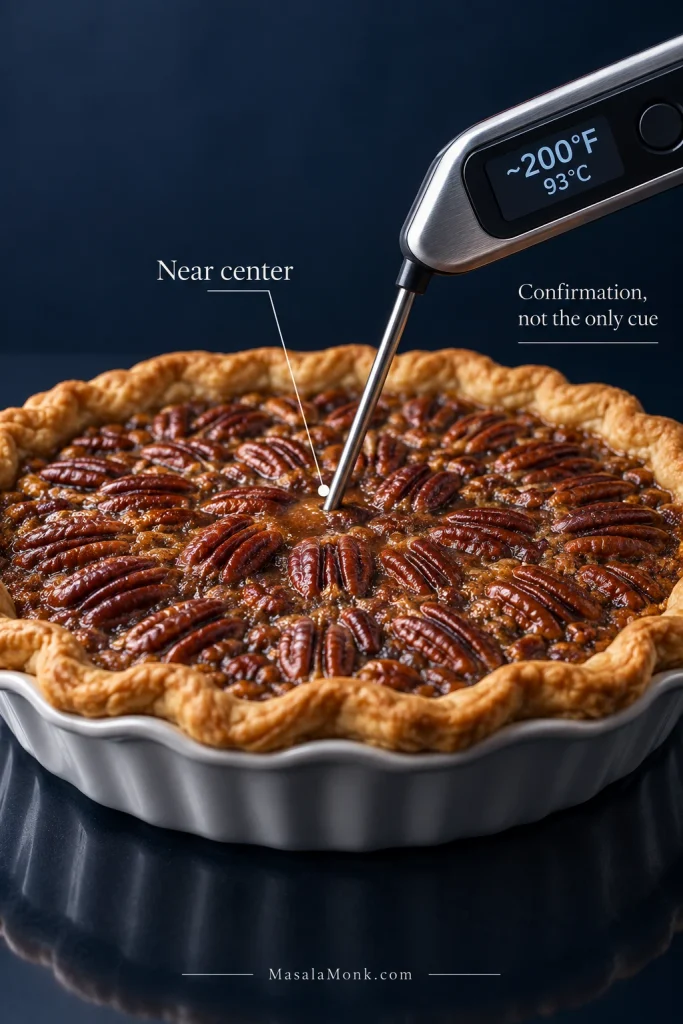
What Temperature Is Pecan Pie Done? About 200°F / 93°C

An instant-read thermometer is useful when the visual cue still leaves you unsure. Check near the center and use the reading as confirmation. Avoid touching the pie plate with the probe.

An instant-read thermometer inserted near the center of a pecan pie reads about 200°F and 93°C, with guidance that temperature is a confirmation of doneness.
Because the center is the last part to set, that is where a temperature check is most useful. Around 200°F / 93°C can confirm what the wobble is already telling you.

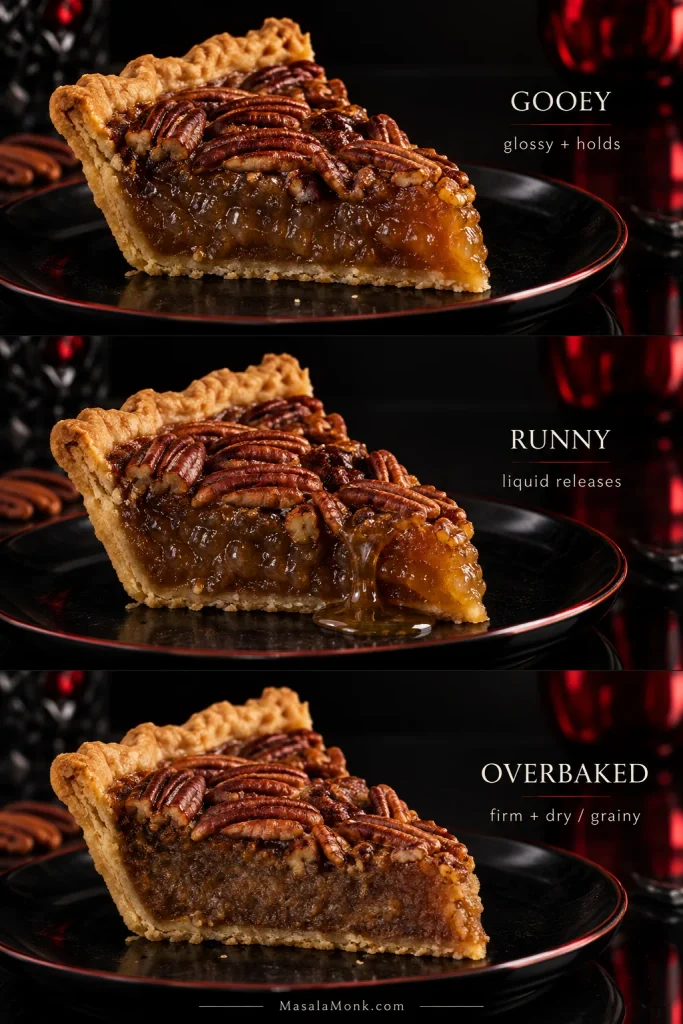
Gooey, Runny and Overbaked

A gooey pie keeps its shape when cut but stays moist and glossy at the edge. The filling yields under the fork without flowing into the space left behind.

A runny pie still releases syrupy filling after it has cooled. Take the bake too far and the center becomes firm, grainy, eggy or almost candy-like.

Skip the clean-knife test. This is not cake.

Back to Recipe Cooling & Slicing Fix a Runny Pie

How Long to Cool Pecan Pie Before Slicing

Give the pie about 2 hours on a cooling rack before cutting it. The filling is still settling as heat leaves the pie, so a center that looked soft from the oven can become exactly the texture you wanted.

Leave it uncovered while it is hot so steam can escape. If you are serving it after that cooling period, slice and serve. Otherwise, cover and refrigerate once it has cooled enough; treat roughly two hours at room temperature as the outer cooling window, not a minimum wait before refrigeration.

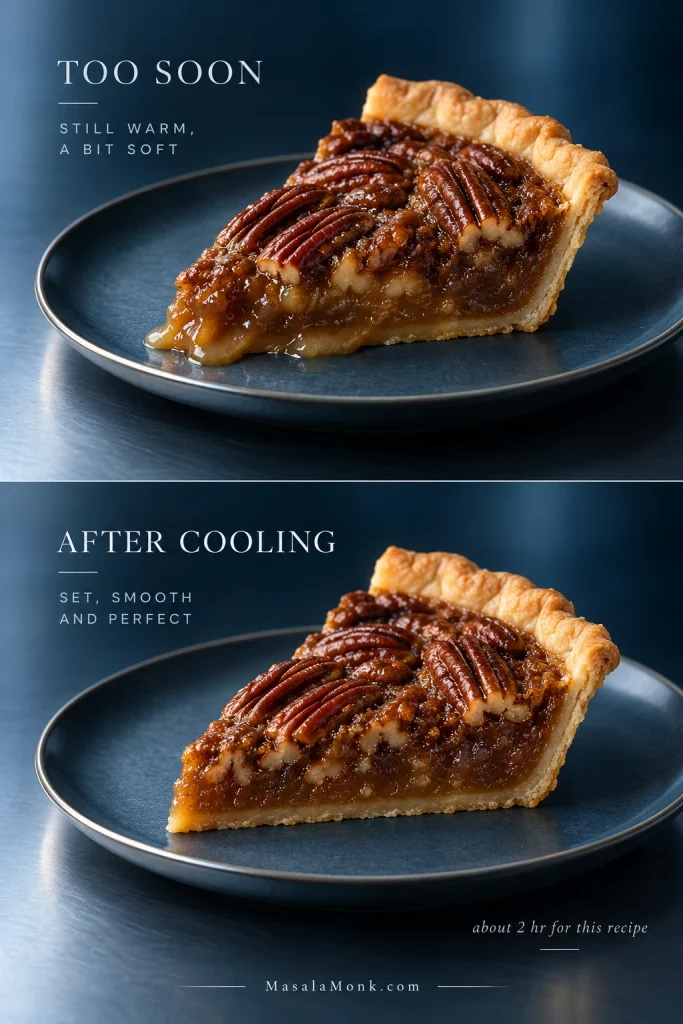
Matching pecan pie slices compare a softer, looser slice cut too soon with a cooled slice that has a cleaner edge while remaining glossy inside.
Warm filling can imitate underbaking. After the pie has cooled, however, the cut edge becomes more defined while retaining the moist gloss that separates a gooey center from a dry one.

Want the slice warm? Let the pie set first, then gently warm the wedge you are serving. A brief warm-up brings the butter and toasted-pecan aroma forward again without loosening the entire pie.

Vanilla ice cream gives you the classic hot-cold contrast. When the pie already feels sweet enough, lightly sweetened or unsweetened homemade whipped cream keeps the finish cooler and lighter.

Pecan Pie Crust: Crisp Underneath and Strong Enough for the Filling

A good bottom crust lifts with the filling instead of remaining glued to the plate.

If the underside looks wrong, notice what is actually there. Pale, soft pastry points toward weak bottom heat. A hard layer of caramelized syrup under the crust means the filling found a route beneath it.

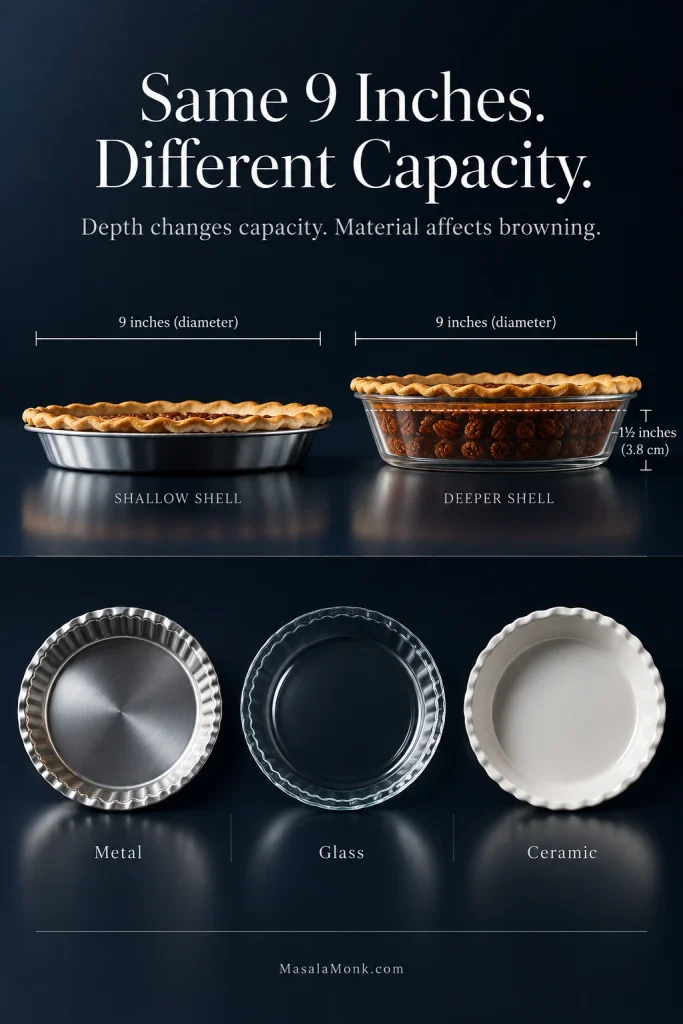
Pan Depth Matters More Than “9 Inch”

A shallow 9-inch shell holds much less than a deeper plate with the same diameter. Around 1½ inches / 3.8 cm deep is comfortable for this filling. With a shallower shell, stop before the filling reaches the top.

Metal pie plates usually brown the bottom most readily. Glass and ceramic work too, although the underside may take longer. A sturdy pie plate bakes directly on the lower-third rack; a flexible foil shell stays on its baking sheet for support.

Pie pan guide comparing shallow and deeper 9-inch dishes, including a deeper dish about 1½ inches or 3.8 centimeters deep, with metal, glass and ceramic pan examples.
Before pouring the filling, look at the pan from the side. Two 9-inch dishes can have very different capacities, and metal generally gives the bottom crust a head start on browning.

Using a Frozen Pie Crust for Pecan Pie? Keep It Supported

Yes, a frozen pie crust works for pecan pie. Choose a deep-dish shell when possible, follow its package directions for thawing and inspect the pastry before filling it. A tiny crack can look harmless until syrup finds it.

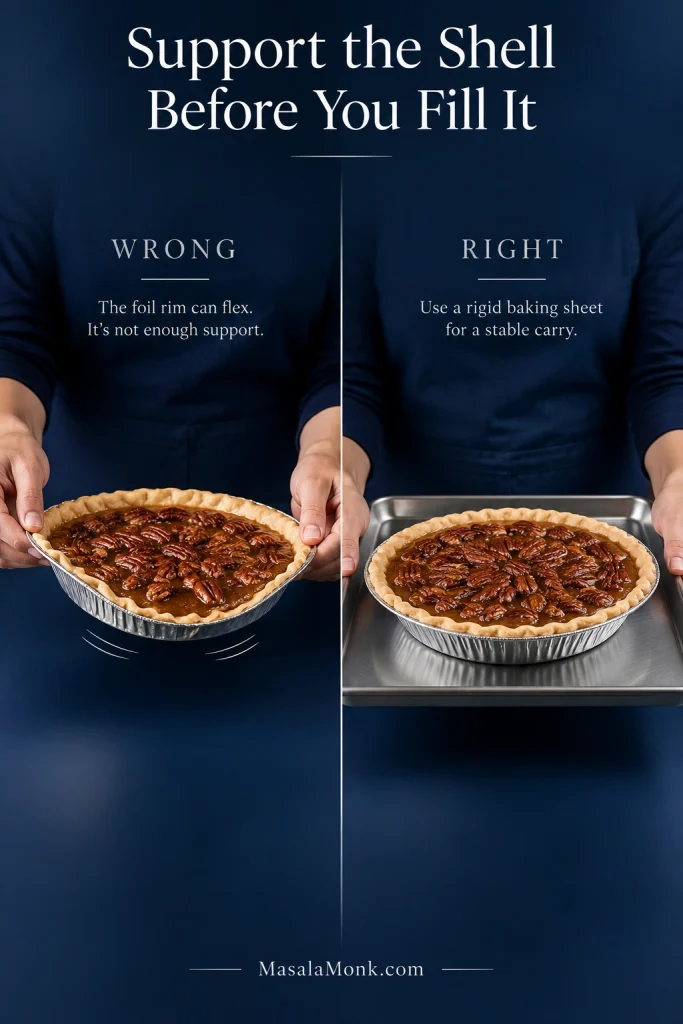
Disposable foil shells become surprisingly floppy once they are full. Put the empty shell on a rigid baking sheet before adding the filling, then carry the pie by the sheet.

Comparison showing a filled disposable foil pie shell flexing when lifted by its rim and the stable method of supporting and carrying the shell on a rigid baking sheet.
With a frozen pie crust in a foil shell, support is preventive rather than cosmetic: once the pan flexes, a tiny crack can become a leak path during filling or transfer.

Blind bake? Not for this pie. This filling can go straight into a cold, unbaked shell. The lower-third rack gives the bottom useful heat without adding another pastry stage. A partial blind bake can help if your usual pie dish repeatedly leaves the bottom pale or if you switch to a thinner filling, but it also creates another chance for warm pastry to slump or shrink.

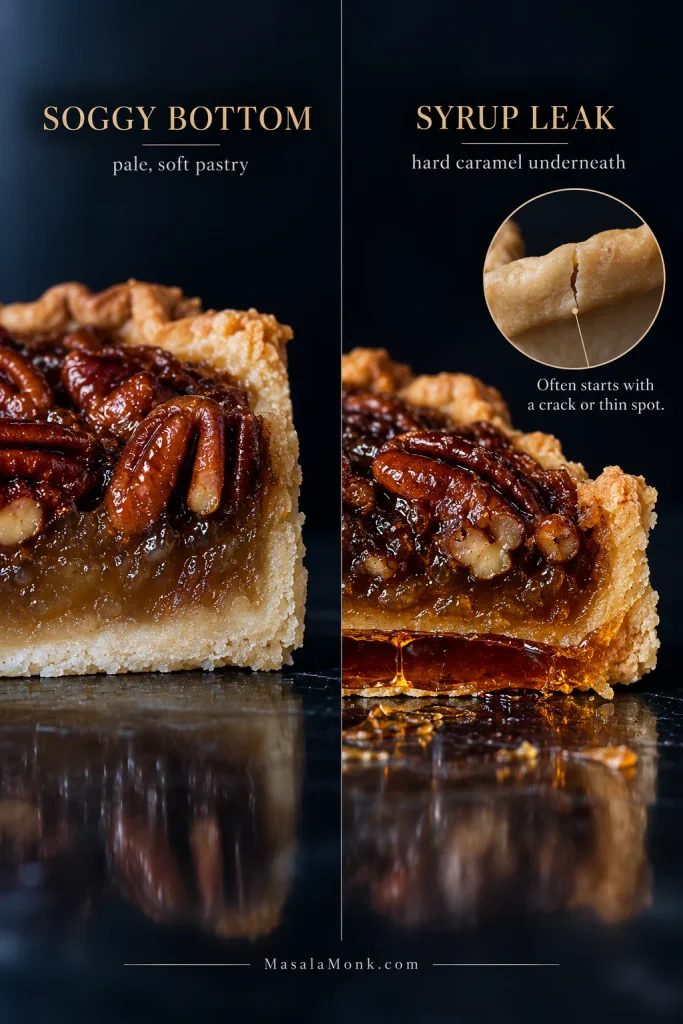
Soggy Bottom or Syrup Under the Crust?

Pale, soft pastry usually needs better bottom heat, colder dough or more time.

A hard, shiny layer of baked sugar underneath tells a different story. The filling probably found a crack, thin patch or opening and slipped below the crust.

Two pecan pie cross-sections compare a pale, soft bottom crust with a hard caramelized syrup layer beneath the pastry; a small inset shows a crack where filling can leak through.
Use the underside to choose the fix: soft pastry points to a baking problem, while a hard amber sheet means syrup crossed the crust and set underneath.
Back to Recipe Pecan Pie Filling Troubleshooting

Pecan Pie Filling: Rich, Gooey and Packed With Pecans

Once the crust is sorted, the filling itself is simple: eggs, syrup, brown sugar, butter, vanilla, salt and pecans. Eggs are what let the filling set, while the syrup and sugar create its sticky body. Butter adds richness, and the pecans bring most of the texture and bulk. Corn syrup also reduces the chance of the sugar crystallizing as the filling cooks, helping the syrupy part of the filling stay smooth.

Many pecan pieces naturally rise toward the surface while the pie bakes. That is part of the classic look. What matters is using enough nuts that every forkful gets pecans along with the filling.

A good forkful catches crisp pastry, sticky filling and toasted pecan in the same bite.

The Best Pecans for Pecan Pie—and Which Ones to Toast

Start with fresh pecan halves or large pieces. Taste one before the bag goes into the recipe. Good pecans are sweet, buttery and clean; stale or paint-like flavors only become louder once the nuts are warm.

Use most of them coarsely chopped inside the filling, then save a smaller handful of halves or larger pieces for the top. Chopped nuts give you more pecan in each bite and make the finished pie easier to cut.

The nuts on top toast in the oven anyway. The chopped pecans under the syrup do not get that same exposure, so they are the ones worth toasting first. Give them 6–8 minutes at 350°F / 177°C and pull them when the aroma turns distinctly nutty; pecans can move from toasted to bitter quickly.

Light or Dark Corn Syrup?

Light corn syrup gives a cleaner sweetness and keeps vanilla and pecans prominent. Dark corn syrup brings a deeper, almost toffee-like flavor with some molasses character. Both work here, and dark brown sugar can also replace the light brown sugar when you want a stronger caramel note.

Two glass vessels compare pale golden light corn syrup with deeper mahogany dark corn syrup, labeled with their different flavor profiles.
Both light and dark corn syrup use the same 1 cup / 240 ml / 312 g amount in this pecan pie, so switching between them changes flavor rather than the mixing or baking method.

Pecan pie is supposed to be sweet. It just should not taste as though sweetness is the only thing happening.

Roasted pecan flavor, salt and darker syrup add contrast. Smaller slices suit a pie this rich. The generous 8 oz / 225 g pecans also keep the dessert tasting like pecans rather than simply sweet syrup in a crust.

Cut the sugar or syrup too far and the center can set differently, so save those changes for a formula built around them.

Making Pecan Pie Without Corn Syrup

Yes, you can make pecan pie without corn syrup—but use a filling built for the sweetener you choose. Golden syrup is a proven alternative in pecan-pie fillings, but do not assume every liquid sweetener can replace corn syrup cup for cup. Recipes built around golden syrup, maple syrup or honey may use different egg and sugar proportions.

Golden syrup, maple syrup and honey displayed in separate glass vessels, with text advising that pecan pie fillings should be formulated for the chosen sweetener rather than swapped cup for cup.
When making pecan pie without corn syrup, the key question is not which liquid looks similar; it is whether the filling’s egg-and-sugar balance was designed for that sweetener.

Pecan Pie Troubleshooting: Runny Filling, Soggy Crust & More

If a fully cooled pecan pie still pours from the cut edge, it was usually underbaked, or the amounts of eggs, sugar or syrup were changed enough to affect the set.

“Runny” is not much of a diagnosis on its own. What matters is when the filling looks loose and what the rest of the pie is doing.

Three matching pecan pie slices compare a glossy gooey filling that holds, a runny filling releasing liquid and an overbaked filling with a firmer, drier, grainier texture.
The useful comparison happens after cooling: gooey filling remains soft but contained, runny filling still releases syrup, and an overbaked center has lost moisture and tenderness.
What You SeeLikely CauseWhat to Do
Center sloshes in the ovenUnderdoneShield browned areas and keep baking
Pie looks very soft while hotMay be completely normalGive it the full cooling time before judging the set
Cold pie still pours from the cut edgeUnderdone or filling amounts changedNext time, bake until the middle moves together in one gentle wobble
Top is dark, middle is liquidThe surface finished firstTent with foil and continue baking
Filling is pale and foamyToo much air was beaten inUsually still edible; whisk gently next time
Baked filling is grainy or eggyEggs overheated during bakingPull the next pie sooner; use the gentle wobble as the doneness cue
Bottom crust is pale and gummyWeak bottom heatUse the lower rack, colder dough or a metal pan
Hard syrup is baked under the pastryCrack, hole or thin spot in the crustKeep the shell intact and avoid unnecessary docking
Pie overflowedShell too shallow or overfilledUse a deeper plate or leave some filling behind
Pie is hard rather than gooeyOverbakedPull the next pie sooner
Top puffed dramatically or crackedFilling may have baked too farStart checking earlier and rely on the center movement

If the Filling Still Looks Wrong

If the raw filling curdles before it reaches the oven, the melted butter was probably too hot; starting again is usually simpler. An eggy or grainy baked filling points more toward too much heat during baking.

If your oven regularly finishes much earlier or later than recipes suggest, check it with an oven thermometer. Sometimes the problem really is the oven.

Serve It, Keep Baking or Start Again?

A slightly uneven top, an imperfect crimp or a pecan that browned more than its neighbors does not make a bad pie. If the filling holds and tastes good, serve it.

Keep baking while liquid still moves freely in the oven. Start again if you have time when the eggs scrambled badly before baking or a major break in the crust sent much of the filling underneath it. Everything else deserves a little perspective before it gets called a failure.

High-altitude note: Baking above about 3,000 feet / 915 metres? Pie pastry generally needs less adjustment than cakes or breads. Colorado State University Extension’s high-elevation baking guide notes that slightly more liquid can sometimes improve pastry texture and recommends baking pies in the lower third of the oven. Judge this filling by its center rather than borrowing adjustments from an unrelated recipe.

Back to Recipe Check Doneness Make Ahead & Store

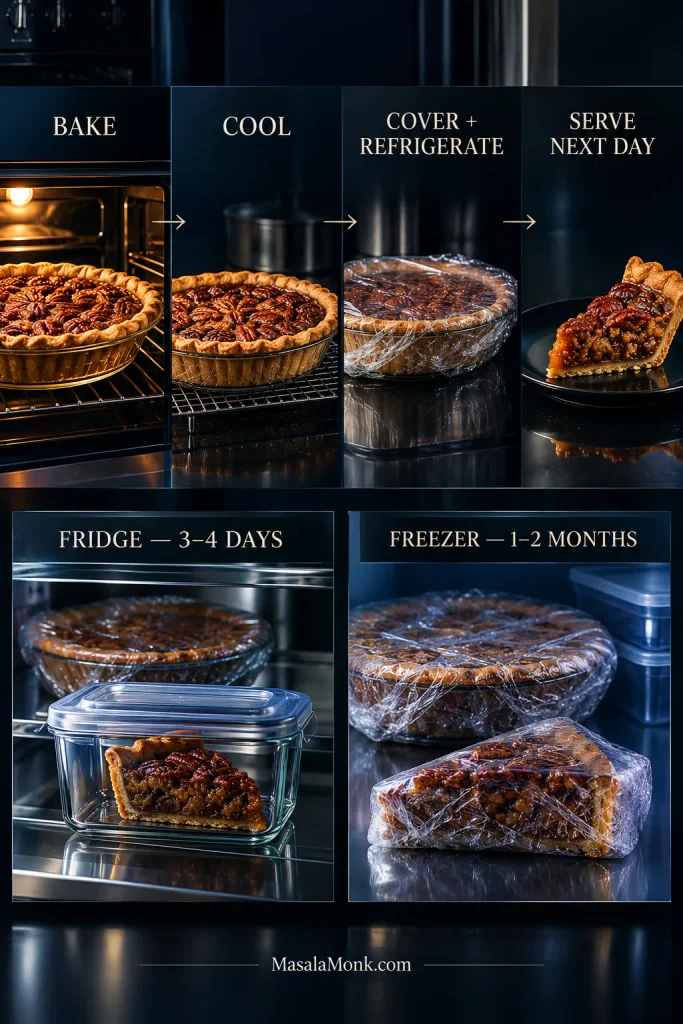
Make-Ahead Pecan Pie: Bake It Before Thanksgiving Gets Busy

Bake it the day before and dessert is already handled before the Thanksgiving oven gets crowded.

After cooling, cover and refrigerate the pie. By the next day the filling will be thoroughly set and easy to portion. Serve it chilled or let some of the refrigerator chill come off before dessert.

Pecan pie make-ahead guide showing bake, cool, cover and refrigerate, then serve the next day, with storage guidance of 3–4 days refrigerated and 1–2 months frozen.
For cleaner portions, serve the pie chilled or let some refrigerator chill come off first; if you want it warm, reheat individual wedges rather than loosening the whole pie.

Does Pecan Pie Need to Be Refrigerated?

Yes. The FoodSafety.gov cold-storage chart gives baked pecan pie about 3–4 days in the refrigerator. Because the filling contains eggs, cover and refrigerate it promptly once cooled; do not leave it sitting at room temperature overnight.

Can You Freeze Pecan Pie?

Yes. Cool the pie, wrap it well and freeze it whole or in portions. For best quality, use it within about 1–2 months. Thaw it in the refrigerator while still wrapped.

Need something easier to carry? Our pecan pie bars with shortbread crust turn the buttery pecan-and-caramel idea into sturdy squares. They are easier to pack, portion and pass around when a round pie would have twelve people negotiating wedges.

Pecan Pie FAQs

1. Can pecan pie sit out overnight?

No. Homemade pecan pie contains eggs. Cool it, cover it and refrigerate it; do not leave it on the counter overnight.

2. Why do pecans float to the top of pecan pie?

That is normal. Many pecan pieces rise through the egg-and-syrup filling as the pie bakes, which is how the familiar nut-heavy top forms. Chopping most of the nuts and using plenty of them still gives every forkful pecans with the filling.

3. Can I make pecan pie two days ahead?

Yes. Bake the pie, cool it and refrigerate it well covered. Two days ahead fits comfortably within the recommended 3–4-day refrigerated storage window, and the filling will be fully set by serving day.

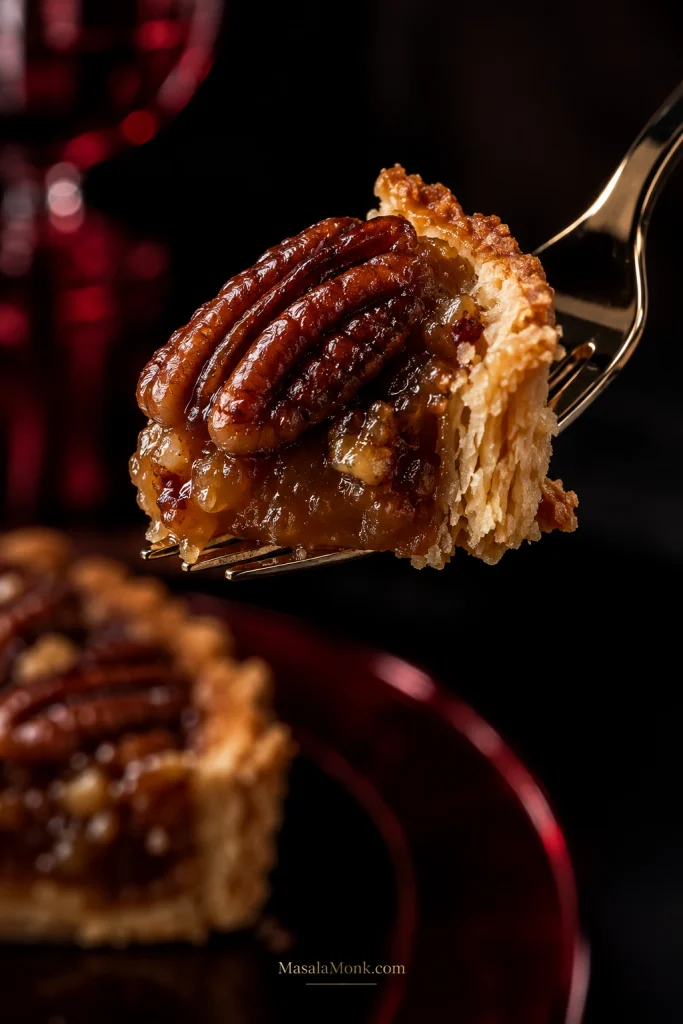
The Slice You’re Waiting For

Extreme close-up of a fork holding pecan pie with visible flaky pastry, glossy caramel filling and toasted pecan against a dark garnet background.
The best bite starts with crisp, flaky pastry, moves into soft caramel filling and finishes with toasted pecan crunch, so the sweetness never lands by itself.

When the first wedge comes out, the crust lifts with it and the exposed edge of the filling stays moist and glossy instead of slowly spreading across the plate.

Once that first slice holds, you can stop thinking about temperatures and wobble. What’s left is crisp pastry, toasted pecans and a soft caramel middle that gives under the fork.

Back to Recipe Troubleshooting Back to Top

Posted on Leave a comment

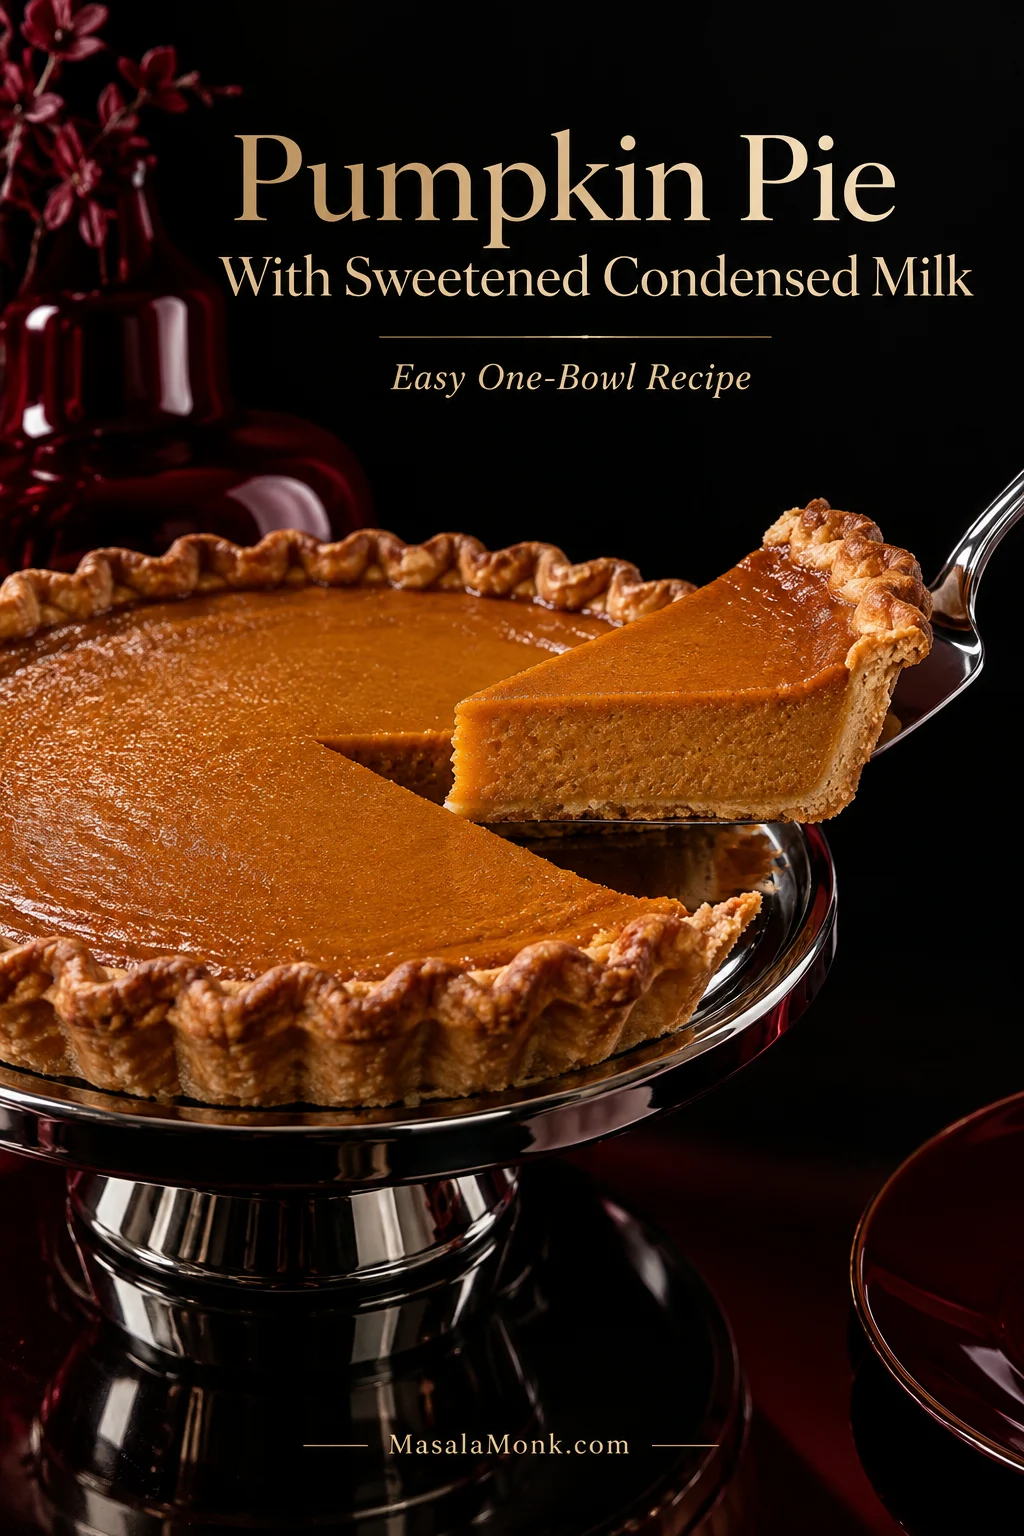
Pumpkin Pie With Sweetened Condensed Milk: Easy One-Bowl Recipe

Whole pumpkin pie with a golden crimped crust and one lifted slice showing smooth orange pumpkin custard against a dark oxblood set.

Pumpkin pie with sweetened condensed milk keeps the filling simple. If condensed milk is the can you already have, yes—it works here. Build the pie around it from the start and skip the separate sugar an evaporated-milk recipe would normally need.

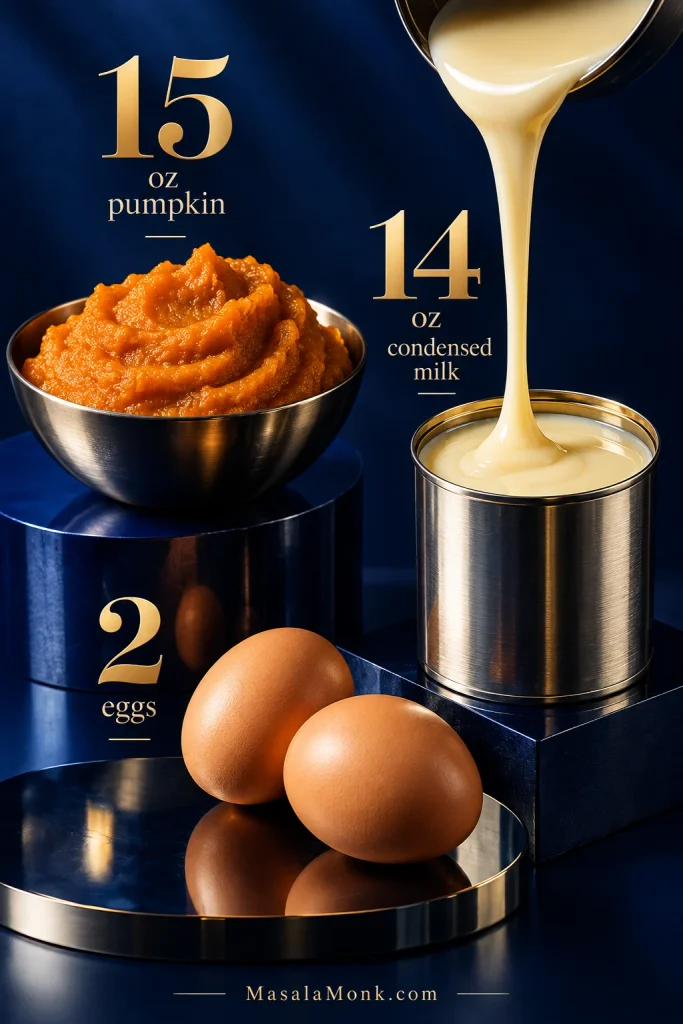
The ratio is easy to remember: 15 oz / 425 g pumpkin + one 14 oz / about 397 g can sweetened condensed milk + 2 large eggs. Add warm spices, salt, and vanilla if you like it, then pour the filling into a cold 9-inch / 23-cm pie crust.

A good slice should feel like custard, not cheesecake: soft pumpkin filling once chilled, with warm cinnamon and ginger in the background. Enough pastry underneath keeps the condensed-milk richness from feeling heavy. The bake is where judgment matters most, because the filling can be ready while the bottom crust still needs help. A center that moves a little isn’t necessarily underdone, either.

See the full pumpkin pie guide

Make It Now: Pumpkin Pie With Sweetened Condensed Milk

The filling itself is one-bowl simple. Most of the judgment comes later, when you’re deciding whether the custard and crust are done.

Cobalt still life showing 15 ounces pumpkin purée, 14 ounces sweetened condensed milk, and two eggs arranged around the numbers 15, 14, and 2.
The 15 / 14 / 2 ratio has a practical advantage: it uses two standard cans without leftovers. One 15 oz can of pumpkin, one 14 oz can of sweetened condensed milk, and two eggs complete the core formula.
At a glanceWhat to know
Active prepAbout 10–15 minutes
BakeAbout 50–60 minutes: 425°F / 220°C for 15 minutes, then 350°F / 180°C for 35–45 minutes
CrustCold unbaked crust works; partially prebake if you want a crisper bottom
DonenessSet outer filling + a small, controlled center wobble
YieldAbout 8 slices
For slices that hold wellCool, then refrigerate for about 4 hours; overnight is easiest
Optional partial prebakeAdds about 30 minutes chilling + 25–30 minutes baking

Ingredients

  • 15 oz / 425 g 100% pure pumpkin purée — about 1¾ cups; use plain pumpkin, not pumpkin pie filling
  • 1 × 14 oz / about 397 g can sweetened condensed milk — different from evaporated milk
  • 2 large eggs / about 100 g without shells
  • 2½ teaspoons pumpkin pie spice
  • ½ teaspoon fine sea salt or table salt / about 2.5–3 g
  • 1 teaspoon / 5 ml vanilla extract, optional
  • 1 cold, unbaked 9-inch / 23-cm single pie crust

No ready-made spice blend? Use 1½ teaspoons cinnamon + ½ teaspoon ginger + ¼ teaspoon nutmeg + ⅛ teaspoon allspice + ⅛ teaspoon cloves. You can also make a batch of homemade pumpkin pie spice and adjust it from there.

Method

  1. Heat the oven and ready the crust. Put a rack in the lower third and preheat fully to 425°F / 220°C. Set the cold shell on a rimmed baking sheet.

Make the Filling

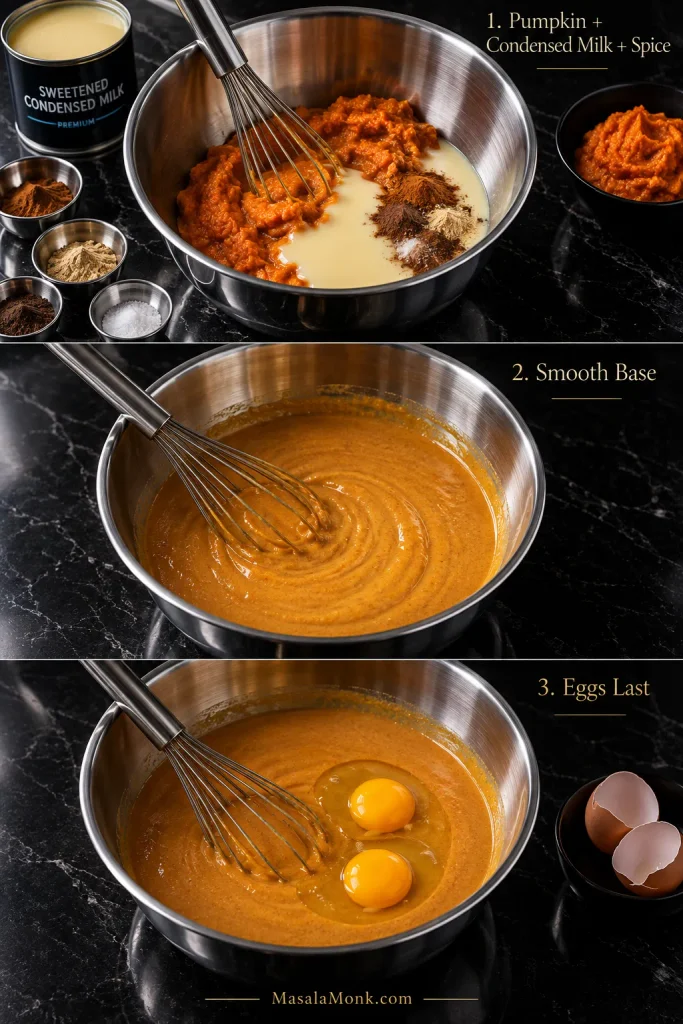
  1. Mix the pumpkin, condensed milk, and seasonings. Whisk the pumpkin, condensed milk, spice, salt, and vanilla until evenly colored and smooth.
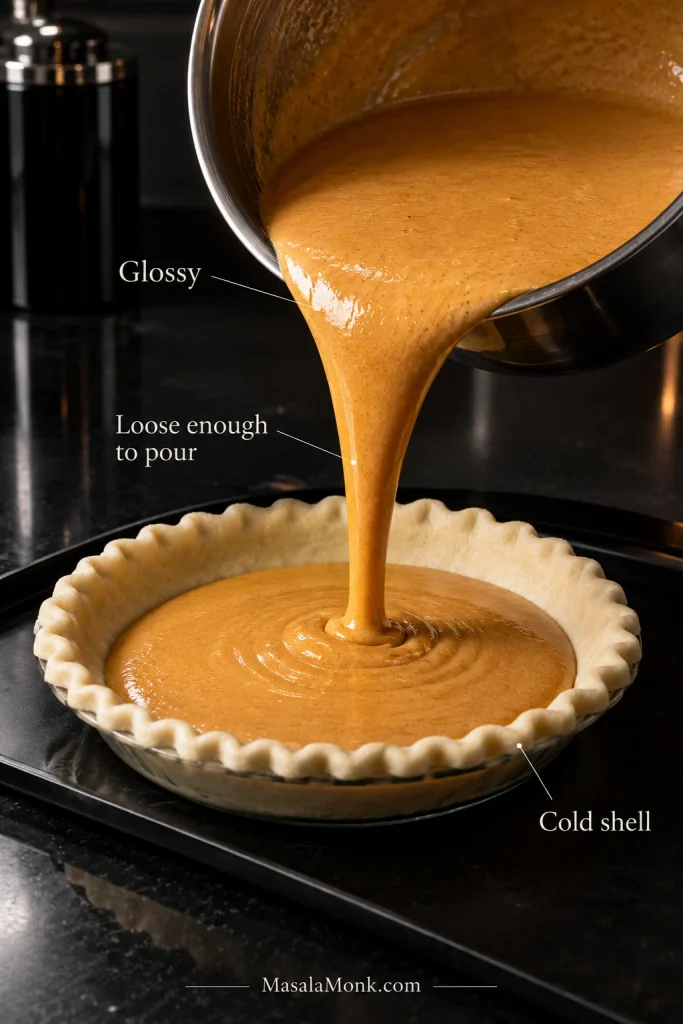
  2. Add the eggs last. Whisk in both eggs just until combined. The filling should look glossy and loose enough to pour easily. That’s normal; pumpkin custard is much thinner before baking than it will be once set. Tap the bowl gently and pop any large bubbles on the surface.
Three-step sequence showing pumpkin and condensed milk with spices, a smooth orange base, and exactly two eggs added last.
Before the eggs go in, you can safely taste the pumpkin-condensed base and decide whether the optional brown sugar is actually needed. Afterward, whisk in the eggs only until combined.

Pour Into the Shell

  1. Fill the shell. Pour in the custard, leaving a little headroom because 9-inch pie shells vary in depth. If you have extra filling, bake it in a lightly greased ramekin alongside the pie, but start checking it earlier. Take it out when the edges are set and the middle has the same small, controlled wobble.
Smooth orange pumpkin custard pouring into a cold unbaked pie shell, with a glossy fluid texture and visible space below the crust rim.
A loose pumpkin pie filling does not need flour or cornstarch just to look thicker. The eggs provide the set in the oven, so look for a smooth, evenly mixed filling rather than judging it by how thick it seems in the bowl.

Bake and Cool

  1. Start hot. Bake at 425°F / 220°C for 15 minutes. Leave the pie inside and lower the oven to 350°F / 180°C.
  2. Finish gently. Bake for about 35–45 minutes more, checking before the upper end of the range.
    Ready: the outer filling is set and the center has a small, controlled wobble.
    Needs longer: a broad section ripples or sloshes like liquid.
    If the rim is already deep golden, cover it with foil or a pie shield while the center finishes.
  3. Cool safely. Let the pie cool uncovered on a rack and refrigerate it within 2 hours of leaving the oven. If it is still warm when refrigerated, leave it uncovered or loosely tented until chilled, then cover it once cold.

Fan or Convection Ovens

Start around 400°F / 200°C for 15 minutes, then lower to about 325°F / 160°C. If your oven already compensates automatically for fan heat, use its normal conversion setting. Countertop ovens deserve an earlier look because the top element can sit much closer to the pie.

Ingredient questions · Check doneness · Crisp the crust · Fix a problem

Pumpkin Purée, Condensed Milk, and Spice

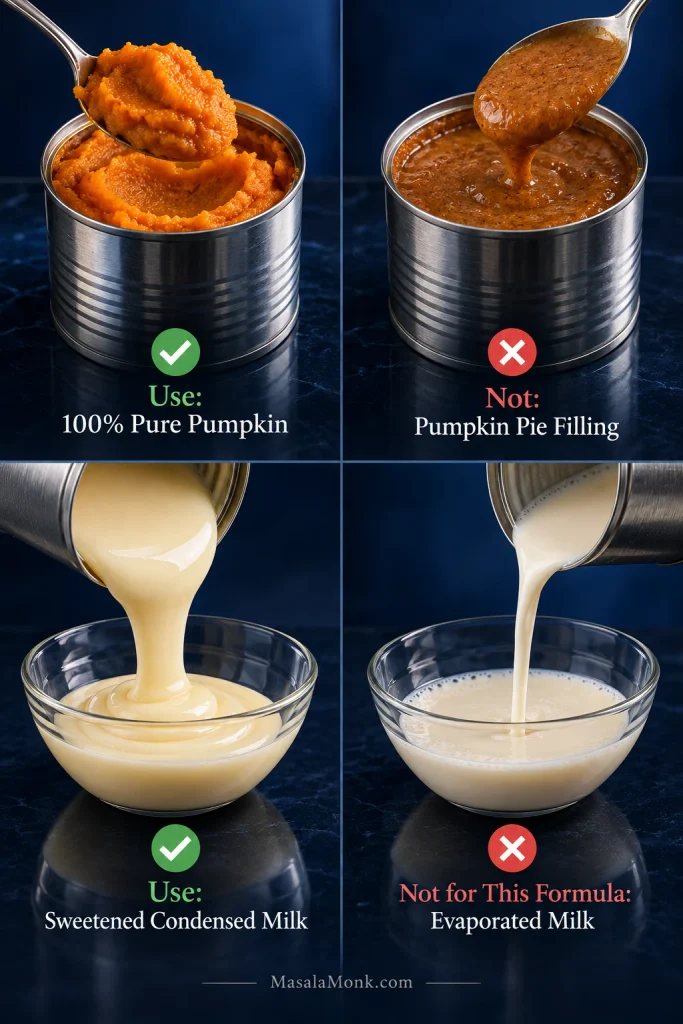
There aren’t many ingredients here, which makes the two common supermarket mix-ups more important than they might seem.

Use Pure Pumpkin, Not Pie Filling

Choose a can labeled 100% pure pumpkin or pumpkin purée. Pumpkin pie filling or pumpkin pie mix already contains sweeteners and seasoning, so it would make this pie sweeter and change the spice balance.

A standard 15 oz can gives the 425 g needed here. Straight from the can, the purée should be thick enough to hold soft spoon marks.

Sweetened Condensed or Evaporated Milk?

Not 1:1. In this pumpkin pie with sweetened condensed milk, the condensed milk is thick and already contains sugar; evaporated milk is unsweetened and much thinner. Each needs a recipe with a different sugar and dairy balance.

FeatureSweetened condensed milkEvaporated milk
Sweet?YesNo
TextureThick and syrupyFluid and pourable
What it bringsDairy, sweetness, richness, bodyDairy and moisture
Extra sugar usually needed?NoUsually yes
Four-part comparison showing pure pumpkin, pumpkin pie filling, sweetened condensed milk, and evaporated milk with visibly different textures.
If evaporated milk is the can you have, switch to an evaporated-milk pumpkin pie formula rather than trying to sweeten or thicken it until it behaves like condensed milk.

The finished pies differ too. A condensed-milk version is usually richer and sweeter; an evaporated-milk version tends to feel lighter and gives you separate control over the sugar. Either can make a soft custard—the eggs and final bake also determine how firmly it sets.

Opened sweetened condensed milk by mistake? You’re already in the right place. Use this formula and leave the separate sugar out.

Do You Need Extra Sugar?

No. The condensed milk already makes the standard filling clearly sweet. If you deliberately want a sweeter pie with a mild molasses note, taste the pumpkin-and-condensed-milk mixture before adding the eggs. Then add 1–2 tablespoons packed brown sugar only if you want it.

Once chilled, the pumpkin should lead the flavor, with cinnamon and ginger behind it and the pastry giving the soft custard some needed contrast.

Choosing Your Spice Level

The 2½ teaspoons in the recipe is a balanced starting point. Use about 2 teaspoons for a milder, more pumpkin-forward pie or 3–3½ teaspoons for something bolder. Go slowly with clove-heavy blends; the spice should sit behind the pumpkin, not bury it.

Once the cans and seasoning are right, the biggest remaining decision is when to stop baking. That matters more than another half-teaspoon of spice.

How to Tell When Pumpkin Pie Is Done

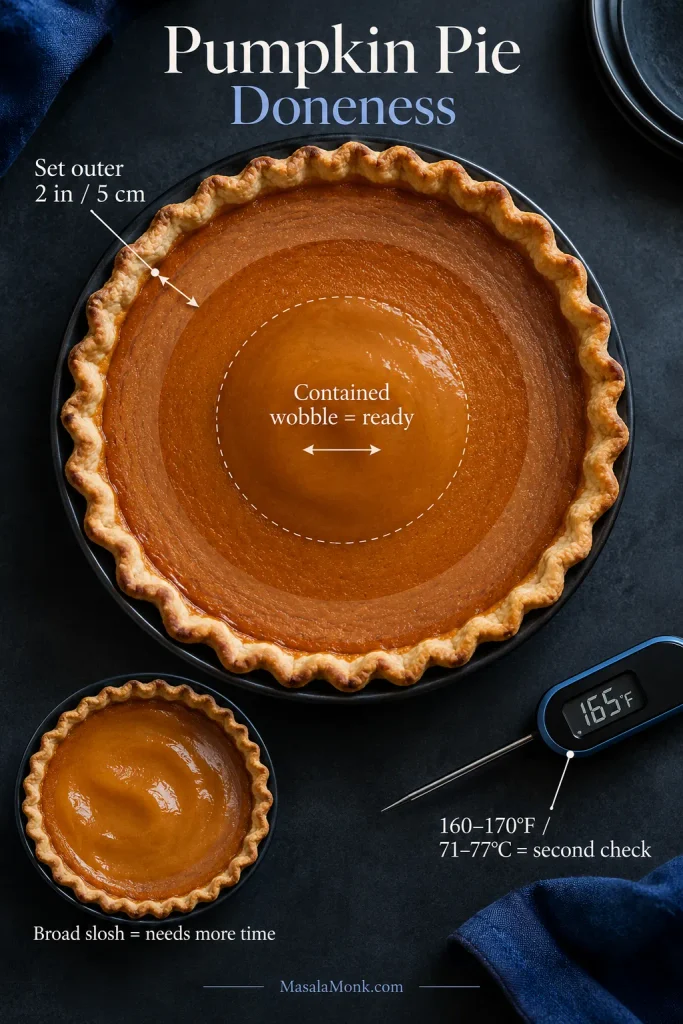
Pumpkin pie is done when the outer 2 inches / 5 cm are set. A smaller center should still wobble softly as one piece when you nudge the plate. Broad liquid ripples or sloshing mean it needs more time.

The middle will move, and the instinct is often to give it another ten minutes “just to be safe.” That’s exactly where a good custard pie can go too far. Start checking within the suggested bake-time range and let the pie itself make the decision.

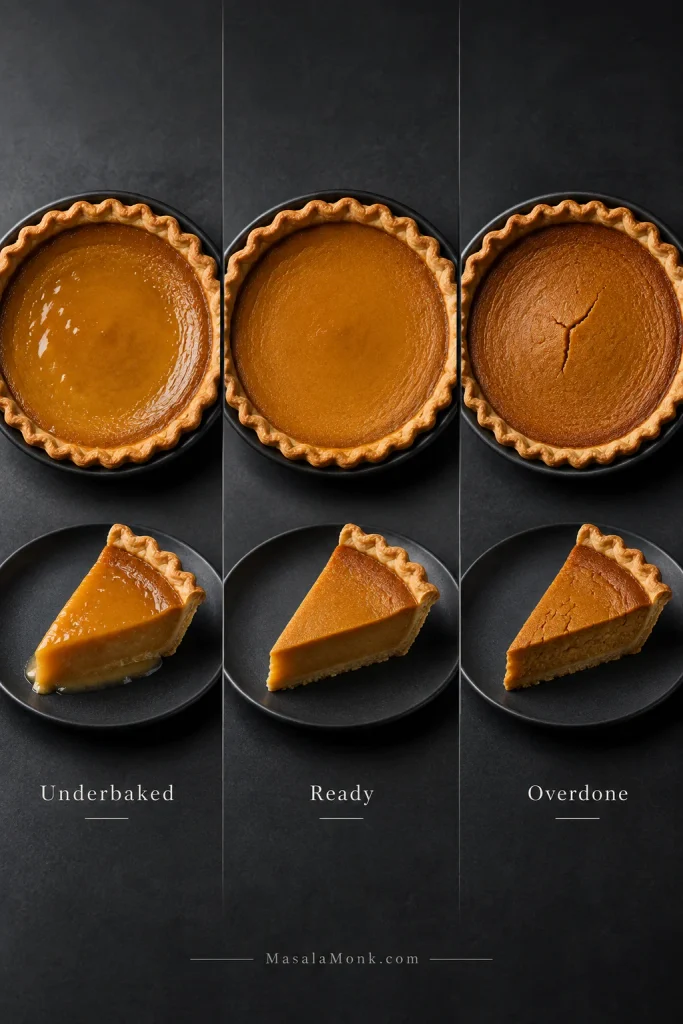
Underbaked, Ready, or Overdone?

StageWhat you seeWhat to do
Too earlyA broad part of the center ripples, waves, or sloshes like liquidKeep baking
ReadySet perimeter + a contained wobble in the middleTake the pie out
Too farThe center is rigid, strongly puffed, cracked, or beginning to pull from the crustRemove it immediately
Three matched pumpkin pies labeled underbaked, ready, and overdone, showing a loose wet center, a softly set center, and a firmer cracked surface.
Surface color is a poor guide to how to tell when pumpkin pie is done because pumpkin and spice can darken before the center sets. Use movement, not browning, to decide when to pull the pie.

Jiggly is not the problem. Liquid is. A small, controlled movement in the middle is what you want; the pie keeps setting as it cools.

You don’t need a perfectly clean knife test. Waiting for the center to look completely firm is more likely to push the custard too far.

Use a Thermometer When the Wobble Is Hard to Read

If you’ve been staring at the center and can’t decide whether that wobble is enough, an instant-read thermometer can break the tie. Roughly 160–170°F / 71–77°C in the middle is a useful secondary check, not a replacement for looking at the pie.

Top-down pumpkin pie diagram showing a set outer 2-inch or 5-centimeter ring, contained center wobble, broad slosh needing more time, and 160–170°F as a secondary check.
Use a simple hierarchy for pumpkin pie doneness: movement first, thermometer if you are unsure, bake time last. That keeps a clock or temperature reading from overruling what the custard is visibly telling you.

King Arthur Baking’s pumpkin pie doneness guide shows the same progression from liquid to softly wobbly to overbaked, alongside temperature cues.

What the Finished Custard Should Feel Like

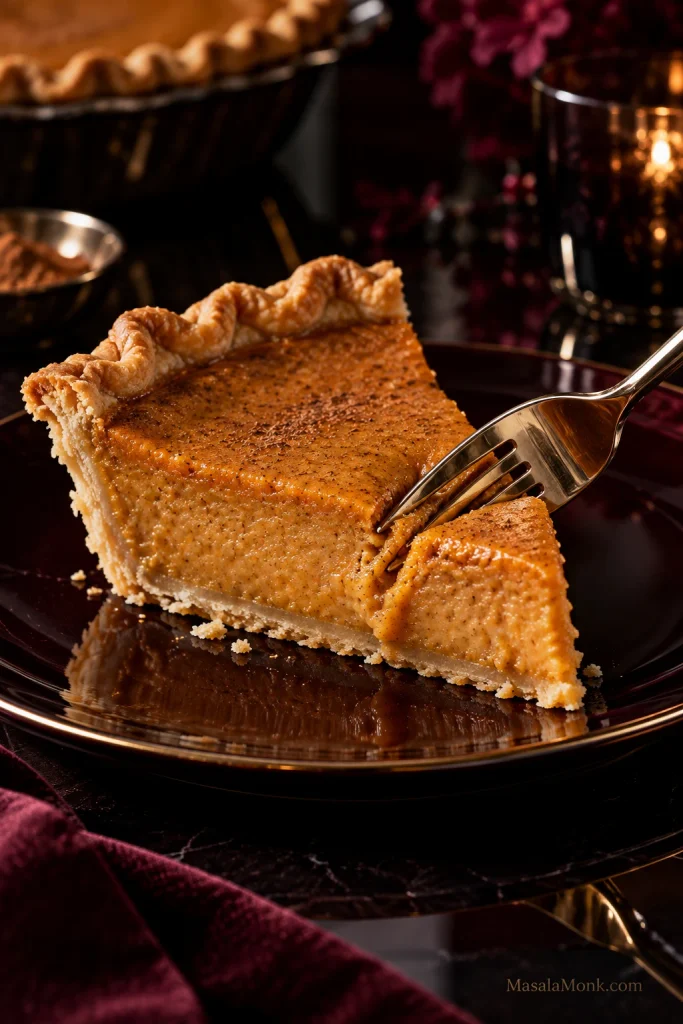
Once thoroughly chilled, that softly set center should hold a slice but yield easily under a fork. If the filling eats firm and bouncy like cheesecake, it probably went farther than it needed to in the oven.

Close-up of a fork pressing into a chilled pumpkin pie slice with softly set orange custard and a golden layered crust.
A clean slice does not require a dry custard. Chilling provides much of the structure, so the filling can stay tender enough to yield under a fork without sacrificing a neat wedge.

But doneness is only half the timing problem because the pastry underneath can be on a different schedule entirely.

Recipe card · Crisp the crust · Fix a problem

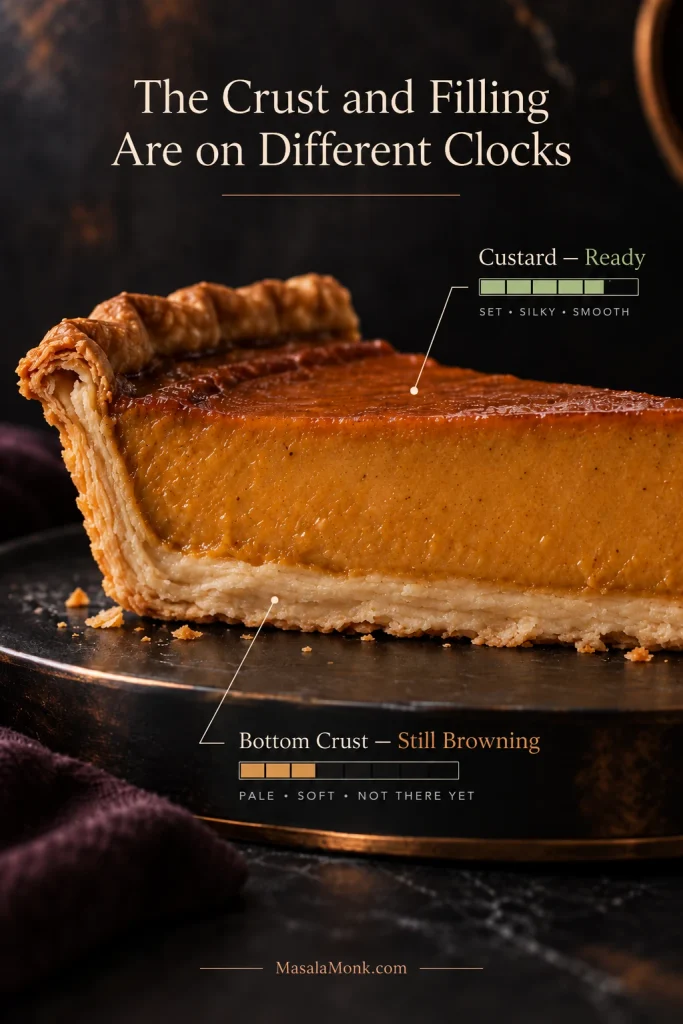
The Crust and Filling Are on Different Clocks

A pumpkin pie can have an overbaked filling and a pale bottom at the same time. More baking isn’t always the answer. Once the custard is done, chasing a darker base can turn a good filling dry before the pastry catches up.

That is also why the recipe starts hot and then drops the temperature. The first 15 minutes give the cold pastry an early burst of heat and get crust browning underway; the lower oven then lets the egg custard finish more gently.

Cutaway pumpkin pie showing set custard labeled ready above a paler bottom crust labeled still browning.
A deeply browned rim does not guarantee a browned bottom: exposed pastry gets direct oven heat, while the base sits beneath wet custard, so judge the filling and bottom crust separately.

For the easiest improvement, bake the pie on a lower rack. If you want a distinctly crisper bottom, partially bake the shell first.

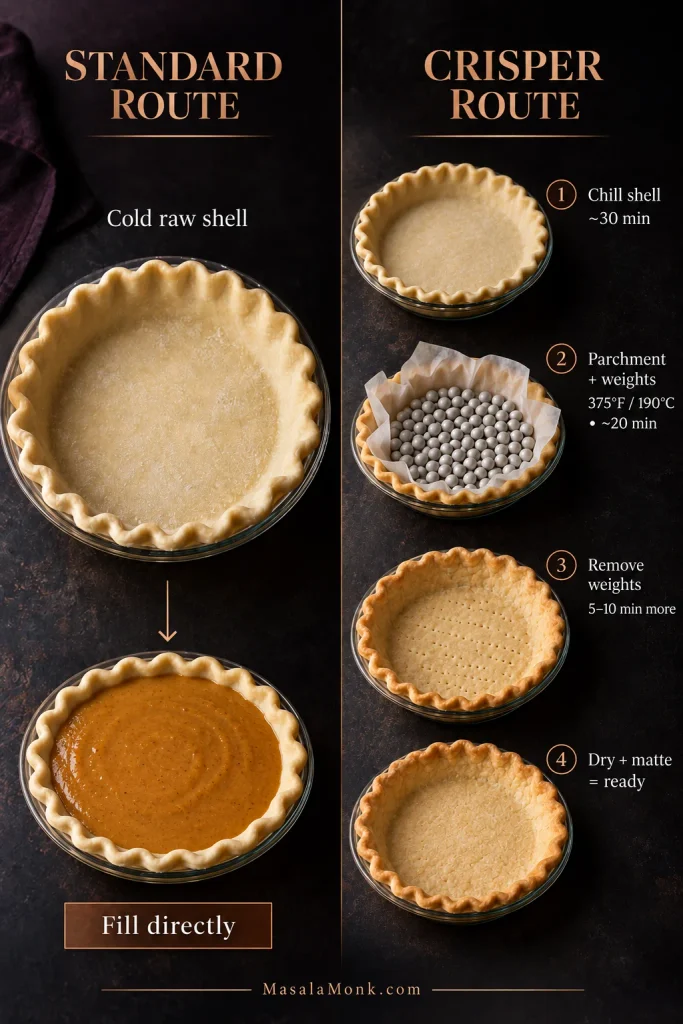
Cold, Unbaked Crust: The Standard Route

The main recipe uses a cold raw crust on a lower oven rack, and that isn’t the inferior version. A refrigerated or frozen store-bought shell is completely fine. Partial prebaking is an extra step for people who care especially about bottom-crust crispness; you don’t need to turn a simple pie into a project.

Prefer making the pastry yourself? This flaky homemade pie crust makes enough for two single-crust 9-inch / 23-cm pies, so one disk can go into this pie and the other can be frozen. Ease the dough into the plate instead of stretching it, then chill the shaped shell again if it has softened.

For a Crisper Bottom, Partially Bake the Shell

You do not have to prebake the crust for this pumpkin pie. Do it when a distinctly crisp bottom matters enough to add the extra step. The key is giving the base a few dry minutes after the weights come out, before wet custard goes in.

Two-route crust guide showing a cold raw shell filled directly and a partial-prebake route with chilling, weights, and a final dry matte base.
You are not trying to fully brown the empty shell. Instead, the useful checkpoint is a base that has lost its damp sheen, because the crust will keep baking after the pumpkin custard goes in.

Partial Prebake, Step by Step

  1. Fit and crimp the pastry, then chill the shaped shell for about 30 minutes.
  2. Heat the oven to 375°F / 190°C.
  3. Line the shell with parchment and fill it about two-thirds full with pie weights, dried beans, uncooked rice, or granulated sugar. Keep the weights against the sides as well as the base.
  4. Bake for about 20 minutes.
  5. Remove the parchment and weights, then bake the empty shell for another 5–10 minutes. The bottom should lose its damp shine and look dry and matte.
  6. Raise the oven to 425°F / 220°C, add the pumpkin filling, and continue with the main recipe.

The rim has already had a head start, so shield it with foil or a pie shield once the color looks right.

Instead of chasing a cracker-dry bottom, aim for enough crispness underneath to give the soft custard some contrast.

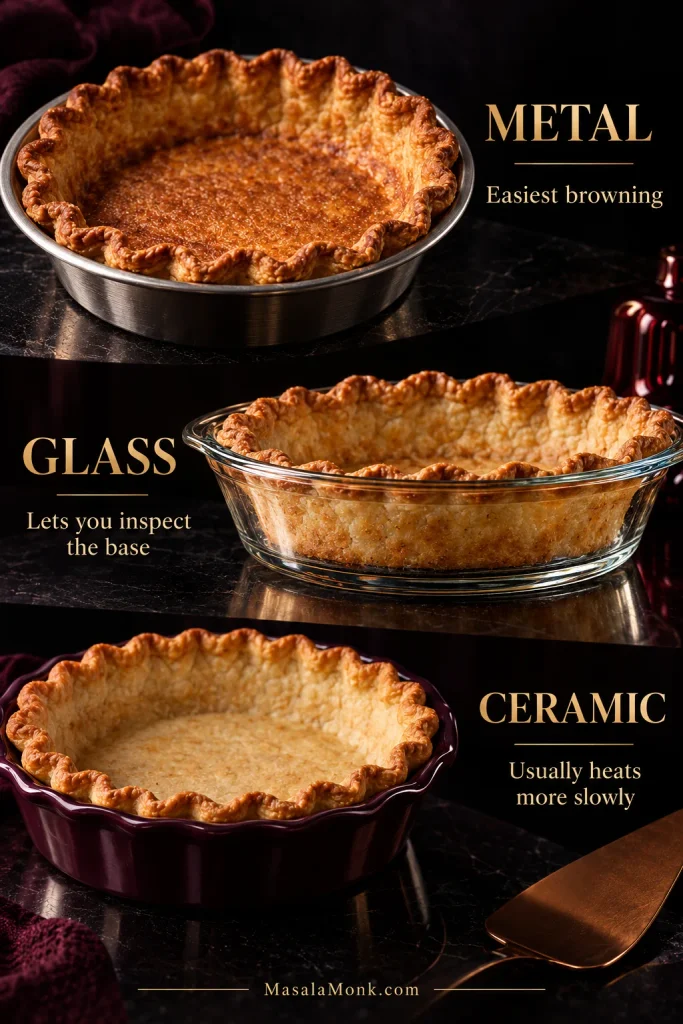
Metal, Glass, or Ceramic Pie Plates?

Pan material can help too. A metal pie plate generally gives the bottom heat more quickly and is the easiest choice when browning is the priority. Glass lets you see how the base is coloring. Ceramic works well but usually heats more slowly.

Comparison of pumpkin pies in metal, clear glass, and ceramic pie plates, with labels explaining bottom-browning speed and the ability to inspect the crust base.
Pan material mostly changes the crust side of the equation. The pumpkin custard still needs the same set-edge and center-wobble cues whether the pie sits in metal, glass, or ceramic.

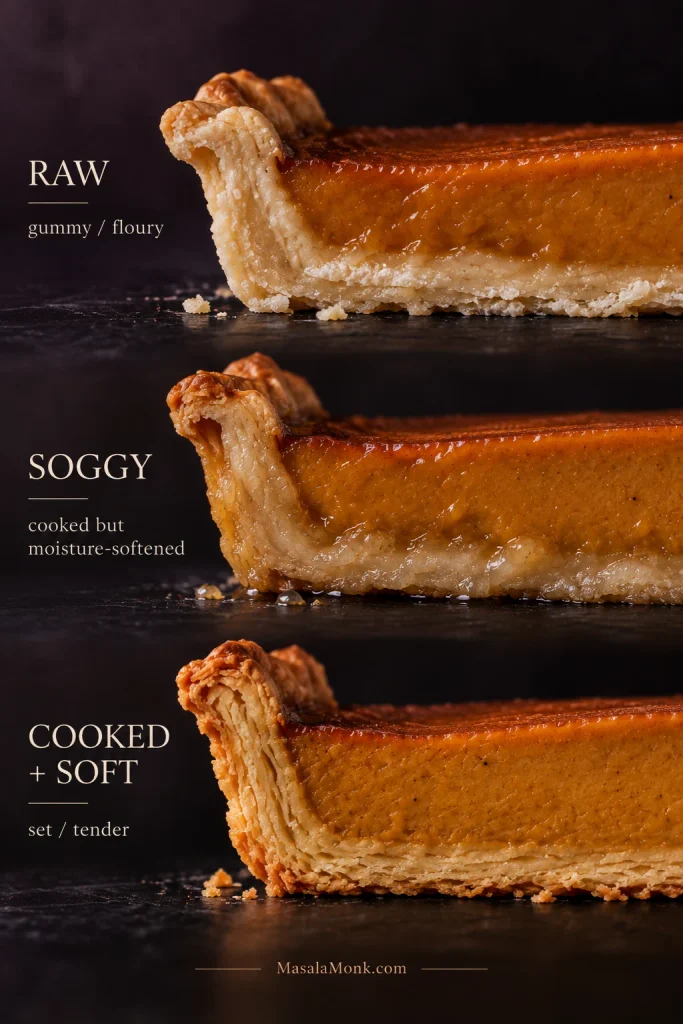
Raw, Soggy, or Simply Soft?

The pastry directly under pumpkin custard will usually be softer than the exposed rim. That doesn’t automatically mean it is raw.

Raw pastry feels gummy, floury, and dough-like. Soggy but cooked pastry has set but absorbed moisture. The layer where the custard meets the crust may simply be soft and tender.

Three pumpkin pie crust cross-sections labeled raw, soggy, and cooked plus soft, showing gummy dough, moisture-softened pastry, and tender baked layers.
Look at the cut edge as well as the color: raw dough smears and compresses, while cooked-soft pastry shows set layers even when it bends instead of snapping.

If the filling is properly done, much more oven time is unlikely to rescue the bottom without hurting the custard. Prevention works better: use a lower rack, choose a metal pie plate, or partially prebake the shell.

Recipe card · Fix a problem · Fresh pumpkin · Make ahead

If the Pie in Front of You Looks Wrong

Got set edges, a softly moving center, and a crust you’re happy with? You’re done here. This section is for the moment something looks off.

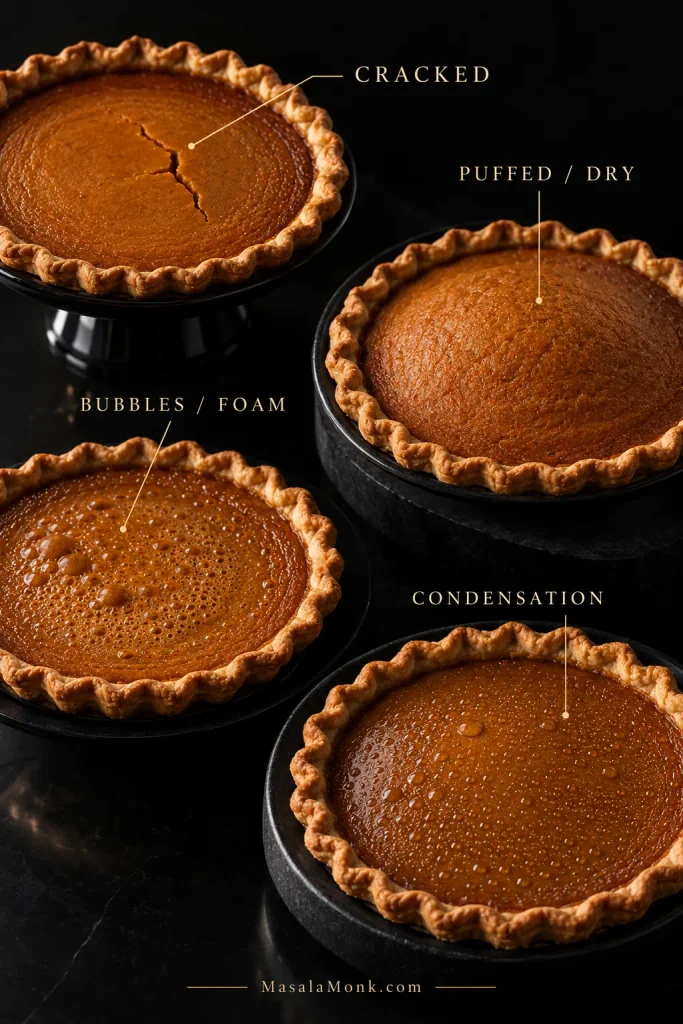
Most pumpkin-pie problems don’t ruin dessert. A crack, soft crust, or condensation can look worse than it actually is, so start with what you can see.

If the Filling or Top Looks Wrong

Four pumpkin pie surfaces showing a fine crack, a puffed dry top, small bubbles or foam, and condensation droplets.
Surface flaws and doneness are not the same diagnosis. Cracks, puffing, bubbles, and condensation tell you something about heat, air, or cooling; a genuinely underbaked center is better recognized by broad liquid movement.

Match What You See to the Fix

What you seeLikely causeWhat to do
Center still sloshesUnderbaked custard.Now: If you just removed it, return it to the oven in 5-minute increments.
Next time: Wait for set edges and a smaller soft wobble.
A warm slice is very softIt may only need more cooling.Now: Chill the rest before judging it.
Next time: Give the pie plenty of refrigerator time before slicing.
The chilled filling is runnyUnderbaking, wet homemade pumpkin, or changed ratios.Now: A cold sliced custard is difficult to repair neatly.
Next time: Control pumpkin moisture and use the doneness cues.
The surface crackedThe custard baked too far.Now: Chill and serve; the crack is mostly cosmetic.
Next time: Pull the pie while the center moves slightly.
The top puffed or looks dryToo much heat or bake time.Now: Let it cool; mild puffing often settles.
Next time: Check sooner, especially in fan or countertop ovens.
The top is foamy or bubblyToo much air entered during mixing.Now: Leave it alone; surface bubbles mainly affect appearance.
Next time: Whisk gently and clear large bubbles before baking.
The custard is grainyThe eggs overheated.Now: The texture can’t really be reversed.
Next time: Remove the pie sooner.
Water droplets appeared after chillingSteam condensed on the surface.Now: Blot large droplets gently.
Next time: Cool uncovered and cover only once thoroughly cold.

Too sweet? Serve it cold with unsweetened or barely sweetened whipped cream. Tastes flat? Check the age of your spices before adding more; fresh cinnamon and ginger often help more than another spoonful of a tired blend.

If the Crust Isn’t Behaving

Three crust problems showing a pale gummy bottom, an overly dark rim, and pastry that has shrunk down and away from the pan sides.
Use the location of the problem as the clue: base issues point toward bottom heat, rim issues toward exposure, while shrinkage points back to dough handling or support.

Match the Crust Problem to the Fix

What you seeLikely causeWhat to do
Bottom crust is pale and gummyNot enough bottom heat.Now: It’s hard to fix once the custard is done.
Next time: Use a metal pan, lower rack, or partial prebake.
Bottom is soft but cookedThe custard softened the pastry.Now: Soft doesn’t necessarily mean raw. If the pastry has set and isn’t gummy or floury, serve it.
Next time: Partially bake the shell if you want more crispness.
Crust rim is too darkThe exposed edge finished first.Now: Cover with foil and let the center finish.
Next time: Shield the rim once the color looks right.
The crust shrankThe pastry was stretched, warm, or poorly supported.Now: There isn’t much to reverse after baking.
Next time: Fit gently, chill thoroughly, and support the sides with weights.
The filling overflowedThe shell was too shallow or too full.Now: Let the baking sheet catch it.
Next time: Leave more headroom.

If the custard is set and tastes good, don’t let a crack or a softer-than-perfect bottom turn dessert into a post-mortem. Some problems are worth learning from without needing to rescue the pie in front of you.

Whole pumpkin pie with a visible cosmetic crack and one slice removed, beside an intact slice with smooth orange custard and golden crust.
If appearance matters, cut the first serving from an intact section and leave the cracked area for later. Chilled pumpkin custard is usually stable enough that a cosmetic crack will not prevent clean wedges.

Recipe card · Check doneness · Cooling & serving · Back to top

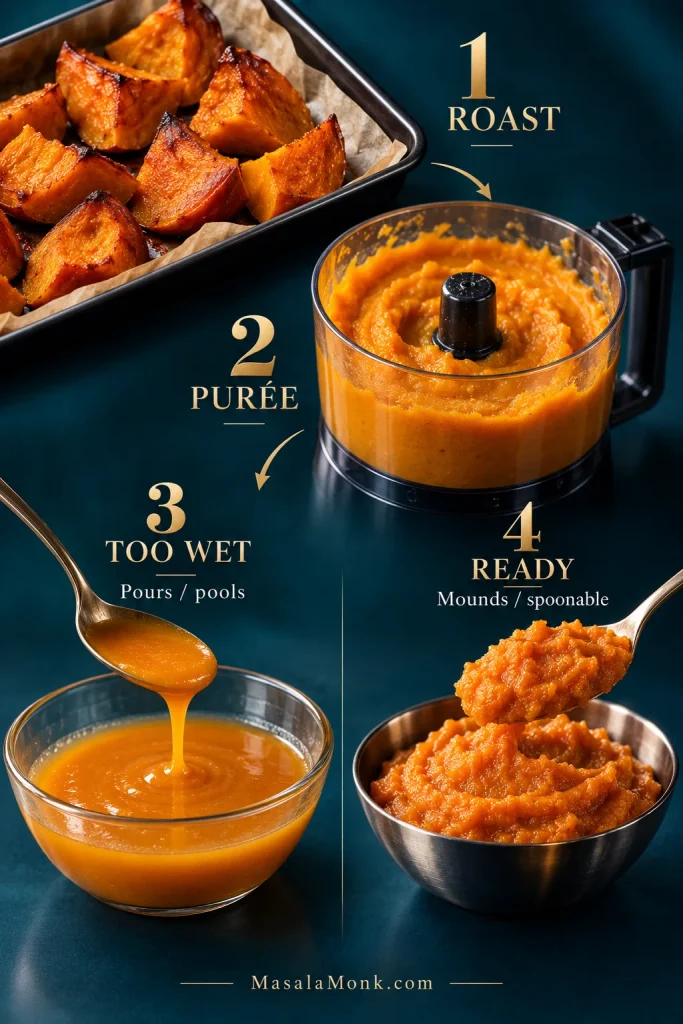
Using Fresh Pumpkin

Working with canned pumpkin? You can skip this section. With fresh pumpkin, moisture is the variable that matters most.

A small pie or sugar pumpkin—or another dense, sweet cooking pumpkin—is usually a better choice than a large carving pumpkin, which tends to be wetter and stringier. Roast it when possible, then purée until smooth. If liquid gathers around the purée or it pours instead of mounding from a spoon, it is too wet. Drain it through a fine sieve or cook it gently until some of that water evaporates.

You want something thick, spoonable, and spreadable, with no watery pooling. Once it reaches that point, weigh 15 oz / 425 g for the pie. Fix the excess water before mixing the custard; adding flour later changes the texture without fixing why the purée was loose in the first place.

Petrol-teal process scene showing roasted pumpkin, smooth purée, watery purée that pours and pools, and thick ready purée that mounds on a spoon.
For slightly wet fresh pumpkin purée, draining removes free water without concentrating the flavor as much. A clearly loose purée benefits more from gentle stovetop reduction.

Any thick purée left after weighing can go into this moist pumpkin bread.

Two Ways to Change the Basic Pie

Two changes are especially useful here: swap the pastry for a graham cracker crust, or warm the pumpkin and spices first for a deeper, more concentrated filling.

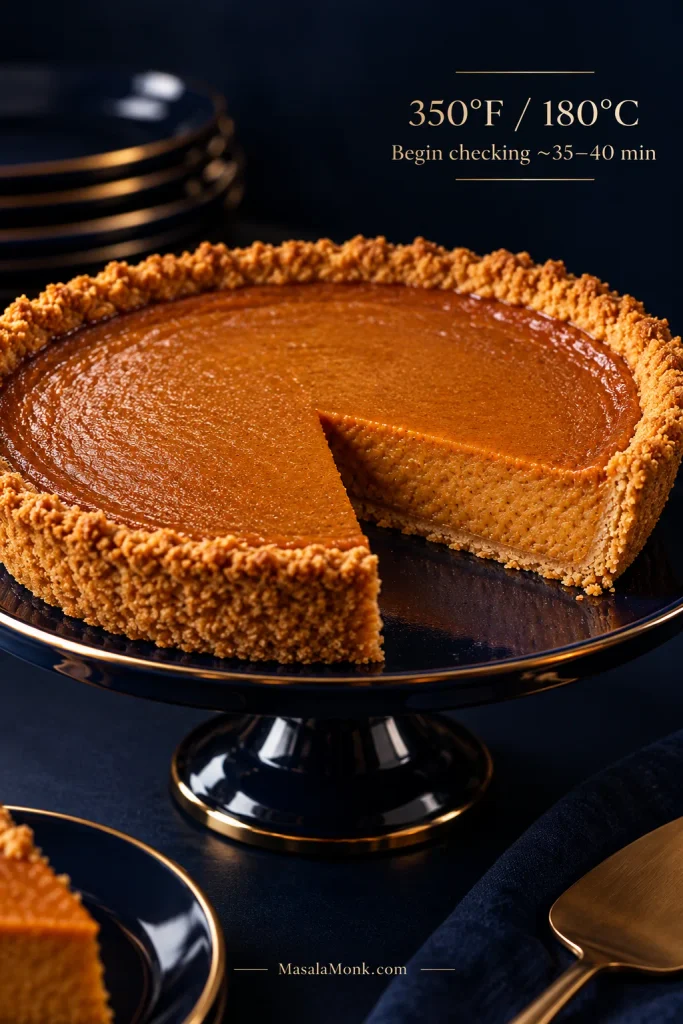
Graham Cracker Crust

The same filling works with graham cracker crust. Use a prepared shell or make a simple homemade graham cracker crust for a 9-inch / 23-cm plate.

For a homemade crust, bake the empty shell at 350°F / 180°C for about 10 minutes, then cool it before adding the filling. Bake the filled pie at the same 350°F / 180°C and begin checking around 35–40 minutes. A standard prepared 9-inch shell may be ready around 40 minutes; a deeper homemade crust can take longer. Let the same set-edge and soft-center cues decide.

Prepared graham shells can be shallow, so don’t be surprised if all of the filling doesn’t fit.

Pumpkin pie with a golden graham cracker crumb crust and one slice removed, with text noting 350°F or 180°C and checking around 35–40 minutes.
A graham cracker crust skips the 425°F / 220°C hot start used for pastry. Bake the filled pie at 350°F / 180°C and begin checking around 35–40 minutes, using the same soft-center wobble to judge doneness.

Want Deeper Pumpkin Flavor? Warm the Purée First

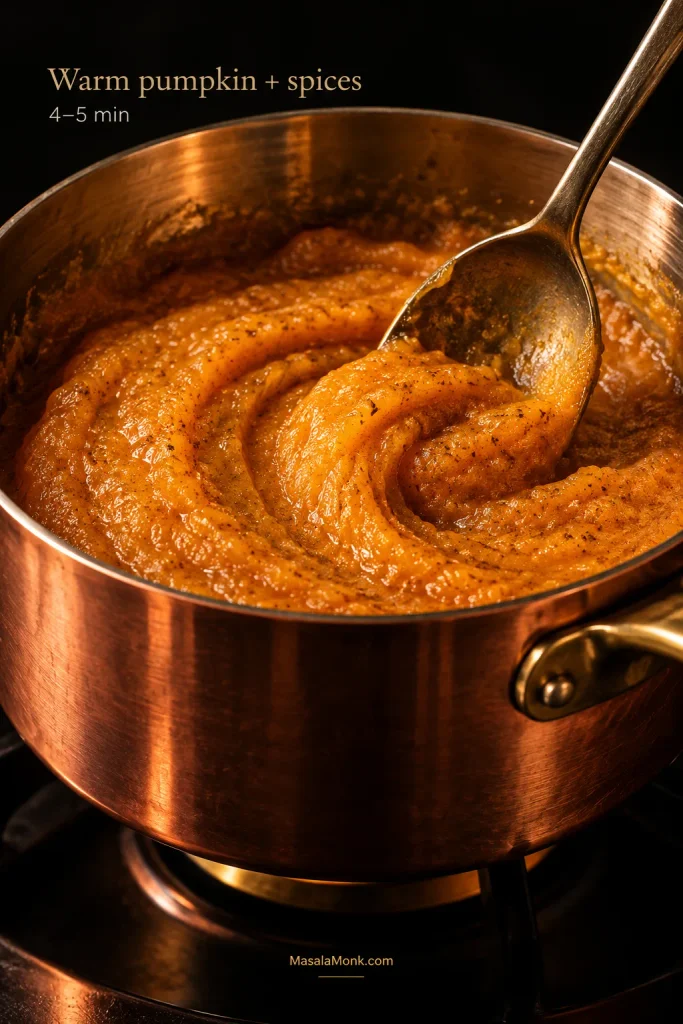
Cook the pumpkin, salt, and spices over low heat for about 4–5 minutes, stirring steadily. You’ll smell the change before you see much of one: the cinnamon and ginger become clearer as some moisture cooks away and the pumpkin loses its raw canned edge.

Let the mixture cool until it is warm rather than hot, then stir in the condensed milk. Add the eggs last and mix gently before filling the crust.

Thick orange pumpkin purée with spice flecks being stirred in a copper saucepan, with text indicating a 4–5 minute warming step.
Let warmed pumpkin cool before the eggs go in; otherwise, residual heat can start setting the egg proteins before the pie reaches the oven. Warm is fine, but hot is not.

Bake Today, Slice Tomorrow

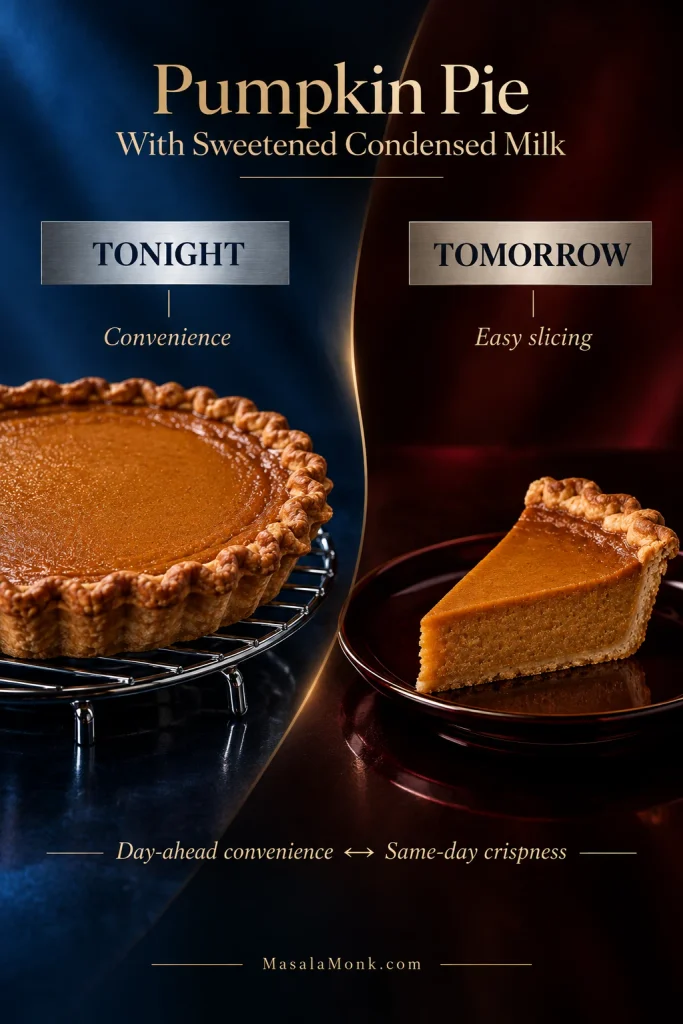
Yes, pumpkin pie can be baked a day ahead. An overnight chill gives the custard time to settle and makes the next day’s slicing much easier.

A day-ahead pie buys you convenience; a same-day bake buys you the crispest crust. If you want both, partially prebake the shell before baking the pie the day before.

When several dishes are competing for oven space, baking the pie the night before also leaves the oven free for food that needs to reach the table hot.

Split scene showing a whole pumpkin pie cooling at night and a clean chilled slice the next day, contrasting day-ahead convenience with same-day crust crispness.
For the best make-ahead pumpkin pie crust, let the pie cool before covering it. Otherwise, trapped steam under wrap or a lid can soften the pastry faster.

Can You Make the Filling Ahead?

Yes. Mix the filling the night before, cover it, and refrigerate it separately from the unbaked crust. The resting time also gives the spices a chance to meld. Give the mixture a gentle stir before pouring it into the cold shell.

Cooling and Serving

Let the baked pie cool uncovered on a rack, but refrigerate it within 2 hours of leaving the oven. It does not need to be completely cold first; if it is still slightly warm, leave it uncovered or loosely tented until chilled. Cover it once cold.

For slices that hold together well, give the pie about 4 hours in the refrigerator after that cooling period. Overnight is easiest. If you prefer the pie less cold, let individual slices stand for 15–30 minutes before serving.

By then the center should cut cleanly but stay soft under a fork, with warm spice and pastry giving the richer filling some contrast. Barely sweetened or unsweetened homemade whipped cream works especially well because it lightens the condensed-milk richness without piling on more sweetness.

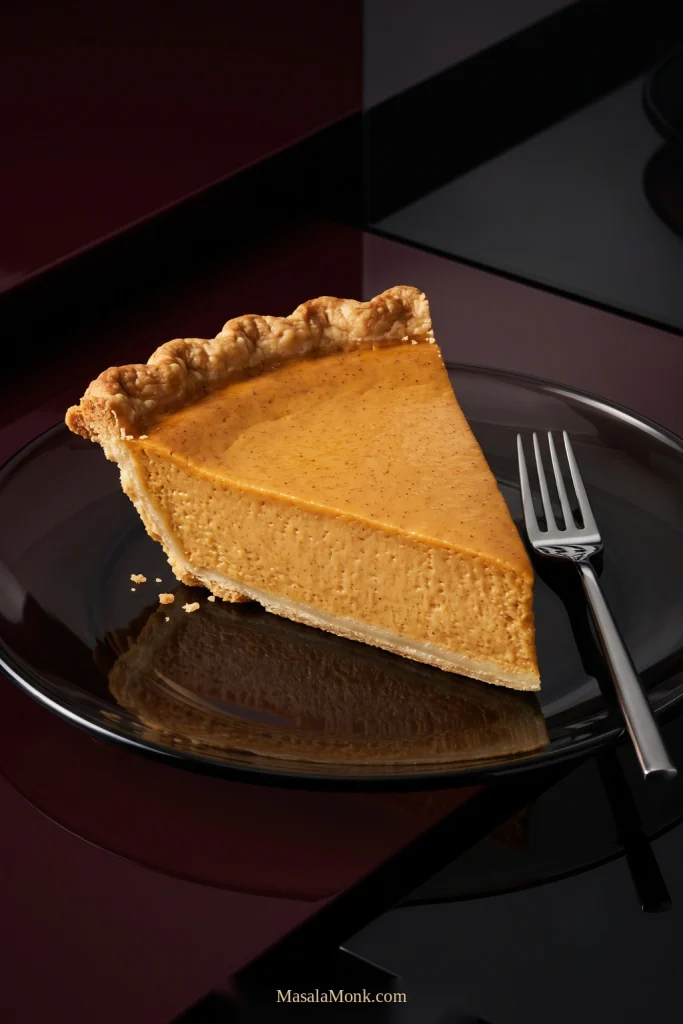
Single pumpkin pie slice with softly set orange custard, fine spice specks, golden flaky crust, and one polished fork on a dark smoked-glass plate.
For cleaner pumpkin pie wedges, use a thin sharp knife, wipe the blade between cuts, and then slide a pie server fully beneath the crust before lifting.

Storage and Freezing

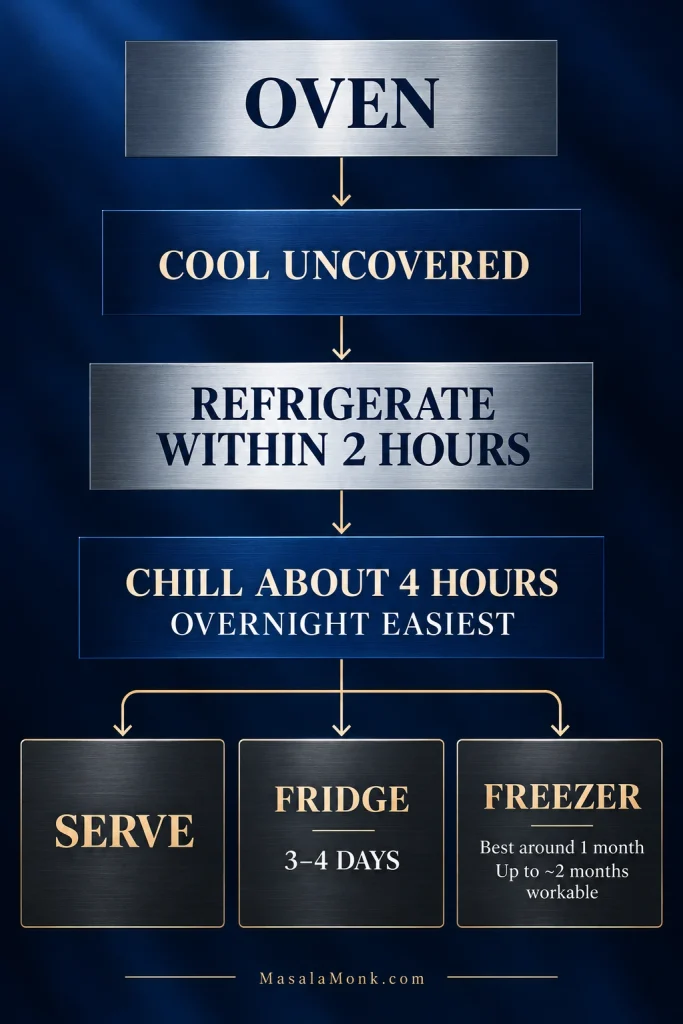
Keep the cooled pie covered in the refrigerator and use it within about 3–4 days. FoodSafety.gov gives the same refrigerator window for baked pumpkin and pecan pies in its cold food storage guidance.

You can freeze the pie too. For the best texture, aim to use it within about 1 month; roughly up to 2 months can work, but the custard may separate slightly and the crust can soften. Wrap the thoroughly cold pie well and thaw it overnight in the refrigerator.

Vertical post-bake timeline showing cooling uncovered, refrigeration within 2 hours, chilling about 4 hours or overnight, then serving, refrigerating, or freezing.
If you freeze only a few servings, freeze individual pumpkin pie slices until firm and wrap them separately. Then you can thaw only what you need overnight in the refrigerator.

Pumpkin Pie Questions That Still Come Up

1. Can I bake two pumpkin pies at once?

Usually, as long as both pans fit with room for air to circulate. Two cold pies can slow the oven’s recovery, so the finish time may shift. Rotate them carefully later in the bake if your oven has obvious hot spots, and check each center separately.

2. Can pumpkin pie sit out overnight?

No. Pumpkin pie is an egg-and-dairy custard, so refrigerate it within 2 hours of leaving the oven. If a baked pumpkin pie has been left at room temperature overnight, the safest choice is to discard it.

3. What if my 9-inch crust doesn’t hold all the filling?

That’s common because 9-inch pie shells vary in depth. Stop before the shell becomes awkwardly full and bake the extra custard in a lightly greased ramekin. Start checking the ramekin earlier than the pie and remove it when the edges are set and the center has the same small, controlled wobble.

Recipe card · Cooling & serving · Storage & freezing · Back to top

Posted on Leave a comment

Tomato Pie Recipe: Southern-Style, Cheesy and Never Soggy

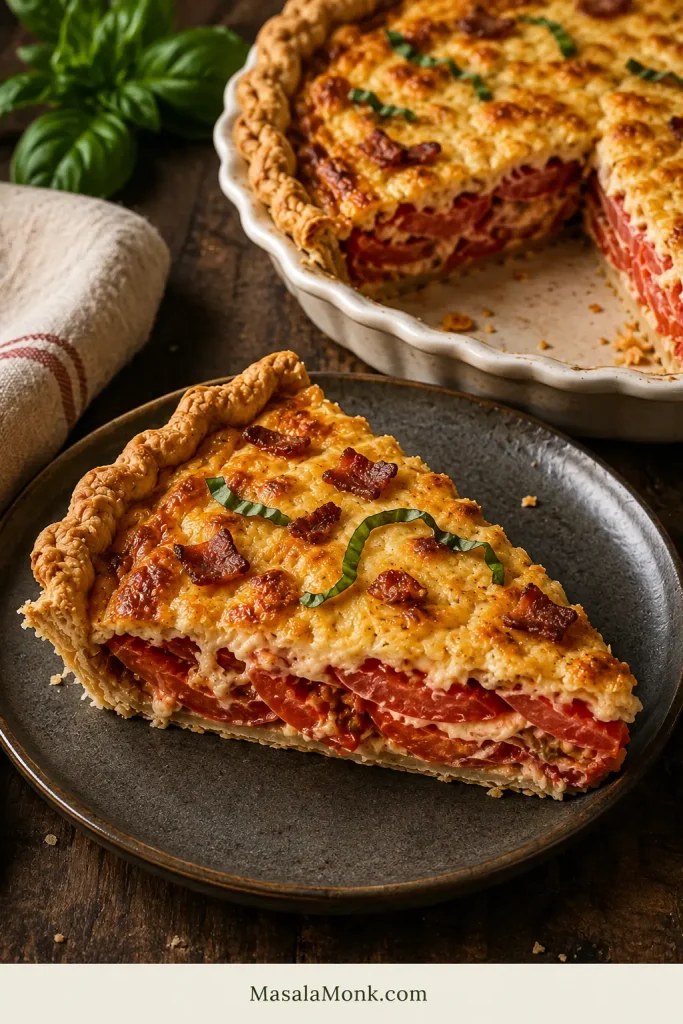
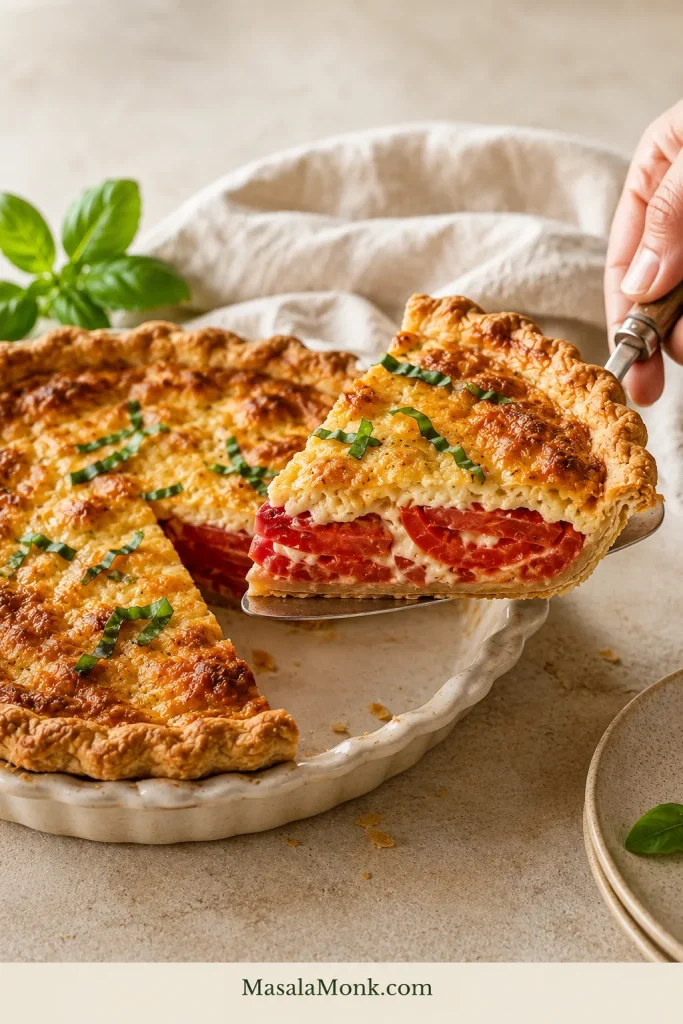
Whole Southern tomato pie with a golden crimped crust, browned cheese topping, fresh basil, and one wedge removed to reveal the red tomato filling.

The first slice tells you whether a tomato pie worked. The tomatoes should still taste unmistakably of summer, the cheese should be creamy and savory, and underneath it all there should be a crust flaky enough to matter—not pale pastry soaking in tomato juice.

This is the kind of pie to make when tomatoes are so ripe and fragrant that dinner can reasonably revolve around them. The aim is to concentrate that ripe tomato flavor while keeping enough water away from the pastry for the first wedge to come out looking—and eating—like a proper slice of pie.

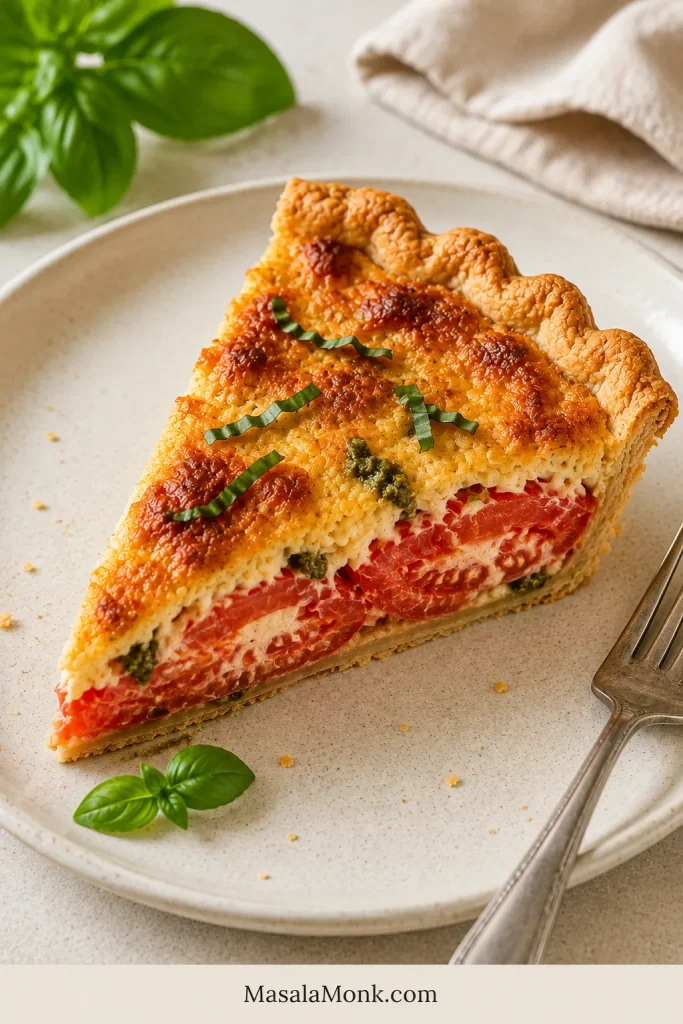
Close side view of a Southern tomato pie wedge showing an intact flaky bottom crust, red tomato layers, and browned creamy cheese topping.
A good slice keeps the flaky crust distinct beneath generous tomato and browned cheese.

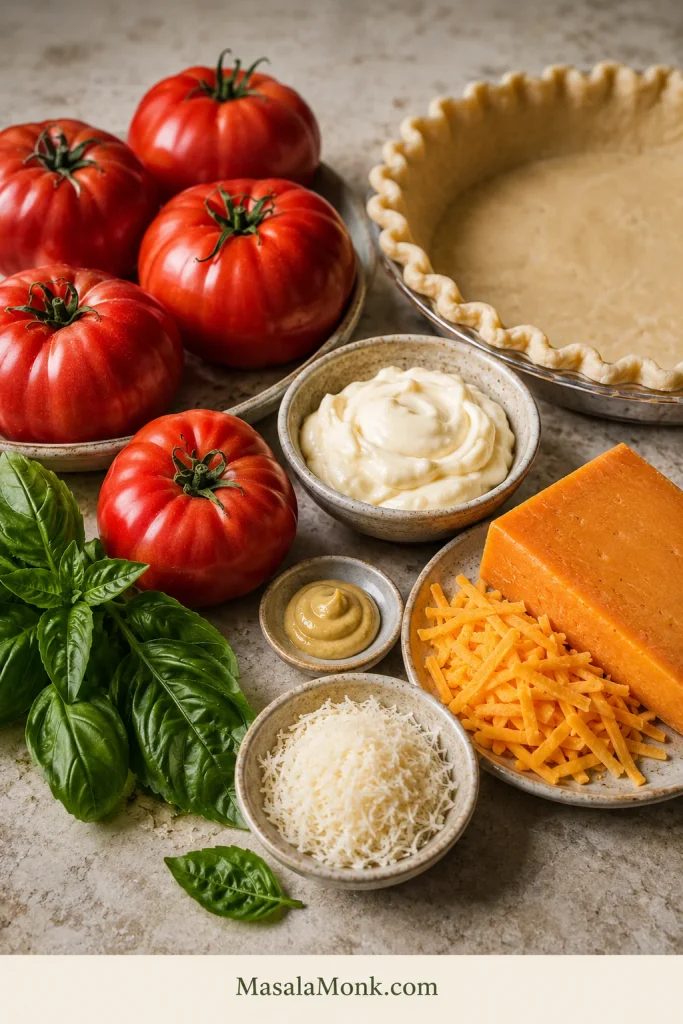
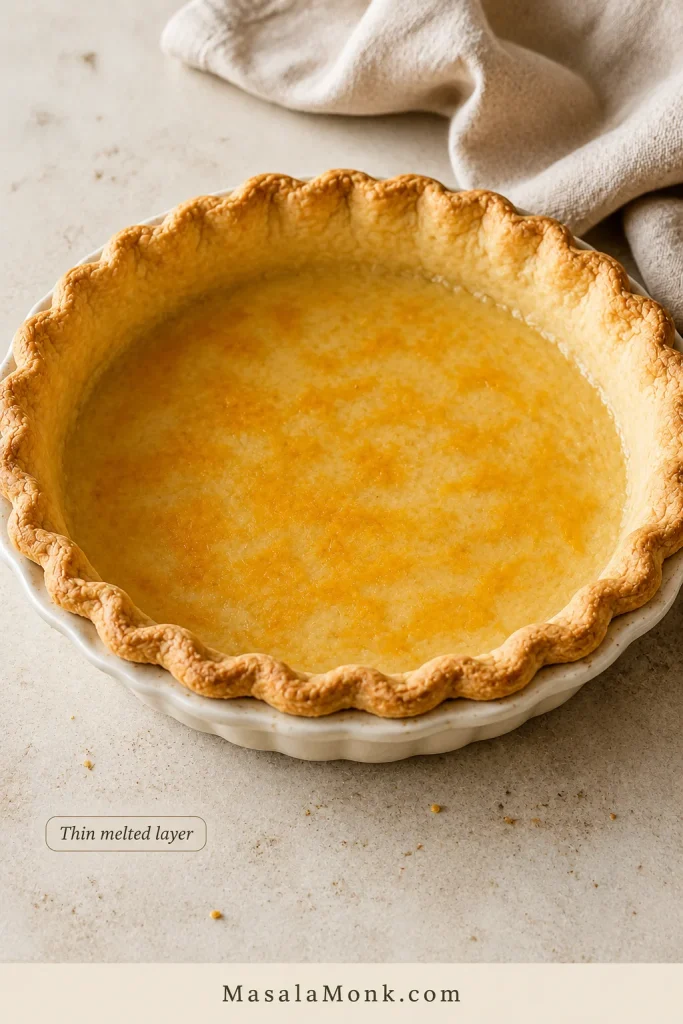
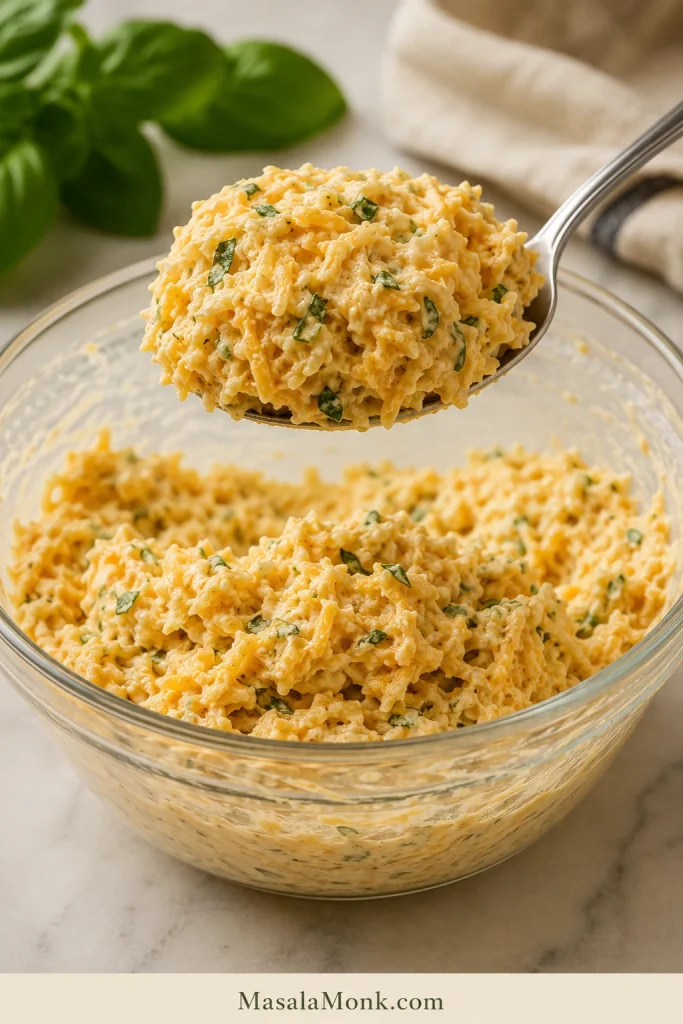
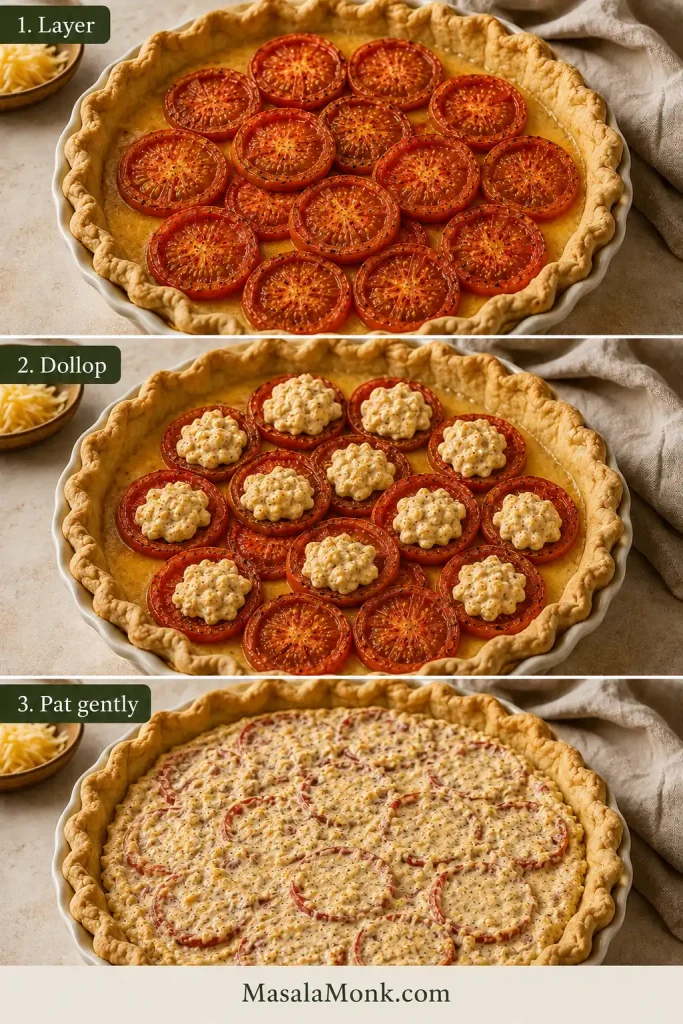
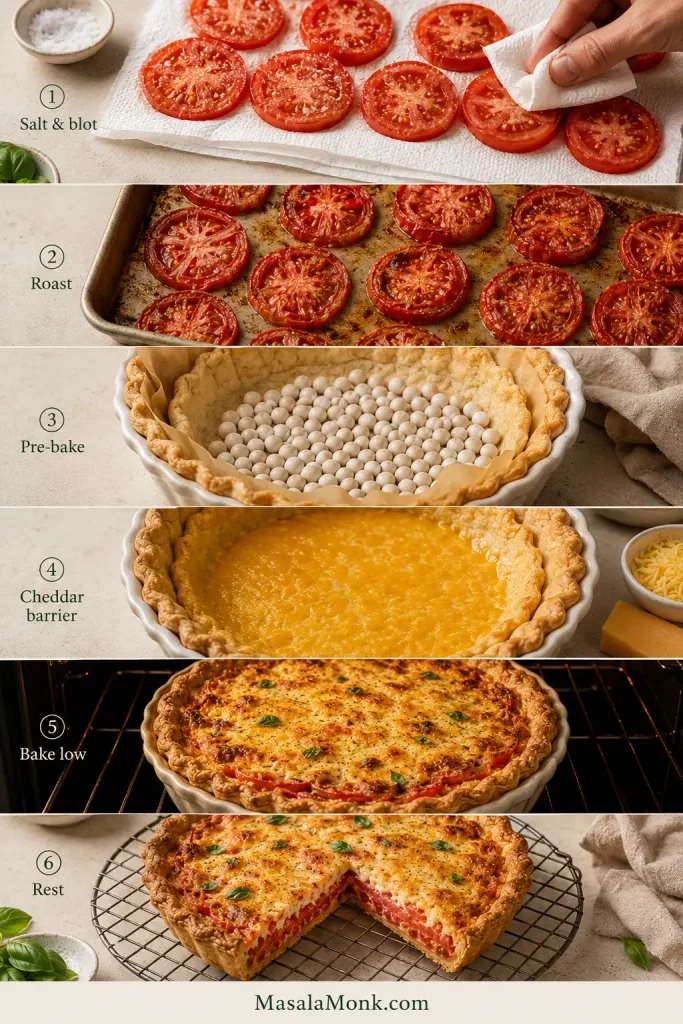
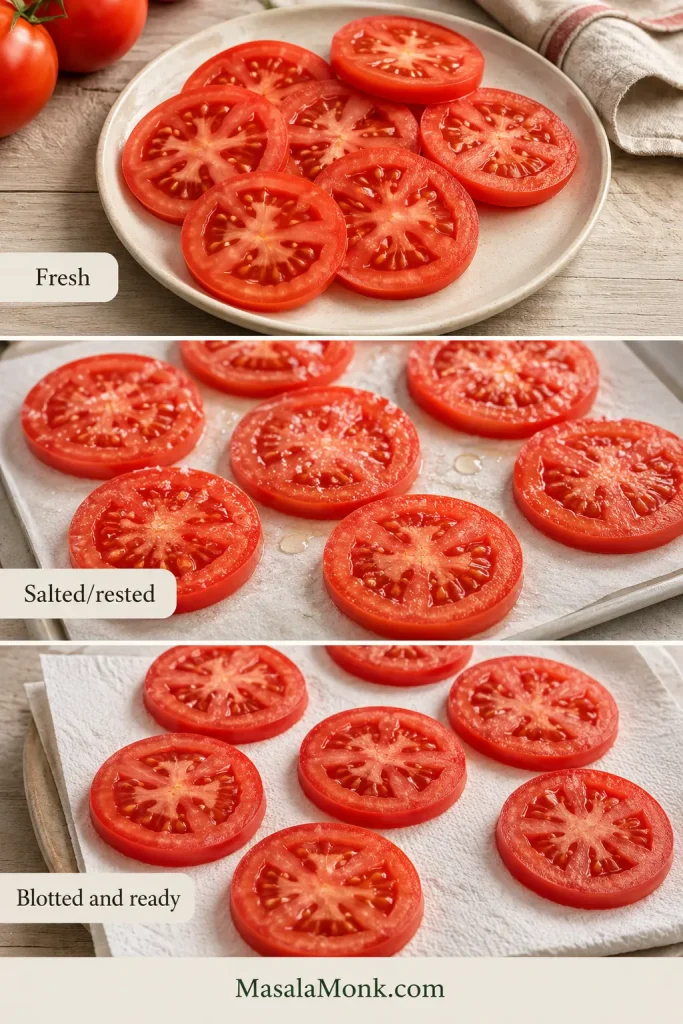
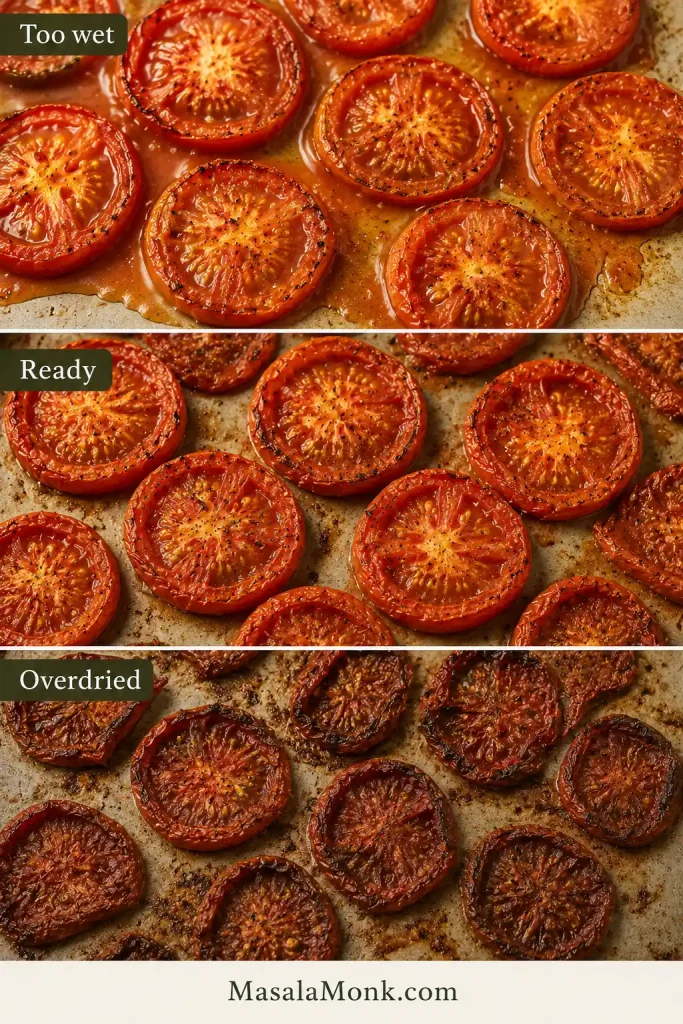
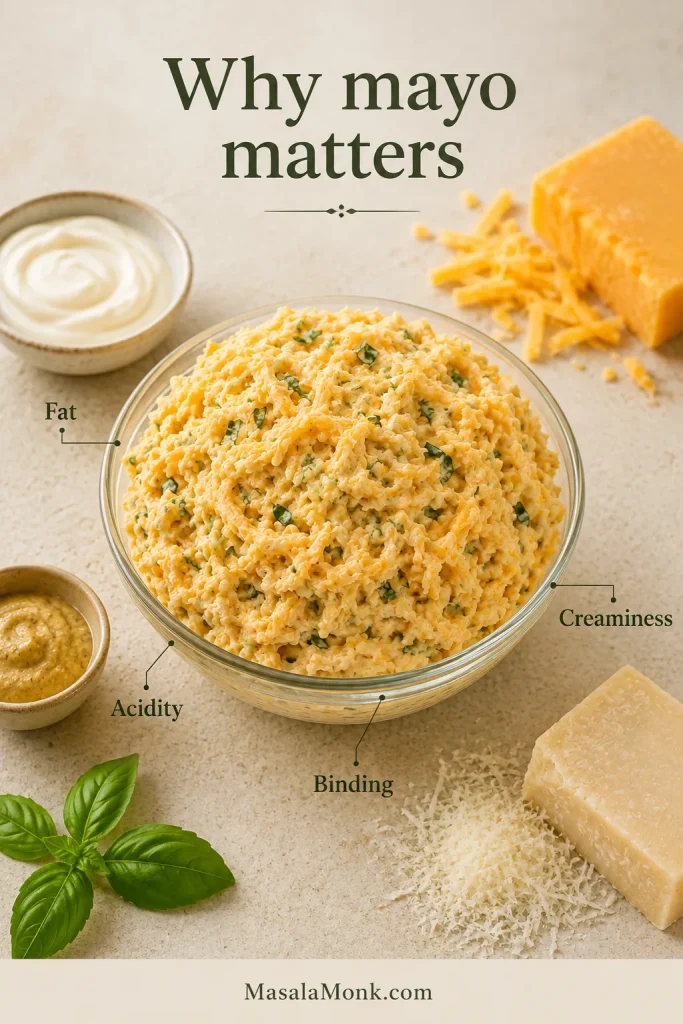
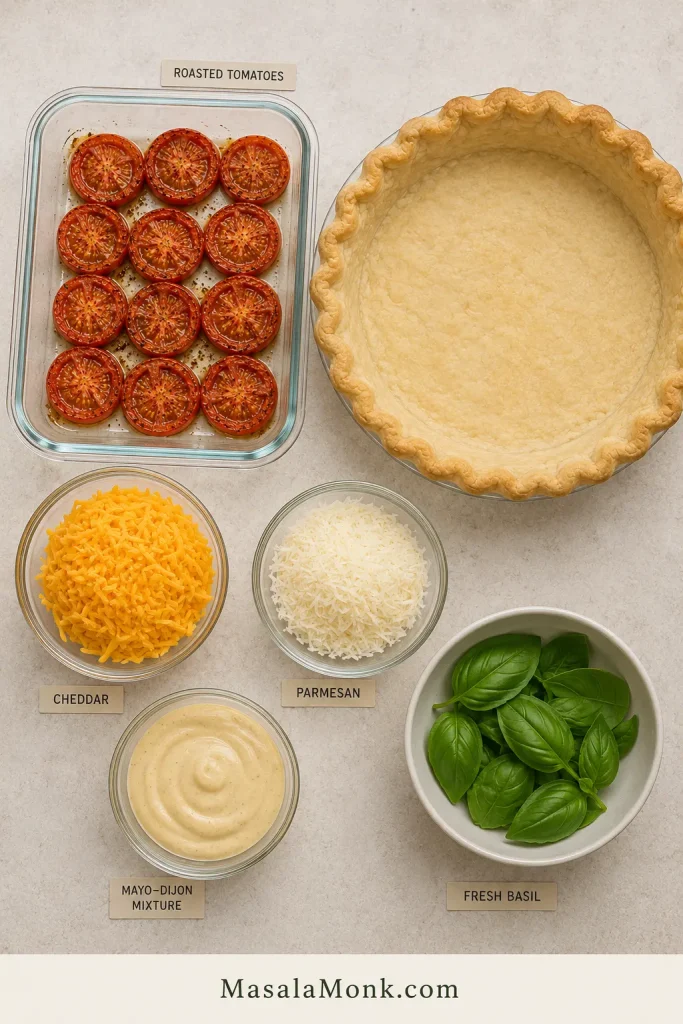
So the tomatoes are lightly salted, blotted and roasted. The crust gets a head start in the oven and a thin layer of melted sharp cheddar before the tomatoes ever touch it. On top goes extra-sharp cheddar, Parmesan, fresh basil, Dijon and enough mayonnaise to make everything creamy while the tomatoes still taste like the reason you made the pie.

Jump to: Recipe · Keep It Crisp · Troubleshooting

Quick Answer: How to Make Tomato Pie Without a Soggy Crust

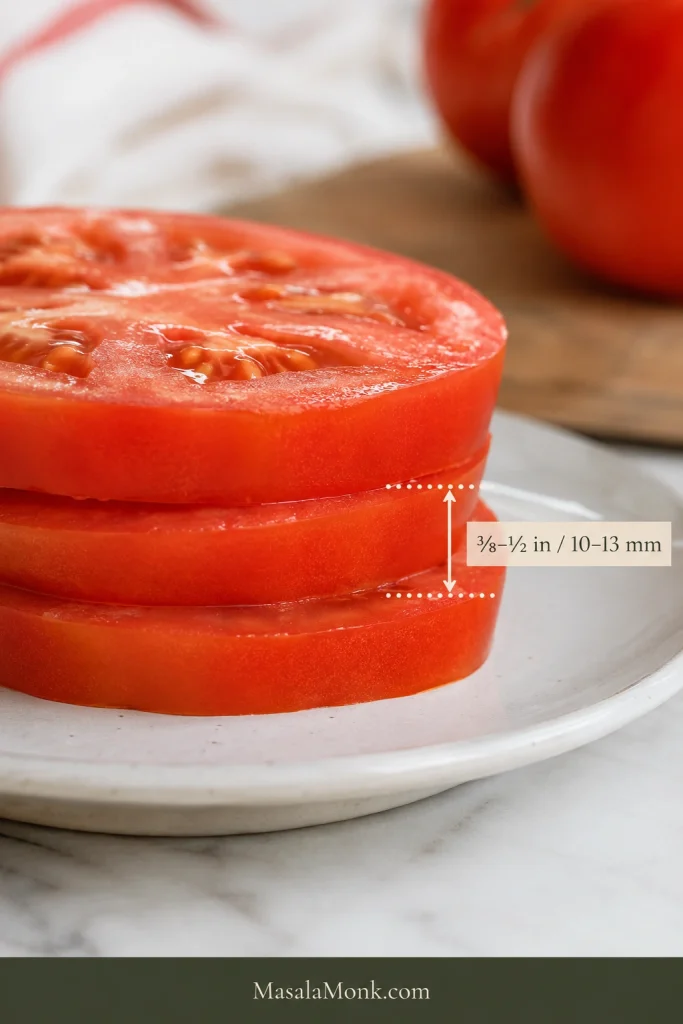
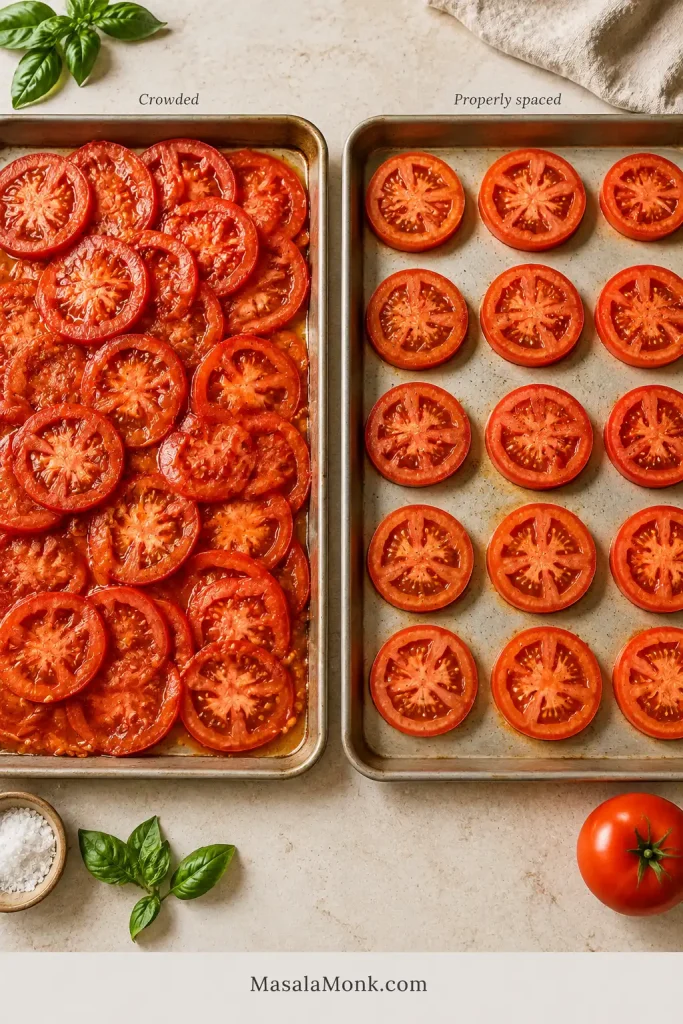
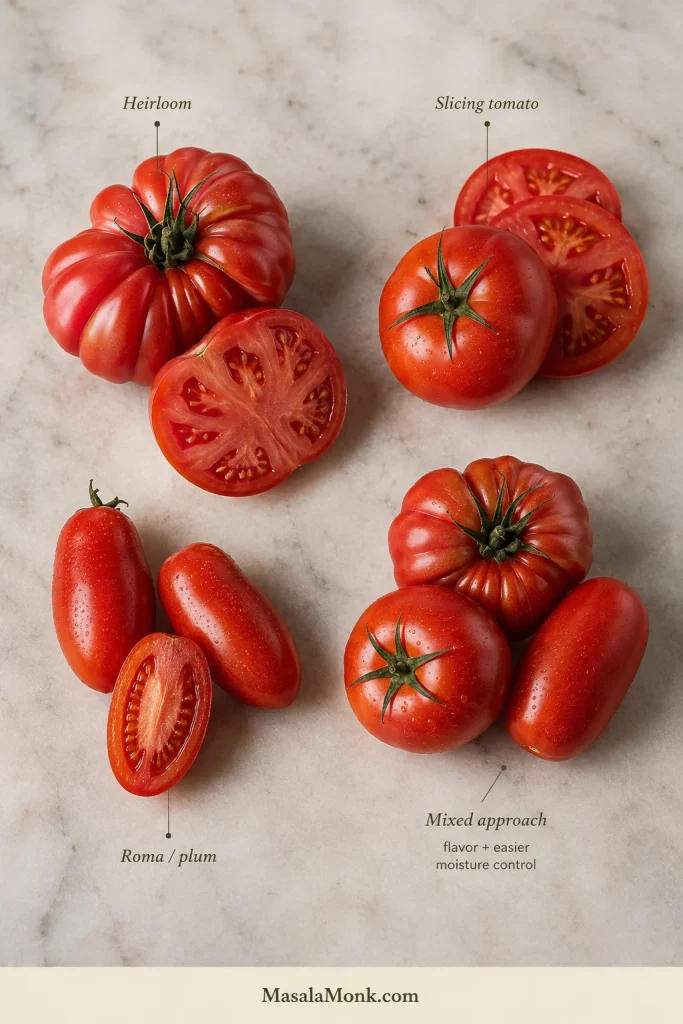
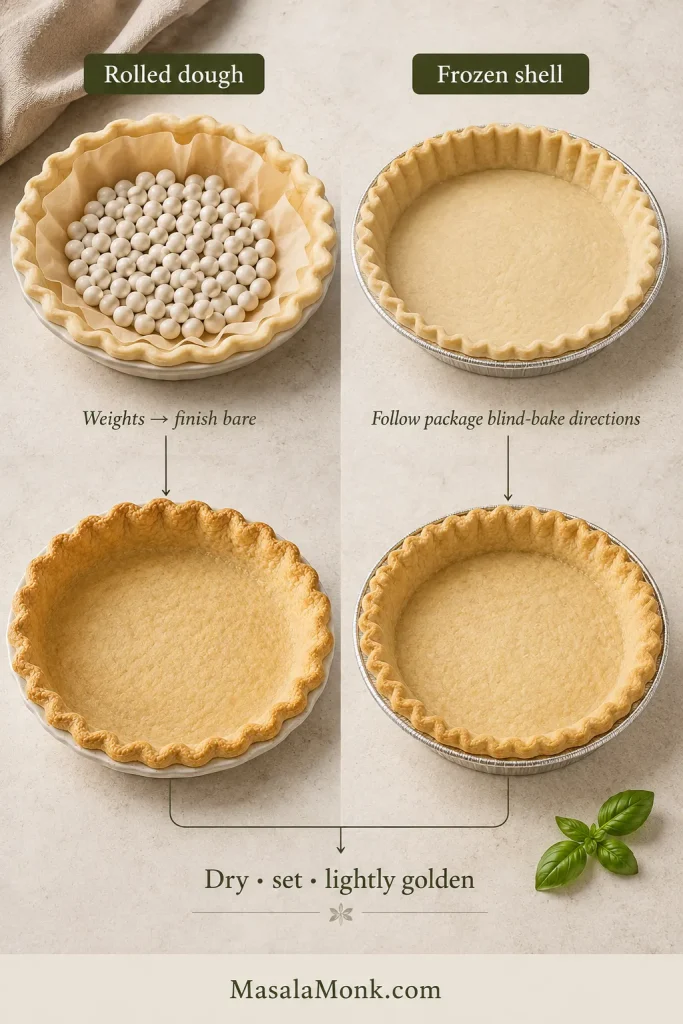
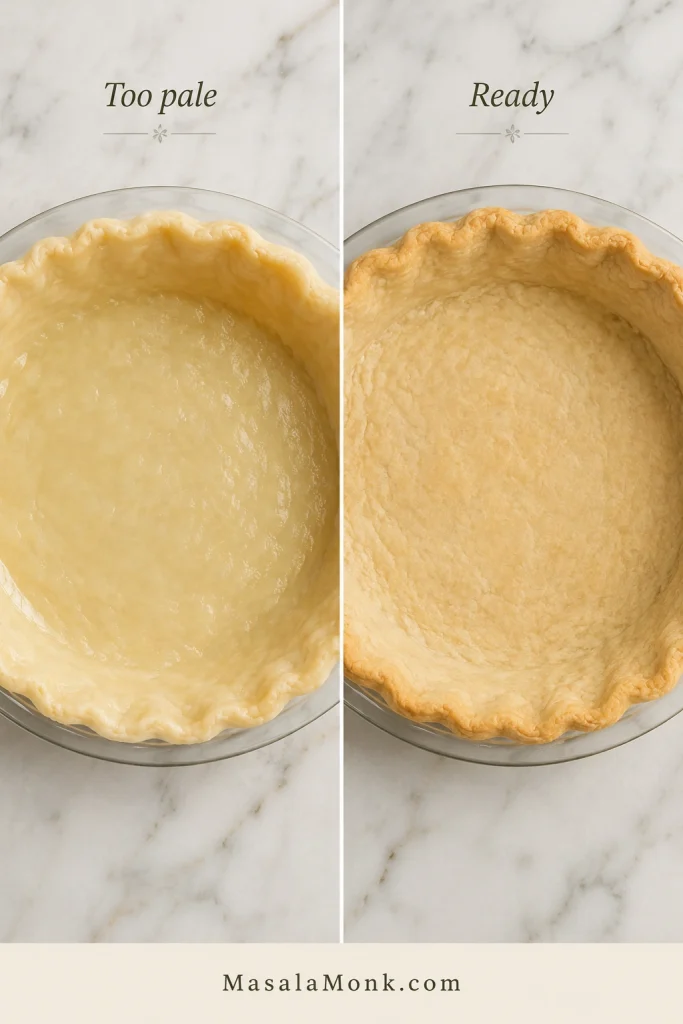
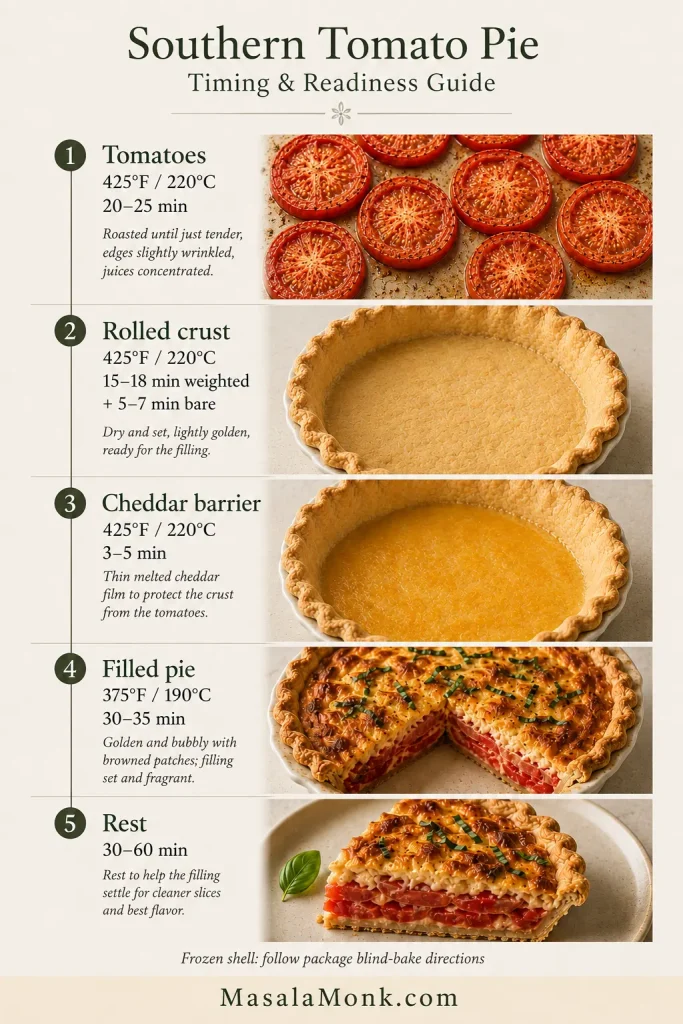
For a standard 9-inch / 23 cm pie, use about 2 lb / 900 g ripe tomatoes. Slice them ⅜–½ inch / 10–13 mm thick, lightly salt and blot them, then roast until slightly wrinkled and no longer wet-looking. Pre-bake the crust until the bottom is dry and lightly golden, then melt a thin layer of cheddar over it.

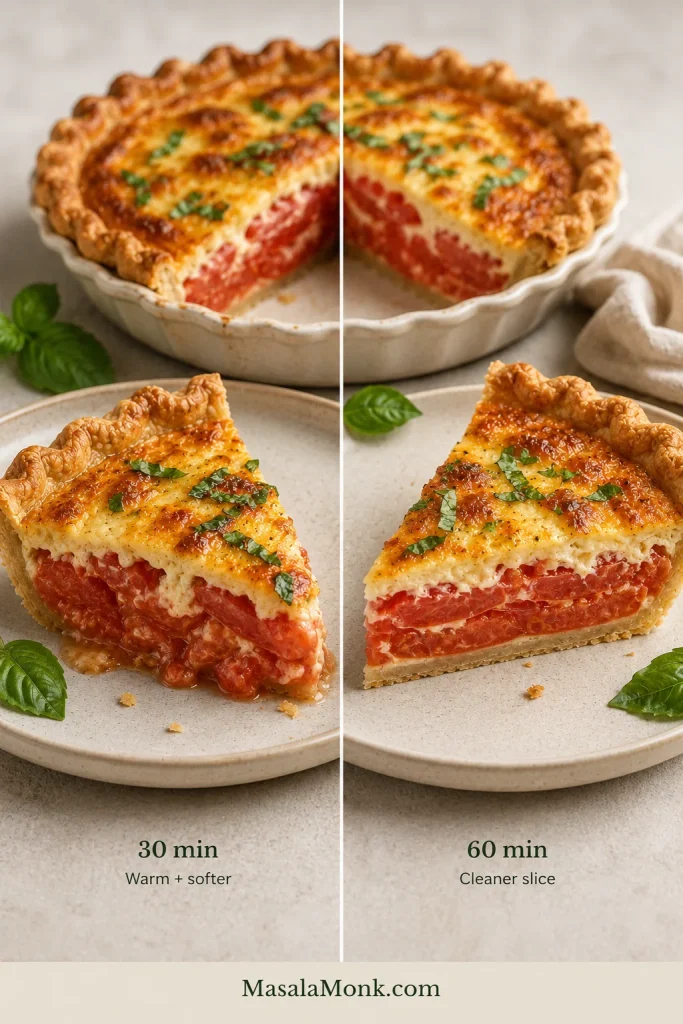
Arrange the tomatoes over the crust, add the cheese topping, and bake on the lower-third rack at 375°F / 190°C for about 30–35 minutes. Rest at least 30 minutes before slicing; closer to an hour gives cleaner wedges.

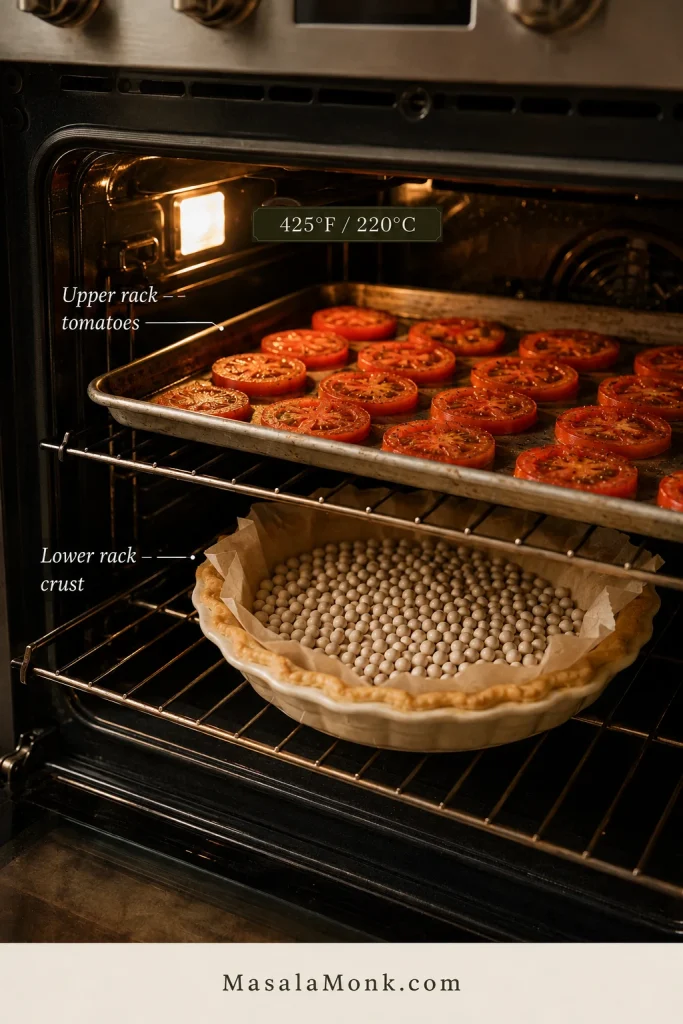
There are a few more steps here than in the quickest versions, but none is difficult. With one tomato tray, the tomatoes roast while the crust pre-bakes, so those two jobs finish at almost the same time.

Southern Tomato Pie Recipe With a Crisp Crust

This version keeps the tomatoes front and center: roasted just enough to deepen their flavor, layered over a pre-baked crust, then covered with a sharp, basil-flecked cheese topping that stays creamy without becoming heavy.

Yield: 1 standard 9-inch / 23 cm pie
Serves: 6 generous portions or 8 smaller portions
Hands-on time: about 30 minutes
Prep + bake: about 1¼–1½ hours
Rest: 30–60 minutes
Total time: about 2–2½ hours
Best served: warm or at room temperature
Timing note: Times assume you are starting with a prepared crust ready to blind-bake.

Equipment

  • Standard 9-inch / 23 cm pie plate, if using rolled dough
  • 1–2 large rimmed baking sheets
  • Parchment paper
  • Pie weights or dried beans, for rolled dough
  • Clean kitchen towels or paper towels
  • Wire cooling rack
  • Foil or a pie shield, optional

Ingredients

Ripe red tomatoes, pie crust, cheddar, Parmesan, mayonnaise, Dijon mustard, and fresh basil arranged together for Southern tomato pie.
Tomatoes bring the juiciness and acidity; cheddar, Parmesan and mayo add richness; Dijon and basil keep it bright.

For the Tomatoes

  • 2 lb / about 900 g ripe tomatoes, about 4–6 large tomatoes
  • ¾ teaspoon fine sea salt / about 4 g
  • ½ teaspoon freshly ground black pepper, divided

For the Crust and Bottom Cheese Layer

  • 1 prepared standard 9-inch / 23 cm pie crust, homemade or store-bought; not deep dish
  • 1½ oz / 40 g extra-sharp cheddar, finely grated

And for the Cheese Topping

  • 5½ oz / 160 g extra-sharp cheddar, freshly grated
  • 1 oz / 28 g Parmesan, finely grated; Pecorino Romano also works but is saltier
  • ½ cup / about 115 g mayonnaise
  • 1 teaspoon / 5 ml Dijon mustard
  • ¼ cup loosely packed fresh basil, torn or chopped, plus more for serving
  • Pinch of red-pepper flakes, optional

Shopping note: You need 7 oz / 200 g cheddar total. One standard 8 oz / 227 g block is enough for the whole pie with a little left over.

Instructions

Prep the Tomatoes and Crust

  1. Heat the oven. Position one rack in the upper half of the oven and another in the lower third. Heat to 425°F / 220°C conventional. Line a large rimmed baking sheet with parchment.
  2. Slice, salt and blot the tomatoes. Core them and cut into slices about ⅜–½ inch / 10–13 mm thick. Arrange them over clean kitchen towels or several layers of paper towel, sprinkle with the ¾ teaspoon / 4 g salt, and leave for 10–15 minutes. Blot firmly, then season with ¼ teaspoon black pepper. Very large rounds can be halved so the finished pie is easier to portion.
Side view of tomato slices with a measurement guide showing the target thickness of 3/8 to 1/2 inch, or 10 to 13 millimeters.
Aim for ⅜–½ inch / 10–13 mm: thick enough to stay substantial after roasting, but not so thick that moisture lingers.
  1. Prepare the crust and arrange the tomatoes.
    Using rolled dough? Fit it into a standard pie plate, crimp the edge, line it with parchment and fill with pie weights or dried beans.
    Using a preformed frozen shell? Keep it in its supplied pan. Follow its package directions for blind-baking; use weights only if those directions call for them.
    Arrange the blotted tomato slices on the baking sheet in one layer with a little breathing room between them. Avoid heavy overlap.
Two sheet pans compare overlapping tomato slices with tomato slices arranged in a single layer with space between them.
Leave breathing room between slices so steam can escape instead of collecting where tomatoes overlap.
  1. Roast the tomatoes while the crust pre-bakes. With one tomato tray, roast the tomatoes on the upper rack while the crust bakes below.
    Rolled crust: Bake it with the weights for 15–18 minutes.
    Preformed frozen shell: Follow its blind-baking time. It may finish before or after the tomatoes; that is fine.
    Need two tomato trays? Roast them first, rotating the pans if needed, then pre-bake the crust afterward. Giving the tomatoes space matters more than forcing the two jobs to overlap.
Home oven showing a tray of tomatoes roasting on the upper rack while a weighted pie crust blind-bakes on the lower rack at 425 degrees Fahrenheit.
With one tomato tray, use the upper rack for tomatoes and the lower rack for the crust so both jobs can happen at once.

Finish the Crust and Make the Topping

  1. Finish the crust and check the tomatoes.
    Crust: For rolled dough, carefully remove the parchment and weights, then return the empty shell to the lower rack for another 5–7 minutes. For a preformed frozen shell, continue according to its package directions as needed. Whichever crust you use, the base should be dry, set and lightly golden before filling. Pale, shiny or slightly translucent pastry needs more time.
    Tomatoes: Their color should be a little deeper, the edges slightly wrinkled and the cut surfaces more matte than glossy. Very little thin juice should remain on the pan. They should still look juicy, not dried out.
  2. Add the cheddar barrier and lower the oven. Scatter the 40 g cheddar over the hot crust and return it to the oven for about 3–5 minutes, until the cheese melts into a thin layer. Reduce the oven temperature to 375°F / 190°C conventional and keep one rack in the lower third.
Close view inside an empty blind-baked pie shell with a thin layer of melted cheddar coating the bottom crust.
A thin melted cheddar layer adds another buffer between the pastry and the juicy tomato filling.
  1. Mix the topping. Combine the remaining 160 g cheddar, Parmesan, mayonnaise, Dijon, the remaining ¼ teaspoon black pepper and the basil. The mixture should be thick enough to hold its shape. Cheddar, Parmesan and mayonnaise already bring plenty of salt, so taste before adding any more.
Spoon holding a thick mound of cheddar, Parmesan, mayonnaise, Dijon, and basil mixture above a bowl, with no dripping or cheese strands.
The topping should mound on the spoon and stay there—thick, cohesive and easy to dollop.

Assemble, Bake and Rest

  1. Assemble the pie. Arrange the roasted tomatoes over the cheese-lined base with light overlap. Blot any slice that has released a fresh puddle while waiting. Dollop the topping in small spoonfuls over the tomatoes, then gently spread or pat it into an even layer with the back of a spoon.
Three stages of tomato pie assembly showing roasted tomatoes layered in the crust, small spoonfuls of cheese topping added, and the topping gently spread.
Dollop first, then spread gently so the roasted tomato slices stay where you placed them.
  1. Bake until browned and set. Bake on the lower-third rack for about 30–35 minutes, beginning to check around 25 minutes. The crust should be deeply golden, the topping browned in patches, and small bubbles should appear around parts of the filling. Give the dish a gentle nudge. A little movement is fine; the filling should move together instead of sloshing. Shield the rim with foil if it browns before the center is ready.
  2. Rest and serve. Set the pie on a wire rack for at least 30 minutes. For cleaner wedges, give it closer to 45–60 minutes. Finish with a little fresh basil before serving.

Recipe Notes

  • Two-tray timing: Allow roughly another 20–30 minutes because the crust can no longer pre-bake alongside the tomatoes.
  • Using coarse kosher salt? Weigh it if possible; crystal size varies enough between brands to make a direct teaspoon conversion unreliable.
  • Very juicy heirlooms may need longer. Trust the tray rather than forcing every batch to finish at exactly 25 minutes.
  • Fan/convection ovens brown faster. Use your oven’s usual temperature adjustment and begin checking both tomatoes and crust early.
  • For cleaner slices, cut through the tomato skins first. A sharp serrated knife or very sharp chef’s knife helps keep a large slice from pulling the filling out with it.

Need something specific? Best Tomatoes · The Best Crust · Cheese & Mayo · Times & Doneness · Troubleshooting · Variations · Serving · Make Ahead

Why Tomato Pie Gets Soggy—and Five Ways to Keep the Crust Crisp

A soft crust can begin in several places. Too much water may come in with the tomatoes. The pastry may need more time before filling, or the bottom may not be browning strongly enough. Sometimes a well-baked pie is simply sliced while everything inside is still loose and steaming.

The crispest pies do not rely on one heroic trick. A handful of smaller choices add up.

Tomato pie guide showing tomatoes salted and blotted, roasted, crust blind-baked, a thin cheddar barrier, a low-rack bake, and the finished pie resting.
Crispness comes from several small protections working together: blot, roast, pre-bake, add a thin cheese barrier, bake low and rest.
  1. Dry the tomatoes in two stages. A short salt-and-blot step removes easy surface water; roasting then drives off more moisture while concentrating the flavor.
  2. Give the crust a real head start. The base should already have color and structure before the tomatoes arrive.
  3. Add a thin cheese layer. Melted cheddar gives the crust another buffer against the tomato juices.
  4. Bake low in the oven. The lower rack encourages better browning underneath while the filling finishes.
  5. Let the pie rest. Cooling lets steam escape and gives the filling time to settle.

Together, those small choices make the difference between a pie that merely tastes good and one you can confidently lift from the dish and put on somebody’s plate.

Surface water is the easiest moisture to remove: salting draws it out, and blotting takes it away before roasting begins.

Three tomato-preparation stages showing fresh glossy slices, salted slices with beads of moisture, and blotted slices with visibly drier surfaces.
The beads that appear after salting are moisture you can blot away before the tomatoes ever reach the crust.

Best Tomatoes for Tomato Pie

Four groups compare heirloom tomatoes, round slicing tomatoes, Roma or plum tomatoes, and a mixed combination of those tomato types.
Heirlooms bring big flavor but more juice; plum tomatoes are meatier; slicing tomatoes sit comfortably between the two.

For pie, tomato flavor matters—but so does how much water that tomato is carrying. Smell them. If they barely smell like tomatoes before you cut them, roasting will not suddenly give them peak-summer flavor.

TomatoBest ForMoisture RiskWhat to Know
HeirloomBig flavor and beautiful colorHighWonderful in season, but very juicy varieties may need extra roasting time.
Ripe slicing tomatoBest all-round choiceMediumGood balance of flavor, structure and availability.
Roma or plumEasiest moisture controlLowerMeatier flesh makes them forgiving, although flavor varies.
Mixed tomatoesFlavor plus reliabilityMediumMix flavorful heirlooms with firmer slicing or plum tomatoes when you want both character and easier moisture control.

What I Would Buy

If I were shopping specifically for this pie, I would choose ripe but still firm slicing tomatoes unless especially flavorful heirlooms were available.

A hand holds a ripe red tomato near the nose while several firm red tomatoes rest nearby on linen and in a paper produce bag.
Choose tomatoes that smell ripe and give slightly under pressure without feeling soft or collapsed.

Peak-season heirlooms are worth using; just let their juiciness decide the roasting time. Mixing a few with meatier plum tomatoes also works well when you want plenty of flavor with a little less water to manage.

Roasting does more than solve a water problem. As excess juice cooks away, the tomatoes taste sweeter, deeper and more intensely like themselves. That concentrated flavor becomes the heart of the finished pie.

Three roasted tomato states labeled too wet, ready, and overdried, ranging from glossy and juicy to lightly wrinkled and then dark and shrunken.
Ready tomatoes stay red and plump with lightly wrinkled edges and a mostly matte surface—not glossy and watery, browned or shriveled.

If some of your tomatoes are already too soft or juicy to give you neat slices, they may be happier in fresh tomato soup, where their extra liquid can be cooked down instead of fought.

Cherry tomatoes can work, but they behave more like a variation than a direct substitute: once halved, they expose much more cut surface and do not create the same layered filling. Canned tomatoes are better saved for another recipe. This one really wants fresh tomatoes that can be sliced, roasted and layered.

The Best Crust

Use a standard 9-inch / 23 cm flaky pie crust, not deep dish. Homemade dough, refrigerated rolled pastry and a standard preformed frozen shell can all work. The base needs enough color and structure before the tomatoes arrive.

Two crust preparation routes compare rolled dough blind-baked with parchment and weights with a standard preformed frozen pie shell baked in its foil pan.
Rolled dough and a frozen shell can both work; what matters is a dry, well-set base before filling.

If store-bought crust gets tomato pie on the table, use it. The tomatoes matter much more here than whether you made the pastry yourself.

Do You Have to Blind-Bake the Crust?

For this recipe, yes. The shell gets a substantial head start so it is already baked across the bottom before it has to support a juicy filling.

Look underneath. Pale or slightly translucent pastry still needs more time. You want the bottom dry and lightly golden across the base, not just browned around the exposed rim.
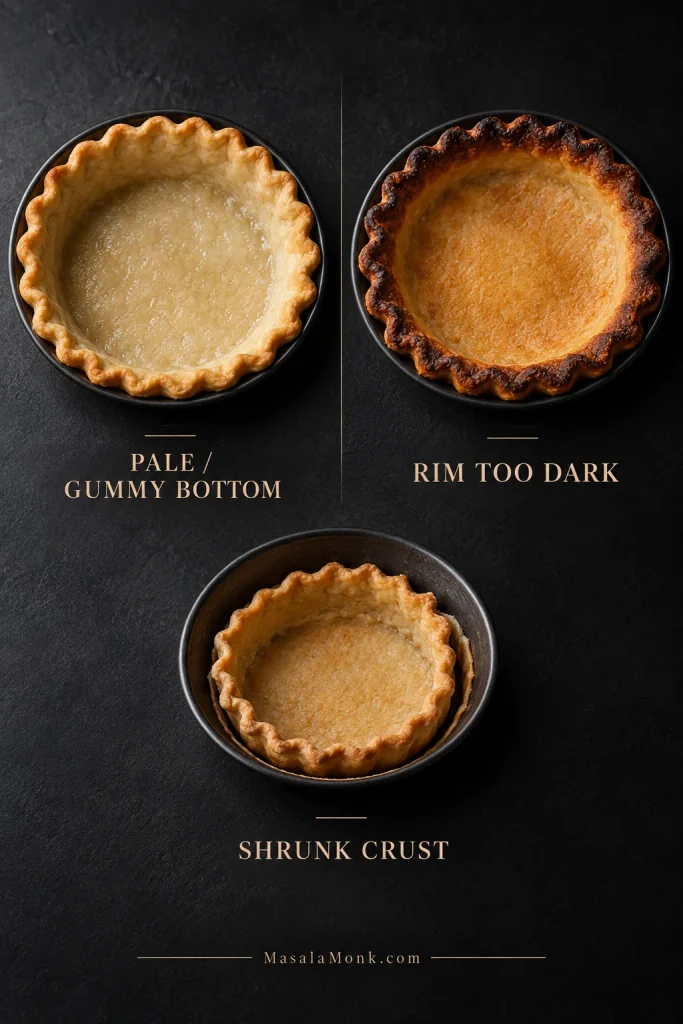
Two empty pie shells compared side by side: one pale and slightly glossy, the other dry, opaque, set, and lightly golden.
Look across the center, not just the rim: the base should be dry, opaque, firm and lightly golden, without shiny or translucent patches.

A crust baked this far does not disappear underneath the filling. You can still feel its flaky edge when you cut into the finished pie.

If you want to make the pastry yourself, this flaky homemade pie crust recipe makes enough dough for two single 9-inch crusts, so you can use one here and freeze the second.

Metal, glass and ceramic pie plates can all work. Metal heats quickly. Glass lets you inspect the underside. Thick ceramic usually heats more slowly, so follow the color of the pastry rather than the clock alone.

Best Cheese—and Why Mayo Matters

Extra-sharp cheddar gives the topping plenty of flavor without requiring an especially thick cheese layer. A little melts directly over the crust, while the rest forms the backbone of the topping. Parmesan adds a concentrated savory edge without bringing much extra water.

Pecorino Romano can stand in for Parmesan, but it is saltier. Taste before adding anything else salty, especially if bacon is also going into the pie.

Why Does Southern Tomato Pie Use Mayonnaise?

Bowl of cheddar and mayonnaise topping surrounded by mayonnaise, cheddar, Parmesan, Dijon, and basil, with callouts for fat, acidity, creaminess, and binding.
Mayo is part of the topping’s structure here, not a separate sauce or finishing condiment.

Mayonnaise brings fat, acidity, creaminess and enough binding to help the cheese topping hold together as it bakes. If you prefer making condiments from scratch, this homemade mayonnaise recipe explains the basic emulsion and gives you a classic mayo you can use here.

The creamy layer needs enough tang to sharpen the tomatoes. The topping should frame the filling, not bury it.

For more stretch, choose low-moisture mozzarella rather than fresh mozzarella. Treat it as a texture variation, not an exact cheddar substitution. Fresh mozzarella carries much more water. Gruyère gives the pie a nuttier, more savory character, while fontina melts into a softer, silkier layer.

How Long to Bake Tomato Pie: Times and Readiness Cues

The timer tells you when to start looking. The food tells you when to move on. Tomato variety, crust thickness, pie-dish material and oven calibration all affect the exact timing, so use the clock together with the visual cues below.

Vertical tomato pie timing guide showing roasted tomatoes, blind-baked crust, melted cheddar barrier, baked filled pie, and rested slice with temperatures and cooking times.
When your oven runs faster or slower than expected, these visual cues are the tie-breaker.
StageTemperatureStarting TimeReady When
Tomatoes425°F / 220°C20–25 minSlightly wrinkled, deeper in color, matte rather than wet-looking, very little thin juice
Weighted rolled crust425°F / 220°C15–18 minShell has set and the rim is beginning to color
Unweighted rolled crust425°F / 220°C5–7 minBase looks dry and lightly golden
Preformed frozen shellPer package directionsPer package directionsBase is dry, set and lightly golden
Cheddar barrier425°F / 220°C3–5 minCheese has melted into a thin layer
Filled pie375°F / 190°C30–35 minCrust deeply golden, topping browned in patches, gentle bubbling, center moves together
RestRoom temperature30–60 minFilling has settled enough for the kind of slice you want

By the end of the bake, the tomatoes should smell sweeter, the cheese will have browned in patches and the pastry should look unmistakably baked.

Two views of the same tomato pie during baking: one pale and glossy with a loose center, and one browned in patches with a cohesive, set filling.
A ready center may jiggle, but the filling should move together; loose liquid sloshing independently means it needs more time.

How Long Should It Cool?

The hardest part of this recipe may be leaving it alone once it comes out of the oven.

For a warm, softer wedge, about 30 minutes is enough. For clean slices at the table, give it closer to 45–60 minutes.

Two tomato pie wedges compare a warmer, softer slice after 30 minutes of resting with a cleaner, more firmly set slice after 60 minutes.
As the pie rests, the topping firms and the filling settles, so extra time buys a cleaner slice.

By then the kitchen will smell like toasted pastry, warm tomato, cheddar and basil, and the filling will have settled without going cold.

Tomato Pie Troubleshooting: What Went Wrong?

“Soggy” can mean several different things. Match the fix to what you actually see.

Six-panel tomato pie troubleshooting guide showing watery filling, pale bottom crust, loose filling, greasy topping, a dark rim with loose center, and several salty ingredients combined.
Start with where the problem appears—under the slice, in the filling, on top or around the rim—then match the fix.
What You SeeLikely CauseFix
Watery filling; tomato juice pools around the sliceTomatoes entered the pie too wetGive them more space or roasting time; blot slices that release juice while waiting
Pale, doughy bottom while the filling looks fineCrust needed more pre-baking or stronger bottom heatGive the base more color before filling and keep the filled pie low in the oven
Loose slice without much free liquidThe pie was cut too hotLet the filling settle longer before slicing
Clear or orange fat gathers on topToo many rich ingredients stacked togetherUse pesto modestly, drain bacon well and avoid another heavy cheese layer
Dark rim, loose centerCrust browned faster than the center cookedShield the rim with foil and keep baking
Harsh, overly salty toppingSalt from tomatoes, cheese and additions stacked upMeasure the tomato salt and taste before adding more when using Pecorino or bacon

Juice underneath? Think tomatoes. Oil on top? Think cheese, mayo, bacon or pesto. They can look similar once the pie is cut, but they need completely different fixes.

Close comparison of tomato pie with thin reddish juice pooling beneath a slice and amber oil droplets sitting on top of the browned cheese.
Tomato juice is usually thin and reddish; rendered fat looks clearer and amber-orange, often beading on the cheese first.

Ready to try again? Back to Recipe · Times & Doneness

What Makes This a Southern Tomato Pie?

Ripe fresh tomatoes, pastry and a creamy cheddar-mayo topping put this firmly in the Southern tomato-pie family. Basil, onion, bacon and other cheeses vary from one kitchen to another, but tomatoes, pastry and a rich cheese layer sit at the center of the dish.

The name can be confusing. Trenton/New Jersey and Utica tomato pies belong to pizza traditions, while green tomato pie can mean something entirely different: a sweet, spiced pie made with unripe tomatoes. This recipe is the Southern savory version.

Easy Variations

Every addition brings something besides flavor—especially water, fat or salt. Keep those three in mind and the basic balance of the pie is much easier to preserve.

With Bacon

Add crisp, well-drained bacon between the tomatoes and topping. If you want an easy small-batch method, this crispy air fryer bacon recipe renders the fat well and lets the strips firm up after cooking. Cool and drain the bacon before crumbling it into the pie, and remember that it brings plenty of salt of its own.

Southern tomato pie wedge with red tomato layers, creamy browned topping, flaky crust, basil, and a restrained amount of small crisp bacon pieces.
Scatter bacon so a few bites get a smoky, crisp accent without turning the whole pie heavy.

With Pesto

Use pesto sparingly. A classic basil pesto already contains olive oil, nuts and Parmesan, so a thick layer beneath the cheese topping can make the finished pie greasy. A thin smear is plenty. If what you mainly want is basil aroma, fresh leaves give you that lift with much less added fat.

Southern tomato pie wedge with red tomato layers, browned cheese topping, flaky crust, basil, and a few small green pesto accents in the filling.
A little pesto goes a long way; keep it as a bright basil-garlic accent, not another rich layer.

Two smaller additions: Sautéed onion or shallot adds sweetness while shedding some of its moisture before it reaches the filling. A modest handful of fresh corn adds little bursts of sweetness and texture.

Can You Make It Without Mayo?

Yes, but do not simply leave the mayonnaise out of this recipe. Mayo supplies fat, acidity, creaminess and binding, so a completely mayo-free pie needs a topping formulated around another binder.

If it is mainly the mayo flavor you want to soften, sour cream can be part of a lower-mayo topping. I would not swap it cup for cup here, though; changing the binder changes the way the topping sets. For a completely mayo-free version, use a recipe built specifically for that style.

What to Serve With Tomato Pie

The pie is rich enough that something cool, crisp or sharp alongside it works especially well.

This cucumber salad with vinegar, dill and onion is a particularly good match because the crunch and acidity cut through the creamy cheese topping.

Southern tomato pie wedge served with cucumber salad and an iced lemon drink, with the remaining pie visible in the background under warm afternoon light.
Warm tomato pie, something crisp and cool, and a cold drink—that is summer lunch.
  • Green salad with a sharp vinaigrette
  • Green beans
  • Corn on the cob
  • Grilled chicken
  • Grilled shrimp
  • Fresh fruit or cold watermelon

For brunch, add eggs, fruit and a simple salad. For a summer lunch, a generous wedge and something cold and crunchy alongside it may be all you need.

Make Ahead, Store and Freeze

Make Ahead: What to Prep Early

If I were preparing this a day ahead, I would stop before assembly.

  • Roast the tomatoes and refrigerate them once cool.
  • Blind-bake the crust, let it cool completely and keep it covered.
  • Grate the cheddar and Parmesan and refrigerate them.
  • Stir the mayonnaise and Dijon together if you want one less job later, but leave the fresh basil whole until assembly.
Overhead arrangement of lightly roasted tomato rounds, empty blind-baked crust, grated cheddar, Parmesan, mayo-Dijon mixture, and whole fresh basil kept separately.
Keep the components separate overnight so the crust stays dry and the basil stays fresh until assembly.

When you are ready to bake, take the roasted tomatoes from the refrigerator as you start preheating the oven so they can lose some of their chill. Melt the 40 g cheddar over the pre-baked crust, combine the remaining cheese and freshly cut basil with the mayo-Dijon mixture, then assemble the pie.

If the filling is still quite cold when it goes into the oven, the final bake may take a little longer. Follow the browned topping, gentle bubbling and center-movement cues rather than forcing it to finish at the usual minute mark.

Storing and Reheating Leftovers

After baking, keep the pie at room temperature for no more than 2 hours total, including cooling and serving time. If the surrounding temperature is above 90°F / 32°C, limit that to 1 hour. Refrigerate leftovers promptly, keep them covered and use them within 3–4 days. These timings follow USDA leftover-safety guidance.

For the best crust, warm slices in an oven or toaster oven at about 325–350°F / 165–175°C. Reheated leftovers should reach 165°F / 74°C in the center. A preheated sheet pan underneath the slice can help crisp the base again.

Leftover tomato pie wedge reheating on a metal sheet pan in the oven, with a close view of the thin golden, crisp pastry on the underside.
Reheat on a hot metal sheet pan to give the pastry direct bottom heat and help it crisp again.

The microwave is fine when speed matters, but expect softer pastry.

Freezing

You can freeze the pie, but it would not be my first choice if crust texture matters.

Tomatoes soften after freezing and thawing; Penn State Extension likewise recommends thawed frozen tomatoes for cooked uses rather than expecting fresh tomato texture. The pastry also tends to come back softer than it was freshly baked.

If you know in advance that you will not need the whole pie, preparing the components ahead and baking closer to serving usually gives you the better result.

Useful shortcuts: Back to Recipe · FAQ · Back to Top

FAQ

Do I need to peel the tomatoes? No. Roasting and baking soften the skins, and leaving them on helps the slices retain their shape. Peel them only if your tomatoes have unusually tough skins or you strongly dislike the texture.

Should I remove the seeds? Not routinely. The seed cavities contain plenty of juice, so removing some can help with exceptionally watery tomatoes, but roasting gives you a more consistent way to manage moisture.

Can I make it gluten-free? Yes. Use a reliable gluten-free pie crust and follow the same tomato-drying and pre-baking method. Check the crust manufacturer’s directions because gluten-free pastry can brown and handle differently from wheat-based pastry.

The Slice You Are Looking For

By the time the pie has rested, the cheese should have settled into the tomatoes and the crust underneath should still feel like part of the dish. Run the knife cleanly through the tomato skins and pastry, then lift the first wedge.

The bottom should come with it.

Hand lifting a clean wedge of Southern tomato pie on a server, with the thin flaky bottom crust attached and the remaining pie behind it.
The payoff: a clean wedge that lifts with its flaky bottom crust still attached.

You get flaky pastry underneath, concentrated ripe tomato through the middle, sharp creamy cheese on top and fresh basil cutting through the richness.

Nothing running across the plate. Nothing drowning anything else.

Just a very good Southern tomato pie.

Back to Recipe · Back to Top

Posted on Leave a comment

Apple Tart Recipe

Rectangular apple tart with thin sliced apples, glossy glaze, and a golden puff pastry border on parchment.

This apple tart recipe is for the moment when you want something prettier than a basic apple dessert but easier than a full apple pie. Store-bought puff pastry, thin apple slices, cinnamon sugar, melted butter, and a glossy apricot finish bake into a crisp, bakery-style tart that smells like cinnamon apples and slices cleanly enough to serve with pride.

The method is simple, but the details matter. Keep the pastry cool, slice the apples evenly, and bake the tart until the base feels firm enough to lift with a spatula. The best slices have flaky pastry, soft cinnamon-scented apples, and just enough glaze to catch the light.

Start with the puff pastry version, then use the notes below when you want a round shortcrust tart, a French-style applesauce layer, mini tarts, or a fix for a base that keeps turning soft.

Quick Answer: How to Make Apple Tart

To make an easy apple tart, place cold puff pastry on parchment, score a border around the edge, dock the center with a fork, and arrange thin apple slices in one overlapping layer. Brush the apples with melted butter, sprinkle with cinnamon sugar, then bake at 400°F / 200°C, or 180°C fan, for 30–35 minutes, until the pastry is well browned and the apples are tender. Brush the warm tart with apricot jam or apple jelly for a glossy finish.

When it is right, the edges will puff into a flaky frame, the apples will look glossy and slightly curled at the tips, and the bottom will feel firm instead of bendy. The goal is not a mountain of apples. The goal is a crisp sheet of pastry with enough fruit to taste generous, but not so much that the juices flood the base.

For the full printable-style version, go straight to the recipe card. If your main worry is texture, the crisp base tips explain how to avoid a soggy apple tart.

Slice of apple tart lifted from a rectangular puff pastry tart, showing glossy apples and flaky pastry layers.
Once the tart cools slightly, a clean slice should show tender apples on top and a firm pastry base underneath.
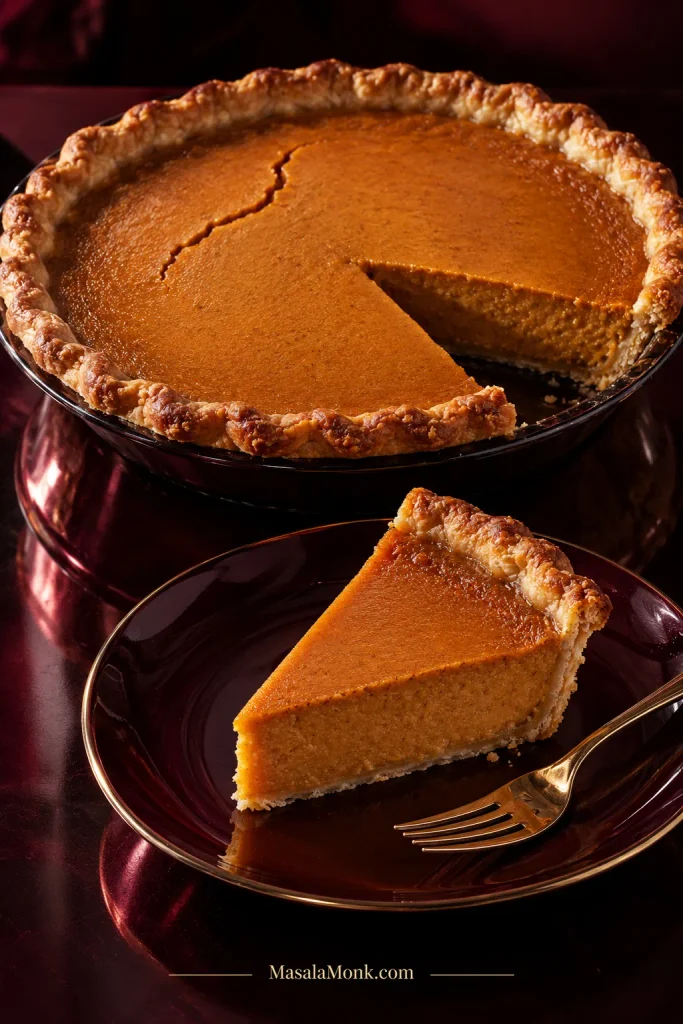
Apple Tart at a Glance

Best pastry for the simple version Store-bought all-butter puff pastry
Apple amount 3 medium apples, about 450–550 g / 1–1¼ lb before peeling and coring
Apple slice thickness ⅛–¼ inch / 3–6 mm
Oven temperature 400°F / 200°C, or 180°C fan
Bake time 30–35 minutes for puff pastry
Best finish Warm apricot jam or apple jelly glaze
Most important texture cue The pastry should be crisp, browned underneath, and firm enough to lift
Apple tart at-a-glance guide showing bake temperature, apple amount, slice thickness, bake time, and apricot glaze.
Use these numbers as guardrails: three apples, thin slices, a hot oven, and apricot glaze keep the tart balanced.

Why This Apple Tart Works

The secret is giving puff pastry the conditions it likes: cold dough, a hot oven, a scored edge, and a thin apple layer that does not weigh down the center. Store-bought puff pastry is the shortcut here; it gives you a flaky, bakery-style apple tart without making dough from scratch.
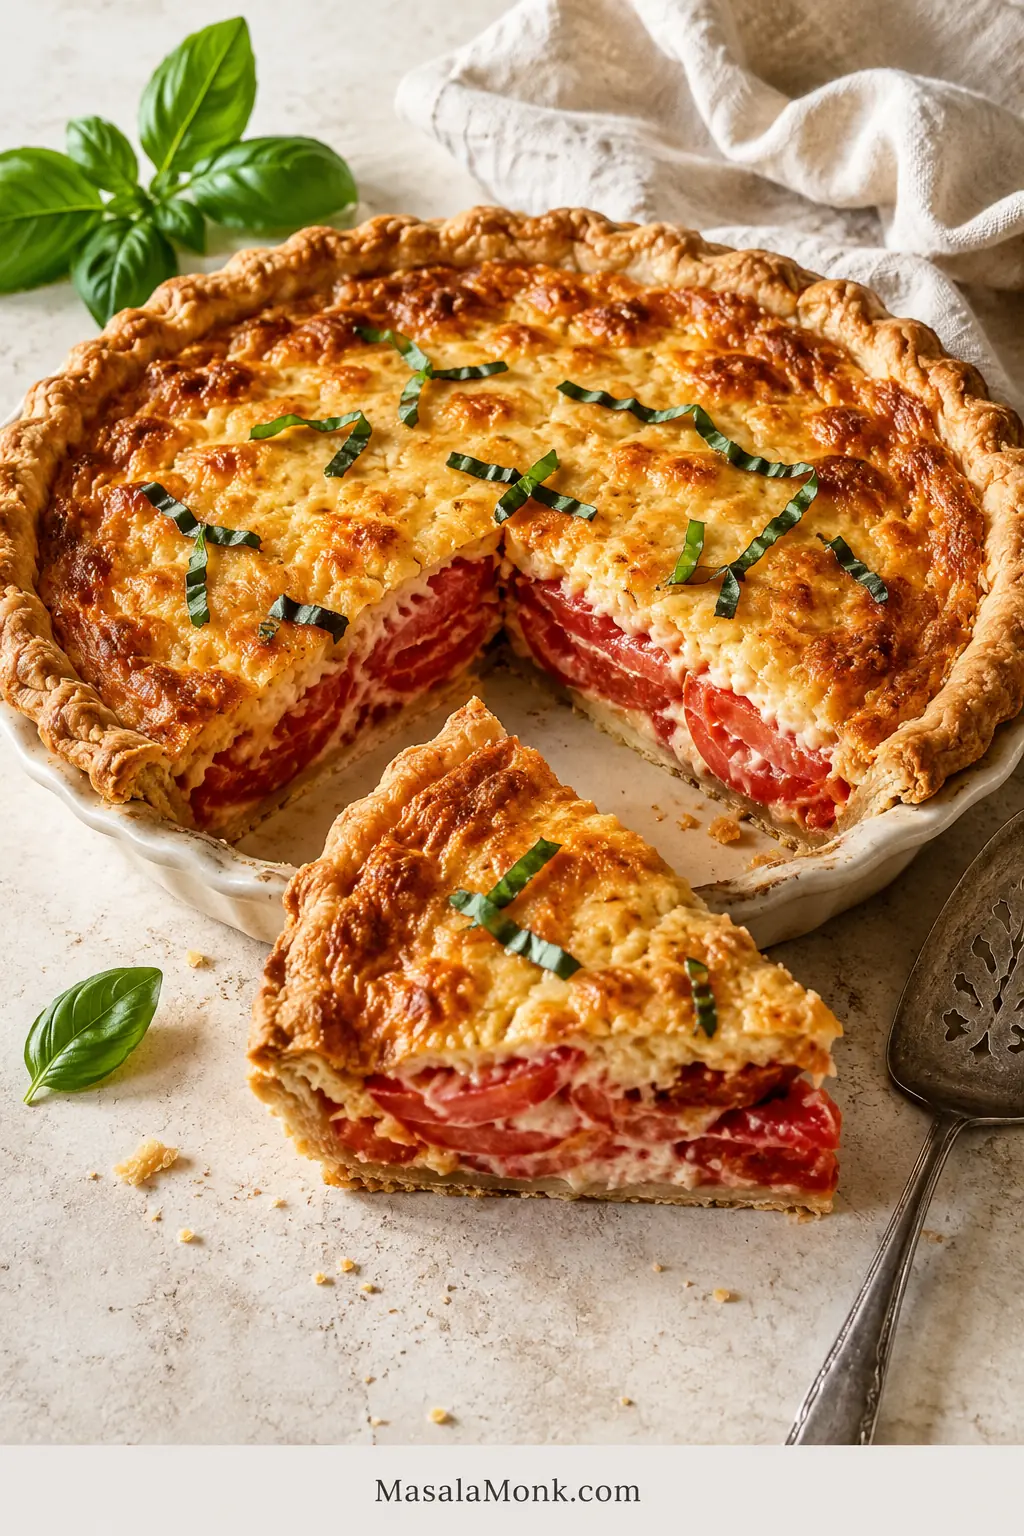
  • Puff pastry keeps the recipe approachable. You get flaky layers without a homemade dough project.
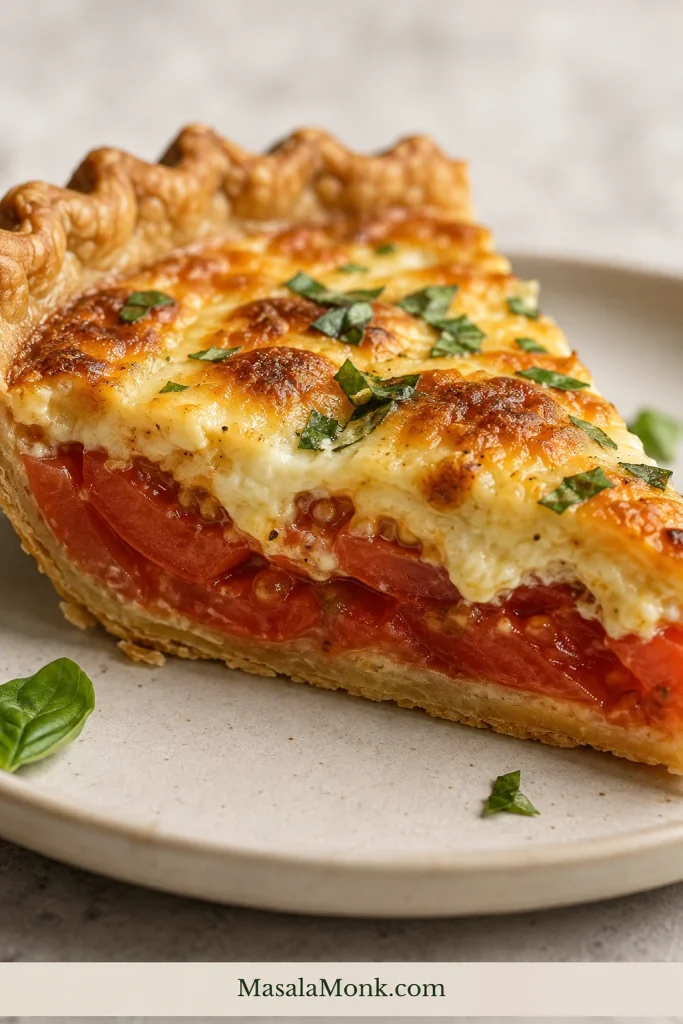
  • A scored border gives the tart structure. The edge rises around the apples and creates a clean frame.
  • Docking the center keeps it flatter. The middle stays lower while the border puffs.
  • Thin apples bake quickly. Slices around ⅛–¼ inch / 3–6 mm soften before the pastry overbrowns.
  • A hot baking sheet helps the bottom set. This gives the pastry a better chance to crisp before apple juices collect.
  • A light glaze makes it look finished. Apricot jam or apple jelly gives shine without making the tart heavy.

The result is the kind of dessert that feels dressed up without being fussy: crisp enough to lift neatly, tender enough to eat with a fork, and glossy enough to look finished even if your apple rows were not perfect.

This is the tart you make when pie sounds too heavy but sliced apples on buttery pastry still feels special. It looks like it took more effort than it did, which is exactly the charm.

Ingredients You Need

The ingredient list is short, so each piece has to pull its weight: buttery pastry, flavorful apples, a little sugar, a little butter, and a glossy finish at the end.

Apple tart ingredients including puff pastry, apples, cinnamon sugar, lemon, butter, apricot jam, egg, and salt.
With a short ingredient list, choose flavorful apples and good puff pastry because there is nowhere for weak ingredients to hide.

If you are still choosing apples, the best apples for apple tart section gives a quick variety guide before you start slicing.

Store-Bought Puff Pastry

Use one sheet of all-butter puff pastry if you can find it. It bakes with better flavor and cleaner flaky layers than pastry made mostly with shortening. Thaw frozen puff pastry in the refrigerator, not on a warm counter, so it unfolds without getting greasy. Soft pastry should go back into the fridge before baking.

Cold pastry matters because firm butter layers create better lift in the oven. King Arthur Baking’s puff pastry guidance explains the same cold-dough, hot-oven principle in more detail.

Store-bought puff pastry unfolded on parchment with sliced apples and a pastry brush nearby.
Store-bought puff pastry gives the shortcut, but keeping it cold is what helps the tart rise cleanly in the oven.

Not sure whether puff pastry or shortcrust is better for your tart? See the puff pastry vs shortcrust comparison before you choose.

Apples

You need about 3 medium apples, or 450–550 g / 1–1¼ lb before peeling and coring. That amount covers one rectangular puff pastry tart without weighing down the center. Pink Lady and Honeycrisp give an easy sweet-tart balance, while Granny Smith makes a sharper tart when mixed with a sweeter apple.

Fresh Apples vs Apple Pie Filling

This tart works best with fresh thin apple slices, not thick cooked filling. A saucy apple pie filling recipe is better for pies, crisps, hand pies, and spoonable toppings because it has more moisture and body than this thin pastry base needs.

Fresh apple slices on puff pastry compared with saucy apple pie filling for an apple tart.
Fresh apple slices suit a thin puff pastry tart because cooked pie filling brings more sauce than this base can handle.

For a deeper, saucier apple dessert instead, compare this with the apple tart vs pie section.

Sugar

Granulated sugar gives a clean, light sweetness. Light brown sugar adds a warmer caramel note. Use 3 tablespoons for sweet apples or 4 tablespoons for sharper apples.

Butter

A little melted butter helps the apple edges soften, shine, and brown. You do not need much because puff pastry already contains fat.

Lemon Juice

Lemon keeps the apples bright so the tart does not taste flat or overly sweet. It also buys you a little time while you arrange the slices.

Cinnamon and Salt

Cinnamon gives warmth without making the tart taste like heavy apple pie filling. A pinch of salt makes the apples and pastry taste fuller.

Apricot Jam or Apple Jelly

A warm glaze brushed over the baked tart gives it shine. Apricot jam is classic because it looks glossy and does not overpower the apples. Apple jelly works well for a more apple-forward finish.

Egg Wash, Optional

Egg wash helps the pastry border brown and shine. Brush it only on the top of the border, not down the cut or scored sides, so the pastry layers can rise cleanly. The tart still works without egg wash; the edge will simply look a little softer.

Best Apples for Apple Tart

The best apples for apple tart should taste good, slice neatly, and soften without collapsing. Because this tart is thin, the apples do not need to stay as firm as apples in a deep pie. Flavor matters just as much as structure.

For the easiest first tart, use Pink Lady or Honeycrisp. They slice neatly, taste bright, and do not need much adjustment. For a sharper flavor, mix Granny Smith with a sweeter apple so the tart tastes lively without becoming too sour.

Apple variety guide for apple tart with Pink Lady, Honeycrisp, Granny Smith, Braeburn, Gala, Fuji, and Golden Delicious apples.
Pair a tart apple with a sweeter one when you want bright flavor, gentle sweetness, and slices that still hold together.
Apple Best For Flavor and Texture
Pink Lady Best overall apple tart Sweet-tart, firm, neat slices
Honeycrisp Sweet-tart, familiar flavor Juicy, crisp, and easy to like
Granny Smith Tarter apple tart Firm and sharp; best mixed with a sweeter apple
Braeburn Balanced baking flavor Warm, aromatic, holds shape well
Gala or Fuji Sweeter puff pastry tart Softer and sweeter; good for quick tarts
Golden Delicious Classic French-style tart Soft, mellow, aromatic

A mix of one tart apple and one sweeter apple often gives the best flavor. For example, use Granny Smith with Honeycrisp, Pink Lady, or Fuji. For a deeper baking-apple guide, see best apples for apple pie; the same flavor logic applies, but tart apples should be sliced thinner and arranged more evenly.

Puff Pastry vs Shortcrust for Apple Tart

For this specific recipe, puff pastry is the best first choice. It gives flaky, dramatic edges with very little work, and it keeps the tart feeling light instead of heavy. Shortcrust or pie crust gives a more classic tart-pan texture, but it needs a little more care.

Puff pastry apple tart compared with a shortcrust apple tart in a round fluted tart pan.
Choose puff pastry for a lighter, flakier apple tart, while shortcrust gives a sturdier, more classic tart-pan base.
Pastry Best For Texture Notes
Puff pastry Easy apple tart, French-style sheet tart Flaky, light, crisp edges Great for a quick, flaky tart; keep it cold and bake on a hot tray.
Shortcrust pastry Classic round apple tart Buttery, tender, sturdier Best in a 9–10 inch tart pan.
Pie crust Homemade tart-pan version Flaky but less puffy Works well if rolled thin and chilled.
Store-bought pie crust Shortcut tart-pan version Softer, simpler Chill before baking so it holds shape.

To make the tart with homemade crust, use a buttery pie dough and roll it thin. This apple pie crust recipe is a good base for a shortcrust-style apple tart when you want something more homemade than puff pastry.

How to Make a Shortcrust Apple Tart

For a shortcrust apple tart, line a 9–10 inch tart pan with chilled dough, prick the base with a fork, and chill the lined pan before adding apples. With especially juicy apples or an applesauce layer, partially blind bake the crust until it looks dry and lightly set before adding the fruit.

Shortcrust pastry in a fluted tart pan with a fork-pricked base and apple slices nearby.
Before the apples go in, a chilled and pricked shortcrust base gives the tart a better chance to bake evenly.

Shortcrust usually needs longer than puff pastry. Plan on 40–55 minutes, depending on the pan, crust thickness, and apple slice thickness. The tart is ready when the apples are tender and the crust is golden all the way through, not just browned at the rim.

How to Slice Apples for Apple Tart

For a neat apple tart, slice the apples evenly. Aim for ⅛–¼ inch / 3–6 mm. Thinner slices give a polished French-style look, while slices closer to ¼ inch / 6 mm feel more rustic and apple-forward. Whatever thickness you choose, keep the slices similar so they soften at the same pace.

Apple slice thickness guide showing thin and slightly thicker apple slices for an apple tart.
Aim for thinner slices when you want a polished French-style apple tart; go thicker for a softer, more rustic bite.

For easier prep, cut the apples into cheeks first, then slice each piece thinly. You can peel the apples or leave the skin on. Peeled apples give a softer, more classic finish. Unpeeled apples add color and a little bite, especially with Pink Lady, Honeycrisp, or another red-skinned apple. A little browning before baking is harmless, especially once cinnamon and glaze go on.

Need to slice the apples a little ahead of time? Lemon water or lemon juice can slow browning. This guide on how to keep sliced apples from turning brown is useful when you are prepping fruit before baking.

Once the apples are sliced, move to the arranging step for simple rows, shingles, or fans.

How to Make Apple Tart Step by Step

Do not worry about making every slice identical. Even slices help the tart bake evenly, but a slightly rustic pattern still looks lovely once the apples soften and the glaze goes on.

1. Preheat the oven and baking sheet

Heat the oven to 400°F / 200°C, or 180°C fan. Place a rimmed baking sheet on the middle rack while the oven preheats. A hot tray helps the pastry bottom set instead of steaming underneath the apples.

Empty rimmed baking sheet preheating in an oven with puff pastry and sliced apples ready on the counter.
A preheated sheet pan gives puff pastry heat from below, so the base starts setting before the apples release juice.

2. Prepare the puff pastry

Place the cold puff pastry on parchment paper. Roll it lightly to smooth creases or even out the shape. Keep it close to a standard sheet-pan tart size; pastry rolled too thin will not puff as well.

Score a ¾–1 inch / 2–2.5 cm border around the edge with a knife, without cutting all the way through. Dock the center with a fork, leaving the border untouched so it can rise.

Puff pastry scored around the border and docked in the center with fork marks for apple tart.
Score for lift and dock for control; together, those two small steps shape the raised border and flatter center.

3. Slice and season the apples

Slice the apples thinly and toss them with lemon juice, sugar, cinnamon, and a pinch of salt. When the apples release a lot of juice while they sit, leave the extra liquid behind instead of pouring it onto the pastry.

Thin apple slices tossed with cinnamon sugar and lemon juice, with extra liquid left in the bowl.
After seasoning the apples, lift the slices out of the bowl instead of pouring extra cinnamon-lemon juice onto the pastry.

4. Arrange the apples

Arrange the apple slices inside the scored border in overlapping rows, shingles, fans, or a simple diagonal pattern. Keep them in one tidy layer. Brush the apples with melted butter. Brush egg wash on the top border if using, but avoid the cut sides.

Rows, shingles, fans, or a loose spiral all work. The pattern matters less than keeping the apples in an even layer, so do not worry if it looks a little rustic before baking.

Hands arranging thin apple slices in overlapping rows on puff pastry for apple tart.
A neat apple tart comes from an even layer first; the exact pattern matters less once the apples soften and shine.

5. Chill the assembled tart

Refrigerate the assembled tart for 10–15 minutes while the oven finishes heating. This keeps the butter layers firm and helps the pastry puff more cleanly.

Unbaked apple tart on a baking sheet being chilled in the refrigerator before baking.
That quick fridge rest firms the butter layers, which helps the puff pastry hold its border instead of slumping.

6. Bake until crisp and browned

Carefully slide the parchment with the tart onto the hot baking sheet. Bake for 30–35 minutes, until the edges are puffed, the bottom is browned, and the apples are tender at the edges.

By the last 10 minutes, the kitchen should smell buttery and cinnamon-warm. Do not pull the tart when the border is only lightly golden; puff pastry tastes best when it has real color, and a pale base is the first sign it may soften as it cools.

Baked apple tart with browned puff pastry, tender apple slices, and a lifted edge showing the base.
Look underneath before you call it done; a pale base can turn soft even when the apples already look glossy.

For ovens that brown pastry quickly, bake on the middle rack or slightly lower. A lower rack can help the base cook before the top gets too dark. If the pastry is browning unevenly or the center looks soft, check the troubleshooting guide before changing the recipe next time.

7. Glaze and cool

Warm the apricot jam with a teaspoon of water until loose, then brush it mostly over the apples while the tart is still warm. For the smoothest glaze, strain out large fruit pieces before brushing, and avoid soaking the pastry border so the edge stays crisp.

Warm apple tart brushed with apricot glaze while the puff pastry border stays crisp.
Glaze adds shine after baking, but brushing mostly over the apples keeps the puff pastry edge crisp.

Let the tart cool for at least 10–15 minutes before slicing so the pastry can settle. Serve it warm when the apples are soft and fragrant, or at room temperature when you want cleaner slices for a dessert table.

Larger pastry sheet note: Puff pastry sheets vary by brand and country. If your sheet is closer to 300–320 g instead of 240–260 g, use 4 medium apples and add 3–5 minutes to the bake time if the center needs it.

How to Keep Apple Tart from Getting Soggy

A soggy apple tart usually comes from warm pastry, too many apples, excess apple juice, or underbaking. The fix is not one trick; it is a small chain of good habits that keep the pastry cool, the fruit layer controlled, and the base properly baked.

Crisp-base guide for apple tart showing cold pastry, a hot tray, one apple layer, excess juice control, and full baking.
Crispness is built in stages: cool pastry, controlled apple juice, heat from below, and enough time in the oven.

If you are still assembling the tart, the preheated baking sheet step, apple seasoning step, and chilling step are the most important places to prevent sogginess.

Before Baking: Keep the Pastry Cold and the Apples Controlled

  • Keep the pastry cool and firm. Warm puff pastry tends to slump before it rises.
  • Use a hot baking sheet. The heat hits the bottom quickly and helps the base set.
  • Score the border. This encourages the edges to puff around the apples.
  • Dock the center only. The middle stays flatter while the border rises.
  • Use one layer of apples. A heavy pile releases too much juice.
  • Leave excess juice behind. Season the apples, then avoid dumping watery liquid onto the pastry.
  • Add a light barrier when needed. For very juicy apples, sprinkle 1 tablespoon almond flour, fine breadcrumbs, or flour over the pastry center before adding apples.
  • Bake until the bottom is firm. The pastry should flake instead of bend.

After Baking: Diagnose What Went Wrong

If the tart has already gone wrong, use the table below to work out what happened. Most texture problems come back to the same few causes: soft pastry, too much moisture, thick apple slices, or pulling the tart from the oven too early.

Apple tart troubleshooting guide showing soggy center, flat edges, burnt edges, firm apples, leaking juice, and greasy pastry fixes.
Use the texture problem first, then fix the cause; apple tart issues usually trace back to moisture, heat, or slice thickness.
Problem Likely Cause Fix
Soggy center Too much apple juice or underbaked pastry Leave excess liquid behind and bake until the base is browned.
Flat edges Border was docked, cut too deeply, or pastry got too warm Dock only the center and chill the assembled tart before baking.
Burnt edges Oven too hot, sugar on the border, or tart baked too high in the oven Brush sugar off the border before baking and move the tart lower if needed.
Apples still firm Slices were too thick Slice apples ⅛–¼ inch / 3–6 mm thick.
Juice leaking everywhere Too many apples or too much liquid added to pastry Use one overlapping layer and leave extra apple liquid in the bowl.
Pastry tastes greasy Pastry was warm before baking Chill the tart for 10–15 minutes before it goes into the oven.

Final Texture Cue

Texture cue: The apple tart is done when the edges are puffed, the bottom feels firm when lifted slightly with a spatula, and the apple edges look tender and lightly caramelized.
Apple tart slice lifted sideways to show a browned underside and flaky puff pastry layers.
The underside tells the truth: if the pastry feels firm and layered, the tart will slice and eat better.

Apple Tart vs Pie, Tarte Tatin, and Galette

An apple tart gives you the apple-and-pastry feeling of pie, but in a lighter, neater form. Instead of a deep layer of saucy filling, the apples are sliced thin and baked right on top of the pastry.

Apple tart, apple pie, Tarte Tatin, and apple galette arranged together as a dessert comparison.
Apple tart is the lighter open-faced dessert, while pie, Tarte Tatin, and galette each bring a different apple texture.
Dessert What It Is Main Difference
Apple tart Open-faced pastry with sliced apples on top Thin, elegant, less filling-heavy
Apple pie Deeper apple filling baked in pie crust Juicier, taller, usually more filling
Tarte Tatin Upside-down caramelized apple tart Apples cook in caramel, then the tart is flipped
Apple galette Free-form rustic apple tart No tart pan or neat border needed

For a deeper, softer dessert with a fuller filling, make a pie instead. This apple pie with apple pie filling is better when you want a shortcut pie with a thicker apple center. For this apple tart recipe, fresh thin apple slices are the better choice because they bake neatly and do not flood the pastry.

French-Style Apple Tart: What Makes It Different?

A French-style apple tart is usually open-faced, neat, and lighter than apple pie. The apples are sliced thin, arranged in rows, shingles, spirals, or fans, and often brushed with apricot glaze after baking. Some versions use puff pastry, while others use shortcrust or a sweet tart dough.

A very thin puff pastry apple tart like this is close to tarte fine aux pommes, the slim French-style apple tart built on pastry, thin apples, and a glossy finish. Deeper tart-pan versions often use shortcrust and sometimes a thin applesauce or compote layer.

Thin French-style apple tart with overlapping apple slices, glossy glaze, and a slim puff pastry border.
Tarte fine aux pommes keeps the idea elegant: thin apples, slim pastry, glossy finish, and very little heaviness.

The classic look is polished but not complicated. Keep the apple layer even, leave a clear pastry border, and glaze the tart while it is still warm. That gives you the glossy bakery finish without turning the recipe into a pastry-school project.

Apple Tart Variations

Use these variations when you want the same apple-and-pastry idea in a different shape: quicker, richer, more classic, more party-friendly, or better suited to a specific diet.

Apple tart variations including puff pastry, shortcrust, applesauce layer, caramel, crumb topping, and mini tarts.
Once the basic apple tart works, you can shift it toward shortcrust, caramel, crumb topping, mini tartlets, or French-style layers.

For the simplest version, stay with the main apple tart recipe. For a more classic tart-pan version, jump back to the shortcrust apple tart notes.

Puff Pastry Apple Tart

Choose this when you want the flakiest apple tart with the least dough work. Store-bought puff pastry does most of the heavy lifting, so this is the best starting point for a weeknight dessert, a last-minute guest dessert, or a simple French-style tart.

Shortcrust Apple Tart

Choose shortcrust when you want a more classic round apple tart in a 9–10 inch tart pan. Chill the lined pan before baking. With juicy apples, a light partial blind bake helps the base set before the fruit goes in.

French-Style Apple Tart with Applesauce

For a more classic French-style apple tart, spread a thin layer of smooth, unsweetened applesauce or apple compote over the pastry before arranging the apple slices. For a puff pastry tart, use only 2–3 tablespoons. A tart-pan shortcrust version can take a slightly thicker layer, but keep it controlled because too much applesauce will soften the base.

Thin applesauce layer spread over puff pastry before apple slices are added for French-style apple tart.
If you add applesauce, spread it thinly because too much moisture can soften the pastry before it crisps.

Caramel Apple Tart

Drizzle a little caramel sauce over the baked tart just before serving. Avoid adding too much caramel before baking because it can burn around the pastry edges.

Apple Crumb Tart

Add a light crumb topping over the apples before baking if you want a Dutch-style feel. For a fuller crumb-topped apple dessert, this Dutch apple pie recipe is the better route.

Mini Apple Tarts

Mini apple tarts are the party-friendly version. Cut puff pastry into smaller squares or rounds, top each piece with a few apple slices, and start checking around 15–18 minutes because small tarts brown faster than one large sheet tart.

Mini apple tarts with glossy sliced apples on puff pastry, cooling on parchment and a wire rack.
Mini apple tarts brown faster than a full sheet tart, so start checking early once the edges puff and deepen.

Apple Frangipane Tart

For a richer bakery-style tart, add a thin layer of almond frangipane under the apples. Because the almond filling needs time to cook through, it is better treated as its own tart style rather than a quick add-on.

Prepared Apple Filling Dessert

Prepared apple pie filling is better in desserts designed for a softer, saucier texture. An apple cinnamon roll bake with apple pie filling is a much better fit when you want a quick dessert using ready-made filling.

Vegan Apple Tart

For a vegan apple tart, choose vegan puff pastry, brush the border with plant milk, and use vegan butter or a neutral oil on the apples. Most of the method stays the same; just check the jam if you are cooking for strict vegans.

Gluten-Free Apple Tart

Use a tested gluten-free puff pastry or a gluten-free tart crust. Do not assume regular pie dough can be swapped one-for-one with gluten-free flour, because pastry structure changes quickly without gluten.

For apple flavor without pastry at all, make an apple crisp recipe instead. It gives you tender cinnamon apples and a crunchy topping without worrying about tart dough.

Storage, Freezing, and Reheating

How to store apple tart

Apple tart is best the day it is baked, when the pastry is crispest. Store leftovers in an airtight container in the refrigerator for up to 3 days; this also stays in line with the USDA’s general leftovers and food safety guidance.

How to reheat apple tart

Reheat slices in a 325°F / 160°C oven or toaster oven for 8–12 minutes, until the pastry feels crisp again. Avoid microwaving if you care about texture; it softens puff pastry quickly.

Apple tart storage and reheating guide showing a slice in an airtight container, oven reheating, and a refreshed slice.
Refrigerate leftovers airtight, then use the oven to revive texture because the microwave softens puff pastry quickly.

Can you freeze apple tart?

You can freeze baked apple tart slices, but the pastry will not be quite as crisp after thawing. Reheat from chilled or partially thawed in the oven until warm and crisp at the edges.

Can you make apple tart ahead?

The best make-ahead plan is to prepare the small pieces, then assemble close to baking. Mix the cinnamon sugar ahead, measure the jam or jelly ahead, and keep thawed puff pastry cold in the refrigerator. Slice the apples shortly before assembly for the freshest texture and color, then warm the glaze just before brushing it over the tart.

For guests, bake the tart the same day and let it sit at room temperature before serving. It slices more neatly once it has cooled slightly, but still tastes special with ice cream, cream, coffee, or tea.

For serving ideas, jump to what goes well with apple tart near the FAQs.

Apple Tart Recipe Card

Apple tart recipe card with a tart slice, puff pastry, apples, bake temperature, bake time, and apricot glaze.
The core method stays simple: cold puff pastry, thin apples, a hot oven, full color, and a warm glaze.

Apple Tart Recipe

This easy apple tart recipe bakes thin apple slices over store-bought puff pastry with cinnamon sugar and a glossy apricot glaze. It looks bakery-style, but the method is simple enough for a casual dessert.

Prep Time20 minutes
Chill Time10–15 minutes
Cook Time30–35 minutes
Cooling Time10–15 minutes
Total Time1 hour 10 minutes to 1 hour 25 minutes
Yield6–8 servings

Ingredients

  • 1 sheet all-butter puff pastry, about 8–9 oz / 240–260 g, thawed but cold
  • 3 medium apples, about 450–550 g / 1–1¼ lb before peeling and coring
  • 1 tablespoon lemon juice / 15 ml
  • 3–4 tablespoons granulated sugar or light brown sugar / 38–50 g
  • ½ teaspoon ground cinnamon
  • Pinch of fine salt
  • 2 tablespoons unsalted butter / 28 g, melted
  • 2 tablespoons apricot jam or apple jelly / 35–40 g
  • 1 teaspoon water / 5 ml, for loosening the glaze
  • Optional egg wash: 1 egg beaten with 1 teaspoon water
  • Optional base barrier: 1 tablespoon almond flour, fine breadcrumbs, or all-purpose flour for juicy apples

Instructions

  1. Preheat the oven. Heat the oven to 400°F / 200°C, or 180°C fan. Place a rimmed baking sheet on the middle rack while the oven preheats.
  2. Prepare the pastry. Place the cold puff pastry on parchment paper. Roll lightly if needed to even it out. Score a ¾–1 inch / 2–2.5 cm border around the edge without cutting all the way through. Dock the center with a fork, leaving the border untouched.
  3. Slice the apples. Peel the apples if you like, then slice them ⅛–¼ inch / 3–6 mm thick.
  4. Season the apples. Toss the apple slices with lemon juice, sugar, cinnamon, and salt. Leave extra juice behind if the apples release a lot of liquid.
  5. Arrange the tart. If using the optional base barrier, sprinkle it lightly over the docked center of the pastry. Arrange the apples in overlapping rows or shingles inside the scored border. Brush the apples with melted butter. Brush egg wash only on the top border if using.
  6. Chill. Refrigerate the assembled tart for 10–15 minutes.
  7. Bake. Carefully slide the parchment and tart onto the hot baking sheet. Bake for 30–35 minutes, until the edges are puffed, the bottom is browned, and the apples are tender.
  8. Glaze. Warm the apricot jam with 1 teaspoon water until loose. Brush mostly over the warm apples.
  9. Cool and serve. Let the tart cool for 10–15 minutes before slicing. Serve warm or at room temperature.

Notes

  • For a sharper tart, use Granny Smith or mix Granny Smith with Honeycrisp or Pink Lady.
  • Honeycrisp, Gala, Fuji, and Golden Delicious make a sweeter, softer tart.
  • A larger 300–320 g puff pastry sheet can take 4 medium apples and may need 3–5 extra minutes in the oven.
  • Shortcrust or pie crust works best in a 9–10 inch tart pan and usually needs 40–55 minutes.
  • Do not overload the pastry with apples. One generous overlapping layer is enough.
  • For a French-style applesauce layer, use only 2–3 tablespoons of smooth, unsweetened applesauce on puff pastry so the base does not soften.
  • Leftovers keep in the refrigerator for up to 3 days. Reheat in the oven, not the microwave, for the best texture.

FAQs

Can I use puff pastry for apple tart?

Yes. Puff pastry works especially well for apple tart because it gives a flaky base and raised edge without homemade dough. The key is to bake it from cold and avoid piling on too many apples.

Do the apples need to be cooked first?

No. For this style of apple tart, thin raw apple slices bake directly on the pastry. Pre-cooked apple pie filling is usually too wet and thick for a thin puff pastry tart.

Can apple pie filling be used for apple tart?

Apple pie filling is not the best choice for this tart. It is saucier and heavier, so it can make puff pastry soggy. Use fresh thin apple slices for this recipe and save cooked filling for deeper pies, crisps, hand pies, cinnamon roll bakes, or shortcut desserts.

What temperature is best for apple tart?

For puff pastry apple tart, 400°F / 200°C, or 180°C fan, is reliable. It is hot enough to puff and brown the pastry, but not so aggressive that the apple edges burn before the base cooks.

How thin should apples be for apple tart?

Slice apples about ⅛–¼ inch / 3–6 mm thick. Thin slices soften quickly and create a neater tart. Thicker slices work, but they make the tart more rustic and may need a few extra minutes in the oven.

Should apples be peeled for apple tart?

Peeling is optional. Peeled apples give a softer, more classic tart. Unpeeled apples add color and a little bite, especially with red-skinned apples like Pink Lady or Honeycrisp.

Why is my apple tart soggy?

The most common reasons are warm pastry, too many apples, too much apple juice, or underbaking. Keep the pastry cold, bake on a hot sheet pan, leave excess apple juice behind, and bake until the bottom is crisp.

Does shortcrust pastry work for apple tart?

Shortcrust pastry works well for a classic round apple tart in a tart pan. Chill the lined pan before baking, prick the base, and bake long enough for the crust to turn fully golden.

Can apple tart be made in an air fryer?

Small puff pastry apple tarts can be made in an air fryer, but a full rectangular tart is usually better in the oven. For mini versions, use parchment, leave room for the pastry to puff, and check early because air fryers brown quickly.

What goes well with apple tart?

Warm slices love vanilla ice cream because the cold cream melts into the glossy apples. At room temperature, the tart is lovely with whipped cream, crème fraîche, plain Greek yogurt, coffee, or tea, especially once the pastry has settled and the apple flavor tastes a little deeper.

Apple tart slice served with vanilla ice cream, coffee, and the remaining tart in the background.
Serve apple tart warm when you want the ice cream to melt into the glossy apples, or let it cool slightly when clean dessert-table slices matter more.

Back to top