Posted on — Leave a comment

Vegetable Pot Pie Recipe: Easy, Creamy & Flaky With Puff Pastry or Pie Crust

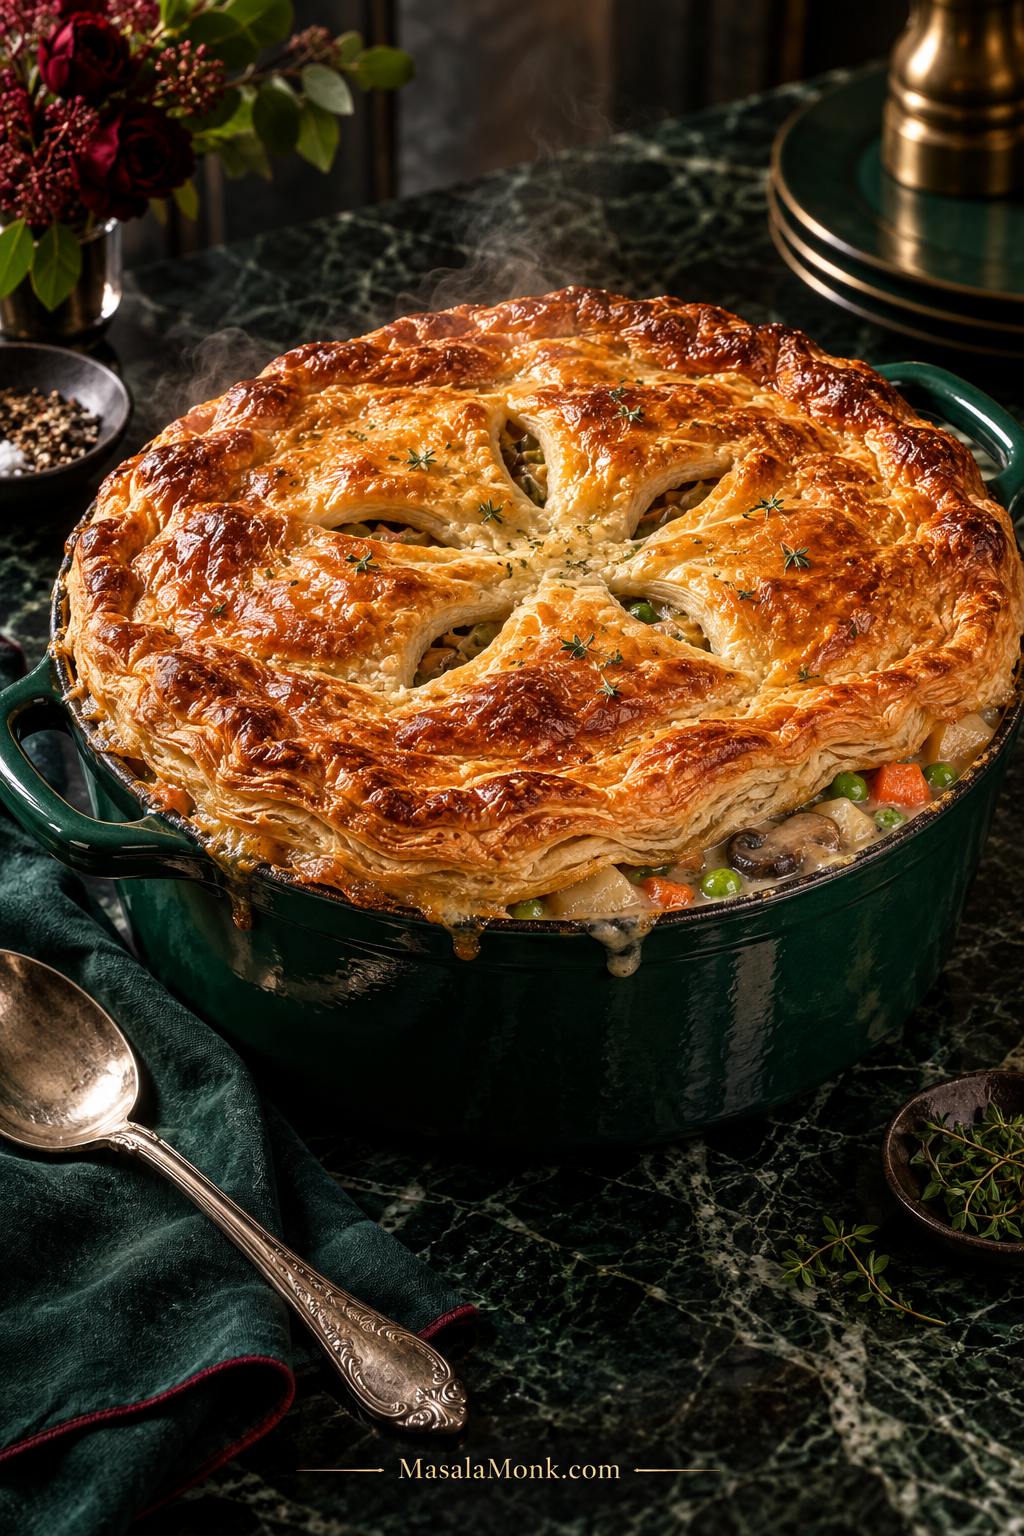
Vegetable pot pie in a deep green casserole with a deeply golden puff-pastry lid and creamy potato, carrot, pea, corn and mushroom filling visible around the rim.

Under a deeply golden pastry lid, the filling is creamy enough to cling to tender potatoes and carrots, with sweet peas, browned mushrooms and flaky crust in every spoonful.

That contrast is what makes vegetable pot pie worth baking: crisp pastry above, rich gravy underneath, and vegetables that stay distinct in the sauce. The key is getting those parts ready at the same time. Potatoes need a head start, mushroom water needs time to cook away, and puff pastry performs best when it reaches the oven still chilled.

This vegetable pot pie recipe handles most of that work before the dish reaches the oven. The cooking is straightforward: soften the vegetables, build the gravy, cover and bake. Once the filling is ready, the pastry turns a pan of creamy vegetables into a generous dinner with a crisp golden lid.

Vegetable Pot Pie Recipe

The recipe pairs a creamy thyme-and-sage vegetable filling with a deeply golden puff-pastry lid. Potatoes, mushrooms, carrots, peas and corn make this vegetarian pot pie substantial enough for dinner, while a single pie crust can replace the puff pastry for a sturdier finish.

Serves
About 6

Dish
2½–3 qt / 2.4–2.8 L

Oven
425°F / 220°C

Prep
20 minutes

Cook
60–70 minutes

Total
About 1 hr 30–1 hr 40 min

Three Checks Before the Crust Goes On

Cook firm vegetables until nearly tender, thicken the gravy until it clings, then add chilled pastry. Those three checks matter more than hitting every minute exactly.

Vegetables

Potatoes and other firm pieces are almost fork-tender. A knife meets only slight resistance.

Gravy

For the gravy, a spatula trail stays open for about 1–2 seconds before slowly closing.

Pastry

Puff pastry is cool and flexible, not sticky, greasy or floppy.
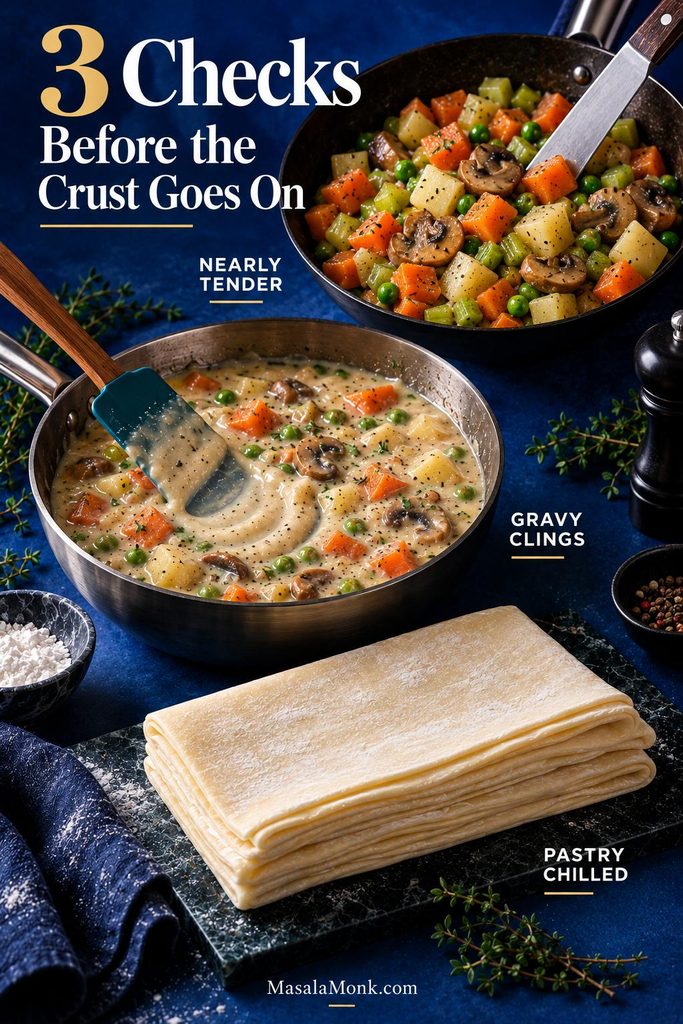
Three pre-baking checks for vegetable pot pie: nearly tender vegetables being tested, thick gravy that clings and leaves a brief trail, and chilled puff pastry ready for the dish.
These checks take pressure off the oven. Once the vegetables and gravy are ready, the bake is mainly about getting the chilled pastry properly puffed and browned.

Ingredients

Vegetables and Aromatics

  • 1 medium-large onion, diced — about 5 oz / 150 g
  • 2 medium carrots — about 5 oz / 150 gCut into ¼- to ⅜-inch / 6- to 10-mm pieces.
  • 2 celery stalks — about 3 oz / 80 gDice into small, even pieces.
  • 8 oz / 225 g mushroomsCremini or white mushrooms both work; slice or chop them.
  • 8 oz / 225 g Yukon Gold or other all-purpose potatoUsually 1 large or 2 small potatoes. Cut into ⅜- to ½-inch / 10- to 12-mm cubes.
  • 3 garlic cloves, minced
  • 1 tsp dried thyme
  • ½ tsp dried sage

For the Creamy Gravy

  • 4 tbsp / 2 oz / 56 g unsalted butter
  • ⅓ cup / about 1½ oz / 42 g all-purpose flour
  • 2 cups / 16 fl oz / 480 ml low-sodium vegetable broth, divided½ cup / 120 ml cooks the potato; the remaining 1½ cups / 360 ml builds the gravy.
  • ½ cup / 4 fl oz / 120 ml whole milkHeavy cream can replace the milk for a richer sauce.
  • 2 tsp / 10 ml soy sauce
  • 1½ cups / about 7½ oz / 210 g total frozen peas and corn
  • ¾ tsp fine salt, divided, plus more if needed
  • ½ tsp black pepper
  • 1 tsp / 5 ml apple cider vinegar or white wine vinegar

For the Puff-Pastry Top

  • Puff pastry — enough to cover the openingUsually one large sheet, often 8½–10½ oz / 240–300 g. Sheet dimensions matter more than package weight.
  • 1 large egg
  • 1 tbsp / 15 ml water or milk

Produce varies in size, so use the gram weights when your carrots, potatoes or onion look unusually large or small.
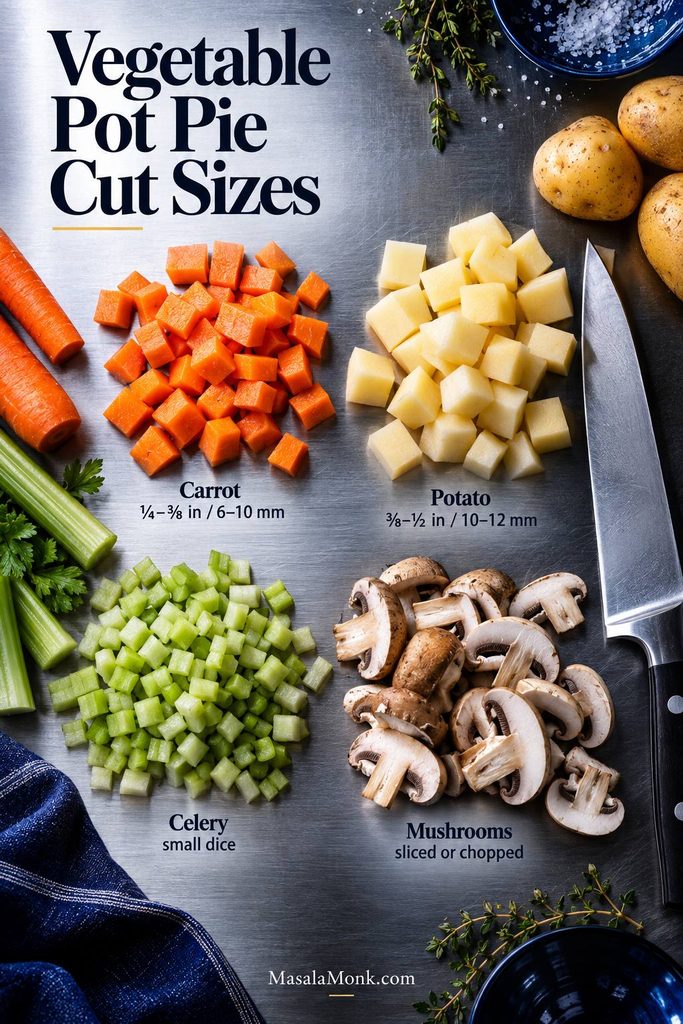
Overhead vegetable prep guide showing carrots cut about ¼ to ⅜ inch, potatoes about ⅜ to ½ inch, small-diced celery and sliced mushrooms.
Keep the firm vegetables small enough to finish before the pastry; a few oversized potato or carrot pieces can still be crunchy when the crust is already browned.

Equipment

  • Large deep skillet or Dutch oven
  • 2½–3 qt / 2.4–2.8 L oven-safe casserole or deep baking dish
  • Rimmed baking sheet
  • Whisk

A dish with an opening around 10–11 in / 25–28 cm works well with most large pastry sheets. Leave ½–¾ in / 1.25–2 cm between filling and rim so bubbling gravy has somewhere to go.

An oven-safe skillet can go straight from stovetop to oven when the filling fits with that headroom and the pastry covers the opening.

Instructions

  1. Heat the oven and chill the pastry. Preheat to 425°F / 220°C. Thaw puff pastry only until it unfolds without cracking, then return it to the refrigerator.
  2. Start the vegetables. Melt the butter over medium heat. Add onion, carrots, celery and ¼ tsp salt. Cook for 6–8 minutes, until the onion is translucent and the carrots have begun to soften.
  3. Brown the mushrooms. Add them and cook for 6–10 minutes. At first they will look wetter; keep going until that liquid evaporates and the pan returns to a clear sizzle. Add garlic, thyme, sage and pepper, then cook for 30–60 seconds, until the herbs smell distinctly savory.

Finish the Filling

  1. Get the potato nearly tender. Add potato and ½ cup / 120 ml broth. Cover for 6–8 minutes, then uncover and cook until the largest cubes offer only slight resistance and the broth has nearly disappeared. The oven is good at baking pastry; it is much less helpful with a raw potato buried under gravy.
  2. Build the gravy. Stir in the flour and cook for 1–2 minutes. Add ½ cup / 120 ml of the remaining broth and stir smooth. Gradually add the final 1 cup / 240 ml broth, then the milk, soy sauce and remaining salt. Simmer for 3–5 minutes.
  3. Add the peas and corn. Stir them in frozen and return the gravy to a gentle simmer for 2–3 minutes. Drag a spatula across the pan; the trail stays open briefly when the gravy is ready. A spoonful slumps back into the skillet, and the sauce clings to the vegetables instead of pooling underneath them.

Season and Add the Pastry

  1. Season the filling. Taste, adjust salt or pepper, then stir in the vinegar. The filling needs enough flavor to stand on its own before pastry covers it. If it is still bubbling vigorously, let it stand for about 5 minutes while the pastry stays refrigerated.
  2. Add the pastry. Transfer the filling if needed. Lay the pastry over the dish with a small overhang, press it lightly against the rim and trim only when necessary. Do not stretch the sheet to make it fit. Cut 3–5 vents, beat the egg with water or milk, and brush the top lightly.
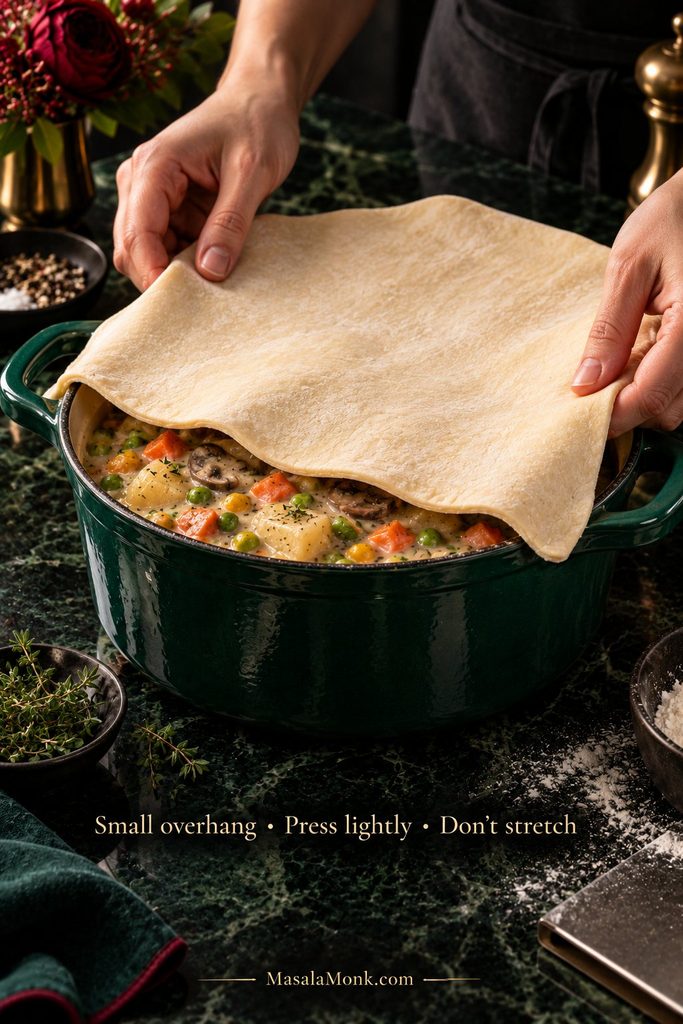
Hands laying one sheet of raw puff pastry over creamy vegetable pot pie filling with a small overhang around a deep green casserole.
If the sheet fits only when it is stretched, change the fit rather than the pastry. Taut layers have less room to separate and lift in the oven.

Bake and Rest

  1. Bake for 22–30 minutes. Look at the center as well as the edge: properly baked pastry is puffed, visibly layered and deeply golden. Gravy bubbling through the vents or around the rim is a good sign that the filling underneath is thoroughly hot. Shield dark edges loosely with foil when needed.
  2. Rest for 10 minutes. The gravy settles slightly while the lid stays crisp enough to break cleanly under a spoon.
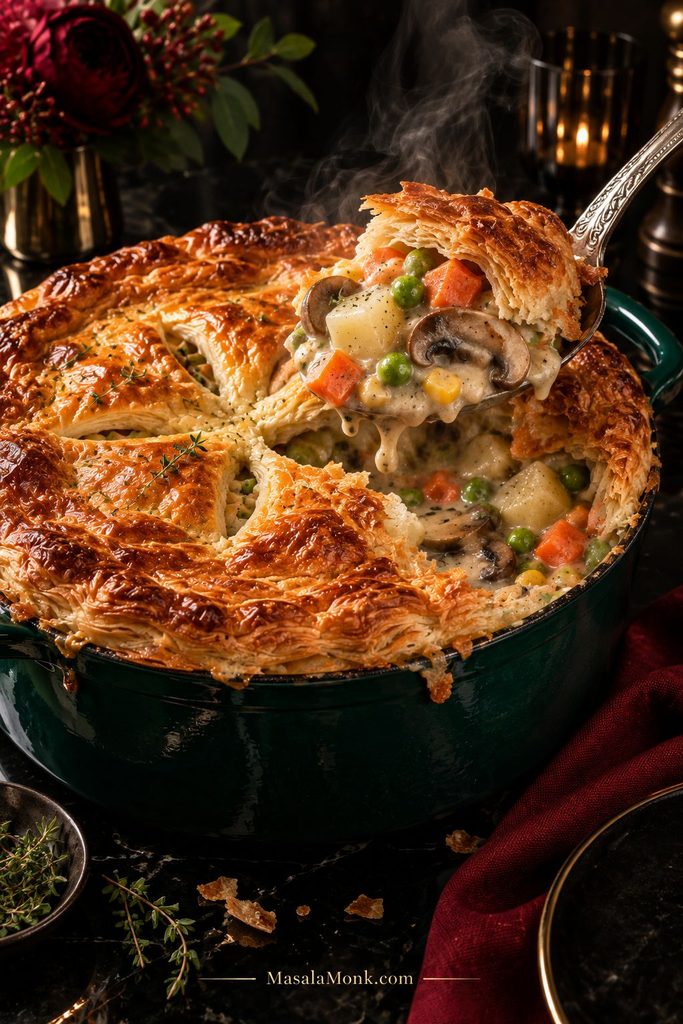
Serving spoon lifting creamy vegetable pot pie filling with potatoes, carrots, peas, corn and mushrooms beneath broken flakes of golden puff pastry.
Ten minutes after baking, look for a filling that holds briefly on the spoon before settling. That soft hold matters more than getting a perfectly tidy first serving.

Pie-crust version: cover the warm or slightly cooled filling with one prepared pie-crust round, cut several vents and brush with egg wash. Bake at 400°F / 205°C for 30–35 minutes, until deeply golden and bubbling. Check packaged crust when the dish needs to stay vegetarian, since some products use animal fat.

Best Vegetables for Pot Pie

Onion, carrots, celery, potatoes, mushrooms, peas and corn make a dependable pot-pie mix. Green beans, cauliflower, broccoli, spinach, sweet potato and squash work too. Two things matter when you swap: how long the vegetable needs to become tender and how much water it carries into the pan.

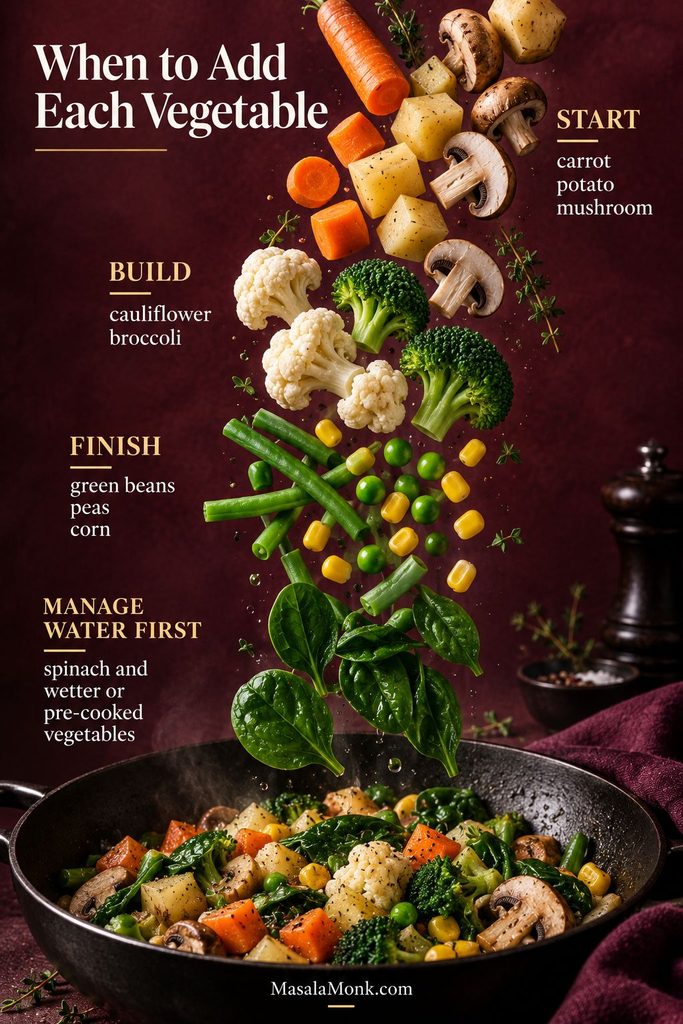
When to Add Each Vegetable

VegetableCut or PrepWhen to Add ItBefore Baking
Potato⅜–½ in / 10–12 mm diceAfter mushrooms, before flourAlmost tender
Carrot¼–⅜ in / 6–10 mm piecesWith onion and celeryMostly tender
CelerySmall diceWith onion and carrotSoftened
MushroomsSliced or choppedAfter aromatics softenWater gone; some browning
CauliflowerSmall floretsWith potato, before flourNearly tender
BroccoliSmall floretsAs the gravy thickensBright and slightly firm
Green beansShort piecesNear the end; slightly earlier if firmTender, not limp
PeasFresh or frozenAt the end, with cornHeated through
CornFresh or frozenNear the endHeated through
SpinachWilted or thawed and squeezedAt the endExcess water removed
Sweet potato½ in / 12 mm cubesWith potato; start checking earlyAlmost tender
Butternut squashSmall cubesWith potato, or roasted and added lateTender, not collapsing
Vegetable timing guide showing carrots, potatoes and mushrooms added early; cauliflower and broccoli next; green beans, peas and corn later; and spinach or wetter vegetables needing moisture control first.
Different vegetable swaps create different problems: sweet potato changes timing, spinach changes moisture, and roasted vegetables arrive with much of their cooking already finished.

Mushrooms and Potatoes Need the Head Start

Mushrooms usually get wetter before they get browner. Once their released water cooks away, the quiet bubbling changes to a sharper sizzle. That is when browning really begins, giving the finished gravy more depth. The same moisture-first sequence matters in our creamy mushroom sauce.
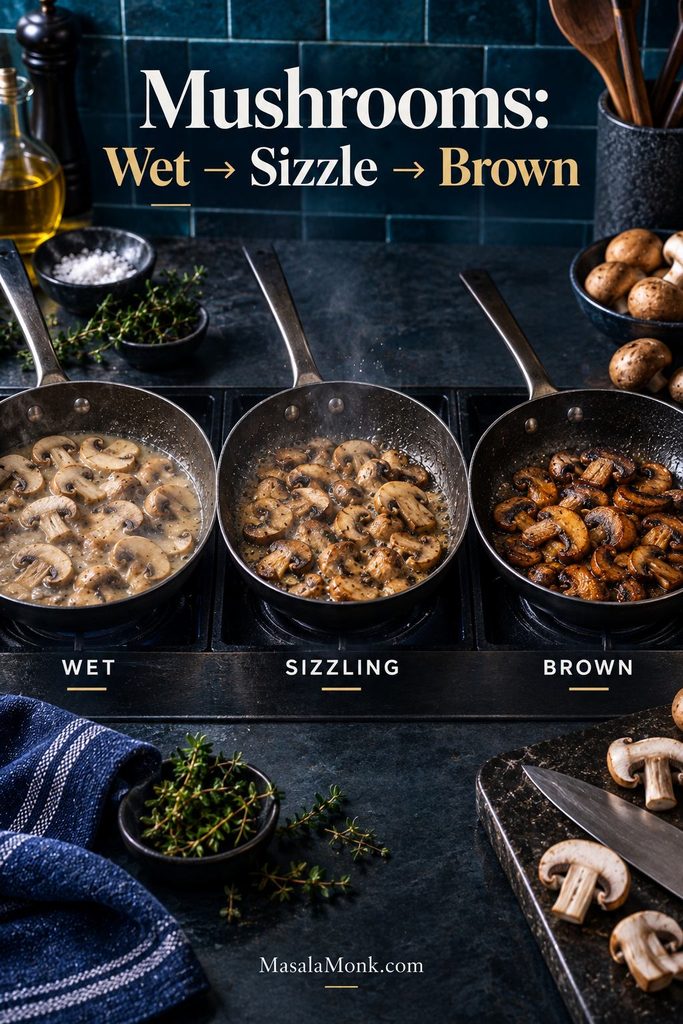
Three pans showing mushrooms releasing liquid, mushrooms sizzling as the liquid evaporates, and mushrooms deeply browned after the excess moisture is gone.
Cook the released mushroom water away before building the gravy. You get better browning now and less excess liquid to reduce later.

Potatoes have the opposite problem: they release little water but need time. Pieces around ⅜–½ inch / 10–12 mm soften efficiently without disappearing into the gravy. When potato shares the filling with cauliflower, smaller potato pieces help their cooking times meet in the middle; the same size logic appears in our roasted cauliflower and potatoes.

Swaps That Work Well

The table handles most substitutions, but a few deserve extra attention. Sweet potato softens faster than regular potato. Frozen spinach is unusually wet, so thawing and squeezing it first is worth the trouble. Already-roasted vegetables belong near the end. Roasting squash, cauliflower, Brussels sprouts or mushrooms also drives off water before it can loosen the gravy—the same moisture-control principle used in our vegetable lasagna.

Canned vegetables can work too, but their softer texture means they are best drained well and folded in late.

Build More Flavor Into the Filling

Browning does more for a meatless pot pie than simply adding extra herbs. Once the mushrooms have browned and the thyme and sage hit the pan, the filling starts smelling like pot pie before the gravy is even finished. Soy sauce gives it savory weight, while a small splash of vinegar keeps the finish lively. Mushrooms help, but cauliflower, green beans or extra potato can replace them.

Easy Vegetable Pot Pie With Frozen Vegetables

Yes. Most frozen mixed vegetables can go straight into the pot-pie filling without thawing. A few exceptions need a little prep first.

For less chopping, keep the onion, celery, mushrooms and potato, then use one 12 oz / 340 g bag of frozen peas, carrots, corn and green beans. Skip the fresh carrots and the separate peas-and-corn mixture from the main recipe.

Add the frozen mix after the gravy has thickened. The cold vegetables temporarily slow the simmer, so wait until the pan is bubbling gently again before judging thickness. Some bags barely change the sauce; heavily frosted ones can loosen it noticeably.

Straight From the Freezer

  • Peas
  • Corn
  • Small diced carrots
  • Green beans
  • Standard mixed-vegetable blends

Prep Before Adding

  • Spinach: thaw and squeeze dry.
  • Heavily frosted bags: knock away loose ice.
  • Large broccoli or cauliflower: give them more time to heat through before judging the gravy.

Frozen vegetable guide showing peas, corn, diced carrots and green beans used directly from frozen, while spinach, heavy frost and large broccoli or cauliflower pieces need extra preparation.
Loose freezer frost is extra water; knock it away before it reaches a gravy that is already close to finished thickness.

Jump to: Check filling thickness · Compare crusts · Back to recipe

Vegetable Pot Pie Filling: How Thick Should It Be?

The gravy should cling to the vegetables but still move slowly when you tilt the pan. Drag a spatula across the bottom; the trail should stay open for about 1–2 seconds before slowly closing.

Vegetable moisture can change a gravy that looked perfect a few minutes earlier, so judge its final thickness only after mushrooms, spinach or frozen vegetables are fully hot.
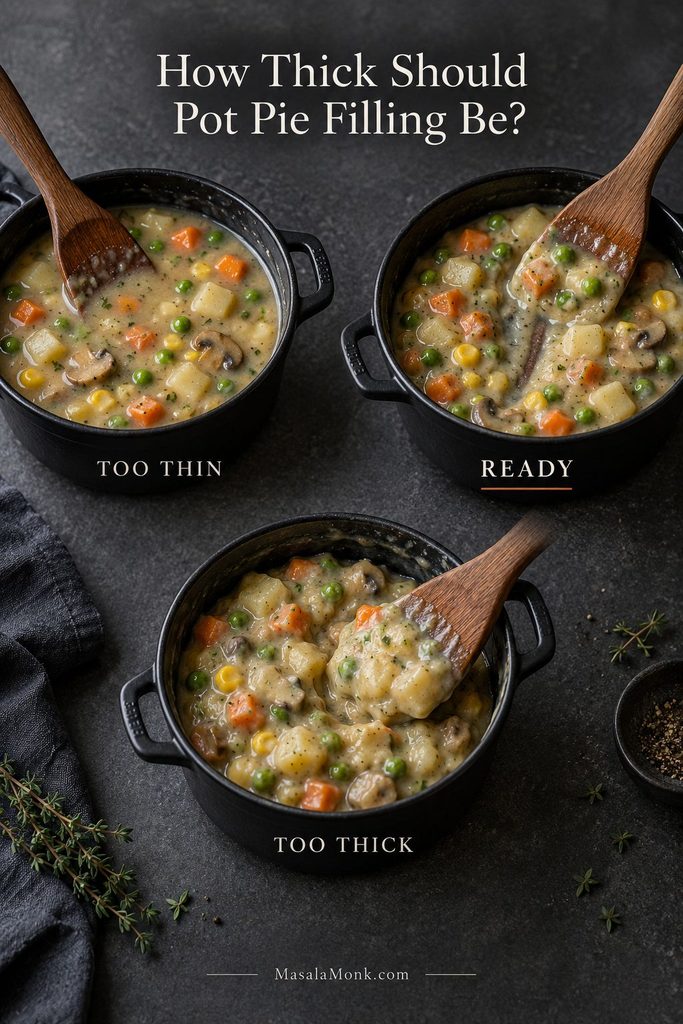
Three vegetable pot pie fillings showing a loose watery consistency, a creamy ready consistency that coats the vegetables, and an overly thick stiff consistency.
Wait for the simmer to return after adding frozen vegetables. Cold pieces can briefly make a correctly thickened pot pie filling look thinner than it really is.

When the Gravy Ends Up Too Thin

Reduce it uncovered before reaching for more starch. A few extra minutes over the heat often solve water introduced by vegetables. When reduction is not enough, mix 1 tsp / about 3 g cornstarch with 2 tsp / 10 ml cold water, stir in part of the slurry and simmer before deciding whether the rest is necessary.

When It Gets Too Thick

Add warm broth or milk 1–2 tbsp / 15–30 ml at a time. Stop once the gravy coats the vegetables easily again.

Puff Pastry, Pie Crust or Biscuits?

Puff pastry is the easiest default when you want a light, flaky lid without making dough. Choose pie crust for a sturdier top, or biscuits for a softer casserole-style finish. The filling itself can stay the same.

ToppingBest ForMain Adjustment
Puff pastryLight, flaky layersKeep chilled until assembly
Pie crustA sturdier classic lidBake around 400°F / 205°C
Double crustPastry underneath and on topCool filling and manage bottom moisture
BiscuitsA soft, hearty toppingCold dough over hot filling
Three vegetable pot pies comparing a tall flaky puff-pastry lid, a flatter crimped pie crust and separate golden biscuit topping.
Each topping changes the handling as well as the texture: keep puff pastry cold, use pie crust for structure, and give biscuits hot filling underneath.

Puff Pastry

For the puff pastry, the sheet is ready when it unfolds without cracking but still feels cool. Sticky, greasy or floppy pastry needs a few minutes back in the refrigerator.

Watch the middle of the lid in the oven. The edge can brown beautifully while the pastry over the wettest part of the filling remains pale and compressed. Properly baked layers look distinct and break under a spoon instead of bending together like damp dough.

Soft underneath is not the same as raw puff pastry. Steam naturally softens the side touching the gravy. Pale, sticky or floury pastry through the center is different and still needs more baking.
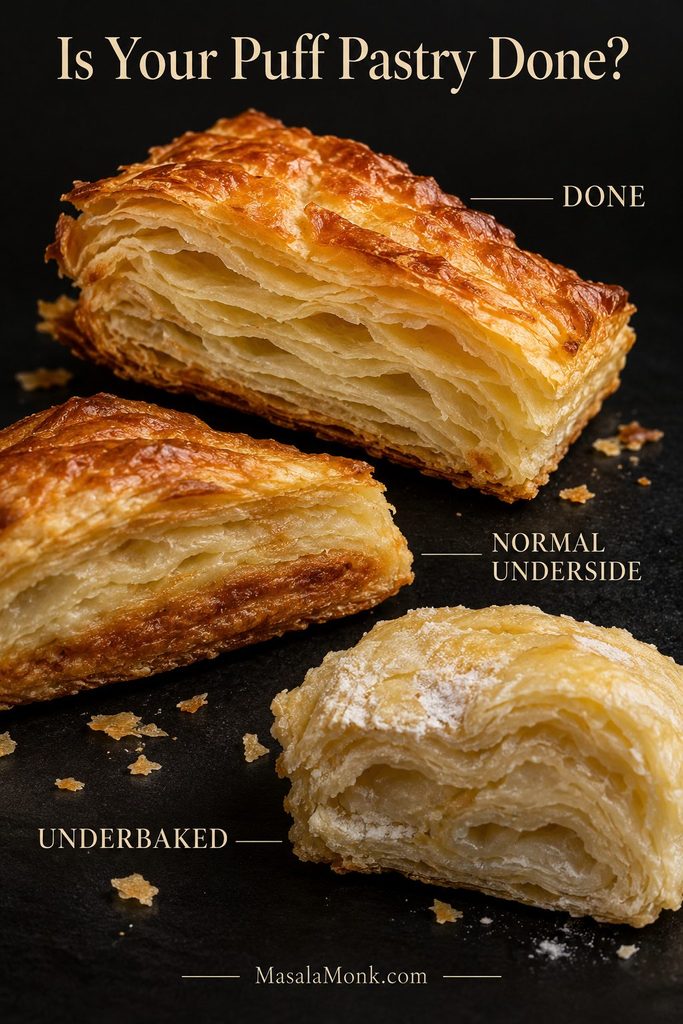
Three puff-pastry cross-sections showing fully baked separated golden layers, a cooked but softer underside, and pale compressed underbaked pastry.
If the center layers are pale, fused or tacky, keep baking—even when the edges are already deeply browned.

For crisp pastry on both sides, bake the sheet separately. Cut it into squares, brush with egg wash and bake on parchment at 400°F / 205°C, starting your check around 15 minutes. Spoon hot filling into bowls or ramekins and set the crisp pastry on top.

Puff pastry is much less forgiving on the bottom of a wet pot pie. Regular pie dough is the easier route when pastry underneath matters.

Pie Crust

For the easiest reliable pie-crust version, use a single top crust. It generally needs about 30–35 minutes at 400°F / 205°C. Cover the rim loosely with foil when it colors well ahead of the center.

Our homemade pie crust guide covers cold butter, hydration, rolling and chilling in more detail. For a double-crust pot pie, cool the filling before it meets the bottom dough and consider partial prebaking when a crisp base matters. Metal pans and stronger bottom heat also help; King Arthur Baking explains the role of pan material and bottom heat.

Using Biscuits as the Topping

Set cold biscuit dough over hot gravy with a little room between the pieces. For medium homemade biscuits, 400°F / 205°C for about 25–30 minutes is a useful starting point. Refrigerated dough should follow its package temperature and timing first.

Check a biscuit near the middle instead of judging only the browned tops. The underside is ready when it is set and no longer gummy.

Individual Pot Pies

Use six 16 oz / 475 ml ramekins, or six to eight smaller 12–14 oz / 355–415 ml dishes. Fill them no more than about three-quarters full. Puff-pastry tops often finish in roughly 18–22 minutes at 400–425°F / 205–220°C, although the center layers remain the better doneness cue.

Changing the dish changes the bake. A shallow ramekin, deep casserole, bottom crust and thick biscuit topping all move heat and steam differently. Borrow another version’s timer cautiously when the vessel or topping changes.
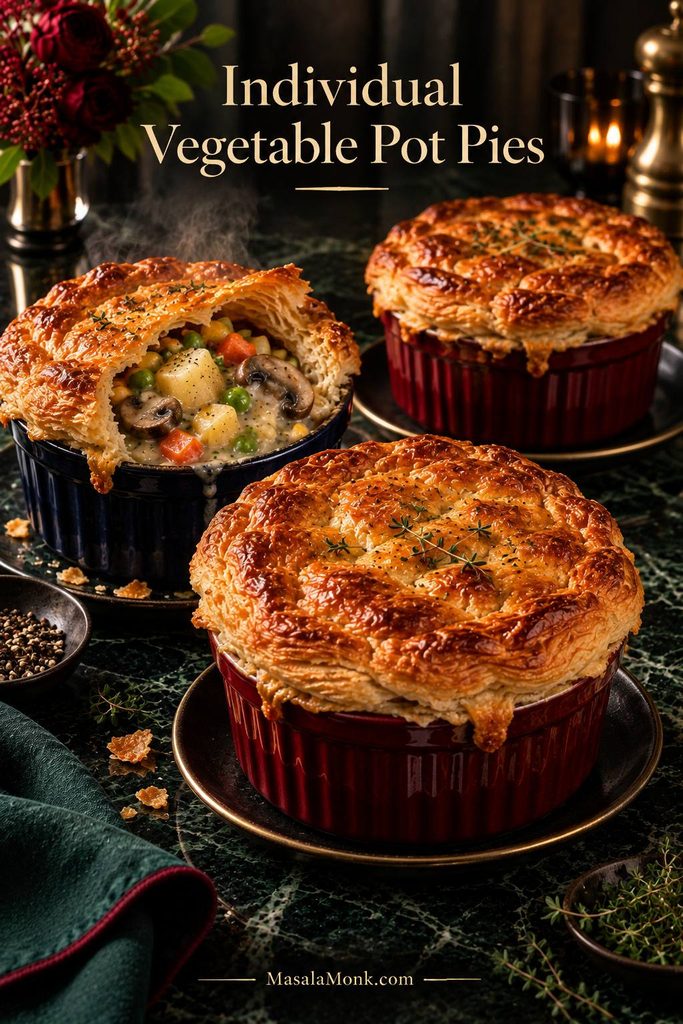
Three individual vegetable pot pies in ramekins with golden puff-pastry tops, including one opened to show creamy vegetable filling.
Three-quarter-full ramekins leave useful headroom for bubbling gravy, so the pastry edge stays cleaner and the filling stays in the dish.

Jump to: Vegetarian variations · Serving ideas · Make ahead · Back to recipe

Vegetarian Pot Pie Variations

Make It Heartier

Add 1–1½ cups / 170–255 g drained white beans or chickpeas and remove roughly the same volume of vegetables. White beans soften into the sauce; chickpeas keep more bite.

Vegan

Use vegan butter or another suitable cooking fat, vegetable broth and unsweetened oat or soy milk. Check the pastry label because prepared puff pastry and pie crusts vary in the fats they contain. Plant milk or aquafaba can replace the egg wash; nutritional yeast or a little extra soy sauce can deepen the gravy.

Gluten-Free

A gluten-free all-purpose blend designed to replace wheat flour can work in the roux. Cornstarch is another straightforward option.

For cornstarch, omit the 42 g flour. Once the vegetables are ready, add the broth and milk and bring them to a simmer. Mix 2½ tbsp / about 20 g cornstarch with 2½ tbsp cold water. Start with roughly half, simmer, then add only as much more as the gravy needs.

Use certified gluten-free tamari or soy sauce and a gluten-free topping.

Making a meat version? Cooked turkey or leftover gravy changes the liquid balance, so start with our Turkey Pot Pie Recipe instead.

What to Serve With Vegetable Pot Pie

Pot pie already brings pastry, gravy and plenty of vegetables, so the best sides add freshness. A cucumber salad with vinegar and dill gives a cold, sharp contrast, while green beans almondine add lemon and toasted-almond crunch. For the same reason, a peppery arugula salad with a bright vinaigrette works well, while simply roasted asparagus keeps the plate warm without making it heavier.
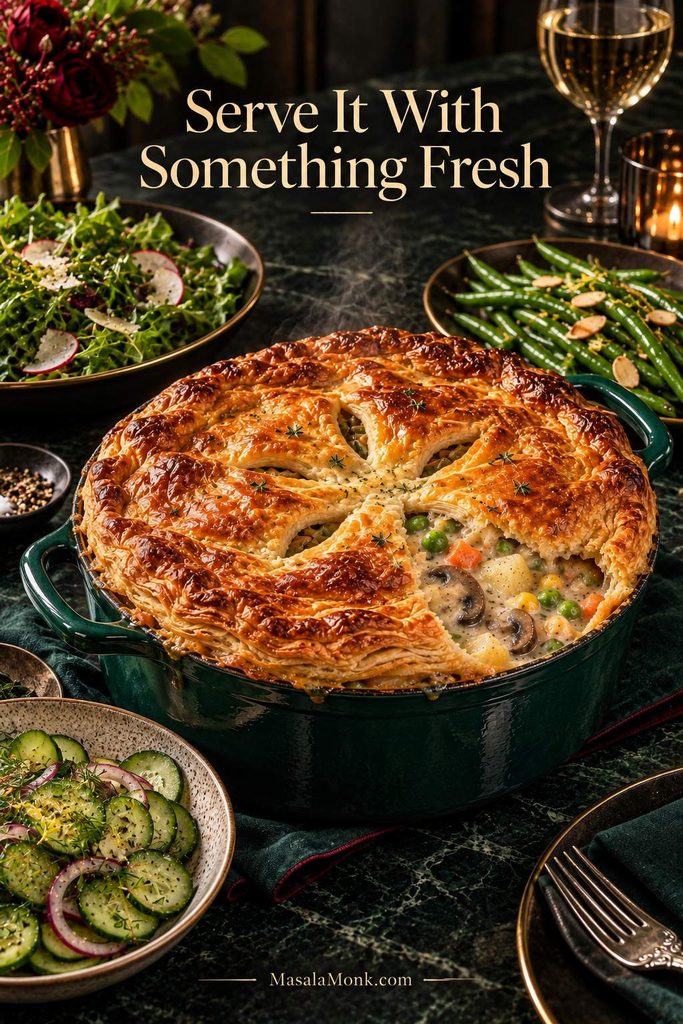
Vegetable pot pie served with fresh sides including cucumber salad, leafy greens and green beans on a dark dining table.
One crisp, fresh or acidic side is usually enough; another starch mostly competes with the pastry.

Make Ahead, Freeze and Reheat

Yes. Make the filling up to 2 days ahead, but keep the pastry separate until you’re ready to bake. Raw puff pastry gradually absorbs moisture when it sits directly against the gravy.

Reheat refrigerated filling until hot before assembly. Chilled flour-thickened gravy often firms up, so loosen it with a small splash of broth or milk when needed. If the filling is bubbling vigorously, let it stand for a few minutes before covering and baking.

Freezing

Freeze the cooked, cooled filling without the crust and aim to use it within 2–3 months for best quality. Thaw overnight in the refrigerator, reheat, adjust the consistency, then add fresh pastry. A fully baked pie can also be frozen, although the reheated crust will be softer.
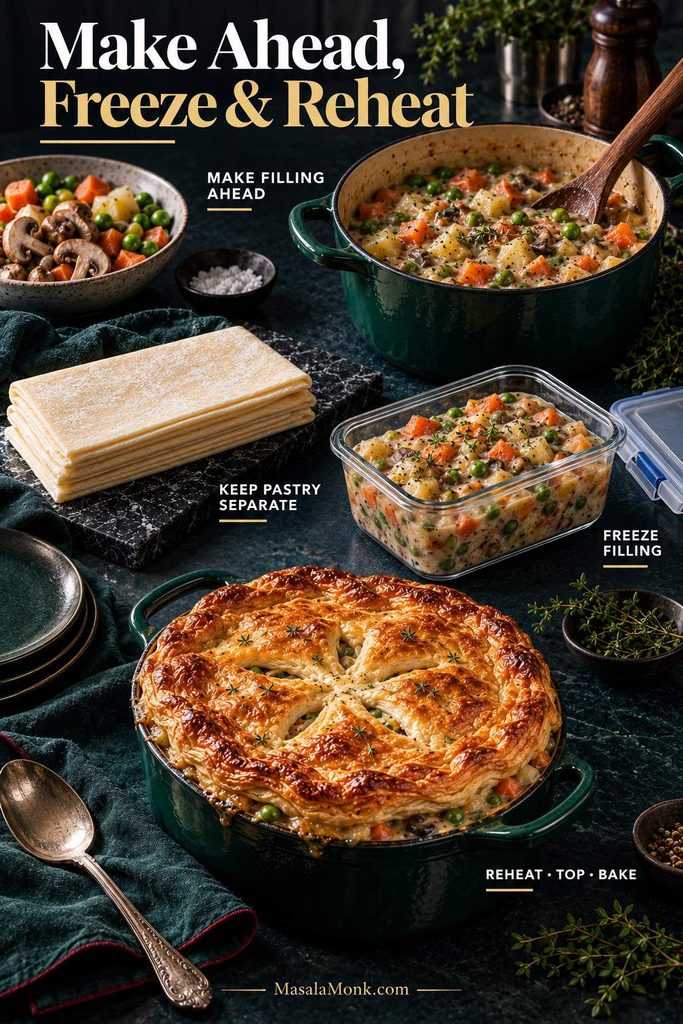
Make-ahead vegetable pot pie sequence showing cooked filling prepared and stored separately from raw puff pastry, followed by reheating, topping and baking.
For make-ahead pot pie, judge the gravy after reheating—not straight from the refrigerator, when the chilled sauce can look deceptively firm.

Leftovers

Refrigerated leftovers are best used within 3–4 days. Reheat in a 325–350°F / 165–175°C oven until the center reaches 165°F / 74°C. A microwave is quicker, but steam softens pastry. See the USDA FSIS leftovers guidance for cooling and reheating safety.

Vegetable Pot Pie Troubleshooting

A pot pie can go sideways for ordinary reasons: wetter vegetables, a deeper dish, cold filling or pastry that simply needs longer in the middle. Start with the stage where the problem appeared.

Before Baking
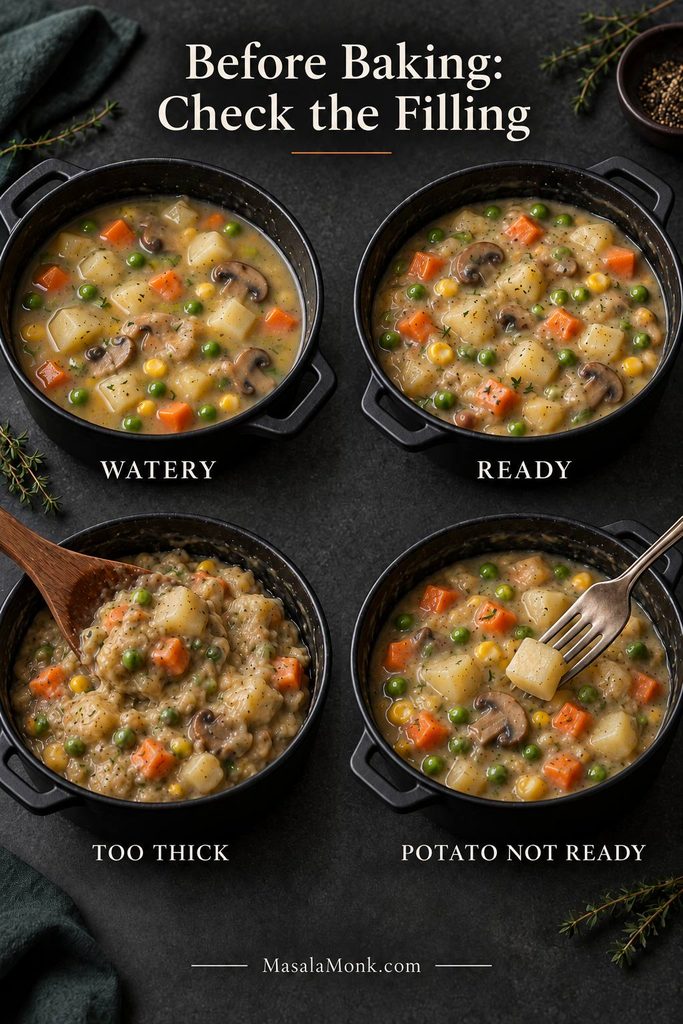
Before-baking troubleshooting guide showing watery filling, correctly thickened filling, overly thick filling and an undercooked potato being checked for tenderness.
Before the crust goes on, test the loosest-looking gravy and one of the largest potato cubes. Those are the two problems least likely to fix themselves in the oven.
What You SeeLikely CauseWhat to Do
Gravy is wateryVegetables released extra water or the sauce needs more reductionSimmer uncovered first; use a small cornstarch slurry only when reduction is not enough
Gravy is glueyToo much thickener or reductionAdd warm broth or milk 1–2 tbsp / 15–30 ml at a time
Flour formed lumpsLiquid reached the flour too quicklyWhisk if practical; next time smooth the first portion of broth in before adding the rest
Everything tastes blandNot enough salt, browning, herbs, umami or acidityCorrect the filling before pastry goes on
Potatoes still crunchPieces are too large or need longer on the stovetopCook longer and test one of the largest cubes

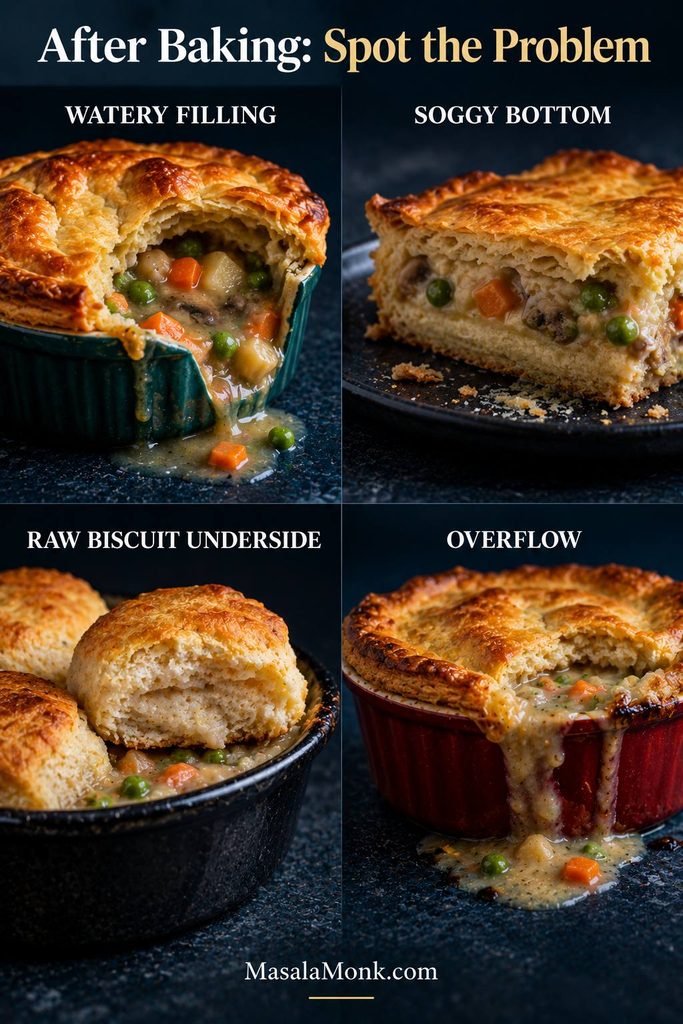
After Baking

After-baking troubleshooting guide showing watery pot pie filling, a soggy bottom crust, a biscuit with a raw or gummy underside and filling overflowing from a baking dish.
Match the symptom to the fix: more oven time can help raw dough, but it cannot undo excess liquid or an overfilled dish.
What You SeeLikely CauseWhat to Do
Gravy became wateryWet vegetables released more liquid in the ovenNext time cook them drier and judge thickness only after frozen vegetables are hot
Puff center is pale or doughyThe middle needs more time, or pastry started too warmBake longer and shield dark edges with foil
Puff is soft underneathSteam softened the side touching the gravyThis can be normal; bake pastry separately next time when a crisp underside matters
Puff is gummy or rawGravy was too wet, pastry too warm or center underbakedContinue baking when possible; next time use thicker gravy and chilled pastry
Bottom pie crust is soggyWet filling reached raw dough before the base setCool the filling and consider partial prebaking plus stronger bottom heat
Biscuits are raw underneathFilling was too cool or biscuits too thick and crowdedContinue under loose foil; next time use hot filling and leave more space
Pie overflowedDish was too small or too fullLeave ½–¾ in / 1.25–2 cm headroom and bake on a rimmed sheet

Quick links: Recipe · Make ahead & leftovers · Back to top


The first scoop does not need to be neat. Break through the lid while it is still crisp and make sure every serving gets some flaky pastry with the creamy vegetables underneath.

Posted on — Leave a comment

Portuguese Custard Tarts Recipe with Puff Pastry

Portuguese custard tarts on a metal tray with flaky pastry shells, creamy custard centers, and dark blistered tops.

The best Portuguese custard tart is a contrast machine: cold pastry, fierce heat, a crisp flaky shell, warm creamy custard, and those dark blistered spots on top that look almost burnt but taste like caramel.

A good tart does not ask you to sit down with a fork. You pick it up while it is still warm, the edges flake onto your fingers, and the custard gives way softly under the browned top. The lemon should be more perfume than sharp citrus, the cinnamon should sit quietly in the background, and the dark spots should taste sweet-bitter, not smoky.

Maybe you are here because you ate one warm from a bakery and have been thinking about it ever since. Maybe you have store-bought puff pastry in the freezer and want something that feels far more special than the effort. Or maybe you have tried Portuguese custard tarts before and ended up with pale tops, soggy bottoms, or custard that set too firm.

This recipe is built for that exact home-kitchen reality: the serious shortcut version, with ready-made all-butter puff pastry for ease, real cinnamon-lemon yolk custard for flavor, and enough heat to make the shortcut bake like something special. You do not need a Lisbon bakery oven; you need cold pastry, a thin base, a hot tray, modest filling, and close attention near the end.

Why This Home-Oven Version Works

This version is built for a regular home oven, ready-made all-butter puff pastry, and either shallow metal tart tins or a standard metal muffin tin. Traditional pastéis de nata bake in very hot ovens, often in shallow metal tins that push heat quickly into the pastry. A home oven is slower, and a muffin tin is deeper, so this recipe compensates in four ways.

Muffin Tin Heat Setup

A muffin tin makes this recipe practical at home, but the metal underneath has to help the pastry base crisp before the custard sets.

Metal muffin tin with Portuguese custard tarts on a dark tray beside a jug of custard in a home kitchen.
A regular muffin tin can work for homemade pastéis de nata, but the tray underneath matters because it gives the pastry base direct heat.
  • Cold pastry keeps the shell layered instead of greasy.
  • Thin pastry bases cook faster before the custard turns firm.
  • Preheated metal gives the tin stronger heat from below.
  • Modest filling leaves room for the custard to puff without flooding the pastry.

The goal is not perfection on the first tray. The goal is crisp pastry, creamy custard, and enough dark spots to give the top that sweet-bitter caramel edge. Once you know how your oven behaves, the second tray is usually easier.

Once this system makes sense, the most important hands-on step is shaping the pastry; see the shaping and chilling steps before you fill the shells.

The Home-Oven System in One Frame

Use the setup as a checklist before baking: cold pastry, thin shells, smooth custard, and hot metal underneath.

Puff pastry log, shaped tart shell, custard jug, and dark baking tray arranged on a kitchen counter.
Notice the method in one frame: cold pastry for layers, thin shells for crisping, smooth custard for texture, and hot metal for the base.

Recipe at a Glance

DetailFor a regular kitchen
Yield12 tarts
DifficultyModerate, but forgiving if you keep the pastry cold, base thin, tray hot, and filling modest
Pastry14 ounces / 400 grams all-butter puff pastry
CustardMilk, cream, egg yolks, sugar syrup, starch, cinnamon, lemon
TinShallow metal tart tins or a standard metal muffin tin
Oven500°F / 260°C; hotter only if your oven safely allows it and you can watch closely
Bake time10–15 minutes, depending on tin depth and oven strength
Fill levelAbout three-quarters full, usually 2–3 tablespoons custard per shell
Eat themWarm, after about 10 minutes of cooling

If you are ready to bake, jump straight to the recipe. If this is your first time making Portuguese custard tarts, read the home-oven method first; it explains why the pastry stays cold, the base stays thin, and the filling stays lower than instinct says.

The Home-Oven Method That Works

A good homemade pastel de nata should feel more like crisp pastry wrapped around warm custard than a soft custard cup in pastry. Around the rim, the shell should flake; underneath, the base should be cooked through; in the center, the custard should stay glossy under the browned top.

Timing does most of the work. Pastry needs strong heat before the custard turns firm, which is why the shaped shells are chilled, the base is pressed thin, and the filled tin goes straight onto hot metal.

Texture Target: Flaky Outside, Creamy Inside

The finished tart should give you a crisp rim first, then warm custard underneath the caramelized top.

Close-up of a Portuguese custard tart with flaky pastry layers, glossy yellow custard, and dark caramelized spots.
The close-up shows the contrast that makes Portuguese custard tarts special: crisp flaky edges around glossy, creamy custard.

If the first tray is not perfect, read what happened. Pale tops need more top heat. Soft bases need stronger bottom heat. Firm custard means the tarts baked too long. Small adjustments matter more than changing the whole recipe.

If you have worked with puff pastry before, the same cold-dough, hot-tray logic also matters in our apple tart recipe, where a crisp base depends on keeping the pastry cool and baking it with enough heat underneath.

What Are Portuguese Custard Tarts?

Portuguese custard tarts are small high-heat custard pastries with flaky shells and caramelized tops. They are meant to be a little messy: crisp flakes at the edge, soft custard in the middle, and a browned top that gives the sweetness a slightly bitter caramel edge.

The Portuguese name is pastéis de nata. One tart is a pastel de nata; more than one are pastéis de nata. You may also see the plural written without the accent as pasteis de nata. In English, people often search for the same dessert as Portuguese custard tarts, Portuguese egg tarts, or Portuguese tarts.

This is not the guarded Pastéis de Belém recipe, and it does not ask you to make traditional laminated pastry from scratch. It is an authentic-style home version: cinnamon-lemon yolk custard, strong oven heat, thin pastry, blistered tops, and a crisp shell adapted for ready-made all-butter puff pastry. For background on the famous original, see the official Pastéis de Belém history.

Portuguese Custard Tarts vs Chinese Egg Tarts vs British Custard Tarts

Portuguese custard tarts are often confused with Chinese egg tarts and British custard tarts. They are related, but the texture and baking style are different.

  • Portuguese custard tarts / pastéis de nata: flaky laminated or puff-style pastry, rich yolky custard, cinnamon-lemon aroma, and dark blistered spots.
  • Chinese egg tarts: smoother, lighter custard, often with shortcrust or puff pastry, and a pale yellow to lightly golden top.
  • British custard tarts: shortcrust pastry, gently baked egg custard, often with nutmeg, and a softly set top rather than blistered spots.

None of these tarts is “better” than the others; they simply answer different cravings. This one is for the person who wants flaky pastry, warm custard, and a top shaped by serious heat.

What the Difference Looks Like

The darker top and flaky rim are the quickest visual clues that you are looking at the Portuguese style.

Portuguese custard tart in the foreground with paler Chinese egg tart and British custard tart styles in the background.
Compared with smoother Chinese egg tarts or gentler British custard tarts, Portuguese custard tarts lean darker, flakier, and more caramelized.

Macau-style Portuguese egg tarts sit close to this world too, usually richer and more caramelized than classic Chinese egg tarts. This recipe is the place to start if you want that blistered Portuguese tart experience without turning the pastry into a weekend project.

Back to top ↑

Ingredients That Keep the Custard Creamy

Every ingredient here is simple; the technique is what makes the tarts feel bakery-level. The small details matter: rich yolks, real dairy, enough sugar for browning, and lemon peel without the bitter white pith.

Ingredient Jobs at a Glance

Before you measure, it helps to see what each ingredient contributes to the pastry, custard, aroma, and browning.

Ingredients for Portuguese custard tarts including puff pastry, egg yolks, milk, cream, sugar, cinnamon, lemon peel, and cornstarch.
Before you start, note the jobs: puff pastry builds layers, egg yolks enrich the custard, and cinnamon-lemon syrup gives pastéis de nata their aroma.

For the pastry

  • All-butter puff pastry: The shortcut I would use first. You need about 14 ounces / 400 grams for 12 tarts.
  • Flour for dusting: Use just enough to roll the pastry without sticking. Too much flour can make the pastry dry.
  • Butter or oil for greasing, if needed: If your tin is not reliably nonstick, grease it lightly. Heavy greasing can smoke at this temperature.

For the custard filling

  • Whole milk: Gives the custard body without making it too heavy.
  • Heavy cream: Adds richness. You can replace it with the same amount of whole milk for a lighter tart.
  • Egg yolks: The heart of the filling. They give the custard its golden color, soft richness, and bakery-style texture.
  • Sugar: Sweetens the custard and helps the tops caramelize.
  • Water: Used to make the sugar syrup.
  • Cornstarch or flour: Stabilizes the custard so it can handle aggressive oven heat.
  • Cinnamon stick: Infuses the syrup gently so the spice tastes warm, not dusty.
  • Lemon peel: Adds the quiet floral lift that keeps the custard from tasting flat. Use only the yellow peel; the white pith can taste bitter.
  • Vanilla: Optional. Cinnamon and lemon should still be the main aroma.
  • Salt: A small pinch keeps the custard from tasting flat.

How sweet should the custard be?

Use 150 grams sugar for a balanced home-style custard or 175 grams for a sweeter, more caramelized bakery-style tart. I would not reduce below 150 grams on the first batch because sugar helps the tops brown and keeps the custard glossy.

Why starch matters

Portuguese custard tarts bake hotter than most custards. Without a little starch, the eggs are more likely to curdle before the tops have time to blister. Cornstarch gives a clean, smooth custard; flour gives a slightly more traditional, thicker body.

You are not trying to make the custard thick. A little starch simply gives it enough structure to stay glossy and soft when the oven gets aggressive. Before it reaches the oven, the filling should smell gently of lemon peel and cinnamon.

If you love the silky-custard side of this dessert, our crème brûlée recipe is another place where egg yolks, sugar, and heat need to be handled carefully.

Equipment That Helps the Pastry Crisp

You do not need Portuguese tart tins, but you do need metal. A standard metal muffin tin on a preheated tray works better than silicone because it pushes heat into the pastry base more quickly.

Tart Tins vs Muffin Tin Depth

The deeper the cup, the more discipline you need with a thin base and restrained custard fill.

Shallow metal tart tins beside a deeper metal muffin tin, each holding a shaped puff pastry shell.
Because muffin tins are deeper than traditional tart tins, keep the pastry thinner and the custard fill lower to avoid a heavy base.
  • Shallow metal Portuguese tart tins: Ideal if you have them. They are shallow rather than deep, which helps the pastry and custard finish at the same time.
  • Standard metal muffin tin: Works well, but treat it like a shallow tart mold. Press the pastry up the sides, then keep the custard level modest.
  • Rolling pin: For thinning and shaping the puff pastry.
  • Small and medium saucepans: One for the syrup, one for the milk-starch base.
  • Whisk and fine-mesh sieve: For a smooth, lump-free custard.
  • Measuring jug with a spout: Makes filling cleaner.
  • Thermometer: Helpful for syrup, but not required.
  • Heavy baking sheet, pizza stone, or baking steel: Adds stronger heat from below.

If your muffin tin is deep, do not try to fill the whole depth. A lower fill gives the pastry a better chance to crisp before the custard becomes firm. Using a deeper tin? Pay special attention to the fill-level visual guide, because tin depth changes how quickly the base crisps.

Why the Hot Tray Matters

The hot tray acts like a heat reservoir, giving the pastry base a stronger start than an oven rack alone.

Dark baking steel or heavy metal tray prepared in a home oven for baking Portuguese custard tarts.
The hot tray is not just a baking surface; it gives the bottom crust a head start before the custard weighs the pastry down.

The Best Pastry Shortcut for Home Bakers

Traditional pastéis de nata use laminated dough that creates crisp, spiraled layers. It is beautiful, but it takes time. For this home version, all-butter puff pastry gives the best balance of ease and texture.

The pastry shortcut only works if you treat it seriously: cold, thin, and baked hard. The goal is not a thick pastry cup. You want a thin shell that bakes into layers, with a rim that flakes before the custard gives way.

Closest bakery-style pastry

Homemade laminated pastry or rough puff gives you the most control over the layers, but it takes more rolling, folding, chilling, and butter handling.

The shortcut I would use first

Ready-made all-butter puff pastry is the easiest good option for a first home batch. Keep it cold but flexible, roll thick sheets thinner before shaping, and chill the shells before filling.

Choosing Store-Bought Puff Pastry

Choose all-butter puff pastry when you can, then treat it like a serious ingredient: cold, thin, and handled quickly.

All-butter puff pastry sheet unrolled on a floured counter with a rolling pin nearby.
All-butter puff pastry is the shortcut, but cold handling is the trick; warm pastry loses definition before it reaches the oven.

If your puff pastry sheet is very wide, cut it into two rectangles first, roll each rectangle into a log, and cut 6 pieces from each log. If cutting rounds instead of using the log method, avoid twisting the cutter because that can seal the pastry layers.

Do Portuguese custard tarts need to be blind baked?

No. The custard and pastry bake together. The key is to keep the pastry cold, press the base thin, fill only when the oven is hot, and bake on a preheated metal tray so the bottom gets enough heat.

Fastest option: frozen Portuguese egg tart shells

Frozen tart shells can work when you want the fastest version or already have Portuguese egg tart shells on hand. Keep them cold, fill them lower than you think, bake on a hot tray if allowed, and start checking early. The shell size decides the bake time more than the clock does.

What to avoid

Shortcrust pastry can make a nice custard tart, but it will not give the flaky Portuguese-style shell. Phyllo pastry can make a crisp mini custard pastry, but it is not the same as a pastel de nata.

Back to top ↑

How to Make Portuguese Custard Tarts Without Soggy Bottoms

Think of the recipe in four moves: perfume the syrup, loosen and stabilize the custard, shape cold pastry shells, then bake everything hard and fast.

1. Make the cinnamon-lemon syrup

Combine sugar, water, a cinnamon stick, and strips of lemon peel in a small saucepan. Bring it to a simmer and cook until the syrup reaches about 225°F / 107°C.

If you do not have a thermometer, look for a syrup that is clear, glossy, and slightly thickened. When a drop is cooled for a moment and rubbed between your fingers, it should feel sticky and pull into a thin thread. The syrup should smell like warm lemon peel and cinnamon, not caramel.

Make the Cinnamon-Lemon Syrup

Clear syrup gives the custard aroma and sweetness without pushing it toward burnt sugar before the tarts even bake.

Clear syrup in a saucepan with lemon peel, cinnamon stick, and a spoon lifting a thin syrup thread.
The syrup should look clear, not amber; meanwhile, lemon peel and cinnamon quietly flavor the custard without making it taste heavy.

2. Make the custard filling

Whisk a little cold milk with the cornstarch until smooth. Warm the remaining milk and cream in a saucepan until steaming, then whisk in the starch mixture. Cook only until barely thickened, like thin cream. It should pour easily but no longer look like plain milk. If it looks like pudding before baking, it has gone too far.

If the milk base gets too thick, whisk in 1–2 tablespoons of milk to loosen it before adding the yolks. It should be pourable enough to strain easily.

Cook the Custard to Thin Cream

The custard base should coat the whisk lightly but still run back into the pan in a smooth stream.

Pale custard mixture coating a whisk and flowing back into a saucepan in a thin stream.
Look for a pourable custard base at this stage; if it sits like pudding, the finished center can bake too firm.

Take the pan off the heat before adding the syrup and yolks. Slowly whisk the warm syrup into the milk mixture, then let it cool for a few minutes. Whisk the egg yolks in a separate bowl, then slowly add the warm milk-syrup mixture while whisking constantly. This gentle tempering keeps the eggs from scrambling.

Strain the custard through a fine-mesh sieve into a jug. If it is very foamy after whisking, let it sit for a few minutes and skim the top before filling the shells.

Strain for Smooth Custard

This is the last chance to remove tiny lumps before the filling goes into the fragile pastry shells.

Custard being poured through a fine mesh sieve into a jug on a warm kitchen counter.
Straining is a small step with a big payoff: it catches tiny lumps so the Portuguese egg tart filling bakes silkier.

3. Shape the pastry shells

This is the one step to slow down for. A thin, even pastry base matters more than a perfectly neat rim.

Keep the puff pastry cold but flexible. If it is frozen, thaw it in the refrigerator until it can be rolled without cracking. If the pastry feels greasy or floppy, pause and put it back in the fridge.

Lightly dust the counter with flour and roll the pastry just enough to even it out. If it is thick, roll it to about 2–3 mm. Roll the pastry tightly into a log, then cut the log into 12 equal pieces.

Roll the Puff Pastry Into a Tight Log

The tighter the log, the clearer the spiral pattern will be when each piece is pressed into the tin.

Hands rolling a sheet of puff pastry into a tight log on a lightly floured work surface.
Rolling the pastry into a tight log creates the spiral that later turns into flaky layers around each pastel de nata shell.

Slice the Spiral Pieces

Each cut piece should show visible layers, because those layers become the flaky sides of the tart shell.

Cut puff pastry log pieces with visible spiral layers resting on a floured kitchen counter.
Once sliced, each spiral shows where the layers are; press from that center point so the pastry spreads evenly up the tin.

For a standard muffin tin, each piece will be roughly 30–35 grams. For shallow tart tins, you may need slightly less pastry per shell, or you must press it very thin.

Place one piece into each muffin cup or tart tin, cut side down. Use your thumbs to press the pastry from the center outward and up the sides. Press instead of stretching. The base should look almost too thin; that is what helps it crisp before the custard fully sets.

Press Shells Thin, Not Tall

Pressing outward gives you a thin bottom and steady sides; stretching upward usually makes the pastry shrink back.

Hands pressing puff pastry into a metal muffin tin to shape a thin Portuguese custard tart shell.
Press outward instead of stretching upward; that keeps the base thin while building enough side structure to hold the custard.

Check the Thin Base

Before filling, check the bottom of each shell; this is where most muffin-tin tarts turn soft if the pastry is too thick.

Empty raw puff pastry shell pressed into a metal muffin tin with a thin base and even sides.
This raw shell shows the cue clearly: the base looks very thin now so it can crisp later instead of steaming under the filling.

Chill the shaped shells for 20–30 minutes before filling. If you have had soft pastry bottoms before, also read the soggy-bottom fixes before baking the next tray.

Chill Before Filling

Cold shaped shells hold their layers better when the hot oven starts pushing butter and steam through the pastry.

Chilled empty puff pastry shells in a metal muffin tin with a jug of custard nearby.
At this point, pause and chill the shells; cold pastry holds its shape better when the hot custard and oven heat hit it.

4. Fill and bake until blistered

Preheat the oven to 500°F / 260°C. If your oven safely goes hotter and you know it runs evenly, you can use a higher setting, but start checking early. Place a heavy baking sheet, pizza stone, or baking steel in the oven while it preheats. Use bare metal, stone, or steel under the tin; skip parchment unless it is rated for very high heat.

When the oven is fully hot, place the chilled tin on the preheated baking sheet. Fill each shell about three-quarters full, usually 2–3 tablespoons custard depending on tin size. Save any extra custard for a small ramekin; the tarts bake better with space to puff.

Fill Below the Rim

Leave visible space at the top so the custard can rise without flooding the pastry layers.

Custard being poured into puff pastry tart shells in a metal muffin tin, stopping below the rim.
Stop below the rim. That three-quarter fill gives the custard room to puff while keeping overflow away from the pastry layers.

Avoid the Overfilled Shell

A little extra custard in the jug is better than custard bubbling over and sealing the pastry layers shut.

Two raw Portuguese custard tart shells in a metal tin, one filled lower and one filled close to the rim.
The lower fill is the safer one; once custard spills over the edge, it can glue the layers together and soften the base.

Bake on Hot Metal

Once filled, the tin should go straight onto the hot tray so the pastry base gets immediate heat from below.

Filled Portuguese custard tart shells in a muffin tin being placed onto a hot tray inside a home oven.
After filling, move fast: the tin should land on the hot tray while the pastry is still cold and the oven is fully heated.

Bake until the pastry is deeply golden at the rim, the custard has puffed in small spots, and the tops are blistered with dark caramelized patches. In a very hot oven, this usually takes 10–15 minutes.

Watch the Custard Puff and Brown

Uneven rising is normal during baking; the custard settles as it cools, so judge the tart by the rim, top, and texture together.

Portuguese custard tarts baking in a metal muffin tin inside a warm oven with glossy custard and browning pastry edges.
During baking, the custard may rise unevenly before it settles; early caramel spots and golden rims tell you the heat is working.

Pull the tarts while the centers still look glossy and gently set. If the pastry is baked but the tops are still pale, broil for 20–60 seconds while watching closely. Only broil if your tin is broiler-safe, and do not walk away.

If your tops are more golden than deeply blistered, the tarts can still be delicious. Crisp pastry and creamy custard matter more than perfect bakery markings. If the tops stay pale after the pastry is baked, use the guidance in the blistered-tops section before extending the bake too far.

How to Get Blistered Tops in a Home Oven

The oven is not just cooking these tarts; it is creating the contrast. Too gentle, and you get pale custard and soft pastry. Hot enough, and the edges crisp while the top blisters.

Aim for Glossy Blistered Tops

Dark spots are a doneness cue here, as long as they look caramelized and glossy rather than dry or smoky.

Close-up of Portuguese custard tarts with glossy golden custard, dark blistered spots, and flaky pastry rims.
These dark patches are the signature finish, not a mistake: glossy caramelized blisters over a creamy pastel de nata center.
Oven situationWhat to do
Oven reaches 550°F / 290°CBake fast and watch closely. The tarts can brown quickly.
Oven reaches 500°F / 260°CUse a hot tray or stone. Broil briefly at the end if needed.
Oven maxes around 240°C / 465°FBake a little longer, then use the grill or broiler for color.
Tops brown but bases are softUse a lower rack or stronger preheated tray next time.
Bases crisp but tops are paleMove higher or broil briefly at the end.

Start on the upper-middle rack if your oven browns gently. If your pastry bottoms are soft, move the next batch slightly lower and keep the hot tray underneath.

Your oven, tin, and pastry brand matter more here than they do in many simple bakes. If your first batch is not perfect, adjust the heat and rack before changing the whole recipe.

How to Prevent Soggy Bottoms

Soggy pastry usually comes from warm pastry, a thick base, too much filling, silicone molds, or weak bottom heat. Fill the shells only when the oven is fully hot, so the custard does not sit long enough to soften the pastry.

For a crisp base, press the pastry thin, chill the shaped shells, use metal tins, and bake on a preheated tray or stone.

Read a Pale Underside

A soft or pale bottom is a clue, not a failure; it tells you where to adjust heat, pastry thickness, or rack position.

Hand holding a Portuguese custard tart to show a pale underside beside tarts with golden pastry on a kitchen counter.
A pale underside points to the fix for next time: stronger bottom heat, thinner pastry, or a slightly lower oven rack.

If your first batch tastes good but the bottoms are soft, do not give up. Next time, press the base thinner, chill the shells longer, and bake on stronger bottom heat.

Confirm a Crisp Base

The underside should look dry and layered enough to hold the custard without bending like soft dough.

Portuguese custard tart held sideways to show a crisp golden base, flaky pastry layers, and set custard.
This is the base you want: golden, dry-looking, and layered enough to support the custard without turning doughy.

Why Do Bakery Portuguese Custard Tarts Taste Different?

Bakery tarts often taste different because bakeries have hotter ovens, specialized shallow tins, practiced pastry shaping, carefully laminated dough, and tarts served soon after baking.

At home, the closest path is not to chase a secret ingredient. Focus on thin cold pastry, smooth strained custard, strong oven heat, hot metal underneath, and eating the tarts warm. The best tops look dramatic, but they should taste caramelized, not burnt.

Back to top ↑

Troubleshooting Portuguese Custard Tarts

Use this section after baking, not as a reason to worry before you start. If something goes wrong, read the tart as a clue. A soft base, pale top, or firm custard each points to a different adjustment. Still preparing the tray? Go back to the step-by-step method and follow the visual cues there.

ProblemLikely causeFix
Custard curdledEggs heated too quickly or tarts overbakedTemper slowly, add yolks off heat, use starch, strain, and pull before the filling looks dry
Custard tastes eggyOverbaking or not enough aromaUse lemon peel, cinnamon, optional vanilla, and avoid baking until rubbery
Tops did not blisterOven too cool, tarts too low, filling too deep, or sugar reduced too muchUse a hotter oven, upper-middle rack, enough sugar, or a brief broiler finish
Pastry is soggyWarm pastry, thick base, too much filling, silicone mold, or weak bottom heatChill shells, press the base thin, use metal tins, and bake on a hot tray
Pastry shrankPastry stretched, too warm, or not chilledPress instead of stretching, keep pastry cold, and chill shaped shells before baking
Filling overflowedShells filled too highFill lower next time and leave room for bubbling
Custard is firm or rubberyOverbakedPull the tarts when the centers are just set and still glossy
Butter leaked or smokedVery buttery pastry, too much greasing, unsafe parchment, or overflowUse a bare hot tray underneath, grease lightly, and avoid overfilling

Make Ahead, Storage, Freezing, and Reheating

Can you make Portuguese custard tarts ahead?

Yes, but the best texture comes from baking them close to serving time. You can shape the pastry shells up to 24 hours ahead, cover them, and refrigerate them. You can also make the custard ahead and refrigerate it. Keep pastry and custard separate until baking.

Can you freeze unbaked pastry shells?

Yes. Shape the pastry shells, freeze them until firm, then transfer them to a freezer-safe container. For best control, bake shaped shells from refrigerated-cold rather than rock-hard frozen. If baking from frozen, add a few minutes and watch the pastry base closely.

What if you have extra custard?

If you have a little extra custard, pour it into a small ramekin and bake it separately in a gentler oven, or discard it if it has touched raw pastry or your hands. The shells bake better with room to puff.

How to store and reheat leftovers

Portuguese custard tarts are best warm, within a few hours of baking. If you have leftovers, let them cool completely, then refrigerate them in an airtight container. Reheat at 350°F / 175°C in an oven or air fryer until the pastry crisps. Avoid the microwave because it makes the pastry soft.

They are still good later, but they are never more themselves than when they are warm and the pastry is dry and crisp.

Can you freeze baked tarts?

Yes. Freeze baked, cooled tarts in a single layer, then store in a freezer-safe container. Reheat from frozen in the oven until hot and crisp. The texture will not be quite as perfect as freshly baked, but it is still much better than microwaving.

Shortcut Variations

With ready-made puff pastry

This is the main shortcut used in this recipe. Choose all-butter puff pastry if possible, roll it thin, keep it cold, and bake it hot. Ready-made puff pastry will not be exactly the same as traditional handmade dough, but it can still make a crisp, flaky, satisfying tart.

With frozen tart shells

Frozen Portuguese egg tart shells are useful when you want the fastest version. Follow the package instructions, keep the filling below the rim, and bake hot. A spoonful of leftover custard is better than an overfilled tart.

With ready-made custard

Ready-made custard is useful in the right dessert, but this is not its best job. It is already thickened, usually too soft for high-heat blistering, and will not set like yolk custard. Save it for softer custard desserts, not pastel de nata filling.

As one large tart

You can make one large tart, but it becomes a different dessert. A large tart is closer to a custard pie; individual tarts give you more crisp edges, more caramelized tops, and a better custard-to-pastry balance.

Without whipping cream

You can replace the cream with the same amount of whole milk. The custard will be lighter and slightly less rich, but it will still work. Keep the yolks and starch in place; they give the custard its rich but stable texture.

What to Serve with Portuguese Custard Tarts

Serve them warm and keep the pairing simple. Espresso, black coffee, or a homemade cappuccino gives the sweet custard a bitter edge. A chai latte works if you want to lean into the cinnamon warmth.

Serve Warm with Coffee or Chai

Pair the sweet custard with something gently bitter or spiced so the caramelized top tastes even deeper.

Portuguese custard tarts served on a plate with coffee, chai latte, lemon slices, and cinnamon sticks nearby.
Serve the tarts warm with coffee, espresso, or chai; the gentle bitterness cuts through the sweet custard and caramelized top.

If you are building a dessert table, add fresh berries, orange slices, or another crisp warm dessert like our churros recipe. But the tarts themselves should be the thing people reach for first.

The moment you are chasing is small but unmistakable: the rim crackles when you lift the tart, the custard trembles slightly under the dark spots, and the first bite is hot enough to make you slow down. That is the point of all the chilling, pressing, heating, and watching.

What Success Looks Like

When the center holds softly and the rim flakes, the tart has the contrast this recipe is built around.

Broken open pastel de nata on a plate showing creamy custard filling and flaky pastry layers.
When you break one open, the center should hold softly like cream, while the pastry flakes instead of bending.

Back to top ↑

Portuguese Custard Tarts Recipe

This is the home-oven version to make first: all-butter puff pastry pressed thin, cinnamon-lemon yolk custard strained until smooth, and enough heat to blister the tops before the centers turn firm.

  • Yield: 12 tarts
  • Prep time: 40 minutes
  • Chill time: 25 minutes
  • Cook time: 10–15 minutes
  • Total time: About 1 hour 20 minutes
  • Tin: shallow metal tart tins or a 12-cup metal muffin tin
  • Rack: upper-middle to start; move lower next time if bases are soft
  • Course: Dessert
  • Cuisine: Portuguese

Ingredients

For the pastry

  • 14 ounces / 400 grams all-butter puff pastry, thawed if frozen but still cold
  • 1–2 teaspoons flour, for dusting
  • Butter or neutral oil, for lightly greasing the tin if needed

For the cinnamon-lemon syrup

  • 3/4 cup / 150 grams granulated sugar, or up to 175 grams for a sweeter bakery-style tart
  • 1/3 cup / 80 ml water
  • 1 cinnamon stick
  • 2 wide strips lemon peel, yellow part only

For the custard

  • 1 1/4 cups / 300 ml whole milk, divided
  • 1/2 cup / 120 ml heavy cream, or replace with another 120 ml whole milk
  • 2 1/2 tablespoons / 20 grams cornstarch, preferred for a smooth custard; or 3 tablespoons / 24 grams all-purpose flour
  • 5 large egg yolks
  • 1 teaspoon vanilla extract, optional
  • Pinch of salt
  • Ground cinnamon or powdered sugar, for serving, optional

Instructions

Make the Cinnamon-Lemon Custard

  1. Make the syrup. Add the sugar, water, cinnamon stick, and lemon peel to a small saucepan. Bring to a simmer over medium heat and cook until the syrup reaches about 225°F / 107°C. If you do not have a thermometer, cook until the syrup looks clear, glossy, and slightly thickened. Remove from the heat and let it cool for a few minutes. Remove the cinnamon stick and lemon peel. You want clear syrup, not caramel.
  2. Make the milk base. In a small bowl, whisk 1/4 cup / 60 ml of the milk with the cornstarch until smooth. Add the remaining milk and cream to a medium saucepan and warm until steaming. Whisk in the cornstarch mixture and cook gently, whisking constantly, only until barely thickened, like thin cream. It should pour easily but no longer look like plain milk. If it looks like pudding before baking, it has gone too far. If using flour instead of cornstarch, cook the milk base for an extra minute on low heat while whisking, but keep it pourable.
  3. Add the syrup. Take the pan off the heat. Slowly whisk the warm syrup into the milk mixture. Let the mixture cool for 5–10 minutes so it is warm but not very hot.
  4. Add the egg yolks. Whisk the egg yolks in a separate bowl. Slowly pour in the warm milk-syrup mixture while whisking constantly. Add vanilla and a pinch of salt. Strain the custard through a fine-mesh sieve into a jug. If the custard is very foamy, let it sit for a few minutes and skim the top before filling the shells.

Shape and Chill the Pastry Shells

  1. Shape the pastry. Lightly flour the counter. Roll the puff pastry just enough to even it out. If the pastry is thick, roll it to about 2–3 mm. If the sheet is very wide, cut it into two rectangles first. Roll into one or two tight logs and cut into 12 equal pieces. Place one piece into each muffin cup or tart tin, cut side down. Press from the center outward and up the sides, making the base thin and the sides even. The base should look almost too thin; that is what helps it crisp before the custard fully sets.
  2. Chill the shells. Refrigerate the shaped pastry shells for 20–30 minutes. Meanwhile, preheat the oven to 500°F / 260°C. If your oven safely goes hotter and you know it runs evenly, you can use a higher setting, but start checking early. Place a heavy baking sheet, pizza stone, or baking steel in the oven while it preheats.

Fill, Bake, and Cool the Tarts

  1. Fill the shells. Place the chilled tin on the preheated baking sheet. Pour custard into each pastry shell, filling only about three-quarters full, usually 2–3 tablespoons depending on tin size. When in doubt, fill a little less.
  2. Bake. Bake for 10–15 minutes, watching closely near the end, until the pastry is deeply golden at the rim, the custard has puffed in spots, and the tops are blistered with dark caramelized patches. If the pastry is baked but the tops are still pale, broil for 20–60 seconds while watching closely. Only broil if your tin is broiler-safe, and do not walk away.
  3. Cool briefly. Let the tarts cool for about 10 minutes before eating; the custard will be extremely hot straight from the oven. Serve warm, plain or dusted with cinnamon or powdered sugar.

Cool Briefly Before Serving

A short rest helps the custard settle, but the best texture comes while the pastry is still crisp.

Baked Portuguese custard tarts cooling in a metal muffin tin with blistered tops and flaky edges.
Let the tarts rest briefly in the tin so the custard settles; then lift them out while the pastry is still crisp.

Recipe Notes

  • Keep the pastry cold: If the pastry becomes soft or greasy while shaping, chill it before continuing.
  • Press the base thin: The base should look almost too thin before baking.
  • Use bottom heat: A preheated tray, stone, or steel helps the pastry base crisp.
  • Do not overfill: Three-quarters full is enough. Overfilled shells can bubble over and turn the pastry soggy.
  • Look for doneness: The rim should be deeply golden, the top spotted, and the center glossy rather than dry.
  • Adjust after the first batch: If the tops brown before the bases crisp, bake the next batch slightly lower. If the bases crisp but the tops stay pale, finish briefly under the broiler.
  • Strain the custard: This gives the smoothest filling and removes any tiny cooked egg bits.
  • Best eaten warm: The pastry is crispest shortly after baking.

If you try these, leave a comment with your oven temperature, tin type, pastry type, sugar amount, and bake time. These tarts depend so much on oven heat and tin shape that your notes can genuinely help the next reader get a better batch.

FAQs

Are Portuguese custard tarts the same as pastéis de nata?

Yes. Portuguese custard tarts are commonly called pastéis de nata. One tart is a pastel de nata, and more than one are pastéis de nata.

What is the difference between pastel de nata and pastéis de nata?

Pastel de nata is singular. Pastéis de nata is plural. You may also see the plural written without the accent as pasteis de nata.

Are Portuguese egg tarts the same as Chinese egg tarts?

Not exactly. Portuguese custard tarts usually have flaky laminated pastry, richer custard, and blistered tops. Chinese egg tarts are often smoother, paler, and may use shortcrust or puff pastry.

Can I use ready-made puff pastry?

Yes. Ready-made all-butter puff pastry is the easiest good shortcut for a first home batch. Roll it thin, keep it cold, and bake it hot.

Can I use frozen Portuguese egg tart shells?

Yes. Frozen shells are convenient. Use the package instructions, fill lower than you think, and start checking early because small shells may bake faster than muffin-tin tarts.

Can I make these in a muffin tin?

Yes. A standard metal muffin tin works, but treat it like a shallow tart mold. Press the pastry thinly, especially at the base, and keep the custard level modest.

What oven temperature is best?

Use 500°F / 260°C if your oven allows it. If your oven goes hotter, check early. If it runs cooler, use a hot tray and finish briefly under the broiler if the tops stay pale.

Do Portuguese custard tarts need to be blind baked?

No. The pastry and custard bake together. Keep the pastry cold, fill only when the oven is hot, and bake on a preheated tray so the base gets enough heat.

Why did the tops not blister?

The oven may not have been hot enough, the tarts may have been too low in the oven, the filling may have been too deep, or the sugar may have been reduced too much.

Why is my pastry soggy?

The pastry may have been too warm, too thick at the base, overfilled, or baked without enough heat from below. The next batch usually improves with colder shells, a thinner base, and a hotter tray.

Why did my custard curdle?

The eggs were probably heated too quickly or the tarts were overbaked. Add yolks off heat, strain the custard, and pull the tarts before the centers look dry.

Do I need a thermometer?

A thermometer helps with the syrup, but you can make the recipe without one. Cook the syrup until it is clear, glossy, slightly thickened, and forms a thin thread when cooled between your fingers.

Can I use whole eggs instead of yolks?

Egg yolks give the best rich, silky texture. Whole eggs can make the filling firmer and more eggy, so the custard will feel less luxurious.

How do I reheat Portuguese custard tarts?

Reheat at 350°F / 175°C in an oven or air fryer until the pastry crisps. Avoid the microwave because it makes the pastry soft.