Posted on Leave a comment

Chicken Paprikash Recipe: Easy Hungarian Paprika Chicken With Sour Cream

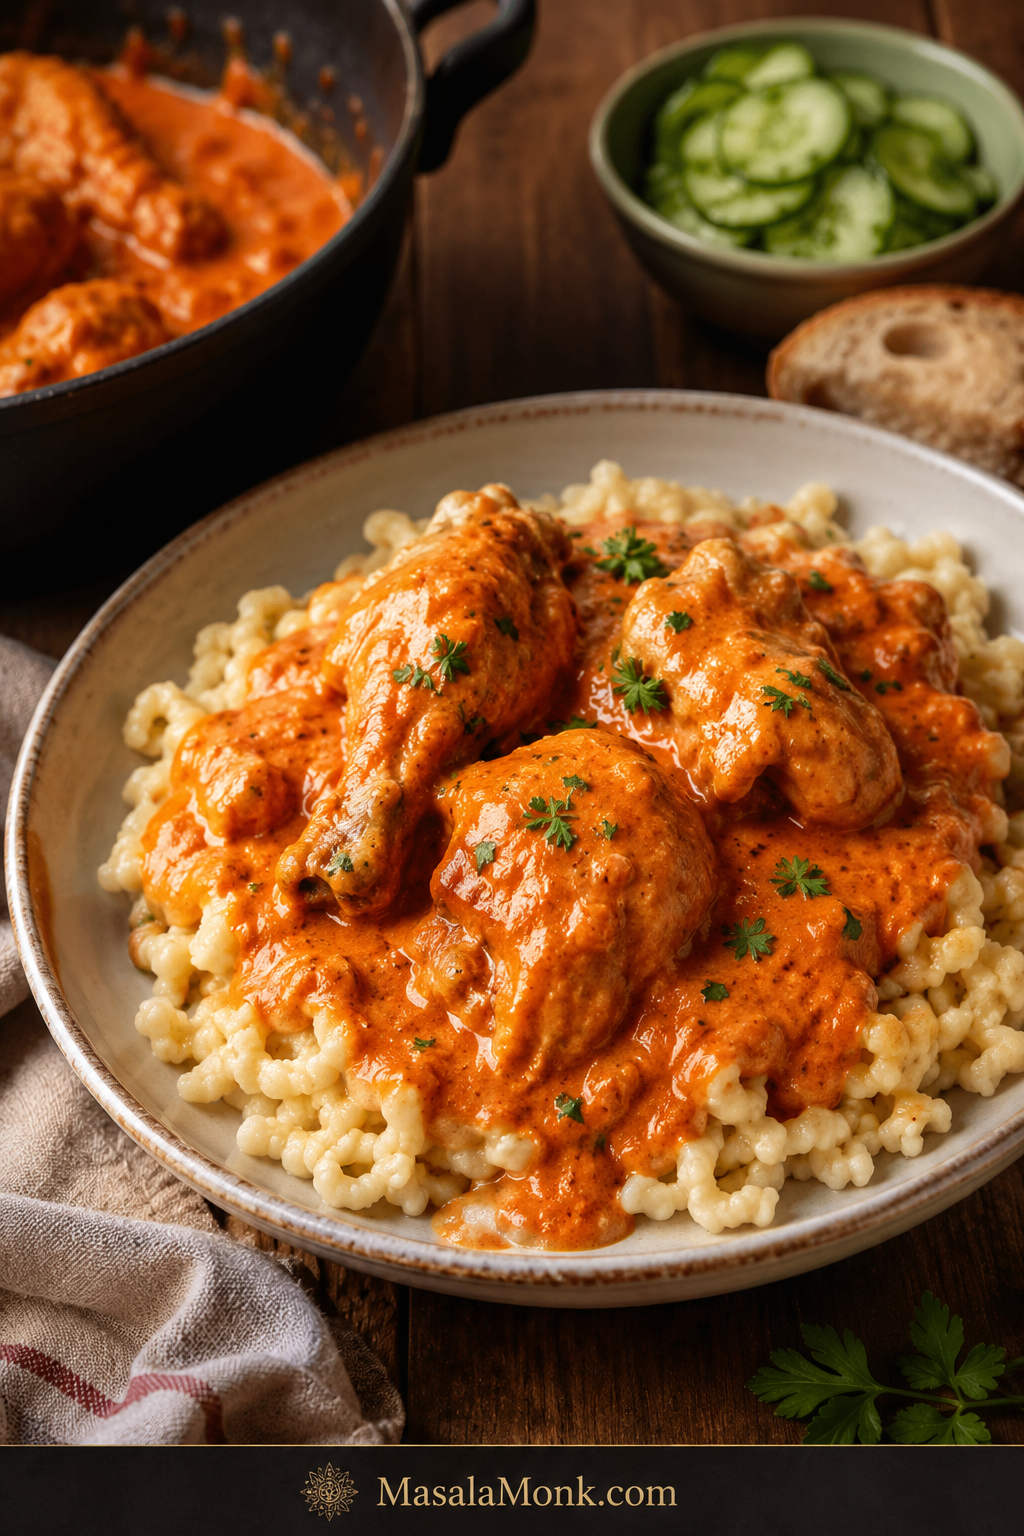
Chicken paprikash with red-orange sour cream sauce served over noodles, garnished with parsley, with cucumber salad and bread nearby.

Chicken paprikash looks like a simple pot of chicken in sauce, but the magic is in a few small moments: the onions softening until they smell sweet, the paprika blooming just long enough to wake up, and the sour cream turning the sauce creamy and red-orange at the end.

Rush those moments and the sauce can taste flat, bitter, or grainy. Handle them gently and you get tender chicken in a paprika-rich sour cream sauce that begs for noodles, dumplings, rice, mashed potatoes, or a piece of crusty bread.

This easy chicken paprikash keeps the familiar Hungarian-style comfort of paprikás csirke, but makes it practical for a normal evening: no scorched paprika, no grainy sour cream, no mandatory dumplings, and enough sauce to make the whole plate feel generous.

Quick Answer: What Is Chicken Paprikash?

Chicken paprikash is a Hungarian chicken dish made with chicken, onions, paprika, broth, and sour cream. The sauce is creamy, savory, red-orange, lightly tangy, and paprika-forward. It is usually mild rather than spicy, unless hot paprika or cayenne is added.

  • Chicken to use: boneless thighs for an easy weeknight version; bone-in thighs or legs for deeper flavor.
  • Paprika to use: sweet Hungarian paprika, ideally fresh and fragrant.
  • Key technique: bloom the paprika briefly off harsh heat, then add sour cream gently at the end.
  • Sides that work: nokedli, spaetzle, egg noodles, rice, mashed potatoes, cucumber salad, or crusty bread.
  • Main mistake to avoid: letting paprika scorch or boiling the sauce after sour cream goes in.

Make This Chicken Paprikash When

  • Creamy chicken sounds good, but you want more character than a plain cream sauce.
  • A cozy dinner needs to feel special without fancy ingredients.
  • You want something saucy enough for noodles, dumplings, rice, or potatoes.
  • Comfort food should reward careful heat, not complicated technique.

Boneless thighs keep it practical, while the important details stay protected: warm paprika, tender chicken, smooth sour cream, and enough sauce to carry the whole plate.

The 4 Details That Make or Break Chicken Paprikash

Chicken paprikash does not need many ingredients, but it does need a little care. These four details make the biggest difference.

  1. Start with good paprika. Old paprika makes the dish taste flat, even if you use enough of it.
  2. Protect the paprika from high heat. It only needs a short bloom, not a long fry.
  3. Simmer gently. The chicken should cook in small, steady bubbles, not a hard boil.
  4. Add sour cream carefully. Temper it first and stir it in after the strongest heat has passed.

This is not a fussy dish, but it does ask you to pay attention for a few small moments. Paprikash rewards patience, not perfection. Slow down for the paprika and sour cream, and the rest of the recipe is very forgiving.

Choose Your Paprikash Path

Are you making the weeknight version or the deeper traditional version? That choice decides the chicken and the side more than anything else.

VersionUse this whenWhat changes
WeeknightYou want dinner fasterUse boneless thighs with egg noodles, rice, or mashed potatoes
More traditionalYou want deeper flavorUse bone-in thighs or drumsticks with nokedli or spaetzle
Extra saucyYou are serving dumplings or noodlesKeep extra broth nearby and loosen as needed
Slow cookerYou want hands-off cookingSauté onions and bloom paprika first for better flavor
ShortcutYou have cooked chickenMake the paprika base first, then fold chicken in at the end

Chicken Paprikash Recipe Card

Recipe: Chicken Paprikash Recipe: Easy Hungarian Paprika Chicken With Sour Cream
Prep time: 15 minutes
Cook time: 40 minutes
Total time: 55 minutes
Servings: 4

Main flavorSweet paprika, onion, chicken, sour cream
TextureTender chicken in a creamy, spoonable sauce
Sauce colorRed-orange, not pale beige
Weeknight chickenBoneless skinless chicken thighs
More traditional optionBone-in thighs, drumsticks, or cut-up chicken
PaprikaSweet Hungarian paprika
Chicken doneness165°F / 74°C internal temperature
Good sidesNokedli, spaetzle, egg noodles, rice, mashed potatoes
Key techniqueUse gentle heat for paprika and sour cream

Useful Equipment

  • Dutch oven or deep 12-inch skillet with lid
  • Sharp knife and cutting board
  • Mixing bowl for tempering sour cream
  • Whisk or fork
  • Wooden spoon or spatula
  • Instant-read thermometer, helpful for checking chicken doneness

Ingredients

For the chicken

  • 2 lb / 900 g boneless skinless chicken thighs, cut into large bite-size pieces
  • 1 teaspoon fine salt
  • 1/2 teaspoon black pepper
  • 2 tablespoons neutral oil, chicken fat, or lard

For the paprika base

  • 2 large yellow onions, finely chopped
  • 1/4 teaspoon fine salt, plus more to taste
  • 3 garlic cloves, minced
  • 3 tablespoons sweet Hungarian paprika
  • 1/4 teaspoon hot Hungarian paprika or cayenne, optional
  • 1 1/4 to 1 1/2 cups / 300 to 360 ml low-sodium chicken broth, plus more if needed

To finish

  • 3/4 cup / 180 g full-fat sour cream, set out while the chicken cooks so it is not ice-cold
  • 1 tablespoon all-purpose flour, optional, for a thicker sauce
  • 1 teaspoon lemon juice or a small splash of vinegar, optional, only if the sauce needs brightness
  • Chopped parsley, optional, for serving

For serving

  • Nokedli, spaetzle, egg noodles, rice, mashed potatoes, or crusty bread

Instructions

Brown, bloom and simmer

  1. Season the chicken. Pat the chicken dry. Season with 1 teaspoon salt and the black pepper.
  2. Brown the chicken. Heat the oil in a Dutch oven or deep skillet over medium-high heat. Brown the chicken in batches for 2 to 3 minutes per side. It does not need to cook through yet. Transfer to a plate.
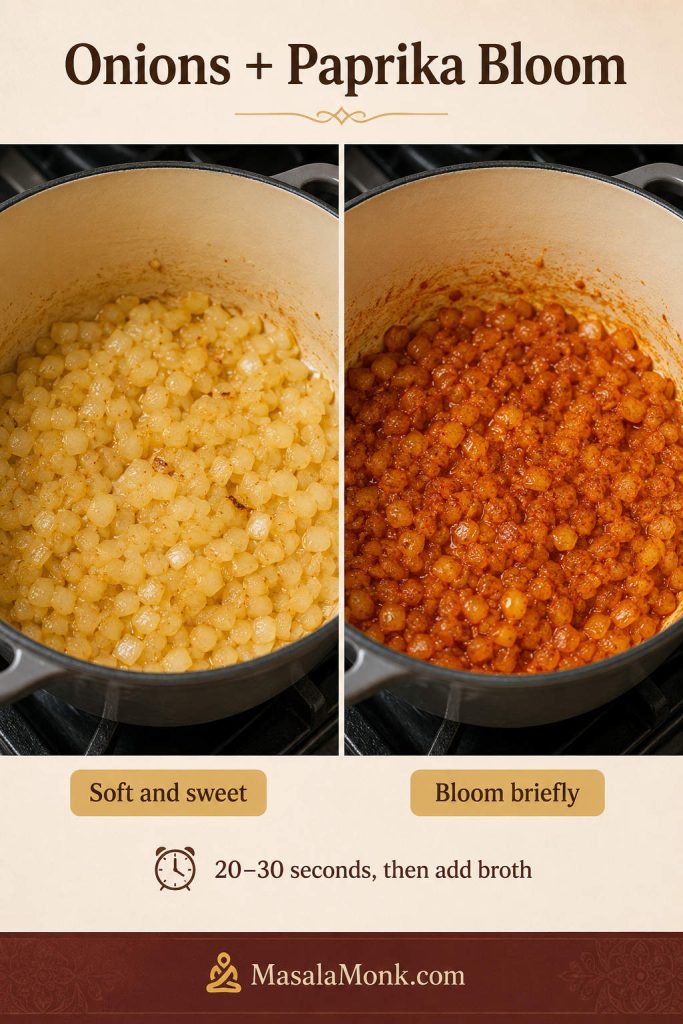
  3. Cook the onions. Reduce heat to medium. Add the chopped onions and the remaining 1/4 teaspoon salt. Cook for 8 to 10 minutes, stirring often, until soft and lightly golden. Stir in the garlic for 30 seconds.
  4. Add the paprika carefully. Lower the heat or briefly move the pot off the burner. Stir in the sweet paprika and optional hot paprika for 20 to 30 seconds. If the pot looks dry or too hot, add a small splash of broth right away.
  5. Simmer the chicken. Pour in 1 1/4 cups broth and scrape up the browned bits from the bottom of the pot. Return the chicken and any juices to the pot. Bring to a gentle simmer with small bubbles, not a hard boil. Partly cover and cook for 18 to 22 minutes, or until the chicken is tender and reaches 165°F / 74°C.

Finish the sauce gently

  1. Check the sauce before adding sour cream. It should be spoonable and flavorful. A thin sauce needs a few uncovered minutes before the sour cream goes in. A tight sauce needs the remaining 1/4 cup broth, or a little more as needed.
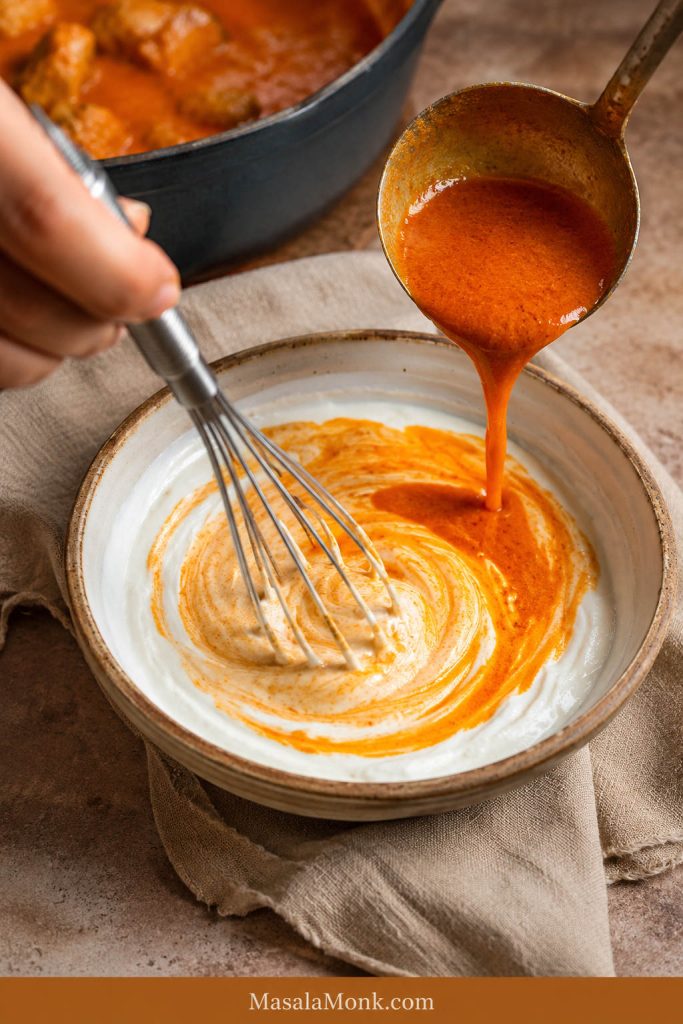
  2. Temper the sour cream. In a bowl, whisk the sour cream with the flour, if using. Slowly whisk in a few spoonfuls of hot sauce from the pot to warm the sour cream mixture gradually.
  3. Finish gently. Turn the heat to very low or off. Stir the tempered sour cream mixture into the pot. Warm through for 2 to 3 minutes without boiling. Taste and adjust salt. Add lemon juice or vinegar only if the sauce tastes too heavy.
  4. Serve. Spoon the chicken paprikash over nokedli, spaetzle, egg noodles, rice, or mashed potatoes. Garnish with parsley if you like.

Recipe Notes

  • Bone-in chicken: use thighs, drumsticks, or a mix. Simmer for 35 to 45 minutes, or until tender and cooked through.
  • Chicken breast: simmer gently and check early so it does not dry out.
  • Thicker sauce: use the flour in the sour cream mixture or simmer the paprika base uncovered before adding sour cream.
  • Gluten-free thickener: mix 1 teaspoon cornstarch with 1 tablespoon cold water, stir it into the simmering base before adding sour cream, and cook briefly until slightly thickened.
  • Looser sauce: skip the flour and add a splash more broth if needed.
  • Best paprika flavor: use fresh sweet Hungarian paprika as the base, add a small pinch of hot Hungarian paprika if you want more depth, and keep the heat gentle when blooming it.
  • Before serving: taste for salt, warmth, and brightness. Add salt if flat, a tiny splash of lemon juice or vinegar if heavy, or a spoonful of sour cream if too sharp.
  • Serving amounts: plan on about 8 oz / 225 g dry egg noodles, 3 to 4 cups cooked nokedli or spaetzle, 3 cups cooked rice, or 4 portions mashed potatoes for 4 servings.

Need help before you cook? See which paprika to use, which chicken cut works best, how to keep sour cream smooth, or what to serve with chicken paprikash.

Once the recipe is clear, the rest is about control: choosing the right paprika, keeping the sour cream smooth, and knowing what the finished dish should look and taste like.

What Is Chicken Paprikash?

Chicken paprikash, often called paprikás csirke, is a Hungarian chicken dish built around onion, paprika, liquid, and sour cream. It is sometimes called chicken paprika in English-language recipes.

What makes it different from plain creamy chicken is the paprika. The finished dish should taste warm, savory, gently sweet from the onions, lightly tangy from the sour cream, and clearly paprika-forward. If it tastes like cream sauce with a little red color, the paprika has not done its job.

Paprikash is not a dry chicken dish with a little sauce on the side. The creamy red-orange sauce is the reason the noodles, dumplings, rice, or potatoes make sense.

If you like creamy chicken dinners such as cream of mushroom chicken, this gives you the same cozy feel in a paprika, onion, and sour cream direction.

Authentic-Style vs Easy Chicken Paprikash

This is a practical home-style version of paprikás csirke, built around the essentials: chicken, onion, paprika, liquid, and sour cream. Hungarian families make paprikash in many ways, so this version keeps the core flavor while making the method easier for a normal evening.

More traditional versions often use bone-in chicken pieces, sweet Hungarian paprika, sour cream, and nokedli or spaetzle on the side. Some cooks add tomato or sweet pepper, while others keep the pot focused on onion, paprika, and sour cream.

Boneless thighs cook faster than bone-in pieces, egg noodles or rice can stand in for dumplings, and the sauce still gets the care it needs: softened onions, protected paprika, gentle simmering, and sour cream added at the end.

For a deeper, more traditional result, use bone-in thighs or drumsticks and simmer them longer. For the easiest dinner, use boneless thighs and serve the chicken over egg noodles, rice, or mashed potatoes.

Why This Recipe Works

This version gives you classic paprikash comfort without making dumplings mandatory, without using hard-to-find steps, and without making the dish grainy or bitter.

The method works because it protects the two delicate parts of the dish: paprika and sour cream. The paprika blooms briefly away from harsh heat, and the sour cream is warmed gradually before it goes into the pot.

Boneless thighs keep the chicken juicy, softened onions give the paprika base body, and the consistency is adjusted before the dairy goes in. The result is tender chicken in a dish that feels rich without being heavy, creamy without being bland, and warm with paprika in every bite.

Ingredients for Chicken Paprikash

Because this recipe uses a short ingredient list, each ingredient matters. Paprika is not just color here; it is the main flavor.

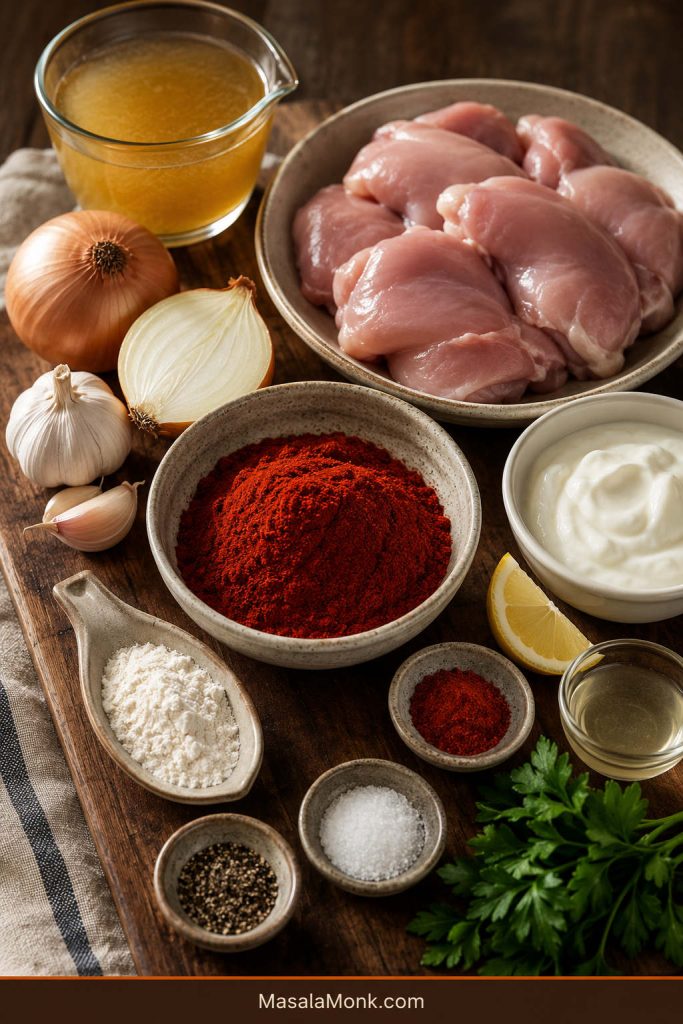
Boneless chicken thighs, sweet paprika, onions, garlic, broth, sour cream, flour, lemon, parsley, salt and pepper arranged on a wooden board.
Chicken paprikash starts with a short ingredient list, so freshness matters. Good paprika brings warmth and color, while onions, broth, and full-fat sour cream build the body of the dish.

Chicken

Boneless skinless chicken thighs are the easiest choice for this version. They stay tender, cook quickly, and hold up well in the sauce. Bone-in thighs and drumsticks give more flavor, while chicken breast gives a leaner but less forgiving result.

Paprika

Use sweet Hungarian paprika if possible. Fresh paprika should smell warm, peppery, and fragrant. A small pinch of hot Hungarian paprika adds depth if you want more character without making the dish truly spicy.

Regular sweet paprika can work if it smells fresh. Smoked paprika should not be the main paprika here because it turns the dish in a smokier direction. Use it only as a small accent if you love the flavor.

Onions

Onions create the body of the sauce. Cook them until soft and lightly golden so they bring sweetness instead of raw sharpness.

Garlic

Garlic should stay in the background here. You want it to round the sauce, not pull attention away from the paprika.

Broth

Broth does two quiet jobs: it loosens the paprika base and pulls the browned bits from the pot into the sauce. Start with 1 1/4 cups and add more if the sauce reduces too much or if you are serving it with noodles or dumplings.

Sour Cream

Sour cream gives paprikash its creamy tang. Full-fat sour cream is the safest choice because it handles gentle heat better than low-fat versions. Add it at the end and keep the heat low.

Flour

Flour is optional, but helpful if you want a sauce that clings more confidently to noodles or dumplings. You can skip it for a looser result, or use the cornstarch slurry in the recipe notes if you need a gluten-free thickener.

Tomato or Pepper

Some versions include a little tomato, tomato paste, or fresh pepper. Others do not. Use 1 small chopped tomato, 1 teaspoon tomato paste, or 1/2 finely chopped bell pepper if you like, but keep it subtle so the dish still tastes like paprika and sour cream, not tomato chicken stew.

The ingredient notes above give the basics. These two choices — paprika and chicken — are where the dish changes most.

Choosing Paprika

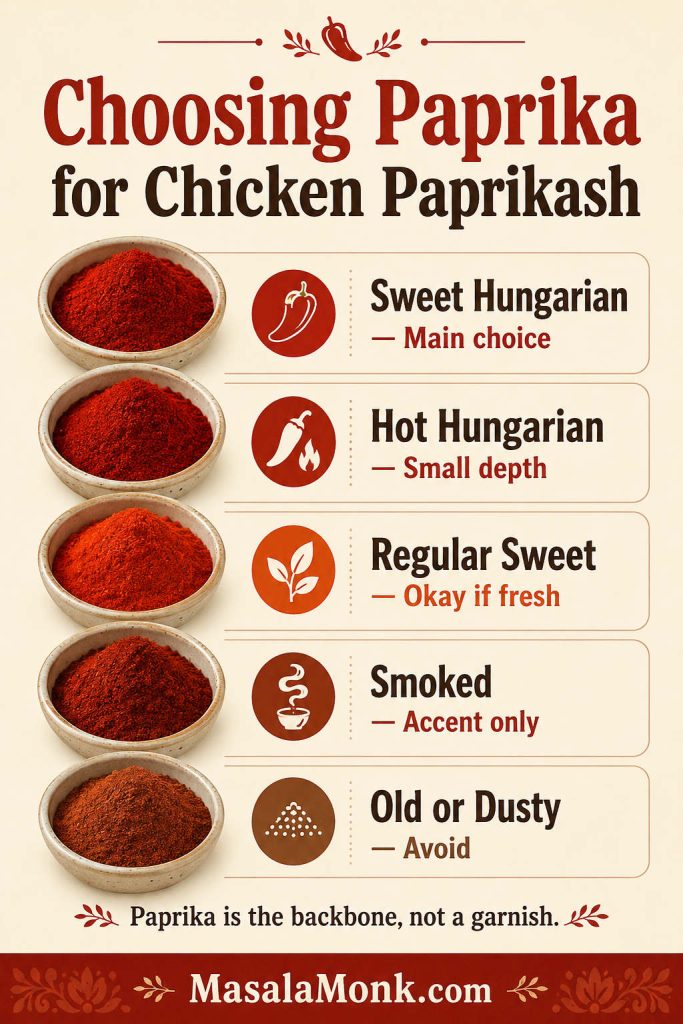
Sweet Hungarian paprika gives chicken paprikash its red-orange color and warm pepper flavor without making it overly spicy. Before you measure it, smell it. Good paprika should smell warm and peppery, not dusty or flat.

Infographic comparing sweet Hungarian paprika, hot Hungarian paprika, regular sweet paprika, smoked paprika and old paprika for chicken paprikash.
Sweet Hungarian paprika is the main flavor in chicken paprikash, not just a color booster. Use fresh paprika for depth, add hot paprika only for gentle heat, and keep smoked paprika as an accent.

Three tablespoons of paprika may look like a lot, but paprikash needs more than a dusting. The spice is the backbone of the dish, not a garnish.

For more depth, use mostly sweet Hungarian paprika with a small pinch of hot Hungarian paprika. Cayenne can add heat, but hot Hungarian paprika keeps the flavor closer to the dish.

Paprika brings both color and flavor here, but it is delicate. A short bloom in onion fat helps it open up; a long fry on high heat makes it harsh. Once the paprika goes in, stay close to the pot. You should smell the paprika before you worry about seeing a big change. The color deepens quickly, but the aroma is the real cue.

Paprika typeUse it?What to know
Sweet Hungarian paprikaYesBest default for classic paprikash flavor
Regular sweet paprikaYes, if freshWorks, but may taste less deep than Hungarian paprika
Hot Hungarian paprikaYes, in small amountsAdds warmth and depth without changing the dish too much
Smoked paprikaOnly as an accentCan taste good, but changes the dish into a smokier version
Old paprikaAvoidMakes the finished dish taste flat and dusty
CayenneOptionalUseful if you want heat but not more paprika flavor

Choosing the Chicken

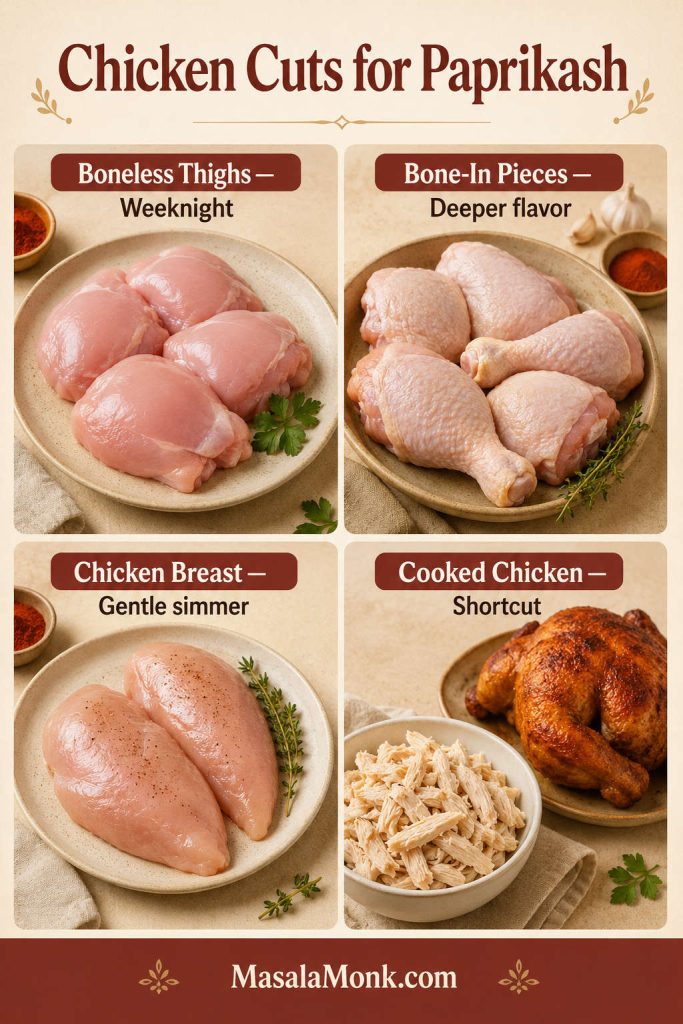
The right cut depends on the kind of dinner you want. Boneless thighs are the easiest all-around choice for weeknight paprikash. Bone-in chicken gives deeper flavor. Chicken breast works, but it needs a gentler hand.

Guide showing boneless thighs, bone-in chicken pieces, chicken breast and cooked chicken as options for chicken paprikash.
Boneless thighs are the easiest choice for weeknight chicken paprikash because they stay juicy. Bone-in pieces are worth using when you want deeper flavor and have time for a longer simmer.

If chicken breast is what you have, this baked chicken breast guide is useful for understanding timing, thickness, and how to avoid dry white meat.

Chicken cutDoes it work?Use when
Boneless thighsYesYou want a juicy, easy weeknight version
Bone-in thighs or drumsticksYesYou want deeper flavor and a longer simmer
Chicken breastYesYou want a leaner version and can cook gently
Rotisserie chickenYesYou want a shortcut and already-cooked chicken
Shredded cooked chickenYesYou want leftovers, bowls, noodles, or quick lunches

For rotisserie chicken, make the paprika base first, then fold in the cooked chicken just long enough to warm it through.

Once the chicken is chosen and the paprika is ready, the cooking is mostly about building the dish in the right order.

How to Make Chicken Paprikash

The recipe card gives you the full method. This section shows what to look for as you cook, because paprikash is easier when you can see and smell the right moments.

The recipe is not difficult because it has many steps. It is difficult only if the heat gets impatient. Keep the pot gentle, and the dish gives you back more comfort than the ingredient list promises.

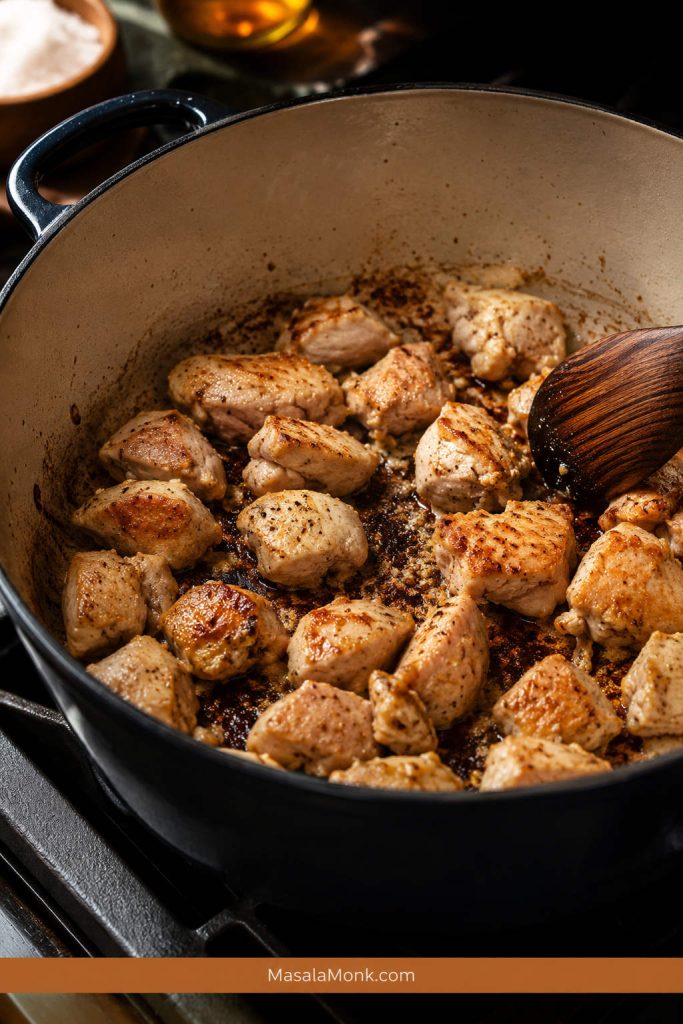
Step 1: Brown the chicken for flavor, not doneness

The chicken should pick up color on the outside, but it does not need to cook through yet. Those browned bits on the bottom of the pot will dissolve into the paprika base later.

Boneless chicken thigh pieces browning in a Dutch oven with golden edges and browned bits on the bottom.
Brown the chicken for flavor, not doneness. Those golden edges and browned bits will later dissolve into the paprika base and make the finished dish taste richer.

Step 2: Cook the onions until they smell sweet

The onions should soften, shrink, and smell sweet instead of sharp. This is where the dish starts getting body. Rushed onions make a thinner-tasting paprikash.

Step 3: Bloom the paprika briefly

Lower the heat before the paprika goes in. The spice should hit warm fat and smell fragrant almost immediately. That is the moment to add broth. A good bloom smells warm and peppery; a scorched one smells harsh.

Two-panel guide showing softened onions on one side and paprika blooming with onions on the other side.
Let the onions turn soft and sweet before adding paprika. Once the spice smells warm and peppery, add liquid so it blooms without scorching.

Step 4: Simmer gently

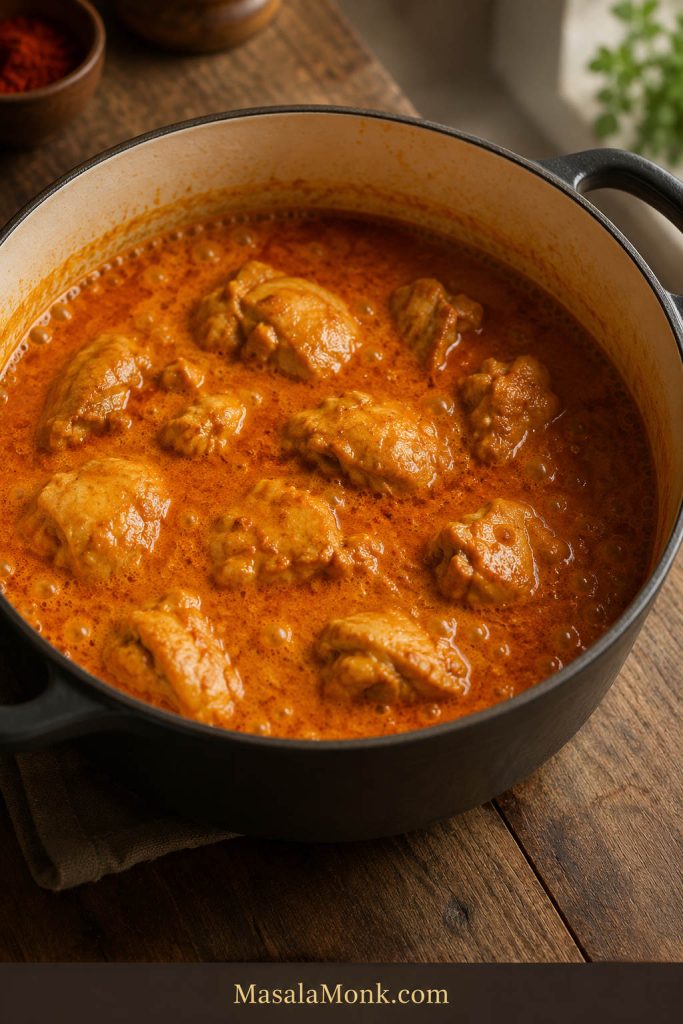
The pot should bubble quietly, not aggressively. Gentle simmering keeps the chicken tender and lets the paprika base pick up flavor without reducing too fast.

Boneless chicken pieces gently simmering in red-orange paprika sauce with small bubbles around the edge of the pot.
Keep chicken paprikash at a quiet simmer with small bubbles. This helps the chicken stay tender while the paprika base reduces slowly.

Step 5: Fix the consistency before the sour cream goes in

The sauce should already taste savory and spoonable before the dairy is added. Reduce it if it looks watery. Loosen it with broth if it looks tight. Once sour cream goes in, you want to warm the dish, not wrestle with it.

Step 6: Temper the sour cream

Whisking hot sauce into sour cream first keeps the temperature change gentle. The mixture should look smooth in the bowl before it goes back into the pot.

Sour cream being whisked in a bowl while hot paprika sauce is added gradually from a spoon.
Tempering sour cream protects the creamy finish. Whisk in a little hot paprika sauce first, then stir the warmed mixture back into the pot on low heat.

Step 7: Finish low and slow

Once the sour cream goes in, the sauce is no longer something to boil; it is something to warm. The finished dish should look creamy, red-orange, and ready to coat every noodle, dumpling, or spoonful of rice underneath.

How It Should Look and Taste

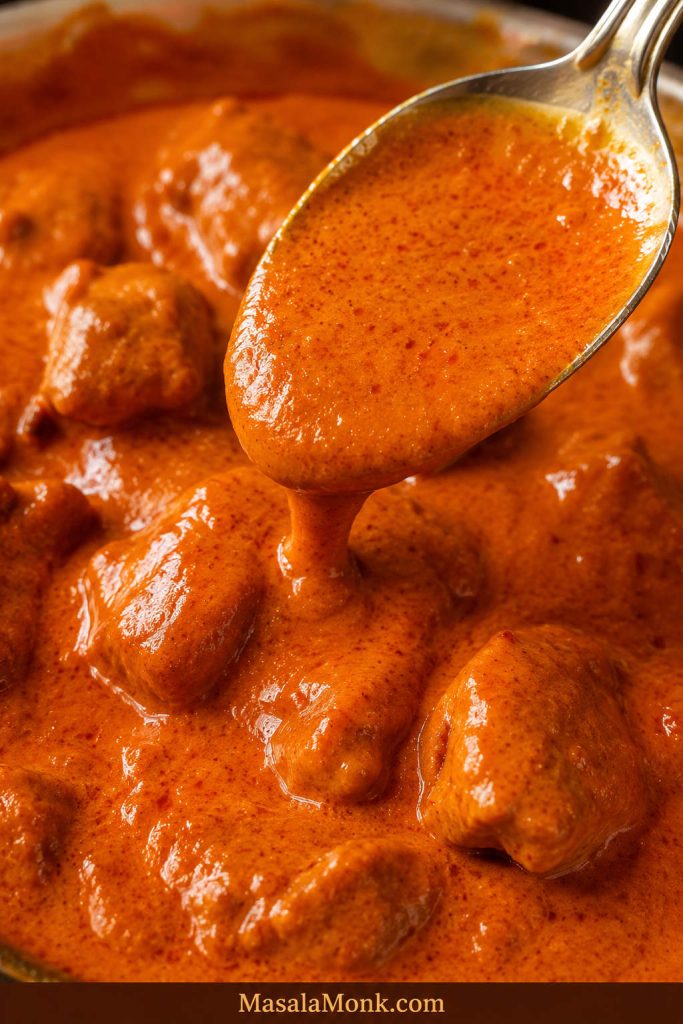
The finished dish should look creamy, warm, and generous. It should be red-orange from paprika, not pale beige and not tomato-red. It should coat the chicken and spoon easily over noodles, dumplings, rice, or potatoes.

Close-up of finished chicken paprikash sauce coating chicken and a spoon with a glossy red-orange texture.
The finished sauce should coat a spoon but still flow easily. Before serving, adjust it so it clings to noodles, rice, nokedli, or potatoes without turning heavy.
  • Color: red-orange and paprika-rich.
  • Texture: creamy and spoonable, not watery or paste-thick.
  • Chicken: tender pieces that still hold their shape.
  • Flavor: savory, paprika-forward, lightly tangy, and gently sweet from onions.
  • Heat level: mild unless you add hot paprika or cayenne.
  • Sauce amount: generous enough to coat whatever you serve underneath.

A good paprikash should coat a spoon and leave a brief trail when you drag the spoon through the pan, but it should still flow easily over noodles, dumplings, rice, or potatoes.

The plate should not look tidy; it should look saucy. Every noodle should catch a little red-orange cream.

If the dish tastes flat, it may need salt or a little brightness. Dull flavor from the start often points to old paprika. Bitterness usually means the paprika caught too much heat.

Sauce not looking right yet? Jump to the troubleshooting guide before serving.

How to Keep the Sour Cream Smooth

The sour cream is where paprikash becomes silky and comforting, as long as the heat stays gentle. If the sauce gets too hot after the sour cream goes in, the creamy finish can turn grainy.

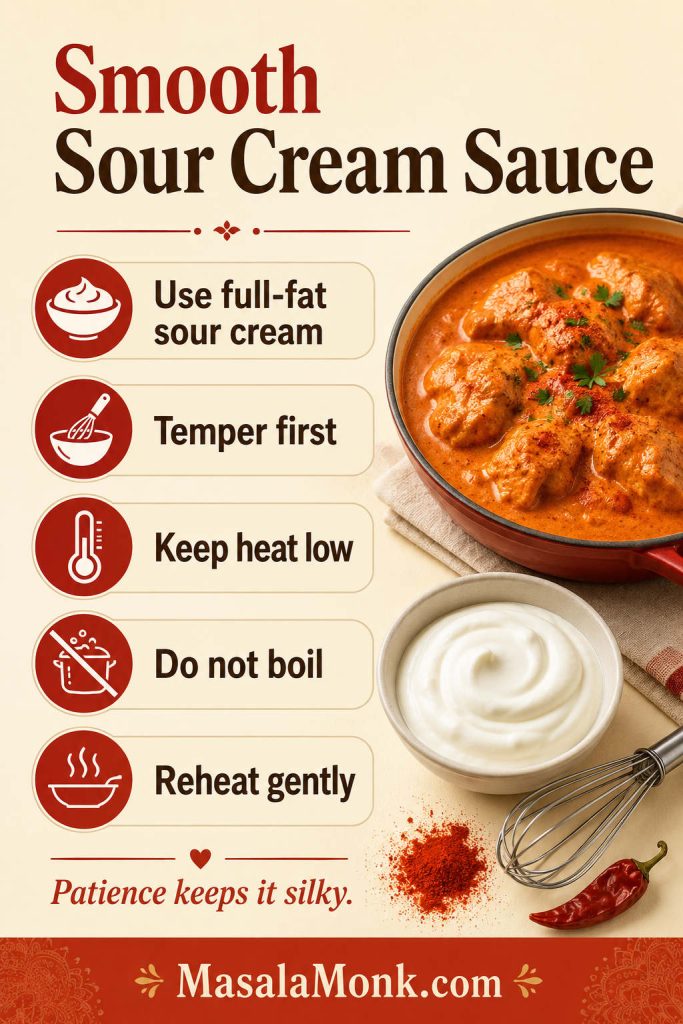
Infographic with tips for smooth sour cream sauce, including using full-fat sour cream, tempering first and keeping heat low.
Sour cream stays smooth when it is warmed gradually and kept away from hard boiling. Low heat is what keeps chicken paprikash silky instead of grainy.

Sour cream behaves better when it is warmed gradually. Tempering is not a fancy step; it simply narrows the temperature gap between cool dairy and hot sauce.

  • Use full-fat sour cream. It is more stable and gives better texture.
  • Do not add it ice-cold. Let it sit while the chicken cooks so it loses the refrigerator chill.
  • Temper it first. Whisk a little hot sauce into the sour cream before adding it to the pot.
  • Lower the heat. Add sour cream on very low heat or off heat.
  • Warm it through. Boiling is what puts the sauce at risk.
  • Reheat slowly. Leftovers need low heat and patience.

The dish does not need bravery here; it needs patience. If sour cream sauces make you nervous, turn the heat off before adding it. You have more control than you think.

If the sauce does split, lower the heat, add a small splash of broth, and stir gently. It may not become perfectly silky again, but it will still taste good.

Ready to cook now? Return to the recipe card and add the sour cream only after the strongest heat has passed.

Chicken Paprikash With Dumplings, Nokedli, Spaetzle or Egg Noodles

A saucy dish like this needs somewhere soft to land. In a more traditional plate, that usually means nokedli or spaetzle. On a weeknight, egg noodles, rice, or mashed potatoes still do the job beautifully.

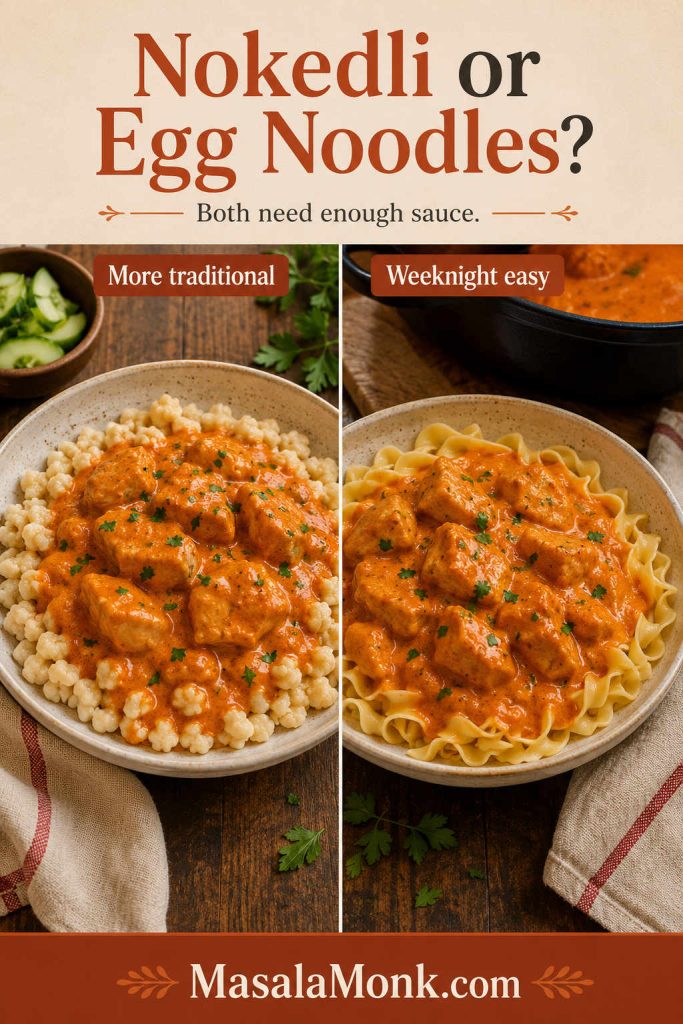
Split image comparing chicken paprikash served over nokedli or spaetzle with chicken paprikash served over egg noodles.
Nokedli or spaetzle gives chicken paprikash a more traditional feel, while egg noodles make it easier for a weeknight dinner. Either way, the side should be soft enough to catch the sauce.

Want the Traditional Side Without a Project?

Nokedli are small Hungarian-style dumplings and one of the most traditional partners for this dish. Spaetzle is very similar and works beautifully. Egg noodles are the easiest weeknight option when you want the comfort of dumplings without making dumplings from scratch.

Use store-bought spaetzle, homemade nokedli, or egg noodles. For homemade nokedli, keep the batter soft and cook the dumplings separately in boiling water, then spoon the paprikash over the top. Do not simmer dumplings directly in the finished sauce unless you want a thicker, heavier pot. The shortcut version is not a failure; it is dinner moving at real-life speed.

SideAmount for 4 servingsUse when
Nokedli3 to 4 cups cookedYou want the most traditional serving
Spaetzle3 to 4 cups cookedYou want an easy dumpling substitute
Egg noodles8 oz / 225 g dryYou want a fast weeknight dinner
Rice3 cups cookedYou want a simple gluten-free meal
Mashed potatoes4 portionsYou want full comfort food

Dumplings make the plate feel most traditional. Egg noodles make it weeknight-easy. Rice keeps it simple. Mashed potatoes make it full comfort. None of them are wrong; the only mistake is not having enough sauce.

If rice is your easiest side, this guide on how to cook perfect rice helps you time the grains while the chicken simmers. For a deeper comfort-food version, spoon the paprika sour cream sauce over creamy mashed potatoes instead.

The side is not just filler here. It is the thing that catches the red-orange cream and makes every forkful feel complete.

Once you choose the base, see what to serve with chicken paprikash for fresh sides that balance the plate.

What to Serve With Chicken Paprikash

Because the dish is rich and creamy, the rest of the plate works best when it adds freshness, crunch, or something simple for wiping up the last spoonfuls.

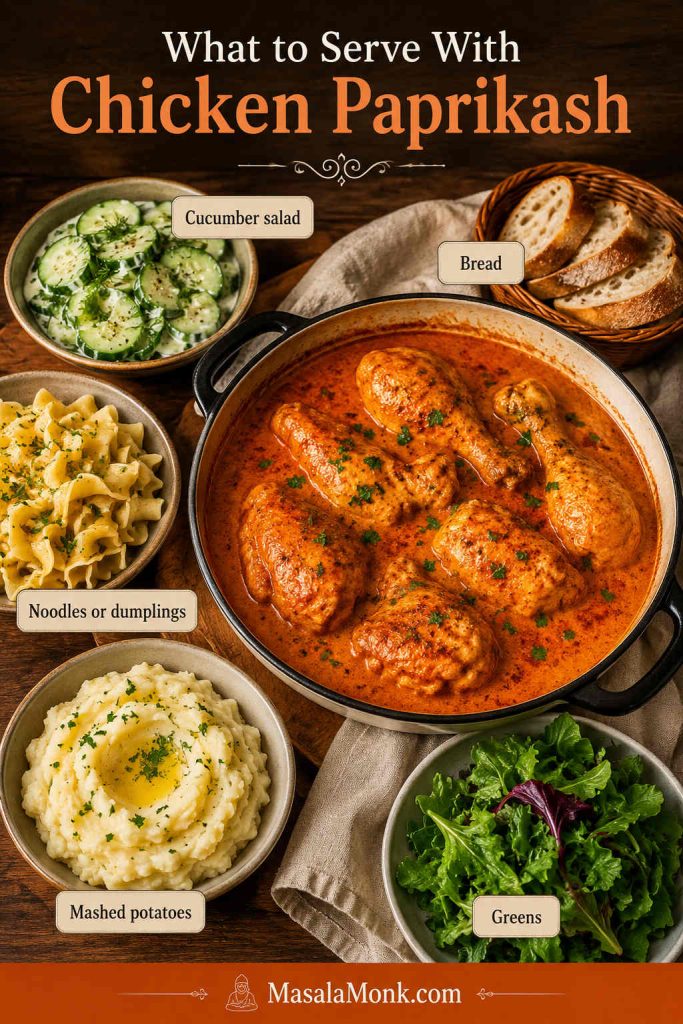
Chicken paprikash served with cucumber salad, bread, noodles or dumplings, mashed potatoes and greens on a wooden table.
Rich chicken paprikash works best with contrast. Cucumber salad and greens add freshness, while noodles, dumplings, mashed potatoes, or bread give the paprika sauce somewhere to land.
  1. Cucumber salad: crisp and refreshing against the creamy sauce, especially a cold cucumber salad with vinegar, dill, and onion.
  2. Green salad: helpful when you want the meal to feel lighter.
  3. Roasted or steamed vegetables: green beans, cabbage, carrots, broccoli, or peas work well.
  4. Roasted potatoes: a crispier potato option if you are not serving mashed potatoes.
  5. Crusty bread: perfect for wiping up the last spoonfuls in the pan.

Choose noodles if you want the dish to feel lighter, dumplings if you want it to feel most traditional, and mashed potatoes if you want the plate to lean fully into comfort.

For the most balanced dinner, serve the chicken with noodles or dumplings and a crisp cucumber salad or green salad on the side.

Slow Cooker and Crock Pot Chicken Paprikash

The stovetop version gives you the best feel for the dish, but the same flavors can work in a slow cooker or Crock Pot as long as the sour cream is added at the end.

Chicken paprikash can be made in a slow cooker or Crock Pot two ways: the deepest-flavor method and the dump-and-go shortcut.

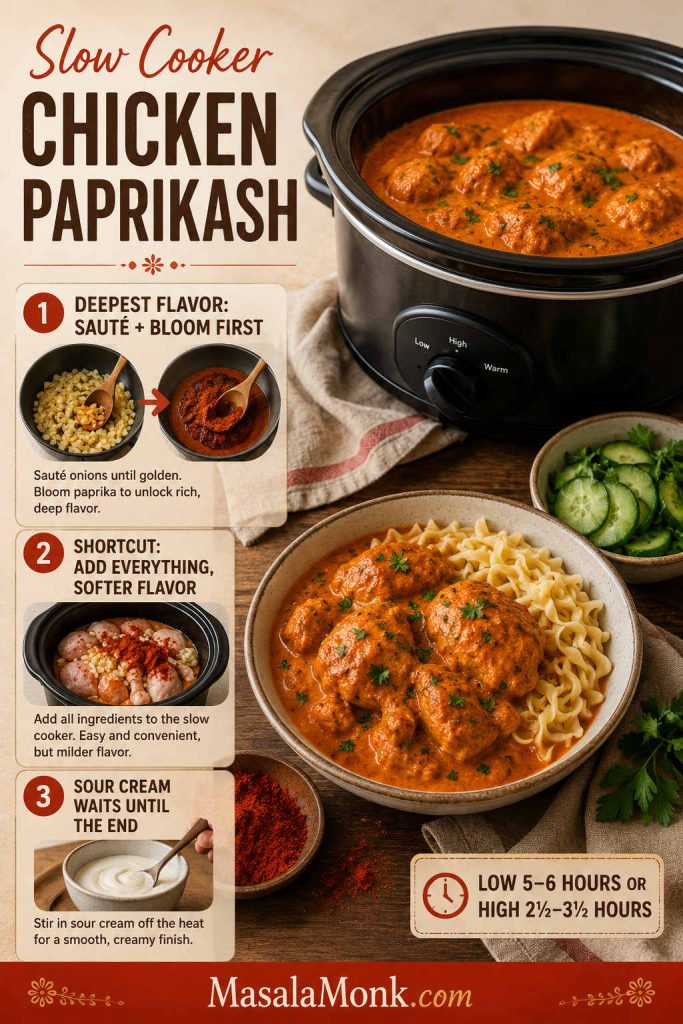
Slow cooker chicken paprikash guide showing a Crock Pot, sautéed onions, paprika bloom, sour cream and egg noodles.
For deeper slow cooker chicken paprikash, sauté the onions and bloom the paprika before everything goes into the Crock Pot. Add sour cream at the end so it stays creamy instead of grainy.

For the deepest flavor

  1. Sauté the onions in a skillet until soft.
  2. Add garlic, then lower the heat and stir in the paprika for 20 to 30 seconds.
  3. Add a splash of broth to loosen the paprika-onion mixture.
  4. Transfer the mixture to the slow cooker with the chicken, salt, pepper, and remaining broth.
  5. Cook boneless thighs on low for 5 to 6 hours or on high for 2 1/2 to 3 1/2 hours, until tender and cooked through.
  6. Whisk a little hot cooking liquid into the sour cream, then stir the tempered sour cream into the slow cooker at the end.

Dump-and-go shortcut

Add chicken, onions, paprika, salt, pepper, and broth directly to the slow cooker. This works, but the flavor will be softer because the onions are not browned and the paprika is not bloomed first. Stir in tempered sour cream only at the end.

Chicken thighs are better than chicken breast for slow cooker paprikash because they stay juicier during long cooking. If you are set on using breast meat, this guide to crock pot chicken breast recipes goes deeper into keeping lean chicken tender in the slow cooker.

If the slow cooker version looks thin, transfer the liquid to a pan and simmer briefly before adding sour cream, or thicken it with a small cornstarch slurry.

For the stovetop version, use the main recipe card. For sauce issues, keep the troubleshooting table nearby.

Instant Pot, Baked and One-Pot Methods

Instant Pot Chicken Paprikash

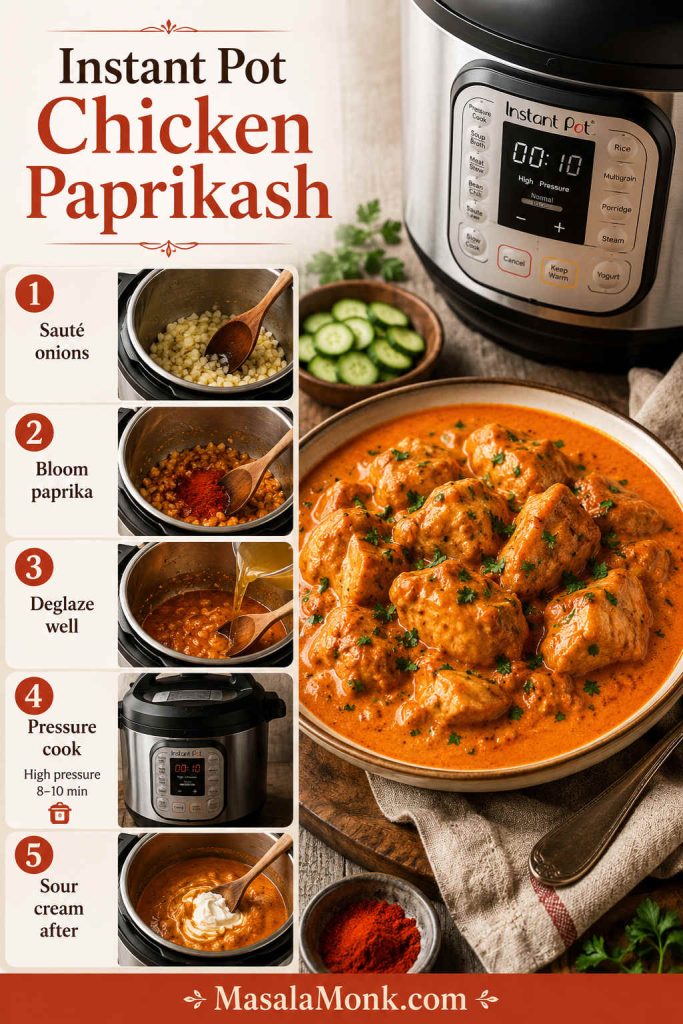
Instant Pot chicken paprikash works best with boneless thighs. Keep the sour cream out until after pressure cooking.

Instant Pot chicken paprikash step guide showing sautéing onions, blooming paprika, deglazing, pressure cooking and adding sour cream after cooking.
In the Instant Pot, deglazing protects the recipe. Scrape the bottom well before pressure cooking, then add sour cream after cooking for a creamy finish.
  1. Sauté the onions first, then add garlic.
  2. Lower the heat briefly and stir in paprika for 20 to 30 seconds.
  3. Add broth and scrape the bottom very well so no browned bits are stuck.
  4. Add the chicken and pressure cook on high for 8 to 10 minutes.
  5. Let the pressure release naturally for 5 minutes, then quick release.
  6. Stir in tempered sour cream after pressure cooking.

Baked Chicken Paprikash

Baked chicken paprikash works best with bone-in pieces. Start the onions and paprika base on the stovetop, add the chicken, cover, and bake at 350°F / 175°C for about 35 to 45 minutes, or until the chicken is cooked through and tender. Stir in sour cream after baking so the sauce stays smoother.

One-Pot Chicken Paprikash

The stovetop version is already a one-pot chicken paprikash if you cook the chicken and paprika base in one Dutch oven or deep skillet. Cook noodles, rice, or dumplings separately so they do not soak up everything before serving.

Cooking by pressure cooker instead? Return to the Instant Pot steps, or use the main recipe card for the classic stovetop flow.

Can You Make Chicken Paprikash Without Sour Cream?

Can you make it without sour cream? Yes. Will it taste like classic chicken paprikash? Not exactly.

Sour cream gives the dish its familiar creamy tang. Without it, the recipe becomes closer to paprika chicken stew or creamy paprika chicken, depending on what you use instead.

SubstituteHow it worksImportant note
Greek yogurtTangy and creamyMore likely to split; add off heat
Heavy creamRich and smoothLess tangy than sour cream
Crème fraîcheSmooth, tangy, and richUsually more heat-stable but heavier
Dairy-free sour creamUseful for dairy-free mealsFlavor and texture depend on the brand
No creamy ingredientLighter paprika dishLess familiar and less creamy

For the most familiar paprikash flavor, use full-fat sour cream and add it gently at the end.

Chicken Paprikash vs Goulash

Chicken paprikash and goulash both use paprika, but they are not the same dish. The easiest difference is texture and finish: paprikash is creamy and saucy, while goulash is usually more stew-like.

DishMain ideaTextureDairy?
Chicken paprikashChicken in paprika sour cream sauceCreamy and saucyUsually finished with sour cream
GoulashPaprika stew, often beef-basedBrothy or stew-likeUsually not finished the same creamy way

This dish should be creamy and saucy, not thin like soup. If you make it much brothier, it starts moving toward chicken paprikash soup or paprika chicken stew instead of the creamy version most people expect.

How to Store, Freeze and Reheat Chicken Paprikash

Fridge

Store leftovers in an airtight container in the fridge for 3 to 4 days. If possible, store noodles, rice, or dumplings separately so they do not soak up too much sauce.

Freezer

You can freeze chicken paprikash, but sour cream can change texture after thawing. For the smoothest result, freeze the chicken and paprika base before adding sour cream, then add sour cream after reheating.

Reheating

Leftovers are still cozy, but creamy sauces need gentle reheating to stay their best. Reheat on the stovetop over low heat and add a splash of broth if the sauce looks too thick.

Make-Ahead Tip

For guests, cook the chicken and paprika base first, then cool and refrigerate it without the sour cream. Reheat gently and stir in the sour cream right before serving so the dish tastes freshly made.

Troubleshooting the Sauce and Chicken

Paprikash is forgiving until the heat gets aggressive. A dish that is too thick, too thin, slightly split, or a little flat can usually be brought back enough for dinner. Use this table before you give up on the pot.

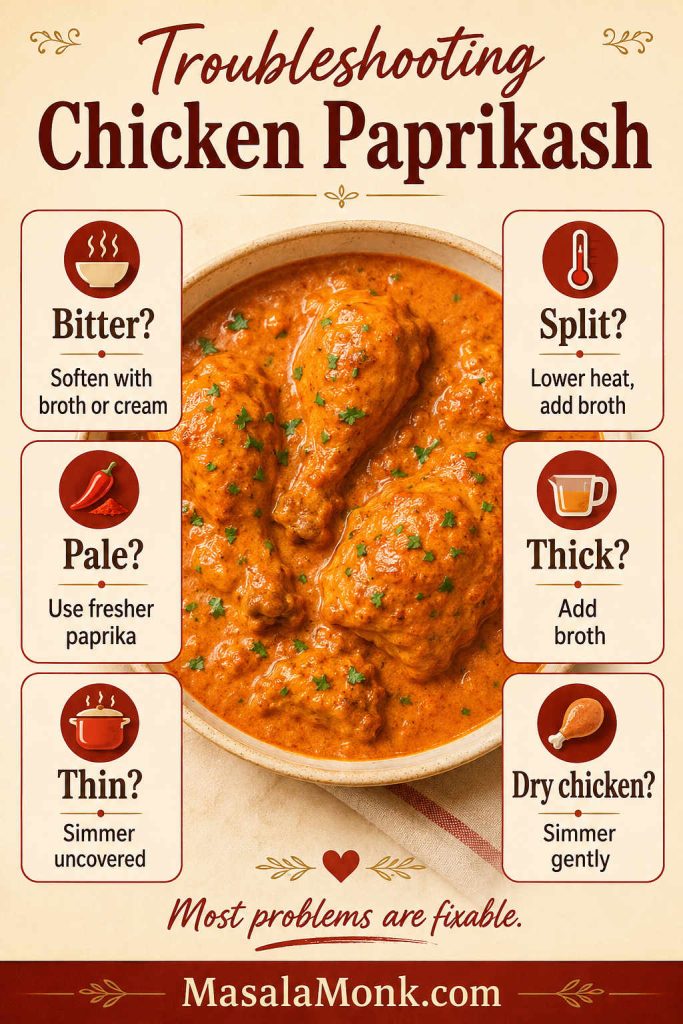
Troubleshooting guide for chicken paprikash with fixes for bitter sauce, split sauce, pale sauce, thin sauce, thick sauce and dry chicken.
Most chicken paprikash problems come back to heat, paprika freshness, or texture. Fortunately, you can soften bitterness, loosen thick sauce, reduce thin sauce, and keep sour cream away from boiling.
ProblemLikely causeFix
Tastes bitterPaprika scorched or heat was too highAdd a little broth or cream to soften the bitterness; next time lower heat before adding paprika
Tastes flatOld paprika, not enough salt, or undercooked onionsSeason in layers, cook onions until soft, and use fresher paprika next time
Looks paleNot enough paprika or paprika is weakUse fresh sweet paprika and let it bloom briefly off high heat
Tastes too tomatoeyToo much tomato or tomato pasteAdd broth and sour cream to rebalance; next time keep tomato subtle
Sour cream curdledAdded cold sour cream to very hot sauce or overheated after addingTemper sour cream first and stir it in off heat or on very low heat
Too thinToo much broth or not enough reductionSimmer uncovered before adding sour cream, or thicken with flour or cornstarch
Too thickReduced too much or used too much flourAdd chicken broth a splash at a time until smooth
Chicken is dryChicken breast overcooked or heat was too highUse thighs next time, or simmer breast pieces gently and check early
Split when reheatedReheated too hot after sour cream was addedReheat on low and stir in a splash of broth or sour cream

FAQ About Chicken Paprikash

What is chicken paprikash made of?

Chicken paprikash is usually made with chicken, onions, paprika, broth or water, and sour cream. Some versions also include garlic, tomato, pepper, flour, hot paprika, or cayenne.

Is chicken paprikash Hungarian?

Chicken paprikash is a Hungarian dish often known as paprikás csirke. This recipe is an easy home-style version with the familiar paprika and sour cream sauce.

Can I use regular paprika if I do not have Hungarian paprika?

Regular sweet paprika works if it is fresh and fragrant. Hungarian paprika gives a deeper flavor, but regular paprika can still make a good dish if it has not gone stale.

Should chicken paprikash be spicy?

Usually, chicken paprikash is more warm and paprika-rich than hot. Use sweet paprika for the base, then add hot paprika or cayenne only if you want extra heat.

Why does my chicken paprikash taste bitter?

Bitter paprikash usually means the paprika scorched. Lower the heat or move the pot off the burner before adding paprika, stir briefly, then add broth before the spice burns.

Does chicken breast work for chicken paprikash?

Chicken breast works, but it asks for a gentler hand. Keep the simmer quiet and check it early so it stays juicy.

Why did my sour cream curdle?

Sour cream usually curdles when the sauce is too hot or the sour cream is too cold. Temper it with warm sauce first, then stir it in off heat or on very low heat.

Do I need dumplings, or are noodles okay?

You do not need dumplings. Nokedli and spaetzle are traditional choices, but egg noodles are a very good weeknight option. Rice, mashed potatoes, and bread also work well.

Can chicken paprikash be frozen?

The sauce is smoother if you freeze it before adding sour cream. Reheat the chicken and paprika base gently, then stir in sour cream just before serving.

Can I make chicken paprikash ahead of time?

For the smoothest make-ahead version, cook the chicken and paprika base ahead, then reheat gently and stir in the sour cream just before serving.

Is chicken paprikash the same as goulash?

No. Chicken paprikash is usually chicken in a paprika sour cream sauce. Goulash is usually more stew-like and often made with beef, vegetables, broth, and paprika.

Can I make chicken paprikash in a slow cooker or Crock Pot?

The slow cooker works, but the sour cream should wait until the end. For deeper flavor, sauté the onions and bloom the paprika before transferring everything to the slow cooker.

Chicken paprikash is simple food, but it pays you back for the few moments when you slow down. Let the onions sweeten, let the paprika bloom, keep the sour cream gentle, and give the sauce something soft to land on. That is the whole comfort of the dish: tender chicken, a warm red-orange sauce, and a plate that feels generous from the first spoonful.

Did you go traditional with nokedli, weeknight-easy with egg noodles, or full comfort with mashed potatoes? Leave a comment and tell us what caught the sauce.

Posted on Leave a comment

Slow Cooker Chicken Fajitas: Easy Crock Pot Chicken Fajita Recipe

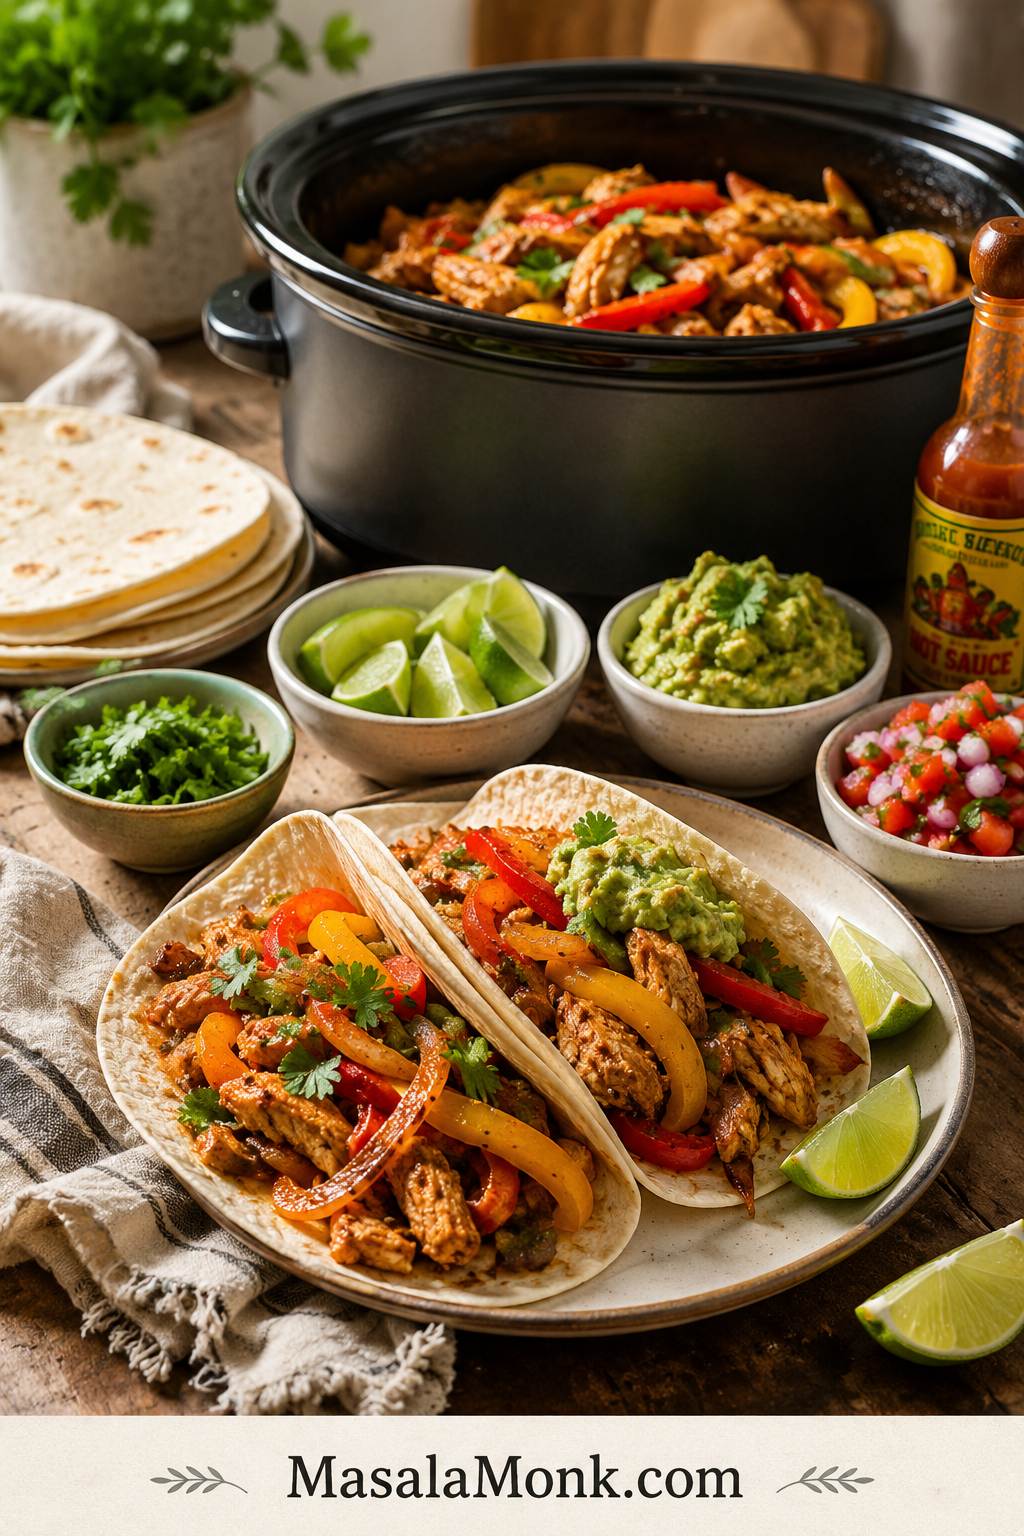
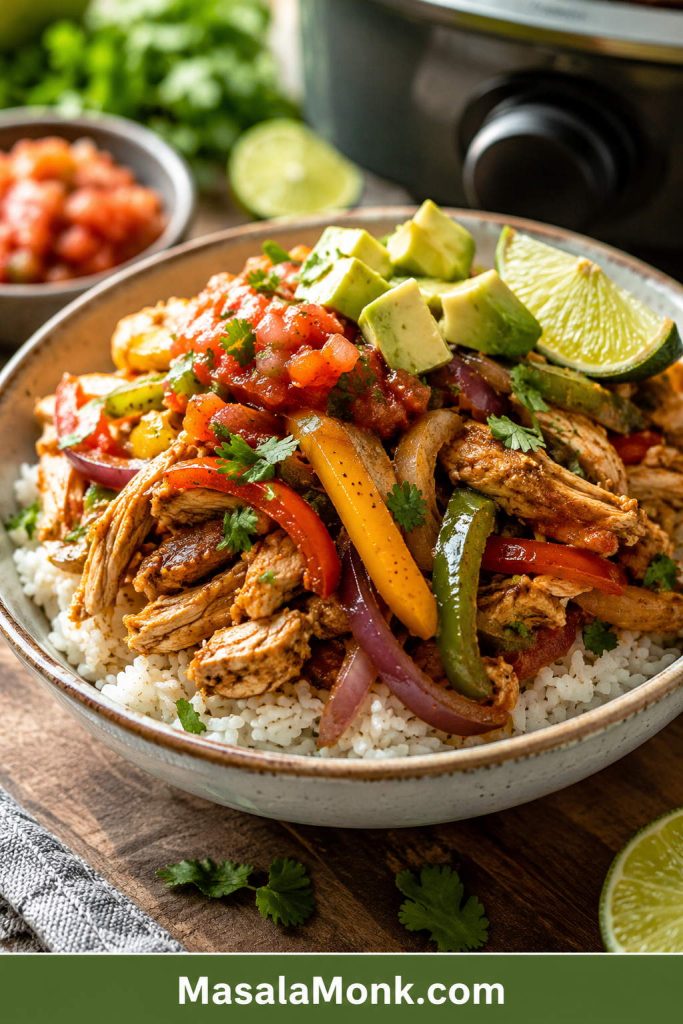
Slow cooker chicken fajitas served with shredded chicken, colorful bell peppers, onions, warm tortillas, lime wedges, salsa, avocado, cilantro, and hot sauce on a dinner table.

These slow cooker chicken fajitas are for the nights when you want the Crock Pot to handle dinner, but you still want the meal to feel fresh when everyone sits down. You get smoky, lime-bright chicken with sweet peppers and soft onions, ready to tuck into warm tortillas or spoon over rice.

The only tricky part is knowing what the slow cooker will do once the lid goes on. It traps moisture, so fajitas can become too wet, too soft, or a little flat if everything cooks together with too much liquid. This version keeps the method easy but gives you one simple rule to remember: less liquid, later peppers, lime at the end.

By the time you warm the tortillas and cut the lime, the chicken is tender, the peppers are sweet, the onions are soft, and dinner feels like more than something you simply left in the slow cooker. Use the cooked chicken and peppers for classic fajitas, tacos, bowls, quesadillas, nachos, or easy leftovers.

It will not have the same char as skillet or sheet pan fajitas, but it gives you an easy, reliable Crock Pot dinner with very little hands-on work.

Quick Answer: How to Make Slow Cooker Chicken Fajitas

To make slow cooker chicken fajitas, add boneless chicken breasts or thighs to a 5.5 to 6 quart slow cooker with sliced bell peppers, onion, garlic, fajita seasoning, and ¾ to 1 cup salsa, Rotel, or diced tomatoes. Cook on low for 4 to 6 hours or high for 2½ to 3½ hours, until the chicken reaches 165°F / 74°C. Slice or shred the chicken, return it with only enough juices to coat, finish with lime, and serve in tortillas, bowls, tacos, salads, or quesadillas.

The three keys are less liquid, later peppers, and lime at the end. For better texture, add only half the peppers and onions at the beginning. Add the rest during the last 30 to 60 minutes so they stay brighter, firmer, and less watery.

For the easiest version, add everything at the beginning and drain before serving. If you want better texture, save some peppers for the end, keep the filling glossy, and finish with lime. The rest of the guide helps you make it tighter for tortillas, saucier for bowls, or softer for shredded leftovers.

Start with Less Liquid

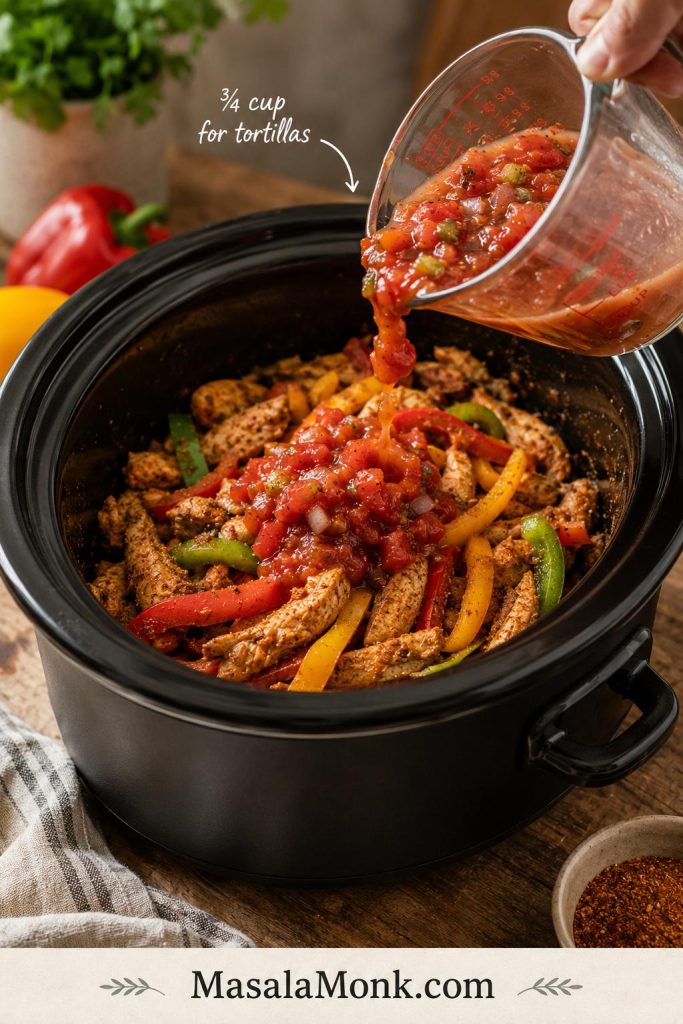
This is the first texture decision in slow cooker chicken fajitas: add enough salsa or Rotel to season the chicken, but not so much that the pot turns soupy.

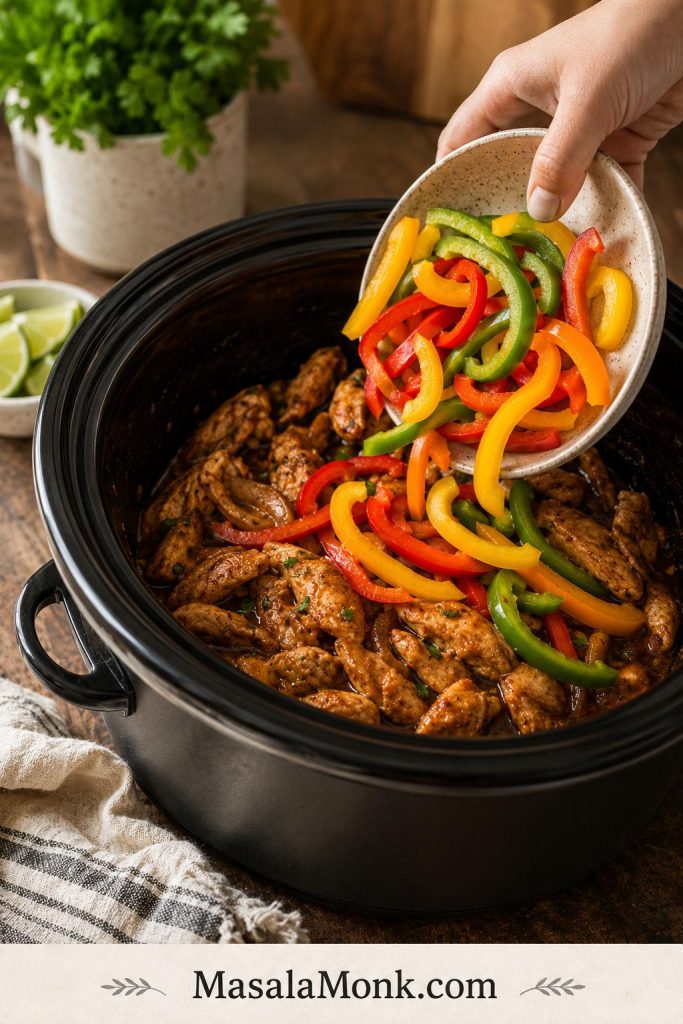
Salsa being poured from a measuring cup into a slow cooker with chicken, bell peppers, onions, garlic, and fajita seasoning.
First, control the liquid. For tortilla-style slow cooker chicken fajitas, about ¾ cup salsa or Rotel seasons the chicken without flooding the pot or making the filling hard to fold.

Slow Cooker Chicken Fajitas at a Glance

Slow cooker size5.5 to 6 quart / 5.2 to 5.7 L
Fill levelAim for about half to two-thirds full for even cooking
Chicken amount2 lb / 900 g
Chicken to useBreasts for slicing, thighs for juicier shredded fajitas
Liquid amount¾ cup for tortillas, up to 1 cup for bowls
Low cook time4 to 6 hours
High cook time2½ to 3½ hours
Pepper methodHalf early, half late
Safe chicken temperature165°F / 74°C
Finish withFresh lime juice after cooking
Serve asFajitas, tacos, bowls, quesadillas, salads, nachos, meal prep

Slow Cooker Chicken Fajitas Recipe

Description: Easy Crock Pot chicken fajitas with juicy chicken, sweet peppers, soft onions, smoky fajita seasoning, lime, and just enough salsa or Rotel to keep everything flavorful without turning watery.

Prep time: 10 to 15 minutes
Cook time: 2½ to 3½ hours on high, or 4 to 6 hours on low
Total time: About 2 hours 45 minutes to 6 hours 15 minutes
Servings: 6
Yield: Enough chicken and peppers for 8 to 12 fajitas, depending on tortilla size
Equipment: 5.5 to 6 quart / 5.2 to 5.7 L slow cooker, knife, cutting board, tongs, slotted spoon, instant-read thermometer

Ingredients

  • 2 lb / 900 g boneless skinless chicken breasts or thighs
  • 3 large bell peppers / 420 to 500 g, sliced, preferably mixed colors
  • 1 large onion / 180 to 220 g, sliced
  • ¾ to 1 cup / 180 to 240 ml salsa, Rotel, or diced tomatoes
  • 3 to 4 garlic cloves / 12 to 16 g, minced
  • 2½ to 3 tablespoons / 22 to 28 g fajita seasoning, homemade or store-bought
  • 2 tablespoons / 30 ml fresh lime juice, plus extra lime wedges for serving
  • 8 to 12 tortillas, flour or corn
  • Optional toppings: sour cream, avocado, guacamole, cilantro, shredded cheese, salsa, jalapeños, lettuce, or hot sauce

Use ¾ cup / 180 ml salsa or Rotel for thicker tortilla-friendly fajitas. For juicier bowls or meal prep, use closer to 1 cup / 240 ml.

Instructions

  1. Slice the vegetables. Cut the bell peppers and onion into strips. Set aside about half of them to add near the end of cooking.
  2. Layer the slow cooker. Add the first half of the peppers and onions to the bottom of the slow cooker. Place the chicken on top.
  3. Add flavor. Sprinkle the chicken with fajita seasoning and garlic. Pour the salsa, Rotel, or diced tomatoes over the top. Do not add extra water.
  4. Cook. Cover and cook on high for 2½ to 3½ hours or low for 4 to 6 hours, until the chicken reaches 165°F / 74°C. Very thick chicken breasts may need the longer end of the range.
  5. Add the remaining peppers. Stir in the reserved peppers and onions during the last 30 to 60 minutes. Use 30 minutes for firmer peppers and 60 minutes for softer peppers.
  6. Slice or shred. Remove the chicken. Rest it for 5 minutes if slicing, or shred it with two forks. Shredded fajitas should pull apart easily. Sliced fajitas should cut cleanly after resting.
  7. Adjust the juices. If there is a lot of liquid in the slow cooker, ladle some out. Return the chicken with only enough juices to coat the meat and vegetables.
  8. Finish with lime. Stir in the lime juice. Taste and adjust salt, seasoning, or lime.
  9. Serve. Fill warm tortillas with the chicken and peppers, or spoon them into bowls, quesadillas, or leftover meals.

Recipe Notes

  • Use ¾ cup / 180 ml salsa or Rotel for tortillas, or up to 1 cup / 240 ml for bowls.
  • Do not add extra water. The chicken, peppers, onions, and tomatoes release liquid as they cook.
  • Add half the peppers and onions late if you want better texture.
  • Thaw frozen chicken before using it in a slow cooker.
  • Finish with lime juice after cooking so the flavor stays fresh.
  • For tortillas, think glossy, not soupy. Drain or lift with tongs before filling tortillas.

Want better texture? See when to add peppers. Need to fix extra liquid? Read the watery fajitas section. Planning leftovers? Jump to storage and meal prep.

Why You’ll Make This Again

This is the kind of recipe that earns its place on a weeknight because it does more than make one dinner. It helps when the day is long, the chicken is already in the fridge, and you need something that can turn into warm tortillas tonight and easy leftovers tomorrow.

  • Mostly hands-off. Once the slow cooker is loaded, dinner is already moving.
  • It works with shortcuts. Use homemade fajita seasoning, a packet, salsa, Rotel, or diced tomatoes.
  • It solves the usual slow-cooker problems. The filling stays glossy instead of watery.
  • It can be tight or saucy. Keep it neat for tortillas or leave it juicier for bowls.
  • It turns into more than fajitas. Use the same batch for tacos, bowls, quesadillas, and leftovers.

Once the basic method is set, you can decide whether you want a tighter tortilla filling, a saucier bowl, or soft shredded chicken for leftovers.

Why This Crock Pot Chicken Fajita Recipe Works

A slow cooker does not brown food, so the flavor has to come from seasoning, acidity, vegetables, and the way you manage the juices. That is why this recipe uses a controlled amount of salsa or Rotel, adds some peppers late, and finishes with lime instead of relying on char.

A lot of Crock Pot chicken fajita recipes are easy, but they make the same mistake: too much liquid, all the peppers added too early, and no clear plan for what to do with the juices at the end. The result can still taste good, but it often behaves more like wet shredded chicken than fajita filling.

Here, you still get the easy Crock Pot dinner, but the chicken stays juicy and the peppers do not all collapse into the sauce. A smaller amount of salsa or Rotel gives the meat enough moisture without drowning it. Some peppers and onions go in early to flavor the chicken, while the rest go in near the end so the finished chicken and peppers still have color and bite. Lime juice goes in after cooking, when it can wake up the smoky seasoning and sweet peppers instead of disappearing into the pot.

  • Controlled liquid keeps the chicken useful for tortillas.
  • Two-stage peppers give you flavor and better texture.
  • Chicken breasts or thighs both work depending on your goal.
  • Sliced or shredded chicken lets you choose classic fajita-style strips or easier pulled chicken.
  • Fresh lime at the end keeps the flavor lively.

Do Slow Cooker Fajitas Taste Like Skillet Fajitas?

Not exactly, and that is worth saying clearly. This is not the sizzling-pan version. It is the weeknight version: softer, juicier, easier, and still bright enough to feel fresh when the tortillas hit the table.

Expect soft, juicy fajita chicken with sweet peppers, smoky seasoning, and a fresh lime finish. It is not charred or sizzling, but it should taste bright, savory, and easy to fold into warm tortillas.

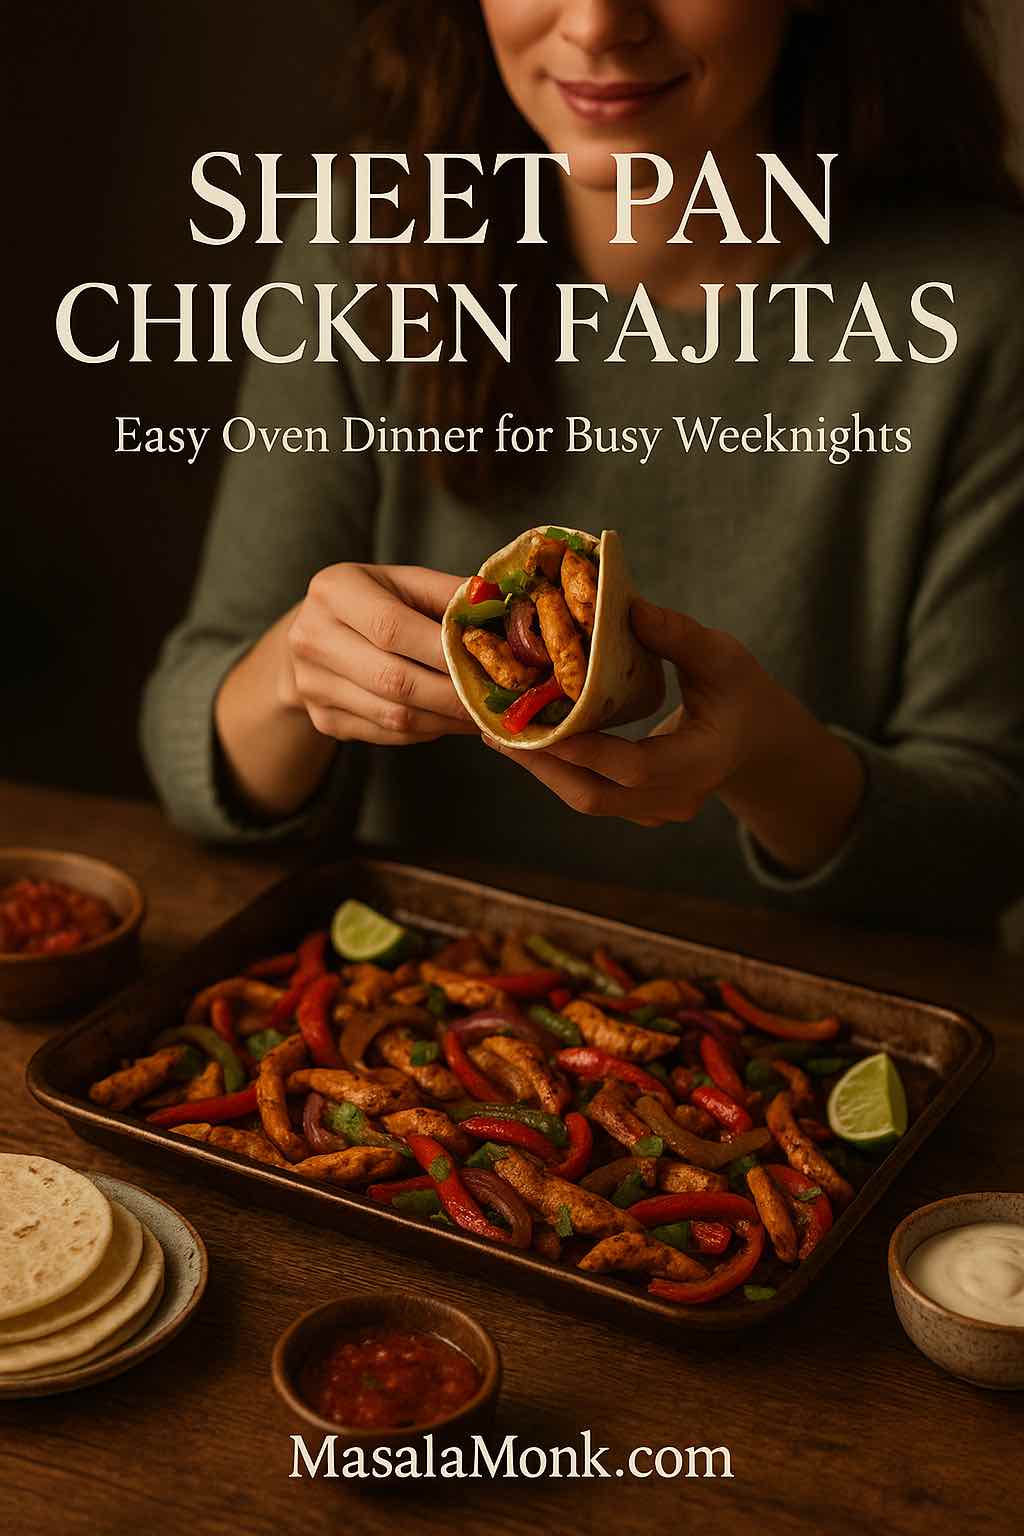
To make the slow-cooked version taste more fajita-like, add some peppers near the end, finish with fresh lime, avoid too much liquid, and use smoked paprika in the seasoning. For more roasted edges and oven-style flavor, try these sheet pan chicken fajitas. They give you the same chicken, peppers, and onion idea with more browning and less slow-cooker softness.

Ingredients You Need

The ingredient list is simple, but each part matters. Good slow cooker fajitas need enough seasoning to stand up to the long cook, enough moisture to keep the chicken juicy, and not so much liquid that the finished chicken and peppers become soupy.

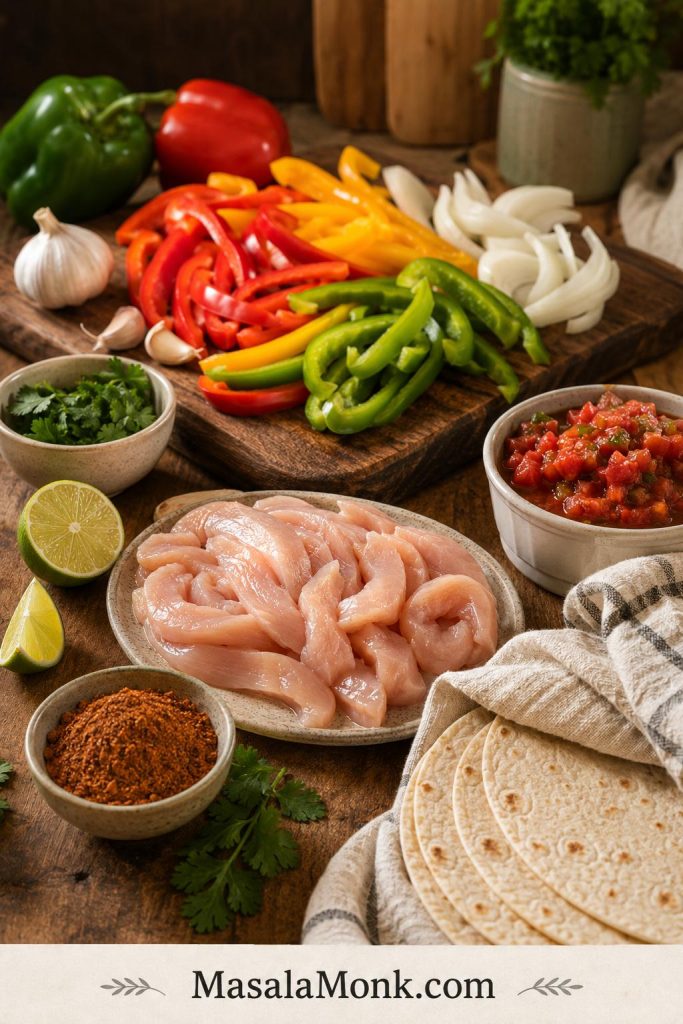
Ingredient checkpoint: the chicken, peppers, onion, seasoning, salsa or Rotel, lime, tortillas, and toppings all support a different part of the final fajita texture.

Ingredients for slow cooker chicken fajitas arranged on a prep surface, including chicken, bell peppers, onion, salsa, fajita seasoning, garlic, lime, tortillas, and cilantro.
Chicken, peppers, onion, seasoning, salsa or Rotel, lime, and tortillas each support a different part of the finished fajita texture.
IngredientWhat it doesUse
ChickenMain proteinBreasts for leaner sliced fajitas; thighs for juicier shredded fajitas
Bell peppersSweetness, color, fajita flavorUse mixed colors for better flavor and appearance
OnionSavory sweetnessYellow, white, or red onion all work
Fajita seasoningMain flavor baseHomemade, packet fajita seasoning, or taco seasoning in a pinch
Salsa, Rotel, or tomatoesMoisture and flavorUse less for tortillas and more for bowls
GarlicDepth and aromaFresh garlic is ideal; garlic powder works if needed
Lime juiceFreshness and balanceAdd after cooking for the liveliest flavor
Tortillas and toppingsTurn the chicken and peppers into dinnerUse tortillas, rice, lettuce cups, or bowls

Chicken Breast vs Chicken Thighs

Choose chicken breasts if you want leaner pieces that can be sliced into strips. They cook well here, but they can dry out if they sit too long, so start checking closer to the shorter end of the timing range.

If chicken breast is your default cut and dry slow-cooker chicken is a recurring problem, this guide to crock pot chicken breast recipes goes deeper into timing, sauce, and keeping lean chicken useful for bowls, wraps, and leftovers.

Choose chicken thighs if you want the most forgiving version. They stay juicier, shred easily, and are especially good for tacos, bowls, and meal prep. If your slow cooker runs hot or dinner timing is unpredictable, thighs are usually easier to work with.

Both breasts and thighs should reach 165°F / 74°C before serving.

Homemade Fajita Seasoning, Packet Seasoning, or Taco Seasoning?

Use what fits the night. A packet of fajita seasoning is fast, easy, and completely acceptable for a weeknight slow cooker dinner. Homemade fajita seasoning gives you more control over salt, heat, smoke, and sweetness.

Taco seasoning also works in a pinch. It may taste a little more like taco chicken than fajitas, but the peppers, onions, lime, and smoked paprika help pull it back toward fajita flavor. If you use a packet, wait until the end before adding extra salt because many store-bought blends are already salty.

Simple Homemade Fajita Seasoning

SpiceAmount
Chili powder1 tablespoon
Ground cumin2 teaspoons
Smoked paprika1 teaspoon
Garlic powder1 teaspoon
Onion powder1 teaspoon
Dried oregano½ teaspoon
Ground coriander½ teaspoon
Black pepper½ teaspoon
Salt1 to 1½ teaspoons
Cayenne pepper⅛ to ¼ teaspoon, optional

This amount seasons about 2 lb / 900 g chicken. If your chili powder or store-bought seasoning already contains salt, reduce the added salt and adjust after cooking.

How to Make Slow Cooker Chicken Fajitas

The easiest method is to add everything at once and cook. That works, especially for shredded tacos and bowls. The better method is almost as easy: add some vegetables at the beginning and some near the end. That small move makes the dish feel more like fajitas and less like slow-cooker chicken stew.

Step 1: Slice the Peppers and Onion

Slice the bell peppers and onion into strips. Keep them similar in size so they cook evenly. Set aside about half of the peppers and onions if you want better texture in the finished fajitas.

Step 2: Build the First Layer

Add half the peppers and onions to the bottom of the slow cooker. This gives the chicken a flavorful base and helps season the cooking juices.

Step 3: Add Chicken, Garlic, Seasoning, and Salsa

Place the chicken on top of the vegetables. Sprinkle the fajita seasoning and garlic over the chicken, then add the salsa, Rotel, or diced tomatoes. Do not add extra water. In most slow cookers, the chicken, peppers, onions, and tomatoes release more liquid than you expect.

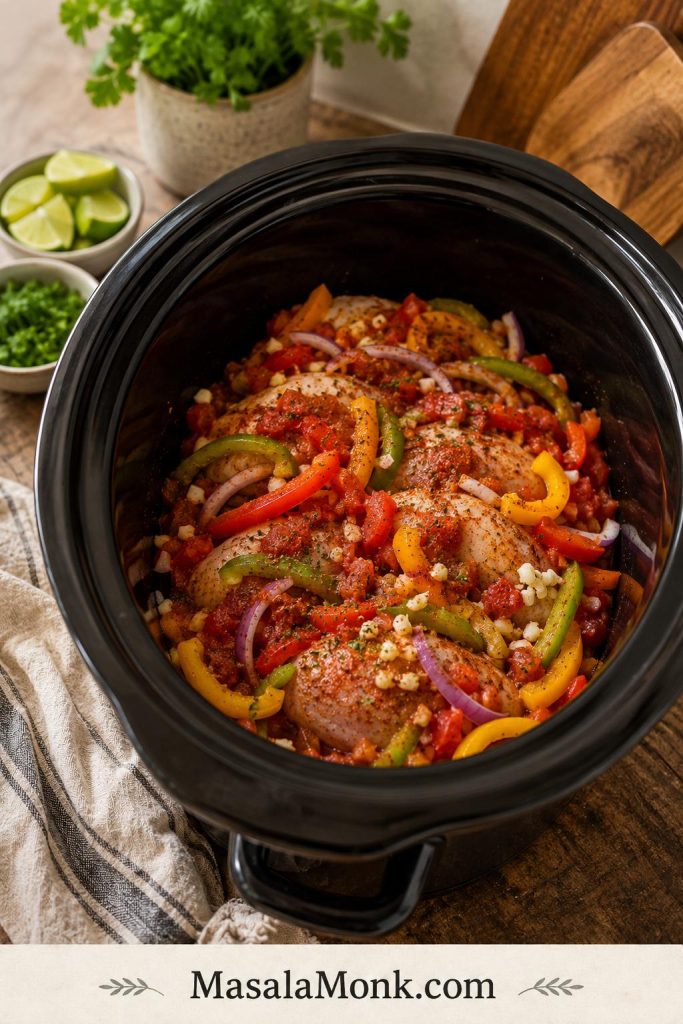
Before the lid goes on: the pot should look seasoned and lightly sauced, not flooded. That setup helps the chicken cook juicy without creating a watery tortilla filling later.

Raw chicken breasts layered in a slow cooker with sliced bell peppers, onions, salsa, garlic, and fajita seasoning before cooking.
Before cooking, the pot should look coated, not drowned. That controlled start keeps the final fajita filling easier to serve.

Step 4: Cook Until the Chicken Is Done

Cook on high for 2½ to 3½ hours or low for 4 to 6 hours. Chicken breasts are usually best closer to the shorter end if you want slices that hold together. Thighs can handle a longer cook and are better for shredding.

Step 5: Add the Remaining Peppers and Onions

Add the reserved peppers and onions during the last 30 to 60 minutes. Use 30 minutes for more bite, or go closer to 60 minutes if you want them softer but still fresher than the vegetables that cooked from the beginning.

Step 6: Slice or Shred the Chicken

Once the chicken reaches 165°F / 74°C, remove it from the slow cooker. Rest it for a few minutes before slicing, or shred it with two forks if you want pulled chicken for tacos, bowls, or leftovers.

Step 7: Manage the Cooking Juices

If the slow cooker has a lot of liquid, ladle some out before returning the chicken. The finished chicken should look shiny and coated, with a little sauce clinging to the peppers, not a pool of liquid under every tortilla. You are not trying to make dry chicken. Instead, keep the chicken and peppers juicy enough to taste good but firm enough to pick up in a tortilla.

Step 8: Finish with Lime and Serve

Stir in fresh lime juice at the end. When the lime goes in, the whole pot should smell brighter. Taste and adjust salt, seasoning, or lime. Serve with warm tortillas, bowls, or whatever leftovers need rescuing tomorrow.

Slow Cooker Timing: Low vs High

Once the pot is set up, timing is the main thing to watch. The goal is not just cooked chicken. It is chicken that is done before it turns stringy.

Slow cookers are not all the same, and chicken breast can go from juicy to dry faster than people expect. Use the times below as a guide, then let temperature and texture decide when the chicken is done. Chicken should reach 165°F / 74°C. You can confirm poultry temperature guidance from FoodSafety.gov.

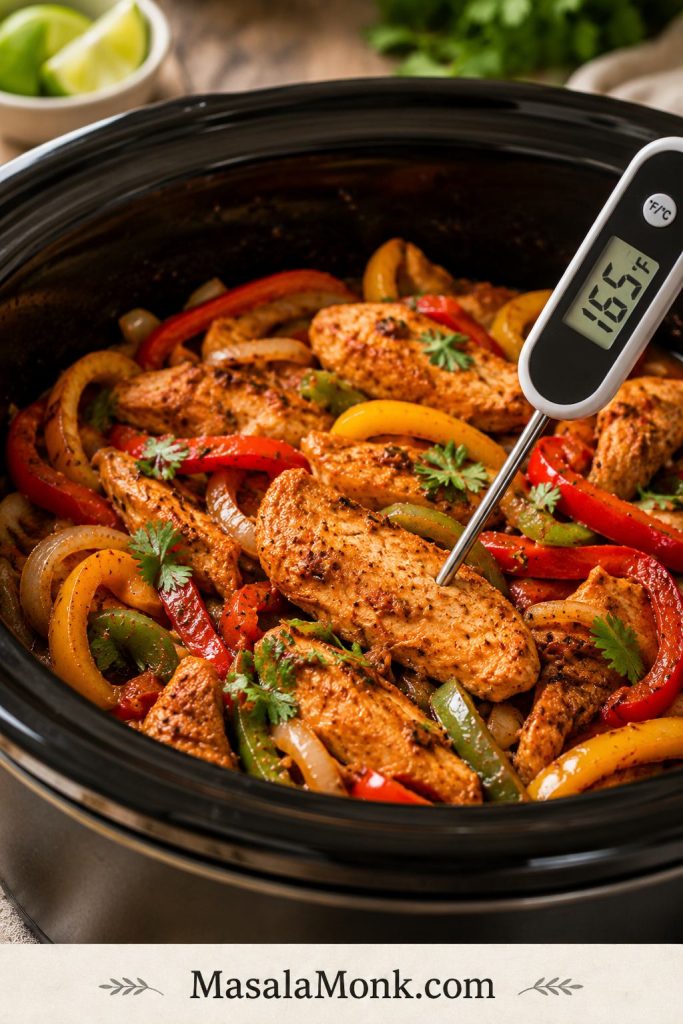
Temperature checkpoint: once the chicken reaches 165°F / 74°C, you can safely slice or shred it and then decide how much cooking juice to keep.

Instant-read thermometer inserted into cooked chicken fajitas in a slow cooker with bell peppers and onions around the chicken.
Use temperature, not just time. Once the chicken reaches 165°F / 74°C, you can safely slice, shred, and finish the filling.
GoalSettingTimeWhat to know
Sliced chicken fajitasLow4 to 5 hoursHelpful when you want the chicken to hold its shape
Shredded chicken fajitasLow5 to 6 hoursWorks well for tacos, bowls, quesadillas, and meal prep
Faster dinnerHigh2½ to 3½ hoursUseful, but check early to avoid dry chicken breast
Chicken thighsLow5 to 6 hoursJuicier and more forgiving than breasts
Holding after cookingWarmAs short as possibleLong holding can make chicken breast dry or stringy

Very thick chicken breasts may need the longer end of the range. If the chicken is done before dinner, remove it from the slow cooker and keep it covered. Return it to the warm chicken and peppers closer to serving time so lean breast meat does not keep cooking while the vegetables sit in the hot pot.

How to Keep Slow Cooker Chicken Fajitas from Getting Watery

If there is one place slow cooker fajitas usually go wrong, it is the liquid. The chicken may taste good, but if it drips through the tortilla, dinner becomes messy fast.

Do not panic if the slow cooker looks juicy when you open the lid. That is normal. The trick is deciding how much of that liquid belongs in the final tortilla filling.

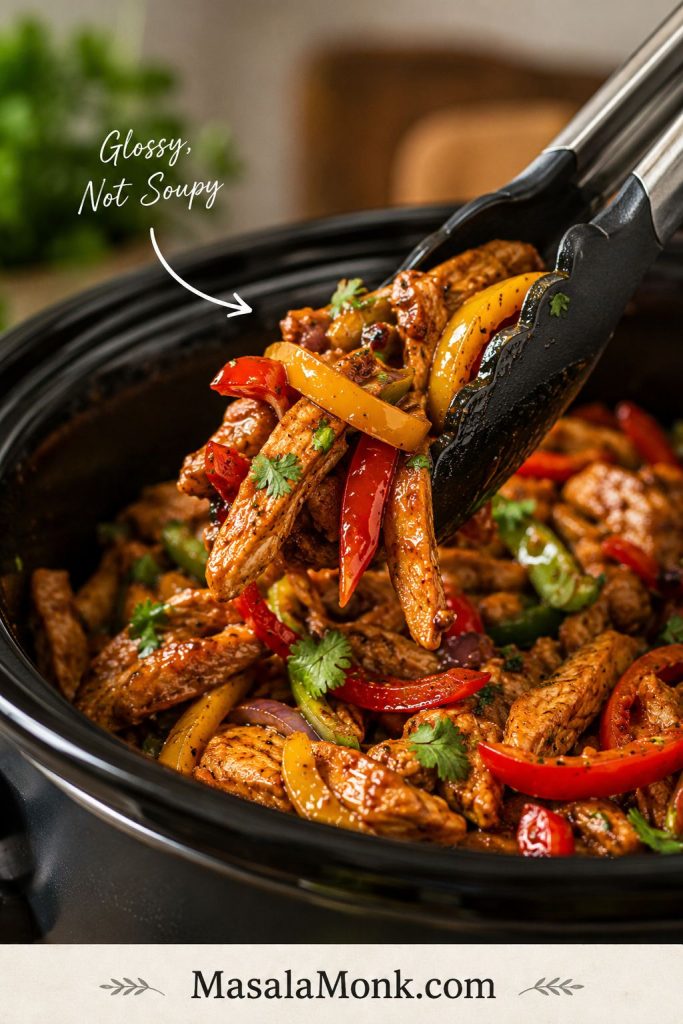
Look for Glossy, Not Soupy

This is the visual cue for tortilla fajitas. The chicken and peppers should be coated with seasoned juices, but the filling should not be loose enough to run through a warm tortilla.

Tongs lifting glossy slow cooker chicken fajita filling with colorful bell peppers and onions from the slow cooker.
This is the texture cue to remember: glossy, not soupy. The chicken and peppers should be coated with seasoned juices, but not swimming if they are going into tortillas.

If past slow-cooker chicken has turned out watery or bland, this is the part that changes it: start with less liquid, add some peppers later, and brighten the pot at the end. A few small choices make the difference between juicy and soggy. For tortillas, think glossy, not soupy. Bowls can stay a little juicier because rice, quinoa, or cauliflower rice can soak up the seasoned liquid.

ProblemFix
Too much salsa, Rotel, or tomatoUse ¾ cup / 180 ml for 2 lb / 900 g chicken if serving in tortillas
Peppers release too much waterAdd half the peppers near the end instead of all at the beginning
Chicken releases a lot of juiceRemove extra liquid before returning sliced or shredded chicken
Tortillas get soggyServe with tongs or a slotted spoon
The pot looks soupyAfter the chicken reaches 165°F / 74°C, remove the lid or set it slightly ajar on high for 20 to 30 minutes to reduce excess liquid
You want bowl-style fajitasLeave it a little juicier for rice, quinoa, or cauliflower rice

How to Fix Watery Fajitas

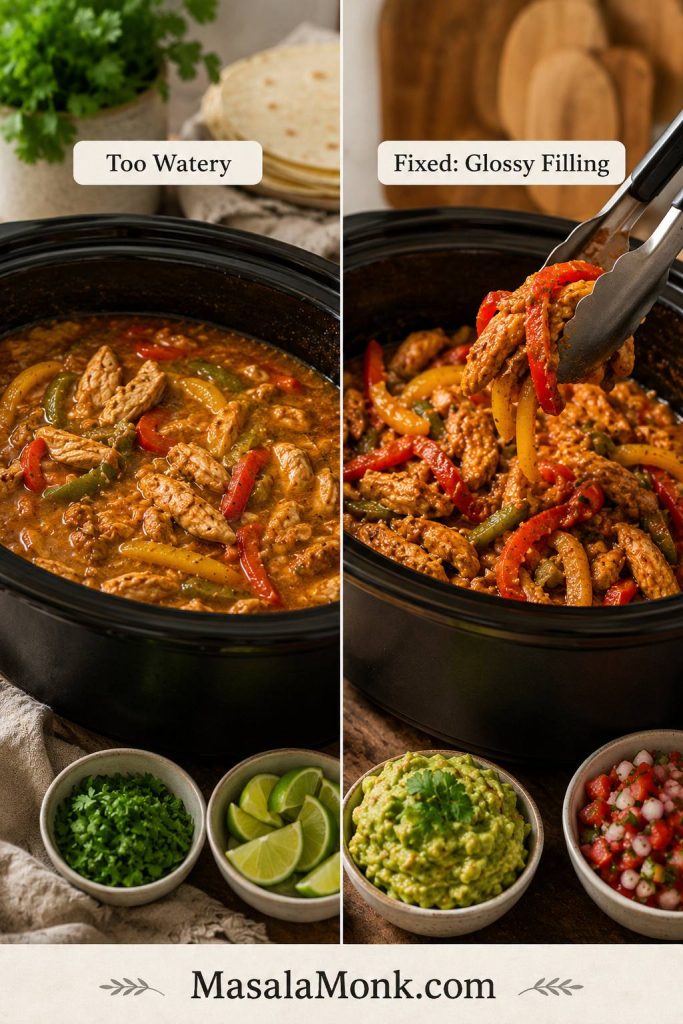
If the pot gave you more liquid than expected, treat it as a final adjustment instead of a failure. Drain, reduce, or lift the filling with tongs so the flavor stays concentrated.

Before and after comparison showing watery slow cooker chicken fajitas on one side and drained glossy chicken fajita filling on the other.
If the pot looks watery, do not panic. Lift the chicken and peppers with tongs, drain or reduce the extra liquid, then add lime so the filling tastes bright instead of diluted.

Before serving, look at the bottom of the slow cooker. A little seasoned juice is fine. However, a pool of liquid means the chicken and peppers should be lifted with tongs, drained with a slotted spoon, or reduced briefly before they go into tortillas.

After the extra liquid is out of the way, the filling tastes more concentrated: smoky, bright, and juicy enough to fold into a tortilla without losing half of it on the plate.

Do not add water at the beginning unless your slow cooker is unusually dry. For most slow cookers, the chicken, vegetables, and salsa or tomatoes create enough moisture on their own.

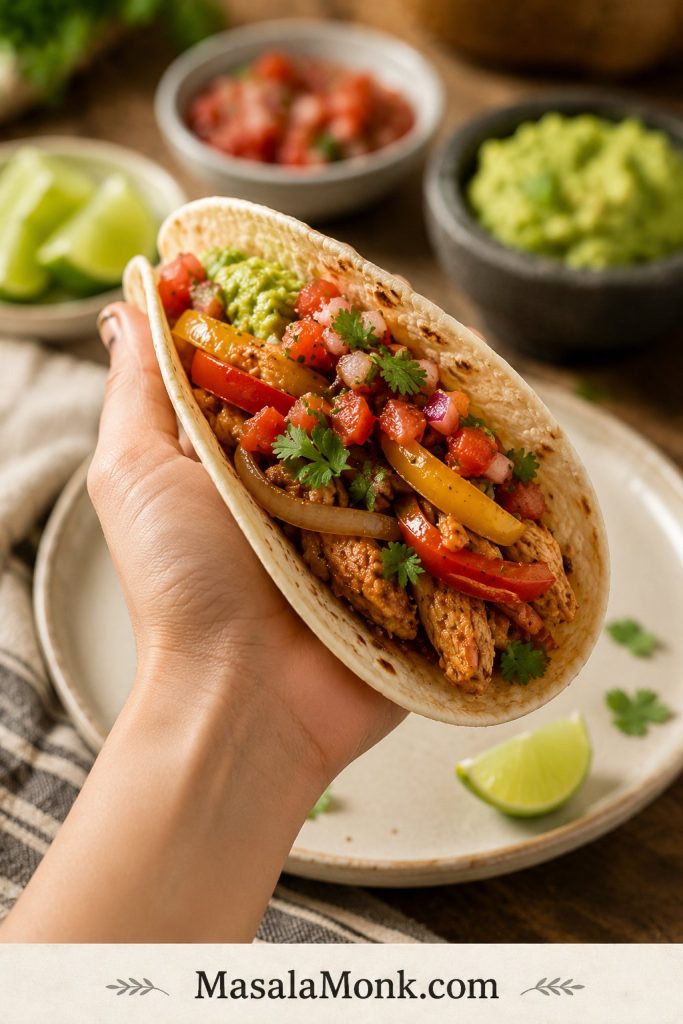
Use the Tortilla Test Before Serving

Before the filling goes to the table, try one tortilla. If it folds neatly and tastes juicy without dripping, the texture is right for fajitas.

Hand holding a warm tortilla filled with slow cooker chicken fajitas, bell peppers, onions, salsa, avocado, and lime nearby.
Then, use the tortilla test. The filling should be juicy enough to taste good, but controlled enough to fold into warm tortillas without soaking, tearing, or dripping everywhere.

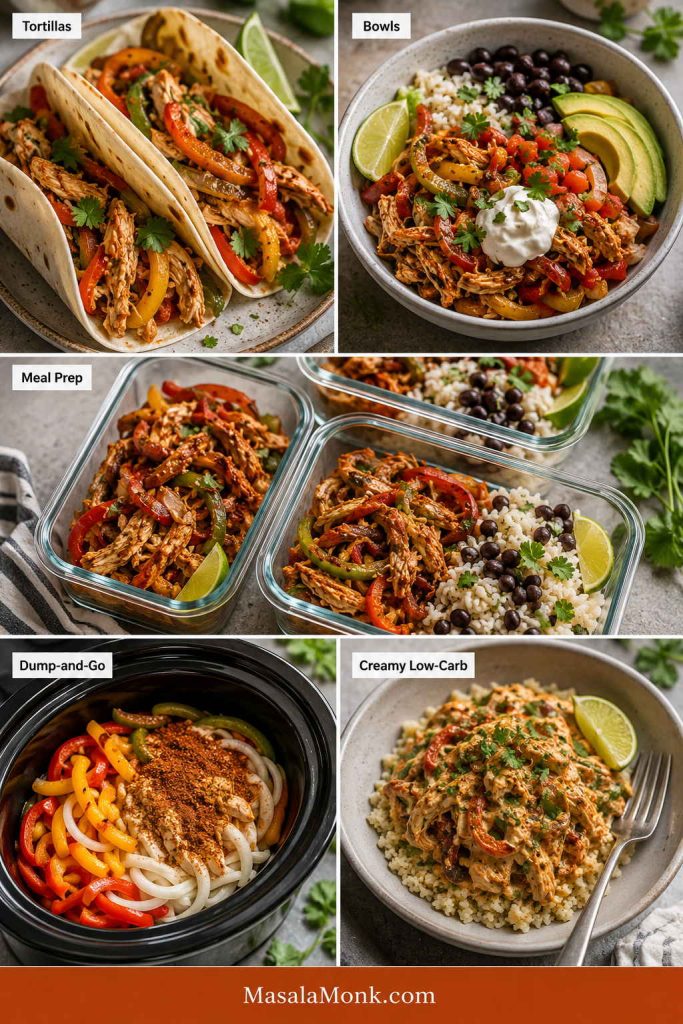
Choose Your Version: Tortillas, Bowls, Meal Prep, or Dump-and-Go

One pot can give you a few different dinners, depending on how much juice you leave behind. Choose the tighter version for tortillas, the juicier version for bowls, the shredded version for meal prep, and the late-pepper version when you want the freshest texture.

Use the visual guide: one batch can become tighter tortilla fajitas, juicier bowls, shredded meal prep, dump-and-go dinner, or creamy low-carb fajita chicken.

Visual guide showing slow cooker chicken fajitas served as tortillas, rice bowls, meal prep containers, dump-and-go style, and creamy low-carb fajita chicken.
Once the chicken is cooked, choose the version that fits the meal. Keep it tighter for tortillas, saucier for rice bowls, shredded for meal prep, or creamy for a low-carb plate.
What you wantLiquidChickenPeppersFinish
Tortilla fajitas¾ cup / 180 mlSliced or chunkyHalf early, half lateDrain well, then add lime
Rice bowls1 cup / 240 mlShredded or chunkyEarly or half-lateKeep some juices
Meal prep¾ to 1 cup / 180 to 240 mlShreddedSofter is finePack toppings separately
Best texture¾ cup / 180 mlSlicedAdd some peppers lateUse lime and tongs
Dump-and-go¾ to 1 cup / 180 to 240 mlShreddedAll at the beginningDrain before serving
Creamy low-carb¾ cup / 180 mlShreddedHalf-lateAdd cream cheese at the end

After the juices are right and the lime goes in, the same batch can become warm tortillas tonight, rice bowls tomorrow, or easy leftovers for lunch.

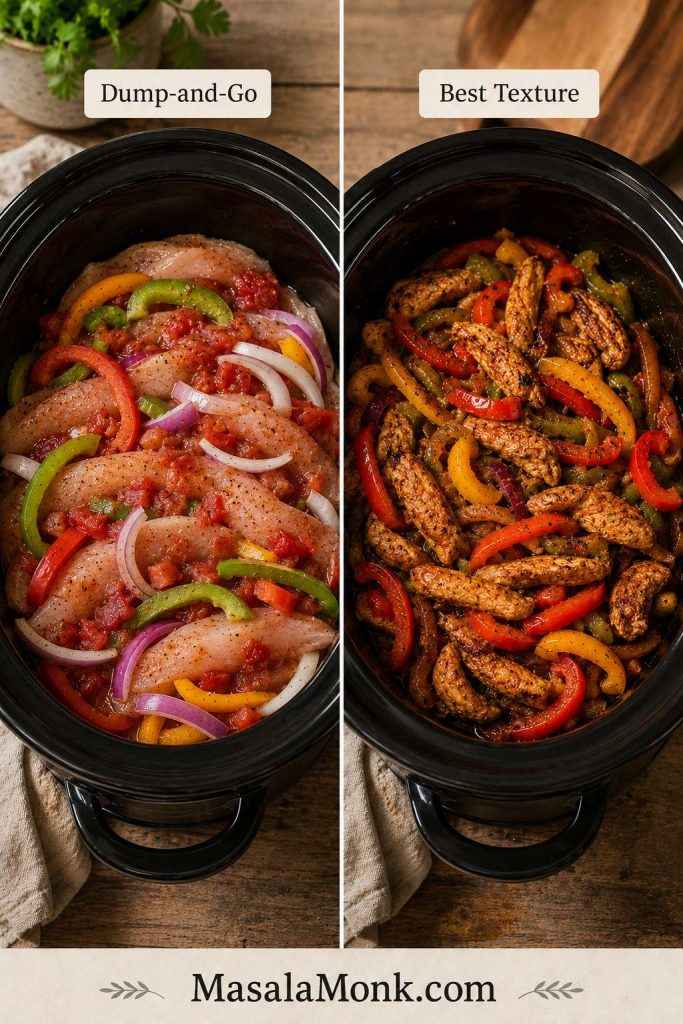
Dump-and-Go vs Best Texture

Both paths work. The fastest path is dump-and-go, while the best-texture version keeps some peppers back so the finished fajitas look brighter and eat less soft.

Comparison of dump-and-go slow cooker chicken fajitas with uncooked ingredients in the pot and best-texture fajitas with cooked chicken and bright peppers.
Dump-and-go is the easiest route, while the best-texture version saves some peppers for the end. That one timing change keeps Crock Pot chicken fajitas brighter and less mushy.

When to Add Peppers and Onions

Once you know whether you are making tortillas, bowls, or meal prep, the next choice is how fresh you want the peppers to feel.

Peppers are where slow cooker fajitas can either feel fresh or fall flat. If they cook for the full time, they become soft and saucy. That is fine for shredded chicken bowls or tacos, but it does not feel as much like classic fajitas.

For the best balance, use the half early, half late method. Early vegetables flavor the chicken. The late peppers should still look colorful and taste sweet, not faded into the sauce.

Add Some Peppers Late

Late peppers are the simplest way to make slow cooker fajitas feel more like fajitas. They add color, sweetness, and bite without requiring a separate skillet.

Fresh sliced red, yellow, orange, and green bell peppers being added to cooked chicken fajitas in a slow cooker.
Add some peppers during the last 30 to 60 minutes when you want more color and bite. This keeps slow cooker fajitas lively without adding another pan to dinner.

If using frozen sliced peppers, add them late and expect a softer, juicier result. Fresh peppers give the best color and bite, but frozen peppers are still useful for quick bowls, tacos, and weeknight dinners.

When you add themResultUse when
At the beginningVery soft peppers and onionsYou want the easiest dump-and-go dinner
Halfway throughBalanced textureYou want a simple family dinner
Last 30 to 60 minutesBrighter, firmer peppersYou want more fajita-like texture
Sauté separatelyMost bite and closest skillet feelYou do not mind one extra pan
Half early, half lateFlavor plus textureYou want the most practical slow cooker method

Shredded vs Sliced Slow Cooker Chicken Fajitas

Once the liquid is under control, the next choice is how you want to eat the chicken. Traditional fajitas usually use sliced meat, but Crock Pot chicken naturally becomes tender enough to shred. Neither option is wrong.

Shredded vs Sliced Chicken

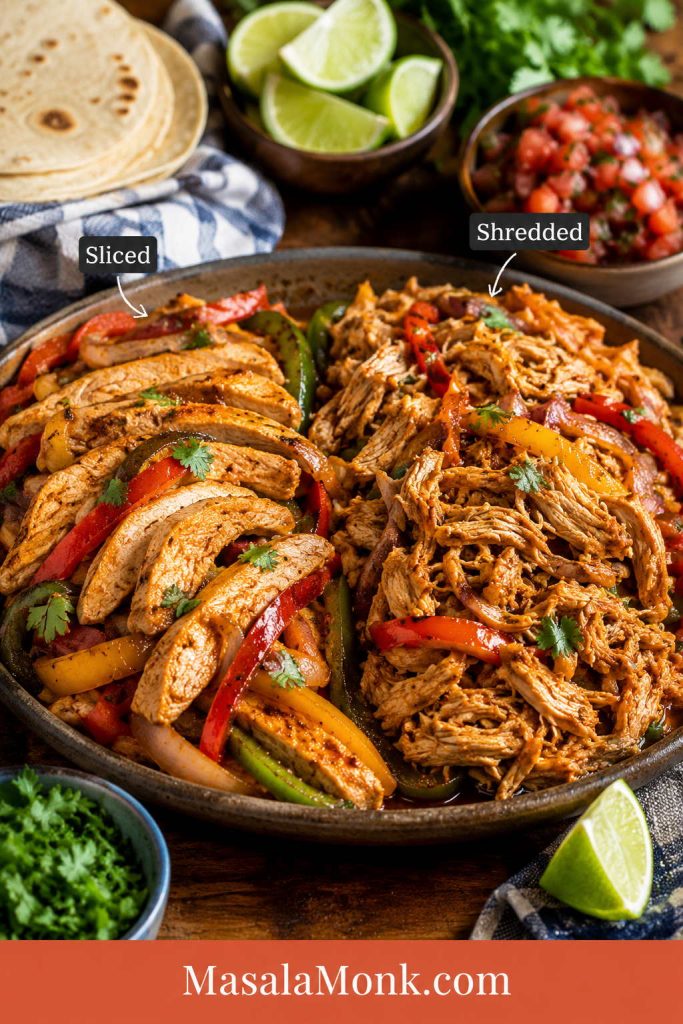
Sliced chicken feels more classic in tortillas. Shredded chicken is easier for tacos, bowls, quesadillas, and leftovers, especially when the juices are controlled.

Side-by-side comparison of sliced slow cooker chicken fajitas and shredded chicken fajita filling with peppers, tortillas, lime, salsa, and cilantro.
Slice the chicken for a more classic fajita feel, or shred it for bowls, tacos, quesadillas, and leftovers. Either way, return it with just enough juice to coat.
StyleUse forHow to do it
Sliced chicken fajitasClassic tortillasCook just until done, rest 5 minutes, then slice across the grain
Shredded chicken fajitasTacos, bowls, quesadillas, leftoversCook until fork-tender, shred with two forks, toss with controlled juices
Chunky chicken fajitasRice bowls and saladsCut cooked chicken into thick pieces and fold back into the peppers and onions

For the most classic fajita feel, slice the chicken and add some peppers late. The easiest meal prep option is shredded chicken with just enough juice to coat.

Troubleshooting Slow Cooker Chicken Fajitas

If the pot looks a little messy at the end, that is normal. Slow cooker fajitas usually need one final adjustment before they become dinner.

If the pot does not look the way you hoped, it is usually one of four easy fixes: too much liquid, peppers that cooked too long, chicken breast that stayed on heat too long, or a finish that needs lime and salt.

Quick Fixes for Common Slow Cooker Fajita Problems

ProblemLikely causeFix
The pot is wateryToo much salsa, Rotel, tomato, or trapped steamDrain extra liquid, reduce it after the chicken is fully cooked, or use ¾ cup liquid next time
Peppers are mushyAll the peppers cooked from the beginningAdd half the peppers in the last 30 to 60 minutes
Chicken breast is dryCooked too long or held on warm too longCheck early, use thighs next time, and return chicken with some juices
Flavor tastes flatSlow cooking muted the seasoningAdd lime juice, salt, smoked paprika, hot sauce, or fresh cilantro
Tortillas get soggyThe chicken and peppers are too wet when assembledUse tongs or a slotted spoon and let liquid drip back into the cooker
Fajitas do not taste fajita-likeNo char, soft peppers, or too much sauceAdd peppers late, sauté peppers separately, or use the sheet pan method next time
Chicken is too dry after chillingIt absorbed liquid in the fridgeReheat with a spoonful of salsa, water, or reserved cooking liquid
Too loose for quesadillasToo much cooking juice left in the meatDrain well and reheat uncovered before adding to tortillas with cheese

From there, the fix is simple: drain a little, brighten with lime, or save the extra juice for bowls. Tortillas need a tighter filling. Quesadillas need the chicken drained well so the cheese and tortilla can crisp instead of steam.

Variations: Dump-and-Go, Rotel, No Tomato, and Creamy Low-Carb

Once the texture is handled, the flavor base can flex around what you have: Rotel, salsa, taco seasoning, no tomatoes, or a creamy finish.

You do not need the exact same jar, can, or seasoning blend every time. Use this section when you want the fastest version, a Rotel version, a no-tomato version, or a creamy low-carb fajita chicken.

Rotel, Salsa, or No Tomato

This choice changes both flavor and moisture. Tomato-based options add a red base, while the no-tomato version stays lighter and depends more on peppers, seasoning, garlic, and lime.

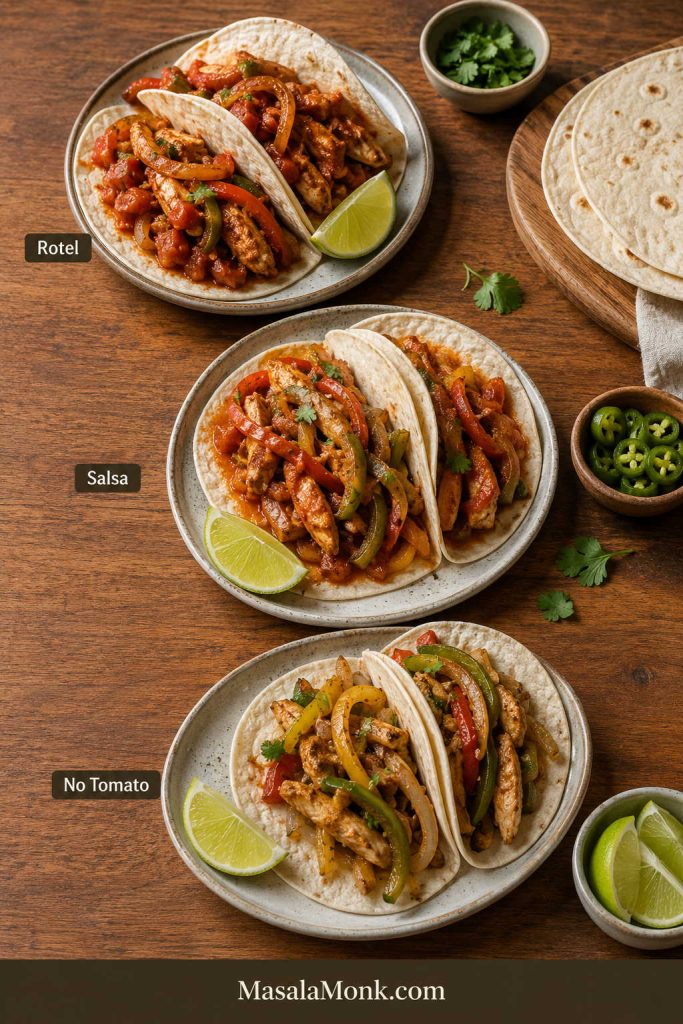
Three slow cooker chicken fajita variations labeled Rotel, Salsa, and No Tomato, each served in tortillas with peppers, onions, lime, and cilantro.
Rotel gives tomato-chile flavor, salsa keeps the recipe shortcut-friendly, and the no-tomato version stays lighter and less saucy. Choose the base based on flavor, moisture, and texture.
VariationWhat changesBest for
4-ingredientUse chicken, peppers and onions, seasoning, and salsa or RotelBusiest nights
RotelUse one 10 oz / 285 g can; drain lightly if very juicyTomato-chile flavor
No tomatoUse seasoning, garlic, lime, peppers, onions, and a small splash of broth only if neededLess watery fajitas
Cream cheeseAdd 3 to 4 oz / 85 to 115 g cream cheese during the last 20 to 30 minutesBowls, lettuce cups, low-carb plates
Taco seasoningUse a packet and adjust salt after cookingShortcut version
Salsa verde toppingAdd after cooking or at the tableBrighter green flavor

Rotel is canned diced tomatoes with green chiles. If you do not have it, use diced tomatoes plus a little chopped green chile, mild salsa, or another tomato-chile blend you like.

No-tomato fajitas need a little extra lime, smoked paprika, garlic, and seasoning so the chicken does not taste flat. For creamy fajita chicken, use the lower amount of salsa or Rotel so the sauce does not become loose.

Creamy Low-Carb Fajita Chicken

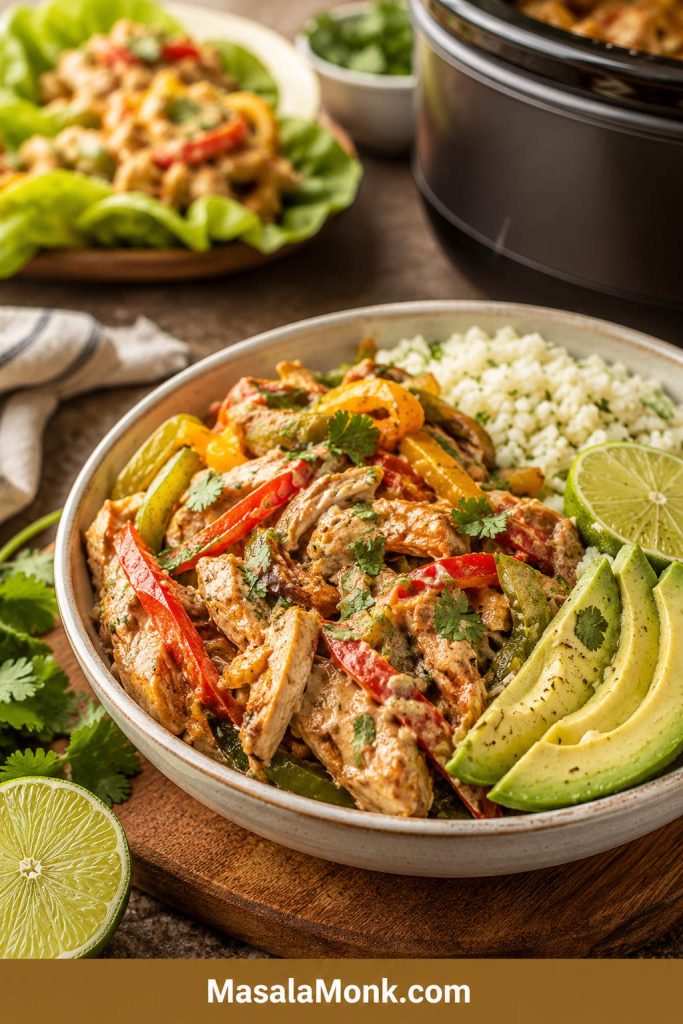
Add cream cheese near the end so the sauce stays smooth and the peppers do not disappear into a heavy base. This version works especially well with cauliflower rice or lettuce cups.

Creamy low-carb slow cooker fajita chicken served in a bowl with bell peppers, avocado slices, lime, cilantro, and cauliflower rice.
For creamy low-carb fajita chicken, stir in cream cheese near the end instead of at the beginning. The sauce should turn smooth and glossy while peppers, lime, and avocado keep the bowl balanced.

A fast dump-and-go Crock Pot chicken fajitas version can be made with chicken, fajita seasoning, one can Rotel, peppers, onions, and lime. It will still work; just drain before serving if the pot looks juicy.

For a brighter green topping instead of more red salsa, a spoon of salsa verde works especially well with the chicken, peppers, lime, and tortillas.

Can You Add Rice to the Slow Cooker?

Cook the rice separately. It is the safer, fluffier option because uncooked rice changes the liquid balance in this recipe and can turn mushy in the slow cooker. For reliable bowls, spoon the chicken, peppers, onions, and some of the juices over cooked rice instead.

Serve It Over Rice

Rice bowls are the place to keep a little more seasoned juice. The rice catches the sauce, while avocado, salsa, cilantro, and lime keep the bowl balanced.

Slow cooker chicken fajita rice bowl with seasoned chicken, bell peppers, white rice, avocado, lime, salsa, cilantro, and a slow cooker in the background.
Rice bowls can stay a little juicier because the rice absorbs the seasoned fajita juices.

If rice texture is where dinner usually goes wrong, this guide on how to cook rice covers stovetop, rice cooker, and Instant Pot timing so your bowl base stays fluffy instead of wet or gummy.

For meal prep, pack the rice and fajita chicken together only after both have cooled. Keep fresh toppings like lettuce, sour cream, avocado, and cilantro separate until serving.

Can You Use Frozen Chicken for Slow Cooker Fajitas?

No. Thaw the chicken first before using it in this recipe. Slow cookers heat gradually, and frozen chicken can take too long to move through unsafe temperatures. FoodSafety.gov’s slow-cooker guidance says frozen meat, poultry, or seafood should be thawed safely before adding it to the slow cooker.

Forgot to thaw? Use a pressure cooker method or cook the chicken separately from frozen with a faster method, then combine it with the peppers, seasoning, salsa, and lime after it is fully cooked. Check that the chicken reaches 165°F / 74°C before serving.

What to Serve with Slow Cooker Chicken Fajitas

Warm tortillas are the classic choice, but this chicken is flexible. One batch can become dinner tonight and a different lunch tomorrow.

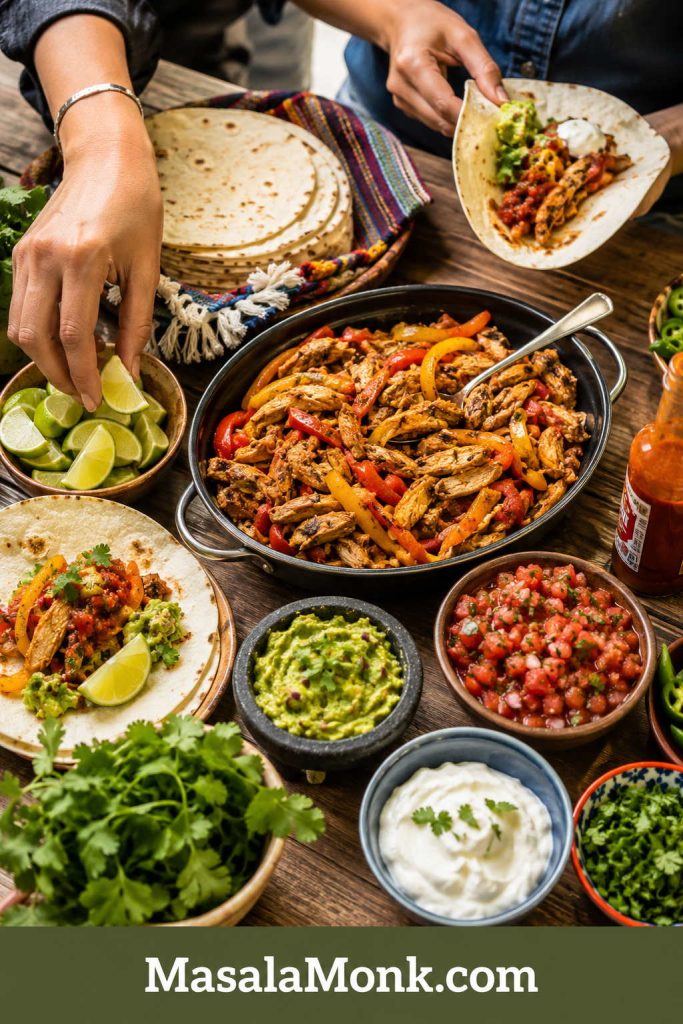
Warm tortillas in a dry skillet for 20 to 30 seconds per side, or wrap a stack in foil and place it in a 250°F / 120°C oven until soft. Soft, warm tortillas fold better, hold the chicken more neatly, and make even a simple Crock Pot dinner feel fresher.

Put the tortillas, lime wedges, avocado, salsa, and hot sauce on the table and let everyone build their own. That is where this slow cooker dinner starts to feel fresh.

Table setup: set the chicken and peppers beside warm tortillas and fresh toppings so everyone can build the fajita they want.

Build-your-own fajita table with slow cooker chicken and peppers, tortillas, lime wedges, guacamole, salsa, sour cream, cilantro, jalapeños, hot sauce, and hands assembling fajitas.
Set out warm tortillas, glossy chicken, peppers, lime, salsa, guacamole, and hot sauce so everyone can build their own fajitas.
Serving ideaWhy it fits
Flour or corn tortillasClassic fajita dinner
Rice bowlsEasy meal prep and filling lunches
Cauliflower riceLower-carb bowl option
Lettuce cupsLighter fajita wraps
TacosFamily-friendly and easy to assemble
QuesadillasOne of the best uses for leftovers
SaladHigh-protein lunch with avocado, lime, and crisp vegetables
NachosCasual snack or game-day style dinner
Pasta or pasta bakeComfort-food variation
CasseroleGood for stretching leftovers into another family dinner

Best Toppings for Chicken Fajitas

Because the chicken is warm and saucy, the best toppings are the ones that wake it up: lime, cilantro, avocado, salsa, crunch, or heat.

  • Sour cream or Greek yogurt
  • Avocado or guacamole
  • Fresh cilantro
  • Lime wedges
  • Shredded lettuce
  • Cheese, shredded or crumbled
  • Salsa or pico de gallo
  • Pickled jalapeños
  • Hot sauce
  • Crushed tortilla chips for bowls or salads

For the creamy avocado route, this guacamole recipe is the easiest topping to put beside warm tortillas, salsa, lime, and fajita chicken.

If you like heat at the table, a thin vinegar-style hot sauce, jalapeño sauce, or smoky chile sauce can wake up the whole plate. This pepper sauce guide gives you several directions, from bright and sharp to smoky and fruity.

Storage, Freezing, and Reheating

Slow cooker chicken fajita filling stores well. Keep tortillas, rice, lettuce, and fresh toppings separate so they do not become soggy.

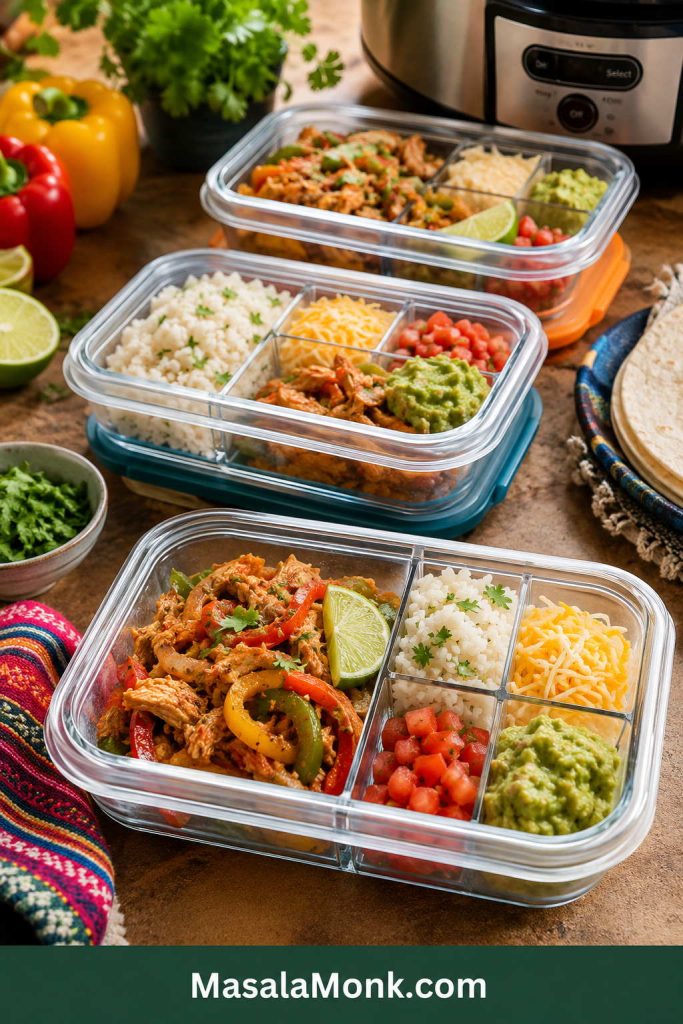
Pack It for Meal Prep

Cool the rice and chicken before packing, then keep wet or fresh toppings separate. That one step keeps fajita bowls from turning soggy in the fridge.

Meal prep containers filled with slow cooker chicken fajitas, rice, peppers, lime wedges, shredded cheese, pico de gallo, guacamole, and separate toppings.
Cool the rice and fajita filling first, then add salsa, guacamole, cheese, and lime after reheating.
Storage methodHow to do it
FridgeStore cooked chicken and peppers in an airtight container for 3 to 4 days
FreezerFreeze cooked chicken and vegetables for 2 to 3 months
Freezer tipFreeze without tortillas or fresh toppings
ReheatingReheat in a skillet or microwave until hot
Meal prep tipPack rice or tortillas separately and add toppings after reheating
To avoid sogginessDrain extra liquid before packing tortillas, tacos, or wraps

If the chicken looks dry after refrigeration, reheat it with a spoonful of salsa, water, or reserved cooking liquid. When it looks too wet, reheat it uncovered in a skillet for a few minutes so some moisture evaporates.

Leftover fajita chicken can also become a baked dinner using the same shredded chicken-and-tortilla logic in this chicken enchilada casserole.

Slow Cooker Chicken Fajitas FAQ

How long do chicken fajitas take in the slow cooker?

Most chicken fajitas take 4 to 6 hours on low or 2½ to 3½ hours on high. Chicken breasts are usually better closer to the shorter end if you want slices. For shredded chicken, cook until the meat is fork-tender and reaches 165°F / 74°C.

Is low or high better for Crock Pot chicken fajitas?

Low is usually better for juicier chicken and more even cooking. High works when you need dinner faster, but chicken breast can dry out if it cooks too long. Start checking around 2½ hours on high, especially if the chicken pieces are not very thick.

Why are my slow cooker fajitas watery?

They are usually watery because a covered slow cooker traps steam while chicken, peppers, onions, salsa, and tomatoes release liquid. Use less salsa, add some peppers late, and drain before filling tortillas.

When should I add peppers and onions?

Add all the peppers and onions at the beginning for the easiest dump-and-go version. For better texture, add half at the beginning and half during the last 30 to 60 minutes so every pepper strip does not turn soft.

Should the chicken be shredded or sliced?

Either works. Sliced chicken feels more like classic fajitas. Shredded chicken is easier in the slow cooker and works well for tacos, rice bowls, quesadillas, nachos, and meal prep.

Can I use taco seasoning instead of fajita seasoning?

Yes. Taco seasoning works in a pinch. It may taste slightly more like taco chicken, but peppers, onions, smoked paprika, and lime help pull the flavor back toward fajitas.

Is Rotel good in Crock Pot fajitas?

Yes. Rotel adds tomatoes, green chiles, and flavor in one can. For 2 lb / 900 g chicken, one 10 oz / 285 g can works well. If the can is very juicy, drain a little first or remove excess liquid after cooking.

Can I make chicken fajitas without tomatoes?

Yes. Skip the salsa, Rotel, or diced tomatoes. Use chicken, peppers, onions, garlic, fajita seasoning, lime, and only a small splash of broth if your slow cooker needs moisture. Add extra lime, smoked paprika, garlic, or seasoning if the flavor tastes flat.

Can I use frozen chicken in the slow cooker?

For this recipe, thaw it first. Slow cookers heat gradually, and frozen chicken can take too long to cook safely. Use a pressure cooker or another faster method if you need to cook chicken from frozen, then check that it reaches 165°F / 74°C.

Can I add rice to the same slow cooker?

Cook rice separately and serve the fajita chicken over it. Uncooked rice changes the liquid ratio and can become mushy in this recipe. For meal prep, cool the rice and chicken before packing them together.

What can I make with leftover chicken fajitas?

Use leftovers in quesadillas, tacos, rice bowls, salads, nachos, or casseroles. Drain juicy chicken before adding it to tortillas or quesadillas. Reheat dry leftovers with a spoonful of salsa or cooking liquid.

Final Note

This slow cooker dinner works because it solves the hard part before dinner starts. Keep the filling glossy, add a handful of peppers late, squeeze in lime at the end, and the pot tastes brighter than a slow cooker dinner usually does.

That is the kind of dinner that feels easy before you eat it and useful again the next day.

If you make it, leave a comment with the version you chose: tighter tortilla fajitas, saucier bowls, dump-and-go, or creamy low-carb. That choice helps other readers decide which path to take.

Posted on Leave a comment

Chicken and Chorizo Recipe

Dark skillet filled with boneless chicken pieces, sliced chorizo, peppers, herbs, and glossy red tomato sauce, with rice and bread behind it.

Chicken and chorizo is the meal you make when you want one pan to taste like it worked harder than it did. The chorizo releases smoky paprika oil, the chicken browns in it, and the tomato-pepper mixture turns rich enough to spoon over rice, toss with pasta, mop up with bread, or finish with cream.

Start with the stovetop smoky tomato version below. Once the chicken is simmering, you can keep it rustic, make it creamy, add orzo, serve it over rice, or use the guide to move the same flavors toward pasta, paella, a tray bake, or the slow cooker.

This is the kind of recipe that helps when dinner feels undecided. You do not have to commit to pasta, rice, or cream at the start. Build the smoky tomato mixture first, then choose the version that fits the night. It feels bigger than a quick dinner, but it still behaves like one.

Quick Answer

The best easy chicken and chorizo recipe is a one-pan tomato dinner: render Spanish-style chorizo, brown chicken thighs in the smoky oil, then simmer with peppers, garlic, tomatoes, paprika, and stock until the mixture coats the chicken.

Chicken thighs give the juiciest result, and firm Spanish-style chorizo is the easiest to cook with. Breast works too, but it needs gentler simmering. Mexican chorizo can be used, but cook it fully first because it behaves like raw seasoned sausage, not sliced cured chorizo.

Add cream at the end for a softer, richer finish. For orzo, add more stock and simmer it into a one-pot meal. Toss the tomato-chorizo mixture with pasta if you want pasta night. Use a paella method from the start if rice is the main event.

Chicken and Chorizo at a Glance

Start withOne-pan tomato chicken and chorizo
Total time35–40 minutes
Most forgiving chickenBoneless skinless chicken thighs
Easiest chorizoFirm Spanish-style cooking chorizo or cured chorizo
Main panLarge deep skillet or sauté pan with lid, ideally 28–30cm / 11–12 inch
Chicken doneness165°F / 74°C in the thickest pieces
Watch forExtra chorizo oil

Before You Start

Before you start, decide only one thing: are you making the smoky tomato version, the creamy version, or the orzo version? The first steps stay the same, but the liquid changes later.

  • Classic smoky tomato version: start with less stock and reduce until the mixture coats the chicken.
  • Creamy chicken and chorizo: spoon off extra chorizo oil before adding cream, or the finish can feel heavy.
  • Orzo version: use more stock and stir often because orzo thickens quickly.
  • Rice version: serve over cooked rice unless you are following a dedicated paella-style method.

Make this stovetop smoky tomato version first if you are unsure; it is the base for almost every direction below.

Decided your version? Go to the recipe card, or compare the chicken and chorizo variations first.

Recipe Card: One-Pan Chicken and Chorizo

One-Pan Tomato Chicken and Chorizo

A smoky, saucy meal made with chicken, chorizo, tomatoes, peppers, garlic, smoked paprika, and an optional creamy finish.

Prep Time10 minutes
Cook Time25–30 minutes
Total Time35–40 minutes
Servings4
EquipmentLarge deep skillet or sauté pan with lid, tongs, wooden spoon, sharp knife, chopping board, measuring jug

Ingredients

  • 600g / 1.3 lb boneless skinless chicken thighs, cut into large bite-size pieces
  • 120–150g / 4–5 oz firm Spanish-style chorizo, sliced or diced
  • 1 medium onion, finely chopped
  • 1 large bell pepper or 2 small bell peppers, sliced
  • 3–4 garlic cloves, minced
  • 1 tbsp tomato paste
  • 1–1½ tsp smoked paprika
  • 1 tsp dried oregano or mixed herbs
  • 400g / 14 oz canned chopped tomatoes or passata
  • 150–250ml / ⅔–1 cup chicken stock
  • 1 tbsp olive oil, only if the skillet needs it
  • Salt and black pepper, to taste
  • Small handful parsley or basil, chopped
  • Squeeze of lemon juice, to finish

Optional Creamy Finish

  • 100–180ml / ⅓–¾ cup cream
  • 20–30g parmesan, finely grated
  • 1–2 handfuls spinach

Instructions

  1. Render the chorizo. Heat a large deep skillet over medium heat. Add chorizo and cook for 2–3 minutes, until red oil appears and the edges start to crisp.
  2. Control the oil. Keep a glossy coating in the pan, but spoon off any shallow red pool before the dish turns heavy.
  3. Brown the chicken. Add the chicken pieces, season lightly, and brown for 4–5 minutes. They do not need to cook through yet.
  4. Soften the vegetables. Add onion and peppers. Cook for 4–5 minutes, then add garlic for 30 seconds.
  5. Build the smoky base. Stir in tomato paste, smoked paprika, and oregano. Cook for 1 minute so the paste darkens and the spices bloom.
  6. Simmer gently. Add tomatoes or passata and 150ml / ⅔ cup stock. Scrape the pan, cover loosely, and simmer for 10–12 minutes.
  7. Reduce until glossy. Uncover and simmer for 5–8 minutes, until the sauce coats the chicken and leaves a light spoon trail. Add stock if it gets too thick.
  8. Make it creamy, if you like. Lower the heat, then stir in cream, parmesan, and spinach. Simmer gently for 2–4 minutes without boiling hard.
  9. Finish fresh. Add parsley or basil and lemon juice. Taste before adding salt because chorizo and stock become stronger as they reduce.
  10. Check doneness. Chicken should reach 165°F / 74°C in the thickest pieces before serving.

Recipe Notes

  • Pan size: a wide 28–30cm / 11–12 inch skillet helps the chicken brown and the tomatoes reduce. If yours is smaller, brown the chicken in batches.
  • No lid? Use a sheet pan, large plate, or foil loosely over the skillet, or simmer uncovered with extra stock nearby. Watch the liquid and add a little more as needed.
  • Stock amount: start with 150ml for a thicker result. Use up to 250ml if your skillet is wide, your tomatoes are thick, or you prefer a looser finish.
  • Chorizo strength: if your chorizo is very salty, spicy, or oily, start closer to 120g.
  • Buying cue: look for firm Spanish-style chorizo that can be sliced or diced. If it is soft and loose like sausage meat, cook it fully first.
  • Tomato paste: 1 tbsp keeps the tomato flavor balanced. Use 2 tbsp if you want it deeper.
  • Chicken breast: use about 500g / 1.1 lb and simmer more gently. Breast cooks faster than thighs.
  • Mexican chorizo: cook it fully first, breaking it up like sausage meat, then continue with the recipe.
  • Lighter plate: use 100–120g chorizo and add extra peppers, spinach, peas, beans, or greens.
  • Thicker result: simmer uncovered for a few extra minutes.
  • Looser result: thin with stock a little at a time.

This is the point where the recipe starts paying you back: the chicken is tender, the smoky tomato mixture is rich, and the side dish almost chooses itself.

Sauce Texture Cue

Before choosing a variation, check the sauce texture. It should look glossy and thick enough to coat the chicken, not like separate pieces sitting in liquid.

Close-up of boneless chicken pieces and sliced chorizo coated in thick red tomato sauce with peppers and herbs.
At the finish, the sauce should cling to the chicken instead of dripping away; that is your cue that the tomatoes have reduced enough.

Need a different finish? Jump to creamy chicken and chorizo, rice, orzo, or pasta, or troubleshooting.

More Helpful Chicken and Chorizo Tips

Why This Chicken and Chorizo Recipe Works

The chorizo is not just an add-in. It is the flavor starter. As it fries, it releases paprika-rich oil that seasons the chicken, vegetables, and tomatoes. That is why the recipe begins with chorizo instead of plain oil.

The chicken is browned before it simmers, so the pieces taste savory instead of boiled. Tomato paste gets a short moment in the hot oil, which deepens the whole dish. Peppers add sweetness, stock gives the chicken enough moisture to finish cooking, and lemon or herbs at the end keep the richness in check.

By the time the tomatoes reduce, you are looking for a smoky, garlicky, slightly sweet mixture that clings to the chicken instead of sitting thin around it. That is when this stops feeling like chicken in tomato sauce and starts feeling like something you want to put in the middle of the table.

The smoky tomato mixture tastes good before you add cream, pasta, or rice, which is what makes it so flexible. Keep it rustic for a saucy skillet meal, add cream for comfort, stir in orzo for one-pot ease, or spoon it over rice when you want something simple.

What This Tastes Like

This is smoky, tomato-rich, and savory, with a little sweetness from the peppers and a salty paprika edge from the chorizo. The lemon and herbs at the end make the whole skillet taste brighter instead of heavy.

In its smoky tomato form, the skillet is bolder and brighter, especially with rice, potatoes, or a torn piece of bread. Cream makes it softer and richer, parmesan gives the finish more body, orzo turns it cozy and spoonable, pasta makes it glossy, and rice keeps it simple.

Ingredients You’ll Need

Chicken and Chorizo Ingredients at a Glance

The ingredient list is simple, but the order matters. Chorizo starts the flavor, chicken browns in that oil, and tomatoes, peppers, garlic, smoked paprika, and stock turn it into a flexible skillet sauce.

Raw boneless chicken thighs on a board with sliced chorizo, peppers, tomatoes, stock, spinach, cream, parmesan, garlic, paprika, lemon, and herbs.
The flavor starts before the sauce: chicken thighs, firm chorizo, smoked paprika, garlic, peppers, tomatoes, and stock all build the base.

Chicken Thighs or Chicken Breast

Chicken thighs are the most forgiving choice because they stay juicy while the tomatoes simmer down. They also hold their own against the smoky, salty richness of chorizo.

Breast works for a leaner or quicker meal. Cut it into larger pieces, brown it lightly, and simmer gently. Smaller pieces can dry out quickly once the tomatoes start reducing.

If keeping breast juicy is usually the problem, this Baked Chicken Breast Recipe will help with timing and texture.

Best Chorizo to Buy

For this recipe, the easiest choice is firm Spanish-style cooking chorizo or cured chorizo that can be sliced or diced. It should release smoky red oil as it fries and leave little browned edges in the skillet.

Mild chorizo gives you more control, especially if you are cooking for family. Spicy chorizo works well, but taste before adding extra paprika or pepper. Diced chorizo is convenient, while sliced chorizo gives better browned edges and a more visible finished dish.

Avoid a very oily chorizo for the creamy version unless you are ready to spoon off extra fat before the cream goes in. Soft, raw, loose chorizo should be cooked fully first and treated like Mexican chorizo.

Spanish Chorizo vs Mexican Chorizo

Spanish-style cooking chorizo or cured chorizo slices cleanly, releases smoky paprika oil, and gives the tomatoes their deep red flavor.

Mexican chorizo is usually raw, soft, and crumbly. It can still taste excellent with chicken, but it changes the texture. Cook it fully first, breaking it up like sausage meat, then build the tomatoes around it. The finished dish will be looser and meatier, not dotted with neat slices of chorizo.

Side-by-side comparison of sliced Spanish-style chorizo and soft crumbly Mexican-style chorizo with labels explaining how each is used.
Choose cured Spanish-style chorizo for clean slices and paprika oil. Cook soft Mexican-style chorizo through first, like fresh sausage.

For more on the ingredient difference, see Food & Wine’s guide to Spanish and Mexican chorizo.

A good amount for 4 servings is 120–150g / 4–5 oz chorizo. More than that can push the final dish toward oily or salty unless you balance it with potatoes, beans, rice, or extra vegetables.

Tomatoes, Peppers, Garlic, and Paprika

Canned chopped tomatoes make the finish rustic and spoonable. Passata gives a smoother result. Tomato paste adds depth, especially when it cooks for a minute in the chorizo oil before the liquid goes in.

Bell peppers are a natural match for chorizo. Red, yellow, and orange peppers add sweetness; green pepper gives a sharper edge. Garlic should go in after the onion and peppers have softened so it does not burn.

Smoked paprika reinforces the chorizo flavor. Use it carefully if your chorizo is already very smoky. The goal is rounded smokiness, not a harsh finish.

Stock, Salt, and Cream

Stock loosens the tomatoes and helps the chicken finish cooking. Start with 150ml / ⅔ cup for a thicker result. Use closer to 250ml / 1 cup if you prefer a looser finish or plan to add orzo.

Taste at the end, not the beginning. Chorizo, stock, parmesan, and olives can all become more intense as they reduce, so early seasoning can turn too salty later.

Cream is optional. Use 100ml / about ⅓ cup for a lightly creamy finish, or up to 180ml / ¾ cup for a richer one. Add it at the end, over lower heat, and simmer gently. A hard boil can make dairy split or turn greasy.

How to Make Chicken and Chorizo

1. Render the Chorizo First

Start the chorizo in a dry or barely oiled skillet over medium heat. Within a few minutes, the bottom should turn glossy and red-orange. This is the smell that tells you the recipe is going somewhere: smoky, salty, and already halfway to dinner.

Sliced chorizo frying in a dark skillet with red-orange oil forming around the crisping edges.
Give the chorizo its own minute first; as the edges crisp, the red oil becomes a smoky seasoning for the whole skillet.

Control the Chorizo Oil

Keep a glossy coating in the skillet, but spoon off any shallow red pool before moving on. That small bit of control keeps the finished dish rich instead of heavy.

Two-panel comparison showing a thin glossy coating of red chorizo oil beside a skillet with too much pooled red oil.
Keep the shine, lose the puddle: a thin chorizo oil coating adds flavor, while a deep pool can make the tomato sauce feel heavy.

2. Brown the Chicken in the Chorizo Oil

Add the chicken pieces and let them take on color. They do not need to cook through yet. Browning creates a better base and helps the chicken taste seasoned from the start.

Bite-size boneless chicken pieces browning in red chorizo oil in a dark skillet, with sliced chorizo pushed to one side.
Before simmering, sear the boneless chicken pieces in chorizo oil so they bring browned flavor into the sauce instead of tasting boiled.

In a crowded skillet, brown the chicken in two batches. Crowded chicken steams, and steamed chicken does not give the same depth.

3. Build the Tomato-Pepper Base

Add onion and peppers and cook until they begin to soften. Garlic goes in next, followed by tomato paste, smoked paprika, and oregano. The cue is a smoky, savory smell before the tomatoes go in.

Cooking the tomato paste for even one minute makes the final flavor richer. It is a small step that keeps the tomatoes from tasting thin or raw.

Tomato paste, smoked paprika, garlic, onions, and peppers cooking in red chorizo oil in a dark skillet before tomatoes are added.
After the chicken browns, briefly fry the tomato paste and smoked paprika; this turns a simple tomato sauce into a deeper, smokier one.

4. Simmer Until It Coats the Chicken

Add tomatoes and stock, then simmer gently. Keep it at a quiet bubble. You want the chicken to finish gently while the tomatoes thicken around it. As the mixture reduces and the chorizo oil folds in, it will turn darker, glossier, and more spoonable.

At this point, the skillet should look like dinner, not separate pieces sitting in liquid: red oil folded in, chicken coated, peppers soft, and everything smelling smoky enough to make rice or bread feel obvious.

You’ll know it is ready when it coats the chicken and leaves a light trail as you drag a spoon through the skillet. At this stage, you should want bread nearby even if you planned rice.

Spoon dragged through thick tomato-chorizo sauce in a skillet, leaving a visible trail with chicken and chorizo pieces around it.
A spoon trail is the easiest visual test: when the sauce parts for a moment, it is thick enough to coat the chicken.

If the chicken is cooked but the skillet still looks thin, simmer uncovered for a few more minutes. Oil pooling on top is your cue to spoon some off. If it gets too thick or tastes too rich, stock, lemon juice, and herbs will bring it back.

5. Finish Based on the Version You Want

For a brighter tomato finish, add herbs and lemon. To make it creamy, lower the heat before stirring in cream and parmesan. Orzo needs extra stock and direct simmering, while pasta works best when the mixture stays thicker and loosens later with pasta water.

Substitutions and Easy Swaps

Use what you have. This is not the kind of recipe that falls apart because you used one pepper instead of two or swapped thighs for breast. Keep the smoky tomato mixture, adjust the liquid, and you still have a good pan of food.

IngredientEasy swapWhat changes
Chicken thighsChicken breast or drumsticksBreast cooks faster; drumsticks need longer.
Spanish chorizoMexican chorizo cooked fully first, or smoked sausage plus smoked paprikaThe texture may become looser or less smoky.
Bell peppersCourgette, mushrooms, peas, spinach, green beans, kaleAdd delicate greens near the end.
Canned tomatoesPassata, crushed tomatoes, fresh chopped tomatoesFresh tomatoes may need longer to reduce.
Chicken stockWater plus bouillon, vegetable stockWatch salt if using cubes or powder.
CreamCrème fraîche, cream cheese, extra stock, pasta waterAdd dairy over low heat to avoid splitting.
ParmesanCheddar, manchego, pecorino, or skip itSaltiness changes, so taste before seasoning.
Parsley or basilCoriander, chives, lemon zestUse a fresh finish to cut the richness.

If you are using smoked sausage instead of chorizo, the skillet logic is similar to this Kielbasa and Potatoes Recipe: brown the sausage first, then let its flavor carry the rest of the meal.

Back to recipe card · Back to table of contents

Choose Your Chicken and Chorizo Variation

Start with the smoky tomato pan recipe first. From there, the table below helps you change the meal without turning the chicken dry, the finish greasy, or the rice mushy.

Already know what you want? Jump to creamy, rice, orzo, or pasta, or tray bake and slow cooker.

Chicken and Chorizo Variation Guide

Four-panel guide showing chicken and chorizo as a tomato skillet, creamy skillet, orzo dish, and rice bowl.
Once the base skillet is right, choose the finish by texture: bright tomato, silky cream, spoonable orzo, or fluffy rice.

Not sure which version to make? The smoky tomato version is the safest weeknight choice. Cream makes it softer and richer, orzo turns it into a full one-pot meal, and rice works best when it is cooked separately or handled with a paella-style method.

You want…Best way to make itWhat to watch
Classic pan mealMake the smoky tomato version as written.Keep it rich, not oily.
Creamy chicken and chorizoAdd cream and parmesan at the end.Lower the heat so the cream does not split.
Chicken and chorizo with riceServe over cooked rice or use a dedicated rice method.Rice needs planned liquid, not guesswork.
Chicken and chorizo orzoAdd orzo and extra stock to the skillet.Stir often because orzo sticks.
Chicken and chorizo pastaUse the tomato-chorizo mixture as a coating for short pasta.Loosen with pasta water, not too much stock.
Chicken and chorizo paellaUse the dedicated paella recipe.Paella needs rice and liquid control from the start.
Chicken and chorizo jambalayaUse Cajun seasoning and long-grain rice.It needs a separate rice-pot method.
Chicken and chorizo tray bakeUse thighs, potatoes, peppers, tomatoes, and chorizo.Do not crowd the tray.
Slow cooker chicken and chorizoUse thighs or drumsticks with less stock.Add cream, pasta, or orzo late.
Lighter chicken and chorizoUse less chorizo and add greens, beans, or extra peppers.Keep it tomato-based instead of creamy.

Creamy Chicken and Chorizo

Creamy chicken and chorizo is the softer, richer version — the one to make when you want the smoky tomato skillet to feel a little more comforting. Cream rounds off the paprika heat, parmesan gives the finish body, and spinach or peas keep the plate from feeling too heavy.

Creamy chicken and chorizo in a dark skillet with boneless chicken pieces, sliced chorizo, spinach, herbs, and pale orange tomato cream sauce.
Wait until the tomato-chorizo sauce has calmed down before adding cream; gentle heat keeps the finish smooth, glossy, and rich.

Make the smoky tomato version first, let it reduce until the chicken is cooked, then lower the heat before adding cream. Use 100ml / about ⅓ cup cream for a lightly creamy finish, or up to 180ml / ¾ cup for a richer one. Add 20–30g parmesan, stir gently, and simmer for 2–4 minutes, just until everything turns silky.

Spinach, peas, mushrooms, and basil all work well here. Lemon juice is small but useful because it cuts through the chorizo and cream. A thick creamy finish can be loosened with stock, milk, or pasta water.

The same gentle-heat rule matters in this Cream of Mushroom Chicken Recipe too.

Creamy rule: remove excess chorizo oil before adding cream. Too much oil plus dairy can make the finish feel heavy or split-looking.

Lighter Chicken and Chorizo

A lighter plate is easy if you let a smaller amount of chorizo do the seasoning. Use 100–120g chorizo, chicken breast or trimmed thighs, extra peppers, spinach, courgette, beans, or greens, and keep the tomatoes bright instead of creamy.

Serve it with salad, cauliflower rice, steamed greens, or a smaller portion of rice rather than pasta or potatoes. Start with little or no added oil because the chorizo will season the skillet on its own.

Chicken and Chorizo with Rice, Orzo, or Pasta

Choose your starch: rice, orzo, or pasta.

Three-panel comparison showing chicken and chorizo over white rice, mixed with orzo, and tossed with short pasta.
Rice, orzo, and pasta need different moves: serve rice underneath, simmer orzo directly in the sauce, and loosen pasta with a splash of pasta water.

Chicken and Chorizo with Rice

For the easiest chicken and chorizo with rice, serve the tomato-chorizo mixture over cooked rice. This keeps the chicken tender, the texture controlled, and the rice from turning mushy. White rice, brown rice, pilaf, and cauliflower rice all work.

Bowl of white rice topped with boneless chicken pieces, sliced chorizo, peppers, herbs, lemon, and red tomato sauce.
Cooked rice keeps this version simple: spoon the bold tomato-chorizo mixture over the grains so they stay fluffy.

If rice texture is where dinner usually goes wrong, this guide on How to Cook Rice will help with ratios, soaking, and cooking methods.

You can also stir cooked rice into the skillet at the end for a quick rice-bowl meal. Thin with stock if the rice absorbs too much of the pan juices.

If paella is what you want, take the rice-pan method from the beginning. Paella depends on rice depth, liquid timing, and resting, so it is better not to improvise it by stirring raw rice into this recipe. Use the Chicken and Chorizo Paella Recipe when you want the saffron rice-pan version.

Chicken and Chorizo Orzo

For chicken and chorizo orzo, add the orzo after the tomatoes and stock go in. Use 200g orzo and increase the total stock to about 500–600ml / 2–2½ cups.

Chicken and chorizo orzo in a dark skillet with boneless chicken pieces, sliced chorizo, tomato sauce, herbs, parmesan, and a serving spoon.
Because orzo drinks up liquid fast, stop while it still looks loose and glossy; it will thicken more as it rests.

Grams are more reliable than cups here. Orzo cup measures vary by brand and shape; 200g is usually around 1 to 1¼ cups.

Simmer for 9–12 minutes, stirring often. Orzo sticks as the mixture thickens, so keep extra stock nearby and stir in a little at a time if the skillet looks dry before the orzo is tender.

Finish orzo with spinach, peas, parmesan, parsley, or a little cream. Serve it while it is loose and saucy because orzo thickens as it sits.

Chicken and Chorizo Pasta

Pasta works best when the tomato-chorizo mixture starts slightly thicker, then loosens with pasta water. Cook 225–300g short pasta such as penne, rigatoni, fusilli, or orecchiette until just tender, then toss it through the skillet.

Creamy tomato pasta works best when the cream and parmesan go in before the pasta. For a pasta bake, mix the cooked pasta with the chicken and chorizo, top with cheese, and bake until bubbling.

The glossy finish uses the same pasta-water logic as this Broccoli Pasta Recipe.

Aim to finish pasta while the mixture still clings. Dry pasta needs pasta water, while soupy pasta needs another minute of simmering before serving.

Chicken and Chorizo Jambalaya

Jambalaya needs its own cooking plan before rice goes in. Instead of this tomato pan recipe, use long-grain rice, Cajun seasoning, peppers, tomatoes, stock, chicken, and chorizo, then simmer until the rice is tender.

Think of it as its own one-pot rice meal rather than a quick variation of this recipe. In this post, serve the skillet over cooked rice or use the paella link when you want saffron rice. Jambalaya needs its own seasoning, rice, and liquid plan from the start.

For another smoky rice-and-beans comfort meal, see this Red Beans and Rice Recipe.

Back to recipe card · Back to table of contents

Tray Bake and Slow Cooker Versions

Chicken and Chorizo Tray Bake

The tray bake version is for the night when you want the oven to take over and the potatoes to catch all that smoky chorizo oil. Use chicken thighs, chorizo, potatoes, peppers, onion, tomatoes, garlic, smoked paprika, and a little olive oil.

Spread everything in a large tray so the ingredients roast instead of steam. Bake at 200°C / 400°F for about 45–50 minutes, turning the potatoes once or twice, until the chicken is cooked through and the potatoes are tender. Bone-in thighs may need a little longer.

Metal roasting tray with browned chicken pieces, sliced chorizo, potatoes, peppers, onions, tomatoes, herbs, and roasted pan juices.
A crowded tray steams; a spread-out tray roasts, giving the chicken, chorizo, potatoes, peppers, and onions better browned edges.

Smaller pieces can brown faster at 220°C / 425°F if the tray is well spread out. For a general family tray bake, 200°C / 400°F is the safer starting point. Crowding is the fastest way to turn a tray bake watery, so use two trays if needed.

The same spread-it-out principle helps these Sheet Pan Chicken Fajitas brown instead of steam.

Slow Cooker Chicken and Chorizo

In the slow cooker, thighs or drumsticks are the safer choice because they stay juicier over longer cooking. Chicken breast can work, but check it earlier and avoid cooking it longer than needed.

If you are using breast in the slow cooker, these Crock Pot Chicken Breast Recipes are useful for keeping it tender.

The slow cooker traps liquid, so start with less stock than you think you need. For 4 servings, 400g / 14 oz tomatoes and about 100–150ml / ½ cup stock is usually enough. Cook for 3–4 hours on high or 6–8 hours on low, depending on your slow cooker and the size of the chicken pieces.

Brown the chorizo first when you have time. It is the difference between a slow cooker meal that tastes fine and one that still has that smoky skillet depth. Add cream, orzo, or pasta near the end so the texture stays right.

What to Serve with Chicken and Chorizo

Because the smoky tomato mixture is the best part, serve it with something that can catch it. A lighter plate works well with greens and bread, while a heartier family meal can take rice, potatoes, pasta, or orzo.

For a hearty plate

  • Steamed rice or pilaf
  • Crusty bread or garlic bread
  • Mashed potatoes
  • Roast potatoes
  • Short pasta
  • Orzo or couscous

For a lighter plate

  • Green salad with lemony dressing
  • Roasted broccoli
  • Green beans
  • Wilted spinach or kale
  • Cauliflower rice
  • Butter beans or chickpeas stirred into the skillet

Put the skillet in the middle of the table with rice or bread and it becomes the kind of meal people keep spooning from.

If bread is your plan for catching the smoky pan juices, this Homemade Garlic Bread Loaf is the kind of side that makes the plate feel complete.

Troubleshooting Chicken and Chorizo

Most problems come from the same few places: too much chorizo oil, overcooked chicken breast, over-reduced salty tomatoes, or the wrong liquid ratio for rice and orzo. The good news is that most of them are fixable while the skillet is still on the stove.

Common Chicken and Chorizo Fixes

Four-panel troubleshooting guide showing greasy red oil, watery tomato sauce, split cream sauce, and sticky orzo with short fix labels.
The fixes are simple: remove excess oil, reduce watery tomatoes, lower heat for cream, and add stock when orzo gets too tight.
ProblemWhy it happenedFix
The dish is greasyThe chorizo released more fat than needed.Spoon off extra oil after rendering the chorizo. Keep a glossy coating, not a shallow pool.
It tastes too saltyChorizo, stock, parmesan, or olives reduced together.Add tomatoes, unsalted stock, cream, beans, potatoes, or cooked rice. Salt later next time.
It is too spicyThe chorizo or paprika was hotter than expected.Add cream, tomatoes, beans, rice, or potatoes to soften the heat.
The chicken is dryBreast pieces cooked too long or too hard.Use thighs, cut breast larger, and simmer gently.
The skillet is wateryIt was covered too long or the vegetables released water.Simmer uncovered until the tomatoes reduce.
It tastes flatThe tomato paste and spices were not cooked in the oil.Cook tomato paste, paprika, and garlic briefly before adding liquid.
The cream splitThe mixture boiled hard after cream was added.Lower the heat and stir cream in at the end.
The orzo is stickingOrzo thickens quickly and catches on the base.Stir often and add stock a little at a time.
The rice is mushyRice was added without the right method or ratio.Use cooked rice on the side, or follow a dedicated rice or paella method.
The plate tastes too richToo much chorizo oil or cream built up.Add lemon juice, parsley, tomatoes, greens, or beans to balance it.

Back to recipe card · Back to table of contents

Storage, Freezing, Reheating, and Make-Ahead

Fridge

Store leftovers in an airtight container in the fridge for up to 3 days. Creamy versions are best within 2–3 days.

If you added rice, pasta, or orzo, the dish will thicken as it sits because the starch keeps absorbing the juices. Thin it with a little liquid when reheating.

Freezer

The smoky tomato version freezes better than creamy, pasta, or orzo versions. Cool completely, pack into freezer-safe containers, and freeze for up to 2 months.

Creamy finishes can separate slightly after freezing, but gentle reheating and stirring usually brings them back together.

Make-Ahead

The tomato chicken and chorizo mixture is the best part to make ahead. Cook it without cream, pasta, or orzo, then cool and store it. Add cream, fresh greens, cooked pasta, or orzo when reheating so the texture stays smoother and the starch does not turn soft.

Leftovers are not an afterthought here. The tomatoes often taste deeper after a night in the fridge, especially if you reheat gently and finish with fresh herbs or lemon.

Reheating

Reheat gently on the stovetop or in the microwave until hot all the way through. Use stock, water, milk, or cream to loosen the texture. Avoid boiling creamy leftovers aggressively.

Once you understand the chorizo oil and tomato mixture, this becomes less of a fixed recipe and more of a weeknight formula you can actually trust.

FAQs

What chorizo is best for chicken and chorizo?

Firm Spanish-style cooking chorizo or cured chorizo is best because it slices cleanly and releases smoky paprika oil. Mexican chorizo can work, but cook it fully first because it behaves like raw sausage meat.

Is chicken breast or chicken thigh better?

Chicken thighs are better for a juicy skillet meal because they stay tender during simmering. Breast works for a leaner version, but it needs gentler heat and a shorter simmer.

How much chorizo should I use?

For 4 servings, use 120–150g / 4–5 oz chorizo. That gives enough smoky flavor without making the dish too oily or salty.

Why is my chicken and chorizo oily?

Chorizo naturally releases fat as it cooks. Fry it first, then spoon off extra oil before adding tomatoes, stock, or cream. A glossy coating is enough for flavor.

How do I make it creamy?

Add 100–180ml / ⅓–¾ cup cream near the end and simmer gently. Parmesan, spinach, and lemon juice all work well in the creamy version.

Can I make chicken and chorizo without cream?

Yes. Keep it tomato-based and finish with lemon juice, herbs, and a little stock if needed. For body without cream, add beans, pasta water, or parmesan.

Can this be made with orzo?

Yes. Add 200g orzo and 500–600ml stock, then simmer for 9–12 minutes, stirring often. Keep extra stock nearby in case the orzo thickens before it turns tender.

Can I use cooked chicken?

Yes. Render the chorizo, build the tomato mixture, then stir in cooked shredded or chopped chicken near the end just long enough to heat through.

Will this work in the slow cooker?

Yes, but use less stock because slow cookers trap liquid. Thighs or drumsticks work better than breast. Add cream, orzo, or pasta near the end.

Can I make it ahead?

Yes. Make the tomato chicken and chorizo mixture ahead, then add cream, pasta, or orzo when reheating so the texture stays smoother.

What pan works best?

Use a large deep skillet or sauté pan with a lid, ideally 28–30cm / 11–12 inch. A wider cooking surface helps the chicken brown and the tomatoes reduce.

What temperature should chicken be cooked to?

Chicken should reach 165°F / 74°C in the thickest part before serving. A small meat thermometer is the easiest way to check. You can also refer to the FoodSafety.gov safe minimum internal temperature chart for poultry guidance.

Back to recipe card · Back to table of contents

Final Tip

The whole meal gets easier when you let the chorizo do its job first. Give it a few minutes to release that smoky red oil, keep only as much richness as the skillet needs, and the tomatoes will taste deeper before they have even simmered.

Keep it tomato-based for a saucy skillet meal, add cream for comfort, stir in orzo for one-pot ease, toss it with pasta, or serve it over rice. Use the paella method when you want the saffron rice-pan version.

Make the smoky tomato version once, and the next time you see chicken and chorizo in the fridge, you will know exactly what kind of meal it wants to become.

Posted on 10 Comments

Sheet Pan Chicken Fajitas Recipe (Easy One-Pan Oven Fajitas)

Woman holding a warm flour tortilla filled with sheet pan chicken fajitas above a tray of oven-baked chicken, bell peppers, and onions on a rustic wooden table.

Sheet pan chicken fajitas are one of those meals that feel like a tiny miracle. You get juicy chicken, caramelised onions, and colourful peppers, all sizzling with smoky fajita spices, but instead of juggling three pans on the stove, everything happens together on one tray in the oven. It’s the kind of recipe that works on frantic weeknights, lazy Sundays, game days, and everything in between. This sheet pan chicken fajitas recipe is all about ease.

You toss strips of chicken and vegetables in a bold spice blend, spread them over a pan, and let the oven transform them into tender, slightly charred perfection. While your oven fajitas roast, you can warm tortillas, mix a simple sauce, or just sit down for a minute and breathe. By the time the timer rings, the kitchen smells like your favourite Tex-Mex spot, and you’ve got a full chicken fajita sheet pan dinner ready to slide onto the table.


Why Sheet Pan Fajitas Chicken Recipe Beats Skillet Fajitas

Traditional skillet fajitas chicken has its charms: a screaming-hot skillet for fajitas, that dramatic sizzle as the pan hits the table, the cloud of steam scented with lime and chili. Yet there’s a reason sheet pan fajitas have become such a staple in modern kitchens.

Hand using tongs over a tray of sheet pan chicken fajitas on a wooden counter, with a skillet of fajitas blurred on the stovetop in the background and text reading Sheet Pan vs Skillet Fajitas.
Sheet pan chicken fajitas in the spotlight, skillet fajitas in the background – same Tex-Mex flavour, but the one-pan oven method keeps dinner simpler and cleaner.

First, there’s the simplicity. With this easy sheet pan chicken fajitas method, you’re making a true one pan chicken fajita dinner. Instead of cooking in batches, then keeping everything warm, the meat and vegetables roast together. That means less hovering, fewer dishes, and more time to deal with everything else calling your name.

Second, the texture is fantastic. High oven heat encourages the peppers and onions to soften while still keeping a bit of bite, and the chicken picks up lovely browned edges. When you spread everything out properly on the tray, your baked chicken fajitas end up tasting like you fussed far more than you did.

Finally, this style is incredibly flexible. You can turn it into a chicken fajita tray bake for a crowd, scale down to chicken fajitas for one, make it extra spicy, keep it mild for kids, or adapt the marinade for pork, shrimp, or vegetables. Once you’ve learned the rhythm of cooking chicken fajitas in the oven, you’ll find yourself using the same technique for other dishes too.

Also Read: 10 Best Espresso Martini Recipe Variations (Bar-Tested)


Understanding Fajitas (and Why They Love the Oven)

Before diving into the nuts and bolts of this sheet pan chicken fajitas recipe, it helps to know what fajitas actually are. Traditionally, fajitas started as strips of grilled skirt steak served with onions and peppers in tortillas as part of Tex-Mex cooking, and the name itself comes from “faja,” meaning “strip” or “belt.” Over time, the concept expanded to include chicken fajitas, shrimp, and even all-vegetable versions, all built around that core idea of savoury strips tucked into warm tortillas.

Because fajitas are usually cooked hot and fast, transferring that method to the oven makes a lot of sense. When you cook fajitas in oven, you’re essentially recreating the high heat of the grill or stovetop, just with a different heat source. The key difference is that instead of shaking a pan throughout the cooking process, you let the oven do most of the work and just give your sheet pan fajita chicken a stir once or twice.

Stovetop chicken fajitas in a pan are still wonderful when you’re in the mood to stand and cook, but making fajitas in the oven is the move when life is hectic. You end up with the same satisfying flavours in a more forgiving, lower-effort format.

Also Read: Katsu Curry Rice (Japanese Recipe, with Chicken Cutlet)


Ingredients for Sheet Pan Chicken Fajitas Recipe

You don’t need anything fancy for baking sheet fajitas—just everyday staples that work incredibly well together.

Thinly sliced chicken breast and chicken thigh strips on a wooden cutting board with a chef’s knife, labeled as breast or thigh for sheet pan chicken fajitas.
Chicken breasts stay lean and tidy, chicken thighs stay extra juicy—both cuts slice into perfect strips for sheet pan chicken fajitas.

Chicken: breast or thigh

Start with about 700–900 g (1½–2 lb) of boneless, skinless chicken. Both options work:

  • Chicken breasts give you leaner chicken breast fajitas oven style fajitas. They cook quickly and slice neatly, which is useful if you’re building bowls or meal-prep boxes.
  • Chicken thighs stay juicy even if they roast a little longer, making them ideal for a slightly more forgiving chicken thigh fajitas oven version.

Slice the chicken into thin strips across the grain. Thin, even strips are crucial for chicken fajitas baked in oven because they cook at roughly the same time as the vegetables.

Sliced red, yellow, green and orange bell peppers with red onion rings and chicken strips arranged on a wooden board under the title Peppers and Onions for sheet pan chicken fajitas.
Colourful strips of peppers and onions, cut to match the chicken, give sheet pan chicken fajitas their sweetness, crunch and even roasting.

Peppers and onions

Next, grab your vegetables:

  • 3 bell peppers (red, yellow, orange, or green)
  • 1–2 medium onions

Bell peppers are naturally sweet and full of vitamin C and antioxidants, so they’re one of the reasons these healthy sheet pan chicken fajitas feel as nourishing as they do. Thin slices roast quickly and tuck perfectly into tortillas or bowls. Onions bring savoury depth and a touch of natural sweetness as they caramelise, turning the entire fajita sheet pan dinner into something rich and comforting.

Slice both peppers and onions into strips that mirror the size of your chicken pieces. Matching everything like this makes your one sheet chicken fajitas cook more evenly.

Small bowls of chili powder, cumin, paprika, garlic, oregano, salt, oil and lime wedges arranged around a central bowl of fajita spice mix, with a hand scooping seasoning for sheet pan chicken fajitas.
A simple fajita spice mix of chili, cumin, paprika, garlic, oregano, oil and lime is all you need to turn basic chicken and peppers into bold sheet pan chicken fajitas.

Oil, lime, and spice mix

For that signature fajita flavour, you’ll need:

  • Neutral oil (or mild olive oil)
  • Fresh lime juice
  • Chili powder
  • Ground cumin
  • Paprika (regular or smoked)
  • Garlic powder or minced garlic
  • Dried oregano
  • Salt and black pepper
  • Optional cayenne for heat

This blend turns basic chicken and peppers into full-on fajita chicken sheet pan magic. As the tray roasts, the spices toast and cling to every piece, giving your sheet fajitas their unmistakable colour and aroma.

Stack of flour and corn tortillas surrounded by bowls of cheese, sour cream, jalapeños, cilantro, lime wedges, onions and fajita filling on a wooden board for sheet pan chicken fajitas.
Soft tortillas, fresh jalapeños, lime, cheese and creamy toppings turn simple sheet pan chicken fajitas into a build-your-own fajita bar everyone can customise.

Tortillas and toppings

Once your chicken fajitas in the oven recipe comes out bubbling and browned, you’ll want a few extras to round things out:

  • Flour or corn tortillas
  • Grated cheese
  • Sour cream or thick Greek yogurt
  • Sliced jalapeños
  • Fresh coriander
  • Extra lime wedges

If you’d like a lighter, more refreshing topping, a bowl of cool Greek tzatziki sauce is a beautiful alternative to sour cream. It brings creaminess, garlic, cucumber, and herbs that play wonderfully with spicy chicken fajita oven tray flavours.


Choosing the Best Sheet Pan for Recipe of Chicken Fajitas

Because this recipe hangs on your pan, it’s worth a quick look at equipment. The same mixture of chicken and peppers behaves differently in a cast-iron chicken fajita pan, a light cookie sheet, and a heavy-duty baking tray.

Sheet pan vs skillet

If you’ve always made skillet fajitas chicken, shifting to the oven might feel like a big step. In reality, each method has its niche:

  • A cast-iron skillet for fajitas is unbeatable when you want dramatic sizzle and dark char. You get those hot spots that bring extra browning, and it’s fun for smaller batches you want to serve right away.
  • A sturdy sheet pan is better when you need 1 pan chicken fajitas for four people (or more) without hovering. You get more surface area, so your pan sheet chicken fajitas can spread out and roast instead of steaming.

For this recipe, a rimmed, heavy-duty baking sheet is ideal. It’s stable under high heat and holds onto some of that warmth, helping the edges crisp up.

Cast iron skillet, heavy rimmed sheet pan with chicken and peppers, and an empty silver cookie sheet arranged side by side under the title Choosing the Best Pan for Fajitas.
A cast iron skillet, cookie sheet and heavy rimmed sheet pan side by side—showing why the sturdy sheet pan is the best choice for oven-baked chicken fajitas.

Cookie sheet vs baking sheet

You can absolutely use a cookie sheet if that’s what you have; a lot of people make cookie sheet fajitas and cookie sheet chicken fajitas successfully. Just keep these points in mind:

  • Thin pans may warp at high temperatures, which can cause the oil to pool and parts of your pan sheet fajitas to brown faster.
  • Darker pans brown more aggressively, which can be great for extra char but requires closer watching at the end.

If you’re shopping with fajitas in mind, look for something marketed as a half-sheet pan or roasting tray. That’s essentially the best pan to cook fajitas in when you’re leaning into the baked fajitas style.

Also Read: Vegan French Toast: 6 Easy Recipes (Pan, Air Fryer, GF & High-Protein)


Step-by-Step: Making Chicken Fajitas in the Oven

Now that your ingredients and pan are ready, it’s time to make easy oven baked chicken fajitas from start to finish.

Sheet pan lined with parchment holding sliced bell peppers and red onions while a hand holds a bowl of raw chicken strips beside it for step one of sheet pan chicken fajitas.
Step 1 – Prep the tray: line the pan, scatter peppers and onions, then add the sliced chicken so everything is ready to roast together.

1. Preheat and prep the tray

Begin by preheating your oven to around 220°C (425°F). This high heat is what makes fajitas baked in oven taste similar to grilled versions. While the oven heats, line your pan with parchment or lightly brush it with oil.

Scatter your sliced peppers and onions across the tray. This base layer becomes the foundation of your sheet pan chicken and peppers, catching juices and seasonings as everything cooks.

Arrange the sliced chicken on top. You’re building your chicken sheet pan fajitas right on the tray, so there’s no need for extra bowls once you get the hang of it.

Hands tossing raw chicken strips, bell peppers and onions on a sheet pan with tongs while a spoonful of fajita seasoning is sprinkled over the top for step two of sheet pan chicken fajitas.
Step 2 – Season and toss: drizzle on oil and lime, sprinkle over the fajita spice mix, then toss everything together until the chicken and veggies are coated.

2. Mix and add the seasoning

Drizzle oil and lime juice over the chicken and vegetables. Sprinkle over your spice mix, making sure every strip has a little colour. Then, use your hands or tongs to toss everything together directly on the pan until the entire chicken fajita sheet pan recipe looks well coated.

At this point, the mixture already resembles a fajita tray bake: vibrant, glossy, and promising. Make sure nothing is piled too high; for the best sheet pan fajitas, you want most pieces in a single layer, or as close as you can get.

Baked sheet pan chicken fajitas with browned chicken strips and peppers being pulled from the oven with an oven mitt while a thermometer checks the chicken’s temperature.
Step 3 – Roast and serve: bake the chicken and peppers until lightly charred, check that the chicken is cooked through, then bring the sizzling sheet pan fajitas straight to the table.

3. Roast until juicy and slightly charred

Slide the pan into the hot oven and roast for about 18–22 minutes:

  • Stir once halfway through to make sure your pan fajita mix cooks evenly.
  • Keep an eye on smaller pieces; they might brown a bit faster at the edges.
  • If you’d like a darker finish, you can increase the heat slightly or use the broiler for the last few minutes for broiled chicken fajitas.

For safety, aim for an internal temperature of 165°F (74°C) in the thickest pieces of chicken. A small instant-read thermometer takes the guesswork out of this part and guarantees fully cooked baked chicken fajitas every time.

When the chicken is opaque and tender and the vegetables have softened and picked up browned spots, your oven baked chicken fajita recipe is ready.

Also Read: Baked Jalapeño Poppers (Oven) — Time, Temp & Bacon Tips


Getting the Texture Just Right

Good chicken fajitas baked in oven are all about balance. You want soft onions, tender peppers, and juicy chicken, but you also want enough colour and char to bring depth.

Sheet pan of chicken fajitas divided in half, with crowded pieces on one side and well-spaced, deeply browned chicken and peppers on the other to show how spreading out gives better char.
Crowded fajitas steam, but when you spread the chicken and peppers out in a single layer you get the charred, deeply flavoured sheet pan chicken fajitas everyone loves.

Here are a few small tweaks that make a big difference:

  • Spread the mixture out. Crowding the tray makes fajitas bake tray style dishes steam. If things are piled high, use two pans.
  • Rotate the pan halfway through if your oven runs hot in certain spots. This simple step can turn a decent fajita sheet pan recipe into the best sheet pan fajitas your oven can produce.
  • Stir gently. Flipping everything once in the middle helps both sides brown without shredding the chicken.

If you love the seared edges you get from cooking fajitas in a pan, you can always transfer a portion of the roasted fajita chicken sheet pan mix to a hot cast-iron chicken fajita pan for a minute or two before serving. It’s the best of both worlds: low-effort cooking plus that restaurant-style finish.

Also Read: Vodka with Lemon: Easy Cocktails, Martini Twist & DIY Infusion


Turning One Recipe into Many: Variations on Sheet Pan Chicken Fajitas

A good sheet pan fajita chicken base opens up a lot of possibilities. Once you’ve mastered the classic version, you can start playing with different combinations.

Classic tray bake sheet pan chicken fajitas with roasted chicken strips, bell peppers, onions, blistered cherry tomatoes, garlic cloves and lime wedges on a metal pan.
Classic tray bake fajitas with roasted garlic, burst cherry tomatoes and lime wedges turn simple sheet pan chicken fajitas into a full, juicy one-pan dinner.

Classic tray bake fajitas

You can lean harder into the chicken fajita tray bake idea by nestling lime wedges, whole garlic cloves, and even halved cherry tomatoes around the pan before roasting. As the tomatoes burst and the garlic softens, they create pockets of extra flavour that melt into the juices and coat the chicken.

For a slightly heartier fajita chicken tray bake, try adding:

  • Drained black beans or chickpeas
  • Frozen corn (no need to thaw)
  • Diced sweet potato or small potato cubes for a more substantial baked fajitas recipe

These additions make your chicken fajita sheet pan meal feel more like a complete tray dinner that can be served as is, without many extra sides.

Sheet pan of extra-charred broiled chicken fajitas with blistered bell peppers and onions being pulled from under the oven broiler with tongs.
Extra-charred, broiled sheet pan chicken fajitas with blistered peppers and smoky edges for anyone who loves that grilled, restaurant-style flavour at home.

Extra-charred and broiled fajitas

If you lean towards the smoky, charred edges you get from grilling or pan fajita recipe styles, the broiler is your friend. Once the chicken is cooked through, slide the pan under the broiler for two to three minutes, watching closely. The vegetables will blister in places, and you’ll end up with something closer to restaurant-style oven fajitas.

Some cooks like to marinate the chicken first, inspired by recipes like sheet pan chicken fajitas from Serious Eats, then finish under the broiler for a deep, roasty flavour. Others love the simplicity of budget-friendly oven fajitas where you just toss everything and bake. Both approaches fit happily within this chicken fajita recipe sheet pan framework; feel free to adapt.

Hand lifting a soft taco filled with shredded sheet pan chicken, peppers, cheese and salsa from a wooden board, with the roasted chicken fajitas still on the sheet pan below.
Turn one tray of sheet pan chicken fajitas into easy chicken tacos by shredding the baked chicken, piling it into warm tortillas and topping with cheese, salsa and herbs.

Sheet pan taco chicken and chicken tacos

Sometimes you’re craving tacos rather than classic fajitas. Luckily, the same sheet pan chicken fajitas mixture doubles as sheet pan taco chicken with almost no changes.

Once your easy sheet pan fajitas come out of the oven:

  • Shred a portion of the chicken with two forks.
  • Spoon the shredded pieces into small tortillas with extra cheese and salsa.
  • Keep some of the sliced version for traditional fajitas.

You’ve just transformed easy baked chicken fajitas into both fajitas and tacos, using one tray and one round of cooking.

Small sheet pan of chicken fajitas beside a single plate with a tortilla being filled, napkin and glass of water on a wooden table for a fajitas for one or two serving.
A mini sheet pan of chicken fajitas with a single plate and tortilla shows how easy it is to scale this recipe down for one or two people without losing the one-pan simplicity.

Small-batch fajitas for one or two

The beauty of this method is how easy it is to scale down. For chicken fajitas for one, just cut the amounts to a single chicken breast, one pepper, and half an onion. You’ll still spread everything out so it roasts properly, and you’ll still be rewarded with a personal-sized chicken fajita sheet pan dinner without leftovers, if that’s what you prefer.

On evenings when you want leftovers on purpose, doubling the recipe turns the same base into meal prep gold.

Also Read: Coconut Water Cocktails: 10 Easy, Refreshing Drinks


Serving Ideas: Toppings, Sides, and Full Fajita Nights

Once your best sheet pan chicken fajitas are out of the oven, you can serve them simply or turn them into an entire feast.

Classic fajita spread

Lay out warmed tortillas, your sheet pan chicken fajitas, and bowls of toppings:

  • Grated cheese
  • Sour cream or Greek yogurt
  • Salsa or pico de gallo
  • Avocado slices or guacamole
  • Fresh coriander and lime wedges

If you’d like something a bit different from sour cream, spoon some Greek tzatziki sauce into a bowl and let people drizzle it over their baked chicken fajitas. The cool yogurt, cucumber, and herbs bring a wonderful contrast to the spicy, smoky chicken.

Sheet pan chicken fajitas surrounded by tortillas, cheese, sour cream, guacamole, salsa, fries, dips and drinks on a wooden table with the text Build Your Own Fajita Night.
Build your own fajita night with sheet pan chicken fajitas in the centre, surrounded by tortillas, toppings, fries, dips and drinks so everyone can customise their perfect plate.

Party platters and game-day food

For gatherings, you can use your one pan fajita recipe as the centrepiece of a game-day spread. Arrange the tray bake fajitas on a board with bowls of tortilla chips, crunchy vegetables, and a few dips. A bubbling Buffalo chicken dip on the side adds creamy heat, while a selection of spinach dips brings extra richness.

If you want something on the side that everyone loves, a tray of crispy homemade French fries turns fajita night into a full-on comfort feast. You can even add a platter of lemon pepper chicken wings so guests can load their plates with wings, fries, and sheet pan chicken fajitas pioneer woman–style trays of sizzling chicken and peppers.

Bowls, salads, and low-carb options

On nights when you’re craving something lighter, skip the tortillas and build fajita bowls:

  • Spoon your fajitas in oven chicken over shredded lettuce, rice, quinoa, or cauliflower rice.
  • Add beans, corn, chopped tomatoes, and avocado.
  • Finish with lime juice and a spoonful of yogurt or tzatziki.

If you’re exploring lower-carb eating, you might enjoy browsing plant-powered keto Mexican recipes for inspiration. You’ll find ideas there for vegetable-based fillings that pair nicely with this fajita oven recipe, especially when you’re using the same spices in creative ways.

Drinks that pair beautifully with this Recipe of Sheet Pan Chicken Fajitas

Fajitas are festive by nature, so they love good drinks. For brunch-style spreads or weekend dinners with friends, a pitcher of Bloody Marys or colourful mimosas fits right in with fajitas, nachos, and dip.

If you’re more in the mood for something sweet after dinner, a slice of tres leches cake or another dessert brings everything to a gentle close after the warm spice of your fajita sheet pan chicken.


Leftovers, Meal Prep, and Next-Day Ideas

One of the nicest things about easy oven baked sheet pan chicken fajitas is how gracefully they turn into other meals.

Storing and reheating

Let leftovers cool slightly, then pack them in airtight containers. They’ll keep well in the fridge for three days or so. Reheat gently in a skillet, in the oven, or even in the microwave, though a quick blast in a pan or oven helps revive those tasty browned edges.

Because the vegetables hold up, easy baked chicken fajitas make excellent lunches. Tuck them into tortillas, spoon them over rice, or toss them through salads for quick meals that still feel satisfying.

Glass containers of leftover sheet pan chicken fajitas above plates with a quesadilla, burrito bowls and scrambled eggs made from the fajita filling, showing easy next-day meal ideas.
Leftover sheet pan chicken fajitas slip easily into glass containers, then reappear as quesadillas, burrito bowls and even a quick fajita-style breakfast the next day.

Fresh ways to use leftovers from Sheet Pan Chicken Fajitas Recipe

Leftover sheet pan fajita chicken doesn’t have to be eaten in exactly the same format. You can:

  • Turn it into quesadillas by folding the chicken and peppers into tortillas with cheese and crisping them in a pan.
  • Build burrito bowls or burritos with rice, beans, and whatever else you have around.
  • Add it to omelettes or scrambled eggs for a fajita-style breakfast.
  • Stir it through a simple pasta with a bit of cream or yogurt and extra lime juice for a fajita-inspired pasta night.

If you’re looking for more easy chicken ideas to keep in your weekly rotation, recipes like whole chicken in crock pot or cheesy chicken broccoli rice fit right alongside this easy chicken fajitas sheet pan method. They all deliver that same comforting feeling with minimal fuss.


Are Sheet Pan Chicken Fajitas Healthy?

Because this sheet pan fajita recipe leans heavily on chicken and vegetables, it’s simple to tweak it towards your own idea of “healthy.”

Protein and vegetables

You’re getting a good dose of protein from the chicken, plus fibre and vitamins from peppers and onions. Bell peppers are rich in vitamin C and antioxidants, while onions contribute their own unique compounds and prebiotic fibre. When you serve this chicken fajita one pan meal with extra vegetables or a salad, you’re building a plate that’s both satisfying and colourful.

Sheet pan chicken fajitas in the background with a healthy bowl of chicken, black beans, avocado and salad on one side and cheesy chicken fajita tacos with tortilla chips on the other, showing how toppings change the balance.
The base of sheet pan chicken fajitas is all about lean protein and colourful vegetables, while your choice of tortillas, beans, salad, cheese or chips is what tips the meal lighter or more indulgent.

Choices that change the balance

The health profile of easy fajitas in the oven depends heavily on what you serve alongside them. Flour tortillas, cheese, sour cream, and chips will make it more indulgent; lettuce, salsa, yogurt, and beans keep it feeling a bit lighter.

You can also swap chicken for vegetables entirely. Jackfruit, mushrooms, and tempeh can all stand in for meat while keeping the spirit of sheet pan fajitas alive. For inspiration, you might enjoy jackfruit-based meal ideas or tempeh “beef” style fillings, both of which adapt beautifully to fajita spices.

If you’re curious about how onions fit into a low-carb or keto approach, you can also explore a gentle breakdown of onions and keto to see how they can still have a place in a mindful diet.


Comparing Sheet Pan Chicken Fajitas Recipe to Stovetop Fajitas

It’s natural to wonder how chicken fajitas in oven recipe versions stack up against the classic pan fajita recipe cooked on the stove.

Stovetop fajitas

With cooking fajitas in a pan, you get:

  • A bit more control over individual pieces as you stir and flip.
  • Very quick cooking, which is great for small batches.
  • That sizzle and sear you might associate with restaurant fajitas.

However, you also get more active time at the stove, and if you’re making a large batch of pan fajitas chicken, you may need to cook in rounds.

Side-by-side photo showing chicken fajitas cooking in a sizzling cast iron skillet on the stovetop on the left and a sheet pan of chicken fajitas being pulled from the oven on the right, with text Stovetop vs Sheet Pan Fajitas
Stovetop fajitas bring hands-on sizzle in a cast iron skillet, while sheet pan chicken fajitas offer the same flavours with an easier, hands-off oven approach.

Oven fajitas

With fajitas baked in oven, you enjoy:

  • A mostly hands-off experience: toss, spread, roast.
  • The ability to cook a lot at once, ideal for families or leftovers.
  • Easy cleanup, because you’ve truly made 1 pan fajitas.

There’s no wrong answer here. Many people use oven methods during the week for easy sheet pan fajitas and save skillet or grilled versions for weekends when they feel like cooking in a more leisurely way. You can even move between methods in the same meal: roast most of the fajita sheet pan bake in the oven, then finish a portion in a hot skillet if you’re craving that extra sear.

Also Read: Whiskey Sour Recipe: Classic Cocktail, Best Whiskey & Easy Twists


A Short Fajita Story to Serve with Dinner

When you bring a tray of sheet pan chicken fajitas to the table, you’re not just serving dinner; you’re offering a tiny piece of culinary history, adapted to modern life. Fajitas may have started as grilled strips of beef cooked over open flames and served to hungry ranch workers, but they’ve travelled a long way from those early days.

Now, they show up as restaurant sizzlers, street food, skillet suppers, and, increasingly, as fajitas in oven chicken dinners pulled from home ovens around the world. Recipes like classic grilled chicken fajitas keep the outdoor tradition alive, while damn delicious sheet pan fajitas and similar recipes prove that you can get big flavour from a humble baking tray.

Your own chicken fajita sheet pan pioneer woman moment might look like a pan pulled from the oven on a Wednesday night, kids spooning sheet pan fajita chicken into tortillas at the counter, someone mixing drinks in the corner, and everyone leaning over the table to build their perfect bite. It doesn’t have to be dramatic; it just has to taste good and feel welcoming.

Sheet pan chicken fajitas on a wooden table with three hands building tortillas, squeezing lime and spooning filling, with the text Sheet Pan Chicken Fajitas Any Night of the Week and MasalaMonk.com
Sheet pan chicken fajitas at the centre of the table, with everyone reaching in to build their own tortillas – an easy any-night-of-the-week dinner straight from one pan.

Bringing It All Together

In the end, this sheet pan chicken fajitas recipe is really an invitation. It invites you to trade a little stovetop juggling for the convenience of easy oven baked fajitas, to let the oven carry more of the load while you use the extra time however you need.

Whether you’re serving classic baked chicken fajitas with warm tortillas, building low-carb bowls from a fajita oven tray, or turning leftovers into quesadillas and tacos, you’re working with a method that’s endlessly adaptable. One night you might pair your pan sheet fajitas with tzatziki and salads; another night you might bring out dips, fries, and wings and turn it into a party.

However you choose to plate them, these best sheet pan chicken fajitas are there to make dinner easier, a little brighter, and a lot more satisfying—one tray at a time.

Close-up of a chicken fajita held in one hand, filled with charred chicken strips, red and yellow peppers, avocado slice, cilantro and a dollop of white sauce in a soft tortilla.
A warm, handheld chicken fajita loaded with charred chicken, sweet peppers, avocado and a touch of creamy sauce—everything you love about sheet pan chicken fajitas in a single perfect bite.

FAQs about Sheet Pan Chicken Fajitas Recipe

1. Can I use chicken breasts or thighs for sheet pan chicken fajitas?

You can use either, and both work beautifully in a sheet pan chicken fajitas recipe. Chicken breasts give leaner baked chicken fajitas, while thighs stay extra juicy and forgiving if they roast a little longer. As long as you slice them into similar strips, your chicken sheet pan fajitas will cook evenly.


2. How thick should I slice the chicken and vegetables?

Aim for strips about 1–1.5 cm thick so everything in your sheet pan fajitas roasts at roughly the same pace. Thin slices of chicken, peppers, and onions give you tender pieces with nicely browned edges. When the sizes match, your one sheet chicken fajitas are much less likely to end up with overcooked chicken and underdone veg.


3. What oven temperature works best for baking sheet fajitas?

A hot oven is ideal; most oven fajitas turn out best around 220°C / 425°F. That higher heat lets the sheet pan fajita chicken caramelise instead of steaming. Once the chicken is cooked through and the vegetables are lightly charred, your chicken fajitas baked in oven are ready to serve.


4. How long do sheet pan chicken fajitas usually take to cook?

For a typical oven baked chicken fajita recipe, the tray needs about 18–22 minutes, depending on your oven and how crowded the pan is. Stir once halfway so the chicken fajita in oven mix colours on all sides. When the chicken is opaque and the vegetables look glossy and tender, your baked fajitas are done.


5. How do I stop my sheet fajitas from going soggy?

Give everything room to breathe on the tray. If your chicken fajita sheet pan is piled too high, the juices collect and you get more steam than roast. Spreading the mixture into a shallow layer—or using two pans for pan sheet chicken fajitas—helps you get those tasty browned edges instead of soft, wet vegetables.


6. What’s the best pan for fajitas in the oven?

A sturdy rimmed baking sheet is usually the best pan for fajitas when you’re using this method. It’s big enough for easy sheet pan chicken fajitas and strong enough not to warp at high heat. You can still make cookie sheet fajitas, but a heavy tray tends to give more even browning.


7. Can I use a non-stick or glass dish for this sheet pan fajita recipe?

You can, although the results change slightly. Non-stick trays make clean-up easier but may brown sheet pan chicken fajitas a little less. Glass dishes hold heat differently, so your chicken fajita one pan dinner might need a few extra minutes; simply watch for colour and doneness rather than relying only on the clock.


8. Can I cook fajitas in the oven if I’m used to making them in a skillet?

Yes, you can easily move from skillet fajitas chicken to a chicken fajitas in the oven recipe. The ingredients stay almost the same; only the technique changes. Instead of tossing everything in a chicken fajita pan on the stove, you toss on a tray, roast, and stir once, letting the heat build flavour while you step away.


9. Are sheet pan chicken fajitas spicy?

They’re usually moderately spiced rather than extremely hot. Most sheet pan fajita recipes rely on chili powder, cumin, and paprika for warmth, then add cayenne or fresh chili for extra kick. If you like mild baked chicken fajitas, simply skip the hotter spices; if you love heat, sprinkle more over your pan fajita before roasting.


10. How can I adjust the heat level in my baked fajitas recipe?

You control the spice level with your seasoning. To keep easy oven baked chicken fajitas gentle, use mild chili powder and no cayenne. On the other hand, if you want fiery sheet pan fajitas, add extra cayenne, fresh jalapeños, or a hotter chili powder to the sheet pan fajita chicken mix before cooking.


11. Can I prepare the chicken fajitas ahead of time?

You can slice the chicken and vegetables and mix them with oil and spices a few hours ahead. Keep the chicken fajita sheet pan mixture covered in the fridge until you’re ready to bake. When it’s time for dinner, spread everything out and roast, turning marinated one pan chicken fajita components into a flavourful tray with very little effort.


12. Is it okay to use frozen vegetables for sheet pan fajitas?

Frozen peppers and onions can work in a pinch, though the texture will be softer. If you scatter them straight onto the tray for baking sheet fajitas, expect less char and more moisture. Fresh vegetables give crisper edges and brighter colour, but frozen still make decent oven fajitas when you’re short on time.


13. How do I keep the chicken from drying out?

Don’t overcook it and avoid very tiny pieces. Cutting even strips, using enough oil, and pulling the chicken fajita in oven tray out as soon as the meat is just done all help keep your chicken fajita pan recipe juicy. Thighs are especially forgiving in a chicken fajita tray bake because they stay tender even if they roast a bit longer.


14. Can I make sheet pan fajitas for one or two people?

Definitely. For chicken fajitas for one or a small household, simply reduce the quantities and use a smaller tray. You’ll still enjoy one sheet fajitas with the same flavour and texture, just in a more manageable size that doesn’t leave you with too many leftovers.


15. Do I need to line the pan when I make sheet pan chicken fajitas?

Lining the pan with parchment makes clean-up easier but isn’t compulsory. If you skip lining, lightly oil the surface so your chicken sheet pan fajitas don’t stick. Either way, the sheet pan chicken and peppers will still roast nicely and pick up plenty of flavour.


16. Can I cook these fajitas under the broiler instead of just baking?

Yes, the broiler can give you extra char. Many people bake the chicken fajita sheet pan dinner until almost done, then move it under the broiler for a couple of minutes for lightly blackened edges. This approach gives broiled chicken fajitas that look close to grilled ones, while still using a single pan.


17. Are baked chicken fajitas healthier than fried versions?

Baked chicken fajitas generally use less oil than deep-fried options, and they’re built around lean protein and vegetables. Because you’re roasting the chicken fajita oven tray rather than frying, the meal often feels lighter. The overall balance still depends on your tortillas, toppings, and portion sizes, but the base of baked chicken fajita recipe is a wholesome starting point.


18. Can I double the recipe for a crowd?

You can absolutely scale this sheet pan chicken fajitas recipe up. For a large group, divide the mixture between two trays so the pan sheet fajitas still roast instead of steaming. Rotate the pans halfway through, and you’ll end up with a big batch of best sheet pan chicken fajitas ready at the same time.


19. What other meats can I use for a sheet pan fajita tray bake?

Chicken is classic, yet the same method works with beef strips, pork, or even shrimp. If you use quicker-cooking proteins like prawns, add them later in the baking time so they don’t overcook. No matter which protein you choose, the basic pan fajita pattern—strips, spices, and high heat—stays the same.


20. Can I make a vegetarian version of sheet pan fajitas?

Yes, it’s simple to adapt this into a vegetable-only fajita sheet pan recipe. Swap the chicken for mushrooms, tofu, paneer, jackfruit, or a mix of hearty vegetables and keep the same seasoning and roasting method. The result still feels like easy sheet pan fajitas, just without the meat.


21. How should I reheat leftover sheet pan chicken fajitas?

Leftover baked chicken fajitas reheat well in a hot skillet or in the oven. Spread the chicken fajita tray bake mixture in a single layer and warm it just until hot, so the chicken doesn’t dry out. A quick reheat brings your pan sheet chicken fajitas back to life for tacos, bowls, or wraps the next day.


22. What’s the difference between sheet pan fajitas and baked chicken tacos?

Sheet pan fajitas focus on strips of chicken and vegetables that you stuff into tortillas right at the table. Baked chicken tacos usually have the filling tucked inside the shells before going into the oven. Nevertheless, the same sheet pan fajita chicken can be used for both; you just decide whether to assemble first or after roasting.


23. Can I make this recipe milder for kids?

Yes, you can easily keep easy sheet pan chicken fajitas gentle enough for younger eaters. Use mild chili powder, skip the cayenne, and maybe add a bit more paprika for colour. Then, if adults want extra heat, they can sprinkle chili or hot sauce over their own chicken fajita sheet pan meal.


24. Do I need special fajita seasoning packets for this recipe?

Packets are convenient, but they’re not required for an easy sheet pan fajita recipe. A simple mix of chili powder, cumin, paprika, garlic, salt, and pepper gives the same character. Once you’ve tasted your homemade seasoning on a chicken fajita in oven tray, you may not feel the need to buy packets again.


25. Can I use this method for a chicken fajita pan on the stovetop?

You can borrow the same spice mix and proportions when you’re cooking chicken fajitas in a pan. Simply sear the chicken and vegetables in a hot skillet for fajitas instead of on a tray. That way, you can enjoy both skillet fajitas chicken and easy oven baked chicken fajitas using one familiar flavour base.

Posted on 14 Comments

Whole Chicken in Crock Pot Recipe (Slow Cooker “Roast” Chicken with Veggies)

Hands lifting the lid off a black slow cooker revealing a golden whole chicken in a crock pot with potatoes and carrots, styled like a premium magazine cover with the title Whole Chicken in a Crock Pot and MasalaMonk.com at the bottom.

There’s something quietly luxurious about dropping a whole chicken in a crock pot, flicking a switch, and knowing dinner is basically taking care of itself. No wrestling with hot roasting pans, no constant basting, no stressing over oven timings. Just a pot humming away in the background while your house slowly fills with the smell of slow cooker roast chicken.

This method gives you everything people love about a Sunday roast—tender meat, rich juices, soft potatoes and vegetables—without demanding your full attention. It also turns one affordable bird into several meals, from roast-style dinners and chicken pot roast to leftovers for sandwiches, pasta and soups.

What follows is a complete guide to cooking a whole chicken in the slow cooker, turning it into a one-pot meal, adapting the technique for thighs and drumsticks, playing with BBQ and rotisserie-style variations, and making the most of every last scrap.


Why Cook a Whole Chicken in a Slow Cooker (Crock Pot)?

Before getting into the nuts and bolts, it’s worth pausing on why a whole chicken in crock pot is so useful to have in your regular rotation.

Whole roast chicken served with potatoes, shredded meat and sides in front of a crock pot, showing how a whole chicken in a crock pot makes three easy meals.
One seasoned bird, a slow cooker and a few vegetables – this whole chicken in a crock pot quietly turns into juicy roast-style dinners plus leftovers for days.

Almost zero babysitting

Traditional roast chicken is wonderful, but it wants attention: preheating, timing, checking, basting, turning, and making sure nothing dries out. With a whole chicken in a slow cooker, you do a little work up front and then the machine does the rest.

You:

  • Season the bird
  • Sit it on a bed of onions or vegetables
  • Add a splash of liquid
  • Put the lid on and walk away

Hours later, you lift the lid on a complete chicken crock pot roast. You don’t have to be home to keep an eye on it; the slow cooker hums along steadily while you’re at work, wrangling kids, or just enjoying your day.

Black crock pot set to low on a wooden counter with lemon, garlic and herbs, illustrating the hands-off prep for a whole chicken in a slow cooker.
Season the chicken, set the crock pot to LOW and get on with your day—this slow cooker whole chicken recipe barely needs five minutes of attention.

Incredibly forgiving texture

Because slow cookers use gentle, moist heat, the meat stays juicy far more easily than in a hot, dry oven. When you slow cook a whole chicken, the connective tissues in the thighs and wings slowly melt, turning everything silky and tender.

You can carve it neatly if you cook for less time, or leave it longer for that “fall-apart shredded chicken” effect. Recipes like this lemon garlic slow cooker roast chicken show the same idea: shorter cooking gives a firmer, carve-able bird; longer cooking gives something you barely need a knife for.

One bird, several meals

A single chicken, cooked well, goes surprisingly far:

  • Night one: whole chicken in crock pot with potatoes and vegetables
  • Night two: leftovers in chicken Alfredo pasta or stuffed into sandwiches
  • Night three: stock and soup made from the bones

When you combine that with the hands-off nature of slow cooking, it’s easy to see why whole chicken recipes slow cooker crock pot approaches are favourite “Sunday prep” moves for busy weeks.

Hand checking a whole roasted chicken with a digital thermometer reading 165°F, demonstrating the safe internal temperature for slow cooker roast chicken.
For perfectly cooked, safe slow cooker roast chicken, aim for 165°F / 74°C in the thickest part of the thigh and breast before you lift it out of the crock pot.

Safe and straightforward

Poultry always raises food-safety questions, and rightly so. Fortunately, the rules are simple:

  • Start with a thawed chicken, not a frozen one
  • Keep the lid on so the crock pot can heat efficiently
  • Cook until the thickest parts of the meat reach 165°F / 74°C

That 165°F number isn’t random. It’s the same temperature recommended on the FoodSafety.gov safe minimum cooking temperature chart for all poultry, including whole chicken. It applies whether you use an oven, grill, Instant Pot, or slow cooker.

A basic digital thermometer is enough to keep your slow cooker roast chicken both tender and safe.


Choosing the Chicken and the Crock Pot

A little thought up front about bird size and slow-cooker capacity makes everything smoother.

What size chicken works best?

Most whole chicken in crock pot recipes shine when you use birds that:

  • Weigh between 1.2–2.2 kg (around 3–5 lb)
  • Fit comfortably in the crock with the lid closing fully
  • Leave a little space around the sides for heat to circulate
Overhead shot of a young whole chicken on a board next to a kitchen scale reading about 4 pounds, showing the best 3–5 lb size range for a whole chicken in a crock pot.
For most slow cooker whole chicken recipes, a young “fryer” bird in the 3–5 lb (1.2–2.2 kg) range cooks evenly, stays tender and leaves enough space in the pot for heat to circulate.

A small whole chicken in slow cooker (3–3½ lb) is perfect for two or three people, especially if you add potatoes and other vegetables underneath. For families or planned leftovers, aim nearer 4½–5 lb.

You’ll sometimes see “young chicken” or “fryer chicken” on the label. These tend to be more tender, which is ideal for slow cook whole chicken recipes. If you’re always feeding a crowd, you can also combine one small whole bird with extra thighs or drumsticks, which we’ll get to later.

Matching it to your slow cooker

A quick test before you start:

  1. Put the wrapped chicken into your cold slow cooker.
  2. Close the lid.

If you have to press hard or the lid doesn’t sit flat, the chicken is too big for that cooker. For reliable results with whole chicken recipes slow cooker crock pot, it helps to follow the usual slow-cooker guideline of filling the pot roughly halfway to two-thirds full. That leaves room for circulation and keeps the heating even.

Wrapped whole chicken placed inside a slow cooker with the lid resting flat, illustrating how to check that a whole chicken fits properly and only fills about half to two-thirds of the crock.
Drop the wrapped chicken into the cold slow cooker before you start—if the lid doesn’t sit flat or the pot feels crammed, the bird is too big. Aim to fill the crock about halfway to two-thirds full for even, safe cooking.

For most people:

  • A 5–6 quart crock pot is perfect for a medium or large whole chicken plus vegetables.
  • A 3.5–4 quart slow cooker works well for a smaller bird without many extras.

The USDA’s advice on slow cooker safety also mentions not overfilling and keeping the lid on as much as possible, which lines up neatly with what you’re doing here.


The Core Recipe: Whole Chicken in Crock Pot, Step by Step

This is the backbone of everything that follows. Once you nail this simple whole chicken in a crock pot method, variations are easy.

Ingredients for a Whole Chicken in Crock Pot (Slow Cooker Roast)

  • 1 whole chicken (about 3–5 lb / 1.2–2.2 kg), fully thawed
  • 2–3 teaspoons fine salt
  • 1–1½ teaspoons black pepper
  • 2–3 teaspoons dried herbs
    • thyme, oregano, rosemary, Italian seasoning, or a mix
  • 4–6 cloves garlic, crushed or finely minced
  • 2–3 tablespoons softened butter or olive oil
  • 1 lemon, halved (optional)
  • 1 large onion, peeled and thickly sliced or cut into wedges
  • ¼–½ cup (60–120 ml) chicken stock or water

These simple ingredients create a very flavourful slow cooker roast chicken with barely any fuss.

Ingredients for slow cooker whole chicken laid out on a wooden board: raw whole chicken, lemon slices, garlic, salt, pepper, dried herbs, butter and a jug of chicken stock.
These simple pantry ingredients—whole chicken, herbs, garlic, lemon, onion and a splash of stock—are all you need for a rich, roast-style whole chicken in the crock pot.

Step 1: Prepare and dry the chicken

Remove the chicken from its packaging. Check inside the cavity for giblets and remove them if present. You can reserve these for stock if you like.

Pat the whole bird dry with paper towels. This step matters more than it seems: drying the skin encourages roasting rather than steaming, and is one reason this feels like a baked chicken crock pot recipe rather than boiled chicken.

Sprinkle a small pinch of salt and pepper inside the cavity. If you’re using lemon, tuck the halves inside along with a clove or two of garlic. It smells like a proper chicken pot roast before you even start cooking.

Hands patting a raw whole chicken dry with paper towels on a wooden board, with lemon halves and garlic cloves nearby, showing step 1 of preparing a slow cooker whole chicken.
Drying the skin thoroughly and tucking lemon and garlic into the cavity is what gives this slow cooker whole chicken a roast-style flavour and keeps it from turning out soggy.

Step 2: Mix the herb and garlic rub

In a small bowl, stir together:

  • The remaining salt
  • The remaining black pepper
  • Your chosen dried herbs
  • Crushed garlic
  • Butter or olive oil

You want a soft paste that’s easy to spread. Rub this all over the chicken, including:

  • Over the breast, thighs, wings, and legs
  • Under the skin on the breast if you can loosen it gently with your fingers

The more of the surface you cover, the more flavour your whole chicken in crock pot will have.

If you like, you can customise the rub:

  • Add smoked paprika and a pinch of chili for something closer to BBQ or paprika chicken.
  • Use extra rosemary, lemon zest, and garlic if you’re aiming for a very classic roast chicken recipe rosemary vibe.
Hands lifting the skin of a raw whole chicken and spreading a creamy herb and garlic butter underneath, showing step 2 of seasoning a slow cooker whole chicken.
Rubbing a herb and garlic butter under the skin as well as on top seasons the meat all the way through and gives this crock pot whole chicken that rich, roast-style flavour.

Step 3: Build an onion “rack”

Scatter the onion slices or wedges evenly across the bottom of your slow cooker. They’ll act as a makeshift rack, lifting the chicken slightly so it doesn’t sit in the liquid the whole time.

Place the seasoned chicken breast-side up on top of the onions.

Pour the stock or water around the bird, not over it. Slow cookers generate plenty of moisture on their own—this small amount of liquid just helps everything get started and leaves you with good pan juices in the end.

Seasoned whole chicken sitting on a bed of onions and vegetables in a slow cooker while chicken stock is poured around it, illustrating step 3 of the crock pot whole chicken recipe.
Resting the chicken on a bed of onions and pouring just ¼–½ cup of stock around it keeps the meat lifted out of the liquid, so you get roast-style flavour and rich pan juices instead of a watery boil.

Step 4: Cook on LOW until tender and safe

Put the lid on, set the crock pot to LOW, and leave it to work. As a general guide for this whole chicken recipes slow cooker crock pot method:

  • A smaller chicken (around 3–3½ lb) usually needs about 6 hours on LOW
  • A larger bird (around 4½–5 lb) often takes 7–8 hours on LOW

Every slow cooker heats slightly differently, though, so these are starting points, not commandments. The real test is internal temperature and feel.

About an hour before you expect it to be done, start checking. Insert a digital thermometer into:

  • The thickest part of the thigh, avoiding the bone
  • The thickest part of the breast

Both should read at least 165°F / 74°C. That’s the same number you’ll see in the FoodSafety.gov temperature chart and USDA guidelines, and it’s what turns raw chicken into safe, succulent slow cooker roast chicken.

If the reading is a little low, put the lid back on and cook longer, checking every 20–30 minutes. When the chicken is ready:

  • The legs will move easily in the sockets
  • Juices will run clear, not pink
  • The meat will feel soft and ready to fall from the bone
Cooked whole chicken in a slow cooker with a hand checking the thickest part of the thigh using a digital thermometer reading 165°F, showing step 4 of the crock pot whole chicken recipe.
After 6–8 hours on LOW, confirm your slow cooker whole chicken is ready by checking the thigh and breast reach 165°F / 74°C—the sweet spot for juicy meat and safe cooking.

Step 5: Rest and optionally crisp the skin

Turn the slow cooker off and let the chicken rest in the hot juices for about 10–15 minutes. This gives the meat time to relax and reabsorb some of the juices, so it slices or shreds more cleanly.

For many people, that’s enough. The meat is tender, the onions and juices are delicious, and you can go straight to carving and serving.

If you’d like something that looks more like a traditional baked chicken crock pot hybrid, though, you can quickly crisp the skin:

  1. Heat your oven’s grill or broiler to high.
  2. Carefully lift the chicken out of the slow cooker and onto a roasting pan. It will be delicate, so use two spatulas or a big spoon under the cavity plus tongs for support.
  3. Spoon or brush a little of the fat from the crock pot over the skin.
  4. Grill or broil for about 5–8 minutes, until the skin is golden and crisp in spots.

This trick is very similar to what you see in recipes like this slow cooker whole chicken: cook low and slow in the crock, then finish under heat for colour. It’s a lovely way to get the best of both worlds.

Roasted whole chicken resting in a pan with foil pulled back, next to an open oven, showing step 5 of letting a slow cooker whole chicken rest and then crisping the skin under the broiler.
Let the chicken rest for 10–15 minutes in its juices, then slide the pan under a hot grill for 5–8 minutes—this quick step turns slow cooker tenderness into full-on crispy roast chicken vibes.

Whole Chicken in Crock Pot with Potatoes and Vegetables (One-Pot Roast Dinner)

The base recipe already gives you a delicious slow cooker whole chicken with plenty of juices. However, you can easily turn it into a complete chicken pot roast recipe by adding potatoes and vegetables under the bird.

Choosing vegetables that can handle long cooking

Because a whole chicken in crock pot spends many hours simmering, you want vegetables that won’t completely disintegrate. Good choices include:

  • Baby potatoes or chunks of regular potatoes
  • Carrots, cut into thick pieces
  • Onion wedges or thick slices
  • Parsnips, chopped
  • Celery sticks, cut into 3–4 cm sections

These vegetables soak up the flavour from the chicken and aromatics, turning into soft, savoury little flavour bombs.

Slow cooker filled with seasoned baby potatoes, carrot sticks and onion wedges, showing the vegetable bed that goes under the whole chicken for a one-pot roast dinner.
Build a sturdy veggie bed of potatoes, carrots and onions under the bird—these soak up the chicken juices as it cooks, so you get buttery, flavour-packed vegetables ready at the same time as your slow cooker roast chicken.

Building the One-Pot Layer for a Whole Chicken in Crock Pot

To make a full roast chicken one pot meal:

  1. Toss the potatoes and carrots in a bowl with a little oil, salt, pepper and herbs.
  2. Spread them in an even layer on the bottom of the slow cooker.
  3. Add onion wedges and any parsnips or celery on top.
  4. Place your seasoned whole chicken on this vegetable bed.

Everything else stays the same: a splash of liquid around the sides, lid on, cook on LOW until your whole chicken in a crock pot is done.

By the end, you get:

  • Soft potatoes infused with chicken juices
  • Sweet carrots and onions
  • A pool of savoury liquid at the bottom acting as a light gravy

This is exactly the “veggie nest” approach you’ll see in recipes like this slow cooker whole chicken with vegetables, and it’s ideal when you want dinner to be more or less ready straight from one pot.

Whole roasted chicken served on a platter surrounded by potatoes, carrots and onions, with a slow cooker in the background, showing a complete one-pot roast dinner made in a crock pot.
Layer potatoes, carrots and onions under the chicken in your slow cooker and you’ll lift out a full one-pot roast dinner—tender meat on top, buttery vegetables and savoury juices all from the same crock pot.

How to Serve Your Whole Chicken in Crock Pot with Vegetables

When the chicken is cooked:

  1. Transfer it gently to a carving board and let it rest.
  2. Use a slotted spoon to lift out potatoes and vegetables onto a warm platter.
  3. Arrange the chicken on top or beside them.
  4. Spoon some of the juices over everything.

A sprinkle of chopped parsley or chives brightens it up visually and adds a fresh note. For extra contrast, adding a small bowl of Greek tzatziki sauce on the table gives you something cool, creamy, and garlicky to swipe chicken and potatoes through.


“Baked” Whole Chicken in Crock Pot: Roast Feel Without the Oven

Many people ask specifically for baked chicken crock pot or baked chicken crock pot slow cooker ideas because they want the taste and look of roast chicken without managing oven time. The good news is your base method is almost there already.

To push the “baked” vibe further:

  • Use butter rather than oil in the herb rub
  • Keep the chicken lifted up well on onions or potatoes
  • Only add a small amount of liquid
  • Always finish under the grill or broiler for crisp skin
Whole roasted chicken with crisp golden skin on a wooden board, served with potatoes and macaroni and cheese in front of an oven, illustrating the baked-style finish for crock pot whole chicken.
For that baked-chicken feel, slow cook the bird until tender, then slide it under a hot grill for 5–8 minutes—crispy, golden skin on the outside, slow-cooker juiciness on the inside.

In practice, that means you follow the same steps as the core whole chicken recipes slow cooker crock pot method, then:

  • Lift the cooked chicken out
  • Pop it under a hot grill for a few minutes
  • Carve it on a board so slices still have crispy bits on top

Serve this “baked” style crock pot chicken with soft potatoes from the pot and a simple salad. For full comfort-food mode, it’s hard to beat a slab of macaroni and cheese on the same plate, or even a side of crispy homemade French fries if you want that roast-chicken-and-chips feeling.


Beyond a Whole Chicken in Crock Pot: Thighs, Quarters and Drumsticks in the Slow Cooker

So far, everything has centred on a full whole chicken in crock pot. However, the same approach works beautifully with chicken pieces, which is handy if:

  • You prefer dark meat
  • Only thighs or drumsticks were on sale
  • You want quicker cook times
Slow cooker filled with golden, herb-seasoned chicken thighs and leg quarters sitting on potatoes and carrots, showing the easy dark-meat version of the crock pot whole chicken recipe.
If you love dark meat or just found thighs and quarters on sale, use the same crock pot method—season well, cook 4–6 hours on LOW, and let the rich leg juices soak into the potatoes and carrots underneath.

Basic method for thighs and quarters

For chicken quarters in crock pot or bone-in thighs:

  1. Pat the pieces dry with paper towels.
  2. Season them generously with salt, pepper, herbs, garlic and a little oil or butter.
  3. Arrange them in a single layer in the crock pot, skin-side up.
  4. Pour in a small splash of stock or water—around ¼ cup is still enough.
  5. Cook on LOW until tender:
    • Thighs and drumsticks: about 4–5 hours
    • Leg quarters: about 5–6 hours

You can tuck potatoes and carrots underneath to create a dark-meat version of chicken pot roast in slow cooker. The juices from thighs and legs are particularly rich, so the vegetables turn out very flavourful.

Black slow cooker filled with paprika and garlic rubbed chicken drumsticks and potatoes, showing the slow cooked drumstick variation of the crock pot chicken recipe.
A smoky paprika and garlic rub turns simple drumsticks into slow cooker gold—cook them on LOW for about 4 hours, until the meat pulls back from the bone and the potatoes underneath are coated in rich, spicy juices.

Slow cooked drumsticks

For slow cooked chicken drumstick recipes, you can lean into paprika and garlic:

  • Season drumsticks heavily with salt, pepper, smoked paprika, garlic, and a bit of oil.
  • Cook on LOW with a splash of liquid until the meat pulls back from the bone and feels tender, usually around 4 hours.

This creates something like slow roasted chicken legs without the oven, ideal for a casual, hands-on dinner.

Black slow cooker filled with a small whole roasted chicken surrounded by extra thighs and drumsticks over potatoes and carrots, showing how to stretch a crock pot whole chicken with additional pieces.
When you’re feeding a crowd, nestle a small whole bird on top of your veggie bed and pack thighs and drumsticks all around it—the same slow cooker method gives you a mix of white and dark meat without any extra fuss.

Stretching a Whole Chicken in Crock Pot with Extra Pieces

If you want the presentation of a whole chicken in crock pot but need more portions, you can combine both approaches:

  • Place a small whole bird on your vegetable bed.
  • Nestle seasoned thighs or drumsticks around the sides.

Everything cooks together in the same slow cooker roast chicken environment, and you end up with a mixture of white and dark meat to serve.


Frozen Whole Chicken in Crock Pot? Why Thawing Matters

It’s tempting, especially on busy days, to think, “I’ll just put a frozen whole chicken in the crock pot and let it go all day.” It sounds convenient, but it’s not a great idea.

Slow cookers heat food gently over a long period. If you start with a solid frozen block, the centre of the chicken can sit for too long at temperatures where bacteria thrive before it finally reaches 165°F. That’s why official advice from sources like FoodSafety.gov is clear: thaw meat and poultry safely in the refrigerator before putting them into a slow cooker.

Split image showing a frozen whole chicken on the counter next to a slow cooker on one side and the same chicken thawing on a tray in the fridge with a timer on the other side, explaining that you should thaw chicken before cooking it in a crock pot.
Skip the temptation to drop a frozen bird straight into the crock pot—thaw it in the fridge first, then slow cook, so the chicken moves quickly through the “danger zone” and reaches a safe 165°F / 74°C all the way through.

So instead of chasing crockpot frozen whole chicken shortcuts, it’s much safer to:

  1. Thaw the chicken fully in the fridge.
  2. Pat it dry and follow the whole chicken in crock pot method.
  3. Check the internal temperature to confirm it’s reached the safe zone.

If you often forget to thaw and find yourself in a rush, it’s better to lean on a pressure cooker or Instant Pot recipe designed for frozen poultry. Something like this Instant Pot rotisserie-style chicken shows how quickly a pressure cooker can handle a whole bird, including from frozen, without the drawn-out lukewarm phase a slow cooker would go through.


BBQ, Stuffed and Rotisserie-Style Slow Cooker Chicken

Once you’re confident with the basic whole chicken recipes slow cooker crock pot format, you can start changing the flavours and finishing touches.

Whole chicken coated in glossy BBQ sauce sitting in a black crock pot with a bowl of extra sauce and a brush beside it, showing a BBQ-style slow cooker whole chicken.
Rub the bird with a smoky spice mix, nestle it into the crock pot and finish with a glossy BBQ sauce—this version is perfect shredded into buns or carved like a sticky, crowd-pleasing roast.

BBQ whole chicken

For a crock pot whole chicken BBQ feel:

  • Stir together salt, pepper, smoked paprika, garlic powder, onion powder, and a little brown sugar.
  • Rub this spice mix all over the chicken.
  • Sit the bird on onions in the crock pot.
  • Pour a small amount of stock and a few tablespoons of BBQ sauce around the base.

Cook on LOW until done. At the end, you can:

  • Brush the top with extra BBQ sauce and crisp it under the grill, or
  • Shred the meat in the crock and add more sauce for a pulled-chicken style dish

Pile it onto buns, add slaw, and dinner becomes a casual BBQ sandwich night. If you want fresh ideas for sandwich fillings, the collection of chicken sandwich recipes offers everything from classic combos to spicy twists.

Slow cooker stuffed whole chicken on a platter, sliced open to show loose bread and rice stuffing with carrots and rich juices, illustrating a stuffed crock pot roast chicken.
Keep the stuffing loose and always check that both the meat and the very centre hit 165°F / 74°C—this way your slow cooker stuffed chicken turns out moist, flavourful and safely cooked all the way through.

Stuffed whole chicken in the crock pot

A stuffed whole chicken crock pot feels very special, but the method is familiar:

  • Assemble a loose bread-based or rice stuffing.
  • Spoon it gently into the chicken’s cavity—it should be comfortably filled, not tightly packed.
  • Season the outside as usual and cook on LOW.

Because stuffing is dense, you need to make sure:

  • The thickest parts of the meat reach 165°F
  • The centre of the stuffing also reaches 165°F

It’s the same principle you’d follow for stuffed roast chicken in the oven; using a thermometer for both meat and stuffing keeps this cosy version of chicken pot roast safely on track.

Rotisserie-style slow cooker chicken with golden paprika and herb crust sliced on a wooden board, surrounded by small bowls of paprika and dried herbs.
A simple paprika–herb rub plus a quick blast under the grill turns slow cooker chicken into a rotisserie-style roast—slice it up for salads, wraps, grain bowls or easy weeknight plates.

Rotisserie-style slow cooker chicken

When people talk about a crockpot rotisserie chicken recipe, they usually mean slow-cooked chicken with that familiar rotisserie-spice flavour and slightly crisp skin.

To approximate that:

  • Make a rub with salt, pepper, paprika, garlic powder, onion powder and dried thyme.
  • Rub it thoroughly over the chicken, including under the skin where possible.
  • Use enough onion or potato underneath to keep the chicken lifted above the liquid.
  • Cook on LOW until fully done.
  • Finish under a grill for rotisserie-like colour and texture.

From there, you can slice the meat neatly like a store-bought rotisserie chicken, or shred it to use in things like chicken Alfredo pasta, quesadillas, tacos, or a bubbling buffalo chicken dip for parties.


What to Serve with Whole Chicken in Crock Pot Dinners

Once your whole chicken in crock pot is done, the fun part begins: putting everything on the table.

Bright and fresh sides

Slow-cooked chicken and potatoes are rich and comforting, so something fresh and tangy on the side keeps the plate lively:

  • A crisp green salad with lemony dressing
  • Sliced cucumbers and tomatoes tossed with olive oil and vinegar
  • A bowl of Greek tzatziki sauce for dipping chicken and vegetables

These light sides work particularly well if you’ve made a chicken pot roast recipe with lots of potatoes and carrots underneath the bird.

Plate of sliced crock pot chicken with roast potatoes surrounded by green salad, cucumber and tomato salad, tzatziki, mashed potatoes, macaroni and cheese and fries, showing fresh and comfort side dishes to serve with slow cooker chicken.
Pair your crock pot chicken with bright salads and tzatziki when you want something light, or lean into full comfort mode with mashed potatoes, mac and cheese and fries—the same slow cooker roast works with both kinds of plates.

Classic comfort sides

On cold evenings or when you just want maximum comfort:

  • Spoon the chicken pot roast in slow cooker over buttery mashed potatoes or rice. If rice sometimes trips you up, the detailed guide on how to cook rice walks through several foolproof methods.
  • Add a baking dish of macaroni and cheese for a rich, indulgent side.
  • Fry up a batch of homemade French fries if your household loves the roast-chicken-and-fries combination.

If you’re feeding a crowd, you can also serve the shredded chicken as part of a “build your own plate” spread: rolls or flatbreads, pickles, raw vegetables, dips like spinach dips and buffalo dip, plus bowls of roasted vegetables from the crock. Everyone assembles their own perfect plate.


Making the Most of Leftover Whole Chicken from the Crock Pot

One of the best things about a whole chicken in crock pot is how generous the leftovers are.

Storing safely

As soon as dinner is over and the chicken has cooled slightly:

  1. Pull off any remaining meat from the bones.
  2. Chop or shred it into bite-size pieces.
  3. Store the meat in an airtight container in the fridge for up to 3–4 days.

Strain the cooking juices into a jar. Once chilled, you’ll see a layer of fat on top and rich jelly-like stock underneath. Both are useful:

  • Use the fat for frying onions or potatoes.
  • Use the stock as a base for soups, sauces, or to cook rice and grains.
Container of shredded leftover chicken, jars of chilled chicken stock with a fat layer on top, and a slow cooker insert filled with bones and vegetables, showing how to save and use every part of a crock pot whole chicken.
Shred the meat for easy meals, pour the fat into a small dish for frying, and turn the bones plus cooking juices into homemade stock—one slow cooker chicken quietly sets you up for several more dinners.

Leftover meal ideas

There are endless ways to use leftover slow cooker roast chicken. A few easy ones:

  • Stir shredded chicken into chicken Alfredo pasta for a quick, creamy dinner.
  • Stuff it into sandwiches or wraps with ideas borrowed from the chicken sandwich recipes collection—BBQ, cheesy melts, buffalo style and more.
  • Toss it into salads with crisp lettuce, cucumber, cherry tomatoes and a sharp dressing.
  • Fold it into soups or stews, using the crock pot juices as part of the broth.
  • Combine it with cooked vegetables and gravy, then top with pastry or mashed potatoes to make comforting chicken pies.

Meanwhile, the bones can go right back into the slow cooker with fresh water, an onion, a carrot and a stick of celery. Let them simmer overnight on LOW and you’ll wake up to a simple homemade stock, ready to be strained, cooled and frozen in portions.


Pulling It All Together

When you step back, a whole chicken in crock pot is one of those quiet kitchen skills that makes life easier without a lot of fanfare. With one method, you can:

  • Make a complete slow cooker roast chicken with very little hands-on time
  • Turn it into a one-pot dinner with potatoes and vegetables
  • Adapt it for thighs, quarters and drumsticks
  • Explore BBQ, stuffed and rotisserie-style variations
  • Stretch leftover meat and bones into several more meals
Black crock pot surrounded by plates of sliced roast chicken with vegetables, dark meat pieces, BBQ and stuffed chicken, plus jars of shredded meat and stock, showing how one slow cooker whole chicken can make many different meals.
One slow cooker method gives you it all—classic roast chicken, one-pot veg, juicy dark meat, BBQ and rotisserie-style twists, plus leftover meat and homemade stock for easy meals later in the week.

It’s also a technique that fits easily inside good food-safety practice: thaw the chicken first, keep the lid on, cook on LOW until a thermometer reads 165°F in the thickest parts, just as guides like FoodSafety.gov’s slow cooker safety article recommend.

Once you’ve cooked a couple of whole chicken recipes slow cooker crock pot style, you’ll probably start tweaking them instinctively—extra garlic one week, more lemon the next, maybe a smoky paprika-heavy rub after that. The beauty is that the core never really changes: a seasoned bird, a gentle heat, a few hours of patience, and you’re rewarded with a pot full of tender meat, vegetables, and aroma that makes your kitchen feel like home long before anyone sits down to eat.

Infographic cheat sheet for cooking a whole chicken in a crock pot, showing recommended chicken size, LOW and HIGH cooking times, safe internal temperature of 165°F / 74°C, vegetable tip and how long leftovers keep in the fridge.
Save or pin this whole chicken in a crock pot cheat sheet so you don’t have to rethink the basics—size, timing, temperature and leftovers—every time you set up your slow cooker.

FAQs

1. How long does it take to cook a whole chicken in crock pot on LOW?

For a 3–5 lb bird, a whole chicken in crock pot usually takes about 6–8 hours on LOW. Smaller chickens finish closer to six hours, while larger ones need nearer eight. Always check that the thickest part of the breast and thigh reaches 165°F / 74°C before serving.


2. Can I cook a whole chicken in crock pot on HIGH instead of LOW?

Yes, you can cook a whole chicken in crock pot on HIGH if you’re short on time. In that case, expect roughly 3½–4½ hours of cooking. However, LOW gives a more tender, juicy result, so use HIGH only when you really need to speed things up.


3. What size bird is best for whole chicken in crock pot recipes?

Most whole chicken in crock pot recipes work best with birds between 3 and 5 lb (1.2–2.2 kg). That size usually fits comfortably in a standard slow cooker and cooks evenly. If the chicken barely fits or pushes the lid up, it’s better to choose a smaller one.


4. Do I need to add liquid for a slow cooker whole chicken?

You only need a small amount of liquid for a slow cooker whole chicken recipe. About ¼–½ cup of stock or water is enough to get things going and prevent scorching. The chicken releases plenty of juices as it cooks, so too much liquid can make the flavour watery.


5. Can I cook potatoes and vegetables with my whole chicken in crock pot?

Absolutely. A whole chicken in crock pot with potatoes and vegetables is one of the easiest one-pot dinners. Place sturdy vegetables like potatoes, carrots and onions under the chicken so they soak up the juices while everything cooks together.


6. Will the vegetables get mushy in a chicken pot roast in slow cooker?

If you cut them too small, they can. For a chicken pot roast in slow cooker, keep potatoes and carrots in larger chunks. That way they become soft and flavourful, but still hold their shape by the time your slow cooker whole chicken is done.


7. Is it safe to cook a frozen whole chicken in a slow cooker?

No, it’s not recommended to put a frozen whole chicken in slow cooker. The centre takes too long to heat up, which can keep it in the “danger zone” for bacteria. Always thaw the chicken in the fridge first, then follow your favourite whole chicken slow cooker recipe.


8. How can I get crispy skin on a whole chicken slow cooker recipe?

A slow cooker makes meat tender but doesn’t crisp the skin. To mimic a baked chicken crock pot result, transfer the cooked chicken to a roasting pan and put it under a hot grill or broiler for a few minutes. The skin will brown and crisp while the inside stays juicy.


9. How do I know when my whole chicken in crock pot is done?

The best way is to use a thermometer. For a safe whole chicken in crock pot, the thickest part of the breast and thigh should read 165°F / 74°C. The legs should also move easily and the juices should run clear, not pink.


10. Can I stuff a whole chicken for a crock pot chicken roast?

Yes, but you have to be careful. For a stuffed crock pot chicken roast, keep the stuffing loose rather than packed, and check the temperature in the centre of the stuffing as well as in the meat. Both should reach 165°F / 74°C before you serve.


11. Do I have to brown the chicken before putting it in the slow cooker?

No, you don’t have to brown the chicken first for a whole chicken in slow cooker. The recipe works perfectly well without that extra step. If you want a deeper flavour, you can brown it in a pan first, but it’s optional rather than essential.


12. Can I cook just chicken thighs or drumsticks instead of a whole chicken in crock pot?

Definitely. The same method works for slow cook whole chicken recipes and for pieces. Bone-in thighs, drumsticks and leg quarters cook faster—usually in 4–6 hours on LOW—so they’re a good option when you don’t need a full bird.


13. How should I store leftover slow cooker whole chicken?

Once your slow cooker whole chicken has cooled slightly, remove the meat from the bones and store it in an airtight container in the fridge. It keeps well for about 3–4 days. You can also freeze leftover chicken for easy future meals.


14. What can I make with leftover whole chicken from the crock pot?

There are lots of options. Shredded meat from a whole chicken in crock pot is perfect for sandwiches, wraps, quesadillas, pasta, fried rice, and soups. You can also use the carcass to make homemade stock for the next batch of chicken pot roast or soup.


15. Is a whole chicken in crock pot healthier than fried chicken or takeout?

Generally, yes. A whole chicken in crock pot uses simple ingredients and doesn’t require deep frying. You control the amount of salt, fat and seasoning, and you can pair it with plenty of vegetables, which usually makes it lighter than most takeout options.


16. Can I use boneless chicken for this slow cooker whole chicken style recipe?

You can adapt the flavours, but it won’t really be a whole chicken in crock pot recipe anymore. Boneless chicken cooks faster and can dry out more easily. If you want the same juicy, roast-style result, bone-in and skin-on pieces are a better substitute.


17. Why does my whole chicken in crock pot fall apart when I lift it out?

That’s usually a good sign. A very tender whole chicken in crock pot can be hard to move because the meat is so soft. Use two large spatulas or a slotted spoon plus tongs, or simply carve and serve it directly from the slow cooker instead of lifting it whole.


18. Can I prepare the chicken the night before and start the crock pot in the morning?

Yes, as long as you handle it safely. You can season your whole chicken in crock pot the night before, cover it and keep it in the fridge. In the morning, place it into the slow cooker insert, add vegetables and liquid, then start cooking immediately.