Posted on Leave a comment

Pork Carnitas Recipe — Juicy with Crispy Edges

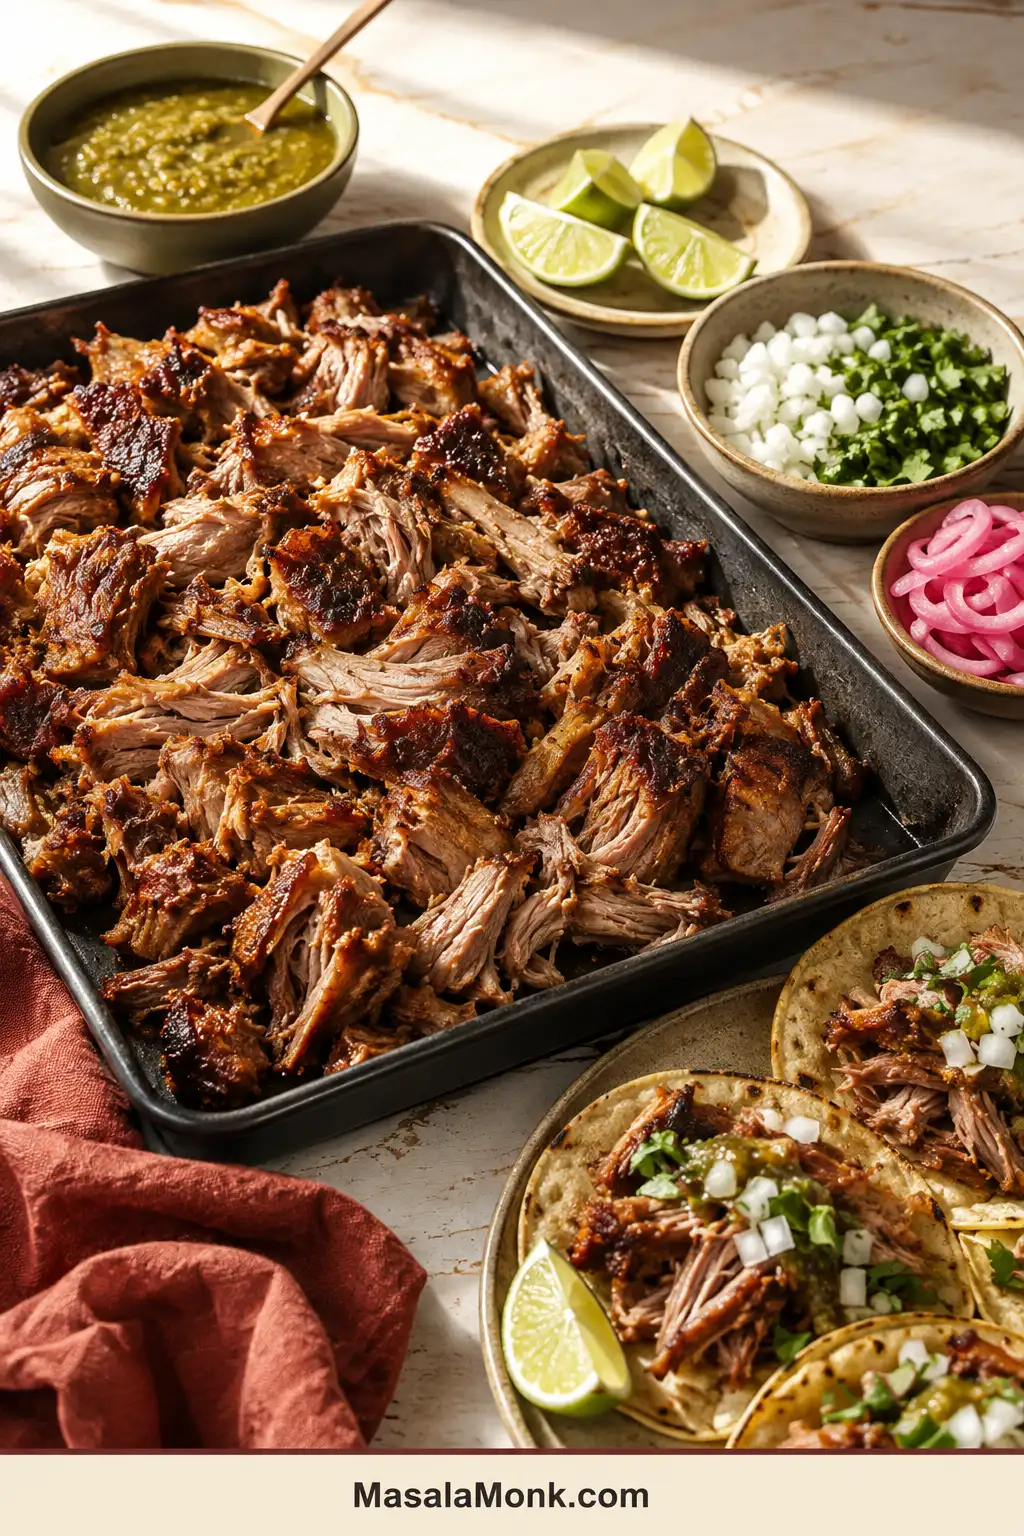
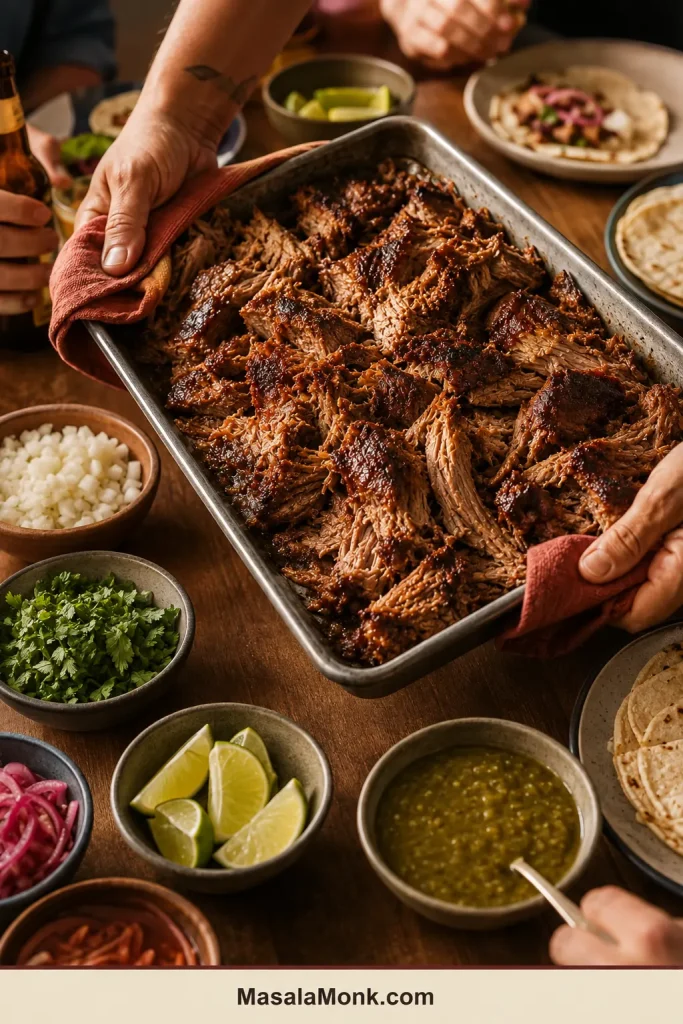
Tray of crisp-edged pork carnitas with corn tortillas, chopped white onion, cilantro, lime wedges, salsa verde and several loosely filled tacos.

Slow cooker pork carnitas can turn out beautifully tender and still miss the reason you wanted carnitas in the first place: dark, crisp edges around pieces that remain juicy in the middle.

Lift the lid and you may find plenty of soft pork, but no crust anywhere. Add too much liquid and it tastes like wet taco filling. Pull it into fine threads, and the broiler can dry those strands before the meat develops a proper browned edge.

The easiest solution is to stop asking the slow cooker to do two opposite jobs. Let it soften the shoulder slowly with orange, lime, garlic, oregano, cumin and ancho chile. Once the thickest section yields easily to a fork, move the pork into dry, intense heat for the finish.

Quick Answer: How to Make Crispy Slow Cooker Carnitas

Cook large pieces of pork shoulder with a small amount of citrus until a fork turns easily through the thickest section. No initial searing or added broth is required. Lift out the pork, strain the cooking juices and reduce them only when they taste thin.

Pull the meat into broad pieces, then broil or skillet-crisp it in a loose layer. Spoon a little reserved juice over the pork only after it has browned. Leave any pork you are saving uncrisped, then brown each portion fresh when you reheat it.

Essential slow cooker pork carnitas decisions
Decision Best starting point
Pork and cooker 4 lb / 1.8 kg trimmed pork shoulder in a 6 qt / 5.7 L slow cooker
Cooking time Begin checking at 6 hours on LOW or 3½–4 hours on HIGH
Doneness A fork turns through the thickest section with little resistance
Best finish Broiler for a full batch; skillet for the deepest crust
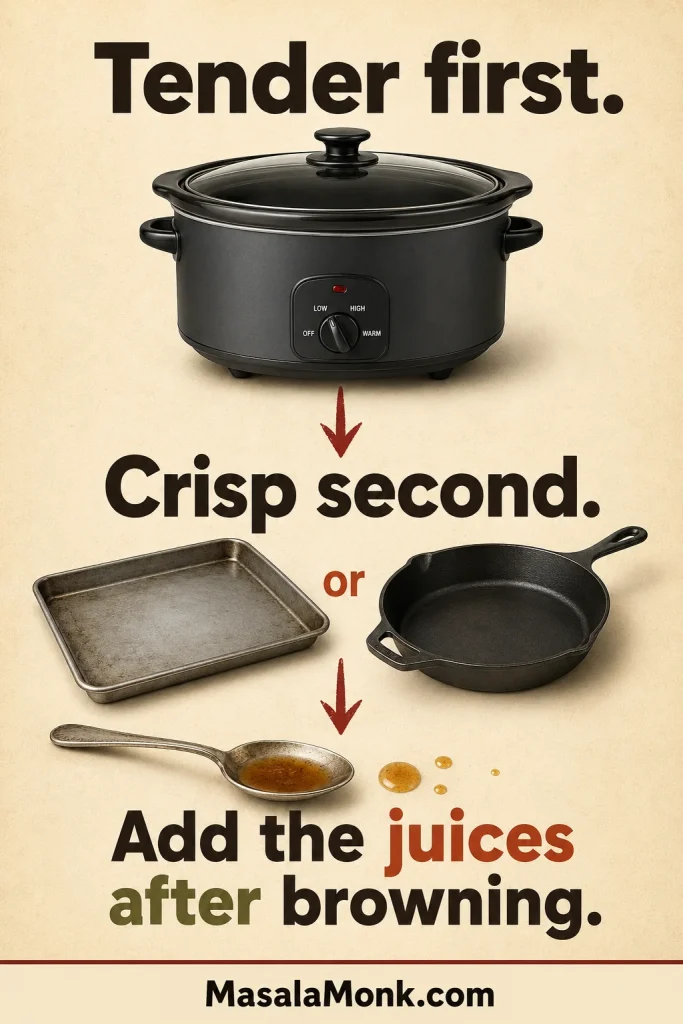
Infographic shows pork moving from a slow cooker to dry heat, followed by a small measured addition of reserved cooking juice.
Slow cooking builds tenderness; dry heat creates the final crust.
Open the Full Carnitas Guide

Slow Cooker Pork Carnitas Recipe

Pork shoulder cooks with a small amount of citrus, garlic, onion and warm spices until it separates easily but still holds broad pieces. The finished tray should contain deeply browned tips, crisp flat edges and thicker pieces that remain soft enough to pull apart.

Use the broiler for a full batch or a skillet for the deepest crust. Allow about 25 minutes to trim, weigh, cut and season the pork. Once the lid is closed, the long cook is hands-off.

Prep 25 minutes
LOW Cook 6½–8½ hours
HIGH Cook 4–5½ hours
Broiler Crisping 5–9 minutes per pan; 15–20 minutes for the batch
Skillet Crisping 3–4 minutes per batch; 20–35 minutes for the recipe
Estimated Yield 2½–3 lb / 1.15–1.35 kg cooked pork

Planning window: Allow about 7½–10 hours on LOW or 5–6¾ hours on HIGH, including preparation, resting and broiling. Allow additional time if the cooking juices need reducing.

Expect approximately 8–11 hearty servings, 10–14 taco-bar servings or 20–30 small tacos.

For serving: warm tortillas, chopped white onion, cilantro, lime wedges and roasted salsa verde or another bright salsa.

Essential Equipment

  • 6 qt / 5.7 L slow cooker or Crock-Pot
  • Kitchen scale
  • Cutting board and chef’s knife
  • Tongs or a large slotted spoon
  • Fine-mesh strainer and wide saucepan
  • One or two uncoated, broiler-safe rimmed metal sheet pans

An instant-read thermometer, fat separator and heavy skillet are helpful but optional.

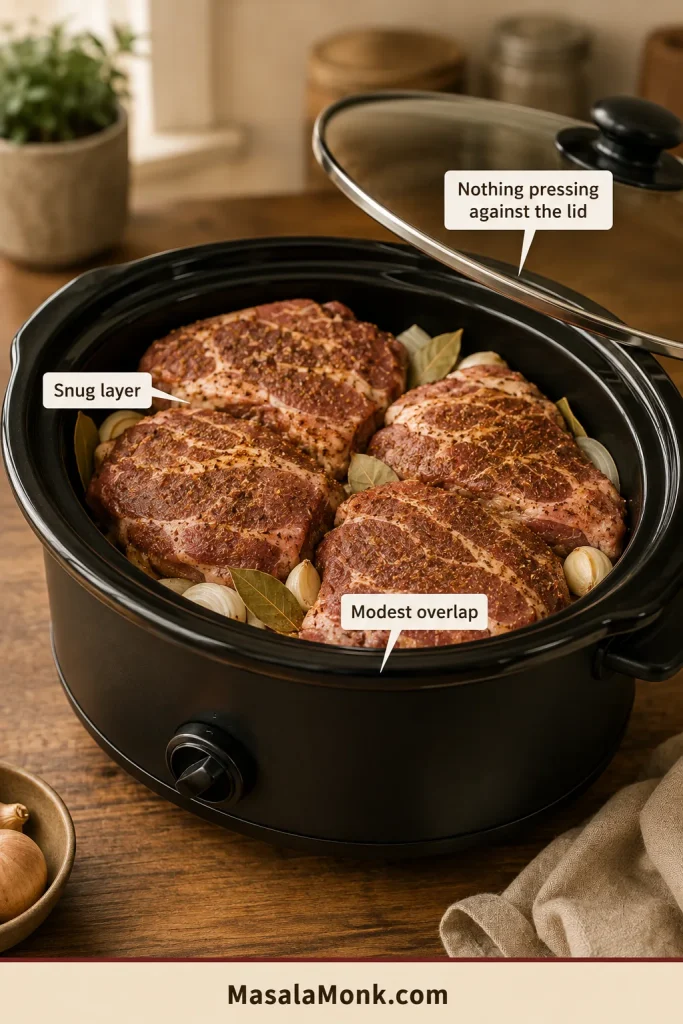
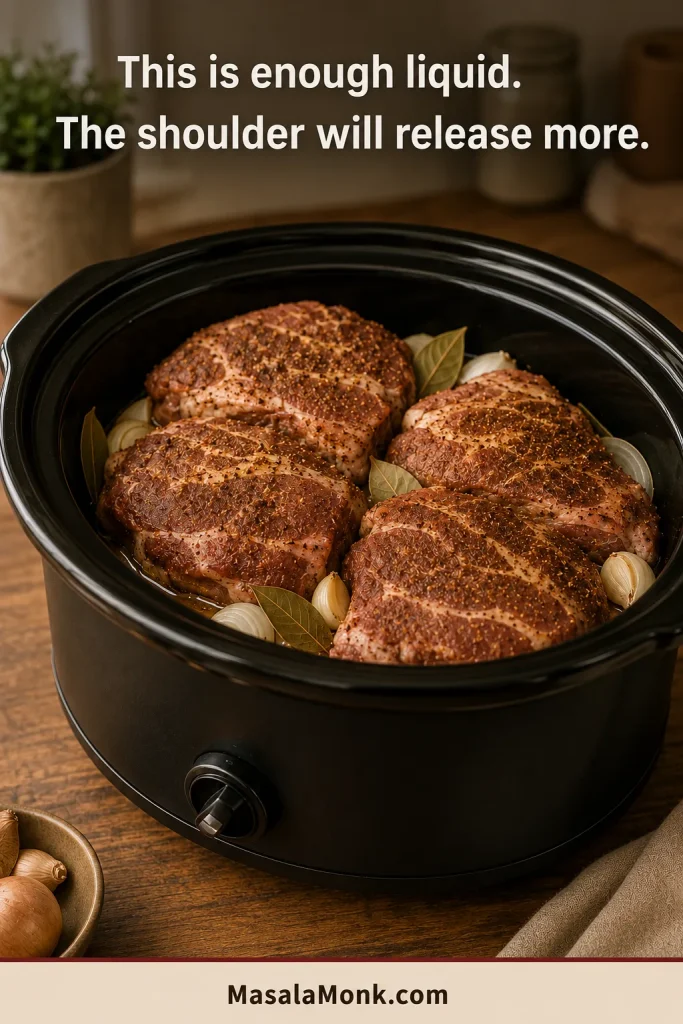
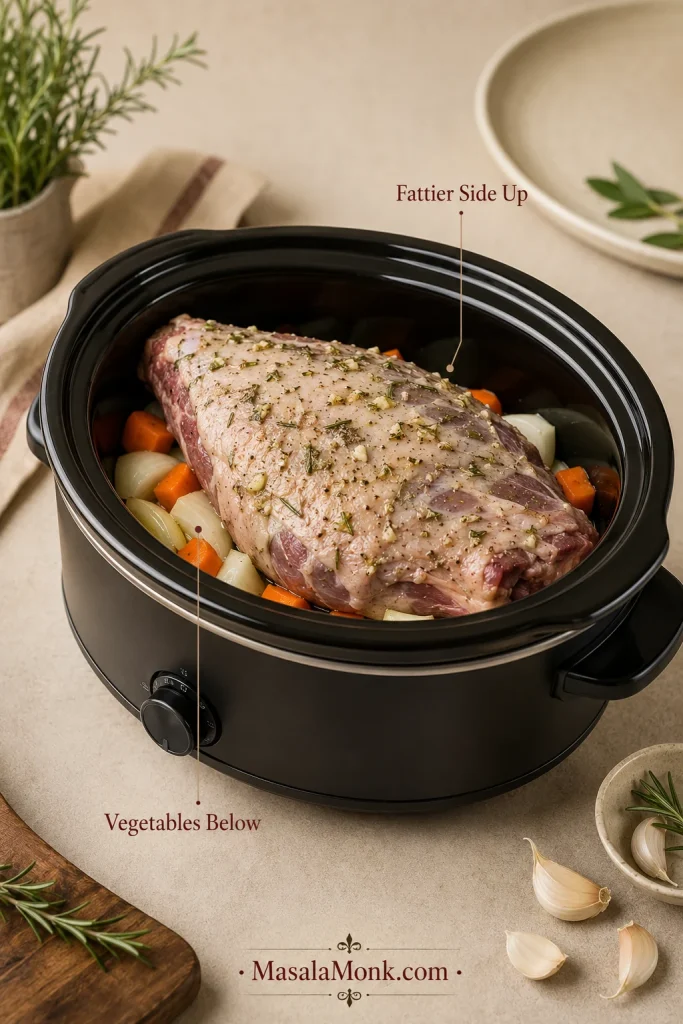
Cooker fit: Arrange the pork in a snug layer with modest overlap. It may touch the sides, but it should not press against the lid. The cooker may look almost dry at first. That is expected—the shoulder will release plenty of moisture and fat.

Seasoned pork shoulder pieces sit snugly over onion, garlic and bay leaves in an oval slow cooker with modest overlap and space beneath the lid.
Modest overlap is fine; a raised lid or compressed pork is not.

Ingredients

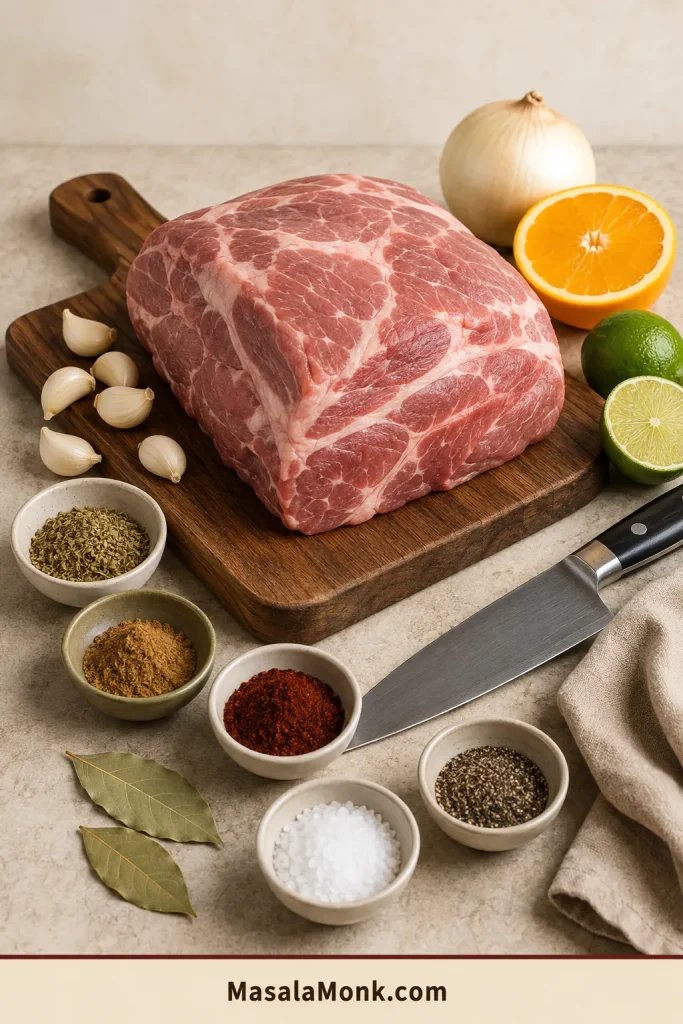
Raw boneless pork shoulder surrounded by orange, lime, onion, garlic, oregano, cumin, ancho chile, black pepper, salt and bay leaves.
Pork shoulder provides the body; citrus, aromatics and spices shape the flavor.
  • 4 lb / 1.8 kg boneless pork shoulder, pork butt or Boston butt, weighed after removing skin and unusually thick external fat
  • 20 g fine sea salt
  • 2 teaspoons dried Mexican oregano, crushed between your fingers
  • 1½ teaspoons ground cumin
  • 1 teaspoon freshly ground black pepper
  • 1 teaspoon ancho chile powder
  • 1 large yellow or white onion, about 8–9 oz / 225–250 g, cut into thick wedges
  • 8 garlic cloves, peeled and lightly crushed
  • ½ cup / 120 ml fresh orange juice
  • 2 tablespoons / 30 ml fresh lime juice
  • 2 bay leaves

Buying note: Choose a slightly larger roast when it has skin or a very thick fat cap, so approximately 4 lb / 1.8 kg remains after trimming.

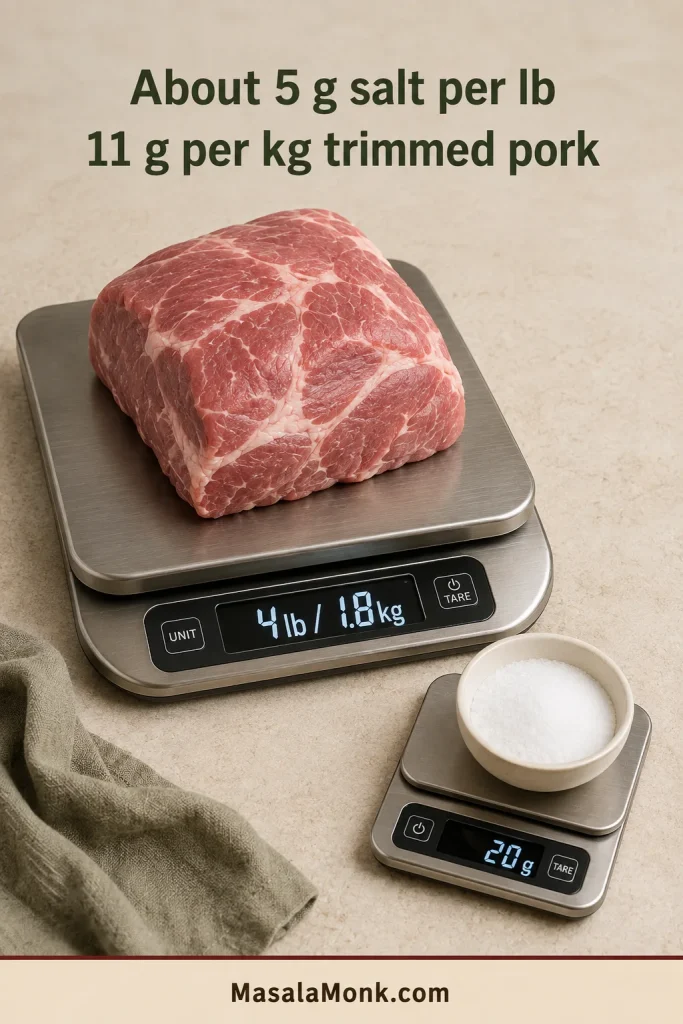
Scaling salt: Use approximately 5 g per pound or 11 g per kilogram of trimmed pork. Salt volume varies significantly by brand and crystal size.

For Crisping

  • Reserved cooking juices
  • Reserved pork fat, lard or neutral oil for skillet crisping, if needed

Go to the instructions ↓

Instructions

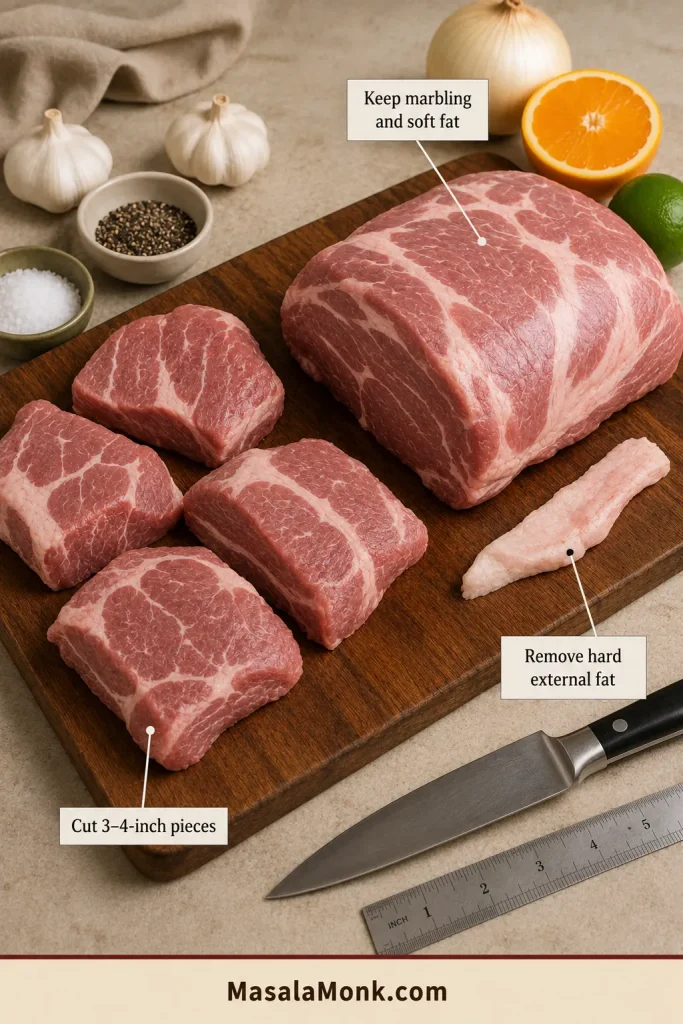
  1. Prepare the pork. Thaw completely in the refrigerator and pat dry. Remove skin and unusually thick, hard external fat, keeping the softer fat and marbling.
  2. Cut and season. Divide the shoulder into roughly 3–4-inch / 7.5–10 cm pieces of similar thickness. Combine the salt, oregano, cumin, pepper and ancho chile, then coat every cut side and fold.
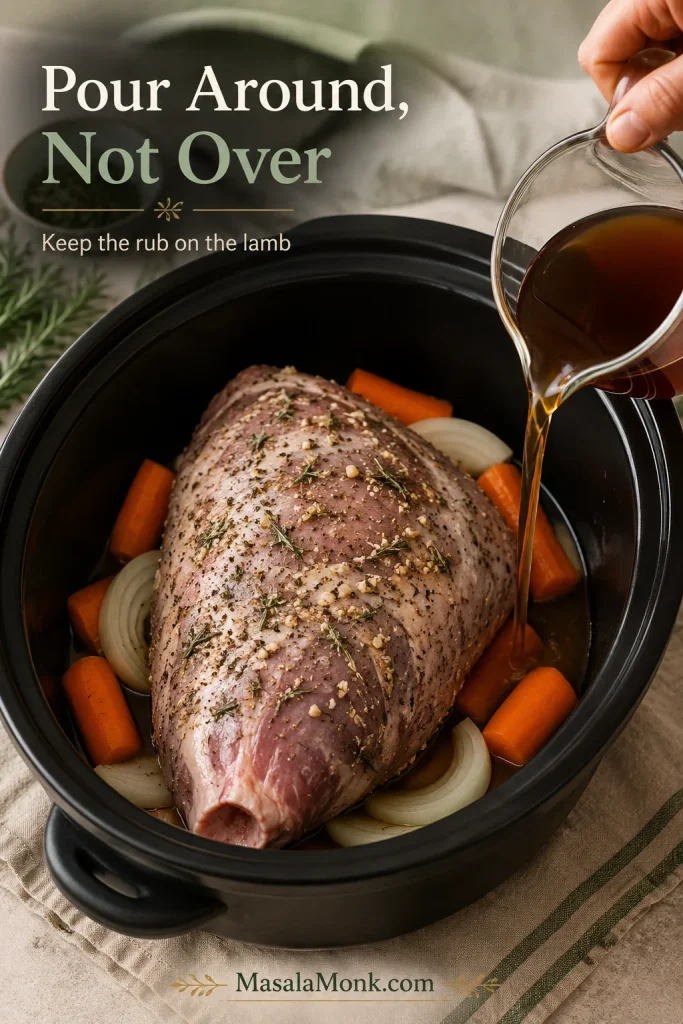
  3. Load the cooker. Scatter the onion and garlic across the bottom. Arrange the pork over them, tuck in the bay leaves and pour the citrus around the meat.
  4. Cook until tender. Cover and cook on LOW, beginning to check at 6 hours, or on HIGH, beginning to check at 3½–4 hours.
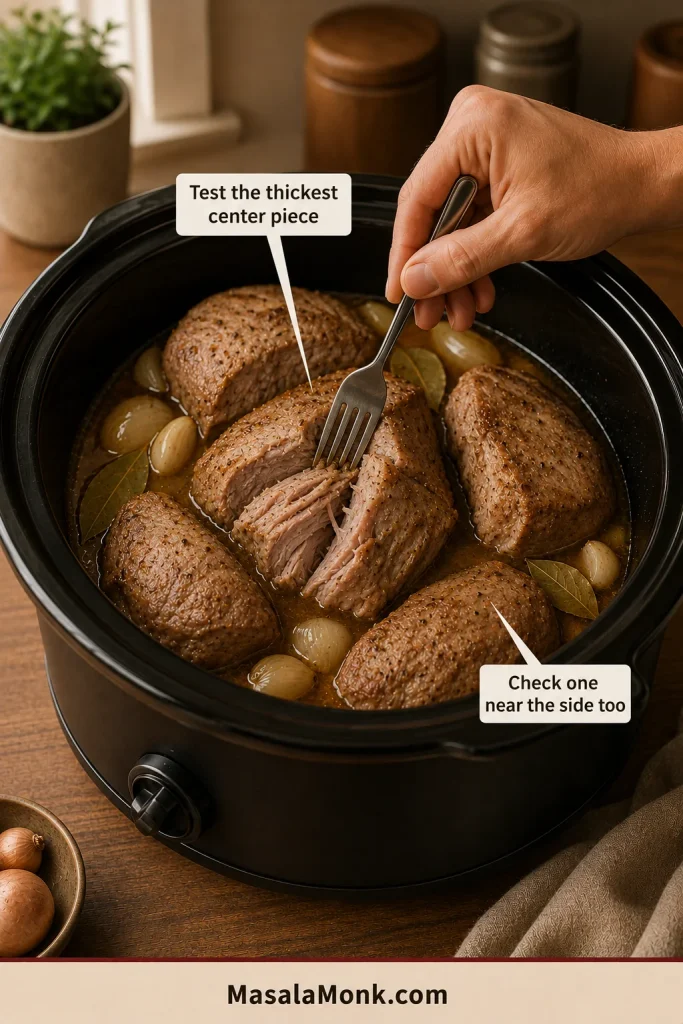
  5. Use the fork test. Test a thick central piece and one near the side. The pork is ready when the fork turns easily and separates a broad section without force.

After the Slow Cook: Rest, Strain and Pull

  1. Rest and strain. Transfer the pork to a rimmed tray and let it rest for about 10 minutes while you strain the cooking liquid into a saucepan. Discard the bay leaves; discard the softened onion and garlic or save them for beans, rice or soup.
  2. Adjust the juices. Spoon off excess fat, reserving a little for skillet crisping. Taste the strained cooking juices once they are cool enough. If they taste thin and citrusy, simmer until the orange settles into the background and the juices taste fuller and lightly coat a spoon. Set them aside as the reserved juices.
  3. Pull the pork. Leave a mixture of meaty chunks, shorter strands and soft interior pieces.
  4. Crisp and finish. Use the broiler for the full batch or a skillet for deeper browning. Add a measured amount of reserved juice after the crust develops. Keep the rest for serving, storage and reheating.

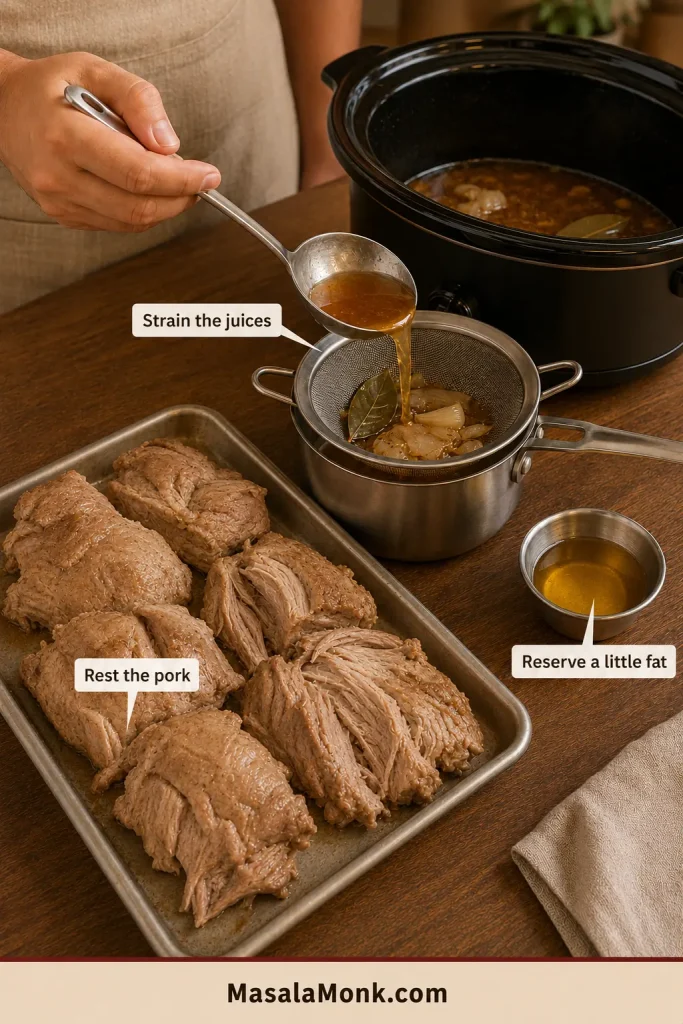
Use the resting window: keep the pork in broad sections while the juices are strained and a small amount of clean fat is reserved.

Cooked pork rests in broad sections on a tray while its cooking liquid is strained into a saucepan and a small portion of fat is reserved.
Rest the pork while the juices are strained, skimmed and tasted.

Broiler Finish for the Full Batch

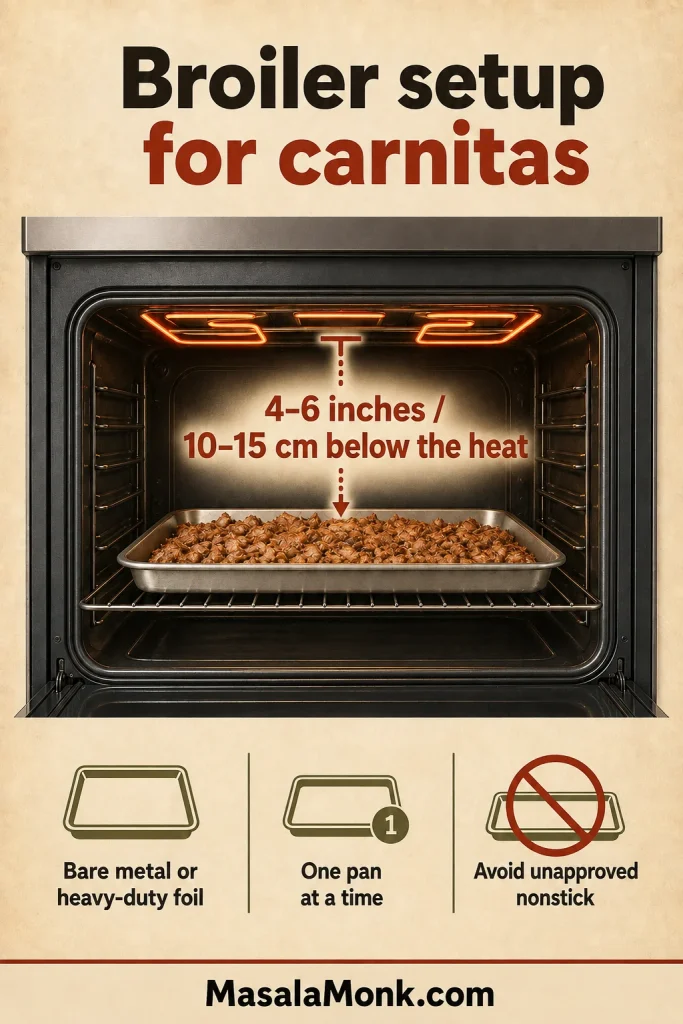
  1. Position an oven rack so the pork will sit approximately 4–6 inches / 10–15 cm beneath the broiler. Preheat the broiler fully.
  2. Use a bare broiler-safe metal sheet pan, or line the pan with heavy-duty foil. Avoid nonstick pans unless the manufacturer explicitly rates them for broiler use.
  3. Divide the pork between two pans in loose single layers. Broil one pan at a time for the most even browning. With only one pan, work in two rounds.
  4. If the pork already glistens, begin without adding liquid. If it looks unusually dry, drizzle with no more than 1 tablespoon / 15 ml reserved juice per pan.
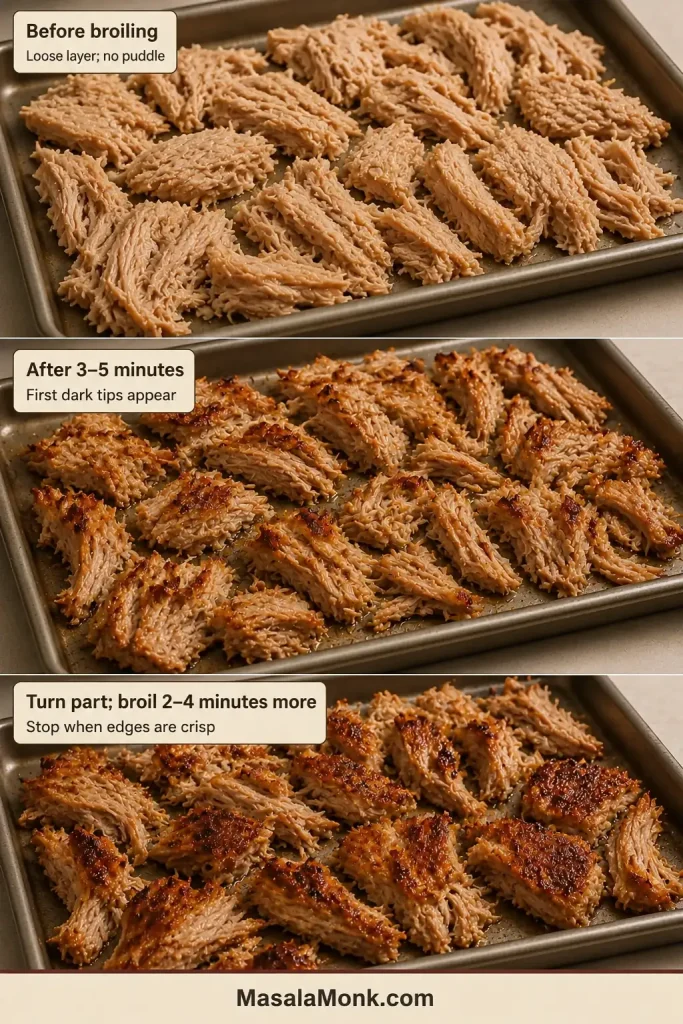
  5. Broil for 3–5 minutes. Turn roughly half the pieces, leaving some browned surfaces facing upward, then broil for another 2–4 minutes.
  6. Finish each pan with 1–2 tablespoons / 15–30 ml hot reserved juices. Toss briefly and serve promptly.

Broiler Browning Cues

Three-stage sequence shows moist pork before broiling, the first dark tips after several minutes and crisp edges after part of the tray is turned.
First dark tips mean redistribute the pork; they do not always mean stop.

The pork should already taste well seasoned before it reaches the broiler. This final step is mainly about browning.

Judge the finished tray by its range of textures rather than by one uniform shade of brown.

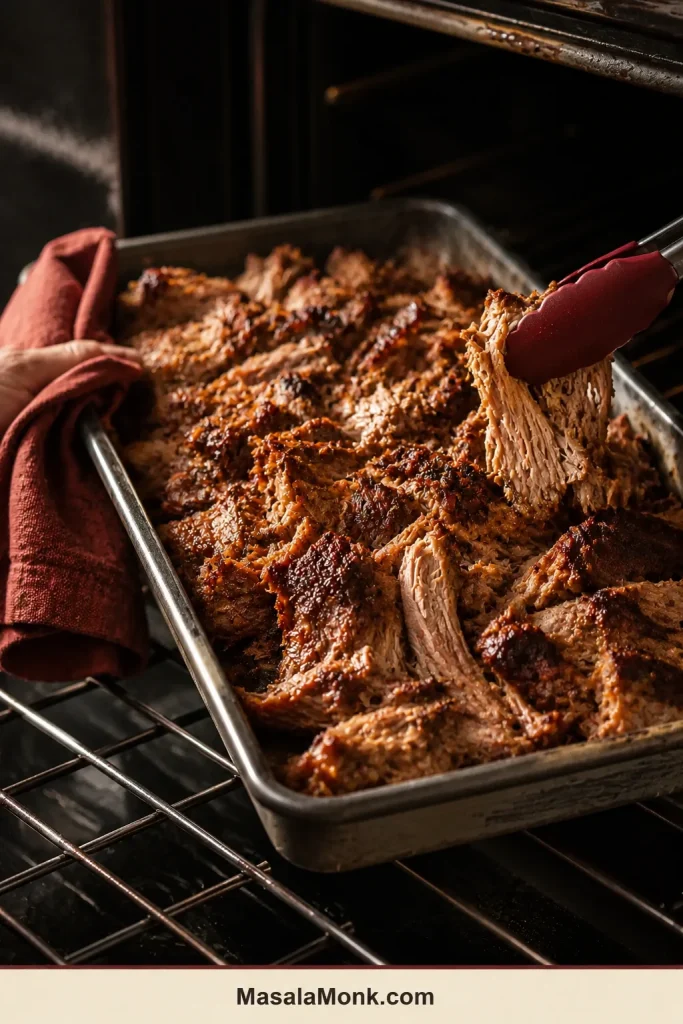
A tray of deeply browned carnitas is pulled from the oven while tongs lift one crisp-edged but still flexible piece.
Stop with deeply crisp tips and thicker pieces that remain soft and juicy.
Skillet Finish for Smaller Batches
  1. Heat a heavy skillet over medium-high heat. Add a teaspoon of reserved pork fat, lard or neutral oil if the pan is dry.
  2. Add about 8 oz / 225 g pork to a 10-inch / 25 cm skillet, or 10 oz / 285 g to a 12-inch / 30 cm skillet.
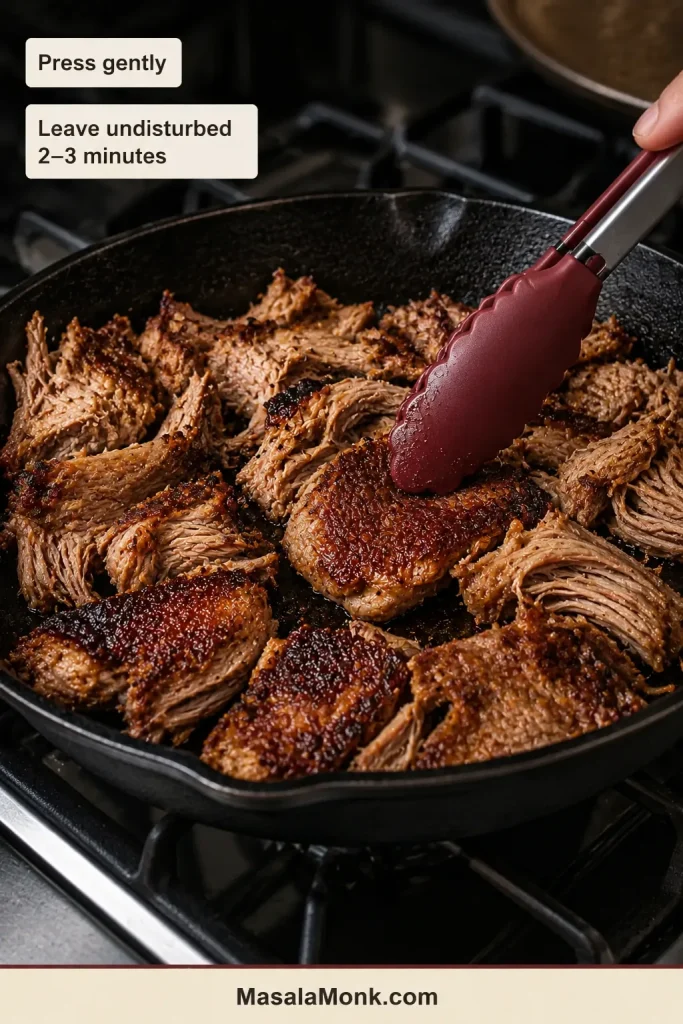
  3. Press gently and leave undisturbed for 2–3 minutes.
  4. Turn part of the pork and cook for another 30–60 seconds.
  5. Remove from the heat, add about 1 tablespoon / 15 ml reserved juice and repeat with the remaining pork.

Success cue: Stop when the exposed edges are dark and crisp but the larger pieces still bend and pull apart softly. Carnitas should have contrast, not uniform crunch.

How this recipe was developed: This slow-cooker adaptation is based on established pork-shoulder cooking principles, measured salt, restrained added liquid and sensory doneness cues. Slow cookers and shoulder cuts vary, so the stated times are checking windows rather than guarantees.

Tender first. Crisp second.

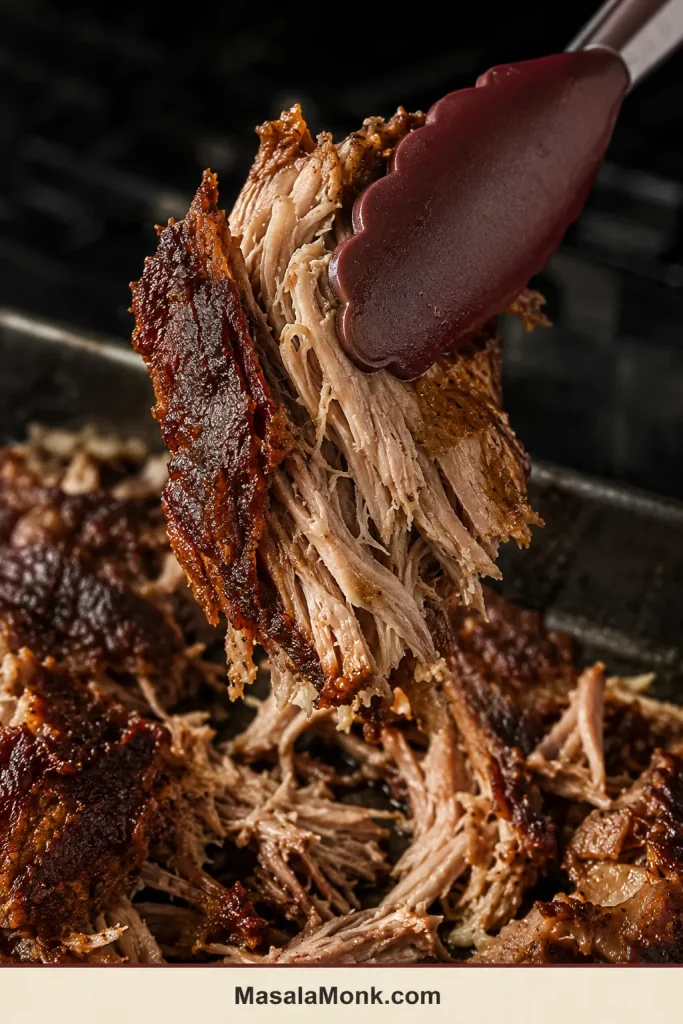
Burgundy-tipped tongs lift a broad carnitas piece with a dark underside, crisp irregular edges and a moist pork center.
Dark crust outside, moist pork inside—the texture carnitas should keep.

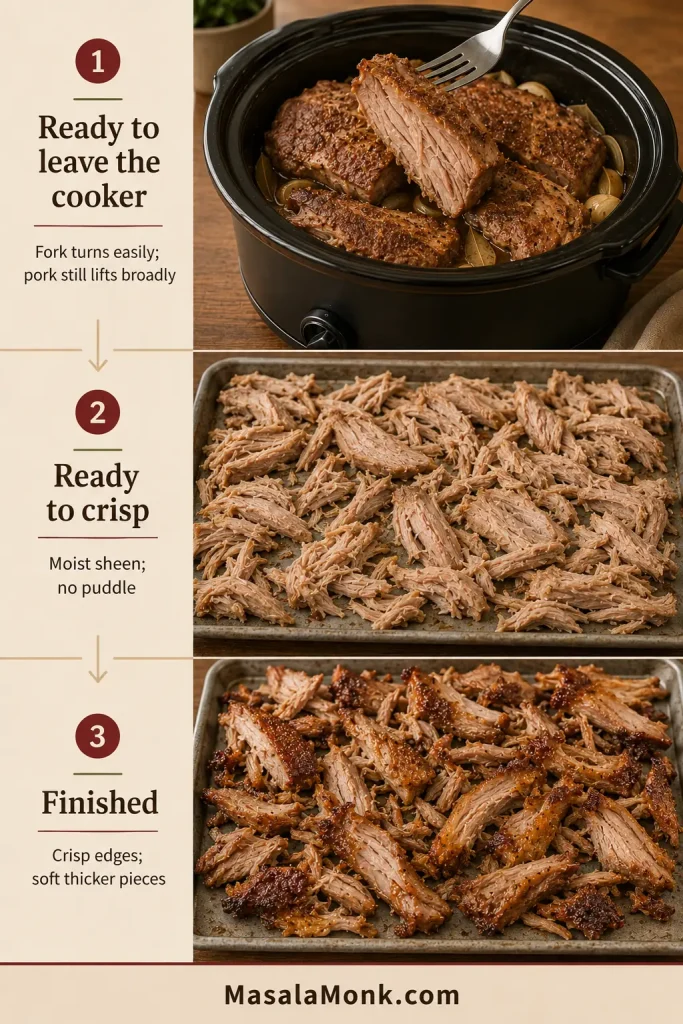
Three Signs Your Carnitas Are on Track

Watch for these three changes as the pork moves from the slow cooker to the crisping tray.

Three-part infographic shows fork-tender pork, moist broad pork pieces without pooled liquid and finished carnitas with browned undersides and crisp tips.
Check tenderness, surface moisture and final crust at three separate stages.
Carnitas appearance and texture checkpoints
Stage What to look for
Ready to leave the slow cooker A fork turns easily, but the pork still lifts in large sections
Ready to crisp The pieces have a moist sheen, with no puddle collecting underneath
Finished Browned undersides and crisp tips surround soft, juicy centers

Choosing the Best Pork for Carnitas

A marbled shoulder gives the slow cooker what it needs: fat for juiciness and connective tissue that softens during the long cook.

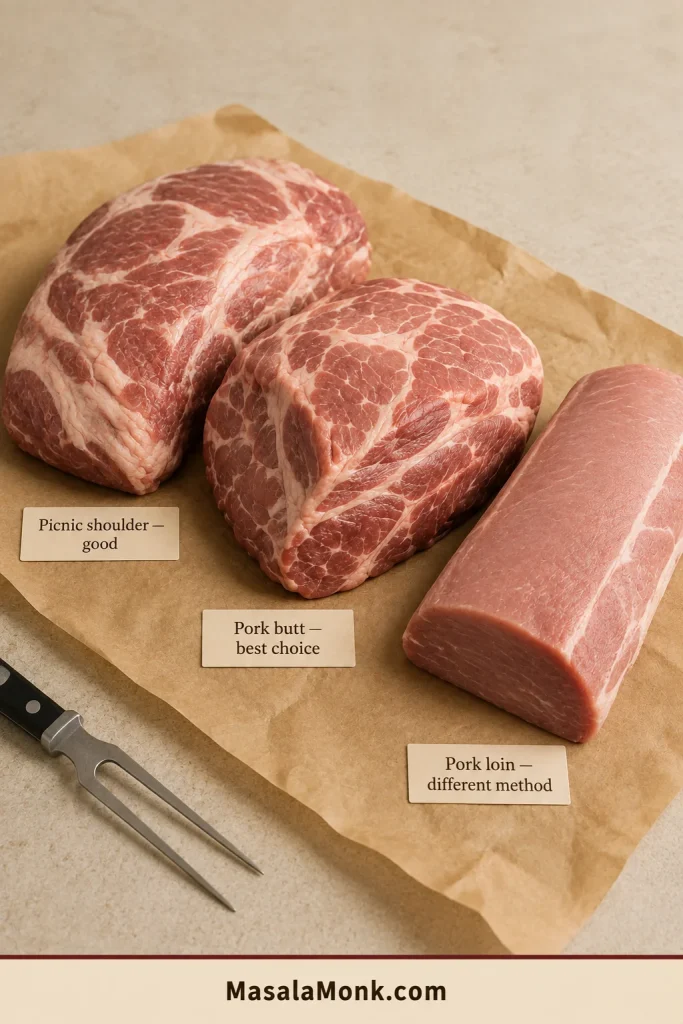
Boneless pork butt, picnic shoulder and lean pork loin displayed together with labels comparing their suitability for carnitas.
Visible marbling protects the pork through slow cooking and final crisping.

On a phone, swipe sideways to see the full table.

Pork cuts suitable for slow cooker carnitas
Pork cut Verdict What changes
Pork butt, Boston butt or shoulder blade roast Best choice Well marbled, forgiving and easy to divide into large pieces
Picnic shoulder Good May need more trimming and can include skin or bone
Bone-in shoulder Good but slower Use more raw weight and expect a wider timing window
Pork loin Separate method Leaner and better with a shorter, gentler cook
Tenderloin or pork chops Not suitable for this timing Too lean and too quick-cooking for the shoulder method

Working with pork loin instead? Its leaner structure needs the shorter method in our slow cooker pork loin recipe. For tenderloin, use the timing and handling in this slow cooker pork tenderloin guide.

Buying and Preparing the Shoulder

Pork butt and Boston butt come from the upper shoulder. Picnic shoulder comes from lower on the front leg. Both work, but pork butt is usually more compact, well marbled and easier to prepare.

Boneless shoulder is easier to weigh, season and divide. For a roughly 5 lb / 2.25 kg bone-in shoulder, 20 g salt is a sensible starting point because part of the packaged weight is bone. Expect a later first check, and taste the reserved juices before making any final seasoning adjustment.

Remove skin and unusually thick, hard fat, but keep the softer fat and marbling.

Partly trimmed pork shoulder with hard exterior fat removed and several large irregular pieces beside a 3–4-inch size guide.
Match the thickest sections; the pieces do not need perfect shapes.

Carnitas Ingredients and Substitutions

Salt and Seasoning

The recipe uses 20 g salt for 4 lb / 1.8 kg trimmed pork—about 1.1% by weight. Salt crystals vary too much for one universal teaspoon conversion, so a scale is the clearest option.

Four pounds of trimmed pork shoulder on one digital scale and 20 grams of fine sea salt in a bowl on another scale.
Salt by weight to avoid the density differences between fine, coarse and flaky crystals.

Mexican oregano brings an earthy, citrusy note. Mediterranean oregano is a practical substitute, although its flavor is more minty and herbal. Cumin stays in the background, while ancho chile adds mild warmth rather than sharp heat.

Using a carnitas seasoning packet? Check the sodium first. With a salted packet, leave out the recipe salt initially and adjust only after tasting the reserved juices.

Citrus and Added Liquid

Orange rounds out the garlic and spices without making the pork taste sweet. Lime brings a sharper edge, so most of it is better saved for the table. Fresh juice is best, and there is no need to add peel—the long cook can draw bitterness from it.

No orange juice? Replace it with the same amount of unsalted chicken broth or water. Use only 1 tablespoon / 15 ml lime juice in the cooker, then brighten the finished pork with fresh lime.

A shallow layer of liquid is enough. Starting with cups of broth gives the pork a weaker flavor and leaves much more moisture to manage before browning.

Do You Need to Sear the Pork?

No. Searing can add another layer of browned flavor, but that crust softens during hours of moist cooking. Skip it for a simpler start; the final crisping stage matters more.

Want to change the flavor?

More Pork-Forward Carnitas

Reduce the cumin to ¾ teaspoon, leave out the ancho chile powder and use only 1 tablespoon / 15 ml lime juice. Offer more lime at the table and use reserved pork fat for skillet crisping.

Smoky Chipotle Carnitas

Add 1 finely chopped chipotle pepper in adobo with 1–2 teaspoons of the sauce. Leave out the ancho chile powder at first because the chipotle will taste stronger after the juices reduce.

A spoonful of fresh mango salsa gives the smoky pork a cool, bright contrast.

Beer or Mexican Coke

  • Beer: Replace ¼ cup / 60 ml orange juice with the same amount of mild lager.
  • Mexican Coke: Replace ¼ cup / 60 ml orange juice with cane-sugar cola for a sweeter finish.

Keep the total liquid unchanged so the pork does not take longer to brown.

Half-Batch Slow Cooker Carnitas

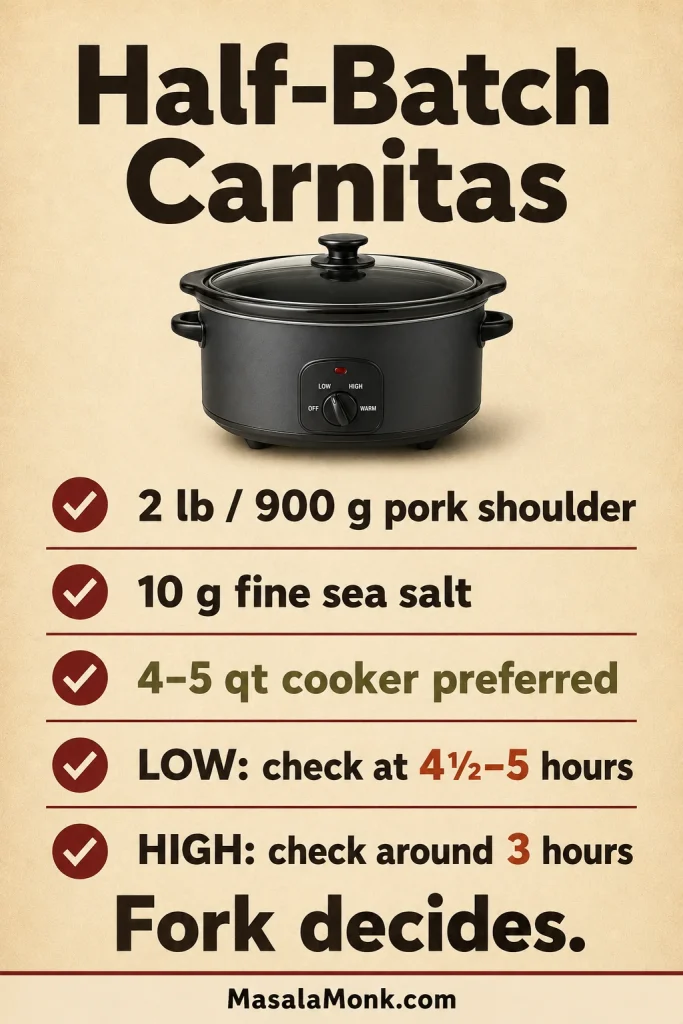
Cooking for fewer people? Make the 2 lb / 900 g half batch

A 4–5 qt / 3.8–4.7 L slow cooker gives a half batch the best fit. A 6-quart model also works, but the shallower fill may alter evaporation and timing.

  • 2 lb / 900 g pork shoulder, weighed after major trimming
  • 10 g fine sea salt
  • 1 teaspoon Mexican oregano
  • ¾ teaspoon ground cumin
  • ½ teaspoon black pepper
  • ½ teaspoon ancho chile powder
  • ½ large onion, about 4–4½ oz / 110–125 g
  • 4 garlic cloves
  • ¼ cup / 60 ml orange juice
  • 1 tablespoon / 15 ml lime juice
  • 1 bay leaf

Begin checking at 4½–5 hours on LOW or around 3 hours on HIGH. A common window is 5½–7 hours on LOW or 3½–4½ hours on HIGH, but the fork still decides.

Half-batch planning: quantities scale directly, but cooker fit and the first tenderness check still need their own adjustment.

Half-batch infographic lists 2 pounds of pork shoulder, 10 grams of salt, a 4–5-quart cooker and earlier LOW and HIGH checking times.
Use a smaller cooker and begin checking earlier; cooking time does not halve.

Carnitas vs Slow Cooker Pulled Pork

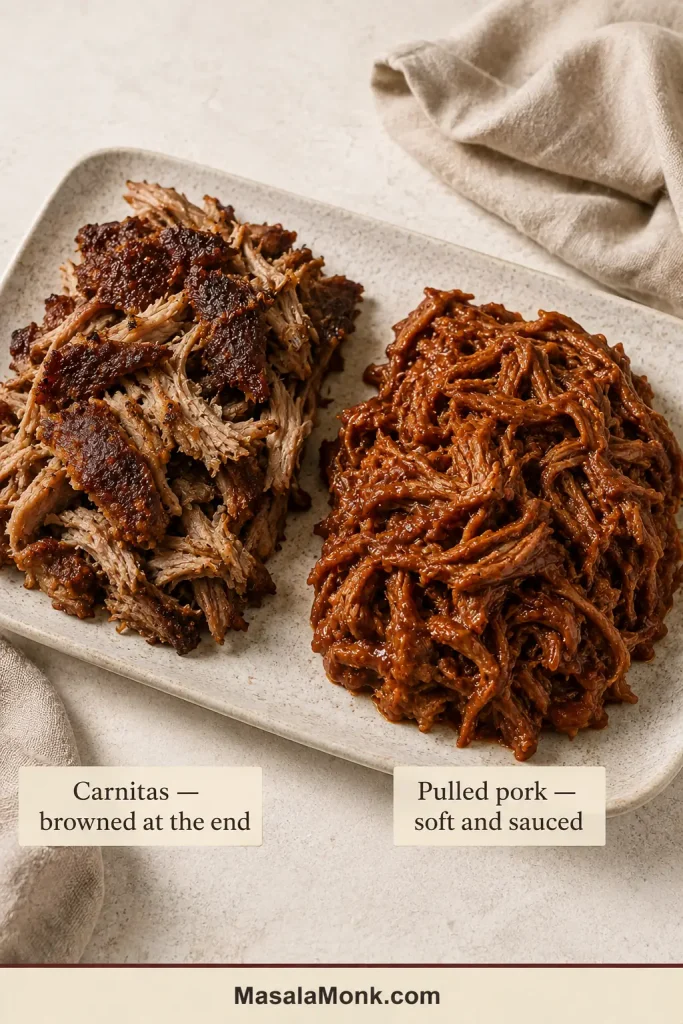
Carnitas are often described as Mexican pulled pork, but the comparison only goes so far. Both can begin with pork shoulder; the seasoning, texture and finish move in different directions.

Broad crisp-edged carnitas pieces sit beside finer strands of barbecue pulled pork coated in reddish-brown sauce.
Carnitas need exposed browned surfaces, not merely separated pork fibers.
  • This slow-cooker version uses citrus, oregano and restrained spices; barbecue pulled pork leans more heavily on rub, smoke, vinegar and sauce.
  • Broader, irregular pieces are typical of carnitas; pulled pork is usually separated into finer strands.
  • Dry heat gives carnitas their browned finish; pulled pork generally stays soft and coated with sauce.
  • Tacos, tostadas and bowls suit carnitas naturally; barbecue pork fits buns, sliders and barbecue plates.

For soft, sauced pork made for sandwiches and sliders, follow our slow cooker pulled pork recipe.

Is This Traditional Carnitas?

Traditional carnitas take a different route. In Michoacán, pork is commonly cooked slowly in rendered fat, often in large copper vessels, as described in Mexico’s Ministry of Culture overview of Michoacán cooking.

This slow-cooker version uses moist heat for tenderness, then adds a separate browning stage for the crisp-soft finish.

Why Each Step Matters for Juicy, Crisp Carnitas

Cut and Season Large Pieces

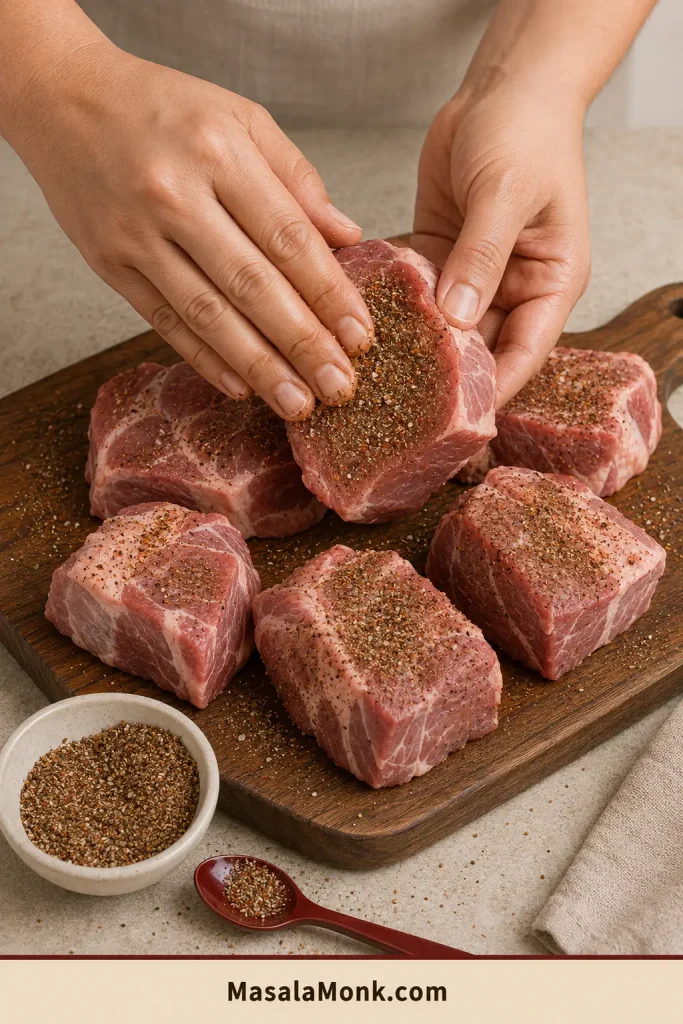
Large pieces reach tenderness more predictably than one compact roast while keeping enough mass to stay succulent. Similar thickness matters more than perfect shape. Mix the salt and spices before applying them, then press the seasoning into the freshly cut surfaces and folds.

Hands rub a dry spice mixture over the sides, cut faces and folds of several large raw pork shoulder pieces.
Season every cut face so flavor reaches beyond the original exterior.

Load the Cooker and Leave It Closed

Put the onion and garlic beneath the shoulder, where the released juices will collect. Pour the citrus around the edges. The cooker may look almost dry, but the pork will release moisture and fat as it cooks. Early stirring and repeated lid lifting only slow the process.

Seasoned pork shoulder sits mostly above a shallow layer of citrus juice, onion and garlic at the bottom of a slow cooker.
The liquid starts low, then rises as the shoulder releases fat and juices.

Check the Center and the Edge

Slow cookers often run hotter near the walls, so test the thickest central piece and one near the side. If the fork still meets resistance at the expected time, close the lid and give the pork another 30 minutes. Nothing has gone wrong; the connective tissue simply needs longer.

A fork tests the thickest pork piece in the center of a slow cooker while a second marked area identifies a piece near the outer edge.
If the edge yields but the thick center resists, keep cooking.

When the fork finally turns easily, the uncertain part is over. The bright citrus aroma should have softened, and the cooker should smell much more deeply of pork, garlic and oregano. The shoulder is ready for the high-heat finish that gives carnitas their contrast.

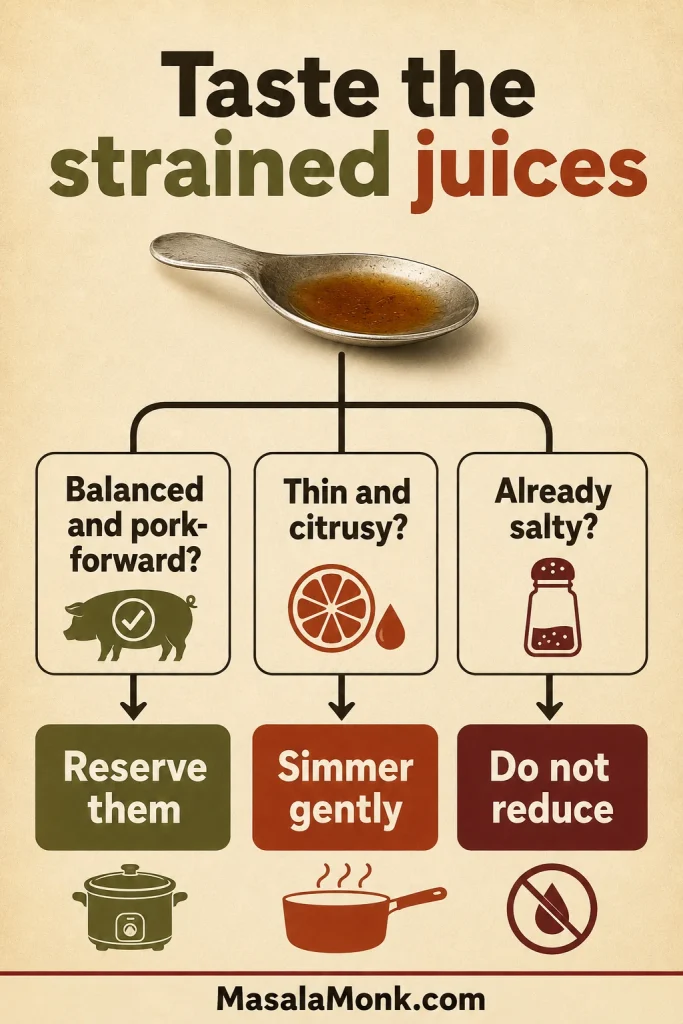
Taste the Juices Before Reducing Them

When you lift the lid, there may be far more cooking liquid than expected. Most of it came from the shoulder itself. Strain it, spoon off only the excess fat and taste once it has cooled enough.

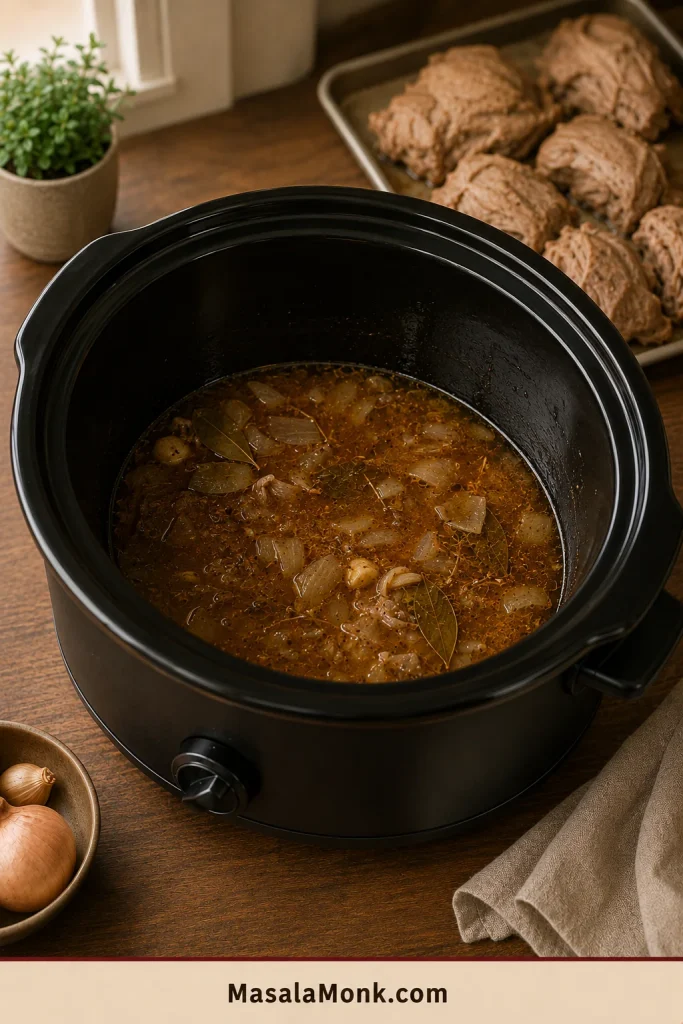
Amber pork cooking liquid, rendered fat, softened onion, garlic and bay leaves remain inside an emptied slow cooker.
Much of the final liquid rendered directly from the pork shoulder.

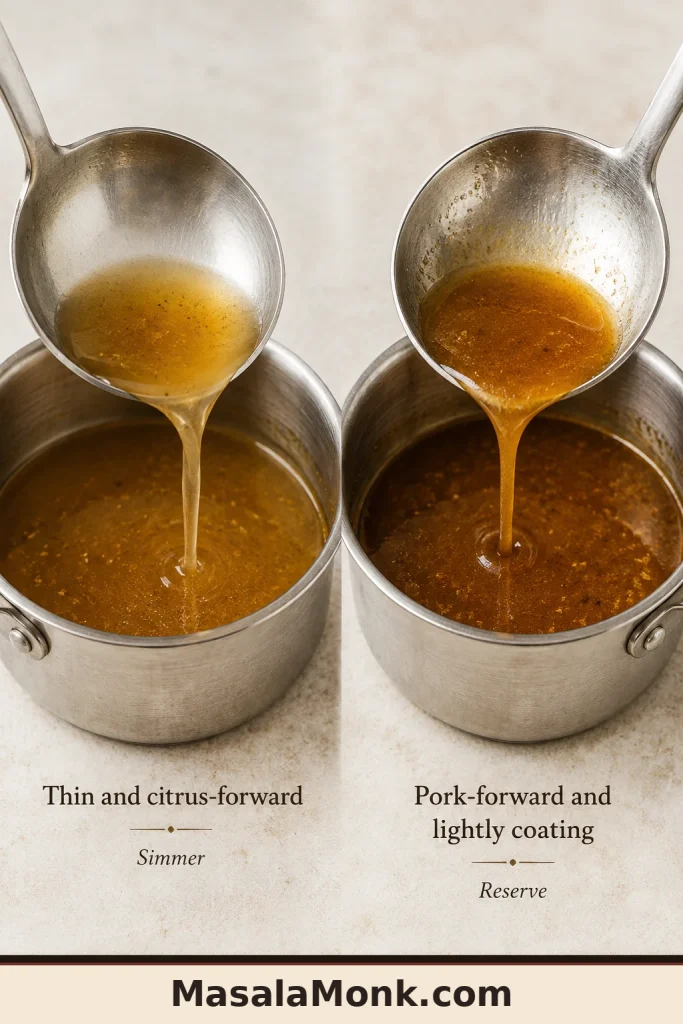
If the strained juices taste thin and citrusy, simmer until the orange settles into the background and the flavor becomes fuller and more savory. The finished juices should taste primarily of pork and garlic, with the citrus supporting the flavor rather than leading it.

Thin amber pork juices run quickly from one spoon while darker reduced juices leave a light coating on a second spoon.
Reduce for fuller flavor, stopping before the juices turn sticky or overly salty.

Stop when the liquid lightly coats a spoon. Juices that already taste balanced do not need reducing.

Decision infographic directs balanced pork juices to be reserved, thin citrusy juices to be simmered and already salty juices not to be reduced.
Reduce only thin juices; balanced or salty juices should stay as they are.

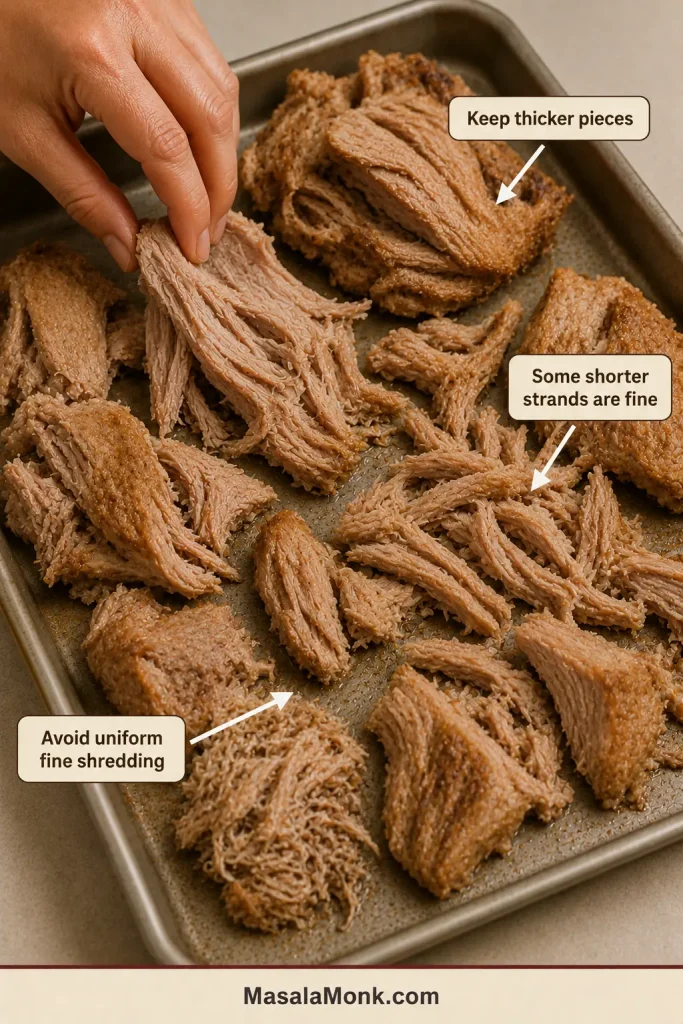
Preserve Some Thicker Pieces

Keep some meaty pieces among the shorter strands, then pull only as much as needed for the first tray or skillet batch. Their edges can brown while their centers remain soft, and larger pieces can always be separated further at the table.

Cooked pork on a metal tray includes broad chunks, shorter strands and a small example of pork shredded too finely.
Thin strands crisp first; thicker pieces protect the juicy interior.

Back to recipe card ↑ · Cooking time and doneness ↓ · Back to top ↑

Carnitas Cooking Time and Doneness

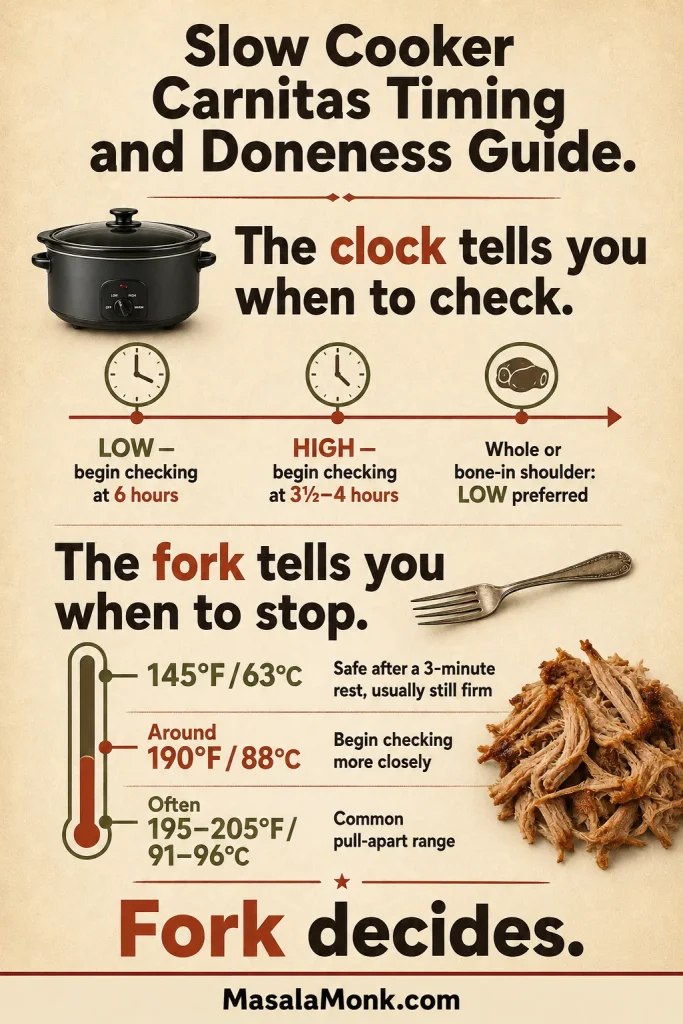
The clock tells you when to start checking. The fork tells you when to stop.

Timing infographic lists LOW and HIGH checking windows, internal-temperature checkpoints and a reminder to judge tenderness with a fork.
Temperature guides the check; fork resistance decides when the shoulder is tender.

On a phone, swipe sideways to see the full table.

Slow cooker pork carnitas cooking times
Pork size and shape Setting Begin checking Common working window
2 lb / 900 g large pieces LOW 4½–5 hours 5½–7 hours
2 lb / 900 g large pieces HIGH About 3 hours 3½–4½ hours
4 lb / 1.8 kg large pieces LOW About 6 hours 6½–8½ hours
4 lb / 1.8 kg large pieces HIGH 3½–4 hours 4–5½ hours
4 lb / 1.8 kg whole boneless roast LOW recommended About 8 hours 8–10 hours
Bone-in shoulder LOW recommended Later than equivalent boneless pieces Depends on bone, thickness and roast shape

LOW is the better choice for whole and bone-in shoulders because their thickness makes HIGH timing less predictable. All of these times are checking guides rather than guarantees; cooker shape, starting temperature and batch depth also affect the finish.

Safe Temperature Is Not the Same as Tenderness

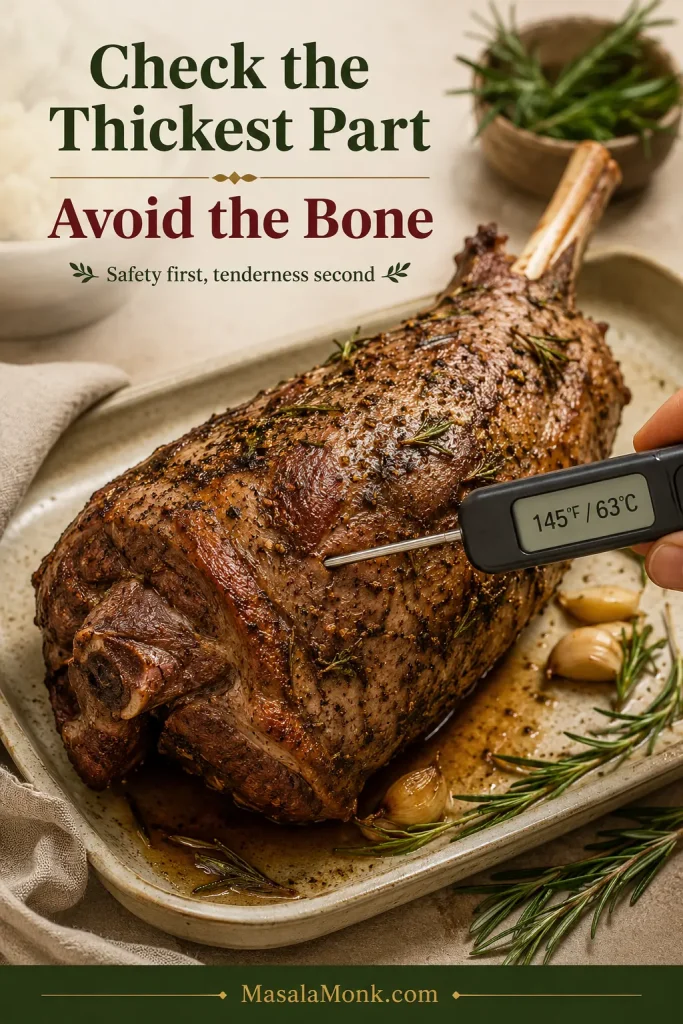
Whole-muscle pork is considered safe at 145°F / 63°C followed by a three-minute rest, but shoulder is normally still firm at that point. Begin checking more closely around 190°F / 88°C. Pull-apart tenderness commonly arrives around 195–205°F / 91–96°C, but the fork makes the final decision.
Thaw pork before slow cooking and keep the lid closed until the first planned check. USDA slow-cooker safety guidance also recommends reheating cold leftovers outside the slow cooker before transferring them to a cooker for hot holding.

Use the Fork Test

  • Not ready: The fork needs pressure, twisting feels tight, or the meat springs back.
  • Ready: The fork enters easily, turns with little resistance and separates a broad section.
  • Very soft: The pork collapses into fine strands with almost no pressure. Remove it promptly and handle it gently; it can still taste excellent, but it will not hold larger pieces as well.

How to Make Carnitas Crispy Without Drying the Pork

Once the pork is tender, its surface needs strong heat and enough space for moisture to escape.

Choose the Best Crisping Method

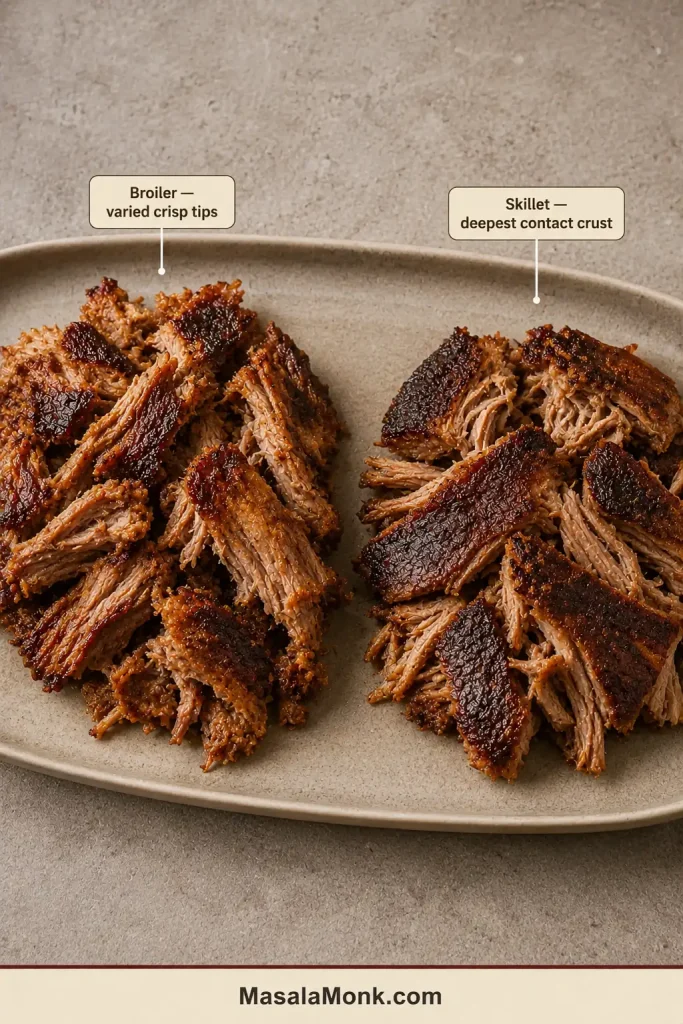
  • Broiler: Best for a full family or party batch. It handles the most pork at once and produces varied crisp edges.
  • Skillet: Best for smaller portions and the deepest contact browning. Work in batches so the meat fries instead of steaming.
  • Air fryer: Best for freshly cooked pork or a small portion of refrigerated leftovers. It can reheat and crisp the pork in the same step.
Broiler-crisped carnitas with irregular dark tips sit beside skillet-crisped carnitas with broad, deeply browned contact surfaces.
Broilers crisp exposed peaks; skillets build broad contact crusts.

Set the broiler rack before the pork reaches the tray. Position the meat 4–6 inches / 10–15 cm below the element so the edges brown quickly without scorching.

Oven cutaway shows a metal sheet pan of carnitas positioned 4–6 inches, or 10–15 centimeters, beneath the upper broiler element.
Four to six inches balances fast browning with enough control to avoid scorching.

How Wet Should the Pork Be?

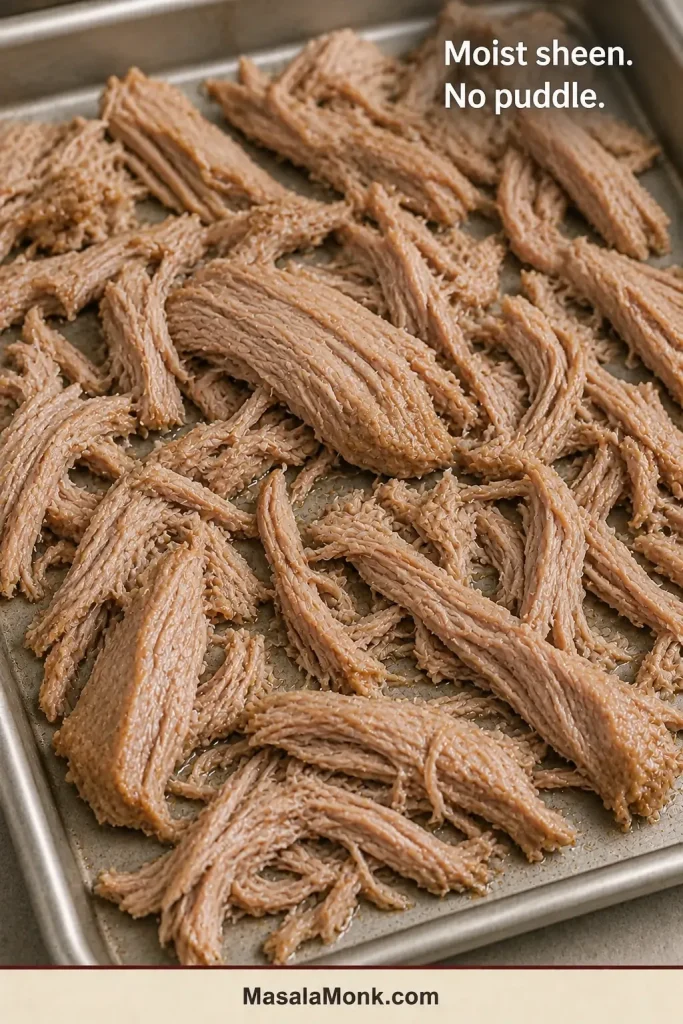
The pieces should glisten, with no puddle collecting underneath. If the tray begins looking soupy, divide the pork before giving it more heat. As the surface dries, the soft hiss of steam becomes a sharper sizzle. That is when the crust begins to form.

Broad pulled pork pieces glisten lightly on a metal sheet pan with visible gaps and no liquid puddle beneath them.
A light sheen is useful; a puddle traps steam and prevents browning.

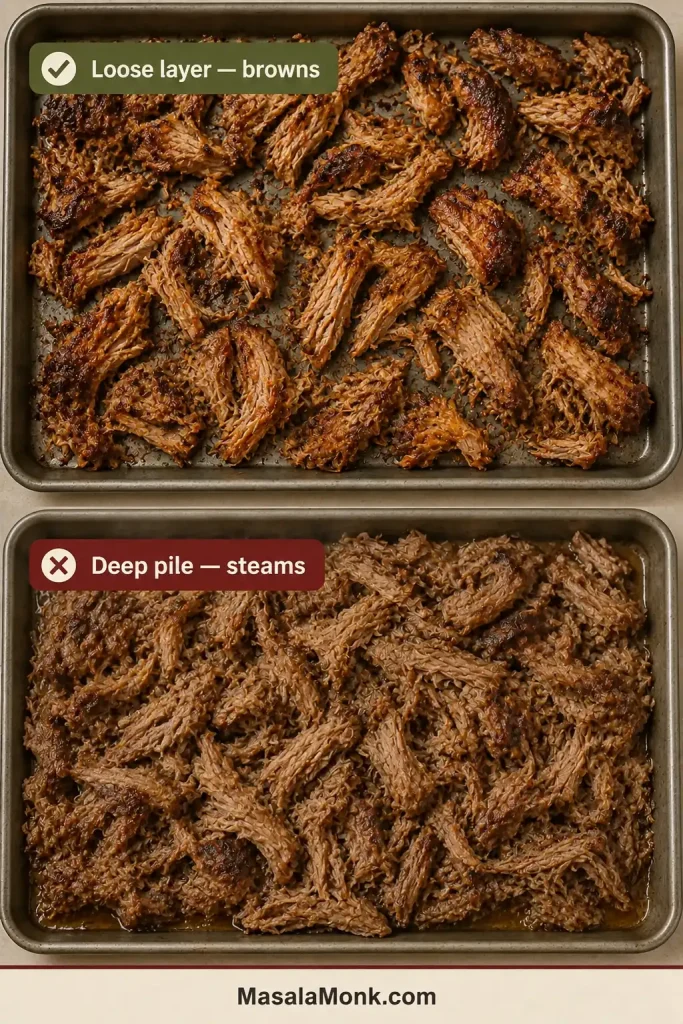
A loose layer browns; a deep pile steams.

Infographic compares a loose layer of browned carnitas with a deep crowded tray of pale pork surrounded by trapped moisture.
Open gaps release steam and let the pork surface grow hotter.

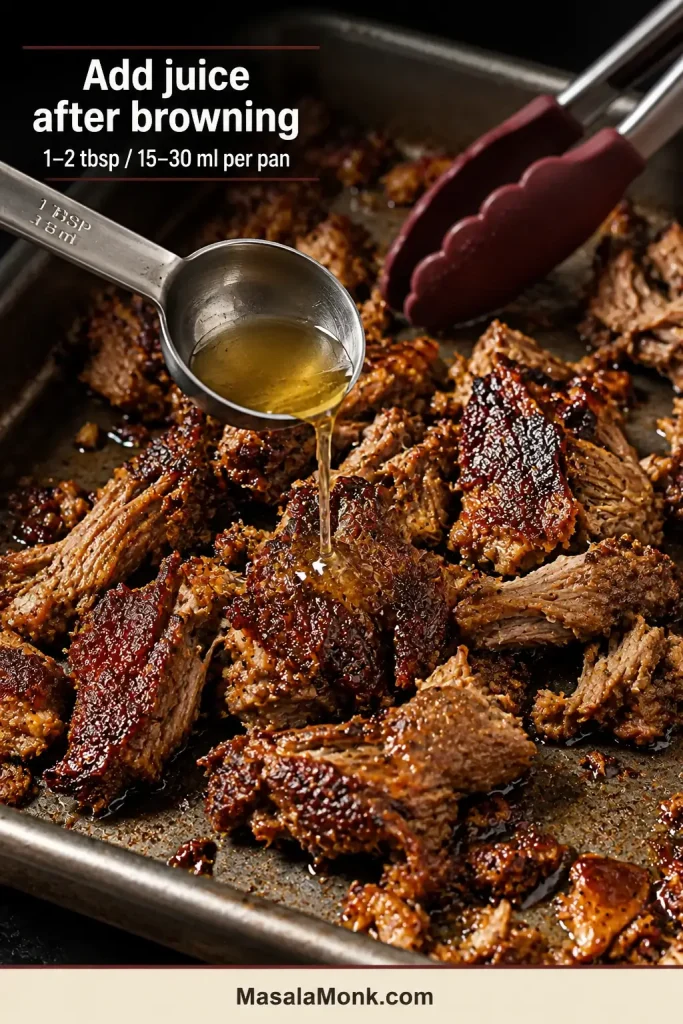
Reserved juices belong in the finishing stage, after dry heat has already done the work of building a crust.

A measured tablespoon of reserved pork cooking juice is drizzled over carnitas after the meat has developed dark browned edges.
Add measured juice after browning so the finished crust stays intact.

What skillet browning should look like: the deepest color develops on the flat surfaces that remain in contact with the hot pan.

Broad pork pieces develop dark contact crusts in a cast-iron skillet while burgundy-tipped tongs turn one browned section.
Stillness against the skillet creates the deepest contact crust.

Air-Fryer Carnitas

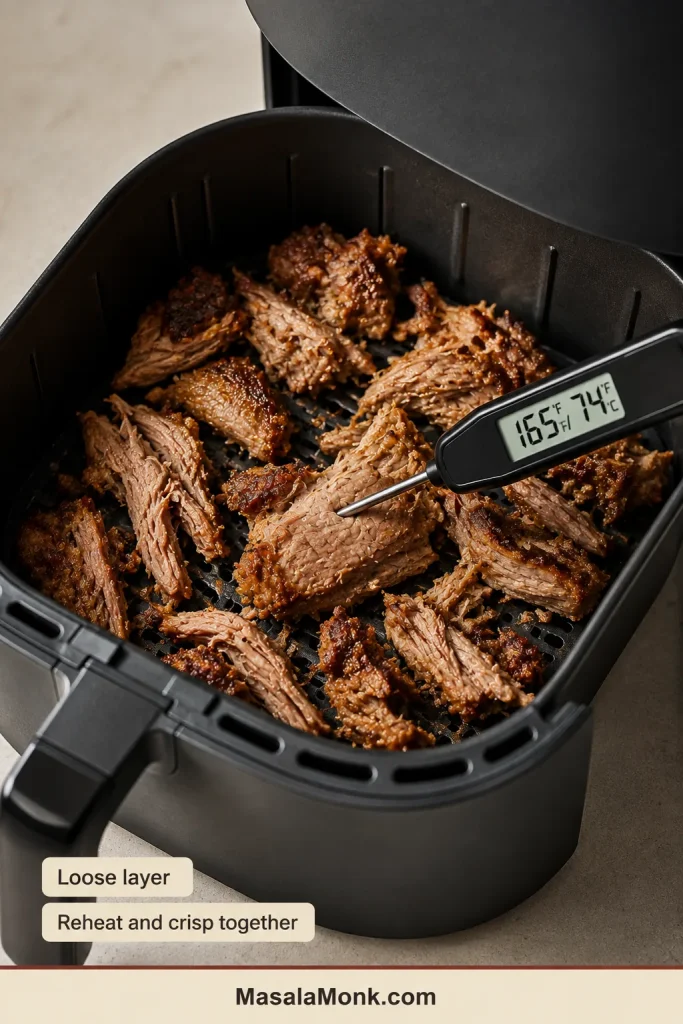
For refrigerated leftovers, use the air fryer to reheat and crisp the pork at the same time. Continue cooking until the center reaches 165°F / 74°C and the edges are browned. Cold pork may need longer than freshly cooked pork.

  1. Preheat the air fryer to 400°F / 200°C.
  2. Add about 8 oz / 225 g pork in a loose layer. If it looks dry, toss it with 1–2 teaspoons of reserved juice.
  3. Air-fry for 3 minutes, then toss or turn part of the pork.
  4. Continue until the center reaches 165°F / 74°C and the edges are crisp. Freshly cooked pork commonly needs another 1–3 minutes; refrigerated pork may need longer.
A loose portion of leftover carnitas crisps inside an air-fryer basket while an instant-read thermometer displays 165°F and 74°C.
Air circulation crisps small portions quickly, so watch the thinnest strands.

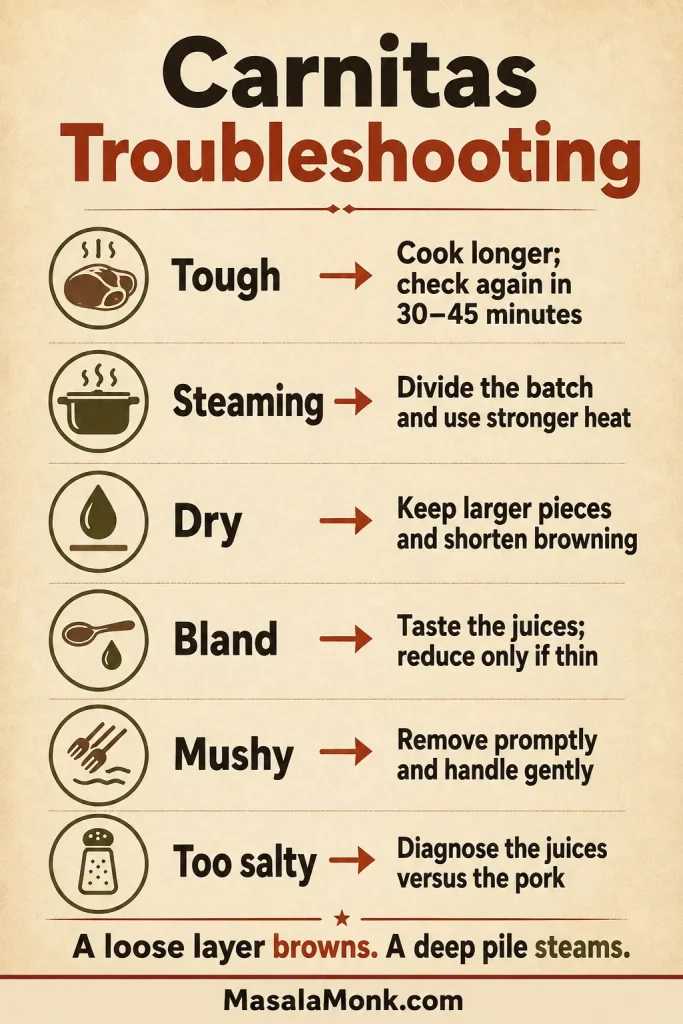
Slow Cooker Carnitas Troubleshooting

Troubleshooting infographic pairs tough, steaming, dry, bland, mushy and overly salty carnitas with different corrective actions.
Most problems trace back to tenderness, tray moisture or high-heat timing.

On a phone, swipe sideways to see the full table.

Common slow cooker carnitas problems and fixes
Problem Likely cause What to do
Pork is still tough The connective tissue has not softened Cover and continue cooking; check again in 30–45 minutes
Pork is mushy Small pieces, overcooking or a long hold in hot liquid Drain promptly and crisp broad portions carefully
Too much liquid The shoulder released moisture and fat Strain, skim and reduce only what you need
Pork will not crisp Wet surface, crowding or weak heat Divide it into loose batches and fully preheat the broiler or skillet
Pork dries beneath the broiler Pieces are too fine or the second pass is too long Keep larger pieces and finish with a measured spoonful of juice
Carnitas taste bland Watery juices or no final seasoning check Reduce the strained juices if needed, then adjust salt and lime
Carnitas are too salty The juices are too salty, or the pork itself is over-seasoned When the juices are too salty, use less of them. Balance over-seasoned pork with plain tortillas, unsalted beans, avocado or rice

The Pork Is Still Tough

A shoulder that is hot but still stubborn simply needs more time. Fully cooked pork can remain tight before its connective tissue has softened enough to pull apart.

If the cooker also looks unusually dry, add a small amount of hot water or unsalted broth around the meat. This is most likely with a small batch in a large cooker.

The Pork Turned Mushy

Mushiness usually comes from small pieces, a long hold after tenderness, repeated stirring or leaving fine strands submerged in all the cooking liquid. Remove finished shoulder promptly and rest it in larger sections. Browning can improve a soft exterior, but it cannot rebuild the meat’s structure.

The Pork Is Steaming Instead of Browning

Move half the pork to another tray or skillet. Let pooled moisture evaporate, then leave the pieces alone long enough for a crust to form.

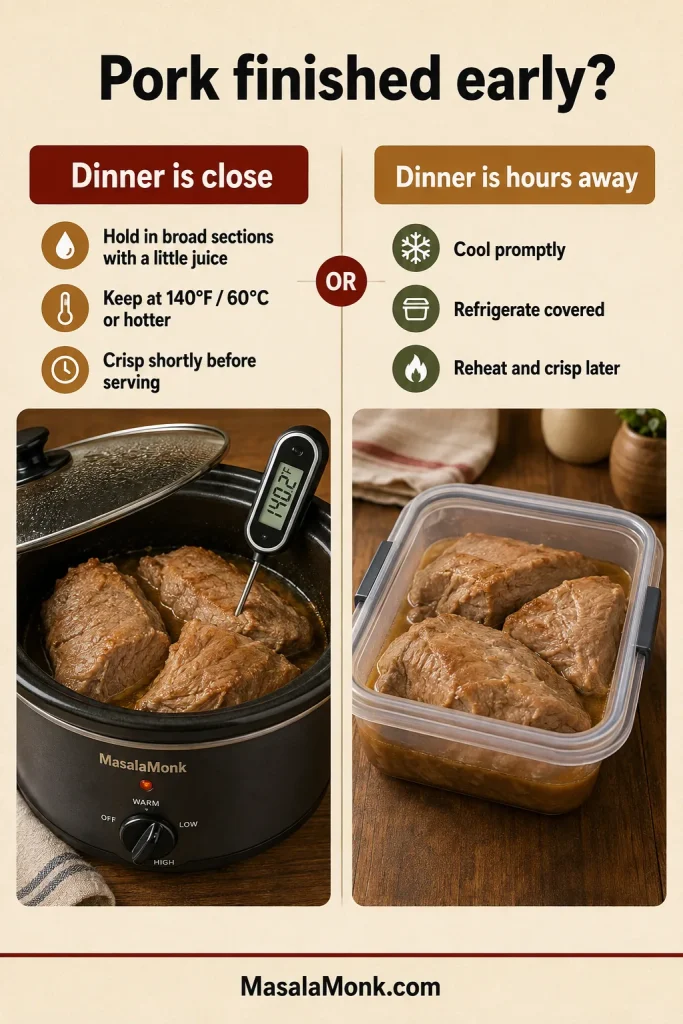
The Pork Finished Early

If dinner is close, hold the pork in large sections with a modest amount of juice on WARM only when a thermometer confirms that it remains at 140°F / 60°C or hotter. Crisp it shortly before serving.

If the meal is still several hours away, cool and refrigerate the pork promptly. Reheat and crisp it closer to dinner instead of leaving it on a long hot hold.

Decision infographic shows pork held with juice above 140°F in a slow cooker or cooled promptly in a covered container for later reheating.
Hold briefly above 140°F / 60°C; chill promptly for a longer delay.

Continue to serving ideas ↓ · Store or reheat later ↓ · Back to recipe card ↑ · Back to top ↑

How to Serve Carnitas

Bring the first tray straight to the table rather than covering it. Warm tortillas, chopped onion, cilantro, lime and one bright salsa are enough; the pork should still be the part everyone notices first.

Let everyone take the crispest pieces while the next batch browns. The last person to build a taco still gets pork fresh from the heat.

Hands carry a hot tray of crisp pork carnitas toward a table with tortillas, chopped onion, cilantro, lime and salsa verde.
Serve in waves so each tray reaches the table with crisp edges.

The Simplest Carnitas Taco

  • Warm corn tortilla
  • Crisp-edged carnitas
  • Finely chopped white onion
  • Fresh cilantro
  • A squeeze of lime
  • Roasted salsa verde or a bright red salsa
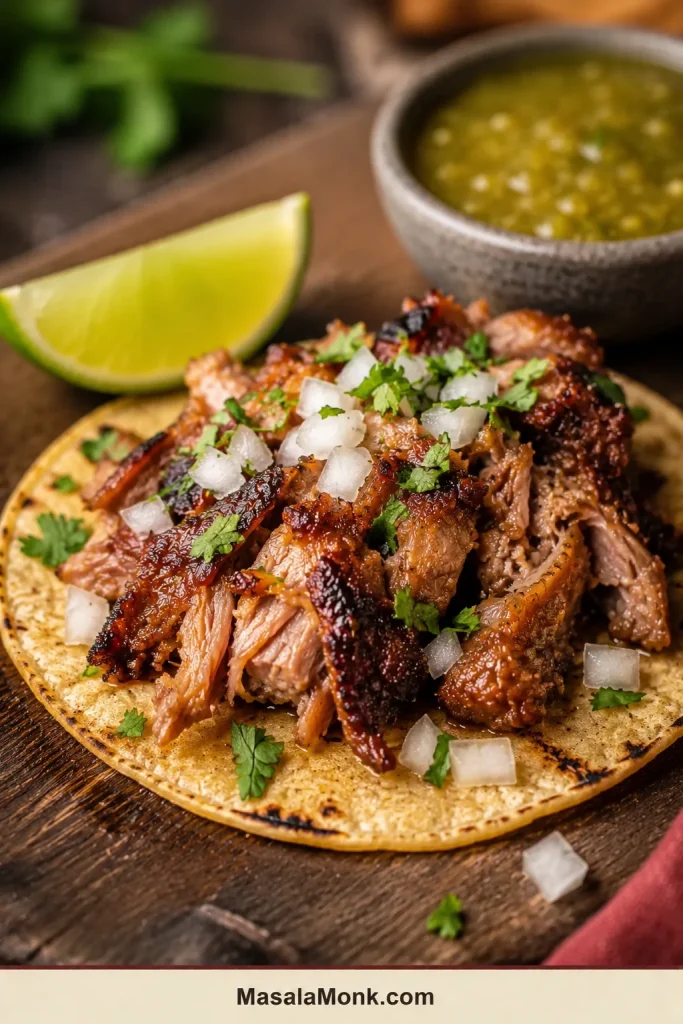
Corn tortilla filled with crisp pork carnitas, diced white onion and cilantro beside lime wedges and a bowl of salsa verde.
Fresh, restrained toppings keep the browned pork in focus.

For a creamier taco, add one rich element rather than several. A small spoonful of fresh guacamole softens the crisp edges without burying the pork.

Build a Carnitas Taco Bar

  • Warm corn and flour tortillas
  • Pickled red onions and radish slices
  • Guacamole or diced avocado
  • Pico de gallo
  • Cotija or another crumbly cheese
  • Black beans or refried beans
  • Lime wedges
Large tray of pork carnitas surrounded by tortillas, salsa verde, chopped onion, cilantro, lime wedges and pickled red onions.
Separate components protect the crust and let guests build to taste.

Add black beans and a bowl of fluffy rice for guests who would rather build a carnitas bowl.

How Much Carnitas Per Person?

On a phone, swipe sideways to see the full table.

Estimated carnitas serving portions
Serving style Pork quantity Approximate yield
Small taco 1½–2 oz / 40–55 g per taco 20–30 tacos
Taco meal with sides 3–4 oz / 85–115 g per person 10–14 people
Hearty tacos or bowl 4–5 oz / 115–140 g per person 8–11 people
Large plated main 5–6 oz / 140–170 g per person 7–9 people

Other Ways to Use Carnitas

Use leftovers in quesadillas, burrito bowls, tostadas, breakfast hash or loaded potatoes, crisping the pork before adding it whenever the dish allows. For breakfast meal prep, the cooling and reheating approach in these breakfast burritos helps keep the tortillas from becoming wet or chewy.

Storing, Freezing and Reheating Carnitas

Carnitas are unusually good make-ahead food—as long as you save the crisping for later.

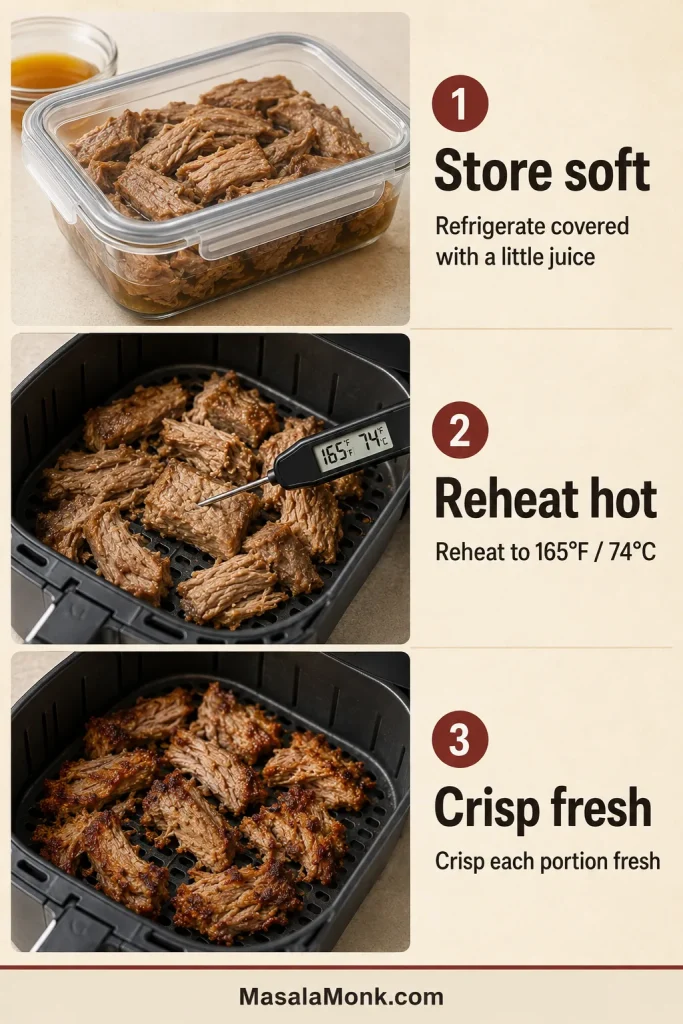
Keep any pork you are not serving soft and juicy. Tomorrow, warm one portion with a little juice, let the surface dry and crisp it fresh so the browned edges return.

Three-step infographic shows soft pork refrigerated with juice, reheated to 165°F in an air fryer and then crisped until browned.
Store the pork soft and juicy, then crisp each portion before serving.

Refrigerating Carnitas

  1. Divide the pork into shallow containers and refrigerate within two hours.
  2. Add enough reserved juice to keep it moist without submerging it.
  3. Keep the remaining juices in a separate container.
  4. Use refrigerated carnitas within 3–4 days.
  5. Crisp only the portion you are about to serve.

Freezing Carnitas

Freeze the pork before crisping in practical meal portions. About 1 lb / 454 g suits a family meal, while 8 oz / 225 g works well for one or two people.

  1. Place each portion in a freezer-safe bag or container.
  2. Add 2–4 tablespoons / 30–60 ml reserved juice per pound / 454 g pork.
  3. Press freezer bags flat to remove excess air.
  4. Label each portion with its date and weight.
  5. Freeze the remaining juices in small portions.

For best quality, use frozen carnitas within about three months.

Reheat Without Drying the Pork

  1. Thaw frozen carnitas in the refrigerator when time allows.
  2. Reheat with a little reserved juice on the stove, in the microwave, in a conventional oven or in the air fryer until the pork reaches 165°F / 74°C.
  3. Allow excess surface moisture to evaporate.
  4. Crisp the pork in a skillet, beneath the broiler or in the air fryer.
  5. Add a small spoonful of hot juice after browning.

Reheat cold leftovers outside the slow cooker. Once fully hot, the pork can be transferred to a preheated cooker and held at 140°F / 60°C or above.

Slow Cooker Pork Carnitas FAQ

Can You Put Frozen Pork in a Slow Cooker?

Thaw pork completely in the refrigerator before slow cooking. Frozen or partly frozen meat may take too long to heat through safely in a slow cooker, and it also makes the cooking window difficult to predict.

Should the Pork Be Covered With Liquid?

No. A shallow layer is enough. The shoulder releases substantial moisture and fat as it cooks.

Can You Cook the Shoulder Whole?

Yes, as long as it fits without pressing against the lid. Place a whole boneless roast with the fattier side facing upward, season it all over and pour the citrus around it. Use LOW and expect a later first check and a wider timing window.

Is LOW or HIGH Better?

LOW gives the broadest and most forgiving window. HIGH works for large boneless pieces when time is limited, but begin checking earlier and watch closely once the meat starts separating.

Can You Halve the Recipe?

Yes. Use the 2 lb / 900 g half-batch quantities above. A 4–5-quart slow cooker gives the smaller batch the best fit, although a 6-quart cooker can also work with a wider timing window.

Tender First, Crisp Second

Serve the pork straight from the tray while the dark edges are crisp and the larger pieces still pull apart softly inside.

Made these carnitas? Tell us whether you cooked them on LOW or HIGH and which crisping method you preferred. If you noted the pork weight, cooker size or fork-tender time, include those too—they may help the next person making dinner.

And tell us what went into the first taco.

Back to recipe card ↑ · Back to top ↑

Posted on Leave a comment

Slow Cooker Lamb Shanks With Rich Gravy

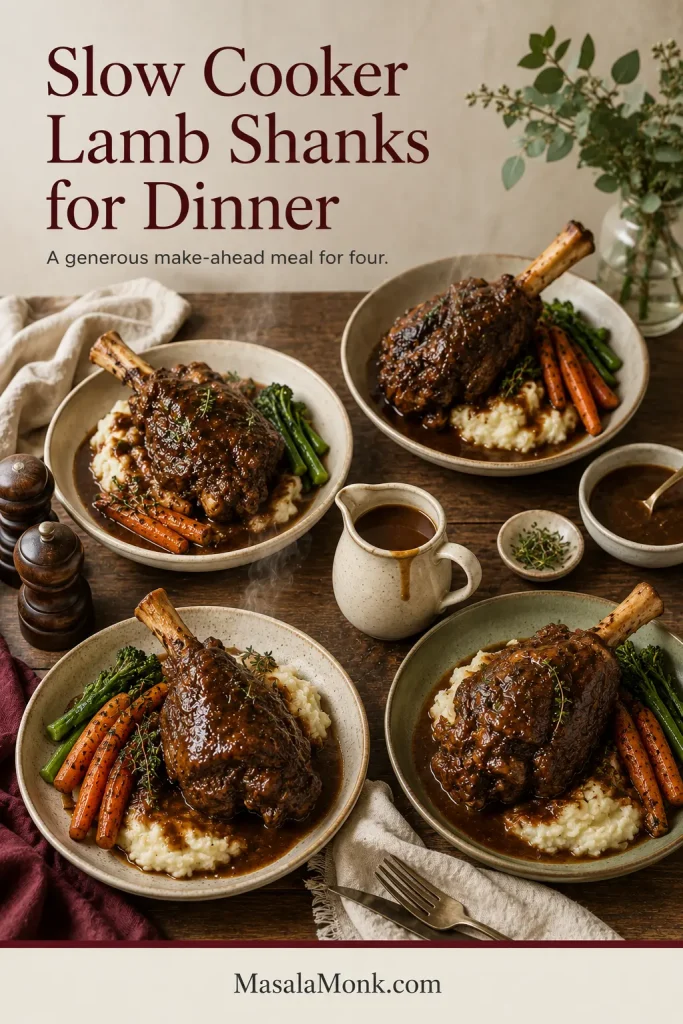
Slow-cooked lamb shank on mashed potatoes with glossy brown gravy, roasted carrots, green vegetables and a cream gravy jug.

The best moment comes before the first bite. You slide a spoon beneath the lamb, lift gently, and the meat gives around the bone without collapsing into dry threads. The gravy settles over the shank in a dark, glossy layer, then runs into the mashed potatoes underneath.

Fall-apart tender does not have to mean collapsed in the slow cooker. The ideal shank still reaches the plate intact, then yields as soon as a fork presses into the meat.

Close-up of a fork pulling moist fibres from a gravy-coated lamb shank served over mashed potatoes.
Moist fibres should separate under light pressure while the shank remains intact.

These slow cooker lamb shanks feel like an occasion dinner, yet almost all the work happens long before anyone sits down. This is a patient dinner, not a difficult one. By the time dinner approaches, the chopping and browning are behind you, and the kitchen smells of rosemary, browned lamb and a darkening sauce.

Whether the appliance says slow cooker or Crock-Pot, keep one rule in mind: the fork decides when the lamb is ready, and the saucepan decides when the gravy is ready.

Choose Your Lamb Shank Version

For the deepest classic flavour, start with the red-wine version. Use the table when you need a wine-free, tomato-free or no-sear alternative.

Medium lamb shanks weighing 12–14 oz / 350–400 g each usually need about 7–8 hours on LOW or 4½–5½ hours on HIGH. Keep the thick meaty portions about halfway in the braising liquid, then cook until a fork or thin probe slides through with almost no resistance.

Quick-guide graphic showing LOW and HIGH cooking windows, halfway liquid depth and a probe entering tender lamb.
Use time to know when to check; let probe resistance decide when the lamb is done.
If you want…Choose this path
The richest classic gravyBrown the shanks and follow the red-wine recipe as written.
No wineUse extra stock, 100% red grape juice with no added sugar and a little balsamic vinegar.
No tomatoOmit the paste, brown more deeply and adjust the acidity after reducing.
The least stovetop workSkip the sear, whisk the braising liquid together, then reduce and season the lighter gravy at the end.
Choose a slow-cooker lamb-shank variation.

Slow Cooker Lamb Shanks With Rich Gravy

Four medium lamb shanks cook slowly in a red-wine braising liquid with onion, carrot, celery, garlic, herbs and a small amount of tomato paste. Once the meat is tender, the cooking liquid is skimmed and reduced into a dark, glossy gravy.

Recipe at a glance

  • Serves: 4
  • Shank size: 12–14 oz / 350–400 g each
  • Prep and stovetop work: About 30–40 minutes
  • LOW: About 7–8 hours, sometimes longer
  • HIGH: About 4½–5½ hours, sometimes longer
  • Gravy finishing: About 10–15 minutes
  • Doneness: A fork or thin probe slides in with almost no resistance
  • Gravy yield: Generous for four servings; final volume depends on reduction

Essential equipment

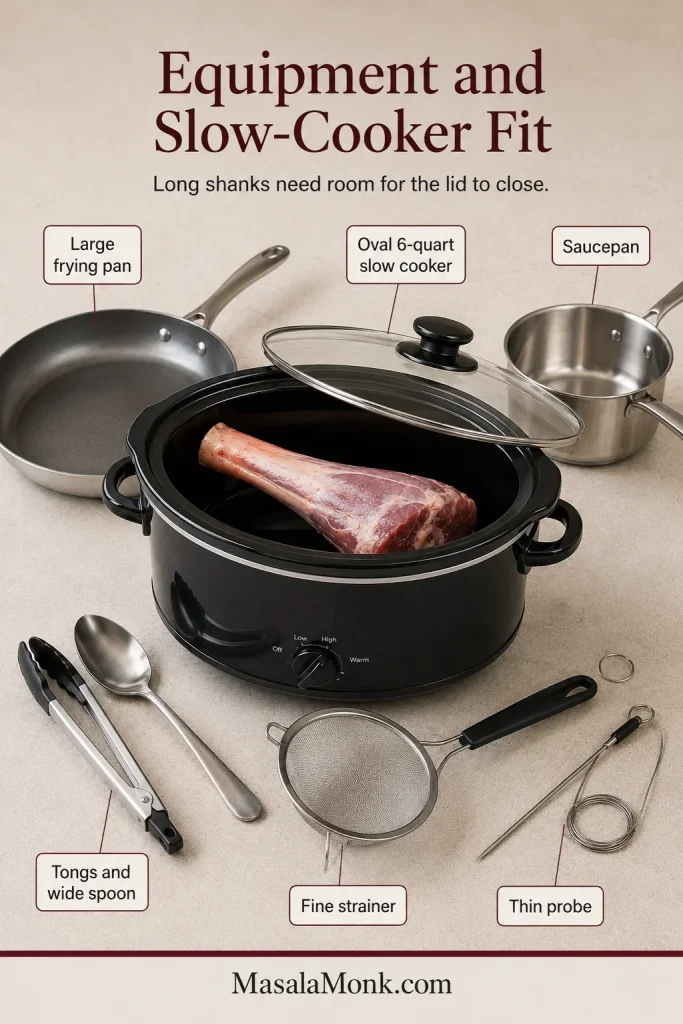
  • 6-quart / 5.7-litre slow cooker, preferably oval
  • Large heavy frying pan or skillet
  • Sturdy kitchen tongs
  • Wide saucepan for finishing the gravy

Helpful, but not required

  • Wide spoon or spatula for supporting the tender meat
  • Fine-mesh strainer or immersion blender
  • Fat separator
  • Instant-read thermometer

Ingredients

For the lamb

  • 4 lamb shanks, about 12–14 oz / 350–400 g each, 3.1–3.5 lb / 1.4–1.6 kg total
  • 8 g fine sea salt, about 1⅓ teaspoons, divided
  • 1 teaspoon freshly ground black pepper
  • 2 tablespoons / 30 ml olive oil, plus a little more if the pan becomes dry

For the braising liquid

  • 1 large yellow onion, diced, about 7–8 oz / 200–225 g
  • 2 medium carrots, diced, about 6 oz / 170–180 g
  • 2 celery ribs, diced, about 3½ oz / 100 g
  • 5 garlic cloves, finely chopped or grated, about ¾ oz / 20 g
  • 2 tablespoons / 30 g tomato paste
  • 1 cup / 240 ml dry red wine
  • 1⅔ cups / 400 ml low-sodium lamb or beef stock
  • Up to ⅓ cup / 80 ml additional low-sodium stock, held in reserve and added only if needed
  • 1 tablespoon / 15 ml Worcestershire sauce
  • 2 fresh rosemary sprigs
  • 4 fresh thyme sprigs
  • 2 bay leaves

To finish the gravy

  • 1 tablespoon / 8 g cornstarch (cornflour), optional
  • 1 tablespoon / 15 ml cold water, optional
  • 1 tablespoon / 14 g unsalted butter, optional
  • Fine sea salt and black pepper, as needed after reducing

Instructions

Prepare and Brown the Lamb

  1. Prepare the lamb. Pat the shanks dry. Trim only large loose flaps of hard fat or silverskin—the shiny, tough membrane on the surface. Season with 6 g / about 1 teaspoon salt and all the black pepper; reserve the remaining 2 g / about ⅓ teaspoon salt for the finished gravy.
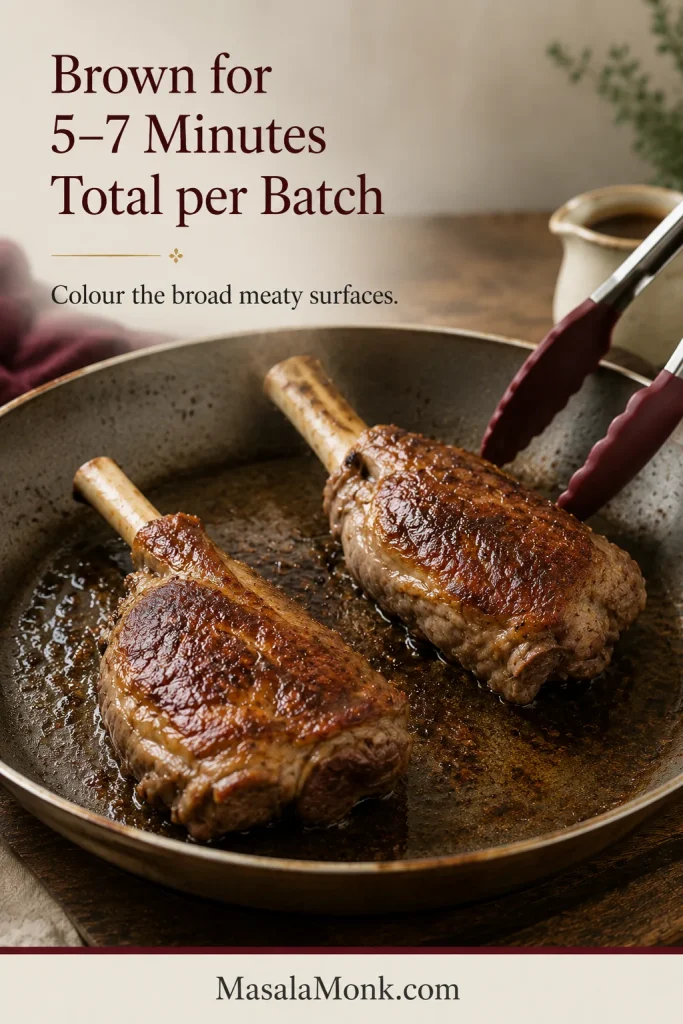
  2. Brown the shanks. Heat 1 tablespoon oil in a large frying pan or skillet over medium-high heat. Work in one or two batches as needed and brown each batch for 5–7 minutes total, turning to colour the broad meaty surfaces. Add a little more oil if the pan becomes dry, then transfer the shanks to the slow cooker.

Build the Flavour Base

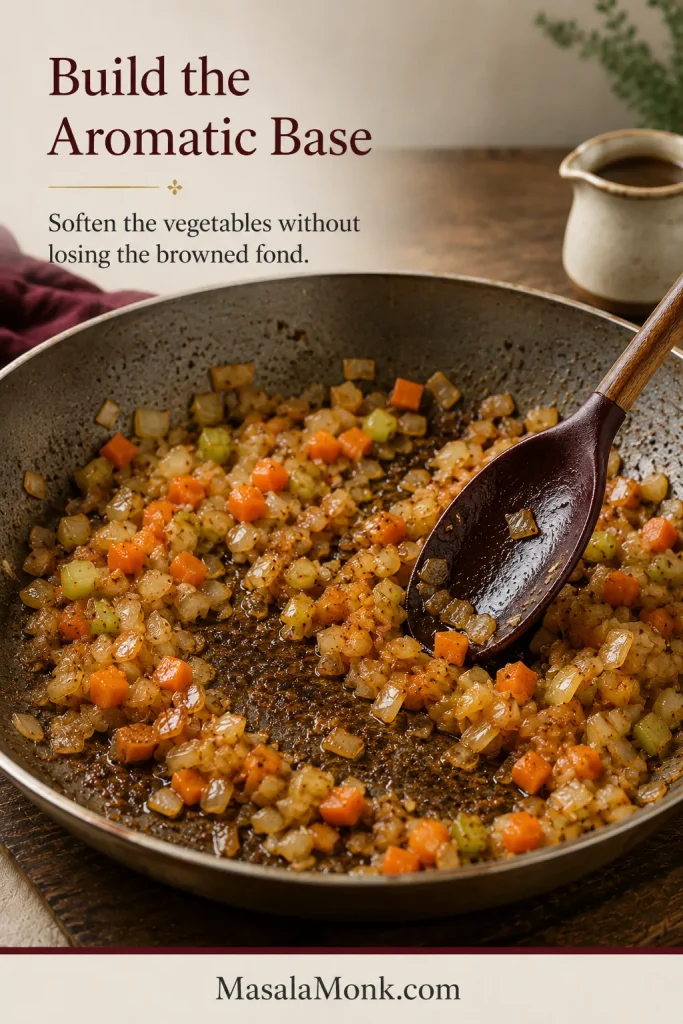
  1. Cook the vegetables. Reduce the heat to medium and add the remaining oil. Cook the onion, carrot and celery for 6–8 minutes, stirring and scraping the pan, until the onion has softened and begun to colour.
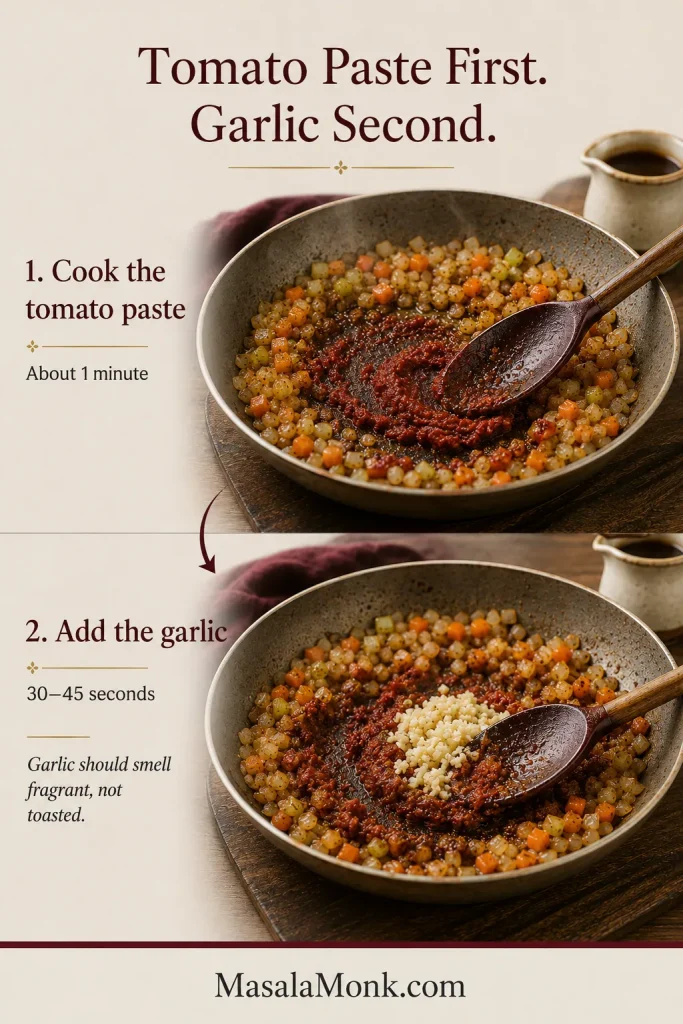
  2. Cook the tomato paste, then the garlic. Stir the tomato paste through the vegetables for about 1 minute, until it darkens slightly. Add the garlic and cook for another 30–45 seconds, just until fragrant. If the garlic is finely grated, add it only during the final 30 seconds.
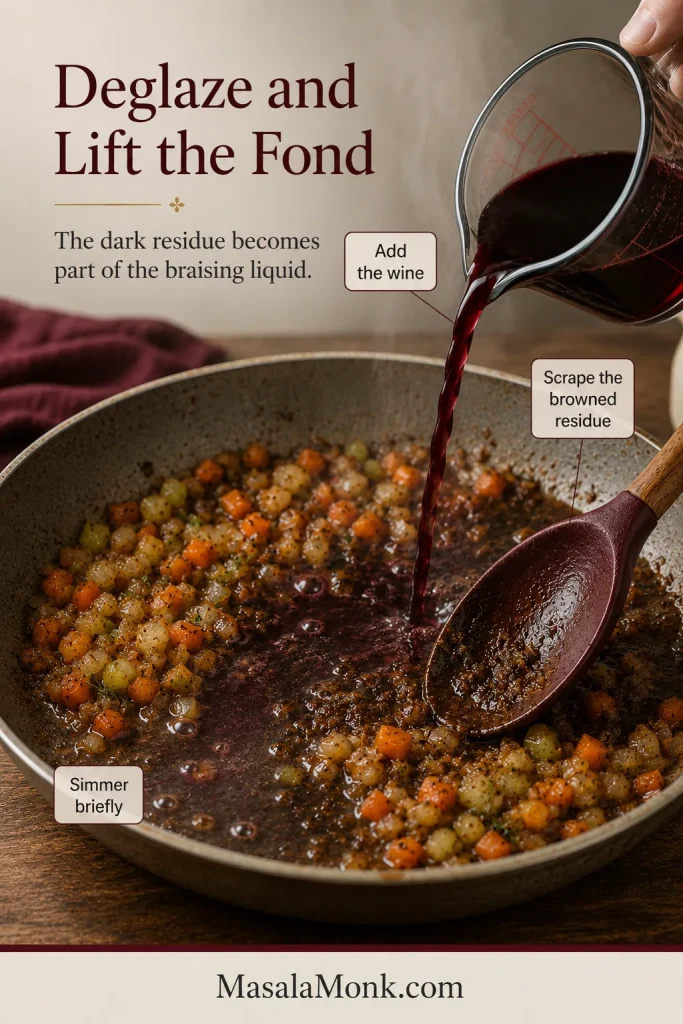
  3. Deglaze with wine. Pour in the red wine and scrape the browned residue from the base of the pan. Simmer for 3–4 minutes, until the sharp raw-wine aroma softens and the liquid reduces slightly.
  4. Build the braising liquid. Stir in the 400 ml stock and Worcestershire sauce. Bring to a gentle simmer, then pour the vegetables and liquid around the lamb in the slow cooker. Add the rosemary, thyme and bay leaves.

Arrange and Slow Cook

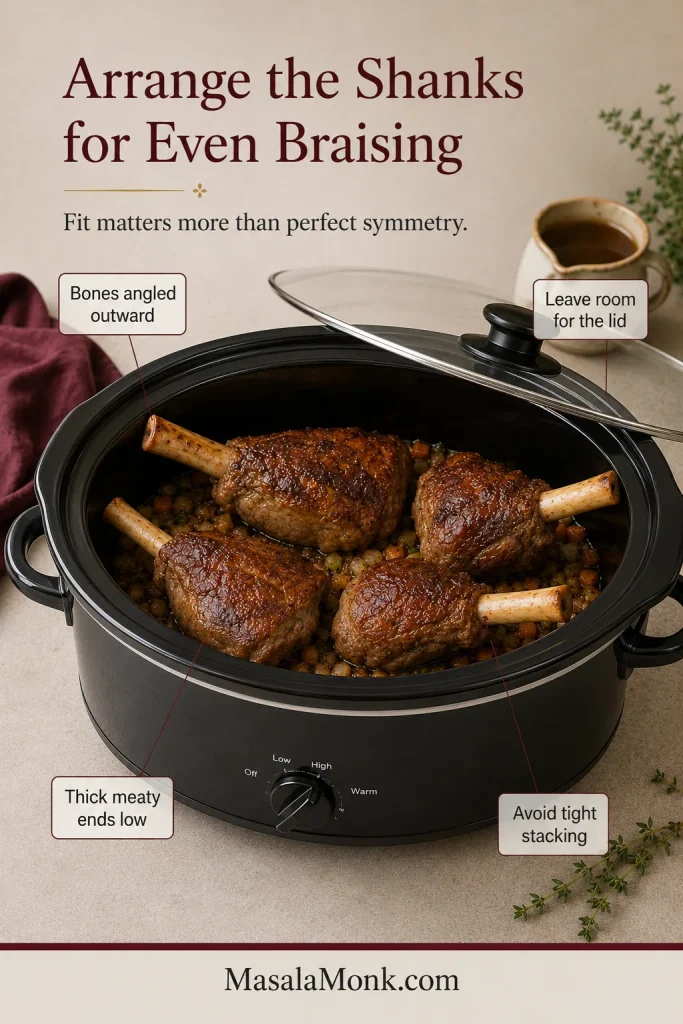
  1. Check the liquid level. Arrange the thick ends of the shanks in the liquid. The shanks may overlap slightly as long as the lid closes securely and each thick end touches the braising liquid. Add reserved stock only as needed to bring the liquid close to halfway up the thick meaty portions. The bones and upper surfaces can remain exposed.
  2. Slow cook. Cover and cook on LOW for about 7–8 hours or HIGH for about 4½–5½ hours for shanks in the stated size range. Keep the lid closed until the checking window; turning is usually unnecessary when the meat is positioned as directed. When the lid first lifts, the meat should look looser around the bone.
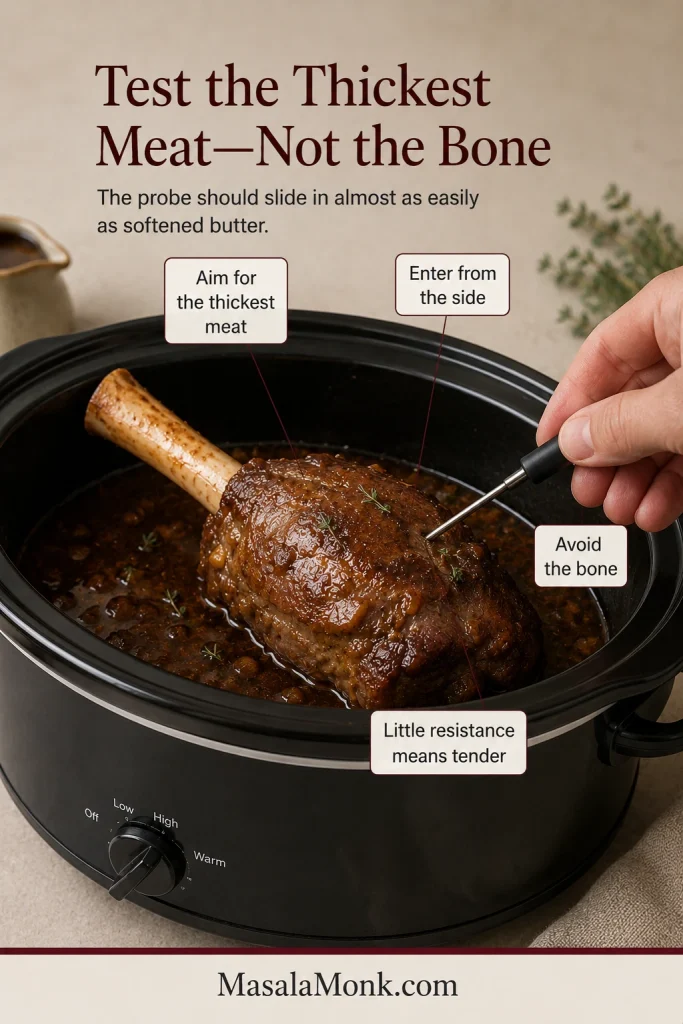
  3. Check tenderness. Insert a fork, skewer or thin thermometer probe into the thickest meat without touching the bone. It should slide in with very little resistance. If the meat still feels firm or springy, cover and continue cooking in 30-minute increments.

Lift the Lamb and Finish the Gravy

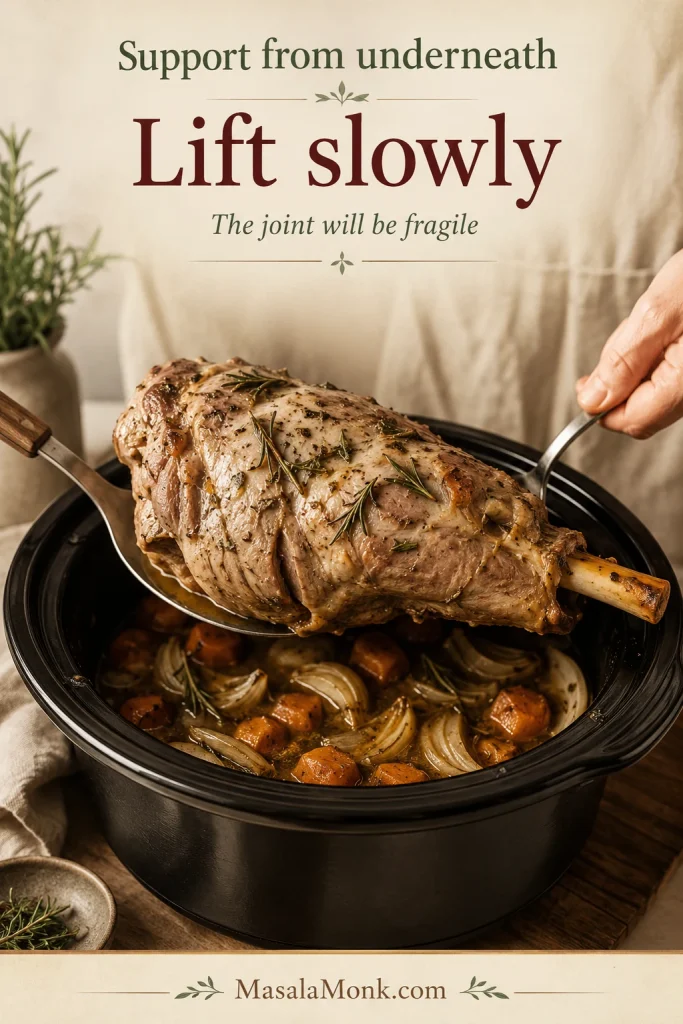
  1. Lift the shanks carefully. Hold each bone gently with tongs while supporting the meat underneath with a wide spoon or spatula. Transfer to a warm platter and cover loosely.
  2. Finish the gravy. Remove the herb stems and bay leaves. Skim visible fat. Strain the cooking liquid for a smooth gravy or blend some of the vegetables into it for a rustic gravy. Simmer in a wide saucepan for about 10–15 minutes, until concentrated and lightly spoon-coating.
  3. Thicken only if needed. Mix the cornstarch with cold water until smooth. Whisk it gradually into the simmering gravy; you may not need all of it after reduction. Cook for 1–2 minutes, taste, then adjust the salt and pepper. Whisk in the optional butter off the heat and spoon the gravy over the lamb.

Why the Lamb Turns Tender and the Gravy Stays Rich

The recipe starts with a hard-working cut and a relatively thin braising liquid. Browning gives the gravy its dark, roasted base. The slow cooker softens the meat while the lamb and vegetables release their own moisture. Once the shanks are tender, the saucepan concentrates what remains into a sauce that clings without becoming heavy.

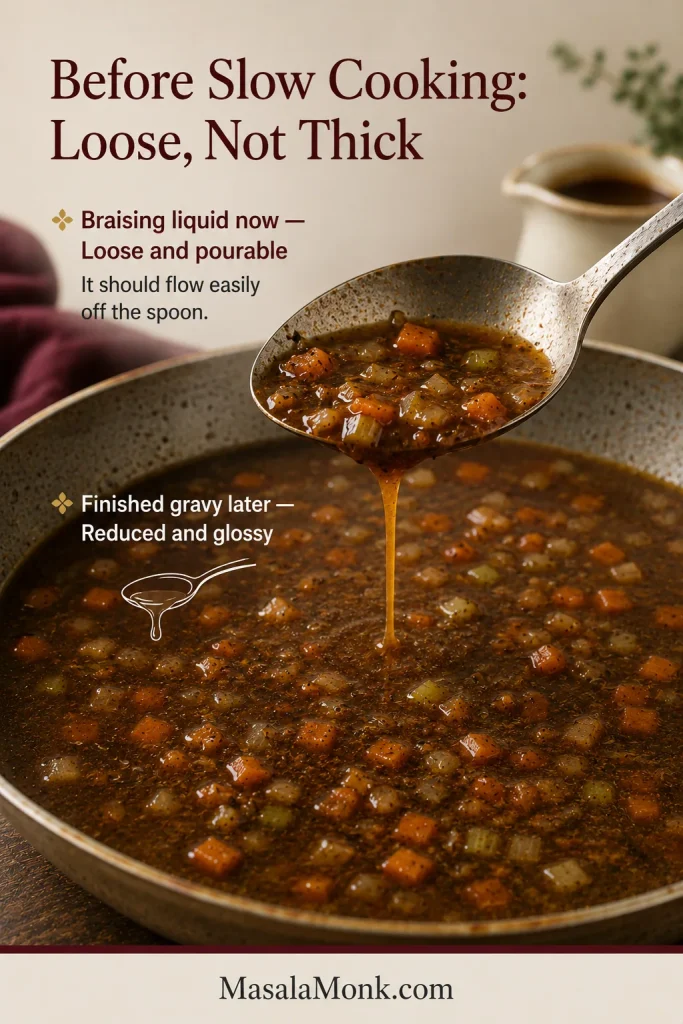
Loose brown braising liquid with vegetables running from a ladle to show its pourable texture before slow cooking.
Keep the braising liquid loose enough to flow around the shanks; concentration and body belong to the final saucepan stage, not the slow cooker.

Choosing Lamb Shanks

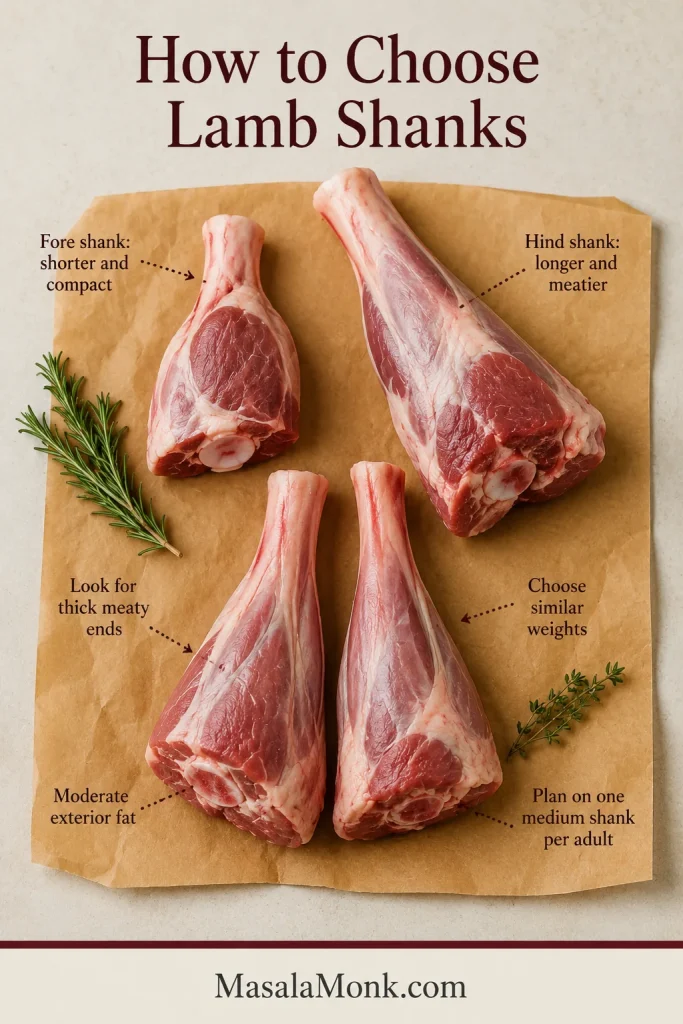
A lamb shank is the lower part of the leg: a bone-in, hard-working cut with plenty of connective tissue. It begins firm and becomes rich and tender only after a long, moist cook.

Plan on one medium shank per adult. At the butcher counter, matching weight matters more than matching appearance. Similar-sized pieces are more likely to become tender together.

Raw fore and hind lamb shanks compared by length, meatiness and matching weight on a butcher-paper background.
Matched weights help, but the thickest meaty end is the better predictor; that slowest shank should set the first tenderness check.
What to checkWhy it matters
Similar-sized piecesThey are more likely to become tender together.
About 12–14 oz / 350–400 g eachThe main cooking window is based on shanks in this range.
A thick, meaty sectionYou get a more satisfying portion after accounting for the bone.
Moderate exterior fatSome fat adds flavour; thick hard deposits can make the gravy oily.
Enough room beneath the lidThe cooker must close securely without the bones forcing the lid upward.
What to look for when buying lamb shanks.

Fore Shanks vs Hind Shanks

Fore shanks come from the front legs and are usually smaller. Hind shanks come from the rear legs and are often larger and meatier. Either works, but very long hind shanks fit more comfortably in a wide oval cooker. The pieces may overlap slightly; if the exposed bones prevent the lid from closing, ask the butcher to shorten them.

Equipment layout with an oval slow cooker, frying pan, saucepan, tongs, wide spoon, strainer and thin probe.
A wide oval cooker gives long shanks room without forcing the lid upward.

Can You Use Mutton Shanks?

Yes. Mutton comes from an older animal, so the shanks may be larger and need a longer cooking window. Use the same method and keep going until a probe slides easily through the thickest meat.

Check the label carefully: Lamb Henry is a bone-in shoulder portion rather than a standard shank. Products sold as lamb hock or knuckle vary by region, so use their weight and tenderness instead of applying the shank table automatically. Boneless lamb shoulder can use the same flavour profile, but it may become tender sooner and will not have the same bone-in presentation.

Ingredients That Build the Gravy

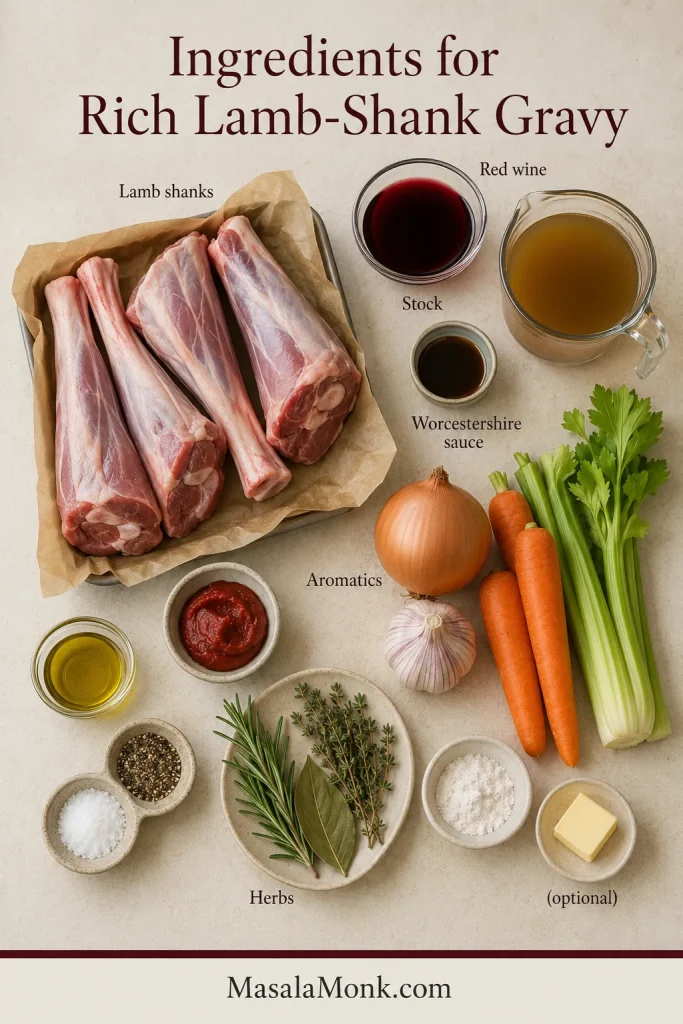
The ingredients are familiar. Wine and stock carry the lamb flavour, the browned vegetables soften into the sauce, and a small amount of tomato paste gives the gravy body without making it taste like tomato sauce. Rosemary and thyme keep it fragrant rather than heavy.

Overhead ingredient layout with four raw lamb shanks, red wine, stock, aromatics, herbs, tomato paste and seasonings.
Low-sodium stock leaves room for reduction; optional butter belongs at the end.

Red Wine

Use a dry, medium-bodied red wine that tastes pleasant enough to drink. It does not need to be expensive. Merlot and everyday red blends are dependable, while noticeably sweet wines are best avoided. By the end of the cook, the wine should no longer announce itself—it should simply make the gravy taste darker and more complete.

Some alcohol cooks off during deglazing, slow cooking and the final reduction, but the finished dish should not be treated as alcohol-free. Use the no-wine path when complete avoidance matters.

Stock and Tomato Paste

Lamb stock is ideal when you can find a good one, but low-sodium beef stock is easier to buy and gives the gravy plenty of depth. Robust chicken stock also works. Low-sodium stock matters because the sauce becomes saltier as it reduces.

Tomato paste gives the liquid colour and body without making the dish taste like tomato sauce. Let it cook against the pan for about a minute before adding the wine; that brief contact softens its raw edge and deepens the finished gravy.

Aromatics, Herbs and Worcestershire

Onion, carrot and celery form the savoury-sweet base. They soften into the cooking liquid, round out the wine and give a rustic blended gravy much of its body.

Two rosemary sprigs perfume the gravy without allowing the herb to dominate after a long cook. When fresh herbs are unavailable, use about ½ teaspoon dried rosemary and ½ teaspoon dried thyme.

Worcestershire sauce adds savoury depth, especially when the wine is omitted. For a fish allergy or fish-free diet, use a clearly labelled fish-free Worcestershire-style sauce because many traditional brands contain anchovies.

How to Make Slow Cooker Lamb Shanks

Prepare and Brown the Shanks

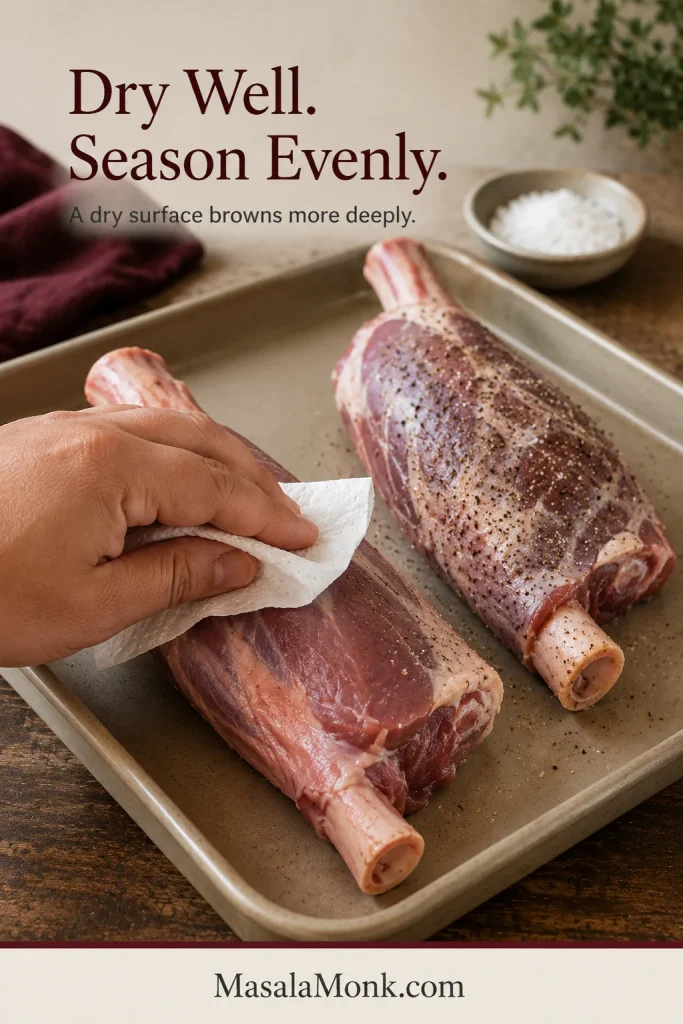
Dry shanks brown more efficiently than damp ones. Pat every surface well, then trim only large loose sheets of hard fat or silverskin. Leave the connective tissue within the meat in place; it softens and enriches a long braise.

A hand pats a raw lamb shank dry beside a second shank seasoned evenly with salt and black pepper.
Drying is complete when the surface looks matte rather than shiny; season afterward so the salt and pepper remain on the meat.

Use a broad, heavy pan and work in batches when necessary. Crowding traps steam and turns the surface grey. Let the broad meaty surfaces develop a deep brown crust; those dark patches and the browned residue in the pan give the finished gravy its roasted depth.

Two lamb shanks browning in a wide pan as silicone-tipped tongs turn one deeply browned meaty side.
Let the broad sides develop deep colour and release naturally from the pan; forcing an early turn can tear away the crust you are trying to build.

Build and Deglaze the Flavour Base

Onion, carrot and celery cooking in a wide pan with dark lamb fond visible beneath the vegetables.
Use the vegetables’ moisture to lift the fond, then stop once the onion loses its raw edge—the goal is sweetness, not another hard sear.

Cook the onion, carrot and celery in the browned pan, scraping as their moisture loosens the browned bits. Cook the tomato paste after the vegetables soften, then add the garlic briefly so neither scorches.

Two-stage graphic showing tomato paste cooked into vegetables before minced garlic is added briefly.
The tomato paste is ready when it darkens slightly and smells sweeter; add garlic afterward, then move on while the garlic is still pale.

Pour in the wine, scrape the base thoroughly and simmer for a few minutes until the sharp raw aroma softens. The liquid does not need to reduce to syrup before it goes into the cooker.

Red wine poured into a pan of vegetables while a wooden spoon scrapes browned residue from the base.
Deglazing is complete when the spoon glides across the pan and no sticky browned patches remain—not when the wine has reduced to syrup.

How Much Liquid Should Be in the Slow Cooker?

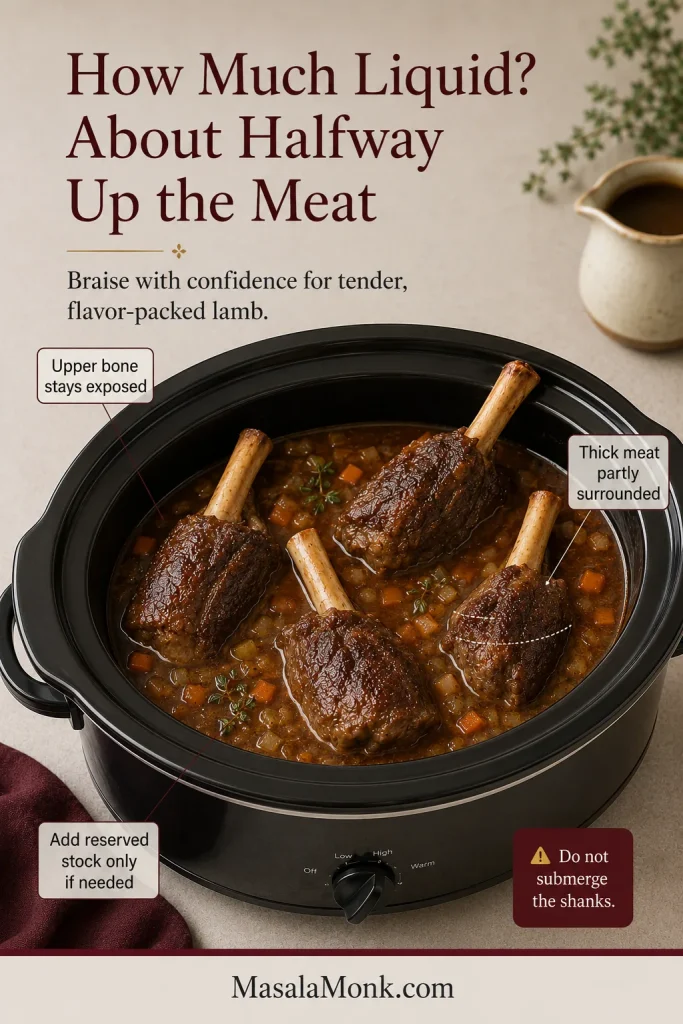
Position the thick ends of the shanks in the braising liquid. The liquid should initially reach around halfway up the meaty portions; in a wide cooker, it may sit closer to two-thirds. The bones may remain almost entirely exposed.

Four browned lamb shanks fitted into an oval slow cooker with bones angled outward and room for the lid.
Change the angle of the bones before stacking the meat; slight overlap is harmless, but a lid that cannot seal makes the cook less predictable.

Why the Bones Can Stay Exposed

If your first instinct is to cover those exposed bones, pause. Slow cookers lose little moisture, while the lamb, onion, carrot and celery all release more liquid as they cook.

Four lamb shanks in a slow cooker with braising liquid reaching roughly halfway up the thick meat and the bones exposed.
Measure the liquid against the thick meat rather than the exposed bones, because the bones need flavourful steam—not full submersion.

The liquid rule

Cover the thick meat with flavour, not the entire bone with stock. Too much starting liquid is a common reason a slow-cooker sauce tastes diluted.

Do You Need to Turn Lamb Shanks?

Turning is usually unnecessary when the meat is positioned as directed. Once the lid goes on, leave it alone unless the cooker leaves a large patch of meat unusually exposed and dry.

There is otherwise very little to gain from checking early. Every unnecessary look releases heat and steam, so leave the cooker alone until the beginning of the expected tenderness window.

The Fork Test Matters More Than the Timer

Insert a fork, skewer or thin thermometer probe into the thickest part of the meat without touching the bone. It should slide through with very little resistance. The meat usually pulls back from part of the bone, and the bone may wiggle slightly when nudged.

A thin probe enters the side of the thickest meat on a cooked lamb shank while avoiding the bone.
Test several spots and every shank; one easy reading near a soft pocket does not prove that the thickest meat is tender throughout.

A shank can be tender without collapsing completely. That gives you a better chance of moving it neatly to the serving plate before it falls apart under the fork.

How Long Lamb Shanks Take

The timer brings you into the right window; it does not overrule what the meat is telling you. Use the table as a planning guide, and leave a little room before serving because a shank that needs another 30 minutes cannot be hurried.

Approximate shank sizeBegin checking on LOWBegin checking on HIGH
9–11 oz / 250–325 gAbout 6½ hoursAbout 4 hours
12–14 oz / 350–400 gAbout 7 hoursAbout 4½ hours
16–19 oz / 450–550 gAbout 8 hoursAbout 5 hours
Approximate lamb-shank checking times by weight.

These are checking points rather than promised finish times. Continue in 30-minute intervals until the meat is tender; shank thickness, animal age, cooker heat and how tightly the pot is loaded can all move the final time.

LOW vs HIGH—and When to Start Checking

LOW is usually the easier setting to plan around and gives the connective tissue time to soften gradually. HIGH is also valid when dinner needs to happen sooner; begin checking promptly and stop once the meat is tender.

Small or medium shanks can sometimes be ready at about four hours on HIGH, especially in an appliance that runs hot. Treat four hours as the start of a checking window, not a universal promise.

Safe Temperature vs Tender Temperature

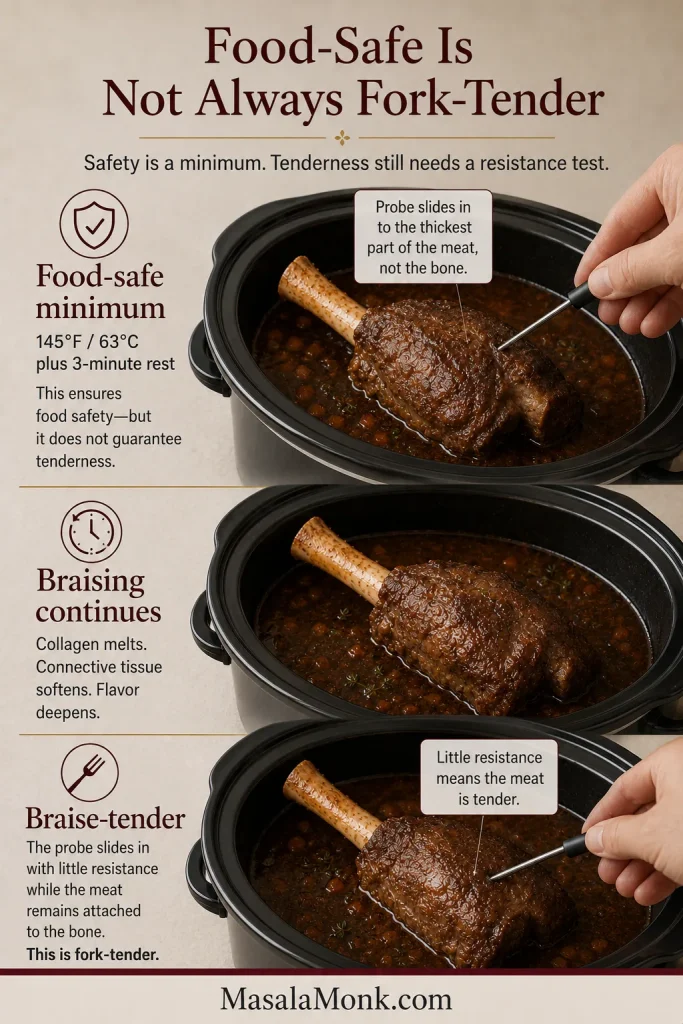
The USDA minimum for whole cuts of lamb is 145°F / 63°C followed by a three-minute rest (opens in a new tab). A shank will normally still feel firm at that temperature.

A tender braised shank will usually cook well beyond the food-safe minimum, but temperature remains supporting evidence. The decisive sign is a fork or probe sliding through the thickest meat with almost no resistance; one shank may soften before another even when their readings look similar.

Three-stage graphic contrasts the food-safe minimum for lamb with continued braising until a probe meets little resistance.
Safe temperature confirms safety; an easy probe test confirms tenderness.

When the Timer Ends but the Lamb Is Still Tough

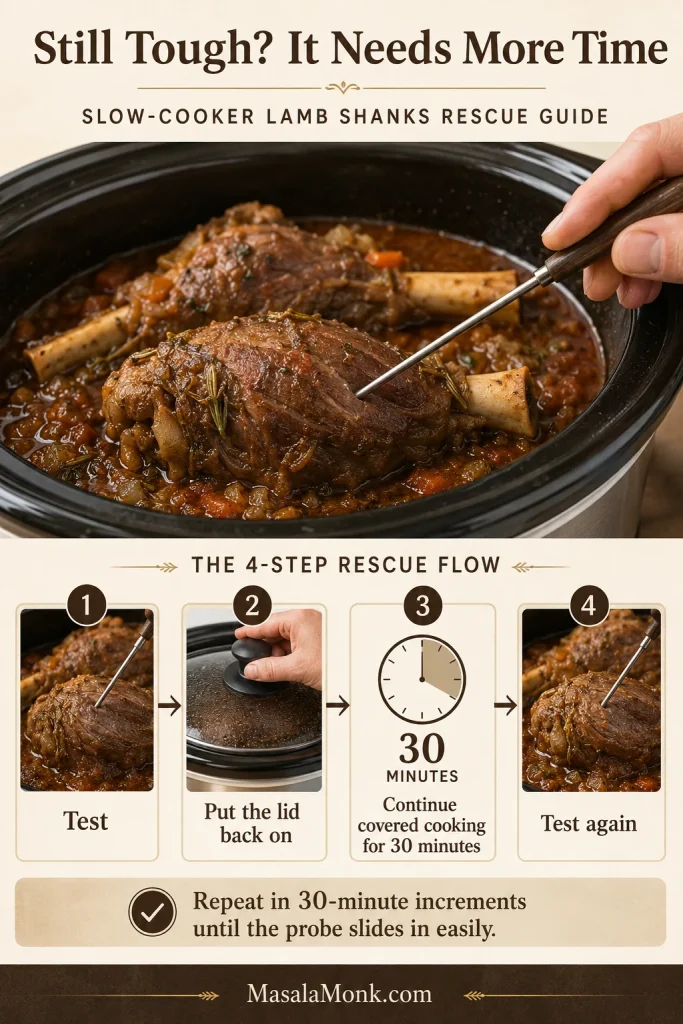
If dinner time is approaching and the meat still grips the probe, it is frustrating—but it is not a lost dinner. Cover the cooker and give it another 30 minutes. Large shanks, mutton shanks, a full cooker or a gently heated appliance can all extend the process. Tough braised meat is usually asking for more time, not more liquid or higher heat.

Slow-cooker lamb shank rescue infographic showing four steps: test the meat, put the lid back on, cook covered for 30 minutes and test again.
Keep cooking covered in 30-minute increments until a probe slides into the thickest meat with very little resistance.

The same late-softening behaviour appears in a slow-cooked beef shoulder roast: meat can be safely cooked before it becomes fork-tender.

From Braising Liquid to Rich, Glossy Gravy

The cooking liquid may look disappointingly thin when the lamb first comes out. That is normal. The flavour is already there; a wide saucepan concentrates it and gives you control over the final texture.

Lift the Shanks and Remove Excess Fat

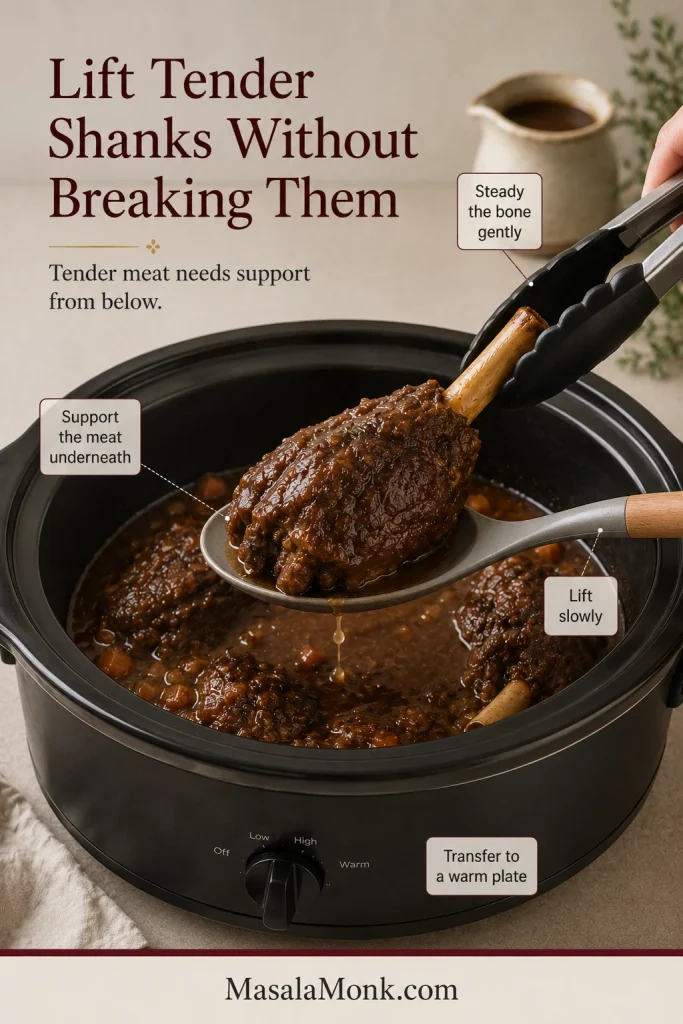
When the meat looks as though it might slip from the bone, support it from underneath rather than gripping it harder. Hold the bone gently with tongs, slide a broad spoon or spatula beneath the meat, and move the shanks to a warm platter.

A wide spoon supports a tender lamb shank from below while tongs steady the bone during transfer.
Think of the spoon as the support and the tongs as the guide—the tender meat should never hang from the bone under its own weight.

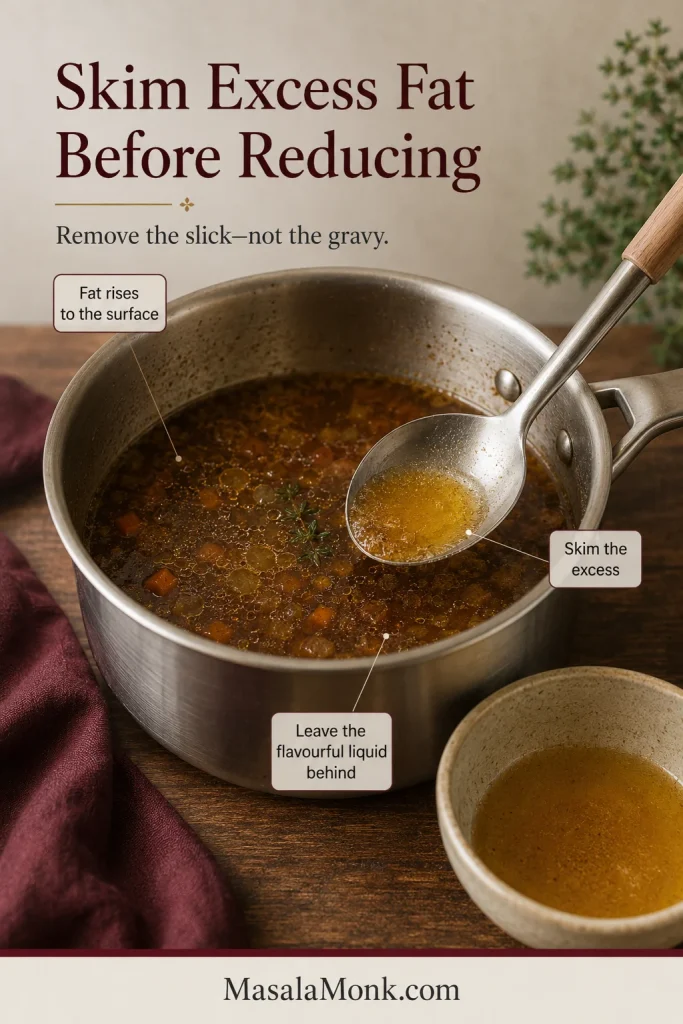
Spoon fat from the liquid, use a fat separator, or chill the dish and lift away the firm layer the next day. Removing excess fat makes the lamb flavour clearer; it does not make the gravy less rich.

A spoon skims pale fat from the surface of dark lamb cooking liquid in a stainless saucepan.
Skim in shallow passes so only the pale surface fat leaves the pan; dipping too deeply removes the dark, flavourful liquid underneath.

Choose Smooth or Rustic Gravy

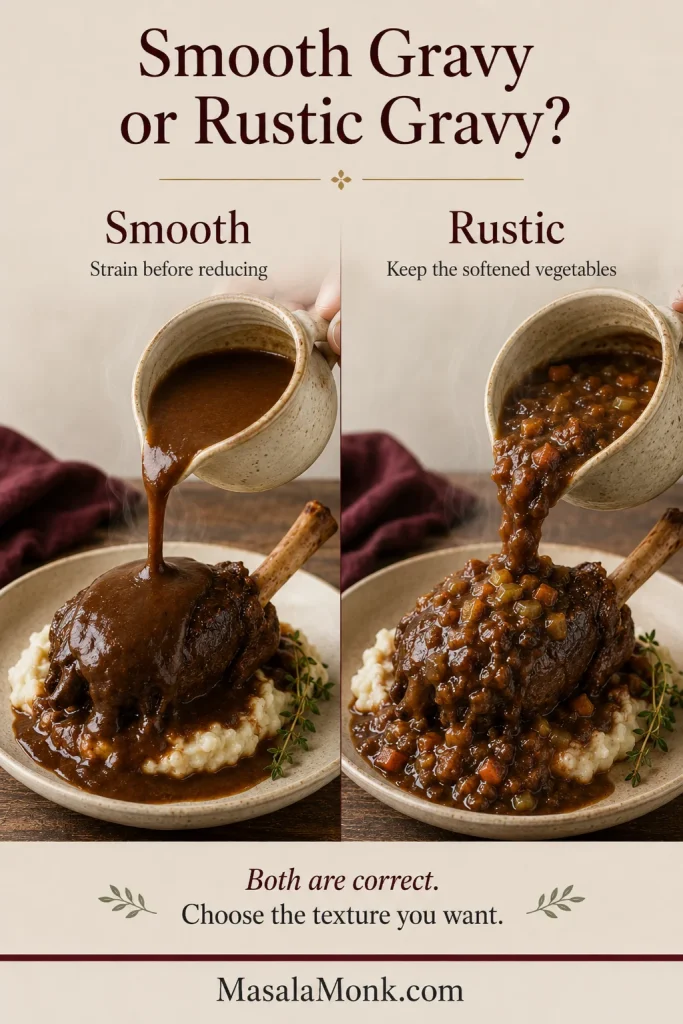
For a smooth gravy, remove the herbs and strain out the vegetables, pressing lightly to recover their juices. For a rustic gravy, remove the woody stems and bay leaves, then blend some or all of the softened vegetables into the liquid.

Two plated lamb shanks compare smooth strained gravy with rustic gravy containing softened vegetables.
Choose smooth or rustic before reducing, because straining becomes messier once the gravy thickens and clings to the softened vegetables.

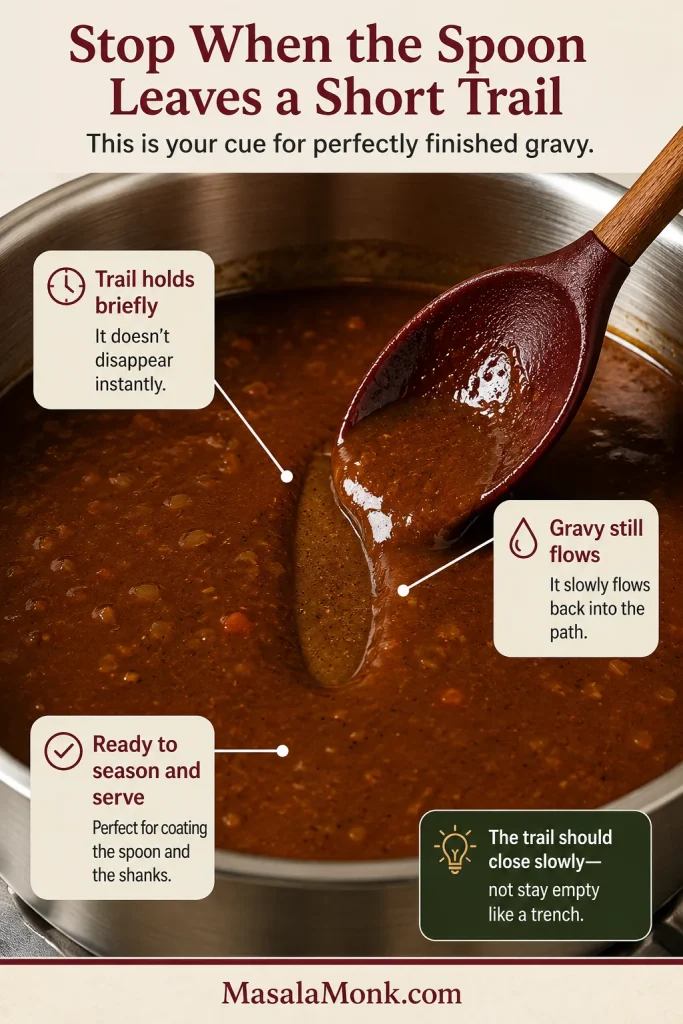
Reduce Until the Spoon Leaves a Trail

Simmer the gravy in a wide saucepan. As water evaporates, it darkens, becomes glossier and starts clinging to the small ridges left by the spoon. Draw a careful line across the back: the trail should remain visible for a moment while the sauce still flows.

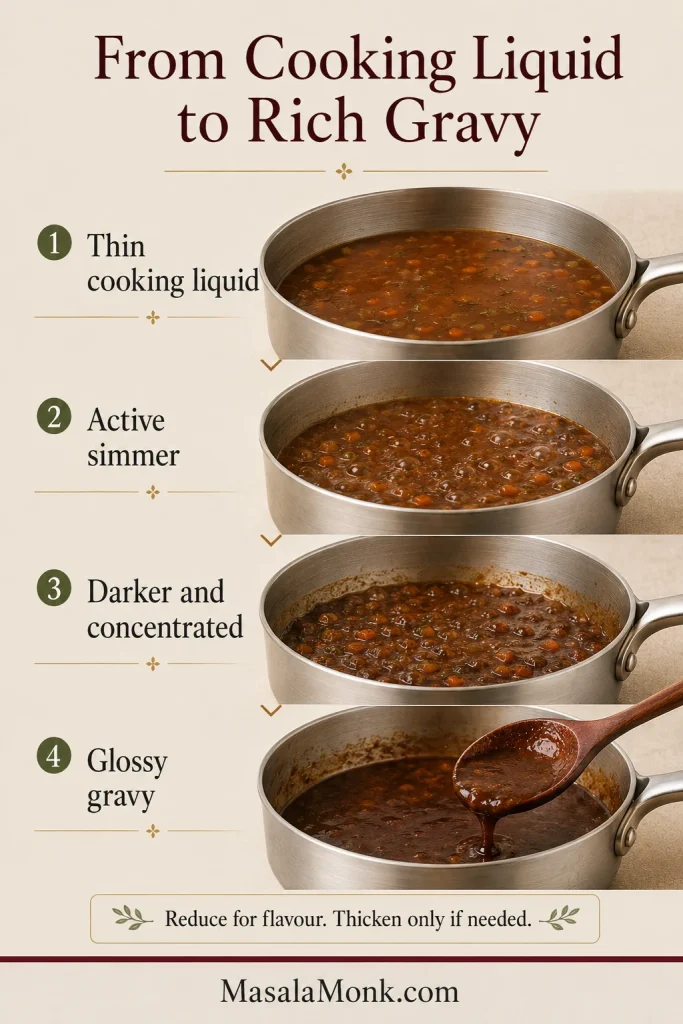
Four saucepan images show lamb cooking liquid progressing from thin to simmering, concentrated and glossy.
As the gravy reduces, the simmer becomes slower and more viscous and the surface looks glossier.

Once the gravy looks glossy and the simmer slows, draw a spoon through it and watch how quickly the trail closes.

A spoon leaves a narrow trail through glossy brown gravy that begins to close slowly.
The ideal spoon trail holds briefly, then closes slowly.

Thicken Only When Reduction Is Not Enough

Mix the cornstarch completely with cold water. Whisk the slurry into the simmering gravy a little at a time, allowing it to cook for a minute before deciding whether it needs more. After reduction, you may not need all of it.

The finished gravy should settle into the soft ridges of creamy garlic mashed potatoes, not sit on the plate like paste.

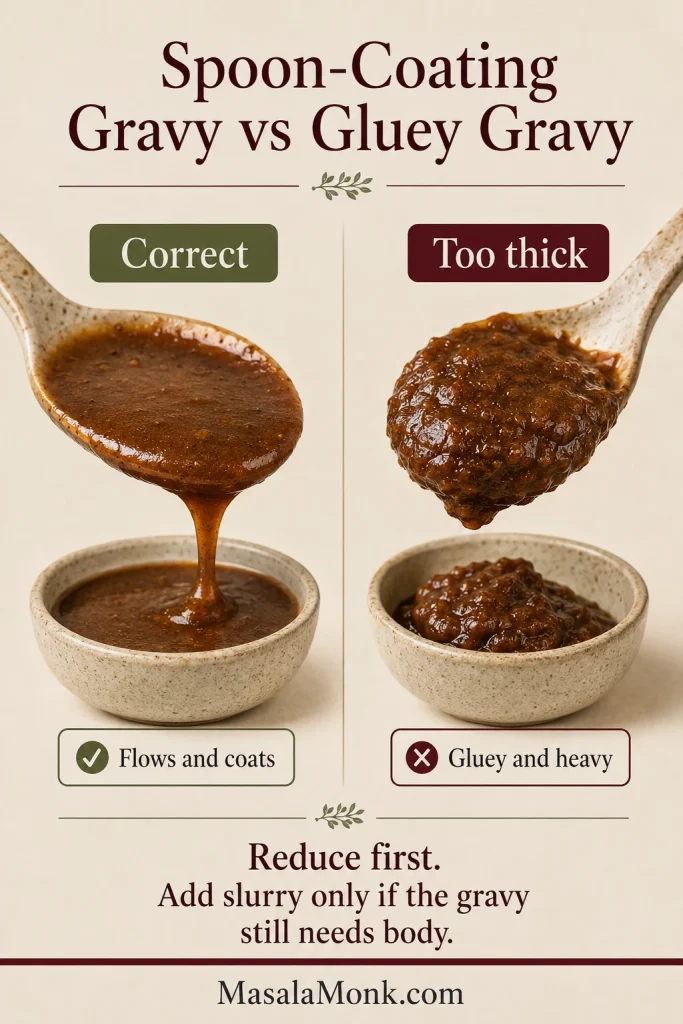
Two spoons compare smooth flowing gravy with thick, gluey gravy that clings in a heavy mound.
If gravy turns gluey, loosen it while hot with unsalted stock a spoonful at a time; pausing between additions prevents a second overcorrection.

Remember

Reduce for flavour; thicken for body. Keep simmering while the gravy tastes weak. Once the flavour is full but the sauce still flows too freely, add a little slurry.

Fixing Tough Lamb and Thin Gravy

Firm lamb or unexpectedly thin gravy does not mean dinner has failed. The shanks usually need more time, while the sauce usually needs reduction after the meat comes out.

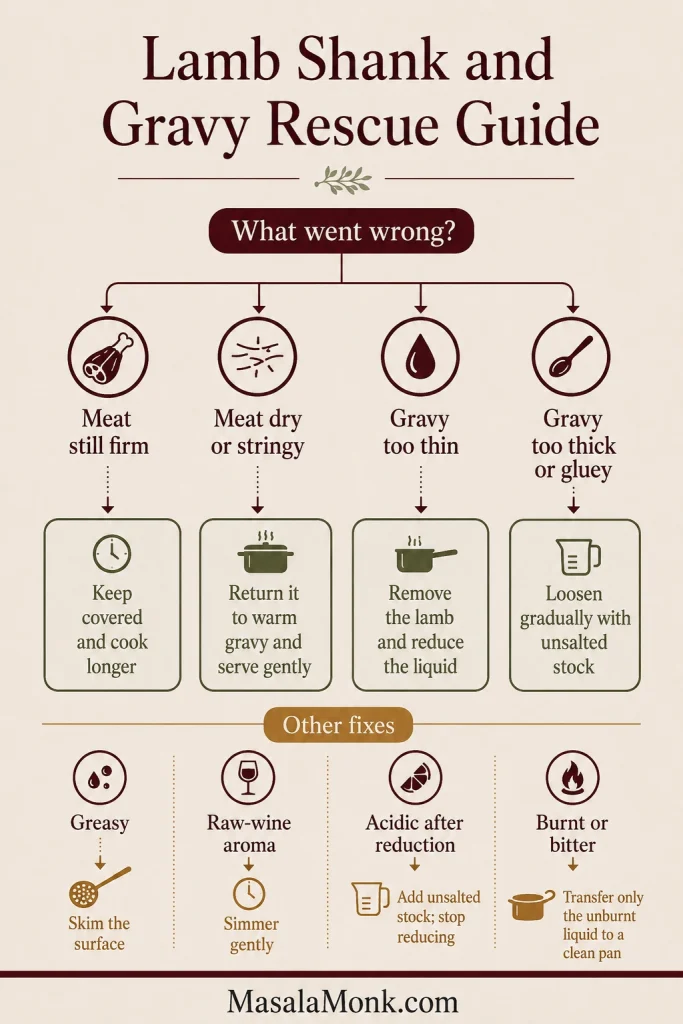
Troubleshooting flowchart lists fixes for firm or dry lamb and gravy that is thin, thick, greasy, acidic, wine-scented or bitter.
Change one variable at a time, then retaste.

Lamb and Slow-Cooker Problems

Meat or cooker problemLikely causeBest fix
Lamb is still tough.The connective tissue has not softened.Continue cooking in 30-minute increments.
Meat is dry or stringy.It cooked well beyond tenderness or stayed on WARM too long.Serve with gravy or shred for ragu, pie or soup.
Shanks break while lifting.The meat is extremely tender.Support it underneath with a broad spoon or spatula.
Slow cooker is overfull.The meat exceeds the fill line or prevents the lid from closing.Transfer to a larger cooker or remove some shanks. Removing liquid alone does not fix overcrowding.
Common lamb-shank and slow-cooker problems.

Lamb Gravy Problems

Gravy problemLikely causeBest fix
Gravy is watery.Too much starting liquid or normal moisture released during cooking.Remove the lamb and reduce the liquid uncovered.
Gravy is thick but weak.Starch was added before the flavour concentrated.Loosen with unsalted stock, then correct the seasoning. Do not reduce it back to a gluey texture.
Gravy is greasy.The shanks released substantial fat.Skim, use a fat separator or chill and remove the firm layer.
Gravy is too salty.Stock or seasoning became concentrated during reduction.Add unsalted stock or water gradually and stop reducing.
Gravy smells sharply of wine.The wine needs more cooking.Simmer gently until the raw aroma softens.
Gravy tastes acidic after reduction.The acidity became concentrated.Add unsalted stock gradually and optional butter. Stop reducing.
Gravy tastes bitter.Garlic, tomato paste or pan residue burned.Move the unburned liquid to a clean pan and dilute cautiously. Strongly burnt gravy may need replacing.
Gravy is lumpy.Dry starch was added directly or the slurry was not smooth.Strain out the lumps. If the gravy still needs thickening, use a fully mixed cold-water slurry.
Gravy is gluey.Too much starch.Whisk in unsalted stock until the gravy loosens.
Common lamb-gravy problems and practical fixes.

Variations and Substitutions

No wine or tomato on hand—or avoiding either ingredient? The shanks can still cook by the same method, though the finished gravy will taste different.

Slow Cooker Lamb Shanks Without Wine

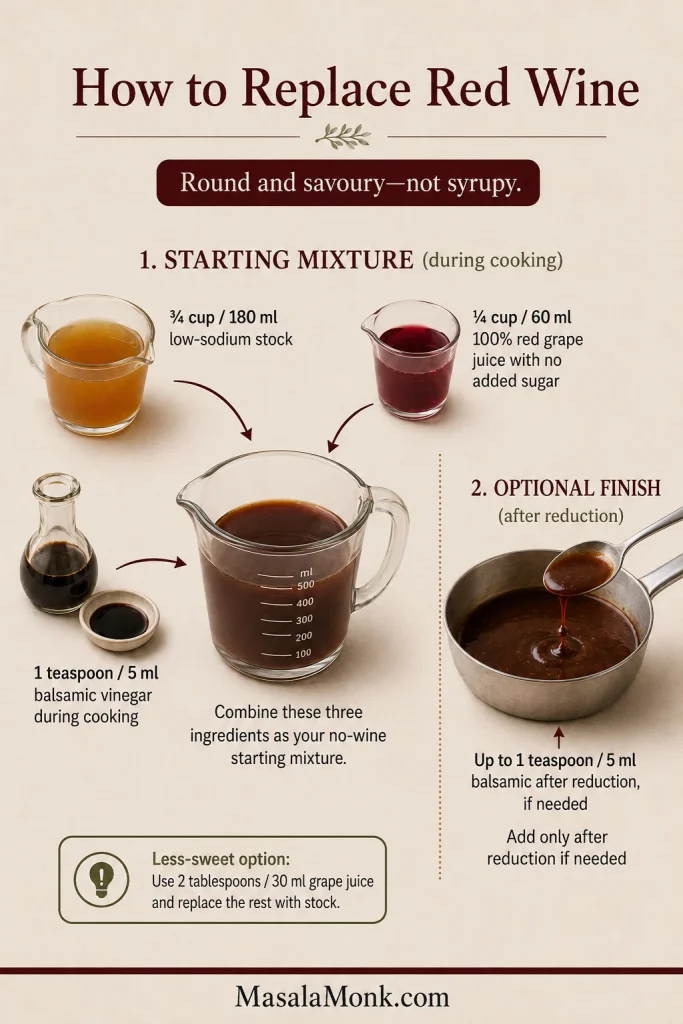
Replace the 1 cup / 240 ml red wine with:

  • ¾ cup / 180 ml additional low-sodium stock
  • ¼ cup / 60 ml 100% red grape juice with no added sugar—not grape drink or cranberry cocktail
  • 1 teaspoon / 5 ml balsamic vinegar during cooking
  • Up to 1 additional teaspoon / 5 ml balsamic vinegar after reduction, only if the gravy needs brightness

The no-wine gravy is slightly rounder and lacks the dry red-wine character, but browning, vegetables and reduction keep it savoury. For a less sweet result, use 2 tablespoons / 30 ml grape juice and replace the remaining amount with stock.

Wine-replacement graphic combining low-sodium stock, red grape juice and balsamic vinegar, with optional balsamic after reduction.
For slow cooker lamb shanks without wine, keep the grape juice restrained: it replaces fruitiness, while balsamic supplies the missing dry, acidic edge.

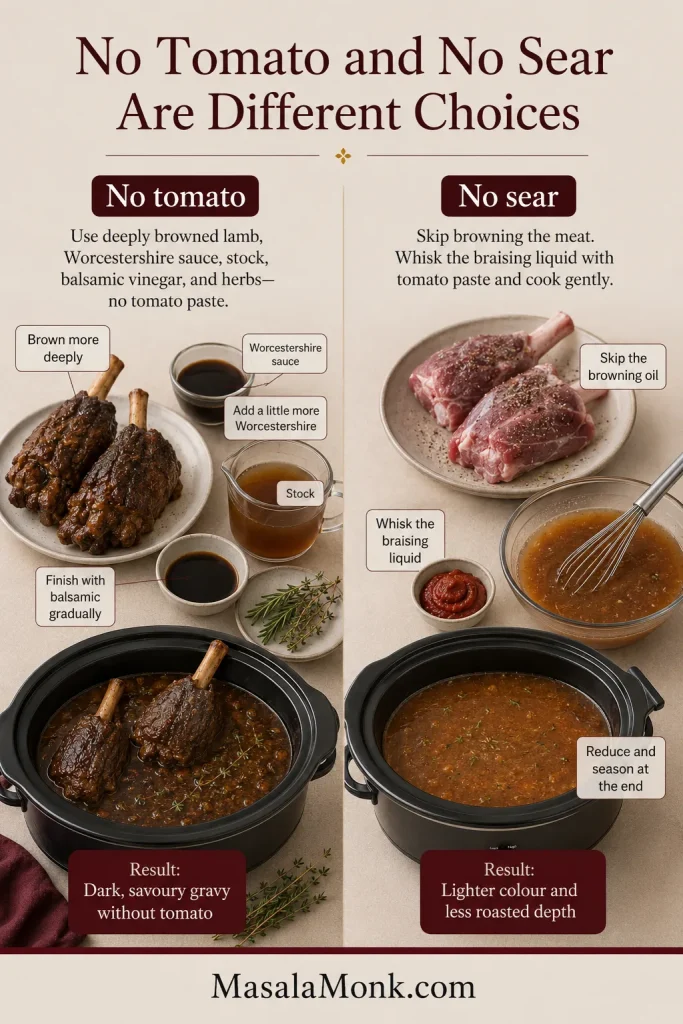
Slow Cooker Lamb Shanks Without Tomato

Omit the tomato paste. Brown the meat and vegetables particularly well, add 1 extra teaspoon Worcestershire sauce, and finish the reduced gravy with 1–2 teaspoons balsamic vinegar as needed. Add it a little at a time, stopping while the sauce still tastes rounded and savoury.

No-Sear Slow Cooker Lamb Shanks

Skipping the sear changes the gravy, not the tenderness. The lamb will still soften, but the finished sauce will be paler and have less roasted depth.

Place the seasoned shanks, onion, carrot and celery in the slow cooker. Whisk the tomato paste into the wine and stock, pour it around the lamb, then add the garlic, Worcestershire sauce and herbs. Omit the browning oil and continue with the slow-cooking and gravy-finishing steps.

Comparison graphic showing browned tomato-free lamb shanks beside an unseared tomato-based version with lighter gravy.
A no-tomato gravy needs help with acidity and body; a no-sear gravy needs help with roasted depth, so the two shortcuts are not interchangeable.

Herb Variations: Rosemary, Garlic or Mint

For a more aromatic rosemary-and-garlic version, add one extra rosemary sprig and one or two extra garlic cloves. Avoid a large handful of rosemary; its flavour intensifies during a long cook.

For minted lamb shanks, stir concentrated mint sauce into the finished gravy, starting with 1 teaspoon. Taste before adding more because brands vary considerably in sweetness, vinegar and strength.

Can You Add Potatoes to the Slow Cooker?

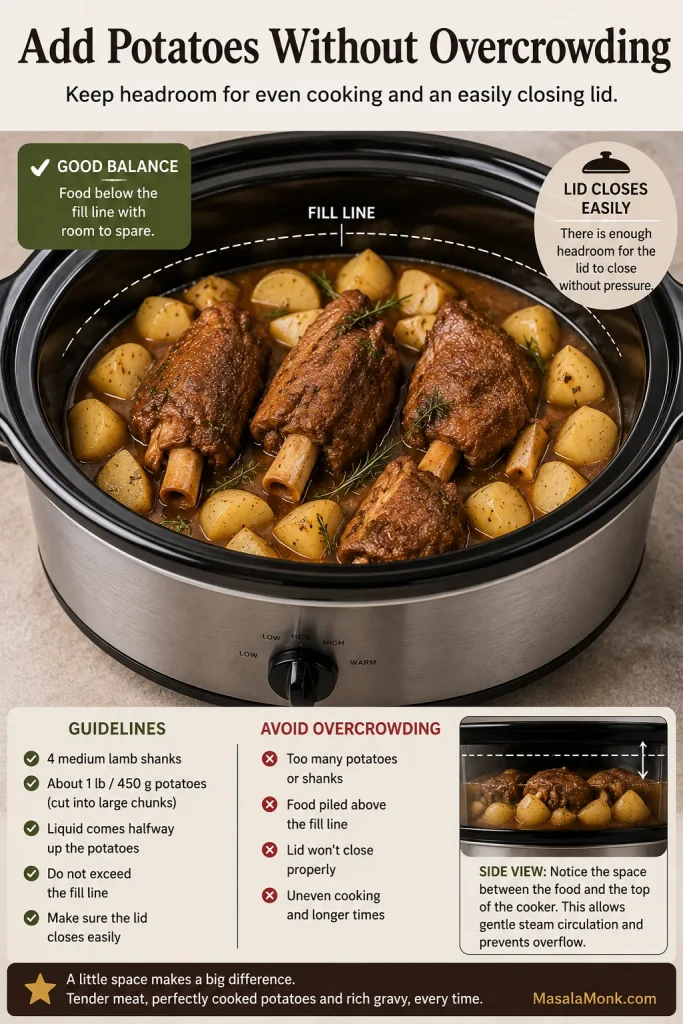
Yes. Use about 1 lb / 450 g waxy potatoes or Yukon Golds, cut into large 1½–2-inch / 4–5 cm pieces. Nestle them around and beneath the shanks without exceeding the slow cooker’s fill line. Small floury pieces may disintegrate during an eight-hour cook.

Four lamb shanks and about 1 pound of potato chunks arranged below the fill line in a slow cooker with visible headroom for the lid.
Keep the lamb and about 1 lb / 450 g potatoes below the fill line, with enough headroom for the lid to close easily.

Potatoes absorb seasoning and reduce the available cooker space, so check that the lid still closes easily and taste the gravy before adding more salt.

Dietary notes: For gluten-free gravy, use clearly labelled stock and Worcestershire sauce and thicken with cornstarch. For dairy-free gravy, omit the optional butter.

How to Cook Two Lamb Shanks

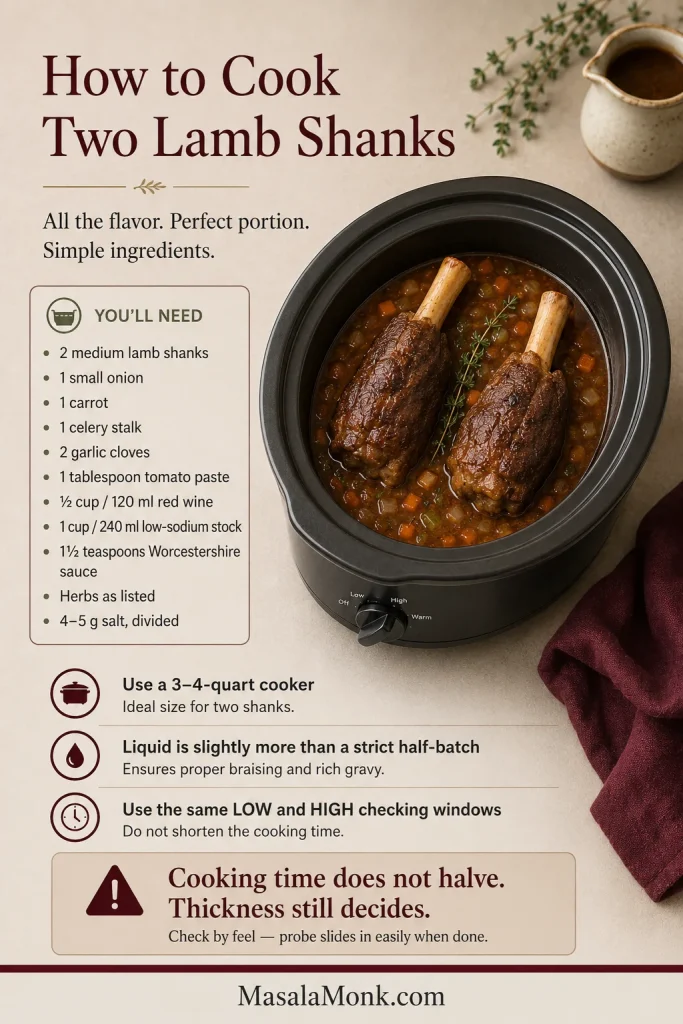
Two shanks take almost the same time as four when the pieces are equally thick. Use a smaller 3–4-quart / 3–4-litre cooker so the braising liquid reaches the meat without requiring unnecessary extra stock.

Scaled Quantities for Two Shanks

For two medium shanks, use:

  • 2 lamb shanks, about 12–14 oz / 350–400 g each
  • 4–5 g fine sea salt, using about 3–4 g on the lamb and reserving the remainder for the gravy, plus ½ teaspoon black pepper
  • 1 tablespoon olive oil, plus more if needed
  • ½ large onion, about 3½–4 oz / 100–115 g
  • 1 medium carrot, about 3 oz / 85–90 g
  • 1 celery rib, about 1¾ oz / 50 g
  • 3 garlic cloves and 1 tablespoon / 15 g tomato paste
  • ⅔ cup / 160 ml red wine
  • 1 cup / 240 ml low-sodium stock, plus up to ¼ cup / 60 ml if needed
  • 2 teaspoons Worcestershire sauce
  • 1 rosemary sprig, 2 thyme sprigs and 1 bay leaf

Timing and Liquid for a Smaller Batch

The liquid is slightly more than a strict half-batch because two shanks still need enough depth around the meat. A smaller cooker avoids the need for additional stock, and the same LOW and HIGH checking windows still apply because shank thickness matters more than piece count.

Two lamb shanks in a small oval slow cooker beside scaled ingredients and reminders about liquid depth and cooking time.
Two lamb shanks need a smaller cooker rather than half the time; preserving liquid depth matters more than shrinking the clock.

What to Serve With Slow Cooker Lamb Shanks

The best sides catch the gravy without competing with the lamb. Creamy mashed potatoes are the classic choice because their soft ridges hold the sauce around the meat.

Four place settings with lamb shanks, mashed potatoes, carrots, green vegetables and gravy on a wooden dinner table.
Fresh green vegetables balance the rich lamb and gravy.

Other Good Bases for the Gravy

  • Soft polenta
  • Buttered egg noodles
  • Steamed rice
  • Crusty bread
  • Cauliflower mash

Vegetables for Contrast

  • Green beans
  • Peas
  • Roasted carrots
  • Brussels sprouts
  • Wilted greens
  • A crisp green salad with a sharp dressing

One shank per bowl makes the dinner feel generous before anyone has taken a bite. Spoon mashed potatoes into a shallow bowl, rest the lamb over them and pour the gravy across both.

Something green and sharp matters here—not because the plate needs decoration, but because each fresh bite makes the next spoonful of gravy taste richer. A green vegetable works well; for a colder contrast, this crisp cucumber salad cuts through the richness without competing with the sauce.

Make Ahead, Store, Freeze and Reheat

Lamb shanks reheat particularly well because the gravy protects the meat. Cool them promptly, store the lamb and gravy together, and reheat them thoroughly.

Making Lamb Shanks Ahead

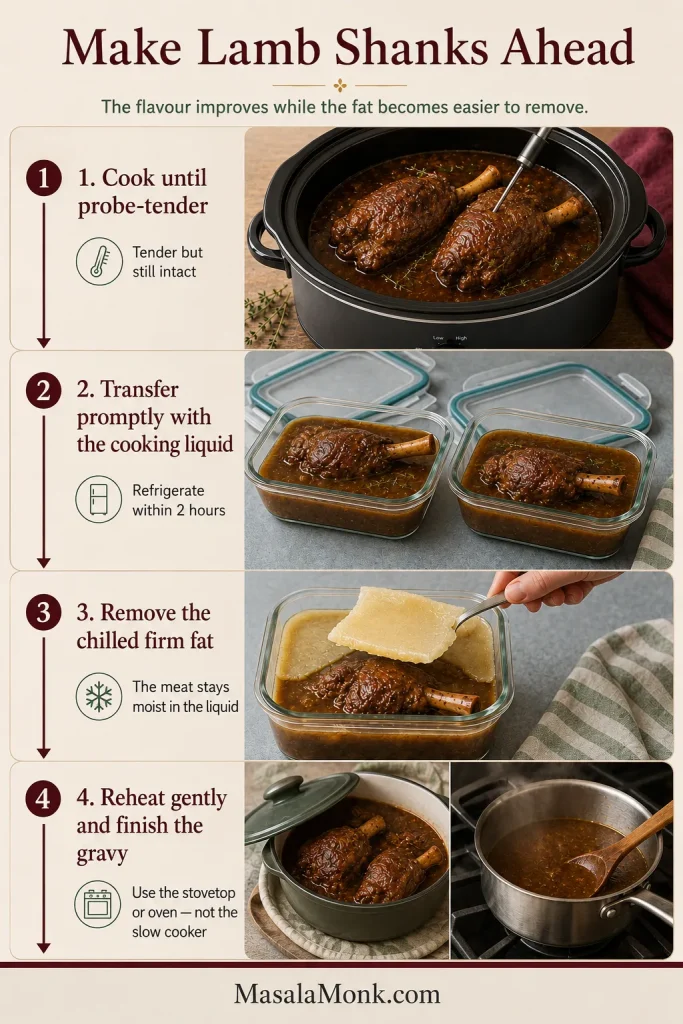
Making the dish a day ahead moves the uncertain tenderness window out of the hours before guests arrive. The chilled fat also lifts away cleanly, leaving the final gravy easier to control.

  1. Cook the lamb until tender, transfer the shanks and braising liquid to shallow containers, then cool promptly and refrigerate.
  2. The next day, lift away the firm fat from the surface.
  3. Reheat the shanks gently in part of the liquid.
  4. Reduce and finish the remaining gravy shortly before serving.
Four-stage guide showing probe-tender lamb, refrigeration in shallow containers, chilled fat removal and reheating outside the slow cooker.
For make-ahead slow cooker lamb shanks, chilling the meat in its liquid prevents dry edges and turns surface fat into a layer that lifts away cleanly.

Can You Cook Lamb Shanks Overnight?

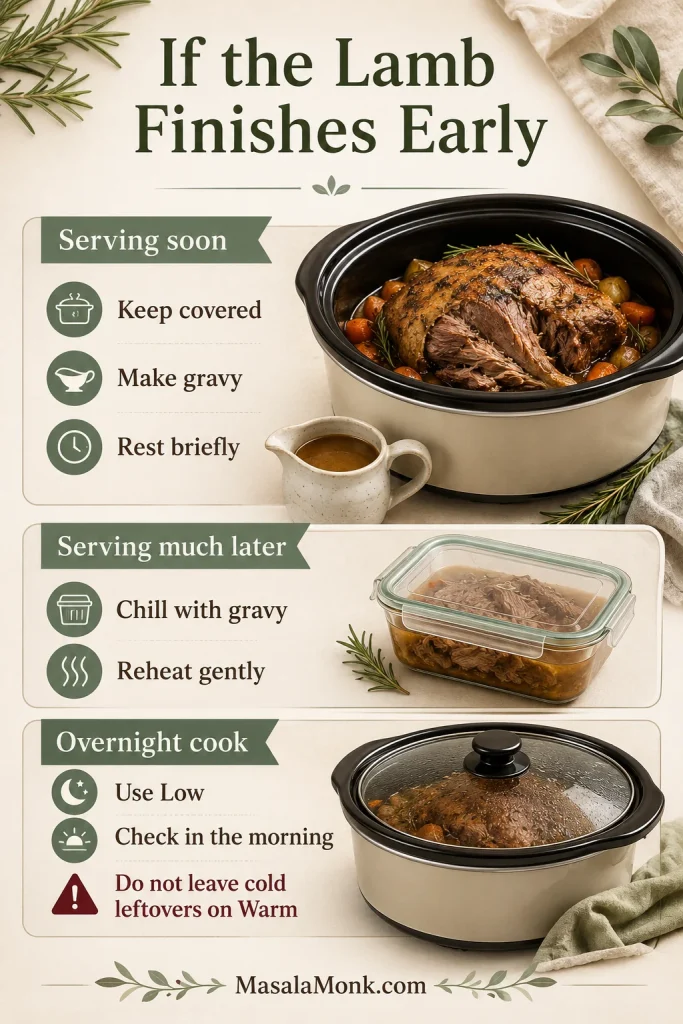
Overnight cooking works when the LOW cooking window suits the shank size and the cooker switches reliably to WARM. Start immediately—never on delay—and plan around the 7–8 hour window. Several extra hours on WARM can leave the meat softer and drier.

A switched-off slow cooker is not a safe place for overnight cooling. Move the lamb and gravy into shallow containers and refrigerate promptly.

Refrigerating and Freezing

Refrigerate the lamb and gravy within two hours and use them within 3–4 days. For longer storage, freeze the shanks with enough gravy to protect the meat in airtight freezer-safe containers. For the best texture and flavour, use within about 3 months.

Thaw in the refrigerator. Large bone-in shanks can take longer than expected to thaw completely.

Reheating

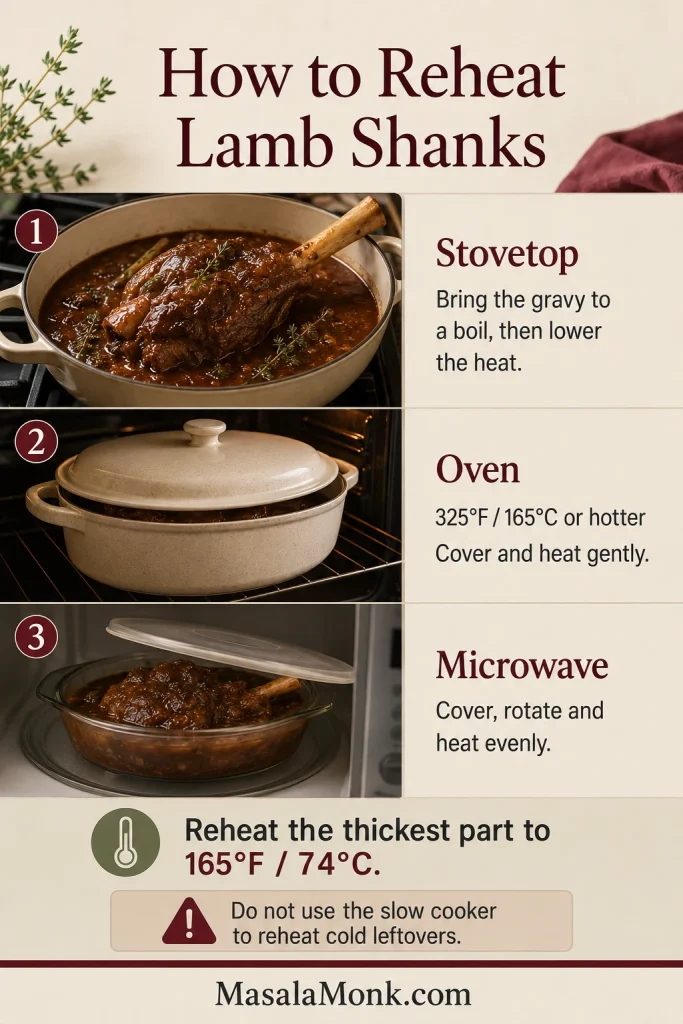
Reheat the lamb, covered with its gravy, on the stovetop, in an oven set to at least 325°F / 165°C, or in the microwave until the thickest part reaches 165°F / 74°C. On the stovetop, bring the gravy to a boil, then lower the heat and warm the lamb gently. Baste as needed so the meat heats evenly.

A slow cooker warms refrigerator-cold leftovers too gradually. Once the food is hot, a preheated slow cooker may hold it at 140°F / 60°C or above for serving. Read the full slow cooker food-safety guidance (opens in a new tab).

Three-method guide showing lamb reheated with gravy on the stovetop, in a covered oven dish and in a vented microwave container.
Reheat only until the thickest part reaches 165°F / 74°C; prolonged holding afterward keeps softening the meat and can dry exposed edges.

Starting with frozen raw shanks: thaw them in the refrigerator before slow cooking. Large, tightly packed bone-in pieces may need up to two days; load the cooker and start it immediately once they are thawed.

Using commercially pre-cooked shanks: follow the package reheating directions rather than giving them another all-day cook. Keep the meat in its sauce while heating so it stays moist.

What to Do With Leftover Lamb Shanks

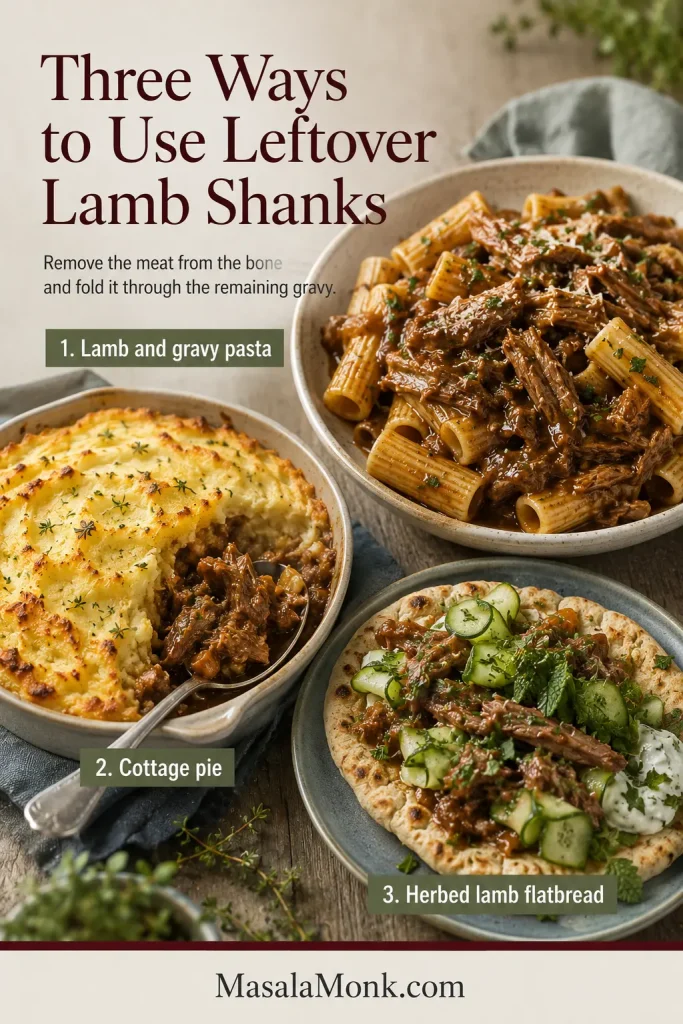
Even one leftover shank can become another meal once the meat is removed from the bone and folded through the remaining gravy.

Three leftover dishes showing lamb-and-gravy pasta, cottage pie and an herbed lamb flatbread with cucumber.
These leftover lamb shank recipes use gravy as both moisture and seasoning; add it gradually so pasta and flatbread stay coated rather than flooded.
  • Lamb ragu: Shred the meat and simmer it with the gravy, tomatoes if desired and enough stock to loosen the sauce. Toss with pasta.
  • Shepherd’s pie: Combine chopped lamb with thickened gravy and vegetables, then cover with mashed potatoes and bake. The potato-topping and moisture-control principles in this slow cooker cottage pie recipe are useful here too.
  • Lamb and barley soup: Thin the gravy with stock and add barley, carrots and greens.
  • Pie filling: Chop the meat, reduce the gravy until thick and cool before adding pastry.
  • Flatbreads or wraps: Reheat shredded lamb with a spoonful of gravy and add yoghurt, herbs and a sharp salad.

Slow Cooker Lamb Shanks FAQ

Do lamb shanks need to be submerged?

They do not need to be submerged. Keep the thick ends partly surrounded by liquid and let the bones remain exposed.

Can you overcook lamb shanks in a slow cooker?

Yes. Once the meat is tender, several more hours on HIGH or prolonged holding on WARM can make it stringy and cause it to collapse from the bone.

Do I have to brown lamb shanks first?

Browning is optional. It deepens the flavour and colour, while the long cook creates the tenderness.

Can I make lamb shanks without red wine?

Red wine is optional. Extra low-sodium stock, a little 100% red grape juice with no added sugar and balsamic vinegar create a rounder but still savoury gravy.

Why are my lamb shanks still tough after eight hours?

They usually need more time. Continue in 30-minute intervals until a fork or probe slides easily into the thickest meat.

Can frozen lamb shanks go straight into the slow cooker?

Frozen raw shanks should be thawed in the refrigerator before the cooker is loaded and started.


If you make these, tell us the shank size, when the meat became tender and whether you used wine. A note about that extra half hour may be exactly what another cook needs while dinner is still in the slow cooker.

The goal is not meat that disintegrates somewhere inside the cooker. It is a shank that reaches the table intact, yields under the fork and leaves enough dark gravy behind for the potatoes to matter.

Back to the top ↑

Posted on Leave a comment

Slow Cooker Leg of Lamb Recipe: Garlic and Rosemary Lamb with Gravy

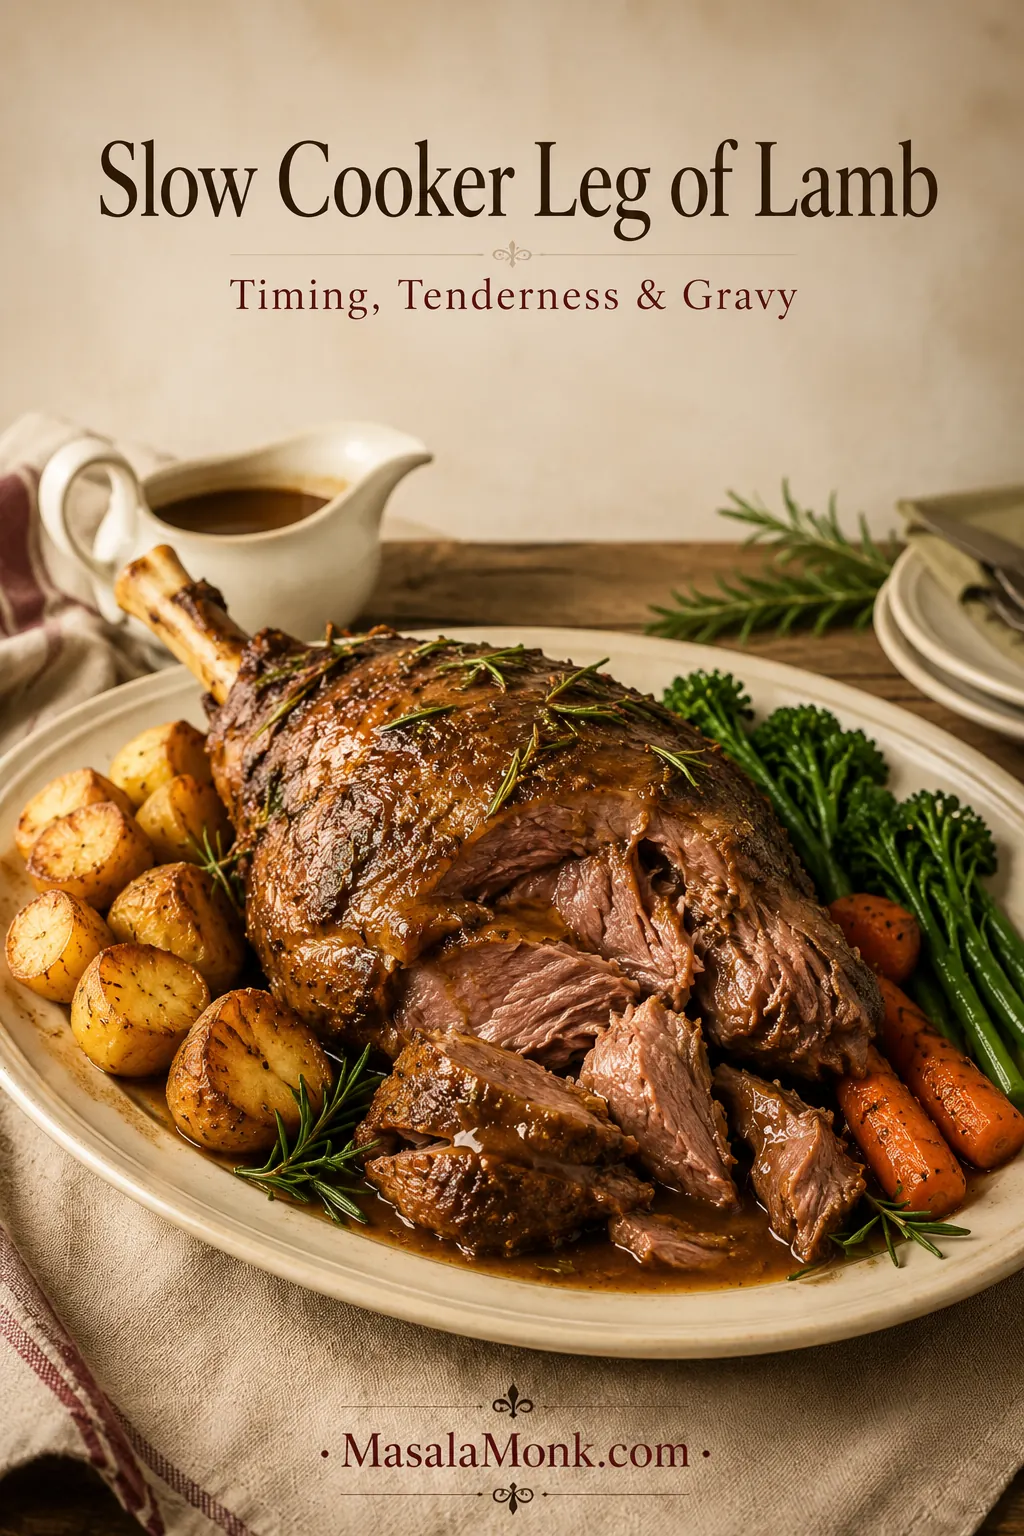
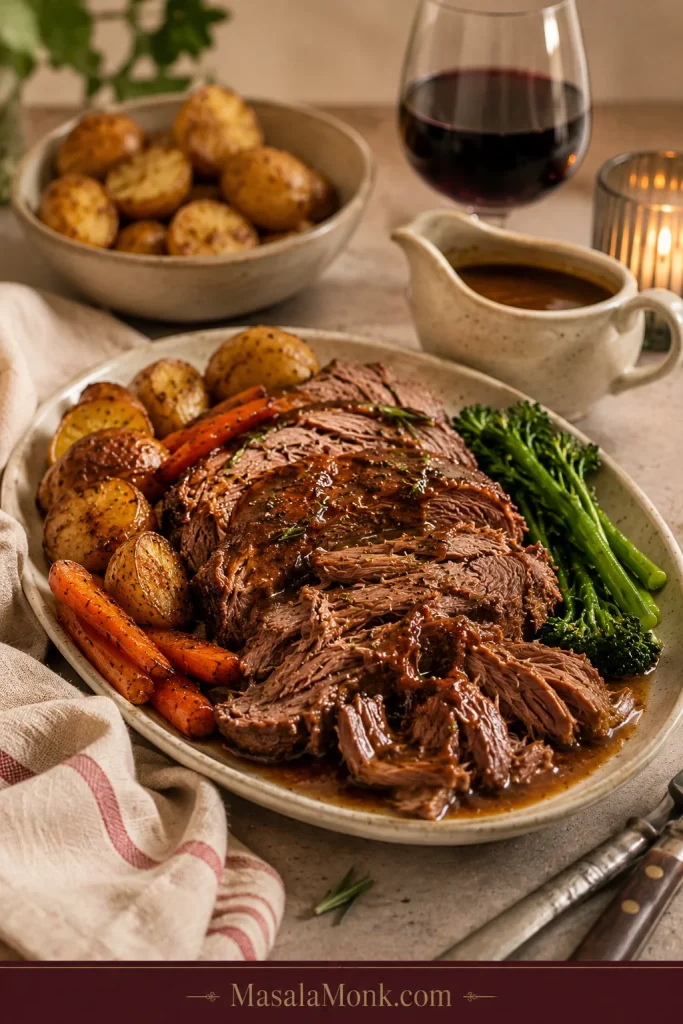
Finished slow cooker leg of lamb on an ivory platter with gravy, roast potatoes, carrots, green vegetables and rosemary.

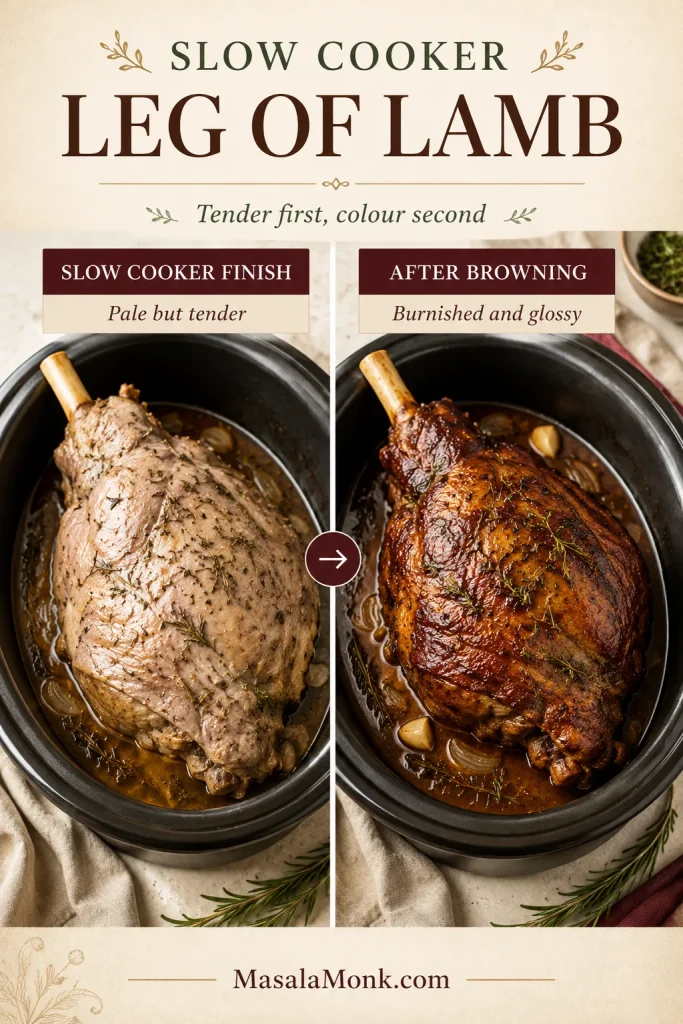
Slow cooker leg of lamb should give you three things when the lid comes off: meat that yields beneath a fork, a kitchen full of garlic and rosemary, and cooking juices already halfway to becoming gravy.

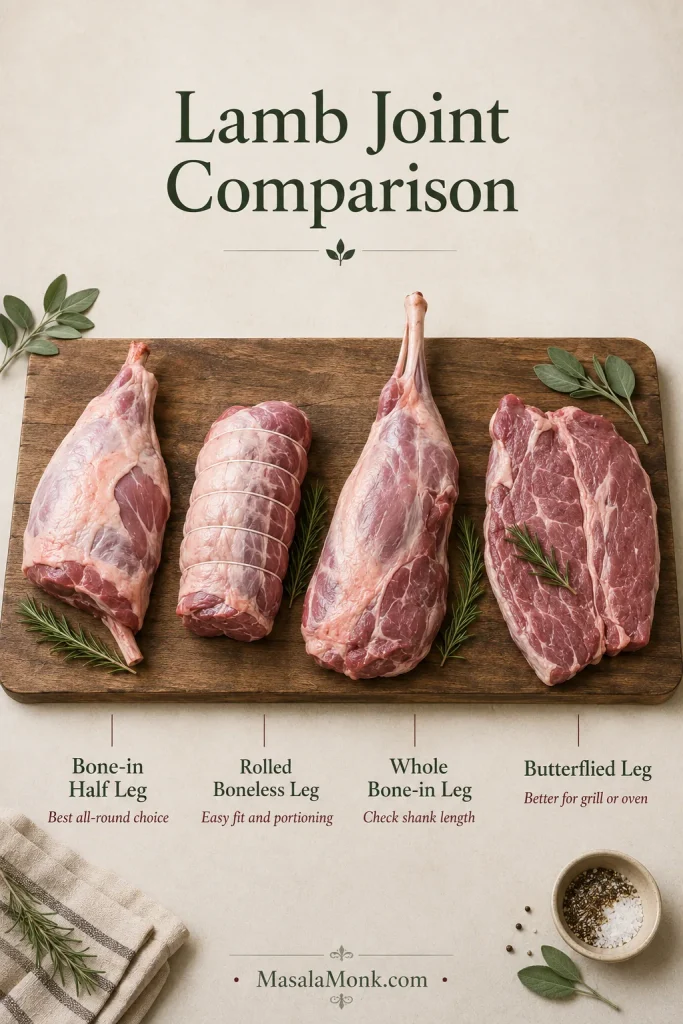
That is the calm version of Sunday lunch. Leg of lamb is not something most people want to experiment with blindly, especially when several people are waiting to eat—and a compact boneless roll, bone-in half leg and large whole leg will not all behave in exactly the same way.

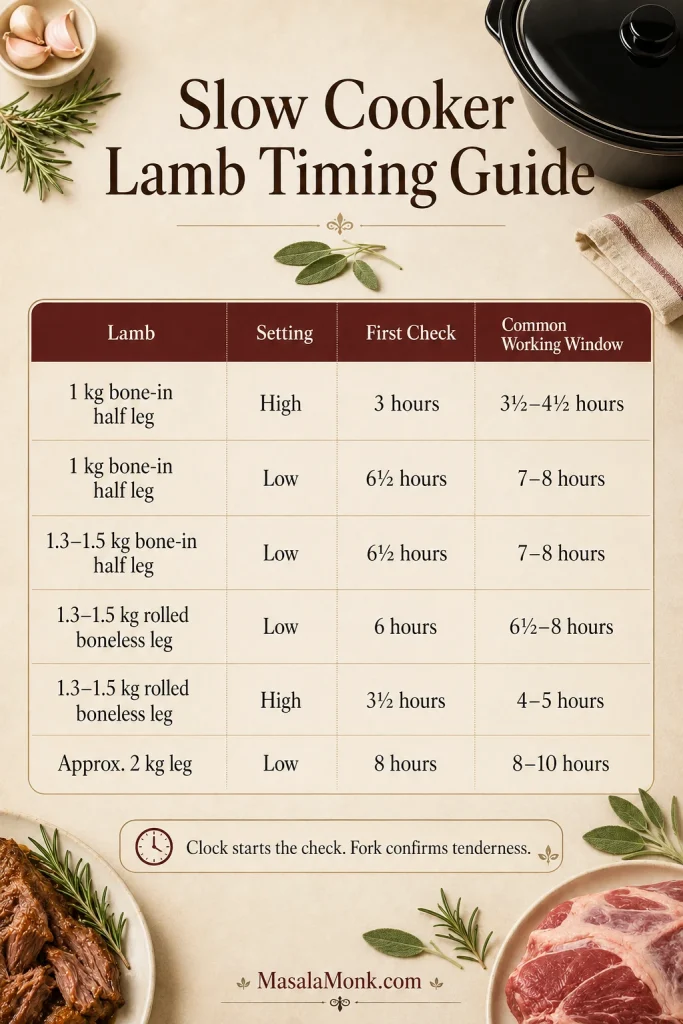
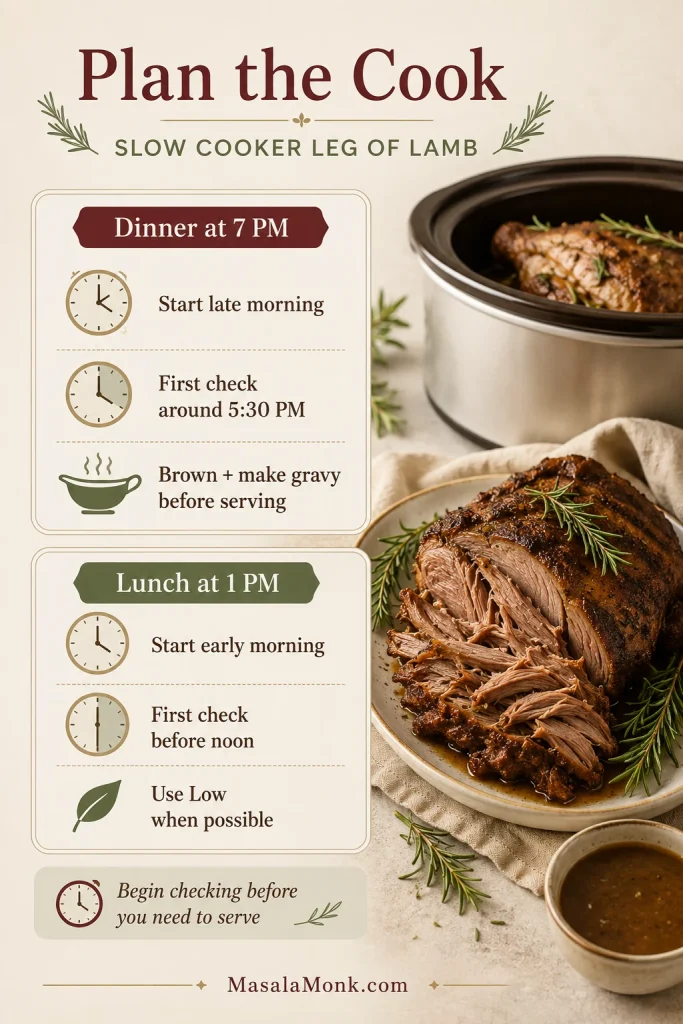
The recipe below gives you a dependable starting point. Then the joint-specific guide shows when to begin checking a 1 kg half leg, a rolled boneless joint or a larger bone-in leg, because shape and thickness can matter almost as much as weight.
Quick Answer: Slow Cooker Leg of Lamb

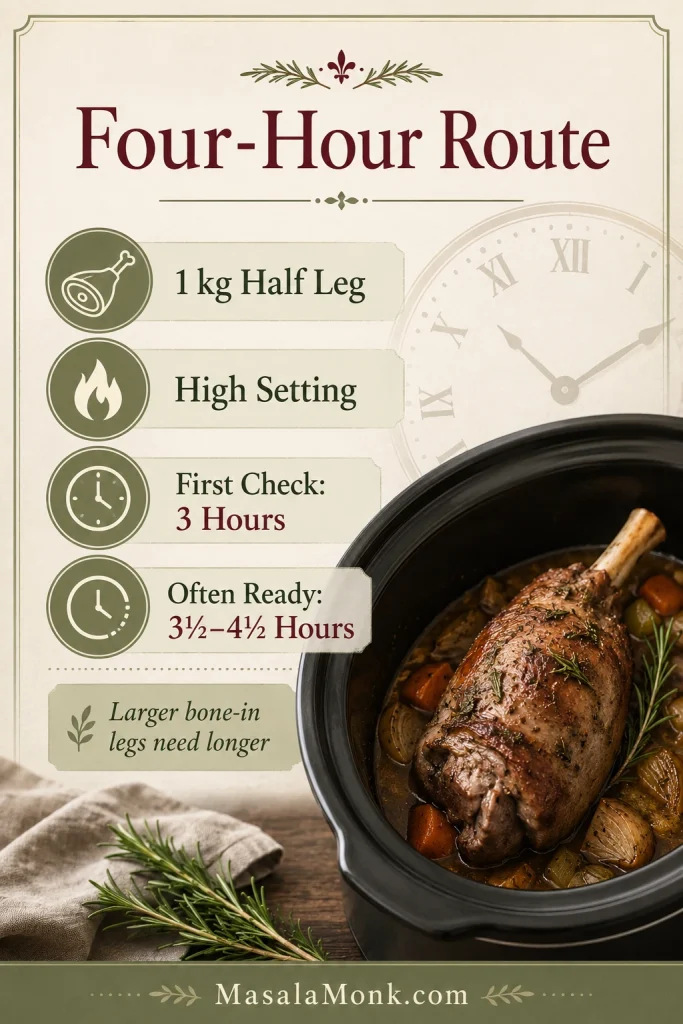
A 1.3–1.5 kg / 2.9–3.3 lb leg of lamb generally needs about 7–8 hours on low in a slow cooker or Crock-Pot. Start checking the thickest meat at around 6½ hours. A smaller 1 kg / 2.2 lb half leg can take about 3½–4½ hours on high, with the first check at three hours.

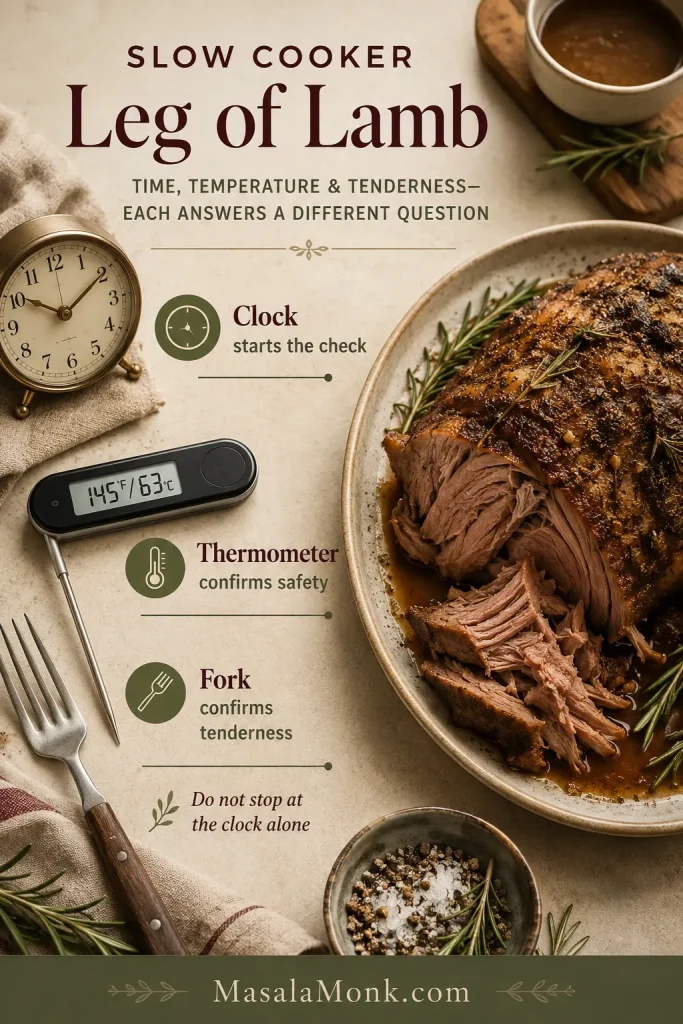
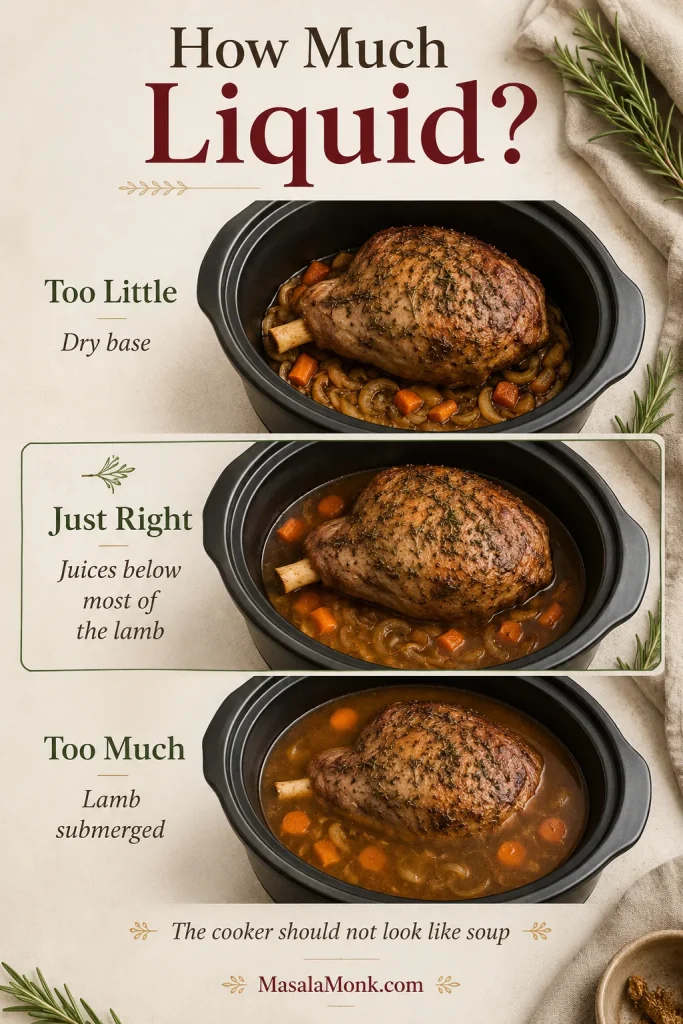
Keep most of the lamb above the liquid. Continue cooking until it has reached a safe temperature and a fork twists through the thickest section with little resistance, then brown it briefly while turning the cooking juices into gravy.

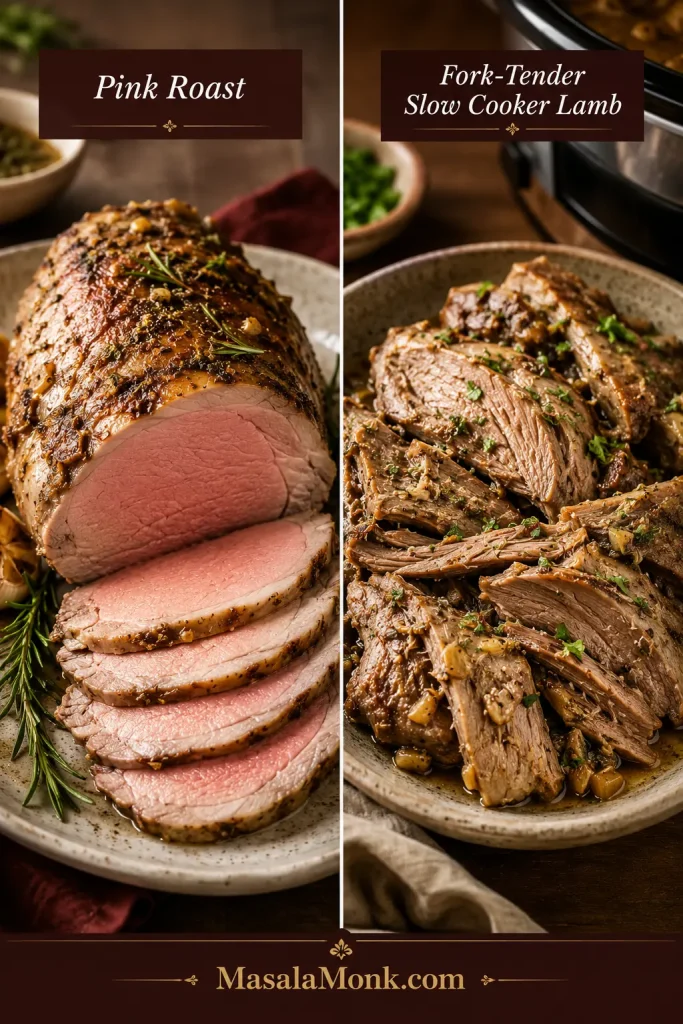
This method produces fully cooked, fork-tender lamb. It is not the right method when you want a pink or medium-rare centre with neat carved slices.

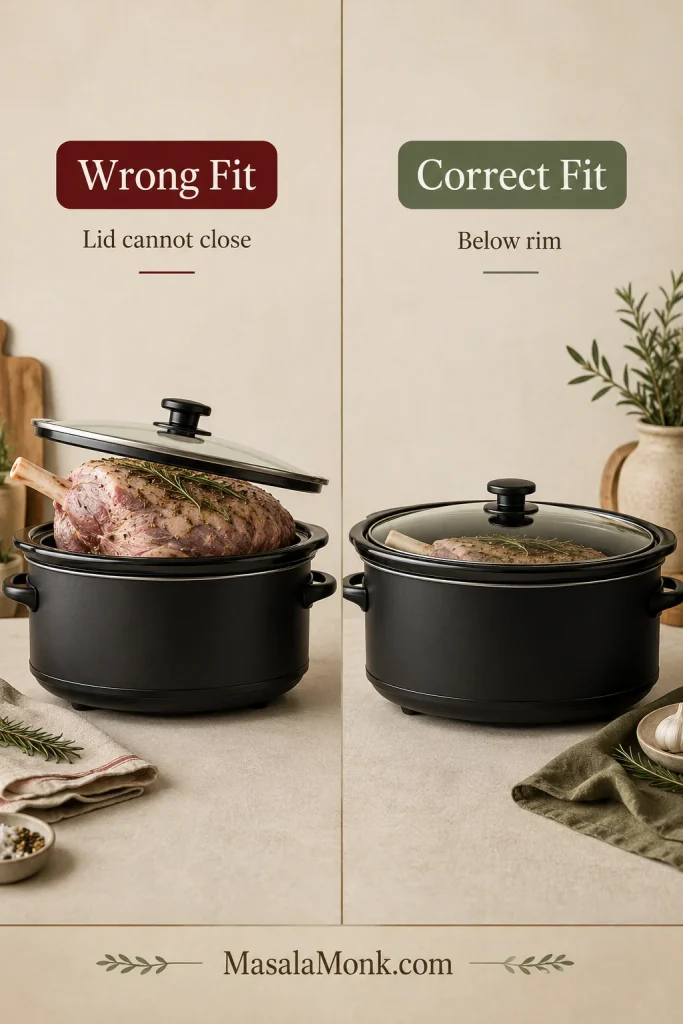
Not sure your joint matches this timing? Check the joint type, test the cooker fit, or use the timing guide.

Slow Cooker Leg of Lamb Recipe

Garlic and Rosemary Lamb with Gravy

The lamb is savoury and rosemary-scented, with mellow garlic, soft sweet onions and plenty of cooking juice for gravy. A short hot-oven finish gives the pale slow-cooked surface burnished edges without drying the tender meat underneath.

Recipe at a glance:
Prep: 25 minutes
Slow cooking: about 7–8 hours on low
Browning and gravy: 15–20 minutes
Final rest: 5–10 minutes
Serves: 4 generously, or 5–6 with substantial sides
Slow cooker: about 5.5–6 litres / 6 quarts

Equipment: slow cooker, meat thermometer, roasting tray, broad spatula or serving spoon, heatproof jug, fine-mesh strainer and saucepan.

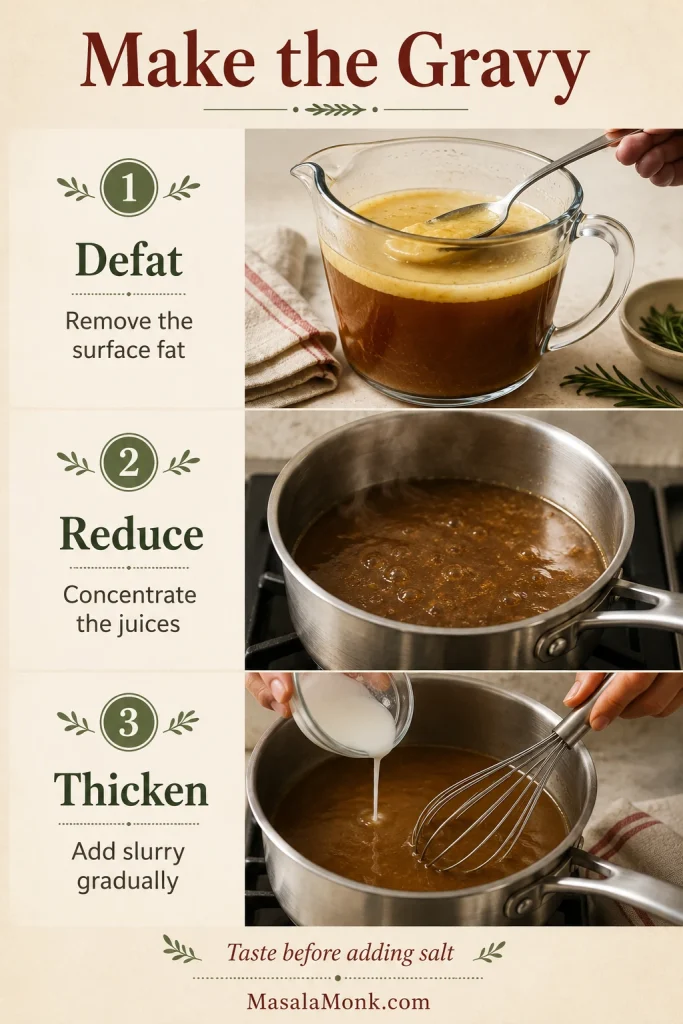
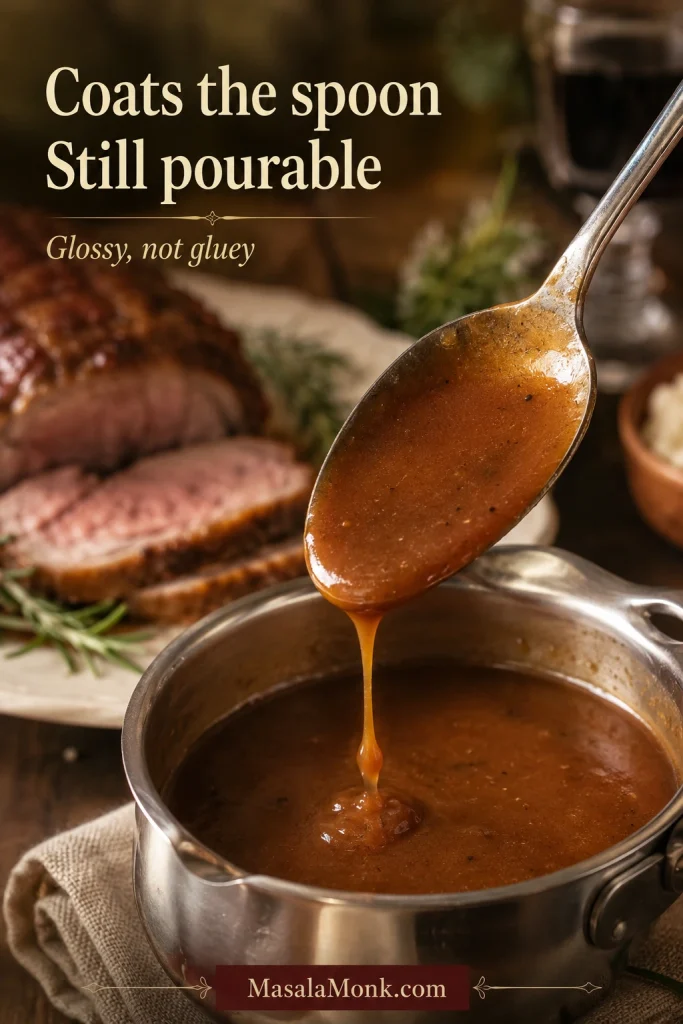
Choose your finish: For the best colour and a fuller gravy, brown the lamb in the oven, then defat, reduce and thicken the cooking juices. For the easiest route, skip the oven finish and serve the pale but tender lamb with defatted cooking juices or a simple gravy.

Before you start: check whether the lamb fits and see how to test doneness if this is your first time slow-cooking a leg of lamb.

Most of the cooking time is unattended. The active work is divided between the initial preparation and the optional browning-and-gravy finish.

Using a smaller or boneless leg? Follow the same preparation and finishing method, then use the timing guide later in the article for the cooking window.

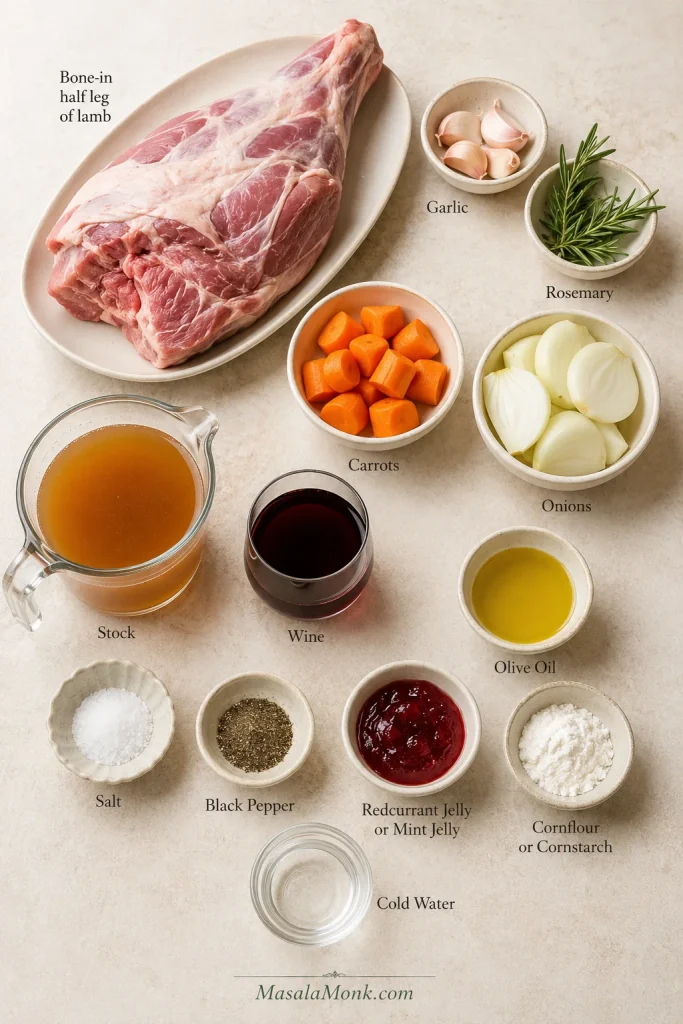
Ingredients

IngredientAmount
Bone-in half leg of lamb1.3–1.5 kg / 2.9–3.3 lb
Fine sea salt10 g / about 1¾ teaspoons
Freshly ground black pepperAbout 2 g / 1 teaspoon
Garlic, finely grated or crushed6 cloves / about 20–24 g
Fresh rosemary, finely chopped2 tablespoons / about 6–8 g
Olive oil, divided30 ml / 2 tablespoons
Large onions, thickly sliced2 / about 350–400 g
Large carrots, cut into large pieces2 / about 200–250 g
Unsalted or low-sodium lamb, beef or chicken stock240 ml / 1 cup
Dry red wine, or additional stock120 ml / ½ cup
Redcurrant jelly or mint jelly, optional2 tablespoons / about 35–40 g

For the Gravy

  • 16 g / 2 tablespoons cornflour or cornstarch
  • 45 ml / 3 tablespoons cold water
  • Hot unsalted stock or water, only if needed
  • Salt and black pepper, added only after tasting

The ingredient set is small, but it builds both the lamb and the gravy.

Ingredient board for slow cooker leg of lamb with lamb, garlic, rosemary, onions, carrots, stock, wine, salt, pepper and gravy ingredients.
Garlic, rosemary, onion, carrot, stock and wine build both lamb flavour and gravy.

Instructions

Prepare and Load the Lamb

  1. Thaw, trim and test the fit. Begin with fully thawed lamb and remove all outer packaging. Leave a thin, soft fat covering in place, but trim away any unusually thick or hard external fat. Put the unseasoned leg inside the clean cooker. The lid must close flat, with room underneath for the vegetables and cooking juices. Remove the lamb and pat it dry.

Trim only the heavy excess fat before seasoning.

Raw leg of lamb on a board showing thin soft fat to leave and a thick flap of excess fat being trimmed with a knife.
Leave a thin fat cover for moisture; trim thick hard excess before it greases the gravy.
  1. Season the lamb. Mix the salt, pepper, garlic, rosemary and 1 tablespoon of olive oil into a damp, coarse paste. It should cling to the meat rather than run off. Rub it over every exposed surface.

Aim for a paste that clings.

Close-up of pale golden garlic and rosemary paste clinging to a spoon, with black pepper specks and whole garlic blurred behind.
The rub should cling like a damp paste, not run into the cooker.
  1. Build the cooker. Spread the onion and carrot over the base. Place the lamb on top with the fattier side facing upward where its shape allows.

This is the setup to copy before the lid goes on.

Raw rubbed leg of lamb resting on onions and carrots in a black slow cooker with labels for vegetables below and fattier side up.
Set the lamb above the vegetables with the fattier side up where possible.
  1. Add the stock and wine. Pour them around the sides rather than over the seasoning. Only the vegetables and lower part of the lamb should sit in the liquid; the cooker is not meant to look like soup.

Pour the liquid around the lamb, not over the rub.

Stock or wine being poured down the side of a slow cooker around a raw rubbed leg of lamb without washing off the seasoning.
Pour liquid around the edge to preserve the rub and keep the gravy base clean.

Cook and Check Doneness

  1. Slow cook. Cover and cook the 1.3–1.5 kg / 2.9–3.3 lb bone-in half leg on low for about 7–8 hours. Keep the lid closed until the first check at around 6½ hours, because repeated lifting releases heat and can lengthen the cook.
  2. Check the thickest part.
    Confirm safety: Insert the thermometer into the thickest meat without touching the bone. It must reach at least 63°C / 145°F, followed by a rest of at least 3 minutes. The final 5–10-minute rest in this recipe satisfies that minimum.

    Then check tenderness: The fork should slide into the thickest section and twist easily. The fibres should begin to separate, and a bone-in leg should feel loose around the bone. Reaching the safe temperature does not automatically mean the lamb is tender.

Need more detail? See the full temperature and fork-tenderness guide.

Brown, Make Gravy and Serve

  1. Transfer and strain. By this point the leg may feel unexpectedly fragile. Support it from underneath with a broad spatula or serving spoon rather than trusting the tongs to hold it together. Move it to a lined roasting tray, then strain the cooking juices through a fine-mesh strainer into a heatproof jug. Heat the oven to 220°C / 425°F.

Lift with support underneath once the lamb is tender.

Cooked leg of lamb being lifted from a slow cooker with a broad spoon underneath while onions, carrots and juices remain below.
Support tender lamb from underneath so it reaches the tray intact.
  1. Brown the lamb. Brush the surface lightly with the remaining olive oil or a thin layer of jelly. Roast for about 10–15 minutes, stopping when the garlic-and-rosemary surface looks burnished and the edges begin to darken. A hot grill or broiler can do the same job in a few minutes, but watch continuously.
  2. Make the gravy. Remove the surface fat from the strained juices, then simmer them in a wide saucepan. Mix the cornflour or cornstarch with the cold water and whisk the slurry in gradually. Stop when the gravy coats the back of a spoon; you may not need all of it.
  3. Rest, portion and serve. Rest the browned lamb for 5–10 minutes. Lift away the loosened bone, discard any large pieces of fat and pull the meat into generous sections rather than fine shreds. Remove the string from a boneless roll before portioning, then serve with hot gravy.

Gravy looking greasy or thin? Jump to the gravy fixing guide.

Recipe Notes

  • Boneless rolled leg: leave ordinary butcher’s string in place while cooking. Follow the package instructions for elastic or synthetic netting.
  • Skipping wine: replace it with the same amount of unsalted or low-sodium stock.
  • Using dried rosemary: use 1–1½ teaspoons dried rosemary, crushed between your fingers.
  • Extra cooking juice is normal: the liquid level usually rises as the lamb, onions and carrots release moisture.
  • Gravy yield: depending on the leg and how far the juices are reduced, there should be enough for roughly 4–6 servings.

Slow-cooker safety: thaw the lamb completely, load and switch on the cooker immediately, and follow your appliance manual for large cuts and fill levels. Use the hob, oven or microwave—not the slow cooker—to reheat refrigerated leftovers.

Choose the Lamb Joint You Actually Have

Best default: use a 1.3–1.5 kg bone-in half leg and cook it on low. It fits more readily than a whole leg, still looks generous on the table and gives you a useful cue near the end as the bone begins to loosen.

Compare Common Lamb Joints

JointBest forMain caution
Bone-in half legBest all-round choiceThe bone reduces the edible yield
Rolled boneless legEasy fit and simple portioningCheck it earlier than a long bone-in leg
Whole bone-in legA larger gatheringThe long shank may prevent the lid from closing
Butterflied legGrilling or faster oven roastingUneven thickness makes it less suited to this method

A smaller 800 g–1 kg bone-in half leg works well on high when time is shorter, although there is less meat to protect from overcooking. A rolled boneless leg gives more edible meat at the same raw weight and is often the easiest choice for a compact cooker.

Whole Leg and Shoulder Cautions

Bought a whole leg? Test it before seasoning. When the shank is too long, ask a butcher whether it can be shortened or partly cut so the joint bends more easily.

Start by identifying the joint you actually bought.

Four lamb cuts on a board labelled bone-in half leg, rolled boneless leg, whole bone-in leg and butterflied leg.
Identify your joint first; the cut decides timing, fit and tenderness expectations.

Lamb shoulder contains more fat and connective tissue and is better treated as a separate recipe rather than assigned the leg timings in this guide.

Will the Lamb Fit Your Slow Cooker?

The slow cooker does not care how elegant the leg looked in the butcher’s case. It cares whether the lid can close.

  1. Before seasoning, place the lamb in the clean cooker insert.
  2. Make sure the thickest part sits below the rim.
  3. Leave room underneath for the onion, carrot and cooking liquid.
  4. Check that the lid closes flat without touching or pressing against the meat.
  5. Remove the lamb before preparing the recipe.

The lid must close flat.

Split image comparing a lamb leg that prevents the slow-cooker lid from closing with a smaller leg below the rim and lid closed flat.
If the lid does not close flat, the cook becomes unpredictable.

The fit test takes less than a minute and is worth doing before your hands are covered in garlic and rosemary. A 5.5–6 litre / 6-quart oval cooker is a useful starting size for many half legs, but the appliance manual should take priority for unusually large cuts.

FoodSafety.gov also recommends checking the manufacturer’s guidance for large cuts. See its slow-cooker safety advice.

Slow Cooker Leg of Lamb Cooking-Time Guide

Two legs with the same weight can still finish at different times. These conservative planning windows bring together timings used for comparable joints. Begin checking at the stated time, then let the thermometer and fork make the final decision.

LambSettingFirst checkCommon working window
1 kg / 2.2 lb bone-in half legHigh3 hoursAbout 3½–4½ hours
1 kg / 2.2 lb bone-in half legLow6½ hoursAbout 7–8 hours
1.3–1.5 kg / 2.9–3.3 lb bone-in half legLow6½ hoursAbout 7–8 hours
1.3–1.5 kg / 2.9–3.3 lb rolled boneless legLow6 hoursAbout 6½–8 hours
1.3–1.5 kg / 2.9–3.3 lb rolled boneless legHigh3½ hoursAbout 4–5 hours
Approximately 2 kg / 4.4 lb legLow8 hoursAbout 8–10 hours

Use the full timing guide for planning, not final doneness.

Slow cooker lamb timing guide table with weights, settings, first-check times and common working windows for leg of lamb.
The table tells you when to check, not when to stop cooking.

Planning around a meal time? Use the dinner and Sunday lunch schedules, or check the four-hour route for a smaller half leg.

Need to use high for a 1.3–1.5 kg bone-in half leg? Treat four hours as an early check rather than a promised finishing time. The thickest meat may need closer to five or six hours before the fork turns easily. Low remains the more forgiving route.

Use the clock to start checking. Confirm safety with the thermometer. Judge tenderness with the fork.

Three checks matter: time, temperature and tenderness.

Instructional graphic with a clock, thermometer reading 145°F and 63°C, fork and cooked lamb showing time, safety and tenderness checks.
Time starts the check; temperature confirms safety; the fork confirms tenderness.

A safe temperature may arrive before the fork agrees. When the thickest meat still pushes back, the connective tissue needs more time to soften.

Can Leg of Lamb Be Ready in Four Hours?

Yes—for a fully thawed 1 kg half leg on high. Check the thickest section from three hours and probe more than one area when the joint is thick or uneven. A larger bone-in leg may still feel firm at four hours.

The four-hour route only suits a smaller half leg.

Four-hour route timing card showing 1 kg half leg, High setting, first check at 3 hours and often ready in 3.5 to 4.5 hours.
A four-hour route is realistic only for a smaller, fully thawed half leg on High.

Choose the setting according to the joint and time available:

  • Low: the most forgiving setting for a larger leg and the best default for a family meal.
  • High: useful for a smaller half leg, compact boneless roll or late start, but with a narrower finishing window.
  • Warm: for holding already-cooked food, not for beginning with raw lamb.

Cooking Schedules for Dinner and Sunday Lunch

Serving planSuggested approach
Dinner at 7 p.m.For the main recipe joint, start on low between about 10:30 and 11:30 a.m. Check from around 5:30–6 p.m., then brown and finish the gravy shortly before serving.
Lunch at 1 p.m.Use a smaller half leg on high, or cook the lamb the previous day and reheat it gently.
Make it the previous dayCook until tender, cool promptly and refrigerate with some cooking juice. Reheat covered before restoring the browned surface.
Cook overnightReserve this for a larger leg whose low-setting window suits the time available. A small, lean joint may become soft but dry during an extreme overnight cook.
Schedule board for slow cooker leg of lamb showing dinner at 7 PM and lunch at 1 PM planning steps.
Plan backwards from the meal and leave time for checking, browning and gravy.

If the lamb becomes tender early: remove it from the cooker. If serving soon, keep it safely hot; if the wait will be longer, cool it promptly and refrigerate it with some cooking juice. Reheat and brown it shortly before serving.

For the previous-day route, cover the lamb and reheat it in a 163°C / 325°F oven until the centre reaches 74°C / 165°F. Uncover and increase the heat briefly to restore the browned surface, then rest the meat while warming the gravy separately.

Have a safe plan if the lamb finishes early.

Decision guide showing what to do if slow cooker lamb finishes early, including keeping covered, chilling with gravy and reheating gently.
Serve soon, or chill with juices and reheat safely when the wait is longer.

How Much Liquid Does Leg of Lamb Need?

During cooking, the slow cooker will usually create considerably more liquid than you put into it. The lamb should therefore sit above most of the stock rather than disappear into it.

  • Little or no added liquid gives concentrated juices and a more roast-like result, but may leave too little for a generous gravy.
  • A moderate amount gives enough cooking juice for gravy without turning the dish into a stew. The main recipe uses this middle route.
  • A large amount creates a wetter, more fully braised result.

Enough liquid for gravy is not the same as submerging the lamb.

Three-panel liquid guide showing too little liquid, just-right liquid below most of the lamb and too much liquid submerging the lamb.
Use enough liquid for gravy, but keep most of the lamb above the juices.

A larger-than-expected pool of cooking juice is normal. Strain it, remove the fat and reduce it before adding cornflour or cornstarch.

Too much liquid after cooking? See how to defat, reduce and thicken the juices.

How to Tell When Slow-Cooked Lamb Is Done

Temperature answers the safety question. The fork tells you what the meat will feel like on the plate.

This slow-cooker version is about fork-tender lamb, not pink carving slices.

Split image comparing pink sliced roast leg of lamb with fully cooked fork-tender slow cooker lamb.
Slow-cooker lamb is fully cooked and fork-tender, not a pink roast for neat slices.
Digital thermometer inserted into the thickest part of a cooked leg of lamb, showing 145°F and 63°C while avoiding the bone.
Probe thick meat away from bone so the reading is useful.

Temperature vs Texture

StageWhat you noticeResult
Firm but safely cookedThe meat slices cleanly and pushes back against the forkSuitable for firm slices
TenderThe fork enters easily but the leg still holds togetherSoft carved slices
Easy to separateThe fibres part with little pressureFork-tender serving pieces
Dry and fibrousThe meat separates but feels cottonyCooked beyond its best point

Doneness is a texture journey, not a single moment.

Four-stage guide showing slow cooker lamb as firm but safe, tender, easy to separate, and dry and fibrous.
Safe lamb is not always tender; keep cooking until the texture matches your goal.

Most slow-cooker cooks are aiming for the third row: lamb that still looks like a roast on the tray but separates easily when served.

Place the thermometer in the thickest meat without touching the bone or sitting inside a large seam of fat. Whole lamb roasts should reach at least 63°C / 145°F and rest for at least 3 minutes. See the FoodSafety.gov safe-temperature chart for current official guidance.

Fork Tenderness Cues

If the fork still pushes back, dinner is not ruined. The lamb is usually asking for more time, not a rescue operation.

By the time the fork turns easily, the garlic has mellowed, the rosemary has scented the cooking juices and the onions have softened into the base of the gravy. The lamb may still look pale, but most of the flavour work is already done.

The fork test tells you what the thermometer cannot.

Fork twisting gently into slow-cooked leg of lamb near the bone, with tender meat separating in broad pieces.
The best texture separates in broad tender sections, not dry strands.

Brown the Lamb and Make the Gravy

When the lid first comes off, the aroma may promise roast lamb before the surface looks the part. That is normal. The slow cooker has done the tenderising; the oven finish supplies the colour.

Do not panic if the lamb looks pale when the lid lifts.

Hand lifting the lid of a slow cooker with a pale cooked bone-in leg of lamb over onions, carrots, rosemary and cooking juices.
Pale lamb from the cooker can still be tender; browning supplies the colour later.

Browning changes the finish, not the tenderness.

Split image showing pale tender slow cooker leg of lamb before browning and burnished glossy lamb after browning.
Tenderness comes from the slow cooker; roast-style colour comes from finishing heat.

Sear First or Brown Afterwards?

Searing first adds browned flavour to the cooking juices, but the crust softens beneath the lid. Browning afterwards gives the most visible colour and avoids handling a heavy raw leg in a hot pan.

  • Hot oven: brown at 220°C / 425°F for about 10–15 minutes.
  • Grill or broiler: use intense top heat for only a few minutes and watch continuously.
  • No oven available: serve the lamb directly from the cooker. It will remain pale and soft, but still taste good.

Jelly glazes contain sugar, so they can move quickly from glossy to burnt. Stop when the surface looks burnished and the edges begin to darken.

Make the Gravy

  1. Strain the cooking juices into a heatproof jug.
  2. Let the fat rise, then remove it with a gravy separator or large spoon.
  3. Taste the defatted liquid before adding any salt.
  4. Simmer it in a wide saucepan until the flavour is concentrated.
  5. Whisk in the cornflour or cornstarch slurry gradually, stopping when the gravy coats the back of a spoon.

Make the gravy in the right order.

Three-step gravy guide showing cooking juices being defatted in a jug, reduced in a saucepan and thickened with slurry.
Defat, reduce and thicken in that order for smooth lamb gravy.

Defat, reduce, then thicken. Reducing first concentrates the flavour and helps prevent a gluey gravy—the same fix that works for a watery slow cooker beef stew.

If the juices look greasy, do not panic. That is rendered fat waiting to be separated—not a failed gravy.

Stop thickening while the gravy still pours.

Spoon lifted from a saucepan of glossy brown lamb gravy, with gravy coating the spoon and dripping back into the pan.
Stop when the gravy coats the spoon while still pouring easily.

When to Add Potatoes and Carrots

  • Add them at the start for flavour. Onion and large carrot pieces beneath the lamb become very soft and enrich the cooking juices.
  • Add them around halfway for more shape. Cut large carrots, parsnips or waxy potatoes into even 4–5 cm / 1½–2 inch pieces and test the largest piece with a knife before serving.
  • Cook them separately for browned edges. Vegetables underneath the lamb cannot become crisp.

Choose soft slow-cooker vegetables or firmer roasted sides.

Vegetable timing guide showing onions and carrots with lamb, firmer vegetables to add halfway and roasted vegetables cooked separately.
Soft gravy vegetables go in early; firmer serving vegetables do better later or separately.

Dense potatoes can take longer than expected. Roast the vegetables separately when lunch needs to arrive on time; their doneness is much easier to control outside the slow cooker. These oven-roasted carrots can cook while the lamb browns and rests.

How to Serve Slow Cooker Leg of Lamb

This is not a roast that needs ceremonial carving. Once the bone lifts away, arrange the meat generously on a warm platter, spoon over enough gravy to make the surface shine and bring the remaining gravy separately so everyone can help themselves.

At the table, the work should feel finished: soft lamb in generous pieces, crisp sides around it and hot gravy passed separately.

This is the payoff: generous lamb, hot gravy and simple sides that make the slow cooking feel worth it.

Slow cooker leg of lamb served in broad tender pieces with gravy, roast potatoes, carrots, green vegetables and extra gravy on the side.
At the table, the lamb should feel generous and easy to serve: broad tender pieces, hot gravy and simple sides that bring colour and bite.

Rich lamb and glossy gravy are at their best with something crisp, green or sharply dressed beside them. For a classic roast-dinner plate, add creamy mashed potatoes, green beans or peas and roasted carrots.

  • Crispy roast potatoes or lemon potatoes
  • Cauliflower cheese
  • Crisp eggless Yorkshire puddings
  • Mint sauce, yogurt-herb sauce or chimichurri
  • A bright cucumber or leafy salad
  • Herbed rice or couscous for a lighter meal

Three Ways to Finish It

Use the same salt, oil, vegetables and cooking liquid as the main recipe. These are flexible ways to change the flavour without turning the guide into three separate recipes.

  • Classic rosemary and redcurrant: use the recipe as written and brush the lamb with a thin layer of redcurrant jelly before browning.
  • Greek lemon and oregano: use 1 tablespoon chopped rosemary, 1½ teaspoons dried oregano and the finely grated zest of 1 lemon. Finish the gravy with a small squeeze of lemon.
  • Sumac, mint and yogurt: add 2 teaspoons sumac and 1 teaspoon dried mint to the garlic paste, then serve with yogurt, lemon and fresh herbs. A cool cucumber salad with dill and onion adds the crispness rich lamb needs.

One method can finish three ways.

Serving platter of sliced slow cooker leg of lamb with gravy and labels for classic, Greek and sumac-mint finishing options.
Change the finish and garnish without changing the slow-cooker method.

Slow Cooker Leg of Lamb Troubleshooting

The Meat

The lamb is tough.
It has not softened enough. Continue cooking and check the thickest section again.

It is cooked but will not pull apart.
It has reached a sliceable stage. Cook it longer only when you want softer meat.

It is dry and fibrous.
A small or lean leg has cooked too long. Serve it with gravy and check it earlier next time.

The outside is soft but the centre is firm.
The joint is thick, cold or unevenly shaped. Continue cooking and probe more than one thick area.

The Finish

The surface is pale.
Slow cookers do not brown meat. Use a short oven or broiler finish.

The leg breaks during transfer.
It has become very tender. Support it from underneath and arrange the meat directly on the serving platter.

The Cooker, Vegetables and Gravy

The leg will not fit.
The cooker is too small or the bone is too long. Use a half leg or ask a butcher to shorten the shank.

There is too much cooking juice.
The lamb released substantial moisture. Reduce the liquid before thickening it.

The gravy is greasy.
Rendered fat remains in the liquid. Separate it before reducing or thickening.

The vegetables are mushy.
Serving vegetables were added too early. Add them later or cook them separately.

Firm meat needs longer. Soft but dry meat has already had enough.

Use the texture first, then choose the fix.

Troubleshooting guide for slow cooker leg of lamb showing tough meat, sliceable but not pull-apart meat, dry meat, pale lamb and greasy gravy with the matching fixes.
Use the texture first. Tough lamb needs more time, dry lamb needs gravy, pale lamb needs browning, and greasy gravy needs the fat removed.

Problem solved? Go back to the recipe steps or continue to storage and reheating.

Storage, Freezing and Reheating

Keep a little gravy with the leftovers. It protects the meat as it reheats and makes tomorrow’s dinner much more forgiving.

Keep the storage plan simple: chill with juices, freeze in portions and reheat gently.

Storage and leftovers guide for slow cooker leg of lamb showing refrigeration with cooking juices, freezing portions, reheating to 165°F, loosening gravy and using leftovers.
Store lamb with some gravy or cooking juices, then reheat gently so the leftovers stay moist instead of drying out.

Cool the lamb promptly and refrigerate it in shallow airtight containers within two hours of cooking. Use refrigerated leftovers within 3–4 days.

Freeze meal-sized portions with a little gravy for around 2–3 months for the best quality. Thaw them safely in the refrigerator.

Reheat the lamb in a saucepan with gravy, in a covered oven dish or in microwave-safe portions until it reaches 74°C / 165°F in the centre. Add a splash of stock or water if the gravy has become very thick.

Use the hob, oven or microwave for refrigerator-cold leftovers rather than warming them slowly in the slow cooker.

Ideas for Leftover Lamb

  • Lamb curry with some leftover gravy stirred into the sauce
  • Turn chopped lamb and gravy into shepherd’s pie. The gravy-first, mash-second approach in our slow cooker cottage pie guide works here too—use cooked lamb instead of beef.
  • Rolls or sandwiches with gravy, mint sauce, crisp lettuce or sharp pickles
  • Lamb tacos with yogurt and herbs
  • Lamb orzo or tomato-based pasta
  • Mix chopped lamb with mashed potato and turn it into crisp homemade croquettes.

Frequently Asked Questions

Will slow-cooker leg of lamb stay pink?

Not with this method. It is designed for fully cooked, fork-tender lamb. Use a conventional oven-roasting method when you want a pink or medium-rare centre.

What if I want slices rather than pull-apart lamb?

Remove the lamb at the tender stage, when the fork enters easily but the joint still holds together. It must still reach the safe minimum temperature and complete the required rest.

Can I put frozen lamb in the slow cooker?

No. Thaw the lamb completely before slow cooking so the centre heats predictably and safely.

Can I cook the lamb the day before?

Yes. Refrigerate the cooked lamb with some of its juices, then reheat it covered until the centre reaches 74°C / 165°F. Brown the surface only after the meat is hot.

Can I cook leg of lamb without added liquid?

Some joints release enough juice to cook with little or no added liquid, but the result depends on the lamb and the appliance. The main recipe uses a moderate amount because it provides a more dependable quantity of cooking juice for gravy.


What size leg did you cook, and when did it become tender? Share the setting too—and your slow-cooker size if you know it. Those details may help the next person cooking the same joint.
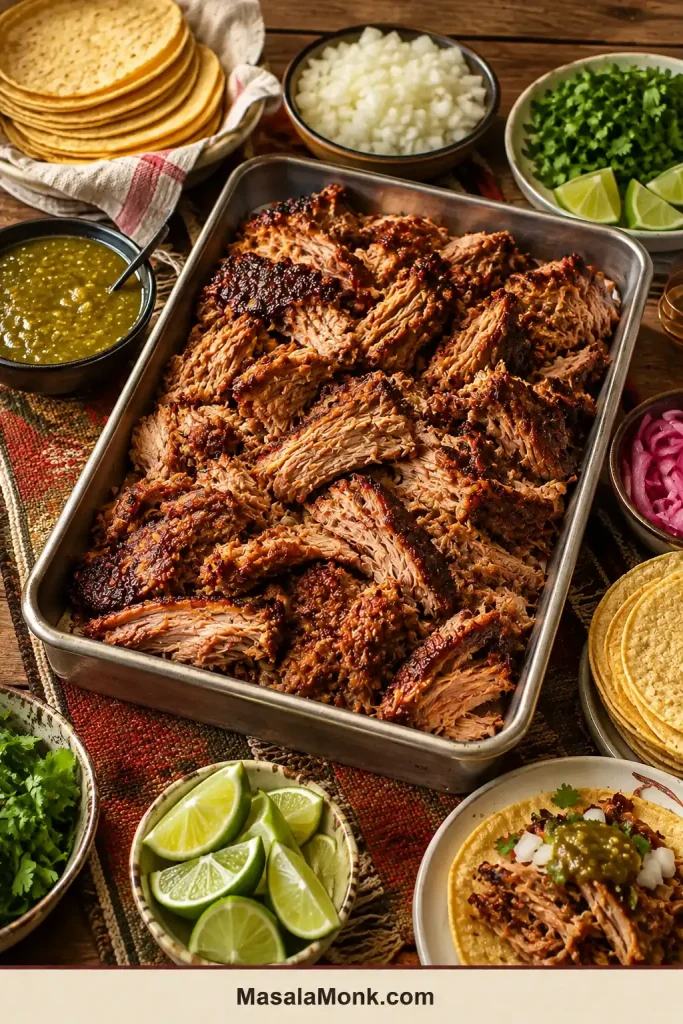
When the fork meets almost no resistance, lift the lamb carefully, give it a little colour and turn the juices into gravy. That is the moment an expensive leg stops feeling risky and starts feeling like dinner is handled.

Back to top

Posted on Leave a comment

Slow Cooker Chicken Fajitas: Easy Crock Pot Chicken Fajita Recipe

Slow cooker chicken fajitas served with shredded chicken, colorful bell peppers, onions, warm tortillas, lime wedges, salsa, avocado, cilantro, and hot sauce on a dinner table.

These slow cooker chicken fajitas are for the nights when you want the Crock Pot to handle dinner, but you still want the meal to feel fresh when everyone sits down. You get smoky, lime-bright chicken with sweet peppers and soft onions, ready to tuck into warm tortillas or spoon over rice.

The only tricky part is knowing what the slow cooker will do once the lid goes on. It traps moisture, so fajitas can become too wet, too soft, or a little flat if everything cooks together with too much liquid. This version keeps the method easy but gives you one simple rule to remember: less liquid, later peppers, lime at the end.

By the time you warm the tortillas and cut the lime, the chicken is tender, the peppers are sweet, the onions are soft, and dinner feels like more than something you simply left in the slow cooker. Use the cooked chicken and peppers for classic fajitas, tacos, bowls, quesadillas, nachos, or easy leftovers.

It will not have the same char as skillet or sheet pan fajitas, but it gives you an easy, reliable Crock Pot dinner with very little hands-on work.

Quick Answer: How to Make Slow Cooker Chicken Fajitas

To make slow cooker chicken fajitas, add boneless chicken breasts or thighs to a 5.5 to 6 quart slow cooker with sliced bell peppers, onion, garlic, fajita seasoning, and ¾ to 1 cup salsa, Rotel, or diced tomatoes. Cook on low for 4 to 6 hours or high for 2½ to 3½ hours, until the chicken reaches 165°F / 74°C. Slice or shred the chicken, return it with only enough juices to coat, finish with lime, and serve in tortillas, bowls, tacos, salads, or quesadillas.

The three keys are less liquid, later peppers, and lime at the end. For better texture, add only half the peppers and onions at the beginning. Add the rest during the last 30 to 60 minutes so they stay brighter, firmer, and less watery.

For the easiest version, add everything at the beginning and drain before serving. If you want better texture, save some peppers for the end, keep the filling glossy, and finish with lime. The rest of the guide helps you make it tighter for tortillas, saucier for bowls, or softer for shredded leftovers.

Start with Less Liquid

This is the first texture decision in slow cooker chicken fajitas: add enough salsa or Rotel to season the chicken, but not so much that the pot turns soupy.

Salsa being poured from a measuring cup into a slow cooker with chicken, bell peppers, onions, garlic, and fajita seasoning.
First, control the liquid. For tortilla-style slow cooker chicken fajitas, about ¾ cup salsa or Rotel seasons the chicken without flooding the pot or making the filling hard to fold.

Slow Cooker Chicken Fajitas at a Glance

Slow cooker size5.5 to 6 quart / 5.2 to 5.7 L
Fill levelAim for about half to two-thirds full for even cooking
Chicken amount2 lb / 900 g
Chicken to useBreasts for slicing, thighs for juicier shredded fajitas
Liquid amount¾ cup for tortillas, up to 1 cup for bowls
Low cook time4 to 6 hours
High cook time2½ to 3½ hours
Pepper methodHalf early, half late
Safe chicken temperature165°F / 74°C
Finish withFresh lime juice after cooking
Serve asFajitas, tacos, bowls, quesadillas, salads, nachos, meal prep

Slow Cooker Chicken Fajitas Recipe

Description: Easy Crock Pot chicken fajitas with juicy chicken, sweet peppers, soft onions, smoky fajita seasoning, lime, and just enough salsa or Rotel to keep everything flavorful without turning watery.

Prep time: 10 to 15 minutes
Cook time: 2½ to 3½ hours on high, or 4 to 6 hours on low
Total time: About 2 hours 45 minutes to 6 hours 15 minutes
Servings: 6
Yield: Enough chicken and peppers for 8 to 12 fajitas, depending on tortilla size
Equipment: 5.5 to 6 quart / 5.2 to 5.7 L slow cooker, knife, cutting board, tongs, slotted spoon, instant-read thermometer

Ingredients

  • 2 lb / 900 g boneless skinless chicken breasts or thighs
  • 3 large bell peppers / 420 to 500 g, sliced, preferably mixed colors
  • 1 large onion / 180 to 220 g, sliced
  • ¾ to 1 cup / 180 to 240 ml salsa, Rotel, or diced tomatoes
  • 3 to 4 garlic cloves / 12 to 16 g, minced
  • 2½ to 3 tablespoons / 22 to 28 g fajita seasoning, homemade or store-bought
  • 2 tablespoons / 30 ml fresh lime juice, plus extra lime wedges for serving
  • 8 to 12 tortillas, flour or corn
  • Optional toppings: sour cream, avocado, guacamole, cilantro, shredded cheese, salsa, jalapeños, lettuce, or hot sauce

Use ¾ cup / 180 ml salsa or Rotel for thicker tortilla-friendly fajitas. For juicier bowls or meal prep, use closer to 1 cup / 240 ml.

Instructions

  1. Slice the vegetables. Cut the bell peppers and onion into strips. Set aside about half of them to add near the end of cooking.
  2. Layer the slow cooker. Add the first half of the peppers and onions to the bottom of the slow cooker. Place the chicken on top.
  3. Add flavor. Sprinkle the chicken with fajita seasoning and garlic. Pour the salsa, Rotel, or diced tomatoes over the top. Do not add extra water.
  4. Cook. Cover and cook on high for 2½ to 3½ hours or low for 4 to 6 hours, until the chicken reaches 165°F / 74°C. Very thick chicken breasts may need the longer end of the range.
  5. Add the remaining peppers. Stir in the reserved peppers and onions during the last 30 to 60 minutes. Use 30 minutes for firmer peppers and 60 minutes for softer peppers.
  6. Slice or shred. Remove the chicken. Rest it for 5 minutes if slicing, or shred it with two forks. Shredded fajitas should pull apart easily. Sliced fajitas should cut cleanly after resting.
  7. Adjust the juices. If there is a lot of liquid in the slow cooker, ladle some out. Return the chicken with only enough juices to coat the meat and vegetables.
  8. Finish with lime. Stir in the lime juice. Taste and adjust salt, seasoning, or lime.
  9. Serve. Fill warm tortillas with the chicken and peppers, or spoon them into bowls, quesadillas, or leftover meals.

Recipe Notes

  • Use ¾ cup / 180 ml salsa or Rotel for tortillas, or up to 1 cup / 240 ml for bowls.
  • Do not add extra water. The chicken, peppers, onions, and tomatoes release liquid as they cook.
  • Add half the peppers and onions late if you want better texture.
  • Thaw frozen chicken before using it in a slow cooker.
  • Finish with lime juice after cooking so the flavor stays fresh.
  • For tortillas, think glossy, not soupy. Drain or lift with tongs before filling tortillas.

Want better texture? See when to add peppers. Need to fix extra liquid? Read the watery fajitas section. Planning leftovers? Jump to storage and meal prep.

Why You’ll Make This Again

This is the kind of recipe that earns its place on a weeknight because it does more than make one dinner. It helps when the day is long, the chicken is already in the fridge, and you need something that can turn into warm tortillas tonight and easy leftovers tomorrow.

  • Mostly hands-off. Once the slow cooker is loaded, dinner is already moving.
  • It works with shortcuts. Use homemade fajita seasoning, a packet, salsa, Rotel, or diced tomatoes.
  • It solves the usual slow-cooker problems. The filling stays glossy instead of watery.
  • It can be tight or saucy. Keep it neat for tortillas or leave it juicier for bowls.
  • It turns into more than fajitas. Use the same batch for tacos, bowls, quesadillas, and leftovers.

Once the basic method is set, you can decide whether you want a tighter tortilla filling, a saucier bowl, or soft shredded chicken for leftovers.

Why This Crock Pot Chicken Fajita Recipe Works

A slow cooker does not brown food, so the flavor has to come from seasoning, acidity, vegetables, and the way you manage the juices. That is why this recipe uses a controlled amount of salsa or Rotel, adds some peppers late, and finishes with lime instead of relying on char.

A lot of Crock Pot chicken fajita recipes are easy, but they make the same mistake: too much liquid, all the peppers added too early, and no clear plan for what to do with the juices at the end. The result can still taste good, but it often behaves more like wet shredded chicken than fajita filling.

Here, you still get the easy Crock Pot dinner, but the chicken stays juicy and the peppers do not all collapse into the sauce. A smaller amount of salsa or Rotel gives the meat enough moisture without drowning it. Some peppers and onions go in early to flavor the chicken, while the rest go in near the end so the finished chicken and peppers still have color and bite. Lime juice goes in after cooking, when it can wake up the smoky seasoning and sweet peppers instead of disappearing into the pot.

  • Controlled liquid keeps the chicken useful for tortillas.
  • Two-stage peppers give you flavor and better texture.
  • Chicken breasts or thighs both work depending on your goal.
  • Sliced or shredded chicken lets you choose classic fajita-style strips or easier pulled chicken.
  • Fresh lime at the end keeps the flavor lively.

Do Slow Cooker Fajitas Taste Like Skillet Fajitas?

Not exactly, and that is worth saying clearly. This is not the sizzling-pan version. It is the weeknight version: softer, juicier, easier, and still bright enough to feel fresh when the tortillas hit the table.

Expect soft, juicy fajita chicken with sweet peppers, smoky seasoning, and a fresh lime finish. It is not charred or sizzling, but it should taste bright, savory, and easy to fold into warm tortillas.

To make the slow-cooked version taste more fajita-like, add some peppers near the end, finish with fresh lime, avoid too much liquid, and use smoked paprika in the seasoning. For more roasted edges and oven-style flavor, try these sheet pan chicken fajitas. They give you the same chicken, peppers, and onion idea with more browning and less slow-cooker softness.

Ingredients You Need

The ingredient list is simple, but each part matters. Good slow cooker fajitas need enough seasoning to stand up to the long cook, enough moisture to keep the chicken juicy, and not so much liquid that the finished chicken and peppers become soupy.

Ingredient checkpoint: the chicken, peppers, onion, seasoning, salsa or Rotel, lime, tortillas, and toppings all support a different part of the final fajita texture.

Ingredients for slow cooker chicken fajitas arranged on a prep surface, including chicken, bell peppers, onion, salsa, fajita seasoning, garlic, lime, tortillas, and cilantro.
Chicken, peppers, onion, seasoning, salsa or Rotel, lime, and tortillas each support a different part of the finished fajita texture.
IngredientWhat it doesUse
ChickenMain proteinBreasts for leaner sliced fajitas; thighs for juicier shredded fajitas
Bell peppersSweetness, color, fajita flavorUse mixed colors for better flavor and appearance
OnionSavory sweetnessYellow, white, or red onion all work
Fajita seasoningMain flavor baseHomemade, packet fajita seasoning, or taco seasoning in a pinch
Salsa, Rotel, or tomatoesMoisture and flavorUse less for tortillas and more for bowls
GarlicDepth and aromaFresh garlic is ideal; garlic powder works if needed
Lime juiceFreshness and balanceAdd after cooking for the liveliest flavor
Tortillas and toppingsTurn the chicken and peppers into dinnerUse tortillas, rice, lettuce cups, or bowls

Chicken Breast vs Chicken Thighs

Choose chicken breasts if you want leaner pieces that can be sliced into strips. They cook well here, but they can dry out if they sit too long, so start checking closer to the shorter end of the timing range.

If chicken breast is your default cut and dry slow-cooker chicken is a recurring problem, this guide to crock pot chicken breast recipes goes deeper into timing, sauce, and keeping lean chicken useful for bowls, wraps, and leftovers.

Choose chicken thighs if you want the most forgiving version. They stay juicier, shred easily, and are especially good for tacos, bowls, and meal prep. If your slow cooker runs hot or dinner timing is unpredictable, thighs are usually easier to work with.

Both breasts and thighs should reach 165°F / 74°C before serving.

Homemade Fajita Seasoning, Packet Seasoning, or Taco Seasoning?

Use what fits the night. A packet of fajita seasoning is fast, easy, and completely acceptable for a weeknight slow cooker dinner. Homemade fajita seasoning gives you more control over salt, heat, smoke, and sweetness.

Taco seasoning also works in a pinch. It may taste a little more like taco chicken than fajitas, but the peppers, onions, lime, and smoked paprika help pull it back toward fajita flavor. If you use a packet, wait until the end before adding extra salt because many store-bought blends are already salty.

Simple Homemade Fajita Seasoning

SpiceAmount
Chili powder1 tablespoon
Ground cumin2 teaspoons
Smoked paprika1 teaspoon
Garlic powder1 teaspoon
Onion powder1 teaspoon
Dried oregano½ teaspoon
Ground coriander½ teaspoon
Black pepper½ teaspoon
Salt1 to 1½ teaspoons
Cayenne pepper⅛ to ¼ teaspoon, optional

This amount seasons about 2 lb / 900 g chicken. If your chili powder or store-bought seasoning already contains salt, reduce the added salt and adjust after cooking.

How to Make Slow Cooker Chicken Fajitas

The easiest method is to add everything at once and cook. That works, especially for shredded tacos and bowls. The better method is almost as easy: add some vegetables at the beginning and some near the end. That small move makes the dish feel more like fajitas and less like slow-cooker chicken stew.

Step 1: Slice the Peppers and Onion

Slice the bell peppers and onion into strips. Keep them similar in size so they cook evenly. Set aside about half of the peppers and onions if you want better texture in the finished fajitas.

Step 2: Build the First Layer

Add half the peppers and onions to the bottom of the slow cooker. This gives the chicken a flavorful base and helps season the cooking juices.

Step 3: Add Chicken, Garlic, Seasoning, and Salsa

Place the chicken on top of the vegetables. Sprinkle the fajita seasoning and garlic over the chicken, then add the salsa, Rotel, or diced tomatoes. Do not add extra water. In most slow cookers, the chicken, peppers, onions, and tomatoes release more liquid than you expect.

Before the lid goes on: the pot should look seasoned and lightly sauced, not flooded. That setup helps the chicken cook juicy without creating a watery tortilla filling later.

Raw chicken breasts layered in a slow cooker with sliced bell peppers, onions, salsa, garlic, and fajita seasoning before cooking.
Before cooking, the pot should look coated, not drowned. That controlled start keeps the final fajita filling easier to serve.

Step 4: Cook Until the Chicken Is Done

Cook on high for 2½ to 3½ hours or low for 4 to 6 hours. Chicken breasts are usually best closer to the shorter end if you want slices that hold together. Thighs can handle a longer cook and are better for shredding.

Step 5: Add the Remaining Peppers and Onions

Add the reserved peppers and onions during the last 30 to 60 minutes. Use 30 minutes for more bite, or go closer to 60 minutes if you want them softer but still fresher than the vegetables that cooked from the beginning.

Step 6: Slice or Shred the Chicken

Once the chicken reaches 165°F / 74°C, remove it from the slow cooker. Rest it for a few minutes before slicing, or shred it with two forks if you want pulled chicken for tacos, bowls, or leftovers.

Step 7: Manage the Cooking Juices

If the slow cooker has a lot of liquid, ladle some out before returning the chicken. The finished chicken should look shiny and coated, with a little sauce clinging to the peppers, not a pool of liquid under every tortilla. You are not trying to make dry chicken. Instead, keep the chicken and peppers juicy enough to taste good but firm enough to pick up in a tortilla.

Step 8: Finish with Lime and Serve

Stir in fresh lime juice at the end. When the lime goes in, the whole pot should smell brighter. Taste and adjust salt, seasoning, or lime. Serve with warm tortillas, bowls, or whatever leftovers need rescuing tomorrow.

Slow Cooker Timing: Low vs High

Once the pot is set up, timing is the main thing to watch. The goal is not just cooked chicken. It is chicken that is done before it turns stringy.

Slow cookers are not all the same, and chicken breast can go from juicy to dry faster than people expect. Use the times below as a guide, then let temperature and texture decide when the chicken is done. Chicken should reach 165°F / 74°C. You can confirm poultry temperature guidance from FoodSafety.gov.

Temperature checkpoint: once the chicken reaches 165°F / 74°C, you can safely slice or shred it and then decide how much cooking juice to keep.

Instant-read thermometer inserted into cooked chicken fajitas in a slow cooker with bell peppers and onions around the chicken.
Use temperature, not just time. Once the chicken reaches 165°F / 74°C, you can safely slice, shred, and finish the filling.
GoalSettingTimeWhat to know
Sliced chicken fajitasLow4 to 5 hoursHelpful when you want the chicken to hold its shape
Shredded chicken fajitasLow5 to 6 hoursWorks well for tacos, bowls, quesadillas, and meal prep
Faster dinnerHigh2½ to 3½ hoursUseful, but check early to avoid dry chicken breast
Chicken thighsLow5 to 6 hoursJuicier and more forgiving than breasts
Holding after cookingWarmAs short as possibleLong holding can make chicken breast dry or stringy

Very thick chicken breasts may need the longer end of the range. If the chicken is done before dinner, remove it from the slow cooker and keep it covered. Return it to the warm chicken and peppers closer to serving time so lean breast meat does not keep cooking while the vegetables sit in the hot pot.

How to Keep Slow Cooker Chicken Fajitas from Getting Watery

If there is one place slow cooker fajitas usually go wrong, it is the liquid. The chicken may taste good, but if it drips through the tortilla, dinner becomes messy fast.

Do not panic if the slow cooker looks juicy when you open the lid. That is normal. The trick is deciding how much of that liquid belongs in the final tortilla filling.

Look for Glossy, Not Soupy

This is the visual cue for tortilla fajitas. The chicken and peppers should be coated with seasoned juices, but the filling should not be loose enough to run through a warm tortilla.

Tongs lifting glossy slow cooker chicken fajita filling with colorful bell peppers and onions from the slow cooker.
This is the texture cue to remember: glossy, not soupy. The chicken and peppers should be coated with seasoned juices, but not swimming if they are going into tortillas.

If past slow-cooker chicken has turned out watery or bland, this is the part that changes it: start with less liquid, add some peppers later, and brighten the pot at the end. A few small choices make the difference between juicy and soggy. For tortillas, think glossy, not soupy. Bowls can stay a little juicier because rice, quinoa, or cauliflower rice can soak up the seasoned liquid.

ProblemFix
Too much salsa, Rotel, or tomatoUse ¾ cup / 180 ml for 2 lb / 900 g chicken if serving in tortillas
Peppers release too much waterAdd half the peppers near the end instead of all at the beginning
Chicken releases a lot of juiceRemove extra liquid before returning sliced or shredded chicken
Tortillas get soggyServe with tongs or a slotted spoon
The pot looks soupyAfter the chicken reaches 165°F / 74°C, remove the lid or set it slightly ajar on high for 20 to 30 minutes to reduce excess liquid
You want bowl-style fajitasLeave it a little juicier for rice, quinoa, or cauliflower rice

How to Fix Watery Fajitas

If the pot gave you more liquid than expected, treat it as a final adjustment instead of a failure. Drain, reduce, or lift the filling with tongs so the flavor stays concentrated.

Before and after comparison showing watery slow cooker chicken fajitas on one side and drained glossy chicken fajita filling on the other.
If the pot looks watery, do not panic. Lift the chicken and peppers with tongs, drain or reduce the extra liquid, then add lime so the filling tastes bright instead of diluted.

Before serving, look at the bottom of the slow cooker. A little seasoned juice is fine. However, a pool of liquid means the chicken and peppers should be lifted with tongs, drained with a slotted spoon, or reduced briefly before they go into tortillas.

After the extra liquid is out of the way, the filling tastes more concentrated: smoky, bright, and juicy enough to fold into a tortilla without losing half of it on the plate.

Do not add water at the beginning unless your slow cooker is unusually dry. For most slow cookers, the chicken, vegetables, and salsa or tomatoes create enough moisture on their own.

Use the Tortilla Test Before Serving

Before the filling goes to the table, try one tortilla. If it folds neatly and tastes juicy without dripping, the texture is right for fajitas.

Hand holding a warm tortilla filled with slow cooker chicken fajitas, bell peppers, onions, salsa, avocado, and lime nearby.
Then, use the tortilla test. The filling should be juicy enough to taste good, but controlled enough to fold into warm tortillas without soaking, tearing, or dripping everywhere.

Choose Your Version: Tortillas, Bowls, Meal Prep, or Dump-and-Go

One pot can give you a few different dinners, depending on how much juice you leave behind. Choose the tighter version for tortillas, the juicier version for bowls, the shredded version for meal prep, and the late-pepper version when you want the freshest texture.

Use the visual guide: one batch can become tighter tortilla fajitas, juicier bowls, shredded meal prep, dump-and-go dinner, or creamy low-carb fajita chicken.

Visual guide showing slow cooker chicken fajitas served as tortillas, rice bowls, meal prep containers, dump-and-go style, and creamy low-carb fajita chicken.
Once the chicken is cooked, choose the version that fits the meal. Keep it tighter for tortillas, saucier for rice bowls, shredded for meal prep, or creamy for a low-carb plate.
What you wantLiquidChickenPeppersFinish
Tortilla fajitas¾ cup / 180 mlSliced or chunkyHalf early, half lateDrain well, then add lime
Rice bowls1 cup / 240 mlShredded or chunkyEarly or half-lateKeep some juices
Meal prep¾ to 1 cup / 180 to 240 mlShreddedSofter is finePack toppings separately
Best texture¾ cup / 180 mlSlicedAdd some peppers lateUse lime and tongs
Dump-and-go¾ to 1 cup / 180 to 240 mlShreddedAll at the beginningDrain before serving
Creamy low-carb¾ cup / 180 mlShreddedHalf-lateAdd cream cheese at the end

After the juices are right and the lime goes in, the same batch can become warm tortillas tonight, rice bowls tomorrow, or easy leftovers for lunch.

Dump-and-Go vs Best Texture

Both paths work. The fastest path is dump-and-go, while the best-texture version keeps some peppers back so the finished fajitas look brighter and eat less soft.

Comparison of dump-and-go slow cooker chicken fajitas with uncooked ingredients in the pot and best-texture fajitas with cooked chicken and bright peppers.
Dump-and-go is the easiest route, while the best-texture version saves some peppers for the end. That one timing change keeps Crock Pot chicken fajitas brighter and less mushy.

When to Add Peppers and Onions

Once you know whether you are making tortillas, bowls, or meal prep, the next choice is how fresh you want the peppers to feel.

Peppers are where slow cooker fajitas can either feel fresh or fall flat. If they cook for the full time, they become soft and saucy. That is fine for shredded chicken bowls or tacos, but it does not feel as much like classic fajitas.

For the best balance, use the half early, half late method. Early vegetables flavor the chicken. The late peppers should still look colorful and taste sweet, not faded into the sauce.

Add Some Peppers Late

Late peppers are the simplest way to make slow cooker fajitas feel more like fajitas. They add color, sweetness, and bite without requiring a separate skillet.

Fresh sliced red, yellow, orange, and green bell peppers being added to cooked chicken fajitas in a slow cooker.
Add some peppers during the last 30 to 60 minutes when you want more color and bite. This keeps slow cooker fajitas lively without adding another pan to dinner.

If using frozen sliced peppers, add them late and expect a softer, juicier result. Fresh peppers give the best color and bite, but frozen peppers are still useful for quick bowls, tacos, and weeknight dinners.

When you add themResultUse when
At the beginningVery soft peppers and onionsYou want the easiest dump-and-go dinner
Halfway throughBalanced textureYou want a simple family dinner
Last 30 to 60 minutesBrighter, firmer peppersYou want more fajita-like texture
Sauté separatelyMost bite and closest skillet feelYou do not mind one extra pan
Half early, half lateFlavor plus textureYou want the most practical slow cooker method

Shredded vs Sliced Slow Cooker Chicken Fajitas

Once the liquid is under control, the next choice is how you want to eat the chicken. Traditional fajitas usually use sliced meat, but Crock Pot chicken naturally becomes tender enough to shred. Neither option is wrong.

Shredded vs Sliced Chicken

Sliced chicken feels more classic in tortillas. Shredded chicken is easier for tacos, bowls, quesadillas, and leftovers, especially when the juices are controlled.

Side-by-side comparison of sliced slow cooker chicken fajitas and shredded chicken fajita filling with peppers, tortillas, lime, salsa, and cilantro.
Slice the chicken for a more classic fajita feel, or shred it for bowls, tacos, quesadillas, and leftovers. Either way, return it with just enough juice to coat.
StyleUse forHow to do it
Sliced chicken fajitasClassic tortillasCook just until done, rest 5 minutes, then slice across the grain
Shredded chicken fajitasTacos, bowls, quesadillas, leftoversCook until fork-tender, shred with two forks, toss with controlled juices
Chunky chicken fajitasRice bowls and saladsCut cooked chicken into thick pieces and fold back into the peppers and onions

For the most classic fajita feel, slice the chicken and add some peppers late. The easiest meal prep option is shredded chicken with just enough juice to coat.

Troubleshooting Slow Cooker Chicken Fajitas

If the pot looks a little messy at the end, that is normal. Slow cooker fajitas usually need one final adjustment before they become dinner.

If the pot does not look the way you hoped, it is usually one of four easy fixes: too much liquid, peppers that cooked too long, chicken breast that stayed on heat too long, or a finish that needs lime and salt.

Quick Fixes for Common Slow Cooker Fajita Problems

ProblemLikely causeFix
The pot is wateryToo much salsa, Rotel, tomato, or trapped steamDrain extra liquid, reduce it after the chicken is fully cooked, or use ¾ cup liquid next time
Peppers are mushyAll the peppers cooked from the beginningAdd half the peppers in the last 30 to 60 minutes
Chicken breast is dryCooked too long or held on warm too longCheck early, use thighs next time, and return chicken with some juices
Flavor tastes flatSlow cooking muted the seasoningAdd lime juice, salt, smoked paprika, hot sauce, or fresh cilantro
Tortillas get soggyThe chicken and peppers are too wet when assembledUse tongs or a slotted spoon and let liquid drip back into the cooker
Fajitas do not taste fajita-likeNo char, soft peppers, or too much sauceAdd peppers late, sauté peppers separately, or use the sheet pan method next time
Chicken is too dry after chillingIt absorbed liquid in the fridgeReheat with a spoonful of salsa, water, or reserved cooking liquid
Too loose for quesadillasToo much cooking juice left in the meatDrain well and reheat uncovered before adding to tortillas with cheese

From there, the fix is simple: drain a little, brighten with lime, or save the extra juice for bowls. Tortillas need a tighter filling. Quesadillas need the chicken drained well so the cheese and tortilla can crisp instead of steam.

Variations: Dump-and-Go, Rotel, No Tomato, and Creamy Low-Carb

Once the texture is handled, the flavor base can flex around what you have: Rotel, salsa, taco seasoning, no tomatoes, or a creamy finish.

You do not need the exact same jar, can, or seasoning blend every time. Use this section when you want the fastest version, a Rotel version, a no-tomato version, or a creamy low-carb fajita chicken.

Rotel, Salsa, or No Tomato

This choice changes both flavor and moisture. Tomato-based options add a red base, while the no-tomato version stays lighter and depends more on peppers, seasoning, garlic, and lime.

Three slow cooker chicken fajita variations labeled Rotel, Salsa, and No Tomato, each served in tortillas with peppers, onions, lime, and cilantro.
Rotel gives tomato-chile flavor, salsa keeps the recipe shortcut-friendly, and the no-tomato version stays lighter and less saucy. Choose the base based on flavor, moisture, and texture.
VariationWhat changesBest for
4-ingredientUse chicken, peppers and onions, seasoning, and salsa or RotelBusiest nights
RotelUse one 10 oz / 285 g can; drain lightly if very juicyTomato-chile flavor
No tomatoUse seasoning, garlic, lime, peppers, onions, and a small splash of broth only if neededLess watery fajitas
Cream cheeseAdd 3 to 4 oz / 85 to 115 g cream cheese during the last 20 to 30 minutesBowls, lettuce cups, low-carb plates
Taco seasoningUse a packet and adjust salt after cookingShortcut version
Salsa verde toppingAdd after cooking or at the tableBrighter green flavor

Rotel is canned diced tomatoes with green chiles. If you do not have it, use diced tomatoes plus a little chopped green chile, mild salsa, or another tomato-chile blend you like.

No-tomato fajitas need a little extra lime, smoked paprika, garlic, and seasoning so the chicken does not taste flat. For creamy fajita chicken, use the lower amount of salsa or Rotel so the sauce does not become loose.

Creamy Low-Carb Fajita Chicken

Add cream cheese near the end so the sauce stays smooth and the peppers do not disappear into a heavy base. This version works especially well with cauliflower rice or lettuce cups.

Creamy low-carb slow cooker fajita chicken served in a bowl with bell peppers, avocado slices, lime, cilantro, and cauliflower rice.
For creamy low-carb fajita chicken, stir in cream cheese near the end instead of at the beginning. The sauce should turn smooth and glossy while peppers, lime, and avocado keep the bowl balanced.

A fast dump-and-go Crock Pot chicken fajitas version can be made with chicken, fajita seasoning, one can Rotel, peppers, onions, and lime. It will still work; just drain before serving if the pot looks juicy.

For a brighter green topping instead of more red salsa, a spoon of salsa verde works especially well with the chicken, peppers, lime, and tortillas.

Can You Add Rice to the Slow Cooker?

Cook the rice separately. It is the safer, fluffier option because uncooked rice changes the liquid balance in this recipe and can turn mushy in the slow cooker. For reliable bowls, spoon the chicken, peppers, onions, and some of the juices over cooked rice instead.

Serve It Over Rice

Rice bowls are the place to keep a little more seasoned juice. The rice catches the sauce, while avocado, salsa, cilantro, and lime keep the bowl balanced.

Slow cooker chicken fajita rice bowl with seasoned chicken, bell peppers, white rice, avocado, lime, salsa, cilantro, and a slow cooker in the background.
Rice bowls can stay a little juicier because the rice absorbs the seasoned fajita juices.

If rice texture is where dinner usually goes wrong, this guide on how to cook rice covers stovetop, rice cooker, and Instant Pot timing so your bowl base stays fluffy instead of wet or gummy.

For meal prep, pack the rice and fajita chicken together only after both have cooled. Keep fresh toppings like lettuce, sour cream, avocado, and cilantro separate until serving.

Can You Use Frozen Chicken for Slow Cooker Fajitas?

No. Thaw the chicken first before using it in this recipe. Slow cookers heat gradually, and frozen chicken can take too long to move through unsafe temperatures. FoodSafety.gov’s slow-cooker guidance says frozen meat, poultry, or seafood should be thawed safely before adding it to the slow cooker.

Forgot to thaw? Use a pressure cooker method or cook the chicken separately from frozen with a faster method, then combine it with the peppers, seasoning, salsa, and lime after it is fully cooked. Check that the chicken reaches 165°F / 74°C before serving.

What to Serve with Slow Cooker Chicken Fajitas

Warm tortillas are the classic choice, but this chicken is flexible. One batch can become dinner tonight and a different lunch tomorrow.

Warm tortillas in a dry skillet for 20 to 30 seconds per side, or wrap a stack in foil and place it in a 250°F / 120°C oven until soft. Soft, warm tortillas fold better, hold the chicken more neatly, and make even a simple Crock Pot dinner feel fresher.

Put the tortillas, lime wedges, avocado, salsa, and hot sauce on the table and let everyone build their own. That is where this slow cooker dinner starts to feel fresh.

Table setup: set the chicken and peppers beside warm tortillas and fresh toppings so everyone can build the fajita they want.
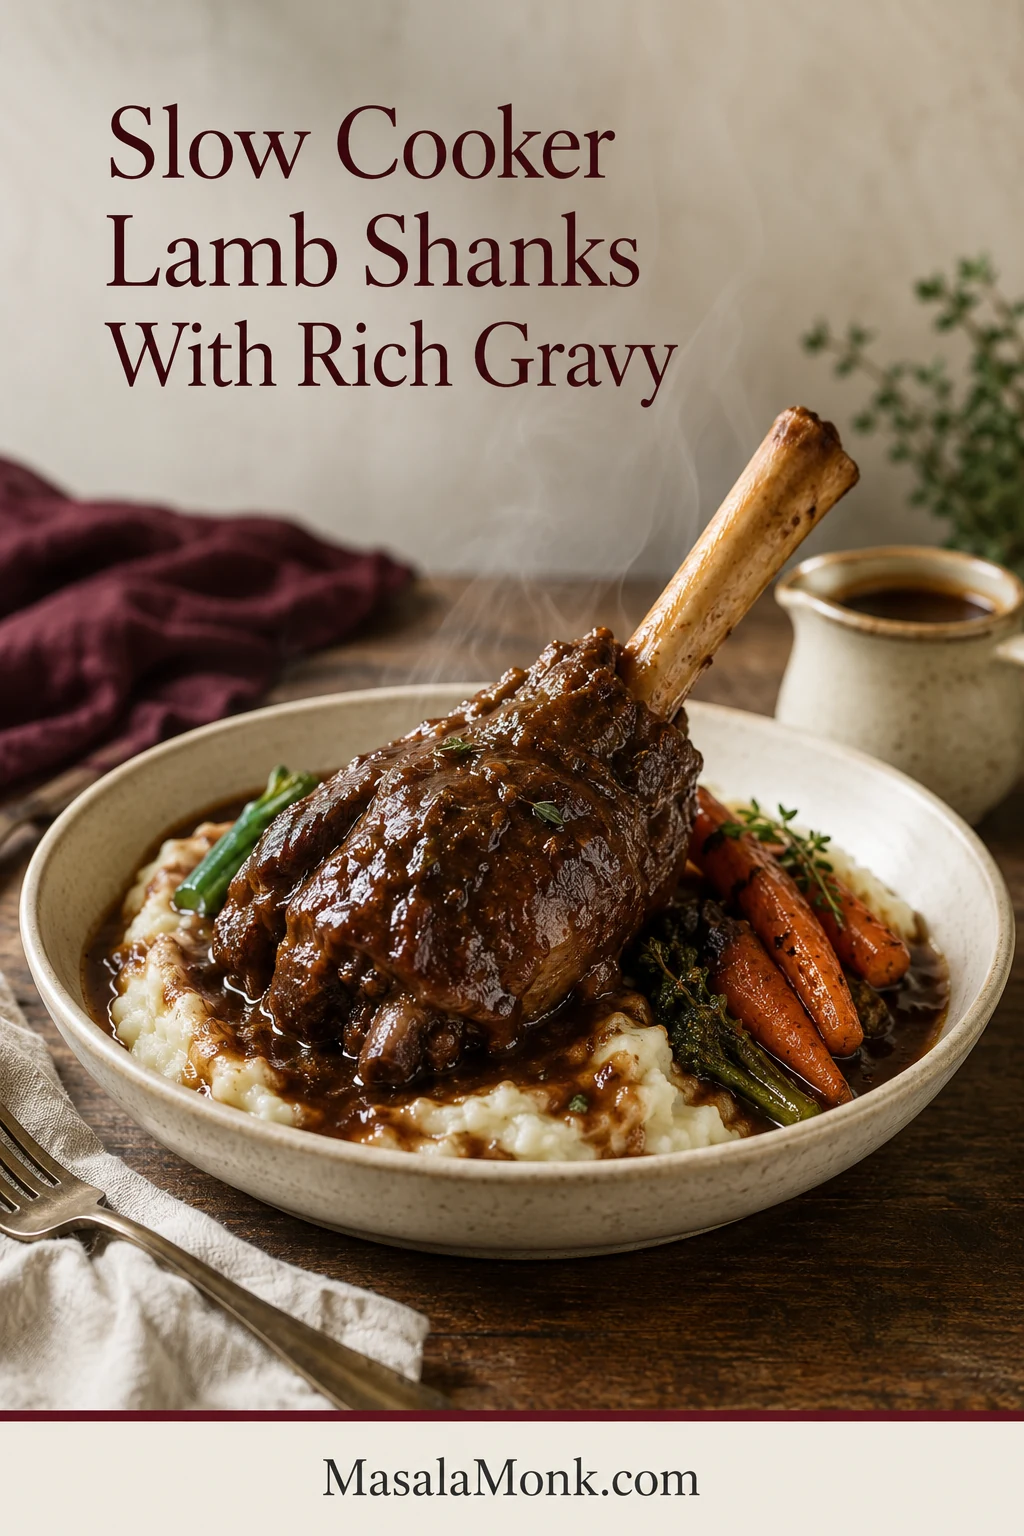
Build-your-own fajita table with slow cooker chicken and peppers, tortillas, lime wedges, guacamole, salsa, sour cream, cilantro, jalapeños, hot sauce, and hands assembling fajitas.
Set out warm tortillas, glossy chicken, peppers, lime, salsa, guacamole, and hot sauce so everyone can build their own fajitas.
Serving ideaWhy it fits
Flour or corn tortillasClassic fajita dinner
Rice bowlsEasy meal prep and filling lunches
Cauliflower riceLower-carb bowl option
Lettuce cupsLighter fajita wraps
TacosFamily-friendly and easy to assemble
QuesadillasOne of the best uses for leftovers
SaladHigh-protein lunch with avocado, lime, and crisp vegetables
NachosCasual snack or game-day style dinner
Pasta or pasta bakeComfort-food variation
CasseroleGood for stretching leftovers into another family dinner

Best Toppings for Chicken Fajitas

Because the chicken is warm and saucy, the best toppings are the ones that wake it up: lime, cilantro, avocado, salsa, crunch, or heat.
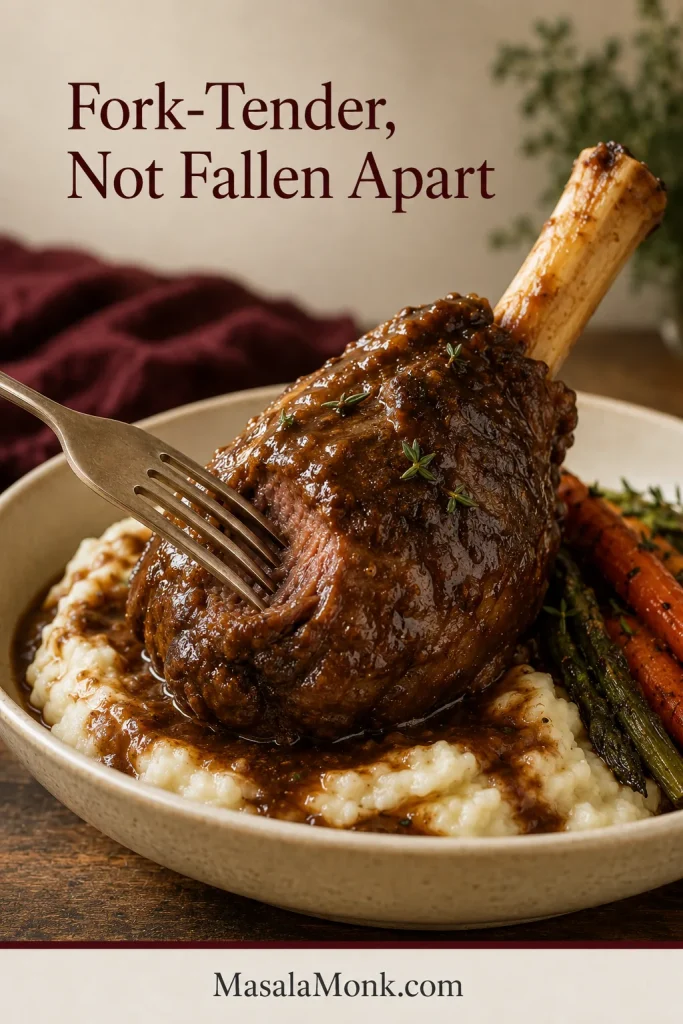
  • Sour cream or Greek yogurt
  • Avocado or guacamole
  • Fresh cilantro
  • Lime wedges
  • Shredded lettuce
  • Cheese, shredded or crumbled
  • Salsa or pico de gallo
  • Pickled jalapeños
  • Hot sauce
  • Crushed tortilla chips for bowls or salads

For the creamy avocado route, this guacamole recipe is the easiest topping to put beside warm tortillas, salsa, lime, and fajita chicken.
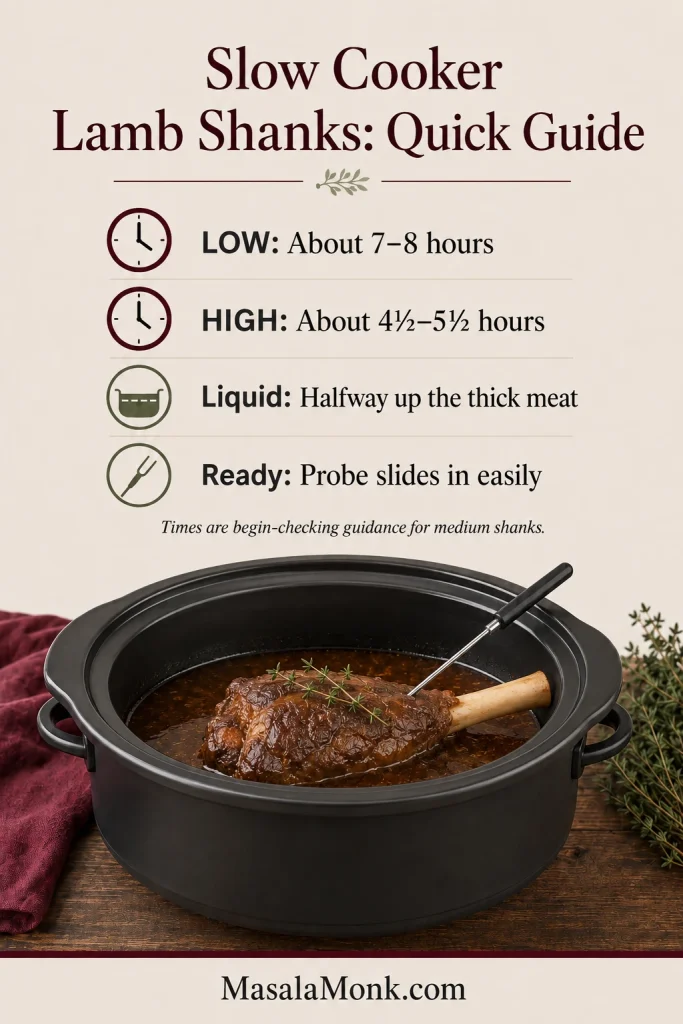
If you like heat at the table, a thin vinegar-style hot sauce, jalapeño sauce, or smoky chile sauce can wake up the whole plate. This pepper sauce guide gives you several directions, from bright and sharp to smoky and fruity.

Storage, Freezing, and Reheating

Slow cooker chicken fajita filling stores well. Keep tortillas, rice, lettuce, and fresh toppings separate so they do not become soggy.

Pack It for Meal Prep

Cool the rice and chicken before packing, then keep wet or fresh toppings separate. That one step keeps fajita bowls from turning soggy in the fridge.

Meal prep containers filled with slow cooker chicken fajitas, rice, peppers, lime wedges, shredded cheese, pico de gallo, guacamole, and separate toppings.
Cool the rice and fajita filling first, then add salsa, guacamole, cheese, and lime after reheating.
Storage methodHow to do it
FridgeStore cooked chicken and peppers in an airtight container for 3 to 4 days
FreezerFreeze cooked chicken and vegetables for 2 to 3 months
Freezer tipFreeze without tortillas or fresh toppings
ReheatingReheat in a skillet or microwave until hot
Meal prep tipPack rice or tortillas separately and add toppings after reheating
To avoid sogginessDrain extra liquid before packing tortillas, tacos, or wraps

If the chicken looks dry after refrigeration, reheat it with a spoonful of salsa, water, or reserved cooking liquid. When it looks too wet, reheat it uncovered in a skillet for a few minutes so some moisture evaporates.

Leftover fajita chicken can also become a baked dinner using the same shredded chicken-and-tortilla logic in this chicken enchilada casserole.

Slow Cooker Chicken Fajitas FAQ

How long do chicken fajitas take in the slow cooker?

Most chicken fajitas take 4 to 6 hours on low or 2½ to 3½ hours on high. Chicken breasts are usually better closer to the shorter end if you want slices. For shredded chicken, cook until the meat is fork-tender and reaches 165°F / 74°C.

Is low or high better for Crock Pot chicken fajitas?

Low is usually better for juicier chicken and more even cooking. High works when you need dinner faster, but chicken breast can dry out if it cooks too long. Start checking around 2½ hours on high, especially if the chicken pieces are not very thick.

Why are my slow cooker fajitas watery?

They are usually watery because a covered slow cooker traps steam while chicken, peppers, onions, salsa, and tomatoes release liquid. Use less salsa, add some peppers late, and drain before filling tortillas.

When should I add peppers and onions?

Add all the peppers and onions at the beginning for the easiest dump-and-go version. For better texture, add half at the beginning and half during the last 30 to 60 minutes so every pepper strip does not turn soft.

Should the chicken be shredded or sliced?

Either works. Sliced chicken feels more like classic fajitas. Shredded chicken is easier in the slow cooker and works well for tacos, rice bowls, quesadillas, nachos, and meal prep.

Can I use taco seasoning instead of fajita seasoning?

Yes. Taco seasoning works in a pinch. It may taste slightly more like taco chicken, but peppers, onions, smoked paprika, and lime help pull the flavor back toward fajitas.

Is Rotel good in Crock Pot fajitas?

Yes. Rotel adds tomatoes, green chiles, and flavor in one can. For 2 lb / 900 g chicken, one 10 oz / 285 g can works well. If the can is very juicy, drain a little first or remove excess liquid after cooking.

Can I make chicken fajitas without tomatoes?

Yes. Skip the salsa, Rotel, or diced tomatoes. Use chicken, peppers, onions, garlic, fajita seasoning, lime, and only a small splash of broth if your slow cooker needs moisture. Add extra lime, smoked paprika, garlic, or seasoning if the flavor tastes flat.

Can I use frozen chicken in the slow cooker?

For this recipe, thaw it first. Slow cookers heat gradually, and frozen chicken can take too long to cook safely. Use a pressure cooker or another faster method if you need to cook chicken from frozen, then check that it reaches 165°F / 74°C.

Can I add rice to the same slow cooker?

Cook rice separately and serve the fajita chicken over it. Uncooked rice changes the liquid ratio and can become mushy in this recipe. For meal prep, cool the rice and chicken before packing them together.

What can I make with leftover chicken fajitas?

Use leftovers in quesadillas, tacos, rice bowls, salads, nachos, or casseroles. Drain juicy chicken before adding it to tortillas or quesadillas. Reheat dry leftovers with a spoonful of salsa or cooking liquid.

Final Note

This slow cooker dinner works because it solves the hard part before dinner starts. Keep the filling glossy, add a handful of peppers late, squeeze in lime at the end, and the pot tastes brighter than a slow cooker dinner usually does.

That is the kind of dinner that feels easy before you eat it and useful again the next day.

If you make it, leave a comment with the version you chose: tighter tortilla fajitas, saucier bowls, dump-and-go, or creamy low-carb. That choice helps other readers decide which path to take.

Posted on Leave a comment

Slow Cooker Broccoli Cheese Soup Recipe

Bowl of creamy broccoli cheese soup with broccoli pieces, carrot bits, shredded cheddar, a spoon, and crusty bread on a wooden table.

A good slow cooker broccoli cheese soup should feel like a full bowl of comfort: thick, creamy, cheddar-rich, and loaded with soft broccoli. It should be cozy enough for a cold night, simple enough for a weeknight, and sturdy enough to hold up to bread, crackers, or a grilled cheese on the side.

This is the slow cooker broccoli cheese soup for people who want real cheddar flavor without a grainy pot. No canned soup, no hours of cooked cheddar, just tender broccoli, a spoonable base, and cheese melted at the finish.

The finished bowl coats the spoon, keeps broccoli in every bite, and tastes cozy instead of heavy. It feels like dinner before you add anything else: warm, creamy, familiar, and balanced with enough broccoli to keep the cheddar from taking over.

Ready to cook? Jump straight to the recipe, or skim the quick notes below if you want the soup thicker, smoother, more Panera-style, or easier to make with what you already have.

Make this tonight:

  • Base ratio: 5 to 6 cups / 450 to 500 g broccoli, 3 1/2 to 4 cups / 840 to 960 ml broth, and 10 to 12 oz / 285 to 340 g cheddar.
  • Timing: low for 4 to 5 hours or high for 2 to 3 hours, until the broccoli is tender.
  • Cheese stage: add cheddar at the end, after the heat settles.
  • Thickening: use cornstarch slurry, partial blending, cream cheese, or a potato variation.

Best version for most people: Use fresh broccoli, 3 1/2 cups broth, evaporated milk or heavy cream, and freshly shredded sharp cheddar. The body comes from broccoli, a small cornstarch slurry, partial blending, and cheese added at the end. The simple rule is broccoli first, cheese last.

Fresh broccoli, shredded cheddar, broth, cream, cornstarch, and a small bowl of broccoli cheese soup arranged on a wooden board.
For the most reliable slow cooker broccoli cheese soup, keep the ingredient list simple: broccoli, cheddar, broth, aromatics, and dairy added late.

In This Guide

Quick Answer: Slow Cooker Broccoli Cheese Soup

For creamy slow cooker broccoli cheese soup, cook the broccoli, onion, carrot, garlic, broth, and cornstarch slurry first. Once the broccoli is tender, blend about one-third of the soup, turn the slow cooker to warm, low, or off, then stir in cream or evaporated milk and freshly shredded cheddar.

Cheddar belongs near the end, not at the beginning. It can turn grainy when it sits in high heat for hours. Add it by handfuls, stir slowly, and let the finished pot rest for 5 to 10 minutes before serving.

For your first batch: use fresh broccoli, low heat, freshly shredded sharp cheddar, 3 1/2 cups broth for a thicker soup, and evaporated milk or cream added at the end. Frozen broccoli works when convenience matters, and a little Velveeta helps when you want the smoothest finish.

The Recipe

Start here when you are ready to cook. The recipe works as written. Use the notes below only when you want to adjust the pot: frozen broccoli, missing cream, grainy cheese, a too-thin base, or a more Panera-style finish.

You do not need to read every note before cooking. The order matters more than perfection: once the broccoli is tender and the cheese melts over soft heat, the soup is on the right track.

Recipe Details

Serves: 6 bowls · Prep: 15 minutes · Cook: 4 to 5 hours on low or 2 to 3 hours on high · Finish: 10 to 15 minutes · Equipment: 5 to 6 quart slow cooker, box grater, whisk, small bowl, ladle, optional immersion blender.

Ingredients

IngredientUS AmountMetric / Notes
Broccoli florets, chopped5 to 6 cups450 to 500 g / about 1 lb
Yellow onion, finely chopped1 small100 to 120 g
Carrot, shredded or finely diced1 medium / about 1 cup80 to 100 g
Celery, finely chopped, optional1 stalk40 to 50 g
Garlic, minced2 to 3 cloves10 to 15 g
Chicken broth or vegetable broth3 1/2 to 4 cups840 to 960 ml
Cornstarch2 tablespoonsAbout 16 g
Heavy cream or evaporated milk1 cup heavy cream, or 1 cup to one 12 oz can evaporated milk240 ml cream; use 240 to 355 ml evaporated milk depending on how creamy or loose you want it
Sharp cheddar, freshly shredded10 to 12 oz285 to 340 g
Velveeta, optional4 to 8 oz as a partial cheddar replacement115 to 225 g, cubed small
Cream cheese, optional2 oz55 g, cubed small and softened
Parmesan, optional1/4 cupAbout 25 g
Butter, optional2 tablespoons28 g
Fine salt3/4 to 1 teaspoon to startAdd more to taste at the end
Black pepper1/2 teaspoonFreshly ground if possible
Mustard powder or Dijon mustard, optional1/2 teaspoon powder or 1 teaspoon DijonBoosts cheddar flavor
Nutmeg, optionalPinchRounds out the creaminess
Cayenne or paprika, optionalPinch to 1/4 teaspoonFor warmth, not heat

Use less salt with salty broth, Parmesan, Velveeta, bacon, or ham. For a full 12 oz can of evaporated milk, start with 3 1/2 cups broth. When using Velveeta, replace part of the cheddar instead of adding it on top.

Instructions

  1. Make the slurry. Whisk the cornstarch with 1/2 cup cold broth until smooth.
  2. Load the slow cooker. Add the broccoli, onion, carrot, celery if using, garlic, remaining broth, slurry, salt, pepper, and butter if using.
  3. Cook until tender. Cover and cook on low for 4 to 5 hours or high for 2 to 3 hours, until the broccoli presses easily against the side of the pot.
  4. Blend for body. Blend about one-third of the soup, or mash some broccoli against the side. Leave pieces for a chunkier bowl.
  5. Lower the heat. Turn the slow cooker to warm, low, or off. Stir in the cream or evaporated milk. Add softened cream cheese now if using.
  6. Add cheese gradually. Fold in shredded cheddar by handfuls, stirring after each addition. Add small Velveeta cubes with or just before the cheddar if using.
  7. Rest and thicken. Cover for 5 to 10 minutes, then stir again. Aim for a creamy cheddar base with visible broccoli and a spoon-coating texture.
  8. Adjust before serving. Add salt, pepper, mustard powder, cayenne, or Parmesan if needed. Loosen thick soup with warm broth or milk, or use the thickening fixes below if it is thin.

Important: hot enough to melt, not hot enough to boil — that is the creamy zone after the cheddar is added.

Finished broccoli cheese soup in a slow cooker with a creamy cheddar base, visible broccoli pieces, and a ladle in the pot.
After the cheese melts, a short rest helps the soup settle into a smooth, ladleable broccoli cheddar texture.

Need to adjust the pot? Jump to Choose Your Version, Fresh vs Frozen Broccoli, Cheese Choices, or Thickening.

Slow Cooker Broccoli Cheese Soup at a Glance

Use this quick table when you want the main numbers without rereading the full recipe.

Recipe ratio card for slow cooker broccoli cheese soup with broccoli, broth, cheddar, cook time, and cheese-at-finish notes.
Use the ratio as a guardrail: plenty of broccoli, controlled broth, enough cheddar for flavor, and a gentle finish.
Slow cooker size5 to 6 quart slow cooker for a standard batch
Broccoli amount5 to 6 cups / 450 to 500 g chopped broccoli
Broth range3 1/2 cups / 840 ml for thicker soup; 4 cups / 960 ml for looser soup
Cook timeLow for 4 to 5 hours or high for 2 to 3 hours, until broccoli is tender
CheeseFreshly shredded sharp cheddar; optional Velveeta or cream cheese for smoother texture
Texture targetCreamy, thick, spoonable, with visible broccoli pieces

Choose Your Version

Start with the fresh-broccoli, sharp-cheddar version. Once that base is clear, every variation is easier: smoother, thicker, lighter, more shortcut-friendly, or more like a restaurant-style broccoli cheddar soup.

Three bowls of broccoli cheese soup labeled Default Cheddar, Smooth, and Panera-Style on a wooden table.
Whether you want bolder cheddar, a smoother family-style bowl, or a Panera-style feel, the same base method still works.
What You WantUse ThisSmart Move
Best default versionFresh broccoli + freshly shredded sharp cheddarUse 3 1/2 cups broth and melt cheddar at the end
Smooth family-style bowlCheddar + 4 to 8 oz VelveetaCube Velveeta small so it melts easily
Frozen broccoli versionFrozen broccoli + evaporated milk + cheddarDrain thawed broccoli or reduce broth slightly
Thicker bowlLower broth amount + cream cheese + partial blendingLet the soup rest before serving
Panera-styleCarrot, onion, sharp cheddar, mustard powder, partial blendingServe with crusty bread or a bread bowl
Hearty dinnerAdd diced potatoes at the startCook until potatoes are fully tender before adding cheese

Why This Recipe Works

The slow cooker is great at softening vegetables, but it is not great at reducing liquid or babysitting cheese. This recipe works because it gives the slow cooker the job it does best and saves the cheddar for the finish.

That is the structure: let the pot soften the vegetables, use a little blending for body, then finish with cheddar once the base is ready.

Step-by-step guide showing broccoli cooking, soup being blended, cream being added, and cheddar added last.
The method is easy to remember: let the slow cooker soften the broccoli first, then finish with cream and cheddar over steady heat.
  • Moderate broth keeps the soup from turning watery. Slow cookers do not reduce liquid like stovetop pots, so the recipe starts with 3 1/2 to 4 cups broth instead of drowning the broccoli.
  • Cornstarch gives the base an easy head start. It helps the soup thicken without needing a stovetop roux.
  • Partial blending adds body naturally. Blending some broccoli makes the soup feel thicker without making it heavy.
  • Cheddar finishes the soup. This protects the melt and keeps the bowl creamy instead of oily or gritty.
  • Freshly shredded cheese melts better. It gives stronger flavor and a cleaner finish than many pre-shredded cheeses.

If you have ever had a cheese sauce split before, the lesson is the same whether it is soup or a creamy macaroni and cheese recipe: low heat wins.

You want the spoon to drag gently through the soup, not splash through it. The broccoli softens into the base, the cheese melts into the cream, and the finished bowl feels thick without turning pasty.

Close-up of creamy broccoli cheese soup coating a spoon with a broccoli piece visible as soup drips back into the bowl.
The spoon test is simple: the soup should coat the spoon, drip slowly, and still pour back into the bowl.

Ingredients and What Each One Does

Nothing here is fancy; every ingredient has a job. The broccoli gives the bowl its heart, the aromatics make it taste like dinner, the broth sets the body, and the cheese brings the comfort.

Broccoli cheese soup ingredients including broccoli, carrot, onion, garlic, celery, broth, cream, cheddar, cream cheese, seasonings, and a box grater.
Before anything goes into the slow cooker, each ingredient has a job: vegetables build flavor, broth carries it, and cheese finishes it.

Broccoli

Use 5 to 6 cups of chopped broccoli florets, about 450 to 500 grams. Fresh broccoli gives steady texture, especially if you like visible pieces in the soup. Frozen broccoli works too, but it usually creates a softer, more blended bowl and can release extra water. Tender peeled broccoli stems can go in as well; chop them small so they soften at the same pace as the florets.

Onion, Carrot, Celery, and Garlic

These are what keep the soup from tasting like cheese melted into broth. Onion adds sweetness, carrot gives color and a mild Panera-style note, celery adds savory depth, and garlic keeps the base from tasting flat. If you dislike celery, skip it. For a smoother soup, chop everything small.

Broth

Chicken broth gives the richest flavor, while vegetable broth keeps the soup vegetarian. Use 3 1/2 cups if you like a thick soup and 4 cups if you prefer it slightly looser. When your broth is salty, start with less added salt and adjust at the end.

Cornstarch

Cornstarch is the easiest thickener for this slow cooker version. Whisk it into cold broth before it goes into the cooker so it spreads evenly. You can also use an extra slurry at the end if the base looks thinner than you want.
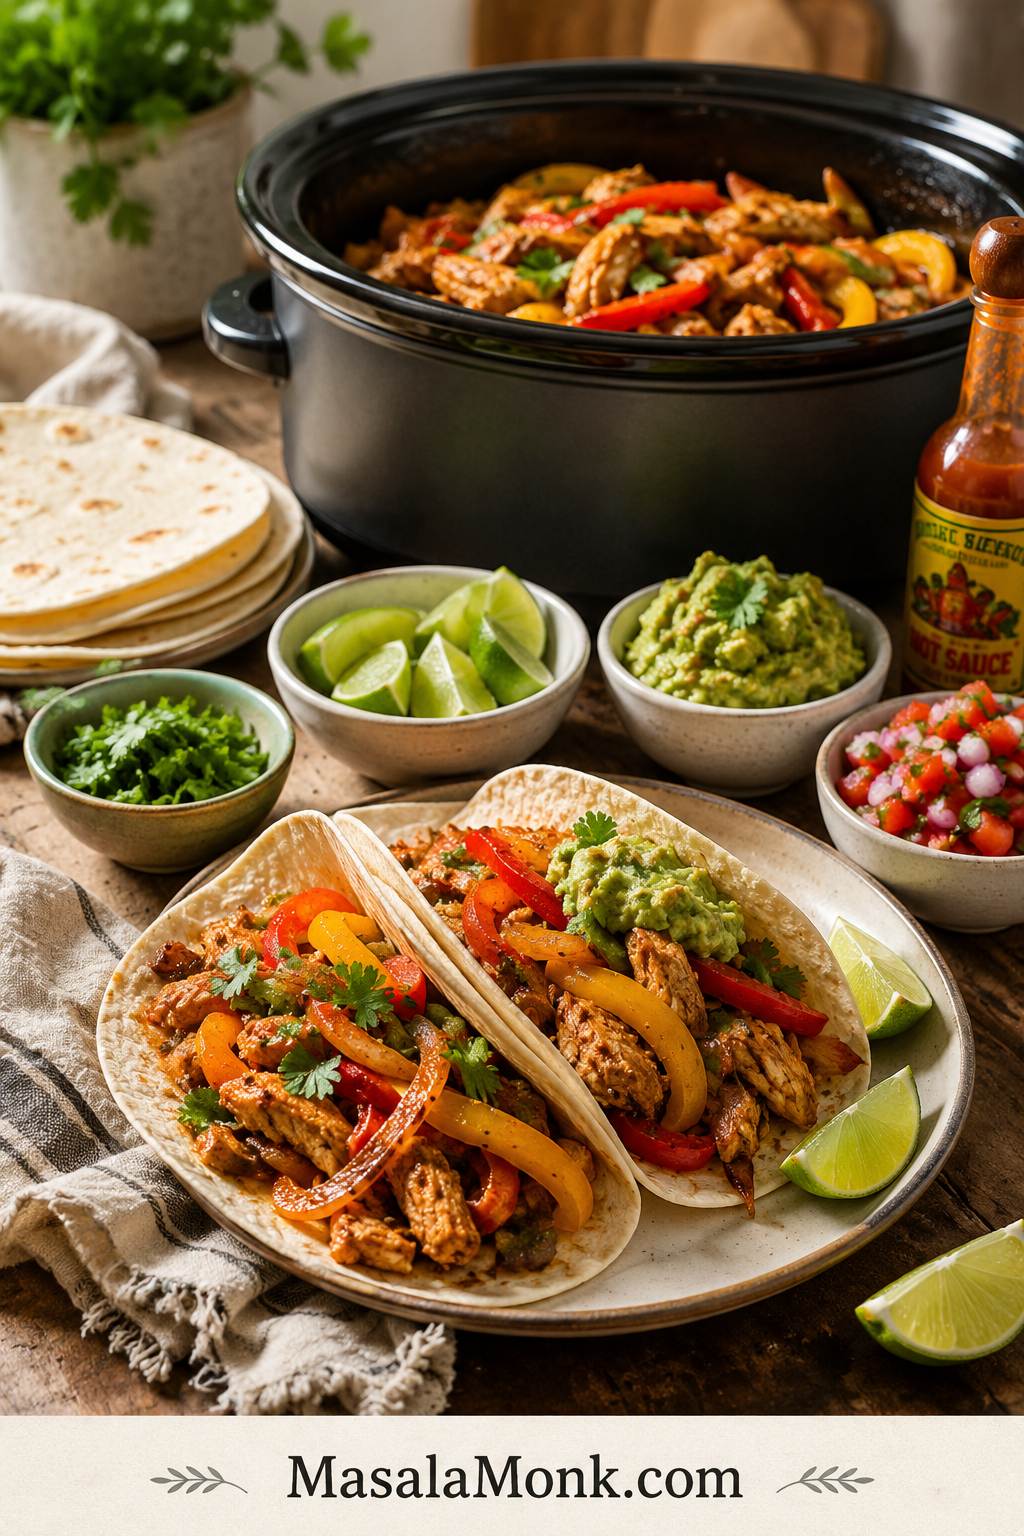
Heavy Cream or Evaporated Milk

Heavy cream gives the richest soup. Evaporated milk gives a creamy, stable finish that is a little lighter than cream. Regular milk can work, but it is thinner and more likely to split if overheated, so add it carefully and keep the pot below a hard bubble after the cheddar melts in.

Cheddar

Sharp cheddar gives the strongest broccoli cheddar flavor. Buy a block and shred it yourself if you can. Pre-shredded cheese is convenient, but it often contains anti-caking ingredients that can make the melt less even. For a deeper look at smooth melting, this cheese sauce recipe walks through the same gentle-heat idea in a stovetop sauce.

Velveeta

Velveeta is optional, but it is useful if you want the soup extra smooth and kid-friendly. It does not give the same sharp cheddar flavor as real cheddar, so the most balanced compromise is usually a mix: cheddar for flavor, Velveeta for easy melting.

Cream Cheese

Cream cheese is optional, but helpful. It adds body and helps the soup taste richer. Use block cream cheese, not whipped cream cheese. Cut it into small cubes and let it soften for a few minutes so it melts more easily.

Mustard, Nutmeg, Cayenne, or Paprika

These are small flavor boosters, so they should stay in the background. Mustard powder or Dijon makes cheddar taste sharper. Nutmeg rounds out creamy soups. Cayenne or paprika adds warmth and keeps the bowl from tasting one-note.

Substitutions: No Milk, No Cream, No Chicken Broth, No Carrots

Real weeknight cooking means the fridge is rarely perfectly stocked. This soup can still work as long as you protect the liquid level and keep the cheese heat gentle.

The swaps below help when you are missing one ingredient. They do not make the soup dairy-free unless you also replace the cheese and cream with dairy-free alternatives. The best swaps keep the bowl creamy without flooding the pot.
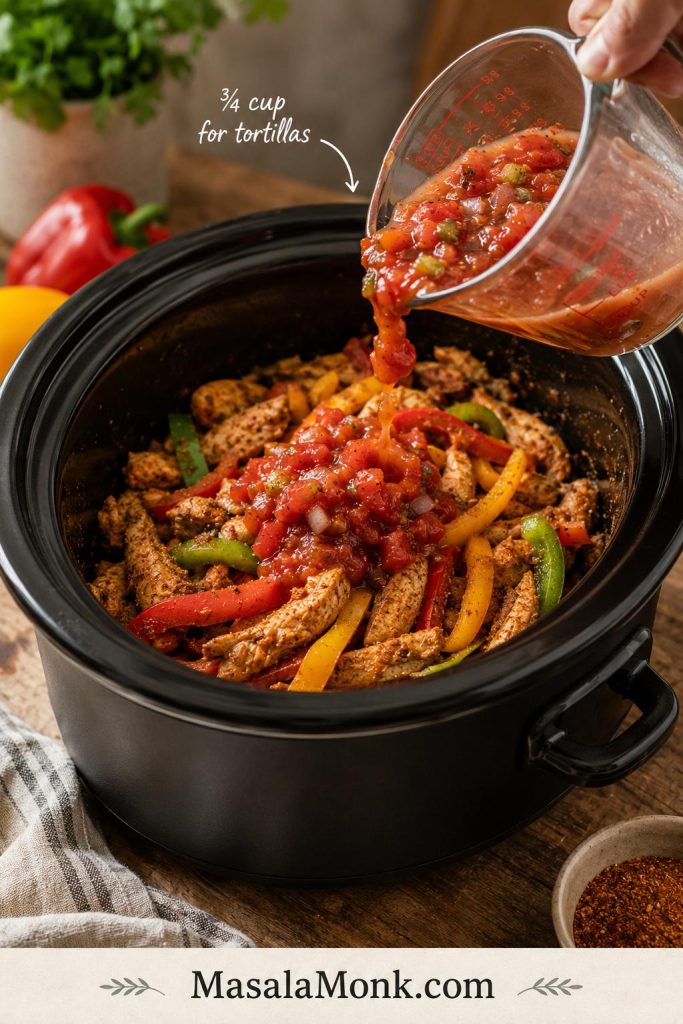
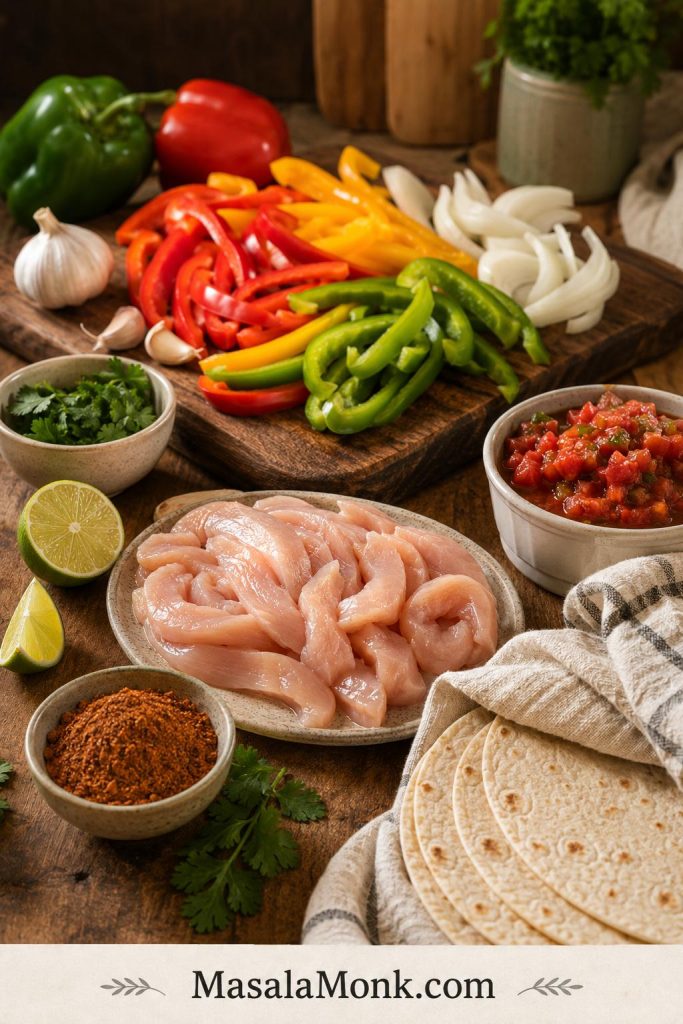
Practical Swap Guide

NeedMost Practical SwapWhat Changes
No milkUse evaporated milk, heavy cream, or extra broth plus cream cheeseEvaporated milk is creamy and stable; broth alone makes a lighter soup
No heavy creamUse evaporated milk or half-and-halfThe soup will be slightly lighter but still creamy
No evaporated milkUse heavy cream or half-and-halfAdd near the end and keep the pot below a hard bubble
No chicken brothUse vegetable brothKeeps the soup vegetarian and still flavorful
No carrotsSkip themThe soup loses a little sweetness and color, but still works
No onionUse 1/2 teaspoon onion powder or add extra garlicLess depth, but still cozy
No celerySkip itNo major change; celery is optional
No flourUse cornstarch and partial blendingSimple thickening route for this recipe
No VelveetaUse freshly shredded cheddar and optional cream cheeseBetter real-cheese flavor, slightly more heat-sensitive
No cream cheeseUse extra cheddar, partial blending, or a little more slurrySoup may be slightly less rich

As long as you protect the liquid level and the cheese stage, the recipe gives you room to improvise.

Slow Cooker Size and Scaling

The only trick with slow cooker size is giving yourself room to stir. A 5 to 6 quart slow cooker gives the broccoli space to cook and leaves enough room to add the dairy and cheese at the end.

Half Batch, Standard Batch, and Double Batch

BatchCooker SizeBroccoliBrothCheddar
Half batch2 to 3 quart2 1/2 to 3 cups / 225 to 250 g1 3/4 to 2 cups / 420 to 480 ml5 to 6 oz / 140 to 170 g
Standard batch5 to 6 quart5 to 6 cups / 450 to 500 g3 1/2 to 4 cups / 840 to 960 ml10 to 12 oz / 285 to 340 g
Double batch6 to 8 quart10 to 12 cups / 900 g to 1 kg7 to 8 cups / 1.7 to 1.9 L20 to 24 oz / 570 to 680 g

For half or double batches, scale the remaining ingredients in the same direction, but start lower with salt and adjust after the cheese melts. The soup scales well, but the cheese stage still needs space. A too-full slow cooker makes it harder to melt cheddar evenly.

If your slow cooker runs hot, check the broccoli early. Once the dairy goes in, slow down and let the soup settle.

How to Make Slow Cooker Broccoli Cheese Soup

The recipe card gives you the exact steps. This section shows what the pot looks and feels like as you cook, which is especially helpful if your slow cooker runs hot or your broccoli pieces are larger.

Step 1: Build a base that looks full, not flooded

Add the broccoli, onion, carrot, celery, garlic, broth, salt, pepper, and cornstarch slurry to the slow cooker. The vegetables need enough liquid to cook, but they do not need to swim. Slow cookers trap steam, so moderate broth helps the final soup stay spoonable.

Dark slow cooker filled with raw broccoli, carrot, onion, celery, garlic, seasonings, and golden broth before cooking.
The pot should look vegetable-heavy at the start, because broccoli shrinks and releases moisture as it slowly cooks.

Step 2: Cook until the broccoli gives in

The broccoli is ready when it presses easily against the side of the slow cooker with a spoon. If it still feels firm, give it more time before adding dairy. This is the stage where the soup builds body.

Spoon pressing tender cooked broccoli against the side of a slow cooker to show the vegetables are soft.
Once the broccoli gives way under a spoon, the base is soft enough to blend partly and turn creamy.

Step 3: Blend just enough for body

Blend about one-third of the soup, or mash some broccoli into the base. You are not trying to erase every piece. A good bowl has creamy body and visible broccoli, so stop while it still looks like broccoli cheese soup, not a completely smooth puree.

Immersion blender partially blending cooked broccoli soup inside a slow cooker while some broccoli pieces remain whole.
Instead of loading in more cheese, blend part of the broccoli base for natural thickness and a better spoonful.

Step 4: Let the heat settle before dairy

Look for a steaming base without a hard bubble. Stir in the cream, evaporated milk, or cream cheese after turning the slow cooker down. If the surface is actively boiling, wait a few minutes. Residual heat is enough to bring everything together.

Cream being poured from a small jug into cooked broccoli soup in a slow cooker, creating a white swirl.
After the vegetables are tender, cream or evaporated milk smooths the base without spending hours on heat.

Step 5: Melt the cheddar with patience

Fold in the cheddar by handfuls and let each handful disappear before adding the next. The base should turn glossy and creamy, not stringy. This is the part where you do less, not more: slow down and let the hot base do the melting.

Freshly shredded cheddar falling into hot broccoli soup in a slow cooker with broccoli pieces visible underneath.
Cheddar behaves best when the soup is already hot and ready, so add it slowly rather than cooking it all day.

Low vs High Slow Cooker Timing

Low is the calmer route. It gives the broccoli time to soften without rushing the pot, while high works when dinner needs to happen faster. Either way, the broccoli needs to be tender before the dairy and cheese go in.

  • Low: 4 to 5 hours for steady broccoli texture.
  • High: 2 to 3 hours when dinner needs to happen faster.
  • Cheese finish: 5 to 15 minutes after the heat settles.
  • Potato variation: allow extra time if needed because potatoes must be fully tender before cheese goes in.

The pot will tell you more than the timer. Look for tender broccoli first, then move into the dairy and cheese finish.

For general slow cooker safety, the USDA slow cooker food safety guide notes that slow cookers cook at low temperatures over time. For this recipe, the practical cue is still texture: broccoli tender first, cheese added after, and no hard boiling once the cheese goes in.

Fresh vs Frozen Broccoli

This is one of the few broccoli soups where frozen broccoli can absolutely work. Use fresh broccoli for the best first batch. Use frozen when convenience matters and a softer soup is okay. Fresh holds shape; frozen melts into the bowl.

Fresh broccoli and frozen broccoli compared with two bowls of broccoli cheese soup showing chunkier and smoother textures.
Fresh broccoli keeps more visible bite, while frozen broccoli makes a softer soup; if frozen pieces look wet, drain them first.

If this soup puts you in a broccoli mood but you want something fork-twirly instead of spoonable, this Broccoli Pasta Recipe goes in a garlic-Parmesan direction.

Broccoli TypeHow to Use ItResult
Fresh chopped floretsAdd at the startClassic texture and visible broccoli pieces
Larger fresh floretsAdd at the start, then chop or mash after cookingChunkier soup with more broccoli shape
Frozen chopped broccoliAdd from frozen or thaw and drain firstSofter, creamier, more blended soup
Frozen floretsAdd during the last 1 to 2 hours if you want more shapeLess mushy than cooking frozen broccoli from the start
Watery frozen broccoliThaw and drain, or reduce broth slightlyHelps prevent thin soup

For a softer soup, add frozen broccoli at the beginning. For more visible pieces, add frozen florets later or use fresh broccoli next time.

If frozen broccoli makes the pot look loose, go straight to How to Thicken or Troubleshooting.

Cheese Choices for Smooth Broccoli Cheese Soup

Cheese decides whether this soup tastes sharp and homemade, smooth and kid-friendly, or rich enough to feel restaurant-style. For most batches, use freshly shredded sharp cheddar. Add Velveeta only if smoothness matters more than sharp cheddar flavor.

Pick the cheese based on the finish you want, not just what is in the fridge. The right cheese melts into the base instead of sitting on top of it.

Cheese board with sharp cheddar, shredded cheddar, processed cheese cubes, cream cheese, Parmesan, and a small bowl of broccoli cheese soup.
Cheese choice changes the bowl: sharp cheddar brings flavor, processed cheese smooths the melt, cream cheese adds body, and Parmesan deepens it.
CheeseGood ForWatch Out For
Sharp cheddarClassic broccoli cheddar flavorCan turn grainy if overheated
Mild cheddarSmoother, less sharp flavorLess depth than sharp cheddar
Freshly shredded block cheddarSmooth melt and stronger flavorTakes a few extra minutes to grate
Pre-shredded cheddarConvenienceCan melt less evenly
VelveetaSmooth shortcut, kid-friendly textureLess real-cheddar flavor
Cream cheeseThicker, more stable soupCan taste tangy if too much is used
ParmesanSalty depth and savory finishToo strong to use as the main cheese

Freshly shredded sharp cheddar gives the most balanced result. If you want the soup extra smooth, replace 4 to 8 ounces of the cheddar with Velveeta or add 2 ounces of cream cheese before the cheddar.

Worried about grainy texture? Check When to Add the Cheese before the troubleshooting table.

When to Add the Cheese

The whole pot depends on this moment. Once the vegetables are tender, the slow cooker has done the hard part. From here, the cheese only needs steady warmth.

Cheddar behaves best as a finish, not a long-cooked ingredient. If it cooks for hours in the slow cooker, it can become oily, stringy, grainy, or clumpy. Let the heat already in the soup do the melting.

  • Shred the cheddar yourself if possible.
  • Turn the slow cooker down before adding cheese.
  • Fold in cheese one handful at a time.
  • Stir after each addition.
  • Let the soup rest for 5 to 10 minutes after the cheese melts.

That cheese-at-the-end habit is useful beyond this soup. It also helps in recipes like Slow Cooker French Onion Chicken, where the slow cooker does the tender cooking first and the cheese works better as a finish.

If you are using cream cheese, add it before the cheddar so it has time to soften into the hot soup. If using Velveeta, cube it small so it melts easily into the base.

How to Thicken Slow Cooker Broccoli Cheese Soup

A thin soup can feel disappointing, especially when the kitchen already smells like dinner. Luckily, this is one of the easiest problems to fix if you catch it before boiling the cheese.

To thicken slow cooker broccoli cheese soup, blend part of the cooked broccoli, use a cornstarch slurry, add softened cream cheese, or let the soup rest after the cheese melts. A thin base needs slurry before cheddar; a loose finished pot usually needs a short rest before any extra fix.

Thickening guide for broccoli cheese soup showing cornstarch slurry, blending, cream cheese, resting, and a bowl of creamy soup.
If the soup looks thin, fix the base first with blending, a slurry, cream cheese, or a few quiet minutes of resting.

Best Thickening Fixes

Thickening MethodGood ForHow to Use It
Cornstarch slurryEasy thickeningWhisk 1 tablespoon cornstarch with 1 tablespoon cold water or broth, then stir into hot soup
Partial blendingNatural bodyBlend one-third of the soup after broccoli is tender
Cream cheeseRich, stable textureAdd small softened cubes before cheddar
PotatoHeartier soupAdd diced potato at the beginning and cook until tender
RouxClassic creamy bodyCook butter and flour separately, then stir into the soup base
Extra cheeseFlavor and bodyAdd at the end, after the heat settles

A roux gives classic cream-soup body, but it adds a skillet step. The cornstarch and partial-blending route is simpler for this slow cooker version and still gives a thick, spoonable soup.

If the soup is only slightly thin, let it rest for 10 minutes after adding the cheese. Cheese soups often thicken as they sit.

Flavor Boosters for Better Broccoli Cheddar Soup

If the soup tastes creamy but a little flat, it usually needs sharper cheese, a touch more salt, or one small background flavor. You do not need to make it spicy or complicated. A tiny amount of the right ingredient can make the cheddar taste more like cheddar.

You should not notice the mustard or nutmeg as separate flavors. They are there to make the cheddar taste fuller.

  • Mustard powder: add 1/2 teaspoon to make cheddar taste sharper without making the soup taste mustardy.
  • Dijon mustard: add 1 teaspoon for gentle tang and a more restaurant-style finish.
  • Nutmeg: add a pinch to round out the creaminess.
  • Cayenne: add a pinch for warmth without making the soup hot.
  • Parmesan: add 1/4 cup for salty, savory depth.
  • Extra sharp cheddar: use it for part or all of the cheddar when you want stronger cheese flavor.
  • Worcestershire sauce: add 1/2 to 1 teaspoon for savory depth, especially in non-vegetarian versions.

Add flavor boosters near the end, then taste again. Once the cheese melts, the salt and sharpness of the soup can change quickly.

Cheddar Version vs Velveeta Version

Some nights you want real cheddar sharpness; some nights you want the soup to melt smoothly with zero drama. The hybrid version gives you both.

Freshly shredded sharp cheddar gives the most homemade broccoli cheddar soup flavor. Velveeta creates the smoothest, most forgiving texture. A mix gives you both flavor and easy melting.

  • Real cheddar version: use 10 to 12 oz freshly shredded sharp cheddar for the strongest flavor. Melt it carefully because real cheddar is more heat-sensitive.
  • Hybrid cheddar-Velveeta version: use 6 to 8 oz cheddar plus 4 to 8 oz Velveeta for a smooth but still flavorful soup.
  • Velveeta-style version: use 12 to 16 oz Velveeta and 1 to 2 cups cheddar if you want the smoothest shortcut version.
  • Three-cheese version: add Parmesan or Colby Jack with cheddar for a richer, deeper cheese flavor.

For most people, the hybrid version is the easiest win: sharp cheddar for flavor, a little Velveeta or cream cheese for smoothness.

Slow Cooker Panera-Style Broccoli Cheddar Soup

This is not an exact Panera copycat, but it moves the soup toward that familiar Panera-style broccoli cheddar bowl: creamy base, visible broccoli, shredded carrot, sharp cheddar, and bread on the side.

When you want the Panera-style feeling, focus on three things: shredded carrot, sharp cheddar, and a creamy base that still leaves little pieces of broccoli in the spoon.

Café-style bowl of broccoli cheddar soup with visible broccoli, shredded carrot, creamy cheddar base, and crusty bread.
For a Panera-style broccoli cheddar soup, keep the carrot visible, use a cheddar-forward base, and serve bread close by.
  • Use sharp cheddar, not only mild cheddar.
  • Keep the carrot in the recipe for color and sweetness.
  • Add onion and garlic for a deeper base.
  • Use evaporated milk or cream for a smooth, creamy finish.
  • Blend part of the soup so it is creamy but still has broccoli pieces.
  • Add a small amount of Dijon or mustard powder to wake up the cheese flavor.
  • Serve it with crusty bread or in a bread bowl.

For a bread-bowl feeling without making actual bread bowls, toast thick slices from a homemade garlic bread loaf and serve them on the side for dipping.

If you want the soup thicker and more restaurant-style, use the lower broth amount, add cream cheese, and let the finished soup rest for 10 minutes before serving.

Potato, Chicken, Bacon, and Ham Variations

Once the base is creamy, the soup can turn into dinner in a few different ways. Add-ins work best when they support the soup instead of making it watery, greasy, or overcooked.

Bowl of broccoli cheese soup surrounded by small bowls of diced potatoes, shredded chicken, bacon pieces, and diced ham.
Once the creamy base is ready, potatoes, chicken, bacon, or ham can turn the soup into a fuller dinner.

Easy Add-In Ideas

VariationHow to Adapt ItNotes
Broccoli cheddar potato soupAdd 1 1/2 to 2 cups small diced potatoes at the startCook until potatoes are fully tender before adding cheese
Chicken broccoli cheese soupAdd cooked shredded chicken near the endRotisserie chicken works well
Bacon broccoli cheese soupTop with cooked crumbled bacon before servingDo not slow cook raw bacon in the soup
Ham broccoli cheese soupAdd diced cooked ham near the endGood for leftover ham; reduce salt if ham is salty
Broccoli cauliflower cheese soupReplace 1 to 2 cups broccoli with cauliflowerCauliflower makes the soup milder and creamier
Gluten-free versionUse cornstarch, not flour, and check broth and cheese labelsBest handled with simple ingredients
Keto or low-carb versionSkip potatoes and reduce or skip carrots; use cream, cheese, and partial blending for bodyFor stricter low-carb cooking, avoid flour and use only a small amount of cornstarch or a keto-friendly thickener
Lighter versionUse evaporated milk instead of heavy creamStill creamy, but less rich

For the chicken version, stir in cooked shredded chicken near the end so it stays tender. If you want the same broccoli-cheese comfort in a rice-based dinner, make this Cheesy Chicken Broccoli Rice on another night.

For the ham version, keep the salt lower and add diced cooked ham near the end. If you still have ham left after soup night, this Ham and Cheese Quiche turns it into an easy brunch-style meal.

Troubleshooting Slow Cooker Broccoli Cheese Soup

If the soup looks thinner, thicker, or less smooth than you hoped, do not panic. Most broccoli cheese soup problems are easier to fix before the pot gets too hot again.

Match the symptom to the fix below, then bring the soup back slowly.

Troubleshooting guide showing thin, grainy, and too-thick broccoli cheese soup with bowls showing each problem and fix.
Thin, grainy, or too-thick broccoli cheese soup usually needs one small correction, not a full restart.

Problem and Fix Guide

ProblemLikely CauseFix
Soup is grainy or grittyCheese overheated, soup boiled after cheese, or pre-shredded cheese was usedLower the heat, whisk slowly, add a splash of cream, and use block cheese next time
Cheese clumpedCheese was added too fast or the soup was too hotAdd cheese by handfuls on warm, low, or off
Soup is wateryToo much broth, frozen broccoli released water, or not enough thickenerAdd slurry, blend part of the soup, or let it rest after adding cheese
Soup is too thickToo much cheese, starch, cream cheese, or potatoAdd warm broth or milk a little at a time
Broccoli is mushyCooked too long or frozen broccoli was added earlyBlend part of the soup and use the soft broccoli as body
Soup tastes blandMild cheese, weak broth, or too little saltAdd salt, mustard powder, cayenne, Parmesan, or sharper cheddar
Cream cheese has lumpsAdded cold in large piecesCube it small, soften it first, or blend it with a ladle of hot soup
Soup split while reheatingReheated too quickly or boiledReheat slowly with a splash of milk or broth and whisk gently

If the soup breaks badly, blend a portion of it and stir it back in. It may not become perfectly smooth again, but it will usually become creamy enough to serve.

Storage, Freezing, and Reheating

Leftovers are worth saving, but cheese soup asks for patience on the reheat. The goal is to warm the bowl back up without pushing the cheese too hard.

  • Refrigerator: Store cooled soup in an airtight container for 3 to 4 days.
  • Reheating: Warm on low heat on the stove or in the microwave at lower power, stirring often.
  • Loosening leftovers: Add a splash of milk, cream, or broth while reheating.
  • Do not boil leftovers: Boiling can make the cheese split or turn grainy.
  • Freezing: Possible, but not ideal. Dairy-based cheese soups can separate or look grainy after thawing.

For make-ahead cooking, the best texture comes from cooking the vegetable base first, then adding dairy and cheese closer to serving.

If you want this for lunches, store it in single portions and reheat slowly. A splash of milk or broth brings the bowl back to life without pushing the cheese too hard.

For the freezer, a vegetable-and-bean soup is usually easier than a dairy-heavy cheese soup. This Minestrone Soup Recipe is a better make-ahead option when you want something lighter to keep on hand.

What to Serve with Broccoli Cheese Soup

This soup can stand alone, but the right side makes it feel like the kind of dinner people come back to for seconds. A bowl this rich loves contrast: something crunchy, something toasted, or something cold and crisp on the side.

This is the kind of bowl that makes bread disappear fast.

Bowl of broccoli cheese soup served with bread and salad, with a glass container of leftover soup in the background.
Serve it with bread, crackers, or salad; afterward, reheat leftovers slowly with a splash of broth or milk.
  • Crusty bread
  • Garlic toast
  • Bread bowls
  • Ranch Oyster Crackers for a crunchy topping
  • Wedge Salad Recipe for a cold, crisp side
  • Roasted vegetables
  • Grilled cheese sandwich
  • Baked potatoes
  • Cooked chicken or ham for a heartier meal

For a bigger comfort-food spread, serve the soup with something crisp or baked rather than another heavy, creamy dish. That contrast makes the bowl feel more satisfying.

FAQs

Here are the quick fixes and common questions readers usually need once the soup is in the slow cooker.

Can raw broccoli go straight into the slow cooker?

Yes. Raw chopped broccoli can go straight into the slow cooker with the broth, onion, carrot, garlic, and seasonings. Cut it into small pieces so it softens evenly. Add dairy and cheese only after the broccoli is tender.

When should cheese go into slow cooker broccoli cheese soup?

Add cheese near the end, after the broccoli is tender and the slow cooker has been turned to warm, low, or off. That keeps the cheddar in the creamy zone instead of pushing it into grainy territory.

Why did my broccoli cheese soup turn grainy?

Grainy soup usually comes from overheated cheese, boiling after dairy is added, or using cheese that does not melt smoothly. Use freshly shredded block cheddar, add it gradually, and keep the heat gentle once the cheese goes in.

Can I use pre-shredded cheese?

You can, but freshly shredded block cheddar usually melts more evenly. Pre-shredded cheese is convenient, but it can make broccoli cheese soup more likely to turn grainy or slightly clumpy.

Is frozen broccoli okay for crock pot broccoli cheese soup?

Frozen broccoli works, especially if you like a softer, creamier bowl. For better texture, use frozen florets and add them during the last 1 to 2 hours, or thaw and drain frozen broccoli before using it.

Do you need to thaw frozen broccoli first?

Not always. Frozen broccoli can go in from frozen if you want a softer soup, but thawing and draining helps prevent a watery pot. For more visible broccoli pieces, add frozen florets during the last 1 to 2 hours.

What cheese melts best in broccoli cheese soup?

Freshly shredded block cheddar gives strong flavor and a smoother melt. Velveeta is the smoothest shortcut. A mix of sharp cheddar and a small amount of Velveeta gives both flavor and easy melting.

How do you make crock pot broccoli cheese soup thicker?

Use a cornstarch slurry, blend part of the soup, add a little cream cheese, or let the soup rest after adding cheese. Potato also thickens the pot, but it turns the recipe into a heartier broccoli cheddar potato soup.

Should this cook on low or high?

Low gives steadier texture. Cook on low for 4 to 5 hours, or use high for 2 to 3 hours if you need it faster. Either way, add the cheese only after the broccoli is tender.

How long can broccoli cheese soup stay on warm?

It can sit on warm for a short serving window, but avoid holding it for hours after the cheese goes in. Stir occasionally, keep it below a boil, and loosen with warm broth or milk if it thickens too much.

Does Velveeta work in slow cooker broccoli cheese soup?

Velveeta works well when smoothness matters most. Replace part of the cheddar with it for a creamier, more forgiving pot.

How do you make it more like Panera broccoli cheddar soup?

Use sharp cheddar, keep the carrot, add onion and garlic, blend part of the soup, and add a little Dijon or mustard powder. Serve it with crusty bread or in a bread bowl for a more restaurant-style feel.

Can this soup be vegetarian?

Yes. Use vegetable broth and skip bacon, ham, chicken, and Worcestershire sauce, or use a vegetarian-friendly alternative. If cheese labels matter to you, check those as well.

Can the vegetable base be made ahead?

Yes. Cook the broccoli, vegetables, broth, and thickener ahead, then refrigerate the base. Reheat it gently and add cream and cheese shortly before serving for the smoothest texture.

What size slow cooker works best?

A 5 to 6 quart slow cooker is the easiest size for a standard batch. Use a 2 quart slow cooker only for a half batch, and a 6 to 8 quart slow cooker if doubling.

Is this the same as cream of broccoli soup?

It is similar, but this soup is cheesier and more cheddar-forward. Cream of broccoli soup is usually more cream-focused and may use less cheese.

Does broccoli cheese soup freeze well?

Freezing is possible, but this is not the soup that comes back perfectly every time. Dairy and cheese can separate after thawing, so reheat gently with a splash of milk, cream, or broth.

Back to the recipe · Back to the guide

Final Tips for Better Broccoli Cheese Soup

Once you know the order, this soup becomes easy to trust. Let the slow cooker handle the broccoli, keep the cheese for the finish, and give the pot a few quiet minutes to settle.

Choose sharp cheddar when flavor matters most. Reach for Velveeta when smoothness matters most. Fresh broccoli gives steadier texture, while frozen broccoli keeps the recipe convenient. The result is creamy, cheddar-rich, familiar, and easy to trust the next time you need a warm bowl fast.