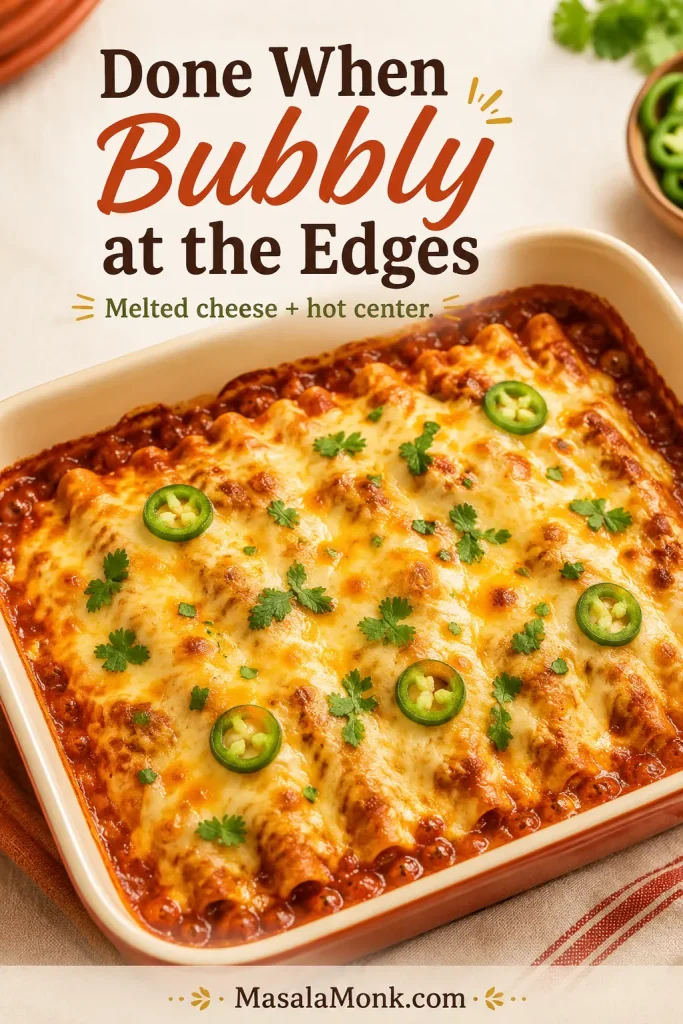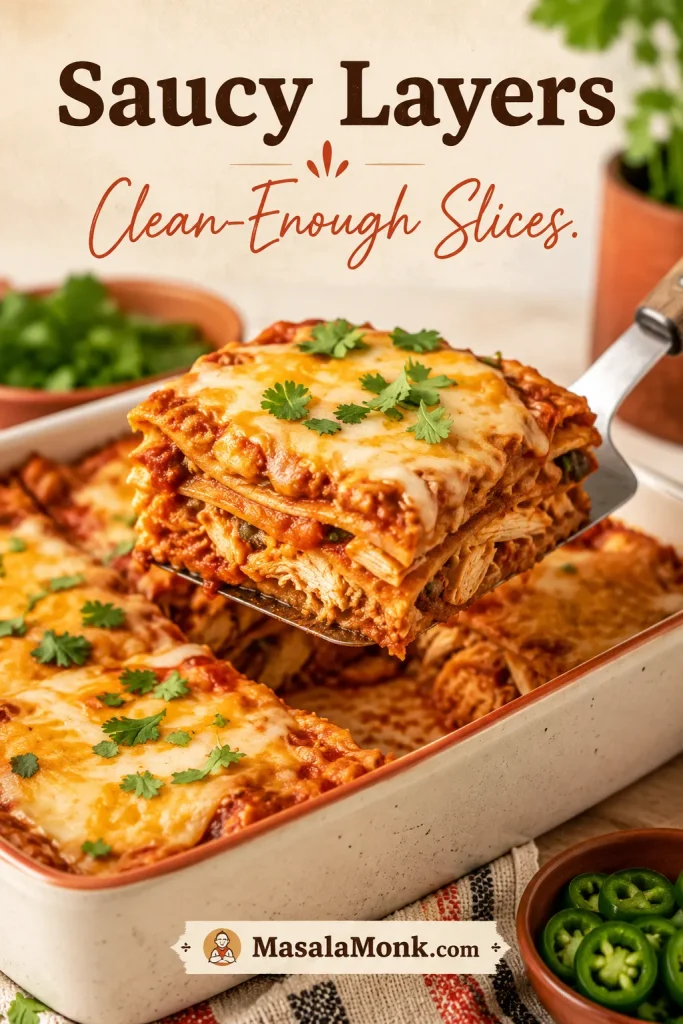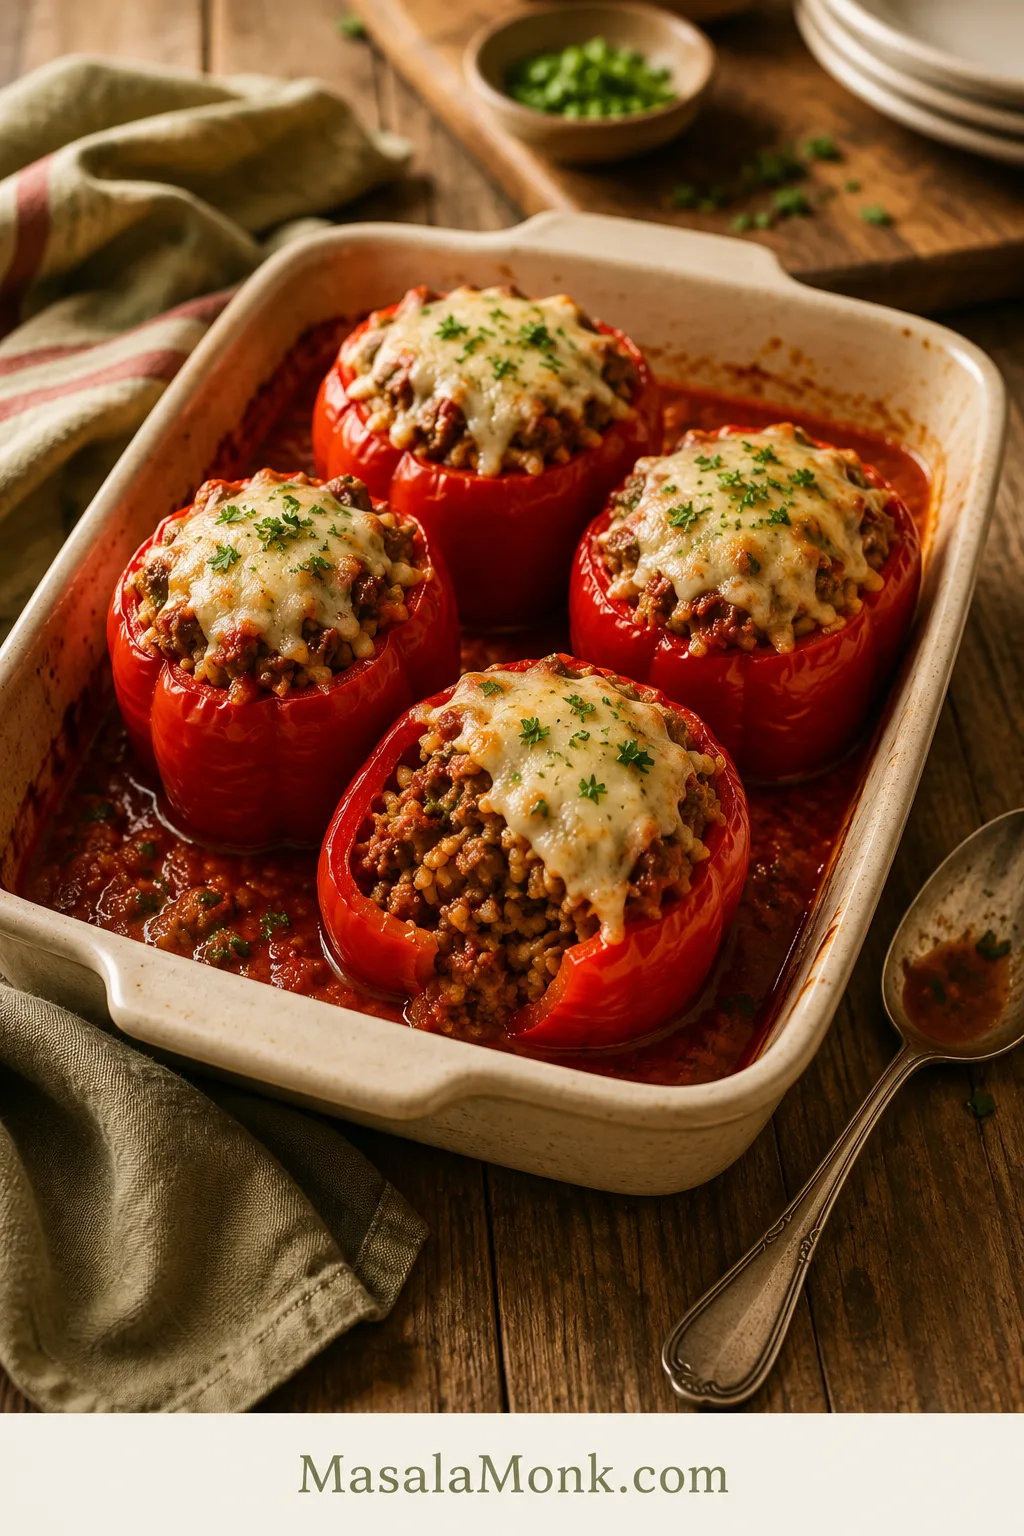
Stuffed red peppers should feel like dinner is handled: sweet pepper walls, savory beef-and-rice filling, tomato sauce, and melted cheese all baked together in one cozy dish. The only catch is that small details matter. If the peppers stay too firm, the rice tastes bland, the filling turns watery, or the cheese browns too early, the whole dish feels less comforting than it should.
This is the no-guesswork version built to avoid those problems. The filling is cooked and seasoned before it ever goes into the peppers, the sauce stays underneath instead of drowning the dish, and the peppers bake covered first so they soften before the cheese goes on. By the time the foil comes off, the dish should smell like tomato sauce, garlic, roasted peppers, and melting cheese.
Think of this as classic baked stuffed bell peppers tuned specifically for red peppers: sweeter, softer in flavor, and especially good with tomato sauce, ground beef, cooked rice, and cheese. You get the old-fashioned dinner feeling, but with clear cues for what the filling, sauce, peppers, and cheese should look like at every step.
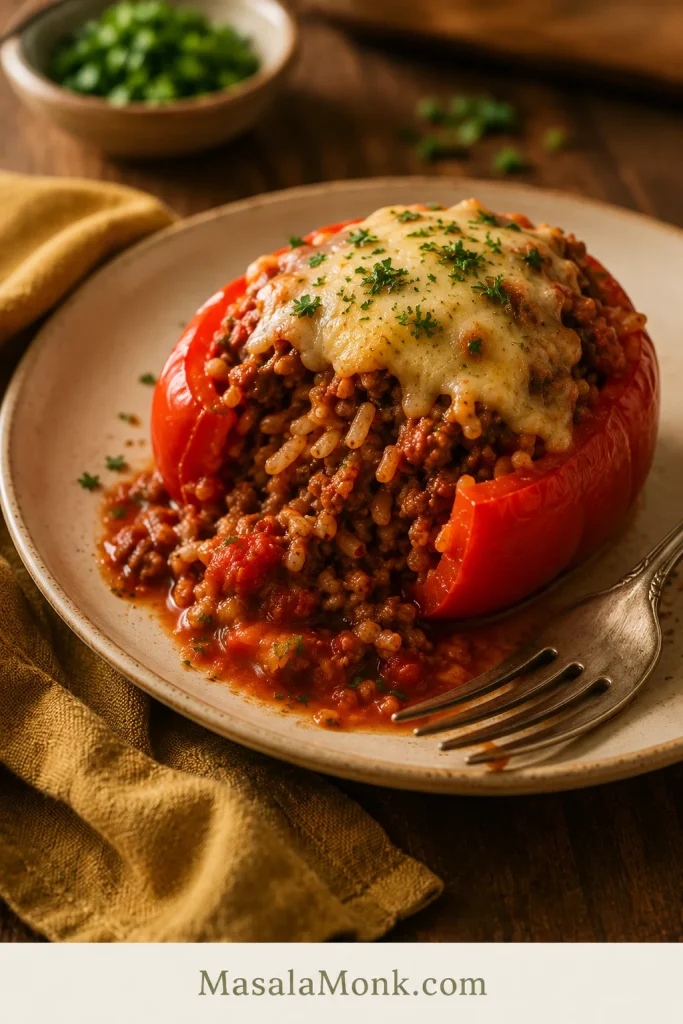
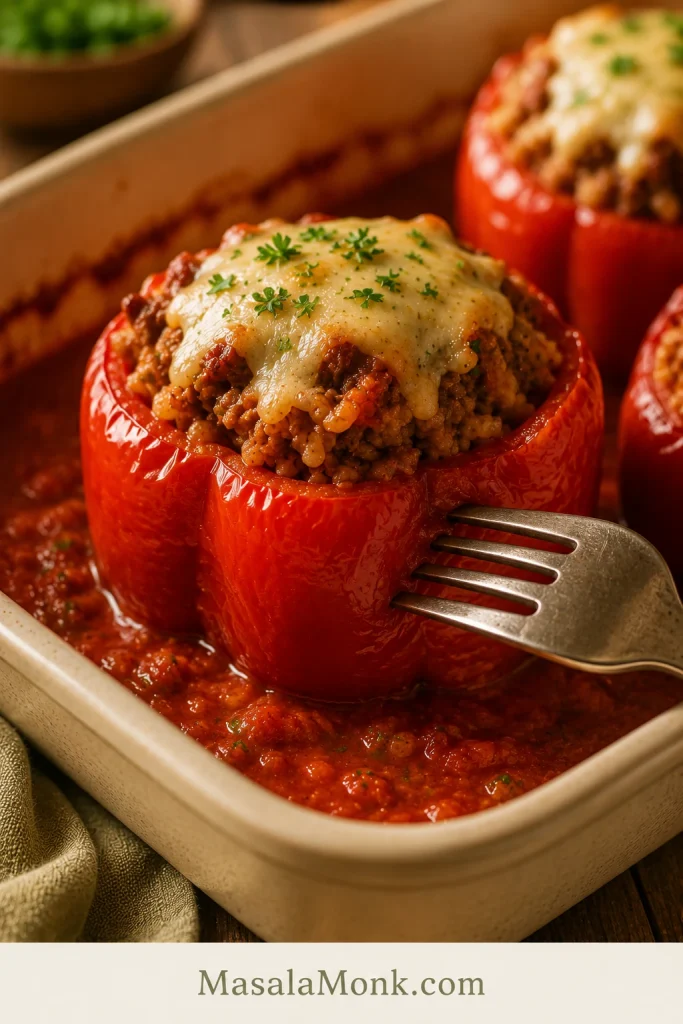
These stuffed red peppers bake up tender, saucy, and full of flavor, with a seasoned beef-and-rice center that holds together instead of turning loose and watery.
Quick Answer: How to Make Stuffed Red Peppers
To make stuffed red peppers, cut the tops off large red bell peppers and remove the seeds. Brown ground beef with onion, garlic, tomato paste, salt, pepper, and herbs, then stir in cooked rice and diced tomatoes. Spread tomato sauce or marinara in a baking dish, fill the peppers, cover with foil, and bake at 375°F / 190°C for 30 to 35 minutes. Uncover, add cheese, and bake for another 10 to 15 minutes, until the peppers are fork-tender, the sauce is bubbling, and the cheese is melted.
Remember the order: filling first, sauce underneath, foil first, cheese last. The key is not to rush the cheese; let the peppers soften under foil before finishing them uncovered.
Make This Version When
Make this version when you want classic stuffed bell peppers, but you do not want to gamble on the texture. The red peppers soften without collapsing, the beef-and-rice filling tastes seasoned before it goes into the oven, and the cheese goes on late enough to melt instead of drying out. It is hearty enough to count as dinner without needing much else, but still flexible enough for turkey, sausage, vegetarian, vegan, no-rice, or halved-pepper versions.
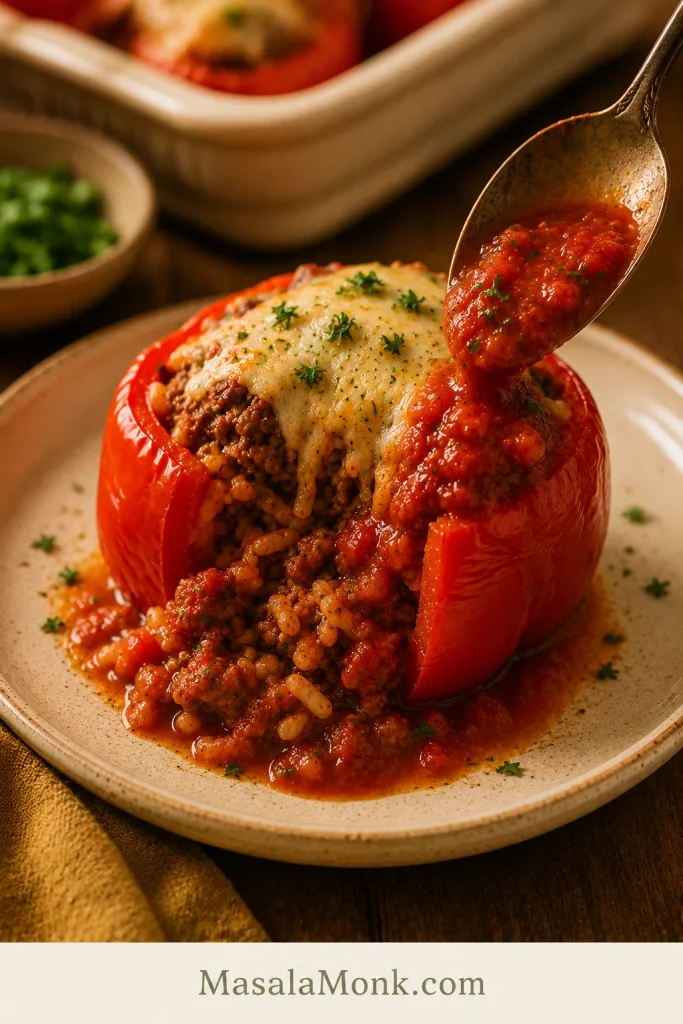
What the Finished Stuffed Red Pepper Should Look Like
Use this as the visual target before you start: the pepper should soften around the edges, while the rice, beef, sauce, and cheese still read as one generous filling.
Stuffed Red Pepper Recipe Card
Easy Baked Stuffed Red Peppers
Whole red bell peppers filled with seasoned ground beef, cooked rice, tomato sauce, and melted cheese. A reliable baked stuffed peppers recipe that turns tender, saucy, and comforting without becoming watery.
| Prep Time | 20 minutes |
| Cook Time | 50 minutes |
| Total Time | 1 hour 10 minutes |
| Servings | 6 stuffed red peppers |
| Oven Temperature | 375°F / 190°C |
| Baking Dish | 13×9-inch / 33×23 cm dish |
| Main Method | Bake covered first, then finish uncovered with cheese |
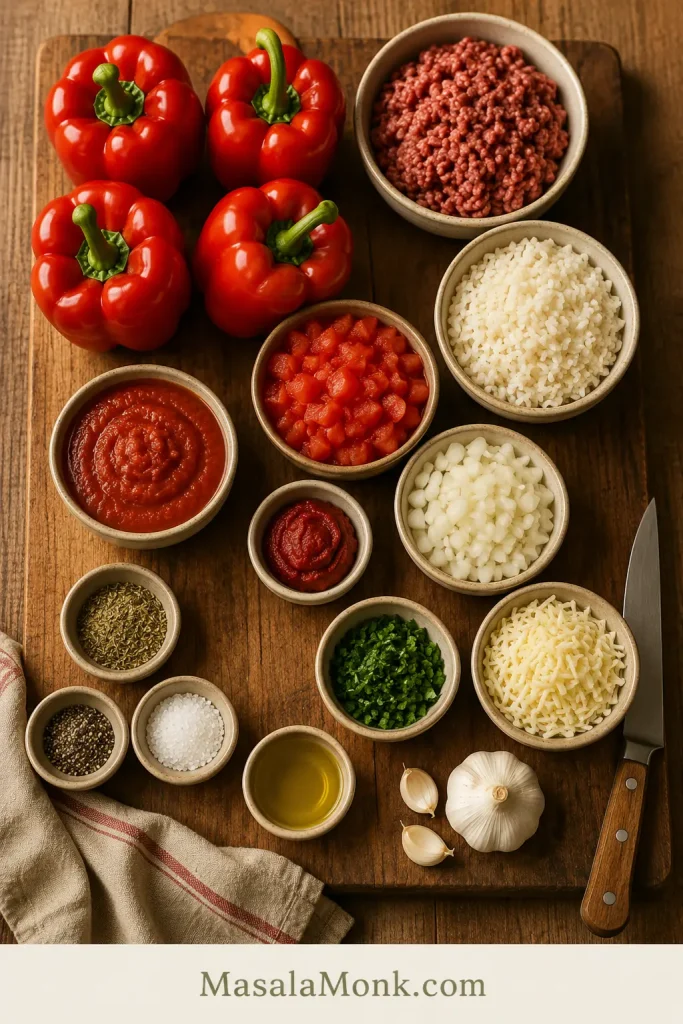
Ingredients
| Ingredient | Amount |
|---|---|
| Large red bell peppers | 6 |
| Olive oil | 2 tablespoons / 30 ml |
| Yellow onion, finely chopped | 1 medium / about 150 g |
| Garlic, minced | 3 cloves |
| Tomato paste | 2 tablespoons / about 30 g |
| Ground beef | 1 lb / 450 g |
| Cooked white or brown rice | 1½ cups / about 240 to 260 g |
| Diced tomatoes, with juices | 1 can, 14.5 oz / 411 g |
| Tomato sauce or marinara | 1½ cups / 360 ml |
| Italian seasoning or dried oregano | 1½ teaspoons |
| Salt | 1 teaspoon, plus more to taste |
| Black pepper | ½ teaspoon |
| Shredded mozzarella, Monterey Jack, cheddar, or a blend | 1 cup / about 110 g, or up to 1½ cups / 170 g for a cheesier top |
| Fresh parsley | Optional, for serving |
Instructions
Build the Filling
- Preheat the oven. Heat the oven to 375°F / 190°C.
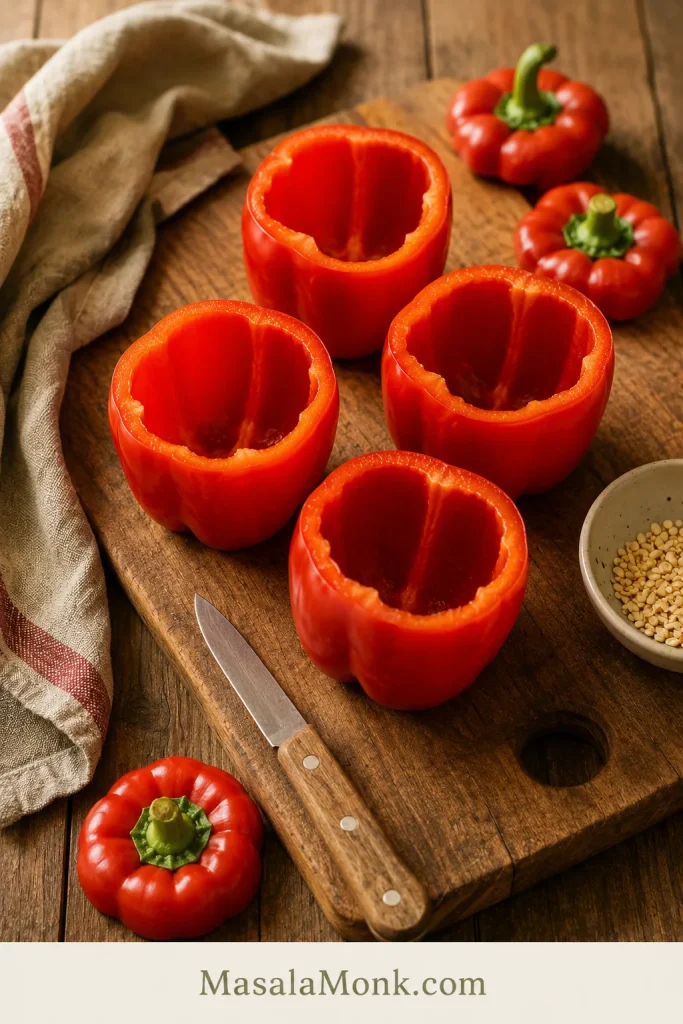
- Prepare the peppers. Slice the tops off the red bell peppers. Remove the seeds and membranes. If needed, trim a very thin slice from the bottom so the peppers stand upright, but do not cut through into the hollow center.
- Soften the onion. Warm the olive oil in a large skillet over medium heat. Add the onion and cook for 3 to 4 minutes, until softened.
- Build the flavor base. Add the garlic and tomato paste. Stir for about 1 minute, until the tomato paste darkens slightly and the garlic smells fragrant.
- Brown the beef. Add the ground beef, salt, black pepper, and Italian seasoning. Cook until the beef is browned and no longer pink, breaking it up as it cooks. Drain excess fat if the skillet looks greasy.
- Add rice and tomatoes. Stir in the cooked rice and diced tomatoes with their juices. Simmer for 3 to 5 minutes, until the mixture is moist but not soupy. Taste and adjust salt if needed.
Fill, Bake, and Finish
- Add sauce to the dish. Spread the tomato sauce or marinara in a shallow layer in the bottom of a 13×9-inch / 33×23 cm baking dish.
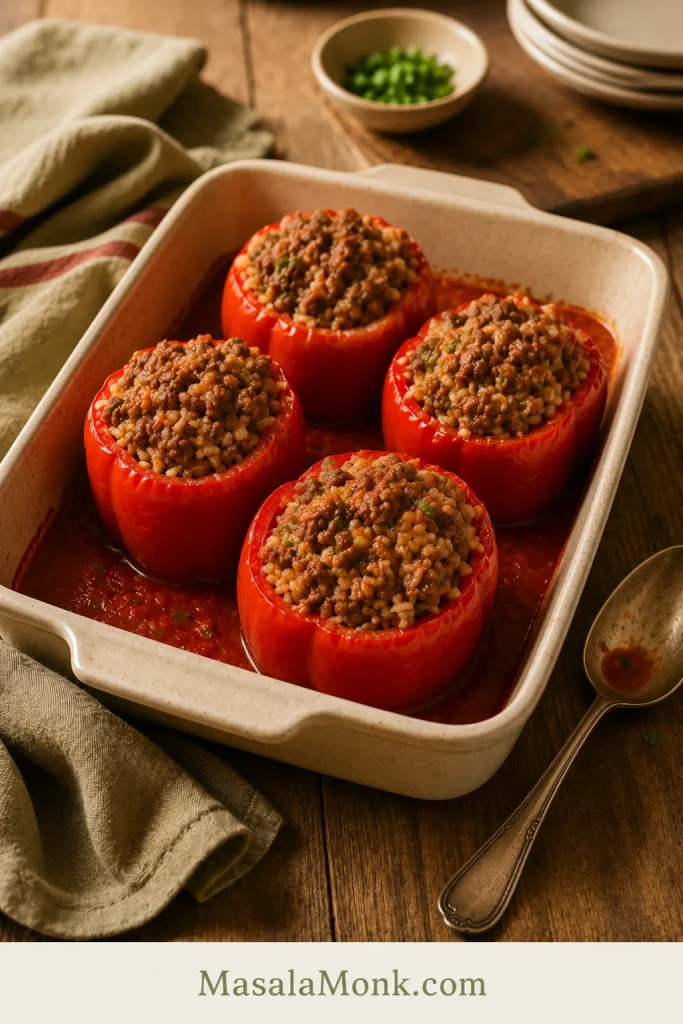
- Stuff the peppers. Spoon the beef and rice mixture into the peppers. Fill generously, but do not press it down hard.
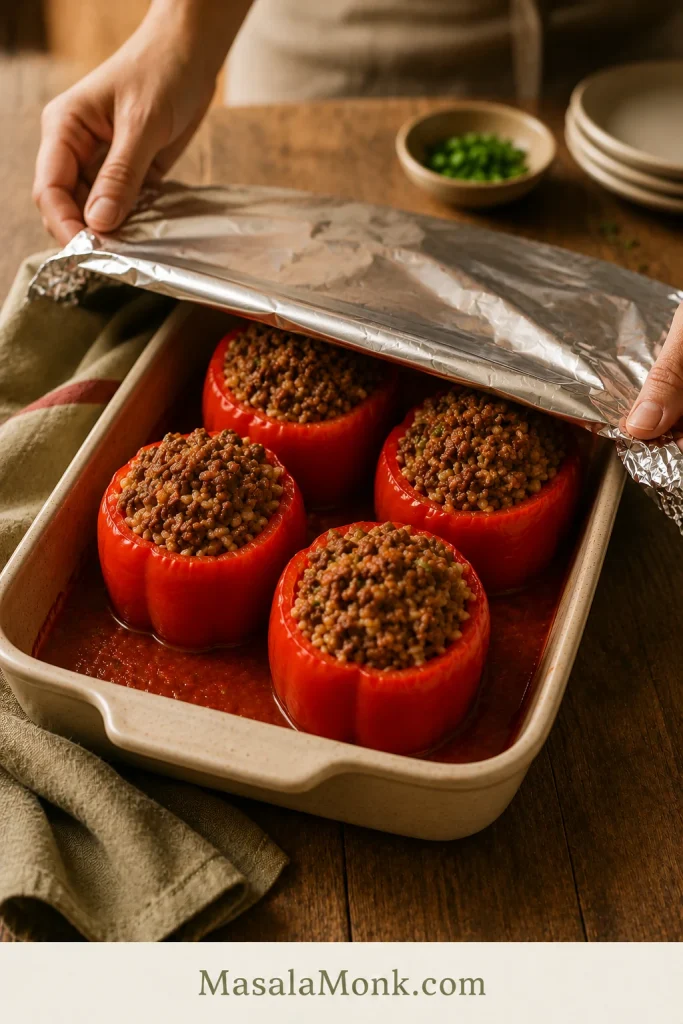
- Bake covered. Place the peppers upright in the baking dish. Cover tightly with foil and bake for 30 to 35 minutes, until the pepper walls are starting to soften.
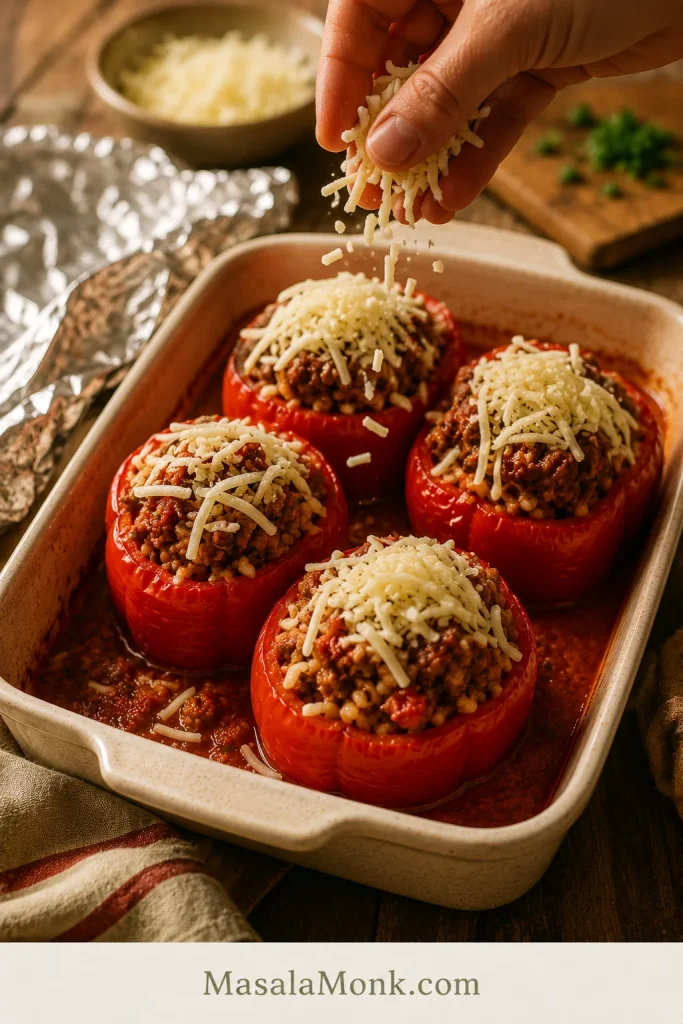
- Add cheese and finish uncovered. Remove the foil. Spoon a little sauce over the peppers if they look dry, then top with shredded cheese. Bake uncovered for 10 to 15 minutes, until the cheese is melted and the peppers are tender.
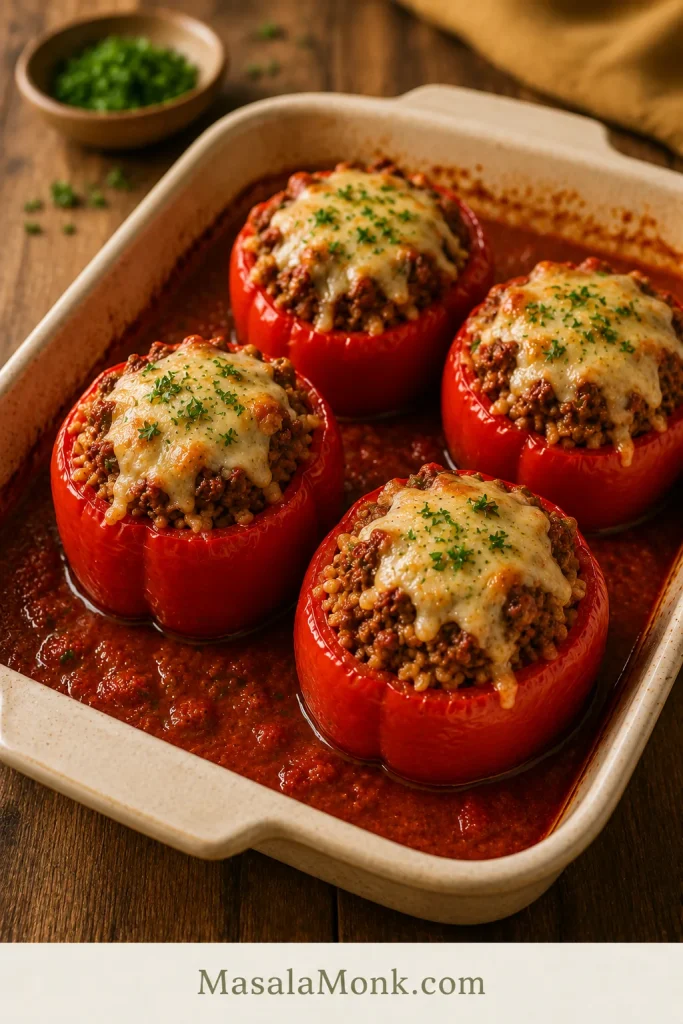
- Check doneness. The peppers are done when they are fork-tender but still holding their shape, the sauce is bubbling around the edges, the center is hot, and the cheese is melted.
- Rest before serving. Let them rest for 5 minutes. Spoon extra sauce from the dish over the top and finish with parsley if using.
Recipe Notes
- Cooked rice gives the most reliable texture. Leftover rice works well.
- Taste the filling before stuffing the peppers. It should taste slightly bold in the skillet because the pepper and rice will soften the flavor once baked.
- If your marinara, canned tomatoes, or cheese are salty, start with ¾ teaspoon salt and adjust after the rice goes in.
- For ground turkey or very lean beef, add an extra spoonful or two of sauce to keep the filling moist.
- Very large peppers may need 5 to 10 extra minutes of covered baking time.
- Let the peppers rest before serving so the filling settles instead of spilling out immediately.
Before You Start: The Stuffed Red Pepper Rules
Use these as your quick mistake-prevention cues, and your stuffed peppers with ground beef and rice are much less likely to turn watery, bland, undercooked, or dry on top.
| Rule | Why It Matters |
|---|---|
| Use cooked rice | It prevents crunchy grains and makes the filling easier to season. |
| Cook the beef first | Browning builds flavor and lets you drain excess fat. |
| Keep the filling thick | The mixture should mound slightly, not run across the skillet. |
| Use a shallow sauce layer | Sauce should cushion the peppers, not boil them. |
| Bake covered first | Steam softens the pepper walls before the top dries out. |
| Add cheese late | The cheese melts cleanly instead of drying out while the peppers finish. |
| Rest before serving | The filling settles, and the peppers are easier to lift from the dish. |
Table of Contents
Start Here
Ingredients & Prep
Cooking Details
After Cooking
What This Recipe Is Built Around
This is the classic baked stuffed bell pepper dinner, but tuned for red peppers: sweeter pepper walls, a thicker beef-and-rice filling, sauce underneath instead of too much liquid inside, and cheese added only once the peppers are nearly tender.
It is practical comfort food, not a fancy project. The dish works because the filling is seasoned well, the sauce is in the right place, and the covered bake gives the peppers enough time to soften before the top is finished.
If you like this kind of saucy, cheesy covered-bake dinner, these baked stuffed shells follow the same comfort-food logic with pasta, filling, sauce, and cheese.
Choose Your Stuffed Red Pepper Path
The main recipe is the classic stuffed bell peppers with ground beef and rice version. Use this table if you already know what style you want.
| If You Want | Use This Approach |
|---|---|
| Classic stuffed red peppers | Use ground beef, cooked rice, tomato sauce, and melty cheese. |
| Softer peppers | Bake covered 5 to 10 minutes longer before adding cheese. |
| No boil stuffed peppers | Skip boiling and let the covered bake soften the peppers. |
| Saucier peppers | Add a little extra marinara to the dish and spoon sauce over before serving. |
| Less watery peppers | Simmer the filling until thick and finish the bake uncovered. |
| Ground turkey version | Replace beef with turkey and add a little extra oil or sauce. |
| Vegetarian version | Use beans, lentils, mushrooms, quinoa, vegetables, and cheese. |
| Vegan version | Use beans or lentils, rice or quinoa, tomato sauce, herbs, and vegan cheese or no cheese. |
| No-rice version | Use cauliflower rice, mushrooms, eggplant, extra meat, lentils, or beans. |
| Faster weeknight bake | Use halved peppers instead of whole peppers. |
Why This Stuffed Red Pepper Recipe Works
The trick is not a special ingredient. It is timing and moisture. These stuffed red bell peppers work because the rice is already cooked, the beef is browned first, the sauce stays shallow, and the cheese goes on only after the peppers have started to soften.
- Cooked rice prevents crunchy grains. The filling bakes evenly instead of waiting for dry rice to soften inside the pepper.
- Browned beef gives better flavor. It also lets you drain extra fat before the rice and tomatoes go in.
- Tomato paste deepens the skillet mixture. One minute in the pan makes the filling taste more rounded.
- A shallow sauce layer prevents boiling. The sauce keeps the peppers moist without turning the dish soupy.
- Foil softens the peppers first. The covered bake gives the pepper walls time to relax before the cheese is added.
- A short rest helps the filling settle. The peppers lift from the dish more neatly after a few minutes.
Ingredients You’ll Need
The ingredients are familiar, which is exactly why the balance matters. A little tomato paste makes the beef taste deeper, cooked rice keeps the texture steady, and tomato sauce in the dish makes the peppers feel finished instead of dry.
Red Bell Peppers
Use large red bell peppers for this recipe. Red peppers are sweet, colorful, and mild, which makes them especially good with beef, rice, tomato sauce, and cheese. In some countries, red bell peppers are sold as red capsicum. Choose the large sweet kind, not small hot red peppers.
Ground Beef
Ground beef gives the filling its classic flavor. Beef that is around 85% to 90% lean works well because it has enough richness without making the dish greasy. The beef should taste a little bold in the skillet because the rice, pepper, and sauce will mellow it once everything bakes together.
Cooked Rice
Cooked rice is the most reliable choice for baked stuffed peppers. White rice, brown rice, basmati, jasmine rice, or leftover rice can all work. The important part is that the rice should already be cooked before it goes into the filling.
Tomato Paste, Diced Tomatoes, and Sauce
Tomato paste adds depth, diced tomatoes bring moisture and texture, and tomato sauce or marinara keeps the baking dish saucy. Together, they stop the filling from tasting flat or dry.
Cheese
Mozzarella gives a mild, stretchy melt. Monterey Jack melts smoothly and tastes creamy. Cheddar adds sharper flavor. Add the cheese near the end, when the peppers are almost tender, so it melts into the top instead of drying out while the peppers catch up.
Seasoning
Italian seasoning or oregano keeps the flavor classic. Paprika, chili flakes, basil, parsley, or a little cumin can also work depending on the version you want. Season the beef before adding the rice, because rice softens the flavor once it goes in.
Best Red Peppers to Use
Choose large, firm, glossy red bell peppers that are close to the same size. Similar-sized peppers bake more evenly, and flat-bottomed peppers are easier to stand upright in the dish.
- Use: large red bell peppers.
- Good backup: yellow or orange bell peppers.
- For a sharper flavor: green bell peppers can work, but they taste less sweet.
- Not ideal for this main recipe: mini peppers, cherry peppers, pimento peppers, long hot red peppers, or red jalapeños.
Mini peppers and pimento peppers are delicious, but they behave differently. They need different filling amounts and shorter cooking times, so save them for appetizer-style stuffed pepper recipes.
No Boil Stuffed Peppers: Do You Need to Boil or Pre-Bake?
You do not need to boil red peppers before stuffing them for this recipe. This no-boil method uses the covered bake to create enough steam to soften the peppers while the filling stays moist.
For very soft peppers, blanch the empty peppers in boiling water for about 5 minutes, then drain and dry them before stuffing. When you prefer peppers that hold their shape and keep a little bite, skip boiling and let the oven do the work.
With halved peppers, pre-baking is more useful than boiling. Bake the empty halves for 10 minutes, tip out any liquid, then add the filling. This helps prevent watery halves and shortens the final bake.
| Method | Use It When | What to Know |
|---|---|---|
| No boiling | You want classic whole stuffed red peppers | Good balance of tenderness and shape |
| Blanch 5 minutes | You like very soft peppers | Drain and dry well before stuffing |
| Pre-bake 10 minutes | You are using halved peppers | Tip out liquid before adding filling |
Equipment
You need a large skillet for the filling and a snug 13×9-inch / 33×23 cm baking dish for the peppers. A snug dish helps the peppers support each other instead of tipping into the sauce.
- 13×9-inch / 33×23 cm baking dish
- Large skillet
- Cutting board and sharp knife
- Spoon for stuffing
- Foil
- Optional baking sheet under the dish to catch bubbling sauce
Cooked Rice or Uncooked Rice?
Use cooked rice for this stuffed red pepper recipe. Cooked rice lets you control the texture before the dish goes into the oven, so you are not guessing whether the grains will soften in time.
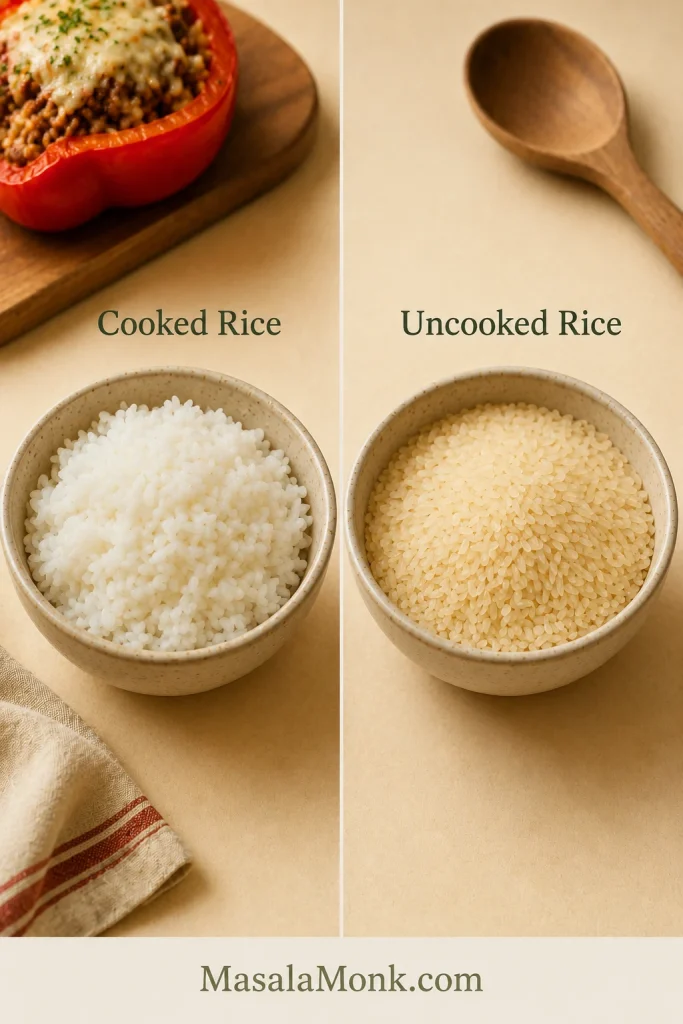
If rice texture is the part that usually trips you up, this guide on how to cook rice is useful before you make the filling.
Uncooked rice can work in some stuffed peppers with tomato sauce, but it needs more liquid, more time, and closer control. Without enough liquid, the rice can stay hard. With too much liquid, the peppers can become watery.
Cooked rice also makes the filling easier to taste and adjust. Rice absorbs seasoning, so the mixture may need a final pinch of salt after the grains go in.
Leftover rice tip: leftover rice is excellent here. Break up any clumps before stirring it into the beef and tomato mixture.
Leftover rice can do double duty: use some here, then save the rest for this shrimp fried rice recipe later in the week.
For uncooked rice, do not add it dry straight into the peppers. Simmer the grains with the meat, tomatoes, and extra liquid until they are mostly tender, then stuff the peppers and bake.
Do You Cook the Meat First?
Yes. Cook the beef first. It is one of the simplest ways to make stuffed peppers with ground beef and rice taste deeper and bake more evenly.
Browning the meat first helps the onion and garlic cook properly, gives you a chance to season the filling, and lets you drain off excess fat. It also makes the final bake more predictable because the oven’s job is to soften the peppers, heat the filling through, and melt the cheese — not cook raw meat hidden inside a pepper.
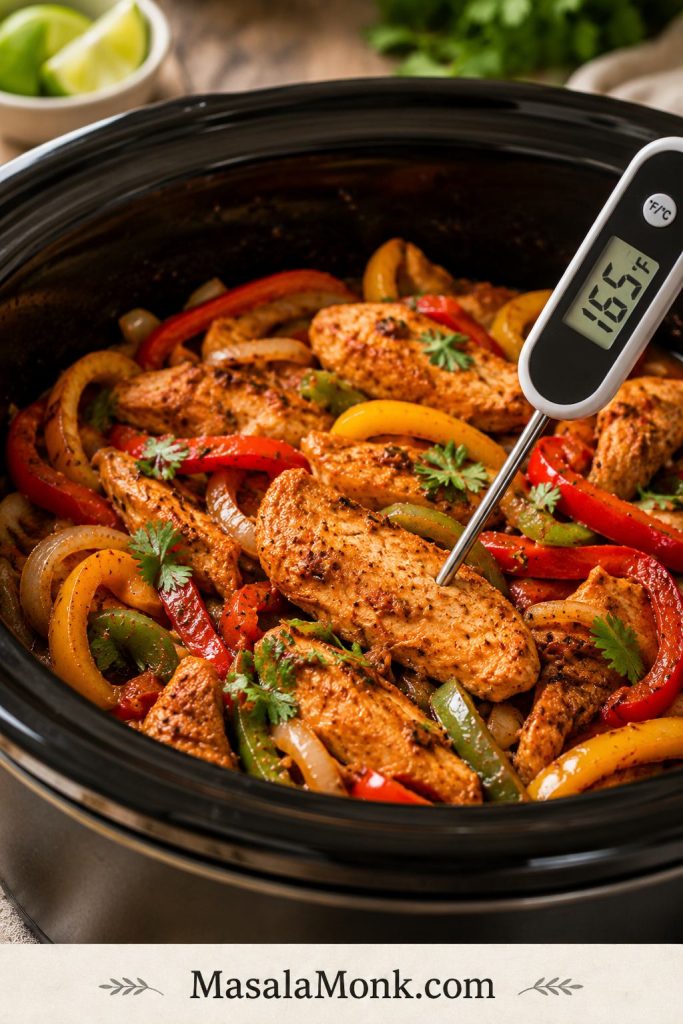
For a thermometer check, USDA guidance lists ground beef at 160°F / 71°C. Since the beef is browned before stuffing, the oven is mainly heating the filling through and finishing the peppers.
Red Sauce for Stuffed Peppers
The best red sauce for stuffed peppers is tomato sauce or marinara. Use about 1½ cups / 360 ml for six peppers, spread in a shallow layer under the peppers, then spoon the sauce over the top after baking.
How Much Sauce to Add First
Start with a thin layer across the bottom of the dish. That gives the peppers moisture from below without turning the baking dish into a pot of sauce.
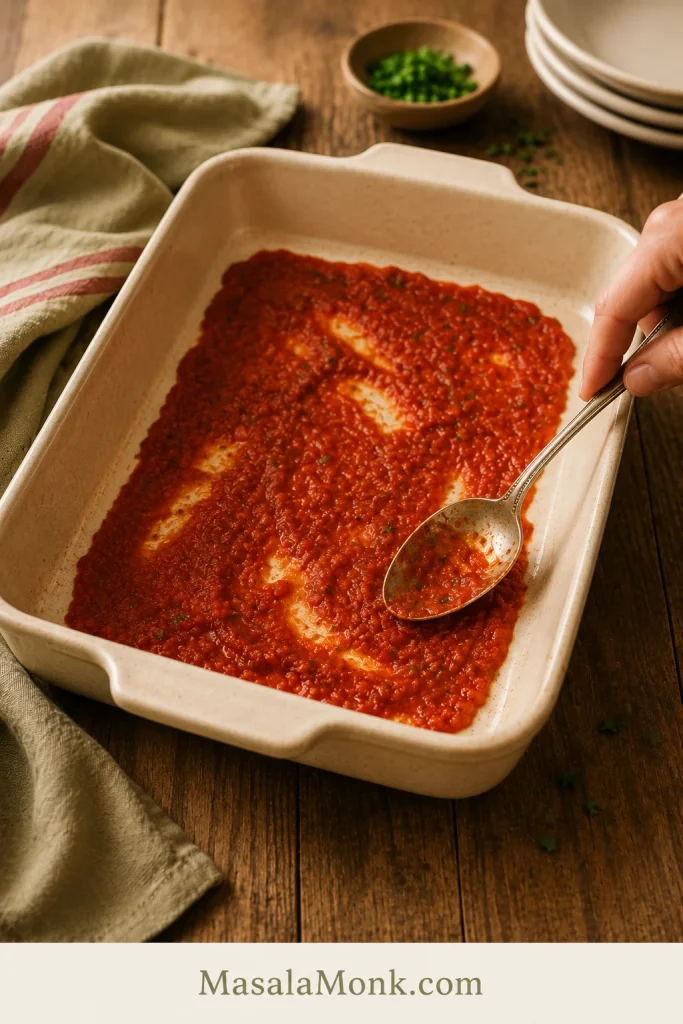
Think of the sauce as the cushion under the peppers, not a soup for them to sit in. You want enough to keep the dish moist and give every serving extra tomato flavor, but not so much that the peppers boil in liquid.
Sauce Cushion, Not Soup
This is the main sauce mistake to avoid. A shallow layer supports the peppers; a deep pool can make them taste more boiled than baked.
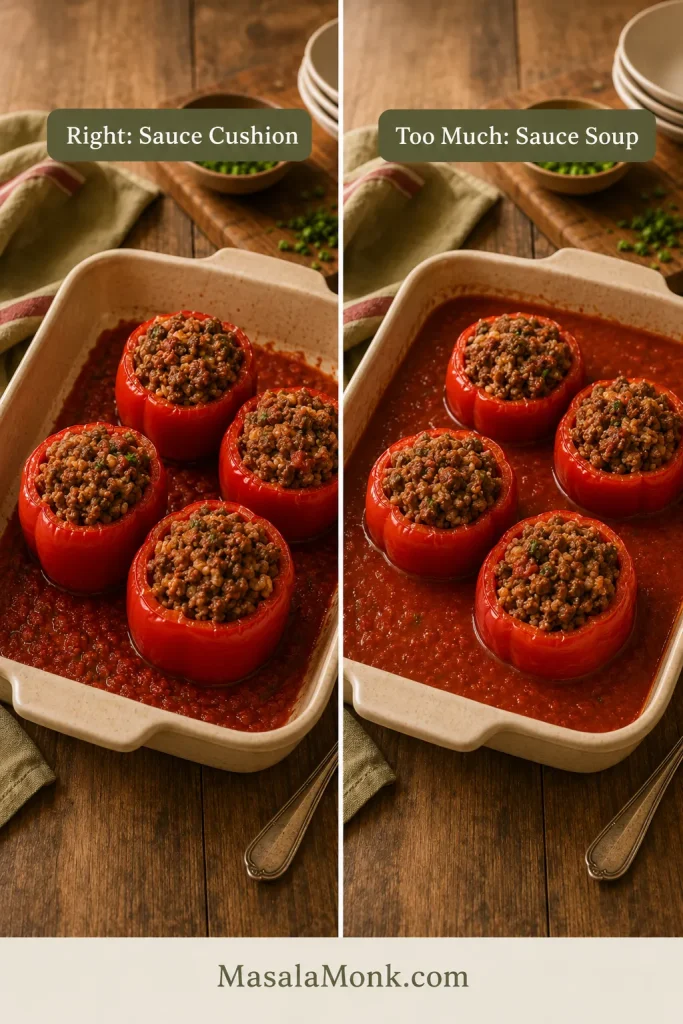
A good sauce layer should show up when you cut into the pepper, without making the pepper taste boiled.
The sauce in the dish is also your finishing sauce. Spoon it over the peppers at the table so the rice and beef taste juicy all the way through.
Jarred sauce is fine, but if you want the dish to feel more homemade, use this marinara sauce recipe as the base.
| Sauce Style | Use It For |
|---|---|
| Plain tomato sauce | Classic stuffed red peppers with a clean tomato flavor |
| Marinara | An easy shortcut when you want more flavor |
| Slightly sweet red sauce | Old-fashioned stuffed pepper flavor |
| Spicy red sauce | Add chili flakes, cayenne, or chopped jalapeño |
When tomatoes are in season, this tomato sauce from fresh tomatoes can also become the base sauce for the baking dish.
For very thick sauce, loosen it with a splash of broth or water before adding it to the dish. With thin sauce, use a little less and let the peppers finish uncovered so excess moisture can reduce.
How to Make Stuffed Red Peppers
The recipe card gives the exact steps. This section is the visual walkthrough: what you should see, smell, and check as the peppers move from raw ingredients to a finished baked dinner.
1. Prep the Red Peppers
After trimming, the peppers should look like little cups and stand upright on their own. Keep the walls intact and avoid cutting through the bottom, because any hole in the base lets filling and sauce escape into the dish.
2. Cook the Tomato Paste and Beef
The tomato paste should darken slightly before the beef goes in. That quick minute makes the filling taste deeper and less raw-tomato sharp. Once the beef is browned, the skillet should smell savory, garlicky, and tomato-rich, not flat or boiled.
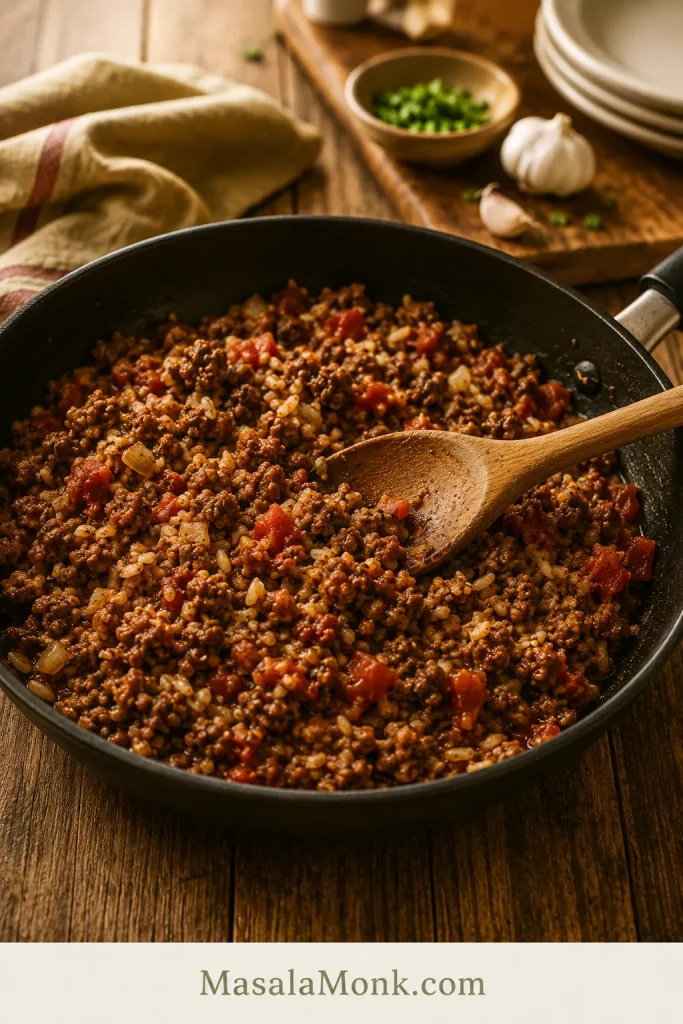
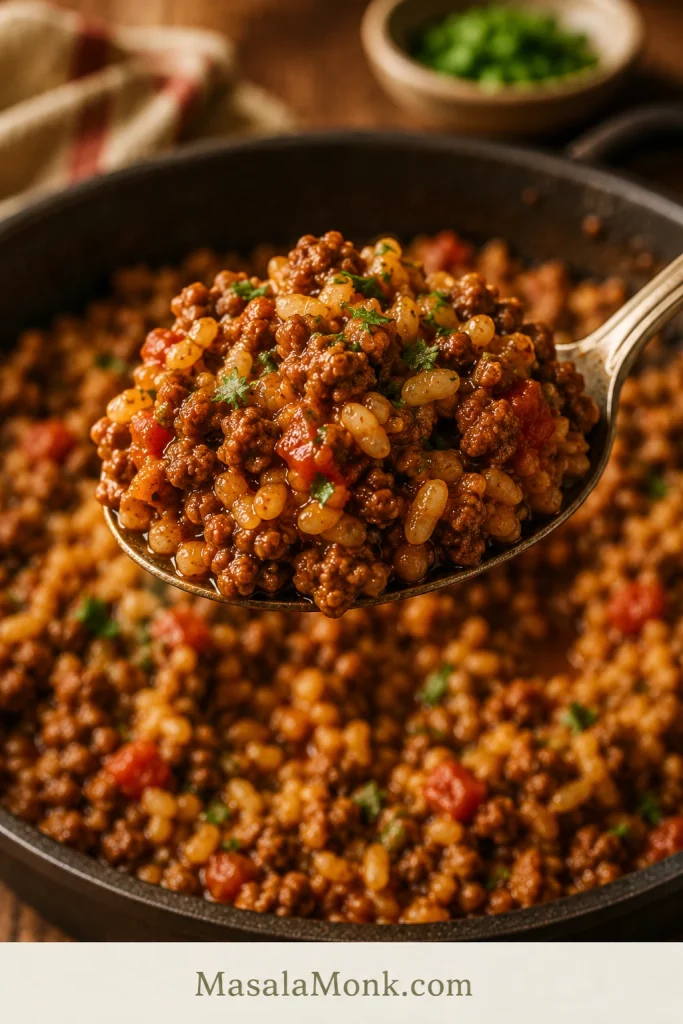
3. Bring the Filling Together
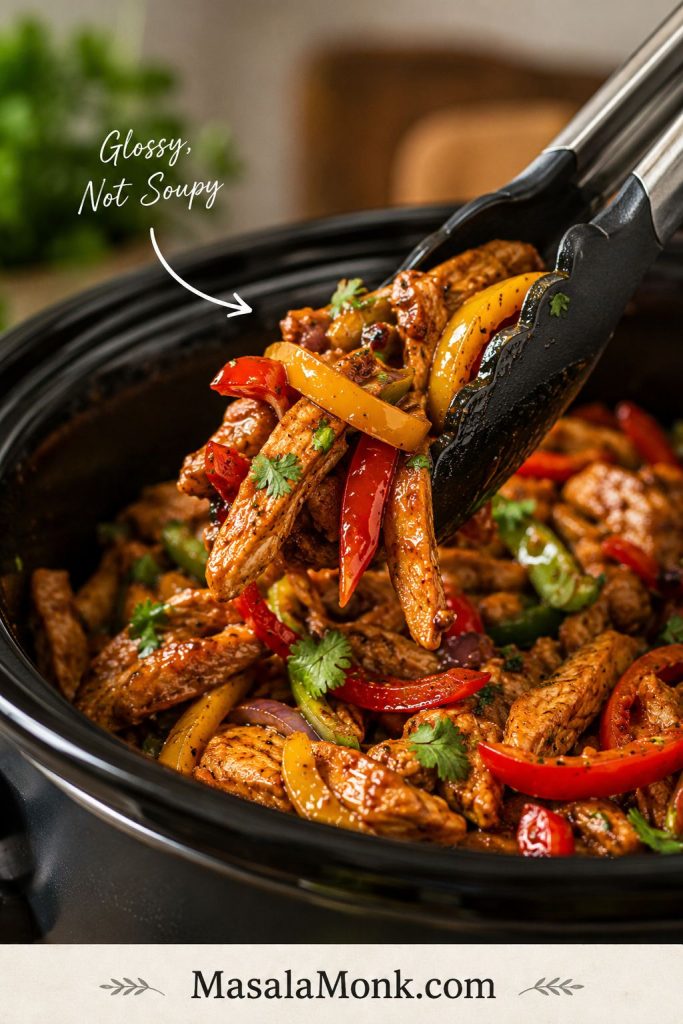
After the cooked rice and diced tomatoes go in, look for a skillet mixture that is moist, glossy, and thick enough to mound slightly. If it looks wet enough to pour, keep simmering. It should sit on the spoon, not run off it.
4. Fill Without Packing Too Hard
Fill each pepper generously, but keep the beef-and-rice mixture loose enough that a spoon can still move it. Pressing too hard makes the center heat less evenly and can cause the filling to spill out when served.
5. Bake Covered Before Adding Cheese
Before the cheese goes on, the pepper walls should already be starting to soften. If they still feel stiff when pierced with a fork, cover the dish again and give them a few more minutes. The cheese should finish the dish, not wait in the oven while the peppers catch up.
6. Add Cheese Near the End
Once the peppers have softened under foil, add the cheese and return the dish to the oven uncovered. The cheese should finish the top, not sit in the oven while firm pepper walls catch up.
7. Rest and Spoon Sauce Over the Top
When the stuffed peppers come out of the oven, the sauce should be bubbling around the base and the cheese should be melted into the top. Let them rest for 5 minutes, then spoon sauce from the dish over each pepper before serving.
Bake Time and Temperature
For whole stuffed red peppers, 375°F / 190°C is the sweet spot. It is hot enough to soften the peppers in a reasonable time, but gentle enough that the filling stays moist and the sauce does not burn.
| Step | Time | What Happens |
|---|---|---|
| Bake covered | 30 to 35 minutes | Peppers soften and filling heats through |
| Bake uncovered with cheese | 10 to 15 minutes | Cheese melts and the top finishes |
| Rest | 5 minutes | Filling settles and serving gets easier |
Bubbling Sauce and Melted Cheese Cues
At the end of baking, look at the sauce and the pepper walls before you rely on the clock. The dish should look hot and settled, not dry or collapsed.
Total baking time is usually 40 to 50 minutes. Start checking around 40 minutes if your peppers are small, and closer to 50 minutes if they are large and thick-walled. The fork test matters more than the clock.
When the foil comes off, the peppers should look relaxed around the edges, not collapsed.
The peppers are ready when they are tender enough to pierce with a fork but still hold their shape. If they are still too firm, cover the dish again and bake a little longer before adding more uncovered time.
The Fork-Tender Test
For the final check, pierce the side of a pepper instead of judging only by the cheese. Tender but upright is the goal.
Should Stuffed Peppers Be Baked Covered or Uncovered?
Stuffed peppers should be baked covered first, then uncovered at the end. The covered bake softens the peppers; the uncovered finish melts the cheese and reduces extra moisture.
If you bake whole stuffed peppers uncovered from the beginning, the cheese and top of the filling can dry before the pepper walls become tender. Covering first and uncovering late makes the difference between peppers that taste baked and peppers that taste boiled.
How to Keep Stuffed Red Peppers From Getting Watery
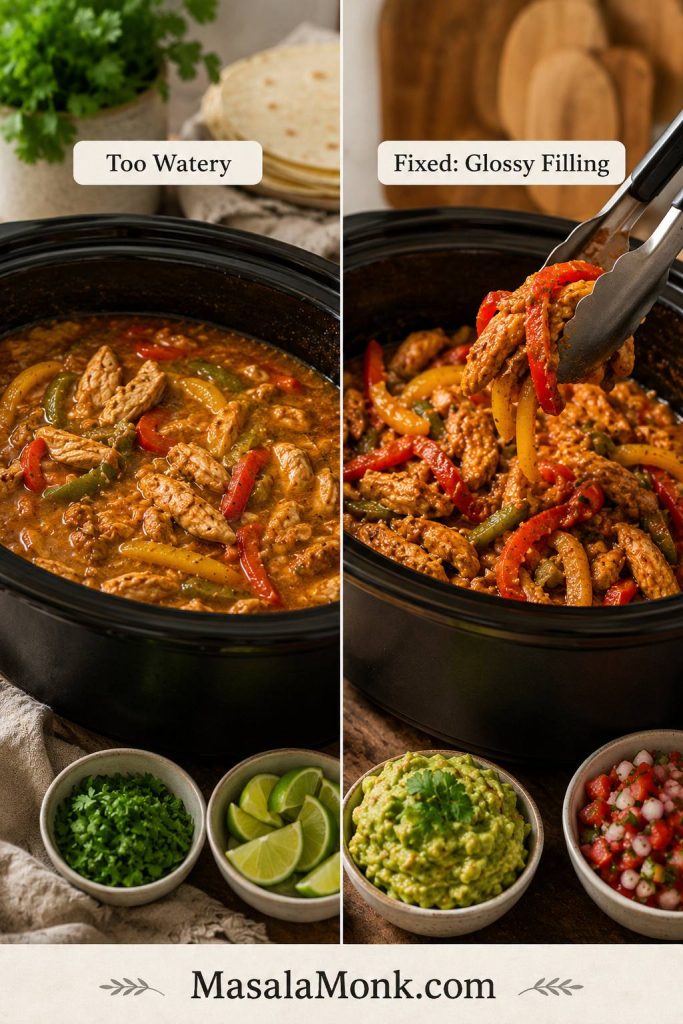
Watery stuffed peppers usually happen for one of three reasons: the filling was too loose, the peppers released a lot of liquid, or the dish had too much sauce. The fix is not complicated, but you need to control moisture before and during baking.
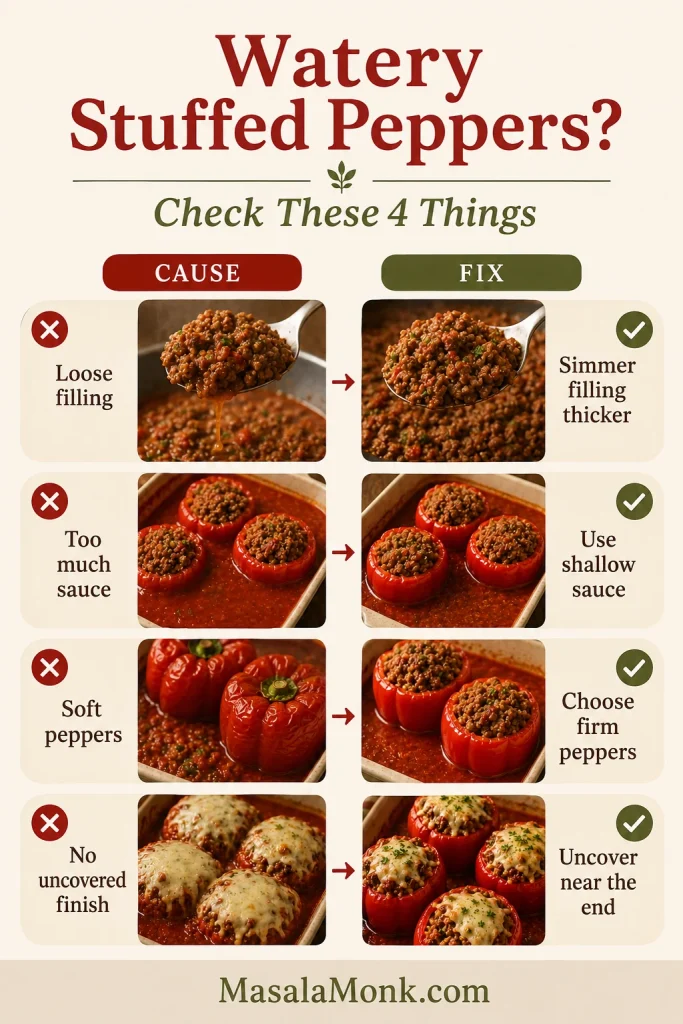
- Use cooked rice. It absorbs flavor without needing extra liquid inside the pepper.
- Brown and drain the beef. Excess fat can make the filling feel greasy and loose.
- Cook the filling until it is thick enough to mound. Let extra tomato liquid simmer off before stuffing.
- Do not flood the baking dish. Use a shallow layer of sauce, not a deep pool.
- Bake covered first, then uncovered. Covered baking softens; uncovered baking lets extra moisture reduce.
- Use firm peppers. Older, softer peppers collapse and release more liquid.
- Rest before serving. Five minutes helps the filling settle.
- For halved peppers, pre-bake and tip out liquid. Halved peppers can release moisture quickly.
Texture cue: the filling should look glossy before stuffing, but not loose enough to run across the skillet. If it looks soupy, simmer it a few minutes longer.
Freezer note: for the best texture, freeze cooked stuffed peppers rather than raw stuffed peppers. Raw peppers can release more water after thawing.
Whole vs Halved Stuffed Red Peppers
This recipe uses whole upright peppers because they give the classic stuffed pepper presentation and hold a generous amount of filling. They need a longer bake and a snug dish, but they look beautiful on the plate.
Halved peppers are better when you want a faster weeknight bake. They cook faster, are easier to portion, and give you more surface area for cheese. Because the cut sides release moisture quickly, a short pre-bake helps.
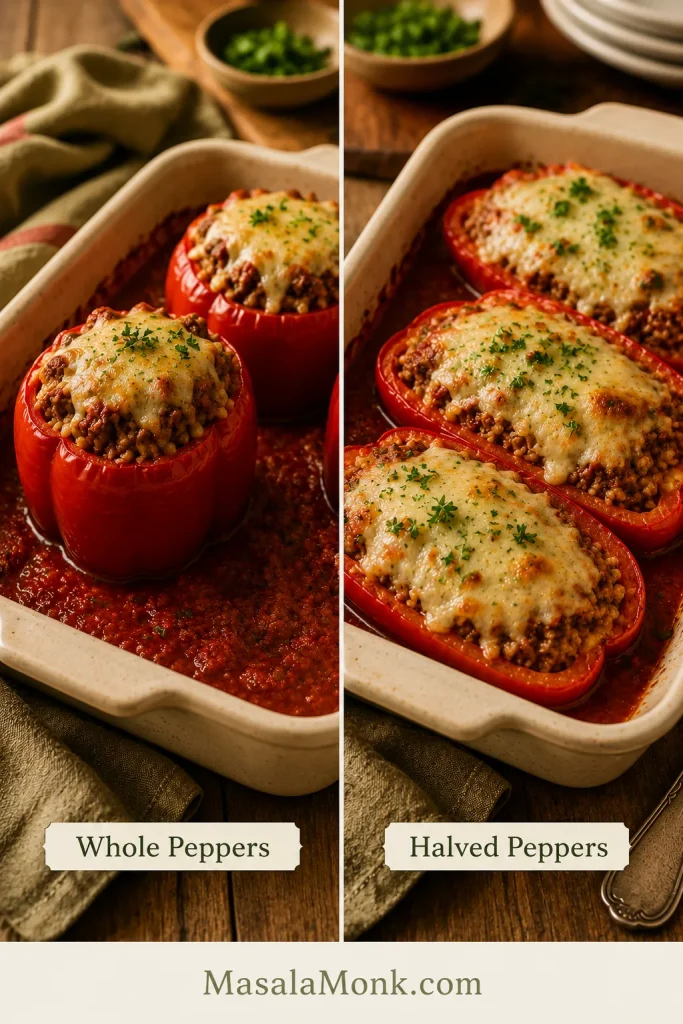
How to Make Halved Stuffed Red Peppers
To use halved peppers, slice them from stem to base, remove the seeds, and place them cut-side up in the dish. Pre-bake the empty halves at 375°F / 190°C for 10 minutes, then tip out any pooled liquid.
Add the filling, cover the dish, and bake for 15 to 20 minutes. Finish uncovered with cheese for another 5 to 10 minutes, until the cheese melts and the peppers are tender. Halved peppers cook faster than whole peppers, so start checking early.
Easy Variations
Once you know the base method, the filling can change without the whole recipe falling apart. Keep the mixture thick, keep the sauce shallow, bake covered first, and add cheese near the end.
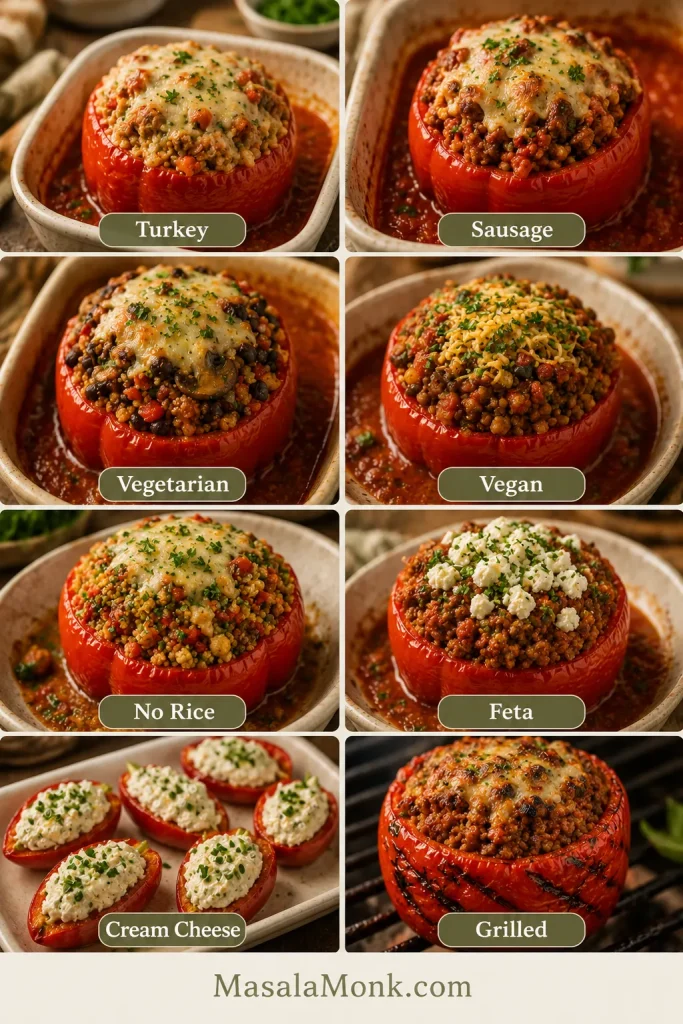
Ground Turkey Stuffed Red Peppers
Ground turkey works well when you want a lighter filling. Since turkey is leaner than beef, add a little extra olive oil or a few extra spoonfuls of tomato sauce so the center does not turn dry. Season well, because turkey needs more help than beef.
Sausage Stuffed Red Peppers
For a richer, more seasoned filling, use half ground beef and half Italian sausage. Because sausage brings salt and flavor, reduce the added salt at first and adjust after tasting.
Vegetarian Stuffed Red Peppers
For a vegetarian version, replace the beef with black beans, pinto beans, lentils, mushrooms, quinoa, or extra vegetables. Beans and lentils make the peppers hearty; mushrooms add savory depth if you cook off their moisture first.
Vegan Stuffed Red Peppers
For a vegan version, use beans, lentils, mushrooms, rice, quinoa, or vegetables cooked down with tomato sauce and herbs. Skip the cheese or use vegan cheese. Keep the mixture moist and well-seasoned so it does not taste like plain rice and vegetables.
Stuffed Red Peppers Without Rice
For no-rice stuffed red peppers, use cauliflower rice, chopped mushrooms, cooked eggplant, extra ground beef, ground turkey, lentils, or beans. If you use watery vegetables like zucchini, mushrooms, or eggplant, cook them first so they release moisture before going into the peppers.
Feta Stuffed Red Peppers
For a Mediterranean-style version, use feta, herbs, lemon, olives, chickpeas, couscous, or rice. Because feta is salty, taste the filling before adding extra salt. This version works especially well with halved peppers.
Cream Cheese Stuffed Red Peppers
Cream cheese stuffed red peppers are usually more of an appetizer than a full dinner. For that style, mini red peppers or small sweet peppers work better than large whole bell peppers. Mix cream cheese with herbs, garlic, cheddar, chives, smoked paprika, or crispy breadcrumbs, then bake or air fry until warm.
Grilled Stuffed Red Peppers
Grilled stuffed red peppers work best with a fully cooked filling. Place the stuffed peppers over medium heat, close the grill, and cook until the pepper walls soften and the center is hot. Add cheese near the end so it melts without burning.
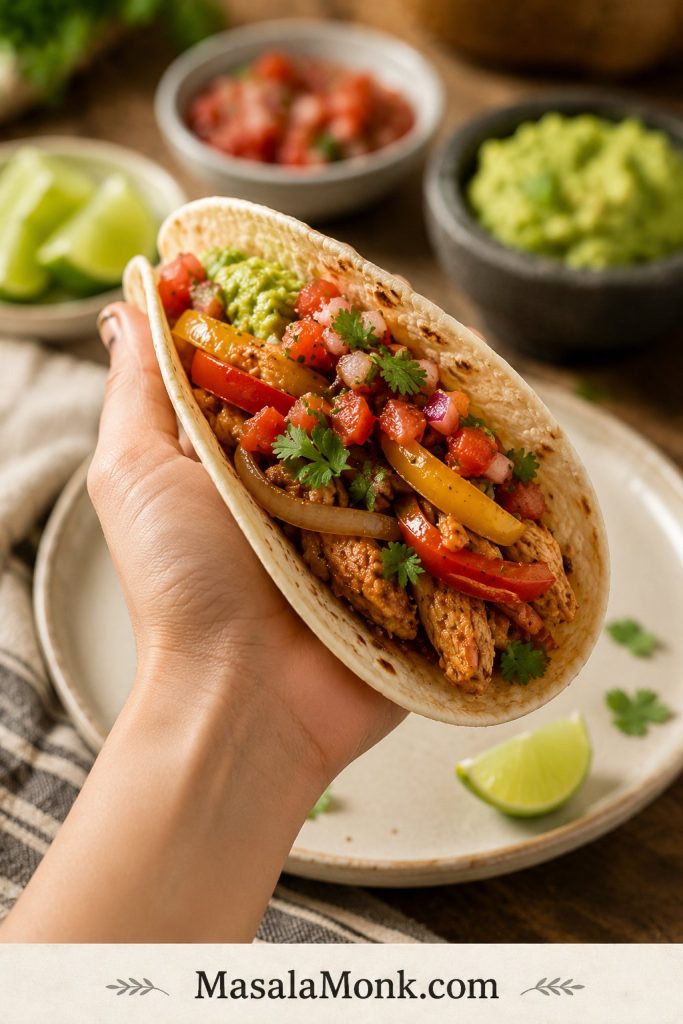
What to Serve With Stuffed Red Peppers
This dish can be a full meal on its own because it already has vegetables, protein, rice, sauce, and cheese. On a busy night, choose one simple side based on the kind of plate you want.
- Fresh and crisp: a cucumber salad for something cold and tangy
- Starchy and cozy: roasted potatoes or warm bread
- Sauce-friendly: homemade garlic bread for catching extra tomato sauce
- Light and vegetable-heavy: steamed broccoli, green beans, or a simple green salad
- For spicy versions: plain yogurt or sour cream
If you want a soup-and-peppers dinner, a bowl of minestrone soup keeps the meal vegetable-heavy without making it feel too rich.
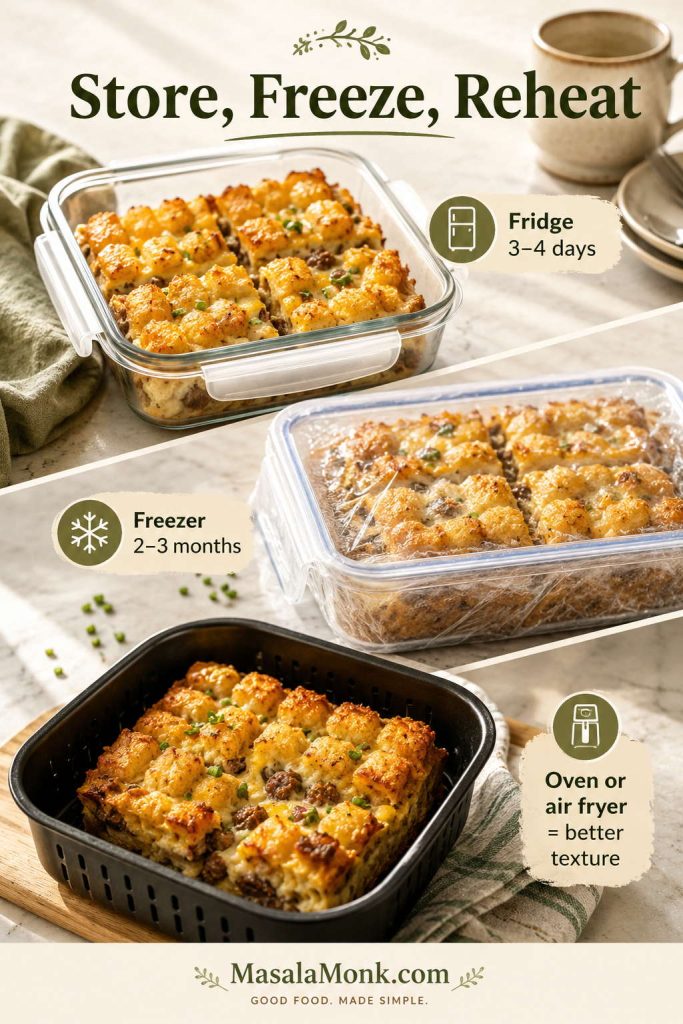
Make Ahead, Storage, Freezing, and Reheating
Make Ahead
You can make the filling 1 to 2 days ahead and store it in the fridge. You can also stuff the peppers several hours ahead, cover the dish, and refrigerate until ready to bake. If baking straight from the fridge, add about 5 to 10 extra minutes to the covered baking time.
For the cleanest make-ahead stuffed peppers, keep a little extra sauce ready. Cold filling can feel drier when it goes into the oven, so spooning sauce into the dish before baking helps everything heat more evenly.
Storage
Store leftovers in an airtight container in the fridge for 3 to 4 days. Keep extra sauce with the peppers if possible, because it helps them reheat without drying out.
That timing also matches USDA leftover guidance, which recommends keeping cooked leftovers in the refrigerator for 3 to 4 days.
Freezing
These peppers freeze best after they are cooked. Let them cool completely, then wrap them well or store them in freezer-safe containers. Freeze for up to 2 to 3 months.
Raw stuffed peppers can be frozen, but the texture is usually softer and wetter after thawing. For the best result, bake first, cool, then freeze.
Reheating
To reheat in the oven, place the peppers in a baking dish with a spoonful of sauce, cover, and warm at 350°F / 175°C until the center is hot. The microwave is faster, but the peppers will be softer. Add a little sauce before reheating if the filling looks dry.
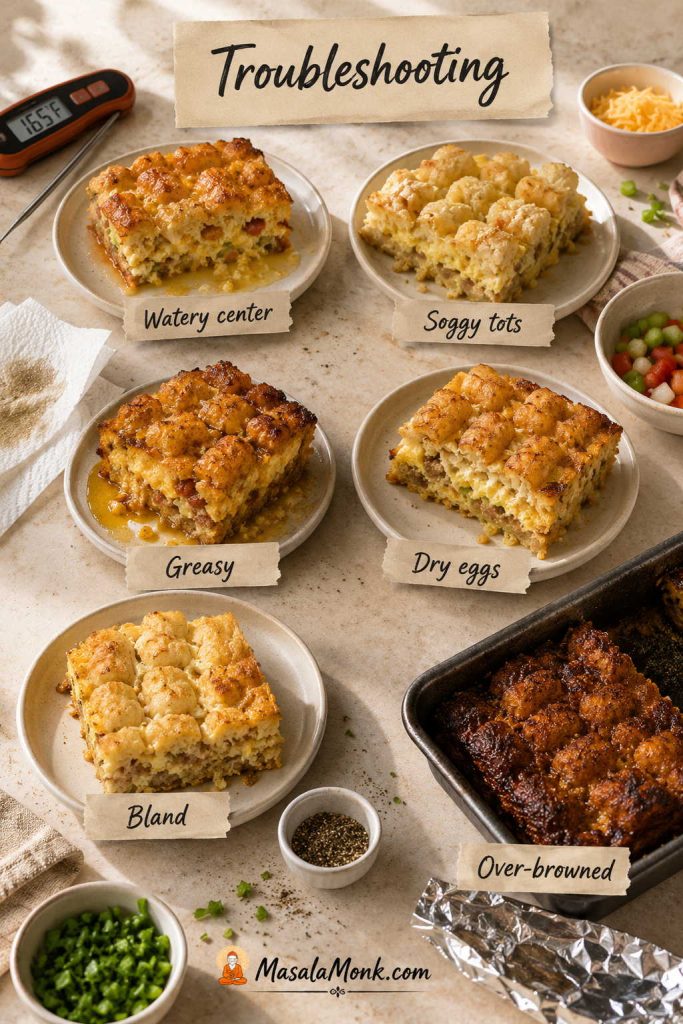
Troubleshooting
Most stuffed red pepper problems come down to moisture, timing, or seasoning. Use this table if something feels off.
| Problem | Likely Cause | Fix |
|---|---|---|
| Peppers are watery | Loose filling, too much sauce, or peppers released liquid | Simmer filling longer, use less sauce, bake uncovered at the end, and rest before serving |
| Peppers are still firm | Not enough covered baking time | Cover again and bake 5 to 10 minutes longer |
| Rice is undercooked | Uncooked or partly cooked rice was added | Use fully cooked rice for this recipe |
| Filling tastes bland | Not enough seasoning before rice was added | Season the beef well and use tomato paste, garlic, herbs, and enough salt |
| Filling is dry | Very lean meat or not enough sauce | Add extra tomato sauce or a splash of broth |
| Peppers collapsed | Overbaking or very soft peppers | Use firm peppers and bake only until tender |
| Cheese browned too fast | Cheese was added too early | Add cheese during the last 10 to 15 minutes only |
| Filling spills out when served | Peppers were overfilled or served immediately | Pack gently and rest 5 minutes before lifting from the dish |
| Peppers will not stand upright | Uneven bottoms or dish is too large | Trim a tiny slice from the bottom or use a snugger dish |
FAQ
Do you cook rice before adding it to stuffed red peppers?
Yes. Cooked rice gives the most reliable texture and keeps you from finding hard grains inside an otherwise tender pepper. Leftover rice works well.
Can I use uncooked rice in stuffed red peppers?
You can, but cooked rice is easier. If using uncooked rice, simmer it with the filling and extra liquid until mostly tender before stuffing the peppers.
Should the ground beef be cooked before stuffing peppers?
Yes. Brown the beef first so the filling tastes deeper, releases excess fat in the skillet, and heats more predictably in the oven.
Do you have to boil red peppers before stuffing them?
No. This recipe uses a no-boil method. Baking the peppers covered gives enough steam to soften them.
How long do stuffed red peppers take in the oven?
Whole peppers usually take 40 to 50 minutes at 375°F / 190°C: 30 to 35 minutes covered, then 10 to 15 minutes uncovered with cheese.
What temperature is best for baking stuffed red peppers?
375°F / 190°C works well because it gives whole peppers time to soften while keeping the filling moist.
How do I know when stuffed red peppers are done?
The peppers should be fork-tender but still holding their shape. Around the edges, the sauce should bubble, the filling should be hot, and the cheese should be melted.
Why are my stuffed peppers watery?
They can turn watery if the filling is loose, the meat was not drained, the dish had too much sauce, or the peppers released liquid. Simmer the filling until thick and finish the bake uncovered.
Do stuffed peppers need to be covered while baking?
Yes, for the first part of baking. Covering traps steam and helps the peppers soften; uncover near the end for melted cheese and reduced moisture.
Is it better to make stuffed peppers whole or halved?
Whole peppers look classic and hold more filling. Halved peppers cook faster, are easier to eat, and give more surface area for cheese.
What sauce goes with stuffed red peppers?
Tomato sauce or marinara is the easiest choice because it keeps the peppers moist and gives you sauce to spoon over the finished dish.
Which cheese melts best on stuffed peppers?
Mozzarella, Monterey Jack, cheddar, or a blend all work. For the final texture, mozzarella is mild and stretchy, Monterey Jack is creamy, and cheddar tastes sharper.
How do you make stuffed red peppers without rice?
Replace the rice with cauliflower rice, mushrooms, eggplant, extra meat, lentils, beans, or quinoa. Cook watery vegetables first so they do not loosen the filling.
What is a good vegetarian filling for red peppers?
Beans, lentils, mushrooms, quinoa, rice, corn, tomatoes, onions, garlic, herbs, and cheese all work well. Keep the filling hearty and well-seasoned.
Can I make stuffed red peppers ahead of time?
Yes. Make the filling 1 to 2 days ahead or stuff the peppers several hours ahead. If baking from cold, add 5 to 10 extra minutes to the covered bake.
Do stuffed red peppers freeze well?
Yes. They freeze best after baking. Cool completely, wrap or store airtight, and freeze for up to 2 to 3 months.
How do you reheat stuffed red peppers without drying them out?
Reheat them covered with a spoonful of sauce in the dish. Use a 350°F / 175°C oven until the center is hot, or microwave gently for a softer result.
Can I use red capsicum for this recipe?
Yes. Red capsicum is another name for red bell pepper in many countries. Use large sweet red capsicum, not small hot red peppers.
Are red peppers better than green peppers for stuffed peppers?
Red peppers are sweeter and milder, which works especially well with tomato, beef, rice, and cheese. Green peppers still work if you prefer a sharper flavor.
Final Bite
The best part is cutting into the pepper while the sauce is still warm enough to slip into the rice and beef. That is when the dish stops feeling like separate parts and becomes the comfort food it is supposed to be: soft red pepper, savory filling, tomato sauce, and melted cheese in one forkful.
Let the peppers rest just long enough for the first forkful to hold together, then serve while the sauce is still warm and glossy.