
Slow cooker pork carnitas can turn out beautifully tender and still miss the reason you wanted carnitas in the first place: dark, crisp edges around pieces that remain juicy in the middle.
Lift the lid and you may find plenty of soft pork, but no crust anywhere. Add too much liquid and it tastes like wet taco filling. Pull it into fine threads, and the broiler can dry those strands before the meat develops a proper browned edge.
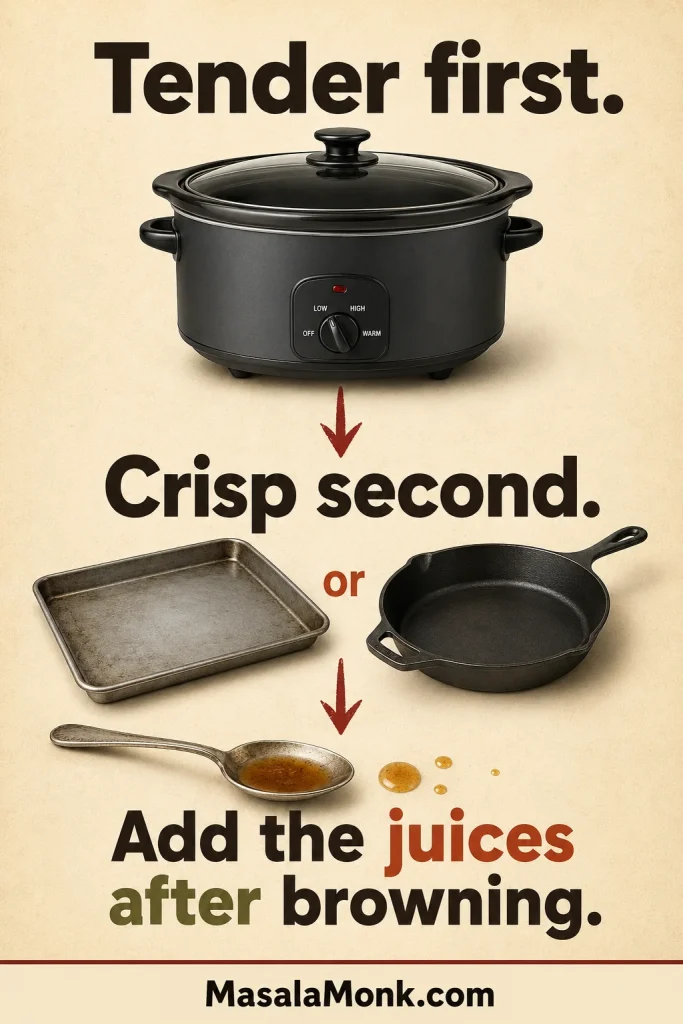
The easiest solution is to stop asking the slow cooker to do two opposite jobs. Let it soften the shoulder slowly with orange, lime, garlic, oregano, cumin and ancho chile. Once the thickest section yields easily to a fork, move the pork into dry, intense heat for the finish.
Quick Answer: How to Make Crispy Slow Cooker Carnitas
Cook large pieces of pork shoulder with a small amount of citrus until a fork turns easily through the thickest section. No initial searing or added broth is required. Lift out the pork, strain the cooking juices and reduce them only when they taste thin.
Pull the meat into broad pieces, then broil or skillet-crisp it in a loose layer. Spoon a little reserved juice over the pork only after it has browned. Leave any pork you are saving uncrisped, then brown each portion fresh when you reheat it.
| Decision | Best starting point |
|---|---|
| Pork and cooker | 4 lb / 1.8 kg trimmed pork shoulder in a 6 qt / 5.7 L slow cooker |
| Cooking time | Begin checking at 6 hours on LOW or 3½–4 hours on HIGH |
| Doneness | A fork turns through the thickest section with little resistance |
| Best finish | Broiler for a full batch; skillet for the deepest crust |
Open the Full Carnitas Guide
Slow Cooker Pork Carnitas Recipe
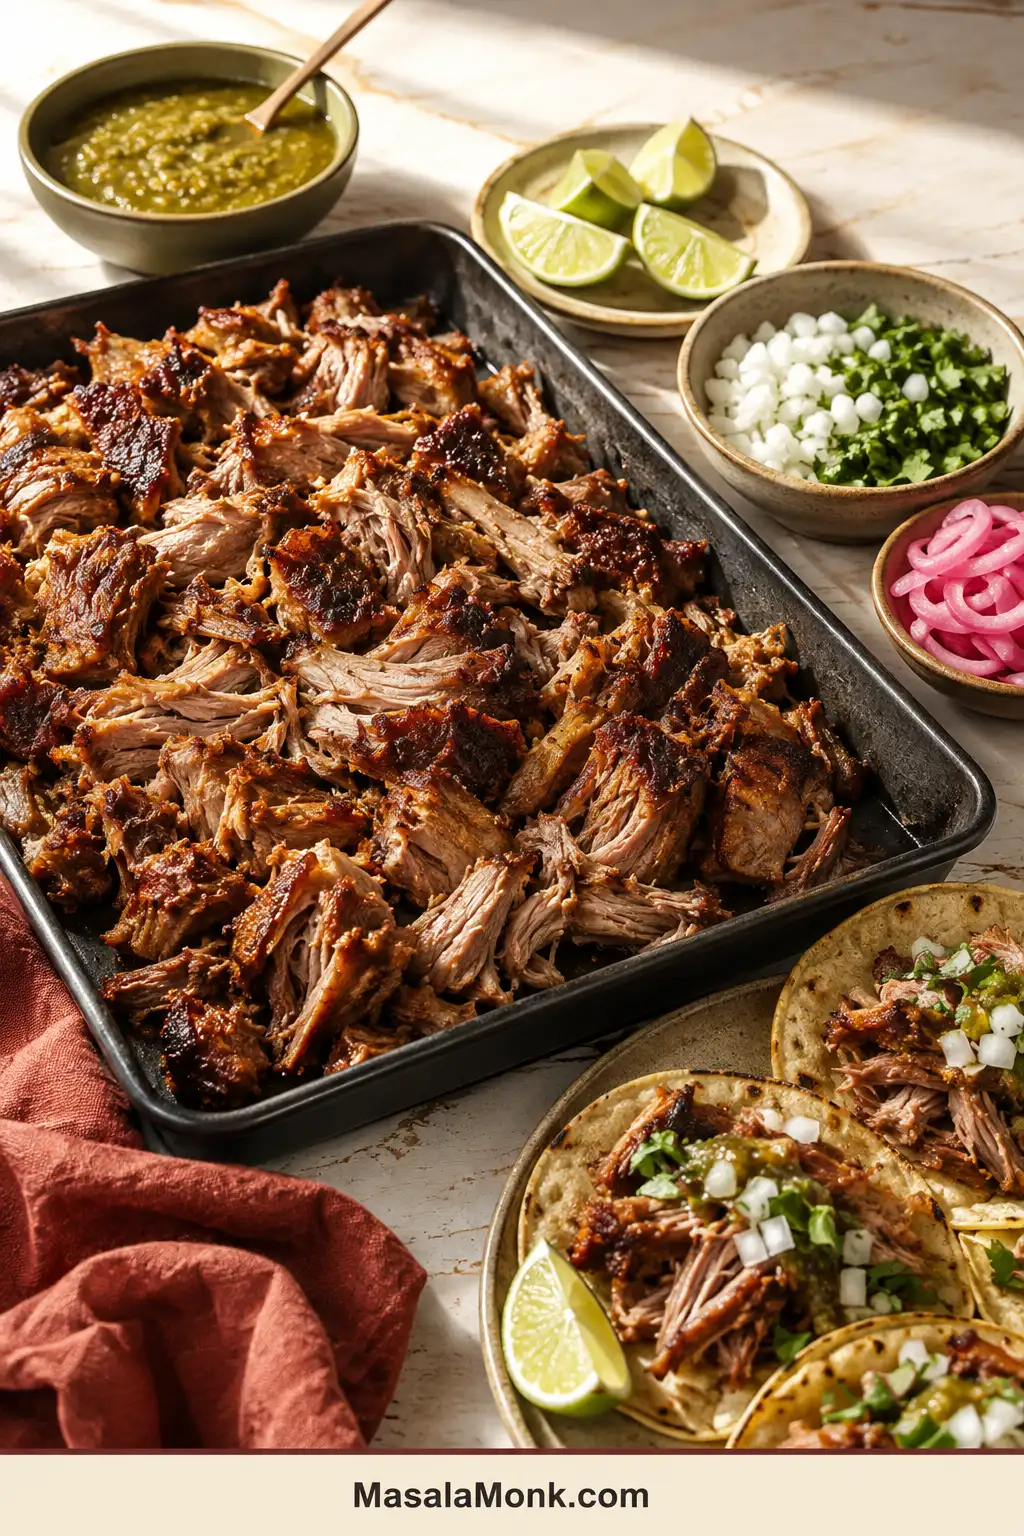
Pork shoulder cooks with a small amount of citrus, garlic, onion and warm spices until it separates easily but still holds broad pieces. The finished tray should contain deeply browned tips, crisp flat edges and thicker pieces that remain soft enough to pull apart.
Use the broiler for a full batch or a skillet for the deepest crust. Allow about 25 minutes to trim, weigh, cut and season the pork. Once the lid is closed, the long cook is hands-off.
Planning window: Allow about 7½–10 hours on LOW or 5–6¾ hours on HIGH, including preparation, resting and broiling. Allow additional time if the cooking juices need reducing.
Expect approximately 8–11 hearty servings, 10–14 taco-bar servings or 20–30 small tacos.
For serving: warm tortillas, chopped white onion, cilantro, lime wedges and roasted salsa verde or another bright salsa.
Essential Equipment
- 6 qt / 5.7 L slow cooker or Crock-Pot
- Kitchen scale
- Cutting board and chef’s knife
- Tongs or a large slotted spoon
- Fine-mesh strainer and wide saucepan
- One or two uncoated, broiler-safe rimmed metal sheet pans
An instant-read thermometer, fat separator and heavy skillet are helpful but optional.
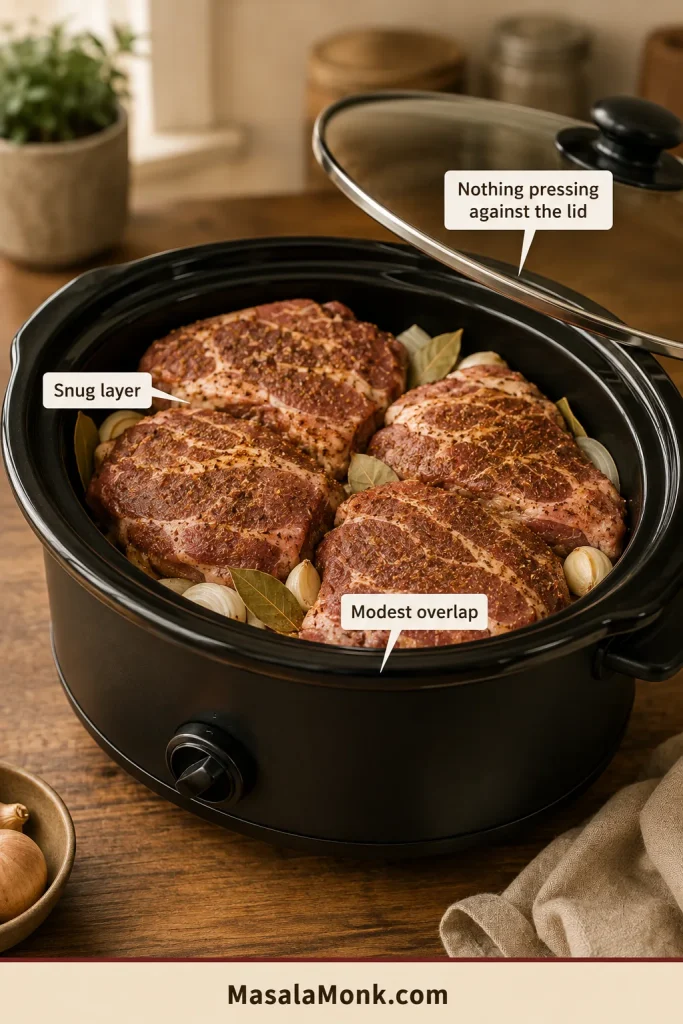
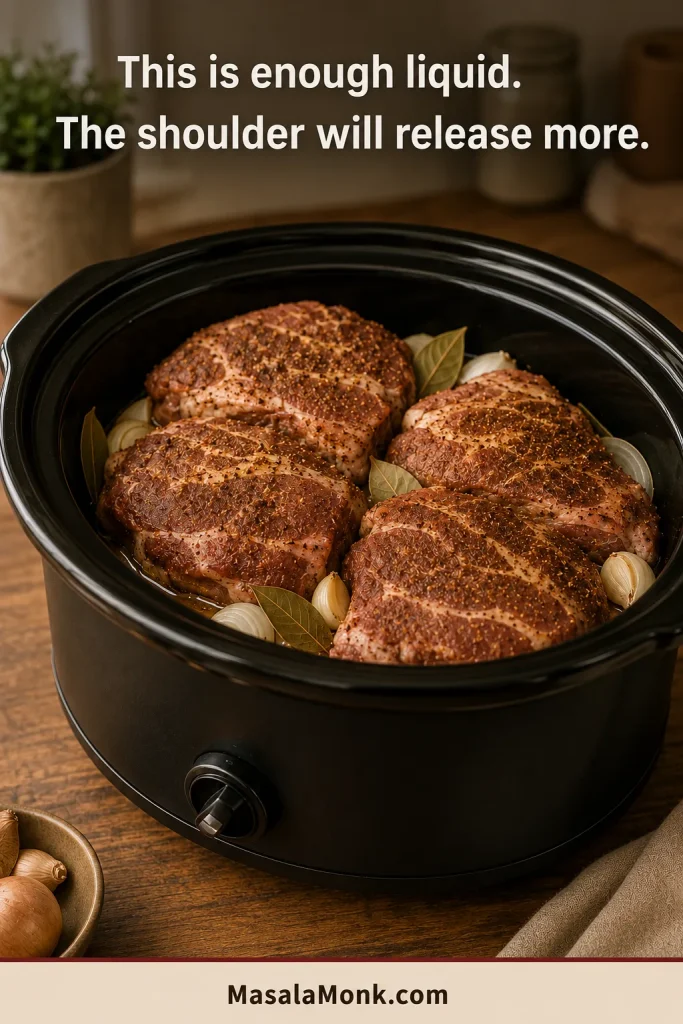
Cooker fit: Arrange the pork in a snug layer with modest overlap. It may touch the sides, but it should not press against the lid. The cooker may look almost dry at first. That is expected—the shoulder will release plenty of moisture and fat.
Ingredients
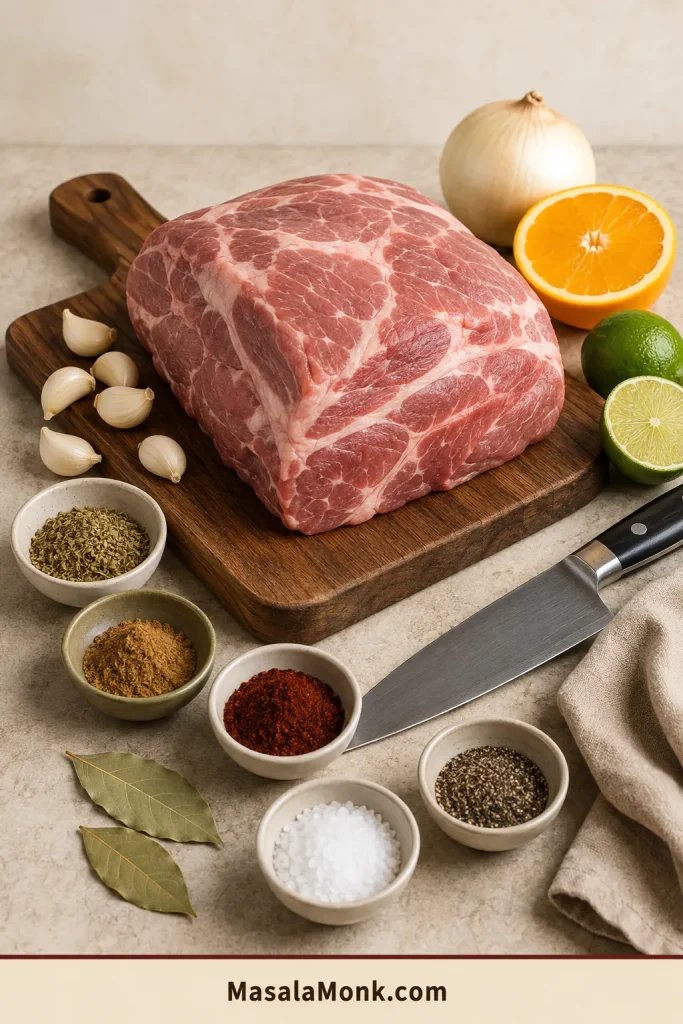
- 4 lb / 1.8 kg boneless pork shoulder, pork butt or Boston butt, weighed after removing skin and unusually thick external fat
- 20 g fine sea salt
- 2 teaspoons dried Mexican oregano, crushed between your fingers
- 1½ teaspoons ground cumin
- 1 teaspoon freshly ground black pepper
- 1 teaspoon ancho chile powder
- 1 large yellow or white onion, about 8–9 oz / 225–250 g, cut into thick wedges
- 8 garlic cloves, peeled and lightly crushed
- ½ cup / 120 ml fresh orange juice
- 2 tablespoons / 30 ml fresh lime juice
- 2 bay leaves
Buying note: Choose a slightly larger roast when it has skin or a very thick fat cap, so approximately 4 lb / 1.8 kg remains after trimming.
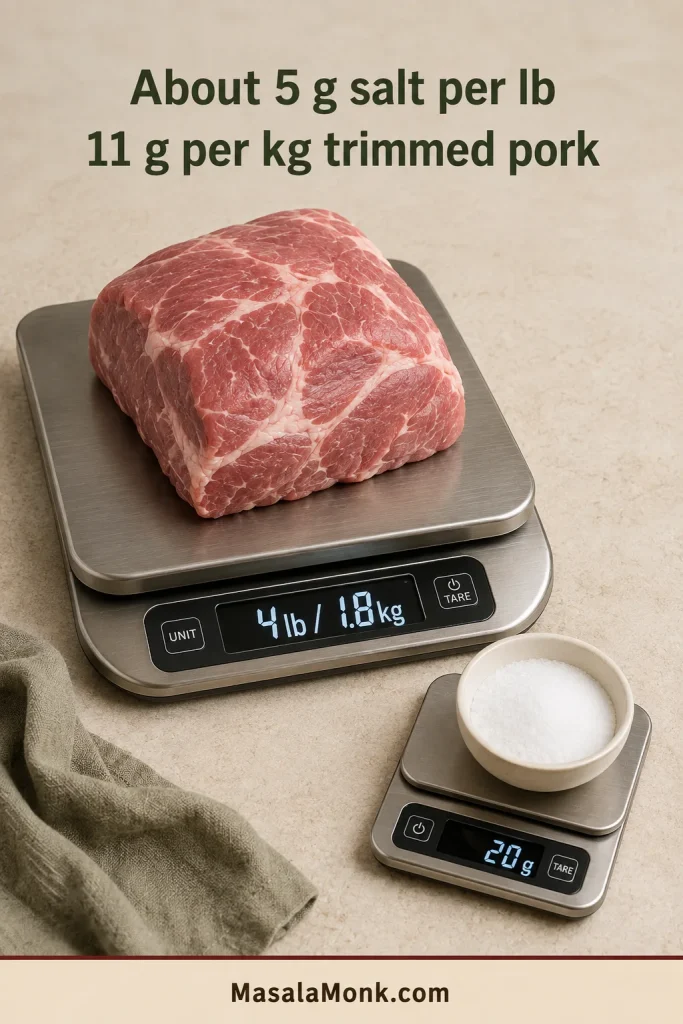
Scaling salt: Use approximately 5 g per pound or 11 g per kilogram of trimmed pork. Salt volume varies significantly by brand and crystal size.
For Crisping
- Reserved cooking juices
- Reserved pork fat, lard or neutral oil for skillet crisping, if needed
Instructions
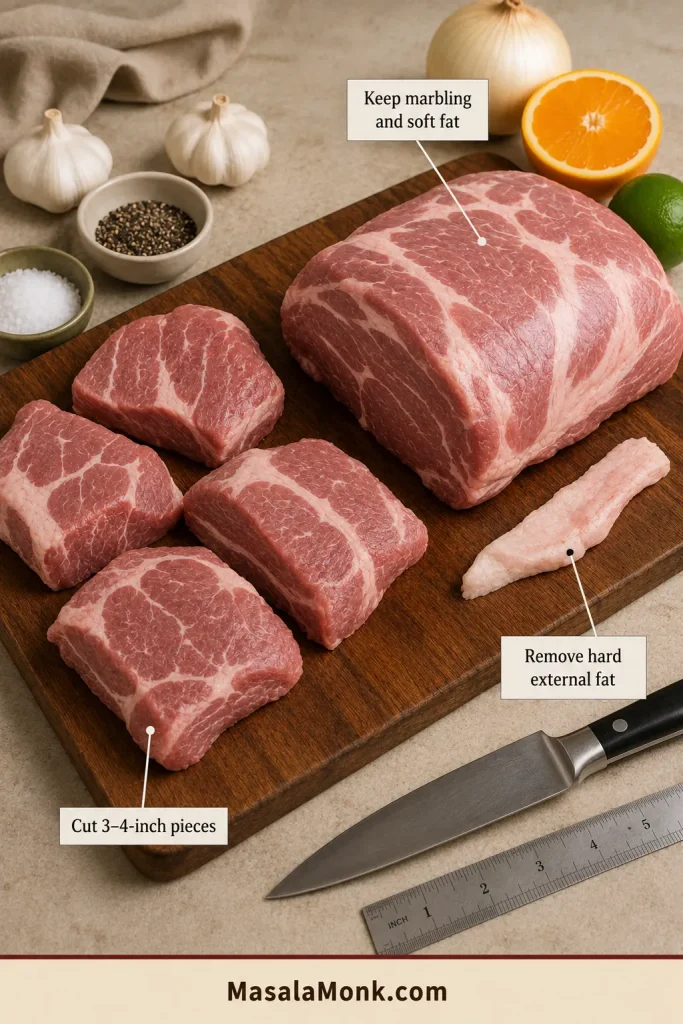
- Prepare the pork. Thaw completely in the refrigerator and pat dry. Remove skin and unusually thick, hard external fat, keeping the softer fat and marbling.
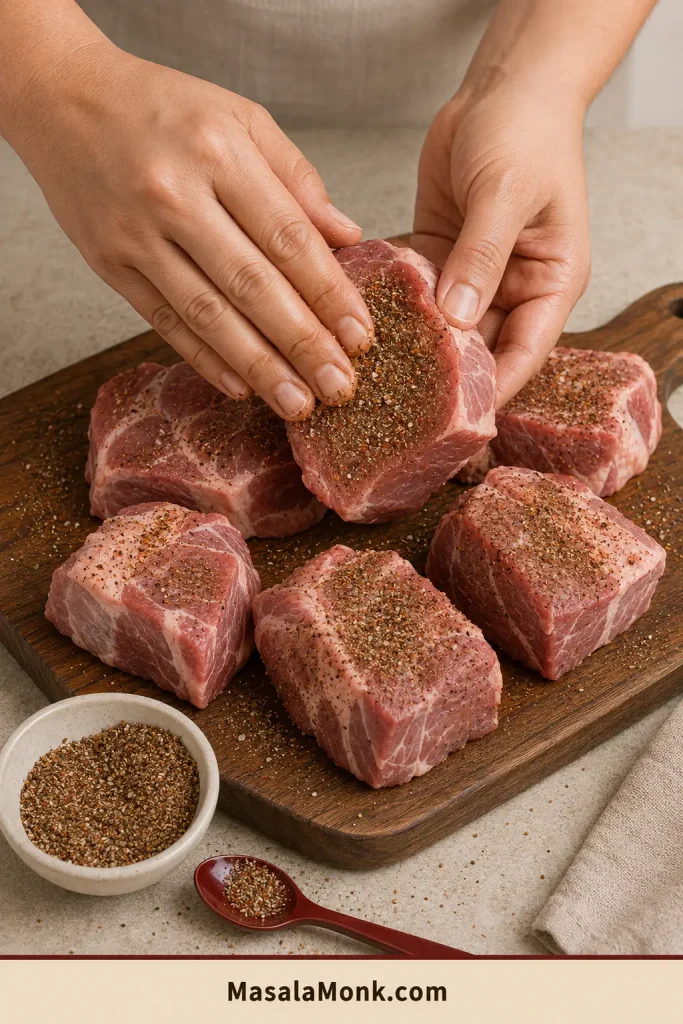
- Cut and season. Divide the shoulder into roughly 3–4-inch / 7.5–10 cm pieces of similar thickness. Combine the salt, oregano, cumin, pepper and ancho chile, then coat every cut side and fold.
- Load the cooker. Scatter the onion and garlic across the bottom. Arrange the pork over them, tuck in the bay leaves and pour the citrus around the meat.
- Cook until tender. Cover and cook on LOW, beginning to check at 6 hours, or on HIGH, beginning to check at 3½–4 hours.
- Use the fork test. Test a thick central piece and one near the side. The pork is ready when the fork turns easily and separates a broad section without force.
After the Slow Cook: Rest, Strain and Pull
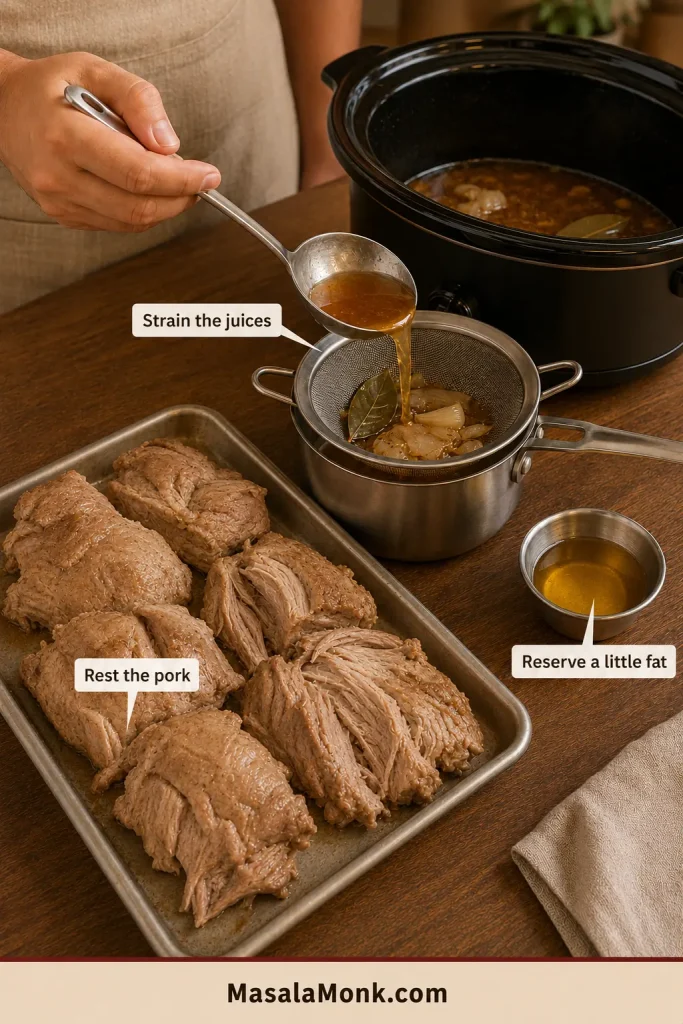
- Rest and strain. Transfer the pork to a rimmed tray and let it rest for about 10 minutes while you strain the cooking liquid into a saucepan. Discard the bay leaves; discard the softened onion and garlic or save them for beans, rice or soup.
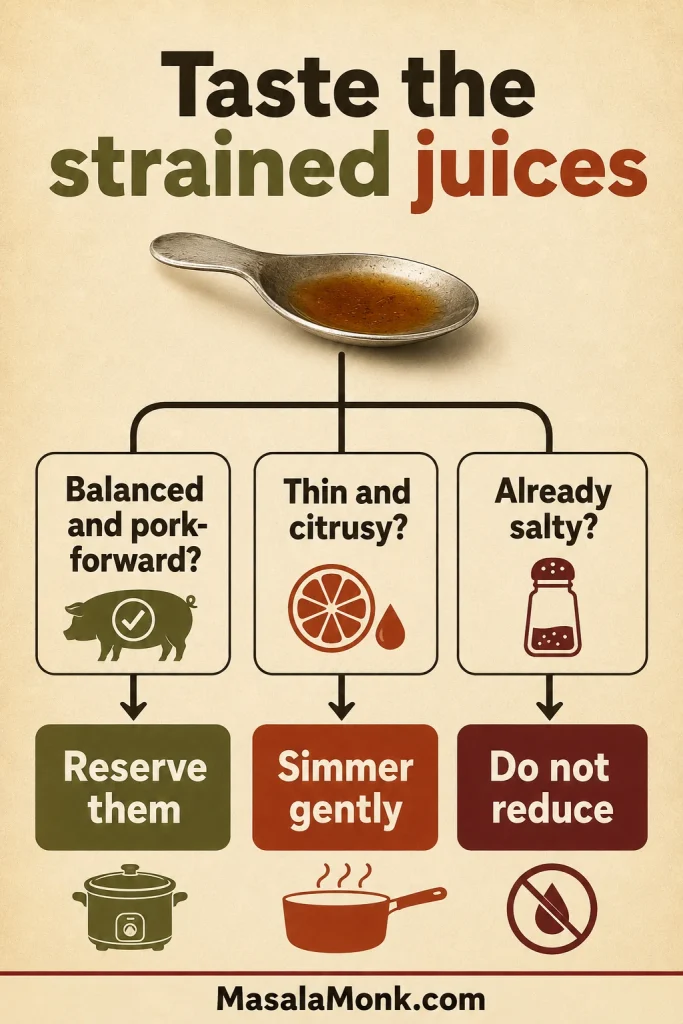
- Adjust the juices. Spoon off excess fat, reserving a little for skillet crisping. Taste the strained cooking juices once they are cool enough. If they taste thin and citrusy, simmer until the orange settles into the background and the juices taste fuller and lightly coat a spoon. Set them aside as the reserved juices.
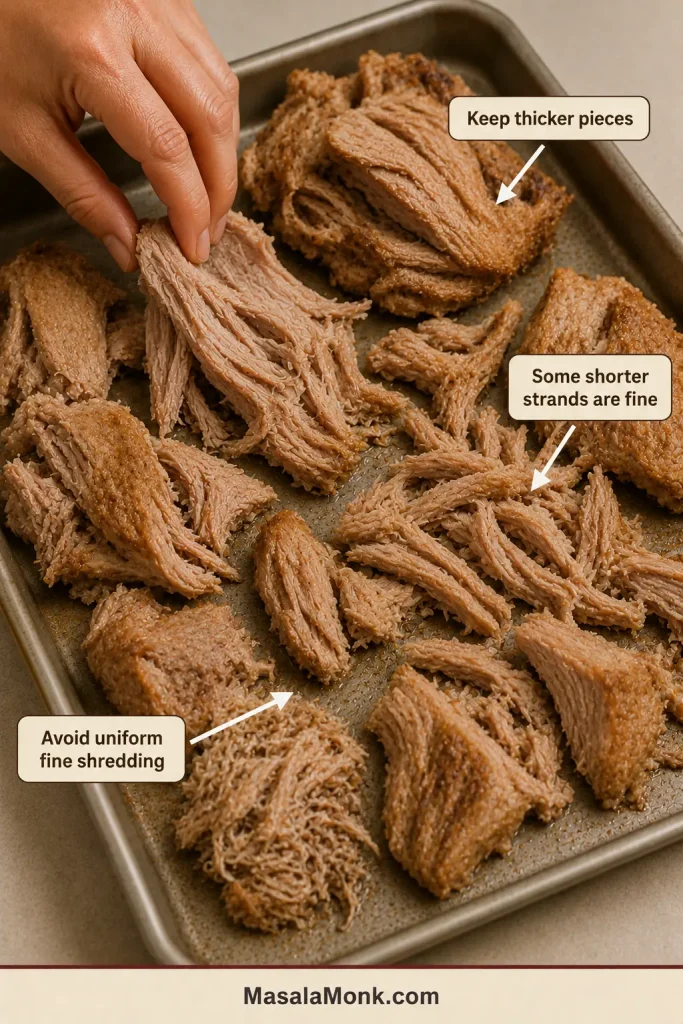
- Pull the pork. Leave a mixture of meaty chunks, shorter strands and soft interior pieces.
- Crisp and finish. Use the broiler for the full batch or a skillet for deeper browning. Add a measured amount of reserved juice after the crust develops. Keep the rest for serving, storage and reheating.
Use the resting window: keep the pork in broad sections while the juices are strained and a small amount of clean fat is reserved.
Broiler Finish for the Full Batch
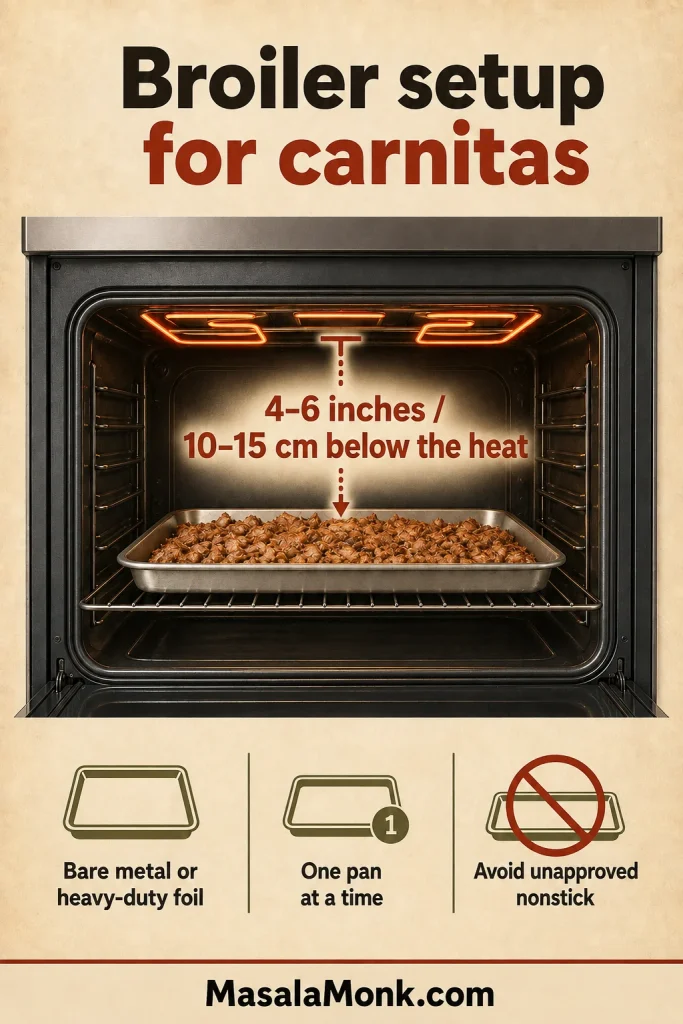
- Position an oven rack so the pork will sit approximately 4–6 inches / 10–15 cm beneath the broiler. Preheat the broiler fully.
- Use a bare broiler-safe metal sheet pan, or line the pan with heavy-duty foil. Avoid nonstick pans unless the manufacturer explicitly rates them for broiler use.
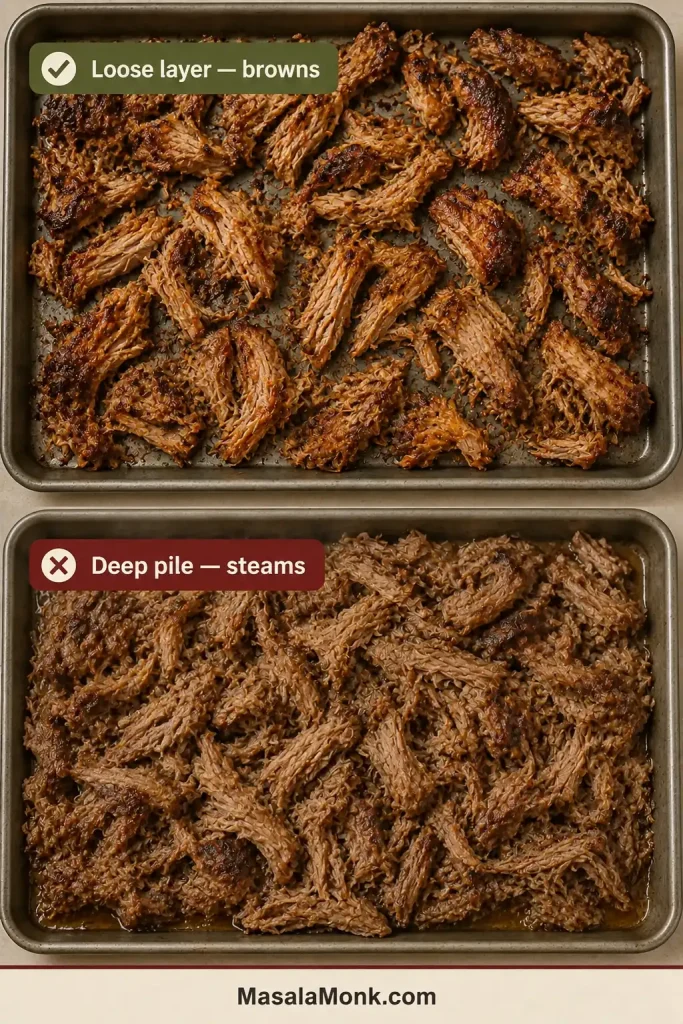
- Divide the pork between two pans in loose single layers. Broil one pan at a time for the most even browning. With only one pan, work in two rounds.
- If the pork already glistens, begin without adding liquid. If it looks unusually dry, drizzle with no more than 1 tablespoon / 15 ml reserved juice per pan.
- Broil for 3–5 minutes. Turn roughly half the pieces, leaving some browned surfaces facing upward, then broil for another 2–4 minutes.
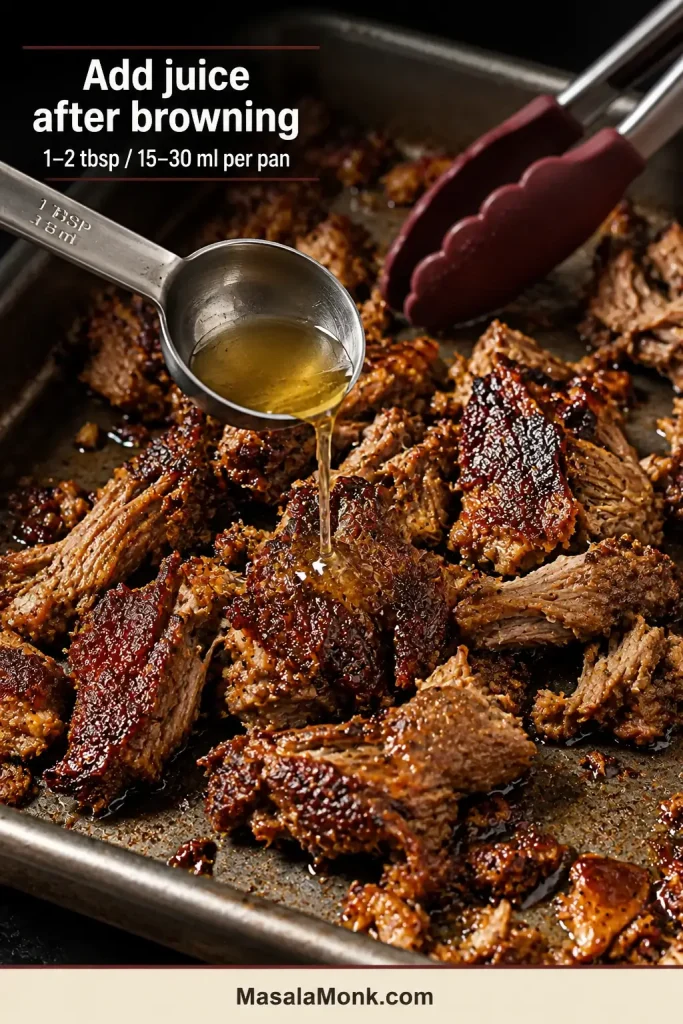
- Finish each pan with 1–2 tablespoons / 15–30 ml hot reserved juices. Toss briefly and serve promptly.
Broiler Browning Cues
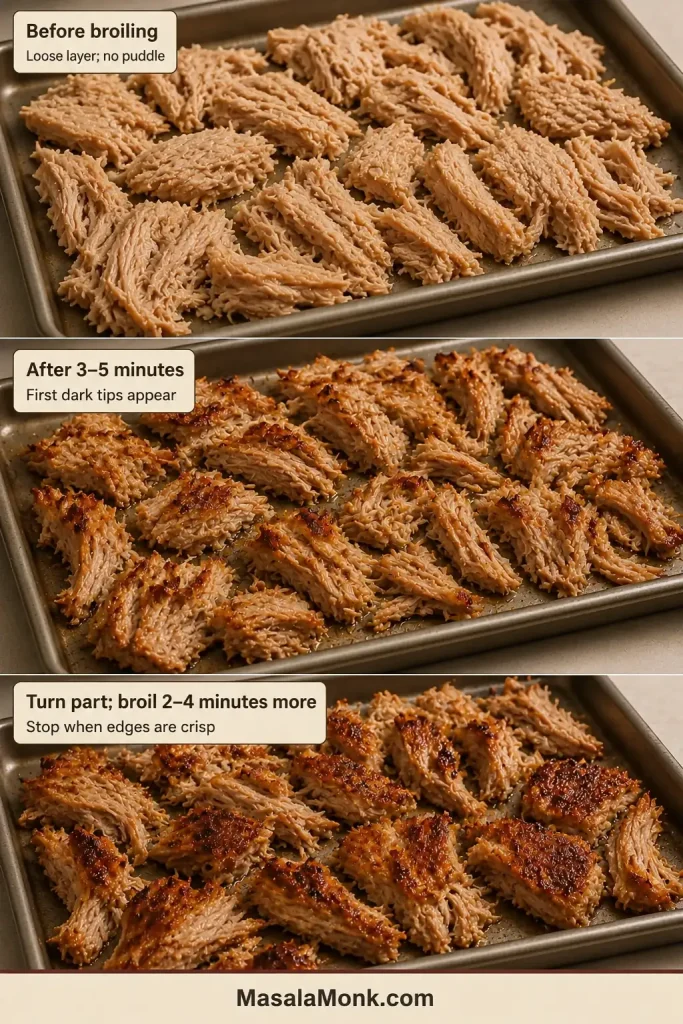
The pork should already taste well seasoned before it reaches the broiler. This final step is mainly about browning.
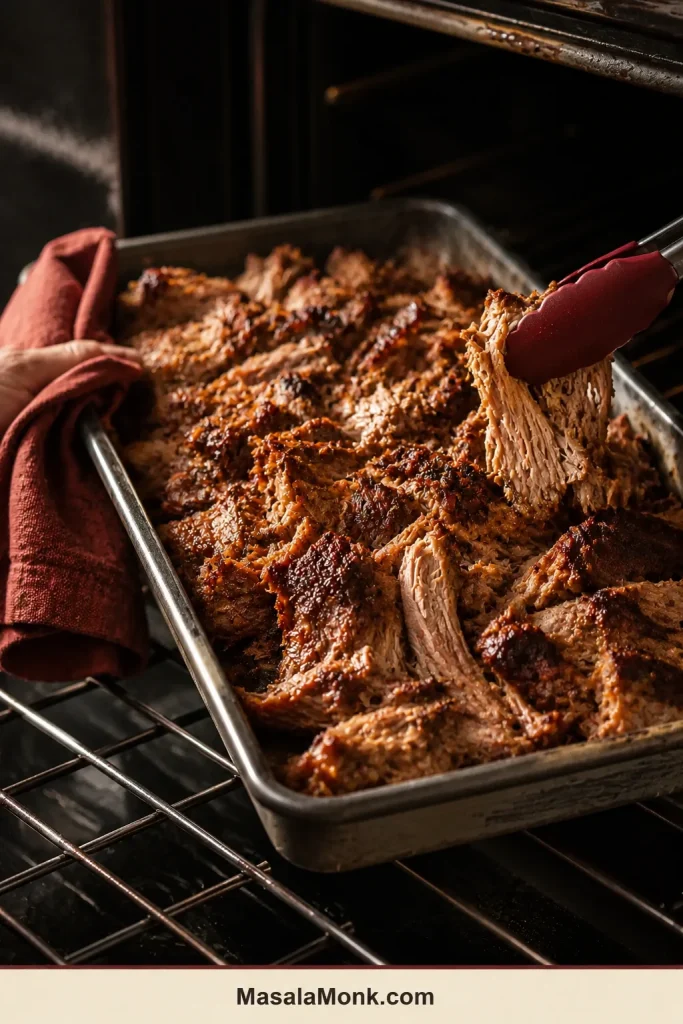
Judge the finished tray by its range of textures rather than by one uniform shade of brown.
Skillet Finish for Smaller Batches
- Heat a heavy skillet over medium-high heat. Add a teaspoon of reserved pork fat, lard or neutral oil if the pan is dry.
- Add about 8 oz / 225 g pork to a 10-inch / 25 cm skillet, or 10 oz / 285 g to a 12-inch / 30 cm skillet.
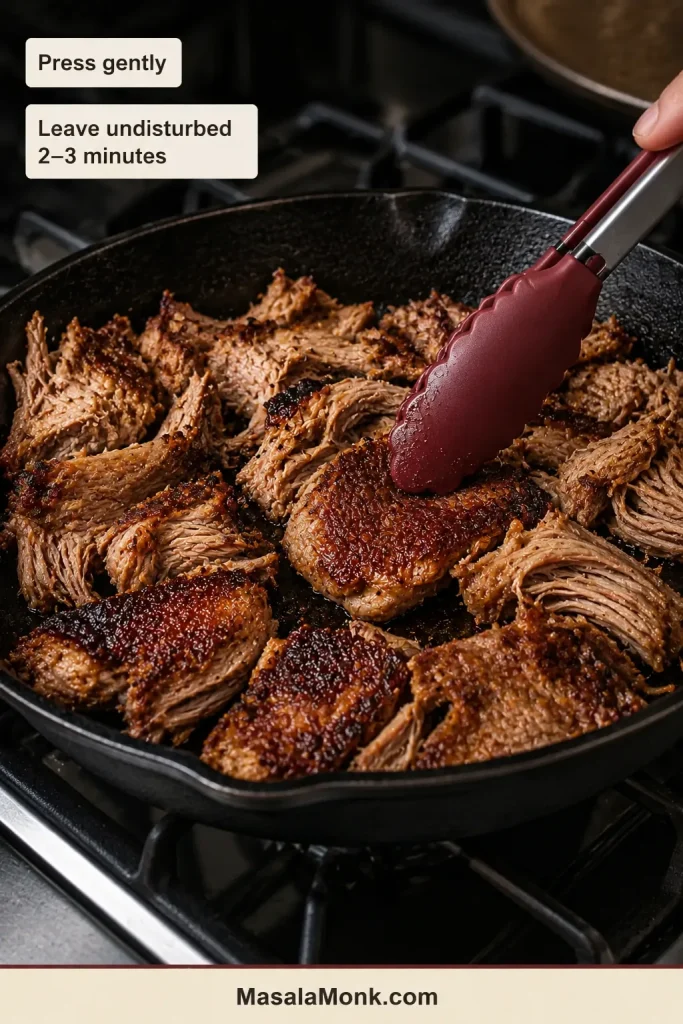
- Press gently and leave undisturbed for 2–3 minutes.
- Turn part of the pork and cook for another 30–60 seconds.
- Remove from the heat, add about 1 tablespoon / 15 ml reserved juice and repeat with the remaining pork.
Success cue: Stop when the exposed edges are dark and crisp but the larger pieces still bend and pull apart softly. Carnitas should have contrast, not uniform crunch.
How this recipe was developed: This slow-cooker adaptation is based on established pork-shoulder cooking principles, measured salt, restrained added liquid and sensory doneness cues. Slow cookers and shoulder cuts vary, so the stated times are checking windows rather than guarantees.
Tender first. Crisp second.
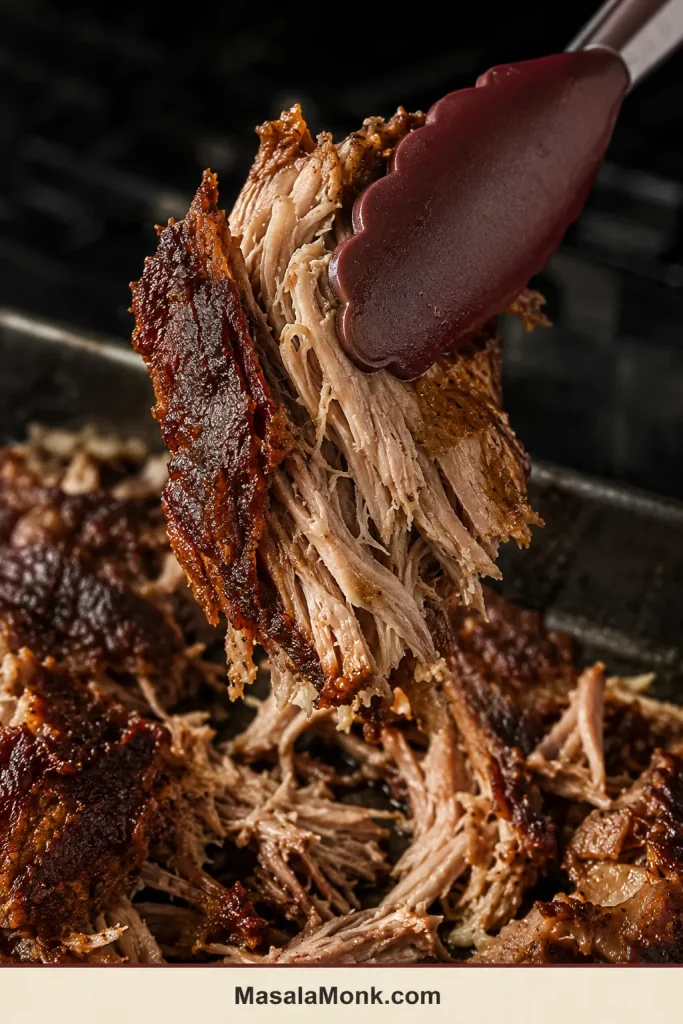
Three Signs Your Carnitas Are on Track
Watch for these three changes as the pork moves from the slow cooker to the crisping tray.
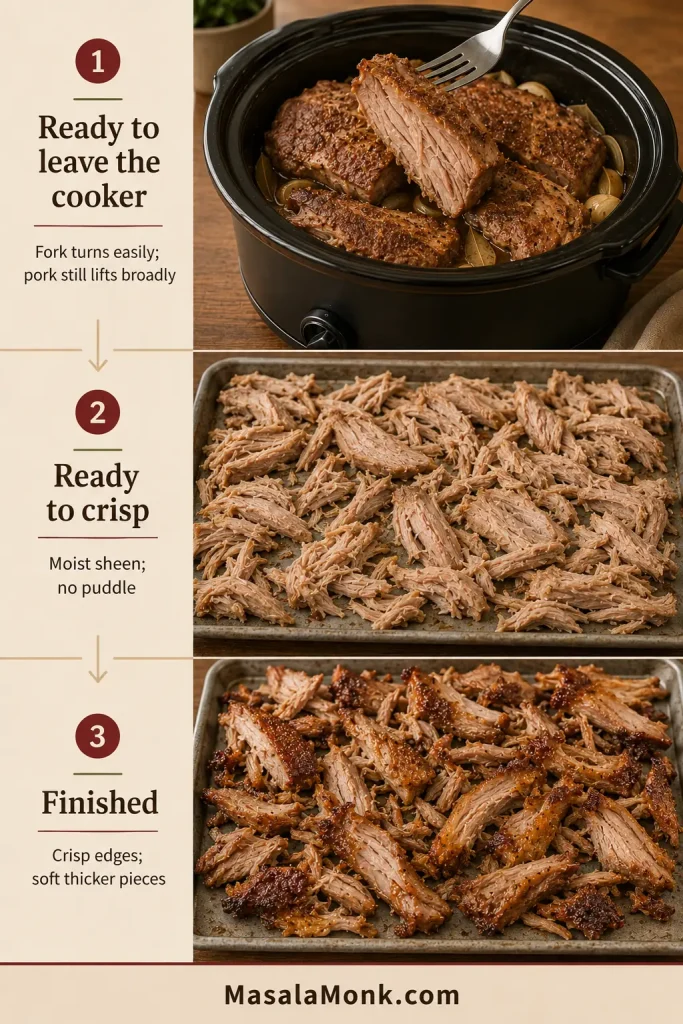
| Stage | What to look for |
|---|---|
| Ready to leave the slow cooker | A fork turns easily, but the pork still lifts in large sections |
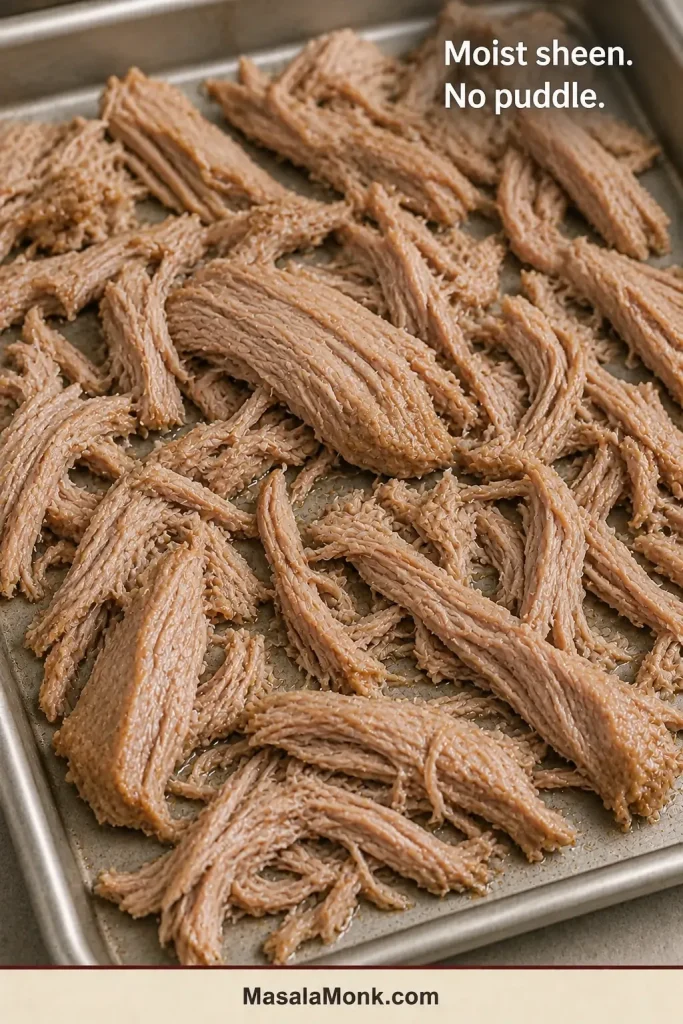
| Ready to crisp | The pieces have a moist sheen, with no puddle collecting underneath |
| Finished | Browned undersides and crisp tips surround soft, juicy centers |
Choosing the Best Pork for Carnitas
A marbled shoulder gives the slow cooker what it needs: fat for juiciness and connective tissue that softens during the long cook.
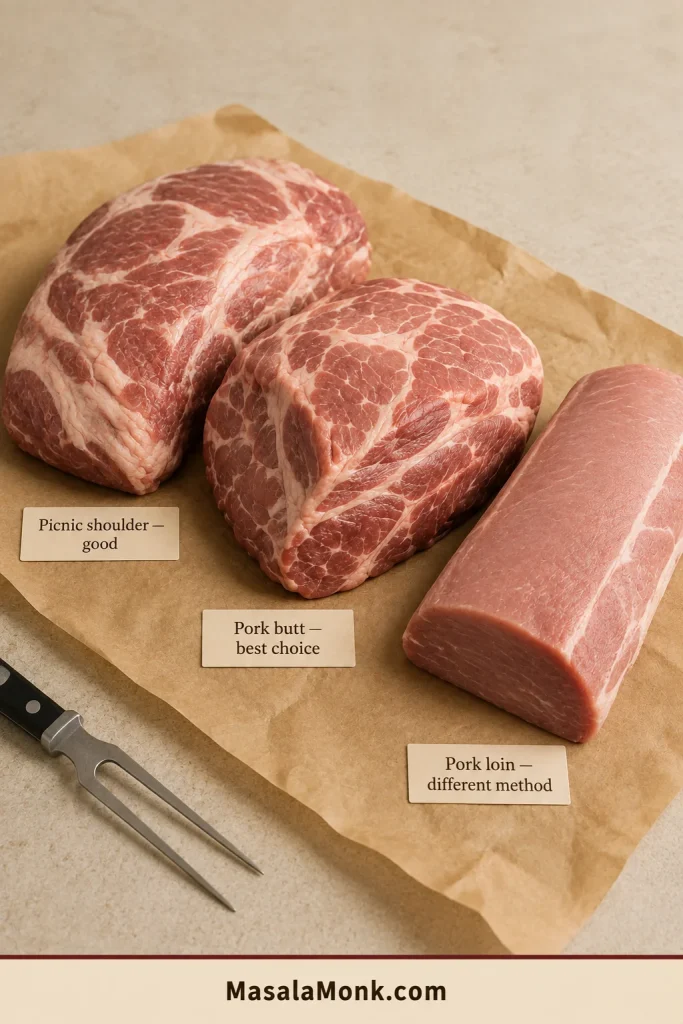
On a phone, swipe sideways to see the full table.
| Pork cut | Verdict | What changes |
|---|---|---|
| Pork butt, Boston butt or shoulder blade roast | Best choice | Well marbled, forgiving and easy to divide into large pieces |
| Picnic shoulder | Good | May need more trimming and can include skin or bone |
| Bone-in shoulder | Good but slower | Use more raw weight and expect a wider timing window |
| Pork loin | Separate method | Leaner and better with a shorter, gentler cook |
| Tenderloin or pork chops | Not suitable for this timing | Too lean and too quick-cooking for the shoulder method |
Working with pork loin instead? Its leaner structure needs the shorter method in our slow cooker pork loin recipe. For tenderloin, use the timing and handling in this slow cooker pork tenderloin guide.
Buying and Preparing the Shoulder
Pork butt and Boston butt come from the upper shoulder. Picnic shoulder comes from lower on the front leg. Both work, but pork butt is usually more compact, well marbled and easier to prepare.
Boneless shoulder is easier to weigh, season and divide. For a roughly 5 lb / 2.25 kg bone-in shoulder, 20 g salt is a sensible starting point because part of the packaged weight is bone. Expect a later first check, and taste the reserved juices before making any final seasoning adjustment.
Remove skin and unusually thick, hard fat, but keep the softer fat and marbling.
Carnitas Ingredients and Substitutions
Salt and Seasoning
The recipe uses 20 g salt for 4 lb / 1.8 kg trimmed pork—about 1.1% by weight. Salt crystals vary too much for one universal teaspoon conversion, so a scale is the clearest option.
Mexican oregano brings an earthy, citrusy note. Mediterranean oregano is a practical substitute, although its flavor is more minty and herbal. Cumin stays in the background, while ancho chile adds mild warmth rather than sharp heat.
Using a carnitas seasoning packet? Check the sodium first. With a salted packet, leave out the recipe salt initially and adjust only after tasting the reserved juices.
Citrus and Added Liquid
Orange rounds out the garlic and spices without making the pork taste sweet. Lime brings a sharper edge, so most of it is better saved for the table. Fresh juice is best, and there is no need to add peel—the long cook can draw bitterness from it.
No orange juice? Replace it with the same amount of unsalted chicken broth or water. Use only 1 tablespoon / 15 ml lime juice in the cooker, then brighten the finished pork with fresh lime.
A shallow layer of liquid is enough. Starting with cups of broth gives the pork a weaker flavor and leaves much more moisture to manage before browning.
Do You Need to Sear the Pork?
No. Searing can add another layer of browned flavor, but that crust softens during hours of moist cooking. Skip it for a simpler start; the final crisping stage matters more.
Want to change the flavor?
More Pork-Forward Carnitas
Reduce the cumin to ¾ teaspoon, leave out the ancho chile powder and use only 1 tablespoon / 15 ml lime juice. Offer more lime at the table and use reserved pork fat for skillet crisping.
Smoky Chipotle Carnitas
Add 1 finely chopped chipotle pepper in adobo with 1–2 teaspoons of the sauce. Leave out the ancho chile powder at first because the chipotle will taste stronger after the juices reduce.
A spoonful of fresh mango salsa gives the smoky pork a cool, bright contrast.
Beer or Mexican Coke
- Beer: Replace ¼ cup / 60 ml orange juice with the same amount of mild lager.
- Mexican Coke: Replace ¼ cup / 60 ml orange juice with cane-sugar cola for a sweeter finish.
Keep the total liquid unchanged so the pork does not take longer to brown.
Half-Batch Slow Cooker Carnitas
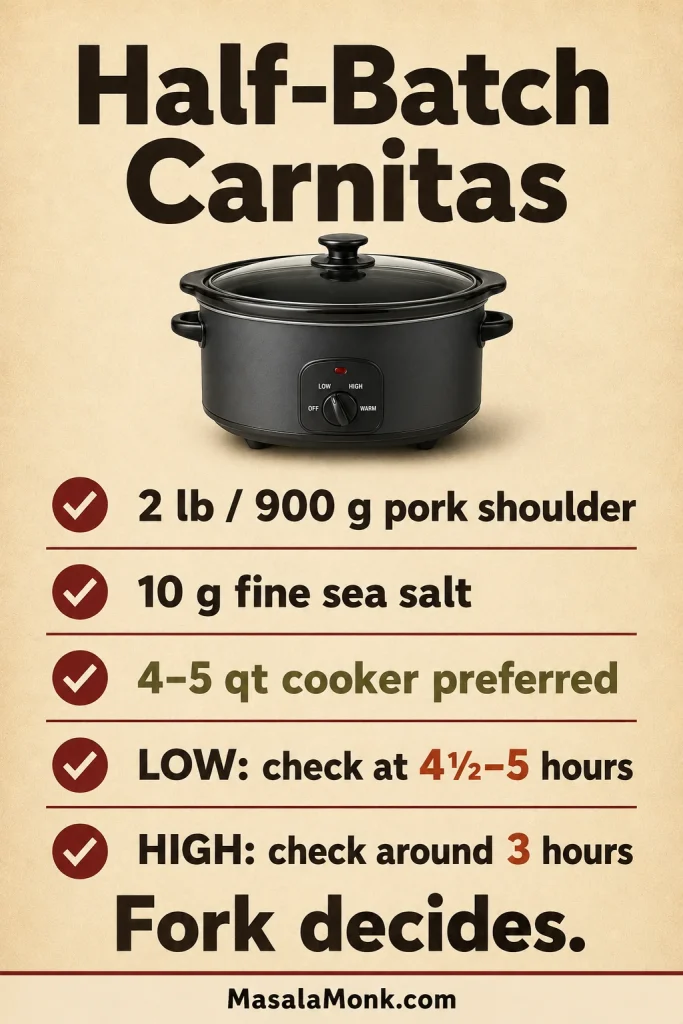
Cooking for fewer people? Make the 2 lb / 900 g half batch
A 4–5 qt / 3.8–4.7 L slow cooker gives a half batch the best fit. A 6-quart model also works, but the shallower fill may alter evaporation and timing.
- 2 lb / 900 g pork shoulder, weighed after major trimming
- 10 g fine sea salt
- 1 teaspoon Mexican oregano
- ¾ teaspoon ground cumin
- ½ teaspoon black pepper
- ½ teaspoon ancho chile powder
- ½ large onion, about 4–4½ oz / 110–125 g
- 4 garlic cloves
- ¼ cup / 60 ml orange juice
- 1 tablespoon / 15 ml lime juice
- 1 bay leaf
Begin checking at 4½–5 hours on LOW or around 3 hours on HIGH. A common window is 5½–7 hours on LOW or 3½–4½ hours on HIGH, but the fork still decides.
Half-batch planning: quantities scale directly, but cooker fit and the first tenderness check still need their own adjustment.
Carnitas vs Slow Cooker Pulled Pork
Carnitas are often described as Mexican pulled pork, but the comparison only goes so far. Both can begin with pork shoulder; the seasoning, texture and finish move in different directions.
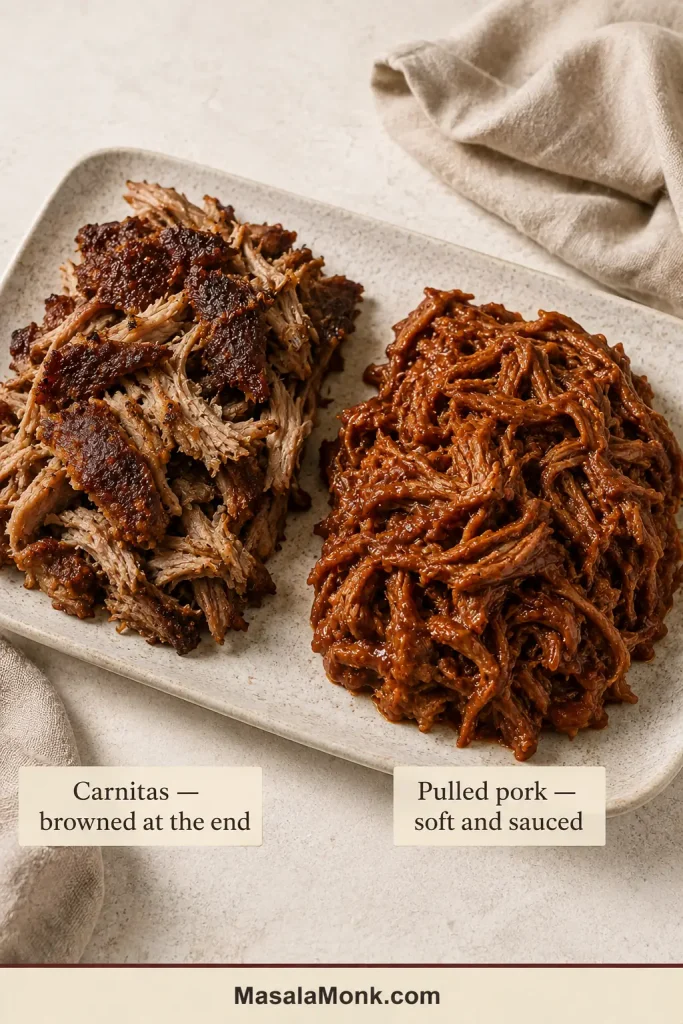
- This slow-cooker version uses citrus, oregano and restrained spices; barbecue pulled pork leans more heavily on rub, smoke, vinegar and sauce.
- Broader, irregular pieces are typical of carnitas; pulled pork is usually separated into finer strands.
- Dry heat gives carnitas their browned finish; pulled pork generally stays soft and coated with sauce.
- Tacos, tostadas and bowls suit carnitas naturally; barbecue pork fits buns, sliders and barbecue plates.
For soft, sauced pork made for sandwiches and sliders, follow our slow cooker pulled pork recipe.
Is This Traditional Carnitas?
Traditional carnitas take a different route. In Michoacán, pork is commonly cooked slowly in rendered fat, often in large copper vessels, as described in Mexico’s Ministry of Culture overview of Michoacán cooking.
This slow-cooker version uses moist heat for tenderness, then adds a separate browning stage for the crisp-soft finish.
Why Each Step Matters for Juicy, Crisp Carnitas
Cut and Season Large Pieces
Large pieces reach tenderness more predictably than one compact roast while keeping enough mass to stay succulent. Similar thickness matters more than perfect shape. Mix the salt and spices before applying them, then press the seasoning into the freshly cut surfaces and folds.
Load the Cooker and Leave It Closed
Put the onion and garlic beneath the shoulder, where the released juices will collect. Pour the citrus around the edges. The cooker may look almost dry, but the pork will release moisture and fat as it cooks. Early stirring and repeated lid lifting only slow the process.
Check the Center and the Edge
Slow cookers often run hotter near the walls, so test the thickest central piece and one near the side. If the fork still meets resistance at the expected time, close the lid and give the pork another 30 minutes. Nothing has gone wrong; the connective tissue simply needs longer.
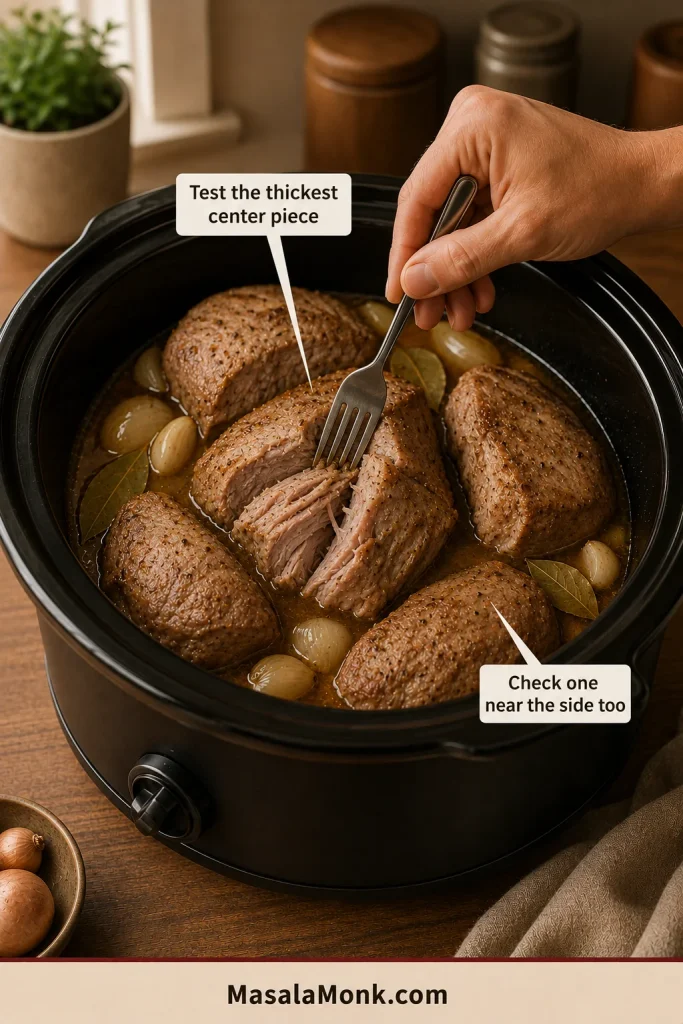
When the fork finally turns easily, the uncertain part is over. The bright citrus aroma should have softened, and the cooker should smell much more deeply of pork, garlic and oregano. The shoulder is ready for the high-heat finish that gives carnitas their contrast.
Taste the Juices Before Reducing Them
When you lift the lid, there may be far more cooking liquid than expected. Most of it came from the shoulder itself. Strain it, spoon off only the excess fat and taste once it has cooled enough.
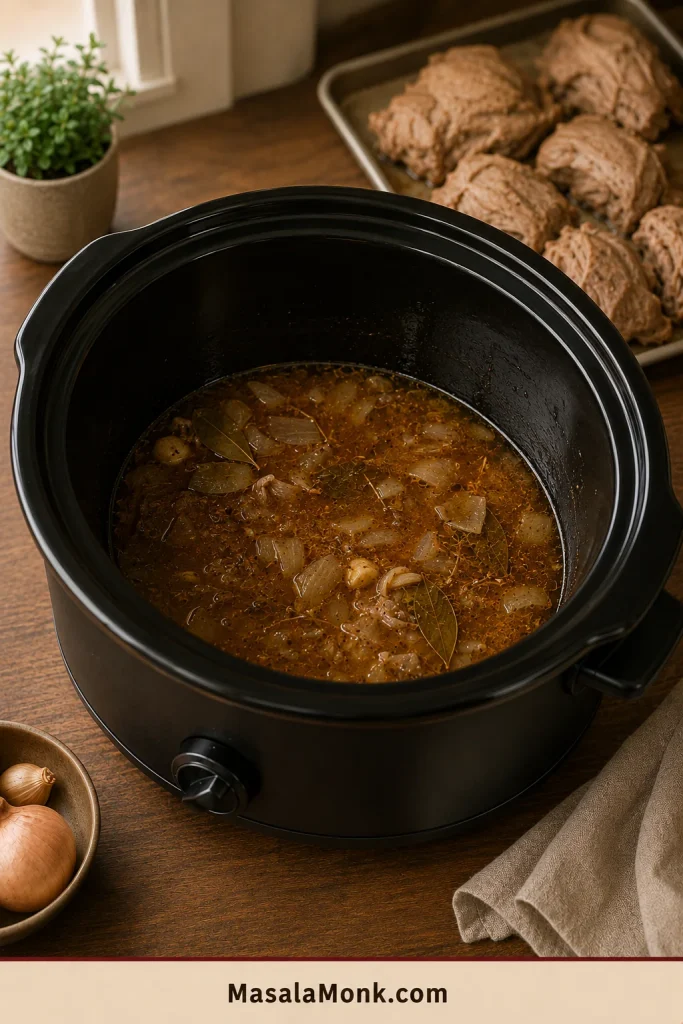
If the strained juices taste thin and citrusy, simmer until the orange settles into the background and the flavor becomes fuller and more savory. The finished juices should taste primarily of pork and garlic, with the citrus supporting the flavor rather than leading it.
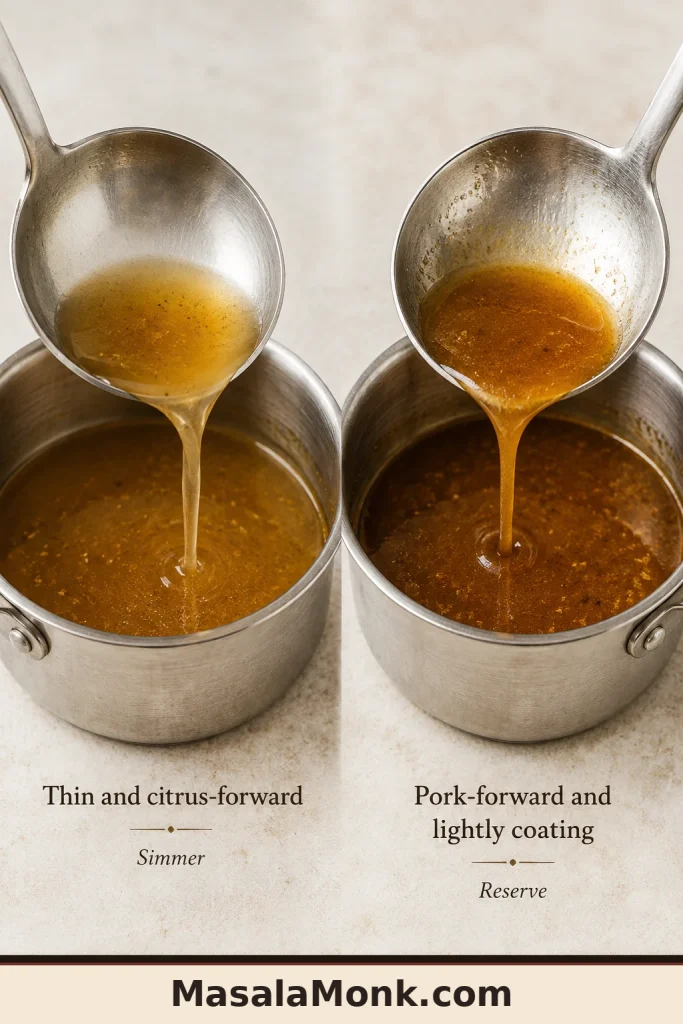
Stop when the liquid lightly coats a spoon. Juices that already taste balanced do not need reducing.
Preserve Some Thicker Pieces
Keep some meaty pieces among the shorter strands, then pull only as much as needed for the first tray or skillet batch. Their edges can brown while their centers remain soft, and larger pieces can always be separated further at the table.
Back to recipe card ↑ · Cooking time and doneness ↓ · Back to top ↑
Carnitas Cooking Time and Doneness
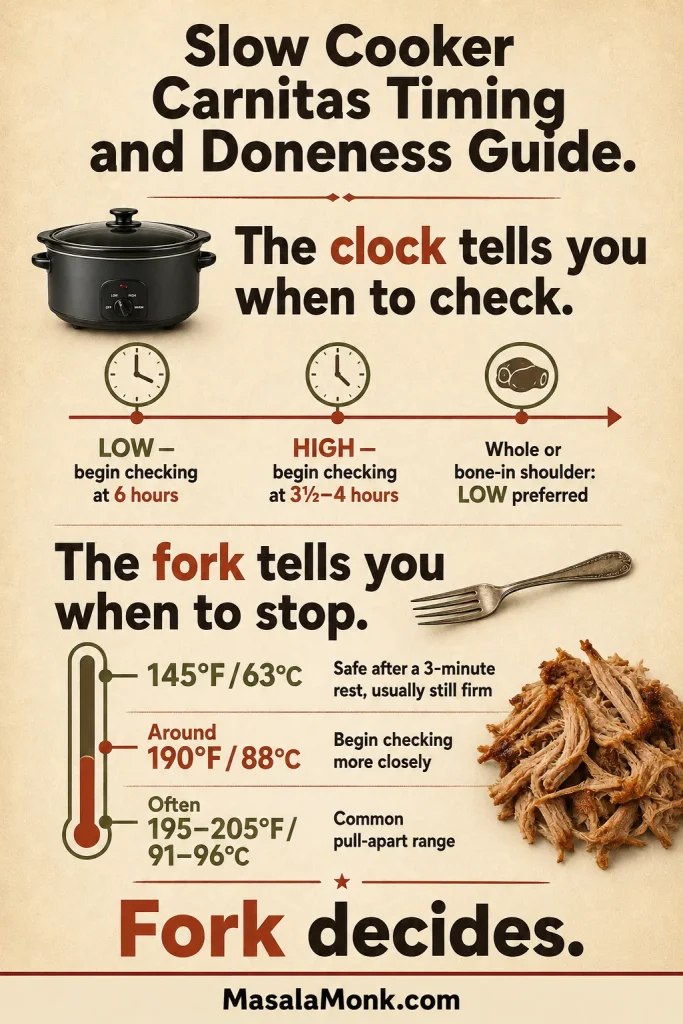
The clock tells you when to start checking. The fork tells you when to stop.
On a phone, swipe sideways to see the full table.
| Pork size and shape | Setting | Begin checking | Common working window |
|---|---|---|---|
| 2 lb / 900 g large pieces | LOW | 4½–5 hours | 5½–7 hours |
| 2 lb / 900 g large pieces | HIGH | About 3 hours | 3½–4½ hours |
| 4 lb / 1.8 kg large pieces | LOW | About 6 hours | 6½–8½ hours |
| 4 lb / 1.8 kg large pieces | HIGH | 3½–4 hours | 4–5½ hours |
| 4 lb / 1.8 kg whole boneless roast | LOW recommended | About 8 hours | 8–10 hours |
| Bone-in shoulder | LOW recommended | Later than equivalent boneless pieces | Depends on bone, thickness and roast shape |
LOW is the better choice for whole and bone-in shoulders because their thickness makes HIGH timing less predictable. All of these times are checking guides rather than guarantees; cooker shape, starting temperature and batch depth also affect the finish.
Safe Temperature Is Not the Same as Tenderness
Whole-muscle pork is considered safe at 145°F / 63°C followed by a three-minute rest, but shoulder is normally still firm at that point. Begin checking more closely around 190°F / 88°C. Pull-apart tenderness commonly arrives around 195–205°F / 91–96°C, but the fork makes the final decision.
Thaw pork before slow cooking and keep the lid closed until the first planned check. USDA slow-cooker safety guidance also recommends reheating cold leftovers outside the slow cooker before transferring them to a cooker for hot holding.
Use the Fork Test
- Not ready: The fork needs pressure, twisting feels tight, or the meat springs back.
- Ready: The fork enters easily, turns with little resistance and separates a broad section.
- Very soft: The pork collapses into fine strands with almost no pressure. Remove it promptly and handle it gently; it can still taste excellent, but it will not hold larger pieces as well.
How to Make Carnitas Crispy Without Drying the Pork
Once the pork is tender, its surface needs strong heat and enough space for moisture to escape.
Choose the Best Crisping Method
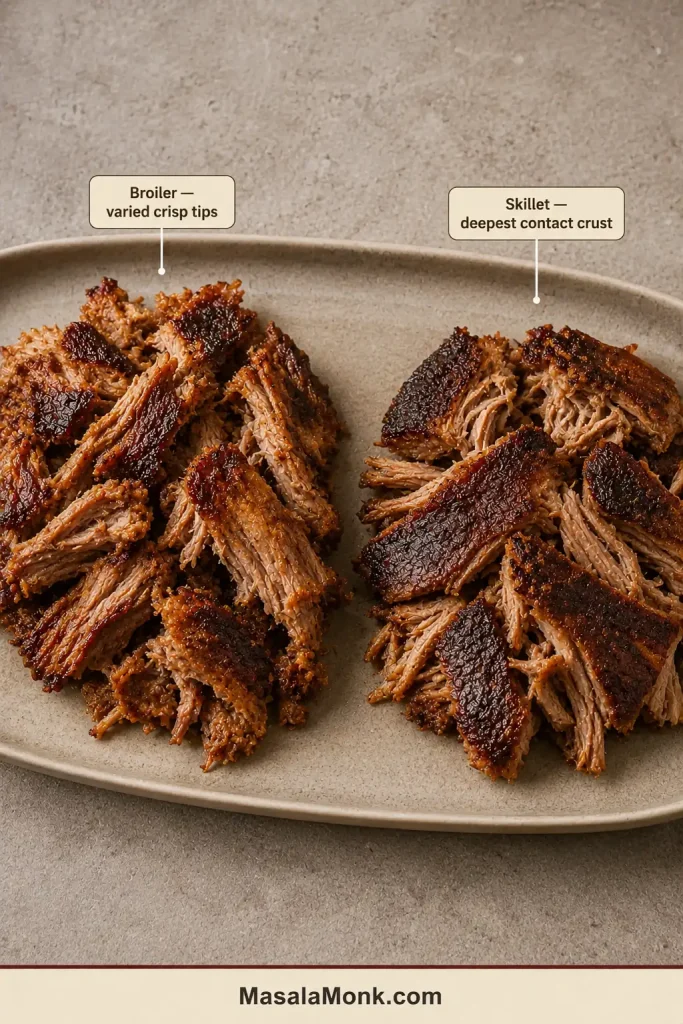
- Broiler: Best for a full family or party batch. It handles the most pork at once and produces varied crisp edges.
- Skillet: Best for smaller portions and the deepest contact browning. Work in batches so the meat fries instead of steaming.
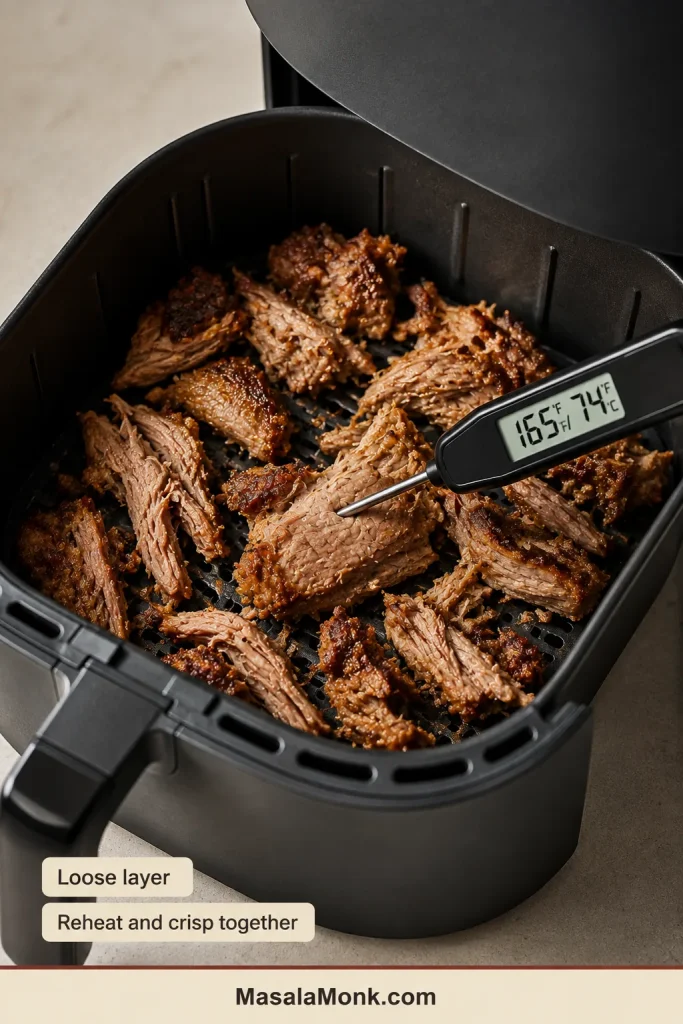
- Air fryer: Best for freshly cooked pork or a small portion of refrigerated leftovers. It can reheat and crisp the pork in the same step.
Set the broiler rack before the pork reaches the tray. Position the meat 4–6 inches / 10–15 cm below the element so the edges brown quickly without scorching.
How Wet Should the Pork Be?
The pieces should glisten, with no puddle collecting underneath. If the tray begins looking soupy, divide the pork before giving it more heat. As the surface dries, the soft hiss of steam becomes a sharper sizzle. That is when the crust begins to form.
A loose layer browns; a deep pile steams.
Reserved juices belong in the finishing stage, after dry heat has already done the work of building a crust.
What skillet browning should look like: the deepest color develops on the flat surfaces that remain in contact with the hot pan.
Air-Fryer Carnitas
For refrigerated leftovers, use the air fryer to reheat and crisp the pork at the same time. Continue cooking until the center reaches 165°F / 74°C and the edges are browned. Cold pork may need longer than freshly cooked pork.
- Preheat the air fryer to 400°F / 200°C.
- Add about 8 oz / 225 g pork in a loose layer. If it looks dry, toss it with 1–2 teaspoons of reserved juice.
- Air-fry for 3 minutes, then toss or turn part of the pork.
- Continue until the center reaches 165°F / 74°C and the edges are crisp. Freshly cooked pork commonly needs another 1–3 minutes; refrigerated pork may need longer.
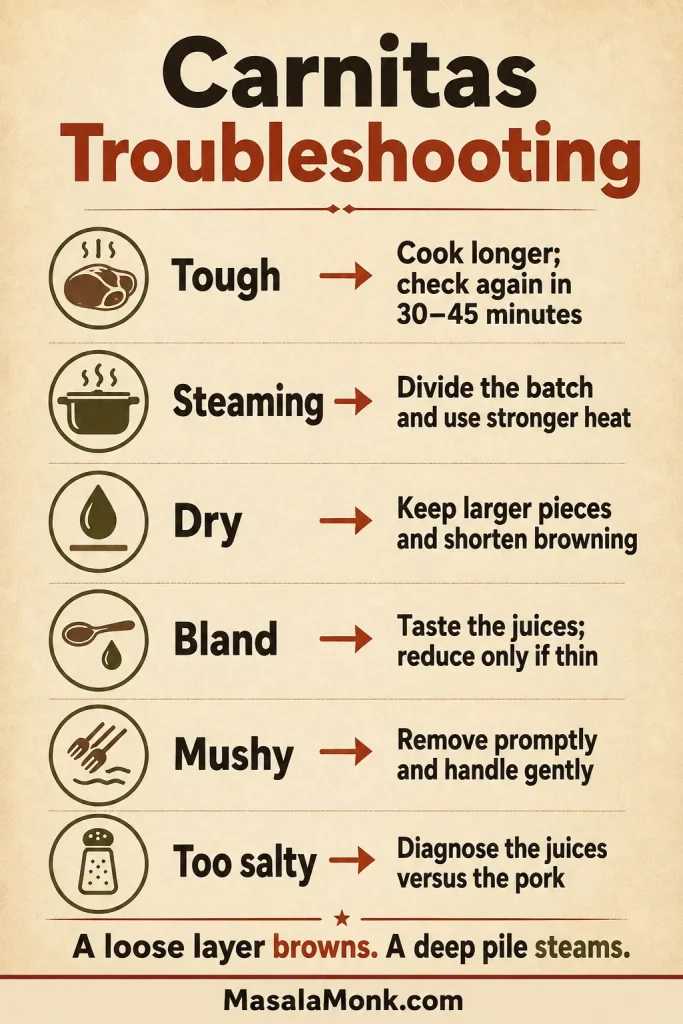
Slow Cooker Carnitas Troubleshooting
On a phone, swipe sideways to see the full table.
| Problem | Likely cause | What to do |
|---|---|---|
| Pork is still tough | The connective tissue has not softened | Cover and continue cooking; check again in 30–45 minutes |
| Pork is mushy | Small pieces, overcooking or a long hold in hot liquid | Drain promptly and crisp broad portions carefully |
| Too much liquid | The shoulder released moisture and fat | Strain, skim and reduce only what you need |
| Pork will not crisp | Wet surface, crowding or weak heat | Divide it into loose batches and fully preheat the broiler or skillet |
| Pork dries beneath the broiler | Pieces are too fine or the second pass is too long | Keep larger pieces and finish with a measured spoonful of juice |
| Carnitas taste bland | Watery juices or no final seasoning check | Reduce the strained juices if needed, then adjust salt and lime |
| Carnitas are too salty | The juices are too salty, or the pork itself is over-seasoned | When the juices are too salty, use less of them. Balance over-seasoned pork with plain tortillas, unsalted beans, avocado or rice |
The Pork Is Still Tough
A shoulder that is hot but still stubborn simply needs more time. Fully cooked pork can remain tight before its connective tissue has softened enough to pull apart.
If the cooker also looks unusually dry, add a small amount of hot water or unsalted broth around the meat. This is most likely with a small batch in a large cooker.
The Pork Turned Mushy
Mushiness usually comes from small pieces, a long hold after tenderness, repeated stirring or leaving fine strands submerged in all the cooking liquid. Remove finished shoulder promptly and rest it in larger sections. Browning can improve a soft exterior, but it cannot rebuild the meat’s structure.
The Pork Is Steaming Instead of Browning
Move half the pork to another tray or skillet. Let pooled moisture evaporate, then leave the pieces alone long enough for a crust to form.
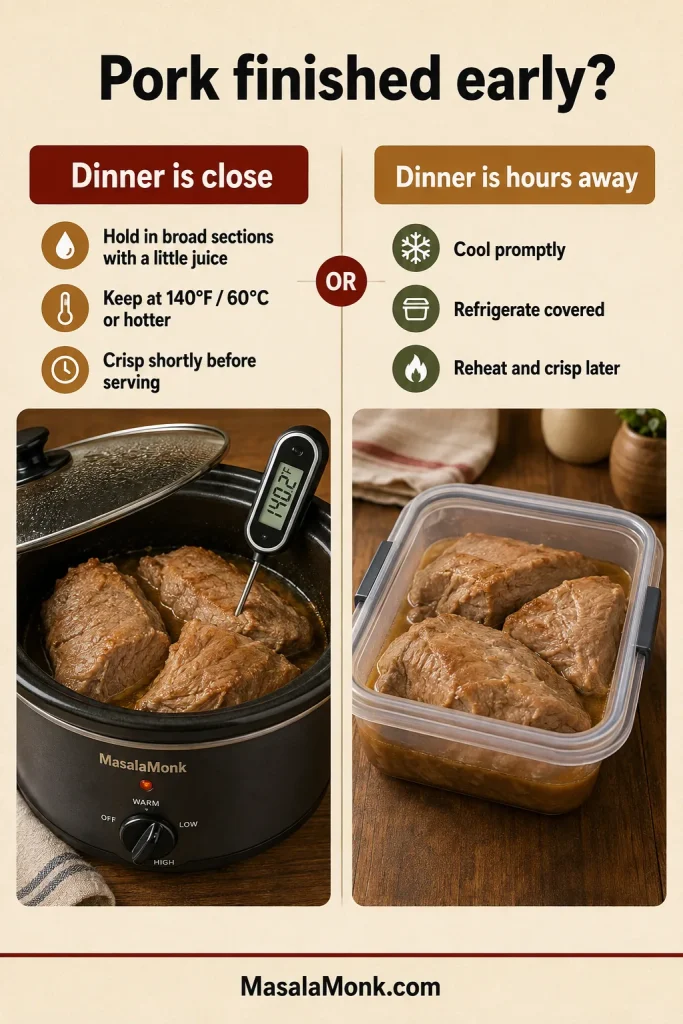
The Pork Finished Early
If dinner is close, hold the pork in large sections with a modest amount of juice on WARM only when a thermometer confirms that it remains at 140°F / 60°C or hotter. Crisp it shortly before serving.
If the meal is still several hours away, cool and refrigerate the pork promptly. Reheat and crisp it closer to dinner instead of leaving it on a long hot hold.
Continue to serving ideas ↓ · Store or reheat later ↓ · Back to recipe card ↑ · Back to top ↑
How to Serve Carnitas
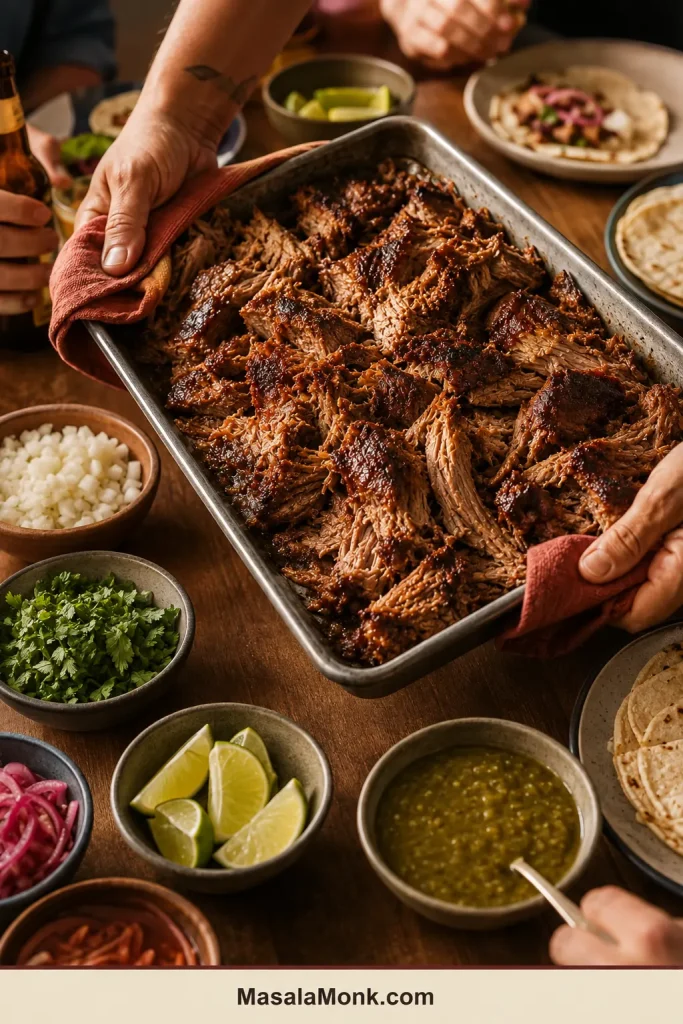
Bring the first tray straight to the table rather than covering it. Warm tortillas, chopped onion, cilantro, lime and one bright salsa are enough; the pork should still be the part everyone notices first.
Let everyone take the crispest pieces while the next batch browns. The last person to build a taco still gets pork fresh from the heat.
The Simplest Carnitas Taco
- Warm corn tortilla
- Crisp-edged carnitas
- Finely chopped white onion
- Fresh cilantro
- A squeeze of lime
- Roasted salsa verde or a bright red salsa
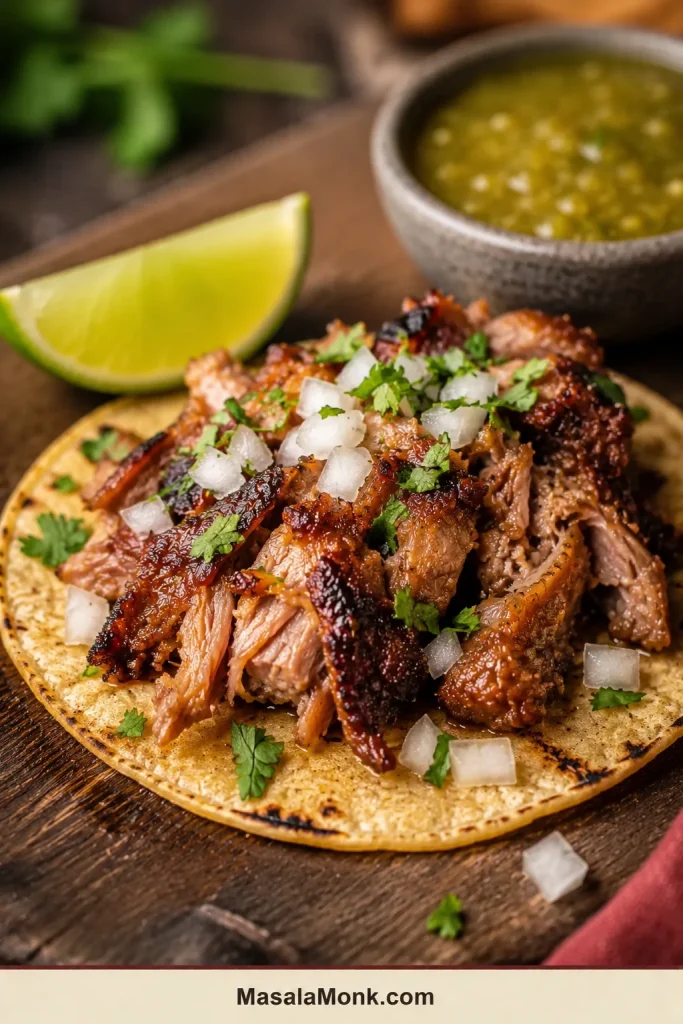
For a creamier taco, add one rich element rather than several. A small spoonful of fresh guacamole softens the crisp edges without burying the pork.
Build a Carnitas Taco Bar
- Warm corn and flour tortillas
- Pickled red onions and radish slices
- Guacamole or diced avocado
- Pico de gallo
- Cotija or another crumbly cheese
- Black beans or refried beans
- Lime wedges
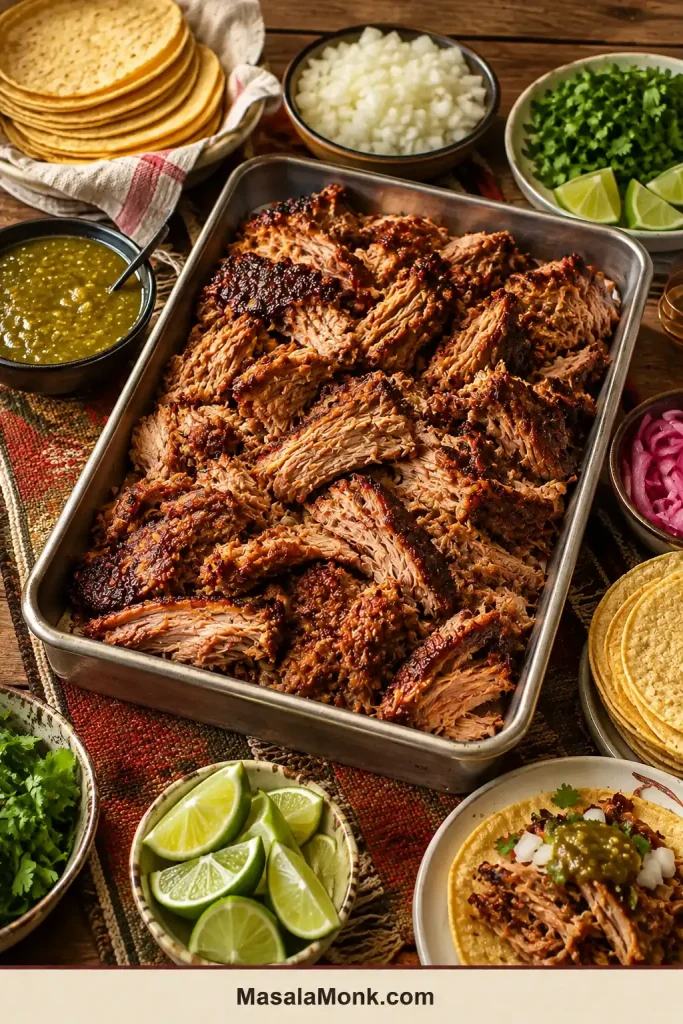
Add black beans and a bowl of fluffy rice for guests who would rather build a carnitas bowl.
How Much Carnitas Per Person?
On a phone, swipe sideways to see the full table.
| Serving style | Pork quantity | Approximate yield |
|---|---|---|
| Small taco | 1½–2 oz / 40–55 g per taco | 20–30 tacos |
| Taco meal with sides | 3–4 oz / 85–115 g per person | 10–14 people |
| Hearty tacos or bowl | 4–5 oz / 115–140 g per person | 8–11 people |
| Large plated main | 5–6 oz / 140–170 g per person | 7–9 people |
Other Ways to Use Carnitas
Use leftovers in quesadillas, burrito bowls, tostadas, breakfast hash or loaded potatoes, crisping the pork before adding it whenever the dish allows. For breakfast meal prep, the cooling and reheating approach in these breakfast burritos helps keep the tortillas from becoming wet or chewy.
Storing, Freezing and Reheating Carnitas
Carnitas are unusually good make-ahead food—as long as you save the crisping for later.
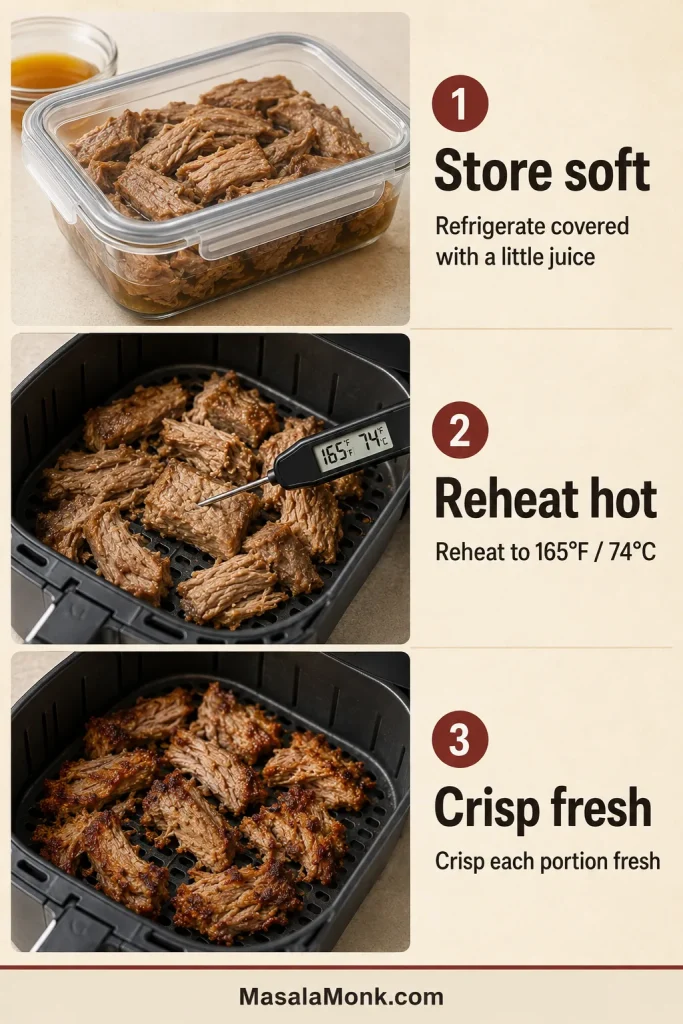
Keep any pork you are not serving soft and juicy. Tomorrow, warm one portion with a little juice, let the surface dry and crisp it fresh so the browned edges return.
Refrigerating Carnitas
- Divide the pork into shallow containers and refrigerate within two hours.
- Add enough reserved juice to keep it moist without submerging it.
- Keep the remaining juices in a separate container.
- Use refrigerated carnitas within 3–4 days.
- Crisp only the portion you are about to serve.
Freezing Carnitas
Freeze the pork before crisping in practical meal portions. About 1 lb / 454 g suits a family meal, while 8 oz / 225 g works well for one or two people.
- Place each portion in a freezer-safe bag or container.
- Add 2–4 tablespoons / 30–60 ml reserved juice per pound / 454 g pork.
- Press freezer bags flat to remove excess air.
- Label each portion with its date and weight.
- Freeze the remaining juices in small portions.
For best quality, use frozen carnitas within about three months.
Reheat Without Drying the Pork
- Thaw frozen carnitas in the refrigerator when time allows.
- Reheat with a little reserved juice on the stove, in the microwave, in a conventional oven or in the air fryer until the pork reaches 165°F / 74°C.
- Allow excess surface moisture to evaporate.
- Crisp the pork in a skillet, beneath the broiler or in the air fryer.
- Add a small spoonful of hot juice after browning.
Reheat cold leftovers outside the slow cooker. Once fully hot, the pork can be transferred to a preheated cooker and held at 140°F / 60°C or above.
Slow Cooker Pork Carnitas FAQ
Can You Put Frozen Pork in a Slow Cooker?
Thaw pork completely in the refrigerator before slow cooking. Frozen or partly frozen meat may take too long to heat through safely in a slow cooker, and it also makes the cooking window difficult to predict.
Should the Pork Be Covered With Liquid?
No. A shallow layer is enough. The shoulder releases substantial moisture and fat as it cooks.
Can You Cook the Shoulder Whole?
Yes, as long as it fits without pressing against the lid. Place a whole boneless roast with the fattier side facing upward, season it all over and pour the citrus around it. Use LOW and expect a later first check and a wider timing window.
Is LOW or HIGH Better?
LOW gives the broadest and most forgiving window. HIGH works for large boneless pieces when time is limited, but begin checking earlier and watch closely once the meat starts separating.
Can You Halve the Recipe?
Yes. Use the 2 lb / 900 g half-batch quantities above. A 4–5-quart slow cooker gives the smaller batch the best fit, although a 6-quart cooker can also work with a wider timing window.
Tender First, Crisp Second
Serve the pork straight from the tray while the dark edges are crisp and the larger pieces still pull apart softly inside.
Made these carnitas? Tell us whether you cooked them on LOW or HIGH and which crisping method you preferred. If you noted the pork weight, cooker size or fork-tender time, include those too—they may help the next person making dinner.
And tell us what went into the first taco.








