Posted on Leave a comment

Grilled Shrimp Recipe: Juicy, Easy & Never Rubbery

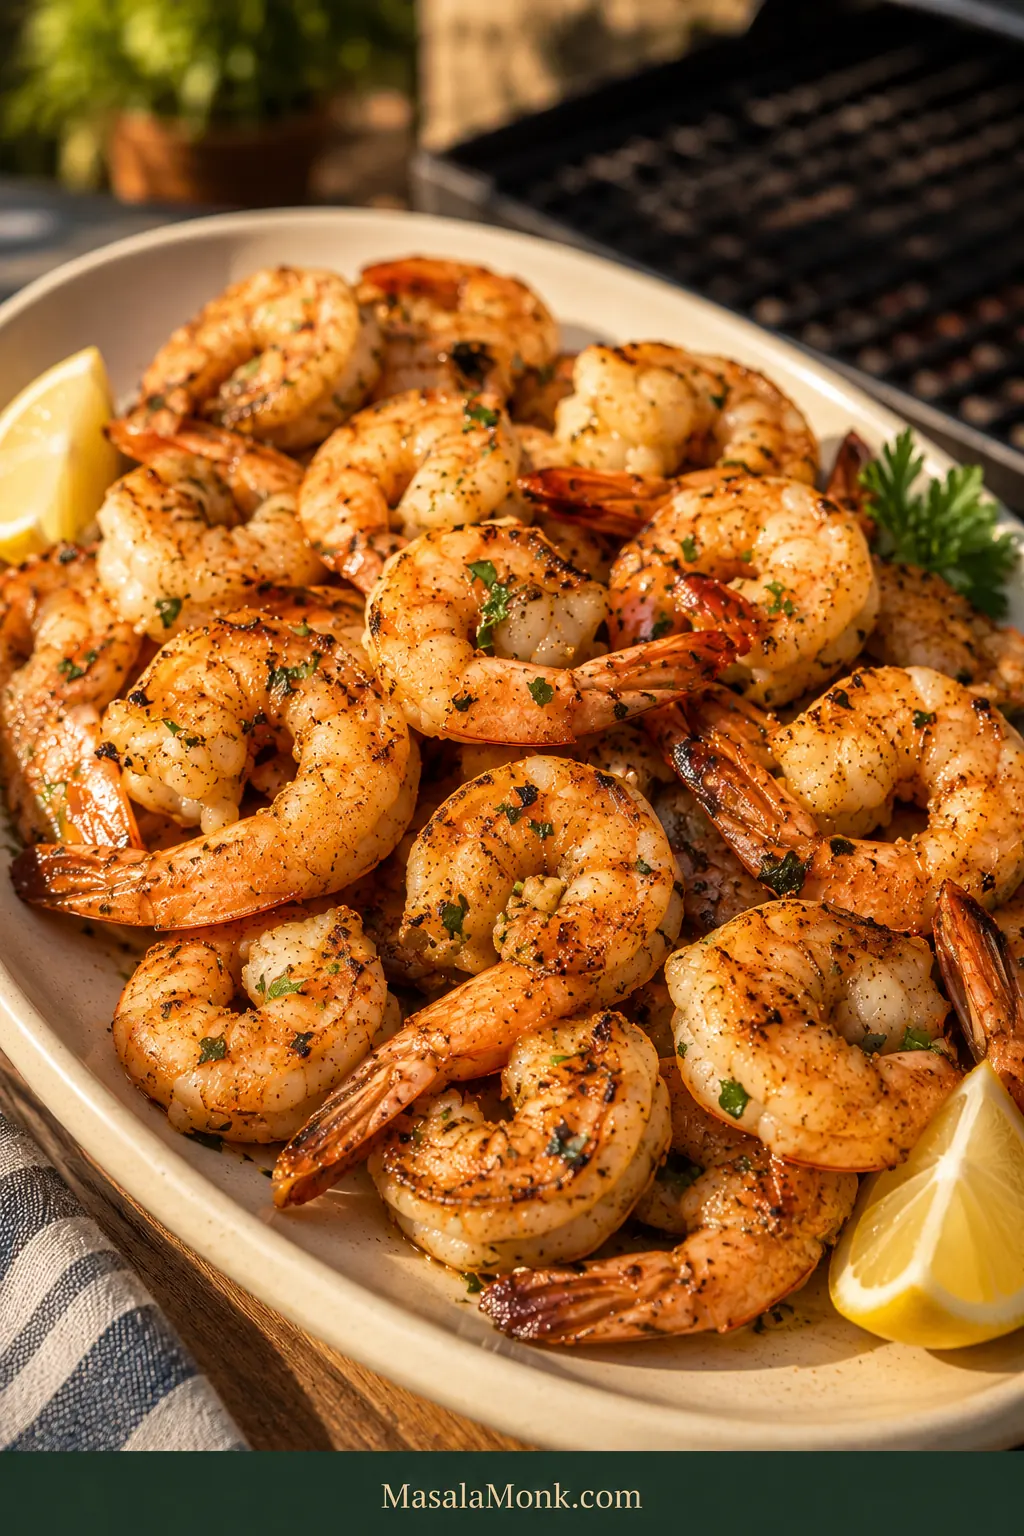
Platter piled with large grilled shrimp with lightly charred edges, lemon wedges and a small amount of parsley on a warm outdoor table.

Grilled shrimp can feel a little luxurious for something that takes only minutes to cook: smoky edges, a plump juicy center, fresh lemon and garlic, all straight from a hot grill.

The only catch is speed. A pound of good shrimp is not something you want to sacrifice to two distracted minutes beside the grill. Shrimp can move from underdone to perfect to rubbery remarkably quickly.

This grilled shrimp recipe keeps that narrow window manageable. The recipe itself is easy. What matters is knowing when to start looking, what “done” actually looks like, and when to stop adding heat.

Quick Answer: How to Grill Shrimp Without Making Them Rubbery

The method at a glance

For large shrimp—about 16/20 or 21/25 count per pound—expect roughly 3–6 minutes total on a well-preheated medium-high grill. Start checking after about 1½–2 minutes on the first side.

You can season and grill immediately; marinating is optional. If the shrimp were frozen, thaw them completely and dry the surface before seasoning.

Check the thickest part of the body rather than the thin tail. When the center is firm, pearly and opaque and the shrimp still feel juicy and springy, get them off the heat.

The clock tells you when to look. The shrimp tell you when to stop.
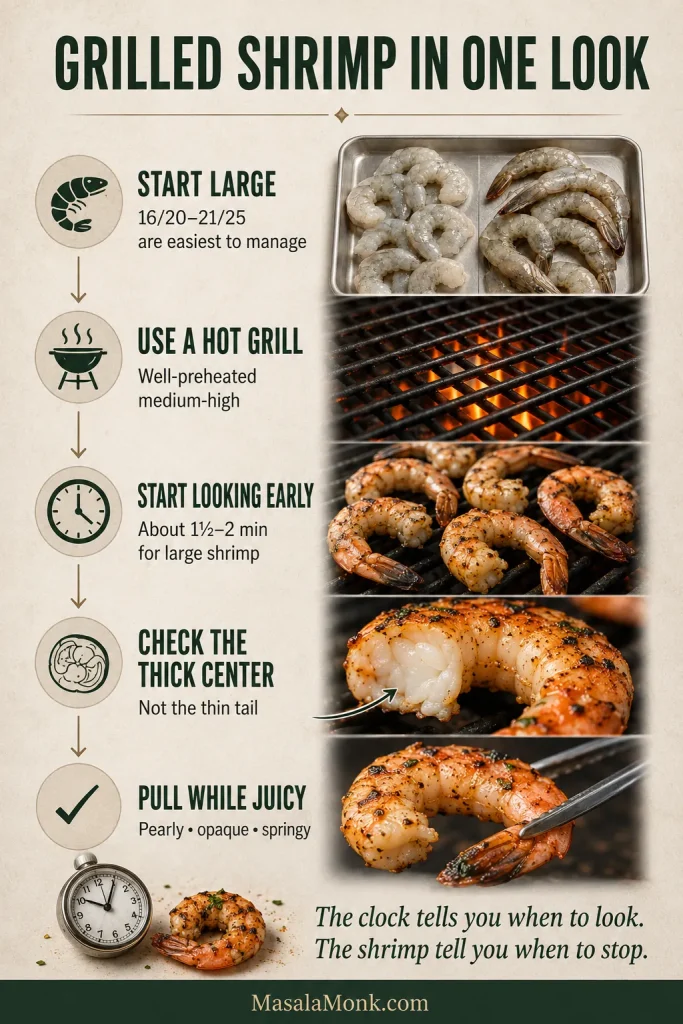
Illustrated grilled shrimp guide showing five steps: choose large shrimp, use a hot grill, check early, inspect the thick center and remove the shrimp while juicy.
Think of grilling shrimp as a chain of decisions: size sets the margin, heat starts the cook, and the thick center ends it.

Easy Lemon-Garlic Grilled Shrimp Recipe

The first bite is smoky and lightly charred; then the lemon and garlic arrive fresh at the finish. The coating stays deliberately light so the grill can brown the shrimp before their juicy centers have time to overcook.

Actual grilling takes only a few minutes. Most of the clock below is prep and optional marinating.

Prep10 minutes

Marinate (optional)15–30 minutes

GrillAbout 3–6 minutes, depending on size

Yield2 generous or 3 lighter mains; 4 appetizer portions, or up to 6 lighter appetizers with generous sides

Useful Equipment

  • Skewers for smaller shrimp or faster batch flipping
  • Grill basket for small shrimp that are awkward on open grates
  • Instant-read thermometer, optional and most practical with jumbo shrimp

Ingredients

  • 1 lb / 454 g raw shrimp, peeled and deveined, preferably 16/20 or 21/25 count
  • 2 tablespoons / 30 ml olive oil
  • 1 tablespoon / 15 ml fresh lemon juice
  • 1 teaspoon finely grated lemon zest
  • 1 teaspoon garlic powder
  • 1 teaspoon smoked or sweet paprika
  • 3 g fine sea salt, about ½ teaspoon
  • ¼ teaspoon freshly ground black pepper
  • Pinch of cayenne or red pepper flakes, optional
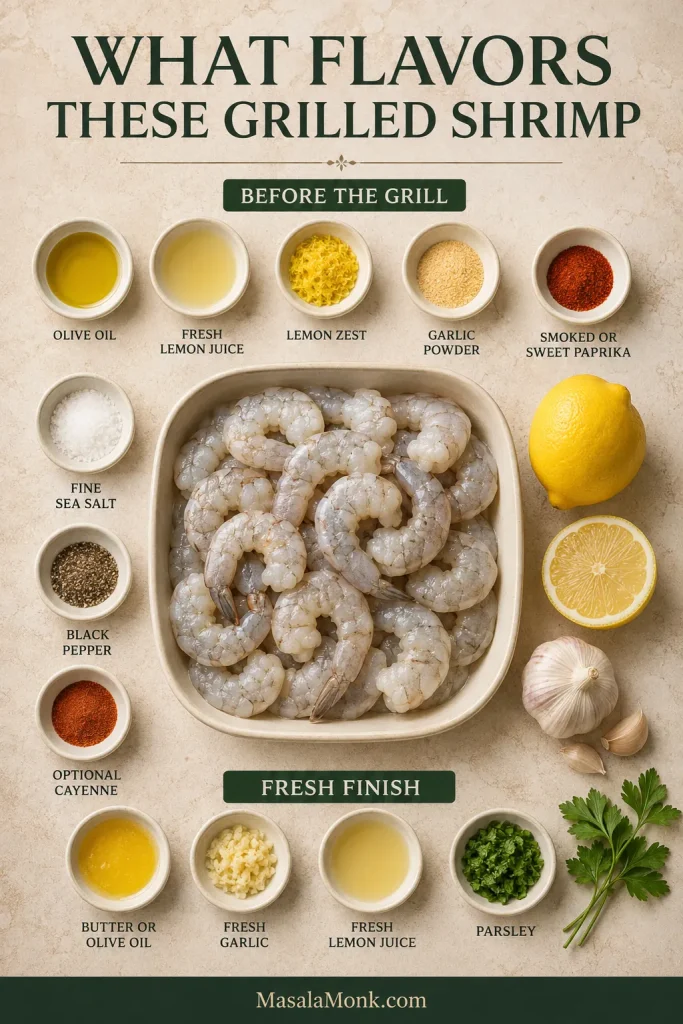
Overhead arrangement of raw shrimp with olive oil, lemon, zest, paprika, garlic powder, salt and pepper grouped separately from butter, fresh garlic, lemon and parsley for finishing.
Use garlic powder, paprika and lemon zest before grilling; save the fresh garlic and final squeeze of lemon for after the heat.

Optional Fresh Garlic-Lemon Finish

  • 1 tablespoon / 14 g unsalted butter or 1 tablespoon / 15 ml olive oil
  • 1 small garlic clove, very finely grated or minced
  • 2 teaspoons / 10 ml fresh lemon juice
  • 1 tablespoon chopped parsley

Before grilling, look for a light, even sheen rather than a wet coating. The shrimp should look glossy enough to carry the seasoning, but not sit in excess liquid.
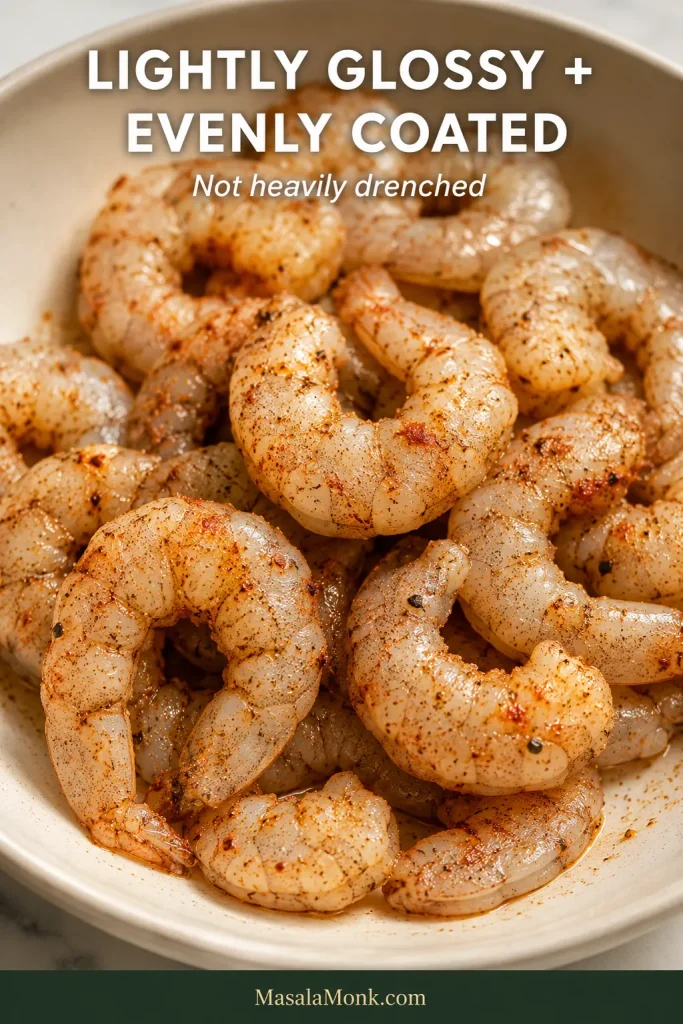
Close-up of raw peeled shrimp in a bowl with a thin, even coating of seasoned oil and lemon, with the shrimp glossy but not submerged in liquid.
That light sheen is enough. Less surface liquid means the grill can start browning sooner instead of spending precious time evaporating marinade.

How to Make Grilled Shrimp

  1. Dry the shrimp. If frozen, thaw and drain first. Pat away visible surface water.
  2. Season. Mix the olive oil, lemon juice, zest, garlic powder, paprika, salt, pepper and optional cayenne. Toss until the shrimp look lightly glossy and evenly coated rather than heavily drenched.
  3. Marinate briefly—or grill now. Refrigerate for 15–30 minutes, or skip the wait and cook immediately. For an even drier surface, omit the 1 tablespoon / 15 ml lemon juice before grilling and add extra fresh lemon to taste after cooking.
  4. Preheat the grill. Use well-preheated medium-high heat. Brush the grates clean and let them heat fully.
  5. Grill. Arrange large shrimp directly on the grates or thread them onto skewers. You should hear an immediate, lively sizzle. Let the first side brown before flipping once.
  6. Pull them as soon as they’re done. Check the thickest part of the body and move the shrimp to a clean serving platter—not the plate or tray that held them raw.
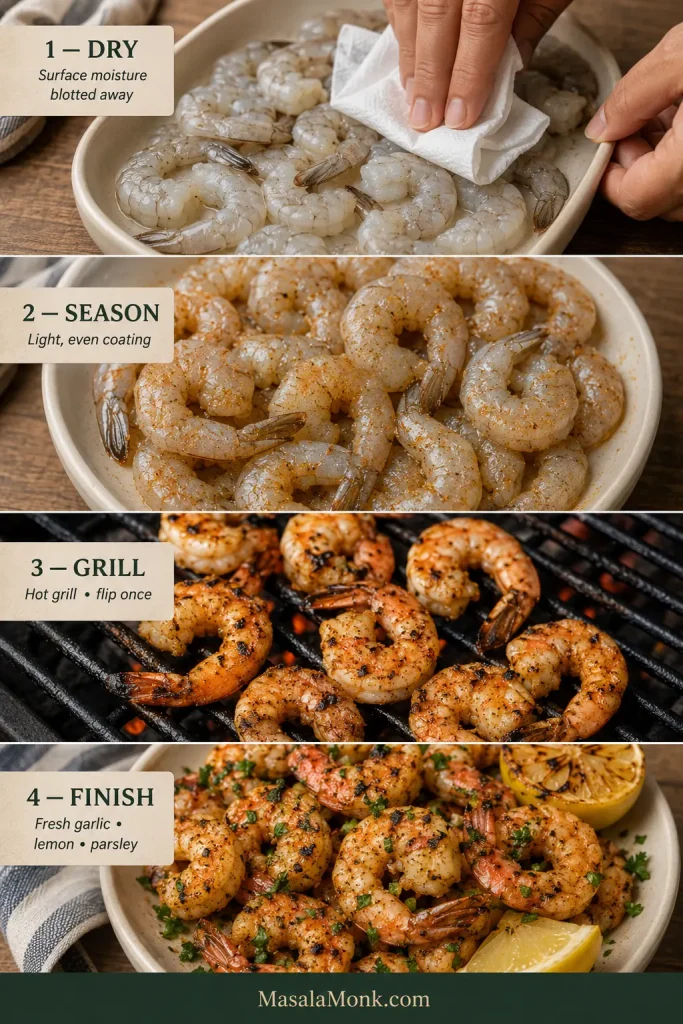
Four-step cooking sequence showing raw shrimp being dried, lightly seasoned, grilled over hot grates and finished with lemon, fresh garlic and parsley.
Dry first, season lightly, grill fast, then finish off the heat—that order keeps browning and fresh flavor working together.

Finish

Melt the butter and take it off direct heat before stirring in the fresh garlic. The garlic should smell fresh and fragrant, not browned. Add the lemon juice and parsley, then spoon or toss the mixture with the hot shrimp.

Garlic powder survives the grill; fresh garlic gets the last word.
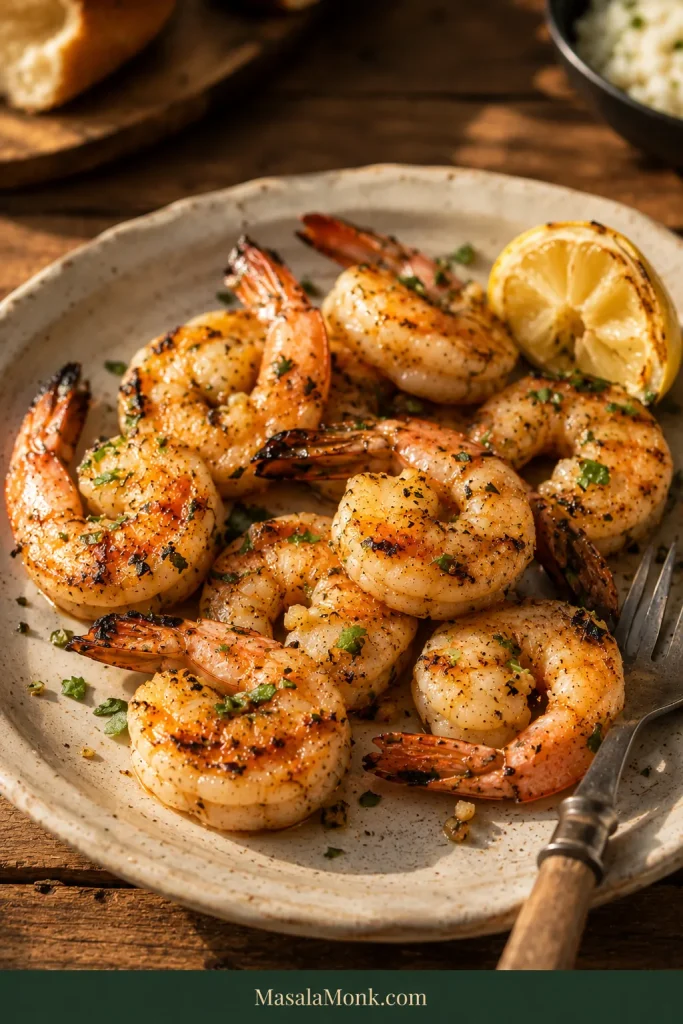
Dinner plate of grilled shrimp with light browning, lemon and a small amount of parsley on a rustic wooden table.
After grilling, a restrained lemon-garlic finish should sharpen the shrimp’s smoky flavor, not bury it under butter or sauce.

Recipe Notes

  • Using a salty seasoning blend? Reduce the separate salt.
  • Using wooden skewers? Soak them for about 30 minutes first.
  • Using commercially precooked shrimp? Warm them only briefly and let the grill add a little char; the raw-shrimp timings below do not apply.
  • Want marinade for serving? Reserve a clean portion before adding the raw shrimp. Otherwise discard the used marinade or boil it before using it as a sauce.

Need More Help With Your Shrimp?

You’ve got the recipe above. If you’re already cooking, jump to timing, doneness or troubleshooting. If you’re planning ahead, start with shrimp size and prep.

Choose the Best Shrimp for Grilling

For the easiest grilling, buy raw 16/20 or 21/25 shrimp if you can. They’re large enough to handle comfortably and give you a little more breathing room before they overcook.

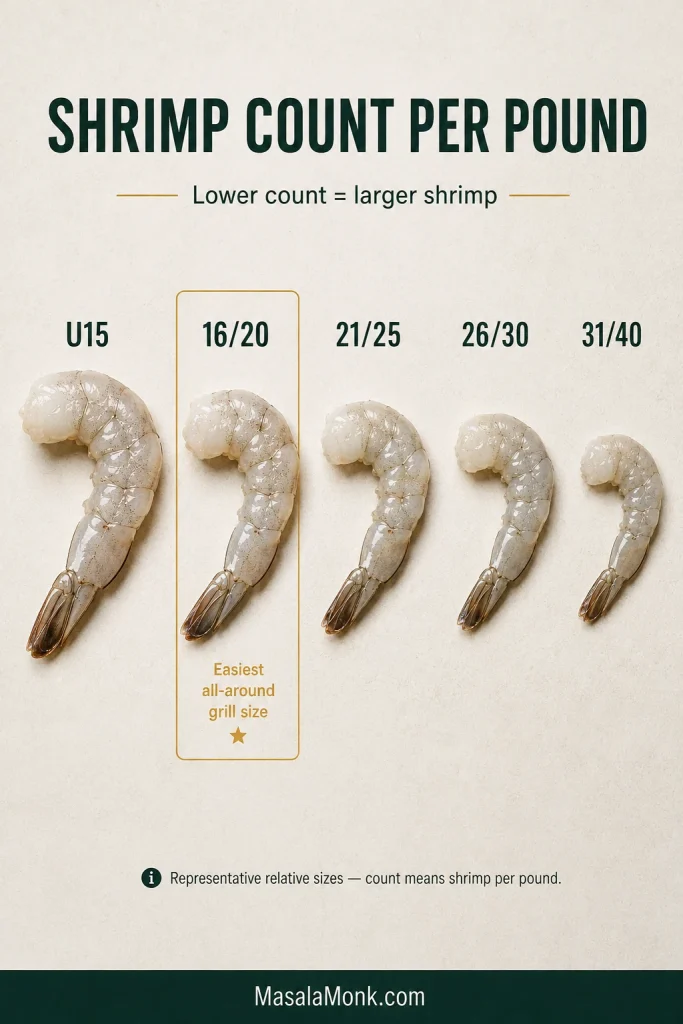
The useful number at the seafood counter is the count per pound. A 16/20 label means roughly 16–20 shrimp make up one pound; lower numbers mean larger shrimp.

Shrimp countRelative sizeBuying note
U15Very largeMost forgiving timing on the grill
16/20LargeEasiest all-around choice for grilling
21/25LargeExcellent balance of size, price and easy handling
26/30Medium-largeStill very grillable, but they cook more quickly
31/40SmallerFast cooking, so you’ll want everything ready before they go on
If you’re buying specifically for the grill and don’t want to overthink it, 16/20 is an excellent place to start.
Raw shrimp shown in decreasing representative sizes labeled U15, 16/20, 21/25, 26/30 and 31/40, with 16/20 highlighted as an easy grilling size.

If the package says prawns, king prawns or tiger prawns, use the actual size and thickness as your guide. Very large prawns behave much like jumbo shrimp.

Raw Shrimp Are Best for Grilling

Raw shrimp give you the most control over browning and doneness, and all of the main timing guidance in this article is written for them.

Commercially precooked shrimp only need enough heat to warm through and pick up a little grill flavor. The same idea helps with shrimp fried rice: get the rest of the dish nearly ready before the cooked shrimp go in.

Frozen Shrimp Work Beautifully

Frozen is not the problem. Surface water is.

Fully thawed frozen shrimp grill very well once excess moisture is blotted from the surface. They can brown and taste every bit as lively as shrimp that never saw the freezer.
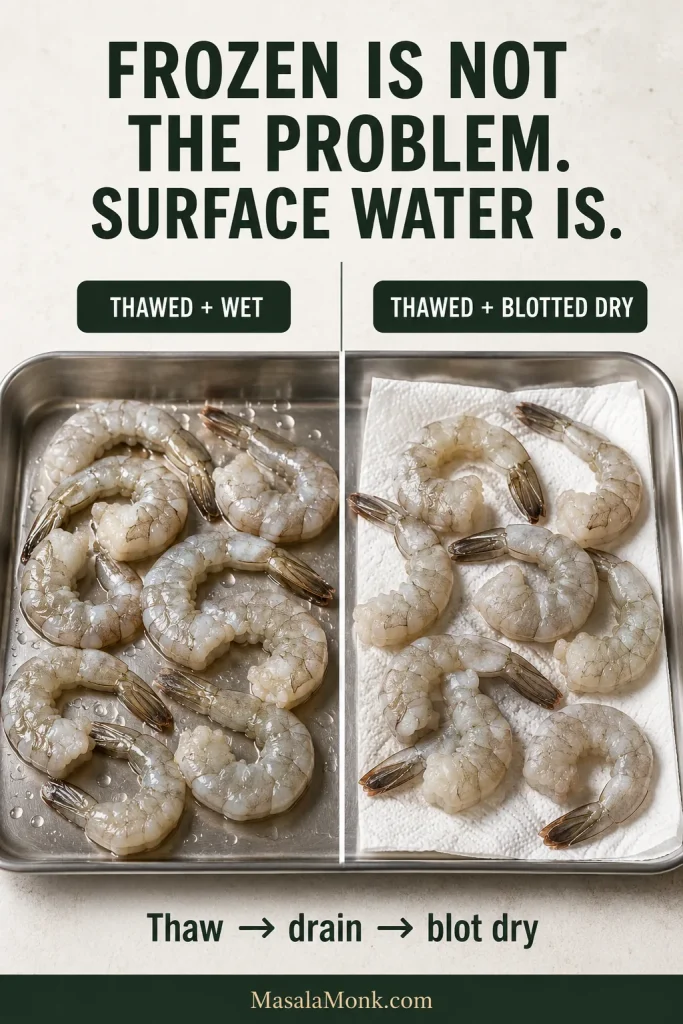
Side-by-side comparison of thawed shrimp that are wet with surface droplets and thawed shrimp that have been thoroughly blotted dry with paper towels.
Thawed frozen shrimp can brown beautifully; the real advantage comes from getting their surface dry before they ever meet the hot grate.

No time to thaw? Our frozen shrimp in the air fryer guide is designed for cooking them straight from frozen.

Should You Grill Shrimp With the Shell On or Off?

Peeled shrimp are the easiest default: seasoning reaches the flesh directly, more surface touches the grill, and they’re easier to eat.

Shell-on shrimp trade some direct seasoning and browning for a little extra protection from intense heat. With jumbo shrimp, you can slit the shell along the back and devein while leaving most of it intact.
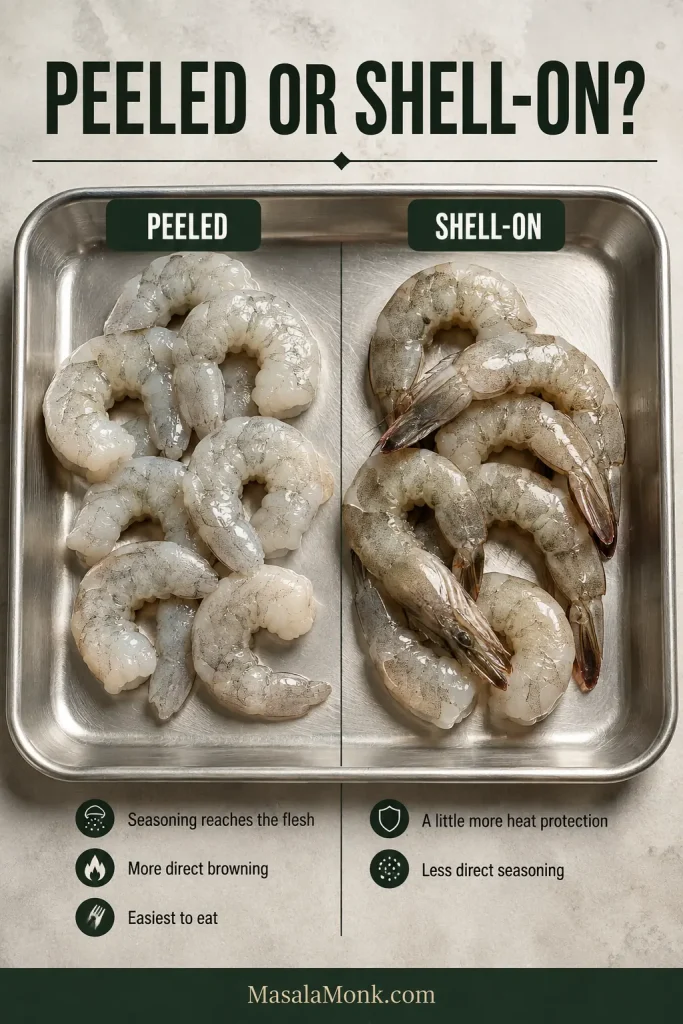
Side-by-side raw shrimp comparison showing peeled and deveined shrimp on one side and similar-sized shell-on shrimp on the other.

How to Prep Shrimp for the Grill

The prep itself is short:

  1. Thaw if needed. Use the refrigerator when you have time. For a faster thaw, keep the shrimp sealed in a leakproof bag in cold water, then cook them promptly.
  2. Peel and devein if needed. Leave the shell in place if you’re deliberately grilling shell-on.
  3. Choose the tails. Leave them on for finger food and presentation; remove them for easier shrimp tacos, pasta or rice bowls.
  4. Drain and dry. Blot away obvious surface moisture before seasoning.
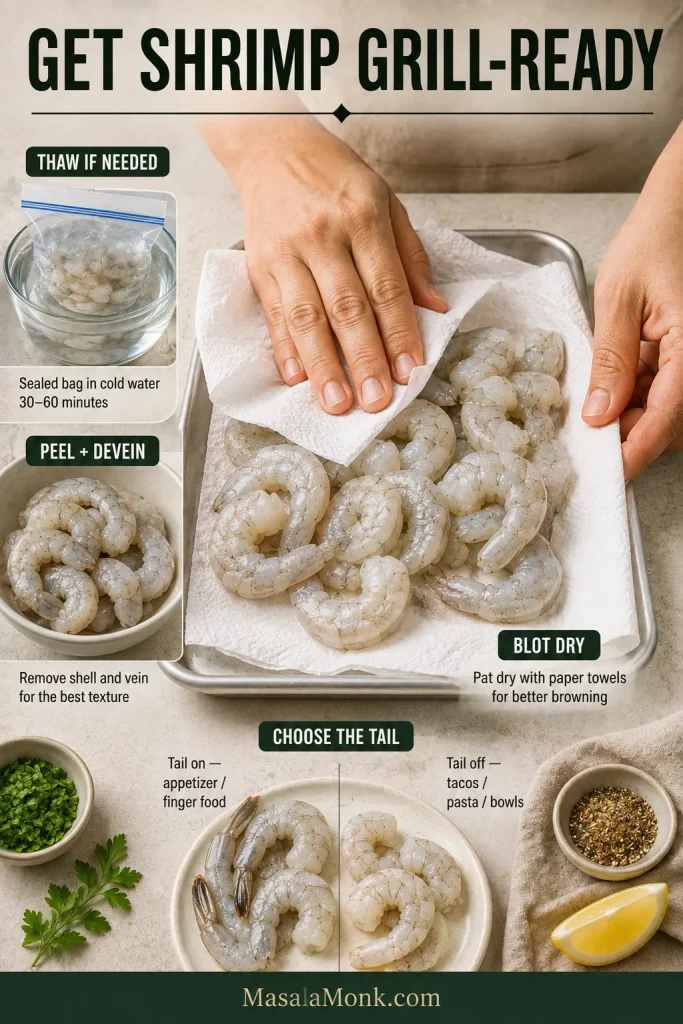
Overhead preparation scene with hands blotting raw peeled shrimp dry, alongside cues for thawing, peeling and deveining, tail choice and drying.
Do the small jobs before the grill gets hot, so the few minutes of actual cooking stay calm and easy to manage.

Butterflying jumbo shrimp is optional. Cut along the back without slicing all the way through, then open the flesh slightly. More surface can touch the grill, which means more browned edges—but also a shorter cooking window, so check butterflied shrimp sooner than intact shrimp of the same size.
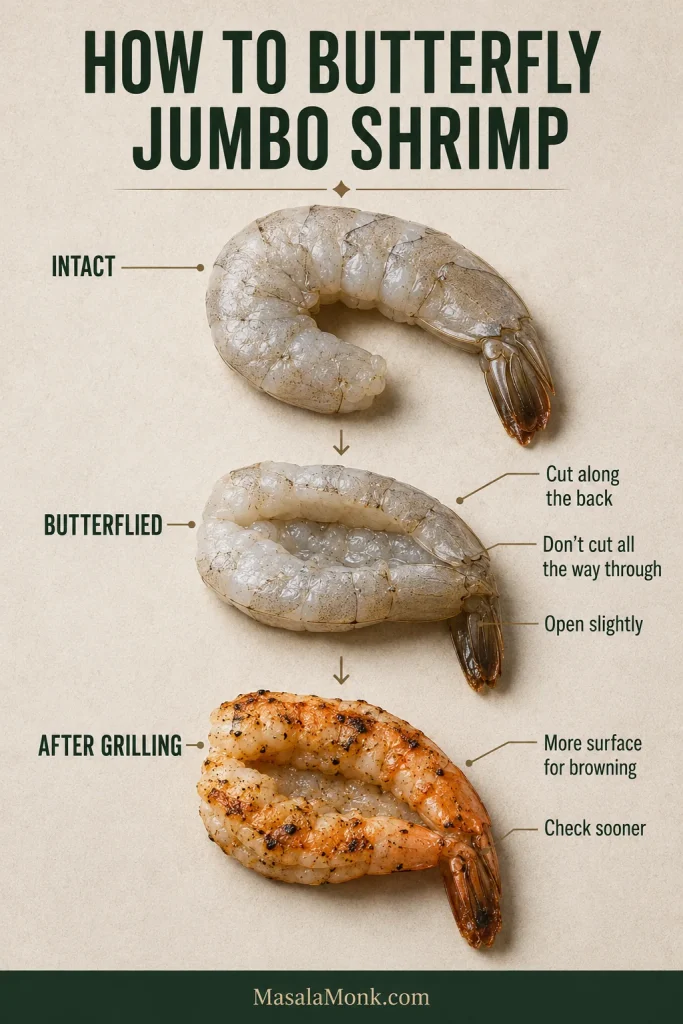
Three-stage view of a jumbo raw shrimp intact, the shrimp cut along the back and opened without splitting apart, and a butterflied shrimp after grilling.
Butterflying jumbo shrimp exposes more flesh to the grate, so you gain browning while giving up a little timing margin.

Marinade or Seasoning? Choose What Fits Dinner

Choose your route

  • Need dinner now? Season and grill immediately.
  • Want to season the shrimp a little ahead of time? Use the short lemon-garlic marinade below.
  • Want stronger fresh-garlic flavor? Keep most of the fresh garlic for the finish.
  • Using a sweet glaze? Brush it on late in grilling so the sugar has less time to scorch.
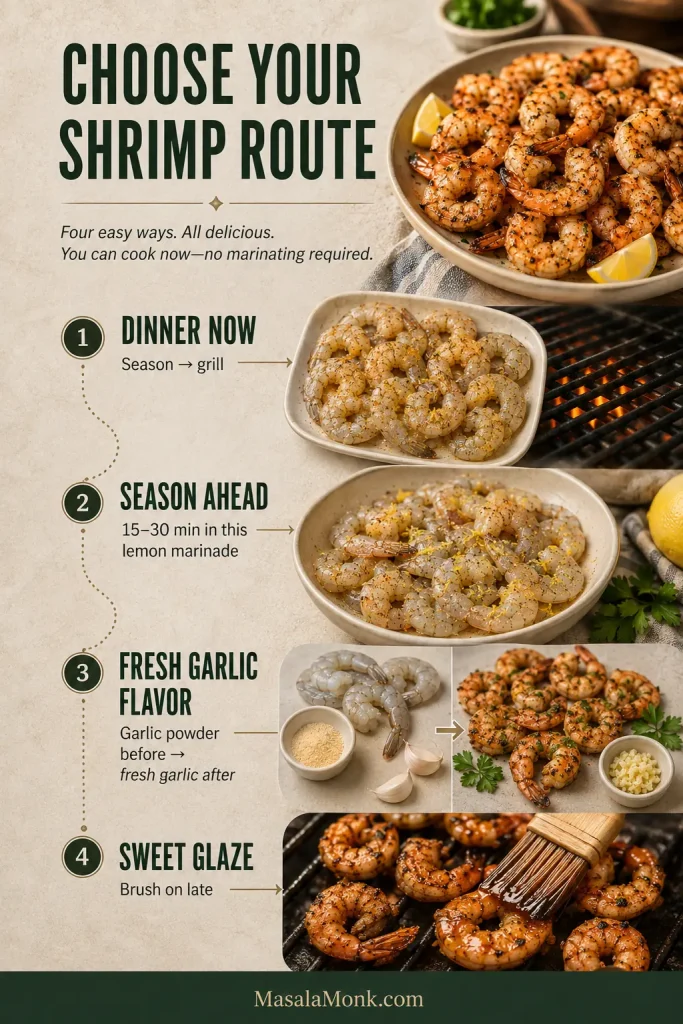
Four-route grilled shrimp guide showing immediate seasoning, a short lemon marinade, garlic powder before with fresh garlic after, and a sweet glaze brushed on late.

How Long Should Shrimp Marinate?

For this lemon marinade, 15–30 minutes is ideal. Keep the shrimp refrigerated while they sit.

If dinner gets delayed, drain the shrimp instead of leaving them in a strongly acidic mixture for hours. You can mix the marinade earlier and add the shrimp closer to cooking.

Reserve any portion you want to serve later before the raw shrimp goes in. Otherwise discard the used marinade or boil it before using it as a sauce.

No marinade? A simple seasoning works perfectly well. For a richer sauce at the table, try this Cajun garlic butter seafood sauce.
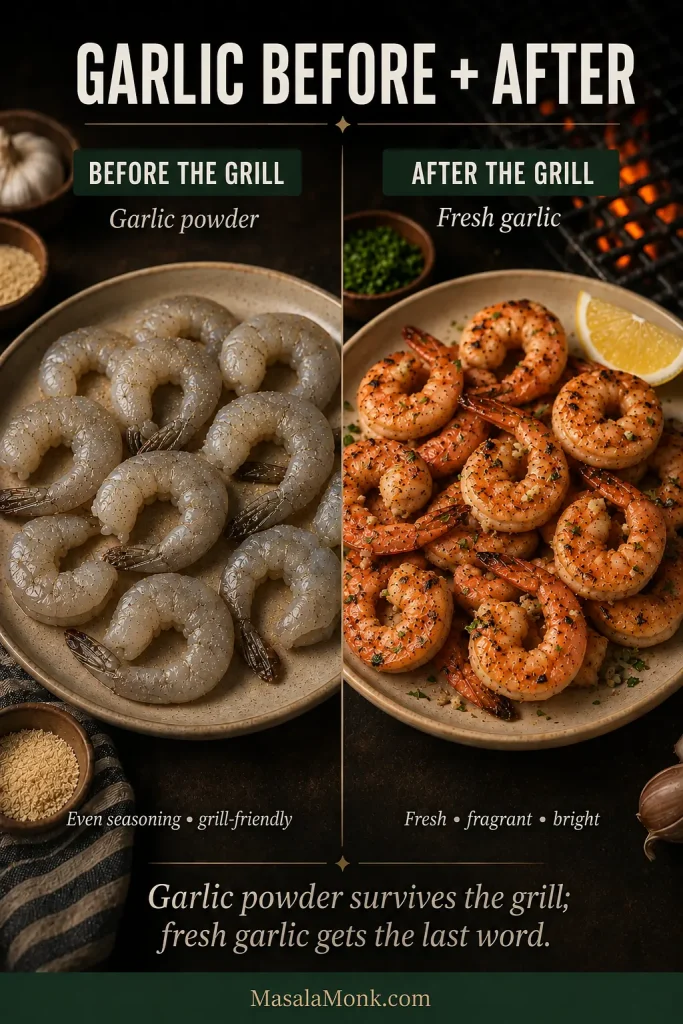
Split image with lightly seasoned raw shrimp and garlic powder before grilling on the left, and finished grilled shrimp with finely minced fresh garlic, lemon and herbs on the right.
Garlic powder distributes through the pre-grill seasoning; meanwhile, fresh garlic added later keeps more of its aroma and bite.

Choose Your Grill Setup

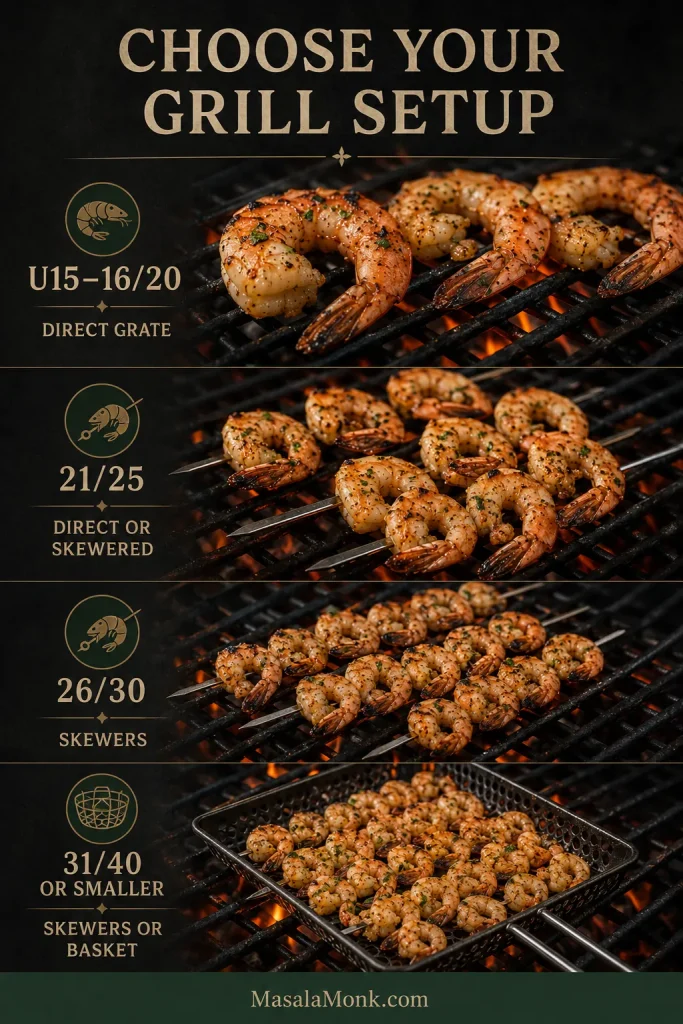
Use 16/20 shrimp directly on the grates; 21/25 can go direct or onto skewers, while smaller shrimp become easier to handle on skewers or in a grill basket.

Shrimp sizeBest setupWhy
U15–16/20Direct grateEasy to handle individually
21/25Direct or skeweredEither works; skewers speed up batch flipping
26/30SkewersSeveral shrimp can move at once during a short cooking window
31/40 or smallerSkewers or basketMuch easier to contain and turn
Grilled shrimp setup guide showing large shrimp directly on grill grates, shrimp on skewers and smaller shrimp cooking in a grill basket.
As shrimp get smaller, skewers and baskets make them much easier to turn and remove before they overcook.

What Temperature Should You Grill Shrimp At?

For most raw large shrimp, use a well-preheated medium-high grill. If your grill has a lid thermometer, about 425–475°F / 220–245°C is a useful reference range. That gets the grill into the right neighborhood, but actual heat at the grate still varies, so don’t treat the number as a finish signal.
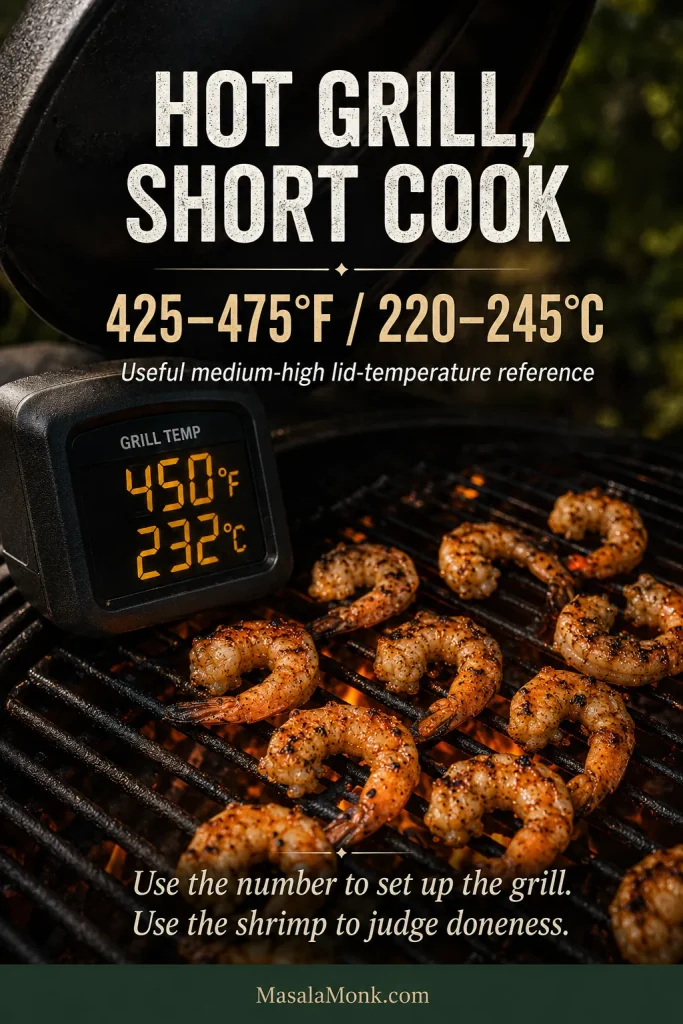
Hot outdoor grill with a temperature reading in the 425 to 475 degree Fahrenheit range and shrimp cooking over the grates.
A 425–475°F grill gets you into the right heat zone; however, wind, grate position and grill design still change the actual cook.

How to Skewer Shrimp for Grilling

Pierce each shrimp through the thick body and again near the tail so it lies flat. If the row still wants to rotate when you turn it, use two parallel skewers.

Large shrimp on skewers usually stay in the same roughly 3–6 minute total window as loose shrimp. Skewers make the batch easier to turn; shrimp size still determines how soon you should begin checking.
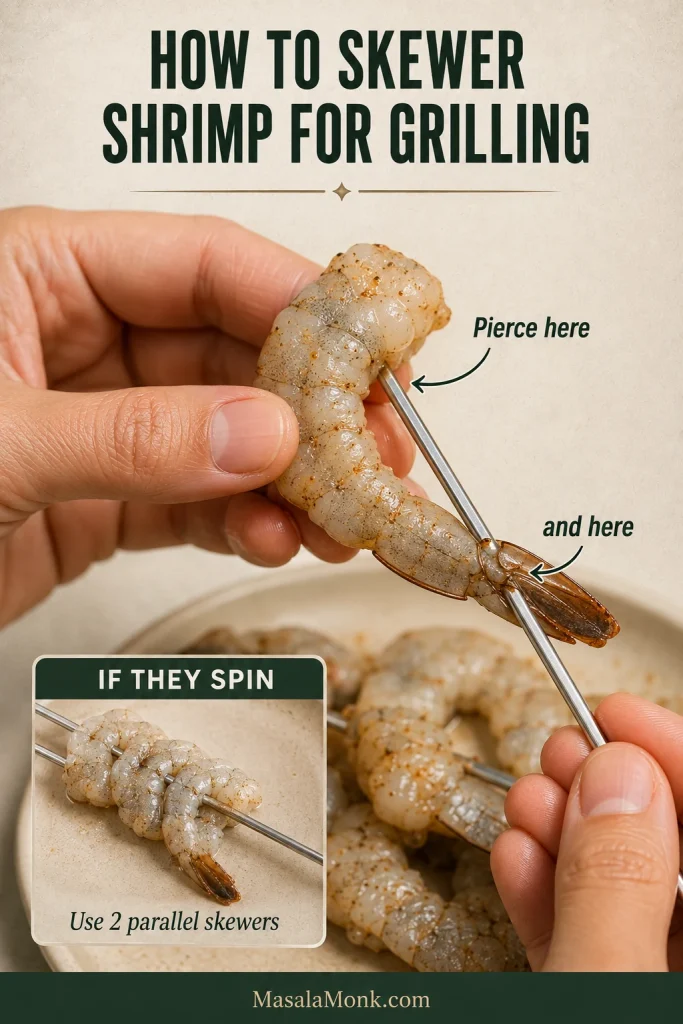
Hands threading large raw shrimp onto a metal skewer through the thick body and near the tail, with a smaller example showing two parallel skewers.
Two-point threading keeps shrimp flat, while parallel skewers let several pieces turn together instead of spinning independently.

If you’re adding vegetables, pair the shrimp with ingredients that cook just as quickly. Thick peppers, onion or bacon are usually easier on their own skewers.

Other Grill Setups

A grill basket is handy for smaller shrimp. Give them enough room to sizzle and brown; if liquid starts pooling underneath, spread them out or cook in two batches.
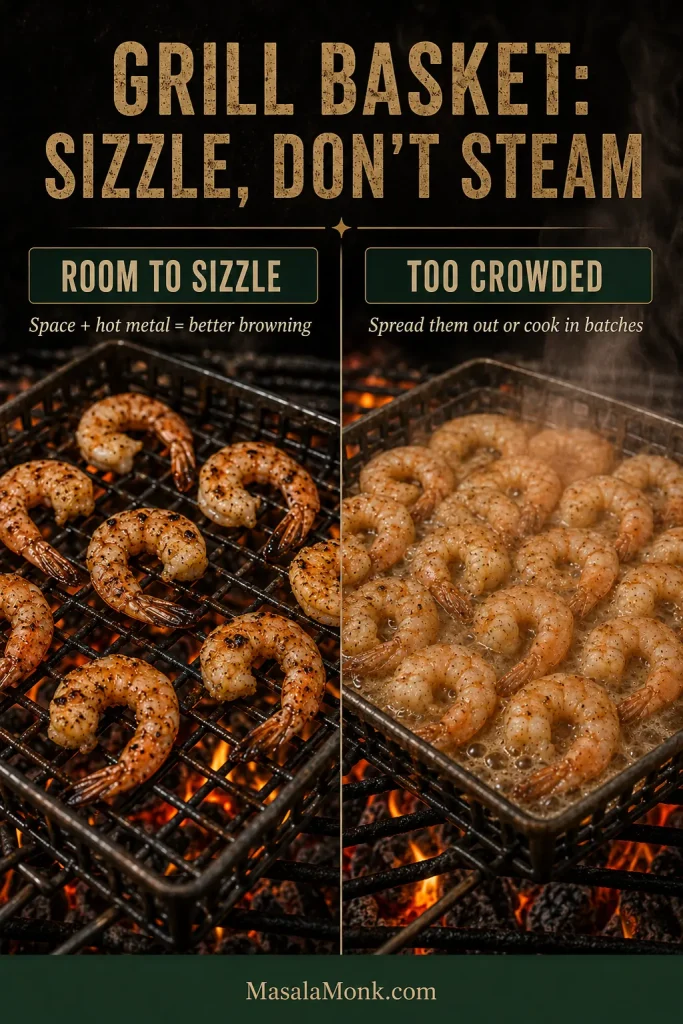
Two grill baskets compared side by side, one with shrimp spaced apart and browning and the other overcrowded with visible steam and moisture.
Steam in a grill basket is usually a spacing problem before it is a timing problem—create room first, then reassess.

Gas grills make the heat easy to control. With charcoal, keep a cooler patch available in case of flare-ups. A hot grill pan or broiler works indoors, while pellet grills vary enough that the visual cues matter more than copying gas-grill timing minute for minute.

How to Grill Shrimp: Four Cues to Watch

1. Listen When They Hit the Grill

You want a definite sizzle. If the shrimp sit quietly in released liquid, the surface is steaming more than browning.

2. Watch the First Side Change

The edges turn pink-orange and opaque while browned spots develop underneath. Once the first side has browned and releases cleanly from the grate, you’re right where you want to be.
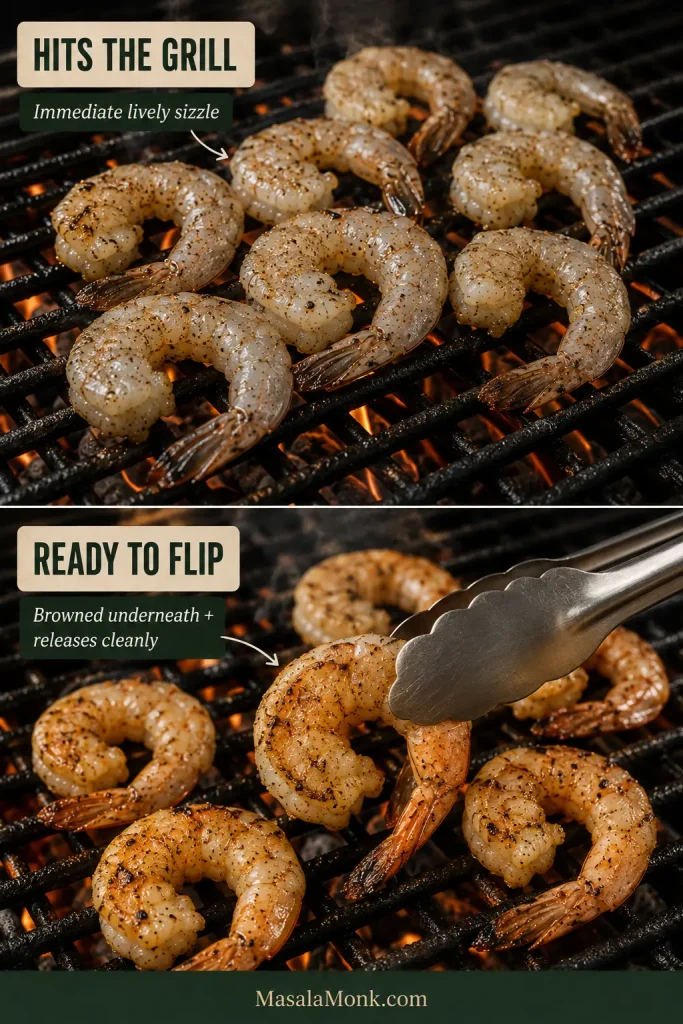
Two-stage grill scene showing raw shrimp sizzling as they hit hot grates and later a shrimp being lifted to reveal a browned underside that releases cleanly.
Sizzle tells you the surface is hot; clean release tells you the first side has actually set and browned.

3. Flip in the Same Order You Loaded

With a full grill, lay the shrimp down in a predictable sequence and follow the same path when flipping and removing them.

First on → first flipped → first off.
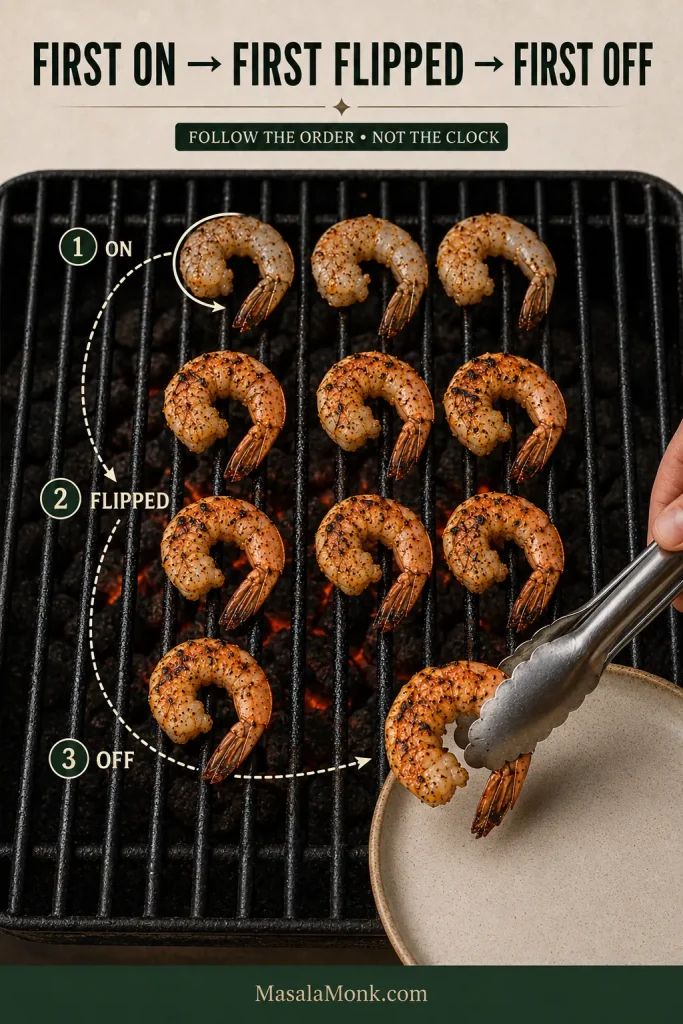
Overhead grill sequence showing shrimp placed, flipped and removed in the same orderly path, with the first shrimp transferred to a clean plate.
Loading order becomes your batch timer: follow the same path for flipping and removal so early shrimp do not quietly overcook.

4. Watch the Thick Center

The thin tail can look cooked before the thickest part of the body is ready. As the second side finishes, watch that center and use the doneness cues below.
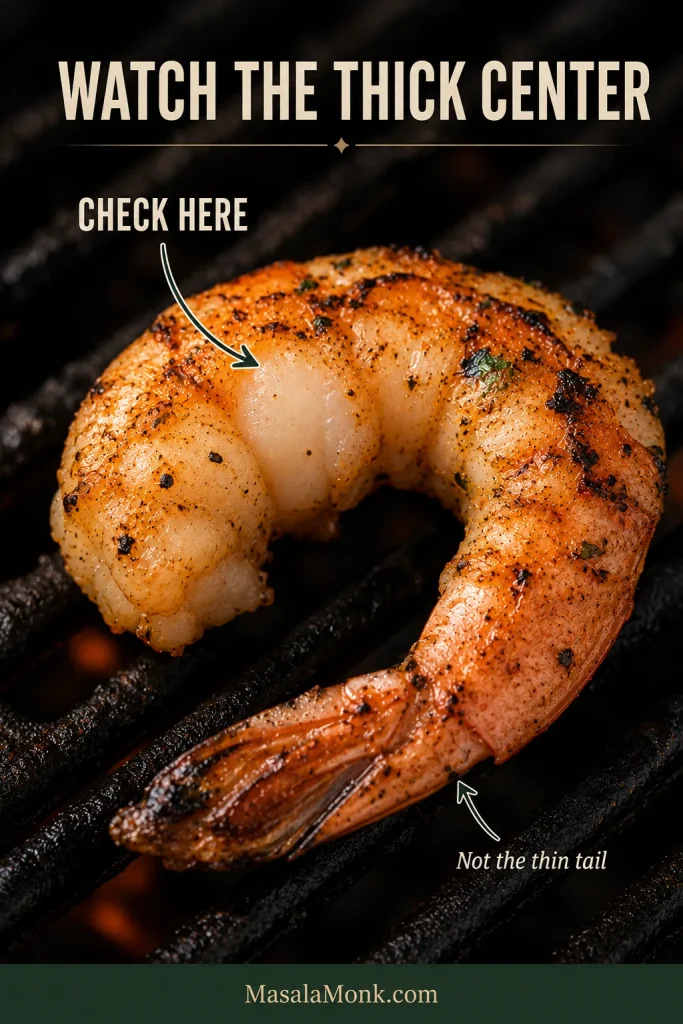
Extreme close-up of a grilled shrimp with an arrow pointing to the thickest part of the body and a note indicating not to judge by the thin tail.
The tail changes color fast, but the thickest body section is the better checkpoint for what is happening inside.

How Long to Grill Shrimp: Timing by Size

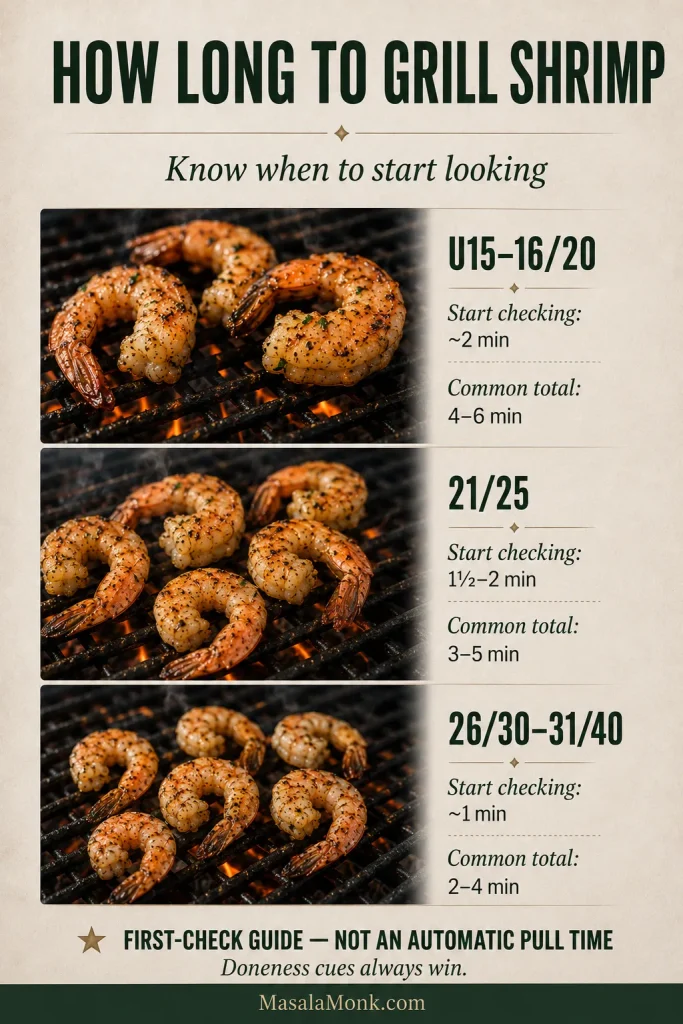
Most large shrimp grill in about 3–6 minutes total. Use the chart to decide when to start checking, then judge the finish from the shrimp themselves.

Shrimp sizeStart checkingCommon total window
U15–16/20Around 2 minutesRoughly 4–6 minutes
21/25Around 1½–2 minutesRoughly 3–5 minutes
26/30–31/40Around 1 minuteRoughly 2–4 minutes
These are first-check guides for raw, thawed shrimp—not automatic pull times.
Grilled shrimp timing guide showing first-check and common total cooking ranges for U15 to 16/20, 21/25, and 26/30 to 31/40 shrimp.
The smaller the shrimp, the sooner you need to start looking; use the chart as a cue, not a countdown.

Shell-on shrimp may take a little longer; butterflied shrimp may finish sooner. Cooler grills, cold weather and crowded baskets can also stretch the window. If some shrimp are noticeably smaller than the rest, take those off as soon as they’re ready.

How to Tell When Grilled Shrimp Are Done

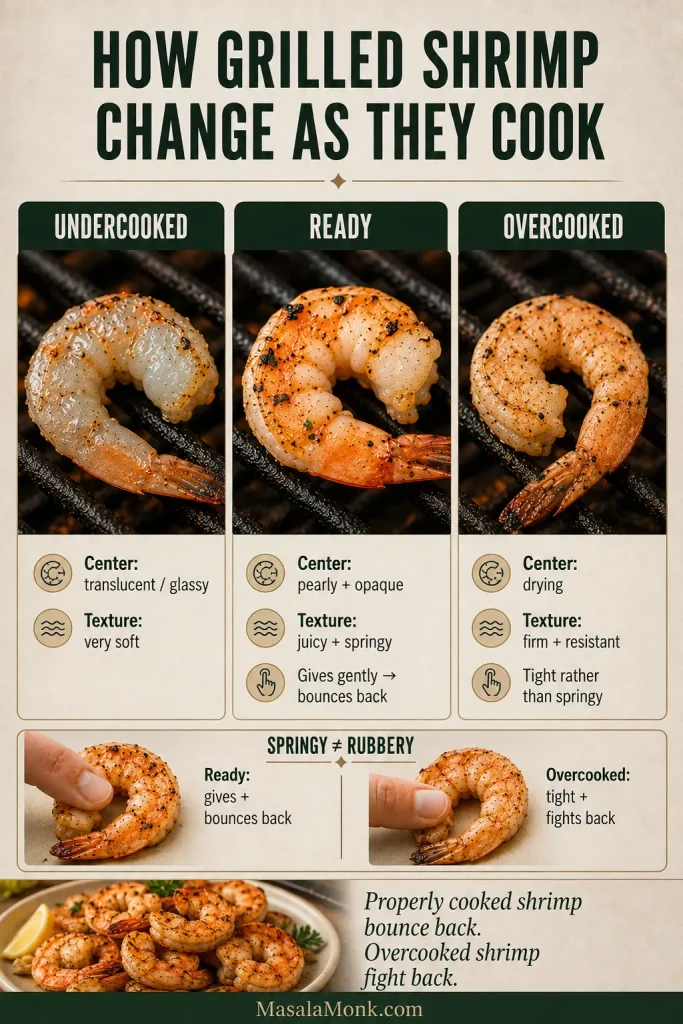
Grilled shrimp are done when the thickest part is firm, pearly and opaque while the texture is still juicy and springy.

StageCenterTexture
UndercookedTranslucent or glassyVery soft
ReadyPearly and opaqueJuicy, tender and springy with a clean snap
OvercookedOpaque but dryingHard, resistant or rubbery
Three close-up grilled shrimp examples labeled undercooked, ready and overcooked, showing changes in center opacity, moisture, curl and texture.
Opacity tells you the center has cooked through; springiness tells you whether the texture still feels juicy instead of tight.

A properly cooked shrimp should feel tender and juicy when you bite into it, with a clean little snap rather than a hard chew. Springy is not the same as rubbery. Properly cooked shrimp bounce back; overcooked shrimp fight back.

The C-vs-O Rule Is a Hint, Not a Test

A gently curved shrimp is usually more promising than one contracted into a tight ring, but shape alone cannot tell you whether the thick center is ready.
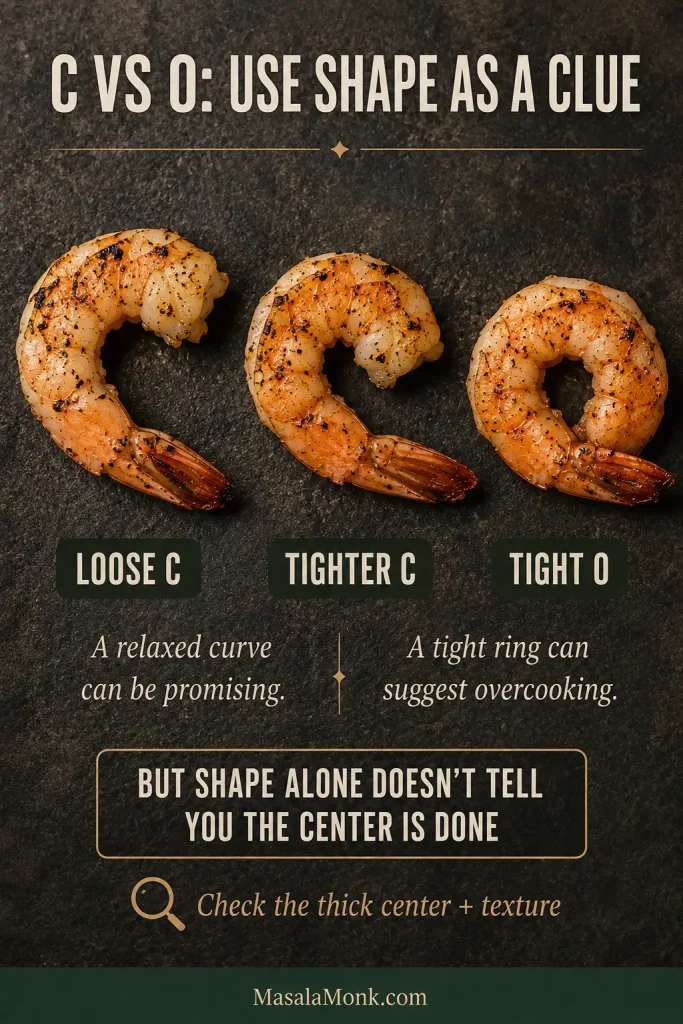
Three cooked shrimp arranged as a loose C, tighter C and tight O, with a reminder to check the thick center and texture rather than relying on shape alone.
Curl shows contraction, not certainty. Use the C-vs-O clue alongside the thick center and texture, never as the final verdict.

FDA guidance recommends cooking most seafood to 145°F / 63°C and describes properly cooked shrimp as firm, pearly and opaque. With jumbo shrimp, an instant-read thermometer can be inserted sideways into the thickest section. FDA seafood safety guidance.
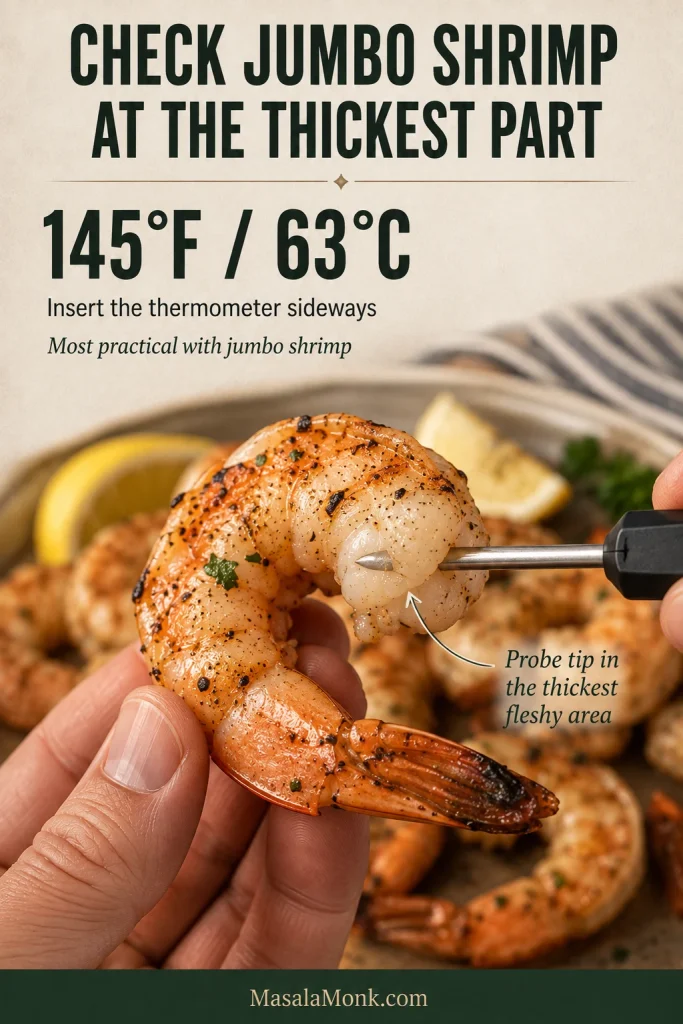
Hand holding a jumbo grilled shrimp while an instant-read thermometer probe enters sideways into the thickest fleshy part, with a 145°F or 63°C reference.
For jumbo shrimp, an accurate internal temperature depends on probe placement as much as the number—aim sideways into the thickest flesh.

Grilled Shrimp Troubleshooting: Fix This Batch Without Making It Worse

Some problems can be fixed now. Others can only be prevented next time. Most importantly, don’t keep cooking shrimp that are already done simply to improve their color.
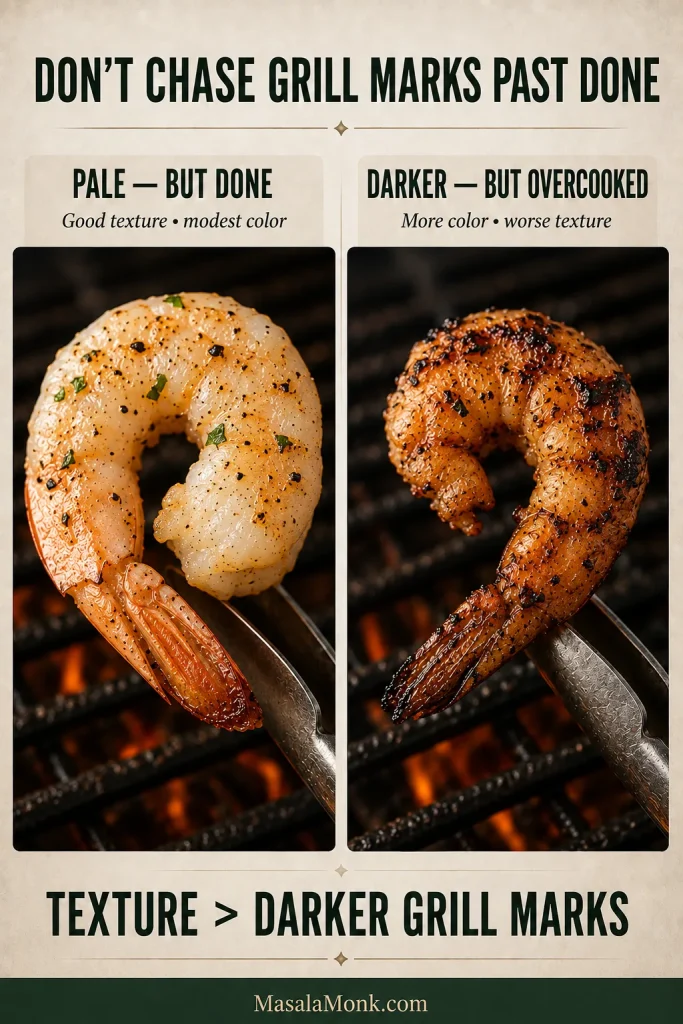
Side-by-side grilled shrimp comparison with a paler but plump cooked shrimp and a darker, more tightly curled and overcooked shrimp.
If the center is already juicy and opaque, don’t keep grilling just to chase darker marks.

Before or While Grilling

What you seeLikely causeWhat to do nowNext time
Mushy or oddly soft before grilling Long acidic soaking, or shrimp that were already unusually soft after thawing Drain immediately. If the shrimp are already badly mushy, grilling won’t make them firm again. Keep citrus exposure brief and start with shrimp that feel firm.
Pale but already cooked Wet surface or grill not hot enough Take them off. Good texture matters more than darker grill marks. Dry more thoroughly and preheat longer.
Still translucent in the thick center Not done yet Return to the heat briefly and check again after a short interval. Use the timing chart to know when to look, then judge the center before pulling them.
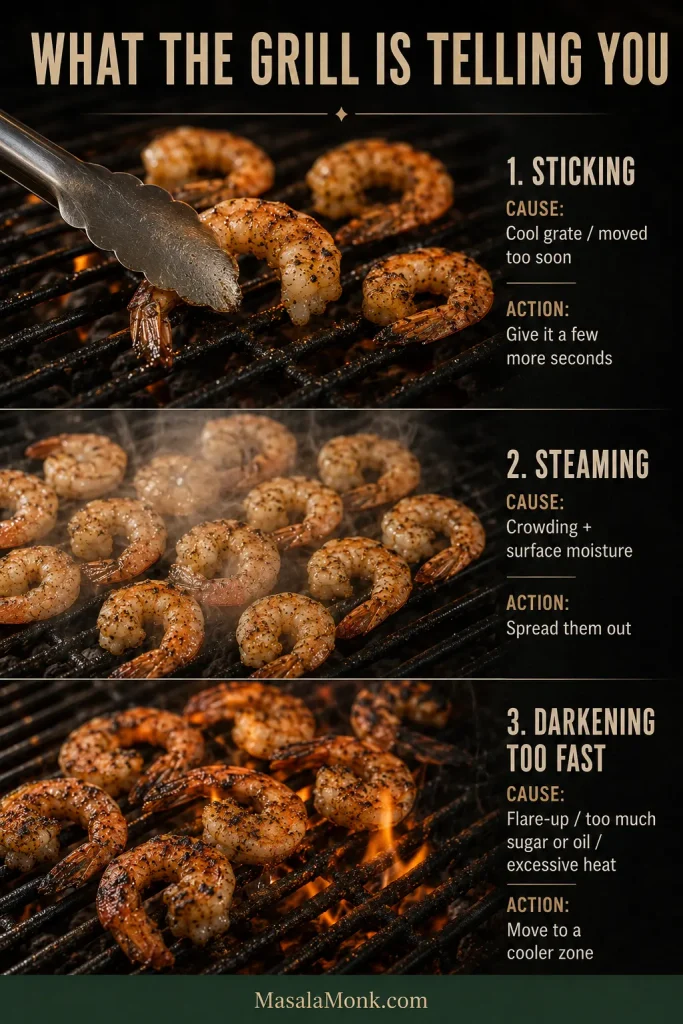
Shrimp sticking Cool or dirty grates, or flipping before the first side has set Give them a few more seconds before lifting again. Preheat well, clean the grates and let the first side sear.
Shrimp steaming in a basket Too many shrimp releasing moisture together Spread them out or remove part of the batch. Keep the basket closer to a single layer.
Outside darkening too fast Flare-ups, excess oily or sugary coating, or overly aggressive heat Move the shrimp to a cooler part of the grill. Use a lighter coating and brush sweet glazes on during the final part of grilling.
Bitter burnt garlic Fresh garlic spent too long over direct heat Finish with fresh lemon or herbs instead of adding more browned garlic. Use garlic powder before grilling and fresh garlic afterward.
Three-part grill troubleshooting image showing shrimp sticking to grates, crowded shrimp steaming and shrimp darkening too quickly near stronger heat.
Read the symptom before changing the cook: sticking needs patience, steaming needs space, and rapid darkening needs gentler heat.

After Grilling

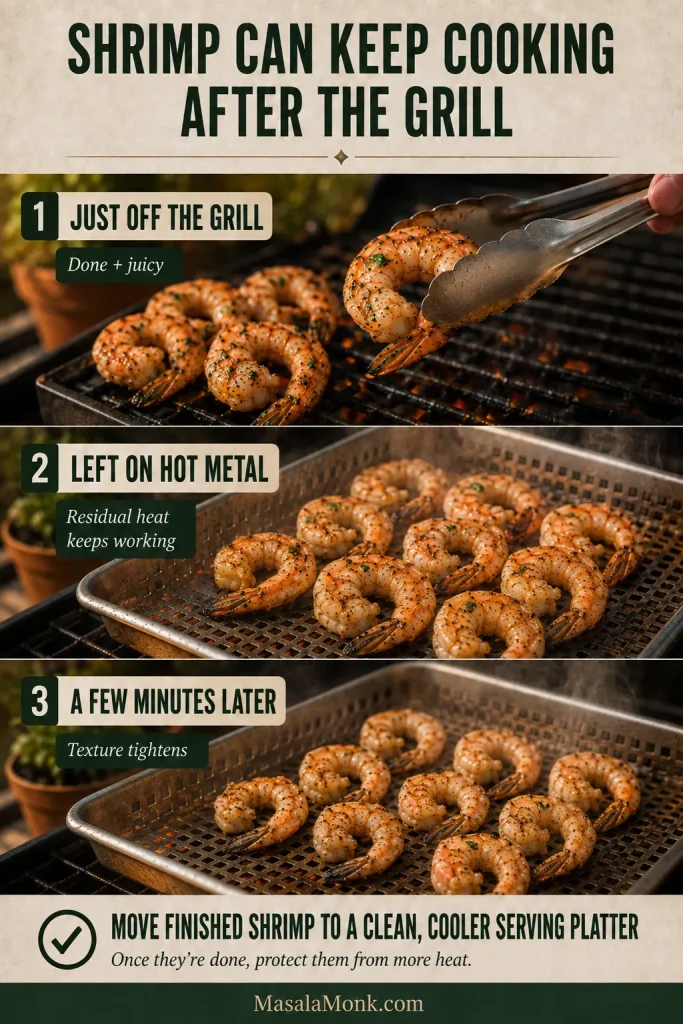
Three-stage sequence showing juicy shrimp leaving the grill, resting on a hot metal basket, and becoming tighter after several minutes from residual heat.
A cooler serving platter helps end the cook; hot metal keeps transferring heat even after the shrimp leave the grate.
What happenedLikely causeWhat to do nowNext time
Perfect off the grill, rubbery later Carryover heat or being held warm too long Get them off the hot pan, basket or tray and onto a clean serving platter away from the heat. Serve finished shrimp close to cooking instead of keeping them warm beside the grill.
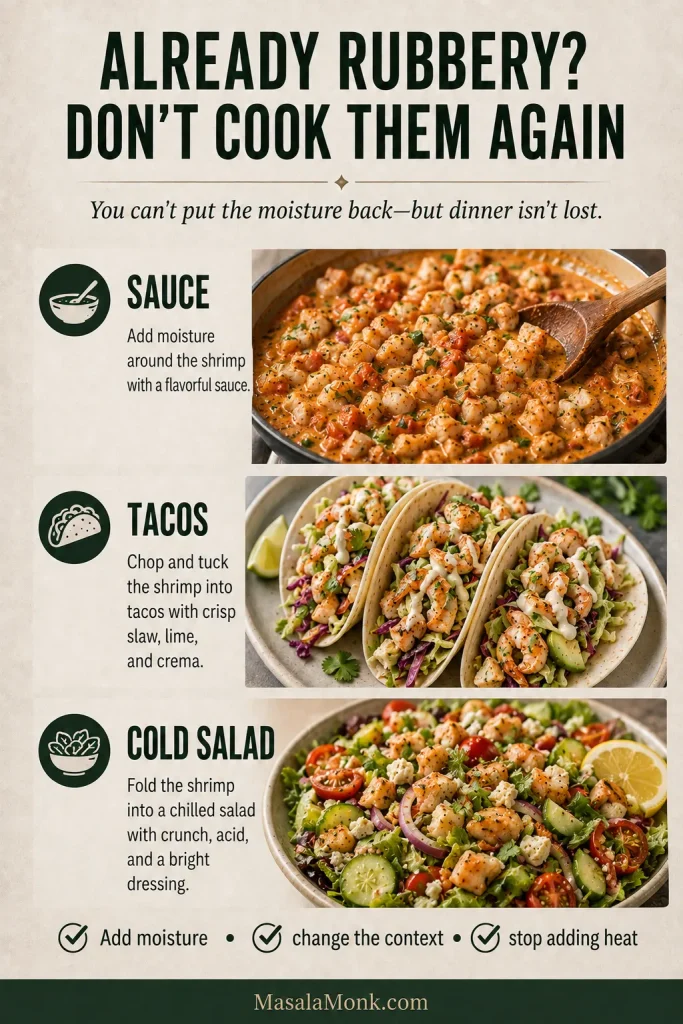
Already rubbery Too much cooking somewhere along the way Once they’re rubbery, you can’t put the moisture back. Add sauce, tuck them into tacos, or chill them for a salad instead of cooking them again. Begin checking earlier and get finished shrimp away from residual heat sooner.
Too salty Salt plus a salty seasoning blend Serve with unsalted rice, bread, salad or extra lemon. Use less separate salt when the seasoning blend already contains plenty.
Once the texture is right, don’t sacrifice it just to fix the color.
Three rescue uses for overcooked shrimp: chopped shrimp in sauce, shrimp tacos with fresh toppings and shrimp folded into a cold salad.
Sauce, tacos and chilled salad can make overcooked shrimp much more enjoyable without pretending the lost moisture can be restored.

Easy Ways to Change the Flavor

Once the basic method feels comfortable, the grill can stay almost exactly the same while the flavors go in very different directions.

  • Garlic Butter: richer and rounder, especially good with crusty bread for catching the buttery lemon juices.
  • Cajun: smoky, savory heat that works especially well with rice, corn or a cookout plate. Account for any salt already in the seasoning blend.
  • Cilantro Lime: bright and sharp, with the kind of freshness that works beautifully in tacos or rice bowls.
  • Old Bay: swap it for the paprika when you want that classic savory Old Bay flavor.
  • Sweet-Spicy: hot honey or another sweet chile glaze gives the shrimp a glossy sweet heat; brush it on late enough to caramelize without scorching.
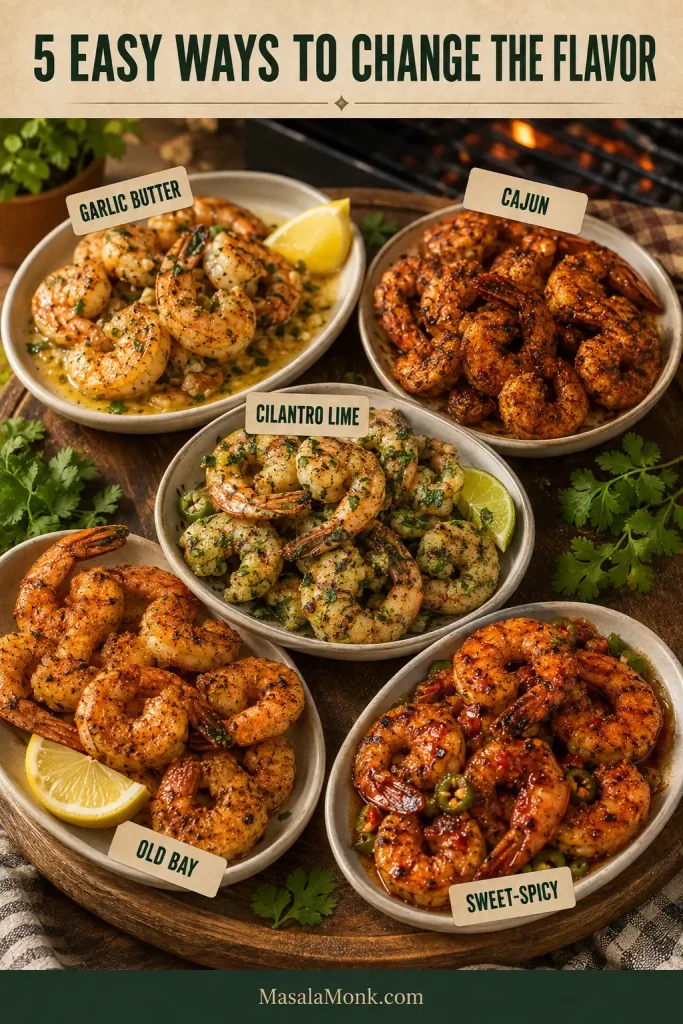
Five bowls of grilled shrimp labeled garlic butter, Cajun, cilantro lime, Old Bay and sweet-spicy, each with visibly different seasoning and garnish.

For something greener and sharper, spoon chimichurri over the shrimp after grilling.

Grilling Shrimp for a Crowd

A large cookout doesn’t require longer shrimp cooking times; it requires a little organization before the first batch hits the grill.

Have the sides, sauces and serving platter ready first. Shrimp cook so quickly that they’re better as the last thing dinner is waiting for, not the first thing sitting around.

How much shrimp should you buy? As a planning range, allow about 3–4 oz / 85–115 g of raw, peeled shrimp per person for appetizers or a buffet, or roughly 6–8 oz / 170–225 g per person when shrimp are the main dish. Generous sides can pull that number down; if you’re buying shell-on shrimp, buy a little extra to account for the shells.
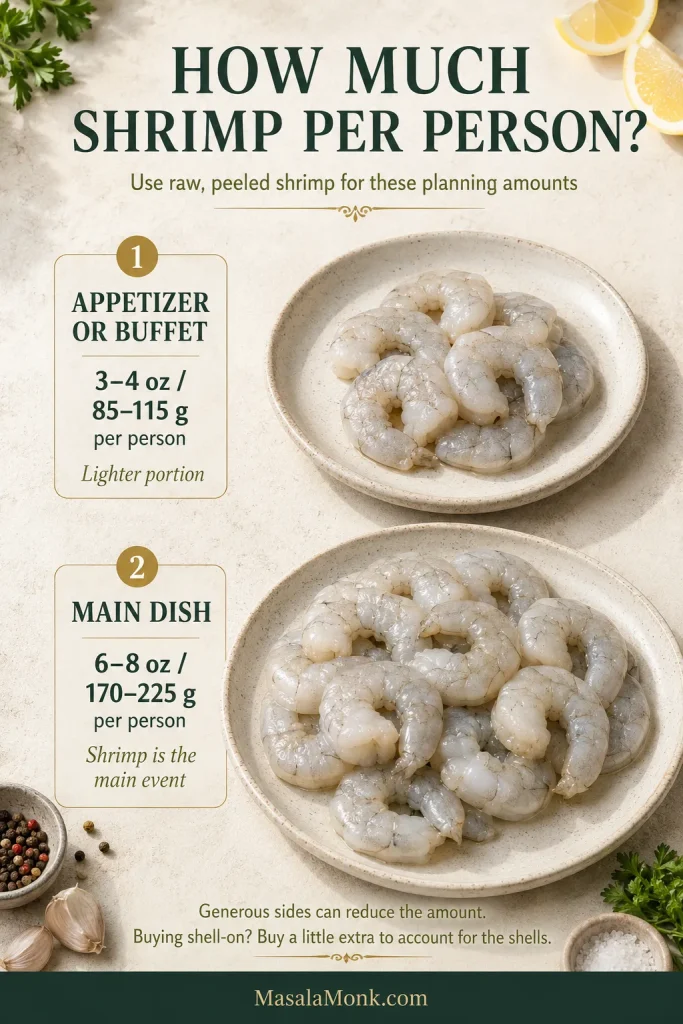
Portion guide comparing raw peeled shrimp amounts of 3 to 4 ounces per person for appetizers or buffets and 6 to 8 ounces per person for a main dish.
  • Do the fiddly work early. Peel, devein, portion seasoning and prepare skewers before cooking begins.
  • Keep raw shrimp cold. Bring out only the batch that’s about to hit the grill.
  • Leave breathing room. Crowding slows browning and makes the batch harder to control.
  • Load in a predictable order. That makes flipping and removing each batch evenly much easier.
  • Serve as you go when practical. Freshly grilled shrimp are at their best before residual heat has time to tighten them.
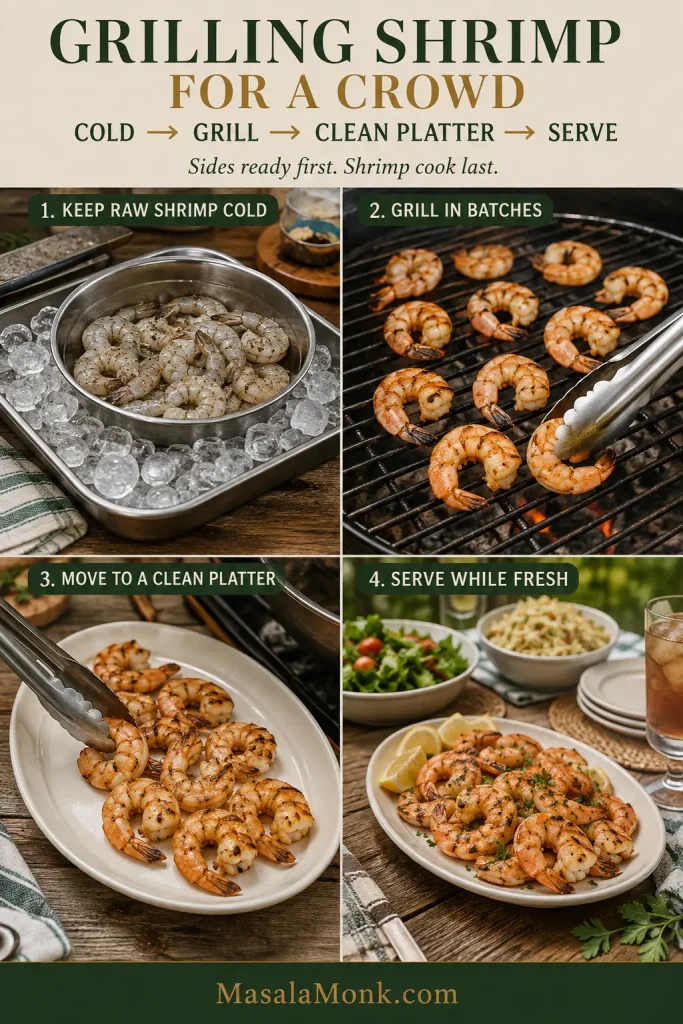
Four-step crowd-grilling guide showing raw shrimp kept in a dry metal container nested over ice, shrimp grilled in batches, cooked shrimp moved to a clean platter and the finished platter served fresh.
For a crowd, keep the raw shrimp cold, grill in small batches, and move each finished batch straight to a clean platter.

A cold crisp coleslaw works especially well because it can be completely ready before the shrimp go on.

What to Serve With Grilled Shrimp

For a quick dinner, serve the shrimp over rice or orzo with grilled zucchini or asparagus. A crisp cucumber salad gives you a particularly good contrast: hot smoky shrimp, cool crunchy cucumber and bright lemon.
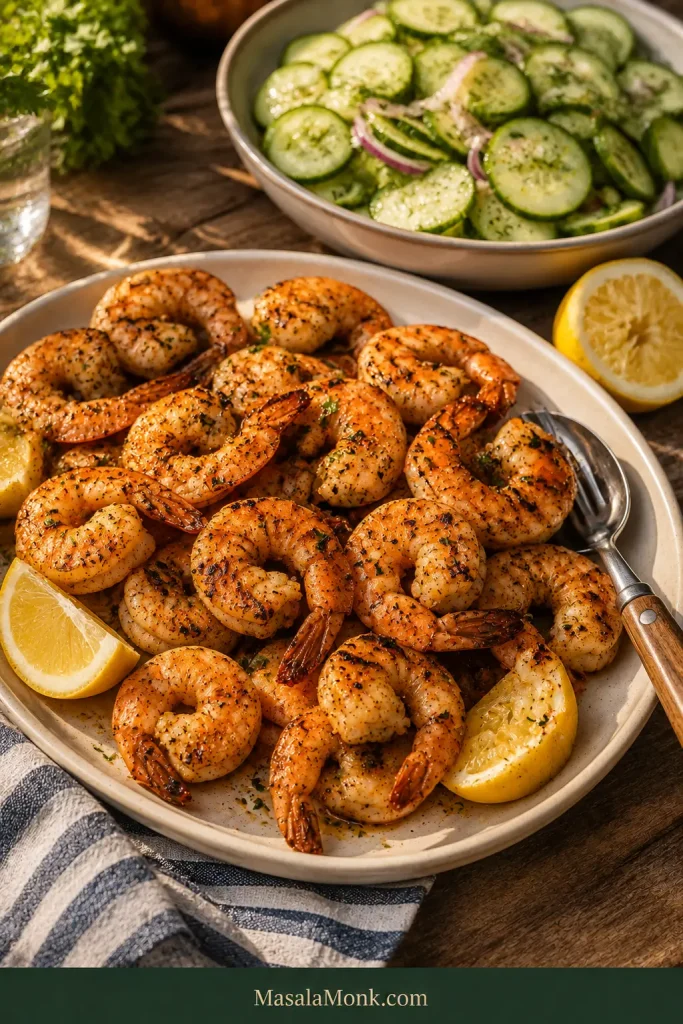
Plate of hot grilled shrimp with lemon beside a bowl of chilled cucumber and red onion salad on a sunny wooden table.
A make-ahead cucumber salad does double duty: it cools the plate and keeps your last-minute attention on the shrimp.

For a cookout, you hardly need to complicate things. Charred shrimp, sweet corn, ripe tomatoes, crusty bread and one cold salad make a generous summer plate.
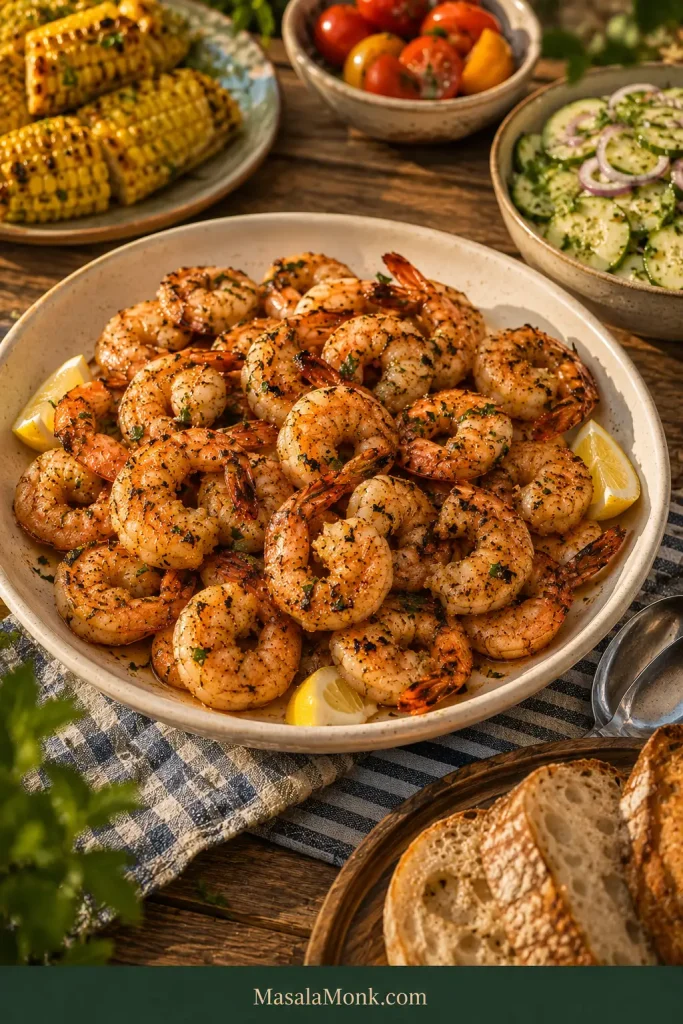
Large platter of grilled shrimp with lemon surrounded by grilled corn, tomatoes, cucumber salad and sliced crusty bread on an outdoor summer table.

Pasta works too—finish the pasta and sauce first, then fold the cooked shrimp through once everything else is ready. If garlic butter and noodles are the main attraction, our shrimp scampi takes that route from the beginning.

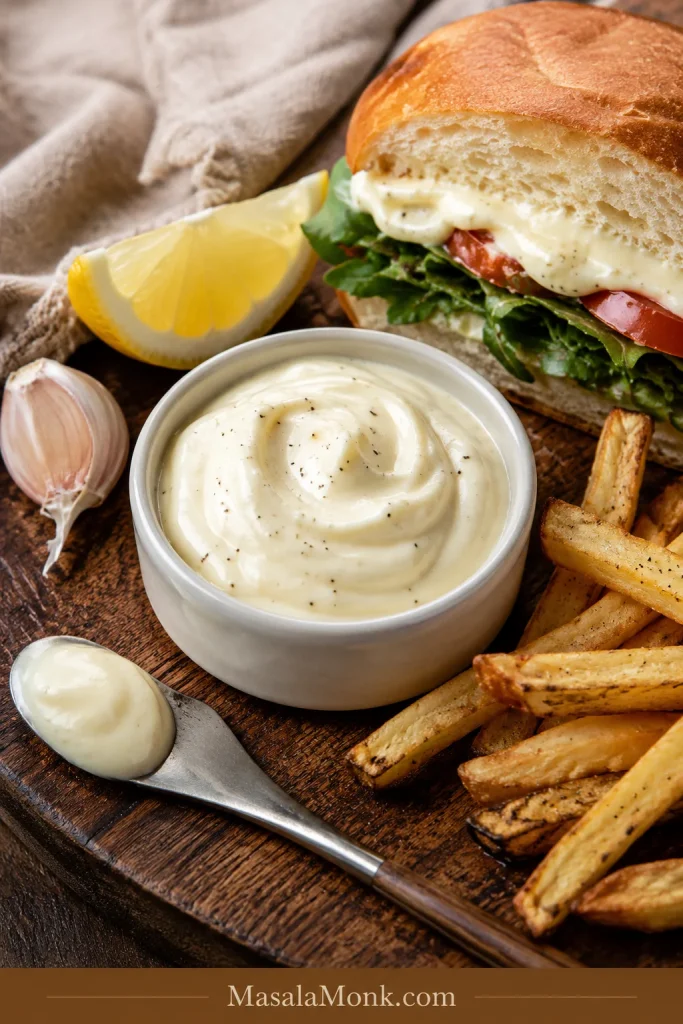
Sauces and dips. Garlic-lemon butter, cilantro-lime sauce, spicy mayo and garlic aioli all work well. Keep the sauce bright enough that you can still taste the smoky shrimp underneath.

Make Ahead, Store and Reheat Grilled Shrimp

Prep ahead. Peel and devein the shrimp, mix the seasoning or marinade, and prepare the finishing sauce earlier in the day. Keep everything refrigerated and combine a citrus-heavy marinade with the shrimp closer to grilling.

Store. Refrigerate cooked shrimp promptly in a covered container and use them within 3–4 days. Do not leave cooked seafood at room temperature for more than 2 hours, or more than 1 hour when the surrounding temperature is above 90°F / 32°C.

Can you freeze grilled shrimp? Yes. Refrigerate them promptly, then freeze the chilled shrimp in an airtight container or freezer bag. USDA lists about 3–4 months for best quality when cooked leftovers are frozen, although shrimp usually have better texture when used sooner.

For the best leftover texture, consider serving them cold. Properly stored grilled shrimp work well in salads, wraps and grain bowls without another round of cooking. They can also turn a lemony chickpea salad into a fuller lunch.

If You Reheat Leftover Shrimp

USDA recommends reheating leftovers to 165°F / 74°C. Reheat them quickly, then stop once they’re hot enough. If they’re going into another hot dish, prepare the rest first and stir the shrimp in only for the final heating.

For official storage and reheating guidance, see the USDA leftovers guidance.
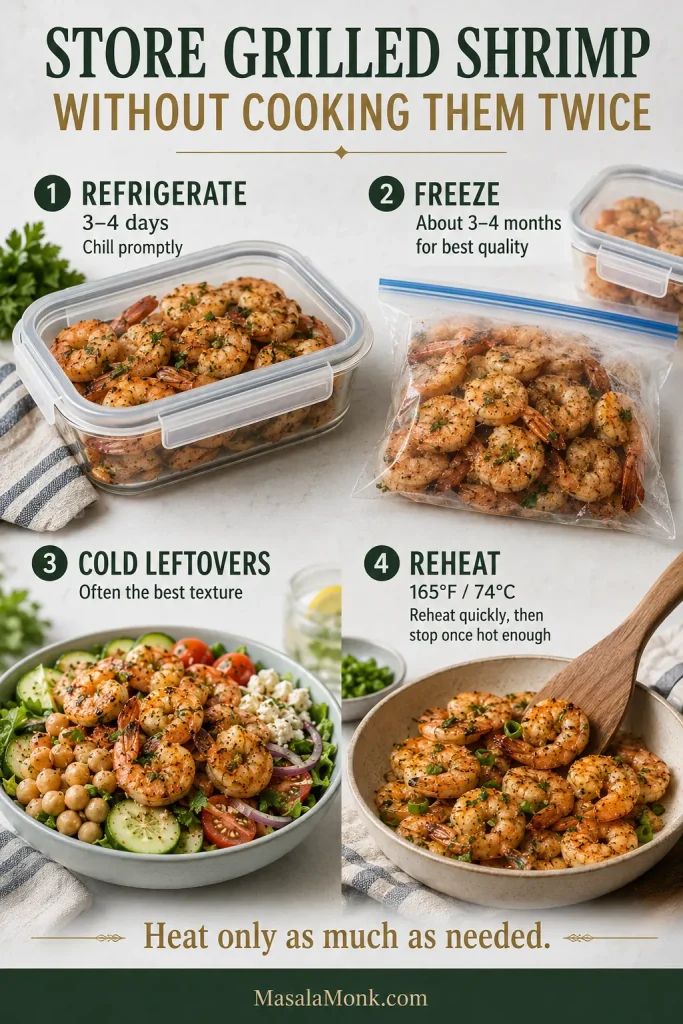
Four-part storage guide showing grilled shrimp refrigerated in an airtight container, frozen in a freezer bag, served cold in a salad and reheated in a bowl.
Cold leftovers often stay juicier; if reheating, warm the rest of the dish first and add the shrimp at the very end.

How Did Your Grilled Shrimp Turn Out?

What size shrimp did you use, and did you grill them directly, on skewers or in a basket? Tell us your approximate cooking time too. Those details can help the next cook judge their own batch.

And when everything goes right, the reward is wonderfully simple: a little smoky char at the edges, a juicy pearly center, and lemon and garlic still bright enough to make the next shrimp very hard to leave alone.
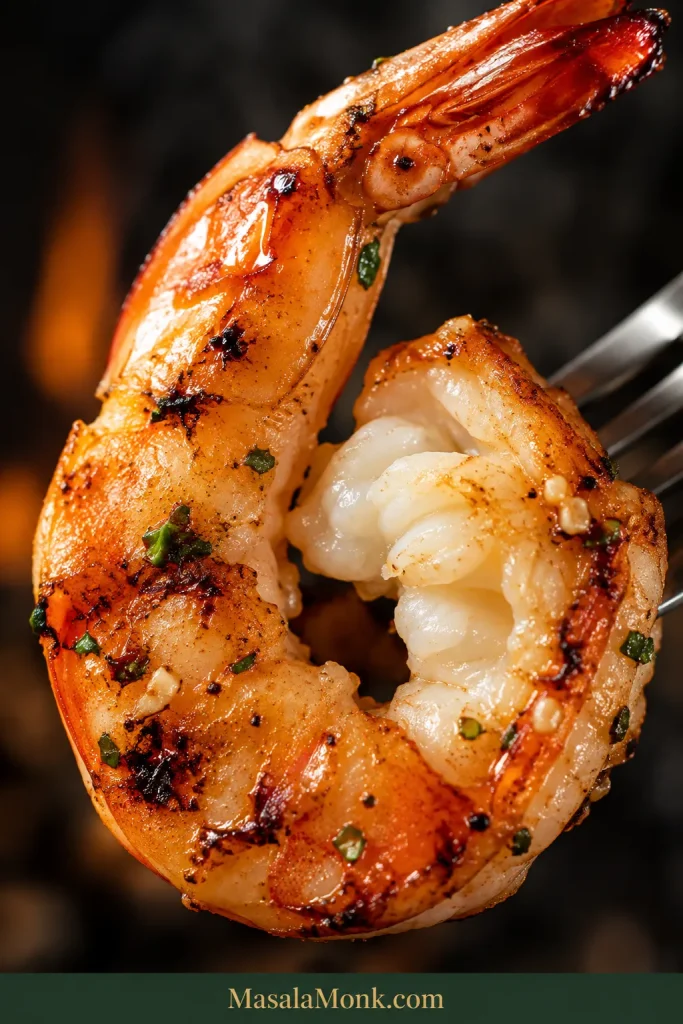
Extreme close-up of one grilled shrimp with a coral lightly charred exterior and an exposed thick center that is opaque, pearly white and moist.
Posted on Leave a comment

Salt and Pepper Squid Recipe: Crispy Chinese-Style Calamari

Pale-golden salt and pepper squid on a platter with rings, scored pieces, tentacles, garlic, red chilli, spring onion and lime wedges.

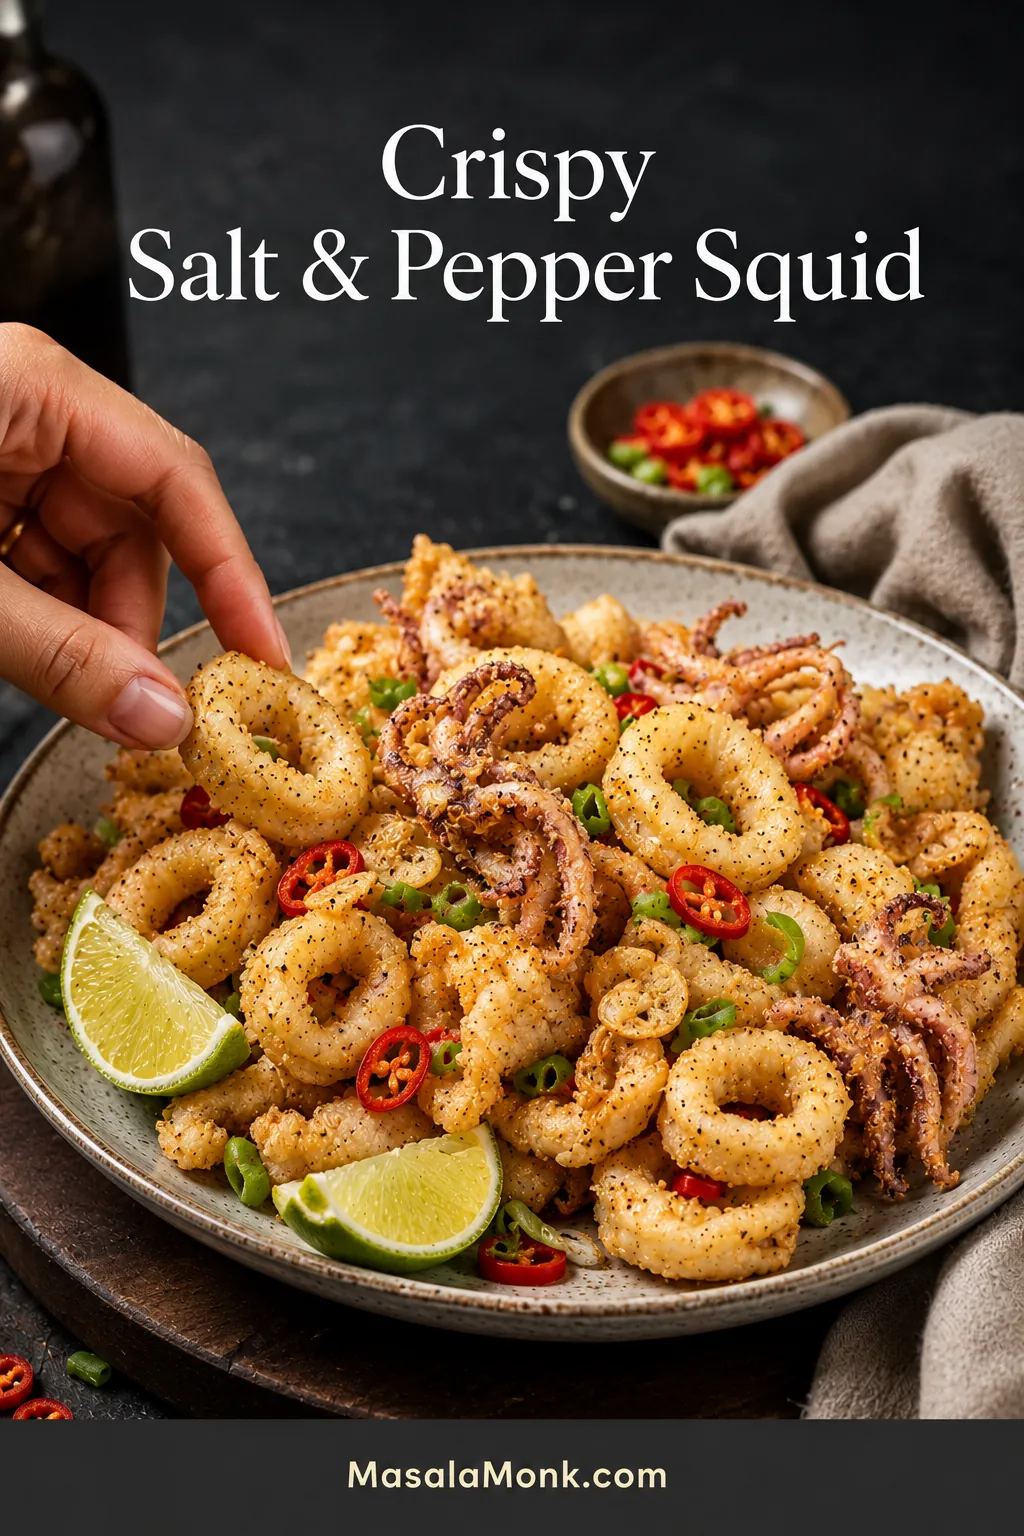
Salt and pepper squid is the plate people start picking at before it properly reaches the table. Curled calamari, a crisp peppery crust, fried garlic, fresh chilli and spring onion make the pile almost impossible to leave alone. The first bite should crack lightly, then give way to tender squid underneath.
That contrast is why the dish can feel risky at home. Squid cooks quickly, while the coating still needs enough heat to set. Wait for deep colour and the centre can turn rubbery; crowd the pot or coat damp squid and the crust can become greasy or patchy.

The first piece removes most of the uncertainty. From there, the method is easy to remember: dry the squid, test one piece, fry in small batches and keep the final toss brief.

This is a lighter Cantonese-style restaurant version, with a thin starch crust and a quick garlic-chilli finish rather than a heavy batter that hides the seafood. Here, calamari and squid refer to the same ingredient.

Quick Answer: How to Make Salt and Pepper Squid

Dry 500 g / about 1 lb 2 oz cleaned squid thoroughly, add only enough egg white to make it lightly tacky, and dredge one batch at a time in a 2:1 starch-and-flour coating. Heat the oil to 375°F / 190°C, then keep it near 350–365°F / 177–185°C.

Test one representative piece and begin checking after 75–90 seconds. Remove the squid when it is opaque and the crust is dry and pale gold, drain it on a rack and let the oil recover. Toss through the cooked garlic, chilli and spring onion with the finishing seasoning for 5–15 seconds.

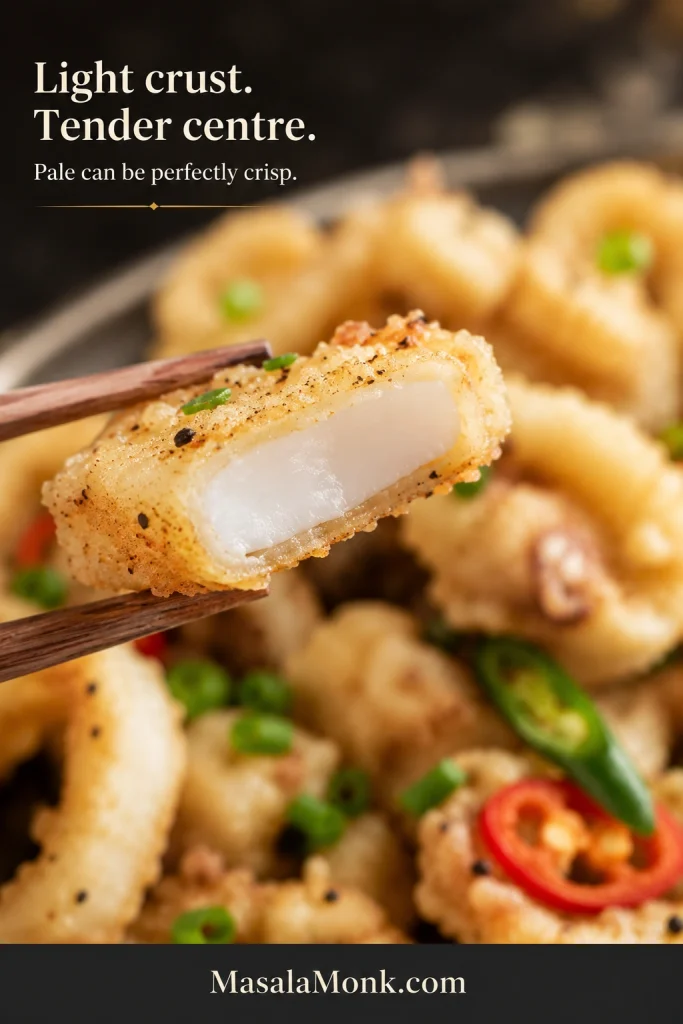
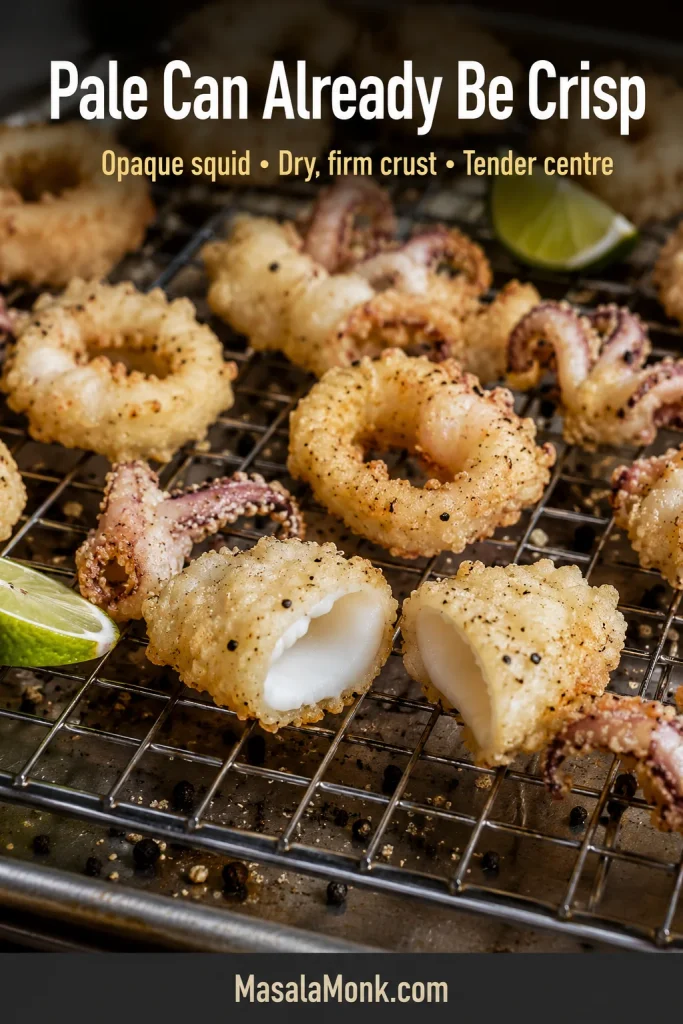
Close-up of fried squid with a thin crisp coating and an opaque tender centre.
Pale can still be crisp; look for an opaque, tender centre beneath a thin shell.

Crispy Chinese-Style Salt and Pepper Squid Recipe

Fresh cleaned squid and fully thawed raw frozen squid both work in this main method; if you are starting from frozen rings or pre-breaded calamari, use the frozen squid guide before choosing the coating.

Prep time About 20 minutes with cleaned squid; up to 30 minutes from whole squid
Cook time About 15 minutes
Total time About 35 minutes with cleaned squid; up to 45 minutes from whole squid
Yield 4 starter servings or 2–3 main-course servings
Best cut 1 cm / ⅜-inch rings or scored 5 × 2.5 cm / 2 × 1-inch pieces
Starting batch size About one-quarter of the squid; use less if the oil falls below 350°F / 177°C
Oil start temperature 375°F / 190°C
Oil temperature while frying 350–365°F / 177–185°C

Equipment

  • Heavy deep pot or Dutch oven with generous headroom
  • Frying thermometer; this is the most reliable way to judge the oil
  • Spider strainer or long-handled slotted spoon
  • Wire rack set over a rimmed tray, so escaping steam does not soften the crust

Ingredients

For the squid

  • 500 g / about 1 lb 2 oz cleaned raw squid tubes and tentacles, or roughly 700–800 g / about 1½–1¾ lb whole squid before cleaning
  • 2 teaspoons / 10 ml Shaoxing wine, optional
  • 1 large egg white, lightly beaten; add gradually as needed
  • 2 tablespoons / about 16 g cornstarch
  • ¼ teaspoon / about 1.5 g fine sea salt
  • ¼ teaspoon ground white pepper

For the crisp coating

  • 80 g cornstarch or potato starch; use weight for the most consistent coating
  • 40 g / about ⅓ cup all-purpose flour
  • ½ teaspoon baking powder
  • ½ teaspoon / about 3 g fine sea salt
  • ½ teaspoon ground white pepper

For frying

  • Enough neutral refined high-heat oil, such as canola, sunflower or rice-bran oil, to reach 5–7 cm / 2–3 inches without filling the pot more than one-third full

For the garlic, chilli and spring onion finish

  • 1 tablespoon / 15 ml neutral oil
  • 4 garlic cloves, finely chopped
  • 2 small red or green chillies, thinly sliced and dried if recently washed
  • 4 spring onions/scallions, whites and greens separated
  • ¼ teaspoon ground white pepper
  • ¼ teaspoon toasted and finely ground Sichuan peppercorns, optional
  • ¼ teaspoon / about 1.5 g fine sea salt, plus more only after tasting
  • ¼ teaspoon MSG or halal-certified chicken powder, optional; if using chicken powder, hold back the finishing salt until tasting
  • Lemon or lime wedges, for serving
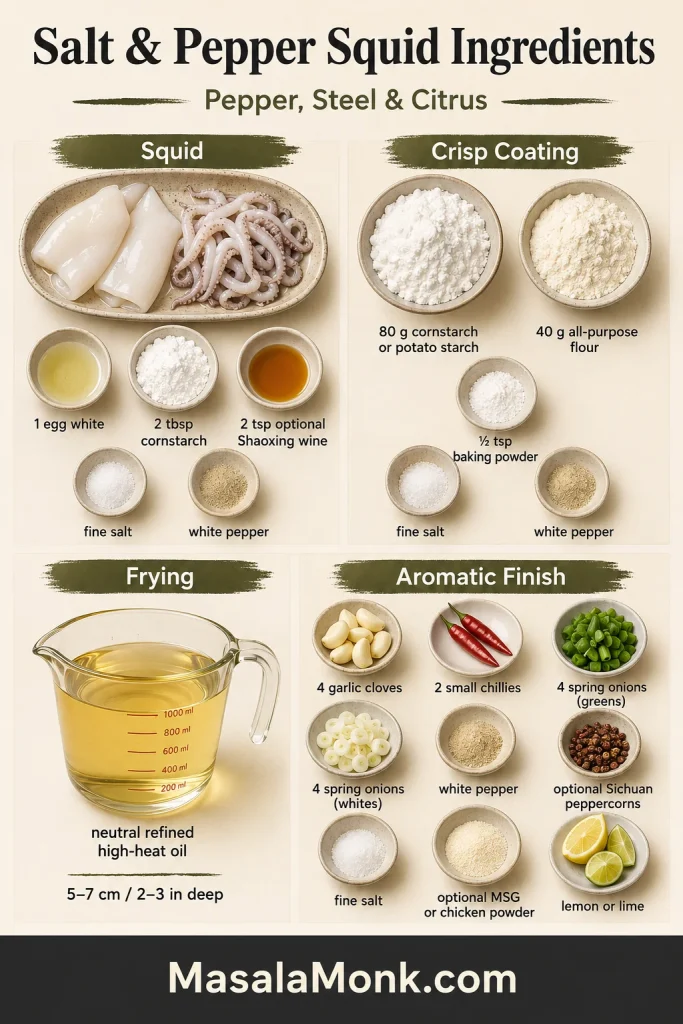
Ingredient board with raw squid, egg white, starch, flour, oil, garlic, chilli, spring onions, pepper seasonings and citrus.
Use this board as a stage check after the ingredient list: squid, coating, oil, aromatics and citrus stay separate until needed.

Use clean, neutral-smelling oil; heavily reused oil can darken the crust and leave a stale flavour. Refined peanut oil also works, but check allergy requirements first.

Frying and Seafood Safety

Keep the pot no more than one-third full, turn handles inward and never leave frying oil unattended. If it smokes, turn off the heat and let it cool; never use water on burning oil. See the London Fire Brigade deep-frying guidance.

Wash hands and clean the knife, board, bowls and work surface before they touch cooked squid, garnishes or dips.

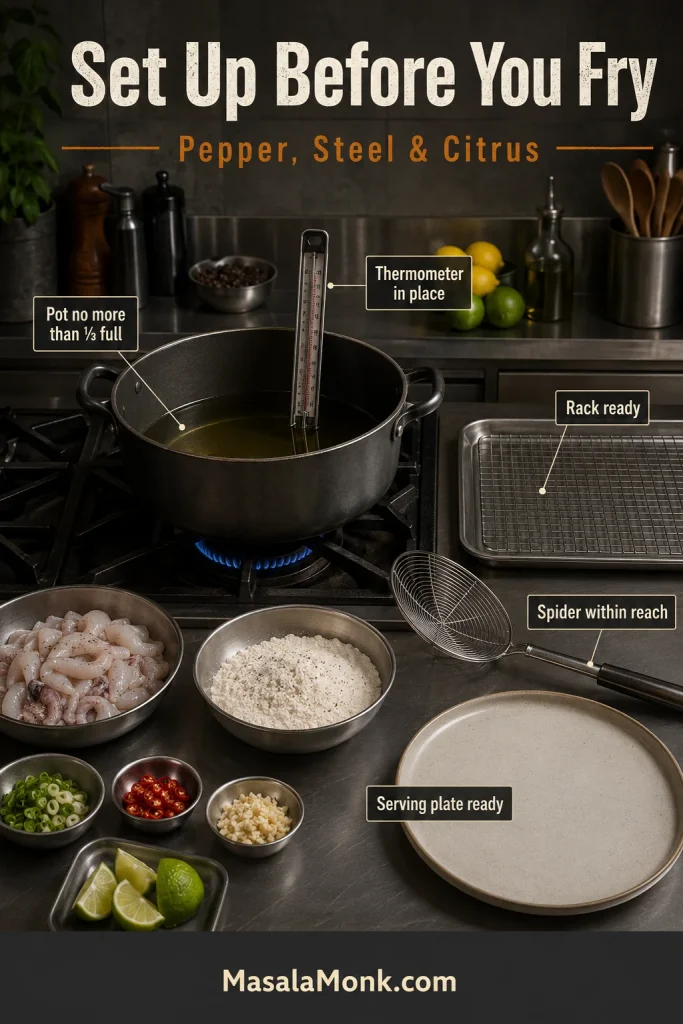
Frying station with a deep pot, thermometer, spider strainer, wire rack, tray, coating bowl, raw squid and serving plate.
Set the pot, thermometer, spider strainer and wire rack in place before the oil heats.

Instructions

Prep, Dry and Set Up

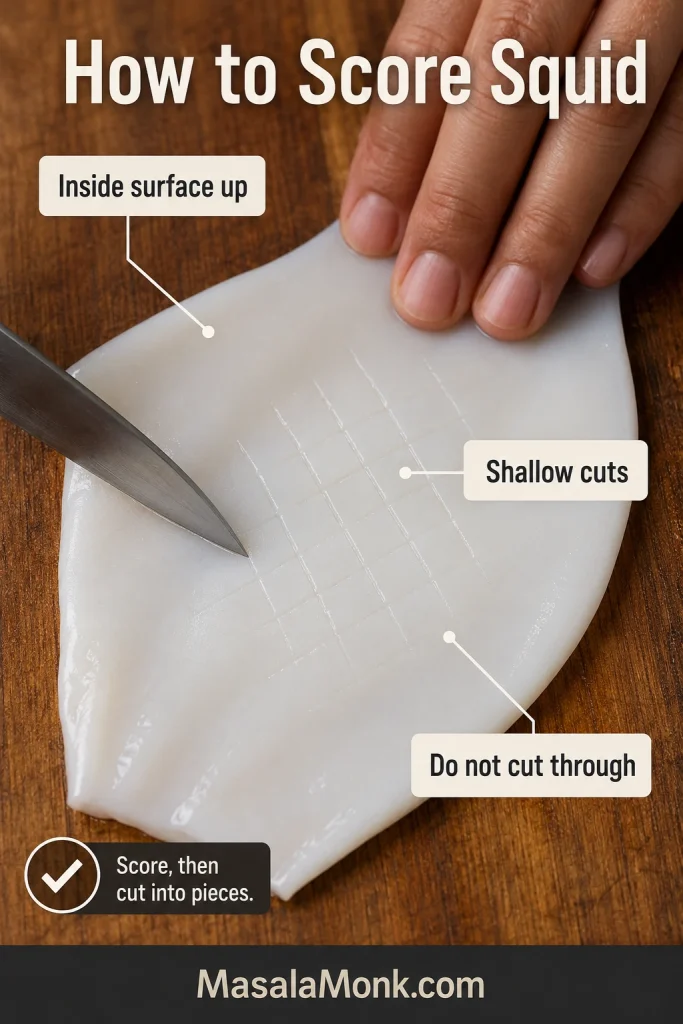
  1. Cut the squid evenly. Slice tubes crosswise into 1 cm / ⅜-inch rings. For scored pieces, cut each tube open, lay it inside-up, score shallow diamonds without cutting through, then divide it into roughly 5 × 2.5 cm / 2 × 1-inch pieces. Leave small tentacles whole and split large clusters.
  2. Dry every surface. Drain the squid well and pat it dry, including inside the rings and between the tentacles. There should be no water collecting in the bowl.
  3. Prepare everything beside the stove. Chop the garlic, chillies and spring onions. Mix the finishing seasoning in a small bowl. Combine the dry-coating ingredients in another wide bowl, then set out the rack, spider and serving plate.
  4. Heat the oil safely. Add enough oil for a depth of 5–7 cm / 2–3 inches while keeping the pot no more than one-third full. Heat to 375°F / 190°C. A thermometer is best; without one, a clean wooden chopstick should release a steady stream of small bubbles when dipped into the oil. Smoking or violent bubbling means the oil is too hot.

Coat and Test

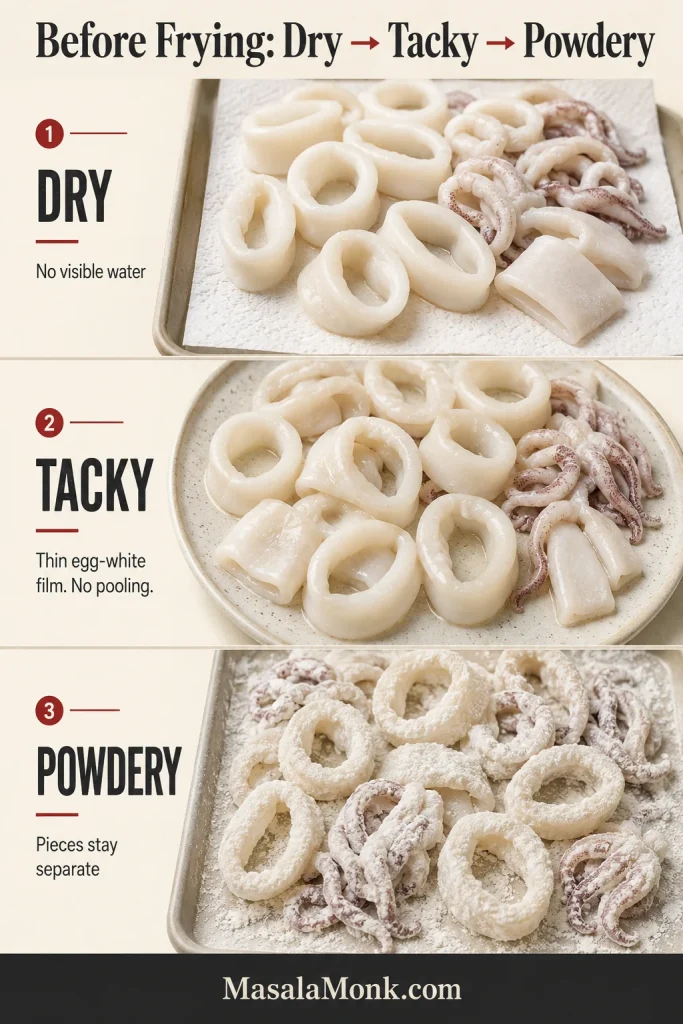
  1. Add the light egg-white layer. Mix the squid with the optional Shaoxing wine, cornstarch, salt and white pepper. Start with about half the beaten egg white, toss well, then add only enough for the pieces to feel lightly tacky; you may not need every drop. Drain any liquid that pools underneath.
Three-stage coating guide showing dry squid, squid with a thin egg-white film and squid covered in a powdery dredge.
Wet squid or pooled egg white can make the crust gummy and loose; aim for dry, tacky and powdery in order.
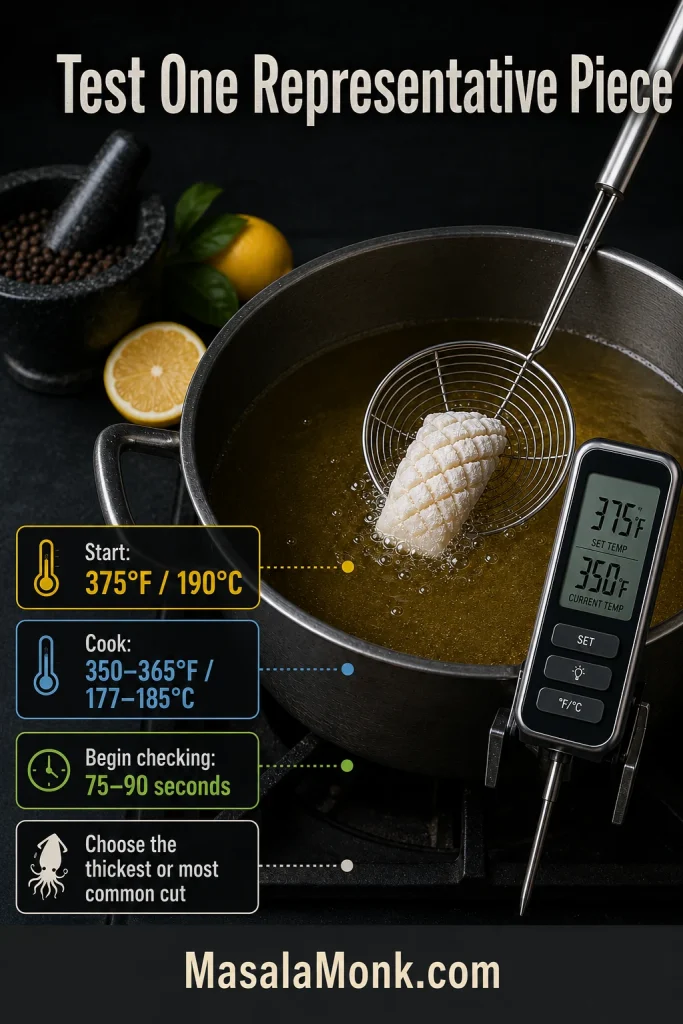
  1. Check one piece first. Choose a piece that represents the thickest or most common cut. Dredge it, shake off the excess and fry it, checking from about 75 seconds. Remove it when the squid is opaque and tender and the crust is dry and set. Taste it, then adjust the timing or the amount of finishing seasoning before frying the full batch. A small correction is normal—that is what this piece is for.
A scored piece of squid entering hot oil with temperature and first-check timing callouts.
The first piece confirms timing, oil temperature and seasoning before the full batch goes in.

Fry in Small Batches

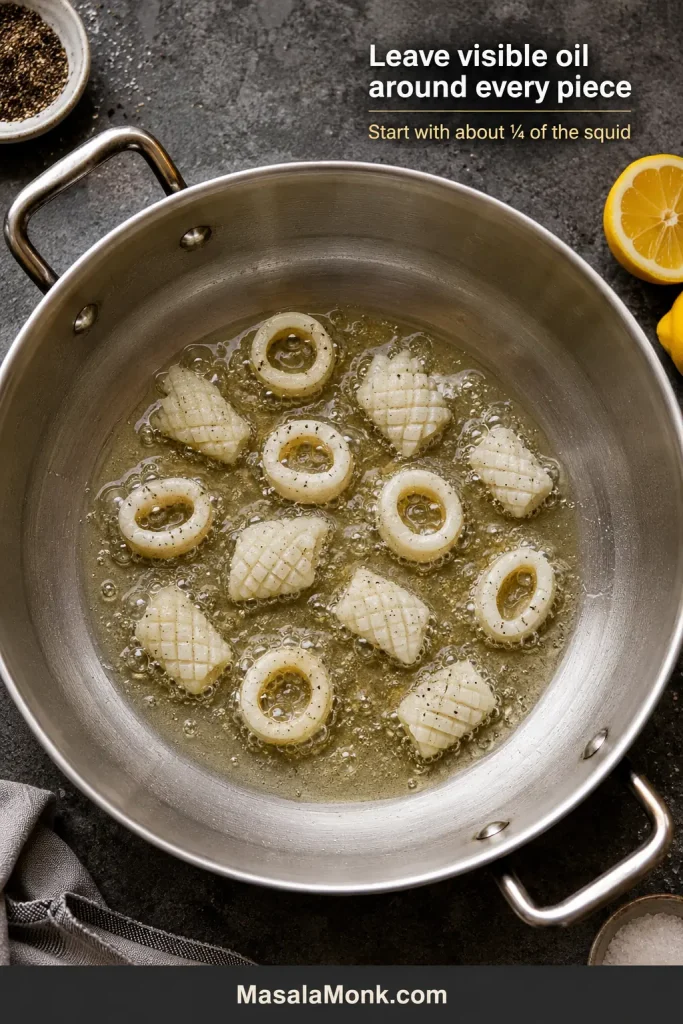
  1. Coat one batch. Start with roughly one-quarter of the squid. Toss it in the dredge until the pieces look powdery and separate, then shake away loose excess. Coat only what is going into the oil now.
Small batch of squid frying with open oil space around each separate piece.
Give every piece room in the oil so the coating sets before the squid can steam.
  1. Fry and drain. Lower the pieces separately and away from your body. Keep the oil near 350–365°F / 177–185°C and begin checking from 75 seconds; most pieces take about 90 seconds to 2½ minutes. Lift them when the squid is opaque and the crust is dry and firm, using the test-piece timing as your guide, then spread them on the rack.
Pale-golden fried squid draining on a wire rack with one piece opened to show the cooked centre.
Drain on a rack once the crust is dry and the squid is opaque.
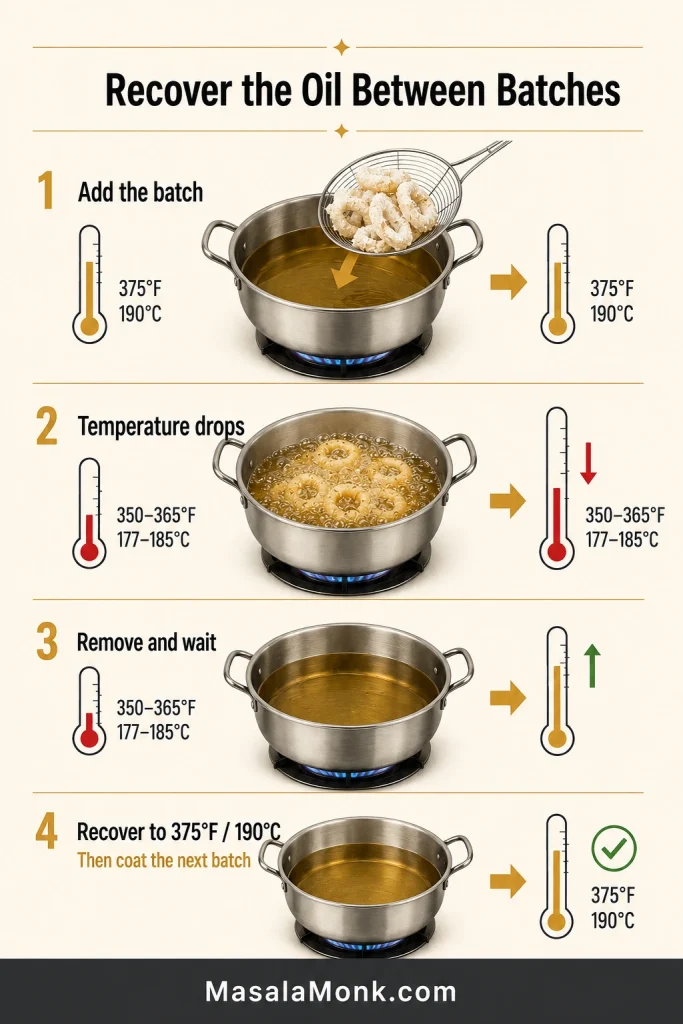
  1. Recover between batches. Return the oil to 375°F / 190°C before coating the next batch. If it drops below the frying range or recovers slowly, make the next batch smaller.
Oil recovery chart showing squid added, temperature dropping, squid removed and oil returning to 375 degrees Fahrenheit.
Return the oil to 375°F / 190°C before coating the next batch.

Finish With Aromatics

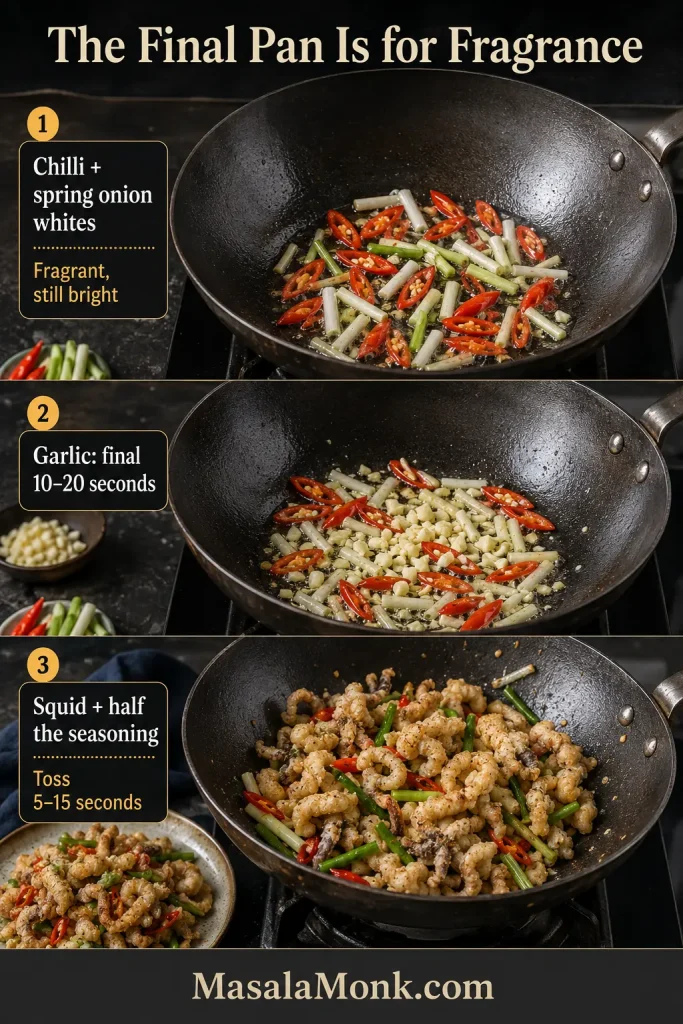
  1. Cook the aromatics. Heat 1 tablespoon oil in a wok or wide skillet over medium heat. Stir the chilli and spring onion whites until fragrant but still brightly coloured, then add the garlic for the final 10–20 seconds. Keep the garlic pale golden and have the serving plate ready.
  2. Finish with the aromatics. The squid is already cooked; this final pan is only for fragrance. Add the fried squid and half the finishing seasoning, toss for 5–15 seconds, then turn off the heat and add the spring onion greens. Taste before adding the rest, especially when using salty chicken powder. Serve immediately with lemon or lime and a cool dip.
Chilli and spring onion whites cooking first, garlic added briefly, and fried squid tossed with seasoning.
The final pan adds fragrance, not another round of cooking.

Recipe Notes

  • A pale-golden starch crust can already be crisp. Rough or uneven edges are normal; the coating should look light rather than perfectly smooth.
  • Dredge each batch only when the oil is ready; resting coated squid draws moisture back to the surface.
  • The dredge is intentionally generous so the pieces can become evenly powdery instead of wet and clumped. Discard anything that has touched raw squid.
  • For an alcohol-free version, omit the Shaoxing wine without replacing it with another liquid. Halal cooks can omit the wine and check that packaged seasonings meet their requirements.
  • The main recipe contains squid (a mollusc), egg and wheat. Check packaged seasonings, sauces and frying oil when cooking for someone with an allergy.

The main recipe is the recommended route. The guide below explains ingredient choices, alternative methods and fixes if anything goes wrong.

More Help With Salt and Pepper Squid

Why This Coating and Single-Fry Method Works

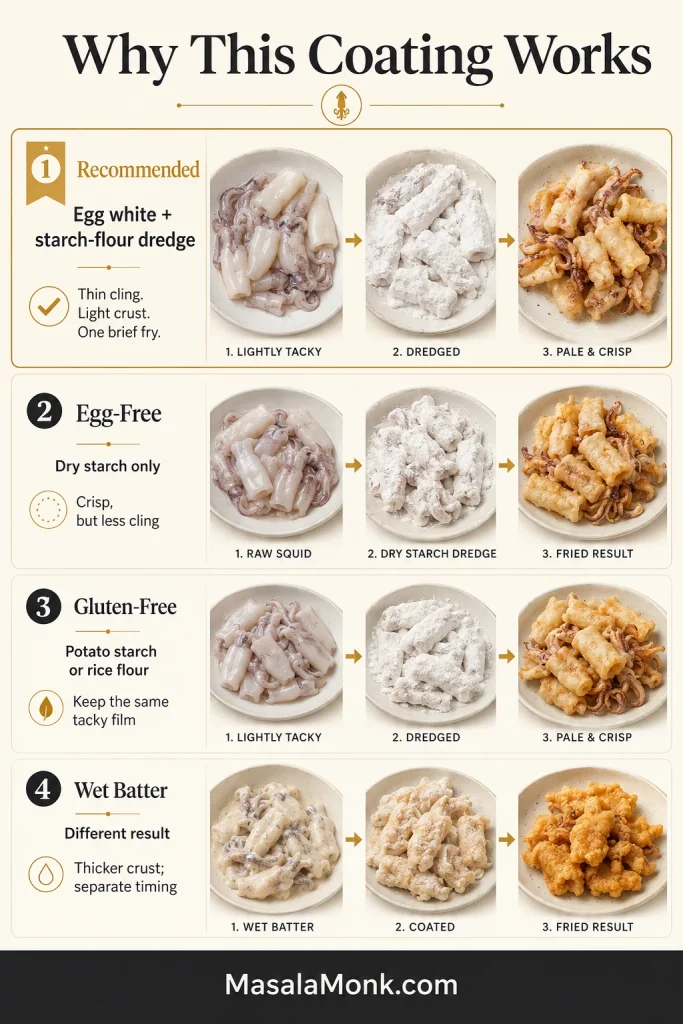
Salt and pepper squid recipes range from plain starch coatings to whole-egg dredges and chilled wet batters. This version uses only enough egg white to help a starch-dominant coating cling without the richer weight of yolk. Plain flour adds structure and colour without making the crust bready.

Brief seasoning avoids drawing extra moisture to the surface, so a long marinade is unnecessary. Double frying suits a thicker wet batter and a longer holding time; this lighter coating is designed for one brief fry and immediate serving. The short aromatic toss adds fragrance without steaming the crust.

Comparison board showing egg-white starch coating, dry starch coating, gluten-free coating and wet batter for squid.
Egg white helps the starch coating cling; dry starch, rice flour and wet batter create different crusts.

Choosing, Cleaning and Cutting Squid

Good squid should smell mild, clean and briny—not sour, strongly fishy or ammonia-like. Good-quality raw frozen squid can be a dependable option, especially when fresh squid is unavailable. Choose another batch when the smell seems wrong; lemon and seasoning cannot restore seafood that is past its best.

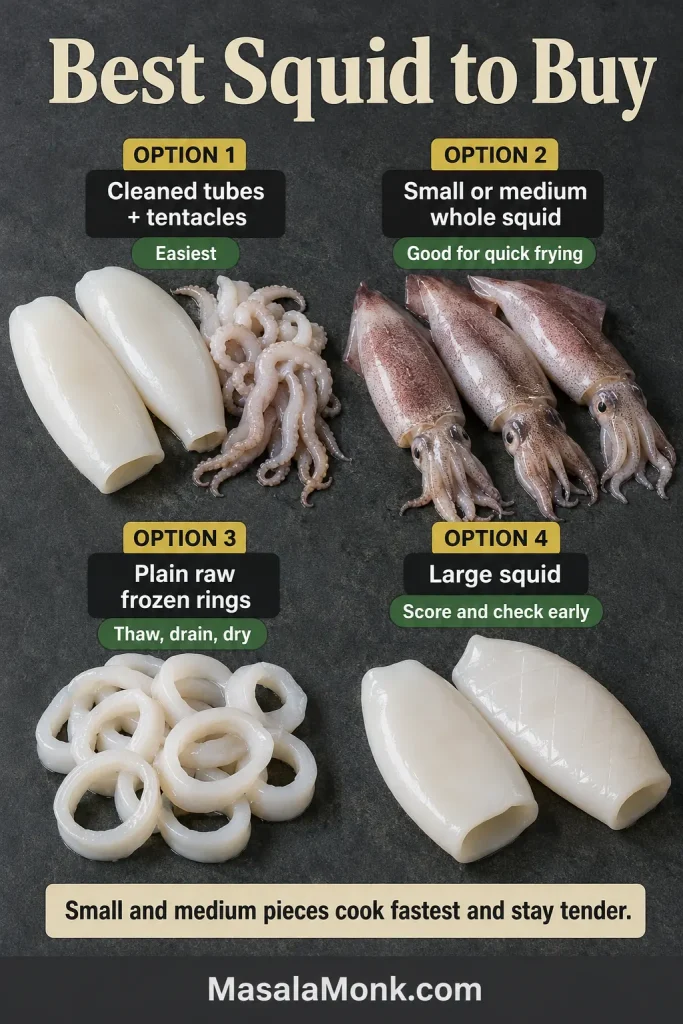
Small to medium squid is the most forgiving for this quick-fry method. Cleaned tubes and tentacles offer the best balance of convenience and control; plain raw frozen rings are quick once fully thawed and dried. If the tubes are very large or thick, slice them more thinly and fry them separately from tentacles and thin rings.

Buying guide with cleaned squid tubes and tentacles, small whole squid, frozen raw rings and larger squid pieces.
Cleaned tubes and tentacles are easiest; raw frozen squid needs thawing, draining and thorough drying.

How much whole squid to buy: allow roughly 700–800 g / about 1½–1¾ lb whole squid for about 500 g / about 1 lb 2 oz cleaned seafood. Yield varies with the species, head-to-body ratio and how much of the fins and tentacles you keep.

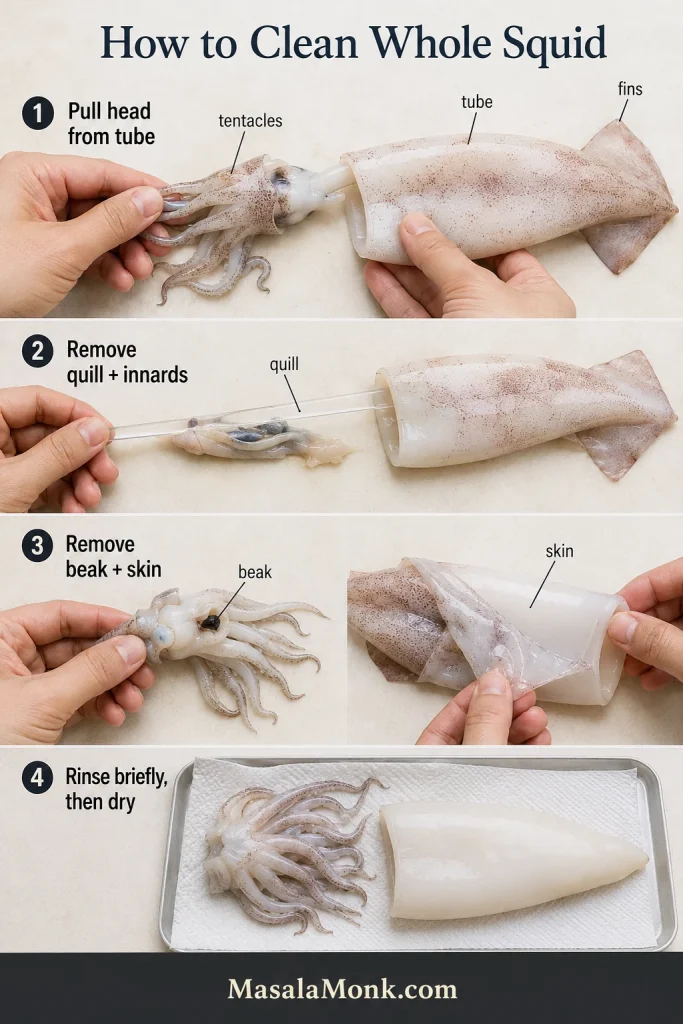
How to Clean Whole Squid

Cleaning whole squid is mostly about removing the firm inner quill, beak and excess moisture before the pieces ever meet the coating.

Four-step guide showing whole squid cleaned by removing the head, quill, innards, beak, skin and moisture.
Remove the quill, innards and beak first; then rinse briefly and dry well.
  1. Hold the body tube and pull the head and innards away.
  2. Remove the clear plastic-like quill from inside the tube.
  3. Peel off the thin skin for a more uniform appearance; leaving a little behind is harmless.
  4. Cut below the eyes to separate the tentacles from the head.
  5. Push out and discard the hard beak from the centre of the tentacles.
  6. Rinse briefly, drain thoroughly and dry before cutting.

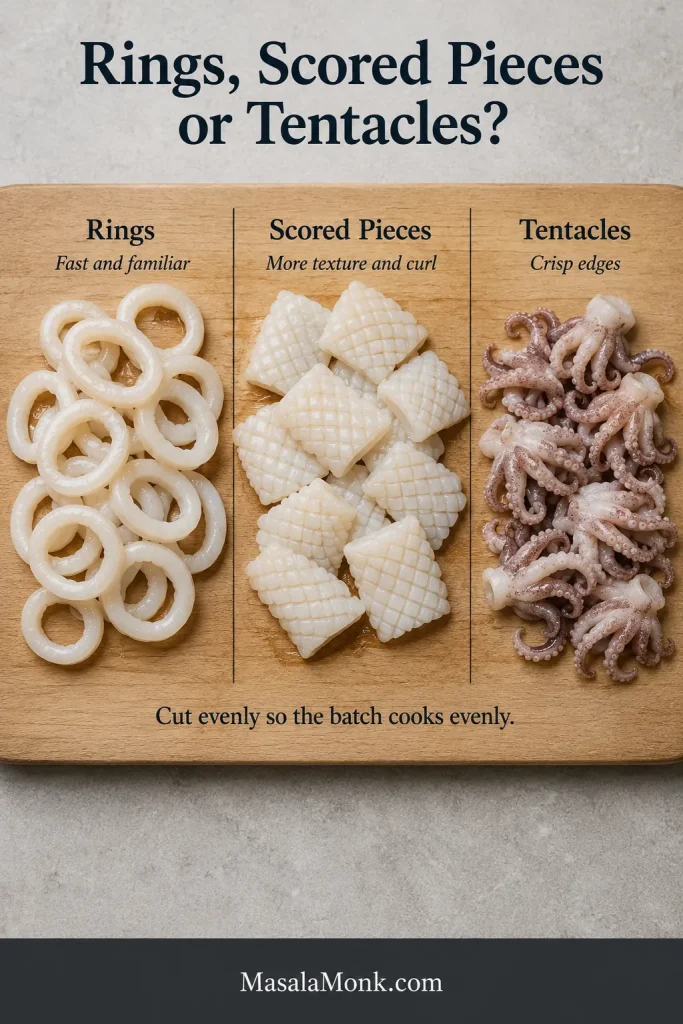
Rings or Scored Pieces?

Raw squid prepared as rings, scored pieces and tentacle clusters on a cutting board.
Rings are the easiest cut, scored pieces curl, and tentacles crisp around the edges.

Use rings for the easiest cut. Slice across the tube into pieces about 1 cm / ⅜ inch thick. Keeping them even matters more than making them perfectly neat.

Scored pieces create more crisp edges. Cut the tube open, lay it inside-up and make shallow diagonal cuts in both directions without slicing through. The pattern helps the pieces curl and gives the seasoning more surface to cling to. Fry unusually thick pieces separately from thin rings and tentacles.

Knife making shallow crosshatch cuts on the smooth inside surface of an opened squid tube.
Score the smooth inside surface with shallow cuts so the squid curls without tearing.

Choosing a Crisp Coating

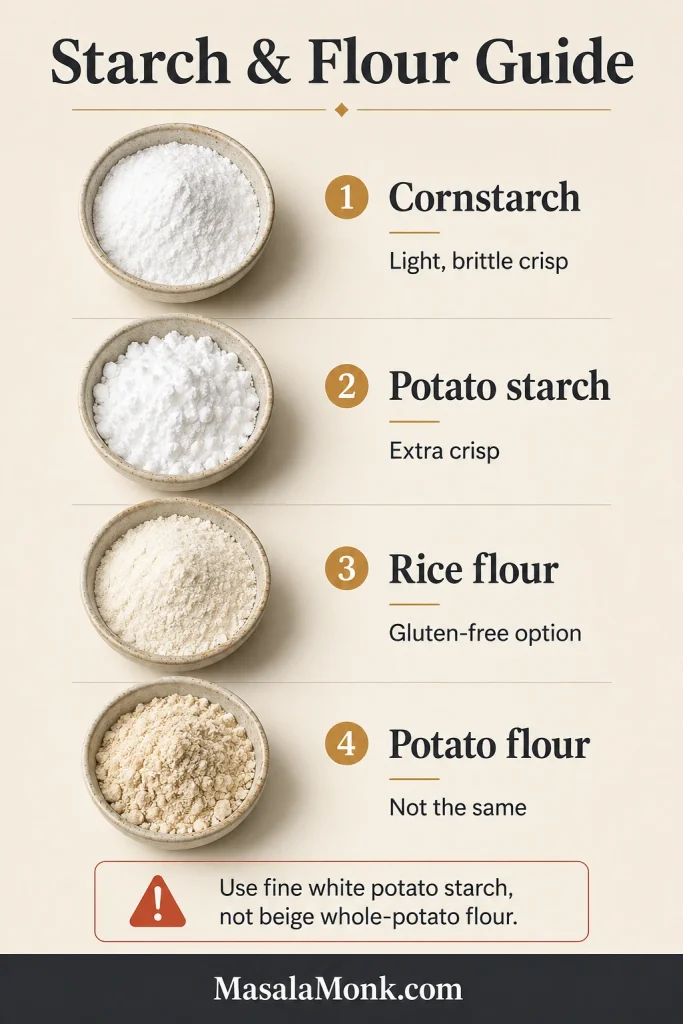
Cornstarch—the fine white powder called cornflour in the UK and Australia—creates a light, brittle crust. Potato starch can become even crisper, while a little plain flour adds colour and structure. Use fine white potato starch, not potato flour made from whole dried potatoes. Neither starch is the same as coarse cornmeal or polenta.

Bowls of cornstarch, potato starch, rice flour and beige potato flour shown as a coating guide.
Cornstarch, potato starch and rice flour all crisp differently; potato flour is not the same swap.
Coating method Result When to use it
Dry starch only Lightest, palest crust; egg-free but less secure adhesion Simple alternative for very dry squid
Egg white plus starch-flour dredge Reliable adhesion with a balanced crisp crust Main Cantonese-style method
Egg white plus gluten-free starch blend Pale, brittle and wheat-free Gluten-free variation

For a thicker pub-style crust, use a wet batter such as the one in the crispy fish batter guide.

Before dredging: squid should feel lightly tacky with no loose liquid underneath. After dredging: look for pieces that are dry, powdery and separate. Thick paste or rings glued together mean there is still too much moisture; use the troubleshooting table before changing the whole recipe.

Use baking powder. Do not substitute the same amount of bicarbonate of soda/baking soda, which is much stronger and can leave an alkaline taste.

Gluten-Free Salt and Pepper Calamari

Replace the 40 g plain flour in the main dredge with 40 g potato starch or certified gluten-free rice flour. Potato starch gives the most brittle crunch; rice flour is slightly drier and more structured. Weigh the replacement for consistency, and check baking powder, stock powder, spice blends, sauces and previously used frying oil when cooking for someone with an allergy.

Time, Temperature and Doneness

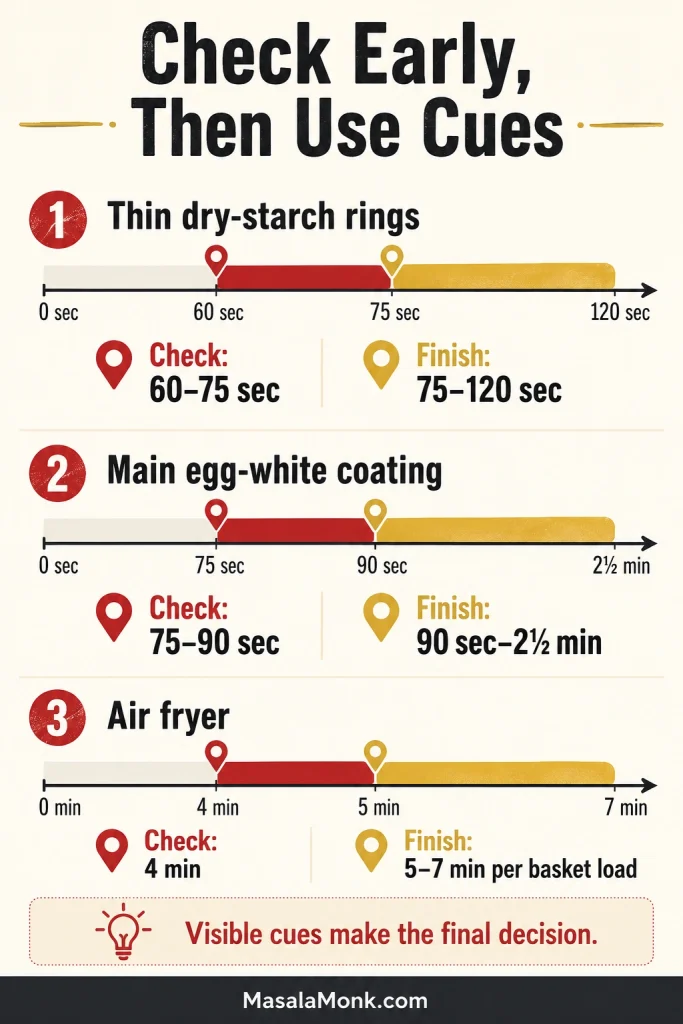
Cut and coating decide the timing together. Fry in 350–365°F / 177–185°C oil, or use 400°F / 200°C for the air fryer, then let opacity, tenderness and crust texture make the final decision.

Method First check Typical finish
Thin rings, dry starch 60–75 seconds 75–120 seconds
Main egg-white coating 75–90 seconds 90 seconds–2½ minutes
Air fryer 4 minutes 5–7 minutes per batch
Timing chart comparing check and finish windows for dry-starch rings, egg-white coating and air-fryer squid.
Start with the timing window, then let opacity, dry coating and tenderness decide.

Fuller wet batters follow their own schedule and may use a second fry. Follow the packet timing for pre-breaded calamari.

Tentacle timing: Small tentacle clusters often crisp as quickly as thin rings. Watch them from the early end of the range and lift them before thicker tube pieces when necessary.

Seafood-safety guidance commonly uses an internal target of 145°F / 63°C. Small pieces are awkward to probe accurately, so pair temperature guidance with opaque flesh and the cues below. The FDA seafood-safety guide also covers safe thawing and handling.

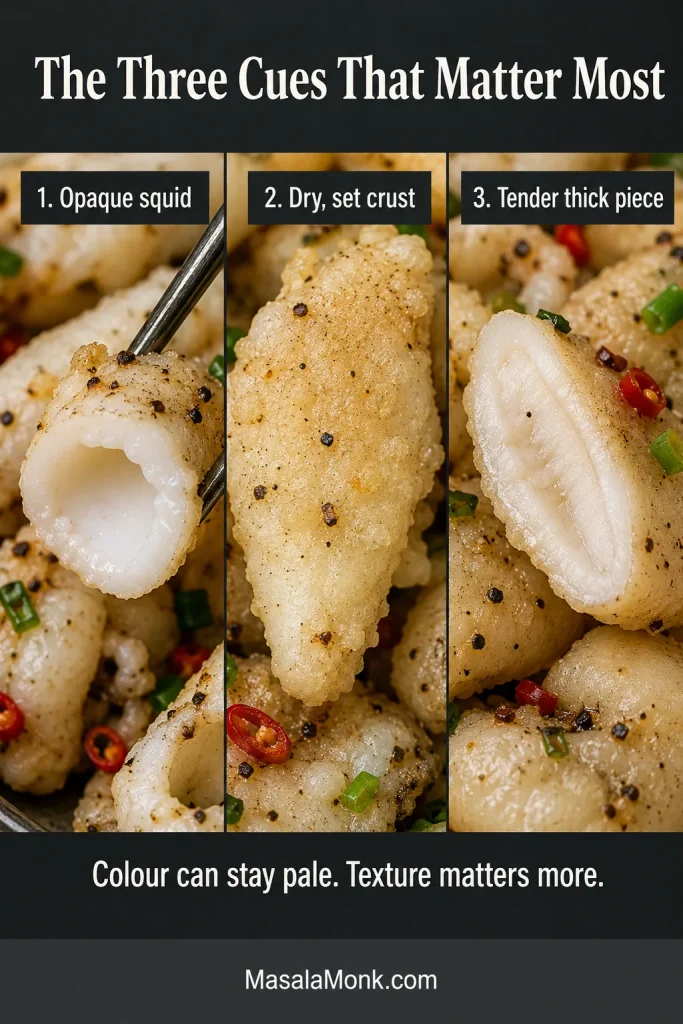
The Three Cues That Matter Most

  • Squid has turned opaque rather than translucent.
  • Coating is dry and set instead of dusty, wet or pasty.
  • A thick piece is cooked through but still tender.
Three-panel doneness guide showing opaque squid, dry set crust and a tender thick piece.
Properly cooked squid may still look pale when the flesh is opaque and the crust is dry.

Curling and calmer bubbling are useful supporting signs, but they can happen at different speeds. Colour is the least reliable cue: a starch-heavy crust may remain pale gold even when it is fully crisp.

Building the Salt and Pepper Seasoning

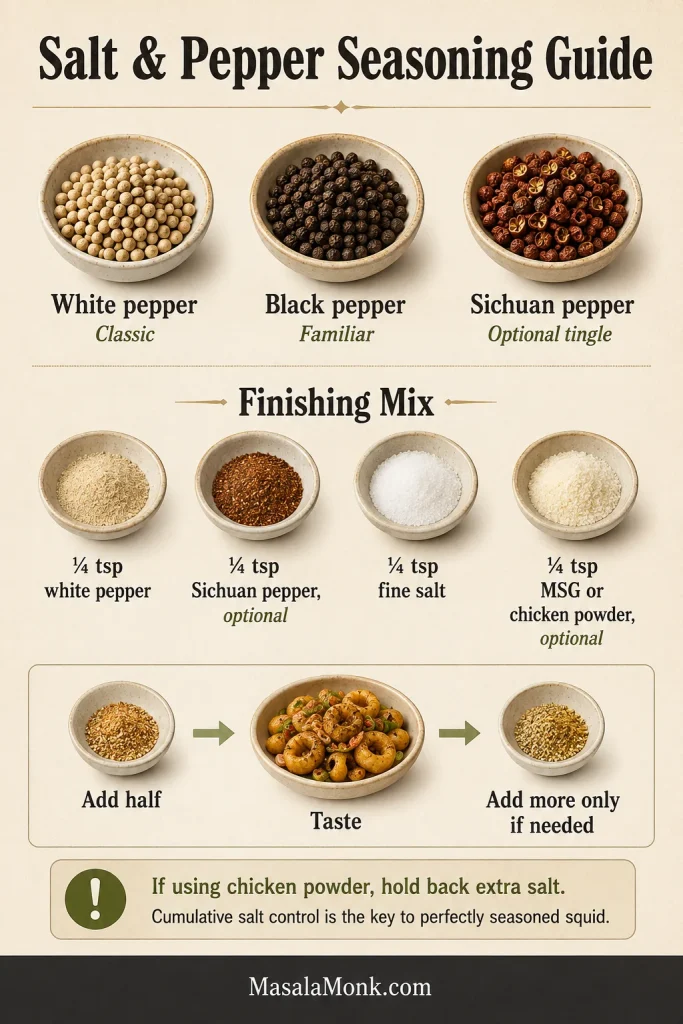
White pepper gives the dish its sharp restaurant-style warmth. Black pepper tastes rounder and more familiar, while Sichuan pepper—also written as Szechuan pepper—adds a citrusy, lightly numbing edge.

For the full batch, use the measured finishing mix from the recipe: ¼ teaspoon white pepper, up to ¼ teaspoon toasted ground Sichuan pepper, ¼ teaspoon fine salt and optional ¼ teaspoon MSG or chicken powder. Add only half after the aromatic toss, taste, then add more if needed. When using salty chicken powder, leave out the finishing salt at first.

Seasoning guide with white pepper, black pepper, Sichuan pepper, fine salt, optional MSG or chicken powder and a taste-first flow.
Add half the finishing seasoning first because salt appears in the dredge and the final mix.

For a clean white-pepper profile, omit the Sichuan pepper. To make a familiar mixed-pepper finish, replace it with ¼ teaspoon freshly ground black pepper. The squid and dredge already contain salt, so add the finishing mix gradually rather than using all of it automatically. For a hotter table sauce, see the pepper sauce guide.

Air Fryer Salt and Pepper Squid

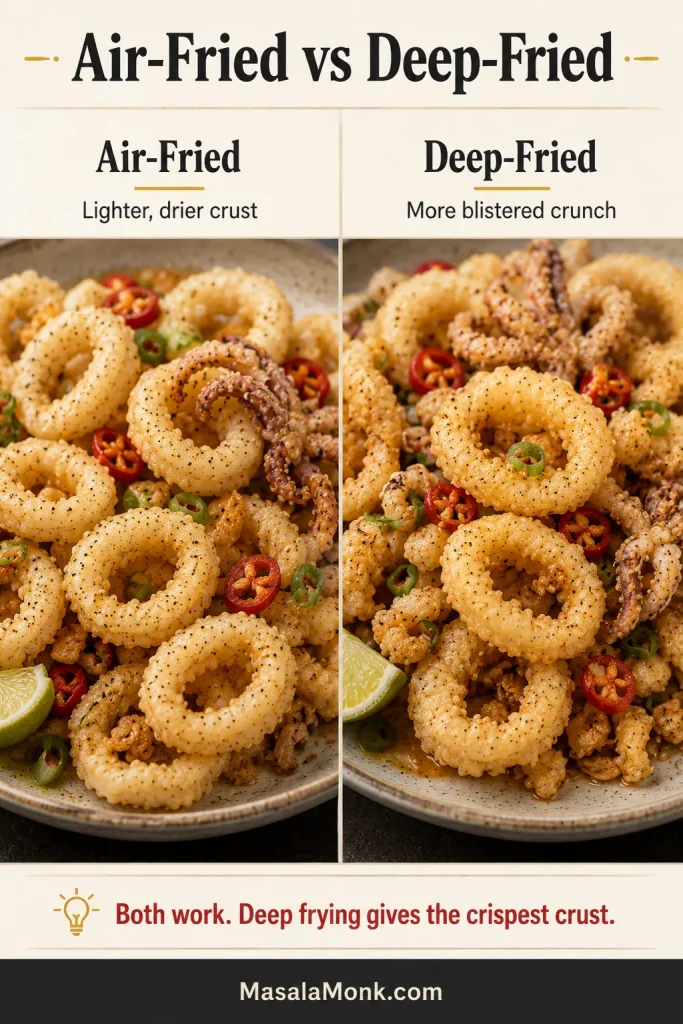
The air fryer works, but it will not mimic deep frying exactly. For the crispest crust, use the main fried method; use the air fryer when less mess and no pot of oil matter more than a deeply blistered crust. Stop when the coating is dry and the squid is just opaque; do not keep cooking merely to chase deeper colour. The 5–7-minute timing applies to each basket load, so allow additional time for multiple batches.

Side-by-side comparison of air-fried and deep-fried salt and pepper squid with different crust textures.
Air frying is lighter; deep frying creates the more blistered crust.

For the egg-white layer: mix 500 g / about 1 lb 2 oz dry squid with 16 g / 2 tablespoons cornstarch, ¼ teaspoon fine salt, ¼ teaspoon white pepper and the optional 2 teaspoons Shaoxing wine. Begin with half a beaten egg white, then add only enough for the squid to feel lightly tacky.

For the air-fryer dredge:

  • 60 g / about ½ cup cornstarch
  • 20 g plain flour, or 20 g certified gluten-free rice flour
  • ½ teaspoon each baking powder, fine salt and white pepper

Use a thinner layer than in the deep-fried version so every powdery patch can be sprayed evenly.

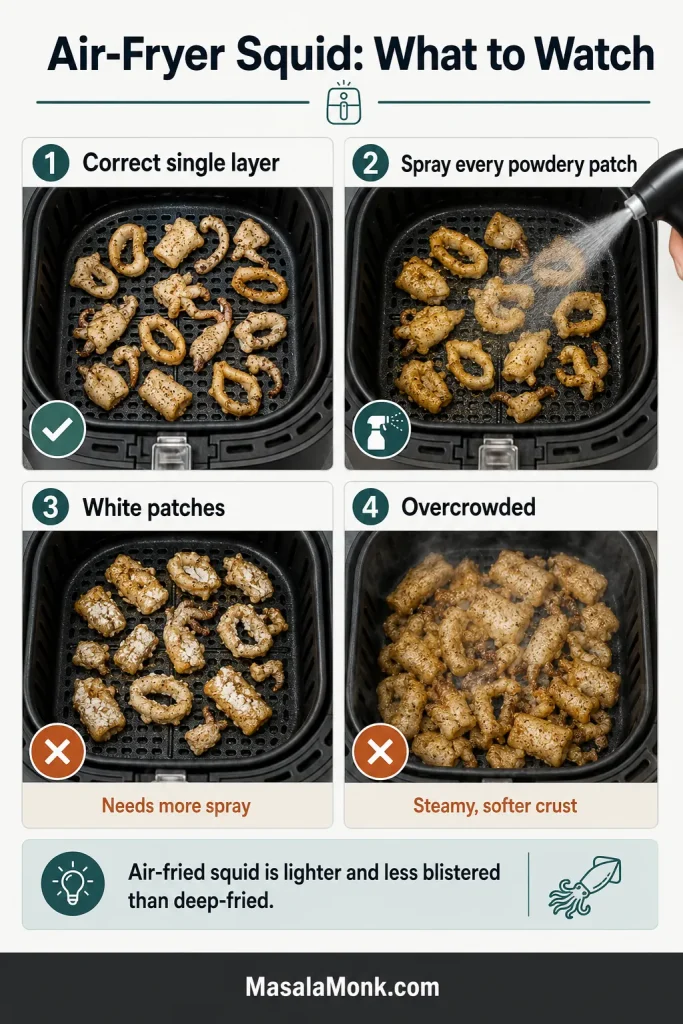
How to Air-Fry the Squid

  1. Preheat the air fryer to 400°F / 200°C for about 3 minutes.
  2. Dredge only the first batch and arrange the pieces in a true single layer.
  3. Spray every powdery patch with neutral oil.
  4. Air-fry for 2–3 minutes, turn, spray again where needed and continue.
  5. Check at 4 minutes. Many small pieces finish around 5–7 minutes per batch, but thick squid, a fuller basket or a cooler-running appliance may need longer. Stop when the squid is opaque and the coating is dry and set, with no wet or floury patches.
  6. Cook in batches without stacking, then toss with separately cooked garlic, chilli and spring onion for only a few seconds.
Air-fryer guide showing single-layer squid, sprayed coating, dry white patches and an overcrowded basket.
Space and oil spray matter most in the air fryer; dry patches stay floury and crowded pieces steam.

White dusty patches mean the coating needed more oil. Wet, steamy patches mean the squid needed more drying or more room. For a cool, slightly sweet dip, try homemade yum yum sauce.

Baking or pan-frying: an oven can cook the squid before the coating has time to become crisp, which is why the air fryer is the better low-oil option. For a skillet or griddle version, skip the dredge. Oil and season the squid lightly, then cook very quickly—roughly a minute per side depending on thickness. It will be tender and lightly charred rather than crisp.

Using Frozen Squid or Frozen Breaded Calamari

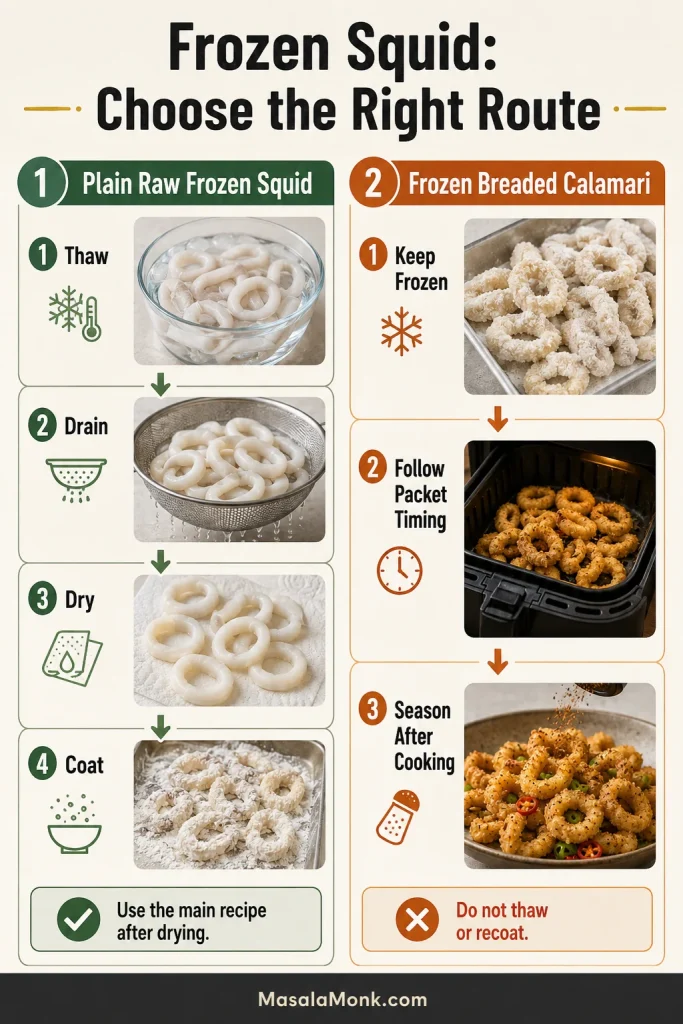
Plain raw frozen squid works well, but it needs completely different treatment from frozen breaded calamari. Check the package before choosing a method.

Two-route guide showing raw frozen squid thawed, drained, dried and coated, and frozen breaded calamari cooked from frozen.
Thaw and dry raw squid for the homemade coating. Cook pre-breaded calamari directly from frozen.

Plain raw frozen squid or rings: thaw overnight in the refrigerator. For a faster thaw, keep the squid in a leak-proof bag, submerge it in cold water, change the water every 30 minutes and cook it promptly once thawed. Never thaw squid on the counter; once it is drained and dry, continue with the main recipe.

  • Drain thoroughly in a colander.
  • Pat every surface dry, including inside the rings.
  • Add the homemade egg-white layer and dredge only after the ice and surface water are gone.
  • Never put partially frozen raw rings into hot oil; the water can cause violent splatter and a weak crust.

Frozen breaded or battered calamari: usually cook it directly from frozen unless the package says otherwise. Do not thaw it or add the raw-squid dredge. Follow the packet timing and safety directions, then add the salt-and-pepper seasoning and separately cooked aromatics once the pieces are hot and crisp. If you want the homemade starch coating instead, start with plain raw squid and return to the main recipe.

For a pub-style frozen calamari plate, keep the Chinese seasoning light and serve the rings with lemon and homemade tartar sauce.

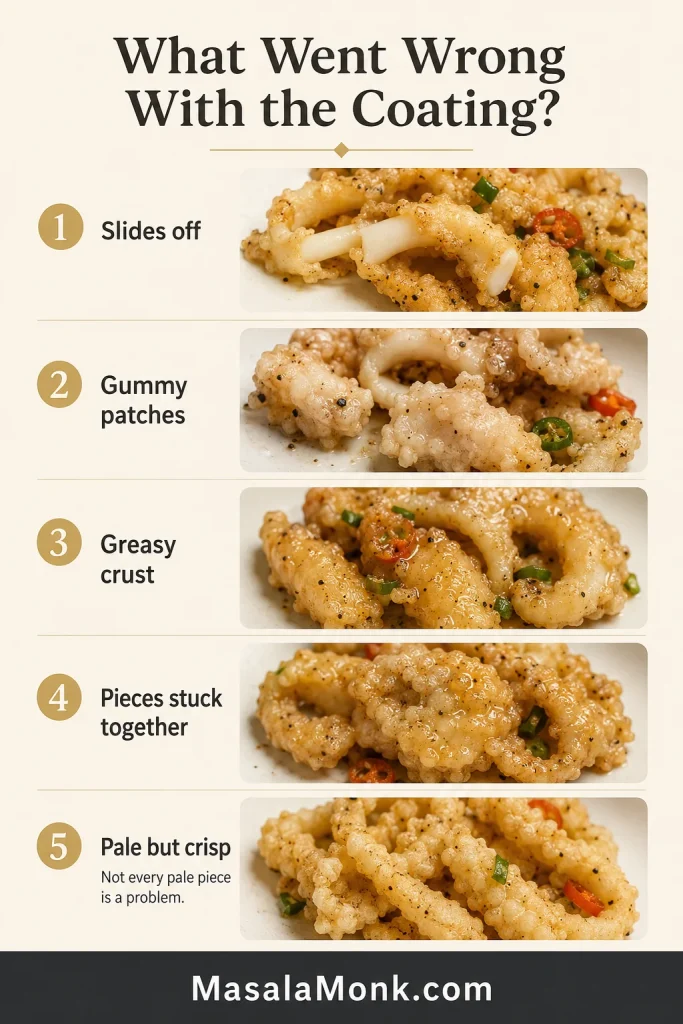
Troubleshooting the Coating and Texture

If the first piece is not quite right, match what you see below before changing several things at once. For the root causes, recheck the coating guide and the time and temperature guide before frying another batch.

Troubleshooting board showing coating sliding off, gummy patches, greasy crust, stuck pieces and pale but crisp squid.
Match the coating problem before changing the method: slipping, gummy, greasy, stuck or pale-but-crisp.

Texture and Coating Fixes

Problem Likely cause Fix
Squid is rubberyToo long in the oil or final panCheck sooner, lift thin pieces first and keep the final toss brief
Coating falls off or turns gummyWet squid, pooled liquid or delayed fryingDry thoroughly, drain pooled liquid, use only enough egg white for a tacky film and dredge immediately
Coating is soggy or greasyLarge batch or cool oilReduce the batch and let the oil recover
Crust is pale but crispStarch-heavy coatingServe it; pale colour can be correct
Later batches become softCool oil, large batches or accumulated crumbsRecover the heat, reduce the batch and skim crumbs

Seasoning, Garlic and Air-Fryer Fixes

Problem Likely cause Fix
Squid tastes too saltySalt added at several stagesAdd finishing seasoning gradually; omit extra salt with chicken powder
Garlic burnsAdded too earlyAdd it only for the final 10–20 seconds
Oil splatters aggressivelyWater remained on the squidDry thoroughly and lower pieces away from the body
Pieces stick togetherThey touched before settingAdd separately and loosen gently with a spider
Air-fryer coating has white patchesDry coating received too little oilSpray every powdery area before and after turning

Quick Rescue Rule

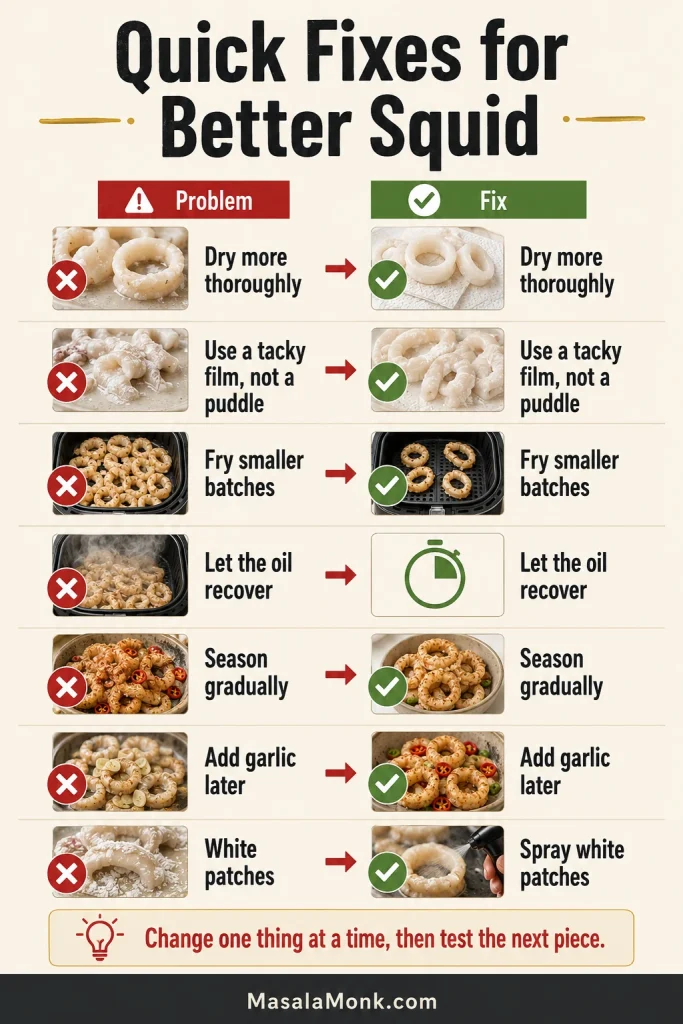
Use this rescue rule: change one variable at a time, then test the next piece before adjusting anything else.

Quick-fix guide showing drying squid, using a tacky film, smaller batches, oil recovery, gradual seasoning, late garlic and sprayed dry patches.
Change one variable at a time, then test the next piece.

What to Do With the Frying Oil

Once frying is finished: let the oil cool completely. If it remains clean and smells neutral, strain it into a labelled covered container for another savoury frying session. Seal unwanted cooled oil for disposal according to local guidance—never pour it down the sink.

Serving, Make-Ahead and Storage

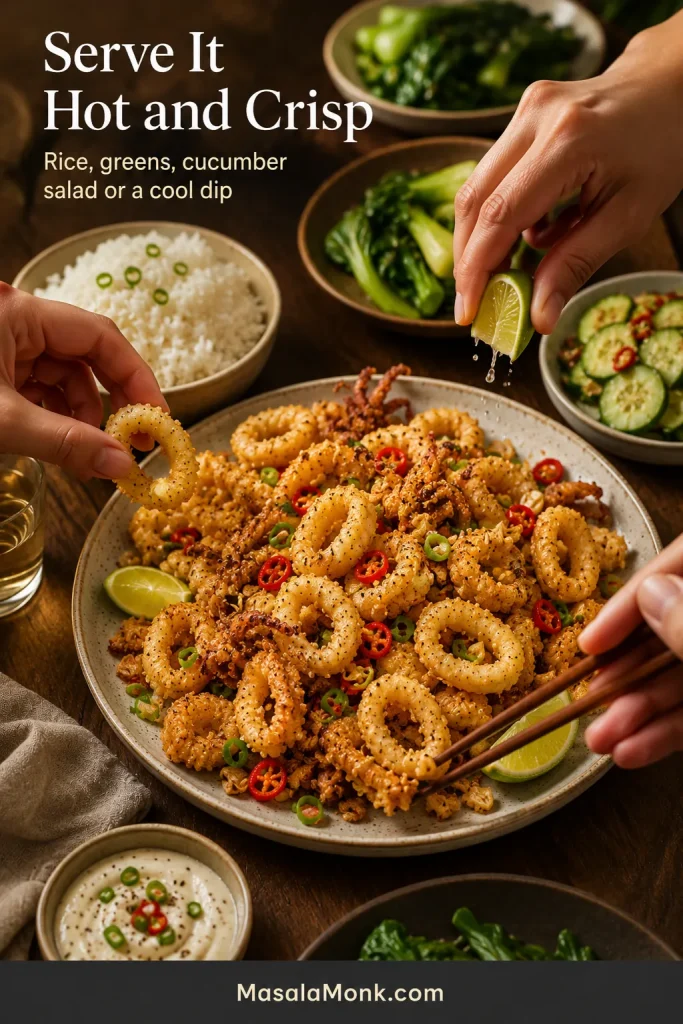
Bring the squid to the table while the crust is still crisp and the garlic and chilli are fragrant. Lemon or lime and something cool make a clean contrast with the peppery coating.

Shared table with salt and pepper squid, steamed rice, greens, cucumber salad, cool dip, lime and several hands serving.
Serve immediately while the crust and aromatics are at their freshest.

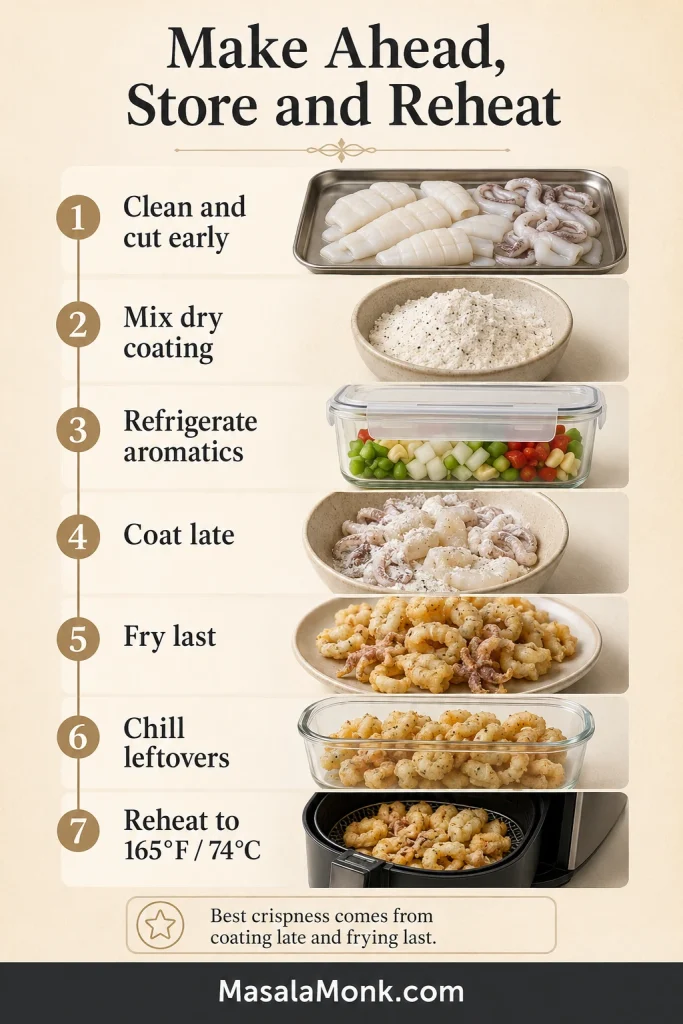
What You Can Prepare Ahead

Almost everything except coating and frying can be organised before guests arrive: prepare early, coat late, fry last.

  • Several hours ahead: clean and cut the squid, then refrigerate it covered and cold.
  • Earlier the same day: mix the coating and seasoning; chop and dry the aromatics, then cover and refrigerate them until needed; make the dip and chill it separately.
  • Just before frying: dry and season the squid, heat the oil and dredge only the next batch.
  • At serving time: cook the aromatics, toss briefly and take the plate straight to the table.

For a larger group, use two racks and keep every batch in one layer. Do not cover the fried squid. A cucumber salad can be made earlier and chilled, leaving the final minutes free for frying. Turn on the extractor or open a window before the oil heats to reduce lingering frying smell.

Storing and Reheating Leftover Calamari

Freshly fried squid has the lightest crust, but leftovers can still be reheated. Refrigerate them within two hours in a shallow airtight container, keep wet dips separate and use within 1–2 days for the best quality.

Air fryer: heat at 375°F / 190°C and check after 2 minutes; most small portions need 3–4 minutes. Oven: spread the pieces on a rack at 400°F / 200°C and check after 5 minutes. Use the microwave only when speed matters more than crunch.

For food safety, reheat leftovers to 165°F / 74°C and remove them from the heat as soon as they reach that temperature. Longer reheating makes the squid firmer.

Timeline showing cleaned squid, dry coating, refrigerated aromatics, late coating, frying, chilled leftovers and reheating to 165 degrees Fahrenheit.
Prepare ahead, but coat late and fry last; reheat leftovers until they reach 165°F / 74°C.

Frequently Asked Questions

Do I need to soak or tenderise squid first?

Small or medium squid usually needs no soaking or tenderising when cut evenly and fried quickly. Very large or unusually thick squid may need different preparation, but milk or bicarbonate of soda/baking soda is unnecessary for this main method.

Is salt and pepper squid the same as calamari?

Calamari is another name for squid. However, “fried calamari” often describes a thicker battered or crumbed pub-style dish, while salt and pepper squid usually has a lighter starch coating and a dry pepper seasoning.

Can I make it without egg?

Yes. Press well-drained squid directly into cornstarch or potato starch and fry immediately. The crust will be lighter and may shed more easily.

Which side of the squid should I score?

Score the inside surface of the opened tube. Shallow diagonal cuts in both directions help the piece curl without slicing it through.

Can I shallow-fry it?

You can, but the crust will be less even and the squid may need turning. Use a thin coating, a generous layer of hot oil and cook only a small number of pieces at once.

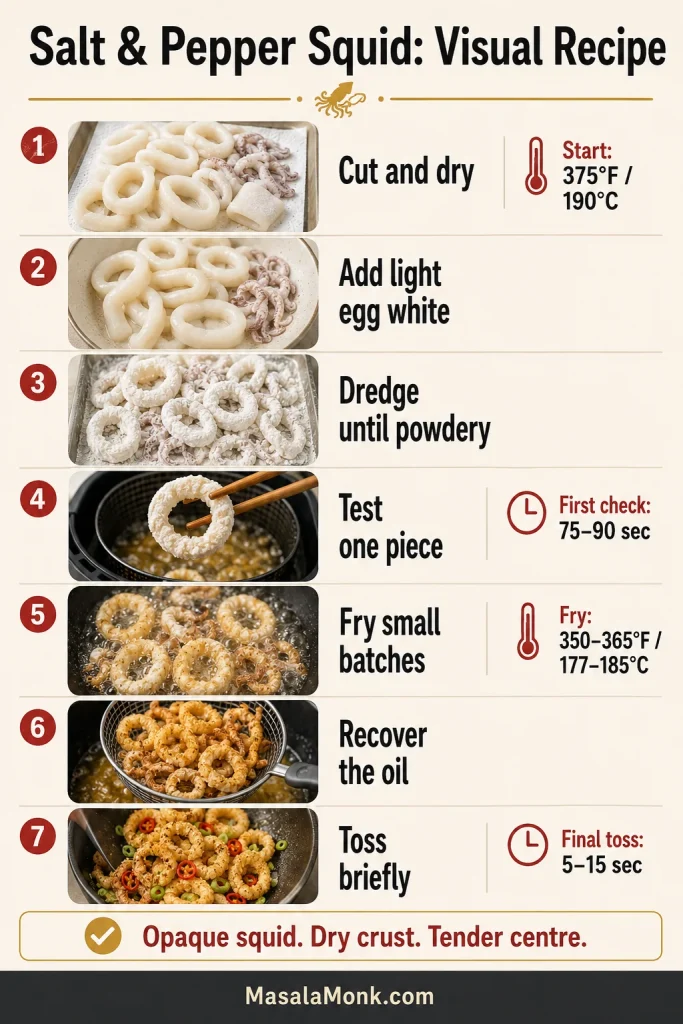
Saveable Salt and Pepper Squid Method

Visual recipe card showing seven stages from cutting and drying squid to tossing it briefly with aromatics.
Dry, test, batch, recover and toss briefly.

Salt and pepper squid stops feeling risky once you stop waiting for dark colour and begin trusting the dry crust and tender centre. Serve it while the garlic is fragrant, the spring onions are fresh and the pale-golden crust is still light and crisp.

What cut did you use, and how long did your first test piece take? That detail may help the next cook using similar squid.

Posted on Leave a comment

Tilapia Tacos Recipe with Crisp Slaw and Creamy Lime Sauce

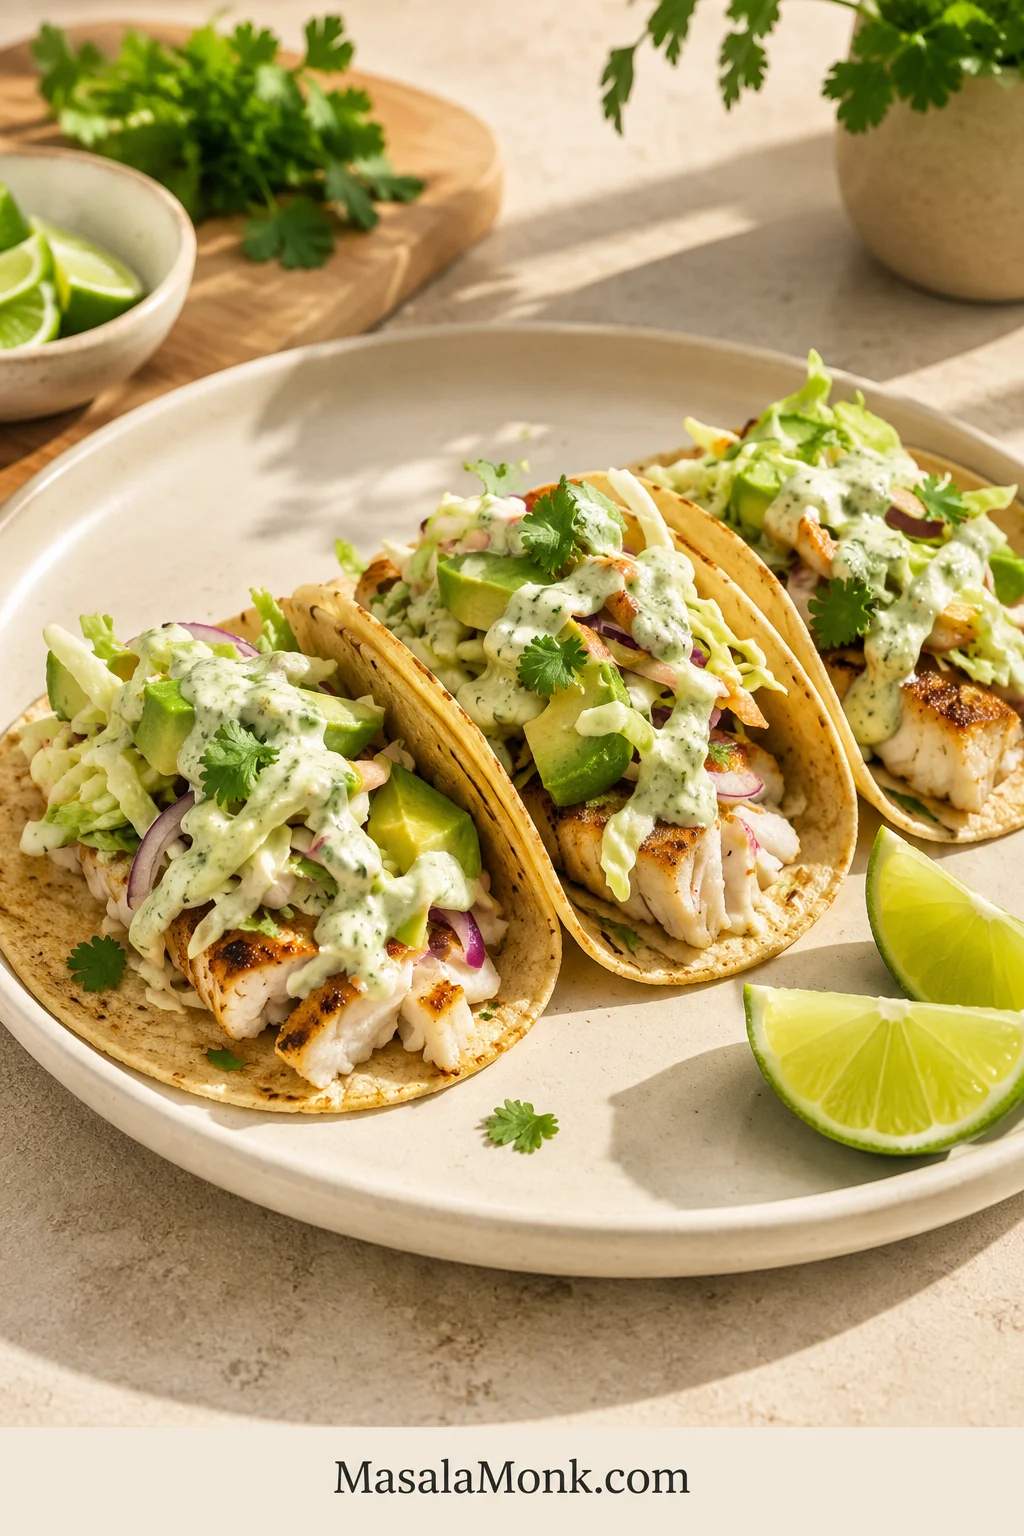
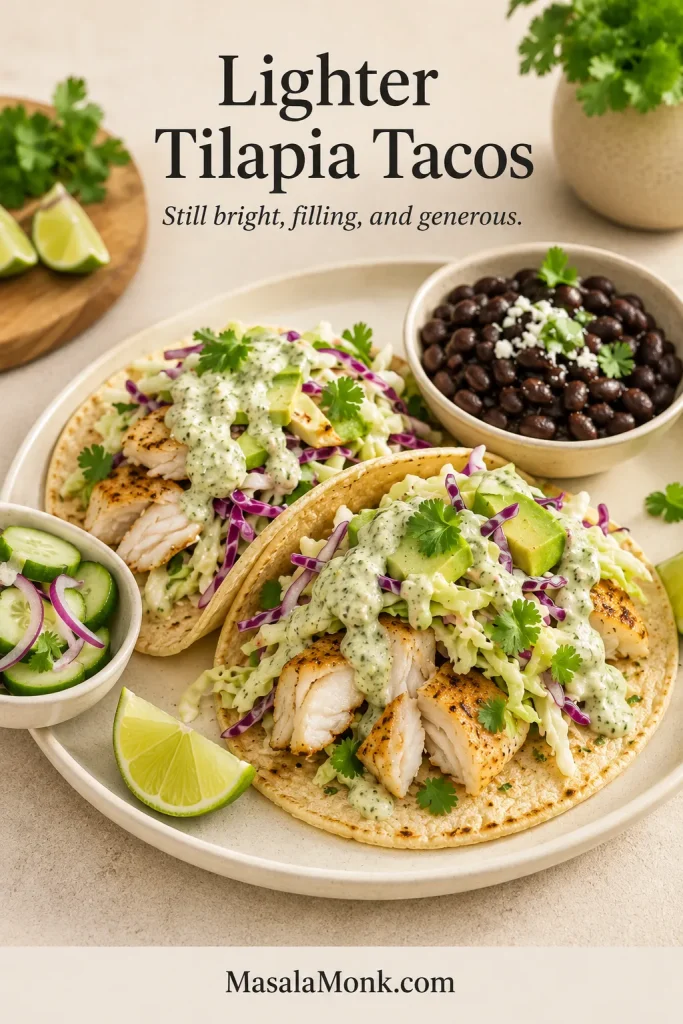
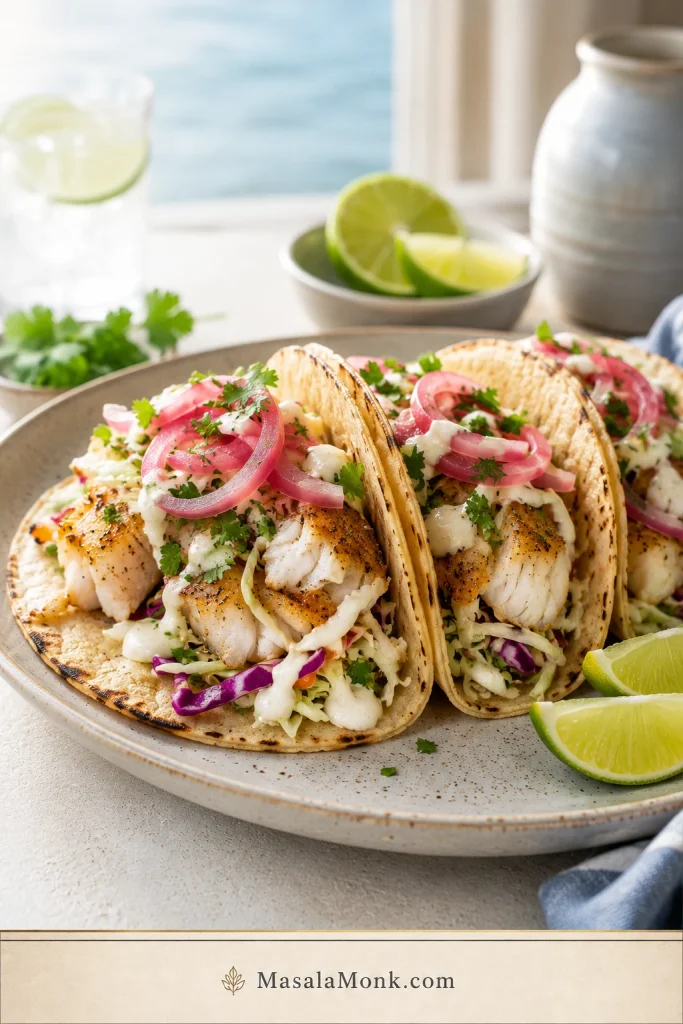
Three corn-tortilla tacos filled with browned tilapia, green and purple cabbage slaw, avocado, pale cilantro-lime sauce and fresh cilantro, with lime wedges beside the plate.

These tilapia fish tacos are for the nights when you want dinner to feel bright and generous without turning the kitchen into a project. Smoky skillet tilapia meets cold lime-dressed cabbage, cool cilantro-jalapeño sauce, avocado, and warm tortillas in every bite.

Tilapia is mild, affordable, and quick-cooking, so it rewards a hot pan and an early check. Dress the cabbage lightly, warm the tortillas before the fish is ready, and each taco stays flaky, crisp, and fresh rather than watery or soggy.

The timing does the work: make the cool sauce and crisp slaw first, warm the tortillas next, and cook the fish last so it reaches the table hot while the cabbage still snaps.

Three rules for better tilapia tacos:

  • Dry before seasoning. Surface moisture is the difference between browned fish and pale, steamed fish.
  • Check by thickness. Thin fillets may finish in 4–5 minutes; remove each piece when it reaches 145°F / 63°C and separates easily.
  • Cook the fish last. Once the tilapia hits the pan, the sauce, slaw, and tortillas should already be waiting.

Tilapia Tacos Recipe

The skillet recipe below is the one to make first: fast enough for a weeknight, but carefully balanced so the mild fish doesn’t disappear beneath the toppings.

Tilapia Tacos with Crisp Slaw and Creamy Lime Sauce

Smoky, tender tilapia with crisp lime slaw, creamy cilantro-jalapeño sauce, avocado, and warm tortillas.

Prep Time20 minutes
Cook Time6–8 minutes for one batch; 12–15 minutes for two
Total TimeAbout 26–35 minutes
Yield8 tacos / 4 servings

Equipment

  • 12-inch / 30 cm nonstick or well-seasoned skillet
  • Thin, wide fish spatula or flexible turner
  • Instant-read thermometer
  • Medium mixing bowl and small bowl
  • Small blender or food processor, optional
  • Tongs and a clean kitchen towel for the tortillas

Limes, Cilantro, and Jalapeños

  • 3–4 medium limes, divided among the slaw, sauce, and wedges for serving
  • 1 small bunch cilantro (fresh coriander), divided
  • 2 small jalapeños, divided, optional

For the Tilapia

  • 1¼ lb / 20 oz / 567 g skinless, boneless tilapia fillets
  • 1 tbsp / 15 ml neutral high-heat oil, plus a little more if the fish needs two batches
  • 2 tsp chili powder
  • 1 tsp smoked paprika
  • 1 tsp ground cumin
  • ¾ tsp garlic powder
  • ½ tsp onion powder
  • ½ tsp dried oregano
  • ¾ tsp / about 4 g fine sea salt
  • ¼ tsp ground black pepper
  • ⅛–¼ tsp cayenne pepper, optional
  • 1–2 of the limes, cut into wedges for finishing

For the Cabbage Slaw

  • 9 oz / 250 g finely shredded green cabbage, red cabbage, or a mixture
  • ¼ cup / about 10 g chopped cilantro from the bunch above
  • 2 tbsp / 30 ml fresh lime juice
  • 1 tbsp / 15 ml olive oil
  • ¼ tsp / about 1.5 g fine sea salt
  • 1 small jalapeño, finely sliced or minced, optional

For the Creamy Lime Sauce

  • ½ cup / 120 g plain Greek yogurt or sour cream
  • ¼ cup / about 60 g mayonnaise
  • 2 tbsp / 30 ml fresh lime juice, plus more to taste
  • ½ packed cup / about 15 g cilantro from the bunch above
  • 1 small garlic clove
  • ½–1 jalapeño, seeded for less heat, or 1 tsp minced chipotle in adobo
  • ¼ tsp / about 1.5 g fine sea salt, plus more to taste
  • 1–2 tbsp / 15–30 ml cold water, only as needed

Sauce yield: about 1 cup / 240 ml—enough for a thin layer underneath and a light drizzle over all eight tacos, with a little extra for the table.

For Assembly

  • 8 sturdy corn or flour tortillas, about 5–6 inches / 13–15 cm, or 16 very thin corn tortillas if using two per taco
  • 1 ripe avocado, sliced or diced
  • Fresh cilantro
  • Lime wedges
  • Crumbled cotija or feta, optional
  • Fresh mango salsa, optional

Instructions

Prepare the Cool Components and Fish
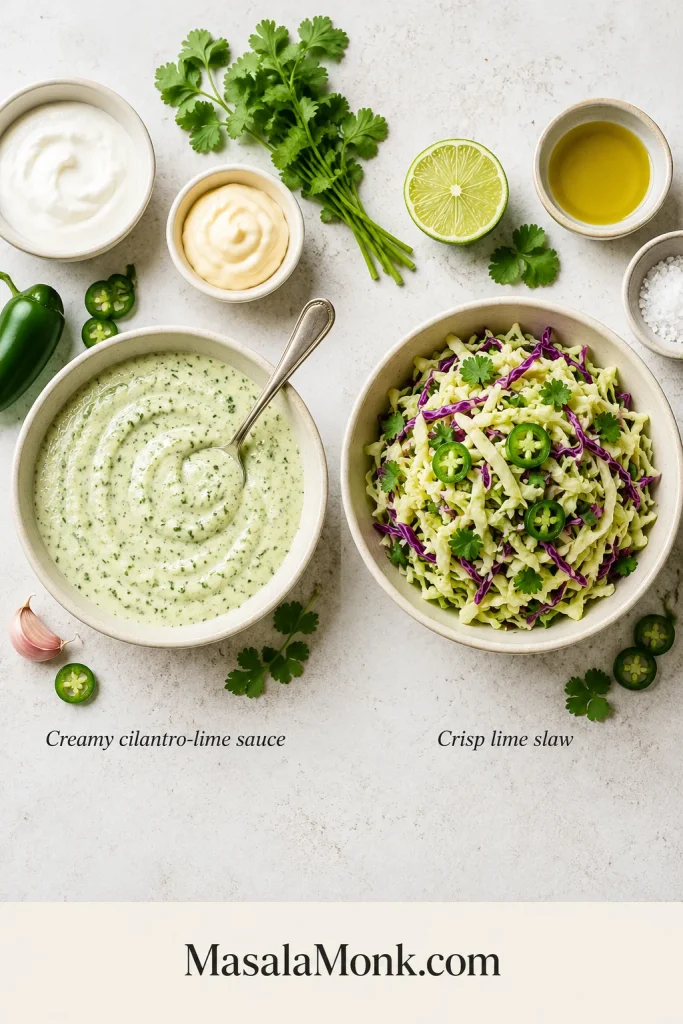
  1. Make the sauce. Blend the yogurt or sour cream, mayonnaise, lime juice, cilantro, garlic, jalapeño or chipotle, and salt. Without a blender, finely mince the cilantro, garlic, and jalapeño first, then whisk everything together. Taste before adding water: the sauce should be bright, lightly salty, and a little more assertive than you want it to taste in the finished taco. Add cold water one tablespoon at a time until it falls from a spoon in a thick ribbon, then refrigerate.
  2. Make the slaw. Toss the cabbage, cilantro, lime juice, olive oil, salt, and optional jalapeño. Let it stand for 10–15 minutes, then taste one strand. It should be crisp, lightly salty, and clearly lime-bright—not sharply sour or wet. If liquid gathers in the bowl, lift the slaw out with tongs when assembling.
  3. Taste the cool components together. Try a strand of slaw with a little sauce. They should taste slightly brighter and bolder than necessary because the warm fish and tortilla will soften both.
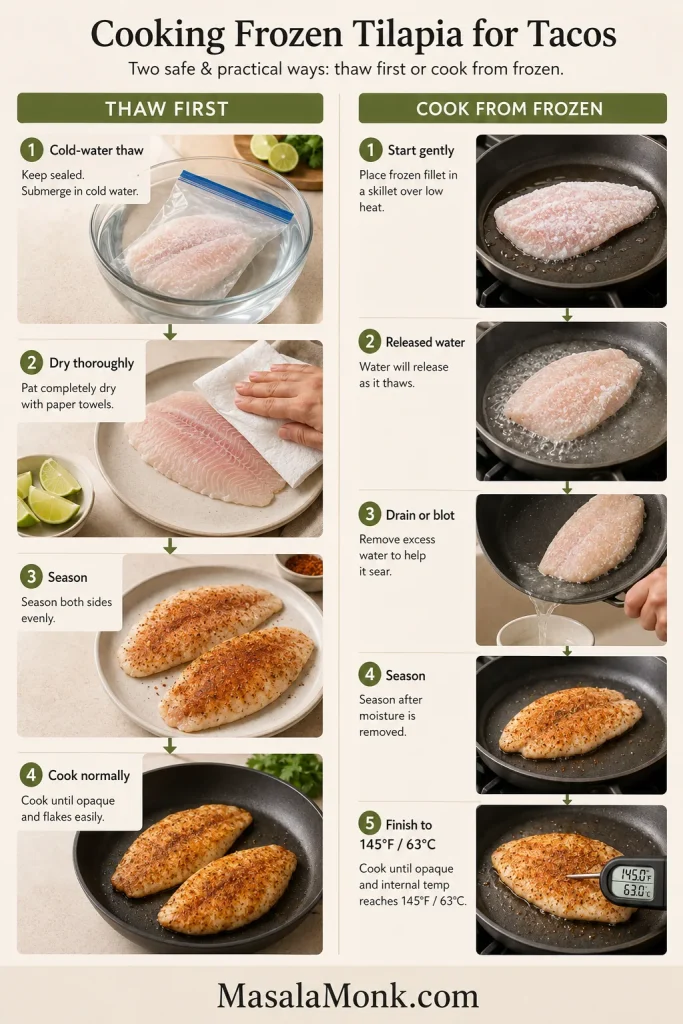
  4. Dry the fish. Pat the tilapia thoroughly dry on both sides, especially if it was previously frozen.
  5. Season. Mix the chili powder, smoked paprika, cumin, garlic powder, onion powder, oregano, salt, black pepper, and optional cayenne. Rub the fish lightly with oil, then press the seasoning evenly over both sides.
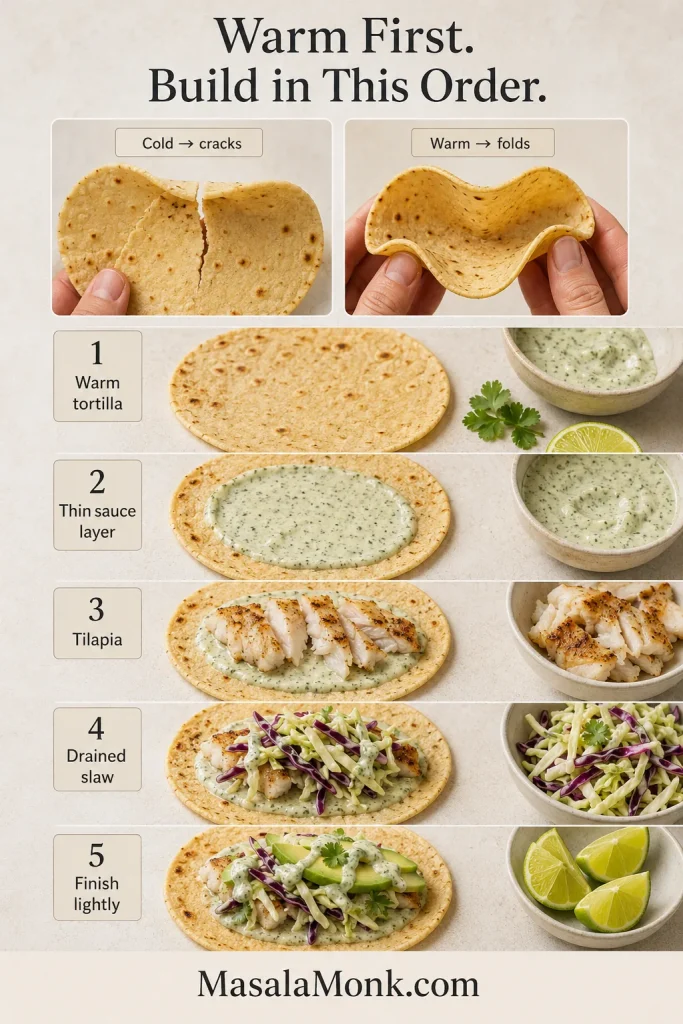
  6. Warm the tortillas. Heat them in a dry skillet for about 15–30 seconds per side, then stack them inside a clean kitchen towel.
Cook, Rest, and Assemble
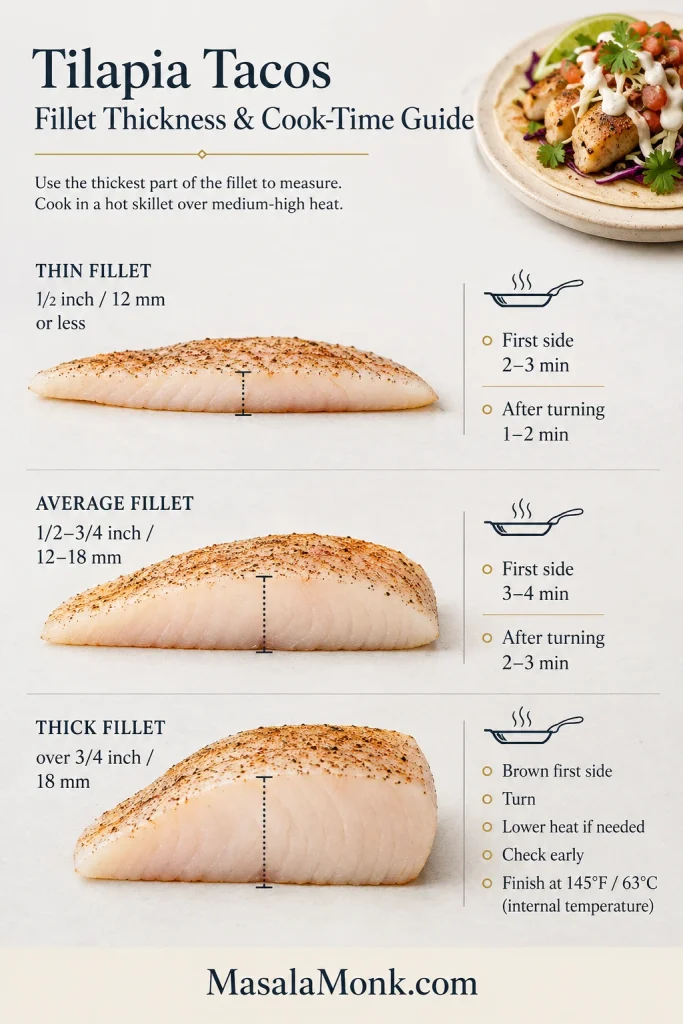
  1. Cook the first side. Heat the 12-inch skillet over medium-high heat. Add a thin film of oil. When it shimmers, add as many fillets as fit in one layer with visible space between them. Cook mostly undisturbed for about 2–4 minutes, depending on thickness.
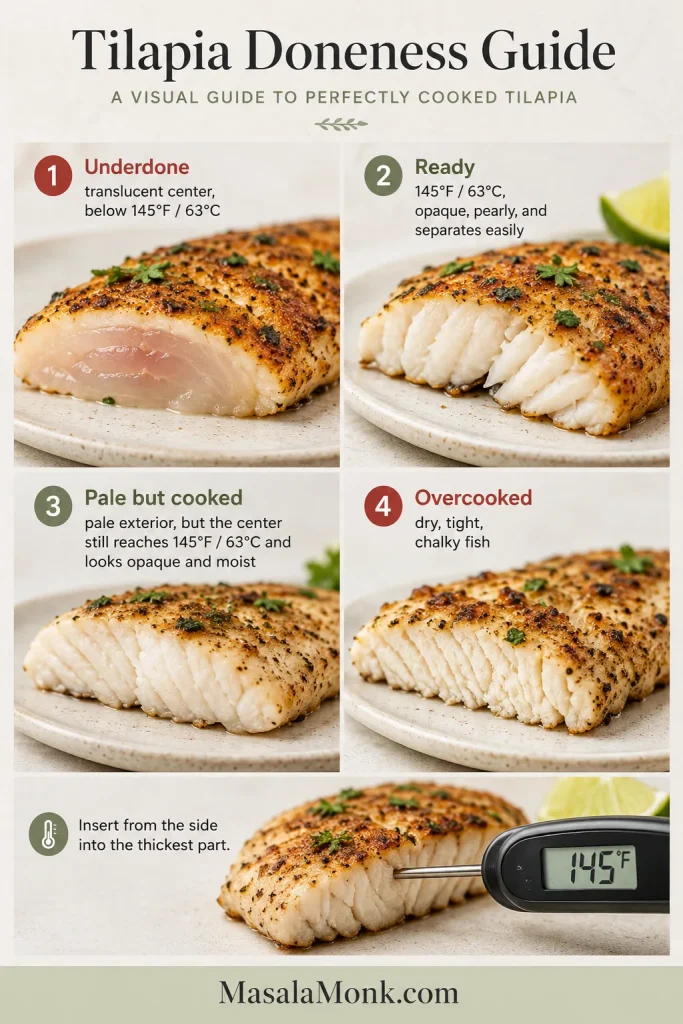
  2. Turn and finish. Carefully turn the fish with a fish spatula and cook for about 1½–3 minutes more. Remove each fillet when the thickest point reaches 145°F / 63°C and the flesh is opaque and easy to separate.
  3. Cook a second batch if needed. Add a little more oil and let the pan recover its heat before adding the remaining fish. Keep the first batch on a warm plate, loosely covered rather than sealed tightly.
  4. Rest and flake. Let the fish rest for 2–3 minutes, then break it into large taco-size flakes.
  5. Assemble. Spread a little sauce over each warm tortilla. Add fish, drained slaw, avocado, another light drizzle of sauce, cilantro, and lime. Serve immediately.

Best result: serve as soon as the fish is ready. Don’t leave finished tilapia in the hot pan while the rest of dinner catches up.

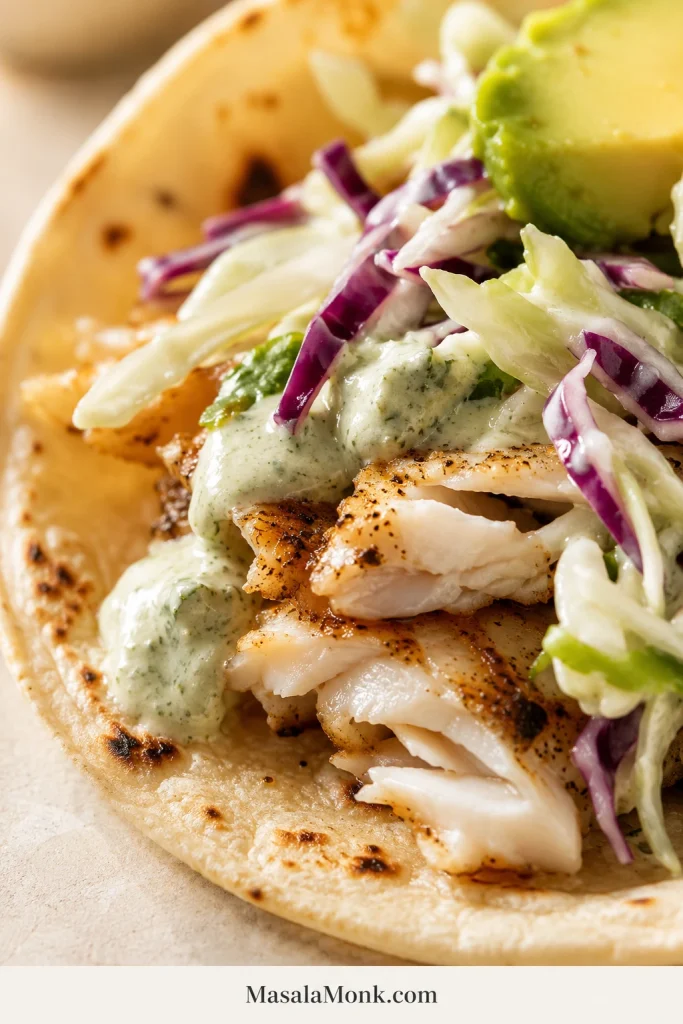
A finished tilapia taco should still show broad fish flakes beneath the toppings. Use the close-up below as a balance check: the slaw and sauce should support the fish, not cover it.

Close view of a corn tortilla holding large browned tilapia flakes, purple and green cabbage slaw, avocado and pale cilantro-lime sauce.
Keep the tilapia in broad flakes so it stays visible beneath the slaw and sits securely inside the tortilla.

Need a technique check? Skillet method·Cook time by thickness·Sauce and slaw·Assembly order

Choose the Method That Fits Tonight

The skillet gives the best balance of browning and control. Use the oven for a larger table, or the air fryer when you are cooking only a few fillets.

Choose This WhenMethodWhat You’ll Get
Making the recipe for the first timeSmoky skilletBrowned edges and moist flakes
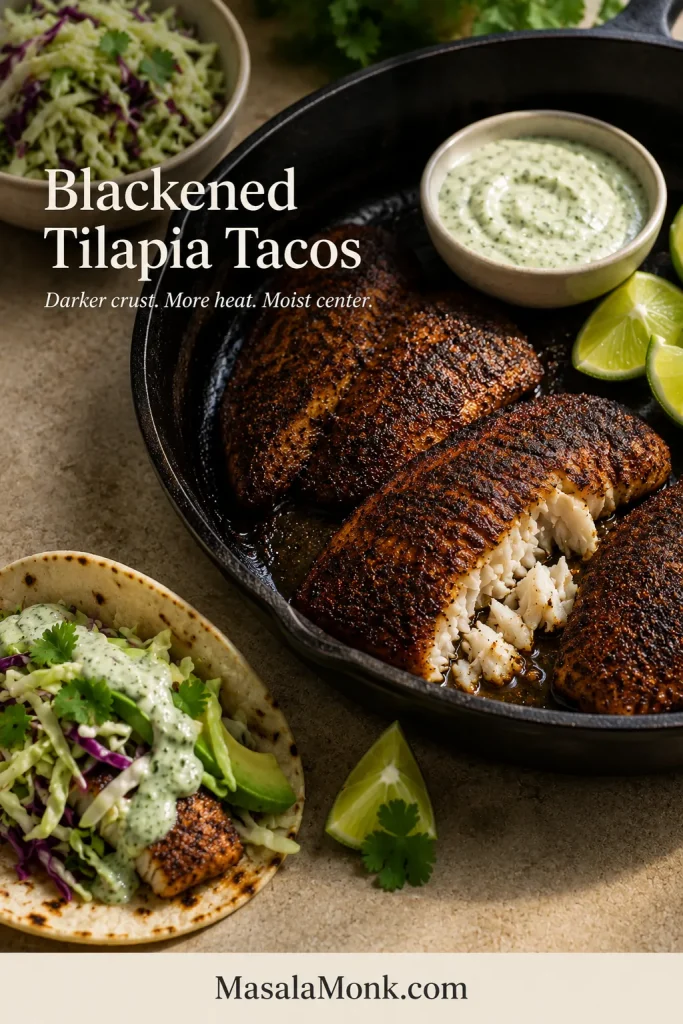
Wanting a darker crust and more heatBlackened skilletDeeper spice and a darker surface
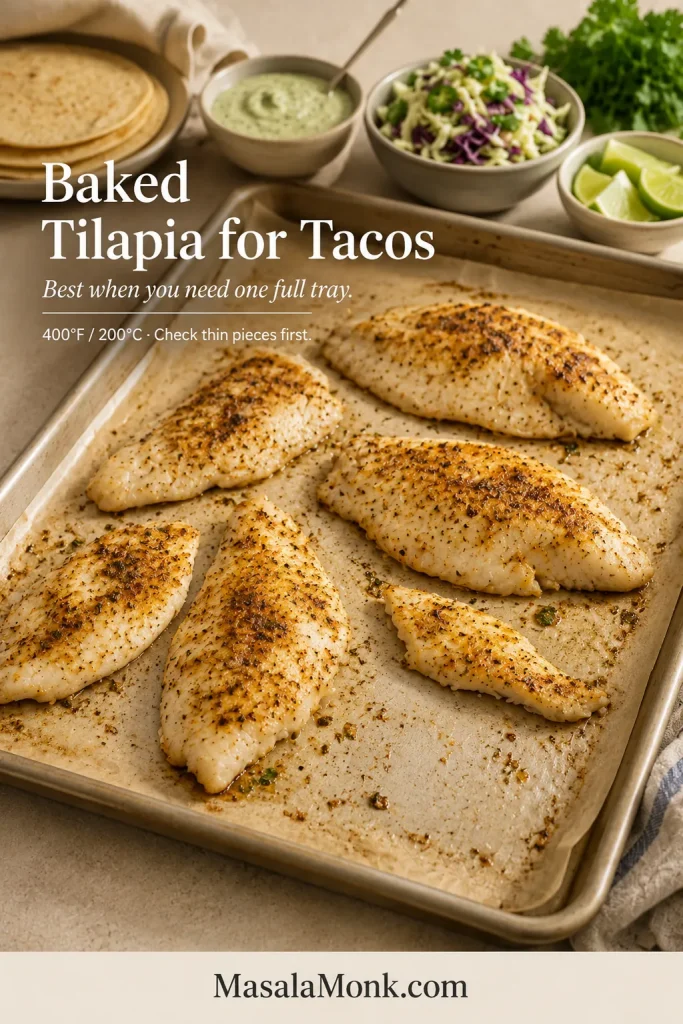
Feeding a larger tableOvenSoft, evenly cooked fish
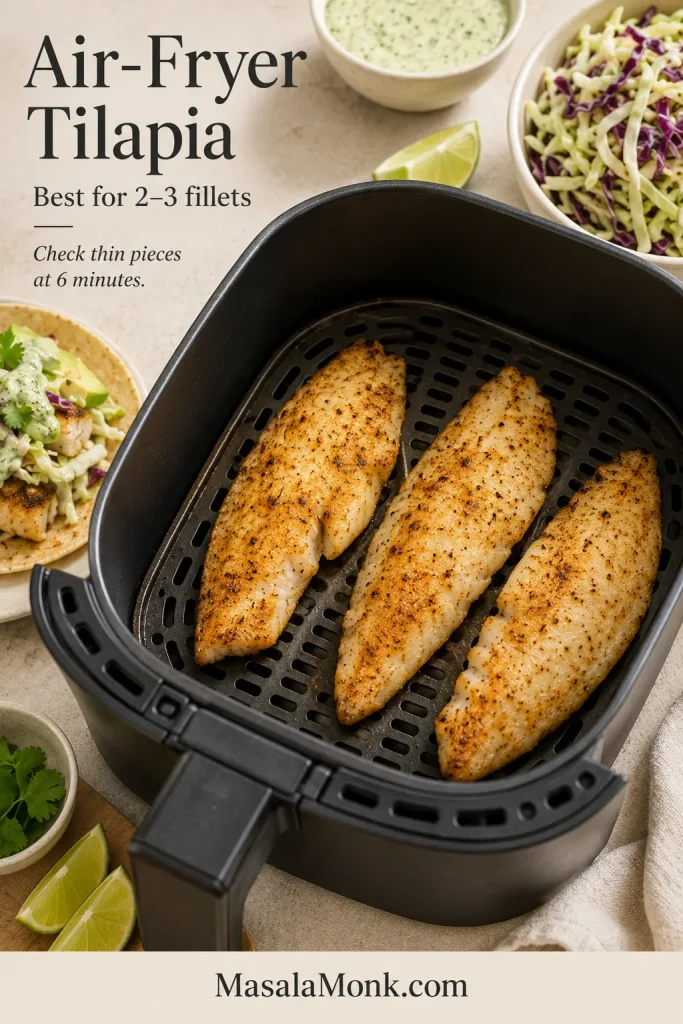
Cooking only two or three filletsAir fryerLightly browned, drier edges
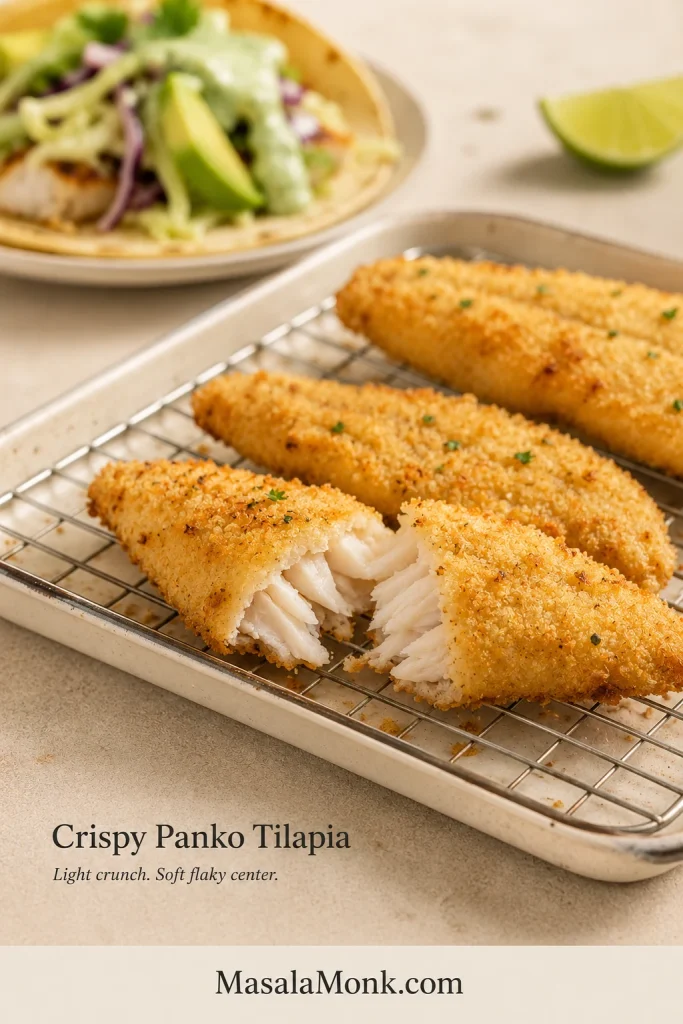
Wanting crunch without deep fryingPanko-coatedCrisp outside, flaky inside
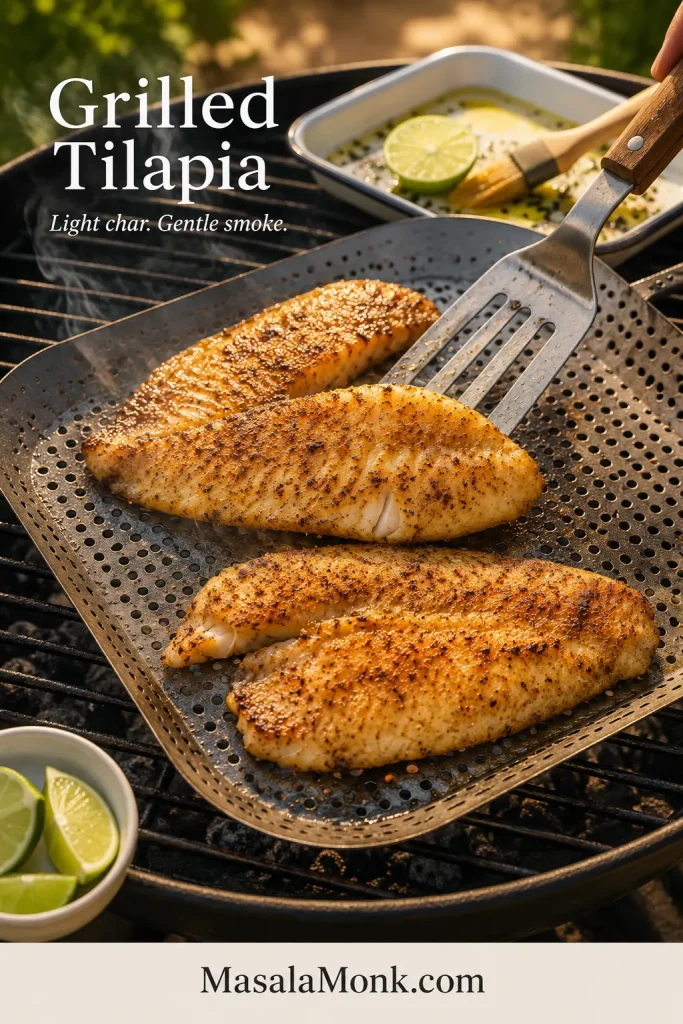
Cooking outdoorsGrillLight char and smoke

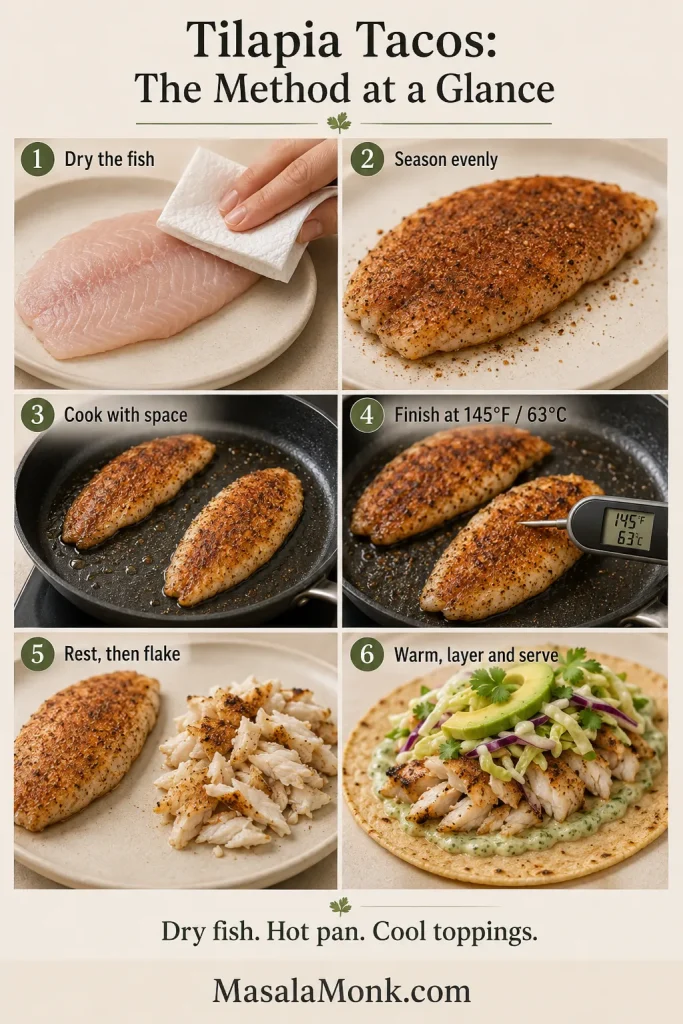
Whichever cooking method you choose, the same quality checkpoints protect the result. The guide below follows the fish from a dry fillet to a balanced taco.

Six-step guide showing tilapia being dried, seasoned, cooked with space, checked with a thermometer, rested and flaked, then assembled in a warm tortilla.
These six checkpoints work across every method: dry, season, space, check, rest, and assemble without burying the fish.

Fish, Seasoning, and Tortillas

Tilapia cooks quickly. Thickness, surface moisture, and pan space decide whether it browns or steams. Choose evenly sized fillets, dry them well, and give them room in the pan.

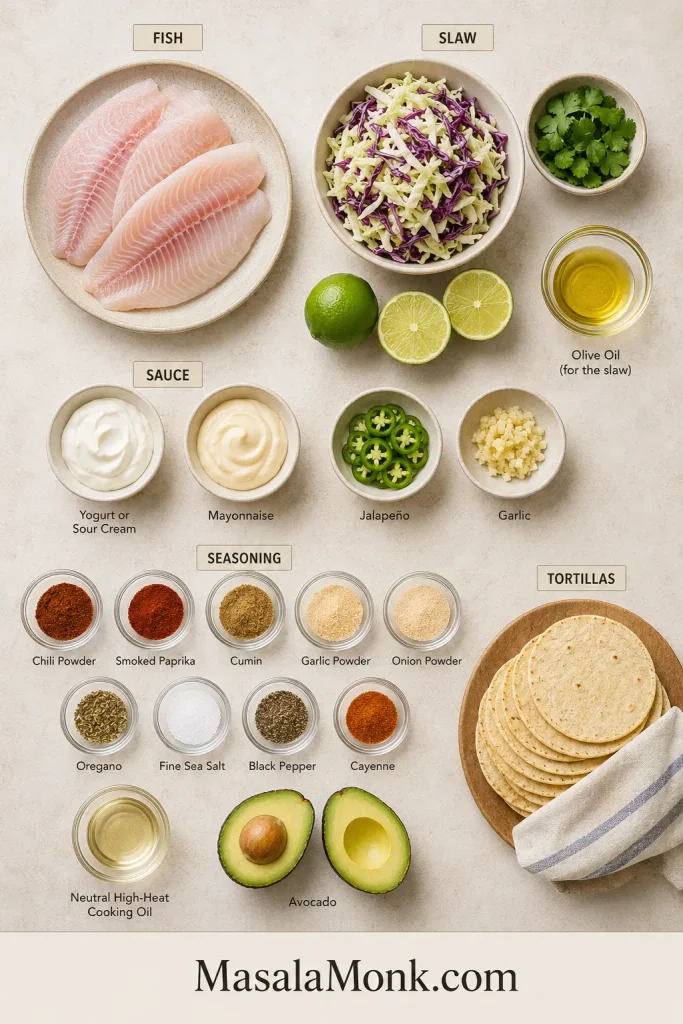
Overhead arrangement of raw tilapia, corn tortillas, cabbage, cilantro, limes, avocado, jalapeño, garlic, yogurt, mayonnaise, two cooking oils and small bowls of spices.
The two oils have different jobs: neutral oil handles the skillet heat, while olive oil dresses the cabbage slaw.

Choosing the Fillets

Choose skinless, boneless fillets with an even pale color and no strong fishy smell. Similar thickness matters more than identical length. When one fillet is much thinner than the others, plan to remove it first instead of forcing the entire batch to finish together.

Fresh and frozen tilapia both work. Previously frozen fish may release more water, so drying isn’t a decorative step. Press both sides with paper towels, replace the damp towel, and check the surface once more immediately before seasoning.

No tilapia? Use the same weight of cod, haddock, or another mild white fish. Choose fillets of similar thickness and follow the doneness cues rather than copying the exact skillet time.

Tilapia is one of the quickest and most affordable fish choices for tacos. To compare it with cod, mahi mahi, salmon, halibut, snapper, and Baja-style fish, use the complete fish tacos guide.

Tilapia Taco Seasoning

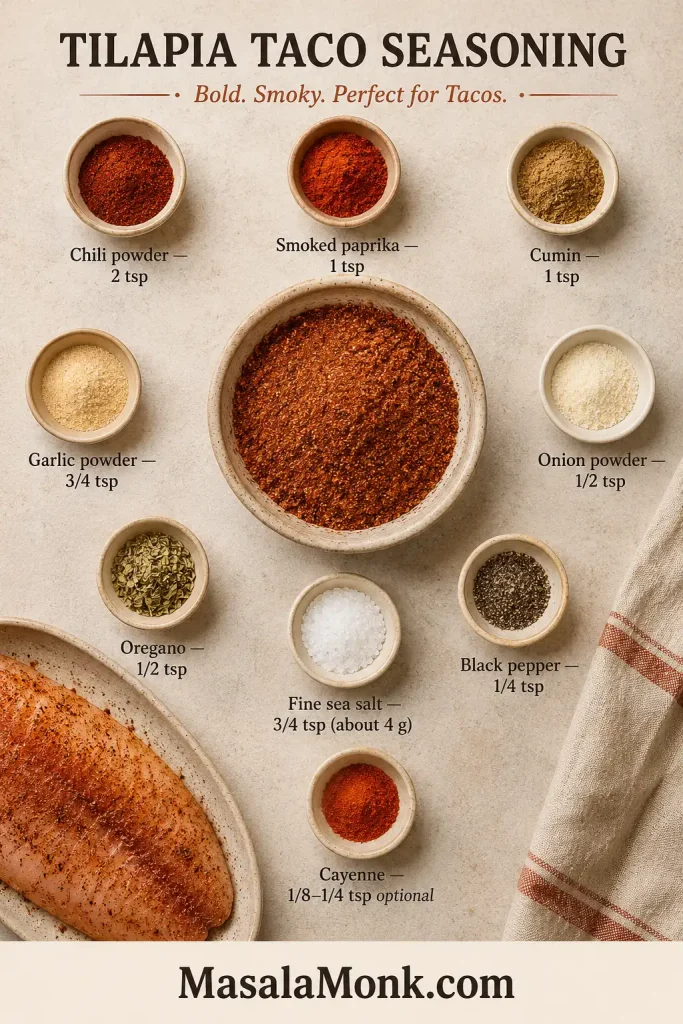
Tilapia doesn’t need to be hidden, but it does need enough seasoning to remain noticeable beside cabbage, sauce, avocado, and tortillas. Chili powder provides the main taco flavor, smoked paprika adds color and a gentle smoky edge, cumin adds warmth, and garlic, onion, and oregano fill out the middle.

Because chili powders vary, taste a tiny pinch before deciding how much cayenne to add. Some are mild seasoning blends, while others are made from hotter ground chilies.

This recipe uses ¾ teaspoon / about 4 g fine sea salt for the fish. If you use coarse kosher salt, weigh 4 g or adjust for the brand. Taste before adding cotija or another salty topping.

Nine labeled bowls containing measured chili powder, smoked paprika, cumin, garlic powder, onion powder, oregano, sea salt, black pepper and optional cayenne.
Mix the seasoning before applying it so salt, cayenne, and smoked paprika reach every fillet evenly.

Don’t use lime as a long marinade. If you want to marinate the fish with lime, keep it to 10–15 minutes. Longer contact can soften the surface of thin fillets. Keep most of the lime in the slaw, sauce, and final squeeze.

Corn or Flour Tortillas?

Corn tortillas bring toasted flavor and keep the tacos lighter. They are also the natural gluten-free choice when the package is certified for your needs. Warm them properly and double very thin tortillas if they split easily.

Flour tortillas are softer, more flexible, and a little richer. Use small taco-size tortillas rather than large wraps so the fish, slaw, and sauce stay balanced.

Cook the Fish Without Rushing It

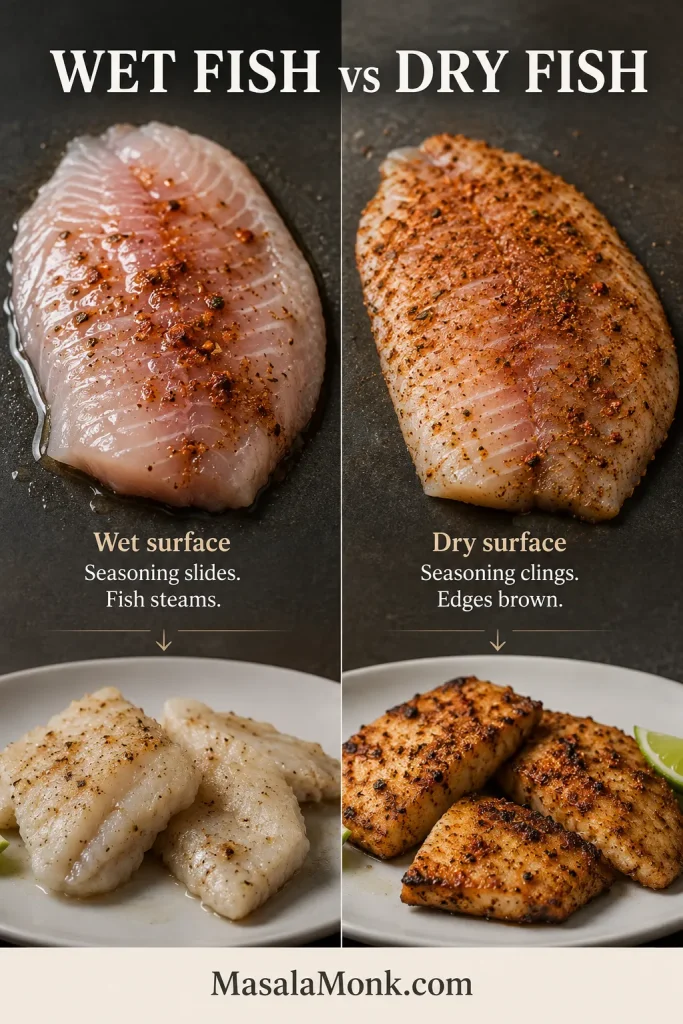
Once the sauce, slaw, and tortillas are ready, the fish needs only a few focused minutes. Dry fish browns; wet fish steams. Pat both sides until slightly tacky, then oil and season just before cooking.

Comparison of a glossy wet tilapia fillet and a matte dried fillet, followed by pale steamed fish on one side and browned cooked fish on the other.
Dry tilapia looks matte and slightly tacky, which helps the seasoning cling. A glossy surface signals moisture that will steam in the skillet.

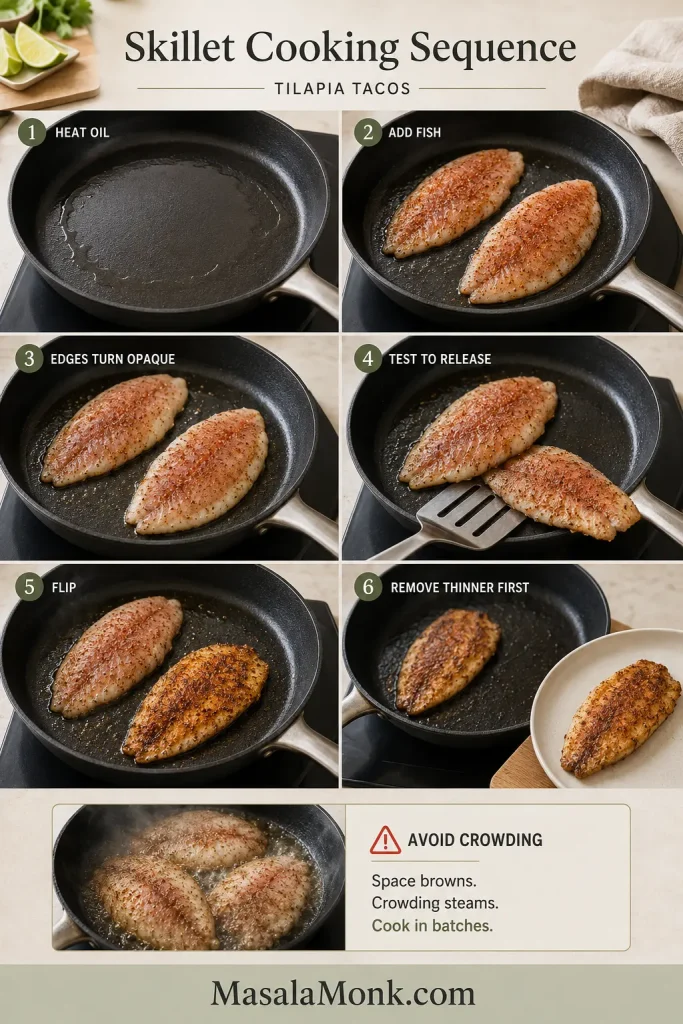
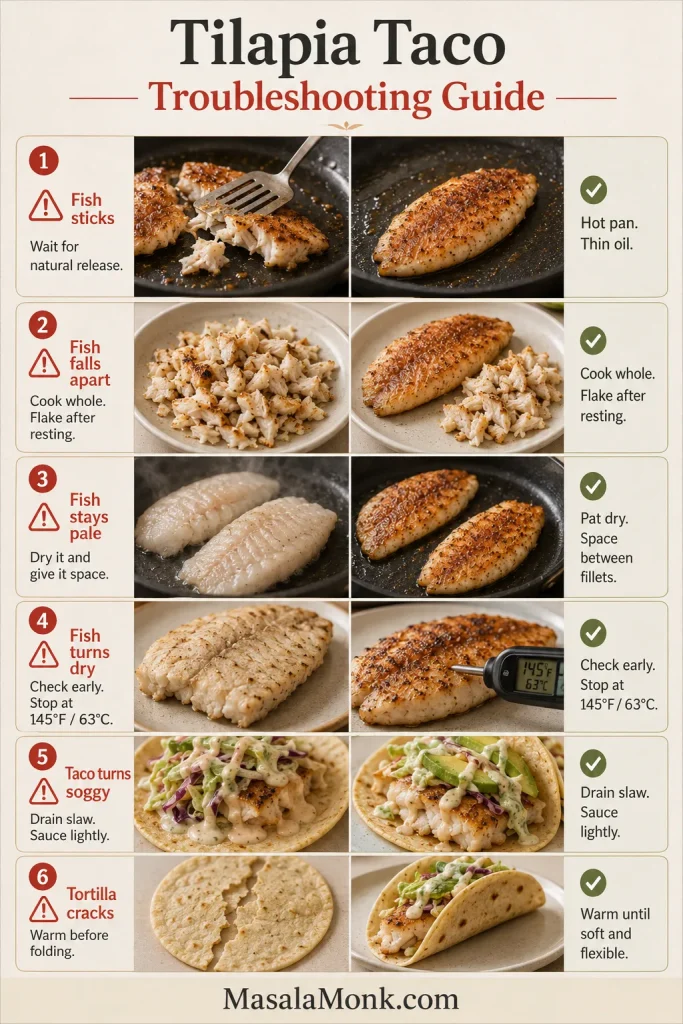
Give the fillets room. Add only as many as fit with visible space between them. Turn once, and remove thinner pieces as soon as they are done. That is good judgment, not a failed batch.
Step-by-step skillet sequence showing oil heating, spaced tilapia fillets cooking, opaque edges forming, release being tested, one fillet flipped and a thinner fillet removed first.
Watch the opaque line climb before testing the first side. If the spatula meets resistance, wait rather than forcing the turn.

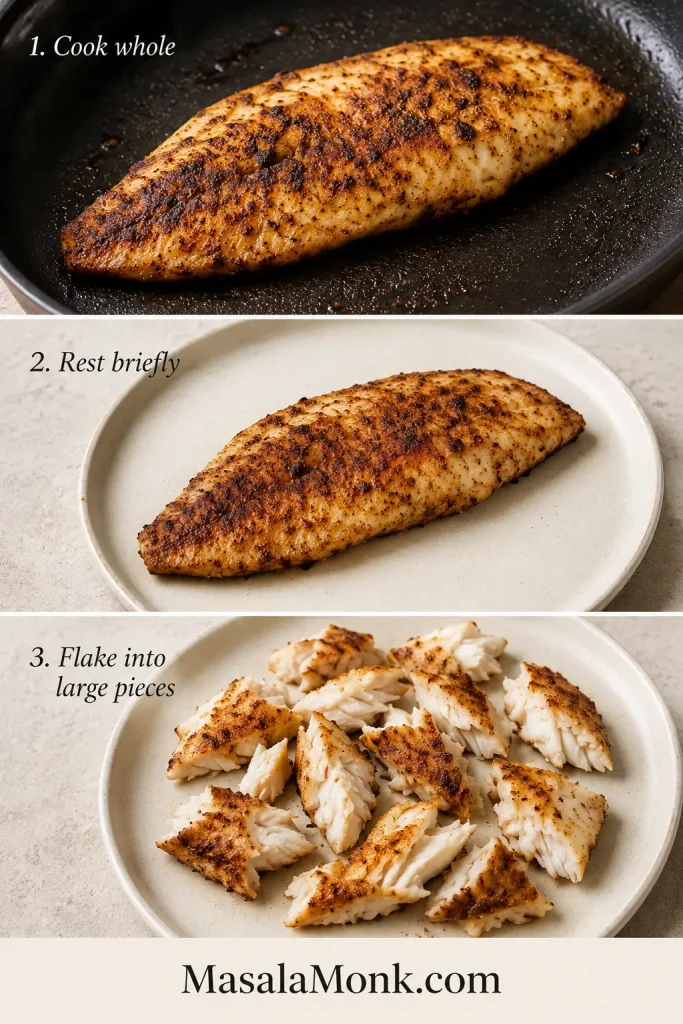
A broken fillet is not a loss—it was going to be flaked for tacos anyway. Cook whole pieces when possible, rest them briefly, and break them into large flakes at the end.

Three stages showing a whole tilapia fillet cooking, resting on a plate and separated into several large moist flakes.
Rest briefly, then separate the tilapia into broad taco-size flakes—not crumbs and not unwieldy chunks.

How Long to Cook Tilapia for Tacos

The thickest point of the fillet matters more than the total weight of the package. Use time as a reminder to begin checking, not as permission to ignore the fish until the timer rings.

Guide comparing thin, average and thick tilapia fillets with thickness measurements, separate first-side and finishing times, and a 145°F or 63°C target.
Measure the thickest part of each fillet. Similar-looking pieces can still finish several minutes apart.
Fillet ThicknessFirst SideSecond SideWhat to Watch
Up to ½ inch / 12 mmAbout 2–3 minutesAbout 1–2 minutesTail ends may finish before the center
½–¾ inch / 12–18 mmAbout 3–4 minutesAbout 2–3 minutesStandard skillet range for many fillets
More than ¾ inch / 18 mmBrown first, then lower heat slightlyCook to temperatureUse the thermometer rather than color alone

Treat these as checking windows, not guarantees. A thick, cold fillet in a crowded pan cooks differently from a thin fillet in a wide, fully heated skillet.

How to Tell When Tilapia Is Done

Check the thickest point. The flesh should have lost its translucent look and separate under gentle pressure. FoodSafety.gov lists 145°F / 63°C for fish such as tilapia, or cooking until the flesh is no longer translucent and separates easily with a fork. See the safe minimum temperature chart.

Pale is not the same as undercooked. A thin fillet can be completely done while the surface is still lightly colored. Once the center is ready, take it out—even if the crust is paler than expected.

The visual difference: moist tilapia separates into pearly flakes. Overcooked tilapia turns chalky, tight, and dry around the edges.

Four tilapia cross-sections showing translucent underdone fish, moist properly cooked fish, pale but cooked fish and dry overcooked fish, plus side-entry thermometer placement.
A properly cooked center looks pearly and moist, not chalky. Use 145°F / 63°C and easy separation as the final checks.

Crisp Slaw and Creamy Lime Sauce

The slaw should stay cold, crisp, and lime-bright; the sauce should be creamy enough to cling without soaking the tortilla. Make both before the fish goes into the pan, then follow the assembly order when the tilapia is ready.

Separate bowls of pale cilantro-lime sauce and green-and-purple cabbage slaw surrounded by yogurt, mayonnaise, cilantro, lime, jalapeño, garlic, oil and salt.
Keep the sauce and slaw separate until serving so cabbage moisture cannot thin the sauce or soak the tortillas.

Cabbage Slaw

Finely shredded cabbage is easier to bite through than thick ribbons. For eight tacos, 250 g gives a generous amount without burying the fish. Dress it lightly for 10–15 minutes; it should look glossy, not wet.

Taste one strand. It should still snap, carry a light saltiness, and taste clearly of lime. If liquid gathers at the bottom, lift the slaw out with tongs so the excess dressing stays in the bowl. Prefer something creamier? This crisp homemade coleslaw keeps the dressing light enough for the cabbage to stay crunchy.

Creamy Lime Sauce

Greek yogurt makes the sauce lighter and tangier; sour cream makes it rounder and richer. Mayonnaise gives either base enough body to cling. Store-bought works well, or make homemade mayonnaise when you want full control over the flavor.

The recipe makes about 1 cup / 240 ml, enough for a thin layer below the fish and a light drizzle on top. Before thinning, the sauce should taste bright and slightly assertive; the fish, cabbage, and avocado will soften it in the finished taco.

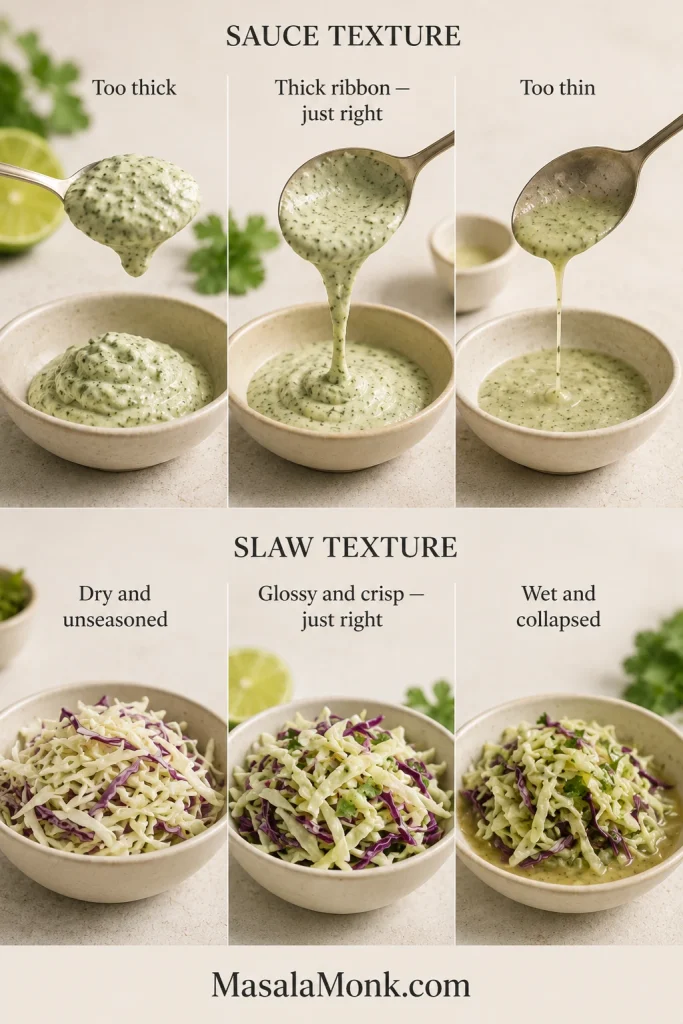
Before assembling, compare both textures below: the sauce should fall in a thick ribbon, while the slaw should remain glossy, loose, and crisp.

Six-panel comparison of sauce that is stiff, correctly ribboning or runny, and cabbage slaw that is dry, glossy and crisp or wet with pooled dressing.
The sauce should fall in a thick ribbon; the slaw should stay glossy, crisp, and loose enough to lift with tongs.

Easy Sauce Variations

  • Chipotle-lime: replace the jalapeño with 1–2 teaspoons minced chipotle in adobo.
  • Lighter: use ¾ cup / 180 g Greek yogurt and 2 tablespoons / 30 g mayonnaise.
  • No cilantro: use lime zest and finely sliced green onion instead.
  • Sweet heat: keep the sauce mild and add a little mango habanero sauce at the table.

The Best Assembly Order

Divide the fish generously among eight small tortillas so every taco feels substantial but still folds easily.

  1. Warm tortilla
  2. Thin layer of creamy sauce
  3. Large flakes of tilapia
  4. Drained cabbage slaw
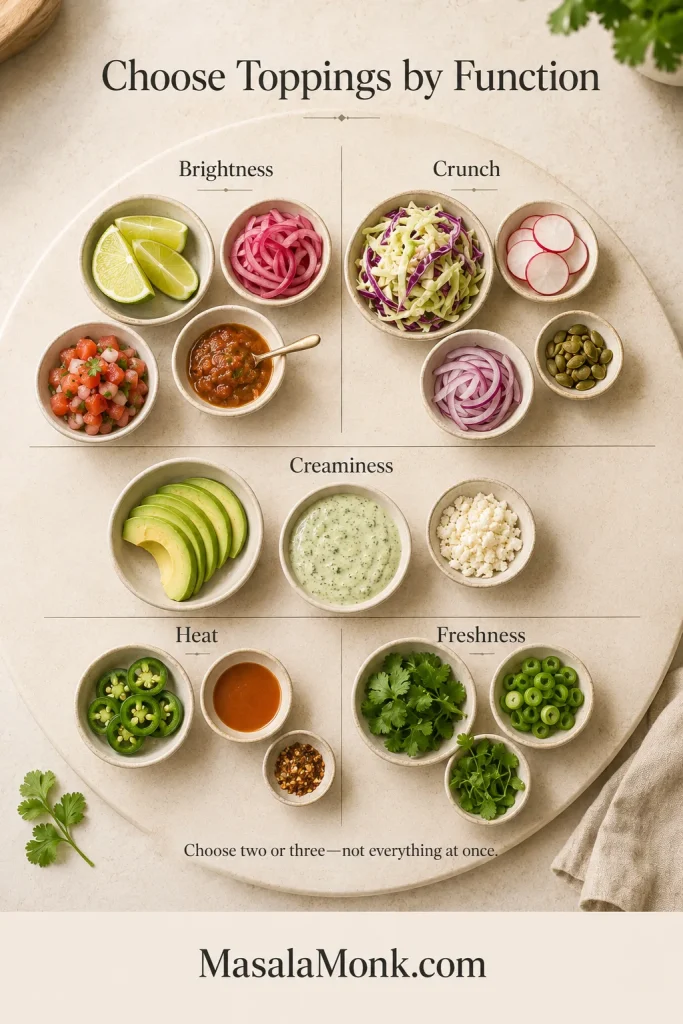
  5. Avocado, salsa, or cheese
  6. Final light drizzle of sauce
  7. Fresh lime and cilantro

The first layer of sauce keeps the taco from tasting dry. Next, the fish creates a barrier between the tortilla and the wetter slaw. Watery salsa, extra lime, and heavy drizzles should go on last.

Guide comparing a cracked cold tortilla with a flexible warm tortilla, followed by assembly with sauce, tilapia, drained slaw, avocado and a light final drizzle.
Start with a thin sauce layer, then add fish, drained slaw, avocado, and only a light final drizzle.

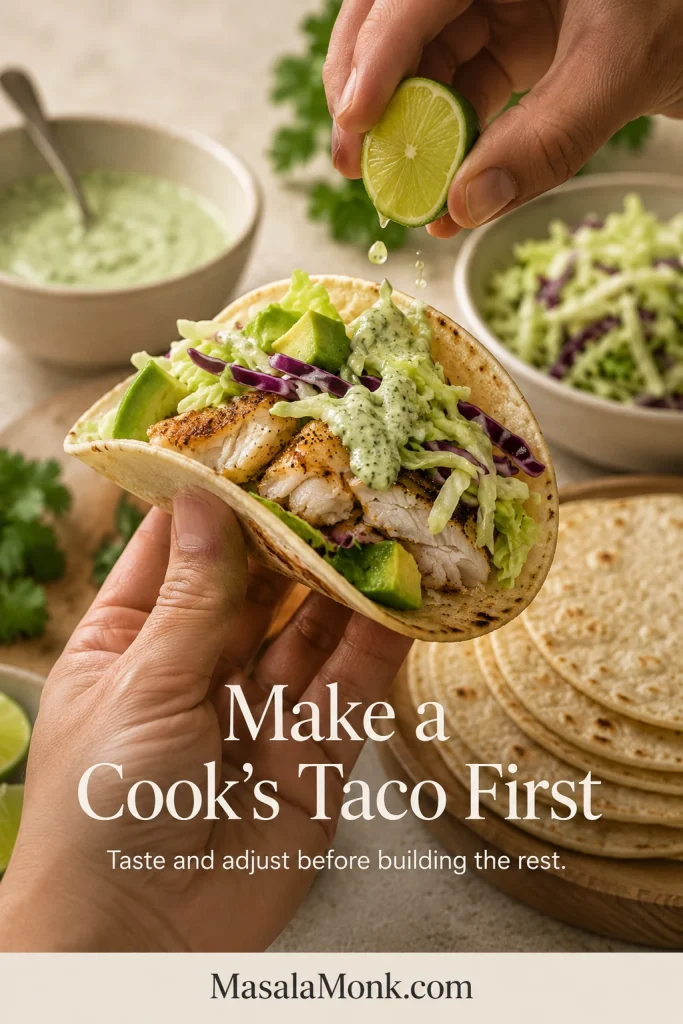
Make a cook’s taco first. Taste one before building the remaining seven. Add lime if it feels flat, salt if the flavors disappear, more slaw for crunch, or another small drizzle of sauce if the fish needs moisture.

Hands holding a tilapia taco while squeezing lime over browned fish, cabbage slaw, avocado and pale sauce, with prepared taco components behind it.
Taste one assembled taco before serving. The combined bite reveals whether the table needs more lime, heat, or crunch.

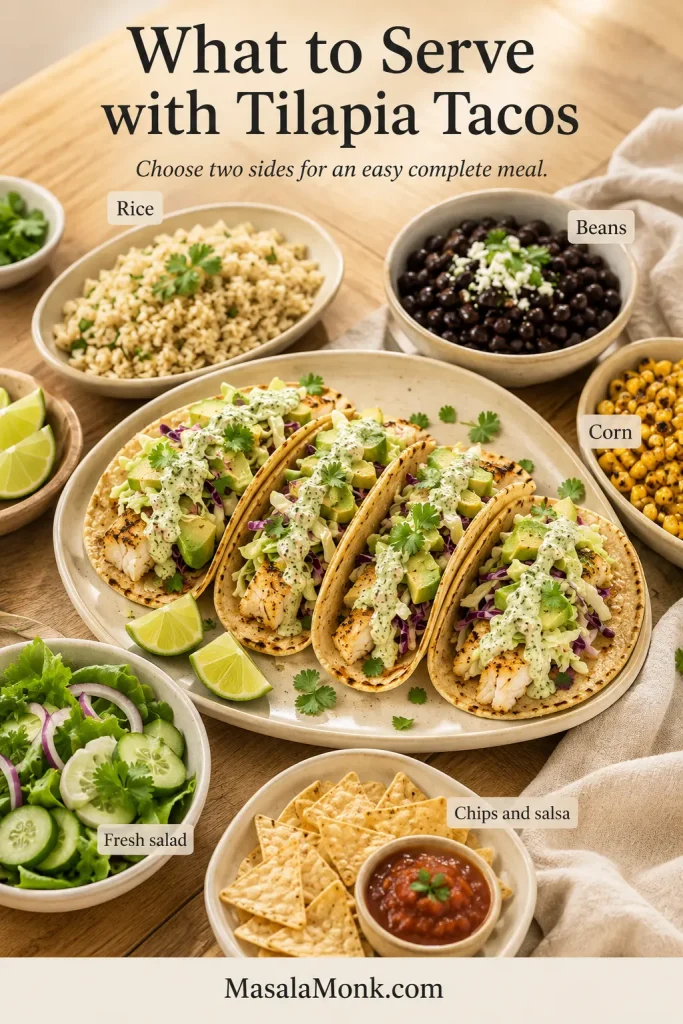
Nothing needs to be plated perfectly. Put the bowls in the middle, keep the tortillas warm, and let the table finish the meal while the fish is hot.

Fresh mango salsa adds sweetness and acidity without weighing down the fish, and its chunky texture is easier on the tortillas than a watery salsa.

Other Ways to Cook Tilapia for Tacos

The skillet remains the best starting point. Go blackened for more heat, use the oven for one full tray, turn to the air fryer for a small batch, choose panko for crunch, or grill the fish for light smoke.

Blackened Tilapia Tacos

For a darker, hotter crust, increase the smoked paprika to 1½ teaspoons, use the full ¼ teaspoon cayenne, and choose a heavy skillet.

Cook over controlled medium-high heat for about 3–4 minutes on the first side and 2–3 minutes after turning. Blackened doesn’t mean burnt. The spices should smell smoky and warm, never bitter. Cool yogurt-lime sauce, cabbage, avocado, and fresh lime keep the stronger crust balanced.

Darkly seasoned tilapia fillets in a cast-iron skillet, with one opened piece showing moist white flakes and sauce, lime, slaw and a taco nearby.
Blackened tilapia should show reddish-brown spice detail, not a uniformly burnt surface; the interior should remain pale and moist.

Baked Tilapia Tacos

Heat the oven to 400°F / 200°C and arrange the seasoned fillets in one layer on a lined rimmed sheet pan. Thin fillets may finish in 9–10 minutes, average pieces in 10–12, and thick fillets in 12–15. Remove each fillet as soon as the center is opaque and separates easily.

Baked fish is softer and paler than skillet tilapia, but it should still separate into moist, broad flakes. Choose the oven when several people are waiting and you would rather slide in one full tray than manage two skillet batches.

Several seasoned tilapia fillets of different sizes spaced on parchment, with an open area on the tray and tortillas, slaw, sauce and lime in the background.
Remove thin baked fillets early rather than waiting for a perfectly symmetrical tray to finish together.

Air Fryer Tilapia Tacos

Preheat to 400°F / 200°C when your model benefits from it, then lightly oil the basket and fish. Cook in one layer for about 7–10 minutes, checking the thinnest pieces at 6 minutes and taking them out first if needed.

The air fryer suits two or three fillets, not the full eight-taco batch; the first fish may cool before the second round finishes. Expect lightly browned, drier edges rather than the deeper crust of a skillet.

Open air-fryer basket containing three separated golden tilapia fillets, with cabbage slaw, pale sauce, lime wedges and a prepared taco nearby.
Leave open space around each fillet; circulating air cannot brown covered surfaces.

Crispy Tilapia Tacos

Cut 567 g tilapia into 1–1½-inch / 2.5–4 cm strips. Set out ½ cup / 60 g flour, 1 beaten egg with 1 tablespoon water, and 1¼ cups / 75 g panko tossed with 1 tablespoon oil. Combine 1 teaspoon chili powder, ½ teaspoon smoked paprika, ½ teaspoon cumin, ½ teaspoon garlic powder, ½ teaspoon fine sea salt, and ¼ teaspoon black pepper; mix half into the flour and half into the panko.

Coat each strip in flour, egg, and panko. Air fry at 400°F / 200°C for 7–9 minutes, or bake for 10–14 minutes, until the thickest strip reaches 145°F / 63°C. The coating should crack lightly and then give way to soft fish, not a thick shell of crumbs. Cook in batches when necessary, and discard coating ingredients that touched raw fish.

Thin golden panko-coated tilapia pieces on a wire rack, including one broken piece showing a delicate crust and moist white flakes inside.
The panko should hug the fish in a thin crust. A thick shell overwhelms delicate tilapia.

For a true fried Baja-style version, use the crispy fish batter recipe.

Grilled Tilapia Tacos

Heat a clean, oiled grill to about 400°F / 200°C. A perforated fish basket or grill-safe foil helps with thin fillets. Grill for 3–4 minutes on the first side and 2–3 minutes after turning. Pull the fish as soon as the center flakes; thin grilled tilapia dries quickly.

Finish with fresh lime and serve with avocado, roasted salsa verde, charred corn, or mango salsa. Avoid a long citrus marinade, which can soften the delicate surface.

Seasoned tilapia fillets cooking inside a perforated grill basket outdoors, with one fillet being lifted by a spatula and lime wedges nearby.
A grill basket supports thin fillets. Light, patchy browning is enough; deep grill stripes can mean the fish cooked too long.

Continue with: Frozen tilapia·Lighter tacos·Topping ideas·Serving ideas·Back to top

How to Cook Frozen Tilapia for Tacos

Thawed and thoroughly dried tilapia gives the best browning. Leave it in the refrigerator overnight, or thaw it in a sealed bag under cold water, changing the water regularly. FoodSafety.gov explains safe seafood handling.

Two-path guide showing sealed cold-water thawing, drying and seasoning on one side, and gentle cooking from frozen, moisture removal, seasoning and temperature checking on the other.
When cooking from frozen, remove the released water before seasoning. That reset allows the surface to brown instead of steam.

Air fryer: cook frozen fillets at 400°F / 200°C for 5 minutes. Transfer them to a clean plate, pour away released liquid, and pat the surface dry. Oil and season, then cook for another 7–10 minutes.

Oven: bake frozen fillets at 400°F / 200°C for 5–7 minutes. Drain the sheet pan carefully, dry the exposed surface, then oil, season, and bake for another 12–18 minutes.

With either method, finish at 145°F / 63°C and check that the thickest part is opaque and easy to separate.

Direct-from-frozen skillet cooking is the weakest choice for browned tacos because the released water steams the fish and carries away seasoning. The baked tilapia guide goes deeper into thickness and frozen-fish troubleshooting.

Healthy Tilapia Tacos: Practical Lighter Swaps

A lighter taco should still feel generous. Keep the fish, cabbage, cilantro, and lime plentiful; lighten the sauce instead of shrinking the whole meal. Use small corn tortillas, make the sauce mostly with Greek yogurt, and treat avocado or cheese as accents. Exact nutrition varies with the tortillas, dairy base, and toppings you choose.

Two tilapia tacos with cabbage slaw, avocado, cilantro and pale sauce, served with black beans, cucumber salad and lime wedges.
Keep the full fish portion. Fresh vegetables and yogurt-forward sauce lighten the taco without making dinner feel skimpy.
  • Keep the full fish portion and use the skillet or oven instead of a crumb coating.
  • Choose small corn tortillas.
  • Use ¾ cup Greek yogurt with only 2 tablespoons mayonnaise for the sauce.
  • Keep cabbage, radish, cilantro, lime, and fresh salsa generous.
  • Use avocado and cheese as accents rather than removing every creamy element.
  • Add black beans or extra slaw when you want a fuller plate.

Gluten-Free and Dairy-Free Options

Making the tacos gluten-free is simple: use certified corn tortillas and check packaged chili powder, chipotle, and sauces when cross-contact matters. The skillet fish and cabbage slaw are naturally gluten-free as written.

To make the tacos dairy-free, use unsweetened dairy-free yogurt or mashed avocado in the sauce and omit cotija or feta. Regular mayonnaise is usually dairy-free; an egg-free vegan mayonnaise covers both needs. Add water slowly because dairy-free yogurt can be thinner than Greek yogurt or sour cream.

Toppings That Work

One creamy element, one crunchy element, and one fresh or acidic finish are usually enough. Too many wet or rich toppings hide the fish and soften the tortilla.

Overhead topping board divided into brightness, crunch, creaminess, heat and freshness, with lime, onion, salsa, cabbage, radish, avocado, sauce, cheese, jalapeño and herbs.
Choose toppings by function: one creamy element, one crunch, and one fresh or acidic finish.
  • Fresh and acidic: lime, cilantro, pico de gallo, pickled onion, or radish.
  • Creamy: avocado, lime sauce, fresh guacamole, cotija, or feta.
  • Sweet heat: mango salsa, pineapple salsa, mango habanero, or chipotle crema.
  • Extra crunch: cabbage, radish, pickled vegetables, or toasted pepitas.

What to Serve with Tilapia Tacos

Keep the sides simple so the tacos remain the center of the meal. Good choices include fluffy rice finished with cilantro and lime, black or pinto beans, grilled corn, a light green salad, or crisp cucumber salad. Fresh mango salsa can work as both a topping and a side.

Family-style spread of four tilapia tacos with seasoned rice, black beans, charred corn, cucumber salad, tortilla chips, salsa and lime wedges.
This spread shows the full range of serving ideas. For an ordinary dinner, choose one substantial side—rice or beans—and one fresh side such as cucumber salad or grilled corn.

Common Problems and Fixes

Most problems begin with moisture, heat, or timing. Fix the cause first instead of trying to hide dry or watery fish under more sauce.

Six-part guide comparing sticking, broken, pale and dry tilapia, plus soggy tacos and cracked tortillas, with corrected examples beside each problem.
Pale fish and soggy tacos point to moisture; torn fillets and cracked tortillas usually signal rushed handling.
ProblemLikely CauseWhat to Do
Fish is watery and paleWet fillets, cool pan, or overcrowdingDry more thoroughly, reheat the pan, and cook in batches
Tilapia is dryThin fillets cooked for a thick-fillet timeBegin checking early and remove pieces separately
Fish breaks while turningMoved too early or turned repeatedlyUse a wide fish spatula and turn only once
Seasoning tastes burntPan too hot, coating too thick, or insufficient oilReduce heat slightly and use a thin, even spice layer
Tacos taste blandFish, slaw, or sauce under-seasonedTaste the fish, slaw, and sauce separately; add salt or lime where it is actually missing
Tortillas become soggyWet slaw, too much sauce, or early assemblyDrain toppings, use controlled sauce, and assemble at the table

Fix the underlying step: Skillet technique·Timing by thickness·Doneness cues·Recipe card

Storage, Make-Ahead, and Reheating

Store the fish, slaw, sauce, and tortillas separately. Following the USDA leftovers guidance, refrigerate cooked tilapia in a shallow, covered container within 2 hours—or within 1 hour when the temperature is above 90°F / 32°C. An assembled taco doesn’t reheat well because the tortilla absorbs moisture from the sauce and slaw.

  • Cooked tilapia: use within 3–4 days, or freeze it sooner if you will not eat it in that window.
  • Sauce: refrigerate for up to 3 days and stir before using.
  • Cabbage: shred a day ahead, but dress it closer to serving for the best crunch.
  • Seasoning: mix several days ahead and store dry.
  • Tortillas: warm immediately before serving.

How to Reheat the Fish

Warm the fish gently in a lightly oiled skillet over medium-low heat, or air fry at 350°F / 175°C for 2–4 minutes, checking after 2 minutes. Reheat the thickest piece to 165°F / 74°C, then stop; extra time makes thin tilapia dry and rubbery.

The microwave works when speed matters. Arrange the fish evenly, cover it loosely with a microwave-safe lid, and heat at 50–70% power in 20–30 second intervals until the thickest piece reaches 165°F / 74°C.

Leftover fish also works well in a taco bowl with warm rice, slaw, sauce, avocado, and lime.

Storage guide showing tilapia, slaw, sauce and tortillas in separate containers, a dated fish container in a refrigerator, three reheating methods and freshly rebuilt tacos.
Store fish, slaw, sauce, and tortillas separately. Reheat only the fish, then rebuild the tacos just before serving.

Frequently Asked Questions

How Many Tacos Should I Plan per Person?

Plan on two small tacos per person, using about 5 oz / 140 g raw fish. Increase that for larger tortillas, bigger appetites, or a meal with very few sides.

What Can I Make Ahead?

Make the sauce up to 3 days ahead, shred the cabbage a day ahead, and mix the seasoning in advance. Dress the slaw and cook the fish close to serving. For leftovers, use the storage and reheating guide.

Hot Fish, Cold Slaw, Warm Tortillas

Bring everything to the table separately and build the first taco while the fish is still hot. That first bite—warm tortilla, smoky tilapia, cool sauce, sharp lime, and crisp cabbage—is the whole point.

Once the cook’s taco tastes balanced, pass the bowls around and let everyone build their own while the tortillas are warm.

What did your cook’s taco need—more lime, more heat, or more crunch?

Quick return: Recipe card·Method chooser·Troubleshooting·Back to top

Posted on Leave a comment

Rockfish Recipe: Easy Pan-Seared Rockfish with Lemon Butter

Pan-seared rockfish fillets with lemon butter sauce, capers, herbs, rice, and lemon wedges on a ceramic plate.

Rockfish rewards a simple approach: a dry fillet, a hot pan, a little butter, and a squeeze of lemon. In less than 20 minutes, this rockfish recipe gives you tender white fish with pale golden edges and a bright garlic lemon butter sauce you can spoon over rice, potatoes, salad, or warm tortillas.

This is the rockfish recipe to use when you want a safe first cook: lightly floured fillets, a quick skillet sear, and a lemony pan sauce that gives the fish flavor without covering it up. The best bite is soft, clean, buttery, and lifted with just enough lemon.

If you bought rockfish and now feel a little unsure what to do with it, start here. The fish is delicate, but it is not difficult. Once you know what to look for, the timing is simple.

Jump to Recipe3-Part RuleCook Time ChartFillet TipsOther MethodsFix Problems

Quick Answer: How to Cook Rockfish

Blot the rockfish fillets very well, season them with salt, pepper, and garlic powder, lightly dredge them in flour, then pan-sear them in a hot skillet with oil and a little butter. Medium fillets usually take 3–4 minutes on the first side and 2–3 minutes on the second side.

The fish is ready when the thickest part turns pearly and opaque, gives gently under a fork, and reaches 145°F / 63°C. Do not chase a dark crust. A light golden surface and a juicy center are better than a deeply browned fillet that turns dry.

Do not chase a hard crust: rockfish is lean and delicate. Pale gold outside and tender inside is the goal, not a deep steak-like sear.

Want the direct method? Jump to the recipe card. Need timing help first? See the cook time chart.

The 3-Part Rockfish Rule

Cooking rule: Dry well, sear briefly, and stop while the flakes stay moist.

Infographic showing three rockfish cooking rules: dry the surface, sear briefly, and stop before the fish dries out.
Before cooking, remember the three-part rockfish rule: dry the fish well, sear it briefly, and stop before the flakes turn dry.

For your first time, keep the fish simple and let the timing teach you. Rockfish is not the fish to force into a hard crust. You are protecting a gentle white fish and pulling it from the heat while it is still tender.

  1. Dry the surface. Moisture makes the fish steam and stick.
  2. Cook hot, but briefly. The first side needs enough heat to set a light crust.
  3. Stop before it looks dramatic. Pale gold outside and juicy inside is the win.

Use skinless fillets, a thin flour coating, and lemon butter for your first batch. Once you learn the feel of the fish in the skillet, the baked, air fryer, grilled, and taco versions become simple adjustments.

Ready to cook? Go to the pan-seared rockfish recipe, or compare all cooking methods.

Make It Now: Pan-Seared Rockfish with Lemon Butter

Recipe shortcut: Use this card for quick timing, ingredients, and the lemon butter finish.

Recipe card for pan-seared rockfish with lemon butter showing cook time, servings, method, and a finished plated dish.
Save this pan-seared rockfish recipe card when you need a quick lemon butter fish dinner with clear timing and simple ingredients.

Easy Pan-Seared Rockfish with Lemon Butter

This is the skillet version to make when you want tender white fish with golden edges and a lemony butter sauce that comes together in the same pan. Keep the coating thin, the heat steady, and the cook time short.

Servings4
Prep Time10 minutes
Cook Time8–10 minutes
Total Time18–20 minutes
MethodPan-seared
Best ForRockfish fillets, quick seafood dinner, lemon butter fish

Equipment

  • Large nonstick, stainless steel, or cast iron skillet
  • Paper towels
  • Fish spatula or thin spatula
  • Instant-read thermometer

Ingredients

  • 4 rockfish fillets, 5–6 oz / 140–170 g each
  • ¾ tsp fine salt, divided
  • ½ tsp black pepper
  • ½ tsp garlic powder
  • ¼ cup all-purpose flour, about 30 g, optional but helpful for a light crust
  • 2 tbsp olive oil or neutral oil, 30 ml
  • 3 tbsp unsalted butter, about 42 g, divided
  • 3 garlic cloves, minced
  • 1½ tbsp fresh lemon juice, about 22 ml
  • 1–2 tbsp capers, drained, optional
  • 2 tbsp chopped parsley or dill
  • Lemon wedges, for serving
  • Optional: ¼ cup white wine or chicken broth, 60 ml, for a looser sauce

Instructions

Work in three short stages: prep the fish, sear the fillets, then make the sauce.

Prep the Fish
  1. Check the fish. Run your fingers gently over the fillets and remove any pin bones with clean tweezers if needed.
  2. Dry the fillets. Blot the rockfish thoroughly with paper towels so the surface sears instead of steams.
  3. Season both sides. Sprinkle the fillets with salt, black pepper, and garlic powder.
  4. Lightly flour. Spread the flour on a shallow plate. Dredge each fillet lightly, then shake off the excess. The coating should be thin, not heavy.
Sear the Fillets
  1. Heat the oil. Set a large skillet over medium-high heat. Add the oil and let it heat until it shimmers. Add 1 tbsp butter, let it foam lightly, then add the fish right away.
  2. Sear the first side. Place the fillets in the pan presentation-side down. Do not crowd the skillet; cook in batches if needed. Cook for 3–4 minutes without moving the fish too early.
  3. Flip gently. Slide a fish spatula under each fillet and turn carefully. Cook the second side for 2–3 minutes, depending on thickness. Lower the heat to medium if the coating or butter is browning too quickly.
  4. Check doneness. The thickest part should look pearly and opaque, not translucent. For the safest check, use a thermometer and look for 145°F / 63°C.
  5. Remove the fish. Transfer the cooked rockfish to a plate. Thin pieces keep cooking slightly from carryover heat, so do not leave them in the hot pan while making the sauce.
Make the Sauce and Serve
  1. Make the sauce. Reduce the heat to medium-low. Add the remaining 2 tbsp butter to the skillet. Stir in the garlic for 20–30 seconds, just until fragrant. Add lemon juice, capers, and optional wine or broth. Scrape up the browned bits; the sauce should taste bright, buttery, and lightly salty.
  2. Finish and serve. Spoon the lemon butter sauce over the rockfish while it is warm, letting it catch in the flakes and run into the rice, potatoes, or vegetables underneath. Sprinkle with parsley or dill and serve with lemon wedges.

Recipe Notes

  • For very thin fillets, start checking after 2 minutes per side.
  • For thicker pieces, reduce the heat slightly after flipping so the outside does not brown before the center cooks.
  • Flour is optional. Skip it for a lighter fish, or use gluten-free flour if needed.
  • Capers add a salty, briny finish. Leave them out for a simple garlic lemon butter sauce.
  • Frozen rockfish works well if thawed overnight in the fridge and blotted thoroughly before cooking.

Choose Your Rockfish Method

Once the skillet version makes sense, choose the method that fits your dinner. Thin, delicate pieces do well in the skillet or air fryer. Larger or uneven fillets are often easier in the oven. Skin-on pieces are the friendliest choice for the grill.

MethodUse WhenResultBest Tip
Pan-searedYou want the best crust and sauceGolden edges, tender center, lemony pan sauceUse oil first, then a little butter
BakedYou want a hands-off dinner or several fillets at onceSoft, simple, easy to serve with sidesAdd butter or olive oil so the fish stays juicy
Air fryerYou want fast, lightly browned fish without heating the ovenQuick, clean, good for thinner piecesKeep the fillets in a single layer
GrilledYou have skin-on or sturdy filletsLightly smoky, fresh, great with lemonUse foil or a grill basket for fragile pieces
TacosYou want a casual meal with slaw and sauceFlaky fish, lime, crunch, and creamy toppingsBlackened seasoning works especially well

Once the method is clear, it helps to know what kind of rockfish you have, what it tastes like, and how the fillet’s thickness affects the cook.

Method chooser: Pick skillet, oven, air fryer, grill, or tacos based on dinner style.

Guide comparing pan-seared, baked, air fryer, grilled, and taco methods for cooking rockfish.
Once the basic skillet method makes sense, choose your path: pan-seared for crust, baked for ease, air fryer for speed, grilled for smoke, or tacos for texture.

What Is Rockfish?

Rockfish is a mild, lean white fish with a tender texture. In U.S. markets, the name is often used for Pacific rockfish, though regional labels can vary.

For this recipe, the exact label matters less than the fillet itself. Thin pieces cook quickly, larger portions need a few extra minutes, and the visual cues matter more than the species name on the package.

What Does Rockfish Taste Like?

The flavor is mild, clean, and slightly sweet. The texture is lean and tender, so it pairs easily with lemon, butter, garlic, herbs, Old Bay, Cajun seasoning, capers, salsa, or creamy taco sauce.

If you like cod, snapper, haddock, tilapia, halibut, or sea bass, this fish will feel familiar. For another gentle white-fish dinner, this baked haddock recipe follows the same easy idea: mild fish, simple seasoning, and a tender finish.

Rockfish Names Can Be Confusing

The word “rockfish” can mean different things depending on where you shop. Do not let the label slow you down; use the fish’s thickness, freshness, and texture as your main cooking guides.

Label You May SeeWhat It Usually MeansHow to Use This Recipe
Pacific rockfishA mild white fish from the Pacific coastUse the recipe as written
Rock codOften another market name for Pacific rockfishUse thickness as your timing guide
Striped bass / Chesapeake rockfishA different fish sometimes called rockfish regionallyThe method still works for similar fillet thickness
Mixed white fish filletsMay include similar mild fishCook by thickness and doneness cues

Fish counter tip: If the label is confusing, cook by thickness and doneness cues.

Guide showing common rockfish names including Pacific rockfish, rock cod, striped bass, Chesapeake rockfish, and white fish fillets.
Rockfish may be sold under different names, but once it is in your kitchen, thickness and doneness cues matter more than the label.

How to Choose Rockfish

Good fish should smell clean and mild, not sour, sharp, or strongly fishy. The flesh should look moist and fresh, not dried out around the edges. If the fillets are frozen, choose pieces without heavy ice crystals or freezer-burned patches.

Buying cue: Choose moist, clean-looking fillets with no dry edges or strong odor.

Fresh raw rockfish fillets with moist white flesh arranged on parchment paper.
Good fish makes everything easier; therefore, choose fillets that look moist and clean, with no dry edges or strong fishy smell.

Buying tip: rockfish names and species vary by region, so buy from a fish counter or brand you trust. If the label is unclear, ask whether it is Pacific rockfish, striped bass, or another mild white fish, then cook by thickness.

For frozen fillets, thaw overnight in the refrigerator. Before cooking, press away as much surface moisture as you can. That one small step makes the difference between a pale steamed surface and a clean skillet sear.

Frozen-fish cue: Blot thawed fillets well so the surface can brown.

Fresh versus frozen rockfish guide comparing fresh fillets, frozen fillets, thawing, freezer burn, and drying before cooking.
Fresh and frozen rockfish can both cook well; however, thawed fillets need extra drying so they brown instead of steam.

Rockfish Fillets: Skin-On, Skinless, Fresh, or Frozen

Most home cooks will use fillets, and thickness matters more than almost anything else. A thin piece may be done before it gets deeply golden, while a larger portion may need gentler heat after the first sear.

Fillet choice: Skinless is easiest for the skillet; skin-on helps on the grill.

Comparison guide showing raw skinless and skin-on rockfish fillets with cooking notes.
Use skinless fillets for the easiest skillet version, while skin-on rockfish is useful when grilling because it helps the fish hold together.
Fillet TypeBest UseWhat to Know
Skinless filletsPan-searing, baking, air fryingEasiest for this recipe, but delicate when thin
Skin-on filletsGrilling or crisp-skin skillet cookingCook skin-side down first; the skin helps hold the fish together
Fresh filletsAny methodShould smell clean and mild, not sour or strongly fishy
Thawed frozen filletsPan-searing, baking, air fryingThaw overnight in the fridge and press away surface moisture before cooking
Very thin filletsQuick skillet or air fryerWatch closely; they may only need 2 minutes per side
Thick filletsSkillet-to-gentle heat, baking, grillingSear first, then reduce heat so the center cooks without burning the outside

If a fillet is uneven, tuck the thin tail end slightly under itself or place that end toward the cooler edge of the pan. This helps the delicate part avoid overcooking before the thicker section is done.
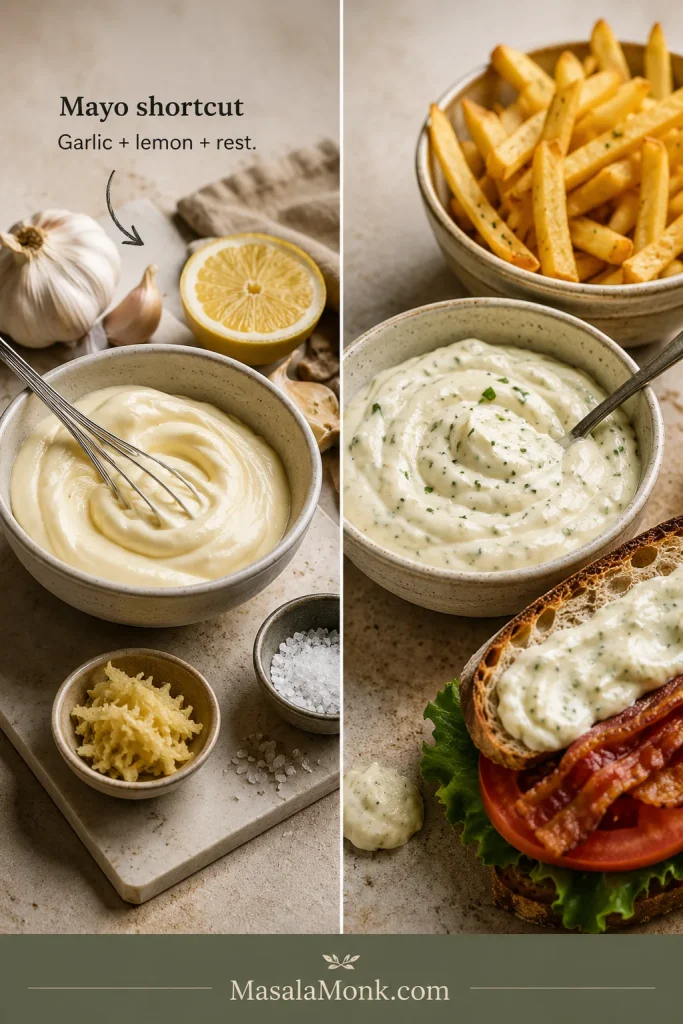
For skin-on fillets, cook skin-side down first for most of the time. Press gently for the first few seconds so the skin makes contact with the pan, then let it cook undisturbed before turning.
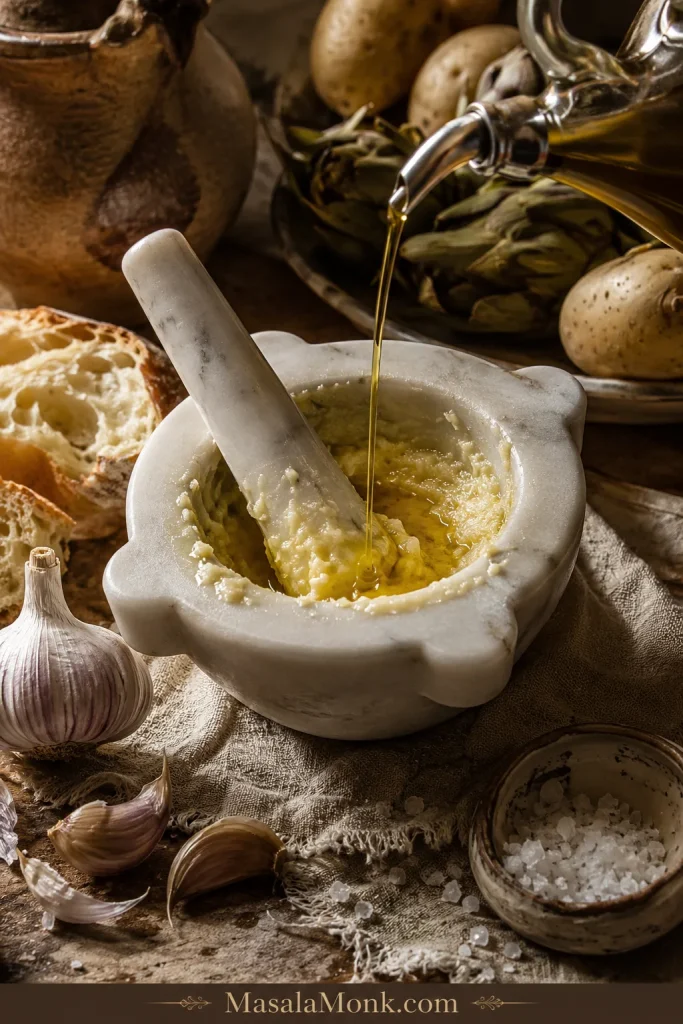
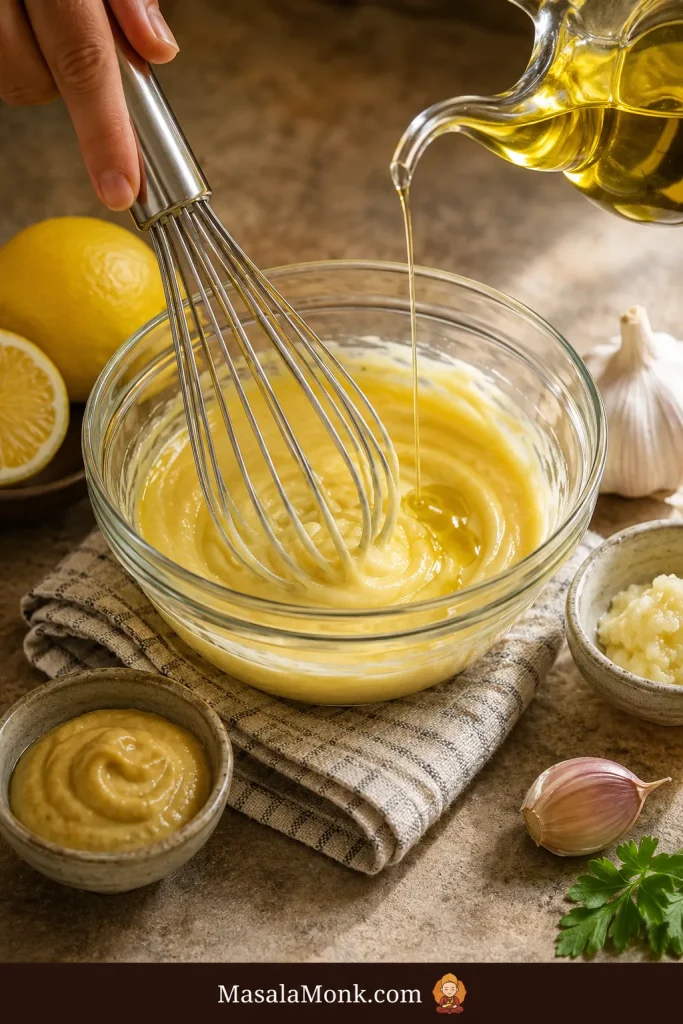
Once your fillets are sorted, check the ingredients or read the cooking walkthrough.

Why This Rockfish Recipe Works

  • It is fast enough for a weeknight. The fish cooks in minutes once the pan is hot.
  • The sauce keeps the flavor bright. You get richness from butter, lift from lemon, and just enough garlic in the background.
  • A light coating makes flipping easier. The thin flour layer helps the surface set without turning the fish heavy.
  • The timing cues are flexible. Thin and thick fillets are both covered, so you are not locked into one exact size.
  • Leftovers can become another meal. Flake them into tacos, salads, rice bowls, or sandwiches.

Rockfish Recipe Ingredients and Why They Matter

Once you know the kind of fillets you have, the ingredient list stays simple. Each item is there to help the fish brown gently, stay tender, or taste brighter at the end.

Ingredient cue: Keep the setup simple and save the flour for a thin release layer.

Ingredient board with raw rockfish fillets, lemon, butter, garlic, capers, herbs, flour, oil, salt, and pepper.
The best rockfish recipe starts with a short ingredient list: fresh fillets, lemon, butter, garlic, capers, herbs, and just enough flour to help the sear.

Rockfish Fillets

Use fresh or thawed frozen fillets. Skinless pieces are easiest in the skillet, while skin-on pieces are helpful for grilling or crisp-skin cooking. Check for pin bones before seasoning.

Salt, Pepper, and Garlic Powder

This gentle white fish does not need heavy seasoning. Salt brings out the flavor, black pepper adds warmth, and garlic powder gives an even savory base without burning quickly.

Flour

A barely-there coating helps the surface brown and makes flipping less stressful. Shake off the excess so the coating stays light instead of gummy.

Oil and Butter

Oil gives you safer heat for the sear. Butter brings richness to the skillet sauce, but most of it goes in after the fish comes out so it stays glossy instead of scorched.

Lemon, Capers, and Herbs

Fresh lemon wakes up the sauce and keeps the fish from tasting heavy. Capers make the finish salty-bright and a little restaurant-style. Parsley keeps things clean, while dill leans more classic seafood.

Got everything ready? Use the recipe card, or read the step-by-step technique notes before you start.

How to Cook Rockfish Fillets Without Drying Them Out

The recipe card gives you the direct steps. This section is the coaching layer: the small choices that keep delicate fillets from sticking, breaking, or drying out.

Before the Fish Hits the Pan

Start by running your fingers gently over the fillets and removing any pin bones with clean tweezers. Then press the surface dry with paper towels, especially if the fish was frozen and thawed. Moisture blocks browning and makes sticking more likely.

Prep cue: Check for pin bones before seasoning.

Hands checking a raw rockfish fillet for pin bones with tweezers on a clean prep surface.
Before seasoning, check for pin bones with your fingers; this quick step makes the finished rockfish easier and safer to eat.

Searing cue: Dry fillets stick less and brown better.

Raw rockfish fillets being patted dry with paper towels before pan-searing.
Dry the fillets before they hit the pan, because surface moisture is the main reason delicate fish sticks, steams, and refuses to brown.

Season the fish right before cooking. If salted fillets sit too long, they can release moisture and make the surface harder to brown. If you are using flour, keep it barely there: a light dusting that helps the surface set, not a thick breaded shell.

Coating cue: Use only a thin dusting so the fish stays delicate.

Raw rockfish fillet with a light flour coating on a shallow plate.
A thin flour coating helps rockfish release cleanly from the skillet; however, the fish should still show through the coating.

While the Fish Cooks

Let the oil shimmer before adding a small amount of butter. The butter should foam lightly, not smoke. Leave space around each piece so the pan does not trap steam, and give the first side time to form a pale golden crust before you try to lift it.

Pan cue: Heat oil first, then add butter just before the fish.

Oil and butter melting in a skillet before adding rockfish fillets.
Heat oil first, then add butter just before the fish; that way, the pan is hot enough to sear without burning the butter.

Skillet cue: Leave space so the fillets sear instead of steam.

Three rockfish fillets searing in a skillet with visible space between each piece.
Leave space between the fillets as they cook, since a crowded skillet traps steam and prevents the pale golden sear you want.

Flip cue: Wait for the first side to set before turning.

Rockfish fillet partly lifted with a fish spatula to show a pale golden seared underside.
Wait until the first side releases easily before flipping; otherwise, delicate rockfish can tear before the crust has set.

Use a fish spatula or the thinnest spatula you own. Slide it fully under the fillet and turn gently. If the coating or butter starts browning too fast, lower the heat slightly and let the center finish more gently.

Tool cue: Support the full fillet with a thin fish spatula.

Thin fish spatula supporting a delicate rockfish fillet during a gentle flip in a skillet.
A thin fish spatula supports the full fillet, so the rockfish turns cleanly instead of breaking into pieces.

After the Fish Comes Out

Remove the cooked rockfish before making the sauce. Thin pieces keep cooking from carryover heat, and the garlic, lemon, butter, and capers come together quickly. The garlic should smell good after 20–30 seconds, not browned or bitter.

Sauce cue: Make the lemon butter after the fish comes out.

Lemon butter sauce with garlic, capers, and herbs bubbling gently in a skillet.
Make the lemon butter sauce after removing the fish, so the garlic, capers, and butter stay bright while the fillets avoid extra heat.

If one fillet breaks, do not treat it like a failure. Spoon the sauce over it, serve it over rice, or turn it into tacos. It will still taste good.

Serving cue: Spoon sauce at the end so it catches in the flakes.

Lemon butter sauce being spooned over pan-seared rockfish with capers, herbs, rice, and lemon.
Spoon the sauce over the fish at the end; then the lemon butter settles into the flakes and flavors the rice or vegetables underneath.

Next, check rockfish cook times, doneness cues, or common fixes.

How Long to Cook Rockfish Fillets

Cooking time depends mostly on thickness. The timer gets you close, but the fish itself tells you when to stop. Thin fillets may be ready in minutes; thicker pieces need more patience and slightly gentler heat.

MethodTemperature / HeatThin FilletsMedium FilletsThick FilletsBest Cue
Pan-searedMedium-high, then medium2–3 min per side3–4 min first side, 2–3 min second side4–5 min per sideGolden outside, pearly center
Baked fillets400°F / 204°C8–10 min10–12 min13–16 minFork opens soft flakes
Baked with topping425°F / 218°C10–12 min15–18 min18–22 minTopping golden, center juicy
Air fryer fillets400°F / 204°C5–6 min6–8 min8–10 minLightly browned, tender inside
Grilled fillets400–450°F / 204–232°C2–3 min per side3–4 min per side4–5 min per sideReleases from grate, gives gently

These times are guides, not strict rules. The safest doneness target for fish is 145°F / 63°C in the thickest part. FoodSafety.gov lists 145°F as the safe minimum internal temperature for fish, so an instant-read thermometer is the easiest way to avoid guessing.

Timing cue: Start with the chart, then adjust by thickness.

Rockfish cook time chart comparing pan-seared, baked, air fryer, and grilled fillets by thickness.
Use the rockfish cook time chart as a guide, then adjust for thickness because thin and thick fillets finish at different speeds.

Best cue: the fish should look juicy at the thickest point and open into tender flakes when pressed gently. If it looks tight, dry, or chalky, it has gone too far.

How to Tell When Rockfish Is Done

The flesh should change from translucent to pearly and opaque. The thickest part should still look juicy, and the flakes should open softly when pressed with a fork.

Doneness cue: Look for pearly, moist flakes instead of dark crust.

Cooked rockfish opened with a fork to show moist white flakes.
Look for pearly, moist flakes rather than a dark crust; rockfish is done when it opens gently with a fork.

With a thermometer, check the thickest part of the fillet and look for 145°F / 63°C. For thin pieces, start checking before the full time is up because carryover heat can finish them quickly after they leave the pan.

Safety cue: Check the thickest part for the clearest doneness read.

Instant-read thermometer inserted into cooked rockfish showing 145°F.
For the safest doneness check, test the thickest part of the fillet and look for 145°F / 63°C before serving.

Do not wait for both sides to become dark or heavily crisp. Light gold outside, tender inside, and no raw translucence in the center is the sweet spot.

Texture cue: Compare undercooked, perfect, and overcooked fish.

Rockfish doneness guide showing undercooked, perfectly cooked, and overcooked fish textures.
Perfect rockfish sits between translucent and chalky: opaque, pearly, moist, and flaky without falling apart.

Baked, Air Fryer, Grilled, and Taco Rockfish Options

The skillet teaches you the feel of rockfish. After that, the other methods are easy to choose: bake when you want hands-off cooking, air fry when you want speed, grill when you have sturdier pieces, and use tacos when dinner wants slaw, lime, and sauce.

Baked Rockfish Fillets

When you want a hands-off dinner, baking is the easiest move. It works especially well when you are cooking several fillets at once.

  1. Heat the oven to 400°F / 204°C.
  2. Place the seasoned fillets in a lightly oiled baking dish.
  3. Add lemon slices, a small pat of butter, or a drizzle of olive oil.
  4. Bake medium fillets for 10–12 minutes.
  5. For larger pieces, check around 13 minutes and continue until the center turns opaque and tender.

For a breadcrumb, parmesan, or panko topping, use 425°F / 218°C and watch closely. The topping should turn golden while the fish stays soft underneath.

Oven cue: Bake when you want several fillets with less hands-on work.

Baked rockfish fillets in a ceramic dish with lemon slices, butter, herbs, and lemony sauce.
Baked rockfish is the hands-off option for cooking several fillets at once, while lemon, butter, and herbs keep the dish bright.

Air Fryer Rockfish Fillets

Use the air fryer when you want a quick, lightly browned fillet and do not feel like heating the oven. Keep the pieces in a single layer so the hot air can move around them.

  1. Preheat the air fryer to 400°F / 204°C.
  2. Blot the fillets well and season them.
  3. Brush lightly with oil, melted butter, or a thin mayo-lemon mixture.
  4. Air fry medium fillets for 6–8 minutes.
  5. Check for tender flakes and a center temperature of 145°F / 63°C.

For breaded pieces meant for tacos, use smaller chunks and air fry around 350°F / 177°C for 5–6 minutes, or until the coating is golden and the fish is cooked through.

Air fryer cue: Keep pieces spaced in one layer.

Three lightly browned rockfish fillets arranged in a single layer inside an air fryer basket.
For air fryer rockfish, keep the fillets in one spaced-out layer so the edges brown lightly instead of steaming.

Grilled Rockfish Fillets

On the grill, delicate fillets need a little protection. Skin-on pieces are easier to grill directly than skinless ones. For thin or fragile fillets, use foil, a grill basket, or a cast iron skillet on the grill.

  • Heat the grill to medium-high, about 400–450°F / 204–232°C.
  • Clean and oil the grates well if grilling directly.
  • Blot the fish dry and brush lightly with oil.
  • Grill thin fillets for 2–3 minutes per side.
  • Grill medium fillets for 3–4 minutes per side.
  • Use a fish spatula and flip gently.

If you are worried about sticking or breakage, foil is your friend. You will lose some direct-grill char, but the fish will be much easier to manage.

Grill cue: Use foil or a grill basket for delicate fillets.

Grilled rockfish fillets with lemon and herbs cooking on foil over a grill.
When grilling rockfish, use foil or a grill basket to protect the delicate fillets while still adding gentle smoky flavor.

Rockfish for Tacos

For tacos, rockfish is a quiet little win: mild enough for slaw and sauce, sturdy enough to flake into warm tortillas. Use pan-seared, blackened, grilled, or air-fried fish, then add cabbage slaw, lime, crema, chipotle mayo, salsa, avocado, cilantro, or pickled onions.

You can cook the fillets whole and flake them into tacos, or cut the fish into larger chunks before cooking. For a full taco-style dinner with slaw, sauce, toppings, and method choices, use this fish tacos recipe as the next step.

Blackened seasoning is especially good here because the smoky spices balance the mild fish and creamy slaw. For a brighter topping, spoon on fresh mango salsa with lime, cilantro, and a little chile.

Taco cue: Add slaw, lime, crema, and crunch for contrast.

Rockfish tacos with flaked white fish, cabbage slaw, crema, cilantro, pickled onions, and lime wedges.
Rockfish tacos work because mild white fish needs contrast: crunchy slaw, lime, crema, cilantro, and pickled onions add freshness.

Whole rockfish note: this recipe is written for fillets. Whole rockfish needs a different timing approach because size, stuffing, bones, and oven temperature all change the cook time.

If you want to explore more traditional rockfish preparations later, NOAA Fisheries has a broader rockfish recipe collection with grilled, taco, pan-roasted, and battered ideas.

Prefer the skillet version? Return to the main recipe. Looking for flavor ideas? See seasonings and sauces.

Best Seasonings and Sauces for Rockfish

Because the flavor is gentle, you can take the seasoning in several directions. For the first cook, choose lemon butter. If the fish is headed for tacos, blackened seasoning brings the best contrast. When you want crunch, move toward panko.

Flavor StyleBest ForWhat to Use
Lemon butterBest first cookButter, lemon, garlic, parsley
Lemon caperRestaurant-style skillet fishButter, lemon, capers, dill or parsley
Old BayBaked or crispy rockfishOld Bay, lemon, butter, parsley
BlackenedBest taco pickPaprika, cayenne, garlic powder, thyme, oregano
MediterraneanBaked filletsOlive oil, tomato, oregano, capers, lemon
Garlic parmesanBaked crusted fishParmesan, breadcrumbs, garlic, lemon
Asian-stylePan-cooked or steamed fishSoy sauce, ginger, scallions, sesame oil

The skillet sauce should taste like butter first, lemon second, and garlic in the background. For a bolder seafood plate, a small spoonful of garlic butter Cajun seafood boil sauce can also work well with simply cooked rockfish.

For crispy, panko, or fried-style fish, a cold spoonful of homemade tartar sauce is often a better match than lemon butter.

Flavor cue: Choose lemon butter, capers, Old Bay, blackened spice, or aromatics.

Rockfish seasoning guide with lemon butter, lemon caper, Old Bay, blackened, Mediterranean, garlic parmesan, and Asian-style options.
Because rockfish is mild, it handles many flavor directions, from lemon butter and capers to Old Bay, garlic parmesan, and Asian-style aromatics.

What to Serve with Rockfish

Because the fish is light, the best sides depend on the kind of dinner you want. Keep the plate fresh and simple, or turn it into a cozier meal with potatoes and extra sauce.

For a Light Dinner

Serve the fish with steamed rice, green beans, roasted asparagus, extra lemon, or a cool cucumber salad. This keeps the meal fresh and lets the pan sauce shine.

Serving cue: Use rice to catch lemon butter, capers, herbs, and pan juices.

Pan-seared rockfish served with rice, green vegetables, capers, herbs, lemon, and lemon butter sauce.
Rice is a smart side for pan-seared rockfish because it absorbs the lemon butter sauce, capers, herbs, and pan juices.

For a Comfort-Food Plate

Pair the fillets with roasted potatoes, garlic bread, or creamy mashed potatoes. Spoon a little sauce around the edges so the potatoes catch the lemony butter.

For Tacos or Sandwiches

Use warm tortillas, soft rolls, lime, salsa, and crisp coleslaw. The cool crunch is especially good with blackened or panko-crusted fish.

Easy Rockfish Variations

Garlic Lemon Butter Rockfish

For the cleanest version, skip the capers. Add an extra garlic clove and a little lemon zest for a brighter garlic butter flavor.

Lemon Caper Rockfish

For a restaurant-style finish, add 1–2 tbsp drained capers to the butter sauce. The salty, briny flavor works well with parsley or dill.

Old Bay Baked Rockfish

When you want an easy oven version, season the fillets with Old Bay, lemon juice, and a little melted butter. Bake at 400°F / 204°C until the thickest part turns tender.

Blackened Rockfish

For something smoky and bolder, coat the fillets with paprika, garlic powder, onion powder, cayenne, thyme, oregano, salt, and pepper. Sear in a hot skillet and serve with lime, slaw, or tacos.

Panko Crusted Rockfish

For a crispier dinner, brush the fillets with a little mayo or beaten egg, then press on a mixture of panko, parmesan, garlic powder, and lemon zest. Bake at 425°F / 218°C until the topping is golden and the center is tender.

If you want a true fried-fish crust instead of a baked panko topping, use this crispy fish batter recipe as the better path.

Mediterranean Rockfish

For a lighter baked plate, add olive oil, cherry tomatoes, oregano, lemon, capers, and a few olives. The juices from the tomatoes make a simple sauce around the fish.

Best Substitutes for Rockfish

If you cannot find rockfish, choose another mild white fish with a similar thickness. Timing changes more with thickness than with the fish name.

SubstituteBest MethodNotes
CodBake or pan-searMild flavor, larger flakes, can be thicker
HaddockBake or pan-searDelicate and lean; check early
SnapperPan-sear or grillSlightly sweeter, good with lemon and herbs
TilapiaPan-sear or air fryUsually thinner, cooks quickly
HalibutPan-sear or bakeThicker and meatier; use gentler heat after searing
Sea bassPan-sear or grillRicher texture, excellent with lemon butter

Substitute cue: Choose another mild white fish by thickness first.

Chart listing cod, haddock, snapper, tilapia, halibut, and sea bass as rockfish substitutes.
If rockfish is unavailable, choose another mild white fish by thickness first; then reduce or extend the cooking time as needed.

Troubleshooting Rockfish

Fix-it cue: For sticking, breaking, dryness, or fishy flavor, return to basics.

Rockfish troubleshooting guide with fixes for sticking, falling apart, dryness, and fishy flavor.
If the fish sticks, breaks, dries out, or tastes fishy, return to the basics: dry surface, hot pan, gentle flipping, early checking, and lemon.

Why Did My Rockfish Stick to the Pan?

If the fish sticks, it usually means the surface was still wet, the pan was not hot enough, there was not enough oil, or the fish was nudged before the crust had time to form. Dry the surface well, preheat the skillet, coat the bottom with enough fat, and give the first side time to release.

Why Did My Rockfish Fall Apart?

Delicate fillets can break if they are flipped too soon, handled with a thick spatula, or cooked past the point of tender flakes. A light flour coating and a thin fish spatula both help. If a piece still breaks, spoon the sauce over it and serve it anyway; it will still taste good.

Why Is My Rockfish Dry?

If the fish turns dry, it probably stayed on the heat a little too long. Rockfish is lean, so it does not give you much extra time once the center is cooked. Start checking early, lower the heat after the first sear, and remove the fillets as soon as the thickest part turns opaque and juicy.

How Do I Make Rockfish Less Fishy?

Start with fish that smells clean and fresh, not sour or strongly fishy. Thaw frozen fillets slowly in the fridge, blot them well, and cook them with lemon, garlic, herbs, and butter. Avoid overcooking, which can make the flavor stronger.

What If My Fillets Are Very Thin?

Very thin pieces cook fast. Use medium heat instead of very high heat, check after 2 minutes per side, and remove them as soon as they give gently under a fork. They are also easier to break, so flip carefully.

What If My Fillets Are Thick?

Thicker fillets need a little more time, but high heat the whole way can overbrown the outside before the center cooks. Sear the first side, flip, then lower the heat slightly so the middle can finish gently.

What If the Butter Starts Burning?

Lower the heat and add a small splash of oil if needed. Butter browns quickly, especially in a hot skillet with flour. That is why the recipe heats the oil first and adds only a little butter before the fish goes in.

Problem solved? Go back to the recipe card, or recheck cook times before your next batch.

Storage and Reheating

Cooked rockfish is best eaten right away, when the flakes are moist and the lemon butter is fresh. If you do have leftovers, keep them gentle and use them in meals where the fish can be flaked instead of served as a whole fillet again.

  • Refrigerate: Store cooked rockfish in an airtight container for up to 2 days.
  • Reheat gently: Warm it in a covered skillet over low heat with a splash of water, broth, or lemon butter.
  • Avoid harsh reheating: Long microwaving can make the fish dry and rubbery.
  • Use leftovers smartly: Flake leftover fish into tacos, salad, pasta, a seafood sandwich, or a rice bowl built like this salmon bowl.

Freezing cooked rockfish is possible, but the texture can suffer. If you do freeze it, wrap it tightly and use it later in dishes where the fish will be flaked rather than served as whole fillets.

Rockfish Recipe FAQs

What is the best way to cook rockfish?

Pan-searing is one of the best ways to cook rockfish fillets because it is quick and gives the fish a lightly golden outside. Baking is better for hands-off cooking, and grilling works well with foil, a grill basket, or skin-on fillets.

How long does rockfish take to cook?

Most fillets take 6–10 minutes in a skillet or 10–16 minutes in the oven, depending on thickness. Start checking early; it is easier to give rockfish another minute than to undo overcooking.

What temperature should rockfish be cooked to?

Rockfish should reach 145°F / 63°C in the thickest part. Without a thermometer, look for flesh that is opaque and feels tender at the thickest point.

Does rockfish taste fishy?

The flavor is usually mild, clean, and slightly sweet. It should not taste strongly fishy if it is fresh, properly thawed, and not overcooked.

Should I remove the skin from rockfish?

Skinless fillets are easiest for this skillet version. Skin-on pieces also work, especially for grilling, because the skin helps hold the fish together. Cook them skin-side down first.

Can I cook frozen rockfish?

Yes, but thaw it first for the skillet. Frozen rockfish releases surface moisture as it thaws, and that moisture keeps it from browning. If the fish is still very cold or slightly icy, baking or air frying is more forgiving.

What seasoning is good on rockfish?

Lemon, garlic, butter, black pepper, Old Bay, paprika, Cajun seasoning, dill, parsley, capers, and thyme all work well. For the first cook, keep it simple with salt, pepper, garlic powder, lemon, and butter.

Is rockfish good for tacos?

Yes. Rockfish is mild enough for slaw and sauce but sturdy enough to flake into tortillas. Pair it with cabbage slaw, lime, crema, chipotle mayo, salsa, avocado, or blackened seasoning.

What fish can I substitute for rockfish?

Cod, haddock, snapper, tilapia, halibut, sea bass, or other mild white fish can work as substitutes. Choose fillets with similar thickness so the timing stays close.

Why is my rockfish mushy?

Mushy fish can come from poor thawing, excess moisture, or overhandling. Thaw frozen fillets in the fridge, dry the surface well, and avoid moving them around too much once they are in the pan.

The Simple Secret to Good Rockfish

Rockfish does not need a heavy hand. Dry it well, cook it briefly, and pull it while the center is still juicy. Once you get that rhythm, the same fillets can become lemon butter dinner, baked fish, tacos, or a quick air fryer meal without stress.

Start with the skillet version because it teaches you the feel of the fish. After that, you can bake it, air fry it, grill it, or tuck it into tortillas with slaw and lime. The lemon butter does the rest, catching in the flakes and making even a simple plate of rice or potatoes feel complete.

Posted on Leave a comment

Easy Garlic Aioli Recipe: Garlic Mayo, Traditional Aioli & Uses

Bowl of creamy garlic aioli served with fries, a burger, shrimp, lemon wedges, roasted vegetables, and garlic on a wooden table.

You want a creamy garlic sauce for fries, burgers, sandwiches, seafood, or roasted vegetables, and then the internet immediately turns it into an argument: traditional garlic and oil, garlic mayo, or the restaurant version that calls itself “real.” The useful answer is simpler. The word can mean different things depending on the kitchen, so this recipe gives you the easy creamy version first, then shows you the traditional version too.

This easy garlic aioli recipe starts with mayonnaise, fresh garlic, lemon juice, Dijon mustard, and salt, but what you really get is the cool, creamy dip you want beside hot fries, the garlicky swipe that makes a burger taste finished, and the lemony sauce that wakes up seafood. For the older, sharper, more classic style, there is also a traditional garlic-and-oil method later in the post.

No need to shame either style. Mayo aioli is fast, stable, and weeknight-friendly; traditional aioli is sharper, more technical, and more olive-oil-forward. Choose the one that fits the food, then adjust from there.

The aioli rule is simple: it should taste bright first, garlicky second, and creamy all the way through.

Make It Now · Full Recipe · Which Version? · Garlic Control · Traditional Aioli · Vegan & Eggless · Flavor Variations · What to Serve It With · Troubleshooting

Make It Now

Need the sauce now? Mix this version first, then use the rest of the post only if you want to adjust the garlic, make it vegan, try a flavor variation, or go traditional from scratch.

Fast Garlic Aioli Ratio

Fast ratio: ¾ cup mayo + 3 grated garlic cloves + 1 tablespoon lemon juice + ½ teaspoon Dijon mustard + ¼ teaspoon salt.

Rest 10 minutes, then taste. Brighten with lemon if it feels heavy, soften the bite with more mayo if the garlic is too sharp, and add salt if it tastes flat.

Recipe ratio card showing mayonnaise, grated garlic, lemon, Dijon mustard, salt, and a whisk on a light stone surface.
Start with mayo, garlic, lemon, Dijon, and salt, then let the sauce rest briefly. That short pause helps the garlic aioli taste smoother and more balanced.

Using it for fries? Go a little bolder. On sandwiches, keep it smoother and milder. With seafood, let lemon lead before the garlic takes over. A small bowl of this can make plain fries, leftover chicken, roasted vegetables, or a simple sandwich feel intentional.

Need a different path? Jump to garlic control, vegan and eggless options, flavor variations, or traditional aioli.

Quick Answer: What Is Aioli?

Aioli is a garlic sauce. Traditionally, it is garlic and oil emulsified with salt and sometimes lemon. In modern recipe use, garlic aioli often means a creamy sauce made by stirring garlic, lemon, and seasonings into mayonnaise.

Both meanings are common. Traditional aioli tastes sharper and more olive-oil-forward; mayo aioli tastes creamier, milder, and more familiar. For fries, burgers, sandwiches, seafood, roasted vegetables, and party dips, the easy mayo version is the best place to start.

Most fixes are simple: acid lifts, mayo softens, salt sharpens, rest settles, and roasted garlic mellows.

Still deciding which style fits your food? The version guide makes that choice easier.

Which Aioli Version Should You Make?

Use this as a decision guide, not a rulebook. For everyday fries, burgers, and sandwiches, the mayo version is the easiest answer. When garlic and oil should be the star, choose traditional aioli. Egg-free, vegan, smoky, spicy, and mellow paths are there when the table needs them.

Choose thisWhen you wantBest with
Easy garlic aioli with mayoFast, creamy, reliable garlic sauceFries, burgers, sandwiches, seafood, wraps
Traditional aioliSharper garlic-and-oil flavorArtichokes, grilled vegetables, roasted potatoes, seafood
Vegan mayo aioliFast egg-free creamy dipFries, sandwiches, wraps, party platters
Soy-milk or aquafaba aioliPlant-based sauce from scratchBowls, vegetables, vegan sandwiches
Roasted garlic aioliSweeter, softer garlicSandwiches, potatoes, grilled cheese, vegetables
Chipotle or sriracha aioliSmoky or spicy heatTacos, burgers, fries, shrimp
Lemon-dill aioliBrighter seafood finishSalmon, crab cakes, shrimp, fish tacos

Easy Garlic Aioli Recipe

Start with this version. It gives you the creamy garlic sauce people expect with fries, burgers, sandwiches, and seafood, but with enough lemon and garlic control to keep it from tasting heavy or harsh. This is the one to make when the fries are already hot and you just need a dip that tastes intentional.

Perfect technique is not the point here. Good garlic, enough lemon, and a few minutes of patience matter more. The first bite should feel cool and creamy, then bright with lemon, then warm with garlic.

Here is the key move: let grated garlic sit with lemon juice and salt before you whisk in the mayonnaise. During that short rest, the raw edge softens and the flavor spreads through the bowl. After 10 minutes, the garlic should taste rounder but still present. If it tastes perfect immediately after mixing, remember that it may taste stronger later.

Start with 3 cloves for balance, 5 for a bolder dip, or roasted garlic for something sweeter and softer. If your cloves are very large, begin with 2 to 3 and add more after tasting.

Recipe Details

  • Prep time: 5 to 8 minutes
  • Garlic rest: 10 to 15 minutes
  • Optional chill: 20 to 30 minutes
  • Total time: 15 to 20 minutes without chilling; about 40 minutes with optional chill
  • Yield: scant 1 cup
  • Servings: 12 to 16 tablespoons
  • Equipment: small bowl, whisk or spoon, microplane or garlic press, optional fine mesh strainer

Garlic Aioli Ingredients

Ingredients for garlic aioli including mayonnaise, garlic cloves, lemon halves, Dijon mustard, salt, pepper, and a small whisk.
In a short ingredient list, every flavor has a job: garlic brings heat, lemon lifts the mayo, Dijon adds depth, and salt pulls the aioli together.
IngredientUS amountMetric amount
Mayonnaise¾ cupabout 180 ml / 165 to 170 g
Fresh garlic, grated or pressed3 to 5 small-to-medium clovesabout 9 to 15 g
Fresh lemon juice1 tablespoon, plus more to taste15 ml
Dijon mustard½ teaspoon, optional2.5 ml
Fine salt¼ teaspoon to startabout 1.5 g
Black pepper⅛ teaspoona small pinch
Lemon zest½ teaspoon, optionaloptional
Olive oil1 teaspoon, optional5 ml

Method

Step 1: Grate or press the garlic

Grate, press, or very finely paste the garlic. Smoother garlic makes a smoother sauce and gives the finished aioli a cleaner bite.

Hand grating a peeled garlic clove on a microplane over a small bowl with lemon and mayonnaise nearby.
Grated garlic blends more evenly than chopped garlic. As a result, the sauce tastes bold without leaving harsh little pieces in the finished aioli.

Step 2: Mix the garlic, lemon, Dijon, and salt

Add the garlic, lemon juice, Dijon mustard, and salt to a small bowl. This is where the raw garlic starts turning into a balanced sauce base.

Step 3: Rest the garlic mixture

Let the mixture rest for 10 to 15 minutes so the lemon can soften the raw bite before the mayonnaise goes in.

Grated garlic resting in lemon juice and salt in a small bowl with a lemon half, spoon, and salt dish nearby.
Before the mayo goes in, lemon juice and salt soften the raw garlic edge. This step is small, but it makes the finished garlic aioli taste cleaner.

Step 4: Whisk in the mayonnaise

Whisk in the mayonnaise until the dip looks smooth and creamy. Scrape the sides of the bowl so the garlic and lemon flavor spreads evenly.

Mayonnaise being whisked into a garlic and lemon mixture in a bowl with garlic cloves and lemon nearby.
Whisk the mayo into the rested garlic mixture until the sauce looks smooth and glossy. Then taste again, because garlic and lemon settle as they mix.

Finished Garlic Aioli Texture

Before you chill or serve it, check the texture. The sauce should look creamy and thick enough to hold its shape on a spoon.

Close-up of creamy garlic aioli in a bowl with a spoon showing thick, glossy texture and small pepper flecks.
A good aioli should hold a spoon trail, yet still spread easily. That middle texture is why it works for fries, sandwiches, burgers, and bowls.

Step 5: Taste and adjust

Taste after resting. Brighten with more lemon, round it out with more mayo, or sharpen the flavor with another pinch of salt.

Step 6: Chill or serve

Serve right away, or chill for 20 to 30 minutes for a thicker, rounder texture.

Chilled Garlic Aioli Texture

After chilling, the dip will thicken slightly and usually taste less sharp. If you are making it ahead, err slightly mild on the garlic and adjust again before serving.

Chilled garlic aioli in a bowl with a spoon groove showing thicker texture, with garlic and lemon nearby.
Chilling thickens the sauce and rounds off some of the garlic bite. Before serving, stir it once and adjust with lemon or salt if needed.

To make it milder and extra smooth, strain the garlic-lemon mixture before whisking the flavored lemon juice into the mayonnaise. You will still get garlic flavor, but without little garlic pieces or a strong raw bite.

Taste and Adjust

Taste after the 10-minute rest, not before. Garlic gets louder as it sits, so a sauce that feels gentle at first can become bolder by the time it reaches the table. Serving guests? Start with 3 cloves and build up only after tasting.

  • Sharp garlic bite: soften it with more mayo or a longer rest.
  • Heavy finish: wake it up with lemon juice a few drops at a time.
  • Sour edge: round it out with another spoonful of mayo.
  • Flat flavor: season with salt, Dijon, or a tiny bit more garlic.
  • Thick texture: loosen with water or lemon juice ½ teaspoon at a time.
  • Mild flavor: add more grated garlic or lemon zest.

How to Adjust Garlic Aioli

Use small changes and taste between each one. A little lemon, mayo, salt, or rest can change the whole bowl.

Garlic aioli adjustment guide with a bowl of aioli, lemon wedge, spoonful of mayonnaise, salt, and simple fix labels.
Fix the flavor by changing one thing at a time: lemon for lift, mayo for softness, salt for focus, and rest for a calmer raw garlic bite.

Maximum garlic is not the goal. You want a dip bright enough to cut through rich food, creamy enough to cling, and garlicky enough that it has a reason to exist.

How to Control the Garlic Bite

This sauce is simple, but garlic decides whether it tastes balanced, bold, sweet, sharp, or too aggressive. Garlic is the one ingredient here that can make the sauce sing or take over the room, so choose the style that fits how you plan to serve it.

Raw, Roasted, Grated, or Pasted Garlic

Different garlic prep changes the same aioli base quickly, so pick the garlic style before adding more cloves.

Garlic control comparison with grated garlic, roasted garlic, garlic paste with salt, and small bowls of aioli.
The garlic choice controls the mood of the sauce. Use grated garlic for punch, roasted garlic for sweetness, and garlic paste for a smoother aioli.

Mild vs Bold Garlic Aioli

Start mild for people, bold for potatoes. Fries and roasted potatoes can handle strong garlic. Sandwiches, burgers, wraps, and fish tacos usually need a gentler spread. Serving a shared dipping bowl? Keep the base gentle and put hot sauce, chili crisp, extra lemon, or grated garlic on the side. If you want a brighter herb-driven dip instead of a creamy garlic one, MasalaMonk’s green chutney recipe gives you that cilantro-mint-lime direction.

Two serving areas showing mild garlic aioli with sandwiches and vegetables and bold garlic aioli with fries and roasted potatoes.
For a shared table, keep the first bowl mild. After that, make a bolder aioli for fries, potatoes, or grilled food that can handle extra garlic.
  • Balanced sauce: start with 3 garlic cloves.
  • Bolder dip: use 5 cloves and grate them finely.
  • Mellow flavor: rest raw garlic in lemon juice for 10 to 15 minutes.
  • Smooth garlic taste: strain the garlic-lemon mixture before adding mayo.
  • Sweeter sauce: use roasted garlic instead of raw garlic.
  • Seafood version: let lemon and herbs lead before raw garlic power.

Why This Aioli Works

This aioli works because it treats garlic like a powerful ingredient, not just a flavoring. Freshly cut garlic can be hot, sharp, and harsh. Lemon and salt tame that raw edge before the mayo goes in, so the final dip tastes like one smooth sauce instead of mayonnaise with garlic stirred through it.

Dijon mustard fills the gap between sharp and creamy. You should not taste mustard first; you should just notice that the sauce feels finished. A short chill thickens the dip and gives the flavors time to settle.

  • Lemon rest: softens raw garlic and spreads the flavor.
  • Mayo base: gives stable body without building an emulsion from scratch.
  • Dijon and salt: make the dip taste complete instead of just creamy.

Ingredient Notes and Smart Swaps

With only a few ingredients, there is nowhere for tired garlic or bland mayo to hide. The base gives creaminess, the garlic gives identity, the lemon gives lift, and the salt pulls the whole thing together.

Mayonnaise

Choose a mayonnaise you already like. This is not the place for a mayo you tolerate but never enjoy; the base flavor follows you into every bite. Full-fat mayo gives the richest garlic aioli and the best dipping texture. Light mayo works, though the result may taste tangier and less full. To build the base from scratch, start with MasalaMonk’s homemade mayo recipe, then add garlic, lemon, Dijon, and salt.

Garlic

Fresh garlic gives the cleanest flavor, but the way you prepare it changes the result. The same three cloves can taste mellow, sharp, or almost spicy depending on how you cut them. Grated garlic tastes strongest and blends smoothly. Pressed garlic is easy and punchy. Minced garlic gives a more rustic texture. Roasted garlic turns the sauce sweeter and softer. Garlic powder works in an emergency, but it will not taste as fresh.

Roasted Garlic Aioli

Roasted garlic makes aioli sweeter and rounder, but it can also make the sauce feel less bright. After adding it, taste for lemon again before deciding the sauce is finished.

Roasted garlic cloves being added to a bowl of creamy aioli with a roasted garlic bulb, lemon, and garlic nearby.
Roasted garlic aioli tastes sweeter, softer, and less sharp than the raw version. To keep it lively, finish with enough lemon to balance the richness.
Garlic formBest forFlavor result
Grated garlicClassic garlic aioliStrong, smooth, bold
Pressed garlicQuick aioliPunchy and easy
Minced garlicRustic dipChunkier, less smooth
Roasted garlicSandwiches, potatoes, vegetablesSweet, mellow, less sharp
Garlic powderEmergency shortcutMilder, less fresh

Lemon Juice

Fresh lemon juice is best because it tastes bright without becoming harsh. The lemon should lift the sauce, not turn it sour. Vinegar can work when lemon is not available, but start with less because vinegar can make the sauce sharper.

Dijon Mustard

Dijon mustard is optional, but useful. It adds depth and helps the sauce taste more complete. Use just enough to support the garlic and lemon. The dip should not taste like mustard unless you are making a mustard variation.

Olive Oil

A teaspoon of olive oil adds a little restaurant-style richness. A heavy pour can make the dip greasy, especially when the mayonnaise is already rich. Keep it small unless you are making the traditional garlic-and-oil version.

Small-Batch Garlic Aioli

Need enough for one burger, one sandwich, one small plate of fries, or one snack bowl? Mix ¼ cup mayo, ¼ to ½ teaspoon grated or pressed garlic, 1 teaspoon lemon juice, a tiny dab of Dijon, salt, and pepper. Let it sit for 5 to 10 minutes before tasting.

Small bowl of garlic aioli served with a sandwich half, fries, lemon wedge, garlic clove, and spoon on a wooden board.
Make a small batch when you only need aioli for one sandwich, one burger, or one plate of fries. It gives you fresh flavor without leftover sauce sitting around.

This is useful for a quick sandwich spread, a breakfast sandwich, a grilled cheese upgrade, or a dipping sauce when leftovers are not needed.

Using Store-Bought Mayo

Store-bought mayo is the fastest path to restaurant-style garlic aioli. Use the same base ratio from the main recipe, then adjust after the 10-minute rest: more garlic for a bolder dip, lemon for lift, or another spoonful of mayo if the bite feels too sharp.

Split scene showing plain mayonnaise with garlic and lemon on one side and finished garlic aioli with fries and a sandwich on the other.
Store-bought mayo is only the starting point. Fresh garlic, lemon, salt, and a little resting time turn it into a brighter garlic aioli.

This is the easiest way to upgrade a sandwich, burger, wrap, or dipping platter without buying a separate bottle of aioli.

Traditional Aioli from Scratch

Choose traditional aioli when you want garlic and oil to be the star: sharper, richer, more Mediterranean, and more technique-driven. Choose the mayo version when you want a fast, stable dip or spread for everyday food.

The classic version is not simply garlic mayonnaise. At its most basic, it is garlic and oil emulsified into a thick sauce, often with salt and lemon juice. Some home versions use egg yolk to make the emulsion more stable and easier to whisk.

The garlic-and-oil path is less forgiving because you are building the sauce, not seasoning an already-stable base. Its flavor is sharper, more garlicky, more olive-oil-forward, and less creamy than the easy mayo path. It works beautifully with grilled vegetables, artichokes, seafood, roasted potatoes, or a Mediterranean-style plate.

This is the version to make when you want the sauce to feel like part of a Mediterranean platter, not just a creamy dip on the side.

Traditional Aioli Mortar and Pestle

The mortar-and-pestle method makes the garlic and oil feel more direct than the mayo shortcut, so expect a sharper and more rustic sauce.

Traditional aioli being made in a mortar and pestle with garlic paste, coarse salt, olive oil, bread, potatoes, and artichokes nearby.
Traditional aioli is sharper and more olive-oil-forward because it begins with garlic, salt, and oil instead of prepared mayonnaise.

If you enjoy sauce technique, the same patience with fat, acid, and emulsion shows up in MasalaMonk’s béarnaise sauce recipe, though that sauce uses butter and egg yolk instead of garlic and oil.

Easier Traditional-Style Aioli with Egg Yolk

This is not the oldest purist version, but it is the easiest traditional-style path for most home cooks. The egg yolk helps the garlic and oil emulsify into a thicker, glossier sauce.

Egg yolk aioli mixture being whisked in a glass bowl while olive oil is poured in a thin stream, with garlic and lemon nearby.
Egg yolk gives traditional-style aioli more stability, but patience still matters. Add the oil slowly until the mixture turns thick, glossy, and emulsified.

Egg-Yolk Aioli Ingredients

IngredientUS amountMetric amount
Garlic2 clovesabout 6 g
Salt¼ teaspoonabout 1.5 g
Egg yolk1 largeabout 18 g
Lemon juice1 to 2 teaspoons5 to 10 ml
Dijon mustard½ teaspoon, optional2.5 ml
Mild extra-virgin olive oil¼ cup60 ml
Neutral oil3 tablespoons45 ml
WaterA few drops as neededAs needed

If raw egg is a concern, anyone avoiding it — including children, pregnant people, older adults, or immunocompromised guests — should choose the mayo-based version, vegan mayo version, or no-egg path.

Method

  1. Mash or grate the garlic with salt until it forms a paste. A mortar and pestle is traditional, but a microplane and bowl also work.
  2. Whisk in the egg yolk, lemon juice, and Dijon mustard if using.
  3. Start adding the oil drop by drop while whisking constantly. Do not rush the first few tablespoons.
  4. Once the mixture thickens and looks glossy, add the remaining oil in a very thin stream.
  5. When the sauce gets too thick, whisk in a few drops of water or lemon juice.
  6. Taste and adjust with salt, lemon, or a few more drops of oil.

The first oil addition is the most important part. Too much oil too quickly can split the emulsion. A damp kitchen towel wrapped into a ring under the bowl helps keep it steady while you whisk. Using a measuring cup with a spout also makes slow pouring easier.

The sauce should turn glossy and thicker as the oil goes in. If it starts looking loose or greasy, stop adding oil and whisk until it tightens before continuing.

No-Egg Traditional Aioli

To make no-egg traditional aioli, mash 3 to 4 garlic cloves with a generous pinch of salt until you have a sticky paste. Add mild olive oil very slowly, drop by drop at first, while grinding or whisking constantly. As the paste tightens, use a few drops of lemon juice or water to loosen it and help the sauce come together.

This older-style method is sharper and more garlic-forward than the egg-yolk path. It may look thicker, rougher, or less glossy than mayo aioli, especially on the first try. That is normal. If it refuses to thicken, turn it into a rustic garlic oil dip instead of forcing it; it will still be delicious with bread, potatoes, grilled vegetables, or seafood.

Rustic no-egg traditional aioli in a shallow bowl with olive oil, bread slices, roasted potatoes, artichokes, lemon, garlic, and salt.
No-egg traditional aioli can stay looser and more rustic than the mayo version. Serve it like a garlicky olive-oil dip with bread, potatoes, or artichokes.

For a milder classic sauce, use a mix of mild olive oil and neutral oil. Strong extra-virgin olive oil can taste bitter or peppery, especially when blended aggressively. With an immersion blender, blend the neutral oil first and stir in the olive oil by hand at the end.

Back to top · Jump to recipe

Vegan, Eggless, No-Mayo, and Lighter Options

Choose this section when regular mayo does not fit the people at your table. You can still make a creamy garlic dip, a sharper no-mayo sauce, or a lighter bowl drizzle without losing the main garlic-lemon idea.

These versions are about hospitality, not compromise. Regular mayonnaise usually contains egg. Vegan mayo is egg-free. Greek yogurt is lighter, but it is not dairy-free. Traditional egg-yolk aioli contains raw egg, while no-egg traditional aioli and vegan versions avoid egg entirely. For a dedicated egg-free creamy base, use MasalaMonk’s eggless mayonnaise recipe and follow the same garlic-lemon balance.

Best Eggless Aioli Base to Use

If you are using vegan mayo, follow the same fast aioli ratio and swap the base. If you want no mayo at all, use the traditional aioli section as your starting point.

Four-panel guide showing vegan mayo, soy milk, aquafaba, and cashews with small bowls of vegan or eggless aioli.
Vegan aioli changes depending on the base. Vegan mayo gives the closest shortcut texture, while soy milk, aquafaba, and cashews create different eggless styles.
  • Closest to the main recipe: vegan mayo.
  • From-scratch vegan emulsion: unsweetened soy milk.
  • Creamy bowl sauce: cashews.
  • No-egg traditional path: garlic, salt, oil, and patience.

Use this table to pick the right base, not to make every version.

Vegan Aioli Base Ratios

OptionQuick ratioBest use
Vegan mayo shortcut¾ cup vegan mayo + 3 garlic cloves + 1 tbsp lemon + saltFast vegan dip or spread
Soy-milk vegan aioli½ cup unsweetened soy milk + 1 cup oil + garlic + lemon or vinegar + saltFrom-scratch vegan emulsion
Aquafaba aioli3 tbsp aquafaba + ½ to ¾ cup neutral oil + garlic + lemon or vinegar + mustardEggless aioli-style sauce
Cashew aioli-style sauce1 cup soaked cashews + ½ to ¾ cup water + garlic + lemon + saltCreamy vegan bowl sauce
Lightened garlic aioli½ cup Greek yogurt + ¼ cup mayo + garlic + lemon + Dijon + saltLighter dip for vegetables, chicken, potatoes, wraps, and bowls
No-mayo traditional aioliGarlic paste + salt + slow olive oil + lemon or waterSharper traditional-style sauce

Plain unsweetened soy milk matters here. Sweetened or flavored plant milk will pull the sauce in the wrong direction before the garlic even has a chance. Vegan mayo tastes closest to the main recipe. Soy milk and aquafaba behave more like emulsions. Cashew aioli is creamy and bowl-friendly, but less like classic aioli.

The Greek yogurt version is tangier and less rich than classic garlic aioli. It works especially well as a dip or bowl sauce. For another cool, garlicky yogurt-based sauce, MasalaMonk’s Greek tzatziki sauce recipe is a better fit when you want cucumber, dill, and a lighter Mediterranean finish.

Back to top · Jump to recipe

Aioli Flavor Variations

Once the base tastes right, the variations should feel easy, not like twelve new recipes. You are giving the same sauce a new mood: smoky for tacos, lemony for seafood, mustardy for burgers, herby for vegetables, spicy for fries.

Best Aioli Variations to Start With

Six bowls of aioli variations on a dark board, including orange spicy aioli, lemon-dill aioli, roasted garlic aioli, dark garlic aioli, and herb aioli.
Once the base aioli is balanced, flavor variations are easy. Chipotle, sriracha, lemon-dill, roasted garlic, black garlic, and herb versions each fit different meals.

If you only try three, make chipotle aioli for tacos and fries, lemon-dill aioli for seafood, and roasted garlic aioli for sandwiches and potatoes. Those three cover smoky, bright, and mellow.

Aioli Variation Ratios

VariationAdd to 1 cup baseGood with
Chipotle aioli1 tbsp adobo or 1 to 2 tsp chipotle powder + 1 tbsp limeTacos, burgers, fries
Sriracha aioli2 tbsp sriracha + 1 tbsp limeShrimp, chicken, fries
Spicy aioli1 to 2 tsp hot sauce, chili paste, or chili crispWraps, sandwiches, fries
Dill aioli1 to 2 tbsp fresh dill + ½ tsp lemon zestSalmon, crab cakes, potatoes
Lemon garlic aioli½ to 1 tsp lemon zest + 1 tsp lemon juiceSeafood, asparagus, chicken
Black garlic aioli3 to 5 mashed black garlic clovesBurgers, fries, roasted vegetables
Mustard aioli1 to 2 tbsp Dijon or whole-grain mustardSandwiches, burgers, potatoes
Truffle aioli¼ to ½ tsp truffle oil or 1 to 2 tsp truffle pasteFries, burgers, mushrooms
Cilantro lime aioli2 tbsp cilantro + 1 tbsp lime + ½ tsp lime zestFish tacos, grain bowls, wraps
Roasted garlic aioli1 to 2 tbsp roasted garlic pastePotatoes, sandwiches, vegetables
Salsa aioli¼ cup well-drained salsa + 1 tsp limeTacos, nachos, burgers
Calabrian chili aioli1 to 2 tbsp chopped Calabrian chilies or paste + lemonSandwiches, fries, grilled vegetables

Chipotle and sriracha both get stronger after a short rest, so begin with less heat and build from there. For fruitier heat, borrow the sweet-hot idea from MasalaMonk’s mango habanero sauce recipe and add it lightly to the aioli base.

Drain salsa first so salsa aioli does not turn watery. If you already have a bright mango salsa, drain it well before folding a spoonful into aioli. For truffle aioli, use a light hand; too much can overpower the garlic and lemon.

Once you pick a flavor, the serving chart will help match it to fries, burgers, seafood, vegetables, or bowls.

What Tastes Best with Aioli?

Start with the food in front of you. Fries want a thick, bold aioli that clings to the crispy edges. Burgers want a smooth spread that does not fight the meat. Seafood wants lemon first, garlic second. Roasted vegetables can handle deeper flavors like black garlic, roasted garlic, herbs, or chili.

What to Serve with Garlic Aioli

Wooden board with garlic aioli, fries, slider, shrimp, croquettes, roasted vegetables, potato wedges, sandwich pieces, lemon, and herbs.
Use garlic aioli wherever food needs creaminess, brightness, and a little bite. Fries, sliders, shrimp, potatoes, roasted vegetables, and sandwiches all work well.

Best Aioli Pairings by Food

Use this as a flavor-matching chart, not a rulebook.

FoodServe withWhy it works
French friesGarlic, truffle, spicyClings to salty fries and cuts through the crunch
Sweet potato friesChipotle, srirachaBalances sweetness with smoke or heat
BurgersGarlic, mustard, chipotleAdds the creamy layer that makes the burger feel finished
Fish tacosChipotle, cilantro limeBrings creaminess, acid, and fresh heat
SalmonLemon dillCuts through rich fish without hiding it
ShrimpLemon garlic, srirachaGives cool brightness against sweet shrimp
Crab cakesLemon dillAdds a creamy seafood-friendly finish
ArtichokesTraditional, lemonTurns each leaf into a rich, garlicky bite
Chicken sandwichGarlic, spicyTurns a dry sandwich into a finished one
Grilled cheeseGarlic, roasted garlicAdds savory depth without needing another filling
Breakfast sandwichGarlic herbWorks with eggs, cheese, and toasted bread
BLTRoasted garlicSoft garlic plays well with tomato and bacon
Roasted vegetablesBlack garlic, herbAdds depth to sweet, browned edges
Potato saladGarlic aioli mixed with mayo or yogurtMakes creamy salads taste brighter and less flat
Deviled eggsGarlic aioli in place of some mayoDeepens the filling without making it heavy
Grain bowlsVegan, cilantro limeTurns grains and vegetables into a real meal

Garlic Aioli for Fries

Classic garlic aioli is the safest first batch for fries because it is thick, creamy, and bold enough to cling to crisp edges.

Hand dipping a golden French fry into thick creamy garlic aioli with lemon, garlic, pepper, and more fries in the background.
Fries need a thicker aioli so the sauce catches on crisp edges instead of sliding off. Keep it creamy, spoonable, and bright.

Garlic Aioli for Burgers

For burgers, a thick garlic, mustard, or chipotle version works especially well with a simple burger patty recipe.

Garlic aioli being spread with a knife on a toasted burger bun with a burger patty, lettuce, tomato, onion, lemon, and garlic nearby.
On burgers, aioli should be a thin, even spread. That way, it adds garlic flavor and moisture without covering up the patty or toppings.

Use the same base with crispy homemade French fries, roasted potatoes, burgers, grilled chicken, or sandwiches.

Chicken and seafood both love this sauce, but in different ways. On chicken, use it as the creamy layer in one of these chicken sandwich recipes, especially with spicy, roasted garlic, or mustard variations. For tacos, the chipotle and cilantro-lime versions fit naturally with MasalaMonk’s shrimp tacos recipe.

Seafood usually wants the lemony side of aioli. Lemon dill aioli is a natural dip for salmon croquettes. Fried fish can go either way: aioli gives you the garlicky option, while MasalaMonk’s tartar sauce recipe gives you the classic pickle-caper direction.

Dip, Spread, or Drizzle

The same sauce can work as a dip, spread, or drizzle with small texture changes. Fries need enough thickness to drag through crispy edges. Seafood tastes better when lemon arrives before the garlic. Sandwiches need a smooth spread, not a garlic bomb.

Three-panel guide showing garlic aioli used as a fry dip, spread on bread, and drizzled over a vegetable and grain bowl.
One sauce can become a dip, spread, or drizzle with small texture changes. Keep it thick for fries, smooth for buns, and looser for bowls or vegetables.
  • Dip: use the aioli as written and chill it before serving.
  • Sandwich spread: keep it thick, smooth, and not too garlicky.
  • Drizzle: add water or lemon juice ½ teaspoon at a time.
  • Bowl sauce: loosen with lemon juice, water, or yogurt.
  • Burger sauce: keep it thick and add mustard, chipotle, black garlic, or roasted garlic.

Thin aioli slowly. A little liquid changes the texture quickly. If the sauce looks loose after thinning, stop adding liquid and let it chill before fixing again. When the creamy version gets too loose, stir in more mayonnaise. With traditional aioli, add more oil only when the emulsion is stable. For a lighter dipping plate, thick garlic aioli works with crunchy vegetables or MasalaMonk’s crispy zucchini chips.

Need to reset the base? Go back to the main garlic aioli recipe. If the texture has already gone too far, use the troubleshooting table.

How to Store Aioli Without Losing Freshness

A short rest improves the flavor, but storage depends on the base. Aioli should still taste fresh, cold, and awake — not like something forgotten at the back of the fridge. Mayo-based garlic aioli is easiest to make ahead. Traditional raw egg aioli is more delicate. No-egg traditional aioli tastes best fresh.

Best Storage Window by Version

VersionStorage guidance
Mayo-based garlic aioliBest within 2 to 4 days for fresh garlic flavor; some versions may keep up to about a week if handled cleanly and kept cold
Homemade raw egg/yolk aioliUse pasteurized eggs when available; refrigerate and use within 3 to 4 days
No-egg traditional aioliBest fresh; use within 24 hours for best texture
Vegan soy-milk aioliRefrigerate airtight for 4 to 7 days
Cashew-style vegan aioliRefrigerate for about 1 week; re-blend if needed
Mayo or egg emulsionDo not freeze when texture matters

Keep aioli refrigerated until serving. Stir before using because garlic, lemon, and oil can settle slightly. At parties, keep the main container cold and refill a smaller bowl as needed; the sauce tastes better that way, and it is safer.

As a general safety habit, do not leave aioli at room temperature for more than 2 hours, and shorten that window when the room is very warm. FoodSafety.gov explains the 2-hour rule for perishable foods. Freezing is not recommended for mayo-based or egg-based aioli because the emulsion can break when thawed. Cashew-style vegan aioli handles freezing better, but the texture may still need a quick blend after thawing.

Troubleshooting Aioli

Most aioli problems are fixable. Decide what is wrong first: sharp garlic, flat flavor, loose texture, or a broken emulsion. Then fix only that problem. Mayo-based aioli is forgiving; the traditional garlic-and-oil path needs slower oil, steadier whisking, and more patience.

Aioli Troubleshooting Guide

Four-panel aioli troubleshooting guide showing sharp garlic ingredients, thick aioli, thin aioli, and a split emulsion with whisk and egg yolk.
Troubleshoot aioli by naming the problem first. Sharp garlic, thick sauce, thin sauce, and a split emulsion each need a different fix.

Quick Fixes for Common Aioli Problems

ProblemFix
Sharp garlic biteRest longer, add more mayo, use roasted garlic next time, or strain the garlic-lemon mixture
Flat flavorAdd salt, lemon juice, Dijon, or a tiny bit more garlic
Salt pushed too farAdd more mayo, yogurt, or a small splash of lemon when it also tastes heavy
Texture too thickAdd lemon juice or water a few drops at a time
Texture too thinAdd more mayo for the creamy version; for traditional aioli, keep emulsifying slowly
Traditional aioli splitStop adding oil, whisk hard, or start with a new yolk and slowly whisk the broken sauce into it
Olive oil tastes bitterUse milder olive oil or blend with neutral oil; avoid high-speed blending with strong extra-virgin olive oil
Bitter even without olive oilCheck for old garlic, sprouted garlic, too much raw garlic, or too much lemon pith/zest
Vegan aioli will not thickenUse unsweetened soy milk, keep oil and milk at a similar temperature, and blend in a narrow cup
Garlic chunks are unpleasantGrate, press, paste, or strain the garlic before mixing

When traditional aioli breaks, do not throw it away immediately. Start with a fresh egg yolk in a clean bowl, then slowly whisk the broken sauce into the yolk as if it were the oil. Add it gradually and stop when the texture begins to loosen too much.

Back to top · Jump to recipe

FAQs

Is aioli just garlic mayonnaise?

Traditional aioli is not garlic mayonnaise. It is a garlic-and-oil emulsion. Many modern garlic aioli recipes use mayonnaise as a shortcut because it is fast, creamy, stable, and familiar.

What is the difference between aioli and mayo?

Traditional aioli is built around garlic and oil, while mayonnaise is usually made from oil, egg yolk, and acid. Mayo-based garlic aioli combines mayonnaise with garlic, lemon, and seasonings to create a quick modern version. Real Simple has a useful explainer on aioli vs mayo.

How do you turn mayo into aioli?

Stir grated garlic, lemon juice, Dijon mustard, salt, and pepper into mayonnaise, then let it rest for 10 to 15 minutes. Start with ¾ cup mayo, 3 garlic cloves, 1 tablespoon lemon juice, ½ teaspoon Dijon, and ¼ teaspoon salt.

How much garlic should you use in aioli?

Use 3 small-to-medium cloves for balanced garlic aioli, 5 cloves for a bold dip, and 1 to 2 cloves for a milder sandwich spread. Resting the garlic in lemon juice helps soften the raw bite.

Do you need egg to make aioli?

No. Some traditional methods use only garlic and oil. Many from-scratch home versions use egg yolk because it helps the sauce emulsify more easily. Vegan aioli can be made with vegan mayo, soy milk, aquafaba, or cashews.

Can you make aioli without mayo?

Yes. Make traditional aioli by emulsifying garlic with oil, salt, and lemon, with or without egg yolk. Vegan no-mayo versions can use soy milk, aquafaba, or cashews as the base.

How long does homemade aioli last?

Mayo-based garlic aioli is best within 2 to 4 days for fresh garlic flavor, though some versions may keep longer when refrigerated and handled cleanly. Traditional raw egg aioli is best used within 3 to 4 days. No-egg traditional aioli tastes best fresh.

Why did my traditional aioli split?

Traditional aioli usually splits when oil is added too quickly or the emulsion is not stable yet. Add oil drop by drop at the beginning, whisk constantly, and repair a broken sauce by slowly whisking it into a fresh yolk.

Why does aioli taste bitter?

Bitterness can come from strong olive oil, high-speed blending, old or sprouted garlic, too much raw garlic, or lemon pith. Choose milder oil, fresh garlic, and a smaller garlic amount for a smoother sauce.

How do you make garlic aioli less strong?

Use fewer cloves, rest the garlic in lemon juice, add more mayo, or strain the garlic out. Roasted garlic gives the mildest, sweetest result, especially for sandwiches or shared dipping bowls.

What is the best aioli for fries?

Classic garlic aioli is the safest first choice for fries because it is thick, creamy, and bold enough to cling. For sweet potato fries or loaded fries, chipotle, sriracha, truffle, or spicy aioli works especially well.

Make the mayo version once, then pay attention to the bite: more lemon for seafood, more garlic for fries, roasted garlic for sandwiches, herbs for vegetables, heat for tacos. Once you learn that balance, aioli stops being a recipe you look up and becomes the sauce you know how to make.