Tangy. Nutritious. Ancient. Scientifically backed. Discover why Roselle and Gongura should be your next pantry staple!
Introduction
In a world obsessed with kale, avocados, and blueberries, an ancient leafy green quietly shines in home kitchens across India, Africa, and the Caribbean. Roselle (Hibiscus sabdariffa) and its leafy cousin, Gongura (popular in South India), are finally stepping into the global superfood spotlight. Their vibrant flavor, powerhouse nutrition, and now—cutting-edge science—make them an essential for anyone serious about health.
What Are Roselle and Gongura?
Roselle is a species of hibiscus, grown for its tart calyces (used in teas, jams, drinks) and nutritious leaves.
Gongura refers to the leaf variety of Roselle, famed in Andhra and Telangana cuisines (India) for its unique tang.
🌱 Nutrition & Phytochemistry: Why Are They So Special?
Both leaves and calyces (the red outer “fruits” used in hibiscus tea) pack an extraordinary nutritional punch:
Key Nutrients
Vitamins: C (immunity), A (vision/skin), B6 & B9 (energy, brain), riboflavin, niacin.
Minerals: Iron (higher than spinach!), calcium, magnesium, potassium, phosphorus, zinc.
Phytochemicals: Polyphenols, flavonoids (quercetin, kaempferol), anthocyanins (in calyces), protocatechuic acid.
🧬 What Does the Science Say? Latest Research (2024–2025)
Forget the hype—what do clinical trials show?
1. Blood Pressure & Heart Health
Multiple recent meta-analyses and RCTs confirm:
Regular consumption of Hibiscus tea/capsules lowers systolic and diastolic blood pressure by 5–8 mmHg (comparable to some medications for mild hypertension!).
LDL cholesterol drops by 7 mg/dL; triglycerides improve as well.
2. Blood Sugar & Metabolic Syndrome
A 2025 Bangkok trial: Roselle extract in people with abdominal obesity and mild metabolic syndrome reduced fasting glucose, improved insulin sensitivity, and lowered triglycerides within weeks.
2024 Tunisia pilot: 1 month of hibiscus tea dropped blood sugar by 47%, HbA1c by 9.5%, triglycerides by 60%, cholesterol by 39%, and BP by 17% (in type 2 diabetics and hypertensives).
3. Cognitive Boost
March 2025 study: A single dose of anthocyanin-rich hibiscus tea improved memory, executive function, and cardiovascular markers in healthy adults.
4. Other Emerging Benefits
Hepato- and nephro-protective: Supports liver and kidney health.
Antimicrobial & anti-inflammatory: Fights common bacteria, fungi; calms inflammation.
Potential anti-cancer effects: Inhibits tumor-promoting pathways (in animal studies).
5. Safety
Generally safe, with rare side effects (mild digestive upset at high doses).
No significant interactions reported with moderate intake.
🍲 How to Use Roselle & Gongura: Practical Kitchen Guide
Gongura (Roselle Leaves):
Chutney: South India’s iconic Gongura pachadi—tangy, spicy, pairs with rice or dosa.
Dal (Lentils): Add chopped leaves to dal for a tart, iron-rich boost.
Stir-fries: Sauté with garlic, chilies, and onions—treat like spinach but enjoy the tang!
Stews & Curries: Uplifts chicken, fish, or prawn curries.
Quick Recipe: Gongura Dal
Boil 1 cup toor dal (split pigeon peas) until soft.
Mix dal + sautéed leaves. Add salt, turmeric. Simmer 10 min. Top with cumin-mustard seed tempering.
Roselle Calyces:
Tea: Boil calyces in water 5–10 min, sweeten if desired—enjoy hot or iced (“sorrel” in the Caribbean).
Jam/Sauces: Calyces cook into brilliant crimson jam—great with toast or cheese.
Drinks: Blend with fruit juice or lemon for a tart, antioxidant-packed beverage.
🌍 Traditional Wisdom Meets Modern Science
Ayurveda & Folk: Used for fever, digestion, anemia, infections, skin health.
Africa & the Caribbean: Known for “sorrel” drinks, pickled calyces, medicinal teas.
Asia: Stews, chutneys, soups—especially for post-partum recovery.
Modern science is validating centuries of traditional use: Roselle and Gongura aren’t just flavorful—they’re functional.
🛒 Buying, Storing, and Using
Fresh: Buy from Indian, African, or Asian groceries; look for vibrant green (leaves) or red (calyces), avoid wilted or slimy.
Dried: Calyces are widely available online for tea; dried leaf powders are emerging in global health markets.
Storage:
Fresh leaves: Refrigerate in a loose bag, use within 4–5 days.
Calyces: Air-dry for long storage, or freeze.
💡 Pro Tips
Tartness varies: Red-stem Gongura is more sour than green-stem. Use accordingly.
Pairing: Acidic leaves replace tamarind or lemon in recipes.
Max nutrition: Steam or sauté lightly; boiling is fine but discard excess water if you want less tartness.
Chutney hack: Add sesame or peanuts for protein and texture.
⚡️ Who Should Try Roselle & Gongura?
Anyone with pre-hypertension or high BP
Those seeking more plant iron (esp. vegetarians)
People with metabolic syndrome or early diabetes
Anyone bored of spinach!
Note: Those with kidney stones or on potassium-sparing diuretics should consult their doctor (leaves are high in potassium and oxalates).
📈 Bottom Line
Roselle and Gongura leaves are among the world’s most underappreciated superfoods—delicious, versatile, and validated by cutting-edge science for real-world health benefits. They’re not a “magic cure,” but when added to a balanced diet, they can support heart, metabolic, and overall well-being.
🥄 Ready to Try?
Pick up some Gongura leaves or Roselle calyces this week.
Try a simple dal, tea, or chutney recipe.
Notice how they add a lively tang and deep nutrition to your meals!
Have you tried Roselle or Gongura yet? Share your experience or questions in the comments below!
FAQs
1. What is the difference between Roselle and Gongura? Roselle (Hibiscus sabdariffa) is the plant species; its tart red calyces are used for tea and jams worldwide. Gongura refers to the edible green leaves of Roselle, especially popular in Indian cuisine for their tangy taste.
2. Are Roselle and Gongura safe for daily consumption? Yes, both are generally safe when eaten in normal food amounts. Most studies report no serious side effects. If you have kidney issues, consult a doctor before frequent use, as the leaves are high in potassium and oxalates.
3. Can I use Roselle leaves and calyces interchangeably in recipes? No. The calyces are intensely tart and used for drinks, teas, and preserves. The leaves (Gongura) are used more like spinach or other greens in curries, stews, and chutneys.
4. Where can I buy Roselle or Gongura? Check Indian, African, or Asian grocery stores for fresh leaves. Dried calyces for hibiscus tea are widely available online and in many supermarkets worldwide.
5. What are the key health benefits of these superfoods? Scientific studies show they can help lower blood pressure, support heart health, improve lipid profiles, aid in blood sugar control, provide antioxidants, and support liver and kidney health.
6. Are there any side effects or contraindications? Very rarely, some people may experience mild digestive upset. People prone to kidney stones or on potassium-restrictive diets should moderate intake or seek medical advice.
7. How should I store Roselle calyces and Gongura leaves? Fresh leaves: refrigerate in a loose bag, use within a week. Calyces: air-dry or freeze for longer storage. Dried products should be kept in airtight containers away from moisture.
8. How much should I consume to get the health benefits? Human studies use 1–3 cups of hibiscus tea daily or 2–3 servings of leaves weekly. For general health, including the leaves or tea a few times per week is a practical and safe approach.
9. Can pregnant or breastfeeding women eat Roselle/Gongura? Traditionally, they are eaten by women in India (including postpartum). However, there is limited research on high-dose supplementation during pregnancy, so moderate, food-level consumption is considered safe.
10. Do these superfoods interact with any medications? Large amounts of hibiscus/roselle can potentially lower blood pressure and blood sugar, so monitor if you’re on related medications. Always check with your healthcare provider for personal guidance.
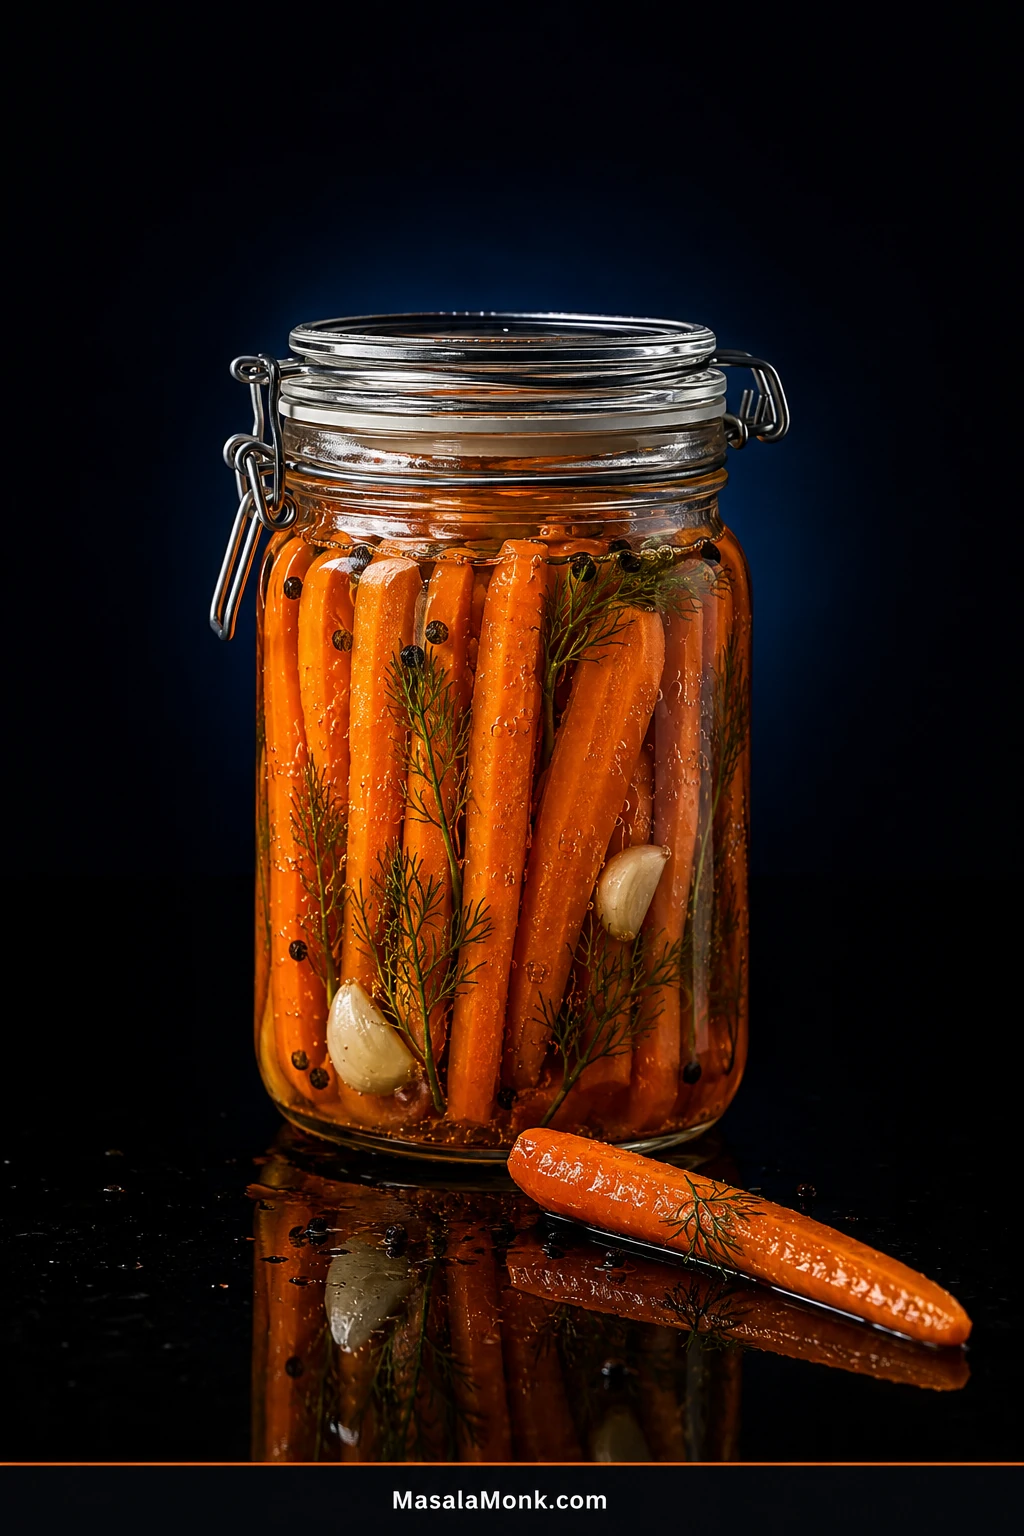
Fresh carrots are almost built for fermentation: firm, naturally sweet, and sturdy enough to keep their snap while salt and time turn them pleasantly sour.
The hands-on work takes only about 15–20 minutes. The unfamiliar part comes afterward. Clear brine turns cloudy. Tiny bubbles gather between the carrots. Sediment appears. A few days in, you may find yourself staring through the glass wondering whether you have made a very good pickle or ruined a perfectly good bag of carrots.
The recipe itself is short. The rest of this guide is here for the days afterward—when the brine clouds, the bubbles slow, a carrot starts floating, or the jar suddenly looks different from the one you packed.
Get the setup right at the beginning and those changes become much easier to read. Measure the salt, keep every solid beneath the brine, give the ferment a stable place away from excess heat, and learn the handful of cues that matter.
Pack about 450 g / 1 lb carrots into a 1-litre / roughly 1-quart jar and cover them with water. Weigh the carrots, seasonings, and water together, then add salt equal to 2.5% of that pre-salt weight. If the food and water weigh 850 g, use 21.25 g salt.
Keep every solid submerged and aim for about 20–22°C / 68–72°F. Use a food pH meter to check acidification and look for a brine pH of 4.6 or lower. Once active bubbling has stopped and the ferment otherwise looks and smells sound, taste a carrot. If the sourness and texture are where you want them, refrigerate the carrots in their brine.
Fermented Carrots Recipe
Start with this dill-garlic version. It is familiar enough for a first jar, but restrained enough that the finished carrot still tastes like carrot.
No vinegar, whey, probiotic capsule, commercial starter culture, or brine from an older ferment is required. These are refrigerated fermented carrots, not a shelf-stable canned product.
Yield
1 litre / roughly 1 quart
Carrots
About 450 g / 1 lb, or enough to pack the jar snugly
Salt
2.5% of the pre-salt carrot + seasoning + water weight
Hands-on time
About 15–20 minutes
Ideal temperature
20–22°C / 68–72°F
Start watching closely
During the first week; warmer ferments move faster
pH check
Brine pH 4.6 or lower
After fermentation
Refrigerate in the brine
Equipment
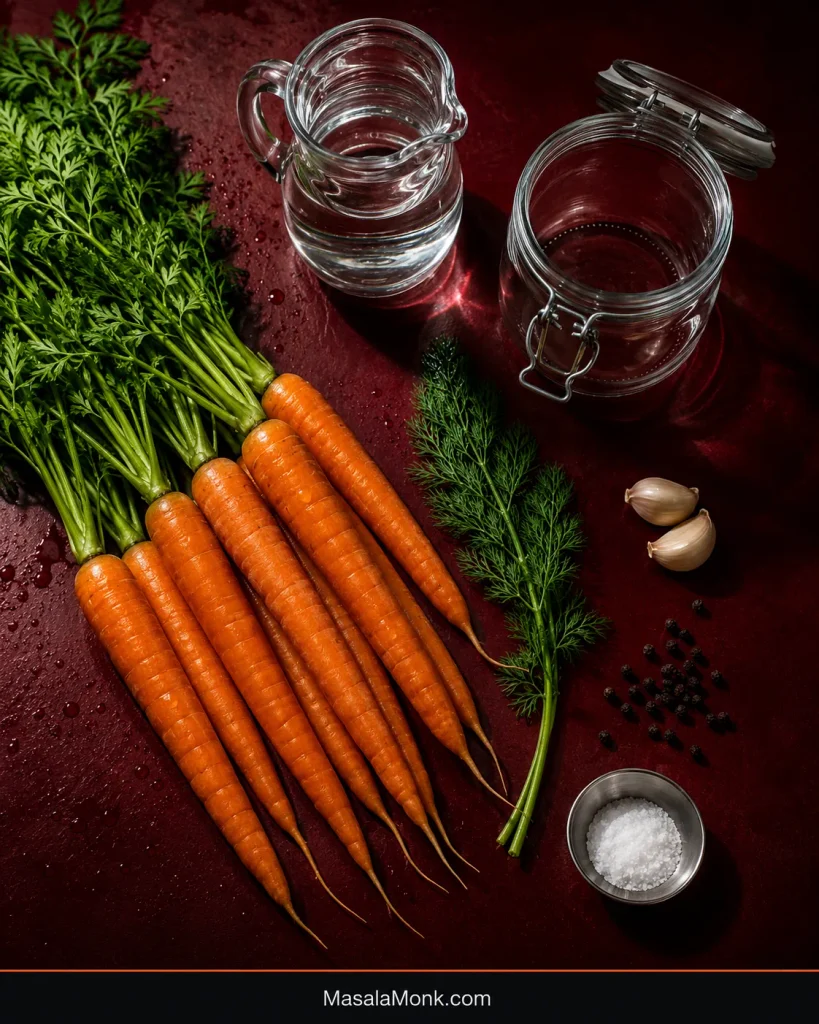
1 clean 1-litre / roughly 1-quart glass jar
digital kitchen scale
fermentation weight
airlock or suitable fermentation lid
food pH meter
knife and cutting board
That list looks more technical than the actual job. The scale replaces salt guesswork. The weight deals with floating food. An airlock lets gas escape without repeatedly opening the jar. And the pH meter answers the question bubbles cannot: has the brine actually become acidic enough?
Ingredients
About 450 g / 1 lb fresh, firm carrots, or enough evenly cut sticks to pack the jar snugly
Potable water, enough to cover the carrots; soft, distilled, or suitably filtered water is useful if your local supply is very hard or heavily treated
Pickling or canning salt, equal to 2.5% of the combined carrots + seasonings + water weight before salt is added
2 garlic cloves, lightly crushed
1 large fresh dill sprig
½ teaspoon whole black peppercorns
Pickling or canning salt is the simplest choice because it is predictable and free of ingredients that can complicate fermentation. If you substitute another plain salt, weigh it in grams rather than matching tablespoons; coarse crystals and fine crystals occupy a spoon very differently.
Potable tap water can work. When the local supply is heavily treated or very hard, suitably filtered, soft, or distilled water removes another variable from the first batch.
How to Make Fermented Carrots
The salt joins the ferment as a dissolved solution, not as dry crystals scattered over the carrots; only after that does the fermentation weight go in and the jar close.
Clean the Equipment
Wash the jar, lid, fermentation weight, knife, cutting board, and anything else that will touch the food with hot soapy water, then rinse well. Sanitize the jar and weight using a food-safe method appropriate for the material; boiling is one option for heat-safe glass.
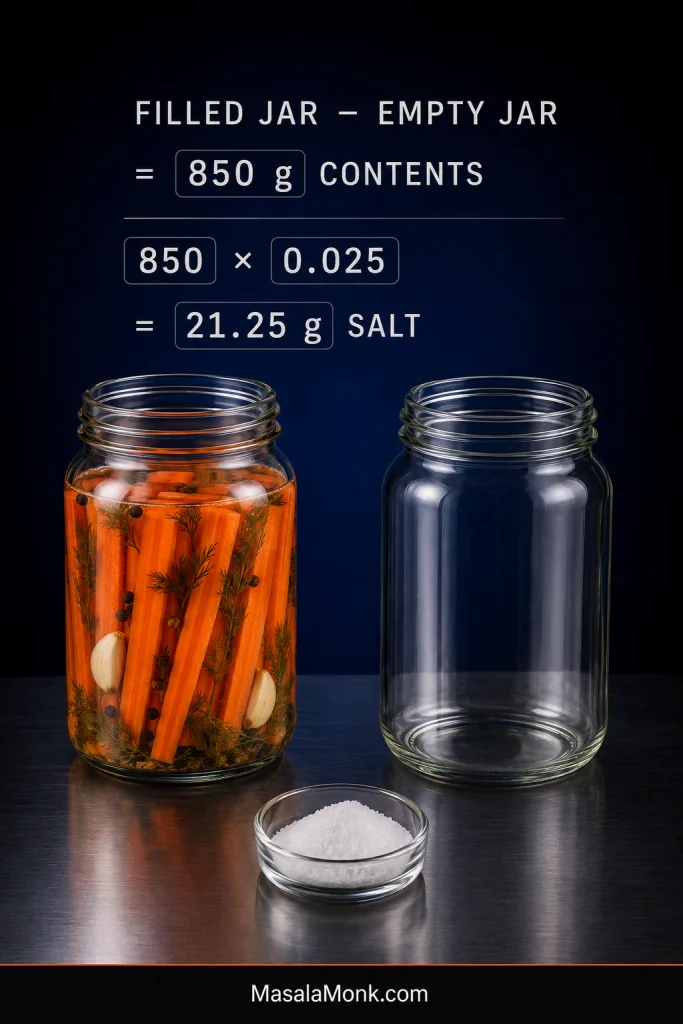
Weigh the Empty Jar
Place the empty jar on the scale and record its weight. You will subtract that number later so the glass never becomes part of the salt calculation.
Cut the Carrots
Rinse the carrots under cool running water, trim the ends, and remove damaged areas. Peeling is optional for sound, fresh carrots.
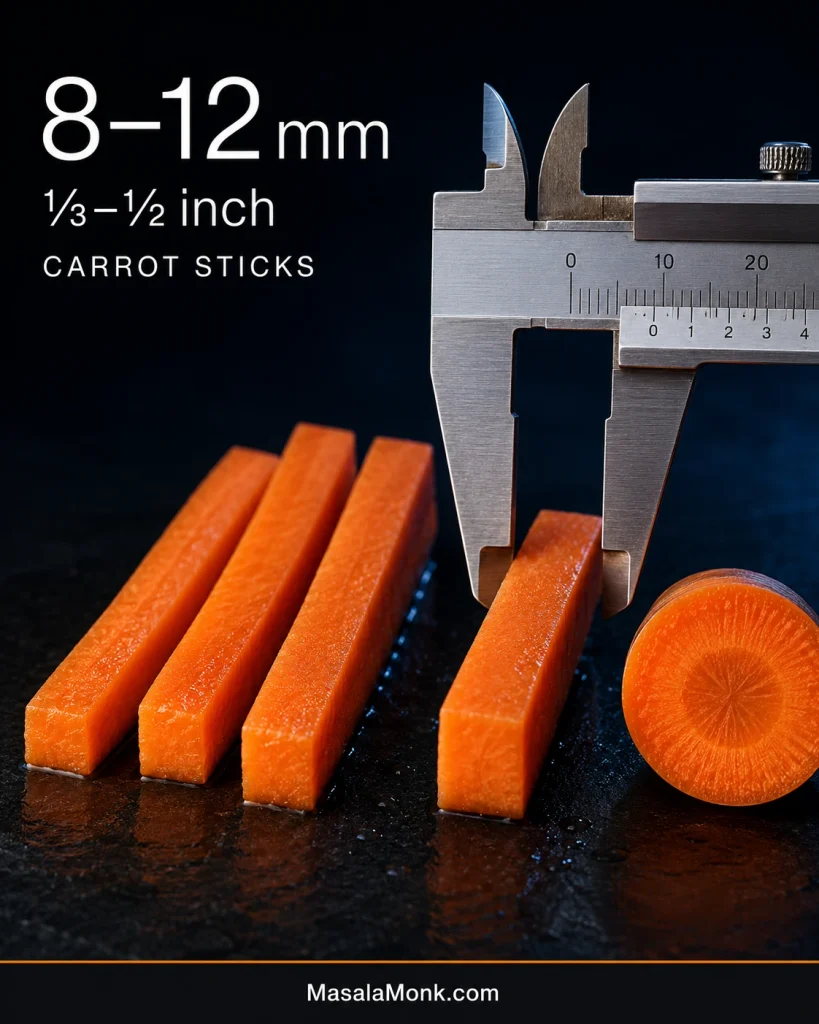
Cut them into fairly even sticks about 8–12 mm / ⅓–½ inch thick. At this size they have enough cut surface to ferment well while keeping some resistance through the centre.
Pack the Jar and Add Water
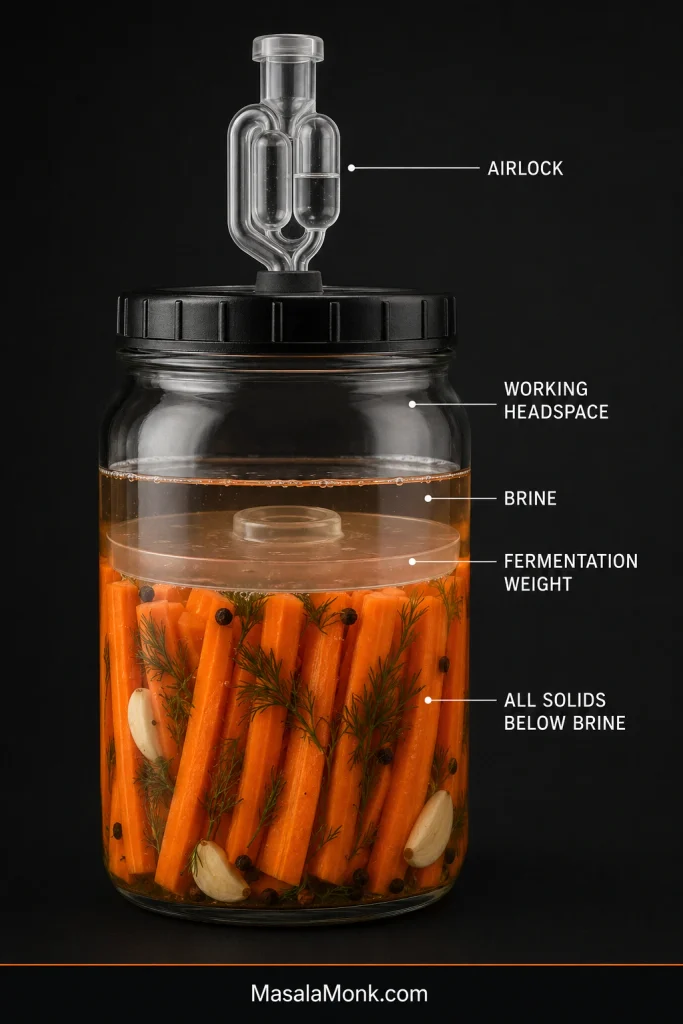
Put the garlic, dill, and peppercorns in first, then pack the carrot sticks snugly around them. Add enough water to cover everything while leaving room for the fermentation weight and some working headspace beneath the lid.
The jar should already look like something worth waiting for: bright orange sticks close together, dill and garlic tucked below the surface, the weight seated above them, and nothing poking through the brine.
Calculate the Salt
Weigh the filled jar and subtract the empty-jar weight. Multiply the weight of the carrots, seasonings, and water by 0.025.
For example, if the contents weigh 850 g:
850 × 0.025 = 21.25 g salt
That is the only calculation you need for any size jar. No tablespoons to compare, no separate brine chart, and no guessing how much water disappeared between tightly packed carrot sticks.
A total-content salt calculation automatically responds to the jar you actually packed: tightly packed carrots leave room for less water, and the final weight accounts for that before the 2.5% is calculated.
Once the salt is measured, the fiddly part is over. From here, most of the job is keeping the carrots submerged and watching them change.
Dissolve, Weight and Close
Pour a little of the jar water into a clean cup, dissolve the measured salt in it, and return it to the carrots. Set the fermentation weight in place, check that every solid ingredient sits below the brine, then fit the airlock or fermentation lid.
Label the jar with the start date, “2.5% pre-salt total weight,” and the flavoring. A week later, when two jars are behaving differently, you will be glad you did.
Put the jar on a small plate or tray in case an energetic ferment pushes a little liquid upward.
Let the Carrots Ferment
Keep the batch in a dark or well-shaded place, away from direct sunlight and excess heat. Over the next several days the brine may cloud, bubbles may move between the sticks, and pale sediment may appear at the bottom. The smell should gradually shift from raw carrot and salty water toward something tart and pickle-like.
Use the date to know when to pay closer attention, not as a promise that the carrots will be ready on a particular day. Once the brine has reached pH 4.6 or lower, active bubbling has stopped, and the jar otherwise looks and smells normal, taste one carrot with a clean utensil. If the sourness and texture are where you want them, refrigerate the carrots in their brine.
Once chilled, they are ready to eat straight from the jar or beside something creamy such as extra-creamy hummus.
Your Carrots Are Packed—What Happens Next?
You can leave the jar alone and return here when you need it. These are the sections most worth bookmarking for the days ahead:
For this recipe, weigh what is in the jar before adding salt and multiply by 0.025. Small jar, large jar, tightly packed carrots, oddly shaped carrots—the calculation stays the same.
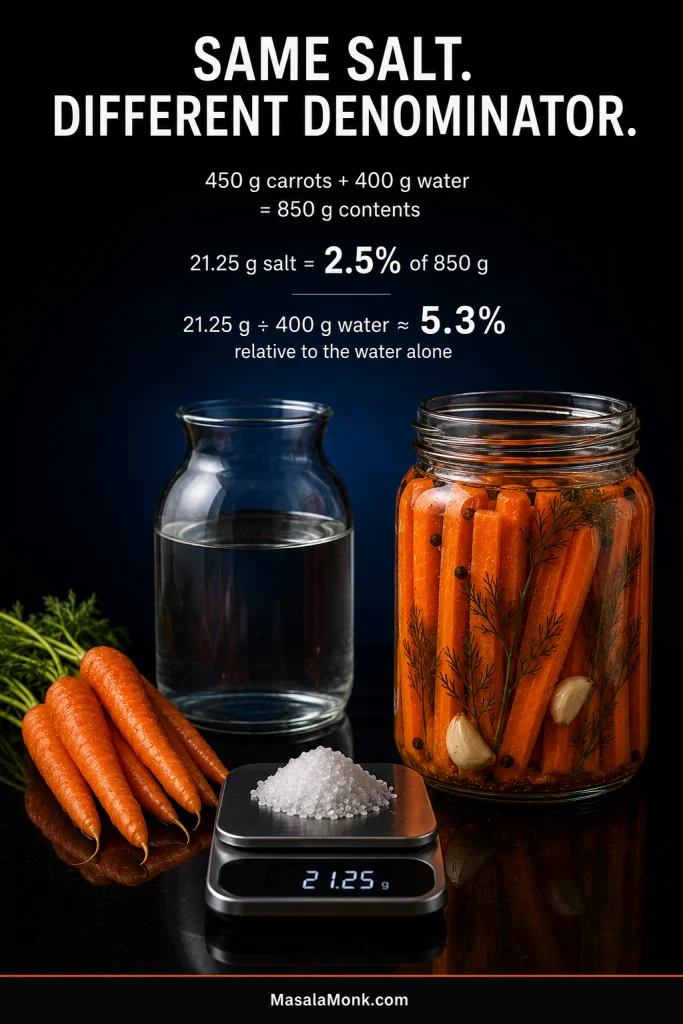
Fermentation recipes can look contradictory because their percentages are not always measuring the same thing. Some calculate salt against the water alone. Here, the salt amount equals 2.5% of the carrots, seasonings, and water before salt is added.
Take a jar with 450 g carrots and 400 g water. The combined weight is 850 g, so this method uses 21.25 g salt. Compared only with those 400 g of water, that same amount of salt is a little over 5%.
When two fermentation recipes quote very different salt percentages, first ask what each percentage is measured against; compare the denominator before comparing the number.
This 2.5% calculation is the salt method used for this recipe. If you follow a different tested fermentation recipe, stick with its salt amount and timing rather than mixing the two approaches.
A smaller jar needs no new formula. For a 500 ml / roughly 1-pint batch, pack the carrots, add the water, subtract the empty-jar weight, and multiply the food-and-water weight by 0.025. A little jar is often an excellent first ferment: enough to watch the brine change and find the texture you like without committing much produce.
Cut, Pack & Keep Everything Under the Brine
Start With Carrots That Still Snap
Hard, fresh carrots give you the best chance of ending with crisp fermented carrots. Slightly limp but otherwise sound ones may firm up after a short soak in very cold water, but genuinely soft or deteriorating carrots are a poor starting point.
You can leave the peel on. Wash the carrots well, trim the ends, remove damaged areas, and peel only when the skin is tough, bitter, or simply not something you want in the jar.
For sticks, aim for roughly 8–12 mm / ⅓–½ inch thick. Thick coins can also be wet-brined. Very thin matchsticks soften more quickly, while shredded carrots are better suited to a dry-salted, sauerkraut-style ferment.
Evenness matters as much as thickness: similarly sized 8–12 mm / ⅓–½ inch carrot sticks tend to move through fermentation at a more similar pace, so one piece is less likely to soften far ahead of another.
Pack Beneath the Brine
The fermentation weight is there to keep food away from the air—including the dill frond slipping around the side, the floating peppercorn, and the little piece of garlic trying to escape.
Pack larger seasonings lower in the jar where possible. Leave enough headspace for fermentation activity without choosing a vessel so large that the carrots sit beneath an unnecessarily big pocket of air.
Think of the brine surface as the critical boundary: food and the fermentation weight belong below it, while working headspace belongs above it.
Airlocks, Pressure & Burping
An airlock makes a beginner ferment easier to manage. Carbon dioxide can escape while the jar stays closed, so you do not have to keep opening it simply to release pressure.
With a functioning airlock, routine burping is unnecessary. Other fermentation lids should be used according to their instructions. A suitable non-venting lid needs brief pressure release as gas builds, then it should be closed again promptly.
Fermentation Time & Temperature
“Room temperature” sounds precise until one kitchen is 19°C and another is 31°C.
Too cool for reliable progress; move the jar somewhere warmer.
16–19°C / 60–67°F
Slower than the ideal range and likely to need more time.
20–22°C / 68–72°F
Ideal for steady fermentation and easier texture control.
23–25°C / 73–77°F
Warmer and faster; watch texture and activity more closely.
26°C / 79°F and above
Over-fermentation, softening, and spoilage become greater concerns.
A thermometer turns vague “room temperature” advice into something usable; the same fermented-carrot jar behaves very differently at 18°C, 21°C and 26°C.
Fermenting Carrots in a Hot Kitchen
A Delhi kitchen in peak summer and a cool northern-European kitchen are not running the same fermentation schedule.
When the room regularly sits around 28–32°C / 82–90°F, use the coolest stable spot available. An air-conditioned room can be more useful than a cupboard beside the stove. Keep the ferment away from direct sun, hot appliances, and refrigerator exhaust.
Warmth speeds more than sourness. The carrots can soften sooner, gas production can become vigorous, and garlic, chilli, onion, or peppercorns can dominate before the carrot itself has developed much sourness.
For these brined carrot sticks, choose shade and a stable temperature. Gajar kanji follows its own fermentation tradition and uses a different method.
In a hot kitchen, correct the environment rather than the recipe: move the jar to the coolest stable shaded location instead of changing the salt ratio mid-ferment.
When Should You Start Checking?
Carrot-specific home recipes often show noticeable fermentation during the first week, while broader Extension produce-fermentation protocols can run for several weeks. Their salt ratios and complete methods differ too, so one timeline should not simply be dropped into another recipe.
Use the first week as a cue to start watching more closely. Early on, the carrot holds more of its raw sweetness and rigid bite. As fermentation develops, the aroma becomes distinctly pickle-like, sourness moves further through the stick, and the texture becomes a little more yielding. A deeper ferment usually tastes more assertively sour and bends more easily.
“Active” is a stage, not a finish line: visible gas tells you fermentation is happening, whereas pH, aroma and texture answer different questions about readiness.
Once the brine is at pH 4.6 or lower and active bubbling has run its course, taste decides which finished texture you prefer. That first properly chilled bite is often the clearest comparison: carrot sweetness still underneath, sourness around it, then the snap.
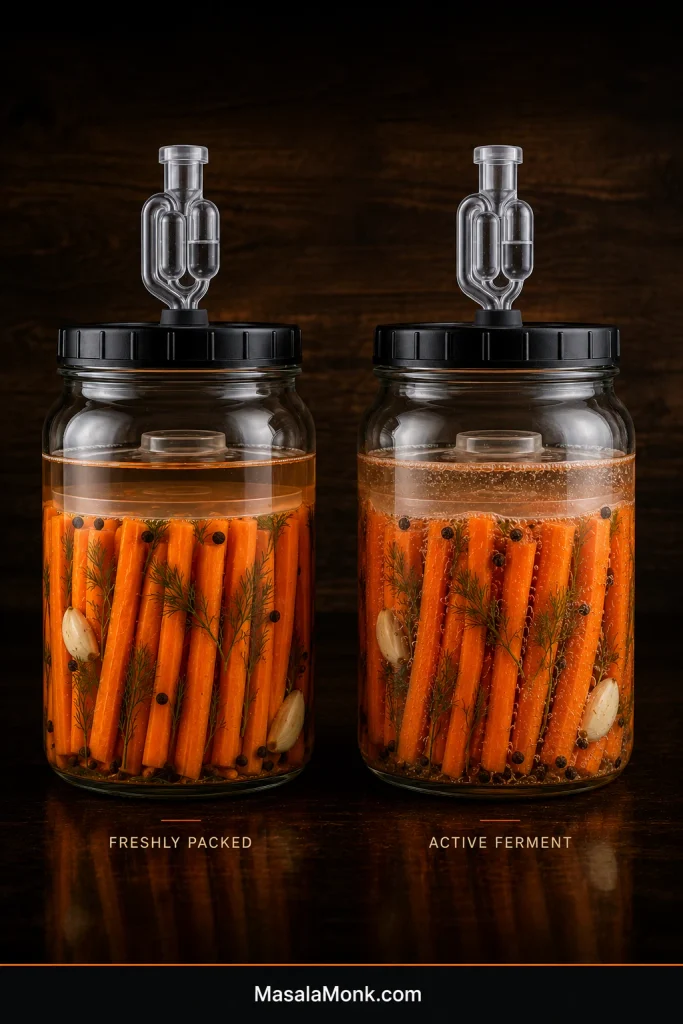
A freshly packed jar can be almost boring: orange carrots, clear brine, no bubbles. Then little pockets of gas may gather along the sticks. The liquid can turn hazy or milky. Pale sediment may collect near the bottom. None of these changes has to arrive on a particular day.
You may walk past a quiet-looking jar in the morning and find bubbles clinging to the carrots by evening. Fermentation rarely performs on command.
Cloudiness worries many first-time fermenters because clear water suddenly stops looking “clean.” In vegetable fermentation, cloudy brine can be part of a perfectly ordinary progression.
Cloudiness stays suspended through the brine; sediment settles. That simple visual distinction is more useful than judging a ferment by whether the liquid still looks “clean.”
The aroma changes too. Raw carrot and salty water gradually give way to something brighter and more pickle-like. Visible activity often becomes quieter later even while acidity continues developing.
Some batches fizz enthusiastically and others barely put on a show. Very little visible bubbling by itself does not tell you the ferment has failed.
Checking pH & Readiness
Calibrate the pH meter according to its instructions. With a clean spoon, transfer a small sample of brine to a clean cup, measure it, and discard the sample afterward rather than pouring it back into the jar.
Look for a brine pH of 4.6 or lower. That tells you the ferment has become sufficiently acidic; it does not cancel obvious trouble elsewhere in the jar.
A quiet jar can still be acidifying, which is why fermented-carrot pH tells you something bubble count cannot: whether the brine has actually crossed the acidification checkpoint.
At the finish there are really two questions: has the ferment progressed properly, and do you actually want to eat the carrot? Once active bubbling has stopped and the jar otherwise looks and smells normal, a good finished stick should still taste unmistakably of carrot—some sweetness through the centre, a rounded lactic sourness around it, and enough resistance that the bite feels satisfying.
Prefer to ferment without measuring pH? Choose one complete tested method designed to work that way and follow it from start to finish. Mixing the salt from one recipe with the timing from another makes the result much harder to judge.
Keeping Fermented Carrots Crunchy
Carrots begin with a texture advantage. Fresh produce, fairly even sticks, measured salt, and moderate fermentation temperature do most of the work. A hotter or longer ferment moves them more quickly from rigid to flexible and eventually soft.
A carrot that bends much more than it did raw but still snaps when pushed far enough may simply be further along the texture spectrum. Flexibility by itself does not tell you that the batch has failed.
Test two things together—bend and resistance. A fermented carrot that flexes but still pushes back and snaps is in a different state from one that folds limply without structure.
Tannin-rich leaves or tea are sometimes added to fermented vegetables for texture. Treat them as an optional tweak, not a safety control or a requirement for crisp carrots. Freshness, time, temperature, and the basic fermentation setup deserve attention first.
Fermented Carrots Troubleshooting: Is My Jar Okay?
Most jars will never give you every problem below. This section is here so that when something odd does appear, you do not have to diagnose it from one blurry photograph and five contradictory forum replies.
The table begins with changes that are commonly ordinary, moves into things that need attention, and ends with clear reasons to discard.
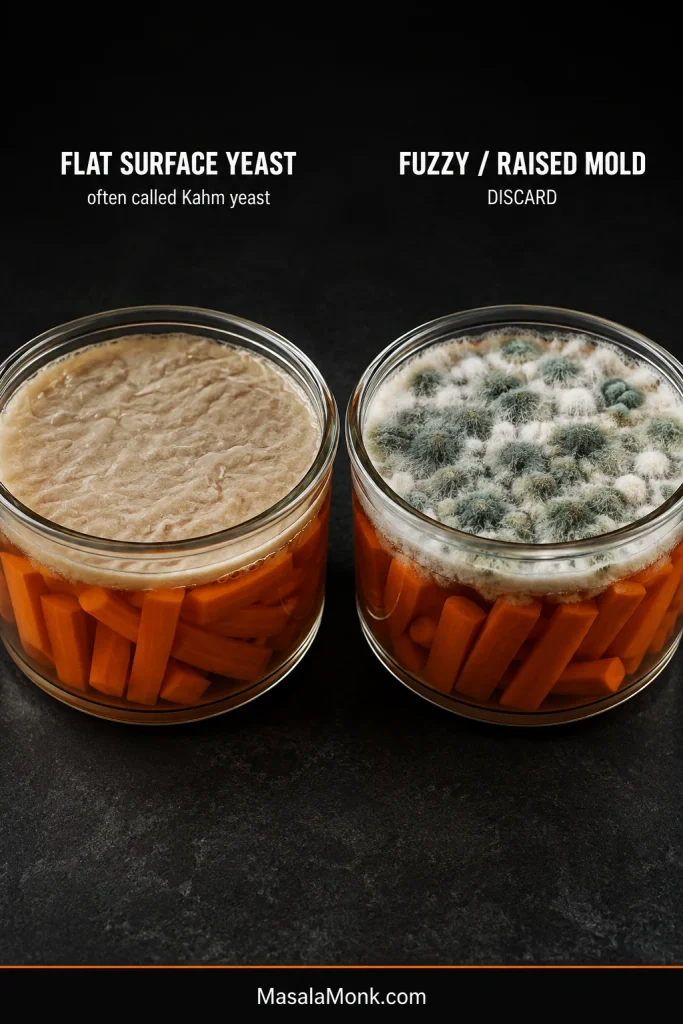
A pale film stretched flat across the brine can look alarming the first time you see it. A flat surface yeast film—often called Kahm yeast by home fermenters—and mold are different problems, and color alone will not reliably tell you which one you have.
Fuzzy, raised, or clearly mold-like colonies mean the batch goes. Confirmed mold should not be scraped from the top while the vegetables underneath are kept for eating. UC Davis’s fermented-fruit-and-vegetable troubleshooting guidance likewise advises discarding a ferment when mold is confirmed.
If you are confident the surface growth is a flat yeast film rather than mold, remove it cleanly, restore good submersion, close the jar again, and continue watching the ferment. Heavy or repeatedly returning yeast can hurt flavor, texture, and acidity.
When you genuinely cannot tell what is growing at the surface, a jar of carrots is not worth gambling on.
Look at structure before color: a flat surface film stays low and sheet-like, whereas mold develops raised, dimensional or fuzzy growth.
Cloudy, Sediment or Slimy?
Cloudiness, sediment, and slime can look surprisingly similar through glass, but they behave very differently. Cloudy brine is hazy or milky while still pouring freely. Sediment settles at the bottom. Both are common sights in vegetable ferments.
A little cloudiness—or even a brine that seems to have slightly more body than plain water—is not the same thing as true ropeiness. The concerning change is obvious viscosity: liquid that pulls into strings, coats the carrots with mucus-like slime, or pours with a distinctly ropey texture. Discard a batch that has reached that point.
Cloudy is an appearance; ropey is a behavior. Cloudy brine still runs freely, whereas genuinely ropey brine stretches into persistent strings.
When the Carrots Turn Soft
Texture moves gradually from rigid to slightly yielding, then bendy-but-snappy, soft, and eventually mushy. A properly acidified batch that smells good and has simply become softer than you prefer may have fermented warmer or longer than your ideal.
Softness alongside slime, mold, putrid odor, or failed acidification tells a different story. Discard that batch.
Floaters, Overflow & Lost Brine
An active ferment can push brine through the airlock and onto the plate underneath. What matters most is the liquid level left inside.
Restore complete submersion promptly when food becomes exposed. If the carrots will fit, moving them into a slightly smaller clean jar is often the simplest fix because the remaining brine rises around them without changing the recipe.
If so much brine has been lost that you cannot restore coverage without substantially rebuilding the ferment, restarting is more predictable than improvising with plain water or an unrelated brine percentage.
Changing the vessel can preserve the original salt balance: a smaller jar raises the same remaining brine around the carrots without introducing an uncalculated top-up.
Yeasty, Alcoholic, Solvent-Like or Rotten Smells
A good carrot ferment should move toward a pleasantly sour pickle aroma. Strongly wine-like or alcoholic smells suggest more yeast activity than you want, so take a closer look at the surface, temperature, and pH.
A strong nail-polish-remover or solvent smell is outside the expected profile. So are distinctly vomit-like, rancid-butter-like, putrid, or rotten odors. When the jar smells unmistakably spoiled, discard it without tasting it to investigate further.
When the Carrots Taste Too Salty
Check the calculation first. Common errors include accidentally counting the jar’s weight, measuring salt by spoon instead of grams, or adding extra salt out of caution.
A properly finished batch may also simply taste saltier than you enjoy as a large standalone snack. Chop a few pieces into otherwise lightly seasoned food and make sure the next jar follows the intended calculation.
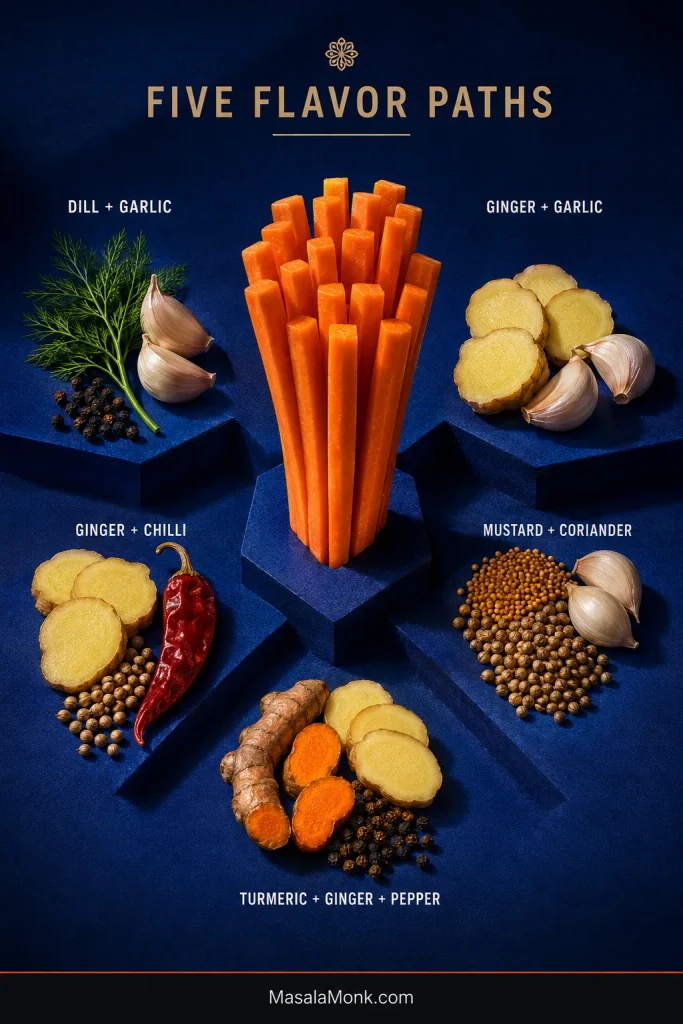
For a first jar, one or two aromatics are enough. It is easier to learn what fermented carrot actually tastes like before you start layering in lots of spices.
Keep the carrots, water, and salt calculation the same. The quantities below are for one 1-litre / roughly 1-quart batch.
Dill + Garlic
2 garlic cloves, lightly crushed
1 large fresh dill sprig
½ teaspoon black peppercorns
The familiar pickle-like version: fresh dill on the nose, garlic underneath, and enough carrot sweetness left to keep the whole thing from tasting one-note. It is especially good beside crisp homemade falafel, pita, and tahini.
Ginger + Garlic
10–15 g / about ½ oz fresh ginger, sliced
2 garlic cloves, lightly crushed
Fresh ginger gives the carrot a warm, citrusy edge. Garlic stays in the background and the carrot remains clearly recognizable underneath.
Ginger + Chilli
10 g fresh ginger, sliced
1 small dried chilli, adjusted for heat
½ teaspoon coriander seeds
Brighter and hotter. Start cautiously with chilli, especially in a warm kitchen where strong spice flavor can move into the brine quickly.
Mustard + Coriander
½ teaspoon mustard seeds
½ teaspoon coriander seeds
2 garlic cloves
Mustard brings bite; coriander rounds it out with citrusy warmth. The combination feels naturally at home beside Indian food while still tasting unmistakably like fermented carrots.
Turmeric + Ginger + Black Pepper
10 g fresh ginger, sliced
5–8 g fresh turmeric, thinly sliced
6–8 whole black peppercorns
Earthy, fragrant, vividly orange—and quite capable of turning your cutting board the same color.
The flavorings should support the vegetable instead of burying it. The first thing you taste should still be carrot.
How to Eat Fermented Carrots
Think of them as cold crunch, acidity, and salt. That combination earns its place anywhere a meal feels rich, creamy, warm, or a little too soft.
Eat them straight from the refrigerator, put them beside eggs or cheese, tuck them into sandwiches and wraps, or chop them over grain bowls and tacos.
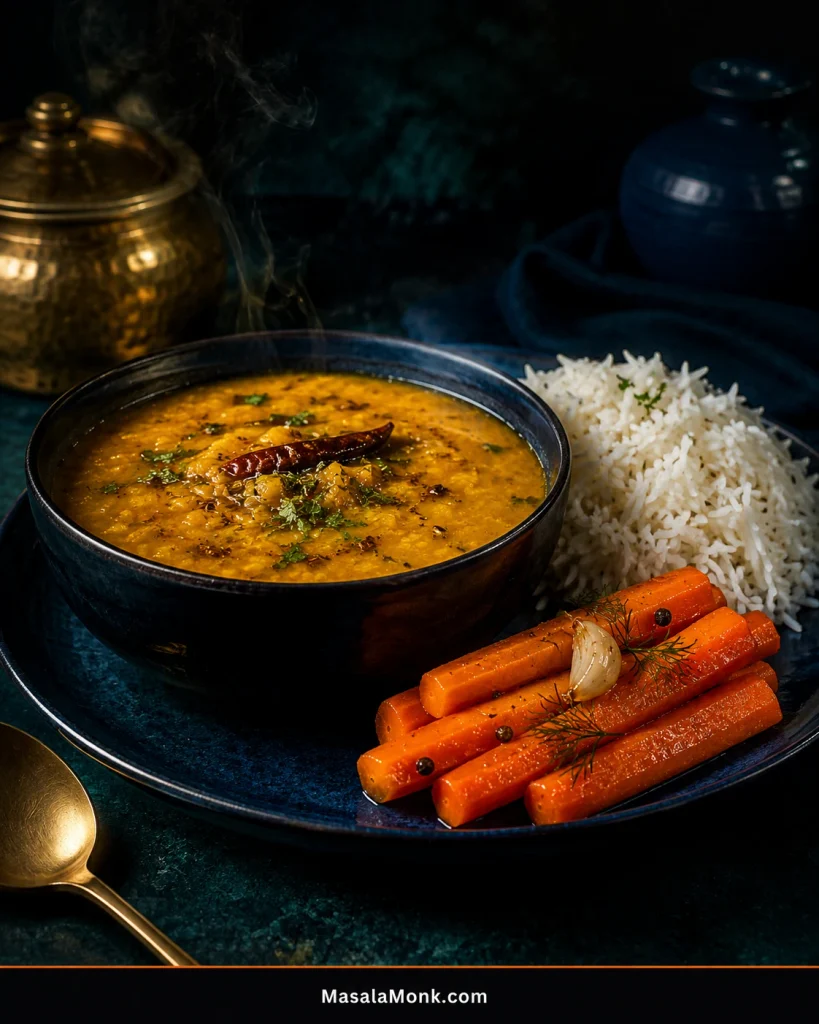
A bowl of dal tadka and rice rarely objects to something cold, sour, and crunchy at the edge of the plate.
They also work beside grilled chicken, tofu, or paneer, where the acidity cuts through a richer main dish and resets the palate for the next bite.
Using the brine: a spoonful from a successful batch can sharpen a dressing or sauce. It works particularly well anywhere you already need both acidity and salt, including the creamy dressing in a bowl of coleslaw. Taste before adding more seasoning. Use the brine because it tastes useful; there is no need to turn drinking it into a wellness assignment.
Refrigeration, Storage & Shelf Life
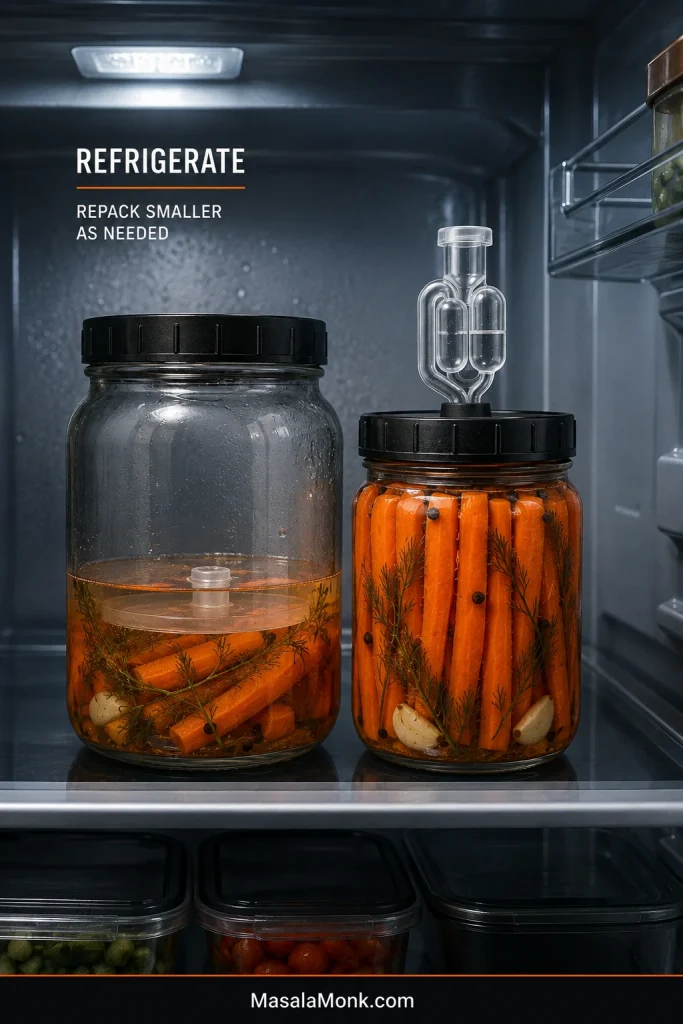
Once fermentation has finished, refrigerate the carrots in their brine. Cold storage slows further change and helps preserve the balance of sourness and crunch you stopped for.
You can remove the fermentation weight once refrigerated if the carrots remain comfortably covered. If they keep rising above the liquid, leaving the weight in is still useful.
Use clean utensils and close the lid between servings. As you eat through the jar, less food is left to displace the brine, so remaining carrots can gradually begin poking above the liquid even though everything was submerged when the jar was full. Moving them into a smaller clean jar is often easier than adding more liquid.
Fermentation slows dramatically in the refrigerator, but a long-stored sealed jar can still hold some pressure. Open it cautiously, particularly after it has been sitting untouched for a while.
Properly fermented vegetables can keep refrigerated for months, but maximum storage time is a poor target for something you made because you wanted it crisp. Eat the carrots while their flavor and texture are still at their best. Mold, genuine slime, or a putrid smell overrides whatever date is written on the lid.
Fermented Carrots vs Vinegar-Pickled Carrots
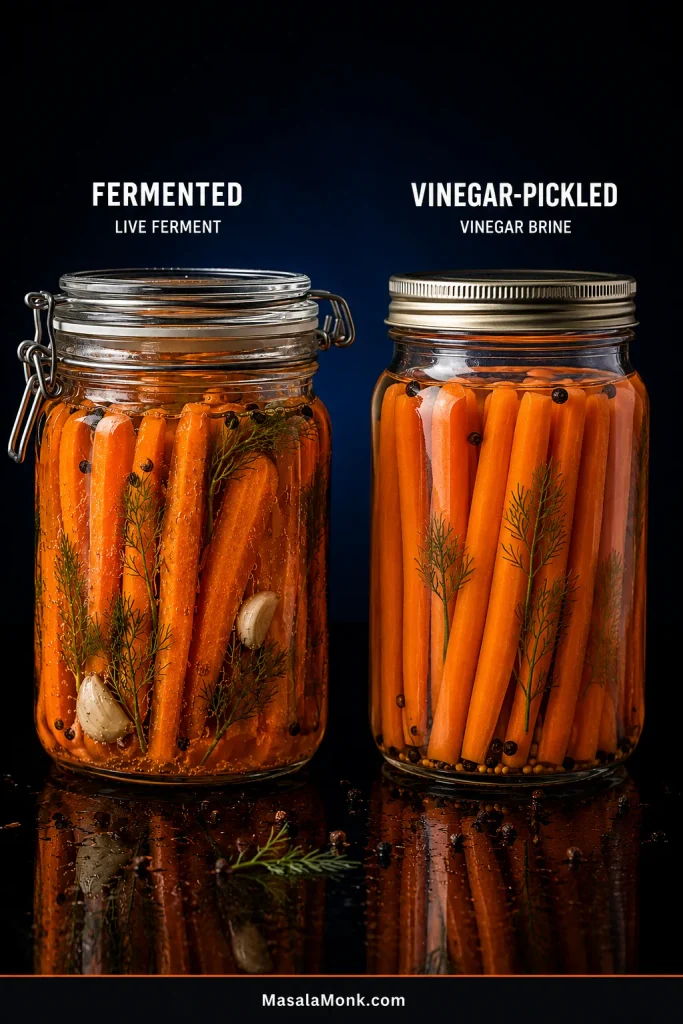
Both give you crisp vegetables with acidity, but they get there differently. Vinegar pickles begin with the acid already present. Fermented carrots begin with salt and water, and microbial activity creates the acidity as the batch develops.
Fermentation tends to build a rounder, evolving sourness and may leave live microbes in the food when it is kept unheated. Vinegar pickling is faster and more immediately predictable.
Fermented vs vinegar-pickled carrots are defined by how acidity gets there—not simply by whether one jar looks cloudy and the other clear. Fermentation develops acid; vinegar pickling supplies it at the start.
When you want cold, vinegar-sharp crunch today, something like a cucumber salad with vinegar and dill gets there quickly. Fermented carrots are the slower project.
Are Fermented Carrots Probiotic?
Unheated fermented vegetables can contain live microbial cultures, including lactic acid bacteria. “Probiotic” makes a more specific scientific claim.
A probiotic is a characterized live microorganism shown to provide a health benefit when consumed in an appropriate amount. A spontaneous home ferment contains a changing microbial community, so it cannot be assigned the specific clinical claims of a known probiotic strain and dose.
What fermentation adds most obviously is a different food. A sweet raw carrot becomes tart, salty, aromatic, and pickle-like while still holding onto the character of the vegetable itself. You are also still eating carrots with their fiber and carotenoid-rich plant material.
A homemade ferment does not come with the identified strain and clinical dose needed for specific probiotic treatment claims. It is better understood simply as fermented food.
The carrots don’t need to be medicine to be worth making.
Frequently Asked Questions
Does “Lacto-Fermented” Mean Dairy?
No. “Lacto” refers to lactic acid fermentation, not lactose or milk. No dairy is required for these carrots.
Can I Use Baby Carrots?
Baby-cut carrots can be fermented, but fresh full-size carrots are the better default for a first jar because you control the freshness, thickness, and packing more precisely. Whichever you use, follow the same salt calculation and keep every piece submerged.
Why Did the Garlic Turn Blue or Green?
Garlic can develop blue or green pigment in acidic conditions because of reactions involving compounds naturally present in the clove. A smooth color change within the garlic is different from fuzzy mold growing across the surface.
The useful clue is where the change lives: blue-green pigment develops within the garlic tissue, while mold is growth on the surface. Color alone is not a fermentation verdict.
Garlic that stays cream-colored is perfectly ordinary too. Color change—or the lack of it—is not a fermentation test.
Yes, but a carrot-only batch is easier to learn from. Mixed vegetables differ in density, texture, and fermentation behavior. Once the cues in a successful carrot ferment feel familiar, mixed jars become easier to interpret.
Can I Reuse Brine From an Older Ferment?
You don’t need to. Fresh water and freshly calculated salt keep the method reproducible and make troubleshooting easier because you know exactly what went into the new jar.
I Left Carrots Sitting in Plain Water. Did They Ferment?
Carrots sitting accidentally in plain water are not the controlled salt-brine fermentation described here. Bubbles or an unusual smell do not turn an unmeasured soak into this recipe.
When you open your fridge or pantry, there’s a good chance you’ll spot a golden slab of butter or, if you love world cuisine, a jar of ghee glowing like liquid sunshine. Both are beloved fats, both are rooted in centuries of tradition, and both spark debate among health enthusiasts and home cooks. But when it comes to choosing between ghee and butter, which one actually deserves a spot in your kitchen?
Let’s peel back the layers—scientifically, nutritionally, and practically—so you can decide what’s best for your table.
What Are Ghee and Butter, Really?
Butter is a staple of European and American kitchens, made by churning cream until the fat separates from the buttermilk. The result: a spreadable, creamy block that makes croissants flaky, cookies rich, and vegetables irresistible.
Ghee, meanwhile, is the pride of South Asian cuisine. It starts as butter, but is simmered until the water evaporates and milk solids brown and are filtered out. The end product is a clear, fragrant fat with a nutty aroma—a pantry hero in Indian, Pakistani, Bangladeshi, and Middle Eastern kitchens.
How Are They Made? (And Why Does It Matter?)
Butter’s Journey:
Cream is separated from milk.
Cream is churned, causing fat globules to clump.
The solid butter is washed, shaped, and (sometimes) salted.
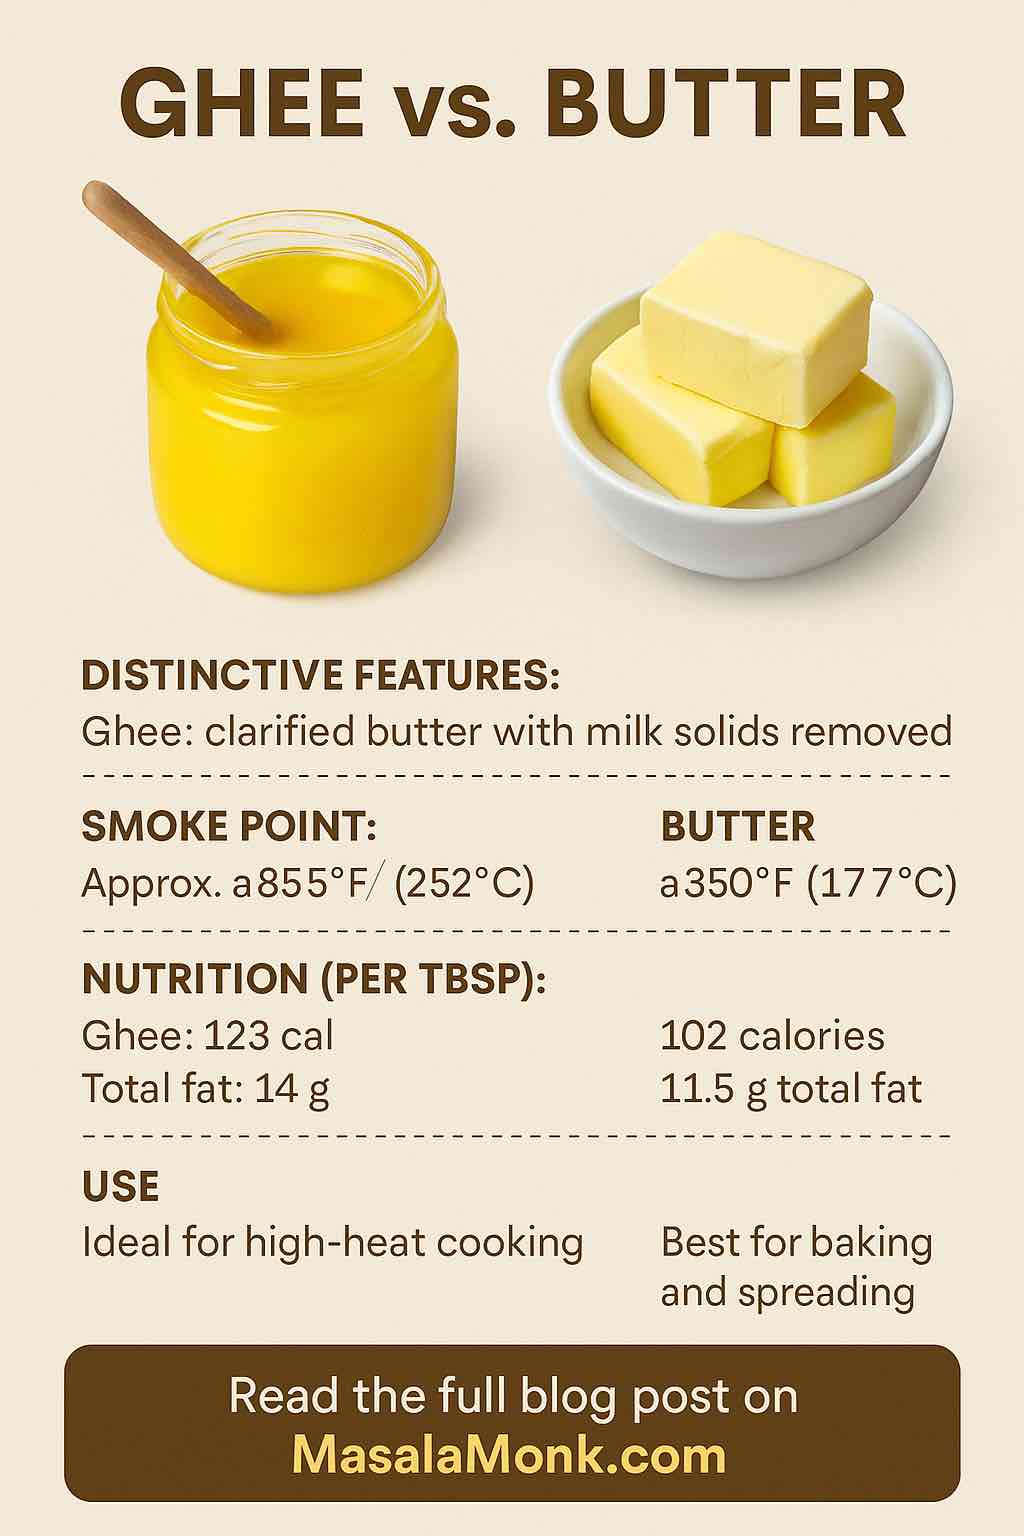
Contains about 80% fat, 16% water, and milk proteins/sugars.
Ghee’s Transformation:
Unsalted butter is slowly simmered.
Water evaporates; milk solids caramelize and sink.
The clear, golden fat is poured off and strained.
Nearly pure fat, almost no lactose or casein.
Why care? Because the absence of milk solids in ghee changes its shelf life, its behavior in the pan, and even how it might affect your body.
The Science: Nutrition at a Glance
Here’s a quick table (per tablespoon):
Butter
Ghee
Calories
~102
~123
Total Fat
~11.5g
~14g
Saturated Fat
~7.2g
~8.7g
Lactose/Casein
Present
Almost none
Vitamins (A, E, K)
Present
Slightly higher concentration (due to fat density)
Smoke Point
~350°F (177°C)
~485°F (250°C)
Shelf Life
Refrigerate
Room temp (months)
TL;DR: Ghee is richer, purer, and more stable at high temperatures, but also packs more calories and fat. Butter contains trace dairy sugars and proteins, which matter for some people.
Health: What Does the Research Say (as of 2025)?
The Latest Evidence
Heart Health: A recent meta-analysis (2024) found no compelling link between ghee consumption and increased cholesterol or heart disease in the general population. However, ghee (like butter) is still high in saturated fat, which is generally advised in moderation by major health agencies.
Gut Health & Nutrients: Ghee is a source of butyrate—a short-chain fatty acid linked to gut health and anti-inflammatory benefits. It’s also a good source of vitamins A, E, and K, as well as conjugated linoleic acid (CLA), which may have subtle metabolic benefits.
Allergies & Sensitivities: Butter contains trace amounts of lactose and casein—potential triggers for people with intolerance. Ghee’s clarification process removes nearly all of these, making it a safer bet for many with sensitivities (though not all with severe dairy allergies).
Cooking Safety: Ghee’s high smoke point means it won’t burn or develop harmful compounds as quickly as butter does when exposed to high heat.
Cooking Showdown: Butter vs. Ghee in the Real World
When to Use Butter
Baking: Butter’s water and milk solids create steam (for flakiness in pastries) and delicious browning in cookies and cakes.
Spreading: Perfect for slathering on toast, pancakes, and warm rolls.
Sauces: Butter’s emulsifying properties make for creamy hollandaise and velvety beurre blanc.
When to Use Ghee
High-Heat Sautéing & Frying: Ghee won’t burn until 485°F—so it’s excellent for searing, frying, roasting, and sautéing.
Flavor-Boosting: Adds a deep, nutty aroma to rice, dals, curries, roasted veggies, and even popcorn.
Dairy Sensitivities: Ghee is almost universally tolerated by those who can’t handle regular dairy fats.
Real-Life Tips: Making the Most of Each
Storage:
Butter: Keep refrigerated (especially unsalted), use within a month for best flavor.
Ghee: Store in a cool, dry place with a tight lid; lasts for months without refrigeration if moisture is kept out.
Homemade Ghee: You can make ghee at home in under 30 minutes. Simmer unsalted butter, skim off foam, filter out solids, and pour the liquid gold into a clean jar.
Blending Fats: Don’t be afraid to use both in your kitchen—each shines in different scenarios!
Practical Buying Advice
Quality Matters: Look for grass-fed sources (for higher nutrients and CLA), minimal processing, and no additives.
Read the Labels: Especially if you have allergies—some commercial ghees aren’t fully clarified and may contain traces of milk proteins.
Final Verdict: Which Should You Choose?
It’s not either/or—it’s about what you need.
Use butter for classic Western baking and when you want that creamy, milky flavor.
Reach for ghee for high-heat cooking, South Asian and Middle Eastern recipes, or if you need a lactose/casein-free option.
Both are delicious. Both are rich. Both should be used thoughtfully—especially if you’re watching your saturated fat intake.
Final Thoughts
Butter and ghee both have rich histories, loyal fans, and unique roles in the kitchen. By understanding their differences, you can use each to its best advantage—and enjoy your food all the more.
Have your own butter or ghee cooking hack? Share in the comments below!
10 Essential FAQs: Ghee vs. Butter
1. What is the main difference between ghee and butter? Ghee is clarified butter—made by simmering butter to remove water and milk solids, resulting in a pure fat that’s lactose- and casein-free. Butter is churned cream, containing water and milk proteins.
2. Is ghee better for people with lactose intolerance? Yes, most people with lactose intolerance tolerate ghee well because the lactose and casein are removed during clarification. However, those with a true milk allergy should still exercise caution.
3. Which is healthier: ghee or butter? Both are calorie-dense and high in saturated fat. Ghee is slightly higher in vitamins A, E, and butyrate, but neither is considered “healthier” for everyone. Moderation is key.
4. Can you substitute ghee for butter in baking? You can, but expect a change in texture and flavor. Ghee’s lack of water/milk solids makes baked goods denser and gives them a nuttier, richer taste.
5. Does ghee need to be refrigerated? No, ghee is shelf-stable at room temperature for several months if kept in a cool, dry place with a tight lid. Butter, on the other hand, requires refrigeration.
6. What is the smoke point of ghee versus butter? Ghee’s smoke point is around 485°F (250°C), making it ideal for high-heat cooking. Butter’s smoke point is lower, about 350°F (177°C), so it burns more easily.
7. Is ghee good for heart health? Recent studies show ghee doesn’t significantly worsen cholesterol for most people, but due to high saturated fat, both ghee and butter should be consumed in moderation—especially for those with heart disease risk.
8. Can you make ghee at home? Yes! Simply simmer unsalted butter until milk solids separate and brown, then strain out the solids for pure ghee.
9. Which tastes better—ghee or butter? Taste is subjective: butter is creamy and slightly sweet; ghee is nutty and aromatic. Ghee adds a deep, rich flavor to many dishes, especially curries and roasted foods.
10. Are there any culinary uses where ghee is clearly superior to butter? Yes, ghee excels in high-heat cooking (like sautéing, frying, roasting) and dishes needing a nutty, rich aroma. It’s a staple in South Asian, Middle Eastern, and some Paleo/Keto recipes.
In today’s wellness landscape, traditional foods are often marketed as secret weapons for effortless weight loss. From ancient grains to herbal teas, these time-tested ingredients are being hailed as “natural fat burners” or “metabolism boosters.” But how much of this is true, and how much is just clever marketing?
In this post, we’re setting the record straight by busting six common myths about traditional foods and their role in weight loss. Whether you’re sipping green tea, adding turmeric to everything, or considering a traditional diet overhaul, this guide will help you separate science from storytelling.
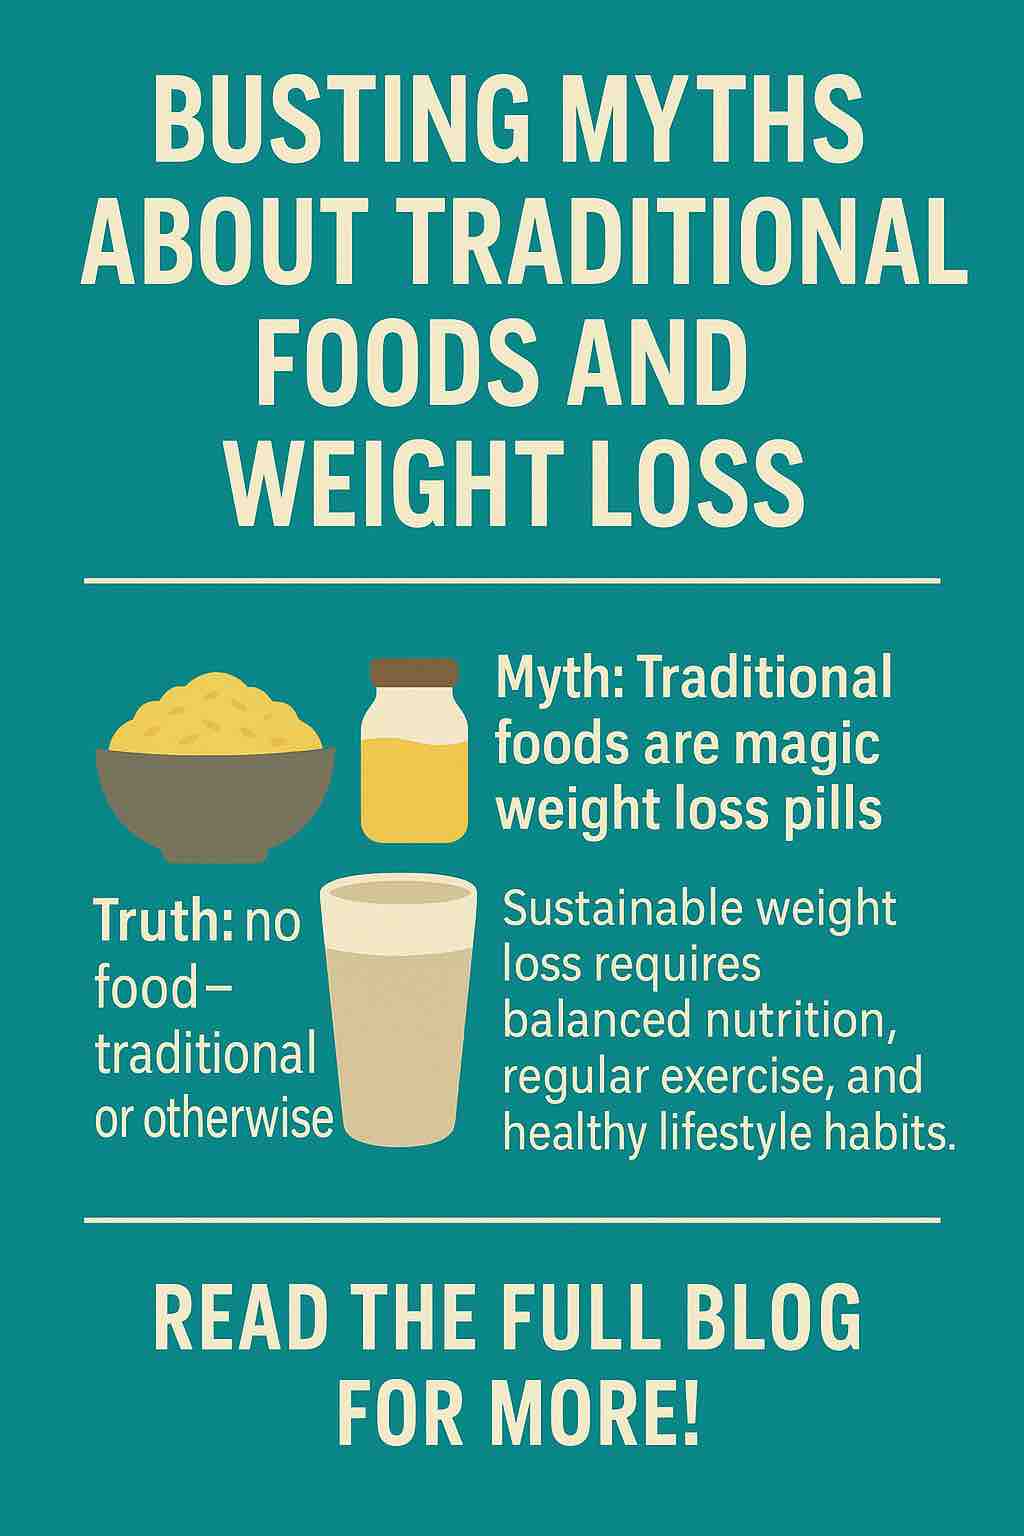
Myth 1: Traditional Foods Are Magic Weight Loss Pills
The Truth: There’s no food—traditional or otherwise—that melts fat on its own. While ingredients like fenugreek, lentils, or fermented foods can support your health, weight loss is a complex equation involving calorie balance, metabolism, and lifestyle factors.
Why It Matters: Relying on a single food or spice can lead to disappointment and neglect of other key elements like balanced nutrition and physical activity.
Takeaway: Traditional foods can support your journey, but they’re tools, not miracles.
Myth 2: Traditional Foods Work the Same for Everyone
The Truth: Each person’s body responds differently to foods based on genetics, gut microbiome, hormonal profile, and overall health. What works wonders for one may have little to no effect for another.
Why It Matters: Chasing someone else’s “magic” food can lead you away from discovering what actually works for your body.
Takeaway: Weight loss is not one-size-fits-all—personalization is key.
Myth 3: If It’s Healthy, More Is Better
The Truth: Even nutrient-dense traditional foods like nuts, ghee, or honey can lead to weight gain when consumed in excess. “Healthy” does not mean “calorie-free.”
Why It Matters: Overeating anything—even traditional superfoods—can derail your progress.
Takeaway: Portion control and balance are non-negotiable for lasting results.
Myth 4: All Traditional Foods Have Proven Weight Loss Benefits
The Truth: Not all traditional foods are backed by modern science. While some like green tea or chili peppers show modest weight-related benefits, others are still supported more by anecdotal or cultural claims.
Why It Matters: Blindly following trends can result in disappointment or poor health choices.
Takeaway: Be informed—combine tradition with research.
Myth 5: You Don’t Need Exercise If You Eat the Right Traditional Foods
The Truth: Nutrition and movement are partners. While diet accounts for a significant portion of weight loss, physical activity supports metabolism, muscle maintenance, and mental health.
Why It Matters: Skipping exercise makes it harder to sustain weight loss over the long term.
Takeaway: Traditional foods complement, not replace, exercise.
Myth 6: Eating Traditional Foods Guarantees Weight Loss
The Truth: Incorporating traditional foods is just one part of a successful strategy. Without attention to overall caloric intake, lifestyle habits, and consistency, even the healthiest diet won’t deliver lasting change.
Why It Matters: Expecting guaranteed results leads to frustration and may cause you to give up prematurely.
Takeaway: Weight loss is multifaceted, and no food guarantees success.
How to Use Traditional Foods the Right Way for Weight Loss
Incorporate mindfully: Use traditional foods like lentils, whole grains, fermented vegetables, or herbal infusions to support digestion, fullness, and nutrient density.
Stay research-informed: Look at current studies and proven benefits rather than relying solely on tradition or influencer hype.
Balance is everything: Pair these foods with other pillars—movement, stress management, and adequate sleep—for a sustainable strategy.
Final Thoughts
Traditional foods offer more than just nostalgia—they bring cultural richness and, in some cases, health-promoting nutrients. But when it comes to weight loss, context is everything. No single food is a silver bullet. Long-term success comes from sustainable habits, balanced choices, and a plan tailored to your body.
Stay tuned for the final post in our series, where we’ll recap everything you’ve learned and help you build your personalized roadmap to weight loss using the best of traditional wisdom and modern science.
Frequently Asked Questions (FAQs)
1. Can traditional foods really help with weight loss? Yes, some traditional foods can support weight loss by promoting satiety, improving digestion, or boosting metabolism—but they work best as part of a balanced diet and active lifestyle.
2. Are traditional foods healthier than modern processed foods? Generally, traditional foods are less processed and richer in nutrients, making them healthier. However, “traditional” doesn’t automatically mean low-calorie or ideal for weight loss.
3. How do I know if a traditional food has scientific backing? Check for peer-reviewed studies or reliable sources like health journals, academic institutions, or registered dietitians. Avoid relying solely on anecdotal claims or social media trends.
4. Do I need to eat only traditional foods to lose weight? Not at all. Weight loss depends on overall calorie balance, nutrient intake, and lifestyle. Traditional foods can be part of your strategy, but don’t need to be exclusive.
5. Are there traditional foods I should avoid while trying to lose weight? Some traditional foods—like those high in sugar, refined carbs, or fats (e.g., fried snacks, sweets, excess ghee)—can hinder weight loss if eaten in excess.
6. What are examples of traditional foods that support weight management? Examples include whole grains (millets, quinoa), legumes (lentils, chickpeas), fermented foods (kimchi, yogurt), and herbs like turmeric and ginger.
7. Can I lose weight without exercising if I eat traditional foods? Unlikely. Exercise plays a crucial role in burning calories, maintaining muscle, and supporting long-term health. Diet alone rarely leads to sustainable weight loss.
8. Is it okay to eat traditional desserts or sweets while losing weight? Yes, in moderation. Focus on portion control and consider healthier versions made with natural sweeteners or whole ingredients.
9. How do I incorporate traditional foods into a modern diet? Blend traditional meals with modern nutritional practices—like portion control, balanced macronutrients, and cooking methods that minimize added fats or sugars.
10. Where can I learn more about how to use traditional foods effectively for weight loss? Our blog series explores this in depth—check out previous posts for food-specific insights and stay tuned for our final roadmap guide.
Discovering the Wonders of Desi Ghee: A Year-Long Journey to Health and Heritage
Desi ghee, often referred to as clarified butter, is much more than a culinary ingredient in the tapestry of Indian culture. It’s a symbol of health, tradition, and familial bonds. Here, we embark on a journey exploring the transformative effects of incorporating desi ghee into your daily diet for a year, alongside its profound cultural significance.
1. A Digestive Powerhouse
Imagine starting your day with a touch of desi ghee, and your digestive system thanking you. Rich in butyric acid, desi ghee is a champion of gut health, reducing inflammation and warding off gastrointestinal disorders. Regular consumption could lead to a more harmonious digestive process, a cornerstone of overall well-being.
2. Fortress of Immunity
In the realm of immunity, desi ghee stands tall. Packed with vital vitamins like A, D, E, and K, it’s akin to donning armor against infections and diseases. These vitamins are the unsung heroes in your body’s defense system, offering a shield of protection that’s essential in today’s fast-paced world.
3. Brain Food
Your brain is a marvel, and feeding it desi ghee could be akin to giving it a superfuel. Laden with omega-3 and omega-6 fatty acids, essential for cognitive function, regular consumption might just sharpen your memory, enhance concentration, and boost overall brain health.
4. Radiant Skin
Desi ghee is a secret elixir for your skin. Its antioxidants combat free radicals, while its moisturizing properties fend off signs of aging. Envision a year of desi ghee in your diet, and your skin might just thank you with a healthy, radiant glow.
5. A Heartfelt Benefit
Contrary to some misconceptions, moderate consumption of desi ghee can be a boon for heart health. It’s about balancing the ‘good’ and ‘bad’ cholesterol, and desi ghee knows this balance artfully.
And There’s More…
Beyond these five benefits, the saga of desi ghee’s goodness continues.
Stronger Bones: Thanks to vitamin K2, it aids in calcium absorption, potentially warding off osteoporosis.
Hormonal Harmony: Its conjugated linoleic acid (CLA) can be a game-changer for hormonal balance and insulin sensitivity.
Soothing Sleep: Its calming nature could be the lullaby for your sleep struggles.
Visionary Advantage: Rich in vitamin A, it’s like a guardian for your eyes, protecting against common eye ailments.
Energizing Essence: The medium-chain triglycerides (MCTs) in desi ghee are quick energy boosters, enhancing physical performance.
Desi Ghee: A Culinary Heirloom
For those who grew up in Indian households, desi ghee is a nostalgic emblem, evoking memories of home-cooked meals and familial love. It’s not just a health enhancer but a carrier of stories, traditions, and emotions.
Desi ghee is the essence of Indian culinary heritage, weaving together generations through shared recipes and culinary secrets. It’s a testament to our ancestors’ wisdom, reflecting their understanding of health and well-being.
Embrace the Tradition
If desi ghee has been a part of your life, cherish it as a legacy of health and heritage. For the uninitiated, welcome to a world where food is not just sustenance but a tapestry of love, tradition, and health.
In conclusion, incorporating desi ghee into your daily diet could be a transformative experience. It’s a journey of discovering its multifaceted health benefits and reconnecting with a rich cultural heritage. Here’s to a year of health, heritage, and heartwarming memories with desi ghee!
10 FAQs About Desi Ghee and Its Benefits
1. What exactly is desi ghee? Desi ghee is a type of clarified butter that’s a staple in Indian cooking. It’s made by simmering butter, which separates the milk solids from the liquid fat, resulting in a rich, aromatic product.
2. Can desi ghee improve digestion? Yes, desi ghee contains butyric acid, which aids in digestion and reduces inflammation in the gut.
3. Is desi ghee beneficial for the immune system? Absolutely! Desi ghee is packed with vitamins A, D, E, and K, all of which bolster the immune system.
4. How does desi ghee affect brain health? Desi ghee is rich in omega-3 and omega-6 fatty acids, crucial for brain function, memory, and cognitive abilities.
5. Can consuming desi ghee lead to healthier skin? Yes, the antioxidants in desi ghee help fight free radicals, and its moisturizing properties can lead to glowing, youthful skin.
6. Is desi ghee good for heart health? When consumed in moderation, desi ghee can be heart-healthy. It contains fats that help in balancing cholesterol levels.
7. How does desi ghee contribute to stronger bones? Desi ghee is a great source of vitamin K2, which improves calcium absorption, thereby contributing to stronger bones.
8. Can desi ghee help with hormonal balance? Yes, desi ghee contains CLA, which helps in regulating hormones and insulin sensitivity, beneficial for conditions like PCOS and diabetes.
9. Does desi ghee aid in better sleep? Desi ghee has calming properties, which may help improve the quality and duration of sleep.
10. How does desi ghee boost energy? Desi ghee contains medium-chain triglycerides (MCTs) that are readily converted into energy, thus boosting physical performance.
Blog Tags
Desi Ghee, Health Benefits, Indian Cuisine, Ayurveda, Digestive Health, Immune System, Brain Function, Skin Care, Heart Health, Bone Strength, Hormonal Balance, Sleep Aid, Energy Boost, Cultural Heritage, Traditional Foods